

Page 1

SERVICE BULLETIN
500
g
)
000
g
)
BULLETIN ISSUED MODEL(S) AFFECTED SUBJECT(S)
SBM01-05
11/8/01 2001 X440s, 2002 X440s, See list on page 5.,
And, units installed with the MC 10 00 U pda te Kit
(P/N 913-5002053)
MC
En
ine Control Unit (ECU
En
ine Control Unit (ECU
1 - MC1000 operating code
2 - Hard starting and cold start
MC1
CONDITION : This service bulletin addresses two conditions identified individually below. Both conditions concern the
engine management system of affected vehicles.
(1) Field reports of intermittent engine sta lling hav e been att ri but ed to ea rly re lea se s of the MC1000 E CU
operating code. The operating code is something like the operating system in an ordinary personal
computer or PC (example: Windows 95). The operating code should not be confused with the calibration
file; that file contains mapping and vehicle specific calibrations.
.
(2) Field reports indicate hard starting and/or difficult cold starting experiences. These experiences have
been attributed to the cold starting “strategies” programmed in early releases of the calibration files on
affected units. A calibration file is something like the software running on a particular operating system
(example: MS Excel or Word).
SOLUTION : (1) For condit ion 1 above, a revised ver sion of the MC1000 operating code has been developed and must
be installed on all affected models. A special MS-DOS program has been developed to install the revised
code file to the vehicle ECU.
(2) A new calibration file has been developed and should be installed into the vehicle ECU after the revised
operating code (Condition (1) above) has been installed.
This service bulletin includes step-by-step instructions to correct both conditions in the same “work procedure.”
PARTS : The kit (P/N 912-5001986) including PC software programs, a data cable, and user manuals is necessary
to perform the instructions of this service bulletin. The kit has been shipped to dealerships. The software
installation is a prerequisi te to per fo rm in g any wo rk. Consult t he kit documentation for more details.
If you have any questions about this service bulletin, call toll free 1-800-MOTO-USA.
SBM01_05.fm
© 2001 Cannondale Corporation - All Rights Reserved
Printed : 11/8/01
5002171
Page 2
INSTRUCTIONS
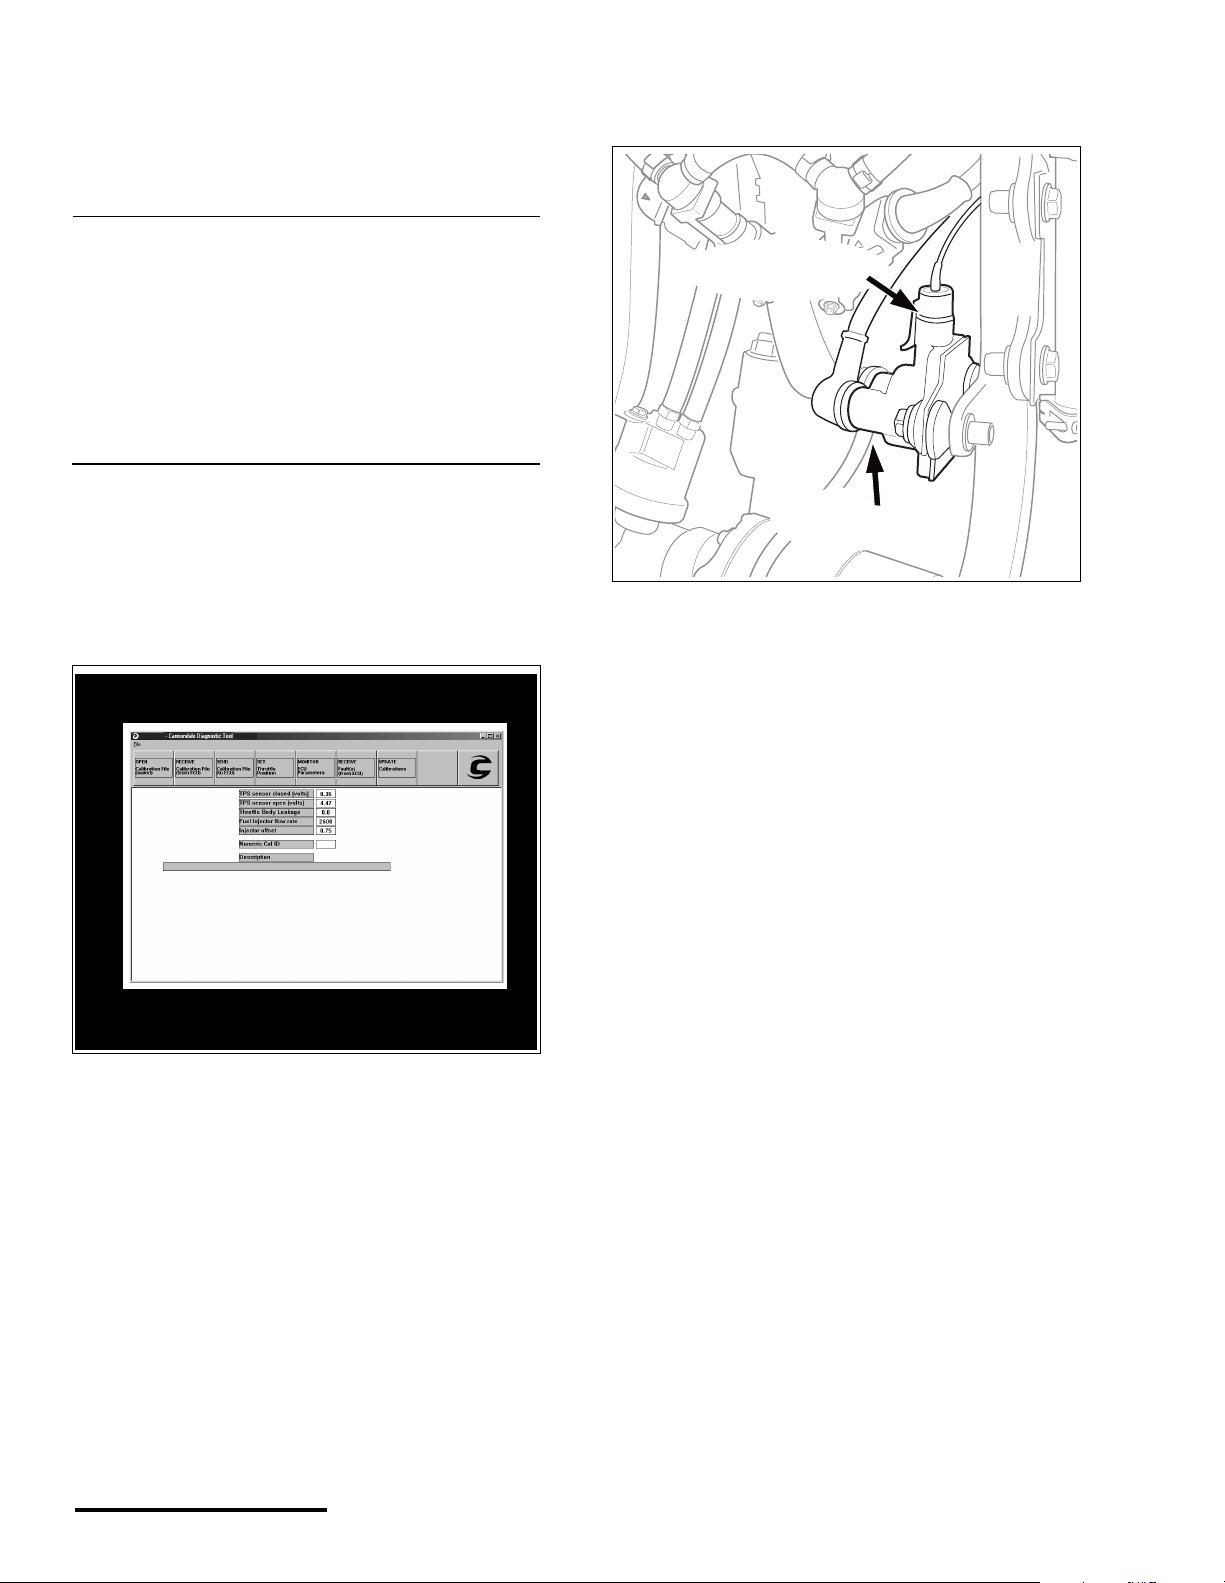
connector can be rel eased easily using only
your finger tips.
NOTE :
Before starting this procedure, we strongly
recommend that you read the Cannondale
Diagnostic Tool Manual (P/N 912-5001985) included
with kit (P/N 912-5001986). The manual contains
impor tant background information and explanations
that will be helpful to know before you attempt this
simple, but very technical procedure. We also
recommend that the service technician performing
the work have moderate PC skills.
1. From the Windows START menu select
DealerCal.exe from the Cannondale
Diagnostic and Ma intenance program group.
The Cannondale Diagnostic Tool main menu
will open. See example below.
00200
00200
00200,X440s,082801
DISCONNECT HERE
SOLENOID
4. Press the vehicle engine start button briefly.
This will activate the engine management
circuits. The green LED on the data cable
block should be lit. Look at the block to
confirm that it is on. If you read the
Cannondale Diagnostic Tool Manual, you
would have learned that this LED stays on
while the ECU is active and that the ECU
remains active for only 2 minutes if
communications are not occurring- then it
shuts down automatically. If the light goes out
anytime during this pr ocedure, just press th e
engine start button again to turn it on.
2. Connect the data cable to the vehicle and PC.
See the Cannondale Diagnostic Tool Manual
for details.
3. Disconnect the vehicle starter solenoid
harness lead. The solenoid is mounted on the
inner side of the left engine r ail just below the
fuel filter mount. In the illus tration below, the
radiator is shown removed for clarity; the
SBM01_05.fm
© 2001 Cannondale Corporation - All Rights Reserved
5. Click the OPEN Calibration file (saved)
button in the Cannondale Diagnostic Tool
main menu.
Then, select the file name d 00202 located in
2
Page 3

the C:\Program Files\Cal directory. You may
2
2
2
have to navigate (use ex plo rer ) to find it.
0020
3020
0020
variables and not the complete calibration file,
the transfer of data occurs qu ickl y.
6. Make sure “00202” is displayed at Numeric
Cal ID. If it is not, repeat the previous step.
7. Make sure the green LED on the data cable
block is still lit. If its not press the engine start
button to turn it on.
Now, click the RECIEVE Calibration file
(from ECU) button.
When the Choose Receive Option window
opens select “Selec t to Receive only Throttle
and Injector Calibr ations” and click OK. This
option reads only the TPS sensor closed
(volts), TPS open (volts), Throttle Body
Leakage, Injector flow rate, and Injector offset
variables from the current calibration file in
the ECU and does not read the calibration
file. These will be needed for the new
calibration file installation later because the
operating code installation wipes them from
the ECU memory. Because the program is
reading this relatively small set of vehicle
8. The vehicle’s variables have now been
merged with the new calibration file (00202)
that you opened in the program in the first few
steps. Write down the val ues d isplay ed in the
main menu (see arrows below). When you
write them down you are creating a kind of
backup just in case you have computer
difficulties (accidentally closing the
Cannondale Diagnostic Tool). If you don’t
have a problem, the next few steps will
transfer this information to the ECU following
the operation code transfer. But if you do
encounter a problem, the Cannondale
Diagnostic Tool enables you to input th em to
the ECU. See Updating Calibrations and
Setting the Throttle Body in the tool manual.
9. Press the engine stop button.
3
3
Printed : 11/8/01
5002066
Page 4

10. From Windows START button (lower left
F
corner of the computer screen) select the
Cannondale Diagnostic and Maintenance
program group and select Code Download.
An MS-DOS program window will open.
11. At the prompt type: D H002V04F
press ENTER yet. D means “download” and
H002v04f is the name of the new operating code
file that the program will transfer to the ECU in the
coming steps.
but do not
14. When the transfer complete message
displays in the lower area of the program
window, your assistant can release the
engine start button.
Type Y and the MS-DOS window will
disappear and the Cannondale Diagnostic
Tool main menu should be visible again.
15. Click the SEND Calibration file (to ECU)
button. The new calibratio n file together with
the vehicle specific variables read from the
ECU before the operating code installation
will be installed into the ECU.
When the send complete window displays,
click OK.
16. Reconnect the starter solenoid. Make sure
the connector is la tc hed pr operly.
17. Disconnect the data cable from the vehicle.
D H002V04
12. Have an assistant PRESS AND CONTINUE
TO HOLD the engine start button on the
vehicle.
13. As your assistant holds the engine start
button, press the ENTER key on your
computer - you will see live data transfer
information in the MS-DOS window.
18. Reinstall removed components.
19. Test engine operation.
SBM01_05.fm
© 2001 Cannondale Corporation - All Rights Reserved
4
Page 5

MODEL(S)
AFFECTED
The following is a list of Vehicle
Identification Numbers (VIN) of
units affected by this service
bulletin:
5B6BC11C02B000003
5B6AA11C21B000004
5B6BC11C22B000004
5B6BC11C62B000006
5B6BC11C82B000007
5B6BC11C82B000010
5B6BC11CX2B000011
5B6BC11C32B000013
5B6BC11C52B000014
5B6BC11C72B000015
5B6BC11C92B000016
5B6BC11C02B000017
5B6BC11C22B000018
5B6BC11C42B000019
5B6BC11C22B000021
5B6BC11C42B000022
5B6AA11C61B000023
5B6BC11C62B000023
5B6BC11C82B000024
5B6BC11CX2B000025
5B6BC11C12B000026
5B6BC11C52B000028
5B6AA11C51B000031
5B6BC11C52B000031
5B6AA11C71B000032
5B6BC11C72B000032
5B6BC11C72B000032
5B6BC11C92B000033
5B6BC11C02B000034
5B6BC11C22B000035
5B6BC11C42B000036
5B6BC11C62B000037
5B6AA11C81B000038
5B6BC11C82B000038
5B6BC11CX2B000039
5B6BC11C82B000041
5B6BC11CX2B000042
5B6BC11C12B000043
5B6BC11C32B000044
5B6BC11C72B000046
5B6BC11C92B000047
5B6BC11C22B000049
5B6BC11C92B000050
5B6BC11C22B000052
5B6BC11C42B000053
5B6BC11C62B000054
5B6BC11C82B000055
5B6AA11CX1B000056
5B6BC11CX2B000056
5B6BC11C52B000059
5B6BC11C12B000060
5B6BC11C32B000061
5B6BC11C52B000062
5B6BC11C72B000063
5B6BC11C92B000064
5B6BC11C02B000065
5B6AA11C21B000066
5B6BC11C42B000067
5B6BC11C62B000068
5B6BC11C82B000069
5B6BC11C42B000070
5B6BC11C62B000071
5B6BC11C82B000072
5B6BC11CX2B000073
5B6BC11C12B000074
5B6BC11C32B000075
5B6BC11C52B000076
5B6BC11C72B000077
5B6BC11C72B000077
5B6BC11C92B000078
5B6BC11C02B000079
5B6BC11C72B000080
5B6BC11C92B000081
5B6BC11C22B000083
5B6BC11C42B000084
5B6BC11C62B000085
5B6BC11C82B000086
5B6BC11CX2B000087
5B6AA11C11B000088
5B6BC11C12B000088
5B6BC11CX2B000088
5B6AA11C31B000089
5B6BC11C32B000089
5B6BC11CX2B000090
5B6BC11C12B000091
5B6BC11C32B000092
5B6BC11C52B000093
5B6BC11C72B000094
5B6BC11C02B000096
5B6AA11C21B000097
5B6AA11C21B000097
5B6BC11C22B000097
5B6AA11C41B000098
5B6BC11C42B000098
5B6AA11C61B000099
5B6AA11C91B000100
5B6BC11C92B000100
5B6BC11C92B000100
5B6BC11C02B000101
5B6BC11C02B000101
5B6BC11C22B000102
5B6BC11C42B000103
5B6BC11C62B000104
5B6BC11C82B000105
5B6BC11CX2B000106
5B6BC11C12B000107
5B6BC11C32B000108
5B6BC11C52B000109
5B6AA11C11B000110
5B6BC11C12B000110
5B6BC11C32B000111
5B6AA11C51B000112
5B6BC11C52B000112
5B6BC11C72B000113
5B6BC11C92B000114
5B6BC11C02B000115
5B6BC11C22B000116
5B6BC1142B0000117
5B6BC11C62B000118
5B6BC11C82B000119
5B6AA11C41B000120
5B6BC11C42B000120
5B6BC11C62B000121
5B6BC11C82B000122
5B6BC11CX2B000123
5B6BC11C12B000124
5B6BC11C32B000125
5B6BC11C52B000126
5B6BC11C72B000127
5B6BC11C02B000129
5B6BC11C72B000130
5B6BC11C72B000130
5B6BC11C91B000131
5B6BC11C02B000132
5B6BC11C22B000133
5B6BC11C42B000134
5B6BC11C62B000135
5B6BC11C82B000136
5B6BC11CX2B000137
5B6BC11C12B000138
5B6BC11CX2B000140
5B6BC11C12B000141
5B6AA11C31B000142
5B6AA11C71B000144
5B6AA11C01B000163
5B6AA11C21B000164
5B6BC11C82B000170
5B6AA11C11B000172
5B6AA11C41B000182
5B6AA11C51B000191
5B6AA11C31B000206
5B6AA11C51B000207
5B6AA11C71B000211
5B6AA11C61B000216
5B6AA11C41B000229
5B6AA11C21B000231
5B6AA11C51B000238
5B6AA11C41B000263
5B6AA11C41B000280
5B6AA11C11B000298
5B6AA11C01B000311
5
5
Printed : 11/8/01
5002066
 Loading...