

Page 1

CANNONDALECANNONDALE®®EASYEASY
RIDERRIDER
TMTM
RECUMBENTRECUMBENT
BICYCLE OWNER’S MANUALBICYCLE OWNER’S MANUAL
SUPPLEMENTSUPPLEMENT
READ THIS MANUAL
CAREFULLY!
It contains important
safety information.
TABLE OF CONTENTSTABLE OF CONTENTS
EASY RIDER CABLE ROUTING..................2
SOME RECUMBENT-SPECIFIC RIDING
CHARACTERISTICS................4-7
SET UP AND ADJUSTMENT..................8-10
Frame Size 8
The Seat 8
The Handlebars and Stem 10
MECHANICAL ADJUSTMENTS............11-21
Holding the Bike in a Work Stand 11
Suspension Set Up 11
Easy Rider Fork 12
Preload Adjustment 13
HeadShok Scheduled Maintenance 16
HeadShok Warranty 18
Fox Rear Shock Service and Warranty 18
Tire Choice and Pressure 18
Shifter Choice and Positioning 19
Mid-Drive / Mid-Drive Bearing 19
Front Chain Tensioner 20
Chainring Bolts 21
Front Derailleur Adjustment 21
Brake Set Up 21
CARRYING STUFF.....................................21
ACCESSORIES...........................................22
TRANSPORTATION....................................23
REFERENCES.............................................23
CANNONDALE WARRANTY ....................24
CONTACT INFORMATION.........................24
Page 2
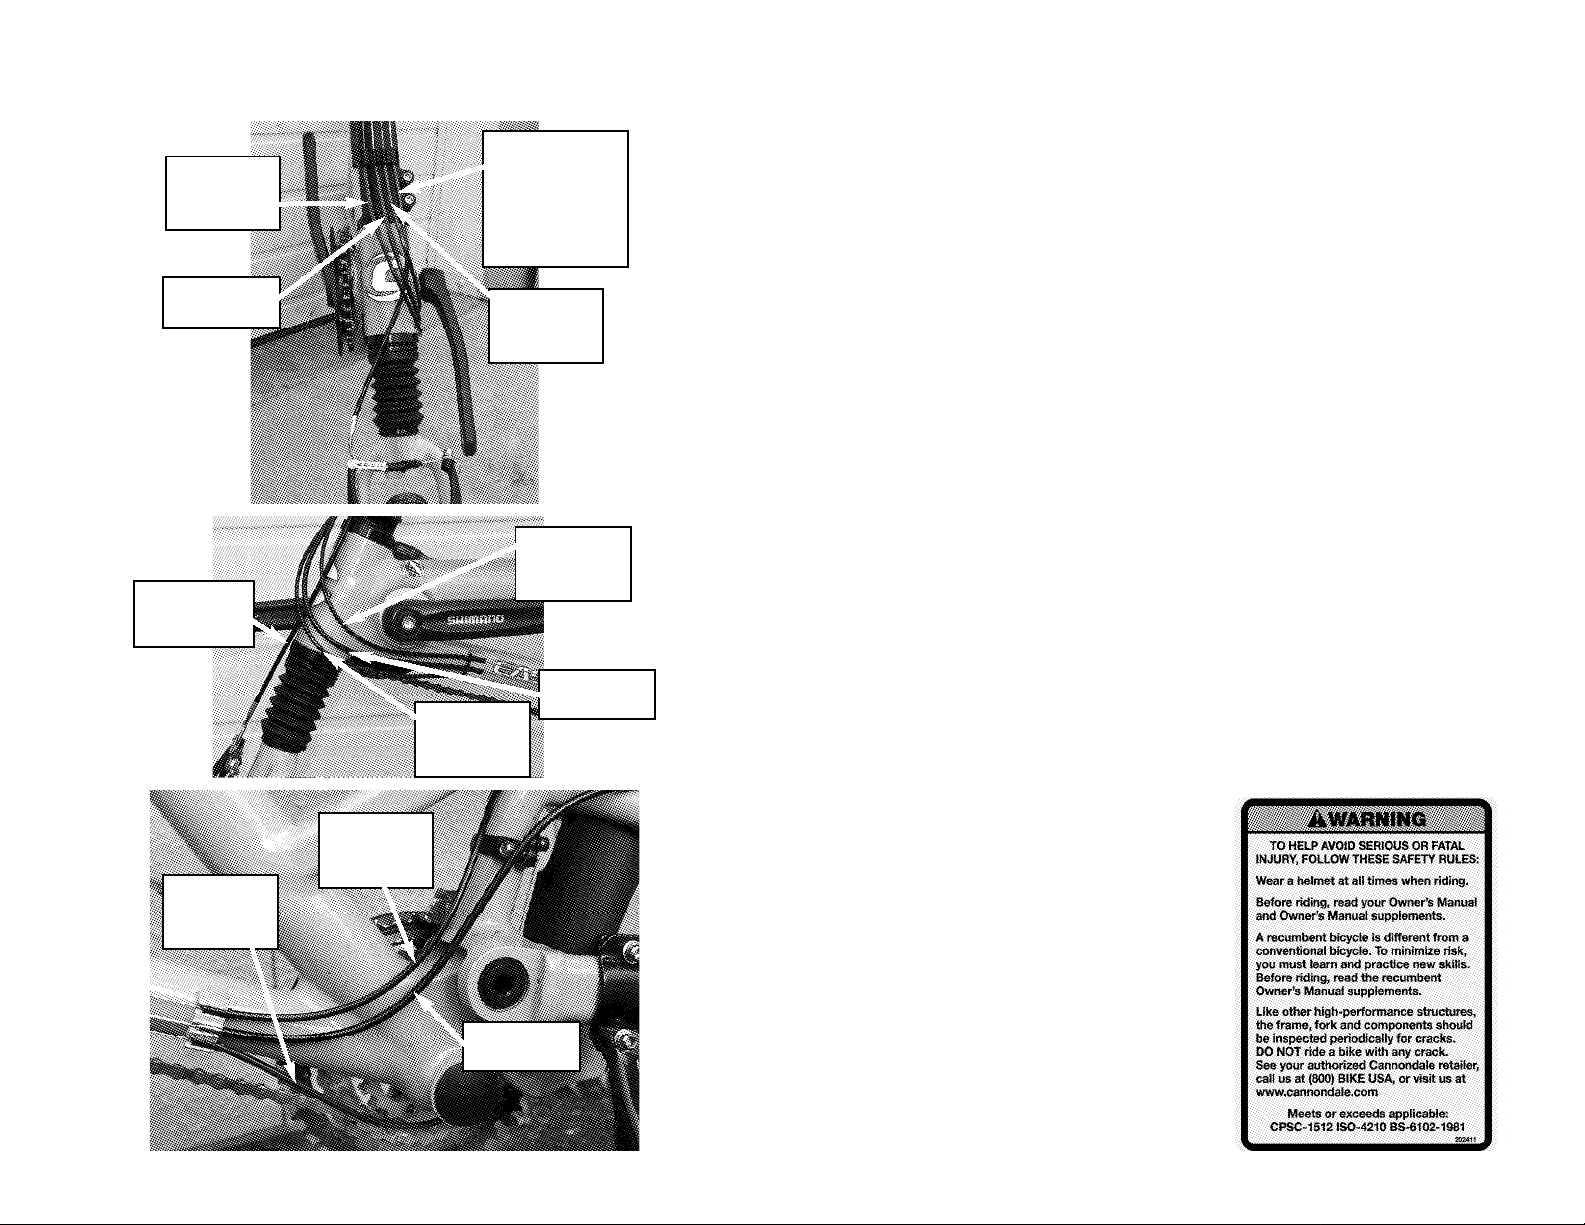
CANNONDALE EASY RIDERCABLE ROUTING
Thanks for purchasing the most sophisticated, comfortable and well crafted Mid
Wheelbase (MWB) recumbent.
Front
Derailleur
Cable
Rear Brake
Cable
Front Brake
Cable
Front Brake
Housing must
(29cm) long!
Derailleur
Front
Derailleur
Cable
Cable.
be 11-3/8”
Rear
Cable
Rear
Derailleur
Cable
Rear Brake
Cable
Please take the time to read and understand this Owners Manual supplement,
the Cannondale Bicycle Owners Manual and any other literature included with
the bike. All contain important safety warnings and performance tips. If you
have any questions about your bicycle or the content of any of this literature
please contact Cannondale.
Your Easy Rider should have included both a standard owner’s manual and this
supplement. If you did not receive both of these documents, please download
and print one from the Cannondale website Tech Center or call our customer
service line at 1-800-BIKE-USA in the U.S. or Canada to have one sent to you.
See the back page for other phone numbers and e-mail contacts.
WARNING: WARNING: A Recumbent bicycle is different from a
conventional bicycle. To help avoid serious or fatal injury and
to minimize risk you must learn and practice new skills. Before
riding, read this Recumbent Owners Manual Supplement, and
learn and practice the skills described below.
Note that a manual alone cannot teach you how to ride, and
a manual the size of an encyclopedia could not cover every
combination of bicycle, rider and conditions. Thus, as a
reasonable person would expect, our manuals focus on the
bicycle and important cautions and warnings, not on
teaching you how to ride.
Front
Derailleur
Cable
Rear
Derailleur
Cable
2 3
Rear Brake
Cable
Many hazards are described in
the warnings, and we have
attempted to explain how to
avoid or minimize the hazards.
Because any fall or crash can
result in serious injury or even
death we do not repeat the
warning of these potential
consequences every time we call
attention to a hazard. The reality
is that the exact nature of the
consequences is not predictable.
Page 3

SOME RECUMBENT-SPECIFIC RIDING CHARACTERISTICS
Handling: Recumbents have handling characteristics that are different from
conventional bicycles, and the Cannondale Easy Rider may handle differently than
other recumbents you may have ridden. Take time to become familiar and
comfortable by doing practice rides in safe, open, level areas with little or no traffic.
Starting off: Getting your recumbent started is a basic skill you must master.
Make sure you are in a moderate gear (with the chain on the middle chainring
and the middle of the cassette). Position the pedal under your stronger or
favored leg with the crank arm straight up (at 12 o’clock). Be sure your path is
clear. Relax your arms and lean against the seat back. Give a strong push with
this leg and promptly get your other foot off the ground and then patiently
position the other foot on the other pedal. It is very helpful to learn this skill with
the seat further forward than you may ultimately place it. Err on the side of a
closer seat until starting off is second nature. This shorter pedal-to-seat back
position and more upright seat back will allow you to use your legs in a more
controlled, knees bent position and minimize the tendency that most people
have to hunch forward towards the handlebars.
Slow speed maneuvering: You will find that as you practice tight turns and
small circles at walking speeds, the handlebars can come close to your knees,
your inside hand grip will get closer to your body and your outside hand grip will
move away from your body. Recumbent enthusiasts call this the “tiller effect”.
Make adjustments (See the SET UP AND ADJUSTMENT section below) and
get used to these characteristics. Remember that these characteristics are not
significant once you start to ride even a little faster but are significant when
maneuvering slowly.
Coming to a stop: This is easier than on a conventional bicycle, but you will
want to practice. As you brake to a stop (see important braking section below)
take one foot off the pedal, and then the other. As your feet come close to
touching the ground be sure you are going very slowly –slower than walking –
and that you heel is down and your toe is up. If you are going too fast, or try to
use your feet as brakes, you may catch the ground with your foot and injure
your foot or leg.
Braking: This recumbent has great braking power, and it is easier to use this
power than it is on a conventional bicycle. Braking characteristics have a lot to
do with weight distribution and weight transfer. When you apply brakes, weight
shifts forward. On a conventional bicycle you have long been taught respect for
the power of front brakes and the need to modulate their use to avoid pitching
yourself over the handlebars (See section 4 C of the Cannondale Owners
Manual). You also have been taught that applying a lot of rear brake will result
in a skid, with little effect on reducing speed.
On this recumbent your weight is relatively lower and much more to the rear.
This means you can use much more rear brake power without skidding the rear
tire. You can brake harder without the hazard of pitching yourself over the
handlebars. In a panic braking situation think, “rear brake hard!”
The front tire of this recumbent is lightly loaded. If you use the front brake too
hard for the circumstances you can cause a skid, lose control, and crash. In
particular, do not apply too much front braking force when the front wheel is
turned or on a loose or slippery surface. Do not over-inflate the front tire (see
Front Tire Pressure section below) as over-inflation will minimize the tire contact
patch and decrease potential braking power.
Maintaining a course: The front wheel is relatively small. It is also relatively
light. These characteristics mean that it has less gyroscopic effect than the
larger front wheel on a conventional bicycle. The gyroscopic effect of a front
wheel adds stability to a bicycle, particularly at speed. The smaller gyroscopic
effect of the front wheel of this recumbent means that you should ride with both
hands on the hand grips and pay attention to your course.
Choice of pedals: Assuming you have prior experience and second nature
familiarity with clipless pedals, we highly recommend the use of clipless pedals.
The forward, relatively high position of the pedals on a recumbent bicycle
maximizes the benefits of their use.
However, if you are not experienced and very familiar with clipless pedals, do
not attempt to learn recumbent riding and clipless pedal use at the same time.
(See section 4 F of the Cannondale Owners Manual and the instructions from
the manufacturer of your clipless pedal system).
The same advice is given for use of pedals with toe clips and straps: Do not
attempt to learn recumbent riding and toe clip & strap use at the same time
(See section 4 E of the Cannondale Owners Manual).
Do not use flat, slippery plastic pedals or wear slippery-soled shoes. You do not
4 5
Page 4
want your foot to slide off, strike or catch the ground and cause injury to your
foot or leg.
Use care “sticking” the front wheel out into a roadway, particularly when you
enter an intersection.
Passengers: Do not carry any passengers, including children, on this
recumbent bicycle. The extra weight of passengers could compromise steering
or braking performance. A passenger could also compromise control.
Off-road riding: These are not mountain bikes. The Easy Rider is similar to a
conventional hybrid in terms of off-road capability. (See section C of the
Cannondale Owners Manual) These bikes work well on roads or bike paths that
are relatively smooth and hard packed, such as cinders, good dirt roads and
“rails to trails” paths. These bikes are not intended or designed for off-road use,
such as trails, “single track” with logs, rocks, roots, or loose dirt.
Recumbents are further limited in the complex and ever changing terrain of offroad riding because the recumbent rider has very little ability to use two
techniques that are fundamental to mountain biking: shifting weight and use of
the legs to absorb shock. For these reasons do not jump a recumbent, on or off
the road.
Recumbents also have a lightly loaded front tire that will be more likely to slide
out or slip than the tire of a conventional bicycle.
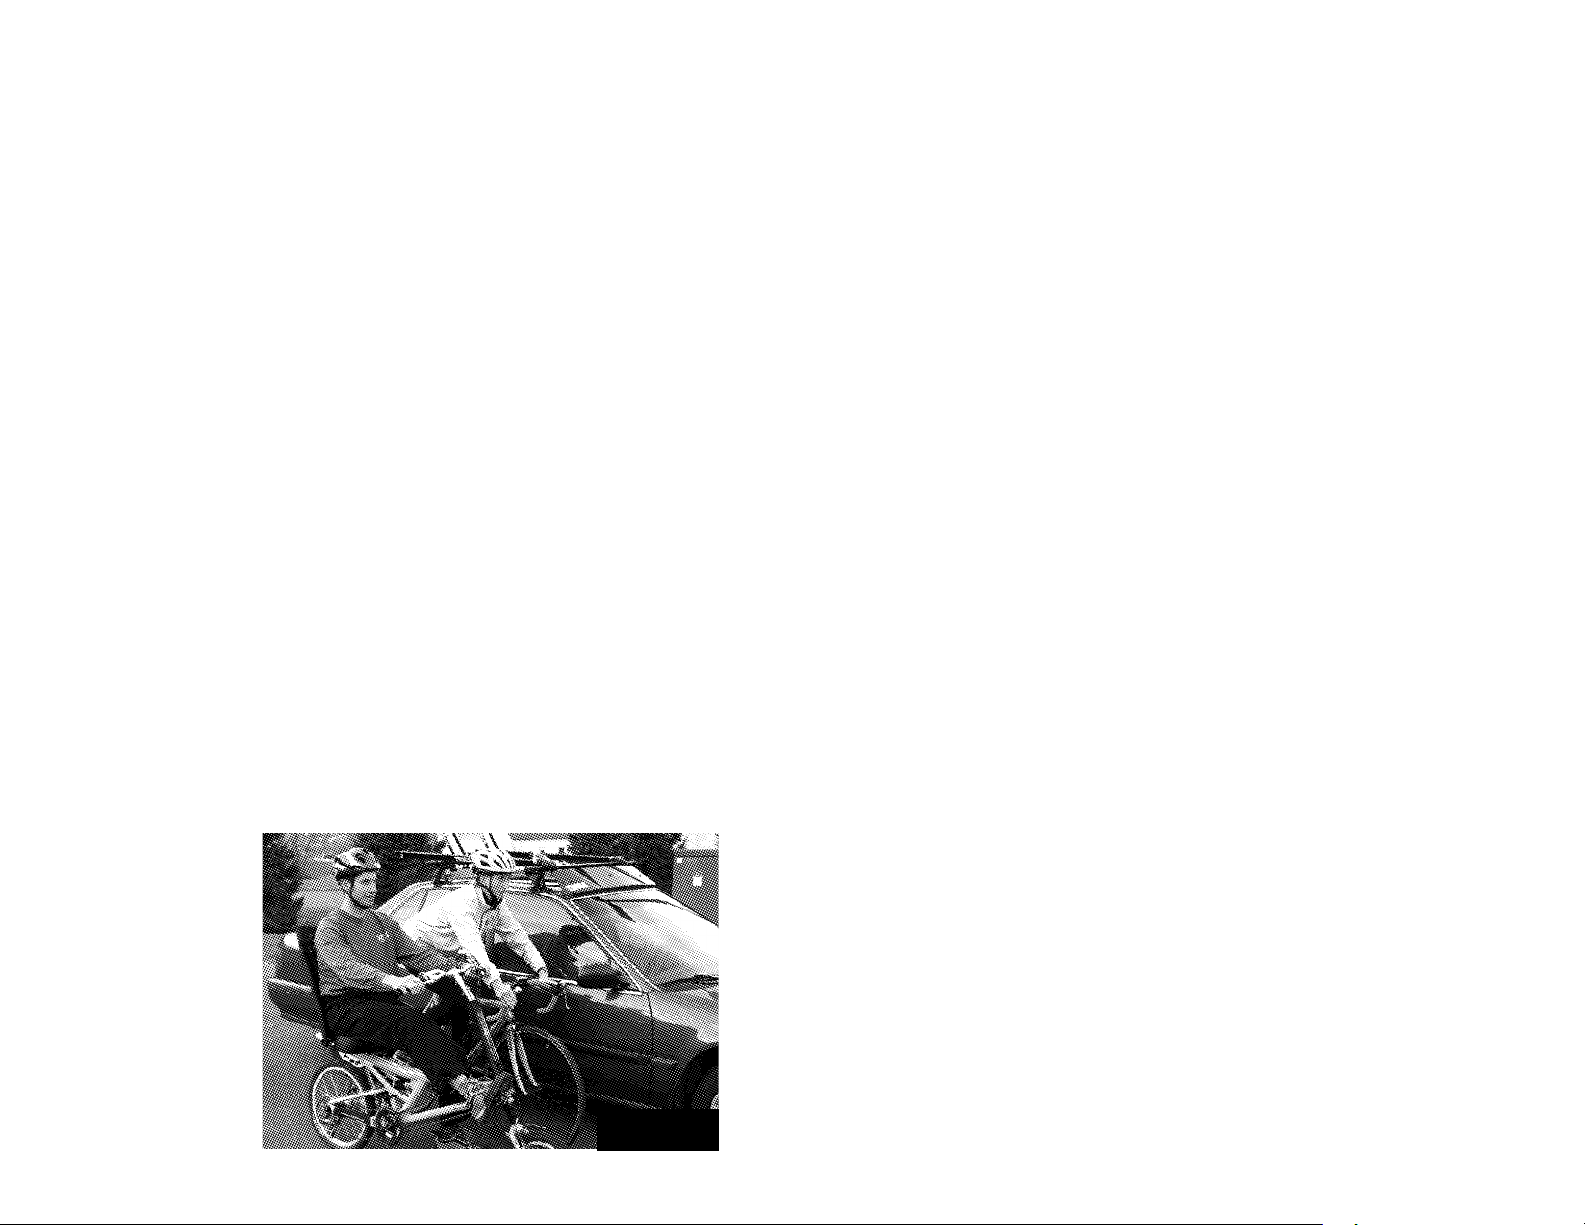
Riding in traffic: See Fig. 1 for a generalized look at your eye height relative
to a conventional bicycle and a typical passenger car. On the Easy Rider, you
may sit slightly lower than on a traditional bicycle, but still high enough to make
eye contact with automobile drivers. You will need to use caution, adapt and
practice this new position, just as you would when driving a sports car one day
and a tall four wheel
drive the next.
Rearward vision: On a conventional bicycle, a rider can stand up on the
pedals and swivel the upper torso around to look to the rear. This swiveling
motion is more limited on a recumbent. We recommend your practice riding
include learning to both turn your head and use a rear view mirror. We have
included a rear view mirror as original equipment. Adjusted for the rider and
used properly this mirror can reduce risk but not eliminate risk.
Pedaling technique: On the Easy Rider, you will be able to use more leg
power than on a traditional bicycle, because you can push against the seat
back, much like using a leg press machine at a gym. Be careful not to
overpower and injure your knees, particularly before your body becomes used
to the new riding position. Our advice? Use lower gears, and spin, spin, spin.
On a conventional bike you can briefly use a gear that is too high by getting out
of the saddle for a few strokes, using gravity and body weight. We often do this
after temporarily slowing the bike, or when climbing a hill. On a recumbent you
cannot get out of the saddle. Our advice? Anticipate changes in speed and
terrain, and shift to lower gears early.
On a conventional bike you will also pull against the handlebars as you push on
the pedals. On a recumbent you can push against the seat back. Learn to relax
your upper body and not to pull on the handlebars. This is the key to the
comfort and pleasure of recumbent riding. This upper body relaxation will also
minimize the small inadvertent steering corrections that often affect new
recumbent riders.
Note that the front
wheel of this
recumbent sticks out
further than the front
wheel of a
conventional bicycle.
You are sitting further
back on the
recumbent bicycle.
Different muscles: The different riding position of the Easy Rider will use
different muscles and different motions. You will need to train your whole body.
As with any fitness program involving a new sport or new equipment, consult
with your doctor regarding your fitness, start slowly, work up progressively,
cross train, stretch, and listen to your body. If you feel pain, work with your
retailer on adjustments and see your doctor.
Fig. 1Fig. 1 5
6 7
Page 5

SET UP AND ADJUSTMENT
Frame sizes: The following is a good starting point.
Height <5’ 7” (170cm) Standard frame
Height >5’ ‘7” (170cm) & >200Lbs (90Kg) Large frame
Height 5’ 9” - 6’10” (175 - 208cm) Large frame
The seat: The Easy Rider seat assembly is adjustable in five ways.
1. The first and most
basic is fore and aft
adjustment of the
whole assembly. See
Fig. 2 & Fig. 3. The
goal of this
adjustment is to fit
the seat to pedal
distance to your own
body size. The
objective is to have
your knee slightly
Fig. 2Fig. 2 5
bent when your foot
is at the forward most part of the pedal rotation. You should not bend your ankle
to reach further forward. As noted in the “starting off” section above, start with a
shorter seat-to-pedal distance. The seat rails are laser etched with a size scale.
Note your preferred setting and save time when sharing a bike or reinstalling
the seat assembly after removing it for transport.
The seat assembly is
clamped in place with
two quick release
assemblies. See
section 4 B of the
Cannondale Owners
Manual for detailed
instructions on the
proper operation of a
quick release.
Fig. 3Fig. 3 5
8 9
WARNINGS:WARNINGS: It is very important that you properly adjust
and firmly close both quick release seat clamp assemblies.
Read and follow the instructions. If they are not properly
adjusted they could slip.
Be sure to position the rear seat clamp quick release lever is
positioned horizontally to maximize clearance with the rear
tire through the full range of suspension travel. See Fig. 4.
Do not adjust seat assembly further forward than minimum
line. See Fig. 5.
Do not attempt to adjust the seat while riding.
Failure to follow these instructions could cause loss of
control and injury.
Fig. 4Fig. 4 5 Fig. 5Fig. 5 5
2. The second adjustment is the seat back angle. The seat back may be
adjusted through 17 degrees. This adjustment is made by loosening the two
bolts (one on each side) shown in Fig. 6. Move the seat back to suit your
preference and
retighten the clamp
bolts. They should be
torqued to 94-130 In-
Lbs (8.7-10.6 Nm)
94-130 In-Lbs
(8.7-10.6 Nm)
before riding. As noted
in the “starting off”
section above, start with
a more upright seat
back angle. We suggest
mid position or steeper.
Fig. 6Fig. 6 5
Page 6

3-4. The third and forth are
seat base angle and seat
base fore and aft
adjustment. The seat base
can be adjusted through 20
degrees of tilt and 30mm
fore and aft relative to the
seat back. This adjustment
77-94 In-Lbs
(8.7-10.6 Nm)
is made by loosening the
four bolts (two on each side)
shown in Fig. 7. Move the
Fig. 7Fig. 7 5
seat base to suit your preference and retighten the bolts. Torque to 77-94 InLbs (8.7-10.6 Nm) before riding.
5. The fifth is the adjustment
of the backrest mesh fabric
tension. You may selectively
loosen or tighten the webbing
straps behind the seat back.
See Fig. 8.
The handlebars and stem:
The general goal is to have
your knees clear the
handlebars and to have your
hands slightly lower than
Fig. 8Fig. 8 5
your shoulders. The height of the handlebars can be adjusted. See Fig. 9. Do
not adjust the stem above the minimum insertion line. (See section 3 A 3 of the
Cannondale Owners
Manual) As you make
Fig. 9Fig. 9 6
adjustments and do short
test rides, be sure to do
some slow maneuvering in
tight circles so that you can
77-94 In-Lbs
(8.7-10.6 Nm)
strike the right personal
compromise between knee
clearance and arm comfort.
Retighten stem clamp bolts.
Torque to 77-94 In-Lbs (8.7-
10.6 Nm) before riding.
The handlebars can be rotated in the stem. Because the handlebars have a
curve or sweep, rotation will allow you to fine-tune your reach. Retighten
handlebar clamp bolts. Torque to 77-94 In-Lbs (8.7-10.6 Nm) before riding.
Other stem choices: The standard Cannondale Easy Rider stem has 70mm
offset. Bike E offers a “straight” stem with no offset, and a 50mm offset stem.
Both Bike E stems will fit the Easy Rider.
MECHANICAL ADJUSTMENTS
This section makes no attempt to be a comprehensive manual on bicycle
mechanics. If you are not a very experienced mechanic we urge you to bring
your bicycle to an authorized Cannondale retailer where a professional mechanic
can do the job right. In addition to putting yourself at risk, poorly done
mechanical work may void your warranty. This section covers design features
unique to the Easy Rider recumbent, and is intended primarily for the Authorized
Cannondale Retailer performing the assembly and adjustments.
WARNING:WARNING: All Cannondale bicycles must be fully
assembled and adjusted by an Authorized Cannondale
Retailer before delivery to the customer.
Your Cannondale dealer should have correctly performed all adjustments before
the sale of the bicycle. If you feel that your Easy Rider is out of adjustment,
please take the bike to your Authorized Cannondale Retailer.
Holding the bike in a work stand: There are several alternatives. You may use
an oversize clamp kit for the popular Park work stands. The down tube is 1 ½”
diameter and is right at the limit for the standard Park clamp. If you clamp the
down tube you may pinch the cables. You may clamp the left-hand chainstay or
the seat back upright. If you clamp the left-hand chain stay or the seat back
upright get help and be careful, as the weight of the bike will be cantilevered.
Use care with any bike stand not to clamp so hard as to dent the tube.
Suspension set up: You will need to understand some suspension terminology in
order to follow these instructions and get the most performance from your bicycle.
Travel: The total distance that the suspended wheel can move.
10 11
Page 7

Spring rate: The force needed to compress the spring one inch. Heavier people
need a higher spring rate than lighter people.
Preload: The initial amount of force placed on the spring. Preload is used to
change or adjust spring rate and therefore sag.
Sag: The amount that the suspension compresses with the rider sitting on the
bike in a normal position. It is usually expressed in percent of suspension travel.
Sag allows the wheel to travel downward to follow the terrain.
FORK WARNINGS CONTINUED
If your bike has suspension, the increased speed you may
develop also increases your risk. When braking, the front of
a suspended bike dips. You could have a bad accident if
your skill is not up to handling this system. Get to know how
to handle your suspension system well before trying any
very fast biking.
Easy Rider fork: The Easy Rider fork features the patented HeadShok
telescoping steerer tube assembly that uses 88 needle bearings for smooth,
responsive suspension action. The fork blades are TIG-welded 6061-T6
aluminum for a lightweight but stiff fork structure for precise steering. These
forks are not disc brake compatible. Do not attempt to fit disc brakes with any
clamps and/or adapters.
The Easy Rider fork includes the MC60 cartridge that offers 60mm of travel
using the Advanced Spring System’s coil spring / MCU combination. The
cartridge also features a mechanical air damper that controls the compression
and rebound speed of the spring.
FORK WARNINGS
If the suspension fork ever begins to make “knocking” or
“clunking” noises, or if it ever shows an unexplained
increase in travel, or looks like it is extended farther than it
was originally, stop riding the bike and bring it to a
Cannondale dealer for inspection. Possible indications of a
problem are:
An increase in the fork’s extension or travel.
A stretched-out fork boot.
A stretched or strained front brake cable.
“Knocking” or “clunking” noises coming from fork.
If any of the above symptoms are ignored, the result could
be a separation of the fork from the bicycle frame.
Separation of the fork could lead to an accident, with risk of
serious injury or death.
12 13
Likewise, suspension will increase handling capabilities and
comfort of your bicycle. This enhanced capability may allow
you to ride faster. But do not confuse the enhanced
capabilities of a suspension bike with your own capabilities.
Increasing your skill will take time and practice. Proceed
carefully until you are sure you are competent to handle the
full capabilities of your bike.
Use only brakes designed to be mounted to existing
cantilever bosses. Do not attempt to add any brake mount or
use any brake device that requires adapting the fork’s existing
brake mounts. Altering or adapting existing brake mounts or
installing new brake mounts will void the fork’s warranty and
may result in structural failure of the fork. Structural failure of
the fork will result in loss of control of the bicycle, placing the
rider in danger of serious injury or death.
Preload Adjustment: Before the bike is ridden, front and rear spring preload
must be adjusted to rider weight. If too much preload is applied, the suspension
will be stiff and unresponsive; too little preload and the rider may feel
“bouncing” while climbing or accelerating hard, and may tend to bottom out the
shock (compress it to the limit of its travel) on large bumps.
The HeadShok front suspension uses a steel coil and MCU spring and a
mechanical air damper, also known as a shock absorber. These components
are hidden from view inside the HeadShok. To adjust the front suspension
spring preload, first use a 6mm hex wrench to remove the stem extension tube.
You will now see a hole in the center of the top of the fork. Insert a 4mm hex
Page 8

wrench to engage the preload
adjusting screw. Turn the screw
Fig. 10Fig. 10 6
clockwise to increase preload,
resulting in a higher spring rate and
less sag. Turn the screw
counterclockwise to reduce
preload, resulting in a lower spring
rate and more sag. See Fig. 10.
The preload screw puts pressure
on the spring. Turn the screw
counterclockwise to the point where you feel that the screw is not compressing
the spring. This is your starting point for adjustment. Now count turns clockwise
per the chart, Fig. 13. After adjustment is made, reinstall the stem extension
tube, making sure that it is seated flush against the headset seal with the bolts
on the left side. Torque to 77-94 In-
Lbs (8.7-10.6 Nm). See Fig. 11.
77-94 In-Lbs
(8.7-10.6 Nm)
Note!
WARNING:WARNING:Do not use the
stem extension tube to
adjust handlebar height.
The stem extension tube
must always be clamped in
place fully seated against
the headset top seal with
Fig. 11Fig. 11 5
the bolts on the left side. If
the stem extension tube is not properly clamped, it may
break with risk of serious injury to the rider.
The rear suspension uses a coil-
Fig. 12Fig. 12 6
over shock, meaning that a steel
coil spring surrounds the oil
damper, also known as a shock
absorber. To adjust the rear
suspension spring preload, you will
turn the spring preload ring. Turning
the ring clockwise increases
preload, resulting in a higher spring
rate and less sag. Turning the ring counterclockwise decreases preload,
resulting in a lower spring rate and more sag. See Fig. 12.
With the rear wheel off the ground, turn the spring and preload ring
counterclockwise until the preload ring is not touching the spring. Now turn the
preload ring until it firmly contacts the coil spring but does not compress it. This
is your starting point for adjustment. Now turn clockwise per the chart, Fig. 13.
Approximate number of turns of spring preload required for the
recommended 40% sag (About 25mm sag front and 30mm sag rear).
Note: this will vary with rider height due to change in weight distribution.
This is a very soft & compliant setup for use on uneven surfaces - riders on
smooth roads may favor a harder suspension set up. If so, increase the number
of turns of spring preload.
Rear shock Fork
Bike size Standard Large Standard Large
Rider Lbs Rider Kg
<140 * * * * 1 * * * * * <64
140-160 1 * * * 3 * * * * * 64-73
160-180 2 1 5 1 73-82
180-200 3 1 7 3 82-91
200-220 4 2 9 5 91-100
220-240 * * 2 * * * * 7 100-109
240-260 * * 3 * * * * 9 109-118
260-280 * * 4 * * * * 11 118-127
* Use 700 lb/in x 1.57 spring - available from Fox
* * Use 1050 lb/in x 1.60 spring or go to LARGE size bike providing you are
over 5’7” (170cm)
* * * Use 900 lb/in x 1.60 spring or STANDARD size bike providing you are
under 6’0” (180cm)
Warning - Do not exceed 5 turns of preload on the Fox rear shock
—————————————————————————————————---——
* * * * Use blue spring (available from your Cannondale retailer) in fork or go to
large size bike providing you are over 5’ 7’’ (170cm)
* * * * * Use green spring (available from your Cannondale retailer) in fork or go
to standard size bike providing you are under 6’ 0’’ (180cm)
Note: A firmer red fork spring is also available for the fork from authorized
Cannondale retailers
Cannondale Part # Description Spring Color
HD110/GRE Soft fork spring Green
HD110/BLU Medium fork spring Blue
HD110/RED Hard fork spring Red
Fig. 13Fig. 13 5
14
15
Page 9

For the majority of riders the standard springs, once preloaded for a rider, will
work fine. Some riders with different preferences may need different springs. As
the chart indicates, there are additional springs available from Cannondale for
the HeadShok fork and from Fox for the rear shock. We urge you to have your
retailer change springs.
Do not attempt to adjust the preload or touch the spring or swingarm
while seated or riding. Suspension movement could cause you to pinch or
injure your fingers. Keep your hands away.
HeadShok scheduled maintenance: It is recommended that you take your
Easy Rider to your Cannondale retailer for a fork tune up every 6 months or 60
hours of riding. Your fork is a high performance suspension system and needs
regular inspection, lubrication, and maintenance. The mechanic will check the
following items and service as necessary. Between tune ups, you will also want
to check your fork as outlined below.
Frame and Fork: Once a month, or every few rides, clean and inspect the entire
frame and fork for any dents, cracks, or other damage. If any damage to the
frame or fork is found, do not ride the bicycle. Have the damage inspected by a
Cannondale retailer.
Headset Bearings: Periodically, particularly after the bicycle is exposed to a lot
of water (rain, mud, or washing) a few drops of lightweight oil (such as Pedro’s
Syn Lube) should be smeared around the upper headset bearing (located just
below the stem). The rubber seal in the top of the bearing must be kept
lubricated, as it protects the headset cartridge bearings from contamination by
water and dirt. Failure to keep the headset bearing lubricated will result in
premature bearing wear.
Suspension Fork Boot: Frequently inspect the rubber boot at the base of the
head tube for tears, cuts, or broken zip ties that could allow contamination. The
fork boot protects the needle bearings and bearing races from water, dirt, and
other contaminants. Make sure that the shifting and brake cables have not
rubbed a hole in the boot. If the cables are rubbing on the boot, you should reroute them to eliminate the contact. Your Cannondale retailer can help you with
this procedure.
If the boot is damaged in any way, it must be replaced immediately. Boot
replacement requires the suspension fork be removed from the frame using
special tools, so only an experienced bicycle mechanic at a Cannondale retailer
should perform this job. Damage to the fork due to contamination by water or
dirt will not be covered under warranty.
Inner Steerer Tube: Several times a year, or if the suspension boot has been
damaged, or if the fork has taken a large or unexpected impact, you should
inspect the inner steerer tube beneath the boot. Before proceeding, make sure
that you have two replacement zip ties to reaffix the HeadShok boot. These
should be available from your Cannondale retailer. Cut both old zip ties off of
the boot and pull the boot up off of the lower boot mount and down off of the
lower collar. Clean the area inside the boot of any dirt and old grease. Inspect
the inner races and the steerer tube for corrosion, cracks, or a bent steerer
tube. Also be sure to slide the large O-ring bottom-out bumper up off of the
crown and carefully check this area.
If there are any cracks on the steerer assembly or if it is bent at all, the fork
must be replaced immediately. DO NOT CONTINUE TO RIDE. If rust, pitting,
or corrosion is present on the steerer tube, you should take the fork to a
Cannondale retailer for inspection and to evaluate the amount of structural
damage that may have resulted.
WARNING: WARNING: Serious, structural corrosion on the inner
steerer tube of a HeadShok fork will decrease the useful life
of the fork. Corrosion or cracks on the steerer tube, or a bent
steerer tube, may lead to the failure of the fork, which could
cause an accident with attendant risk of injury or death.
HeadShok forks that show signs of such structural damage
in the steerer tube must be replaced immediately.
After completing inspection of the HeadShok steerer tube assembly lightly coat
the exposed length of the inner steerer tube and bearing races with a good
quality light bicycle grease, such as Finish Line White Teflon grease, Slick 50
One Grease, or Royal Purple grease (Cannondale part # HD225/). Be sure to
slide the large O-ring bottom-out bumper up from the crown and thoroughly
grease under the O-ring at the junction between the bottom of the inner steerer
tube and the fork crown.
Replace the boot onto the lower collar of the HeadShok telescoping assembly
and to the top of the fork crown. Reattach the boot with two zip ties. Make sure
that the zip ties are secured tightly.
16 17
Page 10

Needle Bearing Lubrication: The needle bearings (which provide the smooth
travel of the HeadShok suspension system) inside all Easy Rider forks should
be lubricated every 6 months or 60 hours of riding. This procedure requires
partial disassembly of the suspension fork, and therefore must be performed
only by an experienced bicycle mechanic at an Authorized Cannondale retailer.
HeadShok warranty: All HeadShok forks and their internal assemblies are
warrantied against manufacturing defects in materials and/or workmanship for a
period of one year from the date of original retail purchase. Not covered under
warranty is damage resulting from improper adjustment or maintenance, lack of
maintenance, crashes, or use judged to be excessive or abusive. Please see
your Cannondale Bicycle Owner’s Manual for more complete warranty
information.
Fox rear shock service and warranty: See the Fox Shox Owners Manual
included with your Easy Rider regarding the Fox “Vanilla” shock.
Tire choice: Standard tires for the Easy Rider are MAXXIS “Hookworm”. This
odd name comes from the fact that these tires were developed for a segment of
the BMX market. We believe that they are ideal for the Easy Rider. They are
very tough, minimizing the risk of flats. They have high air pressure capability,
necessary for use on the rear, which will carry approximately 70% of the weight.
They have a round profile, an important characteristic for smooth, predictable
“turn-in” to a corner and mid-corner steering corrections. This round profile is
particularly important on the front. Note that a ”pointed” or raised center profile
tire will have quick, uneven “turn-in” characteristics. We believe that any
hypothetical reduction in rolling resistance is not worth the adverse effect on
handling. In our testing these tires had low rolling resistance. If you choose to
change to another make and model of tire we recommend you consult with an
experienced bicycle retailer about weight distribution and these characteristics.
Rear tire pressure: This recumbent carries much more weight (approximately
70%) on the rear tire than on the front tire. The MAXXIS Hookworm 20 x 1.95
(ISO 406) rear tire should be inflated to approximately 2/3 of your body weight
in pounds in PSI (pounds per square inch). You may inflate the rear tire up to
the 110 PSI listed on the tire manufacturer’s label, on the sidewall of the tire.
Let’s say you weigh 100 pounds; use 65 PSI. Let’s say you weigh 200 pounds;
two thirds of 200 is 130, and the maximum inflation pressure is 110 PSI, so use
110 PSI.
For metric folks, use 10 % in BAR of your body weight in Kg up to the
maximum inflation pressure of 7.5 BAR. Let’s say you weigh 50 Kg, use 5 BAR.
Let’s say you weigh 100 Kg, ten percent of 100 is 10, and the maximum
inflation pressure is 7.5 BAR, so use 7.5 BAR.
Front tire pressure: When inflating the front tire of the Easy Rider DO NOT
follow the pressure recommendation on the tire’s sidewall. Instead follow these
instructions and the warning on the rim, reproduced below.
English units: The MAXXIS Hookworm 16 x 1.95 (ISO 305) front tire should be
inflated to 1/3 of your body weight in PSI.
Metric units: Use 5 % in BAR of your body weight in Kg. Therefore, if you weigh
50 Kg, you should inflate the front tire to 2.5 BAR. If you weigh 100 Kg, you
should inflate the front tire to 5 BAR.
Lower pressure in the front tire is required because of the low percentage of
weight, approximately 30%, on the front tire. As with any bike, lower tire
pressures give better grip on wet, unpaved, cobbled or loose surfaces. The grip
comes at the price of increased rolling resistance. If you have any difficulty
following these important instructions please see your retailer.
Shifter positioning: Rider position on a recumbent makes it difficult to see the
drive train. We use modern index shifters that have gear position indicators. We
suggest that you rotate the shifters so that the rider can see the gear position
indicators while riding.
Shifter choice: Think twice about using “Rapidfire” style shifters in place of
twist or “Grip Shift” type shifters. The under handlebar levers on “Rapidfire”
style shifters will reduce knee clearance and cause you to raise the stem more
than you might wish to.
Mid-drive/Mid-drive bearing: The Easy Rider uses a mid-drive system. The
front chainring is simply a single crankset. It is connected by the front chain to
the inner chainring of a crankset without crankarms. This special crankset has 4
18 19
Page 11

chainrings and is the heart of the mid-drive system. The inner chainring is
driven by the front crankset via the front chain. The outer three chainrings are
used exactly as the chainrings on any triple crankset conventional bicycle. The
drivetrain is exactly as on any conventional bicycle.
The mid-drive crankset spins on a two special bearings pressed into a recess
on the back of the crankset. These bearings ride on a special shaft threaded
into the drive side of the mid-drive bottom bracket. The bearings are sealed and
maintenance free, but if new ones are needed they can be replaced. To do so,
remove the M6 bolt on the front of the mid-drive crankset. To replace it, torque
the bolt to 77-94 In-Lbs (8.7-10.6 Nm) before riding.
Front chain tensioner: The front chain is tensioned using the same patented
bottom bracket eccentric adjustment mechanism used in Cannondale tandems.
Your Easy Rider will be delivered with this mechanism properly adjusted. If you
think that the front chain seems to have excessive slack, let your retailer take a
look. A properly adjusted front chain will not bind or feel tight at any point in a
rotation of the crankset and will not have excess slack in the chain.
Adjustment: As the chain wears and stretches, use the eccentric to return the
chain to a maximum of 1/2” of vertical chain deflection between the two cranks.
1. Using a 4mm hex wrench, turn the socket head bolt on the right side of the
eccentric counter-clockwise to loosen the eccentric assembly. If the bolt has
been previously installed tightly it will be necessary to tap the head of the bolt
with a mallet to free the wedge (much like a stem wedge) assembly.
2. Once the assembly is free, use a bottom bracket pin tool such as the Park
SPA-1 (green) to rotate
the eccentric until proper
chain tension is
obtained. Secure the
assembly in its new
position, centered in the
frame, by tightening the
60 In-Lbs
(6.75 Nm)
hex bolt clockwise to 60
In-Lbs. (6.75 Nm). See
Fig. 14. Note that the
right crank arm has
been removed for clarity.
Fig. 14Fig. 14 5
20 21
If for any reason the eccentric must be removed from the bike or replaced, it is
very important that the outer surfaces (including under the wedge) are thoroughly
coated with anti-seize compound or greased before re-installation. Also, the
eccentric MUST be re-installed with the head of the hex bolt on the right side of
the bike to assure that the bottom bracket is installed the correct direction.
Chainring bolts: should be periodically checked for tightness, particularly the
five inside bolts that secure the two innermost chainrings. Torque these bolts to
110 In-Lbs (11Nm).
Front derailleur adjustment: It is very important that the front derailleur lower
limit screw be set accurately to avoid the chain accidentally shifting from the
inner chain wheel (the third chain wheel in, also known as the “granny”) onto
the primary drive chain (which turns the fourth chainring in).
Brake set up: Please see enclosed brake manufacturers instructions. Set up is
as on a conventional bike, with one exception. The front “V” brake guide tube,
often called the “noodle”, is a special part. This special noodle has a tight 120
degree radius, rather than the standard 90 degrees. This additional bend,
combined with precise casing length of 11-3/8 inches (29cm) and careful casing
routing prevents the front brake cable and casing from conflicting with the right
pedal or crank. The front brake casing should have minimal slack when the fork
is fully extended. See the photos inside the front cover of this booklet for a
guide to cable routing.
CARRYING STUFF
The tubing on the back of the seat back: is 22.2mm (7/8”) outside diameter.
This is standard handlebar diameter. You can use many handlebar bags
designed to fit handlebars. Follow the bag manufacturer’s instructions.
Day packs/Back packs/Hydration packs: fit nicely over the seat back. Be
sure both shoulder straps are inboard of the vertical frame members. Attach the
waist belt, and any sternum strap, around the seat back to keep the pack
stable. Be sure that no straps hang low enough to tangle in the rear wheel.
Panniers: A rack will be available that attaches to the base of the seat
assembly. The seat assembly is pre drilled and tapped (standard M6) to accept
this pannier rack. This rack will accept a pair of medium panniers, one on each
Page 12

side. The advantage of this design is that the weight of the panniers is centered
with your own weight.
WARNING: Do not strap or lash anything directly to the extended top
tube/rear fender. This is a round, slick surface that is close to the wheel. It
is not a safe place to carry gear. Packages or cargo could fall into the rear
wheel and cause an accident, with risk of serious injury.
ACCESSORIES
Lighting: Must be added if you ever ride at dawn, dusk or night. See section 2
F of the Cannondale Owners Manual. Reflectors alone are not adequate for
night riding. Note that the seat back struts are a good place to add a flashing
rear strobe light designed to be mounted on a conventional seatpost.
Kickstand: Cannondale includes one. Don’t forget to put it up before riding.
Water bottles: The Easy Rider stem has standard bosses for two water bottle
cages on the stem extension tube. If more capacity is needed we suggest a
bladder system suspended from the seat back.
Fenders: Front: Look for 16” front fenders, Bike E fenders work fine. Rear: A
small “shorty” fender used on some mountain bikes fits the Easy Rider and is
available from Cannondale, part # KF032/. Want something larger? Look for 20”
fenders. The swing arm offers good clearance. As with many bikes, fitting
fenders will require adaptation and/or fabrication by a careful professional
mechanic who considers suspension travel, disc brake clearance and vibration.
Fairings: Can be added. At this writing Cannondale does not make them or sell
them. Seek professional installation.
Chain guard: The Easy Rider frame has fittings resembling water bottle bosses
for a chain guard. Cannondale has plans to have one made to fit the Easy
Rider in the future. Please contact your retailer regarding availability.
TRANSPORTATION
On a car: You may need to use a tandem type rack. One design you may wish
to consider is the “Topper” rack (www.Atoc.com). One of the Topper designs
allows one person loading of a longer, heavier bike with a pivoting system.
These systems fit Thule and Yakima roof racks. We strongly recommend that
you remove the seat assembly prior to transportation on top of a car. The seat
assembly will add considerable aerodynamic drag. This drag will increase fuel
consumption, wind noise and stress on your rack.
In a car: Consider
removing the seat
Plastic Slides
assembly. Loosen the
two quick releases and
slide the seat
assembly forward and
off the seat rails.
Removing this bulky
part will ease packing.
When you reinstall the
seat assembly on the
seat rails be sure that
Fig. 15Fig. 15 5
Seat Rail
radius on each plastic
slide lines up with the radius on each side of the seat rail. See Fig. 15. See
also SET UP AND ADJUSTMENT section above regarding seat adjustments.
REFERENCES
The standard for recumbent information, from eclectic to mainstream: RCN,
Recumbent Cyclist News, P.O. Box 2048, Port Townsend WA, 98368 or
www.recumbentcyclistnews.com
Indoor trainers: See your retailer and consider models designed to fit a
recumbent like the Bike E.
22 23
Page 13

CANNONDALE WARRANTY
Your Cannondale East Rider frame is warrantied against manufacturing defects in
materials and/or workmanship for the lifetime of the original owner. Under this warranty
we will repair any defective frame or, at our discretion, we will replace a defective frame
with the same or comparable model (due to product evolution). See the standard
Cannondale Owner’s Manual for more details.
All other components, including HeadShok forks, suspension parts, frame fixtures and
finishes (paint and decals) are warrantied against manufacturing defects in materials
and/or workmanship for a period of one year from the date of purchase.
For complete information regarding your Cannondale Limited Warranty, please refer to
your Cannondale Bicycle Owner’s Manual.
CONTACT INFORMATION
For warranty related questions or for more information on this or any
Cannondale product, please feel free to contact us.
USA and Canada: (800) BIKE-USA
Europe (EC): (31) 541-573580
Japan: (81) 722-99-9399
Australia: (61) 2-9979-5851
http://www.cannondale.com
custserv@cannondale.com
© 2002, The Cannondale Corporation DLC/JCH 011502 #113711
 Loading...