

Cannondale 2002 X440S Owner's Manual

2002 X440s OWNER'S MANUAL
P/N 951-5002032
Printed : 8/13/01
1
P/N 951-05002032
S a fe ty A le rts
• FAILURE TO FOLLOW THE WARNINGS CONTAINED IN THIS MANUAL CAN RESULT IN SERIOUS INJURY OR
DEATH.
• Keep this Owner’s Manual in a safe place.
MESSAGES WITH THE SAFETY ALERT SYMBOL
• Pay special attention to all messages preceded by the Safety Alert Symbol.
It means: ATTENTION! BECOME ALERT! YOUR SAFETY IS INVOLVED.
CAUTION
Indicates a potential hazard could resul t in vehicle dam age if instructi ons are not follo wed .
NOTE : Provides helpful information
Indicates that severe personal injury or
death WILL result if instructions are not
followed.
Indicates a potential hazard that COULD
result in serious injury or death.
DANGER
WARNING

© 2001 Cannondale Corporation - All Rights Reserved
2
X440s Owner's Manual.fm
Contents
Safety Alerts . . . . . . . . . . . . . . . . . 1
Contents . . . . . . . . . . . . . . . . . . . . 2
Important Information . . . . . . . . .3
Pre-Ride Inspection . . . . . . . . . . . 6
Component Locations . . . . . . . . . 7
Controls . . . . . . . . . . . . . . . . . . . . 8
Operating . . . . . . . . . . . . . . . . . . . 11
Fluids. . . . . . . . . . . . . . . . . . . . . . . 14
Brake . . . . . . . . . . . . . . . . . . . . . . . . . . . 14
Coolant . . . . . . . . . . . . . . . . . . . . . . . . . . 16
Engine oil . . . . . . . . . . . . . . . . . . . . . . . . 18
Transmission oil . . . . . . . . . . . . . . . . . . . 23
Fuel. . . . . . . . . . . . . . . . . . . . . . . . . . . . . 26
Maintenance and Adjustments . .27
Break-in . . . . . . . . . . . . . . . . . . . . . . . . . 27
Panels. . . . . . . . . . . . . . . . . . . . . . . . . . . 30
Air . . . . . . . . . . . . . . . . . . . . . . . . . . . . . . 35
Fuel. . . . . . . . . . . . . . . . . . . . . . . . . . . . . 38
Brakes. . . . . . . . . . . . . . . . . . . . . . . . . . . 43
Exhaust. . . . . . . . . . . . . . . . . . . . . . . . . . 46
Clutch . . . . . . . . . . . . . . . . . . . . . . . . . . . 47
Drive . . . . . . . . . . . . . . . . . . . . . . . . . . . . 49
Electrical. . . . . . . . . . . . . . . . . . . . . . . . . 56
Steering . . . . . . . . . . . . . . . . . . . . . . . . . 65
Suspension. . . . . . . . . . . . . . . . . . . . . . . 66
Rear shock . . . . . . . . . . . . . . . . . . . . . . . 69
Tires & Wheels. . . . . . . . . . . . . . . . . . . . 73
Frame, Sub-frame, Swingarm. . . . . . . . . 75
Lubrication . . . . . . . . . . . . . . . . . . . . . . . 76
Cleaning and Storage . . . . . . . . . 83
X440s Model Specifications . . . . 85
X440s Service Specifications . . .86
X440s Torques . . . . . . . . . . . . . . . 87

Printed : 8/13/01
3
P/N 951-05002032
Imp or ta nt
In fo r ma tion
We strongly suggest that you do the following before
operating the vehicle:
• READ and UNDERSTAND this Owner’s Manual.
• Perform the Pre-Ride Inspection found in this
manual.
• Wear appropriate protective gear - approved full
faced helmet, gloves, boots, long-sleeve shirt,
pants). Consider specially designed protective offroad vehic le riding apparel.
ABOUT THIS MANUAL
The purpose of this manual is to provide the owner with
important safety, service, maintenance, and tuning
information, and s hou ld be thoroughly read before operating
or working on the vehicle.
This manual is divided into sections which contain easy-tofollow procedures which are reasonably straight-forward.
Anyone with the mechanical ability and the proper tools
should be able to perform them. Each procedure is
accompanied by illustrations and photos to aid in proper
vehicle operation, basic maintenance, tuning, etc.
• Read and understand the entire procedure before
performing an y work. If you are unfamiliar with or
doubt your o wn abilities to co mplete a pro cedure as
described, have an authori zed Cannondale
motorsports dealer service y our vehicle.
Please keep your Owner's Manual in a safe and convenient
place, and consider it an integral part of your vehicle.
For detailed servicing information refer to the Service
Manual for your vehicle or contact an authorized
Cannondale motorsports dealer for a list of available
publications. If this manual is lost or damaged, contact an
authorized Cannondale motorsports dealer for a
replacement.
LIMITATIONS
Meticulous engineering and aggressive product designs
represent the spirit of innovation - always a driving force at
Cannondale. All information, illustrations, and specifications
in this manual are based on the latest product information
available at the time of publication. Cannondale Corporation
reserves the right to make changes at any time, without
notice.
This vehicle has U.S. and Internation al patents pending.
Cannondale Motorspo rts
Cannondale Corporat ion
EXPERIENCED RIDERS ONLY
• This vehicle is not f or b egin ner s.
All Cannondale motorsports products are designed for use
by trained and experienced riders only. All are very high
performance, competition sport machines and should only
be operated by licensed competition riders in excellent
physical condition, who are well-trained and experienced in
the operation of high perform an ce competition vehicles.
GOOD JUDGEMENT
There is always a risk involved when riding a vehicle;
however, making sure you and the vehicle are in the best
condition possible w il l ens ure a gre at riding ex pe rien ce. Use
sound judgement wh en ridi ng.
Never ride under the influence of alcohol, medication, or
drugs. Doing so will greatly reduce your ability to properly
operate this vehicle and could lead to an accident, injury,
and/or death. If you are taking medications prescribed by
your doctor, consult him/her before riding.
MODIFICATIONS
We recommend that you do not substitute parts, change or
modify your vehicle. Such changes could seriously impair
your vehicle’s handling, stability, and braking, making it
unsafe to ride and causing serious injury and/or vehicle
damage.
NO PASSENGERS
Do not overload this vehicle or carry passengers. Doing so
could seriously impair your vehicle’s handling, stability, and
braking, making it unsafe to ride which could result in
damage to the vehicle or serious injury or death to the
operator and/or passenger.
© 2001 Cannondale Corporation - All Rights Reserved
4
X440s Owner's Manual.fm
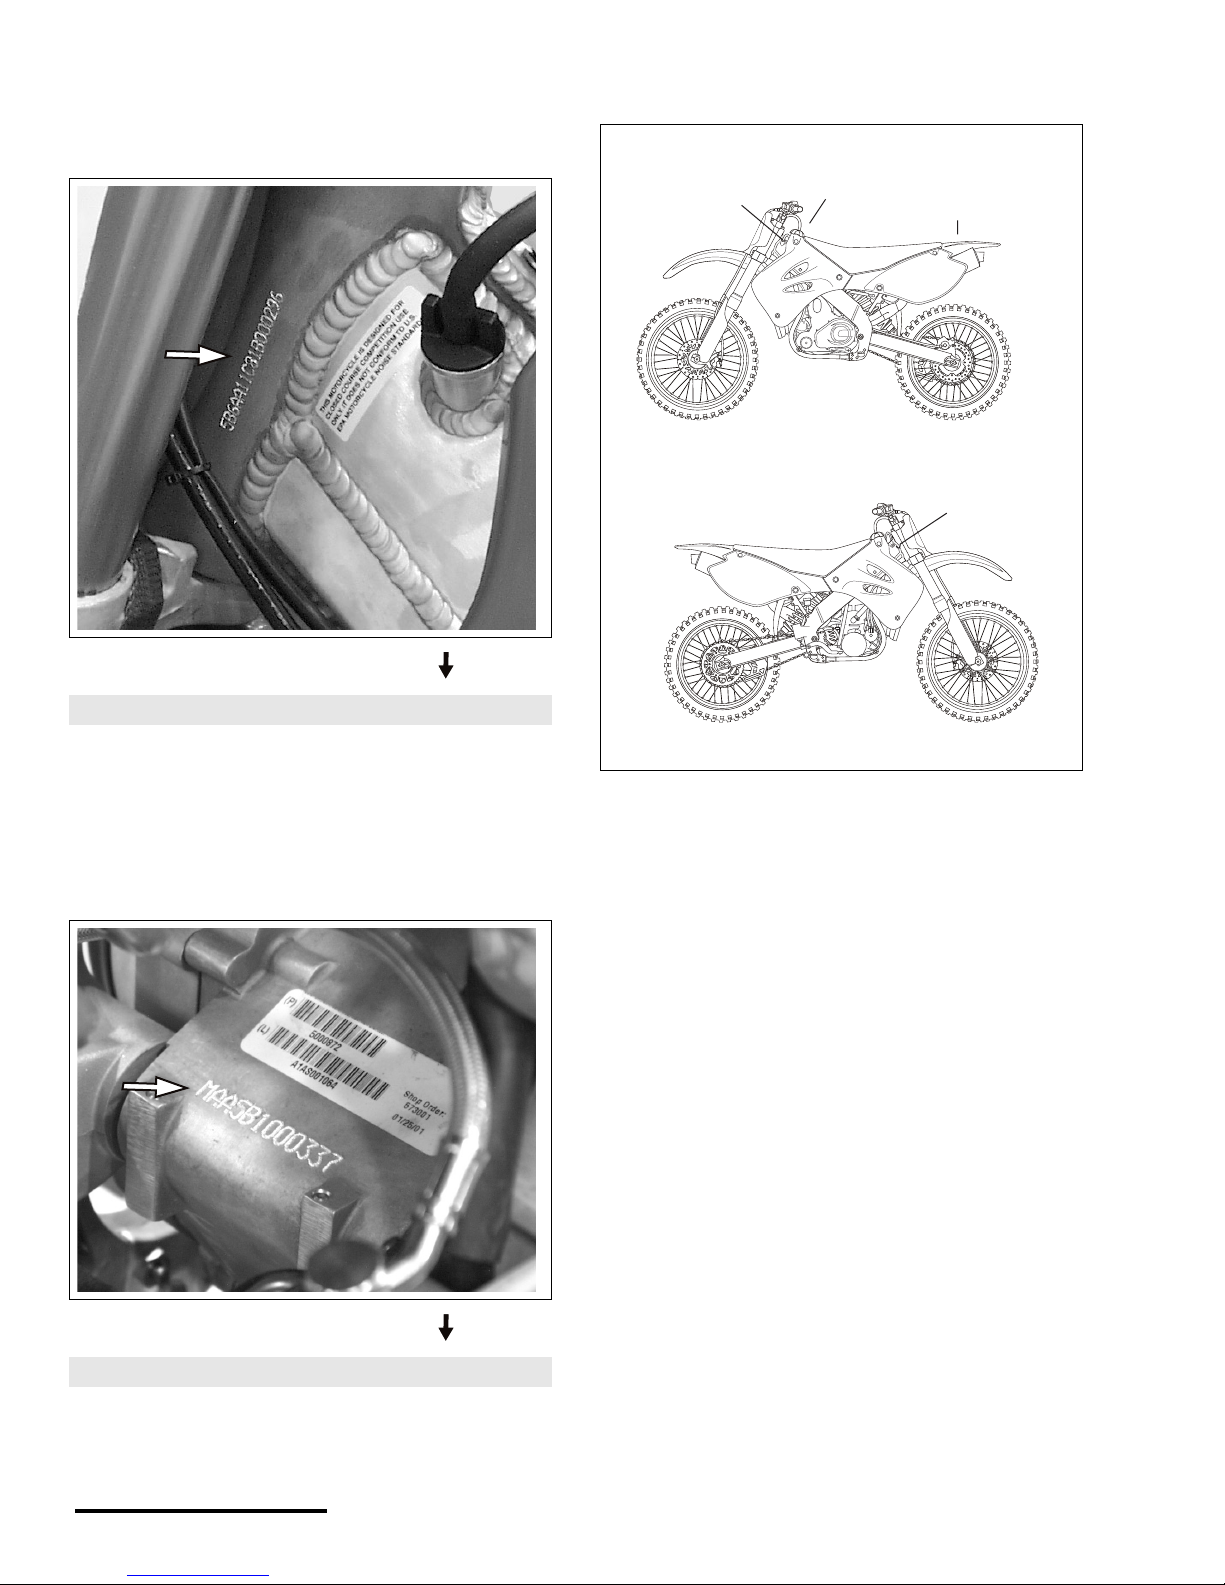
V EHICLE IDENTIFICATION NUMBER (VIN)
The vehicle identification number ( VIN) is located on the left
side of the steering head.
ENGINE SERIAL NUMBER
The engine serial numb er i s etche d/s tam pe d into th e eng ine
crankcase.
LABEL LOCATIONS
Record your vehicle’s ID number here:
Record your vehicle’s ID number here:
XXXXXXXXXXXX
XXXXXXXXXXXX
XXXXXXXXXXXX
XXXXXX
XXXXXX
See illustration on following page for examples of the
numbered labels abov e.
1
2
3
4
Printed : 8/13/01
5
P/N 951-05002032
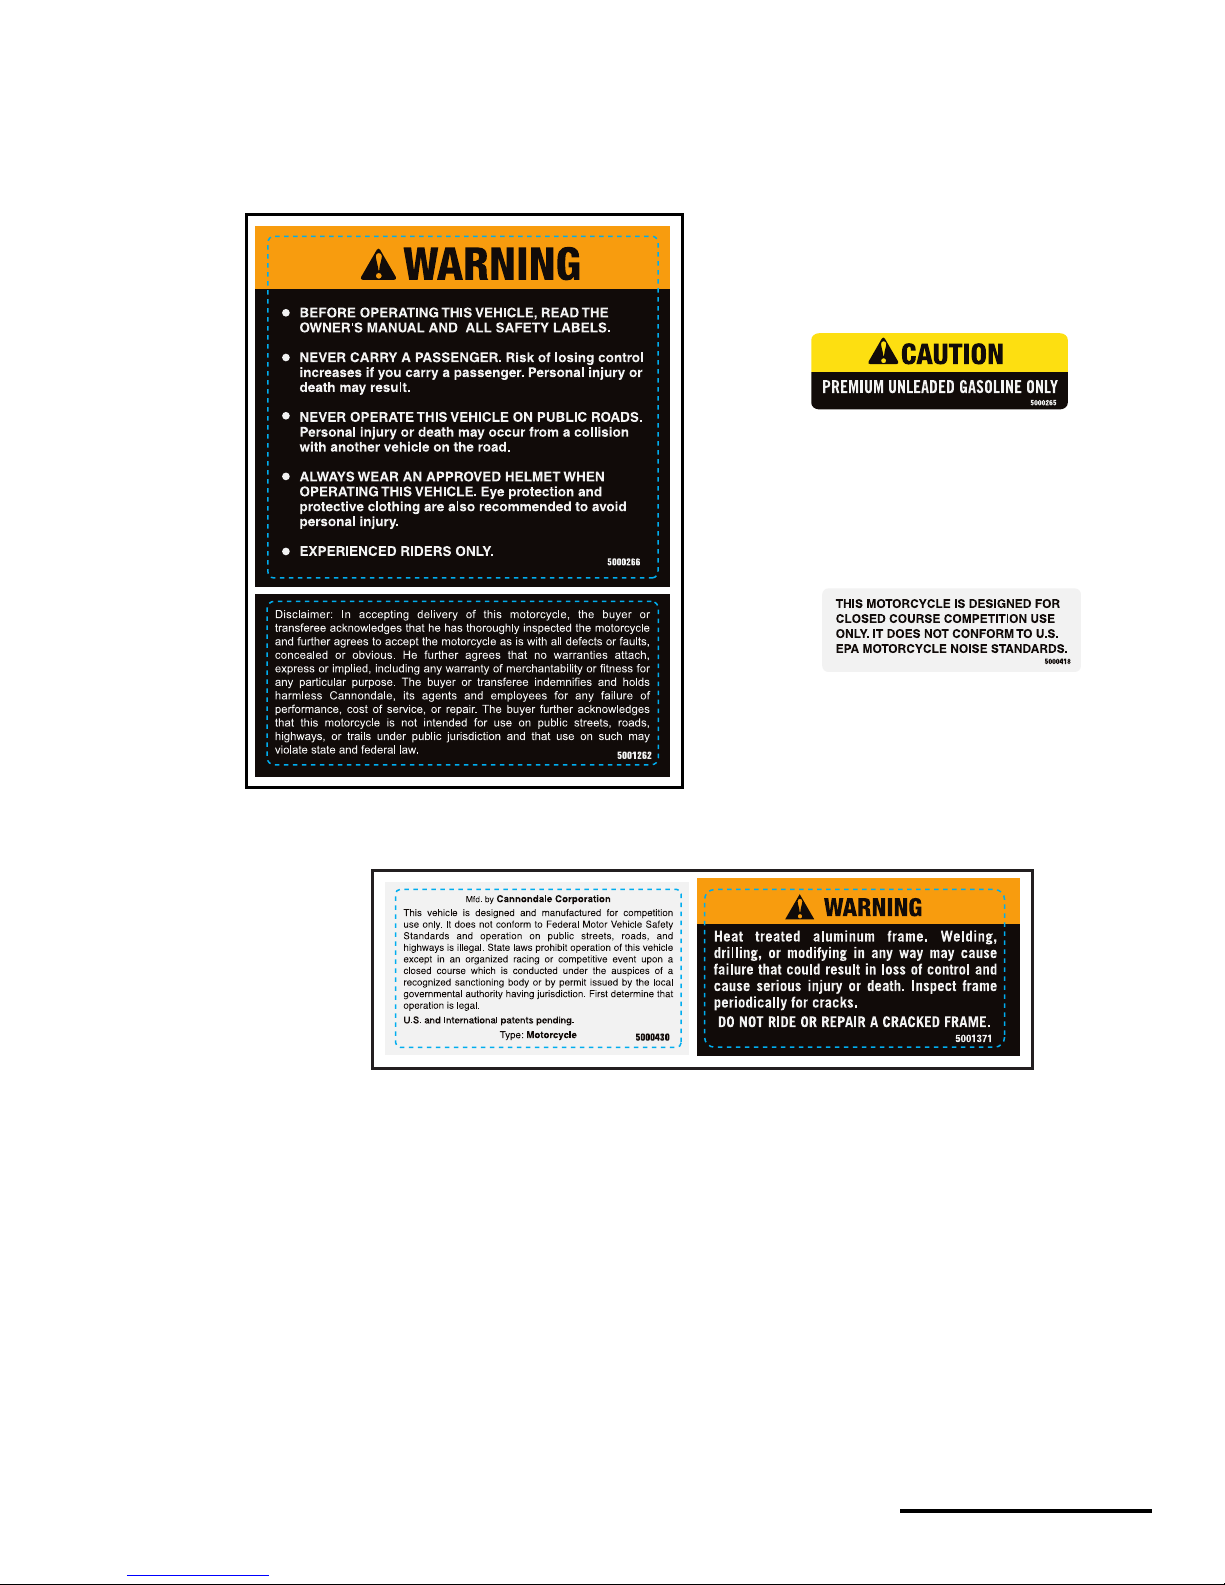
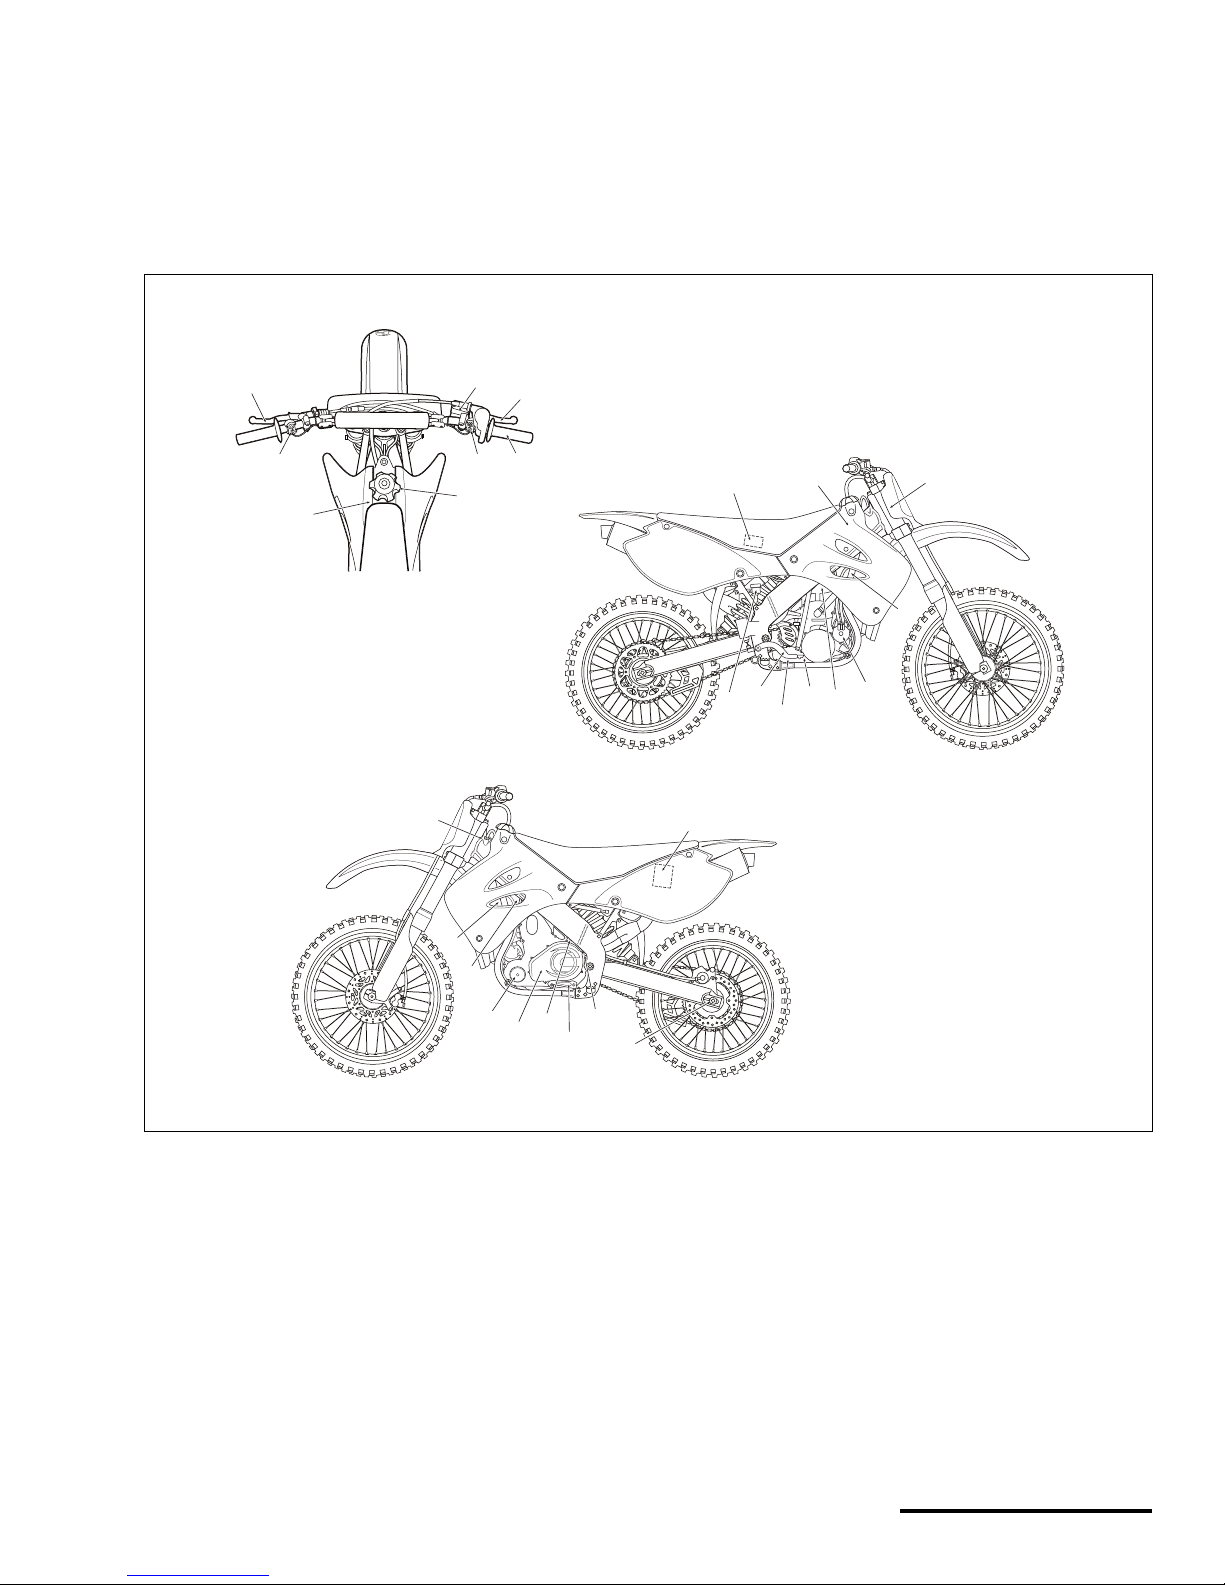
LABELS
1. General
2. Fuel
3. EPA noise
4. Frame
(1)
(2)
(3)
(4)
© 2001 Cannondale Corporation - All Rights Reserved
6
X440s Owner's Manual.fm
Pre-Ride
Inspection
PRE-RIDE CHECKLIST
FLUIDS
brake fluid . . . . . . . . . . . . . . . . . . . . . . . . . . (level correct)
coolant . . . . . . . . . . . . . . . . . . . . . . . . . . . . (level correct)
engine oil . . . . . . . . . . . . . . . . . . . . . . . . . .(level correct)
transmission oil. . . . . . . . . . . . . . . . . . . . . .(level correct)
Fuel cap tightened securely
Inspect vehicle for leaks and repair if necessary.
BRAKES
Front/rear brakes . . . . . . . . . . . . . . . . . .(proper function)
Front/rear pads . . . . . . . . . . . . . . . . . . . . (damage, wear)
Front/rear discs. . . . . . . . . . . . . . . . . . . . (damage, wear)
THROTTLE
lev e r freepl ay. . . . .(as specified in all steering positions ))
proper operation . . . (smooth and returns to idle (clos ed)
position across the entire
steering range)
CLUTCH
clutch lever freeplay . . . . . . . . . . . . . . . . . . (as specified)
actuating arm . . . . . . . . . . . . . . . . . . . . (correct position)
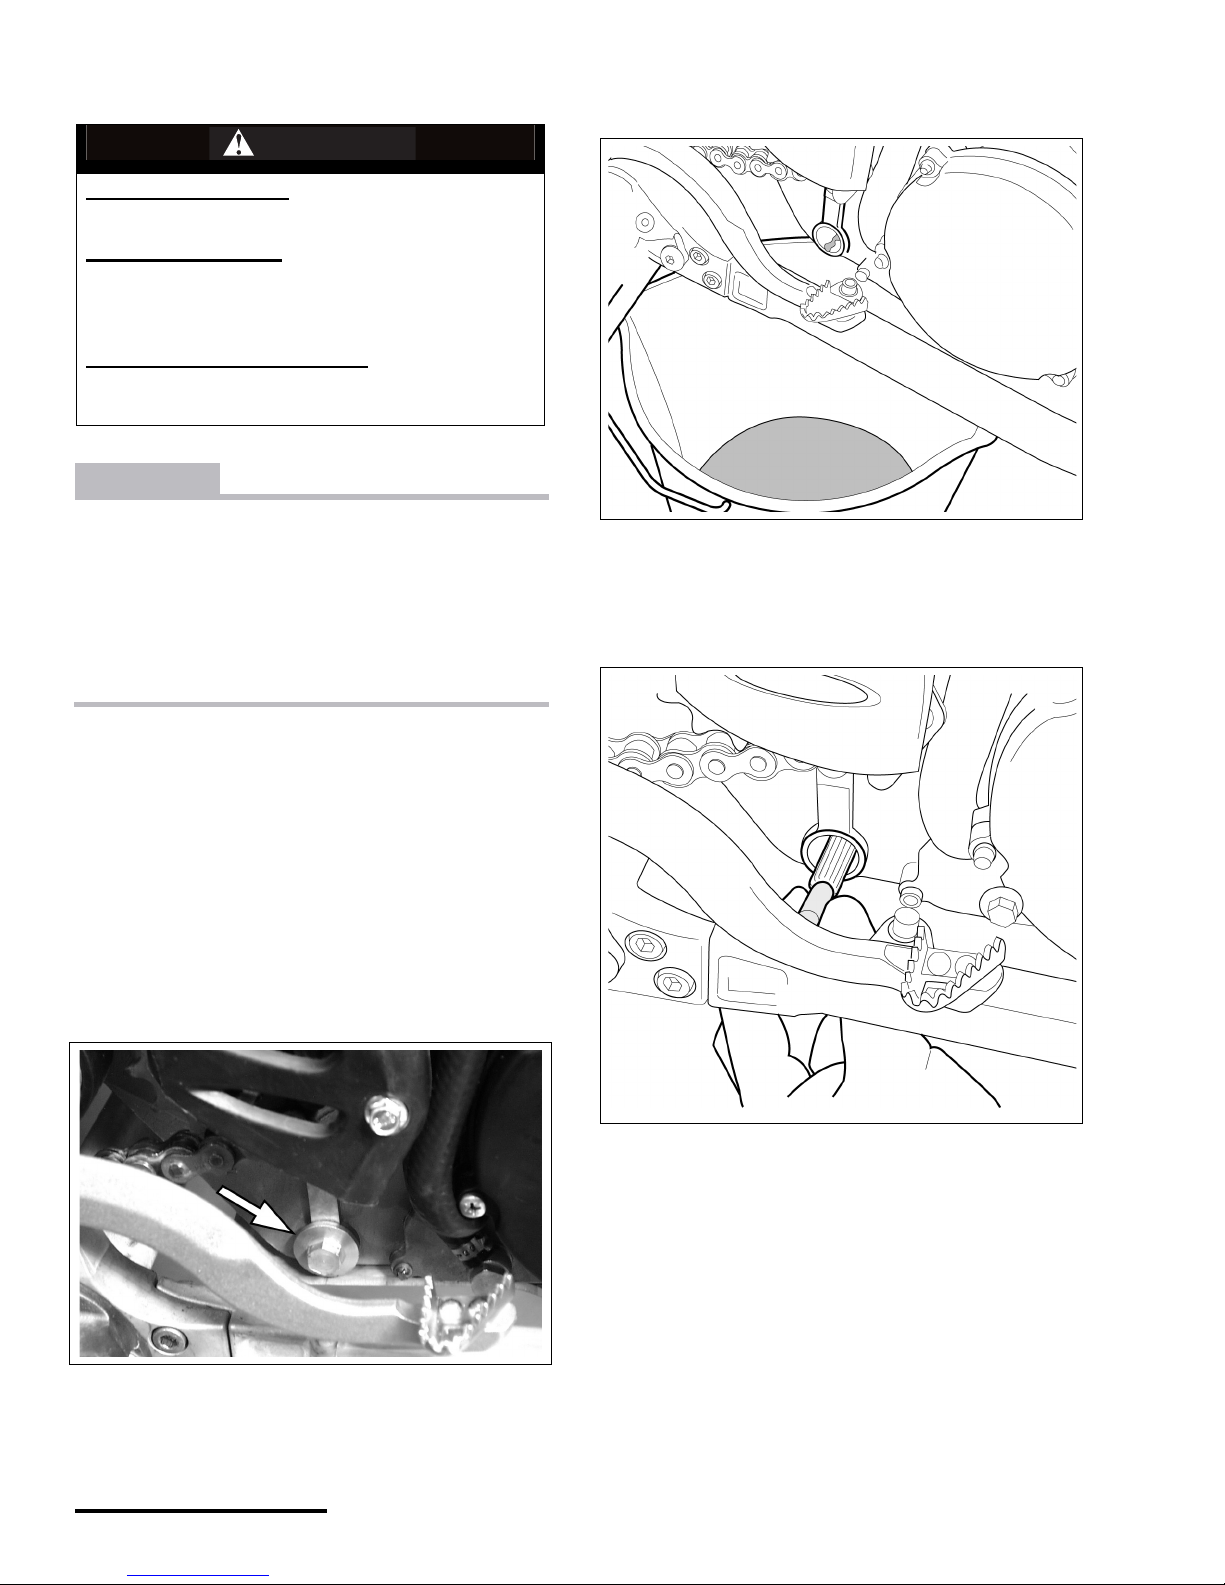
DRIVE
sprocket conditions. . . . . . . . . . . . . . . . . (damage, wear)
chain condition . . . . . . . . . . (damage, wear, stretch limit)
chain sag . . . . . . . . . . . . . . . . . . . . . . . . . . (as specified)
clean and lubricate the chain
chain rollers . (cracks, excessive wear, or other damage)
chain guide block . . . . .(cracks, excessive wear, or other
damage)
swingarm buffer . . . . . .(cracks, excessive wear, or other
damage)
SUSPENSION
fork legs . . . . . . . . . . . (wear, damage,settings, oil leaks)
rear shock. . . . . . . . . .(wear, damage, settings, oil leaks)
WHEELS
wheels . . . . . . . . . . . . . . . . . . . . . . . . . . . . . . . (damage)
spokes . . . . . . . . . . . . . . . . . . (correct tension, damage)
TIRES
physical. . . . (tread conditions, wear, damage, punctures,
tears)
pressure . . . . . . . . . . . . . .(correct, regulate if necessary)
BODY PANELS
seat . . . . . . . . . . . . . . . . . . (damage, installed correctly)
plastics . . . . . . . . . . . . . . . . . . . . . . . . .(secure, damage)
FASTENERS
bolts, fasteners . . . . . . (tightened to the specified torque)
WARNING
POTENTIAL HAZARD
Failure to inspect vehicle before operating.
WHAT CAN HAPPEN
Increases the possibility of equipment failure
resulting in a accident where you can be seriously
injured or killed.
HOW TO AVOID THE HAZARD
Always inspect before operating.
Always follow the inspection and maintenance
procedures found in this Owner’s Manual.
Have an authorized Cannondale Motorsports Dealer
inspect your veh ic le at le ast e very 25 ho urs of ridin g.
Printed : 8/13/01
7
P/N 951-05002032
Component
Locations
15
16
18
9
14
13
12
11
10
17
1
2
3
4
5
6
7
8
19
20
21
22
23
24
25
26
28
27
1. Clutch lever
2. Engine stop button
3. Front brake master cylinder
4. Engine start button
5. Front brake lever
6. Throttle
7. Fuel tank cap
8. Fuel tank
9. Engine oil fill
10. Battery
11. Drive chain adjusters
12. Engine oil drain (frame)
13. Shift lever
14. Transmission oil fill
15. Clutch
16. Engine oil filter
17. Idle adjusting screw
18. Radiator
19. Engine Control Module (ECM)
20. Airbox filter
21. Main air filter
22. Fuel injectors
23. Starter clutch cover
24. Water pump
25. Engine oil crankcase drain
26. Transmission oil drain
27. Brake pedal
28. Rear brake reservoir
© 2001 Cannondale Corporation - All Rights Reserved
8
X440s Owner's Manual.fm
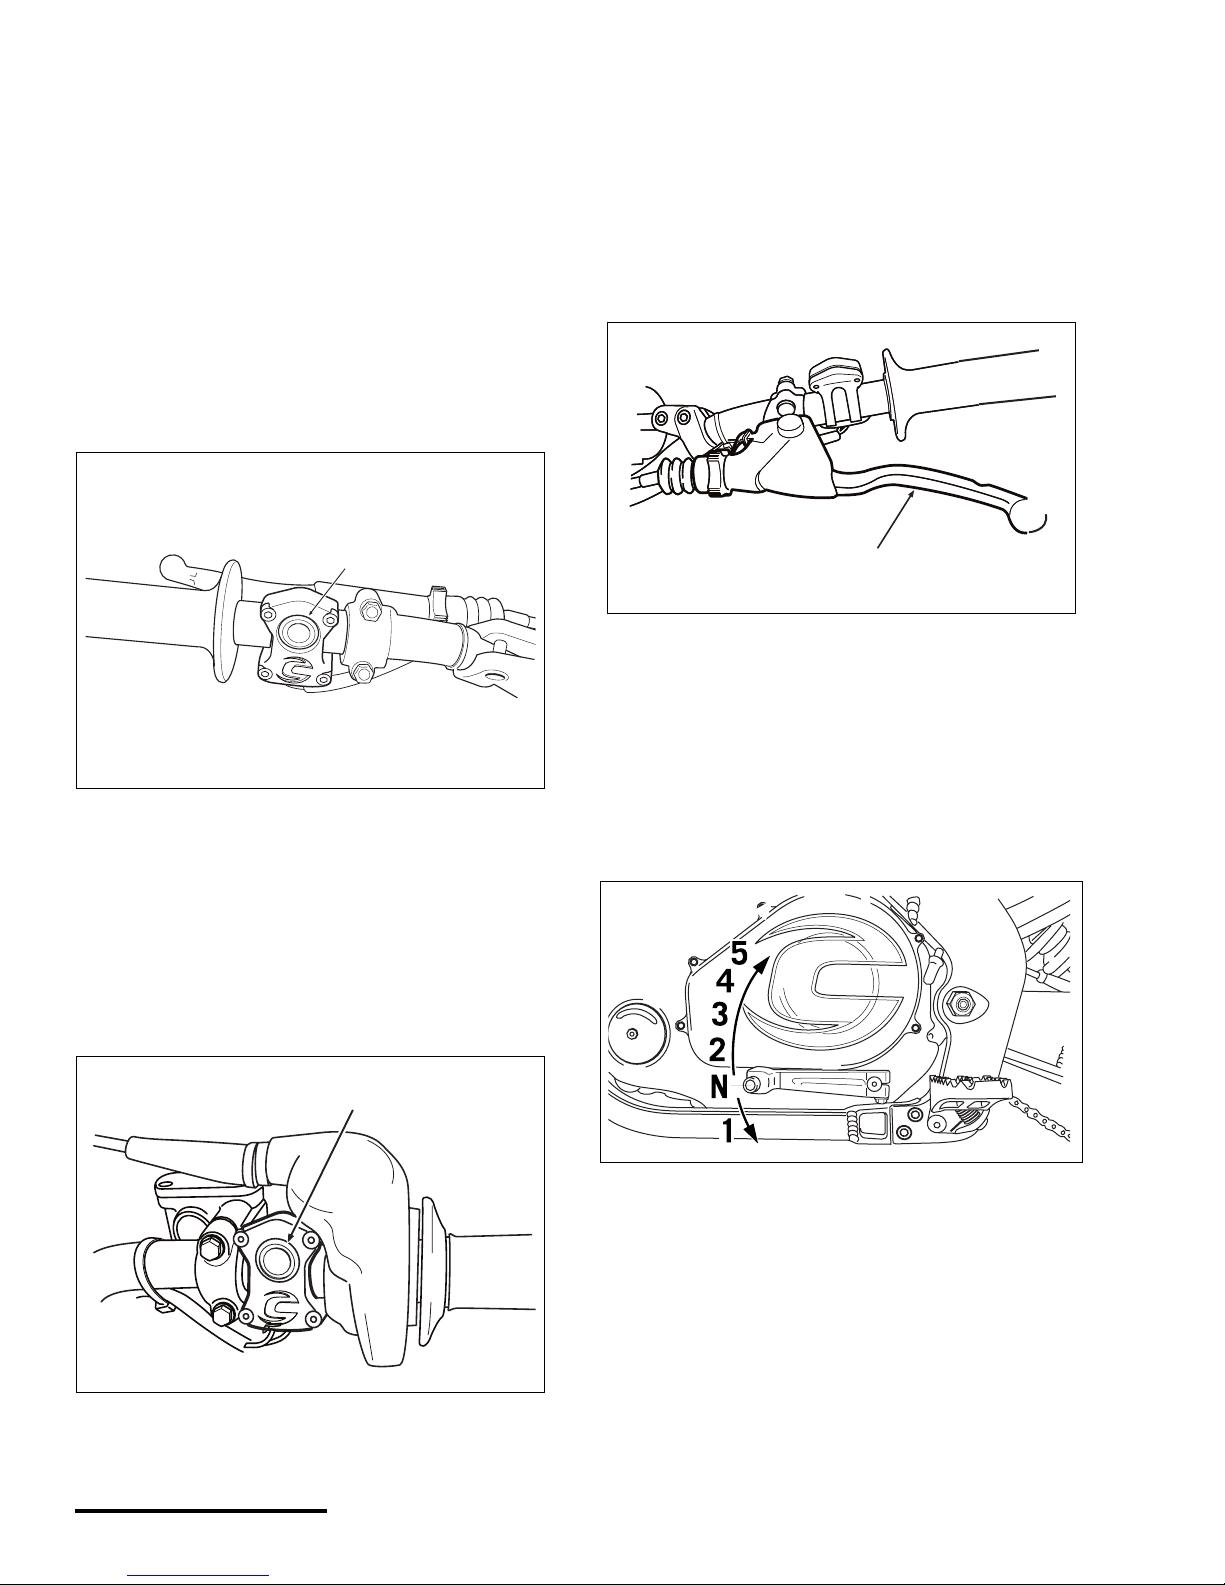
Controls
ENGINE STOP BUTT ON
The engine stop button is located on the left handlebar. The
button is (RED) in color. Push it to stop the engine. Make
sure this button functions properly before you begin riding.
NOTE : The stop button is normally a closed circuit switch.
If the stop switc h is damag ed or the wires a r e fray ed or torn,
(circuit open) the engine may not sta r t.
ENGINE START BUTTON
The engine start button i s locat ed on the rig ht handl ebar and
is (GREEN) in color. Pressing it activates the starter motor.
NOTE : When using the button, hold it for no more than 2-3
seconds at a time.
CLUTCH LEVER
The clutch lever is located on the left handlebar. Pull the
lever to disengage the clutch. Release the lever to engage
the clutch. The lever should be pulled quickly when
disengaging and slo wly when engaging.
NOTE : When starting it is recommended that you shift the
transmission into neutral and pull in the clutch lever to
increase the starte r’s efficiency.
SHIFT LEVER
The shift lever is located on the left side of the engine.
NOTE : The tra n smission is commonly referred to as a “one
down, four up” transmission. Neutral is located between first
and second gears.
1. Engine stop button
1. Engine start button
1
1
1. Clutch lever
1
Printed : 8/13/01
9
P/N 951-05002032
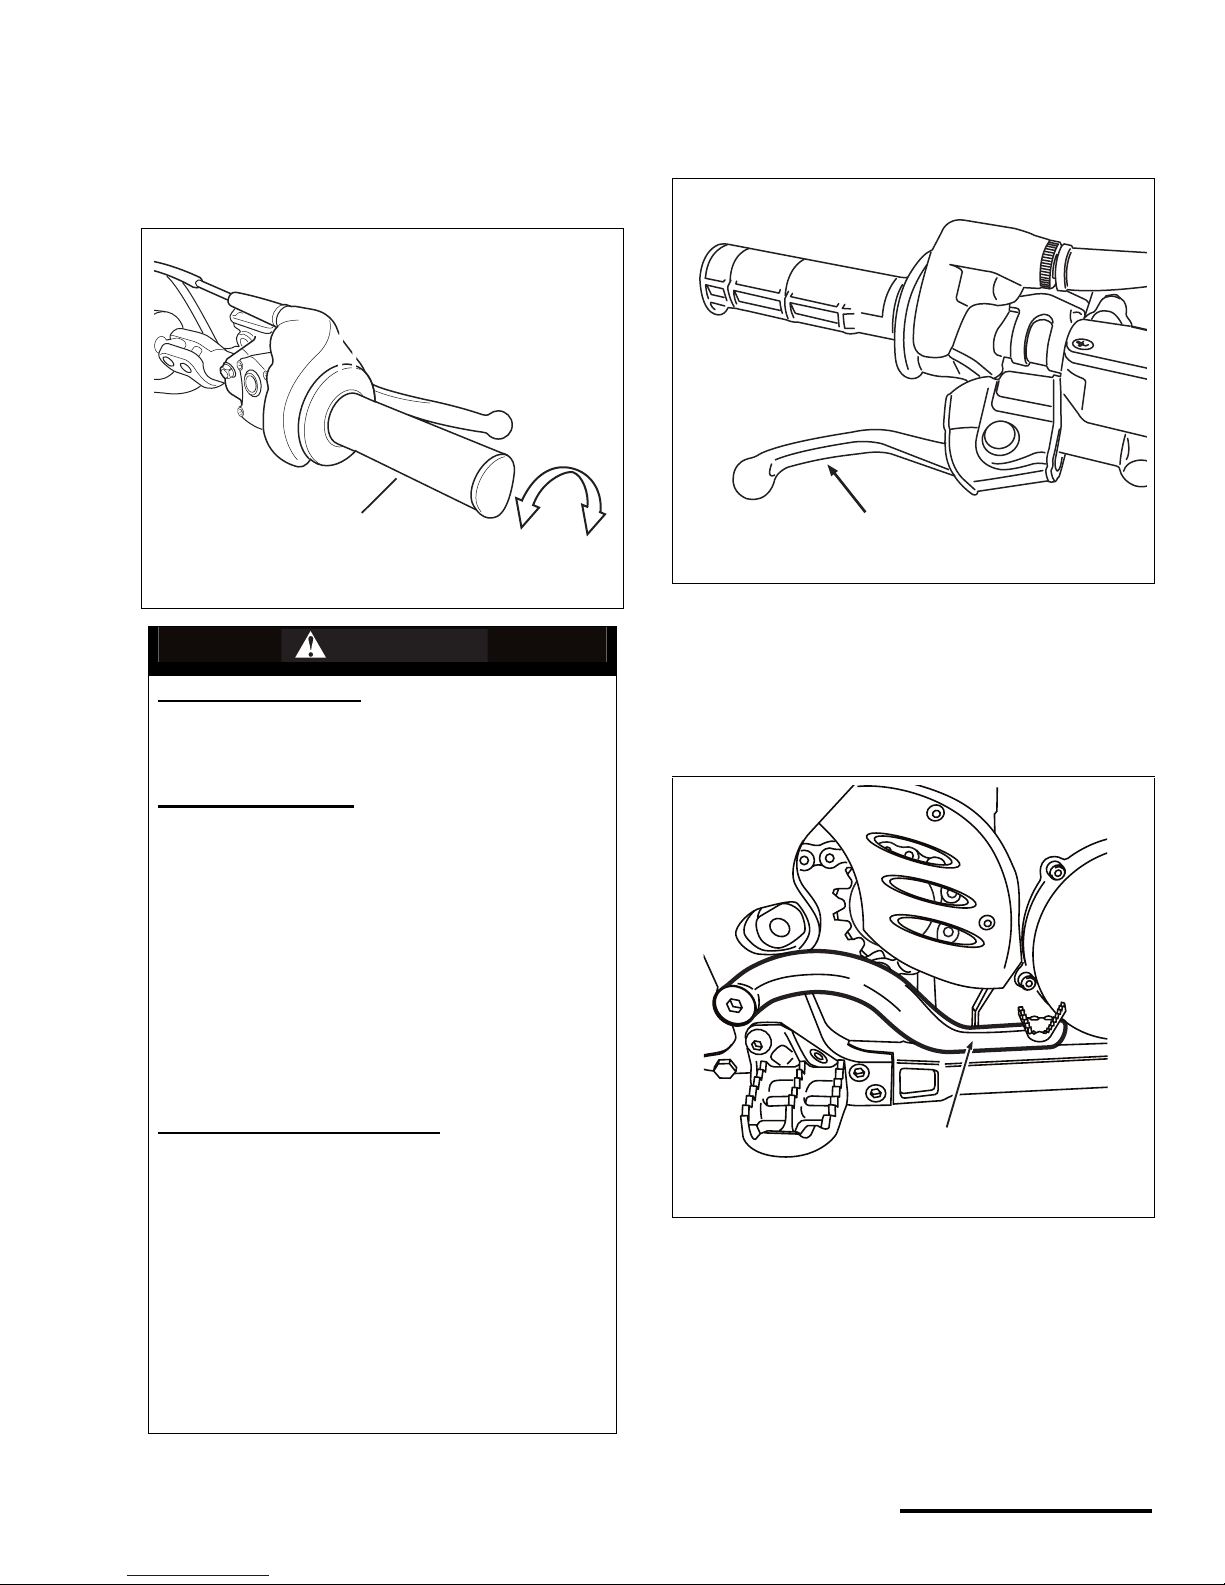
THROTTLE
The throttle lever is located on the right handlebaand
controls acceleration and deceleration of the engine. To
accelerate, turn the grip toward you. To decelerate, turn the
grip away from you.T
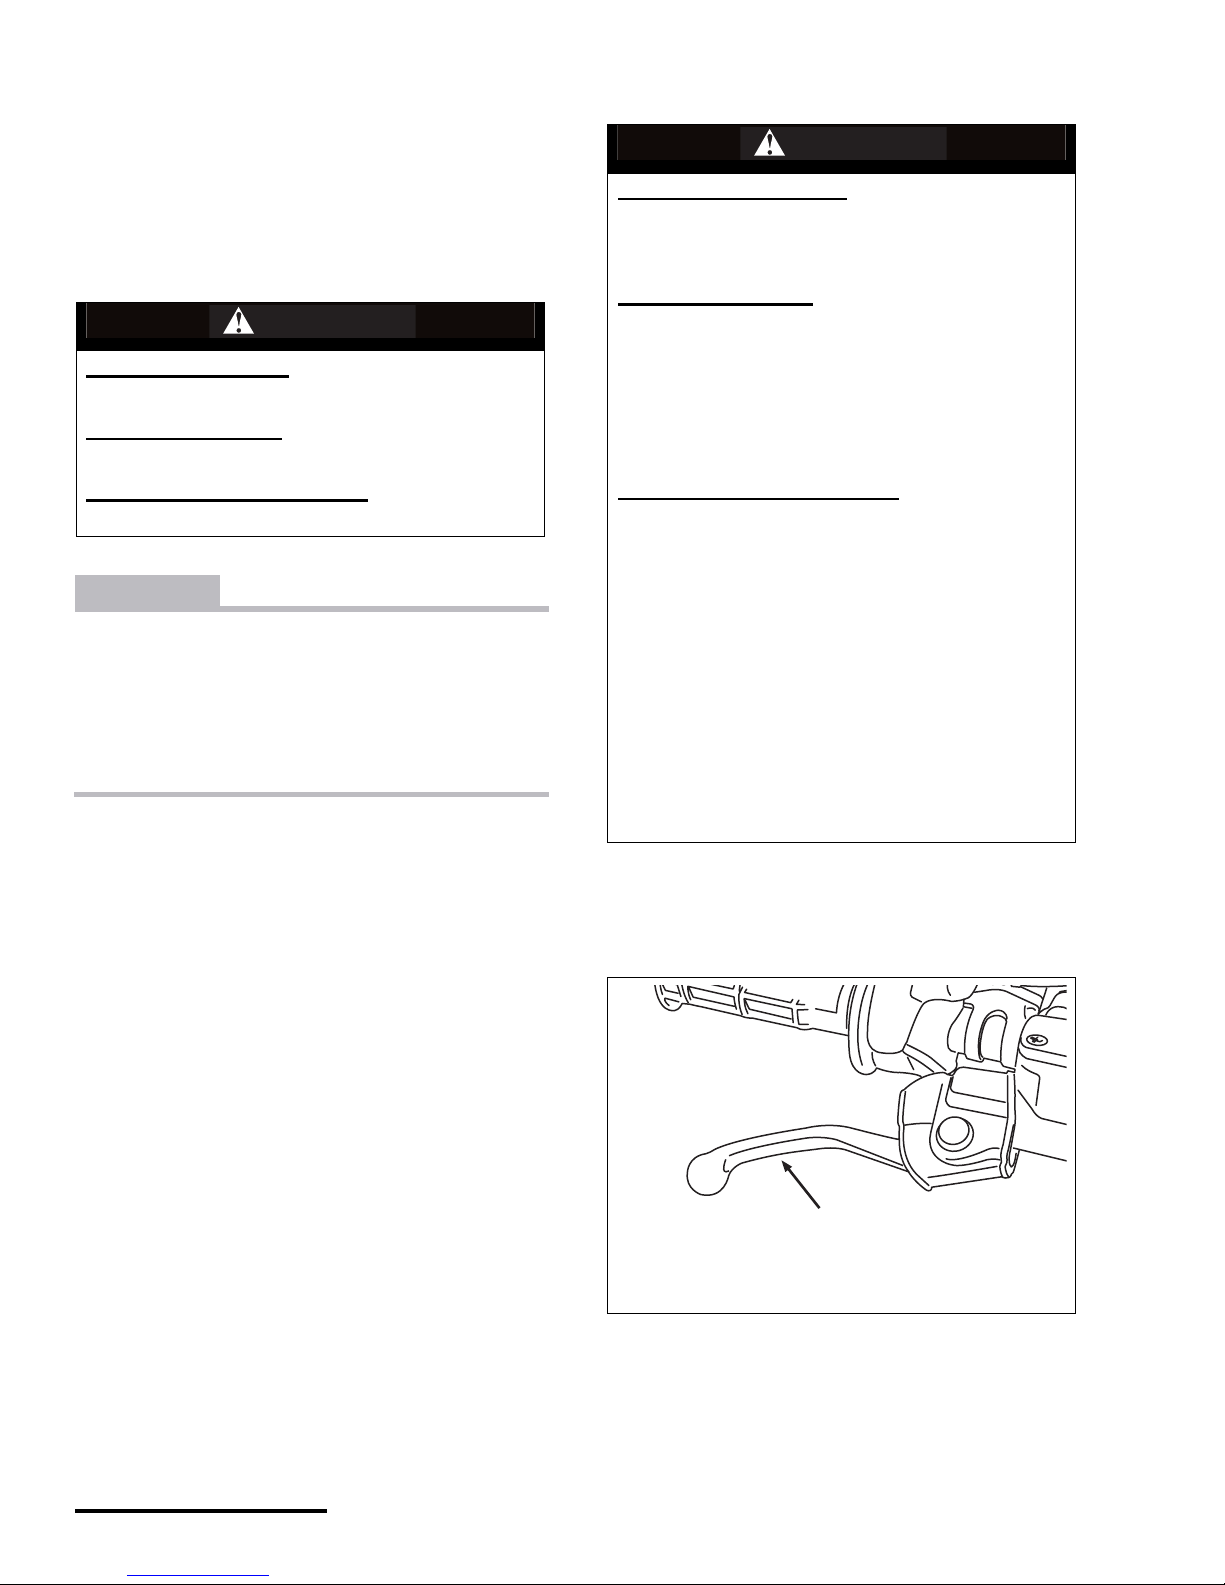
FRONT BRAKE LEVER
The front brake lever is located on the right handlebar. Pull
the lever toward you to activate the front brake.
REAR BRAKE PEDAL
The rear brake pedal is located on the right side of the
vehicle. Press it firmly to apply the rear brake.
WARNING
POTENTIAL HAZARD
(1) Malfunctioning throttle
(2) Incorrect freeplay
WHAT CAN HAPPEN
(1) The throttle must return to to the closed position
when you release it. If it sticks you can lose the
ability to accelerate and decelerate the engine
which could result in an accident where you could
be seriously injured or killed.
(2) The throttle freeplay must be maintained as
specified, otherwise the engine speed could
increase when the handlebars are turned or when
the throttle is slightly grasped. Either situation
could result in an unexpected acceleration of the
engine where you could be seriously injured or
killed.
HOW TO AVOID THE HAZARD
(1) Test the operation of the throttle before each ride.
Make sure it operates smoothly (with no sticking or
binding) in all steering positions. It should return
automatically to the closed position when relea se d.
(2) Make sure the throttle freeplay is adjusted as
specified. See “throttle Freeplay” starting on
page 38.
(1 & 2) If the throttle malfunctions or you can not
adjust the throttle to the specified freeplay, do not
ride the vehicle. Contact an authorized Cannondale
motorsports for servicing.
a
b
1
1. Front brake lever
1. Rear brake pedal
1
1
© 2001 Cannondale Corporation - All Rights Reserved
10
X440s Owner's Manual.fm
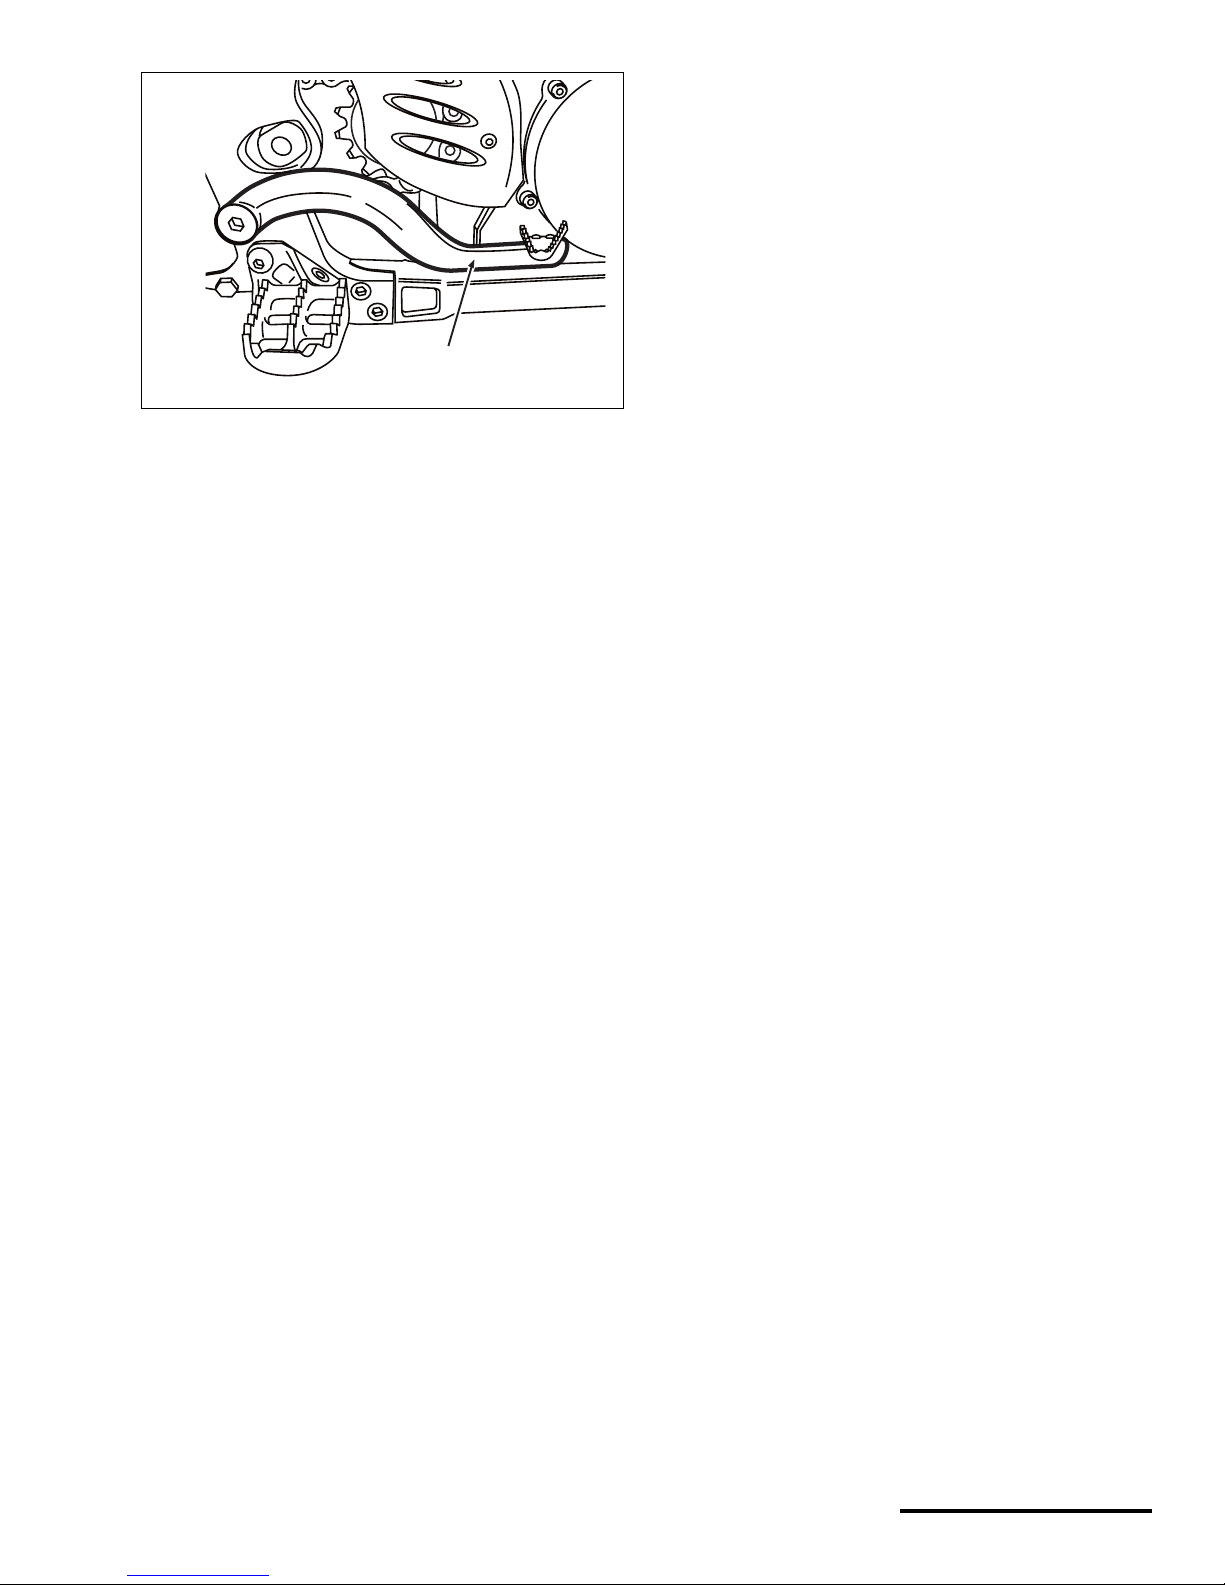
AIR FILTER CLEANING PLUGS
The air filt er cleaning plugs ar e provided with yo ur vehicle
and must be installed when washing/cleaning the
motorcycle. These plugs will help guard against water and
other contaminants entering the engine. Make sure the
sealing foam on the plug is in good condition. See the
cleaning section of this manual for how to install the plugs
properly.
SIDE STAND
The side stand is used to support the vehicle when not in
use. It is only designed to support the weight of the vehicle;
do not apply extra weight when using it (e.g., leaning on the
bike) Be sure to remove it before starting out.
1. Steering head plug
2. Fuel tank bolt hole plug
3. Airbox plug
1
3
2
Printed : 8/13/01
11
P/N 951-05002032
Operating
This section explains basic operating and riding methods
(i.e., starting, stopping, and shifting). If after reading this
manual or at anytime you hav e any q uestio ns rega rding ho w
to operate the vehicle, contact an authorized Cannondale
motorsports dealer for assistance.
CAUTION
Allow the engine to reach operating temperature
before riding.
This vehicle does not have a cooling fan. Airflow
across the radiator is maintained during riding. If
the vehicle runs without airflow, the engine can
overheat and be severely damaged. The time it
would take to overheat will depend on the weather
conditions. Do not allow your vehicle to idle for
more than 3 minutes without airflow across the radiator.
STARTING
BATTERY (FULLY CHARGED)
• Make sure the battery is at full charge. Why? If the
battery voltage dr ops wh ile you are using the
starter motor, the v olta ge could drop and the power
relay of the ECU will shut the ECU off. When this
happens, the engine will turn over but not start.
COLD STARTING - (MC1000 )
NOTE : MC1000 equipped unit utilize an idle air control
valve which automatically adjust throttle air bypass for cold
starts. Do not open the throttle when cold starting.
1. Shift transmission into NEUTRAL and pull-in and hold
in the clutch lever.
2. Press and hold the engine start button for no more
than 2 to 3 seconds at a time.
When the engine fires release the button and slowly
release the clutch lever.
WARNING
POTENTIAL HAZARD
Failure to inspect vehicle before operating.
WHAT CAN HAPPEN
Increases the possibility of equipment failure
resulting in a accident where you can be seriously
injured or killed.
HOW TO AVOID THE HAZARD
Always ins pec t before operating.
Always follow the inspection and maintenance
procedures found in this Owner’s Manual.
Have an authorized Cannondale Motorsports Dealer
inspect your vehicle at least after every 25 hours of
use.
DANGER
POTENTIAL HAZARD
Running the engine indoors.
Breathing exhaust gases
WHAT CAN HAPPEN
Running the engine indoors will expose you to
dangerous exhaust gases. Breathing carbon
monoxide gas leads to poisoning, asphyxiation, and
death. This will happen rapidly and without notice.
HOW TO AVOID THE HAZARD
Never operate the vehicle indoors even for brief
periods.
© 2001 Cannondale Corporation - All Rights Reserved
12
X440s Owner's Manual.fm
STARTING A WARM ENGINE
When starting an engine after it has reached operating
temperature, do not open th e th rottl e. This wi ll m ak e s tart ing
very difficult a nd pos si bly foul the spark plug.
SHIFTING GEARS
CAUTION
When shifting gears, press the shift lever firmly to
make sure the gears engagement is complete.
Careless shifting can result in incomplete gear
engagement and can cause the transmission to
jump out of gear. This can severely damage the
engine.
1. To engage first gear from NEUTRAL, pull in the clutch
lever and push down on the shift lever.
2. Release the shift lever.
3. Open the throttle a little and slowly let out the clutch
lever.
4. To shift into a higher gear, pull in the clutch lever, push
the shift lever up to the next gear, release the shift
lever, then release the clutch lever.
5. To shift into a lower gear, pull in the clutch lever, push
down on the shift lever and release - then release the
clutch lever.
BRAKING
To brake, close the throttle completely with the clutch
engaged (except when shifting gears) so the engine will
help slow down the vehicle. Apply the front and rear brakes
evenly.
WARNING
POTENTIAL HAZARD
Shifting to a lower gear at high speeds.
WHAT CAN HAPPEN
Tires can lose traction and cause an accident.
HOW TO AVOID THE HAZARD
Do not down shift at high speeds.
WARNING
POTENTIAL HAZARD(S)
(1) Using the brakes improperly.
(2) Wet brake system (e.g. discs, pads)
WHAT CAN HAPPEN
(1) If you apply the brakes too quickly or suddenly
the wheels may slide or skid possibly causing you to
lose control resulting in an accident where you
could be seriously injured or killed.
(2)Wet brakes do not provide the stopping power
needed and therefore are extremely dangerous.
HOW TO AVOID THE HAZARD
(1) Apply the front and rear brakes evenly and
gradually. Always consider the surface of the terrain
you are riding on and how it will affect your braking
ability. Concentrate on applyin g both brakes as har d
as possible without skidding. Shift down or fully
disengage the clutch as necessary to keep the
engine from stalling.
(2) In wet conditions test the brake operation
frequently. When riding in wet conditions, ride the
vehicle at sl ow spe eds an d ap ply th e b rake s seve ral
times until they are dry and at full power. Before
riding the vehicle m ake su re the b rakes an d controls
(e.g., brake lever, brake pedal, clutch lever, engine
stop switch, and throttle) operate properly.
1. Front brake lever
1
Printed : 8/13/01
13
P/N 951-05002032
STOPPING
When stopping the vehicle, pull in the clutch lever while
completely closing the throttle, shift the transmission into
neutral, and press the en gin e stop switch with your thumb.
AFTER YOU RIDE
1. After riding the vehicle, clean it thoroughly and allow it
to dry , and th en inspect th e entire veh icle for da mage or
loose fasteners.
2. Repair or tighten any damaged or loose comp onents
and lubricate the vehicle .
3. If the vehicle is damaged, it is recommended that you
put tape over the start button to remind you to not
start the vehicle. Also, attach a piece of paper to the
handlebar with the problem written on it.
1. Rear brake pedal
1
© 2001 Cannondale Corporation - All Rights Reserved
14
X440s Owner's Manual.fm
Fluids
BRAKE
SERVICE : Brake, fluid type, DOT #4
CAUTION
Avoid spilling brake fluid on painted, plastic or rubber parts; damage can result. Place a shop towel or
rag over these parts when servicing the brake system. Any wipe up spills immediat ely.
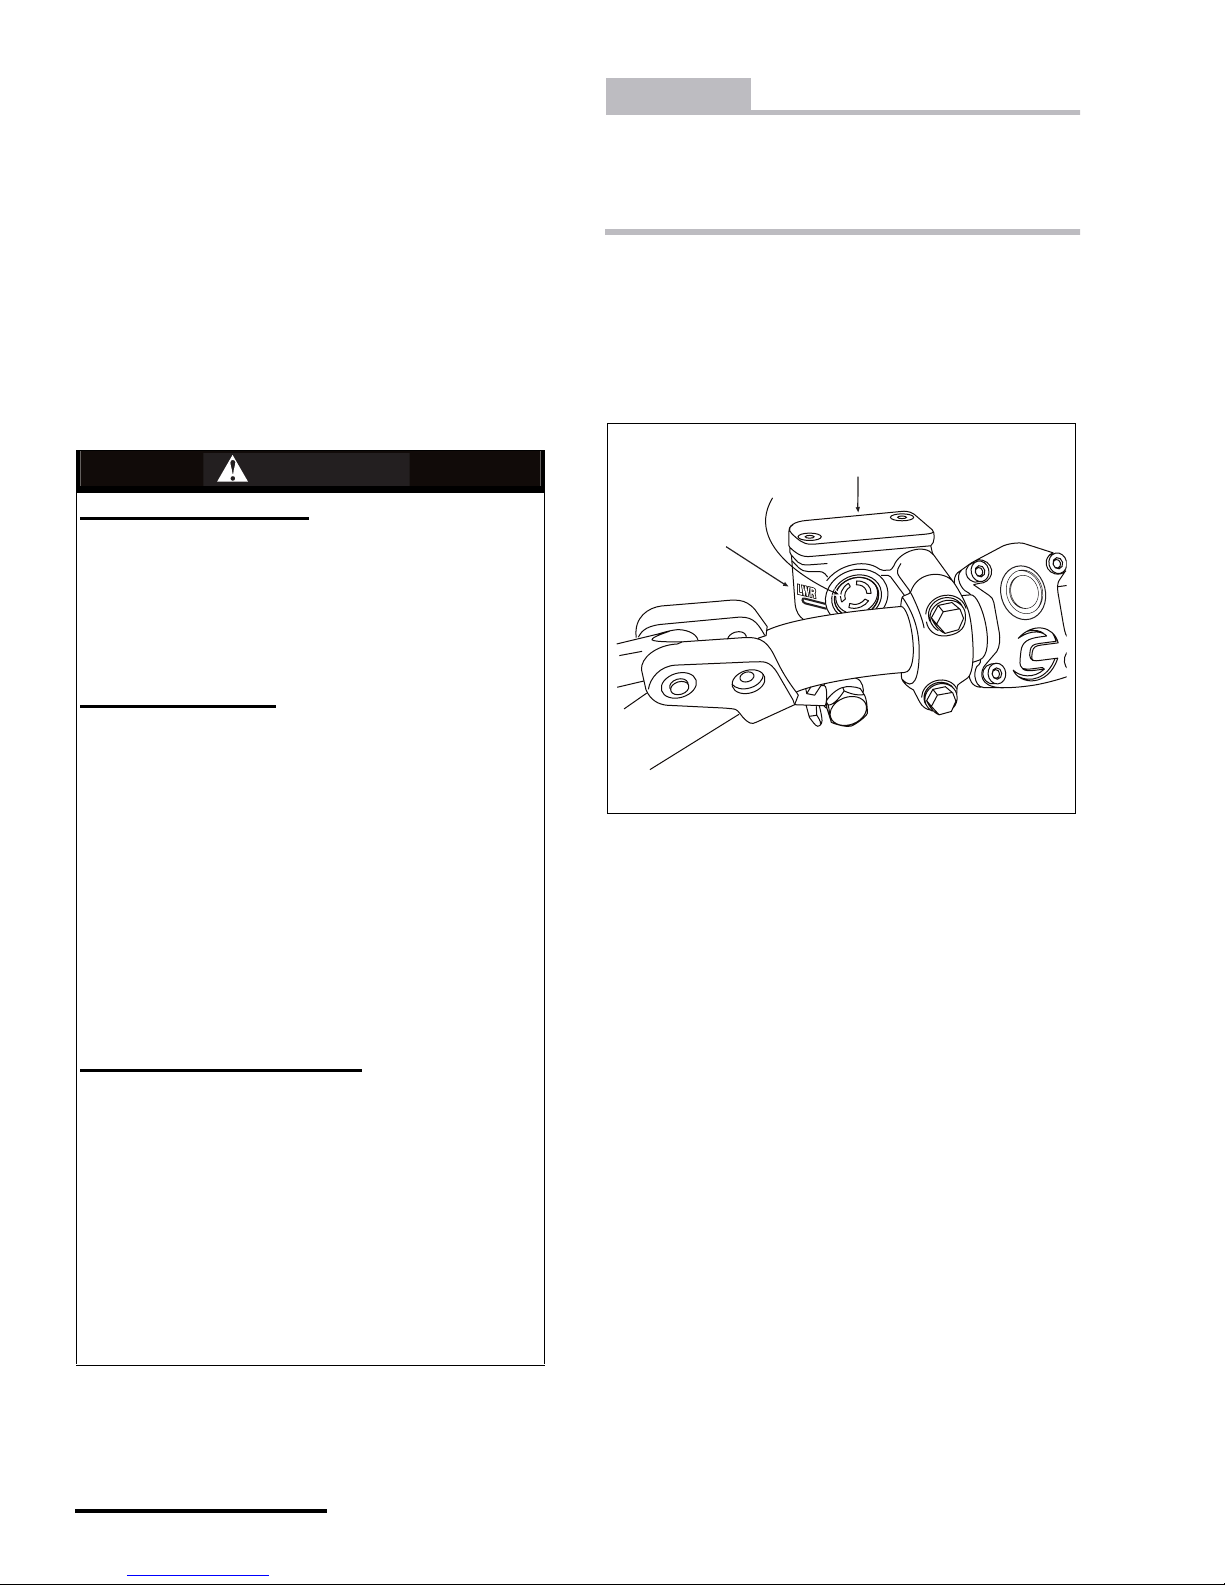
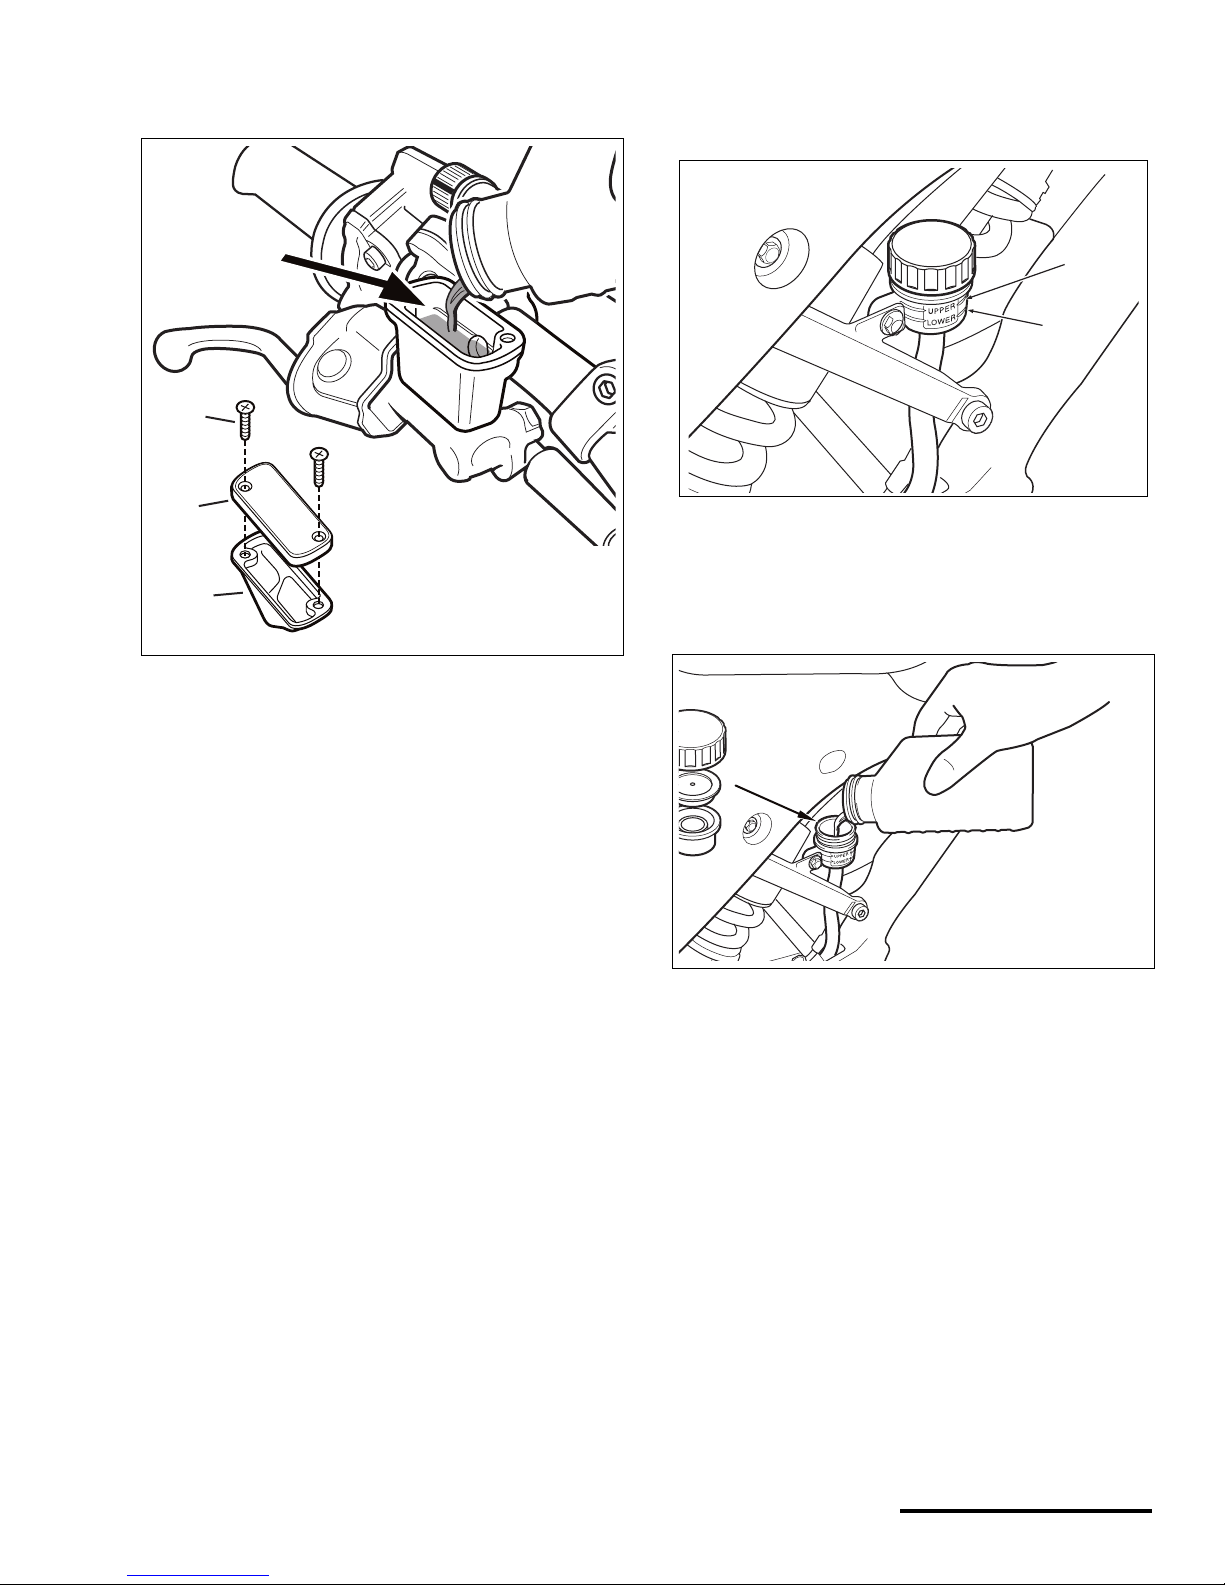
FRONT BRAKE
1. T o ch ec k the front system, start by leveling the top of
the master cylinder (mounted on the right handlebar).
2. Inspect the fluid level through the site glass. If the
fluid level is below the ‘LWR’ mark, add the specified
brake fluid until the fluid is at the top of the window.
3. To add fluid, remove the screws, cover and
diaphragm from the master cylinder. Pour DOT#4
brake fluid from a sealed container into the resevoir.
Pour only until the fluid level rises to the top of the site
window and no higher. If you fill above the window
WARNING
POTENTIAL HAZARD(S)
(1) Eye and skin injury, death if swallowed.
(2) Not using the specified, mixing different types (or
brands) of, and using unsealed containers of brake
fluid.
(3) Inadequate brake fluid levels.
WHAT CAN HAPPEN
(1) Brake fluid is a hazar dous substance. It can cause
injury to your ey es or skin if you touch it. If swallo we d
it can cause death.
(2) Using unspecified brake fluid can damage the
brake system leaving you without brakes. A container
of brake fluid once unsealed can begin to absorb
moisture from the atmosphere - if used in the brake
system, the moisture will reduce braking force. You
could lose your brakes an d hav e an accide nt resulting
in injury or death.
(3) Low brake fluid can allow air to enter the system
and this will reduce braking power. Again, you could
have an accident and be serio usly injured or killed.
HOW TO AVOID THE HAZARD
(1) Always wear eye and hand protection when
working with brake fluid. Keep brake fluid out of the
reach of children and animals. If ingested contact
contact a doctor immediately.
(2) Always use DOT 4 brake fluid from a sealed
container. Don’t mix fluids or use opened fluids.
Have the system drained and refilled by an authorized
Cannonadale Motorsports dealer if you suspect fluids
have been mixed acciden tally .
(3) Check for proper brake operation and fluid level
before riding the vehicle.
1. Master cylinder
2. Site window
3. ‘LWR’ mark
2
3
1
CLEAN BEFORE OPENING!
Printed : 8/13/01
15
P/N 951-05002032
fluid will spill when you re-install the diaphram and
cover.
4. Reinstall the front brake master cylinder diaphragm
and cover. Tighten front master cyli nd er cove r scre ws
to the specified torque.
TORQUE : Brake, master cylinder, front, cover screws
1.9 N•m (1.4 lbf•ft)
REAR BRAKE
1. To check the rear system, level the rear brake master
cylinder reservoir. The fluid level should be above the
‘LOWER’ mark.
2. If the fluid level is below the ‘UPPER’ mark, add
specified brake fluid until it reaches the ‘UPPER’
mark.
NOTE : Do not fill the brake master cylinder above the
‘UPPER’ mark or the fluid will overflow when the diaphragm
is installed.
3. Install reservoir diaphrag m, diaphragm plate and cap.
1. Front brake master cylinder cover screws
2. Front brake master cylinder cover
3. Diaphragm
1
2
3
POUR TO
TOP OF
WINDOW
DOT
4
1. ‘LOWER’ mark
2. ‘UPPER’ mark
1. Reservoir cap
2. Diaphragm plate
3. Diaphragm
2
1
DOT 4
© 2001 Cannondale Corporation - All Rights Reserved
16
X440s Owner's Manual.fm
COOLANT
SERVICE : Coolant, type
Anti-freeze Ethylene glyc ol with corrosion
inhibitors fo r alumin um en gines
SERVICE : Coolant, mixture ratio
1:1 (coolant/distilled water)
CAUTION
Operating the vehicle with a leaky or faulty cooling
system can result in severe engine damage. Always
use the specified coolant.
If the coolant level drops significantly, bleed the system after adding.
NOTE : We recommend that you bleed the coolant system
each time you add fluid.
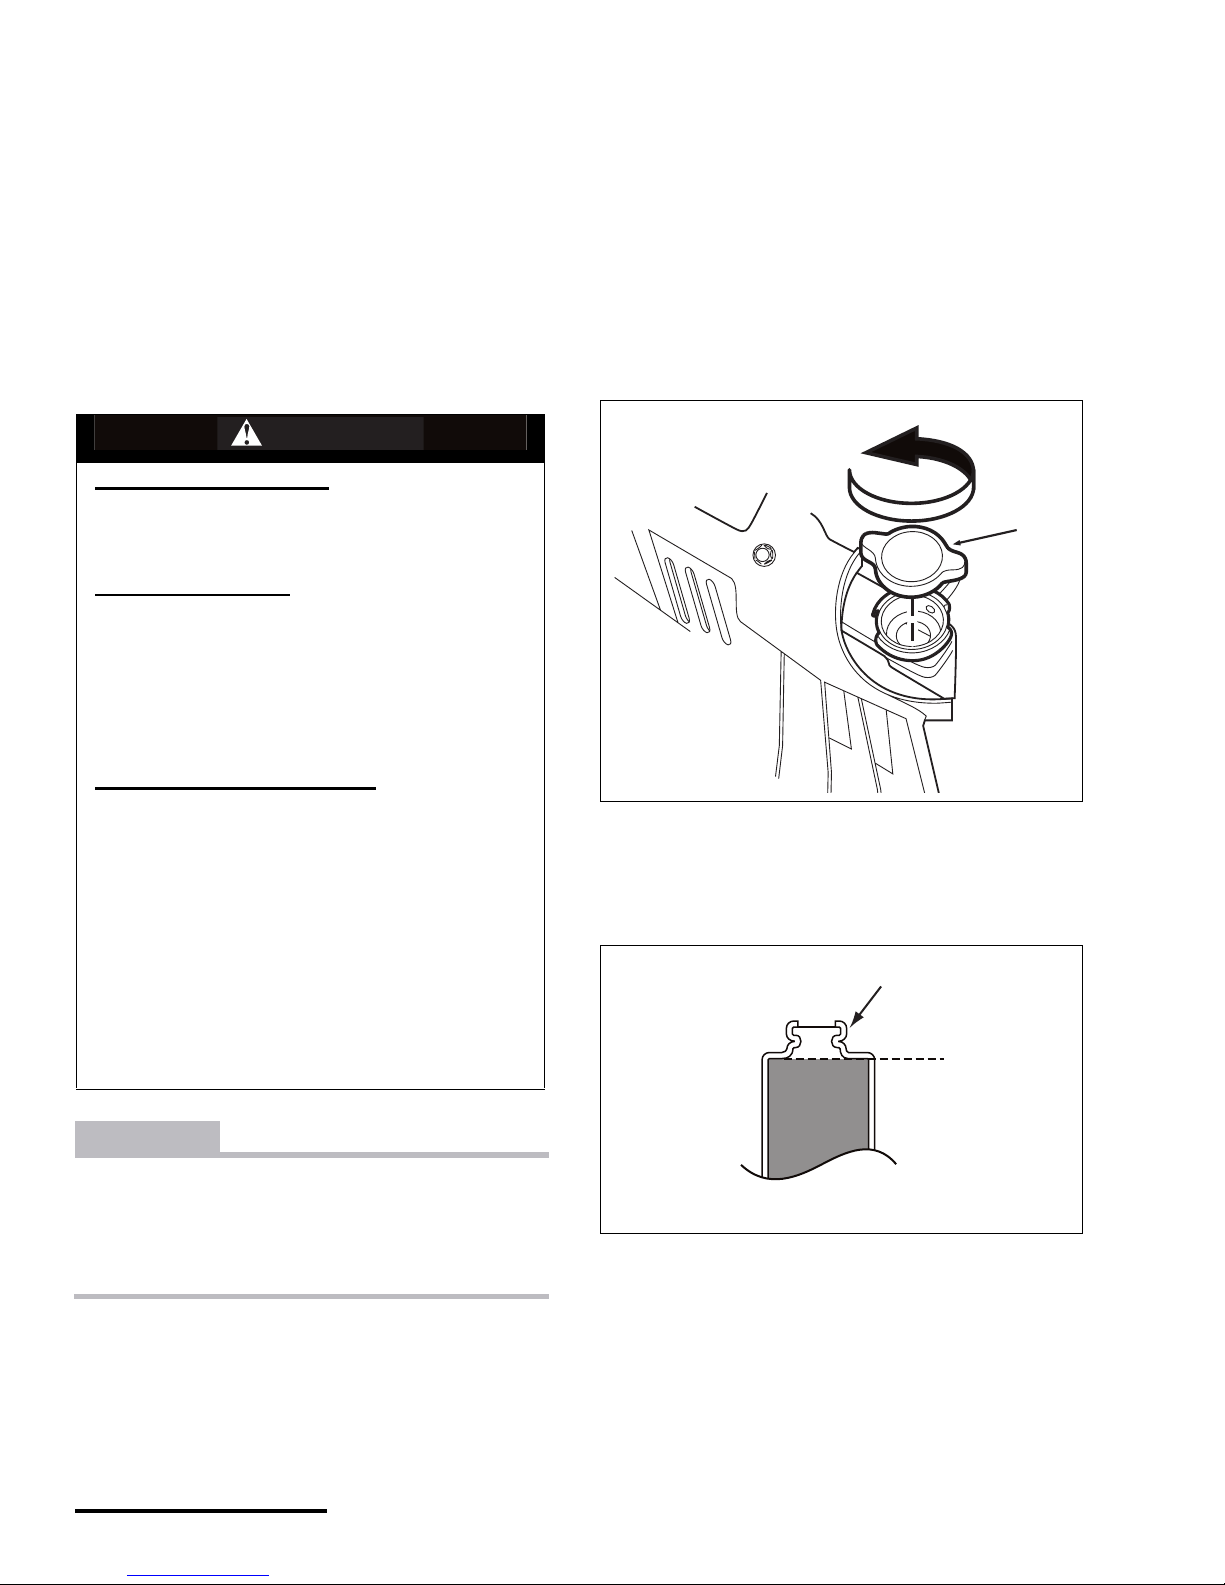
COOLANT LEVEL
1. To check the level, make sure the engine and radiator
are cold.
2. Place a thick towel over the radiator cap.
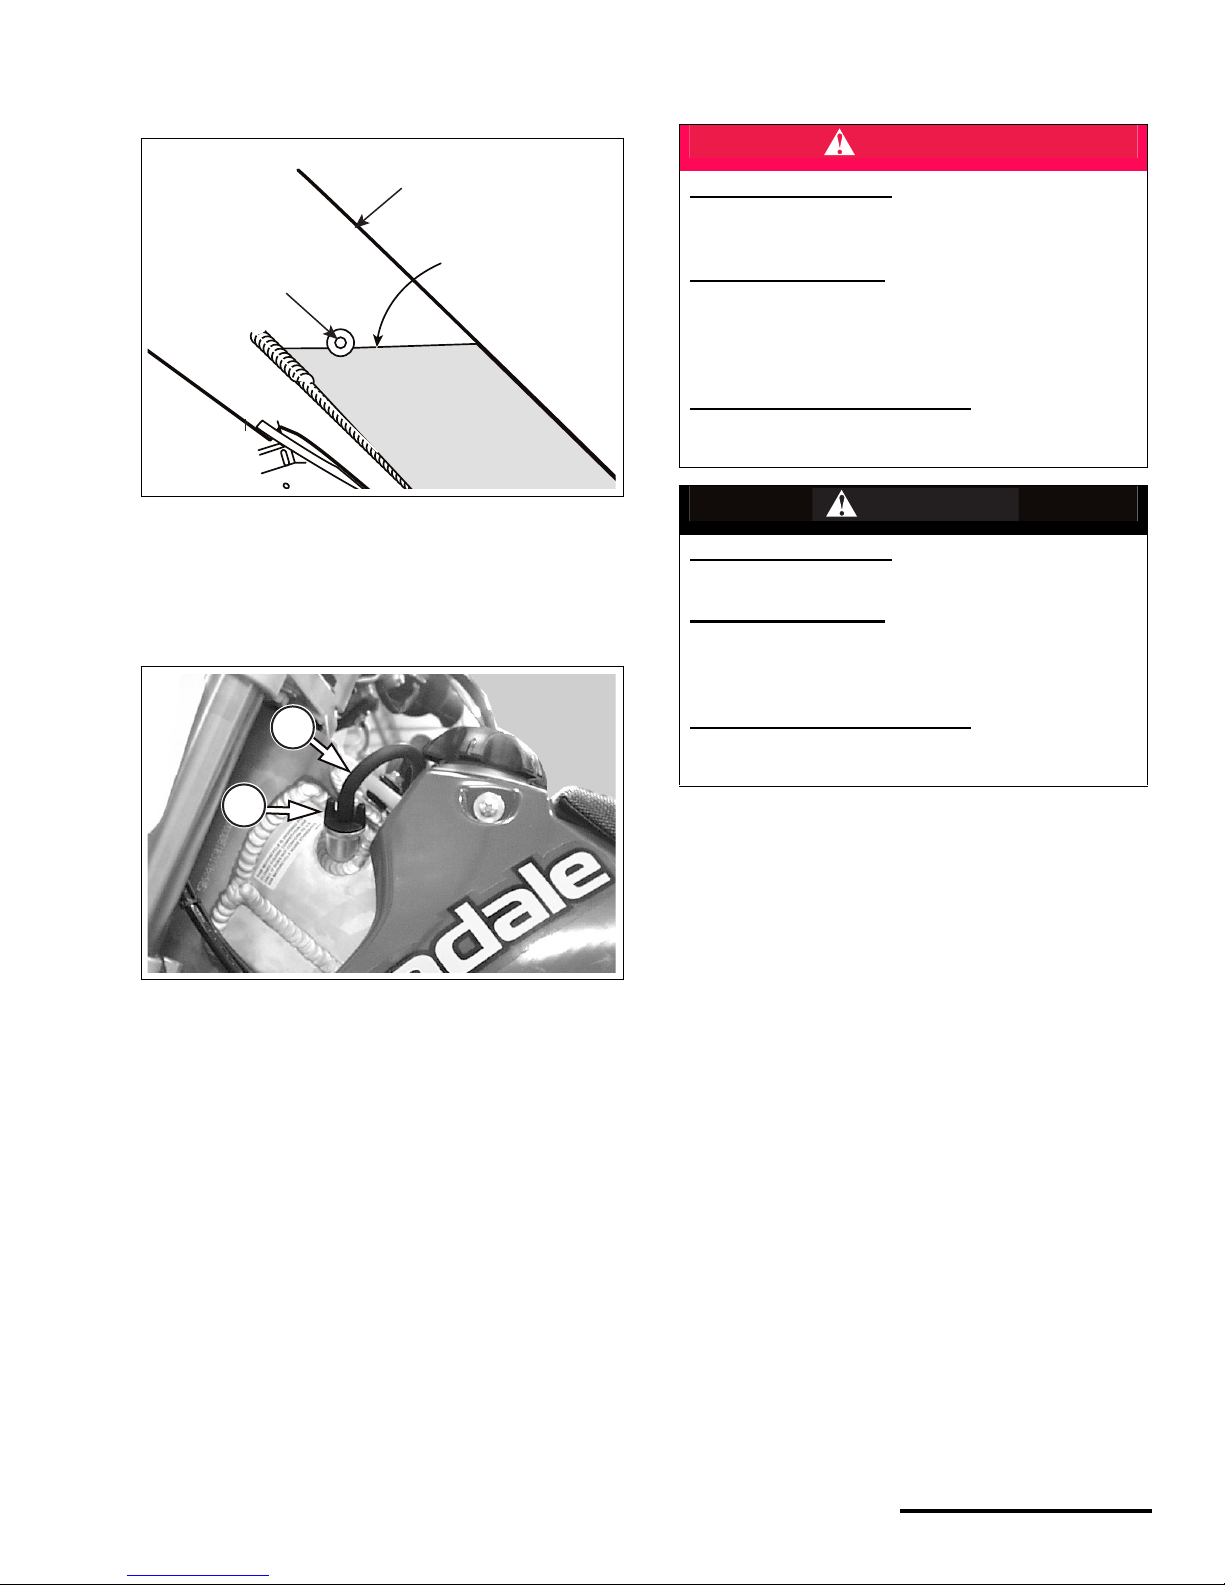
3. Slowly turn the cap in direction (a) until you feel the
cap reach the detent; this will allow any residual
pressure to escape. Allow all pressure to escape
before continuing.
Press down on the cap and keep turning it until it can
be removed.
4. Coolant level should be at the bottom of the filler
neck. Add if necessary.
WARNING
POTENTIAL HAZARD(S)
(1) Scalding coolant sprayed onto YOU
(2) Serious eye or skin injury
WHAT CAN HAPPEN
(1) You can be severely burned by coolant sprayed
out from under high pressure if the bottle is
opened while the system is hot.
(2) Coolant is poisonous. If it gets in your eyes or
contacts your skin the fluid can cause irritation or
severe injury.
HOW TO AVOID THE HAZARD
(1) Wait for engine to cool before removing the cap
or servicing the coolant system. Be sure to wear
eye protection, a long-sleeve shirt, and hand
protection (e.g. rubber gloves) when working with
coolant.
(2) Always wear eye protection and protective
clothing when working with any components of
the cooling system. Keep coolant away from
children and pets. Call a doctor immediately if
coolant is swallowed and induce vomiting. Flush
eyes and skin with water if coolant gets in eyes or
comes into contact with skin.
1. Radiator cap
a. Loosening direction
1. Filler neck
1
a
1
Printed : 8/13/01
17
P/N 951-05002032
5. To add, add the specified coolant at the radiator filler
hole using a clean funnel. Wipe up any spill ed cool ant
with a clean shop towel.
6. Reinstall the radiator cap.
7. Check the entire cooli ng system for le aks.
8. If the coolant level drops after adding and no leaks
are found, contact an authorized Cannondale
Motorsports dealer for servicing.
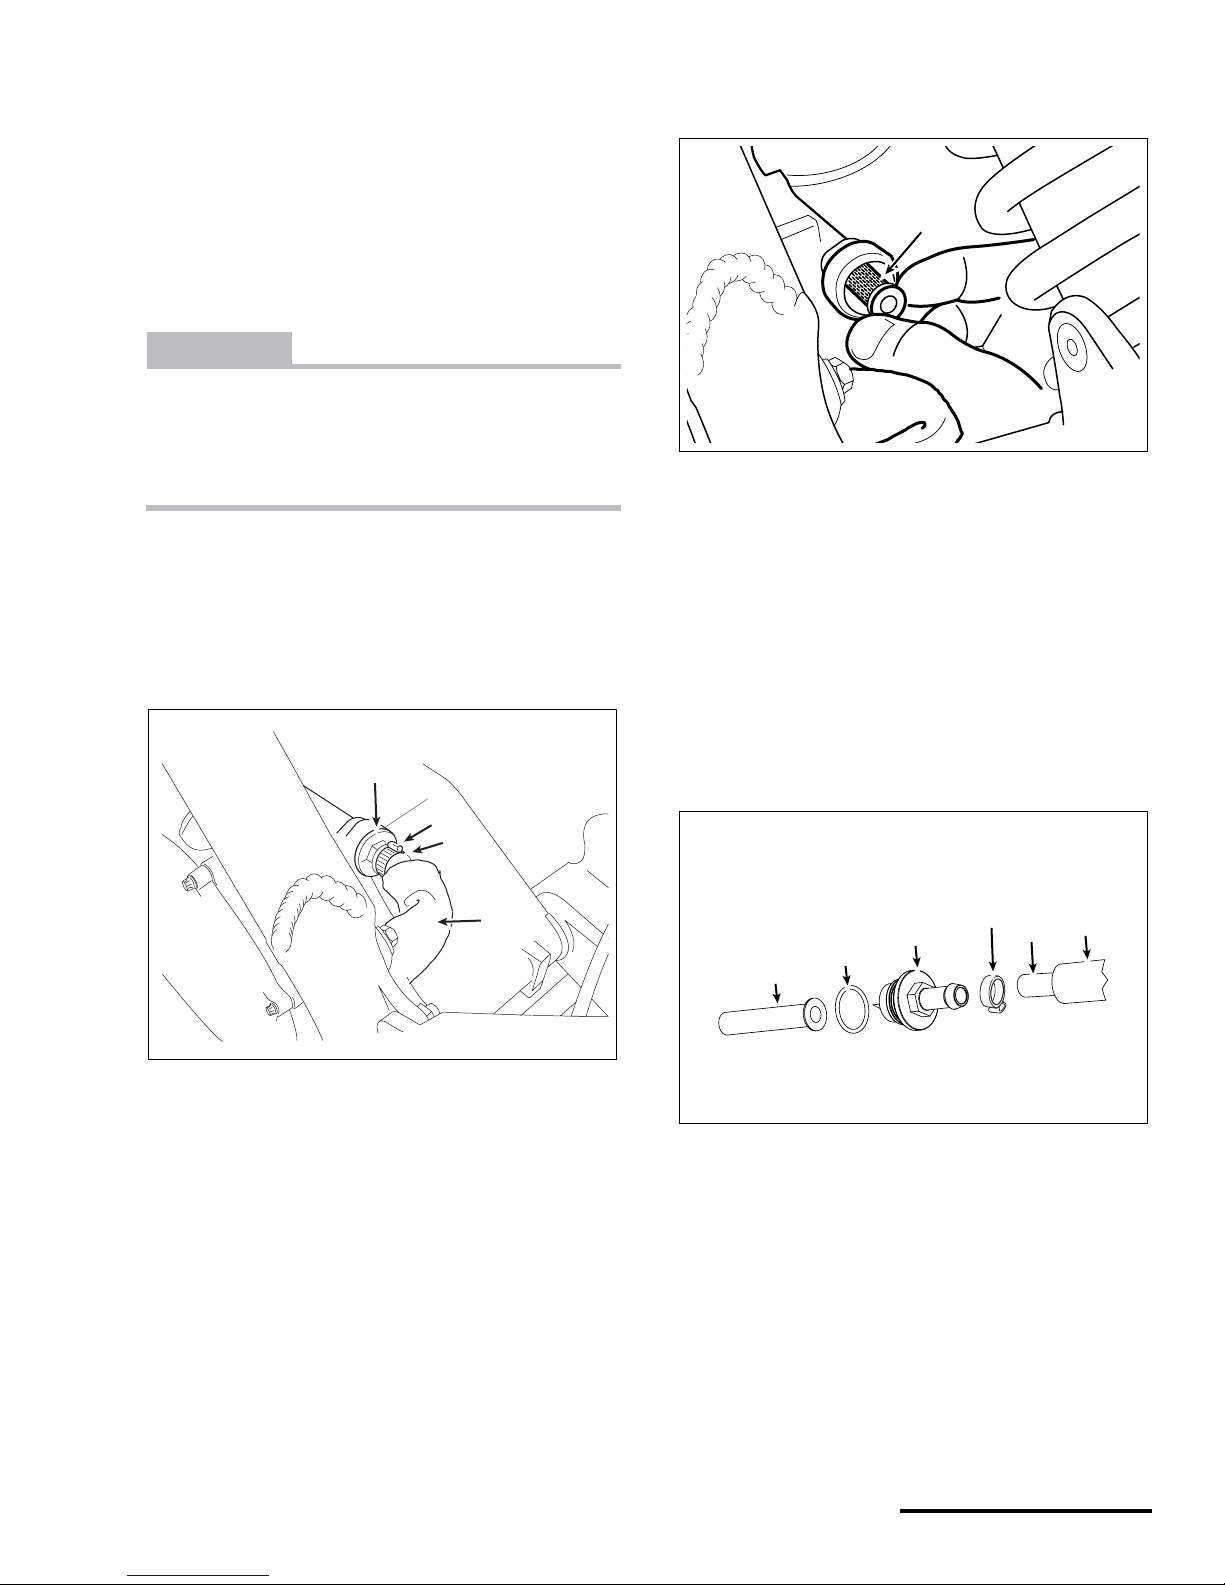
BLEEDING THE COOLANT SYSTEM
CAUTION
Do not over-tighten the bleed bolt and check the
condition of the sealing washer. If it leaks, replace it.
1. Make sure the engine and coolant system are cold.
2. Place vehicle on a stand.
3. Remove radiator cap.
4. Loosen the bleed bolt on the water pump cover and
allow any trapped air to escape. It is not necessary to
remove the bolt.
5. When no more air is coming out of the bolt hole; only
coolant, tighten the bleed bolt. Add coolant at the
radiator to bring to proper level if necessary.
6. Reinstall the radiator cap.
7. Start engine and allow to idle for three minutes and
briefly touch the radiator. If the radiator is warm, the
cooling system was ble d properly . If the radiator is still
cool, stop the engine. Repeat the bleed procedure
and check again.
DANGER
POTENTIAL HAZARD
Running the engine indoors.
Breathing exhaust gases
WHAT CAN HAPPEN
Running the engine indoors will expose you to
dangerous exhaust gases. Breathing carbon
monoxide gas leads to poisoning, asphyxiation, and
death. This will happen rapidly and without notice.
HOW TO AVOID THE HAZARD
Never operate the vehicle indoors even for brief
periods.
1. Sealing washer
2. Bleed bolt
1
2
© 2001 Cannondale Corporation - All Rights Reserved
18
X440s Owner's Manual.fm
ENGINE OIL
SERVICE : Engine, oil recommended
Synthetic or semi-synthetic, 10W-40.
SERVICE : Engine, oil, total quantity,
1.3 US qt. (1.2 L)
SERVICE : Engine, oil, change, quantity (* see note
below)
1 US quart (0.9 L)
CAUTION
The correct oil level can only be checked after the
engine has run for a 1 minute.
NOTE : * When adding engine oil following a change (i.e.
drain of the spars, crankcase, filters removal and cleaning),
small volumes of oil can remain within the spar reservoirs.
Keep this fact in mind and be careful not to over fill the
system. The change quantity specified here provides
sufficient oil to operate engine safely so that level may be
checked in the spar.
Be careful not to overfill the engine oil. Pour small amounts
rechecking the le ve l b etw e en pours. Place vehicle on a level
surface.
CHECKING T H E EN GI NE OI L
1. T o check, place the vehicle on a stan d so it is le ve l.
2. Shift the transmission into NEUTRAL and start the
vehicle. Allow to run for 1 minute at idle speed, then
turn the engine off.
3. Remove the engine oil level check bolt.
WARNING
POTENTIAL HAZARD(S)
Serious injury or irritation to the skin or eyes.
Death if swallowed.
WHAT CAN HAPPEN
Engine oil is a hazardous substance. If it comes into
contact with your skin or eyes you can suffer
serious injury or irritation. If it is swallowed it can
cause death.
HOW TO AVOID THE HAZARD
Wear hand protection and safety glasses when
working with engine oil.
If you touch engine oil, wash it off immediately with
soap and water.
Clean clothes or rags contaminated with engine oil.
If swallowed seek immediate medical attention.
KEEP ENGINE OIL AWAY FROM CHILDREN AND
ANIMALS.
DANGER
POTENTIAL HAZARD
Running the engine indoors.
Breathing exhaust gase s
WHAT CAN HAPPEN
Running the engine indoors will expose you to
dangerous exhaust gases. Breathing carbon
monoxide gas leads to poisoning, asphyxiation, and
death. This will happen rapidly and without notice.
HOW TO AVOID THE HAZARD
Never operate the vehicle indoors even for brief
periods.
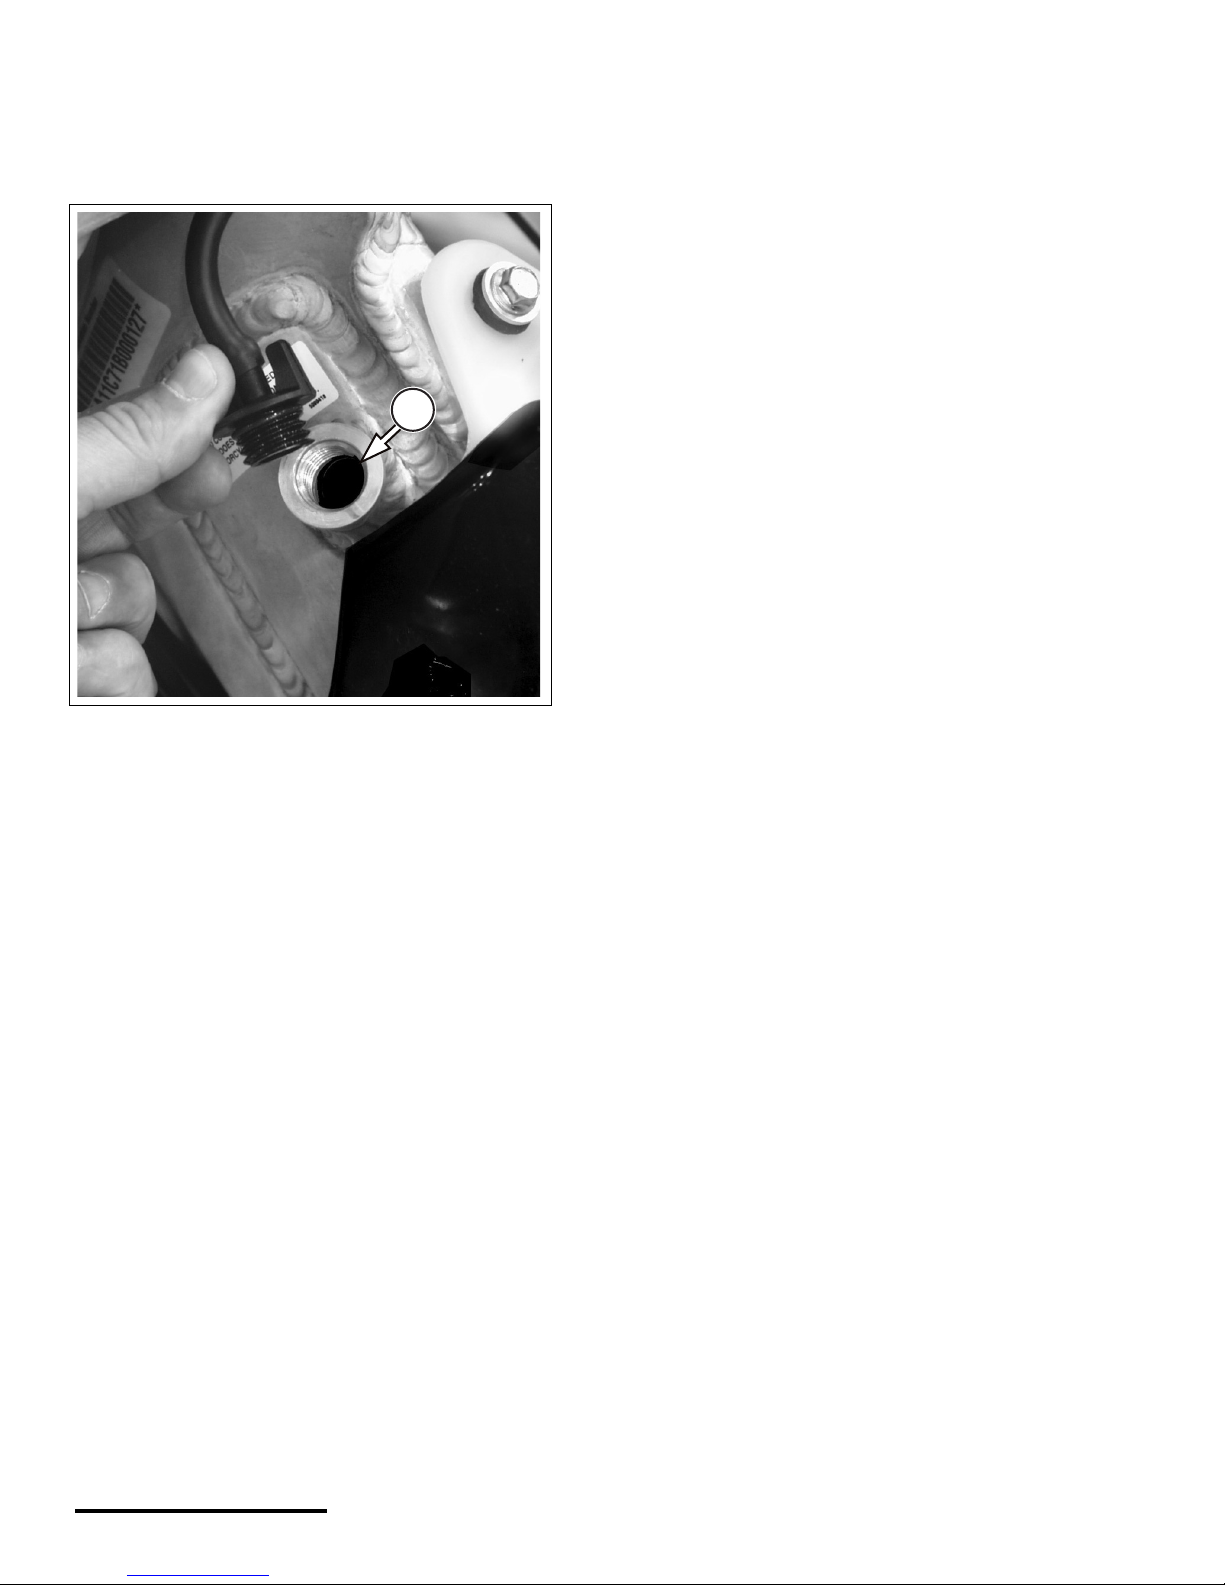
1. Engine oil level check bolt (left frame spar)
1
Printed : 8/13/01
19
P/N 951-05002032
4. The engine oil level should be even with the bo ttom of
the check hole. Add if necessary.
5. To add, remove the filler ca p on the left frame spar
and pour the specified engine oil until the level
reaches the bottom of the check hole. Pour slowly to
allow the oil to flow throughout the spar.
6. Reinstall the check bolt.
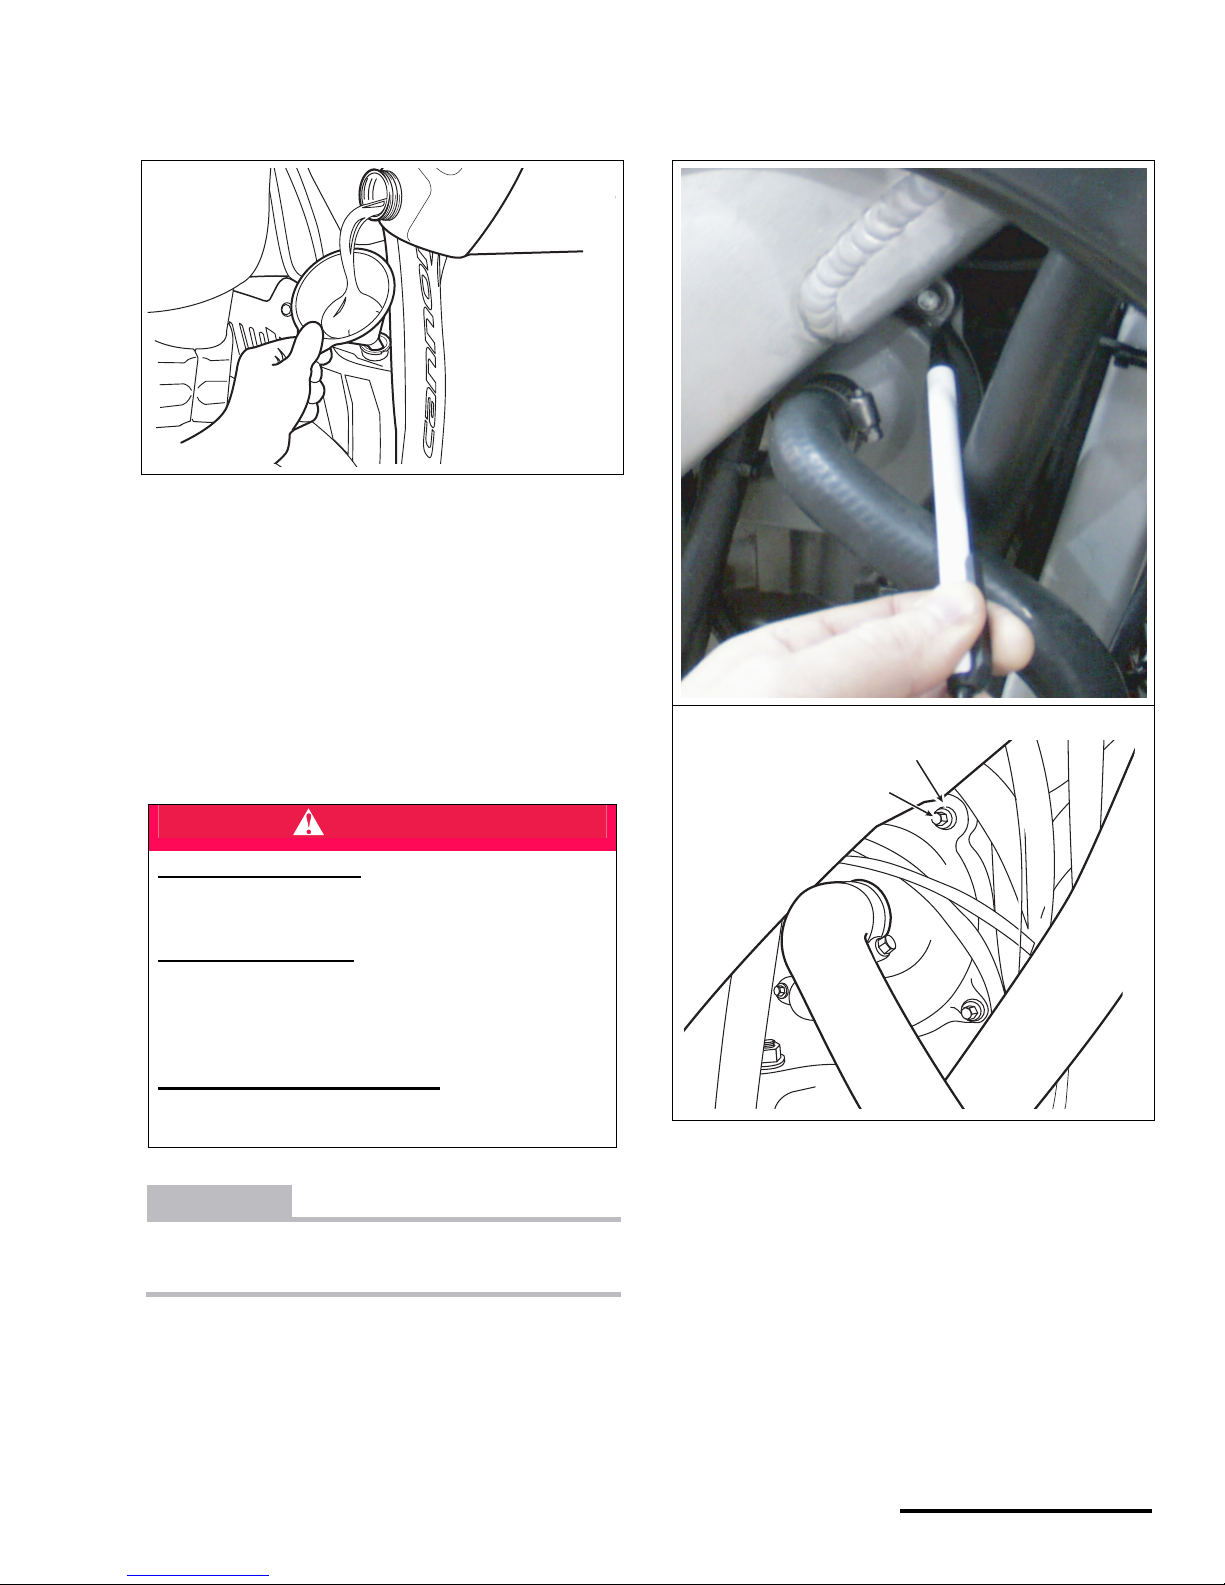
TORQUE : Frame, engine oil spar check bolt
15.0 lbf•ft (20.3 N•m.
CHANGING THE ENGINE OIL
1. Place the vehicle on a stand.
2. Start engine and allow to reach normal operating
temperature 158°F (70°C).
3. Turn the engine off.
4. Place an oil pan under the left frame spar drain bo lt.
5. Connect a clear plastic hose to the engine oil drain
bolt and loosen it
6. Allow the contents of the spar to drain completely into
an oil pan.
1. Engine oil filler cap (left frame spar)
2. Vent hose
CORRECT
OIL LEVEL
AFTER 1 MINUTE
CHECK BOLT
HOLE
LEFT FRAME
SPAR
1
2
DANGER
POTENTIAL HAZARD
Running the engine indoors.
Breathing exhaust gases
WHAT CAN HAPPEN
Running the engine indoors will expose you to
dangerous exhaust gases. Breathing carbon
monoxide gas leads to poisoning, asphyxiation, and
death. This will happen rapidly and without notice.
HOW TO AVOID THE HAZARD
Never operate the vehicle indoors even for brief
periods.
WARNING
POTENTIAL HAZARD
Blindness, eye injury,
WHAT CAN HAPPEN
When cleaning the oil filters, objects propelled by
compressed air can strike your eyes and cause
serious injury or blindness.
HOW TO AVOID THE HAZARD
Wear safety glasses when working with compressed
air.

© 2001 Cannondale Corporation - All Rights Reserved
20
X440s Owner's Manual.fm
NOTE : Remove the spar oil filler cap to facilitate draining.
7. Tighten the bolt.
TORQUE : Engine, engine oil drain bolt (left spar)
15.0 lbf•ft (20.3 N•m)
8. Place a container under engine oil crankcase drain
bolt located on the right side of the engine and
remove it and the sealing washer. Allow the oil to
drain completely.
9. Apply anti-seize compo und to t he threa ds of th e drain
bolt. Then install the sealing washer onto the bolt so
that the flat side faces the crankcase and install.
Tighten to the spe ci fie d torqu e.
TORQUE : Engine, engine oil drain bolt (crankcase)
6.0 lbf•ft (8.1 N•m)
10. Now, place a container under engine oil filter cover
and remove bolt and engine oil filter cover.
NOTE : Be sure to note the two cover O-rings as you
remove the cove r.
11. Remove the seal, filter (screen) and seal from the
filter housing.
12. Clean the filter using compressed air and clean the
the filter housing cavity with a clean shop towel.
13. Inspect the seals and filter element for tears, cracks,
and other damage. Replace new if damaged.
1. Engine oil drain plug (left spar)
2. Clear hose
1. Bolt
2. Sealing washer
1
2
1
SEALING
WASHER
BOLT
FLAT SIDE
1. Filter cover bolt
2. Filter cover
1. Bolt
2. Cover
3. O-ring (2-011)
4. O-ring (2-033)
5. Filter seal
6. Filter (screen)
1
2
1
2
3
4
6
5
5
Printed : 8/13/01
21
P/N 951-05002032
14. Apply a light coat of O-ring grease to the large and
small cover O-rings and insert them back into the
cover.
15. Use some O-ring grease to “stick” the filter seals s o
that they are centered on the filter. This will help
assure that the seals remain in place when you insert
the filter into the housing.
16. Install the cover and cover bolt.
CAUTION
Do not over-tighten the cover bolt. You will damage
the threads of the filter housing. If the cover leaks,
you may need to replace the cover O-rings or
inspect the cover and housing mating surfaces for
damage.
TORQUE : Engine, engine oil, filter cover bolt
3.3 lbf•ft (4.5 N•m)
17. Now, carefully work the heat shield back to expose
the left spar return hose and clamp. Then, remove the
clamp and the hose from the engine oil inlet fitting.
18. Loosen and remove the inlet fitting. Then, remove the
inlet filter (screen) from the crankcase hole.
19. Clean the screen using compressed air.
20. Inspect the inlet fitting, 0-ring, and inlet screen for
tears, cracks, and other damage. Replace any
damaged part with a new one.
21. Reinstall the filter into the crankcase. Inspect the
fitting O-ring and replace it with a new one if
necessary.
22. Apply light coat of clean engine oil to the fitting O-ring
install the fitting. Tighten it to the specified torque.
TORQUE : Engine, engine oil inlet fitting
18.0 lbf•ft (25.0 N•m)
23. Reinstall the engine oil inlet hose and clamp onto the
fitting.
24. Re-position the heat shield up to the cl amp.
1. Heat shield
2. Spar return hose
3. Clamp
4. Inlet fitting
1
2
3
4
1. Inlet filter (screen)
1. Screen
2. O-ring
3. Inlet fitting
4. Clamp
5. Spar return hose
6. Heat shield
1
1
2
3
4
5
6
© 2001 Cannondale Corporation - All Rights Reserved
22
X440s Owner's Manual.fm
25. Now, remove the left spar oil filler cap and add the
specified “engine oil change quantity” using a clean
funnel.
Pour slowly allowing the oil to flow throughout the
spar.
26. Reinstall cap and run engine for 1 minute at idle
speed to circulate the new oil.
27. Recheck the level as described in the engine oil
checking procedure. Add oil as required to bring level
to the bottom of the c hec k bol t hole.
1. Engine oil filler hole (left frame spar)
1
Printed : 8/13/01
23
P/N 951-05002032
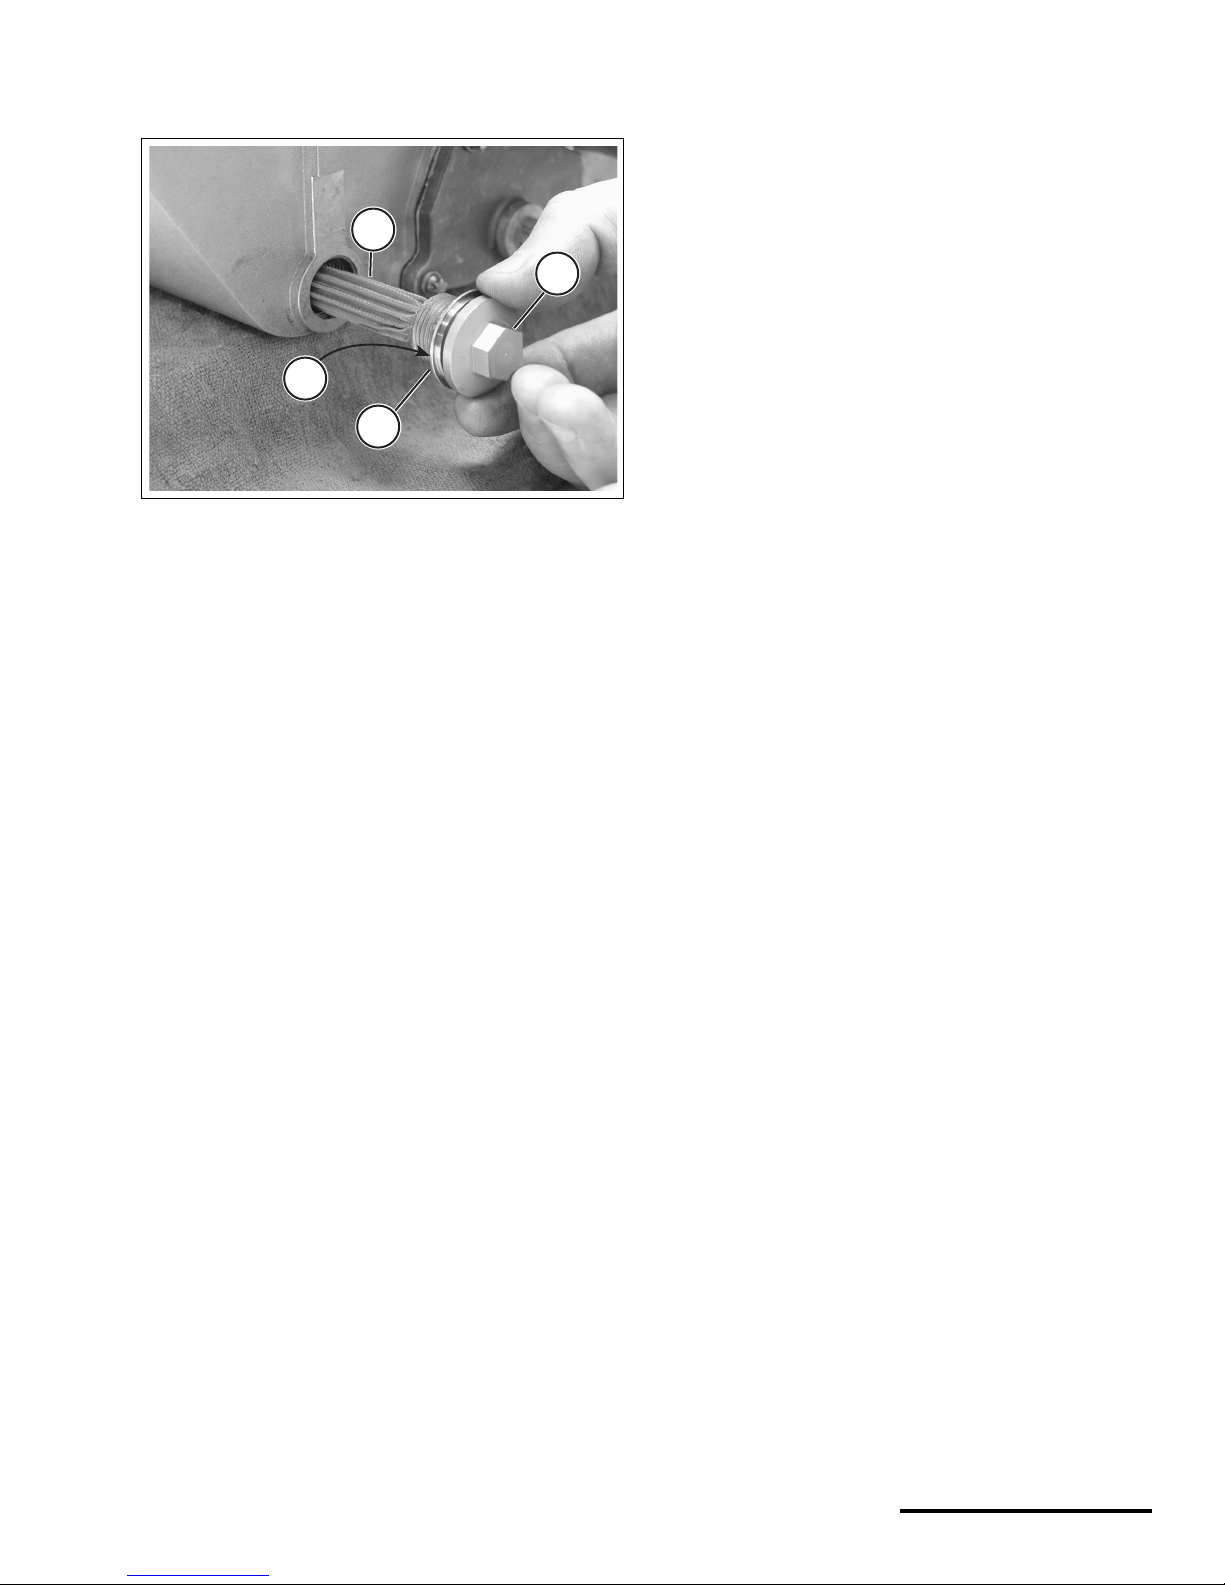
TRANSMISSION OIL
SERVICE : Transmission, oil, recommended type
80W or 85W
SERVICE : Transmission, oil, total quantity (dry fill)
0.74 US quart (0.7 L)
CAUTION
A low transmission oil level may result in severe
engine damage. Check level before eve ry ride.
Always use the specified transmission oil.
Always use a clean funnel when adding transmission oil
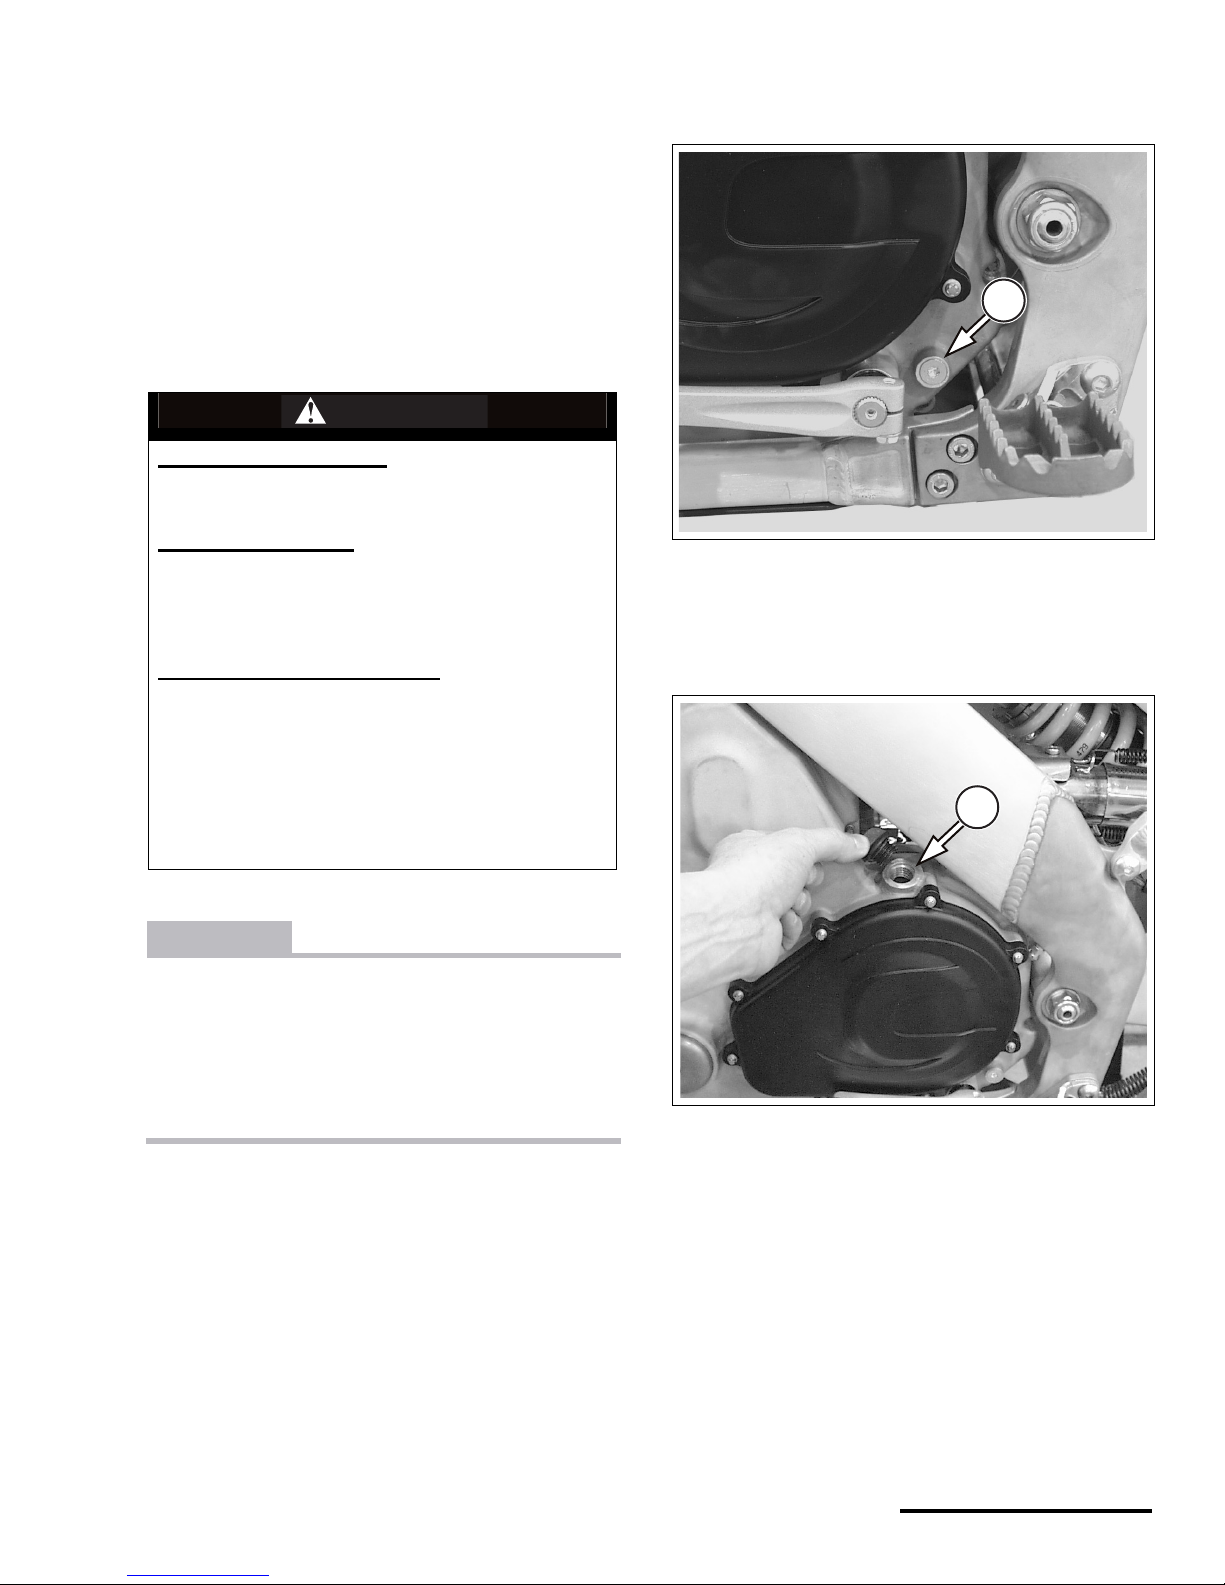
1. To check, make sure the engine is cold.
2. Place the vehicle on a stand so it is level and wait a
few minutes until the tran sm ission oil settles.
3. Place a few rags under the transmission oil level
check bolt and remove it. The transmission oil level
should be even with the bottom of the check hole. If
the transmission oil level is low, install the check bolt,
and add small amounts slowly at the filler hole and
recheck the level.
4. Install t he transmission oil level check bolt.
TORQUE : Transmission, oil level check bolt
5.0 lbf•ft (6.8 N•m)
WARNING
POTENTIAL HAZARD(S)
Serious injury or irritation to the skin or eyes.
Death if swallowed.
WHAT CAN HAPPEN
Transmission oil is a hazardous substance. If it
comes into contact with your skin or eyes you can
suffer serious injury or irritation. If swallowed it can
cause death.
HOW TO AVOID THE HAZARD
Wear hand protection and safety glasses when
working with engine oil.
If you touch tran smissio n oil, wash it off imm ediatel y
with soap and water .
Clean clothes or rags contaminated with engine oil.
If swallowed seek immediate medical attention.
KEEP TRANSMISSION OIL AWAY FROM CHILDREN
AND ANIMALS.
1. Check bolt
1. Transmission oil filler hole
1
1
© 2001 Cannondale Corporation - All Rights Reserved
24
X440s Owner's Manual.fm
CHANGING THE TRANSMISSION OIL
CAUTION
When re-installing the transmission oil filter, be sure
to insert it into the drain bolt, then insert the pair
into the crankcase hole together. This helps assure
that the other end of the filter will locate into the
back of the transmission oil pump (rear of cartridge
plate inside gearbox cavity). If the filter does not
locate into the plate hole, unfiltered oil can enter and
damage the pump.
NOTE : The transmission drain bolt is located on the right
side of the engine. The filter (screen) may not come out with
the drain bolt. After the oil drains, use needle nose pliers to
gently remove it from within the drain hole.
Take notice of the sealing washer on the bolt when you
remove it.
1. Place vehicle on a level surface.
2. Place a suitable container under transmission drain
bolt and remove the bolt.
3. Allow the transmission oil to drain completely.
4. Lean the vehicle slightly to the right to ensure all oil is
drained.
5. If the fil ter did not com e out with the bo lt, remove it
carefully from the hole. Clean it using compressed
air.
6. Inspect the filter for cracks, holes, tears, and other
damage. Replace new if damaged.
7. Make sure the threads of the bolt and crankcase are
clean.
8. Apply anti-seize compound to the threads of the
transmission drain bolt (1). Then install the sealing
washer (2) onto the bolt with the flat side (a) facing
WARNING
POTENTIAL HAZARD
Blindness, eye injury,
WHAT CAN HAPPEN
When cleaning the oil filters, objects propelled by
compressed air can strike your eyes and cause
serious injury or blindness.
HOW TO AVOID THE HAZARD
Wear safety glasses when working with compressed
air.
Printed : 8/13/01
25
P/N 951-05002032
the case. Insert the filter into the bolt, and install into
the case.
9. Tighten the bolt to the specified torque.
TORQUE : Transmission, oil, drain bolt
6.0 lbf•ft (8.1 N•m)
10. Add the specified transmission oil at the filler cap until
oil level reaches the bottom of the check bolt hole.
Pour slowly and allow time for the oil to flow
throughout the case cavity.
11. Then, run the engine briefly (1-2 minutes) to circulate
newly added oil and recheck the level. Add if
necessary.
NOTE : The transmission oil level should always be at the
bottom of the check bolt hole.
1. Drain bolt
2. Sealing washer
3. Filter (screen)
a. Sealing washer flat side
2
1
3
a
© 2001 Cannondale Corporation - All Rights Reserved
26
X440s Owner's Manual.fm
FUEL
SERVICE : Fuel, recommended fuel
Premium unleaded gasoline
SERVICE : Fuel, fuel tank ca pac ity
2.1 US gal (8.0 L)
CAUTION
If engine “knocking” or pinging occurs, use a different brand of gasoline or a higher octane rating.
Never experiment by using fuels other than the recommended type in this vehicle. Other fuels or additives not designed specifically for this vehicle can
severely damage the eng ine a nd its sup porting com ponents (e.g. fuel system, sensor s, tank, hoses, etc. )
1. To add fuel, remove the fuel tank cap by turni ng it
counterclockwise.
2. Carefully fill the fuel tank with the recommended fuel
until the fuel level reaches the bottom of the filler
neck.
3. After fueling, turn the fuel tank cap clockwise to
tighten.
4. Make sure the fuel cap breather hose is routed
correctly.
WARNING
POTENTIAL HAZARD(S)
(1) Fire or explosion
(2) Overfilling the fuel tank.
WHAT CAN HAPPEN
(1) Gasoline is extremely flammable. Handling it
inappropriately or near cigarettes, flame, sparks,
welders, or other sources of ignition can result in a
fire or explosion where you can be seriously injured
or killed.
(2) Fuel expands due to heat (e.g., engine, sun) and
may overflow if the tank is overfilled, resulting in a
fire
HOW TO AVOID THE HAZARD
(1) Only handle gasoline outdoors and away from
cigarettes, flame, sparks, welders, or other sources
of ignition.
(2) Stop adding fuel when the fuel level reaches the
bottom of the filler neck
1. Fuel tank cap
2. Fuel tank
3. Fuel level
4. Filler neck
4
3
1
2
 Loading...