

Page 1
User’s guide
complies to all dispositions of the part 15 of the FCC rules
«FCC » DECLARATION OF CONFORMITY
FCC rules – PART 15
NUM’AXES
declares that
the training c ollar
DOGTEK CANICOM 400
This device complies with part 15 of the FCC. Operation is subject to the following conditions:
(1) this device may not cause harmful interference, and (2) this device must accept any
interference received including interferences that may cause undesired operation.
1/11
Page 2

WARNING
Any person with individual device for cardiac assistance (pacemaker, defibrillator) must take
precautions when they use CANICOM 400.
These devices emit some static magnetic fields (a magnet is located in the remote control)
(Frequency= 915 MHz, at = 0.75 mW).
The device complies with Part 15 of the FCC rules.
Any technical changes or modifications on the receiver collar or on the remote control not
expressly approved by the manufacturer shall void the user’s authority to operate the
equipment.
Thank you for choosing a DOGTEK product.
Before using you r CANICOM 400, please read t he in struct ion s in t hi s gui de carefu ll y and keep it for futu re
reference.
Before using CANICOM 400, we advise you to have your dog checked by your vet to ensure it is
fit to wear a collar.
Check your dog’s neck regularly, the repeated rubbing or the contact points against the
animal’s skin may cause irritation. If this happens, remove the collar until all signs of skin
irritation have disappeared.
Start with the lowest level of stimulation and define the level from which your dog reacts by
increasing gradually.
Do not hesitate to contact a pr o fe s sional trainer for any further advice.
Index Page
Contents of the product CANICOM 400 ........................................................................................... 3
Description of the product ............................................................................................................ 3
First use from new ....................................................................................................................... 3
How to use the remote control ...................................................................................................... 5
Checking/replacing battery(ies) o f remote control ............................................................................ 6
Checking/replacing battery of receiver collar(s) ............................................................................... 7
Changing the contact points ......................................................................................................... 7
How to check that your CANICOM 400 is functioning properly ........................................................... 7
Getting the best results ................................................................................................................ 7
Fitting the collar .......................................................................................................................... 8
Starting out with the training collar ............................................................................................... 8
The difference between “continuous” and “flash” stimulation ............................................................. 8
Cautions for use .......................................................................................................................... 9
Maintenance ............................................................................................................................... 9
Troubleshooting .......................................................................................................................... 9
Technical specifications .............................................................................................................. 10
Receiver collar battery life .......................................................................................................... 10
Warranty .................................................................................................................................. 10
Warranty conditions ................................................................................................................... 10
Spare parts ............................................................................................................................... 11
CANICOM 400 – user’s guide – May 2009 2/11
Page 3
● Contents of the product CANICOM 400
Inside the packaging you will find:
▪ 1 CANICOM receiver collar equipped with short contact points
▪ 1 lithium 3 Volt CR2 battery for the collar
▪ 1 CANICOM 400 remote control equipped with 1 lithium 3 Volt CR2 battery
▪ 1 neon test lamp
▪ 1 pair of long contact points
▪ 1 carry strap
▪ this user’s guide
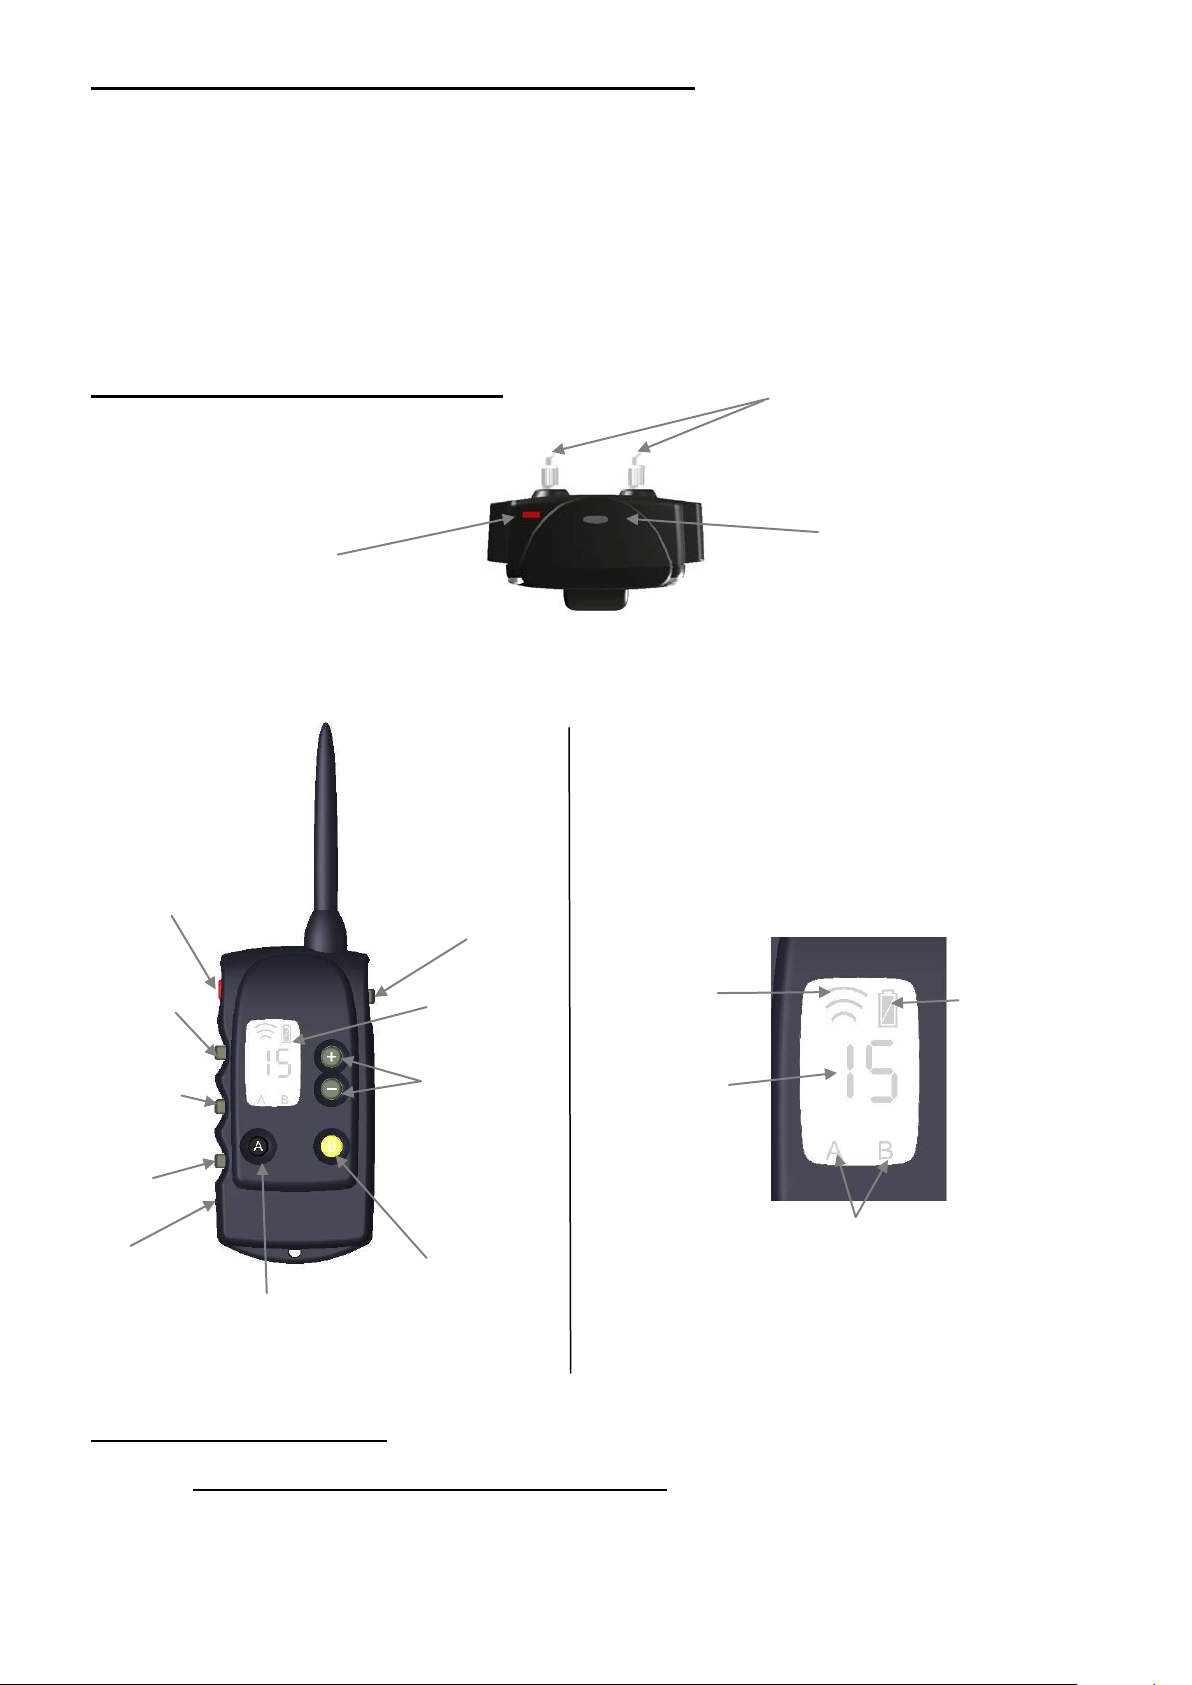
● Description of the product
Red mark:
Area where the On/Off
switch magnet is located
RECEIVER COLLAR
Diagram 1
2 contact points
(short or long)
On/Off indicator
+
indicator of radio reception
+
battery level indicator
On/Off switch
+
LCD screen
retro-lightning
Continuous
stimulations
limited to 8
seconds
Flash
stimulations
lower than
1 second
Beeper
button
Area where the
On/Off switch
magnet is located
Selection key
Dog A
black collar
Booster
button
LCD screen
Adjustment of
the level of the
stimulations
Selection key
dog B
yellow collar
Indicator of
transmission
Stimulations level
indicator
from
CANICOM 400 REMOTE CONTR OL
Diagram 2
radio
1 to 15
Collar selection indic a tor
A or B
CANICOM 400 LCD SCREEN
Diagram 4
Battery
level
indicator
● First use from new
Fitting the battery in the receiver coll a r(s )
- Unscrew the 4 screws of the top of CANICOM using a screwdriver.
- Insert the battery (3 Volt CR2 lithium) paying attention to follow the polarity indicated on the
battery housing (ref. Diagram 6).
- A beep sound (low pitch) is emitted, indicating the correct installation of the battery.
CANICOM 400 – user’s guide – May 2009 3/11
Page 4
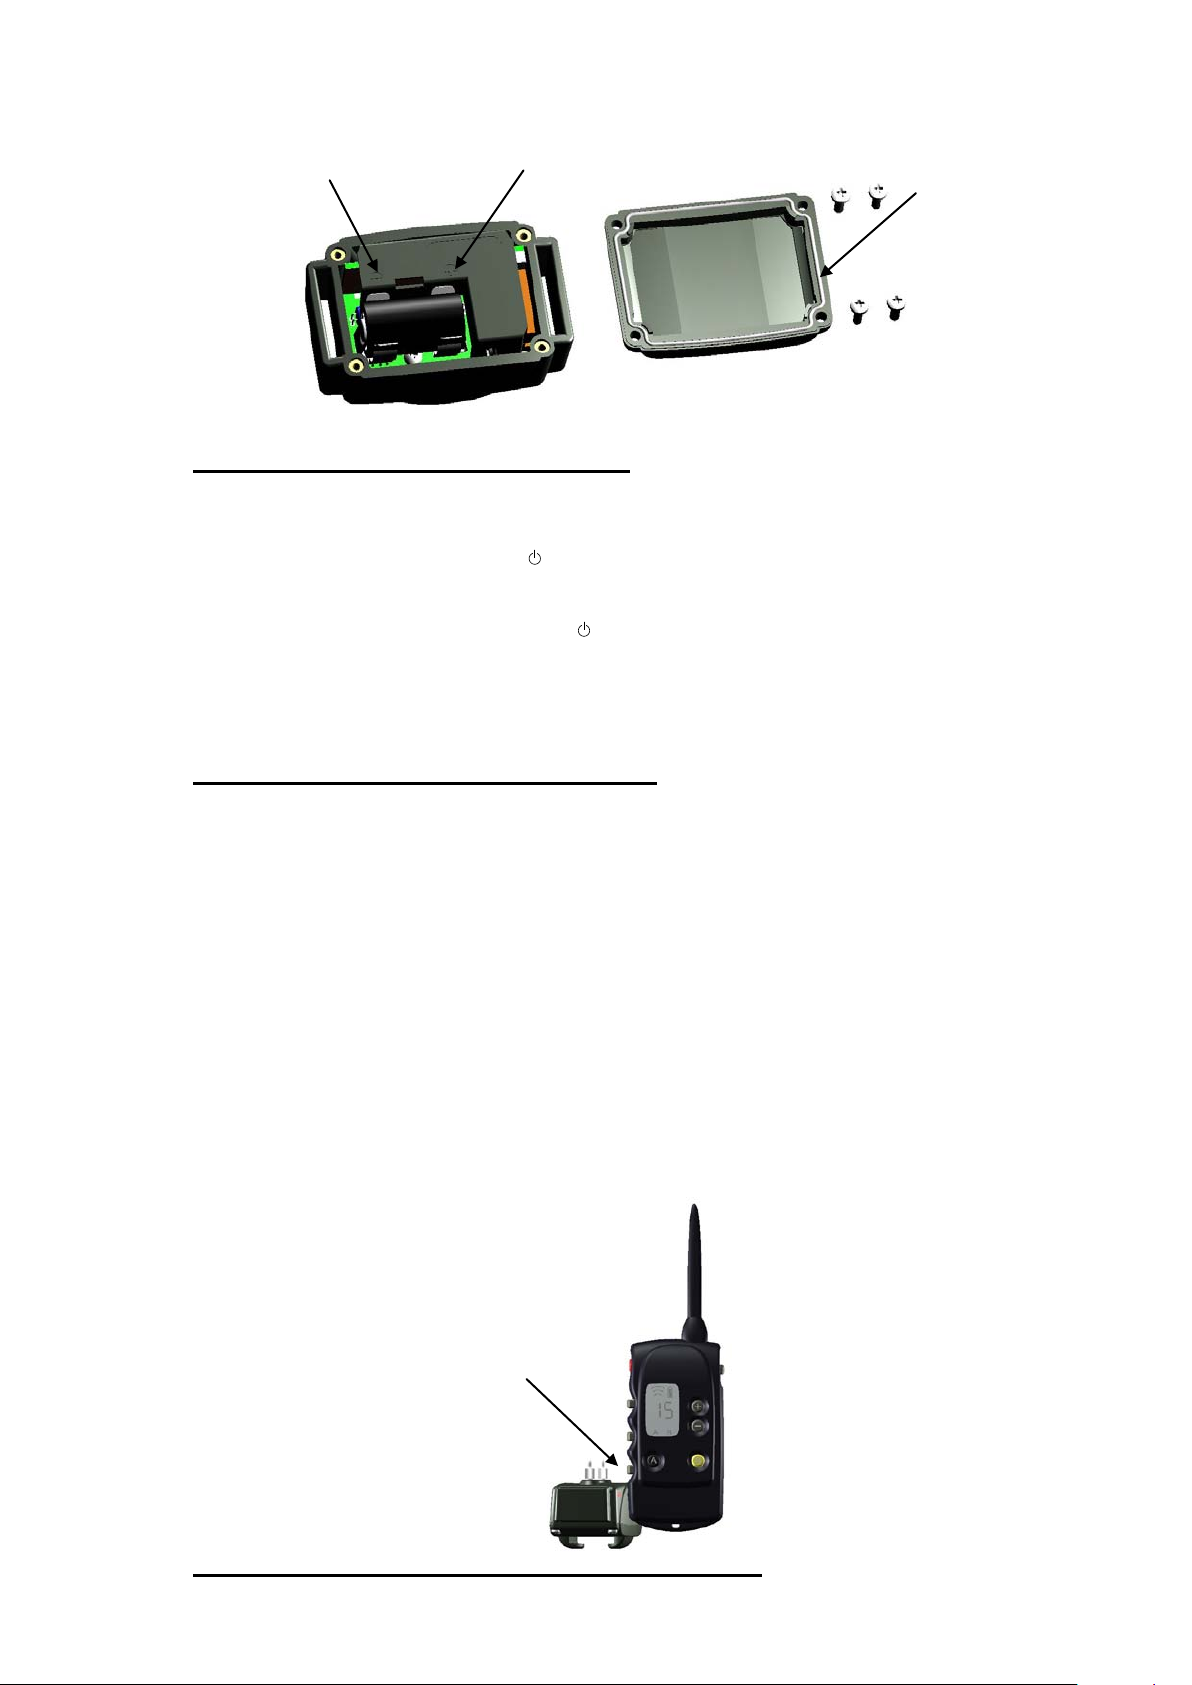
If you do not hear any beep sound after inserting the battery, immediately remove it from its
housing. Check the polarity before trying again.
- Before putting the lid back in place, check that the rubber seal is in its gro ove.
Polarity “-” of the battery
Polarity “+” of the battery
Seal
Diagram 6
Activate/deactivate the r e mote co ntrol
Remote control is supplied with battery fitted.
▪ Activate: Press the On/Off red button (
) loca ted on the side of t he remote control for 1 second
(ref. Diagram 2 or 3). Indications appear on the LCD screen.
▪ Deactivate: Press the On/Off red button (
) located on the side of the remote control for 1
second. The LCD screen is off.
To increase the ba ttery l ife of t he remote con trol , we recommend you to d eacti va te th e un i t i f you are not
using it for a long period.
Activate/deactivate the r e ceiver collar(s)
A magnet located in the remote control is used to either switch on/off the receiver collar.
▪ Activate: Approach the area wh ere the On/Off switch magnet is located in the remote control until
coming in contact on red mark located on the collar for 1 second (ref. Diagram 7 or 8). The
indicator light on the collar will flash in green indicating that the CANICOM receiver is ready
▪ Deactivate : Approach the area where the On/Off switc h magnet is located i n the remote control
until coming in contact on red mark located on the recei ver for 1 second (ref. Diagram 7 or 8). The
indicator light on the collar will flash from green to red and then off: the CANICOM receiver is off.
If you have several collars, renew the same procedure for each one.
To increase the b attery life of the receiver collar, we recommend you dea ctivate the unit if you are not
using it for a long period.
Activate/Deactivate a receiver collar
with a CANICOM 400 remote control
Approach until coming in
contact those 2 areas
during 1 second
Diagram 7
Coding of the remote control and receiver collar(s)
Each remote control has its individual radio operator code.
CANICOM 400 – user’s guide – May 2009 4/11
Page 5

The coding of t h e rem ot e con t rol with th e receiver collar(s ) ena b les to couple you r remot e con t rol with the
receiver collar(s) provided.
IMPORTANT: before beginning the coding (first use of the receiver or re-coding), make sure no
other person is using his CANICOM 400 or other products from DOGTEK range close by. Your
receiver could accidentally record the code of his remote control. If that occurs, re-code the
remote control with the rece iver collar.
For CANICOM 400:
Collar A = collar with black strap – Collar B = collar with yellow strap
CODING PROCEDURE FOR THE FIRST USE
Warning: if you have several collars , you ha ve to code them on e a t a ti me .
1. Activate the remote control: Press for 1 second the On/Off red button (
the remote control.
2. Select the collar you want to code on the remote control: Press the A or B key in ord er to
select the collar (the letter A or B will appear on the LCD screen).
3. Activate the receiver collar: Approach the area where the On/Off switch magnet is located in the
remote control until coming in contact on red mark located on the receiver collar for 1 second.
4. Move the remote control away from the receiver collar.
5. Press the button
synchronized with your remote control.
If you have several collars to code, renew the same procedure for each one.
RE-CODING PROCEDURE (for all the codings except the first one)
Warning: if you have several collars , you ha ve to r e -code th e m on e at a time.
1. Activate the remote control: Press for 1 second the On /Off red button (
the remote control.
2. Select the collar you want to re-code on the remote control:
Press the A or B key in order to select the collar (the letter A or B will appear on the LCD screen).
If you have several collars to re-code, renew the same procedure for each one.
Reprogram a receiver collar
The CANICOM receiver collar can be re-coded indefinitely,
new remote control from the CANICOM range.
Ref. Re-coding procedure
of the remote control. A beep sound is emitted, the receiver collar is then
either wit h the same remote con trol, or wit h a
) l ocated on the side of
) located on the side of
● How to use the remote control
The CANICOM 400 remote control is desi gned to opera te with 1 or 2 receiver coll ar(s). For optimal range
performance, hold the remote control in front of you with your arm extended, at least 10 inches away
from your body. Do not cover the top of the re mote contro l unit or antenna with any part of your hand
Before sending any training instruction (beeper or stimulations), you have to select the dog you
want to send a message to:
- dog A (black collar) or dog B (y ellow collar) for CANICOM 400
To select the dog you want to train on the remote control:
Press the A or B key in order to select the collar (the letter A or B will appear on the LCD screen).
Button: beeper
If you press the “Beeper” button
function: the beeper will continue to so und a s long as you press the button.
A “transmissi on” symbol wi ll appear on the LCD sc reen of the remote control; the indicator light on the
collar goes from flashing green to permanent green as long as you press the button.
the receiver collar will emit sound signals. There is no t ime limit for this
CANICOM 400 – user’s guide – May 2009 5/11
Page 6

It is up to you to use the beeper depending on the way you want to train your dog.
With the beeper you can:
- send a sound to your dog when it is disobedient,
- draw its attention …
It is very important to always use the beeper in the s a me w a y i n or der not to di s turb you r dog.
F button: Flash stimulation
Press the “F” button to send a warning to your dog using stimulations transmitted by two contact points
located on the receiver collar for a defined length of time of less than one second.
A “transmissi on” symbol wi ll appear on the LCD sc reen of the remote control; the i ndicator light on the
collar goes from flashing green to permanent red as long as you press the button.
C button: Continuous stimulation
Press the “C” button to send a warning to your dog usin g stimulations transmitted by two contact points
located on the receiver collar, the duration will be as long as you press the button but limited to 8
seconds maximum.
Booster button
Press the Booster button to stop your dog instantaneously.
You are able to choose the level of stimulation you think to be the best for an immediate effect. As a
result, you do not need to pres s the “+” button.
Those stimulations are transmitted continuously by the two contact points located on the collar for a
defined length of time of 8 seconds maximum.
The stimulation level selected thanks to the “Booster” button can be different for each collar.
Configuration of the Booster button:
Programming the Booster button for the dog A or 1 (black collar):
- press “A” button for 5 seconds (stimulation level flashes on the LCD screen)
- press the “+” or “-” button to modify the stimulation level
- press the “A” button to confirm the level selected
Renew the same procedure to program the Booster button for the dog B.
“+” and “-”: control buttons
Use the +/- buttons for rapid adjustment of the level of stimulation of the receiver collar.
15 levels of stimulation are av a ilable for CANICOM 400.
Level 1: very weak stimulation – Level 15: strong stimulation
Retro-lightning of the LCD screen
You can light the LCD screen for approximately 6 seconds by pressing briefly the On/Off switch
½ second).
(approx.
● Checking/replacing battery(ies) of remote control
Performance (radi o range) of the remot e control may d eteriorate as bat teries become weak. B e prepared
to replace the battery.
To check the condi tion of the battery, turn on the remote control CANICOM 400 and look at the battery
level indicator on the LCD screen. The symbols which appear indicate the following:
Battery fully charged
Weak battery: prepare to replace the battery
Dead battery: your CANICOM 400 functions in safety mode and the system locks up. The
battery must be replaced.
DOGTEK recommends using the same type and same brand of batteries as those supplied in your new
purchased device. Other brand of batteries might not operate, or not be compatible or alter the
performances of your collar.
The right batteries can be purchased from DOGTEK or from your distributor.
Remove the old battery and replace it:
- 1 3-V Lithium CR2 for the CANICOM 400 remote control
CANICOM 400 – user’s guide – May 2009 6/11
Page 7
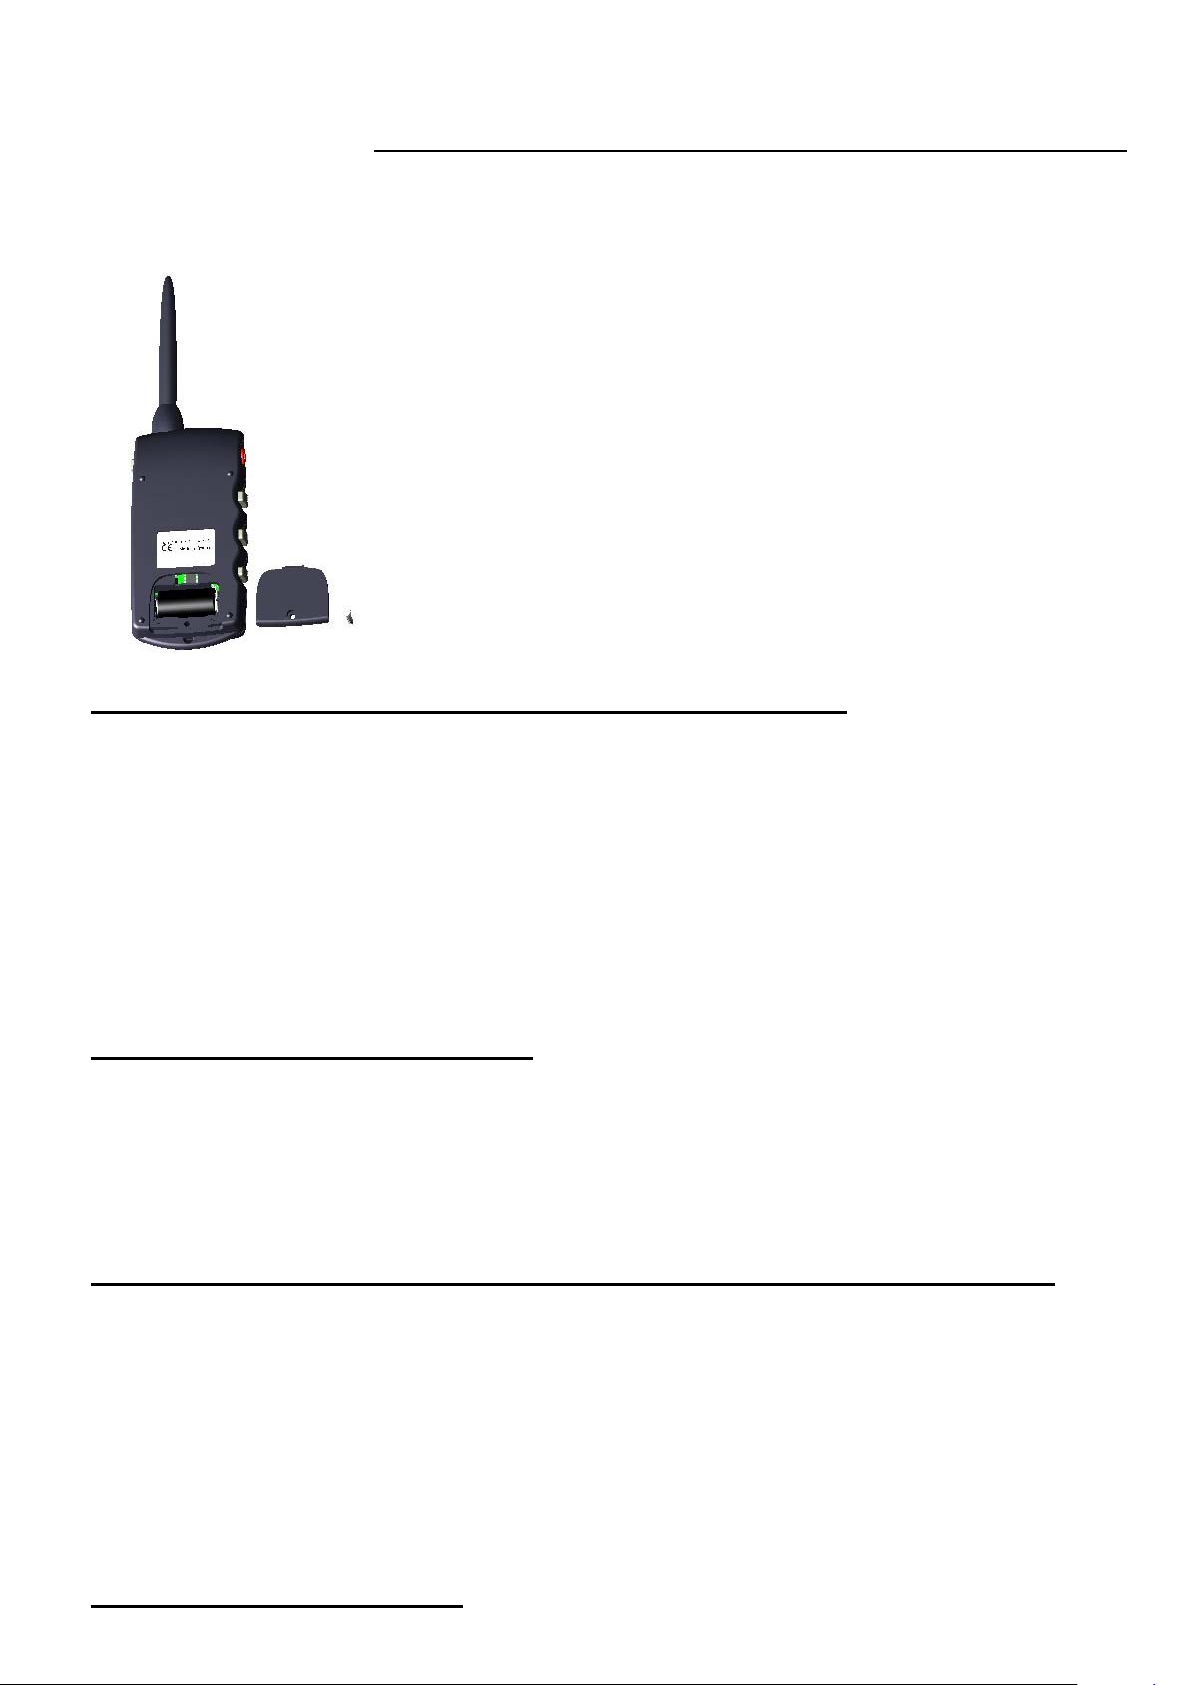
Replace the battery as follows:
▪ On the back of the remote control, unscrew the screw and remove the battery cover.
▪ Remove the old battery.
▪ Insert the new battery paying attention to follow polarity indicated on the battery housi n g.
▪ Put the lid back in place.
▪ Put the top back, using the sc rew.
▪ Check the remote control operates correctly.
Replacing batter y of
CANICOM 400 remote control
Diagram 9
WARNING
Make sure the polarit y is correct
● Checking/replacing battery of receiver collar(s)
To check the condition of the receiver collar bat t ery, observe th e On/Of f indicator light located on the front
of the receiver collar:
Battery fully charged: flashes slow green
Weak battery: flashes q uickly red. Repl ace it with a new 3 Volt Lithi um CR 2 battery (See § First
use from new: fitting the battery in the receiver collar(s))
Check the receiver collar operates correctly.
DOGTEK recommends using the same type and same brand of batteries as those supplied in your new
purchased device. Other brand of batteries might not operate, or not be compatible or alter the
performances of your collar.
The right batteries can be purchased from DOGTEK or from our distributor.
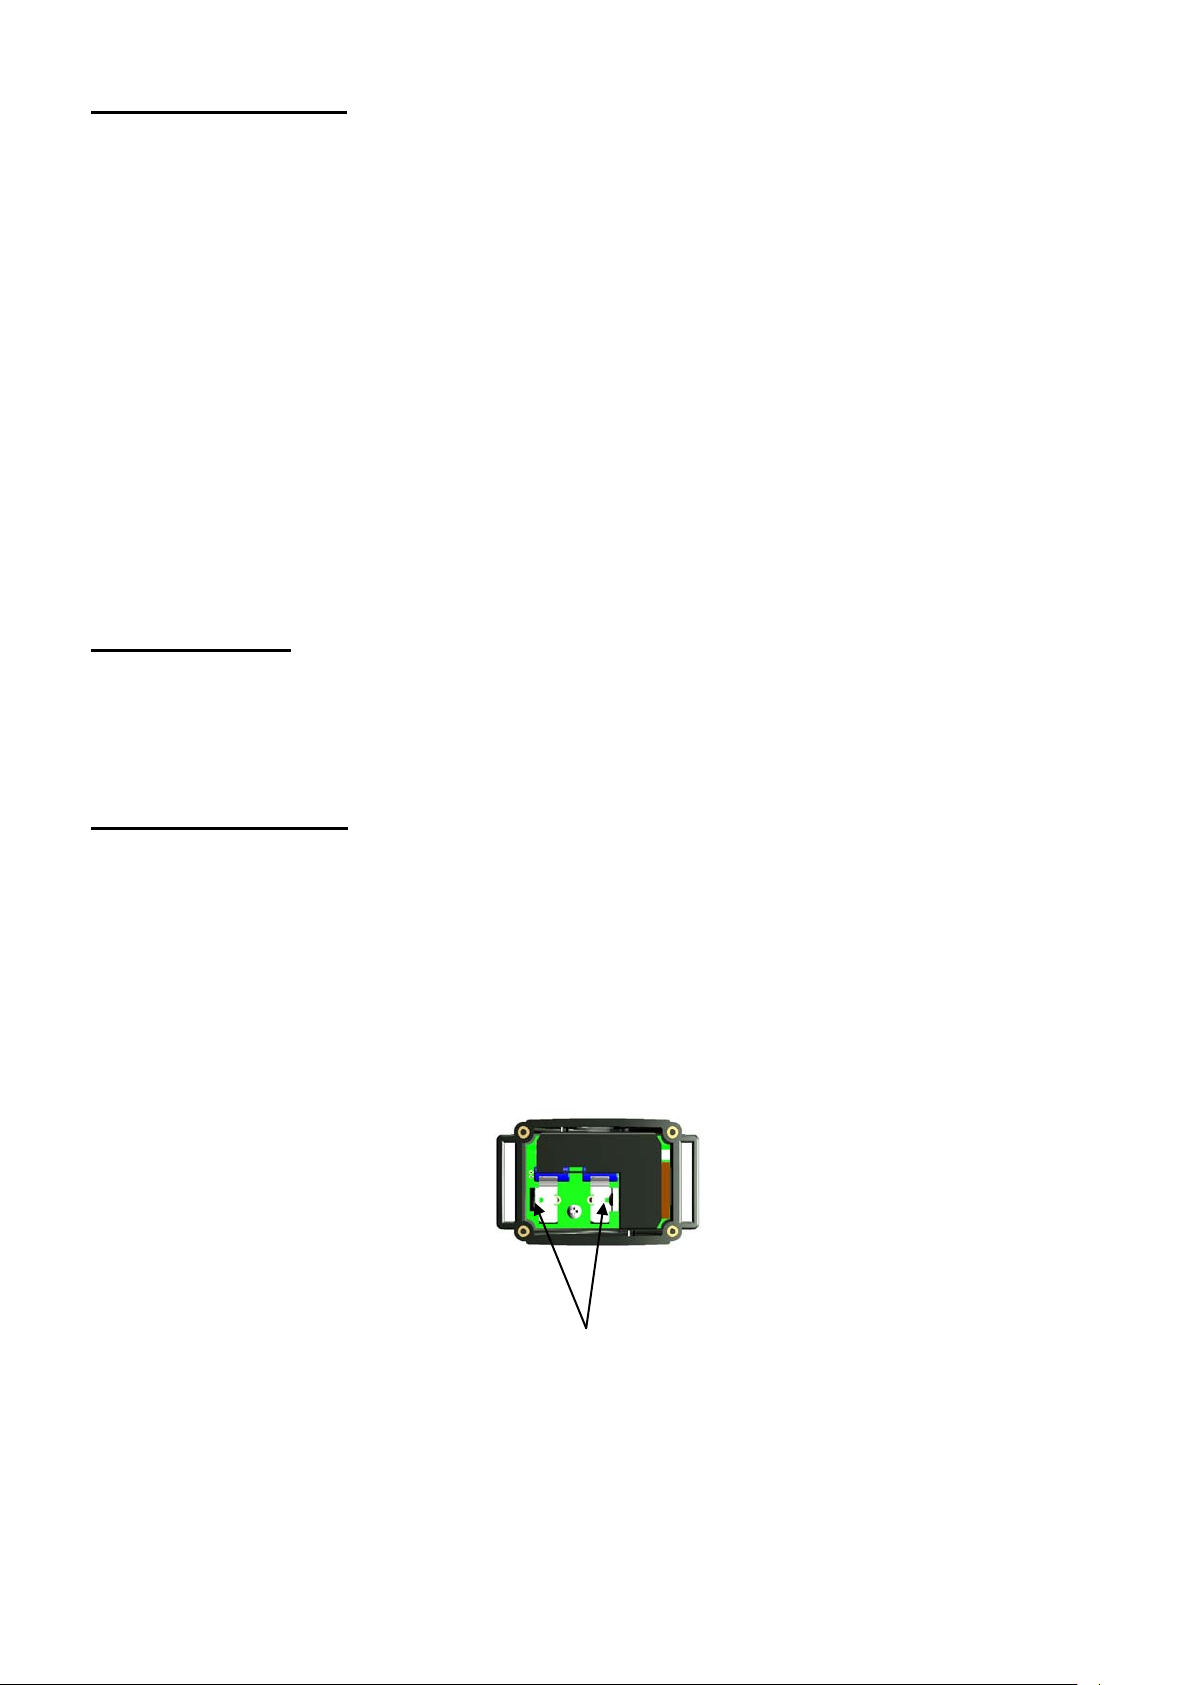
● Changing the contact points
Two different seri es of contact points are su pplied. Th e length of th e contact points must be sufficient to
have proper contact with the dog’s skin, enabling the device to operate correctly.
If you have a long-haired dog and the short contact points fitted to the collar in the factory are
inadequate, remove and replace them with the long ones supplied with the kit.
Carefully tighten them manually (do not use any key).
● How to check that your CANICOM 400 is functioning properly
You can check that your CANICOM 400 is operating correctly at any time.
▪ Before doing so, make sure that the receiver collar is turned “off”.
▪ Place the neon test lamp in contact with each of the contact points (by unscrewing them then by
screwing them up in order to grip wires of the lamp under the contact points).
▪ Turn “on” the remote control and receiver collar you want to test.
▪ Select the receiver collar you want to test on the remote control:
Press the A or B key in order to select the collar (the letter A or B will appear on the LCD screen).
Press t he “F” or “C” button and modify t he l evel of i ntensi ty of th e stimulations: the test lamp will
come on with more or less intensity.
Renew the same procedure for each receiver collar you want to test.
● Getting the best results
CANICOM 400 – user’s guide – May 2009 7/11
Page 8

The training instructions you give to your dog a re sen t from t h e rem ote control to the receiver collar( s) by
radio waves.
These radio waves are sensitive and the range reaches approximately 400 yards for the CANICOM 400
(depending on geography and environment).
The performances of your CANICOM 400 will be optimal if you respect the following
recommendations:
▪ To obtain a good radio range, do not cover the top of the remote control unit with any part of your
hand while holding
▪ For optimal range performa nce, hold t he remote control in fron t of you, wit h your arm exten ded, at
least 10 inches away from your body.
▪ The positi on of the receiver col lar around the neck of th e dog should be in the following way: the
“On/Off” indicator light is visible and is not in contact with the breast of the dog
▪ Check the bat t eries (remote control a n d receiver collar( s) ) b efore u sing the unit and repl a ce th em a s
soon as the level of load is weak.
▪ The performances of th e batt eri es decrease sl i g htl y und er temp era tu res lower than 32° F . If possi b l e,
keep the remote control warm (e.g. inside a pocket) before using it.
.
.
● Fitting the collar
The strap must be adjusted so that the contact points are in contact with the skin of the dog.
Collar adjustment is very important:
- If the strap i s too l oose, t he col l ar i s l i kel y to m ove and repeat ed fri cti on can i rrit at e the ski n of your
dog. Furthermore, it will not function correctly.
- If the collar is too tight, the do g will have breathing difficulties.
Do not leave th e collar posi tioned at the same place for long p eriods (i .e. over 3 hours) beca use this can
cause irrit ations. If your dog m ust carry the coll ar for long peri ods, change regul arly the posit ion around
the neck of your dog.
Never leave the collar more than 8 hours per day on your dog. Check your dog’s neck regularly.
If irritations appear, remove the collar until all signs of skin irritation have disappeared.
● Starting out with the training collar
▪ You can start using the collar with 6-month-old puppies that have already received some basic
training: “stay”, “sit”, or at least “no.
▪ Do not u se the collar with dogs that are not in good physical shape (i.e. cardiac problems, epilepsy)
or have behavioural problems.
▪ Your dog will need to get used to the collar; for a few days let the dog wear the collar but do not use
it.
▪ Positive and effective training takes time. do not rush:
− Choose a familiar area, a place your dog is used to.
− Define the level of stimulation from which your dog reacts by starting with the level
of the lowest intensity and increasing gradually
− Choose the right moment to press the button: at the exact time your dog does something
wrong.
− Give your d og plen ty of encoura gement: i t wi ll learn faster and its desire to respond will only
increase.
▪ Do not hesitate to contact a professional trainer for any further advice.
.
● The difference between “continuous” and “flash” stimulation
Both functions are extremely interesting and useful, since they can be adapted to any dog and any
situation.
“continuous” stimulation
Should be typically used for training at a location that is familiar to the dog (at the beginning).
Because the stimulation i s continuous, use the lowest intensity and take advantage of the length of the
stimulation rather than of the intensity, so your dog has time to understand.
“flash” stimulation
Use this fun ction to correct your dog . The low stimulation will attract its attention, it will feel something
unpleasant at the precise moment when it behaves badly.
CANICOM 400 – user’s guide – May 2009 8/11
Page 9
● Cautions for use
▪ Before using CANICOM 400, we advise you to have your dog checked by your vet to ensure it is fit to
wear a collar.
▪ The CANICOM receiver collar is totally waterproof. Your dog can swim in water. In order to
maintain water tightness, we recommend the repl acement of the seal located in th e receiver collar
every year.
▪ The CANICOM 400 remote control is showerproof only. It is only designed to remain a short
time i n t h e rain. Put it safe from wat er as soon a s p ossible. If t h e remot e con t rol falls into the water,
it could be damaged in an irreversible way.
▪ Your dog sh ould not wear an y medal, metalli c collar, or any other ki nd of collar together w ith the
CANI COM training collar.
▪ Avoid placing the remote control close to objects sensitive to magnetic fields, they could be
irreversibly damaged.
▪ Do not place or keep the unit in places exposed to high temperatures.
▪ It is necessary to repl ace the battery every two years, even if the unit h as not been used for l ong
periods.
▪ Never leave a discharged battery in the unit: leakage could damage your CANICOM 400.
▪ Remove the battery from the receiver collar and the remote control if you are not using the
appliance for 3 months or more. The collar will memorize the configuration chosen (coding).
▪ Keep your CANICOM 400 unit out of reach of children. It is not a toy for you or your children.
● Maintenance
▪ Avoid cleaning the unit with volatile liquids such as solvents or cleaning fluids. Use a soft cloth and
neutral detergent.
▪ In order to maintain water tightness, we recommend the replacement of the seal in the receiver
collar every year.
● Troubleshooting
Should your CANICOM 400 stop working or develop a fault, first read this user’s guide over, and then
check the batteri es and repl ace th em i f necessary ( see § C h ecking/repl acing battery of remot e con t rol and
§ Checking/replacing battery(ies) of receive collar(s)). Also check that you are using the product correctly.
If you encounter any problems, re-code the receiver collar (Ref. Recoding procedure).
Reinitialize the system by removing the battery from its housing, then with a metallic tool (e.g.
screwdriver, scissors) put in connection the 2 battery contacts for 2 seconds approximately. Insert the
battery again: one beep is emitted, indicating the battery is in correct position
Restart your CANICOM 400 using the remote control.
.
If the problem persists, contact your distributor.
According to the extent of the malfunction, you may have to re t u rn your product for check and repair.
For all repairs, please supply the following:
- the complete product
- the proof of purchase (invoice or sales receipt)
If you omit one of these items, the After Sales Service will have to invoice you for any repair costs
incurred.
CANICOM 400 – user’s guide – May 2009 9/11
Reset: connect the 2
supports of the battery
Diagram 11
Page 10

● Technical specifications
CANICOM 400
remote control
Power 1 3-V lithium battery CR2 1 3-V lithium battery CR2
CANICOM
receiver collar
Battery life Continuous use:
approximately 30 000 triggers
Frequency (Power) 915 MHz (0.75 mW) 915 MHz
Antenna flexible integrated
Range approximately 400 yards
Hermetic seal Showerproof waterproof
Radio operator safety and coding by microcontroller by microcontroller
Indicator of wear of batteries indicator on LCD screen indicator light
Levels of stimulation 15
Use temperature between – 5°F and +104°F between – 5°F and +104°F
Dimensions : L x H x D. 4.25” x 2.1” x 1” 2.6” x 1.5” x 1.6”
Weight (with the battery) 3 oz 2.6 oz (without strap)
In stand by: approximately 7
months
Continuous use:
approximately 2 months
collar adjustable to neck sizes
from 8” to 21.5”
● Receiver collar battery life
- 7 months in stand by: for a use of 4 hours a day
- 2 months in continuous use: about 10 000 stimulations of 2 seconds at level 9
To increase the b attery l ife of the recei ver coll ar, we recommen d you to deactivate the unit if you are not
using it for a long period.
● Warranty
DOGTEK guarantees the products against all manufacturing defects for 1 year after purchase.
The manufac t u rer does n ot undertake resp on sibility for damag es d u e t o th e improper use or breakd own of
the product.
All postage and packing charges will be the purc ha ser’s sole responsibility.
● Warranty conditions
All el ectronic component s are covered under warranty for t he life of the product with proof of purchase.
Labor is covered for the first year of ownership. Thereafter, there is a minimum service charge for the
repair or replacement of the product.
This warranty excludes; accidental damage due to dog chews, misuse, loss, or improper handling is not
covered.
DOGTEK will not pay for loss of time, inconvenience, loss of use of your product, or any incidental or
consequential damages.
Warranty is void if product resold.
● Spare parts
CANICOM 400 – user’s guide – May 2009 10/11
Page 11

You can purchase spare parts (batteries, straps, single collar…) from DOGTEK or from your supplier a t an y
time.
For CANICOM 400
3-V lithium battery CR2 (remote control)
3-V lithium battery CR2 (receiver collar)
black strap 25”
yellow strap 25”
orange strap 25”
blue strap 25”
black strap 33”
yellow strap 33”
orange strap 33”
blue strap 33”
set of 2 short electrodes
set of 2 long electrodes
Use this space to record the serial number of your CANICOM 400
(the number is near the barcode):
Transmitter: …………………………………………………………………………………………………
Receiver:……………………………………………………………………………………………………..
receiver collar with black strap
receiver collar with yellow strap
dummy collar
CANICOM 400 remote control
receiver collar seal
test lamp
loop
set of 4 screws receiver top
receiver top
www.dogtek.com
CANICOM 400 – user’s guide – May 2009 11/11
 Loading...