

IT
DE
EN
ES
FR

2

3
IT
Grazie per aver scelto questo prodotto.
Siamo orgogliosi di offrirti un prodotto ideale
per te e la miglior gamma completa di
elettrodomestici per la vita di tutti i giorni.
La lettura completa di questo libretto
permetterà un utilizzo corretto e sicuro
dell’apparecchiatura e darà anche utili
consigli sulla manutenzione più efficiente.
Mettere in funzione la lavatrice solo
dopo aver letto attentamente le istruzioni. Si
consiglia di tenere sempre il manuale a
portata di mano e di conservarlo con cura
per eventuali futuri proprietari.
Ogni prodotto è identificato da un codice
univoco di 16 caratteri, definito anche
“numero di serie”, che si trova nell’adesivo
applicato sull’elettrodomestico (zona oblò) o
nella busta documenti posta all’interno del
prodotto. Questo codice è una sorta di carta
d’identità specifica per il prodotto che
servirà per registrare il prodotto e se fosse
necessario contattare il Centro Assistenza
Tecnica.
Questo elettrodomestico è marcato
conformemente alla Direttiva Europea
2012/19/UE sui Rifiuti da
Apparecchiature Elettriche ed
Elettroniche (RAEE).
I RAEE contengono sia sostanze inquinanti
(che possono avere un impatto negativo
sull’ambiente) sia materie prime (che possono
essere riutilizzate). E’ perciò necessario
sottoporre i RAEE ad apposite operazioni di
trattamento, per rimuovere e smaltire in modo
sicuro le sostanze inquinanti ed estrarre e
riciclare le materie prime. Ogni cittadino può
giocare un ruolo decisivo nell’assicurare che i
RAEE non diventino un problema ambientale;
basta seguire qualche semplice regola:
i RAEE non vanno mai buttati nella
i RAEE devono essere consegnati ai Centri di
Raccolta (chiamati anche isole ecologiche,
riciclerie, piattaforme ecologiche …) allestiti dai
Comuni o dalle Società di igiene urbana; in
molte località viene anche effettuato il servizio
In molte nazioni, quando si acquista una nuova
apparecchiatura, si può consegnare il RAEE al
negoziante, che è tenuto a ritirarlo gratuitamente
(ritiro "uno contro uno") a patto che il nuovo
apparecchio sia dello stesso tipo e svolga le
stesse funzioni di quello reso.
1.
2.
3.
4.
5.
6.
7.
8.
9.
Indice
Indicazioni ambientali
spazzatura indifferenziata;
di ritiro a domicilio dei RAEE ingombranti.
NORME GENERALI DI SICUREZZA
INSTALLAZIONE
CASSETTO DETERSIVO
CONSIGLI PRATICI
PULIZIA E MANUTENZIONE ORDINARIA
CONTROLLO REMOTO (Wi-Fi)
GUIDA RAPIDA ALL'USO
COMANDI E PROGRAMMI
RISOLUZIONE PROBLEMI E GARANZIA

4
1. NORME GENERALI DI SICUREZZA
Questo apparecchio è destinato
ad uso in ambienti domestici e
simili come per esempio:
− aree di ristoro di negozi, uffici
o altri ambienti di lavoro;
− negli agriturismo;
− dai clienti di hotel, motel o
altre aree residenziali simili;
− nei bed & breakfast.
Un utilizzo diverso da quello tipico
dell’ambiente domestico, come
l’uso professionale da parte di
esperti o di persone addestrate, è
escluso anche dagli ambienti
sopra descritti. Un utilizzo non
coerente con quello riportato, può
ridurre la vita del prodotto e può
invalidare la garanzia del
costruttore. Qualsiasi danno
all’apparecchio o ad altro, derivante da
un utilizzo diverso da quello domestico
(anche quando l’apparecchio è
installato in un ambiente domestico)
non sarà ammesso dal costruttore
in sede legale.
Questo apparecchio può essere
utilizzato da bambini di 8 anni e
oltre e da persone con capacità
fisiche, sensoriali o mentali ridotte
o con mancanza di esperienza e
di conoscenza a patto che siano
supervisionate o che siano date
loro istruzioni in merito all’utilizzo
sicuro dell’apparecchio e che
capiscano i pericoli del suo utilizzo.
Evitare che i bambini giochino
con la lavatrice o che si occupino
della sua pulizia e manutenzione
senza supervisione.
I bambini dovrebbero essere
supervisionati per assicurarsi che
non giochino con l'apparecchio.
I bambini di età inferiore a 3 anni
devono essere tenuti lontano
dalla macchina, a meno che non
vengano continuamente sorvegliati.
Se il cavo di alimentazione è
danneggiato, esso deve essere
sostituito da un cavo o da un
assemblaggio speciale, disponibile
presso il costruttore o il suo
servizio assistenza tecnica.
Utilizzare unicamente il tubo di carico
fornito con l'apparecchio per il
collegamento alla rete idrica. I vecchi
tubi non devono essere riutilizzati.
La pressione idrica deve essere
compresa tra un minimo di 0,05
MPa ed un massimo di 1 Mpa.
Assicurarsi che nessun tappeto
ostruisca la base della lavatrice
né i condotti di ventilazione.
Dopo l’installazione, l’apparecchio
deve essere posizionato in modo
che la spina sia raggiungibile.
La massima capacità di carico
di biancheria asciutta differisce
a seconda del modello (fare
riferimento al cruscotto).

5
IT
durante il lavaggio, l’acqua
può raggiungere temperature
molto elevate.
Collegamento elettrico e
prescrizioni di sicurezza
Per ulteriori informazioni sul
prodotto o per consultare la
scheda tecnica fare riferimento
al sito internet del produttore.
I dati elettrici (tensione di
alimentazione e potenza
assorbita) sono riportati nella
targhetta dati apposta sul
prodotto.
Assicurarsi che l'impianto
elettrico sia provvisto di messa
a terra, che la presa di corrente
sia conforme alle normative
nazionali e che la spina e la
presa di alimentazione
corrispondano.
L'uso di adattatori, prese
multiple e/o prolunghe è
fortemente sconsigliato.
Prima di qualsiasi intervento di
pulizia e manutenzione della
lavatrice, togliere la spina e
chiudere il rubinetto dell’acqua.
Non tirare il cavo di
alimentazione o l’apparecchio
stesso per staccare la spina
dalla presa di corrente.
Prima di aprire l’oblò, assicurarsi
che non ci sia acqua nel cestello.
ATTENZIONE:
Non lasciare la lavatrice
esposta a pioggia, sole o ad
altri agenti atmosferici.
In caso di trasloco, non sollevare
la lavatrice dalle manopole né
dal cassetto del detersivo;
durante il trasporto, non
appoggiare mai l’oblò al carrello.
Si consiglia di sollevare la
lavatrice in due persone.
In ogni caso di guasto e/o di
malfunzionamento, si consiglia di
spegnere la lavatrice, chiudere
il rubinetto dell’acqua e non
manomettere l’apparecchio.
Contattare immediatamente il
Centro
Assistenza Tecnica,
richiedendo solo ricambi originali.
Il mancato rispetto di quanto
sopra, può compromettere la
sicurezza dell’apparecchio.
6
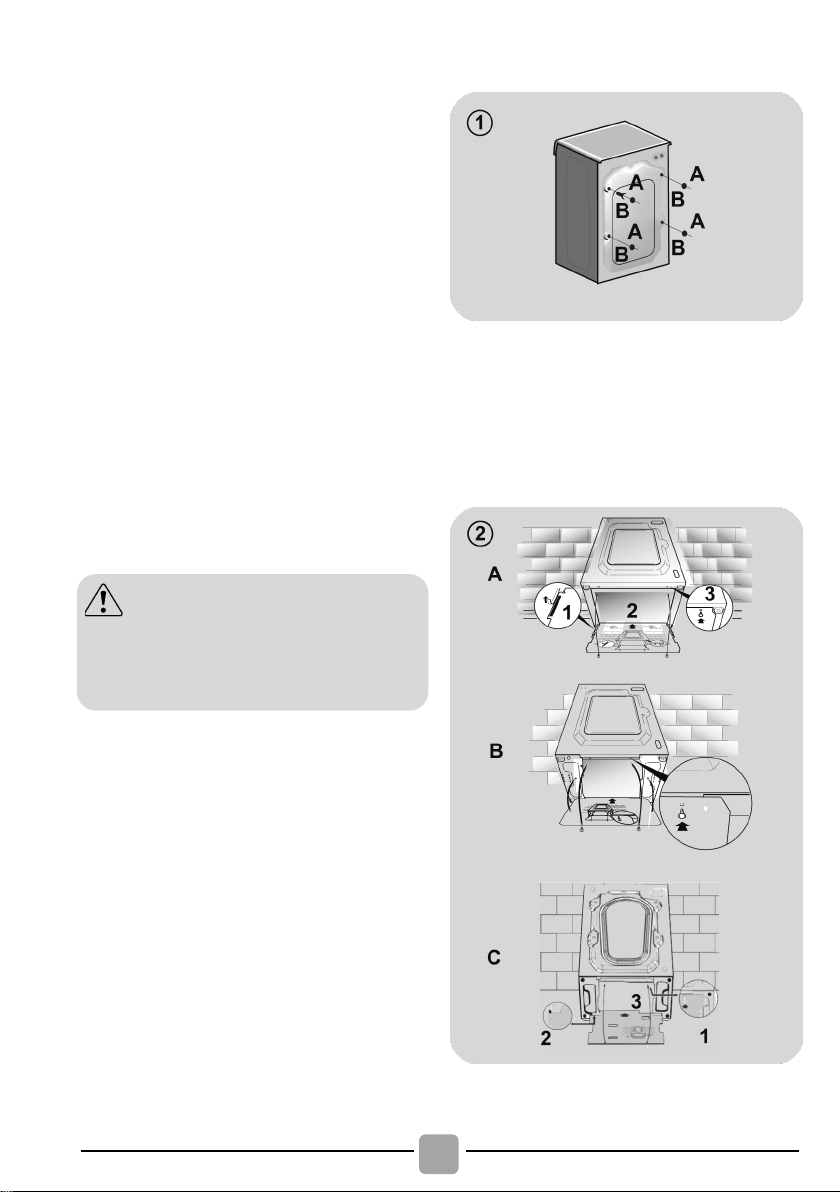
Svitare le 2 o 4 viti (A) sul lato
4
fori utilizzando
i tappi contenuti nella busta
,
e rimuovere
1 o più
distanziali cadranno all’interno
della macchina: inclinare avanti
la lavatrice per rimuoverli.
Richiudere i fori utilizzando i
Applicare il pannello di plastica
corrugata, trovato sul piano
superiore dell'apparecchio durante
fondo
dell'elettrodomestico, come mostrato
(a seconda del
modello, considerare la versione
*
In alcuni modelli, il pannello
di plastica corrugata non è
non lasciare gli elementi
dell’imballaggio a portata dei
bambini.
2. INSTALLAZIONE
posteriore e rimuovere i 2 o
distanziali (B) come in
figura 1
.
Richiudere i 2 o 4
istruzioni.
Se la lavatrice è da incasso
svitare le 3 o 4 viti (A)
i 3 o 4 distanziali (B).
In alcuni modelli,
tappi contenuti nella busta.
ATTENZIONE:
il suo disimballaggio*, sul
in figura 2
A, B o C).
presente.

7
IT
Allacciare il tubo dell’acqua al rubinetto
utilizzando solamente il tubo
fornito con l'apparecchio (i vecchi tubi non
, potrebbero essere
presenti una o più delle seguenti
: predisposizione al
collegamento alla rete idrica con acqua
calda e fredda per un maggiore risparmio
Collegare il tubo grigio al rubinetto
e quello rosso al
rubinetto dell’acqua calda. La macchina può
essere comunque collegata anche solo
all’acqua fredda: in tal caso, l’inizio di alcuni
: dispositivo posizionato
sul tubo di carico che blocca l’afflusso
dell’acqua se il tubo si deteriora; in tal caso,
”
e sarà necessario sostituire il tubo. Per
svitare la ghiera, premere il dispositivo di
TUBO DI CARICO
: in caso di
perdita d’acqua dal tubo primario interno
”, la guaina di contenimento trasparente
” conterrà l’acqua, permettendo di
terminare il lavaggio. Finito il ciclo,
tubo di carico contattando il
Collegamento idraulico
(fig. 3)
devono essere riutilizzati).
IN ALCUNI MODELLI
caratteristiche:
HOT&COLD (fig. 4)
energetico.
dell’acqua fredda
programmi sarà ritardato di alcuni minuti.
AQUASTOP (fig. 5)
apparirà una tacca rossa nella finestrella “
A
antisvitamento “B”.
AQUAPROTECT -
CON PROTEZIONE (fig. 6)
“A
“B
sostituire il
Centro Assistenza Tecnica.

8
Accostare la lavatrice al muro, facendo
attenzione che il tubo non abbia curve o
strozzature e allacciare il tubo di scarico a
bordo della vasca o, preferibilmente, ad
uno scarico fisso di altezza minima 50 cm
etro superiore al tubo della
Livellare la macchina agendo sui piedini
.girare in senso orario il dado per
.ruotare il piedino e farlo salire o
.bloccare infine il piedino, riavvitando il dado,
*
nel caso si renda necessario sostituire il
cavo di alimentazione, si consiglia di
Malfunzionamenti o danni dovuti a
installazione errata non sono coperti
dalla garanzia del produttore.
Posizionamento
e di diam
lavatrice (fig. 7).
come in figura 8:
a
sbloccare la vite;
b
scendere finché non aderisce al suolo;
c
fino a farlo aderire al fondo della lavatrice.
Inserire la spina.
ATTENZIONE:
chiamare il Centro Assistenza Tecnica.
ACCESSORIO VENDUTO SEPARATAMENTE

9
IT
IN ALCUNI MODELLI è presente un
sistema di dosaggio automatico del
In tal caso, per i dettagli fare riferimento
alla sezione specifica nel capitolo
COMANDI E PROGRAMMI.
alcuni detersivi non sono stati
rodotti nel
cassetto per i detersivi, ma sono
forniti di apposito contenitore da porre
direttamente nel cestello.
mettere solo prodotti liquidi; la
lavatrice è predisposta al prelievo
automatico degli additivi in ogni ciclo
durante l’ultimo risciacquo.
3. CASSETTO DETERSIVO
Il cassetto detersivo è suddiviso in 3
vaschette come mostrato in figura 9:
vaschetta “1”: per il detersivo del
prelavaggio;
vaschetta “ ”: per additivi speciali,
ammorbidenti, profumi inamidanti, ecc;
ATTENZIONE:
vaschetta “2”: per il detersivo di lavaggio.
IN ALCUNI MODELLI è presente anche la
bacinella per il detersivo liquido (fig. 10).
Per utilizzarla, introdurla nella vaschetta
“2”. In questo modo, il detersivo liquido
andrà nel cesto solo nel momento
opportuno. Questa bacinella è utile anche
se si desidera candeggiare, scegliendo il
programma “Risciacqui”.
ATTENZIONE:
concepiti per essere int
detersivo liquido e dell'ammorbidente.

10
Dosaggio del detersivo
Consigli utili per risparmiare
Indicazioni sul carico
4. CONSIGLI PRATICI
Durante la selezione del bucato,
assicurarsi:
- di avere eliminato dalla biancheria oggetti
metallici, come fermagli, spille, monete;
- di aver abbottonato federe, chiuso le
cerniere lampo, annodato cinghie sciolte e
lunghi nastri di vestaglie;
- di aver tolto dalle tendine anche i rulli di
scorrimento;
- di aver osservato attentamente le indicazioni
dei tessuti sulle etichette;
- di aver rimosso eventuali macchie persistenti
con un apposito detersivo.
In caso si debbano lavare tappeti,
copriletto o altri indumenti pesanti, si
consiglia di evitare la centrifuga.
In caso si debba lavare biancheria di lana,
assicurarsi che sia idonea al lavaggio in
lavatrice, controllando l'etichetta dei tessuti.
Si consiglia di lasciare lo sportello
dell'apparecchio socchiuso tra un ciclo e
l'altro, per prevenire l'eventuale formazione
cattivi odori all'interno della macchina.
Brevi suggerimenti per un utilizzo del
proprio elettrodomestico nel rispetto
dell’ambiente e con il massimo risparmio.
Caricare la macchina fino alla massima
capacità indicata nella tabella programmi
per i rispettivi programmi contribuirà al
RISPARMIO di energia e acqua.
Il rumore e l’umidità residua nella
biancheria sono influenzati dalla velocità
di centrifuga: più alta è la velocità nella
fase di centrifuga, maggiore è il rumore e
minore è l’umidità residua nella biancheria.
I programmi più efficienti in termini di
consumo combinato di acqua e energia
sono generalmente quelli che operano ad
una temperatura più bassa e con una
maggior durata.
di
Caricare al massimo la propria
lavabiancheria
Per eliminare eventuali sprechi di
energia, acqua o detersivo si raccomanda
di utilizzare la massima capacità di carico
della propria lavabiancheria. È possibile
infatti risparmiare fino al 50% di energia
con un carico pieno effettuato con un
unico lavaggio rispetto a due lavaggi a
mezzo carico.
Quando serve veramente il prelavaggio?
Solamente per carichi particolarmente
sporchi! Si risparmia dal 5 al 15% di
energia evitando di selezionare l’opzione
prelavaggio per biancheria normalmente
sporca.
E' necessario lavare ad alte temperature?
L’utilizzo di smacchiatori prima del
lavaggio in lavabiancheria riduce la
necessità di lavare ad alte temperature.
È possibile risparmiare energia utilizzando
un programma di lavaggio a bassa
temperatura.
Prima di utilizzare un programma di
asciugatura (LAVASCIUGA)
Selezionare un alto numero di giri prima
di un programma di asciugatura per
ridurre l’umidità residua nella biancheria.
Si ottengono così notevoli RISPARMI di
energia e acqua.
Di seguito, viene riportata una
con consigli e raccomandazioni
detersivo
.
breve guida
sull’uso del
Utilizzate soltanto detersivi adatti per
l’impiego in lavatrice.
Scegliere il detersivo in base al tipo di
tessuto (cotone, delicato, sintetico, lana,
seta, ecc…) al colore, al tipo e grado di
sporco e alla temperatura di lavaggio
impostata.

11
IT
Per
lana e seta
, utilizzare esclusivamente
prodotti specifici.
Per lavaggi a basse temperature fino
, è consigliabile l’utilizzo di
detersivi liquidi o polvere specifici per le
basse temperature.
Per lavaggi con programmi a
, la scelta
del detersivo deve essere fatta in base
al tessuto, ai colori e al grado di sporco.
In generale, per capi bianchi resistenti
con un grado di sporco elevato, si
lvere
normale; per capi colorati e in assenza
di macchie difficili, si consiglia un
detersivo liquido o in polvere indicato per
Per lavaggi con programmi cotone a
di capi bianchi
consiglia
l’utilizzo di un detersivo in polvere normale
alte
Per utilizzare la quantità appropriata di
detersivo, ammorbidente o eventuali altri
additivi, ad ogni lavaggio attenersi
scrupolosamente alle indicazioni fornite
dal produttore: un uso e un dosaggio
corretto permettono di evitare sprechi
e di ridurre l'impatto sull'ambiente.
temperature da 60°C in su
resistenti molto sporchi, si
(heavy-duty) che contiene agenti
sbiancanti e che a temperature mediofornisce ottime prestazioni.
temperature tra 60°C e 40°C
raccomanda un detersivo in po
la protezione dei colori.
a 40°C
Un utilizzo eccessivo di detersivo
produrrà schiuma che non consentirà un
corretto svolgimento del ciclo e potrebbe
pregiudicare la qualità del lavaggio e del
risciacquo.
L’utilizzo di detersivi ecologici senza fosfati
può produrre i seguenti effetti:
- acqua di scarico dei risciacqui più
torbida: è un effetto legato alla presenza
di zeoliti in sospensione che non ha effetti
negativi sull’efficacia del risciacquo.
- presenza di polvere bianca (zeoliti) sul
bucato al termine del lavaggio: è un
effetto normale, la polvere non si ingloba
nei tessuti e non ne altererà il loro colore.
Per rimuoverla, effettuare un ciclo di
risciacqui. Provare ad utilizzare meno
detersivo per i futuri lavaggi.
- presenza di schiuma nell’acqua
dell’ultimo risciacquo: non è
necessariamente indice di un cattivo
risciacquo. Provare ad utilizzare meno
detersivo per i futuri lavaggi.
- vistosa formazione di schiuma: è
spesso dovuta ai tensioattivi anionici
presenti nella formulazione dei detersivi
che difficilmente sono allontanabili dalla
biancheria stessa.
In questi casi, non è necessario eseguire
più cicli di risciacquo per eliminare questi
effetti: non si otterrà alcun beneficio.
Se l’inconveniente persiste o se si pensi
che ci sia un malfunzionamento, contattare
immediatamente un nostro Centro
Assistenza Tecnica Autorizzato.

12
NON utilizzare prodotti acidi (ad
per la pulizia del cassetto, per evitare di
danneggiare guarnizioni e/o parti
Prima di procedere nel pulire, tutti i
comparti devono essere vuoti.
Pulizia cassetto detersivo
Pulizia esterna dell'apparecchio
5. PULIZIA E MANUTENZIONE ORDINARIA
Una corretta cura dell’elettrodomestico può
prolungarne il ciclo di vita.
Scollegare la macchina dalla rete
elettrica.
Pulire il mobile esterno dell'apparecchio,
utilizzando un panno umido, EVITANDO
ABRASIVI, ALCOL E/O DILUENTI.
E’ consigliabile pulire il cassetto detersivo
ad intervalli regolari, per evitare
l’accumulo di residui di detersivo e
additivi.
Estrarre il cassetto con leggera forza.
Pulire il cassetto con un getto d’acqua e
reinserirlo nella propria sede.
PER I MODELLI CON SISTEMA DI
DOSAGGIO AUTOMATICO DEL DETERSIVO
LIQUIDO E AMMORBIDENTE:
Riempire il cassetto con acqua calda.
Agitare il cassetto in modo da far fluire
l’acqua in tutti i comparti.
Estrarre completamente il cassetto
premendo il tasto di sblocco, facendo
attenzione alla fuoriuscita di residui di
detersivo.
Svuotare il cassetto dall’acqua in eccesso
e reinserirlo completamente.
ATTENZIONE:
esempio aceto) o detersivi aggressivi
interne dell'apparecchio.

13
IT
PER I MODELLI CON SISTEMA
DI DOSAGGIO AUTOMATICO DEL
nel caso in cui si debba inclinare o
spostare la macchina, prima di
procedere estrarre il cassetto
detersivo, mantenendolo in posizione
orizzontale in modo da evitare
eventuali fuoriuscite.
Suggerimenti in caso di traslochi
o periodi di fermo
Pulizia filtro della pompa di
scarico
• L'apparecchio è dotato di uno speciale
filtro in grado di trattenere i residui più
grossi che potrebbero bloccare lo scarico,
come ad esempio bottoni o monete (a
seconda
versione A o B).
del modello, considerare la
Si consiglia di controllare e pulire il filtro
5 o 6 volte all'anno.
Scollegare la macchina dalla rete
elettrica.
Prima di svitare il filtro, è consigliabile
collocare sotto di esso un panno assorbente
onde evitare che l’acqua residua bagni il
pavimento.
Ruotare il filtro in senso antiorario fino
all’arresto, in posizione verticale.
Estrarre il filtro e pulirlo; successivamente
riposizionarlo e girarlo in senso orario.
Ripetere le precedenti istruzioni all’inverso
per rimontare tutti gli elementi.
Nel caso l'apparecchio resti in un luogo
non riscaldato per molto tempo, è
necessario svuotare completamente i tubi
da ogni residuo d’acqua.
Scollegare la macchina dalla presa di
corrente.
Staccare il tubo dalla fascetta e portare il
tubo verso il basso, svuotando l’acqua
completamente in un catino.
Fissare infine il tubo di scarico
all’apposita fascetta.
DETERSIVO LIQUIDO E AMMORBIDENTE:
14
Questo apparecchio è equipaggiato di
tecnologia
che consente il controllo da
remoto della macchina tramite App.
ASSOCIAZIONE ELETTRODOMESTICO SU
APP
sul proprio dispositivo
Aprire l’App, creare il profilo utente (o fare
il login se già creato in precedenza) e
associare l'elettrodomestico seguendo le
ABILITAZIONE CONTROLLO REMOTO
Verificare che il router sia acceso e
Caricare la biancheria, chiudere l'oblò,
Ruotare lo SMART RING (ghiera di
in posizione
:
l'oblò si blocca, i tasti del pannello
Aprire l'App e procedere con l'avvio del
ciclo. Al termine, spegnere la macchina
per
DISABILITAZIONE CONTROLLO REMOTO
CONTROLLO
durante un ciclo, ruotare lo
in una posizione differente
Fi)
Il pannello
comandi dell'apparecchio torna ad essere
operativo e, se il ciclo è in pausa, dopo lo
PORTA
SMART
CONTROLLO
si potrà tornare ad
avere il controllo della macchina da App.
L'eventuale ciclo in esecuzione
Per ragioni di sicurezza, in alcune fasi
del ciclo di lavaggio, l’apertura
può avvenire solo se il
livello dell’acqua è al di sotto del suo
bordo inferiore e la temperatura è
minore di 45°C. Se queste condizioni
sono soddisfatte, attendere lo
spegnimento della spia PORTA
La frequenza della rete Wi-Fi domestica
deve essere impostata sulla banda a 2,4
GHz. Non è possibile configurare la
macchina se la rete di casa è impostata
sulla banda a 5 GHz.
Per scoprire tutti i dettagli delle
Fi, esplora i menu dell'App
accedendo in modalità DEMO.
L’App è disponibile sia per dispositivi
Android che per
iOS, sia per tablet che per smartphone.
6. CONTROLLO REMOTO (WI-FI)
Wi-Fi
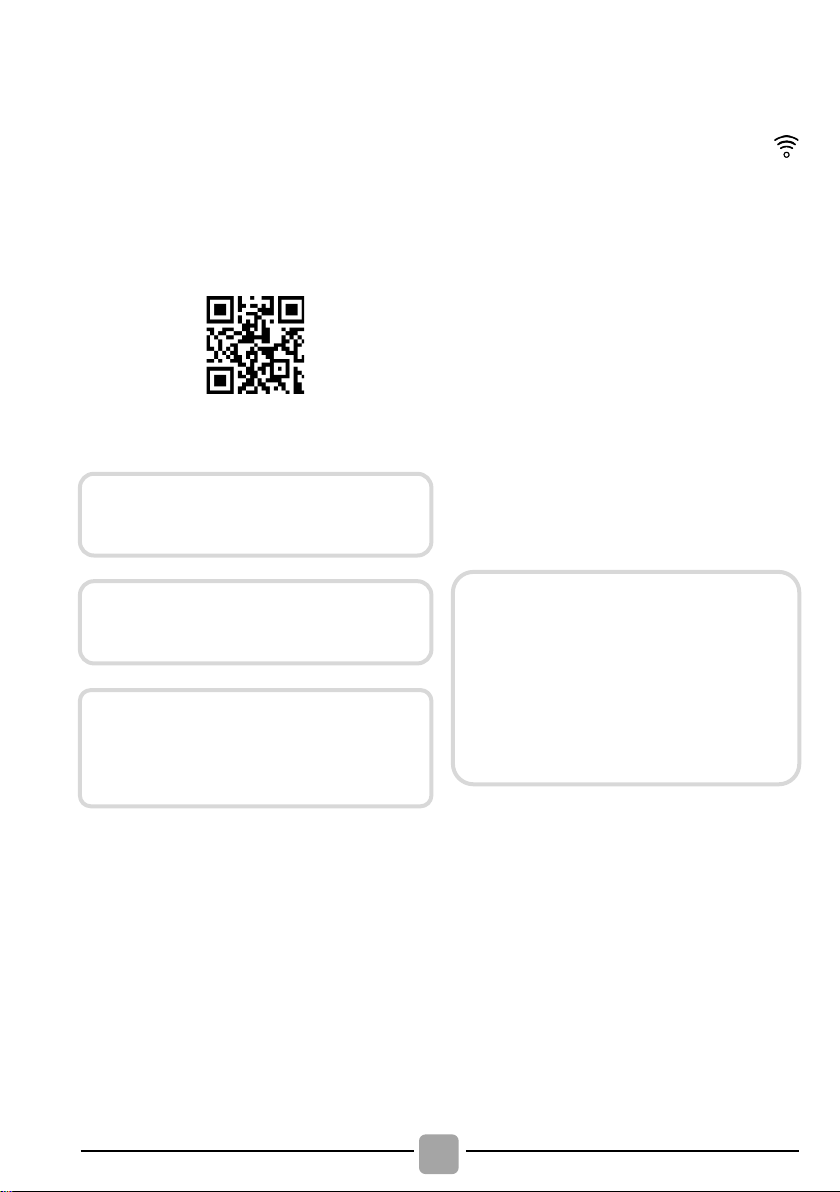
Scaricare l'App hOn
inquadrando il seguente codice QR:
oppure accedendo al link:
go.haier-europe.com/download-app
con sistema operativo
funzioni Wi-
CONTROLLO REMOTO (Wi-Fi)
comandi vengono disabilitati.
selezione programmi)
ruotando lo SMART RING su OFF
sbloccare l'oblò.
Per uscire dalla modalità
REMOTO
SMART RING
da CONTROLLO REMOTO (Wisenza passare da OFF.
spegnimento della spia
BLOCCATA si potrà aprire lo sportello.
dell’oblò
indicazioni sul display del dispositivo.
collegato a Internet.
introdurre eventualmente il detersivo.
BLOCCATA prima di aprire l’oblò.
Con oblò chiuso, ruotando lo
RING in posizione
REMOTO (Wi-Fi),
proseguirà.
15
IT
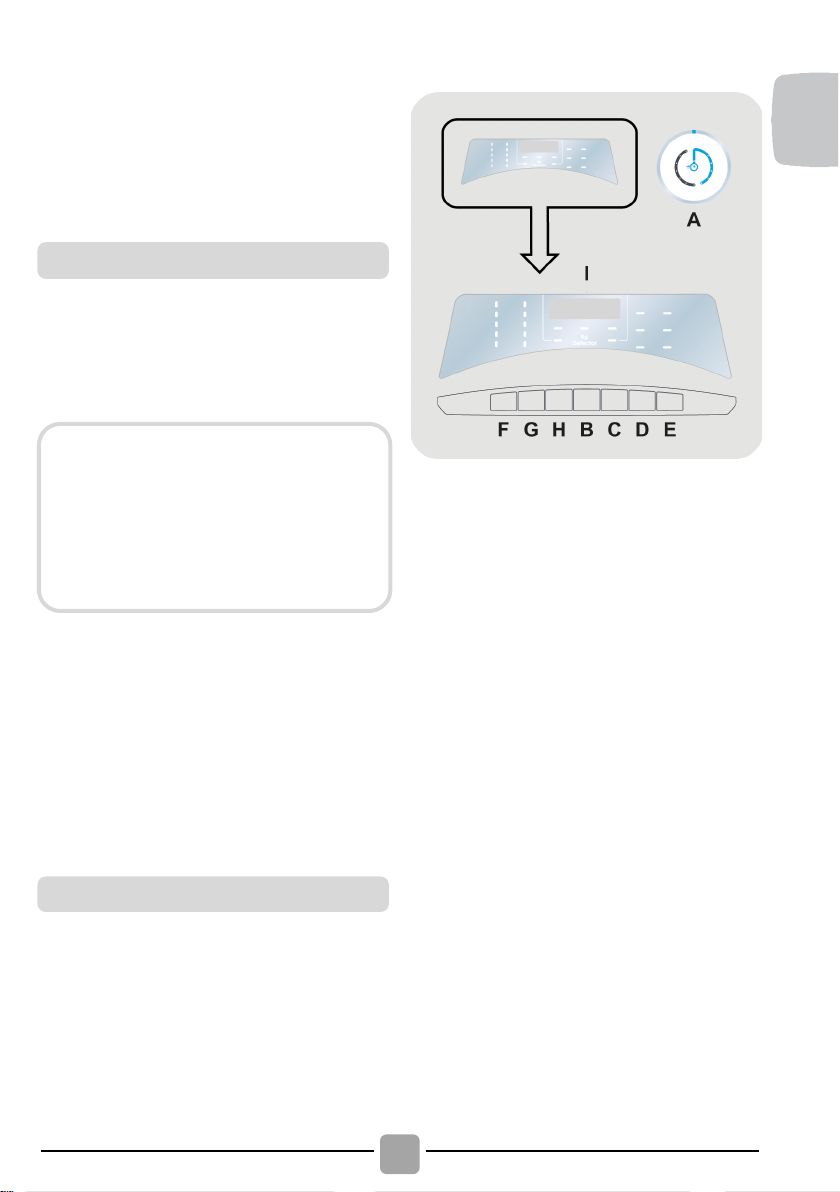
A
SMART RING (ghiera di selezione
programmi)
B
Tasto AVVIO/PAUSA
C
Tasto PARTENZA DIFFERITA
D
Tasto OPZIONI
E
Tasto PROGRAMMI SPECIALI
F
Tasto SELEZIONE TEMPERATURA
G
Tasto SELEZIONE CENTRIFUGA
H
Tasto LIVELLO DI SPORCO/
SELEZIONE PROGRAMMA
ALTERNATIVO/LIVELLO VAPORE
F+G
PROTEZIONE BAMBINI
I
Display
Dati tecnici
ASCIUGATURA (solo per LAVASCIUGA)
Se si vuole che alla fine del lavaggio
inizi automaticamente il ciclo di
asciugatura, selezionare il programma
di lavaggio desiderato e selezionare il
In alternativa, si può
ciugatura
dopo la fine del ciclo di lavaggio.
Selezione del programma
7. GUIDA RAPIDA ALL'USO
Questo apparecchio è in grado di adattare
automaticamente il livello dell’acqua al tipo
e alla quantità della biancheria. Questo
sistema porta ad una diminuzione dei
consumi d’energia e ad una riduzione
sensibile dei tempi di lavaggio.
Accendere l'apparecchio e selezionare il
programma desiderato.
Eventualmente modificare le impostazioni
di lavaggio e selezionare le opzioni
desiderate.
ciclo di asciugatura
selezionare un ciclo di
Premere il tasto di avvio programma.
La fine del programma verrà indicata
tramite un messaggio sul display (in
alcuni modelli si illumineranno tutte le
spie delle fasi di lavaggio).
Spegnere l'apparecchio.
Per qualsiasi tipo di lavaggio consultare
la tabella dei programmi e seguire la
sequenza delle operazioni come indicato.
.
as
8.
COMANDI E PROGRAMMI
Pressione dell’impianto idraulico:
min 0,05 Mpa / max 1 Mpa
Giri di centrifuga:
vedere targhetta dati.
Potenza Assorbita/ Ampere fusibile /
Tensione:
vedere targhetta dati.

16
Lo SMART RING deve essere SEMPRE
portato in posizione di OFF alla fine di
un lavaggio e prima di selezionarne
uno nuovo.
Sono selezionabili solo le opzioni
Chiudere l'oblò PRIMA di premere il
tasto AVVIO/PAUSA.
Tasto AVVIO/PAUSA
Prima accensione
SMART RING (ghiera di selezione
programmi)
spina perché la macchina, nei primi
che potrebbe essere interrotta: se ciò
macchina potrebbe non
funzionare in maniera ottimale. In tal
caso, togliere la spina e ripetere
ATTENZIONE:
Non toccare i tasti all'inserimento della
secondi, effettua un'autocalibrazione
avvenisse la
l'operazione.
Ruotando lo SMART RING l'apparecchio
si accenderà e il display visualizzerà la
descrizione e i parametri del programma
selezionato.
A fine ciclo ricordarsi di spegnere
l'apparecchio ruotando lo SMART RING
sulla posizione OFF, togliere la spina e
chiudere il rubinetto dell’acqua.
- Impostazione lingua
Dopo aver collegato la macchina alla rete
e averla accesa, premere il tasto "F" o
"G" per visualizzare le lingue disponibili.
Selezionare la lingua desiderata
premendo il tasto AVVIO/PAUSA.
- Modifica lingua impostata
Se si desidera modificare la lingua
impostata, sarà necessario tenere premuto
contemporaneamente i tasti "C" e "H" per
circa 5 secondi. Sul display apparirà il la
scritta ENGLISH e sarà possibile scegliere
una nuova lingua (premendo i tasti "F" o
"G").
Per far partire il ciclo selezionato con i
parametri preimpostati premere il tasto
AVVIO/PAUSA. A programma in corso
verrà visualizzato sul display il tempo
rimanente.
Se invece si vuole modificare il programma
scelto, premere i tasti delle opzioni desiderate,
modificare i parametri preimpostati dopodiché
premere AVVIO/PAUSA per iniziare il
ciclo.
compatibili con il programma scelto.
Dopo avere avviato la lavabiancheria si
dovrà attendere alcuni secondi affinché la
macchina inizi il programma.
DURATA PROGRAMMA
Al momento della selezione di un
programma, verrà automaticamente
indicata la durata del ciclo che potrà
variare a seconda delle opzioni che
verranno selezionate.
Dopo l’avvio del programma il display vi
terrà costantemente informati sul tempo
restante alla fine del lavaggio.
L’apparecchio calcola tale tempo in base
a un carico standard, ma durante il ciclo
la macchina corregge il tempo a seconda
del volume e della composizione del
carico.
FINE PROGRAMMA
Dopo la visualizzazione della scritta "FINE"
sul display e lo spegnimento della spia
PORTA BLOCCATA sarà possibile aprire
l'oblò.
A fine ciclo spegnere la lavabiancheria
ruotando lo SMART RING sulla posizione
OFF.

17
IT
METTERE LA MACCHINA IN PAUSA
Tasto OPZIONI
Tasto PARTENZA DIFFERITA
Per ragioni di sicurezza, in alcune fasi
’apertura
dell’oblò può avvenire solo se il livello
dell’acqua è al di sotto del suo bordo
inferiore e la temperatura è minore di
45°C. Se queste condizioni sono
soddisfatte, attendere lo spegnimento
della spia PORTA BLOCCATA prima
Durante l'esecuzione di un ciclo è
possibile
semplicemente p
AVVIO/PAUSA.
del ciclo di lavaggio, l
di aprire l’oblò.
mettere la macchina in pausa
remendo il tasto
Premere nuovamente il tasto AVVIO/
PAUSA per riavviare il programma dalla
fase del ciclo in cui era stato interrotto.
- Confermare premendo il tasto
AVVIO/PAUSA per iniziare il conteggio
alla fine del quale il programma inizierà
automaticamente.
È possibile annullare la partenza ritardata,
ruotando lo SMART RING sulla posizione
OFF.
Se dovesse mancare la corrente durante
il funzionamento dell’apparecchio, una
speciale memoria conserverà l’impostazione
effettuata e, al ritorno della corrente, la
macchina ripartirà dalla fase del ciclo in
cui si era fermata.
Questo tasto permette di scegliere tra tre
differenti opzioni:
CANCELLAZIONE PROGRAMMA
IMPOSTATO
Per annullare il programma, ruotare lo
SMART RING sulla posizione OFF.
Attendere lo spegnimento della spia
PORTA BLOCCATA prima di aprire
l'oblò.
Questo tasto permette di programmare
l’avvio del ciclo di lavaggio con un ritardo
massimo di 24h.
Per impostare la partenza ritardata
procedere nel seguente modo:
- Impostare il programma desiderato.
- Premere il pulsante una prima volta per
attivare la partenza differita poi premerlo
nuovamente (o tener premuto) per
impostare il ritardo desiderato. Ad ogni
pressione successiva il ritardo
impostato aumenterà fino a un massimo
di 24 ore, dopodiché un’ulteriore
pressione azzererà la partenza
ritardata.
- PRELAVAGGIO
Questa opzione permette di effettuare un
prelavaggio ed è particolarmente utile per
la biancheria molto sporca (può essere
utilizzata solo in alcuni programmi come
riportato nella tabella programmi).
Si consiglia di utilizzare solo il 20% della
quantità consigliata sulla confezione del
detersivo.
- EXTRA RISCIACQUO
Questa opzione permette di aggiungere
un risciacquo alla fine del ciclo di lavaggio
ed è stata studiata appositamente per le
persone con pelle delicata e sensibile,
per le quali anche un minimo residuo di
detersivo può causare irritazioni o
allergie.
Si consiglia di utilizzare questa funzione
anche per i capi dei bambini e per tessuti
molto sporchi, per i quali è necessario
utilizzare più detersivo, oppure nel
lavaggio di capi di spugna le cui fibre
tendono maggiormente a trattenere il
detersivo.

SCARICO E CENTRIFUGA
18
- STIRO FACILE
Tasto SELEZIONE CENTRIFUGA
Tasto SELEZIONE TEMPERATURA
Queste opzioni devono essere
selezionate prima di premere il tasto
zionata
un’opzione non compatibile con il
programma scelto, la relativa spia
Tasto PROGRAMMI SPECIALI
Queste opzioni devono essere
emere il tasto
Nel caso sia stata selezionata
un’opzione non compatibile con il
programma scelto, la relativa spia
l L'opzione può essere selezionata solo per
il programma .
Questa funzione permette di ridurre al
minimo la formazione di pieghe, eliminando
le centrifughe intermedie o riducendo
l'intensità dell'ultima centrifuga
(selezionabile solo in alcuni programmi).
Grazie ad un controllo elettronico lo
scarico dell’acqua nelle fasi intermedie
viene fatto in modo silenzioso rendendo
questa opzione molto utile per lavaggi
notturni.
- PULIZIA CESTO
L'opzione è stata sviluppata per pulire il
selezionate prima di pr
AVVIO/PAUSA.
cesto della lavatrice.
Utilizzare solo detersivo in polvere.
Avviare il ciclo con il cesto della lavatrice
prima lampeggerà e poi si spegnerà.
vuoto.
Si suggerisce l'utilizzo di questa opzione
ogni 50 cicli di lavaggio.
Questo tasto permette di scegliere tre
differenti opzioni
alcuni programmi):
(selezionabili solo in
- LAVAGGIO SINGOLO
Questa opzione (abbinabile a numerosi
programmi) ottimizza i consumi di acqua
e energia del programma selezionato,
mantenendo invariate le prestazioni di
lavaggio.
LAVAGGIO SINGOLO è studiato per
carichi ridotti e capi poco sporchi,
limitando inutili sprechi.
- CICLO NOTTURNO
Questa opzione limita le centrifughe
intermedie a 400 giri, dove previsto,
aumenta il livello d’acqua nei risciacqui e
lascia i capi immersi nell’acqua alla fine
dell’ultimo risciacquo, al fine di distendere
perfettamente le fibre.
Durante la fase di fermo acqua in vasca,
la macchina è in pausa.
Premere AVVIO per terminare il ciclo con
la fase di centrifuga (eventualmente
riducibile o annullabile tramite l’apposito
tasto) e scarico.
AVVIO/PAUSA.
Nel caso sia stata sele
prima lampeggerà e poi si spegnerà.
Questo tasto permette di cambiare la
temperatura dei cicli di lavaggio.
Per la salvaguardia dei tessuti, non è
possibile aumentare la temperatura oltre
la massima prevista per ogni programma.
Se si vuole eseguire un programma di
lavaggio a freddo le spie devono essere
tutte spente.
Premendo questo tasto, si può ridurre la
massima velocità di centrifuga possibile per
il programma selezionato, fino alla sua
completa esclusione.

19
IT
Tasto LIVELLO DI SPORCO/
SELEZIONE PROGAMMA
ALTERNATIVO
/LIVELLO VAPORE
Il modello è dotato di un particolare
dispositivo elettronico che impedisce
la partenza della centrifuga con carichi
particolarmente sbilanciati. Questo serve
a ridurre le vibrazioni e a migliorare la
silenziosità, salvaguardando la durata
della lavabiancheria.
Un sovradosaggio di detersivo può
di schiuma. Se la lavatrice rileva
un'eccessiva presenza di schiuma,
può escludere la centrifuga o
prolungare la durata del programma e
aumentare il consumo d'acqua.
Per la salvaguardia dei tessuti, non è
la
Se l’etichetta non riporta alcuna
indicazione è possibile centrifugare
alla massima velocità prevista dal
programma.
possibile aumentare la velocità oltre
massima prevista per ogni programma.
Per riattivare la centrifuga, è sufficiente
premere nuovamente il tasto, fino al
raggiungimento della velocità scelta.
È possibile modificare la velocità della
centrifuga in qualsiasi momento, anche
senza portare la macchina in PAUSA.
causare un'eccessiva formazione
Questo tasto permette di selezionare tre
differenti funzioni, a seconda del programma
selezionato:
- LIVELLO DI SPORCO
Al momento della selezione di un
programma, verrà automaticamente
indicato il tempo di lavaggio preimpostato
per quel programma.
Questa opzione permette di scegliere
tra 3 livelli di intensità di lavaggio, a
seconda del grado di sporco dei tessuti,
modificando la durata del programma
selezionato (può essere utilizzata solo
in alcuni programmi come riportato
nella tabella programmi).
- SELEZIONE PROGRAMMA ALTERNATIVO
Dove indicato in tabella, questa opzione
permette di selezionare un programma
alternativo a quello preimpostato (nel caso
del programma
RAPIDO (14'/30'/44')
permette
di scegliere una delle tre durate disponibili).
- LIVELLO VAPORE
Dopo aver selezionato il programma STIRO
FACILE PLUS, tramite questo tasto sarà
possibile scegliere tra tre trattamenti vapore
di differente intensità, studiati per capi
asciutti o bagnati e a seconda del tipo di
tessuto:
− COTONE (selezione predefinita)
− SINTETICI (una pressione del tasto)
− DELICATI (due pressioni del tasto)
Questo programma si utilizza per capi in
cotone. Su tessuti bagnati (ad esempio,
dopo il lavaggio) è indicato per rilassare
le pieghe dopo la centrifuga, su tessuti
asciutti è studiato per raggiungere il
livello di umidità ideale per una stiratura
più agevole.
Questo programma si utilizza per capi
sintetici. Su tessuti bagnati (ad esempio,
dopo il lavaggio) è indicato per rilassare
le pieghe dopo la centrifuga, su tessuti
asciutti è studiato per raggiungere il
livello di umidità ideale per una stiratura
più agevole.
Grazie all’ausilio del vapore, il ciclo
consente di rinfrescare e rilassare le
pieghe dei capi dopo l’uso. Il
programma è composto da una fase
iniziale in cui agisce il vapore e da una
finale in cui viene eliminata l’umidità in
eccesso per un utilizzo immediato. Il
ciclo è adatto per tessuti asciutti.
20
Nel caso in cui l'oblò non venga chiuso
lampeggiare per circa 7 secondi,
dopodiché il comando d'avvio si
e premere nuovamente il tasto
AVVIO/PAUSA.
Chiudere l'oblò PRIMA di premere il
tasto AVVIO/PAUSA.
Display
BLOCCO TASTI
La pressione contemporanea dei tasti "F"
e "G" per circa 3 secondi permette di
bloccare i tasti. In questo modo, si può
evitare che vengano effettuate modifiche
indesiderate o accidentali.
Il blocco tasti può essere annullato,
semplicemente premendo nuovamente i
due tasti di attivazione o spegnendo
l'apparecchio.
Il display consente di essere costantemente
informati sul funzionamento dell’apparecchio.
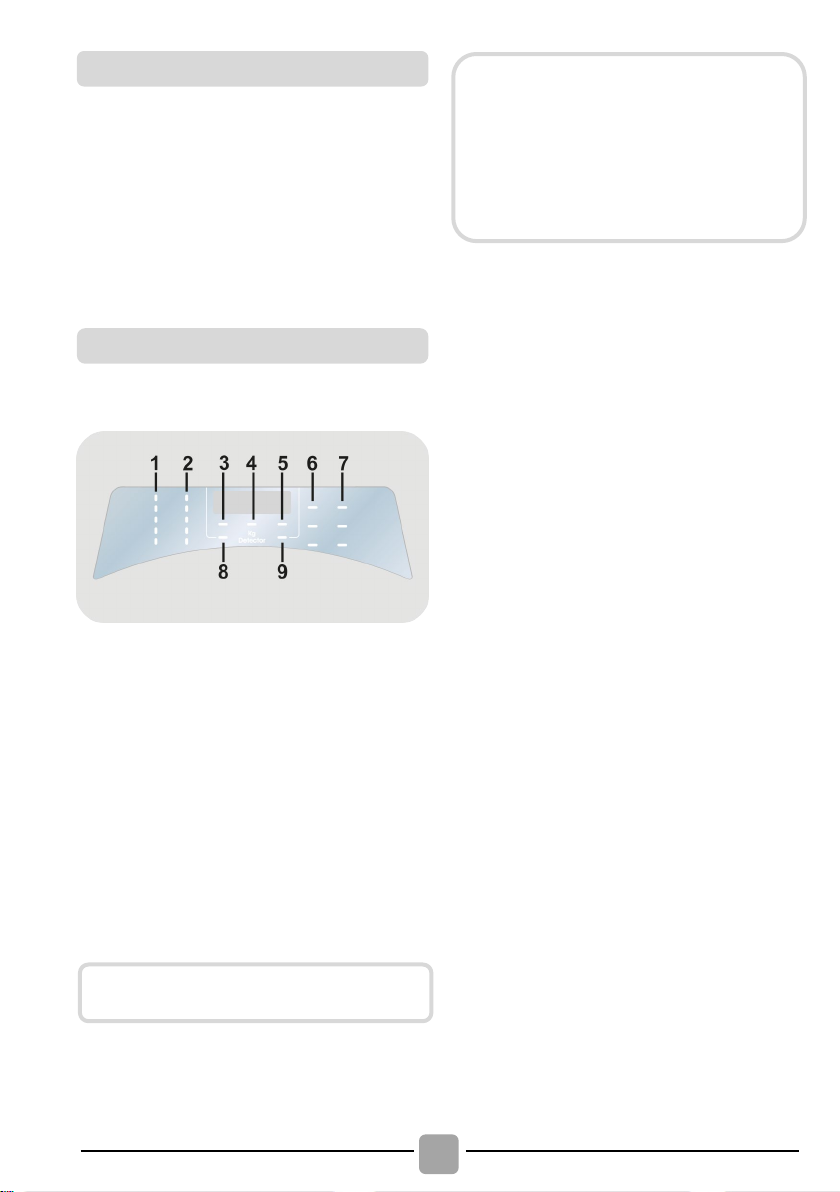
1) SPIE SELEZIONE TEMPERATURA
Indicano la temperatura di lavaggio del
programma selezionato che può essere
cambiata (dove previsto) tramite il relativo
tasto. Se si vuole eseguire un programma
di lavaggio a freddo le spie devono essere
tutte spente.
2) SPIE SELEZIONE CENTRIFUGA
Indicano la velocità di centrifuga del
programma selezionato che può essere
variata o annullata, tramite l'apposito tasto.
3) SPIA PORTA BLOCCATA
La spia indica la chiusura dell'oblò.
Dopo aver premuto il tasto AVVIO/
PAUSA, inizialmente la spia lampeggia
per poi diventare fissa sino alla fine del
lavaggio.
correttamente la spia continuerà a
cancellerà automaticamente. In tal
caso, chiudere correttamente l'oblò
Attendere lo spegnimento della spia
PORTA BLOCCATA prima di aprire
l'oblò.
4) Kg Detector (attiva solo in alcuni
programmi)
Durante i primi minuti di funzionamento la
spia
"Kg Detector"
rimane accesa mentre
la macchina calcola il tempo restante alla
fine del ciclo, in base alla quantità
di biancheria effettivamente introdotta
all’interno del cestello.
"Kg Detector" consente di misurare
durante tutte le fasi del lavaggio una serie
di informazioni sulla biancheria inserita
all’ interno del cesto e nei primi minuti del
ciclo di lavaggio:
- regola la quantità di acqua necessaria;
- determina la durata del lavaggio;
- regola i risciacqui in base al carico e al
tipo di biancheria che si è scelto di
lavare;
- regola il ritmo di rotazione del cesto per
adattarlo al tipo di tessuto;
- riconosce la presenza di schiuma,
aumentando eventualmente il livello
dell’acqua durante i risciacqui;
- regola il numero di giri della centrifuga
in funzione del carico, evitando che ci
siano squilibri.
5) SPIA BLOCCO TASTI
Indica che i tasti sono stati bloccati.

21
IT
6) SPIE OPZIONI
Indicano le opzioni selezionabili tramite
l'apposito tasto.
7) SPIE PROGRAMMI SPECIALI
Indicano le opzioni selezionabili tramite
l'apposito tasto.
8) SPIA LIVELLO DI SPORCO
Indica la selezione della relativa opzione.
9) SPIA Wi-Fi
Nei modelli dotati di Wi-Fi, indica lo stato
della connessione. Può essere:
- ACCESA FISSA: controllo remoto attivo.
- LAMPEGGIANTE LENTA: controllo
remoto disattivo.
- LAMPEGGIANTE VELOCE PER 3
SECONDI, POI SPENTA: la macchina
non riesce a connettersi alla rete Wi-Fi
domestica o non è ancora stata
associata all'App.
-
LAMPEGGIANTE LENTA PER 3 VOLTE,
POI SPENTA PER 2 SECONDI: reset
della rete Wi-Fi (durante l'associazione
all'App).
- ACCESA PER 1 SECONDO, POI
SPENTA PER 3 SECONDI: l'oblò è
aperto. Non è possibile attivare il
controllo remoto.

22
(MAX.)
1)
(MAX.)
2 1
3)
MISTI &
COLORATI 59'
COTONE
PERFETTO 59'
3)
3)
SCARICO E
CENTRIFUGA
SINTETICI E
COLORATI
2)
Tabella programmi
*
PROGRAMMA
(fare riferimento al cruscotto)
SPECIAL 39'
IGIENE PLUS 59'
STIRO FACILE PLUS
DELICATI 59'
RAPIDO
RISCIACQUI
6 7 8 8,5 9 10 11 12 13 14
2 2 2 2 2 2 2 2 2 2
6 7 8 8,5 9 10 11 12 13 14
3 3,5 4 4 4,5 5 5,5 6 6,5 7
1,5 1,5 1,5 1,5 1,5 1,5 1,5 1,5 1,5 1,5
2 2,5 2,5 2,5 2,5 2,5 2,5 3 3 3,5
1 1 1,5 1,5 1,5 1,5 1,5 2 2 2
14'
2 2,5 2,5 2,5 2,5 2,5 2,5 3 3 3
30'
3 3,5 3,5 3,5 3,5 3,5 3,5 4 4 4
44'
- - - - - - - - - -
40°
60°
40°
40°
-
40°
40°
40°
40°
-
LANA/A MANO
- - - - - - - - - -
1 1 2 2 2 2 2 2,5 2,5 2,5
3 3,5 4 4 4,5 5 5,5 6 6,5 7
-
30°
60°
( )
SMART WASH
CONTROLLO REMOTO (WI-FI)
Posizione da selezionare per abilitare/disabilitare il controllo da remoto tramite App, via
Wi-Fi.
COTONE
ECO 40-60
2)
6 7 8 8,5 9 10 11 12 13 14
6 7 8 8,5 9 10 11 12 13 14
2)
4 4,5 5,5 5,5 6 6,5 7 8 8 9
90°
60°
30°
( )

23
IT
Note da considerare
*
La massima capacità di carico di
biancheria asciutta differisce a seconda
(Solo per i modelli dotati di
macchie che richiedono un
liquidi, si può procedere ad una
smacchiatura preliminare in
questo trattamento, spegnere
l'apparecchio, aggiungere ai capi
candeggiati il resto della
biancheria e procedere al bucato
l programma più
( )
Solo con l’opzione PRELAVAGGIO
1)
Quando si seleziona un
programma, sul display viene
che può essere cambiata (dove
previsto) tramite il relativo tasto,
ma non può essere aumentata
2)
Per i programmi indicati è possibile,
regolare il tempo e l'intensità del
3)
Nei programmi indicati, tramite il tasto
PROGRAMMA ALTERNATIVO/
programma RAPIDO 14'/30'/44'
INFORMAZIONI PER I
Nel caso in cui l’elettrodomestico
abbia un’esplicita dichiarazione
energetica: ciò significa che questo
elettrodomestico è più efficiente del
valore limite della classe "A" di
efficienza energetica come indicato
ul cassetto frontale, secondo il
del modello (fare riferimento al cruscotto).
bacinella per il detersivo liquido)
Quando solo alcuni capi presentano
trattamento con prodotti candeggianti
lavatrice. Introdurre nello scomparto
"2"
del cassetto detersivo l'apposita
vaschetta in dotazione nella quale
versare il candeggiante ed impostare
il programma RISCIACQUI. Finito
normale con i
adatto.
selezionata (programmi con opzione
PRELAVAGGIO disponibile).
LABORATORI DI PROVA
PROGRAMMI DI PROVA SECONDO
(UE) No 1015/2010 e No 1061/2010
PROGRAMMA ECO 40-60
IMPOSTANDO LA TEMPERATURA
A 40°C
PROGRAMMA ECO 40-60
IMPOSTANDO LA TEMPERATURA
________________________________________
PROGRAMMA DI PROVA SECONDO
A 60°C
(UE) No 2019/2023
PROGRAMMA ECO 40-60
________________________________________
s
Regolamento delegato UE 2019/2014.
indicata la temperatura consigliata
oltre la massima prevista.
tramite il tasto LIVELLO DI SPORCO,
lavaggio.
LIVELLO DI SPORCO/SELEZIONE
LIVELLO VAPORE è
selezionare un programma alternativo
possibile
a quello preimpostato (nel caso del
permette di scegliere una delle tre
durate disponibili).

24
Per trattare i vari tipi di tessuto e le varie
gradazioni di sporco, la lavatrice è dotata di
programmi specifici, adatti ad ogni esigenza
di lavaggio (vedere tabella programmi).
SPECIAL 39'
La perfetta combinazione di tempo e
performance. Il programma consente di
ottenere un bucato eccellente, in soli 39
minuti. Consigliato per il lavaggio di
indumenti mediamente sporchi.
IGIENE PLUS 59'
Questo programma, grazie alla miglior
combinazione tra alta temperatura, tempo e
azione pulente, garantisce in soli 59 minuti,
la massima forza igienizzante contro i
batteri. Indicato per capi in cotone, prevede
una temperatura di 60°C ed è suggerito per
un carico ridotto.
MISTI & COLORATI 59'/COTONE
PERFETTO 59'
Premendo sul tasto LIVELLO DI SPORCO/
SELEZIONE PROGRAMMA ALTERNATIVO/
LIVELLO VAPORE sarà possibile scegliere
uno dei 2 programmi
-
Il programma offre la libertà di lavare tutti i
tipi di tessuti e di colori non stingenti insieme,
a pieno carico, con eccellenti risultati in soli
59 minuti. Con un lavaggio a temperatura
media, si raccomanda tale programma per
capi poco sporchi.
*Temperatura preselezionata di 20°C
(modificabile tramite l'apposito tasto).
Programma compatibile anche per il
lavaggio dei tessuti in cotone.
-
Questo programma garantisce ottimi
risultati per i capi in cotone. L'opzione è
stata progettata per ridurre il tempo di
lavaggio, a media temperatura, dei capi in
cotone mediamente sporchi. Si consiglia il
mezzo carico per ottenere i risultati migliori.
STIRO FACILE PLUS
Questo programma utilizza un trattamento a
vapore che permette un'azione di rilassamento
delle pieghe ed il raggiungimento del grado
di umidità ideale per una stiratura più
agevole. Tramite l'apposito tasto sarà
possibile selezionare tre livelli di differente
intensità, studiati per capi asciutti o bagnati
e a seconda del tipo di tessuto.
DELICATI 59'
Sviluppato per lavare e trattare i delicati ed i
tessuti più preziosi. Il Programma prevede
un lavaggio a bassa temperatura in 59’
minuti. Consigliato per piccoli carichi.
RAPIDO (14'/30'/44')
Risparmio, ma senza compromessi. Il nuovo
programma consente di ottenere un
eccellente bucato risparmiando acqua,
consumi energetici, detersivo e tempo. Tale
opzione, lavando a media temperatura, si
adatta perfettamente a tutti i tipi di tessuto.
Si consiglia per piccoli carichi e indumenti
poco sporchi. Tramite il tasto LIVELLO DI
SPORCO/SELEZIONE PROGRAMMA
ALTERNATIVO/LIVELLO VAPORE è possibile
scegliere una delle tre durate disponibili.
RISCIACQUI/SCARICO E CENTRIFUGA
Premendo sul tasto LIVELLO DI SPORCO/
SELEZIONE PROGRAMMA ALTERNATIVO/
LIVELLO VAPORE sarà possibile scegliere
uno dei 2 programmi
-
Questo programma effettua 3 risciacqui
CONSIGLI IMPORTANTI PER LE
Il primo lavaggio di capi colorati
nuovi deve essere effettuato
Capi scuri voluminosi come jeans
ed asciugamani dovrebbero essere
In ogni caso, non mischiare mai
CAPI COLORATI STINGENTI.
Nella scelta del programma, attenersi
alle raccomandazioni riportate sulle
etichette dei capi, in particolare alla
Descrizione programmi
temperatura massima consigliata.
ATTENZIONE:
PRESTAZIONI DI LAVAGGIO.
separatamente.
lavati separatamente.
MISTI & COLORATI 59' *
a disposizione:
COTONE PERFETTO 59'
a disposizione:
RISCIACQUI

25
IT
della biancheria con centrifuga intermedia
(eventualmente riducibile o annullabile tramite
l’apposito tasto). È utilizzabile per risciacquare
qualsiasi tipo di tessuto, ad esempio dopo
un lavaggio effettuato a mano.
-
Tramite questo programma la macchina
effettuerà direttamente lo scarico dell’acqua
e una centrifuga ad alta velocità. Qualora si
voglia effettuare solo lo scarico o ridurre
l’intensità della centrifuga, sarà sufficiente
agire sul tasto
LANA/A MANO
Questo programma effettua un ciclo di
lavaggio dedicato ai tessuti in "Lana
lavabile in lavatrice", per i capi da lavare
esclusivamente a mano o per capi in seta
lavabili in lavatrice.
SINTETICI E COLORATI
Questo programma permette di lavare in
modo congiunto biancheria di diverso
colore e tessuto. Il lavaggio ed il risciacquo
sono ottimizzati nei ritmi di rotazione del
cesto e nei livelli di acqua. La centrifuga ad
azione delicata, assicura una ridotta
formazione di p
COTONE
Questo programma è indicato per lavare
capi di cotone colorato a 40°C oppure per
sviluppare il massimo grado di lavaggio per
biancheria di cotone resistente, a 60°C o
90°C. La centrifuga finale alla massima
velocità assicura un’ottima strizzatura.
ECO 40
Il pr
è in grado di
lavare biancheria di cotone normalmente
sporca, dichiarata lavabile a 40°C o 60°C,
insieme nello stesso ciclo. Questo
programma viene utilizzato per valutare la
conformità con la Direttiva UE Ecodesign
(progettazione ecocomp
SMART WASH
Questo programma innovativo è in grado di
regolare automaticamente la sua azione
pulente in base alla quantità e tipologia del
carico scelto per ottenere i migliori risultati,
senza alcuna preoccupazione. La nuova
tecnologia
, grazie a una
miscela perfetta di acqua e detersivo,
garantisce ottimi risultati a 30°C.
L'azione del vapore a fine ciclo aiuta a
distendere in profondità le fibre dei capi e
facilita la fase stiratura.
CONTROLLO REMOTO (WI
Posizione da selezionare per abilitare/
disabilitare il controllo remoto tramite App,
via Wi-Fi. In tal caso, la partenza del ciclo
avverrà mediante i comandi stessi dell'App.
Maggiori dettagli nel capitolo CONTROLLO
REMOTO (Wi
SCARICO E CENTRIFUGA
SELEZIONE CENTRIFUGA.
ieghe sui tessuti.
-60
ogramma ECO 40-60
atibile dei prodotti).
Quick & Clean
-Fi).
-FI)

26
E2 (con display)
La macchina non carica acqua.
Verificare che il rubinetto dell’acqua sia aperto.
Appurare che il tubo di carico non sia piegato o schiacciato.
Tubo scarico non ad altezza corretta (vedere sezione istallazione).
Chiudere il rubinetto, svitare il tubo di carico dal retro della lavatrice e
verificare che il filtro "antisabbia" non sia intasato.
Verificare che il filtro non sia intasato o che non ci siano corpi
deflusso dell'acqua.
E3 (con display)
La macchina non scarica l’acqua.
Verificare che il filtro non sia intasato o che non ci siano corpi
deflusso dell'acqua.
Appurare che il tubo di scarico non sia piegato, schiacciato o
ostruito.
Verificare che l’impianto di scarico a muro non sia intasato, provando
a far scaricare la macchina nel lavandino.
E4 (con display)
La macchina ha rilevato eccessiva schiuma e/o acqua.
Verificare di non aver usato dosi eccessive di detersivo oppure un
prodotto non adatto al lavaggio in lavatrice.
E7 (con display)
Problema oblò.
Verificare la corretta chiusura dell'oblò. Assicurarsi che non vi siano
panni all'interno del cesto che possano ostacolarne la chiusura.
Se l'oblò è bloccato, staccare la spina ed attendere 2-3 minuti prima
di riprovare ad aprirlo.
Qualsiasi altro codice
Spegnere la lavatrice, staccare la spina e attendere un minuto.
l'errore dovesse ripresentarsi, contattare un Centro Assistenza
Tecnica Autorizzato, comunicando l'errore visualizzato.
Modelli dotati di display: gli errori verranno visualizzati tramite un numero
9. RISOLUZIONE PROBLEMI E GARANZIA
Nel caso si pensi che la lavatrice non funzioni in modo corretto, consultare la breve guida
sotto riportata, con alcuni suggerimenti pratici per risolvere le anomalie più comuni.
SEGNALAZIONE ERRORI
preceduto da una "E" (esempio: Errore 2 = E2).
Modelli senza display: gli errori verranno indicati tramite il lampeggìo di tutte le spie
per un numero di volte pari al codice dell'errore, seguiti da una pausa di 5 secondi
(esempio: Errore 2 = 2 lampeggìi, pausa di 5 secondi, 2 lampeggìi, ecc…).
Errore visualizzato Significato e soluzioni
2 lampeggìi delle spie
(senza display)
estranei all'interno del vano filtro che possano ostruire il corretto
3 lampeggìi delle spie
(senza display)
estranei all'interno del vano filtro che possano ostruire il corretto
4 lampeggìi delle spie
(senza display)
7 lampeggìi delle spie
(senza display)
d'errore
Accendere nuovamente la macchina e avviare un programma. Se

27
IT
La lavatrice non
Verificare che la spina sia inserita in modo corretto.
Controllare che non manchi l’alimentazione elettrica.
Appurare che la presa di corrente funzioni, provandola con un altro
apparecchio come ad esempio una lampada.
Verificare la corretta chiusura dell'oblò.
Verificare di aver selezionato e avviato correttamente il programma
di lavaggio.
Assicurarsi che la macchina non sia stata messa erroneamente in
pausa.
Presenza di acqua sul
pavimento vicino alla
È possibile che sia dovuto ad una perdita dalla guarnizione posta tra
eventualmente sostituire la guarnizione.
Assicurarsi che il filtro sia chiuso correttamente.
La lavatrice non
In alcuni condizioni di disposizione non ottimale della biancheria nel
rre le vibrazioni e
Escludere la centrifuga per salvaguardare la durata della
contrario, riposizionarlo e riavviare la macchina.
Potrebbe essere dovuto al fatto che l’acqua non sia ancora stata
persiste, vedere descrizione Errore 3.
In alcuni modelli, è presente la funzione "esclusione centrifuga":
verificare che non sia stata attivata.
Verificare che non siano state selezionate opzioni che modifichino la
centrifuga.
Un eccessivo utilizzo di detersivo può impedire l’esecuzione della
centrifuga: ridurre il quantitativo per i successivi lavaggi.
Si sentono forti
vibrazioni / rumore
La lavatrice potrebbe non essere completamente in piano: in caso,
regolare i piedini come indicato nell’apposita sezione.
Verificare di aver disimballato correttamente la macchina
della stessa.
Assicurarsi che non vi siano corpi estranei nel cesto (monete,
cerniere, bottoni, ecc…).
La garanzia convenzionale copre difetti elettrici e/o meccanici del prodotto
Se un difetto riscontrato è imputabile a fattori esterni, uso scorretto, errata
per l'eventuale riparazione saranno a carico del cliente.
ALTRE ANOMALIE
Problema Possibili cause e soluzioni pratiche
funziona / non parte
lavatrice
rubinetto e tubo di carico. Verificare il corretto serraggio del tubo ed
centrifuga
durante la centrifuga
cesto, la lavatrice potrebbe:
• Aumentare il tempo d’esecuzione della centrifuga nel tentativo di
ridistribuire in maniera omogenea il carico.
• Abbassare la velocità di centrifuga per ridu
migliorare la silenziosità.
•
lavabiancheria.
Assicurarsi che il carico sia distribuito in modo uniforme; in caso
scaricata completamente: attendere alcuni minuti. Se il problema
rimuovendo tutte le viti, i gommini e i distanziali presenti sul retro
attribuibili ad un'azione o omissione del produttore.
installazione o mancato rispetto di quanto riportato nelle istruzioni d'uso, i costi

28
Tranne per l'elenco dei ricambi disponibili
nel nostro sito internet, in nessun caso si
dovrebbe riparare o tentare di riparare
l'apparecchio da soli o far riparare
l'apparecchio da persone inesperte e/o non
qualificate. Le riparazioni effettuate da
persone inesperte e/o non qualificate
possono causare lesioni o gravi
malfunzionamenti degli apparecchi e danni
alle cose. Si consiglia di rivolgersi ai nostri
Centri Assistenza Tecnica Autorizzati.
Si consiglia di utilizzare sempre ricambi
originali, reperibili presso il nostro servizio di
assistenza clienti per un periodo di almeno
10 anni a partire dalla messa in
circolazione dell'apparecchio all'interno
dello Spazio economico europeo.
Dal 1° marzo 2021 le informazioni energetiche
e ambientali relative all'etichettatura energetica
degli elettrodomestici per uso domestico e
alle specifiche per la loro progettazione
ecocompatibile sono visibili in Europa nella
banca dati dei prodotti (EPREL) al seguente
link
o attraverso il
QR code situato sull’etichetta energetica.
Apponendo la marcatura
su questo
prodotto, dichiariamo, sotto la nostra
responsabilità, di ottemperare a tutti i
requisiti relativi alla tutela di sicurezza,
salute e ambiente previsti dalla
legislazione europea in essere per
questo prodotto.
La ditta costruttrice declina ogni
responsabilità per eventuali errori di stampa
contenuti nel libretto presente in questo
prodotto. Si riserva inoltre il diritto di
apportare le modifiche che si renderanno
utili ai proprio prodotti senza
compromettere le caratteristiche essenziali.
Garanzia
Il prodotto è garantito, oltre che ai sensi di
legge, alle condizioni e nei termini riportati
e
inserito nel prodotto. Il certificato dovrà
essere conservato e mostrato al nostro
Centro di Assistenza Tecnica Autorizzato, in
caso di necessità, insieme allo scontrino
zia
Per ottenere assistenza compila l’apposito
line oppure contattaci al numero
che trovi indicato nella pagina di assistenza
del nostro sito internet.
Il costruttore non potrà essere ritenuto
cose e
persone e per problematiche legate
alla sicurezza dovute a riparazioni non
effettuate da un Centro di Assistenza
Tecnica Autorizzato o da un fornitore
di servizi autorizzato dal costruttore in
accordo con le linee guida dell'azienda
parazione ed alla
manutenzione dei propri prodotti.
Qualsiasi danno causato al prodotto
da personale non autorizzato durante
un tentativo di riparazione non potrà
essere coperto dalla garanzia
convenzionale.
ATTENZIONE:
responsabile per danno a
relative alla ri
https://eprel.ec.europa.eu/
sul certificato di garanzia convenzional
comprovante l’acquisto dell’elettrodomestico
Puoi consultare le condizioni di garan
anche sul nostro sito internet.
.
form on-

29
DE
Vielen Dank, dass Sie sich für dieses Produkt
entschieden haben. Wir freuen uns, Ihnen das
ideale Produkt und das bestmögliche,
vollständige Sortiment an Haushaltsgeräten
für Ihren Alltag bieten zu können.
Bitte nehmen Sie sich vor der
Installation und vor dem ersten Gebrauch
unbedingt ausreichend Zeit, um die vorliegende
Gebrauchsanleitung aufmerksam zu lesen und
sich in Ruhe mit der Bedienung des Gerätes
vertraut zu machen. Dadurch schützen Sie
sich und verhindern Schäden an der
Waschmaschine. Die Anleitung enthält wichtige
Hinweise - bitte daher für evtl. Rückfragen
unbedingt aufbewahren bzw. bei der
Weitergabe des Gerätes an Nachbesitzer
mitgeben.
Jedes unserer Geräte verfügt über eine 16stellige Matrikelnummer, die sich auf dem
Typenschild im Innenbereich des Bullauges
befindet. Bitte notieren Sie sich diese
unbedingt, damit Ihnen der Kundendienst bei
Fragen oder im Servicefall schneller und
gezielter helfen kann.
Dieses Gerät ist entsprechend der
europäischen Richtlinie 2012/19/EU
als elektrisches / elektronisches Altgerät
(WEEE) gekennzeichnet.
Elektrische und elektronische Altgeräte
enthalten vielfach noch wertvolle Materialien.
Sie enthalten aber auch schädliche Stoffe, die
für ihre Funktion und Sicherheit notwendig
waren. Im Restmüll oder bei falscher
Behandlung können diese der menschlichen
G
Es ist
daher sehr wichtig, dass elektrische und
elektronische Altgeräte (WEEE) einer
speziellen Verwertung zugeführt werden, damit
die schädlichen Stoffe ordnungsgemäß entfernt
und entsorgt werden bzw. wertvolle Rohstoffe der
Wiederverwertung zugeführt werden können. Sie
können mit der Beachtung der folgenden simplen
Hinweise einen wichtigen Beitrag dazu leisten,
dass elektrische und elektronische Altgeräte
(WEEE) der menschlichen Gesundheit und der
Umwelt nicht schaden
und elektronische Altgeräte
oder
Nutzen Sie stattdessen die an Ihrem Wohnort
eingerichteten kommunalen oder gewerblichen
Sammelstellen zur Rückgabe und Verwertung
scher und elektronischer Altgeräte (WEEE).
Informieren Sie sich, ob ggf. in Ihrem Land bzw.
Ihrer Region für große/sperrige elektrische und
elektronische Altgeräte (WEEE) eine Abholung
Sorgen Sie in jedem Falle dafür,
zum Abtransport kindersicher
In einigen Ländern sind Händler unterbestimmten
Voraussetzungen beim Geräteneukauf auch zur
Rücknahme des Altgerätes verpflichtet, wenn das
Altgerät dem neuen Fabrikat in der Funktion
entspricht.
1.
2.
3.
4.
5.
6.
7.
8.
9.
Inhalt
Umweltbedingungen
esundheit und der Umwelt schaden.
:
Elektrische-
(WEEE) sollten keinesfalls wie RestHaushaltsmüll behandelt werden.
elektri
angeboten wird.
dass Ihr Altgerät bis
aufbewahrt wird.
GENERELLE SICHERHEITSHINWEISE
INSTALLATION
WASCHMITTELSCHUBLADE
PRAKTISCHE TIPPS
WARTUNG UND REINIGUNG
FERNBEDIENUNG (WLAN)
KURZANLEITUNG
STEUERUNG UND PROGRAMME
PROBLEMLÖSUNGEN UND GARANTIE

30
1. GENERELLE SICHERHEITSHINWEISE
Dieses Gerät ist ausschließlich
für den Haushaltsgebrauch konzipiert
bzw. für den haushaltsnahen
Gebrauch, wie z.B:
- Teeküchen für das Personal von
Büros, Geschäften oder ähnlichen
Arbeitsbereichen;
- Ferienhäuser;
- Gäste von Hotels, Motels und
anderen Wohneinrichtungen;
- Gäste von Apartments/
Ferienwohnungen, Bed and
Breakfast Einrichtungen
Eine andere Nutzung als die
normale Haushaltsnutzung, wie z.B.
gewerbliche oder professionelle
Nutzung durch Fachpersonal, ist
auch im Falle der oben erwähnten
Einrichtungen ausgeschlossen.
Sollte das Gerät entgegen diesen
Vorschriften betrieben werden,
kann dies die Lebensdauer des
Gerätes beeinträchtigen und den
Garantieanspruch gegenüber dem
Hersteller verwirken.
Eventuelle Schäden am Gerät oder
andere Schäden oder Verluste, die
durch eine nicht haushaltsnahe
Nutzung hervorgerufen werden
sollten (selbst wenn sie in einem
Haushalt erfolgen), werden, so weit
vom Gesetz ermöglicht, vom
Hersteller nicht anerkannt.
Kinder unter 8 Jahren sowie
Personen, die aufgrund ihrer
physischen, sensorischen oder
geistigen Fähigkeiten oder ihrer
Unerfahrenheit oder Unkenntnis
nicht in der Lage sind, die
Waschmaschine sicher zu bedienen,
dürfen die Waschmaschine nicht
ohne Aufsicht oder Anweisung durch
eine verantwortliche Person benutzen,
sich in der Nähe aufhalten oder das
Gerät saubermachen. Kinder sollten
nicht mit dem Gerät
und Benutzerwartung
spielen. Reinigung
sollten nicht
von Kindern ohne Einführung,
ausgeführt werden.
Kinder sollten über das Gerät
aufgeklärt werden, damit Sie
nicht mit dem gerät spielen.
Kinder unter 3 Jahren dürfen
sich nicht unbeaufsichtigt in der
Nähe des Gerätes aufhalten
oder spielen.
Sollte das Anschlusskabel
beschädigt sein, so muss es
durch einen Fachmann mittels
eines Orginalteils ersetzt werden.
Verwenden Sie nur die mit dem
Gerät zusammen gelieferten
Schläuche.
Für einen ordnungsgemäßen Betrieb
muss der Wasserleitungsdruck
konstant zwischen min. 0,05 MPa
und max. 1 MPa liegen.

31
DE
Wasser kann eine hohe
Temperatur während des
Waschvorgangs annehmen.
Elektrische Anschlüsse und
Sicherheitshinweise
Vergewissern Sie sich, dass
ein Teppich nicht die Maschine
und Ventilatorenöffnungen,
behindert.
Nach der Installation, sollte das
Gerät so positioniert sein, dass
der Stecker frei zugänglich ist.
Die maximale Beladungskapazität
(trockene Kleidung lt. Normtest)
hängt von dem jeweiligen
Gerätemodell ab (s. Bedienblende).
Für die technischen Daten des
Produktes schauen Sie bitte
auf der Internetseite des
Herstellers nach.
Die technischen Details
(Versorgungsspannung und
Leistungsaufnahme) sind auf
dem Typenschild angegeben
Vergewissern Sie sich, dass die
elektrische Anlage geerdet ist, alle
geltenden Gesetze eingehalten
werden und dass Ihre Steckdose
mit dem Stecker des Gerätes
kompatibel ist. Ansonsten
holen Sie sich bitte qualifizierte
professionelle Unterstützung.
Die Verwendung von Spannungswandlern, Mehrfachsteckdosen
oder Verlängerungskabeln bitte
in jedem Fall unterlassen.
Bevor Sie die Waschmaschine
reinigen, ziehen Sie das Gerät vor
und drehen Sie die Wasserzufuhr ab.
Bringen Sie keine Schnur an,
um die Maschine vorzuziehen.
Stellen Sie sicher, dass sich
kein Wasser mehr in der
Trommel befindet, wenn Sie
das Bullauge öffnen.
WARNUNG:
Setzen Sie das Gerät keinem
Regen, direktem Sonnenlicht oder
anderen Wetterelementen aus.
Heben Sie die Maschine nicht
an den Drehknöpfen oder dem
Bullauge an; lassen Sie das
Bullauge nicht im Wagen. Wir
empfehlen, die Maschine, immer
zu zweit anzuheben.
Im Falle einer Störung schalten
Sie die Maschine aus, schließen
Sie die Wasserzufuhr und ändern
Sie nichts mehr an dem Gerät.
Kontaktieren Sie umgehend den
Kundendienst und verwenden Sie
nur Originale als Ersatzteile.

32
Lösen Sie die
2 bzw. 4
Schrauben
) auf der Geräterückseite und
Distanzstücke
Schließen Sie 2 bzw. 4 Öffnungen
anschließend mit den beigefügten
Wenn es sich bei Ihrem Gerät
handelt,
lösen
und die 3 bzw. 4 Distanzstücke
Je nach Modell fallen eine oder
mehrere der Distanzstücke in das
Gerät. Das Gerät dann vorsichtig
nach vorne neigen und die
Distanzstücke entfernen. Die
Öffnungen anschließend mit den
Die gewellte Kunststofffolie, die
oben
auf dem Gerät befand, wie in
dargestellt (je
oder
*
Bei einigen Modellen ist die
gewellte Kunststofffolie nicht
Bewahren Sie die Verpackung
abseits von Kindern auf.
2. INSTALLATION
(A
entfernen die 2 bzw. 4
(B)
wie in
Abbildung 1
gezeigt.
Abdeckungen.
um ein Einbaumodell
die 3 bzw. Schrauben
(B)
entfernen.
beigefügten Abdeckungen schließen.
WARNUNG:
sich beim Auspacken*
Abbildung 2
nach Modell Version A, B
C), in den Geräteboden legen.
(A)
enthalten.

33
DE
Bitte das Gerät ausschließlich mit dem
mitgelieferten Zulaufschlauch (keinesfalls
alten Schlauch benutzen) mit dem
enthalten ein oder
HEIß&KALT (Abbildung 4):
Wasserverbindungseinstellungen mit heiß
und kalt für höhere Energieeinsparungen.
Verbinden Sie den grauen Schlauch mit
dem Wasserhahn und den roten mit dem
ie Waschmaschine
kann auch nur mit dem Kaltwasserhahn
verbunden werden: In diesem Fall brauche
einige Programme etwas länger, um zu
Im Falle
eines defekten Schlauches stoppt die
Wasserzufuhr. In diesem Fall erscheint auf
ein rotes Feld und der
werden. Um die
Schraubenmutter zu lösen, drücken Sie den
Sollte
„A“
vor
kompletten Wasseraustritt. Am Ende
dieses Vorganges kontaktieren Sie den
Kundenservice, damit der Schlauch
Wasseranschluss
Wasseranschluß verbinden
(s. Abbildung 3)
EINIGE MODELLE
mehrere der folgenden Eigenschaften:
Heißwasserhahn. D
starten.
WASSERSTOP (Abbildung 5):
dem Fenster „A“
Schlauch muss entfernt
Entsicherungsknopf „B“.
WASSERSCHUTZ (Abbildung 6):
Wasser aus dem Hauptschlauch
austreten, schützt die Hülle „B“
ausgewechselt wird.
.

34
Seien Sie mit dem Abstand zwischen
Waschmaschine und Wand vorsichtig, da
der Schlauch eingequetscht werden
könnte. Es sollte ein Mindestabstand von
Sie die Höhe der Standfüße wie
Drehen Sie die Schraubenmuttern im
Drehen Sie den Standfuß, um die Höhe
Sie den Standfuß durch
Drehen der Schraubmuttern gegen
*
Bitte versuchen Sie keinesfalls den
Wasserablaufschlauch selber zu
wechseln, sondern setzen sich hierfür mit
das Gerät auf einen Sockel
aufgestellt werden, ist es durch eine
Erkundigen Sie sich bitte hierfür im
Fachhandel. Der Hersteller haftet nicht
Installation. Installationsfehler sind nicht
über die Herstellergarantie abgedeckt.
Aufstellung des Gerätes
50 cm eingehalten werden (Abbildung 7).
Justieren
in Abbildung 8 beschrieben:
a.
Uhrzeigersinn, um diese zu lösen.
b.
einzustellen.
c.Sichern
den Uhrzeigersinn bis zum festen Sitz.
Stecker einstecken.
WARNUNG:
dem Kundendienst in Verbindung.
Sollte
Sockelbefestigung zu sichern.
für unsachgemäße Aufstellung und
SEPARAT ERHÄLTLICHES ZUBEHÖR

35
DE
EINIGE MODELLE sind mit einer
die Waschmittel und Weichspüler
exakt dosiert. In diesem Fall ziehen
Sie den spezifischen Abschnitt im
für weiterführende Informationen hinzu.
Einige Waschmittel sind nicht für den
ausgelegt, sondern werden mit einem
eigenen Dosierhilfe verkauft, die
direkt in der Trommel platziert wird.
Benutzen Sie im mittleren Fach
ausschließlich Flüssigprodukte!
3.
WASCHMITTELSCHUBLADE
Die Waschmittelschublade ist in drei Fächer
aufgeteilt (Abbildung 9):
Fach "1": ist für das in der Vorwäsche
benötige Waschmittel vorgesehen;
Fach " ": ist für spezielle
Wäschezusatzstoffe wie Weichspüler etc.
WARNUNG:
Fach "2": ist für das in der Hauptwäsche
benötige Waschmittel vorgesehen.
JE NACH MODELL
spezieller Einsatz für Flüssigwaschmittel
ein
enthalten
Waschmittels in die Trommel richtig reguliert. Bei
Einsatz von flüssigen Waschmitteln den Einsatz in
Fach "2"
Programm "Spülen" kann dieser Einsatz auch für
den Bleichvorgang genutzt werden (s. Beschreibung).
(Abbildung 10)
einlegen. In Kombination mit dem
ist im Lieferumfang des Gerätes
, der die Einspülung des
WARNUNG:
Einsatz in die Waschmitteleinspülschale
automatischen Dosierung ausgestattet,
Kapitel STEUERUNG UND PROGRAMME

36
Einfüllen von Waschmittel
Praktischer Spartipp
Beladungstipps
4. PRAKTISCHE TIPPS
Beim Sortieren der Wäsche, beachten
Sie folgende Punkte:
- Wurden metallische Objekte aus der
Wäsche entfernt;
- Reißverschlüsse geschlossen;
- Kissen auf links gezogen;
- Clips von Vorhängen entfernt;
- Waschanweisungen auf Schildchen in der
Kleidung gelesen.
Wir empfehlen beim Waschen von
Teppichen/Läufern, Oberbetten und
anderen schweren Textilien den
Schleudervorgang gänzlich abzustellen,
um mögliche Schäden am Gerät zu
vermeiden.
Stellen Sie sicher, dass Ihr
Kleidungsstück aus Wolle mit der
Maschine gewaschen werden darf.
Überprüfen Sie das Stoff-Etikett.
Gerätetüre zwischen den einzelnen
Waschgängen offen stehen lassen, um
das Entstehen unangenehmer Gerüche in
der Maschine zu vermeiden.
Tipps, wie Sie bei der Nutzung Ihres Geräts
Geld sparen und etwas für die Umwelt tun
können.
Füllen Sie die Maschine bis zur
maximalen Kapazität, die in der Tabelle
für jedes Programm angegeben ist.
Dadurch SPAREN Sie Energie und
Wasser.
Lautstärke und restliche Feuchtigkeit der
Wäsche hängen von der Drehzahl des
Schleudergangs ab: Ein schnellerer
Schleudergang erzeugt mehr Lärm, die
Wäsche ist dann jedoch weniger feucht.
Die effizientesten Programme bei
Energie- und Wasserverbrauch sind für
gewöhnlich die längeren Programme mit
niedrigerer Temperatur.
Maximieren Sie die Füllmenge
Erzielen Sie den besten Energie-, Wasser-
und Waschmittelverbrauch, in dem sie Ihre
Waschmaschine immer voll füllen. Sichern
Sie 50% Energie beim Waschen einer vollen
Ladung im Gegensatz zu zwei halben
Ladungen.
Wann ist eine Vorwäsche wirklich notwendig?
In der Regel nur für stark verschmutzte
Wäsche!
Wenn Sie normal oder wenig
verschmutzte Wäsche waschen, sparen
Sie zwischen 5% und 15% Strom, wenn
Sie keine Vorwäsche wählen.
Ist eine Warm- oder Heißwäsche zwingend
erforderlich?
Flecken mit Fleckenentferner vorbehandeln
oder vor dem Waschen eingetrocknete
Flecken in Wasser einweichen, um die
Notwendigkeit eines Warm- oder
Heißwaschprogramms zu reduzieren.
Sparen Sie Energie durch ein
Niedrigtemperatur-Waschprogramm.
Bevor Sie ein Trockenprogramm starten
(WASCHTROCKNER)
Sie SPAREN Energie und Zeit, indem Sie
eine hohe Schleuderdrehzahl auswählen,
um den Restfeuchtegehalt in der Wäsche
bereits vor der Trockenprogramms zu
reduzieren.
Unten finden Sie eine kurze
Dosierungsanleitung mit Tipps und
Ratschlägen zur Verwendung von
Waschmittel.
Verwenden Sie nur Waschmittel, die für
die Waschmaschine geeignet sind.

37
DE
Zum Waschen von Wolle oder Seide
empfehlen wir nur den Gebrauch von
Spezial- und Feinwaschmitteln.
Für Waschvorgänge unter 40 Grad
empfehlen wir den Gebrauch von
flüssigen Waschmitteln, die für niedrige
Für Waschvorgänge zwischen 40 und
muss ein für die Verschmutzung
der Wäsche passendes Waschmittel
ausgewählt werden. Normale
er können für weiße oder
leichte Farben verwendet werden,
während flüssige Waschmittel für
Beim Waschen von weißen Sachen,
empfehlen wir das 60 Grad
Baumwollprogramm und ein normales
Wählen Sie das zum Stoff (Baumwolle,
Feines, Synthetik, Wolle, Seide usw.), zur
Farbe, zum Grad der Verschmutzung und
zur gewählten Waschtemperatur
passende Waschmittel aus.
Befolgen Sie für eine richtige Dosierung
des Waschmittels, Weichspüler oder
sonstiger Reinigungsmittel immer die
Empfehlungen des Herstellers:
Eine ordnungsgemäße Verwendung
des Geräts mit der richtigen Dosierung
verhindert Verschwendung und ist
umweltfreundlicher.
Waschpulver.
60 Grad
Waschpulv
Farbschutz geeignet sind.
Temperaturen geeignet sind.
Zu viel Waschmittel führt zu übermäßiger
Schaumbildung, die verhindert, dass der
Waschgang richtig ausgeführt werden
kann. Sie kann auch die Qualität der
Wäsche und des Spülgangs
beeinträchtigen.
Bei der Nutzung von phosphatfreien
Waschmitteln können folgende Dinge
resultieren:
- Trüberes Abwasser: Dieser Effekt
ist bedingt durch die suspendierten
Zeolithe, was jedoch keine negativen
Auswirkungen auf die Wascheffizienz hat.
- Weißer Schleier auf der Kleidung am
Ende des Waschvorgangs: Dies ist
normal, da das Waschmittel nicht von der
Wäsche aufgenommen wird.
- Schaumbildung im letzten Spülgang:
Dies ist nicht zwingend ein Zeichen für ein
schlechtes Spülergebnis.
- Übermäßige Schaumbildung: Dies tritt
häufig beim Einsatz von anionischen
Tensiden in Waschmitteln auf.
Starten Sie in den vorgenannten Fällen
keinen erneuten Waschvorgang, da dies
nicht helfen wird.
Wenn das Problem fortbesteht oder wenn
Sie einen technischen Defekt vermuten,
kontaktieren Sie umgehend ein autorisiertes
Kundendienstzentrum.

38
Verwenden Sie keine säurehaltigen
ispiel Essig) oder
aggressive Reinigungsmittel für die
Reinigung der Schubladen, weil sonst
die Dichtungen und/oder Innenbauteile
des Gerätes beschädigt werden.
Vor dem Beginn der Reinigung
müssen alle Fächer leer sein.
Reinigung der
Waschmittelschublade
Reinigen der Außenseite
5. WARTUNG UND REINIGUNG
Die richtige Wartung und Pflege Ihres
Elektrogeräts kann seine Lebensdauer
verlängern.
Das Gerät von der Stromversorgung
trennen.
Die Außenseite des Geräts mit einem
feuchten Tuch reinigen, dabei möglichst
keine SCHEUERMITTEL, ALKOHOL
ODER VERDÜNNER VERWENDEN.
•
Es wird empfohlen, die Waschmittelschublade
regelmäßig zu reinigen, damit sich dort
keine Waschmittel- und andere
Rückstände ablagern können.
Schublade vorsichtig aber mit sicherem
Griff herausziehen.
Schublade unter fließendem Wasser
reinigen und zurück in das Fach stecken.
FÜR MODELLE MIT AUTOMATISCHEM
FLÜSSIGWASCHMITTEL- UND
WEICHSPÜLER-DOSIERSYSTEM
Füllen Sie heißes Wasser in die
Schublade.
Schütteln Sie die Schublade, damit das
Wasser in alle Fächer fließen kann.
Drücken Sie die Freigabetaste und
ziehen Sie die Schublade vollständig
heraus. Achten Sie darauf, dass Sie
keine Waschmittelreste verschütten.
Entfernen Sie überschüssiges Wasser
aus der Schublade und setzen Sie sie
wieder vollständig ein.
WARNUNG:
Produkte (zum Be

39
DE
FÜR MODELLE MIT AUTOMATISCHEM
UND
wenn Sie die Maschine neigen oder
bewegen müssen, nehmen Sie zuerst
und halten Sie ihn horizontal, damit
nichts auslaufen kann.
Vorschläge für anhaltenden
Nichtgebrauch
Reinigen des Pumpenfilters
• Das Gerät hat einen besonderen Filter,
der größere Rückstände wie Knöpfe oder
Geldstücke zurückhält, die das Ablaufsystem
verstopfen könnten (befolgen Sie je nach
Modell die Version A oder B).
Es wird empfohlen, den Filter fünf- oder
sechsmal im Jahr zu reinigen.
Das Gerät von der Stromversorgung
trennen.
Bevor Sie die Klammerfalle öffnen,
empfehlen wir, den Boden mit einer
saugfähigen Unterlage auszulegen.
Drehen Sie den Verschluss gegen den
Uhrzeigersinn.
Entnehmen und Reinigen Sie die
Abdeckung mit dem Grobschmutzfilter
und drehen sie anschließend im
Uhrzeigersinn wieder ein.
Wiederholen Sie die restlichen Schritte in
umgekehrter Reihenfolge, um die Teile
wieder einzubauen.
Wird das Gerät längere Zeit in einem
nicht beheizten Raum aufgestellt, müssen
alle Wasserrückstände vollständig aus
den Schläuchen entfernt werden.
Das Gerät von der Stromversorgung
trennen.
Trennen Sie den Schlauch von dem
Riegel und füllen Sie das gesamte
Wasser in eine Schüssel.
Sichern Sie den Schlauch wieder mit den
Riegeln.
FLÜSSIGWASCHMITTELWEICHSPÜLER-DOSIERSYSTEM:
den Waschmittel-Schubkasten heraus,

40
Dieses Gerät ist mit WLAN-Technologie
ausgestattet, so dass Sie es über eine App
steuern können.
GERÄTEPAARUNG (AUF APP)
App auf Ihr Gerät,
Öffnen Sie die App, erstellen Sie das
Benutzerprofil (oder loggen Sie sich ein,
wenn es schon vorher erstellt wurde) und
koppeln Sie das Gerät gemäß den
ZUR AKTIVIERUNG DER FERNBEDIENUNG
und mit
Beladen Sie die Waschmaschine,
schließen Sie die Tür, geben Sie ggf.
SMART RING (Wählscheibe
FERNBEDIENUNG
: Die Türe wird verriegelt und
Starten Sie den Waschgang über die
App.
beendet ist,
schalten Sie die Maschine aus, indem Sie
OFF (AUS)
stellen. Erst dann lässt sich die Türe
ZUR DEAKTIVIERUNG DER FERNBEDIENUNG
FERNBEDIENUNG
beendet werden soll, während die
SMART
auf eine andere Position als
ohne dabei
zu gehen. Jetzt lässt
sich das Bedienfeld wieder bedienen und
die Maschine wird angehalten. Sobald die
erlischt,
Drehen Sie bei geschlossener Türe den
FERNBEDIENUNG
, um das Gerät wieder über die
App zu bedienen. Wenn gerade ein
Aus Sicherheitsgründen kann die
Tür während einiger Waschzyklen
nur geöffnet werden, wenn der
Wasserstand das untere Niveau und
die Temperatur 45°C unterschreitet.
Wenn diese Bedingungen erfüllt
sind, warten Sie bis die Leuchte
vor
Sie die Tür öffnen.
Ihr Wi-Fi zu Hause muss einen
Frequenzbereich von 2.4 GHz haben. Sie
können das Gerät nicht konfigurieren,
GHz
eingestellt ist.
Informieren Sie sich über alle WLAN-
Die App ist für Geräte mit Android und
iOS erhältlich, sowohl für Tablets als
6. FERNBEDIENUNG (WLAN)
Laden Sie die hOn-
indem Sie folgenden QR-Code scannen:
Oder gehen sie zu diesem Link:
go.haier-europe.com/download-app
auch für Smartphones.
Funktionen im DEMO-Modus der App.
wenn Ihr Heimnetzwerk auf 5-
Wenn der Waschgang
den SMART RING auf
öffnen.
Wenn der Modus
Maschine läuft, drehen Sie den
RING
FERNBEDIENUNG (WLAN),
über OFF (AUS)
Leuchte TÜRVERRIEGELUNG
kann die Türe geöffnet werden.
TÜRVERRIEGELUNG erlischt, be
Anweisungen auf dem Gerätedisplay.
Der Router sollte eingeschaltet
dem Internet verbunden sein.
Waschmittel hinzu.
Drehen Sie den
für Programme) auf
(WLAN)
das Bedienfeld deaktiviert.
SMART RING
(WLAN)
Waschgang läuft, wird dieser fortgesetzt.
auf

41
DE
A
SMART RING (Wählscheibe für
Programme)
B
Taste START/PAUSE
C
Taste STARTZEITVORWAHL
D
OPTIONEN-Taste
E
Taste SONDERPROGRAMME
F
Taste WASCHTEMPERATURWAHL
G
Taste SCHLEUDERDREHZAHLWAHL
H
Taste VERSCHMUTZUNGSGRAD/
ALTERNATIVE
PROGRAMMAUSWAHL/
DAMPFSTUFE
F+G
KINDERSICHERUNG
I
Anzeigebereich
Technische Daten
TROCKNEN (nur WASCHTROCKNER)
Soll der Trockenvorgang nach dem
Waschgang automatisch beginnen,
und den Trockenvorgang.
zuerst den Waschvorgang
Trockenprogramm auswählen.
Programmauswahl
7. KURZANLEITUNG
Dieses Gerät verfügt über eine moderne
Mengenautomatik, die automatisch die benötigte
Wassermenge, den Energieverbrauch und die
Waschdauer anpasst.
Schalten Sie die Maschine an und wählen
Sie das gewünschte Programm aus.
Passen Sie gegebenenfalls die
Wascheinstellungen an und wählen Sie
die gewünschten Optionen aus.
dann wählen Sie das gewünschte
Waschprogramm
Sie können auch
abschließen und anschließend das
Drücken Sie die Starttaste.
Das Programmende wird durch eine
Nachricht im Display angezeigt (bei
einigen Modellen leuchten alle
Anzeigeleuchten zur Phase auf).
Schalten Sie die Maschine ab.
Für jeden Waschtyp sehen Sie in der
Tabelle die passenden Sequenzen.
8. STEUERUNG UND PROGRAMME
Wasserdruck:
min 0,05 Mpa / max 1 Mpa
Schleuderdrehzahl:
Siehe Typenschild.
Gesamtanschlußwert/Absicherung/
Spannung:
Siehe Typenschild.

42
Sie können nur Funktionen auswählen,
die zum eingestellten Programm passen.
Schließen Sie die Frontluke, BEVOR
Sie die Taste START/PAUSE drücken.
START/PAUSE-Taste
Erstinbetriebnahme
SMART RING (Wählscheibe für
programme)
Berühren beim Einstecken des Geräts
in keinem Fall die Tasten, da sich die
Maschine in den ersten Sekunden
,
nehmen Sie das Gerät vom Netz und
WARNUNG:
kalibriert. Sollte dies dennoch passieren
wiederholen Sie den Vorgang.
Wird der SMART RING gedreht, wird das
Gerät eingeschaltet und im Display
werden die Beschreibung und die
Parameter des ausgewählten Programms
angezeigt.
Schalten Sie das Gerät nach Programmende
aus, indem Sie den SMART RING auf
OFF (AUS) stellen. Ziehen Sie dann den
Stecker heraus und schließen Sie die
Wasserzufuhr.
- Spracheinstellung
Wenn Sie die Maschine an den Strom
angeschlossen und eingeschaltet
haben, drücken Sie die Taste "F" oder
"G" zum Anzeigen der verfügbaren
Sprachen.
Wählen Sie die gewünschte Sprache mit
der START/PAUSE-Taste.
- Sprache ändern
Zum Ändern der eingestellten Sprache
müssen Sie gleichzeitig die Tasten "C" und
"H" für ca. 5 Sekunden drücken. ENGLISH
erscheint auf der Anzeige, und Sie können
eine neue Sprache auswählen (durch
Drücken der Tasten "F" oder "G").
Zum Starten des gewählten Waschgangs
mit den voreingestellten Parametern
drücken Sie START/PAUSE. Wenn das
Programm läuft, zeigt die Anzeige die zu
erwartende Zeitdauer an.
Falls Sie die Programmauswahl wechseln
möchten, drücken Sie die gewünschten
Funktionstasten, ändern die
Standardparameter und drücken die
Taste START/PAUSE zum Starten des
Waschvorgangs.
Warten Sie nach dem Einschalten des
Geräts einige Sekunden, bis das
Programm startet.
PROGRAMMDAUER
Bei der Programmauswahl zeigt die
Anzeige automatisch die Waschzeit an,
die je nach gewählter Funktion
unterschiedlich ausfallen kann.
Nach dem Programmstart werden Sie
ständig über die Restdauer bis zum Ende
des Waschvorgangs informiert.
Das Gerät ermittelt die Restdauer bis
zum Abschluss des gewählten
Programms mittels einer Standardladung,
während des Waschgangs korrigiert es
sie entsprechend der Größe und
Zusammensetzung der Wäsche.
PROGRAMMENDE
Das Bullauge kann nach Anzeigen von
"ENDE" im Display und Erlischen der
Anzeige TÜRVERRIEGELUNG geöffnet
werden.
Schalten Sie die Waschmaschine nach
Programmende aus, indem Sie den
SMART RING auf OFF (AUS) stellen.

43
DE
UNTERBRECHEN DER MASCHINE
OPTIONEN-Taste
Taste STARTZEITVORWAHL
Aus Sicherheitsgründen kann die Tür
während einiger Waschzyklen nur
45°C unterschreitet. Wenn diese
Bedingungen erfüllt sind, warten Sie bis
die Leuchte TÜRVERRIEGELUNG
Der SMART RING muss nach dem
Waschgang IMMER auf OFF (AUS)
gestellt werden, bevor ein neuer
Waschgang ausgewählt werden kann.
Während ein Programm läuft, kann die
Maschine durch einfaches Drücken der
Taste START/PAUSE angehalten werden.
geöffnet werden, wenn der Wasserstand
das untere Niveau und die Temperatur
s
ich mit jedem Drücken der Taste auf
bis zu 24 Stunden, danach wird die
Verzögerung bei erneutem Drücken der
Taste auf Null zurückgesetzt.
- Durch das Drücken der Taste
START/PAUSE bestätigen Sie Ihre
Auswahl. Der Countdown beginnt und
das Programm startet automatisch.
Sie können den verzögerten Start
abbrechen, indem Sie den SMART RING
auf OFF (AUS) stellen.
Fällt der Strom aus, während die
Maschine läuft, nimmt die Maschine das
Programm am unterbrochenen Zeitpunkt
wieder auf, wenn der Strom zurück ist.
erlischt, bevor Sie die Tür öffnen.
Drücken Sie auf START/PAUSE, um das
Programm dort wieder aufzunehmen, wo
es unterbrochen wurde.
ABBRUCH DES EINGESTELLTEN
PROGRAMMS
Brechen Sie das Waschprogramm ab,
indem Sie den SMART RING auf OFF
(AUS) stellen.
Warten bis die Anzeige TÜRVERRIEGELUNG
erloschen ist, bevor die Tür geöffnet wird.
Der Programmstart kann zwischen 1
Stunde und 24 Stunden verzögert
werden.
Um den Programmstart zu verzögern,
bitte diesen Schritten folgen:
- Stellen Sie das gewünschte Programm ein.
- Drücken Sie die Taste einmal, um den
verzögerten Start zu aktivieren, drücken
Sie dann erneut (oder halten Sie die
Taste gedrückt), um die Verzögerung
einzustellen. Die Verzögerung erhöht
Mit dieser Taste haben Sie die Auswahl
zwischen drei Optionen:
- VORWÄSCHE
Diese Option erlaubt es Ihnen bei stark
verschmutzter vor dem Hauptwaschgang
eine Vorwäsche durchzuführen (nur
in bestimmten Programmen; s.
Programmtabelle).
Es wird empfohlen hierfür 20% der
vom Waschmittelhersteller empfohlenen
Waschmitteldosis im angegebenen
Waschmittelfach zu verwenden.
- EXTRA SPÜLEN
Mit dieser Option können Sie am Ende
des Waschgangs noch ein weiteres Mal
spülen. Diese Option wurde für
Menschen mit empfindlicher und
sensibler Haut entwickelt, bei denen
schon kleinste Waschmittelrückstände zu
Hautreizungen oder Allergien führen.
Der Einsatz dieser Funktion ist auch
ratsam für Gegenstände von Kindern und
für den Fall stark verschmutzter Wäsche,
für die eine größere Menge an
Waschmittel notwendig ist, oder beim
Waschen von Hand- und Badetüchern,
deren Fasern meistens die Tendenz
haben, das Waschmittel zu speichern.

44
- LEICHTBÜGELN
Taste WASCHTEMPERATURWAHL
Diese Optionen müssen vor dem
Drücken der Taste START/PAUSE
ausgewählt werden. Wenn eine Option
, die mit dem
zuerst und geht dann aus.
Taste SONDERPROGRAMME
Diese Optionen müssen vor dem
Drücken der Taste START/PAUSE
ausgewählt werden. Wenn eine Option
ausgewählt wurde, die mit dem
zuerst und geht dann aus.
Durch das Zuwählen dieser Option lässt sich
die Knitterbildung durch Weglassen der
Zwischenschleudergänge bzw. Durchführung
des Endschleuderns bei reduzierter
Schleuderdrehzahl weitestgehend reduzieren
(nur für einige Programme verfügbar).
ausgewählten Programm nicht kompatibel
ist, dann blinkt die Optionsanzeigelampe
Mit dieser Taste können Sie zwischen drei
verschiedenen Optionen auswählen (nur
für bestimmte Programme verfügbar):
- WASCHPROGRAMM FÜR EINEN
ARTIKEL
Diese Option (die mit mehreren Programmen
kombiniert werden kann) optimiert den
Wasser- und Energieverbrauch des
ausgewählten Programms bei gleicher
Waschleistung.
WASCHPROGRAMM FÜR EINEN
ARTIKEL
leicht verschmutzte Kleidungsstücke
geeignet und vermeidet so unnötigen
Wasser- und Energieverbrauch.
ist für geringe Beladungen
und
Während das Wasser in der Trommel
steht, befindet sich die Maschine im
Pausenmodus.
Drücken Sie START, um das Programm
mit Schleudern und Abpumpen zu
beenden (Drehzahl kann über die
entsprechende Schaltfläche reduziert
oder entfernt werden).
Diese Option eignet sich durch die
elektronische, sehr geräuscharme
Überwachung ideal für den nächtlichen
Betrieb des Gerätes.
- REINIGUNG DER TROMMEL
Die Option wurde entwickelt, um die
Waschmaschinentrommel zu reinigen.
Verwenden Sie nur Pulverwaschmittel.
Starten Sie den Zyklus nur mit leerer
Waschtrommel.
Wir empfehlen, diese Option alle 50
Waschgänge anzuwenden.
Diese Option kann nur für das Programm
ABPUMPEN & SCHLEUDERN
werden.
ausgewählt wurde
ausgewählten Programm nicht kompatibel
ist, dann blinkt die Optionsanzeigelampe
ausgewählt
- NACHTWASCHGANG
Diese Option reduziert alle auftretenden
Waschgeräusche auf ein Minimum,
indem die Geschwindigkeit der
Zwischenschleudergänge auf 400 U/Min.
reguliert wird, je nach Programm der
Wäscheposten nach dem letzten Spülgang
komplett im sauberen Spülwasser liegenbleibt,
bis der Waschvorgang durch erneute
Betätigung der Optionstaste mit einem
Endschleudergang beendet wird.
Mit dieser Taste können Sie die
Temperatur des Waschgangs verändern.
Um die Stoffe zu schützen, kann die für
jedes Programm erlaubte Höchsttemperatur
nicht überschritten werden.
Wenn Sie eine Kaltwäsche durchführen
wollen, müssen alle Anzeigelampen
ausgeschaltet sein.

45
DE
Taste VERSCHMUTZUNGSGRAD/
ALTERNATIVE PROGRAMMAUSWAHL/
DAMPFSTUFE
Die Maschine ist mit einem speziellen
elektronischen Gerät ausgestattet,
welches den Schleudergang im Falle
einer Unwucht verhindert. Dadurch
werden Lärm und Schwingungen in der
Maschine verringert und die Lebensdauer
Ihrer Waschmaschine verlängert.
Eine Überdosierung von Waschmittel
u übermäßiger Schaumbildung
führen. Wenn das Gerät übermäßigen
Schaum entdeckt, kann es die
Schleuderphase aussetzen oder die
Dauer des Programms verlängern und
Um eine Schädigung des Stoffes zu
vermeiden, kann die für jedes Programm
erlaubte Höchstgeschwindigkeit nicht
Taste SCHLEUDERDREHZAHLWAHL
Durch das Drücken dieser Taste kann die
Höchstgeschwindigkeit gesenkt und,
wenn Sie wollen, der Schleudergang
abgebrochen werden.
Wenn das Etikett keine spezifischen
Angaben macht, kann die in dem Programm
erwartete maximale Schleudergeschwindigkeit
verwendet werden.
überschritten werden.
Drücken Sie für die Reaktivierung des
Schleudergangs die Taste, bis Sie die
gewünschte Schleudergeschwindigkeit
eingestellt haben.
Sie können die Schleudergeschwindigkeit
ohne ein Anhalten der Maschine ändern.
kann z
den Wasserverbrauch erhöhen.
Mit dieser Taste können Sie je nach
gewähltem Programm zwei unterschiedliche
Funktionen auswählen:
- VERSCHMUTZUNGSGRAD
Sobald das Programm ausgewählt wurde,
wird die eingestellte Waschzeit für dieses
Programm automatisch angezeigt.
Mit dieser Option haben Sie je nach
Verschmutzungsgrad des Stoffs die
Auswahl zwischen 3 Waschintensitätsstufen,
die die Länge des Programms verändern
(sie kann nur bei einigen Programmen
genutzt werden – siehe Programmtabelle).
- ALTERNATIVE PROGRAMMAUSWAHL
Falls in der Tabelle angegeben, ermöglicht
diese Option die Auswahl einer Alternative
für das voreingestellte Programm (beim
Programm KURZ (14'/30'/44') ist dies die
Auswahl der drei verschiedenen Programmdauern).
- DAMPFSTUFE
Nach der Auswahl des Programms
LEICHTBÜGELN PLUS können Sie mit
dieser Taste zwischen drei
Dampfbehandlungen unterschiedlicher
Intensität auswählen, die für trockene
oder nasse Kleidungsstücke und je nach
Art des Stoffes konzipiert sind:
- BAUMWOLLE (Standardauswahl)
Dieses Programm wird für Kleidungsstücke
aus Baumwolle verwendet. Bei nassen
Stoffen (z. B. nach dem Waschen) ist es
zum Auflockern von Knitterfalten nach
dem Schleudern geeignet; bei
trockenen Stoffen soll es stattdessen
den idealen
Feuchtigkeitsgrad für ein leichteres
Bügeln erreichen.
- SYNTHETIK (Taste einmal drücken)
Dieses Programm wird für synthetische
Kleidungsstücke verwendet.
Bei nassen Stoffen (z. B. nach dem
Waschen) ist es zum Auflockern von
Knitterfalten nach dem Schleudern
geeignet; bei trockenen Stoffen soll
es stattdessen den idealen
Feuchtigkeitsgrad für ein leichteres
Bügeln erreichen.

46
Wird die START/PAUSE Taste nicht
innerhalb von 7 Sekunden nach dem
Schließen des Bullauges gedrückt, muss
ZUERST das Bullauge schliessen und
dann die Taste START/PAUSE drücken.
Anzeigebereich
KINDERSICHERUNG
- FEINWÄSCHE (Taste zweimal drücken)
Das Programm frischt die Fasern auf
und glättet Falten in Kleidungsstücken
nach dem Gebrauch.
Das Programm besteht aus einer
Anfangsphase, in der der Dampf wirkt,
und einer Endphase, in
überschüssige Feuchtigkeit entfernt
damit das Kleidungsstück sofort
getragen werden kann. Das Programm
ist für trockene Textilien geeignet.
Drücken Sie gleichzeitig die Tasten "F"
und "G" für ungefähr 3 Sekunden, dann
können die Tasten der Maschine gesperrt
werden. Auf diese Art können Sie
versehentliche oder ungewollte Änderungen
vermeiden, wenn eine Taste auf der
Anzeige während eines Waschgangs aus
Versehen gedrückt wird.
Die Tastensperre kann ganz einfach
durch das gleichzeitige Drücken der zwei
Tasten oder durch das Abschalten des
Geräts aufgehoben werden.
Das Anzeigesystem informiert Sie ständig
über den Zustand der Waschmaschine.
1) ANZEIGEN WASCHTEMPERATUR
Das zeigt die Waschtemperatur des
ausgewählten Programms an, das mit der
entsprechenden Taste (falls erlaubt)
geändert werden kann. Wenn Sie eine
Kaltwäsche durchführen wollen, müssen
alle Anzeigelampen ausgeschaltet sein.
der die
wird,
2) ANZEIGEN SCHLEUDERDREHZAHL
Das zeigt die Schleudergeschwindigkeit des
ausgewählten Programms an, das mit der
entsprechenden Taste geändert oder
weggelassen werden kann.
3)
KONTROLLEUCHTE TÜRVERRIEGELUNG
Die Kontrollleuchte beginnt zu leuchten,
sobald das Bullauge richtig geschlossen.
Wenn die Taste START/PAUSE gedrückt
wird blinkt die Kontrollleuchte zuerst kurz
auf und leuchtet dann permanent.
das Programm neu gestartet werden.
Warten bis die Anzeige TÜRVERRIEGELUNG
erloschen ist, bevor die Tür geöffnet wird.
4)
ANZEIGE "Kg Detector" (Mengenautomatik)
(nur in einigen Programmen aktiv)
Während der ersten Minuten des
Waschprogramm ermittelt die moderne
Mengenautomatik alle Waschparameter
Verbrauchswerte Dieses wird durch die
Anzeige
"Kg Detector"
im Display visualisiert.
Alle Verbrauchswerte und Programmschritte
werden dahingehend automatisch optimiert
und angepasst:
- Benötigte Wassermenge nach Art und
Menge der eingefüllten Wäsche
- Programmdauer nach Art und Menge
des eingefüllten Wäsche
- Anzahl und Intensität der Spülgänge
nach Art und Menge des eingesetzten
Waschmittels
- Trommeldrehrhythmus nach Art und
Menge der eingefüllten Wäsche

47
DE
- Zusätzliche Spülgänge bei übermäßiger
Schaumbildung
- Schleuderdrehzahl nach Art und Menge
der eingefüllten Wäsche, um Unwuchten
zu vermeiden.
5) ANZEIGE TASTENSPERRE
Die Anzeigelampe zeigt an, dass die
Funktion Tastensperre aktiviert ist.
6) OPTIONEN-ANZEIGE
Die Anzeige zeigt die ausgewählten
Zusatzoptionen an.
ANZEIGEN SONDERPROGRAMME
7)
Die Anzeigelampen zeigen die Optionen an,
die mit der entsprechenden Taste
ausgewählt werden können.
ANZEIGE VERSCHMUTZUNGSGRADWAHL
8)
Die Kontrollleuchte zeigt die Auswahl der
entsprechenden Option.
9) WLAN-ANZEIGE
Bei Modellen mit WLAN wird hier der
Verbindungszustand angezeigt. Möglich
sind:
- LEUCHTEND: Fernbedienung aktiv.
- LANGSAM BLINKEND: Fernbedienung
inaktiv.
- 3 S SCHNELL BLITZEND, DANN AUS:
Das Gerät kann sich nicht mit dem
Wi-Fi-Netzwerk verbinden oder es
wurde noch nicht mit der App gekoppelt.
- 3 x LANGSAM BLINKEND, DANN 2 S
AUS: Zurücksetzen des Wi-Fi-Netzwerks
(während der Verbindung mit der App).
- 1 S EIN, 3 S AUS: Die Luke ist offen.
Die Fernbedienung kann nicht
eingeschaltet werden.

48
(MAX.)
1)
(MAX.)
3)
MISCH &
BUNTWÄSCHE 59'
BAUMWOLLE
PERFEKT 59'
LEICHTBÜGELN
PLUS
3)
3)
ABPUMPEN &
SCHLEUDERN
SYNTHETIK UND
BUNTWÄSCHE
2)
2)
Programmübersicht
*
PROGRAMM
(siehe Steuertafel)
2
1
SPECIAL 39'
HYGIENE PLUS 59'
FEINWÄSCHE 59'
KURZ
SPÜLEN
WOLLE/HANDWÄSCHE
6 7 8 8,5 9 10 11 12 13 14
2 2 2 2 2 2 2 2 2 2
6 7 8 8,5 9 10 11 12 13 14
3 3,5 4 4 4,5 5 5,5 6 6,5 7
1,5 1,5 1,5 1,5 1,5 1,5 1,5 1,5 1,5 1,5
2 2,5 2,5 2,5 2,5 2,5 2,5 3 3 3,5
1 1 1,5 1,5 1,5 1,5 1,5 2 2 2
14'
2 2,5 2,5 2,5 2,5 2,5 2,5 3 3 3
30'
3 3,5 3,5 3,5 3,5 3,5 3,5 4 4 4
44'
- - - - - - - - - -
- - - - - - - - - -
1 1 2 2 2 2 2 2,5 2,5 2,5
2)
3 3,5 4 4 4,5 5 5,5 6 6,5 7
40°
60°
40°
40°
-
40°
40°
40°
40°
-
-
30°
60°
( )
BAUMWOLLE
ECO 40-60
SMART WASH
FERNBEDIENUNG (WLAN)
Diesen Punkt müssen Sie zum Einschalten der Fernsteuerung über die App (via
WLAN) auswählen.
6 7 8 8,5 9 10 11 12 13 14
6 7 8 8,5 9 10 11 12 13 14
4 4,5 5,5 5,5 6 6,5 7 8 8 9
90°
60°
30°
( )

49
DE
Bitte beachten Sie folgende Hinweise:
*
Die maximale Beladungskapazität (trockene
Kleidung lt. Normtest) hängt von dem
(Nur für Modelle mit entsprechendem
Wenn nur eine begrenzte Menge
cken behaftet
ist, die mit einem flüssigen
oder Bleichmittel
behandelt werden soll, kann eine
/Bleichmittel in die Vorrichtung für
ttel und setzen
Wählen Sie anschließend das
Programm SPÜLEN aus und
starten den Vorgang. Nach dem
sche hinzu
und fahren Sie mit der normalen
Wäsche Ihres gewünschten
Programms fort.
( )
Nur bei gewählter VORWÄSCHE-
Programmen verfügbar, in denen
ist).
1)
Wenn ein Programm ausgewählt
empfohlene Waschtemperatur
Taste (falls erlaubt) geändert werden
Höchsttemperatur kann jedoch nicht
überschritten werden.
2)
Für die aufgeführten Programme
kann über die Optionstaste
VERSCHMUTZUNGSGRAD die
3)
In den angegebenen Programmen
kann über die Taste
eine Alternative für
ermöglicht dies
Programmdauern).
INFORMATION FÜR PRÜFLABORE
Wenn die Maschine eine ausdrückliche
Energiedeklaration hat, bedeutet dies,
dass diese Maschine gemäß der
Verordnung 2019/2014
effizienter ist als der Grenzwert der
Energieeffizienzklasse „A“, wie auf der
jeweiligen Gerätemodell ab (s. Bedienblende).
Waschmittelfach für Flüssigwaschmittel)
von Textilien mit Fle
Vorreinigungs-
entsprechende Fleckenbehandlung
mit dem Gerät durchgeführt werden.
Gießen Sie das Vorreinigungs-
Flüssigwaschmi
diese in das mit der Ziffer "2"
markierte Fach der Waschmittelschublade.
Ende dieses Waschgangs schalten
Sie die Maschine bitte aus. Geben
Sie den Rest der Wä
Option verfügbar (Nur bei
die VORWÄSCHE-Option zuwählbar
wurde, wird auf der Anzeige
die
angezeigt, die mit der entsprechenden
VERSCHMUTZUNGSGRAD/
ALTERNATIVE PROGRAMMAUSWAHL
DAMPFSTUFE
das voreingestellte Programm
ausgewählt werden (beim Programm
KURZ 14'/30'/44'
die Auswahl aus drei verfügbaren
STANDARD-PROGRAMME
GEMÄSS
(EU) Nr 1015/2010 und Nr 1061/2010
ECO 40-60 PROGRAMM
TEMPERATUR AUF 40°C
EINSTELLEN
ECO 40-60 PROGRAMM
TEMPERATUR AUF 60°C
________________________________________
________________________________________
delegierten EU-
Frontseite der Schublade angegeben.
EINSTELLEN
STANDARD-PROGRAMM
GEMÄSS
(EU) Nr 2019/2023
ECO 40-60 PROGRAMM
/
kann. Die für jedes Programm erlaubte
Dauer und Intensität des
Waschprogramms angepasst werden.

50
Zur Reinigung unterschiedlicher Gewebesorten
und Verschmutzungen bietet die Waschmaschine
eigene programme an, die allen Anforderungen
gerecht werden (siehe Programmtabelle).
SPECIAL 39'
Die perfekte Kombination aus Zeitersparnis
und Leistung. Dieses Programm ermöglicht
einen gründlichen Wäschewaschgang in
nur 39 Minuten. Empfohlen für Wäsche mit
mittlerem Verschmutzungsgrad.
HYGIENE PLUS 59'
Dieses Programm bietet die bestmögliche
Kombination aus hoher Temperatur, Waschdauer
und Reinigung, um eine maximale Desinfektion
von Bakterien in nur 59 Minuten zu
garantieren. Empfohlen für
Baumwolltextilien
und kleine Waschladungen
MISCH & BUNTWÄSCHE 59'/
BAUMWOLLE PERFEKT 59'
Drücken Sie die Taste VERSCHMUTZUNGSGRAD/
ALTERNATIVE
/
DAMPFSTUFE
eins der beiden
verfügbaren Programme auszuwählen:
-
Dieses Programm wäscht alle Textilien und
waschechte Farben zusammen in einer
vollen Waschladung in nur 59 Minuten
perfekt sauber. Bei einer mittleren
Temperatur wird dieses Programm für leicht
verschmutzte Wäsche empfohlen.
*Die voreingestellte Temperatur beträgt
20°C (kann durch Drücken der
entsprechenden Taste geändert werden).
Der Waschzyklus eignen sich auch zum
Waschen von Baumwollgeweben.
-
Dieses Programm garantiert für perfekt
saubere Baumwollwäsche. Die Option
wurde speziell für eine verkürzte
Waschdauer mittelstark verschmutzter
Baumwollwäsche bei mittlerer Temperatur
entwickelt. Für bessere Resultate wird eine
halbe Waschladung empfohlen.
LEICHTBÜGELN PLUS
Dieses Programm glättet Falten mit Dampf
und erzielt den idealen Feuchtigkeitsgrad
für leichteres Bügeln. Über die Taste
können drei verschiedene Intensitätsstufen
gewählt werden, die für trockene oder
nasse Kleidungsstücke und abhängig von
der Art des Stoffes ausgelegt sind.
FEINW
Entwickelt für die Feinwäsche und kostbare
Textilien. Dieses Programm wäscht 59
Minuten bei niedriger Temperatur.
Empfohlen für kleine Waschladungen.
KURZ (14'/30'/44')
Schont den Geldbeutel ohne Kompromisse!
Dieses neue Programm erzielt hervorragende
Ergebnisse und spart gleichzeitig Wasser,
Strom, Waschmittel und Zeit. Es ist
geeignet für alle Textilien, die bei mittlerer
Temperatur gewaschen werden können.
Empfohlen für kleine Waschladungen und
leicht verschmutzte Wäsche.
Sie
über die Taste VERSCHMUTZUNGSGRAD/
ALTERNATIVE PROGRAMMAUSWAHL/
DAMPFSTUFE
der drei verfügbaren
Waschdauern aus.
WICHTIGER HINWEIS ZUR
ue, bunte Wäschestücke sollten
bis sechsmal
Bestimmte große, dunkle
Wäschestücke wie Jeans und
große Handtücher sollten immer
sind, mit anderen waschen.
Wählen Sie das zur Waschanleitung
auf dem Etikett des Kleidungsstücks
passende Programm, vor allem die
empfohlene Höchsttemperatur, aus.
Programmbeschreibungen
WARNUNG:
WASCHLEISTUNG.
Ne
mindestens fünfseparat gewaschen werden.
separat gewaschen werden.
Keine Textilien, die NICHT FARBECHT
MISCH & BUNTWÄSCHE 59' *
PROGRAMMAUSWAHL
, um
bei 60°C.
BAUMWOLLE PERFEKT 59'
ÄSCHE 59'
Wählen
eine

51
DE
SPÜLEN/ABPUMPEN & SCHLEUDERN
Drücken Sie die Taste
/
ALTERNATIVE PROGRAMMAUSWAHL/
DAMPFSTUFE
eins der beiden
verfügbaren Programme auszuwählen:
-
Bei diesem Waschgang werden drei
Spülgänge bei mittlerer Schleuder-leistung
durchgeführt (das Schleudern kann mit der
entsprechenden Taste verrkürzt oder
ausgeschaltet werden), was z. B. nach
einer Handwäsche nützlich ist.
-
Dieses Programm ist eine Kombination aus
Abpumpen und maximaler Schleuderleistung. Sie können den Schleudervorgang
mit der SCHLEUDERGANG-Taste auch
verkürzten oder ganz entfallen lassen.
WOLLE/HANDWÄSCHE
Dieses Programm wäscht Textilien aus
Wolle, die laut Etikett für die
Maschinenwäsche oder ausschließlich für
die Wäsche von Hand geeignet sind, oder
Textilien aus Seide, die für die
Maschinenwäsche geeignet sind.
SYNTHETIK UND BUNTWÄSCHE
Bei diesem Programm können Sie
verschiedene Stoffe und Farben gemeinsam
waschen
präzise Schleudern und die
Wasserstände werden beim Waschen und
Spülen optimiert. Optimal angepasstes
Schleudern bedeutet weniger Knitterfalten.
BAUMWOLLE
Das Programm eignet sich besonders zum
Waschen von farbigen Baumwollkleidungsstücken
bei 40°C oder zur Reinigung für
baumwollhaltige Wäsche bei 60°C oder
90°C mit besten Ergebnissen. Der letzte
Schleudergang erfolgt bei maximaler
Drehzahl und hinterlässt somit eine geringe
Restfeuchte der Wäsche.
ECO 40
Das
Programm wäscht normal
verschmutzte Baumwollwäsche, die laut
Etikett bei 40°C oder 60°C gewaschen
werden kann, zusammen in einem
Waschgang sauber. Dieses Programm wird
verwendet, um die Einhaltung der EURichtlinie Ecodesign (umweltgerechte
Gestaltung von Produkten) zu bewerten.
SMART WASH
Dieses innovative Programm passt die
Reinigungskraft der Wäsche automatisch an
die Art und Menge der Waschladung an und
erzielt so die bestmöglichen Ergebnisse ohne
Risiko. Die neue
Technologie
garantiert durch eine perfekte Mischung aus
Wasser und Waschmittel hervorragende
Ergebnisse bei 30°C.
Die Wirkung des Dampfes am Ende des
Waschgangs hilft, die Fasern der Kleidung tief
zu entspannen und erleichtert das Bügeln.
FERNBEDIENUNG (WLAN)
Diesen Punkt müssen Sie auswählen, wenn
Sie die Fernsteuerung via WLAN über die
App ein-/ausschalten möchten. In diesem
Fall wird der Waschgang über die App
gestartet. Mehr dazu im Abschnitt
FERNBEDIENUNG (WLAN)
VERSCHMUTZUNGSGRAD
, um
SPÜLEN
ABPUMPEN & SCHLEUDERN
. Das
-60
ECO 40-60
Quick & Clean-
.

52
E2 (mit Display)
Das Gerät erhält kein Wasser.
Stellen Sie sicher, dass der Wasserhahn geöffnet ist.
Stellen Sie sicher, dass der Schlauch für den Wasserzulauf nicht geknickt
oder eingeklemmt ist.
Wasser-Anschlüsse nicht in der korrekten Höhe (s. unter Installation)
Wasserhahn des Wasserzulaufs schliessen, am Gerät aufschrauben und
prüfen, ob der "Sandfilter" sauber ist und nicht verstopft.
Vergewissern Sie sich, dass der Filter nicht verstopft ist und dass sich
behindern können.
E3 (mit Display)
Wasser in der Waschmaschine läuft nicht ab.
Vergewissern Sie sich, dass der Filter nicht verstopft ist und dass sich
keine Fremdkörper im Filterabteil befinden, die den Wasserfluss
behindern können.
Stellen Sie sicher, dass der Schlauch nicht geknickt, oder eingeklemmt ist.
Vergewissern Sie sich, dass die Abflüsse im Haus nicht verstopft sind
im Waschbecken abläuft.
E4 (mit Display)
LED (ohne Display)
Es gibt zu viel Schaum und/oder Wasser.
Überprüfen Sie, ob Sie eventuell zuviel Waschmittel benutzt haben oder
ein für Waschmaschinen ungeeignetes Waschmittel.
E7 (mit Display)
Probleme mit der Tür.
Stellen Sie sicher, dass die Tür richtig geschlossen ist. Stellen Sie sicher,
daß keine Wäsche im Gerät das Schließen der Tür behindert.
Falls die Tür sich nicht öffnen lässt, das Gerät ausschalten, den Stecker aus der
Steckdose ziehen, 2-3 Minuten warten und die Tür noch einmal öffnen.
Alle anderen
Schalten Sie das Gerät aus und ziehen Sie den Stecker aus der
autorisiertes Kunden-Service-Center.
Geräte mit Display: die Störung wird durch den Buchstaben E zusammen mit einer
wie es dem Fehlercode entspricht, gefolgt von einer Pause von 5 Sekunden
9. PROBLEMLÖSUNGEN UND GARANTIE
Wenn Sie der Meinung sind, das Gerät würde nicht korrekt funktionieren, dann finden Sie
in der beigelegten Kurzanleitung einige praktische Tipps, wie die häufigsten Probleme zu
beheben sind.
FEHLER-BERICHT
Nummer angezeigt (Beispiel: Error 2 = E2)
Geräte ohne Display: die Störung wird angezeigt, indem die LED so häufig blinken,
(Beispiel: Error 2 = 2 x Blinken - Pause - 2 x Blinken - usw...)
Fehleranzeige Mögliche Ursachen und praktische Lösungen
2 x Blinken der
LED (ohne Display)
keine Fremdkörper im Filterabteil befinden, die den Wasserfluss
3 x Blinken der
LED (ohne Display)
und Wasser ohne Probleme ablaufen kann. Prüfen Sie, ob das Wasser
4 x Blinken der
7 x Blinken der
LED (ohne Display)
Codes
Steckdose. Schalten Sie das Gerät wieder ein und starten Sie ein
Programm. Wenn der Fehler erneut auftritt, wenden Sie sich bitte an ein
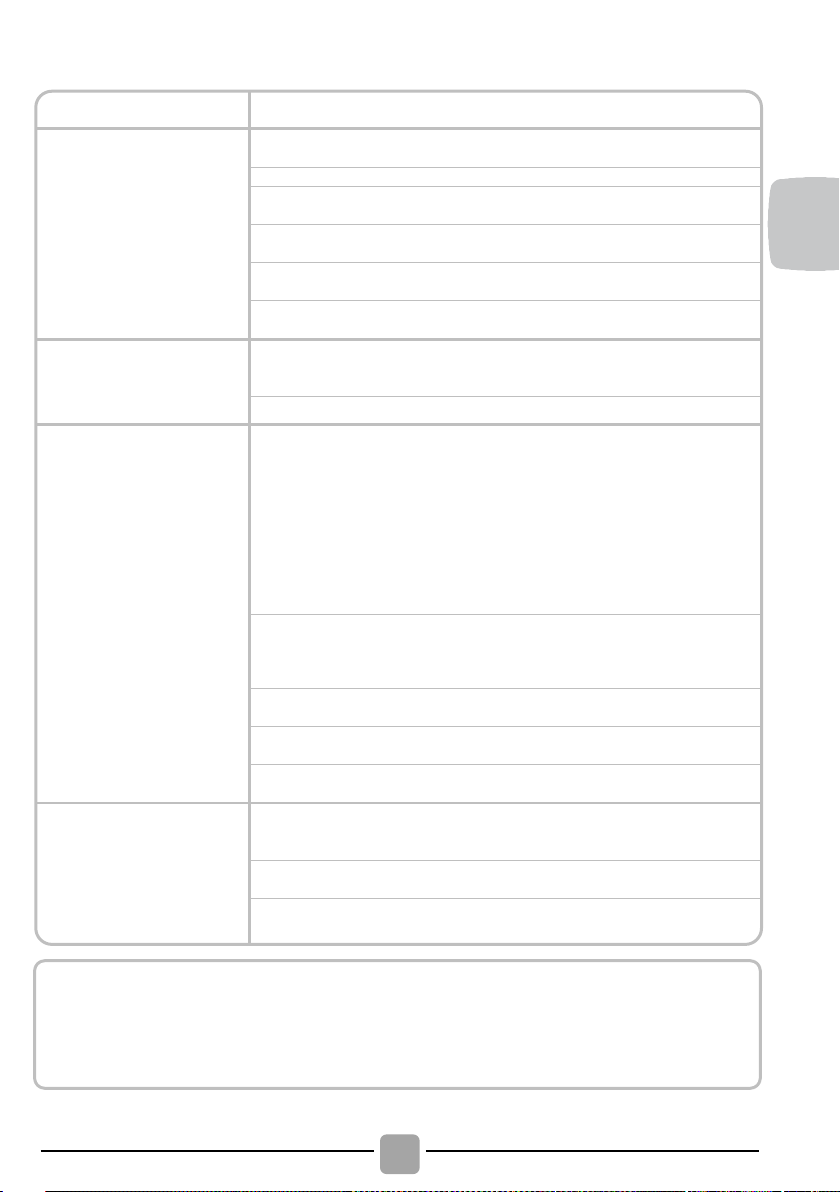
53
DE
Die Waschmaschine
Stellen Sie sicher, dass das Gerät an einer funktionierenden
Steckdose angeschlossen ist.
Stellen Sie sicher, dass das Gerät eingeschaltet ist.
Stellen Sie sicher, dass die Steckdose funktioniert, und testen Sie
das mit einem anderen Gerät (eine Lampe)
Es kann sein, dass die Tür nicht korrekt geschlossen ist: öffnen und
schließen Sie es noch einmal.
Überprüfen Sie, ob das gewünschte Programm richtig gewählt und
die Start-Taste gedrückt ist.
Stellen Sie sicher, dass sich das Gerät nicht im Pause-Modus
befindet.
Wasser ist auf den
ausgelaufen.
Dies kann an einem Leck in der Dichtung zwischen Wasserhahn und
festziehen.
Stellen Sie sicher, dass der Filter richtig geschlossen ist.
Die Trommel der
Falls die Wäsche nicht optimal in die Maschine geladen wurde, kann
erneut und starten Sie das Programm noch einmal.
Dies könnte daran liegen, dass das Wasser noch nicht komplett
läßt, schauen Sie unter Abschnitt Fehler 3.
Einige Modelle verfügen über eine Funktion "Nicht schleudern":
stellen Sie sicher, dass diese nicht aktiviert ist.
Stellen Sie sicher, dass nichts aktiviert ist, was das Schleudern
beeinträchtigt.
Zu viel Waschmittel könnte den Beginn des Schleuderorgangs
verzögern.
Während des
Eventuell steht die Waschmaschine nicht vollständig eben: falls
die Füße einstellen, wie in der Anleitung beschrieben.
Stellen Sie sicher, dass Befestigungsschrauben, Gummistopfen
und Schlauchverlängerungen für den Transport entfernt wurden.
Stellen Sie sicher, daß keine Fremdkörper in die Trommel
Die Standard-Garantie des Herstellers umfasst Fehler, welche durch elektrische
einer nicht beachteten Gebrauchsanleitung, kann eine Gebühr erhoben werden.
SONSTIGE AUFFÄLLIGKEITEN
Problem Mögliche Ursachen und praktische Lösungen
geht nicht/startet nicht
Boden in der Nähe
Waschmaschine
Waschmaschine dreht
sich nicht.
.
Schlauch liegen; in diesem Fall die Dichtung erneuern und alles gut
folgendes passieren:
• Es wird versucht, das Gewicht auszubalanzieren, und dadurch
verlangsamt sich die Umdrehungszahl.
• Drehzahl der Trommel wird langsamer, um Vibrationen und Lärm
zu verringern.
• Trommel schaltet sich ab, um die Waschmachine zu schützen.
Stellen Sie sicher, dass die Wäsche gleichmäßig verteilt ist. Falls
dies nicht so ist, entwirren Sie die Wäsche, füllen Sie die Maschine
eingelaufen ist:
warten Sie ein paar Minuten. Falls dies Problem sich nicht beheben
Schleuderns hört man
notwendig,
starke Vibrationen /
Geräusche.
oder mechanische Fehler des Produktes verursacht wurden, als Handlung oder
Unterlassung des Herstellers. Falls ein Fehler durch Faktoren außerhalb des
(Münzen, Scharniere, Knöpfe, usw...) gelangen.
gelieferten Produktes verursacht wurde, durch Fehlbedienung oder als Resultat

54
Abgesehen von der Ersatzteilliste auf
unserer Website dürfen Sie das Gerät unter
keinen Umständen selbst reparieren oder
versuchen zu reparieren oder das Gerät
von unerfahrenen und/oder unqualifizierten
Personen reparieren lassen. Reparaturen,
die von unerfahrenen und/oder
unqualifizierten Personen durchgeführt
werden, können zu Verletzungen oder
schwerwiegenden Fehlfunktionen des
Geräts sowie zu Sachschäden führen. Es
ist ratsam, sich an unsere autorisierten
technischen Kundendienstzentren zu
wenden.
Wir
Ersatzteile zu verwenden, die Sie bei
unserem Kundendienst für einen Zeitraum
von mindestens
ab dem
Inverkehrbringen des Geräts im
Europäischen Wirtschaftsraum erhalten
können.
Ab dem 1. März 2021 sind die Energie- und
Umweltinformationen im Zusammenhang
mit der Energiekennzeichnung von
Haushaltsgeräten und die Spezifikationen für
deren Ökodesign in Europa in der
Produktdatenbank (EPREL) unter folgendem
Link
oder über den
QR
Mit der Anbringung des
Zeichens
am Gerät zeigen wir an, dass wir
sämtliche für dieses Produkt geltenden
und notwendigen europäischen Sicherheits-,
Gesundheits- und Umweltstandards
einhalten und hierfür haftbar sind.
Wir schließen die Haftung für alle evtl.
Druckfehler aus.
Kleinere Änderungen und technische
Weiterentwicklungen im Detail vorbehalten.
Garantie
Die Garantiezeit des Gerätes entspricht
den jeweiligen gesetzlichen Vorschriften.
Garantieersatzansprüche aufbewahren,
um diese im Bedarfsfall unserem
Werkskundendienst vorzulegen. Ohne
diese Nachweise können wir und unser
enst den Anspruch nicht
anerkennen
et nicht für Schäden
an Sachen und Personen und/oder für
Sicherheitsmängel, die durch
Reparaturen entstehen, die nicht von
einem autorisierten technischen
Kundendienst oder einem vom
Hersteller autorisierten Dienstleister
gemäß den Unternehmensrichtlinien
für die Reparatur und Wartung seiner
Produkte durchgeführt wurden.
Schäden, die durch nicht autorisiertes
Personal während eines
Reparaturversuchs am Produkt
verursacht werden, fallen nicht unter
empfehlen Ihnen, stets Original
10 Jahren
WARNUNG:
Der Hersteller haft
Nähere Angaben zu Art und Umfang
der Garantiebedingungen finden
Sie im Garantieheft. Bitte das
Original der Kaufrechnung für die
Werkskundendi
-
die herkömmliche Garantie.
https://eprel.ec.europa.eu/
-Code auf dem Energieetikett abrufbar.

55
EN
Thank you for choosing this product.
We are proud to offer the ideal product for
you and the best complete range of home
appliances for your daily routine.
Carefully read this manual for correct and
safe appliance use and for helpful tips on
efficient maintenance.
machine after
carefully reading these instructions. We
recommend you always keep this manual on
hand and in good condition for any future
owners.
Each product is identified by a unique 16character code, also called the “serial
number”, printed on the sticker. This can be
found inside the door opening. This code is
a unique code for your product that you will
need to register the product warranty, or if
you need to contact the Customer Service
Centre.
This appliance is marked according to
the European directive 2012/19/EU
on Waste Electrical and Electronic
Equipment (WEEE).
WEEE contains both polluting substances (which
can cause negative consequences for the
environment) and basic components (which can
be re-used). It is important to have WEEE
subjected to specific treatments, in order to
remove and dispose properly all pollutants, and
recover and recycle all materials. Individuals can
play an important role in ensuring that WEEE
does not become an environmental issue; it is
essential to follow some basic rules:
WEEE should not be treated as household
WEEE should be handed over to the relevant
collection points managed by the municipality or
by registered companies. In many countries, for
In many countries, when you buy a new
appliance, the old one may be returned to the
retailer who has to collect it free of charge on a
one
one basis, as long as the equipment is of
equivalent type and has the same functions as
the supplied equipment.
1.
2.
3.
4.
5.
6.
7.
8.
9.
Contents
Environmental conditions
FOR U.K. ONLY
On receipt of your appliance please
check it carefully for damage. Any
damage found must be reported
delivery driver immediately.
damage found must be
reported to the retailer within 2 days of
receipt.
Only use the washing
to the
Alternatively
waste;
large WEEE, home collection could be present.
-to-
GENERAL SAFETY RULES
INSTALLATION
DETERGENT DRAWER
PRACTICAL HINTS
CLEANING AND MAINTENANCE
REMOTE CONTROL (WI-FI)
QUICK USER GUIDE
CONTROLS AND PROGRAMS
TROUBLESHOOTING AND WARRANTY

56
1. GENERAL SAFETY RULES
This appliance is intended to
be used in household and
similar applications such as:
- Staff kitchen areas in shops, offices
and other working environments;
- Farm houses;
- By clients in hotels, motels and
other residential type environments;
- Bed and breakfast type environments.
A different use of this appliance
from household environment
or from typical housekeeping
functions, as commercial use by
expert or trained users, is excluded
even in the above applications. If
the appliance is used in a manner
inconsistent with this it may reduce
the life of the appliance and may
void the manufacturer’s warranty.
Any damage to the appliance or
other damage or loss arising
through use that is not consistent
with domestic or household use
(even if located in a domestic or
household environment) shall not
be accepted by the manufacturer to
the fullest extent permitted by law.
This appliance can be used by
children aged from 8 years and
above and persons with reduced
physical, sensory or mental
capabilities or lack of experience
and knowledge if they have been
given supervision or instruction
concerning use of the appliance
in a safe way and understand the
hazards involved.
Children shall not play with the
appliance. Cleaning and user
maintenance shall not be made
by children without supervision.
Children should be supervised
to ensure that they do not play
with the appliance.
Children of less than 3 years
should be kept away unless
continuously supervised.
If the supply cord is damaged, it
must be replaced by a special
cord or assembly available from
the manufacturer or its service
agent.
Only use the hose-sets
supplied with the appliance for
the water supply connection
(do not reuse old hose-sets).
Water pressure must be between
0.05 MPa and 1 MPa.
Make sure carpets or rugs do
not obstruct the base or any of
the ventilation openings.
After installation, the appliance
must be positioned so that the
plug is accessible.
The maximum load capacity of
dry clothes depends on the
model used (see control panel).
To consult the product technical
specification please refer to the
manufacturer website.

57
EN
water may reach very high
temperatures during the
wash cycle.
Electrical connections and
safety instructions
The technical details (supply
voltage and power input) are
indicated on the product rating
plate
Make sure that the electrical
system is earthed, complies
with all applicable law and that
the (electricity) socket is
compatible with the plug of the
appliance. Otherwise, seek
qualified professional assistance.
The use of converters, multiple
sockets or extension cords is
strongly advised against
Before cleaning or maintaining
the washing machine, unplug
the appliance and turn off the
water tap.
Do not pull on the power cord
or appliance to unplug the
machine.
Make sure there is no water in
the drum before opening the
door.
Do not expose the washing
machine to rain, direct sunlight
or other weather elements.
Protect from possible freezing.
When moving, do not lift the
washing machine by the knobs
or detergent drawer; during
transport, never rest the door on
the trolley. We recommend two
people lift the washing machine.
In the event of fault and/or
malfunction, turn off the
washing machine, close the
water tap and do not tamper
with the appliance.
Immediately contact the
Customer Service Centre and
only use original spare parts.
Failure to observe these
instruction may jeopardise
appliance safety.
WARNING:
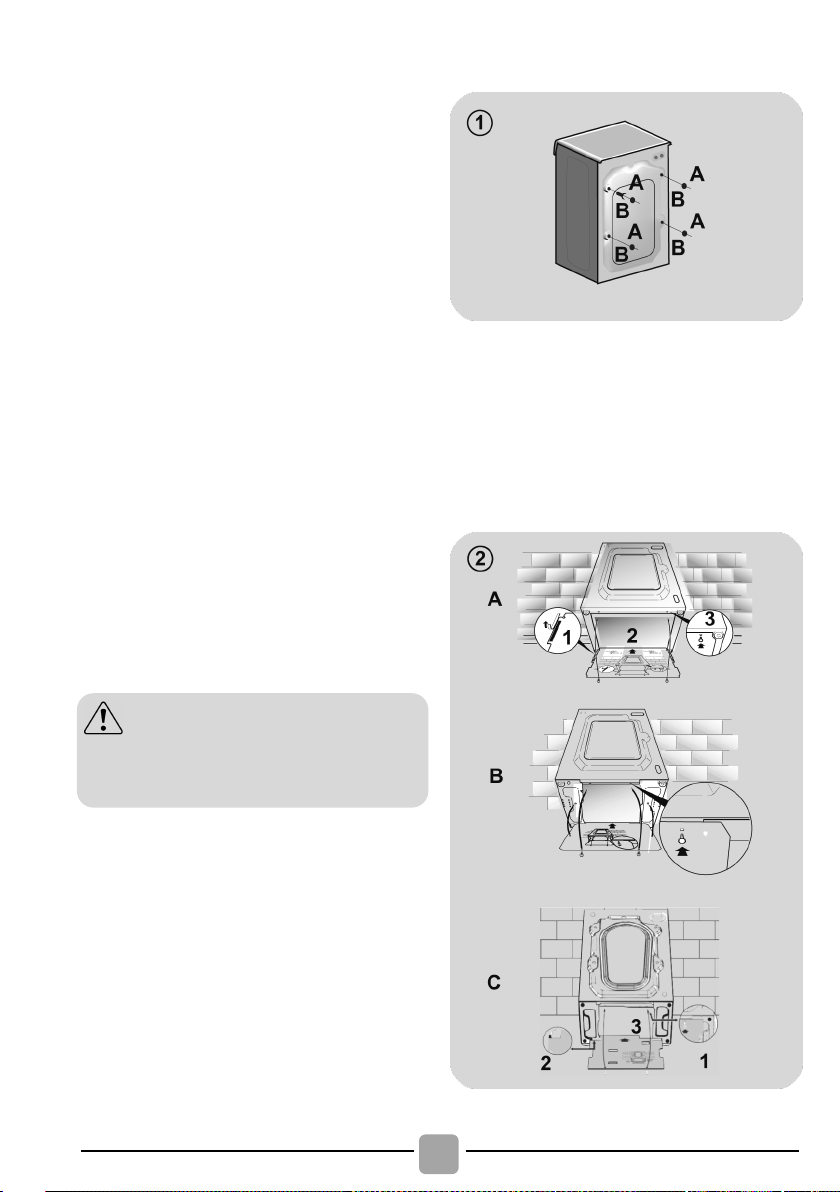
58
Remove the 2 or 4 transportation
on the back and
flat washers,
rubber bungs and plastic spacer
.
-
4
and
flat washers,
rubber bungs and plastic spacer
During the removal of the screws
occasionally spacer tubes fall
inside the product, these can be
remove by tilting the product forward
and recovering them from the floor
Cover the open transportation screw
plastic caps
Place the corrugated plastic
sheet, found on top of the
appliance during the unpacking
, into the base of the
figure 2
(according to the model,
*
In some models, the corrugated
plastic sheet is not provided.
keep packaging materials
away from children.
2. INSTALLATION
screws
remove the 2 or 4
tubes
If the washing machine is
in
, unscrew the 3 or
transportation screws
remove the 3 or 4
tubes
or inside the base of the machine.
holes with the 2 or 4
included in the instruction bag.
WARNING:
(A)
(B)
as illustrated
in figure 1
(B)
.
(A)
built
process*
appliance as shown in
consider version A, B or C).

59
EN
Connect the water hose to the water
only using the hose
supplied with the appliance (do not
may include one or
water mains connection settings with hot
and cold water for higher energy savings.
Connect the grey tube to the cold water
and the red one to the hot water
n be connected to
the cold water tap only: in this case, some
a device located on the supply tube that
stops water flow if the tube deteriorates;
in this case, a red mark will appear in the
” and the tube must be
replaced. To unscrew the nut, press the
SUPPLY TUBE WITH
Should water leak from the primary
, the transparent
" will contain water
to permit the washing cycle to complete.
At the end of the cycle, contact the
Customer Service Centre to replace the
Hydraulic connections
supply tap (fig. 3)
reuse old hose-sets).
SOME MODELS
more of the following features:
HOT&COLD (fig. 4):
tap
tap. The machine ca
programs may start a few minutes later.
AQUASTOP (fig. 5):
window “A
one-way lock device "B".
AQUAPROTECT –
GUARD (fig. 6):
internal tube "A"
containment sheath "B
supply tube.

60
The washing machine should be installed in
its final position such that the water fill hose
is not kinked or trapped. The corrugated
drain hose should be inserted into suitable
drain pipe of between 50 cm and 85 cm
ht above the floor using the curved drain
hose support. If an under sink connection is
used the drain hose must be routed above
the sink overfill opening to prevent back
siphoning. Care must be taken to avoid
Level the appliance using the feet as
turn the nut clockwise to release the
rotate the foot to raise or lower it until it
lock the foot, screwing in the nut, until it
tightens against to the bottom of the
*
contact the Customer Service Centre
should the power cord need
by
the manufacturers warranty.
Setting
heig
kinking or trapping the drain hose
illustrated in figure 8:
a.
screw;
b.
touches to the floor;
c.
washing machine.
Plug in the appliance.
WARNING:
replacement.
Installation faults are not covered
(fig. 7)
.
ACCESSORY SOLD SEPARATELY

61
EN
SOME MODELS are provided with the
automatic dosage, this carries out a
precise measurement of detergent and
In this case, refer to the
specific section in the CONTROLS
AND PROGRAMS chapter for details.
some detergents are not designed for
use in the dispenser drawer but are
wn dispenser that
is placed in the drum directly.
only use liquid products; the washing
machine is set to automatically dose
additives at each cycle during the last
rinse.
3. DETERGENT DRAWER
The detergent draw is split into 3
compartments as illustrated in figure 9:
compartment "1": for prewash detergent;
compartment “ ”: for special additives,
softeners, starch fragrances, etc.;
WARNING:
compartment "2": for washing
detergent.
A liquid detergent cup is also included IN
SOME MODELS (fig. 10). To use it, place it
in compartment "2". This way, liquid
detergent will only enter the drum at the
right time. The cup can also be used for
bleach when the “Rinse” program is
selected.
WARNING:
supplied with their o
softener.

62
Dosing the detergent
Useful advice for saving
Load tips
4. PRACTICAL HINTS
When sorting laundry, make sure:
- have eliminated metallic objects such as
hair clips, pins, coins, from laundry;
- to have buttoned pillow cases, closed zips,
tied loose belts and long robe ribbons;
- to have removed rollers, hooks or clips
from curtains;
- to have carefully read clothing washing
labels;
- to have removed any persistent stains
using specific detergents.
When washing rugs, bedcovers or other
heavy clothing, we recommend you avoid
the spinning cycle.
To wash wool, make sure the item can be
machine washed. Check the fabric label.
Leave the appliance’s door slightly open
between washes, to prevent possible bad
smells developing inside the machine.
Tips on how to save money and not
damage the environment when using your
appliance.
Load the machine to the highest capacity
shown in the programme table for each
programme - this will allow you to SAVE
energy and water.
Noise and residual laundry moisture are
affected by spin speed: a faster spin is
associated with greater noise and lower
residual moisture in the laundry.
The most efficient programmes in terms
of combined use of water and energy are
usually the longer-lasting ones with lower
temperature.
Maximise the load size
Achieve the best use of energy, water,
detergent and time by using the
recommended maximum load size.
Save up to 50% energy by washing a full
load instead of 2 half loads.
Do you need to pre-wash?
For heavily soiled laundry only!
SAVE detergent, time, water and
between 5 to 15% energy consumption
by NOT selecting Prewash for slight to
normally soiled laundry.
Is a hot wash required?
Pretreat stains with stain remover or soak
dried in stains in water before washing to
reduce the necessity of a hot wash
programme. Save energy by using a low
temperature wash programme.
Before using a drying programme
(WASHER-DRYERS)
SAVE energy and time by selecting a
high spin speed to reduce the water
content in laundry before using a drying
programme.
Below is a short guide with tips and advice
on the use of detergent.
Only use detergents suitable for machine
washing.
Select your detergent according to the
type of fabric (cotton, delicates,
synthetics, wool, silk, etc.), the colour, the
type and level of soiling and the
programmed washing temperature.
To use the right amount of detergent,
softener or any other additives, carefully
follow the manufacturer’s instructions
every time: correctly using the
appliance with the right dose allows
you to avoid waste and to reduce the
environmental impact.

63
EN
For washing wool or silk, only use
for
For washing at temperatures below
we recommend the use of liquid
detergents or detergents specifically
labeled as suitable for low temperature
For washes between 40°C and 60°C
e of detergent used needs to be
appropriate for the type of fabric and
level of soiling. Normal powders are
suitable for “white” or colour fast fabrics
with high soiling, while liquid detergents
or “colour protecting” powders are
ics with light
levels of soiling.
When washing heavily soiled whites,
f
or above and a normal washing
powder (heavy duty) that contains
bleaching agents that at medium/high
temperatures provide excellent results.
we recommend using cotton programs
60°C
the typ
suitable for coloured fabr
40°C
washing.
detergents specifically formulated
these fabrics.
Too much detergent leads to excessive
foam, which prevents the cycle being
carried out correctly. It could also affect
the quality of the washing and rinsing.
The use of ecological detergents without
phosphates may cause the following
o
effects:
- cloudier rinse drain water: This effect is
tied to the suspended zeolites which do
not have negative effects on rinse
efficiency.
- white powder (zeolites) on laundry at
the end of the wash: this is normal, the
powder is not absorbed by fabric and does
not change its colour.
To remove the zeolites, select a rinse
programme. In the future consider using
slightly less detergent.
- foam in the water at last rinse: this does
not necessary indicate poor rinsing.
Consider using less detergent in future
washes.
- abundant foam: This is often due to the
anionic surfactants found in the detergents
which are hard to eliminate from laundry.
In this case, do not re-rinse to eliminate
these effects: it will not help at all.
We suggest conducting a maintenance
wash using a proprietary cleaner.
If the problem persists or if you suspect a
malfunction, immediately contact an
Authorised Customer Service Centre.

64
DO NOT use acid products (for example
vinegar) or aggressive detergents to
clean the drawer, in order to avoid
damaging the seals and/or internal
Before proceeding with cleaning, all
the compartments must be empty.
Drawer cleaning
Cleaning the appliance’s exterior
5. CLEANING AND MAINTENANCE
Looking after your appliance correctly can
extend its lifespan.
Fill the drawer with hot water.
Disconnect the machine from the power
supply.
Clean the appliance’s external cabinet,
using a damp cloth and AVOIDING
ABRASIVES, ALCOHOL AND/OR
DILUENTS.
It is advisable to regularly clean the
detergent drawer to avoid the
accumulation of detergent and additive
residues.
Remove the drawer gently but firmly.
Clean the drawer under running water
and put it back into its compartment.
FOR MODELS WITH AUTOMATIC LIQUID
DETERGENT AND SOFTENER DOSING
SYSTEM:
Pull out the drawer completely by
pressing the release button, paying
attention to the leakage of detergent
residues.
Shake the drawer in order to let the water
flow in all the compartments.
Empty the drawer from excess water and
reinsert it completely.
WARNING:
parts of the appliance.

65
EN
FOR MODELS WITH AUTOMATIC
LIQUID DETERGENT AND SOFTENER
should you need to tilt or move the
machine, remove the detergent drawer
before proceeding, keeping it
horizontal so as to avoid any leakage.
Suggestions for moves or
prolonged disuse
Cleaning the pump filter
The appliance has a special filter that
traps larger residues that could block the
draining system, such as buttons or coins
(depending on the model, consider
version A or B).
We recommend checking and cleaning
the filter 5 or 6 times a year.
Disconnect the machine from the power
supply.
Ensure all the water has been emptied
from the drum.
Before unscrewing the filter, we
recommend you place an absorbent cloth
under it to keep the floor dry. A small
amount of water will come out of the filter
as you remove it - this is normal.
Turn the filter counter-clockwise to the
limit stop.
Remove and clean the filter; when
finished, replace it turning it clockwise.
The filter handle will be locked when it is
not possible to turn any further and the
handle is horizontal. Smearing a small
amount of liquid soap on the filter seal will
help refitting.
Repeat the previous steps in reverse
order to reassemble all parts.
If the appliance is kept in a non-heated
room for long periods of time, all water
residues must be completely removed
from the pipes.
Disconnect the machine from the power
supply socket.
Detach the tube from the drainage system
and clip on the rear of the machine and
lower it, fully draining water into a bowl.
Secure the drain tube with the drainage
system and clip on the rear of the
machine when finished.
Keep the door glass and gasket clean.
DOSING SYSTEM:

66
This appliance is equipped with Wi-Fi
technology that allows you to control it
remotely via App.
APPLIANCE PAIRING (ON APP)
App on your device by
Open the App, create the user profile (or
in if it is already created previously)
and pairing the appliance following the
TO ENABLE REMOTE CONTROL
Check that the router is switched on and
Load the laundry, close the door, add the
SMART RING (programme
REMOTE CONTROL
: the door will lock and
the controls on the control panel will be
Start the cycle using the app. When the
cycle has been completed, turn off the
to
TO DISABLE REMOTE CONTR
mode while
SMART
REMOTE
without going
. The control panel on
the appliance will be operative once
again, and if the cycle is paused, you will
DOOR
SMART
Fi)
position to control the appliance using the
app once again. If there is a cycle
For safety reasons, in some wash
cycle phases, the door can be
ly if the level of the water
is below its lower edge and if the
temperature is less than 45°C. If
these conditions are met, wait for the
DOOR LOCKED light to switch off
before opening the door.
The frequency of the home Wi-Fi network
has to be set on the 2.4 GHz band. You
can not configure the machine if your
home network is set to the 5 GHz band.
Get all the details of the Wi-Fi
functions by browsing the App in
DEMO mode.
The App is available for devices
running both Android and iOS, both
for tablets and for smartphones.
6. REMOTE CONTROL (WI-FI)
Download the hOn
framing the following QR code:
or by the link:
go.haier-europe.com/download-app
log-
instructions on the device display.
connected to the Internet.
detergent if it’s necessary.
Turn the
selection ring)
(Wi-Fi) position
disabled.
to the
machine by turning the SMART RING
the OFF position to unlock the door.
OL
To exit REMOTE CONTROL
a cycle is underway, turn the
RING to any position other than
CONTROL (Wi-Fi),
through the OFF
be able to open the door once the
LOCKED indicator light switches off.
opened on
With the door closed, turn the
RING to the REMOTE CONTROL (Wi-
underway, it will continue.

67
EN
A
SMART RING (programme
selection ring)
B
PLAY/PAUSE button
C
DELAY START button
D
OPTIONS button
E
SPECIAL PROGRAMMES button
F
TEMPERATURE SELECTION
button
G
SPIN SELECTION button
H
STAIN LEVEL/ALTERNATIVE
PROGRAMME SELECTION/STEAM
LEVEL button
F+G
CHILD LOCK
I
Digital display
Technical data
DRYING (WASHER-DRYERS only)
If you would like the drying cycle to
begin automatically after washing,
select the washing programme
Or you can finish the wash and then
select the drying programme.
Program selection
7. QUICK USER GUIDE
This appliance automatically adjusts the
level of the water to the type and quantity of
washing. This system gives a reduction in
energy consumption and a saving in
washing times.
Turn on the appliance and select the
required program.
Adjust the washing settings if necessary
and select the required options.
required and select the drying cycle.
Press the programme start button.
The end of the programme will be
indicated by a message on the display
(on some models, all the indicator lights
on the stage will light up).
Turn off the appliance.
For any type of wash, see the program
table and follow the operating sequence
as indicated.
8. CONTROLS AND PROGRAMS
Water pressure:
min 0.05 Mpa / max 1 Mpa
(0.05 MPa dispenses approximately 1 litre
of water in 10 seconds)
Spin r.p.m.: See rating plate.
Power input / Power current fuse amp /
Supply voltage: See rating plate.

68
The SMART RING must ALWAYS be
put in the OFF position at the end of
the washing cycle before you can
select a new washing cycle.
Only the options compatible with the
set programme can be selected.
Close the porthole BEFORE pressing
the PLAY/PAUSE button.
PLAY/PAUSE button
First starting
SMART RING (ring for selecting
programmes)
the plug because the machines
calibrates the systems during the first
, the
machine couldn’t work property. In
this case, remove the plug and repeat
the operation.
WARNING:
Don’t touch the buttons while inserting
seconds: touching the buttons
To start the selected cycle with the preset
parameters, press PLAY/PAUSE. When
the programme is running, the display will
show the time to elapse.
Moreover, if you want to modify the
chosen program, press the desired
options buttons, modify the default
parameters and then press PLAY/
PAUSE button to start the cycle.
When the SMART RING is turned, the
appliance will be turned on and the
display will show the description and
parameters of the selected programme.
At the end of the cycle, remember to
switch off the appliance by turning the
SMART RING to the OFF position, then
unplug the appliance and turn off the
water supply.
- Language setting
After connecting the machine to the
network and turning it on, press the "F"
or "G" button to display the available
languages.
Select the desired language pressing the
PLAY/PAUSE button.
- Change the language
If you want to change the setting language
you will have to press simultaneously "C"
and "H" buttons for about 5 seconds. The
word ENGLISH will appear on the display
and it will be possible to choose a new
language (by pressing button "F" or "G").
After switching on the appliance, wait a
few seconds for the programme to start
running.
PROGRAMME DURATION
When a programme is selected the
display automatically shows the cycle
duration, which can vary, depending on
the options selected.
Once the programme has started you will
be kept informed constantly of the time
remaining to the end of the wash.
The appliance calculates the time to the
end of the selected programme based
upon a standard loading, during the cycle,
the appliance corrects the time to that
applicable to the size and composition of
the load.
PROGRAMME END
"END" will appear in the display at the
end of the program and the DOOR
LOCKED light will go off, it is now
possible to open the door.
At the end of the cycle, turn off the
washing machine by turning the SMART
RING to the OFF position.

69
EN
PAUSING THE MACHINE
OPTIONS button
DELAY START button
For safety reasons, in some wash
cycle phases, the door can be opened
only if the level of the water is below
its lower edge and if the temperature
is less than 45°C. If these conditions
wait for the DOOR LOCKED
light to switch off before opening the
door.
While a cycle is running, the machine can
be paused by simply pressing the
PLAY/PAUSE button.
You can cancel the start delay by turning
the SMART RING to the OFF position.
If there is a break in the power supply
whilst the machine is operating, when
the power is restored, the machine will
restart from the beginning of the phase it
was in when the power was lost.
are met,
Press the PLAY/PAUSE button again to
resume the programme from the cycle
phase where it left off.
CANCELLING THE SET PROGRAMME
To cancel the programme, turn the
SMART RING to the OFF position.
Wait until the DOOR LOCKED light has
gone out before opening the door.
This button allows you to pre-programme
the wash cycle to delay the start of the
cycle for up to 24 hours.
To delay the start use the following
procedure:
- Select the required programme.
- Press the button once to activate the
delay start and then press it again (or
hold it) to set the desired delay. The
delay increases each time the button is
pressed up to 24 hours, at which point
pressing the button again will reset the
delay start to zero.
- Confirm by pressing the PLAY/PAUSE
button. The delay countdown will begin
and when it has finished the programme
will start automatically.
This button allows you to choose between
three different options:
- PREWASH
This option allows you to make a prewash
and it is particularly useful for heavily
soiled loads (can be used only on some
programmes as shown in the table of
programmes).
We recommend you use only 20% of the
recommended quantities shown on the
detergent pack.
- EXTRA RINSE
This option allows you to add one rinse at
the end of the washing cycle and is useful
for people with delicate and sensitive
skin, for which a small amount of
detergent residue can cause irritations or
allergies.
It is advisable to also use this function for
the children clothes and for the washing
of heavily soiled items, which requires a
lot of detergent to be used, or for the
washing of toweling items whose fibres
mostly have the tendency to hold the
detergent.
- EASY IRON
This function allows you to minimizes
creases as much as possible, eliminating
the intermediate spins or reducing the
intensity of the last one (available on some
programmes only).

70
Use only powder detergent.
To prevent damage to the fabrics, it is
not possible to increase the speed
over the maximum allowed for the
programme.
SPIN SELECTION button
TEMPERATURE SELECTION
button
These options must be selected
before pressing the PLAY/PAUSE
If an option is selected that is not
compatible with the selected
programme then the option indicator
light first flashes and then goes off.
SPECIAL PROGRAMMES button
These options must be selected
before pressing the PLAY/PAUSE
at is not
compatible with the selected
programme then the option indicator
light first flashes and then goes off.
button.
If an option is selected th
This button allows you to choose between
three different options (available for some
programmes only):
- SINGLE ITEM
This option (which can be set in several
programs) optimizes the water and
energy consumption of the selected
program, maintaining the washing
performance unchanged.
SINGLE ITEM is designed for reduced
loads and lightly soiled garments, aiming
to limit the unnecessary waste.
- NIGHT WASH
This option reduces the intermediate spin
speed to 400 rpm, where applicable,
increase the water level during rinsing
and keep the laundry immersed in water
after the final rinse, in order to spread the
fiber perfectly.
Do not start the programme with laundry
in the washing machine.
It is suggested that this is carried out after
every 50 washing cycles.
The option can only be selected for the
DRAIN & SPIN programme.
button.
This button allows you to change the
temperature of the wash cycles.
It is not possible to raise the temperature
over the maximum allowed for the
programme, in order to protect the
fabrics.
If you want carry out a cold wash all the
indicators must be off.
During the drum water retention phase,
the machine is in pause mode.
Press PLAY to end the cycle with the
spin (which can be reduced or removed
with the specific button) and drain phase.
Thanks to electronic control, the water in
the intermediate phases is emptied
silently, making this option very useful for
washing at night.
- DRUM CLEAN
Developed to clean the washing machine
drum.
By pressing this button, it is possible to
reduce the maximum speed, and if you
wish, the spin cycle can be cancelled.
If the label does not indicate specific
information, it is possible to use the
maximum spin expected in the program.

71
EN
CHILD LOCK
STAIN LEVEL/ALTERNATIVE
PROGRAMME SELECTION/
STEAM LEVEL button
The machine is fitted with a special
electronic device, which prevents the
spin cycle should the load be
unbalanced. This reduces the noise
and vibration in the machine and so
An over dosing of detergent can cause
excessive foaming. If the appliance
detects the presence of excessive foam,
it may exclude the spinning phase or
and increase water consumption.
To reactivate the spin cycle press the
button until you reach the spin speed you
would like to set.
It is possible to modify the spin speed
without pausing the machine.
extend the duration of the program
prolongs the life of your machine.
This button can be used to select three
different functions, depending on the
selected programme:
- STAIN LEVEL button
Once the programme has been selected
the wash time set for that programme will
be automatically shown.
This option allows you to choose between
3 levels of wash intensity modifying the
length of the programme, depending on
how much the fabrics are soiled (can
only be used on some programmes as
shown in the table of programmes).
- ALTERNATIVE PROGRAMME
SELECTION
Where shown in the table, this option
permits selection of an alternative to the
pre-set programme (in the case of the
RAPID (14'/30'/44') programme, it allows
you to choose one of the three available
durations).
- STEAM LEVEL
After selecting the EASY IRON PLUS
programme, you can use this button to
choose between three steam treatments of
different intensities, designed for dry or wet
garments and depending on the type of
fabric:
- COTTON (default selection)
This programme is used for cotton
garments. On wet fabrics (e.g., after
washing), it is suitable for relaxing
creases after spinning; on dry fabrics it
is instead designed to achieve the ideal
humidity level for easier ironing.
- SYNTHETIC (press button once)
This programme is used for synthetic
garments. On wet fabrics (e.g., after
washing), it is suitable for relaxing
creases after spinning; on dry fabrics it
is instead designed to achieve the ideal
humidity level for easier ironing.
- DELICATES (press button twice)
With the help of steam, the cycle
refreshes and relaxes creases in
garments after use. The programme
consists of an initial phase in which the
steam acts and a final phase in which
the excess humidity is removed for
immediate use. The cycle is suitable for
dry fabrics.
Pressing simultaneously the buttons "F"
and "G" for about 3 seconds, the
machine allows you to lock the keys. In
this way, you can avoid making
accidental or unwanted changes if a
button on the display is pressed
accidently during a cycle.
The key lock can be simply cancelled by
pressing the two buttons simultaneously
again or turning off the appliance.
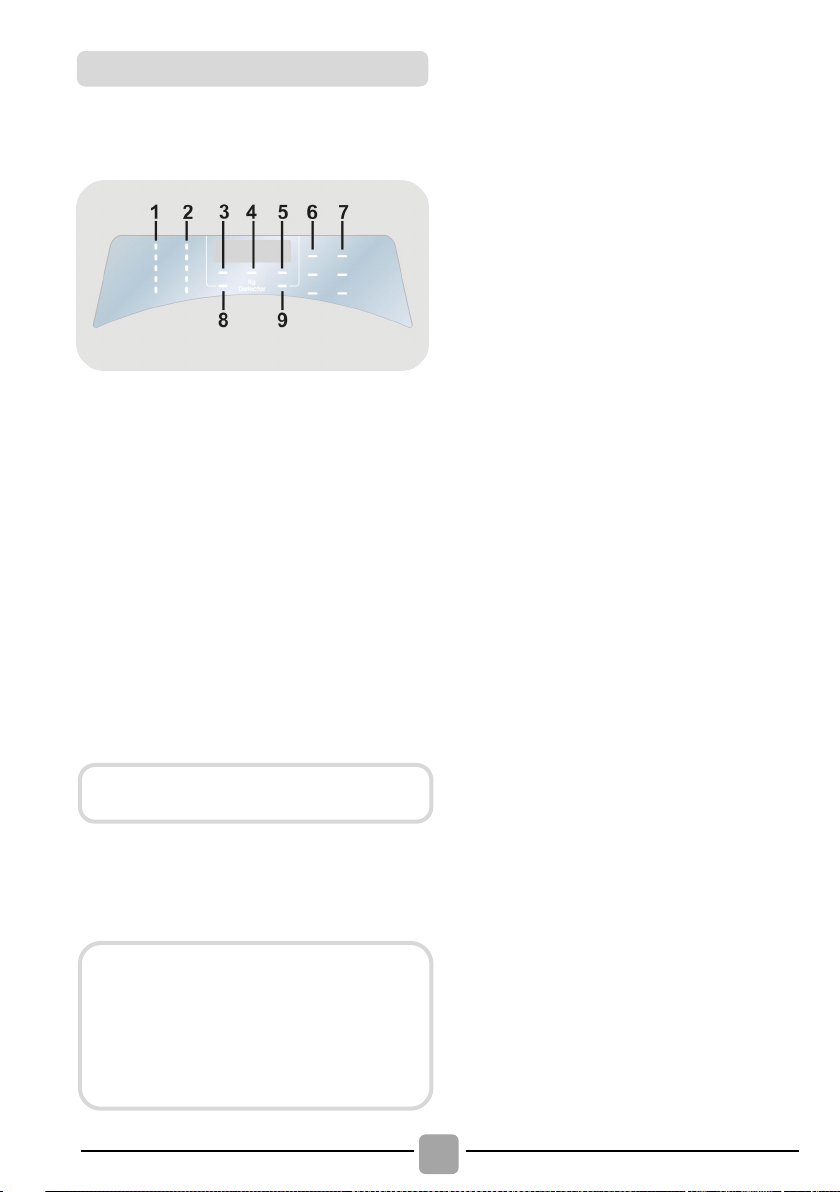
72
If the door is not properly closed,
for
, after which the
will be automatically
the door in
PLAY/PAUSE button.
Close the door BEFORE selecting the
PLAY/PAUSE button.
Digital display
The display’s indicator system allows you to
be constantly informed about the status of
the machine.
1)
WASH TEMPERATURE INDICATOR LIGHTS
This show the washing temperature of the
selected programme that can be changed
(where allowed) by the relevant button. If
you want carry out a cold wash all the
indicators must be off.
2) SPIN SPEED INDICATOR LIGHTS
This show the spin speed of the selected
programme, you can reduce or omit by the
relevant button.
3) DOOR LOCKED INDICATOR LIGHT
The indicator light is illuminated when the
door is fully closed.
When PLAY/PAUSE is pressed on the
machine with the door closed, the
indicator will flash momentarily and then
illuminate.
the light will continue to flash
about 7 seconds
start command
delete. In this case, close
the proper way and press the
Wait until the DOOR LOCKED light has
gone out before opening the door.
4) Kg Detector (function active only on
certain programmes)
During the first minutes of the cycle, the
"Kg Detector" indicator remain on while
the intelligent sensor will weigh the
laundry and adjust the cycle time, water
and electricity consumption accordingly.
Through every wash phase
allows to monitor information on the wash
load in the drum and in the first minutes
of the wash it:
- adjusts the amount of water required;
- determines the length of the wash cycle;
- controls rinsing according to the type of
fabric selected to be washed it;
- adjusts the rhythm of drum rotation for
the type of fabric being washed;
- recognizes the presence of lather,
increasing, if necessary, the amount of
water during rinsing;
- adjusts the spin speed according to the
load, thus avoiding any imbalance.
"Kg Detector"
5) KEY LOCK INDICATOR LIGHT
The indicator light show that the keys
are locked.
6) OPTIONS INDICATOR LIGHTS
The indicator lights show the option that
can be selected by the relevant button.
7) SPECIAL PROGRAMMES INDICATOR
LIGHTS
The indicator lights show the option that
can be selected by the relevant button.
8) STAIN LEVEL INDICATOR LIGHT
The indicator light shows the selection of
the relevant option.

73
EN
9) Wi-Fi INDICATOR LIGHT
On models equipped with Wi-Fi, it
indicates the status of the connection. It
could be:
- FIXED ON: remote control enabled.
- SLOW FLASHING: remote control
disabled.
- QUICK FLASHING FOR 3 SECONDS,
THEN OFF: the machine cannot connect
to the home Wi-Fi network or has not yet
been associated with the App.
- SLOW BLINKING FOR 3 TIMES, THEN
OFF FOR 2 SECONDS: reset of the Wi-Fi
network (during the association with the
App).
- ON FOR 1 SECOND, THEN OFF FOR 3
SECONDS: the door is open. Remote
control cannot be activated.

74
(MAX.)
1)
(MAX.)
3)
MIXED &
COLOURED 59'
PERFECT
COTTON 59'
3)
3)
SYNTHETIC AND
COLOURED
()
2)
()
2)
Table of programmes
*
PROGRAMME
(see control panel)
2
1
SPECIAL 39'
HYGIENE PLUS 59'
EASY IRON PLUS
DELICATE 59'
RAPID
RINSE
DRAIN & SPIN
WOOL/HAND WASH
6 7 8 8,5 9 10 11 12 13 14
2 2 2 2 2 2 2 2 2 2
6 7 8 8,5 9 10 11 12 13 14
3 3,5 4 4 4,5 5 5,5 6 6,5 7
1,5 1,5 1,5 1,5 1,5 1,5 1,5 1,5 1,5 1,5
2 2,5 2,5 2,5 2,5 2,5 2,5 3 3 3,5
1 1 1,5 1,5 1,5 1,5 1,5 2 2 2
14'
2 2,5 2,5 2,5 2,5 2,5 2,5 3 3 3
30'
3 3,5 3,5 3,5 3,5 3,5 3,5 4 4 4
44'
- - - - - - - - - -
- - - - - - - - - -
1 1 2 2 2 2 2 2,5 2,5 2,5
2)
3 3,5 4 4 4,5 5 5,5 6 6,5 7
40°
60°
40°
40°
-
40°
40°
40°
40°
-
-
30°
60°
COTTONS
ECO 40-60
SMART WASH
REMOTE CONTROL (Wi-Fi)
Position that you have to select when you want to enable remote control through the
App (via Wi-Fi).
6 7 8 8,5 9 10 11 12 13 14
6 7 8 8,5 9 10 11 12 13 14
4 4,5 5,5 5,5 6 6,5 7 8 8 9
90°
60°
30°

75
EN
Please read these notes:
*
Maximum load capacity of dry clothes,
according to the model used (see control
(Only for models with liquid
When only a limited number of
treatment with liquid bleaching
agents, preliminary removal of
stain can be carried out in the
Pour the bleach into the liquid
container, inserted into the
in the
detergent drawer, and set the
switch off the appliance, add the
rest of the fabrics and proceed
with a normal wash on the most
suitable programme.
( )
Only with PREWASH option
PREWASH option available).
1)
When a programme is selected,
on the display is shown the
display shows the recommended
wash temperature that can be
reduced (where allowed) by the
relevant button.
2)
For the programmes shown you
can adjust the duration and
STAIN LEVEL button.
3)
In the programmes specified, the
STAIN LEVEL/ALTERNATIVE
programme (in the case of the
programme, it
allows you to choose one of the
INFORMATION FOR THE TEST
SETTING THE TEMPERATURE TO
SETTING THE TEMPERATURE TO
In the case that the machine has an
explicit energy declaration: it means
that this machine is more efficient
than the limit value of the energy
A" as indicated on
egated
EU-Regulation 2019/2014.
panel).
detergent compartment)
articles have stains which require
washing machine.
bleach
compartment marked
special programme RINSE.
"2"
When this phase has terminated,
selected (programmes with
LABORATORIES
STANDARD PROGRAMMES
ACCORDING TO
(EU) No 1015/2010 e No 1061/2010
ECO 40-60 PROGRAMME
40°C
ECO 40-60 PROGRAMME
________________________________________
STANDARD PROGRAMME
60°C
ACCORDING TO
(EU) No 2019/2023
ECO 40-60 PROGRAMME
________________________________________
efficiency class "
frontal drawer, according to del
intensity of the wash using the
PROGRAMME SELECTION/STEAM
LEVEL button
an alternative
RAPID 14'/30'/44'
may be used to select
to the pre-set
three available durations).

76
To clean different types of fabrics and
various levels of dirt, the washing machine
has specific programs to meet every need
of washing (see table of programmes).
SPECIAL 39'
The perfect combination of time saving and
performance. This programme allows for a
thorough laundry washing cycle in just 39
minutes. Recommended for washing
garments with average levels of soiling.
HYGIENE PLUS 59'
This programme offers the best possible
combination of high temperature, time and
cleaning action to guarantee maximum
sanitising power against bacteria in only 59
minutes. Recommended for cotton laundry,
it washes at a temperature of 60°C and is
best used with small loads.
MIXED & COLOURED 59'/PERFECT
COTTON 59'
Press the STAIN LEVEL/ALTERNATIVE
PROGRAMME SELECTION/STEAM LEVEL
button to
choose one of the two available
programmes:
-
This programme offers you the freedom to
wash all kinds of fabrics and non-fading
colours together, with a full load, obtaining
excellent results in only 59 minutes. With
washing at medium temperature, this
programme is recommended for laundry
that is not particularly dirty.
*Preset temperature of 20°C (modifiable
by the relevant button). The washing
cycle is also suitable for washing cotton
fabrics.
-
This programme guarantees excellent results
for cotton laundry. This option was
designed to cut washing time at medium
temperatures for medium-soiled cotton
laundry. Fill the machine only halfway for
best results.
EASY IRON PLUS
This programme uses a steam treatment to
relax creases and achieve the ideal degree
of humidity for easier ironing. Three
different intensity levels can be selected via
the button, designed for dry or wet garments
and depending on the type of fabric.
DELICATE 59'
Developed to wash and treat delicate garments
and precious fabrics. This programme washes
at a low temperature for 59 minutes.
Recommended for small loads.
RAPID (14'/30'/44')
Saving without compromising! This new
programme may be used to obtain excellent
results while saving water, energy,
detergent and time. This option washes at a
medium temperature suitable for any kind of
fabric. Recommended for small loads and
lightly soil
Use the STAIN LEVEL/
ALTERNATIVE PROGRAMME SELECTION/
STEAM LEVEL
choose one of the
three available durations.
RINSE/DRAIN & SPIN
Press the STAIN LEVEL/ALTERNATIVE
PROGRAMME SELECTION/STEAM LEVEL
button to
le
programmes:
-
This program performs 3 rinses with an
intermediate spin (which can be reduced or
IMPORTANT WASH PERFORMANCE
New, coloured garments should be
washed separately for at least 5 or 6
Certain large dark items such as
jeans and towels should always be
Choose programme in accordance
on labels, especially the maximum
Description of programmes
with the laundry instructions appearing
recommended temperature.
WARNING:
ADVICE.
washes.
washed separately.
Never mix NON COLOURFAST fabrics.
MIXED & COLOURED 59'*
PERFECT COTTON 59'
ed items.
button to
choose one of the two availab
RINSE

77
EN
excluded by using the appropriate button). It
is used for rinsing any type of fabric, for
example after a wash carried out by hand.
-
The program completes the drain and a
maximum spin. It is possible to delete or
reduce the spin through the SPIN
SELECTION button.
WOOL/HAND WASH
This programme performs a wash cycle
dedicated to the wool fabrics that can be
washed in a washing machine, the articles
to be washed by hand or laundry items
made from silk or specified as "Wash as
Silk" on the fabric la
SYNTHETIC AND COLOURED
This programme allows you to wash
different type’s fabrics and different colours
all together. The rotation movement of the
drum and the water levels are optimized,
both during the washing the rinsing phase.
The accurate spin action, ensures a
reduced formation of creases in the fabrics.
COTTONS
This programme is suitable for washing
coloured cotton garments at 40°C or for
ensuring the highest degree of cleanliness for
cotton resistant laundry washing at 60°C or
90°C. The final spin is at maximum speed that
ensures excellent water removal.
ECO 40
The
programme is able to clean
normally soiled cotton laundry declared to
be washable at 40°C or 60°C, together in
the same cycle. This programme is used
to assess the compliance with the EU
Ecodesign legislation (environmentally
friendly products des
SMART WASH
This innovative programme is capable to
adapt automatically the cleaning action to
the capacity and typology of the load for the
best results without any worries. The
new
technology, through a
perfect mix of water and detergent,
guarantees excellent results at a 30°C.
The action of the steam at the end of the
cycle helps to deeply relax the fibers of your
clothes and makes ironing easier.
REMOTE CONTROL (Wi
Position that you have to select when you
want to enable / disable remote control
through the App, via Wi-Fi. In this case, the
start of cycle will take place through the App
commands. More details in the REMOTE
CONTROL (Wi
DRAIN & SPIN
-60
ECO 40-60
bel.
Quick & Clean
-Fi) section.
ign).
-Fi)

78
E2 (with display)
The machine cannot load water.
Make sure the water supply tap is open.
Make sure the water supply hose isn’t bent, kinked or trapped.
Make sure the drain pipe is at the proper height (see installation section).
Close the water supply tap, unscrew the filler hose from the back of
and not blocked.
Check that the filter is not clogged or that there are no foreign bodies
water.
E3 (with display)
The washing machine does not drain water.
Check that the filter is not clogged or that there are no foreign bodies
water.
Make sure the drain hose isn’t bent, kinked or trapped.
Make sure the home drainage system is not blocked and is allowing
water to flow through without obstruction. Try to drain the water in the sink.
E4 (with display)
(without display)
There is too much foam and/or water.
Ensure the correct amount of detergent is being used and the
detergent is designed for use in a washing machine.
E7 (with display)
Door problem.
Make sure the door is correctly closed.
from closing fully.
If the door is locked, turn off and unplug the washing machine from
the electrical supply socket, wait 2-3 minutes and reopen the door.
Any other code
Turn off and unplug the washing machine, wait a minute. Turn on the
Authorised Customer Service Centre directly.
Models with a display: the error is shown by a number preceded by the letter “E”
9. TROUBLESHOOTING AND WARRANTY
If you believe the washing machine is not working correctly, consult the quick guide
provided below which includes some practical tips on how to fix the most common
problems.
ERROR CODE FORMAT
(example: E2 = Error 2).
Models without display: an error is shown by a sequence of flashes of every LED.
The error code is shown by the number of flashes followed by a pause of 5 seconds
(example: two flashes – pause 5 seconds – two flashes – repeating = Error 2).
Error shown Possible causes and practical solutions
2 flashes of the LEDs
(without display)
the washing machine and make sure the “anti-sand” filter is clean
inside the filter compartment that can obstruct the proper flow of
3 flashes of the LEDs
(without display)
inside the filter compartment that can obstruct the proper flow of
4 flashes of the LEDs
7 flashes of the LEDs
(without display)
Make sure the clothes inside the drum are not preventing the door
machine and restart a program. If the error occurs again contact an

79
EN
The washing machine
Make sure the product is plugged into a working supply socket.
Make sure power is on.
Make sure the wall socket is working, testing it with another
appliance such as a lamp.
The door may not be correctly closed: open and close it again.
Check whether the required program was correctly selected and the
start button pressed.
Make sure the washing machine is not in pause or time delay mode.
Water leaked on the
This may be due to a leak from the seal between the tap, supply
connections correctly.
Make sure the front filter is correctly closed.
The washing machine
The machine is fitted with a detection system that protects the load
restart the spin program.
This could be due to the fact that water has not been completely
section.
Some models include a "no spin" function: make sure it is not
selected.
Check which options are selected and their effect on the spin cycle.
Excessive detergent can impede the spin cycle, ensure the correct
amount of detergent is being used.
Strong vibrations /
The washing machine may not be fully levelled: if necessary, adjust
the feet as indicated in the specific section.
Make sure transport screws, rubber bungs and spacer tubes were
removed.
Make sure there are no foreign objects inside the drum (coins,
hinges, buttons, etc…).
The standard manufacturer warranty covers faults caused by electrical or
ons on use not being followed, a charge may be
applied.
OTHER ANOMALIES
Problem Possible causes and practical solutions
does not work / start
floor near the
hose and fill valve; in this case, replace it and tighten the hose
washing machine
does not spin
and product from damage if the load is not balanced before spinning.
This may result in:-
• The machine attempts to balance the load, increasing the time of
spin.
• Reduction of the speed of spin to decrease vibrations and noise.
• The spin cycle aborting to protect the machine and load.
If this is experienced remove the load de-tangle it, reload it and
drained: wait a few minutes. If the problem persists, see Error 3
noises are heard
during the spin cycle
mechanical faults in the product due to an act or omission of the manufacturer. If
a fault is found to be caused by factors outside the product supplied, miss-use or
as a result of the instructi

80
Except for the list of spare parts available
on our website, under no circumstances
should you repair or attempt to repair the
appliance yourself or have the appliance
repaired by inexperienced and / or
unqualified persons. Repairs carried out by
inexperienced and / or unqualified persons
can cause injury or serious malfunction of
the equipment and damage to property. It is
advisable to contact our Authorized
Technical Assistance Centres.
We recommend that you always use
original spare parts, which can be obtained
from our customer service for a period of at
least
from the moment the
appliance is put into circulation within the
European Economic Area.
From 1 March 2021, energy and environmental
information relating to the energy labelling of
household appliances and the specifications for
their eco-design are visible in Europe in the
product database (EPREL) at the following link
https://eprel.ec.europa.eu/ or through the QR
code located on the energy label.
By placing the
mark on this
product, we are confirming compliance to
all relevant European safety, health and
environmental requirements which are
applicable in legislation for this product.
The manufacturer declines all
responsibility for any printing errors in
the booklet included with this product.
Moreover, it also reserves the right to
make any changes deemed useful to its
products without changing their essential
characteristics.
Warranty
product is guaranteed under the
terms and conditions stated on the
certificate included with the product. The
certificate has to be stored so as to be
shown to the Authorized Customer
Service Centre in case of need. You can
ns on
our web site. To obtain assistance,
line or contact
us at the number indicated on the
The manufacturer cannot be held
responsible for any damage to things
and / or for safety issues
resulting from repairs not carried out
by an Authorized Technical Assistance
Centre or by a service provider
authorised by the manufacturer in
accordance with company guidelines
relating to the repair and maintenance
cts. Any damage caused to
the product by unauthorized personnel
during a repair attempt will not be
The
10 years
WARNING:
and people
of its produ
covered by the conventional warranty.
also check the warranty conditio
please fill in the form on-
support page of our web site.

81
ES
Gracias por haber elegido este producto.
Estamos orgullosos de ofrecer el producto
ideal para ti y la mejor gama completa de
electrodomésticos para tu rutina diaria.
Lea atentamente este manual de instrucciones
para aprender a usar la lavadora de manera
correcta y segura y para obtener consejos útiles
acerca de su mantenimiento.
Antes de usar su nueva lavadora,
lea atentamente este manual de
instrucciones para optimizar su
funcionamiento. Guarde el manual en buen
estado para otros usuarios que pudieran
necesitarlo más adelante.
Todos los productos están identificados con
un único código o número de serie de 16
caracteres, que figura en una etiqueta
adherida al aparato (puerta de carga) o en
el sobre que se encuentra dentro de la
lavadora. El código es una especie de
documento de identidad, necesario para
registrar el producto y para solicitar la
asistencia del Servicio de Atención al
Cliente.
Este dispositivo tiene el distintivo de la
directiva europea 2012/19/UE sobre
Residuos de Aparatos Eléctricos y
Electrónicos (RAEE).
Los RAEE contienen tanto sustancias
contaminantes (que pueden repercutir
negativamente en el medio ambiente) como
componentes básicos (que pueden
reutilizarse). Es importante que los RAEE
se sometan a tratamientos específicos
con el objeto de extraer y eliminar, de
forma adecuada, todos los agentes
contaminantes. Igual de importante es
r
La gente puede desempeñar una función
importante a la hora de asegurarse de que
los RAEE no se convierten en un problema
medioambiental; es crucial seguir algunas
normas básicas:
Los RAEE no han de tratarse como
Los RAEE han de depositarse en los
puntos de recogida habilitados para ello
que gestiona el ayuntamiento o empresas
contratadas para ello. En muchos países
se ofrece la posibilidad de recogida a
En muchos países, cuando la gente compra
un nuevo dispositivo, el antiguo se puede
entregar al vendedor, quien lo recoge de
forma gratuita (un dispositivo antiguo por
cada dispositivo adquirido) siempre que el
equipo entregado sea similar y disponga de
las mismas funciones qu
1.
2.
3.
4.
5.
6.
7.
8.
9.
Índice
Normas ambientales
ecuperar y reciclar todo el material posible.
residuos domésticos.
domicilio de los RAEE de mayor volumen.
e el adquirido.
NORMAS DE SEGURIDAD
INSTALACIÓN
CUBETA PARA DETERGENTE
CONSEJOS PRÁCTICOS
LIMPIEZA Y MANTENIMIENTO
CONTROL REMOTO (Wi-Fi)
GUÍA RÁPIDA
CONTROLES Y PROGRAMAS
DIAGNÓSTICO DE AVERÍAS Y GARANTÍA

82
1. NORMAS DE SEGURIDAD
Este producto es exclusivamente
para uso doméstico o similar:
−
zona de cocina para el
personal de tiendas, oficinas y
otros entornos laborales;
− granjas;
−
pasajeros de hoteles, moteles
u otros entornos residenciales;
− hostales (B&B).
No se recomienda el uso de este
producto con fines diferentes del
doméstico o similar, por ejemplo,
con fines comerciales o
profesionales. El empleo de
la lavadora con fines no
recomendados puede reducir la
vida útil del artefacto e invalidar
la garantía. Todos los daños,
averías o pérdidas ocasionados
por un uso diferente del
doméstico o similar (aunque ese
uso se realice en un entorno
doméstico) no serán reconocidos
por el fabricante en la medida en
que lo permita la ley.
Este electrodoméstico puede ser
utilizado por niños mayores de 8
años y por personas con
capacidades físicas, sensoriales
o mentales limitadas o que
carezcan de la experiencia
y el conocimiento necesarios,
siempre y cuando estén
supervisadas por una persona
encargada de velar por su
seguridad o hayan sido
instruidas en su utilización de
manera segura.
Los niños no deben jugar con el
electrodoméstico. Los niños no
deben ocuparse del mantenimiento
ni de la limpieza del electrodoméstico,
salvo que estén supervisados una
persona encargada de velar por su
seguridad.
Vigile a los niños de manera
que se asegure que no juegan
con el aparato.
Los niños menores de 3 años se
deben mantener lejos a menos que
estén supervisados de forma continua.
Si el cable de alimentación está
dañado, deberá ser reemplazado
por un cable o conjunto especial
disponible a través del fabricante
o su servicio técnico.
Sólo deben emplearse las
mangueras de suministro de
agua proporcionadas con el
electrodoméstico. No reutilizar
mangueras de lavadoras antiguas
La presión de agua debe estar
.
entre 0,05 MPa y 1 MPa.
Ninguna alfombrilla debe obstruir
las rejillas de ventilación situadas
en la base de la lavadora.
Una vez instalado el
electrodoméstico, se debe poder
acceder fácilmente al enchufe.

83
ES
el agua puede alcanzar
temperaturas muy elevadas
durante el ciclo de lavado.
Conexiones eléctricas e
instrucciones de seguridad
La capacidad máxima de colada
seca depende del modelo
usado (ver panel de control).
Para consultar la ficha del
producto, visitar la web del
fabricante.
Los detalles técnicos (suministro
de corriente y entrada de
alimentación) están indicados en
la placa de características del
producto.
Asegúrate de que el Sistema
eléctrico dispone de conexión
de tierra, de que cumple con
los requisitos legales y de que la
toma de corriente es compatible
con el enchufe. También puede
pedir asistencia profesional
cualificada.
Se recomienda evitar el uso
de transformadores, múltiples
enchufes o alargadores.
Desenchufar la lavadora y
cerrar el grifo del agua antes de
proceder a su limpieza o a
cualquier operación de
mantenimiento.
Asegurarse de que no quede
agua residual en el tambor antes
de abrir la puerta de carga.
ATENCIÓN:
No instalar la lavadora en el
exterior, ni exponerla a la
lluvia, a los rayos del sol, o a
otros factores ambientales.
Para transportar la lavadora, no
levantarla sosteniéndola de los
mandos ni de la cubeta del
detergente y no apoyarla sobre la
puerta de carga. Para levantar la
lavadora, se recomienda la
colaboración de al menos dos
personas.
En caso de fallo o mal
funcionamiento, apagar la lavadora,
cerrar el grifo del agua y no intentar
repararla. Llamar de inmediato al
Servicio de Atención al Cliente y
utilizar sólo piezas de recambio
originales. El incumplimiento de
estas instrucciones puede afectar
la seguridad del aparato.
No desenchufar la lavadora
tirando del cable de alimentación
ni del aparato.

84
Extraer los 2 o 4 tornillos
(A)
que
se encuentran en la parte posterior
o
, tal y
orificios que
quedan tras retirar los tornillos con
los tapones que se encuentran
en el sobre que contiene las
,
4
seguros de
transporte pueden caer dentro de la
lavadora. Para quitarlos, inclinar el
aparato hacia delante de modo de poder
cogerlos. Obstruir los orificios que
los
Coloque la lámina de plástico
ondulada, que se encuentra en
la parte superior del aparato
durante el proceso de
, en la base del
aparato como se muestra en la
(según el modelo,
*
En algunos modelos no se
suministra la lámina de
los niños no deben jugar con
los materiales de embalaje.
2. INSTALACIÓN
de la lavadora y quitar los dos 2
4
seguros de transporte
como se muestra en la
Obstruir los 2 o 4
instrucciones.
Para lavadoras de encastre
extraer los 3 o 4 tornillos
seguros de transporte
En ciertos modelos,
quedan tras retirar los tornillos con
tapones que se encuentran en el sobre.
ATENCIÓN:
figura 1
(A)
(B).
1 o más
(B)
.
y los 3 o
desembalaje*
figura 2
consulte la versión A, B o C).
plástico ondulada.

85
ES
Conectar la manguera de agua al grifo
, empleando únicamente la manguera
suministrada con el electrodoméstico (no
tienen una o más
Conexiones HOT&COLD para agua fría
: Favorecen el ahorro
Conectar el tubo gris al grifo del agua fría
y el rojo, al del agua caliente. El
ctar sólo
al grifo del agua fría, en cuyo caso se
Un dispositivo
situado en el tubo de alimentación impide
la entrada de agua si el tubo está
deteriorado. En caso de avería, aparece
una marca de color rojo en la ventana
que indica que debe reemplazarse el
tubo. Para extraer la tuerca, presionar el
TUBO DE ALIMENTACIÓN
: Si el tubo
pierde agua, el depósito
contiene agua que
permite que se complete el ciclo de
licitar al
Servicio de Atención al Cliente el
Conexión a la red de agua
(fig. 3)
reutilizar mangueras antiguas).
ALGUNOS MODELOS
de las siguientes características:
y caliente (fig. 4)
de energía.
electrodoméstico se puede cone
retrasará el inicio de algunos programas.
AQUASTOP (fig.
5)
:
"A",
dispositivo de bloqueo unidireccional "B".
AQUAPROTECT –
CON PROTECCIÓN (fig. 6)
principal "A"
transparente "B"
lavado. Al finalizar el ciclo, so
reemplazo del tubo de entrada de agua.

86
La lavadora debe quedar cerca de la
pared en su parte posterior, evitando que
el tubo quede doblado o deformado.
Ubicar el tubo de descarga en el
fregadero o, preferentemente, conectarlo
al desagüe de la pared a 50 cm de altura
mayor
Nivelar el electrodoméstico ajustando las
girar la tuerca en el sentido de las
girar la pata regulable hasta que toque
bloquear el movimiento de la pata
insertando la tuerca hasta que toque la
*
si es necesario reemplazar el cable de
alimentación, solicitar la asistencia del
Los fallos de instalación no están
cubiertos por la garantía del
fabricante.
Instalación
como mínimo, con un diámetro
que el tubo de la lavadora (fig. 7).
patas
fig. 8
:
a.
agujas del reloj para extraer el tornillo;
b.
el suelo;
c.
parte inferior de la lavadora.
Enchufar el aparato.
ATENCIÓN:
ACCESORIO VENDIDO POR SEPARADO
Servicio de Atención al Cliente.
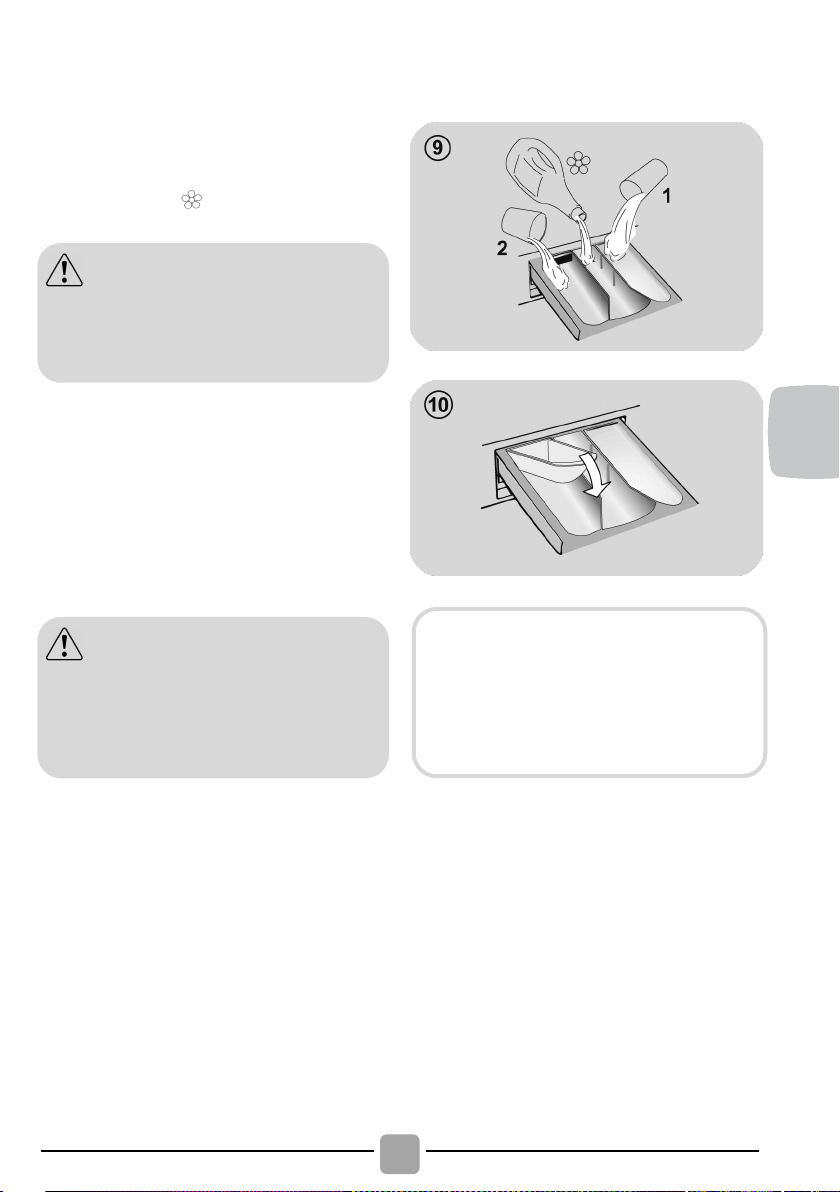
87
ES
3. CUBETA PARA
ALGUNOS MODELOS cuentan con un
sistema de dosificación automática, que
lleva a cabo una dosificación precisa del
En este
ás detalles consúltese la
sección específica en el capítulo
CONTROLES Y PROGRAMAS.
Algunos detergentes no están diseñados
para ser usados en el cajón dispensador,
pleados con su propio
dispensador e introducirlo directamente en
el tambor.
sólo deben emplearse productos
líquidos. La lavadora está configurada
para dosificar automáticamente los
productos durante el último aclarado.
DETERGENTE
La cubeta se divide en tres compartimentos
(fig. 9)
:
compartimento "1": detergente para el
prelavado;
compartimento “ ”:
como suavizantes, almidón, fragancias, etc;
otros productos líquidos
ATENCIÓN:
compartimento "2":
CON ALGUNOS MODELOS se suministra
una pieza especial para el detergente
líquido (fig. 10). Si se desea usar detergente
líquido, ubicar la pieza especial en el
compartimento "2". De ese modo, el
detergente líquido pasará al tambor en el
momento adecuado del ciclo de lavado. La
pieza especial puede emplearse para la lejía
cuando se selecciona el programa de aclarado.
detergente para el lavado.
ATENCIÓN:
pero pueden ser em
detergente y del suavizante.
caso, para m

88
Dosificación del detergente
Consejos prácticos para reducir
el consumo
Consejos para colocar la ropa
en la lavadora
4. CONSEJOS PRÁCTICOS
Al clasificar las prendas, asegurarse de:
- quitar objetos metálicos como broches,
ganchos, monedas, etc.;
- abotonar fundas, cerrar cremalleras,
ajustar cinturones y cintas;
- retirar enganches de las cortinas;
- leer las instrucciones de lavado de cada
prenda;
- tratar previamente las manchas difíciles con
productos especiales.
Al lavar alfombras, mantas o prendas
pesadas, se recomienda desactivar la
función de centrifugado.
Para lavar lana, asegúrate de que la
prenda puede ser lavada a máquina.
Verifica la etiqueta de la prenda.
Entre lavados, deje la puerta del
electrodoméstico ligeramente abierta
para evitar la posible formación de malos
olores en su interior.
Cómo reducir el consumo y no perjudicar el
medio ambiente al utilizar el electrodoméstico.
Cargue el electrodoméstico hasta su
máxima capacidad en función del
programa elegido (consulte la tabla de
programas), de este modo podrá
REDUCIR EL CONSUMO de agua y
energía.
El ruido y la humedad residual en la
colada dependerán de las revoluciones
durante el centrifugado: a mayor número
de revoluciones, más elevado será el
nivel de ruido y menor la humedad
residual en la colada.
Los programas más eficientes en
términos de uso combinado de agua y
energía suelen ser los más largos a las
temperaturas más bajas.
Cargar al máximo la lavadora
Para ahorrar energía, detergente y tiempo,
se recomienda cargar al máximo la lavadora.
Es posible ahorrar hasta un 50% de energía
con una única colada de carga llena, en
lugar de dos coladas a media carga.
¿Cuándo es necesario el prelavado?
¡Sólo cuando las prendas están muy
sucias! Cuando la ropa tiene una
suciedad normal, es posible ahorrar entre
un 5% y un 15% de energía si no se
utiliza la función de prelavado.
¿ Es necesario lavar a altas temperaturas?
Si se emplea un quitamanchas o se
sumergen las prendas manchadas antes
de lavarlas en la lavadora, se reduce la
necesidad de seleccionar un programa
lavado de alta temperatura. Seleccionando
un programa de lavado de baja
temperatura se puede ahorrar energía.
Antes de utilizar un programa de secado
(LAVASECADORAS)
AHORRE energía y tiempo seleccionando
una velocidad de centrifugado elevada para
reducir el contenido de agua en la colada
antes de utilizar un programa de secado.
A continuación, se incluye una guía breve
con sugerencias y consejos sobre el uso
del detergente.
Utilice solo detergentes aptos para los
lavados en lavadora.
Elija su detergente en función del tipo de
tejido (algodón, tejidos delicados, tejidos
sintéticos, lana, seda, etc.), el color, el
tipo y el grado de suciedad y la
temperatura de lavado del programa
elegido.
de

89
ES
Para el lavado de prendas de lana o seda,
emplear sólo detergentes formulados
Para temperaturas de lavado inferiores
el lavado a bajas temperaturas.
Para temperaturas de lavado de 40°C
se debe elegir un detergente
apropiado para el tipo de género y el
en polvo normales dan excelentes
resultados en el lavado de ropa muy
sucia "blanca" o de colores resistentes,
rendas de color son
recomendables para el lavado de ropa
de color con bajo nivel de suciedad.
Para lavar ropa blanca muy sucia
y obtener excelentes resultados, emplear
programas para algodón con temperaturas
y un detergente en
polvo normal con agentes blanqueadores.
Para utilizar la cantidad adecuada de
detergente, suavizante y otros aditivos, siga
detenidamente las instrucciones del
fabricante: utilizar correctamente el
electrodoméstico con la dosis adecuada
evitará el despilfarro y reducirá el
impacto medioambiental.
de 60°C o superiores
a 60°C,
nivel de suciedad. Los detergentes
mientras que los detergentes en
polvo para p
a 40°C, se recomienda emplear
detergentes líquidos o adecuados para
especialmente para ese tipo de géneros.
Un exceso de detergente producirá un
exceso de espuma, lo cual evitará que el
ciclo se desarrolle correctamente.
También podría afectar a la calidad del
lavado y del aclarado.
El uso de detergentes ecológicos sin
fosfatos puede producir los siguientes
efectos:
- El agua de vaciado del aclarado es más
turbia debido a la presencia de zeolitos
en suspensión, sin que resulte
perjudicada la eficacia del aclarado.
- Presencia de polvo blanco (zeolitos) en
la ropa al finalizar el lavado, que no se
incrusta en el tejido ni altera los colores.
- Presencia de espuma en el agua del
último aclarado, que no necesariamente
es indicación de un aclarado deficiente.
- Presencia de abundante espuma debido
a los tensoactivos aniónicos presentes en
las formulaciones de los detergentes para
lavadoras y que son difíciles de separar
de la ropa.
Volver a aclarar la ropa en estos casos no
conlleva ningún beneficio.
Si el problema persiste o sospechas de la
existencia de una avería, contacta
inmediatamente con el Servicio de Atención
al Cliente autorizado.

90
NO utilice productos ácidos (por
ejemplo vinagre) ni detergentes
gresivos para limpiar el cajetín, esto
para evitar dañar las juntas y/o las
Antes de proceder a efectuar la
limpieza, todos los compartimentos
deben estar vacíos.
Limpieza de la cubeta para el
detergente
Limpieza exterior del
electrodoméstico
5. LIMPIEZA Y MANTENIMIENTO
Un mantenimiento adecuado de su electrodoméstico puede prolongar su vida útil.
Desconecte el electrodoméstico de la red
eléctrica.
Limpie las superficies externas del
electrodoméstico con un paño húmedo y
EVITE EL USO DE PRODUCTOS
ABRASIVOS, ALCOHOL Y/O DISOLVENTES
.
• Se recomienda limpiar periódicamente el
cajetín del detergente para evitar que se
acumulen residuos de detergente y de
aditivos.
Retire el cajetín con movimientos suaves
pero firmes.
Lave el cajetín bajo un grifo de agua y
vuelva a colocarlo en su lugar.
PARA LOS MODELOS CON SISTEMA
AUTOMÁTICO DE DOSIFICACIÓN DE
DETERGENTE Y SUAVIZANTE LÍQUIDOS:
Llene el cajetín con agua caliente.
Sacuda el cajetín de manera que el agua
fluya en todos los compartimentos.
Escurra toda el agua del cajetín y vuelva
a ponerlo en su sitio en la lavadora.
Saque el cajón por completo presionando
el botón de desenganche, prestando
atención al eventual derrame de
residuos de detergente.
ATENCIÓN:
a
partes internas del electrodoméstico.

91
ES
• El electrodoméstico tiene un filtro especial
PARA LOS MODELOS CON SISTEMA
AUTOMÁTICO DE DOSIFICACIÓN DE
DETERGENTE Y SUAVIZANTE
si tuviera que inclinar o mover la
lavadora, quite el cajón de detergente
antes de continuar, manteniéndolo
horizontal para evitar cualquier
derrame.
Recomendaciones para el traslado
o para largos períodos de
inactividad de la lavadora
Limpie el filtro de la bomba
que atrapa residuos de mayor tamaño,
como botones o monedas, que podrían
atascar el sistema de drenaje
(dependiendo del modelo, opte por la
versión A o B).
Recomendamos revisar y limpiar el filtro
de 5 a 6 veces al año.
Desconecte el electrodoméstico de la red
eléctrica.
Antes de extraer el filtro, se recomienda
colocar un paño absorbente en el suelo para
evitar que se moje.
Girar el filtro en sentido contrario al de las
agujas del reloj hasta que se detenga en
la posición vertical.
Extraer el filtro, limpiarlo y volver a colocarlo
girándolo en el sentido de las agujas del
reloj.
Para volver a colocar todo en su sitio, repetir
los pasos previos siguiendo las instrucciones
en sentido contrario.
Si el electrodoméstico permanece
instalado en una estancia sin sistema de
calefacción durante largos periodos de
tiempo, los tubos deben quedar
totalmente vacíos de agua.
Desconecte el electrodoméstico de la
toma de corriente.
Soltar el tubo de la abrazadera y colocar
el extremo en un recipiente en el suelo
para recoger toda el agua.
Volver a asegurar el tubo de desagüe con
la abrazadera una vez concluida la
operación.
LÍQUIDOS:

92
Este electrodoméstico está equipado con
tecnología
que le permite controlarlo
de forma remoto a través de una app.
EMPAREJAMIENTO DE ELECTRODOMÉSTICOS
(EN LA APLICACIÓN)
en tu
dispositivo encuadrando el siguiente
Abre la aplicación, crea un perfil de usuario (o
inicia sesión si ya lo has creado
anteriormente) y empareja el electrodoméstico
siguiendo las instrucciones mostradas en la
PARA ACTIVAR EL CONTROL REMOTO
Compruebe que el enrutador esté
Cargue la ropa, cierre la puerta y añada el
Gire el SMART RING (mando de
sición
: la
puerta se bloqueará y los mandos en el
.
el ciclo, apague el
SMART RING
para
PARA DESACTIVAR EL CONTROL
REMOTO
CONTROL
mientras se está llevando a
hasta
CONTROL
sin pasar por la posición
rá a estar
el panel de control del
electrodoméstico y, si el ciclo está en
pausa, podrá abrir la puerta cuando se
PUERTA
SMART
CONTROL
para controlar de
nuevo el electrodoméstico utilizando la
aplicación. Si hay un ciclo en curso,
Por razones de seguridad, en algunas
fases del ciclo de lavado la puerta
puede abrir si el nivel del
agua está por debajo de su borde
inferior y si la temperatura es
inferior a 45°C. Si se cumplen estas
apague
de abrir la puerta.
La banda de frecuencia de la red Wi-Fi
doméstica debe ser la de 2,4 GHz. No
puedes configurar el electrodoméstico si
tu red doméstica está configurada en la
banda de 5 GHz.
Para conocer todos los detalles de las
Fi, explore la App en modo
DEMO
.
La App está disponible para dispositivos
iOS, así como para
tablets y smartphones.
6. CONTROL REMOTO (WI-FI)
Wi-Fi
Descarga la aplicación hOn
código QR:
o desde el enlace:
go.haier-europe.com/download-app
tanto Android como
funciones Wi-
CONTROL REMOTO (Wi-Fi)
panel de control se desactivarán.
Empiece el ciclo utilizando la aplicación
selección programas) hasta la po
Cuando se ha completado
electrodoméstico girando
hasta la posición OFF (APAGADO)
desbloquear la puerta.
el
Para salir del modo de
REMOTO
cabo un ciclo, gire el SMART RING
cualquier posición distinta de
REMOTO (Wi-Fi)
de
OFF (APAGADO)
operativo
apague el piloto indicador de
BLOQUEADA.
solo se
. Volve
pantalla del dispositivo.
encendido y conectado a Internet.
detergente si fuera necesario.
condiciones, espere a que se
la luz de PUERTA BLOQUEADA antes
Con la puerta cerrada, gire el
RING hasta la posición
REMOTO (Wi-Fi)
seguirá adelante.
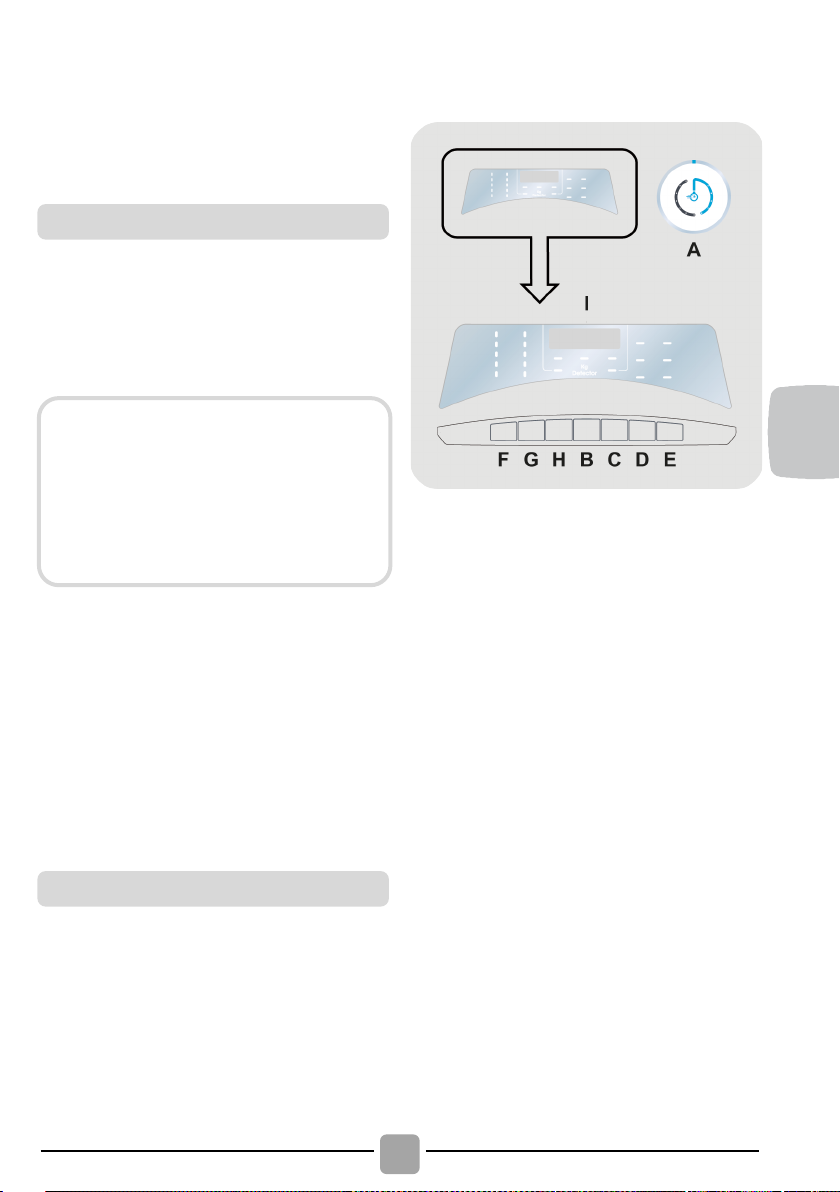
93
ES
A
SMART RING (mando de
selección programas)
B
Tecla INICIAR/PAUSA
C
Tecla INICIO DIFERIDO
D
Tecla OPCIONES
E
Tecla PROGRAMAS ESPECIALES
F
Tecla SELECCIÓN TEMPERATURA
G
Tecla SELECCIÓN CENTRIFUGADO
H
Tecla NIVEL DE SUCIEDAD/
SELECCIÓN DE PROGRAMA
ALTERNATIVO/
VAPOR
F+G
BLOQUEO INFANTIL
I
Display digital
Datos técnicos
SECAR (solo LAVASECADORAS)
Si desea que el ciclo de secado
empiece automáticamente después
del lavado, seleccione el programa de
lavado requerido y seleccione el ciclo
de secado. O también, puede finalizar
el lavado y posteriormente, escoger el
programa de secado.
Selección de programas
7. GUÍA RÁPIDA
El aparato regula automáticamente el nivel
de agua según el tipo de ropa y la carga.
Este sistema reduce el consumo energético
y el tiempo de lavado.
Enciende el aparato y selecciona el
programa requerido.
Modifica los ajustes de lavado si es
necesario y selecciona las opciones
requeridas.
Pulse el botón de inicio del programa.
El final del programa se indicará con un
mensaje en la pantalla (en algunos
modelos, todos los testigos se encenderán).
Apaga el aparato.
Para distintos tipos de lavado, consultar
la tabla de programas y seguir los pasos
indicados.
8. CONTROLES Y PROGRAMAS
NIVEL DE
Presión en el circuito hidráulico:
min 0,05 Mpa / max 1 Mpa
Revoluciones de centrifugado:
ver tarjeta de datos.
Potencia absorbida/ Amperios del
fusible de la red/ Tension:
ver tarjeta de datos.

94
Al final del ciclo de lavado el SMART
ING se tiene que colocar SIEMPRE
en la posición de apagado OFF, de lo
contrario no podrá seleccionar un
nuevo ciclo de lavado.
Solo se podrán seleccionar las opciones
compatibles con el programa ajustado.
Cierre la puerta ANTES de pulsar el
botón de INCIAR/PAUSA.
Botón de INCIAR/PAUSA
Primer uso
SMART RING (corona de selección
programas)
No toque las teclas al enchufar la
clavija en la toma de corriente, ya que
el aparato calibra los sistemas
durante los primeros segundos: si se
tocan las teclas, la máquina podría no
funcionar correctamente. En tal caso,
desenchufe el aparato y repita la
operación.
ATENCIÓN:
Para iniciar el ciclo seleccionado con
los parámetros preconfigurados, pulse
INCIAR/PAUSA. Cuando el programa se
esté ejecutando, la pantalla mostrará el
tiempo restante.
Además, si desea modificar el programa
seleccionado, pulse los botones de
opciones correspondientes, modifique
los parámetros predeterminados y,
seguidamente, pulse el botón de
INCIAR/PAUSA para empezar el ciclo.
Al girar el
SMART RING
, el electrodoméstico
se enciende y en la pantalla se muestran
la descripción y los parámetros del
programa seleccionado.
Al terminar el ciclo, acuérdese de apagar
el electrodoméstico girando el mando
SMART RING hasta la posición OFF
(APAGADO), seguidamente desenchufe
el electrodoméstico e interrumpa el
suministro de agua.
- Configuración de idioma
Después de enchufar el aparato a la red
eléctrica y encenderlo, pulse el botón "F"
o "G" para mostrar los idiomas disponibles.
Seleccione el idioma deseado pulsando
el botón INCIAR/PAUSA.
- Cambiar de idioma
Si desea cambiar el ajuste de idioma,
tendrá que pulsar simultáneamente los
botones de "C" y "H" durante unos 5
segundos. En la pantalla se mostrará
ENGLISH y se le dará la posibilidad de
elegir otro idioma (pulsando las teclas "F" o
"G").
Tras encender el electrodoméstico,
espere unos segundos para que se
ponga en marcha el programa.
DURACIÓN DEL PROGRAMA
Cuando se selecciona un programa, la
pantalla mostrará automáticamente la
duración del ciclo, el cual podrá variar en
función de las opciones seleccionadas.
Una vez iniciado el programa, se
informará de manera permanente del
tiempo restante hasta el final del lavado.
El electrodoméstico calcula el tiempo
hasta el final del programa seleccionado
sobre la base de una carga estándar; durante
el ciclo, la lavadora corrige el tiempo en función
del tamaño y la composición de la carga.
FIN DE PROGRAMA
Abrir la puerta después de visualizar la
palabra "FIN" en la pantalla y se apague
la luz de PUERTA BLOQUEADA.
Al final del ciclo, apague la lavadora
girando el mando SMART RING hasta la
posición OFF (APAGADO).
R

95
ES
PAUSAR LA LAVADORA
Tecla OPCIONES
Tecla INICIO DIFERIDO
Por razones de seguridad, en algunas
fases del ciclo de lavado la puerta
solo se puede abrir si el nivel del agua
está por debajo de su borde inferior y
a 45°C. Si
espere
a que se apague la luz de PUERTA
BLOQUEADA antes de abrir la puerta.
Mientras se está ejecutando un ciclo, la
máquina puede detenerse simplemente
pulsando el botón INICIAR/PAUSA.
si la temperatura es inferior
se cumplen estas condiciones,
Puede anular el inicio diferido girando el
mando SMART RING hasta la posición
OFF (APAGADO).
Si se produce una interrupción en la
fuente de alimentación mientras el
electrodoméstico está en funcionamiento,
al restaurarse la alimentación, el
electrodoméstico se reiniciará desde el
comienzo de la fase en la que se
encontraba cuando se produjo el corte.
Vuelva a pulsar el botón INICIAR/PAUSA
para reiniciar el programa desde el punto
en que se detuvo.
CANCELACIÓN DEL PROGRAMA
AJUSTADO
Para anular el programa, gire el mando
SMART RING hasta la posición OFF
(APAGADO).
Esperar hasta que la luz PUERTA
BLOQUEADA se haya apagado antes de
abrir la puerta.
Esta opción le permite pre-programar el
ciclo de lavado para iniciarlo con una
posterioridad de hasta 24 horas.
Para diferir el inicio del ciclo:
- Introduzca el programa deseado.
- Pulse el botón una vez para activar el
inicio diferido y luego vuelva a pulsarlo
(o manténgalo presionado) para
establecer el tiempo deseado. El
tiempo aumenta cada vez que se pulsa
el botón hasta 24 horas, momento en el
que al volver a pulsar el botón se
restablecerá el inicio diferido a cero.
-
Confirme pulsando la tecla
La cuenta atrás comienza y cuando
termina el programa se iniciará
automáticamente.
INICIAR/PAUSA
Esta tecla permite escoger entre tres
opciones diferentes:
- PRELAVADO
Esta opción le permite realizar un
prelavado y es particularmente útil para
cargas muy sucias (se puede utilizar
sólo en algunos programas, como se
muestra en la tabla de programas).
Le recomendamos que utilice sólo el 20%
de las cantidades recomendadas en el
envase del detergente.
- ACLARADO EXTRA
Esta opción permite añadir un aclarado al
final del ciclo de lavado y está diseñado
especialmente para las personas con
pieles delicadas y sensibles, para las
cuales el mínimo resto de detergente
puede causarles irritación y alergia.
Esta función también está recomendada
para las prendas de niños en caso de
suciedad extrema, en los que se usa
mucho detergente, o para el lavado de
toallas cuyas fibras en su mayoría
tienden a retener el detergente.
- PLANCHADO FÁCIL
Esta tecla le permite minimizar las arrugas
al máximo eliminando las vueltas
.
intermedias o reduciendo la intensidad de
las últimas vueltas (disponible solo en
algunos programas).

96
Use solo detergente en polvo.
Para evitar dañar los tejidos, no es
posible aumentar la velocidad por
encima del máximo permitido para
cada programa.
Tecla SELECCIÓN CENTRIFUGADO
Tecla SELECCIÓN TEMPERATURA
Estas opciones deben seleccionarse
antes de pulsar el botón de INICIAR/
PAUSA. Si escoges una opción que
no es compatible con el programa
parpadeará primero y se apagará
después.
Tecla PROGRAMAS ESPECIALES
Estas opciones deben seleccionarse
antes de pulsar el botón de INICIAR/
PAUSA. Si escoges una opción que
no es compatible con el programa
parpadeará primero y se apagará
después.
No inicie el programa si hay ropa en la
lavadora.
seleccionado, el piloto correspondiente
Esta tecla le permite elegir entre tres
opciones diferentes (disponibles solo
para algunos programas):
- UNA PRENDA
Esta opción (que se puede configurar en
varios programas) optimiza el consumo
de agua y energía del programa
seleccionado, sin alterar el rendimiento
del lavado.
UNA PRENDA está diseñado para
cargas reducidas y prendas poco sucias
con el objetivo de limitar un derroche
energético innecesario.
- CICLO NOCTURNO
Esta opción reduce la velocidad de
centrifugado intermedio a 400 rpm, en su
caso, aumenta el nivel de agua durante el
aclarado y mantiene la ropa sumergida en el
agua después del enjuague final, con el fin
de relajar las fibras.
Durante la fase de retención del agua del
tambor, la lavadora está en el modo pausa.
Pulse INICIAR para terminar el ciclo con
la fase de centrifugado (que se puede
reducir o eliminar con el botón específico)
y de vaciado.
Gracias a electrónico de control, el agua en
las fases Intermedias se vacía en silencio, lo
que hace esta opción muy útil para el lavado
durante la noche.
Se aconseja llevarlo a cabo después de
cada 50 ciclos de lavado.
Esta opción solo se puede seleccionar
para el programa DESAGÜE &
CENTRIFUGADO.
seleccionado, el piloto correspondiente
Esta tecla permite cambiar la temperatura
de los ciclos de lavado.
No se puede aumentar la temperatura
por encima del máximo permitido para
cada programa, para conservar los tejidos.
Si deseas lavar con un programa frío,
todos los indicadores deben estar
desconectados.
Si pulsas esta tecla, es posible reducir la
velocidad máxima, y si lo deseas, puedes
cancelar el ciclo de centrifugado.
Si la etiqueta no proporciona información
específica, significa que se puede usar el
centrifugado máximo previsto por el
programa.
- LIMPIEZA DEL TAMBOR
Desarrollado para lavar el tambor de la
lavadora.

97
ES
BLOQUEO INFANTIL
Tecla NIVEL DE SUCIEDAD/
SELECCIÓN DE PROGRAMA
ALTERNATIVO/NIVEL DE VAPOR
La lavadora está equipada con un
a el
ciclo de centrifugado si la carga está
desequilibrada. Esto reduce el ruido y
la vibración en la lavadora, y prolonga
la vida de la lavadora.
Una cantidad excesiva de detergente
puede provocar un exceso de
detecta la presencia de una cantidad
de espuma, puede descartar
la fase de centrifugado, o extender la
duración del programa y aumentar el
consumo de agua.
Para reactivar el ciclo de centrifugado,
pulsa la tecla hasta alcanzar la velocidad
de centrifugado deseada.
Es posible modificar la velocidad de
centrifugado sin detener la lavadora.
espuma. Si el electrodoméstico
excesiva
dispositivo electrónico que descart
Esta tecla se puede utilizar para seleccionar
dos funciones diferentes, dependiendo del
programa seleccionado:
- NIVEL DE SUCIEDAD
Una vez se ha seleccionado el programa,
el tiempo de lavado establecido para ese
programa se mostrará automáticamente.
Esta opción te permite escoger entre 3
niveles de intensidad de lavado,
modificando la duración del programa, y
dependiendo de la suciedad de las
prendas
programas tal y como se muestra en la
tabla de programas).
- SELECCIÓN DE PROGRAMA
ALTERNATIVO
Cuando figura en el cuadro, esta opción
permite seleccionar una alternativa
respecto al programa preconfigurado (en el
(solo pueden usarse en algunos
caso del programa RÁPIDO (14'/30'/44'), le
permite escoger uno de los tres tiempos
disponibles).
- NIVEL DE VAPOR
Después de seleccionar el programa
PLANCHADO FÁCIL PLUS, puede utilizar
este botón para elegir entre tres
tratamientos de vapor de diferentes
intensidades, diseñados para prendas
secas o húmedas y dependiendo del tipo
de tejido:
- ALGODÓN (selección por defecto)
Este programa se utiliza para prendas
de algodón. En los tejidos húmedos (por
ejemplo, después del lavado), es
adecuado para suavizar las arrugas
después del centrifugado; en cambio,
en los tejidos secos está diseñado para
conseguir el nivel de humedad ideal
para facilitar el planchado.
- SINTÉTICOS (pulsar el botón una vez)
Este programa se utiliza para prendas
sintéticas. En los tejidos húmedos (por
ejemplo, después del lavado), es
adecuado para suavizar las arrugas
después del centrifugado; en cambio,
en los tejidos secos está diseñado para
conseguir el nivel de humedad ideal
para facilitar el planchado.
- DELICADOS (pulse el botón dos veces)
Con la ayuda del vapor, el ciclo refresca
y suaviza las arrugas en las prendas
después del uso. El programa consiste
en una fase inicial en la que actúa el
vapor y una fase final en la que se
elimina el exceso de humedad para su
uso inmediato. Este ciclo es adecuado
para tejidos secos.
Pulsando simultáneamente las teclas "F"
y "G" durante 3 segundos, la lavadora te
permitirá bloquear las teclas. De esta
forma, si pulsas accidentalmente alguna
de las teclas en el display durante un
ciclo, podrás evitar que se cambie el
programa accidentalmente.

98
Si la puerta no está bien cerrada, la luz
seguirá parpadeando durante unos 7
a orden de marcha se elimina
automáticamente. En este caso, cierre
la puerta de la manera adecuada y
pulse la tecla INICIAR/PAUSA.
Cierre la escotilla ANTES de seleccionar
INICIAR/PAUSA.
Display digital
El bloqueo de tecla se desactiva
sencillamente pulsando ambas teclas
de nuevo, o desconectando el
electrodoméstico.
segundos, después de lo cual
l
El sistema de señalización de la pantalla le
permite estar siempre informado acerca del
estado de la máquina.
1) INDICADORES SELECCIÓN
TEMPERATURA
Los indicadores muestran la temperatura
de lavado del programa seleccionado que
puede cambiarse (si está permitido) con la
tecla correspondiente.
Si deseas lavar con un programa frío, todos
los indicadores deben estar desconectados.
2) INDICADORES SELECCIÓN
CENTRIFUGADO
Los indicadores muestran la velocidad de
centrifugado del programa seleccionado
que puede cambiarse o descartarse con la
tecla correspondiente.
3) INDICADOR PUERTA BLOQUEADA
El icono indica que la puerta está cerrada.
Cuando INICIAR/PAUSA se presiona
con la puerta cerrada, el indicador se
parpadeará y luego de manera fija.
Esperar hasta que la luz PUERTA
BLOQUEADA se haya apagado antes de
abrir la puerta.
4) Kg Detector (esta función solo se
activa con algunos programas)
Durante los primeros minutos del ciclo, el
indicador "Kg Detector" permanecerá
encendido mientras el sensor inteligente
obtendrá el peso de la ropa y ajustará el
tiempo de ciclo, el agua y el consumo de
electricidad en consecuencia.
A través de cada fase de lavado "Kg
Detector" permite monitorear la
información sobre la carga de ropa en el
tambor y en los primeros minutos de la
colada él:
- Ajusta la cantidad de agua necesaria;
- Determina la duración del ciclo;
- Control de los aclarados en function del
tip ode tejido a seleccionado para ser
lavado;
- Ajusta el ritmo de rotación del tambor
para el tipo de tejido que se lava;
- Reconoce la presencia de espuma,
aumentando, si es necesario, la
cantidad de agua durante el aclarado;
- Ajusta la velocidad de centrifugado de
acuerdo a la carga, evitando así
cualquier desequilibrio.
5) INDICADOR BLOQUEO DE TECLA
El indicador muestra que las teclas están
bloqueadas.

99
ES
6) INDICADORES OPCIONES
Los indicadores muestran la opción que se
puede seleccionar mediante el botón
correspondiente.
7)
INDICADORES PROGRAMAS ESPECIALES
Los indicadores muestran las opciones que
pueden seleccionarse con las teclas
correspondientes.
8) INDICADOR NIVEL DE SUCIEDAD
La luz indicadora muestra la selección de la
opción relevante.
9) INDICADOR Wi-Fi
En los modelos equipados con Wi-Fi,
indica el estado de la conexión. Puede
presentar los estados siguientes:
- FIJO: control remoto activado.
- PARPADEA LENTAMENTE: control
remoto desactivado.
- PARPADEA RÁPIDAMENTE DURANTE
3 SEGUNDOS Y, SEGUIDAMENTE, SE
APAGA: el electrodoméstico no puede
conectarse a la red Wi-Fi doméstica o
todavía no se ha emparejado con la
aplicación.
- PARPADEA LENTAMENTE 3 VECES Y
SE APAGA DURANTE 2 SEGUNDOS:
restablecimiento de la red Wi-Fi (durante
el emparejamiento con la aplicación).
- SE ENCIENDE DURANTE 1 SEGUNDO
Y SE APAGA DURANTE 3 SEGUNDOS:
la puerta está abierta. El control remoto no
se puede activar.

100
(MAX.)
1)
(MAX.)
3)
COLOR Y
MIXTOS 59'
ALGODÓN
PERFECTO 59'
PLANCHADO FÁCIL
PLUS
3)
3)
DESAGÜE &
CENTRIFUGADO
SINTETICOS Y
ROPA DE COLOR
2)
2)
Tabla de programas
*
PROGRAMA
(ver panel de control)
2
1
ESPECIAL 39'
HIGIENE PLUS 59'
DELICADOS 59'
RÁPIDO
ACLARADOS
LANA/A MANO
6 7 8 8,5 9 10 11 12 13 14
2 2 2 2 2 2 2 2 2 2
6 7 8 8,5 9 10 11 12 13 14
3 3,5 4 4 4,5 5 5,5 6 6,5 7
1,5 1,5 1,5 1,5 1,5 1,5 1,5 1,5 1,5 1,5
2 2,5 2,5 2,5 2,5 2,5 2,5 3 3 3,5
1 1 1,5 1,5 1,5 1,5 1,5 2 2 2
14'
2 2,5 2,5 2,5 2,5 2,5 2,5 3 3 3
30'
3 3,5 3,5 3,5 3,5 3,5 3,5 4 4 4
44'
- - - - - - - - - -
- - - - - - - - - -
1 1 2 2 2 2 2 2,5 2,5 2,5
2)
3 3,5 4 4 4,5 5 5,5 6 6,5 7
40°
60°
40°
40°
-
40°
40°
40°
40°
-
-
30°
60°
( )
ALGODÓN
ECO 40-60
SMART WASH
CONTROL REMOTO (WI-FI)
Posición que hay que seleccionar cuando se desee activar/desactivar el control
remoto a través de la aplicación (por Wi-Fi).
6 7 8 8,5 9 10 11 12 13 14
6 7 8 8,5 9 10 11 12 13 14
4 4,5 5,5 5,5 6 6,5 7 8 8 9
90°
60°
30°
( )
 Loading...