

Page 1
HOBS
USER INSTRUCTIONS
TABLES DE CUISSON
NOTICE D’EMPLOI
VARNÉ DESKY
NÁVOD POUŽITĺ
UND BEDIENUNGSANLEITUNG
INSTALLATIONS
ENCIMERAS
INSTRUCCIONES DE USO
INSTRUKCJE
UŻYCIA I MONTAŻU
OCAK
KULLANIM KLAVUZU
ВАРОЧНЫЕ ПОВЕРХНОСТИ
ИНСТРУКЦИЯ ПОЛЬЗОВАТЕЛЯ
GB - IE
FR
CZ
DE
ES
PL
TR
RU
NAVODILA ZA UPORABO
VGRADNJO IN PRIKLJUČITEV
PIANI COTTURA
ISTRUZIONI PER L’USO
PLACAS
INSTRUÇÕES DE UTILIZAÇÃO
TŰZHELYLAPOK
HASZNÁLATI UTASÍTÁS
PLITE
MANUAL DE UTILIZARE
SIJEČNJA
UPUTE ZA UPORABU I INSTALACIJU
SL
IT
PT
HU
RO
HR
CANDY HOOVER GROUP S.R.L. • Via Privata Eden Fumagalli • 20047 Brugherio Milano Italy
Page 2

CONTENT
Safety Instuructions
1. Instructions For The Installer
1.1. Bulding In
2. Electrical Connection (For U.K. Only)
2.1. Electrical Connection
2.2. Hotplates
3. Use Of Hob - User Instructions
3.1. Use Of Cooktop Electrical Plates
4. Maintenance and Cleaning
5. Aftercare
6. Protection Of The Environment
.........................................................................................07
.........................................................................05
.........................................................06
......................................................................................06
...................................................................06
.....................................................................................06
....................................................07
.................................................07
...........................................................07
.....................................................07
GB - IE
.........................................06
CONTENU
Conseils De Sécurité
1. Installation
1.1 Encastrement
2.1. Raccordement Electrique
2.2.
4 Plaques De Cuisson
3. Utilisation De La Table
3.1. Utilisation Des Plaques Electriques
4. Maintenance Et Entretien
5. Assistance Technique
6. Protection De L'environnement
..........................................................................08
......................................................................................09
.................................................................................09
.............................................................09
...................................................................09
...................................................................09
..............................................................10
.................................................................10
FR
..............................................09
..................................................10
OBSAH
Bezpečnostní Pokyny
1. Pokyny pro instalatéra
1.1 Vestavba
2.1. Připojení k elektrické síti
2.2. 4 Varné Zóny
3. Použití varné desky
3.1. Použití Elektrických Ploten
4. Údržba a čištění
5. Servis
6. Ochrana životního prostředí
.........................................................................................12
..............................................................................................13
.........................................................................11
....................................................................12
..............................................................12
..................................................................................12
.......................................................................12
............................................................12
..............................................................................13
........................................................13
CONTENIDO
Instrucciones Para Un Uso Seguro
1. Instrucciones Para El Instalador
1.1 Integración
2.1 Conexión Eléctrica
2.2.
4 Placas Calıentes
3. Utilización De La Placa Instrucciones Para El Usuario
3.1. Uso De La Cocina De Las Placas Eléctricas
4. Mantenimiento Y Limpieza
5. Servicio Técnico
6. Protección Del Medioambiente
.....................................................................................18
.........................................................................18
........................................................................18
...........................................................................19
.................................................17
..................................................18
...............................18
............................................................19
.....................................................19
İÇİNDEKİLER
Güvenlik Uyarıları
1. Kurulum Talimatları
1.1. Ankastre Montaj
2.1. Elektrik Bağlantısı
2.2. Ocak Gözleri
3. Ocak Kullanımı Kullanım Talimatları
3.1. Elektrikli Isıtıcının Kullanımı
4. Bakim Ve Temizlik
5. Satış Sonrası Servis
6. Çevrenin Korunması
Garanti Belgesi
..............................................................................23
........................................................................24
............................................................................24
.........................................................................24
..................................................................................24
..........................................24
.........................................................24
..........................................................................25
......................................................................25
.....................................................................25
...............................................................................25
CZ
ES
..............18
TR
INHALT
Sicherheitsvorschriften
1. Installationsanweisung
1.1 Einbau
2.1.Elektrischer Anschluss
2.2. 4 Heızplatten
3. Bedienungsanleitung
3.1. Benutzung Der Elektrischen Kochlatten
4. Wartung Und Reinigung
5. Technischer Kundendienst
6. Umweltgerechte Entsorgung
............................................................................................15
........................................................................................15
...................................................................14
..................................................................15
...................................................................15
....................................................................15
.......................................15
...............................................................16
..........................................................16
.........................................................16
SPIS TREŚCI
Instrukcje Bezpıieczeństwa
1. Instrukcje Dla Instalatora
1.1 Zabudowa
2.1 Podłączenie Do Sieci Elektrycznej
2.2. 4 Grzejnıkı
3. Użytkowanie Płyty - Instrukcje Dla Użytkownika
3.1. Eksploatacja Kuchenek Z Płytami Elektrycznymi
4. Czyszczenie I Konserwacja
5. Obsługa Serwisowa
6. Ochrona Środowiska
......................................................................................21
......................................................................................21
..............................................................20
..............................................................21
................................................21
.........................21
........................21
...........................................................22
......................................................................22
.....................................................................22
СОДЕРЖАНИЕ
Правила Техники Безопасности
1. Инструкции по выполнению установки
1.1. Встраиваемые варочные поверхности
2. Подключение к электросети (только для Великобритании)
2.1. Подключение к электросети
2.2. 4
Электро- Плитки
3. Инструкции по эксплуатации варочной поверхности
3.1. Руководство По Использованию Электрических Плит
4. Обслуживание и чистка
5. Послепродажное обслуживание
6. Защита окружающей среды
............................................................................28
.............................................................27
..............................................28
................................................28
..............................................................28
.........................29
...........................29
....................................................................29
.......................................................29
...............................................................29
DE
PL
RU
...............28
VSEBINA
Varnostna Navodıla
1. Vgradnja In Priključitev
1.1. Vgradnja
2.1. Priključitev Na Električno Omrežje
2.2. 4 G (plın) Grelne Plošče
3. Uporaba Kuhalne Plošče Navodila Za Uporabnika
3.1. Uporaba Električnih Kuhališč
4. Vzdrževanje In Čiščenje
5. Servisiranje
6. Protection De L'environnement
........................................................................................32
........................................................................31
.................................................................32
................................................32
................................................................32
.......................................................32
.................................................................33
.....................................................................................33
....................................................33
ÍNDICE
Instruções De Segurança
1. Instruções Para O Instalador
1.1 Preparação
2.1. Ligação Eléctrica
2.2. 4 Dıscos De Calor
3. Utilização Da Placa Instruções Para O Utilizador
3.1. Utilização Das Placas Eléctricas De Vitrocerâmica
4. Manutenção E Limpeza
5. Antes De Chamar A Assistência Técnica
6. Protecção Do Ambiente
.....................................................................................38
..................................................................37
.......................................................38
..........................................................................38
..........................................................................38
.................................................................39
....................................39
................................................................39
SL
..................32
PT
......................38
......................38
INDICE
Indicazioni Di Sicurezza
1. Istruzioni Per L'installatore
1.1. Installazione
2.1. Connessione Elettrica
2.2. 4 Placche Calde
3. Uso Del Piano - Istruzioni Utente
3.1. Uso Dí Fornelli Con Le Piastre Elettriche
4. Manutenzione E Pulizia
5. Ripristino
6. Rispetto Dell'ambiente
..................................................................................35
......................................................................................36
...................................................................34
...........................................................35
...................................................................35
.............................................................................35
.................................................35
......................................35
...............................................................36
.................................................................36
TARTALOMJEGYZÉK
Bıztonságı Utasítások
1. Utasítások a telepítő számára
1.1. Beépítés
2. Elektromos bekötés (csak az Egyesült Királyságban)
2.1. Elektromos bekötés
2.2. 4 Fözölapok
3. A tűzhelylap használata Felhasználói utasítások
Önállóan Beépíthető Elektromos Főzőlap Használati
3.1.
4. Karbantartás és tisztítás
5. Vevőszolgálat
6. Környezetvédelem
........................................................................................41
...................................................................................41
.....................................................................40
.......................................................41
.....................................................................41
.....................41
.............................................................42
................................................................................42
........................................................................42
IT
HU
..............41
..................42
Page 3

CUPRINS
Instrucţıunı Prıvınd Sıguranţa
1. Instrucţiuni de Instalare
1.1. Incorporare
2. Conexiunea electrică (numai pentru G.B.)
2.1. Conexiunea electrică
2.2. 4 Placıle Calde
3. Utilizarea plitei Instrucţiuni de utilizare
3.1.
Utilizarea Plăcilor Electrice Pentru Aragaz
4. Întreţinere şi curăţare
5. Service
6. Protejarea mediului
....................................................................................44
.....................................................................................44
...........................................................................................45
........................................................................45
..........................................................43
..............................................................44
.....................................................................44
...................................................................45
RO
................................44
.....................................44
...................................45
SADRŽAJ
Sıgurnosne Upute
1. Upute za instalatere
1.1. Ugradnja
2. Spajanje na plinsku i električnu mrežu
2.1. Spajanje na električnu mrežu
4 Grijače Ploče
2.2.
3. Uporaba ploče za kuhanje - upute za korisnika
3.1. Korištenje električnih ploča
4. Čišćenje i održavanje
5. Ovlašteni servis
6. Zaštita prirodnog okoliša
Važne napomene i savjeti
.............................................................................46
.......................................................................47
.......................................................................................47
.........................................47
........................................................47
.....................................................................................47
...........................................................47
....................................................................48
.............................................................................48
.............................................................48
............................................................48
HR
..........................47
Page 4
Brides
Joint
Figure 1
Min 10 mm
Figure 3
Figure 2
Figure 4
accessible space
25 a 45 mm
60 cm
2
240 cm
2
OUI NON NON NON NON
Figure 5
120 cm
180 cm
2
2
Figure 6
Figure 7
04
Page 5

SAFETY INSTURUCTIONS
WARNING: The appliance and its accessible parts become hot during use. Care should be taken to avoid
touching heating elements.
• Children under 8 Year of age must be kept away from the appliance unless they are continuously
supervised.
• This appliance can be used by children aged from 8 years and above and persons with reduced
physical, sensory or mental capabilities or lack of experience and knowledge if they have been given
supervision or instruction concerning use of the appliance in a safe way and understand the hazards
involved.
• Children must not play with the appliance.
• Cleaning and user maintenance shall not be made by children without supervision
WARNING: Unattended cooking on a hob with fat or oil can be dangerous and may result in fire.
• NEVER try to extinguish a fire with water, but switch off the appliance and then cover flame e.g. with a lid
or a fire blanket.
WARNING: Danger of fire: do not store items on the cooking surfaces.
WARNING: If the surface is cracked, switch off the appliance to avoid the possibility of electric shock.
• Do not use a steam cleaner for cleaning operations.
• Any spillage should be removed from the lid before opening.
• The hob surface must be allowed to cool down before closing the lid.
• This appliance is not intended to be operated by means of an external timer or separate remote-control
system.
• The means for disconnection must be incorporated in the fixed wiring in accordance with the wiring
rules.
• The instructions state the type of cord to be used, taking into account the temperature of the rear surface
of the appliance.
• If the supply cord is damaged, it must be replaced by a special cord or assembly available from the
manufacturer or its service agent.
CAUTION: In order to avoid a hazard due to inadvertent resetting of the thermal cutout, this appliance
must not be supplied through an external switching device, such as a timer, or connected to a circuit that
is regularly switched on and off by the utility.
• This appliance must be installed in accordance with the regulations in force and only used in a well
ventilated space. Read the instructions before installing or using this appliance.
• "These instructions are only valid if the country symbol appears on the appliance. If the symbol does not
appear on the appliance, it is necessary to refer to the technical instructions which will provide the
necessary instructions concerning modification of the appliance to the conditions of use of the country".
• "Prior to installation, ensure that the local distribution conditions (nature of the gas and gas pressure)
and the adjustment of the appliance are compatible";
• "The adjustment conditions for this appliance are stated on the label (or data plate)";
• "This appliance is not connected to a combustion products evacuation device. It shall be installed and
connected in accordance with current installation regulations. Particular attention shall be given to the
relevant requirements regarding ventilation".
• The use of a gas cooking appliance results in the production of heat and moisture in the room in which it
is installed. Ensure that the kitchen is well ventilated: keep natural ventilation holes open or install a
mechanical ventilation device (mechanical extractor hood). Prolonged intensive use of the appliance
may call for additional ventilation, for example opening of a window, or more effective ventilation, for
example increasing the level of mechanical ventilation where present.
05 GB
Page 6
1. INSTRUCTIONS FOR THE INSTALLER
INSTALLING A DOMESTIC APPLIANCE CAN BE A COMPLICATED OPERATION WHICH IF NOT CARRIED OUT CORRECTLY, CAN SERIOUSLY
AFFECT CONSUMER SAFETY. IT IS FOR THIS REASON THAT THE TASK SHOULD BE UNDERTAKEN BY A PROFESSIONALLY QUALIFIED
PERSON WHO WILL CARRY IT OUT IN ACCORDANCE WITH THE TECHNICAL REGULATIONS IN FORCE. IN THE EVENT THAT THIS ADVICE IS
IGNORED AND THE INSTALLATION IS CARRIED OUT BY AN UNQUALIFIED PERSON, THE MANUFACTURER DECLINES ALL RESPONSIBILITY
FOR ANY TECHNICAL FAILURE OF THE PRODUCT WHETHER OR NOT IT RESULTS IN DAMAGE TO GOODS OR INJURY TO INDIVIDUALS.
1.1 BUILDING IN 2.1. ELECTRICAL CONNECTION
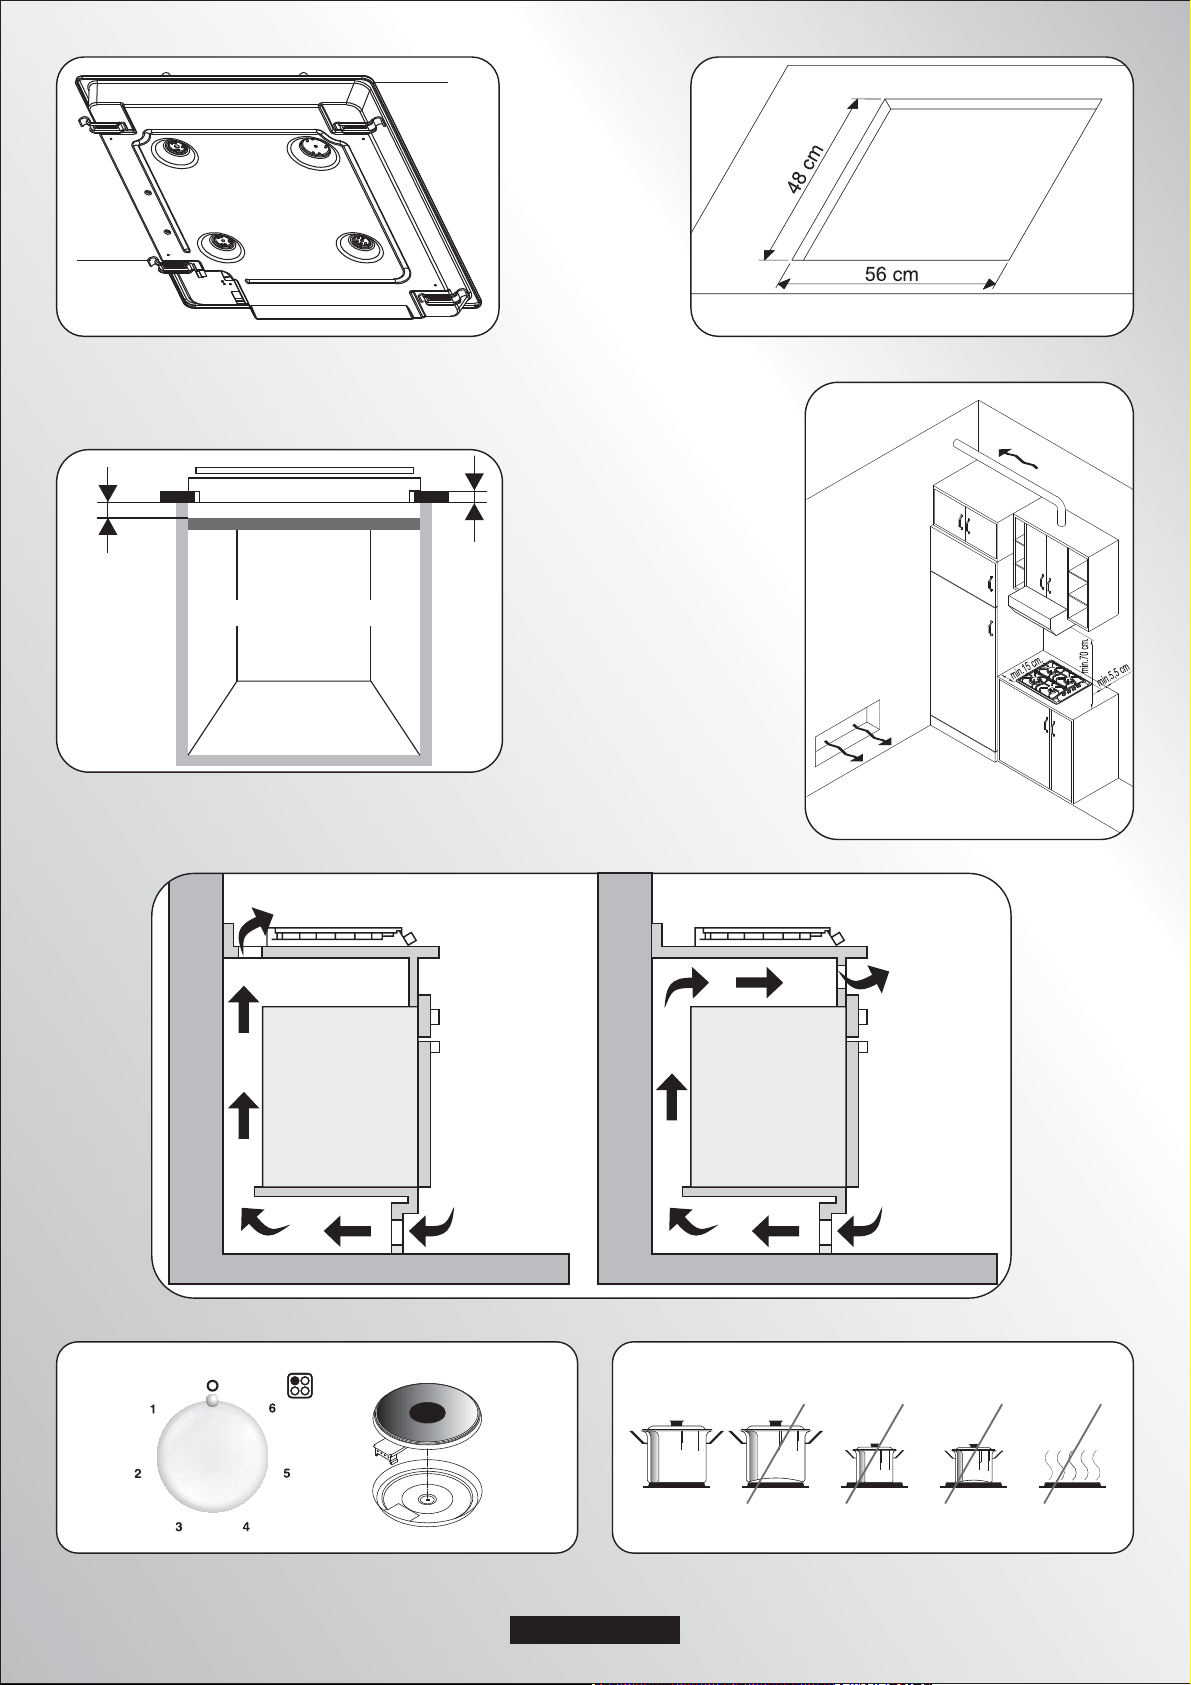
The hob may be installed in any worktop which is heat resistant to a
temperature of 100°C, and has a thickness of 25-45 mm. The
dimensions of the insert to be cut out of the worktop are in shown in
Figure 2.
If the Hob is fitted next to a cabinet on either side, the distance
between the Hob and the cabinet must be at least 15 cm (see Figure
4); while the distance between the hob and the rear wall must be at
least 5,5 cm.
The distance between the hob and any other unit or appliance above it
(e.g. An extractor hood) must be no less than 70 cm (Figure 4).
When there is an accessible space between the built-in hob and the
cavity below, a dividing wall made of insulating material should be
inserted (wood or a similar material) (Figure 3).
Important - The diagram in figure 1 shows how the sealant should
be applied.
The Hob unit is fitted by attaching the Fixing Clamps supplied, using
the holes at the base of the unit.
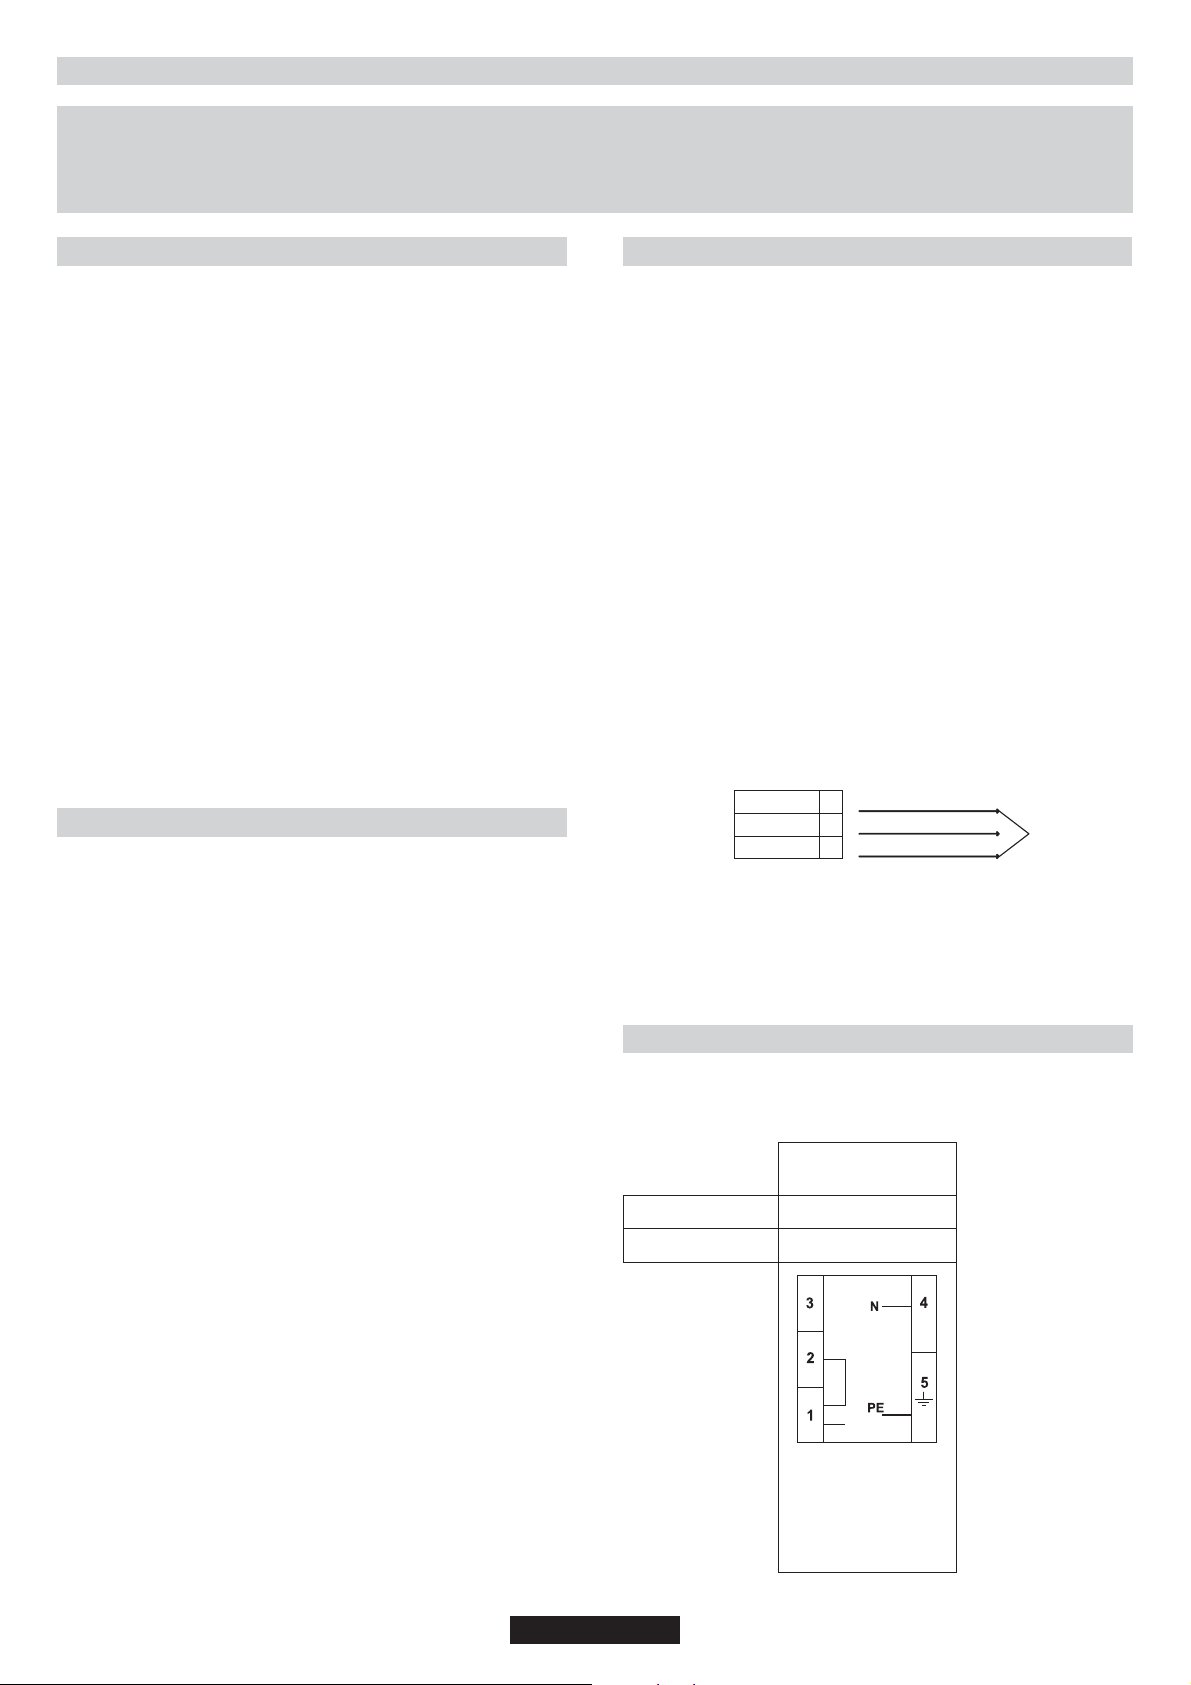
If a hob of 60 cm is fitted above an oven which is not equipped with fan
cooling system it is recommended that openings are created within
the built in furniture to ensure correct air circulation.
The size of these openings must be at least 300 cm2 and placed as
shown in Figure 5.
Check the data on the rating plate, located on the outside of the unit, to
ensure that the supply and input voltage are suitable.
Before connection, check the earthing system.
Check the data on the rating plate, located on the outside of the unit, to
ensure that the supply and input voltage are suitable.
Before connection, check the earthing system.
By Law, this appliance must be earthed. If this regulation is not
complied with, the Manufacturer will not be responsible for any
damage caused to persons or property. If a plug is not already
attached, fit a plug appropriate to the load indicated on the rating plate.
The earth wire is coloured yellow/green. The plug should always be
accessible.
Where the Hob is connected direct to the electricity supply, a circuit
breaker must be fitted.
If the power supply cord is damaged this is to be replaced by a
qualified engineer so as to prevent any potential risk.
The earth wire ( green and yellow coloured ) must be at least 10 mm
longer than the live and neutral wires.
The section of the cable used must be of the correct size in relation to
the absorbed power of the hob.
The means for disconnection must be incorporated in the fixed wiring
in accordance with the wiring rules.
The instructions state the type of cord to be used, taking into account
the temperature of the rear surface of the appliance.
Please check rating plate for the power details and ensure that the
power supply cord is of the type H05RR F, H05VV-F, F-H05V2V2.
2. ELECTRICAL CONNECTION (FOR U.K. ONLY)
Warning - this appliance must be earthed
This appliance is designed for domestic use only. Connection to the
main supply must be made by a competant electrician, ensuring that
all current regulations concerning such installations are observed.
The appliance must only be connected to a suitably rated spur point, a
3 pin 13 amp plug/socket is not suitable. A double pole switch must be
provided and the circuit must have appropriate fuse protection.
Further details of the power requirement of the individual product will
be found in the users’ instruction and on the appliance rating plate. In
the case of built-in product you are advised, should you wish to use a
longer cable than the one supplied, that a suitably rated heat resistant
type must be used.
The wiring must be connected to the mains supply as follows:
CONNECT TO SPUR TERMINAL
Green & Yellow Wire Earth Connection
Blue Wire Neutral Connection
Brown Wire Live Connection
Note: We do not advocate the use of earth leakage devices with
electric cooking appliances installed to spur points because of the
«nuisance tripping» which may occur. You are again reminded that the
appliance must be correctly earthed, the manufacturer declines any
responsibility for any event occurring as a result of incorrect electrical
installation.
LIVE
Mains Supply
The means for disconnection must be incorporated in the fixed wiring
in accordance with the wiring rules.
If an appliance is not fitted with a supply cord and a plug, or with other
means for disconnection from the supply mains having a contact
separation in all poles that provide full disconnection under
overvoltage category III conditions, the instructions shall state that
means for disconnection must be incorporated in the fixed wiring in
accordance with the wiring rules.
EARTH
NEUTRAL
Brown Wire
L
Green/Yellow Wire
Blue Wire
N
Power Cable
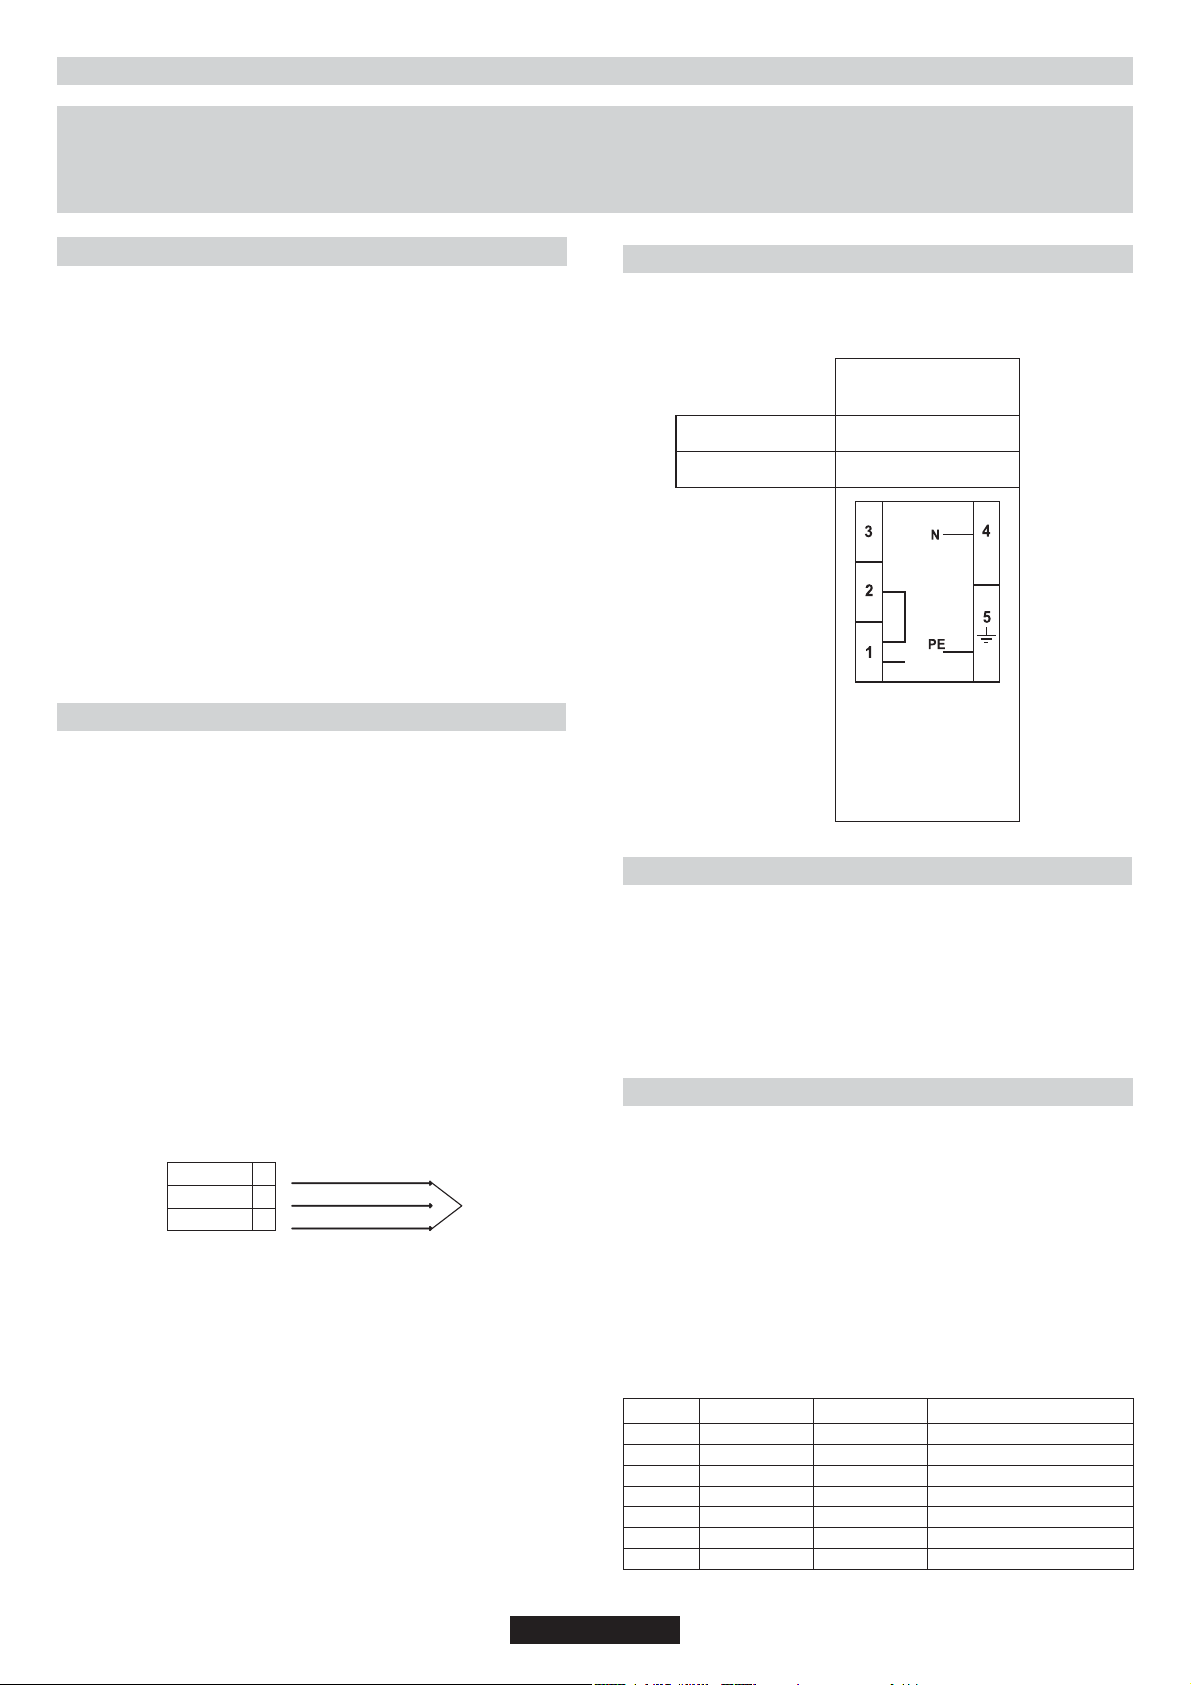
2.2. 4 HOTPLATES
These hobs are delivered without cable. For connection, cable type
and section referred to the table.
Monophase
220-240 V~
Cable - Section
Cable - Type
3 G 2.5 mm
H05VV-F
2
06 GB
L1
L1 : Phase
shunt 1-2
4-Neutral
PE-Earth
Page 7
3. USE OF HOB - USER INSTRUCTIONS
This appliance must only be used for the purpose for which it is
intended, domestic cooking, and any other use will be considered
improper and could therefore be dangerous. The Manufacturer will
not be responsible for any damage or loss resulting from improper
use.
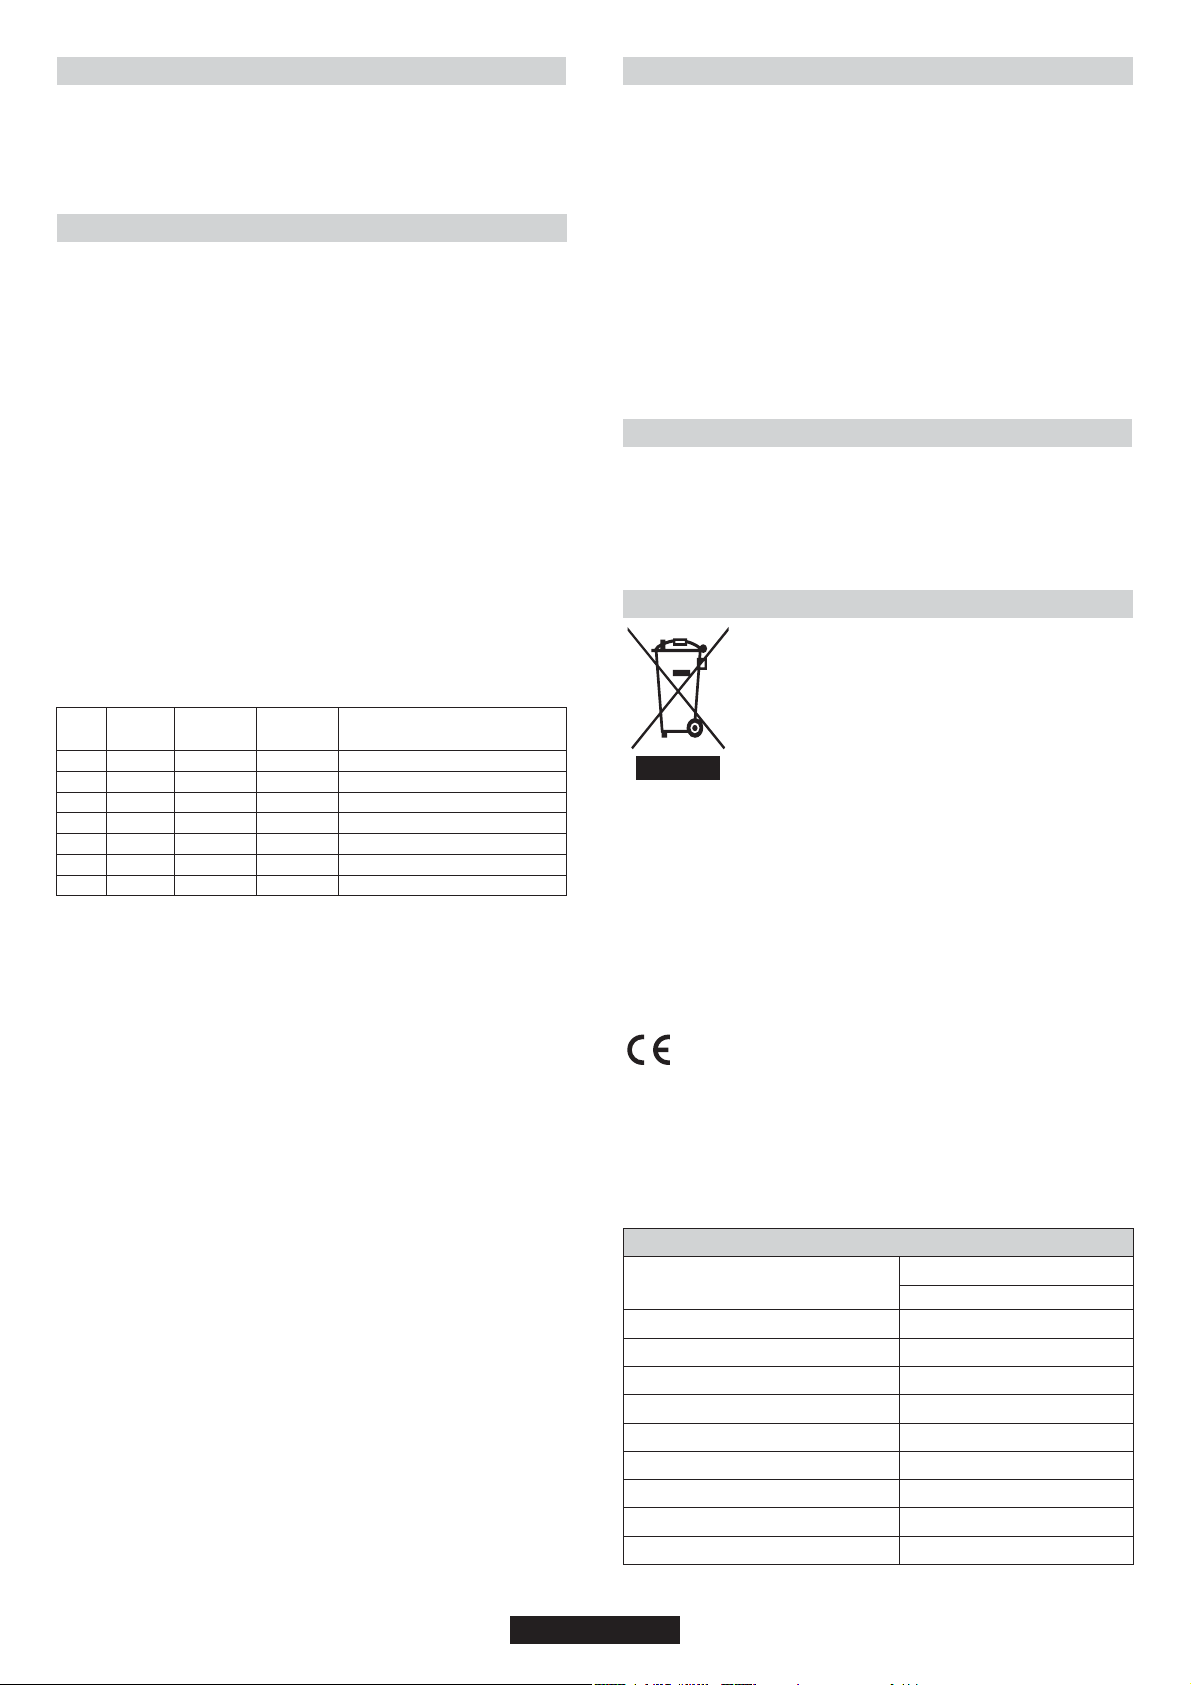
3.1. USE OF COOKTOP ELECTRICAL PLATES
Turn the knob to the position for the required temperature of the hot
plate. The indicator light of the hot plate will come on and the hot plate
will start to heat.
When cooking is completed, turn the knob to the “ O” position. (Figure
6). Do not leave the hot plate turned on without a pan on it. The Turn
the knob to the position for the required temperature of the hot plate.
The indicator light of the hot plate will come on and the hot plate will
start to heat.
When cooking is completed, turn the knob to the “ O” position. (Figure
6). Do not leave the hot plate turned on without a pan on it. The
diameter and the base of the pan you use is critical. The maximum
diameter of the pan base is 14 cm and the base should be flat.
Leave the hot plate to heat up for 5 minutes before placing a pan on it
the first time you use it. This will allow the heat resistant coating of the
plate to harden due to burning.
Use a wet cloth and detergent for cleaning the hot plates. Do not
remove food residues from the hot plates with a knife or any other
hard, sharp object.
Turn on the hot plate for a few moments to dry it after cleaning.
However, it must never be left on for more than a few moments without
a pan on top.
Position
0
1
2
3
4
5
6
Power
(Watt)
0
100 W
180 W
250 W
500 W
750 W
1000 W
Power
(Watt)
0
135 W
220 W
300 W
850 W
1150 W
1500 W
Suitability of Cooking Pans (Figure 7)
Keep in mind that larger pans have larger heating surfaces.
This will help them to cook the food faster than pans with smaller
heating surfaces.
Always use pan sizes proportionate to the amount of the food to be
cooked. In order to prevent splashing, do not use very small pans,
especially for foods with excess liquid. If you use excessively large
pans for quick cooked foods, sausages and liquids will stick and
residues will remain attached to the pan after being emptied.
Closed pans and baking trays or moulds are suggested for cooking
sweets. Splashed sugar and juices from an open pan may stick to the
cooker surface and will be difficult to remove.
This is especially important for pans used for roasting or pressurized
cooking at high temperature.
Do not leave burners unattended without a pan or with an empty pan
on top.
Check the suitability of cooking pans with respect to the following
criteria;
They should be heavy.
They should completely cover the burner surface; they may be a little
bigger but no smaller.
Base surfaces should be completely flat and fit well on the cooking
surface.
•For the best use of the electric hotplates and to minimize energy
consumption, only pans with smooth flat bases should be used. The
size of the pan should be as close as possible to the diameter of the
hotplate, and never smaller. The base of the pan should be dry and
spillage should be avoided. Empty pans must not be left on the plates,
and the plates should not be left switched on without a pan.
Power
(Watt)
0
175 W
220 W
300 W
850 W
1150 W
2000 W
Explanation
Off
Heating
Cooking at low temperature
Cooking at low temperature
Cooking, Roasting, Boiling
Cooking, Roasting, Boiling
Cooking, Roasting, Boiling
4. MAINTENANCE AND CLEANING
Before cleaning the hob, ensure the appliance has cooled down.
Remove the plug from the socket or (if connected directly) switch off
the electricity supply.
Cleaning and user maintenance shall not be made by children without
supervision.
Never use abrasives, corrosive detergents, bleaching agents or
acids. Avoid any acid or alkaline substances (lemon, juice, vinegar
etc.) on the enamelled, varnished or stainless steel sections.
When cleaning the enamelled, varnished or chrome sections, use
warm soapy water or a non caustic detergent. For stainless steel use
an appropriate cleaning solution.
The burners can be cleaned with soapy water. To restore their original
shine, use a household stainless steel cleaner. After cleaning, dry the
burners and replace.
It is important the Burners are replaced correctly.
5. AFTERCARE
Before calling out a Service Engineer please check the following:
• that the plug is correctly inserted and fused;
• that the gas supply is not faulty.
If the fault cannot be detected:
Switch off the appliance and call the After Service Centre. DO NOT
TAMPER WITH THE APPLIANCE.
6. PROTECTION OF THE ENVIRONMENT
This appliance is marked according to the European
directive 2002/96/EC on Waste Electrical and
Electronic Equipment (WEEE).
By ensuring this product is disposed of correctly, you
will help prevent potential negative consequences for
the environment and human health, which could
otherwise be caused by inappropriate waste handling
of this product.
may not be treated as household waste. Instead it shall be handed
over to the applicable collection point for the recycling of electrical and
electronic equipment.
Disposal must be carried out in accordance with local environmental
regulations for waste disposal.
For more detailed information about treatment, recovery and recycling
of this product, please contact your local city office, your household
waste disposal service or the shop where you purchased the product.
Declaration of compliance: This equipment, in the parts intended to
come into contact with food, complies with the regulations laid down in
EEC directives 89/109.
2004/108/EC, and subsequent amendments.
The Manufacturer will not be responsible for any inaccuracy resulting from
printing or transcript errors contained in this brochure. We reserve the right
to carry out modifications to products as required, including the interests of
consumption, without prejiudice to the characteristics relating to safety or
function.
Burner
Type / reference
Electric Plate (R 2000W)
Electric Plate (1500W)
Electric Plate (1000W)
Electric Plate (R 1500W)
Installation Class
Voltage / Frequency V / Hz
Electrical input power
Product dimension
This appliance has been designed for non-professional, i.e. domestic, use.
The symbol on the product indicates that this product
Appliance complies with European Directives 2006/95/EC and
Table 1
BUILT IN HOBS
1
4E
S60 / HBGS
1
1
1
1
3
220-240 V / 50-60 Hz
6000 W
585 x 510
07 GB
Page 8

CONSEILS DE SÉCURITÉ
AVERTISSEMENT: L'appareil et les parties accessibles deviennent chauds pendant l'utilisation. Des
précautions doivent être prises pour éviter de toucher les éléments chauffants.
• Les enfants de moins de 8 ans doivent être tenus à l'écart à moins d'être surveillés continuellement.
• Cet appareil n'est pas destiné à être utilisé par des personnes (y compris les enfants) dont les capacités
physiques, sensorielles ou mentales sont réduites, ou ayant un manque d'expérience et de
connaissances, à moins qu'elles n'aient été formées à l'utilisation de l'appareil, par une personne
responsable de leur sécurité.
• Les enfants ne doivent jouer avec l'appareil.
• Le nettoyage et l'entretien par l'utilisateur ne doit pas être fait par des enfants sans surveillance.
ATTENTION: La cuisson sans surveillance sur une plaque de cuisson avec de la graisse ou d'huile peut
être dangereuse et peut entraîner un incendie.
• Ne jamais tenter d'éteindre un incendie avec de l'eau, mais éteindre l'appareil, puis couvrir la flamme
par exemple avec un couvercle ou une couverture anti-feu.
AVERTISSEMENT: Danger d'incendie: ne pas stocker des éléments sur les surfaces de cuisson.
ATTENTION: Si la surface est fêlée, éteindre l'appareil pour éviter les risques de choc électrique.
• Ne pas utiliser de nettoyants vapeur pour le nettoyage.
• Tout liquide doivent être enlevé du couvercle avant ouverture.
• Il est recommandé de laisser refroidir la table de cuisson avant de refermer le couvercle.
• l'appareil n'est pas destiné à être utiliser avec une minuterie externe ou un système de contrôle à
distance.
• Un système de déconnexion doit être incorporé dans le compteur conformément aux règles de
câblage.
• Les instructions ndiquent le type de cordon à utiliser, en tenant compte de la température de la surface
arrière de l'appareil.
• Si le cordon d'alimentation est endommagé, il doit être remplacé par un cordon spécial disponible
auprès du fabricant ou de stations de dépannage agrées.
ATTENTION: Pour éviter tout danger dû à une réinitialisation accidentelle, cet appareil ne doit pas être
alimenté par un dispositif de commutation externe, comme une minuterie, ou connecté à un circuit qui est
régulièrement allumé et éteint par l'utilitaire.
• Cet appareil doit être installé en conformité avec la réglementation en vigueur et utilisé uniquement
dans un espace ventilé. Lisez les instructions avant d'installer ou utiliser cet appareil.
• Ces instructions ne sont valables que si le symbole du pays apparaît sur l'appareil. Si le symbole
n'apparaît pas sur l'appareil, il est nécessaire de se référer à la notice technique qui fournira les
instructions nécessaires concernant la modification de l'appareil selon les conditions d'utilisation du
pays.
• Avant l'installation, s'assurer que les conditions de distribution locale (la nature du gaz et la pression) et
le réglage de l'appareil sont compatibles"
• Les conditions de réglage de cet appareil sont indiqués sur l'étiquette (ou données de la plaque) ;
• "Cet appareil n'est pas relié à un dispositif d'évacuation des produits de combustion. Il doit être installé
et raccordé conformément aux règles d'installation en cours. Une attention particulière doit être
accordée aux exigences concernant la ventilation ".
• "Les résultats de la table gaz dans la production de chaleur depend de l'humidité dans la pièce dans
laquelle elle est installé Veiller à ce que la cuisine soit bien ventilée. Laissez les ouvertures de ventilation
naturelle ouvertes ou installez un dispositif de ventilation mécanique (hotte aspirante mécanique). Une
utilisation intensive prolongée de l'appareil peut faire appel à l'utilsation d'une ventilation
supplémentaire, par exemple d'ouverture d'une fenêtre, ou plus efficace de ventilation mécanique, par
exemple en augmentant le niveau de la ventilation mécanique présent
08 FR
.
Page 9

1. INSTALLATION
La mise en place fonctionnelle des appareils ménagers dans leur environnement est une opération délicate qui, si elle n'est pas correctement
effectuée, peut avoir de graves conséquences sur la sécurité des consommateurs. Dans ces conditions, il est impératif de confier cette tâche à
un professionnel qui la réalisera conformément aux normes techniques en vigueur. Si malgré cette recommandation, le consommateur
réalisait lui-même l'installation, le constructeur déclinerait toute responsabilité en cas de défaillance technique du produit entraînant ou non
des dommages aux biens et/ou aux personnes.
1.1. ENCASTREMENT
Le meuble ou le support dans lequel doit être encastrée la table, ainsi
que les parois du meuble qui pourraient juxtaposer celui-ci, doivent
être d'une matière résistant à une température élevée (jusqu'à 100°C)
et d'une épaisseur comprise entre 25 et 45 mm.
Les dimensions d'encastrement sont indiquées sur le schéma 2.
Si la table est installée entre deux meubles de cuisine, la distance
entre la table et les meubles doit être au moins de 15 cm (voir schéma
4); tandis que la distance entre la table et le mur du fond doit être au
moins de 5,5 cm. La distance entre la table et tout autre appareil ou
meuble situé au dessus (par exemple une hotte) doit être au moins de
70 cm (voir schéma 4).
Si, en fonction de l'installation de la table, la partie inférieure de son
caisson se trouve à proximité d'une zone normalement accessible
lors de manipulations et/ou de rangements, placer une cloison (bois
ou similaire) pour éviter tous risques de brûlure ou de détérioration
(schéma 3).
Attention : Lors de la mise en place, un soin particulier doit être
porté au joint entourant le bord de la table afin d'éviter toute
infiltration dans le meuble support (schéma 1).
Lors de la mise en place du joint sur la partie arrière, veiller à ne pas
obstruer les passages d'air nécessaires à la combustion.
Le caisson de la table est équipé en dessous de 4 emplacements
prévus pour recevoir les brides de fixation destinées à l'immobilisation
de la table sur le meuble. Placer les 4 brides de fixation de manière à
ce que la table de travail soit parfaitement plaquée au meuble.
Si une table de 60 cm de large est installée au-dessus d'un four qui
n'est pas équipé de ventilation tangentielle, il est recommandé de
créer des ouvertures dans le caisson de cuisine pour faire ainsi
circuler l'air.
La taille de ces ouvertures doit être au moins de 300 cm² et placées
comme indiqué sur le schéma 5.
2.1. RACCORDEMENT ELECTRIQUE
"L'installation recevant l'appareil cité en référence doit être
conforme à la norme en vigueur dans le pays d'installation". Le
constructeur décline toute responsabilité en cas de non respect
de cette disposition.
Vérifier les données sur la plaque signalétique, située à l'extérieur de
l'appareil, pour s’assurer que l'alimentation et le voltage conviennent.
Avant le branchement, vérifier le raccordement de mise à la terre.
Attention : vérifier la continuité de la terre de l'installation avant
de procéder au raccordement. Notre responsabilité ne saurait
être engagée pour tout incident ou ses conséquences
éventuelles qui pourraient survenir à l'usage d'un appareil non
relié à la terre, ou relié à une terre dont la continuité serait
défectueuse.
Si une prise n'est pas déjà fournie, installer une prise appropriée pour
la charge indiquée sur la plaque signalétique.
La prise devrait toujours être accessible.
Le fil de terre est de couleur jaune / vert.
Lorsque la table de cuisson est reliée directement à l'approvisionnement en électricité, un disjoncteur doit être installé.
Si le cordon d'alimentation est endommagé, il doit être remplacé par
un technicien qualifié afin d'éviter tout risque potentiel.
Le fil de terre (couleur vert et jaune) doit être au moins 10mm plus long
que les fils de phase et neutre.
La section du câble utilisé doit être de la bonne taille par rapport à la
puissance absorbée de la table de cuisson.
Un système de déconnexion doit être incorporé dans le compteur
conformément aux règles de câblage.
Les instructions indiquent le type de cordon à utiliser, en tenant
compte de la température de la surface arrière de l'appareil.
Fil Marron
L
Fil Vert/jaune
Fil Bleu
N
Câble
lectrique
é
d’alim
Alimentation
PHASE
TERRE
NEUTRE
Un système de déconnexion doit être incorporé dans le compteur
conformément aux règles de câblage.
Si l’appareil n'est pas muni d'un cordon d'alimentation et d'une prise,
ou d’un autre moyen assurant que l’appareil puisse être déconnecté
du réseau d'alimentation dans le cas d’un surtension répondant aux
conditions de catégorie III, il est nécessaire d’intégrer un système de
disjoncteur dans le câblage, conformément aux règles établies en la
matière.
2.2 4 PLAQUES DE CUISSON
Ces appareils sont livrées sans câble. Pour le raccordement, le type
et la section de câble se référer au tableau.
Monophasé
220-240 V~
Section du câble
Type de câble
3 G 2.5 mm
H05VV-F
2
L1
L1 : phase
Pour obtenir la
phase L1, relier
(shunter) 1 et 2
4 : N : Neutre
5 : PE : Terre
3. UTILISATION DE LA TABLE
Cet appareil ne doit être utilisé que pour des fins pour lesquelles il est
destiné : la cuisson domestique. Toute autre utilisation sera
considérée comme abusive et peut donc être dangereuse. Le
fabricant ne sera pas responsable pour tout dommage ou perte
découlant d'une utilisation abusive.er des éléments sur les surfaces
de cuisson.
3.1. UTILISATION DES PLAQUES ELECTRIQUES
Placer la manette sur la position voulue pour régler la température
de la plaque électrique. Le voyant lumineux s'allume et la plaque
chauffante électrique commence à chauffer.
A la fin de la cuisson placer la manette sur la position "0" pour
éteindre la plaque électrique (Schéma 6).
Ne laisser jamais allumer la plaque électrique sans un récipient
dessus. Le diamètre et la forme du fond du récipient utilisé a une
très grande importance. Le fond du récipient doit être plat et son
diamètre ne doit pas être supérieur à 14 cm. Avant d’utiliser pour
la première fois la plaque électrique, la faire chauffer quelques
minutes à vide (sans récipient dessus) pour permettre le
durcissement du revêtement protecteur.
Pour nettoyer les plaques électriques utiliser un chiffon humide et
du détergent à vaisselle. N'essayer jamais d’enlever les résidus
carbonisés en grattant sur les plaques chauffantes à l'aide d'un
couteau ou autres instruments aigus et durs. Après le nettoyage
des plaques électriques, les laisser allumées pendant quelques
minutes pour les faire sécher.
Lorsque la plaque est chaude, éviter tout contact avec des
récipients en matière plastique ou du papier aluminium.
09 FR
Page 10
Position
0
1
2
3
4
5
6
Puissance
(Watt)
0
100 W
180 W
250 W
500 W
750 W
1000 W
Puissance
(Watt)
0
135 W
220 W
300 W
850 W
1150 W
1500 W
Puissance
(Watt)
0
175 W
220 W
300 W
850 W
1150 W
2000 W
Remarques
Fermée
Réchauffage
Cuisson à basse température
Cuisson à basse température
Cuisson légumes, poissons, Ebullition
Cuisson, Saisie, Ebullition
Cuisson, Saisie, Ebullition
5. ASSISTANCE TECHNIQUE
Avant d'appeler le Service d'Assistance Technique, vérifier les
points suivants:
• La prise est bien insérée
Si la panne ne peut être identifiée:
Éteignez l'appareil (ne pas l'utiliser) et appeler le Service
d'Assistance Technique.
La conformité des récipients de cuisson (Schéma 7)
N'oubliez pas que des récipients plus grands ont des surfaces de
chauffe plus larges.
Des grands récipients permettent une cuisson plus rapide par
rapport aux récipients ayant des petites surfaces de chauffe.
Utiliser toujours des récipients qui sont conformes aux quantités
des plats à cuire. Pour que les aliments ne débordent pas, surtout
pour la cuisson des plats relativement liquides, n'utilisez pas des
petits récipients. En cas d'utilisation des grands récipients pour
les plats dont la cuisson est rapide, la sauce du plat restera collée
au récipient et quand vous le transférez dans une assiette de
service, les restes du plat resteront aussi collés au fond du
récipient.
Conseils
Pour obtenir entière satisfaction de votre appareil, il est
absolument nécessaire de prendre quelques précautions ou de
respecter certaines conditions.
• Utiliser des récipients épais et à fond plat :
le fond rigoureusement plat supprimera les points de surchauffe
sur lesquels les aliments attachent, et l'épaisseur du métal
permettra une parfaite répartition de la chaleur.
• Veiller à ce que le fond des récipients soit sec :
cette précaution évitera toute attaque de la plaque par l'humidité.
• Utiliser des récipients d'un diamètre suffisant pour
recouvrir
entièrement la plaque sinon vous aurez une dépense inutile
d'une partie de l'énergie et en cas de débordement, la plaque
électrique sera très rapidement attaquée et difficile à entretenir
(rouille, déchets ...).
• Ne jamais laisser la plaque électrique fonctionner à vide :
elle pourrait se déformer, ce qui ne permettrait plus d'avoir des
résultats de cuisson satisfaisants.
•Lorsque vous cuisinez avec des graisses ou de l'huile, ne
vous éloignez pas de la table de cuisson.
Les graisses et l'huile surchauffées peuvent s'enflammer
rapidement.
•Lorsque la plaque est chaude, éviter tout contact avec des
récipients en matière plastique ou du papier aluminium.
Attention :
Durant le fonctionnement de la plaque électrique la surface
de chauffe devient obligatoirement très chaude, il est donc
conseillé d'éloigner les jeunes enfants.
4. MAINTENANCE ET ENTRETIEN
Avant de nettoyer la table de cuisson, assurez-vous du
refroidissement de l’appareil. Retirez la fiche de la prise ou (s'il est
connecté directement), éteindre l'alimentation électrique.
Ne jamais utiliser de produits abrasifs, de détergents corrosifs,
agents de blanchiment ou d'acides. Éviter les substances acides
ou alcalines (citron, jus, vinaigre etc…) sur l'émail ou l'acier.
6. PROTECTION DE L'ENVIRONNEMENT
Cet appareil est commercialisé en accord avec la
directive européenne 2002/96/CE sur les déchets
des équipements électriques et électroniques
(DEEE).
En vous assurant que ce produit est correctement
recyclé, vous participez à la prévention des
conséquences négatives sur l'environnement et la santé publique
qui pourrait être causé par une mise au rebut inappropriée de ce
produit.
Le symbole sur ce produit indique qu'il ne doit pas être traité
comme un déchet ménager. Il doit être rapporté jusqu'à un point
de recyclage des déchets électriques et électroniques.
La collecte de ce produit doit se faire en accord avec les
réglementations environnementales concernant la mise au rebut
de ce type de déchets.
Pour plus d'information au sujet du traitement, de la collecte et du
recyclage de ce produit, merci de contacter votre mairie, votre
centre de traitement des déchets ou le magasin où vous avez
acheté ce produit.
Déclaration de conformité: cet équipement, dans les parties
destinées à entrer en contact avec les aliments, est conforme aux
normes fixées par les directives CEE 89/109.
L'appareil est conforme aux directives européennes
remplacée par 2006/95/EC et 2004/108/EC, et ses
modifications ultérieures.
Table 1
TABLES DE CUISSON
Foyers
Modèle
Plaque électrique (R 2000W)
Plaque électrique (1500W)
Plaque électrique (1000W)
Plaque électrique (R 1500W)
Classe d'installation
Voltage / Frequency V / Hz
Puissance électrique
Dimensions appareil (LxP) mm
Cet appareil a été dessiné pour un usage non professionnel,
usage domestique uniquement
220-240 V / 50-60 Hz
1
4E
S60 / HBGS
1
1
1
1
3
6000 W
585 x 510
Lors du nettoyage de l'émail, vernis ou des sections chromées,
utilisez de l'eau chaude savonneuse ou un détergent non corrosif.
Pour l'acier inoxydable, utilisez une solution de nettoyage
appropriée.
Les brûleurs peuvent être nettoyés avec de l'eau savonneuse.
Pour restaurer leur éclat d'origine, utilisez un nettoyant ménager
pour acier inoxydable. Après nettoyage, séchez les brûleurs et les
replacer.
Il est important que les brûleurs soient remplacés
correctement à leur position.
10 FR
Page 11

BEZPEČNOSTNÍ POKYNY
UPOZORNĚNÍ: Spotřebič a jeho přístupné části se během použití zahřívají. Nedotýkejte se topných
prvků.
• Děti do 8 let držte mimo dosah spotřebiče, pokud nejsou neustále pod dohledem.
• Tento spotřebič smí používat děti starší 8 let a osoby se sníženými fyzickými, senzorickými nebo
mentálními schopnostmi nebo bez dostatečných zkušeností, pokud jsou pod dohledem a byly poučeny o
použití spotřebiče a možném riziku.
• Nedovolte dětem hrát si se spotřebičem.
• Čištění a údržbu nesmí provádět děti bez dohledu.
UPOZORNĚNÍ: Vaření na desce s tuky a oleji bez dohledu je nebezpečné a může způsobit požár.
• NIKDY se nepokoušejte uhasit plamen vodou, vypněte spotřebič a poté překryjte plamen pokličkou
nebo protipožární přikrývkou.
UPOZORNĚNÍ: Pokud je povrch varné desky prasklý, spotřebič vypněte, abyste zabránili riziku
zasažení elektrickým proudem.
• K čištění nepoužívejte vysokotlaké parní čističe.
• Nečistoty z krytu odstraňte před otevřením.
• Varnou desku nechte před zavřením krytu vychladnout.
• Spotřebič nesmíte ovládat pomocí externího časovače nebo samostatného dálkového ovládání.
• Odpojovací zařízení musí být včleněno do napájení v souladu s platnými předpisy.
• Pokud je poškozený přívodní kabel, musíte jej vyměnit za speciální kabel dostupný u výrobce nebo
servisního technika.
UPOZORNĚNÍ: abyste zabránili nebezpečí z neúmyslného resetování tepelné pojistky, tento spotřebič
nesmíte napájet přes externí spínací zařízení, jako je časovač, nebo připojovat k obvodu, který se
pravidelně zapíná a vypíná elektrikářskou službou.
•Tento spotřebič musí být instalován v souladu s platnými předpisy a používat na dobře větraném místě.
Před instalací a použitím spotřebiče si přečtěte pokyny k použití.
• "Tyto pokyny platí pouze v případě, pokud je symbol země uvedený na spotřebiči. Pokud není, je nutné
prostudovat si technické instrukce, týkající se příslušných změn spotřebiče podle dané země".
• "Před instalací se ujistěte, zda místní napájecí podmínky (typ plynu a tlak plynu) a nastavení spotřebiče
odpovídají";
• "Podmínky nastavení tohto spotřebiče jsou uvedeny na výrobním štítku";
• "Tento spotřebič není připojený k systému odvodu spalin. Musí být instalován a připojován v souladu s
platnými instalačními předpisy. Zvyšte pozornost na příslušné požadavky týkající se ventilace".
• "Použití plynových varných spotřebičů způsobuje tvorbu tepla a vlhkosti v místnosti, kde je spotřebič
instalován. Ujistěte se, zda je kuchyň dobře větraná: udržujte přirozené větrací otvory volné nebo
instalujte mechanické větrací zařízení (odsavač par). Dlouhodobé intenzivní použití spotřebiče může
vyžadovat další větrání, například otevření dveří nebo okna, nebo efektivnější větrání, například
zvýšením úrovně mechanické ventilace".
UPOZORNĚNÍ: Riziko požáru: neskladujte žádné předměty na varné desce.
11 CZ
Page 12
1. POKYNY PRO INSTALATÉRA
INSTALACE DOMÁCÍCH SPOTŘEBIČŮ MŮŽE BÝT SLOŽITÁ OPERACE, KTERÁ, POKUD NENÍ PROVEDENA SPRÁVNĚ, MŮŽE
VÁŽNĚ OHROZIT BEZPEČNOST UŽIVATELE. Z TOHOTO DŮVODU POŽÁDEJTE O INSTALACI KVALIFIKOVANÉHO
SERVISNÍHO TECHNIKA, KTERÝ INSTALACI PROVEDE PODLE PLATNÝCH PŘEDPISŮ. V PŘÍPADĚ NEOPRÁVNĚNÉ
INSTALACE VÝROBCE NENESE ŽÁDNOU ODPOVĚDNOST ZA TECHNICKÉ ZÁVADY VÝROBKU, KTERÉ MOHOU VÉST KE
POŠKOZENÍ VÝROBKU NEBO ZRANĚNÍ OSOB.
1.1 VESTAVBA
Varnou desku lze instalovat do pracovní desky, která je z teplu
odolného materiálu do 100°C a má tloušťku 25-45 mm. Rozměry
výřezu v pracovní desce jsou na obrázku 2.
Pokud je varná deska připevněná k nábytku na kterékoli straně,
vzdálenost mezi varnou deskou a nábytkem musí být nejméně 15 cm
(viz obrázek 4); zatímco vzdálenost mezi varnou deskou a zadní
stěnou musí být nejméně 5,5 cm.
Vzdálenost mezi varnou deskou a spotřebičem nad ní (např. odsavač
par) musí být nejméně 70 cm (obrázek 4).
Pokud není volný prostor mezi varnou deskou a skříňkou pod ní, je
nutné instalovat vhodné mezidno (dřevěné nebo z podobného
materiálu) (obrázek 3).
Důležité - Obrázek 1 znázorňuje aplikaci těsnění.
Varná deska se upevňuje pomocí dodaných upevňovacích svorek,
pomocí otvorů ve spodní části spotřebiče.
Pokud je 60 cm varná deska nad troubou, která není vybavená
chladicím ventilátorem, doporučujeme udělat větrací otvory v nábytku
pro zajištění správné ventilace.
Velikost otvorů musí být nejméně 300 cm2 a umístění podle obrázku
5.
2.1. PŘIPOJENÍ K ELEKTRICKÉ SÍTI
Zkontrolujte data na výrobním štítku, na vnější straně přístroje, pro
kontrolu, zda napětí odpovídá napětí elektrické sítě. Před připojením
zkontrolujte uzemnění. Tento spotřebič musí být uzemněný. Pokud
tuto podmínku nesplníte, výrobce nenese žádnou odpovědnost za
poškození spotřebiče nebo úrazy osob. Pokud přívodní kabel není
vybavený zástrčkou, připojte vhodnou zástrčku podle údajů na
výrobním štítku.
Uzemňovací systém je barevně označený žlutozelenou. Zástrčka
musí zůstat i po instalaci snadno přístupná.
Pokud je varná deska připojená přímo k elektrické síti, musíte
instalovat odpojovací zařízení. Pokud se poškodí přívodní kabel,
musí jej vyměnit kvalifikovaný servisní technik, aby se zabránilo
možnému nebezpečí.
Uzemňovací vodič (žlutozelený) musí být nejméně o 10 mm delší než
živý a neutrální vodič.Použijte vhodný kabel podle parametrů výkonu
trouby. Zkontrolujte výrobní štítek a ujistěte se, zda je přívodní kabel
typu 3x0.75 mm² H05RR-F.
Živý
Napájení
Odpojovací zařízení musí být včleněno do napájení v souladu s
platnými předpisy.
Pokud spotřebič není vybaven přívodním kabelem se zástrčkou, nebo
jiným typem odpojovacího ařízení nabízejícím odstup kontaktu v
odpojeném stavu podle požadavků proti přepětí III kategorie, musíte
uskutečnit toto připojení podle platných směrnic.
Uzemnění
Neutrální
Hnědý vodič
L
Zelenožlutý vodič
Modrý vodič
N
Přívodní
kabel
2.2. 4 VARNÉ ZÓNY
Tyto desky jsou dodávány bez kabelu. Pro připojení, typ kabelu a
úsek uvedený v tabulce.
Jednofáze
220-240 V~
KABEL
KABEL
3 G 2.5 mm
H05VV-F
2
L1
L1 : Fáze
Zkrat 1-2
4- Neutrálni
PE- Uzemněni
3. POUŽITÍ VARNÉ DESKY
Tento spotřebič se musí používat pouze k účelům, pro které byl
navržený a to pro vaření v domácnosti. Jakékoli jiné použití je
nesprávné a může být nebezpečné. Výrobce nenese žádnou
odpovědnost za poškozené vyplývající z nesprávného použití tohoto
spotřebiče.
3.1. POUŽITÍ ELEKTRICKÝCH PLOTEN
Otočte voličem do pozice požadované teploty.
Rozsvítí se kontrolka příslušné plotny a plotna se začne zahřívat.
Po skončení vaření otočte voličem zpět do pozice „O. (Obrázek 6).
Nenechávejte varnou plotnu zapnutou bez nádobí. Průměr plotny a
použitého nádobí je velmi důležitý. Maximální průměr dna je 14 cm a
dno musí být rovné.
Při prvním použití nechte plotnu zahřát po dobu 5 minut, než na ní
postavíte nádobí. To umožní vytvrdnutí povrchu vypálením.
K čištění horké plotny použijte vlhkou utěrku a čisticí prostředek.
Neodstraňujte zbytky pokrmů z plotny pomocí nože ani jiných ostrých
předmětů.
Po čištění zapněte plotnu na několik sekund k vysušení.
Nenechávejte ji však zapnutou dlouhou dobu.
12 CZ
Pozice
0
1
2
3
4
5
6
Výkon (Watty)
0
100 W
180 W
250 W
500 W
750 W
1000 W
Výkon (Watty)
0
135 W
220 W
300 W
850 W
1150 W
1500 W
Popis
Vypnutá
Ohřev
Vaření na nízké teplotě
Vaření na nízké teplotě
Vaření, pečení
Vaření, pečení
Vaření, pečení
Page 13
Vhodnost varného nádobí (Obrázek 7)
Mějte na paměti, že větší pánve mají větší ohřevný povrch.
To umožňuje rychlejší přípravu než u nádobí s menším průměrem
dna. Vždy používejte velikosti nádobí vhodné k množství
připravovaného pokrmu. Pro zabránění stříkání nepoužívejte příliš
malé nádobí, zejména pro pokrmy s velkým množstvím tekutin.
Pokud používáte nadměrně velké nádobí pro rychle připravované
pokrmy, omáčky a šťáva se přilepí a zbytky mohou zůstat na dně
nádobí.
Uzavřené nádoby a pečicí plechy nebo formy se doporučují pro
přípravu cukroví. Vytečený cukr a šťáva z otevřené nádoby se může
přilepit na povrch plotny a je obtížné jej odstranit.
Toto je zejména důležité pro nádobí používané pro pečení nebo
tlakové vaření při vysoké teplotě.
Nenechávejte plotny bez nádobí ani prázdné nádobí na plotně.
Zkontrolujte vhodnost nádobí s ohledem na následující požadavky;
Musí být těžké.
Musí zcela zakrývat povrch plotny; mohou být o něco větší, nikoli
menší. Dno nádoby musí být rovné.
•Pro nejlepší použití elektrických varných ploten a k minimalizaci
spotřeby elektrické energie používejte pouze nádobí s hladkým
rovným dnem. Velikost nádobí musí být shodná s průměrem varné
plotny, nikdy menší. Dno nádoby musí být suché. Na plotně
nenechávejte prázdné nádoby a plotny nepoužívejte bez nádobí.
4. ÚDRŽBA A ČIŠTĚNÍ
6. OCHRANA ŽIVOTNÍHO PROSTŘEDÍ
Tento spotřebič je označený v souladu s
Evropskou směrnicí 2002/96/EC o likvidaci
starých elektrických a elektonických spotřebičích
(WEEE). Zajištením správné likvidace spotřebiče
pomáháte chránit před možnými negativními
dopady na životní prostředí a lidské zdraví, které
může být ovlivněné nesprávnou likvidací
spotřebiče.
Symbol na výrobku označuje, že tento výrobek nesmí být
likvidován společně s běžným domovním odpadem. Musíte jej
odnést na sběrné místo nebo do recyklačního střediska k
recyklaci elektrických a elektronických zařízení.
Likvidace musí být provedena v souladu s ohledem na životní
prostředí.
Pro podrobnější informace o likvidaci a recyklaci tohoto
spotřebiče kontaktujte místní zprávu, vašeho prodejce nebo
recyklační středisko.
Prohlášení o shodě: Tento spotřebič přicházející do kontaktu s
potravinami vyhovuje předpisům směrnice EEC 89/109.
Spotřebič vyhovuje Evropské směrnici 2006/95/EC a
2004/108/EC a následným změnám.
Před čištěním varné desky se ujistěte, zda dostatečně vychladla.
Odpojte zástrčku od elektrické zásuvky nebo vypněte jistič.
Čištění a údržbu nesmí provádět děti bez dohledu.
K čištění nepoužívejte drsné, korosivní prostředky, bělidla, nebo
kyseliny. Vyhněte se jakýkoli kyselinám (citrónová šťáva, ocet,
apod.) Na smaltovaném nebo nerezovém povrchu.
Pokud čistíte smaltovaný, lakovaný nebo chrómový povrch,
použijte roztok saponátu a vody. Pro nerezovou ocel používejte
vhodný čisticí prostředek.
Hořáky můžete čistit vodou se saponátem. K obnovení původního
lesku použijte čistič na nerezovou ocel. Po vyčistění nechte
hořáky vysušit a vraťte na své místo.
Je důležité nasadit hořáky správně.
5. SERVIS
Dříve než zavoláte servis, zkontrolujte následující:
• je připojená zástrčka k síťové zásuvce;
• není problém v přípojce plynu.
Pokud nelze závadu odstranit: vypněte spotřebič, nedemontujte
jej a kontaktujte autorizované servisní středisko.
Výrobce nenese žádnou odpovědnost za nepřednosti vyplývající
z tisku nebo překladu v tomto návodu. Vyhrazujeme si právo na
změny výrobku, včetně bodů o spotřebě, bez předchozího
upozornění, které nemají vliv na funkčnost nebo bezpečnost
výrobku.
Tabulka 1
Vestavné varné desky
Hořák
Typ / reference
Elektrických Ploten (R 2000W)
Elektrických Ploten (1500W)
Elektrických Ploten (1000W)
Elektrických Ploten (R 1500W)
Instalační třída
Napětí/frekvence V / Hz
Příkon
Rozměry spotřebiče
Tento spotřebič je navržený pro nekomerční použití v domácnosti.
220-240 V / 50-60 Hz
1
4E
S60 / HBGS
1
1
1
1
3
6000 W
585 x 510
13 CZ
Page 14

SICHERHEITSVORSCHRIFTEN
WARNUNG: Das Gerät und die zugänglichen Teile des Gerätes werden während des Betriebs heiß. Das
Berühren der heißen Geräteteile sollte vermieden werden.
• Kinder unter 8 Jahren sollten ohne Aufsicht nicht in die Nähe des Gerätes gelassen werden.
• Dieses Gerät ist nicht bestimmt zum Gebrauch durch Personen (einschließlich Kindern) mit
beeinträchtigten körperlichen, sensorischen oder geistigen Fähigkeiten oder durch Personen, die keine
entsprechenden Erfahrungen oder Kenntnisse besitzen, es sei denn, sie werden beaufsichtigt oder
angewiesen durch eine Person, die für ihre Sicherheit verantwortlich ist.
• Kinder dürfen nicht mit dem Gerät spielen.
• Die Reinigung und Wartung des Gerätes darf nicht durch Kinder ohne Aufsicht durchgeführt werden.
WARNUNG: unbeaufsichtigtes Kochen auf dem Herd mit Fett oder Öl kann gefährlich sein und
Feuerentstehung verursachen.
• Versuchen Sie NIEMALS das Feuer mit Wasser zu löschen; schalten Sie den Herd aus und bedecken
sie die Flamme mit z.B. einem Deckel oder einer Feuerlöschdecke.
WARNUNG: FEUERGEFAHR - Bewahren Sie keine Gegenstände auf der Herdoberfläche auf.
WARNUNG: ist die Herdoberfläche beschädigt, schalten Sie das Gerät aus, um einen Stromschlag zu
vermeiden.
• Nutzen Sie kein Dampfreinigungsgerät zur Reinigung des Ofens.
• Jegliche verschüttete Lebensmittel sollten vom Deckel entfernt werden, bevor Sie diesen öffnen.
• Die Herdoberfläche sollte erst abkühlen, bevor Sie den Deckel schließen.
• Das Gerät sollte nicht durch einen externen Timer oder eine Fernbedienung gesteuert werden.
• Die Abschaltung muss mit einer festen Verdrahtung im Einklang mit den Verkabelungsregeln
durchgeführt werden.
• Ist das Gerätekabel beschädigt, muss es durch ein spezielles Kabel ersetzt werden, welches beim
Kundendienst/Hersteller erhältlic ist.
ACHTUNG: Um elektrische Schläge durch unbeabsichtigtes Zurückstellen des Wärmerelais zu
vermeiden, sollte das Gerät nicht über eine externe Schalteinrichtung versorgt werden, wie
beispielsweise ein Timer oder einem Stromkreislauf, der regelmäßig ausgeschaltet wird.
• Das Gerät sollte gemäß den Installationsanweisungen installiert werden und genügend Belüftung
gewährleistet werden. Lesen Sie bitte die Anweisungen, bevor Sie das Gerät installieren.
• "Diese Anleitung ist nur gültig, wenn das entsprechende Landessymbol auf dem Gerät zu finden ist.
Wenn das Symbol nicht auf dem Gerät angebracht ist, ist es notwendig, die technischen Anweisungen,
welche die notwendigen Anweisungen zur Änderung des Gerätes an die Einsatzbedingungen des
jeweiligen Landes beinhalten, zu beachten ".
• Vor der Installation vergewissern Sie sich, dass die örtliche Bedingungen (Art des Gases und
Gasdruck) und die Anpassung des Gerätes kompatibel sind»
• Die Einstellung für dieses Gerät sind auf dem Etikett (oder Typenschild) angegeben"
• "Dieses Gerät nicht in die Nähe von leicht entflammbaren Materialien positionieren. Es soll gemäß den
geltenden Installationsvorschriften montiert und angeschlossen werden. Besonderes Augenmerk sollte
auf die Anforderungen hinsichtlich der Belüftung gelegt werden."
• «Der Einsatz eines Gaskochgerätes erzeugt Wärme und Feuchtigkeit in dem Raum, in dem es
installiert ist. Vergewissern Sie sich, dass die Küche gut belüftet ist. Halten Sie die Belüftungsschlitze
geöffnet oder installieren Sie eine mechanische Lüftungseinrichtung (mechanische
Dunstabzugshaube). Längere intensive Nutzung des Gerätes kann eine zusätzliche Belüftung
erfordern, z. B. Öffnen eines Fensters oder die Erhöhung der mechanischen Belüftung, falls vorhanden."
14 DE
Page 15
1. INSTALLATIONSANWEISUNG
Die Installation eines Haushaltsgeräts kann unter Umständen eine komplexe Arbeit sein; wenn diese nicht korrekt ausgeführt wird, könnte es
zu schweren Beeinträchtigungen der Sicherheit des Benutzers kommen. Das ist der Grund, warum sie von einem qualifizierten Fachmann
unter Einhaltung der geltenden technischen Regeln durchgeführt werden soll. Falls diese Empfehlung nicht beachtet und die Installation des
Gerätes durch eine nicht qualifizierte Person durchgeführt werden sollte, lehnt der Hersteller jede Verantwortung für eventuelle technische
Fehler des Produktes ab, gleichviel, ob es zu Schäden an Personen oder Sachen führt.
1.1. EINBAU
Die Arbeitsplatte, in der diese Kochmulde eingebaut werden soll, kann
aus beliebigem Material sein, vorausgesetzt, es ist hitzebeständig
und kann eine Temperatur von 100°C aushalten. Die Arbeitsplatte
kann zwischen 25 und 40 mm dick sein. Die Einbaumaße entnehmen
Sie bitte der Abb. 2.
Falls an einer Seite der Kochmulde die Wand eines Möbels ist, muss
der Abstand der Mulde zur Möbelwand mindestens 15 cm betragen (s.
Abb. 4). Zwischen Küchenwand und Mulde muss ein Abstand von
mindestens 5,5 cm eingehalten werden. Der Abstand zwischen der
Kochmulde und einem eventuell darüber befindlichen Element (z.B.
Dunstabzugshaube) muss mindestens 70 cm betragen (s. Abb. 4).
Wenn unter der Kochmulde ein zugängliches Möbelteil vorhanden ist,
muss zwischen der Kochmulde und der unteren Möbelnische eine
Trennplatte aus isolierendem, hitzebeständigem Material (Holzplatte
o.Ä.) dazwischen gebaut werden (s. Abb. 3).
Wichtig: Entnehmen Sie der Abb. 1, wie die Dichtungsstreifen
angebracht werden müssen.
Die Befestigung an das Möbel erfolgt mit Fixierbügel, die als Zubehör
zur Mulde mitgeliefert werden. Am Geräteboden sind die Bohrungen
zum Verschrauben der Fixierbügel bereits vorhanden.
Falls unter der Kochmulde (60 cm) ein Backofen ohne
Kühlungsventilator installiert sein sollte, müssen in der Einbaunische
Öffnungen angebracht werden, damit die Luftzirkulation
gewährleistet ist. Diese Öffnungen müssen eine freie Oberfläche von
mindestens 300 cm² gewährleisten, verteilt wie in der Abb. 5 gezeigt.
Das Gerät sollte nicht durch einen externen Timer oder eine
Fernbedienung gesteuert werden.
2.1. ELEKTRISCHER ANSCHLUSS
Überprüfen Sie die auf dem Matrikelschild angegebenen Daten. Das
Matrikelschild befindet sich auf der unteren Seite des
Gerätegehäuses. Notieren Sie alle Daten wie Matrikel- und
Seriennummer am besten direkt auf dem Deckblatt der
Bedienungsanleitung, da diese Angaben in einem eventuellen
Servicefall vom Kundendienst benötigt werden. Überprüfen Sie, dass
die Netzspannung und die Leistung für den Betrieb des Gerätes
geeignet sind.
Vor dem elektrischen Anschluss ist die einwandfreie Erdung der
elektrischen Hausinstallation zu prüfen. Die Erdung des Gerätes ist
gesetzlich vorgeschrieben. Der Hersteller weist jede Verantwortung für
Sach- oder Personenschäden zurück, die auf fehlende bzw.
mangelhafte Erdung zurückzuführen sind. Bei den Modellen, die ohne
Stecker geliefert werden, ist ein genormter Stecker an das Kabel zu
montieren, welcher für die auf das Matrikelschild angegebene Belastung
geeignet ist. Der Erdleiter ist durch das gelb-grüne Kabel
gekennzeichnet. Der Stecker muss in jedem Fall zugänglich sein.
Soll das Gerät an einer festen Anschlussdose angeschlossen werden,
ist zwischen dem Gerät und dem Versorgungsnetz eine der Last
entsprechende, genormte Abschaltvorrichtung einzubauen.
Sollte das Netzkabel beschädigt sein, muss dieser durch einen
qualifizierten Fachmann ausgewechselt werden.
Der gelb-grüne Erdleiter muss mindestens 10 mm länger sein als die
Phasenleiter. Der Querschnitt der Kabel muss der Leistung der
Kochmulde entsprechen (s. Matrikelschild). Benutzen Sie
ausschließlich ein Netzkabel des Typs 3x0.75 mm² H05RR-F.
Stromversorgungsnetz
Um das Gerät direkt an das Stromnetz anzuschließen, beachten Sie bei
der Verkabelung die elektronischen Vorschriften sowie die Bedingungen
eines Überspannungsschutz Klasse 3.
Um das Gerät direkt an das Stromnetz anzuschließen, beachten Sie bei
der Verkabelung die elektronischen Vorschriften sowie die Bedingungen
eines Überspannungsschutz Klasse 3.
PHASE
ERDE
NULL
L
N
Broun
Gelb/Grün
Blau
Netzkabel
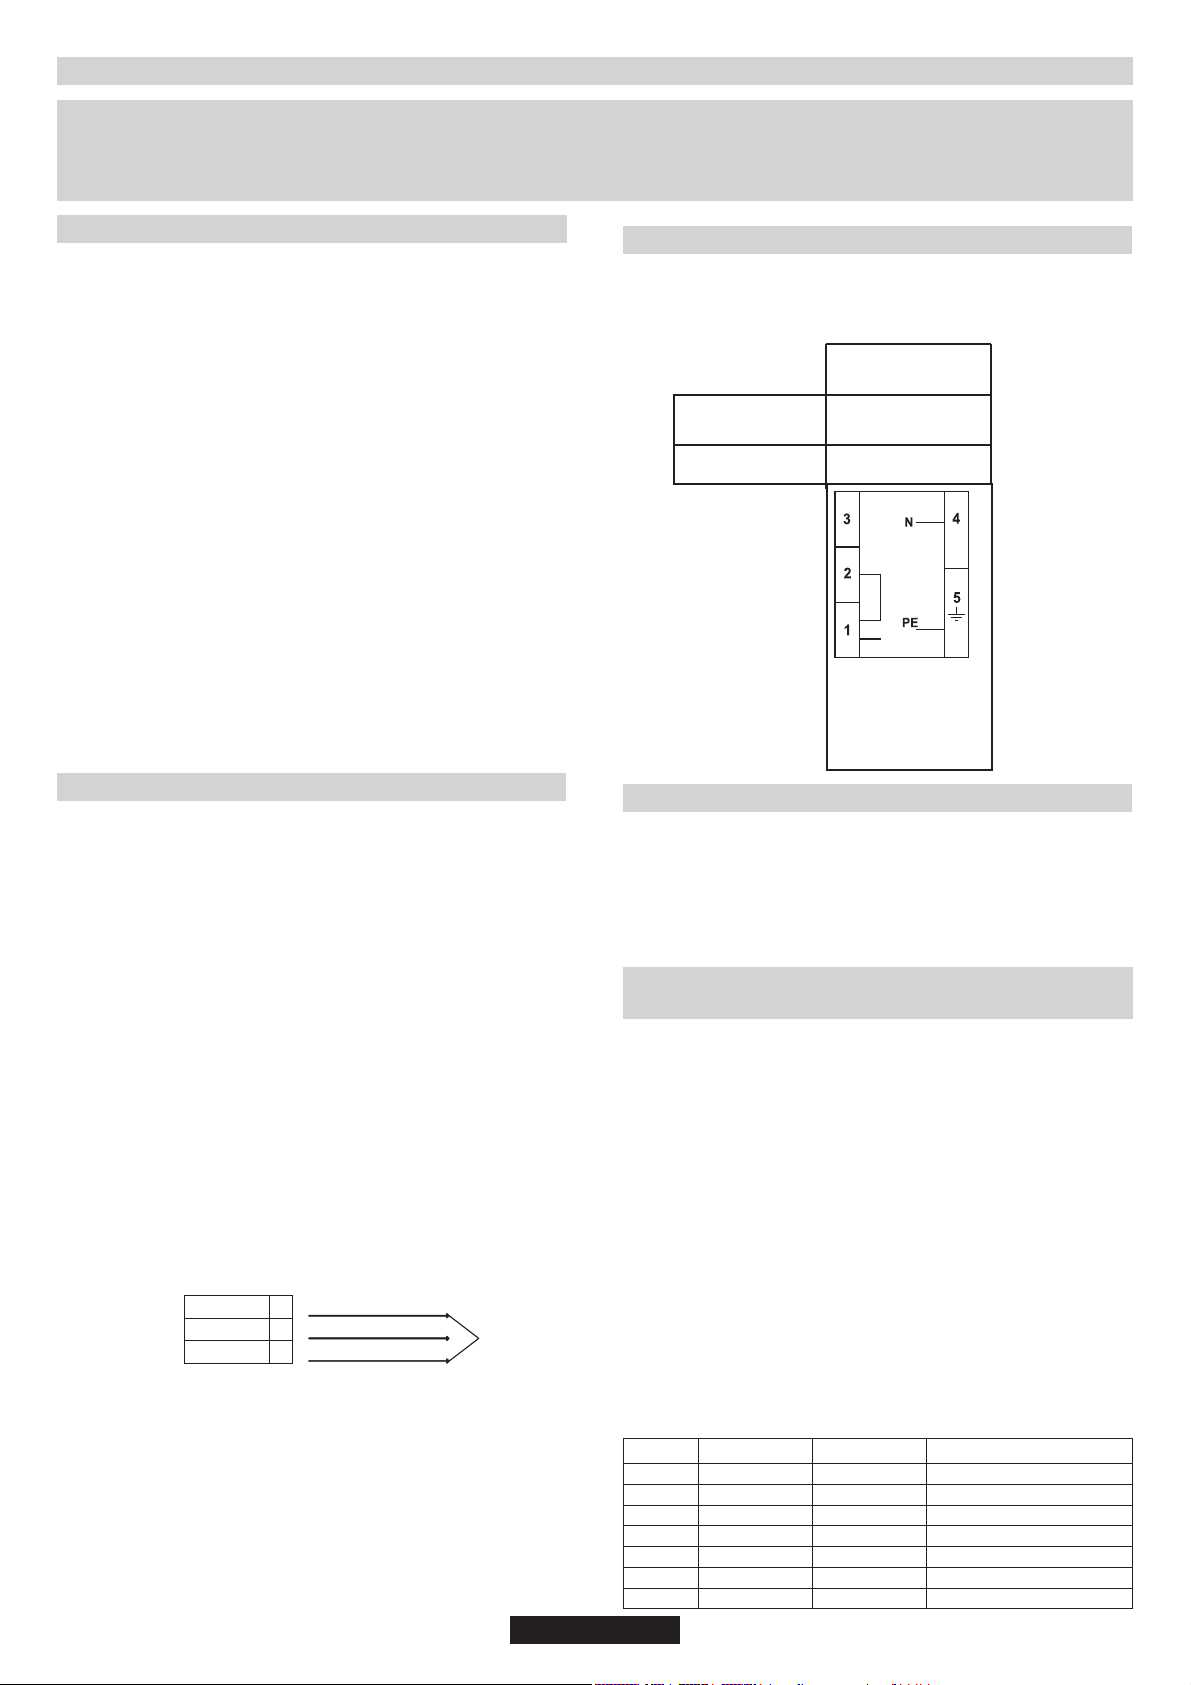
2.2. 4 HEIZPLATTEN
Diese Kochfelder werden ohne Kabel ausgeliefert. Für Verbindung,
Kabeltyp und Abschnitt wie auf der Tafel beschrieben
Einphasig
220-240 V~
Kabeldurchmesser
Kabeltyp
3 G 2.5 mm
H05VV-F
L1
2
1-Phase
1-2 Brücke (Shunt)
4-Neutral
PE-Erdung
3. BEDIENUNGSANLEITUNG
Dieses Gerät ist ausschließlich für den Gebrauch gedacht, Speisen
zuzubereiten. Jede andere Verwendung wäre zweckentfremdend
und gegebenenfalls gefährlich. Der Hersteller kann für eventuelle
Schäden, die auf einen ungeeigneten, fehlerhaften und
unvernünftigen Einsatz zurückzuführen sind, nicht haftbar gemacht
werden.
3.1. BENUTZUNG DER ELEKTRISCHEN
KOCHLATTEN
Drehen Sie bitte den Knopf, um die gewünschte Temperatur der
Kochplatte einzustellen. Das Anzeigelicht beginnt zu leuchten und die
Kochplatte wird heiß.
Nachdem der Kochvorgang beendet ist, drehen Sie bitte den Knopf
wieder auf die Position "0" (Abbildung 6). Lassen Sie die Kochplatte
auf keinem Fall in eingeschalteter Position, wenn kein Kochgeschirr
darauf steht. Der Durchmesser und die untere Form des
Kochgeschirrs, welches Sie benutzen, sind wichtig. Der maximale
Durchmesser des Kochgeschirrs sollte 14 cm sein.
Die untere Form sollte eben sein. Bei der ersten Benutzung warten
Sie bitte 5 Minuten nachdem Sie die Kochplatte eingeschaltet haben,
bevor Sie dann ein Kochgeschirr darauf stellen. Durch die erste
Erhitzung härten die Kochplatten vollständig aus.
Zur Säuberung der Kochplatte benutzen Sie bitte ein feuchtes Tuch
und ein Putzmittel. Entfernen Sie auf keinem Fall
Lebensmittelrückstände mit einem Messer oder mit anderen harten,
scharfen Gegenständen von der Kochplatte.
Nach dem Putzen schalten Sie bitte die Kochplatte ein paar
Sekunden ein, damit sie dadurch trocknet. Bitte beachten Sie dabei,
dass die Kochplatte niemals länger als ein paar Sekunden
eingeschaltet werden darf, wenn kein Kochgeschirr darauf steht.
Erläuterung
Ausgeschaltet
Erwärmung
Kochen in niedriger Temperatur
Kochen in niedriger Temperatur
Kochen, Braten, Garen
Kochen, Braten, Garen
Kochen, Braten, Garen
15 DE
Position
0
1
2
3
4
5
6
Leistung (Watt)
0
100 W
180 W
250 W
500 W
750 W
1000 W
Leistung (Watt)
0
135 W
220 W
300 W
850 W
1150 W
1500 W
Page 16
Geeignetes Kochgeschirr
Denken Sie bitte daran, dass größeres Kochgeschirr größere Flächen
hat, die erwärmt werden.
Das führt im Vergleich zu Kochgeschirr mit kleineren Flächen dazu,
dass Lebensmittel schneller zubereitet werden können.
Verwenden Sie bitte immer nur diejenige Kochgeschirrgröße, die
angesichts der zuzubereitenden Lebensmittel als erforderlich
erscheint. Um Spritzer zu vermeiden, sollten Sie kein allzu kleines
Kochgeschirr benutzen. Besonders bei Lebensmittel mit großen
Flüssigkeitsanteilen. Wenn Sie großes Kochgeschirr für schnell
zubereitbare Lebensmittel verwenden, können z.B. Soßen und
Flüssigkeiten anbrennen und deren Rückstände im Kochgeschirr
bleiben.
Zur Zubereitung von Desserts empfehlen wir Kochgeschirr mit Deckel
und Backofenbleche bzw. Kuchenformen. Aus einem Kochgeschirr
ohne Deckel können Zucker und Säfte herausspritzen, wobei diese
dann auf der Kochoberfläche kleben bleiben, einbrennen können und
schwer zu entfernen sind.
Das ist vor allem bei Kochgeschirr zu beachten, mit dem bei hohen
Temperaturen z.B. Braten zubereitet werden. Auch während des
Kochens unter hohem Druck sollten Sie unserer Empfehlung folge
leisten.
Lassen Sie Kochplatten bitte nicht unbeaufsichtigt eingeschaltet,
wenn kein Kochgeschirr darauf steht oder wenn nur ein leeres
Kochgeschirr darauf steht.
Kontrollieren Sie bitte die Eignung des Kochgeschirrs unter
Berücksichtigung der
folgenden Kriterien:
Das Kochgeschirr muss schwer sein.
Das Kochgeschirr muss die Wärmefläche vollständig bedecken.
Achten Sie unbedingt darauf, dass der Durchmesser des
Kochgeschirrs nicht kleiner ist als die Kochplatte. Der Topfboden
muss gerade sein und eben auf der Kochplatte stehen. Zur
bestmöglichsten Um den Energieverbrauch zu minimieren,
verwenden Sie bitte nur solches Kochgeschirr, das eine ebene untere
Fläche hat.. Die untere Seite des Kochgeschirrs sollte trocken sein,
wobei Spritzer vermieden werden müssen. Leeres Kochgeschirr darf
auf der Platte nicht stehen gelassen werden. Die Kochplatten dürfen
nicht eingeschaltet werden, wenn kein Kochgeschirr darauf steht.
(Abbildung 7)
4. WARTUNG UND REINIGUNG
Vor jedem Vorgang zur Reinigung des Gerätes schalten Sie den
Strom durch Ziehen des Steckers aus der Steckdose oder durch
Ausschalten der Haussicherung ab. Bevor Sie das Gerät reinigen,
warten Sie, bis es vollständig abgekühlt ist.
Kinder dürfen nicht mit dem Gerät spielen.
Verwenden Sie bitte niemals scheuernde oder korrosive
Reinigungsmittel, auch kleine Bleichmittel oder Säuren. Achten Sie
darauf, dass keine säurehaltigen bzw. ätzenden Substanzen
(Zitronensäure, Essig. o.Ä.) auf die emaillierten bzw. lackierten
Flächen liegen bleiben.
Reinigen Sie die emaillierten, verchromten oder lackierten Teile mit
lauwarmem Seifenwasser oder mit nicht scheuernden Flüssigmitteln.
Für die Edelstahlteile verwenden Sie bitte die handelsüblichen Mittel
zur Pflege von Edelstahl.
Reinigen Sie die Gasbrenner mit Seifenwasser. Um den
ursprünglichen Glanz zu bewahren, verwenden Sie einen
handelsüblichen Spezialreiniger für Aluminiumlegierungen. Nach der
Reinigung sind die Brenner sorgfältig zu trocken, bevor sie wieder
aufgesetzt werden.
Kontrollieren Sie bitte unbedingt, dass die Brenner wieder
richtig aufliegen, da eine fehlerhafte Montage der Brenner zur
mangelhaften Verbrennung des Gases führen kann.
5.TECHNISCHER KUNDENDIENST
Sollte Ihr Gerät einmal nicht ordnungsgemäß funktionieren,
kontrollieren Sie bitte folgendes, bevor Sie den technischen
Kundendienst rufen:
• überprüfen Sie, dass das Gerät stromversorgt ist
• überprüfen Sie, dass die Gaszufuhr in Ordnung ist. Sollte die
Ursache für die Funktionsstörung nicht ermittelt werden können,
trennen Sie das Gerät vom Stromnetz und rufen Sie den
Kundendienst. Unternehmen Sie nichts auf eigene Faust!
6. UMWELTGERECHTE ENTSORGUNG
Dieses Gerät ist entsprechend der EU-Richtlinie
2002/96/CE über Elektro- und Elektronik-Altgeräte
(WEEE) gekennzeichnet. Bitte sorgen Sie dafür, dass
das Gerät ordnungsgemäß entsorgt wird, damit
mögliche negative Auswirkungen auf die Umwelt und
die Gesundheit vermieden werden, die bei einer
unsachgemäßen Entsorgung des Altgerätes
Das Symbol auf dem Produkt bedeutet, dass dieses Gerät nicht in den
normalen Haushaltsmüll gehört, sondern an die nächste
Entsorgungsstelle für Elektro- und Elektronik-Altgeräte abgegeben
werden muss.
Die Entsorgung muss im Einklang mit den geltenden
Umweltrichtlinien für die Abfallentsorgung erfolgen.
Für nähere Informationen über die Entsorgung, Wiederverwertung
und Recycling dieses Produktes wenden Sie sich bitte an Ihre
kommunalen Einrichtungen (Umweltamt) oder an die
Abfallentsorgungsgesellschaft Ihrer Stadt oder an Ihren Händler.
Konformitätserklärung: Dieses Gerät entspricht in den Teilen, die
mit Lebensmitteln in Berührung kommen, den Vorgaben der
Europäischen Richtlinie EEC 89/109.
Änderungen.
Der Hersteller übernimmt keine Haftung für eventuelle Fehler, die durch
den Druck, die Transkription oder Übersetzung dieser Broschüre
entstanden sein könnten, ab. Wir behalten uns das Recht vor, technische
Änderungen im Interesse der Konsumenten an den Produkten
vorzunehmen, ohne die Sicherheitseigenschaften oder die Funktion der
Geräte zu verändern.
Brenner
Typ / Bezeichnung
Elektrischen kochplate (R 2000W)
Elektrischen kochplate(1500W)
Elektrischen kochplate(1000W)
Elektrischen kochplate (R 1500W)
Installationsklasse
Spannung / Frequenz V / Hz
Gesamtanschlusswert
Gerätemaße
Dieses Gerät ist für die nichtprofessionelle Benutzung, d.h.
Für Haushaltsnutzung, vorgesehen
entstehen könnten.
Das Gerät entspricht den Europäischen Richtlinien
2006/95/EC, 2004/108/EC und deren nachfolgenden
Tabelle 1
EINBAUKOCHMULDE
1
4E
S60 / HBGS
1
1
1
1
3
220-240 V / 50-60 Hz
6000 W
585 x 510
16 DE
Page 17

INSTRUCCIONES PARA UN USO SEGURO
ADVERTENCIA: El aparato y sus componentes accesibles se calientan durante el uso. Se debe tener
cuidado de no tocar los elementos calefactores.
• Los niños menores de 8 años deben permanecer alejados o supervisados de forma continuada por
una persona adulta.
• Este aparato puede ser usado por niños mayores de 8 años y personas con capacidades físicas,
sensoriales o mentales reducidas o falta de experiencia y conocimiento siempre y cuando hayan sido
supervisadas o instruidas sobre el uso del aparato de forma segura y del conocimiento de los riesgos
que comporta.
• Los niños no deben jugar con el aparato.
• La limpieza y el mantenimiento que debe realizar el usuario no será realizada por niños sin supervisión.
ADVERTENCIA: Desatender cocinas, utilizando grasas o aceites, es peligroso y puede ocasionar un
incendio.
• NUNCA trate de apagar un incendio con agua, apague el aparato y cubra la llama con una tapa o
manta ignifuga.
ADVERTENCIA: Peligro de incendio: no almacene artículos en las superficies de cocción.
ADVERTENCIA: Si la superficie está agrietada, apague el aparato para evitar la posibilidad de una
descarga eléctrica.
• No utilice limpiadores de vapor para la limpieza del aparato.
• Elimine cualquier tipo de derrame de la tapa antes de abrirlo.
se debe enfriar la superficie de la placa antes de cerrar la tapa.
• El aparato no está ideado para ser utilizado mediante un temporizador externo o un sistema de control
remoto independiente.
• Los medios de desconexión deben ser incorporados en el cableado fijo en conformidad con las reglas
del cableado.
las instrucciones indicarán el tipo de cable a utilizar, teniendo en cuenta la temperature de la parte
posterior del aparato.
• Si el cable de alimentación está dañado, se debe sustituir por un cable o conjunto especial suministrado
por el fabricante o el servicio técnico.
PRECAUCIÓN: Con el fin de evitar peligros derivados de alteraciones en el suministro energético, este
aparato no debe ser suministrado a través de un dispositivo de conmutación externo, como un
temporizador, o conectado a un circuito que sea encendido y apagado frecuentemente por los servicios
públicos.
• “Este aparato debe ser instalado según normativa vigente y utilizado en un espacio lo suficientemente
ventilado. Lea las instrucciones antes de instalar o de utilizar este aparato.”
• “Estas instrucciones son válidas únicamente si aparece en símbolo del país en el aparato. Si no
aparece el símbolo en el aparato, es necesario referirse a las instrucciones técnicas que proporcionarán
las instrucciones necesarias referentes sobre la modificación del aparato según las condiciones de uso
del país.”
• “Antes de la instalación, asegúrese de que las condiciones de distribución locales (naturaleza del gas y
presión) y el ajuste del aparato son compatibles”
• “Las condiciones de ajuste para este aparato están indicadas en la etiqueta (o placa de datos)”.
• “Este aparato no está conectado a un dispositivo de evacuación de productos de combustión. Deberá
ser instalado y conectado conforme a la normativa de instalación actual. Se deberá prestar especial
atención a los requerimientos sobre ventilación”
• “El uso de un aparato de cocción a gas resulta de la producción de calor y humedad del lugar donde
está instalado. Asegúrese de que la cocina está bien ventilada: mantenga abierto los conductos de
ventilación o instale un sistema de ventilación mecánico (campana extractora mecánica). Un uso
intensivo prolongado puede requerir ventilación adicional, por ejemplo, de la apertura de una ventana, o
de una ventilación más efectiva, incrementando el nivel de ventilación mecánica presente”
17 ES
Page 18

1. INSTRUCCIONES PARA EL INSTALADOR
LA INSTALACIÓN DE UN ELECTRODOMÉSTICO PUEDE SER UNA OPERACIÓN QUE PUEDE AFECTAR GRAVEMENTE A LA SEGURIDAD DEL
USUARIO SI NO SE REALIZA ADECUADAMENTE. POR ELLO ES UNA TAREA QUE HA DE REALIZAR UNA PERSONA AUTORIZADA Y
CUALIFICADA QUE PUEDA HACER LA INSTALACIÓN DE ACUERDO CON LA NORMATIVA TÉCNICA EN VIGOR. EN CASO DE DESATENDER
ESTA ADVERTENCIA Y QUE QUIEN REALICE LA INSTALACIÓN NO SEA UNA PERSONA CUALIFICADA, EL FABRICANTE NO ASUME
RESPONMSABILIDAD ALGUNA POR POSIBLES FALLOS TÉCNICOS DEL PRODUCTO DERIVEN O NO EN DAÑOS MATERIALES O
PERSONALES.
1.1. INTEGRACIÓN
La placa puede instalarse en cualquier superficie que sea resistente al
calor a 100ºC y cuyo grosor sea de entre 25 y 45 mm. Las dimensiones
para el corte de la superficie y la inclusión de la placa se muestran en la
Figura 2.
Si la placa se coloca entre dos armarios, la distancia entre la misma y
el armario ha de ser de al menos 15 cm (véase Figura 4); mientras que
la distancia entre la placa y la pared posterior tiene que ser de al
menos 5,5 cm.
La distancia entre la placa y otra unidad o electrodoméstico que tenga
encima (por ejemplo, el extractor) tiene que ser superior a 70 cm
(Figura 4).
En caso de haber espacio entre la placa incrustada y la cavidad
inferior, ha de colocarse una separación divisoria hecha de un material
aislante (madera o similar) (Figura 3).
Importante el diagrama de la figura 1 muestra cómo ha de
aplicarse el sellado.
La placa se encaja con las sujeciones proporcionadas utilizando los
agujeros de la base de la unidad.
Si se coloca una placa de 60 cm encima de un horno que no disponga
de un sistema de refrigeración por ventilador, se recomienda la
creación de aperturas en el mueble en el que se vaya a colocar para
garantizar una circulación correcta del aire.
La dimensión de estas aperturas ha de ser de al menos 30 cm2 y han
de hacerse como se muestra en la Figura 5.
2.1. CONEXIÓN ELÉCTRICA
Comprobar la placa informativa situada en la parte exterior de la
unidad para asegurar que el voltaje de entrada es el adecuado.
Antes de la conexión compruebe la toma de tierra.
Por ley este electrodoméstico tiene que tener toma de tierra. En caso
de no cumplirse ese requisito el Fabricante no se responsabiliza de
daños personales o materiales. Si no se adjunta enchufe alguno
conecte un enchufe adecuado con la carga indicada en la placa de
información. El cable de la toma de tierra es verde/amarillo. El enchufe
tiene que estar siempre accesible.
Cuando la Cocina se conecta directamente a la corriente eléctrica ha
de instalarse también un cortacircuitos.
Si el cable está dañado le corresponde a una persona autorizada su
sustituciónpara evitar posibles riesgos.
El cable de la toma de tierra (verde o amarillo) tiene que tener una
longitud mínima de 10 mm más que los cables neutro y de corriente.
La sección del cable utilizada tiene que tener la dimensión correcta
según la potencia que requiera la placa.
Compruébese la placa de información para información sobre
suministro eléctrico y asegúrese de que el cable eléctrico es del tipo
3x075 mm² H05RR-F.
Suministro
eléctrico
Los medios de desconexión deben ser incorporados en el cableado
fijo en conformidad con las reglas del cableado.
Si una unidad no dispone de cable eléctrico y un enchufe, y no dispone
de otros medios de desconexión de la red eléctrica como por ejemplo
una separación de contacto de los polos que proporcione una
desconexión total según las condiciones de sobrecarga de voltaje de
la categoría III, las instrucciones han de indicar que han de
incorporarse al cableado fijo medios de desconexión de acuerdo con
las normas de cableado.
CORRIENTEL
TOMA DE TIERRA
NEUTRON
Cable Marrón
L
Cable verde/Amarillo
Cable Azul
N
Cable de
corriente
2.2. 4 PLACAS CALIENTES
Estas placas se entregan sin cable. Para la conexión, el tipo y la
sección del cable están referidos en la tabla.
Una Fase
220-240 V~
CableSección
CableTipo
3 G 2.5 mm
H05VV-F
L1
1-Fase Paralelo
1-2
4-Neutral
PE-Toma de tierra
2
3. UTILIZACIÓN DE LA PLACA
INSTRUCCIONES PARA EL USUARIO
La unidad sólo puede utilizarse para el fin para el que está diseñado,
la cocina casera, y otros posibles utilizaciones se considerarán
inadecuados y podrían ser peligrosos. El Fabricante declina toda
responsabilidad por daños o pérdidas que puedan derivarse de una
utilización inadecuada.
3.1 .USO DE LA COCINA DE LAS PLACAS
ELÉCTRICAS
Gire el mando hasta la posición de potencia deseada de la zona a
calentar. Se encenderá la luz correspondiente a la zona encendida y
la placa comenzara a calentarse. Una vez acabada la cocción, gire el
botón de nuevo a la posición de "0" (figura 6). No deje encendida la
placa cuando no haya una cacerola encima.
Es muy importante tener en cuenta el diámetro y la base de la
cacerola que vaya a usar. El diámetro máximo de la cacerola debe ser
14cm y la base debe ser plana. En el primer uso de la placa, es
aconsejable encenderla durante 5 minutos sin ninguna cacerola. Esto
hará que la placa se curta con el calentamiento. Para limpiar las
placas use un paño mojado y jabón. No use ni cuchillos ni objetos
afilados para quitar los restos de comida de los platos.
Después de limpiar las placas déjelas encendidas durante unos
minutos sin ninguna cazuela para secar. Aparte de para esto, no se
debe dejar encendida la placa sin nada encima.
Posición
0
1
2
3
4
5
6
Potencia(Wat)
0
100 W
180 W
250 W
500 W
750 W
1000 W
Potencia(Wat)
0
135 W
220 W
300 W
850 W
1150 W
1500 W
Explicación
Apagado
Calentar
La cocción a baja temperatura
La cocción a baja temperatura
Cocción, tueste, ebullición
Cocción, tueste, ebullición
Cocción, tueste, ebullición
18 ES
Page 19

La apropiación de las cacerolas: (Figura 7)
No olvide que las cacerolas con base más ancha tienen más
superficie del calentamiento.
Con las cacerolas de base ancha se cocina más rápido.
Siempre utilice cacerolas adecuadas teniendo en cuenta la cantidad
de comida que se quiera preparar. Para evitar las salpicaduras,
especialmente en la preparación de comidas caldosas es
aconsejable no utilizar cacerolas pequeñas.
Si se utiliza cacerolas grandes para cocinar comida rápidamente, se
puede pegartoda la salsa en la superficie de la cazuela, y al sacarla a
un plato, se quedaría incrustada y pegada.
Si se van a cocinar dulces, es recomendable utilizar cazuelas
cerradas, bandejas de horno o moldes de tarta, ya que si no se tapan,
la salpicadura del azúcar y los jugos podrían pegarse en la cocina lo
que dificultaría su limpieza.
Esto es especialmente importante cuando se cocina con
temperaturas muy altas. Controle la adecuación de las cacerolas con
respecto los criterios indicados abajo:
Deben ser pesadas.
Deben cubrir completamente la superficie de las placas calientes;
pueden ser un poco más grandes de la superficie pero no más
pequeñas.
La base de la superficie debe ser completamente plana y con una
buena fijación encima de la superficie de las placas de cocina.
•Esto es debido a que se minimiza el consumo de energía y se hace
un mejor uso de las placas eléctricas. El tamaño de la cacerola debe
ser casi igual al diámetro de la placa de la cocina, pero nunca más
pequeña. La base de las cacerolas debe estar. Las cacerolas vacías
no se deben dejar puestas en las placas encendidas.
6. PROTECCIÓN DEL MEDIOAMBIENTE
Este electrodoméstico tiene la marca de cumplimiento
de la Directiva Europea 2002/96/EC sobre Residuos
de Aparatos Eléctricos y Electrónicos (RAEE).
Asegurando un desguace correcto del aparato, usted
puede ayudar a prevenir las consecuencias
potenciales negativas para el medio ambiente y la
salud de las personas.
El símbolo en el aparato, o en los documentos que lo acompañan,
indica que el electrodoméstico no debe tratarse como residuo
doméstico.
El aparato ha de depositarse en un centro de recogida para el
reciclaje del equipo eléctrico y electrónico. Deshágase del
electrodoméstico cumpliendo las normativas locales sobre
eliminación de residuos.
Para más información sobre el tratamiento, recuperación y el reciclaje
del electrodoméstico, póngase en contacto con la oficina local
competente, el servicio de recogida de residuos domésticos o la
tienda donde lo compró.
Declaración de cumplimiento: en este equipo, las piezas que se
prevé que puedan estar en contacto con los alimentos, cumplen las
regulaciones de la CEE indicadas en la directiva 89/109.
Electrodoméstico que cumple las Directivas europeas
2006/95/EC y 2004/108/EC y sus Correspondientes
enmiendas.
4. MANTENIMIENTO Y LIMPIEZA
Antes de limpiar la placa ésta tiene que estar fría. Desenchúfese o
(si está conectada directamente) desconéctese de la corriente.
La limpieza y el mantenimiento que debe realizar el usuario no será
realizada por niños sin supervisión.
No utilice jamás detergentes abrasivos y corrosivos, lejía o ácidos.
Evite los ácidos o sustancias parecidas (zumo de limón, vinagre, etc.)
en las secciones lacadas, barnizadas o de acero inoxidable.
Para limpiar las zonas esmaltadas, barnizadas o cromadas utilícese
agua templada con jabón o detergente no cáustico. Después de
limpiarla séquense los quemadores y vuelvan a colocarse.
Es importante que los Quemadores se coloquen correctamente.
5. SERVICIO TÉCNICO
Antes de llamar al Servicio Técnico compruebe lo siguiente:
• que el enchufe está correctamente insertado y que el fusible
funciona;
• que no hay problema con el suministro de gas.
Si no puede identificarse el fallo:
Desenchufe la placa no intente averiguarlo- llame al Servicio
Técnico.
El Fabricante no se responsabiliza de las posibles imprecisiones
derivadas de la impresión o transcripción que se contengan en este
libreto. Nos reservamos el derecho de realizar las modificaciones
necesarias de los productos, incluidos los intereses de consumo, sin
perjuicio de las características relacionadas con la seguridad o el
funcionamiento.
Tabla 1
PLACAS INTEGRADAS
Quemador
Tipo / referencia
Placa Eléctrica (R 2000W)
Placa Eléctrica (1500W)
Placa Eléctrica (1000W)
Placa Eléctrica (R 1500W)
Clase de instalación
Voltaje / Frecuencia V / Hz
Potencia de entrada
Dimensión del producto
Este electrodoméstico está pensado para aquellos que no son
profesionales, es decir, uso casero.
220-240 V / 50-60 Hz
1
4E
S60 / HBGS
1
1
1
1
3
6000 W
585 x 510
19 ES
Page 20

INSTRUKCJE BEZPIECZEŃSTWA
UWAGA: Podczas pracy urządzenie oraz jego elementy są gorące. Należy zachowac ostrożność i nie
dotykać gorących części.
• Dzieci w wieku do 8 lat nie mogą zbliżać się do urządzenia chyba że pozostaja one pod ciągłym
nadzorem.
• Dzieci w wieku powyżej 8 lat oraz ososby z ograniczeniami ruchowymi, umysłowymi, czuciowymi lub
nie posiadające odpowiedniej wiedzy lub doświadczenia mogą obsługiwać urządzenie jedynie pod
nadzorem lub po przeszkoleniu odnośnie bezpiecznego uzykowania urządzenia i związanych z tym
zagrożeń.
• Dzieci nie mogą bawić się urządzeniem.
• Dzieci bez nadzoru nie mogą obsługiwac ani czyścić urządzenia.
UWAGA: gotowanie na płycie z użyciem oleju lub tłuszczu bez nadzoru może być niebezpieczne i
spowodować pożar.
• NIGDY nie gasić ognia wodą, należy wyłączyc urządzenie i przykryć płomień np. pokrywką lub kocem
ognioodpornym.
UWAGA: niebezpieczeństwo pożaru. Nie wolno przchowywać przedmiotów na powierzchniach
grzejnych.
UWAGA: w razie uszkodzenia powierzchni należy wyłączyć urządzenie aby uniknąć niebezpieczeństwa
porażenia prądem elektrycznym.
• Nie stosować do czyszczenia urządzeń parowych.
usunąć wylany płyn z pokrywy przed otwarciem.
• Poczekać aż powierzchnia płyty ostygnie przed zamknięciem pokrywy.
• Urządzenie nie jest przeznaczone do sterowania zewnętrznym minutnikiem lub oddzielnym układem
zdalnego sterowania.
• Wyłącznik musi być podłączony do okablowania zgodnie z obowiązujacymi przepisami.
instrukcja musi określać jaki rodzaj przewodu może być zastosowany, z uwzglednieniem temperatury
tylnej ścianki urządzenia.
• Jeżeli przewód zasilający jest uszkodzony należy go wymienić na nowy dostarczony przez producenta
lub autoryzowany serwis.
UWAGA: w celu uniknięcia zagrożeń związanych z przypadkowym zadziałaniem zabezpieczeń
termicznych urządzenie nie może być zasilane z sieci sterowanej niezależnie lub z obwodów które są
regularnie włączane i wyłączane.
• Urządzenie pusi być zainstalowane zgodnie z obowiązującymi przepisami i w miejscu dobrze
wentylowanym. Proszę zapoznać się z instrukcją przed przystapieniem do instalacji.
Te instrukcje są ważne jedynie dla krajów których symbol pojawia się na urządzeniu. Jeżeli symbol kraju
jest nieobecny należy odnieść się do insterukcji technicznej określającej zmiany urządzenia
wprowadzone dla danego kraju.
• "Przed instalacją należy upewnić się czy lokalne warunki (rodzaj i ciśnienie gazu) są zgodne z
ustawieniami urządzenia";
• "Ustawienia urządzenia są podane na tabliczce znamionowej";
• Urządzenie nie jest podłączone do układu odprowadzania gazów spalinowych. Musi być podłączone
do takiego układu zgodnie z przepisami ze szczególnym uwzględnieniem wymagań odnośnie
wentylacji.
• Użytkowanie gazowych urządzeń kuchennych wiąże się z wytwarzaniem ciepła i wilgoci w
pomieszczeniu. Kuchnia musi być dobrze wentylowana za pomoca wentylacji grawitacyjnej lub
wymuszonej (mechanicznej). Dłuższe intensywne gotowanie może wymagać dodatkowj wentylacji jak
otwarcia okien lub zwiększenia mocy wentylacji wymuszonej.
20 PL
Page 21

1. INSTRUKCJE DLA INSTALATORA
INSTALACJA URZĄDZENIA DOMOWEGO MOŻE BYĆ SKOMPLIKOWANĄ OPERACJĄ, KTÓRA JEŻELI NIE BĘDZIE WYKONANA
PRAWIDŁOWO, MOŻE POWAŻNIE ZAGROZIĆ BEZPIECZEŃSTWU UŻYTKOWNIKA. DLATEGO TEŻ, ZADANIE TO POWINNO BYĆ WYKONANE
PRZEZ OSOBĘ O ODPOWIEDNICH KWALIFIKACJACH ORAZ ZGODNIE Z OBOWIĄZUJĄCYMI PRZEPISAMI. W PRZYPADKU ZIGNOROWANIA
NINIEJSZEGO ZALECENIA I WYKONANIA INSTALACJI PRZEZ OSOBĘ BEZ ODPOWIEDNICH KWALIFIKACJI, PRODUCENT NIE PONOSI
ŻADNEJ ODPOWIEDZIALNOŚCI ZA JAKIEKOLWIEK USTERKI TECHNICZNE, BEZ WZGLĘDU NA TO, CZY SPOWODUJĄ ONE SZKODY W
MIENIU, CZY TEŻ USZKODZENIA CIAŁA U LUDZI.
1.1. ZABUDOWA
Płytę można zamontować w dowolnym blacie kuchennym, który jest
odporny na działanie temperatury do 100C oraz posiada grubość 25-45
mm. Wymiary otworu, który należy wyciąć w blacie kuchennym, podane
są na Rysunku 2.
Jeżeli kuchenka jest montowana obok szafki kuchennej, odległość
pomiędzy płytą i szafką musi być co najmniej 15 cm (patrz Rysunek 4);
natomiast odległość pomiędzy płytą i ścianą kuchni musi być co najmniej
5,5 cm.
Odległość pomiędzy płytą i szafką lub jakimkolwiek urządzeniem
zamontowanym nad kuchenką (np. okapem) musi być nie mniejsza niż
70 cm (Rysunek 4).
Jeżeli pod zabudowaną płytą znajduje się dostępna przestrzeń,
konieczne jest zamontowanie przegrody z materiału izolacyjnego (np.
drewna) (Rysunek 3).
Uwaga - Na Rysunku 1 pokazano sposób przyklejenia uszczelki.
Płytę należy zamocować przy użyciu uchwytów znajdujących się w jej
wyposażeniu, korzystając z otworów wykonanych w podstawie płyty.
W przypadku montowania płyty o szerokości 60 cm nad piekarnikiem,
który nie jest wyposażony w obieg chłodzący, zaleca się utworzenie
otworów w zabudowie w celu zapewnienia prawidłowego przepływu
powietrza.
Wielkość tych otworów powinna wynosić co najmniej 300 cm i należy je
rozmieścić w sposób pokazany na Rysunku 5.
2
2.1. PODŁĄCZENIE DO SIECI ELEKTRYCZNEJ
Upewnić się, że napięcie w sieci odpowiada napięciu podanemu na
tabliczce znamionowej znajdującej się na obudowie urządzenia.
Przed podłączeniem, sprawdzić obwód uziemienia.
Zgodnie z przepisami prawa, niniejsze urządzenie musi być uziemione.
W razie nie przestrzegania tego wymagania, producent nie poniesie
żadnej odpowiedzialności za jakiekolwiek szkody w stosunku do osób
lub mienia. Jeżeli kabel zasilający nie posiada wtyczki, należy
zamontować wtyczkę dopasowaną do obciążenia wskazanego na
tabliczce znamionowej urządzenia. Przewód uziemienia jest w kolorze
żółtozielonym. Wtyczka powinna być zawsze dostępna.
W przypadku gdy płyta podłączona jest bezpośrednio do sieci
elektrycznej, konieczne jest zainstalowanie wyłącznika automatycznego.
W razie uszkodzenia kabla zasilającego, musi on być wymieniony przez
wykwalifikowanego elektryka w celu wyeliminowania potencjalnych
zagrożeń.
Przewód uziemienia (w kolorze żółtozielonym) musi być co najmniej 10
mm dłuższy niż przewód fazowy i neutralny.
Przekrój poprzeczny kabla zasilającego musi być o wielkości
dostosowanej do mocy pobieranej przez płytę.
Sprawdzić na tabliczce znamionowej dane dotyczące podłączenia do
sieci elektrycznej oraz upewnić się, że kabel zasilający jest typu 3x0.75
mm² H05RR-F.
Zacisk sieci
zasilającej
Wyłącznik musi być podłączony do okablowania zgodnie z
obowiązujacymi przepisami.
Jeśli urządzenie nie posiada kabla i wtyczki lub innego rozwiązania
umożlwiającego odłączenie od odpowiednio zabezpieczonej sieci
elektrycznej pozwalającej na pełne odłączenie przy wystąpieniu
nadnapięcia spełniającego warunki kategorii III,instrukcja stwierdza, że
sposoby odłączenia muszą być wbudowane w instalację elektryczną,
zgodnie z zasadami okablowania.
FAZOWY
UZIEMIENIE
NEUTRALNY
Przewód brązowy
L
Przewód żółtozielony
Przewód niebieski
N
Kabel
zasilający
2.2. 4 GRZEJNIKI
Te kuchenki dostarczane są bez kabla. Dla połączeń, typy i przekróje
kabla podane są w tabeli.
Jednofazowe
220-240 V~
Kabel - Część
Kabel - Rodzaj
3 G 2.5 mm
H05VV-F
L1
2
1-Faza
równoległa 1-2
4-Neutralne
PE- Ziemia
3. UŻYTKOWANIE PŁYTY - INSTRUKCJE DLA
UŻYTKOWNIKA
Urządzenie może być używane wyłącznie do celu, do którego zostało
przeznaczone, tzn. do przyrządzania potraw w gospodarstwie
domowym, i jego używanie do wszelkich innych celów będzie
traktowane jako niewłaściwe i może być niebezpieczne. Producent
nie ponosi odpowiedzialności za wszelkie szkody spowodowane
niewłaściwym użytkowaniem urządzenia.
3.1. EKSPLOATACJA KUCHENEK Z PŁYTAMI
ELEKTRYCZNYMI
Pokrętło nastawić do żądanej temperatury płyty grzewczej. Zapala się
lampka wskazująca włączenie i płyta grzewcza zaczyna się grzać.
Po zakończeniu gotowania zakręcić pokrętło do pozycji "0" (rys. 6).
Kuchenki nie zostawiać w stanie włączonym bez naczynia. Ważne są
średnica i podstawa używanego naczynia do gotowania. Maksymalna
średnica podstawy naczynia wynosi 14 cm a podstawa powinna być
płaska.
Przy pierwszym używaniu płyty zostawić ją na 5 minut do ogrzania,
zanim postawisz na niej naczynie. Pozwoli to na zahartowanie powłoki
odpornej na temperaturę na płycie grzewczej.
Do czyszczenia płyt grzewczych należy używać wilgotnej ściereczki i
detergentów. Do usuwania wyschniętych pozostałości potraw z płyty
grzewczej nie należy używać noży lub innych twardych i ostrych
przedmiotów. Po czyszczeniu płytę grzewczą pozostawić na kilka minut
do wyschnięcia. Płyty grzewczej nie należy jednak zostawiać włączonej
na dłużej niż kilka minut bez naczynia znajdującego się na niej.
Objaśnienie
Zakręcona
Grzanie
Grzanie w niskiej temperaturze.
Grzanie w niskiej temperaturze.
Gotowanie, Smażenie, Duszenie
Gotowanie, Smażenie, Duszenie
Gotowanie, Smażenie, Duszenie
21 PL
Położenie
0
1
2
3
4
5
6
Moc (Watt)
0
100 W
180 W
250 W
500 W
750 W
1000 W
Moc (Watt)
0
135 W
220 W
300 W
850 W
1150 W
1500 W
Page 22

Stosowność naczyń do gotowania: (Rys. 7)
Należy pamiętać, że większe naczynia posiadają szersze powierzchnie
ogrzewania. To powoduje, że potrawy gotują się szybciej w większych
naczyniach niż w naczyniach o mniejszej powierzchni ogrzewania.
Zawsze należy wybierać naczynie o wielkości stosownej do ilości
gotowanej potrawy. Dla zapobiegania pryskaniu nie używać bardzo
małych naczyń do potraw o dużej ilości płynu. Jeżeli będziesz używać
nadmiernie dużego naczynia do gotowania szybkich potraw z dużą
ilością płynu , sos potrawy przylepi się do wewnętrznych ścianek
naczynia i po przełożeniu potrawy pozostanie tam.
Do przyrządzania deserów proponujemy używać naczyń zamkniętych,
blach i form do ciast. Rozpryski cukru lub syropu z naczynia otwartego
mogą przykleić się na powierzchnię grzewczą i sprawiać trudności
podczas czyszczenia.
Jest to ważne zwłaszcza dla naczyń używanych do smażenia lub do
gotowania w wysokich temperaturach pod ciśnieniem.
Płyty nie zostawiać włączonej bez opieki bez naczynia lub z pustym
naczyniem na niej.
Stosowność naczyń do gotowania należy sprawdzać pod kątem
następujących kryteriów:
Powinny być ciężkie.
Powinny całkowicie pokrywać powierzchnię grzewczą. Mogą być trochę
większe ale nie mniejsze.
Powierzchnia podstawy powinna być płaska, przylegająca do
powierzchni płyty grzewczej.
Dla optymalnego zużycia energii na płytach grzewczych używane
naczynia powinny mieć płaskie podstawy . Wielkość naczynia powinna
być jak najbardziej zbliżona do średnicy płyty grzewczej, ale nigdy nie
mniejsza od niej. Dolna powierzchnia podstawy naczynia powinna być
sucha. Należy zapobiegać wykipieniu. Pustych naczyń nie należy
zostawiać na płytach grzewczych a płyt nie należy włączać bez naczyń.
4. CZYSZCZENIE I KONSERWACJA
6. OCHRONA ŚRODOWISKA
Niniejsze urządzenie zostało oznakowane zgodnie z
Europejską Dyrektywą 2002/96/WE dotyczącą
utylizacji sprzętu elektrycznego i elektronicznego.
Prawidłowe postępowanie ze likwidowanym
sprzętem pozwala na uniknięcie potencjalnie
szkodliwych dla zdrowia ludzi i środowiska
naturalnego skutków wynikających z niewłaściwego
usuwania odpadów.
Symbol umieszczony na produkcie wskazuje, że niniejszy produkt
nie może być usuwany razem z odpadami gospodarstwa domowego.
Należy go przekazać do punktu zajmującego się utylizacją sprzętu
elektrycznego i elektronicznego.
Likwidacja takiego sprzętu musi być prowadzona zgodnie ze
stosownymi regulacjami dotyczącymi usuwania odpadów.
Aby uzyskać więcej szczegółowych informacji dotyczących utylizacji
niniejszego produktu, należy skontaktować się z lokalnymi władzami
administracyjnymi, punktem utylizacji sprzętu domowego lub
sklepem, w którym dokonano zakupu niniejszego produktu.
Deklaracja zgodności: Niniejsze urządzenie, w części przeznaczonej do
kontaktu ze środkami spożywczymi spełnia wymagania przepisów
ustanowionych w Dyrektywie 89/109/EWG.
Urządzenie spełnia wymagania Dyrektyw 2006/95/EC i
2004/108/EC , z późniejszymi zmianami.
Producent nie ponosi odpowiedzialności za jakiekolwiek niedokładności
spowodowane błędami w druku lub w transkrypcji zawarte w niniejszej
broszurze. Zastrzegamy sobie prawo do dokonywania modyfikacji
produktu zgodnie z potrzebami, w tym w interesie konsumenta, bez
uszczerbku dla charakterystyki dotyczącej bezpieczeństwa lub
funkcjonalności.
Przed przystąpieniem do czyszczenia, należy upewnić się, że płyta
wystygła. Wyjąc wtyczkę z gniazdka zasilania lub (w przypadku
podłączenie bezpośredniego) wyłączyć zasilanie elektryczne.
Dzieci bez nadzoru nie mogą obsługiwac ani czyścić urządzenia.
Do czyszczenia płyty nigdy nie należy używać środków ściernych,
środków zawierających substancje żrące, wybielające lub kwasy.
Należy również unikać stosowania substancji kwaśnych lub
alkalicznych (sok z cytryny, ocet itp.) do części emaliowanych,
lakierowanych lub wykonanych ze stali nierdzewnej.
Podczas czyszczenia emaliowanych, lakierowanych lub
chromowanych części, należy używać ciepłej wody z mydłem lub
detergentu nie zawierającego substancji żrących. Do czyszczenie
części ze stali nierdzewnej, należy używać odpowiedniego roztworu
czyszczącego.
Palniki można czyścić wodą z mydłem. Aby przywrócić ich oryginalny
blask, należy stosować domowy płyn do czyszczenia stali
nierdzewnej. Po wyczyszczeniu, palniki należy wysuszyć i umieścić
na płycie.
Istotne jest, aby palniki były umieszczone dokładnie na swoim
miejscu.
5. OBSŁUGA SERWISOWA
Przed zadzwonieniem do pracownika serwisu, należy upewnić się,
że:
• wtyczka jest prawidłowa umieszczona w gniazdku;
• nie ma awarii zasilania gazowego.
Tabela 1
PŁYTY DO ZABUDOWY
Palnik
Typ / odnośnik
Płytam Elektrycznymi (R 2000W)
Płytam Elektrycznymi (1500W)
Płytam Elektrycznymi (1000W)
Płytam Elektrycznymi (R 1500W)
Klasa instalacji
Napięcie / Częstotliwość V / Hz
Moc elektryczna pobierana
Wymiary produktu
Niniejsze urządzenie przeznaczone jest do użytku domowego.
220-240 V / 50-60 Hz
1
4E
S60 / HBGS
1
1
1
1
3
6000 W
585 x 510
Jeżeli nie można zidentyfikować źródła usterki:
urządzenie należy wyłączyć - nie próbować go samodzielnie
naprawiać - zadzwonić do centrum serwisowego.
22 PL
Page 23

GÜVENLİK UYARILARI
UYARI: Cihaz ve aparatları kullanım sırasında ısınır. Isınmış parçalara dokunmaktan kaçınınız.
• 8 yaşın altındaki çocukları cihazdan uzakta tutmalı ve sürekli denetlemelisiniz.
• Bu cihaz, 8 yaş ve üzeri çocuklar ve fiziksel, duyusal veya zihinsel yetenekleri veya bilgi ve tecrübe
açısından yetersiz kişiler tarafından ancak yetişkin bir bireyin denetiminde ve cihazın nasıl
kullanılacağına dair verilen talimatların uygulanması durumunda ve oluşabilecek tehlikleri kavradıkları
takdirde güvenle kullanılabilir.
• Çocuklar cihazla oynamamalıdırlar.
• Cihazın temizlik ve bakımı gözetmen olmaksızın çocuklar tarafından yapılmamalıdır.
UYARI: Sadece yağın ocak üzerinde bırakılması tehlikeli olabilir ve yangına neden olabilir.
• Yangını HİÇBİR ZAMAN su ile söndürmeyin, cihazı kapatınız ve kapak gibi bir aparatla yada yangın
battaniyesi ile alevi örterek kontrol altına alınız.
UYARI: Yangın tehlikesi: Ocak yüzeyini bir takım malzemelerinizi depolamak için kullanmayınız, yüzeyi
boş bırakınız.
UYARI: Yüzey kırık ise elektrik çarpması olasılığını önlemek için, cihazı kapatınız.
• Fırını temizlemerken buharlı temizleyiciler kullanmayınız.
• Kapağa dökülen artıklar temizliğe başlamadan önce çıkarılmalıdır.
• Ocak yüzey kapağını kapatmadan önce soğumasına izin verilmelidir.
• Cihaz, harici bir zamanlayıcı veya ayrı uzaktan kumanda sistemi ile kontrol edilmeye uygun değildir.
• Bağlantının sağlanamaması kablolama kurallarına göre kabloların bağlanmamasından
kaynaklanmıştır.
• Talimatlarda kullanılacak prizin tipi cihazın arka kısmındaki sıcaklık düşünülerek belirtilmelidir.
•Elektrik kablosu hasarlı ise, özel bir kablo ya da üretici veya yetkili servisin uygun gördüğü kablo ile
değiştirilmelidir.
Uyarı: Termal ısı kesici dikkatsizce yerleşiminden doğacak zararları engellemek için, bu cihaz kaynağı
zamanlayıcı veya sürekli açık ya da kapalı olacak devre gibi dış devre cihazlarına bağlanmamalıdır.
• Bu cihaz, yürürlükteki mevzuata uygun olarak kurulmalıdır ve sadece iyi havalandırılan bir alanda
kullanılmalıdır.
• Cihazı kurarken veya kullanmadan önce talimatları okuyun."
• Bu talimatlar sadece ülke sembolleri cihaz üzerinde olduğu zaman geçerlidir. Eğer cihaz üzerinde
sembol yoksa, ürün üzerinde kullanılacak ülkenin koşullarına uygun modifikasyonların nasıl
yapılacağını tarif eden teknik talimatları incelemek gerekmektedir.
• "Kurulum işleminden önce, yerel dağıtım koşulları (gaz ve gaz basıncı niteliği) ve cihazın ayarlara
uyumlu olması garanti altına alınmalıdır."
• "Bu cihaz için gerekli tüm koşullar tip etiket üzerinde belirtilmiştir."
• Bu cihaz yanmalı ürünlerin tahliye aparatlarına bağlanmamalıdır.Cihaz mevcut montaj yönetmeliğine
göre kurulup bağlanmalıdır. Havalandırma ile ilgili gerekli şartların sağlaması için özel önem
gösterilmelidir.
• Gazlı pişirme cihazlarının kullanımı montajlandığı yere göre oda içinde ısı ve nem yaratmaktadır.
Mutfağın iyi havalandırılmış olduğundan emin olun: Doğal havalandırma delikleri açın veya mekanik bir
havalandırma cihazı(mekanik aspiratör) takın.Cihazın uzun süre yoğun kullanımı durumunda ilave bir
havalandırma yapın; örneğin bir pencere açın veya mekanik ventilasyon düzeyini artırarak daha etkili bir
havalandırma yapın.
23 TR
Page 24

1. KURULUM TALİMATLARI
EVDE KULLANIMA YÖNELİK BİR CİHAZIN KURULUMU, DOĞRU ŞEKİLDE YAPILMAZSA MÜŞTERİNİN GÜVENLİĞİNİ CİDDİ BİÇİMDE
ETKİLEYEBİLECEK KARMAŞIK BİR İŞLEM OLABİLİR. BU NEDENLE, BU İŞLEM MESLEKİ YETERLİLİĞE SAHİP BİR KİŞİ TARAFINDAN,
YÜRÜRLÜKTEKİ TEKNİK MEVZUATA UYGUN OLARAK GERÇEKLEŞTİRİLMELİDİR. BU ÖNERİNİN GÖZ ARDI EDİLMESİ VE KURULUMUN
YETKİSİZ BİR KİŞİ TARAFINDAN YAPILMASI DURUMUNDA ÜRETİCİ, İSTER ÜRÜNLERİN, İSTER KİŞİLERİN ZARAR GÖRMESİYLE
SONUÇLANSIN, ÜRÜNÜN HİÇBİR TEKNİK ARIZASINDA SORUMLULUK KABUL ETMEZ.
1.1. ANKASTRE MONTAJ
Ocak 100 °C sıcaklığa dayanıklı ve 25-45 mm kalınlıkta bir tezgah
içine yerleştirilebilir. Tezgah içinde oluşturulacak bölmenin boyutları
Şekil 2'de verilmiştir.
Ocak bir kabinin yanına yerleştirilecekse, Ocak ile kabin arasındaki
mesafe en az 15 cm olmalıdır (Şekil 4'e bakın); ocak ile arkasındaki
duvar arasındaki mesafe de en az 5,5 cm olmalıdır.
Ocak ile diğer herhangi bir ünite veya cihaz (örn, hava tahliye
aspiratörü) arasındaki mesafe 70 cm'den az olmamalıdır (Şekil 4).
Ankastre ocak ile aşağıdaki boşluk arasındaki erişilebilir bir mesafe
olduğunda, izole bir malzemeden yapılmış bir bölme duvarı
yerleştirilmelidir (ahşap malzeme veya benzeri bir başka malzeme)
(Şekil 3).
Önemli Şekil 1'deki diyagram dolgu malzemesinin nasıl
uygulanacağını göstermektedir.
Ocak ünitesi, ünite kaidesindeki delikler kullanılarak Sabitleme
Kelepçeleriyle yerleştirilir.
60 cm'lik ocak, soğutucu sistemi olmayan bir fırın üzerine
yerleştirilecekse, doğru hava sirkülasyonunun sağlanması için
ankastre mobilyada hava çıkışlarının oluşturulması tavsiye edilir. Bu
hava delikleri en az 300cm olmalıdır ve Şekilde gösterildiği gibi
yerleştirilmelidir.(Şekil 5)
2.1. ELEKTRİK BAĞLANTISI
Ünitenin dışına yerleştirilmiş olan değer plakasındaki verilerin, güç
kaynağı ve giriş voltajı değerlerine uygun olduğunu kontrol edin.
Bağlantı öncesinde, topraklama sistemini kontrol edin. Kanun
gereğince, bu cihaz topraklanmalıdır. Bu düzenlemeye uyulmadığı
taktirde, Üretici kişilere veya mülkiyete verilecek zararlardan sorumlu
olmayacaktır. Fiş henüz takılmadıysa, değer plakasında gösterilen
yüke uygun bir fiş takınız. Topraklama teli sarı/yeşil renklidir. Fiş her
zaman erişilebilir durumda olmalıdır.
Ocağın doğrudan bir elektrik kaynağına bağlandığı yerde, bir devre
kesicisi (şalter) tesis edilmelidir.
Güç kaynağı kablosu zarar görürse, potansiyel bir riski önlemek için
ehliyetli bir mühendis tarafından değiştirilmelidir. Topraklama kablosu
(yeşil veya sarı renkli) aktif ve nötr kablolardan en az 10 mm daha
uzun olmalıdır.
Kullanılan kablo bölümü, ocağın çektiği elektriğe göre uygun
ölçülerde olmalıdır.
Lütfen güç bilgileri için değer plakasını kontrol edin ve güç kaynağı
kablosunun3x0.75 mm² H05RR-F, tipinde olmasını sağlayın.
Ana Güç
Kaynağı
Bağlantının sağlanamaması kablolama kurallarına göre kabloların
bağlanmamasından kaynaklanmıştır.
Eğer ocak, kablo veya fiş bağlantısına sahip değilse veya diğer bir deyişle
aşırı voltaj kategorisi şartları altında bütün kutuplar ana şebeke
bağlantısından ayrılma durumu varsa yönergelerce belirlenen kablolama
kurallarına uygun bağlantı sağlanmalıdır.
AKTİF
TOPRAK
NOTR
Kahverengi Kablo
L
Yeşil/Sarı Kablo
Mavi Kablo
N
Güç
Kablosu
2.2. 4 OCAK GÖZLERİ
Ocaklar kablo olmadan teslim edilir. Bağlantısı, kablo türü ve bölüm
için tablo aşağıdaki tablo dikkate alınmalıdır.
Monofaze
220-240 V~
Kablo - Bölüm
Kablo - Tip
3 G 2.5 mm
H05VV-F
L1
2
L1 : Faz
Şönt 1-2
4- Nötr
PE- Toprak
3. OCAK KULLANIMI KULLANIM TALİMATLARI
Bu cihaz sadece evde yemek pişirmek için tasarlanmıştır ve bu amaçla
kullanılmalıdır. Diğer kullanım türleri sakıncalı olup tehlikeli durumlara
neden olabilir. Üretici uygunsuz ve sakıncalı kullanımlardan kaynaklanan
zarar ve ziyandan sorumlu olmayacaktır.
3.1. LEKTRİKLİ ISITICININ KULLANIMIE
İstenilen sıcaklığa göre elektrikli ısıtıcının düğmesini çevirin. Elektrikli
ıstıcı çalışmaya başladığında uyarı lambası yanacaktır.
Pişirme tamamlandığında düğmeyi “O” kapalı pozisyona getirin.
(Şekil 6 ). Pişirme kabı üzerinde olmadan elektrikli ısıtıcıyı çalışır
durumda bırakmayın. Kullanılaacak pişirme kabı çapları önemlidir.
Pişirme kabı tabanı düz olmalı ve çapı 14 cm yi geçmemelidir. İlk
kullanımda, pişirme kabı koymadan önce 5 dakika elektrikli ısıtıcıyı
çalıştırın. Bu ısınma sonucunda rezistansın kaplamasının sertleşmesi
sağlanacaktır.
Elektrikli ısıtıcıyı temizlemek için ıslak bez ve deterjan kullanınız.
Elektrikli ısıtıcı üzerinde kalmış yemek parçalarını bıçak ve benzeri
sert ve keskin malzemelerle temizlemeyiniz.
Temizlemeden sonra elektrikli ısıtıcıyı kurutmak için bir kaç dakika
çalıştırın. Bununla beraber, elektrikli ısıtıcıyı üzerinde pişirme kabı
olmadan bir kaç dakikadan fazla çalıştırmayın.
Pozisyon
0
1
2
3
4
5
6
Güç (Watt)
0
100 W
180 W
250 W
500 W
750 W
1000 W
Güç (Watt)
0
135 W
220 W
300 W
850 W
1150 W
1500 W
Açıklama
Kapalı
Isıtma
Düşük sıcaklıkta pişirme
Düşük sıcaklıkta pişirme
Pişirme, kızartma, kaynatma
Pişirme, kızartma, kaynatma
Pişirme, kızartma, kaynatma
24 TR
Page 25

Pişirme kabının uygunluğu (Şekil 7)
Büyük pişirme kaplarının büyük pişirme yüzeylerine sahip olduğunu
unutmayınız.
Büyük pişirme yüzeyli kaplar, küçük pişirme yüzeyli kaplardan daha
hızlı pişirmeyi sağlayacaktır. Her zaman pişirilecek yiyecek miktarına
göre pişirme kabı seçiniz. Özellikle çok fazla sıvı içeren yiyeceklerin
pişirme esnasında sıçramasını önlemek için çok küçük pişirme kapları
seçmeyiniz. Aşırı büyük pişirme kapları seçilirse, kabın
boşaltılmasından sonra sos ve sıvılar pişirme kabına yapışarak
kalacaktır. Tatlıların pişirilmesinde pişirme kabının kapatılması
tavsiye edilir. Açık kalan kapaktan sıçrayan şeker ve meyve suları
pişirme yüzeyine yapışabilir. Bu atıkların yüzeyden temizlenmesi
güçtür.
Bu özellikle yüksek sıcaklıkta basınçla pişen yemekler ve kızartmalar
için önemlidir. Isıtıcıları, üzerinde boş pişirme kabı veya pişirme
kabsız olarak çalıştırmayınız.
Aşağıdaki kriterlere göre pişirme kabının uygunluğunu kontrol ediniz;
Pişirme kapları ağır olmalı.
Pişirme kapları ısıtıcının tüm yüzeyini kaplamalı veya bu yüzeyden
biraz büyük olmalı, ancak küçük olmamalı.
Pişirme kabı tabanı düz olmalı ve pişirme yüzeyine uygun olmalı.
Elektrikli ısıtıcının en iyi şekilde kullanımı ve en az enerji tüketimi için,
sadece düz tabana sahip pişirme kapları kullanılmalıdır. Pişirme
kabının çapı, ısıtıcı ölçüsüne yakın olmalı ancak hiç bir zaman küçük
olmamalıdır. Pişirme kabının tabanı kuru olmalı ve kabın dökülmesi
önlenmelidir. Boş pişirme kapları ısıtıcı üzerinde bırakılmamalı ve
pişirme kabı konulmadan ısıtıcı çalıştırılmamalıdır.
4. BAKIM VE TEMİZLİK
6. ÇEVRENİN KORUNMASI
Bu cihaz, Atık Elektrikli ve Elektronik Cihazlar (WEEE)
hakkındaki Avrupa Birliği Yönergesi 2002/96/EC'ye
uygun biçimde işaretlenmiştir. Bu cihazın doğru
şekilde elden çıkartılmasını sağlamak suretiyle, bu
ürünün hatalı şekilde atılmasının yol açabileceği
çevre ve insan sağlığı üzerindeki potansiyel olumsuz
etkilerin ortadan kaldırılmasına yardım etmiş
olacaksınız.
Ürünün üzerindeki sembol, bu ürünün evsel atıklarla aynı şekilde ele
alınamayacağını ifade etmektedir. Bunun yerine, elektrikli ve
elektronik cihazların geri dönüştürülmesine yönelik bir toplama
noktasına verilmelidir.
Ürün, atık imhasına ilişkin yerel çevre mevzuatına uygun olarak
atılmalıdır.
Bu ürünle ilgili işlemler, geri kazanım ve geri dönüşüm hakkında daha
ayrıntılı bilgi için lütfen yerel belediye makamlarına, evsel atıkları
toplayan şirkete ya da ürünü satın almış olduğunuz mağazaya
başvurun.
Uygunluk Beyanı: Bu ekipman, gıdalarla temas ettiği parçalarda,
89/109 sayılı EEC Direktifinde öngörülen düzenlemelere uygundur.
Cihaz, 2006/95/EC, 2004/108/EC ve sayılı Avrupa
Direktiflerine uygundur.
Üretici bu broşürde bulunan basım veya kopyalama hatalarından
kaynaklanan herhangi bir eksiklikten sorumlu olmayacaktır. Güvenlik
veya işlevle ilgili özelliklere zarar vermeden tüketim istekleri dahil olmak
üzere ürünlerde gerektiğinde değişiklik yapma hakkımız mahfuzdur.
Ocağı temizlemeden önce, cihazın soğutulmasını sağlayın. Fişini
prizden çekin veya (direkt bağlıysa) güç kaynağını kapatın.
Cihazın temizlik ve bakımı gözetmen olmaksızın çocuklar tarafından
yapılmamalıdır.
Asla, zımpara, yıpratıcı deterjan, ağartıcı veya asit ürünü
kullanmayın. Emaye kaplı, vernikli veya paslanmaz çelik bölümlerin
üzerine asit veya alkalin madde (limon suyu, sirke, vb.) dökmeyin.
Emaye kaplı, vernikli veya krom yüzeyleri temizlerken, sıcak sabunlu
su veya aşındırıcı olmayan deterjanlar kullanın. Paslanmaz çelik için,
uygun bir temizleme solüsyonu kullanın.
Ocak gözleri sabunlu suyla temizlenebilir. Orijinal parlaklıklarını
muhafaza etmek için, evsel bir paslanmaz çelik temizleyici kullanın.
Temizleme işlemi sonunda, ocak gözlerini kurutun ve yerine takın.
Ocak gözlerinin doğru yerleştirilmesi önemlidir.
5. SATIŞ SONRASI SERVİS
Bir Servis Teknisyeni çağırmadan önce, lütfen aşağıdaki kontrolleri
yapın:
• fiş doğru şekilde takılmış ve yerine oturmuş;
• gaz kaynağı hatalı değil.
Arıza belirlenemiyorsa:
cihazı kapatın -kurcalamayın- ve Satış Sonrası Servis Merkezini
arayın.
Tablo 1
BUILT IN HOBS
Gazlı Ocak Gözü
Tür / referans
Elektrikli Isıtıcı (R 2000W)
Elektrikli Isıtıcı (1500W)
Elektrikli Isıtıcı (1000W)
Elektrikli Isıtıcı (R 1500W)
Montaj Sınıfı
Voltaj / Frekans V/Hz
Elektrik Giriş Gücü
Ürün Boyutları
Bu cihaz, profesyonel kullanım için değil yalnızca evde kullanılmak
üzere tasarlanmıştır.
220-240 V / 50-60 Hz
1
4E
S60 / HBGS
1
1
1
1
3
6000 W
585 x 510
25 TR
Page 26

Yetkili servislerimizden hizmet talebiniz olduğunda ekteki servis listesinden size en yakın yetkili servisimize ulaşabilirsiniz.
Servis hizmeti ve ürünlerimiz ile ilgili genel öneri ve talepleriniz için aşağıdaki numaradan müşteri hizmetleri merkezimize ulaşabilirsiniz.
Müşteri Hizmetleri:
Candy - Hoover Euroasia tarafından sağlanan garanti şartları aşağıdaki koşullarda geçersiz olacaktır.
•Ürüne, yetkili servis dışındaki kişiler tarafından müdahale edilmesi.
•Kullanım hatalarından dolayı oluşan arıza ve hasarlar.
•Ürünün, müşteriye ulaştırılması sonrası yapılan taşıma işlemine bağlı arıza ve hasarlar.
•Doğal afetler veya yangın sonucu oluşan arıza ve hasarlar.
•Hatalı elektrik tesisatı, ürünün üzerinde belirtilen voltajdan farklı voltajda kullanılması veya şebeke voltajındaki dalgalanmalar sonucu oluşan arıza
ve hasarlar.
•Kullanım kılavuzunda belirtilen hususlara aykırı kullanılmasından kaynaklanan arıza ve hasarlar.
Yukarıda belirtilen arızaların giderilmesi ücret karşılığı yapılır.
Ürününüzün kullanım ömrü 10 yıldır. (Ürünün işlevlerini yerine getirebilmesi için gerekli yedek parça süresi).
TİCARİ MERKEZ:
CANDY HOOVER EUROASIA EV GEREÇLERİ SAN. VE TİC. AŞ.
İçerenköy Mh Hal Yolu cd Çayır Yolu Sk. No:11 Sayar İş Hanı
Kat:7 34752 Ataşehir / İstanbul / TÜRKİYE
Fax: 0216 466 15 45 - Tel: 0216 466 42 42
444 03 98
ÜRETİM MERKEZİ:
CANDY HOOVER EUROASIA EV GEREÇLERİ SAN. VE TİC. AŞ.
Organize Sanayi Bölgesi 8. Cad. 26110 Eskişehir / TÜRKİYE
Tel: 0222 236 00 75 - Fax: 0222 236 03 14
ANKASTRE OCAK
Ocak’ın kullanma kılavuzunda gösterildiği şekilde kullanılması ve yetkili kıldığımız servis elemanları dışındaki şahıslar tarafından bakımı,
onarımı veya başka bir nedenle müdahale edilmemiş olması şartıyla bütün parçaları dahil olmak üzere tamamı malzeme, işçilik ve üretim
hatalarına karşı ürünün teslim tarihinden itibaren 3 (ÜÇ ) YIL SÜRE İLE GARANTİ EDİLMİŞTİR.
Ürünün garanti kapsamı içinde malzeme, işçilik ve montaj hatalarından dolayı arızalanması halinde yapılan işlemler için işçilik masrafı,
değiştirilen parça bedeli ya da başka bir ad altında hiçbir ücret talep edilmeyecektir. Garanti süresi içinde yapılacak onarımlarda geçen süre,
garanti süresine ilave edilir. Tamir süresi 20 (yirmi) iş günüdür. Bu süre mamulün yetkili servis atölyelerimize, yetkili servis atölyelerimizin
bulunmaması durumunda yetkili satıcılarımıza veya firmamıza bildirildiği tarihten itibaren başlar. Ürünün arızasının 10 iş günü içerisinde
giderilmemesi halinde Candy Hoover Euroasia Ev Gereçleri San. Ve Tic. A.Ş. ürünün tamiri tamamlanıncaya kadar, benzer özelliklere sahip
başka bir ürünü, müşterinin kullanımına tahsis edecektir. Arızanın giderilmesi konusunda uygulanacak teknik yöntemlerin tespiti ile
değiştirilecek parçaların saptanması tamamen firmamıza aittir.
Arızanın giderilmesi için yapılacak faaliyetler ürünün bulunduğu yerde veya yetkili servis atölyesinde yapılabilir. Müşterinin buna onayı şarttır.
Aşağıda belirtilen üç koşuldan birinin oluşması halinde sırasıyla yetkili satıcılarımız, bayi, acente temsilciliğimizden birisinin bölgeye en yakın
servis yetkilisiyle birlikte veya firmamız yetkilisince düzenlenecek raporla, arızanın tamirinin mümkün bulunmadığının belirlenmesi durumunda,
ürün ücretsiz olarak yenisiyle değiştirilecektir.
1.Ürünün teslim tarihinden itibaren, garanti süresi içinde kalmak kaydıyla, bir yıl içersinde en az dört defa veya Candy - Hoover Euroasia Ev
Gereçleri Aş. tarafından belirlenen garanti süresi içersinde altı defa arızalanmasının yanı sıra bu arızaların maldan yararlanamamayı sürekli
kılması,
2.Ürünün tamiri için gerekli sürenin aşılması,
3.Ürüne hizmet verecek yetkili servis istasyonunun mevcut olmaması.
Garanti şartları ile ilgili olarak çıkabilecek sorunlar için Sanayi ve Ticaret Bakanlığı, Tüketicinin ve Rekabetin Korunması Genel Müdürlüğü'ne
başvurulabilir. Bu Garanti Belgesi'nin kullanılmasına 4077 sayılı Tüketicinin Korunması Hakkında Kanun ile bu Kanun'a dayanılarak yürürlüğe
konulan Garanti Belgesi Uygulama Esaslarına Dair Tebliğ uyarınca, T.C. Sanayi ve Ticaret Bakanlığı, Tüketicinin ve Rekabetin Korunması
Genel Müdürlüğü tarafından izin verilmiştir.
CANDY-HOOVER-EUROASIA EV GEREÇLERİ SAN VE TİC. A.Ş.
Bu Belge, Sanayi ve Ticaret Bakanlığı’nın 109290 No’lu ve 30.01.2012 izin tarihli belgesine göre düzenlenmiştir.
Bu bölümü, ürünü aldığınız Yetkili Satıcı imzalayacak ve kaşeleyecektir.
26 TR
Page 27

ПРАВИЛА ТЕХНИКИ БЕЗОПАСНОСТИ
ПРЕДУПРЕЖДЕНИЕ: Бытовой электроприбор и его открытые части во время работы могут
нагреваться до высокой температуры. Соблюдайте осторожность, не дотрагивайтесь до них.
• Дети моложе 8 лет не должны приближаться к бытовому прибору без постоянного надзора.
• Данным бытовым электроприбором могут пользоваться дети старше 8 лет, а также люди с
нарушенными физическими или умственными способностями или с отсутствием надлежащего
опыта в том случае, если они находятся под наблюдением и проинструктированы относительно
безопасного использования бытового прибора, а также, если они осведомлены об имеющихся
опасностях.
• Не разрешайте детям играть с бытовым прибором.
• Чистка и обслуживание бытового прибора не должны выполняться детьми без надзора
взрослых.
ПРЕДУПРЕЖДЕНИЕ: Приготовление пищи на варочной поверхности с использованием жира или
масла без надлежащего присмотра может быть опасным и может привести к пожару.
НИКОГДА не пытайтесь погасить пламя водой. Выключите бытовой электроприбор, и накройте
пламя крышкой, или огнестойкой тканью.
ПРЕДУПРЕЖДЕНИЕ: Опасность возгорания: не используйте варочную поверхность для
хранения на ней предметов.
ПРЕДУПРЕЖДЕНИЕ: В случае появления на варочной поверхности трещины выключите
бытовой прибор, чтобы предотвратить поражение электрическим током.
• Не пользуйтесь для чистки парогенератором.
• перед закрыванием крышки дайте варочной поверхности остынуть.
• бытовой электроприбор не предназначен для управления с помощью внешнего таймера или
отдельной системы дистанционного управления.
• Электрическое подключение бытовой прибора должно быть выполнено с использованием
разъединительного устройства в соответствии с действующими правилами и нормами
электробезопасности.
• в инструкции должен быть указан тип электрошнура. При этом должна учитываться температура
задней стенки электроприбора.
• В случае повреждения шнура питания он должен быть заменен специальным шнуром питания,
который можно приобрести у производителя или у агента по техобслуживанию.
ВНИМАНИЕ: Чтобы избежать опасности, связанной со случайным сбросом устройства тепловой
защиты, данный бытовой электроприбор не должен запитываться через наружные
переключающие устройства, например, таймер, или другое устройство, которое регулярно
включает и выключает электроприбор.
"Данный бытовой прибор должен устанавливаться в соответствии с действующими правилами, и
только в хорошо проветриваемых помещениях. Перед установкой или использованием бытового
прибора прочтите инструкцию".
• "Данная инструкция имеет силу только в том случае, если на бытовом приборе имеется символ
страны. Если такого символа нет, то необходимо обратиться к техническому описанию, в котором
содержатся необходимые инструкции относительно модификации прибора в соответствии с
условиями эксплуатации в данной стране.".
• "перед выполнением установки проверьте, что местные условия распределения (тип газа и
давление газа) и регулировки прибора совместимы друг с другом";
• "условия регулировок для данного бытового прибора указаны на ярлыке (или в паспортной
табличке)";
• "данный бытовой прибор не подсоединен к вытяжке продуктов сгорания. Он должен быть
установлен и подключен в соответствии с действующими правилами подключения. Необходимо
обратить особое внимание на требования относительно вентиляции ".
•"Эксплуатация газовой плиты сопровождается выделением тепла и влаги в комнате, где
установлена плита. Убедитесь в том, что кухня хорошо вентилируется: отверстия естественной
вентиляции не должны быть загорожены, или установите механическое вентиляционное
устройство (вытяжка). При продолжительном и интенсивном использовании печи может
потребоваться дополнительная вентиляция, например открывание окна, или более эффективная
вентиляция, например, увеличение производительности вытяжки (если она используется).
27 RU
Page 28

1. ИНСТРУКЦИИ ПО ВЫПОЛНЕНИЮ УСТАНОВКИ
УСТАНОВКА БЫТОВОЙ ТЕХНИКИ ЯВЛЯЕТСЯ СЛОЖНОЙ РАБОТОЙ, НЕПРАВИЛЬНОЕ ВЫПОЛНЕНИЕ КОТОРОЙ МОЖЕТ ОТРИЦАТЕЛЬНО
СКАЗАТЬСЯ НА БЕЗОПАСНОСТИ ПОЛЬЗОВАТЕЛЯ. ПО ЭТОЙ ПРИЧИНЕ УСТАНОВКА БЫТОВОЙ ТЕХНИКИ ДОЛЖНА ВЫПОЛНЯТЬСЯ
ВЫСОКОКВАЛИФИЦИРОВАННЫМИ СПЕЦИАЛИСТАМИ, КОТОРЫЕ ВЫПОЛНЯТ УСТАНОВКУ С СОБЛЮДЕНИЕМ ВСЕХ ДЕЙСТВУЮЩИХ ПРАВИЛ
И НОРМ. В ТОМ СЛУЧАЕ, ЕСЛИ ЭТО ПРЕДОСТЕРЕЖЕНИЕ БУДЕТ ПРОИГНОРИРОВАНО, И УСТАНОВКА БУДЕТ ВЫПОЛНЕНА ЛИЦОМ, НЕ
ИМЕЮЩИМ ДОСТАТОЧНОЙ КВАЛИФИКАЦИИ, ПРОИЗВОДИТЕЛЬ НЕ БУДЕТ ПРИНИМАТЬ НИКАКИХ ПРЕТЕНЗИЙ ОТНОСИТЕЛЬНО ВЫХОДА
ОБОРУДОВАНИЯ ИЗ СТРОЯ И НАНЕСЕННОГО ПРИ ЭТОМ УЩЕРБА ИМУЩЕСТВУ ИЛИ ЗДОРОВЬЮ ЛЮДЕЙ.
1.1. ВСТРАИВАЕМЫЕ ВАРОЧНЫЕ ПОВЕРХНОСТИ
Варочная поверхность может устанавливаться на любой рабочей
поверхности кухонного стола, которая выдерживает нагрев до
температуры 100 °С, и имеет толщину от 25 до 40 мм. Размеры
отверстия, которое должно быть вырезано в рабочей поверхности
кухонного стола, показаны на рис. 2.
Если варочная поверхность устанавливается так, что по обе ее
стороны располагаются шкафы, то расстояние между варочной
поверхностью и шкафом должно быть не меньше 15 см (см. рис. 4),
а расстояние между варочной поверхностью и расположенной
сзади стеной должно быть не меньше 5,5 см.
Расстояние между варочной поверхностью и другим
электроприбором (например, вытяжной колпак) должно быть не
меньше 70 см (см. рис. 4).
Если под варочной поверхностью имеется свободное пространство,
то под варочной поверхностью нужно установить разделительную
панель, изготовленную из теплоизоляционного материала
(например, из дерева) (см. рис. 3).
Важная информация На рис. 1 показано, как наносится
герметик
Варочная поверхность крепится с помощью фиксирующих зажимов,
которые вставляются в отверстия, расположенные на основании
варочной поверхности.
Если варочная поверхность 60 см устанавливается над духовкой, в
которой нет системы охлаждения с вентилятором, то во
встраиваемой мебели рекомендуется сделать отверстия для
обеспечения нормальной циркуляции воздуха.
Площадь этих отверстий должна быть не меньше 300 см2 и эти
отверстия должны располагаться так, как показано на рис. 5.
2. ПОДКЛЮЧЕНИЕ К ЭЛЕКТРОСЕТИ
(ТОЛЬКО ДЛЯ ВЕЛИКОБРИТАНИИ)
Внимание данный электроприбор должен быть заземлен
Данный электроприбор предназначен только для бытовых
применений. Подключение к электросети должно выполняться
только опытным электриком с соблюдением всех действующих
привил и норм электробезопасности.
Данный электроприбор должен подключаться к ответвлению
электросети с достаточной нагрузочной способностью. 3штырьковая вилка/розетка на 13 А не подходит для данного
подключения. В линии электропитания должен быть установлен
двухполюсный выключатель, и цепь должна быть защищена с
помощью плавкого предохранителя соответствующего
номинала. Более подробная информация относительно
требований, предъявляемых к электропитанию для конкретного
изделия, представлена в инструкции по эксплуатации и в
паспортной табличке, закрепленной на изделии. Если длина
кабеля питания, поставляемого в комплекте с варочной
поверхностью, является недостаточной, то следует
использовать более длинный теплостойкий кабель питания с
достаточной нагрузочной способностью. Подключение к
электросети должно быть выполнено следующим образом:
ПОДСОЕДИНИТЕ К КЛЕММЕ ОТВОДА ЭЛЕКТРОСЕТИ
Зелено-желтый провод Земля
Синий провод Нейтраль
Коричневый провод Фаза
Данный электроприбор обязательно должен быть заземлен. В
случае несоблюдения этого требования производитель снимает с
себя ответственность за нанесение вреда здоровью людей и
повреждение имущества. Если к кабелю питания не подсоединена
вилка, подсоедините к кабелю питания вилку, нагрузочная
способность которой соответствует указанной в паспортной
табличке. Провод заземления имеет желто-зеленый цвет. К
электрической розетке должен всегда обеспечиваться свободный
доступ.
Если варочная поверхность подключается к электросети напрямую,
то должен быть установлен автоматический выключатель.
Для предотвращения опасностей замена поврежденного кабеля
питания должна выполняться только квалифицированным
специалистом.
Провод заземления (желто-зеленый) должен быть приблизительно
на 10 мм длиннее проводов фазы и нейтрали.
Сечение проводников кабеля питания должно соответствует
мощности, потребляемой варочной поверхностью.
Проверьте значение мощности, потребляемой электроприбором,
указанное в паспортной табличке, а также проверьте, что
используется кабель питания типа 3x0.75 mm² HO5RR-F.
Линия
электропитания
I класс защиты от поражения током
Электрическое подключение бытовой прибора должно быть
выполнено с использованием разъединительного устройства в
соответствии с действующими правилами и нормами
электробезопасности.
Если электроприбор поставляется без кабеля питания с вилкой,
или без других устройств для отсоединения от электросети с
отсоединением всех фаз, что обеспечивает полное
отсоединение электроприбора от электросети в случае
возникновения перенапряжения категории III, то электроприбор
должен подключаться через разъединяющее устройство с
жесткой электропроводкой, смонтированной в соответствии с
правилами прокладки электропроводки.
2.2. 4
Шнур питания не входит в комплект поставки. Для подлючения
тип и разрез кабеля передан на рассмотрение на плите. Тип и
сечение провода зависит от подключаемой плиты.
ФАЗА
ЗЕМЛЯ
НЕЙТРАЛЬ
ЭЛЕКТРО- ПЛИТКИ
Коричневый провод
L
Желто-зеленый провод
Синий провод
N
Кабель
питания
Одна фаза
220-240 V~
Кабель Сечение
Кабель - Тип
3 G 2.5 mm
H05VV-F
2
Примечание: Не подключайте варочную поверхность через
устройство обнаружения утечки тока на землю, так как это может
привести к "ложным отключениям". Еще раз напоминаем, что
электроприбор должен быть правильно заземлен, и что
производитель не принимает никаких претензий в случае
повреждений и несчастных случаев, возникших в результате
неправильного подключения электроприбора к электросети.
2.1. ПОДКЛЮЧЕНИЕ К ЭЛЕКТРОСЕТИ
Проверьте данные, приведенные в паспортной табличке,
закрепленной снаружи на варочной поверхности, для того, чтобы
убедиться в том, что входное напряжение варочной поверхности
соответствует напряжению электросети.
Перед подключением варочной поверхности к электросети
проверьте систему заземления.
L1
1 Параллельная
фаза
1-2
4 Нейтраль
Т Заземление
28 RU
Page 29

3. ИНСТРУКЦИИ ПО ЭКСПЛУАТАЦИИ
ВАРОЧНОЙ ПОВЕРХНОСТИ
Данный электроприбор предназначен только для использования по
его прямому назначению, то есть, для приготовления пищи в
домашних условиях. Любое другое применение варочной
поверхности считается неправильным, и поэтому может быть
опасным. Производитель не несет ответственности за повреждения
и потери, являющиеся следствием неправильного использования
варочной поверхности.
3.1. РУКОВОДСТВО ПО ИСПОЛЬЗОВАНИЮ
ЭЛЕКТРИЧЕСКИХ ПЛИТ
Для выбора необходимой температуры нагрева электроплиты
поверните выключатель в соответствующее положение. При
этом загорится световой индикатор и электроплита начнет
нагреваться.
Поверните выключатель в положение “ O” по окончании процесса
приготовления. (Рисунок 6). Не оставляйте пустую электроплиту
включенной. Диаметр и форма дна используемой посуды
является очень важным фактором. Максимальный диаметр дна
посуды - 14 см, рекомендуется пользоваться посудой с плоским и
ровным дном.
При первом включении электроплиты подождите 5 минут перед
тем, как поставить посуду. Это позволит жаростойкому покрытию
плиты затвердеть в результате нагрева.
Используйте влажную ткань и моющее средство для очистки
поверхности электроплиты. Не используйте ножи или другие
острые и твердые предметы для удаления остатков пищи с
поверхности электроплиты.
После очистки поверхности, включите электроплиту на
несколько секунд до полного высыхания конфорок. Однако, не
следует оставлять пустую электроплиту включенной более чем
на несколько секунд.
Мощность (Вт)
0
135 W
220 W
300 W
850 W
1150 W
1500 W
Пояснение
Выключено
Нагревание
Приготовление при низкой температуре
Приготовление при низкой температуре
Варка, Жаренье, Кипячение
Варка, Жаренье, Кипячение
Варка, Жаренье, Кипячение
0
1
2
3
4
5
6
Мощность (Вт)
0
100 W
180 W
250 W
500 W
750 W
1000 W
Положение
Рекомендуемые размеры посуды (Рисунок 7)
Не следует забывать, что посуда большего размера имеет
большую площадь нагрева.
Это обеспечивает более быстрое приготовление по сравнению с
посудой с меньшей площадью нагрева.
Всегда используйте посуду, размером соответствующую
количеству приготавливаемой пищи. Во избежание проливания
или разбрызгивания не следует использовать посуду небольших
размеров, в особенности для жидких блюд. Не используйте
слишком большую посуду для быстро приготовляемой пищи, так
как она может прилипнуть и остатки пищи останутся на
поверхности посуды.
Для выпечки сладкого следует использовать закрытую посуду,
противни или форму. Пролитый сок или сахар из незакрытой
посуды могут прилипнуть к поверхности электроплиты и их будет
трудно удалить.
Это особенно важно для посуды для жарки или готовки под
давлением при высокой температуре.
Не оставляйте без присмотра пустую конфорку или конфорку с
пустой посудой.
Проверьте соответствие посуды следующим критериям:
Она должна быть тяжелой.
Она должна полностью покрывать поверхность конфорки; может
быть немного больше, но ни в коем случае не меньше.
Дно должно быть абсолютно плоским и плотно прилегать к
поверхности конфорки.
•Для лучшего использования электроплиты и сокращения
потребления электроэнергии, используйте посуду с ровным,
плоским дном. Размер посуды должен быть равен или чуть
больше диаметра конфорки, но ни в коем случае не меньше.
Избегайте попадания жидкости на поверхность конфорки и не
ставьте на конфорку мокрую посуду. Не оставляйте пустую посуду
на конфорке, и не оставляйте пустую конфорку включенной.
4. ОБСЛУЖИВАНИЕ И ЧИСТКА
Перед тем как приступить к выполнению чистки варочной
поверхности, проверьте, что она остыла. Выньте вилку из розетки,
или (если варочная поверхность подсоединена к электросети
напрямую), выключите питающее напряжение.
Чистка и обслуживание бытового прибора не должны выполняться
детьми без надзора взрослых.
Запрещается использовать абразивные и коррозирующие
чистящие средства, отбеливающие вещества, или кислоты. Не
пользуйтесь для чистки эмалированных и лакированных деталей, а
также деталей из нержавеющей стали кислотами и щелочами
(лимонный сок, уксус и т. п.)
ПРЕДУПРЕЖДЕНИЕ Не пользуйтесь для чистки варочной
поверхности пароочистителями.
Очистка эмалированных, лакированных и хромированных
поверхностей должна выполняться с помощью мыльной воды или
нейтрального моющего средства. Для очистки поверхностей из
нержавеющей стали необходимо пользоваться подходящим
чистящим раствором.
Конфорки можно очищать с помощью мыльной воды. Для
восстановления их первоначального блеска используйте бытовое
чистящее средство для нержавеющей стали. После чистки горелок
высушите их и установите на место.
Проследите за тем, чтобы конфорки были собраны правильно.
5. ПОСЛЕПРОДАЖНОЕ ОБСЛУЖИВАНИЕ
Перед тем как вызвать специалиста по техническому
обслуживанию для выполнения ремонта варочной поверхности,
выполните следующие проверки:
• Проверьте, что вилка кабеля питания правильно вставлена в
электрическую розетку, и что не перегорел плавкий
предохранитель.
• Проверьте, что газ подается.
Если вы не можете самостоятельно определить причину
Если вы не можете самостоятельно определить причину
неисправности:
Выключите варочную поверхность и обратитесь в центр
послепродажного обслуживания. НЕ ПЫТАЙТЕСЬ
ОТРЕМОНТИРОВАТЬ ЭЛЕКТРОПРИБОР САМОСТОЯТЕЛЬНО.
Серийный номер состоит из 16 цифр. Первые 8 цифр – код
модели. Следующие 4 цифры – дата производства (год, неделя).
Последние 4 цифры – заводские номера.
6. ЗАЩИТА ОКРУЖАЮЩЕЙ СРЕДЫ
Данный электроприбор промаркирован в
соответствии с требованиями, изложенными в
директиве 2002/96/ЕС относительно утилизации
электрического и электронного оборудования
(WEEE).
Правильно выполняя утилизацию данного
изделия, вы поможете предотвратить загрязнение
окружающей среды и нанесение вреда здоровью
людей.
Этот символ указывает на то, что данное изделие не должно
выбрасываться, как обычный бытовой мусор. Вместо этого оно
должно быть отправлено на пункт сбора отслужившего свой срок
электрического и электронного оборудования для выполнения
его последующей утилизации и повторного использования
материалов.
Утилизация данного изделия должна выполняться в
соответствии с местными законами по охране окружающей
среды.
Для получения более подробной информации относительно
обработки, восстановления и повторного использования
материалов данного изделия, свяжитесь с органами местной
власти, службой вывоза бытовых отходов, или торговой
организацией, в которой вы приобрели данное изделие.
Декларация соответствия: Данное оборудование, детали
которого вступают в контакт с пищей, отвечает требованиям
Европейской директивы 89/109/ЕЕС.
Этот электроприбор соответствует требованиям
Европейских 2006/95/EC и 2004/108/EC, и последующих
поправок к ним.
29 RU
Page 30

Производитель не несет ответственности за опечатки и
неточности, которые могут встретиться в данной
инструкции. Мы оставляем за собой право вносить изменения
в конструкцию выпускаемых нами изделий с целью улучшения
качества выпускаемой продукции. При этом основные функции
изделия и его безопасность будут оставаться неизменными.
Таблица 1
ВСТРАИВАЕМЫЕ ВАРОЧНЫЕ ПОВЕРХНОСТИ
Конфорки
1
4E
Тип / обозначение
Электрическая плита (R 2000W)
Электрическая плита (1500W)
Электрическая плита (1000W)
Электрическая плита (R 1500W)
Класс установки
Напряжение/Частота В/Гц
Входная электрическая мощность
Размеры варочной поверхности
Данное изделие предназначено только для бытовых применений.
S60 / HBGS
1
1
1
1
3
220-240 V / 50-60 Hz
6000 W
585 x 510
30 RU
Page 31

VARNOSTNA NAVODILA
OPOZORILO: Aparat in njegovi dostopni deli se med uporabo segrejejo. Pazite, da se ne dotaknete
grelcev!
• Otroci, mlajši od 8 let, naj se aparatu ne približujejo nenadzorovani.
• Otroci, starejši od 8 let, ter osebe z zmanjšanimi fizičnimi, zaznavnimi ali umskimi sposobnostmi ali
pomanjkljivimi izkušnjami ter znanjem lahko uporabljajo aparat le pod nadzorom oseb, ki so odgovorne
za njihovo varnost, in ki so jih seznanili z varno uporabo aparata ter le v primeru, da razumejo tveganje, ki
je s tem povezano.
• Otroci se ne smejo igrati z aparatom.
• Otroci lahko sodelujejo pri čiščenju in vzdrževalnih delih le pod nadzorom odraslih.
OPOZORILO: Pri segrevanju maščobe ali olja se ne oddaljujte od aparata, saj se te snovi zlahka
vnamejo in povzročijo požar.
• NIKOLI ne gasite ognja z vodo, ampak izklopite aparat in nato pokrijte plamen - npr. s pokrovko ali
primerno nevnetljivo krpo ali odejo.
OPOZORILO: Nevarnost vžiga! Na kuhalno površino ne odlagajte nikakršnih predmetov.
OPOZORILO: Če je površina razpokana, takoj izklopite aparat, da se izognete tveganju za električni
udar!
• Pri čiščenju ne uporabljajte aparatov za čiščenje s paro.
• Če se vam po pokrovu razlije tekočina, jo pred dviganjem pokrova obrišite.
• Pred zapiranjem pokrova počakajte, da se kuhalna plošča ohladi.
• Aparat ni namenjen priključitvi na zunanjo programsko uro ali poseben sistem za daljinsko upravljanje.
• Pri fiksni priključitvi mora biti zagotovljena možnost izklopa iz električnega omrežja skladno z veljavnimi
predpisi.
• V navodilih je navedena ustrezna vrsta priključnega kabla, saj je potrebno upoštevati temperaturo na
hrbtni strani aparata.
• Če je priključni električni kabel poškodovan, ga je treba zamenjati z enakovrednim ali sklopom, ki vam je
na voljo pri pooblaščenem servisu.
POZOR: Da bi se izognili slučajnemu resetiranju termičnega prekinjala, aparat ne sme biti napajan preko
zunanje naprave, npr. programske ure, ter ne sme biti priključen na tokokrog, ki ga redno vklaplja oz.
izklaplja dobavitelj energije.
• "Aparat mora biti inštaliran skladno z vsemi veljavnimi predpisi in uporabljan samo v ustrezno zračnih
prostorih. Pred inštalacijo in uporabo preberite navodila za uporabo.»
• "Ta navodila veljajo samo v državi, s katere simbolom je aparat označen. Če simbola ni na aparatu,
upoštevajte tehnična navodila, v katerih so podana potrebna navodila za prilagoditev aparata pogojem
uporabe v vaši državi."
• "Pred inštalacijo se prepričajte o ustreznosti lokalnih pogojev (vrsta in tlak plina) ature of the gas and
gas pressure) in možnostjo prilagoditve aparata na te pogoje";
• "POgoji za prilagoditev aparata so navedeni na nalepki (ali tablici s podatki)";
• "Ta aparat se ne priključi na napravo za odvajanje plinov, ki nastajajo pri izgorevanju. Inštaliran in
priključen mora biti skladno z vsemi veljavnimi predpisi. Posebno pozornost posvetite ustreznim
predpisom o zračenju".
•Uporaba plinskih štedilnikov in kuhalnih plošč povzroča toploto in vlago v prostoru, kjer se uporabljajo.
Poskrbite za dobro prezračevanje kuhinje; naravne odprtine za prezračevanje morajo biti odprte, ali pa
vgradite mehansko napravo za prezračevanje (mehansko kuhinjsko napo). Dolgotrajna intenzivna
uporaba aparata bo morda pogojevala dodatno prezračevanje, npr. odpiranje okna, ali bolj učinkovito
prezračevanje, npr. vklop višje stopnje pri obstoječi napravi za prezračevanje.
31 SL
Page 32

1. VGRADNJA IN PRIKLJUČITEV
VGRADNJA IN PRIKLJUČITEV GOSPODINJSKEGA APARATA JE DOKAJ ZAPLETEN POSTOPEK, KI MORA BITI OPRAVLJEN BREZHIBNO,
SICER OBSTAJA TVEGANJE ZA VARNOST UPORABNIKA. ZATO PRIPOROČAMO, DA DELO PREPUSTITE USTREZNO USPOSOBLJENIM
STROKOVNJAKOM, KI BODO PRI TEM UPOŠTEVALI TUDI VSE VELJAVNE PREDPISE. PROIZVAJALEC NE PREVZEMA ODGOVORNOSTI ZA
ŠKODO ALI POŠKODBE ZARADI NEPRAVILNE VGRADNJE IN PRIKLJUČITVE.
1.1. VGRADNJA
Kuhalna plošča je namenjena vgradnji v kuhinjski pult debeline med 25
in 45 mm, ki so odporne na temperature do 100ºC. Mere izreza v
kuhinjskem pultu so prikazane na sliki 2.
Če namestite kuhalno ploščo ob visoko kuhinjsko omarico na eni strani,
mora biti razdalja med kuhalno ploščo in stranico omarice vsaj 15 cm (gl.
sliko 4), kuhalna plošča pa mora biti na zadnji strani od zidu oddaljena
vsaj 5,5 cm.
Razdalja med kuhalno ploščo in elementom nad njo (npr. kuhinjsko
napo) mora znašati vsaj 70 cm (slika 4).
Če je pod vgradno kuhalno ploščo prazen prostor, mora biti dostop do
nje s spodnje strani onemogočen z vgradnjo predelne stene iz
izolacijskega materiala (les ali podoben material) (slika 3).
Pomembno: Na sliki 1 je prikazano nameščanje tesnila.
Kuhalna plošča je opremljena s sponkami za pritrditev, ki jih namestite v
za to predvidene luknje na spodnji strani kuhalne plošče.
Če je kuhalna plošča širine 60 cm vgrajena nad pečico, ki ni opremljena
z ventilatorskim sistemom za hlajenje, priporočamo, da z izrezom v
kuhinjski omarici omogočite pravilno kroženje zraka.
Površina odprtine za zračenje mora biti vsaj 300 cm2, izrežite pa jo tako,
kot je to prikazano na sliki 5.
2.1. PRIKLJUČITEV NA ELEKTRIČNO OMREŽJE
Prepričajte se, da vrednosti v hišnem električnem omrežju ustrezajo
predpisanemu napajanju in napetosti. Podatki so navedeni na tablici na
zunanji strani kuhalne plošče.
Kuhalna plošča mora biti ozemljena. Proizvajalec ne prevzema
odgovornosti za morebitno škodo ali poškodbe v primeru
neupoštevanja teh navodil. Če kuhalna plošča ni opremljena z
vtikačem, uporabite ustrezen vtikač za obremenitev, navedeno na
tablici s podatki. Ozemljitveni vod je obarvan rumeno/zeleno. Vtikač
mora biti dosegljiv tudi po vgradnji.
V primeru fiksne priključitve je potrebno vgraditi prekinjalo.
Če je priključni električni kabel poškodovan, ga mora zamenjati
ustrezno usposobljen strokovnjak pooblaščenega servisa, da se
izognete morebitnemu tveganju.
Ozemljitveni vod (obarvan rumeno/zeleno) mora biti vsaj 10 mm daljši
od faze in nule.
Presek kabla mora po velikosti ustrezati odvzemni moči kuhalne
plošče.
Prosimo, da preverite vrednosti, navedene na tablici s podatki, in se
prepričate, da je uporabljen kabel tipa 3x0,75mm H05RR-F.
2.2. 4 G (PLIN) GRELNE PLOŠČE
Te plošče so dostavljene brez kabla. Za podatke o povezavi, vrsti in
preseku kabla si oglejte tabelo.
Enofazno
220-240 V~
Presek kabla
Vrsta kabla
3 G 2.5 mm
H05VV-F
L1
2
1-paralelna faza
1-2
4-Nula
PE-Ozemljitev
3. UPORABA KUHALNE PLOŠČE NAVODILA
ZA UPORABNIKA
Dovoljena je samo namenska uporaba kuhalne plošče, tj. za kuhanje
v gospodinjstvih. Drugačna uporaba ni dovoljena in predstavlja
tveganje za uporabnika. Proizvajalec ne prevzema odgovornosti za
poškodbe ali škodo zaradi nenamenske uporabe.
Faza
Napajanje
Pri fiksni priključitvi mora biti zagotovljena možnost izklopa iz
električnega omrežja skladno z veljavnimi predpisi.
Če aparat ni opremljen s priključnim električnim kablom in vtikačem,
ali z drugo napravo za izključitev iz električnega omrežja z ločenimi
kontakti na vseh polih, ki zagotavlja popolno izključitev v primeru
preobremenjenosti v pogojih kategorije III, mora biti v navodilih za
priključitev navedeno, da mora biti naprava za izključitev vgrajena v
fiksni priklop skladno z vsemi veljavnimi predpisi.
Ozemljitev
Nula
rjava žica
L
zelena/rumena žica
modra žica
N
priključni kabel
3.1. UPORABA ELEKTRIČNIH KUHALIŠČ
Obrnite gumb na ustrezno stopnjo, skladno z želeno temperaturo
kuhališča. Osvetli se kontrolna lučka kuhališče in kuhališče se začne
segrevati
Ko ste s kuhanjem zaključili, obrnite gumb na" O". (Slika 6 ).
Kuhališče naj ne bo vklopljeno, če na njem ni posode. Zelo
pomembno je, da kuhate v posodi ustrezne velikosti in ustreznega
premera dna. Največji dovoljeni - premer dna je 14 cm, dno pa mora
biti povsem ravno.
Ko prvič vklopite kuhališče, ga pustite 5 minut, da se segreva prazno,
šele potem položite nanj posodo. To je potrebno zato, da se na toploto
odporna prevleka, s katero je prevlečeno kuhališče, zaradi toplote
strdi.
Kuhališča čistite z mokro krpo in ustreznim čistilom. Za odstranjevanje
ostankov hrane ne uporabljajte noža ali drugih trdih, ostrih predmetov.
Po čiščenju za nekaj trenutkov vklopite kuhališče, da se poosuši,
vendar naj ne bo nikoli vklopljeno več kot par sekund, če na njem ni
posode.
29 SL
32 SL
Page 33

Stopnja
0
1
2
3
4
5
6
Moč (W)
0
100 W
180 W
250 W
500 W
750 W
1000 W
Moč (W)
0
135 W
220 W
300 W
850 W
1150 W
1500 W
Pojasnilo
Izklopljeno
Segrevanje
Kuhanje na nizki temperaturi
Kuhanje na nizki temperaturi
Kuhanje, pečenje, segrevanje do vrelišča
Kuhanje, pečenje, segrevanje do vrelišča
Kuhanje, pečenje, segrevanje do vrelišča
5. SERVISIRANJE
Preden se obrnete na pooblaščeni servis, preverite:
• da je vtikač pravilno v vtičnici;•
da je dovod plina brezhiben
Če vam ne uspe odpraviti nepravilnosti v delovanju, izključite kuhalno
ploščo in pokličite najbližji pooblaščeni servis.
Ustrezna posoda
(Slika 7)
Upoštevajte, da imajo večje posode tudi večjo grelno površino.
Zato je jed v večji posodi hitreje kuhana kot v manjši posodi, ki ima
manjšo grelno površino.
Vedno izberite ustrezno veliko posodo za količino, ki jo želite skuhati.
Ne kuhajte v premajhnih posodah, predvsem jedi z veliko tekočine, da
se izognete kipenju. Če uporabite zelo veliko posodo za kuhanje živil,
ki so zelo hitro kuhana, se bo živilo, npr. klobase in tekočina oprijelo
dna in sten in del ga bo ostal v posodi. Za sladke jedi priporočamo
kuhanje v posodah s pokrovom. Sladkor in sokove, ki bi brizgali iz
nepokrite posode, je zelo težko očistiti.
To je še posebej pomembno upoštevati pri posodah, namenjeni
pečenju ali kuhanju pod tlakom pri visokih temperaturah.
Ne vžigajte gorilnikov, če na njih ni posode oziroma je na njih prazna
posoda. Primernost svoje posode ugotovite s pomočjo spodnjih
kriterijev:
Posoda mora biti težka
Posoda mora v celoti prekrivati površino gorilnika; lahko je nekoliko
večja, toda ne manjša.
Dno mora biti povsem ravno in se dobro prilegati kuhalni površini.
•Da bi kar najbolje izrabili odlike električnih kuhališč in porabili kar
najmanj energije, uporabljajte samo posodo s povem ravnim dnom.
Premer dna posode naj bo kar se da podoben premeru kuhališče,
nikoli manjši. Dno posode naj bo vedno čisto; pazite, da se vam živilo
ne razlije ali raztrosi po kuhalni plošči. Na kuhališče ne postavljajte
praznih posod; kuhališča ne puščajte vklopljenega, če na njem ni
posode.
4. VZDRŽEVANJE IN ČIŠČENJE
Pred čiščenjem počakajte, da se vsi deli ohladijo. Potegnite vtikač iz
vtičnice ali odvijte varovalko, da izključite kuhalno ploščo iz
električnega omrežja.
Otroci lahko sodelujejo pri čiščenju in vzdrževalnih delih le pod
nadzorom odraslih.
Nikoli ne uporabljajte grobih čistil ali čistilnih pripomočkov; korozivnih
detergentov, belil ali kislin. Izogibajte se tudi kislim ali alkalnim
snovem (limonin sok, kis ipd.) na emajliranih ali lakiranih površinah ali
površinah iz nerjavečega jekla.
Za čiščenje emajliranih, lakiranih ali kromiranih površin uporabljajte
toplo milnico in blagi detergent. Površine iz nerjavečega jekla čistite z
namenskim čistilom.
Gorilnike čistite z milnico; lesk jim lahko povrnete z namenskim
čistilom za nerjaveče jeklo. Po čiščenju jih obrišite do suhega in
ponovno namestite.
Pomembno je, da so gorilniki pravilno sestavljeni.
6. PROTECTION DE L'ENVIRONNEMENT
Izdelek je označen skladno z direktivo evropske
Gospodarske zbornice 2002/96 o odpadni električni
in elektronski opremi (WEEE).
S pravilnim načinom odstranjevanja izdelka boste
pomagali preprečiti morebitne negativne posledice na
okolje in zdravje ljudi, ki bi jih lahko povzročilo
nepravilno odstranjevanje aparata.
dovoljeno ravnati kot z običajnimi gospodinjskimi odpadki. Izdelek
odpeljite na ustrezno zbirno mesto za predelavo električne in
elektronske opreme.
Odstranjevanje mora biti opravljeno skladno z lokalnimi
okoljevarstvenimi predpisi o odstranjevanju odpadkov.
Za podrobnejše informacije o odstranjevanju in predelavi tega izdelka
se obrnite na pristojen mestni organ za odstranjevanje odpadkov,
komunalno službo ali trgovino, v kateri ste izdelek kupili.
Proizvajalec ne prevzema odgovornosti za morebitne tiskarske
napake v tej knjižici. Pridržujemo si pravico do sprememb na izdelku
brez predhodnega obvestila.
Število gorilnikov
Tip/referenca
Elektrický ohrievač (R 2000W)
Elektrický ohrievač (1500W)
Elektrický ohrievač (1000W)
Elektrický ohrievač (R 1500W)
Razred
Napetost/Frekvenca
El. priključna moč
Mere izdelka
Aparat je namenjen za neprofesionalno uporabo v gospodinjstvih.
Simbol na izdelku označuje, da s tem izdelkom ni
Izjava o skladnosti: Deli aparata, ki prihajajo v stik z živili, so
izdelani skladno z določili, navedenimi v direktivi 89/106.
Aparat ustreza evropskim smernicam št. 2006/95/EC,
2004/108/EC in 2009/142/EC ter kasnejšim spremembam in
dopolnitvam.
Razpredelnica 1
1
4E
S60 / HBGS
1
1
1
1
3
220-240 V / 50-60 Hz
6000 W
585 x 510
33 SL
Page 34

INDICAZIONI DI SICUREZZA
ATTENZIONE: l'apparecchio e le parti accessibili diventano calde durante l'uso. Prestare attenzione a
non toccare le parti calde.
• I bambini al di sotto di 8 anni dovrebbero essere tenuti a distanza se non continuamente supervisionati.
• L'apparecchio può essere usato da bambini dagli 8 anni in su e persone con ridotte capacità fisiche,
sensoriali o mentali o senza esperienza e conoscenza del prodotto se supervisionate o dando loro
istruzioni riguardo al funzionamento dell'apparecchio in maniera sicura e coscente del rischio possibile.
• I bambini non dovrebbero giocare con l'apparecchio.
• La pulizia e la manutenzione non dovrebbero essere fatte da bambini senza supervisione.
ATTENZIONE: cucinare senza supervisione grasso o olio sul piano cottura può essere pericoloso e può
provocare incendi.
• MAI provare a spegnere il fuoco con acqua. Prima spegnere l'apparecchio e poi coprire le fiamme, ad
esempio con un coperchio o un telo non infiammabile.
ATTENZIONE: pericolo di incendo: non lasciare oggetti sul piano cottura.
ATTENZIONE: Se la superficie è incrinata, spegnere l’apparecchio per evitare la possibilità di scosse
elettriche.
• Non utilizzare un pulitore a vapore.
• Rimuovere gli eventuali liquidi tracimati dal coperchio prima di aprirlo.
• Far raffreddare la superficie del piano di cottura prima di chiudere il coperchio.
• L'apparecchio non è progettato per funzionare con un timer esterno o con un sistema di comando
separato.
• Il mezzo di disconnessione deve essere incorporato nel cablaggio fisso in accordo con le leggi di
cablaggio.
• Le istruzioni devono indicare quale tipo di cavo debba essere utilizzato, tenendo presente la
temperatura della superficie posteriore dell’apparecchio.
• Se il cavo di alimentazione è danneggiato, esso deve essere sostituito da un cavo o un assieme speciali
disponibili presso il costruttore o il suo servizio assistenza tecnica.
ATTENZIONE: Al fine di evitare ogni pericolo dovuto al riarmo accidentale del dispositivo termico di
interruzione, il presente apparecchio non deve essere alimentato con un dispositivo di manovra esterno,
quale un temporizzatore oppure essere connesso a un circuito che viene regolarmente alimentato o
disalimentato dal servizio.
• Questo apparecchio può essere installato in accordo con il regolamento vigente e solo in un ambiente
ben ventilato. Leggere le istruzzioni prima dell'installazione o l'uso dell'apparecchio.
• Queste istruzioni sono valide solamente se appare il simbolo del paese sull'apparecchio. Se non
appare il simbolo sull'apparecchio, è necessario consultare le istruzioni tecniche che vi daranno le
istruzioni necessarie riguardo alle modifiche delle condizioni d'uso dell'apparecchio nel paese di
riferimento.
• Prima dell'installazione, assicurarsi che le condizioni di distribuzione del locale (natura del gas e
pressione del gas) e l'aggiustamento dell'apparecchio siano compatibili;
• le condizione di aggiustamento dell'apparecchio sono indicate nell'etichetta (o nella targa);
• l'apparecchio non è connesso a un sistema di avacuazione dei prodotti di combustione. Dovrebbe
essere installato e connesso in accordo con le correnti norme di installazione. Particolare attenzione
deve essere posta sui rilevanti requisiti riguardo alla ventilazione.
• L'utilizzo di un apparecchio a gas causa calore e umidità nella stanza in cui è installato. Assicurarsi che
la cucina sia ben ventilata: lasciare aperti i fori di ventilazione naturale o installare un dispositivi di
ventilazione meccanica (cappa meccanica aspirante). L'uso intensivo prolungato dell'apparecchio
potrebbe richiedere un sistema di ventilazione addizionale, per esempio aumentando il livello di
ventilazione meccanica dove presente.
34 IT
Page 35

1. ISTRUZIONI PER L'INSTALLATORE
INSTALLARE UN ELETTRODOMESTICO PUÒ ESSERE UN'OPERAZIONE COMPLICATA CHE, SE NON ESEGUITA CORRETTAMENTE, PUÒ
COMPROMETTERE SERIAMENTE LA SICUREZZA DELL'UTENTE. È PER QUESTA RAGIONE CHE L'OPERAZIONE DEV'ESSERE CONDOTTA
DA PERSONALE PROFESSIONALMENTE QUALIFICATO CHE TENGA PRESENTE LE NORME VIGENTI. NEL CASO IN CUI QUESTO AVVISO
VENGA IGNORATO E L'INSTALLAZIONE VENGA ESEGUITA DA PERSONALE NON QUALIFICATO, IL PRODUTTORE DECLINA OGNI
RESPONSABILITÀ PER OGNI PROBLEMA TECNICO DEL PRODOTTO SIA IN CASO DI DANNI A COSE O PERSONE SIA IN ASSENZA DI ESSI.
1.1. INSTALLAZIONE
Il plano cottura può essere Installato In qualsiasi top che sia resistente
ad una temperatura di 100°C e abbia uno spessore di 25-45 mm. La
dimensione del vano di Inserimento del plano cottura è mostrata In
Figura 2.
Qualora II plano venga Incassato In modo che sul suo lato sinistro o
destro ci sia una parete, la distanza non dev'essere Inferiore a 15 cm
(vedere Figura 4); mentre la distanza tra la parete posteriore e II plano
deve essere di almeno 5,5 cm.
La distanza tra II plano cottura e qualsiasi altro apparecchio sopra di
esso (es. una cappa) non deve essere Inferiore a 70 cm (Figura 4).
Qualora sotto II plano cottura vi sia un vano accessibile bisogna
predisporre un parete di divisione In materiale Isolante (legno o slmili)
(Figura 3).
Importante - Il diagramma In figura 1 mostra come deve essere
applicato il sigillante.
Il piano cottura è fissato grazie a morsetti di supporto agganciati alla
base.
Se un piano cottura da 60 cm è posizionato sopra un forno non
equipaggiato con un sistema di raffreddamento a ventola si
raccomanda di predisporre delle aperture che assicurino una corretta
circolazione d'aria.
La dimensione di queste aperture deve essere di almeno 300 cm² e
posizionate come in Figura 5.
2.1. CONNESSIONE ELETTRICA
Controllare i dati sulla placca segnaletica, situata sotto l'unità, per
assicurarsi che il collegamento elettrico sia corretto. Prima della
connessione, controllare l'impianto di messa a terra. Per legge,
quest'apparecchio deve avere la messa a terra. Se questa
operazione non viene eseguita, il produttore non sarà responsabile di
eventuali danni occorsi a persone o proprietà. Se non è già applicata
una spina, applicarne una appropriata come indicato sulla placca
segnaletica. Il cavo di messa a terra è di color verde/giallo. La spina
deve essere posizionata in modo tale che sia sempre accessibile.
Qualora il piano cottura sia connesso direttamente all'alimentazione
principale, bisognerà predisporre anche un salvavita. Se il cavo di
alimentazione è danneggiato dovrà essere sostituito da personale
qualificato in modo da prevenire qualsiasi potenziale rischio.
Il cavo di messa a terra (di color verde/giallo) deve essere più lungo di
almeno 10 mm rispetto ai cavi neutro e fase. La sezione del cavo
usato deve essere delle giuste dimensioni in base all'assorbimento
dell'apparecchio.
Si prega di controllare la placca segnaletica per i dettagli riguardanti la
potenza dell'aparecchio e assicurare che il cavo di connessione sia
dei tipi 3x0.75mm² H05RR-F.
Alimentazione
principale
Il mezzo di disconnessione deve essere incorporato nel cablaggio
fisso in accordo con le leggi di cablaggio.
Per il collegamento diretto alla rete, è necessario prevedere un
dispositivo che assicuri la disconnessione dalla rete, con una
distanza di apertura dei contatti che consenta la disconnessione
completa nelle condizioni della categoria di sovratensione III,
conformemente alle regole di installazione.
FASE
TERRA
NEUTRA
Cavo Marrone
F
Cavo Verde/Giallo
Cavo Blu
N
Cavo di
alimentazione
2.2. 4 PLACCHE CALDE
Questi fulcri(centri) sono consegnati senza cavo. Per il collegamento,
il tipo del cavo e la sezione si riferiscono alla tabela.
Monofase
220-240 V~
Cavo-Sezione
Tipo
3 G 2.5 mm
H05VV-F
L1
1-Fase
Smistamento 1-2
4-Neutrale
PE-Collegamento
A terra.
2
3. USO DEL PIANO - ISTRUZIONI UTENTE
Quest'apparecchio deve essere utilizzato solo per gli scopi con cui è stato
pensato, qualsiasi altro utilizzo può essere considerato improprio e quindi
pericoloso. Il produttore non è responsabile per qualsiasi danno o perdita
dovuti ad un uso inappropriato.
3.1. USO DÍ FORNELLI CON LE PIASTRE
ELETTRICHE
Girare la manopola alla posizione per la temperatura richiesta della
piastra. L'indicatore luminoso della piastra calda sarà acceso e la
piastra si avvia al calore.
Quando la cottura è completata, girare la manopola per la posizione
"O". (Figura 6). Non lasciare la piastra accesa senza una padella su di
esso. Il diametro e la base di pentola da usare sono critica. Il diametro
massimo della base di pentola deve essere 14 centimetri e la base
piatta. Per la prima volta che si utilizza, lasciare la piastra a riscaldarsi
per 5 minuti prima di mettere un tegame su di esso. Questo consentirà
il rivestimento resistente al calore della piastra per indurire a causa di
combustione. Utilizzare un panno umido e detersivo per la pulizia
delle piastre. Non rimuovere residui di cibo dalle piastre con un
coltello o di qualsiasi altro disco, oggetto appuntito. Accendere il piatto
caldo per qualche minuto ad asciugare dopo la pulizia. Tuttavia, essa
non deve mai essere lasciata per più di qualche minuto senza un
tegame in cima.
35 IT
Page 36

Posizione
0
1
2
3
4
5
6
Potenza (Watt)
0
100 W
180 W
250 W
500 W
750 W
1000 W
Idoneità delle pentole di cucina
Potenza (Watt)
0
135 W
220 W
300 W
850 W
1150 W
1500 W
(Figura 7)
Descrizione
Spento
Riscalda
Cottura alla bassa temperatura
Cottura alla bassa temperatura
Cottura, Arrostimento, bollitura
Cottura, Arrostimento, bollitura
Cottura, Arrostimento, bollitura
Tieni presente che le pentole più grandi sono più grandi superfici di
riscaldamento. Questo li aiuterà a cuocere il cibo più veloce di
vaschette con piccole superfici di riscaldamento. Utilizzare sempre il
tegame quale dimensione è proporzionata alla quantità di cibo da
cucinare. Al fine di evitare spruzzi, non usare molto piccole padelle, in
particolare peri prodotti alimentari con eccesso di liquido. Se si usa le
padelle troppo grandi per cibi cotti rapidamente, salsicce e liquidi
bastone e rimangono residui allegata al tegame dopo essere stati
svuotati. Chiuso padelle e vassoi di cottura o stampi sono suggeriti
per cucinare i dolci. Spruzzata di zucchero e succhi di frutta da una
pentola aperta può attaccare alla superficie del fornello e sarà difficile
da rimuovere.
Questo è particolarmente importante per le padelle di arrostimento o
utilizzati per la cottura a pressione ad alta temperatura. Non lasciare
incustoditi bruciatori senza una padella o tegame o senza coperchio.
Controlla l'idoneità di pentole da cucina con il rispetto dei seguenti
criteri, Devono essere pesanti.
Essi dovrebbero coprire completamente la superficie del bruciatore;
ma può essere un po"più grande, ma non minore.
Le superfici della base devono essere completamente pianeggianti e
adatta bene alla cottura.
•X Per la migliore utilizzazione delle piastre calde a elettrico e per
ridurre al minimo il consumo di energia, solo le padelle con le basi
buoni piatti dovrebbero essere usato. La dimensione della pentola
dovrebbe essere al più vicino possibile al diametro della piastra, e mai
più piccoli. La base della vasca deve essere asciutta e la fuoriuscita
deve essere evitato. Tegami vuoti non devono essere lasciati sui
piatti, e le lastre non devono essere lasciato acceso senza una
padella.
5. RIPRISTINO
Prima di contattare un tecnico del Centro Assistenza si prega di
controllare:
• che la spina sia ben inserita e collegata;
• che l'alimetazione gas non sia difettosa.
Se il malfunzionamento non è identificabile:
spegnere l'apparecchio - non manometterlo - e chiamare il Centro
Assistenza.
6. RISPETTO DELL'AMBIENTE
Questo apparecchio è conforme alle direttive
Europee 2002/96/EC sullo smaltimento di apparecchi
elettrici ed elettronici (WEEE).
Garantendo che questo prodotto sia disposto
correttamente, puoi aiutare a prevenire delle
potenziali conseguenze negative per l'ambiente e la
salute dell'uomo, che possono essere causate anche
da un inappropriato smaltimento di questo prodotto. Il
simbolo sul prodotto indica che non può essere considerato come un
normale rifiuto domestico. Può invece essere consegnato in punti di
raccolta adeguati per lo smaltimento di apparecchi elettrici o
elettronici. Lo smaltimento deve essere eseguito in accordo con le
regolamentazioni locali per la disposizione di questo tipo di
apparecchi. Per informazioni più dettagliate circa trattamento,
recupero e riciclaggio di questo prodotto, si prega di contattare il
proprio ufficio cittadino, il centro di smaltimento rifiuti locale o il
negozio dove si è acquistato il prodotto.
Dichiarazione di conformità: questo apparacchio, nelle parti
progettate per venire a contatto con cibi, è conforme con le
regolamentazioni espresse nelle direttive EEC 89/109.
Apparecchio conforme con le direttive Europee 2006/95/EC,
2004/108/EC , e emendamenti successivi.
4. MANUTENZIONE E PULIZIA
Prima di pulire il piano cottura, assicurarsi che l'apparecchio si sia
raffreddato.
La pulizia e la manutenzione non dovrebbero essere fatte da bambini
senza supervisione.
Rimuovere la spina dalla presa corrente o (se connessa direttamente
all'alimentazione generale) togliere la corrente dall'impianto
generale.
Non usare sostanze abrasive, detergenti corrosivi, agenti sbiancanti o
acidi. Evitare ogni tipo di acido o sostanza alcalina (limone, aceto,
etc.) per pulire le parti smaltate, laccate o in acciao inox.
Quando bisogna pulire le parti smaltate, laccate o cromate, usare
acqua calda con sapone o un detergente non corrosivo. Per l'acciaio
antimacchia usare una soluzione appropriata.
I bruciatori possono essere puliti con acqua e sapone. Per ripristinare
la loro brillantezza originale, usare un comune prodotto di pulizia per
superfici in acciaio. Dopo averli puliti, asciugarli e ricollocarli al loro
posto.
È importante che i bruciatori vengano riposizionati
correttamente.
// produttore non si rende responsabile per alcuna imprecisione
dovuta a errori di stampa o trascrizione contenuti nel libretto. Ci
riserviamo il diritto di apportare modifiche al prodotto qualora sia
necessario, inclusi i consumi, senza compromettere le caratteristiche
inerenti la sicurezza del funzionamento.
Tabella 1
PIANI COTTURA DA INCASSO
Bruciatore
1
4E
Nome prodotto
Piastra elettrica (R 2000W)
Piastra elettrica (1500W)
Piastra elettrica (1000W)
Piastra elettrica (R 1500W)
Classe di installazione
Voltaggio / Frequenza
Potenza elettrica in ingresso
Dimensione prodotto (mm)
Questo apparecchio è stato progettato per uso domestico e non
professionale.
S60 / HBGS
1
1
1
1
3
220-240 V / 50-60 Hz
6000 W
585 x 510
36 IT
Page 37

INSTRUÇÕES DE SEGURANÇA
AVISO: Durante a sua utilização, tanto o aparelho, como os componentes acessíveis do mesmo ficam
muito quentes. Evite sempre tocar nos elementos de aquecimento.
• Mantenha as crianças de com menos de 8 anos afastadas do aparelho, excepto se estiverem a ser
supervisionadas por um adulto.
• Este electrodoméstico pode ser utilizado por crianças com oito anos ou mais e por pessoas com
capacidades físicas, sensoriais ou mentais diminuídas, ou que não disponham da experiência e dos
conhecimentos necessários, desde que lhes tenham sido dadas instruções sobre a utilização do
aparelho por uma pessoa responsável pela sua segurança, ou que o utilizem sob sua supervisão.
• Nunca deixe as crianças brincarem com este aparelho.
• Crianças sem supervisão não devem nem limpar, nem manter este aparelho.
AVISO: Nunca deixe a placa sem vigilância sempre que a utilizar para confeccionar alimentos com
gorduras, caso contrário corre o risco de incêndio.
• NUNCA utilize água para extinguir um incêndio; desligue o aparelho e, em seguida, abafe a chama com
uma tampa ou uma manta anti-fogo.
AVISO: Perigo de incêndio: nunca utilize as superfícies de cozedura para arrumar objectos.
AVISO: Se a superfície da placa estiver estalada, desligue o aparelho para evitar a possibilidade de
choque eléctrico.
• Nunca utilize um sistema de limpeza a vapor para limpar este aparelho.
• Remova sempre eventuais líquidos derramados da tampa antes de a abrir.
• Espere sempre que a placa arrefeça antes de baixar a tampa.
Este aparelho nunca pode ser operado com um temporizador externo nem com qualquer outro sistema
de comando à distância.
• O sistema de desligamento tem de estar integrado na instalação fixa, de acordo com as regras
aplicáveis à instalação e ligação eléctrica.
• As instruções têm de indicar o tipo de cabo a ser utilizado, tendo em consideração a temperatura
registada na superfície traseira do aparelho.
• Se o cabo de alimentação estiver danificado, tem de ser substituído por um cabo ou conjunto especial,
que pode ser obtido junto do fabricante ou do seu serviço de assistência técnica.
CUIDADO: Com vista a evitar perigos resultantes da reposição acidental do disjuntor térmico, este
aparelho não pode ser alimentado a partir de um comutador externo como, por exemplo, um
temporizador, nem pode ser ligado a um circuito que seja regularmente ligado e desligado pela empresa
abastecedora de electricidade.
• Este aparelho tem de ser instalado de acordo com as normas e regulamentos em vigor e só pode ser
utilizado num local bem ventilado. Leia as instruções antes de instalar ou de utilizar este aparelho.
• Estas instruções só são válidas se o aparelho tiver o símbolo do país. Se o aparelho não tiver o símbolo
do país, tem de consultar as instruções técnicas, onde encontrará as instruções necessárias para
modificar o aparelho de modo a ficar em conformidade com as condições de utilização no país.
• Antes de proceder à instalação, certifique-se sempre de que o aparelho está regulado para as
condições de distribuição locais (tipo e pressão do gás)";
• As regulações a realizar neste aparelho estão indicadas na etiqueta (ou na placa de características);
• Este aparelho não está ligado a um dispositivo de evacuação dos produtos da combustão. Este
aparelho tem de ser instalado e ligado de acordo com os regulamentos de instalação e ligação em vigor.
• Deve ser prestada uma atenção muito especial aos requisitos aplicáveis à ventilação.
A utilização de um forno ou fogão a gás dá azo à produção de calor e de humidade no compartimento em
que está instalado. Certifique-se sempre de que a cozinha é bem ventilada: mantenha as aberturas de
ventilação natural abertas ou instale um dispositivo mecânico de ventilação (exaustor mecânico). Uma
utilização intensa prolongada do aparelho pode tornar necessária uma ventilação adicional, como, por
exemplo, a abertura de uma janela, ou uma ventilação mais eficaz, aumentando, por exemplo, a
velocidade do exaustor.
37 PT
Page 38

1. INSTRUÇÕES PARA O INSTALADOR
A INSTALAÇÃO DE ELECTRODOMÉSTICOS PODE SER UMA OPERAÇÃO COMPLICADA QUE, SE NÃO FOR EFECTUADA
CORRECTAMENTE, PODE AFECTAR SERIAMENTE A SEGURANÇA DO CONSUMIDOR. POR ESTA RAZÃO, ESTA TAREFA DEVE SER
EXECUTADA POR UMA PESSOA QUALIFICADA PROFISSIONALMENTE, QUE A FARÁ DE ACORDO COM OS REGULAMENTOS
TÉCNICOS EM VIGOR. SE ESTE CONSELHO FOR IGNORADO, E SE A INSTALAÇÃO FOR EXECUTADA POR UMA PESSOA NÃO
QUALIFICADA, O FABRICANTE DECLINA TODAS AS RESPONSABILIDADES POR FALHA TÉCNICA DO PRODUTO, QUE PROVOQUE
OU NÃO DANOS DE PROPRIEDADE OU FERIMENTOS.
1.1 PREPARAÇÃO
A placa pode ser instalada em qualquer bancada que seja resistente
até uma temperatura de 100°C e que tenha uma espessura de 25-45
mm. As dimensões da abertura para o encastre, a ser feita na bancada,
estão indicadas na Figura 2.
Se a placa for instalada numa bancada ficando com um armário de
qualquer um dos lados, a distância entre a placa e o armário tem de ser
de, pelo menos, 15 cm (vide a Figura 4); já a distância entre a placa e a
parede traseira tem de ser de, pelo menos, 5,5 cm.
A placa deve sempre ficar a uma distância de, pelo menos, 70 cm de
qualquer unidade ou aparelho instalado sobre ela (como, por exemplo,
um extractor). (Figura 4)
Sempre que houver um espaço que seja acessível entre a placa
encastrada e a cavidade por baixo dela, tem de ser instalada uma
divisória feita de material isolante, como, por exemplo, madeira ou um
material semelhante, entre ambas (Figura 3).
Importante O diagrama apresentado na figura 1 mostra a forma de
aplicação do vedante.
Para poder encastrar a placa tem de instalar os grampos de fixação,
inserindo-os nos orifícios existentes na base da placa.
Sempre que uma placa de 60 cm for instalada sobre um forno que não
esteja equipado com um sistema de refrigeração por ventoinha, o
fabricante recomenda que sejam introduzidas aberturas no móvel em
que as unidades vão ser encastradas, a fim de assegurar uma
circulação correcta do ar.
Estas aberturas devem ter uma área mínima de 300 cm2 e devem estar
localizadas nos pontos indicados na Figura 5.
2.2. 4 DISCOS DE CALOR
Estas placas são fornecidas sem cabo. Para conexão, o tipo de cabo
e a secção são referidos na tabela.
Monofásico
220-240 V-
Cabo-Secção
Cabo-Tipo
3 G 2.5 mm
H05VV-F
L1
2
1-Fase/Shunt 1-2
4-Neutro
PE-Terra
2.1. LIGAÇÃO ELÉCTRICA
Verifique os dados indicados na placa de características do aparelho,
afixada do lado de fora da placa, para se certificar de que tanto a
alimentação de energia como a tensão de entrada são as adequadas.
Antes de proceder à ligação do aparelho, verifique o sistema de ligação à
terra.
Por lei, esta placa tem de ser ligada à terra. Se este requisito não for
cumprido, o fabricante declina toda e qualquer responsabilidade por
eventuais danos materiais ou lesões pessoais. Se o aparelho não estiver
equipado com uma ficha, instale uma ficha adequada para a carga indicada
na placa de características. O fio de ligação à terra é o fio amarelo/verde. A
ficha tem de estar sempre acessível.
Sempre que a placa for directamente ligada à rede eléctrica, tem de ser
instalado um disjuntor no circuito.
Sempre que o cabo de alimentação de energia estiver danificado deverá o
mesmo ser substituído por um técnico devidamente qualificado, de modo a
evitar qualquer risco potencial.
O fio de ligação à terra (verde e amarelo) deve ser pelo menos 10 mm mais
comprido do que os fios condutor e neutro.
O cabo de alimentação de energia deve ter uma secção transversal
adequada à potência máxima absorvida pela placa.
O fabricante recomenda que consulte a placa de características do aparelho
para se informar sobre as características eléctricas do mesmo e ainda que se
assegure de que o cabo de alimentação de energia seja do tipo 3x0.75 mm²
H05RR-F.
CONDUTORL
Rede
TERRA
NEUTRO
O sistema de desligamento tem de estar integrado na instalação fixa, de
acordo com as regras aplicáveis à instalação e ligação eléctrica.
Se um equipamento não estiver equipado com um cabo de alimentação
e uma ficha, ou com outros meios para desligar da alimentação, precisa
de uma separação de contacto em todos os pólos que permita a
desconexão total em condições de sobretensão de categoria III, e as
instruções devem indicar que devem ser incorporados meios para
desligar na cablagem fixa de acordo com os regulamentos de ligação.
Fio castanho
L
Fio verde/amarelo
Fio azul
N
Cabo de
alimentação
3. UTILIZAÇÃO DA PLACA INSTRUÇÕES
PARA O UTILIZADOR
Esta placa só pode ser utilizada para o fim para que foi concebida, ou
seja, para uma utilização doméstica, sendo qualquer outra utilização
considerada imprópria e, por conseguinte, perigosa. O fabricante
declina toda e qualquer responsabilidade por danos decorrentes de
uma utilização imprópria da placa.
3.1. UTILIZAÇÃO DAS PLACAS ELÉCTRICAS
DE VITROCERÂMICA
Gire o botão até à posição desejada para ter placa quente e o calor
desejado. A lâmpada do Indicador da placa quente acende e a
mesma começa a aquecer-se.
Gire o botão para posição "0" depois da cozedura. (Figura 6). Não
deixe a placa quente ligada quando não há uma panela sobre a
mesma. A base e o diâmetro da panela usada têm grande
importância. O diâmetro máximo da base da panela é de 14 cm e
deve ser rasa. Aqueça a placa durante 5 minutos sem colocar
nenhuma panela sobre a mesma, quando usada pela primeira vez.
Esta faz com que o revestimento da placa, que é resistível ao calor, se
endureça graças ao fogo.
Use detergente e um pano molhado para limparas placas quentes.
Não tente eliminar os restos de comida com uma faca ou outros
objectos duros e afiados.
Deixe a placa quente ligada por uns minutos para que esta fique seca
depois da limpeza. Não a deixe ligada vários minutos caso não tenha
uma panela sobre a mesma.
38 PT
Page 39

Posição
0
1
2
3
4
5
6
Potência (Watt)
0
100 W
180 W
250 W
500 W
750 W
1000 W
Potência (Watt)
0
135 W
220 W
300 W
850 W
1150 W
1500 W
Adequalibilidade das panelas da cozedura:
Definição
Desligada
Aquecimento
Cozer a baixa temperatura
Cozer a baixa temperatura
Cozer, Assar, Ferver
Cozer, Assar, Ferver
Cozer, Assar, Ferver
(Figura 7)
Não se esqueça que maiores panelas têm maiores superfícies de
cozedura. Panelas grandes fazem com que o prato seja cozido mais
rapidamente em comparação com panelas pequenas.
Use panelas apropriadas para a quantidade do prato que deseja
cozinhar. Para prevenir salpicos, não use panelas muito pequenas,
sobretudo quando coze pratos com mais molho. Os molhos da
comida ficam colados à panela, e ficam restos na mesma quando o
prato é deitado para outro recipiente caso use uma grande panela
para os pratos que são cozidos rapidamente. Aconselha-se a
utilização de panelas cobertas, tabuleiros de fogão e formas de bolos
para cozer sobremesas.Molhos e açúcar que salpicam de uma
panela aberta podem ficar colados à superfície da cozedura e a
remoção destes pode ser difícil.
Isto é importante sobretudo para panelas que são usadas para assar
a temperaturas altas e cozer sob pressão.
Não deixe a zona de cozedura abandonada quando não há uma
panela ou uma panela vazia sobre o mesmo.
Verifique as superfícies das panelas tendo em conta os seguintes
pontos: Devem ser pesadas.
Devem cobrir totalmente a superfície da zona de cozedura (podem
ser um pouco maiores mas não devem ser de nenhum modo
menores).
As superfícies da base devem ser totalmente rasas e colocadas
devidamente na superfície da cozedura.
•Usam-se as panelas com superfícies rasas para reduzir o consumo
de energia e para utilizar as placas eléctricas da melhor forma. O
tamanho da panela deve ser tão próximo quanto possível ao diâmetro
da placa, não deve ser menor de nenhum modo. A base da panela
deve estar seca e os salpicos do prato devem ser impedidos. Panelas
vazias não devem ser deixadas sobre a placa e a mesma não deve
ser deixada ligada quando não há uma panela sobre ela.
5. ANTES DE CHAMAR A ASSISTÊNCIA TÉCNICA
Antes de solicitar a comparência de um técnico do Serviço de
Assistência Técnica, agradecemos que proceda às seguintes
verificações:
• certifique-se de que a ficha está devidamente inserida na tomada e
de que o fusível tem a amperagem correcta e não disparou;
• de que o gás está a ser devidamente alimentado à placa.
Se não conseguir detectar o problema:
desligue o aparelho, não o tente reparar, e entre em contacto com a
Assistência Técnica.
6. PROTECÇÃO DO AMBIENTE
Este electrodoméstico está marcado em
conformidade com o disposto na directiva
comunitária 2002/96/CE relativa aos resíduos de
equipamentos eléctricos e electrónicos (REEE).
Ao assegurar que este produto é eliminado
correctamente, estará a ajudar a prevenir as
potenciais consequências negativas para o ambiente
e para a saúde pública resultantes de uma eliminação
incorrecta deste produto.
O símbolo no produto indica que este produto não pode ser eliminado
com os resíduos domésticos. De facto, ele tem de ser entregue nos
pontos de recolha apropriados, para reciclagem de equipamentos
eléctricos e electrónicos.
A eliminação deste produto tem de ser efectuada em conformidade
com a legislação local sobre eliminação de resíduos.
Para informações mais detalhadas sobre o tratamento, a
recuperação e a reciclagem deste produto, agradecemos que entre
em contacto com as entidades responsáveis do seu município, com o
seu serviço de eliminação de resíduos domésticos ou com o
estabelecimento em que este produto foi adquirido.
Declaração de conformidade: Este equipamento, nas zonas destinadas a
estar em contacto com alimentos, está em conformidade com os
regulamentos constantes nas directivas EEC 89/109.
O equipamento cumpre as Directivas Europeias 2006/95/EC e
2004/108/EC , e emendas posteriores.
4. MANUTENÇÃO E LIMPEZA
Antes de limpar a placa, certifique-se de que ela já está fria. Desligue
a ficha do cabo de alimentação da tomada de rede ou, no caso de a
placa estar directamente ligada à rede, corte a alimentação de
energia à placa.
Crianças sem supervisão não devem nem limpar, nem manter este
aparelho.
Nunca utilize abrasivos, detergentes corrosivos, produtos de
branqueamento ou ácidos. Evite quaisquer produtos ácidos ou
alcalinos (limão, sumo, vinagre, etc.) nas zonas esmaltadas,
envernizadas ou de aço inoxidável.
“AVISO - não utilize máquinas de vapor para limpar as placas”.
Quando limpa as zonas esmaltadas, envernizadas ou cromadas,
utilize uma saponária quente ou um detergente não cáustico. No aço
inoxidável, utilize uma solução de limpeza apropriada.
Os queimadores podem ser limpos com uma saponária. Para
restaurar o seu brilho original, utilize um produto doméstico para aço
inoxidável. Depois de limpar, seque os queimadores e coloque-os de
novo.
É importante que os queimadores sejam colocados
correctamente.
O fabricante não será responsável por qualquer imprecisão resultante da
impressão ou erros de transcrição contidos desta documentação.
Reservamos o direito de efectuar modificações aos produtos de acordo
com o necessário, incluindo os direitos de consumo, sem prejuízo das
características relacionadas com segurança ou função.
Tabela 1
PIANI COTTURA DA INCASSO
Queimador
1
4E
Tipo/referência
Placa Eléctrica (R 2000W)
Placa Eléctrica (1500W)
Placa Eléctrica (1000W)
Placa Eléctrica (R 1500W)
Classe de instalação
VTensão/frequência V/Hz
Potência absorvida
Dimensões do produto
Este aparelho foi exclusivamente concebido para uma utilização não
profissional, ou seja, doméstica.
S60 / HBGS
1
1
1
1
3
220-240 V / 50-60 Hz
6000 W
585 x 510
39 PT
Page 40

BIZTONSÁGI UTASÍTÁSOK
FIGYELMEZTETÉS: A készülék és a hozzáférhető részei használat közben felmelegszenek. A
fűtőelemeket nem szabad megérinteni.
• A 8 évnél fiatalabb gyerekeket – folyamatos felügyelet hiányában – távol kell tartani a készüléktől.
• A készüléket csak akkor használhatják 8 éven felüli gyerekek, csökkent fizikai, érzékszervi vagy
szellemi képességű, illetve tapasztalatokkal és ismeretekkel nem rendelkező személyek, ha
felügyeletben részesülnek vagy útmutatást kaptak a készülék biztonságos használatáról, és
megértették a készülék használatában rejlő veszélyeket.
• A gyerekek nem játszhatnak a készülékkel.
• A tisztítást és a karbantartást nem végezhetik felügyelet nélküli gyerekek.
FIGYELMEZTETÉS: A zsírral vagy olajjal végzett felügyelet nélküli sütés-főzés veszélyes lehet és tüzet
okozhat.
• SOHA ne próbálja meg vízzel eloltani a tüzet. Kapcsolja ki a készüléket, majd pedig takarja le a lángot
például egy fedővel vagy egy takaróval.
FIGYELMEZTETÉS: Tűzveszély: ne tároljon semmit a főzőfelületeken.
FIGYELMEZTETÉS: Ha a felület megrepedt, kapcsolja ki a készüléket az esetleges áramütés
elkerülése érdekében.
• A tisztításhoz ne használjon gőzsugaras tisztítóberendezést.
• A felnyitás előtt törölje le a fedőlapra fröccsent maradékokat.
• A fedél lecsukása előtt hagyja kihűlni a tűzhelylap felületét.
• A készülék nem működtethető külső időkapcsolóval vagy külön távvezérlő rendszerrel.
• A kikapcsolást szolgáló eszközt a huzalozási szabályoknak megfelelően a fix vezetékbe kell beépíteni.
• A készülék hátsó felülete hőmérsékletének figyelembevételével az előírások határozzák meg a
használandó vezeték típusát.
• Ha a hálózati kábel megsérült, akkor azt a gyártótól vagy a helyi szervizközpontban beszerezhető
speciális kábellel kell kicserélni.
• A hálózati kábel nem cserélhető. Ha kábel megsérült, a készüléket ki kell selejtezni.
FIGYELMEZTETÉS: A hőkioldó véletlen visszaállítása miatti veszélyek elkerülése érdekében a
készülék áramellátását nem szabad külső kapcsolóberendezésen, például időkapcsolón keresztül
biztosítani, illetve nem szabad olyan áramkörre kapcsolni, amelyet a szolgáltató rendszeresen ki-be
kapcsol.
• A készüléket az érvényes szabályoknak megfelelően kell telepíteni, és csak jól szellőztetett
helyiségekben szabad használni. A készülék telepítése vagy használata előtt olvassa el az utasításokat.
• Ezek az utasítások csak akkor érvényesek, ha az ország-szimbólum megtalálható a készüléken. Ha a
szimbólum nem látható a készüléken, akkor olvassa el a műszaki utasításokat, amelyek az adott ország
használati feltételeinek megfelelően tartalmazzák a készülék módosításához szükséges útmutatásokat.
• A telepítés előtt ellenőrizze, hogy megfelelőek a helyi körülmények (gáztípus és gáznyomás) és a
készülék beállítása";
• A készülék beállítási feltételei a címkén (vagy az adattáblán) találhatók";
• A készülék nincs elszívó berendezéshez csatlakoztatva. Az elszívó berendezés a hatályos telepítési
előírásoknak megfelelően csatlakoztatható. Nagy figyelmet kell fordítani a szellőztetéssel kapcsolatos
követelményekre."
• A gáztűzhely használata közben hő és nedvesség keletkezik a telepítés helyszínén. Gondoskodjon a
konyha megfelelő szellőztetéséről: hagyja nyitva a természetes szellőzőnyílásokat vagy szereljen fel
mechanikus szellőztető berendezést (szagelszívót). A készülék tartós, intenzív használata esetén
kiegészítő szellőztetésre lehet szükség, például ablaknyitásra, vagy még hatékonyabb szellőztetésre,
például a mechanikus szellőztető berendezés teljesítményszintjének növelésére.
40 HU
Page 41

1. UTASÍTÁSOK A TELEPÍTŐ SZÁMÁRA
A HÁZTARTÁSI KÉSZÜLÉKEK TELEPÍTÉSE BONYOLULT MŰVELET LEHET, AMELYNEK HELYTELEN ELVÉGZÉSE KOMOLYAN
VESZÉLYEZTETHETI A FOGYASZTÓK BIZTONSÁGÁT. EZÉRT FONTOS AZ, HOGY EZT A FELADATOT SZAKKÉPZETT SZEMÉLY VÁLLALJA,
AKI A MUNKÁT A HATÁLYOS MŰSZAKI ELŐÍRÁSOKNAK MEGFELELŐEN VÉGZI EL. HA EZT A TANÁCSOT FIGYELMEN KÍVÜL HAGYJÁK ÉS A
TELEPÍTÉST SZAKKÉPZETLEN SZEMÉLY VÉGZI EL, A GYÁRTÓ SEMMILYEN FELELŐSSÉGET SEM VÁLLAL A TERMÉK MŰSZAKI
MEGHIBÁSODÁSÁÉRT, FÜGGETLENÜL ATTÓL, HOGY AZ OKOZ-E ANYAGI KÁROKAT VAGY SZEMÉLYI SÉRÜLÉSEKET.
1.1. BEÉPÍTÉS
A tűzhelylap olyan munkalapra helyezhető, amelynek hőálló képessége
100°C, vastagsága pedig 25-45 mm. A munkalapból kivágandó betét
méretei a 2. ábrán láthatók.
Ha a tűzhelylapot mindkét oldalon szekrény mellé helyezzük, akkor a
tűzhelylap és a szekrény közötti távolságnak legalább 15 cm-nek (lásd a
4. ábrát), míg a tűzhelylap és a hátsó fal közötti távolságnak legalább 5,5
cm-nek kell lennie.
A tűzhelylap és más, fölötte lévő egységek vagy készülékek (például
szagelszívó) közötti távolságnak legalább 70 cm-nek kell lennie (4. ábra).
Ha szabad tér van a beépített tűzhelylap és az alatta lévő üreg között,
akkor szigetelőanyagból (fából vagy hasonló anyagból) készült
válaszfalat kell beilleszteni (3. ábra).
Fontos! Az 1. ábra a tömítőanyag elhelyezésének módját mutatja
be.
A tűzhelylapot a mellékelt rögzítőkapcsokkal kell rögzíteni az egység
aljában lévő furatok felhasználásával.
Ha a 60 cm-es tűzhelylapot olyan sütő fölé helyezi, amely nem
rendelkezik ventilátoros hűtőrendszerrel, javasoljuk, hogy a megfelelő
levegőáramlás biztosítása érdekében alakítson ki nyílásokat a bútorban.
A nyílások mérete legalább 300 cm² legyen, elhelyezésüket az 5. ábra
mutatja be.
2. ELEKTROMOS BEKÖTÉS
(CSAK AZ EGYESÜLT KIRÁLYSÁGBAN)
Figyelmeztetés: A készüléket földelni kell.
A készüléket kizárólag háztartási célra tervezték. A hálózatra történő
csatlakoztatást szakképzett villanyszerelőnek kell elvégeznie a
telepítéssel kapcsolatos szabályok szigorú betartása mellett. A
készüléket csak megfelelő, előírt csatlakozási pontra szabad
csatlakoztatni, a 3-csapos 13 A-es dugó/aljzat nem felel meg.
Kétsarkú kapcsolót kell biztosítani, és az áramkört megfelelő
biztosító-védelemmel kell ellátni. Az egyes termékek
teljesítményigényével kapcsolatos további részletek a felhasználói
utasításban és a készülék géptörzslapján találhatók. Beépített
készülék esetén javasoljuk, hogy ha a meglévőnél hosszabb kábelt
szeretne, akkor megfelelő, hőálló típust használjon.
Ha a hálózati kábel sérült, az esetleges veszélyek elkerülése
érdekében cseréjét szakképzett szerelőnek kell elvégeznie. A
(zöld/sárga színű) földvezetéknek legalább 10 mm-rel hosszabbnak
kell lennie a feszültség alatti vezetéknél és a nullavezetéknél.
FIGYELMEZTETÉS: Ha a felület megrepedt, kapcsolja ki a
készüléket az esetleges áramütés elkerülése érdekében.
HÁLÓZATI
CSATLAKOZÁS
A kikapcsolást szolgáló eszközt a huzalozási szabályoknak
megfelelően a fix vezetékbe kell beépíteni.
A készülék táphálózatra történõ közvetlen csatlakoztatásához a
rögzített huzalozásba beépített eszköz szükséges, amely az összes
pólusnál olyan érintkezõ-elkülönítéssel rendelkezik, amely a
huzalozási szabályoknak megfelelõen teljes megszakítást biztosít III.
kategóriájú túlfeszültség esetén.
FESZÜLTSÉG ALATTI
FÖLDELŐ
NULLA
Barna vezeték
L
Zöld-sárga vezeték
N
Kék vezeték
Hálózati kábel
2.2. 4 FÖZÖLAPOK
Ezek a fözölapok a kabelek nelkül hozhatoak. A csatlakozasert a
kabel es a metszet, ami azonositott a tablaval.
Egy fázis
220-240 V~
Kábel
keresztmetszet
Kábel típus
3 G 2.5 mm
H05VV-F
2
A vezetékeket az alábbiak szerint kell a hálózatra csatlakoztatni:
CSATLAKOZTATÁS A CSOMÓPONTRA
Zöld-sárga vezeték Földvezeték
Kék vezeték Nullavezeték
Barna vezeték Feszültség alatti vezeték
Megjegyzés: Nem javasoljuk földzárlati készülékek használatát a
csomópontokra telepített elektromos tűzhelyekkel, mert ún.
„terheléskioldás” következhet be. Ismételten emlékeztetjük, hogy a
készüléket megfelelően földelni kell; a gyártó elhárít minden
felelősséget a hibás elektromos telepítésből származó
eseményekkel kapcsolatban.
2.1. ELEKTROMOS BEKÖTÉS
Ellenőrizze a készülék külső részén elhelyezett géptörzslapon lévő
adatokat, hogy a hálózati és bemeneti feszültség megfelelő-e. A
csatlakoztatás előtt ellenőrizze a földelő rendszert. Az előírásoknak
megfelelően a készüléket földelni kell. Ennek az előírásnak a be nem
tartása esetén a gyártó nem vállal felelősséget a személyi
sérülésekért és az anyagi károkért. Ha a csatlakozódugó még nincs
felszerelve, akkor a géptörzslapon jelzett terhelésnek megfelelő
dugót használjon. A földelőkábel színe sárga-zöld. A
csatlakozódugónak mindig hozzáférhetőnek kell lennie.
A tűzhelylap elektromos hálózatra történő közvetlen csatlakoztatása
esetén megszakítót
kell beépíteni.
L1
L1 : fázis
sönt 1-2
4 - nulla
PE - föld
3. A TŰZHELYLAP HASZNÁLATA
FELHASZNÁLÓI UTASÍTÁSOK
A készüléket csak rendeltetésszerűen, háztartási célra szabad
használni, az ettől eltérő használat nem minősül megfelelőnek, és
ezért veszélyes lehet. A gyártó nem vállal felelősséget a helytelen
használatból eredő károkért és veszteségekért.
41 HU
Page 42

3.1. ÖNÁLLÓAN BEÉPÍTHETŐ ELEKTROMOS
FŐZŐLAP HASZNÁLATI ÚTMUTATÓJA
Ahhoz, hogy az elektromos főzőlap a megfelelő hőmérséklet elérje, a
szabályozó gombot a megfelelő állapotba kell elfordítani. Az elektromos
főzőlap mutatólámpája kiég és a főzőfelület melegedni kezd. Amikor a
főzés befejeződött, fordítsa vissza a szabályozó gombot '0' fokra (6. ábra).
Ne hagyja bekapcsolva a főzőfelületet, ha nincs az elektromos
főzőlafelületen edény. A használt edény átmérőjének és aljának nagyon
fontos szerepe van.
Az edény maximum átmérője 14 cm lehet, fontos, hogy az alja sima
legyen. Ha először használja az elektromos főzőlapot, 5 percig melegítse
be mielőtt az edényt felhelyezné a főzőfelületre. Ez biztosítja, hogy a
melegedésnek ellenálló főzőlap felszíne a melegedésnek köszönhetően
megkeményedjen.
Az elektromos főzőlap tisztításához nedves törlőrongyot és
mosogatószert használjon. A főzőlapon maradt ételmaradékot késsel
vagy más durva és éles eszközzel nem szabad eltávolítani. A főzőlap
megtisztítását követően a könnyebb száradás érdekében néhány percig
hagyja bekapcsolva a főzőlapot. Ügyeljen arra, hogy ha nincs edény a
főzőfelületen, akkor néhány percnél semmiképpen nem szabad tovább
bekapcsolva hagyni.
Energia (Watt)
0
135 W
220 W
300 W
850 W
1150 W
1500 W
0
1
2
3
4
5
6
Energia (Watt)
0
100 W
180 W
250 W
500 W
750 W
1000 W
Állapot
A megfelelő főző edények (7. ábra)
Ne felejtse el, hogy a nagyobb edények nagyobb melegítő felszínnel
rendelkeznek. A nagyobb edények a kisebb melegítő felülettel rendelkező
edényeknél gyorsabban főzik meg az ételt.
Mindig akkora edényt válasszon a főzéshez, amekkora mennyiséget főzni
szeretne. Azétel kifröccsenésének megelőzése érdekében, különösen a
vizes ételek főzésekor ne használjon nagyon kicsi edényt. Ha a gyorsan
megfőlő ételekhez nagyon nagy edényt használ, akkor a szószok és az
ételből kipárolgó víz egy része ráragad az edényre, majd amikor tálaljuk
az ételt, a használt edényben ételmaradékok lesznek találhatók.
Javasoljuk, hogy abban az esetben, ha édességet készít, zárt edényt,
sütő edényt vagy süteményformát használjon. Ha fedetlen edényt
használ, akkor az edényből a cukor vagy a szirup kipattoghat és
ráragadhat a felületre, ami megnehezítheti a tisztítást.
Ez elsősorban a magas hőmérsékleten történő sütés és főzés esetében
fontos.
Ne hagyja bekapcsolva a főzőfelületet, ha nincs rajta edény, vagy ha a
rajta lévő edény üres.
Az alábbi szempontok szerint ellenőrizze, hogy az edény megfelelő-e:
Fontos, hogy súlyos legyen.
A főzőlap felszínét takarja el (lehet egy kicsit nagyobb, de semmiképp ne
legyen kisebb). Az edény alja teljesen legyen sima, alkalmazkodjon a főző
felülethez.
•A legjobb használat és az energiatakarékosság szempontjából az
elektromos főzőlapon csak teljesen sima aljú edényt használjon.
Amennyire csak lehetséges, az edény magassága feleljen meg a
főzőfelület átmérőjének, viszont semmiképpen ne legyen kisebb. Az
edény alja száraz legyen, és amennyire lehetséges, figyelni kell arra, hogy
az étel ne fusson ki. Nem szabad az üres edényt a főzőfelületen hagyni, és
ha nincs edény rajta, akkor nem szabad bekapcsolva hagyni. Hálózati
kábel nélküli sütők
Magyarázat
Kikapcsolva
Melegítés
Alacsony hőmérsékleten való főzés
Alacsony hőmérsékleten való főzés
Főzés, Sütés, Forralás
Főzés, Sütés, Forralás
Főzés, Sütés, Forralás
4. KARBANTARTÁS ÉS TISZTÍTÁS
A tűzhelylap tisztítása előtt hagyja a készüléket lehűlni. Húzza ki a dugót a
csatlakozóaljzatból, vagy közvetlen csatlakoztatás esetén kapcsolja ki az
áramellátást.
A tisztítást és a karbantartást nem végezhetik felügyelet nélküli gyerekek.
Soha ne használjon dörzsölő hatású, korróziót okozó tisztítószereket,
fehérítőszereket vagy savakat. A zománcozott, lakkozott vagy
rozsdamentes acélból készült felületeken kerülje a lúgos vagy savas
anyagok (citromlé, ecet stb.) Alkalmazását.
5. VEVŐSZOLGÁLAT
A szerelő kihívása előtt kérjük, ellenőrizze a következőket:
• A csatlakozódugó megfelelően van-e bedugva és biztosítékkal ellátva;
• Nincs-e hiba a gázellátásában.
Ha a hiba nem azonosítható:
Kapcsolja ki a készüléket és hívja a vevőszolgálatot.
KERÜLJE A KÉSZÜLÉK SZAKSZERŰTLEN KEZELÉSÉT.
6. KÖRNYEZETVÉDELEM
A készülék jelölése megfelel az elektromos és az
elektronikus berendezések hulladékelhelyezéséről szóló
2002/96/EK európai irányelvnek (WEEE). A termék
megfelelő hulladék-elhelyezésével Ön segítséget nyújt a
környezetre és az emberi egészségre kifejtett esetleges
negatív következmények megelőzésében, amelyeket a
termék nem megfelelő hulladékkezelése idézhet elő.
A terméken lévő szimbólum azt jelzi, hogy a termék
kijelölt, elektromos és elektronikus berendezések újrahasznosítására
alkalmas gyűjtőhelyen kell leadni.
Az elhelyezést a hulladékkezelésre vonatkozó helyi környezetvédelmi
szabályokkal összhangban kell elvégezni.
A termék kezelésével, visszanyerésével és újrahasznosításával
kapcsolatos részletes információkért kérjük, vegye fel a kapcsolatot a
helyi önkormányzattal, a hulladékkezelő szolgálattal vagy azzal az
üzlettel, ahol a terméket vásárolta.
Megfelelőségi nyilatkozat: A berendezés a fával érintkező alkatrészek
tekintetében megfelel a 89/109/EGK irányelvben meghatározott
A gyártó nem vállal felelősséget e kiadványban előforduló nyomtatási és
átírási hibákból eredő pontatlanságokért. A biztonsággal vagy a
működéssel kapcsolatos jellemzők sérelme nélkül fenntartjuk a jogot a
termékek szükség szerinti változtatására.
Égőfej
Típus / referencia
PlaElektromos tány r (R 2000W)
Elektromos tányér (1500W)
Elektromos tányér (1000W)
Elektromos tányér (R 1500W)
Telepítési osztály
Feszültség/Frekvencia, V/Hz
Elektromos bemeneti teljesítmény
A termék mérete
A készüléket nem nagyüzemi, hanem háztartási felhasználásra tervezték.
háztartási hulladékként nem kezelhető. A készüléket arra
szabályoknak.
A készülék megfelel az európai irányelveknek
2006/95/EC és 2004/108/EC, későbbi módosításai.
BEÉPÍTETT TŰZHELYLAPOK
1
4E
S60 / HBGS
é
1
1
1
1
3
220-240 V / 50-60 Hz
6000 W
585 x 510
1. Táblázat
A zománcozott, lakkozott vagy krómozott részek tisztításakor használjon
meleg szappanos vizet vagy maró hatástól mentes tisztítószert. A
rozsdamentes acélhoz használjon megfelelő tisztítóoldatot.
Az égőfejek szappanos vízzel tisztíthatók. Eredeti fényük
helyreállításához használjon háztartási rozsdamentesacél-tisztítót. A
tisztítás után szárítsa meg és tegye vissza az égőfejeket a helyükre.
Fontos, hogy az égőfejek megfelelően kerüljenek vissza a helyükre.
42 HU
Page 43

INSTRUCŢIUNI PRIVIND SIGURANŢA
AVERTIZARE: Aparatul şi părţile accesibile devin fierbinţi în timpul utilizării. Aveţi grijă să nu atingeţi
elementele fierbiniţi.
• Nu permiteţi copiilor mai mici de 8 ani să stea în preajma aparatului, fără supravegherea adulţilor.
• Nu permiteţi copiilor şi persoanelor cu capabilităţi fizice, senzoriale sau mentale reduse sau care nu
cunosc modul de utilizare al aparatului să îl utilizeze, fără stricta supraveghere a unui adult responsabil
pentru siguranţa lor sau dacă nu au fost instruiţi asupra modului de utilizare şi a potenţialelor pericole
care pot apare în timpul utilizării aparatului.
• Nu permiteţi copiilor să se joace cu acest aparat.
• Nu permiteţi copiilor să realizeze operaţiuni de curăţare şi întreţinere, fără supravegherea unui adult.
AVERTIZARE: Nu lăsaţi nesupravegheate recipientele în care preparaţi alimente cu ulei sau grăsime,
deoarece există pericol de incendiu.
• NU încercaţi să stingeţi focul cu apă, ci opriţi funcţionarea aparatului şi acoperiţi flacăra, de exemplu cu
un capac sau o pătură.
AVERTIZARE: Pericol de incendiu: nu depozitaţi obiecte pe suprafaţa de preparare.
AVERTIZARE: Dacă suprafaţa este fisurată, opriţi funcţionarea aparatului, pentru a evita pericolul de
electrocutare.
• Nu utilizaţi un dispozitiv pe bază de abur pentru curăţarea aparatului.
• Reziduurile alimentare trebuie îndepărtate de pe capac înainte de deschidere.
lăsaţi suprafaţa plitei să se răcească înainte de a închide capacul.
aparatul nu poate fi controlat prin intermediul unui programator extern sau al unui sistem de control de la
distanţă.
• Cablul de alimentare al aparatului trebuie să respecte reglementările în vigoare.
în instrucţiuni trebuie specificat tipul de cablu care trebuie utilizat, având în vedere temperatura din
partea din spate a aparatului.
• În cazul în care cablul de alimentare este deteriorat, acesta trebuie înlocuit cu un cablu special de către
o persoană calificată de la un centru de service autorizat
ATENŢIE: Pentru a se evita orice pericol ca urmare a resetării dispozitivului de siguranţă, acest aparat nu
trebuie alimentat prin intermediul unui echipament de întrerupere extern, cum ar fi un programator sau
un alt tip de circuit care este pornit şi oprit periodic de către un alt dispozitiv.
• Acest aparat trebuie instalat în conformitate cu reglementările în vigoare şi trebuie utilizat numai într-un
spaţiu bine ventilat. Citiţi instrucţiunile înainte de a instala sau utiliza acest aparat.»
• Aceste instrucţiuni sunt valabile numai pentru ţara al cărui cod apare menţionat pe aparat. Dacă nu
apare pe aparat simbolul corespunzător, va fi necesar să citiţi instrucţiunile tehnice care vă oferă
informaţiile necesare pentru modificarea aparatului în funcţie de ţara unde este utilizat".
• "înainte de instalare, verificaţi dacă acele condiţii de distribuţie locale (tipul de gaz şi presiunea gazului)
şi reglajele aparatului sunt compatibile";
• Condiţiile de reglare pentru acest aparat sunt menţionate pe plăcuţa cu date tehnice;
• Acest aparat nu trebuie conectat la un echipament pentru evacuarea produselor rezulate prin
combustie. Acesta trebuie instalat şi conectat în conformitate cu reglementările de instalare în vigoare. O
atenţie deosebită trebuie acordată cerinţelor specifice referitoare la ventilaţie.
• Utilizarea unui aparat de preparare pe gaz duce la formarea de căldură şi umezeală în încăperea în
care este instalat. Verificaţi ca bucătăria să fie bine aerisită: lăsaţi spaţiile de ventilaţie naturală deschise
sau instalaţi un echipament pentru ventilaţie mecanică (o hotă de evacuare). Utilizarea îndelungată şi
prelungită a aparatului poate necesita o sursă de ventilaţie suplimentară, de exemplu deschiderea unei
ferestre sau mărirea vitezei de evacuare a hotei, acolo unde este instalată o hotă.
43 RO
Page 44

1. INSTRUCŢIUNI DE INSTALARE
INSTALAREA UNUI APARAT ELECTROCASNIC REPREZINTĂ O OPERAŢIUNE COMPLICATĂ CARE, DACĂ NU ESTE CORECT
REALIZATĂ, POATE AVEA CONSECINŢE NEPLĂCUTE ASUPRA SIGURANŢEI UTILIZATORULUI. DE ACEEA, INSTALAREA TREBUIE
REALIZATĂ NUMAI DE CĂTRE O PERSOANĂ CALIFICATĂ ÎN ACEST SENS, CARE SĂ RESPECTE REGLEMENTĂRILE ÎN VIGOARE
PRIVIND INSTALAREA. ÎN CAZUL ÎN CARE INSTALAREA NU ESTE REALIZATĂ DE CĂTRE O PERSOANĂ CALIFICATĂ,
PRODUCĂTORUL NU ÎŞI ASUMĂ NICIO RESPONSABILITATE PENTRU EVENTUALELE PROBLEME SAU DEFECŢIUNI.
1.1. INCORPORARE
Plita poate fi instalată în orice blat de lucru care rezistă la o temperatură
de până la 100°C şi are o grosime de 25-45 mm. Dimensiunile cadrului
în care poate fi incorporată plita sunt indicate în Figura 2.
Dacă plita va fi fixată în apropierea unui corp de mobilier, distanţa dintre
plită şi corpul de mobilier trebuie să fie de cel putin 15 cm ( vezi Figura
4); distanţa dintre plită şi peretele din spate trebuie să fie de cel puţin
5,5 cm.
Distanţa dintre plită şi orice corp de mobilier sau aparat (ex. Hotă)
situat deasupra plitei trebuie să fie de minimum 70 cm (Figura 4).
Dacă există un spaţiu care este accesibil între plita incorporabilă şi
cavitatea de sub aceasta, este recomandat să fie fixat un panou de
izolare (din lemn sau un material similar) (Figura 3).
Important Diagrama din figura 1 arată modul de aplicare a
garniturii de etanşare.
Plita se fixează cu ajutorul clemelor de fixare furnizate şi se utilizează
găurile de la baza aparatului.
Dacă instalaţi o plită de 60 cm deasupra unui cuptor care nu este
prevăzut cu sistem de ventilaţie pentru răcire, se recomandă realizarea
unor fante de aerisire în corpul de mobilier pentru a permite circulaţia
corectă a aerului.
Dimensiunea acestor fante de ventilaţie trebuie să fie de cel puţin 300
cm² şi să fie amplasate aşa cum se poate observa din Figura 5.
Firul pentru împământare (colorat în verde şi galben) trebuie să fie cu
10 mm mai lung decât firele pentru fază şi nul.
Secţiunea cablului utilizat trebuie să fie corespunzătoare cu puterea
absorbită a plitei.
Vă rugăm să verificaţi plăcuţa cu date tehnice pentru mai multe detalii
şi cablul de alimentare trebuie să fie unul din următoarele tipuri 3x0.75
mm² H05RR-F.
Sursa de
alimentare
Cablul de alimentare al aparatului trebuie să respecte reglementările
în vigoare.
Pentru a conecta aparatul direct la reþeaua de alimentare, un mijloc de
deconectare cu o separare de contact în toþi polii care asigurã
deconectarea completã în condiþii de supratensiune categoria a-III-a,
trebuie sã fie încorporat în cabluri de fixare, în conformitate cu normele
de cablare.
Fază
Împământare
Nul
Fir maro
L
Fir verde/galben
Fir albastru
N
Cablu
alimentare
2.2. 4 PLACILE CALDE
2. CONEXIUNEA ELECTRICĂ
(NUMAI PENTRU G.B.)
Avertizare Acest aparat trebuie conectat la o priză prevăzută cu
împământare.
Acest aparat este destinat numai pentru uz casnic. Conexiunea la
sursa de alimentare trebuie efectuată de către un electrician
autorizat, care să respecte toate reglemetările în vigoare referitoare
la instalare.
Aparatul trebuie conectat la o priză adecvată o priză cu 3 pini de 13
amp nu este adecvată. Trebuie să existe un comutator bipolar şi
circuitul trebuie să aibă o siguranţă de protecţie adecvată. Mai multe
detalii referitoare la sursa de alimentare pentru acest produs se
regăsesc în manualul de utilizare şi pe plăcuţa cu date tehnice a
produsului. În cazul în care cablul de alimentare al plitei nu este
suficient de lung şi va trebui înlocuit cu un altul mai lung, trebuie să
utilizaţi un cablu rezistent la temperaturi ridicate.
Firele cablului de alimentare trebuie conectate astfel:
CONECTARE TERMINAL
Fir galben şi verde Împământare
Fir albastru Nul
Fir maro Fază
Observaţie: Vă rugăm să verificaţi ca împământarea să fie realizată
corect. În cazul în care apar defecţiuni ca urmare a unei împământări
realizate incorect, producătorul îşi declină orice responsabilitate.
2.1. CONEXIUNEA ELECTRICĂ
Verificaţi informaţiile de pe plăcuţa cu date tehnice, situată pe
exteriorul aparatului, pentru a vă asigura că sursa de alimentare la
care va fi conectată plita este corespunzătoare.
Înainte de a realiza conectarea, verificaţi împământarea.
În conformitate cu legea, aparatul trebuie conectat la o priză prevăzută
cu împământare. În cazul în care această recomandare nu este
respectată, producătorul îşi declină orice responsabilitate pentru
eventualele pagube sau avarii care se produc. În situaţia în care cablul
de alimentare nu este prevăzut cu un ştecher, respectaţi diagrama de
conectare a firelor. Cablul pentru împământare este colorat în verde şi
galben. Ştecherul trebuie să fie întotdeauna accesibil.
În cazul în care plita este conectată direct la sursa de alimentare,
trebuie montat un întrerupător de circuit.
Dacă este deteriorat cablul de alimentare, acesta trebuie înlocuit de
către un electrician autorizat, astfel încât să se evite orice risc.
Aceste placi sunt trimise fara cablu. Pentru conexiune, tip şi
sectiunea cablului uitati-va la tablou.
Monofazic
220-240 V~
Secţiune cablu
Tip cablu
3 G 2.5 mm
H05VV-F
L1
2
L1 : Fază derivată
1-2
4 – Nul
PE - Împământare
3. UTILIZAREA PLITEI INSTRUCŢIUNI DE
UTILIZARE
Acest aparat trebuie utilizat numai în scopul pentru care a fost creat şi
anume, pentru uz casnic, pentru prepararea mâncării. Utilizarea în
alte scopuri este considerată improprie şi periculoasă. Producătorul
nu se consideră responsabil pentru eventualele pagube şi deteriorări
care apar ca urmare a unei utilizări necorespunzătoare a acestui
aparat.
Nu permiteţi copiilor şi persoanelor cu capabilităţi fizice, senzoriale
sau mentale reduse sau care nu cunosc modul de utilizare al
aparatului să îl utilizeze, fără stricta supraveghere a unui adult
responsabil pentru siguranţa lor sau dacă nu au fost instruiţi asupra
modului de utilizare şi a potenţialelor pericole care pot apare în timpul
44 RO
Page 45

utilizării aparatului.
Acest aparat nu este destinat pentru a fi utilizat de către persoane
(inclusiv copii) cu capabilităţi fizice, senzoriale sau mentale reduse
sau care nu cunosc modul de utilizare al acestuia, decât sub stricta
supraveghere a unui adult responsabil pentru siguranţa acestora.
Nu permiteţi copiilor să se joace cu acest aparat.
AVERTIZARE: Aparatul şi părţile accesibile devin fierbinţi în timpul
utilizării. Aveţi grijă să nu atingeţi elementele fierbiniţi.
Nu permiteţi copiilor mai mici de 8 ani să stea în preajma aparatului,
fără supravegherea adulţilor.
AVERTIZARE: Nu lăsaţi nesupravegheate recipientele în care
preparaţi alimente cu ulei sau grăsime, deoarece există pericol de
incendiu.
NU încercaţi să stingeţi focul cu apă, ci opriţi funcţionarea aparatului şi
acoperiţi flacăra, de exemplu cu un capac sau o pătură.
AVERTIZARE: Pericol de incendiu: nu depozitaţi obiecte pe suprafaţa
de preparare.
3.1. UTILIZAREA PLĂCILOR ELECTRICE
PENTRU ARAGAZ
Pentru a obţine temperatura dorita a plăcii calde întoarceţi butonul la
poziţia arătata, indicatorul cu lumina a plăcii calde se va aprinde şi
placa calda va începe sa se încălzească.
Atunci cand ati terminat de gătit, întoarceţi butonul in poziţia "O"
(Figura 6). Nu lasati placa calda aprisa atunci cand exista o cratita pe
ea. Diametrul şi baza cratitii pe care o utilizaţi sunt critice. Diametrul
maxim a bazei cratitii este 14 cm şi baza trebuie sa fie complect
dreapta.
Atunci cand gatiti pentru prima data lasati placa calda sa se
încălzească pentru 5 minute înainte de a pune o cratita pe ea. In acest
fel stratul rezistent la căldura al plăcii se va întări datorita arderii.
Utilizaţi o cârpa umeda şi detergent pentru a curata placa calda. Nu
îndepărtaţi rămăşiţele de mâncare de pe placa calda cu un cuţit sau
alte obiecte dure şi ascuţite. Deschideţi placa calda pentru câteva
secunde pentru a o usca dupa curăţare. Dar nu o lasati niciodată
deschisa atunci cand se afla o cratita pe ea mai mult decât câteva
secunde.
Poziţie
0
1
2
3
4
5
6
Putere(Watt)
0
100 W
180 W
250 W
500 W
750 W
1000 W
Adecvarea Cratitelor de Gătit
Putere(Watt)
0
135 W
220 W
300 W
850 W
1150 W
1500 W
(Figura 7)
Nu uitaţi ca cratitele mai mari vor necesita suprafeţe de căldura mai
mare.
In felul acesta va vor ajuta sa gatiti mâncarea mult mai repede in
comparaţie cu cratitele care au suprafeţe de încălzire mai mici.
întotdeauna utilizaţi cratiti cu mărimea proportionata cu cantitatea de
mâncare pe care o gatiti. Pentru a preventa darea in foc a mâncării nu
utilizaţi cratiti mici, in special atunci cand gatiti o mâncare care conţine
lichid excesiv. Daca utilizaţi cratiti foarte mari pentru produse care sa
gătesc repede, de exeplu carnati şi lichide, acestea se vor lipi şi
rămăşiţele vor ramane pe fundul cratitei dupa ce o veti goli. Pentru
gatirea dulciurilor va recomandam cratiti cu capac, tavi pentru
coacere sau forme speciale. Zahărul care poate curge şi fructele dintro cratita deschisa se pot lipi de suprafaţa aragazului şi vor fi foarte
greu de scos.
Asta este important in special pentru cratiti utilizate pentru prajire sau
fripturi sau gatire cu presiune la temperaturi înalte.
Nu lasati aragazul deschis fara o cratita pe el sau cu o cratita goala.
Controlaţi adecvarea cratitilor in respectul criteriilor de mai jos: Ele
trebuie sa fie grele.
Ele trebuie sa acopere suprafaţa aragazului complect; pot fi un pic mai
mari, dar in nici un caz mult mai mici.
Suprafaţa bazei trebuie sa fie complect dreapta şi sa stea foarte bine
pe suprafaţa de gătit.
•Pentru cea mai buna utilizare a plăcilor calde electrice şi pentru a
minimiza consumul de energie, utilizaţi numai cratiti cu baze drepte.
Mărimea cratitei trebuie sa fie cat mai apropiata de cea a diametrului
plăcii, dar in nici un caz mai mici. Baza cratitei trebuie sa fie uscata; nu
lasati mâncarea sa dea in foc. Cratitile goale nu trebuie lăsate pe foc,
şi plăcile nu trebuie lăsate aprinse atunci cand nu exista o cratita pe
ele.
Descriere
Închisa
Î
ncălzire
Gatire la temperatura scăzuta
Gatire la temperatura scăzuta
Gatire, prajire, fierbere
Gatire, prajire, fierbere
Gatire, prajire, fierbere
4. ÎNTREŢINERE ŞI CURĂŢARE
Înainte de a curăţa plita, lăsaţi-o să se răcească. Scoateţi ştecherul
din priză sau (dacă este conexiune directă) deconectaţi aparatul de la
sursa de alimentare cu energie.
Nu permiteţi copiilor să realizeze operaţiuni de curăţare şi întreţinere,
fără supravegherea unui adult.
Nu utilizaţi substanţe abrazive, detergenţi corozivi, agenţi de înnălbire
sau substanţe acide. Nu aplicaţi substanţe alcaline sau acide (suc de
lămâie, oţet etc.) pe suprafeţele emailate, lăcuite sau din inox.
Pentru curăţarea suprafeţelor din email, lăcuite sau cromate, utilizaţi o
soluţie de apă şi detergent lichid sau un detergent care să nu fie
caustic. Pentru suprafeţele din inox, utiilzaţi o soluţie specială pentru
curăţarea inoxului.
Arzătoarele pot fi spălate cu o soluţie de apă cu detergent lichid.
Pentru a le reda strălucirea originală, puteţi utiliza o soluţie specială
pentru curăţarea suprafeţelor din inox. După curăţare, ştergeţi bine
arzătoarele şi aşezaţi-le la loc.
Este foarte important ca arzătoarele să fie aşezate corect.
5. SERVICE
Înainte de a apela la service, vă rugăm să verificaţi următoarele:
• Dacă ştecherul este corect introdus în priză.
• Dacă alimentarea cu gaz este corectă.
În cazul în care defecţiunea nu poate fi detectată:
Opriţi imediat funcţionarea aparatului şi luaţi legătura cu un centru
de service autorizat. NU ÎNCERCAŢI SĂ REPARAŢI
DUMNEAVOASTRĂ APARATUL!
6. PROTECŢIA MEDIULUI
Conform prevederilor legislaţiei privind gestionarea
deşeurilor, este interzisă eliminarea deşeurilor de
echipamente electrice şi electronice (DEEE) alături de
deşeurile municipale nesortate. Ele trebuie predate la
punctele municipale de colectare, societatile autorizate
de colectare/reciclare sau distribuitori (în cazul în care
se achiziţionează echipamente noi de acelaşi tip).
pentru colectarea selectivă a deşeurilor precum şi funcţionalitatea
acesotra. Contactaţi societatea de salubrizare sau compartimentul
specializat din cadrul primăriei pentru informaţii detaliate.
Deşeurile de echipamente electrice şi electronice pot fi predate şi
distribuitorilor, la achiziţionarea de echipamente noi de acelaşi tip
(schimb 1 la 1).
Predarea, de către utilizatori, a deşeurilor de echipamente electrice şi
electronice, la punctele de colectare municipale, societăţile autorizate
de colectare/reciclare sau distribuitori ( în cazul în care se
achiziţioneaza de echipamente noi de acelaşi tip) facilitează
refolosirea, reciclarea sau alte forme de valorificare a acestora.
Declaraţie de conformitate: Acest aparat şi părţile care vin în contact cu
alimentele respectă reglemetările stipulate în Directiva 89/109 CEE.
ulterioare.
Importator: CANDY HOOVER ROMANIA SRL
Calea Victoriei, 155, bl.D1, sc.7, et.4, sector 1, Bucuresti
Tel/Fax: 021 318 32 97; 021 318 32 98
Arzător
Tip/referinţă
Electrice placă (R 2000W)
Electrice placă (1500W)
Electrice placă (1000W)
Electrice placă (R 1500W)
Clasa de instalare
Voltaj / Frecvenţă V / Hz
Putere intrare
Dimensiuni produs
Acest produs este destinat pentru uz casnic.
45 RO
Autorităţile locale trebuie să asigure spaţiile necesare
Aparatul este în conformitate cu Directivele Europene
2006/95/EC şi 2004/108/EC , precum şi cu amendamentele
PLITE INCORPORABILE
1
4E
S60 / HBGS
1
1
1
1
3
220-240 V / 50-60 Hz
6000 W
585 x 510
Tabelul 1
Page 46

SIGURNOSNE UPUTE
UPOZORENJE: tijekom korištenja, uređaj i njegovi dostupni dijelovi postaju vrući. Budite oprezni i ne
dirajte vruće dijelove.
• Djecu mlađu od 8 godina drižite podalje od uređaja, odnosno neka budu pod stalnim nadzorom.
• Ovaj uređaj nije namijenjen za uporabu osobama (uključujući i malu djecu mlađu od 8 godina) sa
smanjenim fizičkim, osjetilnim ili mentalnim sposobnostima te osobama bez iskustva i znanja, osim
ako ih koriste uz nadzor osobe odgovorne za njihovu sigurnost ili od iste osobe dobiju pravilne upute
za korištenje uređaja.
• Pazite i nadzirite djecu kako se nebi igrala sa uređajem.
• Čišćenje i održavanje uređaja nemojte povjeravati djeci. Kada su u blizini uređaja, djeca moraju biti
pod stalnim nadzorom.
UPOZORENJE: budite oprezni i ne ostavljajte ploču bez nadzora kada kuhate na ulju ili masti,
pregrijana masnoća može izazvati požar.
NIKADA ne pokušavajte vatru ugasiti vodom; isključite uređaj i pokrijte plamen poklopcem ili
vatrootpornim materijalom.
UPOZORENJE: ne ostavljajte na ploči za kuhanje zapaljive predmete ili tvari - opasnost od požara.
UPOZORENJE: u slučaju da površina ploče za kuhanje napukne, odmah isključite uređaj - opasnost
od električnog udara.
• Za čišćenje uređaja nikada nemojte koristiti čistaće na paru.
• Prije podizanja, uklonite sa poklopca eventualno prolivene tekućine.
• Prije spuštanja poklopca, pustite da se ploča za kuhanje potpuno ohladi.
• Uređaj nije namijenjen za rad pomoću vanjskog "timera" ili odvojenog daljinskog sustava kontrole.
• U skladu s propisima, u stalnoj električnoj instalaciji mora biti predviđeno sredstvo za isključivanje.
• U uputama za uporabu navedena je vrsta električnog kabla koji se može koristiti s uređajem,
uzimajući u obzir temperaturu stražnje strane uređaja.
• Ako se ošteti glavni električni kabel, potrebno ga je zamijeniti posebnim kablom ili cijelim sklopom
koji se mogu nabaviti u ovlaštenom servisu.
NAPOMENA: u cilju izbjegavanja opasnosti od slučajnog resetiranja termo prekidača, ovaj uređaj ne
smije biti spojen na električnu mrežu preko uređaja kao što su "timer" ili uobičajeni prekidač za
uključivanje/isključivanje.
• Uređaj se mora instalirati u prostoriju s dobrom ventilacijom i u suglasnosti s propisima i normama
koji su na snazi. Prije instalacije ili korištenja uređaja pročitajte odgovarajuće upute.
• "Ove upute vrijede samo ako je na uređaju navedena oznaka države. Ako na uređaju nije
navedena oznaka države, neophodno je pročitati tehničke upute u kojima je navedeno sve potrebno
za modifikaciju uređaja prema uvjetima države u kojoj se koristi".
• Prije instalacije uređaja, provjerite da su vrsta i pritisak korištenog plina u skladu s podacima na
uređaju,
• Podaci su navedeni na pločici/naljepnici koja se nalazi na uređaju ;
• Ovaj uređaj nema priključak na uređaje za odvod plinova i para nastalih izgaranjem. Takav uređaj
mora biti instaliran i spojen u skladu s važećim propisima. Posebnu pozornost potrebno je obratiti na
zahtjeve u vezi ventilacije .
• Tijekom korištenja plinskog uređaja za kuhanje u prostoriji se stvaraju toplina, vlaga te plinovi i pare
od izgaranja. Osigurajte u toj prostoriji dobru ventilaciju; držite ventilacijske otvore otvorenima ili
ugradite mehanički uređaj za ventilaciju (npr. kuhinjsku napu). Dugotrajno korištenje plinskog
uređaja za kuhanje zahtijeva dodatnu ventilaciju: otvaranje prozora ili djelotvorniju ventilaciju, npr.
pojačanu razinu mehaničke ventilacije.
46 HR
Page 47

1. UPUTE ZA INSTALATERA
POSTUPAK UGRADNJE KUĆANSKOG UREĐAJA MOŽE BITI KOMPLICIRANI POSAO I AKO NIJE PRAVILNO IZVEDEN MOŽE OZBILJNO
UTJECATI NA SIGURNOST KORISNIKA. IZ TOG RAZLOGA TAJ ZADATAK TREBA IZVESTI PROFESIONALNO OBUČEN STRUČNJAK UZ
POŠTIVANJE TEHNIČKIH PROPISA I NORMI KOJI SU NA SNAZI. U SLUČAJU DA SE OVAJ SAVJET NE POŠTUJE I UGRADNJU IZVEDE
NESTRUČNA OSOBA, PROIZVOĐAČ NE PREUZIMA ODGOVORNOST ZA BILO KOJI TEHNIČKI KVAR, OŠTEĆENJE PROIZVODA, ŠTETU NA
IMOVINI ILI OZLJEDU OSOBA.
1.1 UGRADNJA
Ploča za kuhanje može se ugraditi u svaku kuhinjsku radnu ploču koja
je izrađene od materijala otpornog na temperaturu od 100° C i debljine
od 25 do 45 mm. Mjere otvora za ugradnju moraju odgovarati mjerama
prikazanim na slici 2.
Ako se ploča postavlja pokraj stranice kuhinjskog namještaja s bilo koje
strane, udaljenost između ploče i stranice kuhinjskog namještaja mora
iznositi najmanje 15 cm (pogledati sliku 4); dok udaljenost između
stražnjeg zida i ruba ploče mora iznositi najmanje 5,5 cm. Udaljenost po
visini između ploče za kuhanje i nekog drugog uređaja ili kuhinjskog
elementa (npr. kuhinjska napa) ne smije biti manja od 70 cm (pogledati
sliku 4). Kada ispod ploče koja se ugrađuje postoji dostupana praznina,
između ploče i tog prostora treba umetnuti pregradu izrađenu od
izolacionog materijala (drvo ili sličan materijal) (slika 3).
Važno - na slici 1 prikazano je kako treba postaviti brtvu.
Ploča se mora pričvrstiti na radnu ploču pomoću isporučenih stezaljki i
otvora u donjem dijelu uređaja. Ako se ispod ploče za kuhanje od 60 cm
nalazi ugradbena pećnica koja nije opremljena sustavom za hlađenje,
savjetujemo da se na kuhinjskom namještaju u kojem su ugrađeni
uređaji naprave otvori za ventilaciju kako bi se osigurala ispravna
cirkulacija zraka. Veličina tih otvora mora biti najmanje 300 cm² a
moraju biti smješteni kako je prikazano na slici 5.
Ako je ploče za kuhanje od 75 cm postavljena iznad ugradbene
pećnice, pećnica mora biti hlađena ventilatorom.
2. SPAJANJE NA ELEKTRIČNU I PLINSKU MREŽU
2.1. ELECTRICAL CONNECTION
Provjerite podatke navedene na natpisnoj pločici smještenoj na
vanjskoj strani uređaja kako biste se uvjerili da su električna mreža i
izlazni napon odgovarajući.
Prije priključenja ploče, provjerite ispravnost uzemljenja u vašoj
električnoj instalaciji. U skladu sa zakonom, uređaj mora biti
uzemljen.
Ako tom propisu nije udovoljeno, proizvođač ne odgovara za ozljede
osoba ili štetu na imovini proizašlu zbog neuzemljene ili neispravno
uzemljene električne instalacije.
Kod modela koji nisu opremljeni utikačem, na kabel za električno
napajanje postavite utikač koji može podnijeti opterećenje označeno na
pločici s podacima. Žica za uzemljenje na kabelu obojena je žutozeleno. Utikač uvijek mora biti dostupan.
Smeđa žica
L
Žuto/zelena žica
Plava žica
N
Električni
Kabel
Električna
Mreža
FAZA
UZEMLJENJE
NEUTRLNO
2.2. 4 GRIJAČE PLOČE
Ovi grijači se isporučuju bez kabla. Za podatke o spajanju, vrsti kabla i
presjeku, pogledajte tablicu.
Kabel-Odjeljenje
Kabel-Tip
Jedno fazna
220-240 V~
3 G 2.5 mm
H05VV-F
2
3. UPORABA PLOČE ZA KUHANJE UPUTE ZA KORISNIKA
Ovaj uređaj mora se koristiti samo u svrhu za koju je namijenjen a to je
kuhanje u domaćinstvu. S v a k o d r u g o k o r i š t e n j e s m a t r a s e
neodgovarajućim i zato može biti opasno. Proizvođač se ne smatra
odgovornim za moguće štete koje bi proizašle zbog neodgovarajućeg,
pogrešnog i nerazumnog korištenja.
3.1. KORIŠTENJE ELEKTRIČNIH PLOČA
Okrenite gumb električne poloče do položaja za potrebnu temperaturu
kuhanja. Uključit će se signalno svjetlo i električna ploča počet će se
zagrijavati. Kada završite s kuhanjem, okrenitegumb na položaj “O”
(slika 6). Ne ostavljajte električnu površinu uključenom bez postavljene
posude. Savjetujemo korištenje posude maksimalno dozvoljenog
promjera od 14 cm i s potpuno ravnim dnom. Prije prvog korištenja,
pustite električnu ploču da se zagrijava 5 minuta bez postavljene
posude. Zagrijavanje će omogućiti da otvrdne zaštitni premaz koji se
nalazi na ploči. Za čišćenje električne ploče koristite vlažnu krpu i
deterdžent. Ostatke hrane i drugu prljavštinu nemojte čistiti nožem ili
drugim oštrim predmetima.
Da osušite ploču nakon čišćenja, uključite je na vrlo kratko vrijeme.
UPOZORENJE! električna ploča ne smije raditi bez postavljene
posude, čak ni vrlo kratko vrijeme.
0
1
2
3
4
5
6
Korištenje odgovarajućeg posuđa (sl. 7)
Imajte na umu da veće posude imaju i veću grijaću površinu. To će
pomoći da se hrana kuha brže nego u malim posudama. Uvijek koristite
posude čija je veličina proporcionalna količini hrane koju ćete kuhati.
Nemojte koristiti vrlo male posude a posebno ne za hranu kojoj je
potrebno više tekućine. Ako za brzo kuhanje hrane koristite vrlo velike
posude, moguće je da se hrana zalijepi i ostavi zagorene mrlje na dnu
posude. Zatvorene posude i plitice za pečenje savjetujemo za pripremu
slastica. Otopljeni šećer i proliveni voćni sokovi mogu se zalijepiti na
tople površine štednjaka i biti će ih vrlo teško očistiti. To je posebno
važno za posude koje se koriste za pečenje ili kuhanje pod pritiskom na
visokoj temperaturi.
Provjerite prikladnost posuda za kuhanje uz poštivanje navedenih
kriterija:
- Posude trebaju biti teške,
- Posude moraju potpuno pokrivati površinu za kuhanje i mogu biti veće,
ali ne manje,
- Donja površina posude treba biti potpuno ravna i imati dobro priajanje
na površinu za kuhanje,
0
100 W
180 W
250 W
500 W
750 W
1000 W
0
135 W
220 W
300 W
850 W
1150 W
1500 W
L1
1-Faza
1-2 skretnica
4-Neutralni
PE-Uzemljenje
• Za najbolje korištenje električnih ploča i malu potrošnju energije
potrebno je koristiti samo posude s potpuno glatkim i ravnim dnom.
Promjer posude treba biti što je bliže moguće promjeru električne
površine a nikada manji. Dno posuda mora biti potpuno suho i treba
izbjegavati proljevanje iz posude. Ne stavljajte prazne posude na
uključenu električnu površinu, odnosno, ne ostavljajte ih uključenima
ako na njima nema posuda.
47 HR
Page 48

4. ČIŠĆENJE I ODRŽAVANJE
Prije čišćenja ploče za kuhanje, pazite da je u potpunosti hladna.
Izvucite utikač iz zidne utičnice ili ako je spojena izravno isključite je iz
električnog napajanja.
Nikada nemojte koristiti oštre predmete, deterdžente koji izazivaju
koroziju, sredstva za izbjeljivanje ili kiseline.
Spriječite proljevanje tvari koje sadrže kiseline ili lužine (sok limuna,
ocat i sl.) po emajliranim, glaziranim ili površinama od inoxa.
Kada čistite emajlirane, glazirane ili kromirane površine ploče, koristite
samo toplu vodu i blagi deterdžent. Nemojte koristiti oštra ili sredstva
koja nagrizaju.
Za inox koristite specijalizirano sredstvo za čišćenje.
Plamenike operite sredstvom za pranje i vodom. Ukoliko im želite vratiti
izvorni sjaj, biti će dovoljno koristiti proizvode posebno namijenjene za
čišćenjene inoxa.
Nakon svakog čišćenja, dobro osušite plamenike i ponovno ih
namjestite u njihova ležišta.
Neophodno je provjeriti da li su plamenici ispravno postavljeni .
Kromirani držači posuda i plamenici
Tijekom uporabe kromirani držači posuda i plamenici promijenit će boju.
To ne utječe na pravilan rad ploče za kuhanje.
U ovlaštenim servisima možete nabaviti sve potrebne rezervne
doijelove.
6. ZAŠTITA PRIRODNOG OKOLIŠA
Ovaj uređaj je označen u skladu s europskom
smjernicom 2002/96/EZ-a o "otpadu električne i
elektronske oprema" (WEEE). Pravilnom i sigurnom
odlaganju ovog proizvoda možete pomoći i Vi te tako
spriječiti potencijalne negativne posljedice za okolinu i
ljudsko zdravlje koje inače mogu biti uzrokovane
neodgovarajućim odlaganjem ovog proizvoda.
Oznaka na proizvodu pokazuje da ovaj proizvod ne
može biti tretiran kao kućni otpad. Umjesto toga ovaj
proizvod mora biti predan na odgovarajuće sabirno mjesto za
recikliranje električne i elektronske opreme.
Odlaganje mora biti izvršeno u skladu s lokalnim ekološkim propisima
za odlagališta otpada.
Za opširnije informacije o tretmanu, recikliranju ili korištenju ovog
proizvoda kao otpada, molimo da kontaktirate svoj lokalni gradski ured,
službu vašeg lokalnog odlagališta otpada ili trgovnu gdje ste kupili
proizvod.
Izjava o sukladnosti: dijelovi uređaja koji mogu doći u dodir sa
prehrambenim proizvodima izrađeni su sukladno propisima EEC
89/109.
Uređaj je izrađen sukladno europskim propisima , izmjenama
2006/95/EC i 2004/108/EC , daljnjim dopunama.
5. OVLAŠTENI SERVIS
Prije nego se obratite ovlaštenom servisu, provjerite slijedeće:
- Da li je utikač ispravno utaknut u zidnu utičnicu i da nije oštećen,
- Da nema poremećaja u dovodu plina.
Ako ne možete ustanoviti kvar:
- Isključite uređaj i pozovite ovlašteni servis.
- Nemojte pokušavati sami popravljati uređaj.
- NEMOJTE "PRČKATI" PO UREĐAJU
Proizvođač ne snosi odgovornost za eventualne greške u ovoj knjižici
nastale u tisku ili prijepisu. Proizvođač zadržava pravo na svaku
izmjenu proizvoda koju bude smatrao potrebnom ili korisnom
uključujući i udio u potrošnji a koja neće imati negativnih utjecaja na rad
i sigurnost proizvoda.
Tabela 1
UGRADBENE PLOČE ZA KUHANJE
Plamenik
1
4E
Tip
Električna Ploča (R 2000W)
Električna Ploča (1500W)
Električna Ploča (1000W)
Električna Ploča (R 1500W)
Klasa instalacije
Napon / frekvencija V / Hz
Električna izlazna snaga
Dimenzije proizvoda mm
S60 / HBGS
1
1
1
1
3
220-240 V / 50-60 Hz
6000 W
585 x 510
Ovaj uređaj namijenjen je isključivo za korištenje u domaćinstvu i
nije primjeran za profesionalno korištenje.
48 HR
Page 49

Napomene i važni savjeti pri uporabi uređaja
•VAŽNO! Ovaj je priručnik sastavni dio uređaja. Čuvajte ga i neka vam se uvijek nalazi pri ruci za vrijeme cijelog radnog vijeka ploče za
kuhanje. Savjetujemo vam da prije korištenja uređaja pozorno pročitate ovaj priručnik te sve upute koje sadrži. Čuvajte eventualne
rezervne dijelove koji su priloženi uz uređaj. Postavljanje mora izvršiti ovlašteno/kvalificirano osoblje uz poštivanje svih važećih
propisa. Ovaj je uređaj namijenjen korištenju u domaćinstvu i proizveden je za sljedeću funkciju: kuhanje/zagrijavanje hrane. Svaka
druga namjena smatra se neprikladnom. Proizvođač odbacuje svaku odgovornost za nepravilno instaliranje, neovlašteno
otvaranje, neiskustvo pri uporabi te za uporabu različitu od navedene.
•Provjerite da uređaj nije oštećen tijekom transporta.
•Dijelovi ambalaže (plastične vrećice, espandirani polistirol, najlon, itd.) ne smiju biti ostavljeni na dohvat djeci budući da predstavljaju
potencijalne izvore opasnosti.
•Ambalaža je proizvedena od recikliranog materijala i označena je simbolom .
Ne odlažite ambalažu u prirodni okoliš na neodgovoran i neprikladan način.
•Ovaj uređaj moraju koristiti isključivo odrasle osobe. Osigurajte da djeca ne diraju kontrole i da se ne igraju s uređajem.
•Instaliranje svih plinskih i/ili električnih priključaka treba biti povjereno ovlaštenom/kvalificiranom osoblju koje te postupke treba izvesti
prema uputama proizvođača pridržavajući se sigurnosnih normi i važećih propisa.
•Električna sigurnost je zajamčena samo kada je proizvod spojen na ispravno i učinkovito uzemljenje.
•Svaka izmjena ili pokušaj izmjene uređaja predstavlja opasnost. U slučaju kvara nemojte sami pokušavati popraviti uređaj, već zatražite
pomoć kvalificiranog servisera.
•Nakon što ste koristili ploču za kuhanje, provjerite da su svi kontrolni gumbi u položaju zatvoreno.
•Ukoliko odlučite više ne koristiti ovaj uređaj, prije njegovog zbrinjavanja na odlagalište morate ga onesposobiti na način koji je predviđen
važećim zakonima o zaštiti zdravlja i okoliša tako da učinite bezopasnima dijelove koji mogu predstavljati opasnost za djecu.
•Natpisna pločica s tehničkim podacima postavljena je na vidljivom mjestu ispod kućišta ili je priložena uz ovaj priručnik. Pločicu s
tehničkim podacima na kućištu uređaja ne smijete nikada ukloniti.
OPĆENITA VAŽNA UPOZORENJA
•Savjetujemo da ugradnju uređaja u kuhinjski elemenat i spajanje na električnu mrežu izvede isključivo ovlaštena /kvalificirana
osoba.
•Isključite uređaj iz plinske i/ili električne mreže ako ga ne namjeravate upotrebljavati duže vrijeme (npr. odlazak na odmor). Pojedini djelovi
uređaja (oko grijaćih površina, ugriju se tokom rada, zato se pazite da djeca budu na dovoljnoj udaljenosti od izvora topline i pravovremeno
ih upozorite na opasnost od opekotina.
•Pregrijana masnoća tijekom kuhanja ili prženja može se vrlo brzo zapaliti te postoji opasnost opekotina, budite oprezni pri kuhanju jela na
masti ili ulju (npr. prženi krumpirici), pripremajte ih pažljivo i pod stalnim nadzorom.
•Plinski plamenici/električne ploče ne smiju biti uključeni prazni, bez postavljenih posuda.
•Ne upotrebljavajte uređaj za zagrijavanje prostorije.
Opće upozorenje!
Candy kućanski uređaji namijenjeni su isključivo za korištenje u domaćinstvu.
Ugradbenu plinsku ploču koristite samo prema uputama!
Sva su prava zadržana. Nijedan dio ovog izdanja ne smije biti reproduciran ili prepisan u bilo kojem obliku odnosno na bilo koji način, bilo
mehanički, fotokopiranjem ili na neki drugi način, bez prethodnog odobrenja vlasnika autorskih prava (copyrighta).
Proizvođač ne odgovara za eventualne greške u tiskanju ovih uputa.
Proizvođač zadržava pravo na odgovarajuće izmjene na proizvodu koje ne mijenjaju njegove bitne osobine.
plinsku i/ili
49 HR
Page 50

Page 51

Page 52

GB - IE
The manufacturer will not be responsible for any inaccuracy resulting from printing or transcript errors contained in this brochure. We reserve the right
to carry out modifications to products as required, including the interests of con sumption, without prejudice to the characteri stics relating to safety or
function.
FR
Le constructeur décline toute responsabilité concernant d'éventuelles inexacitudes imputables à des erreurs d'impression ou de transcription contenue dans
cette notice. Le constructeur se réserve le droit de modifier les produits en cas de nécessité, même dans l'intérêt de l'utilisation, sans causer de préjudices
aux caractéristiques de fonctionnement de sécurité des appareils.
CZ
Výrobce nezodpovídá za nepřesnosti obsažené v této příručce vzniklé při tisku nebo překladu. Vyhrazujeme se právo provádět úpravy výrobku podle
potřeby, aniž by byly dotčeny charakteristiky vztahující se k bezpečnosti nebo provozu.
DE
Der Hersteller übernimmt keine Haftung für eventuelle Druck- oder Übersetzungsfehler dieser Bedienungsanleitung. Der Hersteller behält sich vor
technische Änderungen zurVerbesserung der Produktqualität im Interesse des Endverbrauchers vorzunehmen.
ES
La empresa constructora declina toda responsabilidad derivada de eventuales errores de impresión contenidos en el presente libro. Se reserva además el
derecho de realizar las modificaciones que se consideren útiles a los productos sin comprometer las características esencial es.
PL
Producent nie będzie ponosić odpowiedzialności za jakiekolwiek niedokładności wynikające z druku lub błędЧw tłumaczenia występujące w niniejszej
broszurze. Zastrzegamy sobie prawo do wprowadzania modyfikacji produktu zgodnie z potrzebami, w tym w interesie konsumenta, bez szkЧd dla
charakterystyk dotyczących bezpieczeństwa lub działania.
TR
Üretici, bu klavuzda meydana gelecek baskı hatalarından sorumlu değildir. Üretici gerekli olması durumunda ürünün emniyet ve işlevine ilişkin olmamak
kaydıyla üründe değişiklik yapma hakkını saklı tutar.
RU
Производитель не несет ответственности за опечатки и неточности, которые могут встретиться в данной инструкции. Мы оставляем за собой право
вносить изменения в конструкцию выпускаемых нами изделий с целью улучшения качества выпускаемой продукции. При этом основные функции
изделия и его безопасность будут оставаться неизменными.
SL
Proizvajalec ni odgovoren za napake v tej knjižici, ki bi nastale ob tisku ali prepisu. Pridržujemo si pravico izvajanja potrebnih sprememb na izdelku, tudi tistih,
ki se nanašajo na porabo, brez škode za varnost in funkcionalnost naprave.
IT
La Ditta costruttrice declina ogni responsabilità per eventuali errori di stampa contenuti nel presente libretto. Si riserva inoltre il diritto di apportare le modifiche
che si renderanno utili ai propri prodotti senza compromettere le caratteristiche essenziali.
PT
O fabricante não será responsável por quaisquer imprecisões resultantes de impressão ou transcrição de erros contidos na presente brochura.
Reservamo-nos ao direito de efectuar alterações aos produtos, conforme necessário, incluindo as taxas de consumo, sem prejuízo das características
relacionadas com a segurança ou funcionamento.
HU
A gyártó nem vállal felelősséget az ebben a kiadványban előforduló nyomtatási és elírási hibákból eredő pontatlanságokért. A biztonsággal vagy a
működéssel kapcsolatos jellemzők sérelme nélkül fenntartjuk a jogot a termékek szükség szerinti változtatására.
RO
Producătorul nu se face responsabil pentru erorile de printare din acest manual. Ne rezervăm dreptul de a realiza modificări asupra produselor fără a afecta
caracteristicile privind siguranţa sau funcţionarea. Versiunea în limba engleză este de referinţă.
HR
Proizvođač nije odgovoran za greške u tisku ili prijepisu ove knjižice. Proizvođač zadržava pravo na svaku izmjenu proizvoda koju bude smatrao
potrebnom ili korisnom uključujući i udio u potrošnji a koja neće imati negativnih utjecaja na rad i sigurnost proizvoda.
10.2013 • REV:0 • 42810857
 Loading...