


EN User instructions
CD 934 CD 950

Congratulations! |
Contents |
|
|
|
|
|
|
|
|
Thank you for choosing a Candy appliance; quality dishwashers |
|
|
|
|
|
|
|
||
which guarantee high performance and reliability. |
Safety advice |
page |
4 |
|
Candy manufacture a vast range of domestic appliances: washing |
||||
machines, washer/dryers, cookers, microwave ovens, ovens and |
Setting up, installation |
page |
5 |
|
hobs, refrigerators and freezers. |
Opening the door |
page |
8 |
|
Ask your dealer for the catalogue with the complete range of Candy |
Water softener unit |
page |
9 |
|
products. |
Adjusting the upper basket |
page |
11 |
|
Please read this booklet carefully as it provides important informa- |
Loading the dishes |
page |
12 |
|
tion regarding the safe installation, use, and maintenance of the |
Half load washing |
page |
15 |
|
machine, together with some useful advice on how to achieve the |
Information for test laboratories |
page |
16 |
|
best results from your dishwasher. |
Loading the detergent and rinse aid |
page |
16 |
|
For future reference please keep this instruction booklet in a safe |
Cleaning the filters |
page |
18 |
|
place. |
Some practical hints |
page |
19 |
|
|
|
Routine cleaning and maintenance |
page |
20 |
|
|
|||
Guarantee & After Sales Service |
Description of the controls |
page |
22 |
|
|
|
Technical data |
page |
22 |
|
|
Operating the programmes and special functions |
page |
23 |
This appliance is supplied with a guarantee certificate which offers |
Programme selection |
page |
24 |
|
a free one year labour guarantee and a free five year parts |
Identifying minor faults |
page |
26 |
|
guarantee - see the guarantee certificate for further details. |
|
|
Remember to post part A of the guarantee certificate within 10 days |
Fig. A |
|
of the purchase date to register your guarantee with us. |
||
|
||
Part B should be filled in and retained by you, to be shown to the |
|
|
GIAS service engineer if required. You should also keep your sales |
|
|
receipt. |
|
|
After Sales Service |
|
|
For service and repairs call your local engineer on our national |
|
|
number 08705 990011 |
|
Summary of manufacturers guarantee conditions
Your new appliance is fully guaranteed by the manufacturer for 12 months against electrical/mechanical breakdown excluding:
A.Any faults which occur due to bad installation or misuse of the machine.
B.Any faults which occur due to repair of, or interference with, the machine by any person not authorised by the manufacturer to carry out service.
C.Any faults which occur due to any parts which are fitted to the machine which are not the original manufacturers parts.
D.Any faults arising from non-domestic use or unusual or abnormal use of the machine.
E.Any faults arising from operation at incorrect voltage.
F.Any faults arising from incorrect operation of the machine.
The guarantee applies to Gt Britain and Northern Ireland only, and is an addition to your statutory rights.
5
1
4
2 |
|
|
|
3 |
|
|
2 |
3 |
Safety Instructions
Please read the instructions in this booklet carefully because they contain important information on how to install, use and maintain your dishwasher safely as well as containing useful tips on how to make the most of it.
Keep this booklet safe for future reference.
There are certain basic safety rules which are valid for any domestic appliance. They are the following:
-never touch the appliance when your hands or feet are wet or damp
-do not use when your feet are bare
-do not remove the plug from the mains supply socket by pulling the mains cable or the machine itself
-do not leave the appliance exposed to the elements (rain, sun etc)
-do not let children (or others incapable of operating it) use the machine without supervision
-make sure that the plug fitted to the machine is compatible with the power supply socket. If it is not, get a suitably qualified person to fit the correct type, and to make sure that the cables to the mains socket are able to cope with the power rating of the appliance
-ensure that the dishwasher does not crush power cables
-if there is a water softening device installed in the home there is no need to add salt to the water softener fitted in the dishwasher
-the dishwasher is designed for normal kitchen utensils.
Objects that have been contamined by petrol, paint, traces of steel or iron, corrosive chemicals, acids or alkalis must not be washed in the dishwasher
-if you wish to dispose of an old dishwasher be careful to remove the door to eliminate the risk of children becoming trapped inside it
-the dishwasher has been made from materials which can be recycled so that it can be disposed of in an environmentally friendly way
-in general it is not advisable to use adaptors, multiple plugs and/or extension cables
-Water left in the machine or on the dishes at the end of the wash programme should not be swallowed.
-Leaning or sitting on the open door of the dishwasher could cause it to tip over.
-Cutlery is washed best if it is placed in the basket with the handles downwards; however, to avoid any injury from blades or sharp points, it can be placed with the handles upwards.
-Should it be necessary to replace the supply cord, call the Service Department.
-This appliance is designed for domestic use only.
If the appliance breaks down or stops working properly, switch it off, turn off the water supply and do not tamper with it. Repair work should only be carried out by an approved service agent and only genuine spare parts should be fitted. Any failure to follow the above advice may have serious consequences for the safety of the appliance.
INSTALLATION (Technical notes)
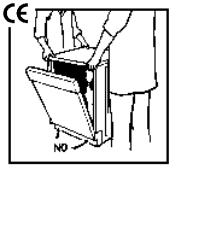
After unpacking, adjust the height of the dishwasher. For the dishwasher to work correctly it must be level. Adjust the feet so that the machine does not tilt by more than 2 degrees. If it you need to move the machine after removing the packaging, do not try to lift it by the bottom of the door. Follow the instructions in figure. Open the door slightly and lift the machine by holding on the top.
Important: when the appliance is located on a carpet floor, attention must be paid to ensure that there is no obstruction to the bottom vents.
Make sure that the plug on the appliance remains accessible after installation.
This appliance complies with Directives 89/336/EEC, 73/23/EEC and following changes.
4 |
5 |

Electrical connection
Plug your dishwasher into the power socket. If the plug we supply does not fit
• CUT IT OFF AND DESTROY IT!
You can't use it on other appliances, and the exposed wires could be dangerous if anyone plugged it in.
• Fit a suitable plug, as follows:
Connect |
to the terminal in the plug |
|
|
green and yellow wire |
marked with the letter E, |
|
OR marked with the Earth symbol, |
|
OR coloured green, |
|
OR coloured green and yellow. |
blue wire |
marked N |
|
OR coloured black. |
brown wire |
marked L |
|
OR coloured red. |
|
|
"WARNING"
THIS APPLIANCE MUST BE EARTHED
Fuses and plugs
This appliance should be used only on a socket with a minimum rating of 13 Amp.
Our ready-fitted plug is already equipped
with a 13 amp fuse which is BS 1362 ASTA approved. Any replacement should be exactly the same.
If the fuse cover is lost, do not use the plug until it is replaced. A correct replacement fuse cover (obtainable from your dealer or Electricity Board) must be the same colour as shown or named on the insert on the base of the plug.
Water connection
The inlet and drain hoses can be directed to left or right.
The dishwasher can be connected to either cold or hot water, as long as it is no hotter than 60 °C.
Water pressure must be between 0,08 MPa and 0,8 MPa. If the pressure is below the minimum consult our service department for advice.
The inlet hose must be connected to a tap so that the water supply can be cut off when the machine is not in use (fig.1 B).
The dishwasher is fitted with 3/4" threaded connector (fig. 2).
Connect inlet hose A to water tap B with a 3/4" attachment making sure that it has been properly tightened.
If it is necessary to lengthen the inlet pipe, an extension pipe can be fitted.
If limescale deposits or sand are present in the water, it is advisable to obtain the appropriate filter, art. 9226085, from the Service Centre (fig. 3).
The filter D must be inserted between the tap B and the inlet hose A, remembering to fit the washer C.
If the dishwasher is connected to new pipes or to pipes which have not been in use for a long time run water through for a few minutes before connecting the inlet hose. In this way no deposits of sand or rust will clog up the water inflow filter.
1 |
2 |
3 |
Connecting the outlet hose
The outlet hose should disharge into a standpipe, making sure that there are no kinks (fig. 4).
The standpipe must be at least 40 cm above floor level and it must have an internal diameter of at least 4 cm. It is advisable to fit an anti-odour air trap (fig. 4 x).
If necessary the outlet hose can be extended up to 2,6 m, provided that it is kept at a maximum height of 85 cm above floor level.
The hose can be hooked over the side of the sink (it must not be immersed in water, in order to prevent water from being syphoned back to the machine when this is in operation) (fig. 4 y).
When installing the appliance under a worktop the hose pipe clamp must be attached to the wall in the highest possible position under the worktop (fig. 4 z).
Check that there are no kinks in the inlet and outlet hoses.
4
6 |
7 |
Installation in fitted kitchens
Fitting between existing cabinets
The height of the dishwasher, 85 cm, has been designed in order to allow the machine to be fitted between existing cabinets of the same height in modern fitted kitchens. The feet can be adjusted so that correct height is reached.
The laminated top of the machine does not require any particular care since it is heatproof, scratchproof and stainproof (fig. 5).
The work top can be easily adjusted to line it with the top of existing cabinets; this is done by moving it by 5 mm each time up to a maximum of 25 mm.
To adjust it, unscrew the two screws at the back and fix the top in the position required (fig. 6).
Underneath existing work top (when fitting beneath a work top)
In most modern fitted kitchens there is only one single work top under which cabinets and electrical appliances are fitted.
In this case remove the work top of the dishwasher by unscrewing the screws under the rear edge of the top (fig. 6).
The height will then be reduced to 82 cm, as scheduled by the International Regulations (ISO) and the dishwasher will fit perfectly under the kitchen working top (fig. 7).
5 |
6 |
7 |
598
556/563
Opening the door
Put your hand into the recess and push upwards.
If the machine comes open while it is working, an electrical safety device automatically switches everything off.
For the machine to work properly, the door should not be opened while it is in operation.
Closing the door
Place the baskets in the machine.
Make sure that both the spray arms are free to rotate and are not obstructed by cutlery, crockery or pans. Close the door, pressing on it to make sure it is firmly shut.
Water softener unit
Depending on the source of the supply, water contains varying amounts of limestone and minerals which are deposited on the dishes leaving whitish stains and marks. The higher the level of these minerals present in the water, the harder the water is. The dishwasher is fitted with a water softener unit which, through the use of special regenerating salt, supplies softened water for washing the dishes. The softener unit can treat water with a hardness of up to 60°fH (French grading) or 33°dH (German grading) through five different settings.
The degree of hardness of your water can be obtained from your water supply company.
Regulating the water softener
The table below lists different degrees of water hardness with the corresponding setting for the softener unit.
Level |
Water |
Water |
|
|
|
|
|
|
hardness |
hardness |
Use of |
Water |
N° |
|
|
°fH |
°dH |
regenerating |
softener |
of |
|
|
salt |
setting |
washes |
||
|
|
(french) |
(German) |
|||
|
|
|
|
|
||
|
|
|
|
|
|
|
0 |
|
0-9 |
0-5 |
NO |
FREE |
|
1 |
|
10-30 |
6-16 |
YES |
position N.1 |
50 |
*2 |
|
31-40 |
17-22 |
YES |
position N.2 |
40 |
3 |
|
41-50 |
23-27 |
YES |
position N.3 |
30 |
4 |
|
51-60 |
28-33 |
YES |
position N.4 |
20 |
-*The water softener unit is set in the factory at level 2, as this is suitable for the
majority of users. |
TYPE 1 |
If your water is at level 0, you need not |
|
use any regenerating salt, nor need you |
|
make any adjustment, as your water is |
|
soft. |
|
According to the degree of hardness of |
|
your water, regulate the softener unit in |
|
the following way: |
|
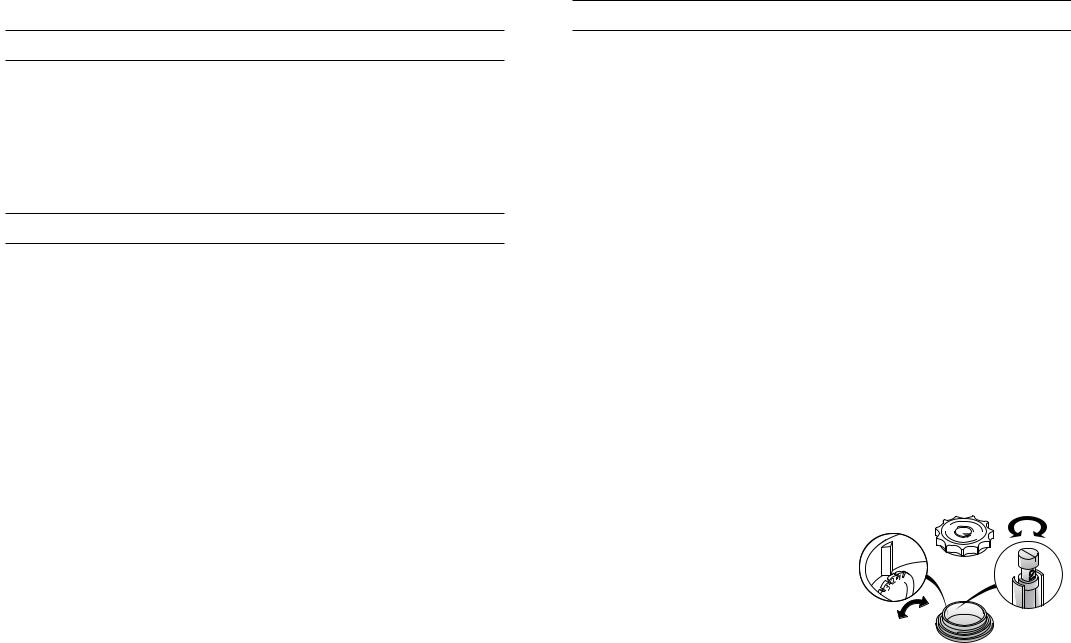
- remove the lower rack. Unscrew and |
TYPE 2 |
remove the cap from the salt dispenser |
|
located in the bottom of the tub (Fig. A “1”); |
|
-Turn the selector screw to the required position with a screwdriver or a knife.
8 |
9 |

Loading the salt
The dishwasher is fitted with a softener which clears the water of lime which could cause scale and damage the dishwasher.
On the bottom of the machine there is a container for the salt for regenerating the softener.
The filter medium of the softening plant must be reactivated with dishwasher water softener regenerating salt.
Other types of salt contain small quantities of insoluble particles which over a long period of time may affect and deteriorate the softener performance.
To add salt, unscrew the cap of the container on the bottom and then refill the container.
During this operation a little water will overflow; but keep adding salt until the container is full. When the container is full, clean the thread of salt residue and retighten the tap.
If the dishwasher is not required straightaway, set the Prewash programme so that the salt solution which has overflowed is discharged from the washing tank.
The salt dispenser has a capacity of between 1.5 and 1.8 kg and, for efficient use of the appliance, it should be refilled from time to time according to the regulation of the water softener unit.
Important: it is necessary to add water until the container overflows. Only install the dishwasher after completely filling the salt container.
Salt loading indicator
This model is provided with an indicator light on the control panel which will light up when it is necessary to reload the salt container.
Important: the appearance of white stains on dishes is generally an important sign that the salt container needs filling.
Adjustment of the upper basket
If 27 cm to 31 cm plates are normally used, load them onto the lower basket after the upper basket has been placed in its upper position and proceed as detailed below :
1)Pull out the upper basket;
2)Then grasp the basket from both sides and lift it upwards (fig. 1).
Dishes that are bigger than 20 cm in diameter can no longer be loaded onto the upper basket and the mobile supports cannot be used when the basket is in the upper position.
ADJUST BASKET TO THE LOWER POSITION:
1)Grasp the basket from both sides and lift slightly upwards (fig. 2a);
2)Then slowly release into the correct position (fig. 2b) .
N. B. : NEVER LIFT OR LOWER THE BASKET BY ONE SIDE ONLY (fig.3).
Attention :
It is advisable to adjust the basket before loading the dishes.
1 |
2 |
a |
b |
a |
b |
3 |
10 |
11 |
 Loading...