

Page 1
ICW 101 TR H/C
Mode d’emploi
Istruzioni per l’uso
Instrucciones para el uso
Bedienungsanleitung
User instructions
FR
IT
ES
DE
EN
Page 2
2
FR
TOUS NOS
COMPLIMENTS
En achetant cet appareil
ménager Candy, vous avez
démontré que vous
n’acceptez aucun
compromis: vous voulez
toujours ce qu’il y a de
mieux.
Candy a le plaisir de vous
proposer cette nouvelle
machine à laver qui est le
résultat d’années de
recherches et d’études des
besoins du consommateur.
Vous avez fait le choix de la
qualité, de la fiabilité et de
l’efficacité.
Candy vous propose une
large gamme d’appareils
électroménagers: machines
à laver la vaisselle,machines
à laver et sécher le linge,
cuisinières, fours à microondes, fours et tables de
cuisson, hottes, réfrigerateurs
et congélateurs.
Demandez à votre
Revendeur le catalogue
complet des produits Candy.
Nous vous prions de lire
attentivement les conseils
contenus dans ce livret. Il
contient d’importantes
indications concernant les
procédures d’installation,
d’emploi, d’entretien et
quelques suggestions utiles
en vue d’améliorer
l’utilisation de la machine à
laver.
Conservez avec soin ce
livret: vous pourrez le
consulter bien souvent.
Quand vous communiquez
avec Candy, ou avec ses
centres d’assistance, veuillez
citer le Modèle, le n° et le
numéro G (éventuellement).
DE
EN
HERZLICHEN
GLÜCKWUNSCH!
Mit dem Kauf dieses Candy
Elektrogerätes haben Sie
bewiesen, daß Sie stets nur
das Beste wählen - ohne
Kompromisse.
Candy freut sich, Ihnen diese
neue Waschmaschine
anbieten zu können. Sie ist
das Ergebnis jahrelanger
Forschung und einer
Markterfahrung, die im
ständigen direkten Kontakt
mit dem Verbraucher gereift
ist. Sie haben mit diesem
Gerät Qualität, lange
Lebensdauer und einen
hohen Leistungsstandard
gewählt.
Candy bietet Ihnen darüber
hinaus eine breite Palette
weiterer elektrischer
Haushaltsgeräte:
Waschmaschinen,
Geschirrspüler,
Wäschetrockner,
Elektroherde,
Mikrowellenherde,Backöfen
und Kochfelder, Kühl - und
Gefrierschränke.
Fragen Sie Ihren Fachhändler
nach dem kompletten
Candy Katalog.
Lesen Sie bitte aufmerksam
die Anweisungen,die Sie in
diesem Heft finden.Sie finden
dort wichtige Hinweise zur
sicheren Installation, zur
Bedienung, zur Pflege und zur
optimalen Verwendung der
Waschmaschine.
Bewahren Sie das Heft für
eine spätere Nutzung gut auf.
Geben Sie bitte in allen
Mitteilungen an Candy oder
an Ihre zuständige
Kundendienststelle stets das
Modell, die Nummer und die
G-Nummer (falls vorhanden),also praktisch alle Angaben
des Typenschildes -,an.
OUR COMPLIMENTS
With the purchase of this
Candy household appliance,
you have shown that you will
not accept compromises:
you want only the best.
Candy is happy to present
their new washing machine,
the result of years of research
and market experience
through direct contact with
Consumers. You have chosen
the quality, durability and
high performance that this
washing machine offers.
Candy is also able to offer a
vast range of other
household appliances:
washing machines,
dishwashers, washer-dryers,
cookers, microwave ovens.
Traditional ovens and hobs,
refrigerators and freezers.
Ask your local retailer for the
complete catalogue of
Candy products.
Please read this booklet
carefully as it provides
important guide lines for safe
installation, use and
maintenance and some
useful advise for best results
when using your washing
machine.
Keep this booklet in a safe
place for further consultation.
When contacting Candy
or a Customer Services
Centre always refer to the
Model, No., and G number (if
applicable of the appliance
see panel).
3
IT
COMPLIMENTI
Con l’acquisto di questo
elettrodomestico Candy;
Lei ha dimostrato di non
accettare compromessi:
Lei vuole il meglio.
Candy é lieta di proporLe
questa nuova lavatrice
frutto di anni di ricerche e di
esperienze maturate sul
mercato, a contatto diretto
con i Consumatori. Lei ha
scelto la qualità, la durata e
le elevate prestazioni che
questa lavatrice Le offre.
Candy Le propone inoltre
una vasta gamma di
elettrodomestici: lavatrici,
lavastoviglie,lavasciuga,
cucine, forni a microonde,
forni e piani di cottura,
frigoriferi e congelatori.
Chieda al Suo Rivenditore
il catalogo completo dei
prodotti Candy
La preghiamo di leggere
attentamente le avvertenze
contenute nel presente
libretto in quanto forniscono
importanti indicazioni
riguardanti la sicurezza di
installazione, d’uso, di
manutenzione e alcuni utili
consigli per il migliore utilizzo
della lavatrice.
Conservi con cura questo
libretto per ogni ulteriore
consultazione.
Quando comunica con la
Candy o con i suoi centri di
assistenza citi sempre il
Modello, il n° e il numero G
(se c’è). Praticamente tutto
ciò che é citato nel
riquadro.
ES
ENHORABUENA
Con la compra de este
electrodoméstico Candy;
usted ha demostrado no
conformarse con cualquier
cosa: usted quiero lo mejor.
Candy se complace en
ofrecerle esta nueva
lavadora,fruto de años de
investigación y de
experiencia en el marcado
y del contacto directo con
los Consumidores. Usted ha
escogido la calidad, la
duración y las enormes
prestaciones que esta
lavadora le ofrece.
Candy le ofreces además,
una amplia gama de
electrodomésticos:
lavadoras,lavavajillas,
lavadoras-secadoras,
cocinas, microondas, hornos
y encimeras, frigoríficos y
congeladores.
Solicite a su vendedor el
catálogo completo de la
gama de productos Candy.
Le rogamos lea
atentamente la información
contenida en este manual
ya que proporciona
importantes instrucciones
sobre seguridad en su
instalación, uso,
mantenimiento y algunos
consejos prácticos para que
ested saque el mejor
provecho de su lavadora.
Conserve este manual para
cualquier consulta posterior.
Cuando se ponga en
contacto con Candy o con
sus centros de Asistencia
mencione siempre el
Modelo, el n° y el número G
(si lo tiene).
Es decir todo lo que viene
anotado en el recuadro.
Page 3
CHAPITRE
CAPITOLO
CAPÍTULO
KAPITEL
CHAPTER
1
2
3
4
5
6
7
8
9
10
11
12
13
14
15
16
4
FR
INDEX
Avant-propos
Notes générales à la
livraison
Garantie
Mesures de sécurité
Données techniques
Mise en place, installation
Description des commandes
Tiroir à lessive
Sélection/Conseils utiles
pour l’utilisateur
Le produit
Tableau des programmes
Lavage
Séchage
Liste des programmes de
séchage
Cycle automatique de
lavage/séchage
Nettoyage et entretien
ordinaire
Recherche des pannes
IT
INDICE
Prefazione
Note generali alla consegna
Garanzia
Prescrizioni di sicurezza
Dati tecnici
Messa in opera, installazione
Descrizione comandi
Cassetto detersivo
Selezione/
Consigli utili per gli utenti
Il prodotto
Tabella programmi
Lavaggio
Asciugatura
Tabella asciugatura
Ciclo automatico lavaggio
asciugatura
Pulizia e manutenzione
ordinaria
Ricerca guasti
EN
INDEX
Introduction
General points on delivery
Guarantee
Safety Measures
Technical Data
Setting up and Installation
Control Description
Detergent drawer
Selection/Customer
Awareness
The Product
Table of Programmes
Washing
Drying
List of drying programmes
Automatic washing/drying
cycle
Cleaning and routine
maintenance
Faults Search
5
ES
ÍNDICE CAPÍTULO
Introduccíon
Notas generales a la
entrega
Garantía
Normas de seguridad
Datos técnicos
Puesta en funcionamiento
instalación
Descripción de los mandos
Cubeta del detergente
Seleción/Consejos útiles
para el usuario
El producto
Tabla de programas
Lavado
Secado
Tabla secado
Ciclo automático
lavado-secado
Limpieza y mantenimiento
ordinario
Causas de averías
DE
INHALT
Einleitung
Allgemeine Hinweise zur
Lieferung
Garantie
Sicherheitsvorschriften
Technische Daten
Inbetriebnahme, Installation
Bedienungsanleitung
Waschmittelbehälter
Programm/Temperaturwahl/
Einige nützliche hinweise
Das Produkt
Programmtabelle
Waschen
Trocknen
Trocknungstabelle
Automatischer Ablauf
Waschen/Trocknen
Reinigung und allgemeine
Wartung
Fehlersuche
Page 4
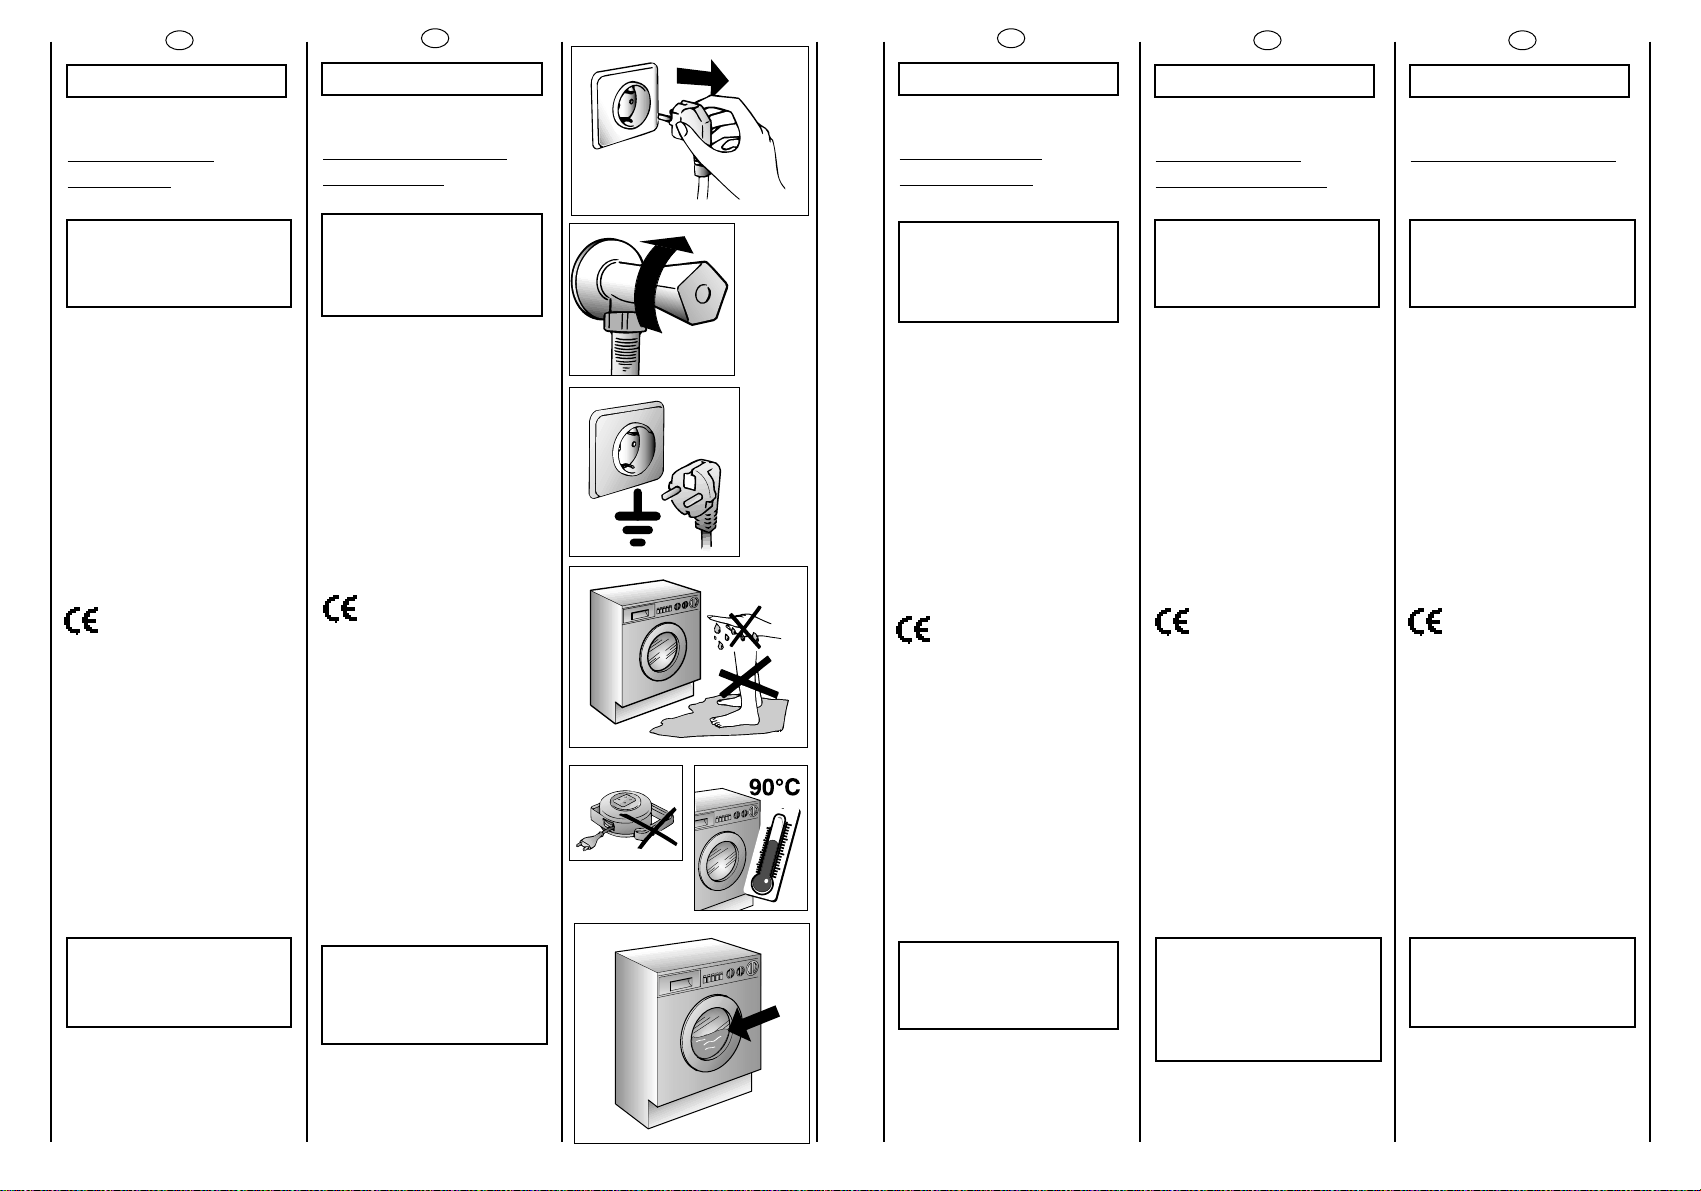
7
6
SPEDIRE
TRATTENERE
AB
C
EUROPE
Dovunque
tu sia.
F
D
E
IT
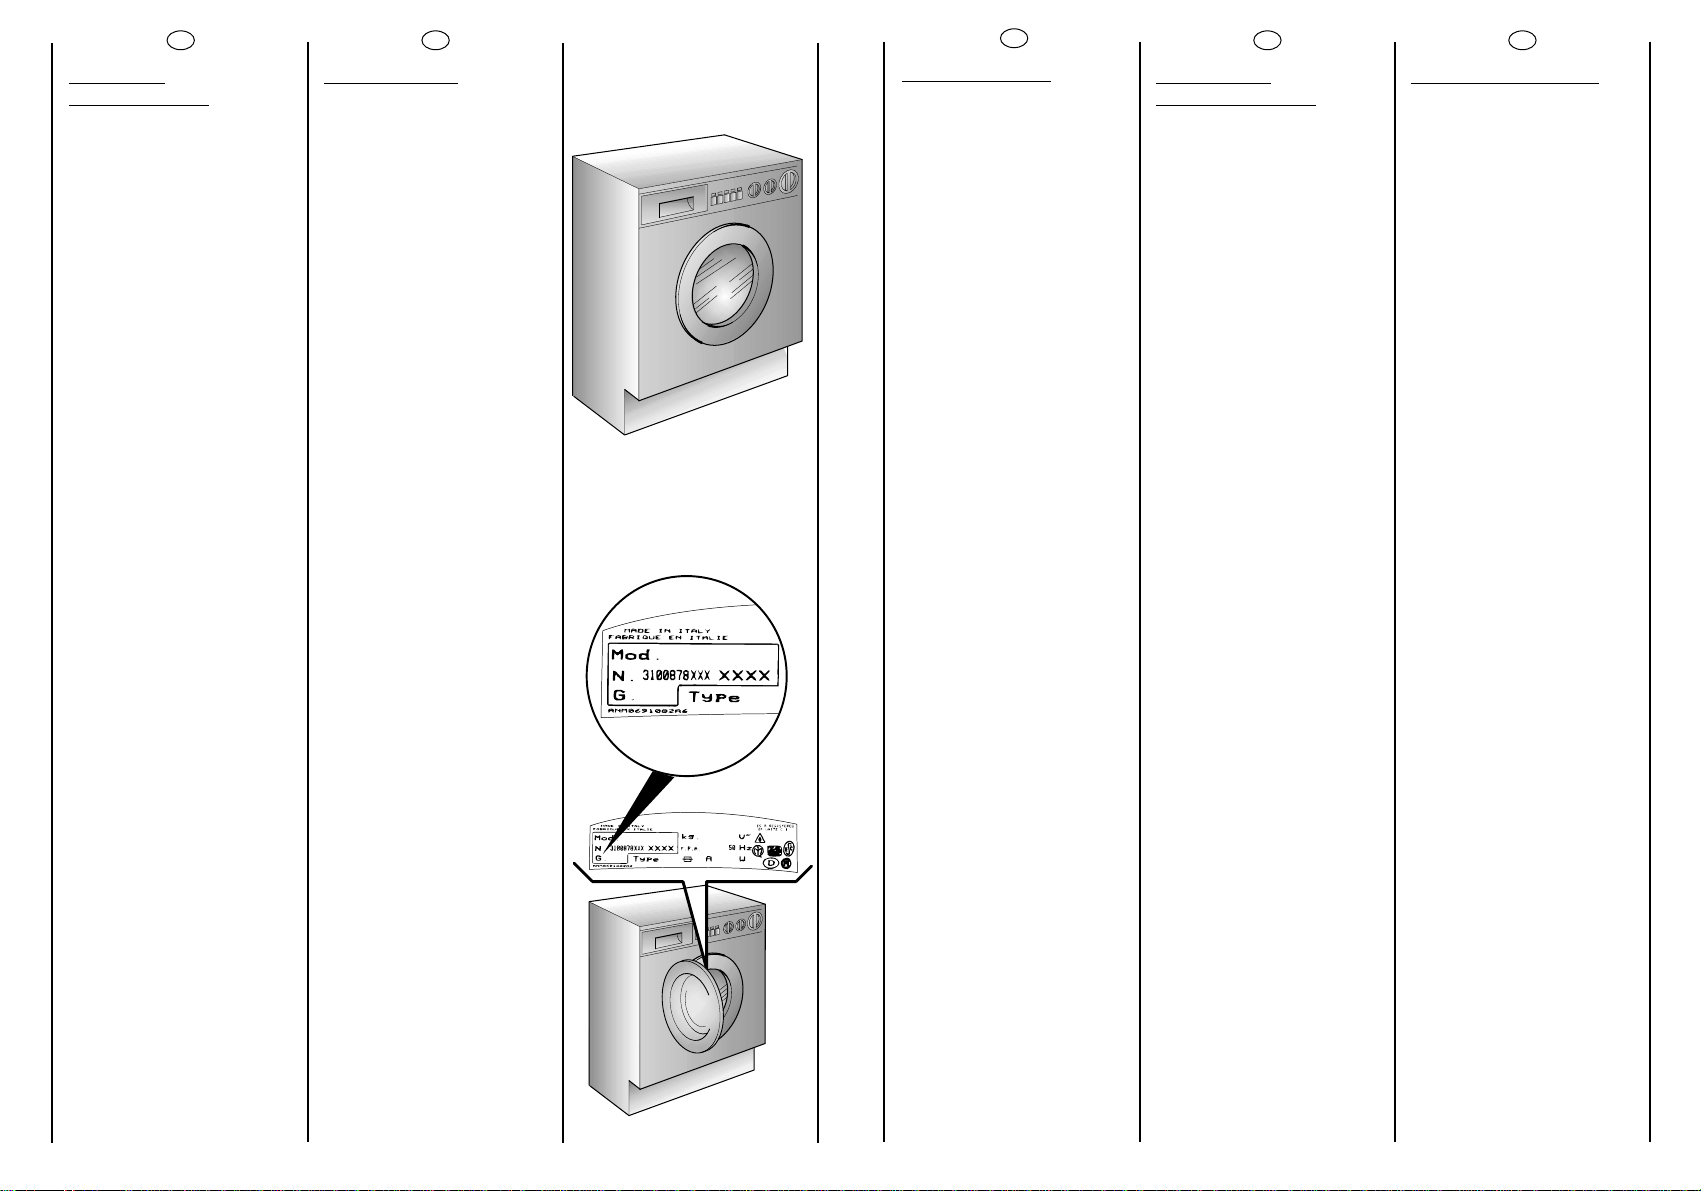
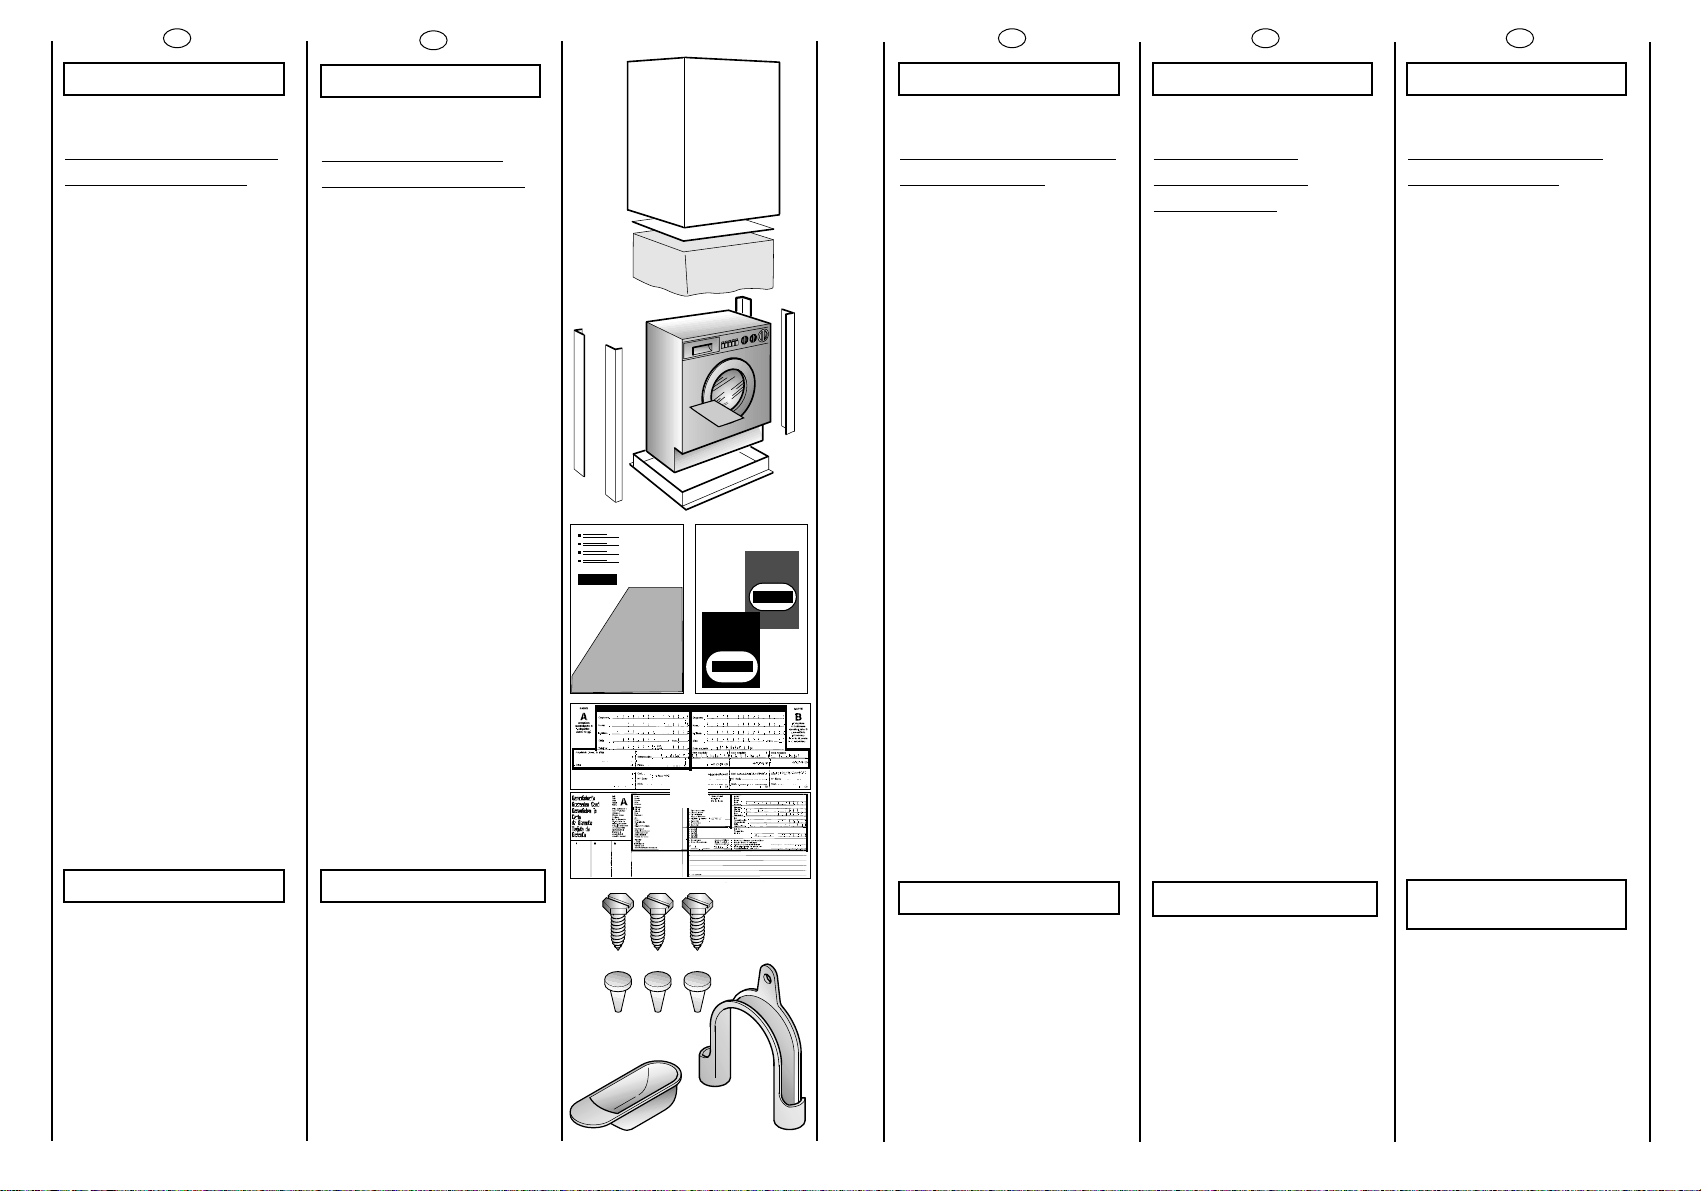
CAPITOLO 1
NOTE GENERALI
ALLA CONSEGNA
Alla consegna controlli che
con la macchina ci siano:
A) MANUALE
D’ISTRUZIONE
B) INDIRIZZI DI ASSISTENZA
C) CERTIFICATI DI
GARANZIA
D) VITI FISSAGGIO
PANNELLO
POSTERIORE
E) TAPPI
F) CURVA PER TUBO
SCARICO
G) MISURATORE
DETERSIVO
PROGRAMMA 32’
CONSERVATELI
e controlli che non abbia
subito danni durante il
trasporto, in caso contrario
chiami il centro Candy più
vicino.
FR
CHAPITRE 1
NOTES GENERALES
A LA LIVRAISON
A la livraison veuillez,
contrôler que le matériel
suivant accompagne la
machine:
A) LIVRET
D’INSTRUCTIONS
B) ADRESSES DE SERVICE
APRES VENTE
C) CERTIFICAT DE
GARANTIE
D) VIS DE FIXATION DU
PANNEAU ARRIERE
E) BOUCHONS
F) COUDES POUR LE TUBE
DE VIDANGE
G) DOSEUR
PROGRAMME 32’
LES CONSERVER
et contrôler que ce matériel
soit en bon état; si tel n’est
pas le cas appelez le centre
Candy le plus proche.
ES
CAPÍTULO 1
NOTAS GENERALES
DE ENTREGA
A la entrega compruebe
que con la máquina estén:
A) MANUAL DE
INSTRUCCIONES
B) DIRECCIONES DE
ASISTENCIA TÉCNICA
C) CERTIFICADOS DE
GARANTÍA
D) TORNILLOS DE
FIJACIÓN DEL PANEL
POSTERIOR
E) TAPONES
F) CURVAS PARA EL TUBO
DE DESAGÜE
G) MEDIDOR
PROGRAMA 32’
CONSÉRVELOS
y compruebe que no haya
sufrido desperfectos durante
el transporte, en caso
contrario llame al centro
Candy más cercano.
EN
CHAPTER 1
GENERAL POINTS
ON DELIVERY
On delivery, check that the
following are included with
the machine:
A) INSTRUCTION MANUAL
B) CUSTOMER SERVICE
ADDRESSES
C) GUARANTEE
CERTIFICATES
D) SCREWS FOR
ASSEMBLY OF REAR
PANEL
E) CAPS
F) BEND FOR OUTLET TUBE
G) 32MINUTE
PROGRAMME DOSING
SCOOP
KEEP THEM IN A SAFE
PLACE
Check that the machine has
not incurred damage during
transport. If this is the case,
contact your nearest Candy
Centre.
DE
KAPITEL 1
ALLGEMEINE
HINWEISE ZUR
LIEFERUNG
Kontrollieren Sie bei
Anlieferung des Gerätes, ob
das folgende Zubehör
mitgeliefert wurde:
A) BEDIENUNGS-
ANLEITUNG
B) VERZEICHNIS DER
KUNDENDIENSTSTELLEN
C) GARANTIESCHEIN
D) BEFESTIGUNGS-
SCHRAUBEN FÜR DIE
RÜCKWAND
E) STÖPSEL
F) ROHRBOGEN FÜR
ABLAUFSCHLAUCH
G) WASCHMITTELDOSIERER
PROGRAMM 32’
BITTE GUT AUFBEWAHREN
Gerät bei Lieferung auf
eventuelle
Transportschäden
untersuchen und
gegebenenfalls beim
Händler reklamieren.
32'
G
32'
Page 5
8
FR
CHAPITRE 2
GARANTIE
L’appareil est accompagné
par un certificat de
gàrantie.
Ne pas oublier d’expédier le
coupon B du certificat de
garantie afin qu’il soit validé
dans les 10 jours à dater de
l’achat.
Vous devez conserver le
coupon A, dûment rempli,
qui sera montré au Service
d’Assistance Technique en
cas d’intervention;
conservez également votre
facture d’achat.
DE
EN
KAPITEL 2
GARANTIE
Der beiliegende
Garantieschein ermöglicht
die kostenlose
Inanspruchnahme des
technischen Kundendienstes.
Die Garantiezeit beträgt ein
Jahr ab Kaufdatum. In den
ersten 6 Monaten werden
alle Reparaturaufwendungen
von Candy getragen,die
Übernahme der
Anfahrtkosten entfällt 6
Monate nach Anlieferung
beim Endverbraucher.
IM SERVICEFALL WENDEN
SIE SICH BITTE AN UNSEREN
AUTORISIERTEN
WERKSKUNDENDIENST.
DIE SERVICE-NUMMER FÜR
DEUTSCHLAND
01805-625562 VERBINDET
SIE AUTOMATISCH MIT DEM
ZUSTÄNDIGEN GIASWERKSKUNDENDIENST IN
IHRER NÄHE.
Vergessen Sie nicht,Abschnitt
B des Garantiescheines
innerhalb von 10 Tagen nach
dem Kaufdatum
einzusenden.
Abschnitt A bitte ausgefüllt zu
Ihren Unterlagen heften, und
bei Bedarf dem technischen
Kundendienst vorlegen,
gemeinsam mit der von
Ihrem Händler ausgestellten
Kaufquittung.
CHAPTER 2
GUARANTEE
The appliance is supplied
with a guarantee certificate
which allows free use of the
Technical Assistance Service,
apart from a fixed call out
charge, for a period of one
year from the date of
purchase.
Remember to post part B of
the guarantee certificate
within 10 days of the
purchase date.
Part A should be filled in and
kept by you to be shown if
necessary to the technician
from the Technical Assistance
Service. The sales receipt
should also be kept.
9
IT
CAPITOLO 2
GARANZIA
L’apparecchio é
corredatoda un certificato
di garanzia che Le permette
di usufruire gratuitamente
del Servizio di Assistenza
Tecnica,salvo l’addebito di
un diritto fisso di chiamata,
per il periodo di un anno
dalla data d’acquisto.
Ricordi di spedire la parte A
del certificato di garanzia,
per la necessaria convalida
entro10 giorni dalla data di
acquisto.
La parte B dovrà essere da
Lei conservata,
debitamente compilata, per
essere esibita al Servizio
Assistenza Tecnica,in caso
di necessità di intervento,
insieme alla ricevuta fiscale
rilasciata dal rivenditore al
momento dell’acquisto.
SERVIZIO ASSISTENZA TECNICA
☎
199. 123. 123
ES
CAPÍTULO 2
GARANTIA
El aparato va acompañado
de un Certificado de
Garantía de 1 año.
En los primeros 6 meses, a
partir de la fecha de la
compra, la garantía le
cubre: piezas, recambios,
mano de obra y
desplazamientos.
En los 6 meses siguientes, la
garantía le cubre piezas y
recambios.
No olvide remitir la parte B
del Certificado de Garantia
para la debida
convalidación en los 10 días
siguientas a la fecha de
compra.
La parte A deberá
conservarla, debidamente
cumplimentada, para
presentarla al Servicio
Técnico de Asistencia, en
caso de necesitar su
intervención junto a la
factura legal expedida por
el vendedor en el momento
de combra.
*Rellenar la garantía que
viene en Castellano.
SERVICIO POST VENTA
☎
902. 100. 150
Page 6
10
CHAPITRE 3
MESURES DE
SECURITE
ATTENTION:
EN CAS D’INTERVENTION
DE NETTOYAGE ET
D’ENTRETIEN
● Débrancher la prise de
courant.
● Fermer le robinet
d’alimentation d’eau.
● Toutes les machines Candy
sont pourvues de mise à la
terre.
Vérifier que l’installation
électrique soit alimentée par
une prise de terre, en cas
contraire demander
l’intervention du personnel
qualifié.
Cet appareil est
conforme aux directives
89/336/EEC, 73/23/EEC et
modifications successives.
● Ne pas toucher l’appareil
pieds nus.
● Autant que possible éviter
l’usage de rallonges dans les
salles de bains ou les
douches.
ATTENTION:
PENDANT LE LAVAGE
L’EAU PEUT ATTEINDRE
90°C.
● Avant d’ouvrir le hublot
vérifier que le tambour soit
sans eau.
FR
KAPITEL 3
SICHERHEITSVORSCHRIFTEN
ZUR BEACHTUNG:
BEI REINIGUNG UND
WARTUNG DES
GERÄTES
●
Netzstecker ziehen.
●
Wasserzufuhr sperren.
●
Alle Candy Geräte sind
geerdet.
Versichern Sie sich, daß Ihr
Stromnetz geerdet ist. Sollte
dies nicht der Fall sein, rufen
Sie einen Fachmann.
Das Gerät entspricht
den europäischen
Richtlinien 89/336/ECC,
73/23/ECC und deren
nachträglichen
Änderungen.s.
●
Benutzen Sie nach
Mögkichkeit keine
Verlängerungskabel in
Feuchträumen.
ACHTUNG:
JE NACH
WASCHPROGRAMM
KANN SICH DAS
WASSER BIS AUF 90° C
AUFHEIZEN.
●
Vor dem Öffnen des
Bullauges sicherstellen, daß
kein Wasser mehr in der
Trommel steht.
CHAPTER 3
SAFETY MEASURES
IMPORTANT:
FOR ALL CLEANING
AND MAINTENANCE
WORK
● Remove the plug
● Turn off the water inlet tap.
● All Candy appliances are
earthed.
Ensure that the main
electricity circuit is earthed.
Contact a qualified
electrician if this is not the
case.
This appliance complies
with Directives 89/336/EEC,
73/23/EEC and following
changes.
● Do not touch the appliance
with wet or damp hands or
feet.
● Do not use the appliance
when bare-footed.
● Extreme care should be
taken if extension leads are
used in bathrooms or shower
rooms. Avoid this where
possible.
WARNING: DURING THE
WASHING CYCLE,THE
WATER CAN REACH A
TEMPERATURE OF 90°C.
● Before opening the washing
machine door, ensure that
there is no water in the drum.
DE
EN
11
IT
CAPITOLO 3
PRESCRIZIONI DI
SICUREZZA
ATTENZIONE:
PER QUALSIASI
INTERVENTO DI PULIZIA
E MANUTENZIONE
DELLA LAVATRICE
● Tolga la spina.
● Chiuda il rubinetto
dell’acqua.
● La Candy correda tutte le
sue macchine di messa a
terra. Si assicuri che
l’impianto elettrico sia
provvisto di messa a terra in
caso contrario richieda
l’intervento di personale
qualificato.
Apparecchio
conforme alle Direttive
Europee 89/336/CEE,
73/23/CEE e successive
modifiche.
● Non tocchi l’apparecchio
con mani, piedi bagnati o
umidi.
● Non usi l’apparecchio a
piedi nudi.
● Non usi, se non con
particolare cautela,
prolunghe in locali adibiti a
bagno o doccia.
ATTENZIONE:
DURANTE IL LAVAGGIO
L’ACQUA PUO’ ANDARE
A 90°C.
● Prima di aprire l’oblò si
assicuri che non vi sia
acqua nel cestello.
ES
CAPÍTULO 3
NORMAS DE
SEGURIDAD
ATENCION:
PARA
CUALQUIER TRABAJO
DE LIMPIEZA Y
MANTENIMIENTO
● Desenchúfela.
● Cierre el grifo del agua.
● Candy provede a todas
sus máquinas de toma de
tierra.
Asegúrese de que la
instalación electrica tenga
toma de tierra,en caso
contrario llame a un Servicio
cualificado.
Estos aparatos
cumplen con las Directivas
EEC 89/336, EEC 73/23 y
modificaciónes siguientes.
● No toque el aparato con
las manos, los pies mojados
o húmedos.
● No use el aparato
estando descalzo.
● No use, si no es con
especial cuidado, alargos
en cuartos de baño o
aseos.
ATENCION:
DURANTE EL LAVADO EL
AGUA PUEDE ALCANZAR
LOS 90°C.
● Antes de abrir el ojo de
buey, asegúrese de que no
haya agua en el tambor.
Page 7
12
FR
● Ne pas utiliser
d’adaptateurs ou de prises
multiples.
● Cet appareil ne doit pas
être utilisé sans surveillance.
● Pour débrancher la prise,
ne pas tirer sur le câble.
● Ne pas laisser la machine
exposée aux agents
atmosphériques (pluie, soleil,
etc...).
● En cas de déménagement
ne jamais soulever la
machine par les boutons ou
par le tiroir des produits
lessiviels.
● Pendant le transport ne
pas appuyer le hublot sur le
chariot.
Important!
Les ouvertures à la base de
l’appareil ne doivent en
aucun cas être obstruées par
des tapis, moquette ou
autres objets.
● 2 personnes pour soulever
la machine (voir dessin).
● En cas de panne et/ou de
mauvais fonctionnement
éteindre la machine, fermer
le robinet d’alimentation
d’eau et ne pas toucher à la
machine. Pour toute
réparation adressez-vous
exclusivement à un centre
d’assistance technique
Candy en demandant des
pièces de rechange
certifiées constructeur.Le fait
de ne pas respecter les
indications susmentionnées
peut compromettre la
sécurité de l’appareil.
● Si le remplacement du
câble d’alimentation s’avère
nécessaire, il devra être
remplacé par un câble
special fourni par le service
après-vente.
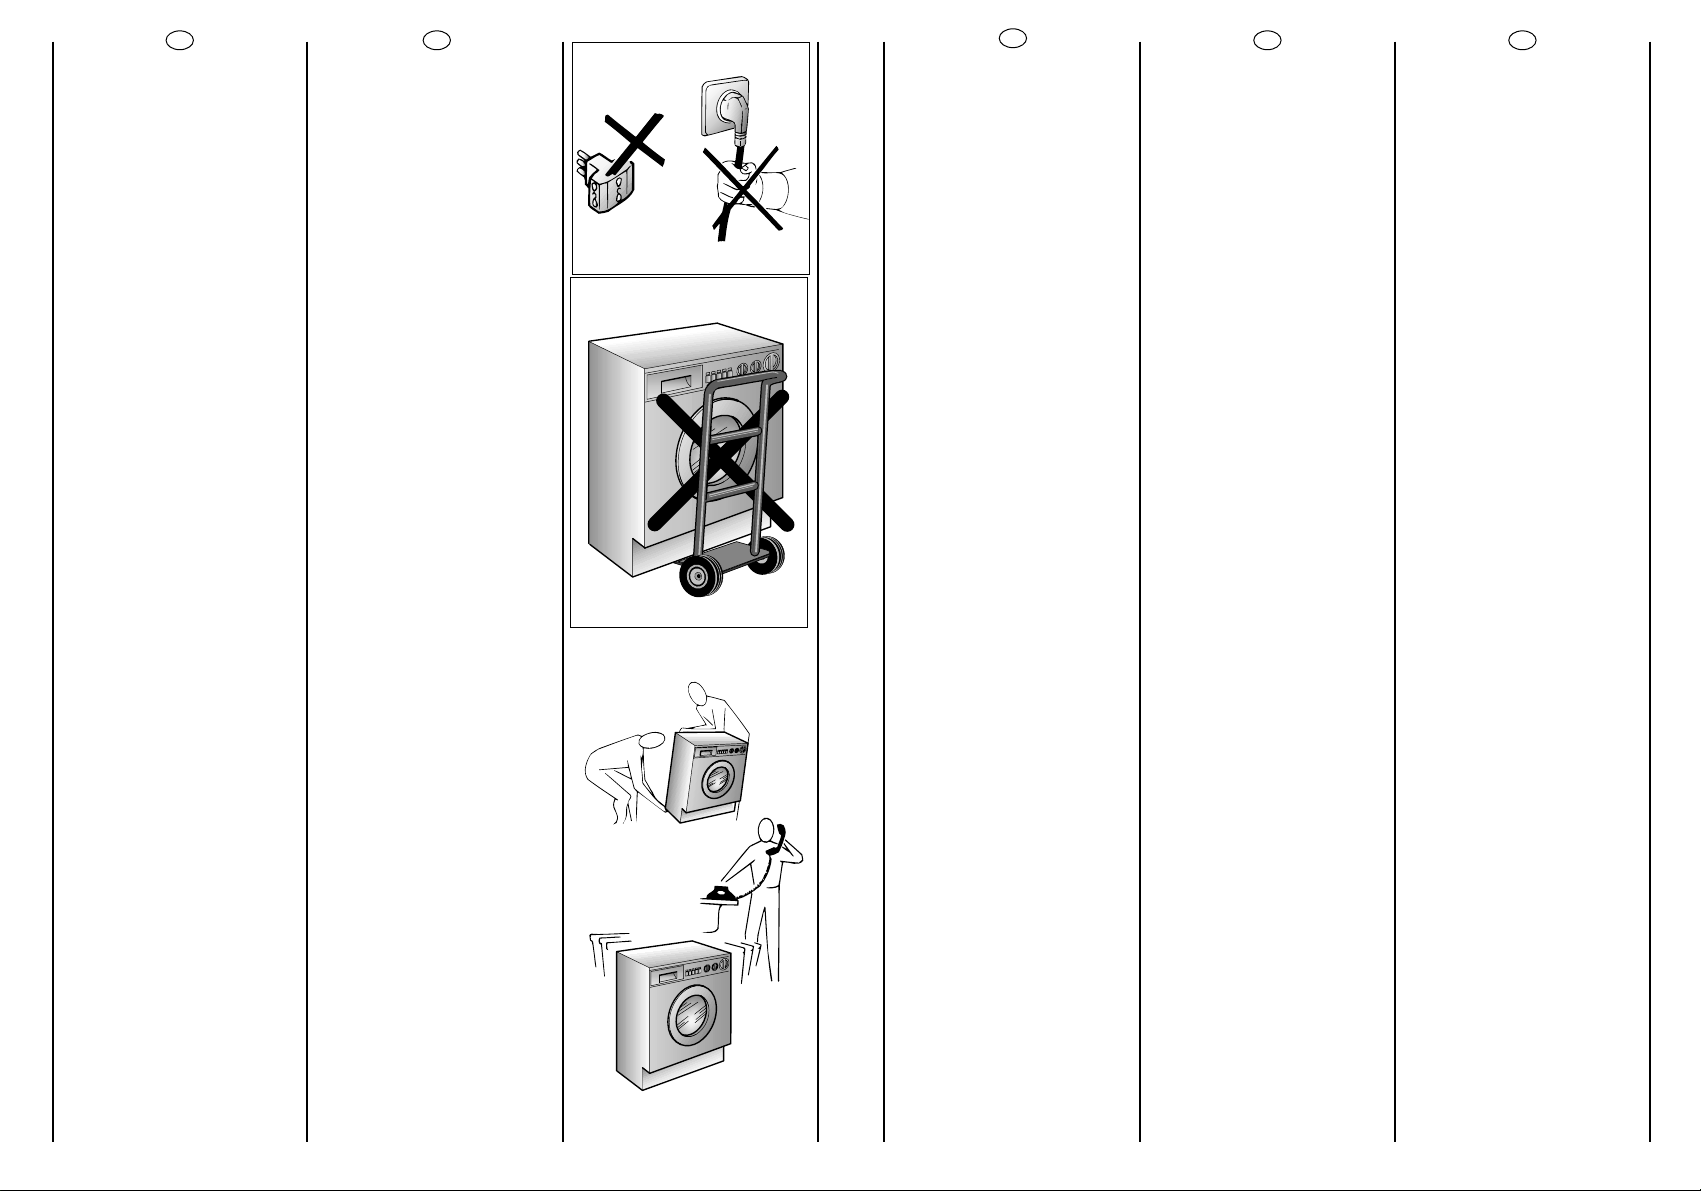
● Do not use adaptors or
multiple plugs.
● Do not allow the
appliance to be used by
children or the incompetent
without due supervision.
● Do not pull the mains lead
or the appliance itself to
remove the plug from the
socket.
● Do not leave the
appliance exposed to
atmospheric agents (rain,
sun etc.)
● In the case of removal,
never lift the appliance by
the knobs or detersive
drawer.
● During transportation
do not lean the door
against the trolley.
Important!
When the appliance
location is on carpet floors,
attention must be paid so as
to ensure that there is no
obstruction to the bottom
vents.
● Lift the appliance in pairs
as illustrated in the diagram.
● In the case of failure
and/or incorrect operation,
turn the washing machine
off, close the water inlet tap
and do not tamper with the
appliance. Contact a
Candy Technical Assistance
Centre for any repairs and
ask for original Candy spare
parts. Avoidance of these
norms may compromise the
safety of the appliance.
● Should the supply cord
(mains cable) be demaged,
this is to be replaced by a
specific cable available
from the after sales service
centre.
DE
EN
●
Gerät nicht an Adapter
oder Mehrfachsteckdosen
anschließen.
●
Achten sie darauf,daß
Kinder nicht unbeaufsichtigt
am Gerät hantieren.
●
Ziehen Sie den Stecker
immer am Stecker selbst aus
der Steckdose.
●
Setzen Sie das Gerät keinen
Witterungseinflüssen (Regen,
Sonne usw.) aus.
●
Das Gerät niemals an den
Schaltknöpfen oder am
Waschmittelbehälter
anheben.
●
Während des Transportes
mit einer Sackkarre das Gerät
nicht auf das Bullauge
lehnen.
Wichtig!
Falls Sie das Gerät auf einen
Teppich oder Teppichboden
aufstellen, achten Sie darauf,
daß die Lufteinlässe am
Boden des Gerätes nicht
verstopft werden.
●
Stets, wie auf der
Zeichnung dargestellt, zu
zweit anheben.
●
Bei eventuellen Defekten
und Fehlfunktionen das Gerät
abschalten, die Wasserzufuhr
unterbrechen und die
Waschmaschine nicht
gewaltsam öffnen. Bei
anfallenden Reparaturen
wenden Sie sich bitte
ausschließlich an die
Kundendienststelle der Firma
Candy und bestehen Sie auf
die Verwendung von
Originalersatzteilen. Die
Nichtbeachtung der o.a.
Vorschriften kann zur
Beeinträchtigung der Geräte
sicherheit führen.
●
Wenn das Gerät einmal
ausgedient hat, entsorgen Sie
es bitte ordnungsgemäß über
Ihren Fachhändler oder die
kommunalen
Entsorgungseinrichtungen.
●
Sollte das Netzkabel
beschädigt sein, muß dieses
mit dem speziellen Netzkabel
ersetzt werden, das vom
Gias-Kundendienst zur
Verfügung gestellt werden
kann.
13
IT
● Non usi adattatori o spine
multiple
● Non permetta che
l’apparecchio sia usato dai
bambini o da incapaci,
senza sorveglianza.
● Non tiri il cavo di
alimentazione, o
l’apparecchio stesso, per
staccare la spina dalla
presa di corrente.
● Non lasci esposto
l’apparecchio ad agenti
atmosferici (pioggia, sole,
ecc...).
● In caso di trasloco non la
sollevi mai dalle manopole o
dal cassetto del detersivo.
● Durante il trasporto non
appoggi mai l’oblò al
carrello.
Importante!
Nel caso si installi
l’apparecchio su un
pavimento ricoperto da
tappeti o con moquette, si
deve fare attenzione che le
aperture di ventilazione alla
base dell’apparecchio non
vengano ostruite.
● Sollevarla in due persone
come illustrato in figura.
● In caso di guasto e/o di
cattivo funzionamento
dell’apparecchio, lo
spenga, chiuda il rubinetto
dell’acqua e non
manometta
l’elettrodomestico. Per
l’eventuale riparazione si
rivolga solamente a un
centro di Assistenza Tecnica
Candy e richieda l’utilizzo di
ricambi originali.
Il mancato rispetto di
quanto sopra può
compromettere la sicurezza
dell’apparecchio.
● Se il cavo di alimentazione
risultasse danneggiato,
dovrà essere sostituito da un
cavo speciale disponibile
presso il servizio di Assistenza
Tecnica.
ES
● No use adaptadores o
enchufes múltiples.
● No permita la
manipulación del aparato a
niños o incapacitados, sin
vigilancia.
● No tire del cable de
alimentación, ni del
aparato, para desconectar
la toma de corriente.
● No deje el aparato a la
intemperie o expuesto a la
acción de los agentes
atmosfericos (lluvia, sol,
etc..).
● En caso de traslado no la
sujete nunca por los mandos
ni por la cubeta de
detergente.
● Durante su transporte no
apoye el ojo de buey en la
carretilla.
Importante!
Si se va a instalar el aparato
sobre una alfombra o
moqueta, es necesario
tener cuidado para evitar
que se obstruyan las rejillas
de ventilación situadas en la
base de la lavadora.
● Levántela ayudado por
otra persona tal como
aparece en la figura.
● En caso de avería y/o mal
functionamiento del
aparato, desconéctelo,
cierre el grifo del agua y no
manipule el
electrodoméstico. Para su
eventual reparación diríjase
únicamente a un centro de
Asistencia Técnica Candy y
solicite el uso de recambios
originales. El incumplimiento
de estas sugerencias puede
comprometer la seguridad
del aparato.
● Si el cable de
alimentación resultase
dañado, tendrá que ser
sustituido por un cable
especiäl disponible en el
servicio de asistencia
técnica.
Page 8
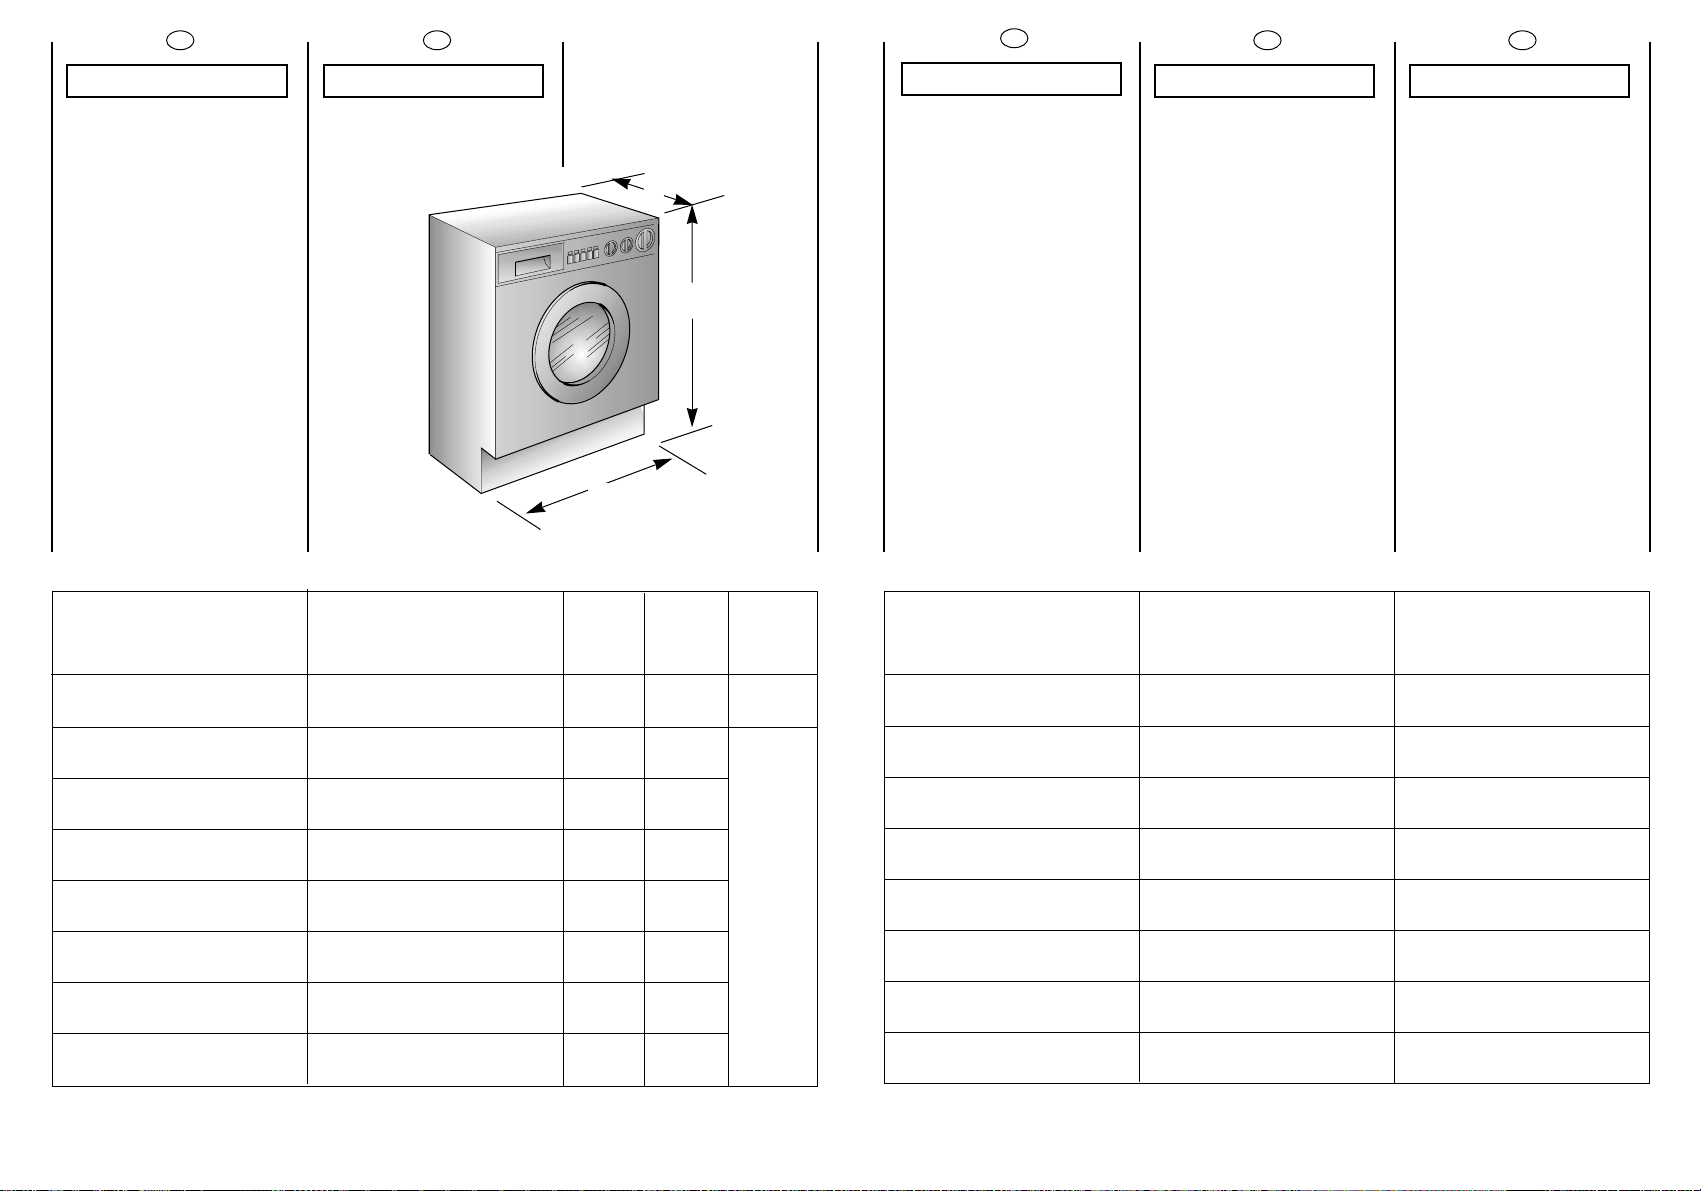
82 cm
60 cm
52 cm
WASSERDRUCK
FR DE
EN
KAPITEL 4 CHAPTER 4CHAPITRE 4
14 15
CAPACITE DE LINGE
SEC
EAU NIVEAU NORMAL
PUISSANCE
ABSORBEE
CONSOMMATION ENERGIE
(PROG. 1)
AMPERAGE
PRESSION DANS
L’INSTALLATION HYDRAULIQUE
TENSION
kg
l
W
kWh
A
ESSORAGE (Tours/min.) giri/min.
MPa
V
MAXIMUM WASH
LOAD DRY
NORMAL WATER LEVEL
POWER INPUT
ENERGY CONSUMPTION
(PROG.1)
POWER CURRENT FUSE
AMP
WATER PRESSURE
SUPPLY VOLTAGE
FASSUNGSVERMÖGEN
TROCKENWÄSCHE
WASSERSTAND NORMAL.
GESAMTANSCHLUßWERT
ENERGIEVERBRAUCH
(PROGR. 1)
ABSICHERUNG
SPIN
r.p.m.
SCHLEUDERDREHZAHL
(U/min.)
SPANNUNG
IT
CAPITOLO 4
CAPACITA’ DI BIANCHERIA
ASCIUTTA
ACQUA
LIVELLO NORMALE
POTENZA
ASSORBITA
CONSUMO DI ENERGIA
(PROG. 1)
AMPERE DEL
FUSIBILE DELLA RETE
PRESSIONE NELL’IMPIANTO
IDRAULICO
TENSIONE
GIRI DI
CENTRIFUGA
ES
PRESIÓN EN EL CIRCUITO
HIDRÁULICO
TENSION
CAPÍTULO 4
CAPACIDAD DE ROPA
SECA
NIVEL NORMAL DE AGUA
POTENCIA
ABSORBIDA
CONSUMO DE ENERGÍA
(PROG. 1)
AMPERIOS DEL FUSIBLE
DE LA RED
REVOLUCIONES DE
CENTRIFUGADO (rpm/min.)
5
10÷15
2150
1,75
10
min. 0,05
max. 0,8
230
1000
LAVAGE
LAVAGGIO
LAVADO
WASCHEN
WASHING
SÉCHAGE
ASCIUGATURA
SECADO
TROCKNEN
DRYING
2,5
Page 9
16
17
FR
CHAPITRE 5
MISE EN PLACE
INSTALLATION
Placer la machine sur le lieu
d’utilisation sans le socle
d’emballage.
Couper les colliers
serre-tubes
Extraire les 2 vis et enlever le
panneau arrière.
Extraire les 4 vis de l’étrier
gauche et l’enlever.
Extraire les 4 vis de l’étrier
droit et l’enlever.
Extraire les 4 vis de l’étrier
inférieur et l’enlever.
Remonter le panneau
arrière en encastrant la zone
supérieure, visser les 2 vis
enlevées et les 4 vis
contenues dans l’enveloppe
des instructions.
Fermer les 6 trous par les
bouchons livrés avec la
machine.
ATTENTION:
NE PAS LAISSER À LA
PORTÉE DES ENFANTS
DES ELEMENTS
D’EMBALLAGE QUI
PEUVENT CAUSER DES
RISQUES.
IT
CAPITOLO 5
MESSA IN OPERA
INSTALLAZIONE
Porti la macchina vicino al
luogo di utilizzo senza il
basamento dell’imballo.
Tagli le fascette fermatubo
Tolga le due viti e rimuova il
pannello posteriore.
Tolga le 4 viti della staffa
sinistra e la asporti.
Tolga le 4 viti della staffa
destra, e l’asporti.
Tolga le 4 viti della staffa
inferiore e l’asporti.
Rimonti il pannello posteriore
incastrando la zona
superiore, avviti le 2 viti tolte
e le 4 viti contenute nella
busta istruzioni.
Richiuda i 6 fori con i tappi in
dotazione.
ATTENZIONE:
NON LASCI ALLA
PORTATA DI BAMBINI
GLI ELEMENTI
DELL’IMBALLAGGIO IN
QUANTO POTENZIALI
FONTI DI PERICOLO.
ES
CAPÍTULO 5
PUESTA EN
FUNCIONAMIENTO
INSTALACIÓN
Ponga la máquina cerca
del lugar de uso sin la base
del embalaje.
Corte las cintas del tubo
Extraiga los 2 tornillos y retire
el panel posterior.
Extraiga los 4 tornillos del
soporte de fijación izquierdo
y quitélo.
Extraiga los 4 tornillos del
soporte de fijación derecho
y quitélo.
Extraiga los 4 tornillos del
soporte de fijación inferior y
quitélo.
Vuelva a colocar el panel
posterior encajando la
parte superior,enrosque los
2 tornillos extraídos más los 4
tornillos contenidos en el
sobre de instrucciones.
Cierre los 6 agujeros con los
tapones adjuntos.
ATENCIÓN:
NO DEJE AL ALCANCE
DE LOS NIÑOS LOS
ELEMENTOS DE
EMBALAJE YA QUE
PUEDEN SER
PELIGROSOS.
DE
KAPITEL 5
INBETRIEBNAHME
INSTALLATION
Gerät ohne
Verpackungsunterteil in die
Nähe des Aufstellungsortes
bringen.
Lösen Sie die Klammern der
Schlauchbefestigung.
Die beiden Schrauben
entfernen und Rückwand
abnehmen.
Die vier Schrauben des linken
Bügels entfernen und Bügel
abnehmen.
Die vier Schrauben des
rechten Bügels entfernen
und Bügel abnehmen.
Die vier Schrauben des
unteren Bügels entfernen
und Bügel abnehmen.
Die Rückwand wieder
montieren, dabei die obere
Fläche einrasten lassen, die
beiden vorher entfernten
sowie die 4 mitgelieferten
Schrauben eindrehen.
Die sechs Öffnungen mit den
mitgelieferten Stöpseln
abdecken.
ACHTUNG:
DIE VERPACKUNG IST
IN DEN HÄNDEN
VON KINDERN EINE
GEFAHRENQUELLE.
BITTE ENTSORGEN SIE
DAS VERPACKUNGSMATERIAL
ORDNUNGSGEMÄß.
EN
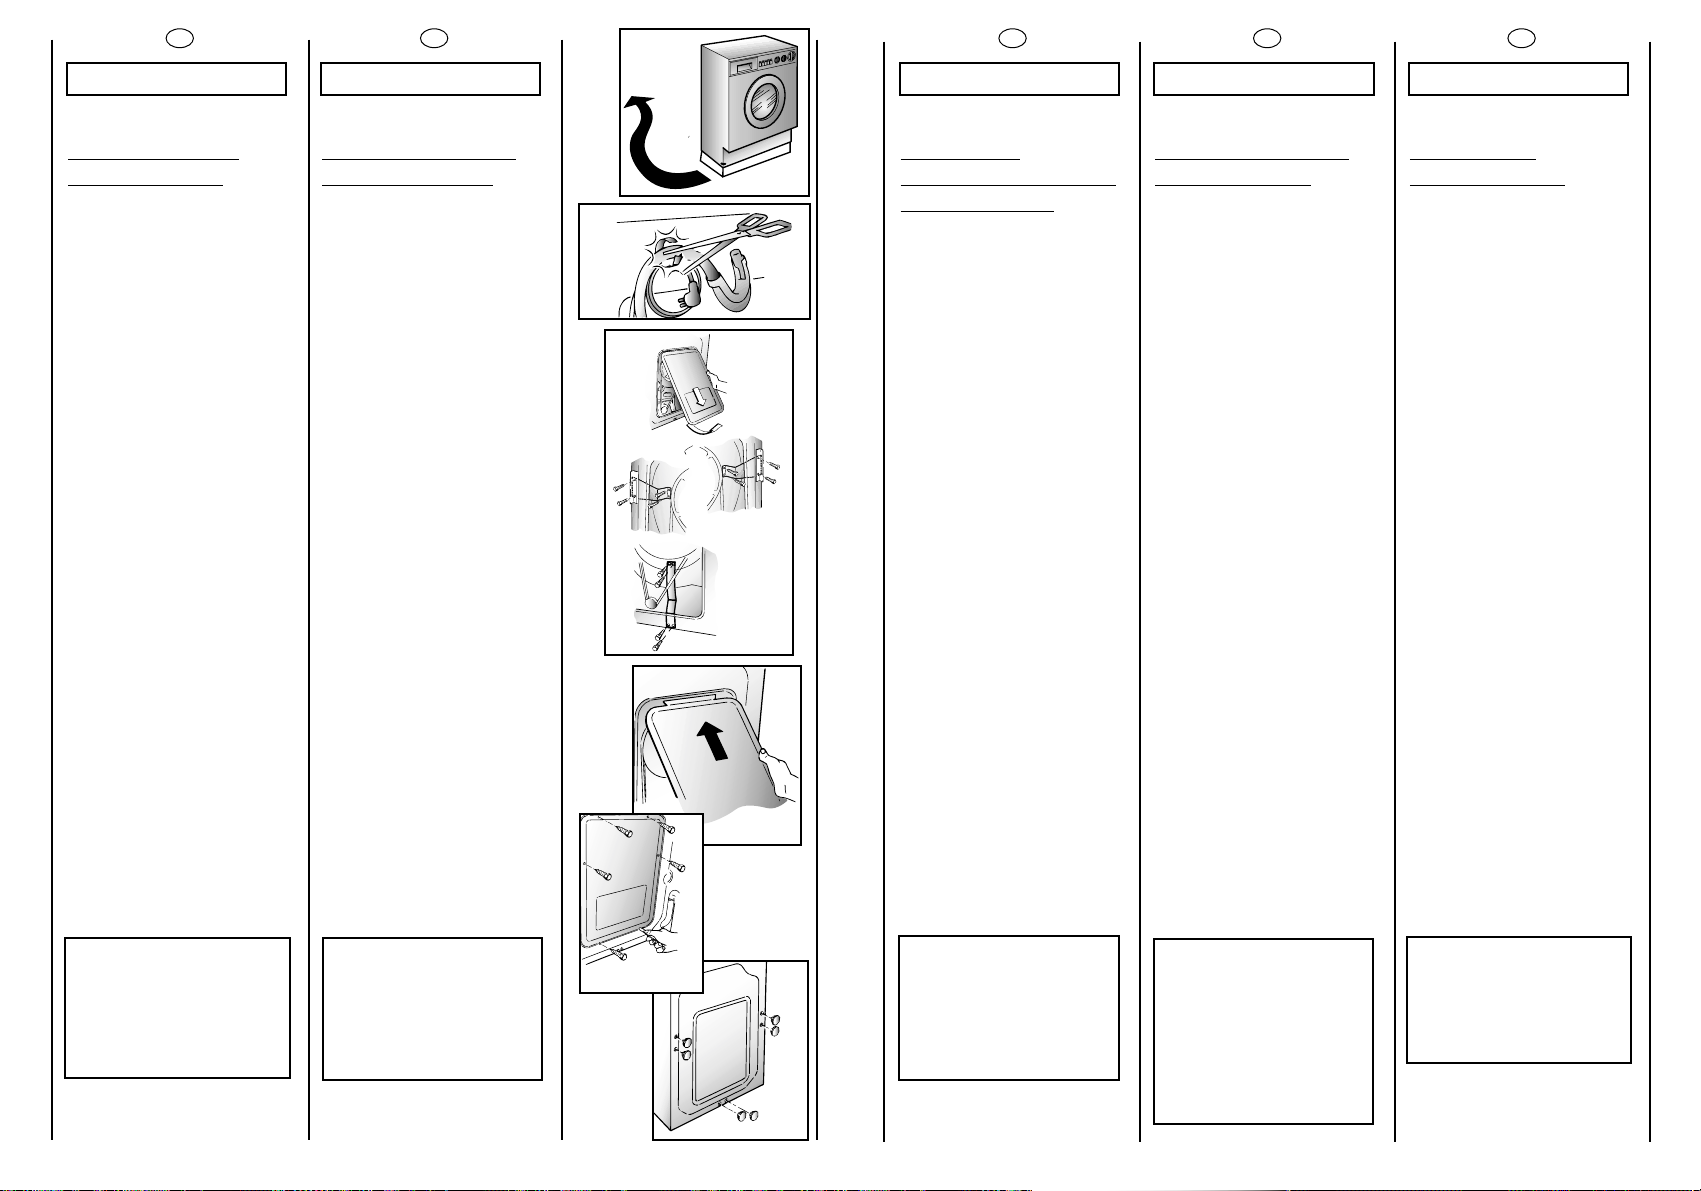
CHAPTER 5
SETTING UP
INSTALLATION
Move the machine near its
permanent position without
the packaging base.
Cut tube-holding straps.
Unscrew the 2 screws and
remove the back panel.
Unscrew the 4 screws on the
left bracket and remove.
Unscrew the 4 screws on the
right bracket and remove.
Unscrew the 4 screws on the
lower bracket and remove.
Remount the back panel by
slotting the upper edge in
place. Screw in the 2 screws
removed previously and the
4 screws from the instruction
envelope.
Cover the 6 holes with the
caps provided.
WARNING:
DO NOT LEAVE THE
PACKAGING IN THE
REACH OF CHILDREN
AS IT IS A POTENTIAL
SOURCE OF DANGER.
Page 10
18
FR
Appliquer la feuille
supplémentaire sur le fond
comme dans la figure.
L'appareil doit être relié à
l'arrivée d'eau exlusivement
avec les tuyaux fournis .
Ne pas réutiliser les anciens
tuyaux.
ATTENTION:
NE PAS OUVRIR LE
ROBINET
IMPORTANT:
Pour l’optimisation des
consommations
énergétiques, il est possible
d’alimenter ce lave-linge
directement en eau
chaude.
Reliez:
- le tuyau gris a l’eau froide
- le tuyau rouge a l’eau
chaude
Si vous n’en avez pas la
possibilité, utilisez
l’accessoire en forme de
“Y”, livré avec le lave-linge.
Suivez les indications du
dessin ci joint.
Approcher la machine
contre le mur en faisant
attention à ce que le tuyau
n’ait ni coudes ni
étranglements.
Raccorder le tuyau de
vidange au rebord de la
baignoire ou, mieux encore,
à un dispositif fixe
d’évacuation,hauteur mini.
50 cm et de diamètre
supérieur au tuyau de la
machine à laver.
En cas de besoin, utiliser le
coude rigide livré avec la
machine.
DE
EN
19
IT
Applichi il foglio di polionda
sul fondo come mostrato in
figura.
L’apparecchio deve essere
connesso alla rete idrica
solo con i nuovi tubi di
carico forniti in dotazione. I
vecchi tubi di carico non
devono essere riutilizzati.
ATTENZIONE:
NON APRA
IL RUBINETTO
IMPORTANTE
Questa Lavabiancheria è
predisposta al
collegamento della rete
idrica con acqua calda e
acqua fredda per maggiore
risparmio energetico.
Il tubo grigio deve essere
collegato al rubinetto
dell’acqua fredda
mentre il tubo rosso deve
essere collegato al rubinetto
dell’acqua calda.
Nel caso non disponiate del
collegamento acqua calda
utilizzare l’accessorio a “Y” in
dotazione, come da
disegno allegato.
Accosti la lavatrice al muro
facendo attenzione che
non vi siano curve o
strozzature, allacci il tubo di
scarico al bordo della
vasca.
o meglio a uno scarico fisso;
altezza minima 50 cm, di
diametro superiore al tubo
della lavatrice.
In caso di necessità utilizzare
la curva rigida in dotazione.
ES
Aplique la lamina de
polionda como se muestra
en la figura.
El aparato debe ser
conectado a la red
hidraulica sólo con los
nuevos tubos de carga
disponibles en dotación.
Los viejos tubos de carga no
tienen que ser reutilizados.
ATENCIÓN:
NO ABRA EL GRIFO.
IMPORTANTE:
Esta lavadora permite ser
conectada a la red
hidraulica con agua
caliente y fría para un
mayor ahorro energético.
El tubo gris debe ser
conectado a la salida de
agua fría mientras que el
tubo rojo debe ser
conectado
al del agua caliente.
En el caso de no disponer
de conexión para el agua
caliente
utilizar el accesorio "Y"
suministrado en dotación,
segun el dibujo
adjunto.
Acerque la lavadora a la
pared procurando que no
se formen curvas o
estrangulamientos, fije el
tubo desagüe al borde de
la pila.
o mejor aún, a un desagüe
fijo,con un diámetro mayor
que el del tubo de la
lavadora,a una altura
mínima de 50 cm.
En caso necesario, utilice la
curva rígida adjunta.
Befestigen Sie die gewellte
Bodenplatte wie in der
Abbildung dargestellt.
Das Gerät muß an die
Wasserversorgung mit neuen
Schläuchen angeschlossen
werden.
Alte Schläuche dürfen nicht
wiederverwendet werden.
ACHTUNG:
WASSERHAHN NOCH
NICHT ÖFFNEN.
WICHTIG:
Um den Stromverbrauch zu
senken, ist diese
Waschmaschine,zuzüglich
zum Kaltwasseranschluß,mit
einem Warmwasseranschluß
ausgestattet.
Der graue Schlauch ist an
den Kaltwasserhahn
anzuschließen, während der
rote Schlauch an den
Warmwasseranschluß zu
verbinden ist.
Falls keine
Warmwasserleitung
vorhanden sein sollte,ist das
mitgelieferte Y-förmige
Zubehörteil einzusetzen, wie
in der beigefügten
Abbildung aezeigt.
Die Waschmaschine an die
Wand rücken,darauf
achten, daß dabei der
Schlauch nicht verkrümmt
oder eingeengt wird.
Ablaufschlauch am
Wannenrand
befestigen, oder an einem
festen Abfluß von
mindestens 50 cm Höhe
anbringen, dessen
Durchmesser größer ist als
der des
Waschmaschinenschlauchs.
Falls erforderlich den
mitgelieferten starren
Rohrbogen benutzen.
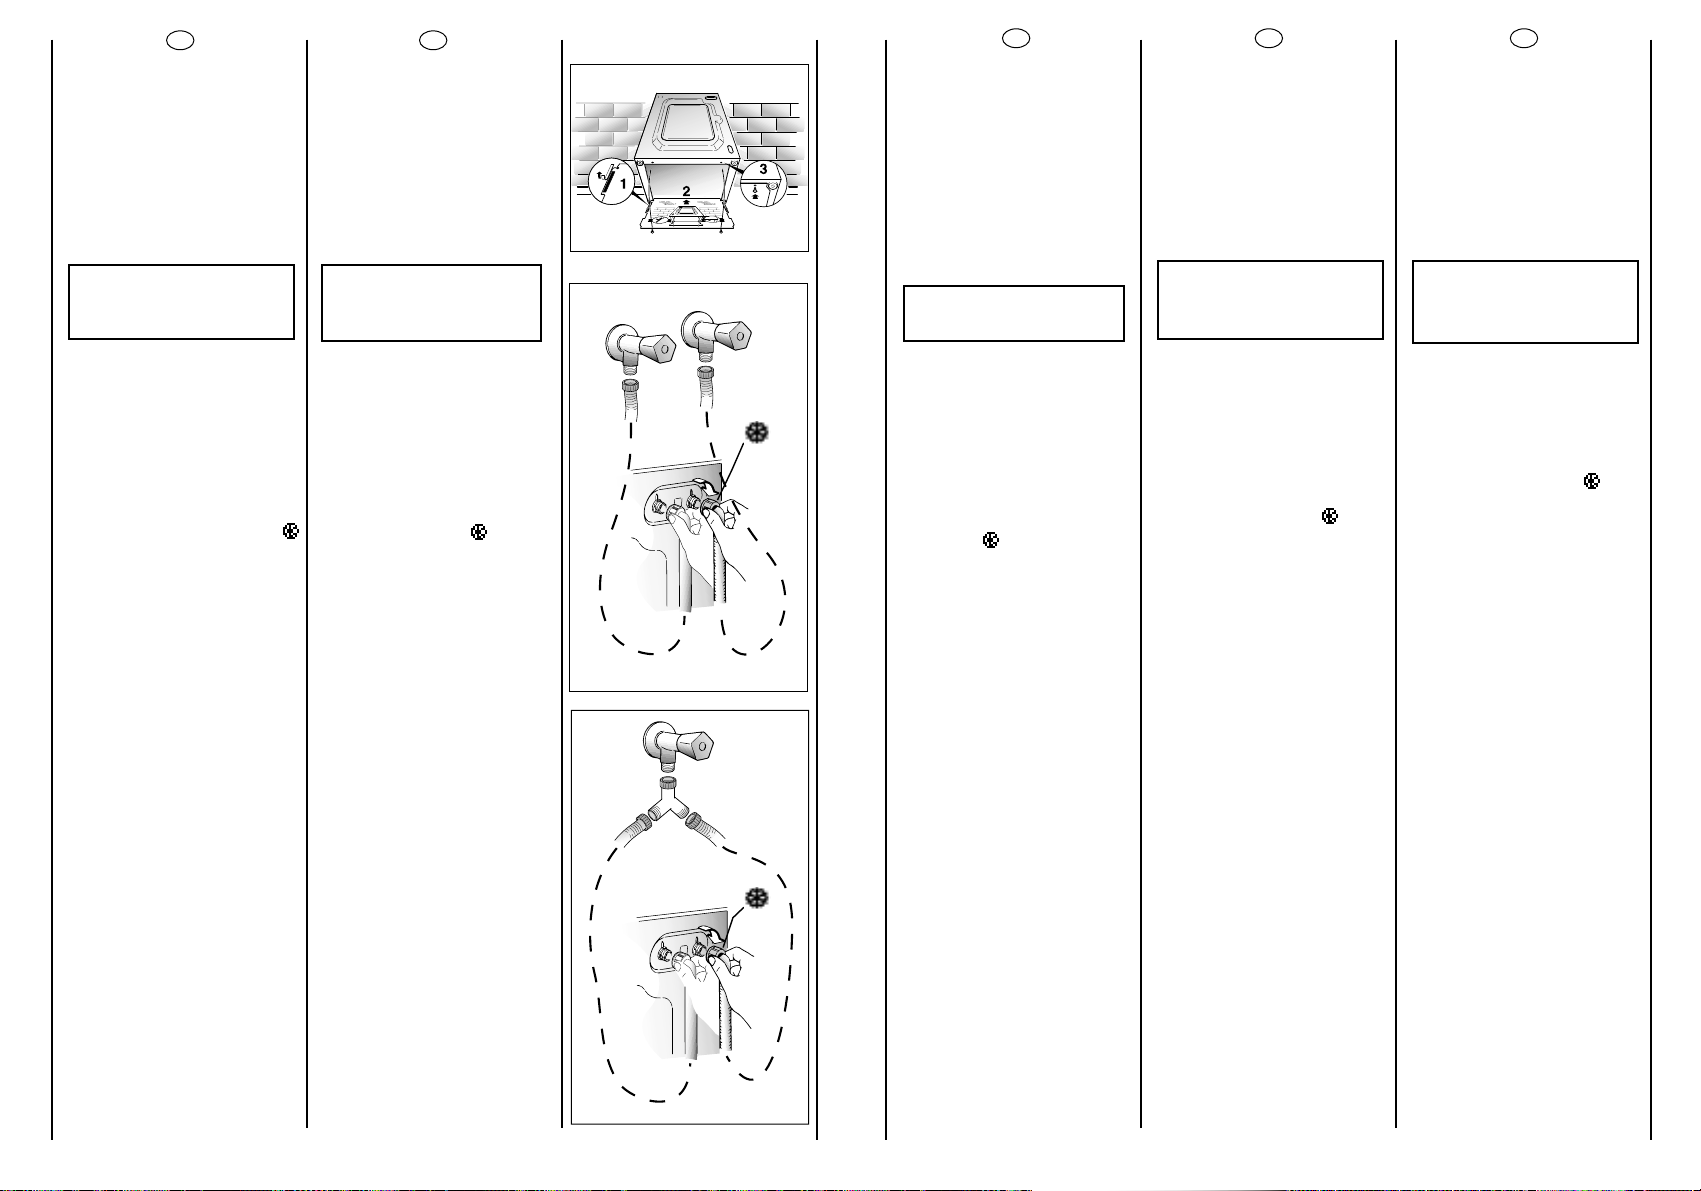
Fix the sheet of corrugated
material on the bottom as
shown in picture.
The appliance must be
connected to the water
mains using new hose-sets.
The old hose-sets should not
be reused.
IMPORTANT:
DO NOT TURN THE TAP
ON AT THIS TIME.
IMPORTANT
This appliance is set to be
connected to hot and cold
water supply for improved
energy consumption.
The grey hose must be
attached to the cold
water tap and the red hose
must be attached to the hot
water tap.
Should the hot water supply
not be available, please, use
the “Y” attachement as per
diagram shown.
Position the washing
machine next to the wall.
Hook the outlet tube to the
edge of the bath tub,
paying attention that there
are no bends or
contractions along the tube.
It is better to connect the
discharge hose to a fixed
outlet of a diameter greater
than that of the outlet tube
and at a height of min. 50
cm. If is necessary to use the
plastic sleeve supplied.
Page 11

20
A
B
C
FR
Enlever la légende en
“français” et l’appliquer à
l’interieur de la porte, suivant
les indications.
Mettre la machine avec les
pieds avant.
a) Tourner dans le sens des
aiguilles d’une montre
l’écrou de façon à
dévérouiller la vis du pied.
b) Tourner le pied et le faire
monter ou descendre
jusqu’à obtenir une parfaite
adhérence au sol.
c) Enfin bloquer le pied en
revissant l’écrou dans le sens
inverse des aiguilles d’une
montre et le faire adhérer au
fond de la machine.
Vérifier que le bouton
Marche/Arrêt (C) ne soit pas
enfoncé.
Vérifier que toutes les
manettes soient sur la
position “0” et que le hublot
soit fermé.
Brancher la prise.
Une fois l'appareil installé, la
prise électrique doit rester
accessible.
Appuyer sur la touche
Marche/Arrêt (C) pour
allumer la lampe-témoin de
fonctionnement courant
branché (N); si elle ne
s’allume pas se reporter à la
liste des recherches de
panne.
DE
EN
Den Aufkleber der
Programmlegende in
deutscher Sprache
abtrennen und wie gezeigt
im Inneren der Klappe
anbrinen.
Ausrichten der Maschine
über die vorderen
Verstellfüße
a) Kontermuttern im
Uhrzeigersinn lösen.
b) Standfuß einregulieren, bis
das Gerät genau
ausgerichtet ist (möglichst
mit der Wasserwaage
justieren!).
c) Kontermuttern (gegen
den Uhrzeigersinn) festziehen.
Wichtig: Sollte das Gerät auf
einen Sockel aufgestellt
werden,ist es durch eine
Sockelbefestigung zu sichern.
Erkundigen Sie sich bitte
hierfür im Fachhandel.
Der Hersteller haftet nicht für
unsachgemäße Aufstellung
und Installation.
Sicherstellen, daß die StartStop-Taste (C) nicht gedrückt
ist.
Sicherstellen, daß alle
Schalter auf “0” stehen, und
das Bullauge geschlossen ist.
Stecker einstecken.
Nach der Installation muß der
Anschluß zugänglich sein.
Bei Betätigen der “START”
Taste leuchtet die
Leuchtanzeige auf.Sollte dies
nicht der Fall sein, bitte im
Kapitel “Fehlersuche”
nachsehen.
Remove the key in “English”
and apply to the inside of
the door as indicate.
Use front feet to level the
machine with the floor.
a) Turn the nut clockwise to
release the screw adjuster of
the foot.
b) Rotate foot to raise or
lower it until it stands firmly on
the ground.
c) Lock the foot in position
by turning the nut anticlockwise until it comes up
against the bottom of the
machine.
Ensure that the Off/On
button (C) is not pressed.
Ensure that all the knobs are
on the “0” position and that
the door is closed.
Insert the plug.
After installation, the
appliance must be
positioned so that the plug is
accessible.
Press the START (C) button.
The power on (N) light will
light up.
If this does not light up see
faults search.
21
IT
Stacchi la legenda adesiva
in “ITALIANO”e la applichi
all’interno dell’anta.
Livelli la macchina con i
piedini anteriori.
a) Girare in senso orario il
dado per sbloccare la vite
del piedino.
b) Ruotare il piedino e farlo
scendere o salire fino ad
ottenere la perfetta
aderenza al suolo.
c) Bloccare infine il piedino
riavvitando il dado in senso
antiorario, fino a farlo
aderire al fondo della
lavatrice.
Si assicuri che il pulsante
Marcia/Arresto (C) non sia
premuto.
Si assicuri che tutte le
manopole siano in posizione
“0” e l’oblò sia chiuso.
Inserisca la spina.
L’apparecchio deve essere
posto in modo che la spina
sia accessibile ad
installazione avvenuta.
Quindi prema il tasto START
(C), si accenderà la spia di
funzionamento corrente
inserita (N), se non si
accende veda ricerca
guasti.
ES
Quite la etiqueta en
“CASTELLANO”y péguela en
el interior de la puerta tal
como viene indicado.
Nivele la máquina con las
patas delantares
a) Girar la tuerca en el
sentido de las agujas del
reloj para desbloquear el
tornillo del pie.
b) Girar el pie y hacerlo
bajar o subir hasta
conseguir su perfecta
adherencia al suelo.
c) Bloquear el pie girando la
tuerca en el sentido
contrario a las agujas del
reloj hasta que se adhiera al
fondo de la lavadora.
Asegúrese de que el botón
Marcha/Paro (C) no esté
pulsado.
Asegúrese de que todos los
mandos estén en posición
“0” y que el ojo de buey
esté cerrado.
Enchúfela.
El aparato tiene que ser
colocado de forma que el
enchufe sea accesible una
vez instalado.
El aparato tiene que ser
colocado de forma que el
enchufe sea accesible una
vez instalado.
A continuación pulse el
botón START (C) se
encenderá el piloto de
funcionamiento “conexión
de corriente efectuada” (N)
si no se enciende vea “
causas de averías”
Page 12
CAPITOLO 6
COMANDI
Cassetto detersivo
Tasto apertura oblò
Tasto marcia arresto
Tasto super risciacquo
Tasto Super Rapido
Tasto asciugatura cotone
Manopola di regolazione
della temperatura di lavaggio
Manopola programmi di
asciugatura
Manopola programmi di
lavaggio
Segnalazione asciugatura
Segnalazione luminosa di
funzionamento
Segnalazione luminosa
asciugatura potenziata
CHAPITRE 6
COMMANDES
Bacs à produits
Touche ouverture porte
Touche marche/arrêt
Touche super rinçage
Touche Super Rapide
Touche séchage coton
Manette de réglage de
température de lavage
Manette sélection
programmes de séchage
Manette des programmes de
lavage
Voyant séchage
Voyant de mise sous tension
Voyant séchage plus
puissant
22
F
E
D
A
IH
B
C
L
FR
DE
EN
KAPITEL 6
BEDIENUNGSELEMENTE
Waschmittelbehälter
Taste zum Öffnen des
Bullauges
Start/Stop Taste
Taste Mehr-Wasser
Taste Super-Schnell
Taste Extratrocken
Temperaturwahlschalter
Trockenprogrammwahlschalter
Waschprogrammwahlschalter
Trocknen-Anzeige
Leuchtanzeige “Betrieb”
Anzeige “Extratrocken”
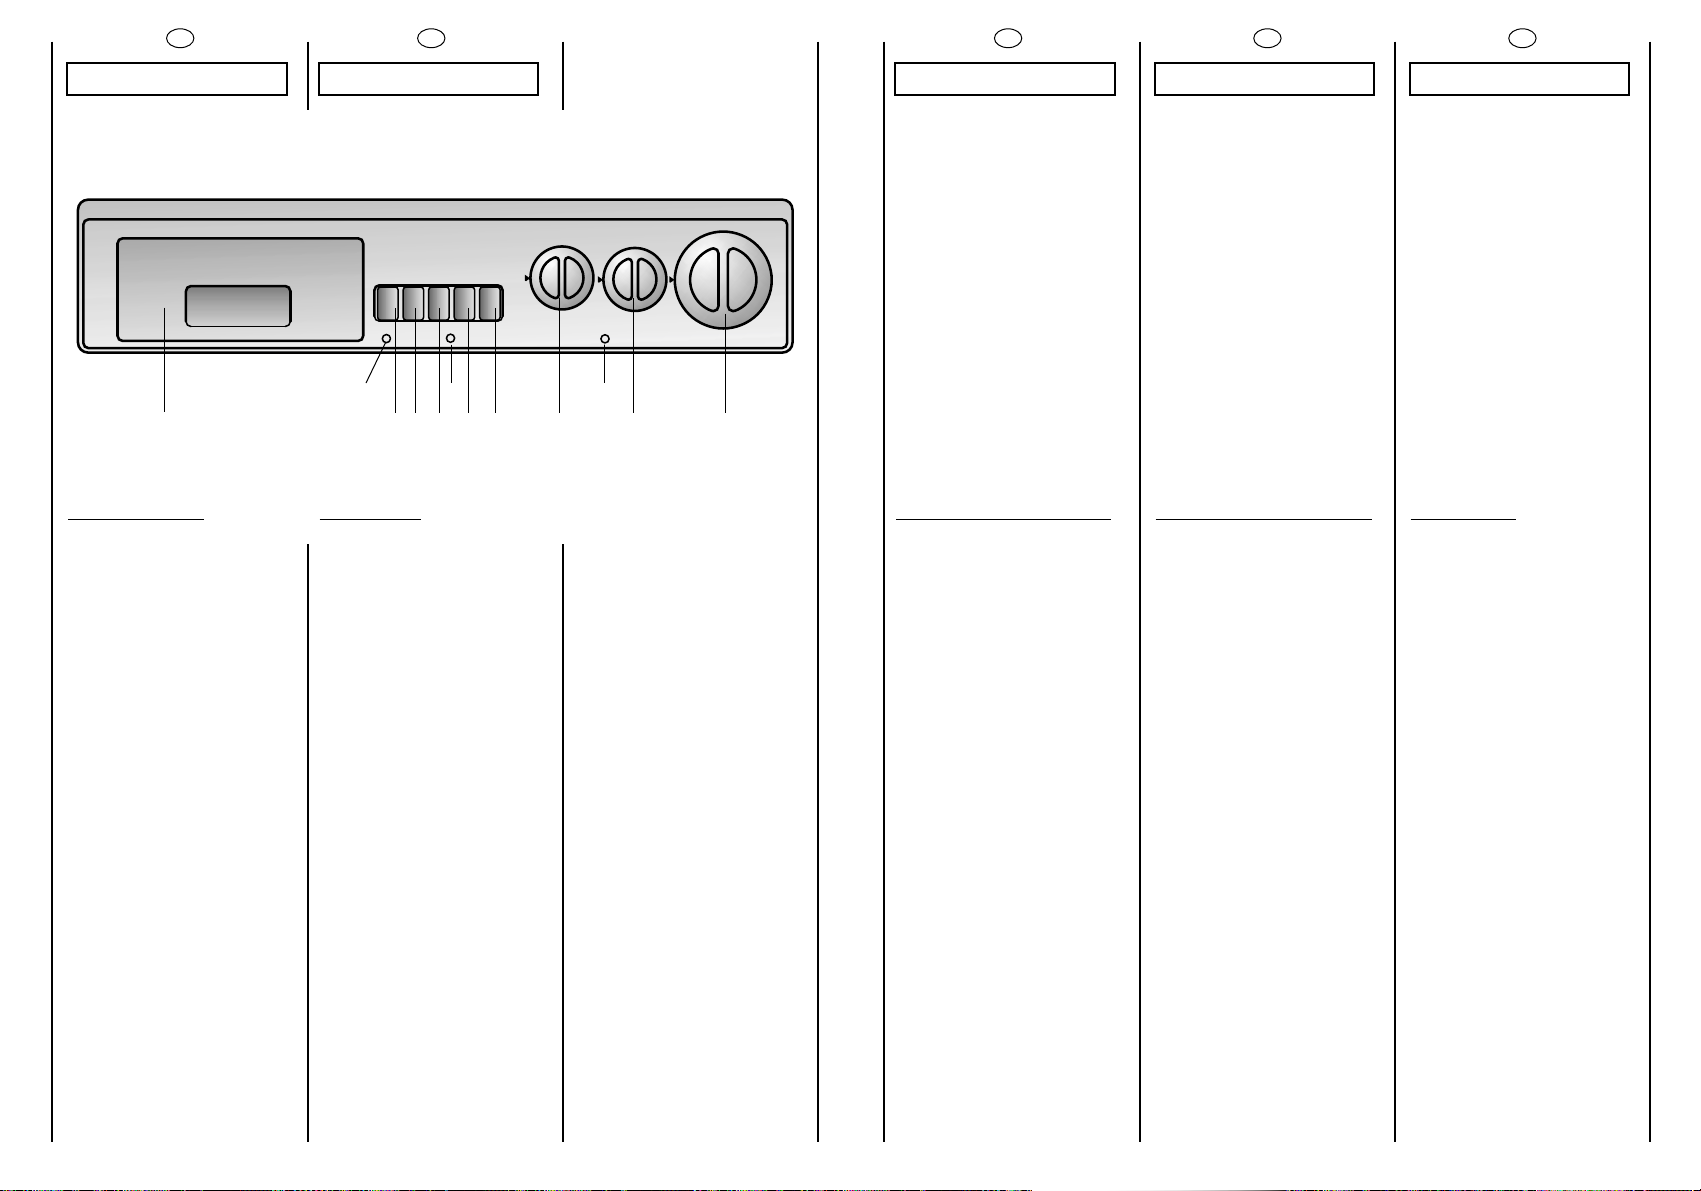
CHAPTER 6
CONTROLS
Detergent drawer
Door open button
Off/On button
Super rinse button
Super Rapid button
Dry high button
Wash control temperature
knob
Timer knob for drying
programmes
Timer knob for wash
programmes
Dry indicator light
Off/On indicator light
Dry high indicator light
23
A
B
C
D
E
F
H
I
L
M
N
O
IT ES
CAPÍTULO 6
CUADRO DE MANDOS
Cubeta del detergente
Botón de apertura del ojo de
buey
Botón de puesta en
marcha/paro
Botón de super aclarado
Botón Super Rápido
Botón secado algodón
Selector para regular la
temperatura de lavado
Mando programación
secado
Selector de programas de
lavado
Señalización secado
Piloto luminoso de
funcionamiento
Señalización secado intenso
N M
O
Page 13
24
D
C
B
2 min.
FR
DESCRIPTION DES
COMMANDES
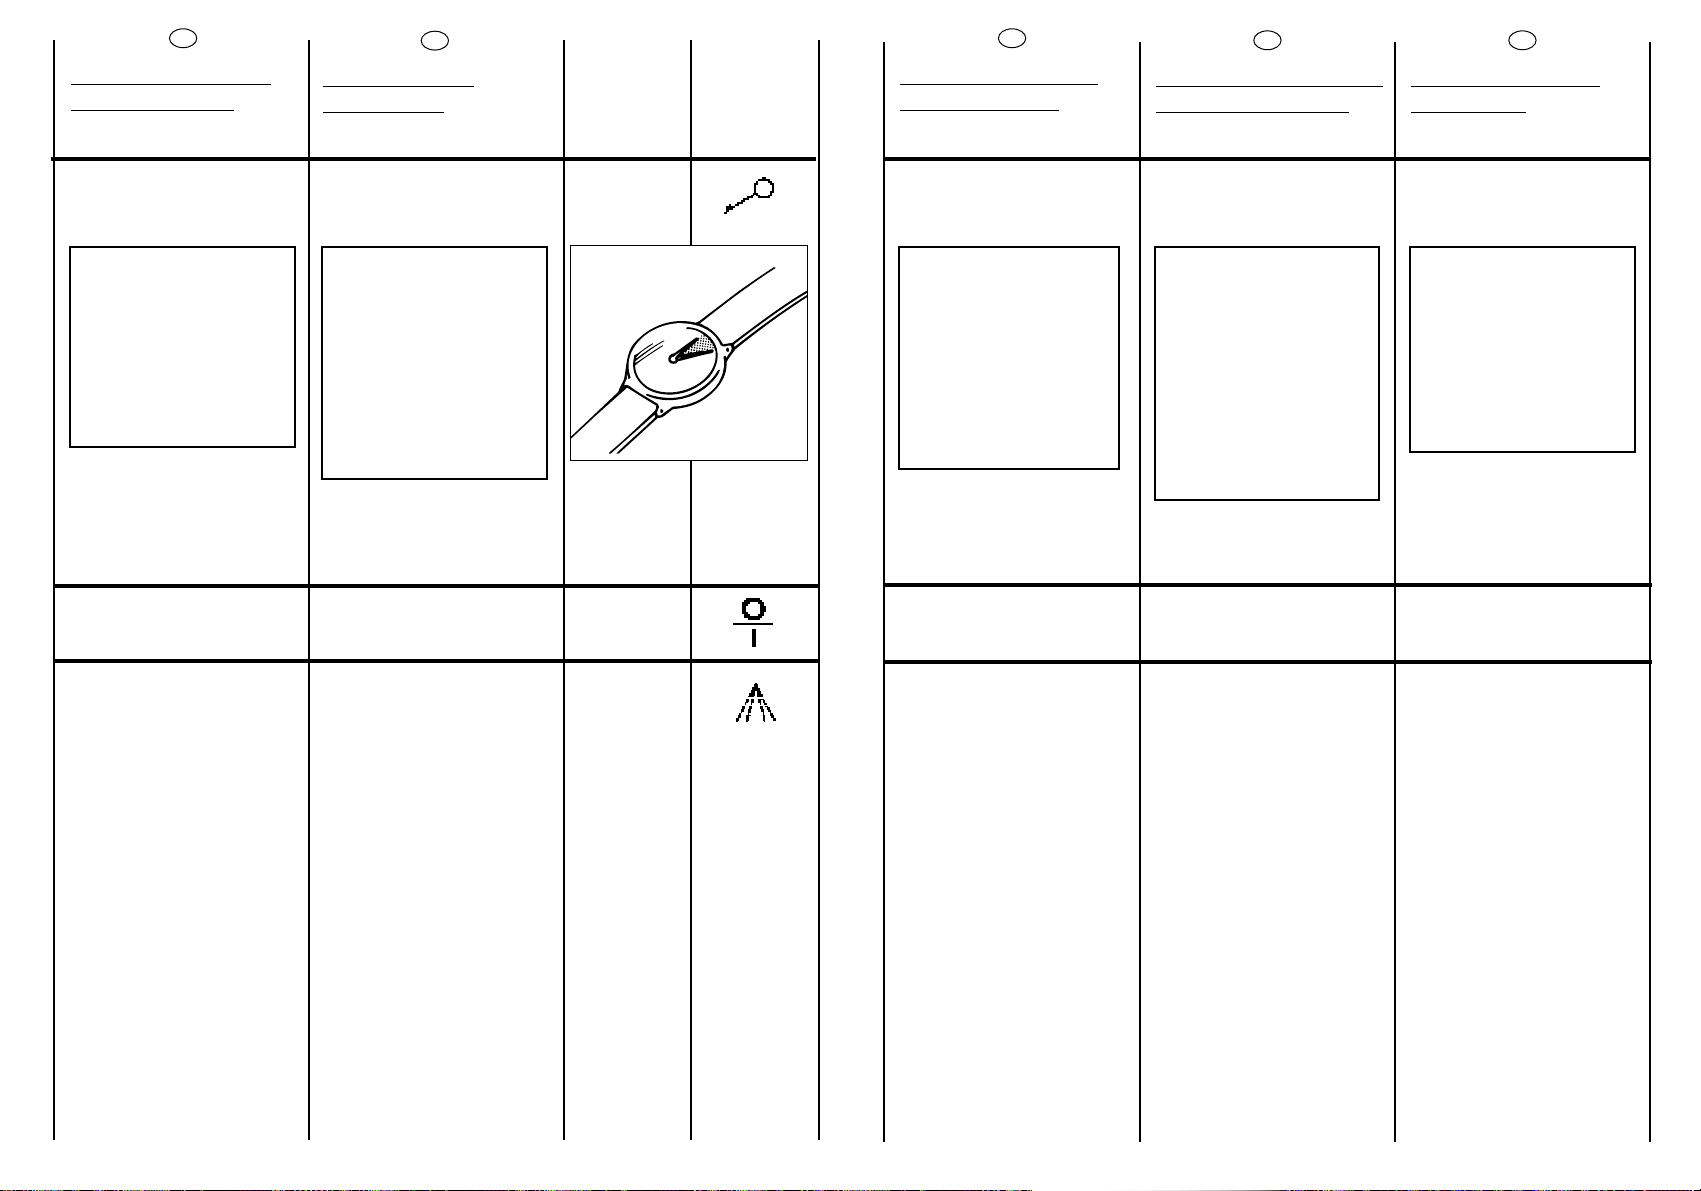
TOUCHE D’OUVERTURE PORTE
ATTENTION:
UN DISPOSITIF SPECIAL
DE SECURITE EMPECHE
L’OUVERTURE
IMMEDIATE DU HUBLOT
A LA FIN DU LAVAGE.
APRES LA PHASE
D’ESSORAGE ATTENDRE
2 MINUTES AVANT
D’OUVRIR LE HUBLOT.
TOUCHE MARCHE/ARRET
TOUCHE EXTRA RINÇAGE
Appuyer sur la touche
“EXTRA RINÇAGE”pour
éliminer le moindre résidu de
détersif sur les tissus. Cette
opération est importante
pour les personnes ayant la
peau délicate.
DE
EN
BESCHREIBUNG DER
BEDIENELEMENTE
TASTE ZUM ÖFFNEN DES
BULLAUGES
ACHTUNG:
DIE SICHERHEITSTÜRVERRIEGELUNG
VERHINDERT DAS
SOFORTIGE ÖFFNEN
DES BULLAUGES NACH
BEENDIGUNG DES
WASCH-PROGRAMMS.
WARTEN SIE DAHER
NACH DEM LETZTEN
SCHLEUDERN CA. ZWEI
MINUTEN, BEVOR SIE
DIE TÜR ÖFFNEN.
START/STOP TASTE
TASTE MEHR-WASSER
Diese Taste erhöht den
Wasserstand der Spülgänge
und sorgt dafür, daß auch die
letzten
Waschmittelrückstände aus
der Wäsche entfernt werden.
Dies ist besonders wichtig für
Personen mit empfindlicher
oder allergischer Haut.
DESCRIPTION OF
CONTROL
DOOR OPEN BUTTON
IMPORTANT:
A SPECIAL SAFETY
DEVICE PREVENTS THE
DOOR FROM OPENING
AT THE END OF THE
WASH/SPIN CYCLE.AT
THE END OF THE SPIN
PHASE WAIT UP TO 2
MINUTES BEFORE
OPENING THE DOOR.
OFF/ON BUTTON
EXTRA RINSE BUTTON
By pressing the “EXTRA
RINSE” button, even the
slightest residue of detersive
is removed from fabrics. This
is particularly important for
people with delicate skins.
25
IT
DESCRIZIONE
COMANDI
TASTO APERTURA OBLÒ
ATTENZIONE:
UNO SPECIALE
DISPOSITIVO DI
SICUREZZA IMPEDISCE
L’IMMEDIATA
APERTURA DELL’OBLO”
ALLA FINE DEL
LAVAGGIO. AL
TERMINE DELLA FASE DI
CENTRIFUGA ATTENDA
2 MINUTI PRIMA DI
APRIRE L’OBLÒ.
TASTO
MARCIA /ARRESTO
TASTO SUPER RISCIACQUO
Premendo il tasto viene
aggiunta più acqua ad ogni
risciacquo.
Questo risulta
particolarmente importante
per le persone con pelli
delicate.
ES
DESCRIPCIÓN DE
LOS MANDOS
BOTÓN DE APERTURA DEL
OJO DE BUEY
ATENCIÓN:
UN DISPOSITIVO DE
SEGURIDAD ESPECIAL
IMPIDE LA APERTURA
INMEDIATA DEL OJO DE
BUEY AL FINALIZAR EL
LAVADO. AL FINAL DE
LA FASE DE
CENTRIFUGADO, ESPERE
2 MINUTOS ANTES DE
ABRIR EL OJO DE BUEY.
BOTÓN DE PUESTA EN
MARCHA/PARO
BOTÓN DE SUPERACLARADO
Pulsando el botón de
“SUPERACLARADO”se
elimina incluso el más
mínimo resto de detergente
de los tejidos. Esto es
especialmente importante
para las personas de piel
delicada
Page 14

26
F
E
FR
TOUCHE SUPER RAPIDE
En actionnant cette touche,
la durée du cycle de lavage
est réduite de 50 minutes, au
maximum,en fonction du
programme et de la
température sélectionnés.
Cette touche peut être
actionnée pour laver des
charges de linge de 1 à
5 kg.
(Cette touche est active
seulement pour les
programmes coton et
synthétiques).
TOUCHE SECHAGE COTON
Recomandation: presser sur
cette touche pour sécher
les tissus résistants qui ne
doivent pas etre repassér.
Ou pour abréger le temps
de séchage.
DE
EN
TASTE SUPER-SCHNELL
Durch Drücken dieser Taste
reduziert sich die
Waschdauer des
Waschprogrammes um bis
zu 50 Minuten, je nach
Programm und eingestellter
Temperatur. Die Taste SuperSchnell kann bei
Waschladungen von 1 bis 5
kg. eingesetzt werden.
(Diese Funktion kann nur für
Baumwolle und Synthetik
Programme benutzt
werden).
TASTE “EXTRATROCKEN”
Hinweis: Nur für
unempfindliche,bügelfreie
Stoffe oder zur Reduzierung
der Trocknungszeiten
verwenden.
SUPER RAPID BUTTON
By pushing this button the
time of the wash programme
is reduced to a maximum of
50 minutes depending on the
programme and the
temperature selected.The
super rapid button can be
used for washing loads of 1
to 5 kg.
(This button can be utilised
only on cottons and
synthetic programmes).
DRY HIGH BUTTON
Recommended: press this
button for extra intense
drying cycle suitable for hard
wearing fabrics e.g. towels.
27
IT
TASTO SUPER RAPIDO
Premendo questo tasto la
durata dei programmi di
lavaggio di questa
lavabiancheria viene ridotta
fino ad un massimo di 50
minuti a seconda del
programma e della
temperatura prescelti.È
possibile utilizzare il tasto
Super rapido per lavaggi da
1 a 5 kg. di biancheria.
(Questo tasto è attivo solo
nei cicli cotone e sintetici).
TASTO ASCIUGATURA
COTONE
Consiglio: lo prema per
asciugare tessuti resistenti
che non devono essere
stirati, o per abbreviare i
tempi di asciugatura.
ES
OPCIÓN SUPER RAPIDO
Apretando esta tecla la
duración de los programas
de lavado de esta lavadora
se reducen hasta un
máximo de 50 minutos
según el programa y la
temperatura de lavado
elegida. Es posible utilizar la
tecla Super Rápido para
lavados de 1 a 5 kg.de
colada.
(Esta tecla es funcional sólo
para los programas algodón
y mixtos).
TECLA SECADO ALGODÓN
Consejo: Selecciónelo para
secar tejidos resistentes que
no sean planchados o para
reducir el tiempo de
secado.
Page 15

28
H
I
29
MANETTE DE REGLAGE DE LA
TEMPERATURE DE LAVAGE
ELLE PEUT TOURNER
DANS LES DEUX SENS
Cette machine à laver est
pourvue de ce dispositif
pour déterminer la
température de lavage
désirée.
Le tableau des programmes
de lavage indique la
température maxi.
conseillée pour ce type de
lavage.
ATTENTION! NE JAMAIS
LA DEPASSER
MANETTE PROGRAMME DE
SECHAGE
ATTENTION:
NE JAMAIS TOURNER
LA MANETTE DANS LE
SENS CONTRAIRE DES
AIGUILLES D’UNE
MONTRE.
Cette manette permet de
règler le temps de sèchage
voulu,jusqu’a un maximum
de 120 minutes (le
symbole veut dire
10 minutes, le numero 2 veut
dire 20 minutes, etc...)
La liste des programmes
indique les temps
recomandés pour le type
de tissu.
IMPORTANT:
Le sèchage peut etre arrèté
même quand la machine
est en marche.Il suffit de
tourner la manette sèchage
dans le sens des aiguilles
d’une montre jusqu’au signe
indiquant le
REFROIDISSEMENT,
Attendre la fin du cycle et
ouvrir le hublot.
FR
IT
MANOPOLA DI
REGOLAZIONE DELLA
TEMPERATURA DI LAVAGGIO
PUO’ RUOTARE NEI DUE
SENSI
Questa lavatrice é dotata di
questo dispositivo per
impostare la temperatura di
lavaggio desiderata.
La tabella programmi di
lavaggio indica la
temperatura massima
consigliata per tipo di
lavaggio.
ATTENZIONE QUESTA
TEMPERATURA NON
DEVE MAI ESSERE
SUPERATA
MANOPOLA PROGRAMMI
DI ASCIUGATURA
ATTENZIONE:
NON RUOTI MAI LA
MANOPOLA IN SENSO
ANTIORARIO MA
SEMPRE IN SENSO
ORARIO
Questa manopola
permette di impostare il
tempo desiderato di
asciugatura fino a un
massimo di 120 minuti (il
vuole dire 10 minuti, il n° 2
vuol dire 20 minuti, ecc.)
La tabella indica i tempi
consigliati per tipo di
tessuto.
IMPORTANTE:
può arrestare l’asciugatura
anche durante il
funzionamento, basta che
ruoti la manopola
ASCIUGATURA in senso
orario fino alla zona della
scala corrispondente al
RAFFREDDAMENTO,
attenda la fine del ciclo e
poi apra l’oblò.
ES
SELECTOR PARA REGULAR LA
TEMPERATURA DE LAVADO
PUEDE GIRARSE EN
AMBOS SENTIDO
Esta lavadora está provista
de este dispositivo para
seleccionar la temperatura
de lavado deseada.
La tabla de los programas
de lavado indica la
temperatura máxima
aconsejada para cada tipo
de lavado.
ATENCIÓN NUNCA
DEBE SER SUPERIOR
MANDO PROGRAMACIÓN
SECADO
ATENCIÓN:
NO GIRE NUNCA EL
MANDO EN EL SENTIDO
CONTRARIO DE LAS
AGUJAS DEL RELOJ.
HÁGALO SIEMPRE EN EL
SENTIDO HORARIO.
Este mando sirve para
seleccionar los tiempos de
secado hasta máximo 120
minutos ( = significa 10
min., 2 = 20 min, etc...)
IMPORTANTE
Para parar el proceso de
secado durante il
funcionamiento, girar
el mando SECADO en
el sentido de las agujas del
reloj hasta la zona de la
graduacion
correspondiente al
ENFRAMIENTO
esperar el final del cyclo y
abrir la puerta.
TEMPERATURWAHLSCHALTER
KANN IN BEIDE
RICHTUNGEN GEDREHT
WERDEN.
Der Thermostat dient zur
Einstellung der gewünschten
Waschtemperatur.
In der Programmtabelle
finden Sie die jeweils
empfohlenen
Höchsttemperaturen für die
einzelnen
Waschprogramme.
ACHTUNG: HÖCHSTTEMPERATUR NICHT
ÜBERSCHREITEN!
TROCKENPROGRAMMWALSCHALTER
ACHTUNG:
DREHEN SIE DEN
SCHALTER NIEMALS
GEGEN SONDERN
IMMER IM
UHRZEIGERSINN.
Mit diesem Schalter können
Sie die gewünschte
Trockenzeit - bis zu 120
Minuten - einstellen.
(symbol = 10 Minuten,
symbol 2 = 20 Minuten etc.)
Die Tabelle zeigt die für die
einzelnen Gewebearten
empfohlenen Zeiten.
WICHTIG:
Der Trockner kann auch
während des Laufs gestoppt
werden,indem man den
Wahlschalter im
Uhrzeigersinn bis an den
Anfang der Abkühlphase
dreht.
Warten Sie das Ende dieser
Phase ab, bevor Sie das
Bullauge öffnen.
DE
WASH TEMPERATURE
CONTROL KNOB
ROTATES IN BOTH
DIRECTIONS
With this device it is possible
to reduce, but no increase
washing cycle temperature.
The table of programmes
indicate the maximum
temperature advised for
each type of wash.
WARNING: THIS
TEMPERATURE MUST
NEVER BE EXCEEDED
TIMER KNOB FOR DRYING
PROGRAMMES
CAUTION: NEVER TURN
KNOB ANTICLOCKWISE, BUT
ALWAYS CLOCKWISE.
The knob sets drying time up
to a max. 120 min. (the
symbol represents 10
minutes. Number 2
represents 20 minutes, etc.)
The list of programmes show
time recommended for
each type of fabric.
WARNING:
Drying can be stopped
even when machine is
running. Just turn the drying
control knob clockwise on
cooling
symbol and wait for
cycle to end then open
door.
EN
Page 16

30
L
FR
MANETTE DES PROGRAMMES
DE LAVAGE
ATTENTION:
NE JAMAIS FAIRE
TOURNER LA POIGNEE
DANS LE SENS
CONTRAIRE A CELUI
DES AIGUILLES D’UNE
MONTRE: TOURNER LA
POIGNEE EN SENS
HORAIRE ET NE JAMAIS
APPUYER SUR LA
TOUCHE DE MARCHE
(C) AVANT D’AVOIR
EFFECTUE LA
SELECTION DU
PROGRAMME.
Les tableaux indiquent quel
est le programme de lavage
selon le numéro ou le
symbole choisi.
TEMOIN FONCTIONNEMENT
SECHAGE
Quand il s’allume, la
machine à laver/sécher est
en train de sécher
VOYANT DE MISE SOUS
TENSION
VOYANT SECHAGE PLUS
PUISSANT
Ceux-ci s’allument quand la
touche essorage coton est
enfoncee.
DE
EN
PROGRAMMWAHLSCHALTER
ACHTUNG:
DIESEN SCHALTER
NIEMALS GEGEN DEN
SONDERN IMMER IM
UHRZEIGERSINN
DREHEN UND DIE
“START” TASTE (C) ERST
NACH DER
EINSTELLUNG DES
GEWÜNSCHTEN
PROGRAMMES
DRÜCKEN.
Die Tabellen beschreiben die
einzelnen Programme
anhand von Nummern oder
Symbolen.
ANZEIGE TROCKNEN
Leuchtet, solange die
Trocknungsphase des Geräts
nicht beendet ist.
LEUCHTANZEIGE “BETRIEB”
ANZEIGE “EXTRATROCKEN”
Leuchtet auf,wenn die Taste
“Extratrocken”betätigt wird.
TIMER KNOB FOR WASH
PROGRAMMES
IMPORTANT:
ALWAYS ROTATE THE
KNOB IN A CLOCKWISE
DIRECTION, NEVER IN
AN ANTI-CLOCKWISE
DIRECTION. DO NOT
PRESS THE “ON” BUTTON
(C) BEFORE SELECTING
THE PROGRAMME
The tables describe the
washing programme on the
basis of the number or
symbol chosen.
“DRYING” INDICATOR LIGHT
Pilot light comes on to
indicate that washer/dryer is
drying.
ON/OFF INDICATOR LIGHT
PILOT LIGHT FOR EXTRA
DRYING
Pilot light will come on when
dry high button is pressed.
31
N
IT
MANOPOLA PROGRAMMI DI
LAVAGGIO
ATTENZIONE:
NON RUOTI MAI LA
MANOPOLA IN SENSO
ANTIORARIO MA LA
RUOTI IN SENSO ORARIO
E NON PREMA IL TASTO
MARCIA (C) PRIMA
DELLA SELEZIONE DEL
PROGRAMMA.
Le tabelle descrivono il
programma di lavaggio in
base al numero o simbolo
scelto.
SEGNALAZIONE
ASCIUGATURA
Quando è accesa indica
che la lavasciuga sta
asciugando.
SEGNALAZIONE LUMINOSA
DI FUNZIONAMENTO
SEGNALAZIONE
ASCIUGATURA POTENZIATA
Si accende quando si
preme il tasto asciugatura
cotone.
ES
SELECTOR DE PROGRAMAS DE
LAVADO
ATENCIÓN:
NO GIRE NUNCA EL
PROGRAMADOR EN
SENTIDO CONTRARIO A
LAS MANECILLAS DEL
RELOJ, SINO EN EL
SENTIDO DE ÉSTAS Y NO
PULSE EL BOTÓN DE
PUESTA EN MARCHA (C)
ANTES DE LA
SELECCION DEL
PROGRAMA.
Las tablas indican el
programa de lavado en base
al número o símbolo
seleccionado.
SEÑALIZACIÓN SECADO
Cuando está encendido
indica que la
lavadorasecadora está
secando.
PILOTO LUMINOSO DE
FUNCIONAMENTO
SEÑALIZACIÓN SECADO
INTENSO
Se ilumina cuando se
selecciona la tecla secado
algodón.
M
O
Page 17

32
cl
FR
CHAPITRE 7
TIROIR A LESSIVE
Le tiroir à lessive est divisé en
4 petits bacs:
- le premier I sert pour la
lessive du programme
32 minutes
- le deuxième II sert pour
les produits de lavage
ATTENTION:
NOUS RAPPELONS QUE
CERTAINS PRODUITS
SONT DES DIFFICULTES A
ETRE EVACUES; DANS
CE CAS NOUS VOUS
CONSEILLONS D’UTILISER
LE GODET QUI VA
DIRECTEMENT DANS LE
TAMBOUR.
- le troisième sert pour
le produit blanchissant
(eau de javel)
ATTENTION:
DANS LE TROISIEME ET LE
QUATRIEME BAC
N’INTRODUIRE QUE DES
PRODUITS LIQUIDES.
- le quatrième ✿✿ sert
pour des additifs
spéciaux: adoucisseurs,
parfums, amidon,
produits pour l’azurage,
etc.
DE
EN
33
KAPITEL 7
WASCHMITTELBEHÄLTER
Der Waschmittelbehälter ist
in vier Fächer unterteilt.
- Das erste I für das
Schnellprogramm 32
minuten
- das zweite II für das
Hauptwaschmittel
ACHTUNG:
BEKANNTLICH LASSEN
SICH EINIGE
WASCHMITTEL SCHWER
EINSPÜLEN, IN SOLCHEN
FÄLLEN BENUTZEN SIE
BITTE DIE SPEZIELLEN
BEHÄLTER FÜR DIE
VERWENDUNG DIREKT
IN DER TROMMEL.
- das dritte für
Bleichmittel
ACHTUNG:
IN DAS DRITTE UND
VIERTE FACH NUR
FLÜSSIGE MITTEL
EINFÜLLEN.
- das vierte
✿✿
für
spezielle Zusätze wie
Weichspüler, Duftstoffe,
Stärke usw.
CHAPTER 7
DETERGENT
DRAWER
The detergent drawer is
divided into 4
compartments:
- The first I for the
32 minute rapid
programme detergent
- The second II for the
main wash detergent
IMPORTANT:
REMEMBER THAT SOME
DETERGENT ARE
DIFFICULT TO REMOVE.
IN THIS CASE WE ADVISE
THE USE OF THE SPECIAL
CONTAINER TO BE USED
INSIDE THE DRUM.
- The third bleach
compartment
IMPORTANT:
ONLY INTRODUCE
LIQUID PRODUCTS IN
THE THIRD AND FOURTH
COMPARTMENTS.
- The fourth ✿✿ is for
special additives,
softeners, perfumes,
starches, whiteners, etc.
IT
CAPITOLO 7
CASSETTO
DETERSIVO
Il cassetto detersivo é
suddiviso in 4 vaschette:
- la prima I serve per il
detersivo per il
programma rapido 32
minuti
- la seconda II per il
detersivo di lavaggio
ATTENZIONE:
SI RICORDI CHE ALCUNI
DETERSIVI SONO
DI DIFFICILE
ASPORTAZIONE.
IN QUESTO CASO LE
CONSIGLIAMO L’USO
DELL’APPOSITO
CONTENITORE DA
PORRE NEL CESTELLO.
- la terza serve per il
candeggiante
ATTENZIONE:
NELLA TERZA E QUARTA
VASCHETTA METTERE
SOLO PRODOTTI
LIQUIDI.
- la quarta ✿✿ serve per
additivi speciali,
ammorbidenti, profumi
inamidanti, azzurranti,
ecc.
ES
CAPÍTULO 7
CUBETA DEL
DETERGENTE
La cubeta del detergente
está dividida en 4
compartimentos:
- el primero I sirve para el
detergente para el
programa rapido de 32
minutos
- el segundo II para el
detergente de lavado
ATENCIÓN:
RECUERDE QUE
ALGUNOS
DETERGENTES SON
DIFÍCILES DE
ARRASTRAR, EN ESTE
CASO, LE
ACONSEJAMOS
UTILIZAR EL
CONTENEDOR
APROPIADO PARA
PONERLO
DIRECTAMENTE EN EL
TAMBOR.
- el tercero sirve para
el blanqueador
ATENCIÓN:
EN EL TERCER Y CUARTO
COMPARTIMENTO,
INTRODUZCA
UNICAMENTE
PRODUCTOS LÍQUIDOS.
- el cuarto ✿✿ sirve para
aditivos especiales,
suavizantes, perfumes
almidonados, azuletas,
ecc.
cl
Page 18

34 35
FR
CHAPITRE 8
SELECTION
Pour traiter les divers types
de tissus et les différents
degrés de salissures, la
machine a 3 niveaux de
programmes qui se
différencient par le type de
lavage,la température et la
durée (voir le tableau des
programmes de lavage).
1 Tissus résistants
Les programmes sont
conçus pour optimiser les
résultats de lavage.
Des phases d’essorage qui
garantissent un rinçage
parfait.
2 Tissus mixtes et
synthétiques
Le lavage et le rinçage sont
optìmisés dans les rythmes
de rotation du tambour et
dans les niveaux d’eau.
L’essorage à action délicate
assure une formation de plis
réduite sur les tissus.
3 Tissus extrêmement
délicats
Il s’agit d’un nouveau
concept de lavage qui
alterne des moments de
brassage et de trempage
du linge; ce processus est
particulièrement indiqué
pour le lavage de tissus
extrêmement délicats
comme la Pure Laine Vierge.
Le lavage et le rinçage sont
effectués à pleine eau afin
d’obtenir les meilleures
prestations.
IT
CAPITOLO 8
SELEZIONE
PROGRAMMI
Per trattare i vari tipi di
tessuto e le varie gradazioni
di sporco, la lavatrice ha 3
fasce di programmi diversi
per tipo di: lavaggio,
temperatura e durata
(vedere tabella programmi
di lavaggio).
1 Tessuti resistenti
I programmi sono realizzati
per sviluppare il massimo
grado di lavaggio e i
risciacqui, intervallati da fasi
di centrifuga, assicurano
una perfetta sciacquatura.
La centrifuga finale assicura
un’ottima strizzatura.
2 Tessuti misti e sintetici
Il lavaggio ed il risciacquo
sono ottimizzati nei ritmi di
rotazione del cesto e nei
livelli di acqua.
La centrifuga ad azione
delicata, assicura una
ridotta formazione di pieghe
sui tessuti.
3 Tessuti delicatissimi
E’ un nuovo concetto di
lavaggio in quanto alterna
momenti di lavoro a
momenti di pausa,
particolarmente indicato
per il lavaggio di tessuti
molto delicati quali la Pura
Lana Vergine. Il lavaggio e i
risciacqui sono eseguiti con
alto livello di acqua per
assicurare le migliori
prestazioni.
ES
CAPÍTULO 8
SELECCIÓN
Para tratar los distintos tipos
de tejido y los diferentes
grados de suciedad, la
lavadora tiene 3 áreas de
programas diferentes para
cada tipo de: lavado,
temperatura y duración
(vea tabla de programas de
lavado).
1 Tejidos resistentes
Los programas se han
confeccionado para
desarrollar el máximo grado
de lavado y los aclarados
regulados por las fases de
centrifugado aseguran un
perfecto aclarado.
El centrifugado final asegura
un escurrido óptimo.
2 Tejidos mixtos y sintéticos.
El lavado y el aclarado
estan optimizados por los
ritmos de rotación del
tambor y los niveles de
agua.
El centrifugado de accion
delicada, asegura una
reducida formación de
arrugas sobre los tejidos.
3 Tejidos muy delicados
Es un nuevo concepto de
lavado,ya que alterna
momentos de
funcionamiento y
momentos de pausa,
especialmente indicado
para el lavado de tejidos
muy delicados tales como
la Pura Lana Virgen. El
lavado y los aclarados son
llevados a cabo con un alto
nivel de agua para asegurar
las mejores prestaciones.
DE
KAPITEL 8
PROGRAMM/
TEMPERATURWAHL
Um unterschiedliche Textilien
und Verschmutzungsgrade
optimal behandeln zu
können, bietet Ihnen diese
Waschmaschine 3
Programmtypen an für
unterschiedliche
Waschzyklen,Temperaturen
und Programmdauern.
(siehe Programmtabelle).
1 Unempfindliche Stoffe
Die Programme bieten eine
maximale Reinigung und
jeweils von Schleuderphasen
unterbrochene Spülgänge,
die die optimale Spülung
der Wäsche garantieren.
Der abschließende
Schleudergang sichert die
bestmögliche Trocknung.
2 Mischgewebe und
Kunstfasern
Das Waschen und Spülen
dieser Gewebearten ist
durch die optimale Drehzahl
der Trommel und durch das
perfekt abgestimmte
Wasserniveau besonders
wirksam.
Das Schonschleudem
verhindert außerdem die
Bildung von Falten in der
Wäsche.
3 Hochempfindliche Stoffe
Dieses neue Waschkonzept
mit abwechselnden Waschund Einweichphasen ist
besonders geeignet für die
Wäsche feinster Textilien, wie
z.B. reiner Wolle.Wasch-und
Spülgänge werden mit
hohem Wasserstand
durchgeführt, um eine
schonende Behandlung und
beste Ergebnisse zu sichern.
EN
CHAPTER 8
SELECTION
For the various types of
fabrics and various degrees
of dirt the washing machine
has 3 different programme
bands according to: wash
cycle, temperature and
lenght of cycle (see table of
washing cycle
programmes).
1 Resistants Fabrics
The programmes have been
designed for a maximum
wash and the rinses, with
spin intervals, ensure perfect
rinsing.
The final spin gives more
efficient removal of water.
2 Mixed and Synthetic
Fabrics
The main wash and the rinse
gives best results thanks to
the rotation rhythms of the
drum and to the water
levels.
A gentle spin will mean that
the fabrics become less
creased.
3 Special Delicate Fibres
This is a new wash cycle
which alternates washing
and soaking and is
particularly recommended
for very delicate fabrics such
as Pure Machine Washable
Wool.The wash cycle and
rinses are carried out with
high water levels to ensure
best results.
Page 19

36 37
FR
CONSEILS UTILES
POUR L’UTILISATEUR
SUGGESTION POUR
L’UTILISATION DE VOTRE
LAVE-LINGE
Dans le souci du respect de
l’environnement et avec le
maximum d’économie
d’énergie, charger au
maximum votre lave-linge
pour éliminer les éventuels
gaspillages d’énergie et
d’eau. Nous recommandons
d’utiliser la capacité
maximale de chargement
de votre lave-linge.Vous
pouvez ainsi économiser
jusqu’à 50% d’énergie si
vous pratiquez le
chargement maximal.
Effectuez un lavage unique
à l’opposé de 2 lavages en
1/2 charge.
QUAND LE LAVAGE EST-IL
VRAIMENT NÉCESSAIRE ?
Seulement dans le cas d’un
linge particulièrement sale.
Dans le cas d’un linge
normalement sale, ne
sélectionnez pas l’option
"prélavage ",ceci vous
permettra une économie
d’énergie de 5 à 15%.
QUELLE TEMPÉRATURE DE
LAVAGE SÉLECTIONNER ?
L’utilisation des détachants
avant le lavage en machine
ne rend pas nécessaire le
lavage au-delà de 60°C.
L’utilisation de la
température de 60°C
permet de diminuer la
consommation d’énergie
de 50%.
AVANT D’UTILISER UN
PROGRAMME DE SÉCHAGE.
Sélectionnez une vitesse
d’essorage élevée avant de
débuter le séchage.Vous
diminuerez ainsi l’humidité
résiduelle du linge. Grâce à
cette opération vous
obtiendrez des substantielles
économies d’énergie et
d’eau
IT
CONSIGLI UTILI
PER GLI UTENTI
Brevi suggerimenti per un
utilizzo del proprio
elettrodomestico nel rispetto
dell’ambiente e con il
massimo risparmio
CARICARE AL MASSIMO LA
PROPRIA LAVABIANCHERIA
Per eliminare eventuali
sprechi di energia, acqua o
detersivo si raccomanda di
utilizzare la massima
capacità di carico della
propria lavabiancheria. E’
possibile infatti risparmiare
fino al 50% di energia con
un carico pieno effettuato
con un unico lavaggio
rispetto a due lavaggi a
mezzo carico.
QUANDO SERVE VERAMENTE
IL PRELAVAGGIO?
Solamente per carichi
particolarmente sporchi!
Si risparmia dal 5 al 15% di
energia evitando di
selezionare l’opzione
prelavaggio per biancheria
normalmente sporca.
QUALE TEMPERATURA DI
LAVAGGIO SELEZIONARE?
L’utilizzo di smacchiatori
prima del lavaggio in
lavabiancheria riduce la
necessità di lavare a
temperature superiori a
60°C. E’ possibile risparmiare
fino al 50% utilizzando la
temperatura di lavaggio di
60°C.
PRIMA DI UTILIZZARE UN
PROGRAMMA DI
ASCIUGATURA
Selezionare un alto numero
di giri prima di un
programma di asciugatura
per ridurre l’umidità residua
nella biancheria. Si
ottengono così notevoli
risparmi di energia e acqua.
ES
CONSEJOS ÚTILES
PARA EL USUARIO
Breves sugerencias para la
utilización del
electrodoméstico en el
respeto del medio ambiente
y con el máximo ahorro.
CARGAR AL MÁXIMO LA
LAVADORA
Para eliminar eventuales
despilfarros de energía,
agua o detergente, se
recomienda utilizar la
máxima capacidad de
carga de la lavadora.Es
posible, ahorrar hasta el 50%
de energía con una carga
llena efectuada en una
única colada, respecto a
dos coladas a 1/2 carga.
CUANDO SIRVE REALMENTE
EL PRELAVADO?
Solamente para cargas
particularmente sucias!
Se ahorra del 5 al 15% de
energía evitando la
selección de la opción del
prelavado para ropa de
suciedad normal.
QUÉ TEMPERATURA DE
LAVADO SELECCIONAR?
La utilización de productos
para eliminar manchas
antes del lavado en la
lavadora,reduce la
necesidad de lavar a
temperaturas superiores a
60°C. Es posible ahorrar
hasta un 50% utilizando una
temperatura de lavado de
60°C.
ANTES DE UTILIZAR UN
PROGRAMA DE SECADO
Seleccionar un alto número
de revoluciones antes de un
programa de secado para,
de esta manera,reducir la
humedad residual en la
ropa. Se obtienen de esta
manera,ahorros de energía
y agua.
DE
EINIGE NÜTZLICHE
HINWEISE
Wir möchten Ihnen im
folgenden einige Hinweise
für die richtige Nutzung Ihres
Haushaltsgerätes, damit Sie
es umweltschonend und mit
der höchstmöglichen
Ersparnis betreiben können.
STETS MAXIMALE FÜLLUNG
BELADEN
Um Strom,Wasser und
Waschmittel nicht zu
verschwenden, empfehlen
wir,Ihre Waschmaschine
stets mit der maximalen
Wäschefüllung zu beladen.
Das Waschen einer vollen
Wäscheladung emöglicht
eine Erspamis von bis zu 50%
Strom gegenüber zwei
Wäscheladungen mit halber
Menge.
WANN IST EINE VORWÄSCHE
WIRKLICH NOTWENDIG?
In der Regel nur für stark
verschmutzte Wäsche!
Wenn Sie normal oder wenig
verschmutzte Wäsche
waschen,sparen Sie
zwischen 5% und 15% Strom,
wenn Sie keine Vorwäsche
wählen.
WELCHE
WASCHTEMPERATUR?
Durch die Vorbehandlung
der Wäsche mit geeigneten
Fleckentfernern ist eine
Waschtemperatur von über
60°C in den meisten Fällen
nicht mehr nötig. Sie können
bis zu 50% sparen, wenn Sie
die Waschtemperatur auf
60°C begrenzen.
VOR DEM TROCKNEN BITTE
BEACHTEN
Wählen Sie vor jedem
Trocknungsgang immer eine
hohe Schleuderdrehzahl,
damit die Restfeuchte der
Wäsche so gering wie
möglich gehalten wird. So
können Sie Wasser und
Strom in erheblichem Maße
sparen.
EN
CUST
OMER
AWARENESS
A guide environmentally
friendly and economic use
of your appliance.
MAXIMISE THE LOAD SIZE
Achieve the best use of
energy, water, detergent
and time by using the
recommended maximum
load size.
Save up to 50% energy by
washing a full load instead
of 2 half loads.
DO YOU NEED TO PRE-WASH?
For heavily soiled laundry
only!
SAVE detergent, time, water
and between 5 to 15%
energy consumption by NOT
selecting Prewash for slight
to normally soiled laundry.
IS A HOT WASH REQUIRED?
Pretreat stains with stain
remover or soak dried in
stains in water before
washing to reduce the
necessity of a hot wash
programme.
Save up to 50% energy by
using a 60°C wash
programme.
BEFORE USING A DRYING
PROGRAMME...
SAVE energy and time by
selecting a high spin speed
to reduce the water content
in laundry before using a
drying programme.
Page 20

38
FR
CHAPITRE 9
LE PRODUIT
ATTENTION:
si vous devez laver des tapis,
des couvre-lits ou d’autres
pièces lourdes, nous
conseillons de ne pas
essorer.
Ne pas sécher les vêtements
en laine, vêtements
particuliers avec
rembourrage (duvets,
anoraks), fibres délicates.
Pour laver à la machine des
vêtements en laine et de la
lingerie se reporter à
l’étiquette du vêtement qui
doit mentionner “pure laine
vierge” et l’indication “ne se
feutre pas” ou “peut être
lavé en machine”.
ATTENTION:
Au cours de la phase
de sélection vérifier
que:
- aucun objet
métallique ne se
trouve dans le linge à
laver (boucles,
épingles de nourrice,
épingles, monnaie,
etc.);
- les taies d’oreiller
soient boutonnées, les
fermetures à glissière,
les crochets, les oeillets
soient fermés, les
ceintures et les rubans
des robes de chambre
soient noués;
- les anneaux soient
enlevés des rideaux;
- n’oublier pas de lire
attentivement
l’étiquette sur les tissus;
- Si, au cours de la
sélection, vous trouvez
des taches résistantes,
les enlever à l’aide
d’un nettoyant
spécial.
EN
39
CHAPTER 9
THE PRODUCT
IMPORTANT:
When washing heavy rugs,
bed spreads and other
heavy articles, it is advisable
not to spin.
Do not dry wool, items with
special padding delicate silk
irems; rubber,plastic,
including some types of
plastic poppers on duvet
covers and foam plastic
items are not suitable for
tumble drying.
To be machine-washed,
woollen garments and other
articles in wool must bear
the “Machine Washable
Label”.
IMPORTANT:
When sorting articles
ensure that:
- there are no metal
objects in the washing
(e.g. brooches, safety
pins, pins, coins etc.).
- cushion covers are
buttoned, zips and
hooks are closed, loose
belts and long tapes on
dressing gowns are
knotted.
- runners from curtains
are removed.
- attention is paid to
garment labels.
- when sorting, any tough
stains should be
removed prior to
washing using stain
removers only
recommended on
label.
ES
CAPÍTULO 9
EL PRODUCTO
ATENCION:
si tiene que lavar alfombras,
colchas u otras prendas
pesadas es mejor no
centrifugar,asi como no
debe secar prendas que
contengan gomapluma,
anoraks o tejidos muy
delicados del tipo lana o
seda.
Las prendas y ropa de lana,
para poderlas lavar en la
lavadora,deben llevar el
símbolo “Pura Lana Virgen” y
tener además la indicación
“no se apelmaza” o bien
“lavable en máquina”.
ATENCIÓN:
Durante la selección
asegúrese de que:
- en la ropa para lavar
no haya objetos
metálicos (por
ejemplo, clips,
imperdibles, alfileres,
monedas, etc.);
- abroche las fundas de
las almohadas, cierre
las cremalleras, las
anillas, ate las cintas
sueltas y las tiras largas
de los vestidos;
- quite de las cortinas
tanbién los elementos
de rodamiento;
- lea atentamente las
etiquetas de los
tejidos;
- si durante la selección
aprecia manchas
resistentes, quítelas
con un detergente
especial o con una
pasta de lavado
apropiada.
DE
KAPITEL 9
DAS PRODUKT
ACHTUNG:
Wenn Sie kleinere Läufer,
Tagesdecken oder ähnliche,
schwere Textilien waschen,
sollten Sie auf das
Schleudern verzichten.
Bitte achten Sie auch
darauf,keine Textilien mit
Schaumgummibestandteilen, keine gefütterte
Textilien sowie keine sehr
empfindliche Gewebe aus
Wolle oder Seide zu
trocknen.
Das Symbol “reine Wolle”
kennzeichnet Kleidung und
Textilien aus Wolle, die für die
Maschinenwäsche geeignet
sind. Darüber hinaus sollten
solche Textilien den Hinweis
“nicht filzend”oder
“waschmaschinen-echt”
tragen.
ACHTUNG:
Achten Sie beim
Sortieren der Wäsche
auf folgende Details:
- keine Metallteile (z.B.
Schnallen,
Sicherheitsnadeln,
Anstecknadeln, Münzen)
an oder in der Wäsche;
- Kissenbezüge
zuknöpfen,
Reißverschlüsse und
Druckknöpfe schließen,
lose Gürtel und Bänder
von Morgenröcken
zuknöpfen;
- Rollen von den
Gardinen entfernen;
- Hinweise auf den
Wäscheetiketten
genauestens beachten;
- beim Sortieren
auffallende, hartnäckige
Flecken mit
Spezialreiniger oder
geeigneter Waschpaste
vorbehandeln.
CAPITOLO 9
IL PRODOTTO
ATTENZIONE:
se deve lavare tappetoni,
copriletti o altri indumenti
pesanti é bene non
centrifugare, così come
non deve asciugare capi
contenenti gommapiuma,
imbottiture o tessuti molto
delicati tipo: lana o seta.
Indumenti e biancheria di
lana, per poter essere lavati
in lavatrice, devono essere
contrassegnati con il
simbolo “Pura Lana
Vergine” e avere inoltre
l’indicazione “Non
infeltrisce” oppure “Lavabile
in lavatrice”.
ATTENZIONE:
Durante la selezione si
assicuri che:
- nella biancheria da
lavare non vi siano
oggetti metallici (ad
esempio fermagli, spille
di sicurezza, spilli,
monete, ecc.);
- abbottoni federe,
chiuda le cerniere
lampo, gancetti a
occhielli, annodi cinghie
sciolte e lunghi nastri di
vestaglie;
- asporti dalle tendine
anche i rulli di
scorrimento;
- osservi attentamente le
etichette sui tessuti;
- se durante la selezione
vede delle macchie
resistenti, le asporti con
del detersivo speciale o
con un’apposita pasta
di lavaggio.
IT
Page 21

FR
TABLEAU DES PROGRAMMES
40 41
TYPE DE TISSU
Tissus résistants
Coton, lin,chanvre
Coton, mixtes
résistants
Coton, mixte
Coton
Coton, lin
Tissus mixtes et
synthétiques
Mixtes résistants
Mixtes, cotons,
Synthétiques
Synthétiques (Nylon,
mixtes de coton)
Mixtes, Synthétiques
délicats
Tissus très délicats
Laine
Synthétiques
acryliques
Mixtes, Synthétiques
délicats, laine
Pour le linge à ne pas
essorer
PROGRAMME POUR
Intensif - Très sale
Lavage hebdomadaire
Couleurs résistantes
Peu sale - Couleurs délicates
Rinçages énergiques
Adoucissant
Essorage énergique
Sèchage
Très sale
Lavage hebdomadaire
Couleurs délicates
Peu sale
Rinçages délicats
Apprêt parfum adoucissant
Essorage délicat
Sèchage
Laine “lavable en machine”
très délicats
Rideaux
Rinçages délicats
Adoucissant
Essorage délicat
Cycle super rapide
Tâches organiques
Uniquement vidange
CHARGE
MAXI
kg
5
5
5
3,5
-
-
2,5
2
2
2
2
-
-
1,5
1
1,5
-
-
2
5
-
SELEC.
PROG.
1
2
3
4
5
6
7
8
9
10
32’
Z
SELEC.
TEMP.
°C
Jusqu’à
90°
Jusqu’à
60°
Jusqu’à
50°
Jusqu’à
40°
-
-
-
Jusqu’à
60°
Jusqu’à
50°
Jusqu’à
40°
Jusqu’à
30°
-
-
-
Jusqu’à
40°
Jusqu’à
30°
-
-
Jusqu’à
50°
-
-
❙ ❙ ❙
●●●
●●●
●●●
●●●
●
●
●●
●●
●●
●●
●
●
●●
●●
●
●
●
●
❀
CHARGE DE LESSIVE
1)
1)
1)
Notes importantes
Si les sous-vêtements sont très sales, réduire le chargement à
3 kg maxi.
Dans les programmes indiqués, on peut effectuer le
blanchissage automatique en mettant de l’eau de javel liquide
dans le tiroir à lessive .
Votre lave-linge vous permet à l’aide du thermostat, de laver à des
températures inférieures à celle prévue par le programme.
1)
Programmes en accord EN 60456.
Programme Rapide 32 Minutes
Ce programme permet d’effectuer un cycle de lavage complet en 30
minutes environ pour des charges de linge jusqu’à 2 kg et à une
température maximale de 50°C.
La température de lavage peut être abaissée à l’aide de la manette
de thermostat H.
La quantité maximale de lessive qui peut être utilisée est indiquée sur la
jauge spécifique fournie avec l’appareil.
La lessive doit être placée dans le bac pour le “Programme rapide 32
minutes” (marqué I) du tiroir à produits lessiviels.
Le programme rapide 32 minutes peut également servir de prélavage
en cas de linge très sale, avant de sélectionner le programme de
lavage principal.
Obtenez les meilleurs résultats avec votre nouvelle Candy
Pour obtenir les meilleurs résultats de lavage avec votre nouveau lavelinge Candy, il est important de choisir une lessive parfaitement
appropriée pour vos lavages en machine quotidiens.Dans les magasins
aujourd’hui, il y a tellement de lessives différentes que nous savons qu’il
est parfois difficile de faire un choix parmi tout ce qui est proposé.
Chez Candy, nous testons régulièrement différentes lessives afin de
déterminer celles qui donneront les meilleurs résultats de lavage dans
nos machines. Nous n’avons trouvé qu’une seule marque pour satisfaire
à tous nos critères. Elle permet d’enlever un très grand nombre de
taches, tout en préservant l’aspect des vêtements. C’est pour celà que
Candy recommande Ariel.
CHAPITRE 10
POUR VOTRE NOUVEAU LAVE-LINGE
Page 22

SELEZ.
PROG.
1
2
3
4
5
6
7
8
9
10
32’
Z
TABELLA PROGRAMMI
TIPO DI TESSUTO
Tessuti resistenti
Cotone, lino, canapa
Cotone, misti resistenti
Cotone, misti
Cotone
Cotone, lino
Tessuti misti e
sintetici
Misti resistenti
Misti, cotone, sintetici
Sintetici (Nylon Perlon)
misti di cotone
Misti, sintetici delicati
Tessuti delicatissimi
Biancheria in lana
Sintetici (Dralon, Acrylico
Trevira)
Misti, sintetici delicati, lana
Per biancheria da non
centrifugare
PROGRAMMA PER
Intensivo
Colorati resistenti
Colorati resistenti
Colorati delicati
Risciacqui energici
Appretto, profumo, ammorbidente
Centrifuga energica
Asciugatura
Tessuti misti
Colorati
Acrilici
Acrilici
Risciacqui delicati
Appretto, profumo, ammorbidente
Centrifuga delicata
Asciugatura
LANA “LAVABILE in LAVATRICE”
Lavaggio delicato
Risciacqui delicati
Appretto, profumo, ammorbidente
Centrifuga delicata
Ciclo rapido
Candeggio
Solo scarico
CARICO
MAX
kg
5
5
5
3,5
-
-
2,5
2
2
2
2
-
-
1,5
1
1,5
-
-
2
5
-
SELEZ.
TEMP.
°C
Fino a
90°
Fino a
60°
Fino a
50°
Fino a
40°
-
-
-
Fino a
60°
Fino a
50°
Fino a
40°
Fino a
30°
-
-
-
Fino a
40°
Fino a
30°
-
-
Fino a
50°
-
-
❙ ❙ ❙
●●●
●●●
●●●
●●●
●
●
●●
●●
●●
●●
●
●
●●
●●
●
●
●
●
❀
CARICO DETERSIVO
*
)
*
)
*
)
DASH-SCELTO E RACCOMANDATO
DA CANDY
Quando costruiamo un nuovo modello di lavatrice, lo
sottoponiamo a tutti i possibili test. Ed uno dei più
importanti è quello che permette ai nostri esperti di
individuare il detersivo idoneo a risolvere i problemi del
bucato. Dash ha saputo rispondere alle nostre esigenze:
far funzionare bene la lavatrice, non comprometterne la
durata, raggiungere i migliori risultati di lavaggio. Questa
costante eccellenza di risultati, che era l’obiettivo
principale del test che abbiamo effettuato, ha determinato
la nostra scelta e la nostra raccomandazione. La funzione
primaria di un detersivo che risponda a tutte le esigenze
del lavaggio è quella di collaborare con l’acqua per
rimuovere lo sporco dai tessuti, trattenendolo in
sospensione affinché sia eliminato al momento dello
scarico e controllare il volume della schiuma che si forma
nella lavatrice, sempre senza danneggiare le fibre dei capi
del bucato. Dash soddisfa pienamente queste esigenze,
perchè contiene elementi d’alta qualità, frutto delle più
avanzate ricerche, che assicurano eccellenti risultati in
tutte le condizioni.
Dash lo puoi trovare in polvere, liquido e nella nuova
formula compatta di Dash Ultra.
Note da considerare
In caso di biancheria con elevato grado di sporco é consigliata la riduzione del carico
a non più di 3 kg.
Nei programmi indicati può essere eseguito il candeggio automatico mettendo il
candeggiante liquido nella vaschetta .
* Programmi di prova secondo CENELEC EN 60456.
Regolando opportunamente il termostato è possibile lavare a qualsiasi temperatura al
disotto della massima prevista per ciascun programma.
Programma rapido 32 minuti
Il programma rapido 32 minuti permette di effettuare in 30 minuti circa un ciclo
completo di lavaggio per un massimo di 2 kg di biancheria ad una temperatura di 50°.
È possibile ridurre la temperatura di lavaggio utilizzando l’apposita manopola H.
La quantità massima di detersivo utilizzabile per questo programma è indicata
sull’apposito misuratore 32’ in dotazione.
Il detersivo deve essere caricato nella vaschetta per il programma rapido 32’ (vaschetta I).
Il programma rapido 32 minuti può essere, inoltre, utilizzato come ciclo di
prelavaggio nel caso di carichi particolarmente sporchi selezionando
successivamente il programma principale desiderato.
42 43
IT
Page 23

SELECC.
PROG.
1
2
3
4
5
6
7
8
9
10
32’
Z
ES
TABLA DE PROGRAMAS
44 45
TYPO DE TEJIDO
Tejidos resistentes
Algodón, lino,cáñamo
Algodón, mixtos
resistentes
Algodón, mixtos
Algodón
Algodón, lino
Tejidos mixtos y
sintéticos
Mixtos resistentes
Mixtos, algodón,
sintéticos
Sintéticos (Rayon,
Acrilicos)
Mixtos, sintéticos
delicados
Tejidos muy
delicados
Ropa de lana
Sintéticos (Rayon,
Acrilicos)
Mixtos, sintéticos
delicados, lana
Para que no precisa
centrifugad
CARGA
MAX
kg
5
5
5
3,5
-
-
2,5
2
2
2
2
-
-
1,5
1
1,5
-
-
2
5
-
SELECC.
TEMP.
°C
Hasta
90°
Hasta
60°
Hasta
50°
Hasta
40°
-
-
-
Hasta
60°
Hasta
50°
Hasta
40°
Hasta
30°
-
-
-
Hasta
40°
Hasta
30°
-
-
Hasta
50°
-
-
CARGA DETERGENTE
1)
1)
1)
CAPÍTULO 10
Notas a considerar
En caso de ropa con un alto grado de suciedad,
se aconseja la reducción de la carga a máximo 3 kg.
En los programas indicados puede conseguirse un
blanqueo automático, colocando el blanqueador en la
cubeta .
Regulando oportunamente el termostato es posible lavar
a cualquier temperatura por debajo de la prevista en el
programa seleccionado.
1)
Programas según normas EN 60456.
Programa rápido de 32 minutos
El programa rápido de 32 minutos permite efectuar en 30 minutos un
ciclo completo de lavado para un máximo de 2 kg de colada y una
temperatura de 50°C.Es posible reducir la temperatura de lavado
utilizando el programador específico (programador H).
La cantidad máxima de detergente para este programa está indicada
sobre el medidor 32’ en dotación.
El detergente debe ser cargado en el dispensador para el “programa
rápido de 32 minutos” (dispensador I).
El programa rápido 32 minutos puede ser, además, utilizado como ciclo
de prelavado en el caso de coladas particularmente sucias
seleccionando a continuación el programa principal deseado.
Consigue los mejores resultados con tu lavadora Candy
Para asegurarte que consigues los mejores resultados con tu nueva
lavadora Candy, es importante que uses el detergente correcto en tu
colada diaria. Existen muchos detergentes en los lineales de las tiendas,
y elegir el correcto entre tantos puede ser complicado.
En Candy regularmente hacemos pruebas entre diferentes tipos de
detergentes, para saber cual obtiene los mejores resultados con
nuestras lavadoras.Hemos concluido que solo una marca cumple
siempre los estandares de excelencia que necesitamos y consigue una
blancura superior en una amplia gama de manchas,además
proporciona un cuidado especial a la ropa.Es por todo esto por lo que
Candy otorga a Ariel su sello de aprobacion oficial.
❙ ❙ ❙
●●●
●●●
●●●
●●●
●
●
●●
●●
●●
●●
●
●
●●
●●
●
●
●
●
❀
PROGRAMA PARA
Intensivo - Muy sucio
Suciedad normal
Algodón resistentes
Poco sucio - Colores delicados
Aclarados enérgicos
Suavizante
Centrifugado enérgico
Secado
Muy sucio
Sucio normal
Colores delicados
Poco sucio
Aclarados delicados
Suavizante
Centrifugado delicado
Secado
LANA “LAVABLE A MAQUINA”
Cortinas
Aclarados delicados
Suavizante
Centrifugado delicado
Ciclo rápido
Manchas orgánicas
Sólo desagüe
PARA TU NUEVA LAVADORA
Page 24

46 47
FÜLLMENGE
MAX.
kg
5
5
5
3,5
-
-
2,5
2
2
2
2
-
-
1,5
1
1,5
-
-
2
5
-
PRO-
GRAMM
WAHL.
1
2
3
4
5
6
7
8
9
10
32’
Z
TEMPERATUR-
WAHL
bis
90°
bis
60°
bis
50°
bis
40°
-
-
-
bis
60°
bis
50°
bis
40°
bis
30°
-
-
-
bis
40°
bis
30°
-
-
bis
50°
-
-
❙ ❙ ❙
●●●
●●●
●●●
●●●
●
●
●●
●●
●●
●●
●
●
●●
●●
●
●
●
●
❀
1)
1)
1)
DE
PROGRAMMTABELLE
EINSPÜLKAMMERN
Hinweise:
Es empfiehlt sich,bei stark verschmutzter Wäsche die Füllmenge
auf höchstens 3 kg zu reduzieren.
Bei den gekennzeichneten Programmen wird automatisch
Bleichmittel zugeführt, wenn Sie flüssiges Bleichmittel in die
entsprechende Einspülkammer füllen .
Der Temperaturwähler ermöglicht die Reduktion der
Waschtemperatur. Zum Beispiel kann eine Intensiv-Kochwäsche
auch mit Kaltwasser gewaschen werden indem der
Temperaturwähler auf den Wasserhahn gestellt wird.
1)
Vergleichsprogramme NACH EN 60456
Schnellprogramm 32 Minuten
Das Schnellprogramm 32 Minuten ist ein komplettes
Waschprogramm, das bei 50°C Temperatur maximal 2 kg.
Wäsche in kaum mehr als einer halben Stunde wäscht.
Die Temperatur kann durch Betätigen des Temperaturreglers
(Drehknopf H) reduziert werden.
Die maximale Waschmittelmenge für dieses Programm ist auf
der mitgelieferten Waschmittel-Dosierer 32’ angegeben.
Das Waschmittel muß in die Kammer für das “Schnellprogramm
32 minuten” (Kammer I) eingegeben werden.
Das Schnellprogramm 32 Minuten kann auch als
Vorwaschprogramm für stark verschmutzte Wäsche benutzt
werden. Wählen Sie danach das gewünschte
Hauptwaschprogramm.
Beste Waschergebnisse mit Ihrer neuen Candy-Maschine
Um sicherzustellen, daß Sie mit Ihrer neuen Candy-Maschine
beste Waschergebnisse erzielen, ist es wichtig, täglich das
richtige Waschmittel zu verwenden. Da es heutzutage im
Handel so viele Waschmittel und Waschmittelarten gibt,ist es oft
schwierig, hieraus die richtige Wahl zu treffen.
Wir bei Candy testen regelmäßig Waschmittel,um
herauszufinden,welche für unsere Maschinen hervorragend
geeignet sind.Wir fanden heraus,daß ARIEL unseren hohen
Anforderungen gerecht wird und hervorragende
Fleckentfernung über alle Fleckenarten hinweg,verbunden mit
einem hohen Niveau an Waschepflege bietet.Candy hat aus
diesem Grunde Ariel sein offizielles Gütesiegel verliehen.
KAPITEL 10
FÜR IHRE NEUE WASCHMASCHINE
GEWEBEART
Koch-und
Buntwäsche
Baumwolle Leinen Jute
Baumwolle Leinen
strapazierfähige
Gewebe
Baumwolle
Mischgewebe
Baumwolle
Baumwolle Leinen
Pflegeleicht
Strapazierfähige
Gewebe
Mischgewebe aus
Baumwolle und Synthetik
Synthetik (Nylon, Perlon)
Baumwolle
Mischgewebe
Empfindliche
Mischgewebe und
Synthetik Wolle
Feinwäsche
Wolle
Synthetik (Dralon,Acryl,
Trevira)
Empfindliche
Mischgewebe und
Synthetik
Für Wäsche, die nicht
geschleudert werden soll
PROGRAMM FÜR
Intensiv-Programm
Normal verschmutzt
Leicht verschmutzt
Farbige Feinwäsche
Intensiv Spülgang
Weichspüler, Appretur etc.
Intensivschleudern
Trocknen
Stark verschmutzt
Normal verschmutzt
Farbige Feinwäsche
Leicht verschmutzt
Schonspülen
Weichspülen,Appretur etc.
Schonschleudern
Trocknen
Maschinengeeignete Wolle mit
Sonderausstattung
Gardinen
Schonspülen
Weichspülen,Appretur etc.
Schonschleudern
Schnellprogramm 32 Minuten
Flecken organischen Ursprungs
Abpumpen
Page 25

EN
TABLE OF PROGRAMMES
48 49
FABRIC
Resistants fabrics
Cotton, linen
Cotton, mixed
resistants
Cotton, mixed
Cotton
Cotton, linen
Mixed fabrics and
synthetics
Mixed, resistants
Cotton, mixed fabrics,
synthetics
Synthetics (nylon,
perlon), mixed cotton
Mixed, delicate
synthetics
Very delicate fabrics
Woollens
Synthetics (Dralon,
Acryl, Trevira)
Mixed, delicate
synthetics, wool
For fabrics that should
not be spin
PROGRAM FOR
Intensive - Heavily soiled
Normally soiled
Cotton resistant
Lightly soiled - Delicates colours
Energetic rinsing
Conditioner,fragrance, softener
Energetic spin
Drying
Heavily soiled
Normal soiling
Colour fast
Lightly soiled
Delicate rinsing
Conditioner,fragrance, softener
Delicate spin
Drying
“MACHINE WASHABLE” woollens
Curtains
Delicate rinsing
Conditioner,fragrance, softener
Delicate spin
rapid cycle
Organic stains
bleaching
Drain only
WEIGHT
MAX
kg
5
5
5
3,5
-
-
2,5
2
2
2
2
-
-
1,5
1
1,5
-
-
2
5
-
SELECT
PROG.
1
2
3
4
5
6
7
8
9
10
32’
Z
SELECT
TEMP.
°C
Up to
90°
Up to
60°
Up to
50°
Up to
40°
-
-
-
Up to
60°
Up to
50°
Up to
40°
Up to
30°
-
-
-
Up to
40°
Up to
30°
-
-
Up to
50°
-
-
CHARGE DETERGENT
1)
1)
1)
CHAPTER 10
Please, read these notes
In case of very dirty underwear,a 3 kg maximum load is
advised.
In the programs as shown in the table,automatic bleaching is
possible by pouring the liquid bleach into the detergent
draw .
The variable temperature selector allows a reduction in the wash
temperature.For example,an intense cottons cycle can be
washed in cold water simply by moving the dial to the tap symbol.
1)
Programmes according to directives EN 60456.
32 Minute Rapid Programme
The 32 minute rapid programme allows a complete washing
cycle to be carried out in approximately 30 minutes, with up to
a maximum load of 2 kg and a the temperature of up to 50°C.
The washing temperature can be reduced by using the
control knob H.
The maximum quantity of detergent that can be used is
marked on the enclosed 32 minute gauge.
The detergent must be placed in the “ 32 minute rapid
programme”compartment (marked I) in the detergent
dispenser.
The 32 minute rapid programme can also be used as a
prewash cycle in the case of heavily soiled garments, before
selecting the main wash programme.
Get the best results from your new Candy machine
To ensure you get the best results from your new Candy
machine it is important to use the right detergent in your
everyday wash.There are many detergents available in the
market and making a choice from the wide range available
can often be confusing.
At Candy we regularly test many different types of detergent
to assess which give the best wash results in our machines.We
found only one brand always lives up to our exacting
standards and provides outstanding cleaning across a broad
range of dirt and stains, as well as providing high levels of
fabric care.That’s why Candy gave Ariel their official seal of
approval.
❙ ❙ ❙
●●●
●●●
●●●
●●●
●
●
●●
●●
●●
●●
●
●
●●
●●
●
●
●
●
❀
FOR YOUR NEW WASHING MACHINE
Page 26

50
FR
CHAPITRE 11
LAVAGE
CAPACITÉ VARIABLE
AUTOMATIQUE
Cette machine peut adapter
automatiquement le niveau
d’eau au type et à la quantité
de linge.Vous pouvez ainsi
obtenir un lavage “personnalisé”,
même du point de vue
énergétique.
Ce système permet de diminuer
la consommation d’énergie et
réduit nettement les temps de
lavage.
Supposons que le linge à laver
soit en COTON EXTREMEMENT
SALE (s’il a des taches
particulièrement résistantes les
enlever avec un détachant).
Quand certaines pièces ont des
taches qui doivent être traitées
par un produit blanchissant
liquide, vous pouvez les détacher
dans la machine.Verser le
produit blanchissant liquide dans
le bac et placer la manette (L)
sur le programme spécial:
“DETACHAGE
PRE-LAVAGE” .Après ce
traitement,ajouter à ces pièces
le reste du linge et effectuer un
lavage normal selon le
programme choisi.
Nous vous conseillons de ne pas
faire un lavage exclusivement de
serviettes-éponge qui, absorbant
beaucoup d’eau, deviennent
trop lourdes.
DE
EN
KAPITEL 11
WASCHEN
UNTERSCHIEDLICHE
WÄSCHEMENGEN
Die Waschmaschine gleicht die
Wassermenge automatisch an
Art und Menge der Wäsche an.
So ist, auch im Hinblick auf den
Energieverbrauch,eine sehr
“individuelle” Form des
Waschens möglich.
Dieses System ermöglicht eine
spürbare Reduzierung sowohl
des. Wasserverbrauches als auch
der Waschzeiten.
Angenommen, Sie waschen z.B.
STARK VERSCHMUTZTE
BAUMWOLLE (auf die
hartnäckigen Flecken vorher
eine geeignete Waschpaste
auftragen).
Wenn nur einige Wäschestücke
Flecken haben, die mit einem
flüssigen Bleichmittel
vorbehandelt werden müssen,
können Sie für diese
in der Maschine eine vorherige
Fleckenreinigung durchführen.
Geben Sie dazu das Bleichmittel
direkt in die Trommel und stellen
Sie den Programmwahlschalter
(L) auf das Spezialprogramm
“Fleckentfernung
Vorwäsche” .
Nach Beendigung dieses
Programms füllen Sie die übrige
Wäsche ebenfalls in die
Maschine und setzen Sie die
Wäsche mit dem geeigneten
Programm fort.
Waschen Sie nach Möglichkeit
niemals ausschließlich sehr
saugfähige Wäschestücke,die
bedingt durch die extreme
Wasseraufnahme,sehr schwer
werden.
CHAPTER 11
WASHING
VARIABLE CAPACITY
This washing machine
automatically adapts the level
of the water to the type and
quantity of washing.In this way it
is also possible to obtain a
“personalized” wash from an
energy saving point of view.
This system gives a decrease in
energy consumption and a
sensible reduction in washing
times.
Let us suppose that the washing
consists of HEAVILY SOILED
COTTON (tough stains should be
removed with suitable stain
removal).When only a limited
number of articles have stains
which require treatment with
liquid bleaching agents,
preliminary removal of stains can
be carried out in the washing
machine.
Pour the bleach into the special
compartment and set the knob
(L) on the special programme
“PRE-WASH STAIN REMOVAL” .
When this phase has terminated
add the rest of the washing and
proceed with a normal wash on
the most suitable programme.It
is advisable not to wash a load
made up entirely of articles in
towelling fabric which absorb a
lot of water and become too
heavy.
51
IT
CAPITOLO 11
LAVAGGIO
CAPACITÁ VARIABILE
Questa lavatrice é in grado
di adattare
automaticamente il livello
dell’acqua al tipo e alla
quantità di biancheria.
E’ così possibile ottenere
un bucato “personalizzato”
anche dal punto di vista
energetico.
Questo sistema porta ad una
diminuzione dei consumi
d’energia e ad una riduzione
sensibile dei tempi di
lavaggio.
Supponiamo che il bucato
da lavare sia di COTONE
MOLTO SPORCO (se ha delle
macchie particolarmente
resistenti le asporti con
l’apposita pasta).
Quando solo alcuni capi
presentano macchie che
richiedono un trattamento
con prodotti candeggianti
liquidi, si può procedere a
una smacchiatura
preliminare in lavatrice.
Versare il candeggiante
nella vaschetta e posizionare
la manopola (L) sullo
speciale programma
“SMACCHIATURA
PREBUCATO” . Finito
questo trattamento,
aggiungere ai capi
candeggiati il resto della
biancheria e procedere al
bucato normale con il
programma più adatto.
Le consigliamo di non fare un
carico di soli capi in tessuto
di spugna che, assorbendo
molta acqua, diventano
troppo pesanti.
ES
CAPÍTULO 11
LAVADO
CAPACIDA VARIABILE
Esta lavadora adapta
automáticamente el nivel
del agua al tipo y cantidad
de ropa.Así pues, es posible
obtener una colada
“personalizada”, incluso
desde el punto de vista
energético.
Este sistema aporta una
disminución del consumo
de energía y una sensible
reducción del tiempo de
lavado.
Supongamos que la colada
que va a hacer sea de
ALGODON MUY SUCIO (si
hay manchas
especialmente resistentes,
quítelas con la pasta
apropiada).
Cuando son sólo algunas
prendas las que presentan
manchas que requieren un
tratamiento con productos
blanqueadores líquidos, se
puede proceder a una
eliminación de manchas
previa en la lavadora.
Eche el blanqueador en el
compartimento
correspondiente de la
cubeta del detergente y
posicione el selector (L) en
el programa especial
“ELIMINACION DE
MANCHAS PRELAVADO” .
Finalizado este tratamiento
agregue a las prendas
blanqueadas el resto de la
ropa y proceda al lavado
normal con el programa
más adecuado.
Le aconsejamos no realizar
una colada con sólo
prendas de tejidos
esponjosos, ya que al
absorber mucha agua,
sehacen demasiado
pesadas.
cl
cl
cl
cl
cl
Page 27

52
60° C
5 kg MAX
FR
La charge admise pour les
tissus résistants est de 5 kg,
tandis qu’en cas de tissus
délicats nous conseillons de ne
pas dépasser 2 kg (1 kg en cas
de pièces en “pure laine
vierge”lavables dans la
machine à laver),pour éviter la
formation de plis difficiles à
repasser.Pour les tissus
extrêmement délicats nous
conseillons d’utiliser un filet.
EXEMPLE:
Consulter le tableau des divers
programmes de lavage et
vous trouverez les conseils de
Candy:
● Les étiquettes doivent
indiquer “60° C”.
● Ouvrir le hublot à l’aide de la
touche (B).
● Remplir le tambour (maxi.
5 kg de linge sec).
● Fermer le hublot.
ATTENTION:
AU MOMENT DE
CHOISIR LE
PROGRAMME VERIFIER
QUE LA TOUCHE
MARCHE/ARRET NE
SOIT PAS ENFONCEE.
Choisir le programme 1: pour
choisir le programme,tourner
la manette (L) DANS LE SENS
DES AIGUILLES D’UNE MONTRE
et faire coïncider le numéro du
programme avec l’index.
● Placer la manette de la
température (H) sur 60°C maxi.
● Ouvrir le tiroir à produits
lessiviels (A).
DE
EN
Die für widerstandsfähige
Textilien geeignete Lademenge
beträgt 5 kg, für Feinwäsche
sollte eine Menge von 2 kg
nicht überschritten werden
(1 kg für waschmaschinengeeignete Wollarten).
So vermeidet man am
wirksamsten die Bildung von
schwer ausbügelbaren Falten.
Für die Wäsche extrem
empfindlicher Teile empfiehlt
sich die Verwendung eines
Waschnetzes.
BEISPIEL:
Candy zeigt Ihnen in der
Tabelle, welche Vorgehensweise
die beste ist:
●
Überzeugen Sie sich, daß das
Wäscheetikett die Eignung für
Temperaturen bis “60° C”
ausweist;
●
Öffnen Sie das Bullauge mit
Taste (B).
●
die Trommel mit max. 5 kg
Trockenwäsche beladen.
●
Bullauge schließen.
ACHTUNG:
BEIM EINSTELLEN DES
PROGRAMMS STETS
DARAUF ACHTEN, DAß
DIE START/STOP TASTE
NICHT GEDRÜCKT IST.
Wahl Programm 1: die
Programmwahl erfolgt durch
Drehen des Wahlschalters (L) im
Uhrzeigersinn bis die Nummer
des gewählten Programms und
der Pfeil übereinstimmen.
●
Temperaturwahlschalter (H)
auf max.60° C stellen.
●
Waschmittelbehälter (A)
öffnen.
The maximum load for heavy
fabrics is 5 kg, while, in the case
of delicate fabrics, it is
advisable not to exceed 2 kg
(1 kg in the case of machine
washable articles in “Machine
Washable Woolens”) so as to
avoid the formation of creases
which may be difficult to iron.A
net bag should be used for
particularly delicate fabrics.
EXAMPLE:
The advice of Candy is set out
in the washing programme
table:
● Ensure that article labels
carry the indication 60°C.
● Open the door by pressing
button (B).
● Load the drum with a
maximum of 5 kg.of dry
washing.
● Close the door
IMPORTANT:
WHEN SETTING THE
PROGRAMME ENSURE
THAT THE ON/OFF BUTTON
IS NOT TURNED ON.
Select programme 1:
Choose the programme by
rotating the knob (L) in a
CLOCKWISE DIRECTION and
make the number of the
programme coincide with the
sign.
● Move the temperature knob
(H) to maximum 60° C.
● Open the detergent drawer
(A).
53
IT
Il carico ammesso per i tessuti
resistenti é di 5 kg mentre nel
caso di tessuti delicati, si
consiglia di non superare i 2
kg (1 kg nel caso di capi in
“Pura Lana Vergine” lavabile
in lavatrice), per evitare la
formazione di pieghe difficili
da stirare. Per tessuti molto
delicati é consigliabile l’utilizzo
di un sacchetto di rete.
ESEMPIO DI USO:
Guardi la tabella dei
programmi di lavaggio,vedrà
come Candy le consiglia di
comportarsi:
● Si assicuri che sulle etichette
dei capi ci sia scritto “60° C”.
● Apra l’oblò con il tasto (B).
● Riempia il cestello con
5 kg massimo di biancheria
asciutta
● Chiuda l’oblò.
ATTENZIONE:
NELL’IMPOSTARE IL
PROGRAMMA SI
ASSICURI CHE IL TASTO
MARCIA/ARRESTO
NON SIA INSERITO.
Selezioni il programma 1:
il programma viene scelto
ruotando la manopola (L) in
SENSO ORARIO e facendo
coincidere il numero del
programma con l’indice.
● Porti la manopola della
temperatura (H) su 60°
massimo
● Apra il cassetto detersivo
(A).
ES
La carga admitida para los
tejidos resistentes es de 5 kg.
mientras que en el caso de
tejidos delicados se aconseja
no superar los 2 kg. (1 kg. en
el caso de prendas de “Pura
Lana Virgen” lavables en
lavadora),para evitar la
formación de arrugas difìciles
de planchar.Para tejidos
delicados se aconseja el uso
de una bolsa de rejilla.
EJEMPLO:
Mire la tabla de los
programas de lavado, verá
como Candy le aconseja
sobre el modo de operar:
● Asegúrese que en las
etiquetas de las prendas esté
indicado “60° C”.
● Abra el ojo de buey con el
botón (B).
● Cargue el tambor con 5
kg. como máximo de ropa
en seco.
● Cierre el ojo de buey.
ATENCIÓN:
AL SELECCIONAR EL
PROGRAMA, ASEGURESE
DE QUE EL BOTÓN DE
PUESTA EN
MARCHA/PARO NO ESTÁ
APRETADO.
Seleccione el programa 1: el
programa se selecciona
haciendo girar el mando (L)
en el SENTIDO DE LAS
MANECILLAS DEL RELOJ y
haciendo coincidir el número
del programa con el
indicator.
● Gire el mando de la
temperatura (H) hasta 60°C
como máximo.
● Abra la cubeta del
detergente (A).
Page 28

54
cl
FR
● Remplir le deuxième
bac II de lavage avec 120 g
de produit.
● Remplir le bac de
blanchissage avec 100 cc
d’eau-de-javel.
● En cas de besoin, remplir
le bac des additifs avec
50 cc de produit ✿✿.
● Fermer le tiroir (A).
● Vérifier que le robinet
d’eau soit ouvert.
● Vérifier que la vidange
soit placée correctement.
● Contrôler que la manette
de séchage (I) est sur la
position “0”. Sans cela le
programme continuera
jusqu’à la fin du séchage.
● Appuyer sur le bouton de
mise en route (C). Le témoin
de fonctionnement (N)
s’allumera.
La machine accomplira le
programme demandé.
● A la fin,appuyer sur la
touche (C) marche/arrêt et
la lampe-témoin s’éteindra.
● Ouvrir le hublot et retirer le
linge.
POUR TOUS LES TYPES
DE LAVAGE CONSULTER
TOUJOURS LE TABLEAU
DES PROGRAMMES ET
SUIVRE LA SEQUENCE
DES OPERATIONS
INDIQUEE.
cl
DE
EN
●
in das zweite II Fach
(Hauptwäsche) ca 120 gr.
Waschmittel geben.
●
In den Behälter für
Bleichmittel ca. 100 cc
Bleichmittel geben
●
auf Wunsch ca.50 cc
Zusatzmittel in den
Behälter
✿✿
für Zusatzmittel
geben.
●
Waschmittelbehälter (A)
schließen.
●
überzeugen Sie sich, daß
die Wasserzufuhr geöffnet ist.
●
daß der Ablaufschlauch
richtig angebracht ist.
●
Achten Sie darauf,daß
der Wahlschalter (I) für den
Trockner in “0” -Position steht,
sonst startet nach dem
Waschen automatisch ein
Trocken-Programm.
●
Drücken Sie die START
Taste (C).
Die Leuchtanzeige (N)
leuchtet auf.
Die Maschine durchläuft
jetzt das gewählte
Programm.
●
Nach Ablauf des
Programms START/STOP Taste
(C) drücken,die
Leuchtanzeige erlischt.
●
Das Bullage öffnen und
die Wäsche entnehmen.
BENUTZEN SIE FÜR JEDE
WÄSCHE DIE
PROGRAMMTABELLE
UND BEACHTEN SIE DIE
O.A. REIHENFOLGE.
● Put 120 g in the second II
wash compartment .
● Put 100 cc of bleach
in the bleach
compartment.
● Put 50 cc of the desired
additive in the additives
compartment ✿✿.
● Close the detergent
drawer (A).
● Ensure that the water inlet
tap is turned on.
● And that the discharge
tube is in place.
● Make sure the drying
control knob is on “0”, or else
the programme will carry on
till drying is completed.
● Press the “ON” button (C).
The light (N) will come on.
The washing machine will
carry out the set
programme.
● At the end of the
programme,press the
On/Off button (C).The light
will go out.
● Open the door and
remove the washed articles.
FOR ALL TYPES OF
WASH CONSULT THE
PROGRAMME TABLE
AND FOLLOW THE
OPERATIONS IN THE
ORDER INDICATED.
55
cl
cl
IT
● Metta nella 2ª vaschetta II
di lavaggio 120 g di
detersivo.
● Metta 100 cc di
candeggina nella vaschetta
candeggio
● Metta 50 cc dell’additivo
che desidera nella
vaschetta additivo
✿✿.
● Chiuda il cassetto
detersivo (A).
● Si assicuri che il rubinetto
dell’acqua sia aperto.
● Che lo scarico sia in
posizione regolare.
●
Si assicuri che la
manopola di asciugatura (I)
sia sullo “0” altrimenti il
programma continuerà fino
all’asciugatura.
● Prema il pulsante di
marcia (C) si accenderà la
segnalazione luminosa (N).
La lavatrice svolgerà il
programma che le ha
ordinato.
● Al termine prema il tasto
(C) di marcia/arresto,si
spegneranno le segnalazioni
luminose.
● Apra l’oblò e tolga i
tessuti.
PER QUALSIASI TIPO DI
LAVAGGIO CONSULTI
SEMPRE LA TABELLA DEI
PROGRAMMI E SEGUA
LA SEQUENZA DELLE
OPERAZIONI COME
INDICATO
ES
● Ponga en el segundo
compartimento II de lavado
120 g de detergente.
● Ponga 100 cc de lejía en
el compartimento para
blanqueadores
● Ponga 50 cc del aditivo
que desee en el
compartimento para
aditivos
✿✿
.
● Cierra la cubeta del
detergente (A).
● Asegúrese de que el grifo
del agua esté abierto,
● Que el desagüe esté en
posición correcta.
●
Asegúrese que el mando
de programación secado (I)
esté en “0”. Si no el
programa continuará hasta
el secado.
● Pulse el botón de puesta
en marcha (C).
Se encenderá el piloto
luminoso (N).
La lavadora ejecutará el
programa que usted ha
seleccionado.
● Al finalizar el programa,
pulse el botón (C) de
puesta en marcha/paro,se
apagará el piloto luminoso.
● Abra el ojo de buey y
saque la ropa.
PARA CUALQUIER TIPO
DE LAVADO, CONSULTE
SIEMPRE LA TABLA DE
LOS PROGRAMAS Y
SIGA LA SECUENCIA DE
LAS OPERACIONES TAL
COMO VIENE
INDICADO.
cl
Page 29

CHAPTER 12
DRYING
WARNING: NEVER DRY
GARMENTS MADE IN
FOAM RUBBER OR
FLAMMABLE MATERIALS.
The washer/dryer is fitted with
an automatic safety cut out
in the event of overheating.
IMPORTANT:
THIS DRYER CAN ONLY
BE USED FOR LAUNDRY
WHICH HAS BEEN
WASHED AND SPIN
DRIED.
WARNING:
Indications given are
general, therefore some
practice is needed for best
drying results. We
recommend setting lower
times than indicated, when
first using, so as to establish
degree of drying wanted. We
recommend not to dry
fabrics that fray easily, such
as rugs or garments with a
deep pile, so as to avoid air
duct clogging.The drying
unit allows perfect drying of
fabrics without steam being
released outside. Heated air
is strongly blown on the
damp laundry thereby drying
it.The damp air is recycled
through a duct in which cold
water condenses water
contained in the air.
CAPÍTULO 12
SECADO
NO SECAR PRENDAS
EN GOMAPLUMA O
TEJIDOS INFLAMABLES.
La lavadora-secadora está
dotada de un dispositivo que
previene cualquier
posibilidad de
sobrecalentamiento o
incendio, incluso en caso de
manipulaciones erróneas o
de anomalías en cualquier
componente. En cualquier
caso no se producirá el
calentamiento durante la
fase de secado.
IMPORTANTE
EN ESTA SECADORA DE
ROPA UNICAMENTE
PUEDE SECARSE ROPA
CENTRIFUGADA
PROCEDENTE DE UN
LAVADO CON AGUA.
IMPORTANTE
Las indicaciones
presentadas son generales,
es necesario un poco de
práctica para una óptima
utilización de la secadora.
Le aconsejamos al inicio
seleccionar tiempos
inferiores a los aconsejados,
de forma a poder
determinar el grado de
secado deseado por Usted.
Le aconsejamos no secar
muy a menudo tejidos
hilachosos, tipo alfombras o
prendas de pelo largo, para
no obturar los conductos de
aire.
El dispositivo de secado
permite la perfecta
eliminación de la humedad
sin la emisión de vapores al
exterior.Un potente chorro
de aire, previamente
calentado, incide sobre la
ropa húmeda evaporando el
agua; el aire saturado de
humedad viene reciclado a
través de un conducto
CHAPITRE 12
SECHAGE
NE SÈCHER JAMAIS DES
VÊTEMENTS EN
CAOUTCHOUC MOUSSE
OU DES TISSUS
INFLAMMABLES.
La machine à laver/séchante est équipée d’un dispositif
qui prévient toute possibilité
de surchauffage ou de feu,
même dans le cas de
manoeuvres incorrectes ou
d’anomalies dans un des
composants. Dans ce cas, le
chauffage ne fonctionne pas
pendant le sèchage.
IMPORTANT:
DANS CETTE MACHINE À
LAVER SÉÇHANTE, PEUT
ÊTRE SÉCHÉ
EXCLUSIVEMENT LE
LINGE ESSORÉ ET LAVÉ À
L’EAU.
IMPORTANT
Les indications fournies sont
générales et il sera
nécessaire de s’exercer un
peu pour un fonctionnement
optimal du sèchage.Au
début, nous recomandons
de régler des temps inférieurs
à ceux qui sont indiqués, de
façon à pouvoir définir le
degré de sèchage voulu.
Nous vous recommandons
de ne pas sècher les tissus
qui s’effilochent souvent, du
genre carpette ou
vêtements à poils longs, pour
ne pas obstruer les conduites
d’air.Le dispositif de sèchage
permet un sèchage parfait
des tissus sans aucune
émission de vapeur à
l’extérieur.Un puissant souffle
d’air,idealemént chauffé,
pénètre le linge humide, l’air
saturé d’humidité est recyclé
à travers une conduite dans
56 57
FR
ES
EN
KAPITEL 12
TROCKNEN
AUF KEINEN FALL
GUMMIKLEIDUNG,
DAUNENKISSEN ODER
LEICHT BRENNBARE
TEXTILIEN TROCKNEN.
Der Wasch/Trockenautomat
hat eine
Sicherheitsvorrichtung, die
Überhitzung und Brandgefahr
ausschließt, solange das
Gerät nicht unsachlich
bedient wird oder
Geräteteile defekt sind. In
einem solchen Fall bleibt die
Heizung während des
Trocknens ausgeschaltet.
ZU BEACHTEN:
IN DIESEM TROCKNER
DARF AUSSCHLIEßLICH
GESCHLEUDERTE, IN
WASSER GEWASCHENE
WÄSCHE GETROCKNET
WERDEN.
WICHTIG:
Die mitgelieferten Hinweise
sind nur zur Orientierung
gedacht. Die jeweils
optimale Nutzung des
Gerätes ergibt sich am
ehesten aus der persönlichen
Erfahrung im Umgang mit
dem Gerät. Um den
gewünschten
Trocknungsgrad besser
steuern zu können, sollte man
anfangs die Trockenzeiten
etwas niedriger als
empfohlen einstellen.
Langfaserige Textilien,
Badematten,Vorleger und
andere langflorige Stoffe
nicht zu häufig trocknen,um
die Luftkanäle nicht zu
verstopfen.
Eine spezielle
Trockenvorrichtung garantiert
die perfekte Trocknung der
Wäsche ohne Dampfaustritt
nach außen.
Ein kräftiger warmer Luftstrom
entzieht der Wäsche die
DE
CAPITOLO 12
ASCIUGATURA
ASSOLUTAMENTE NON
ASCIUGARE CAPI IN
GOMMAPIUMA O
TESSUTI INFIAMMABILI.
La lavasciuga é dotata di un
dispositivo che previene
qualsiasi possibilità di
surriscaldamento o incendio
anche in caso di manovre
errate o di anomalie di
qualche componente, in
questo caso viene a
mancare il riscaldamento
durante la fase di
asciugatura.
IMPORTANTE:
IN QUESTA
ASCIUGABIANCHERIA
PUÒ ESSERE ASCIUGATA
ESCLUSIVAMENTE
BIANCHERIA
CENTRIFUGATA
PROVENIENTE DA UN
LAVAGGIO IN ACQUA.
IMPORTANTE
le indicazioni fornite sono
generali, sarà necessaria un
po’ di pratica per un
funzionamento ottimale
dell’asciugatura.Le
consigliamo all’inizio di
impostare tempi inferiori a
quelli consigliati, in modo da
poter determinare il grado di
essiccazione da Lei
desiderato. Le consigliamo di
non asciugare
frequentemente tessuti
filacciosi,tipo tappetini o
capi a pelo lungo, per non
intasare i condotti dell’aria.
Il dispositivo di asciugatura
consente una perfetta
essiccazione dei tessuti senza
nessuna emissione di vapori
all’esterno.
Un potente soffio d‘aria
opportunamente riscaldata
investe la biancheria umida
facendone evaporare
l’acqua; l’aria satura di
umidità viene riciclata
attraverso un condotto in
IT
Page 30

laquelle l’eau froide
condense l’humidite
contenue dans l’air; tout le
circuit est fermé et étanche,
donc il n’y a aucune
émission de vapeur à
l’extérieur.
ATTENTION:
EN AUCUN CAS OUVRIR
L’HUBLOT QUAND LE
CYCLE DE SÈCHAGE A
COMMENCÉ, MAIS
ATTENDRE LA PHASE DE
REFROIDISSEMENT
PRÉVUE PAR LE CYCLE.
Il est possible de sècher
uniquement le linge qui a
déjà été essoré.
Avec la machine à
laver/séchante, deux types
de sèchage peuvent être
accomplis:
1 Sèchage de tissus en
coton, éponge, lin, chanvre,
etc...
2 Sèchage de tissus
mélangés
(synthétiques/coton), tissus
synthétiques.
PAR EXEMPLE: SECHAGE DE
TISSUS EN COTON, EPONGE,
LIN, CHANVRE, ETC.
Supposons que le linge à
sècher soit en coton et qu’il
s’agisse de draps.
The water is then conveyed
to the drain circuit,wich is
sealed and therefore,no
steam can be released
outside.
WARNING:
NEVER OPEN DOOR,
FOR ANY REASON
WHATS OEVER WHEN
DRYING IS IN PROCESS,
BUT WAIT
FOR COOLING
CYCLE TO BE
COMPLETED.
Spun laundry can be dried
only.
The washer/dryer can
perform two types of drying:
1 Cotton, terry towelling,
linen, hemp fabrics, etc...
2 Mixed fabrics
(synthetics/cotton), synthetic
fabrics.
THEREFORE, YOU MAY DRY
COTTON, TERRY TOWELLING,
LINEN, HEMP FABRICS, ETC.
AS FOLLOWS:
A practical example:
Your laundry to be dried is
cotton sheets.
58 59
bañado por agua fría que
condensa el agua
contenida en el aire; el
agua es evacuada a través
del desagüe.Todo el circuito
es perfectamente estanco,
no existiendo ninguna
posibilidad de emisión de
vapor al exterior.
ATENCION:
NO ABRIR NUNCA LA
PUERTA UNA VEZ
INICIADO EL CICLO DE
SECADO. ESPERAR A LA
FASE DE
ENFRIAMIENTO
PREVISTA EN EL CICLO.
Es posible secar sólo ropa ya
centrifugada.
Con la lavadorasecadora se
pueden efectuar 2 tipos de
secado:
1 Secado de tejidos de
algodón, felpa, lino,
cañamo, etc...
2 Secado de tejidos mixtos
(sintéticos/algodon),
sintéticos.
EJEMPLO: SECADO TEJIDOS
DE ALGODON, FELPA, LINO,
CAÑAMO, ETC...
Supongamos que la ropa a
secar es de algodón,
sábanas.
FR
ES
EN
DE
Feuchtigkeit.Die so mit
Wasserdampf angereicherte
Luft wird durch einen Kanal
geleitet. Durch einen kalten
Wasserstrahl kondensiert die
Luftfeuchtigkeit zu Wasser
und wird in den Ausfluß
abgepumpt. Das
Kondensationssystem ist
100% abgedichtet, so daß
während des Trocknens kein
Dampf nach außen
entweichen kann.
ACHTUNG:
ÖFFNEN SIE NIEMALS
DAS BULLAUGE NACH
DEM BEGINN DES
TROCKENVORGANGS.
WARTEN SIE IMMER, BIS
DIE ABKÜHLPHASE MIT
DEM SYMBOL IN DER
PROGRAMMABLAUFANZEIGE ERSCHEINT.
Es kann nur bereits
geschleuderte Wäsche
getrocknet werden.
Zwei Trockenarten sind
möglich:
1 Trocknen von Textilien aus
Baumwolle,Frottee,Leinen,
Hanf etc.
2 Trocknen von
Mischgeweben
(Synthetik/Baumwolle) und
synthetischen Stoffen.
BEISPIEL: TROCKNEN VON
TEXTILIEN AUS BAUMWOLLE,
FROTTEE, LEINEN, HANF ETC.
Angenommen, Sie wollen
Bettücher aus Baumwolle
trocknen.
IT
cui un velo d’acqua fredda
condensa l’acqua
contenuta nell’aria; l’acqua
viene poi evacuata
attraverso il circuito di
scarico. Tutto il circuito é
sigillato per cui non vi é
nessuna emissione di vapore
all’esterno.
ATTENZIONE:
NON APRIRE MAI
L’OBLO’ PER NESSUNA
RAGIONE UNA VOLTA
INIZIATO IL CICLO DI
ASCIUGATURA MA
ATTENDERE LA FASE DI
RAFFREDDAMENTO
PREVISTA DAL CICLO
E’ possibile asciugare solo
biancheria già centrifugata.
Con la lavasciuga si
possono effettuare due tipi
di asciugatura:
1 Asciugatura tessuti di
cotone, spugna, lino,
canapa, ecc...
Asciugatura di tessuti misti
(sintetici/cotone), tessuti
sintetici.
ESEMPIO: ASCIUGATURA
TESSUTI DI COTONE, SPUGNA,
LINO, CANAPA, ECC...
Supponiamo che la
biancheria da asciugare sia
di cotone e si tratti di
lenzuola.
Page 31

Candy recommande:
● Ouvrir l’hublot.
● Remplir le tambour avec
2,5 kg maximum.Dans le cas
de vêtements de grande
taille (par exemple, des
draps), ou très absorbants
(par exemple, des peignoirs
ou blue jeans), il est
recommandé de réduire la
quantité de linge à laver.
● Fermer l’hublot.
● Mettre la manette
programmes (L) sur
● Si l’on veut pendre les
vêtements directement
dans les armoires, mettre la
manette de sèchage (I) sur
“7-8”. Si les tissus doivent être
prêts au repassage, mettre
la manette de sèchage (I)
sur “6-7”.
● Pousser sur la manette de
sèchage coton (F). Quand
cette manette est pressée,
la température de sèchage
augmente
considérablement.
● Protection de hublot
La machine-à-laver dispose
d’un dispositif de protection
pour le verre du hublot qui
rejoint des températures
élevées durant la phase de
séchage.
ATTENTION:
NE TOUCHER L’HUBLOT
EN AUCUN CAS.
● S’assurer que le robinet
d’eau est ouvert.
● S’assurer que le tuyau de
vidange soit en position
correcte.
Candy le aconseja:
●
Abra el cesto.
●
Llénelo con máximo 2,5
kg. En caso de prendas de
grandes dimensiones (por
ejemplo sábanas) o muy
absorbentes (por ejemplo
albornoces de baño o blue
jeans) es aconsejable
reducir la cantidad de ropa.
●
Cierre la puerta.
●
Coloque el mando de
programación (L) en
●
Si desea los tejidos listos
para guardar en el armario,
posicione el mando de
secado (I) en 7-8.
●
Si quiere los tejidos
preparados para el
planchado, posicione el
mando de secado (I)
en 6-7.
●
Pulse la tecla secado de
algodón (F). Cuando
selecciona esta tecla la
temperatura de secado
aumenta notablemente.
PROTECCIÓN DE LA PUERTA
La lavadora dispone de una
pantalla protectora del
vidrio del ojo de buey que
alcanza temperaturas
elevadas durante la fase de
secado.
ATENCION:
NO TOCAR EL OJO DE
BUEY BAJO NINGUN
CONCEPTO.
●
Asegúrese que el grifo de
agua esté abierto.
●
Que el tubo de desagüe
esté bien colocado.
What Candy
recommends is:
● Open the drum.
● Load 2,5 kg maximum,
with large-size (e.g. sheets),
or very absorbant (e.g. bath
robes or blue jeans) laundry,
reduce number of items to
be dried.
● Close door.
● Turn programme control
knob (L) to
● If clothes are to be hung
in cupboards straight from
the machine, set drying
knob (I) on “7-8”; if laundry is
to be ironed, set drying knob
(I) on “6-7”.
● Press “DRY HIGH” button
(F): drying temperature will
increase considerably.
DOUBLE-SKIN DOOR
The appliance door is fitted
with a protective shield to
prevent contact being
made with the glass which
reaches high temperatures,
particularly during the
drying cycle.
WARNING: DO NOT
TOUCH DOOR FOR ANY
REASON WHATSOEVER.
● Make sure water tap is
open.
● Make sure water drain is
correctly positioned.
60 61
FR
ES
EN
2,5 kg MAX
DE
Candy empfiehlt,wie folgt
vorzugehen:
● Trommel öffnen.
● Höchstens 2,5 kg
Naßwäsche einfüllen.
Bei großen Wäschestücken
(wie Bettlaken) oder sehr
saugfähigen Stoffen
(wie Blue Jeans) ist es
ratsam, die Wäschemenge
zu reduzieren.
● Bullauge schließen.
● Programmschalter (L) auf
stellen.
● Für schrankfertig
getrocknete Wäsche,
Schalter für Trocknungsgrad
(I) auf 7-8 stellen.
● Für bügelfertig
getrocknete Wäsche,
Schalter für Trocknungsgrad
(I) auf 6-7 stellen.
● Taste Extratrocken (F)
betätigen. Die Benutzung
dieser Taste erhöht die
Trockentemperatur
beträchtlich.
FENSTERSCHUTZ
Die Waschmaschine verfügt
über einen Fensterschutz, der
während der Trockenphase
eine höhere Temperatur
erreicht.
ACHTUNG:
IN KEINEM FALL DAS
BULLAUGE BERÜHREN.
● Achten Sie darauf,daß der
Wasserhahn geöffnet ist.
● Der Ablaufschlauch muß
richtig angebracht sein.
IT
Candy le consiglia:
● Apra il cestello.
● Lo riempia con 2,5 kg
massimo, in caso di capi di
grandi dimensioni (es.
lenzuola), o molto assorbenti
(es. accappatoi o blue
jeans), é bene ridurre la
quantità di biancheria.
● Chiuda l’oblò.
● Porti la manopola
programmi (L) su .
● Se vuole i tessuti pronti per
metterli nell’armadio,
posizioni la manopola di
asciugatura (I) sul “7-8”.
Se vuole i tessuti pronti per lo
stiro, posizioni la manopola di
asciugatura (I) sul “6-7”.
● Prema il tasto asciugatura
cotone (F).
Quando preme questo tasto
la temperatura di
asciugatura aumenta
notevolmente.
● Protezione oblò
La lavabiancheria dispone di
uno schermo protettivo al
vetro oblò,che durante la
fase di asciugatura si riscalda
molto.
ATTENZIONE:
NON TOCCARE L’OBLO’
PER NESSUNA RAGIONE.
● Si assicuri che il rubinetto
dell’acqua sia aperto.
● Che lo scarico sia in
posizione regolare.
Page 32

ATTENTION:
NE PAS SECHER LES
VETEMENTS EN LAINE,
LES VETEMENTS AVEC
DES REMBOURRAGES
PARTICULIERS (DUVET,
ANORAKS, ETC...), LES
VETEMENTS TRES
DELICATS . SI LES
VETEMENTS SONT DU
GENRE “LAVE-REPASSE”,
IL EST RECOMMANDE
DE REDUIRE ENCORE LE
CHARGEMENT POUR
EVITER LA FORMATION
DE PLIS.
● S’assurer que la manette
de la température (H) soit
sur la position “0”.
● Appuyer sur la touche de
mise en marche (C).
● Les témoins de
fonctionnement (M-N)
s’allumeront.
● La manette de sèchage
(I) tournera
automatiquement, jusqu’à
la fin du programme préréglé.
● La phase de séchage
aura lieu avec la manette
programmes (L) arrêté sur le
symbole et/ou le
symbole jasqu’à la fin
du séchage, puis se
déplacera sur “STOP”.
● A la fin,presser sur la
touche d’arrêt “STOP”(C).
● Les témoins de
fonctionnement (M-N)
s’éteindront.
● Ouvrir le hublot et enlever
le linge.
ATENCION:
NO SECAR PRENDAS DE
LANA, ACOLCHADAS
(PLUMONES, ANORAKS,
ETC...) PRENDAS MUY
DELICADAS. SI LAS
PRENDAS SON LAVADAS
PREVIAMENTE ES
ACONSEJABLE REDUCIR
LA CARGA ANTES DEL
CICLO DE SECADO
PARA EVITAR LA
FORMACION DE
ARRUGAS.
●
Que el mando de
temperatura (H) esté en “0”.
●
Pulse la tecla de conexión
(C).
●
Se iluminan los
indicadores luminosos (M-N).
●
El mando de secado (I) se
moverá automáticamente,
hasta alcanzar el tiempo
seleccionado.
●
La fase de secado se
desarrollará con el mando
de programación (L) fijo en
el símbolo y/o sino al
final del secado,avanzado
hasta la posición stop.
●
Al terminar,pulsar la tecla
de parado (C).
●
La señalización luminosa
(M-N) se apagará.
●
Abra la puerta y saque la
ropa.
WARNING:
DO NOT DRY WOOLLEN
GARMENTS OR
ARTICLES WITH SPECIAL
PADDING, (E.G. QUILTS,
QUILTED ANORAKS,
ETC.). DELICATE
FABRICS; IF GARMENTS
ARE DRIP/DRY, LOAD
LESS ITEMS SO AS TO
PREVENT CREASING.
● Set temperature control
knob (H) on “0”.
● Press start button (C).
● Warning lights (M-N) will
come on.
● The drying knob (I) will
rotate automatically to
zeroize the preset time.
● Drying will start with
programme control knob (L)
stationary on symbol
and/or symbol , till drying
cycle ends, then it rotates to
“Stop”.
● Now press “Stop” button
(C).
● Warning lights (M-N) will
go off.
● Open load door and take
out your laundry.
62 63
FR
ES
EN
DE
ACHTUNG:
KEINE TEILE AUS REINER
WOLLE, KEINE TEILE MIT
BESONDERER FÜLLUNG
(FEDERN, WINDJACKEN
ETC) UND KEINE
BESONDERS
EMPFINDLICHEN
TEXTILIEN TROCKNEN;
BEI BÜGELFREIEN (WASH
AMD WEAR) TEXTILIEN
DIE EINFÜLLMENGE
REDUZIEREN, UM
KNITTERBILDUNG ZU
VERMEIDEN.
● Der
Temperaturwahlschalter (H)
muß in “0” Position stehen.
● Starttaste (C) betätigen.
● Die Anzeigen (M-N)
leuchten auf.
● Der Schalter für das
Trockenprogramm (I) dreht
sich automatisch, bis die
eingestellte Zeit abgelaufen
ist.
● Der
Programmwahlschalter (L)
bleibt bis zum Ende des
Trockenvorgangs auf
und/oder , stehen und
stellt sich dann automatisch
auf “stop”.
● Nach dem Ende des
Programmes die Stoptaste
(C) betätigen.
● Die Anzeigen (M-N)
erlöschen.
● Bullauge öffnen und
Wäsche entnehmen.
IT
ATTENZIONE:
NON ASCIUGHI CAPI
IN LANA, CON
IMBOTTITURE
PARTICOLARI (PIUMINI,
GIACCHE A VENTO,
ETC...) CAPI
DELICATISSIMI.
SE I CAPI SONO LAVA
E INDOSSA E’ BENE
CHE RIDUCA
ULTERIORMENTE IL
CARICO PER EVITARE
LA FORMAZIONE DI
PIEGHE.
●
Che la manopola di
temperatura (H) sia sullo “0”.
●
Prema il tasto di marcia
(C).
●
Si accenderanno le
segnalazioni luminose
(M-N).
●
La manopola di
asciugatura (I) si muoverà in
automatico, fino
all’azzeramento del tempo
impostato.
●
La fase di asciugatura
avverrà con la manopola
programmi (L) ferma sul
simbolo e/o sino a fine
asciugatura; poi avanzerà
sullo stop.
●
Al termine prema il tasto
di arresto (C).
●
Le segnalazioni luminose
(M-N) si spegneranno.
●
Apra l’oblò e tolga i
tessuti.
Page 33

CHAPITRE 13
Tissu
Coton: draps, linge,
taies d’oreiller.
Coton: petit linge.
Coton: éponge,
peignoirs, blue jeans.
Coton avec plis
difficiles: blouses,
chemises.
Mélanges
Mélanges
Synthétiques
Chemises “lavé-
repassé”
ATTENTION:
Ne pas sécher les vêtements en laine, les vêtements avec des rembourrages particuliers (duvets,
anoraks, etc.), les vêtements très délicats. Si les vêtements sont du genre “lavé-repassé”, il est
recommandé de réduire encore le chargement pour éviter la formation de plis.
2,5
2,5
2,0
1,5
1,5
1,0
1,0
4 au max.
7-8
7-8
6-7
5-6
4-5
4-5
6-7
5-6
6-7
7-8
3-4
2-3
OUI
OUI
OUI
NON
NON
NON
NON
NON
Charger le
tambour
avec un
poids en kg
max. de:
Sur le
programme
(L)
choisir
Prêts à
pendre,
manette
(I) sur:
Prêts à
repasser
manette
(I) sur
Presser la
touche de
séchage (F)
sur OUI ou
NON:
FR
64 65
CAPÍTULO 13
Si tiene un tejido de
Algodón, sábanas,
lenceria, fundas
Algodón,
prendas pequeñas
Algodón,
felpa, albornoces,
blue jeans
Algodón con pliegues
dificiles,
blusas, camisas.
Mixtos
Mixtos Sintéticos
Camisas no plancha
ATENCION:
No secar prendas de lana, prendas con acolchados particulares (plumones, anoraks,
etc..), prendas muy delicadas.
2,5
2,5
2,0
1,5
1,5
1,0
1,0
max. 4
prendas
7-8
7-8
6-7
5-6
4-5
4-5
6-7
5-6
6-7
7-8
3-4
2-3
SI
SI
SI
NO
NO
NO
NO
NO
Llene el
tambor con
una carga
máxima de
kg
Seleccione
el
programa
(L)
Si listo para
guardar
seleccione
en el
mando (I)
Si listo para
planchar
seleccione
en el
mando (I)
Pulse la
tecla
secado
algodón SI
NO (F)
ES
CAPITOLO 13
IT
Se ha un tessuto di
Cotone, lenzuola,
biancheria, federe
Cotone, capi piccoli.
Cotone, spugna,
accappatoi,
blue jeans.
Cotone con pieghe
difficili, bluse, camicie
Misti
Misti
Sintetici
Camicie da indosso
ATTENZIONE:
Non asciughi capi in lana, capi con imbottiture particolari (piumini, giacche a vento,
ecc...) capi delicatissimi. Se i capi sono “lava e indossa” é bene che riduca
ulteriormente il carico per evitare la formazione di pieghe.
2,5
2,5
2,0
1,5
1,5
1,0
1,0
max. 4 capi
7-8
7-8
6-7
5-6
4-5
4-5
6-7
5-6
6-7
7-8
3-4
2-3
SI
SI
SI
NO
NO
NO
NO
NO
Riempia
il cestello
con un
carico
massimo di
kg
Selezioni
il
programma
(L) su
Per pronto
armadio
porti
la
manopola
(I) su
Per pronto
stiro porti
la
manopola
(I) su
Prema il
tastto
asciugatura
cotone SI o
NO (F)
Page 34

CHAPTER 13
Fabric
Cotton: sheets, linens,
pillowcases.
Cotton: small items.
Cotton: terry
towelling,bath robes,
blue jeans.
Cotton: with difficult
pleats, blouses, shirts.
Mixed
Mixed
Synthetics
Drip/dry shirts
WARNING:
Do not dry woollen garments or with special padding (e.g. quilts, quilted anoraks, etc..)
or delicate fabrics. If garments are drip/dry, load less items to prevent creasing.
2,5
2,5
2,0
1,5
1,5
1,0
1,0
max. 4
7-8
7-8
6-7
5-6
4-5
4-5
6-7
5-6
6-7
7-8
3-4
2-3
YES
YES
YES
NO
NO
NO
NO
NO
Load drum
with max.
kg
Set
programme
(L) on:
Ready to
hang: set
knob
(I) on:
Ready to
iron set
knob
(I) on:
Press
YES or NO
“Dry high”
button (F)
on:
EN
66 67
KAPITEL 13
DE
Für Textilien aus:
Baumwolle,
Bettlaken,
Unterwäsche,kleine
Teile Frottee,
saugfähige Stoffe,
Blue jeans, Baumwolle
mit Plissierung, Blusen,
Hemden
Mischgewebe
Mischgewebe
Synthetik
Kittel/Jacken
ACHTUNG:
Keine Teile aus reiner Wolle oder Teile mit besonderer Füllung (Federn, Daunenjacken
etc) und keine besonders empfindlichen Textilien trocknen; bei bügelfrein (wash and
wear) Textilien die Einfüllmenge reduzieren, um Knitterbildung zu vermeiden.
2,5
2,5
2,0
1,5
1,5
1,0
1,0
höchstens
4 Teile
7-8
7-8
6-7
5-6
4-5
4-5
6-7
5-6
6-7
7-8
3-4
2-3
JA
JA
JA
NEIN
NEIN
NEIN
NEIN
NEIN
Maximale
Trommelfül-
lung
kg
Programm-
schalter
(L) auf
Schalterstel-
lung (I) für
schranktrockene
Wäsche
Schalterstel
-lung (I) für
bügel-
feuchte
Wäsche
Taste für
“Extra-
trocken”
betätigen
Page 35

CHAPTER 14
AUTOMATIC
WASHING/DRYING
WARNING:
ONLY A MAXIMUM
2,5 kg OF DRY LAUNDRY
CAN BE LOADED.
Refer to the list of washing
programmes according to
fabrics to be washed (e.g.
very dirty cotton) and
without pressing start button
(C), prepare wash as
described in WASHING.Refer
to list of drying programmes
according to fabrics to be
dried (e.g. cotton) and set
drying programme as
described in DRYING, then
press “Start” button (C).
Washing/drying will be fully
performed when control
knob (L) rotates to “Stop”.
When cycle has been
completed:
● Press “Stop” button (C).
● Warning lights (M-N) will
go off.
● Open load door and take
out your laundry.
CAPÍTULO 14
CICLO
AUTOMATICO
LAVADO-SECADO
ATENCION:
EL CICLO COMPLETO
SOLO PUEDE UTILIZARSE
CON UN MAXIMO DE
2,5 kg DE ROPA SECA.
Consulte la tabla de
programas de lavado en
base a los tejidos a lavar (Ej
algodón muy sucio), sin
pulsar la tecla de puesta en
marcha (C),prepare el
lavado tal como está
descrito en el capítulo
LAVADO; consultar la tabla
de programas de secado (Ej
algodón), programe el
secado como está descrito
en el capítulo SECADO,
pulse la tecla de puesta en
marcha (C).
La lavadorasecadora
seguirá todo el ciclo
programado hasta que el
mando de programación (L)
alcance la posición stop.
Completado el ciclo:
●
Pulsar la tecla de paro
(C).
●
La señalización luminosa
(M-N) se apagará.
●
Abra la puerta y saque la
ropa.
CHAPITRE 14
CYCLE
AUTOMATIQUE
LAVAGE/SECHAGE
ATTENTION:
LE CYCLE COMPLET NE
PEUT ETRE EXECUTE
QU’AVEC 2,5 kg DE
LINGE SEC.
Consulter la liste des
programmes de lavage et,
selon les tissus à laver (par
exemple, coton très sale) et
sans presser sur la touche de
la mise en marche (C),
préparer le linge comme
décrit dans le chapitre
LAVAGE; consulter la liste des
programmes de séchage et,
selon les tissus à sécher (par
exemple, coton), choisir le
programme de séchage
comme décrit dans le
chapître SECHAGE, ensuite
presser sur la touche de la
mise en marche (C).
La machine à laver/séchante exécutera tout le
programme jusqu’à ce que
la manette des programmes
(L) ne tourne sur la position
d’arrêt “STOP”.
A cycle complet:
● Appuyer sur la touche
d’arrêt (C) “Stop”.
● Les témoins de
fonctionnement (M-N)
s’éteindront.
● Ouvrir l’hublot et retirer le
linge.
68 69
FR
ES
EN
KAPITEL 14
AUTOMATISCHER
ABLAUF WASCHEN
UND TROCKNEN
ACHTUNG:
FÜR DEN GESAMTEN
PROGRAMMABLAUF
NIEMALS MEHR ALS
HÖCHSTENS 2,5 kg
WÄSCHE EINFÜLLEN.
Ziehen Sie die Tabelle mit
den Waschprogrammen zu
Rate, und bereiten Sie die
Wäsche (z.B. stark
verschmutzte Baumwolle)
wie im Abschnitt “WASCHEN”
beschrieben vor, ohne die
Starttaste (C) zu drücken.
Wählen Sie dann aus der
Trocknentabelle das zu den
eingefüllten Textilien
passende Trockenprogramm
aus, so wie es im Abschnitt
Trocknen beschrieben ist.
Betätigen Sie danach die
Start-Taste.Das Gerät startet
dann nach dem Ende des
Waschprogramms
automatisch das
Trockenprogramm, bis der
Programmschalter (L) die
“Stopposition” erreicht hat.
Nach dem Ende des
Programmablaufs:
● Stoptaste (C) betätigen.
● Die Leuchtanzeigen
(M-N) erlöschen.
● Das Bullauge öffnen und
die Wäsche entnehmen.
DE
CAPITOLO 14
CICLO
AUTOMATICO
LAVAGGIO
ASCIUGATURA
ATTENZIONE:
IL CICLO COMPLETO
PUO’ ESSERE ESEGUITO
SOLO CON MASSIMO
2,5 kg DI BIANCHERIA
ASCIUTTA
Consulti la tabella dei
programmi di lavaggio e in
base ai tessuti da lavare (es.
cotone molto sporco), senza
premere il tasto di marcia
(C), prepari il lavaggio come
descritto nel capitolo
LAVAGGIO; consulti la
tabella dei programmi di
asciugatura e in base ai
tessuti da asciugare
(esempio cotone)
programmi l’asciugatura
come descritto nel capitolo
ASCIUGATURA,dopodiché
prema il tasto marcia (C).
La lavasciuga eseguirà tutto
il programma fino a che la
manopola dei programmi
(L) raggiungerà la posizione
di stop.
A ciclo completato:
● prema il tasto di arresto
(C).
● le segnalazioni luminose
(M-N) si spegneranno
● apra l’oblò e tolga i
tessuti.
IT
60°C
2,5 kg MAX
Page 36

70
FR
CHAPITRE 15
NETTOYAGE ET
ENTRETIEN
ORDINAIRE
Ne jamais utiliser de produits
abrasifs, d’alcool et/ou de
diluant, pour laver l’extérieur
de votre machine; il suffit de
passer un chiffon humide.
La machine n’a besoin que
de peu d’entretien:
● Nettoyage des bacs.
● Déménagements ou
longues périodes d’arrêt de
la machine.
NETTOYAGE DES BACS
Même si cette opération
n’est pas strictement
nécessaire, il vaut mieux
nettoyer de temps en temps
les bacs à produits lessiviels.
Il suffit de tirer légèrement sur
le tiroir pour l’extraire.
Nettoyer le tiroir sous un jet
d’eau.
Remettre le tiroir dans sa
niche.
DE
EN
KAPITEL 15
REINIGUNG UND
ALLGEMEINE
WARTUNG
Benutzen Sie für die äußere
Reinigung niemals
Scheuermittel, Alkohol oder
Verdünnungsmittel. Es genügt,
wenn Sie die Maschine mit
einem feuchten Lappen
abwischen.
Das Gerät braucht nur sehr
wenig Pflege:
●
Reinigung des
Waschmittelbehälters
●
Umzug oder längerer
Stillstand der Maschine.
REINIGUNG DES
WASCHMITTELBEHÄLTERS
Obwohl nicht unbedingt
notwendig, empfiehlt es sich,
den Behälter gelegenlich von
Waschmittel-und
Weichspülerrückständen zu
reinigen.
Hierzu den Behälter mit wenig
Kraft herausziehen.
Die Rückstände unter
fließendem Wasser abspülen.
Den Behälter wieder
einschieben.
CHAPTER 15
CLEANING AND
ROUTINE
MAINTENANCE
Do not use abrasives, spirits
and/or diluents on the
exterior of the appliance. It is
sufficient to use a damp
cloth.
The washing machine
requires very little
maintenance:
● Cleaning of drawer
compartments.
● Removals or long periods
when the machine is left
standing.
CLEANING OF DRAWER
COMPARTMENTS
Although not strictly
necessary,it is advisable to
clean the detergent, bleach
and additives compartments
occasionally.
Remove the compartments
by pulling gently.
Clean with water.
Put the compartments back
into place
71
IT
CAPITOLO 15
PULIZIA E
MANUTENZIONE
ORDINARIA
Per la Sua lavatrice
all’esterno non usi abrasivi,
alcool e/o diluenti, basta
solo una passata con un
panno umido.
La lavatrice ha bisogno di
pochissime manutenzioni:
● Pulizia vaschette.
● Traslochi o lunghi periodi
di fermo macchina.
PULIZIA VASCHETTE
Anche se non strettamente
necessario é bene pulire
saltuariamente le vaschette
da detersivo, candeggiante
e additivi.
Per questa operazione
basta che le estragga con
una leggera forza.
Pulisca tutto il contenuto
sotto un getto d’acqua.
Reinserisca il tutto nella
propria sede.
ES
CAPÍTULO 15
LIMPIEZA Y
MANTENIMIENTO
ORDINARIO
Para su limpieza exterior no
use productos abrasivos,
alcohol y/o disolventes,
basta sólo una pasada con
un paño húmedo.
La lavadora necesita muy
poco mantenimiento:
● Limpieza de la cubeta y
sus compartimentos
● Traslados o largos
períodos de inactividad de
la máquina.
LIMPIEZA DE LA CUBETA DEL
DETERGENTE Y SUS
COMPARTIMENTOS
Aunque no sea
estrictamente necesario, es
conveniente limpiar de vez
en en cuando los
compartimentos del
detergente, blanqueadores
y aditivos.
Para esta operacion basta
extraerlos haciendo un
poco de fuerza.
Limpie todo el contenido
bajo un chorro de agua.
Vuelva a colocar todo en su
sitio.
Page 37

72
FR
DEMENAGEMENTS OU
LONGUES PERIODES D’ARRET
DE LA MACHINE
En cas de déménagement,
ou de longues périodes
d’arrêt de la machine dans
des endroits non chauffés,il
faut vidanger
soigneusement tous ses
tuyaux.
Débrancher le courant et se
servir d’un seau.
Enlever la bague sur le tuyau
et le plier vers le bas, dans le
seau jusqu’à ce qu’il ne
sorte plus d’eau.
Après cette opération, la
répéter en sens inverse.
DE
EN
UMZUG ODER LÄNGERER
STILLSTAND DER MASCHINE
Bei einem Umzug, oder wenn
die Maschine längere Zeit in
ungeheizter Umgebung
stillstehen wird, müssen alle
Schläuche vollständig
entleert werden.
Strom abschalten und eine
Waschschüssel bereitstellen.
Schlauch von der Klemme
nehmen und bis zur völligen
Entleerung in die Schüssel
halten.
REMOVALS OR LONG PERIODS
WHEN THE MACHINE IS LEFT
STANDING
For eventual removals or
when the machine is left
standing for long periods in
unheated rooms, the drain
hose should be emptied of
all remaining water.
The appliance must be
switched off and unplugged.
A bowl is needed. Detach
the drainage hose from the
clamp and lower it over the
bowl until all the water is
removed.
Repeat the same operation
with the water inlet hose.
73
IT
TRASLOCHI O LUNGHI
PERIODI DI FERMO
MACCHINA
Per eventuali traslochi o
qualora la macchina
restasse ferma a lungo in
luoghi non riscaldati, é
necessario svuotare
completamente da ogni
residuo di acqua tutti i tubi.
A corrente disinserita, stacchi
il tubo dalla fascetta e lo
porti, verso il basso, sul catino,
fino alla completa fuoriuscita
dell’acqua.
Al termine ripeta
l’operazione in senso inverso.
ES
TRASLADOS O LARGOS
PERÍODOS DE INACTIVIDAD
DE LA MÁQUINA
En eventuales traslados o en
caso que la máquina
estuviese inactiva durante
largo período de tiempo en
lugares fríos, hay que vaciar
completamente todo
residuo de agua en los
tubos.
Estando desconectada
suelte el tubo de la
abrazadera y dirijalo hacia
abajo, en el cubo, hasta
conseguir la salida completa
del agua.
Finalizada la operación,
repita los pasos en sentido
contrario.
Page 38

74
CHAPITRE 16
FR
ANOMALIE
Si le mauvais fonctionnement persiste,adressez-vous au Centre d’Assistance Technique Candy; communiquez
le nom du modèle indiqué sur la plaque-signaletique se trouvant sur la carrosserie à l’intérieur du hublot ou sur
le certificat de garantie.
En indiquant ces informations vous obtiendrez une intervention plus rapide et efficace.
1 L’utilisation des produits écologique sans phosphates peut produire les effets suivants:
- L’eau de vidange du rinçage est trouble à cause de zéolites en suspension; l’efficacité du rinçage n’est
absolument pas compromis;
- Présence de poudre blanche (zéolites) sur le linge à la fin du lavage: cette poudre ne pénètre pas dans le
tissu et n’en altère pas la couleur;
- présence de mousse dans l’eau du dernier rinçage: elle ne signifie pas pour autant un mauvais rinçage;
- Les tensioactifs anioniques de la formule des produits pour machines à laver, s’enlèvent difficilement du
linge et, même en toute petite quantité, ils peuvent provoquer d’importants phénomènes de formation de
mousse;
- L’exécution d’autres cycles de rinçage, en de tels cas, n’apporte aucun avantage.
2 Avant d’appeler le Centre d’Assistance technique Candy, si votre machine ne fonctionne pas, effectuer les
contrôles susmentionnés.
1.Aucun
fonctionnement
sur n’importe quel
programme
2.Absence
d’alimentation
d’eau
3. L’eau n’est pas
évacuèe
4. Présence d’eau sur
le sol tout autour
de la machine
5. La machine
n’essore pas
6. De fortes vibrations
pendant la phase
d’essorage
La fiche n’est pas introduite dans la
prise de courant
L’interrupteur géneral n’est pas branché
L’alimentation électrique est coupée
Les valves de l’installation électrique
sont défectueuses
Portillon ouvert
Voir cause 1
Robinet de l’eau fermé
Programmateur mal positionné
Tuyau de vidange plié
Fuite du joint se trouvant entre le robinet
et le tuyau de remplissage
La machine n’a pas encore évacué
l’eau
La fonction “suppresion d’essorage” est
introduite (exclusivement sur certains
modèles)
La machine n’est pas à niveau
Les étriers de transport n’ont pas été
enlevés
La charge de linge n’est pas répartie
de façon uniforme
Brancher la prise
Brancher l’interrupteur général
Contróler
Contróler
Fermer le portillon
Contróler
Ouvrir le robinet d’alimentation d’eau
Positionner correctement le
programmateur
Redresser le tuyau de vidange
Remplacer le joint et serrer à fond le
tube sur le robinet
Attendre quelques minutes et la
machine évacuera l’eau
Relever la touche “exclusion essorage”
Régler les pieds
Enlever les étriers de transport
Répartir le linge de façon uniforme
CAUSE
REMEDE
75
CAPITOLO 16
IT
ANOMALIA
Se il malfunzionamento dovesse persistere si rivolga al Centro di Assistenza Tecnica Candy comunicando il
modello di lavabiancheria, riportato sulla targhetta posta sul mobile all’interno dell’oblò o sul foglio di garanzia.
Fornendo tali informazioni otterrete un intervento più tempestivo ed efficace.
Attenzione:
1 L’utilizzo di detersivi ecologici senza fosfati può produrre i seguenti effetti:
- l’acqua di scarico dei risciacqui risulta più torbida per la presenza di zeoliti in sospensione senza che
l’efficacia del risciacquo ne risulti pregiudicata
- presenza di polvere bianca (zeoliti) sulla biancheria al termine del lavaggio che non si ingloba nei tessuti e
non ne altera il colore.
- La presenza di schiuma nell’acqua dell’ultimo risciacquo non é necessariamente indice di una cattiva
sciacquatura.
- I tensioattivi anionici presenti nelle formulazioni dei detersivi per lavabiancheria, risultano spesso
difficilmente allontanabili dalla biancheria stessa e, anche in minima quantità, possono produrre vistosi
fenomeni di formazione di schiuma.
- L’esecuzione di ulteriori cicli di risciacquo, in casi come questi, non comporta alcun beneficio.
2 Se la Sua lavabiancheria non funzionasse, prima di chiamare il Centro di Assistenza Tecnica Candy
eseguire i controlli sopradescritti.
1. Non funziona con
qualsiasi
programma
2. Non carica acqua
3. Non scarica acqua
4. Presenza di acqua
sul pavimento
attorno alla
lavabiancheria
5. Non centrifuga
6. Forti vibrazioni
durante la
centrifuga
Spina corrente elettrica
non inserita nella presa
Tasto interruttore generale
non inserito
Manca energia elettrica
Valvole impianto elettrico guaste
Sportello aperto
Vedi cause 1
Rubinetto acqua chiuso
Timer non correttamente posizionato
Tubo di scarico piegato
Perdita della guarnizione posta
tra rubinetto e tubo carico
La lavabiancheria non ha ancora
scaricato l’acqua
“Esclusione centrifuga” inserita
(solo per alcuni modelli)
Lavabiancheria non perfettamente
in piano
Staffe di trasporto
non ancora asportate
Carico biancheria
non uniformemente distribuito
Inserire la spina
Inserire tasto.
Interruttore generale
Controllare
Controllare
Chiudere sportello
Controllare
Aprire il rubinetto acqua
Posizionare timer correttamente
Raddrizzare tubo di scarico
Sostituire guarnizione e
stringere bene tubo e rubinetto
Attendere alcuni minuti, la macchina
scaricherà
Disinserire tasto
“esclusione centrifuga”
Regolare gli appositi piedini regolabili.
Asportare staffe di trasporto
Distribuire in modo uniforme
la biancheria
CAUSA
RIMEDIO
Page 39

77
KAPITEL 16
FEHLVERHALTEN
Läßt sich der Fehler nicht beheben, wenden Sie sich bitte an den Technischen Kundendienst der Firma Candy.
Geben Sie dabei das Maschinenmodell laut Typenschild * oder Garantieschein an,um eine schnelle effektive
Hilfe zu ermöglichen.
* (welches sich an der Rückseite des Gerätes, oder im Bullauge befindet)
Achtung:
1 Die Verwendung von umweltfreundlichen Waschmitteln kann folgende Effekte auslösen:
- Die schwebenden Minerale führen zu einer Trübung des Spülwassers, die aber weder die Wirkung der
Spülungen noch das Waschergebnis beeinflussen.
- Nach erfolgter Wäsche können sich auf der Wäsche Spuren weißen Pulvers (Minerale) befinden, die sich
aber weder in der Wäsche festsetzen noch die Farben beeinträchtigen.
- Schaumbildung auf dem letzten Spülwasser bedeutet nicht unbedingt unzureichende Spülresultate.
- Die in den Waschmitteln enthaltenen waschaktiven anionischen Tenside sind häufig sehr schwer ausspülbar,
und erzeugen auch in nur geringer Dosierung auffällige Schaummengen.
- Zusätzliche Spülgange sind in solchen Fällen nicht sehr effektiv.
2 Bitte wenden Sie sich bei Defekten an der Maschine erst dann an den Kundendienst, wenn Sie anhand der
obigen Liste selbst versucht haben, eventuelle Fehler zu beheben.
1. Programme
funktionieren nicht
2. Kein Wasserzulauf
3. Kein Wasserablauf
4.Wasser auf dem
Boden rund um
das Gerät
5. Keine
Schleuderfunktion
6. Starke Vibrationen
während des
Schleuderns
Stecker nicht in der Steckdose
Hauptschalter nicht eingedrückt
Stromausfall
Sicherungen defekt
Bullauge nicht geschlossen
Siehe Gründe zu 1
Wasserhahn geschlossen
Programmwahlschalter nicht richtig
eingestellt
Ablaufschlauch gekrümmt
Dichtung vom Wasserzulaufschlauch
defekt
Die Waschmaschine hat das Wasser
noch nicht abgepumpt
Taste “Schleuderstop” eingestellt (nur bei
einigen Modellen)
Waschmaschine nicht richtig justiert
Transportstange noch nicht entfernt
Wäsche nicht gleichmäßig in der
Trommel verteilt
Stecker einstecken
Strom einschalten
Kontrollieren
Kontrollieren
Bullauge schließen
Kontrollieren
Wasserhahn öffnen
Programmwahlschalter richtig einstellen
Ablaufschlauch begradigen
Dichtung ersetzen und Zulaufschlauch
am Wasserhahn befestigen
Einige Minuten warten, bis das Wasser
abgepumpt ist
Taste “Schleuderstop” herausdrücken
Über die entsprechenden einstellbaren
Füße justieren
Transportstange entfernen
Wäsche gleichmäßig verteilen
GRUND
ABHILFE
DE
76
CAPÍTULO 16
ANOMALÍA
Si la anomalía persistiese, diríjase al Centro Asistencia Técnica Candy, indicando el modelo de lavadora,
relacionado en la placa colocada en el mueble al interior de la puerta o en la hoja de garantía.
Suministrando estas informaciones obtendrá un servicio más rápido y eficaz.
Atención
1 El uso de detergentes ecológicos sin fosfstos puede producir los siguientes efectos:
- El agua de vaciado de los aclarados es más turbia debido a la presencia de zeolitos en suspensión sin que
resulte perjudicada la eficacia del aclarado.
- Presencia de polvo blanco (zeolitos) en la ropa al finalizar el lavado que no se incrusta en el tejido ni altera
los colores.
- La presencia de espuma en el agua el último aclarado no es necesariamente una indicación de un mal
aclarado.
- Los tensioactivos aniónicos presentes en las formulaciones de los detergentes para lavadoras, resultan ser a
menudo difíciles de separar de la ropa y, aunque en una cantidad mínima, pueden producir visibles
fenómenos de formación de espuma.
- La ejecución de más ciclos de aclarado, en casos como éste, no conlleva ningún beneficio.
2 Si su lavadora no funcionase, antes de llamar al Centro de Asistencia Técnica Candy, compruebe los puntos
arriba mencionados.
1. No funciona con
nigún programa
2. No carga agua
3. No descarga agua
4. Presencia de agua
en el suelo
alrededor de la
lavadora
5. No centrífuga
6. Fuertes vibraciones
durante el
centrifugado
El enchufe de la corriente eléctrica no
está conectado a la toma de corriente
El botón del interruptor general no está
pulsado
No hay corriente eléctrica
Las válvulas de la instalación eléctrica
están averiadas
Puerta abierta
Vea causa 1
El grifo del agua está cerrado
El timer no está posicionado
correctamente
El tubo de desagüe está doblado
Pérdida de agua por la guarnición de
goma que está entre el grifo y el tubo
de carga del agua
La lavadora todavía no ha vaciado el
agua
“Exclusión de centrifugado” pulsado
(sólo en algunos modelos)
La lavadora no está bien nivelada
Los soportes de fijación del transporte
no han sido retirados todavía
La carga de ropa no ha sido distribuida
uniformemente
Conecte el enchufe
Pulse el interruptor general
Compruébelo
Compruébelo
Cierre la puerta
Compruébelo
Abra el grifo del agua
Posicione el timer correctamente
Enderezca el tubo de desagüe
Sustituya la guarnición de goma y
enrosque bien el tubo al grifo
Espere unos minutos, la maquina
vaciara el agua
Desactive el botón “exclusión
centrifugado”
Regule las patas regulables
Retire los soportes de fijación del
transporte
Distribuya uniformemente la ropa
CAUSA
SOLUCIÓN
ES
Page 40

Le constructeur décline toute responsabilité pour les éventuelles erreurs d’imprimerie
contenues dans le présent mode d’emploi. Il se réserve en outre le droit d’apporter
toutes modifications qui se révèleraient utiles à ses propes produits sans pour autant
en compromettre les caractéristiques essentielles.
La Ditta costruttrice declina ogni responsabilità per eventuali errori di stampa contenuti
nel presente libretto. Si riserva inoltre il diritto di apportare le modifiche che si
renderanno utili ai propri prodotti senza compromettere le caratteristiche essenziali.
La firma fabricante declina toda responsabilitad por los posibles errores de impresión
que puedan haber en este libreto. Asimismo, se reserva el derecho de efectuar las
modificaciones que se consideren ùtiles a sus propios productos sin comprometer las
caraterìsticas esenciales.
Wir schileßen die Haftung für alle evtl. Druckfehler aus. Kleinere Änderungen und
technische Weiterentwicklungen im Detail vorbehalten.
The manufacturer declines all responsibility in the event of any printing mistakes in
this booklet. The manufacturer also reserves the right to make appropriate
modifications to its products without changing the essential characteristics.
78
CHAPTER 16
EN
FAULT
If the fault should persist, contact a Candy Technical Assistance Centre. For prompt servicing, give the model of
the washing machine,to be found on the label placed on the cabinet inside of the porthole or on the
guarantee certificate.
Important
1 The use of environment friendly detersives without phosphates may produce the following effects:
- The discharge rinse water may result cloudier due to the presence of zeolites in suspension. This does not
compromise the efficiency of the rinses.
- The presence of white powder (zeolites) on the washing at the end of the washing cycle.This does not
remain incorporated in the fabric and does not alter the colour.
- The presence of foam in the last rinse water which is not necessarily a sign of inadequate rinsing.
- The non-ionic surface-active agents present in the composition of washing machine detersives are often
difficult to remove from the washing itself and, even in small quantities,may produce visible signs of the
formation of foam.
- Carrying out further rinses, in cases such as this, is not useful.
2 If your washing machine fails to function,carry out the above-mentioned checks before calling the Candy
Technical Assistance Service.
1. Does not function
on any
programme
2. Does not load
water
3. Does not discharge
water
4.Water on floor
around washing
machine
5. Does not spin
6. Strong vibrations
during spin
Mains plug not plugged in
Mains switch not on
No power
Electric circuit fuses failure
Load door open
See cause 1
Inlet tap turned off
Timer not set correctly
Discharge tube bent
Leak from the washer between the tap
and inlet tube
The washing machine has not
discharged water
“No spin” setting (some models only)
Washing machine not perfectly level
Transport bracket not removed
Washing load not evenly distributed
Insert plug
Turn on mains switch
Check
Check
Close load door
Check
Turn on water inlet tap
Set timer on correct position
Straighten discharge tube
Replace washer and tighten the tube
on the tap
Wait a few minutes until the machine
discharges water
Turn the programme dial onto spin
setting
Adjust special feet
Remove transport bracket
Distribute the washing evenly
CAUSE
REMEDY
Page 41

01.04 - 91501004 - Printed in Italy - Imprimé en Italie
FR
IT
ES
DE
EN
 Loading...