

Page 1
GO W 475
Mode d’emploi
Istruzioni per l’uso
Bedienungsanleitung
NNaavvooddiilloo zzaa uuppoorraabboo
User instructions
FR
IT
DE
SL
EN
Page 2
FR
TOUS NOS
COMPLIMENTS
En achetant cet appareil
ménager Candy, vous avez
démontré que vous
n’acceptez aucun
compromis: vous voulez
toujours ce qu’il y a de
mieux.
Candy a le plaisir de vous
proposer cette nouvelle
machine à laver qui est le
résultat d’années de
recherches et d’études des
besoins du consommateur.
Vous avez fait le choix de la
qualité, de la fiabilité et de
l’efficacité.
Candy vous propose une
large gamme d’appareils
électroménagers: machines
à laver la vaisselle,machines
à laver et sécher le linge,
cuisinières, fours à microondes, fours et tables de
cuisson, hottes, réfrigerateurs
et congélateurs.
Demandez à votre
Revendeur le catalogue
complet des produits
Candy.
Nous vous prions de lire
attentivement les conseils
contenus dans ce livret. Il
contient d’importantes
indications concernant les
procédures d’installation,
d’emploi, d’entretien et
quelques suggestions utiles
en vue d’améliorer
l’utilisation de la machine à
laver.
Conservez avec soin ce
livret: vous pourrez le
consulter bien souvent.
Quand vous communiquez
avec Candy, ou avec ses
centres d’assistance, veuillez
citer le Modèle, le n° et le
numéro G (éventuellement).
2
IT
COMPLIMENTI
Con l’acquisto di questo
elettrodomestico Candy;
Lei ha dimostrato di non
accettare compromessi:
Lei vuole il meglio.
Candy é lieta di proporLe
questa nuova lavatrice
frutto di anni di ricerche e di
esperienze maturate sul
mercato, a contatto diretto
con i Consumatori. Lei ha
scelto la qualità, la durata e
le elevate prestazioni che
questa lavatrice Le offre.
Candy Le propone inoltre
una vasta gamma di
elettrodomestici: lavatrici,
lavastoviglie,lavasciuga,
cucine, forni a microonde,
forni e piani di cottura,
frigoriferi e congelatori.
Chieda al Suo Rivenditore
il catalogo completo dei
prodotti Candy
La preghiamo di leggere
attentamente le avvertenze
contenute nel presente
libretto in quanto forniscono
importanti indicazioni
riguardanti la sicurezza di
installazione, d’uso, di
manutenzione e alcuni utili
consigli per il migliore utilizzo
della lavatrice.
Conservi con cura questo
libretto per ogni ulteriore
consultazione.
Quando comunica con la
Candy o con i suoi centri di
assistenza citi sempre il
Modello, il n° e il numero G
(se c’è). Praticamente tutto
ciò che é citato nel
riquadro.
DE
HERZLICHEN
GLÜCKWUNSCH!
Mit dem Kauf dieses Candy
Elektrogerätes haben Sie
bewiesen, daß Sie stets nur
das Beste wählen - ohne
Kompromisse.
Candy freut sich, Ihnen diese
neue Waschmaschine
anbieten zu können. Sie ist
das Ergebnis jahrelanger
Forschung und einer
Markterfahrung, die im
ständigen direkten Kontakt
mit dem Verbraucher gereift
ist. Sie haben mit diesem
Gerät Qualität, lange
Lebensdauer und einen
hohen Leistungsstandard
gewählt.
Candy bietet Ihnen darüber
hinaus eine breite Palette
weiterer elektrischer
Haushaltsgeräte:
Waschmaschinen,
Geschirrspüler,
Wäschetrockner,
Elektroherde,
Mikrowellenherde,Backöfen
und Kochfelder, Kühl - und
Gefrierschränke.
Fragen Sie Ihren Fachhändler
nach dem kompletten
Candy Katalog.
Lesen Sie bitte aufmerksam
die Anweisungen,die Sie in
diesem Heft finden.Sie finden
dort wichtige Hinweise zur
sicheren Installation, zur
Bedienung, zur Pflege und zur
optimalen Verwendung der
Waschmaschine.
Bewahren Sie das Heft für
eine spätere Nutzung gut auf.
Geben Sie bitte in allen
Mitteilungen an Candy oder
an Ihre zuständige
Kundendienststelle stets das
Modell, die Nummer und die
G-Nummer (falls vorhanden),also praktisch alle Angaben
des Typenschildes -,an.
SL
âESTITAMO!
Z nakupom na‰ega stroja ste
pokazali, da ne i‰ãete
kompromisnih re‰itev in da
ste kupec, ki hoãe le
najbolj‰e.
Z velikim zadovoljstvom vam
ponujamo nov pralni stroj,
rezultat dolgoletnih
raziskovanj in izku‰enj, ki
smo jih pridobili na trÏi‰ãu v
neposrednem stiku s kupci.
Izbrali ste kakovost,
vzdrÏljivost in zanimivo
obliko.
Razen stroja, ki ste ga izbrali,
pa imamo na izbiro ‰e
pomivalne in su‰ilne stroje,
prostostojeãe ‰tedilnike,
kuhalne plo‰ãe,
mikrovalovne peãice,
vgradne peãice in ‰tedilnike
ter hladilnike in
zamrzovalnike. Pri svojem
prodajalcu zahtevajte
najnovej‰i Candyjev
katalog.
Uporaba tega novega
pralnega stroja je
enostavna, vendar pa vas
prosimo, da skrbno
preberete NAVODILO ZA
UPORABO in ga v celoti
upo‰tevate.
V navodilu so navedene vse
pomembne informacije v
zvezi s prikljuãitvijo,
vzdrÏevanjem in uporabo
stroja.
Priporoãamo, da skrbno
shranite to knjiÏico z navodili,
da jo boste lahko prebrali
tudi kdaj kasneje, ãe bo
potrebno.
Kadar boste morali zaradi
morebitne okvare pralnega
stroja poklicati enega od
na‰ih serviserjev mu
obvezno sporoãite oznako
modela, ‰t. stroja in ‰t. G, ãe
je navedena na plo‰ãici s
tehniãnimi podatki, ki je
pritrjena na stroju.
EN
OUR COMPLIMENTS
With the purchase of this
Candy household
appliance, you have shown
that you will not accept
compromises: you want only
the best.
Candy is happy to present
their new washing machine,
the result of years of
research and market
experience through direct
contact with Consumers.
You have chosen the quality,
durability and high
performance that this
washing machine offers.
Candy is also able to offer a
vast range of other
household appliances:
washing machines,
dishwashers, washer-dryers,
cookers, microwave ovens.
Traditional ovens and hobs,
refrigerators and freezers.
Ask your local retailer for the
complete catalogue of
Candy products.
Please read this booklet
carefully as it provides
important guide lines for
safe installation, use and
maintenance and some
useful advise for best results
when using your washing
machine.
Keep this booklet in a safe
place for further
consultation.
When contacting Candy
or a Customer Services
Centre always refer to the
Model, No., and G number
(if applicable of the
appliance see panel).
3
Page 3

INDEX
Avant-propos
FR
INDICE
Prefazione
IT
CHAPITRE
CAPITOLO
KAPITEL
POGLAVJE
CHAPTER
INHALT
Einleitung
DE
KAZALO
Uvod
SL
EN
INDEX
Introduction
Notes générales à la
livraison
Garantie
Mesures de sécurité
Données techniques
Mise en place, installation
Description des commandes
Tableau des programmes
Sélection
Tiroir à lessive
Le produit
Lavage
Séchage
Note generali alla consegna
Garanzia
Prescrizioni di sicurezza
Dati tecnici
Messa in opera, installazione
Descrizione comandi
Tabella programmi
Selezione
Cassetto detersivo
Il prodotto
Lavaggio
Asciugatura
10
11
12
1
2
3
4
5
6
7
8
9
Allgemeine Hinweise zur
Lieferung
Garantie
Sicherheitsvorschriften
Technische Daten
Inbetriebnahme, Installation
Bedienungsanleitung
Programmtabelle
Programm/Temperaturwahl
Waschmittelbehälter
Das Produkt
Waschen
Trocknen
Splo‰na opozorila in nasveti
ob prevzemu aparata
Garancija
Varnostni predpisi
Tehniãni podatki
Namestitev in prikljuãitev
stroja
Opis stikalne plo‰ãe
Razpredelnica s programi
Izbiranje programov in
temperatur
Predalãek za pralna
sredstva
Priprava perila na pranje
Razpredelnica programov
pranja
Su‰enje
General points on delivery
Guarantee
Safety Measures
Technical Data
Setting up and Installation
Control Description
Table of Programmes
Selection
Detergent drawer
The Product
Washing
Drying cycle
Cycle automatique de
lavage/séchage
Nettoyage et entretien
Recherche des pannes
4 5
Ciclo automatico lavaggio
asciugatura
Pulizia e manutenzione
ordinaria
Ricerca guasti
13
14
15
Automatischer Ablauf
Waschen/Trocknen
Reinigung und allgemeine
Wartung
Fehlersuche
Automatsko Pranje/Su‰enje
âi‰ãenje in vzdrÏevanje
stroja
Ugotavljanje motenj pri
delovanju
Automatic washing/Drying
cycle
Cleaning and routine
maintenance
Faults Search
Page 4
FR
IT
DE
SL
EN
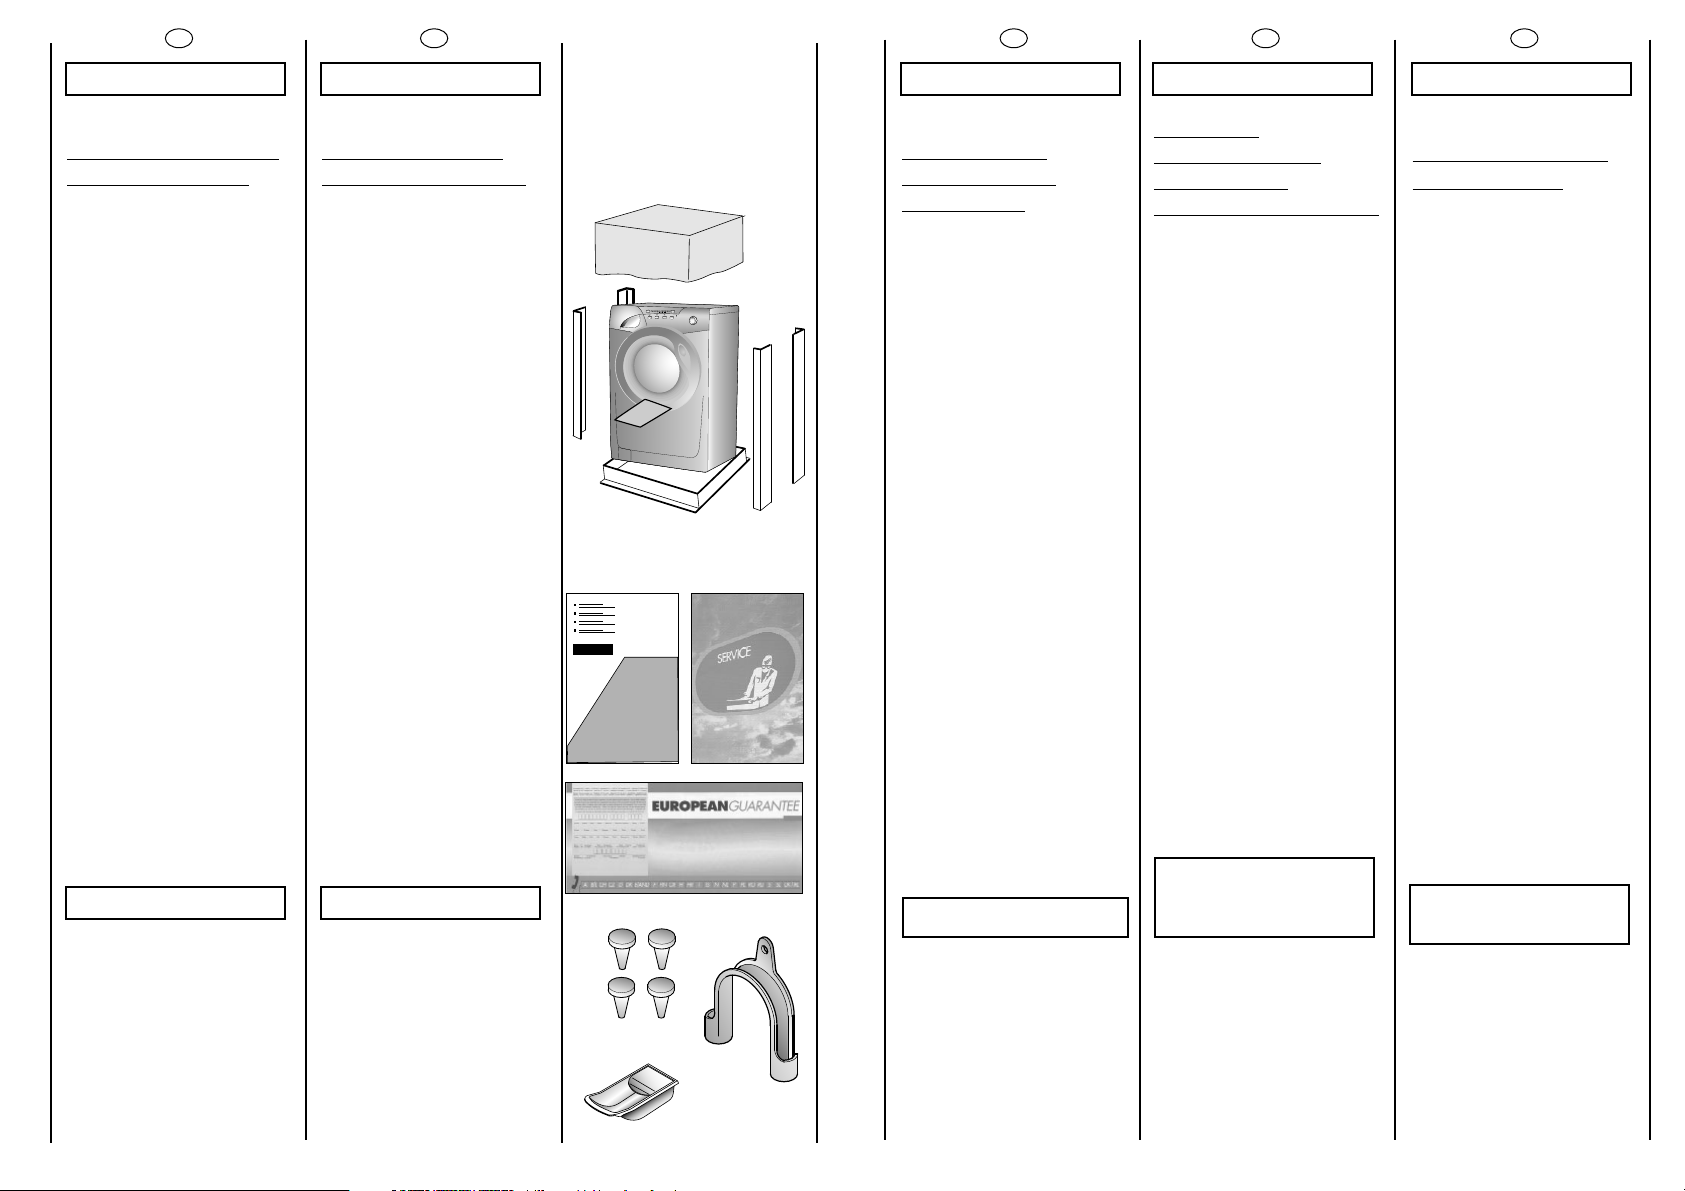
CHAPITRE 1
NOTES GENERALES
A LA LIVRAISON
A la livraison veuillez,
contrôler que le matériel
suivant accompagne la
machine:
A) LIVRET
D’INSTRUCTIONS
B) ADRESSES DE SERVICE
APRES VENTE
C) CERTIFICAT DE
GARANTIE
D) BOUCHONS
E) COUDES POUR LE TUBE
DE VIDANGE
F) BAC POUR LES
PRODUITS LESSIVIELS
LIQUIDES OU POUR LES
PRODUITS
BLANCHISSANTS
LIQUIDES
LES CONSERVER
CAPITOLO 1
NOTE GENERALI
ALLA CONSEGNA
Alla consegna controlli che
con la macchina ci siano:
A) MANUALE
D’ISTRUZIONE
B) INDIRIZZI DI ASSISTENZA
C) CERTIFICATI DI
GARANZIA
D) TAPPI
E) CURVA PER TUBO
SCARICO
F) BACINELLA DETERSIVO
LIQUIDO O
CANDEGGIANTE
CONSERVATELI
D
AB
C
KAPITEL 1
ALLGEMEINE
HINWEISE ZUR
LIEFERUNG
Kontrollieren Sie bei
Anlieferung des Gerätes, ob
das folgende Zubehör
mitgeliefert wurde:
A) BEDIENUNGSANLEI-
TUNG
B) VERZEICHNIS DER
KUNDENDIENSTSTELLEN
C)GARANTIESCHEIN
D) STÖPSEL
E) ROHRBOGEN FÜR
ABLAUFSCHLAUCH
F) EINSATZ FÜR
FLÜSSIGWASCHMITTEL
BZW. BLEICHMITTEL
BITTE GUT AUFBEWAHREN
1. POGLAVJE
SPLO·NA
OPOZORILA IN
NASVETI OB
PREVZEMU APARATA
Ob prevzemu aparata vam
mora trgovec izroãiti
naslednje dokumente
in pribor:
A) NAVODILO ZA
UPORABO
B) SPISEK POOBLA·âENIH
SERVISOV
C) GARANCIJSKI LIST
D) POKROVâKI
E) UKRIVLJENI NOSILEC
ODTOâNE CEVI
F) POSODICO ZA TEKOâI
DETERGENT ALI BELILO
PROSIMO, DA VSE
NA·TETO SKRBNO
SHRANITE!
CHAPTER 1
GENERAL POINTS
ON DELIVERY
On delivery, check that the
following are included with
the machine:
A) INSTRUCTION MANUAL
B) CUSTOMER SERVICE
ADDRESSES
C) GUARANTEE
CERTIFICATES
D) CAPS
E) BEND FOR OUTLET TUBE
F) LIQUID DETERGENT OR
LIQUID BLEACH
COMPARTMENT
(CONTAINER)
KEEP THEM IN A SAFE
PLACE
et contrôler que ce matériel
soit en bon état; si tel n’est
pas le cas appelez le centre
Candy le plus proche.
6
e controlli che non abbia
subito danni durante il
trasporto, in caso contrario
chiami il centro Candy più
vicino.
F
E
Gerät bei Lieferung auf
eventuelle
Transportschäden
untersuchen und
gegebenenfalls beim
Händler reklamieren.
Kupec mora stroj pregledati
ob prevzemu pri trgovcu in
preveriti, ãe na njem ni
vidnih po‰kodb!
Check that the machine has
not incurred damage during
transport. If this is the case,
contact your nearest Candy
Centre.
7
Page 5
FR
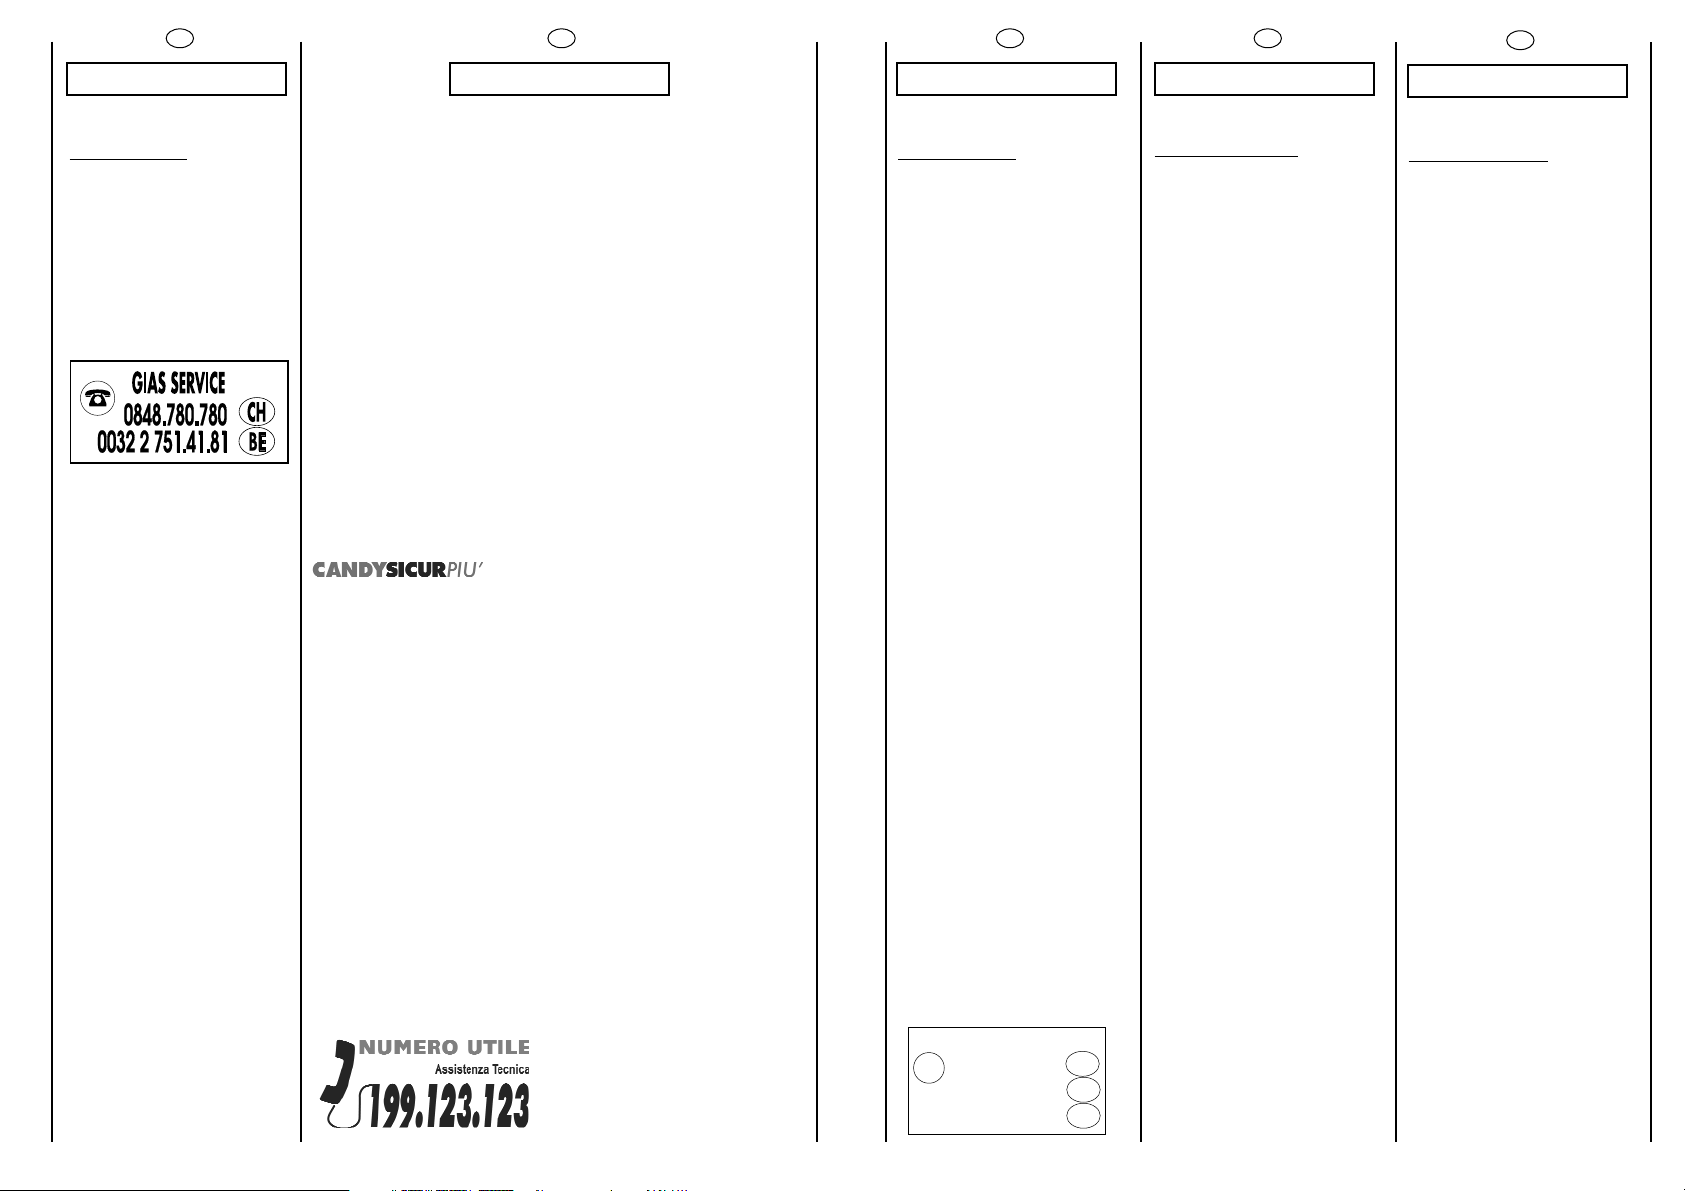
GIAS SERVICE
0820.220.224
0848.780.780
☎
A
CH
DE
01805.625.562
IT
DE
SL
EN
CHAPITRE 2
GARANTIE
L’appareil est accompagné
par un certificat de
gàrantie.
CAPITOLO 2
KAPITEL 2
Servizio Assistenza Clienti
CERTIFICATO DI GARANZIA CONVENZIONALE: cosa fare?
Il Suo prodotto è garantito, alle condizioni e nei termini riportati sul certificato inserito nel
prodotto ed in base alle previsioni del decreto legislativo 24/02, nonché del decreto
legislativo 6 settembre 2005, n. 206, per un periodo di 24 mesi decorrenti dalla data di
consegna del bene.
Così come riportato nei testi dei Decreti Legislativi citati, il certificato di garanzia dovrà
essere da Lei conservato, debitamente compilato, per essere mostrato al Servizio
Assistenza Tecnica Autorizzato, in caso di necessità, unitamente ad un documento
fiscalmente valido rilasciato dal rivenditore al momento dell’acquisto (bolla di consegna,
fattura, scontrino fiscale, altro) sul quale siano indicati il nominativo del rivenditore, la
data di consegna, gli estremi identificativi del prodotto ed il prezzo di cessione.
Resta pure inteso che, salvo prova contraria, poiché si presume che i difetti di conformità
che si manifestano entro sei mesi dalla consegna del bene esistessero già a tale data, a
meno che tale ipotesi sia incompatibile con la natura del bene o con la natura del difetto
di conformità, il Servizio di Assistenza Tecnica Autorizzato Gias, verificato il diritto
all’intervento, lo effettuerà senza addebitare il diritto fisso di intervento a domicilio, la
manodopera ed i ricambi. Per contro, nel successivo periodo di diciotto mesi di vigenza
della garanzia, sarà invece onere del consumatore che intenda fruire dei rimedi
accordati dalla garanzia stessa provare l’esistenza del difetto di conformità del bene sin
dal momento della consegna; nel caso in cui il consumatore non fosse in grado di fornire
detta prova, non potranno essere applicate le condizioni di garanzia previste e pertanto il
Servizio di Assistenza Tecnica Autorizzato Gias effettuerà l’intervento addebitando al
consumatore tutti i costi relativi.
Le ricordiamo inoltre che sullo stesso certificato di garanzia convenzionale Lei troverà le
informazioni ed i documenti necessari per una copertura sino a 5 anni e così, in caso di
guasto, non pagare il diritto fisso di intervento a domicilio, la manodopera ed i ricambi.
Per qualsiasi informazione necessitasse, La preghiamo rivolgersi al numero telefonico
del Servizio Clienti 199 12 13 14.
ANOMALIE E MALFUNZIONAMENTI: a chi rivolgersi ?
Per qualsiasi necessità il centro assistenza autorizzato è a Sua completa disposizione
per fornirLe i chiarimenti necessari; comunque qualora il Suo prodotto presenti anomalie
o mal funzionamenti, prima di rivolgersi al Servizio Assistenza Autorizzato, consigliamo
vivamente di effettuare i controlli indicati nel capitolo 13.
UN SOLO NUMERO TELEFONICO PER OTTENERE ASSISTENZA.
Qualora il problema dovesse persistere, componendo il “Numero Utile” sotto indicato,
sarà messo in contatto direttamente con il Servizio Assistenza Tecnica Autorizzato che
opera nella Sua zona di residenza.
Attenzione:
la chiamata è a pagamento; il costo verrà comunicato, tramite messaggio vocale, dal
Servizio clienti dell’operatore telefonico utilizzato. Dettagli sono presenti sul sito internet
www.candy.it.
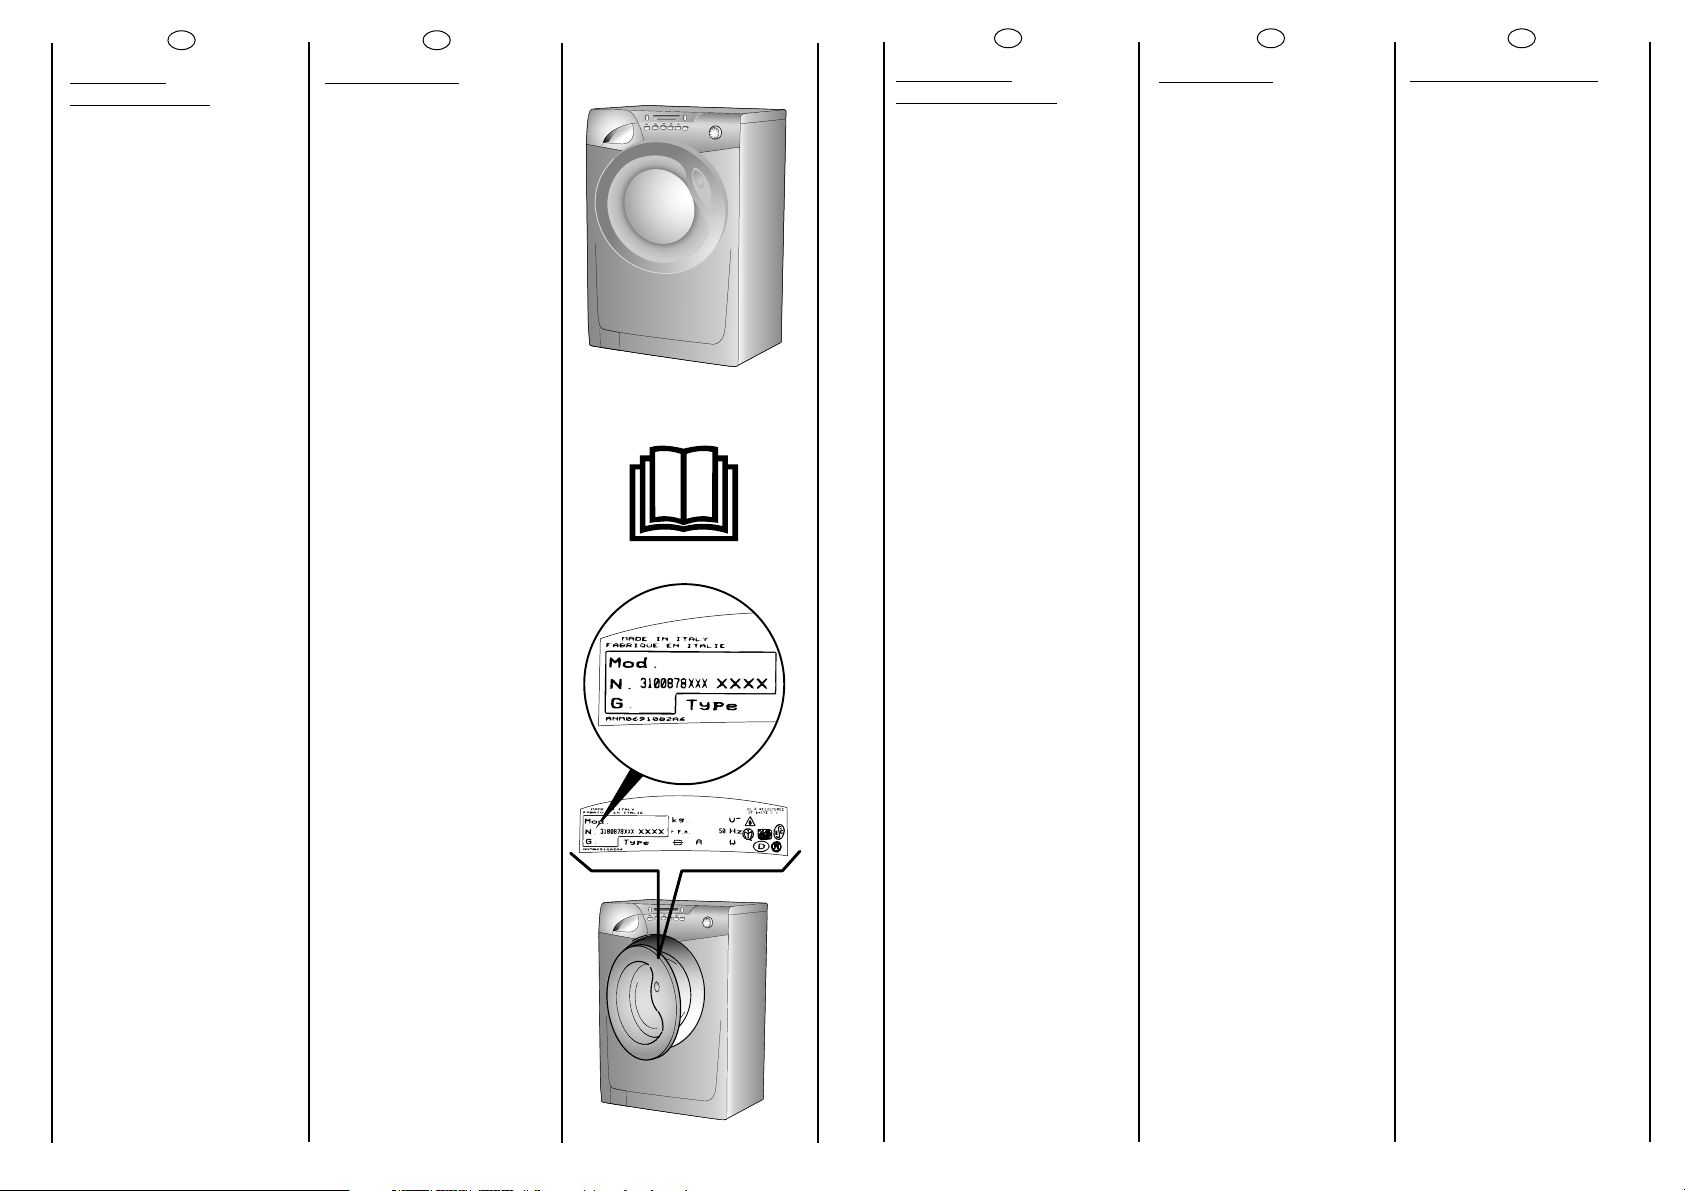
MATRICOLADEL PRODOTTO. Dove si trova?
E’ indispensabile che comunichi al Servizio Assistenza Tecnica Autorizzato la sigla del
prodotto ed il numero di matricola (16 caratteri che iniziano con la cifra 3) che troverà sul
certificato di garanzia oppure sulla targa matricola posta sul frontale della lavabiancheria
(zona oblò). In questo modo Lei potrà contribuire ad evitare trasferte inutili del tecnico,
risparmiando oltretutto i relativi costi.
GARANTIE
Die Vorlage der OriginalKaufrechnung ist
Voraussetzung für die
Inanspruchnahme einer
Garantieleistung durch
den Werkskundendienst.
Die detaillierten
Garantiebedingungen
entnehmen Sie bitte den
beigefügten Unterlagen
"European Guarantee".
Bewahren Sie die
Kaufrechnung gut auf Und
zeigen Sie diese im
Servicefall dem
Kundendiensttechniker, um
Ihren
Garantieanspruch
nachzuweisen.
SERVICENUMMER FÜR DEN
KUNDENDIENST
Im Servicefall wenden Sie
sich bitte an unseren
autorisierten
Werkskundendienst.Bitte
schauen Sie in den
mitgelieferten
Garantieunterlagen nach.
WO KANN ICH DIE
MATRIKELNUMMER DES
GERÄTES FINDEN?
Um eine schnelle und
effektive Hilfe zu leisten,
braucht der Kundendienst
das Gerätemodell und die
Matrikelnummer laut
Typenschild.Das ist eine 16stellige Zahl, die mit 3
anfängt und sich im
Bullaugenbereich befindet.
Teilen Sie diese Nummer
stets dem Kundendienst
mit, wenn Sie ihn
benötigen.
2. POGLAVJE
GARANCIJA
Ob nakupu aparata vam
mora prodajalec izdati
izpolnjen in potrjen
garancijski list.
Na osnovi potrjenega
garancijskega
lista in raãuna imate v roku
enega leta od dneva
nakupa pravico do
brezplaãnega servisiranja
va‰ega aparata s strani na‰e
tehniãne sluÏbe, oziroma
na‰ih poobla‰ãenih
serviserjev pod pogoji, ki so
navedeni v garancijskem
listu.
Poleg garancijskega lista
vam mora trgovec izroãiti
tudi spisek na‰ih
poobla‰ãenih serviserjev, ki so
edini pristojni za popravila
Candyjevih aparatov v
garancijskem roku.
CHAPTER 2
GUARANTEE
The appliance is supplied
with a guarantee certificate
which allows free use of the
Technical Assistance Service.
8
9
Page 6
FR
IT
DE
SL
EN
CHAPITRE 3
MESURES DE
SECURITE
ATTENTION:
EN CAS
D’INTERVENTION DE
NETTOYAGE ET
D’ENTRETIEN
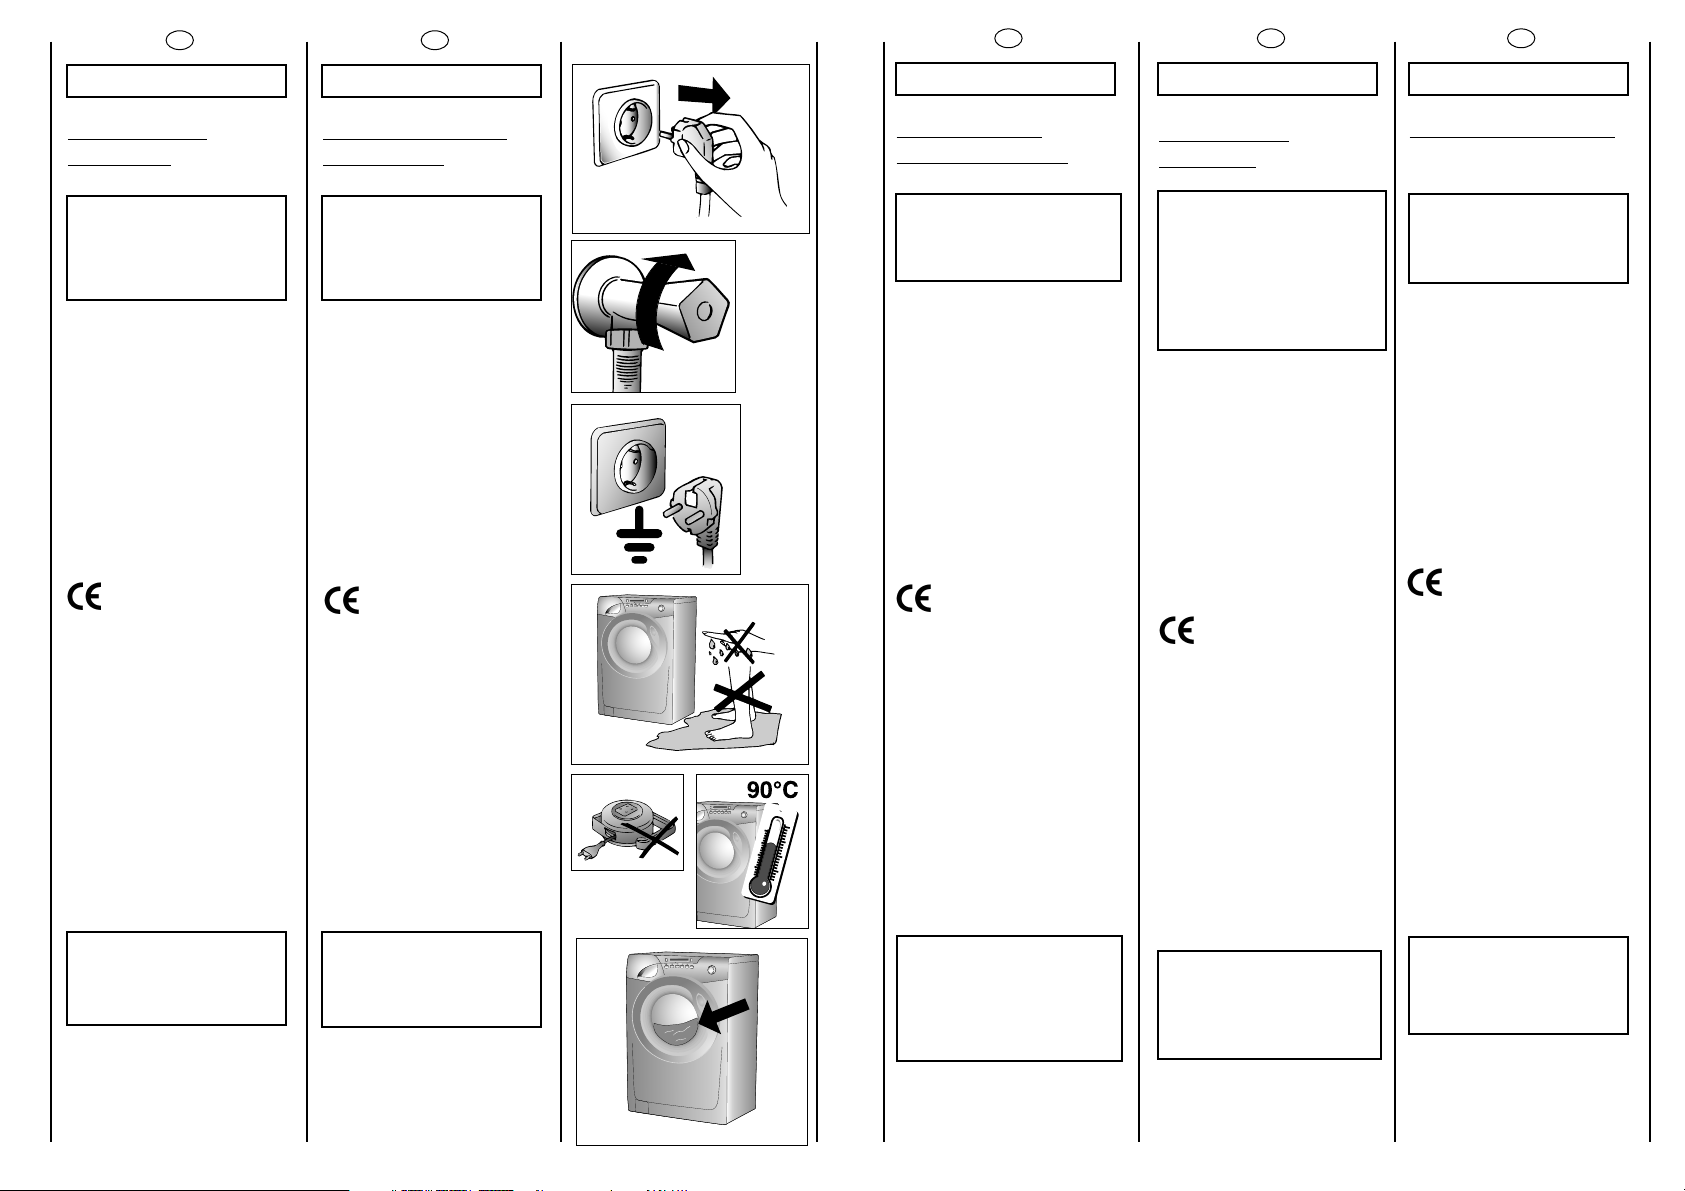
● Débrancher la prise de
courant.
● Fermer le robinet
d’alimentation d’eau.
● Toutes les machines Candy
sont pourvues de mise à la
terre.
Vérifier que l’installation
électrique soit alimentée par
une prise de terre, en cas
contraire demander
l’intervention du personnel
qualifié.
Produit compatible
avec les Directives
Européennes 73/23/EEC et
89/336/EEC, remplacé par
2006/95/EC et 2004/108/EC,
et les amendements
successifs.
● Ne pas toucher l’appareil
pieds nus.
● Autant que possible éviter
l’usage de rallonges dans les
salles de bains ou les
douches.
ATTENTION:
PENDANT LE LAVAGE
L’EAU PEUT ATTEINDRE
90°C.
CAPITOLO 3
PRESCRIZIONI DI
SICUREZZA
ATTENZIONE:
PER QUALSIASI
INTERVENTO DI PULIZIA
E MANUTENZIONE
DELLA LAVATRICE
●
Tolga la spina.
●
Chiuda il rubinetto
dell’acqua.
●
La Candy correda tutte le
sue macchine di messa a
terra.
Si assicuri che l’impianto
elettrico sia provvisto di
messa a terra in caso
contrario richieda
l’intervento di personale
qualificato.
Apparecchio
conforme alle Direttive
Europee 73/23/CEE e
89/336/CEE , sostituite
rispettivamente da
2006/95/CE e 2004/108/CE ,
e successive modifiche.
●
Non tocchi l’apparecchio
con mani, piedi bagnati o
umidi.
●
Non usi l’apparecchio a
piedi nudi.
●
Non usi, se non con
particolare cautela,
prolunghe in locali adibiti a
bagno o doccia.
ATTENZIONE:
DURANTE IL LAVAGGIO
L’ACQUA PUO’ ANDARE
A 90°C.
KAPITEL 3
SICHERHEITSVORSCHRIFTEN
ZUR BEACHTUNG:
BEI REINIGUNG UND
WARTUNG DES
GERÄTES
● Netzstecker ziehen.
● Wasserzufuhr sperren.
● Alle Candy Geräte sind
geerdet.
Versichern Sie sich, daß Ihr
Stromnetz geerdet ist.Sollte
dies nicht der Fall sein, rufen
Sie einen Fachmann.
Das Gerät entspricht
den Europäischen Richtlinien
73/23/CEE und 89/336/CEE,
ersetzt durch 2006/95/CE
bzw. 2004/108/CE , und deren
nachträglichen
Veränderungen.
● Benutzen Sie nach
Mögkichkeit keine
Verlängerungskabel in
Feuchträumen.
ACHTUNG:
JE NACH
WASCHPROGRAMM
KANN SICH DAS
WASSER BIS AUF 90° C
AUFHEIZEN.
3. POGLAVJE
VARNOSTNI
PREDPISI
PRED ZAâETKOM
âI·âENJA ALI
VZDRÎEVANJA
PRALNEGA
STROJA OBVEZNO
UPO·TEVAJTE
NASLEDNJE
VARNOSTNE PREDPISE:
● Iztaknite vtiã iz vtiãnice.
● Zaprite pipo za dotok
vode.
● Vsi Candyjevi gospodinjski
aparati so opremljeni z
ozemljitvenim kablom.
Preverite, ãe je va‰a
elektriãna napeljava pravilno
ozemljena! âe ni, naj vam
napeljavo pred prikljuãitvijo
pravilno napelje strokovnjak!
Aparat je skladen z
doloãili Evropske
gospodarske zbornice 73/23
in 89/336 , nadomestnimi
doloãili 2006/95 in 2004/108
ter kasnej‰imi modifikacijami.
● Z vlaÏnimi rokami ali
nogami se aparata ne
dotikajte. Ne uporabljajte
pomivalnega stroja
bosonogi.
● Ne uporabljajte podalj‰kov
za prikljuãitev stroja na
elektriãno omreÏje, ãe je stroj
name‰ãen v kopalnici ali
drugem vlaÏnem prostoru.
OPOZORILO!
MED PRANJEM SE
VODA V STROJU
LAHKO SEGREJE TUDI
DO 90° C.
CHAPTER 3
SAFETY MEASURES
IMPORTANT:
FOR ALL CLEANING
AND MAINTENANCE
WORK
● Remove the plug
● Turn off the water inlet tap.
● All Candy appliances are
earthed. Ensure that the
main electricity circuit is
earthed. Contact a qualified
electrician if this is not the
case.
Appliance complies
with European Directives
73/23/EEC and 89/336/EEC,
replaced by 2006/95/EC and
2004/108/EC, and
subsequent amendments.
● Do not touch the
appliance with wet or damp
hands or feet.
● Do not use the appliance
when bare-footed.
● Extreme care should be
taken if extension leads are
used in bathrooms or shower
rooms. Avoid this where
possible.
WARNING: DURING THE
WASHING CYCLE,THE
WATER CAN REACH A
TEMPERATURE OF 90°C.
●
● Avant d’ouvrir le hublot
vérifier que le tambour soit
sans eau.
10 11
Prima di aprire l’oblò si
assicuri che non vi sia
acqua nel cestello.
● Vor dem Öffnen des
Bullauges sicherstellen, daß
kein Wasser mehr in der
Trommel steht.
● Pred odpiranjem vrat stroja
se prepriãajte, ãe v bobnu
stroja ni vode.
● Before opening the
washing machine door,
ensure that there is no water
in the drum.
Page 7
FR
● Ne pas utiliser
d’adaptateurs ou de prises
multiples.
● Cet appareil n’est pas
destiné à être utilisé par des
personnes (notamment les
enfants) incapables,
irresponsables ou sans
connaissance sur l’utilisation
du produit, à moins qu’elles
ne soient surveillées, ou
instruites sur l’utilisation de
l’appareil, par une personne
responsable de leur sécurité.
Surveillez les enfants pour
être sûr qu’ils ne jouent pas
avec l’appareil.
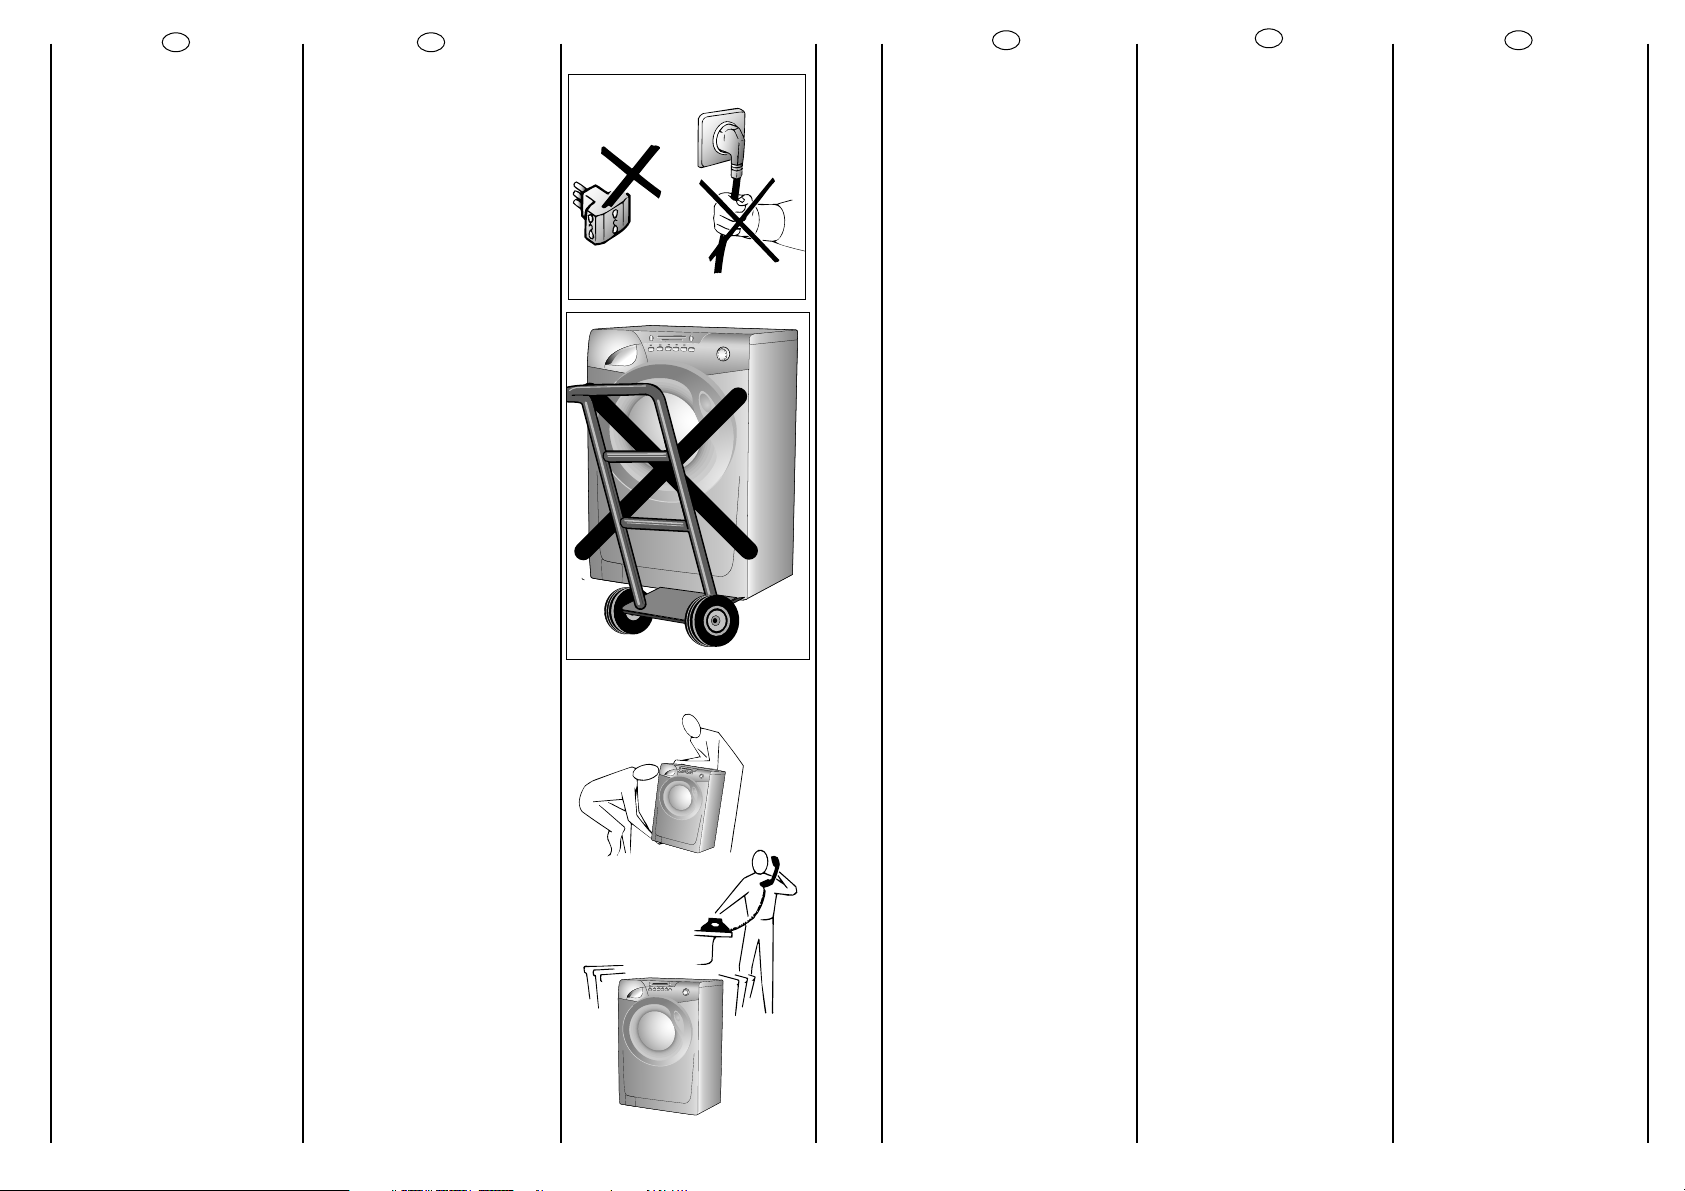
● Pour débrancher la prise,
ne pas tirer sur le câble.
● Ne pas laisser la machine
exposée aux agents
atmosphériques (pluie, soleil,
etc...).
● En cas de déménagement
ne jamais soulever la
machine par les boutons ou
par le tiroir des produits
lessiviels.
● Pendant le transport ne
pas appuyer le hublot sur le
chariot.
Important!
Les ouvertures à la base de
l’appareil ne doivent en
aucun cas être obstruées par
des tapis, moquette ou
autres objets.
● 2 personnes pour soulever
la machine (voir dessin).
● En cas de panne et/ou de
mauvais fonctionnement
éteindre la machine,fermer
le robinet d’alimentation
d’eau et ne pas toucher à la
machine. Pour toute
réparation adressez-vous
exclusivement à un centre
d’assistance technique
Candy en demandant des
pièces de rechange
certifiées constructeur.Le fait
de ne pas respecter les
indications susmentionnées
peut compromettre la
sécurité de l’appareil.
● Si le remplacement du
câble d’alimentation s’avère
nécessaire, il devra être
remplacé par un câble
special fourni par le service
après-vente.
12
IT
●
Non usi adattatori o spine
multiple
● Questo apparecchio non è
destinato ad essere usato da
bambini e persone incapaci o
inesperte all'uso del prodotto, a
meno che non vengano
sorvegliate o istruite riguardo
all'uso dell'apparecchio da
una persona responsabile
della loro sicurezza.
Sorvegliare i bambini in modo
tale da assicurarsi che non
giochino con l'apparecchio.
●
Non tiri il cavo di
alimentazione, o
l’apparecchio stesso, per
staccare la spina dalla presa
di corrente.
●
Non lasci esposto
l’apparecchio ad agenti
atmosferici (pioggia, sole,
ecc...).
●
In caso di trasloco non la
sollevi mai dalle manopole o
dal cassetto del detersivo.
●
Durante il trasporto non
appoggi mai l’oblò al
carrello.
Importante!
Nel caso si installi
l’apparecchio su un
pavimento ricoperto da
tappeti o con moquette, si
deve fare attenzione che le
aperture di ventilazione alla
base dell’apparecchio non
vengano ostruite.
●
Sollevarla in due persone
come illustrato in figura.
●
In caso di guasto e/o di
cattivo funzionamento
dell’apparecchio, lo spenga,
chiuda il rubinetto
dell’acqua e non
manometta
l’elettrodomestico. Per
l’eventuale riparazione si
rivolga solamente a un
centro di Assistenza Tecnica
Candy e richieda l’utilizzo di
ricambi originali.
Il mancato rispetto di quanto
sopra può compromettere la
sicurezza dell’apparecchio.
●
Se il cavo di alimentazione
risultasse danneggiato, dovrà
essere sostituito da un cavo
speciale disponibile presso il
servizio di Assistenza Tecnica.
DE
● Gerät nicht an Adapter oder
Mehrfachsteckdosen
anschließen.
● Kinder oder Personen mit
eingeschränkten körperlichen
oder geistigen Fähigkeiten oder
mit ungenügenden Kenntnissen
und Erfahrung dürfen nur dann
das Gerät benutzen, wenn sie
beaufsichtigt werden oder
hinreichend Anweisungen zur
sicheren Behandlung des
Gerätes durch eine für ihre
Sicherheit verantwortliche Person
erhalten haben.
Kinder sind zu beaufsichtigen, um
sicher zu stellen, dass sie nicht mit
dem Gerät spielen.
● Ziehen Sie den Stecker immer
am Stecker selbst aus der
Steckdose.
● Setzen Sie das Gerät keinen
Witterungseinflüssen (Regen,
Sonne usw.) aus.
● Das Gerät niemals an den
Schaltknöpfen oder am
Waschmittelbehälter anheben.
● Während des Transportes mit
einer Sackkarre das Gerät nicht
auf das Bullauge lehnen.
Wichtig!
Falls Sie das Gerät auf einen
Teppich oder Teppichboden
aufstellen, achten Sie darauf,daß
die Lufteinlässe am Boden des
Gerätes nicht verstopft werden.
● Stets, wie auf der Zeichnung
dargestellt, zu zweit anheben.
● Bei eventuellen Defekten und
Fehlfunktionen das Gerät
abschalten, die Wasserzufuhr
unterbrechen und die
Waschmaschine nicht
gewaltsam öffnen. Bei
anfallenden Reparaturen
wenden Sie sich bitte
ausschließlich an die
Kundendienststelle der Firma
Candy und bestehen Sie auf die
Verwendung von
Originalersatzteilen. Die
Nichtbeachtung der o.a.
Vorschriften kann zur
Beeinträchtigung der Gerätesicherheit führen.
● Wenn das Gerät einmal
ausgedient hat, entsorgen Sie es
bitte ordnungsgemäß über Ihren
Fachhändler oder die
kommunalen
Entsorgungseinrichtungen.
● Sollte das Netzkabel
beschädigt sein, muß dieses mit
dem speziellen Netzkabel ersetzt
werden,das vom
Gias-Kundendienst zur Verfügung
gestellt werden kann.
SL
● Odsvetujemo prikljuãitev
stroja na elektriãno omreÏje
preko razliãnih pretvornikov ali
razdelilnikov.
● Osebe (vkljuãno z otroci) z
zmanj‰animi fiziãnimi,
zaznavnimi ali du‰evnimi
sposobnostmi ter osebe, ki
nimajo zadostnih izku‰enj ali
predznanja, smejo uporabljati
aparat le pod nadzorom in z
navodili oseb, ki so seznanjene s
pravilno uporabo aparata in ki
so odgovorni za njihovo varnost.
Otroke med uporabo aparata
nadzirajte. Poskrbite, da se ne
bodo igrali z aparatom.
● Ne vlecite prikljuãnega kabla
ali celo aparata samega, ãe
Ïelite iztakniti vtiã iz vtiãnice.
● Elektriãni aparati ne smejo biti
izpostavljeni razliãnim
atmosferskim vplivom kot so npr.
deÏ, sonce ipd.
● Pazite, da stroja ob
preme‰ãanju ali prevaÏanju ne
dvigajte na strani, kjer so
name‰ãene stikala in gumbi,
oziroma na strani, kjer je
name‰ãena posodica za
detergent.
● Med prevaÏanjem nikoli ne
naslonite sprednje strani stroja
(tj., strani, kjer so name‰ãena
vrata) na voziãek.
POMEMBNO!
âe postavite stroj na pod, ki je
prekrit s tekstilnimi oblogami,
skrbno preverite, ãe vlakna take
talne obloge ne zapirajo
odprtin za zraãenje, ki so
name‰ãene na spodnjem robu
stroja.
Stroj morata dvigniti vedno dve
osebi, tako kot je prikazano na
skici.
● V primeru okvare ali
nepravilnega delovanja stroja,
stroj takoj izklopite in iztaknite
vtikaã iz vtiãnice ter zaprite pipo
za dotok vode do stroja. Nato
pokliãite enega od
poobla‰ãenih Candyjevih
serviserjev, da vam stroj
popravi.
Ob morebitni zamenjavi
vgradnih delov vedno
zahtevajte vgradnjo originalnih
Candyjevih rezervnih delov.
Neupo‰tevanje gornjih
navodil lahko vpliva na varno in
pravilno delovanje stroja.
● âe se po‰koduje prikljuãni
kabel, ga morate zamenjati s
POSEBNIM PRIKLJUâNIM
KABLOM, ki ga lahko nabavite
kot rezervni del pri
poobla‰ãenem prodajalcu.
EN
● Do not use adaptors or
multiple plugs.
● This appliance is not
intended for use by persons
(including children) with
reduced physical,sensory or
mental capabilities, or lack of
experience and knowledge,
unless they have been given
supervision or instruction
concerning use of the
appliance by a person
responsible for their safety.
Children should be
supervised to ensure that
they do not play with the
appliance.
● Do not pull the mains lead
or the appliance itself to
remove the plug from the
socket.
● Do not leave the
appliance exposed to
atmospheric agents (rain, sun
etc.)
● In the case of removal,
never lift the appliance by
the knobs or detersive
drawer.
● During transportation
do not lean the door against
the trolley.
Important!
When the appliance
location is on carpet floors,
attention must be paid so as
to ensure that there is no
obstruction to the bottom
vents.
● Lift the appliance in pairs
as illustrated in the diagram.
● In the case of failure
and/or incorrect operation,
turn the washing machine
off, close the water inlet tap
and do not tamper with the
appliance. Contact a Candy
Technical Assistance Centre
for any repairs and ask for
original Candy spare parts.
Avoidance of these norms
may compromise the safety
of the appliance.
● Should the supply cord
(mains cable) be demaged,
this is to be replaced by a
specific cable available from
the after sales service centre.
13
Page 8
FR
IT
DE
SL
EN
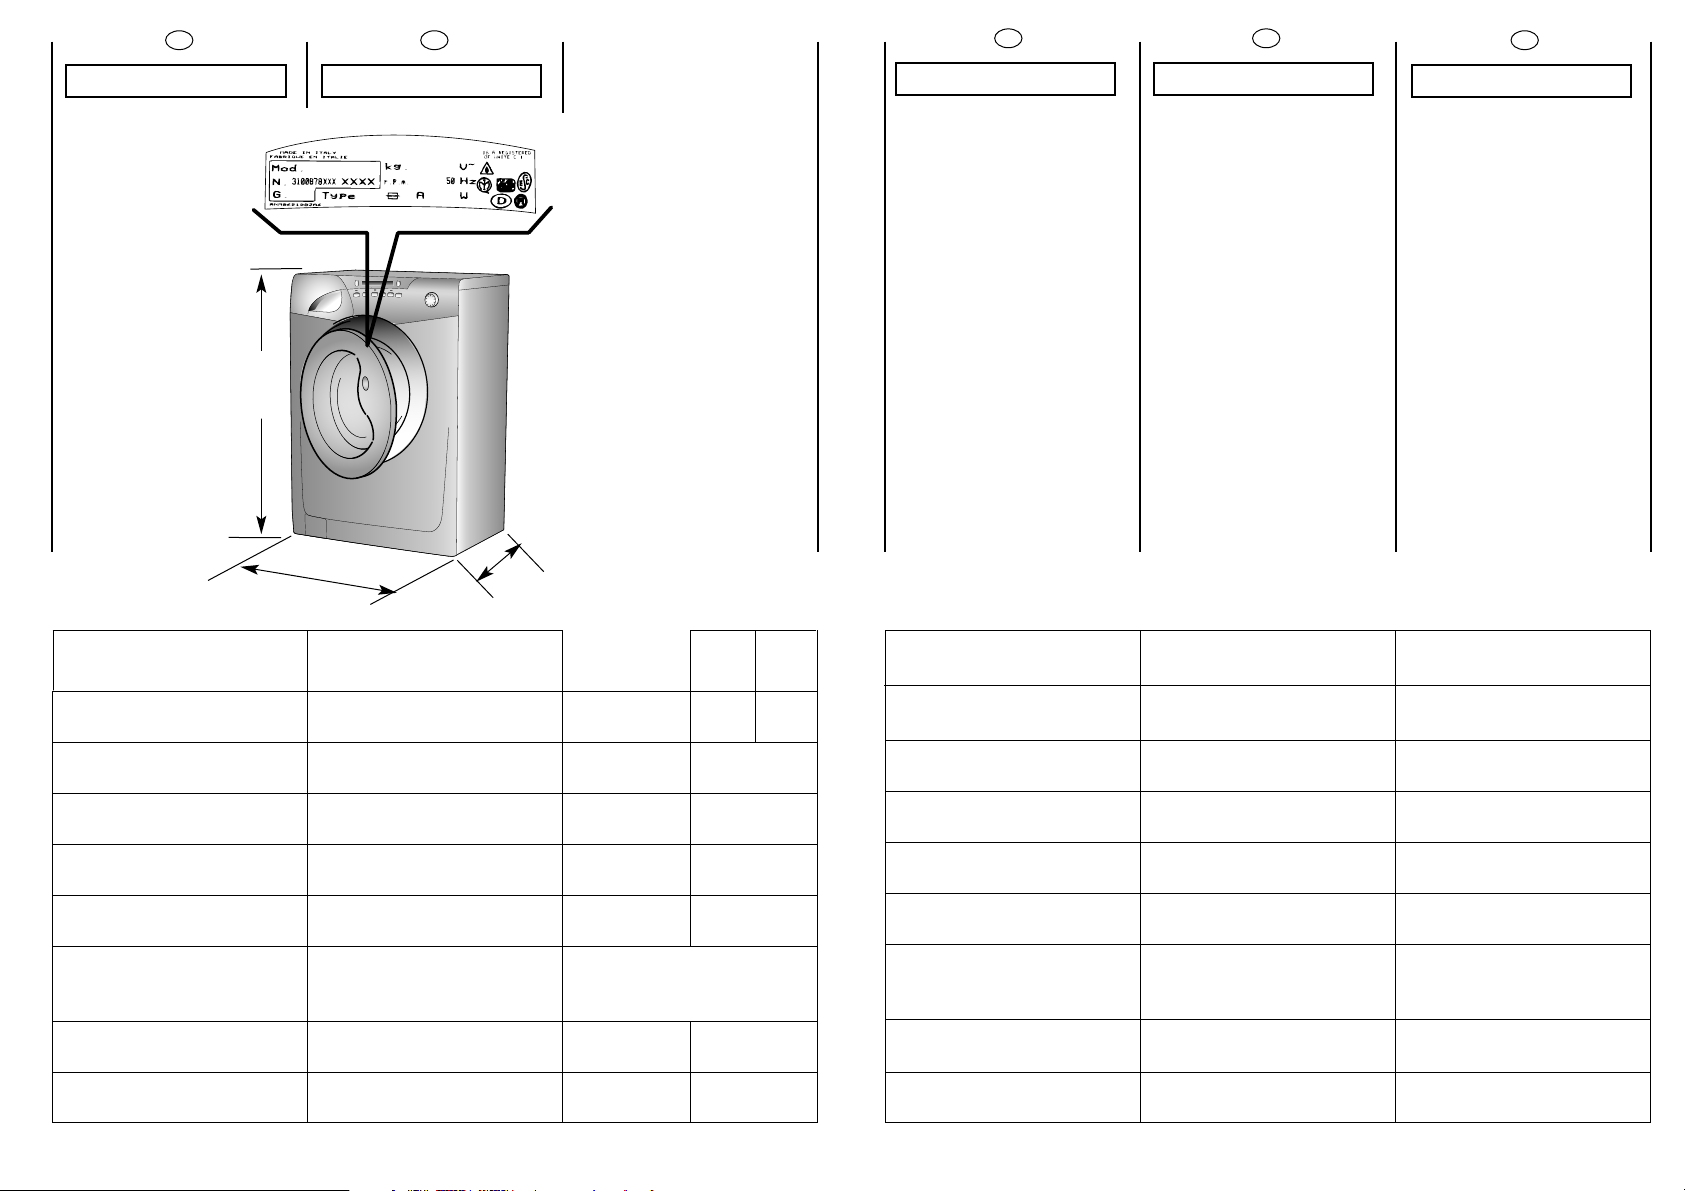
85
cm
DONNÉES TECHNIQUES
CAPACITE DE LINGE
SEC
EAU NIVEAU NORMAL
PUISSANCE
ABSORBEE
CONSOMMATION ENERGIE
(PROG. 90°C)
AMPERAGE
60 cm
CAPITOLO 4CHAPITRE 4
54 cm
DATI TECNICI
CAPACITA’ DI BIANCHERIA
ASCIUTTA
ACQUA LIVELLO NORMALE
POTENZA
ASSORBITA
CONSUMO DI ENERGIA
(PROG. 90°C)
AMPERE DEL
FUSIBILE DELLA RETE
Lavage
lavaggio
Asciugatura
Waschen
Pranje
Washing
kg 5
l
W
kWh
A
7
6÷15
2150
1,8
10
Séchage
Trocknen
Su‰enje
Drying
KAPITEL 4
TECHNISCHE DATEN
FASSUNGSVERMÖGEN
TROCKENWÄSCHE
WASSERSTAND NORMAL.
GESAMTANSCHLUßWERT
ENERGIEVERBRAUCH
(PROGR. 90°C)
ABSICHERUNG
44.. PPOOGGLLAAVVJJEE
TEHNIâNI PODATKI
NAJVEâJA KOLIâINA SUHEGA
PERILA ZA ENO PRANJE
KOLIâINA VODE PRI
OBIâAJNEM PRANJU
SKUPNA PRIKLJUâNA MOâ
PORABA ELEKTRIâNE ENERGIJE
(PROGRAM ZA PRANJE PRI 90°C)
MOâ VAROVALKE
CHAPTER 4
TECHNICAL DATA
MAXIMUM WASH
LOAD DRY
NORMAL WATER LEVEL
POWER INPUT
ENERGY CONSUMPTION
(PROG. 90°C)
POWER CURRENT FUSE
AMP
ESSORAGE
(Tours/min.)
PRESSION DANS
L’INSTALLATION HYDRAULIQUE
TENSION
14
CENTRIFUGA (giri/min.)
GIRI DI
PRESSIONE NELL’IMPIANTO
IDRAULICO
TENSIONE
MPa
V
1400
min. 0,05
max. 0,8
220-240
SCHLEUDERDREHZAHL
(U/min.)
WASSERDRUCK
SPANNUNG
·TEVILO VRTLJAJEV
CENTRIFUGE (vrt./min.)
DOVOLJENI TLAK VODE V
VODOVODNEM OMREÎJU
NAPETOST
SPIN
r.p.m.
WATER PRESSURE
SUPPLY VOLTAGE
15
Page 9
FR
IT
DE
SL
EN
CHAPITRE 5
MISE EN PLACE
INSTALLATION
Placer la machine près du
lieu d’utilisation sans la base
d’emballage.
Couper avec précaution le
cordon qui maintient le
tuyeau d’évacuation et le
cable d’alimentation
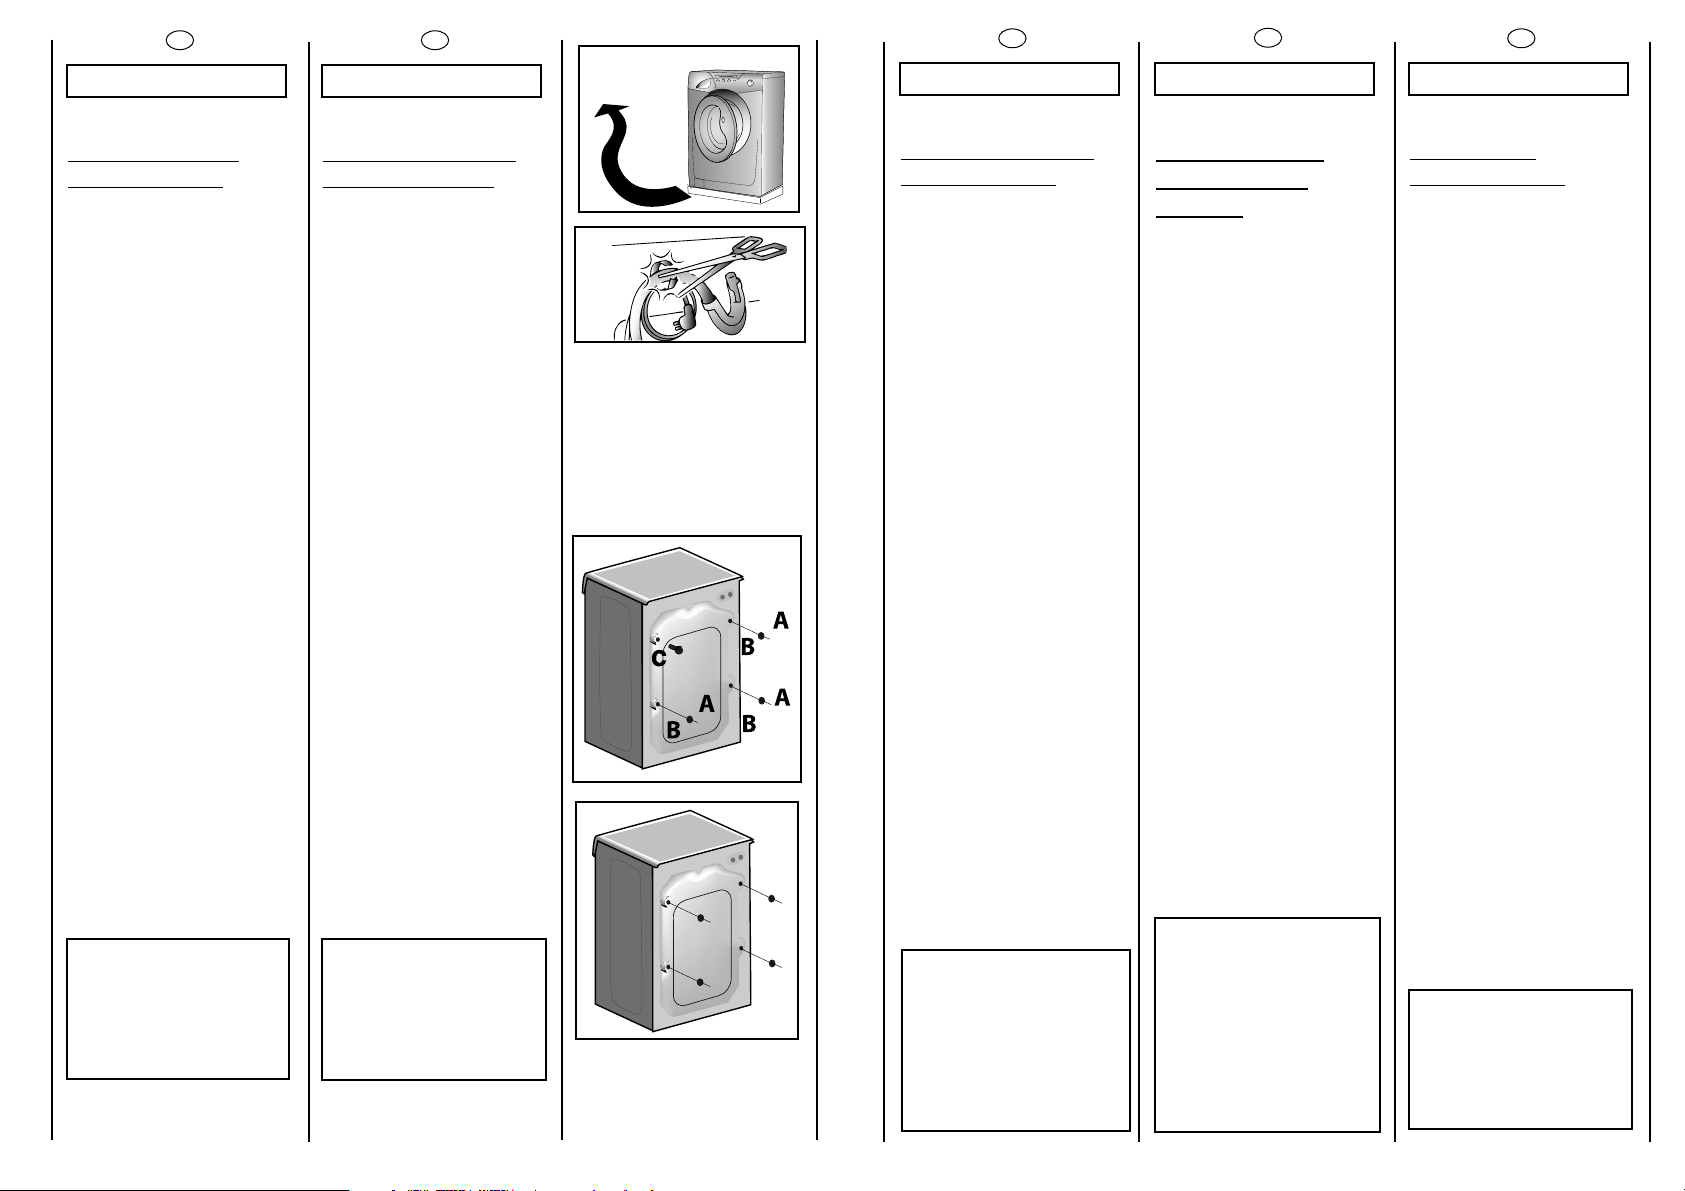
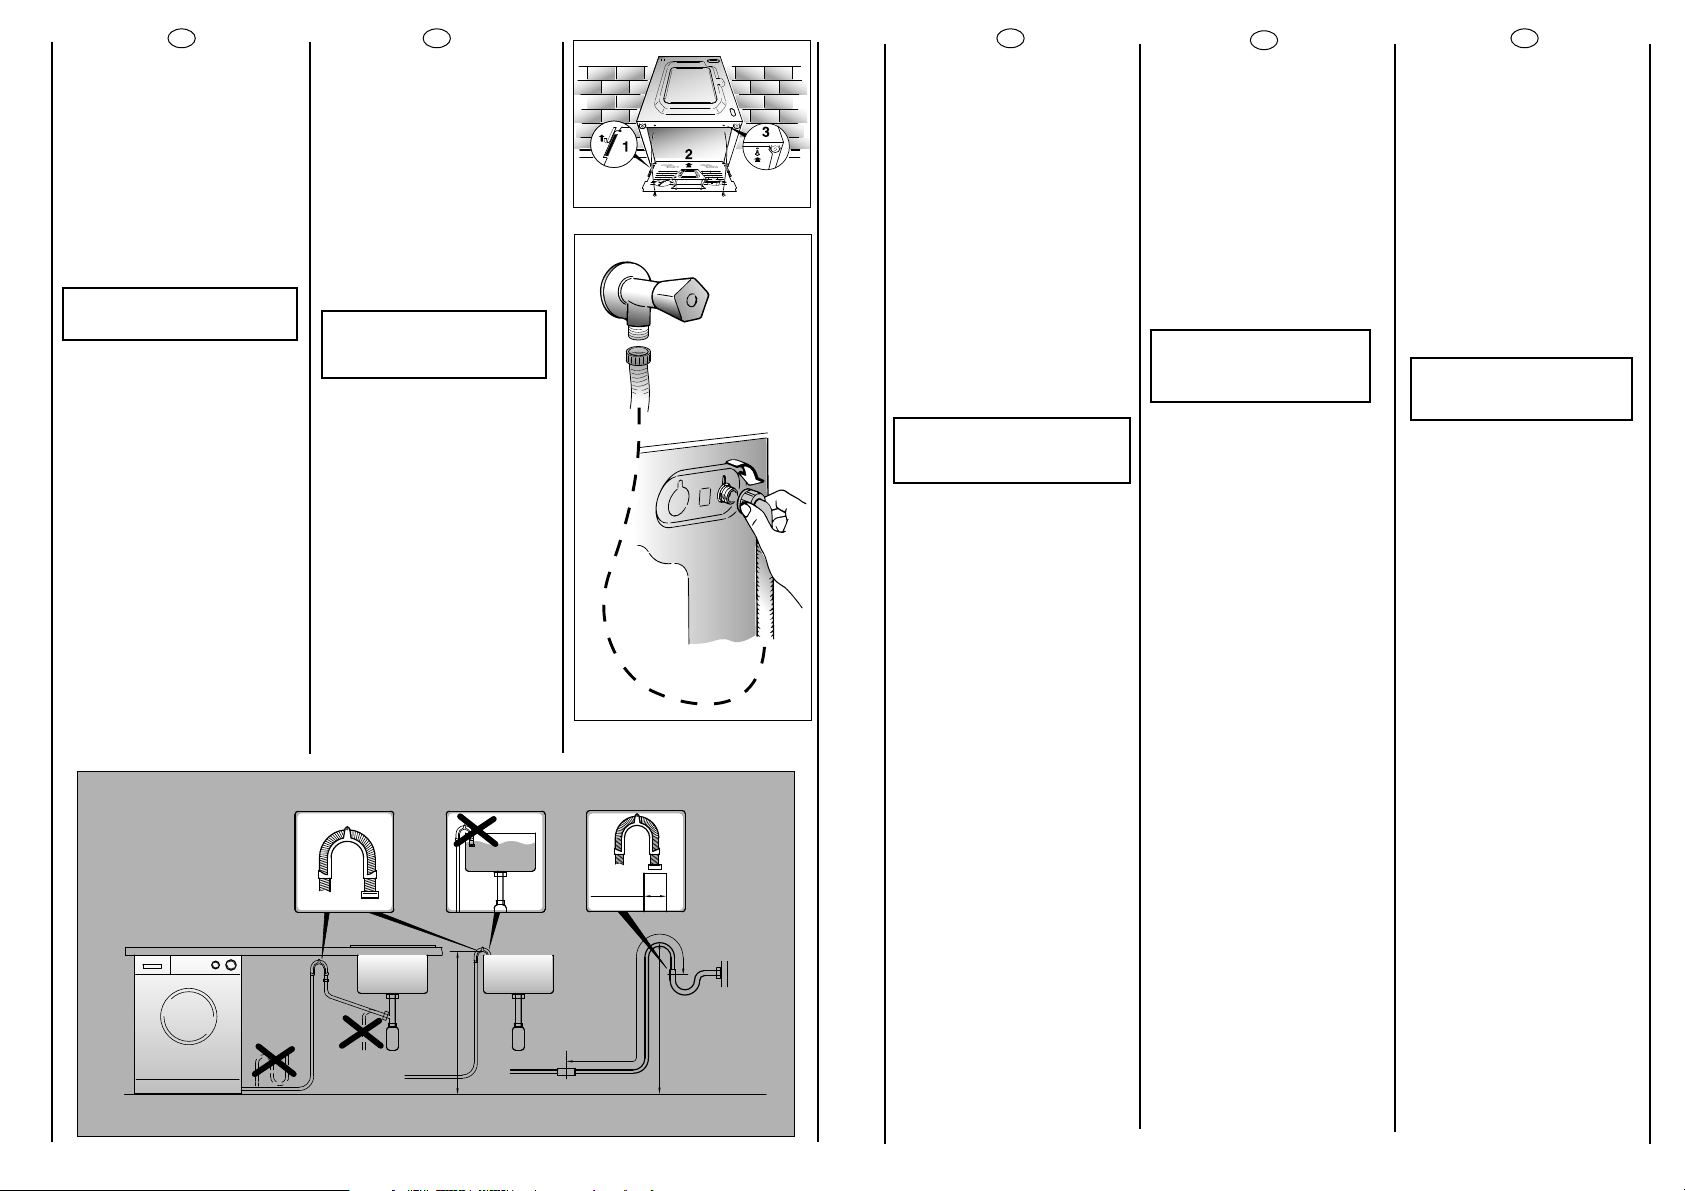
Enlever les 3 vis de fixation
indiquées en (A) et enlever
les espaces indiqués en (B)
CAPITOLO 5
MESSA IN OPERA
INSTALLAZIONE
Porti la macchina vicino al
luogo di utilizzo senza il
basamento dell’imballo.
Tagliare le fascette
fermatubo, prestando
attenzione di non
danneggiare il tubo e il
cavo elettrico
Svitare le 3 viti (A) sul lato
posteriore e rimuovere i 3
distanziali (B).
KAPITEL 5
INBETRIEBNAHME
INSTALLA
Gerät ohne
Verpackungsunterteil in die
Nähe des Aufstellungsortes
bringen.
Schneiden Sie das
Kunststoffband der
Schlauchbefestigung durch.
Achten Sie darauf,den
Schlauch und das Kabel
nicht zu beschädigen.
Schrauben Sie die 3
Schrauben (A) auf der
Rückseite ab und entfernen
Sie die 3 Distanzstücke (B).
TION
55.. PPOOGGLLAAVVJJEE
NAMESTITEV IN
PRIKLJUâITEV
STROJA
Stroj brez podstavka
postavite v bliÏino mesta,
kjer bo stalno prikljuãen.
Previdno prereÏite
jermenãek, ki pridrÏuje
prikljuãni kabel in odtoãno
cev.
Odvijte 3 vijake (A) in
odstranite 3 podloÏke (B).
CHAPTER 5
SETTING UP
INSTALLA
Move the machine near its
permanent position without
the packaging base.
Carefully cut the securing
strap that holds the main
cord and the drain hose.
Remove the 3 fixing screws
marked (A) and remove the
3 spacers marked (B)
TION
Dévisser la vis (C).
Un élément en plastique
tombera à l’intérieur de la
machine à laver.
Incliner la machine vers
l’avant et enlever l’élément
plastique ci-dessus.
Couvrir les quatre trous en
utilisant les capuchons
prévus à cet effet dans le
sachet où se trouve la
notice
ATTENTION:
NE PAS LAISSER À LA
PORTÉE DES ENFANTS
DES ELEMENTS
D’EMBALLAGE QUI
PEUVENT CAUSER DES
RISQUES.
16
Svitare la vite (C).
Così facendo cadrà all’
interno della macchina un
distanziale.
Inclinare in avanti la
macchina e togliere il
distanziale sopraccitato.
Richiudere i 4 fori utilizzando
i tappi contenuti nella busta
istruzione.
ATTENZIONE:
NON LASCI ALLA
PORTATA DI BAMBINI
GLI ELEMENTI
DELL’IMBALLAGGIO IN
QUANTO POTENZIALI
FONTI DI PERICOLO.
Entfernen Sie die Schraube
(C).
Dadurch fällt aus dem
Inneren des Gerätes ein
Distanzstück ab.
Lehnen Sie das Gerät nach
vorne und ziehen Sie das
Distanzstück heraus.
Schließen Sie die 4
Öffnungen mit den im
Beipack mitgelieferten
Stöpseln.
ACHTUNG:
DIE VERPACKUNG IST IN
DEN HÄNDEN VON
KINDERN EINE
GEFAHRENQUELLE. BITTE
ENTSORGEN SIE DAS
VERPACKUNGSMATERIAL
ORDNUNGSGEMÄß.
Odvijte vijak (C).
PodloÏka bo padla v
notranjost stroja.
Nagnite stroj in odstranite
omenjeno podloÏko.
Zakrijte luknje s priloÏenimi
pokrovãki; na‰li jih boste v
vreãki z Navodili za
uporabo.
OPOZORILO:
DELOV EMBALAÎE NE
SMETE PU·âATI NA
DOSEGU OTROK, KER JE
ZANJE LAHKO ZELO
NEVARNA! PROSIMO,
DA EMBALAÎO
ODLOÎITE V SKLADU Z
VELJAVNIMI
OKOLJEVARNOSTNIMI
PREDPISI!
Remove the screw (C).
A spacer will fall inside the
machine.
By tilting the machine,
remove the above
mentioned spacer.
Cover the 4 holes using the
caps provided in the
instruction booklet pack.
WARNING:
DO NOT LEAVE THE
PACKAGING IN THE
REACH OF CHILDREN
AS IT IS A POTENTIAL
SOURCE OF DANGER.
17
Page 10
min 50 cm
max 85 cm
+2,6 mt max
max 100 cm
min 4 cm
FR
Appliquer la feuille
supplémentaire sur le fond
comme dans la figure.
Raccorder le tuyau d’arrivée
d’eau au robinet.
L'appareil doit être relié à
l'arrivée d'eau exlusivement
avec les tuyaux fournis .
Ne pas réutiliser les anciens
tuyaux.
ATTENTION:
NE PAS OUVRIR LE ROBINET
Approcher la machine contre
le mur en faisant attention à
ce que le tuyau n’ait ni
coudes ni étranglements.
Raccorder le tuyau de
vidange au rebord de la
baignoire ou, mieux encore, à
un dispositif fixe d’évacuation,
hauteur mini. 50 cm, et de
diamètre supérieur au tuyau
de la machine à laver.
En cas de besoin, utiliser le
coude rigide livré avec la
machine.
L’appareil ne doit pas être
installé derrière une porte
fermée à clef,une porte
coulissante ou une porte
avec une fermeture sur le
côté opposé à celui de
l’appareil.
IT
Applichi il foglio di polionda
sul fondo come mostrato in
figura.
Allacci il tubo dell’acqua al
rubinetto.
L’apparecchio deve essere
connesso alla rete idrica
solo con i nuovi tubi di
carico forniti in dotazione. I
vecchi tubi di carico non
devono essere riutilizzati.
ATTENZIONE:
NON APRA IL RUBINETTO
Accosti la lavatrice al muro
facendo attenzione che
non vi siano curve o
strozzature,allacci il tubo di
scarico al bordo della
vasca.
o meglio a uno scarico fisso;
altezza minima 50 cm, di
diametro superiore al tubo
della lavatrice.
In caso di necessità utilizzare
la curva rigida in dotazione.
L’apparecchio non deve
essere installato dietro una
porta richiudibile a chiave,
una porta scorrevole o una
porta con cerniera sul lato
opposto a quello della
lavasciuga.
DE
Befestigen Sie die gewellte
Bodenplatte wie in der
Abbildung dargestellt.
Den Zulaufschlauch an den
Wasserhahn anschließen.
Beim Anschließen des
Zulaufschlauchs ist die
Benutzung einer Rohrzange zu
vermeiden. Handfestes Ziehen
reicht völlig aus.
Das Gerät muß an die
Wasserversorgung mit neuen
Schläuchen angeschlossen
werden.
Alte Schläuche dürfen nicht
wiederverwendet werden.
ACHTUNG:
WASSERHAHN NOCH NICHT
ÖFFNEN.
Die Waschmaschine an die
Wand rücken,darauf achten,
daß dabei der Schlauch nicht
verkrümmt oder eingeengt
wird.
Ablaufschlauch am
Wannenrand
befestigen,oder an einem
festen Abfluß von mindestens
50 cm Höhe anbringen, dessen
Durchmesser größer ist als der
des
Waschmaschinenschlauchs.
Falls erforderlich den
mitgelieferten starren
Rohrbogen benutzen.
Das Gerät darf nicht hinter
einer verschließbaren Tür, einer
Schiebetür oder einer Tür
installiert werden,deren
Scharnier an der
gegenüberliegenden Seite wie
das des Gerätes ist.
SL
Izolacijsko plo‰ão iz
valovitega kartona
namestite na dno stroja
tako, kot je prikazano na sliki.
Dotoãno cev za vodo
privijte na pipo.
Aparat smete prikljuãiti na
vodovodno omreÏje
izkljuãno z novimi, priloÏenimi
dovodnimi cevmi. Starih
cevi ne smete uporabiti.
OPOZORILO!
PIPE ZA VODO ·E NE
ODPRITE!
Stroj potisnite k steni in pri
tem pazite, da dotoãna in
odtoãna cev za vodo nista
zviti ali stisnjeni. Odtoãno
cev za vodo obesite nato
preko robu kadi.
Mnogo bolje pa je, ãe v
vodovodni napeljavi
predvidite stalni odtok, ki
mora biti enakega premera
kot je odtoãna cev,
namestiti pa ga morate v
vi‰ini najmanj 50 cm od tal.
âe je potrebno, namestite
na konec odtoãne cevi ‰e
ãvrsto nosilno koleno, ki je
priloÏeno v vreãki s priborom.
Aparata ne smete postaviti
za vrati, ki se zaklenejo, za
drsnimi vrati ali za vrati, pri
katerih so teãaji na nasprotni
strani od tiste, na kateri stoji
pralo-su‰ilni stroj!
EN
Fix the sheet of corrugated
material on the bottom as
shown in picture.
Connect the fill hose
to the tap.
The appliance must be
connected to the water
mains using new hose-sets.
The old hose-sets should not
be reused.
IMPORTANT:
DO NOT TURN THE TAP
ON AT THIS TIME.
Position the washing
machine next to the wall.
Hook the outlet tube to the
edge of the bath tub,
paying attention that there
are no bends or
contractions along the tube.
It is better to connect the
discharge hose to a fixed
outlet of a diameter greater
than that of the outlet tube
and at a height of min. 50
cm. If is necessary to use the
plastic sleeve supplied.
The appliance must not be
installed behind a lockable
door,a sliding door or a door
with a hinge on the opposite
side to that of the washer
dryer.
18
19
Page 11
FR
A
B
C
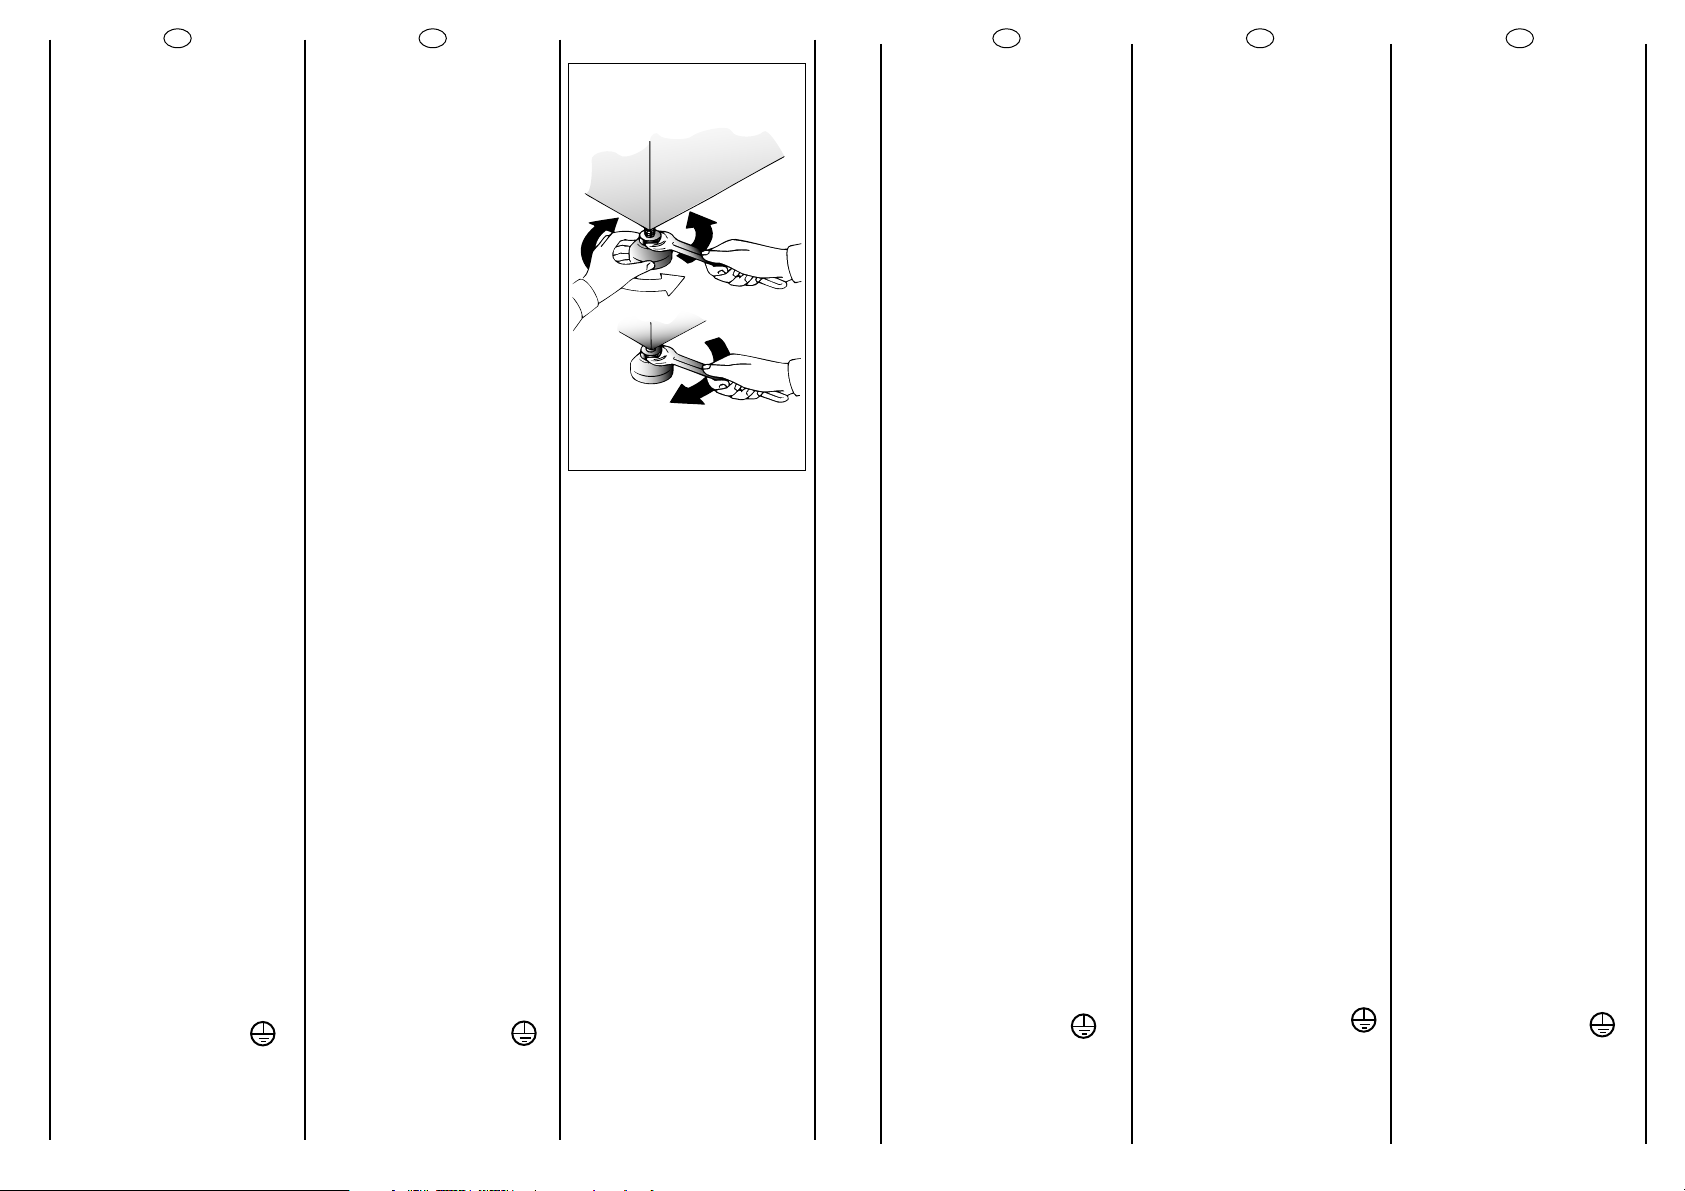
Mettre la machine à niveau
en reglant les 4 pieds:
a) Tourner dans le sens des
aiguilles d’une montre
l’écrou de façon à
dévérouiller la vis du pied.
IT
Livelli la macchina con i 4
piedini:
a) Girare in senso orario il
dado per sbloccare la vite
del piedino.
DE
Richten Sie das Gerät mit
den 4 Verstellfüßen
waagerecht aus:
a) Kontermuttern im
Uhrzeigersinn lösen.
SL
Uporabite vse 4 nogice,
zravnate pralni stroj z tlemi
a) Matico, s katero je pritrjena
nogica sprostite tako, da jo
odvijete z
ustreznim kljuãem.
EN
Use the 4 feet to level the
machine with the floor:
a) Turn the nut clockwise to
release the screw adjuster of
the foot.
b) Tourner le pied et le faire
monter ou descendre
jusqu’à obtenir une parfaite
adhérence au sol.
c) Enfin bloquer le pied en
revissant l’écrou dans le sens
inverse des aiguilles d’une
montre et le faire adhérer au
fond de la machine.
Vérifier que la manette soit
sur la position “OFF” et que le
hublot soit fermé.
Brancher la prise.
ATTENTION:
Au cas où il serait nécessaire
de remplacer le cable
d’alimentation, assurez vous
de respecter les codescouleur suivants dans le
branchement de chacun
des fils:
BLEU - NEUTRE (N)
MARRON - PHASE (L)
VERT-JAUNE - TERRE ( )
b) Ruotare il piedino e farlo
scendere o salire fino ad
ottenere la perfetta
aderenza al suolo.
c) Bloccare infine il piedino
riavvitando il dado in senso
antiorario, fino a farlo aderire
al fondo della lavatrice.
Si assicuri che la manopola
sia in posizione “OFF” e l’oblò
sia chiuso.
Inserisca la spina.
ATTENZIONE:
nel caso si renda necessario
sostituire il cavo di
alimentazione, assicurarsi di
rispettare il seguente
codice-colore durante il
collegamento dei singoli fili:
BLU - NEUTRO (N)
MARRONE - FASE (L)
GIALLO-VERDE - TERRA ( )
b) Standfuß einregulieren, bis
das Gerät genau
ausgerichtet ist (möglichst
mit der Wasserwaage
justieren!).
c) Kontermuttern (gegen
den Uhrzeigersinn) festziehen.
Wichtig: Sollte das Gerät auf
einen Sockel aufgestellt
werden,ist es durch eine
Sockelbefestigung zu sichern.
Erkundigen Sie sich bitte
hierfür im Fachhandel.
Der Hersteller haftet nicht für
unsachgemäße Aufstellung
und Installation.
Sicherstellen, daß der
Schalter auf “OFF” steht, und
das Bullauge geschlossen ist.
Stecker einstecken.
ACHTUNG:
Falls das Netzkabel
ausgetauscht werden sollte,
achten Sie beim Anschluss
der einzelnen Kabel
unbedingt auf die folgende
Farbenbelegung:
BLAU - NULLLEITER (N)
BRAUN - PHASE (L)
GELB-GRÜN - ERDE ( )
b) Nogico z obraãanjem
zvi‰ujte ali zniÏujte toliko ãasa,
dokler se ne bo povsem
prilegala tlom.
c) Po konãanem izravnavanju
nogico ponovno pritrdite tako,
da jo z ustreznim kljuãem
privijate v smeri nasprotni od
gibanja urinih kazalcev dokler
se povsem ne prileÏe dnu
stroja.
Prepriãajte se, da je gumb
programatorja v izklopljenem
poloÏaju in da so vrata stroja
zaprta.
Vtaknite vtiã v vtiãnico.
POZOR:
ãe je treba zamenjati prikljuãni
elektriãni kabel, prikljuãite Ïice
skladno s spodaj navedenimi
barvami/kodami:
MODRA - NULA (N)
RJAVA - FAZA (L)
RUMENA-ZELENA - OZEMLJITEV ( )
b) Rotate foot to raise or
lower it until it stands firmly on
the ground.
c) Lock the foot in position
by turning the nut anticlockwise until it comes up
against the bottom of the
machine.
Ensure that the knob is on the
“OFF” position and the load
door is closed
Insert the plug.
ATTENTION:
should it be necessary to
replace the supply cord,
connect the wire in
accordance with the
following colours/codes:
BLUE - NEUTRAL (N)
BROWN - LIVE (L)
YELLOW-GREEN - EARTH ( )
Une fois l'appareil installé,la
prise électrique doit rester
accessible.
20
L’apparecchio deve essere
posto in modo che la spina
sia accessibile ad
installazione avvenuta.
Nach der Installation muß der
Anschluß zugänglich sein.
Stroj mora biti name‰ãen tako,
da lahko vtiãnico doseÏete v
vsakem trenutku.
After installation, the
appliance must be
positioned so that the plug is
accessible.
21
Page 12
FR
IT
DE
SL
EN
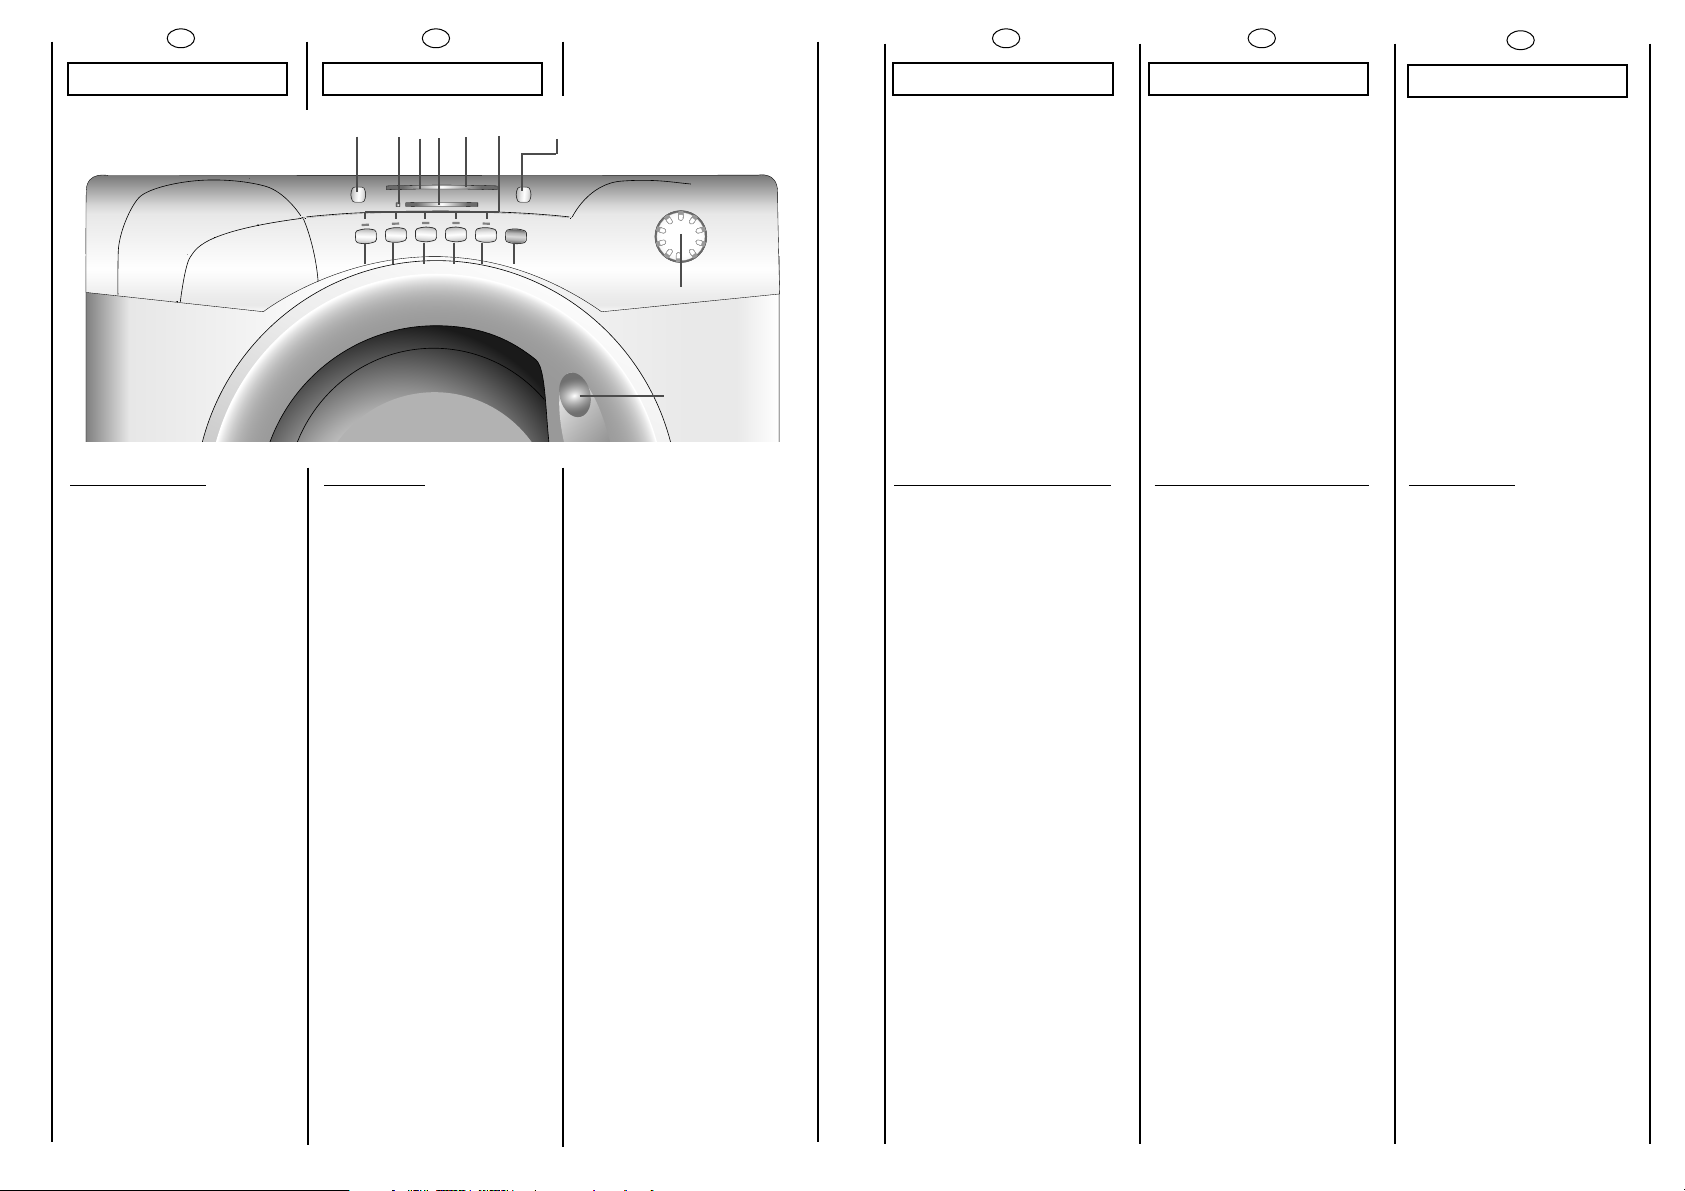
CHAPITRE 6
R
COMMANDES
Poignée d’ouverture du
hublot
Temoin de verrouillage de
porte
Manette des programmes de
lavage avec OFF
Touche Départ Différé
Indicateur lumineux temps
restant
Touche "Essorage"
Indicateur lumineux vitesse
d'essorage
Les voyants des touches
Touche "Très Sale"
CAPITOLO 6
G
DH
EBN
F
I L M O P Q
COMANDI
Maniglia apertura oblò
Spia porta bloccata
Manopola programmi di
lavaggio con OFF
Tasto Partenza Differita
Spie tempo restante
Tasto Selezione Centrifuga
Spie giri centrifuga
Spie tasti
Tasto Lavaggio Intensivo
C
A
A
B
C
D
G
H
E
F
KAPITEL 6
BEDIENUNGSELEMENTE
Türöffnungsgriff
Leuchtanzeige Tür
geschlossen
Waschprogrammwahlschalter mit OFF
Taste Startzeitvorwahl
Restzeitanzeige
Taste “Schleuderdrehzahl”
Schleuderdrehzahlanzeigen
Tastenanzeige
I
Taste “Flecken”
6. POGLAVJE
OPIS STIKALNE PLO·âE
Roãaj vrat
Kontrolna luãka zaklenjena
vrata
Gumb za nastavitev
programov pranja – gumb
programatorja
Tipka za zamik vklopa
Sistem za prikaz ãasa do
konca programa
Gumb za nastavitev ‰tevila
vrtljajev centrifuge
Kontrolna luãka za nastavljeno
hitrost centrifugiranja
Kontrolne luãke posameznih
tipk
Tipka za intenzivno pranje
CHAPTER 6
CONTROLS
Door handle
Door locked indicator light
Timer knob for wash
programmes with OFF position
Start Delay button
Time countdown system
Spin Speed button
Spin speed indicator light
Buttons indicator light
Intensive button
Touche "Aquaplus"
Touche de sélection du
programme de séchage
Témoins des programmes de
séchage
Touche Lavage à Froide
Touche "Repassage facile"
Touche marche/pause
Bacs à produits
22
Tasto Aquaplus
Tasto Selezione Programma
Asciugatura
Spie Programmi Asciugatura
Tasto Lavaggio a Freddo
Tasto Stiro Facile
Tasto Avvio/pausa
Cassetto detersivo
L
M
N
O
P
Q
R
Taste “Aquaplus”
Taste Trockenprogramm
Leuchtanzeigen
trockenprogramme
Kaltwasch Taste
Taste “Leichtbülgen”
Start/Pause Taste
Waschmittelbehälter
Tipka za Allergie
Tipka za izbiranje programov
‰enja
su
Indikatorji programov
su‰enja
Tipka za pranje s hladno vodo
Tipka za lahko likanje
Tipka Start
Predalãek za pralna sredstva
Aquaplus button
Drying programme selection
button
Drying programme indicators
Cold wash button
Crease Guard button
Start/Pause button
Detergent drawer
23
Page 13

FR
IT
DE
SL
EN
DESCRIPTION DES
COMMANDES
POIGNEE D’OUVERTURE DU
HUBLOT
Pour ouvrir le hublot
actionner le bouton dans
la poignée.
ATTENTION:
UN DISPOSITIF SPECIAL
DE SECURITE EMPECHE
L’OUVERTURE IMMEDIATE
DU HUBLOT A LA FIN DU
LAVAGE. APRES LA PHASE
D’ESSORAGE, ATTENDRE 2
MINUTES AVANT
D’OUVRIR LE HUBLOT.
TEMOIN DE VERROUILLAGE DE
PORTE
Le voyant lumineux s’allume
lorsque la porte est
totalement fermée et que la
machine est en marche.
Lorsque la touche "MARCHE"
est enfoncée sur la machine
et que la porte est fermée,
l’indicateur clignote
temporairement puis
s’allume.
Si la porte n’est pas
fermée, le voyant lumineux
continue de clignoter.
Un dispositif de sécurité
spécial vous empêche
d’ouvrir la porte
immédiatement après la fin
du cycle.Attendez
2 minutes après la fin du
cycle de lavage et assurezvous que le témoin est éteint
avant d’ouvrir la porte. Par
mesure de sécurité, vérifiez
qu’il n’y a plus d’eau dans le
tambour.A la fin du cycle,
tournez le sélecteur de
programmes à la position
OFF.
DESCRIZIONE
COMANDI
MANIGLIA APERTURA OBLÒ
Per aprire l’oblò premere la
leva situata all’interno della
maniglia.
ATTENZIONE:
UNO SPECIALE
DISPOSITIVO DI SICUREZZA
IMPEDISCE L’IMMEDIATA
APERTURA DELL’OBLO”
ALLA FINE DEL LAVAGGIO.
AL TERMINE DELLA FASE DI
CENTRIFUGA ATTENDA 2
MINUTI PRIMA DI APRIRE
L’OBLÒ.
SPIA PORTA BLOCCATA
La spia è illuminata quando
l’oblò è chiuso correttamente
e la macchina è accesa.
Dopo aver premuto il tasto
AVVIO/PAUSA inizialmente la
spia lampeggia per poi
diventare fissa sino alla fine
del lavaggio.
Nel caso in cui l’oblò non sia
chiuso correttamente la spia
continuerà a lampeggiare.
Uno speciale dispositivo di
sicurezza impedisce che l’oblò
possa venire aperto
immediatamente dopo la fine
di un ciclo di lavaggio,
attendere 2 minuti che la spia
si spenga e quindi spegnere la
macchina portando la
manopola programmi in
posizione di OFF.
A
2 min.
B
BESCHREIBUNG DER
BEDIENELEMENTE
TÜRÖFFNUNGSGRIFF
Um das Bullauge zu öffnen,
drücken Sie den Hebel im
Türgriff.
ACHTUNG:
DIE SICHERHEITSTÜRVERRIEGELUNG VERHINDERT
DAS SOFORTIGE ÖFFNEN
DES BULLAUGES NACH
BEENDIGUNG DES WASCHPROGRAMMS. WARTEN SIE
DAHER NACH DEM LETZTEN
SCHLEUDERN CA. ZWEI
MINUTEN, BEVOR SIE DIE TÜR
ÖFFNEN.
LEUCHTANZEIGE TÜR
GESCHLOSSEN
Die Anzeige leuchtet,wenn die
Tür korrekt geschlossen ist und
das Gerät eingeschaltet ist.
Nach Drücken der Taste
START/PAUSE blinkt die Taste
zuerst, dann leuchtet sie
permanent bis zum
Programmende.
Wenn das Bullauge nicht korrekt
geschlossen wurde, blinkt die
Leuchtanzeige weiter.
Eine spezielle
Sicherheitsvorrichtung
verhindert,dass das Bullauge
unmittelbar nach dem
Programmende geöffnet
werden kann.Warten Sie ca.2
Minuten,bis die Leuchtanzeige
ausgeht und schalten Sie dann
das Gerät durch Drehen des
Programmwahlschalters auf die
Position AUS ab.
OPIS POSAMEZNIH
TIPK IN GUMBOV
ROâAJ VRAT
Vrata odprete tako, da
pritisnete na vzvod v
notranjosti vrat.
POMEMBNO:
POSEBNA VARNOSTNA
NAPRAVA PREPREâUJE
ODPIRANJE VRAT TAKOJ
PO KONâANEM PRANJU.
PO KONâANEM
CENTRIFUGIRANJU
POâAKAJTE ·E PRIBLIÎNO
2 MIN., DA SE VARNOSTNA
NAPRAVA SPROSTI, ·ELE
NATO LAHKO ODPRETE
VRATA STROJA.
LUâKA 'ZAKLENJENA VRATA'
Luãka se osvetli, ko pravilno
zaprete vrata in vklopite stroj.
Ko pritisnete na tipko START,
medtem ko so vrata zaprta,
luãka kratek ãas utripa, nato
pa ostane osvetljena.
âe vrata niso pravilno zaprta,
luãka ‰e naprej utripa.
Posebna varnostna naprava
prepreãuje takoj‰nje
odpiranje vrat po koncu
programa. Poãakajte 2
minuti in ko luãka ugasne,
lahko odprete vrata. Ko je
program pranja zakljuãen,
obrnite stikalo programatorja
na OFF.
DESCRIPTION OF
CONTROL
DOOR HANDLE
Press the finger-bar inside
the door handle to open the
door
IMPORTANT:
A SPECIAL SAFETY
DEVICE PREVENTS THE
DOOR FROM OPENING
AT THE END OF THE
WASH/SPIN CYCLE.AT
THE END OF THE SPIN
PHASE WAIT UP TO 2
MINUTES BEFORE
OPENING THE DOOR.
DOOR LOCKED INDICATOR
The “Door Locked” indicator
light is illuminated when the
door is fully closed and the
machine is ON.
When START/PAUSE is
pressed on the machine
with the door closed the
indicator will flash
momentarily and then
illuminate.
If the door is not closed the
indicator will continue to
flash.
A special safety device
prevents the door from
being opened immediately
after the end of the cycle.
Wait for 2 minutes after the
wash cycle has finished and
the Door Locked light has
gone out before opening
the door.At the end of cycle
turn the programme
selector to OFF .
24
25
Page 14
FR
MANETTE DES PROGRAMMES
DE LAVAGE AVEC OFF
IT
MANOPOLA PROGRAMMI
CON OFF
C
DE
PROGRAMMWAHLSCHALTER MIT
OFF
SL
GUMB PROGRAMATORJA ZA
IZBIRANJE PROGRAMOV IN
OZNAKO OFF (IZKLOPLJENO)
EN
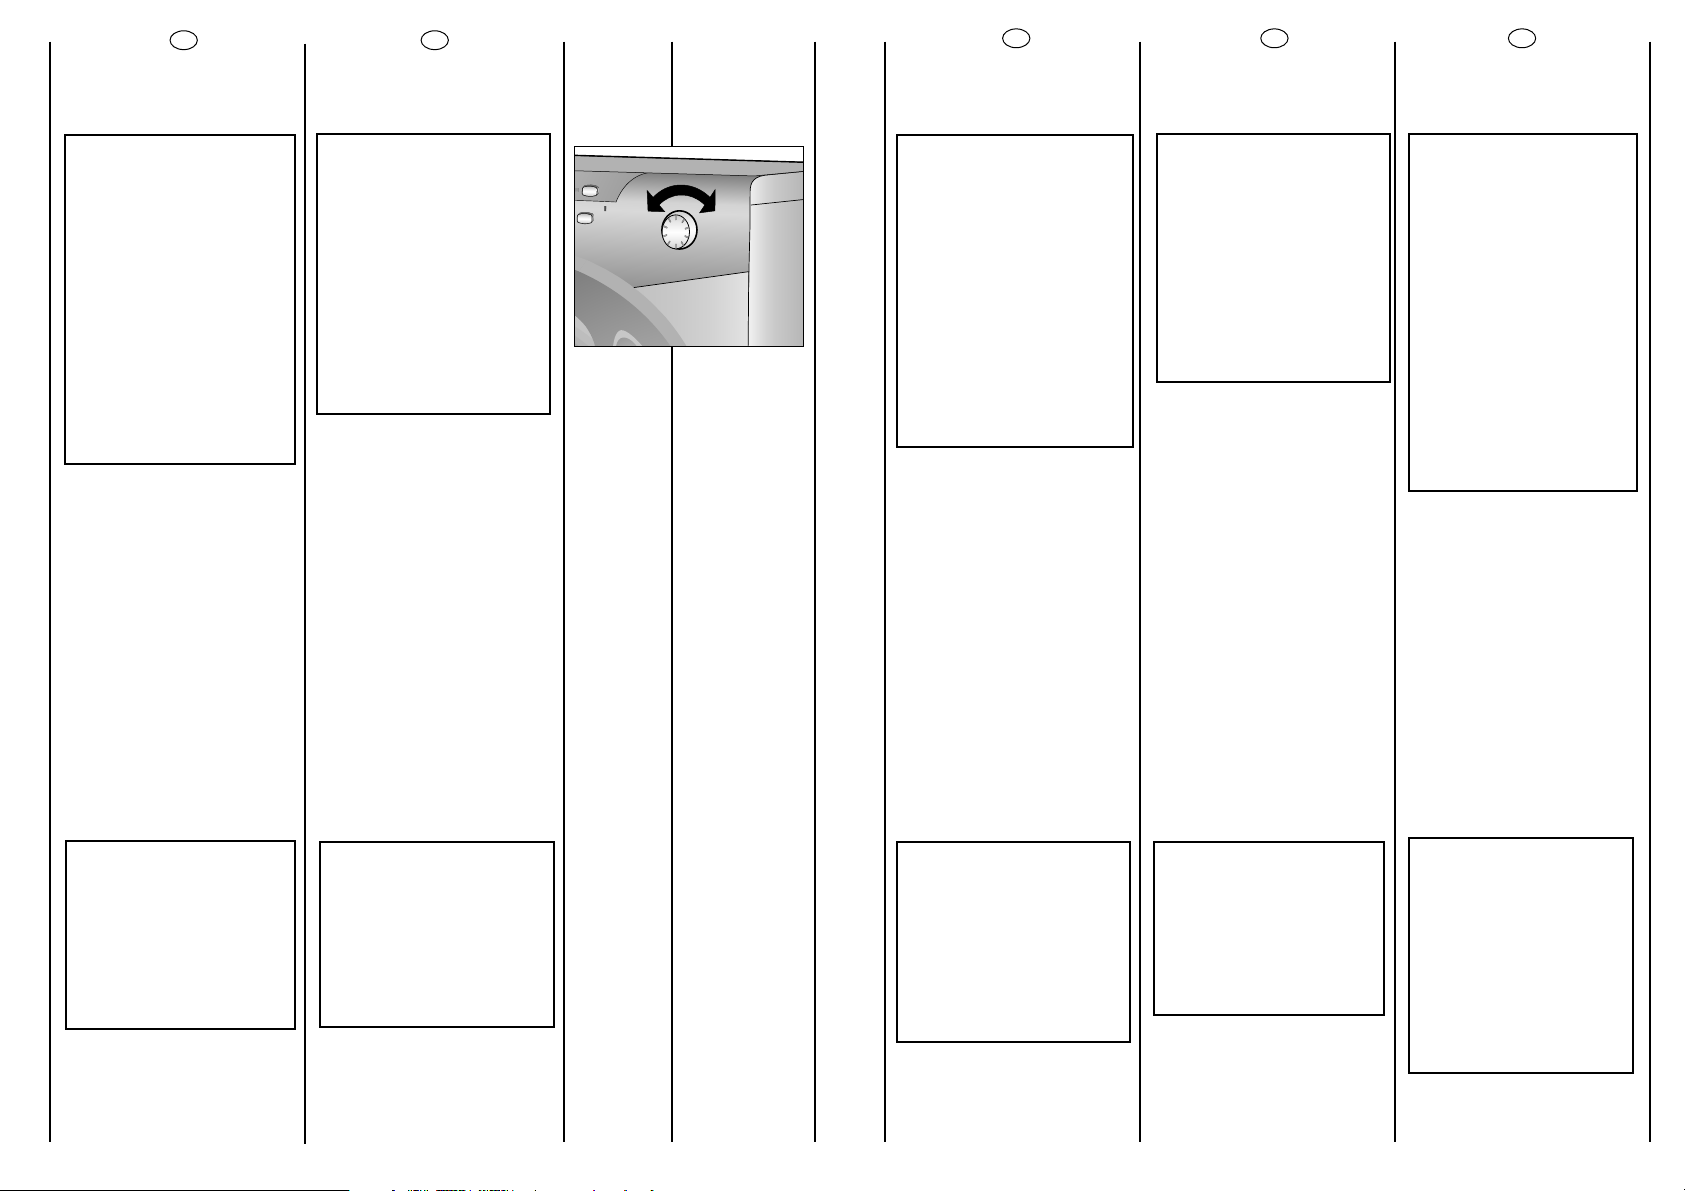
PROGRAMME SELECTOR WITH
OFF POSITION
ELLE PEUT TOURNER
DANS LES DEUX SENS.
LA MACHINE EST MISE
EN MARCHE EN
SELECTIONNANT UN
PROGRAMME SUR LE
SELECTEUR DE
PROGRAMME. CE MODE
EST INDIQUE PAR LE
VOYANT LUMINEUX
STOP, QUI CLIGNOTE
JUSQU’A CE
QUE LA MACHINE SE
METTE EN MARCHE OU
JUSQU’A CE QU’ELLE
SOIT REMISE EN
POSITION OFF.
Appuyez sur la touche
"MARCHE/PAUSE" pour
commencer le cycle.
Le cycle de lavage se
réalisera avec la manette
des programmes arrêtée sur
le programme sélectionné
jusqu'à la fin de celui-ci.
A la fin du lavage,mettez la
machine à l' arrêt en
tournant la manette
programmes sur la position
"OFF"
PUO RUOTARLA NEI DUE
SENSI.
QUANDO SI SELEZIONA
UN PROGRAMMA, DOPO
ALCUNI SECONDI, LA
SEGNALAZIONE
LUMINOSA “STOP” INIZIA
A LAMPEGGIARE.
N.B. PER SPEGNERE LA
SEGNALAZIONE
LUMINOSA STOP
RUOTARE LA MANOPOLA
PROGRAMMI SULLA
POSIZIONE OFF.
Premere il tasto "Avvio/Pausa"
per iniziare il ciclo di lavaggio
Il ciclo di lavaggio avverrà
con la manopola programmi
ferma sul programma
selezionato sino alla fine del
lavaggio.
A fine ciclo spegnere la
lavabiancheria portando la
manopola programmi in
posizione "OFF".
KANN IN BEIDE
RICHTUNGEN GEDREHT
WERDEN EINIGE
SEKUNDEN, NACHDEM
SIE EIN
WASCHPROGRAMM
GEWÄHLT HABEN, FÄNGT
DIE STOP-ANZEIGE AN
ZU BLINKEN.
HINWEIS: UM DIE STOPANZEIGE
AUSZUSCHALTEN,
DREHEN SIE DEN
PROGRAMMWAHLSCHA
LTER AUF DIE POSITION
AUS.
Drücken Sie die START-Taste,
um das Programm zu starten.
Während des Waschgangs
bleibt der
Programmwahlschalter bis
zum Ende des Programmes
auf dem gewählten
Programm stehen.
Am Ende des
Waschprogrammes schalten
Sie das Gerät ab durch
Drehen des Wahlschalters auf
die Position OFF
GUMB SE VRTI V OBE
SMERI. STROJ VKLOPITE
TAKO, DA OBRNETE GUMB
NA ÎELENI PROGRAM.
UTRIPATI ZAâNE
KONTROLNA LUâKA STOP,
KI UTRIPA, DOKLER STROJ
NE ZAâNE DELOVATI OZ.
DOKLER NE OBRNETE
GUMBA NAZAJ V
IZKLOPLJENI POLOÎAJ
(OFF).
Stroj zaÏenete s pritiskom na
tipko Start/pavza.
Med potekom programa
gumb programatorja miruje
(se ne obraãa).
Stroj izklopite tako, da obrnete
gumb programatorja na OFF.
ROTATES IN BOTH
DIRECTIONS.
THE MACHINE IS
TURNED ON BY
SELECTING A
PROGRAMME VIA THE
PROGRAMME
SELECTOR.
THIS STATUS WILL BE
INDICATED BY THE STOP
INDICATOR LIGHT
FLASHING, THIS LIGHT
WILL CONTINUE TO
FLASH UNTIL THE
MACHINE HAS STARTED
OR THE MACHINE IS
RETURNED TO THE OFF
POSITION.
Press the "Start/Pause"
button to start the selected
cycle.
The programme carries out
with the programme
selector stationary on the
selected programme till
cycle ends.
Switch off the washing
machine by turning the
selector to OFF.
NOTE: LORS DE LA MISE EN
MARCHE DU CYCLE DE
LAVAGE SUIVANT, LE
SELECTEUR DE
PROGRAMME DOIT ETRE
REMIS EN POSITION OFF
AVANT DE SELECTIONNER
ET DE LANCER LE
PROGRAMME SUIVANT.
NOTA:
LA MANOPOLA
PROGRAMMI DEVE
ESSERE SEMPRE PORTATA
IN POSIZIONE DI OFF
ALLA FINE DI UN
LAVAGGIO E PRIMA DI
SELEZIONARNE UNO
NUOVO.
HINWEIS:
DREHEN SIE IMMER
NACH BEENDIGUNG DES
PROGRAMMS, UND
BEVOR SIE EIN NEUES
PROGRAMM EINSTELLEN,
DEN
PROGRAMMWAHLSCHA
LTER AUF DIE POSITION
AUS.
OPOMBA:
GUMB PROGRAMATORJA
MORATE OBRNITI NA OFF
PO ZAKLJUâENEM
PROGRAMU PRANJA OZ.
âE ÎELITE IZBRATI IN
ZAGNATI NOVI
PROGRAM.
NOTE:
THE PROGRAMME
SELECTOR MUST BE
RETURN TO THE OFF
POSITION AT THE END
OF EACH CYCLE OR
WHEN STARTING A
SUBSEQUENT WASH
CYCLE PRIOR TO THE
NEXT PROGRAMME
BEING SELECTED AND
STARTED.
26 27
Page 15

FR
TOUCHE DEPART DIFFERE
Cette option permet de
différer jusqu’à 9 heures la
mise en marche du cycle de
lavage.La sélection de
temps se fait en appuyant sur
la touche Départ Différé; Un
voyant indique alors le temps
sélectionné.
Lorsque la période de départ
différé qui convient a été
sélectionnée, appuyez sur la
touche "MARCHE"
Si vous désirez annuler le
Départ Différé,procédez de
la maniére suivante :
Enfoncez la touche "Départ
Différé" pour éteindre le
témoin du Temp (le témoin
"STOP" commence à
clignoter).
Vouz devez alors presser la
touche "MARCHE" pour la
mise en marche du
programme sélectionnée ou
annuler le programme choisi
en tournant la manette
programmes sur la position
"OFF".
IT
TASTO PARTENZA DIFFERITA
Questo tasto permette di
programmare l’avvio del ciclo di
lavaggio con un ritardo di 3, 6 o
9 ore.
Per impostare la partenza
ritardata procedere nel
seguente modo:
Impostare il programma scelto
(la spia STOP inizia a
lampeggiare)
Premere il pulsante PARTENZA
DIFFERITA (ad ogni pressione si
potrà impostare una partenza
ritardata rispettivamente di 3,6 o
9 ore e la spia corrispondente al
tempo scelto inizierà a
lampeggiare)
Premere il tasto AVVIO (La spia
corrispondente al tempo scelto
rimarrà accesa) per iniziare il
conteggio alla fine del quale il
programma inizierà
automaticamente.
E’ possibile annullare la partenza
ritardata agendo come segue:
premere ripetutamente il tasto
PARTENZA DIFFERITA per
spegnere le spie ( a conferma
che la partenza ritardata è stata
annullata la spia STOP inizierà a
lampeggiare) .
A questo punto è possibile
iniziare il programma scelto in
precedenza premendo il tasto
AVVIO o annullare l’operazione
portando il selettore in posizione
di OFF e successivamente
selezionare un altro programma.
D
DE
TASTE STARTZEITVORWAHL
Diese Taste ermöglicht Ihnen,das
Waschprogramm mit einer
Zeitverzögerung von 3,6 oder 9
Stunden zu starten. Um die
Startzeitvorwahl einzustellen,
gehen Sie wie folgt vor:
Wählen Sie das gewünschte
Waschprogramm (die STOPLeuchte fängt an zu blinken).
Drücken Sie die Taste
STARTZEITVORWAHL.Bei jedem
Drücken stellt sich die
Startverzögerung auf 3, 6 oder 9
Stunden ein, und die
entsprechende Zeitanzeige
fängt an zu blinken.
Drücken Sie die START Taste: die
Zeitanzeige der gewählten
Starverzögerung bleibt
permanent an, und die
eingestellte Zeit fängt
abzulaufen. Am Ende der Zeit
wird das Programm automatisch
starten.
Sie können die Startzeitvorwahl
folgendermaßen löschen:
Drücken Sie mehrmals die Taste
STARTZEITVORWAHL,um alle
Anzeigen zu löschen. Zur
Bestätigung, dass die Zeitvorwahl
annulliert wurde, fängt die STOPLeuchte an zu blinken.
Jetzt können Sie das vorher
gewählte Programm mit der
START-Taste manuell starten, oder
das Programm löschen,indem
Sie den Programmwahlschalter
auf die Position AUS drehen, und
ein neues Programm einstellen.
SL
âASOVNI ZAMIK VKLOPA
S pomoãjo tipke lahko
nastavite ãasovni zamik
vklopa za 3, 6 ali 9 ur. To
storite na naslednji naãin:
Izberite program (kontrolna
luãka "STOP" utripa). Pritisnite
na tipko za zamik vklopa; ob
vsakem pritisku se spremeni
vrednost - 3 - 6 - 9; utripa
ustrezna kontrolna luãka.
S pritiskom na tipko START
aktivirate od‰tevanje
nastavljenega ãasa
nastavljenega ãasovnega
zamika (kontrolna luãka
nastavljene vrednosti
preneha utripati in ostane
osvetljena).
Ko preteãe nastavljeni
ãasovni zamik, zaãne stroj
prati.
âe Ïelite preklicati
nastavljeni ãasovni zamik,
pritiskajte na tipko za
nastavljanje ãasovnega
zamika, dokler vse luãke (3-6-
9) ne ugasnejo (kontrolna
luãka STOP utripa). Zdaj
lahko roãno vklopite
program pranja - pritisnite na
tipko START, ali pa izklopite
stroj - obrnite gumb
programatorja v izklopljeni
poloÏaj.
EN
START DELAY BUTTON
Appliance start time can be
set with this button, delaying
the star by 3, 6 or 9 hours.
Proceed as follow to set a
delayed start:
Select a programme
(“STOP”indicator light blinks)
Press Start Delay button
(each time the button is
pressed the start will be
delayed by 3,6 or 9 hours
respectively and the
corresponding light will
blink).
Press START to commence
the Start Delay operation
(the indicator light
associated with the
selected Start Delay time
stops blinking and remains
ON).
At the end of the required
time delay the programme
will start.
To cancel the Start Delay
function :
press the Start Delay button
until the indicator lights will
be off (The STOP light blinks)
and the programme can be
started manually using the
START button or switch off
the appliance by turning the
programme selector to off
position.
INDICATEUR LUMINEUX TEMPS
RESTANT
Afin de mieux gérer votre
temps, ce lave-linge est
équipé d’un système
indicateur lumineux qui vous
informe constamment sur le
temps restant jusqu’à la fin du
cycle.
Voyant “90” s’allume: Temps
restant supérieur à 60 minutes
Voyant “60” s’allume:
Temps restant inférieur à 60
minutes
Voyant “30” s’allume:
Temps restant inférieur à 30
minutes
Voyant “15” s’allume:
Temps restant inférieur à 15
minutes
Voyant “STOP”s’allume:
Fin du programme
28
SPIE TEMPO RESTANTE
Per gestire meglio il suo tempo,
il sistema di segnalazione a led
consente di essere
costantemente aggiornati sul
tempo restante alla fine del
ciclo.
Spia 90:
tempo restante superiore a 60’
Spia 60:
tempo restante inferiore a 60’
Spia 30:
tempo restante inferiore a 30’
Spia 15:
tempo restante inferiore a 15’
Spia STOP:
fine programma
E
RESTZEITANZEIGE
Die Restzeitanzeigen geben
Ihnen ständig Auskunft über
die verbleibende zeit zum
Programmende.
Leuchtanzeige 90:
Restzeit über 60 Minuten
Leuchtanzeige 60:
Restzeit weniger als 60 Minuten
Leuchtanzeige 30:
Restzeit weniger als 30 Minuten
Leuchtanzeige 15:
Restzeit weniger als 15 Minuten
Leuchtanzeige STOP:
Programmende
PRIKAZ âASA DO KONCA
PROGRAMA
Da bi vam omogoãili bolj‰e
razpolaganje s ãasom, smo
ta pralni stroj opremili s
sistemom za prikaz ãasa, ki
mora ‰e preteãi do konca
programa. Tako ste sproti
obve‰ãeni, kdaj bo perilo
oprano.
Indikator 90 minut: do konca
programa je veã kot 60
minut
Indikator 60 minut: do konca
programa je manj kot 60
minut
Indikator 30 minut: do konca
programa je manj kot 30
minut
Indikator 15 minut: do konca
programa je manj kot 15
minut
Osvetljen indikator STOP:
Program je zakljuãen.
TIME COUNTDOWN SYSTEM
INDICATOR LIGHTS
In order to better manage
your time,this washing
machine features an
indicator light system that
keeps you constantly
informed on the remaining
cycle time.
Indicator light 90: Remaining
time above 60 minutes
Indicator light 60: Remaining
time less than 60 minutes
Indicator light 30: Remaining
time less than 30 minutes
Indicator light 15: Remaining
time less than 15 minutes
Indicator light Stop: End of
the programme.
29
Page 16

FR
TOUCHE "ESSORAGE"
La phase d'essorage est très
importante pour la
préparation à un bon séchage
et votre modèle est doté d'une
grande flexibilité pour satisfaire
chaque exigence.
En agissant sur cette touche
vous pouvez réduire la vitesse
maximale possible pour le
programme sélectionnée,
jusqu'à une complète
élimination de l'essorage.
Pour réactiver l'essorage, il est
suffisant de presser la touche
de nouveau,jusqu'à atteindre
la vitesse choisie.
Pour la sauvegarde des tissus,
il n'est pas possible
d'augmenter la vitesse
d'essorage, au-delà de celle
qui est indiquée
automatiquement au moment
de la sélection du programme.
Il est toujours possible de
modifier la vitesse d'essorage,
sans mettre la machine en
PAUSE.
IT
TASTO SELEZIONE CENTRIFUGA
La fase di centrifuga è molto
importante per la
preparazione ad una buona
asciugatura ed il vostro
modello è dotato della
massima flessibilità per ogni
vostra esigenza.
Premendo questo tasto, si può
ridurre la massima velocità di
centrifuga possibile per il
programma selezionato,fino
alla sua completa esclusione.
Per riattivare la centrifuga,è
sufficiente premere
nuovamente il tasto,fino al
raggiungimento della velocità
scelta.
Per la salvaguardia dei tessuti,
non è possibile aumentare la
velocità oltre quella
automaticamente indicata al
momento della selezione del
programma.
E' possibile modificare la
velocità della centrifuga in
qualsiasi momento, anche
senza portare la macchina in
PAUSA.
F
DE
TASTE SCHLEUDERDREHZAHL
Die Schleuderphase ist sehr
wichtig für eine gute Trocknung
der Wäsche.Auch hier kann Ihr
Gerät sich sehr flexibel an Ihre
Bedürfnisse anpassen.
Durch Betätigen der Taste
Schleuderdrehzahl können Sie
die für das jeweilige Programm
höchstmögliche Tourenzahl
reduzieren oder die
Schleuderung ganz
ausschließen.
Um den Schleudergang wieder
zu aktivieren,brauchen Sie nur
die Taste erneut zu drücken,bis
die gewünschte Tourenzahl
angezeigt wird.
Um die Gewebe zu schonen, ist
es nicht möglich, eine höhere
Schleuderdrehzahl einzustellen,
als die, die bei der
Programmwahl automatisch
angezeigt wird.
Die Schleuderdrehzahl kann zu
jedem Zeitpunkt des Programms
eingestellt werden.Dabei
brauchen Sie die Taste PAUSE
nicht zu betätigen.
SL
GUMB ZA NASTAVITEV HITROSTI
CENTRIFUGIRANJA
Faza centrifugiranja je zelo
pomembna, saj naj bi iz perila
odstranila ãimveã vlage, ne
da bi ga pri tem
po‰kodovala.
Hitrost centrifuge lahko
prilagodite svojim potrebam.
Z nastavitvijo niÏjih vrednosti
lahko zniÏate maksimalno
hitrost centrifuge na minuto.
Centrifugo lahko tudi
izkljuãite. âe Ïelite ponovno
aktivirati fazo centrifugiranja,
preprosto pritisnete na tipko,
dokler ni nastavljena Ïelena
hitrost centrifugiranja.
Da bi prepreãili po‰kodbe
perila, ni mogoãe nastaviti
vi‰je hitrosti centrifugiranja od
najvi‰je predvidene za
posamezne programe.
Hitrost centrifugiranja lahko
nastavite kadarkoli, ne da bi
morali prej preklopiti stroj v
naãin pavze.
EN
SPIN SPEED BUTTON
The spin cycle is very
important to remove as
much water as possible from
the laundry without
damaging the fabrics.You
can adjust the spin speed of
the machine to suit your
needs.
By pressing this button, it is
possible to reduce the
maximum speed,and if you
wish, the spin cycle can be
cancelled.
To reactivate the spin cycle
is enough to press the
button until you reach the
spin speed you would like to
set.
For not damage the fabrics,
it is not possible to increase
the speed over that
automatically suitable
during the selection of the
program.
It is possible to modify the
spin speed in any moment,
also without to pause the
machine.
INDICATEUR LUMINEUX VITESSE
D'ESSORAGE
Une fois sélectionné le
programme désiré,le voyant
s'allumera relatif à la vitesse
d'essorage maximale
possible.
En choisissant une vitesse
inférieure en agissant sur la
touche appropriée, le voyant
correspondant s'allumera
LES VOYANTS DES TOUCHES
Ces témoins s’allument
lorsque qu’une option est
choisie
Si une option est
incompatible avec le
programme,le témoin de
l’option clignotera puis
s’éteindra.
.
SPIE GIRI CENTRIFUGA
Al momento della selezione di
un programma,la massima
velocità di centrifuga
possibile verrà
automaticamente indicata
tramite l'accensione della
relativa spia.
Scegliendo una minor
velocità tramite l'apposito
tasto, si illuminerà la spia
corrispondente.
SPIE TASTI
Si accendono quando i
rispettivi tasti vengono
premuti.
Nel caso in cui sia stata
selezionata un’ opzione non
compatibile con il
programma scelto la luce sul
pulsante prima lampeggia e
dopo si spegne.
G
H
SCHLEUDERDREHZAHLANZEIGEN
Wenn Sie ein Programm
wählen, wird die für dieses
Programm höchstmögliche
Schleudergeschwindigkeit
durch das Aufleuchten der
entsprechenden Anzeige
automatisch angezeigt.
Wenn Sie mit der Taste für die
Schleuderdrehzahl eine
niedrigere Tourenzahl wählen,
leuchtet die entsprechende
Anzeige auf.
TASTENANZEIGE
Sie leuchten auf,sobald die
entsprechenden Tasten
gedrückt werden.
Falls eine Option gewählt wird,
die mit dem eingestellten
Programm nicht kompatibel ist,
blinkt die Anzeige auf der Taste
zuerst, dann erlischt sie.
INDIKATORJI HITROSTI
CENTRIFUGIRANJA
Ko izberete Ïeleni program, se
osvetli luãka skladno z najvi‰jo
moÏno hitrostjo centrifugiranja
za izbrani program. Ob
nastavljanju niÏje hitrosti
centrifugiranja se osvetli
ustrezen indikator.
KONTROLNE LUâKE ZA
POSAMEZNE OPCIJE
Osvetlijo se, ko pritisnete na
katero od tipk.
âe izberete opcijo, ki ni na
voljo v kombinaciji z izbranim
programom, kontrolna luãka
tipke najprej utripa, nato pa
ugasne.
SPIN SPEED INDICATOR LIGHT
When you set a program,
the maximum possible spin
speed will be automatically
shown by the relevant
indicator light.
Choosing a smaller spin
speed by the appropriate
button, the relevant
indicator light will go on.
BUTTONS INDICATOR LIGHT
These light up when the
relevant buttons are
pressed.
If an option is selected that
is not compatible with the
selected programme then
the light on the button first
flashes and then goes off.
30
31
Page 17

FR
Les options doivent être
sélectionnées AVANT
d’appuyer sur la touche
“MARCHE”.
IT
I tasti opzione devono
essere selezionati prima di
premere il tasto AVVIO.
DE
Die Optionstasten müssen
VOR der Betätigung der
START-Taste gedrückt
werden.
SL
Na tipke za opcije pritisnite
pred pritiskanjem na tipko
START!
EN
The option buttons should
be selected before pressing
the START button
TOUCHE "TRÈS SALE"
En pressant cette touche,
activable uniquement pour
les cycles coton, les capteurs
du nouveau “Sensor” System
agissent sur la température
sélectionnée pour la
maintenir constante durant
toutes les phases du cycle
de lavage et sur la rotation
du tambour.
En effet,le tambour tourne à
deux vitesses différentes dans
les moments déterminants.
Quand la lessive pénètre
dans le linge, le tambour
tourne de manière à ce
qu’elle se répande de façon
homogène ; la vitesse
augmente au moment du
lavage et du rinçage pour
que l’action mécanique soit
maximale.Grâce à cette
option, l’efficacité de lavage
des taches réputées difficiles
est très largement améliorée
SANS AUGMENTER LA DUREE
DU PROGRAMME.
TASTO LAVAGGIO INTENSIVO
Premendo questo tasto,
attivabile solo nei cicli
cotone, entrano in funzione i
sensori del nuovo “Sensor”
system che agiscono sia sulla
temperatura selezionata,
mantenendola costante
durante tutte le fasi del ciclo
di lavaggio,sia sull’azione
meccanica del cesto.
Il cesto viene fatto girare a
due diverse velocità nei
momenti cruciali. Quando il
detersivo entra nei capi il
cesto ruota in modo che non
si formino disomogeneità
nella distribuzione dello stesso,
la velocità aumenta, invece,
al momento del lavaggio e
del risciacquo in modo che
l’azione pulente sia massima.
Grazie a questo speciale
sistema si migliora l’efficacia
del lavaggio SENZA
AUMENTARE LA DURATA DEL
PROGRAMMA.
TASTE FLECKEN
I
Durch Auswahl dieser Option,
die nur in den Koch- und
Buntwäscheprogrammen
gewählt werden kann,wird
das neue “Sensor” System
aktiviert. Hierdurch wird zum
Einen die gewählte
Programmtemperatur
konstant über alle Phasen
des Waschprogramms
gehalten und zum Anderen
wird Trommelbewegung wie
folgt beeinflusst:
In den wichtigsten
Programmphasen reversiert
die Trommel mit zwei
unterschiedlichen
Geschwindigkeiten. In der
Einspülphase des
Waschmittels dreht sich die
Trommel so,dass eine
gleichmäßige Verteilung auf
alle Wäschestücke
gewährleistet wird.Während
der Wasch- und Spülphasen
dagegen erhöht sich die
Drehgeschwindigkeit, um die
maximale Reinigungskraft zu
gewährleisten. Dank dieses
speziellen Systems werden
die Waschergebnisse
verbessert OHNE DIE
PROGRAMMDAUER ZU
VERLÄNGERN.
TIPKA ZA INTENZIVNO PRANJE
S pritiskom na to tipko lahko
pri programih za bombaÏ
aktivirate senzorje za novi
sistem “Sensor”. Senzorji
zagotavljajo, da se
nastavljena temperatura
ohranja tekom
faze pranja, ter nadzirajo tudi
mehaniãno delovanje
bobna.
Boben se vrti z dvema
razliãnima hitrostima, hitrost
pa se spreminja v kljuãnih
trenutkih. Ko se detergent
dozira med perilo, se boben
vrti tako, da se detergent
enakomerno razporedi med
perilom, med fazo pranja in
izpiranja pa se hitrost vrtenja
bobna poveãa, kar
zagotavlja optimalen uãinek.
Zahvaljujoã
temu posebnemu sistemu je
uãinkovitost pranja izbolj‰ana
OB ENAKI DOLÎINI
PROGRAMA.
INTENSIVE BUTTON
By pressing this button,
which can only be
activated in the Cotton
cycles, the sensors in the
new “Sensor” system come
into operation.They affect
both the selected
temperature,keeping it at a
constant level throughout
the wash cycle,and the
mechanical function of the
drum.
The drum is made to turn at
two different speeds at
crucial moments. When the
detergent enters the
garments, the drum rotates
in such a way that the
detergent is distributed in a
uniform manner; during the
wash and rinse procedures,
however, the speed
increases in order to
maximise the cleaning
action.Thanks to this special
system, the efficiency of the
wash procedure is improved
WITHOUT ANY INCREASE IN
THE LENGTH OF THE
PROGRAM.
32
33
Page 18

FR
TOUCHE "AQUAPLUS"
Grâce au nouveau Sensor
System, il est possible, en
activant la touche Aquaplus,
d’effectuer un cycle de
lavage spécifique pour les
tissus résistants et mixtes.Le
lavage ainsi effectué permet
d’éliminer tout résidu lessiviel
et donc de prendre soin des
peaux délicates qui seront
en contact avec ces fibres.
L’ajout d’une plus grande
quantité d’eau au lavage
ainsi que l’action renforcée
de 5 rinçages avec
essorages intermédiaires
permettent d’obtenir un
linge propre parfaitement
rincé. Afin d’obtenir un
résultat optimal de lavage,la
quantité d’eau est accrue
pendant cette phase du
cycle garantissant une
parfaite dilution de la lessive.
La quantité d’eau est
également accrue au
moment du rinçage de
manière à éliminer toute
trace de lessive des fibres.
Cette fonction a été
spécialement étudiée pour
les PEAUX DELICATES ET
SENSIBLES pour lesquelles
même un minimum de résidu
de lessive peut causer
irritations ou allergies.
Il est aussi conseillé d’utiliser
cette fonction pour le LINGE
DES ENFANTS,pour le LINGE
DELICAT en général ainsi que
pour le lavage des TISSUS
EPONGE dont les fibres
tendent à retenir la lessive.
Pour assurer une meilleure
prestation de lavage,cette
fonction est toujours active
pendant les programmes
Délicat et Laine/lavage a la
main.
IT
TASTO “AQUAPLUS”
Grazie al nuovo Sensor
System, agendo sul tasto è
possibile effettuare un nuovo
speciale ciclo di lavaggio
applicabile nei programmi
per tessuti resistenti e misti
che si prende cura delle fibre
e della pelle delicata di chi le
indossa.
L’aggiunta di molta più
acqua e la nuova azione
combinata di cicli di
rotazione del cesto con
carico e scarico d’acqua,
permette di ottenere capi
perfettamente puliti e
risciacquati.Viene aumentata
l’acqua in lavaggio per
ottenere la perfetta
dissoluzione del detersivo,
garantendo un’efficace
azione pulente.Viene
aumentata l’acqua anche al
momento dei risciacqui in
modo da eliminare ogni
traccia di detersivo dalle
fibre.
Questa funzione è stata
studiata appositamente per
le persone con pelle delicata
e sensibile, per le quali anche
un minimo residuo di detersivo
può causare irritazioni o
allergie.
Si consiglia di utilizzare questa
funzione anche per i capi dei
bambini e per i delicati in
generale, oppure nel
lavaggio di capi di spugna le
cui fibre tendono
maggiormente a trattenere il
detersivo.
Per assicurare le migliori
prestazioni di lavaggio questa
funzione è sempre attiva nei
programmi Delicati e
Lana/lavaggio a mano.
DE
TASTE “AQUAPLUS”
L
Dank des neuen „Sensor
Systems“ kann durch
Drücken dieser Taste ein
neues, spezielles
Waschprogramm für Kochund Buntwäsche
durchgeführt werden,das
nicht nur Ihre Wäsche
besonders gut pflegt,
sondern auch besonders
schonend für empfindliche
Haut ist.
Durch die Hinzunahme von
bedeutend mehr Wasser
und die Kombination von
Trommeldrehungen
während der Wasserzu- und
-ablaufphasen wird Ihre
Wäsche porentief gereinigt
und rückstandsfrei gespült.
Um die vollständige
Auflösung des Waschmittels
zu garantieren,wird mehr
Wasser für die Waschlauge
hinzugefügt, so dass
perfekte Waschergebnisse
erreicht werden.Auch für
die Spülgänge wird die
Wassermenge erhöht,so
dass jegliche
Waschmittelrückstände von
den Fasern restlos entfernt
werden.
Diese Funktion wurde
speziell für Menschen mit
empfindlicher Haut
konzipiert, für die auch die
kleinsten
Waschmittelrückstände zu
Hautreaktionen oder
Allergien führen können.
Wir empfehlen, diese
Funktion auch zum Waschen
von Kinderwäsche und für
Feinwäsche im Allgemeinen
zu wählen, oder zum
Waschen von besonders
saugfähigem Gewebe,wie
Frottee o.Ä., dessen Fasern
die Waschlauge stärker
aufnehmen.
Damit die besten
Waschergebnisse
gewährleistet werden,ist
diese Funktion in den
Programmen für Feinwäsche
und Wolle/Handwäsche
immer aktiviert.
TIPKA “ALLERGIE”
S pritiskom na to tipko lahko
aktivirate poseben novi
program, namenjen pranju
barvno obstojnih tkanin in
tkanin iz me‰anice vlaken, ki
deluje na osnovi novega
sistema Sensor. Ta opcija
zagotavlja neÏno ravnanje s
perilom in je predvsem
namenjena osebam z neÏno
in obãutljivo koÏo, pri katerih
bi lahko tudi najmanj‰e sledi
pralnih sredstev povzroãale
alergije.
Perilo se opere v veãji
koliãini vode, kar ob novem
kombiniranem uãinkovanju
faz obraãanja bobna med
polnjenjem z vodo in
izãrpavanjem vode
zagotavlja temeljitej‰e
pranje in popolno izpiranje.
V stroj se natoãi veãja
koliãina vode, tako da se
detergent bolje raztopi, kar
zagotavlja ‰e bolj uãinkovito
pranje. Tudi pri izpiranju se v
stroj natoãi veã vode, kar
zagotavlja uãinkovitej‰e
odstranjevanje sledi
detergenta iz perila, kar je
‰e posebej pomembno za
osebe z neÏno in obãutljivo
koÏo, pri katerih bi lahko tudi
najmanj‰e sledi pralnih
sredstev povzroãale alergije.
To funkcijo priporoãamo tudi
za pranje otro‰kih oblaãil in
obãutljivega perila nasploh,
pa tudi za pranje frotirja, saj
ta med pranjem absorbira
veã detergenta.
Da bi zagotovili kar najveãjo
uãinkovitost pranja pa se ta
funkcija vedno aktivira pri
pranju na programih za
obãutljivo perilo in
volno/roãno pranje.
SL
EN
“AQUAPLUS” BUTTON
By pressing this button you
can activate a special new
wash cycle in the Colourfast
and Mixed Fabrics
programs, thanks to the new
Sensor System.This option
treats with care the fibres of
garments and the delicate
skin of those who wear
them.
The load is washed in a
much larger quantity of
water and this, together with
the new combined action
of the drum rotation cycles,
where water is filled and
emptied, will give you
garments which have been
cleaned and rinsed to
perfection.The amount of
water in the wash is
increased so that the
detergent dissolves
perfectly, ensuring an
efficient cleaning action. The
amount of water is also
increased during the rinse
procedure so as to remove
all traces of detergent from
the fibres.
This function has been
specifically designed for
people with delicate and
sensitive skin, for whom even
a very small amount of
detergent can cause
irritation or allergy.
You are advised to also use
this function for children’s
clothing and for delicate
fabrics in general, or when
washing garments made of
towelling,where the fibres
tend to absorb a greater
quantity of detergent.
To ensure the best
performance for your wash,
this function is always
activated on the Delicates
and Woollens/Handwash
programs.
34
35
Page 19

FR
TOUCHE DE SELECTION DU
PROGRAMME DE SECHAGE
Assurez-vous que le sélecteur
de programme n'est pas réglé
sur OFF, puis appuyez sur le
bouton pour sélectionner le
programme de séchage
souhaité. Chaque fois que vous
appuyez sur le bouton, un
témoin s'allume pour indiquer
le type de séchage
sélectionné.
Si vous souhaitez annuler une
sélection avant le démarrage
du programme de séchage,
appuyez plusieurs fois sur le
bouton, jusqu'à ce que les
témoins s'éteignent, ou réglez
le sélecteur sur OFF.
Pour annuler un cycle pendant
la phase de séchage,
maintenez le bouton enfoncé
pendant 2 secondes jusqu'à ce
que le témoin de
refroidissement s'allume.En
raison de la température
élevée à l'intérieur du tambour,
il est conseillé de patienter
jusqu'à la fin de la phase de
refroidissement avant de régler
le sélecteur de programme sur
OFF et de retirer le linge.
NOTE:
Ne pas sécher du linge non
lavé dans la lavante-séchante.
Pour le linge taché de
substances comme l’huile de
cuisine, l’acétone,l’alcool,
l’essence, le kérosène,les
détachants, la térébenthine, la
cire, et les substances pour
retirer la cire, il convient de le
laver à l’eau chaude avec une
plus grande quantité de lessive
avant de le sécher dans la
lavante-séchante.
Les éléments comme le
caoutchouc, le latex,les
charlottes pour la douche, les
tissus imperméables, les articles
contenant du caoutchouc ou
du latex ne doivent pas être
séchés dans la lavanteséchante.
Adoucissants ou produits
assimilés, doivent être utilisés
conformément aux instructions
relatives aux adoucissants.
La dernière partie du cycle se
déroule sans chaleur (cycle de
refroidissement) pour s’assurer
que les articles soient soumis à
une température qui garantisse
qu’ils ne soient pas abîmés.
ATTENTION:
Ne jamais arrêter la lavanteséchante avant la fin du cycle
de séchage, à moins que tous
les articles ne soient retirés
rapidement et étendus pour
dissiper la chaleur.
36
IT
TASTO SELEZIONE
PROGRAMMA ASCIUGATURA
Con il selettore dei programmi
in posizione differente da OFF,
premere il tasto per selezionare
il programma di asciugatura
desiderato; ad ogni pressione
lampeggerà una spia ad
indicare il risultato di
asciugatura selezionato.
In caso di annullamento della
selezione prima dell’avvio di un
programma di asciugatura,
premere ripetutamente il tasto
fino allo spegnimento delle spie
o riportare il selettore
programmi in posizione di OFF.
Per annullare il ciclo durante la
fase di asciugatura tenere
premuto il tasto per 2 secondi
fino all’accensione della spia di
raffreddamento;data l’elevata
temperatura all’interno del
cesto si consiglia di lasciare
terminare il ciclo di
raffreddamento prima di
riportare il selettore dei
programmi in posizione di OFF
ed estrarre la biancheria.
NOTA:
Non asciugare capi non lavati
nella lavasciuga.
Conviene che i capi sporchi di
sostanze quali l'olio di cottura,
l'acetone, l'alcol, la benzina,il
cherosene, gli smacchiatori,la
trementina, la cera e le
sostanze per rimuoverla siano
lavati in acqua calda con una
quantità maggiore di
detergente prima di asciugarli
nella lavasciuga.
Oggetti come gomma espansa
(schiuma di lattice), le cuffie per
la doccia, i materiali tessili
impermeabili, gli articoli con un
lato di gomma e i vestiti o i
cuscini che hanno delle parti in
schiuma di lattice non
dovrebbero essere asciugati
nella lavasciuga.
Ammorbidenti o prodotti simili,
dovrebbero essere usati
conformemente alle istruzioni
relative agli ammorbidenti.
La parte finale di un ciclo nella
lavasciuga avviene senza
calore (ciclo di
raffreddamento) per assicurarsi
che gli articoli siano sottoposti
ad una temperatura che
garantisca che non verranno
danneggiati.
ATTENZIONE:
Non arrestare mai la
lavasciuga prima della fine del
ciclo d'asciugatura, a meno
che tutti gli articoli non
vengano ritirati rapidamente e
stesi per dissipare il calore.
M
DE
TASTE TROCKENPROGRAMM
Der Programmwahlschalter muss
auf einer anderen Position als OFF
stehen.Drücken Sie die Taste
Trockenprogramm,um die
gewünschte Trockenart
einzustellen.Bei jedem Drücken
leuchtet eine Anzeige auf,welche
das entsprechende
Trocknungsergebnis anzeigt.
Wenn Sie Ihre Einstellung löschen
wollen,bevor das
Trocknungsprogramm beginnt,
drücken Sie die Taste mehrmals, bis
die Leuchtanzeigen alle erloschen
sind,oder bringen Sie den
Programmwahlschalter auf die
Position OFF.
Um das Trocknungsprogramm zu
löschen,während die
Trocknungsphase bereits läuft,
halten Sie die Trocknungswahltaste
2 Sekunden lang gedrückt,bis die
Leuchtanzeige der Abkühlphase
aufleuchtet.Wegen der hohen
Temperatur im Inneren der
Trommel empfiehlt es sich,das
Ende der Abkühlphase
abzuwarten, bevor der
Programmwahlschalter wieder auf
OFF gedreht wird und die Wäsche
entnommen werden kann.
ANÔERKUNG:
Trocknen Sie keine
ungewaschenen Wäschestücke
im Waschtrockner.
Wäschestücke,die mit Substanzen
wie Speiseöl,Aceton,Alkohol,
Benzin,Kerosin,Reinigungsbenzin,
Terpentin,Wachs und
Wachsentfernern verschmutzt sind,
sollten zuerst mit Warmwasser und
einer erhöhten Waschmittelmenge
gewaschen werden,bevor sie im
Waschtrockner getrocknet
werden.Gegenstände aus
Schaumgummi oder Latex,
Duschhauben,
wasserundurchlässige Textilien,
gummibeschichtete Artikel und
Kleidungsstücke oder
Kissenbezüge mit gummierten
Applikationen sollten nicht im
Waschtrockner getrocknet
werden.Weichspüler und ähnliche
Produkte nur unter Beachtung der
Herstellerangaben im
Waschtrockner verwenden.
Die letzte Phase des
Trocknungsgangs erfolgt ohne
Wärmezufuhr (Kaltlüftung), damit
gewährleistet ist,dass die Faser der
Wäschestücke abkühlen und
somit nicht beschädigt werden.
WICHTIG:
Unterbrechen Sie niemals den
Trocknungsgang,bevor er zu Ende
gegangen ist, es sei denn, Sie
entnehmen sofort die warme
Wäsche und breiten Sie sie aus,
damit die Hitze abgeführt werden
kann.
SL
TIPKA ZA IZBIRANJE
PROGRAMOV SU·ENJA
âe gumb za izbiranje ni v
izklopljenem poloÏaju (OFF),
ustrezen program su‰enja
izberete s pritiskom na to tipko.
Ob vsakem pritisku na tipko se
osvetli indikator za rezultat
su‰enja skladno z izbranim
programom.
âe Ïelite izbiro preklicati pred
zagonom programa su‰enja,
tolikokrat pritisnite na tipko, da
vsi indikatorji ugasnejo, ali pa
obrnite gumb za izbiranje
programov v izklopljeni
poloÏaj.
âe Ïelite program preklicati
med fazo su‰enja, 2 sekunde
pritiskajte na tipko, dokler se
ne osvetli indikator faze
hlajenja. Ker je temperatura v
bobnu visoka, priporoãamo,
da pred pobiranjem perila iz
stroja poãakate, da stroj
opravi fazo hlajenja in ‰ele
nato obrnete gumb za
izbiranje programov v
izklopljeni poloÏaj.
OPOMBA:
V su‰ilnem stroju ne su‰ite
neopranega perila.
Perilo, na katerem so sledi od
jedilnega olja, acetona,
alkohola, bencina, petroleja,
sredstev za odstranjevanje
madeÏev, serpentina, voska
ali sredstev za odstranjevanje
voska pred su‰enjem v stroju
operite v vroãi vodi z veãjo
koliãino detergenta od
obiãajno uporabljene.
Oblaãil in drugih kosov, ki
vsebujejo penasto gumo
(peno latex), kap za prhanje,
vodoodpornih tkanin, z gumo
podloÏenih kosov in drugih
oblaãil ali vzglavnikov z vloÏki
iz penaste gume ne smete
su‰iti v su‰ilnem stroju.
Mehãalec in podobne izdelke
uporabljajte skladno z navodili
proizvajalca.
Zadnja faza programa su‰enja
poteka brez gretja (faza
ohlajanja), kar zagotavlja, da
je perilo na koncu programa
ustrezne temperature in da ne
bo po‰kodovano.
OPOZORILO:
Nikoli ne izklapljajte pralnosu‰ilnega stroja pred
zakljuãkom programa
su‰enja, razen ãe imate
namen perilo takoj pobrati iz
stroja in ga razgrniti, kar bo
omogoãilo razpr‰itev toplote.
EN
DRYING PROGRAMME
SELECTION BUTTON
With the programme selector
not in the OFF position, press
the button to select the
required drying programme; an
indicator will light to display the
drying result selected each
time you press the button.
To cancel the selection before
the start of a drying
programme,press the button
repeatedly until the indicators
go out or return the
programme selector to the OFF
position.
To cancel the cycle during the
drying phase, hold the button
down for 2 seconds until the
cooling indicator lights up;
given the high temperature
inside the drum, we
recommend that you allow the
dryer to complete the cool
down period before returning
the programme selector to the
OFF position and removing the
laundry.
NOTE:
Do not dry unwashed items in
the washer dryer.
Items that have been soiled
with substances such as
cooking oil, acetone, alcohol,
petrol, kerosene,spot removers,
turpentine, waxes and wax
removers should be washed in
hot water with an extra amount
of detergent before being
dried in the washer dryer.
Items such as foam rubber
(latex foam),shower caps,
waterproof textiles, rubber
backed articles and clothes or
pillows fitted with foam rubber
pads should not be dried in the
washer dryer.
Fabric softeners, or similar
products, should be used as
specified by the fabric softener
instructions.
The final part of a washer dryer
cycle occurs without heat
(cool down cycle) to ensure
that the items are left at a
temperature that ensures that
the items will not be damaged.
WARNING:
Never stop a washer dryer
before the end of the drying
cycle unless all items are
quickly removed and spread
out so that the heat is
dissipated.
37
Page 20

FR
TEMOINS DES PROGRAMMES DE
SECHAGE
Les témoins lumineux indiquent
le type de programme et/ou la
durée du séchage :
Programmes automatiques: si
vous sélectionnez l'un des 3
programmes automatiques,la
machine calcule le temps
nécessaire pour le séchage
ainsi que le degré d'humidité
résiduelle requis, en fonction de
la charge et du type de
séchage choisi.
Lorsque vous appuyez sur START,
un témoin s'allume pour
indiquer le temps de séchage
restant.
" " = programme de
séchage extra sec
(recommandé pour les
serviettes, les peignoirs et les
charges volumineuses)
" " = programme de
séchage prêt-à-ranger
" " = programme de
séchage prêt-à-repasser
CONSEILS UTILES :
Pour les petites charges de linge
(inférieures à 1 kg) ou les
charges légèrement humides,il
est recommandé de choisir le
programme de séchage de 30
minutes. La machine interrompt
automatiquement le cycle
lorsque le degré de séchage
sélectionné est atteint.
Pour garantir le bon
fonctionnement de la machine,
il est préférable d'interrompre la
phase de séchage uniquement
lorsque cela est absolument
nécessaire.
Pr
ogrammes minutés:
120 minutes – 90 minutes – 60
minutes – 30 minutes :
Témoins à double fonction:
Si vous sélectionnez l'un des 3
programmes de séchage
automatiques,les témoins
indiquent le temps de séchage
restant.
Ces témoins peuvent servir à
sélectionner des programmes
de séchage minutés.
Phase de r
Cette phase est déclenchée au
cours du refroidissement final,
lors des 10 dernières minutes de
chaque phase de séchage.
efroidissement :
38
IT
SPIE PROGRAMMI
ASCIUGATURA
Le spie indicano il tipo di
programma e/o la durata di
asciugatura:
Programmi Automatici:
Selezionando uno di questi 3
programmi automatici la
lavasciuga calcolerà in base
al carico e al tipo di
asciugatura scelto,il tempo
necessario di asciugatura ed il
grado di umidità residua
desiderata.
Premuto il tasto START si
accenderà una delle spie
indicanti il tempo di
asciugatura restante.
asciugatura extra asciutto
(consigliato per spugne,
accappatoi e carichi
ingombranti).
asciugatura pronto armadio
asciugatura pronto stiro
CONSIGLI UTILI:
Per piccoli carichi di
biancheria (inferiori ad 1 Kg) o
per carichi leggermente umidi
si consiglia di utilizzare il
programma asciugatura a
tempo 30’.
La vostra lavasciuga conclude
il ciclo automaticamente al
raggiungimento del grado di
asciugatura impostato.
Per un corretto funzionamento
dell’apparecchio è preferibile
non interrompere la fase di
asciugatura se non realmente
necessario.
Pr
ogrammi a Tempo:
120’– 90’– 60’– 30’:
Spie a doppia funzione :
1) Nel caso in cui sia stato
selezionato uno dei 3
programmi automatici di
asciugatura indicano il tempo
restante alla fine
dell’asciugatura
2) Possono essere utilizzati per
impostare dei programmi di
asciugatura a tempo.
Fase raffreddamento :
Si accende nella fase finale di
raffreddamento,negli ultimi 10
minuti di ogni asciugatura.
= Programma di
= Programma di
= Programma di
N
DE
LEUCHTANZEIGEN
TROCKENPROGRAMME
Die Leuchtanzeigen zeigen die
Art des Trockenprogramms
und/oder die Dauer der
Trocknung an.
utomatische Trocknung: Wird
A
eines der 3 möglichen
automatischen Programme
eingestellt, errechnet der
Waschtrockner aufgrund der
Wäscheladung und der
eingestellten Trocknungsart die
für die Trocknung erforderliche
Zeit und die entsprechende
Restfeuchte. Nachdem die
Taste START gedrückt wurde,
leuchtet eine der
Leuchtenanzeigen auf,um die
Restzeit zum Programmende
anzuzeigen.
“ ” = Trockenprogramm
Extratrocken (für FrotteeHandtücher,Bademäntel und
umfangreiche
Wäscheladungen empfohlen)
“ ” = Trockenprogramm
Schranktrocken
“ ” = Trockenprogramm
Bügelfertig
NÜTZLICHE HINWEISE:
Für kleine Wäscheladungen
(unterhalb 1 kg) oder für leicht
feuchte Wäsche empfehlen wir,
das 30’ zeitgesteuerte
Trockenprogramm einzustellen.
Ihr Waschtrockner wird das
Trockenprogramm automatisch
beenden, wenn der
eingestellte Trocknungsgrad
erreicht worden ist. Für eine
einwandfreie Funktion des
Gerätes empfiehlt es sich,den
Trockenvorgang nicht zu
unterbrechen, wenn es nicht
unbedingt notwendig ist.
Zeitgesteuer
(Trockenzeit):
120’ – 90’ – 60’ – 30’:
Die Leuchteanzeigen erfüllen
zwei Funktionen:
Wenn eines der drei
automatischen
Trockenprogramme gewählt
wurde, zeigen die Leuchten die
Restzeit zum Programmende.
Sie dienen auch zur Einstellung
der gewünschten Trockenzeit.
Abkühlphase
Die Leuchte der Abkühlphase
leuchtet in den letzten 10
Minuten des Programms auf,
wenn die Abkühlphase
eingeleitet wird.
te Trocknung
:
SL
INDIKATORJI PROGRAMOV
SU·ENJA
Indikatorji kaÏejo izbrani
program in/ali trajanje
su‰enja.
Avtomatski programi
âe izberete katerega od 3
avtomatskih programov, bo
pralno-su‰ilni stroj sam
preraãunal ãas, potreben za
su‰enje, in sam doloãil
ustrezno stopnjo vlaÏnosti na
osnovi vrste perila in izbrane
vrste su‰enja.
Po pritisku na tipko START bo
osvetljeni indikator za prikazal
trajanje su‰enja.
“ ” = Program su‰enja
za zelo suho perilo
(priporoãamo ga za brisaãe,
kopalne halje,…)
“ ” = Program su‰enja
za v omaro
“ ” = Program su‰enja
za likanje
KORISTNI NASVETI:
30-minutni program su‰enja je
primeren za su‰enje manj‰e
koliãine perila (manj kot 1 kg)
ali za le nekoliko vlaÏno perilo.
Pralno-su‰ilni stroj avtomatsko
zakljuãi program, ko doseÏe
izbrano stopnjo suhosti.
Zaradi pravilno delovanje
stroja odsvetujemo prekinitev
programa su‰enja, razen ãe je
to nujno potrebno.
âasovni pr
120 minut – 90 minut – 60
minut – 30 minut:
Indikatorji imajo dve vlogi:
âe izberete katerega od 3
avtomatskih programov
su‰enja, indikatorji kaÏejo ãas
do konca su‰enja.
S pomoãjo indikatorjev pa
tudi izberate ãasovne
programe su‰enja.
Faza hlajenja
Program se zakljuãi s fazo
hlajenja, ki poteka zadnjih 10
minut vsakega programa
su‰enja.
ogrami:
:
:
EN
DRYING PROGRAMME
INDICATORS
The indicators display the
type of programme and/or
drying time:
utomatic Pr
A
ogrammes: By
selecting one of these 3
automatic programmes,the
washer-dryer will calculate
the time needed for drying
and the residual dampness
required, according to the
load and drying type
selected.
After pressing the START
button, one of the indicators
will light to display the drying
time remaining.
= Extra dry drying
programme (recommended
for towels,bathrobes and
bulky loads)
= Cupboard dry
drying programme
= Iron dry drying
programme
USEFUL TIPS:
The 30 minute drying
programme is recommended
for small loads (less than 1 kg)
or slightly damp loads.
Your washer-dryer ends the
cycle automatically when it
reaches the drying level
selected.
For the correct operation of
the appliance, it is preferable
not to interrupt the drying
phase unless it is really
necessary.
T
imed programmes:
120 minutes – 90 minutes – 60
minutes – 30 minutes:
Dual function indicators:
If one of the 3 automatic
drying programmes is
selected, the indicators
display the drying time
remaining
They may be used to select
timed drying programmes.
Cool do
wn phase :
Switched on during the final
cool down period, in the last
10 minutes of each drying
phase.
39
Page 21

FR
LAVAGE EN EAU FROIDE
En appuyant sur la touche
correspondante on peut faire
exécuter tous les cycles de lavage
sans le chauffage de l’eau, tandis
que toutes les autres
caractéristiques restent
inchangées (niveau d’eau,temps,
rythmes de lavage, etc.).
Les programmes en eau froide sont
conseillés pour le lavage de tous
les tissus de couleur qui ne
supportent pas la température,et
pour le lavage de rideaux,fibres
synthétiques particulièrement
délicates, petits tapis,ou tissus peu
sales.
IT
LAVAGGIO A FREDDO
Inserendo questa funzione si
possono eseguire tutti i cicli di
lavaggio senza il riscaldamento
dell’acqua, mentre rimangono
invariate tutte le altre
caratteristiche (livello d’acqua,
tempi, ritmi di lavaggio ecc.).I
programmi a freddo sono indicati
per il lavaggio di tutti i capi di
biancheria i cui colori non sono
resistenti e per il lavaggio di
tende, copriletti, fibre sintetiche
particolarmente delicate, piccoli
tappeti o tessuti poco sporchi.
O
DE
KALTWASCH-TASTE
Durch das Drücken dieser Taste
wird in allen Waschprogrammen
das Aufheizen der Waschlauge
verhindert, während alle übrigen
Programmerkmale (Wasserstand,
Waschzeit,Trommelrhythmus
etc.) unverändert bleiben. Das
Kaltwaschen eignet sich für
Gardinen, Bettvorleger,
empfindliche Synthetik und alle
ausfärbenden Textilien.
SL
TIPKA ZA PRANJE S HLADNO
VODO
âe pritisnete na to tipko, bo stroj
ne glede na izbrani program
opral perilo s hladno vodo,
medtem ko ostanejo druge
znaãilnosti programa
nespremenjene (koliãina vode,
trajanje programa, faze ipd.).
Zahvaljujoã tej novi funkciji lahko
zdaj varno perete tudi zavese,
manj‰e preproge, obãutljive
sintetiãne tkanine in perilo
neobstojnih barv.
EN
COLD WASH BUTTON
By pressing this button it is
possible to transform every
programme into a cold washing
one, without modifying other
characteristics (water level,times,
rythmes, etc...).
Curtains, small carpets,man
made delicate fabrics, non
coulor fast garments can be
safely washed thanks to this new
device.
TOUCHE “REPASSAGE FACILE”
Si vous utilisez cette touche (Non
disponible sur les programmes
COTON),il vous sera possible de
réduire la formations des plis,
selon le programme choisi et la
nature du tissu lavé.
Tissu mixte et synthetique:
- le refroidissement de l’eau sera
fait graduellement pour éviter les
chocs thermiques;
- la vidange sera faite sans
aucune action mécanique du
tambour;
- une phase d’essorage doux,
pour assurer la distension
maximale des fibres.
Tissu délicat:
- Votre lave-linge effectuera les
actions ci dessus mentionnées,
ensuite un "arrêt cuve pleine"
après le dernier rinçage.
Laine et lavage a la main:
- Votre lave linge effectuera un
"arrêt cuve pleine".
Le indicateur d’option clignote et
le linge reste dans l’eau du
tambour.
Pour terminer le cycle des tissus
délicats, de la laine et lavage a
la main, les opérations à
accomplir sont les suivantes :
1. Relâcher la touche de
repassage facile pour terminer le
cycle.
2. Sinon,vous pouvez effectuer
une simple vidange
- Tourner le sélecteur de
programme à la position “OFF”;
- Sélectionner le programme
“Uniquement vidange” ;
- Allumer de nouveau la lavelinge en appuyant sur la touche
“MARCHE/PAUSE”.
40
TASTO “STIRO FACILE “
Attivando questa funzione (non
disponibile per i programmi
cotone) è possibile ridurre al
minimo la formazione di pieghe
personalizzando ulteriormente il
ciclo di lavaggio in base al
programma scelto ed al tipo di
biancheria da lavare.
In modo particolare per i tessuti
misti e sintetici l’azione combinata
di una fase di raffreddamento
graduale dell’acqua, l’assenza di
rotazione del cesto durante gli
scarichi dell’acqua ed una
centrifuga delicata a bassa
velocità assicura la massima
distensione dei capi.
Per i tessuti delicati vengono
svolte le fasi già descritte sopra
per i tessuti misti ad eccezione del
raffreddamento graduale
dell’acqua ma con l’aggiunta di
una fase di fermo acqua in vasca
con stop dopo l’ultimo risciacquo.
Nel programma lana e lavaggio a
mano questo tasto ha la sola
funzione di lasciare i capi immersi
nell’acqua alla fine dell’ultimo
risciacquo al fine di distendere
perfettamente le fibre.
Durante la fase di fermo acqua in
vasca la spia del tasto lampeggia
ad indicare che la macchina è in
pausa.
Per terminare il ciclo dei tessuti
delicati, della lana e lavaggio a
mano, le operazioni possono
essere:
- rilasciare il tasto per terminare il
ciclo.
Nel caso in cui si voglia effettuare
solo lo scarico:
- portare la manopola
programmi prima in posizione di
“OFF”;
- selezionare il programma solo
scarico ;
- riavviare la macchina
premendo nuovamente il
pulsante “AVVIO/PAUSA”.
P
TASTE “LEICHTBÜGELN”
Diese Funktion (nicht verfügbar
für die Programme
KOCHWÄSCHE) reduziert die
Knitterbildung durch die
individuelle Wahl der Programme
und der Wäscheart.
Im Besonderen für Mischgewebe
sorgt die Kombination der
langsamen Abkühlphase
verbunden mit dem Stillstand der
Wäsche während des
Abpumpens und einem
Schonschleudern für die
optimale Schonung der Wäsche.
Für die Feinwäsche sind die
Phasen wie bei Mischgewebe
beschrieben, mit Ausnahme der
Abkühlphase unter Hinzunahme
des Wasserstopps nach dem
letzten Spülgang.
Für die Programme Woolmark
(Wolle) und Handwäsche dient
diese Taste ausschließlich als
Spülstopp, um die Fasern zu
glätten.
In der Spülstopp-Phase blinkt die
Leuchtanzeige der Taste,um
anzuzeigen, dass das Gerät sich
in Pause befindet.
Um die Feinwäsche bzw. das
Woll-oder HandwäscheProgramm zu beenden, können
Sie wie folgt vorgehen:
- Drücken Sie die Taste
Leichtbügeln zurück, um das
Programm mit Abpumpen und
Schleudern
zu beenden
Wenn Sie nur abpumpen wollen:
- drehen Sie den
Programmwahlschalter auf die
Position OFF
- wählen Sie das Programm
Abpumpen
- schalten Sie das Gerät durch
erneutes Drücken der Taste
START/PAUSE ein
TIPKA ZA “LAHKO LIKANJE”
âe Ïelite, da je perilo kar najmanj
zmeãkano (ni moÏno na
programih za BOMBAÎ), vklopite
to funkcijo. Ta edinstveni sistem za
prepreãevanje meãkanja perila
je prilagojen posebnim vrstam
tkanin.
Tkanine iz me‰anice vlaken –
voda se med zadnjima dvema
fazama izpiranja
postopoma ohlaja brez
centrifugiranja; sledi neÏno
centrifugiranje, kar zagotavlja, da
perilo ne bo zmeãkano.
Obãutljive tkanine – zadnji dve
fazi izpiranja sta brez
centrifugiranja, po konãanem
pranju pa ostane perilo v vodi,
dokler ga ne Ïelite pobrati iz
stroja.
Takrat pritisnete na tipko za
prepreãevanje meãkanja perila
in ‰ele takrat bo stroj izãrpal vodo
in oÏel perilo.
Volna/roãno pranje – po zadnjem
izpiranju ostane perilo v vodi,
dokler ga ne Ïelite pobrati iz
stroja; kontrolna luãka utripa.
Ko Ïelite pobrati perilo iz stroja,
pritisnite na tipko za
prepreãevanje meãkanja
perila in ‰ele takrat bo stroj izãrpal
vodo in oÏel perilo. âe pa ne
Ïelite, da bi stroj
perilo oÏel, lahko vklopite samo
izãrpavanje vode:
- Obrnite gumb programatorja na
oznako OFF.
- Izberite program za izãrpavanje
vode .
- Vklopite stroj – znova pritisnite na
tipko START/Pavza.
“CREASE GUARD” BUTTON
The Crease Guard function (Not
available on COTTON
programmes) minimizes creases
as much as possible with a
uniquely designed anti-crease
system that is tailored to specific
fabrics.
MIXED FABRICS - the water is
gradually cooled throughout the
final two rinses with no spinning
and then a delicate spin assures
the maximum relaxation of the
fabrics.
DELICATE FABRICS – final two
rinses with no spinning and then
the fabrics are left in water until it
is time to unload.When you are
ready to unload, press the
"Crease Guard" button – this will
drain.
WOLLENS/HAND WASH – after the
final rinse the fabrics are left in
water until it is time to unload
and the button indicator blinking.
When you are ready to unload,
press the "Crease Guard" button,
this will drain and spin ready for
emptying.
If you do not want to spin the
clothes and activate drain only:
- Turn the programme selector to
the "OFF" position;
- Select programme drain only
;
- Switch on the appliance again
by pressing the "Start/Pause"
button.
41
Page 22

FR
TOUCHE MARCHE/PAUSE
Après avoir sélectionné un
programme attendre que le
témoin "STOP" commence à
clignoter avant de presser la
touche MARCHE
Appuyez sur la touche pour
commencer le cycle (une
voyant s’allumera).
IT
TASTO AVVIO/PAUSA
Dopo avere selezionato un
programma attendere che la
spia “STOP” inizi a lampeggiare
prima di premere il tasto AVVIO
Premere per avviare il ciclo
impostato con la manopola
programmi (a seconda del
ciclo impostato si illuminerà una
delle spie).
Q
DE
START/PAUSE TASTE
Nachdem Sie das gewünschte
Waschprogramm eingestellt
haben, warten Sie, bis die STOPAnzeige anfängt zu blinken,
bevor Sie die START-Taste
drücken.
Drücken Sie diese Taste, um das
Programm zu starten,die mit dem
Programmwahlschalter gewählt
wurde (je nach eingestelltem
Programm wird eine der
Leuchtanzeigen aufleuchten).
SL
TIPKA START
Ko je program izbran,
poãakajte, da zaãne utripati
kontrolna luãka STOP, nato
pa pritisnite na tipko START.
S pritiskom na tipko START
zaÏenete izbrani program
(osvetli se ustrezna kontrolna
luãka).
EN
START/PAUSE BUTTON
When a programme is
selecting, wait for the “STOP”
indicator light to flash before
pressing the START button.
Press to start the selected
cycle (according to the
selected cycle one indicator
lights will go on) .
ATTENTION:
LORSQUE LA TOUCHE
START A ETE ENCLENCHEE
L’APPAREIL NE
COMMENCERA LE CYCLE
QU’APRES QUELQUES
SECONDES.
CHANGER LA
PROGRAMMATION APRES LE
DEMARRAGE DE LA MACHINE
(PAUSE)
Il est possible d’arrêter
momentanément le
programme pendant le cycle
de lavage,en maintenant le
bouton "MARCHE/PAUSE"
enfoncé pendant environ
deux secondes. Lorsque la
machine est en mode de
pause, les voyants des touches
d’options, du temps restant du
programme et de la vitesse
d’essorage clignotent.
Le voyant lumineux " Témoin
de verrouillage de porte "
reste allumé pendant environ
2 minutes. Il est possible
d’ouvrir la porte une fois le
voyant lumineux éteint.
Pour relancer le programme,
appuyez une nouvelle fois
sur le bouton "MARCHE".
ANNULATION D’UN
PROGRAMME SELECTIONNÉ
Afin d’annuler un programme,
positionnez le sélecteur sur OFF
Sélectionnez un programme
différent
Repositionnez le sélecteur sur
OFF.
42
NOTA: DOPO AVERE
AVVIATO LA
LAVABIANCHERIA CON IL
TASTO START SI DOVRÀ
ATTENDERE ALCUNI
SECONDI AFFINCHÉ LA
MACCHINA INIZI IL
PROGRAMMA.
MODIFICARE IMPOSTAZIONI
DOPO AVVIO DEL PROGRAMMA
(PAUSA)
Dopo l’avvio del programma
possono essere modificate solo
le regolazioni e le opzioni
tramite i tasti opzione.Tenere il
tasto “START/PAUSA” premuto
per circa 2 secondi, Il
lampeggio delle spie dei tasti
funzione, di una spia del tempo
residuo e di quella della
centrifuga, indica che la
macchina è in pausa, modifichi
quanto desiderato e prema
nuovamente il tasto
“START/PAUSA” annullando
l’intermittenza.
Se si desidera aggiungere o
togliere capi durante il
lavaggio,attendere DUE minuti
affinché il dispositivo di sicurezza
liberi il blocco dell’oblò e ne
permetta l’apertura.
Effettuata la manovra,dopo
aver richiuso l’oblò e premuto il
tasto AVVIO/PAUSA,la
macchina ripartirà dal punto in
cui era stata fermata.
CANCELLAZIONE PROGRAMMA
IMPOSTATO
Per annullare il programma,
portare il selettore in posizione
OFF. Selezionare un programma
diverso. Riportare il selettore
programmi in posizione OFF.
ANMERKUNG: NACH DER
BETÄTIGUNG DER STARTTASTE DAUERT ES EINIGE
SEKUNDEN, BIS DAS GERÄT
ANFÄNGT ZU ARBEITEN.
EINSTELLUNGEN NACH DEM
PROGRAMMSTART ÄNDERN
(PAUSE)
Nachdem das Programm
gestartet wurde, können nur die
Programmoptionen und die
Zusatzfunktionen mit den
Funktionstasten verändert
werden.
Drücken Sie und halten Sie die
Taste START für ca. 2 Sekunden
gedrückt.
Das Blinken der Anzeigen der
Optionstasten, der
Schleuderdrehzahlanzeige und
einer der Restzeitanzeigen zeigt
an, dass das Gerät sich in einer
Betriebspause befindet. Sie
können die Einstellungen nach
Wunsch verändern und das
Gerät durch Drücken der STARTTaste wieder in Betrieb setzen.
Die Anzeigen hören auf zu
blinken.
Wenn Sie während des
Programmablaufs Wäsche
entnehmen bzw. hinzufügen
wollen,warten Sie ZWEI Minuten,
damit der
Türverriegelungsmechanismus
die Tür entriegelt.
Nachdem Sie die Wäsche
entnommen bzw. hinzugefügt
haben, schließen Sie die Tür und
drücken Sie die START-Taste.Das
Gerät fängt wieder dort an zu
arbeiten,wo es aufgehört hatte.
EINGESTELLTES PROGRAMM
LÖSCHEN
Um das Programm zu löschen,
drehen Sie den
Programmwahlschalter auf OFF.
Wählen Sie nun ein anderes
Programm.
Drehen sie dann den
Programmwahlschalter wieder
auf OFF.
OPOMBA:
STROJ LAHKO ZAâNE
DELOVATI ·ELE NEKAJ
SEKUND PO PRITISKU NA
TIPKO START.
Spreminjanje nastavitev po
zaãetku izvajanja izbranega
programa
V vsakem trenutku lahko
program zaãasno prekinete pribliÏno 2 sekundi pritiskajte
na tipko Start/pavza. Ko je
stroj v naãinu pavze, utripata
kontrolni luãki 'âas do
konca programa', hitrost
centrifugiranja in tipke za
opcije. Ko Ïelite s pranjem
nadaljevati, spet pritisnite na
tipko START/Pavza.
âe Ïelite med pranjem
dodati kak‰en kos perila v
stroj, poãakajte 2 minuti,
da se sprosti varnostni zapah
vrat in da se vrata odklenejo.
Nato spet zaprite vrata stroja
in pritisnite na
tipko START/Pavza; stroj bo
nadaljeval s pranjem, kjer je
bil program prekinjen.
Preklic potekajoãega
programa
âe Ïelite preklicati program,
obrnite gumb za izbiranje
programov na poloÏaj “OFF”
(Izklopljeno).
Izberite drugi program.
Gumb za izbiranje programov
obrnite na poloÏaj “OFF”
(Izklopljeno).
NOTE: WHEN THE START
BUTTON HAS BEEN
PRESSED, THE APPLIANCE
CAN TAKE FEW SECONDS
BEFORE STARTS
WORKING.
CHANGING THE SETTINGS
AFTER THE PROGRAMMES HAS
STARTED (PAUSE)
Once the programme has
started the settings can only
altered by pressing the
relevant buttons.
The programme may be
paused at any time during
the wash cycle by holding
down the "Start/Pause"
button for about two
seconds. When the machine
is in the paused mode, the
indicator light "Time To End",
spin speed and option
buttons will flash.
To restart the programme,
press the "Start/Pause" button
once again.
If you wish to add or remove
items during washing, wait 2
minutes until the safety
device unlocks the door.
When you have carried out
the manoeuvre,close the
door,press START button and
the appliance will continue
working where it left off.
CANCELLING THE
PROGRAMME
To cancel the programme,
set the selector to the OFF
position.
Select a different
programme.
Re-set the programme
selector to the OFF position.
43
Page 23

PROGRAMME POUR:
FR
TABLEAU DES PROGRAMMES
MANETTE DES
PROGRAMME DE
LAVAGE SUR:
CHARGE
MAXI
kg
TEMP.
°C
CHARGE DE LESSIVE
21
Tissus résistants
Coton, lin,chanvre
Coton, mixtes
résistants
Coton, mixte
Tissus mixtes et synthétiques
Mixtes résistants
Mixtes, cotons,
Synthétiques
Synthétiques (Nylon,
mixtes de coton)
Tissus très délicats
Laine
Synthétiques
acryliques
Blanc
*
Couleurs résistantes
avec prélavage
*
Couleurs résistantes
*
Couleurs résistantes
*
Couleurs délicates
*
Couleurs résistantes
avec prélavage
*
Couleurs résistantes
*
Couleurs résistantes
*
Couleurs délicates
*
Rinçage
*
Essorage Energique
*
Uniquement
vidange
Délicat
Laine “lavable en
machine”
Lavage main
7
7
90°
60°
●●
●●●
Notes importantes
**
7
7
60°
40°
●●
●●
Si les sous-vêtements sont très sales, réduire le chargement à 4 kg maxi.
Pour chaque programme vous avez la possibilité de sélectionner la vitesse d’essorage selon les
conseils du fabricant du tissu. Si l’étiquette du textile ne présente pas d’indication, vous pouvez
essorer à la vitesse maximale.
INFORMATION POUR LES ESSAIS EN LABORATOIRE
(Selon norme EN 50229)
Lavage
Utiliser le programme **.
3,5
3,5
3,5
7
30°
60°
60°
50°
●●
●●●
●●
●●
Séchage
3,5
2,5
1,5
40°
-
-
-
-
-
-
40°
2
30°
30°
●●
●
●●
●●
●●
Premier séchage effectué avec 5kg (composition du linge = taies d’oreiller et serviettes)
en sélectionnant le programme séchage coton ( ) prêt-à-rager ( ).
Le second séchage effectué avec 2Kg (composition du linge = 2 draps e serviettes) en
sélectionnant le programme séchage coton ( ) 90 minutes (90’).
*
Programmes pour un séchage automatique.
Quand certaines pièces ont des taches qui doivent être traitées par un produit
blanchissant liquide, vous pouvez les détacher dans la machine. Introduire dans la section
"2" du tiroir à lessive le bac pour les produits liquide, le remplir avec le produit blanchissant
liquide e
t sélectionner le programme "RINÇAGE" ( ).
Après ce traitement, tourner la manette des programmes sur la position "OFF", ajouter à
ces pièces le reste du linge et effectuer un lavage normal, selon le programme choisi.
Mixtes, Synthétiques
délicats
*
Cycle rapide
*
Programme “Mix &
Wash System”
*
Mixtes - Séchage
Coton - Séchage
32’
3,5
3,5
30°
2
7
30°
40°
●●
●●
●●
-
5
-
Speciaux
Coton - Mixtes
1,5
44 45
30°
●●
Page 24

CAPITOLO 7
PROGRAMMA PER:
esistenti
Tessuti r
Cotone, lino,canapa
Cotone, misti resistenti
Cotone, misti
essuti misti e sintetici
T
Misti resistenti
Misti, cotone,sintetici
Sintetici (Nylon Perlon)
misti di cotone
Tessuti delicati
Biancheria in lana
Sintetici (Dralon,
Acrylico, Trevira)
TABELLA PROGRAMMI
Bianchi
*
Colorati resistenti
con prelavaggio
*
Colorati resistenti
*
Colorati resistenti
*
Colorati delicati
*
Colorati resistenti
con prelavaggio
*
Colorati resistenti
*
Colorati resistenti
*
Colorati delicati
*
Risciacqui
*
Centrifuga energica
*
Solo scarico
Delicati
Lana "lavabile in
lavatrice"
Lavaggio a mano
IT
SELEZIONE
PUNTATORE
MANOPOLA
PROGRAMMI SU:
**
CARICO
MAX
kg
7
7
7
7
7
3,5
3,5
3,5
3,5
-
-
-
2,5
2
1,5
TEMP.
°C
90°
60°
60°
40°
30°
60°
60°
50°
40°
-
-
-
40°
30°
30°
CARICO DETERSIVO
21
●●
●●●
●●
●●
●●
●●●
●●
●●
●●
●
●●
●●
●●
Note da considerare
In caso di biancheria con elevato grado di sporco é consigliata la riduzione del carico a non più di 4 kg.
Informazione per i laboratori di prova
( norma EN 50229)
Lavaggio
Utilizzare il programma **
Asciugatura
Prima asciugatura effettuata con 5kg (composizione carico biancheria = federe e asciugamani)
selezionando il programma asciugatura cotone ( ) pronto armadio ( ).
Seconda asciugatura effettuata con 2kg (composizione carico biancheria = 2 lenzuola e asciugamani)
selezionando il programma asciugatura cotone ( ) 90 minuti (90’).
In tutti i programmi è possibile regolare la velocità della centrifuga secondo il consiglio del fabbricante del
tessuto.
Se l’etichetta non riporta alcuna indicazione è possibile centrifugare alla massima velocità prevista dal
programma.
* Programmi abilitati all’ asciugatura automatica.
Quando solo alcuni capi presentano macchie che richiedono un trattamento con prodotti candeggianti
liquidi, si può procedere ad una smacchiatura preliminare in lavatrice.
Introdurre nello scomparto "2" del cassetto detersivo l'apposita vaschetta in dotazione nella quale
versare il candeggiante ed impostare il programma "RISCIACQUI" ( ).
Finito questo trattamento, riportare la manopola programmi in posizione "OFF", aggiungere ai capi
candeggiati il resto della biancheria e procedere al bucato normale con il programma più adatto.
Misti sintetici delicati
3,5
30°
●●
*
Ciclo rapido 32'
*
Programma di
"Mix & Wash"
*
Misti - Asciugatura
Speciali
Cotone - Asciugatura
Cotone e Misti
lavaggio
2
7
3,5
5
1,5
46 47
30°
40°
30°
●●
●●
-
-
●●
Page 25

KAPITEL 7
PROGRAMM FÜR / GEWEBEART
DE
PROGRAMMTABELLE
PROGRAMM-WAHL-
SCHALTER
EINSTELLEN
AUF
MAX
BELADUNG
kg
HÖCHST-
TEMPERAT
UR
°C
WASCHMITTEL
EINFÜLLEN
21
Koch-/Buntwäsche
Baumwolle Leinen Jute
Baumwolle Leinen
strapazierfähige
Gewebe
Baumwolle
Mischgewebe
Synthetik
Strapazierfähige
Gewebe
Mischgewebe aus
Baumwolle und Synthetik
Synthetik (Nylon, Perlon)
Baumwolle
Mischgewebe
Feinwäsche
Synthetik (Dralon,Acryl,
Wolle
Trevira)
Kochwäsche
*
Widerstandsfähige
Buntwäsche mit
Vorwäsche
*
Widerstandsfähige
Buntwäsche
*
Widerstandsfähige
Buntwäsche
*
Pflegeleichte
Buntwäsche
*
Widerstandsfähige
Buntwäsche mit
Vorwäsche
*
Widerstandsfähige
Buntwäsche
*
Widerstandsfähige
Buntwäsche
*
Pflegeleichte
Buntwäsche
*
Spülen
*
Intensivschleudern
*
Abpumpen
Feinwäsche
Waschmaschinenge-
eignete Wolle
Handwäsche
7
7
**
7
7
7
90°
60°
60°
40°
30°
●●
●●●
●●
●●
●●
Hinweise:
* Programmen für die automatische Trocknung vorgesehen.
Es empfiehlt sich, bei stark verschmutzter Wäsche die Füllmenge auf höchstens 4 kg zu reduzieren.
Informationen zu Normtestzwecken
(Norm EN 50229)
3,5
60°
●●●
Waschen
Stellen Sie das Programm ** ein.
3,5
3,5
3,5
-
-
-
2,5
60°
50°
40°
40°
●●
Trocknen
Erste Trocknung mit 5 kg Wäsche (bestehend aus Handtüchern und Kissenbezügen) unter
●●
●●
-
●
-
-
●●
Verwendung des Trocknungsprogramms für Baumwolle ( ), Einstellung Schranktrocken ( ).
Zweite Trocknung mit 2 kg Wäsche (bestehend aus 2 Bettlaken und Handtüchern) unter Verwendung
des Trocknungsprogramms für Baumwolle ( ) und Einstellung 90 Minuten (90’).
In allen Programmen können Sie die Schleuderdrehzahl entsprechend dem Pflegeetikett des
Wäschestücks herunterregulieren. Wenn Sie keine Angabe im Wäscheetikett vorfinden, können sie die
höchstmögliche Schleuderdrehzahl des Programms anwenden.
Wenn nur einige Wäschestücke Verschmutzungen aufweisen, die mit einem flüssigen Bleichmittel
behandelt werden müssen, können Sie eine Vorbehandlung mit Bleichmittel in der Waschmaschine
vornehmen.
Legen Sie in die Waschmittelkammer “2“ den hierfür vorgesehenen Einsatz für Flüssigmittel und füllen
Sie das Bleichmittel ein. Stellen Sie das Programm „Spülen“ ( ) ein.
1,5
2
30°
30°
●●
●●
Nach der Behandlung mit Bleichmittel stellen Sie den Programmwahlschalter wieder auf OFF, fügen
Sie die anderen Wäschestücke in die Trommel hinzu und waschen normal mit dem Waschprogramm
Ihrer Wahl.
*
Schnellprogramm
*
“Mix & Wash system”
*
Spezial
Empfindliche
Mischgewebe
Programm
Mischgewebe -
Trocknen
Baumwolle -
Trocknen
Baumwolle-
Mischgewebe
3,5
3,5
1,5
30°
2
7
30°
40°
●●
●●
●●
-
30°
-
●●
5
48 49
Page 26

7. POGLAVJE
Program za:
SL
RAZPREDELNICA S PROGRAMI
GUMB ZA
IZBIRANJE
PROGRAMOV
NA:
TEÎA
(NAJVEâ]
Kg.
TEMP.
PRALNA
°C
SREDSTVA V:
21
Odporne tkanine
BombaÏ, platno
BombaÏ, odporne
tkanine iz me‰anice vlaken
BombaÏ, tkanine iz
me‰anice vlaken
Tkanine iz
vlaken in sintetike
me‰anih vlaken, sintetika
Sintetika (najlon, perlon),
bombaÏne me‰anice
me‰anice
Odporne tkanine
BombaÏ, tkanine iz
Zelo ob
ãutljive
tkanine
Belo perilo
*
Belo perilo s
predpranjem
*
Obstojne barve
*
Obstojne barve
*
Neobstojne barve
*
Obstojne barve s
predpranjem
*
Obstojne barve
*
Obstojne barve
*
Neobstojne barve
*
Izpiranje
*
Centrifugiranje z
veliko hitrostjo
*
Samo
izãrpavanje
Obãutljive tkanine
Volna (za strojno
pranje)
Roãno pranje
7
7
**
7
90°
60°
60°
●●
●●●
●●
Prosimo, da upo‰tevate naslednje:
7
7
40°
30°
●●
●●
âe je perilo zelo umazano, perite naenkrat le 4 kg perila.
Podatki za testne laboratorije
(Ref. EN 50229 Standards)
3,5
3,5
3,5
3,5
-
60°
60°
50°
40°
●●●
Pranje
Izberite program **
●●
Su‰enje
Za prvo su‰enje 5kg perila (vrsta perila: prevleke za blazine, brisaãe) izberite program za su‰enje
●●
●●
-
●
bombaÏa ( ), za v omaro ( ).
Za drugo su‰enje 2kg perila (vrsta perila: 2 rjuhe in brisaãe) izberite program za su‰enje bombaÏa
( ) v trajanju 90 minut (90’).
Pri vseh programih lahko po potrebi zniÏate hitrost centrifugiranja pod najvi‰jo
predvideno za posamezni program, pri pranju zelo obãutljivih tkanin pa lahko
-
-
-
-
tudi prekliãete centrifugiranje. To storite s pomoãjo tipke za nastavljanje hitrosti centrifugiranja.
* Programi za avtomatsko su‰enje.
âe so na posameznih kosih perila madeÏi, ki jih je treba odstraniti s pomoãjo tekoãega belila,
2,5
2
40°
30°
●●
●●
priporoãamo, da ta postopek opravite v stroju pred pranjem polnega stroja perila.
Odmerite tekoãe belilo v ustrezen predalãek, vstavljen v predelek 2 (predelek za detergent za
glavno pranje) in izberite posebni program Izpiranje . Ko je ta program zakljuãen, obrnite
gumb za izbiranje programov v izklopljeni poloÏaj, dodajte preostalo perilo in nato izberite
ustrezen program pranja.
1,5
30°
●●
Me‰anica vlaken,
obãutljiva sintetika
*
Hitri 32-min.
program
*
Program Mix &
Wash System
*
‰ano
- Su‰enje
Me
Posebni
programi
50 51
BombaÏ - Su‰enje
BombaÏ - Me
‰ano
3,5
2
7
3,5
5
1,5
30°
30°
40°
30°
●●
●●
●●
-
-
●●
Page 27

CHAPTER 7
PROGRAM FOR:
EN
TABLE OF PROGRAMMES
PROGRAMME
SELECTOR ON:
WEIGHT
MAX
kg
TEMP.
°C
CHARGE DETERGENT
21
Resistant fabrics
Cotton, linen
Cotton, mixed
resistant
Cotton, mixed
Mixed fabrics and synthetics
Mixed, resistant
Cotton, mixed fabrics,
synthetics
Synthetics (nylon,
perlon), mixed cotton
Very delicate fabrics
Whites
*
Whites with
Prewash
*
Fast coloureds
*
Fast coloureds
*
Non fast coloureds
*
Fast coloureds with
Prewash
*
Fast coloureds
*
Fast coloureds
*
Non fast coloureds
*
Rinse
*
Fast spin
*
Drain only
Delicates
“MACHINE
WASHABLE”
woollens
Hand wash
7
7
**
7
7
7
90°
60°
60°
40°
30°
●●
●●●
●●
●●
●●
Please read these notes
When washing heavily soiled laundry it is recommended the load is reduced to 4 kg maximum.
Information for the test laboratories
(Ref. EN 50229 Standards)
Washing
3,5
3,5
3,5
3,5
60°
60°
50°
40°
-
-
-
-
●●●
●●
●●
●●
●
Use the programme **
Drying
First drying with 5kg (the load consist: pillowcases and hand-towels) selecting the cotton
drying programme ( ) cupboard dry ( ).
Second drying with 2kg (the load consist: 2 sheets and hand towels) selecting the cotton
drying programme ( ) 90 minutes
(90’).
The spin speed may also be reduced, to match any guidelines suggested on the fabric label, or for
very delicate fabrics cancel the spin completely this option is available with a spin speed button.
* Programmes for automatic drying.
-
-
When only a limited number of articles have stains which require treatment with liquid
bleaching agents, preliminary removal of stain can be carried out in the washing machine.
2,5
1,5
40°
2
30°
30°
●●
●●
●●
Pour the bleach into the liquid bleach container, inserted into the compartment marked "2"
in the detergent drawer, and set the special programme "RINSE" .
When this phase has terminated, turn the programme selector on the "OFF" position, add the
rest of the fabrics and proceed with a normal wash on the most suitable programme.
Mixed, delicate
synthetics
*
Rapid 32 minute
*
Mix & Wash
system programme
3,5
30°
2
7
30°
40°
●●
●●
●●
*
Mixed - Drying
Cotton - Drying
3,5
5
-
-
SpecialS
Cotton - Mixed
52 53
1,5
30°
●●
Page 28

FR
IT
DE
SL
EN
CHAPITRE 8
SELECTION
L’appareil dispose de groupes
de programmes différents pour
laver tous types de tissus et
selon différents degrés de
salissure en attribuant au type
de lavage,la température et la
durée (voir tableau des
programmes de lavage).
TISSUS RÉSISTANTS
Ces programmes sont destinés
à accomplir des lavages et des
rinçages avec le maximum
d’efficacité.Ils sont
entrecoupés de cycles
d’essorages qui offrent des
résultats parfaits sur le rinçage.
L’essorage final retire le
maximum d’eau contenue
dans les tissus.
TISSUS MIXTES ET SYNTHÉTIQUES
La combinaison d’un système
de lavage efficace, une
rotation optimum du tambour
et l’autogestion du niveau
d’eau assurent des résultats de
lavage excellents, pendant
qu’un rinçage délicat évite les
faux plis.
CAPITOLO 8
SELEZIONE
PROGRAMMI
Per trattare i vari tipi di
tessuto e le varie gradazioni
di sporco, la lavatrice ha
fasce di programmi diversi
per tipo di tessuto,
temperatura e durata
(vedere tabella programmi
di lavaggio).
TESSUTI RESISTENTI
I programmi sono realizzati
per sviluppare il massimo
grado di lavaggio e i
risciacqui, intervallati da fasi
di centrifuga, assicurano un
perfetto risciacquo.
La centrifuga finale alla
massima velocità assicura
un’ottima strizzatura.
TESSUTI MISTI E SINTETICI
Il lavaggio ed il risciacquo
sono ottimizzati nei ritmi di
rotazione del cesto e nei
livelli di acqua.
La centrifuga ad azione
delicata, assicura una
ridotta formazione di pieghe
sui tessuti.
KAPITEL 8
PROGRAMM/
TEMPERATURWAHL
Um unterschiedliche Textilien und
Verschmutzungsgrade optimal
behandeln zu können, bietet
Ihnen diese Waschmaschine
Programmtypen für
unterschiedliche Gewebearten,
Temperaturen und
Programmdauer (siehe
Programmtabelle) an .
UNEMPFINDLICHE STOFFE
Die Programme bieten eine
maximale Reinigung und jeweils
von Schleuderphasen
unterbrochene Spülgänge, die
die optimale Spülung der
Wäsche garantieren.
Der abschließende
Schleudergang sichert die
bestmögliche Trocknung.
MISCHGEWEBE UND
KUNSTFASERN
Das Waschen und Spülen dieser
Gewebearten ist durch die
optimale Drehzahl der Trommel und
durch das perfekt abgestimmte
Wasserniveau besonders wirksam.
Das Schonschleudern verhindert
außerdem die Bildung von Falten in
der Wäsche.
8. POGLAVJE
IZBIRANJE
PROGRAMOV
Pralni stroj ima skupine
programov, ki omogoãajo
pranje razliãno umazanega
perila, kot seveda tudi
pranje razliãnih vrst tkanin.
Programi pranja se med
seboj razlikujejo po naãinu
pranja, temperaturah in po
trajanju (gl. razpredelnico
programov pranja).
OBSTOJNE TKANINE
Stroj pere in izpira perilo na
teh programih z intenzivno
moãjo. Po vsakem vmesnem
izpiranju stroj perilo tudi
oÏame, kar zagotavlja
popolno izpiranje. Konãno
centrifugiranje perilo
temeljito oÏame.
TKANINE IZ ME·ANIH IN
SINTETIâNIH VLAKEN
Ritem vrtenja bobna in nivo
vode zagotavljata najbolj‰e
rezultate pranja in izpiranja.
NeÏno oÏemanje prepreãi,
da bi se perilo preveã
zmeãkalo.
CHAPTER 8
SELECTION
For the various types of
fabrics and various degrees
of dirt the washing machine
has different programme
bands according to: wash
cycle, temperature and
lenght of cycle (see table of
washing cycle
programmes).
RESISTANTS FABRICS
The programmes have been
designed for a maximum
wash and the rinses, with
spin intervals, ensure perfect
rinsing.
The final spin gives more
efficient removal of water.
MIXED AND SYNTHETIC
FABRICS
The main wash and the rinse
gives best results thanks to
the rotation rhythms of the
drum and to the water
levels.
A gentle spin will mean that
the fabrics become less
creased.
PROGRAMME SPÉCIAL
“RINÇAGES”
Ce programme effectue trois
rinçages et un essorage
intermédiaire (qui peut être
réduit ou supprimé en
agissant sur la touche
appropriée). Il peut être utilisé
pour rincer tous types de
tissus, par exemple après un
lavage à la main.
Ce programme peut être en
outre utilisé comme cycle de
BLANCHISSAGE (voir le
tableau des programmes).
PROGRAMME SPÉCIAL
“ESSORAGE ENERGIQUE”
Ce programme effectue un
essorage à la vitesse
maximale (qui peut être
réduit en agissant sur la
touche appropriée).
UNIQUEMENT VIDANGE
Ce programme vous permet
d’effectuer la vidange de l’eau.
54 55
PROGRAMMA SPECIALE
“RISCIACQUI”
Questo programma effettua
3 risciacqui della biancheria
con centrifuga intermedia
(eventualmente riducibile o
annullabile tramite
l’apposito tasto). E’
utilizzabile per risciacquare
qualsiasi tipo di tessuto, ad
esempio dopo un lavaggio
effettuato a mano.
Questo programma può
essere inoltre utilizzato come
ciclo di CANDEGGIO (vedi
tabella programmi).
PROGRAMMA SPECIALE
“CENTRIFUGA FORTE”
Questo programma effettua
una centrifuga alla massima
velocità (eventualmente
riducibile tramite l’apposito
tasto).
SOLO SCARICO
Questo programma effettua
lo scarico dell’acqua.
SPEZIALPROGRAMM
“SPÜLEN”
Das Programm Spülen führt drei
Spülgänge aus mit letztem
Schleudergang,der evtl.
reduziert oder ganz
ausgeschlossen werden kann
(drücken Sie die entsprechende
Taste).
Geeignet zum Spülen jedweder
Gewebeart,z.B.nach dem
Waschen per Hand.
Dieses Programm kann auch als
BLEICHPROGRAMM benutzt
werden (s.Programmtabelle).
SPEZIALPROGRAMM
“EXTRASCHLEUDERN”
Dieses Spezialprogramm führt
einen Intensivschleudergang
(die Schleuderdrehzahl kann
evtl. durch Drücken der
entsprechenden Taste
reduziert werden).
ABPUMPEN
Das Programm pumpt das
Wasser nur ab.
POSEBEN PROGRAM
“IZPIRANJE”
Ta program opravi tri
izpiranja z vmesnim
centrifugiranjem (hitrost
lahko prilagodite s pomoãjo
ustrezne tipke). Ta program
je namenjen izpiranju
razliãnega perila po pranju
na roke.
Primeren je tudi za
odstranjevanje madeÏev s
perila s pomoãjo belila, kot
je bilo to Ïe opisano.
HITRO CENTRIFUGIRANJE
Ta program je namenjen
intenzivnemu centrifugiranju
perila (hitrost lahko
prilagodite s pomoãjo
ustrezne tipke).
IZâRPAVANJE VODE
Program je namenjen
izãrpavanju vode iz bobna.
SPECIAL “RINSES”
PROGRAMME
This programme carries out
three rinses with a
intermediate spin (which
can be reduced or
excluded by using the
correct button). It can be
used for rinsing any type of
fabric, eg. use after handwashing.
This program can be also
used as cycle of Bleaching
(see table of washing cycle
programmes).
SPECIAL “FAST SPIN”
PROGRAMME
Programme “FAST SPIN”
carries out a maximum spin
(which can be reduced by
using the correct button).
DRAIN ONLY
This programme drains out
the water.
Page 29

FR
TISSUS TRÈS DÉLICATS
Il s’agit d’un nouveau
concept de lavage qui
alterne des moments de
brassage et de trempage du
linge; ce processus est
particulièrement indiqué pour
le lavage de tissus
extrêmement délicats.
Le lavage et le rinçage sont
effectués à pleine eau afin
d’obtenir les meilleures
prestations.
PROGRAMME LAINE
Un programme spécialisé
pour laver les articles ont
l’étiquette Woolmark .Le
cycle consiste en périodes
alternées d’activité et de
repos avec une température
maximum de 30°C et se
termine par 3
rinçages, dont un pour
l’assouplissant,et un essorage
court.
IT
TESSUTI DELICATISSIMI
E’ un nuovo concetto di
lavaggio in quanto alterna
momenti di lavoro a
momenti di pausa,
particolarmente indicato
per il lavaggio di tessuti
molto delicati. Il lavaggio e i
risciacqui sono eseguiti con
alto livello di acqua per
assicurare le migliori
prestazioni.
PROGRAMMA LANA
E’ un programma dedicato
esclusivamente ai tessuti in
“Lana lavabile in lavatrice”.
Il ciclo alterna momenti di
lavoro a momenti di pausa
con una temperatura
massima di 30°C e si
conclude con 3 risciacqui
ed una centrifuga delicata.
DE
HOCHEMPFINDLICHE STOFFE
Dieses neue Waschkonzept
mit abwechselnden Waschund Einweichphasen ist
besonders geeignet für die
Wäsche feinster Textilien. Die
Spülgänge werden mit
hohem Wasserstand
durchgeführt, um eine
schonende Behandlung und
beste Ergebnisse zu sichern.
WOLLPROGRAMM
Das Programm ist
ausschließlich für
waschmaschinengeeignete
Wolle vorgesehen. Das
Programm wechselt zwischen
Arbeits- und Ruhepausen mit
einer Höchsttemperatur von
30°C und schließt mit 3
Spülgängen und einem
Schonschleudergang ab.
SL
ZELO OBâUTLJIVE TKANINE
To je nov program, ki perilo
izmeniãno pere in namaka,
in je predvsem namenjen
pranju zelo obãutljivih tkanin.
Pranje in izpiranje poteka v
veãji koliãini vode, kar
zagotavlja najbolj‰e
rezultate.
PROGRAM ZA VOLNO
Ta program je namenjen
pranju perila iz volne,
oznaãenega z etiketo
„Woolmark”. Tekom
programa se izmenjujejo
aktivne faze in premori.
Pranje poteka pri temperaturi
do 30°, zakljuãi pas se s 3
izpiranji in kratkotrajnim
centrifugiranjem.
EN
SPECIAL DELICATE FIBRES
This is a new wash cycle
which alternates washing
and soaking and is
particularly recommended
for very delicate fabrics.
The wash cycle and rinses
are carried out with high
water levels to ensure best
results.
WOOLMARK PROGRAMME
A programme dedicated to
washing fabrics labelled
with the woolmark .The
cycle comprises of alternate
periods of activity and
pauses. The programme has
a maximum temperature of
30° and concludes with 3
rinses and a short spin.
LAVAGE A LA MAIN
Cette machine à laver est
également équipée d’un
programme de Lavage à la
main.
Ce programme vous permet
d’effectuer un cycle de
lavage complet pour les
vêtements qui exigent d’être
lavés à la main.
Le programme a une
température de 30°C et se
termine par 3 rinçages et un
essorage rapide.
PROGRAMME CHEMISES
Cycle de lavage complet
pour chemises.
Le lavage et le rinçage sont
optimisés au niveau des
rythmes de rotation du
tambour et des niveaux
d’eau.
Le programme atteint une
température maximale de
30°C et se termine par 3
rinçages ainsi qu’un essorage
délicat.
56
PROGRAMMA SPECIALE
“LAVAGGIO A MANO“
La macchina presenta
anche un ciclo di lavaggio
delicato chiamato Lavaggio
a mano.
Il programma consente un
ciclo di lavaggio completo
per i capi da lavare
esclusivamente a mano.
Il programma raggiunge
una temperatura massima di
30°C e termina con 3
risciacqui e una centrifuga
delicata.
PROGRAMMA CAMICIE
Ciclo di lavaggio completo
per camicie.
Il lavaggio e il risciacquo
sono ottimizzati nei ritmi di
rotazione del cesto e nei
livelli di acqua.
Il programma raggiunge
una temperatura massima
di 30°C e termina con 3
risciacqui e una centrifuga
delicata.
SPEZIALPROGRAMM
“HANDWÄSCHE”
Das Gerät verfügt auch über
ein besonders sanftes
Waschprogramm,das
Handwäsche-Programm.Es
handelt sich um einen
kompletten Waschzyklus für
Wäschestücke,die nur mit der
Hand gewaschen werden
können.Das Programm erreicht
eine Höchsttemperatur von
30°C und endet mit 3
Spülgängen und einem
Schonschleudergang.
PROGRAMM HEMDEN
Das ist ein komplettes
Waschprogramm extra für
Oberhemden.
Trommelreversierrhythmus
und Wassermenge der
Wasch- und Spülgänge sind
optimal abgestimmt.
Das Programm arbeitet bei
einer maximalen Temperatur
von 30°C und endet mit 3
Spülgängen und einer
sanften Schonschleuderung.
'ROâNO' PRANJE
Pralni stroj omogoãa tudi
neÏno pranje zelo
obãutljivega perila,
enakovredno roãnemu
pranju. Ta program je
namenjen pranju perila,
oznaãenega z etiketo 'Roãno
pranje'. Stroj opere perilo pri
30°C, program pa se zakljuãi
z 3 izpiranji in neÏnim
centrifugiranjem.
PROGRAM “SRAJCE”
Ta program je namenjen
pranju srajc.
Zaradi prilagojenega
obraãanja bobna in vi‰ine
gladine vode so zagotovljeni
optimalni rezultati pranja in
izpiranja.
Najvi‰ja za ta program
predvidena temperature je
30°C, program pa se zakljuãi
s 3 izpiranji in kratkotrajnim
oÏemanjem.
SPECIAL “HAND WASH”
This washing machine also
has a gentle Hand Wash
programme cycle.This
programme allows a
complete washing cycle for
garments specified as
“Hand Wash only”on the
fabric care label. The
programme has a
temperature of 30°C and
concludes with 3 rinses and
a slow spin.
“SHIRTS” PROGRAMME
This programme allows a
complete washing cycle for
shirts.
The main wash and the rinse
gives best results thanks to
the rotation rhythms of the
drum and to the water
levels.
The programme has a
maximum temperature of
30°C and concludes with 3
rinses and a short spin.
57
Page 30

FR
PROGRAMME “RAPIDE 32
MINUTES”
Ce programme permet
d’effectuer un cycle de
lavage complet en 30
minutes environ pour des
charges de linge jusqu’à 2
kg et à une température de
30°C.
Quand vous sélectionnez le
programme "Rapide 32
minutes", nous vous
recommandons d'utiliser
seulement 20% de la
quantité indiquée sur la
boîte de produit.
IT
PROGRAMMA RAPIDO “32
MINUTI”
Il programma rapido 32
minuti permette di effettuare
in 30 minuti circa un ciclo
completo di lavaggio per un
massimo di 2 kg di
biancheria ad una
temperatura di 30°C.
Quando selezionate il
“programma rapido 32
minuti” utilizzate solo il 20%
della quantità di detersivo
riportata sulla confezione.
DE
SCHNELLPROGRAMM 32
MINUTEN
Das Schnellprogramm 32
Minuten ermöglicht es, in ca.
30 Minuten einen kompletten
Waschzyklus für maximal 2 kg.
Wäsche bei 30°C
durchzuführen.
Bei Wahl der
“Schnellprogramm 32
Minuten” empfehlen wir, nur
20% der auf der
Waschmittelverpackung
angegebenen Menge zu
verwenden.
CZ
'32-MINUTNI HITRI' PROGRAM
âe izberete ta program, bo
perilo oprano v pribl. 30
minutah; perete lahko najveã
2 kg perila hkrati, pranje pa
poteka pri temperaturi 30°C.
Priporoãamo, da v predelek II
predalãka za pralna sredstva
odmerite le 20% priporoãene
koliãine detergenta za
obiãajno pranje.
EN
32 MINUTE RAPID
PROGRAMME
The 32 minute rapid
programme allows a
complete washing cycle to
be carried out in
approximately 30 minutes,
with up to a maximum load
of 2 kg and a temperature of
30°C.
When selecting the "32
minute rapid" programme,
please note that we
recommend you use only
20% of the recommended
quantities shown on the
detergent pack.
PROGRAMME “MIX & WASH
SYSTEM”
Il s'agit d'un brevet exclusif
Candy et il comporte 2
grands avantages pour
l'utilisateur:
• pouvoir laver différents
tissus ensemble (exemple:
coton + synthétique etc…)
QUI NE DÉTEINT PAS;
• effectuer le lavage avec
une économie d'énergie
considérable.
Le programme de lavage
"Mix & Wash" a une
température de 40°C et
alterne phases dynamiques
(le panier qui tourne) aux
phases statiques (linge en
trempage en phase de
repos).
Pour ce motif il a une durée
plus élevée, en atteignant
presque les 2 heures.
La consommation d'énergie
électrique pour le cycle
entier est de seulement 850
W/h.
Important:
• le premier lavage de
nouveau linge colorées,
doit être effectué
séparément;
• dans chaque cas, ne
jamais mélanger du linge
coloré QUI DÉTÉINT.
PROGRAMMA “MIX & WASH”
Si tratta di un brevetto
esclusivo Candy e offre 2
grandi vantaggi:
• poter lavare insieme capi
di diversi tessuti (es. cotone
+ sintetico ecc…) NON
STINGENTI;
• effettuare il lavaggio con
un notevolissimo risparmio
di energia.
Il programma di lavaggio
“Mix & Wash” ha una
temperatura di 40°C ed
alterna fasi dinamiche (il
cesto che gira) a fasi statiche
(capi in ammollo in fase di
riposo). Per questo motivo ha
una durata più elevata,
raggiungendo quasi le 2 ore.
Il consumo di energia
elettrica per l’intero ciclo a
pieno carico è di soli 850
W/h.
Avvertenze:
•il primo lavaggio di capi
colorati nuovi deve essere
effettuato separatamente.
•in ogni caso, non mischiare
mai capi colorati stingenti.
“MIX & WASH SYSTEM”
PROGRAMM
Es handelt sich um ein
exklusives, von Candy
patentiertes
Spezialprogramm,das für Sie
einen doppelten Vorteil
bedeutet:
• Sie können NICHT
AUSFÄRBENDE Wäschestücke
aus unterschiedlichen
Geweben zusammen
waschen (z.B.Baumwolle
und Kunstfasern, usw.)
• Gleichzeitig erreichen Sie
mit diesem Programm eine
außerordentliche
Energieersparnis
Das Waschprogramm “Mix &
Wash“ wäscht mit einer
Temperatur von nur 40°C,
wobei sich dynamische Phasen
(in denen sich die Trommel
dreht) mit Ruhepausen (in
denen die Wäsche in der
Waschflotte liegen bleibt)
abwechseln.Aus diesem
Grund ist die Programmdauer
mit fast 2 Stunden zwar länger,
aber der Energieverbrauch für
das gesamte Waschprogramm
beträgt nur 0,85 KW/h.
Wichtiger Hinweis:
• Buntwäsche, die zum ersten
Mal gewaschen wird,sollte
separat gewaschen werden.
•Mischen Sie niemals
ausfärbende Wäschestücke
mit anderer Wäsche.
PROGRAM »MIX & WASH«
To je ekskluzivni Candyjev
sistem pranja, ki nudi
uporabniku dve veliki
prednosti:
● moÏno je skupno pranje
perila iz razliãnih
materialov, npr. bombaÏ +
sintetika.
● Ta program zagotavlja
obãuten prihranek
energije.
Stroj opere perilo pri 40°C,
izmenjujeta se dinamiãna
faza (obraãanje bobna) in
statiãna faza (tkanina se
med fazo mirovanja
namaka); program pa traja
dlje ãasa - skoraj 2 ure.
Poraba energije za cel
program je samo 850 W/h.
Pomembno!
● Nove, pisane kose prviã
perite posebej!
● Nikoli ne perite skupaj
razliãne neobstojne pisane
kose!
“MIX & WASH SYSTEM”
PROGRAMME
This is an exclusive Candy
system and involves 2 great
advantages for the
consumer:
• to be able to wash
together different type of
fabrics (e.g. cotton +
synthetic etc…) FAST
COLOUREDS;
•to wash with a considerable
energy saving.
The "Mix & Wash" programme
has a temperature of 40°C
and alternate dynamic
phases (the basket that turns)
to static phases (fabrics in
soak in phase of rest) with a
duration programme that
almost reaching the 2 hours.
The energy consumption for
the complete cycle is only
850 W/h.
Important:
•the first washing of new
coloureds fabrics must be
done separately;
• in every case, never mix
NON-FAST COLOUREDS
fabrics.
58
59
Page 31

FR
SECHAGE MIXTES
Sèchage de tissus mélangés
(synthétiques/coton), tissus
synthétiques.
IT
ASCIUGATURA MISTI
Asciugatura di tessuti misti
(sintetici/cotone), tessuti
sintetici.
DE
SCHONTROCKNEN
Trocknen von Mischgeweben
(Synthetik/Baumwolle) und
synthetischen Stoffen.
SL
SU·ENJE “ME·ANO”
Tkanine iz me‰anice vlaken
sintetike in bombaÏa,
sintetiãne tkanine - simbol
na stikalu za izbiranje
programov.
EN
SYNTHETICS DRYING
Mixed fabrics
(synthetics/cotton), synthetic
fabrics.
SECHAGE COTON
Sèchage de tissus en coton,
éponge, lin, chanvre,etc...
59’ TOUT EN 1
Un programme de lavage et
de séchage complet d’une
durée de 59min environ.
C’est le programme idéal
pour obtenir des vêtements
propres et secs prêts à être
portés immédiatement.
- Pour des petites charges
de 1,5 kg maxi (pour 4
chemises par exemple)
- Pour des vêtements peu
sales (coton et mixte)
Il est recommandé de
réduire le dosage de lessive
(par rapport à la charge
normale) pour éviter tout
gaspillage.
ASCIUGATURA COTONE
Asciugatura tessuti di cotone,
spugna, lino, canapa, ecc...
RAPIDO 59’
Un programma completo di
lavaggio e asciugatura
rapida della durata di circa
59’. E’ ideale per ottenere
capi puliti ed asciutti che
desideriamo indossare
immediatamente.
- Per piccoli carichi di max
1,5 kg (ad esempio 4
camicie)
- Capi poco sporchi (cotone
e misti)
Con questo programma
raccomandiamo di ridurre la
dose di detersivo (rispetto a
quella normale) per evitare
lo spreco dello stesso.
INTENSIVTROCKNEN
Trocknen von Textilien aus
Baumwolle,Frottee, Leinen,
Hanf etc.
KURZPROGRAMM 59’
Es handelt sich um ein
komplettes Wasch- und
Trocknungsprogramm, das nur
ca. 59 Minuten dauert. Ideal
zum Waschen und Trocknen
von Wäschestücken,die sofort
wieder bereit stehen sollen.
- Für eine kleine
Wäschemenge von max.1,5
kg (z.B. 4 Oberhemden)
- Für gering verschmutzte
Wäsche (Baumwolle und
Mischgewebe)
Wir empfehlen bei diesem
Programm die
Wachmittelmenge
entsprechend zu reduzieren,
um unnötige Verschwendung
zu vermeiden.
SU·ENJE “BOMBAΔ
BombaÏ, frotir, platno, juta,
lan itd. - simbol na
stikalu za izbiranje programov.
HITRI 59’
Kompleten program pranja
in su‰enja, ki traja samo 59'.
Tako imate v zelo kratkem
ãasu na voljo oprano,
posu‰eno in osveÏeno perilo,
ki ga lahko ponovno
uporabite takoj, ko je
program zakljuãen.
- Najveãja dovoljena
koliãina perila: 1,5 kg (npr. 4
srajce)
- Manj (bombaÏ, me‰anica
vlaken)
Priporoãamo, da za ta
program v stroj odmerite
manj‰o koliãino detergenta
(v primerjavi z obiãajnim
programom), da se izognete
nepotrebni potrati.
COTTON DRYING
Cotton, terry towelling, linen,
hemp fabrics, etc...
RAPID 59’
A complete express washing
and drying cycle lasting only
59'.This is an ideal program
for having dry, refreshed
and ready-to-wear clothes
as soon as the cycle is
finished.
- Maximum load: 1,5 kg (4
shirts for example)
- Lightly soiled fabrics
(cotton and mixed fabrics)
With this program we
recommend that you
reduce the detergent
loading dose (compared to
the normal one), in order to
avoid detergent waste.
60 61
Page 32

FR
IT
DE
SL
EN
CHAPITRE 9
TIROIR A LESSIVE
Le tiroir à lessive est divisé en
3 petits bacs:
– le bac marquée du
symbole “1” sert pour la
lessive destinée au
prélavage;
– le bac marquée du
symbole “✿✿” sert pour
des additifs spéciaux:
adoucisseurs, parfums,
amidon, produits pour
l’azurage, etc;
– le bac marquée du
symbole “2” sert pour la
lessive destinée au
lavage.
Si vous souhaitez utiliser une
lessive liquide, un récipient
spécial peut être inséré
dans la section “2” du tiroir à
lessive. Grâce à ce système,
la lessive s’écoulera dans le
tambour seulement au bon
moment.
Ce bac doit être introduit
dans la section "2" du tiroir à
lessive, également lorsque
l’on désire utiliser le
programme "RINÇAGE"
comme cycle de
BLANCHISSAGE.
ATTENTION :
NOUS RAPPELONS QUE
CERTAINS PRODUITS
ONT DES DIFFICULTÉS A
ÊTRE ÉVACUÉS; DANS
CE CAS NOUS VOUS
CONSEILLONS D’UTILISER
LE DOSEUR QUI VA
DIRECTEMENT DANS LE
TAMBOUR.
ATTENTION :
DANS LE BAC
MARQUÉE DU SYMBOLE
“
✿✿” N’INTRODUIRE
QUE DES PRODUITS
LIQUIDES. LA MACHINE
EST PROGRAMMÉE DE
MANIÈRE À
AUTOMATIQUEMENT
ABSORBER LES
PRODUITS
COMPLÉMENTAIRES
PENDANT LE DERNIER
RINÇAGE DE TOUS LES
CYCLES DE LAVAGE.
62
CAPITOLO 9
CASSETTO DETERSIVO
Il cassetto detersivo è
suddiviso in 3 vaschette:
– la vaschetta
contrassegnata con “1”
serve per il
detersivo del prelavaggio;
– la vaschetta
contrassegnata con“✿✿”,
serve per additivi speciali,
ammorbidenti, profumi
inamidanti, azzurranti, ecc.
– la vaschetta
contrassegnata con “2”
serve per il detersivo di
lavaggio.
Se si desidera adoperare
detersivi liquidi, va introdotta
l’apposita vaschetta in
dotazione nello scomparto
contrassegnato con “2”del
cassetto detersivo.
Questo assicura che il sapone
liquido vada nel cesto solo al
momento in cui è necessario.
Se si desidera Candeggiare
occorre utilizzare il
programma Risciacqui ed
inserire la sopracitata
vaschetta sempre nello
scomparto “2”.
ATTENZIONE: SI RICORDI
CHE ALCUNI DETERSIVI
SONO DI DIFFICILE
ASPORTAZIONE. IN
QUESTO CASO LE
CONSIGLIAMO L’USO DI
UN APPOSITO
CONTENITORE DA PORRE
NEL CESTELLO.
ATTENZIONE: NELLA
VASCHETTA
CONTRASSEGNATA
CON “
✿✿” METTERE
SOLO PRODOTTI LIQUIDI.
LA MACCHINA È
PREDISPOSTA AL
PRELIEVO AUTOMATICO
DEGLI ADDITIVI
DURANTE I’ULTIMO
RISCIACQUO IN TUTTI I
CICLI DI LAVAGGIO.
KAPITEL 9
WASCHMITTELBEHÄLTER
Der Waschmittelbehälter ist in
3 Fächer unterteilt:
– Das Fach mit "1" ist für die
Vorwäsche.
– Das Fach “✿✿”, ist für
spezielle Zusätze wie
Weichspüler, Duftstoffe,
Stärke usw.
– Das Fach mit "2" ist für das
Hauptwaschmittel.
Für Flüssigwaschmittel
benutzen Sie bitte den
beiliegenden Einsatz, der wie
abgebildet in die
Waschmittelkammer “2” der
Waschmittelschublade
einzusetzen ist.
Der Einsatz für Flüssigmittel ist
ebenfalls in die
Waschmittelkammer "2"
einzusetzen, wenn Sie das
Programm “SPÜLEN“ als
BLEICHPROGRAMM nutzen
wollen.
ACHTUNG:
BEKANNTLICH LASSEN
SICH EINIGE
WASCHMITTEL SCHWER
EINSPÜLEN, IN SOLCHEN
FÄLLEN BENUTZEN SIE
BITTE DIE SPEZIELLEN
BEHÄLTER FÜR DIE
VERWENDUNG DIREKT
IN DER TROMMEL.
ACHTUNG:
IN DAS FACH “
FLÜSSIGE MITTEL
EINFÜLLEN. DAS GERÄT
SPÜLT DIE ZUSATZMITTEL
AUTOMATISCH
WÄHREND DES LETZTEN
SPÜLGANGS IN ALLEN
WASCHPROGRAMMEN
EIN.
✿✿” NUR
9. POGLAVJE
PREDALâEK ZA
PRALNA SREDSTVA
Predalãek za pralna sredstva
je razdeljen na tri predelke:
- prvi, "1", je namenjen
detergentu za
predpranje;
- v predelek, oznaãen s
simbolom ✿✿, odmerite
posebne dodatke mehãalec, ‰krob, di‰ave
ipd.
- predelek, oznaãen s
‰tevilko "2", je namenjen
detergentu za glavno
pranje;
âe uporabljate tekoãi
detergent, vstavite priloÏeno
posodico za uporabo
tekoãega detergenta v
predelek "2". To zagotavlja,
da se bo detergent odmeril v
boben v pravem trenutku.
To posodico vstavite tudi v
primeru, da Ïelite s pomoãjo
programa 'Izpiranje' s
pomoãjo belila odstraniti
madeÏe s perila.
OPOMBA!
âE UPORABLJATE
DETERGENTE, KI SE
TEÎKO DOZIRAJO V
BOBEN, PRIPOROâAMO,
DA UPORABITE POSEBNO
POSODICO, V
KATERO ODMERITE
DETERGENT IN JO
POLOÎITE V BOBEN
DIREKTNO MED PERILO.
OPOMBA!
V PREDELEK, OZNAâEN S
SIMBOLOM
ODMERITE SAMO TEKOâE
DODATKE! Stroj
bo pri vseh programih te
dodatke v
pravem trenutku, ob
zadnjem izpiranju,
samodejno doziral v stroj.
✿✿,
CHAPTER 9
DETERGENT
DRAWER
The detergent draw is split
into 3 compartments:
- the compartment labelled
"1" is for prewash
detergent;
- the compartment
labelled “✿✿” is for special
additives, fabric softeners,
fragrances, starch,
brighteners etc;
- the compartment labelled
"2" is for main wash
detergent.
If liquid detergents are used,
please insert the special
container supplied into the
compartment marked “2”in
the detergent drawer. This
ensures that the liquid
detergent enters the drum
at the right stage of the
wash cycle.
This special container must
be inserted into the
compartment marked "2" in
the detergent drawer, also
when you wish to use the
"RINSE" programme as
BLEACHING cycle.
NOTE: SOME
DETERGENTS ARE
DIFFICULT TO REMOVE.
FOR THESE, WE
RECOMMEND YOU USE
THE SPECIAL DISPENSER
WHICH IS PLACED IN
THE DRUM.
NOTE: ONLY PUT
LIQUID PRODUCTS IN
THE COMPARTMENT
LABELLED “
MACHINE IS
PROGRAMMED TO
AUTOMATICALLY TAKE
UP ADDITIVES DURING
THE FINAL RINSE
STAGE FOR ALL WASH
CYCLES.
✿✿”. THE
63
Page 33

FR
IT
DE
SL
EN
CHAPITRE 10
LE PRODUIT
ATTENTION:
si vous devez laver des tapis,
des couvre-lits ou d’autres
pièces lourdes, nous
conseillons de ne pas
essorer.
Pour laver à la machine des
vêtements et de la lingerie
se reporter à l’étiquette qui
doit mentionner “pure laine
vierge” et l’indication “ne se
feutre pas”ou “peut être
lavé en machine”.
ATTENTION:
Au cours de la phase
de sélection vérifier
que:
- aucun objet
métallique ne se
trouve dans le linge à
laver (boucles,
épingles de nourrice,
épingles, monnaie,
etc.);
- les taies d’oreiller
soient boutonnées, les
fermetures à glissière,
les crochets, les oeillets
soient fermés, les
ceintures et les rubans
des robes de chambre
soient noués;
- les anneaux soient
enlevés des rideaux;
- n’oublier pas de lire
attentivement
l’étiquette sur les tissus;
- Si, au cours de la
sélection, vous trouvez
des taches résistantes,
les enlever à l’aide
d’un nettoyant
spécial.
CAPITOLO 10
IL PRODOTTO
ATTENZIONE:
se deve lavare tappetoni,
copriletti o altri indumenti
pesanti é bene non
centrifugare.
Indumenti e biancheria di
lana, per poter essere lavati
in lavatrice, devono essere
contrassegnati con il
simbolo “Pura Lana Vergine”
e avere inoltre l’indicazione
“Non infeltrisce” oppure
“Lavabile in lavatrice”.
ATTENZIONE:
Durante la selezione si
assicuri che:
- nella biancheria da
lavare non vi siano
oggetti metallici (ad
esempio fermagli, spille
di sicurezza, spilli,
monete, ecc.);
- abbottoni federe,
chiuda le cerniere
lampo, gancetti a
occhielli, annodi cinghie
sciolte e lunghi nastri di
vestaglie;
- asporti dalle tendine
anche i rulli di
scorrimento;
- osservi attentamente le
etichette sui tessuti;
- se durante la selezione
vede delle macchie
resistenti, le asporti con
del detersivo speciale o
con un’apposita pasta
di lavaggio.
KAPITEL 10
DAS PRODUKT
ACHTUNG:
Wenn Sie Kleinere Läufer,
Tagesdecken oder ähnliche,
schwere Textilien waschen,
sollten Sie auf das
Schleudern verzichten.
Das Symbol “reine Wolle”
kennzeichnet Kleidung und
Textilien aus Wolle, die für die
Maschinenwäsche geeignet
sind. Darüber hinaus sollten
solche Textilien den Hinweis
“nicht filzend”oder
“waschmaschinenecht”
tragen.
ACHTUNG:
Achten Sie beim
Sortieren der Wäsche
auf folgende Details:
- keine Metallteile (z.B.
Schnallen,
Sicherheitsnadeln,
Anstecknadeln,
Münzen) an oder in der
Wäsche;
- Kissenbezüge
zuknöpfen,
Reißverschlüsse und
Druckknöpfe schließen,
lose Gürtel und Bänder
von Morgenröcken
zuknöpfen;
- Rollen von den
Gardinen entfernen;
- Hinweise auf den
Wäscheetiketten
genauestens
beachten;
- beim Sortieren
auffallende,
hartnäckige Flecken
mit Spezialreiniger oder
geeigneter
Waschpaste
vorbehandeln.
10. POGLAVJE
PRIPRAVA PERILA
NA PRANJE
OPOZORILO!
PRIPOROâAMO, DA
IZKLOPITE CENTRIFUGO,
KADAR V PRALNEM
STROJU PERETE MANJ·E
PREPROGE, POSTELJNA
PREGRINJALA ALI TEÎJA
OBLAâILA.
V pralnem stroju smete prati
le taka volnena oblaãila in
perilo, pri katerih je na etiketi
z navodili za vzdrÏevanje
navedeno "MOÎNO PRANJE
V PRALNEM STROJU".
OPOZORILO:
Pred zaãetkom pranja
razvrstite perilo in vsak
kos posebej skrbno
preglejte, kar velja ‰e
posebej za Ïepe, ter
istoãasno naredite
oziroma preglejte ‰e
naslednje:
- ãe na oz. v perilu, ki ga
Ïelite oprati ni kovinskih
predmetov kot npr.
priponk, varnostnih
zaponk, kovancev ipd.),
• zapnite gumbe na
posteljnini, zaprite
zadrge, sponke, stiskaãe
in podobno, zaveÏite
pasove in dolge trakove
na haljah,
• z zaves odstranite
drsnike, skrbno preglejte
etikete na perilu,
• ãe med razvr‰ãanjem
opazite na posameznih
kosih perila madeÏe,jih
odstranite pred
priãetkom pranja s
posebnimi detergenti za
odstranjevanje
madeÏev.
CHAPTER 10
THE PRODUCT
IMPORTANT:
When washing heavy rugs,
bed spreads and other
heavy articles, it is advisable
not to spin.
To be machine-washed,
woollen garments and other
articles in wool must bear
the “Machine Washa ble
Label”.
IMPORTANT:
When sorting articles
ensure that:
- there are no metal
objects in the washing
(e.g. brooches, safety
pins, pins, coins etc.).
- cushion covers are
buttoned, zips and
hooks are closed, loose
belts and long tapes on
dressing gowns are
knotted.
- runners from curtains are
removed.
- attention is paid to
garment labels.
- when sorting, any tough
stains should be
removed prior to
washing using stain
removers only
recommended on
label.
64 65
Page 34

FR
IT
DE
SL
EN
CHAPITRE 11
CONSEILS UTILES
POUR L’UTILISATEUR
SUGGESTION POUR L’UTILISATION DE
VOTRE LAVE-LINGE
Dans le souci du respect de
l’environnement et avec le
maximum d’économie d’énergie,
charger au maximum votre lavelinge pour éliminer les éventuels
gaspillages d’énergie et d’eau.Nous
recommandons d’utiliser la capacité
maximale de chargement de votre
lave-linge.
Vous pouvez ainsi économiser
jusqu’à 50% d’énergie si vous
pratiquez le chargement maximal.
Effectuez un lavage unique à
l’opposé de 2 lavages en 1/2
charge.
QUAND LE PRE-LAVAGE EST-IL
VRAIMENT NÉCESSAIRE ?
Seulement dans le cas d’un linge
particulièrement sale. Dans le cas
d’un linge normalement sale, ne
sélectionnez pas l’option
" prélavage ",ceci vous permettra
une économie d’énergie de 5 à
15%.
CAPITOLO 11
CONSIGLI UTILI
PER GLI UTENTI
Brevi suggerimenti per un
utilizzo del proprio
elettrodomestico nel rispetto
dell’ambiente e con il massimo
risparmio
CARICARE AL MASSIMO LA
PROPRIA LAVABIANCHERIA
Per eliminare eventuali sprechi
di energia, acqua o detersivo si
raccomanda di utilizzare la
massima capacità di carico
della propria lavabiancheria. E’
possibile infatti risparmiare fino
al 50% di energia con un
carico pieno effettuato con un
unico lavaggio rispetto a due
lavaggi a mezzo carico.
QUANDO SERVE VERAMENTE IL
PRELAVAGGIO?
Solamente per carichi
particolarmente sporchi!
Si risparmia dal 5 al 15% di
energia evitando di
selezionare l’opzione
prelavaggio per biancheria
normalmente sporca.
KAPITEL 11
EINIGE NÜTZLICHE
HINWEISE
Wir möchten Ihnen im folgenden
einige Hinweise für die richtige
Nutzung Ihres Haushaltsgerätes,
damit Sie es umweltschonend und
mit der höchstmöglichen Ersparnis
betreiben können.
STETS MAXIMALE FÜLLUNG BELADEN
Um Strom,Wasser und Waschmittel
nicht zu verschwenden,empfehlen
wir,Ihre Waschmaschine stets mit der
maximalen Wäschefüllung zu
beladen. Das Waschen einer vollen
Wäscheladung emöglicht eine
Erspamis von bis zu 50% Strom
gegenüber zwei Wäscheladungen
mit halber Menge.
WANN IST EINE VORWÄSCHE
WIRKLICH NOTWENDIG?
In der Regel nur für stark
verschmutzte Wäsche!
Wenn Sie normal oder wenig
verschmutzte Wäsche waschen,
sparen Sie zwischen 5% und 15%
Strom,wenn Sie keine Vorwäsche
wählen.
11. POGLAVJE
NEKAJ KORISTNIH
NASVETOV
V nadaljevanju vam
navajamo nekaj koristnih, da
boste lahko va‰ pralni stroj
uporabljali dobro, varãno in v
skladu z varovanjem okolja.
PRIPOROâENA KOLIâINA
PERILA
âe Ïelite prepreãiti
nepotrebno tro‰enje
energije, vode in pralnih
sredstev, priporoãamo, da
perete poln stroj perila,
vendar pa ne prekoraãite
predpisanih najveãjih koliãin.
Pri pranju polnega stroja
perila boste prihranili do 50%
energije.
KDAJ JE PREDPRANJE V
RESNICI POTREBNO?
Predpranje je potrebno samo
takrat, kadar je perilo res zelo
umazano.
âe opustite predpranje,
kadar perilo ni zelo umazano,
zmanj‰ate porabo pralnih
sredstev, ãasa, vode in od 5
do 15% energije.
CHAPTER 11
CUSTOMER
AWARENESS
A guide environmentally
friendly and economic use of
your appliance.
MAXIMISE THE LOAD SIZE
Achieve the best use of
energy, water,detergent and
time by using the
recommended maximum
load size.
Save up to 50% energy by
washing a full load instead of
2 half loads.
DO YOU NEED TO PRE-WASH?
For heavily soiled laundry
only!
SAVE detergent, time, water
and between 5 to 15%
energy consumption by NOT
selecting Prewash for slight to
normally soiled laundry.
QUELLE TEMPÉRATURE DE LAVAGE
SÉLECTIONNER ?
L’utilisation des détachants avant le
lavage en machine ne rend pas
nécessaire le lavage au-delà de
60°C. L’utilisation de la température
de 60°C permet de diminuer la
consommation d’énergie de 50%.
AVANT D’UTILISER UN
PROGRAMME DE SÉCHAGE.
Sélectionnez une vitesse
d’essorage élevée avant de
débuter le séchage.Vous
diminuerez ainsi l’humidité
résiduelle du linge. Grâce à
cette opération vous
obtiendrez des substantielles
économies d’énergie et
d’eau
QUALE TEMPERATURA DI
LAVAGGIO SELEZIONARE?
L’utilizzo di smacchiatori prima
del lavaggio in lavabiancheria
riduce la necessità di lavare a
temperature superiori a 60°C.
E’ possibile risparmiare fino al
50% utilizzando la temperatura
di lavaggio di 60°C.
PRIMA DI UTILIZZARE UN
PROGRAMMA DI
ASCIUGATURA
Selezionare un alto numero di
giri prima di un programma di
asciugatura per ridurre
l’umidità residua nella
biancheria. Si ottengono così
notevoli risparmi di energia e
acqua.
WELCHE WASCHTEMPERATUR?
Durch die Vorbehandlung der
Wäsche mit geeigneten
Fleckentfernern ist eine
Waschtemperatur von über 60°C in
den meisten Fällen nicht mehr nötig.
Sie können bis zu 50% sparen, wenn
Sie die Waschtemperatur auf 60°C
begrenzen.
VOR DEM TROCKNEN BITTE
BEACHTEN
Wählen Sie vor jedem
Trocknungsgang immer eine
hohe Schleuderdrehzahl,
damit die Restfeuchte der
Wäsche so gering wie möglich
gehalten wird. So können Sie
Wasser und Strom in
erheblichem Maße sparen.
JE PRANJE PRI VISOKIH
TEMPERATURAH NUJNO?
Uporaba belil in sredstev za
odstranjevanje madeÏev
zmanj‰uje potrebo po pranju
pri visokih temperaturah. S
pranjem pri temperaturi 60°C
lahko prihranite do 50%
energije.
PRIPRAVA PERILA ZA SU·ENJE
V SU·ILNEM STROJU
Priporoãamo, da perilo pred
su‰enjem v su‰ilnem stroju
ãimbolj oÏnamete in sicer
tako, da izberete
centrifugiranje z najvi‰jim
moÏnim ‰tevilom vrtljajev. Na
ta naãin boste pri su‰enju v
su‰ilnem stroju prihranili veliko
energije.
IS A HOT WASH REQUIRED?
Pretreat stains with stain
remover or soak dried in
stains in water before
washing to reduce the
necessity of a hot wash
programme.
Save up to 50% energy by
using a 60°C wash
programme.
BEFORE USING A DRYING
PROGRAMME...
SAVE energy and time by
selecting a high spin speed
to reduce the water content
in laundry before using a
drying programme.
66 67
Page 35

FR
IT
DE
SL
EN
LAVAGE
CAPACITÉ VARIABLE
AUTOMATIQUE
Cette machine peut adapter
automatiquement le niveau
d’eau au type et à la
quantité de linge.Vous
pouvez ainsi obtenir un
lavage “personnalisé”, même
du point de vue énergétique.
Ce système permet de
diminuer la consommation
d’énergie et réduit nettement
les temps de lavage.
EXEMPLE:
Pour les tissus extrêmement
délicats nous conseillons
d’utiliser un filet.
Supposons que le linge à
laver soit en COTON
EXTREMEMENT SALE (s’il a des
taches particulièrement
résistantes les enlever avec
un detachant).
Nous vous conseillons de ne
pas faire un lavage
exclusivement de servietteséponge qui, absorbant
beaucoup d’eau, deviennent
trop lourdes.
LAVAGGIO
CAPACITÁ VARIABILE
Questa lavatrice é in grado di
adattare automaticamente il
livello dell’acqua al tipo e alla
quantità di biancheria.
E’ così possibile ottenere
un bucato “personalizzato”
anche dal punto di vista
energetico.
Questo sistema porta ad una
diminuzione dei consumi
d’energia e ad una riduzione
sensibile dei tempi di
lavaggio.
ESEMPIO DI USO:
Per tessuti molto delicati é
consigliabile l’utilizzo di un
sacchetto di rete.
Supponiamo che il bucato da
lavare sia di COTONE MOLTO
SPORCO (se ha delle
macchie particolarmente
resistenti le asporti con
l’apposita pasta).
Le consigliamo di non fare un
carico di soli capi in tessuto di
spugna che, assorbendo
molta acqua, diventano
troppo pesanti.
WASCHEN
UNTERSCHIEDLICHE
WÄSCHEMENGEN
Die Waschmaschine gleicht die
Wassermenge automatisch an
Art und Menge der Wäsche an.
So ist, auch im Hinblick auf den
Energieverbrauch,eine sehr
“individuelle” Form des
Waschens möglich.
Dieses System ermöglicht eine
spürbare Reduzierung sowohl
des.Wasserverbrauches als
auch der Waschzeiten.
BEISPIEL:
Für die Wäsche extrem
empfindlicher Teile empfiehlt
sich die Verwendung eines
Waschnetzes.
Angenommen, Sie waschen
z.B. STARK VERSCHMUTZTE
BAUMWOLLE (auf die
hartnäckigen Flecken vorher
eine geeignete Waschpaste
auftragen).Waschen Sie
nach Möglichkeit niemals
ausschließlich sehr
saugfähige Wäschestücke,
die, bedingt durch die
extreme Wasseraufnahme,
sehr schwer werden.
PRANJE
PRILAGODLJIVA
ZMOGLJIVOST
POLNJENJA
Ta pralni stroj avtomatsko
prilagodi nivo vode vrsti in
koliãini v stroj vloÏenega perila.
Ta sistem omogoãa, da pranje
prilagodite svojim Ïeljam in
potrebam, obenem pa
ustrezno zmanj‰ate tako
porabo vode, energije in
detergenta. Prilagodljiva
zmogljivost zmanj‰uje porabe
energije in obãutno skraj‰uje
trajanje pranja.
PRIMER:
Priporoãamo, da vloÏite zelo
obãutljivo perilo v posebno
mreÏasto vreãko in ‰ele nato
v stroj.
âe Ïelite oprati zelo
umazano perilo iz bombaÏa
(trdovratne madeÏe
odstranite prej s pomoãjo
ustreznega sredstva za
odstranjevanje madeÏev).
Pranje polnega stroja
frotirastih brisaã ipd.
odsvetujemo, ker frotir vpija
veliko vode in bi bilo perilo v
stroju preteÏko.
WASHING
VARIABLE CAPACITY
This washing machine
automatically adapts the level
of the water to the type and
quantity of washing.In this way
it is also possible to obtain a
“personalized” wash from an
energy saving point of view.
This system gives a decrease in
energy consumption and a
sensible reduction in washing
times.
EXAMPLE:
A net bag should be used
for particularly delicate
fabrics.
Let us suppose that the
washing consists of HEAVILY
SOILED COTTON (tough
stains should be removed
with suitable stain removal).
It is advisable not to wash a
load made up entirely of
articles in towelling fabric
which absorb a lot of water
and become too heavy.
● Ouvrir le tiroir à produits
lessiviels.
● Remplir le bac de lavage 2
avec 120 g de produit.
● En cas de besoin, remplir le
bac des additifs avec 50 ml
de produit
● Fermer le tiroir.
68 69
✿✿
.
●
Apra il cassetto detersivo.
●
Metta nella vaschetta di
lavaggio 2 120 g di detersivo.
●
Metta 50 ml dell’additivo
che desidera nella vaschetta
additivo ✿✿.
●
Chiuda il cassetto detersivo.
●
Waschmittelbehälter
öffnen.
●
in das Fach mit 2
(Hauptwäsche) ca 120 g
Waschmittel geben.
●
auf Wunsch ca.50 ml
Zusatzmittel in den Behälter
für Zusatzmittel geben.
✿✿
●
Waschmittelbehälter
schließen.
● Odprite predalãek za
pralna sredstva.
● V predelek 2 odmerite
120 g detergenta.
● V predelek "✿✿" vlijte
pribliÏno 50 cc enega od
dodatkov za oplemenitenje
perila npr. mehãalec, ‰krob
ali pa di‰ave.
● Zaprite predalãek za
pralna sredstva.
● Open the detergent
drawer.
● Put 120 g in the main wash
compartment marked 2.
● Put 50 ml of the desired
additive in the additives
compartment ✿✿.
● Close the detergent
drawer.
Page 36

FR
●
● Vérifier que le robinet
d’eau soit ouvert.
● Vérifier que la vidange soit
placée correctement.
SÉLECTION DU PROGRAMME
Sélectionnez le programme
en tournant le sélecteur de
programmes et en alignant
le nom du programme sur
l’indicateur.
Vérifiez que le voyant
lumineux STOP clignote et
dans le cas contraire,assurezvous que la porte est bien
fermée.
Appuyez sur le bouton " START
" et quelques secondes plus
tard, le programme se lance.
Le cycle de lavage se
réalisera avec la manette
des programmes arrêtée sur
le programme sélectionné
jusqu'à la fin de celui-ci.
Attention: En cas de coupure
de courant pendant un
programme de lavage,une
mémoire spéciale restaure le
programme sélectionné et,
lorsque le courant est rétabli,
reprend le cycle là où il s’est
arrêté.
● La machine accomplira le
programme demandé.
● Lorsque le programme est
terminé le temoin “fin du
cycle” s’allumera.
● Attendez que le verrou de
porte se désactive. Le voyant
lumineux "" Témoin de
verrouillage de porte "
s’éteint après environ 2
minutes;
● Mettez la machine à l’arrêt
en tournant le sélecteur de
programme à la position OFF.
● Ouvrez la porte et enlevez
le linge.
● Fermer le robinet d’eau.
POUR TOUS LES TYPES DE
LAVAGE CONSULTER
TOUJOURS LE TABLEAU
DES PROGRAMMES ET
SUIVRE LA SEQUENCE
DES OPERATIONS
INDIQUEE.
70 71
Si assicuri che il rubinetto
dell’acqua sia aperto.
●
Che lo scarico sia in
posizione regolare.
SELEZIONE PROGRAMMA
Fate riferimento alla tabella
dei programmi o alla
legenda dei programmi sulla
macchina, per scegliere il
programma più adatto.
Il programma viene scelto
ruotando la manopola
programmi e facendo
coincidere il numero del
programma con l’indice
(Dopo alcuni secondi la spia
“STOP”inizia a lampeggiare).
Premete il tasto
AVVIO/PAUSA.
Il programma ha inizio.
Il ciclo di lavaggio avverrà
con la manopola programmi
ferma sul programma
selezionato sino alla fine del
lavaggio.
Attenzione: Se dovesse
mancare la corrente
durante il funzionamento
della lavabiancheria, una
speciale memoria
conserverà l’impostazione
effettuata e,al ritorno della
corrente, la macchina
ripartirà dal punto in cui si
era fermata.
●
Alla fine del programma si
illumina la spia di fine ciclo.
●
Attendete lo spegnimento
della spia oblò bloccato (2
minuti dalla fine del
programma).
●
Spegnere la
lavabiancheria portando la
manopola programma in
posizione OFF.
●
Apra l’oblò e tolga i tessuti.
●
Chiuda il rubinetto dell’
acqua.
PER QUALSIASI TIPO DI
LAVAGGIO CONSULTI
SEMPRE LA TABELLA DEI
PROGRAMMI E SEGUA
LA SEQUENZA DELLE
OPERAZIONI COME
INDICATO.
IT
DE
● überzeugen Sie sich, daß
die Wasserzufuhr geöffnet ist.
● daß der Ablaufschlauch
richtig angebracht ist.
PROGRAMM WÄHLEN
Die Programmtabelle oder die
Programmübersicht am Gerät
hilft Ihnen,das geeignete
Programm für Ihre Wäsche zu
finden.Drehen Sie den
Programmwahlschalter auf das
gewünschte Programm,bis die
Programmnummer mit der
Anzeigemarke übereinstimmt
(nach einigen Sekunden
beginnt die STOP-Leuchte zu
blinken).
Drücken Sie die Taste
START/PAUSE.
Das Programm startet.
Während des Waschgangs
bleibt der
Programmwahlschalter bis zum
Ende des Programmes auf dem
gewählten Programm stehen.
ACHTUNG: Bei einem
eventuellen Stromausfall
während des Betriebs der
Waschmaschine werden die
gewählten Einstellungen in
einem speziellen Speicher
abgespeichert, so daß das
Gerät wieder dort anfängt zu
arbeiten, wo es aufgehört
hatte, wenn der Strom wieder
da ist.
● Am Ende des Programmes
leuchtet die Anzeige
Programmende auf.
● Warten Sie,bis die
Türverriegelungsanzeige
ausgeht (2 Minuten nach
Programmende).
● Schalten Sie die ab und
Waschmaschine stellen Sie
den Programmwahlschalter
auf die Position OFF
● Das Bullage öffnen und die
Wäsche entnehmen.
● Schließen Sie den
Wasserhahn.
BENUTZEN SIE FÜR JEDE
WÄSCHE DIE
PROGRAMMTABELLE UND
BEACHTEN SIE DIE O.A.
REIHENFOLGE.
● Prepriãajte se, da je pipa
za dotok vode odprta.
● Preverite, da je cev za
odtok vode pravilno
name‰ãena.
IZBIRANJE PROGRAMOV
Upo‰tevajte navodila v
razpredelnici programov in
izberite najustreznej‰i
program. Obrnite gumb
programatorja na izbrani
program.
Poãakajte, da zaãne utripati
indikator "STOP".
Nato pritisnite na tipko START;
stroj zaãne izvajati program.
Gumb programatorja se med
izvajanjem programa ne
obraãa.
Opozorilo: âe med
delovanjem stroja zmanjka
elektriãne energije, se izbrani
program shrani v spomin in ko
je stroj spet pod napetostjo,
nadaljuje z izvajanjem
programa.
● Ko je program zakljuãen, se
osvetli indikator 'Konec
programa'.
● Ko je program zakljuãen,
poãakajte pribl. 2 minuti, da
se sprosti zapah vrat.
● Izklopite stroj z obraãanjem
gumba programatorja na
OFF.
● Odprite vrata stroja in
poberite perilo iz bobna.
● Po vsaki uporabi stroja
zaprite pipo za vodo.
PRED IZBIRO PROGRAMA
ZA PRANJE POSAMEZNIH
VRST PERILA PREGLEJTE
RAZPREDELNICO
PROGRAMOV TER
UPO·TEVAJTE ZGORAJ
NAVEDENI VRSTNI RED
OPRAVIL.
SL
● Ensure that the water inlet
tap is turned on.
● And that the discharge
tube is in place.
PROGRAMME SELECTION
Refer to the programme
guide to select the most
suitable programme.
Turning the selector knob
required programme is
activate.
Wait for the “STOP” indicator
light to flash.
Then press the START button.
When the START button is
pressed the machine sets
the working sequence in
motion.
The programme carries out
with the programme
selector stationary on the
selected programme till
cycle ends.
Warning: If there is any break
in the power supply while
the machine is operating,a
special memory stores the
selected programme
and,when the power is
restored, it continues where
it left off.
● At the end of the
programme the indicator
light “end cycle” will go on.
● Wait for the door lock to
be released (about 2
minutes after the
programme has finished).
● Switch off the machine by
turning the programme
selector to the “OFF”
position.
● Open the door and
remove the laundry.
● Turn off the water supply
after every use.
FOR ALL TYPES OF
WASH CONSULT THE
PROGRAMME TABLE
AND FOLLOW THE
OPERATIONS IN THE
ORDER INDICATED.
EN
Page 37

FR
IT
DE
SL
EN
CHAPITRE 12
SECHAGE
CAPITOLO 12
ASCIUGATURA
NE SÈCHER JAMAIS DES
VÊTEMENTS EN
CAOUTCHOUC MOUSSE
OU DES TISSUS
INFLAMMABLES.
IMPORTANT:
DANS CETTE MACHINE À
LAVER SÉÇHANTE, PEUT
ÊTRE SÉCHÉ
EXCLUSIVEMENT LE
LINGE ESSORÉ ET LAVÉ À
L’EAU.
ASSOLUTAMENTE NON
ASCIUGARE CAPI IN
GOMMAPIUMA O
TESSUTI INFIAMMABILI.
IMPORTANTE:
IN QUESTA
ASCIUGABIANCHERIA
PUÒ ESSERE ASCIUGATA
ESCLUSIVAMENTE
BIANCHERIA
CENTRIFUGATA
PROVENIENTE DA UN
LAVAGGIO IN ACQUA.
IMPORTANT
Les indications fournies sont
générales et il sera
nécessaire de s’exercer un
peu pour un fonctionnement
optimal du sèchage.Au
début, nous recomandons
de régler des temps inférieurs
à ceux qui sont indiqués, de
façon à pouvoir définir le
degré de sèchage voulu.
Nous vous recommandons
de ne pas sècher les tissus
qui s’effilochent souvent, du
genre carpette ou
vêtements à poils longs, pour
ne pas obstruer les conduites
d’air.Le dispositif de sèchage
permet un sèchage parfait
des tissus sans aucune
émission de vapeur à
l’extérieur.Un puissant souffle
d’air,idealemént chauffé,
pénètre le linge humide, l’air
saturé d’humidité est recyclé
à travers une conduite dans
laquelle l’eau froide
condense l’humidite
contenue dans l’air; tout le
circuit est fermé et étanche,
donc il n’y a aucune
émission de vapeur à
l’extérieur.
72 73
IMPORTANTE
le indicazioni fornite sono
generali, sarà necessaria un
po’ di pratica per un
funzionamento ottimale
dell’asciugatura.Le
consigliamo all’inizio di
impostare tempi inferiori a
quelli consigliati, in modo da
poter determinare il grado di
essiccazione da Lei
desiderato. Le consigliamo di
non asciugare
frequentemente tessuti
filacciosi,tipo tappetini o
capi a pelo lungo, per non
intasare i condotti dell’aria.
Il dispositivo di asciugatura
consente una perfetta
essiccazione dei tessuti senza
nessuna emissione di vapori
all’esterno.
Un potente soffio d‘aria
opportunamente riscaldata
investe la biancheria umida
facendone evaporare
l’acqua; l’aria satura di
umidità viene riciclata
attraverso un condotto in cui
un velo d’acqua fredda
condensa l’acqua
contenuta nell’aria; l’acqua
viene poi evacuata
attraverso il circuito di
scarico. Tutto il circuito é
sigillato per cui non vi é
nessuna emissione di vapore
all’esterno.
KAPITEL 12
TROCKNEN
AUF KEINEN FALL
GUMMIKLEIDUNG,
DAUNENKISSEN ODER
LEICHT BRENNBARE
TEXTILIEN TROCKNEN.
ZU BEACHTEN:
IN DIESEM TROCKNER
DARF AUSSCHLIEßLICH
GESCHLEUDERTE, IN
WASSER GEWASCHENE
WÄSCHE GETROCKNET
WERDEN.
WICHTIG:
Die mitgelieferten Hinweise sind
nur zur Orientierung gedacht.
Die jeweils optimale Nutzung
des Gerätes ergibt sich am
ehesten aus der persönlichen
Erfahrung im Umgang mit dem
Gerät.Um den gewünschten
Trocknungsgrad besser steuern
zu können,sollte man anfangs
die Trockenzeiten etwas
niedriger als empfohlen
einstellen.
Langfaserige Textilien,
Badematten,Vorleger und
andere langflorige Stoffe nicht
zu häufig trocknen,um die
Luftkanäle nicht zu verstopfen.
Eine spezielle
Trockenvorrichtung garantiert
die perfekte Trocknung der
Wäsche ohne Dampfaustritt
nach außen.
Ein kräftiger warmer Luftstrom
entzieht der Wäsche die
Feuchtigkeit.
Die so mit Wasserdampf
angereicherte Luft wird durch
einen Kanal geleitet.Durch
einen kalten Wasserstrahl
kondensiert die Luftfeuchtigkeit
zu Wasser und wird in den
Ausfluß abgepumpt.Das
Kondensationssystem ist 100%
abgedichtet, so daß während
des Trocknens kein Dampf
nach außen entweichen kann.
12. POGLAVJE
SU·ENJE
SU·ENJE PERILA, KI
VSEBUJE PENASTO
GUMO ALI VNETLJIVE
SNOVI, NI DOVOLJENO.
POMEMBNO:
TA SU·ILNI STROJ JE
NAMENJEN SAMO
SU·ENJU OPRANEGA IN
S CENTRIFUGO OÎETEGA
PERILA.
OPOZORILO:
V teh navodilih so podana
splo‰na navodila; za
najbolj‰e rezultate su‰enja bo
potrebno ‰e nekaj vaje.
Priporoãamo, da na zaãetku
nastavite kraj‰i ãas su‰enja
od priporoãenega in tako
ugotovite stopnjo suhosti, ki
vam najbolj ustreza.
Odsvetujemo su‰enje kosov iz
katerih se izloãa veãja
koliãina 'muck' (delcev
tkanin), kot so to preproge ali
perilo iz debelih tkanin, saj bi
te lahko zama‰ile vode za
zrak.
V takih primerih se namreã
voda nabira v su‰ilnem
tokokrogu, ki je zaprt in
onemogoãa uhajanje pare
na prosto.
CHAPTER 12
DRYING
DON’T DRY GARMENTS
MADE FROM FOAM
RUBBER OR
FLAMMABLE
MATERIALS.
IMPORTANT:
THIS DRYER CAN ONLY
BE USED FOR LAUNDRY
WHICH HAS BEEN
WASHED AND SPIN
DRIED.
WARNING:
Indications given are
general, therefore some
practice is needed for the
best drying results. We
recommend setting a lower
drying time than indicated,
when first using, so as to
establish the degree of
dryness required. We
recommend not to dry
fabrics that fray easily, such
as rugs or garments with a
deep pile, to avoid air duct
clogging.
The water is then conveyed
to the drain circuit,wich is
sealed and therefore,no
steam can be released
outside.
Page 38

FR
IT
DE
SL
EN
ATTENTION:
N'OUVREZ JAMAIS LE
HUBLOT DE LA
MACHINE PENDANT UN
CYCLE DE SÉCHAGE.
PATIENTEZ JUSQU'À LA
PHASE DE
REFROIDISSEMENT
PRÉVUE POUR LE
CYCLE.
Il est possible de sècher
uniquement le linge qui a
déjà été essoré.
Avec la machine à
laver/séchante, deux types
de sèchage peuvent être
accomplis:
1 Sèchage de tissus en
coton, éponge, lin, chanvre,
etc...
Note d’information
Pendant la phase de
séchage, le tambour
effectue des rotations à
grande vitesse pour brasser
le linge et ainsi optimiser le
cycle.
ATTENZIONE:
EVITARE SEMPRE DI
APRIRE L’OBLÒ UNA
VOLTA INIZIATO IL
CICLO DI
ASCIUGATURA MA
ATTENDERE FINO ALLA
FASE DI
RAFFREDDAMENTO
PREVISTA DAL CICLO
E’ possibile asciugare solo
biancheria già centrifugata.
Con la lavasciuga si
possono effettuare due tipi
di asciugatura:
1 Asciugatura tessuti di
cotone, spugna, lino,
canapa, ecc...
Nota
Durante la fase di
asciugatura il cestello
esegue rotazioni ad alta
velocità per bilanciare il
carico ed ottimizzare il ciclo.
BITTE VERMEIDEN SIE ES,
DIE TÜR ZU ÖFFNEN,
WENN DAS
TROCKENPROGRAMM
BEREITS BEGONNEN HAT
UND WARTEN SIE STETS
AB, BIS DIE LETZTE
ABKÜHLPHASE BEENDET
WORDEN IST, BEVOR SIE
DIE TÜR ÖFFNEN .
Es kann nur bereits
geschleuderte Wäsche
getrocknet werden.
Zwei Trockenarten sind
möglich:
1 Trocknen von Textilien aus
Baumwolle,Frottee, Leinen,
Hanf etc.
Hinweis
Während der Trocknung
reversiert die Trommel bei
hoher Geschwindigkeit, um
die Waschladung
gleichmäßig zu verteilen und
somit die Trocknung zu
optimieren.
POMEMBNO:
PO ZAâETKU
PROGRAMA SU·ENJA
NIKOLI NE ODPIRAJTE
VRAT - POâAKAJTE, DA
SE ZAKLJUâI FAZA
SU·ENJA ( ).
V stroju su‰ite samo
centrifugirano perilo.
Pralno/su‰ilni stroj omogoãa
dve vrsti su‰enja:
1 BombaÏ, frotir, platno, juta,
lan itd. - simbol na
stikalu za izbiranje
programov.
Pomembno
Med su‰enjem se bo boben
zaãel vrteti z veãjo hitrostjo;
tako se bo perilo bolj
enakomerno razporedilo,
su‰enje pa bo bolj
uãinkovito.
IMPORTANT
NEVER OPEN THE DOOR
AFTER THE DRYING
CYCLE HAS BEGUN WAIT UNTIL THE COOL
DOWN PERIOD
PROVIDED FOR BY THE
CYCLE.
Only dry pre-spun laundry
The washer/dryer can
perform two types of drying:
1 Cotton, terry towelling,
linen, hemp fabrics, etc...
Advisory note
During drying phase the
drum will accelerate to a
higher speed to
distribute the load and to
optimize the drying
performance
2 Sèchage de tissus
mélangés
(synthétiques/coton), tissus
synthétiques.
74 75
2 Asciugatura di tessuti misti
(sintetici/cotone), tessuti
sintetici.
2 Trocknen von
Mischgeweben
(Synthetik/Baumwolle) und
synthetischen Stoffen.
2 Tkanine iz me‰anice
vlaken sintetike in bombaÏa,
sintetiãne tkanine
- simbol na stikalu za
izbiranje programov.
2 Mixed fabrics
(synthetics/cotton), synthetic
fabrics.
Page 39

FR
EXEMPLE D’UTILISATION EN
SECHAGE UNIQUEMENT
● Ouvrez le hublot de la
machine.
● Remplissez la machine
(5 kg max.). En cas de linge
de maison de grande taille
(draps, etc.) ou de linge très
absorbant (peignoirs,
pantalons en jean, etc.), il est
préférable de réduire la
charge.
● Refermez le hublot de la
machine.
● Réglez le sélecteur de
programme sur
coton.
● Sélectionner le degré de
séchage désiré.
Les possibilités disponibles
comprennent l’option Linge
extra sec ( ), idéal pour
serviettes et peignoirs,
l’option Linge sec prêt à
ranger ( ) pour du linge
qui ne nécessite pas d’être
repassé, et Linge sec à
repasser ( ) pour du linge
prêt à être repassé.
Si vous désirez sélectionner
un séchage minuté, appuyez
sur la touche " Séchage "
jusqu’à atteindre le niveau
de temps désiré.
PROTECTION DE HUBLOT
La machine-à-laver dispose
d’un dispositif de protection
pour le verre du hublot qui
rejoint des températures
élevées durant la phase de
séchage.
IT
ESEMPIO D’USO SOLO
ASCIUGATURA
● Apra l’oblò.
● Lo riempia con 5 kg
massimo, in caso di capi di
grandi dimensioni (es.
lenzuola), o molto assorbenti
(es. accappatoi o blue
jeans), é bene ridurre la
quantità di biancheria.
● Chiuda l’oblò.
● Porti la manopola
programmi su
cotone.
● Selezionare il grado di
asciugatura desiderato.
Le possibilità disponibili
comprendono l’opzione
Capi extra asciutti ( ),
ideale per asciugamani e
accappatoi, l’opzione Capi
asciutti da riporre ( ), per
capi che non è necessario
stirare,e capi asciutti da
stirare ( ) che lasciano la
biancheria pronta per la
stiratura.
Se vuole impostare un’
asciugatura a tempo prema
il tasto “Selezione
programma
asciugatura”fino all’
accensione di una delle spie
tempo.
PROTEZIONE OBLÒ
La lavabiancheria dispone di
uno schermo protettivo al
vetro oblò,che durante la
fase di asciugatura si riscalda
molto.
MAX
5 kg
DE
NUTZUNGSBEISPIEL NUR
TROCKNEN
● Öffnen Sie das Bullauge
● Füllen Sie die Trommel mit
max. 5 kg Wäsche, wenn es
sich um große Wäschestücke
(z.B. Bettwäsche) oder um
stark saugfähige Stoffe (z.B.
Frottee, Jeans) handelt,
empfiehlt es sich,die Ladung
entsprechend zu reduzieren.
● Schließen Sie das Bullauge.
● Drehen Sie den
Programmwahlschalter auf
die Position
Baumwolle.
● Wählen Sie den
gewünschten
Trocknungsgrad. Sie können
unter verschiedenen
Optionen wählen: Extra
trocken ( ),ideal für
Handtücher und
Bademäntel; Schranktrocken
( ), für Wäsche,die nicht
gebügelt zu werden braucht,
und Bügeltrocken ( ),für
eine optimale Trocknung vor
dem Bügeln.
Wenn Sie eine zeitgesteuerte
Trocknung einstellen wollen,
drücken Sie die Taste
„Einstellung
Trocknungsprogramm“, bis
die Anzeige der
gewünschten Zeit
aufleuchtet.
FENSTERSCHUTZ
Die Waschmaschine verfügt
über einen Fensterschutz, der
während der Trockenphase
eine höhere Temperatur
erreicht.
SL
PROGRAM SU·ENJA
● Odprite vrata.
● V stroj vloÏite do 5 kg perila
- ãe Ïelite posu‰iti veãje kose
(npr. rjuhe) ali perilo iz zelo
vpojnih tkanin (npr. brisaãe ali
kavbojke) priporoãamo, da
to koliãino zmanj‰ate.
● Zaprite vrata.
● Obrnite gumb za
izbiranje programov na
bombaÏ .
● Izberite ustrezno stopnjo
suhosti perila.
Izbirate lahko med stopnjami
Extra Dry ( ) – zelo suho,
kar je primerno za brisaãe,
kopalne halje ipd., do stopnje
Cupboard Dry ( ) – za v
omaro, kar je primerno za
perilo, ki ga nimate namena
likati, ampak zloÏiti in shraniti v
omaro, do stopnje Iron dry
( ) – za likanje, ki je
primerna za perilo, ki ga
imate namen zlikati, saj
ostane ‰e ravno prav vlaÏno.
âe Ïelite izbrati ãasovni
program su‰enja, pritiskajte
na tipko za izbiranje
programov su‰enja, dokler se
ne osvetli ustrezni ãasovni
indikator.
ZA·âITENA VRATA
Vrata stroja so opremljena
tudi z za‰ãitno plo‰ão, ki med
su‰enjem onemogoãa
dostop do stekla v vratih, saj
se ta zelo segrejejo. Med
normalno uporabo snemanje
za‰ãitne plo‰ãe ni potrebno.
EN
DRYING CYCLE
● Open door.
● Fill with up to 5 kg - in case
of large items (e.g. sheets) or
very absorbent items (e.g.
towels or jeans),it is a good
idea to reduce the load.
● Close door.
● Turn programme dial to
● Select the degree of
dryness that you require.
This ranges from Extra Dry
( ) for bath towels and
bathrobes, through
Cupboard Dry ( ) for
items that will be put away
without ironing, to iron dry
( ) that leaves the laundry
suitable
for ironing.
If you wish to select a timed
drying cycle, press the “drying
programme selection”button
until the required time
indicator lights up.
DOUBLE-SKIN DOOR
The appliance door is fitted
with a protective shield to
prevent contact with the
glass door which can reach
high temperatures, during the
drying cycle.
cotton.
ATTENTION:
NE TOUCHER L’HUBLOT
EN AUCUN CAS.
● S’assurer que le robinet
d’eau est ouvert.
● S’assurer que le tuyau de
vidange soit en position
correcte.
76
ATTENZIONE:
NON TOCCARE L’OBLO’
PER NESSUNA RAGIONE.
● Si assicuri che il rubinetto
dell’acqua sia aperto.
● Che lo scarico sia in
posizione regolare.
ACHTUNG:
IN KEINEM FALL DAS
BULLAUGE BERÜHREN.
● Achten Sie darauf,daß der
Wasserhahn geöffnet ist.
● Der Ablaufschlauch muß
richtig angebracht sein.
OPOZORILO: V
NOBENEM PRIMERU SE
NE DOTIKAJTE VRAT!
● Prepriãajte se, da je pipa
za vodo odprta.
● Prepriãajte se, da je
odtoãna cev pravilno
name‰ãena.
WARNING: DO NOT
TOUCH DOOR FOR
ANY REASON.
● Make sure water inlet valve
is open.
● Make sure water drain is
correctly positioned.
77
Page 40

FR
IT
DE
SL
EN
ATTENTION:
NE PAS SECHER LES
VETEMENTS EN LAINE,
LES VETEMENTS AVEC
DES REMBOURRAGES
PARTICULIERS (DUVET,
ANORAKS, ETC...), LES
VETEMENTS TRES
DELICATS . SI LES
VETEMENTS SONT DU
GENRE “LAVE-REPASSE”,
IL EST RECOMMANDE
DE REDUIRE ENCORE LE
CHARGEMENT POUR
EVITER LA FORMATION
DE PLIS.
● Appuyez sur le bouton
START.
● La phase de séchage
démarre avec le sélecteur
de programme réglé
sur jusqu'à la fin du
cycle de séchage.
● Le voyant du programme
de séchage restera allumé
jusqu’à la phase de
refroidissement ( ).
● Lorsque le programme est
terminé le temoin “fin du
cycle” s’allumera.
ATTENZIONE:
NON ASCIUGHI CAPI
IN LANA, CON
IMBOTTITURE
PARTICOLARI (PIUMINI,
GIACCHE A VENTO,
ETC...) CAPI
DELICATISSIMI.
SE I CAPI SONO LAVA
E INDOSSA E’ BENE
CHE RIDUCA
ULTERIORMENTE IL
CARICO PER EVITARE
LA FORMAZIONE DI
PIEGHE.
●
Prema il tasto di START.
●
La fase di asciugatura
avverrà con la manopola
programmi ferma sul
simbolo sino a fine
asciugatura.
●
La spia del programma di
asciugatura rimarrà accesa
fino alla fase di
raffreddamento che verrà
segnalata con l’accensione
della spia ( ).
●
Alla fine del programma si
illumina la spia di fine ciclo.
ACHTUNG:
KEINE TEILE AUS REINER
WOLLE, KEINE TEILE MIT
BESONDERER FÜLLUNG
(FEDERN, WINDJACKEN
ETC) UND KEINE
BESONDERS
EMPFINDLICHEN
TEXTILIEN TROCKNEN;
BEI BÜGELFREIEN (WASH
AMD WEAR) TEXTILIEN
DIE EINFÜLLMENGE
REDUZIEREN, UM
KNITTERBILDUNG ZU
VERMEIDEN.
● Drücken Sie die START
Taste.
● Während die Abkühlphase
läuft, bleibt der
Programmwahlschalter auf
der Position ,bis zum
Ende des
Trockenprogramms.
● Die Anzeige des
Trocknungsprogramms bleibt
eingeschaltet, bis die
Abkühlphase eingeleitet
wird, wobei dann die
Anzeige ( ) aufleuchtet.
● Am Ende des Programmes
leuchtet die Anzeige
Programmende auf.
OPOZORILO: V STROJU
NE SU·ITE VOLNENIH
OBLAâIL ALI KOSOV S
POSEBNIMI VLOÎKI
(NPR. ODEJ,
PODLOÎENIH
ANORAKOV IPD.) IN
OBâUTLJIVIH OBLAâIL
PRI SU·ENJU OBLAâIL
IZDELANIH IZ TKANIN
(DRIP/DRY) "OPERI IN
NOSI" PA VLOÎITE V
STROJ MANJ·O
KOLIâINO PERILA, S
âIMER BOSTE
ZMANJ·ALI MOÎNOST
MEâKANJA OBLAâIL.
● Pritisnite na tipko START.
● Gumb za izbiranje
programov se med
potekom programa ne
premika in ostane do
konca programa na
simbolu .
● Indikator programa
su‰enja bo osvetljen, dokler
se ne zaãne faza ohlajanja
in se osvetli indikator “ ”.
● Ko stroj zakljuãi program,
se osvetli indikator "STOP".
WARNING:
DO NOT DRY WOOLLEN
GARMENTS OR ARTICLES
WITH SPECIAL PADDING,
(E.G. QUILTS, QUILTED
ANORAKS, ETC.).
DELICATE FABRICS IF
GARMENTS ARE
DRIP/DRY, LOAD LESS
ITEMS AO AS TO PREVENT
CREASING.
● Press the START button.
● The drying phase will
begin with the programme
dial fixed on the
symbol until the end of
drying.
● The drying programme
indicator will be on until the
cool down phase will begin
and the indicator ( ) will
go on.
● At the end of the
programme the indicator
light “STOP” will go on.
●
● Attendez que le verrou de
porte se désactive. Le
voyant lumineux "" Témoin
de verrouillage de porte "
s’éteint après environ 2
minutes;
● Mettez la machine à
l’arrêt en tournant le
sélecteur de programme à
la position OFF.
● Ouvrez la porte et enlevez
le linge.
● Fermer le robinet d’eau.
78 79
Attendete lo spegnimento
della spia oblò bloccato (2
minuti dalla fine del
programma).
●
Spegnere la
lavabiancheria portando la
manopola programma in
posizione OFF.
●
Apra l’oblò e tolga i
tessuti.
●
Chiuda il rubinetto dell’
acqua.
● Warten Sie,bis die
Türverriegelungsanzeige
ausgeht (2 Minuten nach
Programmende).
● Schalten Sie die ab und
Waschmaschine stellen Sie
den Programmwahlschalter
auf die Position OFF
● Das Bullage öffnen und
die Wäsche entnehmen.
● Schließen Sie den
Wasserhahn.
● Poãakajte, da se sprosti
zapah vrat (pribl. 2 minuti po
koncu programa).
Opozorilna luãka "Door
Security /Vrata zaklenjena
ugasne.
● Stroj izklopite z
obraãanjem gumba za
izbiranje programov v
izklopljeni poloÏaj (OFF).
● Odprite vrata in poberite
perilo iz stroja. Zaprite pipo
za vodo.
● Po vsaki uporabi stroja
zaprite pipo za vodo.
● Wait for the door lock to
be released (about 2
minutes after the
programme has finished).
The "Door Security" indicator
light will go out.
● Switch off the machine by
turning the programme
selector on the “OFF”
position.
● Open the door and
remove the laundry.
● Turn off the water supply
after every use.
Page 41

FR
IT
DE
SL
EN
CHAPITRE 13
CYCLE
OMATIQUE
AUT
AGE/SECHAGE
LAV
ATTENTION : LE CYCLE
COMPLET PEUT ÊTRE
UTILISE UNIQUEMENT
AVEC UNE CHARGE
MAXIMALE DE 5KG DE
LINGE SEC. DANS LE CAS
CONTRAIRE LE RESULTAT
DU SECHAGE NE SERA
PAS SATISFAISANT.
Lavage:
Ouvrir le bac à produits et
introduire la lessive dans les
compartiments appropriés.
Consulter la liste des
programmes de lavage et,
selon les tissus à laver (par
exemple, coton très sale) et
sans presser sur la touche de
la mise en marche,préparer
le lavage comme décrit:
Sélectionnez le programme
en tournant le sélecteur de
programmes et en alignant le
nom du programme sur
l'indicateur .
Pressez les boutons d’options si
besoin
Vérifiez que le robinet est
ouvert et que le tuyau
d'évacuation est bien en
place.
Sechage:
Sélectionner le degré de
séchage désiré.
Les possibilités disponibles
comprennent l’option Linge
extra sec ( ), idéal pour
serviettes et peignoirs,
l’option Linge sec prêt à
ranger ( ) pour du linge
qui ne nécessite pas d’être
repassé, et Linge sec à
repasser ( ) pour du linge
prêt à être repassé.
80
CAPITOLO 13
CICLO AUTOMATICO
AGGIO
LAV
ASCIUGATURA
ATTENZIONE: IL CICLO
COMPLETO PUÒ ESSERE
ESEGUITO SOLO CON
MASSIMO 5 KG DI
BIANCHERIA ASCIUTTA
ALTRIMENTI IL RISULTATO
DELL’ ASCIUGATURA
NON SARA’
SODDISFACENTE.
Lavaggio:
Apra il cassetto e introduca il
detersivo negli appositi
scomparti.
Consulti la tabella dei
programmi di lavaggio e in
base ai tessuti da lavare,
senza premere il tasto di
marcia,prepari il lavaggio
come segue:
Il programma viene scelto
ruotando la manopola
programmi e facendo
coincidere il numero del
programma con l’indice.
Premere i tasti opzione (se
desiderati)
Si assicuri che il rubinetto
dell’acqua sia aperto.
Che lo scarico sia in posizione
regolare.
Asciugatura:
Selezionare il grado di
asciugatura desiderato.
Le possibilità disponibili
comprendono l’opzione
Capi extra asciutti ( ),
ideale per asciugamani e
accappatoi, l’opzione Capi
asciutti da riporre ( ), per
capi che non è necessario
stirare,e capi asciutti da
stirare ( ) che lasciano la
biancheria pronta per la
stiratura.
KAPITEL 13
AUTOMATISCHER
ABLA
UF WASCHEN
UND TROCKNEN
ACHTUNG: EIN
KOMPLETTER ZYKLUS
KANN NUR BEI EINER
LADUNG VON 5 KG
TROCKENWÄSCHE
EINGESTELLT WERDEN,
SONST IST DAS
TROCKNUNGSERGEBNIS
NICHT AUSREICHEND.
Waschen:
Öffnen Sie die
Waschmittelschublade und
füllen Sie das Waschmittel in die
entsprechende Kammer ein.
Vergleichen Sie zuerst die
Programmtabelle der
Waschprogramme und stellen
Sie je nach Gewebeart das
gewünschte Programm wie
folgt ein,ohne die Start Taste
vorher zu drücken:
Drehen Sie den
Programmwahlschalter auf
das gewünschte Programm.
Optionstasten (sofern
gewünscht) drücken.
überzeugen Sie sich, daß die
Wasserzufuhr geöffnet ist.
daß der Ablaufschlauch
richtig angebracht ist.
Trocknen:
Wählen Sie den gewünschten
Trocknungsgrad. Sie können
unter verschiedenen
Optionen wählen: Extra
trocken ( ),ideal für
Handtücher und Bademäntel;
Schranktrocken ( ),für
Wäsche, die nicht gebügelt
zu werden braucht,und
Bügeltrocken ( ),für eine
optimale Trocknung vor dem
Bügeln.
13. POGLAVJE
AVTOMATSKO
PRANJE/SU·ENJE
OPOZORILO: NAJVEôJA
DOVOLJENA TEÎA
SUHEGA PERILA JE 5 KG;
V NASPROTNEM PRIMERU
REZULTATI SU‚ENJA NE
BODO ZADOVOLJIVI.
Pranje:
Odprite predalãek, izberite
ustrezen detergent in
odmerite ustrezno koliãino.
Glede na vrsto perila izberite
program za pranje perila
(npr. zelo umazano
bombaÏno perilo) in ne da bi
pritisnili na tipko START
pripravite stroj:
S pomoãjo razpredelnice
programov ali opisa
programa na stroju izberite
najustreznej‰i program.
Program aktivirate z
obraãanjem gumba za
izbiranje programov.
Po potrebi izberite opcije s
pomoãjo ustreznih tipk.
Prepriãajte se, da je pipa za
vodo odprta ter da je
odtoãna cev pravilno
name‰ãena.
Su‰enje:
Izberite ustrezno stopnjo
suhosti perila.
Izbirate lahko med stopnjami
Extra Dry ( ) – zelo suho,
kar je primerno za brisaãe,
kopalne halje ipd., do
stopnje Cupboard Dry ( ) –
za v omaro, kar je primerno
za perilo, ki ga nimate
namena likati, ampak zloÏiti
in shraniti v omaro, do
stopnje Iron dry ( ) – za
likanje, ki je primerna za
perilo, ki ga imate namen
zlikati, saj ostane ‰e ravno
prav vlaÏno.
CHAPTER 13
OMATIC
AUT
WASHING/DRYING
WARNING: ONLY A
MAXIMUM 5 KG OF DRY
LAUNDRY CAN BE
LOADED OTHERWISE THE
DRIED LAUNDRY WILL BE
NOT SATISFACTORY.
Washing:
Open the drawer, choose
the detergent and put in the
correct amount.
Refer to the list of washing
programmes according to
fabrics to be washed (e.g.
very dirty cotton) and
without pressing Start
button, prepare wash as
described:
Turning the selector knob,
the required programme is
activated.
Press the option buttons (if
required)
Check that the tap is turned
on and that the discharge
hose is positioned correctly.
Drying:
Select the degree of dryness
that you require.
This ranges from Extra Dry
( ) for bath towels and
bathrobes, through
Cupboard Dry ( ) for
items that will be put away
without ironing, to iron dry
( ) that leaves the
laundry suitable for ironing.
81
Page 42

FR
Si vous désirez sélectionner un
séchage minuté, appuyez sur
la touche " Séchage " jusqu’à
atteindre le niveau de temps
désiré.
Appuyer sur la touche
"DÉBUT/PAUSE".
IT
Se vuole impostare un’
asciugatura a tempo prema
il tasto “Selezione
programma
asciugatura”fino all’
accensione di una delle
spie tempo.
Prema il tasto di avvio.
DE
Wenn Sie eine zeitgesteuerte
Trocknung einstellen wollen,
drücken Sie die Taste
„Einstellung
Trocknungsprogramm“, bis die
Anzeige der gewünschten
Zeit aufleuchtet.
Drücken Sie die START Taste.
SL
âe Ïelite izbrati ãasovni
program su‰enja, pritiskajte
na tipko za izbiranje
programov su‰enja, dokler se
ne osvetli ustrezni ãasovni
indikator.
Pritisnite na tipko
"start/pavza".
EN
If you wish to select a timed
drying cycle, press the
“drying programme
selection” button until the
required time indicator lights
up.
Press the "Start/Pause"
button.
Le cycle de lavage se
réalisera avec la manette
des programmes arrêtée sur
le programme sélectionné
jusqu'à la fin de celui-ci.
La machine exécute alors la
totalité du programme de
séchage.
Le voyant du programme de
séchage restera allumé
jusqu’à la phase de
refroidissement ( ).
Lorsque le programme est
terminé le temoin “fin du
cycle” s’allumera.
Attendez que le verrou de
porte se désactive. Le voyant
lumineux "" Témoin de
verrouillage de porte "
s’éteint après environ 2
minutes;
Mettez la machine à l’arrêt
en tournant le sélecteur de
programme à la position OFF.
Ouvrez la porte et enlevez le
linge.
Fermer le robinet d’eau.
Il ciclo di lavaggio avverrà
con la manopola
programmi ferma sul
programma selezionato sino
alla fine del lavaggio.
Successivamente la
lavasciuga eseguirà tutto il
programma di asciugatura.
La spia del programma di
asciugatura rimarrà accesa
fino alla fase di
raffreddamento che verrà
segnalata con l’accensione
della spia ( ).
Alla fine del programma si
illumina la spia di fine ciclo.
Attendete lo spegnimento
della spia oblò bloccato (2
minuti dalla fine del
programma).
Spegnere la lavabiancheria
portando la manopola
programma in posizione OFF.
Apra l’oblò e tolga i tessuti.
Chiuda il rubinetto dell’
acqua.
Während des Waschgangs
bleibt der
Programmwahlschalter bis
zum Ende des Programmes
auf dem gewählten
Programm stehen.
Anschließend wird das Gerät
das Trockenprogramm
durchführen.
Die Anzeige des
Trocknungsprogramms bleibt
eingeschaltet, bis die
Abkühlphase eingeleitet wird,
wobei dann die Anzeige ( )
aufleuchtet.
Am Ende des Programmes
leuchtet die Anzeige
Programmende auf.
Warten Sie,bis die
Türverriegelungsanzeige
ausgeht (2 Minuten nach
Programmende).
Schalten Sie die ab und
Waschmaschine stellen Sie
den Programmwahlschalter
auf die Position OFF
Das Bullage öffnen und die
Wäsche entnehmen.
Schließen Sie den
Wasserhahn.
Gumb za izbiranje
programov se med potekom
programa ne premika in
ostane do konca programa
na izbranem programu.
Nato pralno/su‰ilni stroj opravi
‰e program su‰enja.
Indikator programa su‰enja
bo osvetljen, dokler se ne
zaãne faza ohlajanja in se
osvetli indikator “ ”.
Ko stroj zakljuãi program, se
osvetli indikator "STOP".
Poãakajte, da se sprosti
zapah vrat (pribl. 2 minuti po
koncu programa).
Opozorilna luãka "Door
Security /Vrata zaklenjena"
ugasne.
Stroj izklopite z obraãanjem
gumba za izbiranje
programov v izklopljeni
poloÏaj (OFF).
Odprite vrata in poberite
perilo iz stroja. Zaprite pipo za
vodo.
Po vsaki uporabi stroja zaprite
pipo za vodo.
The programme carries out
with the programme selector
stationary on the selected
programme till cycle ends.
The washer-dryer will then
complete the entire drying
programme.
The drying programme
indicator will be on until the
cool down phase will begin
and the indicator ( ) will
go on.
At the end of the
programme the indicator
light “STOP”will go on.
Wait for the door lock to be
released (about 2 minutes
after the programme has
finished).
The "Door Security" indicator
light will go out.
Switch off the machine by
turning the programme
selector on the “OFF”
position.
Open the door and remove
the laundry.
Turn off the water supply
after every use.
82
83
Page 43

FR
TABLEAU DES DURÉES DE SÉCHAGE (EN MINUTES):
SL
RAZPREDELNICA âASOV SU·ENJA (V MINUTAH)
PROGRAMME
Extra sec
Prêt-à-ranger
Prêt-à-repasser
PROGRAMMA
Extra
Armadio
Stiro
COTON MIXTE
1 Kg Min
30’
30’
30’
5 Kg Max
à 230’
à 220’
à 170’
IT
1 Kg Min
30’
30’
30’
TABELLA TEMPI ASCIUGATURA
COTONE MISTI
Min 1 Kg
da 30’
da 30’
da 30’
Max 5 Kg
a 230’
a 220’
a 170’
Min 1 Kg
da 30’
da 30’
da 30’
3,5 Kg Max
à 170’
à 150’
à 80’
Max 3,5 Kg
a 170’
a 150’
a 80’
PROGRAM
Zelo suho
Za v omaro
Za likanje
PROGRAMME
Extra
Cupboard
Iron
BOMBAÎ ME·ANO
Najmanj 1 kg
Od 30'
Od 30'
Od 30'
Najveã 5 kg
do 230'
do 220'
do 170'
EN
Najmanj 1 kg
od 30'
od 30'
od 30'
TABLE OF DRYING TIMES (IN MINUTES):
COTTON MIXED
Min 1 Kg
from 30’
from 30’
from 30’
Max 5 Kg
to 230’
to 220’
to 170’
Min 1 Kg
from 30’
from 30’
from 30’
Najveã 3 ,5 kg
do 170'
do 150'
do 80'
Max 3,5 Kg
to 170’
to 150’
to 80’
PROGRAMM
Extra
Schranktrocken
Bügelfertig
DE
TABELLE TROCKENZEITEN:
BAUMWOLLE MISCHGEWEBE
Min 1 Kg
von 30’
von 30’
von 30’
Max 5 Kg
bis 230’
bis 220’
bis 170’
Min 1 Kg
von 30’
von 30’
von 30’
Max 3,5 Kg
bis 170’
bis 150’
bis 80’
8584
Page 44

FR
IT
DE
SL
EN
CHAPITRE 14
NETTO
YAGE ET
ENTRETIEN
ORDINAIRE
Ne jamais utiliser de produits
abrasifs, d’alcool et/ou de
diluant, pour laver l’extérieur
de votre machine; il suffit de
passer un chiffon humide.
La machine n’a besoin que
de peu d’entretien:
● Nettoyage des bacs.
● Nettoyage filtre.
● Déménagements ou
longues périodes d’arrêt de
la machine.
CAPITOLO 14
PULIZIA E
MANUTENZIONE
ORDINARIA
Per la Sua lavatrice
all’esterno non usi abrasivi,
alcool e/o diluenti, basta
solo una passata con un
panno umido.
La lavatrice ha bisogno di
pochissime manutenzioni:
●
Pulizia vaschette.
●
Pulizia filtro.
●
Traslochi o lunghi periodi
di fermo macchina.
KAPITEL 14
REINIGUNG UND
ALLGEMEINE
WARTUNG
Benutzen Sie für die äußere
Reinigung niemals
Scheuermittel, Alkohol oder
Verdünnungsmittel. Es genügt,
wenn Sie die Maschine mit
einem feuchten Lappen
abwischen.
Das Gerät braucht nur sehr
wenig Pflege:
● Reinigung des
Waschmittelbehälters
● Reinigen des Flusensiebs
● Umzug oder längerer
Stillstand der Maschine.
14. POGLAVJE
âI·âENJE IN
VZDRÎEVANJE
STROJA
Ohi‰je pralnega stroja
obri‰ite vedno le z vlaÏno
krpo. Ohi‰ja stroja ne
smete ãistiti z abrazivnimi –
jedkimi ãistili, alkoholom
in/ali topili.
VzdrÏevanje stroja je zelo
enostavno, pomembno pa
je, da redno ãistite
naslednje dele:
● predalãek za detergent,
● filter. oziroma, da
pripravite stroj v primeru:
● selitve ali dalj‰ega
mirovanja.
CHAPTER 14
CLEANING AND
ROUTINE
MAINTENANCE
Do not use abrasives, spirits
and/or diluents on the
exterior of the appliance. It is
sufficient to use a damp
cloth.
The washing machine
requires very little
maintenance:
● Cleaning of drawer
compartments.
● Filter cleaning
● Removals or long periods
when the machine is left
standing.
REINIGUNG DES
NETTOYAGE DES BACS
Même si cette opération
n’est pas strictement
nécessaire, il vaut mieux
nettoyer de temps en temps
les bacs à produits lessiviels.
Il suffit de tirer légèrement
sur le tiroir pour l’extraire.
Nettoyer le tiroir sous un jet
d’eau.
Remettre le tiroir dans sa
niche.
86 87
PULIZIA VASCHETTE
Anche se non strettamente
necessario é bene pulire
saltuariamente le vaschette
del detersivo, del
candeggiante e additivi.
Per questa operazione
basta estrarre il cassetto con
una leggera forza.
Pulisca tutto il contenuto
sotto un getto d’acqua.
Reinserisca il tutto nella
propria sede.
WASCHMITTELBEHÄLTERS
Obwohl nicht unbedingt
notwendig, empfiehlt es sich,
den Behälter gelegenlich von
Waschmittel-und
Weichspülerrückständen zu
reinigen.
Hierzu den Behälter mit wenig
Kraft herausziehen.
Die Rückstände unter
fließendem Wasser abspülen.
Den Behälter wieder
einschieben.
âI·âENJE PREDALâKA ZA
DETERGENT
âeprav ni nujno, pa
priporoãamo, da obãasno
oãistite predalãek za pralna
sredstva, saj se v njem
sãasoma naberejo ostanki
le-teh.
● Predalãek previdno
izvlecite iz stroja.
● Predalãek nato sperite
pod tekoão vodo.
Po konãanem ãi‰ãenju ga
ponovno vstavite v ohi‰je
stroja in ga potisnite nazaj v
stroj.
CLEANING OF DRAWER
COMPARTMENTS
Although not strictly
necessary,it is advisable to
clean the detergent, bleach
and additives
compartments occasionally.
Remove the compartments
by pulling gently.
Clean with water.
Put the compartments back
into place
Page 45

FR
NETTOYAGE FILTRE
La machine à laver est
équipée d’un filtre spécial
qui peut retenir les résidus les
plus gros qui pourraient
bloquer le tuyau
d’évacuation (pièces de
monnaie, boutons, etc.). Ce
dispositif permet de les
récupérer facilement.Pour
nettoyer le filtre,suivre les
indications ci-dessous:
● Ouvrez le capot
● Disponible sur certains
modèles uniquement :
Sortez le tuyau, ôtez le
bouchon et videz l’eau
dans un récipient.
● Avant de retirer le filtre,
placez un tissue absorbant
en dessous de ce dernier
afin de récupérer le résidu
d’eau contenu dans la
pompe
● Tourner le filtre dans le
sens contraire des aiguilles
d’une montre jusqu’à l’arrêt,
en position verticale.
● Enlever et nettoyer.
● Apres avoir nettoyé,
utilisez l’entaille et remontez
le filtre en faisant toutes les
opérations précédentes
dans le sens inverse.
IT
PULIZIA FILTRO
La lavatrice è dotata di uno
speciale filtro in grado di
trattenere i residui più grossi
che potrebbero bloccare lo
scarico (monete, bottoni,
ecc.) che possono così essere
facilmente recuperati.
Quando lo deve pulire si
comporti così:
● Abbassi lo sportellino.
● Solo su alcuni modelli:
Estragga il tubicino,tolga il
tappo e raccolga l’acqua
in un contenitore.
● Prima di svitare il filtro si
raccomanda di collocare
un panno assorbente sotto
di esso al fine di raccogliere
l’acqua residua che ne
fuoriesce.
● Ruoti il filtro in senso
antiorario fino all’arresto,in
posizione verticale.
● Lo estragga e lo pulisca.
● Dopo averlo pulito osservi
la tacca e lo rimonti
seguendo in senso contrario
tutte le operazioni
precedentemente descritte.
DE
REINIGEN DER
KLAMMERNFALLE
Das Gerät besitzt eine
Klammernfalle zur Aufnahme
größerer Gegenstände
(Münzen, Knöpfe), die das
Abpumpen des Waschwassers
behindern könnten. Die
Klammernfalle kann
problemlos wie folgt gereinigt
werden:
●
Klappe herunter klappen
●
Nur bei einigen Modellen:
Schlauch herausziehen,
Stöpsel entfernen und
Restwasser in einem Behälter
auffangen.
●
Bevor Sie den Filter
herausnehmen, empfiehlt es
sich, einen saugfähigen
Aufnehmer darunter zu
legen, um das daraus
fließende Restwasser
aufzufangen.
●
Drehen Sie die
Klammernfalle gegen den
Uhrzeigersinn bis zum
Anschlag in vertikaler
Stellung.
●
Entnehmen Sie und
reinigen Sie die
Klammernfalle.
●
Beim Einsetzen nach der
Reinigung achten Sie bitte
auf die Einkerbung, und
verfahren Sie in umgekehrter
Reihenfolge wie zuvor
beschrieben.
SL
âI·âENJE FILTRA
Pralni stroj ima vgrajen filter, ki
zadrÏi vse veãje delce (npr.
kovance, gumbe ipd.), ki bi
lahko prepreãili izãrpavanje
vode. Priporoãamo, da filter
obãasno oãistite in sicer
takole:
● Odprite pokrov.
● Samo nekateri modeli:
Izvlecite gibljivo cev,
odstranite ãep in odtoãite
vodo v posodo.
● Preden izvleãete filter, pod
pokrovãek filtra poloÏite
vpojno brisaão, saj se v
ãrpalki obiãajno nahaja
malo vode.
● Primite filter za roãaj in ga
obrnite v smeri nasprotni od
gibanja urinih kazalcev tako,
da bo stal roãaj navpiãno.
● Izvlecite filter in ga oãistite.
● Po konãanem ãi‰ãenju
filter ponovno vstavite v stroj.
Pri namestitvi bodite pozorni
na mali zatiã, ki je na notranji
strani oboda odprtine filtra.
Filter in okrasno podnoÏje
namestite nazaj v obratnem
vrstnem redu, kot ste ga sneli.
EN
FILTER CLEANING
The washing-machine is
equipped with a special filter
to retain large foreign matter
which could clog up the
drain, such as coins, buttons,
etc.These can, therefore,
easily be recovered.The
procedures for cleaning the
filter are as follows:
● Open the flap
● Only available on certain
models:
Pull out the corrugated hose,
remove the stopper and
drain the water into a
container.
● Before removing the filter,
place an absorbent towel
below the filter
cap to collect the small
amount of water likely to be
inside the pump
● Turn the filter anticlockwise
till it stops in vertical position.
● Remove and clean.
● After cleaning, replace by
turning the notch on the end
of the filter clockwise.Then
follow all procedures
described above in reverse
order.
DEMENAGEMENTS OU
LONGUES PERIODES D’ARRET
DE LA MACHINE
En cas de déménagement,
ou de longues périodes
d’arrêt de la machine dans
des endroits non chauffés,il
faut vidanger
soigneusement tous ses
tuyaux.
Débrancher le courant et se
servir d’un seau.
Enlever la bague sur le tuyau
et le plier vers le bas, dans le
seau, jusqu’à ce qu’il ne
sorte plus d’eau.
Après cette opération, la
répéter en sens inverse.
88
TRASLOCHI O LUNGHI PERIODI
DI FERMO MACCHINA
Per eventuali traslochi o
qualora la macchina restasse
ferma a lungo in luoghi non
riscaldati, é necessario
svuotare completamente da
ogni residuo di acqua tutti i
tubi.
A corrente disinserita, stacchi il
tubo dalla fascetta e lo porti,
verso il basso,in un catino, fino
alla completa fuoriuscita
dell’acqua.
Al termine dell’operazione
fissare il tubo di scarico
all’apposita fascetta.
UMZUG ODER LÄNGERER
STILLSTAND DER MASCHINE
Bei einem Umzug, oder wenn
die Maschine längere Zeit in
ungeheizter Umgebung
stillstehen wird,müssen alle
Schläuche vollständig entleert
werden.
Strom abschalten und eine
Waschschüssel bereitstellen.
Schlauch von der Klemme
nehmen und bis zur völligen
Entleerung in die Schüssel
halten.
PRIPRAVA STROJA NA SELITEV
ALI DALJ·E MIROVANJE
âe bi se mogoãe selili ali pa
bi morali stroj za dalj‰e
obdobje postaviti v
neogrevan prostor, morate iz
stroja in cevi iztoãiti vso vodo.
Najprej iztaknite vtikaã iz
vtiãnice, nato pa iztaknite ‰e
odtoãno cev iz objemke na
hrbtni strani stroja. Pripravite
si ustrezno posodo in nato
upognite cev navzdol ter
poãakajte, da iz nje izteãe
vsa voda.
Cev nato namestite nazaj v
objemko.
Postopek ponovite tudi s
cevjo za dotok vode.
REMOVALS OR LONG PERIODS
WHEN THE MACHINE IS LEFT
STANDING
For eventual removals or
when the machine is left
standing for long periods in
unheated rooms, the drain
hose should be emptied of
all remaining water.
The appliance must be
switched off and unplugged.
A bowl is needed. Detach
the drainage hose from the
clamp and lower it over the
bowl until all the water is
removed.
Repeat the same operation
with the water inlet hose.
89
Page 46

FR
IT
CHAPITRE 15
ANOMALIE
1. Aucun
fonctionnement
sur n’importe quel
programme
2. Absence
d’alimentation
d’eau
3. L’eau n’est pas
évacuèe
4. Présence d’eau sur
le sol tout autour
de la machine
5. La machine
n’essore pas
6. De fortes vibrations
pendant la phase
de centrifugation
La fiche n’est pas introduite dans la
prise de courant
L’interrupteur géneral n’est pas branché
L’énergie électrique est coupée
Les valves de l’installation électrique
sont défectueuses
Portillon ouvert
Voir cause 1
Robinet de l’eau fermé
Programmateur mal positionné
Tuyau de vidange plié
Présence de corps étrangers dans le
filtre
Fuite du joint se trouvant entre le robinet
et le tuyau de remplissage
La machine n’a pas encore évacué
l’eau
La fonction “suppression d’essorage” est
introduite (exclusivement sur certains
modèles)
La machine n’est pas à niveau
Les étriers de transport n’ont pas été
enlevés
La charge de linge n’est pas répartie
de façon uniforme
CAUSE
Brancher la fiche
Brancher l’interrupteur général
Contróler
Contróler
Fermer le portillon
Contróler
Ouvrir le robinet d’alimentation d’eau
Positionner correctement le timer
Redresser le tuyau de vidange
Inspecter le filtre
Remplacer le joint et serrer à fond le
tube sur le robinet
Attendre quelques minutes et la
machine évacuera l’eau
Relever la touche “exclusion
centrifugation”
Régler les pieds
Enlever les étriers de transport
Répartir le linge de façon uniforme
NOTE:
LA MACHINE EST DOTEE D’UN DISPOSITIF ELECTRONIQUE QUI EMPECHE LE DÉPART DE
L’ESSORAGE SI LES CHARGES SONT MAL REPARTIES ET LIMITE LES VIBRATIONS ET LE BRUIT DURANT
LE LAVAGE.
Note d’information
Pendant la phase de séchage, le tambour effectue des rotations à grande vitesse pour brasser
le linge et ainsi optimiser le cycle.
Si le mauvais fonctionnement persiste,adressez-vous au Centre d’Assistance Technique Candy; communiquez
le nom du modèle indiqué sur la plaquette se trouvant sur la carrosserie à l’intérieur du hublot ou sur le bulletin
de garantie.
En indiquant ces informations vous obtiendrez une intervention plus rapide et efficace.
1 L’utilisation des produits écologiques sans phosphates peut produire les effets suivants:
- L’eau de vidange du rinçage est trouble à cause de zéolites en suspension; l’efficacité du rinçage n’est
absolument pas compromis;
- Présence de poudre blanche (zéolites) sur le linge à la fin du lavage: cette poudre ne pénètre pas dans le
tissu et n’en altère pas la couleur;
- présence de mousse dans l’eau du dernier rinçage: elle ne signifie pas pour autant un mauvais rinçage;
- Les tensioactifs anioniques de la formule des produits pour machines à laver, s’enlèvent difficilement du linge
et, même en toute petite quantité, ils peuvent provoquer d’importants phénomènes de formation de mousse;
- L’exécution d’autres cycles de rinçage, en de tels cas, n’apporte aucun avantage.
2 Avant d’appeler le Centre d’Assistance technique Candy,si votre machine ne fonctionne pas, effectuer les
contrôles susmentionnés.
90
REMEDE
CAPITOLO 15
ANOMALIA
1. Non funziona con
qualsiasi
programma
2. Non carica acqua
3. Non scarica acqua
4. Presenza di acqua
sul pavimento
attorno alla
lavabiancheria
5. Non centrifuga
6. Forti vibrazioni
durante la
centrifuga
NOTA:
IL MODELLO È DOTATO DI UN PARTICOLARE DISPOSITIVO ELETTRONICO CHE IMPEDISCE LA
PARTENZA DELLA CENTRIFUGA CON CARICHI PARTICOLARMENTE SBILANCIATI. QUESTO SERVE
A MIGLIORARE LE VIBRAZIONI,LA SILENZIOSITÀ E LA DURATA DELLA LAVABIANCHERIA.
Spina corrente elettrica
non inserita nella presa
Tasto interruttore generale
non inserito
Manca energia elettrica
Valvole impianto elettrico guaste
Sportello aperto
Vedi cause 1
Rubinetto acqua chiuso
Timer non correttamente posizionato
Tubo di scarico piegato
Presenza corpi estranei nel filtro
Perdita della guarnizione posta
tra rubinetto e tubo carico
La lavabiancheria non ha ancora
scaricato l’acqua
“Esclusione centrifuga” inserita
(solo per alcuni modelli)
Lavabiancheria non perfettamente
in piano
Staffe di trasporto
non ancora asportate
Carico biancheria
non uniformemente distribuito
CAUSA
Inserire la spina
Inserire tasto.
Interruttore generale
Controllare
Controllare
Chiudere sportello
Controllare
Aprire il rubinetto acqua
Posizionare timer correttamente
Raddrizzare tubo di scarico
Ispezionare filtro
Sostituire guarnizione e
stringere bene tubo e rubinetto
Attendere alcuni minuti, la macchina
scaricherà
Disinserire tasto
“esclusione centrifuga”
Regolare gli appositi piedini regolabili.
Asportare staffe di trasporto
Distribuire in modo uniforme
la biancheria
Nota
Durante la fase di asciugatura il cestello esegue rotazioni ad alta velocità per bilanciare il
carico ed ottimizzare il ciclo.
Se il malfunzionamento dovesse persistere si rivolga al Centro di Assistenza Tecnica Candy comunicando il
modello di lavabiancheria, riportato sulla targhetta posta sul mobile all’interno dell’oblò o sul foglio di garanzia.
Fornendo tali informazioni otterrete un intervento più tempestivo ed efficace.
Attenzione:
1 L’utilizzo di detersivi ecologici senza fosfati può produrre i seguenti effetti:
- l’acqua di scarico dei risciacqui risulta più torbida per la presenza di zeoliti in sospensione senza che
l’efficacia del risciacquo ne risulti pregiudicata
- presenza di polvere bianca (zeoliti) sulla biancheria al termine del lavaggio che non si ingloba nei tessuti e
non ne altera il colore.
- La presenza di schiuma nell’acqua dell’ultimo risciacquo non é necessariamente indice di una cattiva
sciacquatura.
- I tensioattivi anionici presenti nelle formulazioni dei detersivi per lavabiancheria, risultano spesso
difficilmente allontanabili dalla biancheria stessa e, anche in minima quantità, possono produrre vistosi
fenomeni di formazione di schiuma.
- L’esecuzione di ulteriori cicli di risciacquo, in casi come questi, non comporta alcun beneficio.
2 Se la Sua lavabiancheria non funzionasse, prima di chiamare il Centro di Assistenza Tecnica Candy
eseguire i controlli sopradescritti.
RIMEDIO
91
Page 47

DE
SL
KAPITEL 15
FEHLVERHALTEN
1. Programme
funktionieren nicht
2. Kein Wasserzulauf
3. Kein Wasserablauf
4.Wasser auf dem
Boden rund um
das Gerät
5. Keine
Schleuderfunktion
6. Starke Vibrationen
während des
Schleuderns
ANMERKUNG:
DAS MODELL IST MIT EINER ELEKTRONISCHEN VORRICHTUNG AUSGESTATTET, DIE VERHINDERT, DAß DER
SCHLEUDERGANG MIT FÜLLMENGEN, DEREN GEWICHT UNGLEICHMÄßIG VERTEILT SIND, STARTET. DIES TRÄGT ZU
EINER REDUZIERUNG DER VIBRATIONEN,DER GERÄUSCHENTWICKLUNG UND ZU EINER VERLÄNGERUNG DER
LEBENSDAUER DER WASCHMASCHINE BEI.
Stecker nicht in der Steckdose
Hauptschalter nicht eingedrückt
Stromausfall
Sicherungen defekt
Bullauge nicht geschlossen
Siehe Gründe zu 1
Wasserhahn geschlossen
Programmwahlschalter nicht richtig
eingestellt
Ablaufschlauch gekrümmt
Fremdkörper in der Klammernfalle
Dichtung vom Wasserzulaufschlauch
defekt
Die Waschmaschine hat das Wasser
noch nicht abgepumpt
Taste “Schleuderstop” eingestellt (nur bei
einigen Modellen)
Waschmaschine nicht richtig justiert
Transportstange noch nicht entfernt
Wäsche nicht gleichmäßig in der
Trommel verteilt
GRUND
Stecker einstecken
Strom einschalten
Kontrollieren
Kontrollieren
Bullauge schließen
Kontrollieren
Wasserhahn öffnen
Programmwahlschalter richtig einstellen
Ablaufschlauch begradigen
Klammernfalle reinigen
Dichtung ersetzen und Zulaufschlauch
am Wasserhahn befestigen
Einige Minuten warten, bis das Wasser
abgepumpt ist
Taste “Schleuderstop” herausdrücken
Über die entsprechenden einstellbaren
Füße justieren
Transportstange entfernen
Wäsche gleichmäßig verteilen
Hinweis
Während der Trocknung reversiert die Trommel bei hoher Geschwindigkeit, um die Waschladung
gleichmäßig zu verteilen und somit die Trocknung zu optimieren.
Läßt sich der Fehler nicht beheben, wenden Sie sich bitte an den Technischen Kundendienst der Firma Candy.
Geben Sie dabei das Maschinenmodell laut Typenschild * oder Garantieschein an,um eine schnelle effektive
Hilfe zu ermöglichen.
* (welches sich im Bullauge befindet)
Achtung:
1 Die Verwendung von umweltfreundlichen Waschmitteln kann folgende Effekte auslösen:
- Die schwebenden Minerale führen zu einer Trübung des Spülwassers, die aber weder die Wirkung der
Spülungen noch das Waschergebnis beeinflussen.
- Nach erfolgter Wäsche können sich auf der Wäsche Spuren weißen Pulvers (Minerale) befinden, die sich
aber weder in der Wäsche festsetzen noch die Farben beeinträchtigen.
- Schaumbildung auf dem letzten Spülwasser bedeutet nicht unbedingt unzureichende Spülresultate.
- Die in den Waschmitteln enthaltenen waschaktiven anionischen Tenside sind häufig sehr schwer ausspülbar,
und erzeugen auch in nur geringer Dosierung auffällige Schaummengen.
- Zusätzliche Spülgange sind in solchen Fällen nicht sehr effektiv.
2 Bitte wenden Sie sich bei Defekten an der Maschine erst dann an den Kundendienst, wenn Sie anhand der
obigen Liste selbst versucht haben, eventuelle Fehler zu beheben.
92
ABHILFE
MOTNJE V DELOVANJU
MOTNJA
1. Stroj ne deluje na
nobenem
programu
2. Voda ne priteka v
stroj
3. Stroj ne izãrpava
vode
4. Na tleh okrog stroja
je voda
5. Centrifuga se ne
vkljuãi
6. Stroj med
centrifugiranjem
moãno vibrira
OPOMBA:
STROJ JE OPREMLJEN S POSEBNO ELEKTRONSKO NAPRAVO, KI PREPREâUJE CENTRIFUGIRANJE,
âE PERILO V BOBNU NI URAVNOTEÎENO. S TEM JE ZMANJ·ANA GLASNOST DELOVANJA TER
VIBRACIJE, OBENEM PA TUDI PODALJ·ANA ÎIVLJENJSKA DOBA VA·EGA PRALNEGA STROJA.
Pomembno
Med su‰enjem se bo boben zaãel vrteti z veãjo hitrostjo; tako se bo perilo bolj enakomerno
razporedilo, su‰enje pa bo bolj uãinkovito.
Opozorilo!
1. Pranje z ekolo‰kimi detergenti brez fosfatov lahko povzroãi naslednje stranske uãinke:
- Voda, ki med izpiranjem izteka iz stroja, lahko izgleda zaradi prisotnosti zeolitov motna, vendar pa to ne
vpliva na kakovost izpiranja.
- Zeoliti, ki se po konãanem pranju pojavljajo na perilu kot bel prah ne prodrejo v tkanine in tudi ne vplivajo
na obstojnost barv.
- âe se voda med zadnjim izpiranjem peni, to ‰e ne pomeni, da ni dobro izplaknjeno.
- Aktivne anione, ki so prisotni v detergentih brez fosfatov, voda le steÏka izpere iz perila, zato se voda peni
tudi pri minimalnih ostankih teh uãinkovin .
- Tudi nadaljnja izpiranja v takih primerih stanja ne izbolj‰ajo.
2. âe opazite motnjo v delovanju va‰ega pralnega stroja, najprej s pomoãjo zgoraj podanih navodil poskusite
sami odpraviti nepravilnost. ·ele ãe vam to ne uspe, poi‰ãite pomoã pri najbliÏjem poobla‰ãenem servisu
Candy.
Za morebitne tiskovne napake se opraviãujemo! PridrÏujemo si pravico do tehniãnih sprememb, ki ne bodo
bistveno spremenile lastnosti proizvoda. Vse pravice pridrÏane. Noben del te izdaje ne sme biti reproduciran ali
prepisan v katerikoli obliki oz. na katerikoli naãin bodisi mehansko, s fotokopiranjem ali kako drugaãe, brez
privoljenja lastnikov avtorskih pravic.
Stroja niste prikljuãili na elektriãno
omreÏje
Stroja niste vklopili
Ni elektriãne napestosti
Varovalka je pregorela
Vrata stroja so odprta
Preglejte vzroke pod toãko 1
Pipa za dotok vode je zaprta
Gumb programatorja ni pravilno
nastavljen
Odtoãna cev je zvita ali upognjena
V filtru so tujki
Pri tesnilu med pipo in odtoãno cevjo
uhaja voda
Stroj ‰e ni izãrpal vode
Vkljuãena je tipka ''izklop centrifuge'' –
vgrajena je samo pri nekaterih modelih
Stroj ne stoji popolnoma vodoravno
Transportne za‰ãite niste odstranili
Perilo v stroju ni enakomerno
razporejeno
15. POGLAVJE
MOREBITNI VZROK
KAKO JO ODPRAVITE
Vtaknite vtiã v vtiãnico
Pritisnite tipko vklop/izklop
Preverite
Preverite
Zaprtie vrata stroja
Preverite
Odprite pipo za dotok vode
Gumb programatorja naravnajte toãno
na ustrezen program
Zravnajte odtoãno cev
Preglejte filter
Zamenjajte tesnilo in dobro privijte cev
na pipo
Poãakajte nekaj trenutkov in stroj bo
vodo izãrpal
Izklopite tipko ali obrnite gumb za
nastavitev vrtljajev centrifuge
Izravnajte stroj z regulirnimi nogicami
Odstranite trnsportno za‰ãito
Perilo v bobnu enakomerno porazdelite
93
Page 48

EN
CHAPTER 15
FAU LT
1. Does not function
on any
programme
2. Does not load
water
3. Does not discharge
water
4. Water on floor
around washing
machine
5. Does not spin
6. Strong vibrations
during spin
CAUSE
Mains plug not plugged in
Mains switch not on
No power
Electric circuit fuses failure
Load door open
See cause 1
Inlet tap turned off
Timer not set correctly
Discharge tube bent
Odd material blocking filter
Leak from the washer between the tap
and inlet tube
The washing machine has not
discharged water
“No spin” setting (some models only)
Washing machine not perfectly level
Transport bracket not removed
Washing load not evenly distributed
REMEDY
Insert plug
Turn on mains switch
Check
Check
Close load door
Check
Turn on water inlet tap
Set timer on correct position
Straighten discharge tube
Check filter
Replace washer and tighten the tube
on the tap
Wait a few minutes until the machine
discharges water
Turn the programme dial onto spin
setting
Adjust special feet
Remove transport bracket
Distribute the washing evenly
NOTE:
THE MACHINE IS FITTED WITH A SPECIAL ELECTRONIC DEVICE, WHICH PREVENTS THE SPIN CYCLE
SHOULD THE LOAD BE UNBALANCED.
THIS REDUCES THE NOISE AND VIBRATION IN THE MACHINE AND SO PROLONGS THE LIFE OF YOUR
MACHINE.
Advisory note
During drying phase the drum will accelerate to a higher speed to distribute the load and to
optimize the drying performance
If the fault should persist, contact a Candy Technical Assistance Centre.For prompt servicing, give the model of
the washing machine,to be found on the label placed on the cabinet inside of the porthole or on the
guarantee certificate.
Important
1 The use of environment friendly detersives without phosphates may produce the following effects:
- The discharge rinse water may result cloudier due to the presence of zeolites in suspension. This does not
compromise the efficiency of the rinses.
- The presence of white powder (zeolites) on the washing at the end of the washing cycle. This does not
remain incorporated in the fabric and does not alter the colour.
- The presence of foam in the last rinse water which is not necessarily a sign of inadequate rinsing.
- The non-ionic surface-active agents present in the composition of washing machine detersives are often
difficult to remove from the washing itself and, even in small quantities, may produce visible signs of the
formation of foam.
- Carrying out further rinses, in cases such as this, is not useful.
2 If your washing machine fails to function, carry out the above-mentioned checks before calling the Candy
Technical Assistance Service.
94
Le constructeur décline toute responsabilité pour les éventuelles erreurs d’imprimerie
contenues dans le présent mode d’emploi. Il se réserve en outre le droit d’apporter
toutes modifications qui se révèleraient utiles à ses propes produits sans pour autant
en compromettre les caractéristiques essentielles.
La Ditta costruttrice declina ogni responsabilità per eventuali errori di stampa contenuti
nel presente libretto. Si riserva inoltre il diritto di apportare le modifiche che si
renderanno utili ai propri prodotti senza compromettere le caratteristiche essenziali.
Wir schileßen die Haftung für alle evtl. Druckfehler aus. Kleinere Änderungen und
technische Weiterentwicklungen im Detail vorbehalten.
Za morebitne tiskovne napake se opraviãujemo! PridrÏujemo si pravico do
tehniãnih sprememb, ki ne bodo bistveno spremenile lastnosti proizvoda.
The manufacturer declines all responsibility in the event of any printing mistakes in
this booklet. The manufacturer also reserves the right to make appropriate
modifications to its products without changing the essential characteristics.
Page 49

FR
IT
DE
SL
EN
Cet appareil est commercialisé en accord avec la directive européenne 2002/96/CE sur les déchets
des équipements électriques et électroniques (DEEE).
En vous assurant que ce produit est correctement recyclé, vous participez à la prévention des
conséquences négatives sur l’environnement et la santé publique qui pourrait être causé par une
mise au rebut inappropriée de ce produit.
Le symbole sur ce produit indique qu’il ne doit pas être traité comme un déchet ménager. Il doit
être rapporté jusqu’à un point de recyclage des déchets électriques et électroniques.
La collecte de ce produit doit se faire en accord avec les réglementations environnementales
concernant la mise au rebut de ce type de déchets.
Pour plus d’information au sujet du traitement, de la collecte et du recyclage de ce produit, merci
de contacter votre mairie, votre centre de traitement des déchets ou le magasin où vous avez
acheté ce produit.
Questo elettrodomestico è marcato conformemente alla Direttiva Europea 2002/96/CE sui rifiuti da
apparecchiature elettriche ed elettroniche (WEEE).
Assicurandovi che questo prodotto sia smaltito correttamente, aiuterete ad evitare possibili conseguenze
negative all’ambiente e alla salute delle persone, che potrebbero verificarsi a causa d’un errato trattamento di
questo prodotto giunto a fine vita.
Il simbolo sul prodotto indica che questo apparecchio non può essere trattato come un normale rifiuto
domestico; dovrà invece essere consegnato al punto più vicino di raccolta per il riciclo delle apparecchiature
elettriche ed elettroniche.
Lo smaltimento deve essere effettuato in accordo con le regole ambientali vigenti per lo smaltimento dei rifiuti.
Per informazioni più dettagliate sul trattamento, recupero e riciclo di questo prodotto, per favore contattare
l’ufficio pubblico di competenza (del dipartimento ecologia e ambiente), o il vostro servizio di raccolta rifiuti a
domicilio, o il negozio dove avete acquistato il prodotto.
Dieses Elektrohaushaltsgerät ist entsprechend der EU-Richtlinie 2002/96/CE über Elektro- und ElektronikAltgeräte (WEEE) gekennzeichnet. Bitte sorgen Sie dafür, dass das Gerät ordnungsgemäß entsorgt wird,
damit mögliche negative Auswirkungen auf Umwelt und Gesundheit vermieden werden, die bei einer
unsachgemäßen Entsorgung des Altgerätes entstehen könnten.
Das Symbol auf dem Produkt bedeutet, dass dieses Gerät nicht in den normalen Hausmüll gehört, sondern
den jeweiligen kommunalen Rücknahmesystemen für Elektro- und Elektronik-Altgeräte übergeben werden
muss. Die Entsorgung muss im Einklang mit den geltenden Umweltrichtlinien für die Abfallentsorgung
erfolgen.
Für nähere Informationen über Entsorgung und Recycling dieses Produktes wenden Sie sich bitte an Ihre
kommunalen Einrichtungen (Umweltamt) oder an die Abfallentsorgungsgesellschaft Ihrer Stadt bzw. an Ihren
Händler.
Izdelek je oznaãen skladno z evropsko direktivo 2002/96 o odpadni elektriãni in elektronski opremi
(WEEE).
S pravilnim naãinom odstranjevanja izdelka boste pomagali prepreãiti morebitne negativne
posledice na okolje in zdravje ljudi, ki bi jih lahko povzroãilo nepravilno odstranjevanje aparata.
Simbol na izdelku oznaãuje, da s tem izdelkom ni dovoljeno ravnati kot z obiãajnimi gospodinjskimi
odpadki. Izdelek odpeljite na ustrezno zbirno mesto za predelavo elektriãne in elektronske opreme.
Odstranjevanje mora biti opravljeno skladno z lokalnimi okoljevarstvenimi predpisi o odstranjevanju
odpadkov.
Za podrobnej‰e informacije o odstranjevanju in predelavi tega izdelka se obrnite na pristojen mestni
organ za odstranjevanje odpadkov, komunalno sluÏbo ali trgovino, v kateri ste izdelek kupili.
This appliance is marked according to the European directive 2002/96/EC on Waste Electrical and Electronic
Equipment (WEEE).
By ensuring this product is disposed of correctly, you will help prevent potential negative consequences for the
environment and human health, which could otherwise be caused by inappropriate waste handling of this
product.
The symbol on the product indicates that this product may not be treated as household waste. Instead it shall
be handed over to the applicable collection point for the recycling of electrical and electronic equipment
Disposal must be carried out in accordance with local environmental regulations for waste disposal.
For more detailed information about treatment, recovery and recycling of this product, please contact your
local city office, your household waste disposal service or the shop where you purchased the product.
11.05 - 41035655 - www.graficaestampa.it - Printed in Italy - Imprimé en Italie
 Loading...