

Page 1
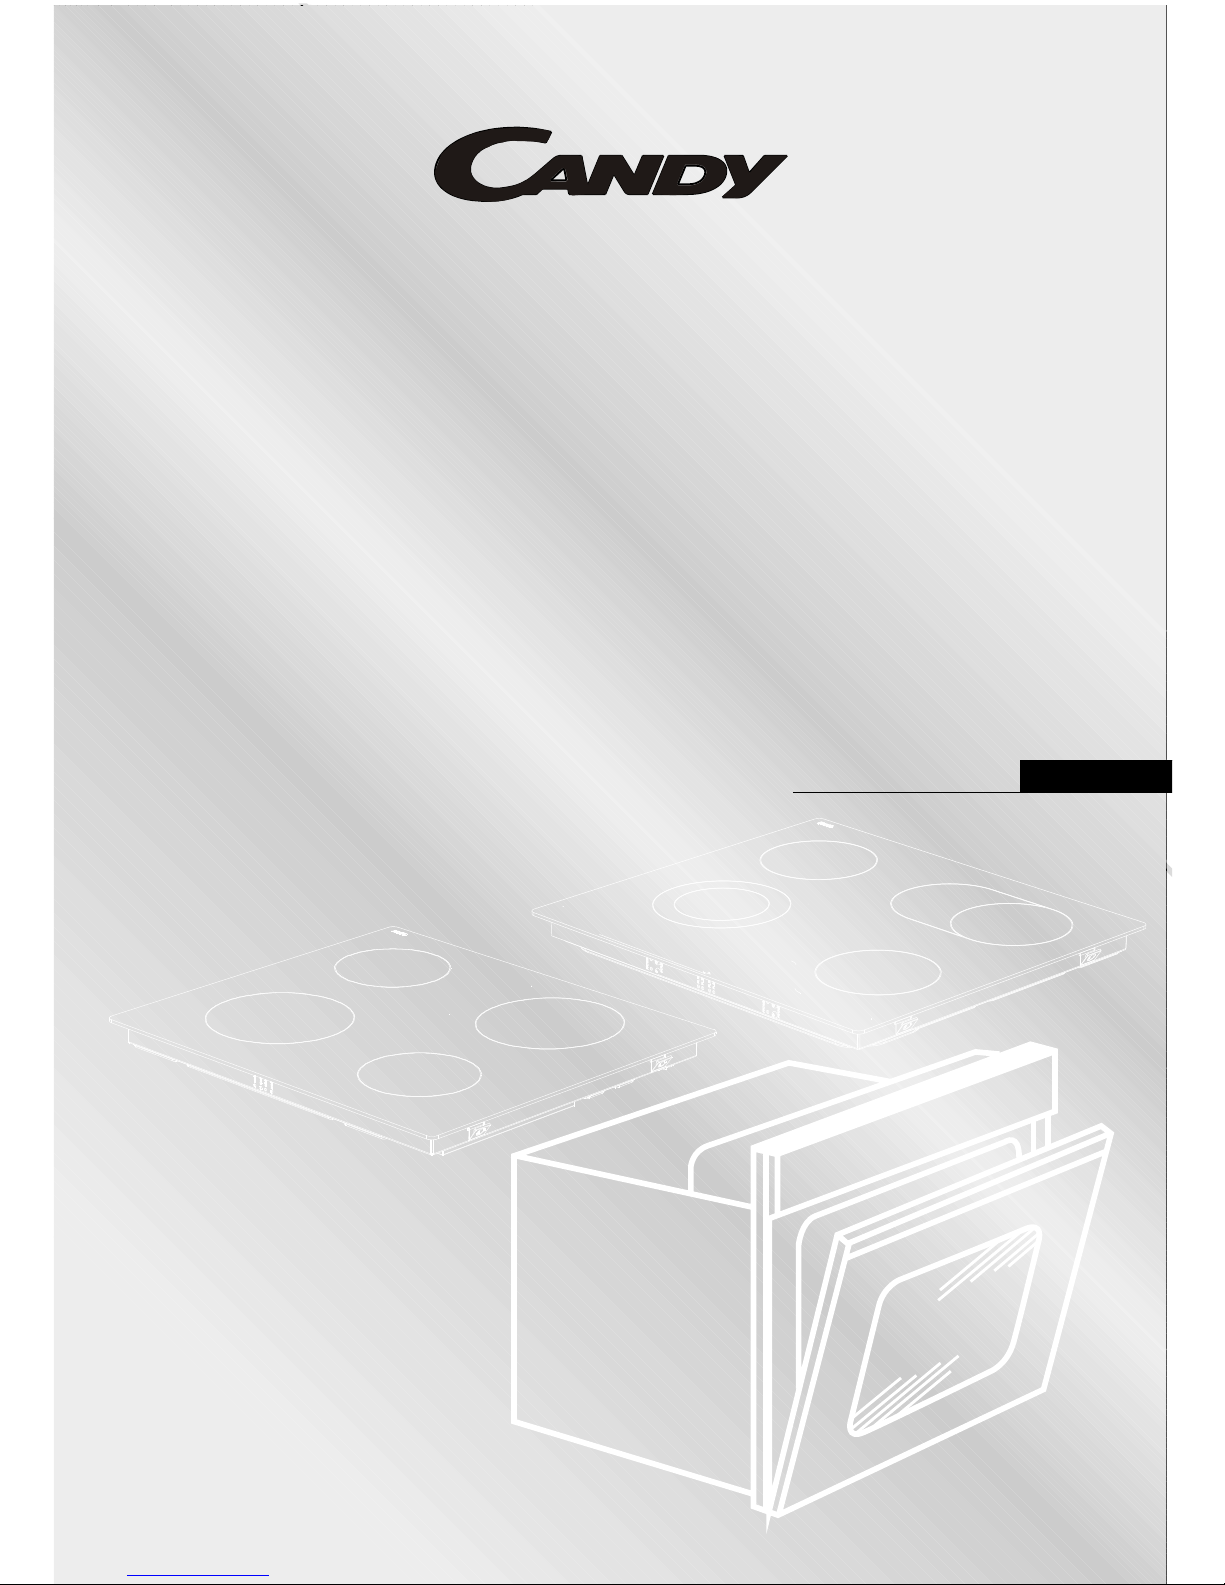
PVU 640 C
PVU 640 X
PVU 647 X
PVU 647 N
FUNP 610 X
FUNP 611 X
FUHP 615 X
FUHP 825 X
FUS 100-40 W
FUS 100-40 X
PVU 640 C
PVU 640 X
PVU 647 X
PVU 647 N
FUNP 610 X
FUNP 611 X
FUHP 615 X
FUHP 825 X
FUS 100-40 W
FUS 100-40 X
ENG
BUILT-IN OVEN AND HOB
USER'S MANUAL
Page 2
ENG
Dear Customer,
Thank you for purchasing this product. The safety precautions
and recommendations in these instructions are for your own
safety and that of others.They will also provide a means by which
to make full use of the features offered by your appliance.
Please keep this booklet in a safe place. It may be useful in
future, either to yourself or to others in the event that doubts
should arise relating to its operation.
This appliance must be used only for its intended purpose, that is
for the domestic cooking of foodstuffs. Any other form of usage is
to be considered as inappropriate and therefore dangerous.
The manufacturer declines all responsibility in the event of
damage caused by improper or incorrect use of the appliance.
Page 3
ENG
Introduction of product
Transportation
and hob
Page 4

ENG
MAIN PARTS
PART 1: INTRODUCTION OF PRODUCT
Hob - Oven
Combination
Possibility
FUNP 610 X
PVU 640 C
FUNP 611 X FUHP 615 X
FUHP 825 X
FUS 100-40 W FUS 100-40 X
PVU 640 X
PVU 647 X
PVU 647 N
√ √ √ √
√ √
√
√
√
√
√
√
√
√
√
√
√
√
Page 5

VITROCERAMIC HOB: PVU 647 X - PVU 647 N
1
4
5
1 o 145 Highlight Zone (1200W)
2 o 180 Highlight Zone (1800W)
4 Lower Casing
3 Vitroceramic Surface
/
/
5 Hot Hob Indicator
6 Hot Hob Indicator
1 o 145 Highlight Zone (1200W)
3 Extensible Highlight Zone (1800W)
2 o 180 Dual Highlight Zone (1700W)
/
/
5 Lower Casing
4 Vitroceramic Surface
ENG
VITROCERAMIC HOB: PVU 640 C - PVU 640 X
1
3
1
6
4
2
5
Page 6
ENG
4
This appliance has been designed for home as built-in furniture.
After removing the packaging, make sure to check if there is any damage to the
appliance. If there is any damage, never attempt to use the appliance and
immediately contact your Authorised Service. As packaging metarials (
nylon,perforator, syrofoam etc.) will pose a threat to children, such metarials need to
be collected immediately and put out of reach.
The appliance must be installed and put in operation by an authorised technician
under the conditions provided by the manufacturer in this manual. The manufacturer
cannot be held responsible for any damage that might occur due to faulty installation.
Before connecting your appliance to the mains at home, make sure to check the
conformity of voltage and gas settings, which are specified on the information sticker
attached to the appliance and/or packaging, with the usage conditions available.
Do not operate the oven before it is fully installed.
Be sure that all of its knobs are turned off when the appliance is not in use.
Be sure that the power cord is not wedged during the installation of the appliance.
The power cord should never be replaced by the customer. In the event any damage
occurs to the power cord for any reason, please contact your Authorised Service.
Switch off the appliance may preserve their heat for a long time; please wait untill the
parts primarily exposed to heat cool off touching them.
Do not keep flammable items/substances near while it is in use.
When operating other electrial devices near the appliance, pay attention that their
cables do not come into contact with the heated parts.
When the appliance is not in use, make sure that the knobs are in ‘’0’’ (off) position.
Your appliance needs sufficient air circulation while it is operating. Carefully read the
part of this manual, where installation procedures are explained, and make sure the
relevant conditions are satisfied.
This operating manual has been prepared jointly for multible models. Some of the
specifications explained in the manual may not be included in your appliance. Pay
attention to the explanations with illustrations while reading the manual.
In case that hi-light halogen heaters are installed as hob elements do not stare into
the light.
Page 7
ENG
5
Caution (Only for FUS 100-40 W and FUS 100-40 X models): The heat vapour
is given out through the ventilation holes at the handle during normal operation
of the oven. Please kindly be aware of that usage .
This appliance is not intended for use by persons (including children) with reduced physical,
sensory or mental capabilities, or lack of experience and knowledge, unless they have been
given supervision or instruction concerning use of the appliance by a person responsible for
their safety.
Children should be supervised to ensure that they do not play with the appliance.
Page 8

Figure 1
ENG
IinstallIinstall
Wworktop
Page 9
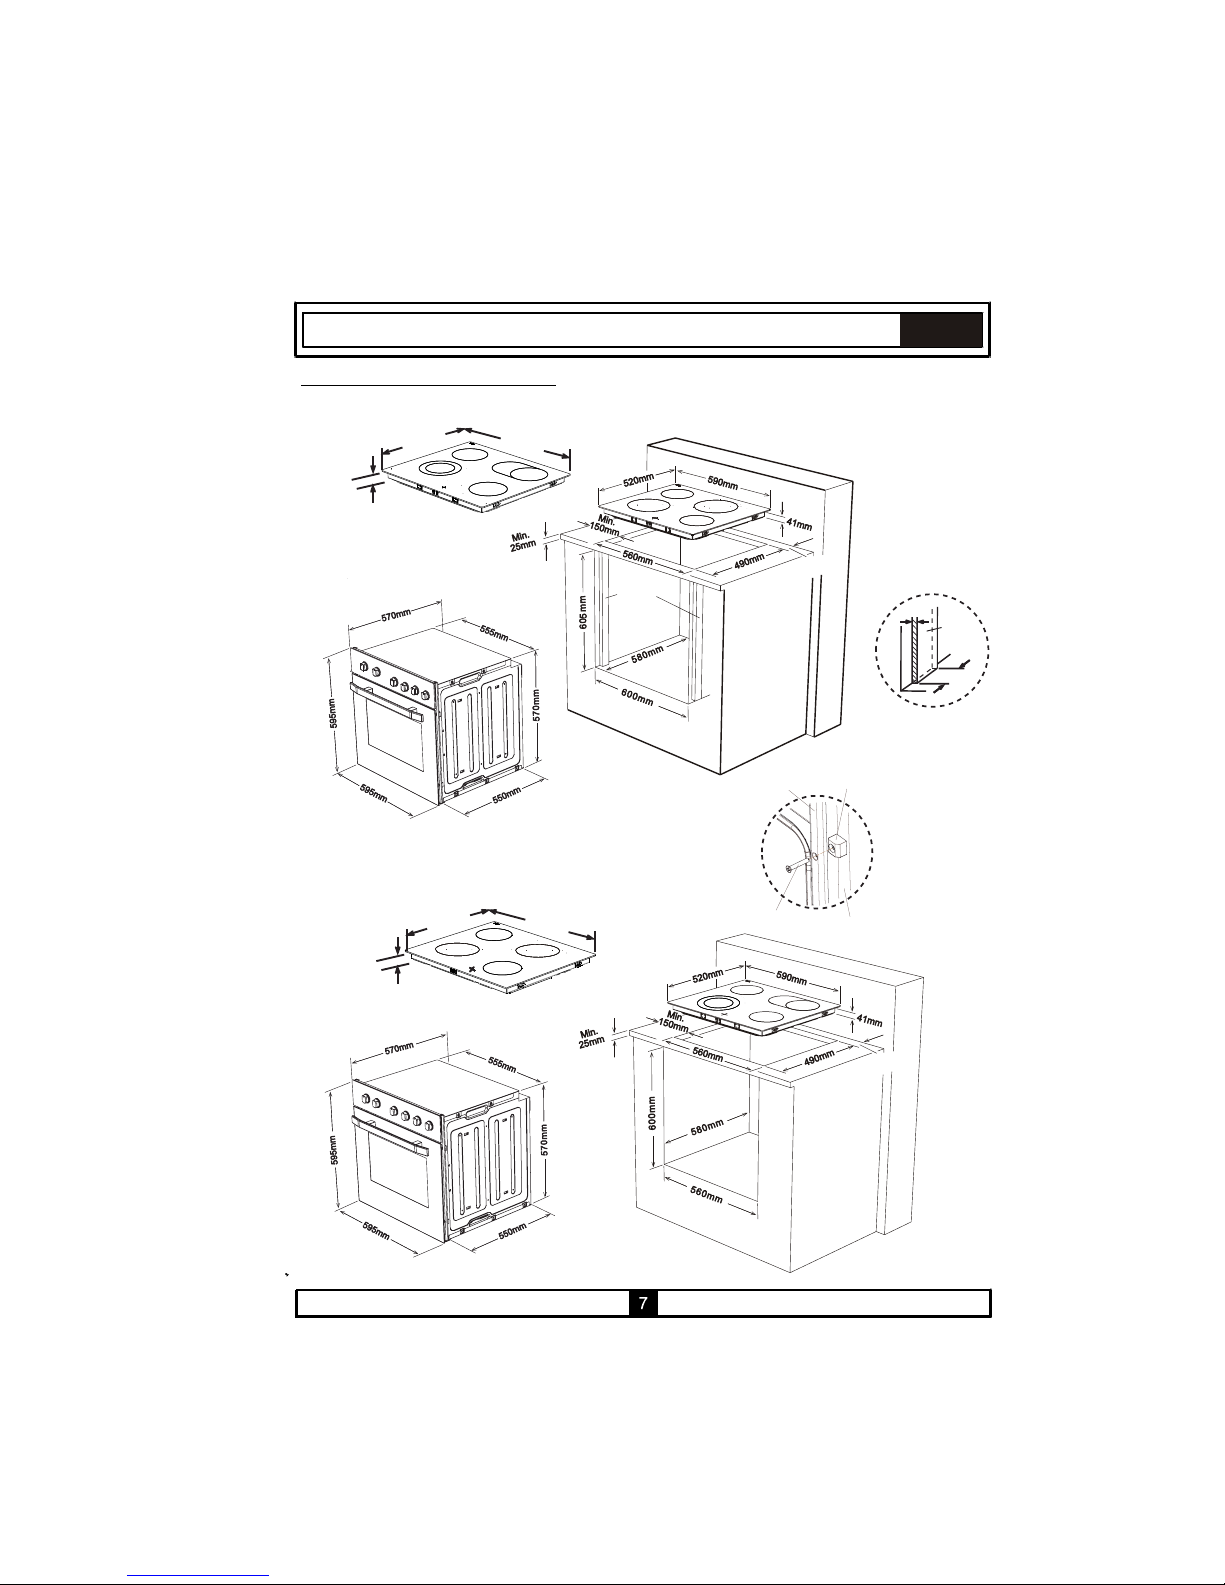
3.2 OVEN and HOB INSTALLATION
Figure A- Flush Installation of Oven
ENG
Wooden
part
Wooden
part
.Min
60mm
.Min
60mm
52 m
m0
95 0mm
41mm
520mm
95 0mm
41mm
20mm
Min.
40mm
Wooden
part
Figure B- Regular Installation of Oven
Front
frame
Spacer
Wooden
part
Mounting
screw
M .in
mm60
M .in
mm60
Page 10

ENG
Fixing the vitroceramic hob:
· Apply the one-sided self-adhesive sealing tape supplied all the way round the lower edge
· Screw the 4 worktop mounting brackets on the side walls of product.
· Place the hob into the opening on the worktop.
of the cooking surface along the outer edge of the glass ceramic panel. Do not stretch it.
Installation steps:
1.Place the hob into the opening on worktop. The size of opening is given in Figure A.
For details, see the heading Fixing the vitroceramic hob.
2.Connect the hob to the oven using the plug given on the hob. The socket for plug is
placed on the rear panel of oven.
3.Connect the oven to the electrical supply.
4.Place the oven into its built-in niche. Either placement in Figure A or placement in Figure B
is applicable depending on the size of cabinet opening. For details, see the heading Fixing
the oven.
worktop mounting bracket
Page 11

9
ENG
Insert the oven into cabinet partly by pushing it forward. Open the oven door and insert 4
screws into countersunk holes on the front frame. Locate the spacers behind the flange of
front frame and screw them till the surface of spacer touches the front frame. While doing
this, please pay attention that the chamfered edge of each spacer is faced to the rounded
edge of front frame. Push forward the product completely and finally screw it to wooden
part.
The dimensions and material of the cabinet in which the oven will be installed must be
correct and resistant to increases in temparature. In a correct installation, contact with
electrical or insulated parts must be pervented. Insulating parts need to be fitted in a way to
ensure that they cannot be removed by using any kind of tool. Installing the appliance in the
close vicinity of a refrigerator or a deep-freezer is not recommended. Otherwise, the
performance of the above-mentioned appliances will be negatively affected due to
emanating heat.
Warning regarding the installation of built-in oven without cooling fan
5mm5mm
Prior inserting the oven, it is necessary to remove the
rear kitchen element panel in the area of the oven
opening.
Equally, the front part of the element must have an
opening of no less than 5 mm.
Fixing the oven:
( FUS 100-40 W
FUS 100-40 X )
Page 12
10
ENG
Power
2
ATTENTION:
Should it be necessary to replace the supply cord, connect the wire in accordance with
the following colours/codes:
BLUE - NEUTRAL (N)
BROWN - LIVE (L)
YELLOW-GREEN - EARTH ( )
Page 13

22
WARNING: The cablying and wiring system must be able to bear the maximum electric power
required by the oven. This is indicated on the rating plate oven. In case of any doubt, please
refer to professionals.
11
ENG
4
2
Page 14
12
ENG
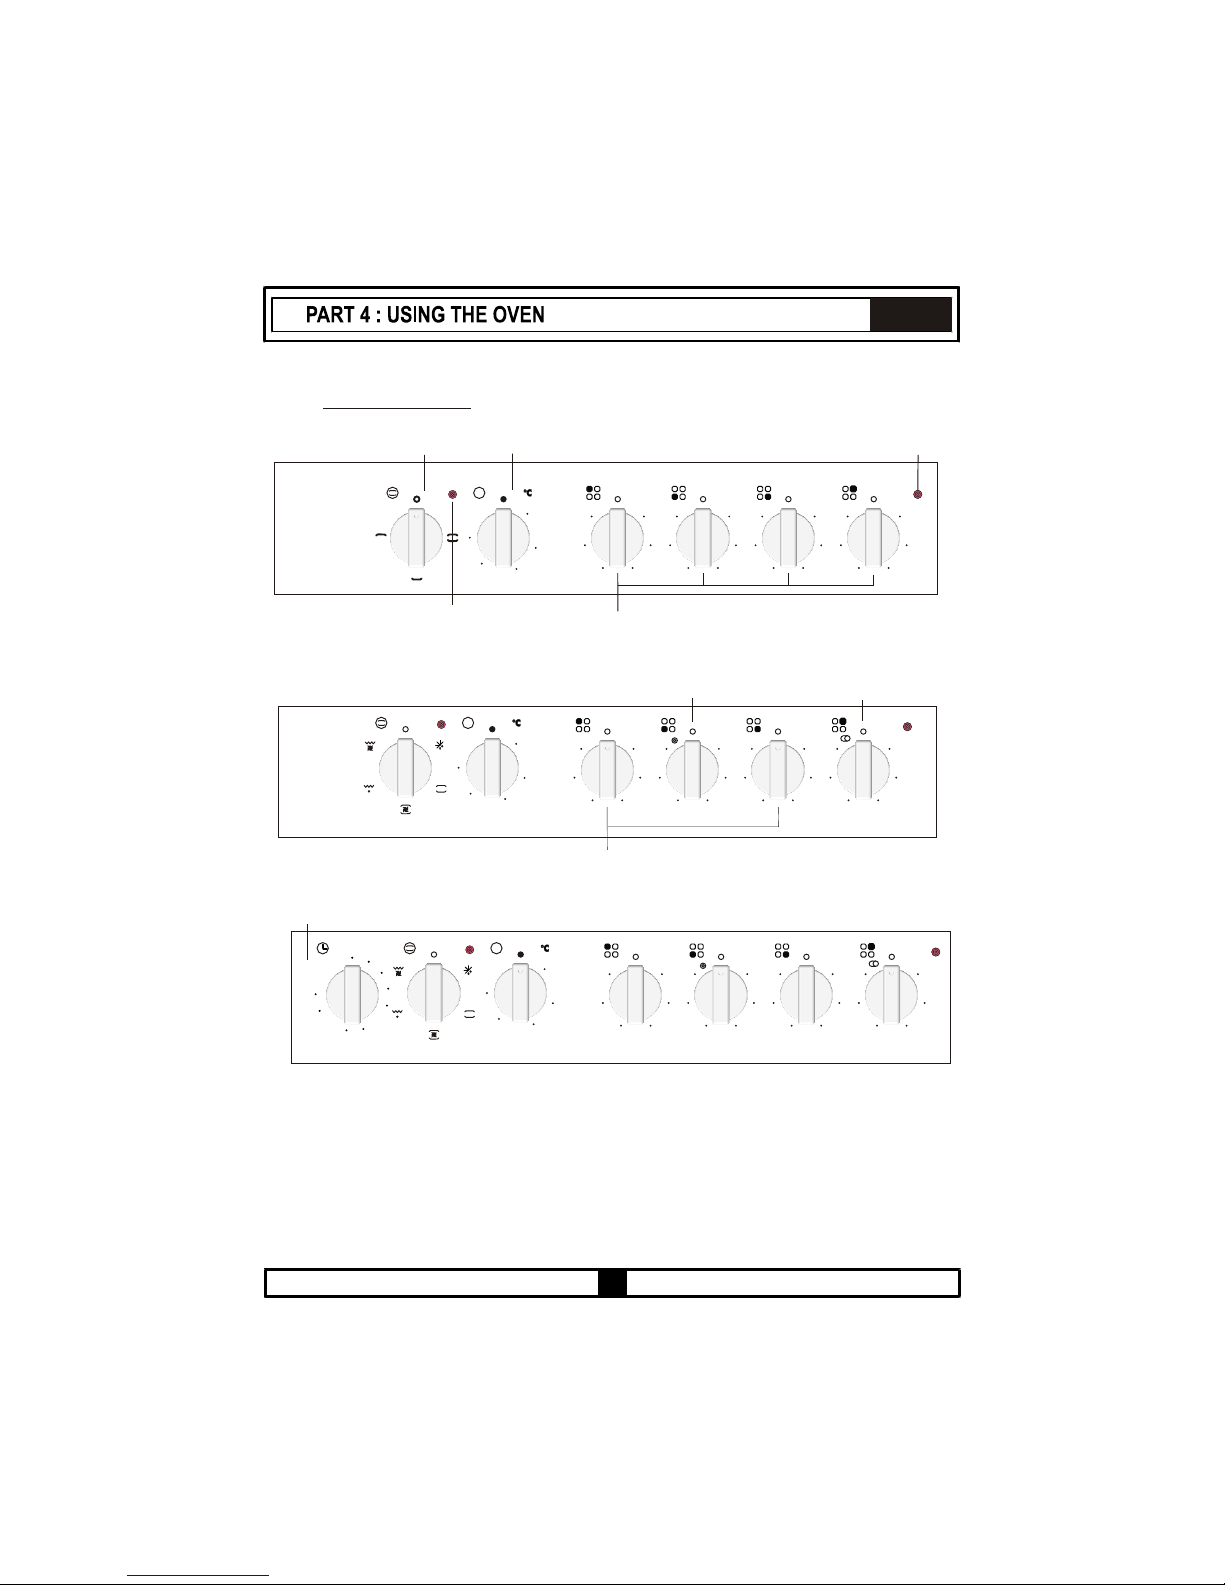
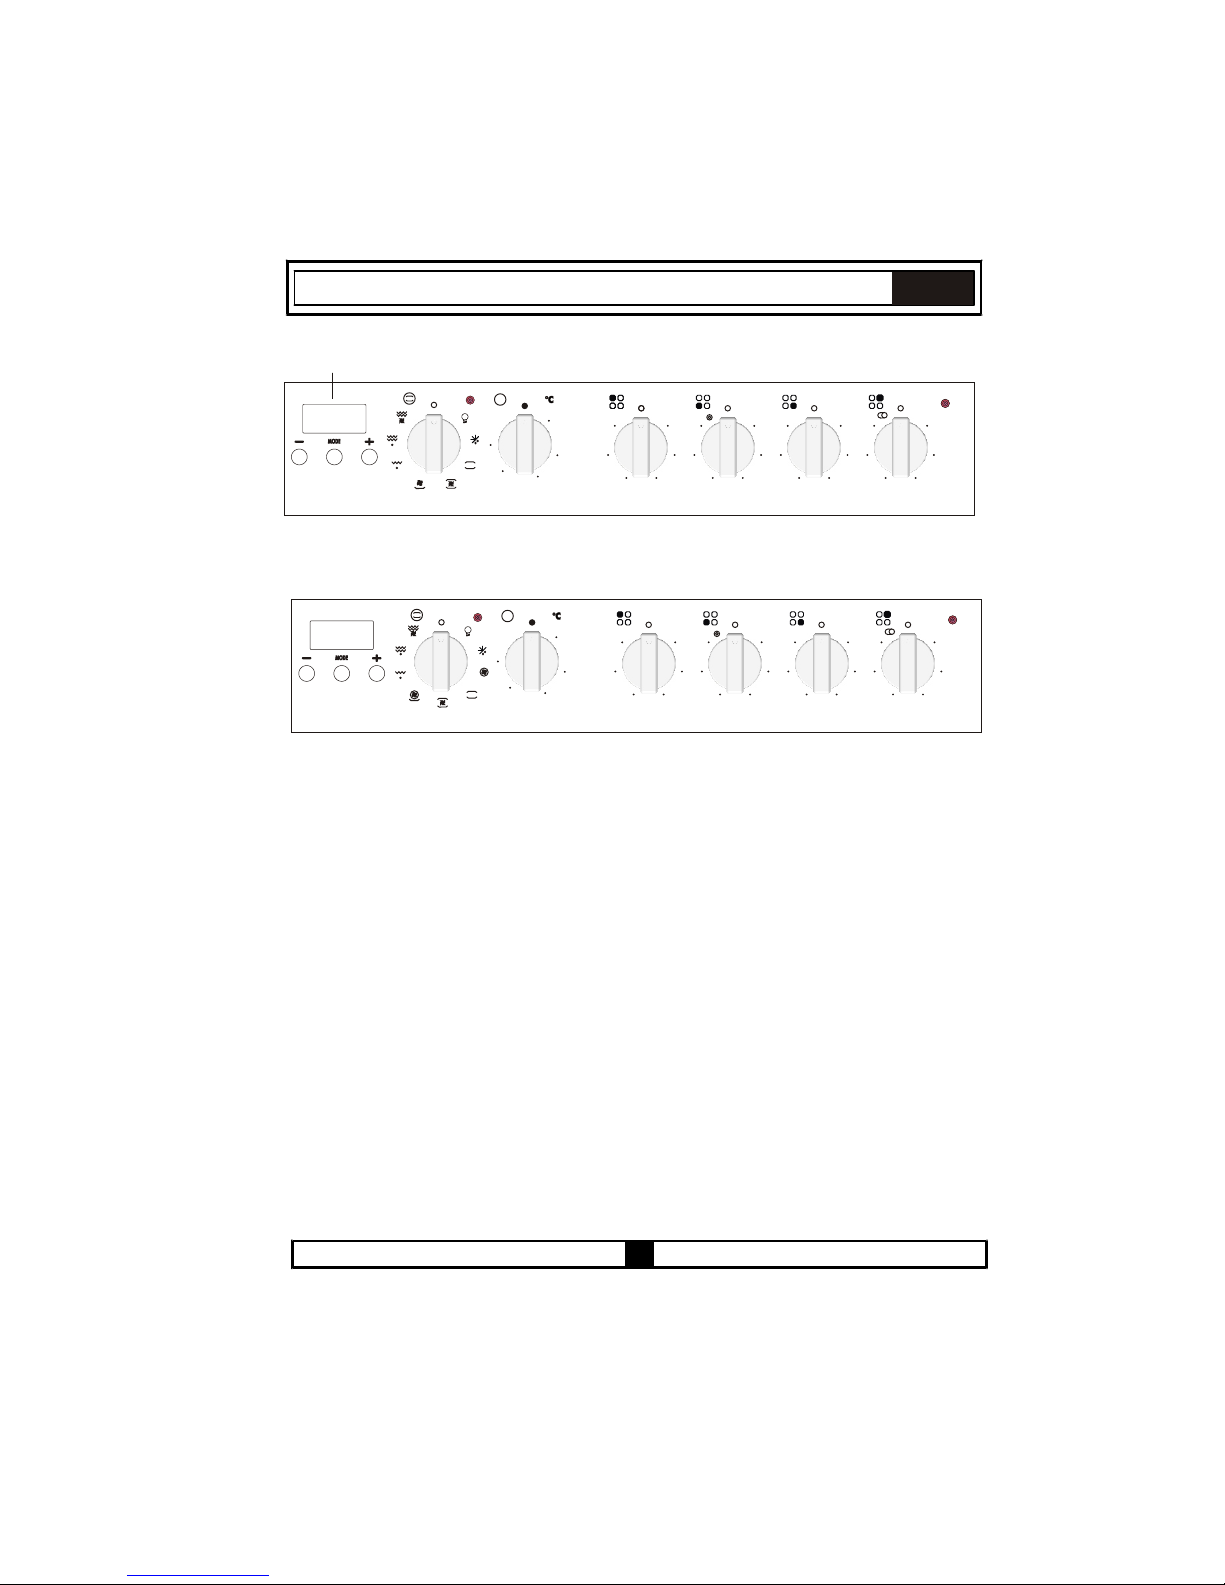
Oven Thermostat Knob
Oven Function Control Knob
Electric Burner Control Light
5050
200200
150150
100100
MAXMAX
T
FUS 100-40 W
FUS 100-40 X
44
33
55
22
11
66
44
33
55
22
11
66
44
33
55
22
11
66
44
33
55
22
11
66
Oven Thermostat Light
Single Zone Control Knob
FUNP 611 X
100
10
20
30
40
50
70
80
90
0
60
M
5050
200200
150150
100100
MAXMAX
T
44
33
55
22
11
66
44
33
55
22
11
66
44
33
55
22
11
66
44
33
55
22
11
66
Mechanic Timer
5050
200200
150150
100100
MAXMAX
T
FUNP 610 X
44
33
55
22
11
66
44
33
55
22
11
66
44
33
55
22
11
66
44
33
55
22
11
66
Single Zone Control Knob
Dual Zone Control Knob
Extensible Zone Control Knob
4.1 CONTROL PANELS:
Page 15
ENG
5050
200200
150150
100100
MAXMAX
T
FUHP 825 X
44
33
55
22
11
66
44
33
55
22
11
66
44
33
55
22
11
66
44
33
55
22
11
66
5050
200200
150150
100100
MAXMAX
T
FUHP 615 X
44
33
55
22
11
66
44
33
55
22
11
66
44
33
55
22
11
66
44
33
55
22
11
66
Electronic Timer
13
Page 16

1.........
2 - 3....Heating in Low Temperature
4-5-6...Cooking, Frying and Boiling
While using the electric burners, attention
should be paid that the pots used have smooth
even bottoms. You can obtain maximum
performance from your hob if you use pots with
suitable diameters and even bottoms. Using
pots with small diameters on burners with large
diameters is not recommended. Because that
will cause heat loss and lead to a waste of energy.
CORRECT
WRONG
pot bottom is round
pot buttom is small
pot buttom does not sit well
Burner
control knob
mperature is very high.
eating unit is run, you
hnical structure of the
ots should rub against
come damaged. It is
ReSistance of the vitroceramic glass to heat and extreme changes of te
A redness will be noticed on the heated surface with time. When any h
may hear a weak sound; this is normal and it has to do with the tec
system.
It does not pose any problems in terms of quality. In case sharp-edged p
or roughly placed on the vitroceramic glass, the surface may be
recommended that you pay attention to this.
14
ENG
4.2 USING THE COOKTOP BURNERS:
WRONG WRONG
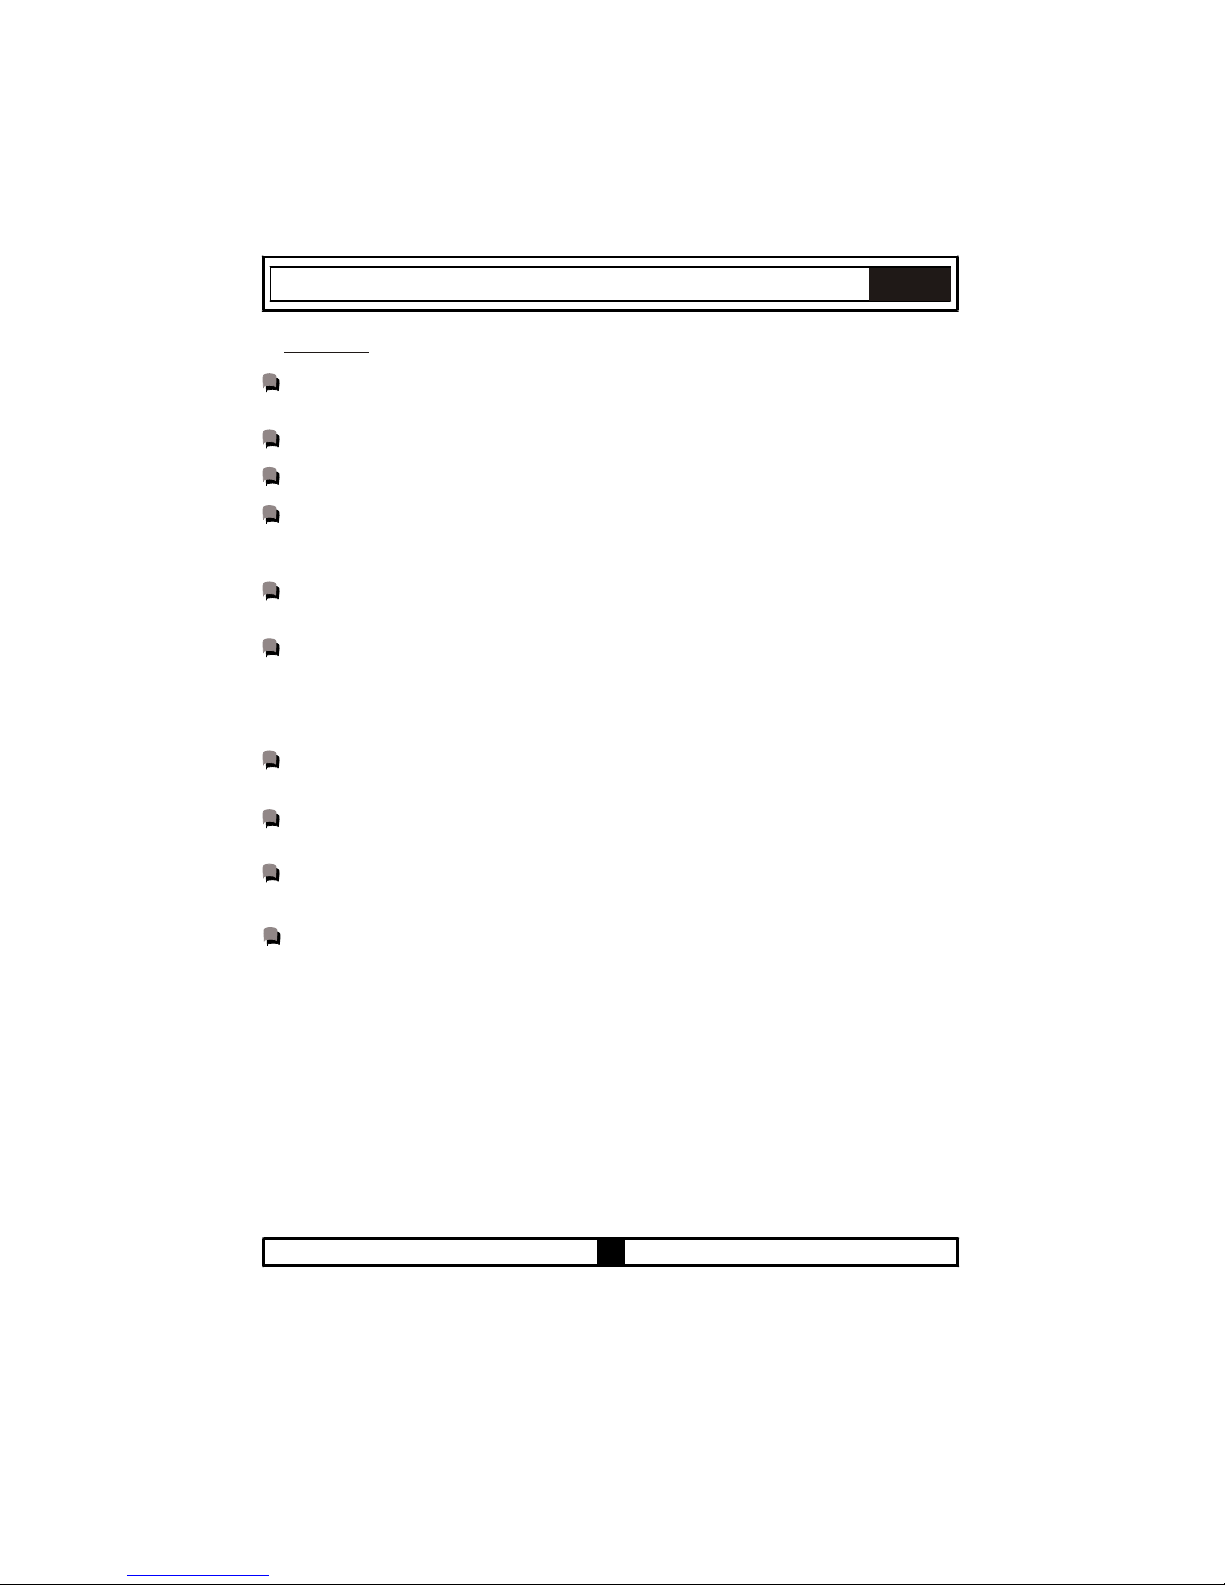
The hob part of the product is controlled by energy regulators. Please see Figure 3.
( PVU 647 X-PVU 647 N )
Keeping warm
Figure
3
6
5
4
3
2
1
6
5
4
3
2
1
6
5
4
3
2
1
Dual or Extensible Zone Vitroceramic Burner
Dual or extensible zone vitroceramic burners
can heat in two different position. For operating
the big diameter of dual zone vitroceramic
burner turn the switch to ‘’ ‘’. Both big and
small diameter of the burner will operate. For
operating the extensible part of the extensible
zone vitroceramic burner, turn the switch to
‘’ ‘’. Both extensible and round parts will
operate.
Page 17
15
ENG
WARNINGS
When a cooktop burner knob is brought to another position other than the ‘’0’’ position, the
operation light will be on.
Use only pots which fit the burner diameter.
Before placing the pot on the burner, be sure that its bottom is not wet.
Never operate a cooktop burner while empty. Pot temperature may be high when the
appliance is in use. Therefore, it is recommended that you keep children and pets away
from the hob both during and after operation.
In case you notice any crack on the ceramic glass, it must be immediately switched off
and replaced by the Authorised Service.
In order to prevent waste of energy, the pots to be used should not be smaller or larger
than the burner surfaces.
Take the necessary measures so that small children will not come close to the burner
surface in any way, as it will be hot in operating position.
Due to the flammable nature of hot oil, operations such as frying should be performed with
the container lids closed.
Do not cut anything, bread etc., on the glass. Do not use pots with aluminium bottoms.
Avoid placing too heavy materials on your hob.
Do not place materials such as plastic, aluminium on the ceramic glass surface. If for any
reason there should be a plastic or aluminium material melted on it, clean it up with a
spatula immediately.
Do not wipe the ceramic surface with materials such as dish cloth or sponge. Residues of
detergents may lead to fire as well as cause the glass colour to fade.
Page 18

16
Figure
4
Figure
5050
200200
150150
100100
MAXMAX
T
5
ENG
4.3 USING THE OVEN:
First, you need to adjust the oven function (see figure 4) and
then set the oven temperature to desired value (see figure 5).
Otherwise, the oven will not operate.
When the temperature inside your oven reaches the value you
set, the thermostat will cut the circuit and the thermostat light will
go off. When the temperature falls below the set value, the
thermostat will again be turned on and the thermostat light will
be on.
Table 1
The oven’s t
grill heater,
The oven lig
Pe rfo rms
The oven’s
be switched
The oven’s t
switched on
The oven’s
heating elem
hermostat and warning lights, the upper heating element, the
the fan
function will be switched on.
ht, the red warning light and the fan will be turned on.
th e fu nct i on of defro stin g th e fr oze n fo ods .
thermostat and warning lights, the fan and the turbo heater will
on.
hermostat and warning lights, the grill heater
function will be
.
thermostat and warning lights and the lower and upper
ents will be switched on.
B (convection) for FUNP 610 X
A (convection) for FUNP 611 X,
FUHP 615 X-825 X, FUS 100-40 X-W
B (forced air) for FUNP 610 X
A (forced air) for FUNP 611 X,
FUHP 615 X- 825 X
Symbol Explanation
Energy Class according to
CENELEC EN 50304
_
_
_
_
_
Your oven’s lamp starts to operating.
Your oven’s thermostat and warning lamps, turbo heater, lower heater and
fan
start operating.
Your oven’s thermostat and warning lamps and turbo heater, fan are put into
use.
The oven’s
The oven’s l
upper heating element will be switched on.
ower heating element will be switched on.
_
_
Page 19
17
Lower-Upper Heating Element Function (Static Cooking) :
In this type of cooking which is described as the traditional method, the heat emanating
evenly from the lower and upper resistors into the oven ensures even cooking of the lower
and upper side of the food that you are cooking. of your oven to
a temperature recommended on the cooking table for the cooking operation you will perform.
A preheating of the oven for about 10 minutes is recommended. Leave the food to cook, which
is placed in a suitable container, for the recommended duration. This position is a preferred
function in making cakes, sponge cakes, pastry, baked pasta, lasagne, pizza.
After the cooking/baking, turn off the oven function control and the thermostat
.
Take the cooked/baked food out of the oven, place
it on a safe place and ensure that the oven
completely cools off by keeping the oven door open.
As the oven will be hot, stay away from
the
oven and keep your children away as well.
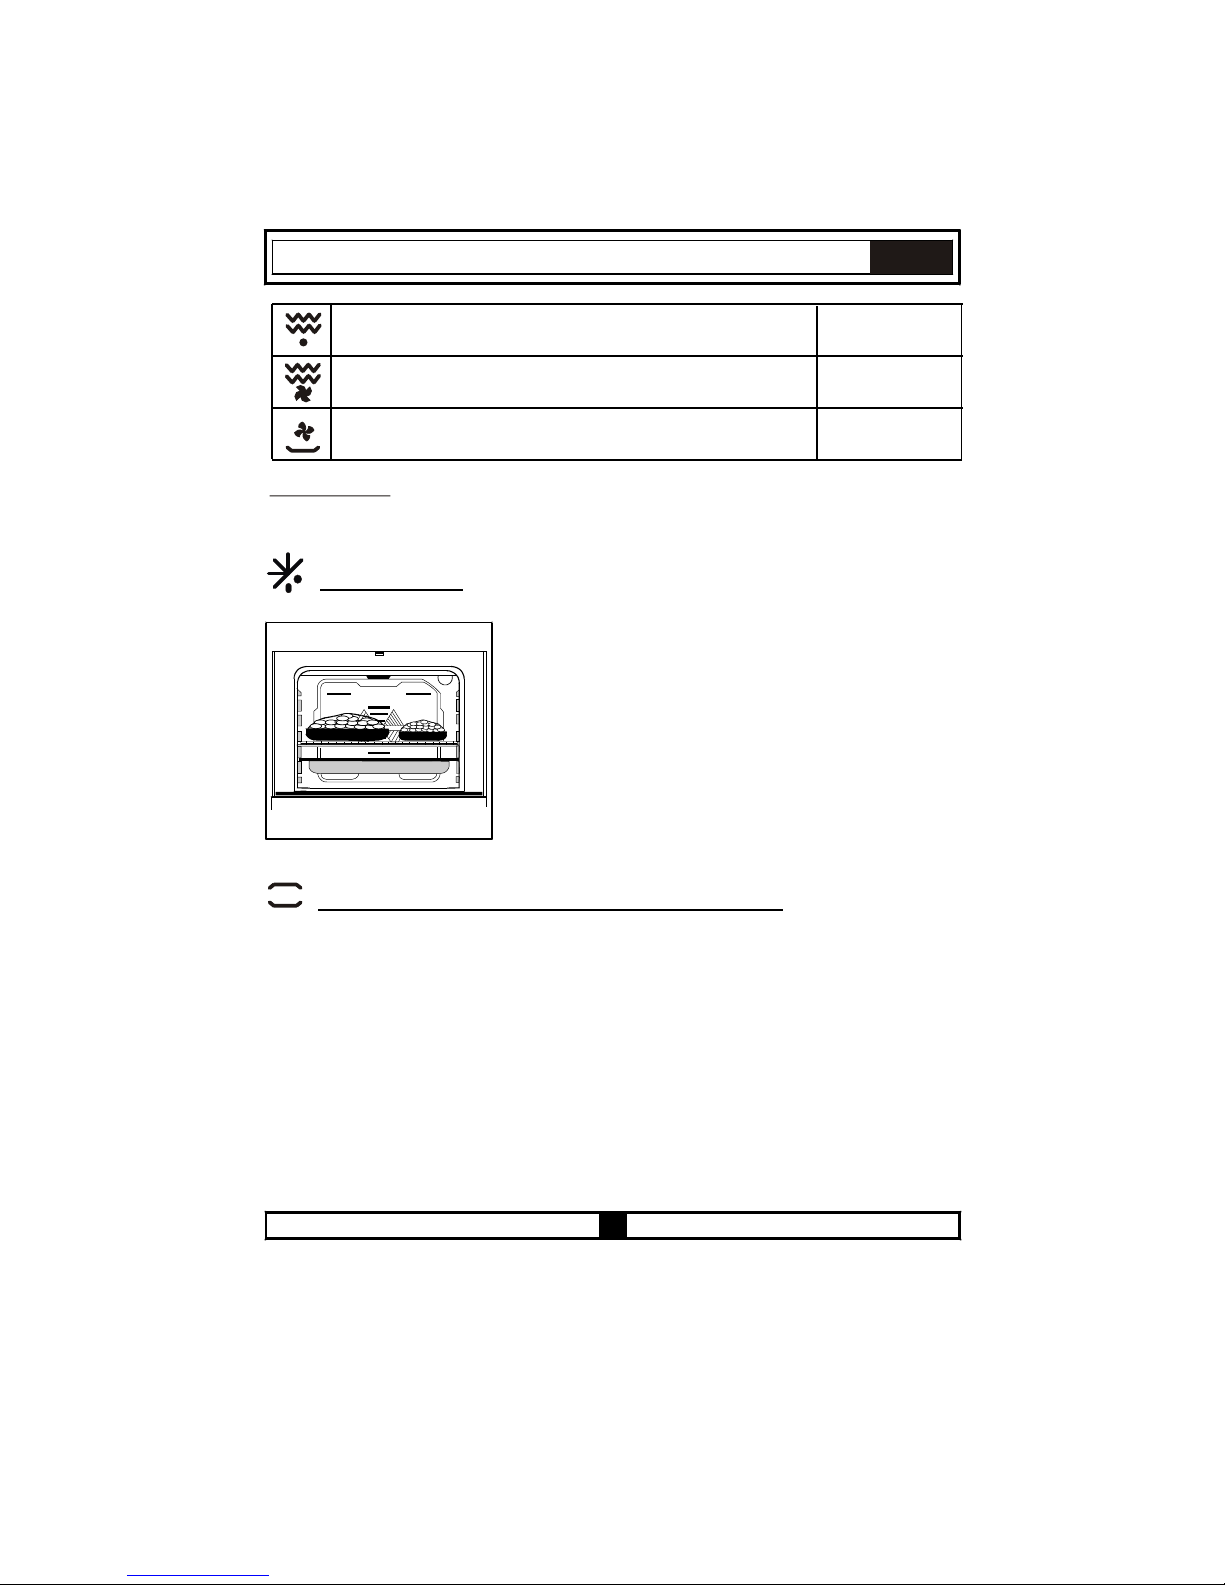
You can start the defrost operation by putting the frozen
food into the oven and bringing the button to the indicated
mark. This function does not cook/bake the food; it only
helps defrost it within a short time. Put the food to be
defrosted on the wire rack that you will place on the third
r
ack support from the bottom (Figure
6
)
. To collect the
water to accumulate due to the melting ice, insert an oven
t
ray into the lower rack.
Defrost Function :
Figure
6
Availability of the functions explained below vary depending on the product model.
ENG
4.4 FUNCTIONS:
Adjust the thermostat knob
k
n
o
b
Your oven’s thermostat and warning lamps,lower heater and start operating.
Your oven’s thermostat and warning lamps and upper heater, grill heater
and start operating.
Your oven’s thermostat and warning lamps and upper heater, grill heater
and fan start operating.
_
_
_
Page 20
18
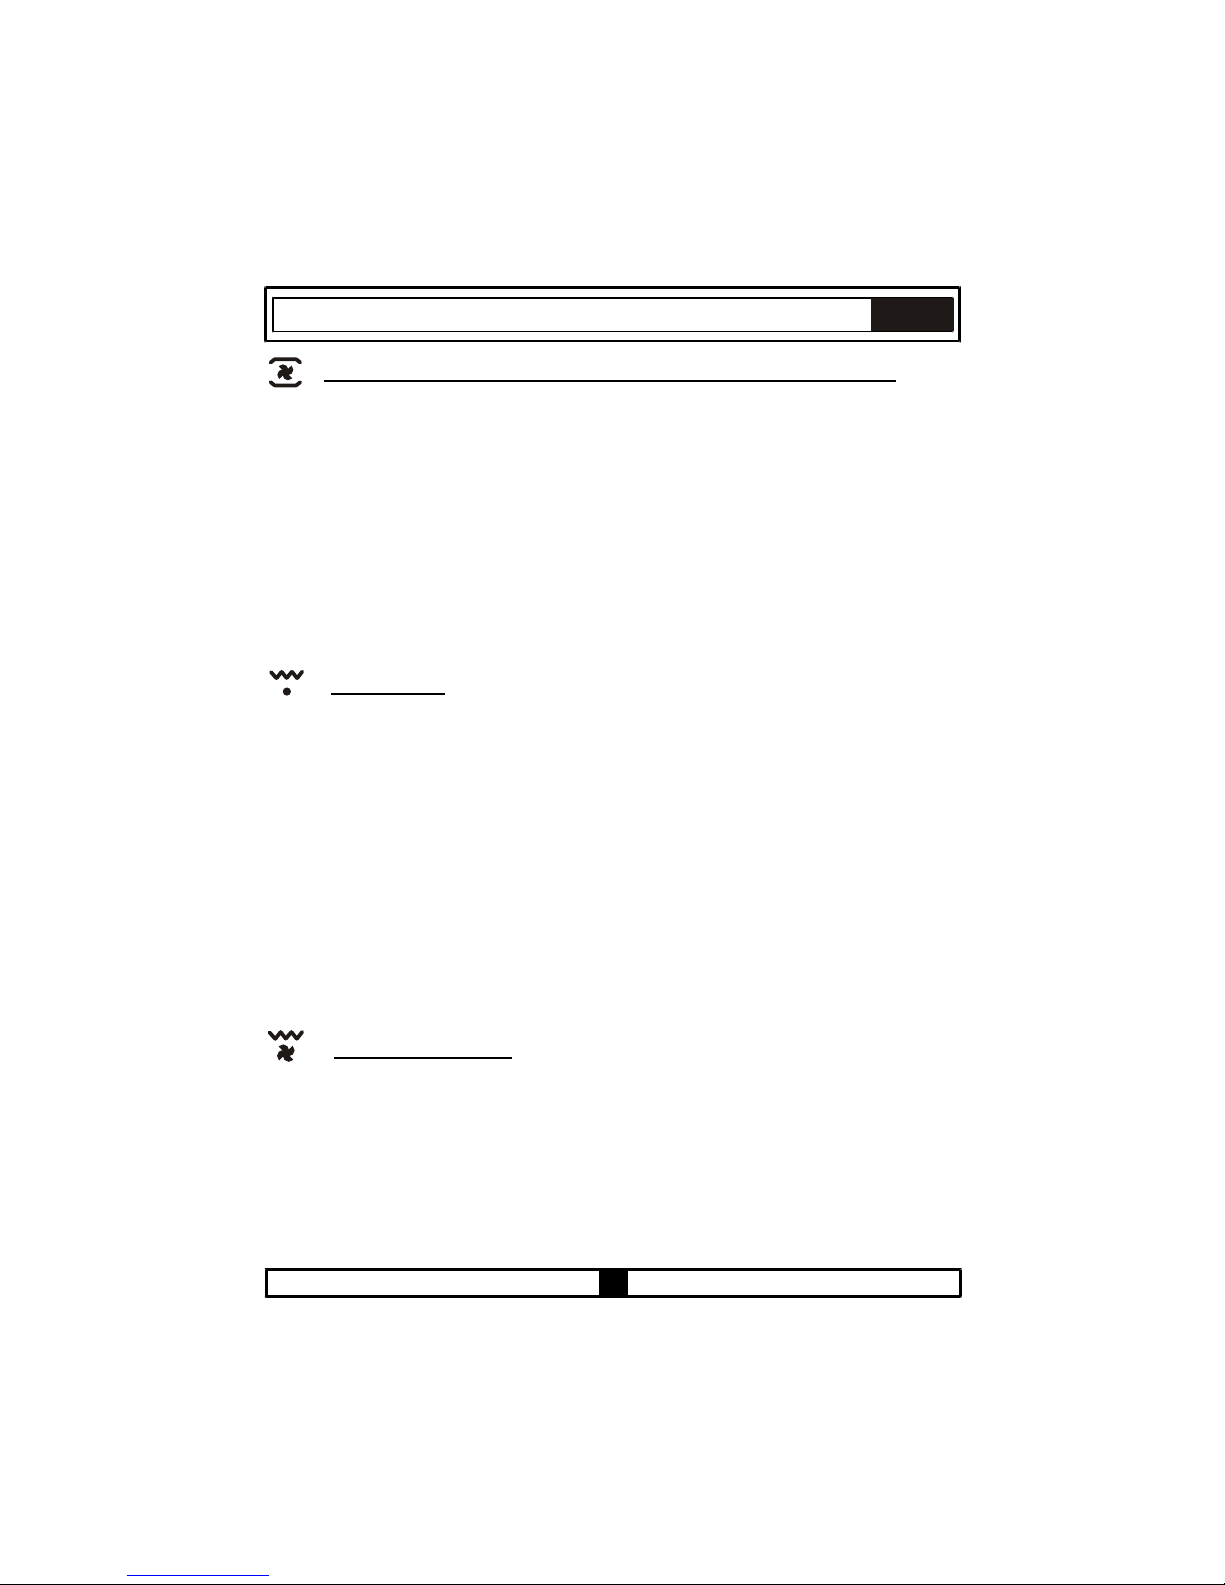
This is the position where the air coming from the lower and upper heating elements is
circulated into the oven by the fan
.
Adjust the thermostat of your oven to a temperature recommended on the cooking
table for the cooking operation you will perform. Turn the oven so it will point to the
symbol of this function, adjust the oven timer to the recommended time for the cooking and
preheat the oven for about 10 minutes. The food placed in a suitable container is put into the
oven and the operation is started. This position is a position where usually very good results
are obtained in baking pastry. All parts of the foods will be cooked evenly in this position.
Suitable for cooking with one tray.
After the cooking/baking, turn off the oven function control and the temperature setting
.
Take the cooked/baked food out of the oven,
place it on a safe place and ensure that the
oven completely cools off by keeping the oven
door open. As the oven will be hot,
stay
away from the oven and keep your children away
.
Fan and the Lower-Upper Heating Element Function (Static Cooking With Fan) :
Grill Function :
This function is used for grills, roast chicken and roast on skewer.
For grills; put the foods
on the gri ,
and on the
highest rack. After placing the oven
tray on the
rack,
you can start the grill operation. The tray placed on the rack will ensure
that the oil
dropping from the
foods will be collected.
When grilling, the oven door must be closed and the oven temperature should be
adjusted to 190° .
Turn your oven’s thermostat so it will point to this temperature value. After a preheating
period of 5 minutes, put your foods into the oven.
After the cooking, turn off the oven function control and the thermostat
Take the cooked/baked food out of the oven, place it on a safe place and ensure that the oven
completely cools off by keeping the oven door open. As the oven will be hot, stay away from
the oven and keep your children away
.
At this function; ensuring complete frying by working together the fan, grill and
heating element perform the operation.
For grills; put the foods on the gri , and
on the highest rack.
After placing the
oven tray
on the rack,
you can start the grill operation.
The tray placed on the
rack
will
ensure
that
the oil dropping from the foods will be collected.
When grilling, the oven door must be closed and the oven temperature should be
adjusted to 190° .
Grill
and Fan Function :
ENG
k
n
o
b
b
k
n
o
b
k
n
o
d
place
the gri
d
t
hi
r
d
t
hi
r
d
C
b
k
n
o
b
k
n
o
.
upper
d
place
the gri
d
C
t
h
i
r
d
t
h
i
r
d
Page 21
19
ENG
Turbo Fan Function
Turbo Fan and Lower heater Function
The turbo fan function evenly disperses the heat in the oven. All foods on all racks will be
cooked evenly.
Adjust the thermostat button to the desired degree. Turn the function button so it will point to
the Turbo function symbol. After completing the preheating of 10 minutes, place the foods
into the oven, which need to be put into suitable containers. This function is suitable for
cooking multiple dishes.
If you are going to cook using two trays at the same time; while adjusting the cooking
temperature, select the temperature that is the lowest among the levels suitable for your foods,
as shown on the table. Cooking with two trays requires additional cooking time compared to
cooking with one tray. Usually, the foods on both trays do not finish at the same time. Therefore,
take the tray out of the oven, which you observed is finished, and continue the cooking
operation for the other tray.
After the cooking/baking, turn off the oven function control button and the thermostat button
and cancel the timer program if available. Take the cooked/baked food out of the oven, place
it on a safe place and ensure that the oven completely cools off by keeping the oven door
open. As the oven will be hot, stay away from the oven and keep your children away as well.
Turbo Fan and the Lower Heating Element Function is ideal for baking pizza. While the
turbo fan evenly disperses the heat of the oven, the lower heating element ensures the baking
of the pizza dough. Adjust your oven’s function button so it will point to the symbol of this function.
After a preheating period of 10 minutes, put your foods into the oven.
After the cooking, turn off the oven function control button and the thermostat button and cancel
the timer program. Take the cooked/baked food out of the oven, place it on a safe place and
ensure that the oven completely cools off by keeping the oven door open. As the oven will be
hot, stay away from the oven and keep your children away as well.
Turbo Fan and the Lower Heating Element Function is ideal for baking pizza. While the turbo
fan evenly disperses the heat of the oven, the lower heating element ensures the baking of the
pizza dough.
Upper Heating Function
In this type of cooking, the heat emanating from upper heating element cooks the upper side
of the food. Upper heating function is appropriate for frying the upper side of already cooked
food and heating the food.
At this cooking, the best is spreaded from the lower heating element. Lower heating function
is appropriate for heating the food instead of cooking.
Lower Heating Function
Page 22

20
ENG
Lower Heater and Fan Function
At this cooking, the heat is spreaded from the lower heating element and fan
motor. This function can be used to heat the food equally in a short time.
At this function; ensuring complete frying by working together, the fan, the grill and
the upper heating element perform the operation. It is also used for faster grills and for grills
on a larger surface, roast chicken and roast on skewer.
For grills; put the foods on the grill
,
and
t
he grill
on the highest rack. After placing the oven tray on the 3. rack, you can start the grill operation.
3. The tray placed on the 3. rack will ensure that the oil dropping from the foods will be collected.
When grilling, the oven door must be closed and the oven temperature should be
adjusted to 190°°.
Turn your oven’s thermostat button so it will point to this temperature value. After a preheating
period of 5 minutes, put your foods into the oven.
After the cooking, turn off the oven function control button and the thermostat button and
cancel the timer program. Take the cooked/baked food out of the oven, place it on a safe place
and ensure that the oven completely cools off by keeping the oven door open. As the oven will
be hot, stay away from the oven and keep your children away as well.
Double Grill and Fan Function
Double Grill Function
At this function the grill and the upper heating element perform the operation. This funtion
is used for roast chicken and roast on skewer. For grills; put the foods on the grill, and the grill on
the highest rack. After placing the oven tray on the 3. rack, you can start the grill operation. 3. the
tray placed on the 3. rack will ensure that the oil dropping from the foods will be collected.
When grilling the oven door must be closed and the oven temperature should be adjusted
to 190 .
Turn your oven’s thermostat so it will point to this temperature value. After a preheating
period of 5 minutes, put your foods into the oven.
After the cooking, turn off the oven function control and the thermostat
Take the cooked/baked food out of the oven, place it on a safe place and ensure that the oven
completely cools off by keeping the oven door open. As the oven will be hot, stay away from
the oven and keep your children away
.
b
k
n
o
b
k
n
o
.
Page 23
21
ENG
TURBO FAN
Min.
Min.
Min.
Min.
Page 24
ENG
22
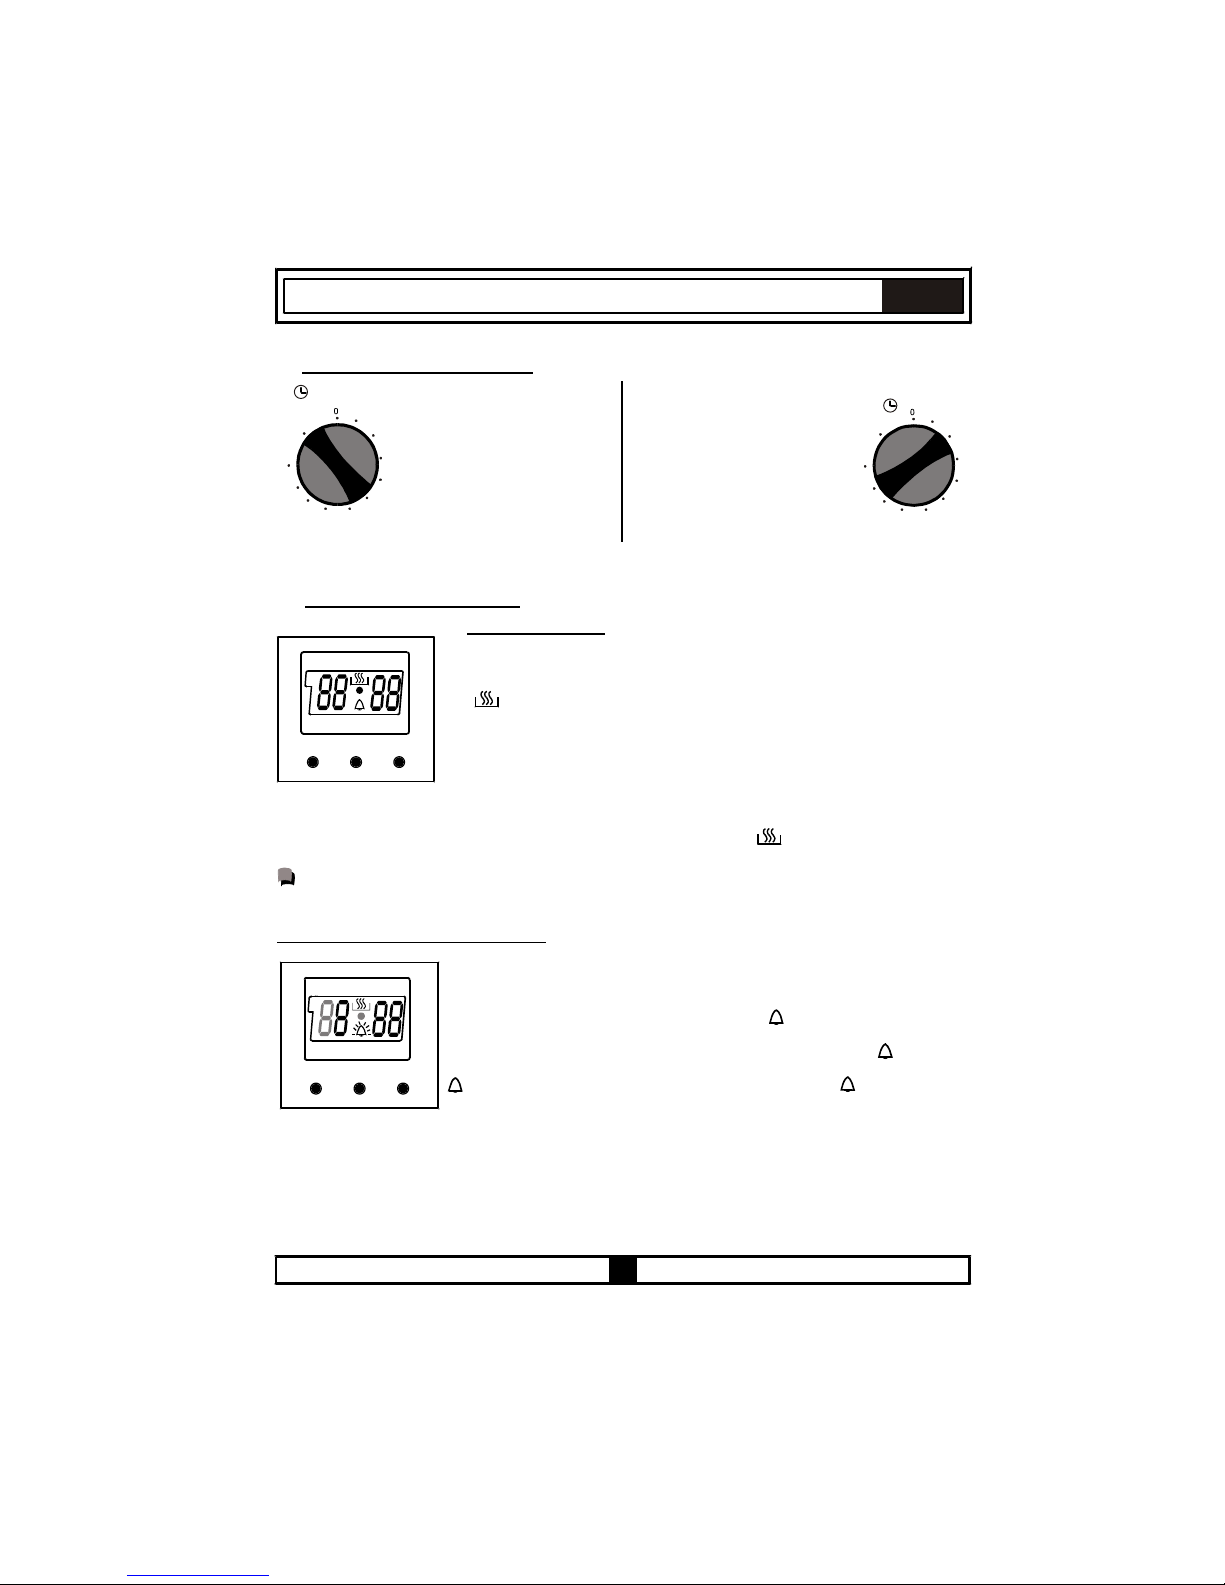
As the adjusted time will be reset in the event of a power failure, time adjustment
operation will have to be performed again.
This function can be used to receive audible warning at the
completion of the adjusted time period.
Press the MODE key in the middle. The symbol will flash on the
screen. Also, three “0”s will appear. Adjust the desired time period
for the warning by using (+) and (-) keys while the symbol is
flashing. Some time after the completion of the adjustment, the
symbol will begin to light continuously. When the symbol begins
to light continuously, the audible warning time adjustment is done.
Following the power supply to the oven, when the symbol (A) and the three «0»s on the
screen begin to flash, the oven cannot be operated using the control buttons. When the (+)
and (-) keys are pressed simultaneously for time adjustment, the symbol will appear on the
screen. When this symbol appears on the screen, you can manually operate the oven part.
USING THE DIGITAL TIMER :
Time Adjustment :
The time must be adjusted before starting to use the oven. Following
the power supply to the oven, the symbol (A) and the three "0"s on
the screen will begin to flash. Press the (+) and (-) keys simultaneously.
The symbol will appear on the screen. Also, the dot in the middle of
the screen will begin to flash. Using the (+) and (-) keys, adjust the
day’s time while this dot is flashing. After the adjustment, it should be
expected that the dot will be lit continuously.
-
+
MODE
A
Audible Warning Time Adjustment :
-
+
MODE
A
Rotate the timer button clockwise
to a certain time range between
0-100 minutes, as shown on the
picture. The oven will stop
when the set time range is
completed, and the timer will
give an audible warning once.
USING THE MECHANIC TIMER :
10
20
30
40
50
70
80
90
60
100
M
When you bring the Timer
button to the position
indicating M as shown on the
picture, you can continuously
run your oven.
When the timer button is in
0 position the oven will not
operate.
Manuel Operation
Operating by adjusting the time
10
20
30
40
50
70
80
90
60
100
M
Page 25

23
ENG
At the completion of the set duration, the timer will stop the oven and give an audible warning.
Also, the symbol (A) will begin to flash on the screen. After bringing the oven button and oven
thermostat button to 0 position, pressing any button of the timer will end the audible warning.
Also, the timer will be brought to manual use function.
Semi- Automatic Programming According to Cooking Period :
This function is used to cook in the desired time range.
The foods to be cooked are put into the oven. The oven is adjusted to
the desired cooking function. The oven thermostat is adjusted to the
desired degree depending on the dish to be cooked.
Keep pressing on the MODE button until you see "stop" on the
timer screen. When you see "stop" on the timer screen, the symbol (A)
will begin to flash. Adjust the cooking period for the food you wish to cook,
by using the (+) and (-) keys while the timer is in this position. Some time
after the adjustment operation is completed, the day’s time will appear on
the screen and the symbols (A) and will begin to continuously light on
the screen. While doing this, the oven will also start to operate.
Semi-Automatic Programming According to Finishing Time :
This function is used to cook according to the desired finishing time.
The food to be cooked is put into the oven. The oven is adjusted to the
desired cooking function. The oven thermostat is adjusted to the desired
degree depending on the dish to be cooked.
Keep pressing on the MODE button until you see "end" on the timer
screen. When you see "end" on the timer screen, the symbol (A) and the
day’s time will respectively begin to flash.
-
+
MODE
A
du
r
Figure 14
-
+
MODE
A
En
d
Figure 15
A cooking period between the time range of 0 and 10 hours can be set.
At the completion of the set duration, the timer will stop the oven and give an audible warning.
Also, the symbol (A) will begin to flash on the screen. After bringing the oven button and oven
thermostat button to 0 position, pressing any button of the timer will end the audible warning.
Also, the timer will be brought to manual use function.
Adjust the finishing time for the food you wish to cook, by using the (+) and (-) keys while the
timer is in this position. Some time after the adjustment operation is completed, the day’s time
will appear on the screen and the symbols (A) and will begin to continuously light on the
screen. While doing this, the oven will also start to operate.
You can set a time which can be up to 10 hours after the day’s time.
Audible Warning Time Adjustment is for warning purposes only. The oven will not
be activated at this function.
The audible warning time can be set to a time between the time range of 0 and 23.59.
When the time is up, the timer gives an audible warning and the symbol begins to flash
on the screen. Pressing any key will stop the audible warning and the symbol disappears
on the screen.
Page 26

Full- -Automatic Programming :
The oven will start operating at the time calculated by deducting the cooking period from the
set finishing time, and will stop at the set finishing time. The timer will give an audible warning
and the symbol (A) will begin to flash. After bringing the oven button and oven thermostat button
to 0 position, pressing any button of the timer will end the audible warning. Also, the timer will
be brought to manual use function.
First; keep pressing on the MODE button until you see "stop" on the timer screen. When you
see "stop" on the timer screen, the symbol (A) will begin to flash. Adjust the cooking period for
the food you wish to cook, by using the (+) and (-) keys while the timer is in this position. Some
time after the adjustment operation is completed, the day’s time will appear on the screen and
the symbols (A) and will begin to continuously light on the screen (Figure 14).
A cooking period between the time range of 0 and 10 hours can be set.
Second; keep pressing on the MODE button until you see "end" on the timer screen. When
you see "end" on the timer screen, the symbol (A) and the day’s time will begin to flash, with
the addition of the set cooking period. Adjust the finishing time for the food, by using the (+)
and (-) keys while the timer is in this position. Some time after the adjustment operation is
completed, the day’s time will appear on the screen and the symbol (A) will begin to
continuously light on the screen (Figure 15).
You can set a time which can be up 23.59 hours after the time obtained by adding
the cooking period to the day’s time.
2
4
ENG
Page 27

25
Before starting to clean your oven, be sure that all controL knobs are off and your
appliance
is cooled off. Unplu
g
the a liance.
Do not use cleaning materials containing particles that might scratch the enamelled
and
painted parts of your oven. Use cream cleaners or liquid cleaners, which do not contain
particles.
As they might harm the surfaces, do not use caustic creams, abrasive cleaning
powders,
rough wire wool or hard tools. In the event the excess liquids spilling over your
oven
should burn, it may cause a damage to the enamel. Immediately clean up the spilt
liquids.
Do not use steam cleaners for cleaning the oven.
PART 5 : CLEANING AND MAINTENANCE
Make sure to unplug the oven before starting to clean it. You will obtain best results if
you clean
the oven interior while the oven is slightly warm. Wipe your oven with a soft piece of
cloth
dampened with soap water after each use. Then wipe it again, this time with a wetted cloth,
and
wipe it dry. A complete cleaning may be necessary from time to time, using a liquid
cleaning material. Do not clean using dry and powder type cleaners. For products with catalytic
enamel frames, the rear and side walls of the inner frame do not require cleaning. However;
depending on usage, it is recommended that you replace them after a certain period
of time.
ENG
5.1 GENERAL
5.2 CLEANING THE OVEN
pp
Unplug the appliance before starting the cleaning.
Wait for the vitroceramic glass to completely cool off before starting the cleaning.
Make sure that the cleaning materials you will use do not contain particles that might
scratch
t e glass Use cream detergents or liquid detergents.
The vitroceramic surface should be wiped with cold water and wiped dry with a soft piece
until no cleaning material is left on the surface.
You can use the cleaning spatula
supplied together with your product, for the cleaning of
spilt
foods and residue.
Dessert type of foods should be cleaned immediately after they spill without waiting for the
vitroceramic glass to cool off.
5.3 CLEANING THE VITROCERAMIC HOB
of cloth
if
,
h
s
.
Scrubbing with steel cleaning wires may harm the vitroceramic glass surface. Formations
of dust
on the surface should be cleaned up using a dampened cloth.
Changes in colour which might occur on the ceramic glass surface do not affect the functional
structure
or permanence of the vitroceramic. The reason for the changes in colour is not the change
in the
material; it may be because the burnt residues on the surface are not cleaned up or the pots
used
have worn the glass surface or because unsuitable cleaning materials were used.
The cleaning spatula should always be used prior to chemical cleaning substances. With this
spatula,
you can clean up the tiniest of dirts on the vitroceramic surface. Dirts that are difficult to remove
,
such
as melted plastic, heavy oils, sweet substances, can be removed easily with the spatula. As the
spatula includes a razor, it is dangerous and must be kept out of reach of children
During cleaning with the spatula, pay attention not to scrape off the sillicon adhesives found on
the sides
of the glass.
.
Page 28

It is recommended that you leave this operation to the Authorised Service.
Unplug the oven first and make sure that it is cold. After removing the lid infront of the light, take the
bulb out . Insert the new bulb resistant to 3000C, which you find at Authorised Services, into
the
place of the bulb you have removed. Then fit the light protecting back into its place. After that,
your
oven will be ready for use.
26
ENG
5.4 MAINTENANCE
Replacing the Oven Light Bulb
l
i
d
w
ill
Page 29

27
If the oven does not operate ;
The oven may be plugged off, there has been a black out.
If the oven does not heat ;
If the oven light does not operate does not light;
be controlled whether the defective.
Cooking (If lower-upper part does not cook equally) ;
PART 6 : SERVICE AND TRANSPORTATION
If you need any transport ;
If the original packaging is not available;
ENG
6.1 REQUIREMENTS BEFORE CONTACTING TO SERVICE
6.2 INFORMATION RELATED TO TRANSPORT
The temperature may be not adjusted with oven’s temperature control switch.
The electricity should be controlled.
It should
b
u
l
b
s
i
Control the shelf locations, cooking period and temperature values according to the manual.
Keep the original packaging of product and carry it with its original packaging when needed.
Follow the transport signs on the packaging.
Take measure for the external surfaces (glass and painted surfaces) of oven and hob aganist
possible blows.
CUSTOMER ASSISTANCE SERVICE
If you cannot identify the cause of the operating anomaly, switch off the appliance (do not
subject it to rought treatment) and contact the Assistance Service.
PRODUCT SERIAL NUMBER. Where can I find it?
It is important you to inform the Assistance Service of your product code and its serial
number (a 16 character code which begins with the number 3); this can be found on the
guarantee certificate or on the data plate located on the appliance.
It will help to avoid wasted journerys to technicians, thereby (and most significantly) saving
the corresponding callout
Page 30

The symbol on the product or on its packaging indicates that
this product may not be treated as household waste. Instead it shall
be handed over to the applicable collection point for the recycling
of electrical and electronic equipment. By ensuring this product is
disposed of correctly, you will help prevent potential negative
consequences for the environment and human health, which could
otherwise be caused by inappropriate waste handling of this
product. For more detailed information about recycling of this
product, please contact your local city office, your household
waste disposal service or the shop where you purchased the
product.
Page 31
PVU 640 C
PVU 640 X
PVU 647 X
PVU 647 N
FUNP 610 X
FUNP 611 X
FUHP 615 X
FUHP 825 X
FUS 100-40 W
FUS 100-40 X
PVU 640 C
PVU 640 X
PVU 647 X
PVU 647 N
FUNP 610 X
FUNP 611 X
FUHP 615 X
FUHP 825 X
FUS 100-40 W
FUS 100-40 X
DE
EINBAUOFEN UND KOCHFELD –
BEDIENUNGSANLEITUNG
Page 32
DE
Lieber Kunde !
Vielen Dank für den Kauf unseres Produkts.. Die
Sicherheitshinweise und Empfehlungen in dieser Anleitung
dienen Ihrer eigenen Sicherheit und der Sicherheit anderer
Personen. Hier erfahren Sie auch, wie Sie die Funktionen
Ihres neuen Gerätes optimal nutzen können.
Bitte bewahren Sie diese Anleitung an einem sicheren Ort auf.
Eventuell möchten Sie zukünftig darin nachschlagen - zum
Beispiel, wenn Fragen während des Betriebes aufkommen
oder sich andere Personen mit der Bedienung des Gerätes
vertraut machen möchten.
Das Gerät darf nur für seinen bestimmungsgemäßen
Einsatzzweck genutzt werden: Zur Zubereitung von
Lebensmitteln im Haushalt. Jede andere Art des Einsatzes
muss als nicht bestimmungsgemäß und als gefährlich
betrachtet werden.
Der Hersteller haftet keinesfalls bei Schäden, die durch den
unsachgemäßen oder falschen Einsatz des Gerätes
Page 33

DE
INHALT
1- Ihr neues Haushaltsgerät
2- Warnhinweise
3- Vorbereitungen für Installation und Gebrauch
4- Ofen und Kochfeld verwenden
5- Reinigung und Wartung
6- Service und Transport
Page 34
DE
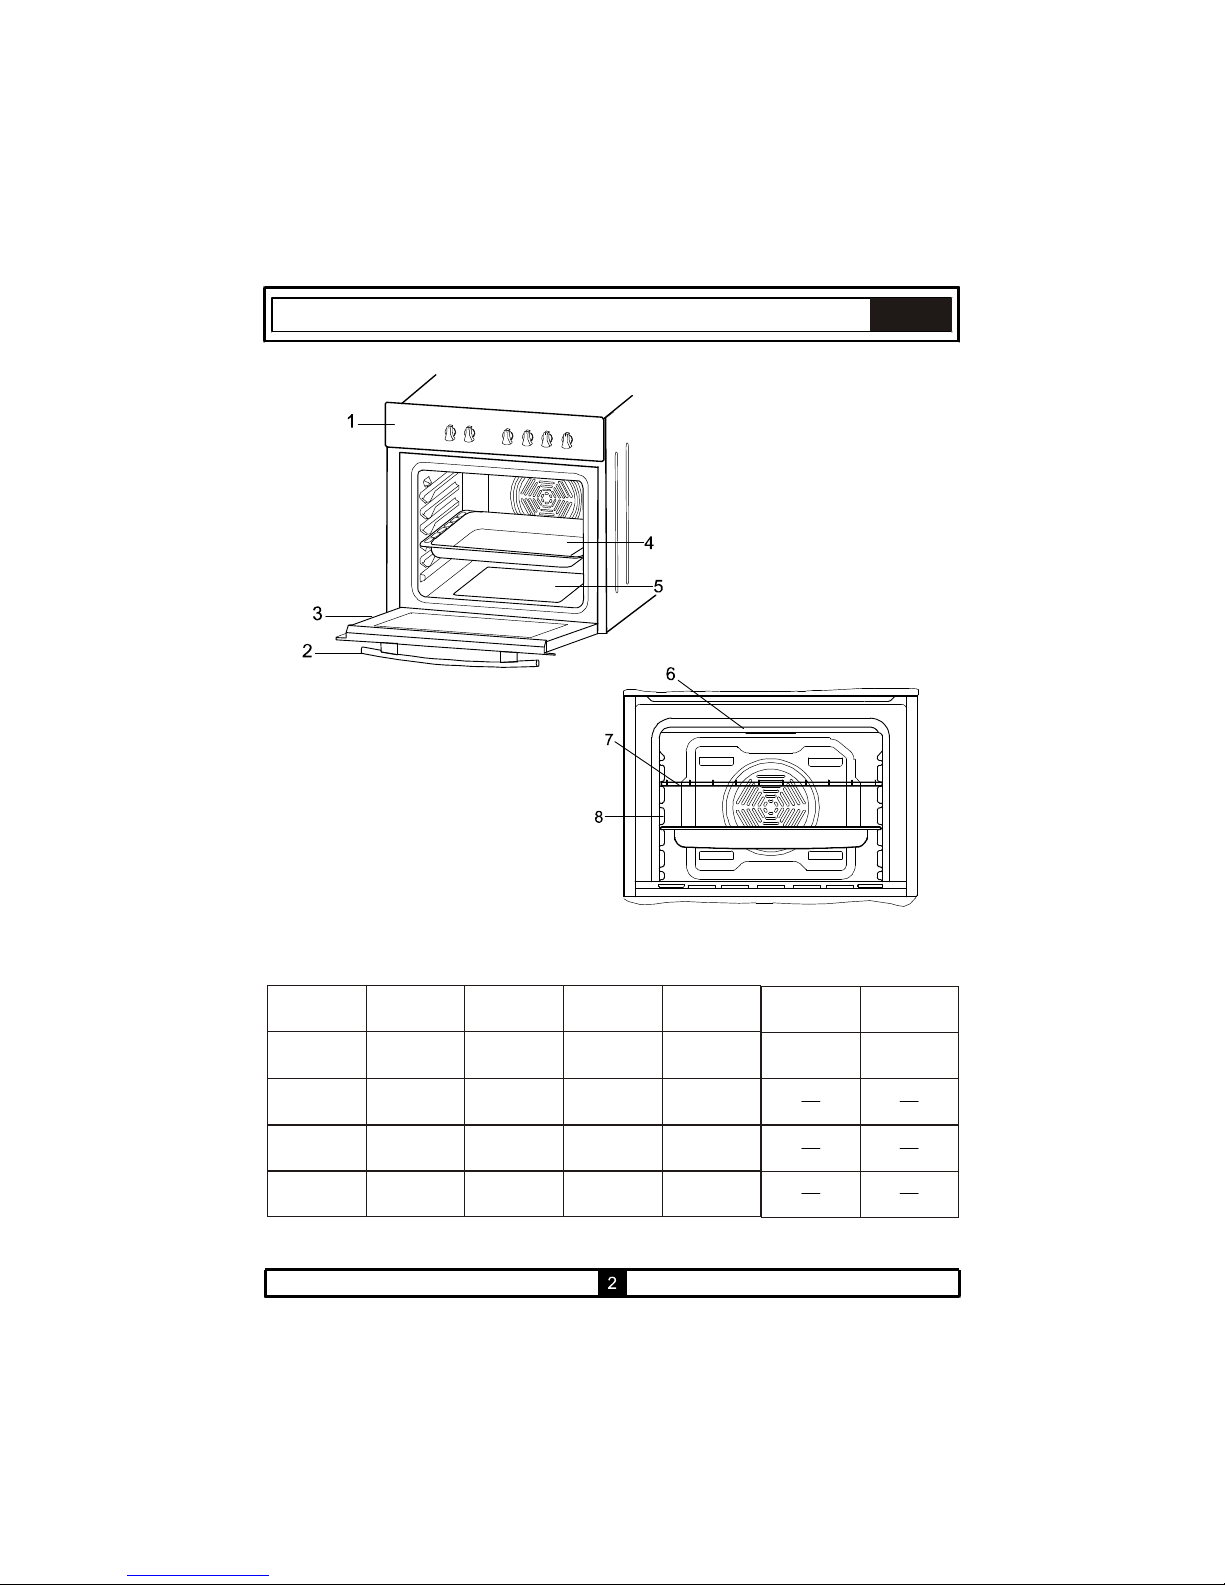
Kochfeld-Ofen
-Kombinationen
FUNP 610 X
PVU 640 C
FUNP 611 X FUHP 615 X
FUHP 825 X
FUS 100-40 W FUS 100-40 X
PVU 640 X
PVU 647 X
PVU 647 N
√ √ √ √
√ √
√
√
√
√
√
√
√
√
√
√
√
√
HAUPTKOMPONENTEN
1. Bedienfeld
2. Ofentürgriff
3. Ofentür
4. Backblech
5. Unteres Heizelement
6. Oberes Heizelement
7. Rost
8. Einschübe
TEIL 1: IHR NEUES HAUSHALTSGERÄT
Page 35
1
4
5
DE
1
3
1
6
4
2
5
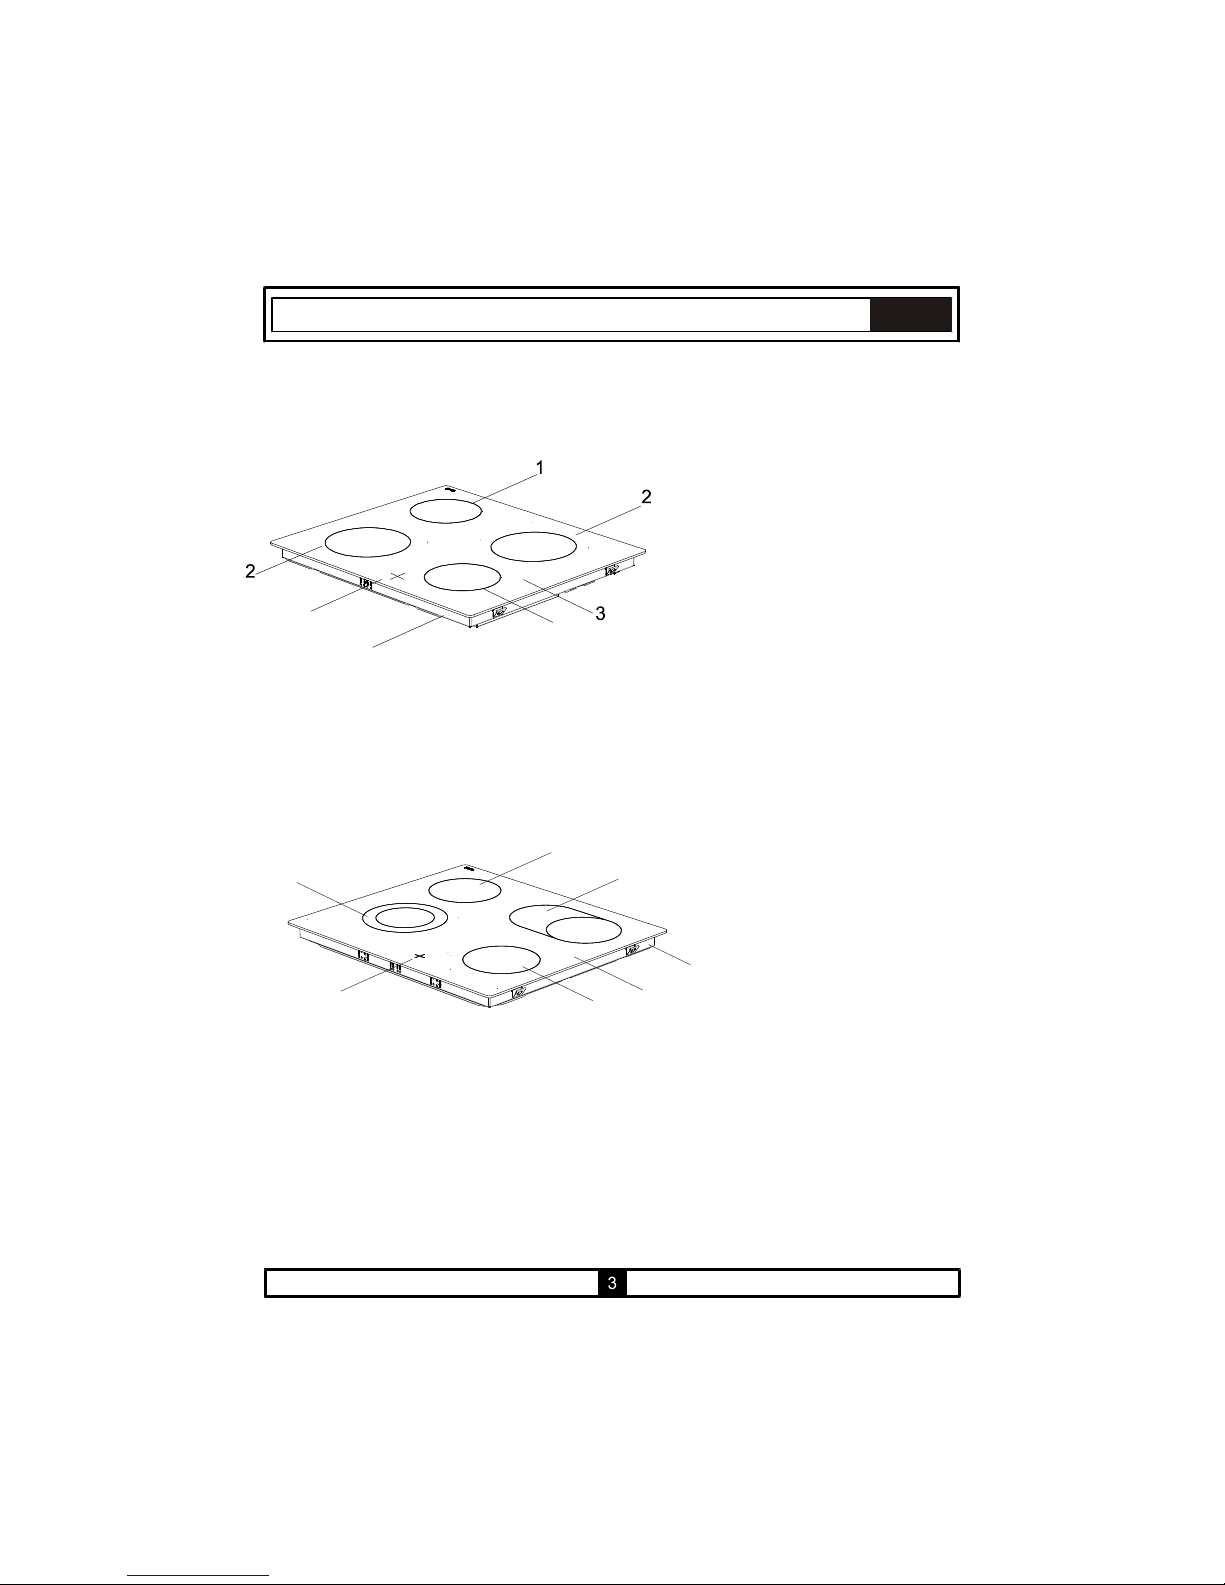
GLASKERAMISCHES KOCHFELD: PVU 640 C - PVU 640 X
1 Ø14,5 cm-Kochstelle (1200 W)
2 Ø 18,0 cm-Kochstelle (1800 W)
3 Glaskeramik
4 Unterteil
5 Restwärmeanzeige
GLASKERAMISCHES KOCHFELD: PVU 647 X - PVU 647 N
1 Ø 14,5 cm-Kochstelle (1200 W)
2 Ø 18,0 cm-Kochstelle (1700 W)
3 Erweiterbare Schnellkochstelle (1800 W)
4 Glaskeramik
5 Unterteil
6 Restwärmeanzeige
Page 36
DE
4
TEIL 2: WARNHINWEISE
Bevor Sie das Gerät benutzen, beachten Sie bitte sämtliche
Sicherheitshinweise und lesen die Bedienungsanleitung
aufmerksam durch.
Dieses Gerät wurde zur Integration in Haushalts-Küchenmöbel
entwickelt.
Nach dem Auspacken überzeugen Sie sich zunächst, dass das Gerät
keinerlei Schäden aufweist. Falls Beschädigungen vorliegen sollten,
nehmen Sie das Gerät keinesfalls in Betrieb, sondern wenden sich
sofort an den autorisierten Kundendienst. Da Verpackungsmaterialien
(Kunststoffe, Styropor, usw.) eine Gefahr für Kinder darstellen können,
müssen solche Materialien sofort gesammelt und außerhalb der
Reichweite von Kindern aufbewahrt werden.
Das Gerät muss gemäß den Anweisungen des Herstellers in dieser
Anleitung durch eine autorisierte Fachkraft installiert und in Betrieb
genommen werden. Der Hersteller haftet nicht für jegliche Schäden, die
durch unsachgemäße Installation entstehen können.
Bevor Sie Ihr Gerät mit den Versorgungsleitungen in Ihrem Haushalt
verbinden, überzeugen Sie sich von der Richtigkeit der Spannungs- und
Gaseinstellungen. Die entsprechenden Angaben finden Sie auf einem
Aufkleber am Gerät und/oder an der Verpackung.
Schalten Sie den Ofen nicht ein, bevor er komplett installiert wurde.
Überzeugen Sie sich davon, dass sämtliche Bedienelemente
abgeschaltet werden, wenn das Gerät nicht genutzt wird.
Achten Sie darauf, dass das Netzkabel bei der Installation nicht
eingeklemmt werden.
Das Netzkabel sollte nie vom Kunden selbst ausgetauscht werden. Falls
es zu Beschädigungen des Netzkabels kommen sollte, wenden Sie sich
bitte an den autorisierten Kundendienst.
Schalten Sie das Gerät komplett ab, bevor Sie es reinigen, warten oder
ähnliche Tätigkeiten ausführen.
Einige Teile des Gerätes können längere Zeit heiß bleiben; bitte warten
Sie ab, bis heiße Teile komplett abgekühlt sind, bevor Sie sie berühren.
Wenn das Gerät arbeitet, dürfen sich keinerlei entflammbaren
Gegenstände oder Substanzen in der Nähe befinden.
Wenn Sie andere Elektrogeräte der Nähe des Gerätes benutzen, achten
Sie darauf, dass deren Kabel nicht mit heißen Teilen in Kontakt geraten.
Page 37
DE
Achten Sie darauf, dass sich sämtliche Bedienelemente in der „0“-
Position (aus) befinden, wenn Sie das Gerät nicht benutzen.
Im Betrieb benötigt Ihr Gerät zur Kühlung eine ausreichende
Luftzirkulation. Lesen Sie den Teil dieser Anleitung, in dem die nötigen
Schritte zur Installation beschrieben werden, aufmerksam durch und
achten Sie darauf, dass die erforderlichen Vorgaben eingehalten
werden.
Diese Bedienungsanleitung wurde für mehrere leicht unterschiedliche
Modelle geschrieben. Daher kann es vorkommen, dass nicht sämtliche
Erläuterungen auf Ihr spezielles Modell zutreffen. Achten Sie beim
Lesen dieser Anleitung besonders auf die bebilderten Erläuterungen.
Halten Sie Kinder vom Ofen fern.
Geben Sie bei der Benutzung Ihres Gerätes auf Folgendes acht:
Schließen Sie Ihr Gerät grundsätzlich nur an geerdete Schutzkontaktsteckdosen an.
Verlegen Sie das Netzkabel Ihres Gerätes nicht an heißen Stellen entlang.
Bei Beschädigungen des Netzkabels wenden Sie sich an den autorisierten Kundendienst
in Ihrer Nähe.
Wenn Sie Ihren Ofen zum ersten Mal benutzen, tritt ein ungewöhnlicher Geruch durch die
Erwärmung von isolierenden Materialien und Heizelementen auf. Aus diesem Grund
lassen Sie Ihren Ofen zunächst 45 Minuten lang bei maximaler Temperatureinstellung
arbeiten, bevor Sie Lebensmittel damit zubereiten. Dabei achten Sie besonders auf eine
gute Belüftung des Raumes, in dem Sie Ihren Ofen installiert haben.
Berühren Sie weder den Ofen-Innenraum noch die Heizelemente, wenn Sie den
Backofen des Gerätes nutzen: Diese Teile bleiben auch nach dem Abschalten des
Gerätes eine Weile lang heiß und dürfen erst nach ausreichender Abkühlung mit den
Händen berührt werden.
5
Wenn Ihr Kochfeld mit Halogenbrennern ausgestattet ist, achten Sie darauf,
im Betrieb nicht in das Licht zu schauen.
Dieses Gerät darf nicht von Personen (einschließlich Kindern) bedient
werden, die über eingeschränkte physische, sensorische oder geistige
Fähigkeiten verfügen oder denen es an Erfahrung und Wissen mangelt; es sei
denn, dass diese Personen von einer verantwortlichen Person beaufsichtigt
und gründlich in die Bedienung des Gerätes eingewiesen werden.
Kinder sollten grundsätzlich beaufsichtigt werden, damit sie nicht mit dem
Gerät spielen.
Page 38
DE
Geben Sie keinerlei entflammbaren oder gar explosiven Gegenstände in den Ofen.
Stellen Sie keinerlei brennbare Gegenstände (einschließlich Druckbehälter, Papier,
Kunststoffe und Textilien) in die Nähe des Kochfeldes.
Achten Sie bei der Nutzung des Backofens darauf, dass sich die Außenflächen des Ofens
stark erhitzen können. Halten Sie Kinder vom Ofen fern.
Lassen Sie Kinder nicht auf die Ofentür klettern oder darauf sitzen.
Die technischen Angaben zum Produkt wurden gemäß zutreffender Normen im Labor
ermittelt. Diese Werte können je nach Einsatz- und Umgebungsbedingungen abweichen.
Bei Einbauprodukten überzeugen Sie sich davon, dass die Verbindung zwischen
Kochfeld und Ofen richtig hergestellt wurde.
Achten Sie darauf, dass das Hauptkabel, das Kochfeld und Ofen miteinander verbindet,
nicht eingeklemmt wird.
Falls Sprünge (auch winzige) in der Glaskeramik des Kochfeldes auftreten sollten,
ziehen Sie sofort den Netzstecker!
Vorsicht (nur bei Modellen FUS 100-40 W und FUS 100-40 X): Im Betrieb des Ofens
tritt heißer Dampf durch die Entlüftungsöffnungen am Ofentürgriff aus. Vergessen Sie
dies bitte nicht.
Page 39
DE
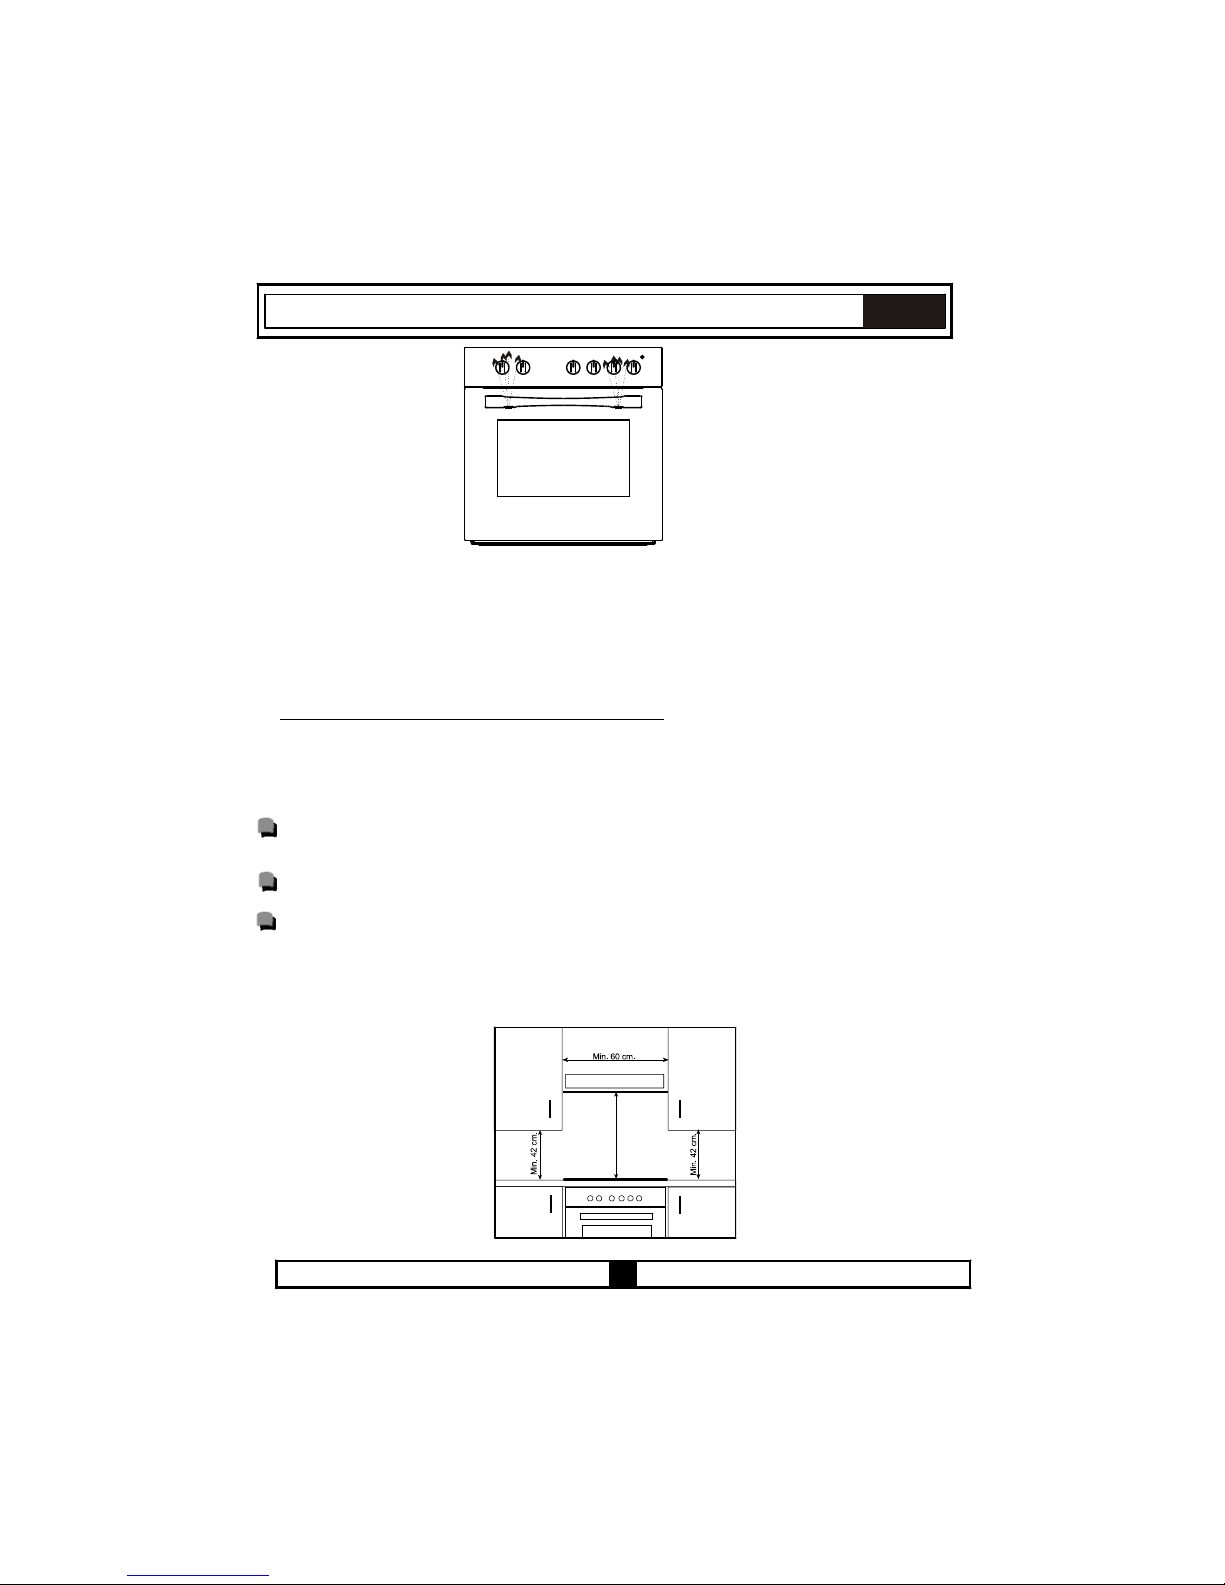
ABZUGSHAUBE
Min. 65 cm(mit
Abzugshaube)
Min. 70 cm (ohne Haube)
Abbildung 1
7
Dieser moderne, funktionale und praktische Ofen wurde mit Teilen und Materialien höchster
Güte hergestellt und wird Ihre Ansprüche in jeder Hinsicht erfüllen. Vergessen Sie nicht, diese
Anleitung aufmerksam durchzulesen, damit Sie gleich zu Anfang richtig und sicher mit dem
Gerät arbeiten können und es auch in Zukunft nicht zu Problemen kommt. In den
nachstehenden Informationen finden Sie bestimmte Regeln, die wichtig für richtige
Aufstellung und Wartungsarbeiten sind. Diese Informationen sollten (insbesondere vom
Installateur) mit besonderer Aufmerksamkeit gelesen werden.
3.1 DER RICHTIGE PLATZ FÜR IHREN OFEN
Bei der Auswahl des richtigen Aufstellungsortes für Ihren Ofen müssen einige
Punkte beachtet werden. Halten Sie sich in jedem Fall an unsere nachstehenden
Empfehlungen, damit es später nicht zu Problemen oder gefährlichen Situationen
kommt!
Bei der Auswahl des richtigen Platzes für Ihren Ofen sollten Sie darauf achten, dass sich
keine entflammbaren oder explosiven Materialien in nächster Nähe befinden; dies können
Vorhänge, ölige Tücher und ähnliche Materialien sein, die schnell Feuer fangen.
Die Ihren Ofen umgebenden Möbel müssen aus hitzebeständigen Materialien bestehen, die
auch Temperaturen von mehr als 50 °C aushalten.
In Abbildung 1 finden Sie eine Darstellung der erforderlichen Gegebenheiten oder
Änderungen hinsichtlich Wandschränken und Abzugshauben sowie der nötigen
Minimalabstände zum Ofen und seinen Flächen.
Demzufolge sollte die Abzugshaube mit einem minimalen Abstand von 65 cm von der
Oberfläche des Kochfeldes angebracht werden. Ohne Abzugshaube sollte ein Abstand von
mindestens 70 cm eingehalten werden.
TEIL 3: VORBEREITUNGEN FÜR INSTALLATION UND GEBRAUCH
Page 40
DE
8
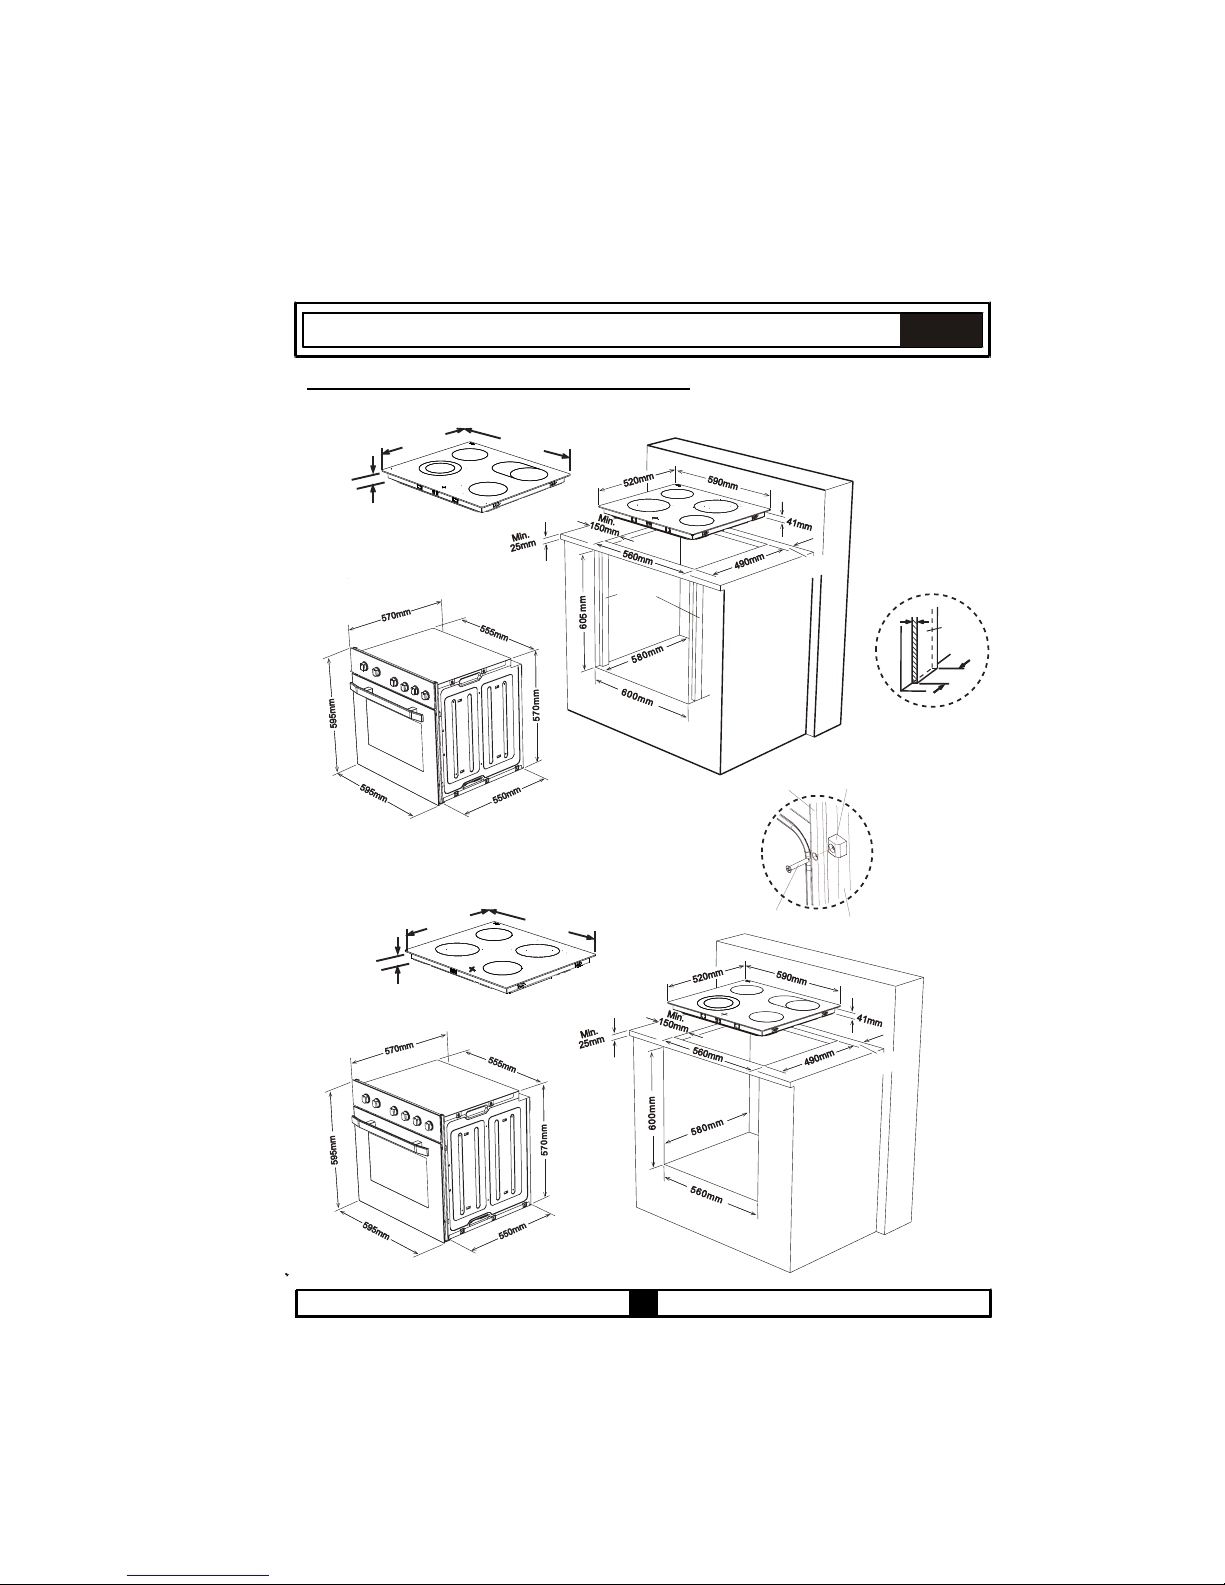
3.2 OFEN- UND KOCHFELDINSTALLATION
Abbildung A – Bündige Ofeninstallation
52 m
m0
95 0mm
41mm
HolzHolz
M .
in
6 m0 m
M .
in
6 m0 m
520mm
95 0mm
41mm
20mm
Min.
40mm
Frontrahmen
Distanzstück
Holz
Befestigungsschraube
Mi .n
60mm
Mi .n
60mm
Holz
Abbildung B Normale Ofeninstallation
Page 41
DE
Installationsschritte:
1. Setzen Sie das Kochfeld in die Arbeitsplattenaussparung ein. Die Größe der Aussparung
entnehmen Sie bitte Abbildung A.
Details finden Sie unter Glaskeramisches Kochfeld fixieren.
2. Verbinden Sie das Kochfeld über den Stecker am Kochfeld mit dem Ofen. Das
Gegenstück des Steckers befindet sich an der Rückwand des Ofens.
3. Schließen Sie den Ofen an die Stromversorgung an.
4. Setzen Sie den Ofen in die Einbauöffnung. Je nach Größe der Einbauöffnung kann das
Gerät wie in Abbildung A oder B gezeigt platziert werden. Details finden Sie unter Ofen
fixieren.
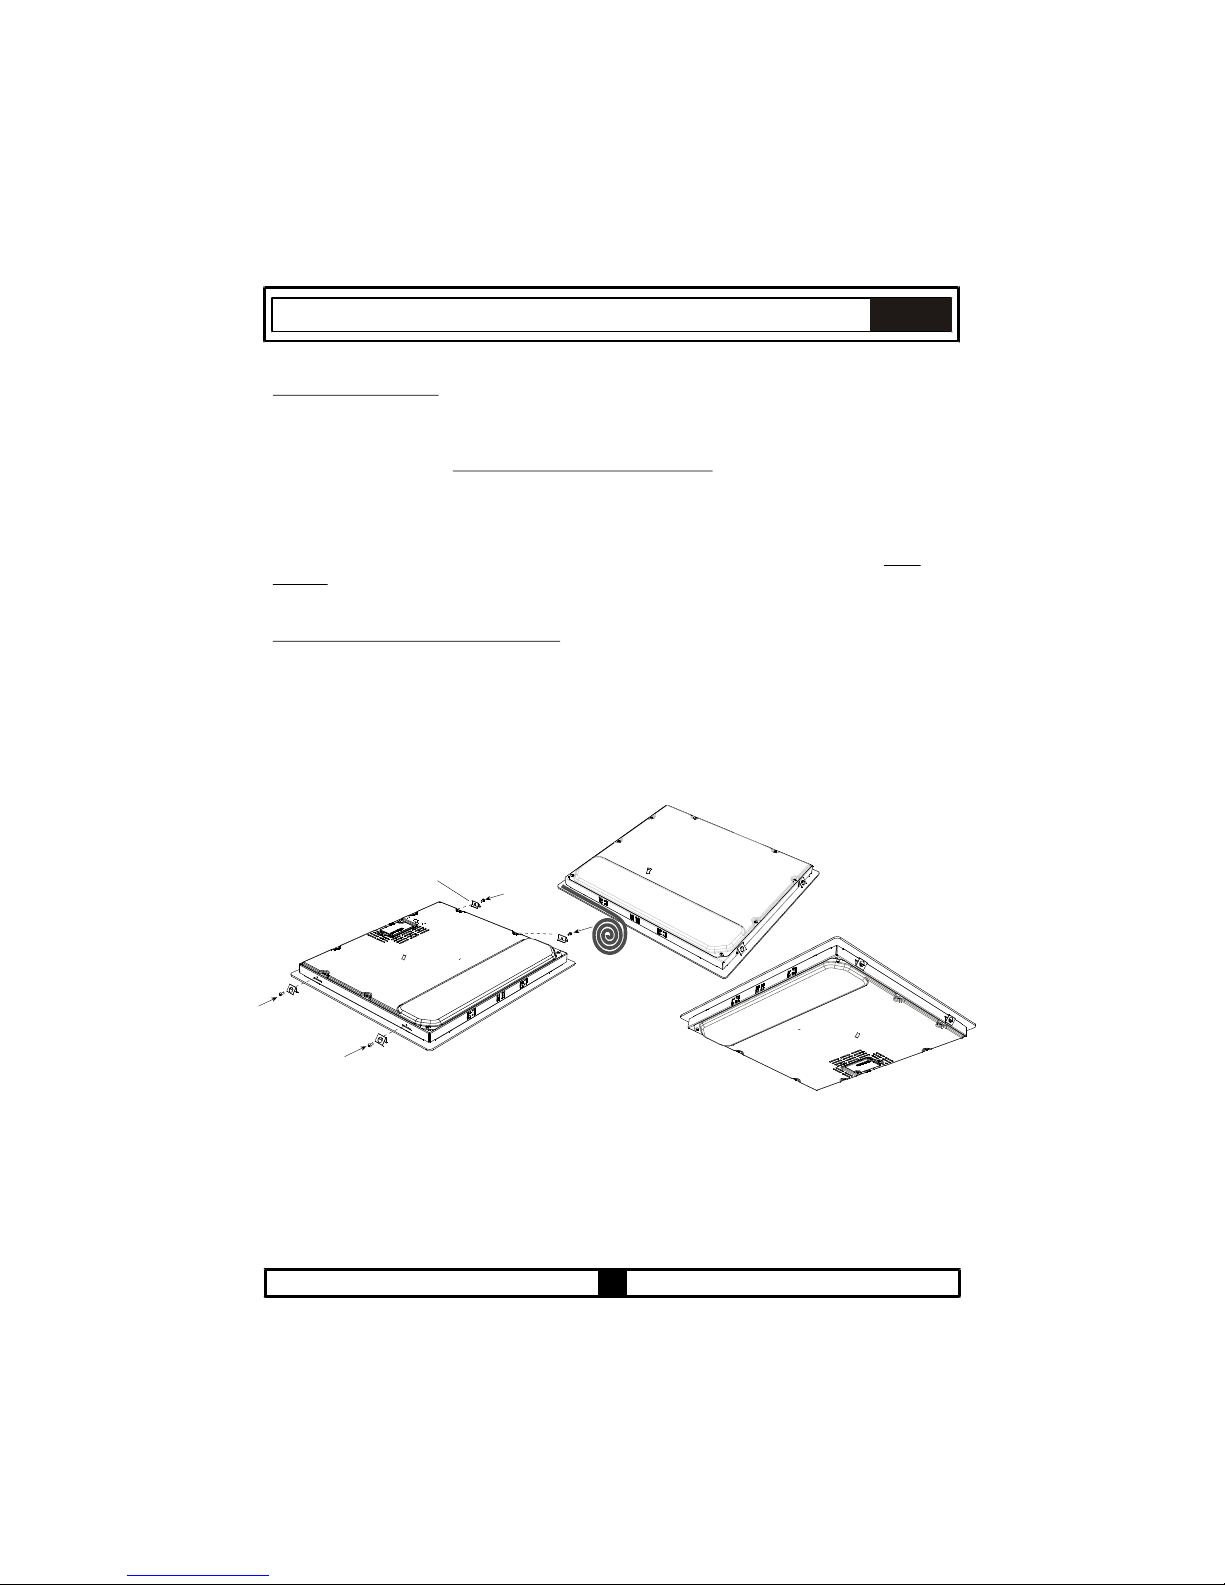
Glaskeramisches Kochfeld fixieren:
■ Verlegen Sie das einseitig klebende Dichtungsband um die gesamte äußere
Unterseitenkante des Kochfeldes. Dehnen Sie das Band nicht.
■ Schrauben Sie die 4 Arbeitsplattenklemmen an die Seitenflächen des Produktes.
■ Setzen Sie das Kochfeld in die Arbeitsplattenaussparung ein.
9
Arbeitsplattenklemme
Page 42
10
Ofen fixieren:
Schieben Sie den Ofen ein Stück weit vorwärts in das Gehäuse. Öffnen Sie die
Ofentür, setzen Sie 4 Schrauben in die vertieften Schraublöcher am Frontrahmen ein.
Führen Sie die Schrauben durch die Kante des Frontrahmens und in das jeweilige
Distanzstück dahinter. Ziehen Sie die Schrauben an, bis das Distanzstück am
Frontrahmen anliegt. Achten Sie dabei darauf, dass die abgeschrägten Kanten der
einzelnen Distanzstücke zur abgerundeten Kante des Frontrahmens zeigen. Schieben
Sie das Produkt komplett ein und verschrauben Sie es mit den Holzteilen.
Die Abmessungen des Gehäuses, in das der Ofen eingebaut wird, müssen absolut
passend, das Material muss für höhere Temperaturen geeignet sein. Zur korrekten
Installation darf das Produkt keine elektrischen oder isolierten Teile berühren. Isolierte Teile
müssen so angebracht werden, dass sie auch mit Werkzeugen nicht entfernt werden
können. Wir raten von der Installation des Gerätes in nächster Nähe zu Kühl- und
Gefriergeräten ab. Andernfalls kann die Leistung dieser Geräte durch Abwärme des
Produktes beeinträchtigt werden.
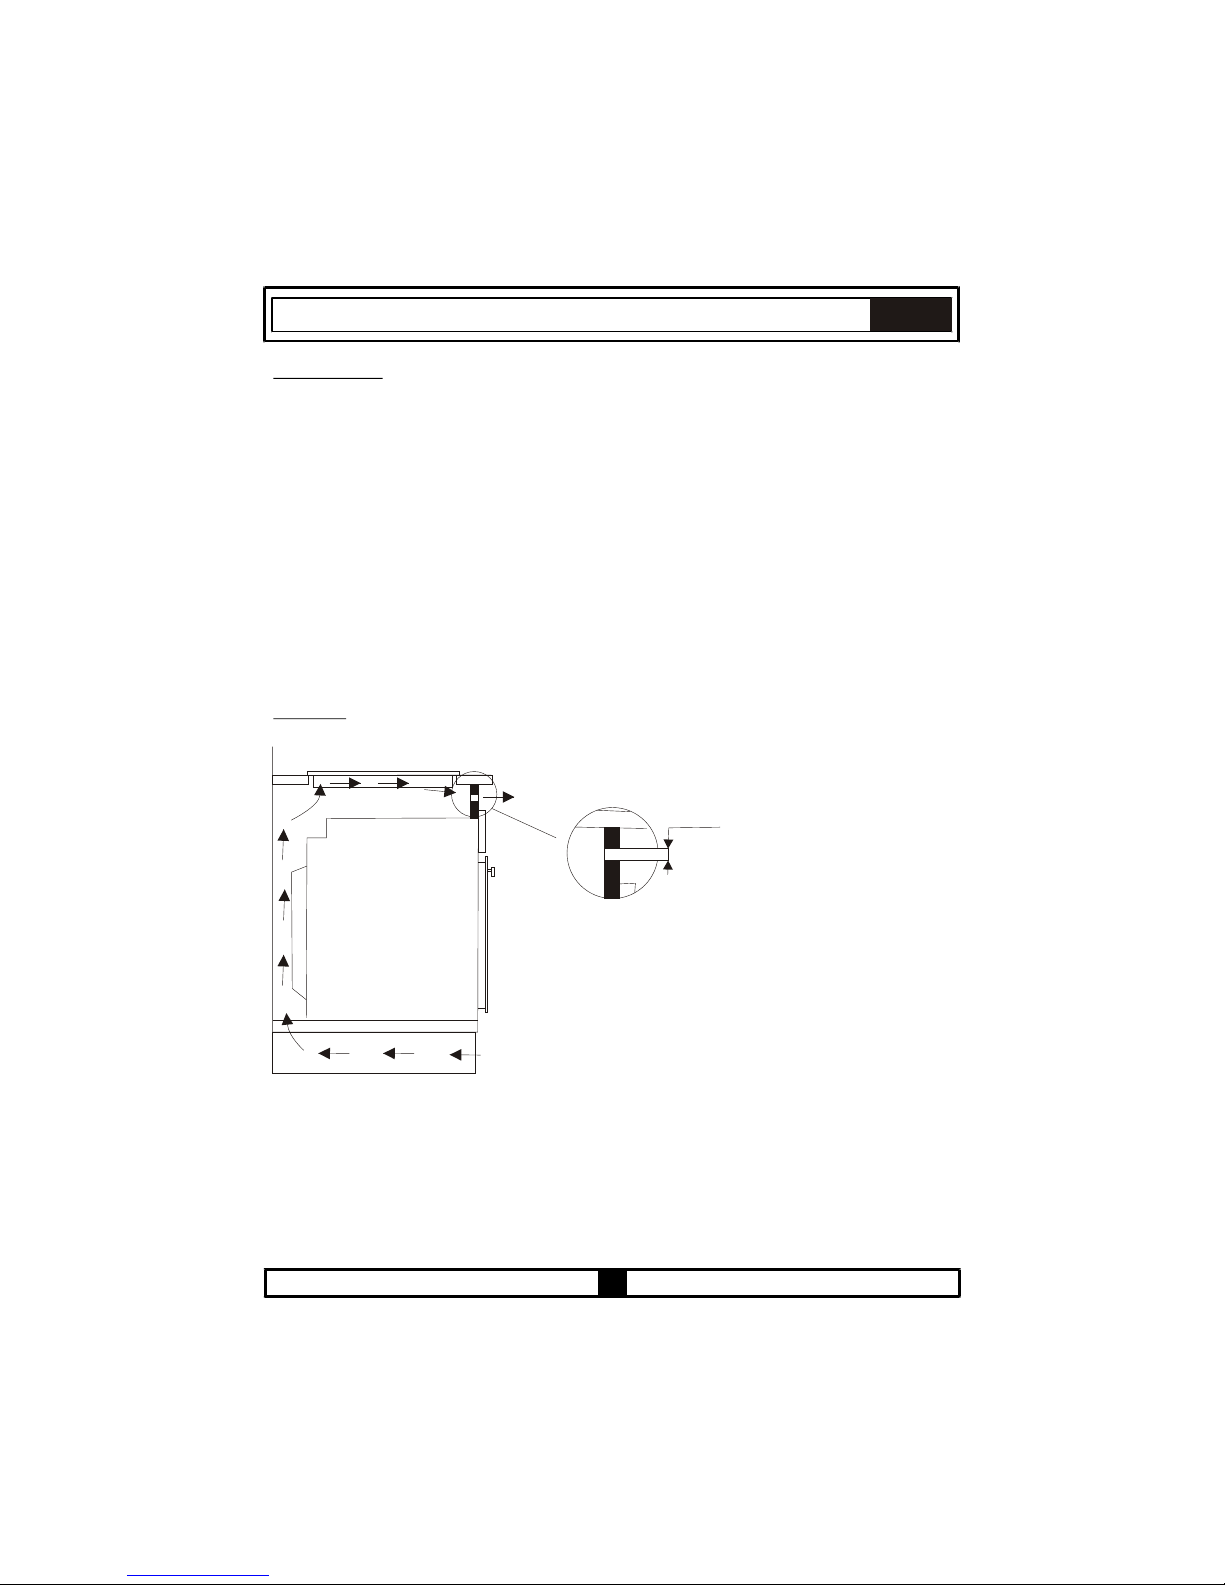
Warning: Installation eines Einbauofens ohne Kühlungslüfter (FUS 100-40 W, FUS 100-40
X)
5mm5mm
Vor dem Einsetzen des Ofens muss die Rückwand des
Küchenmöbels im Bereich des Ofens entfernt werden.
Gleichermaßen muss am Vorderteil des Möbels eine
Öffnung von mindestens 5 mm vorhanden sein.
DE
Page 43

11
ACHTUNG:
Falls das Netzkabel ausgetauscht werden muss, schließen Sie die Adern gemäß folgender
Farbkodierung an:
Blau - Nullleiter (N)
Braun - Phase (L)
Gelb-grün - Erde( )
DE
3.3 VERKABELUNG UND SICHERHEIT EINBAUOFEN:
Bei der Verkabelung müssen die nachstehenden Anweisungen exakt eingehalten
werden:
Das Erdungskabel muss über die Schraube mit dem Erdungsanschluss () verbunden
werden. Das Netzkabel muss wie in Abbildung 2 gezeigt angeschlossen werden. Falls
kein geerdeter, den lokalen Normen entsprechender Stromanschluss zur Verfügung
stehen sollte, wenden Sie sich unverzüglich an den autorisierten Kundendienst.
Die geerdete Steckdose muss sich in unmittelbarer Nähe des Gerätes befinden. Benutzen
Sie niemals Verlängerungskabel.
Das Versorgungskabel darf keine heißen Flächen des Produktes berühren.
Bei jeglichen Beschädigungen des Versorgungskabels wenden Sie sich in jedem Fall an
den autorisierten Kundendienst. Das Kabel muss vom autorisierten Kundendienst
ausgetauscht werden.
Die Verkabelung des Gerätes muss durch den autorisierten Kundendienst ausgeführt
werden. Dazu müssen Netzkabel vom Typ H05W-F eingesetzt werden.
Durch eine nicht ordnungsgemäße Verkabelung kann das Gerät beschädigt werden.
Solche Schäden werden nicht durch die Garantie abgedeckt.
Das Gerät ist für eine Versorgungsspannung von 220 bis 240 V Wechselspannung sowie
380 bis 415 V Dreiphasen-Drehstrom vorgesehen. Falls Ihre Netzspannung von diesen
Werten abweichen sollte, wenden Sie sich unverzüglich an den autorisierten
Kundendienst.
Der Hersteller übernimmt keinerlei Haftung für jegliche Arten von Schäden oder
Verlusten, die durch Nichteinhaltung von Sicherheitsnormen entstehen!
Page 44
12
DE
3.4 VERKABELUNG UND SICHERHEIT KOMBINIERTER EINBAUOFEN:
Die Verkabelung des Gerätes muss durch den autorisierten Kundendienst ausgeführt werden. Das
Gerät ist für eine Versorgungsspannung von 220 bis 240 V Wechselspannung sowie 380 bis 415 V
Dreiphasen-Drehstrom vorgesehen. Falls Ihre Netzspannung von diesen Werten abweichen sollte,
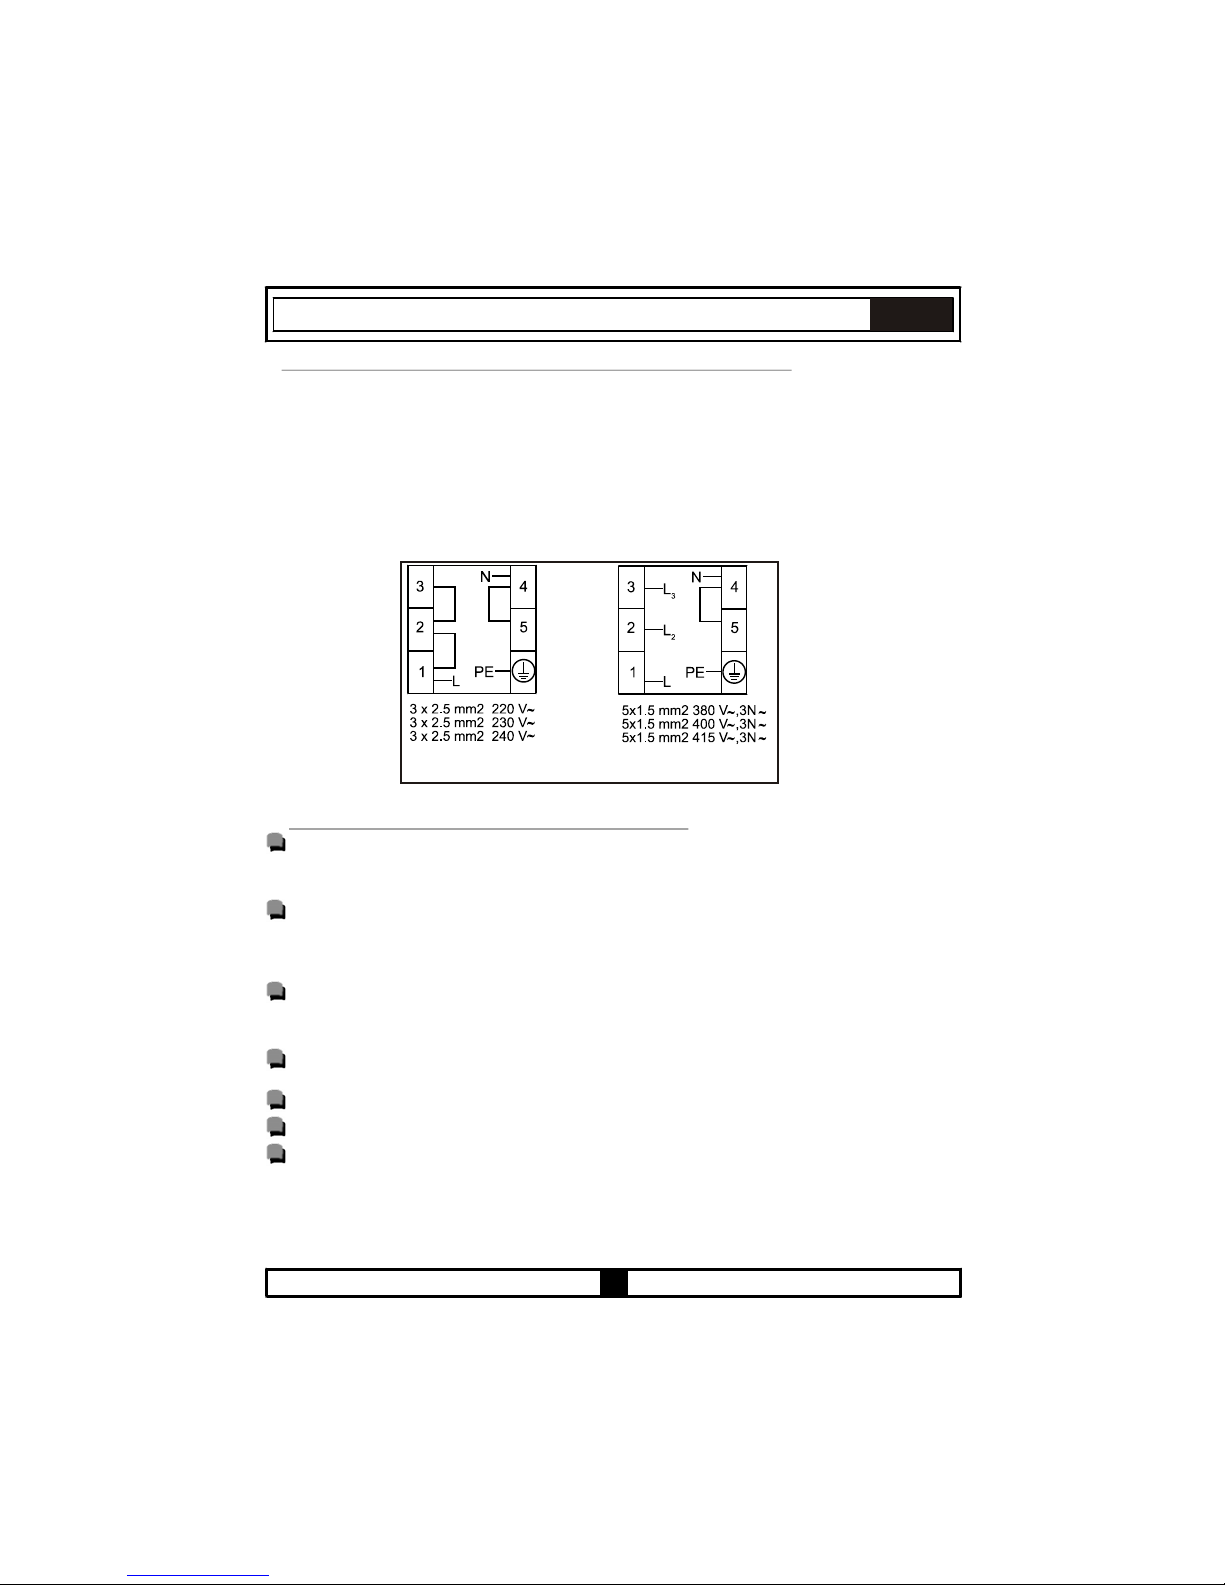
wenden Sie sich unverzüglich an den autorisierten Kundendienst. Das Gerät muss wie in Abbildung 2
gezeigt angeschlossen werden. Das Gerät ist für eine Festverbindung mit der Stromversorgung
vorgesehen. Eine Trenneinrichtung des Versorgungskreises über sämtliche Pole mit einem minimalen
Kontaktabstand von 3mm (auf 32 A ausgelegt, verzögerter Einsatz) muss installiert werden.
WARNUNG: Die Verkabelung muss mit der maximalen elektrischen Leistung des Ofens belastet
werden können. Entsprechende Angaben finden Sie auf dem Typenschild des Ofens. Bei Zweifeln
oder Unsicherheiten wenden Sie sich bitte an eine Fachkraft.
Bei Modellen mit einer Leistung von mehr als 9500 W müssen Kabel mit
einem minimalen Querschnitt von 3 x 4,0 mm² verwendet werden.
Abbildung 2
3.5 ALLGEMEINE WARN- UND SICHERHEITSHINWEISE:
Ihr Gerät wurde gemäß den zutreffenden Sicherheitsvorschriften für Elektrogeräte hergestellt.
Wartungs- und Reparaturarbeiten dürfen ausschließlich von autorisierten, vom Hersteller geschulten
Servicetechnikern durchgeführt werden. Installations- und Reparaturarbeiten, die unter
Nichtbeachtung der relevanten Vorschriften ausgeführt werden, können große Gefahren bergen.
Die Außenflächen erhitzen sich im Betrieb des Gerätes. Die Heizelemente im Inneren des Ofens und
der austretende Dampf erhitzen sich besonders stark. Diese Bereiche bleiben auch längere Zeit nach
dem Ausschalten des Gerätes sehr heiß. Berühren Sie niemals die heißen Oberflächen. Halten Sie
Kinder fern.
Lassen Sie das Gerät nie unbeaufsichtigt arbeiten, wenn Sie mit Fetten oder Ölen kochen. Bei
Überhitzung können sich die Materialien spontan entzünden. Gießen Sie niemals Wasser in
brennendes Öl. Zum Ersticken der Flammen legen Sie einen Deckel auf den Topf oder die Pfanne und
schalten das Gerät sofort ab.
Um Lebensmittel in Ihrem Ofen zuzubereiten, müssen Ofenfunktion und Temperatur eingestellt und
der Ofentimer (sofern vorhanden) programmiert werden. Andernfalls arbeitet Ihr Ofen nicht.
Legen Sie keinerlei Gegenstände auf die geöffnete Ofentür. Das Gerät kann im schlimmsten Fall
umkippen, die Ofentür kann schwer beschädigt werden.
Ziehen Sie den Netzstecker, wenn Sie das Gerät nicht benutzen.
Schützen Sie Ihr Gerät vor Umwelteinflüssen. Schützen Sie das Gerät vor direkter
Sonneneinstrahlung, Regen, Schnee, Staub und ähnlichen Einflüssen.
Page 45
13
DE
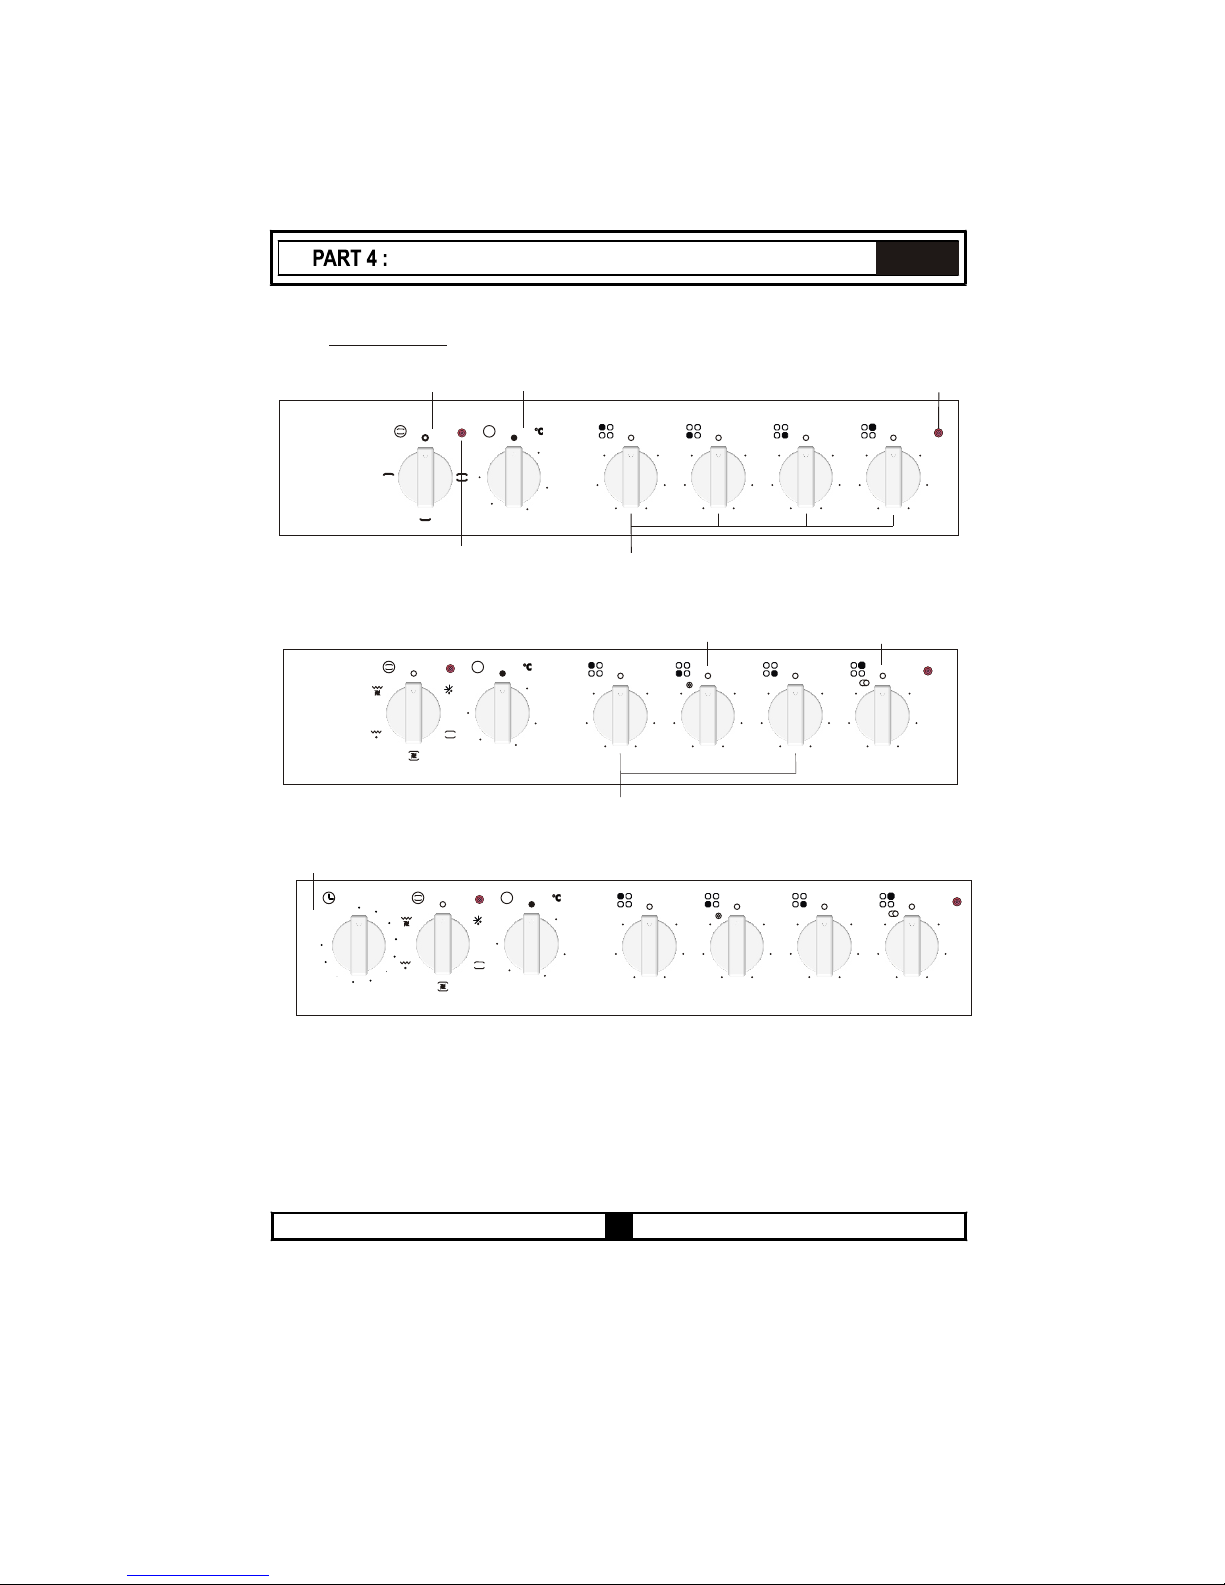
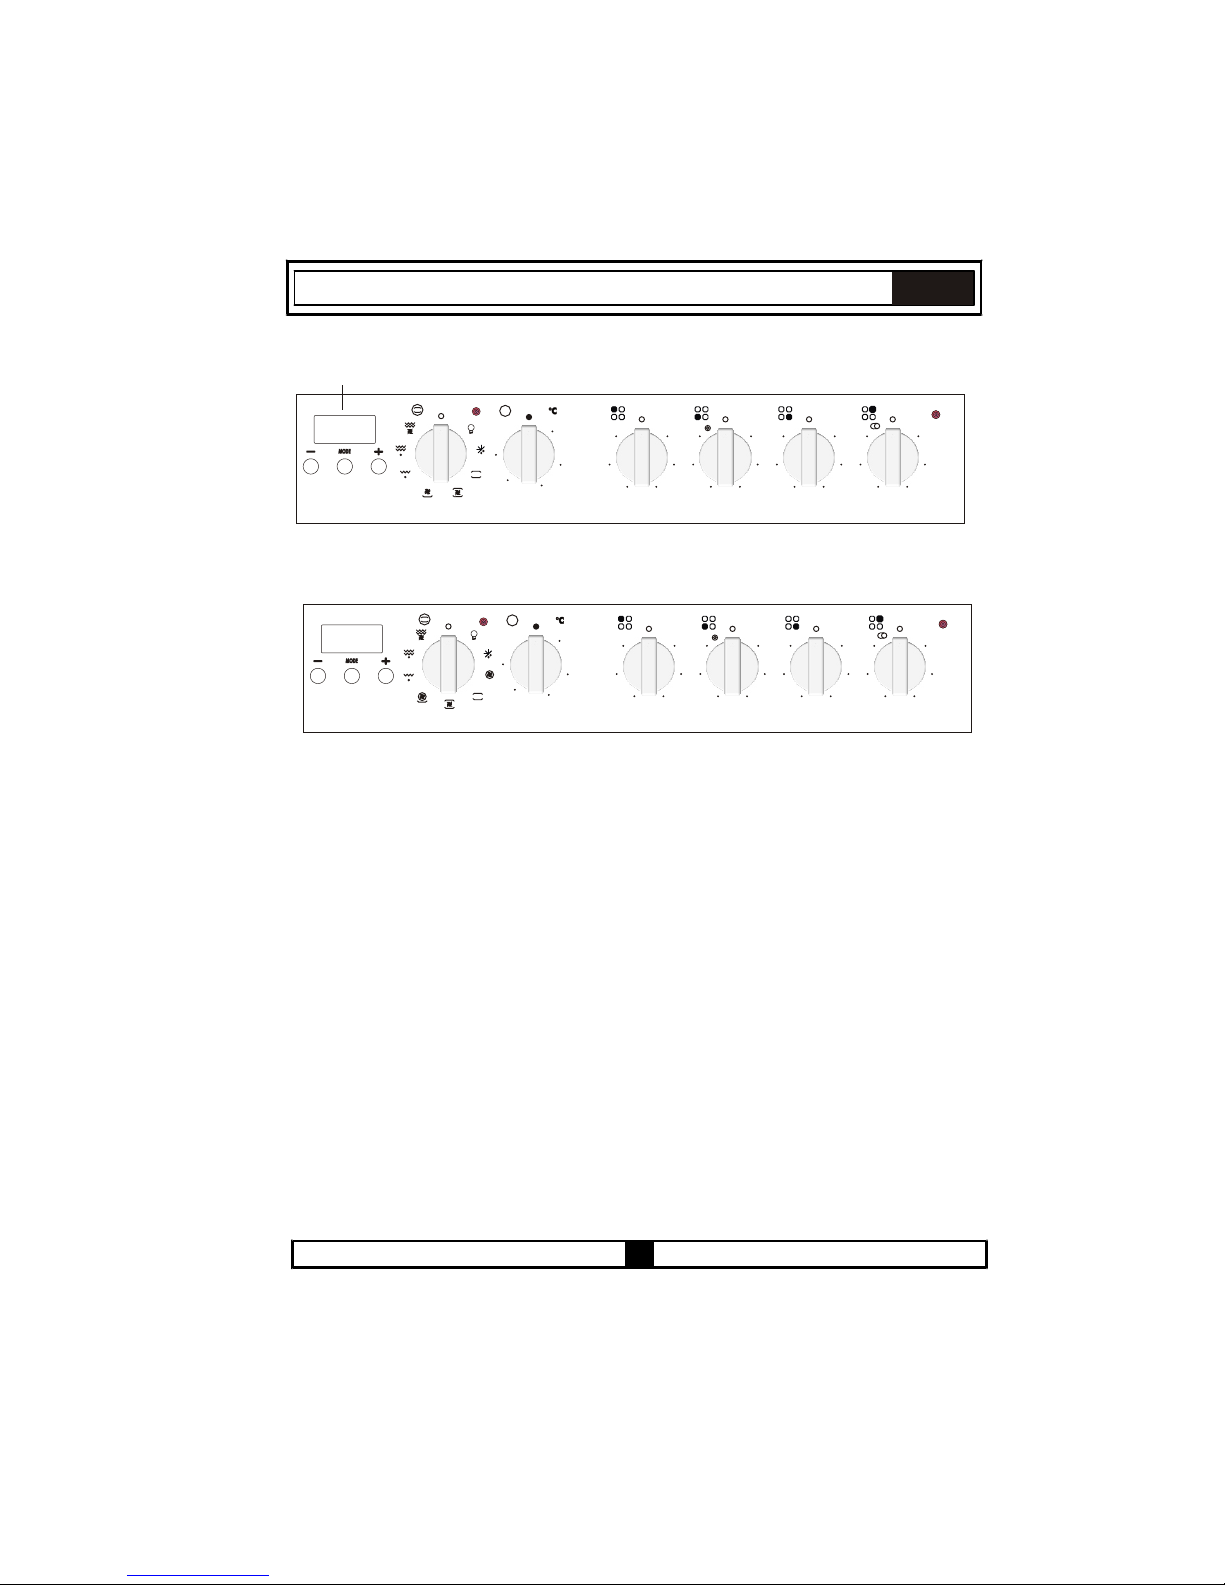
Ofentemperatur-Einstellknopf
Ofenfunktion-Einstellknopf
5050
200200
150150
100100
MAXMAX
T
FUS 100-40 W
FUS 100-40 X
44
33
55
22
11
66
44
33
55
22
11
66
44
33
55
22
11
66
44
33
55
22
11
66
Ofentemperatur-Leuchte
Einzelzone-Bedienknopf
Einzelzone-Bedienknopf
Dualzone-Bedienknopf
Erweiterbare Zone-Bedienknopf
Kochplatten-Kontrollleuchte
FUNP 611 X
100
10
20
30
40
50
70
80
90
0
60
M
5050
200200
150150
100100
MAXMAX
T
44
33
55
22
11
66
44
33
55
22
11
66
44
33
55
22
11
66
44
33
55
22
11
66
Mechanischer Timer
5050
200200
150150
100100
MAXMAX
T
FUNP 610 X
44
33
55
22
11
66
44
33
55
22
11
66
44
33
55
22
11
66
44
33
55
22
11
66
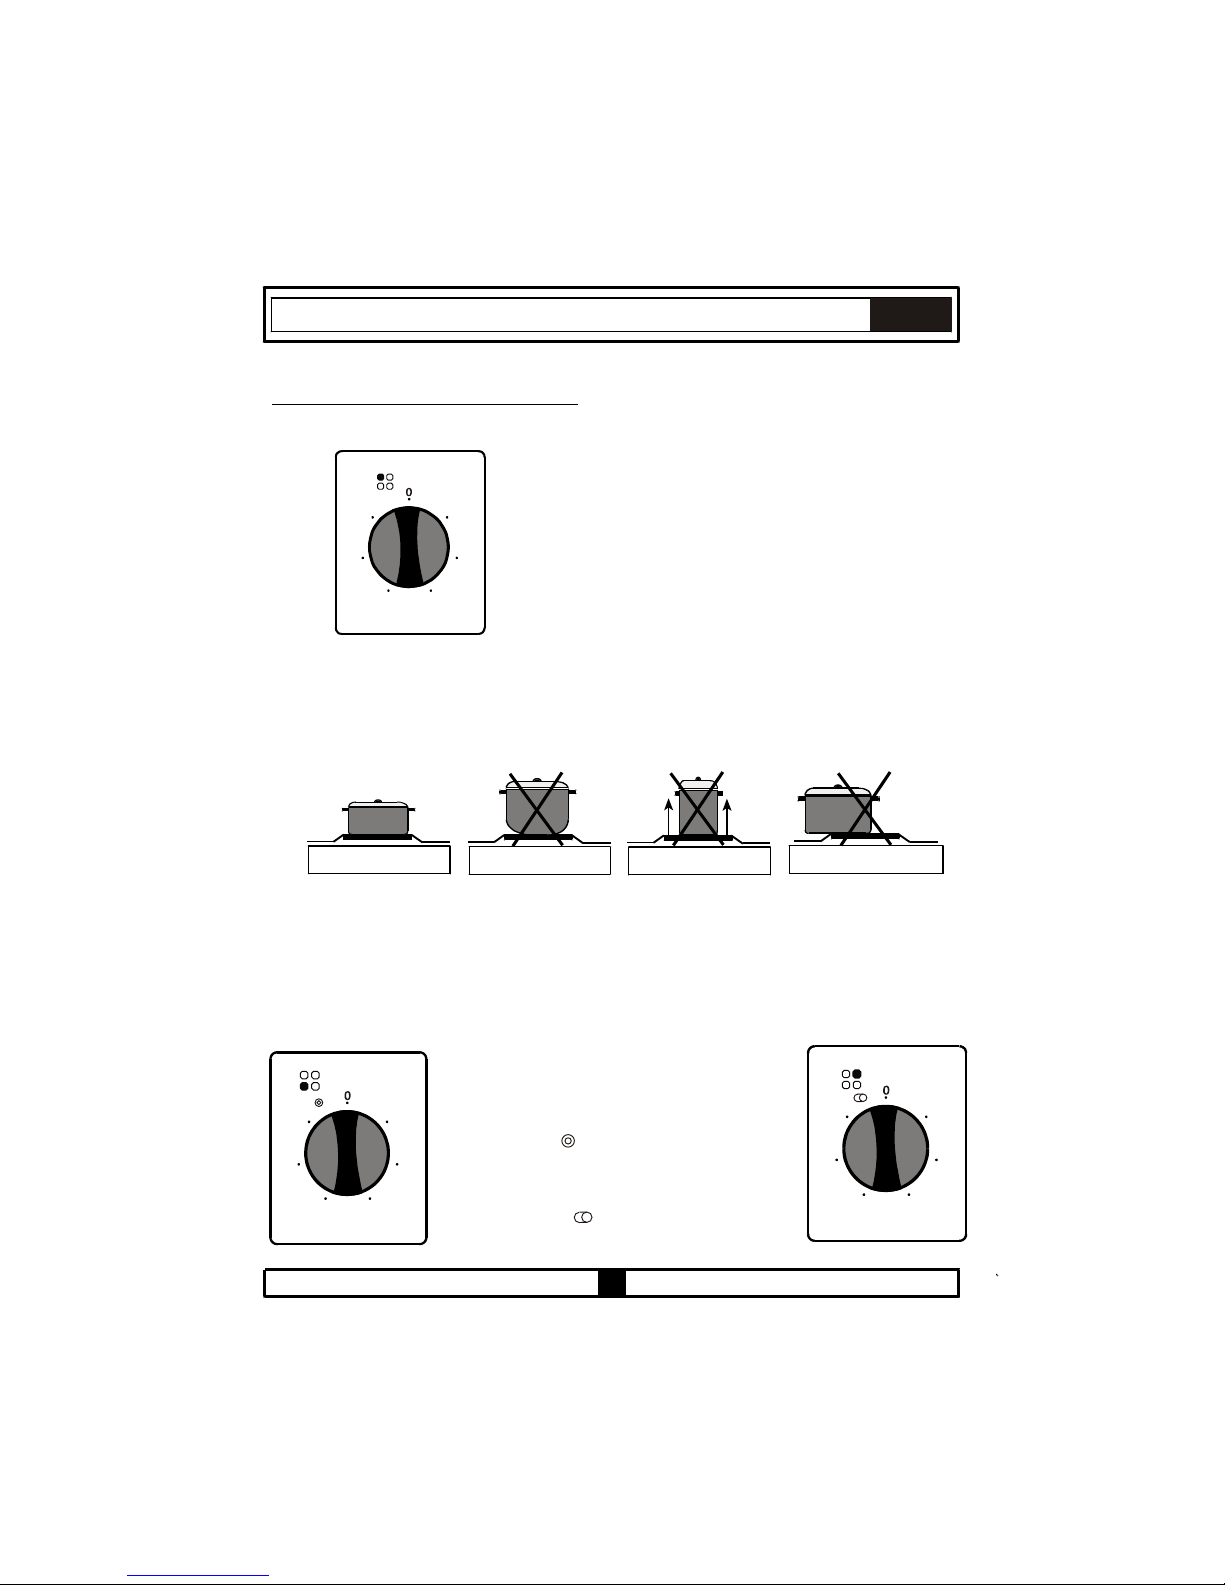
4.1 BEDIENFELD :
BEDIENUNG
Page 46
DE
5050
200200
150150
100100
MAXMAX
T
FUHP 615 X
44
33
55
22
11
66
44
33
55
22
11
66
44
33
55
22
11
66
44
33
55
22
11
66
5050
200200
150150
100100
MAXMAX
T
FUHP 825 X
44
33
55
22
11
66
44
33
55
22
11
66
44
33
55
22
11
66
44
33
55
22
11
66
Elektronischer Timer
14
Page 47
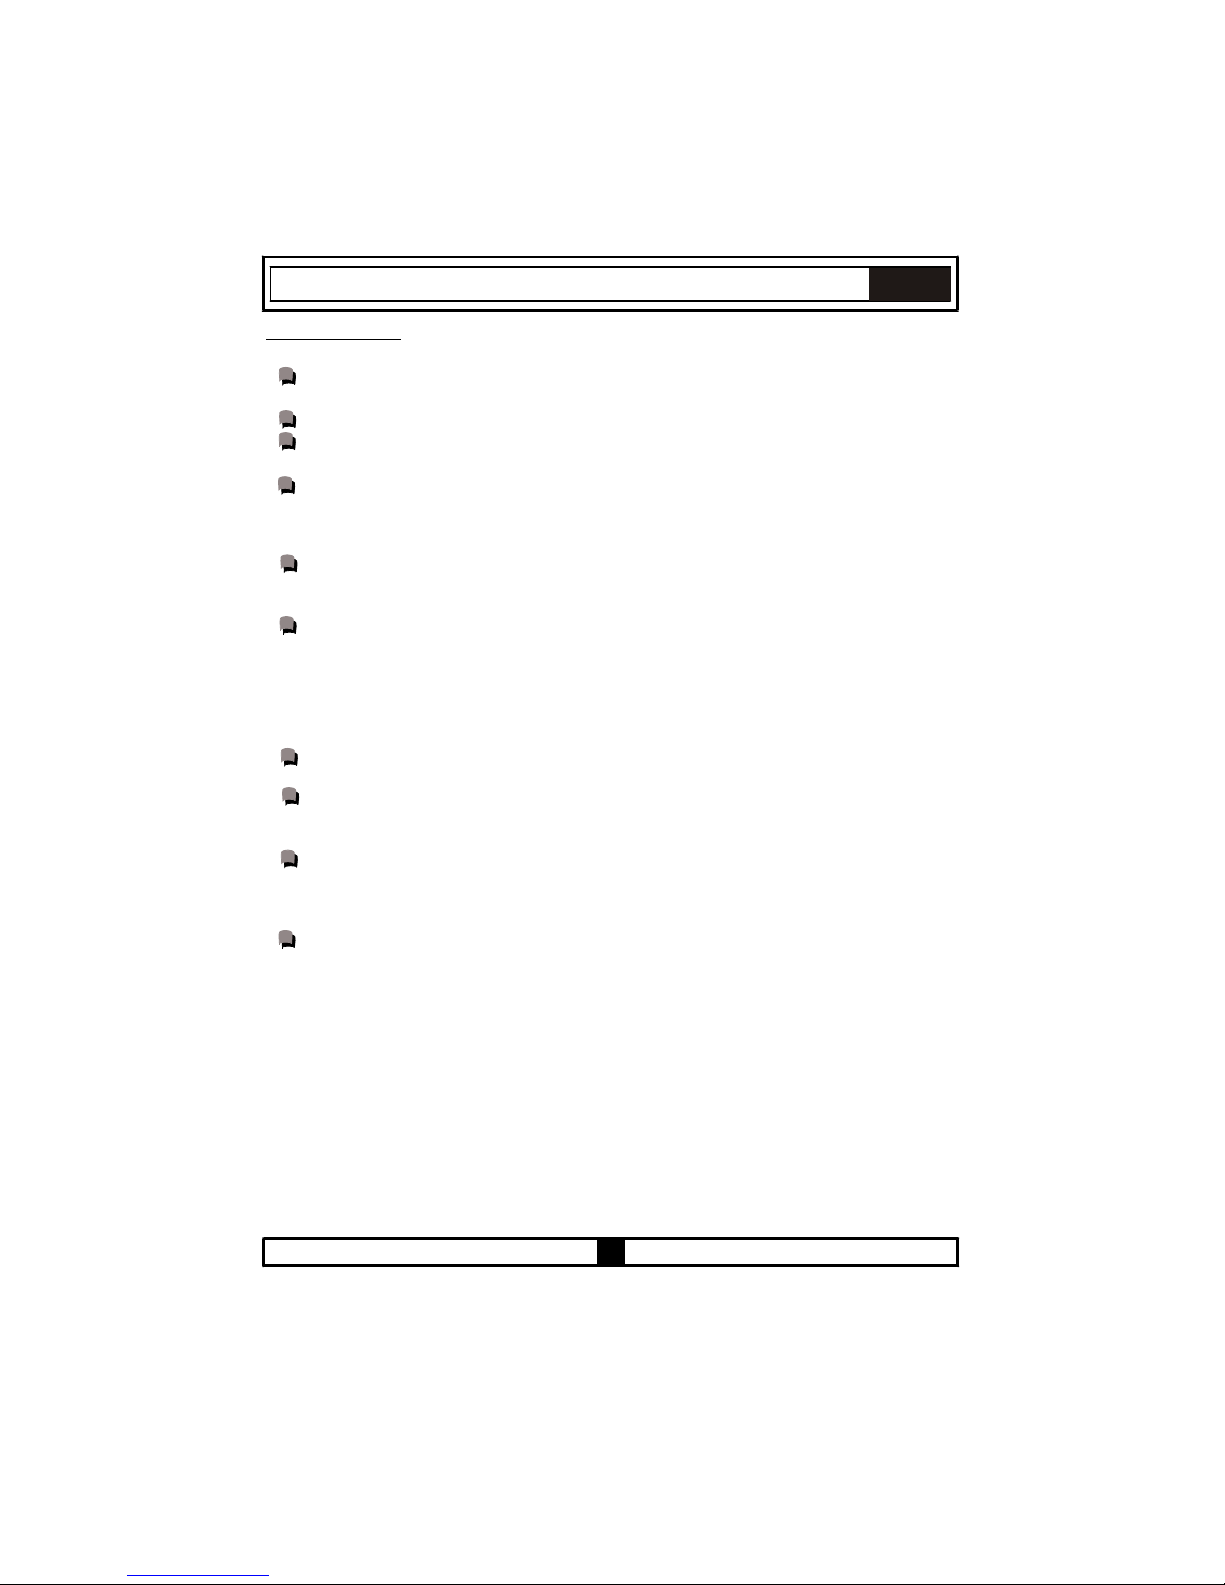
Kochplatten-Einstellknopf
15
4.2 KOCHPLATTEN VERWENDEN:
Der Kochfeldteil des Produktes wird mit Energiereglern gesteuert. Bitte schauen Sie sich Abbildung 3 an.
( PVU 647 X-PVU 647 N )
Figure
3
6
5
4
3
2
1
6
5
4
3
2
1
6
5
4
3
2
1
Duale oder ovale glaskeramische Kochstellen
Duale oder ovale glaskeramische Kochstellen
können sich an zwei Positionen aufheizen.
Wenn Sie die größere Fläche einer dualen
Kochstelle nutzen möchten, stellen Sie die
Schalter auf ’ ‘ ein. Nun arbeiten sowohl
kleine als auch große Kochfläche der
Kochstelle. Wenn Sie die ovale Fläche einer
ovalen Kochstelle nutzen möchten, stellen Sie
die Schalter auf ’ ‘ ein. Nun arbeiten sowohl
runder als auch ovaler Teil.
DE
1 .................Warm halten
2 bis 3 ........Erhitzen bei geringerer Temperatur
4, 5, 6 .........Kochen, Braten, stark erhitzen
Achten Sie bei der Benutzung der Kochplatten darauf, nur Kochgeschirr mit glatter, ebener
Unterseite zu verwenden. Ihr Kochfeld erreicht nur dann seine volle Leistung, wenn Sie
Kochgeschirr passenden Durchmessers mit ebener Unterseite benutzen. Wir raten von der
Benutzung von Kochgeschirr ab, dessen Durchmesser kleiner als der Durchmesser der
jeweiligen Kochstelle ist. Dabei geht viel Hitze verloren; Energieverschwendung ist das
Resultat.
RICHTIG
FALSCH
Runde Unterseite
FALSCH
Geschirrboden zu klein
FALSCH
Topf nicht richtig aufgestellt
Glaskeramik ist besonders widerstandsfähig gegen Hitze und starke Temperaturänderungen.
Beim starken Aufheizen leuchtet die jeweilige Kochstelle rot auf. Beim Erhitzen können leise Geräusche
auftreten; dies ist völlig normal und liegt am technischen Aufbau des Systems.
Eine leichte Geräuschentwicklung wirkt sich nicht auf die Qualität aus. Die Glaskeramik kann beschädigt
werden, wenn Sie Kochgeschirr mit scharfen Kanten darüber schieben oder unsanft auf der Glaskeramik
abstellen. Gehen Sie entsprechend sorgsam vor.
Page 48
16
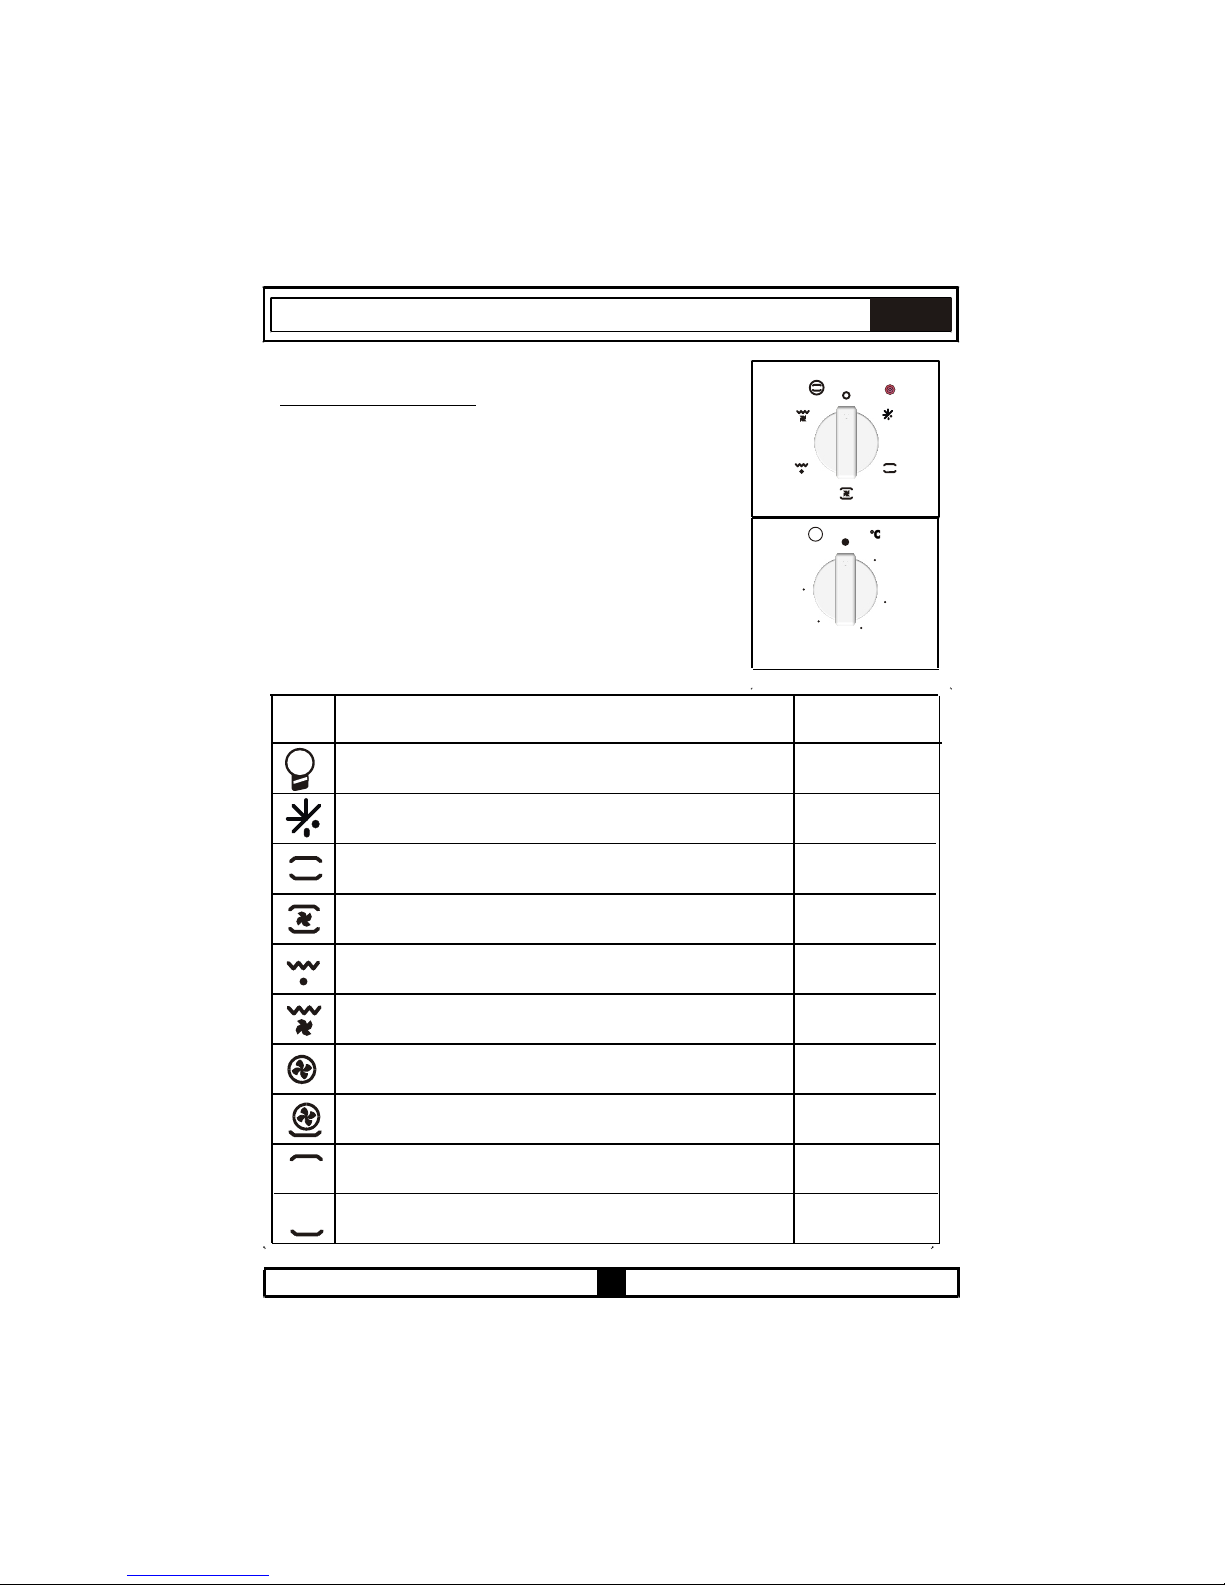
WARNHINWEISE
Wenn Sie einen der Einstellknöpfe aus der „0“-Position drehen, leuchtet die
Kochplatten-Kontrollleuchte auf.
Verwenden Sie ausschließlich Geschirr mit passendem Durchmesser.
Vergewissern Sie sich, dass der Boden Ihres Kochgeschirrs nicht nass ist, wenn Sie
das Geschirr auf die Kochstelle setzen.
Lassen Sie die Kochstellen nicht ohne aufgesetztes Geschirr arbeiten. Im Betrieb
erreicht das Geschirr naturgemäß eine hohe Temperatur. Daher sollten Sie Kinder
und Haustiere vom Herd fernhalten; dies gilt sowohl im Betrieb als auch in der Zeit
kurz danach.
Falls Sie Sprünge oder Risse in der Glaskeramik entdecken sollten, schalten Sie das
Gerät sofort ab und lassen das beschädigte Kochfeld vom autorisierten
Kundendienst austauschen.
Um keine Energie zu verschwenden, sollte der Durchmesser des Geschirrs niemals
kleiner oder größer als der Durchmesser der Kochstelle sein.
Sorgen Sie dafür, dass kleine Kinder niemals nahe an die Kochplatten gelangen
können, da sich diese im Betrieb natürlich stark erhitzen.
Da sich heiße Öle und Fette entzünden können, sollten Sie Zubereitungsarten wie
Frittieren nur mit aufgelegtem Deckel ausführen.
Missbrauchen Sie die Glaskeramik nicht als Schneidbrett oder Arbeitsfläche.
Benutzen Sie kein Geschirr mit Aluminiumboden. Stellen Sie keine schweren
Gegenstände auf dem Kochfeld ab.
Stellen Sie keine Gegenstände aus Kunststoff, Aluminium oder ähnlichen Materialien
auf der Glaskeramik ab. Falls doch einmal ein Gegenstand aus Kunststoff oder
Aluminium auf der Glaskeramik schmelzen sollte, schaben Sie die Rückstände sofort
mit einem Schaber ab.
Reiben Sie nicht mit Geschirrtüchern oder Schwämmen über die Glaskeramik.
Rückstände von Reinigungsmitteln können einen Brand verursachen und zu
unschönen Verfärbungen der Oberfläche führen.
DE
Page 49
17
5050
200200
150150
100100
MAXMAX
T
Tabelle 1
B (Konvektion) nur bei FUNP 610 X
A (Konvektion) bei FUNP 611 X,
FUHP 615 X-825 X, FUS 100-40 X-W
B (Umluft) nur bei FUNP 610 X
A (Umluft) bei FUNP 611 X,
FUHP 615 X- 825 X
Symbol
Erläuterung
Energieklasse gemäß
CENELEC EN 50304
_
_
_
_
_
_
_
DE
4.3 OFEN VERWENDEN:
Zuerst wählen Sie die gewünschte Ofenfunktion (Abbildung 4),
anschließend stellen Sie die gewünschte Ofentemperatur ein
(Abbildung 5). Andernfalls arbeitet Ihr Ofen nicht.
Wenn die Temperatur im Inneren des Ofens die von Ihnen
vorgegebene Temperatur erreicht, werden die Heizelemente
vom Thermostat ausgeschaltet, die Ofentemperatur-Leuchte
erlischt. Wenn die Temperatur unter den eingestellten Wert
abfällt, schalten sich die Heizelemente wieder ein, die
Ofentemperatur-Leuchte leuchtet auf.
Abbildung 4
Abbildung 5
Die Ofenbeleuchtung schaltet sich ein.
Die Ofenbeleuchtung, die rote Warnleuchte und der Lüfter schalten
sich ein. Zum Auftauen von gefrorenen Lebensmitteln.
Ofenthermostat, Warnleuchten sowie unteres und oberes
Heizelement schalten sich ein.
Ofenthermostat, Warnleuchten, Lüfter und Turbolüfter schalten
sich ein.
Ofenthermostat, Warnleuchten, Lüfter und Grillfunktion
schalten sich ein.
Ofenthermostat, Warnleuchten, Lüfter, oberes Heizelement,
Grillelement und Lüfter schalten sich ein.
Ofenthermostat, Warnleuchten, Lüfter und Turbolüfter schalten
sich ein.
Ofenthermostat, Warnleuchten, unteres Heizelement, Lüfter
und Turbolüfter schalten sich ein.
Das obere Heizelement des Ofens wird eingeschaltet.
Das untere Heizelement des Ofens wird eingeschaltet.
Page 50
18
_
_
_
DE
Ofenthermostat, Warnleuchten, oberes Heizelement und Grillelement
schalten sich ein.
Ofenthermostat, Warnleuchten, oberes Heizelement, Lüfter und
Grillelement schalten sich ein.
Ofenthermostat, Warnleuchten, unteres Heizelement und Lüfter
schalten sich ein.
4.4 FUNKTIONEN:
Je nach Modell sind eventuell nicht alle der nachstehend erklärten Funktionen verfügbar.
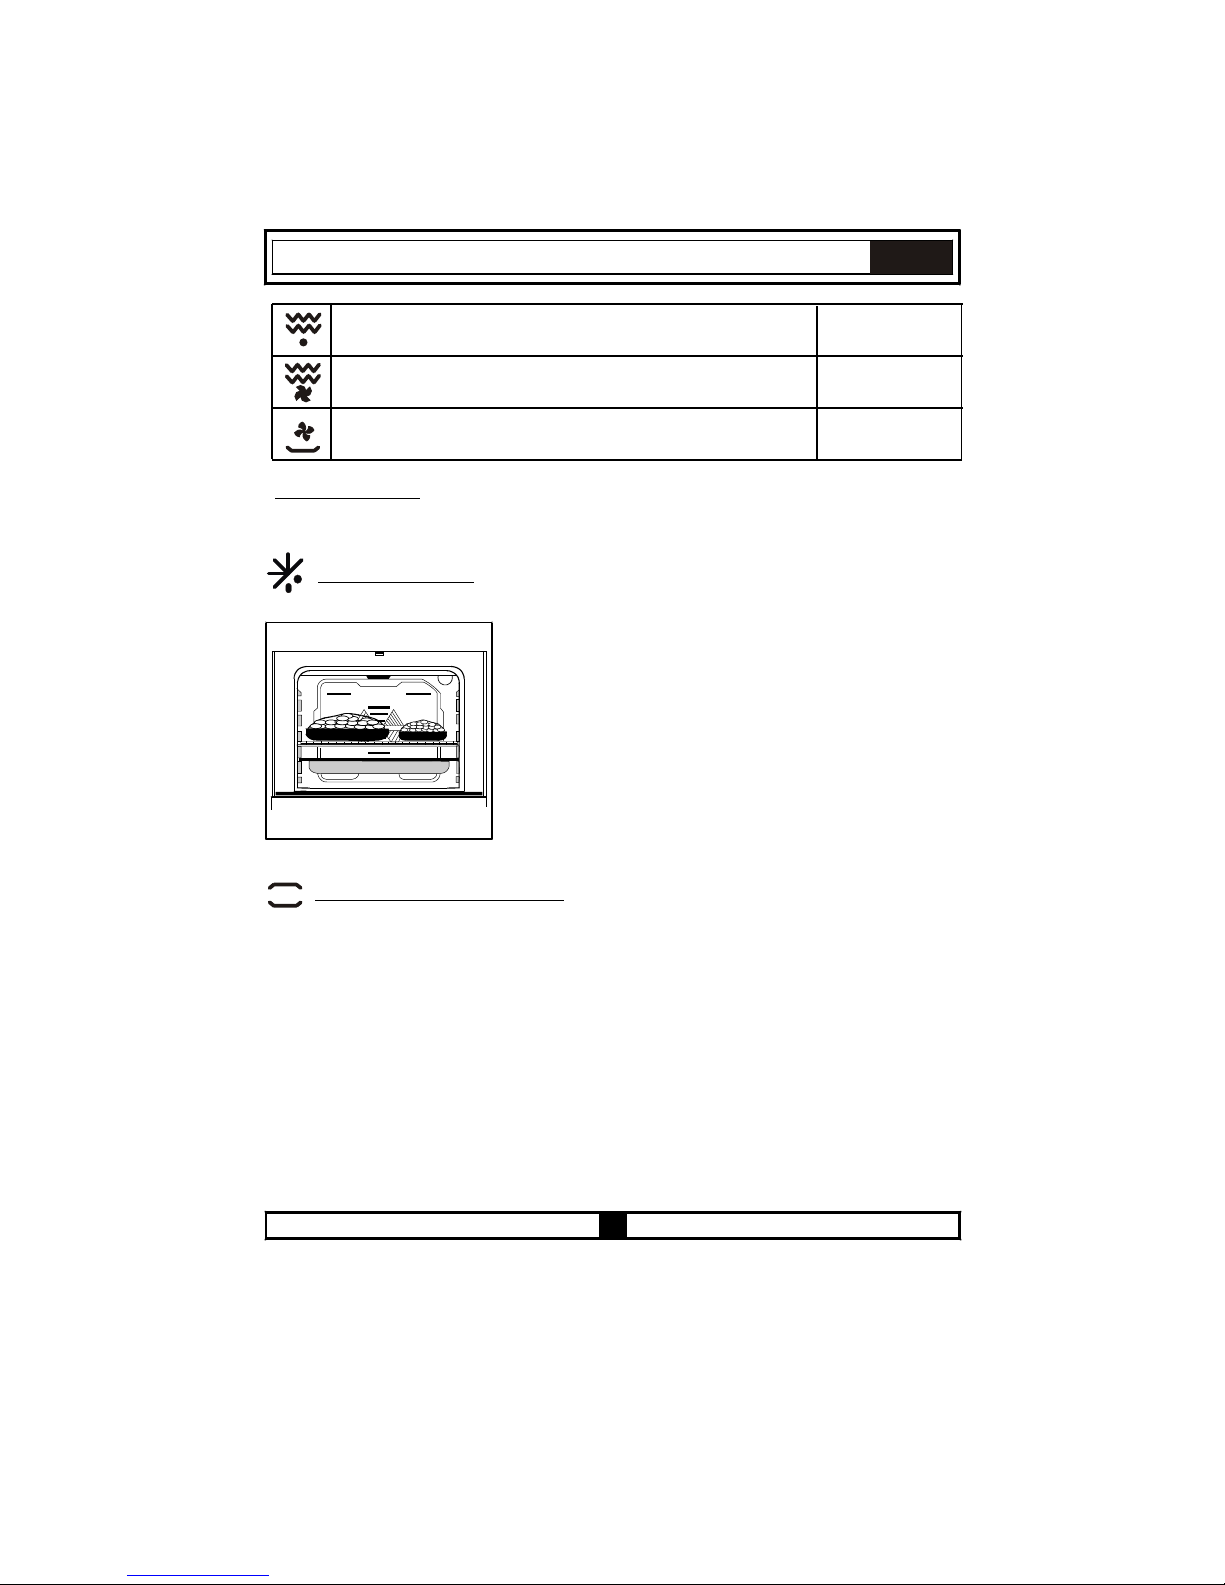
Auftauen-Funktion:
Legen Sie die aufzutauenden Lebensmittel in den
Backofen und stellen Sie den Einstellknopf auf das
abgebildete Symbol ein. Dabei werden die Lebensmittel
nicht gekocht oder gebacken; sie werden lediglich in
kurzer Zeit aufgetaut. Am besten legen Sie die
aufzutauenden Lebensmittel auf das Grillrost, das Sie in
der dritten Position von unten einschieben (Abbildung 6).
Zum Auffangen des Schmelzwassers schieben Sie das
Backblech in der unteren Position ein.
Abbildung 6
Unterhitze/Oberhitze-Funktion:
Bei dieser klassischen Backofenfunktion werden Lebensmittel gleichmäßig von oben und
unten erhitzt. Stellen Sie die Ofentemperatur je nach gewünschter Zubereitungsart auf die
empfohlene Temperatur ein, die Sie der Temperaturtabelle entnehmen können. Wir
empfehlen, den Ofen etwa 10 Minuten lang vorzuheizen. Lassen Sie die Lebensmittel
eventuell in einem geeigneten Behälter über die gesamte Zubereitungsdauer im Backofen.
Diese Funktion eignet sich besonders zum Backen von Kuchen, Biskuit, Gebäck,
Nudelgerichten, Lasagne und Pizza.
Nach der Zubereitung schalten Sie Ofenfunktion- und Ofentemperatur-Einstellknopf ab.
Nehmen Sie die zubereiteten Lebensmittel aus dem Ofen, stellen Sie sie an einem sicheren
Ort ab und lassen Sie den Ofen abkühlen, indem Sie die Ofentür geöffnet lassen. Da der
Ofen eine Zeit lang heiß bleibt, halten Sie sich und besonders Kinder vom Ofen fern.
Page 51
19
DE
Unterhitze/Oberhitze + Umluft:
Bei dieser Funktion wird heiße Luft an den oberen und unteren Heizelementen entlang geleitet und durch
den Lüfter gleichmäßig im Inneren des Backofens verteilt.
Stellen Sie die Ofentemperatur je nach gewünschter Zubereitungsart auf die empfohlene Temperatur ein,
die Sie der Temperaturtabelle entnehmen können. Stellen Sie den Ofenfunktion-Einstellknopf auf das
Symbol dieser Funktion ein, stellen Sie den Ofentimer (sofern vorhanden) auf die empfohlene
Zubereitungszeit ein und lassen Sie den Ofen etwa 10 Minuten lang vorheizen. Geben Sie die
Lebensmittel (eventuell in einem passenden Behälter) in den Ofen. Diese Funktion eignet sich
insbesondere zum Backen von Gebäck. Die Lebensmittel werden dabei besonders gleichmäßig
durchgegart.
Zur Zubereitung mit einem Rost/Backblech.
Nach der Zubereitung schalten Sie Ofenfunktion- und Ofentemperatur-Einstellknopf ab. Nehmen Sie
die zubereiteten Lebensmittel aus dem Ofen, stellen Sie sie an einem sicheren Ort ab und lassen Sie
den Ofen abkühlen, indem Sie die Ofentür geöffnet lassen. Da der Ofen eine Zeit lang heiß bleibt,
halten Sie sich und besonders Kinder vom Ofen fern.
Grill-Funktion:
Diese Funktion nutzen Sie für Grillgerichte, Brathähnchen und Spieße. Grillgerichte geben Sie auf das
Grillrost, das Sie auf der höchsten Stufe einschieben. Nachdem Sie das Backblech in der 3. Position
von unten eingeschoben haben, beginnen Sie mit dem Grillen. Das auf der 3. Position von unten
eingeschobene Backblech sorgt dafür, dass von den Lebensmitteln herabtropfendes Öl oder Fett
aufgefangen wird.
Beim Grillen muss die Ofentür geschlossen bleiben, die Temperatur sollte auf 190 °C eingestellt
werden.
Stellen Sie den Temperatur-Einstellknopf auf die gewünschte Temperatur ein. Lassen Sie den Ofen 5
Minuten lang vorheizen, geben Sie die Lebensmittel anschließend in den Ofen.
Nach der Zubereitung schalten Sie Ofenfunktion- und Ofentemperatur-Einstellknopf ab.
Nehmen Sie die zubereiteten Lebensmittel aus dem Ofen, stellen Sie sie an einem sicheren Ort ab und
lassen Sie den Ofen abkühlen, indem Sie die Ofentür geöffnet lassen. Da der Ofen eine Zeit lang heiß
bleibt, halten Sie sich und besonders Kinder vom Ofen fern.
Grill + Umluft:
Bei dieser Funktion arbeiten Grill, oberes Heizelement und Umluft zusammen und sorgen für ein
besonders gleichmäßiges Garen.
Grillgerichte geben Sie auf das Grillrost, das Sie auf der höchsten Stufe einschieben. Nachdem Sie das
Backblech in der 3. Position von unten eingeschoben haben, beginnen Sie mit dem Grillen. Das auf der
3. Position von unten eingeschobene Backblech sorgt dafür, dass von den Lebensmitteln
herabtropfendes Öl oder Fett aufgefangen wird.
Beim Grillen muss die Ofentür geschlossen bleiben, die Temperatur sollte auf 190 °C
eingestellt werden.
Page 52
20
DE
Turbolüfter
Turbolüfter + Unterhitze
Der Turbolüfter sorgt für eine gleichmäßige Wärmeverteilung im Ofen. Dadurch werden Lebensmittel
auf sämtlichen Einschüben gleichmäßig gegart.
Stellen Sie den Ofentemperatur-Einstellknopf auf die gewünschte Temperatur ein. Stellen Sie den
Ofenfunktion-Einstellknopf auf das Turbo-Symbol ein. Lassen Sie den Ofen 10 Minuten lang
vorheizen, geben Sie dann das Gargut in den Ofen. Vergessen Sie nicht, dies in geeignete Behälter zu
geben. Diese Funktion eignet sich zur Zubereitung mehrerer Gerichte auf einmal.
Wenn Sie mit zwei Einschüben gleichzeitig arbeiten möchten, wählen Sie die geringstmögliche für die
jeweiligen Lebensmittel geeignete Temperatur. Orientieren Sie sich dabei an der Tabelle. Die
Zubereitung mit zwei Einschüben gleichzeitig benötigt mehr Zeit als die Zubereitung mit nur einem
Einschub. Gewöhnlich werden nicht beide Gerichte gleichzeitig fertig. Nehmen Sie daher den Einschub
mit dem bereits fertig zubereiteten Gericht aus dem Ofen, während Sie den zweiten Einschub
entsprechend länger im Ofen belassen.
Nach der Zubereitung schalten Sie Ofenfunktion- und Ofentemperatur-Einstellknopf ab und beenden
den Timer (sofern vorhanden). Nehmen Sie die zubereiteten Lebensmittel aus dem Ofen, stellen Sie sie
an einem sicheren Ort ab und lassen Sie den Ofen abkühlen, indem Sie die Ofentür geöffnet lassen. Da
der Ofen eine Zeit lang heiß bleibt, halten Sie sich und besonders Kinder vom Ofen fern.
Die Kombination aus Turbolüfter und Unterhitze eignet sich ideal zur Zubereitung von Pizza. Während
der Turbolüfter eine gleichmäßige Wärmeverteilung im Ofen gewährleistet, sorgt die Unterhitze für das
richtige Ausbacken des Pizzateiges. Stellen Sie den Ofenfunktion-Einstellknopf auf das Symbol dieser
Funktion ein. Lassen Sie den Ofen 10 Minuten lang vorheizen, geben Sie die Lebensmittel
anschließend in den Ofen.
Nach der Zubereitung schalten Sie Ofenfunktion- und Ofentemperatur-Einstellknopf ab und beenden
den Timer (sofern vorhanden). Nehmen Sie die zubereiteten Lebensmittel aus dem Ofen, stellen Sie
sie an einem sicheren Ort ab und lassen Sie den Ofen abkühlen, indem Sie die Ofentür geöffnet lassen.
Da der Ofen eine Zeit lang heiß bleibt, halten Sie sich und besonders Kinder vom Ofen fern.
Die Kombination aus Turbolüfter und Unterhitze eignet sich ideal zur Zubereitung von Pizza. Während
der Turbolüfter eine gleichmäßige Wärmeverteilung im Ofen gewährleistet, sorgt die Unterhitze für das
richtige Ausbacken des Pizzateiges.
Unterhitze
Oberhitze
Bei dieser Funktion wird die größte Hitze im unteren Bereich des Ofens erreicht. Unterhitze
eignet sich besonders zum Aufwärmen von Lebensmitteln.
Bei dieser Funktion wird die größte Hitze im oberen Bereich des Ofens erreicht. Oberhitze eignet
sich besonders zum Erhitzen der Oberseite von Lebensmitteln und zum Bräunen bereits
gegarter Gerichte.
Page 53
21
Double Grill-Funktion:
Bei dieser Funktion arbeiten Grill und oberes Heizelement.Diese Funktion nutzen Sie für Grillgerichte,
Brathähnchen und Spieße.Grillgerichte geben Sie auf das Grillrost, das Sie auf der höchsten Position
einschieben. Nachdem Sie das Backblech in der dritten Position von unten eingeschoben haben, beginnen Sie
mit dem Grillen.
3. Das auf der dritten Position von unten eingeschobene Backblech sorgt dafür, dass von den Lebensmitteln
herabtropfendes Öl oder Fett aufgefangen wird.
Beim Grillen muss die Ofentür geschlossen bleiben, die Temperatur sollte auf 190 °C eingestellt werden.
Stellen Sie den Temperatur-Einstellknopf auf die gewünschte Temperatur ein. Lassen Sie den Ofen 5 Minuten
lang vorheizen, geben Sie die Lebensmittel anschließend in den Ofen.
Nach der Zubereitung schalten Sie Ofenfunktion- und Ofentemperatur-Einstellknopf ab und beenden den Timer
(sofern vorhanden). Nehmen Sie die zubereiteten Lebensmittel aus dem Ofen, stellen Sie sie an einem sicheren
Ort ab und lassen Sie den Ofen abkühlen, indem Sie die Ofentür geöffnet lassen. Da der Ofen eine Zeit lang heiß
bleibt, halten Sie sich und besonders Kinder vom Ofen fern.
DE
Grill + Umluft
Bei dieser Funktion arbeiten Grill, oberes Heizelement und Umluft zusammen und sorgen für ein besonders
gleichmäßiges Garen. Diese Funktion eignet sich auch zum schnelleren Grillen, zum Grillen größerer Mengen,
zur Zubereitung von Grillhähnchen und für Fleischspieße.
Grillgerichte geben Sie auf das Grillrost, das Sie auf der höchsten Position einschieben. Nachdem Sie das
Backblech in der dritten Position von unten eingeschoben haben, beginnen Sie mit dem Grillen.
3. Das auf der dritten Position von unten eingeschobene Backblech sorgt dafür, dass von den Lebensmitteln
herabtropfendes Öl oder Fett aufgefangen wird.
Beim Grillen muss die Ofentür geschlossen bleiben, die Temperatur sollte auf 190 °C eingestellt werden.
Stellen Sie den Temperatur-Einstellknopf auf die gewünschte Temperatur ein. Lassen Sie den Ofen 5 Minuten
lang vorheizen, geben Sie die Lebensmittel anschließend in den Ofen.
Nach der Zubereitung schalten Sie Ofenfunktion- und Ofentemperatur-Einstellknopf ab und beenden den Timer
(sofern vorhanden). Nehmen Sie die zubereiteten Lebensmittel aus dem Ofen, stellen Sie sie an einem sicheren
Ort ab und lassen Sie den Ofen abkühlen, indem Sie die Ofentür geöffnet lassen. Da der Ofen eine Zeit lang heiß
bleibt, halten Sie sich und besonders Kinder vom Ofen fern.
Unterhitze + Umluft
Bei dieser Zubereitungsart wird die Hitze des unteren Heizelementes gleichmäßig durch den Lüfter
verteilt. Mit dieser Funktion können Sie Lebensmittel gleichmäßig und in kurzer Zeit zubereiten.
Page 54
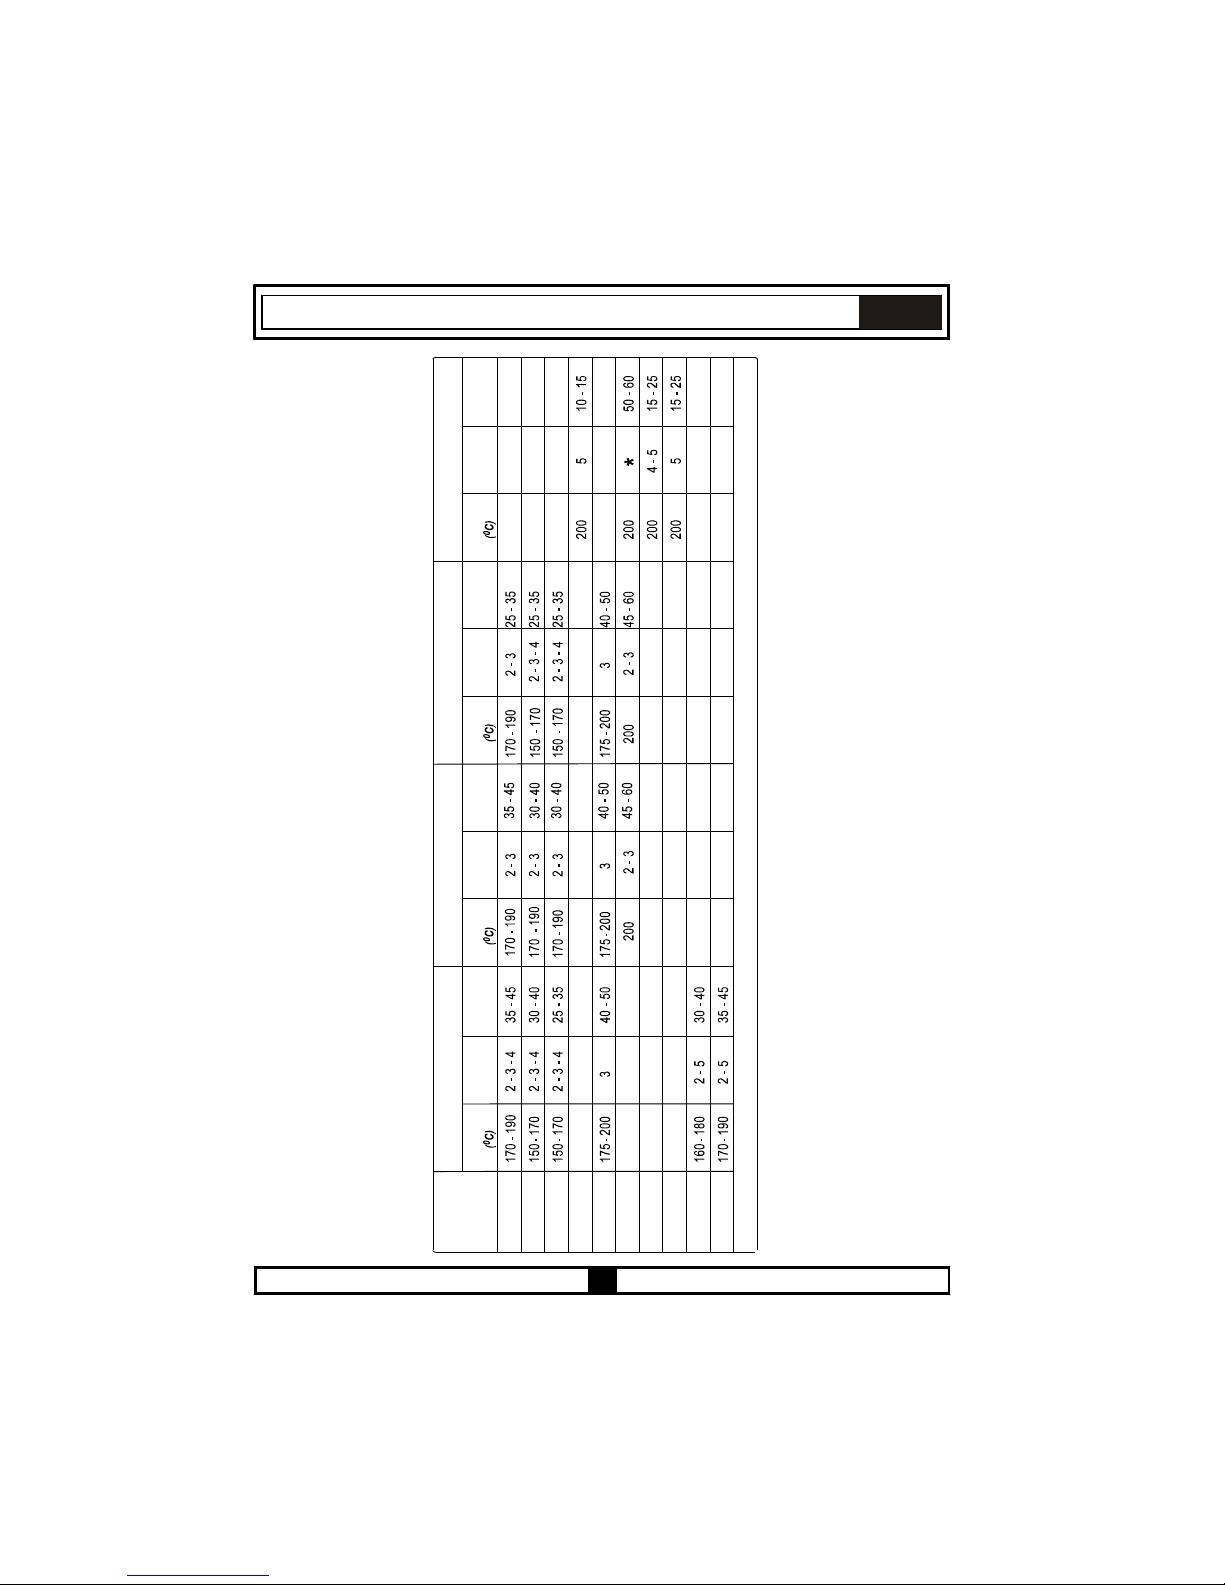
22
DE
TURBO FAN
SPEISEN
Ober-Unterhitze + Umluft
Ober-Unterhitze
Grill
Temperatur Temperatur TemperaturTemperatur
Einschubposition
Einschubposition Einschubposition Einschubposition
Garzeit
(Min.)
Garzeit
(Min.)
Garzeit
(Min.)
Garzeit
(Min.)
Schichtgebäck
Kuchen
Kekse
Frikadellen
Wasserhaltige
Speisen
Geflügel
Koteletts
Rindersteacks
Zwei-Blech-
Kuchen
Am Bratspieß zubereiten.
Drei-Blech-
Kuchen
Page 55
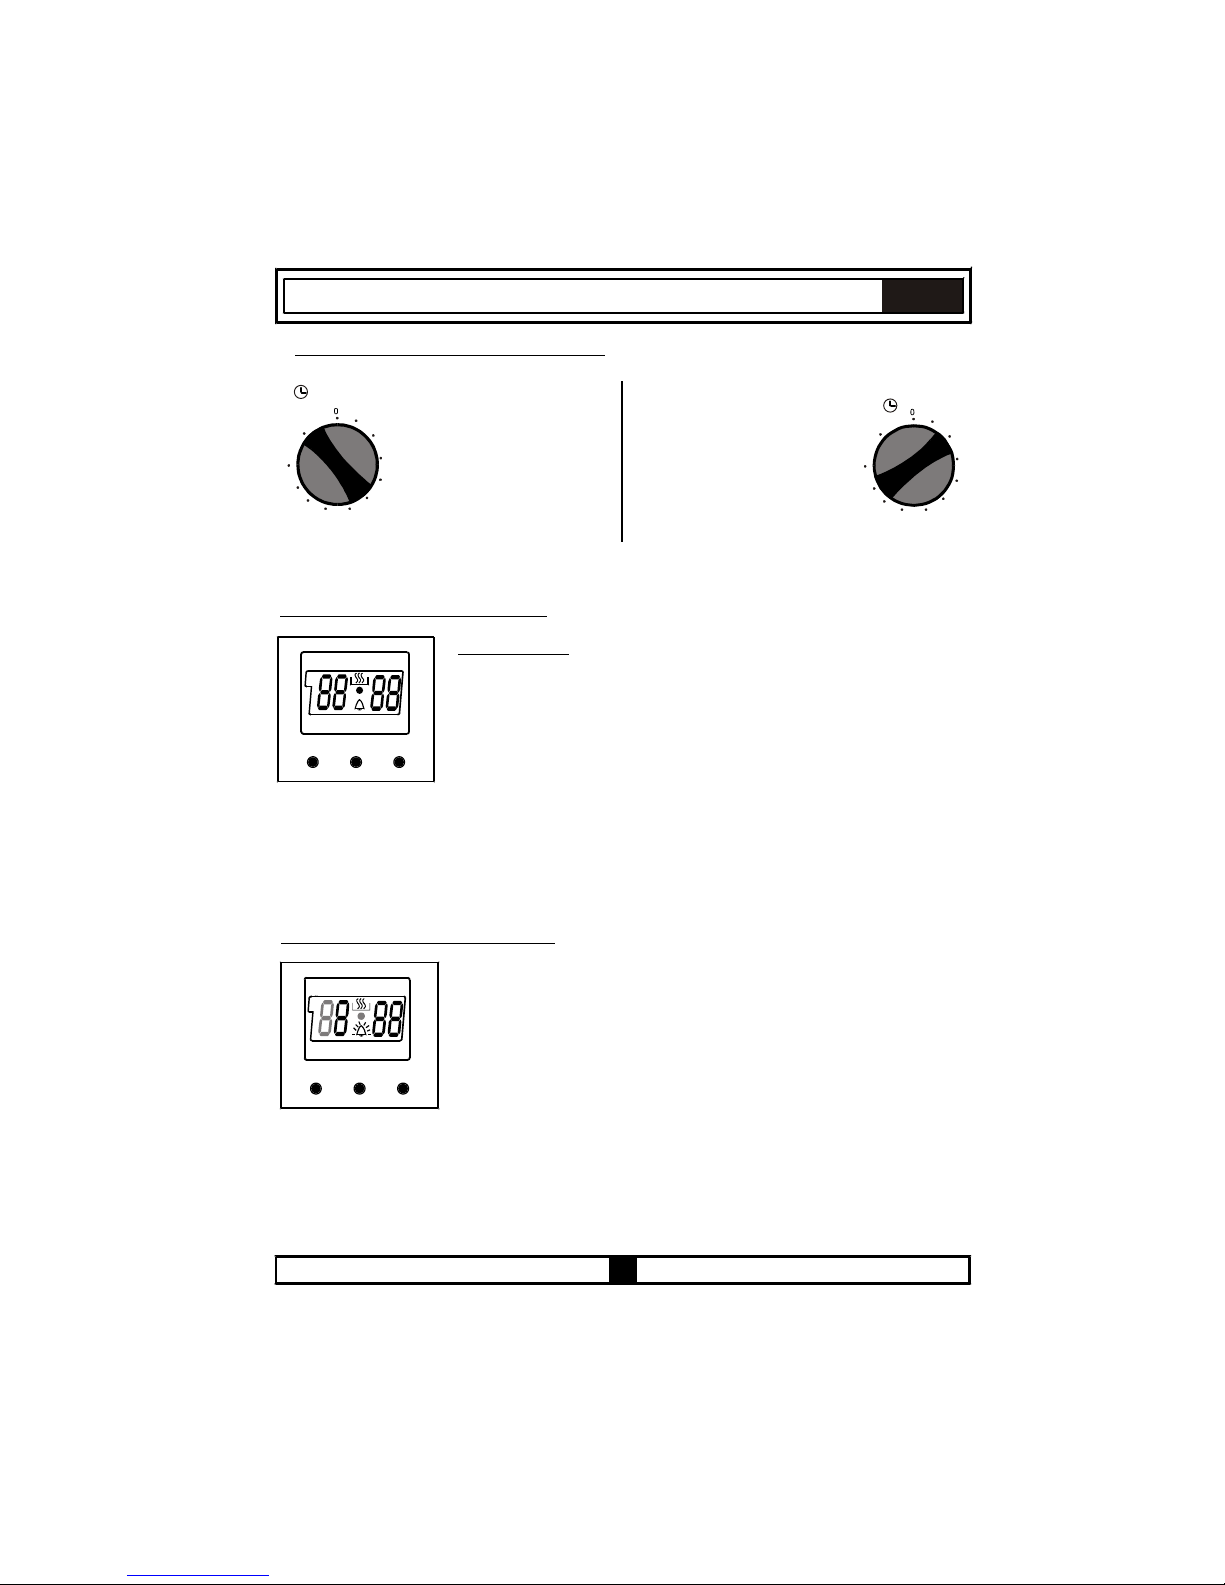
23
-
+
MODE
A
-
+
MODE
A
10
20
30
40
50
70
80
90
60
100
M
10
20
30
40
50
70
80
90
60
100
M
DE
MECHANISCHEN TIMER VERWENDEN:
Manueller Betrieb
Wenn Sie den Timerknopf in die
im ersten Bild gezeigte MPosition bringen, können Sie im
Dauerbetrieb mit dem Ofen
arbeiten.
Wenn sich der Knopf in der
Position 0 befindet, arbeitet der
Ofen nicht.
Betrieb mit Zeitvorgabe
Stellen Sie den Timerknopf wie
im nebenstehenden Bild auf die
gewünschte Zeit (0 bis 100
Minuten) ein. Nach Ablauf der
eingestellten Zeit erklingt ein
Tonsignal, der Ofen schaltet sich
ab.
DIGITALEN TIMER VERWENDEN:
Zeiteinstellung:
Die Zeit wird eingestellt, bevor Sie den Ofen benutzen. Nach dem Sie den
Ofen eingeschaltet haben, blinken das Symbol (A) und drei Nullen in der
Anzeige. Drücken Sie die Tasten + und - gleichzeitig. Das Symbol erscheint in
der Anzeige. Zusätzlich beginnt der Punkt in der Mitte der Anzeige zu blinken.
Stellen Sie nun die gewünschte Uhrzeit mit den Tasten +/- ein, solange dieser
Punkt blinkt. Nach der Einstellung sollte der Punkt dauerhaft leuchten.
Wenn nach dem Einschalten des Ofens das Symbol (A) und die drei Nullen in der Anzeige blinken, kann
der Ofen nicht mit den Bedienknöpfen gesteuert werden. Nachdem Sie die Tasten + und - zur
Uhrzeiteinstellung gleichzeitig gedrückt haben, wird das Symbol in der Anzeige dargestellt. Wenn dieses
Symbol in der Anzeige erscheint, können Sie den Ofen manuell bedienen.
Nach einem Stromausfall wird die eingestellte Zeit zurückgesetzt, muss also erneut eingestellt
werden.
Akustische Erinnerung einstellen:
Diese Funktion gibt nach Ablauf einer voreingestellten Zeit ein Tonsignal zur
Erinnerung aus.
Drücken Sie die MODE-Taste in der Mitte. Das Symbol blinkt in der Anzeige.
Zusätzlich werden drei Nullen angezeigt. Stellen Sie die gewünschte
Erinnerungszeit mit den Tasten +/- ein, solange das Symbol blinkt. Kurz nach
dem Abschluss der Einstellung hört das Symbol auf zu blinken. Sobald das
Symbol nicht mehr blinkt, ist die Einstellung der akustischen Erinnerung
abgeschlossen.
Page 56
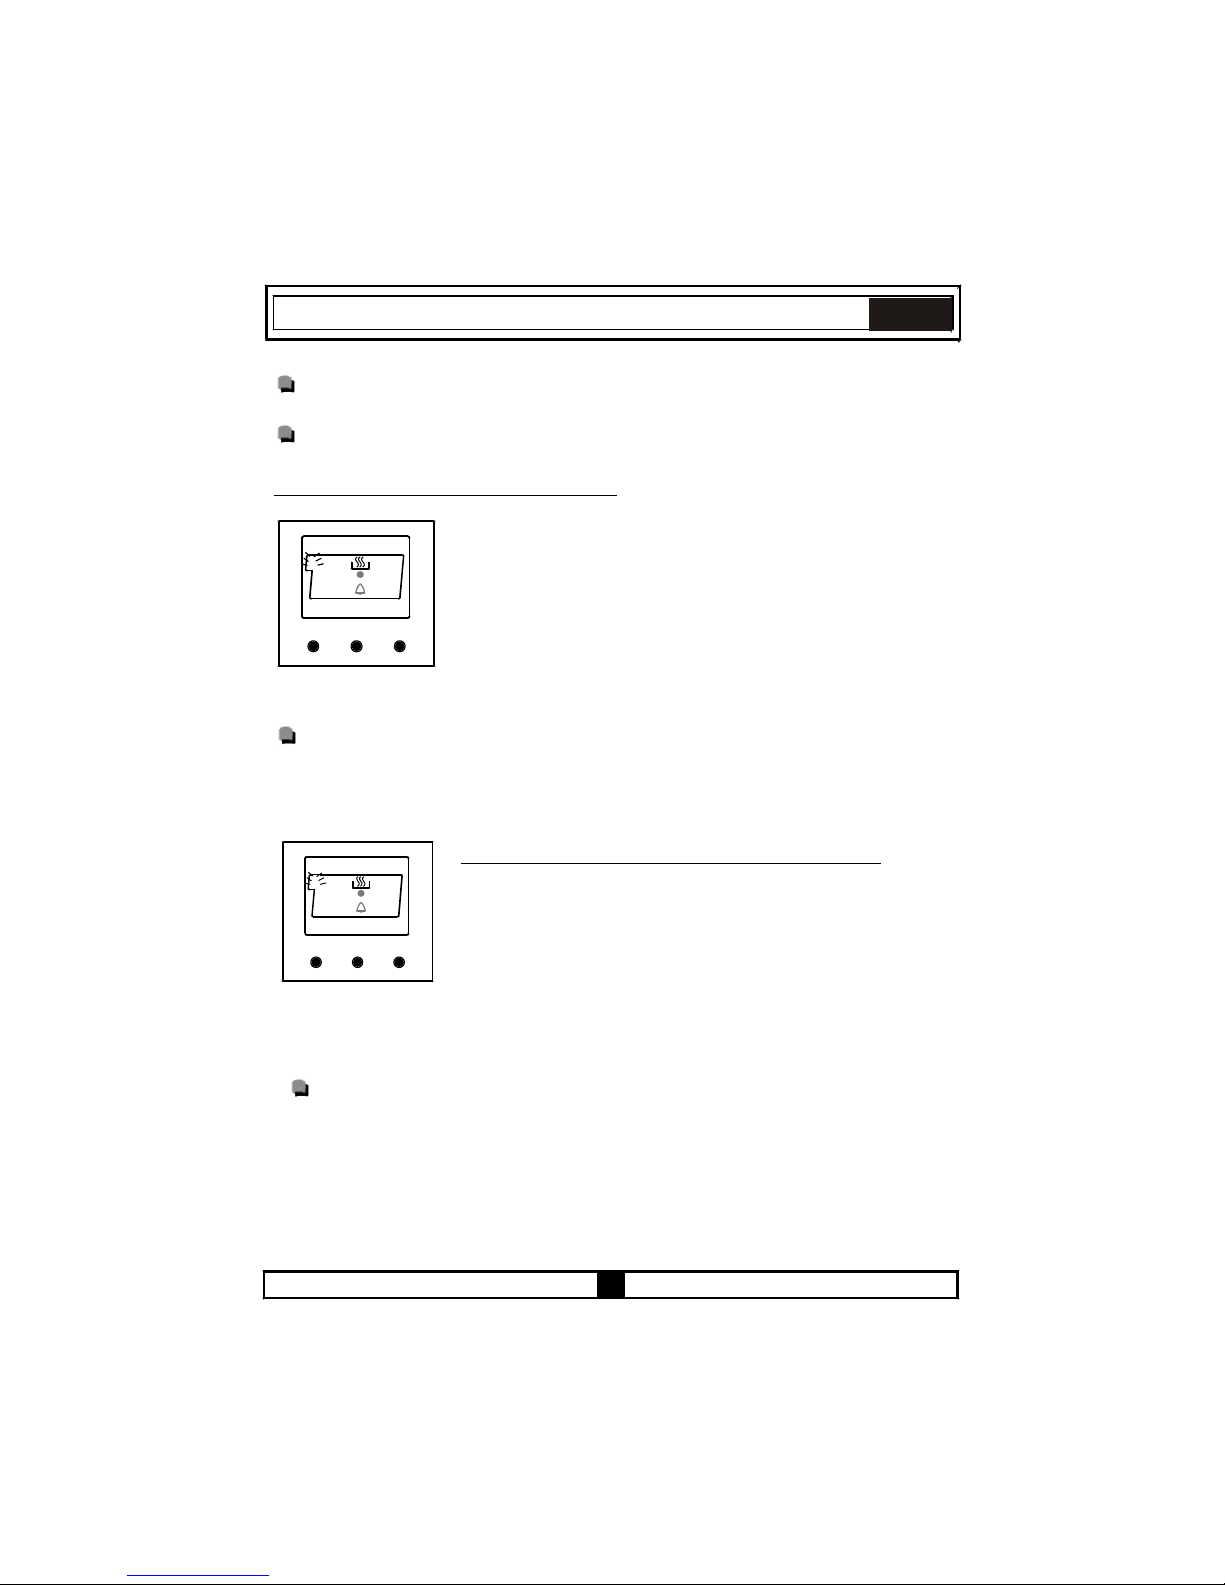
24
-
+
MODE
A
du
r
DE
Die akustische Erinnerung kann im Bereich 0 bis 23:59 eingestellt werden.
Nach Ablauf dieser Zeit erklingt ein Tonsignal, das Symbol blinkt in der Anzeige. Durch Betätigen
einer beliebigen Taste schalten Sie das Tonsignal ab, das Symbol erlischt.
Die akustische Erinnerung ist eine reine Erinnerungsfunktion. Die Funktion hat keinen
Einfluss auf den Ofen.
Halbautomatische Programmierung der Garzeit:
Mit dieser Funktion können Sie eine bestimmte Garzeit vorgeben. Dazu geben
Sie die gewünschten Lebensmittel in den Ofen. Stellen Sie die gewünschte
Betriebsart ein. Wählen Sie die zu den jeweiligen Lebensmitteln passende
Temperatureinstellung.
Drücken Sie die MODE-Taste, bis „stop“ in der Timer-Anzeige erscheint. Wenn
„stop“ in der Timer-Anzeige erscheint, beginnt das Symbol (A) zu blinken.
Stellen Sie nun die gewünschte, für Ihre Lebensmittel geeignete, Garzeit mit
den Tasten +/- ein. Kurz nach dem Abschluss der Einstellung erscheint die
Uhrzeit in der Anzeige, die Symbole (A) und leuchten dauerhaft. Der Ofen
beginnt nun zu arbeiten.
Abbildung 14
-
+
MODE
A
En
d
Abbildung 15
Sie können Garzeiten zwischen 0 und 10 Stunden voreinstellen.
Nach Ablauf der eingestellten Zeit schaltet der Timer den Ofen ab, ein Tonsignal erklingt. Zusätzlich
beginnt das Symbol (A) in der Anzeige zu blinken. Zum Abschalten des Tonsignals bringen Sie
Ofenfunktion- und Temperatureinstellknopf in die Position 0 und drücken eine beliebige Timer-Taste.
Der Timer wird auf manuellen Betrieb umgeschaltet.
Halbautomatische Programmierung der Fertigstellungszeit:
Mit dieser Funktion können Sie eine bestimmte Fertigstellungszeit vorgeben.
Dazu geben Sie die gewünschten Lebensmittel in den Ofen. Stellen Sie die
gewünschte Betriebsart ein. Wählen Sie die zu den jeweiligen Lebensmitteln
passende Temperatureinstellung.
Drücken Sie die MODE-Taste, bis „end“ in der Timer-Anzeige erscheint.
Wenn „end“ in der Timer-Anzeige erscheint, beginnen das Symbol (A) und die
Uhrzeit zu blinken.
Stellen Sie nun die gewünschte Fertigstellungszeit mit den Tasten +/- ein. Kurz nach dem Abschluss der
Einstellung erscheint die Uhrzeit in der Anzeige, die Symbole (A) und leuchten dauerhaft. Der Ofen
beginnt nun zu arbeiten.
Bei dieser Funktion können Sie eine Zeit bis zu 10 Stunden nach der aktuellen Uhrzeit
vorgeben.
Nach Ablauf der eingestellten Zeit schaltet der Timer den Ofen ab, ein Tonsignal erklingt. Zusätzlich
beginnt das Symbol (A) in der Anzeige zu blinken. Zum Abschalten des Tonsignals bringen Sie
Ofenfunktion- und Temperatureinstellknopf in die Position 0 und drücken eine beliebige Timer-Taste.
Der Timer wird auf manuellen Betrieb umgeschaltet.
Page 57
2
5
DE
Vollautomatische Programmierung:
1. Drücken Sie die MODE-Taste, bis „stop“ in der Timer-Anzeige erscheint. Wenn „stop“ in der
Timer-Anzeige erscheint, beginnt das Symbol (A) zu blinken. Stellen Sie nun die gewünschte,
für Ihre Lebensmittel geeignete, Garzeit mit den Tasten +/- ein. Kurz nach dem Abschluss der
Einstellung erscheint die Uhrzeit in der Anzeige, die Symbole (A) und leuchten dauerhaft.
(Abbildung 14).
Sie können Garzeiten zwischen 0 und 10 Stunden voreinstellen.
2. Drücken Sie die MODE-Taste, bis „end“ in der Timer-Anzeige erscheint. Wenn „end“ in der
Timer-Anzeige erscheint, beginnen das Symbol (A) und die Uhrzeit mit aufaddierter Garzeit
zu blinken. Stellen Sie nun die gewünschte Fertigstellungszeit mit den Tasten +/- ein. Kurz
nach dem Abschluss der Einstellung erscheint die Uhrzeit in der Anzeige, das Symbol (A)
leuchtet dauerhaft (Abbildung 15).
Bei dieser Funktion können Sie eine Gesamtzeit bis zu 23:59 Stunden nach der
aktuellen Uhrzeit vorgeben.
Zum Zeitpunkt, der sich durch Abziehen der Garzeit von der voreingestellten
Fertigstellungszeit ergibt, beginnt der Ofen zu arbeiten und stoppt zur gewünschten
Fertigstellungszeit. Ein Tonsignal erklingt, das Symbol (A) beginnt zu blinken. Zum
Abschalten des Tonsignals bringen Sie Ofenfunktion- und Temperatureinstellknopf in die
Position 0 und drücken eine beliebige Timer-Taste. Der Timer wird auf manuellen Betrieb
umgeschaltet.
Page 58

26
DE
TEIL 5: REINIGUNG UND WARTUNG
5.1 ALLGEMEIN
Bevor Sie Ihren Ofen reinigen, vergewissern Sie sich zunächst, dass sämtliche
Bedienelemente abgeschaltet sind und der Ofen abgekühlt ist. Ziehen Sie wenn möglich den
Netzstecker.
Benutzen Sie keine Reinigungsmittel, die Scheuermittel enthalten: Diese können die
emaillierten und lackierten Teile Ihres Ofens beschädigen.
Verwenden Sie Creme- oder Flüssigreiniger ohne Scheuerzusätze.
Benutzen Sie keinerlei ätzende Reiniger, Scheuerpulver, Stahlwolle oder harte
Gegenstände, damit die Oberflächen Ihres Gerätes nicht beschädigt werden.
Überlaufende Lebensmittel und verschüttete Flüssigkeiten können sich in die
Oberflächen Ihres Ofens einbrennen und Schäden an der Emaille verursachen.
Wischen Sie verschüttete Flüssigkeiten sofort auf.
Benutzen Sie keinerlei Dampfreiniger zum Reinigen des Ofens.
5.2 OFEN REINIGEN
Trennen Sie den Ofen vor dem Reinigen von der Stromversorgung. Der Ofen-Innenraum
lässt sich am besten reinigen, wenn er noch etwas warm ist. Wischen Sie den Ofen nach
jeder Benutzung mit einem weichen Tuch aus, das Sie mit etwas Seifenwasser angefeuchtet
haben. Wischen Sie den Ofen anschließend mit einem feuchten Tuch aus, danach wischen
Sie ihn trocken. Von Zeit zu Zeit sollten Sie den Ofen mit einem flüssigen Reinigungsmittel
komplett reinigen. Benutzen Sie keine Trockenreiniger und keine Reinigungspulver. Bei
Produkten mit katalytischen Emaillerahmen müssen Rückwand und Seitenwände des Ofen-
Innenraums nicht gereinigt werden. Allerdings sollten diese nach einer bestimmten Zeit
(abhängig von der Nutzung) ausgetauscht werden.
5.3 GLASKERAMISCHES KOCHFELD REINIGEN
Trennen Sie das Gerät von der Stromversorgung, bevor Sie mit dem Reinigen beginnen.
Lassen Sie die Glaskeramik vor dem Reinigen komplett abkühlen.
Vergewissern Sie sich, dass die von Ihnen eingesetzten Reinigungsmittel keinerlei
Scheuermittel enthalten, die das Glas verkratzen können. Benutzen Sie am besten Creme-
oder Flüssigreiniger. Die Glaskeramik sollte mit kaltem Wasser abgewischt und mit einem
weichen Tuch trocken gerieben werden, bis auch der letzte Reinigungsmittelrest entfernt ist.
Übergelaufene Lebensmittel und sonstige Rückstände können Sie mit dem Schaber
entfernen, der mit Ihrem Gerät geliefert wurde.
Zuckerhaltige Lebensmittel sollten sofort entfernt werden, solange die Glaskeramik noch heiß
ist.
Page 59

27
DE
Stahlwolle kann zu Beschädigungen der Glaskeramik führen. Staub entfernen Sie am besten
mit einem angefeuchteten Tuch von den entsprechenden Oberflächen.
Im Laufe der Zeit können Verfärbungen der glaskeramischen Oberfläche auftreten; diese
wirken sich jedoch nicht auf Funktion und Leistung der Glaskeramik aus. Der Grund dieser
Verfärbungen liegt nicht in Veränderungen der Glaskeramik: Solche Verfärbungen treten auf,
wenn sich Lebensmittelreste in die Oberfläche einbrennen, die Glaskeramik durch
Kochgeschirr abgenutzt wird oder ungeeignete Reinigungsmittel verwendet wurden. Bevor
Sie chemische Reinigungsmittel einsetzen, sollten Sie zunächst grundsätzlich den
mitgelieferten Schaber verwenden. Mit diesem Schaber können Sie auch die kleinsten
Verschmutzungen von der Glaskeramik entfernen. Auch schwierig zu entfernende
Verunreinigungen wie geschmolzene Kunststoffe, Öl und Fette sowie zuckerhaltige
Substanzen können ebenfalls leicht mit dem Schaber entfernt werden. Da der Schaber mit
einer scharfen Rasierklinge arbeitet, ist er nicht ganz ungefährlich und sollte stets außerhalb
der Reichweite von Kindern aufbewahrt werden. Achten Sie beim Einsatz des Schabers
darauf, nicht das Silikon an den Kanten des Glases zu beschädigen.
5.4 WARTUNG
Ofenbeleuchtung austauschen
Wir empfehlen, diesen Arbeitsschritt dem autorisierten Kundendienst zu überlassen. Trennen
Sie den Ofen von der Stromversorgung und vergewissern Sie sich, dass er komplett
abgekühlt ist. Entfernen Sie zunächst das Schutzglas, nehmen Sie dann das Leuchtmittel aus
der Fassung. Setzen Sie ein neues, bis 300 °C beständiges Leuchtmittel in die Fassung ein;
dieses Leuchtmittel erhalten Sie beim autorisierten Kundendienst. Setzen Sie dann das
Schutzglas wieder auf. Anschließend können Sie Ihren Ofen wieder ganz normal benutzen.
Page 60

28
DE
TEIL 6: SERVICE UND TRANSPORT
6.1 BEVOR SIE SICH AN DEN KUNDENDIENST WENDEN
Falls der Ofen nicht funktionieren sollte:
Der Ofen ist eventuell von der Stromversorgung getrennt oder ein Stromausfall ist
eingetreten.
Falls sich der Ofen nicht aufheizen sollte:
Möglicherweise haben Sie vergessen, die Ofentemperatur einzustellen.
Falls die Ofenbeleuchtung nicht aufleuchten sollte:
Überprüfen Sie die Stromversorgung.
Vergewissern Sie sich, dass das Leuchtmittel nicht defekt ist.
Probleme beim Garen (z. B. ungleichmäßige Erwärmung bei Oberhitze/Unterhitze):
Kontrollieren Sie, ob das Grillrost/Backblech in der richtigen Position eingeschoben, die
richtige Garzeit eingehalten und die Temperatur richtig eingestellt wurde.
KUNDENDIEST
Falls Sie die Ursache einer Betriebsstörung nicht identifizieren können, schalten Sie das
Gerät ab (keine Gewalt anwenden) und wenden sich an den Kundendienst.
Produkt-Seriennummer. Wo ist diese zu finden?
Wenn Sie sich an den Kundendienst wenden, halten Sie den Produktcode des Modells und
seine Seriennummer (16-stellige Nummer, beginnend mit einer 3) bereit. Diese Daten finden
Sie auf dem Garantieschein oder dem Typenschild.
Dies trägt dazu bei, dass unnötige Wege und vor allem unnötige Anfahrten vermieden werden
können.
6.2 HINWEISE ZUM TRANSPORT
Falls das Gerät transportiert werden muss:
Zum Transportieren des Gerätes benutzen Sie am besten das Original-Verpackungsmaterial.
Halten Sie sich an die Transporthinweise auf der Verpackung.
Falls die Originalverpackung nicht aufbewahrt wurde:
Schützen Sie die Außenflächen (Glas und lackierte Flächen) von Ofen und Kochfeld vor
möglichen Stößen.
Page 61

Dieses Symbol am Produkt oder auf seiner Verpackung zeigt an, dass dieses
Produkt nicht mit dem regulären Hausmüll entsorgt werden darf. Stattdessen
muss es bei einer geeigneten Sammelstelle zum Recycling von elektrischen
und elektronischen Geräten abgegeben werden. Durch die ordnungsgemäße
Entsorgung dieses Produktes helfen Sie, potentielle negative Auswirkungen
auf Umwelt und Gesundheit zu vermeiden, die ansonsten durch
unsachgemäße Entsorgung dieses Produktes entstehen können.
Detailliertere Informationen zum Recycling dieses Produktes erhalten Sie von
Ihrer Stadtverwaltung, Ihren lokalen Entsorgungsunternehmen oder im
Geschäft, in dem Sie das Produkt gekauft haben.
Page 62
PVU 640 C
PVU 640 X
PVU 647 X
PVU 647 N
FUNP 610 X
FUNP 611 X
FUHP 615 X
FUHP 825 X
FUS 100-40 W
FUS 100-40 X
PVU 640 C
PVU 640 X
PVU 647 X
PVU 647 N
FUNP 610 X
FUNP 611 X
FUHP 615 X
FUHP 825 X
FUS 100-40 W
FUS 100-40 X
EL
ΕΝΤΟΙΧΙΖΟΜΕΝΟΣ ΦΟΥΡΝΟΣ ΚΑΙ
ΠΛΑΚΑ ΕΣΤΙΩΝ ΕΓΧΕΙΡΙΔΙΟ
ΧΡΗΣΤΗ
Page 63
EL
Αγαπητέ Πελάτη,
Ευχαριστούμε που προμηθευτήκατε αυτό το προϊόν. Οι
προφυλάξεις και οι συστάσεις σ' αυτό το εγχειρίδιο είναι για τη
δική σας ασφάλεια δική αλλά και των άλλων. Επίσης θα
συμβάλλουν στην πλήρη χρήση των δυνατοτήτων που
προσφέρει η συσκευή σας.
Φυλάξτε αυτό το εγχειρίδιο σε ασφαλές μέρος. Μπορεί να
χρειαστεί μελλοντικά, είτε σε σας είτε σε άλλους, αν
προκύψουν αμφιβολίες σχετικά με το χειρισμό του προϊόντος.
Η συσκευή αυτή θα πρέπει να χρησιμοποιείται μόνο για την
προβλεπόμενη χρήση της, δηλαδή για οικιακό μαγείρεμα
τροφίμων. Οποιαδήποτε άλλη μορφή χρήσης πρέπει να
θεωρείται ως ακατάλληλη και επομένως επικίνδυνη.
Ο κατασκευαστής αποκλείει κάθε ευθύνη του σε περίπτωση
ζημιάς λόγω ακατάλληλης ή λανθασμένης χρήσης της
συσκευής.
Page 64

EL
ΠΕΡΙΕΧΟΜΕΝΑ
1- Γνωριμία με το προϊόν
2- Προειδοποιήσεις
3- Προετοιμασία για εγκατάσταση και χρήση
4- Χρήση του φούρνου και της πλάκας εστιών
5- Καθαρισμός και συντήρηση
6- Σέρβις και μεταφορά
Page 65
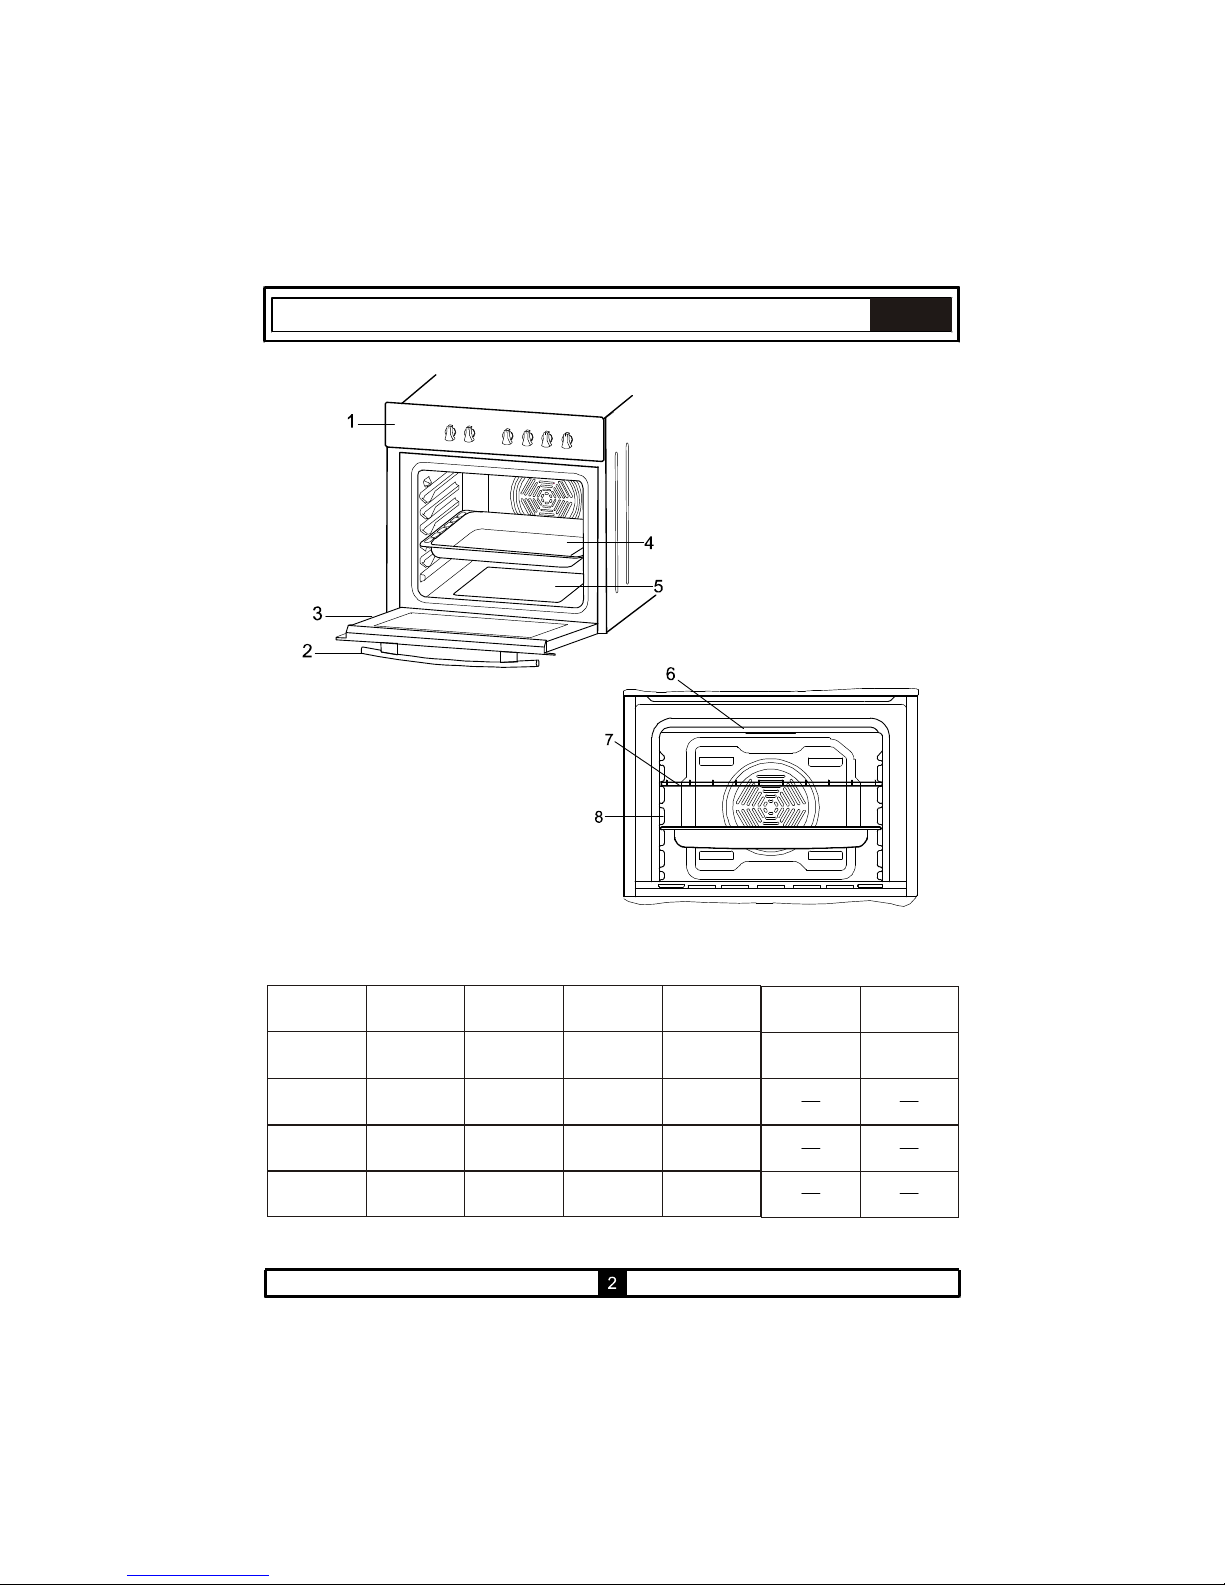
EL
Δυνατότητα
συνδυασμού
φούρνου-πλάκας
εστιών
FUNP 610 X
PVU 640 C
FUNP 611 X FUHP 615 X
FUHP 825 X
FUS 100-40 W FUS 100-40 X
PVU 640 X
PVU 647 X
PVU 647 N
√ √ √ √
√ √
√
√
√
√
√
√
√
√
√
√
√
√
ΜΕΡΟΣ 1: ΓΝΩΡΙΜΙΑ ΜΕ ΤΟ ΠΡΟΪΟΝ
ΚΥΡΙΑ ΜΕΡΗ
1- Πίνακας ελέγχου
2- Λαβή πόρτας φούρνου
3- Πόρτα φούρνου
4- Δίσκος
5- Κάτω αντίσταση
6- Πάνω αντίσταση
7- Σχάρα
8- Στηρίγματα σχαρών
Page 66
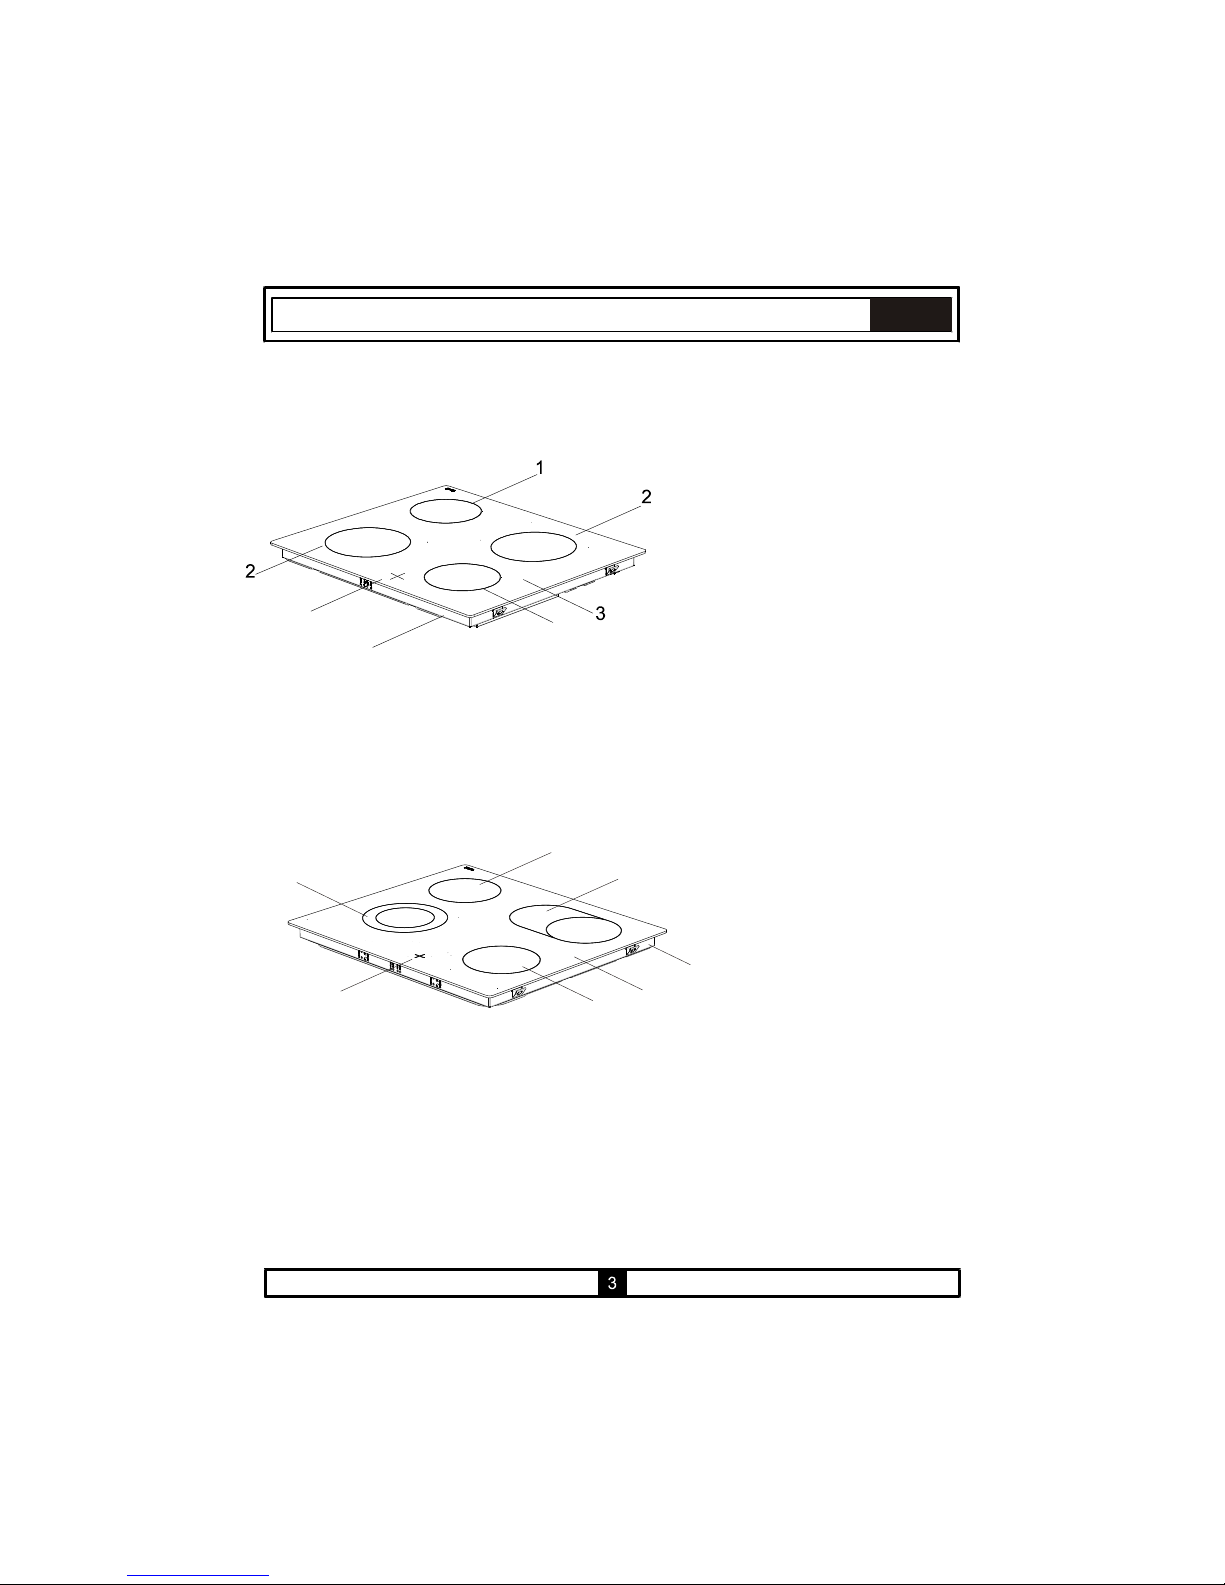
1
4
5
EL
1
3
1
6
4
2
5
ΥΑΛΟΚΕΡΑΜΙΚΗ ΠΛΑΚΑ ΕΣΤΙΩΝ: PVU 640 C - PVU 640 X
1 Ø145 Ζώνη θέρμανσης (1200W)
2 Ø 180 Ζώνη θέρμανσης (1800W)
3 Υαλοκεραμική επιφάνεια
4 Κάτω περίβλημα
5 Ένδειξη θερμής πλάκας εστιών
ΥΑΛΟΚΕΡΑΜΙΚΗ ΠΛΑΚΑ ΕΣΤΙΩΝ: PVU 647 X - PVU 647 N
1 Ø145 Ζώνη θέρμανσης (1200W)
2 Ø180 Διπλή Ζώνη ταχείας θέρμανσης (1700W)
3 Επεκτάσιμη ζώνη θέρμανσης (1800W)
4Υαλοκεραμική επιφάνεια
5Κάτω περίβλημα
6Ένδειξη θερμής πλάκας εστιών
Page 67
EL
4
ΜΕΡΟΣ 2: ΠΡΟΕΙΔΟΠΟΙΗΣΕΙΣ
ΠΡΙΝ ΤΗΝ ΕΝΑΡΞΗ ΧΡΗΣΗΣ ΤΗΣ ΣΥΣΚΕΥΗΣ, ΛΑΒΕΤΕ ΟΛΑ ΤΑ
ΑΠΑΡΑΙΤΗΤΑ ΜΕΤΡΑ ΑΣΦΑΛΕΙΑΣ ΚΑΙ ΔΙΑΒΑΣΤΕ ΔΙΕΞΟΔΙΚΑ
ΤΟ ΕΓΧΕΙΡΙΔΙΟ ΧΡΗΣΗΣ
Η συσκευή αυτή έχει σχεδιαστεί για οικιακή χρήση σαν εντοιχισμένο
έπιπλο.
Μετά την αφαίρεση της συσκευασίας, ελέγξτε οπωσδήποτε αν υπάρχει
οποιαδήποτε ζημιά στη συσκευή. Αν υπάρχει ζημιά, ποτέ μην
προσπαθήσετε να χρησιμοποιήσετε τη συσκευή και απευθυνθείτε
αμέσως στο εξουσιοδοτημένο συνεργείο που συνεργάζεστε. Επειδή τα
υλικά συσκευασίας (νάιλον, ταινίες, αφρώδες πολυστυρένιο κλπ.) Θα
αποτελέσουν κίνδυνο για τα παιδιά, τα υλικά αυτά θα πρέπει να
συλλέγονται αμέσως και να τοποθετούνται σε μέρος μακριά από τα
παιδιά.
Η συσκευή πρέπει να εγκαθίσταται και να τίθεται σε λειτουργία από
εξουσιοδοτημένο τεχνικό υπό τις συνθήκες που αναφέρει ο
κατασκευαστής σ' αυτό το εγχειρίδιο. Ο κατασκευαστής δεν μπορεί να
θεωρηθεί υπεύθυνος για οποιαδήποτε ζημιά ενδέχεται να προκύψει λόγω
λανθασμένης εγκατάστασης.
Πριν συνδέσετε τη συσκευή σας στην οικιακή παροχή ρεύματος δικτύου,
ελέγξτε οπωσδήποτε ότι οι διαθέσιμες παροχές ρεύματος και αερίου,
συμφωνούν με τις ρυθμίσεις τάσης και αερίου που αναφέρονται στο
πληροφοριακό αυτοκόλλητο που έχει τοποθετηθεί στη συσκευή και/ή τη
συσκευασία της.
Μη χρησιμοποιήσετε το φούρνο πριν ολοκληρωθεί η εγκατάστασή του.
Να βεβαιώνεστε ότι όλα τα κουμπιά είναι στη θέση απενεργοποίησης όταν
δεν χρησιμοποιείται η συσκευή.
Βεβαιωθείτε ότι το καλώδιο ρεύματος δεν θα συμπιεστεί κατά την
εγκατάσταση της συσκευής.
Το καλώδιο ρεύματος δεν πρέπει σε καμία περίπτωση να αντικαθίσταται
από τον πελάτη. Σε περίπτωση που για οποιοδήποτε λόγο προκύψει
ζημιά στο καλώδιο ρεύματος, απευθυνθείτε στο Εξουσιοδοτημένο Σέρβις.
Απενεργοποιείτε τη συσκευή πριν από εργασίες καθαρισμού, συντήρησης
κλπ.
Ορισμένα μέρη της συσκευής μπορεί να διατηρηθούν σε υψηλή
θερμοκρασία για πολλή ώρα. Πριν ακουμπήσετε τα μέρη που κυρίως
εκτίθενται στη θερμότητα, περιμένετε να κρυώσουν.
Μη διατηρείτε εύφλεκτα είδη ή ουσίες κοντά στη συσκευή, όταν αυτή
χρησιμοποιείται.
Όταν χρησιμοποιείτε άλλες ηλεκτρικές συσκευές κοντά στη συσκευή,
προσέξτε τα καλώδιά τους να μην έρχονται σε επαφή με τα θερμαινόμενα
μέρη.
Όταν η συσκευή δεν χρησιμοποιείται, να βεβαιώνεστε ότι τα κουμπιά είναι
στη θέση "0" (απενεργοποίησης).
Page 68
EL
5
Η συσκευή σας χρειάζεται επαρκή κυκλοφορία αέρα κατά τη λειτουργία της.
Διαβάστε προσεκτικά στο εγχειρίδιο αυτό το σημείο όπου εξηγούνται οι
διαδικασίες εγκατάστασης και βεβαιωθείτε ότι ικανοποιούνται οι σχετικές
προϋποθέσεις.
Αυτό το εγχειρίδιο χρήσης έχει ετοιμαστεί ώστε να ισχύει για πολλά μοντέλα.
Ορισμένες από τις προδιαγραφές που εξηγούνται στο εγχειρίδιο αυτό
ενδεχομένως να μην περιλαμβάνονται στη δική σας συσκευή. Όταν διαβάζετε το
εγχειρίδιο, προσέξτε τις εξηγήσεις με τις απεικονίσεις.
Κρατάτε τα παιδιά μακριά από το φούρνο.
Σε περίπτωση που θερμαντικά σώματα αλογόνου τύπου hi-light έχουν εγκατασταθεί
ως εστίες σε πλάκα εστιών, μην κοιτάζετε κατ' ευθείαν το φως.
Αυτή η συσκευή δεν προορίζεται για χρήση από άτομα (περιλαμβανομένων των
παιδιών) με μειωμένες σωματικές, αισθητηριακές ή πνευματικές ικανότητες ή με
έλλειψη εμπειρίας και γνώσεων, εκτός αν τα άτομα αυτά έχουν λάβει
επιτήρηση ή καθοδήγηση σχετικά με τη χρήση της συσκευής από άτομο
υπεύθυνο για την ασφάλειά τους.
Τα παιδιά θα πρέπει να βρίσκονται υπό επίβλεψη, ώστε να μην παίζουν με τη
συσκευή.
Όταν χρησιμοποιείτε τη συσκευή σας, προσέχετε τα εξής:
Προσέξτε να συνδέσετε τη συσκευή σας σε πρίζα ή γραμμή ρεύματος που διαθέτει
γείωση.
Μην τοποθετείτε το καλώδιο ρεύματος της συσκευής σας κοντά σε σημείο που
θερμαίνεται.
Σε περίπτωση που το καλώδιο ρεύματος υποστεί οποιαδήποτε ζημιά, απευθυνθείτε
στο πλησιέστερο εξουσιοδοτημένο συνεργείο.
Όταν χρησιμοποιείτε πρώτη φορά το φούρνο σας, θα παραχθεί κάποια οσμή από τα
μονωτικά υλικά και τις αντιστάσεις θέρμανσης. Για το λόγο αυτό, πριν
χρησιμοποιήσετε το φούρνο, αφήστε τον να λειτουργήσει χωρίς τρόφιμα στη μέγιστη
θερμοκρασία για 45 λεπτά. Συγχρόνως πρέπει να αερίζεται σωστά το περιβάλλον
όπου είναι εγκατεστημένος ο φούρνος.
Μην εγγίζετε το εσωτερικό του φούρνου και τις αντιστάσεις όταν χρησιμοποιείτε το
τμήμα φούρνου της συσκευής, γιατί θα βρίσκονται σε υψηλή θερμοκρασία. Αφού
απενεργοποιήσετε μία εστία, μην την αγγίξετε με το χέρι σας πριν κρυώσει εντελώς.
Μην τοποθετείτε εύφλεκτα ή καύσιμα υλικά στο φούρνο. Μην τοποθετείτε κοντά στην
επιφάνεια της πλάκας εστιών καύσιμα υλικά, περιλαμβανομένων οποιουδήποτε
δοχείου υπό πίεση, χαρτιού, πλαστικού και υφάσματος.
Page 69
EL
Προσέχετε όταν χρησιμοποιείτε το τμήμα φούρνου της συσκευής, γιατί η εξωτερική
επιφάνειά του μπορεί να βρίσκεται σε υψηλή θερμοκρασία. Κρατάτε τα παιδιά μακριά
από το φούρνο.
Όταν είναι ανοιχτή η μπροστινή πόρτα, μην αφήνετε τα παιδιά να ανεβαίνουν ή να
κάθονται σ' αυτή.
Οι τιμές που αναφέρονται στη γραπτή τεκμηρίωση που συνοδεύει τα προϊόντα έχουν
αποκτηθεί στο εργαστήριο σύμφωνα με τα αντίστοιχα πρότυπα. Οι τιμές αυτές μπορεί να
διαφέρουν ανάλογα με τη χρήση και τις συνθήκες περιβάλλοντος του προϊόντος.
Για συνδυασμένα εντοιχιζόμενα προϊόντα, βεβαιωθείτε ότι έχει γίνει η σύνδεση της
πλάκας εστιών με το φούρνο.
Βεβαιωθείτε ότι δεν συμπιέζεται το καλώδιο ρεύματος που συνδέει την πλάκα εστιών με
το φούρνο.
Αν εντοπίσετε οποιαδήποτε ρωγμή στην υαλοκεραμική επιφάνεια της πλάκας εστιών,
αποσυνδέστε τη συσκευή από την παροχή ρεύματος!
Προσοχή (μόνο για μοντέλα FUS 100-40 W και FUS 100-40 X): Κατά την κανονική
λειτουργία του φούρνου διαφεύγουν θερμοί υδρατμοί από τις οπές αερισμού στη λαβή.
Να λαμβάνετε αυτό υπόψη σας κατά τη χρήση.
Page 70
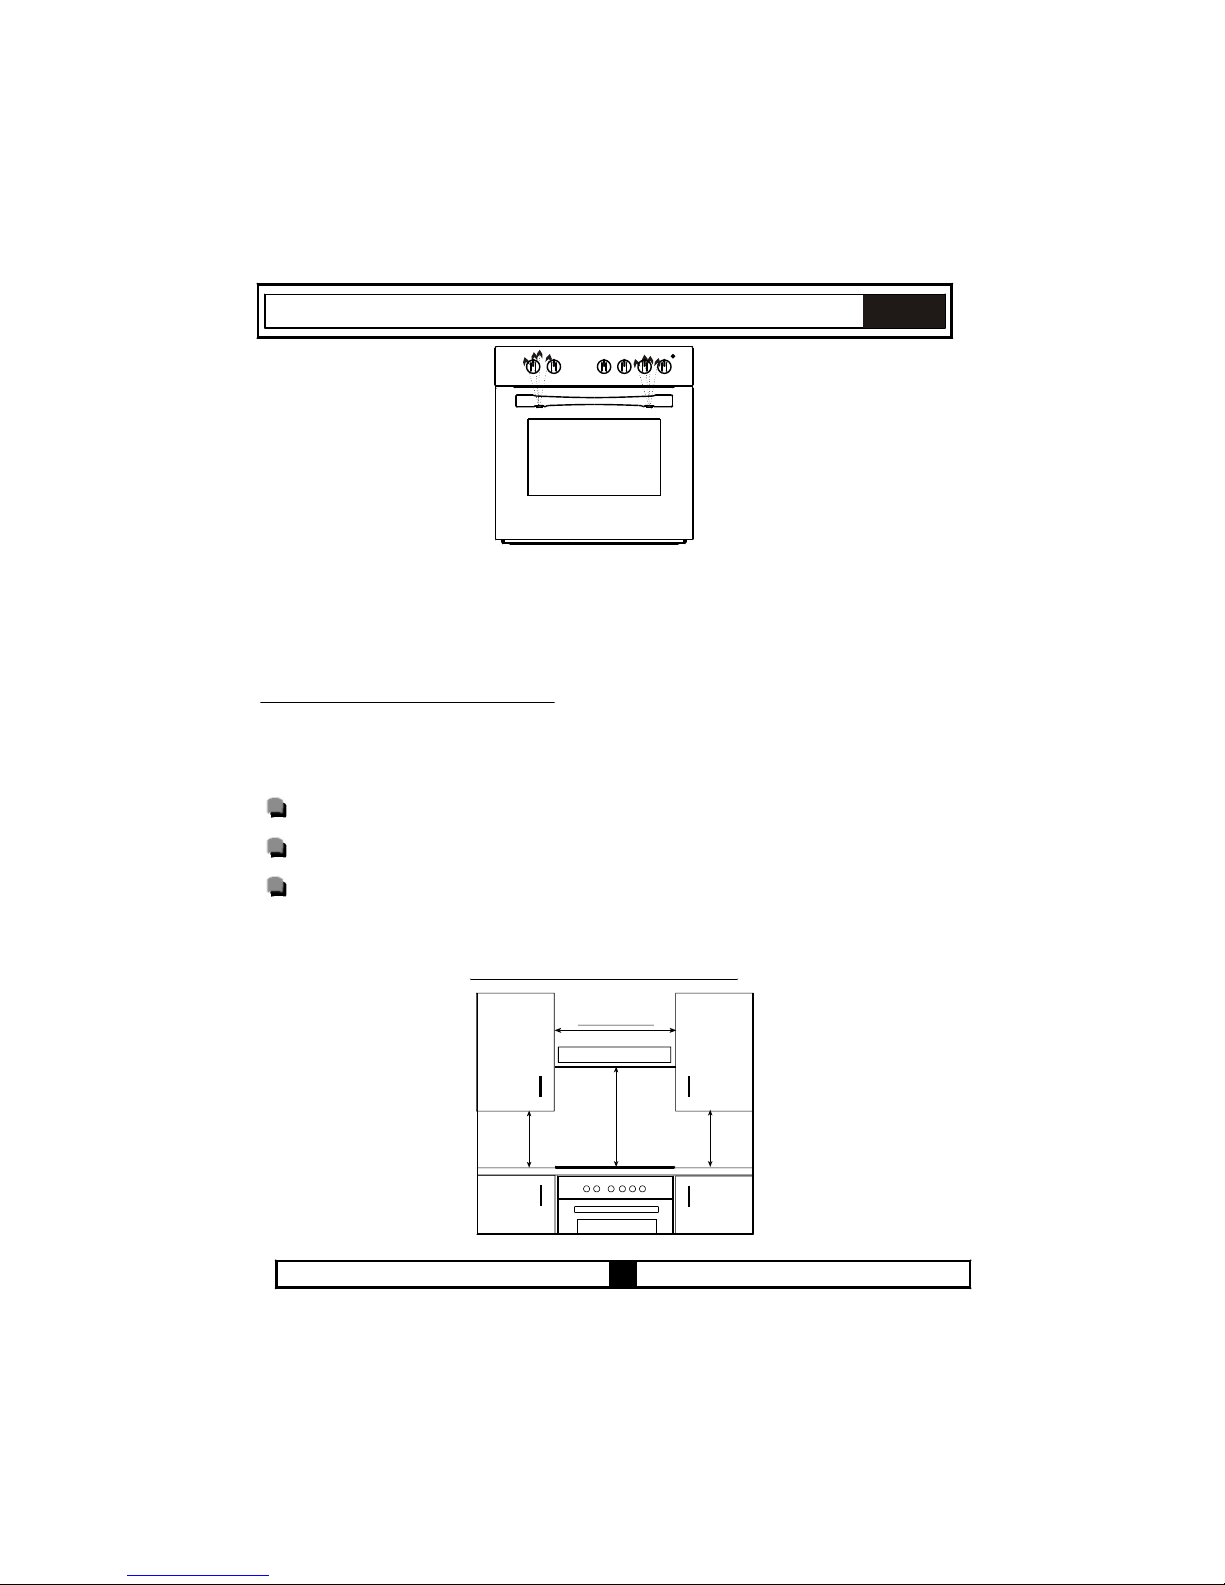
EL
ΑΝΕΜΙΣΤΗΡΑΣ ΕΞΑΕΡΙΣΜΟΥ
Τουλάχ. 65 cm (με
απορροφητήρα)
Τουλάχ. 70 εκ.
(Χωρίς απορροφητήρα)
Εικόνα 1
7
Τουλάχ. 42 εκ.,
Τουλάχ. 42 εκ.,
Τουλάχ. 60 εκ.
Αυτός ο μοντέρνος, λειτουργικός και πρακτικός φούρνος, που έχει κατασκευαστεί με εξαρτήματα
και υλικά της καλύτερης ποιότητας, θα ικανοποιήσει τις ανάγκες σας από κάθε άποψη. Διαβάστε
οπωσδήποτε το εγχειρίδιο αυτό για να έχετε επιτυχή αποτελέσματα και για να μην αντιμετωπίσετε
προβλήματα μελλοντικά. Οι πληροφορίες που δίνονται πιο κάτω περιέχουν κανόνες
απαραίτητους για τη σωστή τοποθέτηση και το σωστό σέρβις. Θα πρέπει οπωσδήποτε να
διαβαστούν, ειδικά από τον τεχνικό που θα εγκαταστήσει τη συσκευή.
3.1 ΕΠΙΛΟΓΗ ΘΕΣΗΣ ΓΙΑ ΤΟ ΦΟΥΡΝΟ
Κατά την επιλογή θέσης για το φούρνο, πρέπει να προσεχτούν αρκετά σημεία. Λάβετε
οπωσδήποτε υπόψη σας τις πιο κάτω συστάσεις μας για να προλάβετε προβλήματα και
επικίνδυνες καταστάσεις, που μπορεί να προκύψουν μελλοντικά!
Όταν επιλέγετε θέση για το φούρνο, προσέχετε να μην υπάρχουν κοντά εύφλεκτα ή καύσιμα
υλικά, όπως κουρτίνες, μουσαμάδες κλπ., που μπορούν να πιάσουν γρήγορα φωτιά.
Τα έπιπλα που περιβάλλουν το φούρνο πρέπει να είναι κατασκευασμένα από υλικά ανθεκτικά
σε θερμοκρασίες άνω των 50C°.
Οι αλλαγές που απαιτούνται για τα εντοιχισμένα ντουλάπια και οι εξαεριστήρες πάνω από το
εντοιχιζόμενο συνδυασμένο προϊόν, καθώς και τα ελάχιστα ύψη από την πάνω επιφάνεια
του φούρνου φαίνονται στην Εικόνα 1.
Επιπλέον, ο ανεμιστήρας εξαερισμού θα πρέπει να βρίσκεται σε ελάχιστο ύψος 65 εκ. από
την επιφάνεια της πλάκας εστιών. Αν δεν υπάρχει ανεμιστήρας εξαερισμού το ύψος δεν θα
ΜΕΡΟΣ 3: ΠΡΟΕΤΟΙΜΑΣΙΑ ΓΙΑ ΕΓΚΑΤΑΣΤΑΣΗ ΚΑΙ ΧΡΗΣΗ
Page 71
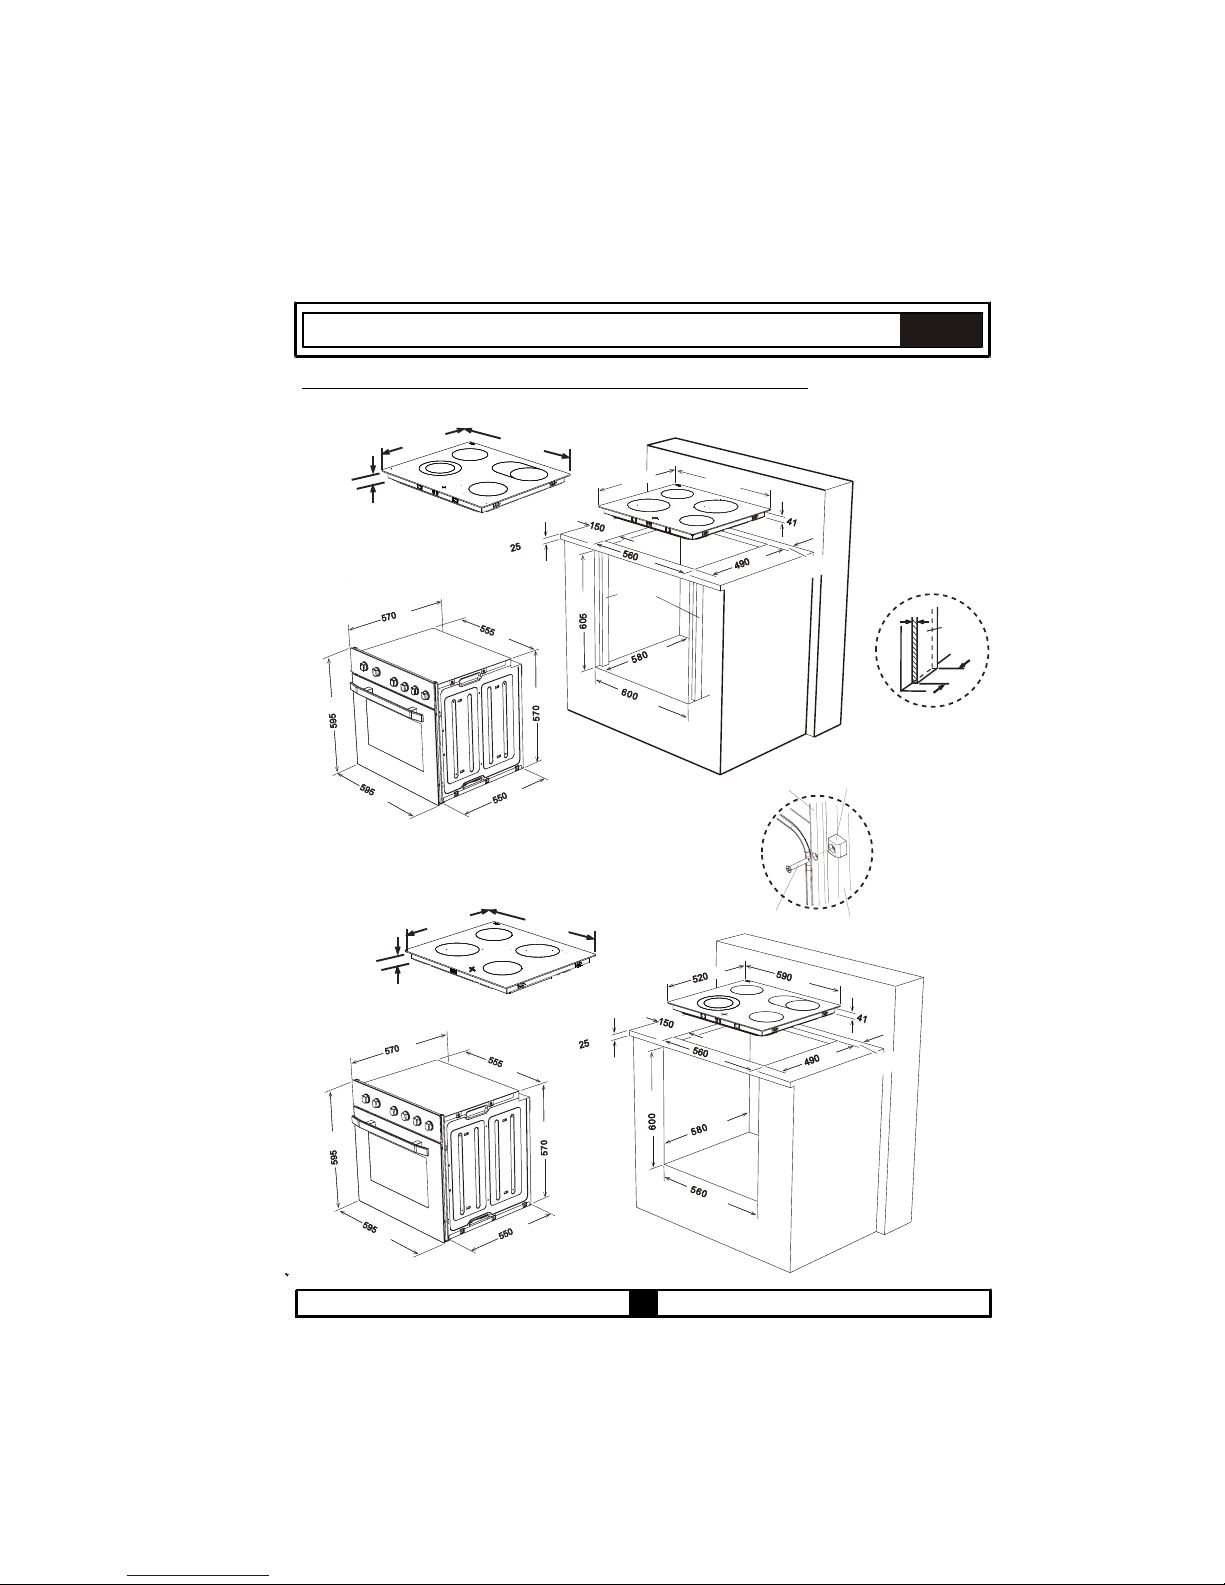
EL
8
3.2 ΕΓΚΑΤΑΣΤΑΣΗ ΦΟΥΡΝΟΥ ΚΑΙ ΠΛΑΚΑΣ ΕΣΤΙΩΝ
Εικόνα A-Ομοεπίπεδη εγκατάσταση του φούρνου
52 χι .
0 λ
52 χι .0 λ
1 .4 χιλ
Ξύλινο τμήμα
Τουλάχ.
0 ιλ.6 χ
Τουλάχ.
0 ιλ.6 χ
Τ χ.ουλά
40 χιλ.
Τ χ.ουλά
χιλ.40
Τουλάχ.
0 ιλ.6 χ
Τουλάχ.
0 ιλ.6 χ
520χιλ.
95 0 ιχ λ.
41χιλ.
20
Μπροστά πλαίσιο
Αποστάτης
Ξύλινο τμήμα
Βίδα στερέωσης
Ξύλινο τμήμα
Εικόνα Β- Κανονική εγκατάσταση του φούρνου
590 χιλ.
590 χιλ.
Χιλ.
Χ .ιλ
Χιλ.
Χιλ.
Χ λ.ι
Χιλ.
Χιλ.
ιλΧ .
Χιλ.
Χιλ.
Χ
ιλ.
Χιλ.
Χιλ.
ιλ.Χ
Χιλ.
Χιλ.
Χιλ.
Χιλ.
Χιλ.
ιλΧ .
λΧι .
Χιλ.
ιΧ λ.
Χιλ.
Χι .λ
ιΧ λ.
Χι .
λ
ιΧ λ.
ιΧ λ.
ι
Χ λ.
Χι .λ
υ χ.Το λάυ χ.Το λά
Τουλάχ.Τουλάχ.
ο λάχΤ υ .ο λάχΤ υ .
ο άχΤ υλ .
ο άχΤ υλ .
Page 72
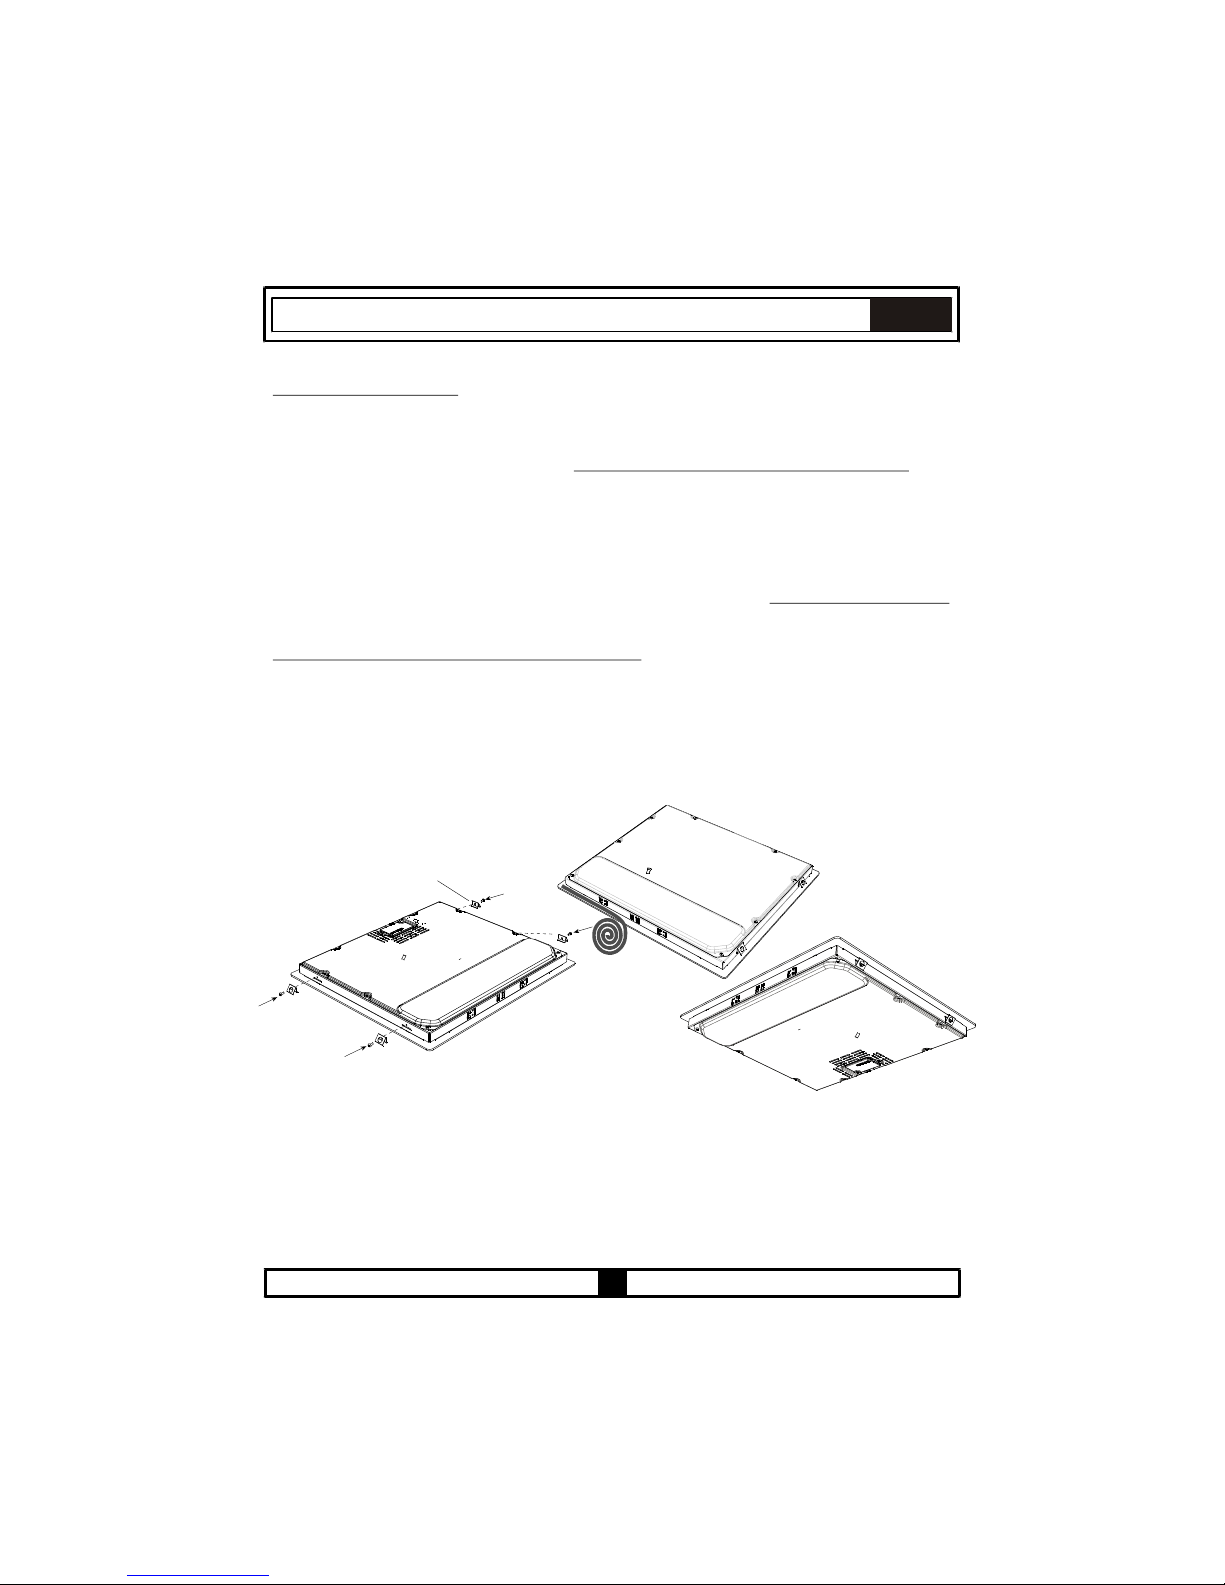
EL
Βήματα εγκατάστασης:
1 .Τοποθετήστε την πλάκα εστιών στο άνοιγμα του πάγκου. Το μέγεθος του ανοίγματος
δίνεται στην Εικόνα A.
Για λεπτομέρειες δείτε το τμήμα με τίτλο Στερέωση της υαλοκεραμικής πλάκας εστιών.
2. Συνδέστε την πλάκα εστιών στο φούρνο με το βύσμα που παρέχεται στην πλάκα εστιών.
Η υποδοχή
για το βύσμα βρίσκεται στο πίσω κάλυμμα του φούρνου.
3.Συνδέστε το φούρνο στην παροχή ρεύματος.
4.Τοποθετήστε το φούρνο στην υποδοχή εντοιχισμού του. Μπορεί να έχει εφαρμογή είτε η
τοποθέτηση της Εικόνας Α είτε η τοποθέτηση της Εικόνας Β ανάλογα με το μέγεθος του
ανοίγματος στο ντουλάπι. Για λεπτομέρειες δείτε το τμήμα με τίτλο Στερέωση του φούρνου.
Στερέωση της υαλοκεραμικής πλάκας εστιών:
■ Εφαρμόστε την παρεχόμενη αυτοκόλλητη ταινία στεγανοποίησης περιμετρικά της κάτω
άκρης της επιφάνειας μαγειρέματος κατά μήκος της εξωτερικής πλευράς της
υαλοκεραμικής πλάκας. Μην τεντώσετε την ταινία.
■ Βιδώστε στα πλευρικά τοιχώματα του προϊόντος τα 4 άγκιστρα στερέωσης στον πάγκο.
■ Τοποθετήστε την πλάκα εστιών στο άνοιγμα του πάγκου.
άγκιστρο στερέωσης στον πάγκο.
9
Page 73
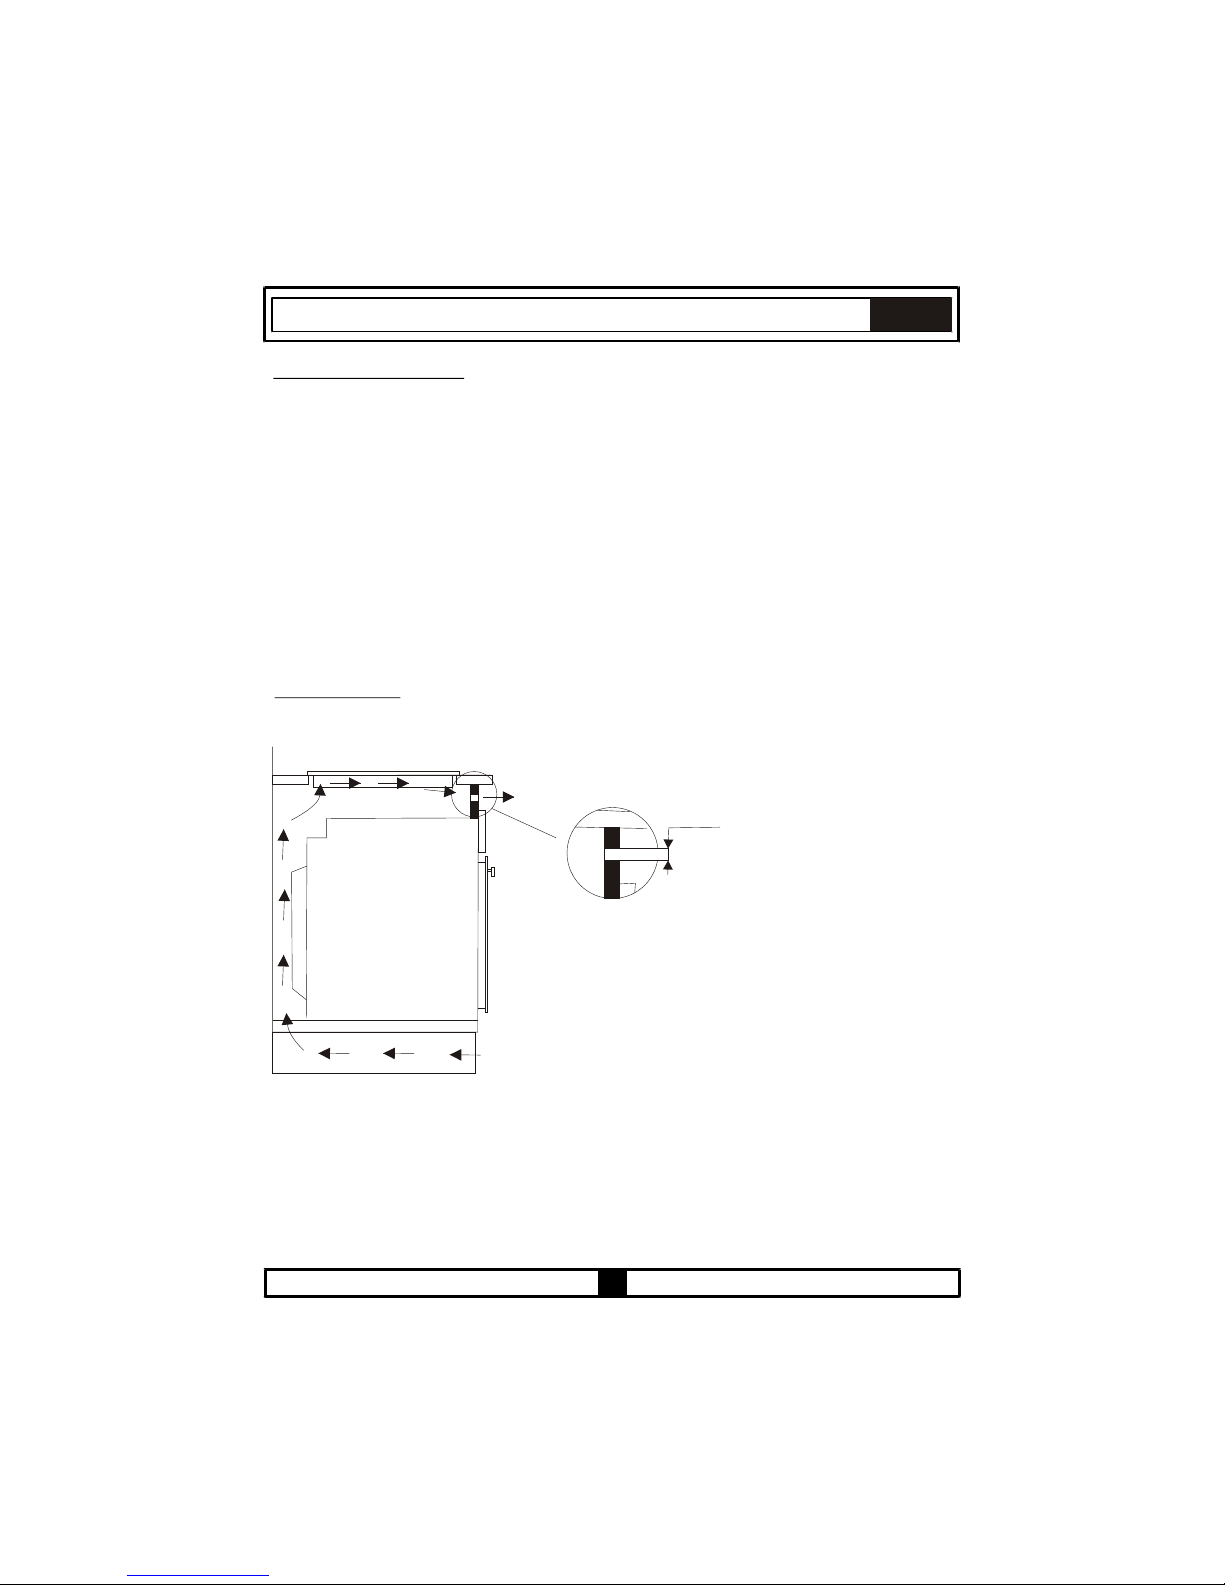
10
Στερέωση του φούρνου:
Τοποθετήστε το φούρνο στο ντουλάπι κατά ένα μέρος του, σπρώχνοντάς τον προς τα εμπρός.
Ανοίξτε την πόρτα του φούρνου και τοποθετήστε 4 βίδες στις οπές για χωνευτές βίδες στο
μπροστινό πλαίσιο. Τοποθετήστε τους αποστάτες πίσω από τη φλάντζα του μπροστινού
πλαισίου και βιδώστε τους έως ότου η επιφάνεια του αποστάτη έρθει σε επαφή με το
μπροστινό πλαίσιο. Όταν το κάνετε αυτό, προσέχετε η λοξοτομημένη άκρη κάθε αποστάτη να
αντικρίζει τη στρογγυλεμένη άκρη του μπροστινού πλαισίου. Σπρώξτε το προϊόν εντελώς
εμπρός και τέλος βιδώστε το στο ξύλινο τμήμα.
Οι διαστάσεις και το υλικό των ντουλαπιών όπου θα εγκατασταθεί ο φούρνος πρέπει να είναι
σωστά και ανθεκτικά σε αυξημένη θερμοκρασία. Σε μια σωστή εγκατάσταση, πρέπει να
εμποδίζεται η επαφή με ηλεκτρικά ή μονωμένα μέρη. Τα μονωτικά τμήματα πρέπει να είναι
τοποθετημένα με τρόπο που να εξασφαλίζεται ότι δεν μπορούν να αφαιρεθούν με χρήση
οποιουδήποτε εργαλείου. Δεν συνιστάται η τοποθέτηση της συσκευής πολύ κοντά σε ψυγείο ή
σε καταψύκτη. Αλλιώς, η απόδοση των συσκευών αυτών θα επηρεαστεί αρνητικά λόγω της
εκπεμπόμενης θερμότητας.
Προειδοποίηση σχετικά με την εγκατάσταση ενσωματωμένου φούρνου χωρίς ανεμιστήρα
ψύξης ( FUS 100-40 W FUS 100-40 X)
5 χιλ.5 χιλ.
Πριν την τοποθέτηση του φούρνου, πρέπει οπωσδήποτε
να αφαιρέσετε το πίσω τμήμα της επιφάνειας του
ντουλαπιού κουζίνας στην περιοχή του ανοίγματος του
φούρνου.
Επίσης το μπροστινό μέρος του ντουλαπιού πρέπει
να έχει άνοιγμα τουλάχιστον 5 χιλ.
EL
Page 74
11
ΠΡΟΣΟΧΗ:
αν χρειαστεί να αντικαταστήσετε το καλώδιο ρεύματος, συνδέστε τους αγωγούς
σύμφωνα με τα ακόλουθα χρώματα/κωδικούς:
ΜΠΛΕ - ΟΥΔΕΤΕΡΟΣ (N)
ΚΑΦΕ - ΦΑΣΗ (L)
ΚΙΤΡΙΝΟ -ΠΡΑΣΙΝΟΣ - ΓΕΙΩΣΗ ( )
EL
3.3 ΚΑΛΩΔΙΩΣΗ ΚΑΙ ΑΣΦΑΛΕΙΑ ΤΟΥ ΕΝΤΟΙΧΙΖΟΜΕΝΟΥ ΦΟΥΡΝΟΥ:
Ακολουθήστε οπωσδήποτε τις πιο κάτω οδηγίες για την καλωδίωση:
Το καλώδιο γείωσης πρέπει να συνδεθεί μέσω της βίδας με το σύμβολο γείωσης
. Η σύνδεση του καλωδίου ρεύματος πρέπει να γίνει όπως φαίνεται στην Εικόνα
2. Αν στο χώρο εγκατάστασης δεν υπάρχει γειωμένη πρίζα σε συμμόρφωση με
τους κανονισμούς, καλέστε αμέσως το εξουσιοδοτημένο συνεργείο.
Η γειωμένη πρίζα πρέπει να είναι κοντά στη συσκευή. Ποτέ μη χρησιμοποιήσετε
καλώδιο επέκτασης.
Το καλώδιο παροχής ρεύματος δεν πρέπει να έρχεται σε επαφή με τις θερμές
επιφάνειες του προϊόντος.
Σε περίπτωση οποιασδήποτε ζημιάς ή φθοράς στο καλώδιο ρεύματος, καλέστε
οπωσδήποτε το εξουσιοδοτημένο συνεργείο. Το καλώδιο πρέπει να
αντικατασταθεί από το εξουσιοδοτημένο συνεργείο.
Η καλωδίωση της συσκευής πρέπει να γίνει από το εξουσιοδοτημένο συνεργείο.
Πρέπει να χρησιμοποιηθεί καλώδιο ρεύματος τύπου H05W-F.
Τυχόν λανθασμένη καλωδίωση μπορεί να προκαλέσει ζημιά στη συσκευή. Ζημιά
αυτού του είδους δεν θα καλύπτεται από την εγγύηση.
Η συσκευή είναι σχεδιασμένη για σύνδεση σε παροχή ρεύματος 220-240V~ και
380-415V 3N ~. Αν η παροχή ρεύματος είναι διαφορετική από την τιμή που
αναφέρεται πιο πάνω, καλέστε αμέσως το εξουσιοδοτημένο συνεργείο.
Η εταιρεία κατασκευής δηλώνει ότι δεν φέρει καμία απολύτως ευθύνη για
οποιοδήποτε είδος ζημιάς και απώλειας προκύψει από μη συμμόρφωση
με τα πρότυπα ασφαλείας!
Page 75
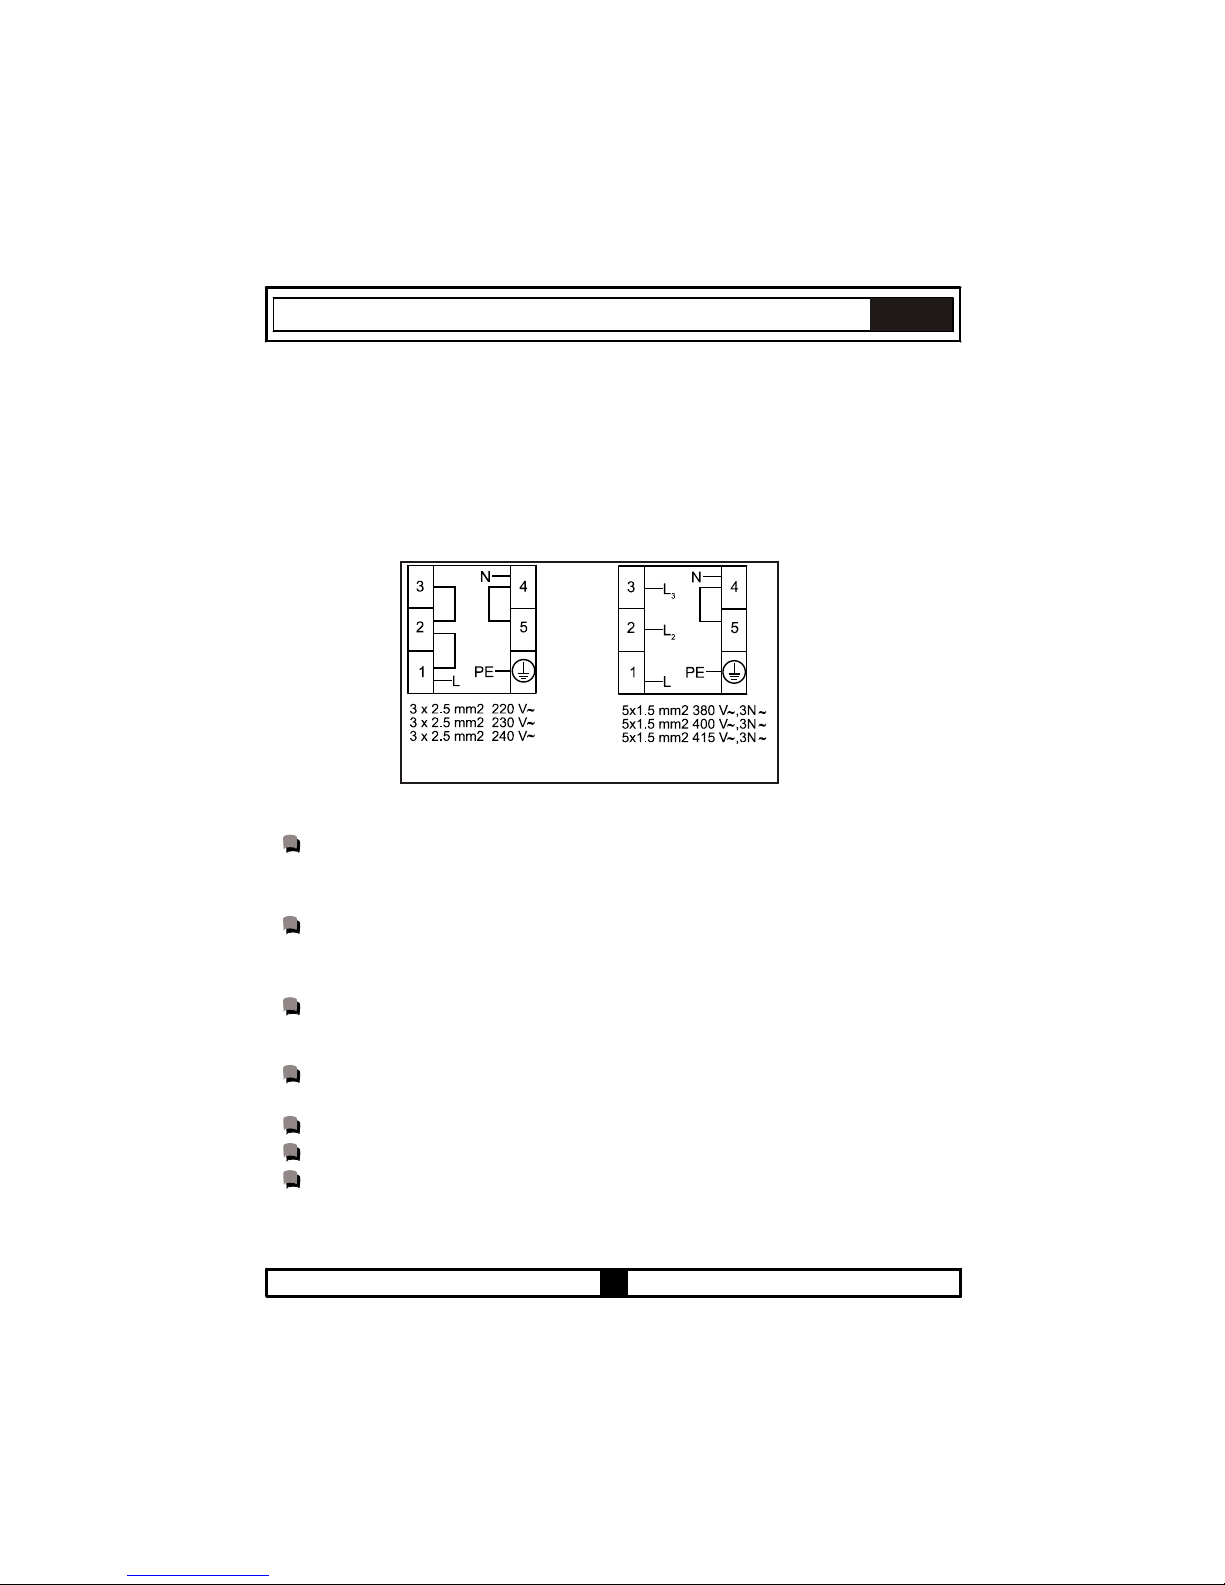
12
EL
3.4 ΚΑΛΩΔΙΩΣΗ ΚΑΙ ΑΣΦΑΛΕΙΑ ΤΟΥ ΕΝΤΟΙΧΙΖΟΜΕΝΟΥ ΣΥΝΔΥΑΣΜΕΝΟΥ ΦΟΥΡΝΟΥ:
Η καλωδίωση της συσκευής πρέπει να γίνει από το εξουσιοδοτημένο συνεργείο. Η συσκευή είναι
σχεδιασμένη για σύνδεση σε παροχή ρεύματος 220-240V~ και 380-415V 3N ~. Αν η παροχή ρεύματος
είναι διαφορετική από την τιμή που αναφέρεται πιο πάνω, καλέστε αμέσως το εξουσιοδοτημένο συνεργείο.
Η σύνδεση της συσκευής πρέπει να γίνει όπως φαίνεται στην Εικόνα 2. Η συσκευή αυτή έχει σχεδιαστεί για
μόνιμη σύνδεση στο ρεύμα δικτύου. Πρέπει στο κύκλωμα τροφοδοσίας ρεύματος να εγκατασταθεί
διακόπτης αποσύνδεσης όλων των πόλων με άνοιγμα επαφών τουλάχιστον 3 χιλ. (ονομαστικού ρεύματος
32Α και τύπου καθυστερημένης λειτουργίας).
ΠΡΟΕΙΔΟΠΟΙΗΣΗ : Το σύστημα καλωδίωσης και αγωγών πρέπει να είναι σε θέση να αντέχει τη μέγιστη
ηλεκτρική ισχύ που απαιτείται από το φούρνο. Αυτή η πληροφορία φαίνεται στην πινακίδα στοιχείων του
φούρνου. Σε περίπτωση οποιασδήποτε αμφιβολίας, ζητήστε τη βοήθεια επαγγελματιών.
Για μοντέλα άνω των 9500 W, πρέπει να χρησιμοποιηθούν
2
καλώδια διατομής 3x4,0mm
Εικόνα 2
3.5 ΓΕΝΙΚΕΣ ΠΡΟΕΙΔΟΠΟΙΗΣΕΙΣ ΚΑΙ ΠΡΟΦΥΛΑΞΕΙΣ:
Η συσκευή σας κατασκευάζεται σε συμμόρφωση με τις σχετικές οδηγίες ασφαλείας που αφορούν
ηλεκτρικές συσκευές. Οι εργασίες συντήρησης και επισκευών πρέπει να εκτελούνται μόνο από
τεχνικούς του εξουσιοδοτημένου συνεργείου εκπαιδευμένους από την κατασκευάστρια εταιρεία. Οι
εργασίες εγκατάστασης και επισκευών που εκτελούνται χωρίς τήρηση των κανόνων μπορεί να είναι
επικίνδυνες.
Οι εξωτερικές επιφάνειες θερμαίνονται όταν λειτουργεί η συσκευή σας. Οι αντιστάσεις που
θερμαίνουν την εσωτερική επιφάνεια του φούρνου και ο ατμός που διαφεύγει βρίσκονται σε πολύ
υψηλή θερμοκρασία. Τα τμήματα αυτά θα διατηρήσουν τη θερμότητά τους για ορισμένο διάστημα
ακόμα και αν απενεργοποιηθεί η συσκευή. Ποτέ μην αγγίζετε τις θερμές επιφάνειες. Κρατάτε τα
παιδιά μακριά.
Μην απομακρύνεστε από την πλάκα εστιών όταν μαγειρεύετε με λίπος ή λάδι. Σε περίπτωση
υπερθέρμανσης, μπορεί να συμβεί ανάφλεξη. Ποτέ μη ρίξετε νερό σε λάδι που έχει πιάσει φωτιά. Για
να περιορίσετε τη φλόγα, κλείστε το καπάκι της κατσαρόλας ή του τηγανιού και σβήστε αμέσως την
εστία.
Για να μαγειρέψετε στο φούρνο σας, πρέπει να ρυθμιστούν τα κουμπιά λειτουργίας και ρύθμισης
θερμοκρασίας του φούρνου και να προγραμματιστεί ο χρονοδιακόπτης φούρνου, αν υπάρχει.
Αλλιώς ο φούρνος δεν θα λειτουργήσει.
Μην τοποθετείτε οτιδήποτε πάνω στην πόρτα του φούρνου ή το συρτάρι όταν βρίσκονται στην
ανοικτή τους θέση. Μπορεί να διαταράξετε την ισορροπία της συσκευής ή να σπάσετε την πόρτα.
Αποσυνδέετε τη συσκευή σας από το ρεύμα όταν δεν χρησιμοποιείται.
Προστατέψτε τη συσκευή σας από τις καιρικές επιδράσεις. Μην την αφήνετε εκτεθειμένη στην
επίδραση ήλιου, βροχής, χιονιού, σκόνης κλπ.
Page 76
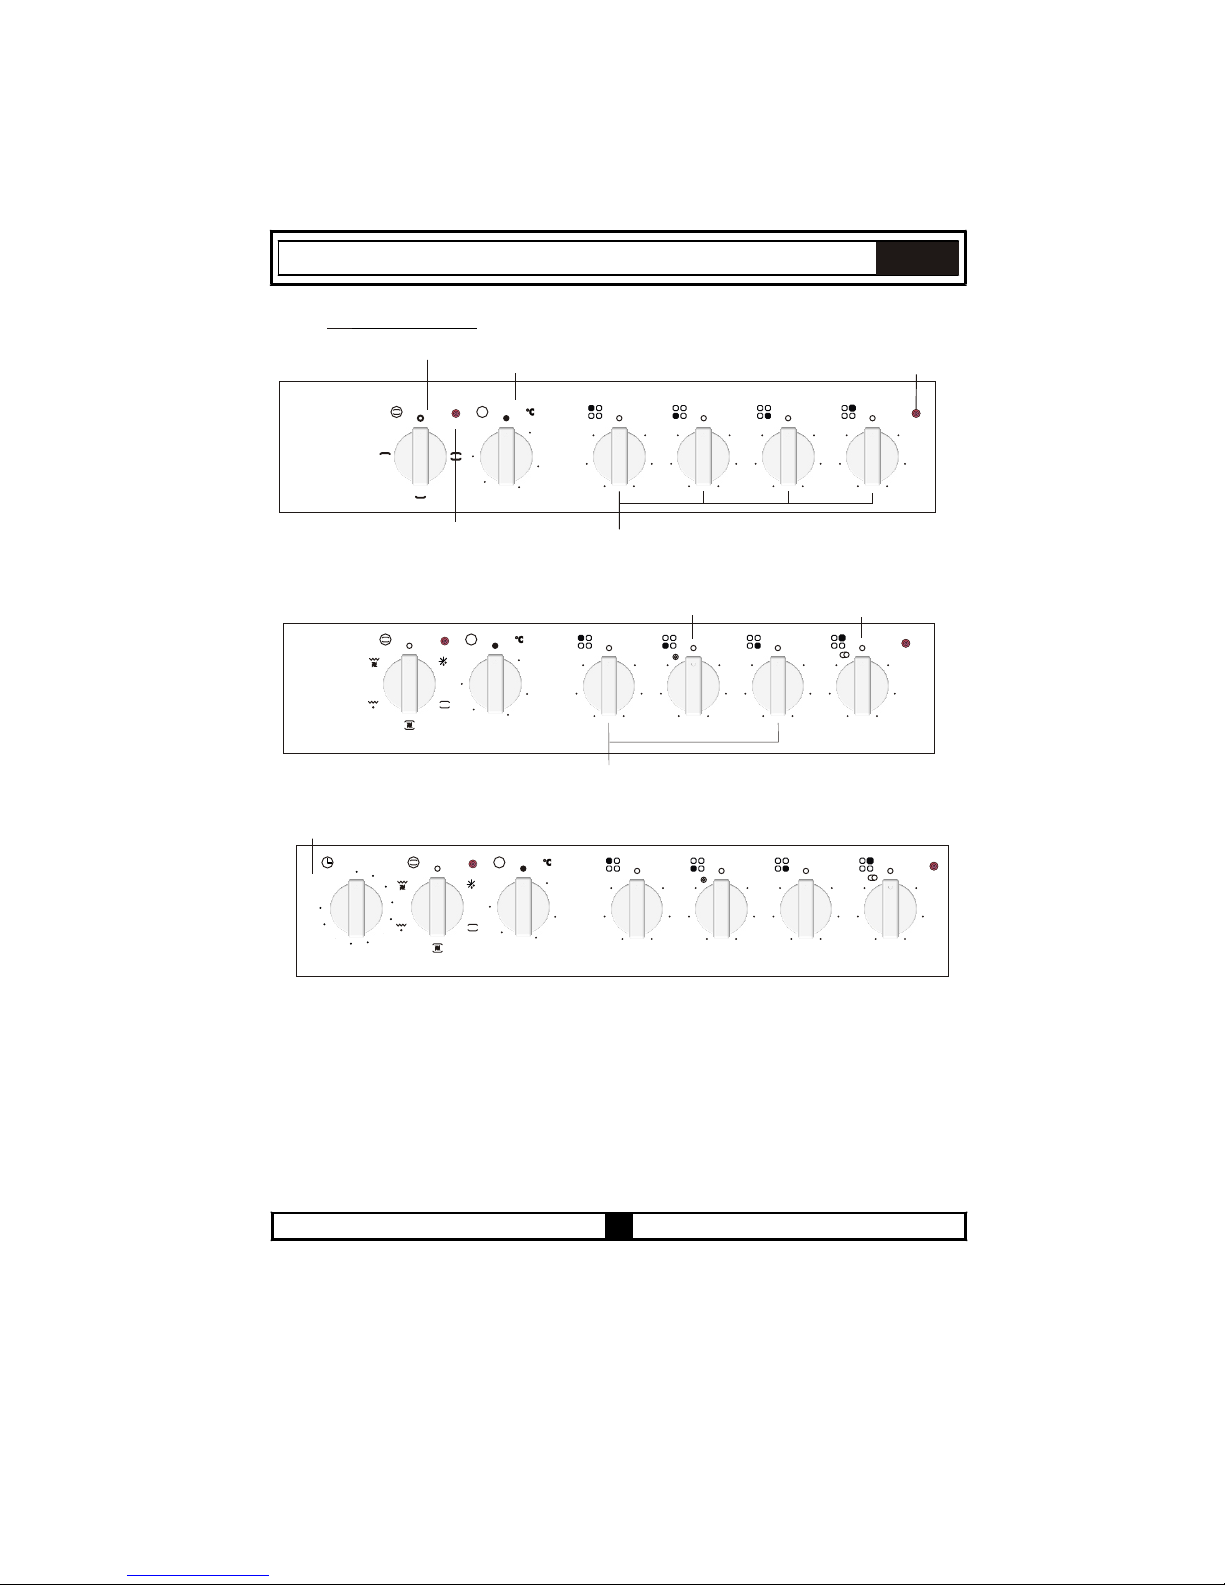
13
EL
Μέρος 4 : Χρήση του φούρνου
Κουμπί ελέγχου θερμοκρασίας φούρνου
5050
200200
150150
100100
MAXMAX
T
FUS 100-40 W
FUS 100-40 X
44
33
55
22
11
66
44
33
55
22
11
66
44
33
55
22
11
66
44
33
55
22
11
66
FUNP 611 X
100
10
20
30
40
50
70
80
90
0
60
M
5050
200200
150150
100100
MAXMAX
T
44
33
55
22
11
66
44
33
55
22
11
66
44
33
55
22
11
66
44
33
55
22
11
66
5050
200200
150150
100100
MAXMAX
T
FUNP 610 X
44
33
55
22
11
66
44
33
55
22
11
66
44
33
55
22
11
66
44
33
55
22
11
66
4.1 :
Κουμπί ελέγχου λειτουργίας φούρνου
Μηχανικός χρονοδιακόπτης
Κουμπί
Κουμπί
ελέγχου
ελέγχου
μονής
μονής
ζώνης
ζώνης
Κουμπί ελέγχου διπλής ζώνης
Κουμπί ελέγχου επεκτάσιμης ζώνης
Λυχνία ελέγχου ηλεκτρικής εστίας
Πίνακες ελέγχου
Λυχνία θερμοστάτη φούρνου
Page 77
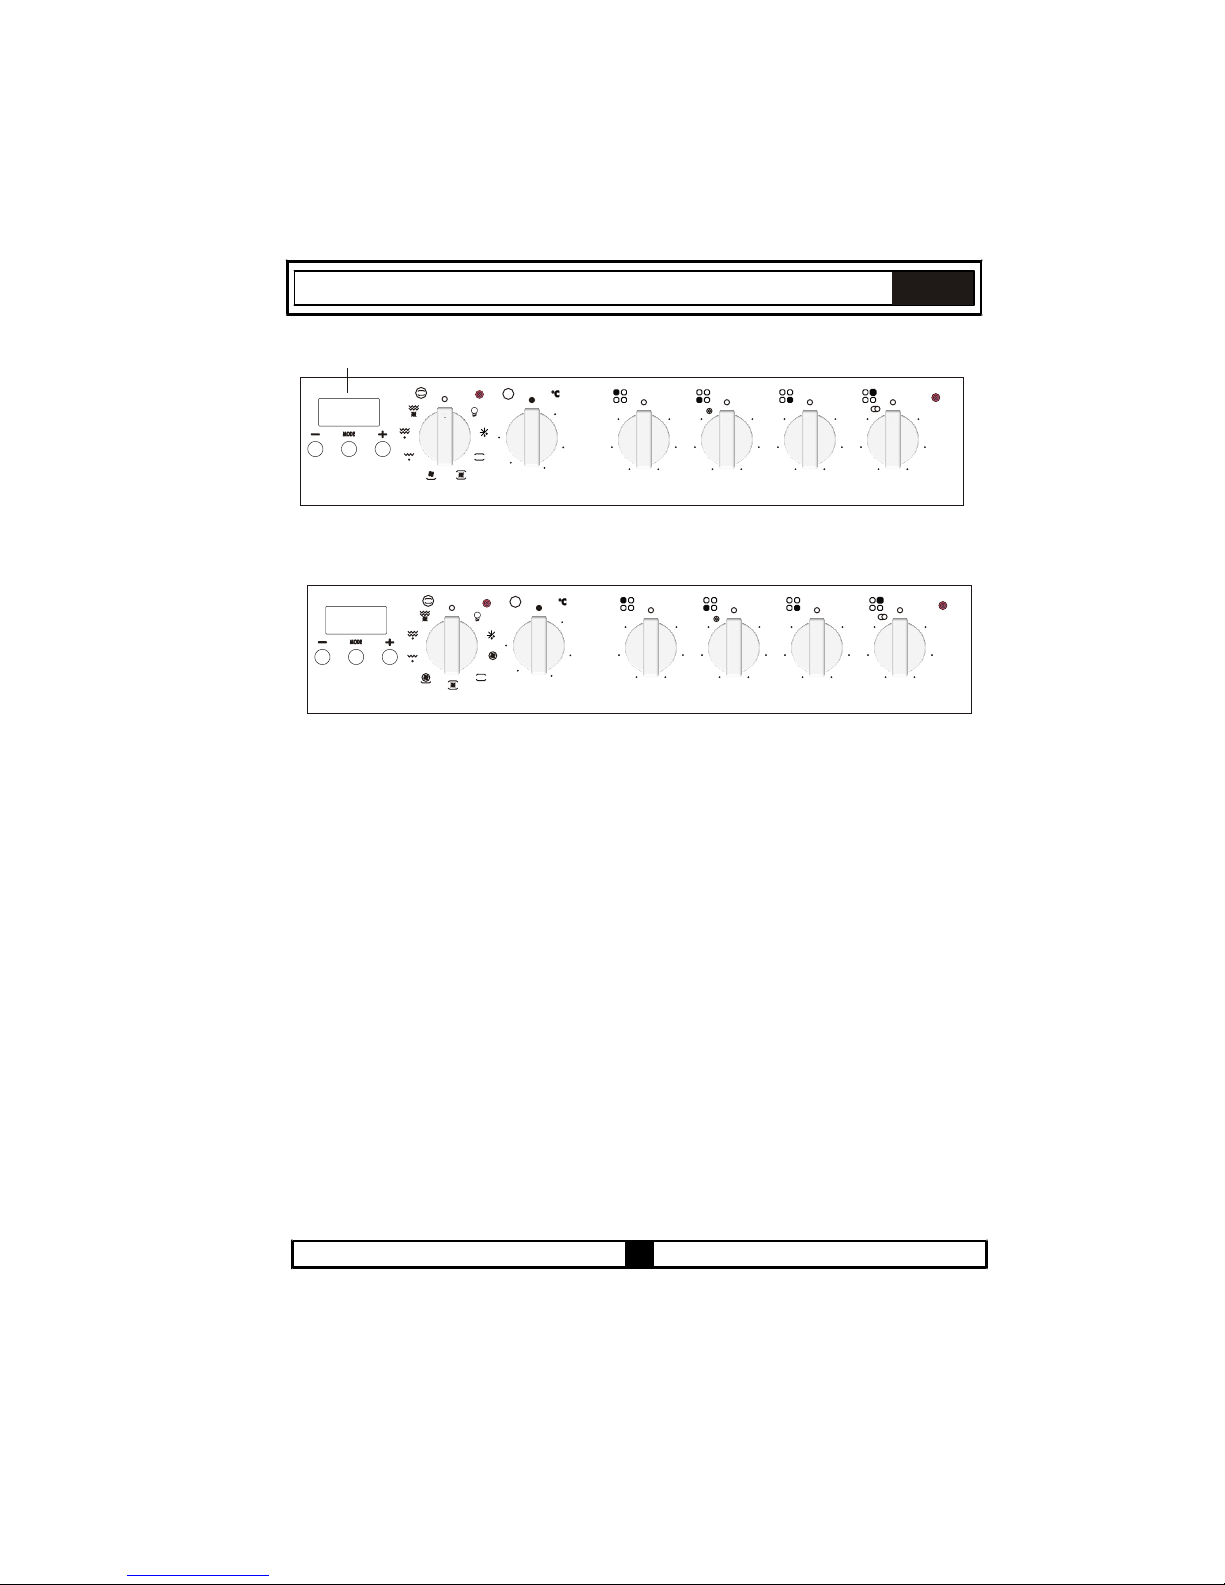
EL
5050
200200
150150
100100
MAXMAX
T
FUHP 615 X
44
33
55
22
11
66
44
33
55
22
11
66
44
33
55
22
11
66
44
33
55
22
11
66
5050
200200
150150
100100
MAXMAX
T
FUHP 825 X
44
33
55
22
11
66
44
33
55
22
11
66
44
33
55
22
11
66
44
33
55
22
11
66
Ηλεκτρονικός χρονοδιακόπτης
14
Page 78
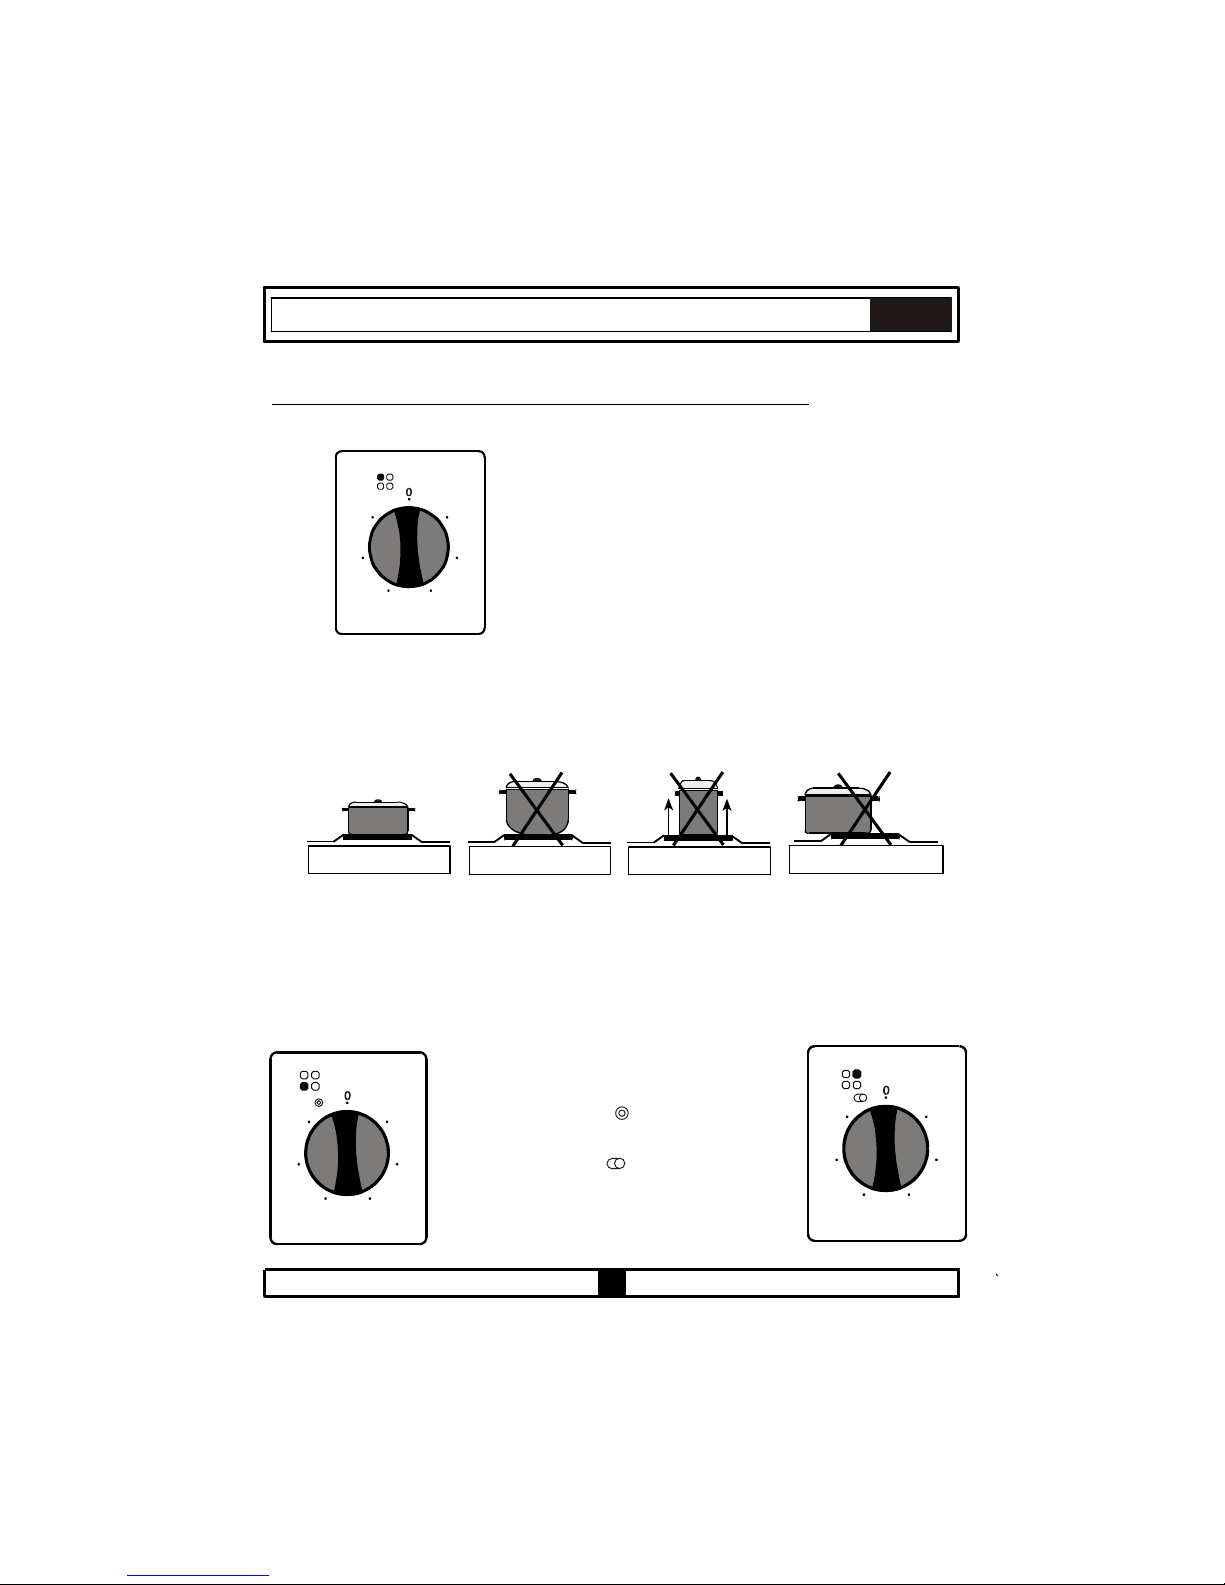
Κουμπί ελέγχου εστίας
15
4.2 ΧΡΗΣΗ ΤΩΝ ΕΣΤΙΩΝ ΤΗΣ ΕΠΙΦΑΝΕΙΑΣ ΜΑΓΕΙΡΕΜΑΤΟΣ:
Το τμήμα πλάκας εστιών του προϊόντος ελέγχεται από ρυθμιστές ενέργειας. Ανατρέξτε στην
Εικόνα 3.
( PVU 647 X-PVU 647 N )
Figure
3
6
5
4
3
2
1
6
5
4
3
2
1
6
5
4
3
2
1
Διπλή ή Οβάλ υαλοεραμική εστία
EL
1 ........Θέση διατήρησης θερμότητας
2-3......Θέση θέρμανσης σε χαμηλή
θερμοκρασία
4-5-6...Θέση για μαγείρεμα, τηγάνισμα και
βράσιμο
Όταν χρησιμοποιείτε τις ηλεκτρικές εστίες,
προσέχετε τα σκεύη να έχουν ομαλή και επίπεδη βάση. Θα έχετε βέλτιστη απόδοση από την
πλάκα εστιών όταν χρησιμοποιείτε σκεύη με κατάλληλες διαμέτρους και επίπεδες βάσεις. Δεν
συνιστάται χρήση σκευών με μικρή διάμετρο σε εστίες με μεγάλες διαμέτρους. Αλλιώς θα
προκληθεί απώλεια θερμότητας και σπατάλη ενέργειας.
ΣΩΣΤΟ
ΛΑΘΟΣ
καμπύλη βάση σκεύους
ΛΑΘΟΣ
μικρή βάση σκεύους
ΛΑΘΟΣ
κακή επαφή βάσης σκεύους
Η υαλοκεραμική επιφάνεια έχει μεγάλη αντοχή σε θερμότητα και ακραίες αλλαγές θερμοκρασίας.
Με τον καιρό θα παρατηρηθεί κοκκίνισμα της θερμαινόμενης επιφάνειας. Όταν χρησιμοποιείται
οποιαδήποτε μονάδα θέρμανσης μπορεί να ακούγεται ένας αδύναμος ήχος. Αυτός είναι φυσιολογικός
και σχετίζεται με την τεχνική δομή του συστήματος.
Δεν τίθεται θέμα προβλήματος ποιότητας. Η επιφάνεια μπορεί να υποστεί ζημιά αν
συρθούν ή τοποθετηθούν απότομα πάνω στο υαλοκεραμικό υλικό σκεύη με αιχμηρές ακμές. Πρέπει
να δοθεί προσοχή σ' αυτό το θέμα.
Οι διπλές ή οβάλ υαλοκεραμικές εστίες μπορούν να
θερμάνουν σε δύο διαφορετικές θέσεις. Για τη
λειτουργία της μεγάλης διαμέτρου της διπλής εστίας
γυρίστε το διακόπτη στο’ ‘ . Θα λειτουργήσουν και
η μικρή και η μεγάλη διάμετρος της εστίας. Για
λειτουργία του οβάλ τμήματος της οβάλ εστίας,
γυρίστε το διακόπτη στο‘ ‘ . Τότε θα λειτουργούν και
το οβάλ και το στρογγυλό τμήμα.
Page 79
16
ΠΡΟΕΙΔΟΠΟΙΗΣΕΙΣ
Όταν το κουμπί μιας εστίας τοποθετηθεί σε θέση άλλη από το “0”, θα είναι αναμμένη η λυχνία
ένδειξης λειτουργίας.
Χρησιμοποιείτε μόνο σκεύη που ταιριάζουν στη διάμετρο της εστίας.
Πριν τοποθετήσετε το σκεύος στην εστία, βεβαιωθείτε ότι η βάση του είναι στεγνή.
Ποτέ μη χρησιμοποιείτε τις εστίες χωρίς σκεύος. Η θερμοκρασία του σκεύους μπορεί να είναι υψηλή
όταν χρησιμοποιείται η συσκευή. Γι' αυτό συνιστάται να κρατάτε παιδιά και κατοικίδια μακριά από
την πλάκα εστιών κατά τη διάρκεια και μετά τη λειτουργία της.
Αν προσέξετε οποιοδήποτε ρωγμή στην υαλοκεραμική επιφάνεια, πρέπει να απενεργοποιηθεί
αμέσως και να αντικατασταθεί από το εξουσιοδοτημένο συνεργείο.
Για πρόληψη της σπατάλης ενέργειας, τα σκεύη που χρησιμοποιείτε δεν πρέπει να είναι μικρότερα ή
μεγαλύτερα από τις επιφάνειες των εστιών.
Λάβετε τα απαραίτητα μέτρα ώστε σε καμία περίπτωση να μην πλησιάσουν μικρά παιδιά στην
επιφάνεια των εστιών, γιατί αυτή θα βρίσκεται σε υψηλή θερμοκρασία κατά τη λειτουργία της.
Επειδή το καυτό λάδι είναι εύφλεκτο, εργασίες όπως το τηγάνισμα θα πρέπει να γίνονται με τα
καπάκια των σκευών κλειστά.
Μην κόβετε τίποτα, όπως ψωμί κλπ., πάνω στην υαλοκεραμική επιφάνεια. Μη χρησιμοποιείτε σκεύη
με βάση από αλουμίνιο. Αποφεύγετε να τοποθετείτε πολύ βαριά αντικείμενα στην πλάκα των
εστιών.
Μην τοποθετείτε πάνω στην υαλοκεραμική επιφάνεια υλικά όπως πλαστικό και αλουμίνιο. Αν, για
οποιοδήποτε λόγο, λειώσει πάνω στην επιφάνεια πλαστικό ή αλουμινένιο, καθαρίστε το αμέσως με
μια σπάτουλα.
Μη σκουπίζετε την υαλοκεραμική επιφάνεια με πανιά ή σφουγγάρια για πλύσιμο πιάτων. Τα
κατάλοιπα απορρυπαντικού μπορεί να προκαλέσουν φωτιά και αλλοίωση του χρώματος του
γυαλιού.
EL
Page 80
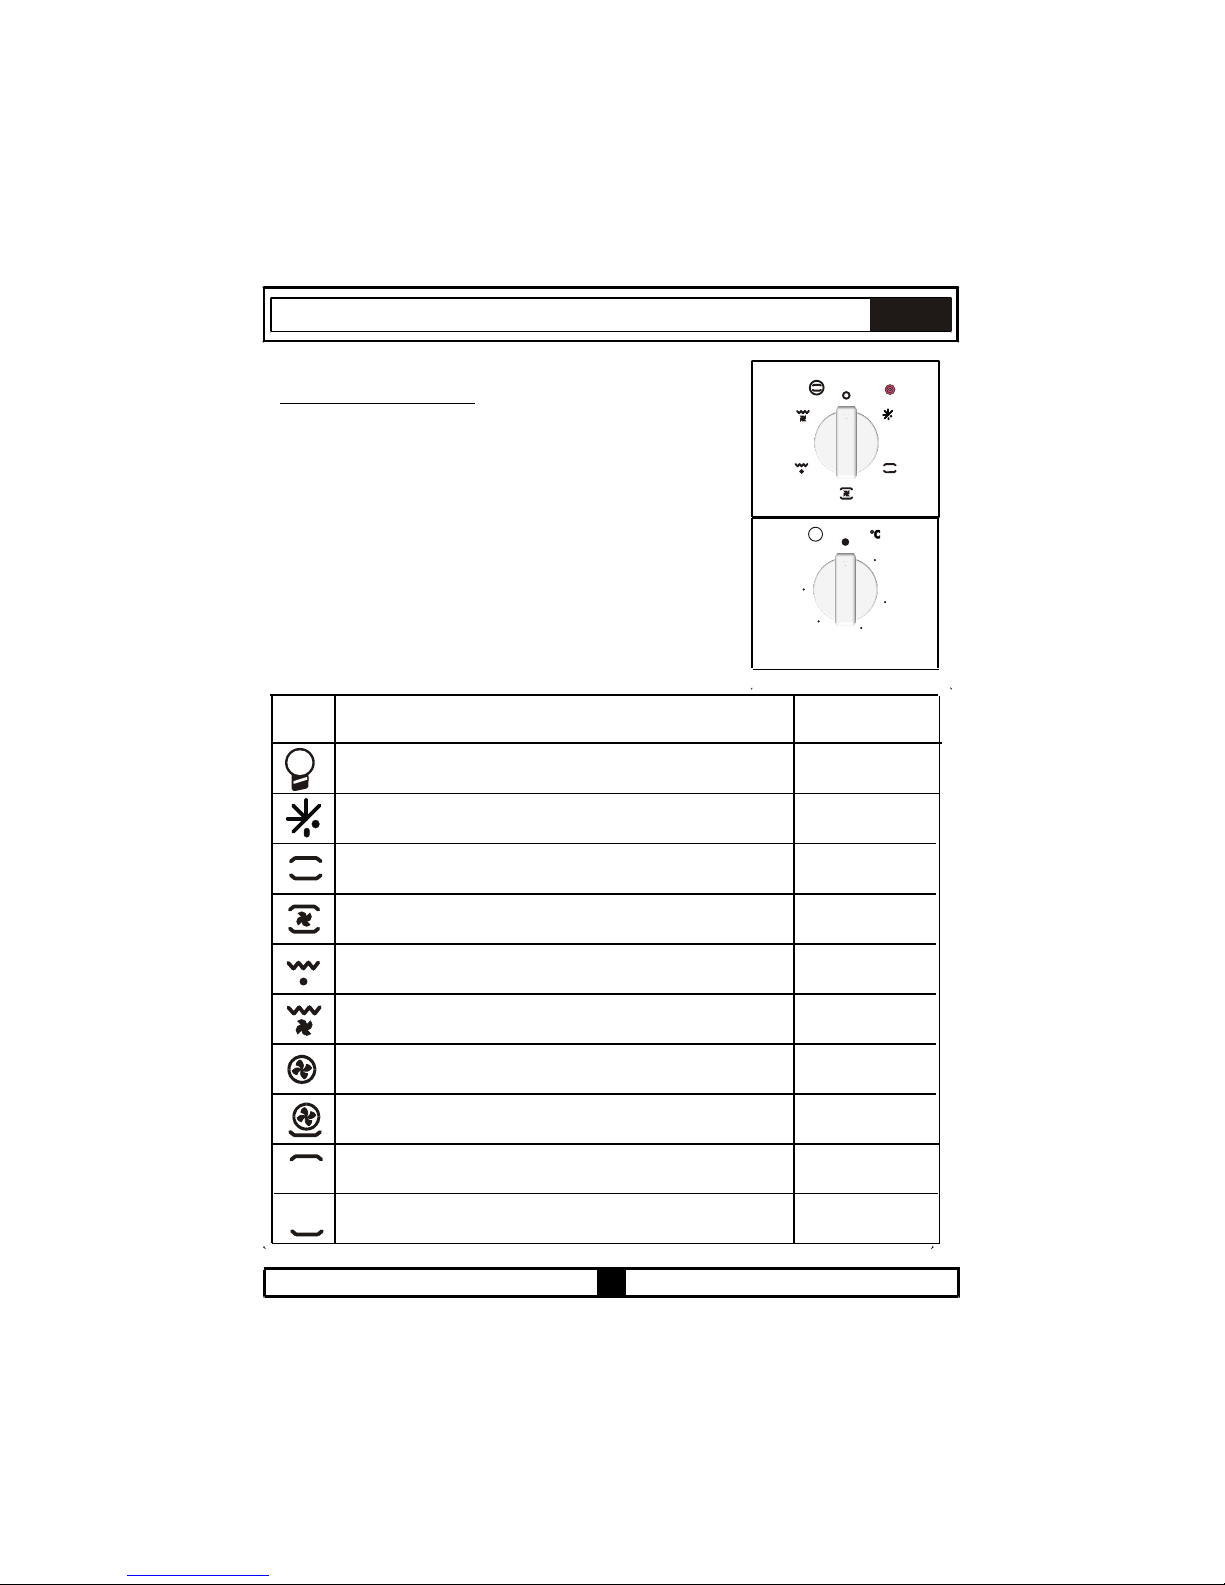
17
5050
200200
150150
100100
MAXMAX
T
Πίνακας 1
B (Konvektion) nur bei FUNP 610 X
A (Konvektion) bei FUNP 611 X,
FUHP 615 X-825 X, FUS 100-40 X-W
B (Umluft) nur bei FUNP 610 X
A (Umluft) bei FUNP 611 X,
FUHP 615 X- 825 X
Σύμβολο
Επεξήγηση
Ενεργειακή κλάση σύμφωνα
με το CENELEC EN 50304
_
_
_
_
_
_
_
EL
4.3 ΧΡΗΣΗ ΤΟΥ ΦΟΥΡΝΟΥ:
Πρέπει πρώτα να ρυθμίσετε τη λειτουργία φούρνου (βλ. Εικόνα 4) και
κατόπιν να ρυθμίσετε τη θερμοκρασία του φούρνου στην επιθυμητή
τιμή (βλ. Εικόνα 5). Αλλιώς ο φούρνος δεν θα λειτουργήσει.
Όταν η θερμοκρασία στο φούρνο φθάσει την τιμή που ρυθμίσατε, ο
θερμοστάτης θα διακόψει το κύκλωμα και η λυχνία του θερμοστάτη θα
σβήσει. Όταν η θερμοκρασία πέσει κάτω από τη ρυθμισμένη τιμή, ο
θερμοστάτης θα ενεργοποιηθεί πάλι και θα ανάψει η ενδεικτική λυχνία.
Εικόνα 4
Εικόνα 5
Ενεργοποιείται η λάμπα του φούρνου.
Ενεργοποιούνται η λάμπα του φούρνου, η κόκκινη προειδοποιητική
λυχνία και ο ανεμιστήρας. Χρησιμεύει για απόψυξη κατεψυγμένων
τροφίμων.
Ενεργοποιούνται ο θερμοστάτης του φούρνου, οι προειδοποιητικές
λυχνίες και η πάνω και κάτω αντίσταση.
Ενεργοποιούνται ο θερμοστάτης του φούρνου, οι προειδοποιητικές
λυχνίες, ο ανεμιστήρας και ο ταχυθερμαντήρας.
Ενεργοποιούνται ο θερμοστάτης του φούρνου, οι
προειδοποιητικές λυχνίες και το γκριλ.
Ενεργοποιούνται ο θερμοστάτης του φούρνου, οι προειδοποιητικές
λυχνίες, η πάνω αντίσταση, το γκριλ και ο ανεμιστήρας.
Ενεργοποιούνται ο θερμοστάτης του φούρνου, οι
προειδοποιητικές λυχνίες, ο ταχυθερμαντήρας και ο ανεμιστήρας.
Ενεργοποιούνται ο θερμοστάτης του φούρνου, οι προειδοποιητικές
λυχνίες, ο ταχυθερμαντήρας, η κάτω αντίσταση και ο ανεμιστήρας.
Θα είναι αναμμένη η πάνω αντίσταση του φούρνου.
Θα είναι αναμμένη η κάτω αντίσταση του φούρνου.
Page 81
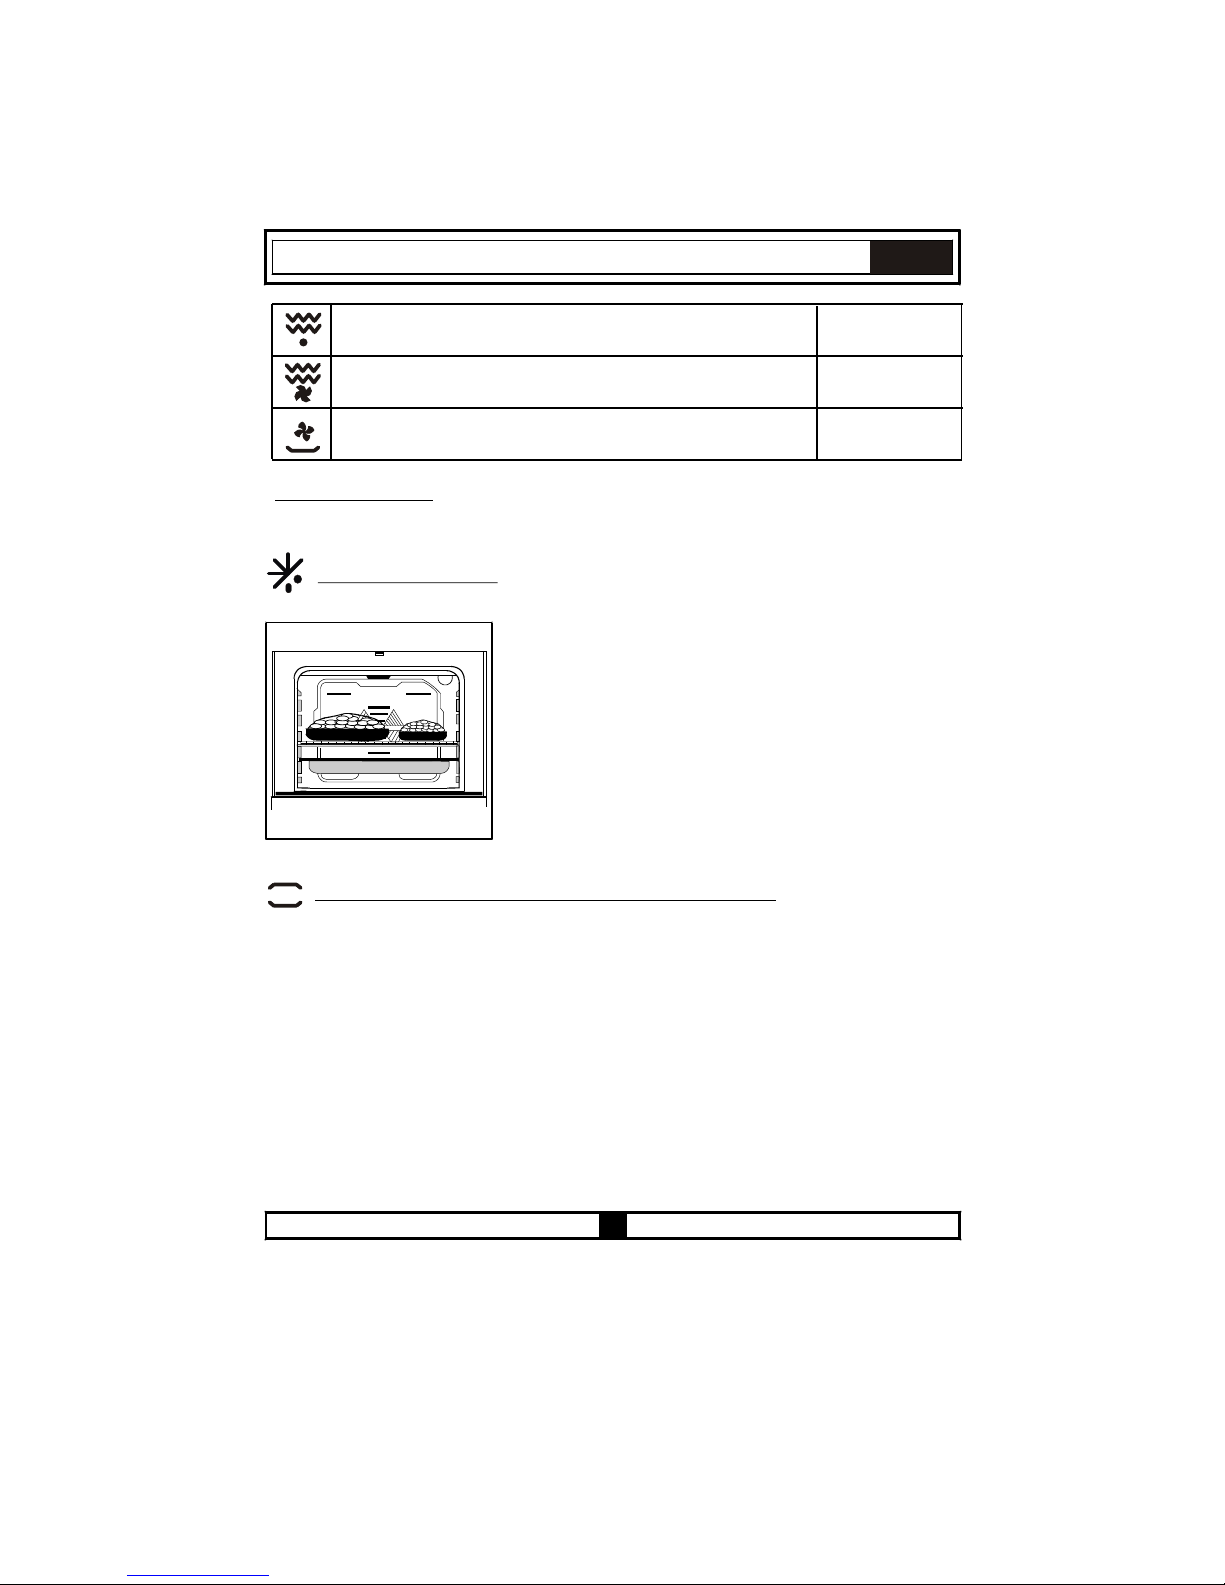
18
_
_
_
EL
Ενεργοποιούνται ο θερμοστάτης του φούρνου, οι προειδοποιητικές
λυχνίες, η πάνω αντίσταση και η αντίσταση γκριλ..
Ενεργοποιούνται ο θερμοστάτης του φούρνου, οι προειδοποιητικές
λυχνίες, η πάνω αντίσταση, η αντίσταση γκριλ και ο ανεμιστήρας..
Ενεργοποιούνται ο θερμοστάτης του φούρνου, οι
προειδοποιητικές λυχνίες και η κάτω αντίσταση.
4.4 ΛΕΙΤΟΥΡΓΙΕΣ:
Η διαθεσιμότητα των λειτουργιών που εξηγούνται πιο κάτω διαφέρει, ανάλογα με το
μοντέλο του προϊόντος.
Λειτουργία απόψυξης:
Μπορείτε να ξεκινήσετε τη λειτουργία απόψυξης
τοποθετώντας τα παγωμένα τρόφιμα στο φούρνο και
γυρίζοντας το κουμπί στην ένδειξη που φαίνεται. Η
λειτουργία αυτή δεν μαγειρεύει ή ψήνει το φαγητό, απλά
βοηθά να ξεπαγώσει γρήγορα. Τοποθετήστε το φαγητό
που θέλετε να αποψυχθεί στη σχάρα στην τρίτη θέση από
κάτω (Εικόνα 6). Για να συλλέξετε το νερό από το λιώσιμο
του πάγου, τοποθετήστε ένα δίσκο σε χαμηλότερη θέση.
Εικόνα 6
Λειτουργία πάνω - κάτω αντίστασης (στατικό μαγείρεμα) :
Σ' αυτό το είδος μαγειρέματος, που περιγράφεται σαν παραδοσιακή μέθοδος, η θερμότητα εκπέμπεται
ομοιόμορφα στο φούρνο από την πάνω και κάτω αντίσταση, εξασφαλίζοντας ομοιόμορφο μαγείρεμα
στην πάνω και κάτω πλευρά του φαγητού. Ρυθμίστε το κουμπί θερμοστάτη του φούρνου σας στη
θερμοκρασία που συνιστάται στον πίνακα μαγειρέματος, ανάλογα με το μαγείρεμα που θα
πραγματοποιήσετε. Συνιστάται προθέρμανση του φούρνου για 10 λεπτά. Αφήστε το φαγητό να
μαγειρευτεί για τη συνιστώμενη χρονική διάρκεια, τοποθετημένο σε κατάλληλο σκεύος. Η θέση αυτή
προτιμάται για κέικ, παντεσπάνι, γλυκά, μακαρονάδα φούρνου, λαζάνια, πίτσα.
Μετά το μαγείρεμα ή ψήσιμο, γυρίστε το κουμπί ελέγχου λειτουργίας φούρνου και το κουμπί του
θερμοστάτη στη θέση απενεργοποίησης. Αφαιρέστε το μαγειρεμένο ή ψημένο φαγητό από το φούρνο
τοποθετώντας το σε ασφαλές μέρος και διασφαλίστε ότι ο φούρνος θα κρυώσει τελείως αφήνοντας
την πόρτα του ανοιχτή. Επειδή ο φούρνος θα βρίσκεται σε υψηλή θερμοκρασία, μείνετε μακριά από
το φούρνο και επίσης κρατάτε και τα παιδιά σας μακριά.
Page 82
19
EL
Λειτουργία ανεμιστήρα και πάνω - κάτω αντίστασης (στατικό μαγείρεμα
με ανεμιστήρα):
Σ' αυτή τη θέση ο αέρας θερμαίνεται από την πάνω και κάτω αντίσταση και κυκλοφορεί στο φούρνο με τη
βοήθεια του ανεμιστήρα.
Ρυθμίστε το κουμπί θερμοστάτη του φούρνου σας στη θερμοκρασία που συνιστάται στον πίνακα
μαγειρέματος, ανάλογα με το μαγείρεμα που θα πραγματοποιήσετε. Γυρίστε το κουμπί του φούρνου στο
σύμβολο αυτής της λειτουργίας, ρυθμίστε το χρονοδιακόπτη στο συνιστώμενο χρόνο μαγειρέματος και
προθερμάνετε το φούρνο για περίπου 10 λεπτά. Τοποθετήστε το φαγητό στο φούρνο σε κατάλληλο
σκεύος και το μαγείρεμα αρχίζει. Στη θέση αυτή συνήθως επιτυγχάνονται πολύ καλά αποτελέσματα στο
ψήσιμο γλυκών. Σ' αυτή τη θέση όλα τα μέρη των φαγητών θα μαγειρευτούν ομοιόμορφα.
Ενδείκνυται για μαγείρεμα σε ένα δίσκο.
Μετά το μαγείρεμα ή ψήσιμο, γυρίστε το κουμπί ελέγχου λειτουργίας φούρνου και τη ρύθμιση
θερμοκρασίας στη θέση απενεργοποίησης. Αφαιρέστε το μαγειρεμένο ή ψημένο φαγητό από το φούρνο
τοποθετώντας το σε ασφαλές μέρος και διασφαλίστε ότι ο φούρνος θα κρυώσει τελείως αφήνοντας την
πόρτα του ανοιχτή. Επειδή ο φούρνος θα βρίσκεται σε υψηλή θερμοκρασία, μείνετε μακριά από το
φούρνο και επίσης κρατάτε και τα παιδιά μακριά.
Λειτουργία γκριλ:
Η λειτουργία αυτή χρησιμεύει για ψητά σχάρας, ψητό κοτόπουλο και ψητό στη σούβλα. Για ψητά
σχάρας, τοποθετήστε τα φαγητά στη σχάρα και τη σχάρα στην ψηλότερη θέση. Αρχίστε τη λειτουργία
γκριλ αφού τοποθετήσετε το δίσκο φούρνου στην τρίτη θέση. Ο δίσκος που τοποθετείται στην τρίτη
θέση θα συλλέγει το λάδι που στάζει από τα φαγητά.
Κατά το ψήσιμο στη σχάρα, η πόρτα του φούρνου πρέπει να διατηρείται κλειστή και η
θερμοκρασία του φούρνου να ρυθμίζεται στους 190°C.
Γυρίστε το κουμπί του θερμοστάτη του φούρνου να δείχνει αυτήν την τιμή θερμοκρασίας. Μετά από
προθέρμανση 5 λεπτών, τοποθετήστε τα φαγητά σας στο φούρνο.
Μετά το μαγείρεμα, απενεργοποιήστε το κουμπί ελέγχου λειτουργίας φούρνου και θερμοστάτη.
Αφαιρέστε το μαγειρεμένο ή ψημένο φαγητό από το φούρνο τοποθετώντας το σε ασφαλές μέρος και
διασφαλίστε ότι ο φούρνος θα κρυώσει τελείως αφήνοντας την πόρτα του ανοιχτή. Επειδή ο φούρνος θα
βρίσκεται σε υψηλή θερμοκρασία, μείνετε μακριά από το φούρνο και επίσης κρατάτε και τα παιδιά μακριά.
Λειτουργία γκριλ και ανεμιστήρα:
Στη λειτουργία αυτή εξασφαλίζεται πλήρες ψήσιμο με ταυτόχρονη λειτουργία του ανεμιστήρα, του
γκριλ και της πάνω αντίστασης.
Για ψητά σχάρας, τοποθετήστε τα φαγητά στη σχάρα και τη σχάρα στην ψηλότερη θέση. Αρχίστε τη
λειτουργία γκριλ αφού τοποθετήσετε το δίσκο φούρνου στην τρίτη θέση. Ο δίσκος που τοποθετείται
στην τρίτη θέση θα συλλέγει το λάδι που στάζει από τα φαγητά.
Κατά το ψήσιμο στη σχάρα, η πόρτα του φούρνου πρέπει να διατηρείται κλειστή και η
θερμοκρασία του φούρνου να ρυθμίζεται στους 190°C.
Page 83
20
EL
Λειτουργία ταχυθερμαντήρα με ανεμιστήρα
Λειτουργία ταχυθερμαντήρα με ανεμιστήρα με κάτω αντίσταση
Η λειτουργία ταχυθερμαντήρα με ανεμιστήρα κατανέμει ομοιόμορφα τη θερμότητα στο φούρνο. Όλα τα
φαγητά θα μαγειρευτούν ομοιόμορφα σε όλες τις σχάρες.
Ρυθμίστε το κουμπί του θερμοστάτη στους επιθυμητούς βαθμούς. Γυρίστε το κουμπί λειτουργιών στο
σύμβολο Ταχυθερμαντήρα. Αφού ολοκληρωθεί η προθέρμανση των 10 λεπτών. τοποθετήστε τα
φαγητά στο φούρνο σε κατάλληλα σκεύη. Η λειτουργία αυτή είναι κατάλληλη για ψήσιμο φαγητών σε
πολλούς δίσκους.
Αν πρόκειται να μαγειρέψετε με δύο δίσκους ταυτόχρονα, όταν ρυθμίζετε τη θερμοκρασία μαγειρέματος
επιλέξτε τη χαμηλότερη θερμοκρασία από τις δύο που αντιστοιχούν στα φαγητά σας, όπως φαίνεται
στον πίνακα. Το μαγείρεμα με δύο δίσκους απαιτεί πρόσθετο χρόνο μαγειρέματος σε σύγκριση με το
μαγείρεμα με ένα δίσκο. Συνήθως το μαγείρεμα δεν τελειώνει ταυτόχρονα και στους δύο δίσκους. Γι
αυτό, βγάλτε από το φούρνο το δίσκο όπου τελείωσε το μαγείρεμα και συνεχίστε το μαγείρεμα με τον
άλλο δίσκο.
Μετά το μαγείρεμα ή ψήσιμο, γυρίστε το κουμπί ελέγχου λειτουργίας φούρνου και το κουμπί του
θερμοστάτη στη θέση απενεργοποίησης. Επίσης ακυρώστε το πρόγραμμα του χρονοδιακόπτη, αν
διατίθεται. Αφαιρέστε το μαγειρεμένο ή ψημένο φαγητό από το φούρνο τοποθετώντας το σε ασφαλές
μέρος και διασφαλίστε ότι ο φούρνος θα κρυώσει τελείως αφήνοντας την πόρτα του ανοιχτή. Επειδή ο
φούρνος θα βρίσκεται σε υψηλή θερμοκρασία, μείνετε μακριά από το φούρνο και επίσης κρατάτε και τα
παιδιά σας μακριά.
Η λειτουργία ταχυθερμαντήρα με ανεμιστήρα και κάτω αντίσταση είναι ιδανική για ψήσιμο πίτσας. Ο
ταχυθερμαντήρας με ανεμιστήρα διανέμει ομοιόμορφα τη θερμότητα στο φούρνο, ενώ η κάτω
αντίσταση εξασφαλίζει το ψήσιμο της ζύμης της πίτσας. Ρυθμίστε το κουμπί επιλογής λειτουργιών του
φούρνου στο σύμβολο αυτής της λειτουργίας. Μετά από προθέρμανση 10 λεπτών, τοποθετήστε τα
φαγητά σας στο φούρνο.
Μετά το μαγείρεμα, γυρίστε το κουμπί ελέγχου λειτουργίας φούρνου και το κουμπί του θερμοστάτη στη
θέση απενεργοποίησης και ακυρώστε το πρόγραμμα του χρονοδιακόπτη. Αφαιρέστε το μαγειρεμένο ή
ψημένο φαγητό από το φούρνο τοποθετώντας το σε ασφαλές μέρος και διασφαλίστε ότι ο φούρνος θα
κρυώσει τελείως αφήνοντας την πόρτα του ανοιχτή. Επειδή ο φούρνος θα βρίσκεται σε υψηλή
θερμοκρασία, μείνετε μακριά από το φούρνο και επίσης κρατάτε και τα παιδιά σας μακριά.
Η λειτουργία ταχυθερμαντήρα με ανεμιστήρα και κάτω αντίσταση είναι ιδανική για ψήσιμο πίτσας. Ο
ταχυθερμαντήρας με ανεμιστήρα διανέμει ομοιόμορφα τη θερμότητα στο φούρνο, ενώ η κάτω
αντίσταση εξασφαλίζει το ψήσιμο της ζύμης της πίτσας.
Λειτουργία κάτω αντίστασης
Λειτουργία πάνω αντίστασης
Με αυτόν τον τρόπο μαγειρέματος, η θερμότητα προέρχεται από την κάτω αντίσταση. Η
λειτουργία κάτω αντίστασης είναι κατάλληλη για θέρμανση του φαγητού αντί για
μαγείρεμα.
Με αυτόν τον τρόπο μαγειρέματος, η θερμότητα που εκπέμπεται από την πάνω
αντίσταση μαγειρεύει το πάνω μέρος του φαγητού. Η λειτουργία πάνω αντίστασης είναι
κατάλληλη για ξεροψήσιμο της πάνω πλευράς ήδη μαγειρεμένου φαγητού και για
θέρμανση του φαγητού.
Page 84
21
ΚΑΤΩ-ΠΑΝΩ και ανεμιστήρα
Στη λειτουργία αυτή εξασφαλίζεται του γκριλ και της πάνω αντίστασης.Η λειτουργία αυτή χρησιμεύει
για ψητά σχάρας, ψητό κοτόπουλο και ψητό στη σούβλα. Για ψητά σχάρας, τοποθετήστε τα φαγητά στη
σχάρα και τη σχάρα στην ψηλότερη θέση. Μπορείτε να ξεκινήσετε τη λειτουργία γκριλ αφού τοποθετήσετε το
δίσκο φούρνου στην 3η θέση.
3. Ο δίσκος που τοποθετήθηκε στην 3η θέση θα συλλέγει το λάδι που στάζει από τα φαγητά.
Κατά το ψήσιμο στη σχάρα, η πόρτα του φούρνου πρέπει να διατηρείται κλειστή και η θερμοκρασία
του φούρνου να ρυθμίζεται στους 190°C.
Γυρίστε το κουμπί του θερμοστάτη φούρνου σ' αυτή την τιμή θερμοκρασίας. Μετά από προθέρμανση 5
λεπτών, τοποθετήστε τα φαγητά σας στο φούρνο.
Μετά το μαγείρεμα, γυρίστε το κουμπί ελέγχου λειτουργίας φούρνου και το κουμπί του θερμοστάτη στη θέση
απενεργοποίησης και ακυρώστε το πρόγραμμα του χρονοδιακόπτη. Αφαιρέστε το μαγειρεμένο ή ψημένο
φαγητό από το φούρνο τοποθετώντας το σε ασφαλές μέρος και διασφαλίστε ότι ο φούρνος θα κρυώσει
τελείως αφήνοντας την πόρτα του ανοιχτή. Επειδή ο φούρνος θα βρίσκεται σε υψηλή θερμοκρασία, μείνετε
μακριά από το φούρνο και επίσης κρατάτε και τα παιδιά σας μακριά
EL
Λειτουργία διπλού γκριλ και ανεμιστήρα
Στη λειτουργία αυτή εξασφαλίζεται πλήρες ψήσιμο με ταυτόχρονη λειτουργία του ανεμιστήρα,
του γκριλ και της πάνω αντίστασης. Επίσης χρησιμοποιείται για γρηγορότερο ψήσιμο σχάρας και ψήσιμο
σε μεγαλύτερη επιφάνεια, για ψητό κοτόπουλο και ψητό στη σούβλα.
Για ψητά σχάρας, τοποθετήστε τα φαγητά στη σχάρα και τη σχάρα στην ψηλότερη θέση. Μπορείτε να
ξεκινήσετε τη λειτουργία γκριλ αφού τοποθετήσετε το δίσκο φούρνου στην 3η θέση.
3. Ο δίσκος που τοποθετήθηκε στην 3η θέση θα συλλέγει το λάδι που στάζει από τα φαγητά.
Κατά το ψήσιμο στη σχάρα, η πόρτα του φούρνου πρέπει να διατηρείται κλειστή και η θερμοκρασία
του φούρνου να ρυθμίζεται στους 190°C.
Γυρίστε το κουμπί του θερμοστάτη φούρνου σ' αυτή την τιμή θερμοκρασίας. Μετά από προθέρμανση 5
λεπτών, τοποθετήστε τα φαγητά σας στο φούρνο.
Μετά το μαγείρεμα, γυρίστε το κουμπί ελέγχου λειτουργίας φούρνου και το κουμπί του θερμοστάτη στη
θέση απενεργοποίησης και ακυρώστε το πρόγραμμα του χρονοδιακόπτη. Αφαιρέστε το μαγειρεμένο ή
ψημένο φαγητό από το φούρνο τοποθετώντας το σε ασφαλές μέρος και διασφαλίστε ότι ο φούρνος θα
κρυώσει τελείως αφήνοντας την πόρτα του ανοιχτή. Επειδή ο φούρνος θα βρίσκεται σε υψηλή
θερμοκρασία, μείνετε μακριά από το φούρνο και επίσης κρατάτε και τα παιδιά σας μακριά.
Λειτουργία κάτω αντίστασης και ανεμιστήρα
Με αυτόν τον τρόπο μαγειρέματος, η θερμότητα κατανέμεται από την κάτω αντίσταση και τον
ανεμιστήρα. Η λειτουργία αυτή μπορεί να χρησιμοποιηθεί για να θερμάνει το φαγητό ομοιόμορφα σε
σύντομο χρόνο.
Page 85
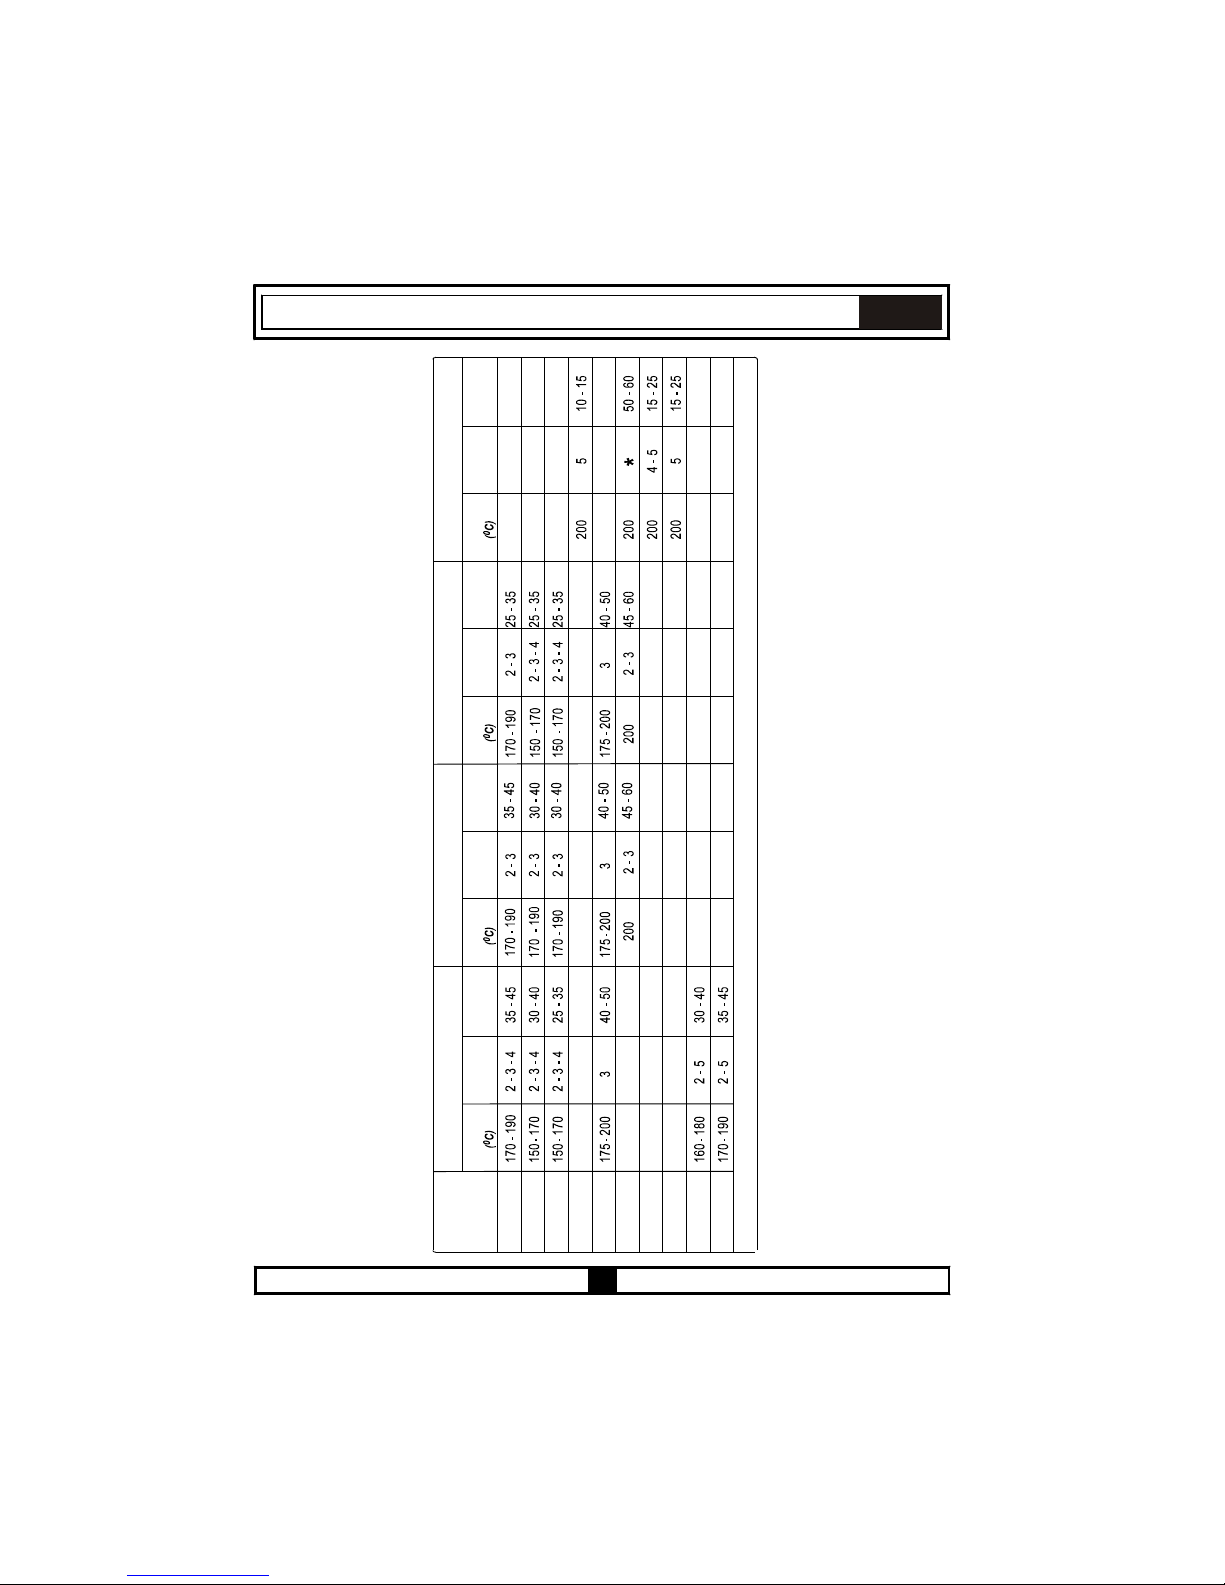
22
EL
ΤΑΧΥΘΕΡΜΑΝΤΗΡΑΣ
ΦΑΓΗΤΑ
ΚΑΤΩ-ΠΑΝΩ ΜΕ ΑΝΕΜΙΣΤΗΡΑ
ΠΑΝΩ-ΚΑΤΩ
ΓΚΡΙΛ
Θέση στο
φούρνο
Θέση στο
φούρνο
Θέση στο
φούρνο
Θέση στο
φούρνο
Χρόνος
μαγειρέματος
(λεπτά)
Χρόνος
μαγειρέματος
(λεπτά)
Χρόνος
μαγειρέματος
(λεπτά)
Χρόνος
μαγειρέματος
(λεπτά)
Γλυκό
ταψιού
Κέικ
Μπισκότα
Μπιφτέκια
Φαγητό
ταψιού
Κοτόπουλο
Χοιρινή
μπριζόλα
Μοσχαρίσια
μπριζόλα
Κέικ σε
δύο δίσκους
* Μαγείρεμα με σούβλα για κοτόπουλο…
Γλυκό ταψιού
σε δύο δίσκους
Θέση
θερμοστάτη
Θέση
θερμοστάτη
Θέση
θερμοστάτη
Θέση
θερμοστάτη
Page 86
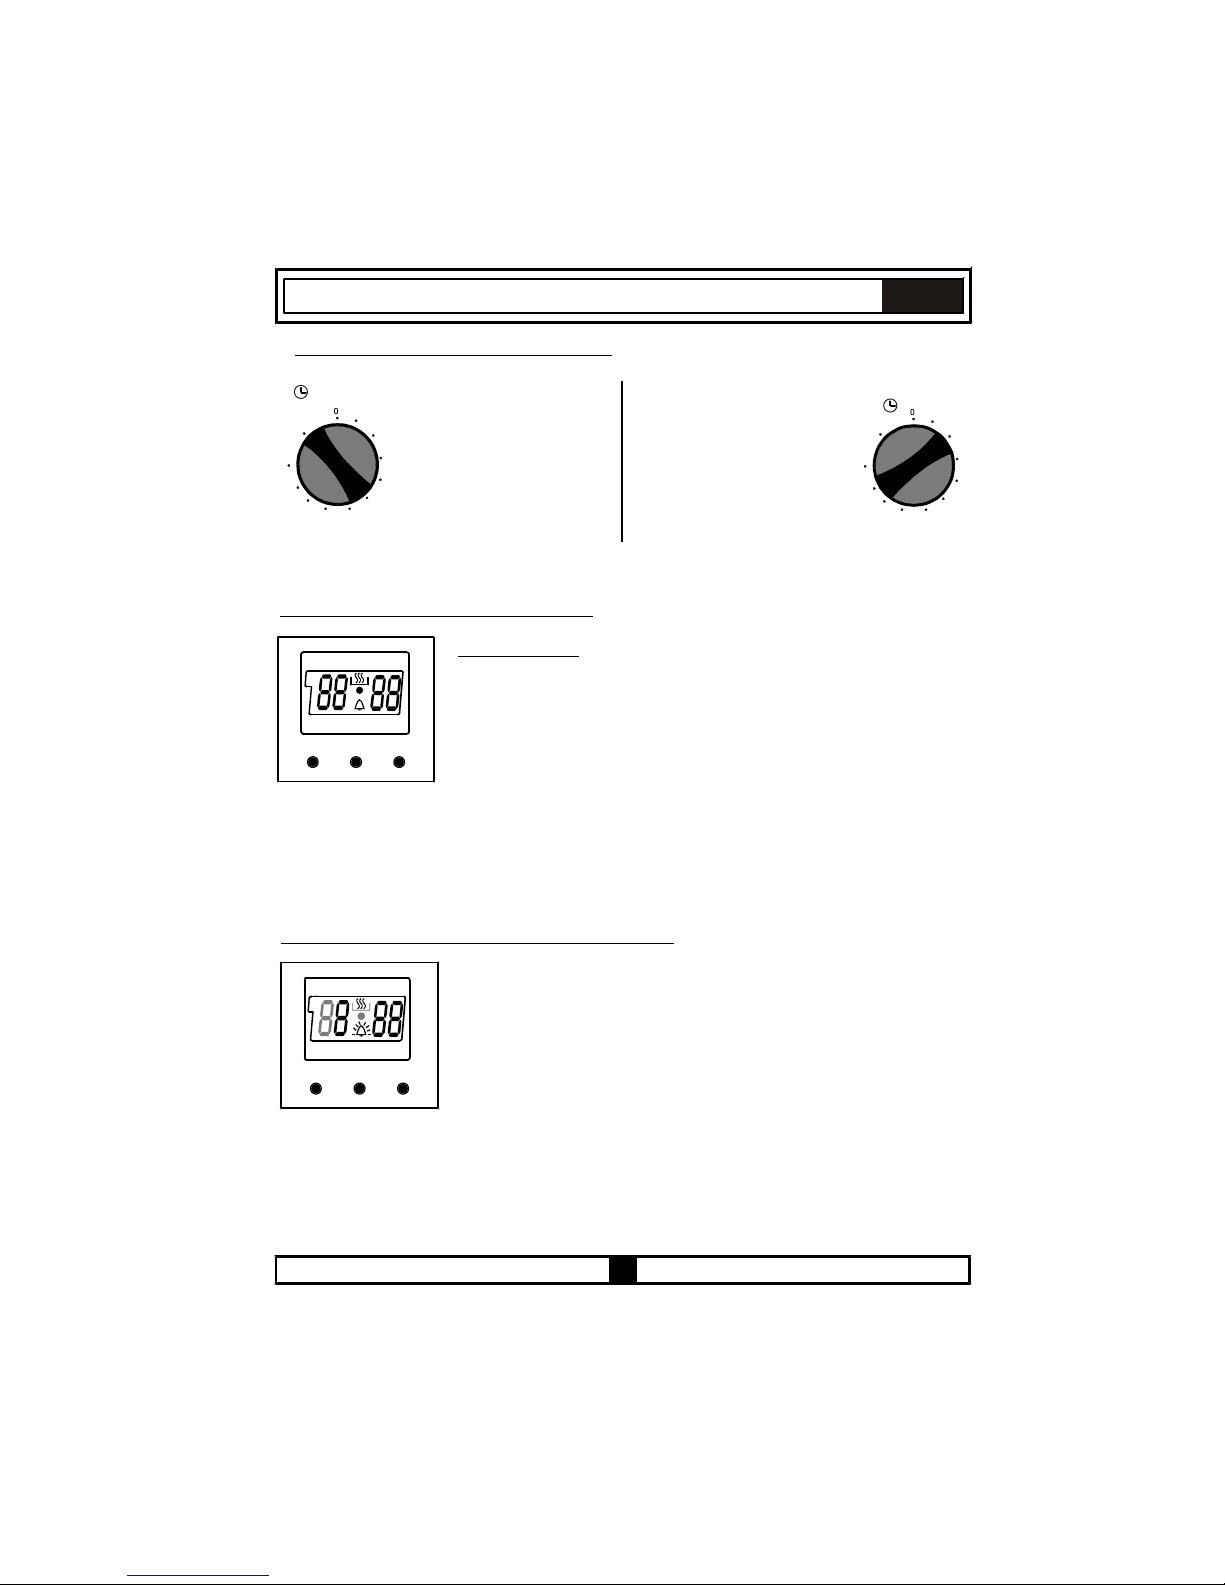
23
-
+
MODE
A
-
+
MODE
A
10
20
30
40
50
70
80
90
60
100
M
10
20
30
40
50
70
80
90
60
100
M
EL
ΧΡΗΣΗ ΤΟΥ ΜΗΧΑΝΙΚΟΥ ΧΡΟΝΟΔΙΑΚΟΠΤΗ:
Χειροκίνητη λειτουργία
Όταν γυρίσετε το κουμπί
χρονοδιακόπτη στη θέση Μ, όπως
φαίνεται στην εικόνα, μπορείτε να
χρησιμοποιείτε το φούρνο χωρίς όριο
χρόνου.
Όταν το κουμπί χρονοδιακόπτη είναι
στη θέση 0, ο φούρνος δεν θα
λειτουργήσει.
Λειτουργία μέσω ρύθμισης
χρόνου
Περιστρέψτε το κουμπί
χρονοδιακόπτη δεξιόστροφα σε
ορισμένο χρόνο μεταξύ 0 και 100
λεπτών, όπως φαίνεται στην εικόνα.
Ο φούρνος θα σβήσει όταν περάσει
το ορισμένο χρονικό διάστημα και ο
χρονοδιακόπτης θα δώσει μια
ηχητική ειδοποίηση μια φορά.
ΧΡΗΣΗ ΤΟΥ ΨΗΦΙΑΚΟΥ ΧΡΟΝΟΔΙΑΚΟΠΤΗ:
Ρύθμιση ώρας:
Πριν αρχίσετε τη χρήση του φούρνου, πρέπει να ρυθμίσετε την ώρα. Αφού
ο φούρνος συνδεθεί στο ρεύμα, θα αρχίσουν να αναβοσβήνουν στην οθόνη
το σύμβολο (A) και τα τρία ”0”. Πιέστε τα πλήκτρα (+) και (-) ταυτόχρονα.
Στην οθόνη θα εμφανιστεί το σύμβολο . Επίσης θα αρχίσει να αναβοσβήνει
η τελεία στο μέσον της οθόνης. Με τα πλήκτρα (+) και (-) ρυθμίστε την
τρέχουσα ώρα ενώ αναβοσβήνει η τελεία. Μετά τη ρύθμιση η τελεία θα
πρέπει να είναι μόνιμα αναμμένη.
Αφού ο φούρνος συνδεθεί στο ρεύμα, όταν αναβοσβήνουν στην οθόνη το σύμβολο (A) και τα τρία “0”, ο
φούρνος δεν μπορεί να λειτουργήσει με χρήση των κουμπιών. Όταν πιεστούν ταυτόχρονα τα πλήκτρα (+)
και (-) για τη ρύθμιση ώρας, στην οθόνη θα εμφανιστεί το σύμβολο . Όταν εμφανιστεί αυτό το σύμβολο,
μπορείτε να χειριστείτε το φούρνο χειροκίνητα.
Αν ο ρυθμισμένος χρόνος του φούρνου μηδενιστεί λόγω διακοπής ρεύματος, η διαδικασία
ρύθμισης πρέπει να επαναληφθεί.
Ρύθμιση χρόνου ηχητικού σήματος ειδοποίησης:
Η λειτουργία αυτή χρησιμοποιείται για τη λήψη ηχητικής ειδοποίησης στο
τέλος της ρυθμισμένης χρονικής περιόδου.
Πιέστε το πλήκτρο MODE στο μέσο. Στην οθόνη θα αναβοσβήνει το σύμβολο
. Επίσης θα εμφανιστούν τρία "0". Ρυθμίστε την επιθυμητή χρονική περίοδο
για την ειδοποίηση με τα πλήκτρα (+) και (-) ενώ αναβοσβήνει το σύμβολο .
Μετά την ολοκλήρωση της ρύθμισης, το σύμβολο θα είναι μόνιμα αναμμένο.
Όταν το σύμβολο αρχίσει να είναι μόνιμα αναμμένο, έχει ολοκληρωθεί η
ρύθμιση του χρόνου ηχητικής ειδοποίησης.
Page 87
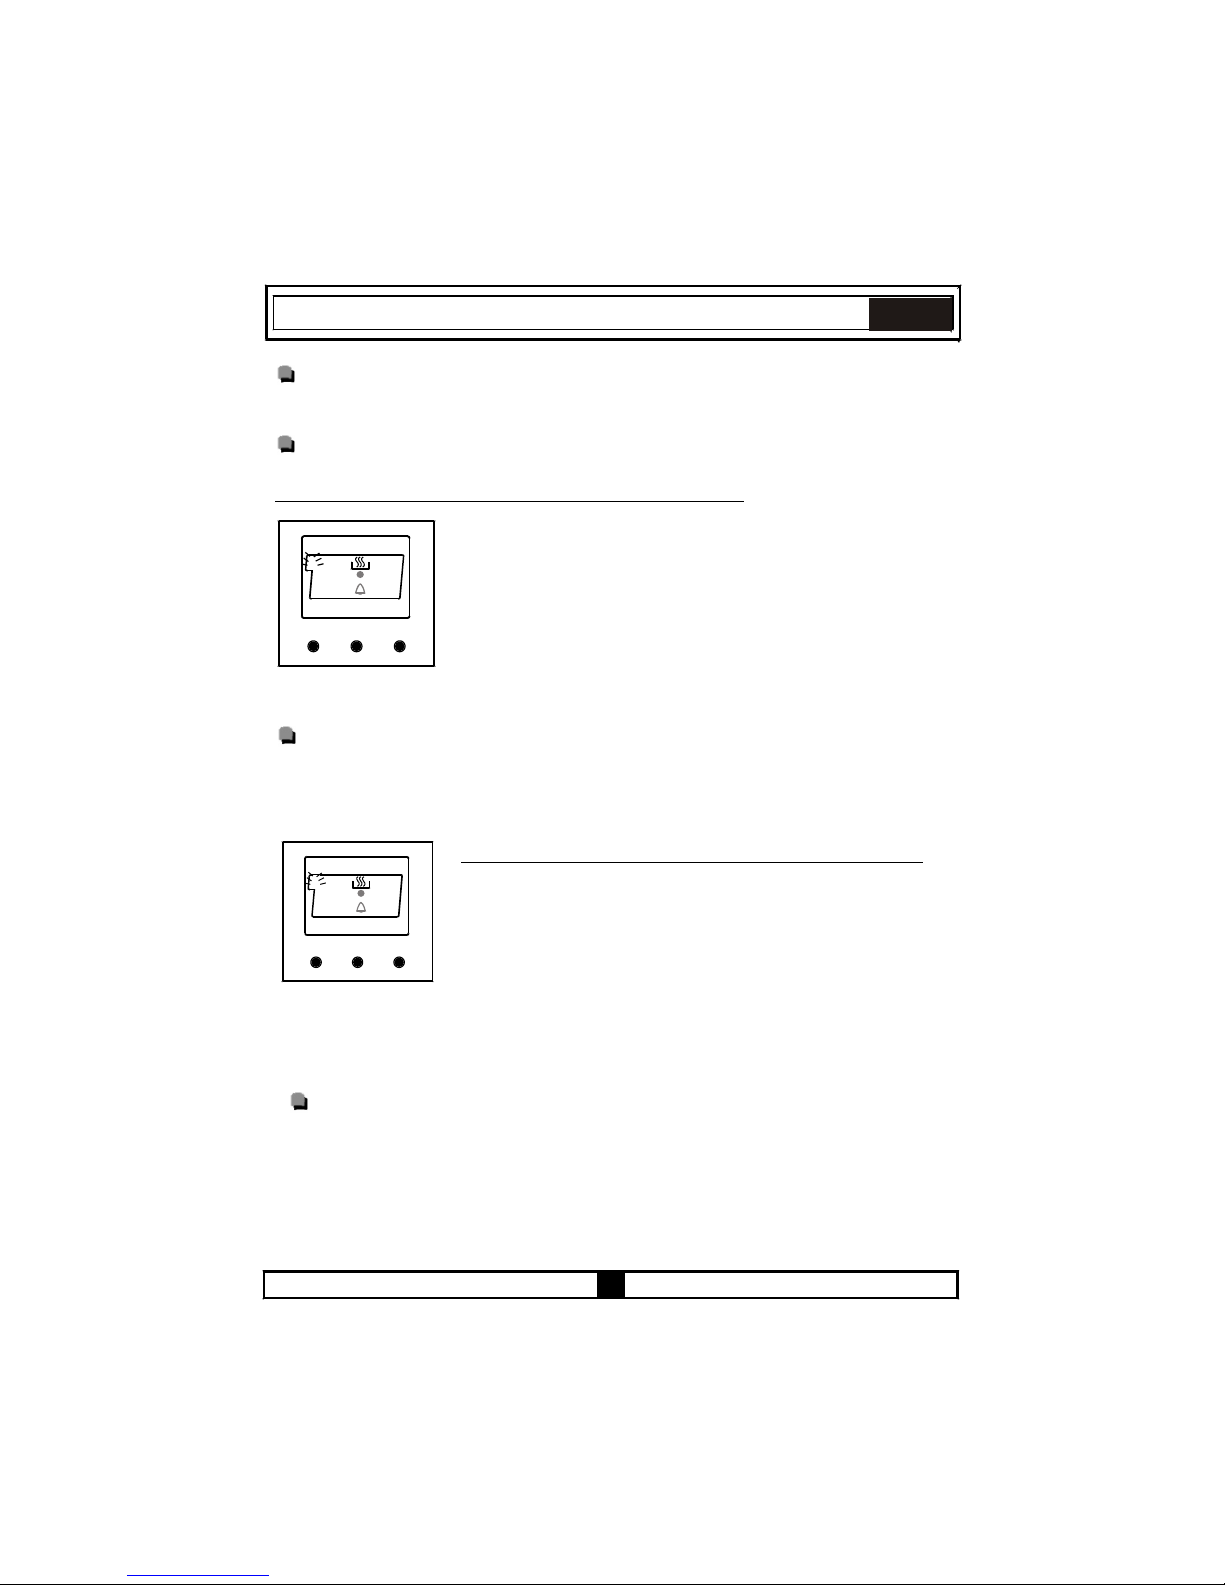
24
-
+
MODE
A
du
r
EL
Ο χρόνος ηχητικής ειδοποίησης μπορεί να ρυθμιστεί στην περιοχή από 0 ως 23.59.
Όταν λήξει ο χρόνος, ο χρονοδιακόπτης εκπέμπει ηχητική ειδοποίηση και στην οθόνη αρχίζει να
αναβοσβήνει το σύμβολο . Πιέζοντας οποιοδήποτε πλήκτρο θα σταματήσει η ηχητική ειδοποίηση και
το σύμβολο θα πάψει να εμφανίζεται στην οθόνη.
Η ρύθμιση χρόνου ηχητικής ειδοποίησης είναι μόνο για λόγους ειδοποίησης. Ο φούρνος δεν
θα ενεργοποιηθεί με τη λειτουργία αυτή.
Ημιαυτόματος προγραμματισμός βάσει του χρόνου μαγειρέματος:
Η λειτουργία αυτή χρησιμοποιείται για μαγείρεμα επιθυμητής διάρκειας. Τοποθετήστε στο
φούρνο τα φαγητά που θα μαγειρευτούν. Ο φούρνος ρυθμίζεται στην επιθυμητή
λειτουργία μαγειρέματος. Ο θερμοστάτης φούρνου ρυθμίζεται στους επιθυμητούς
βαθμούς ανάλογα με το φαγητό που θα μαγειρευτεί.
Πατήστε συνεχόμενα το πλήκτρο MODE ώσπου να εμφανιστεί " stop" (διακοπή) στην
οθόνη του χρονοδιακόπτη. Όταν δείτε την ένδειξη "stop" στην οθόνη του χρονοδιακόπτη,
θα αρχίσει να αναβοσβήνει το σύμβολο (A). Όταν ο χρονοδιακόπτης είναι σ' αυτή τη θέση
ρυθμίστε με τα πλήκτρα (+) και (-) τον κατάλληλο χρόνο για το φαγητό που θέλετε να
μαγειρέψετε. Όταν έχει ολοκληρωθεί η διαδικασία ρύθμισης, θα εμφανιστεί στην οθόνη η
τρέχουσα ώρα και τα σύμβολα (A) και θα αρχίσουν να είναι μόνιμα αναμμένα στην οθόνη.
Όταν γίνει αυτό θα αρχίσει και η λειτουργία του φούρνου.
Εικόνα 14
-
+
MODE
A
En
d
Εικόνα 15
Μπορεί να ρυθμιστεί χρόνος μαγειρέματος μεταξύ 0 και 10 ωρών.
Όταν λήξει το καθορισμένο χρονικό διάστημα, ο χρονοδιακόπτης θα σταματήσει τη λειτουργία του φούρνου και θα
εκπέμψει ηχητική ειδοποίηση. Επίσης στην οθόνη θα αρχίσει να αναβοσβήνει το σύμβολο (A). Αφού γυρίσετε το κουμπί
φούρνου και το κουμπί θερμοστάτη στη θέση 0, η ηχητική ειδοποίηση θα σταματήσει πιέζοντας οποιοδήποτε πλήκτρο
του χρονοδιακόπτη. Επίσης ο χρονοδιακόπτης θα επιστρέψει στη λειτουργία χειροκίνητης χρήσης.
Ημιαυτόματος προγραμματισμός βάσει χρόνου τέλους μαγειρέματος:
Αυτή η λειτουργία χρησιμοποιείται για μαγείρεμα σύμφωνα με τον επιθυμητό
χρόνο τέλους μαγειρέματος. Τοποθετήστε το φαγητό στο φούρνο. Ο φούρνος
ρυθμίζεται στον επιθυμητό τρόπο μαγειρέματος. Ο θερμοστάτης φούρνου
ρυθμίζεται στους επιθυμητούς βαθμούς ανάλογα με το φαγητό που θα μαγειρευτεί.
Πατήστε συνεχόμενα το πλήκτρο MODE έως ότου εμφανιστεί "end" (τέλος) στην
οθόνη του χρονοδιακόπτη. Όταν δείτε την ένδειξη "end" στην οθόνη του
χρονοδιακόπτη, θα αρχίσουν να αναβοσβήνουν το σύμβολο (A) και η τρέχουσα
ώρα.
Ενώ ο χρονοδιακόπτης είναι σ' αυτή τη θέση, με τα πλήκτρα (+) και (-) ρυθμίστε το χρόνο τέλους
μαγειρέματος που αντιστοιχεί στο φαγητό που θέλετε να μαγειρέψετε. Όταν έχει ολοκληρωθεί η
διαδικασία ρύθμισης, θα εμφανιστεί στην οθόνη η τρέχουσα ώρα και τα σύμβολα (A) και θα αρχίσουν
να είναι μόνιμα αναμμένα στην οθόνη. Όταν γίνει αυτό θα αρχίσει και η λειτουργία του φούρνου.
Μπορείτε να ορίσετε μία ώρα τέλους έως 10 ώρες μετά την τρέχουσα ώρα.
Όταν λήξει το καθορισμένο χρονικό διάστημα, ο χρονοδιακόπτης θα σταματήσει τη λειτουργία του
φούρνου και θα εκπέμψει ηχητική ειδοποίηση. Επίσης στην οθόνη θα αρχίσει να αναβοσβήνει το
σύμβολο (A). Αφού γυρίσετε το κουμπί φούρνου και το κουμπί θερμοστάτη στη θέση 0, η ηχητική
ειδοποίηση θα σταματήσει πιέζοντας οποιοδήποτε πλήκτρο του χρονοδιακόπτη. Επίσης ο
χρονοδιακόπτης θα επιστρέψει στη λειτουργία χειροκίνητης χρήσης.
Page 88

2
5
EL
Πλήρως αυτόματος προγραμματισμός:
Πρώτα, πατήστε συνεχόμενα το πλήκτρο MODE έως ότου εμφανιστεί "stop" (διακοπή) στην
οθόνη του χρονοδιακόπτη. Όταν δείτε την ένδειξη "stop" στην οθόνη του χρονοδιακόπτη, θα
αρχίσει να αναβοσβήνει το σύμβολο (A). Όταν ο χρονοδιακόπτης είναι σ' αυτή τη θέση
ρυθμίστε με τα πλήκτρα (+) και (-) τον κατάλληλο χρόνο για το φαγητό που θέλετε να
μαγειρέψετε. Όταν έχει ολοκληρωθεί η διαδικασία ρύθμισης, στην οθόνη θα εμφανιστεί η
τρέχουσα ώρα και θα είναι μόνιμα αναμμένα στην οθόνη τα σύμβολα (A) και (Εικόνα 14).
Μπορεί να ρυθμιστεί διάρκεια μαγειρέματος μεταξύ 0 και 10 ωρών.
Στη συνέχεια, πατήστε συνεχόμενα το πλήκτρο MODE έως ότου εμφανιστεί η ένδειξη "end"
(τέλος) στην οθόνη του χρονοδιακόπτη. Όταν δείτε "end" στην οθόνη του χρονοδιακόπτη, θα
αρχίσουν να αναβοσβήνουν το σύμβολο (A) και η τρέχουσα ώρα, με την προσθήκη της
ορισμένης περιόδου μαγειρέματος. Ενώ ο χρονοδιακόπτης είναι σ' αυτή τη θέση, με τα
πλήκτρα (+) και (-) ρυθμίστε τον κατάλληλο χρόνο τέλους για το φαγητό. Όταν έχει
ολοκληρωθεί η διαδικασία ρύθμισης, στην οθόνη θα εμφανιστεί η τρέχουσα ώρα και το
σύμβολο (A) θα αρχίσει να είναι μόνιμα αναμμένο στην οθόνη (Εικόνα 15).
Μπορείτε να ρυθμίσετε χρόνο έως 23.59 ώρες μετά το χρόνο που υπολογίζεται
προσθέτοντας τη διάρκεια μαγειρέματος στην τρέχουσα ώρα.
Η λειτουργία του φούρνου θα αρχίσει την ώρα που υπολογίζεται αφαιρώντας τη διάρκεια
μαγειρέματος από τον χρόνο τέλους που ορίστηκε και θα σταματήσει στον καθορισμένο
χρόνο τέλους. Ο χρονοδιακόπτης θα εκπέμψει ηχητική ειδοποίηση και το σύμβολο (Α) θα
αρχίσει να αναβοσβήνει. Αφού γυρίσετε το κουμπί φούρνου και το κουμπί θερμοστάτη στη
θέση 0, η ηχητική ειδοποίηση θα σταματήσει πιέζοντας οποιοδήποτε πλήκτρο του
χρονοδιακόπτη. Επίσης ο χρονοδιακόπτης θα επιστρέψει στη λειτουργία χειροκίνητης
χρήσης.
Page 89

26
EL
ΜΕΡΟΣ 5: ΚΑΘΑΡΙΣΜΟΣ ΚΑΙ ΣΥΝΤΗΡΗΣΗ
5.1 ΓΕΝΙΚΑ
Πριν αρχίσετε τον καθαρισμό του φούρνου σας, βεβαιωθείτε ότι όλα τα κουμπιά ελέγχου είναι στη
θέση απενεργοποίησης και η ότι η συσκευή έχει κρυώσει. Αποσυνδέστε τη συσκευή από το ρεύμα.
Μη χρησιμοποιήσετε υλικά καθαρισμού με σωματίδια τα οποία μπορούν να χαράξουν τα εμαγιέ και
βαμμένα μέρη του φούρνου σας.
Χρησιμοποιείτε καθαριστικά σε μορφή κρέμας ή υγρού, που δεν περιέχουν σωματίδια.
Επειδή μπορεί να προκαλέσουν ζημιά στις επιφάνειες της συσκευής, μη χρησιμοποιείτε
καυστικές κρέμες, σκόνες καθαρισμού που χαράζουν, χοντρό σύρμα καθαρισμού ή σκληρά
εργαλεία. Σε περίπτωση που στο φούρνο σας καούν τυχόν υγρά που χύθηκαν, θα προκληθεί
ζημιά στην εμαγιέ επιφάνεια. Καθαρίζετε αμέσως υγρά που χύνονται κατά το μαγείρεμα.
Μη χρησιμοποιείτε συσκευές καθαρισμού με ατμό για τον καθαρισμό του φούρνου.
5.2 ΚΑΘΑΡΙΣΜΟΣ ΤΟΥ ΦΟΥΡΝΟΥ
Φροντίστε απαραίτητα να αποσυνδέσετε το φούρνο από το ρεύμα πριν αρχίσετε τον καθαρισμό του.
Τα αποτελέσματα του καθαρισμού θα είναι καλύτερα αν καθαρίσετε το εσωτερικό του φούρνου όταν ο
φούρνος είναι ελαφρά ζεστός. Μετά από κάθε χρήση, σκουπίστε το φούρνο σας με μαλακό πανί που
έχει υγρανθεί με σαπουνόνερο. Κατόπιν σκουπίστε τον πάλι, αυτή τη φορά με ένα υγρό πανί και
τέλος σκουπίστε τον για να στεγνώσει. Από καιρό σε καιρό ίσως χρειαστεί πλήρης καθαρισμός με
χρήση υγρού καθαριστικού. Μην καθαρίζετε με ξηρά καθαριστικά και σκόνες. Για προϊόντα με
καταλυτικά εμαγιέ πλαίσια δεν απαιτείται καθαρισμός για τα πίσω και τα πλευρικά τοιχώματα του
εσωτερικού πλαισίου. Ωστόσο, συνιστάται να τα αντικαθιστάτε μετά από ορισμένη χρονική περίοδο,
ανάλογα με τη χρήση τους.
5.3 ΚΑΘΑΡΙΣΜΟΣ ΤΗΣ ΥΑΛΟΚΕΡΑΜΙΚΗΣ ΠΛΑΚΑΣ ΕΣΤΙΩΝ
Πριν αρχίσετε τον καθαρισμό αποσυνδέστε τη συσκευή από το ρεύμα.
Περιμένετε να κρυώσει εντελώς η υαλοκεραμική επιφάνεια πριν αρχίσετε τον καθαρισμό.
Βεβαιωθείτε ότι τα καθαριστικά που θα χρησιμοποιήσετε δεν περιέχουν σωματίδια που μπορεί να
χαράξουν το γυαλί. Χρησιμοποιείτε καθαριστικά σε μορφή κρέμας ή υγρού. Θα πρέπει να καθαρίσετε
την υαλοκεραμική επιφάνεια με πανί βρεγμένο με νερό και στη συνέχεια να τη στεγνώσετε με μαλακό
πανί έως ότου απομακρυνθεί κάθε κατάλοιπο καθαριστικού.
Για τον καθαρισμό χυμένων φαγητών και καταλοίπων μπορείτε να χρησιμοποιήσετε τη σπάτουλα
καθαρισμού, αν παρέχεται μαζί με το προϊόν που προμηθευτήκατε.
Τα φαγητά με ζάχαρη πρέπει να σκουπίζονται αμέσως μόλις χυθούν, χωρίς να περιμένετε να κρυώσει
η υαλοκεραμική επιφάνεια.
Page 90

27
EL
Το τρίψιμο με σύρμα καθαρισμού μπορεί να προξενήσει ζημιά στην υαλοκεραμική επιφάνεια. Η σκόνη
που συσσωρεύεται στην επιφάνεια θα πρέπει να καθαρίζεται με υγρό πανί.
Τυχόν αλλαγές σε χρώμα που μπορεί να προκύψουν στην υαλοκεραμική επιφάνεια δεν επηρεάζουν τη
λειτουργικότητα ή την ανθεκτικότητα του υαλοκεραμικού υλικού. Ο λόγος για τις αλλοιώσεις χρώματος δεν
είναι η αλλαγή του υλικού, αλλά ίσως το ότι δεν καθαρίζονται καμένα κατάλοιπα από την επιφάνεια ή
φθορές της επιφάνειας από χρησιμοποιούμενα σκεύη ή χρήση ακατάλληλων καθαριστικών. Θα πρέπει
πάντα να χρησιμοποιείται η σπάτουλα καθαρισμού πριν τα χημικά καθαριστικά. Με τη σπάτουλα αυτή
μπορείτε να καθαρίσετε και τους μικρότερους λεκέδες από την υαλοκεραμική επιφάνεια. Οι ακαθαρσίες
που απομακρύνονται δύσκολα, όπως το λειωμένο πλαστικό, παχύρρευστα λάδια και υλικά με ζάχαρη,
μπορούν να αφαιρεθούν εύκολα με τη σπάτουλα. Η σπάτουλα, επειδή περιλαμβάνει λεπίδα ξυραφιού,
είναι επικίνδυνη και πρέπει να την φυλάσσετε μακριά από τα παιδιά. Κατά τον καθαρισμό με τη σπάτουλα,
προσέξτε ιδιαίτερα να μην ξύσετε τη συγκολλητικά από σιλικόνη στις πλευρές του γυαλιού.
5.4 ΣΥΝΤΗΡΗΣΗ
Αντικατάσταση της λάμπας του φούρνου
Συνιστάται να αφήσετε αυτήν την εργασία για το εξουσιοδοτημένο συνεργείο. Πριν προχωρήσετε,
αποσυνδέστε το φούρνο από το ρεύμα και βεβαιωθείτε ότι έχει κρυώσει. Αφού αφαιρέσετε το κάλυμμα της
λάμπας, αφαιρέστε τη λάμπα. Τοποθετήστε στη θέση της λάμπας που έχετε αφαιρέσει τη νέα λάμπα, που
θα πρέπει να έχει χαρακτηριστικά αντοχής ως τους 300°C. Ανταλλακτική λάμπα μπορείτε να
προμηθευτείτε στα εξουσιοδοτημένα καταστήματα. Κατόπιν τοποθετήστε πάλι το προστατευτικό γυαλί
της λάμπας. Με την ολοκλήρωση της διαδικασίας ο φούρνος θα είναι έτοιμος για χρήση.
Page 91

28
EL
TEIL 6: SERVICE UND TRANSPORT
6.1 ΑΠΑΙΤΗΣΕΙΣ ΠΡΙΝ ΑΠΕΥΘΥΝΘΕΙΤΕ ΣΤΟ ΣΕΡΒΙΣ
Αν δεν λειτουργεί ο φούρνος:
Ίσως ο φούρνος έχει αποσυνδεθεί από το ρεύμα ή υπάρχει διακοπή ρεύματος.
Αν ο φούρνος δεν θερμαίνει:
Ίσως δεν έχει ρυθμιστεί η θερμοκρασία με το κουμπί ρύθμισης θερμοκρασίας φούρνου.
Αν δεν ανάβει το φως του φούρνου:
Ελέγξτε αν η συσκευή τροφοδοτείται με ρεύμα.
Ελέγξτε μήπως έχει καεί η λάμπα.
Μαγείρεμα (Αν το μαγείρεμα δεν είναι ομοιόμορφο στην πάνω και στην κάτω πλευρά):
Ελέγξτε τις θέσεις των ραφιών, το χρόνο μαγειρέματος και τις τιμές θερμοκρασίας
σύμφωνα με το εγχειρίδιο.
ΥΠΗΡΕΣΙΑ ΕΞΥΠΗΡΕΤΗΣΗΣ ΠΕΛΑΤΩΝ
Αν δεν μπορείτε να εντοπίσετε την αιτία της δυσλειτουργίας, απενεργοποιήστε τη συσκευή
(μην την υποβάλετε σε κακομεταχείριση) και απευθυνθείτε στην Υπηρεσία Εξυπηρέτησης.
ΑΡΙΘΜΟΣ ΣΕΙΡΑΣ ΠΡΟΪΟΝΤΟΣ. Που μπορώ να τον βρω;
Είναι σημαντικό να αναφέρετε στην Υπηρεσία Εξυπηρέτησης τον κωδικό του προϊόντος
σας και τον αριθμό σειράς του (16ψήφιος κωδικός ο οποίος αρχίζει με τον αριθμό 3).
Μπορείτε να τον βρείτε στο πιστοποιητικό εγγύησης ή στην πινακίδα στοιχείων που
βρίσκεται στην ίδια τη συσκευή.
Αυτό θα βοηθήσει να αποφευχθούν περιττές μετακινήσεις των τεχνικών και επομένως
(πράγμα που είναι πιο σημαντικό) να γίνει εξοικονόμηση των αντίστοιχων δαπανών.
6.2 ΠΛΗΡΟΦΟΡΙΕΣ ΣΧΕΤΙΚΑ ΜΕ ΤΗ ΜΕΤΑΦΟΡΑ
Αν χρειάζεται μεταφορά:
Φυλάξτε την αρχική συσκευασία του προϊόντος και αν χρειαστεί μεταφορά, μεταφέρετέ το
σ' αυτήν. Ακολουθήστε τις επισημάνσεις μεταφοράς πάνω στη συσκευασία.
Αν δεν διατίθεται η αρχική συσκευασία:
Πάρτε μέτρα προστασίας από πιθανά χτυπήματα των εξωτερικών επιφανειών (γυάλινων
και βαμμένων) του φούρνου και της πλάκας εστιών.
Page 92

Το σύμβολο στο προϊόν ή τη συσκευασία του δείχνει ότι το προϊόν αυτό δεν
επιτρέπεται να απορριφθεί με τα οικιακά απορρίμματα. Αντίθετα θα πρέπει να
παραδοθεί σε αρμόδια θέση συλλογής ηλεκτρικών και ηλεκτρονικών
συσκευών για ανακύκλωση. Εξασφαλίζοντας σωστή απόρριψη του
προϊόντος, συμβάλλετε στην πρόληψη πιθανών αρνητικών συνεπειών για το
περιβάλλον και την ανθρώπινη υγεία, που αλλιώς θα μπορούσαν να
προκληθούν από την ακατάλληλη απόρριψη ως αποβλήτου αυτού του
προϊόντος. Για λεπτομερέστερες πληροφορίες σχετικά με την ανακύκλωση
αυτού του προϊόντος, επικοινωνήστε με το αρμόδιο γραφείο του δήμου σας,
με την τοπική υπηρεσία συλλογής οικιακών απορριμμάτων ή με το κατάστημα
όπου προμηθευτήκατε το προϊόν.
Page 93
PVU 640 C
PVU 640 X
PVU 647 X
PVU 647 N
FUNP 610 X
FUNP 611 X
FUHP 615 X
FUHP 825 X
FUS 100-40 W
FUS 100-40 X
PVU 640 C
PVU 640 X
PVU 647 X
PVU 647 N
FUNP 610 X
FUNP 611 X
FUHP 615 X
FUHP 825 X
FUS 100-40 W
FUS 100-40 X
ES
MANUAL DE USUARIO DE HORNO
Y HORNALLAS INTEGRADAS
Page 94
ES
Estimado cliente,
Gracias por adquirir este producto. Las precauciones y
recomendaciones de seguridad contenidas en estas
instrucciones tienen como objeto velar por su seguridad y
la de las demás personas. Le proporcionan también los
medios para hacer un uso pleno de las prestaciones del
electrodoméstico.
Conserve este cuadernillo en lugar seguro. Puede que le
sea de utilidad en el futuro, a usted o a terceras personas,
en el caso de que surja alguna duda acerca del
funcionamiento del aparato.
Este aparato debe utilizarse únicamente para el fin para el
que fue diseñado, esto es, la cocción doméstica de
alimentos. Cualquier otro uso se considerará inadecuado
y por lo tanto peligroso.
El fabricante declina toda responsabilidad en caso de
daños causados por un uso inadecuado o incorrecto del
aparato.
Page 95

ES
ÍNDICE
1- Introducción al producto
2-Advertencias
3-Instalación y preparación para el uso
4-Utilización del horno y las hornallas
5-Limpieza y mantenimiento
6-Servicio y transporte
Page 96
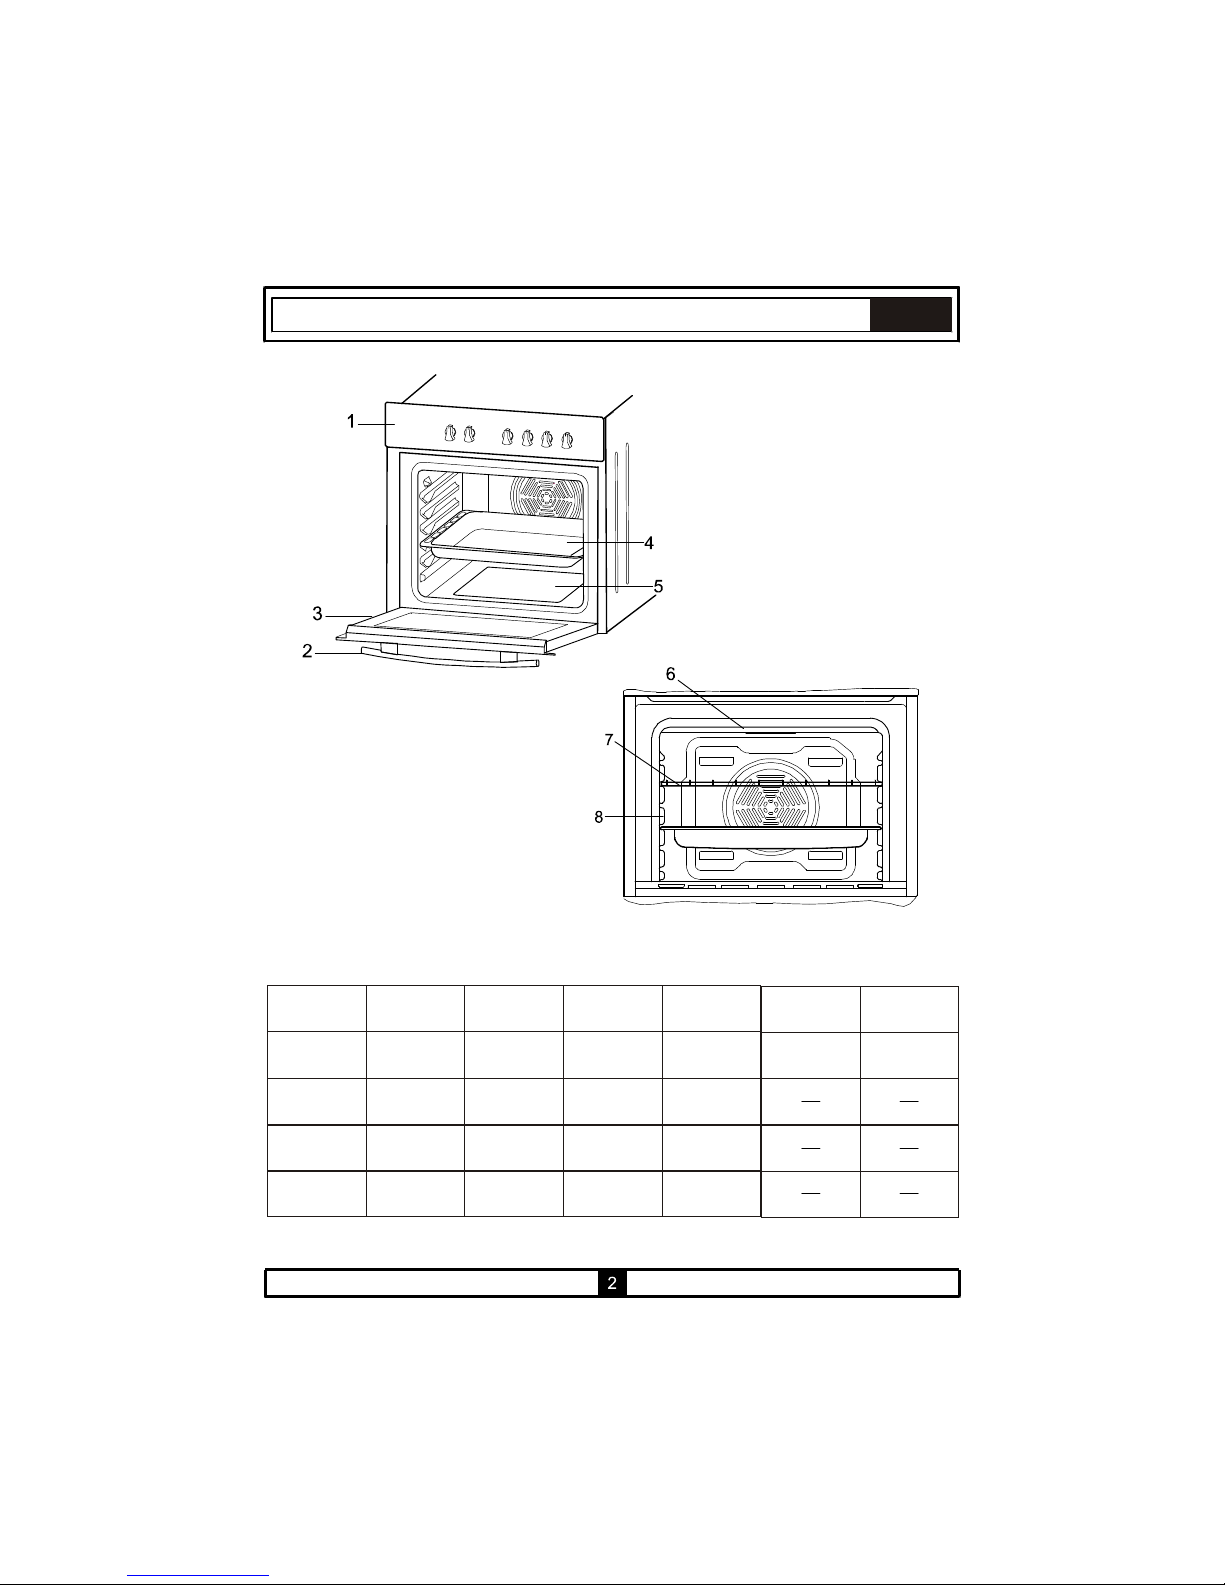
ES
PARTE 1: INTRODUCCIÓN AL PRODUCTO
Hornalla Posibilidad
de combinación
del horno
FUNP 610 X
PVU 640 C
FUNP 611 X FUHP 615 X
FUHP 825 X
FUS 100-40 W FUS 100-40 X
PVU 640 X
PVU 647 X
PVU 647 N
√ √ √ √
√ √
√
√
√
√
√
√
√
√
√
√
√
√
PARTES PRINCIPALES
1- Panel de control
2- Asa de la puerta del horno
3- Puerta del horno
4- Bandeja
5- Elemento de calentamiento inferior
6- Elemento de calentamiento superior
7- Parrilla
8- Estantes
Page 97
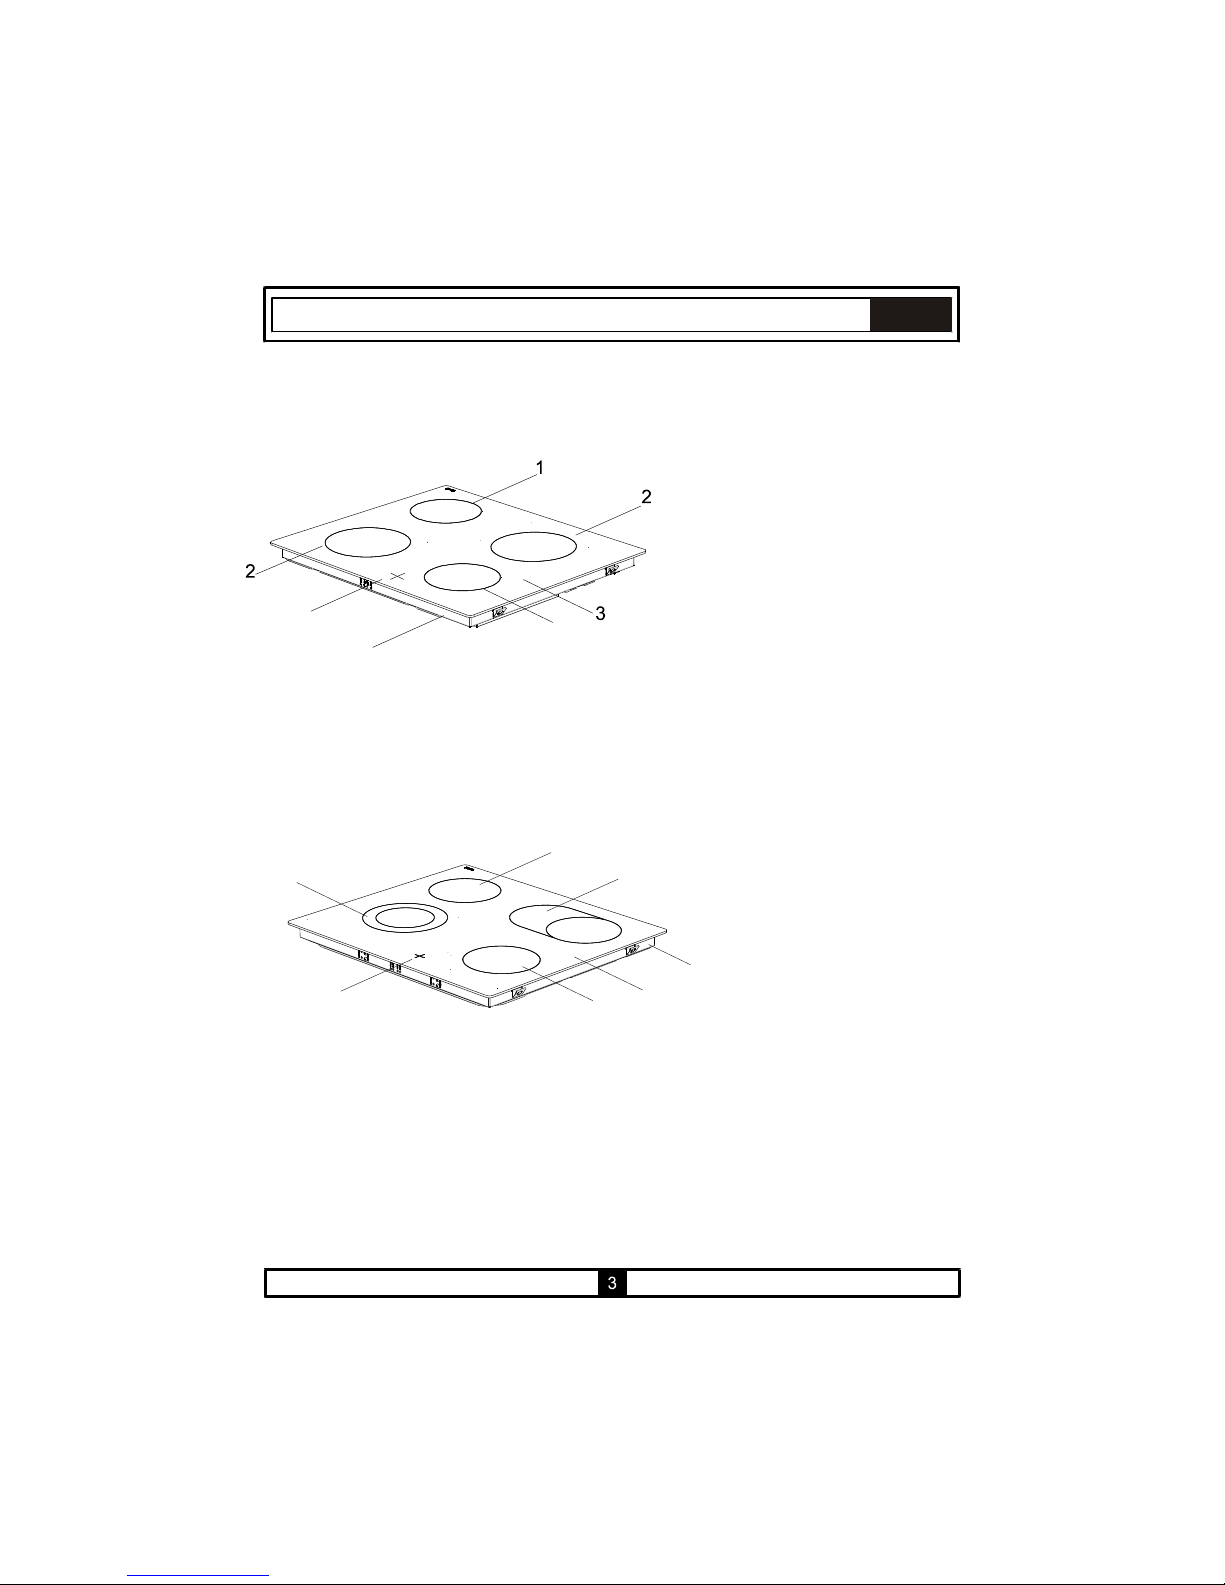
HORNALLA DE VITROCERÁMICA PVU 647 X - PVU 647 N
1
4
5
ES
HORNALLA DE VITROCERÁMICA PVU 640 C - PVU 640 X
1
3
1
6
4
2
5
1 Ø Zona destacada 145(1200W)
2 Ø Zona destacada 180(1800W)
3 Superficie de vitrocerámica
4 Revestimiento inferior
5 Indicador de hornalla caliente
1 Ø Zona destacada 145(1200W)
2 Ø Zona dual destacada 180(1700W)
3 Zona destacada expansible (1800W)
4 Superficie de vitrocerámica
5 Revestimiento inferior
6 Indicador de hornalla caliente
Page 98
ES
4
ANTES DE COMENZAR A UTILIZAR LA APLICACIÓN, POR FAVRO, TOME
TOD A S L AS M ED I DAS D E S EG U RID AD E SE N CIA LES Y L E A
CUIDADOSAMENTE EL MANUAL OPERATIVO
Esta aplicación ha sido diseñada para uso doméstico como mobiliario integrado.
Una vez que trasladó el paquete, asegúrese de verificar si existe algún daño en la
aplicación Si existe algún daño, nunca intente utilizar la aplicación y comuníquese de
inmediato con su servicio de reparaciones autorizado Como los materiales de
embalaje, tales como el (nailon, perforador, espuma de estireno) significarán una
amenaza para los niños, tales materiales necesitan ser recogidos de inmediato y
puestos fuera del alcance de los mismos.
La aplicación debe ser instalada y puesta en funcionamiento por un técnico autorizado
bajo las condiciones provistas por el fabricante en este manual. El fabricante no puede
ser considerado responsable de ningún daño que pueda ser producto de una
instalación defectuosa.
Antes de conectar su aplicación a la red de energía eléctrica de su hogar, asegúrese de
verificar que la tensión y los ajustes de gas se encuentren conforme a las normas, que
se especifican en el autoadhesivo informativo pegado a la aplicación y/o embalaje, con
las condiciones de uso disponibles.
No ponga en funcionamiento en horno antes de que se encuentre completamente
instalado.
Asegúrese de que todos sus pernos se encuentren cerrados cuando la aplicación no
se encuentra en uso.
Asegúrese de que el cable de alimentación no se encuentre apretado durante la
instalación de la aplicación.
El cable de alimentación nunca debe ser sustituido por el cliente En el caso eventual en
que tenga lugar un daño al cable de alimentación, cualquiera fueren las causas, por
favor, comuníquese con su Servicio técnico autorizado.
Apague el dispositivo antes de limpiar, realizar mantenimiento etc.
Algunas partes del dispositivo pueden conservar su calor por largo tiempo, por favor,
espere hasta que las partes principalmente expuestas al calor, se enfríen antes de
tocarlas.
No mantenga objetos/sustancias inflamables en cercanías de la aplicación mientras
se encuentra en uso.
Cuando opere otros artefactos eléctricos cerca de la aplicación, asegúrese de que sus
cables no entren en contacto con las partes calentadas.
Cuando el artefacto no se encuentra en uso, asegúrese de que las perillas se
encuentren en la posición “0" (apagado).
PARTE 2: ADVERTENCIAS
Page 99
ES
5
Su artefacto necesita suficiente circulación de aire mientras se encuentra en
funcionamiento Lea cuidadosamente la parte de este manual donde se encuentran
detallados los procedimientos de instalación y asegúrese de que se encuentren
satisfechas las condiciones de importancia.
Este manual operativo ha sido preparado en forma conjunta para múltiples modelos Es
posible que algunas de las especificaciones detalladas en el manual no se encuentren
incluidas en su dispositivo Preste atención a las explicaciones con ilustraciones mientras
lee el manual.
Mantenga a los niños alejados del horno.
En caso de que haya instalados calentadores halógenos de tipo 'hi-light' como elementos
quemadores, no fije la vista en la luz.
Este aparato no ha sido diseñado para ser utilizado por niños ni por adultos con sus
facultades físicas, sensoriales o mentales mermadas o bien que carezcan de la
experiencia y los conocimientos necesarios, a menos que lo hagan bajo supervisión o bien
luego de haber recibido instrucciones de uso de parte de una persona responsable de su
seguridad.
No permita que los niños jueguen con el aparato.
Preste atención a lo siguiente cuando usa su dispositivo
Asegúrese de conectar su aplicación a una red de energía con conexión a tierra o línea.
No coloque el cable de alimentación de su artefacto cerca de cualquier punto calentado.
Comuníquese con su Servicio técnico más cercano en el caso eventual que tenga lugar
cualquier daño al cable de alimentación.
La primera vez que ponga en funcionamiento su horno, los materiales de aislamiento y los
elementos del calentador emitirán cierto olor Por esta razón, antes de utilizar su horno,
póngalo en funcionamiento vacío a temperatura máxima por 45 minutos. Al mismo tiempo,
necesita ventilar adecuadamente el entorno en el que el horno se instala.
No toque el interior ni los calentadores cuando utilice la parte del horno de la aplicación ya
que después de apagar el quemador permanecerá caliente, no lo toque con sus manos
hasta que no se haya enfriado por completo.
No coloque materiales inflamables o combustibles dentro del horno No coloque
combustibles incluyendo ningún contenedor presurizado, papel, plástico ni tela en
cercanías de la superficie de la hornalla.
Actúe con cautela al utilizar la parte de horno de la aplicación ya que la superficie exterior
del horno puede encontrarse caliente Mantenga a los niños alejados del horno.
Mientras la puerta frontal se encuentra abierta, no permita que los niños trepen a la puerta o
se sienten sobre ella.
Page 100
5
ES
Los valores señalados en los documentos impresos que se hallan sobre el producto, son valores
obtenidos en un entorno de laboratorio, de conformidad con las normas de relevancia. Estos valores,
pueden variar de acuerdo al uso y a las condiciones ambientales del producto.
Para productos combinados integrados, asegúrese de que la conexión de la hornalla con el horno se
haya establecido.
Asegúrese de que el cable principal que conecta la hornalla al horno no se encuentre apretado.
En caso tal que detecte algún quiebre sobre la superficie de vitrocerámica de la hornalla,
desenchufe su aplicación.
Precaución (Sólo para modelos FUS 100-40 W y FUS 100-40 X): El vapor del calor emitido sale al
exterior a través de los orificios de ventilación de la manija durante el funcionamiento normal del
horno Por favor, le pedimos amablemente que se encuentre al tanto de ese uso.
 Loading...