

Page 1

• FCS 100
0002
USER INSTRUCTIONS
OVENS
EN
MANUALE D’ISTRUZIONI
FORNO
IT
INSTRUCCIONES DE USO
HORNOS EMPOTRABLES
ES
KULLANIM KILAVUZU
FIRINLAR
CANDY HOOVER GROUP S.R.L. • Via Privata Eden Fumagalli • 20047 Brugherio Milano Italy
TR
02
12
22
32
Page 2

Safety Indications
• WARNING:the appliance and accessible parts become hot during use.
Be carefulnot to touch anyhot parts.
•WARNING: the accessible parts can become hot when the oven is in
use. Childrenmust be keptat a safedistance.
•WARNING: ensure that the appliance is switched off before replacing
the bulb, toavoid the possibility ofelectricshocks.
•WARNING:beforeinitiating the automatic cleaningcycle:
- Clean theovendoor;
- Removelarge or coarse foodresidues from the inside of the ovenusing
a damp sponge.Do notuse detergents;
- Removeall accessories and the sliding rackkit (where present);
- Do notplacetea towels
• In ovens with meat probe it is necessary, before making the cleaning
cycle, close the hole with the nut provided. Always close the hole with
the nut whenthemeat probe is not used.
•Children under 8 must be kept at a safe distance from the appliance if
not continuouslysupervised.
•Children must not play with the appliance. The appliance can be used
by those aged 8 or over and by those with limited physical, sensorial or
mental capacities, without experience or knowledge of the product,
only if supervised or provided with instructionas tothe operation of the
appliance, in asafe waywith awarenessof thepossible risks.
•Cleaning and maintenance should not be carried out by unsupervised
children.
•Do not use rough or abrasive materials or sharp metal scrapers to
clean the oven door glasses, as they can scratch the surface and cause
the glass toshatter.
•The oven must be switched off before removing the removable parts
and, aftercleaning,reassemblethem according theinstructions.
•Only use themeatprobe recommendedfor this oven.
•Do not useasteam cleaner forcleaningoperations.
•Connect a plug to the supply cable that is able to bear the voltage,
current and load indicated on the tag and having the earth contact.
EN 02
Page 3

The socket must be suitable for the load indicated on the tag and must
be having the earth contact connected and in operation. The earth
conductor is yellow-green in colour. This operation should be carried
out by a suitably qualified professional. In case of incompatibility
between the socketand theappliance plug, aska qualifiedelectrician to
substitute the socket with another suitable type. The plug and the
socket must be conformed to the current norms of the installation
country. Connection to the power source can also be made by placing
an omnipolar breaker between the appliance and the power source
that can bear the maximum connected load and that is in line with
current legislation. The yellow-green earth cable should not be
interrupted by the breaker. The socket or omnipolar breaker used for
the connection should be easily accessible when the appliance is
installed.
•The disconnection maybe achievedby having the plug accessible or by
incorporating a switch in the fixed wiring in accordance with the wiring
rules.
•If the power cable is damaged, it must be substituted with a cable or
special bundle available from the manufacturer or by contacting the
customerservicedepartment.
•The type ofpowercable must be H05V2V2-F.
•Failure to comply with the above can compromise the safety of the
appliance and invalidate the guarantee.
•Anyexcess of spilled materialshould be removedbeforecleaning.
•During the pyrolytic cleaning process, surfaces can heat up more than
usual, childrenmust thereforebe keptat a safedistance.
•The appliance must not be installed behind a decorative door in order
toavoidoverheating.
•When you place the shelf inside, make sure that the stop is directed
upwardsand in the back of the cavity.
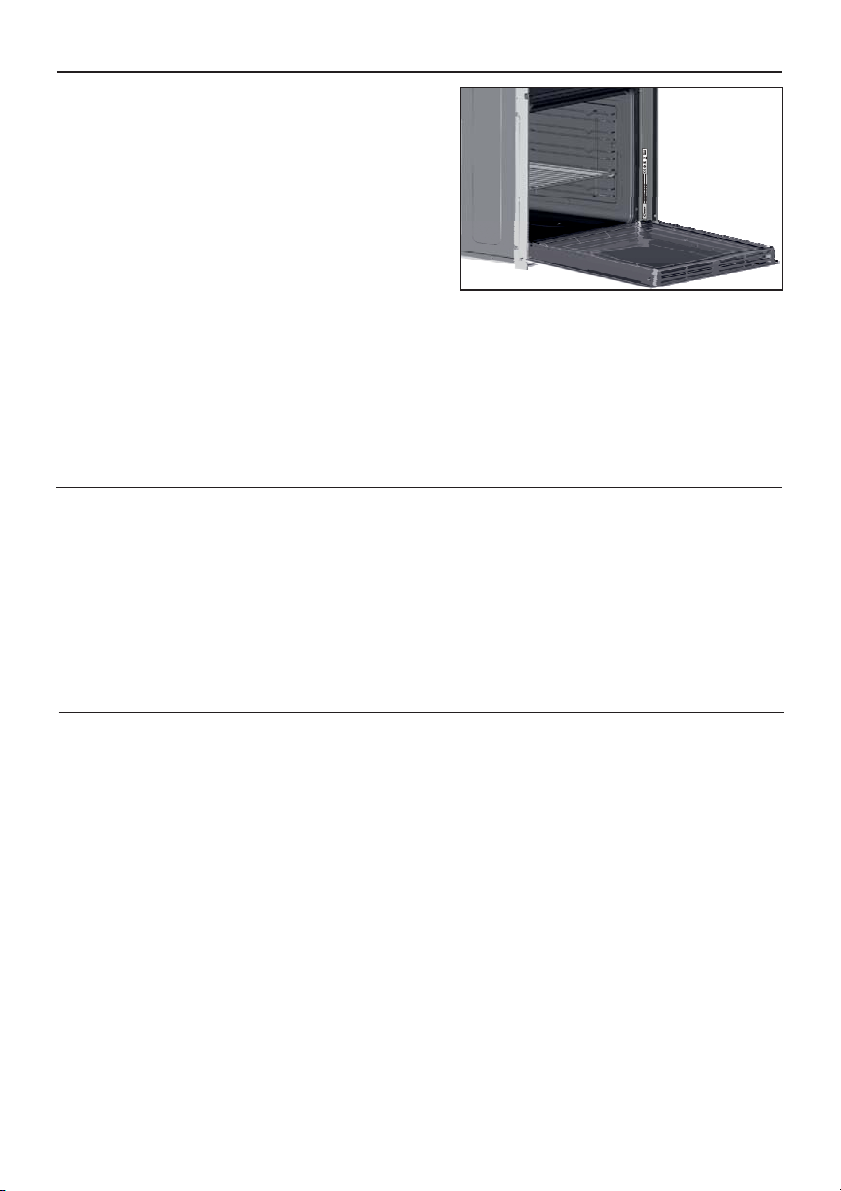
The shelf mustbe inserted completely into the cavity
• WARNING: Do not linethe oven walls with aluminum foil or single-use
protectionavailable from stores.Aluminum foil or anyother protection,
in direct contact with the hot enamel, riskmelting anddeteriorating the
enamel of theinsides.
• WARNING:Never removethe oven doorseal.
EN 03
Page 4

Summary
General Instructions
5
Product Description
7
Use of the Oven
8
Oven Cleaning and Maintenance
9
1.1 Safety indications
1.2 Electrical safety
1.3 Recommendations
1.4 Installation
1.5 Waste management
1.6 Conformity declaration
2.1 Overview
2.2 Accessories
2.3 First use
3.1 Display description
3.2 Cooking modes
4.1 General notes on cleaning
4.2 Maintenance
• Removal of the oven window
• Removal and cleaning of the glass
door
• Changing the bulb
Troubleshooting
11
5.1 F.A.Q.
EN 04
Page 5

1. General Instructions
We thank you for choosing one of ourproducts. Forthe
best results with your oven, you should read this
manual carefully and retain it for future reference.
Before installing the oven, take note of the serial
number so that you can give it to customer service staff
if any repairs are required. Having removed the oven
from itspackaging, check that it has not been damaged
during transportation. If you have doubts, do not use
the oven and refer to a qualified technician for advice.
Keep all of the packaging material (plastic bags,
polystyrene, nails) out of the reach of children. When
the oven is switched on for the first time, strong
smelling smoke can develop, which iscaused bythe glueon the insulation panels surrounding theoven
heating for the first time. This is absolutely normal and, if it occurs, you should wait for the smoke to
dissipate before putting food in the oven. The manufacturer accepts no responsibility in cases where
the instructions contained inthis document are notobserved.
NOTE: the oven functions, properties and accessories cited in this manual will vary, depending on the
model you have purchased.
1.1 Safety Indications
Only use the oven for its intended purpose, that is only for the cooking of foods; any other use, for
example as a heat source, is considered improper and therefore dangerous. The manufacturer cannot
be held responsiblefor anydamage resultingfromimproper, incorrect orunreasonable usage.
The use ofanyelectricalappliance impliesthe observanceof some fundamental rules:
- do notpullon thepower cabletodisconnect the plugfromthe socket;
- do nottouchthe appliance withwetor damp handsor feet;
- in general theuse ofadaptors, multiplesockets andextensioncablesis notrecommended;
- in caseof malfunctionand/or poor operation,switch off theappliance anddo not tamperwithit.
1.2 Electrical Safety
ENSURE THAT AN ELECTRICIAN ORQUALIFIED TECHNICIAN MAKESTHE ELECTRICAL CONNECTIONS.
The powersupply towhich the oven is connected must conform withthe laws in forcein the country of
installation.The manufacturer accepts noresponsibilityforany damage causedby thefailureto observe
these instructions. The oven must be connected to an electrical supplywith an earthedwall outlet or a
disconnector with multiple poles, depending on the laws in force in the country of installation. The
electrical supply should be protected with suitable fuses and the cables used must have a transverse
section that can ensure correctsupply to theoven.
CONNECTION
The ovenis suppliedwith a power cablethat shouldonly be connected toan electricalsupply with 220240 Vac 50 Hz power between the phases or between the phase and neutral. Before the oven is
connectedto the electricalsupply, itis important to check:
- power voltage indicatedon thegauge;
- the settingof thedisconnector.
The groundingwire connected to theoven's earthterminal mustbe connectedto theearth terminal of
the power supply.
WARNING
Beforeconnectingthe oven to thepowersupply,aska qualifiedelectricianto check thecontinuity of the
power supply's earth terminal. The manufacturer accepts no responsibility for any accidents or other
problems caused byfailureto connect the ovento theearth terminal orby anearth connection thathas
defectivecontinuity.
EN 05
Page 6
NOTE: as theoven couldrequiremaintenance work, itis advisableto keep another wall socket available
so that the oven can be connected to this if it is removed from the space in which it is installed. The
power cable must only be substituted by technical service staff or by technicians with equivalent
qualifications.
1.3 Recommendations
Aftereach useof theoven, a minimumofcleaning willhelp keepthe ovenperfectlyclean.
Do not linethe oven walls withaluminium foil orsingle-use protectionavailablefrom stores. Aluminium
foil or any other protection, in direct contact with the hot enamel, risks melting and deteriorating the
enamel of the insides. In order to prevent excessive dirtying of your oven and the resulting strong
smokey smells, we recommend not using the oven at very high temperature. It is better to extend the
cooking time and lower the temperature a little. In addition to the accessories supplied withthe oven,
weadvise you only usedishesand baking mouldsresistantto veryhigh temperatures.
1.4 Installation
The manufacturers have noobligationto carry thisout. Ifthe assistance ofthe manufacturer is required
to rectify faults arising from incorrect installation, this assistance is not covered by the guarantee. The
installation instructions for professionally qualified personnel must be followed. Incorrect installation
may cause harm or injury to people, animals or belongings. The manufacturer cannot be held
responsiblefor such harmor injury.
The oven can be located high in a column or under a worktop. Before fixing, you must ensure good
ventilation in the oven space to allow proper circulation of the fresh air required for cooling and
protectingthe internal parts.Make theopenings specifiedon last pageaccordingtothe type offitting.
1.5 Waste management and environmental protection
This appliance is labelled in accordance with European Directive 2012/19/EU regarding
electric and electronic appliances (WEEE). The WEEE contain both polluting substances
(that can have a negative effect on the environment) and base elements (that can be
reused). It isimportant that theWEEE undergo specifictreatmentsto correctly remove and
dispose of the pollutants and recover all the materials. Individuals can play an important
role in ensuring that the WEEE do not become an environmental problem;it is essential to
followa few basicrules:
- the WEEEshouldnot be treatedas domesticwaste;
- the WEEE should be taken to dedicated collection areas managed by the town council or a registered
company.
In many countries, domestic collections may be available for large WEEEs. When you buy a new
appliance, the old one canbe returned to the vendorwho must accept it freeof charge as a one-off,as
long as theapplianceis of anequivalenttype and hasthesame functionsas thepurchased appliance.
SAVINGAND RESPECTINGTHE ENVIRONMENT
Where possible,avoid pre-heating the oven andalways try to fillit. Openthe ovendoor asinfrequently
as possible, because heat from the cavity disperses every time it is opened. For a significant energy
saving, switch off theoven between5 and 10 minutes before theplanned endof the cooking time, and
use the residualheat thatthe oven continues togenerate.Keepthe seals cleanand in order, toavoidany
heat dispersal outside of the cavity. If you have an electric contract with an hourly tariff, the "delayed
cooking" programme makes energy saving more simple, moving the cooking process to start at the
reducedtariff time slot.
1.6 Declaration of compliance
The parts ofthis appliance thatmay comeintocontactwith foodstuffs comply withthe provisions ofEEC
Directive89/109.
By placing the mark on thisproduct,we are confirmingcompliance toall relevant European safety,
health and environmental requirements whichareapplicable in legislationforthisproduct.
EN 06
Page 7

2. Product Description
2.1 Overview
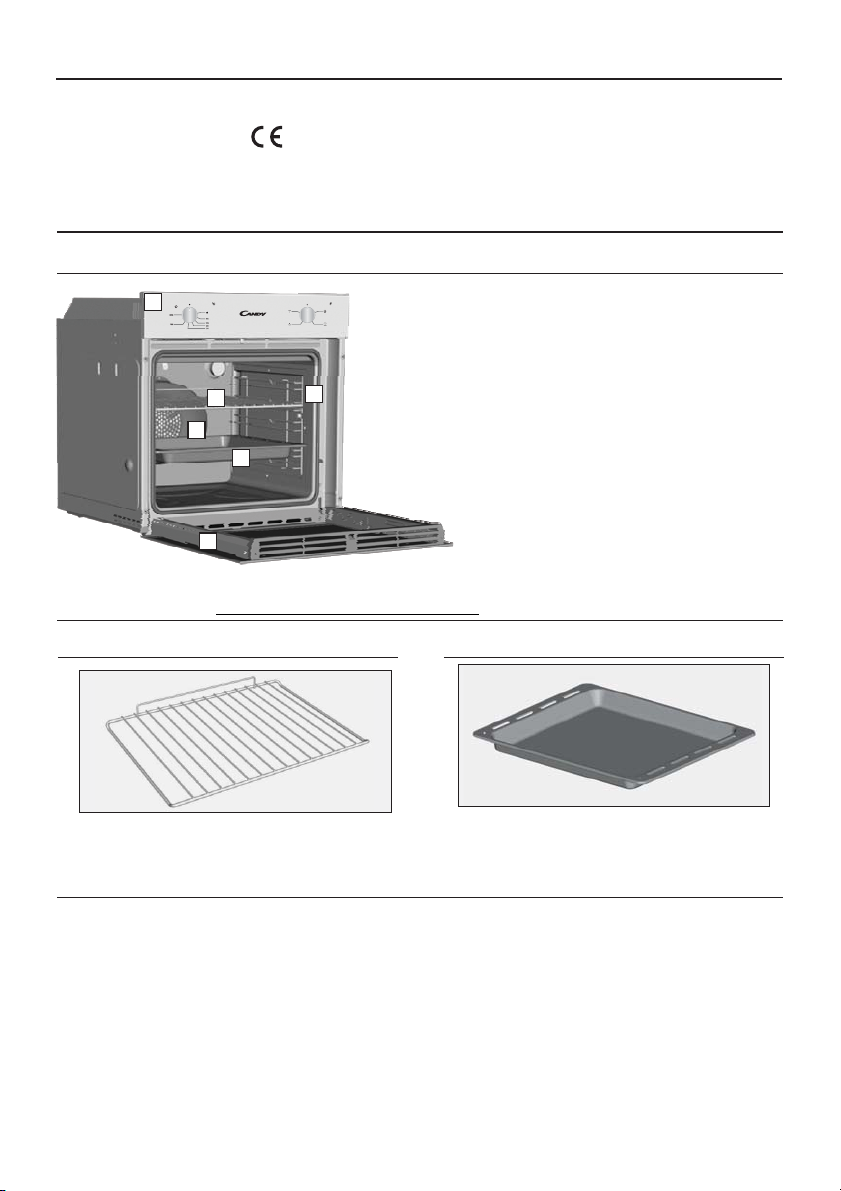
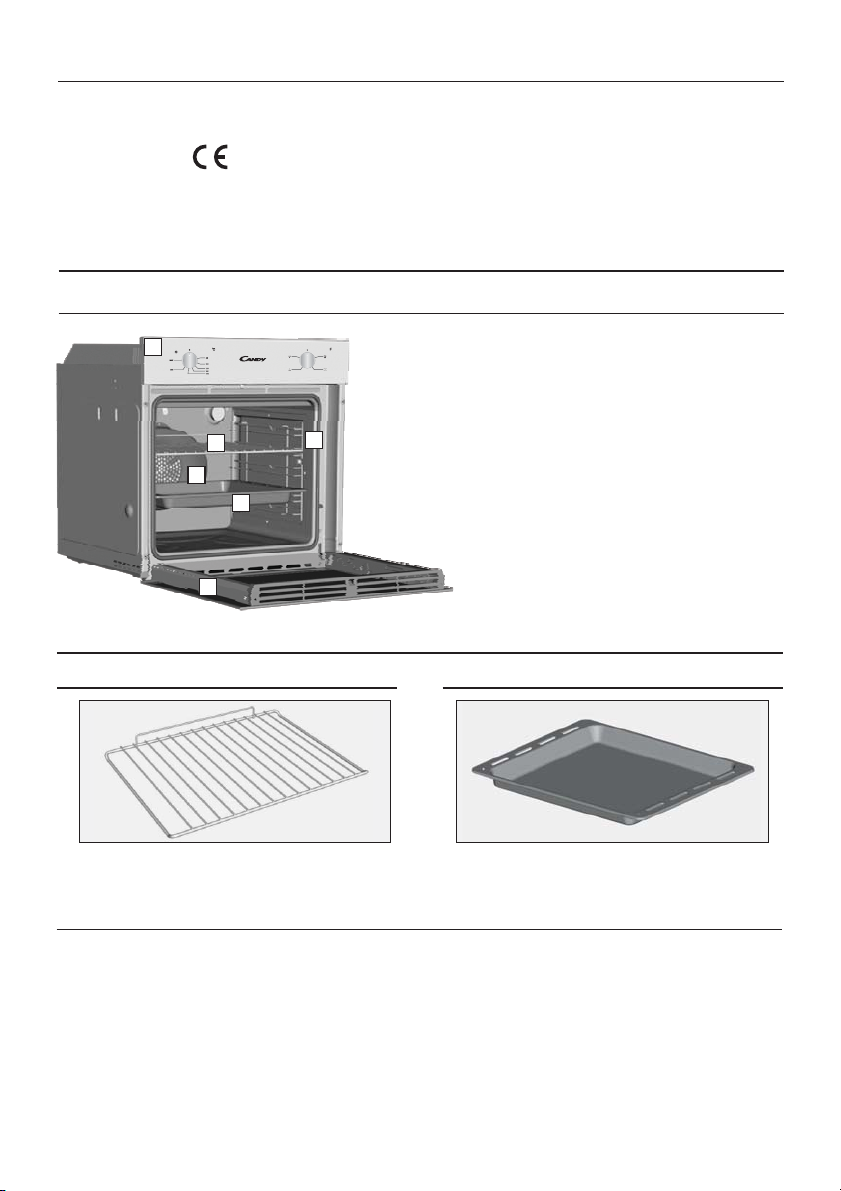
1
3
5
4
6
2
2.2 Accessories
Drip pan
1
Collects the residuesthat dripduring the cooking
of foods on thegrills.
1. Control panel
2. Shelf positions
(lateral wire grid if included)
3. Metal grill
4. Drip pan
5. Fan (behind the steel plate)
6. Oven door
Metal grill
2
Holds baking trays and plates.
2.3 First Use
PRELIMINARYCLEANING
Clean theoven before using forthe first time. Wipe overexternal surfaces witha dampsoft cloth.Wash
all accessories and wipe inside the oven with a solution of hot water and washing up liquid. Set the
empty ovento themaximum temperature andleave onfor about1 hour, this willremove any lingering
smells of newness.
EN 07
Page 8

3. Use of the Oven
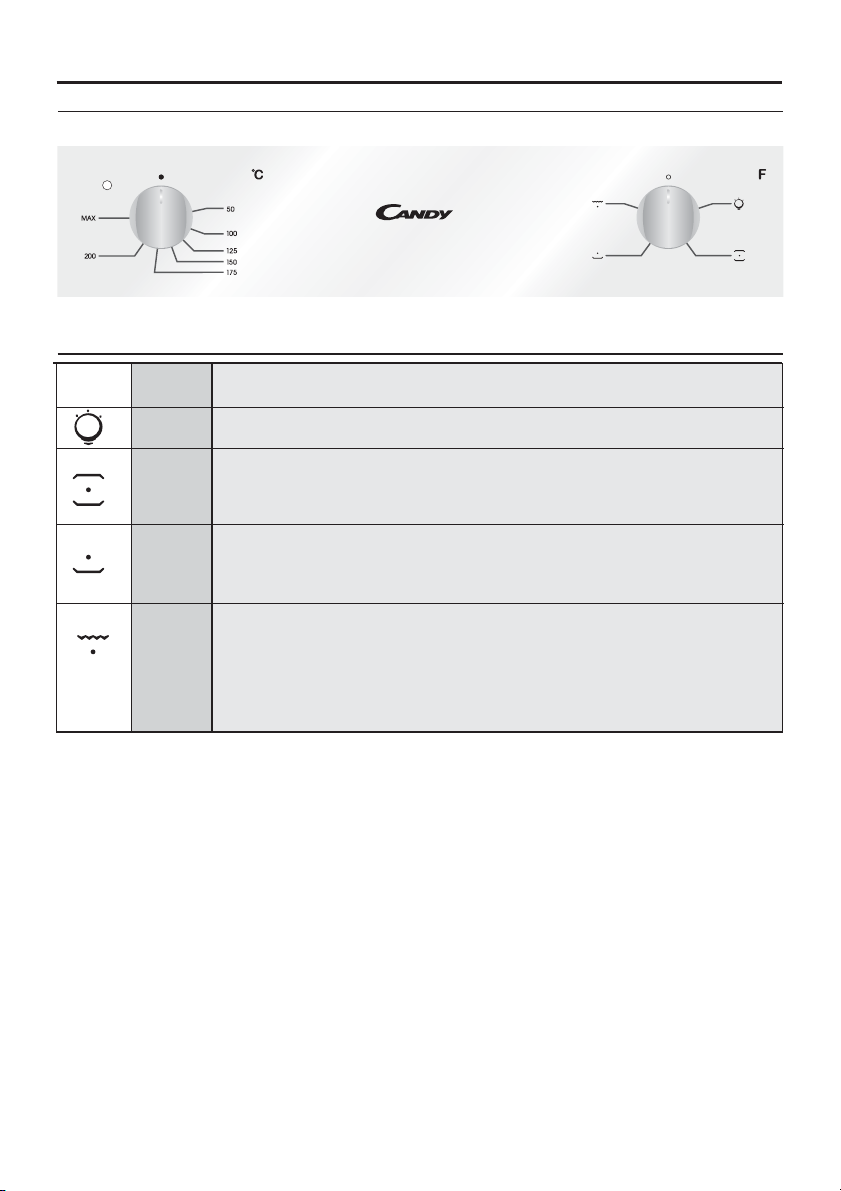
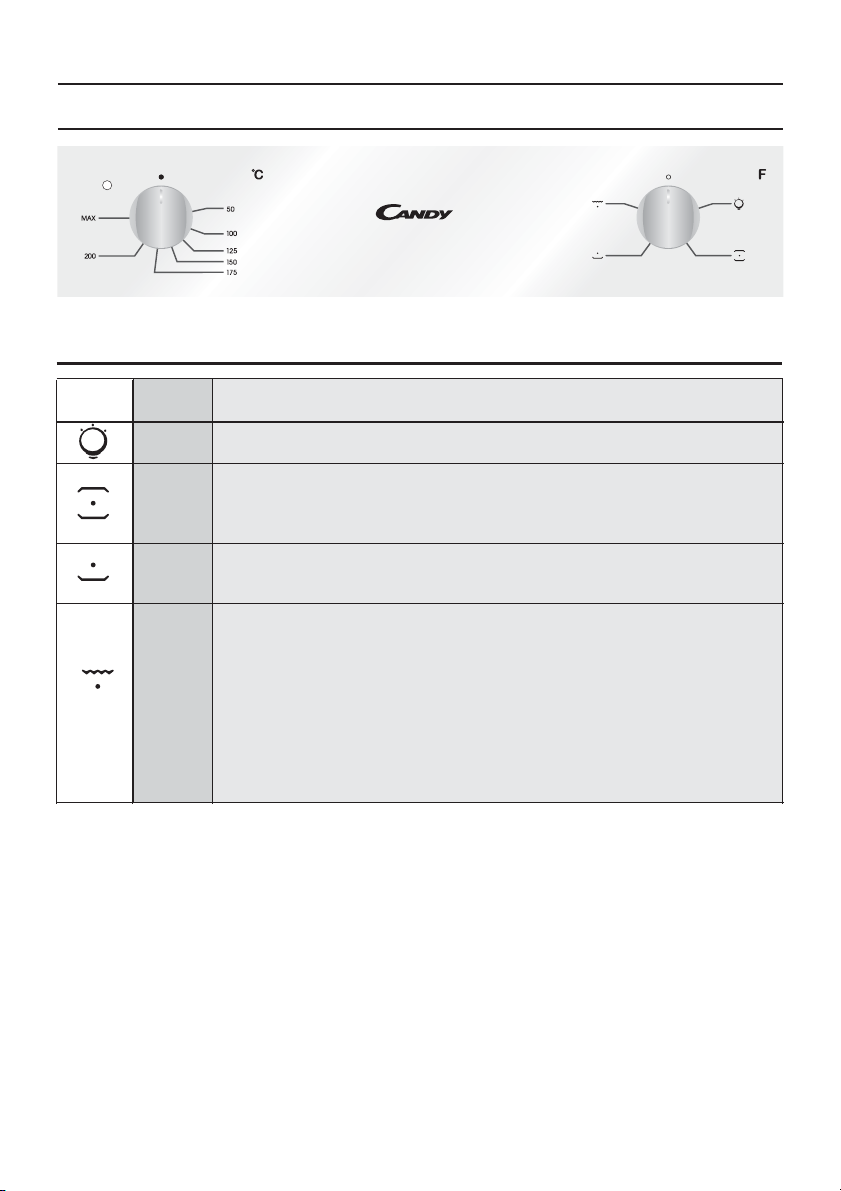
3.1 Display description
3.2 Cooking Modes
Function
Dial
*
T °C
range
50 ÷ 280
LAMP: Turns on the oven light.
CONVENTIONAL COOKING: Both top and bottom heating elements are used.
Preheat the oven for about ten minutes. This method is ideal for all traditional
roastingand baking.For seizing redmeats, roast beef, leg oflamb, game, bread,foil
wrapped food (papillotes), flaky pastry.Place the food and its dish ona shelf in mid
position.
Function (Depends on the oven model)
50 ÷ 230
L1 ÷ L5
*Tested in accordance with the CENELEC EN 60350-1 used for definition of energy class.
BOTTOM: Using the lower element. Ideal for cooking all pastry based dishes. Use
this for flans, quiches,tarts, pateandany cooking that needsmore heatfrombelow.
GRILL: use thegrill withthe door closed.
The top heating element is used alone and you can adjust the temperature. Five
minutes preheating is required toget the elements red-hot. Success is guaranteed
forgrills, kebabs and gratin dishes. Whitemeats shouldbe put ata distancefromthe
grill; the cooking time is longer, but the meat will be tastier. You can put red meats
and fish fillets on the shelf with the drip tray underneath. The oven has two grill
positions:
Grill: 2140 W Barbecue: 3340 W
Grill function MUSTbe performedat200°C maximum
EN 08
Page 9

4. Oven cleaning and maintenance
4.1 General notes on cleaning
The lifecycle of theappliancecan be extendedthrough regularcleaning. Waitforthe oven to coolbefore
carrying out manualcleaning operations. Never use abrasivedetergents,steelwool orsharp objects for
cleaning, so as to not irreparably damage the enamelled parts. Use only water, soap or bleach-based
detergents(ammonia).
GLASS PARTS
It is advisable to clean the glass window with absorbent kitchen towel after every use of the oven. To
remove more obstinate stains, you can use a detergent-soaked sponge, well wrungout, and thenrinse
with water.
OVENWINDOW SEAL
If dirty,the seal canbe cleanedwith a slightlydampsponge.
ACCESSORIES
Clean accessories with a wet, soapy sponge before rinsing and drying them: avoid using abrasive
detergents.
DRIP PAN
After using thegrill, remove thepan from theoven. Pourthe hot fatintoa container andwashthe panin
hot water, usinga sponge andwashing-upliquid.
If greasy residues remain,immerse thepan inwater anddetergent.Alternatively, you can wash the pan
in the dishwasheror usea commercial oven detergent.Never put adirtypan backinto theoven.
4.2 Maintenance
REMOVALOF THEOVEN WINDOW
1. Open thefrontwindow.
2. Openthe clampsof the hinge housing on the right and leftside of the frontwindow bypushing them
downwards.
3. Replace thewindow bycarryingout theprocedure inreverse.
EN 09
Page 10

LOW-E
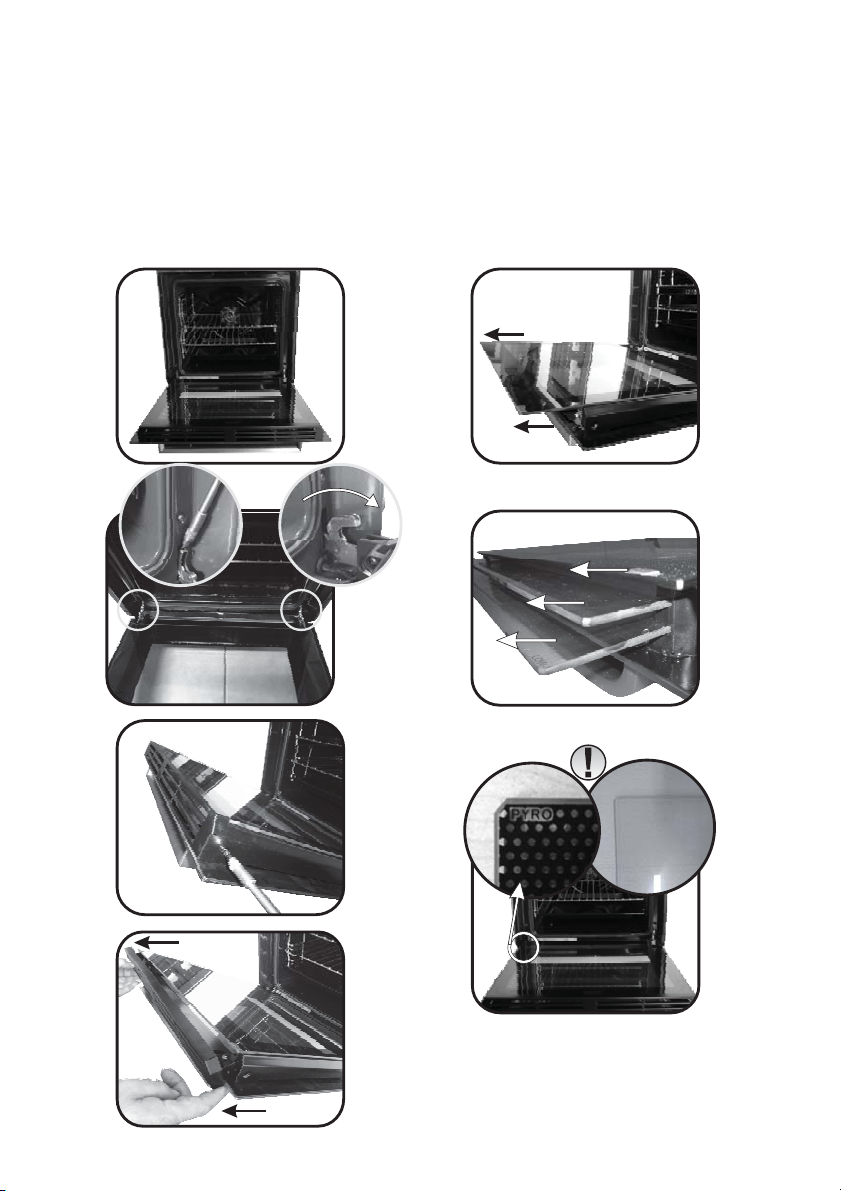
REMOVALAND CLEANINGOF THE GLASSDOOR
1. Open theovendoor.
2.3.4. Lock thehinges,removethe screws andremovethe upper metalcoverbypulling itupwards.
5.6. Remove the glass, carefully extracting it from the oven door (NB: in pyrolytic ovens, also remove
the second andthird glass(if present)).
7. At the endof cleaning orsubstitution,reassemblethe parts inreverseorder.
On all glass,the indication "Pyro" mustbe legible andpositioned onthe left sideof the door, closeto the
left-handlateralhinge. In thisway, theprintedlabel of thefirstglasswill beinside thedoor.
1.
2.
3.
5.
6.
1
2
3
7.
4.
EN 10
Page 11
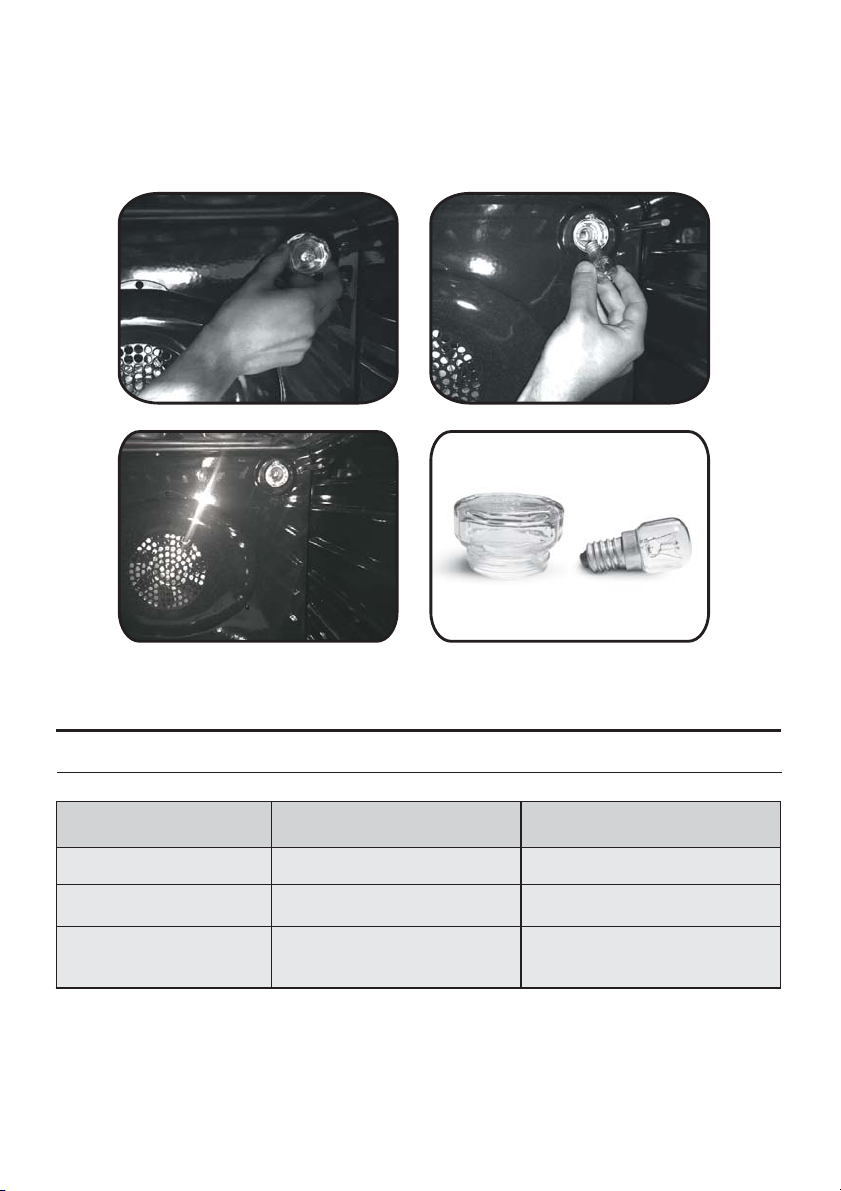
CHANGING THE BULB
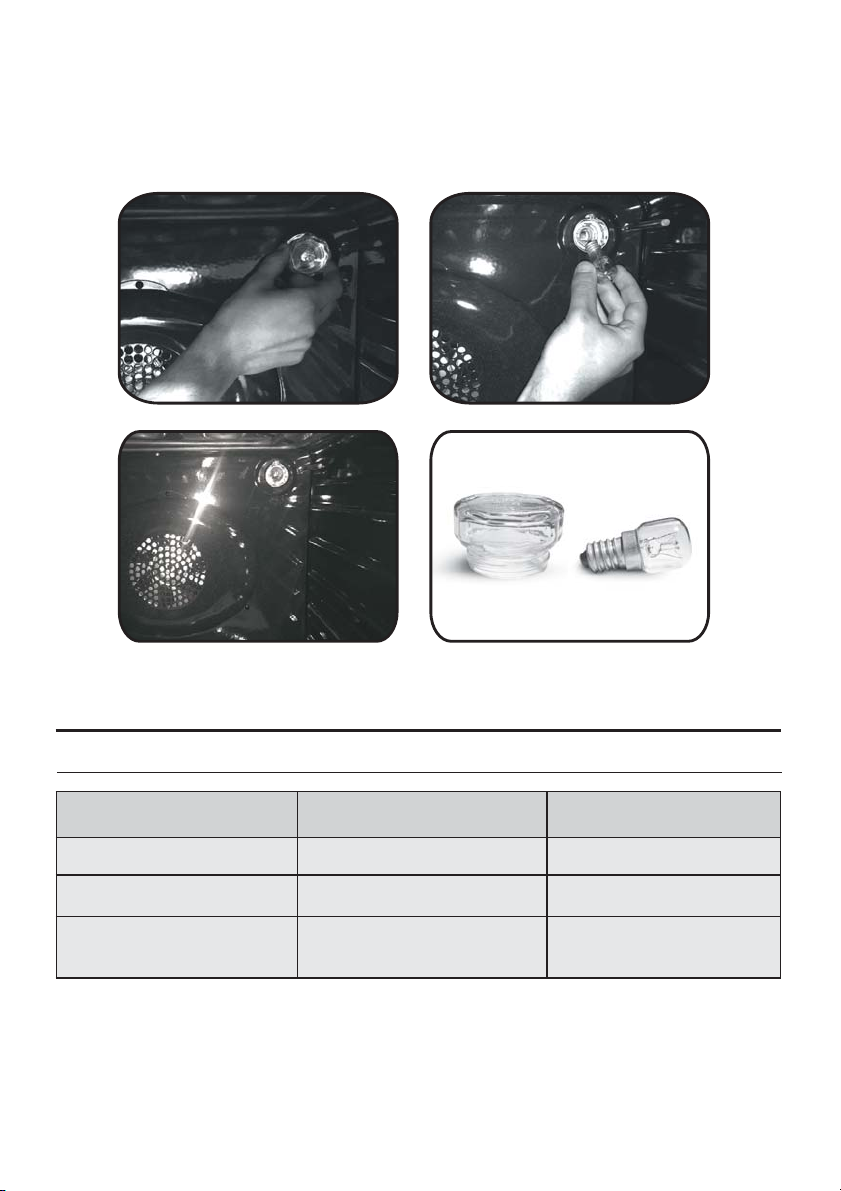
1. Disconnect theoven fromthemains supply.
2. Undo theglasscover, unscrewthebulb andreplace itwith a newbulb ofthe sametype.
3. Once thedefectivebulb isreplaced, replace theglass cover.
5. Troubleshooting
5.1 FAQ
PROBLEM POSSIBLE CAUSE SOLUTION
The oven does not heat up
The oven does not heat up
The oven does not heat up
The clock is not set Set the clock
The child lock is on
A cooking function and
temperature has not been set
Deactivate the child lock
Ensure that the necessary
settings are correct
EN 11
Page 12

Indicazioni di Sicurezza
• ATTENZIONE: l'apparecchio e le parti accessibili diventano calde
durantel'uso. Prestareattenzionea nontoccareleparti calde.
• ATTENZIONE: le parti accessibili possono diventare molto calde
quando si utilizza il forno. I bambini devono essere tenuti a distanza di
sicurezza.
• L'apparecchio può essere usato da bambini dagli 8 anni in su e
persone con ridotte capacità fisiche, sensoriali o mentali o senza
esperienza e conoscenza del prodotto se supervisionate o dando loro
istruzioni riguardo al funzionamento dell'apparecchio in maniera sicura
e coscentedel rischio possibile.
• I bambininondovrebbero giocarecon l'apparecchio.
• La pulizia e la manutenzione non dovrebbero essere fatte da bambini
senzasupervisione
• Durante l’uso l’apparecchio diventa molto caldo. Si dovrebbe fare
attenzionea non toccaregli elementi riscaldantiall’interno del forno.
• ATTENZIONE: Le parti accessibili possono diventare molto calde
durantel’uso. I bambinidovrebbero essere tenuti adistanza.
• Non usare per la pulizia materiali ruvidi abrasivi o raschietti metallici
affilatiper pulirele porte di vetro del fornodatoche possonograffiarela
superficie e causarela frantumazionedelvetro.
• Spegnereilfornoprima di rimuovere lo schermodiprotezione e, dopo
la pulizia, rimontarlosecondo le istruzioni.
• Usaresolo lasonda termica raccomandata per questo forno.
• Non utilizzareun pulitorea vapore.
•Collegare al cavo di alimentazione una spina dimensionata per la
tensione, la corrente e la potenza indicate nella targhetta e dotata del
contatto di terra. La presa deve essere dimensionata per la potenza
indicata sulla targhetta e deve avere il contatto di terra collegato e
funzionante. Il conduttore di terra è giallo-verde. Questa operazione
deve essere eseguita solo da un tecnico adeguatamente addestrato. In
caso di incompatibilità tra presa e spina dell'elettrodomestico,
richiedere ad un tecnico specializzato di sostituire la presa con un'altra
di tipo compatibile. La spina e la presa devono essere conformi alle
IT 12
Page 13

normative attuali del paese di installazione. Il collegamento alla rete di
alimentazione può essere effettuato anche collocando un interruttore
automaticoonnipolare tra l'elettrodomestico ela rete di alimentazione,
in grado di supportare il carico massimo collegato, in linea con la
legislazione corrente. Il cavo di terra giallo-verde non deve essere
interrotto dall'interruttore automatico. La presa o l'interruttore
automatico onnipolare utilizzati per il collegamento devono essere
facilmente accessibili al momento del montaggio
dell'elettrodomestico.
• La disconnessione può essere eseguita con la spina accessibile o
aggiungendo un interruttore sul cablaggio fisso, nel rispetto delle
normativerelative ai cablaggi.
• Se il cavo di alimentazione si danneggia, deve essere sostituito con un
cavo o uno speciale fascio di cavi disponibile presso il produttore o
contattando il repartoassistenza alcliente.
• Il cavodi alimentazionedeve essere di tipo H05V2V2-F.
• Il mancato rispetto di quanto indicato sopra può compromettere la
sicurezzadell'elettrodomesticoe rendere nullalagaranzia.
• Qualsiasi materiale fuoriuscito in eccesso deve essere tolto prima
della pulizia.
• Durante il processo di pulizia pirolitico, le superfici possono
surriscaldarsi più del normale: mantenere sempre i bambini a distanza
di sicurezza;
•L’elettrodomestico non deve essere installato dietro a una porta a
scopoornamentaleper evitarne il surriscaldamento.
• Quando si posiziona uno scaffale all’interno, accertarsi che il blocco
sia rivoltoverso l’alto e nella parteposteriore dellaguida.
Lo scaffale deve essere inserito completamente nella guida
• AVVERTENZA: Non coprire le pareti del forno con fogli di alluminio o
protezioni monouso disponibili in commercio. I fogli di alluminio o le
altre protezioni, se a diretto contatto con lo smalto caldo, rischiano di
fondersie di danneggiare lo smaltointerno stesso.
• AVVERTENZA: Nontogliere mai laguarnizionedella porta delforno.
IT 13
Page 14

Riassunto
Avvertenze Generali
15
Descrizione del Prodotto
17
Utilizzo del Forno
18
Pulizia e Manutenzione del Forno
19
1.1 Suggerimenti sulla sicurezza
1.2 Sicurezza elettrica
1.3 Raccomandazioni
1.4 Installazione
1.5 Gestione dei rifiuti
1.6 Dichiarazione di conformità
2.1 Panoramica
2.2 Accessori
2.3 Primo utilizzo
3.1 Descrizione del display
3.2 Modalità di cottura
4.1.Note generiche di pulizia
4.2 Manutenzione
• Rimozione dello sportello del forno
• Rimozione e pulizia della porta in
vetro
• Sostituzione della lampadina
Risoluzione dei problemi
21
5.1 F.A.Q.
IT 14
Page 15
1. liIndicazioni generali
Vi ringraziamo per aver scelto uno dei nostri prodotti.
Per utilizzare il forno in modo ottimale è consigliabile
leggere con attenzione questo manuale e conservarlo
con cura per ogni ulteriore consultazione. Prima di
installare il forno, prendere nota del numero di serie in
modo da poterlocomunicarealpersonale del serviziodi
assistenza in caso di richiesta di intervento. Dopo aver
rimosso il forno dall’imballaggio, verificare che non
abbia subito danni durante il trasporto. In caso di
dubbi, non utilizzare il forno e richiedere l’assistenza di
un tecnico qualificato. Tenere tutto il materiale da
imballaggio (sacchetti di plastica, polistirolo, chiodi)
fuori dalla portata dei bambini. Alla prima accensione del forno può svilupparsi fumo di odore acre,
causatodal primoriscaldamento del collantedei pannelli d’isolamentoavvolgentiil forno: si tratta di un
fenomeno assolutamente normale e, in caso si verificasse, occorre attendere la cessazione del fumo
prima di introdurre le vivande. Il produttore declina ogni responsabilità in caso di mancata osservanza
delle istruzioni contenute inquestodocumento.
NOTA: le funzioni, le proprietà e gli accessori dei forni citati in questo manuale possono variare a
secondadei modelli.
1.1 SicurezzaAvvertenze di
Utilizzare il forno solo per lo scopo per cui è stato progettato, ossia solo per la cottura di alimenti;
qualsiasi altro utilizzo, ad esempio come fonte di riscaldamento, è considerato improprio e quindi
pericoloso. Il costruttore non può essere considerato responsabile per eventuali danni derivanti da usi
impropri,erronei ed irragionevoli.
L’uso diun qualsiasi apparecchioelettrico comporta l’osservanzadi alcuneregole fondamentali:
- non tirareil cavodi alimentazione perstaccare la spinadella presa di corrente;
- non toccarel’apparecchiocon manio piedi bagnatio umidi;
- in generale èsconsigliabile l’uso di adattatori, presemultiplee prolunghe;
- in casodi guastoe/ocattivofunzionamentodell’apparecchio,spegnerlo enon manometterlo.
1.2 Sicurezza Elettrica
ACCERTARSI CHE I COLLEGAMENTI ELETTRICI SIANO EFFETTUATI DA UN ELETTRICISTA O DA UN
TECNICOQUALIFICATO.
La rete di alimentazione alla quale si collega il forno deve rispettare le leggi in vigore nello stato in cui
viene installato. Il produttore non si assume responsabilità per danni causati dal mancato rispetto di
queste istruzioni. Il forno deve essere collegato ad una rete di alimentazione elettrica, con un'uscita a
parete con messaa terra oppure un interruttoreautomatico multipolare, aseconda delleleggi invigore
nello stato in cui viene installato. L'alimentazione elettricadeve essere protetta tramite appositifusibili;
i cavi utilizzati devono avere una sezione trasversale in grado di garantire un'alimentazione corretta al
forno.
COLLEGAMENTO
Il forno è alimentato da un cavo che deve essere collegato unicamente ad una rete di alimentazione
elettrica da 220-240 Vac, 50 Hz tra le fasi o tra fase e neutro. Prima di collegare il forno alla rete di
alimentazioneelettrica,è importante controllare quantosegue:
- tensionedi alimentazioneriportatasull'indicatore;
- impostazione dell'interruttore automatico. Ilcavo dimessa aterra collegato almorsetto di terradel
fornodeve essere asua voltacollegatoal morsettodi terradellarete di alimentazione.
ATTENZIONE
Prima di collegare il forno alla rete di alimentazione, chiedere ad un tecnicoqualificato di controllare la
continuità del morsetto di terra della rete di alimentazione. Il produttore non si assume responsabilità
per incidenti o altri problemi causati dal mancato collegamento del forno al morsetto di terra o da un
IT 15
Page 16
collegamentoditerra con continuitàdifettosa.
NOTA: considerando che il forno potrebbe richiedere attività di manutenzione, si consiglia di tenere a
disposizione un'altra presa a parete in modo da potere collegare a questa il forno se viene tolto dallo
spazio nel quale è montato. Il cavo di alimentazione deve essere sostituito unicamente da personale di
assistenzatecnicoo da tecniciconqualifiche equivalenti.
1.3 Consigli
Dopo ogni utilizzo del forno, si consiglia di effettuare una rapida pulizia per mantenerlo sempre in
condizioni ottimali. Non rivestire le pareti del forno con pellicola di alluminio o protezione monouso
disponibili neisupermercati.La pellicoladi alluminioo leeventuali altre protezioni, trovandosi a diretto
contattocon losmalto caldo, rischiano difondersi e di danneggiare lo smalto che si trova all'interno del
forno. Per evitare di sporcare eccessivamente il forno e causare odore di fumo acre, si consigliadi non
utilizzare il forno a temperature molto elevate. È meglio prolungare il tempo di cottura e abbassare
leggermente latemperatura.Oltre agliaccessori forniticon il forno, siconsiglia diutilizzare solo piatti e
stampidi cottura resistenti alle temperature elevate.
1.4 Installazione
Il produttore non è obbligato ad effettuarla. Se è necessaria l'assistenza del produttore per correggere
errori dovuti ad un'installazione non corretta, questo intervento in assistenza non è coperto da
garanzia. Le istruzioni di installazione destinate al personale professionalmente qualificato devono
essere rispettate. Un'installazione non corretta può causare lesioni o danni alle persone, agli animali o
alle cose. Ilproduttore non siassumela responsabilità pertalilesioni odanni.
Il forno può essere posizionato in alto all'interno di una colonna o sotto un piano di lavoro. Prima del
fissaggio, è necessario garantire una corretta ventilazione nella zona del forno per permettere la
corretta circolazione dell'aria fresca necessaria per raffreddare e proteggere i componenti interni.
Praticarele aperturespecificateall'ultima pagina asecondadel tipo diinserimento.
1.5 Gestione dei rifiuti e rispetto dell’ambiente
Questo elettrodomestico dispone di contrassegno ai sensi della direttiva europea
2012/19/CE in materia di apparecchi elettrici ed elettronici (RAEE). I RAEE contengono sia
sostanze inquinanti (che possono avere un effetto negativo sull'ambiente) sia elementi
base (che possono essere riutilizzati). È importante che i RAEE siano sottoposti a
trattamenti specifici in modo da togliere e smaltire in modo corretto gli inquinanti e
recuperare tutti i materiali. Spetta ai singoli individui garantire che i RAEE non diventi un
problemaa livello ambientale. Esistono alcune regolespecificheda rispettare:
- i RAEEnondevono essere trattati come rifiutidomestici;
- i RAEE devono essere portati nelle aree di smaltimento specifiche, gestite dai comuni o da società
autorizzate.
In molti stati, nel caso di RAEE di grandi dimensioni sono disponibili servizi di prelievo a domicilio.
Durante l'acquisto di un nuovo elettrodomestico, quello vecchio può essere restituito al venditore che
lo deve accettare gratuitamente in un'unica soluzione, a condizione che l'elettrodomestico sia di tipo
simile ed abbialestesse funzioni diquello acquistato.
SALVATAGGIO E RISPETTO DELL'AMBIENTE
Cercare per quantopossibile di evitare ilpreriscaldamento e cercaredi riempiresempre ilforno. Aprire
la porta del forno il meno possibile, in quanto il calore del vano di cottura si disperde ogni volta che la
porta viene aperta. Per un buon risparmio di energia, spegnere il forno 5 e 10 minuti prima del tempo
previsto di cottura; utilizzare il calore residuo che il forno continua a generare. Mantenere pulite e in
buone condizioni le guarnizioni, per evitare di disperdere il calore all'esterno del vano di cottura. Se si
dispone di un contratto di fornitura di elettricità con tariffa oraria, il programma "cottura ritardata"
semplificail risparmioenergetico, facendo iniziare ilprocesso di cottura nelperiodoa tariffa ridotta.
IT 16
Page 17
1.6 Dichiarazione di conformità
I componenti di questo elettrodomestico che possono entrare in contatto con sostanze alimentari
devonorispettarele disposizioni delladirettivaCEE89/109.
Apponendo il marchio
su questo prodotto, confermiamo la conformità a tutti i requisiti di legge europei in materia di
sicurezza,salutee tutela ambientaleapplicabiliper legge aquestoprodotto.
2. Descrizione del Prodotto
2.1 Panoramica
1
1. Pannello comandi
2. Posizioni ripiani
3
5
4
6
2
2.2 Accessori )(a seconda del modello
Griglia metallica
1
(griglia laterale a rete se in dotazione)
3. Griglia metallica
4. Vaschetta raccogligocce
5. Ventola (dietro alla piastra in acciaio)
Porta forno6.
2
Vaschetta raccogligocce
Supporta vassoi e piastre di cottura.
Raccoglie i residui che gocciolano durante la
cottura del cibo sulle griglie.
2.3 Primo utilizzo
PULIZIA PRELIMINARE
Prima del primo utilizzo, pulire il forno. Ripulire le superfici esterne con un panno morbido e umido.
Lavare tutti gli accessori e ripulire l'interno del forno con una soluzione di acqua calda e liquido
detergente. Impostare il forno (vuoto) alla temperatura massima e lasciarlo in questa posizione per
circa1 ora, pertogliere qualsiasiodorepungentedi prodotto nuovo.
IT 17
Page 18
3. Utilizzo del Forno
3.1 Descrizione del display
3.2 Modalità di cottura
Manopola
commuta-
tore
Intervallo
di T°
LAMPADA: accende la luce interna.
Funzione (a seconda del modello)
*
* Programma di prova secondo CENELEC EN 60350-1 utilizzato per la definizione della classe energetica.
50 ÷ 280
50 ÷ 230
L1 ÷ L5
CONVEZIONE NATURALE: sono in funzione le resistenze superiore e inferiore. È la
cottura tradizionale, ottima per arrostire cosciotti, selvaggina, ideale per biscotti,
mele al forno eper rendere icibi molto croccanti.
ELEMENTO RISCALDANTE INFERIORE: Ideale perla cottura di tutti i piatti a base di
pasta. Utilizzare questa funzione per crostate, torte salate, torte, paté e qualsiasi
cotturacheha bisognodi piùcaloree radiazioni dal basso.
GRILL: Grigliaturatradizionale a porta chiusa: con questa funzione viene inserita la
resistenza del grill. Ottima nella cottura di carni di medio e piccolo spessore
(salsicce, costine, bacon).
La funzione Grilldeve essreeseguitamassimo a 200°C
IT 18
Page 19

4. Pulizia e manutenzione del forno
4.1 Note generiche di pulizia
La vita diservizio dell’apparecchio siallungase questo viene pulito adintervalli regolari. Attendere cheil
forno si raffreddi prima di effettuare le operazioni di pulizia manuali. Non utilizzare mai detergenti
abrasivi, pagliette diferroo oggetti appuntiti perlapulizia, per non danneggiare inmodo irreparabile le
parti smaltate.Utilizzaresoloacqua, saponeo detergentia basedi candeggina (ammoniaca).
PARTI IN VETRO
E’ consigliabile pulire lo sportello in vetro con carta assorbente da cucina dopo ogni utilizzo del forno.
Per rimuovere le macchie più ostinate, è possibile anche utilizzare una spugna imbevutadi detergente
ben strizzatae sciacquare con acqua.
GUARNIZIONEDELLO SPORTELLO DEL FORNO
Se sporca, la guarnizionepuòessere pulita conuna spugnaleggermente inumidita.
ACCESSORI
Pulire gli accessori con una spugna imbevuta con acqua e sapone, sciacquarli e asciugarli : evitare di
usaredetergenti abrasivi.
VASCHETTA DIGOCCIOLAMENTO
Dopo l’uso del grill, rimuoverela vaschetta dal forno.Versare il grasso caldo in un contenitore e lavare la
vaschettainacqua calda, utilizzando una spugnae del detergente perpiatti.
Se rimangono dei residui di grasso, immergere la vaschetta in acqua e detergente. In alternativa, è
possibile anche lavare la vaschetta nella lavastoviglie oppure utilizzare un detergente per forni di tipo
commerciale.Non reinserire maiuna vaschetta sporcanel forno.
4.2 Manutenzione
RIMOZIONEDELLO SPORTELLO DEL FORNO
1. Aprire losportello anteriore.
2. Aprire i morsetti dell’alloggiamento della cerniera sullato destro e sinistro dello sportello anteriore,
premendoliverso il basso.
3. Installare nuovamentelo sportello eseguendola procedura all’inverso.
IT 19
Page 20
RIMOZIONEE PULIZIADELLA PORTA INVETRO
LOW-E
1. Aprile laportadel forno.
2.3.4. Bloccare le cerniere, rimuovere le viti e rimuovere la copertura metallica superiore tirandola
versol’alto.
5.6. Rimuovere il vetro, estraendolo con molta cura, dalla controporta del forno (NB: nei forni pirolitici,
rimuovereanche il secondoeterzovetro(se presente)).
7. Al terminedella puliziao sostituzione riassemblare le partinell’ordine oppostoalla rimozione.
Su tutti i vetri, l’indicazione ”Low-E” deve essere correttamente leggibile e posizionata sul lato sinistro
della porta, vicino alla cerniera laterale sinistra. In questo modo, l’etichetta stampata del primo vetro
rimarràinterna alla porta.
1.
5.
2.
3.
4.
6.
1
2
3
7.
IT 20
Page 21
SOSTITUZIONEDELLA LAMPADINA
1. Scollegare il forno allarete.
2. Allentare la copertura invetro,svitarelalampadina esostituirla conunanuova dello stesso modello.
3. Una volta sostituitala lampadina difettosa, riavvitarela copertura in vetro.
5. Risoluzione dei Problemi
5.1 FAQ
PROBLEMA POSSIBILE CAUSA SOLUZIONE
Il forno non si scalda
Il forno non si scalda
Il forno non si scalda
L’orologio non è impostato
Il blocco bambini è attivo
Le regolazioni necessarie
non sono impostate
IT 21
Impostare l’orologio
Disattivare il blocco bambini
Assicurarsi che le impostazioni
necessarie siano corrette
Page 22

Indicaciones de seguridad
• ADVERTENCIA: El aparato y sus componentes accesibles se calientan
durante el uso. Se debe tener cuidado de no tocar los elementos
calefactores.
• ADVERTENCIA: Las partes accesibles pueden estar muy calientes
cuando se utiliza el horno. Los niños deben mantenerse a una distancia
segura.
• Este aparatopuede ser usado por niños mayores de 8 años y personas
con capacidades físicas, sensoriales o mentales reducidas o falta de
experiencia y conocimiento siempre y cuando hayan sido supervisadas
o instruidas sobre el uso del aparato de forma segura y del
conocimientode los riesgos que comporta.
• Los niñosnodeben jugar con el aparato.
• La limpieza y el mantenimiento que debe realizar el usuario no será
realizadapor niños sin supervisión.
• Durante el uso, se calienta el aparato. Se debe tener cuidado de no
tocarlos elementos calefactoresdelinterior del horno.
ADVERTENCIA: Las partesaccesibles pueden calentarse durante el uso.
Los niños debenpermanecer alejados.
• No utilizar limpiadores abrasivos o rascadores metálicos afilados para
limpiar el cristal de la puerta del horno ya que pueden rayar la
superficie, pudiendocomportarla roturadel cristal.
• Se debe apagar el horno antes de retirar la pantalla, después de la
limpieza,se debe colocar según lasinstrucciones.
• Use solamente el sensor de temperatura recomendado para este
horno.
• No utilicelimpiadoresde vapor parala limpieza del aparato.
• Conecte unenchufe enel cable que transporta la tensión, lacorriente
y la carga indicadas en la etiqueta y que tiene el contacto de masa. La
toma de corriente debe adecuarse a la carga indicada en la etiqueta y
disponer de un contacto de masa conectado y operativo. El conductor
de tierra es de color amarillo verdoso. Esta operación debe realizarla un
profesional debidamente cualificado. Si la toma de corriente es
incompatiblecon el enchufe del electrodoméstico, pida a un electricista
ES 22
Page 23

profesional que sustituya la toma por otra adecuada. El enchufe y la
toma deben cumplir las normas actuales del país donde se instala el
electrodoméstico. En la conexión con la fuente de alimentación
también puede utilizarse un contactor omnipolar entre la fuente y el
electrodoméstico. Este debe soportar la carga conectada máxima y
cumplir la legislación vigente. El contactor no debe interrumpir el cable
de tierra de color amarillo verdoso. La toma de corriente o el contactor
omnipolar empleados deben estar fácilmente accesibles cuando se
instalael electrodoméstico.
•La desconexión puede realizarse mediante el enchufe accesible o
mediante la incorporación de un interruptor en el cableado fijo con
arregloa lasnormativas de cableado.
•Si el cable de alimentación está dañado, debe sustituirse por un cable
o un haz de cables especial comercializado por el fabricante; también
puede ponerseen contactoconel departamento deatenciónal cliente.
• El cablede alimentación debe ser de tipo H05V2V2-F.
•El incumplimiento de lo anterior puede poner en peligro la seguridad
del electrodomésticoy anular la garantía.
•Cualquier vertido de material excesivo debe eliminarse ante de la
limpieza.
•Durantela limpieza pirolítica,las superficies pueden calentarsemás de
lo habitual, por lo que los niños deben mantenerse a una distancia de
seguridad.
•El electrodoméstico no debe instalarse detrás de una puerta
decorativa para evitar que se calienteenexceso.
•Cuando coloque la bandeja interior, asegúrese de dirigir el tope hacia
arriba en lapartetrasera delacavidad.
La bandeja debeintroducirsepor completo en la cavidad.
• ADVERTENCIA: No forre las paredes del horno con papel de aluminio
ni utilice las protecciones desechables que se encuentran disponibles
en los comercios. El papel de aluminio o cualquier otra protección que
entre en contacto directo con el esmalte caliente puede derretirse y
dañar el esmaltedel interior.
• ADVERTENCIA: Nunca quite la junta de estanqueidad de la puerta del
horno.
ES 23
Page 24

Resumen
Advertencias generales
25
Descripción del producto
27
Utilización del horno
28
Limpieza y mantenimiento
del horno
29
1.1 Recomendaciones de seguridad
1.2 Seguridad eléctrica
1.3 Recomendaciones
1.4 Instalación
1.5 Gestión de residuos
1.6 Declaración de conformidad
2.1 Descripción general
2.2 Accesorios
2.3 Primer uso
3.1 Descripción de la pantalla
3.2 Modalidades de cocción
4.1 Notas genéricas de limpieza
4.2 Limpieza a Vapor
4.3 Mantenimiento
• Extracción y limpieza de las
resistencias
• Extracción de la puerta del horno
• Extracción y limpieza de la puerta
de vidrio
• Sustitución de la bombilla
Solución de problemas
31
5.1 Preguntas más frecuentes
ES 24
Page 25
1. Advertencias Generales
Le agradecemos que haya elegido uno de nuestros
productos. Para utilizar el horno de forma óptima es
aconsejable leer con atención este manual y
conservarlo para poder consultarlo en el futuro. Antes
de instalar el horno, anote el número de serie para
poder facilitárselo al personal del servicio de asistencia
técnicaen caso de solicitarsu intervención. Después de
extraer elhorno del embalaje, compruebe que no haya
sufrido daño alguno durante el transporte. En caso de
duda, no utilice el horno y solicite la asistencia de un
técnico cualificado. Conserve todo el material de
embalaje (bolsitas de plástico, poliestireno, clavos)
fuera delalcance de losniños. La primera vez que se enciende el horno puede producirse un humo de
olor acre, causado porel primercalentamiento del adhesivodelos paneles deaislamientoque recubren
el horno: se trata de un fenómeno absolutamente normal y, en caso de que se produzca, será preciso
esperar a quecese el humoantes de introducirlos alimentos. Elfabricantedeclinatoda responsabilidad
en caso deno observarlas instrucciones contenidas enestedocumento.
NOTA: las funciones, las propiedades y los accesorios de los hornos citados en este manual pueden
variarsegún losmodelos.
1.1 Recomendaciones de seguridad
Utilice el horno solo con el fin para el que se ha diseñado, es decir: únicamente para cocer alimentos;
cualquier otro uso, por ejemplo como fuente de calefacción, se considera impropio y por lo tanto
peligroso. El fabricante no puedeser considerado responsable de eventuales daños derivados de usos
impropios,erróneos o irracionales.
El uso decualquieraparatoeléctrico comporta la observacióndeuna seriede reglasfundamentales:
- no tirar del cablede alimentaciónparadesenchufarel conector dela toma decorriente;
- no tocar el aparato conlas manos nilospies mojados ohúmedos;
- en general noes aconsejable usaradaptadores,regletasni alargadores;
- en casode averíaomal funcionamientodel aparato, apágueloy nolo manipule.
1.2 Seguridad eléctrica
CONFÍE LA CONEXIÓNELÉCTRICA AUN ELECTRICISTAOA UNTÉCNICO CUALIFICADO.
La red de alimentación a la que se conecte el horno debe cumplir la normativa vigente en el país de
instalación. El fabricante declina toda responsabilidad por eventuales daños derivados de no observar
dicha normativa. Elhornodebe conectarse ala red eléctricamedianteun enchufe depared con tomade
tierra omediante unseccionador convarios polos,según la normativa vigente enel país de instalación.
La red eléctrica debe estar protegida mediante fusibles adecuados y deben utilizarse cables con una
sección transversalidónea que garantice unacorrectaalimentacióndel horno.
CONEXIÓN
El horno se suministra con un cable de alimentación que debe conectarse únicamente a una red
eléctrica con una tensión de 230 V de CA entre fases o entre la fase y el neutro. Antes de conectar el
horno a laredeléctrica es imprescindible comprobar:
- la tensiónde alimentaciónindicadapor el medidor;
- la configuración delseccionador.
El hilo detoma de tierra conectado al terminalde tierra delhorno debe estar conectado al terminal de
tierrade la redeléctrica.
ATENCIÓN
Antes de conectar el horno a la red eléctrica, confíe la comprobación de la continuidad de la toma de
tierra de la red eléctricaa unelectricista cualificado. Elfabricanteno sehace responsablede eventuales
accidentes uotros problemas derivados deno conectarel horno a tierra o de conectarlo auna tomade
tierracon una continuidaddefectuosa.
ES 25
Page 26
NOTA: puesto que el horno podría requerir la intervención del servicio de asistencia, es aconsejable
prever la disponibilidad de otro enchufe de pared al que conectar el horno después de extraerlo del
espacio donde se ha instalado. El cable de alimentación debe sustituirse únicamente por personal de
asistenciatécnica o portécnicos conunacualificación análoga.
1.3 Recomendaciones
Una limpieza mínimadespués de utilizarelhorno ayudaráa mantenerlolimpio durantemás tiempo. No
forrar las paredes del horno con aluminio u otras proteccionesdisponibles entiendas. El aluminio o los
protectores, en contacto directo con el esmalte caliente puede derretirse y deteriorar el esmalte del
interior. Para evitar un exceso de suciedad en el horno y que pueden derivar en olores y humo en
exceso, recomendamos no utilizar el horno a temperaturas muy elevadas. Es mejor ampliar el tiempo
de cocción ybajar unpoco la temperatura.
1.4 Instalación
No es obligación del fabricante instalar el horno. Si se requiere la ayuda del fabricante para subsanar
fallosderivados de unainstalaciónincorrecta,dichaasistencia no lacubrirá lagarantía.
Han de seguirse a rajatabla las instrucciones de instalación para personal cualificado. Una instalación
incorrecta puede provocar daños personales, materiales o en animales. El fabricante no se hace
responsablede esosposibles daños.
El horno se puede colocar encima, en una columna, o debajo de una encimera. Antes de fijar el horno
hayque asegurar una buenaventilación en elhueco donde sevayaa colocar yque el airenecesariopara
enfriar y proteger las piezas internas circula sin problema. Realizar las aperturas especificadas en la
última página segúneltipo de altura.
1.5 Gestión de residuos y respeto por el medio ambiente
Este aparato está certificado conforme a la directiva europea 2012/19/EU sobre aparatos
eléctricos y electrónicos (WEEE). Los dispositivos WEEE contienen sustancias
contaminantes (que pueden provocar consecuencias negativas en el medio ambiente) o
componentes básicos (que pueden reutilizarse). Es importante que dichos dispositivos
estén sujetos a tratamientosespecíficos para eliminar y desechar correctamente todos los
contaminantes y recuperar todos los materiales. Cada individuo puede desempeñar un
papel importante a la hora de asegurar que los dispositivos WEEE no se conviertan en un
problemamedioambiental;es esencialseguir algunasreglas básicas:
- los dispositivosWEEE nodeben tratarsecomo residuos domésticos;
- los dispositivosWEEE deben llevarse alos puntos de recogida específicos gestionadospor elmunicipio
o por unasociedadregistrada.
En muchos países, para los WEEE de grandes dimensiones, puede haber disponible un servicio de
recogida a domicilio. Cuando se compra un nuevo aparato, el viejo puede entregarse al vendedor, que
debe adquirirlo gratuitamente siempre que el aparato sea de tipo equivalente y tenga las mismas
funciones que elquese haadquirido.
AHORRAR Y RESPETAR EL MEDIOAMBIENTE
Siempre que sea posible, eviteprecalentarel hornoe intente utilizarlosiempre lleno.Abra la puertadel
horno lo menos posible, ya que se producen dispersiones de calor cada vez que se lleva a cabo esta
operación.Para ahorrar muchaenergíabasta apagar elhorno de 5a 10 minutosantes del findel tiempo
de cocción planificado y servirse del calor que el horno continúa generando. Mantener las juntas
limpias y en buen estadopara evitarposibles dispersiones de energía. Si se dispone de un contrato de
energía eléctrica por tarifa horaria, elprograma de cocciónretardada permitirá ahorrar másfácilmente
retrasandoel encendido delhornohastael horario detarifareducida.
ES 26
Page 27
1.6 Consejos De Cumplimiento
En este equipo, las piezas que se prevé que puedan estar en contacto con los alimentos, cumplen las
regulacionesde laCEE indicadasen la directiva 89/109.
Al mostrar el logo marcado en esteproducto, declaramos, bajonuestra propia responsabilidad,
el cumplimiento de todos los requisitos europeos en términos de seguridad, salud y medio ambiente,
establecidosen la legislacióndeeste producto.
2. Descripción del producto
2.1 Descripción general
1
3
5
4
6
2
1. Panel de control
2. Posiciones de las bandejas
(y del soporte elevado si corresponde)
3. Rejilla metálica
4. Bandeja
5. Ventilador (detrás de la placa de acero)
6. Puerta del horno
2.2 Accesorios (depende del modelo de horno)
1 Rejilla metálica
Sostiene fuentes y platos.
2 Bandeja
Recoge los residuos que gotean durante la
cocciónde alimentos con lasresistencias.
2.3 Primer uso
LIMPIEZA PRELIMINAR
Limpie el horno antes de utilizarlo por primera vez. Limpie las superficies externas con un paño suave
levementehumedecido.
Lave todos los accesorios y limpie el interior del horno con detergente lavavajillas y agua caliente.
Compruebe queel horno esté vacío,seleccione latemperatura máxima y déjelo encendido durante un
mínimo de unahoraparaeliminar todos losoloresque suele haberpresentesenlos hornosnuevos.
ES 27
Page 28
3. Uso del horno
3.1 Descripción de la pantalla
3.2 Modalidades de cocción
Mando
selector
*
* Programa de prueba según CENELEC EN 60350-1 utilizado para la definición de la clase energética.
Rango
de T°C
50 ÷ 280
50 ÷ 230
L1 ÷ L5
FUNCIÓN ( )dependiendo del modelo
LAMPARA: Conecta la luz interior
CONVECCİÓN NATURAL: Funcionan la resistencia inferior y laresistencia superior
del horno. Es la cocción tradicional, ideal para cocinar asados, caza, galletas,
manzanasal horno yparaconseguiralimentoscrujientes.
BASE: Utilizar el elemento inferior. Ideal para todo tipo de reposteria. Utilizar para
flanes, quiches,tartas,pastas y procesosque requieran mas calordesde abajo.
GRILL: El grill debe utilizarse con la puerta cerrada. Utilización de la resistencia
superior con posibilidad de ajustar la temperatura. Es necesario un
precalentamiento de 5 minutos para que la resistencia se ponga al rojo. Éxito
seguro con lasparrilladas, las brochetas ylos gratinados. Lascarnes blancasdeben
alejarse del grill, porque aunque así se alargará el tiempo de cocción, la carne
quedará más sabrosa. Las carnes rojas y los filetes de pescado se pueden colocar
encima de larejilla colocandodebajola grasera.
La parrilla DEBEutilizarse a200°Ccomo máximo.
ES 28
Page 29

4. Limpieza y mantenimiento del horno
4.1 Notas genéricas de limpieza
La vida útil del aparato se prolonga si se limpia a intervalos regulares. Espere a que el horno se enfríe
antes de llevar a cabo las operaciones de limpieza manuales. No utilice nunca detergentes abrasivos,
estropajosmetálicos ni objetospuntiagudos para lalimpiezacon elfin de nodañar deformairreparable
las piezas esmaltadas. Utiliceúnicamente agua,jabóno detergentesabase deamoniaco.
PIEZASDE VIDRIO
Es aconsejable limpiar la puerta de vidrio con papel absorbente de cocina después de cada uso del
horno. Para eliminar las manchas más persistentes, se puede utilizar también una esponja empapada
en detergentebien escurrida yaclararcon agua.
JUNTA DELA PUERTA DEL HORNO
Si se ensucia,lajunta se puedelimpiar conuna esponja ligeramentehúmeda.
ACCESORIOS
Limpie los accesorios con una esponja empapada en agua y jabón, escúrralos y séquelos: no utilice
detergentesabrasivos.
FUENTE DE GOTEO
Después deusar las resistencias, extraiga la fuente del horno. Vierta la grasa calienteen unrecipiente y
lavela fuente con agua caliente utilizandouna esponja ydetergente lavavajillas.
Si quedanresiduos grasos, sumerjala fuente en agua y detergente. También se puedelavar la fuenteen
el lavavajillas o bien utilizar un detergente comercial para hornos. Nunca vuelva a introducir la fuente
sucia en elhorno.
4.2 Mantenimiento
EXTRACCIÓNDE LAPUERTADEL HORNO
1. Abra la puertaanterior.
2. Abra las pestañas de alojamiento de la bisagra por el lado derecho e izquierdo de la puerta anterior
presionándolashacia abajo.
3. Vuelva a instalar lapuerta llevando a caboelprocedimientoa lainversa.
ES 29
Page 30
EXTRACCIÓNY LIMPIEZA DE LAPUERTA DEVIDRIO
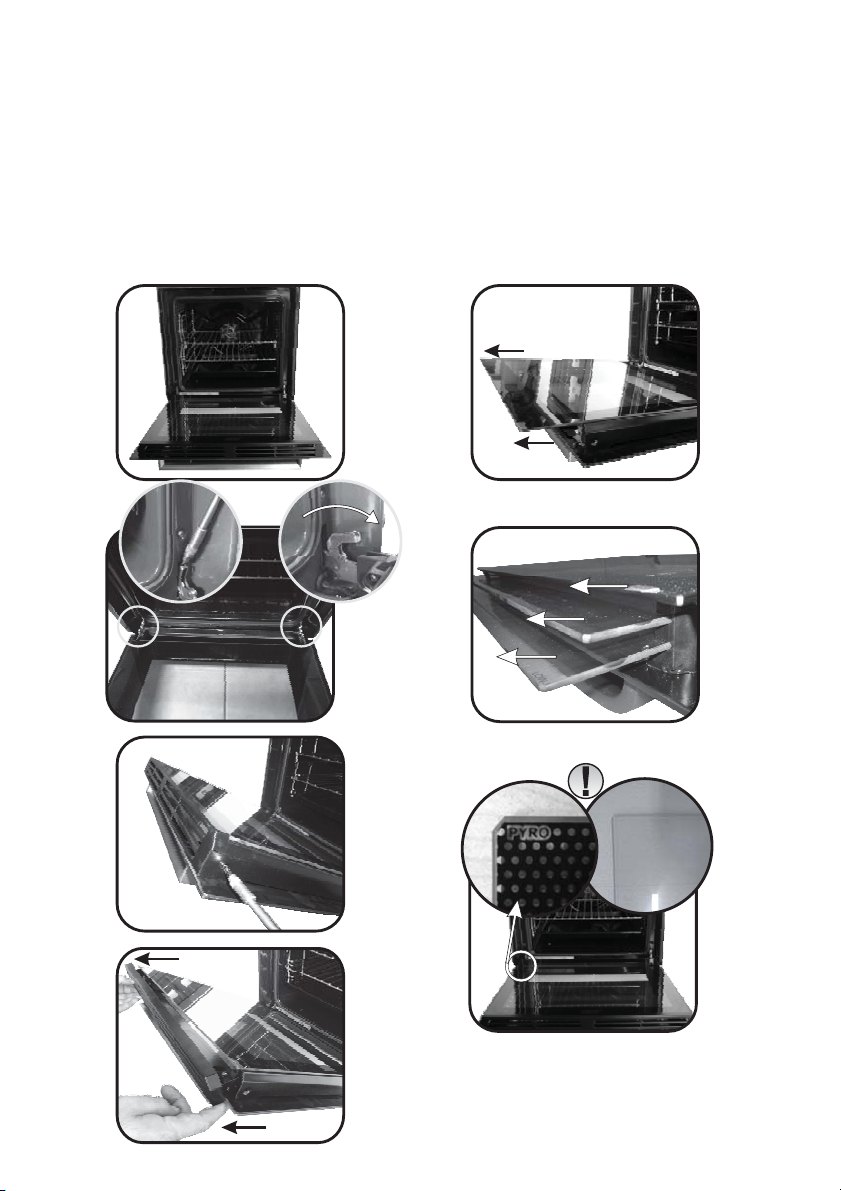
LOW-E
1. Abra la puertadelhorno.
2.3.4. Bloquee las bisagras, desenrosque los tornillos y extraiga la cubierta metálica superior tirando
hacia arriba.
5.6. Extraiga el vidrio con mucho cuidado de la contrapuerta del horno (N. B.: si se trata de un horno
pirolítico,extraigatambién elsegundo y eltercervidrio si loshubiera).
7. Al término de la limpieza o sustitución, vuelva a ensamblar las piezas en el orden opuesto a la
extracción.
En todoslos vidrios, la indicación ”Low-E” debe sercorrectamente legible y estar ubicada ala izquierda
de la puerta, cerca de la bisagra lateral izquierda. De este modo, la etiqueta estampada en el primer
vidrio quedará por elinteriorde la puerta.
1.
5.
2.
3.
4.
6.
1
2
3
7.
ES 30
Page 31
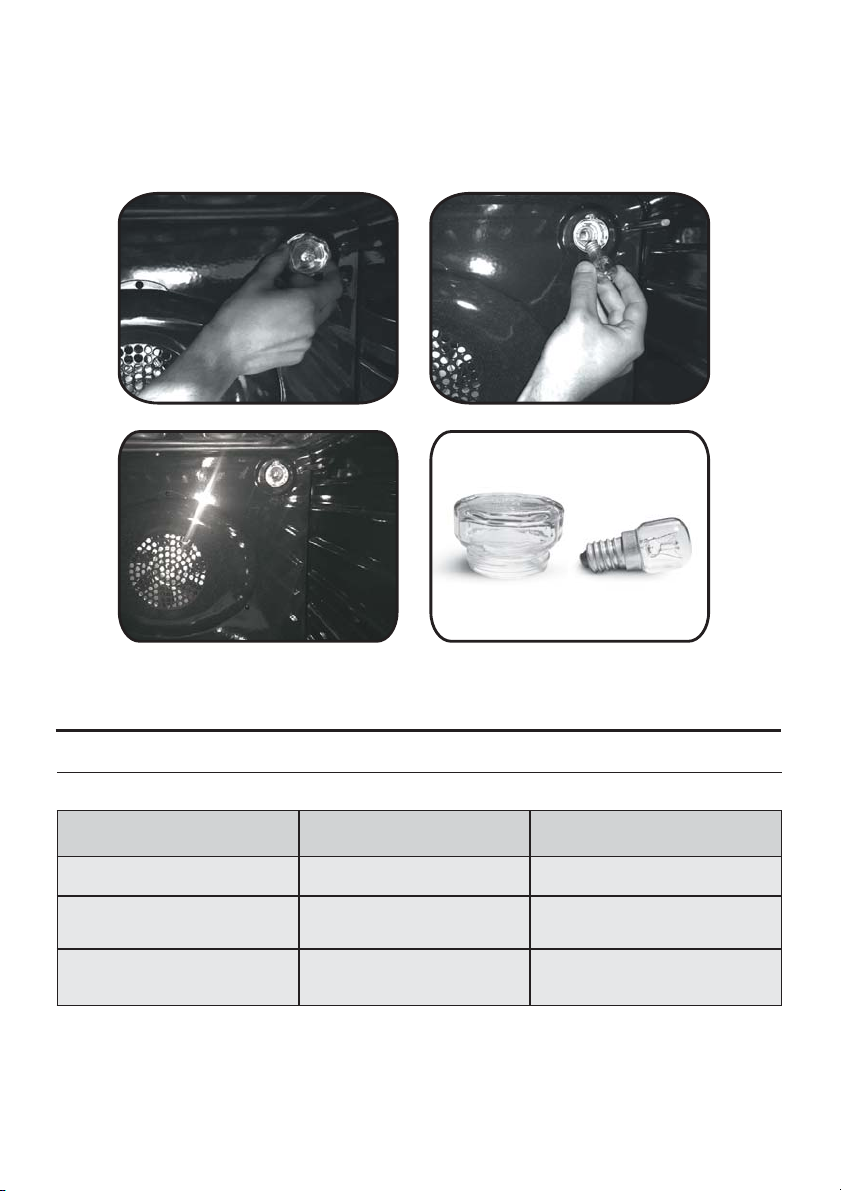
SUSTITUCIÓNDE LABOMBILLA
1. Desenchufe el hornodela red eléctrica.
2. Suelte lacubierta devidrio,desenrosque la bombillay sustitúyalaporuna nueva delmismo modelo.
3. Una vez sustituida labombilla defectuosa,vuelva aatornillarla cubierta devidrio.
5. Solución de problemas
5.1 Preguntas más frecuentes
PROBLEMA CAUSA POSIBLE SOLUCIÓN
El horno no se calienta
El horno no se calienta
El horno no se calienta
El reloj no está en hora Configure el reloj
El bloqueo infantil está
activado
Los ajustes necesarios no
están configurados
Desactive el bloqueo infantil
Asegúrese de que los ajustes
necesarios sean correctos
ES 31
Page 32

Güvenlik uyarıları
• UYARI: Cihaz ve aparatları kullanım sırasında ısınır. Isınmış parçalara
dokunmaktankaçınınız.
• UYARI: Fırın kullanımdayken erişilebilir parçalar çok sıcak olabilir.
Çocuklar güvenlibir mesafede tutulmalıdır.
• Bu cihaz, 8 yaş ve üzeri çocuklar ve fiziksel, duyusal veya zihinsel
yetenekleri veya bilgi ve tecrübe açısından yetersiz kişiler tarafından
ancak yetişkin bir bireyin denetiminde ve cihazın nasıl kullanılacağına
dair verilen talimatların uygulanması durumunda ve oluşabilecek
tehlikelerikavradıklarıtakdirdegüvenle kullanılabilir.
• Çocuklar cihazlaoynamamalıdırlar.
• Cihazın temizlik ve bakımı gözetmen olmaksızın çocuklar tarafından
yapılmamalıdır.
• Kullanım sırasında cihaz ısınabilir. Fırının içindeki ısıtma elemanlarının
dokunurkendikkatliolunmalıdır.
UYARI: Erişilebilir parçalar kullanım sırasında ısınabilir. Küçük çocuklar
uzaktutulmalıdır.
• Fırın kapak camını temizlerken kuvvetli aşındırıcı temizleyiciler veya
keskin metal kazıyıcılar kullanmayın çünkü bu camın kırılmasına veya
yüzeyinçizilmesine nedenolabilir.
• Koruma çıkarılmadan önce fırın kapatılmalıdır ve temizlikten sonra
korumaparçası talimatlarauygun olarakyerine koyulmalıdır.
• Sadece bufırıniçin önerilensıcaklık probukullanın.
• Fırını temizlerken buharlıtemizleyiciler kullanmayınız.
•Besleme kablosuna etikette belirtilen gerilimi, akımı ve yükü
kaldırabilecek, toprak bağlantısı olan bir fiş takın. Prizin etikette
belirtilen yüke uygun, toprak bağlantısı yapılmış ve çalışır durumda
olması gerekir. Topraklama iletkeni sarı-yeşil renklidir. Bu işlem yalnızca
uygun yetkinliğe sahip personel tarafından gerçekleştirilmelidir. Prizle
cihazın fişi arasında uyumsuzluk olması durumunda, yetkin bir elektrik
ustasından prizi uygun tipte bir prizle değiştirmesini isteyin. Fiş ve priz
kurulumun yapıldığı ülkede geçerli olan normlara uygun olmalıdır. Güç
kaynağı bağlantısı, cihazla güç kaynağı arasına maksimum bağlı yükü
TR 32
Page 33

kaldırabilecekve geçerli mevzuatauygun olan omnipolar bir devrekesici
yerleştirilerek de yapılabilir. Sarı-yeşil topraklama kablosu devre kesici
tarafından kesintiye uğratılmamalıdır. Priz veya bağlantı için kullanılan
omnipolar devre kesici, cihazın kurulumu yapıldığında kolayca
erişilebilir durumdaolmalıdır.
•Bağlantı, fişin erişilebilir durumda tutulması veya kablolama
kurallarına uygun şekilde sabit kablo tesisatına bir anahtarın eklenmesi
yoluylakesilebilir.
•Güç kablosu hasarlıysa üreticiden temin edilen bir kablo veya özel bir
demet ile ya da müşteri hizmetleri departmanıyla iletişim kurularak
değiştirilmelidir.
•Güç kablosuH05V2V2-F tipiolmalıdır.
•Yukarıdaki yönergelere uyulmaması cihazın güvenliğini tehlikeye
atabilirve garantiyigeçersiz kılabilir.
•Temizlemeden önce dökülen malzemelertemizlenmelidir.
•Pirolitik temizleme işlemi sırasında yüzeyler normalden daha fazla
ısınabilir; bu nedenleçocuklar güvenli birmesafedetutulmalıdır.
•Cihaz, aşırı ısınmayı önlemek için dekoratif bir kapının arkasına monte
edilmemelidir.
•Rafı fırının içine yerleştirirken stopun yukarıya baktığından ve
bölmenin arkatarafında olduğundaneminolun.
Raf, bölmeye tamamen girerekyerleştirilmelidir.
• UYARI: Fırın duvarlarını alüminyum folyoyla kaplamayın veya
mağazalardan alınan tek kullanımlık koruma malzemelerini
kullanmayın. Alüminyum folyo veya diğer tüm koruma malzemeleri,
sıcak emayeyle doğrudan temas ettiğinde iç yüzeylerdeki emayenin
erimesine vebozulmasına neden olma riski taşımaktadır.
• UYARI: Fırın kapağı contasınıkesinlikleçıkarmayın.
TR 33
Page 34

Özet
Genel Açıklamalar
35
Ürün Açıklaması
37
Fırının Temizlenmesi ve Bakımı
38
Fırının Temizlenmesi ve Bakımı
39
1.1 Güvenlik ipuçları
1.2 Elektriksel güvenlik
1.3 Tavsiyeler
1.4 Kurulum
1.5 Atık yönetimi
1.6 Uygunluk beyanı
2.1 Genel bakış
2.2 Aksesuarlar
2.3 İlk kullanım
3.1 Gösterge açıklamaları
3.2 Pişirme modları
4.1 Temizleme hakkında genel notlar
4.2 Buharla Temizleme
4.3 Bakım
• Fırın kapağının sökülmesi
• Camın sökülmesi ve temizlenmesi
• Ampulün değiştirilmesi
Sorun Giderme
41
5.1 Sorun giderme
TR 34
Page 35
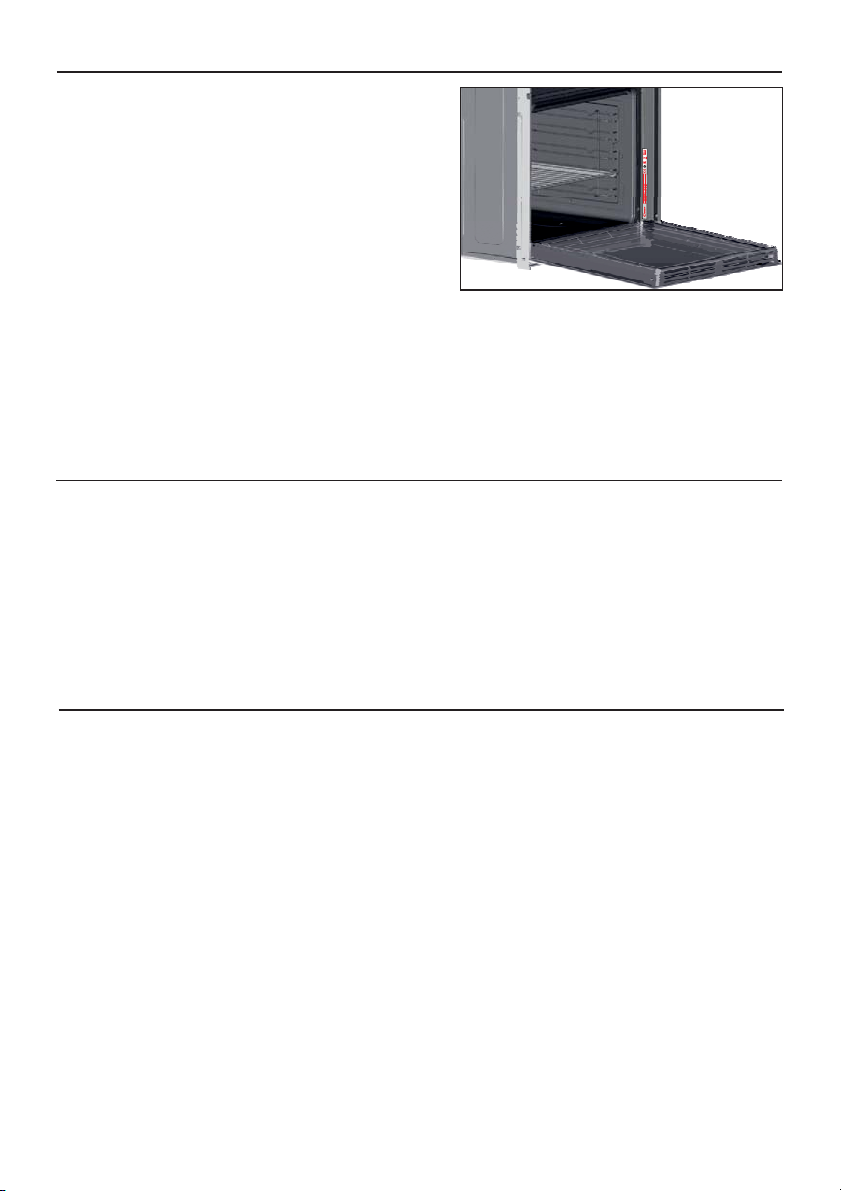
1. Genel Açıklamalar
Ürünlerimizden birini tercih ettiğiniz için teşekkür
ederiz. Fırınınızdan en iyi sonuçları almak için bu
kılavuzu
dikkatle okuyun ve daha sonra başvurmak için saklayın.
Fırının montajından önce, herhangi bir onarım
gerekmesi halinde müşteri hizmetleri personeline
vermek üzere seri numarasını not edin. Fırını
ambalajından çıkardıktan sonra nakliye sırasında hasar
almamış olduğunu kontrol edin. Eğer tereddüdünüz
varsa fırını kullanmayın ve tavsiye almak için kalifiye bir
teknisyenebaşvurun.
Tümambalaj malzemelerini (plastik torbalar,polistiren,
vidalar) çocukların erişemeyeceği yerlerde tutun. Fırın ilk kez çalıştırıldığında güçlü bir duman kokusu
oluşabilir, bunun nedeni fırın ilk kez ısındığında yalıtım panelleri üzerinde bulunan yapışkan maddenin
yanmasıdır. Bu kesinlikle normal bir durumdur ve oluştuğu zaman dumanın yayılması beklendikten
sonra yiyeceklerin fırının içine konulması gereklidir. Bu dokümanda verilen açıklamalara uyulmaması
halinde ortayaçıkabilecek durumlar içinimalatçıherhangi bir sorumlulukkabul etmez.
NOT: Bu kılavuzda belirtilen fırın işlevleri, özellikleri ve aksesuarları satın almış olduğunuz modele bağlı
olarakfarklılık gösterecektir.
1.1 Güvenlik İpuçları
Fırın sadecekullanım amacınauygun biçimdekullanılmalıdır, kullanım amacıyiyeceklerin pişirilmesidir;
başka bir amaç için,örneğin birısı kaynağıolarak kullanılması uygunsuz ve bu nedenle tehlikelikullanım
olarak değerlendirilir. Uygunsuz,hatalı veyamakul olmayankullanım sonucunda ortaya çıkabilecek her
türlü zarardanimalatçı sorumlu tutulamaz.
Herhangi bir elektriklicihazınkullanımı sırasında bazıasli kurallara uyulması gereklidir:
- elektrik fişiniprizdençıkarmakiçin asla kablodantutarak çekmeyin;
- elleriniz yada ayaklarınızıslakveyanemli iken cihazadokunmayın;
- genellikle adaptörlerin, çoklu prizlerinve uzatmakablolarının kullanılmasıtavsiyeedilmez;
- arızalanması ve/veya düzgünçalışmamasıdurumunda cihazı kapatın ve kurcalamayın.
1.2 Elektriksel Güvenlik
ELEKTRİK BAĞLANTILARINI BİR ELEKTRİKÇİNİN YA DA KALİFİYE BİR TEKNİSYENİN YAPMASINI
SAĞLAYIN
Fırının bağlanmış olduğu elektrik beslemesinin montajın yapıldığı ülkede yürürlükte bulunan yasalara
uygun olması gereklidir. Bu açıklamalara uyulmaması durumunda ortaya çıkabilecek zararlar için
imalatçı herhangi bir sorumluluk kabul etmemektedir. Montajın yapıldığı ülkede yürürlükte bulunan
yasalara bağlı olarak fırının topraklı bir priz ya da bütün kutupları ayıran bir devre kesici kullanılarak
elektrik beslemesine bağlanması gereklidir. Elektrik beslemesinin uygun sigortalarla korunması ve
kullanılankabloların fırının doğrubirşekilde beslenebilmesineyeterli kapasitede olmasıgereklidir.
BAĞLANTI
Fırın, faz arası veya faz nötr arası 220-240 VAC 50 Hz olan bir elektrik beslemesine bağlanması gereken
bir elektrikkablosu ilesağlanmıştır. Fırın elektrik beslemesine bağlanmadan önce aşağıdakilerin kontrol
edilmesi gereklidir:
- etikettebelirtilen gerilim değeri;
- devre kesicinin ayarı.
Fırının topraklama klemensine bağlanmış olan topraklama kablosunun elektrik beslemesinin
topraklamaklemensine bağlanması gereklidir.
UYARI
Fırını elektrik beslemesine bağlamadan önce, elektrik beslemesinin topraklama klemensinin
sürekliliğini kontrol etmesi için kalifiye bir elektrikçiye başvurun. Fırının topraklama klemensine
bağlanmaması veya topraklama bağlantısının sürekliliğinde bir sorun olması sonucunda ortaya
TR 35
Page 36
çıkabilecekher türlükaza veya zarardaimalatçı herhangi birsorumlulukkabul etmemektedir.
NOT:fırında bazıbakım işlemleriyapılması gerektiğinden, montajınyapılmış olduğu alandan çıkarılması
halinde fırının bağlanabileceği başka bir prizin yakınlarda bulunması tavsiye edilir. Elektrik kablosunun
sadece teknik servis personeli ya da eşdeğer niteliklere sahip teknisyenler tarafından değiştirilmesi
gereklidir.
1.3 Tavsiyeler
Fırını her kullandıktan sonrayapılacak kısasüreli temizlikişlemi fırının her zaman mükemmel temizlikte
kalmasını sağlayacaktır. Fırının yan duvarlarını alüminyum folyo veya mağazalardan satın alınabilecek
tek kullanımlık koruma malzemeleri ile kaplamayın. Sıcak emaye ile temas eden alüminyum folyo veya
başka herhangi bir koruma malzemesi erime riskine sahiptirve emaye iç yüzeylerin bozulmasına neden
olabilir. Fırınınızın aşırı kirlenmesini ve bunun sonucunda duman kokusu oluşmaması için fırını çok
yüksek sıcaklıklarda kullanmamanızı tavsiye ederiz. Pişirme süresini uzun tutmak ve sıcaklığı biraz
düşürmek daha iyidir. Fırın ile birlikte verilen aksesuarlara ek olarak, sadece çok yüksek sıcaklıklara
dayanıklıtabaklarve pişirme kaplarıkullanmanızıtavsiyeederiz.
1.4 Kurulum
Ürünün kurulumu firmanın yetkilendirilmiş servis/yetkilendirilmiş kişi tarafından yapılmalıdır. Yetkisiz
kişi ve kuruluşlar tarafından yapılan kurulumlardan doğan tüm ürün, kişi, mahal hasarları firmanın
sorumluluğunda değildir. Kurulum yapılacak mahalin ürünün çalışma ve teknik koşullara kullanma
kılavuzunda belirlenen kurallara uygun şekilde olması/sağlanması tüketicinin sorumluluğundadır. Eğer
tüketicitarafındanyapılankurulum nedeniyle ortaya çıkanhatalarındüzeltilmesiiçin imalatçının desteği
gerekirse,bu destek garanti kapsamındasağlanmaz. Kurulum açıklamaları profesyonelkalifiye personel
içindir ve kurulum sırasında uyulması gereklidir. Hatalı kurulum insanların ve evcil hayvanların
yaralanmasınave eşyaların zarargörmesine nedenolabilir. Böylesibir yaralanma veyazarariçin imalatçı
sorumlu tutulamaz.
Fırın yüksek bir mutfak dolabına ya da tezgah altına yerleştirilebilir. Sabitlemeden önce, iç parçaların
soğutulması ve korunması için gerekli temiz havanın uygun biçimde dolaşımının sağlanması amacıyla
fırının etrafında iyi bir havalandırma sağlandığından emin olun. Sabitleme şekline göre son sayfada
belirtilen havaalma açıklıklarını açın. Bu cihaz ev standartlarında kullanımına uygun olarak tasarlanmış
ve üretilmiş olup
ticari ve profesyonel amaçla kullanımlara uygun değildir. Ticari kullanımlarda (ev harici) ürün teslim
tarihinden itibaren 1 (bir) ay sure ile üretim hatalarına karşı garanti kapsamındadır. Ticari kullanımlarda
cihazın ömrü kısalabilir ve kullanım beklentilerini karşılamayabilir. Ev ve benzeri kullanım amacıyla
örtüşmeyen (ev veya ev tipi bir mekanda bile olsa) kullanım dolayısıyla cihazda meydana gelebilecek
herhangi bir arızave/veyahasar üretici/ satıcı tarafından kabuledilmeyecektir. Ticariamaç ilekullanılan
ürünlerde, Malın ayıplı olduğu teslim sırasında açıkça belli ise alıcı 2 (iki) gün içinde durumu satıcıya
ihbar etmelidir. Açıkça belli değilse alıcı malı teslim aldıktan sonra 8 (sekiz) gün içinde incelemek veya
incelettirmekle ve bu inceleme sonucunda malın ayıplı olduğu ortaya çıkarsa, haklarını korumak için
durumu bu süreiçinde satıcıyaihbarlayükümlüdür.
Bu cihaz ev standartlarında kullanılmak üzere üretilmiştir. Profesyonel kullanım veya
ticare kullanım için kurulmuş olması durumunda, ilgili ticari hususta uygulanan
standartlar dikkate alınmalıdır.
1.5 Atık yönetimi ve çevrenin korunması
Bu cihaz, 2012/19/EU Atık Elektrikli ve Elektronik Cihazlar (WEEE) hakkında Avrupa
Yönergesine göre etiketlenmiştir. WEEE hem kirletici maddeleri (çevreye olumsuz bir etkisi
olabilecek), hem de baz elemanları (yeniden kullanılabilir olan) içermektedir. Kirletici
maddelerin bertaraf edilmesi ve tüm malzemelerin geri dönüştürülebilmesi için
WEEE'lerin doğru bir şekilde tasnif edilmesi önemlidir. WEEE'lerin çevre açısından bir
son derece önemlidir:
- WEEE evsel atık olarak işlem görmemelidir;
- WEEE belediyeler veya tescilli bir firma tarafından yönetilen belirlenmiş toplama alanlarına
götürülmelidir.
sorun oluşturmaması için bireyler önemli bir rol oynayabilir; birkaç temel kurala uyulması
TR 36
Page 37
Birçok ülkede, büyük WEEE'ler için şehir içinde toplama noktaları bulunmaktadır. Yeni bir cihaz satın
aldığınızda, eski cihazın satın alınan cihazla aynı tipte olması ve aynı işlevlere sahip olması
durumunda eski cihazı ücretsiz olarak bire bir kabul etmesi gereken satıcıya iade edebilirsiniz.
ENERJİ TASARRUFU VE ÇEVREYE SAYGI
Mümkün olduğunda, fırını önceden ısıtmaktan kaçının ve her zaman doldurmaya çalışın. Fırın
kapağını olabildiğince az açın çünkü her açılışında ısı kaybı oluşur. Önemli oranda enerji tasarrufu
için, fırını planlanan pişirme süresinden 5 ile 10 dakika daha önce kapatın ve fırının üretmeye devam
edeceği artakalan ısıyı kullanın. Isının hazne dışına kaçmaması için contaları temiz ve düzgün tutun.
Eğer saatlik bir tarife ile ücretlendirilen bir elektrik sözleşmeniz varsa, pişirmeye başlama saatini
indirimli fiyat tarifesinin saatine taşıyan "gecikmeli pişirme" programı ile daha basit bir şekilde enerji
tasarrufu yapılabilir.
1.6 Uygunluk beyanı
Bu cihazın gıdalarla temas edebilecek parçaları 89/109 EEC Yönetmeliği hükümlerine uygundur.
Bu ürüne işaretinin yerleştirilmesi ile cihazın bu ürün için yürürlükte olan tüm ilgili Avrupa
güvenlik, sağlık ve çevre standartlarına uygun olduğunu doğruluyoruz.
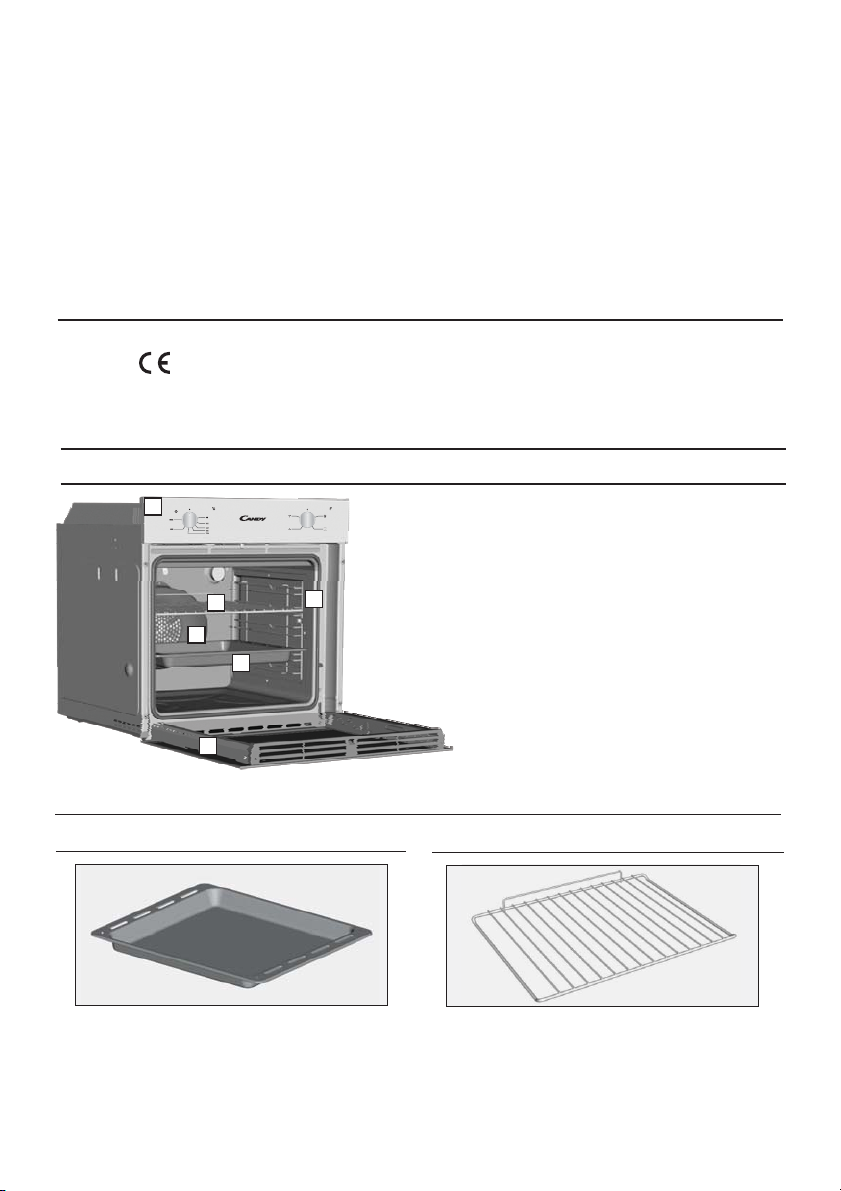
2. Ürün Açıklaması
2.1 Genel bakış
1
1.Kontrol paneli
2. Raf konumları
3
5
4
2
(eğer varsa yan tel raflar)
3. Metal ızgara
4. Tepsi
5. Fan (çelik plakanın arkasında)
6. Fırın kapağı
6
2.2 Aksesuarlar
Tepsi
1
Yiyeceklerin ızgara üzerinde pişirilmesi sırasında
damlayan sularını toplar.
Metal ızgara
2
Pişirme tepsilerini ve tabaklarını tutar.
TR 37
Page 38
2.3 İlk Kullanım
İLK TEMİZLEME
İlk kez kullanmadan önce fırını temizleyin. Dış yüzeyleri yumuşak bir ıslak bezle silin. Tüm aksesuarları
yıkayın ve fırının içini sabunlu su ve sıvı bulaşık deterjanı karışımına batırılmış bir bezle silin. Boş fırını
maksimum sıcaklık değerine ayarlayın ve yaklaşık 1 saat çalıştırın, bu şekilde fırının yeni olmasından
kaynaklıtüm kokulargiderilecektir.
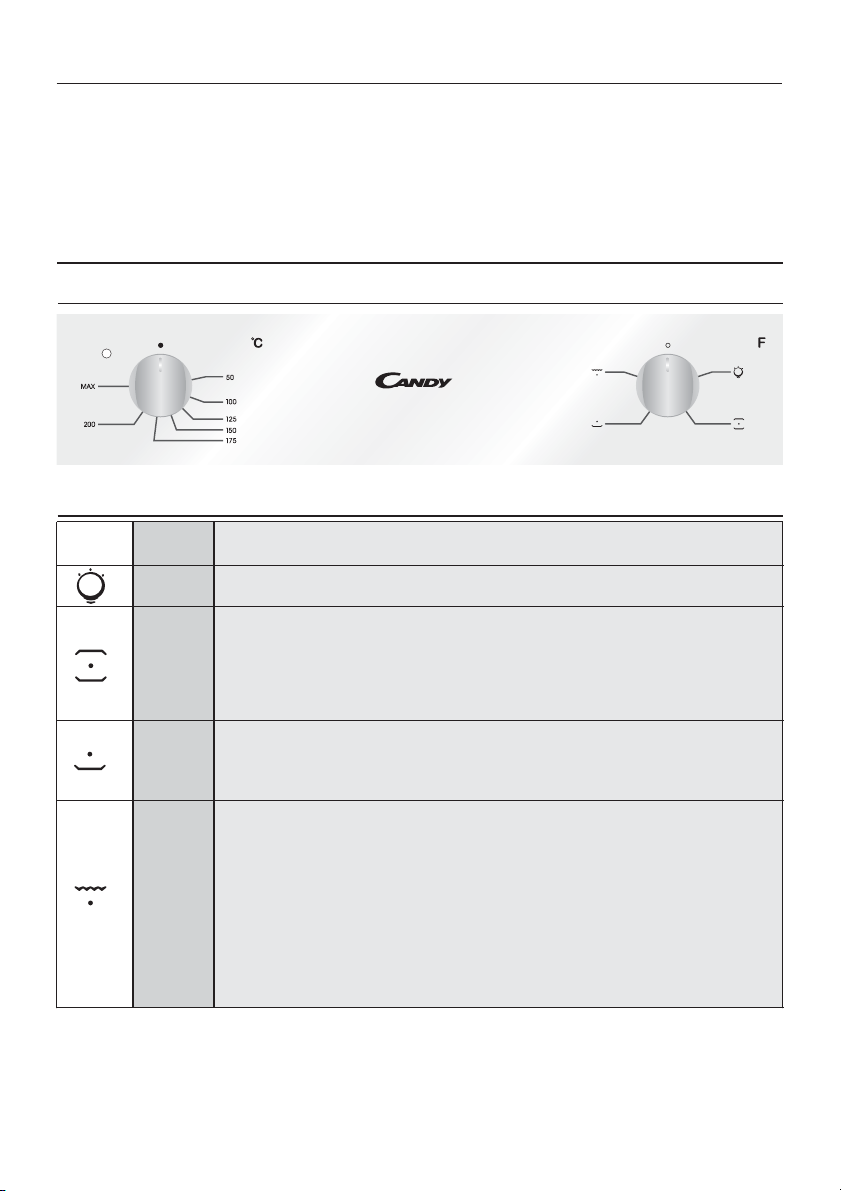
3. Fırının Kullanımı
3.1 Gösterge açıklamaları
3.2 Pişirme Modları
Fonksiyon
ikonu
*
Sıcaklık
aralığı °C
50 ÷ 280
Fonksiyon (Fırın modeline bağlıdır)
LAMBA: Fırın lambasını yakar.
STATİK/GELENEKSEL PİŞİRME: Hem üst, hem de alt ısıtıcı elemanlar kullanılır.
Fırını yaklaşık on dakika öncedenısıtın. Bu yöntemher türlü geleneksel kızartmave
fırında pişirme için idealdir. Kırmızı etler, rosto, kuzu butu, ekmek, folyoya sarılmış
yiyecekler (papillote), katmer içindir. Gıdayı bir tabağın içinde orta rafın üzerine
yerleştirin.
ALT: Alt ısıtma elemanını kullanır. Tüm hamur işlerinin pişirilmesi icin idealdir. Bu
50 ÷ 230
L1 ÷ L5
*CENELEC EN 60350-1 uyumlu olarak test edilmiştir enerji sınıfının tanımlanması için kullanılmıştır.
ısıtma yöntemini, alt taraftandaha fazla ısı ve ışınımgerektiren pasta,tart, ezmeve
diğer bu turluyiyecekler içinkullanın.
IZGARA:fırın kapağı kapalıikenbufonksiyonukullanın.
Üst ısıtıcı eleman tek başına kullanılır ve sıcaklık ayarı yapılabilir. Elemanların
ısınması için beş dakikalık ön ısıtma gereklidir. Izgaralar, kebaplar ve üstü örtülen
yemeklerin pişirilmesindebaşarı garanti edilir. Beyazetlerin ızgaradan birazaçıkta
tutulması gereklidir; pişirme süresi daha uzundur, ancak et daha lezzetli olacaktır.
Kırmızı etleri ve balık filetolarını altında damlama tepsisi ile rafın üzerine
yerleştirin.Fırın ikiızgara konumuna sahiptir:
Izgara:2140W Barbekü: 3340W
Izgaraişlevimaksimum 200°C’de GERÇEKLEŞTİRİLMELİDİR
TR 38
Page 39

4. Fırının Temizlenmesi ve Bakımı
4.1 Temizleme hakkında genel notlar
Düzenli temizlik ile cihazın kullanım ömrü uzatılabilir. Elle temizlik işlemlerini yapmadan önce fırının
soğumasını bekleyin. Temizlik için asla aşındırıcı deterjanlar, çelik tel veya keskin nesneler kullanmayın,
aksi takdirde emaye parçalarda onarılamaz hasarlar oluşabilir. Sadece su, sabun veya ağartıcı bazlı
deterjanlar(amonyak)kullanın.
CAM PARÇALAR
Fırın her kullanıldıktan sonda pencerenin camının emici bir mutfak bezi ile temizlenmesi tavsiye edilir.
İnatçı lekeleri temizlemek için deterjana batırılmış ve iyice sıkılmış bir sünger kullanın ve sonra su ile
durulayın.
FIRIN KAPAKCONTASI
Kirlendiği zaman hafifçe ıslatılmış bir süngerletemizlenebilir.
AKSESUARLAR
Aksesuarları sabunlu su ile ıslatılmış bir süngerle temizleyin, ardından durulayın ve kurutun: aşındırıcı
deterjanlarkullanmaktankaçının.
DAMLAMATEPSİSİ
Izgarayıkullandıktan sonra tepsiyi fırından çıkarın. Sıcak yağı bir kaba dökün ve birsünger ve sıvı bulaşık
deterjanıkullanaraktepsiyi sıcak suileyıkayın.
Eğer yap artıkları kalırsa, tepsiyi deterjanlı suya batırın. Alternatif olarak, tepsiyi bulaşık makinesinde
yıkayabilir veya piyasada bulunan fırın deterjanlarını kullanabilirsiniz. Kirli tepsiyi asla fırına geri
koymayın.
4.2 Bakım
FIRIN KAPAĞININ SÖKÜLMESİ
1. Kapağı açın.
2. Aşağı doğru iterek fırın kapağının sağ ve sol tarafında bulunan menteşe yuvalarının kıskaçlarını
açın.
3. Bu işlemin tersini uygulayarak kapağı yerine takın.
TR 39
Page 40
LOW-E
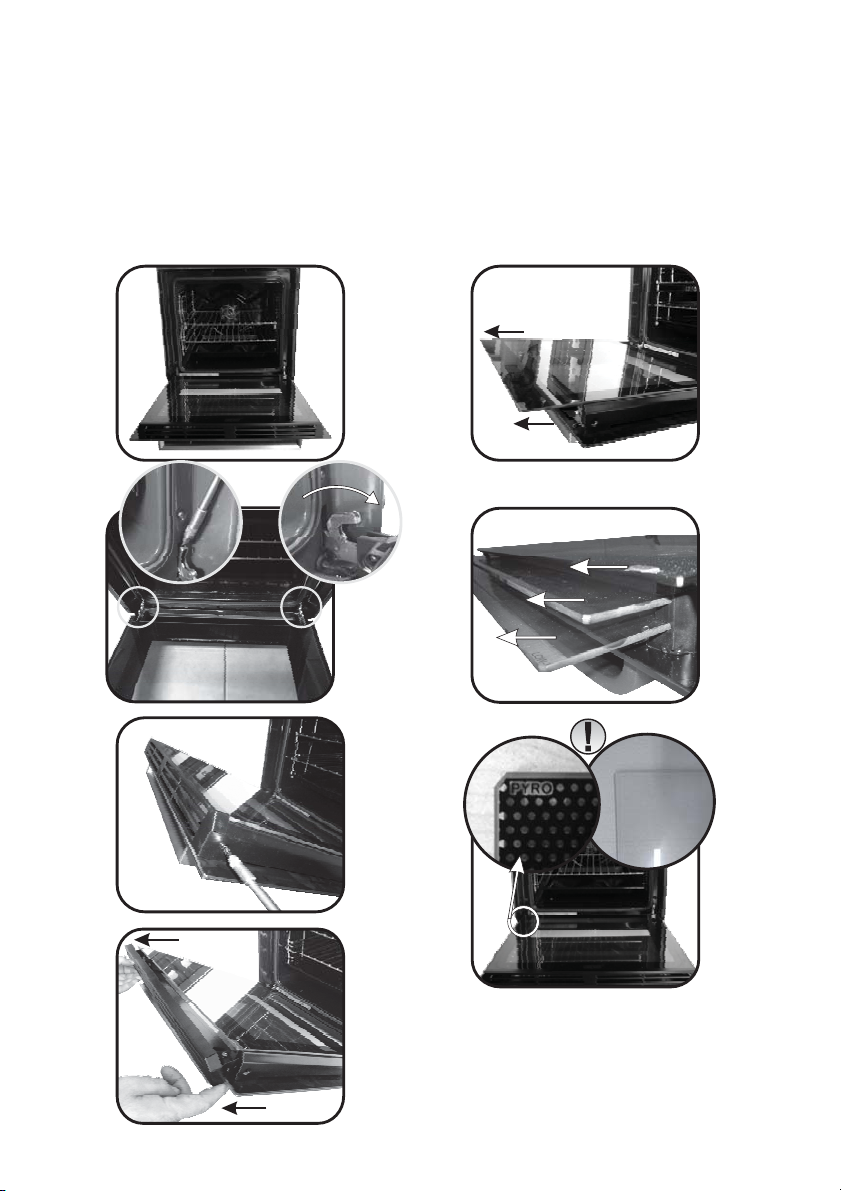
CAMIN SÖKÜLMESİ VE TEMİZLENMESİ
1. Fırının kapağını açın.
2.3.4. Menteşeleri kilitleyin, vidaları çıkarın ve yukarı doğru çekerek üst metal kapağı çıkarın.
5.6. Camı dikkatli bir şekilde fırın kapağından çekerek çıkarın (Not: pirolitik fırınlarda ikinci ve üçüncü
camı (eğer varsa) da çıkarın).
7. Temizleme veye değişim işleminin sonunda parçaları sökme işleminin ters sıralaması ile toplayın.
Tüm camların üzerinde "PYRO" kelimesinin okunabilmesi ve kapağın sol tarafında bulunması
gereklidir, soldaki yatay menteşeyi kapatın. Bu şekilde birinci camın baskılı yüzeyi kapağın içinde
kalacaktır.
1.
5.
2.
3.
4.
6.
1
2
3
7.
TR 40
Page 41
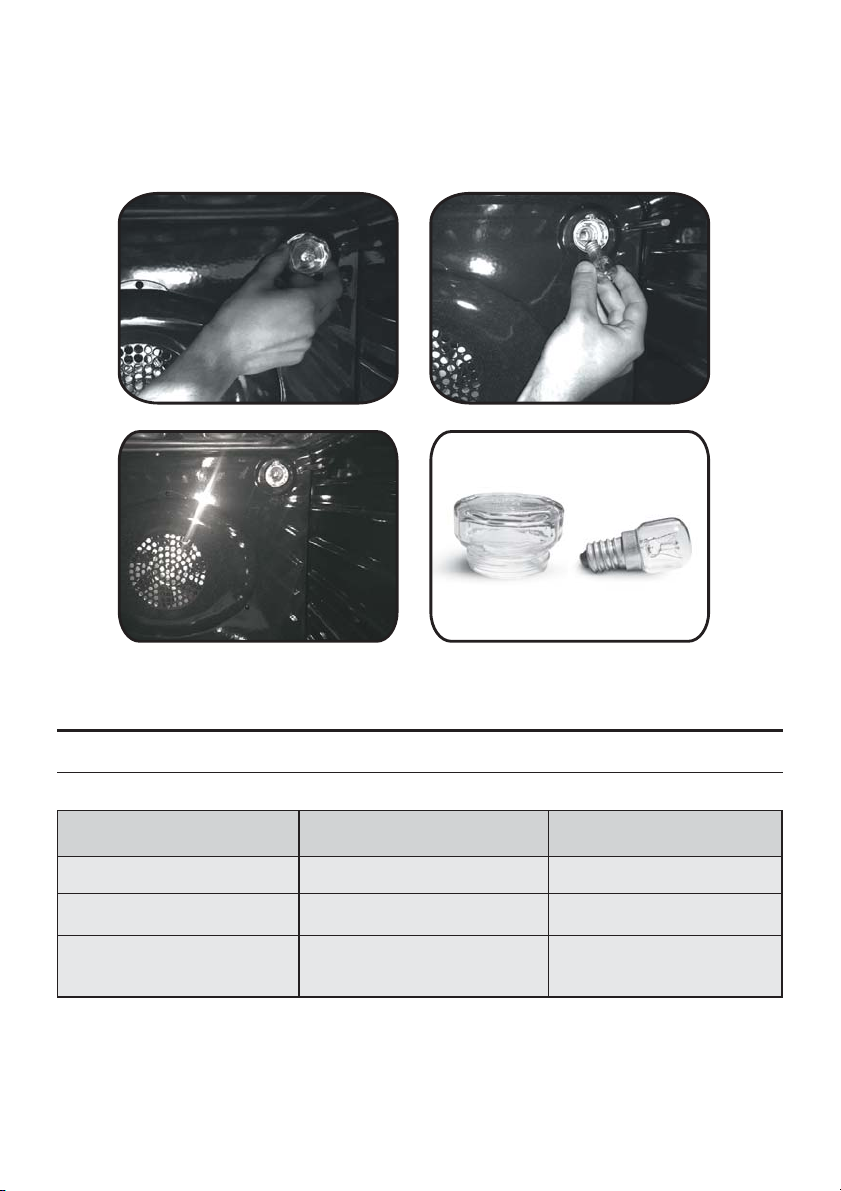
AMPULÜNDEĞİŞTİRİLMESİ
1. Fırını elektrikbeslemesindenayırın.
2. Cam kapağısökün, ampulüsökün ve aynı türdeyeni bir ampulile değiştirin.
3. Arızalı ampuldeğiştirildikten sonracam kapağıyerinetakın.
5. Sorun Giderme
5.1 Sorun giderme
SORUN
Fırın ısınmıyor
Fırın ısınmıyor
Fırın ısınmıyor
OLASI NEDENİ
Saat ayarlanmamış
Çocuk kilidi devrede
Bir pişirme işlevi ya da sıcaklık
ayarlanmamış
TR 41
ÇÖZÜMÜ
Saati ayarlayın
Çocuk kilidini devre dışı bırakın
Gerekli ayarların doğru
olduğunu kontrol edin
Page 42

TÜKETİCİ HİZMETLERİ
Yetkili servislerimizden hizmet talebiniz olduğunda veya ürünlerimizle ilgili genel öneri ve talepleriniziçin
aşağıdaki numaradan ulaşabilirsiniz.
TÜKETİCİ HATTI: 444 03 98
Sabit telefonlardan veyacep telefonlarından alan kodu çevirmeden arayınız.
Ürününüzü kullanmadan önce montaj ve kullanma kılavuzunu mutlaka okuyunuz. Ürünün montaj ve
kullanım kılavuzundayer alan hususlara aykırı kullanılması, kullanım hataları ve cihazın standartkullanım
şartları / amaçlarıharicinde kullanılması halinde ürün garanti kapsamı dışındakalacaktır.
Ürünün standart ve sorunsuz çalışma koşullarının sağlanması için gerekli / zorunlu olan montaj ve
kullanım kılavuzunda belirtilen teknik özelliklerinin (subasıncı, voltajdeğeri, gaz besleme basıncı, sigorta
değeri, topraklama, yakıt cinsi, yakıt kalitesi vb.) uygun olmaması, sabit olmaması ve/veya değişken
olması halinde, cihazdameydana gelebilecek arızalar ve sorunlar garanti kapsamıdışında kalacaktır.
Candy Hoover Euroasia tarafından sağlanangaranti şartları aşağıdakikoşullarda geçersiz olacaktır.
• Ürüne, yetkili servis dışındaki kişiler tarafından müdahale edilmesi, elektrik-su kesintisi ve üründen
kaynaklanmayan kaçaklar garantikapsamı dışındadır.
• Kullanım hatalarından dolayı oluşan arıza ve hasarlar, elektrik-gaz -su tesisatı ve / veya tesisat
ekipmanları nedeniyle meydanagelebilecek arızalar garanti kapsamı dışındadır.
•Ürünün, müşteriye ulaştırılması sonrası yapılan taşıma işlemine bağlı arıza ve hasarlar, tüketici
tarafından yapılan yanlış depolama ve ortam koşulları nedeniyle cihazda meydana gelen hasarlar ve
arızalar garanti kapsamıdışındadır.
• Hatalı elektrik tesisatı, ürünün üzerinde belirtilen voltajdan farklı voltajda kullanılması veya şebeke
voltajındaki dalgalanmalar sonucu oluşan arıza ve hasarlar, doğal afetler, üründen kaynaklanmayan
harici/fiziki dış etkenler, mevsimsel hava şartları ve çevresel etkenler (deprem, yangın, sel, su basması,
şiddetli rüzgar, yıldırım düşmesi, kireç, nem, rutubet, toz, nakliye, taşıma, ürünün dona maruz kalması,
susuz çalışma vb.)nedeniyle oluşan arızalar garanti kapması dışında kalacaktır.
• Kullanım kılavuzunda belirtilen hususlaraaykırı kullanılmasından kaynaklananarızalar ve hasarlar.
Yukarıda belirtilenarızaların giderilmesi ücret karşılığıyapılır.
Ürünün kullanım ömrü 10 (on) yıldır. Bu ürünün tanımlandığı şekilde çalışabilmesi için gerekli yedek
parçaları bulundurma süresidir.
Üretim yeri Türkiye'dir.
İTHALATCI FİRMA:
CANDY HOOVER EUROASIA EV GEREÇLERİ SAN. VE TİC. A.Ş.
İçerenköy Mh. Hal Yolu Cd. Çayır Yolu Sk. No: 11
Sayar İş Merkezi Kat: 7 34752 Ataşehir / İSTANBUL/ TÜRKİYE
Tel: 0216 466 42 42 • Fax: 0216 466 15 45
www.hoover.com.tr • [email protected]
ÜRETİCİ FİRMA:
CANDY HOOVER GROUP
Via Privata E. Fumagalli 20861 Brugherio (MB) - ITALY
Tel: 039.2086.1 • Fax: 039.2086.403
www.candy-group.com
TR 42
Page 43
GARANTİ BELGESİ
ANKASTRE FIRIN
Ankastre fırın kullanma kılavuzunda gösterildiği şekilde kullanılması ve yetkili kıldığımız servis elemanları dışındaki
şahıslar tarafından bakımı, onarımı veya başka bir nedenle müdahale edilmemiş olması şartıyla bütün parçaları dahil
olmak üzere tamamı malzeme, işçilik ve üretim hatalarına karşı ürünün teslim tarihinden itibaren 3 ( ÜÇ ) YIL SÜRE
İLE CANDY HOOVER EUROASIA A.Ş. TARAFINDAN GARANTİ EDİLMİŞTİR.
Malın bütün parçaları dahil olmak üzere tamamı garanti kapsamındadır.
Malın ayıplı olduğunun anlaşılması durumunda tüketici, 6502 sayılı Tüketicinin Korunması Hakkında Kanunun 11
inci maddesinde yer alan;
a) Satılanı geri vermeye hazır olduğunu bildirerek sözleşmeden dönme,
b) Satılanı alıkoyup ayıp oranında satış bedelinde indirim isteme,
c) Aşırı bir masraf gerektirmediği takdirde, bütün masrafları satıcıya ait olmak üzere satılanın ücretsiz onarılmasını
istem,
ç) İmkan varsa, satılanın ayıpsız bir misli ile değiştirilmesini isteme, seçimlik haklarından birini kullanabilir.
Tüketicinin, Kanunun 11. maddesinde yer alan seçimlik haklarından ücretsiz onarım hakkını seçmesi durumunda
satıcı; işçilik masrafı, değiştirilen parça bedeli ya da başka herhangi bir ad altında hiçbir ücret talep etmeksizin malın
onırımını yapmak veya yaptırmakla yükümlüdür. Tüketici ücretsiz onarım hakkını üretici veya ithalatçıya karşı da
kullanılabilir. Satıcı, üretici ve ithalatçı tüketicinin bu hakkını kullanmasından müteselsilen sorumludur.
Tüketicinin, ücretsiz onarım hakkını kullanması halinde malın;
• Garanti süresi içinde tekrar arızalanması,
• Tamiri için gereken azami sürenin aşılması,
• Tamirinin mümkün olmadığının, yetkili servis istasyonu, satıcı, üretici veya ithalatçı tarafından bir raporla
belirlenmesi durumlarında;
tüketici malın bedel iadesini alıp, ayıp oranında beden indirimini veya imkan varsa malın ayıpsız misli ile
değiştirilmesini satıcıdan talep edebilir. Satıcı, tüketicinin talebini reddetmez. Bu talebin yerine getirilmemesi
durumunda satıcı, üretici ve ithalatçı müteselsilen sorumludur.
Garanti uygulaması sırasında değiştirilen malın garanti süresi, satın alınan malın kalan garanti süresi ile sınırlıdır.
Malın tamir süresi 20 iş gününü geçemez. Bu süre, garanti süresi içerisinde mala ilişkin arızanın yetkili servis
istasyonuna veya satıcıya bildirimi tarihinde, garanti süresi dışında ise malın yetkili servis istasyonuna teslim
tarihinden itibaren başlar. Malın arızasının 10 iş günü içerisinde giderilememesi halinde, üretici veya ithalatçı; malın
tüketicinin kullanımına tahsis etmek zorundadır. Malın garanti süresi içerisinde arızalanması durumunda, tamirde
geçen süre garanti süresine eklenir.
Malın kullanma kılavuzunda yer alan hususlara uykırı kullanılmasından kaynaklanın arızalar garanti kapsamı
dışındadır.
Tüketici, garantiden doğan haklarının kullanılması ile ilgili olarak çıkabilecek uyuşmazlıklarda yerleşim yerinin
bulunduğu veya tüketici işleminin yapıldığı yerdeki Tüketici Hakem Heyetine veya Tüketici Mahkemesine
başvurabilir.
Garanti belgesinin tekemmül ettirilerek tüketiciye verilmesi ve bu yükümlülüğün yerine getirildiğinin ispatı satıcıya
aittir.
Satılan mala ilişkin olarak düzenlenen faturalar garanti belgesi yerine geçmez.
Satıcı tarafından bu Garanti Belgesinin verilmemesi durumunda, tüketici Gümrük ve Ticaret Bakanlığı Tüketicinin
Korunması ve Piyasa Gözetimi Genel Müdürlüğüne başvurabilir.
CANDY-HOOVER-EUROASIA EV GEREÇLERİ SAN VE TİC. A.Ş.
Genel Müdür:
Model:..............................
Bandrol ve Seri No:...........
Teslim Tarihi Yeri: ..............
Bu bölümü, ürünü aldığınız Yetkili Satıcı imzalayacak ve kaşeleyecektir.
Bu garanti belgesi ile kesilen fatura garanti süresi boyunca garanti belgesi ile muhafaza edilmesi önerilir.
Fatura Tarihi No: .................
Satıcı Firma Ünvanı: ............
Adres:
Tel - Fax:
Satıcı Firma (Kaşe ve İmza):
TR 43
Page 44
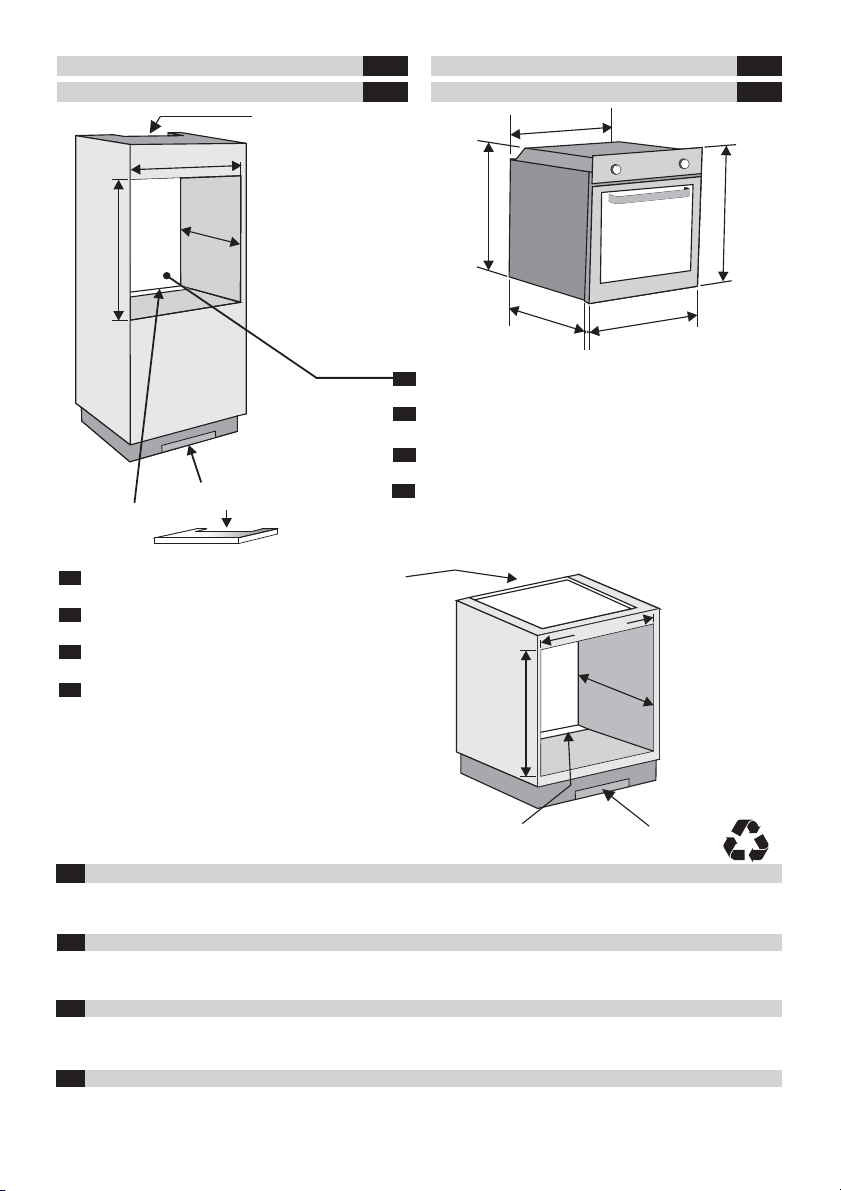
INSTALLATION
560 mm
Opening/ AçıklıkApertura/
460 mm x 15 mm
EN
ITINSTALLAZIONE
INSTALACIÓN
KURULUM
550 mm
ES
TR
560 mm
590 mm
500 mm x 10 mm
560 mm x 45 mm
GB
If the oven does not have a cooling fan, create an
opening 460 mm x 15 mm
IT
Se il forno non dispone di una ventola di
raffreddamento, lasciare uno spazio 460 mm x 15 mm
Si el horno no tiene ventilador de refrigeración,
ES
practique una abertura. 460 mm x 15 mm
TR
Fırında soğutma fanı yoksa bir açıklık oluşturun
460 mm x 15 mm
580 mm
545 mm
GB
If the furniture is coverage with a bottom at the back part,
provide an opening for the power supply cable.
IT
Se il mobile ha un fondo posteriore, praticare un foro
22 mm
595 mm
per il passaggio del cavo di alimentazione.
ES
Si el mueble tiene panel posterior, haga un orificio para el
cable de alimentación.
TR
Mobilyanın arka tarafında bir kaplama bulunuyorsa
güç kaynağı kablosu için bir delik açın.
mm
560
560
mm
mm
600
595 mm
Opening/ AçıklıkApertura/
460 mm x 15 mm
Opening/ AçıklıkApertura/
460 mm x 15 mm
EN
The manufacturer willnotbe responsibleforanyinaccuracy resultingfromprinting ortranscripterrorscontained inthis brochure.We
reserve theright to carryout modifications toproducts as required,including theinterests of consumption, withoutprejudice to the
characteristicsrelating tosafetyor function.
IT
Il produttore declina ogni responsabilitàper inesattezze contenute neldocumento stampato pererrori ditrascrizione contenuti ino
questa brochure. Inoltre, si riserva il diritto di apportare modifiche al prodotto, nell'interesse dei consumatori, senza alcun
pregiudizioper la suasicurezza funzionalità.o
ES
El fabricante no se responsabiliza de las inexactitudes debidasa fallos de impresión o transcripción contenidos en este folleto. Nos
reservamos el derecho a modificar los productos como sea necesario, incluidos los intereses de consumo, sin perjuicio de las
característicasrelacionadas conla seguridad o sufuncionamiento.
TR
Üretici bu kullanma kılavuzunda bulunan basım veya kopyalama hatalarından kaynaklanan herhangi bir yanlışlıktan sorumlu
olmayacaktır. Güvenlik veya işlevle ilgili özelliklere zarar vermeden tüketim istekleri dahil olmak üzere ürünlerde gerektiğinde
değişiklik yapma hakkımız mahfuzdur.
12.2017 • REV.B • 42817811
 Loading...