

Page 1
BUILT-IN OVEN AND HOB
USER'S MANUAL
EINBAUOFEN UND KOCHFELD
BEDIENUNGSANLEITUNG
PCV 6422 X
FCO 607 X
FCO 827 XL
GB
DE
CANDY HOOVER GROUP S.R.L. • Via Privata Eden Fumagalli • 20047 Brugherio Milano Italy
Page 2

Page 3

CONTENTS
GB
INHALT
DE
Safety Instructions
1. General Warnings
1.1 Declaration Of Compliance
1.2 Safety Hints
1.3 Installation
1.4 Fitting The Oven Into The Kitchen Unit
1.5 Important
1.6 Connecting To The Power Supply
2. Introduction Of Product
3. Oven Equipment
4. Useful Tips
4.1 Shelf Safety System
4.2 Grilling
4.3 Cooking Time
4.4 Cleaning And Maintenance
4.5 Service Centre
5. Preparation For Installation And Use
5.1 Choosing A Place For The Oven
5.2 Oven And Hob Installation
5.2.1. Installation Steps
5.2.2. Fixing the vitroceramic hob
5.2.3. Fixing the oven
5.2.4. Warning
5.3 Wiring And Safety Of The Built-in Combined Oven
5.4 Vitroceramic Hob Without Control Knob “PVS”
6. Using The Oven
6.1 Control Panels
6.2 Use Of The Electronic Programmer
6.3 Setting The Correct Time
6.4 Using The Cooktop Burners
6.5 Using The Oven
6.6 Functions
7. Cleaning And Maintenance
7.1 General
7.2 Cleaning The Oven
7.3 Cleaning The Solid Hotplate Hob
7.4 Cleaning The Vitroceramic Hob
7.5 Maintenance
8. Service And Transportation
8.1 Requirements Before Contacting To Service
8.2 Information Related To Transport
................................................................................................7
................................................................................4
..............................................................................5
................................................................5
........................................................................................5
..........................................................................................5
..............................................5
...........................................................................................5
.....................................................5
....................................................................6
................................................................................6
.........................................................................................7
..........................................................................7
.....................................................................................7
................................................................7
...................................................................................7
..............................................7
.......................................................7
.................................................................8
...................................................................8
....................................................8
......................................................................8
.................................................................................8
..................................9
...............................................................................10
.................................................................................10
.................................................11
.................................................................11
............................................................12
...............................................................................12
.........................................................................................13
.............................................................14
...........................................................................................14
.........................................................................14
....................................................14
.......................................................14
...................................................................................14
..........................................................14
..................................14
...................................................14
..........................9
Sicherheitsvorschriften
1. Allgemeine Hinweise
1.1 Konformitätserklärung
1.2 Sicherheitshinweise
1.3 Installation
1.4 Einbau In Den Schrank
1.5 Wichtig
1.6 Elektrischer Anschluß
2. Ihr Neues Haushaltsgerät
3. Ofenausstattung
4. Einige Nützliche Hinweise
4.1 Kippgesicherte Gitterroste
4.2 Grillen
4.3 Garzeiten
4.4 Reinigung Und Wartung
4.5 Technischer Kundendienst
5. Vorbereitungen Für Installation Und Gebrauch
5.1 Der Richtige Platz Für Ihren Ofen
5.2 Ofen - Und Kochfeldinstallation
5.2.1. Installationsschritte
5.2.2. Glaskeramisches Kochfeld fixieren
5.2.3. Ofen fixieren
5.2.4. Warnung
5.3 Verkabelung Und Sicherheit Einbauofen
5.4 Ceranfelder Ohne Bedienelemente “PVS”
6. Bedienung
6.1 Bedienfeld
6.2 Gebrauch Des Elektronischen Programmierers
6.3 Einstellung Der Richtigen Uhrzeitt
6.4 Kochplatten Verwenden
6.5 Ofen Verwenden
6.6 Funktionen
7. Reinigung Und Wartung
7.1 Allgemein
7.2 Ofen Reinigen
7.3 Kochplatten-kochfeld Reinigen
7.4 Glaskeramisches Kochfeld Reinigen
7.5 Wartung
8. Service Und Transport
8.1 Bevor Sie Sich An Den Kundendienst Wenden
8.2 Hinweise Zum Transport
........................................................................................16
.............................................................................................16
..............................................................................17
..............................................................................................18
.........................................................................................18
..............................................................................19
.......................................................................................21
.......................................................................................21
.............................................................................23
....................................................................................24
.........................................................................................25
.................................................................................25
..........................................................................................25
...............................................................15
...............................................................16
.......................................................................16
.....................................................................16
.........................................................................16
....................................................................16
.......................................................................17
..............................................................18
...............................................................18
..................................................................18
..............................................................18
...................................................18
.......................................................19
.............................................................19
......................................19
........................................................................19
.........................................20
......................................20
...................................................22
..................................................................23
.................................................................25
.......................................................25
...............................................25
...................................................................25
.................................................................25
...........................18
.............................22
...............................25
Page 4

SAFETY INSTRUCTIONS
WARNING: The appliance and its accessible parts become hot during use. Care should be taken to avoid
touching heating elements.
• Children under 8 Year of age must be kept away from the appliance unless they are continuously
supervised.
• This appliance can be used by children aged from 8 years and above and persons with reduced
physical, sensory or mental capabilities or lack of experience and knowledge if they have been given
supervision or instruction concerning use of the appliance in a safe way and understand the hazards
involved.
• Children must not play with the appliance.
• Cleaning and user maintenance shall not be made by children without supervision.
• During use the appliance becomes hot. Care should be taken to avoid touching heating elements inside
the oven.
WARNING: Accessible parts may become hot during use. Young children must be kept away.
• Do not use harsh abrasive cleaners or sharp metal scrapers to clean the oven door glass since they can
scratch the surface, which may result in shattering of the glass.
• The oven must be switched off before removing the guard, after cleaning, the guard must be replaced in
accordance with the instructions.
• Only use the temperature probe recommended for this oven.
• Do not use a steam cleaner for cleaning operations.
• WARNING: Avoid possibility of electric shock - ensure the appliance is switched off before replacing the
lamp.
• The means for disconnection must be incorporated in the fixed wiring in accordance with the wiring
rules.
• The instructions state the type of cord to be used, taking into account the temperature of the rear surface
of the appliance.
• If the supply cord is damaged, it must be replaced by a special cord or assembly available from the
manufacturer or its service agent.
• CAUTION: In order to avoid a hazard due to inadvertent resetting of the thermal cutout, this appliance
must not be supplied through an external switching device, such as a timer, or connected to a circuit that
is regularly switched on and off by the utility.
CAUTION: Accessible parts may be hot when the grill is in use. Young children must be kept away.
• Excess spillage must be removed before cleaning.
• During self-cleaning pyrolytic operation the surfaces may get hotter than usual and children MUST be
kept away.
04 GB
Page 5

1. GENERAL WARNINGS
Thank you for choosing one of our products. To get the most out of your oven we recommend that you:
• Read the notes in this manual carefully: they contain important instructions on how to install, use and service this oven safely.
• Keep this booklet in a safe place for easy, future reference.
When the oven is first switched on it may give out acrid smelling fumes. This is because the bonding agent for insulating panels around the oven has
been heated up for the first time. This is a completely normal, if it does occur you merely have to wait for the fumes to clear before putting the food into
the oven. An oven by its very nature becomes very hot. Especially the glass of the oven door.
1.1 DECLARATION OF COMPLIANCE
The parts of this appliance that may come into contact with foodstuffs
comply with the provisions of EEC Directive 89/109.
By placing the mark on this product, we are confirming
compliance to all relevant European safety, health and environmental
requirements which are applicable in legislation for this product.
When you have unpacked the oven, make sure that it has not been
damaged in any way. If you have any doubts at all, do not use it:
contact a professionally qualified person. Keep packing materials
such as plastic bags, polystyrene, or nails out of the reach of children
because they are dangerous for children.
1.2 SAFETY HINTS
•The oven must be used only for the purpose for which it was
designed: it must only be used for cooking food. Any other use, e.g. as
a form of heating, is an improper use of the oven and is therefore
dangerous.
•The manufacturers cannot be held responsible for any damage
caused by improper, incorrect or unreasonable use. When using any
electrical appliance you must follow a few basic rules.
– Do not pull on the power cable to remove the plug from the socket.
– Do not touch the oven with wet or damp hands or feet.
– Do not use the oven unless you are wearing something on your feet.
– It is not generally a good idea to use adapters, multiple sockets for
several plugs and cable extensions.
– If the oven breaks down or develops a fault switch it off at the mains
and do not touch it.
•If the cable is at all damaged it must be replaced promptly.
When replacing the cable, follow these instructions. Remove the
power cable and replace it with one of the H05RRF, H05VV-F,
H05V2V2-F type. The cable must be able to bear the electrical current
required by the oven. Cable replacement must be carried out by
properly qualified technicians. The earthing cable (yellow-green) must
be 10 mm longer than the power cable.
Use only an approved service centre for repairs and ensure that only
original parts are used. If the above instructions are not adhered to the
manufacturers cannot guarantee the safety of the oven.
1.3 INSTALLATION
Installation is the customer’s responsibility. The manufacturers
have no obligation to carry this out. If the assistance of the
manufacturer is required to rectify faults arising from incorrect
installation, this assistance is not covered by the guarantee.
The installation instructions for professionally qualified personal
must be followed. Incorrect installation may cause harm or injury
to people, animals or belongings. The manufacturer cannot be
held responsible for such harm or injury.
1.5 IMPORTANT
If the oven is to work properly, the kitchen housing must be
suitable. The panels of the kitchen unit that are next to the oven
must be made of a heat resistant material. Plastics or glues that
cannot withstand such temperatures will melt and deform the unit.
Once the oven has been lodged inside the unit, the electrical parts
must be completely insulated. This is a legal safety requirement.
All guards must be firmly fixed into place so that it is impossible to
remove them without using special tools.
Remove the back of the kitchen unit to ensure an adequate
current of air circulates around the oven. The hob must have
a rear gap of at least 45 mm.
1.6 CONNECTING TO THE POWER SUPPLY
Plug into the power supply. Ensure first that there is a third contact
that acts as earthing for the oven. The oven must be properly
earthed.
If the model of oven is not fitted with a plug, fit a standard plug to
the power cable. It must be able to bear the power supply indicated
on the specifications plate. The earthing cable is yellowgreen. The
plug must be fitted by a properly qualified person. If the socket and
the plug are incompatible the socket must be changed by a
properly qualified person.A properly qualified person must also
ensure that the power cables can carry the current required to
operate the oven.
An ON/OFF switch may also be connected to the power supply.
The connections must take account of the current supplied and
must comply with current legal requirements. The yellow-green
earthing cable must not be governed by the ON/OFF switch. The
socket or the ON/OFF switch used for connecting to the power
supply must be easily accessible when the oven has been
installed.
Important: During installation, position the power cable in such a
way that it will not be subjected to temperatures of above 50°C at
any point.
The oven complies with safety standards set by the regulatory
bodies. The oven is safe to use only if it has been adequately
earthed in compliance with current legal requirements on wiring
safety. You must ensure that the oven has been adequately
earthed.
The manufacturers cannot be held responsible for any harm
or injury to persons, animals or belongings caused by failure
to properly earth the oven.
The cabling and wiring system must be able to bear the maximum
electric power required by the oven. This is indicated on the
specifications plate. If you are in any doubt at all, use the services
of a professionally qualified person.
1.4 FITTING THE OVEN INTO THE KITCHEN UNIT
Fit the oven into the space provided in the kitchen unit; it may be
fitted underneath a work top or into an upright cupboard. Fix the
oven in position by screwing into place.(Figure 11).
To locate the fixing holes, open the oven door and look inside.To
allow adequate ventilation, the measurements and distances
indicated in the diagram on last page must be adhered to when
fixing the oven.
Note: For ovens that are combined with a hob unit the instructions
contained in the manual for the hob unit must be followed.
05 GB
Page 6
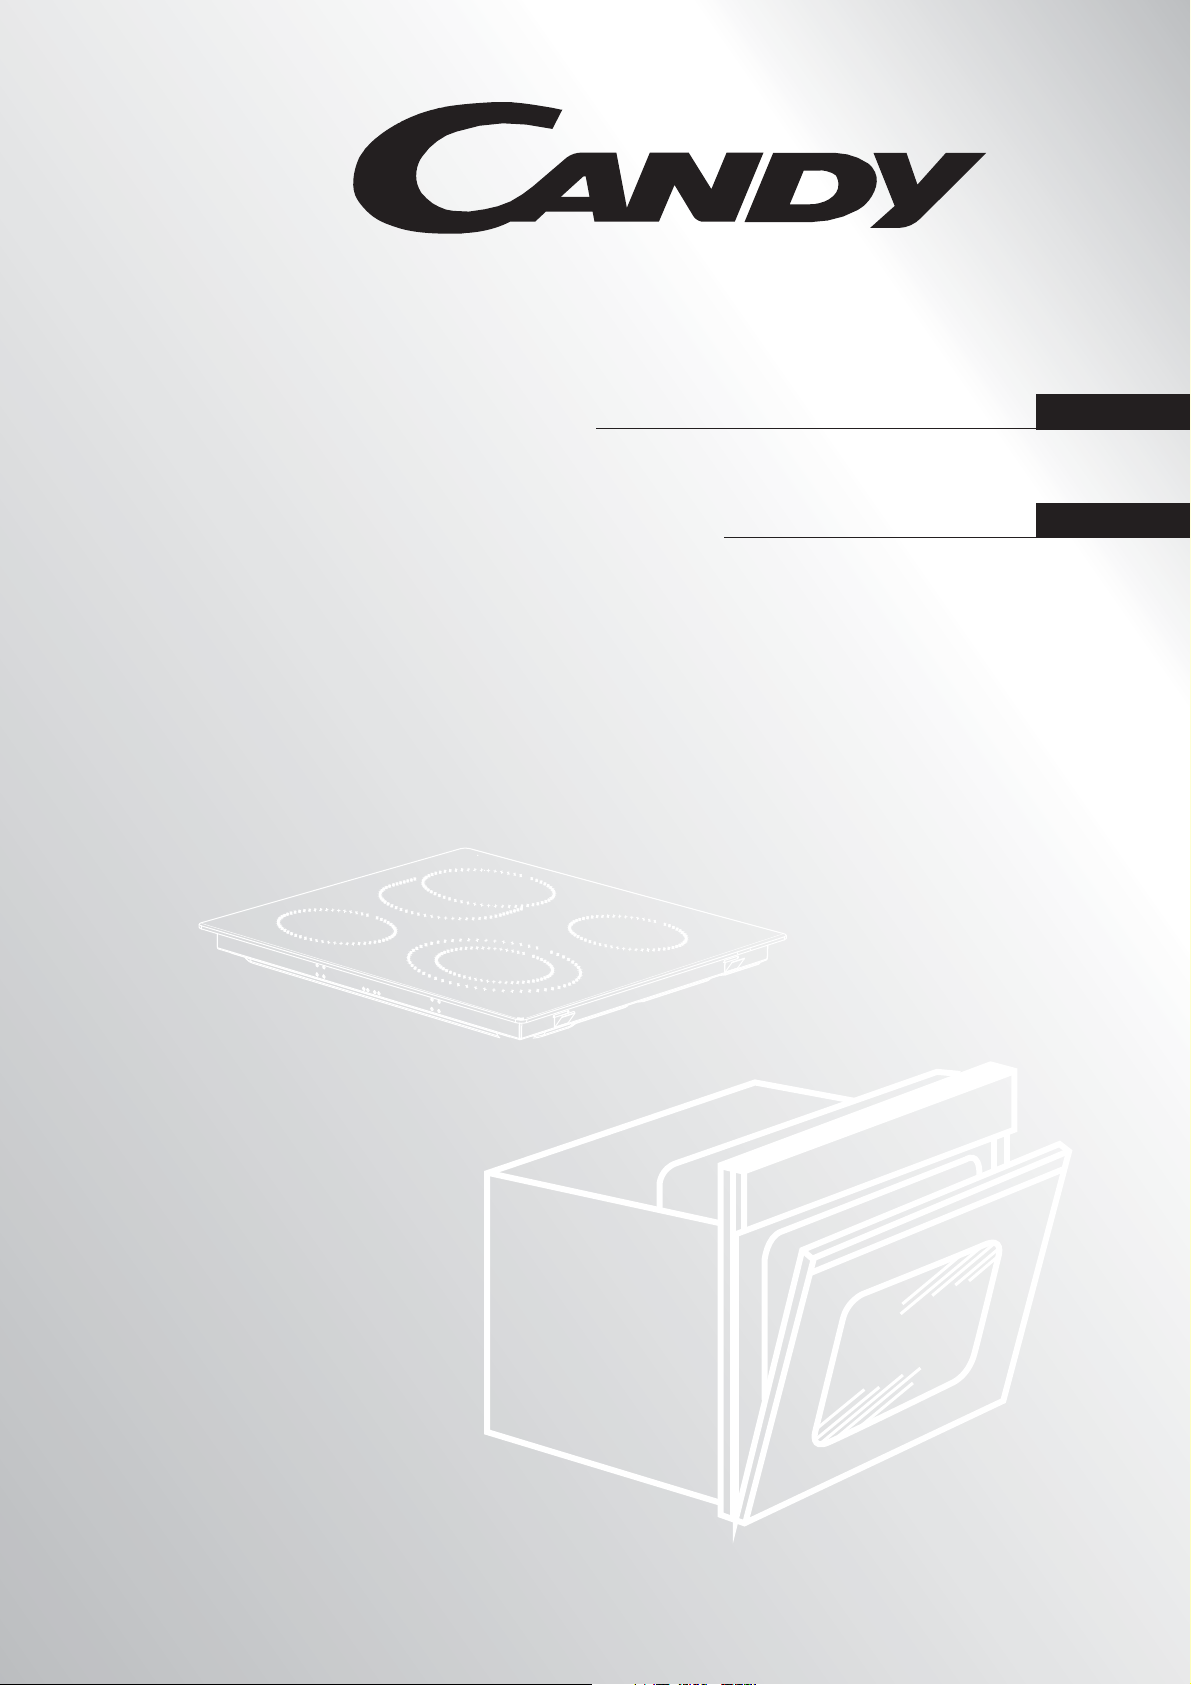
2. INTRODUCTION OF PRODUCT
MAIN PARTS
1. Control Panel
2. Oven Door Handle
3. Oven Door
4. Tray
5. Lower Heating
Element
6. Upper Heating
Element
7. Grid
8. Racks
Figure 2
Figure 1
VITROCERAMIC HOB: PCV 6422 X
2
1
Figure 3
1200 W
1000 W
+
1200 W
1500+900 W
3
1200 W
4
5
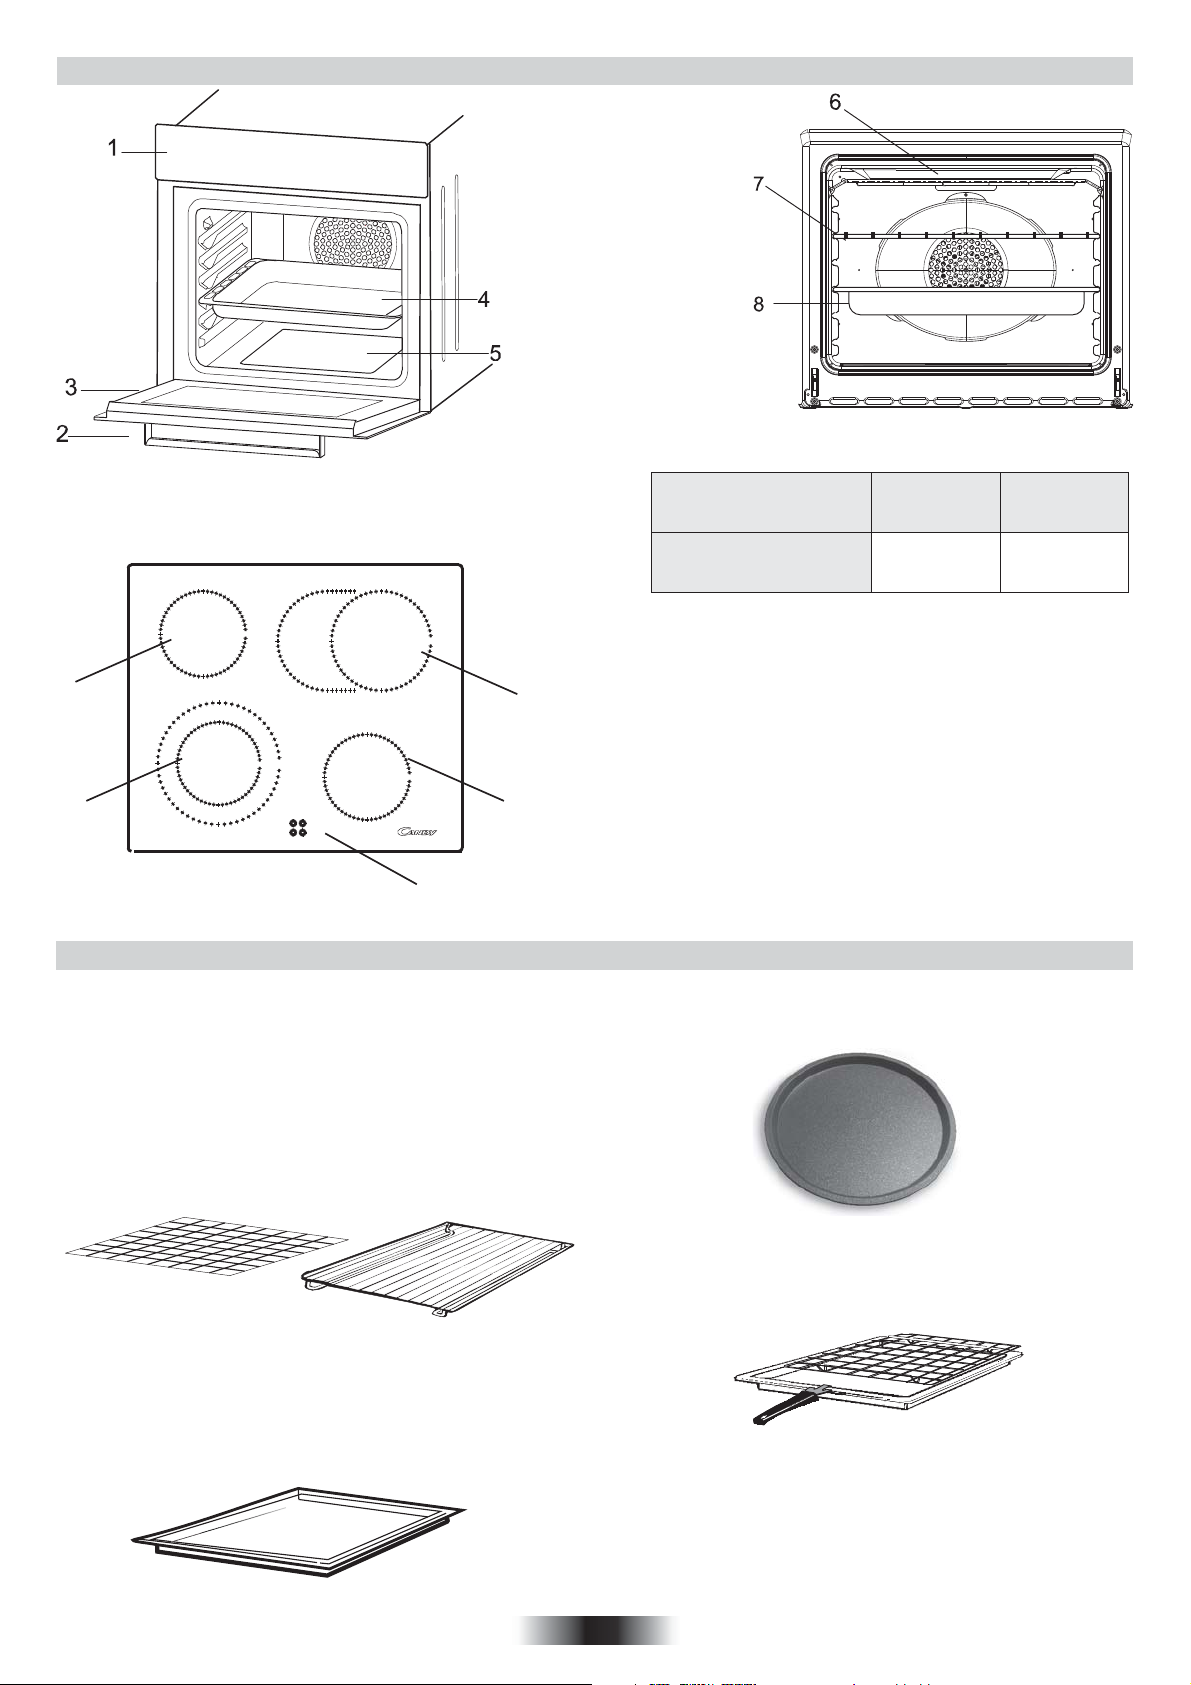
3. OVEN EQUIPMENT (according to the model)
It is necessary to do an initial cleaning of the equipment
before the first use of each of them.Wash them with a sponge.
Rinse and dry off.
The simple shelf can take moulds and dishes.
The tray holder shelf is especially good for grilling things. Use it
with the drip tray.
Hob - Oven
Combination Possibility
PCV 6422 X
MAIN PARTS
1. Ø 202 Radiant Zone (1000+1200W)
2. Ø 147 Radiant Zone (1200W)
3. Ø 260 Radiant Zone (1500+900W)
4. Ø 147 Radiant Zone (1200W)
5. Vitroceramic Surface
6. Lower Casing
The pizza set is designed for pizza cooking. In order to obtain the
best results the set must be used together with Pizza function.
FCO 607 X FCO 827 XL
√√
Table 1
The special profile of the shelves means they stay horizontal even
when pulled right out. There is no risk of a dish sliding or spilling.
Figure 4
The drip tray catches the juices from grilled foods. It is only used
with the Grill, Rotisserie, or Fan Assisted Grill ; remove it from the
oven for other cooking methods.
Never use the drip tray as a roasting tray as this creates smoke
and fat will spatter your oven making it dirty.
Figure 5
Figure 6
The tray holder
The tray holder shelf is ideal for grilling. Use it in conjunction with
the drip tray. A handle is included to assist in moving the both
accessories safely. Do no leave the handle inside the oven.
Figure 7
06 GB
Page 7
4. USEFUL TIPS
5. PREPARATION FOR INSTALLATION AND USE
4.1 SHELF SAFETY SYSTEM
The oven features a new shelf safety
system.
This allows you to pull out the oven
shelves when inspecting the food
without danger of food spillages or
shelves falling accidentally out of the
oven.
To remove the shelves pull out and lift.
Figure 8
4.2 GRILLING
Grilling makes it possible to give food a rich brown colour quickly.
For browning we recommend that you insert the grill onto the
fourth level, depending on the proportions of the food (see fig.
page 12).
Almost all food can be cooked under the grill except for very lean
game and meat rolls.
Meat and fish that are going to be grilled should first be lightly
doused with oil.
4.3 COOKING TIME
For recommended cooking times and temperatures the first time you
use the oven, refer to the tables on page 12. You may then wish to vary
these times and settings in the light of your own experience.
Manufactured with best quality parts and materials, this modern,
functional and practical oven will meet your needs in all respects.
Make sure to read this manual to obtain successful results and not
to experience any problems in the future. The information given
below contain rules that are necessary for correct positioning and
service operations. They should be read without fail especially by
the technican who will install the appliance.
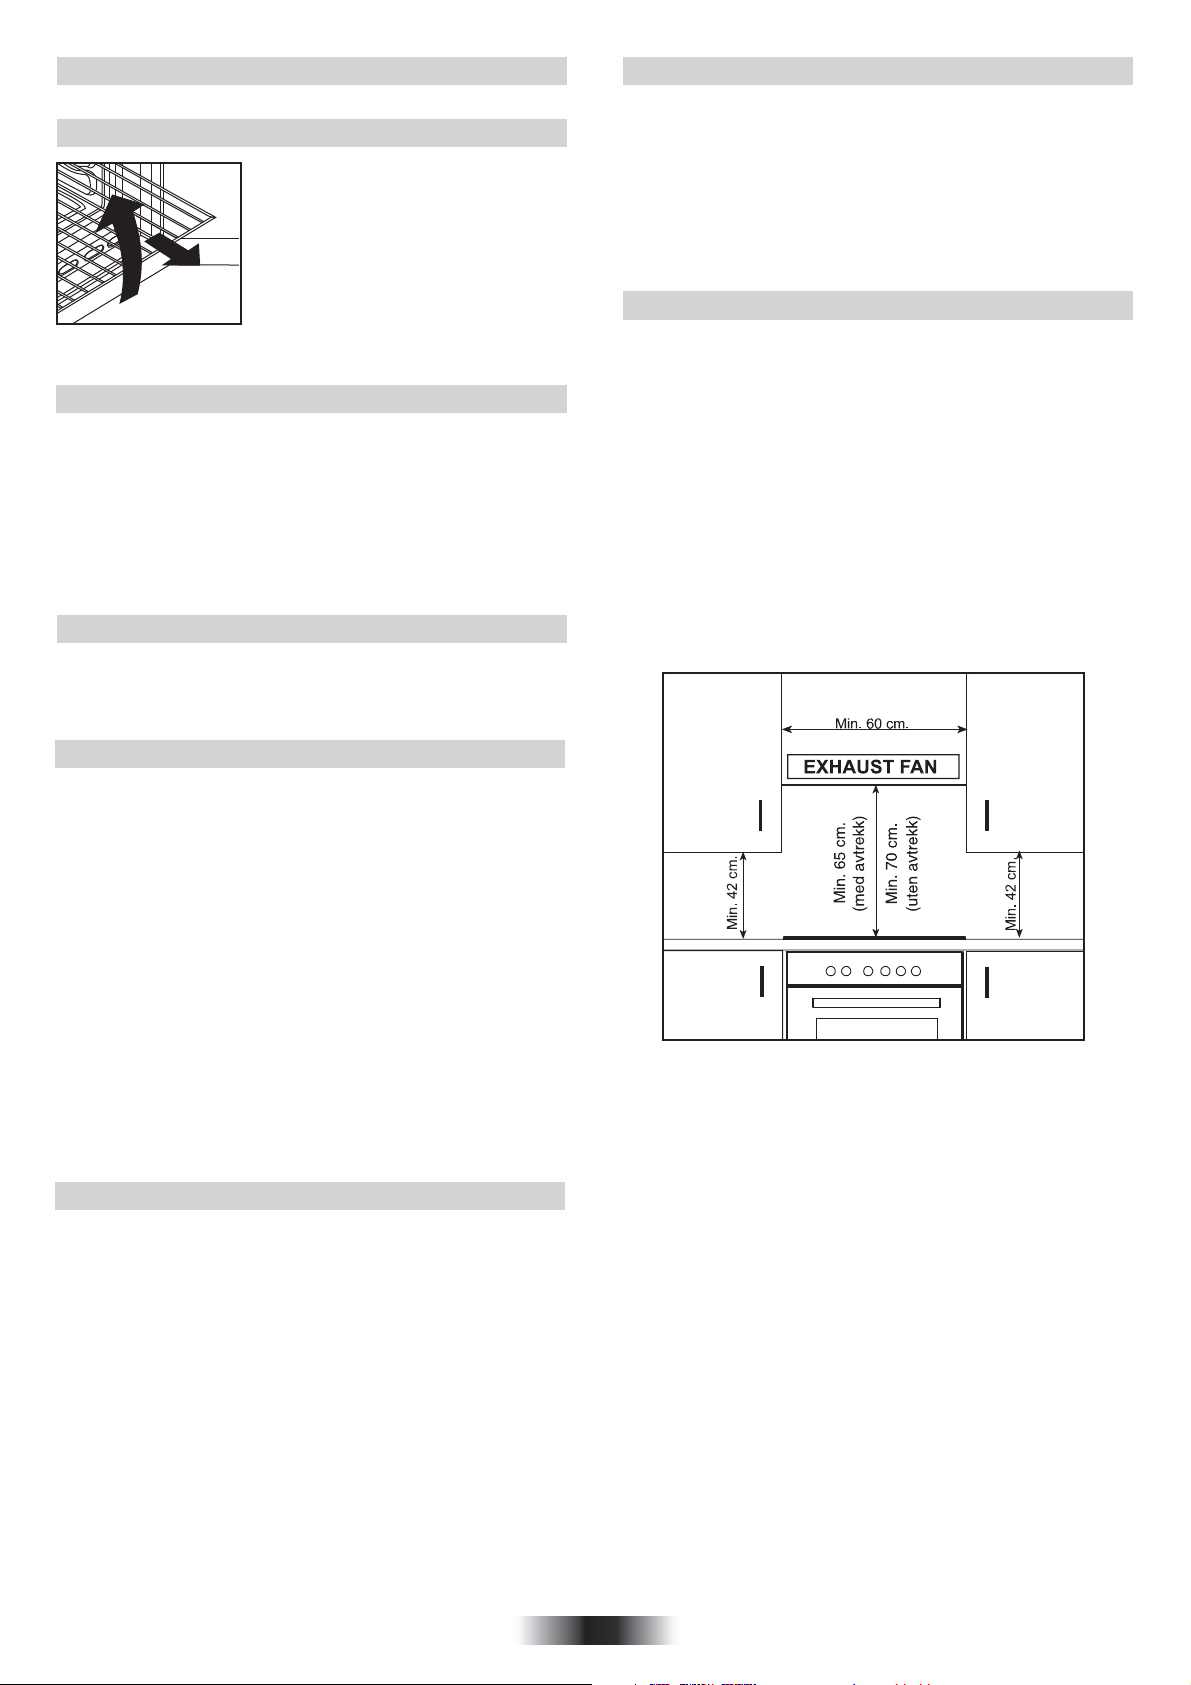
5.1 CHOOSING A PLACE FOR THE OVEN
There are several points to pay attention to when choosing a place
for your oven. Make sure to take into account our
recommendations below in order to prevent any problems and
dangerous situations, which might occur later!
• When choosing a place for the oven, attention should be
paid that there are no flammable or combustible materials in the
close vicinity, such as curtains, oilcloth etc., Which quickly catch
fire.
• Required changes to wall cabinets and exhaust fans
above the built-in combined product as well as minimum height
from the oven board are show in Figure 9.
Accordingly, the exhaust fan should be at a minimum
height of 65 cm from the worktop. If there is no exhaust fan the
height should not be less than 70 cm.
4.4 CLEANING AND MAINTENANCE
Clean the stainless steel and enamelled surfaces with warm, soapy
water or with suitable brand products. On no account use abrasive
powders that may damage surfaces and ruin the oven’s appearance.
It is very important to clean the oven each time that it is used. Melted
fat is deposited on the sides of the oven during cooking. The next time
the oven is used this fat could cause unpleasant odours and might
even jeopardise the success of the cooking. Use hot water and
detergent to clean; rinse out thoroughly.
To make this chore unnecessary all models can be lined with catalytic
self-cleaning panels: these are supplied as an optional extra (see the
section SELF-CLEANING OVEN WITH CATALYTIC LINING).
Use detergents and abrasive metal pads like «brillo pads» for the
stainless steel grills.
The glass surfaces as the top, oven door and warming compartment
door must be cleaned when they are cold. Damage that occurs to
them because this rule was not adhered to are not covered by the
guarantee.
To replace the interior light:
• switch off the mains power supply and unscrew bulb. Replace with an
identical bulb that can withstand very high temperatures.
4.5 SERVICE CENTRE
Before calling the Service Centre
If the oven is not working, we recommend that:
you check that the oven is properly plugged into the power supply.
If the cause of the fault cannot be detected:
disconnect the oven from the mains, do not touch the oven and call the
after sales service.
Before calling the Service Centre remember to make a note of the
serial number on the specifications plate (see fig. page 7).
The oven is supplied with a guarantee certificate that ensures that it
will be repaired free of charge by the Service Centre
Figure 9
07 GB
Page 8
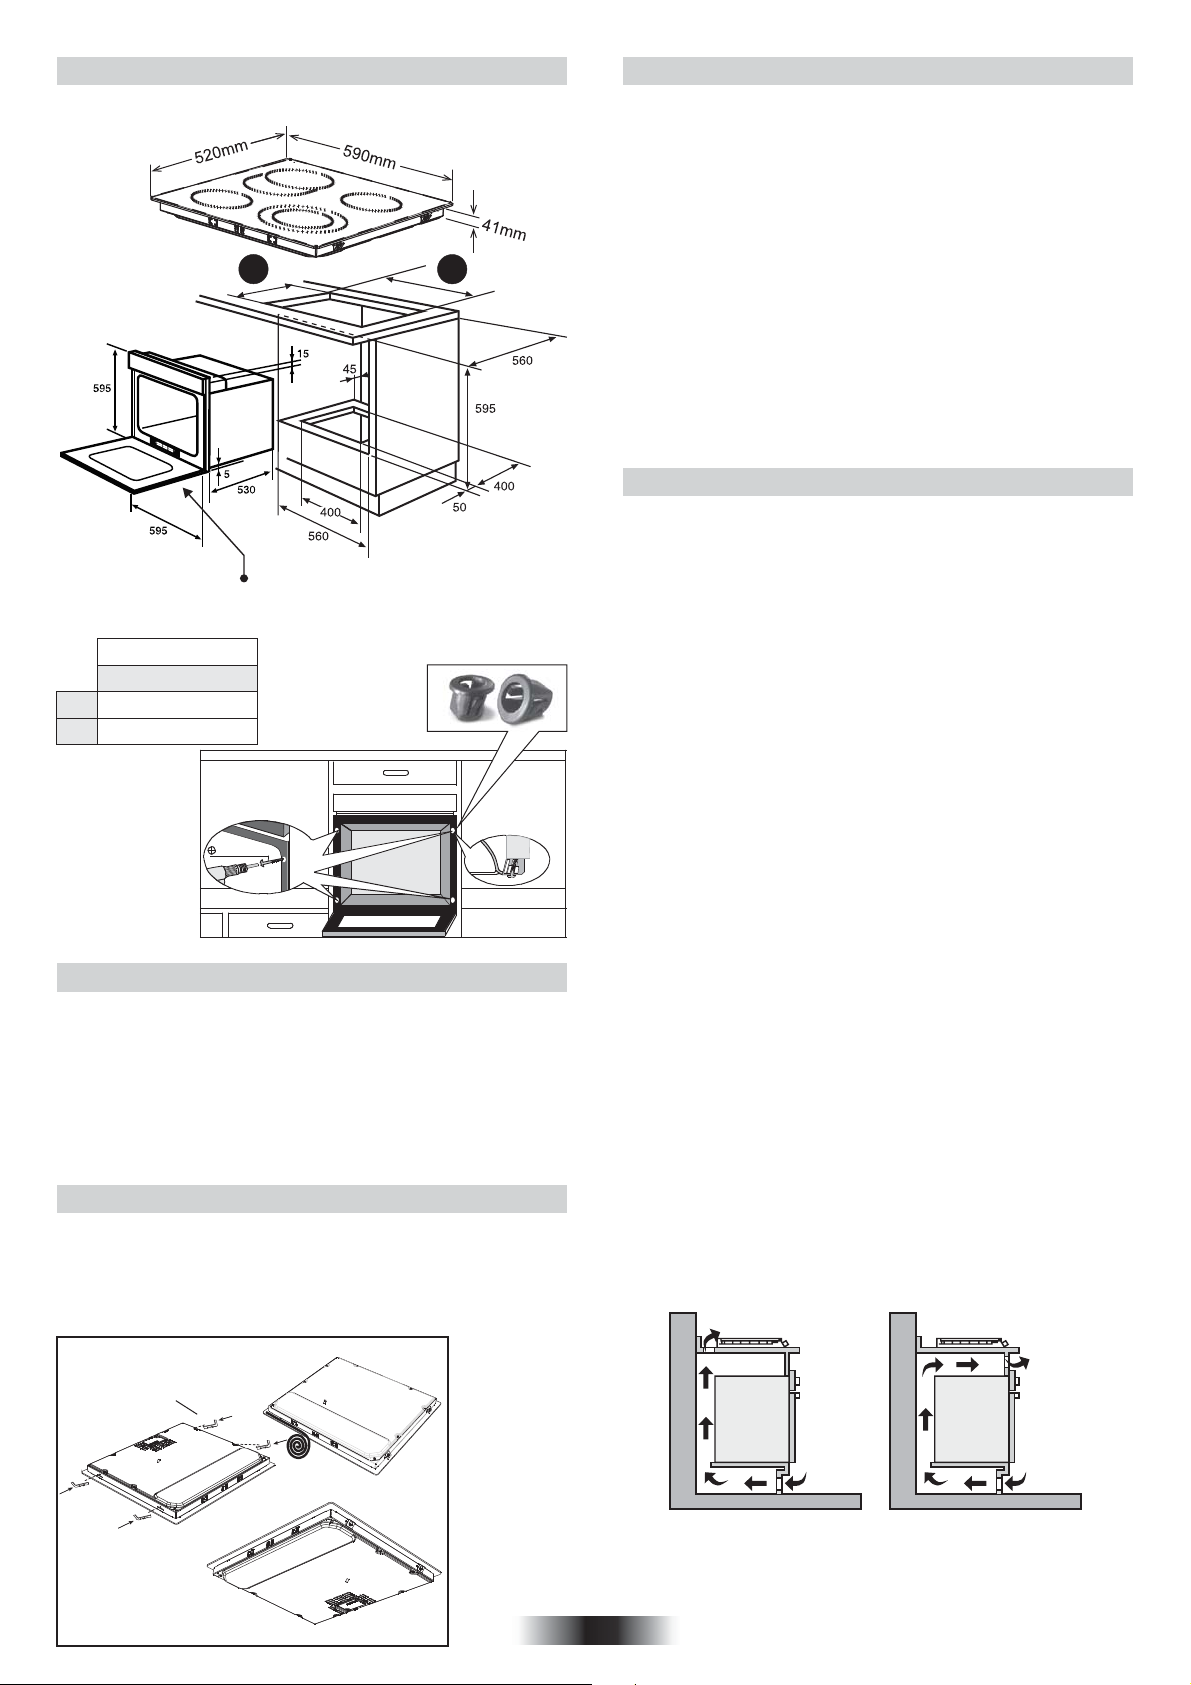
5.2 OVEN and HOB INSTALLATION
5.2.3. Fixing the oven
Figure 10 - Regular Installation of Oven
B
A
Rating Plate
Table 2
BUILDING-IN HOBS
VITRO
A
B
560
490
4x3.5x25
5.2.1. Installation Steps
1.Place the hob into the opening on worktop. The size of opening is
given in Figure 10. Fordetails, see the headings either Fixing the
vitroceramic hob.
.2.Connect the hob to the oven using the the plug given on the hob.
The socket for plug is placed on the rear panel of oven.
3.Connect the oven to the electrical supply.
4.Place the oven into its built-in niche. Either placement in Figure10 is
applicable depending on the size of cabinet opening. For details, see
the heading Fixing the oven.
5.2.2. Fixing the vitroceramic hob
• Apply the one-sided self-adhesive sealing tape supplied all the way
round the lower edge of the cooking surface along the outer edge of
the glass ceramic panel. Do not stretch it.
• Screw the 4 worktop mounting brackets on the side walls of product.
• Place the hob into the opening on the worktop.
Worktop mounting braket
Fit the oven into the space provided in the kitchen unit; it may be
fitted underneath a work top or into an upright cupboard. Fix the
oven in position by screwing into place, using the two fixing holes
in the frame. To locate the fixing holes, open the oven door and
look inside.
To allow adequate ventilation, the measurements and distances
indicated in the diagram on last page must be adhered to when
fixing the oven.
The dimensions and material of the cabinet in which the oven will
be installed must be correct and resistant to increases in
temparature. In a correct installation, contact with electrical or
insulated parts must be prevented. Insulating parts need to be
fitted in a way to ensure that they cannot be removed by using any
kind of tool. Installing the appliance in the close vicinity of a
refrigerator or a deep-freezer is not recommended. Otherwise, the
performance of the above-mentioned appliances will be
negatively affected due to emanating heat.
5.2.4. Warning
Warning regarding the installation of built-in oven without cooling
fan. Prior inserting the oven, it is necessary to remove the rear
kitchen element panel in the area of the oven opening. Equally, the
front part of the element must have an opening.
• When a cooktop burner knob is brought to another position than
the ‘’0’’ position, the operation light will be on.
• Use only pots which fit the burner diameter.
• Before placing the pot on the burner, be sure that its bottom is not
wet.
• Never operate a cooktop burner while empty. Pot temperature
may be high when the appliance is in use. Therefore, it is
recommended that you keep children and pets away from the hob
both during and after operation.
• In case you notice any crack on the ceramic glass , it must be
immediately switched off and replaced by the Authorised Service.
• After use (in order to ensure its continuously effective operation
and long service life), hotplates need to be thoroughly cleaned
using appropriate cleaning materials. In order to prevent any
formation of rust and preserve their initial appearance, it is
recommended to clean the hotplates rubbing them with a piece of
cloth that is slightly damped by oil. Never use steam cleaners.
• In order to prevent waste of energy, the pots to be used should
not be smaller or larger than the burner surfaces.
• Take the necessary measures so that small children will not come
close to the burner surface in any way, as it will be hot in operating
position.
• Due to the flammable nature of hot oil, operations such as frying
should be performed with the container lids closed.
• Do not cut anything, bread etc., on the glass. Do not use pots with
aluminium bottoms. Avoid placing too heavy materials on your
hob.
• Do not place materials such as plastic, aluminium on the ceramic
glass surface. If for any reason there should be a plastic or
aluminium material melted on it, clean it up with a spatula
immediately.
• Do not wipe the ceramic surface with materials such as dish cloth
or sponge. Residues of detergents may lead to fire as well as
cause the glass colour to fade.
2
60 cm
2
120 cm
Figure 11
08 GB
240 cm
2
Figure 12
180 cm
2
Page 9

5.3 WIRING AND SAFETY OF THE BUILT-IN
Shunt
COMBINED OVEN
5.4 VITROCERAMIC HOB WITHOUT
CONTROL KNOB
•Before making the connection, make sure that the installation is
protected by a suitable fuse, see table, and that it is fitted with
wires of a large enough section to supply the appliance normally.
•Turn over the hob, glass side against the work top, taking care to
protect the glass.
•Open the cover in the following sequence;
Figure 13 Figure 14 Figure 15
• Unscrew the cable clamp “1”,
• Find the two tabs located on the sides,
• Put the blade of a flat screw-driver in front of each tab “2” e “3”,
push in and press,
• Remove the cover.
To release the power supplying cord.
• Remove the screws retaining the terminal block which contains
the shunt bars and the conductors of the supply cord,
• Pull out the supply cord.
•Operations to be carried out to make a mew connection:
-Choose the power supply cable in accordance with the
recommendations in the table.
-Pass the power supply cable in to the clamp.
-Strip the end of each conductor of the supply
cord on a 10 mm length, by taking in account
the requested length of the cord for the
connection to the terminal block.
-According to the installation and with the help
of shunt bars which you should have recovered
in the first operation, fix the conductor as
shown on the chart.
-Fix the cover.
-Screw the cable clamp.
Note: make sure the terminal board screws are
Figure 16
tight.
Connection to the electrical circuit, on the oven or glass ceramic
hob, should be made via the oven.
The ceramic hob without controls, has been developed to be used
only in conjunction with specific separate control units or built in
ovens with integral hob controls.
A detailed table (supplied with ovens with integral hob control or
with independent control units) shows clearly how the hobs are to
be connected to the specified units.
Under no circumstances must the hob be connected with any
other control or oven not specified in the list.
To proceed with the connection, it is necessary to joint male
connectors 1 and 2 of the hob with the “female”
connectors 3 of the oven or of the control panel.
Figure 18
INSTALLATION WITH OVEN
HOB
OVEN
550x10
Bult-in oven "apertures" : Refer to the
instructon booklet concerned.
22 mini
This connection can be made before or after the oven is
screwed into place.
3
2
1
L1: Phase
shunt 1-2 and
shunt 2-3
N: Neutral
shunt 4-5
T: Earth
MONOPHASE
220 - 240 V~ 220 - 240 V2~ 220 - 240 V3~ 380 - 415 V3N~
3 G 2.5 mm 23 G 2.5 mm 24 G 1.5 mm 25 G 1.5 mm
HO5VV-F HO5VV-F HO5VV-F HO5VV-F
453
L1: Phase
shunt 1-2 and
shunt 2-3
L2: Phase
shunt 4-5
T: Earth
TWO-PHASE
2
453
2
1
2
1
L1: Phase
shunt 1-2
L2: Phase
shunt 3
L3: Phase
shunt 4-5
T: Earth
THREE-PHASE THREE-PHASE
453
2
1
L1: Phase
L2: Phase
L3: Phase
N: Neutral
shunt 4-5
T: Earth
4
5
Figure 17
VOLTAGE
CABLE-SECTION
CABLE-TYPE
09 GB
Page 10

6. USING THE OVEN
6.1 CONTROL PANELS
Figure 19
Timer Control Knob
Figure 20
Electric Burner Control Light
1
12
12
1
12
4
8
8
4
1
12
4
8
8
Electric Burner Control Knob
1
12
4
1
8
4
Oven Function
Control Knob
Oven Thermostat Light
Oven Thermostat Knob
12
8
1
12
4
8
1
4
12
8
1
12
4
8
1
4
10 GB
Page 11

6.2 USE OF THE ELECTRONIC PROGRAMMER
FUNCTION
MINUTE MINDER
MANUAL
FUNCTION
COOKING
TIME
END OF
COOKING
HOW TO ACTIVATE IT
• Press and hold the
button
• Press the buttons or
to set the required time
• Release all the buttons
• Press the button
• Set the cooking function
with the oven function
selector
•
Press and hold the
TIMER button
• Press the buttons or
to set the lenght of cooking required
• Release all buttons
• Set the cooking function with
the oven function selector
• Press and hold the END
button
• Press the buttons
to set the time at which you
wish the oven to switch off
• Release the buttons
• Set the cooking function
with the oven function
selector
HOW TO SWITCH IT OFF
• When the set time as
elapsed an audible alarm
is activated (this alarm will
stop on its own, however
it can be stopped
immediately by pressing
the button)
•
Turn the oven function
selector to position O.
• When the time is elapsed
the oven will switch off
automatically. Should you
wish to stop cooking
earlier either turn the
function selector to 0, or
set time to 0:00
(TIMER and buttons)
• At the time set, the oven
will switch off. To switch
off manually, turn the
oven function selector
to position O.
WHAT IT DOES
• Sounds an alarm at the
end of the set time.
• To check how long is
left to run press the
button
• Enables you to operate
the oven.
• It allows to preset the
cooking time required
for the recipe chosen
• To check how long is
left to run press the
TIMER button.
• To alter/change the
preset time press
TIMER and buttons
• Enables you to set the
end of cooking time
• To check the preset
time press the END
button
• To modify the preset
time press buttons
END +
WHAT IT IS FOR
•Allows to use the oven as
alarm clock (could be
activated either with
operating the oven or
with out operating the
oven)
• For cooking the desired
recipes
• At the end of the
cooking set time,
the oven will switch
off automatically and an
audible alarm will ring.
This function is typically
•
used with “cooking time”
function. For example
if the dish has to be cooked
for 45 minutes and needs
to be ready by 12:30,
simply select the required
function, set the cooking
time to 45 minutes and the
end of cooking time to
12:30.
• Cooking will start automatically at 11:45 (12:30
minus 45 mins) and will
continue until the pre-set
end-of-cooking-time, when
the oven will switch itself
off automatically.
WARNING.
If the END of cooking is
selected without setting
the length of cooking time,
the oven will start cooking
immediately and it will
stop at the END of
cooking time set.
6.3 SETTING THE CORRECT TIME
WARNING : the first operation to carry out after the oven has been installed or following the
interruption of power supply (this is recognizable the display pulsating and showing ) is
setting the correct time. This is achieved as follows.
• Press and hold the TIMER and END buttons ( and TIMER on some models)
• Set time with buttons
• Release all buttons
ATTENTION the oven only operates if set on manual function or preset time.
N.B.: on some models the symbols are replaced by + and - .
11 GB
Page 12

6.4 USING THE COOKTOP BURNERS
6.5 USING THE OVEN
The hob part of the product is controlled via the on the control
panel (Figure 21).
Stage "0" means off position. The remaining 12 stages indicate
the following types of use:
• Locate the sign corresponding to the
cooking zone that you need.
• Turn the control knob to the required
cooking setting.
Initially we recommend that the heat zone
be set at the highest position until such
times as the contents of the saucepan
have reached the required temperature,
the heat can then be reduced to the
required cooking setting.
• The residual heat indicator light is
illuminated when the hob surface
Figure 21
temperature reaches 60 degrees or
above. It will remain on even if the hob is
switched off and will only go out when the hob surface has cooled
down.
• To switch off the hob, turn the knob to "0".
Warning : The extra large highlight zone, will depending upon the
dimensions of the cookware and/or the quantity of food being
cooked provide even higher levels of performance.
* The oval heating zone consists of two heating areas, a
circular area with a complementary oval shaped section.
Turn the control knob from 1 to 12 to regulate the circular area. To
operate the oval section, simply turn the control knob to position
12 and then select a position from 1 to 12.
* The heating area consists of two concentric zones.
The inner circle is activated when the knob is turned to any of the
positions from 1 to 12. The outer ring will only be activated when
the control is turned beyond 12 up to a power of 2200 W.
First, you need to adjust the oven function (Figure 23 and 24) and
then set the oven temperature to desired value (Figure 25).
Otherwise, the oven will not operate.
When the temperature inside your oven reaches the value you set,
the thermostat will cut the circuit and the thermostat light will go off.
When the temperature falls below the set value, the thermostat will
again be turned on and the thermostat light will be on.
Figure 23 Figure 24 Figure 25
Table 3
Energy Class
EXPLANATION
Symbol
Light
The oven light, red warning light and the fan
will be turned on. Performs the function of
defrosting the frozen foods.
according
to CENELEC
EN 50304
Position
1
2
3
4
5
6
Very Low
1-2
Low
3-4
Moderate
5-6
Medium
7-8
High
9-10
Very High
11-12
YES NO NO NO
To keep a dish hot, melt butter and chocolate...
Slow cooking, sauces, stews, rice pudding poached eggs...
Beans, frozen foods, fruit, boiling water...
Steamed apples, fresh vegetables, pasta, crepes, fish...
More intense cooking, omelettes, steaks...
Steaks,chops, frying...
Some Tips
NO
Figure 22
Resistance of the vitroceramic glass to heat and extreme changes
of temperature is very high. A redness will be noticed on the
heated surface with time. When any heating unit is run, you may
hear a weak sound; this is normal and it has to do with the
technical structure of the system.
It does not pose any problems in terms of quality. In case sharpedged pots should rub against or roughly placed on the
vitroceramic glass, the sur face may become damaged. It is
recommended that you pay attention to this.
The oven’s thermostat and warning light and
*
the lower and upper heating elements will be
switched on.
The oven’s thermostat and warning light, the
fan and the turbo heater will be switch on.
The oven’s thermostat and warning light, the
*
grill heater function will be switched on.
The oven’s thermostat and warning light, the
upper heating element, the grill heater, the fun
function will be switched on.
This function is ideal for delicate dishes
(pies-souffle).
This function with hot air circulated in the oven
ensure perfect result for dishes such as pizza
or focaccia.
Air that has been heated is blown by the fan
onto the different levels. It is ideal for cooking
different types of food at the same time (e.g.
meat and fish) without mixing tastes and
smells. It cooks very gently and is ideal for
sponge cakes, pastries, etc.
B (convection)
for
FCO 607 X
FCO 827 XL
B (forced air)
only for
FCO 607 X
FCO 827 XL
* Tested in accordance with the CENELEC EN 60350-1 used for
definition of energy class.
12 GB
Page 13

6.6 FUNCTIONS
Grill Function
Availability of the functions explained below vary depending on
the product model.
Defrost Function
When the dial is set to this position. The fan circulates air at
room temperature around the, frozen food so that it defrosts
in a few minutes without the protein content of the food
being changed or altered.
Fan Cooking Function
Both top and bottom elements are used with the fan
circulating the air inside the oven. We recommend you use
this method for poultry, pastries, fish and vegetables. Heat
penetrates into the food better and both the cooking and
preheating times are reduced. You can cook different foods at the
same time with or without the same preparation in one or more
positions. This cooking method gives even heat distribution and
the smells are not mixed. Allow about ten minutes extra when
cooking foods at the same time.
Lower-Upper Heating Element Function
(Static Cooking) :
In this type of cooking which is described as the
traditional method, the heat emanating evenly from the lower and
upper resistors into the oven ensures even cooking of the lower
and upper side of the food that you are cooking. Adjust the
thermostat knob of your oven to a temperature recommended on
the cooking table for the cooking operation you will perform. A
preheating of the oven for about 10 minutes is recommended.
Leave the food to cook, which is placed in a suitable container, for
the recommended duration. This position is a preferred function in
making cakes, sponge cakes, pastry, baked pasta, lasagne,
pizza.
After the cooking/baking, turn off the oven function control knob
and the thermostat. Take the cooked/baked food out of the oven,
place it on a safe place and ensure that the oven completely cools
off by keeping the oven door open. As the oven will be hot, stay
away from the oven and keep your children away as well.
Fan and the Lower - Upper Heating Element
Function (Static Cooking With Fan)
This is the position where the ai r coming from the lower
and upper heating elements is circulated into the oven by the fan.
Adjust the thermostat knob of your oven to a temperature
recommended on the cooking table for the cooking operation you
will perform. Turn the oven so it will point to the symbol of this
function, adjust the oven timer to the recommended time for the
cooking and preheat the oven for about 10 minutes. The food
placed in a suitable container is put into the oven and the
operation is started. This position is a position where usually very
good results are obtained in baking pastry. All parts of the foods wil
l be cooked evenly in this position.
Suitable for cooking with one tray.
After the cooking/baking, turn off the oven function control knob
and the temperature setting. Take the cooked/baked food out of
the oven, place it on a safe place and ensure that the oven
completely cools off by keeping the oven door open. As the oven
will be hot, stay away from the oven and keep your children away.
This function is used for grills, roast chicken and roast on
skewer. For grills; put the foods on the grid , and on the highest
rack. After placing the oven tray on the third . Rack, you can start
the grill operation. The tray placed on the thrid rack will ensure that
the oil dropping from the foods will be collected.
When grilling, the oven door must be closed and the oven
temperature should be adjusted to 190° C.
Turn your oven’s thermostat knob so it will point to this
temperature value. After a preheating period of 5 minutes, put your
foods into the oven.
After the cooking, turn off the oven function control knob and the
thermostat.
Take the cooked/baked food out of the oven, place it on a safe
place and ensure that the oven completely cools off by keeping the
oven door open. As the oven will be hot, stay away from the oven
and keep your children away.
Grill and Fan Function
At this function; ensuring complete frying by working
together the fan, grill and upper heating element perform the
operation.
For grills; put the foods on the grid, and place the grid on the
highest rack. After placing the oven tray on the third rack, you can
start the grill operation. The tray placed on the third rack will
ensure that the oil dropping from the foods will be collected.
When grilling, the oven door must be closed and the oven
temperature should be adjusted to 190°C.
Turn your oven’s thermostat knob so it will point to this
temperature value. After a preheating period of 5 minutes, put your
foods into the oven.
After the cooking, turn off the oven function control knob and the
thermostat knob.
Take the cooked/baked food out of the oven, place it on a safe
place and ensure that the oven completely cools off by keeping the
oven door open. As the oven will be hot, stay away from the oven
and keep your children away.
Lower Heating Function
At this cooking, the best is spreaded from the lower
heating element. Lower heating function is appropriate for heating
the food instead of cooking.
Upper Heating Function
In this type of cooking, the heat emanating from upper
heating element cooks the upper side of the food. Upper heating
function is appropriate for frying the upper side of already cooked
food and heating the food.
LOWER - UPPER
DISHES
Layered
pastry
Cake
Cookie
Grilled
meatballs
Watery
food
Chicken
Chop
Beefstake
Two-tray
cake
Two-tray
pastry
Thermostat
pos. (°C).
170 - 190
170 - 190
170 - 190
175 -200
200
Rack
pos.
2-3
2-3
2-3
3
2-3
Cooing
period
(dk)
35 - 45
30 - 40
30 - 40
40 - 50
45 - 60
LOWER-UPPER FAN
Thermostat
pos. (°C).
170 - 190
150 - 190
150 - 190
175 -200
200
Rack
pos.
2-3
2-3-4
2-3-4
2-3
Cooing
period
(dk)
25 - 35
25 - 35
25 - 35
3
40 - 50
45 - 60
Thermostat
pos. (°C).
200
200
200
200
GRILL
Rack
pos.
Table 4
Cooing
period
5
10 - 15
50 - 60
4-5
15 - 25
5
15 - 25
(dk)
13 GB
Page 14

7. CLEANING AND MAINTENANCE
8. SERVICE AND TRANSPORTATION
7.1 GENERAL
Before starting to clean your oven, be sure that all control knobs
are off and your appliance is cooled off. Unplug the appliance.
Do not use cleaning materials containing particles that might
scratch the enamelledand painted parts of your oven. Use cream
cleaners or liquid cleaners, which do not contain particles.
As they might harmthe surfaces, do not use caustic creams,
abrasive cleaning powders, rough wire wool or hard tools. In the
event the excess liquids spilling over your oven should burn, it may
cause a damage to the enamel. Immediately clean up the spilt
liquids.
7.2 CLEANING THE OVEN
Make sure to unplug the oven before starting to clean it.You will
obtain best results if you clean the oven interior while the oven is
slightly warm. Wipe your oven with a soft piece of cloth dampened
with soap water after each use. Then wipe it again, this time with a
wetted cloth, and wipe it dry. A complete cleaning may be
necessary from time to time, using a liquid cleaning material. Do
not clean using dry and powder type cleaners. For products with
catalytic enamel frames, the rear and side walls of the inner frame
do not require cleaning. However; depending on usage, it is
recommended that you replace them after a certain period of time.
7.3 CLEANING THE VITROCERAMIC HOB
Unplug the appliance before starting the cleaning.
Wait for the vitroceramic glass to completely cool off before
starting the cleaning.
Make sure that the cleaning materials you will use do not contain
particles that might scratch the glass Use cream detergents or
liquid detergents.
The vitroceramic surface should be wiped with cold water and
wiped dry with a soft piece of cloth until no cleaning material is left
on the surface.
You can use the cleaning spatula, if supplied together with your
product, for the cleaning of spilt foods and residues.
Dessert type of foods should be cleaned immediately after they
spill without waiting for the vitroceramic glass to cool off.
Scrubbing with steel cleaning wires may harm the vitroceramic
glass surface. Formations of dust on the surface should be
cleaned up using a dampened cloth.
Changes in colour which might occur on the ceramic glass surface
do not affect the functional structure or permanence of the
vitroceramic. The reason for the changes in colour is not the
change in the material; it may be because the burnt residues on
the surface are not cleaned up or the pots used have worn the
glass surface or because unsui table cleaning materials were
used.
The cleaning spatula should always be used prior to chemical
cleaning substances. With this spatula, you can clean up the
tiniest of dirts on the vitroceramic surface Dirts that are difficult to
remove such as melted plastic, heavy oils, sweet substances, can
be removed easily with the spatula. As the spatula includes a
razor, it is dangerous and must be kept out of reach of children.
During cleaning with the spatula, pay attention not to scrape off the
sillicon adhesives found on the sides of the glass.
8.1 REQUIREMENTS BEFORE CONTACTING
TO SERVICE
If the oven does not operate ;
The oven may be plugged off, there has been a black out.
If the oven does not heat ;
The temperature may be not adjusted with oven’s temperature
control switch.
If the oven light does not operate does not light;
The electricity should be controlled.
It should be controlled whether the ulb is defective.
Cooking (If lower-upper part does not cook equally) ;
Control the shelf locations, cooking period and temperature
values according to the manual. In case of the product doesn't
work properly and malfunctioning causes cannot be found, switch
off the product. Please do not tamper with it and call the Technical
Service.
It is important to communicate to Authorized Technical Service the
product model and it's serial number that can be found on the
rating label.
8.2 INFORMATION RELATED TO TRANSPORT
If you need any transport ;
Keep the original packaging of product and carry it with its original
packaging when needed.
Follow the transport signs on the packaging.
If the original packaging is not available;
Take measure for the external surfaces (glass and painted
surfaces) of oven and hob aganist possible blows.
7.4 MAINTENANCE
Replacing the Oven Light Bulb
It is recommended that you leave this operation to the Authorised
Service.
Unplug the oven first and make sure that it is cold. After removing
the lid infront of the light, take the bulbout. Insert the new bulb
resistant to 300 C, which you will find at Authorised Services, into
the place of the bulb you have removed. Then fit the light
protecting lid back into its place. After that, your oven will be ready
for use.
0
14 GB
Page 15

SICHERHEITSVORSCHRIFTEN
WARNUNG: Das Gerät und die zugänglichen Teile des Gerätes werden während des Betriebs heiß. Das
Berühren der heißen Geräteteile sollte vermieden werden.
• Kinder unter 8 Jahren sollten ohne Aufsicht nicht in die Nähe des Gerätes gelassen werden.
• Dieses Gerät ist nicht bestimmt zum Gebrauch durch Personen (einschließlich Kindern) mit
beeinträchtigten körperlichen, sensorischen oder geistigen Fähigkeiten oder durch Personen, die keine
entsprechenden Erfahrungen oder Kenntnisse besitzen, es sei denn, sie werden beaufsichtigt oder
angewiesen durch eine Person, die für ihre Sicherheit verantwortlich ist.
• Kinder dürfen nicht mit dem Gerät spielen.
• Die Reinigung und Wartung des Gerätes darf nicht durch Kinder ohne Aufsicht durchgeführt werden.
• Während des Betriebs wird das Gerät heiß. Bitte vermeiden Sie die Berührung der heißen Geräteteile.
WARNUNG: zugängliche Geräteteile werden während des Betriebs heiß. Kinder sollten fern gehalten
werden.
• Nutzen Sie keine scharfen oder scheuernden Reiniger oder scharfe Metallreiniger um den Herd und
das Glass zu reinigen, da dadurch Kratzer auf der Oberfläche entstehen können.
• Der Ofen muss ausgeschaltet werden, bevor der Deckel zur Reinigung entfernt wird. Anschließend
den Deckel gemäß der Anweisungen wieder montieren.
• Nutzen Sie nur die empfohlene Temperatureinstellung für den Ofen.
• Nutzen Sie kein Dampfreinigungsgerät zur Reinigung des Ofens.
WARNUNG: Um einen elektrischen Schlag zu vermeiden, vergewissern Sie sich, dass der Herd
ausgeschaltet ist, bevor Sie die Ofenlampe auswechseln.
• Die Abschaltung muss mit einer festen Verdrahtung im Einklang mit den Verkabelungsregeln
durchgeführt werden.
• Die Bedienungsanleitung legt die Art des Kabels, das genutzt werden soll, in Abhängigkeit von der
Maximal-Temperatur des Geräts fest.
• Ist das Gerätekabel beschädigt, muss es durch ein spezielles Kabel ersetzt werden, welches beim
Kundendienst/Hersteller erhältlich ist.
ACHTUNG: Um elektrische Schläge durch unbeabsichtigtes Zurückstellen des Wärmerelais zu
vermeiden, sollte das Gerät nicht über eine externe Schalteinrichtung versorgt werden, wie
beispielsweise ein Timer oder einem Stromkreislauf, der regelmäßig ausgeschaltet wird.
ACHTUNG: Zugängliche Teile können sich erhitzen, wenn der Grill in Benutzung ist. Kinder sollten
daher fern gehalten werden.
• Verschüttete Lebensmittel/Flüssigkeiten müssen beseitigt werden.
• Während der Selbstreinigung kann die Oberfläche heißer werden als gewöhnlich. Bitte halten Sie
daher Kinder fern.
15 DE
Page 16

1. ALLGEMEINE HINWEISE
Herzlichen Glückwunsch! Sie haben ein hochwertiges Qualitätsprodukt erworben. Damit Ihr Gerät stets zu Ihrer Zufriedenheit arbeitet, raten wir
Ihnen folgendes:
• Lesen Sie dieses Heft aufmerksam durch: es enthält wichtige Hinweise zur korrekten Benutzung Ihres Gerätes
• Bewahren Sie diese Bedienungsanleitung zur späteren Benutzung sorgfältig auf. Bei der ersten Inbetriebnahme kann es zu Rauchentwicklung
und beißendem Geruch kommen. Hierbei handelt es sich um einen ganz normalen Vorgang, der auf die erste Erwärmung des Isolierplattenklebers
zurückzuführen ist, welcher zur Verkleidung des Backofens verwendet wurde. Warten Sie mi t dem Einschieben der Speisen, bis kein Rauch mehr
vorhanden ist. Die Backofentür wird während des Betriebes naturgemäß heiß.
1.1 KONFORMITÄTSERKLÄRUNG
Dieses Gerät entspricht der EU-Vorschrift 89/109 für die Bereiche, die
mit Lebensmitteln in Berührung kommen.
Mit der Anbringung des -Zeichens am Gerät zeigen wir an, dass
wir sämtliche für dieses Produkt geltenden und notwendigen
europäischen Sicherheits-, Gesundheits- und Umweltstandards
einhalten und hierfür haftbar sind.
1.2 SICHERHEITSHINWEISE
•Dieses Gerät darf ausschließlich für den Zweck eingesetzt werden,
für den es hergestellt wurde, nämlich die Zubereitung von Speisen.
Jede andere Anwendung (beispielsweise das Heizen von Räumen)
ist deshalb als zweckentfremdet zu betrachten und demzufolge
gefährlich. Der Hersteller kann für eventuelle Schäden, die auf einen
ungeeigneten, fehlerhaften und unvernünftigen Einsatz
zurückzuführen sind, nicht verantwortlich gemacht werden.
Die Verwendung jedes elektrischen Gerätes erfordert die Beachtung
einiger grundsätzlichen Regeln. Das sind insbesondere:
- das Gerät nicht mit nassen oder feuchten Händen oder Füßen
berühren.
- das Gerät nicht barfuß bedienen
- bei Ausfällen und/oder Funktionsstörungen ist das Gerät
abzuschalten. Versuchen Sie nicht, den Fehler auf eigene Faust zu
beheben.
- Bei Beschädigung des Zuleitungskabels ist dieses so schnell wie
möglich auszutauschen. Dies ist ausschließlich durch qualifiziertes
Fachpersonal durchzuführen, unter Beachtung folgender Hinweise:
Blechschutzdeckel abnehmen, Kabel abschrauben und durch ein
anderes (Typ HO5RR-F, H05VVF, H05V2V2-F) ersetzen. Das Kabel
muß der Leistung des Gerätes entsprechen. Der Erdleiter (gelb-grün)
muß vorschriftsgemäß 10 mm länger sein als die Hauptleiter.
Bei einer erforderlichen Reparatur wenden Sie sich bitte an Ihren
zuständigen Werkskundendienst und verlangen Sie die Verwendung
von Original-Ersatzteilen.
Die Mißachtung der vorgenannten Hinweise kann die Sicherheit des
Gerätes beeinträchtigen.
1.5 WICHTIG
1.6 ELEKTRISCHER ANSCHLUß
1.3 INSTALLATION
Der Einbau erfolgt auf Kosten des Endverbrauchers. Der
Hersteller ist von diesem Dienst entbunden. Eventuell an den
Hersteller herangetragene Ansprüche, die auf einen falschen
Einbau zurückgehen, sind von jeder Garantieleistung
ausgeschlossen. Der Einbaumuß entsprechend der Anleitung
und durch qualifiziertes Fachpersonal erfolgen. Durch einen
falschen Einbau können Schäden an Personen, Tieren oder
Sachen verursacht werden, für die der Hersteller nicht
verantwortlich gemacht werden kann.
1.4 EINBAU IN DEN SCHRANK
11
16 DE
Page 17

2. IHR NEUES HAUSHALTSGERÄT
HAUPTKOMPONENTEN
1. Bedienfeld
2. Ofenturgriff
3. Ofentur
4. Backblech
5. Unteres Heizelement
6. Oberes Heizelement
7. Rost
8. Einschube
Abbildung 1
Abbildung 2
GLASKERAMISCHES KOCHFELD: PCV 6422 X
2
1
Abbildung 3
1200 W
1000 W
+
1200W
1500+900 W
1200 W
5
3. OFENAUSSTATTUNG (Je nach Modell)
Kochfeld - Ofen
Kombinationen
PCV 64 C
3
4
HAUPTKOMPONENTEN
1. Ø 202 Kochstellen (2200W)
2. Ø 147Kochstellen (1200W)
3. Ø 260 Kochstellen (1500+900W)
4. Ø 147 Kochstellen (1200W)
5. Glaskeramik
6. Unterteil
Des Pizza-Set ist ideal zum Pizzabacken.
Das Set sollte zusammen mit dem Backprogramm genutzt
werden
FCO 607 X FCO 827 XL
√√
Tabelle 1
Abbildung 4
Der Soßenfänger ist zum Auffangen des Saftes der Grillstücke
bestimmt.
Er kann auf den Rost gestellt, under ihn geschoben oder auf die
Bodenplatte gestellt werden. Den Soßenfänger niemals als
Unterlage zum Braten verwenden.
Dies würde Rauchentwicklung und Fettspritzer und damit eine
schnelle Verschmutzung des Ofens verursachen.
Abbildung 5
Abbildung 6
Gitter mit Aufnahme Das Gitter mit Aufnahme für die Fettpfanne
ist ideal zum Grillen. Verwenden Sie es hierzu in Kombination mit
der Fettpfanne. Ein Griff wird mit dem Gitter mitgeliefert, damit
beide Zubehörteile sicher ein-und ausgezogen werden können.
Lassen Sie bitte den Griff nicht im Backofen, wenn dieser im
Betrieb ist.
Abbildung 7
17 DE
Page 18

4. EINIGE NÜTZLICHE HINWEISE
ABZUG
Min. 65 cm
(Mit Abzug)
Min. 70 cm
(Ohne Abzug)
5. VORBEREITUNGEN FÜR INSTALLATION
UND GEBRAUCH
4.1 KIPPGESICHERTE GITTERROSTE
Abbildung 8
4.2 GRILLEN
Zum Grillen empfehlen wir, das Grillgut je nach Größe auf den 3.
Oder 4. Gitterrost von unten zu schieben (seite 22). Fast alle
Fleischsorten eignen sich zom Grillen, mit Ausnahme von sehr
magerem Wild. Vor dem Grillen sollte das Grillgut ein wenig mit Öl
oder Fett bestrichen werden.
4.3 GARZEITEN
Auf Seite 22 finden Sie eine Tabelle, in der Richtzeiten und
Temperaturen zum Braten und Backen verschiedener Speisen
angegeben sind. Durch Ihre persönliche Erfahrung werden Sie diese
Angaben entsprechend Ihrem Geschmack und Ihren Gewohnheiten
anpassen können.
4.4 REINIGUNG UND WARTUNG
Dieser moderne, funktionale und praktische Ofen wurde mit Teilen
und Materialien höchster Güte hergestellt und wird Ihre
Ansprüche in jeder Hinsicht erfüllen. Vergessen Sie nicht, diese
Anleitung aufmerksam durchzulesen, damit Sie gleich zu Anfang
richtig und sicher mit dem Gerät arbeiten können und es auch in
Zukunft nicht zu Problemen kommt. In den nachstehenden
Informationen finden Sie bestimmte Regeln, die wichtig für
richtige Aufstellung und Wartungsarbeiten sind. Diese
Informationen sollten (insbesondere vom Installateur) mit
besonderer Aufmerksamkeit gelesen werden.
5.1 DER RICHTIGE PLATZ FÜR IHREN OFEN
Bei der Auswahl des richtigen Aufstellungsortes für Ihren Ofen
müssen einige Punkte beachtet werden. Halten Sie sich in jedem
Fall an unsere nachstehenden Empfehlungen, damit es später
nicht zu Problemen oder gefährlichen Situationen kommt!
• Bei der Auswahl des richtigen Platzes für Ihren Ofen
sollten Sie darauf achten, dass sich keine entflammbaren oder
explosiven Materialien in nächster Nähe befinden; dies können
Vorhänge, ölige Tücher und ähnliche Materialien sein, die schnell
Feuer fangen.
• In Abbildung 10 finden Sie eine Darstellung der
erforderlichen Gegebenheiten oder Änderungen hinsichtlich
Wandschränken und Abzugshauben sowie der nötigen
Minimalabstände zum Ofen und seinen Flächen.
Demzufolge sollte die Abzugshaube mit einem minimalen
Abstand von 65 cm von der Oberfläche des Kochfeldes
angebracht werden. Ohne Abzugshaube sollte ein Abstand von
mindestens 70 cm eingehalten werden.
4.5 TECHNISCHER KUNDENDIENST
Seite 17
Abbildung 9
18 DE
Page 19

5.2 OFEN - UND KOCHFELDINSTALLATION
5.2.3. Ofen fixieren
Abbildung 10 - Bündige Ofeninstallation
B
A
Typenschild
Tabelle 1
EINBAU KOCHFELD
VITRO
A
B
560
490
4x3.5x25
5.2.1. Installationsschritte
1. Setzen Sie das Kochfeld in die Arbeitsplattenaussparung ein. Die
Größe der Aussparung entnehmen Sie bitte Abbildung 11.
Details finden Sie unter Kochplatten-Kochfeld fixieren oder
Glaskeramisches Kochfeld fixieren.
2. Verbinden Sie das Kochfeld über den Stecker am Kochfeld mit dem
Ofen. Das Gegenstück des Steckers befindet sich an der Rückwand
des Ofens.
3. Schließen Sie den Ofen an die Stromversorgung an.
4. Setzen Sie den Ofen in die Einbauoffnung. Je nach Größe der
Einbauöffnung kann das Gerät wie in Abbildung 11. Details finden Sie
unter Ofen fixieren.
5.2.2. Glaskeramisches Kochfeld fixieren
•Verlegen Sie das einseitig klebende Dichtungsband um die gesamte
äußere
Unterseitenkante des Kochfeldes. Dehnen Sie das Band nicht.
•Schrauben Sie die 4 Arbeitsplattenklemmen an die Seitenflächen
des Produktes.
•Setzen Sie das Kochfeld in die Arbeitsplattenaussparung ein.
Arbeitsplattenklemme
Une fois le four inséré dans son meuble, I’ancrage se fait par 2 vis
visibles en ouvrant la porte du four, voir illustration sur dernière
page.
Pour permettre une meilleure aération du meuble, les fours doivent
être encastrés conformément aux mesures et distances indiquées
sur l’illustration de la dernière page.
Die Abmessungen des Gehäuses, in das der Ofen eingebaut wird,
müssen absolut passend, das Material muss für höhere
Temperaturen geeignet sein. Zur korrekten Installation darf das
Produkt keine elektrischen oder isolierten Teile berühren. Isolierte
Teile müssen so angebracht werden, dass sie auch mit Werkzeugen
nicht entfernt werden können. Wir raten von der Installation des
Gerätes in nächster Nähe zu Kuhl - und Gefriergeräten ab.
Andernfalls kann die Leistung dieser Geräte durch Abwärme des
Produktes beeinträchtigt werden.
5.2.4. Warnung
Installation eines Einbauofens ohne Kühlungslüfter.
Vor dem Einsetzen des Ofens muss die Rückwand des
Küchenmöbels im Bereich des Ofens entfernt werden.
Gleichermaßen muss am Vorderteil des Möbels eine Öffnung von
mindestens 10 mm vorhanden sein.
•Wenn Sie einen der Einstellknöpfe aus der „0“-Position drehen,
leuchtet die Kochplatten-Kontrollleuchte auf.
•Verwenden Sie ausschließlich Geschirr mit passendem
Durchmesser.
•Vergewissern Sie sich, dass der Boden Ihres Kochgeschirrs nicht
nass ist, wenn Sie das Geschirr auf die Kochstelle setzen.
•Lassen Sie die Kochstellen nicht ohne aufgesetztes Geschirr
arbeiten. Im Betrieb erreicht das Geschirr naturgemäß eine hohe
Temperatur. Daher sollten Sie Kinder und Haustiere vom Herd
fernhalten; dies gilt sowohl im Betrieb als auch in der Zeit kurz
danach.
•Falls Sie Sprünge oder Risse in der Glaskeramik entdecken sollten,
schalten Sie das Gerät sofort ab und lassen das beschädigte
Kochfeld vom autorisierten Kundendienst austauschen.
•Nach dem Einsatz muss das Kochfeld mit geeigneten
Reinigungsmitteln sorgfältig gereinigt werden, damit es Ihnen lange
Zeit Freude bereitet und zuverlässig arbeiten kann. Damit sich kein
Rost bilden kann und das Gerät lange Zeit wie neu aussieht, sollten
Sie das Kochfeld mit einem Lappen abwischen, auf den Sie ein klein
wenig Öl gegeben haben. Benutzen Sie niemals Dampfreiniger.
•Um keine Energie zu verschwenden, sollte der Durchmesser des
Geschirrs niemals kleiner oder größer als der Durchmesser der
Kochstelle sein.
•Sorgen Sie dafür, dass kleine Kinder niemals nahe an die
Kochplatten gelangen können, da sich diese im Betrieb natürlich
stark erhitzen.
•Da sich heiße Öle und Fette entzünden können, sollten Sie
Zubereitungsarten wie Frittieren nur mit aufgelegtem Deckel
ausführen.
•Missbrauchen Sie die Glaskeramik nicht als Schneidbrett oder
Arbeitsfläche. Benutzen Sie kein Geschirr mit Aluminiumboden.
Stellen Sie keine schweren Gegenstände auf dem Kochfeld ab.
•Stellen Sie keine Gegenstände aus Kunststoff, Aluminium oder
ähnlichen Materialien auf der Glaskeramik ab. Falls doch einmal ein
Gegenstand aus Kunststoff oder Aluminium
auf der Glaskeramik schmelzen sollte, schaben Sie die Rückstände
sofort mit einem Schaber ab.
•Reiben Sie nicht mit Geschirrtüchern oder Schwämmen über die
Glaskeramik. Rückstände von Reinigungsmitteln können einen
Brand verursachen und zu unschönen Verfärbungen der Oberfläche
fähren.
2
60 cm
2
120 cm
Abbildung 11
19 DE
240 cm
2
180 cm
2
Abbildung 12
Page 20

5.3 VERKABELUNG UND SICHERHEIT
Shunt
EINBAUOFEN
5.4 CERANFELDER OHNE BEDIENELEMENTE
•Bevor Sie die Verbindung herstellen, stellen Sie sicher, dass das
Gerät durch eine angemessene Sicherung geschützt-siehe
hierzu die umseitige Tabelle-und mit Kabeln mit zu einer normalen
Versorgung ausreichendem Querschnitt ausgestattet ist.
• Drehen Sie das Kochfeld so um, dass die Seite aus Glas auf der
Arbeitsplatte aufliegt, wobei für einen geeigneten Schutz des
Glases zu sorgen ist.
•Klappen Sie den Deckel unter Beachtung der
nachstehenden Reihenfolge auf:
Abbildung 13
Abbildung 14 Abbildung 15
•Finden Sie die zwei Stifte, die an den Seiten angebracht sind;
•Legen Sie das Blatt eines Schraubenziehers vor je einen Stift,
legen Sie es hinein und drücken Sie ein;
•Nehmen Sie den Deckel ab.
•Drehen Sie die Schrauben heraus, welche die Einheit mit den
Shunt-Schienen und den Leitern des Netzkabels halten;
•Lösen Sie die Kabelschellen, um das Netzkabel entfernen zu
können;
•ziehen Sie das Netzkabel heraus.
•Schritte zur Herstellung einer neuen Verbindung
•Wählen Sie das Netzkabel gemäß den Anweisungen in der
umseitigen Tabelle.
•Führen Sie das Netzkabel durch die Kabelschelle hindurch;
•Isolieren Sie die Enden jedes Leiters auf eine Länge von 10 mm
ab; dabei berücksichtigen Sie die erforderliche Länge des
Netzkabels für den Anschluss an das Klemmbrett
•Auf der Grundlage der nachstehenden Tabelle
positionieren Sie die Shunt-Schienen, die Sie im
dem vorherigen Arbeitsschritt aufgehoben
haben, unter Beachtung der entsprechenden
Markierungen auf dem Klemmbrett (die ShuntSchienen ermöglichen es, eine Brücke zwischen
zwei Klemmen herzustellen) und befestigen Sie
die Leiter. Überprüfen Sie die Befestigung an den
verschiedenen Klemmen.
•Schrauben Sie die Kabelschelle wieder auf und
schließen Sie den Deckel fest.
Abbildung 16
Der Anschluß ans Stromnetz des Backofens und des Ceranfeldes
erfolgt über den Backofen.
Die Glaskeramikkochfelder ohne Bedienelemente haben eine
sehr spezifische Ausstattung.
Die Kochfelder können ausschließlich über einen geeigneten
Herd oder eine geeignete Bedienblende betrieben werden. Die
Verbindung der beiden Geräte ist auf einer detaillierten Übersicht
beschrieben, die entweder mit dem Herd oder der Bedienblende
mitgeliefert wird.
Es können ausschließlich Produkte, die aufgelistet sind, an das
Kochfeld angeschlossen werden.
Um die Geräte miteinander anzuschließen, genügt es, den
Kompaktstecker 1 und 2 des Ceranfeldes mit dem
Kompaktstecker 3 des Backofens oder des
Einbauschaltbretts zu verbinden.
INSTALLATION MIT EINBAU-BACKOFEN
Abbildung 18
CERANFELD
BACKOFEN
550x10
Einbau-Backofen "Öffnung" :
Bedienungs- und installationsanleitung ofen.
22 mini
Die Verbindung des Ceranfeldes mit dem Backofen kann vor
oder nach der Installation des Backofens erfolgen
3
2
1
L1: Phase
shunt 1-2 and
shunt 2-3
N: Nulleiter
shunt 4-5
T: Erdung
Einphasenwech-
selspannug
220 - 240 V~ 380 - 415 V3N~
3 G 2.5 mm 23 G 2.5 mm 24 G 1.5 mm 25 G 1.5 mm
HO5VV-F HO5VV-F HO5VV-F HO5VV-F
4
3
5
2
1
L1: Phase
shunt 1-2 and
shunt 2-3
L2: Phase
shunt 4-5
T: Erdung
Zweiphasigen-
selspannug
220 - 240 V2~ 220 - 240 V3~
2
4
3
5
2
1
L1: Phase
shunt 1-2
L2: Phase
shunt 3
L3: Phase
shunt 4-5
T: Erdung
Dreiphasenwech-
selspannug
4
3
5
2
1
L1: Phase
L2: Phase
L3: Phase
N: Nulleiter
shunt 4-5
T: Erdung
Dreiphasenwech-
selspannug
4
5
Abbildung 17
SPANNUNG
KABELQUERSCHNITT
KABELTYP
20 DE
Page 21

6. BEDIENUNG
6.1 BEDIENFELD
Abbildung 19
Kochplatten-Kontrollleuchte
1
12
12
1
12
4
4
8
8
Ofenfunktion-Einstellknopf Ofentemperatur-Einstellknopf
12
8
1
12
4
8
1
4
1
12
4
8
Kochplatten-Einstellknopf
1
12
4
8
1
4
8
12
Ofentemperatur-Leuchte
1
12
4
8
8
1
4
Abbildung 20
21 DE
Page 22

6.2 GEBRAUCH DES ELEKTRONISCHEN PROGRAMMIERERS
FUNKTION
MANUELLER
BETRIEB
MANUELLE
FUKTIONS-
EINSTELLUNG
BACKDAUER
BACKZEITENDE
EINSCHALTEN
•Den Knopf drücken und
gedrückt halten.
•Die Knöpfe drücken,
um die erforderliche Backzeit
einzustellen.
•Alle Knöpfe loslassen.
•Drücken Sie den Knopf
•Wählen Sie die Backfunktion
mit dem entsprechenden
Kontrollknebel für die
Backofenfunktion.
•Den Knopf TIMER drücken
und gedrückt halten.
•Die Knöpfe drücken,
um die erforderliche Backzeit
einzustellen.
•Alle Knöpfe loslassen.
•Stellen Sie die Backfunktion
mit dem entsprechenden
Kontrollknopf die
Backfunktion ein.
•Den Knopf END drücken
und gedrückt hal ten.
•Die Knöpfe drücken,um
den Zeitpunkt zu wählen,
wenn Sie möchten, dass der
Ofen sich abschaltet.
•Knöpfe loslassen.
•Wählen Sie die Backfunktion
mit dem entsprechenden
Kontrollknopf für die
Backofenfunktion
AUSSCHALTEN FUNKTION
•Wenn die eingestellte
Backzeit abgelaufen ist, wird
ein akustisches Signal aktiviert
(dieser Alarm hört von alleine
auf, er kann jedoch sofort
ausgeschaltet werden, wenn
man auf drückt).
•Drehen Sie den Kontrollknopf
für die Backfunktion bis zur
gewünschten Position O.
•Wenn die eingestellte Zeit
abgelaufen ist, schaltet sich der
Ofen automatisch ab.Wenn Sie
den Backvorgang vorzeitig
ab-bzw.unterbrechen möchten,
drehen Sie den Knopf zum
Auswählen der Ofenfunktion bis
zur Position O oder stellen Sie
die programmierte Zeit auf 0.00
(Knöpfe TIMER und )
•Zum eingestellten Zeitpunkt
wird der Ofen sich automatisch
abschalten.
•Wenn Sie den Ofen manuell
ausschalten möchten, drehen
Sie den Knopf zur Einstellung
der Ofenfunktion auf Position
O.
•Aktiviert einen Alarm am
Ende der eingestellten
Backzeit.
•Um die Restzeit zu erfahren,
drücken Sie den Knopf .
•Es ermöglicht den
Gebrauch des Ofens.
•Es ermöglicht Ihnen,die für
das gewählte Rezept
erforderliche Backzeit vorzuprogrammieren.
•Um die Restzeit zu erfahren
drücken Sie den Knopf TIMER.
•Um die eingestellte Zeit zu
ändern, drücken Sie den Knopf
TIMER und nehmen Sie die
neue Einstellung durch
Betätigung der Knöpfe vor
•Es ermöglicht die
Einstellung der Backendzeit.
•Um die voreingestellte Zeit
zu überprüfen, drücken Sie
den Knopf END.
•Um die voreingestellte Zeit
zu ändern, drücken Sie den
Knopf END und die Knöpfe
gleichzeitig.
NÜTZLICH FÜR
•Es ermöglicht Ihnen, das
Signal als Erinnerungsfunktion
zu benutzen (auch wenn der
Ofen nicht zum Backen
verwendet wird)
•Zum Zubereiten der
gewünschten Rezepte
•Bei Erreichen der
eingestellten Backzeit schaltet
sich der Ofen automatisch ab
und ein akustisches Signal
ertönt.
•Diese Funktion wird
zusammen mit der Backdauer
benutzt. Z.B. Soll Ihre Speise
45 Minuten backen und um
12:30 fertig sein. Wählen Sie
zuerst die Backfunktion, dann
Backzeitdauer 45 Minuten
einstellen, dann Backzeitende
12:30 eingeben. Der
Backofen startet automatisch
um 11:45 (12:30 minus 45
Min.) und schaltet sich dann
zu der eingestellten Zeit ab.
ACHTUNG:
Wenn nur die Backendzeit,
nicht jedoch die
Dauer der Backzeit
eingestellt worden ist,
setzt sich der Ofen sofort
in Betrieb und schaltet
sich bei Erreichen der
eingestellten Backendzeit
ab.
6.3 EINSTELLUNG DER RICHTIGEN UHRZEIT
HINWEIS: Das erste, was nach der Installation des Ofens oder nach der Unterbrechung der
Stromversorgung (die am blinkenden Display mir der Anzeige zu erkennen ist) gemacht
werden muss, ist die Einstellung der korrekten Uhrzeit.
• Die Knöpfe TIMER + END drücken und gedrückt halten. ( + TIMER bei einigen Modellen)
• Die Zeit mit den Knöpfen und einstellen.
• Alle Knöpfe loslassen.
ACHTUNG: Der Ofen arbeitet nur, wenn er auf manuelle Funktion eingestellt ist oder eine bestimmte Backzeit programmiert
worden ist.
HINWEIS: Bei einigen Modellen stehen anstelle der Symbole die Zeichen + und - .
22 DE
Page 23

6.4 KOCHPLATTEN VERWENDEN
6.5 OFEN VERWENDEN
Das Kochfeld wird uber die 7-stufigen Einstellknopfe am
Bedienfeld (Abbildung 22) gesteuert.
Stufe „0“ bedeutet: Ausgeschaltet. Die restlichen 6 Stufen
verwenden Sie fur Folgendes:
• Suchen Sie sich das Zeichen, das Ihr
gewünschtes Kochfeld anzeigt.
• Drehen Sie den Kontrollknebel, bis die
gewünschte Kochposition eingestellt
ist.
Wir empfehlen, die Pfanne bei hoher
Temperatur richtig anzuheizen und sie
dann auf die gewünschte Temperatur
zurückzudrehen.
• Die Restwärmeanzeige leuchtet auf,
wenn die Temperatur 60°C oder mehr
beträgt.
Sie wird auch weiterhin Resthitze
Abbildung 21
anzeigen, selbst wenn das Kochfeld
abgeschaltet wurde, solange, bis das Kochfeld
genügend abgekülhlt ist. Sie schaltet sich ab,
wenn die Temperatur unter 60°C gefallen ist.
• Um die Kochzone auszuschalten, drehen Sie den Knopf auf
Position"0".
Dei erweiterbaren Kochzonen ermöglichen bei größeren Töpfen oder
größeren Mengen von Speisen eine bessere Garleistung dank der
zuschaltbaren runden bzw. ovalen Kochfläche.
* Die Bräterzone besteht aus einer runden und einer ovalen
Fläche, die zusammen zu einer Bräterzone geschaltet werden
können.
Die runde Zone wird durch Drehen des Knopfes von der Position 1 bis
12 eingestellt. Zur Einstellung der Bräterzone, 2400 W, drehen Sie
den Kontrollknebel von der Position 12 bis zum Stop und wählen Sie
dann die gewünschte Hitzeleistung durch Einstellung von Position 1
bis 12.
* 2 Zonen Feld : Das ist eine Zweikreis-Zone und besteht aus
einer inneren, runden Fläche und einer äußeren, ringförmigen
Fläche.
Die innere Kochfläche wird durch Drehen des entsprechenden
Kontrollknebeln von 1 bis 12 eingestellt. Zum Zuschalten der äußeren
Ringzone (Gesamtleistung 2200 W) drehen Sie den Kontrollknebel
über die Position 12 hinaus und stellen Sie dann die gewünschte
Leistung ein.
Einstellung
Sehr langsam
1
1-2
3-4
2
3
4
5
6
Langsam
5-6
Normal
Mittel
7-8
Hoch
9-10
Sehr hoch
11-12
RICHTIG FALSCH
Warmhalten von Geschirr, Schmelzen von Butter und Schokolade usw
Langsames Kochen, Bechamel, Eintöpfe, Milchreis, pochierte Eier usw
Trockene Bohnen, Tiefgefrorenes, Obst, Kochendes Wasser...
Gedünstete Äpfel, frisches gemüse Pasta, Crêpes, Fisch
Intensives langsames Kochen, Omeletts, Steaks...
Steaks, Kotelettes, Braten....
FALSCH
FALSCH
FALSCH
Zuerst wählen Sie die gewünschte Ofenfunktion (Abbildung 27
und 28),anschließend stellen Sie die gewünschte Ofentemperatur
ein (Abbildung 29). Andernfalls arbeitet Ihr Ofen nicht.
Wenn die Temperatur im Inneren des Ofens die von Ihnen
vorgegebene Temperatur erreicht, werden die Heizelemente vom
Thermostat ausgeschaltet, die Ofentemperatur-Leuchte erlischt.
Wenn die Temperatur unter den eingestellten Wert abfällt,
schalten sich die Heizelemente wieder ein, die OfentemperaturLeuchte leuchtet auf.
Abbildung 23 Abbildung 24 Abbildung 25
Tabelle 3
Energieklasse
Erläuterung
Symbol
Light
In dieser Einstellung erfolgt eine Luftzirkulation
bei Raumtemperatur zum Auftauen von
Tiefkülkost in wenigen Minuten, ohne eine
Ver nderung des Proteingehalts herberzurunren.ä
*
Ofenthermostat, Warnleuchten sowie unteres
und oberes Heizelement schalten sich ein.
Ofenthermostat, Warnleuchten, Lüfter und
Turbolüfter schalten sich ein.
Ofenthermostat, Warnleuchten, Lüfter und
Grillfunktion schalten sich ein.
Ofenthermostat, Warnleuchten, Lüfter, oberes
*
Heizelement, Grillelement und Lüfter schalten
sich ein.
Diese Funktion ist ideal für empfindlichen
Speisen (Souffl s, kuchen).ê
Die umfassende Hitze dieser Function
reproduziert im Backofen ahnliche. Bedingungen
wie im Holzofen einer Pizzeria.
gemäß
CENELEC
EN 50304
B (Konvektion)
für
FCO 607 X
FCO 827 XL
B (Umluft)
nur für
FCO 607 X
FCO 827 XL
Abbildung 22
Glaskeramik ist besonders widerstandsfähig gegen Hitze und
starke Temperaturänderungen. Beim starken Aufheizen leuchtet
die jeweilige Kochstelle rot auf. Beim Erhitzen kännen leise
Geräusche auftreten; dies ist völlig normal und liegt am
technischen Aufbau des Systems.
Eine leichte Geräuschentwicklung wirkt sich nicht auf die Qualität
aus. Die Glaskeramik kann beschädigt werden, wenn Sie
Kochgeschirr mit scharfen Kanten darüber schieben oder unsanft
auf der Glaskeramik abstellen. Gehen Sie entsprechend sorgsam
vor.
Die zwischen 50’C und 240’C heiße Luft wird
gleichmäßig in den Backofen verteilt. Ideal für
das gleichzeitige Braten von verschiedenen
Arten von Speisen (Fleisch, Fisch), ohne dabei
eine Vermischung von Geschmack und Geruch
zu verursachen. Geeignet auch für schonendes
Backen, z.B. Für Blätterteig, Biskuitteig o.Ä.
EN 60350-1
23 DE
Page 24

6.6 FUNKTIONEN
Grill-Funktion
Je nach Modell sind eventuell nicht alle der nachstehend erklärten
Funktionen verfügbar.
Auftauen
In dieser Einstellung erfolgt eine Luftzirkulation bei
Raumtemperatur zum Auftauen von Tiefkühlkost in wenigen
Minuten, ohne eine Veränderung des Proteingehalts
herbeizuführen.
Umluft
Dİe zwischen 50°C und 240°C heiße Luft wird
gleichmäßig in den Backofen verteilt. Ideal für das gleichzeitige
Braten von verschiedenen Arten von Speisen (Fleisch, Fisch),
ohne dabei eine Vermischung von Geschmack und Geruch zu
verursachen. Geeignet auch für schonendes Backen, z.B. Für
Blätterteig, Biskuitteig o:ä.
Unterhitze/Oberhitze-Funktion
Bei dieser klassischen Backofenfunktion werden
Lebensmittel gleichmäßig von oben und unten erhitzt. Stellen Sie
die Ofentemperatur je nach gewünschter Zubereitungsart auf die
empfohlene Temperatur ein, die Sie der Temperaturtabelle
entnehmen können. Wir empfehlen, den Ofen etwa 10 Minuten
lang vorzuheizen. Lassen Sie die Lebensmittel eventuell in einem
geeigneten Behälter uber die gesamte Zubereitungsdauer im
Backofen. Diese Funktion eignet sich besonders zum Backen
von Kuchen, Biskuit, Gebäck, Nudelgerichten, Lasagne und
Pizza.
Nach der Zubereitung schalten Sie Ofenfunktion - und
Ofentemperatur-Einstellknopf ab. Nehmen Sie die zubereiteten
Lebensmittel aus dem Ofen, stellen Sie sie an einem sicheren Ort
ab und lassen Sie den Ofen abkuhlen, indem Sie die Ofentür
geöffnet lassen. Da der Ofen eine Zeit lang heiß bleibt, halten Sie
sich und besonders Kinder vom Ofen fern.
Diese Funktion nutzen Sie für Grillgerichte,
Brathähnchen und Spieße. Grillgerichte geben Sie auf das
Grillrost, das Sie auf der höchsten Stufe einschieben. Nachdem
Sie das Backblech in der 3. Position von unten eingeschoben
haben, beginnen Sie mit dem Grillen. Das auf der 3. Position von
unten eingeschobene Backblech sorgt dafür, dass von den
Lebensmitteln herabtropfendes Öl oder Fett aufgefangen wird.
Beim Grillen muss die Ofentür geschlossen bleiben, die
Temperatur sollte auf 190 °C eingestellt werden.
Stellen Sie den Temperatur-Einstellknopf auf die gewünschte
Temperatur ein. Lassen Sie den Ofen 5 Minuten lang vorheizen,
geben Sie die Lebensmittel anschließend in den Ofen. Nach der
Zubereitung schalten Sie Ofenfunktion-und OfentemperaturEinstellknopf ab. Nehmen Sie die zubereiteten Lebensmittel aus
dem Ofen, stellen Sie sie an einem sicheren Ort ab und lassen Sie
den Ofen abkühlen, indem Sie die Ofentür geöffnet lassen. Da der
Ofen eine Zeit lang heiß bleibt, halten Sie sich und besonders
Kinder vom Ofen fern.
Grill + Umluft
Bei dieser Funktion arbeiten Grill, oberes Heizelement
und Umluft zusammen und sorgen für ein besonders
gleichmäßiges Garen.
Grillgerichte geben Sie auf das Grillrost, das Sie auf der höchsten
Stufe einschieben. Nachdem Sie das Backblech in der 3. Position
von unten eingeschoben haben, beginnen Sie mit dem Grillen.
Das auf der 3. Position von unten eingeschobene Backblech sorgt
dafür, dass von den Lebensmitteln herabtropfendes Öl oder Fett
aufgefangen wird.
Beim Grillen muss die Ofentür geschlossen bleiben, die
Temperatur sollte auf 190 °C eingestellt werden.
Stellen Sie den Temperatur-Einstellknopf auf die gewünschte
Temperatur ein. Lassen Sie den Ofen 5 Minuten lang vorheizen,
geben Sie die Lebensmittel anschließend in den Ofen. Nach der
Zubereitung schalten Sie Ofenfunktion-und OfentemperaturEinstellknopf ab. Nehmen Sie die zubereiteten Lebensmittel aus
dem Ofen, stellen Sie sie an einem sicheren Ort ab und lassen Sie
den Ofen abkühlen, indem Sie die Ofentür geöffnet lassen. Da der
Ofen eine Zeit lang heiß bleibt, halten Sie sich und besonders
Kinder vom Ofen fern.
Unterhitze/Oberhitze + Umluft
Bei dieser Funktion wird heiße Luft an den oberen und
unteren Heizelementen entlang geleitet und durch den Lüfter
gleichmäßig im Inneren des Backofens verteilt. Stellen Sie die
Ofentemperatur je nach gewünschter Zubereitungsart auf die
empfohlene Temperatur ein, die Sie der Temperaturtabelle
entnehmen können. Stellen Sie den Ofenfunktion - Einstellknopf
auf das Symbol dieser Funktion ein, stellen Sie den Ofentimer
(sofern vorhanden) auf die empfohlene Zubereitungszeit ein und
lassen Sie den Ofen etwa 10 Minuten lang vorheizen. Geben Sie
die Lebensmittel (eventuell in einem passenden Behälter) in den
Ofen. Diese Funktion eignet sich insbesondere zum Backen von
Gebäck. Die Lebensmittel werden dabei besonders gleichmäßig
durchgegart. Zur Zubereitung mit einem Rost/Backblech.
Nach der Zubereitung schalten Sie Ofenfunktion - und
Ofentemperatur - Einstellknopf ab. Nehmen Sie die zubereiteten
Lebensmittel aus dem Ofen, stellen Sie sie an einem sicheren Ort
ab und lassen Sie den Ofen abkühlen, indem Sie die Ofentür
geöffnet lassen. Da der Ofen eine Zeit lang heiß bleibt, halten Sie
sich und besonders Kinder vom Ofen fern.
Unterhitze
Bei dieser Funktion wird die größte Hitze im unteren
Bereich des Ofens erreicht. Unterhitze eignet sich besonders zum
Aufwärmen von Lebensmitteln.
Oberhitze
Bei dieser Funktion wird die größte Hitze im oberen
Bereich des Ofens erreicht. Oberhitze eignet sich besonders zum
Erhitzen der Oberseite von Lebensmitteln und zum Bräunen
bereits gegarter Gerichte
Ober-/Unterhitze + Umluft
Temperatur
Garzeit
(Min.)
position
35 - 45
30 - 40
30 - 40
40 - 50
45 - 60
(°C)
170 - 190
150 - 190
150 - 190
175 -200
200
position
Einschub-
2-3
2-3-4
2-3-4
3
2-3
Garzeit
(Min.)
25 - 35
25 - 35
25 - 35
40 - 50
45 - 60
Temperatur
(°C)
200
200
200
200
24 DE
SPEISEN
Schichtgebäck
Kuchen
Kekse
Frikadellen
Wasserhaltige
Speisen
Geflügel
Koteletts
Rindersteaks
Zwei-BlechKuchen
Drei-BlechKuchen
Ober-/Unterhitze
Temperatur
(°C)
170 - 190
170 - 190
170 - 190
175 -200
200
Einschub-
2-3
2-3
2-3
3
2-3
Grill
Garzeit
(Min.)
position
Einschub-
5
10 - 15
50 - 60
4-5
15 - 25
5
15 - 25
Tabelle 4
Page 25

7. REINIGUNG UND WARTUNG
7.1 ALLGEMEIN
Bevor Sie Ihren Ofen reinigen, vergewissern Sie sich zunächst,
dass sämtliche Bedienelemente abgeschaltet sind und der Ofen
abgekühlt ist. Ziehen Sie wenn möglich den Netzstecker.
Benutzen Sie keine Reinigungsmittel, die Scheuermittel
enthalten: Diese können die emaillierten und lackierten Teile Ihres
Ofens beschädigen. Verwenden Sie Creme - oder
Flüssigreiniger ohne Scheuerzusätze.
Benutzen Sie keinerlei ätzende Reiniger, Scheuerpulver,
Stahlwolle oder harte Gegenstände, damit die Oberflächen
Ihres Gerätes nicht beschädigt werden. Überlaufende
Lebensmittel und verschüttete Flüssigkeiten können sich in
die Oberflächen Ihres Ofens einbrennen und Schäden an der
Emaille verursachen.
7.2 OFEN REINIGEN
Trennen Sie den Ofen vor dem Reinigen von der
Stromversorgung. Der Ofen - Innenraum lässt sich am besten
reinigen, wenn er noch etwas warm ist. Wischen Sie den Ofen
nach jeder Benutzung mit einem weichen Tuch aus, das Sie mit
etwas Seifenwasser angefeuchtet haben. Wischen Sie den Ofen
anschließend mit einem feuchten Tuch aus, danach wischen Sie
ihn trocken. Von Zeit zu Zeit sollten Sie den Ofen mit einem
flüssigen Reinigungsmittel komplett reinigen. Benutzen Sie keine
Trockenreiniger und keine Reinigungspulver. Bei Produkten mit
katalytischen Emaillerahmen müssen Rückwand und
Seitenwände des Ofen-Innenraums nicht gereinigt werden.
Allerdings sollten diese nach einer bestimmten Zeit (abhängig von
der Nutzung) ausgetauscht werden.
7.4 WARTUNG
Ofenbeleuchtung austauschen
Wir empfehlen, diesen Arbeitsschritt dem autorisierten
Kundendienst zu überlassen. Trennen Sie den Ofen von der
Stromversorgung und vergewissern Sie sich, dass er komplett
abgekuhlt ist. Entfernen Sie zunächst das Schutzglas, nehmen
Sie dann das Leuchtmittel aus der Fassung. Setzen Sie ein
neues, bis 300 C beständiges Leuchtmittel in die Fassung ein;
dieses Leuchtmittel erhalten Sie beim autorisierten
Kundendienst. Setzen Sie dann das Schutzglas wieder auf.
Anschließend können Sie Ihren Ofen wieder ganz normal
benutzen.
0
8. SERVICE UND TRANSPORT
8.1 BEVOR SIE SICH AN DEN KUNDENDIENST
WENDEN
Falls der Ofen nicht funktionieren sollte:
Der Ofen ist eventuell von der Stromversorgung getrennt oder ein
Stromausfall ist eingetreten.
Falls sich der Ofen nicht aufheizen sollte:
Möglicherweise haben Sie vergessen, die Ofentemperatur
einzustellen.
Falls die Ofenbeleuchtung nicht aufleuchten sollte:
7.3 GLASKERAMISCHES KOCHFELD REINIGEN
Trennen Sie das Gerät von der Stromversorgung, bevor Sie mit
dem Reinigen beginnen. Lassen Sie die Glaskeramik vor dem
Reinigen komplett abkühlen.
Vergewissern Sie sich, dass die von Ihnen eingesetzten
Reinigungsmittel keinerlei Scheuermittel enthalten, die das Glas
verkratzen können. Benutzen Sie am besten Cremeoder
Flussigreiniger.
Die Glaskeramik sollte mit kaltem Wasser abgewischt und mit
einem weichen Tuch trocken gerieben werden, bis auch der letzte
Reinigungsmittelrest entfernt ist.
Übergelaufene Lebensmittel und sonstige Rückstände können
Sie mit dem Schaber entfernen, der mit Ihrem Gerät geliefert
wurde.
Zuckerhaltige Lebensmittel sollten sofort entfernt werden,
solange die Glaskeramik noch heiß Ist.
Stahlwolle kann zu Beschädigungen der Glaskeramik führen.
Staub entfernen Sie am besten mit einem angefeuchteten Tuch
von den entsprechenden Oberflächen.
Im Laufe der Zeit konnen Verfärbungen der glaskeramischen
Oberfläche auftreten; diese wirken sich jedoch nicht auf Funktion
und Leistung der Glaskeramik aus. Der Grund dieser
Verfärbungen liegt nicht in Veränderungen der Glaskeramik:
Solche Verfärbungen treten auf, wenn sich Lebensmittelreste in
die Oberfläche einbrennen, die Glaskeramik durch Kochgeschirr
abgenutzt wird oder ungeeignete Reinigungsmittel verwendet
wurden. Bevor Sie chemische Reinigungsmittel einsetzen, sollten
Sie zunächst grundsätzlich den mitgelieferten Schaber
verwenden. Mit diesem Schaber können Sie auch die kleinsten
Verschmutzungen von der Glaskeramik entfernen. Auch
schwierig zu entfernende Verunreinigungen wie geschmolzene
Kunststoffe, Öl und Fette sowie zuckerhaltige Substanzen
können ebenfalls leicht mit dem Schaber entfernt werden. Da der
Schaber mit einer scharfen Rasierklinge arbeitet, ist er nicht ganz
ungefährlich und sollte stets außerhalb der Reichweite von
Kindern aufbewahrt werden. Achten Sie beim Einsatz des
Schabers darauf, nicht das Silikon an den Kanten des Glases zu
beschädigen.
Überprufen Sie die Stromversorgung.
Vergewissern Sie sich, dass das Leuchtmittel nicht defekt ist.
Probleme beim Garen (z. B. ungleichmäßige Erwärmung bei
Oberhitze/Unterhitze):
Kontrollieren Sie, ob das Grillrost/Backblech in der richtigen
Position eingeschoben, die richtige Garzeit eingehalten und die
Temperatur richtig eingestellt wurde. Falls das Gerät nicht richtig
arbeiten sollte und keine Ursache festgestellt werden kann,
schalten Sie das Gerät aus. Versuchen Sie bitte keine
eigenmächtigen Reparaturen; wenden Sie sich an den
technischen Kundendienst. Wenn Sie sich an den autorisierten
technischen Kundendienst wenden, halten Sie Informationen
zum Modell und seiner Seriennummer (16-stellige Nummer,
beginnend mit einer 3) bereit. Diese Daten finden Sie auf dem
Typenschild.
8.2 HINWEISE ZUM TRANSPORT
Falls das Gerät transportiert werden muss:
Zum Transportieren des Gerätes benutzen Sie am besten das
Original - Verpackungsmaterial. Halten Sie sich an die
Transporthinweise auf der Verpackung.
Falls die Originalverpackung nicht aufbewahrt wurde:
Schützen Sie die Außenflächen (Glas und lackierte Flächen) von
Ofen und Kochfeld vor möglichen Stößen.
25 DE
Page 26

Page 27

Page 28

GB
DE
08.2016 • REV:C • 42810874
This appliance is marked according to the European directive 2012/19/EU on Waste Electrical and Electronic Equipment (WEEE). WEEE
contains both polluting substances (which can cause negative consequences for the environment) and basic components (which can be reused). It is important to have WEEE subjected to specific treatments, in order to remove and dispose properly all pollutants, and recover and
recycle all materials.
Individuals can play an important role in ensuring that WEEE does not become an environmental issue; it is essential to follow some basic rules:
• WEEE shall not be treated as household waste.
• WEEE shall be handed over to the relevant collection points managed by the municipality or by registered companies. In many countries, for
large WEEE, home collection could be present.
• When you buy a new appliance, the old one may be returned to the retailer who has to collect it free of charge on a one-to-one basis, as long as
the equipment is of equivalent type and has the same functions as the supplied equipment.
ENERGY SAVING AND RESPECTING THE ENVIRONMENT
Where possible, avoid pre-heating the oven and always try to fill it. Open the oven door as infrequently as possible, because heat from the cavity
disperses every time it is opened. For a significant energy saving, switch off the oven between 5 and 10 minutes before the planned end of the
cooking time, and use the residual heat that the oven continues to generate. Keep the seals clean and in order, to avoid any heat dispersal
outside of the cavity. If you have an electric contract with an hourly tariff, the "delayed cooking" programme makes energy saving more simple,
moving the cooking process to start at the reduced tariff time slot.
Dieses Gerät ist in Übereinstimmung mit der europäischen Richtlinie 2012/19/EU zu elektrischen und elektronischen Altgeräten (WEEE)
gekennzeichnet. Elektrische und elektronische Altgeräte enthalten sowohl Schadstoffe (die negative Auswirkungen auf die Umwelt haben
können) als auch Basiskomponenten (die wiederverwendet werden können). Es ist wichtig, dass elektrische und elektronische Altgeräte
spezifischer Handhabung unterliegen, damit alle Schadstoffe angemessen entfernt und entsorgt und alle Materialien wiederverwertet und
recycelt werden.
Verbraucher spielen eine wichtige Rolle bei der Gewährleistung, dass elektrische und elektronische Altgeräte nicht zu Umweltproblemen
werden; es ist wichtig, einige grundlegende Regeln zu befolgen:
• Elektrische und elektronische Altgeräte können nicht als Haushaltsabfall behandelt werden.
• Elektrische und elektronische Altgeräte sollten an relevante Sammelpunkte übergeben werden, die von der Stadtverwaltung oder
eingetragenen Unternehmen verwaltet werden. In vielen Ländern können bei großen elektrischen und elektronischen Altgeräten heimische
Sammeldienste verfügbar sein.
• Wenn Sie ein neues Gerät erwerben, kann das alte Gerät möglicherweise an den Händler übergeben werden, der es kostenlos auf einer 1:1Basis sammeln muss, solange das Gerät von dem gleichen Typ ist und dieselben Funktionen hat wie das gelieferte Gerät
ENERGIESPAREND UND UMWELTSCHONEND
Verzichten Sie nach Möglichkeit darauf, den Ofen vorzuheizen, und machen Sie ihn stets so voll es geht. Öffnen Sie die Ofentür so selten wie
möglich, da bei jedem Öffnen Wärme aus dem Garraum entweicht. Das Abschalten des Ofens 5 bis 10 Minuten vor dem vorgesehenen Ende
der Garzeit spart große Mengen Energie ein. Dabei wird die Restwärme des Ofens zum Fertiggaren der Speisen genutzt. Achten Sie darauf,
dass die Dichtungen sauber und in einem guten Zustand sind, da sie dafür sorgen, dass keine Hitze aus dem Garraum entweichen kann.
Wenn der Versorgungsvertrag mit Ihrem Stromversorger je nach Tageszeit unterschiedliche Tarife vorsieht, können Sie durch das Garen mit
„Zeitprogrammierung“ den Garbeginn auf den Anfang des günstigen Zeitraums legen.
GB
The manufacturer will not be responsible for any inaccuracy resulting from printing or transcript errors contained in this brochure. We reserve the right to carry
out modifications to products as required, including the interests of consumption, without prejudice to the characteristics relating to safety or function.
DE
Der Hersteller übernimmt keine Hauftung für eventuelle Druck-oder Übersetzungsfehler dieser Bedienungsanleitung. Der Hersteller behält sich vor,
technische Änderungen zur Verbesserung der Produktqualität im Interesse des Endverbrauchers vorzunehmen.
 Loading...