

Page 1
הלעפה תוארוה
ןוילע חתפ הסיבכ תנוכמ
EVOT 10061D
:םגד
Page 2

םיניינע ןכות
10
11
12
14
16
18
3
4
6
8
תוצופנ תויעב ןורתפ
ינכט טרפמ
תוחיטב תוארוה
הנקתה
תובושח תוצע
הסיבכ ינומיס
הרקבה חול
לועפת
הסיבכה תוינכות
ןויקנו הקוזחת
2
Page 3

מ"ס 40 בחור
ינכט טרפמ
םגדEVOT 10061D
מ"ס 85 הבוג
מ"ס 60 קמוע
הנתוכל
הנתוכל
רב 8 וא MPa 0.8 :ילמיסכמ ץחל
רב 0.5 וא MPa 0.05 :ילמינימ ץחל
רטיל 50 :ףותה תלוביק
220-230V 50Hz :חתמ
10A :ילמיסכמ םרז
:םינקתב הדימע
- 2004/108/CE (Electromagnetic Compatibility)
- 2006/95/CE (Low Voltage)
תינכות
תינכות
םידממ
הסיבכ תלוביקג"ק 6 דע 1
ףותה בוביס תוריהמד"לס 1000 דע
תוינקת הסיבכ תוינכות
םימ
למשח
- 2011/65/EU (RoHS)
3
Page 4

תוחיטב תוארוה
הנקתה
.דיה תלגע לע תלדה תא ןיעשהל ןיא הלבוהה ךלהמב .תוריגמב
.רונת ןוגכ םוח רוקמל דומצב הנוכמה תא ןיקתהל ןיא .תודיער
ןייוצמכ וז הנוכמ לש ילמיסכמה למשחה קפסהב ךומתל ךירצ עקשה .הנגה
.הנגה קספמ ידי לע ןגומ דרפנ חתמ וק ץלמומ .תפרוצמה תיותה יבג לע
תושרדנה תומאתהה תא עצבל שי ,למשחה עקשל םיאתמ וניא עקתה םא
םישמתשמ םאו למשח לצפמב שמתשהל אלש ץלמומ .ךמסומ יאלמשח י"ע
.וז הנוכמ לש ילמיסכמה למשחה קפסהב ךמות אוהש אדוול שי ךיראמ לבכב
.ךרדב לושכמ הווהי אלש ןפואב למשחה לבכ תא ןיקתהל שי .למשחה תשרמ
ףשחיי אלש ךכ למשחה לבכ תא םקמל שי !ותוא חותמל וא ותוא ףפוכל רוסא
.תוביטרל וא ידמ ההובג הרוטרפמטל
g !ןאוביה םעטמ השרומ ןיקתמ י"ע קר הנקתהה
g וא הלעפהה תוידיב רזעהל ילבמ תוגוזב התוא ומירה ,הנוכמה תרבעה תעב
g דגנ התוא סלפל ודיפקהו ביציו ,השק ,רשי חטשמ לע הנוכמה תא ומקמ
g !דבלב םירק םימ זרבל הנוכמה לש םימה תסינכ רוניצ תא ורבח
g תקראה םע 50Hz 230V אוה ריקבש עקשל עיגמה למשחה חתמש ואדוו
g הנוכמה לש (למשחה לבכ) הניזה עקת קותינו רוביחל החונ השיג רשפאל שי
יללכ
.ידיתע שומישל
.םיאתמ חוקיפ תחת אלא ,םיאתמ עדי וא ןויסינ ירסח וא תישפנ וא תינפוג
.םידלי תברקב תלעפומ איה
g ןהילע רומשלו הנוכמה תלעפה ינפל תוחיטבה תוארוה לכ תא אורקל שי
g םילבגומ (םידלי ללוכ) םישנא ידי לע שומישל תדעוימ וניא וז הסיבכ תנוכמ
g רשאכ בטיה הילע חיגשהל שיו דבלב יתיב שומישל הדעונ וז הסיבכ תנוכמ
4
Page 5

תוחיטב תוארוה
תכרעמ וא ינוציח ("רמייט") ןמז בצוק תועצמאב לעפומ תויהל דעוימ וניא
.תדרפנ קוחרמ הטילש
g הנוכמה .שומישב אצמנ אוהש ןמזב החגשה אלל הנוכמה תא ריאשהל ןיא
.הסיבכ תנוכמב שומישל םימיאתמ םניאש יוקינ ירמוחב שמתשהל ןיא
.םיקלוד תורנ ןוגכ ,הפושח שא רוקמ הנוכמה לע ביצהל ןיא
.לבכה תכישמב אלו ומצע למשחה עקת תכישמב הקותינ לע ודיפקה .תופחי
.תולמשחתה וא הפירש תנכס עונמל ידכ ,רחא ךמסומ םדא וא ולש
תוקסעתהמ וענמיהו תורישה זכרמ םע רשק ורצ .םימה תסינכ זרב תא ורגסו
.הב תפסונ
הקתנל שי ,הכורא הפוקת הנוכמב שמתשהל םינווכתמ אל םא
!םימה יפדוע תא זקנלו התוקנל ,למשחהמ
g
g .דאמ םימח תויהל םילולע הנוכמב םימה ,הלועפה ךלהמב :תוריהז
g .ףותב םימ ןיא יכ ואדוו הנוכמה תחיתפ ינפל
g
g .הילע םיחנומ יוקינ ירמוח ילכמ רשאכ הנוכמה תא ליעפהל ןיא
g םיילגר םע וא תובוטר םיידיב למשח עקשמ הנוכמה תא קתנל וא רבחל ןיא
g תורישה ןכוס ,ןרציה ידי לע ופילחהל שי ,קוזינ (למשחה לבכ) הניזה ליתפ םא
g .יוקינ ירמוח אלל דבלב הכר תילטמ תועצמאב הנוכמה תא וקנ
g למשחהמ התוא וקתנ ,הסיבכה תנוכמ תא תידיימ ובכ ,ילועפת לשכ הרקמב
g
5
Page 6
הנקתה
הביצי הפצר לע הסיבכה תנוכמ תא וניקתה .1
.םיטיהר וא תוריקב עגיתש ילבמ החוטשו
דומעת הנוכמהש רוסא ,תודיער תעינמל
התוא סלפל ןתינ .תולעמ 2-מ הלודג הייטהב
.תוימדקה םיילגרה הבוג ןוויכ תועצמאב
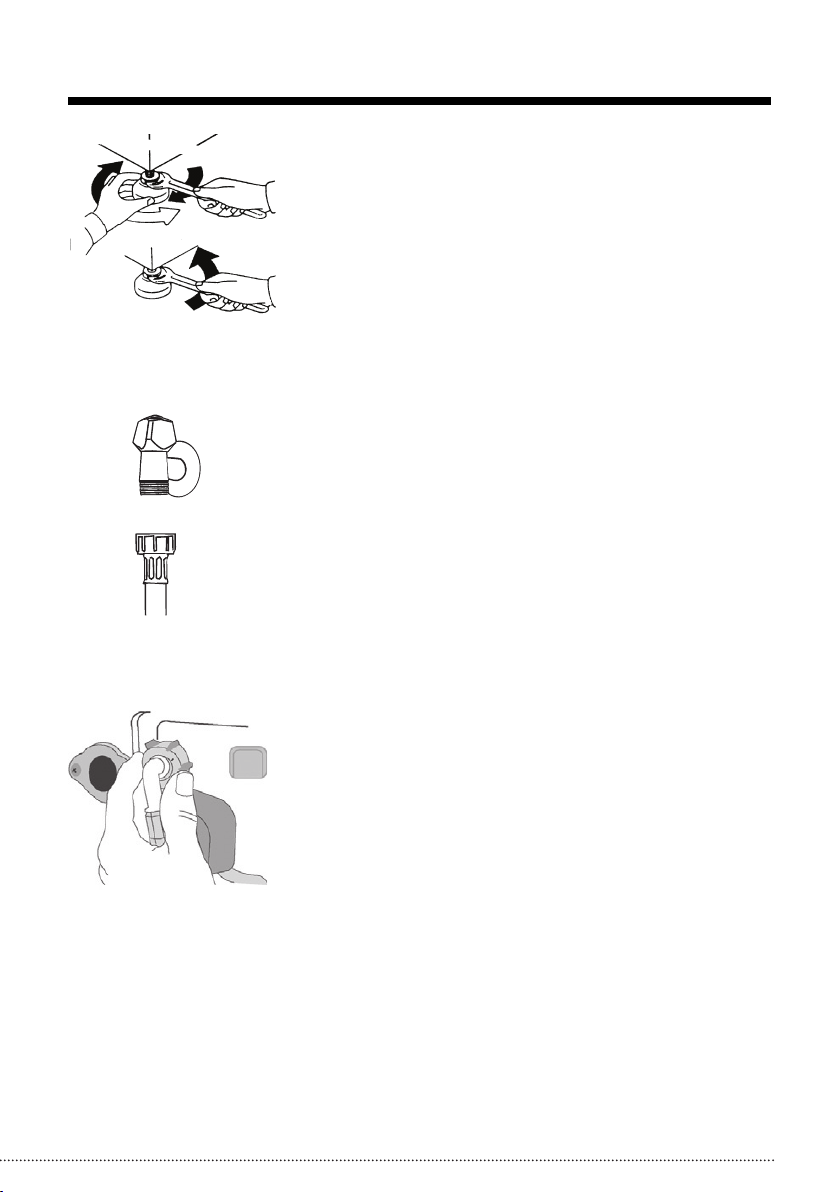
םירק םימ זרבל םימה תקפסא רוניצ תא ורבח
חווטב םימ ץחל קפסמה המיאתמ הגרבה םע
.ינכטה טרפמב םיבוקנה םיכרעה
םימה תקפסא רוניצ לש ינשה ודיצ תא ורבח
רוניצהש ודיפקה .הנוכמה לש םימה תסינכל
רוניצב שמתשהל ןיא .ףפוכתי אלו לתפתי אל
!שמושמ
.2
.3
6
Page 7
הנקתה
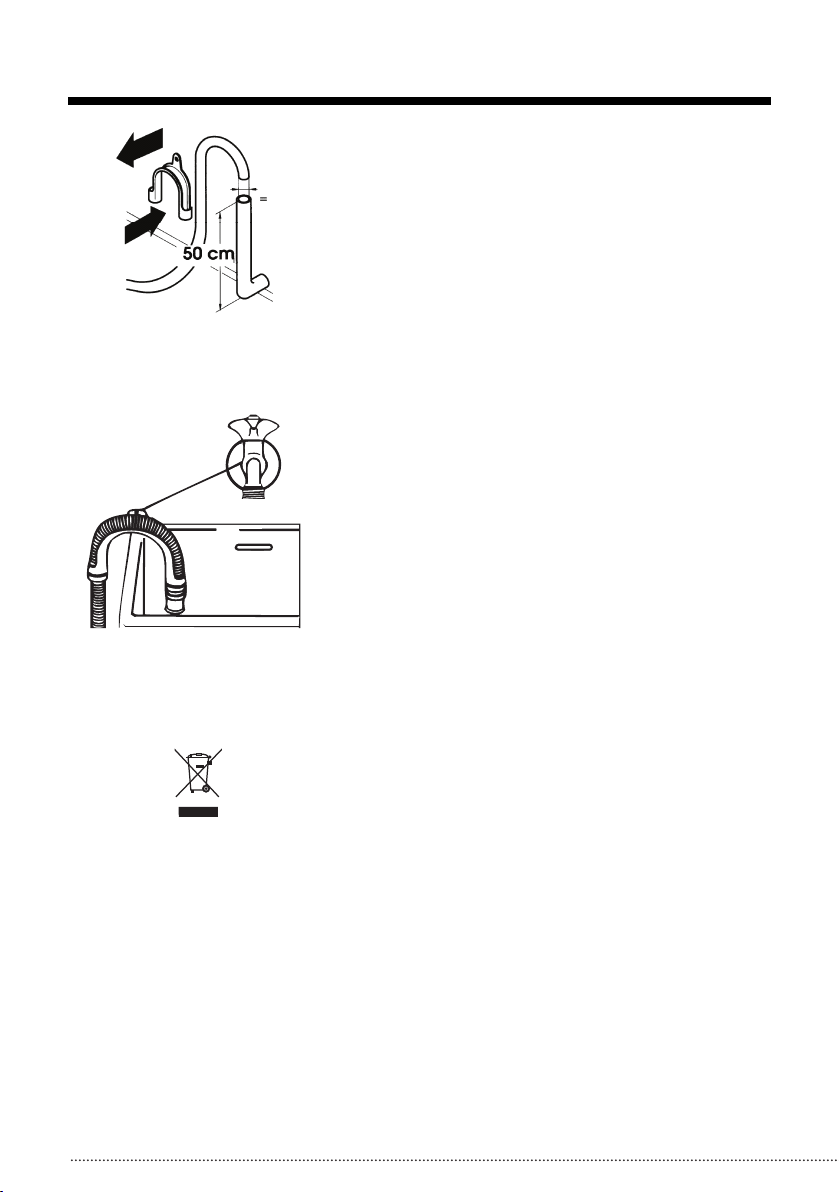
ילבמ ,הנוכמה לש זוקינה רוניצ תא ורבח .4
וא הפצרהמ אצויה זוקינ רוניצל ,ותוא ףפוכל
.הפצרהמ תוחפל מ"ס 50 הבוגב ריקהמ
לעמ זוקינה רוניצה הצק תא וחינה ,ןיפוליחל
(זרבל לשמל) וחוטביא ךות היטבמא וא רויכ
היהי רוניצה הצקש רוסא .םיאתמה הבוגב
.םימל תחתמ
עבטומה
יפוריאה דוחיאה תונקתל םאתהב ,ןייצמ םיוולנה םיכמסמה לע וא רצומה לע
ןיאש ,(WEEE) שמושמ ינורטקלאו ילמשח דויצ יוניפו קוליסל EC/2002/96
ףוסיא זכרמל ותונפל שי אלא ,הליגר תיתיב הפשא לאכ רצומל סחייתהל
תימוקמה תושרל ורשקתה ,ףסונ עדימל .ינורטקלאו ילמשח דויצ רוזחמל םיאתמה
תואצות תעינמב עייסל ולכות ךכ .הביבסה תנגהל דרשמל וא םכירוגמ םוקמב
,רישכמה תכלשה ינפל .םדאה ינב לש םתואירבלו הביבסל תוירשפא תוילילש
.למשחה תשרל הנוכמה תא רבחל היהי ןתינ אלש ךכ למשחה לבכ תא וכתח
ןמיסה .רזוח שומישל םינתינה םירמוחמ היונב וז הסיבכ תנוכמ
7
Page 8
לא
וגרחת
הסיבכה תומכמ
תינכותב תצלמומה
הסיבכה
תובושח תוצע
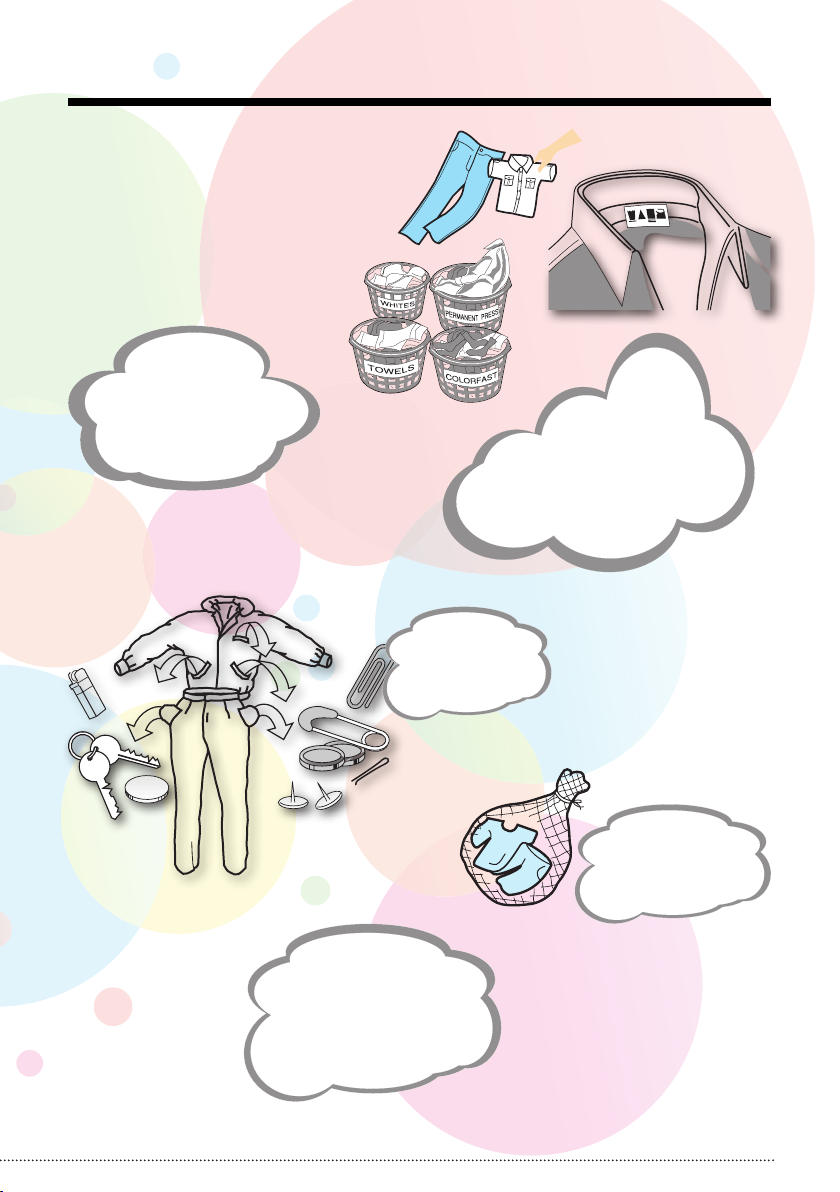
וניימ
םיטירפ
םאתהב
הסיבכה תינכותל
ץלמומ .םהל המיאתמה
יטירפ םע תובגמ בברעל
שובל
ודיפקה
לכ תא ןקורל
םיסיכה
תעב
,םיחיטש סוביכ
םיטירפו הטימ ייוסיכ
ולטב ,םירחא םיגפוס
הטיחסה תורשפא תא
םיטירפ
דחוימב םינידע
תיקשל וסינכה
תשר
8
Page 9
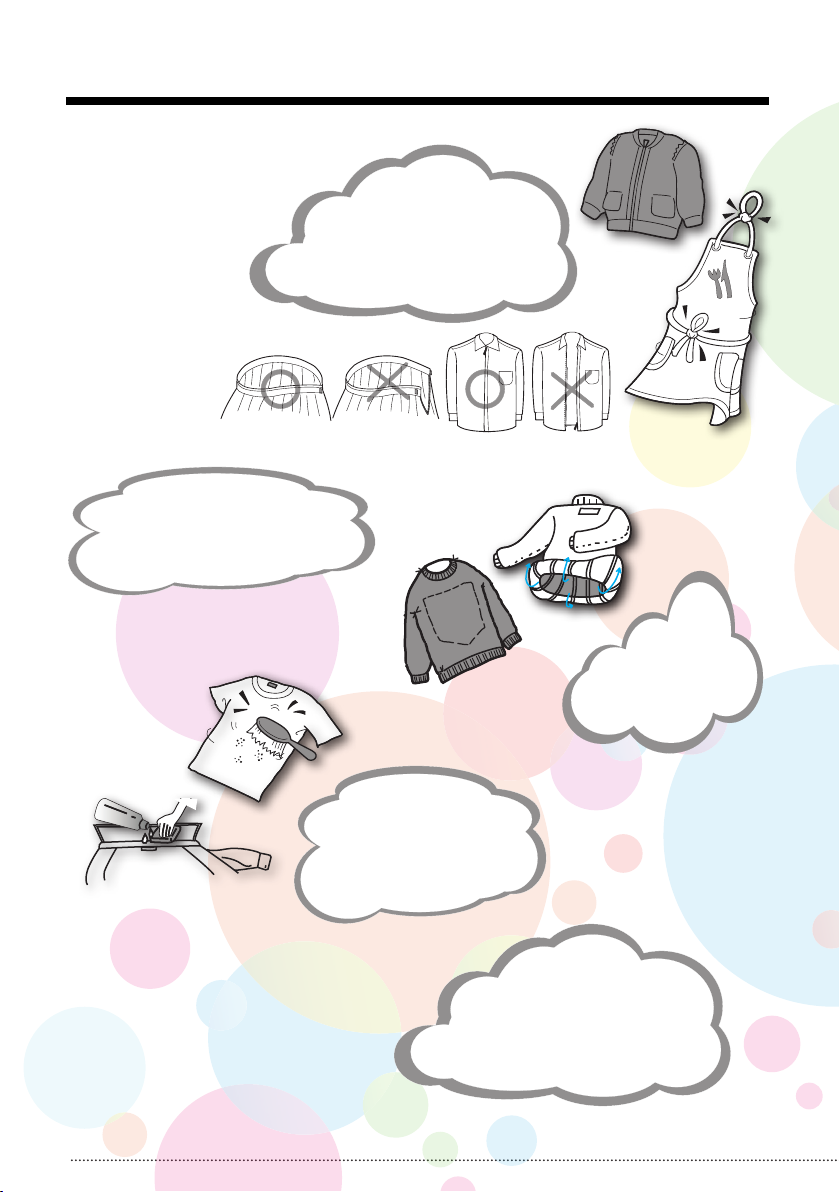
וריסה
םיטוחו םירזיבא
ףוסאל ץלמומ .תונוליוומ
רודכל םיטוחה תא
תובושח תוצע
וקדה
,תוירכ ייוסיכ
םיקדהמו םינסכור ורגס
םיררחושמ םיטרס ורשקו
תולמש לש תורוגח וא
וחתפ
םילפק
יפלכ וכפהו
שובל יטירפ ץוח
םישיגר
וקנ
םידקמ יוקינ
ךולכיל םע םיטירפ
ןוראווצ ומכ) יתייעב
(הצלוח
תוינכותב
ץלמומ תורצקה
ללכ שמתשהל אלש
ילזונב אלא הסיבכ תוקבאב
.דבלב הסיבכ
9
Page 10
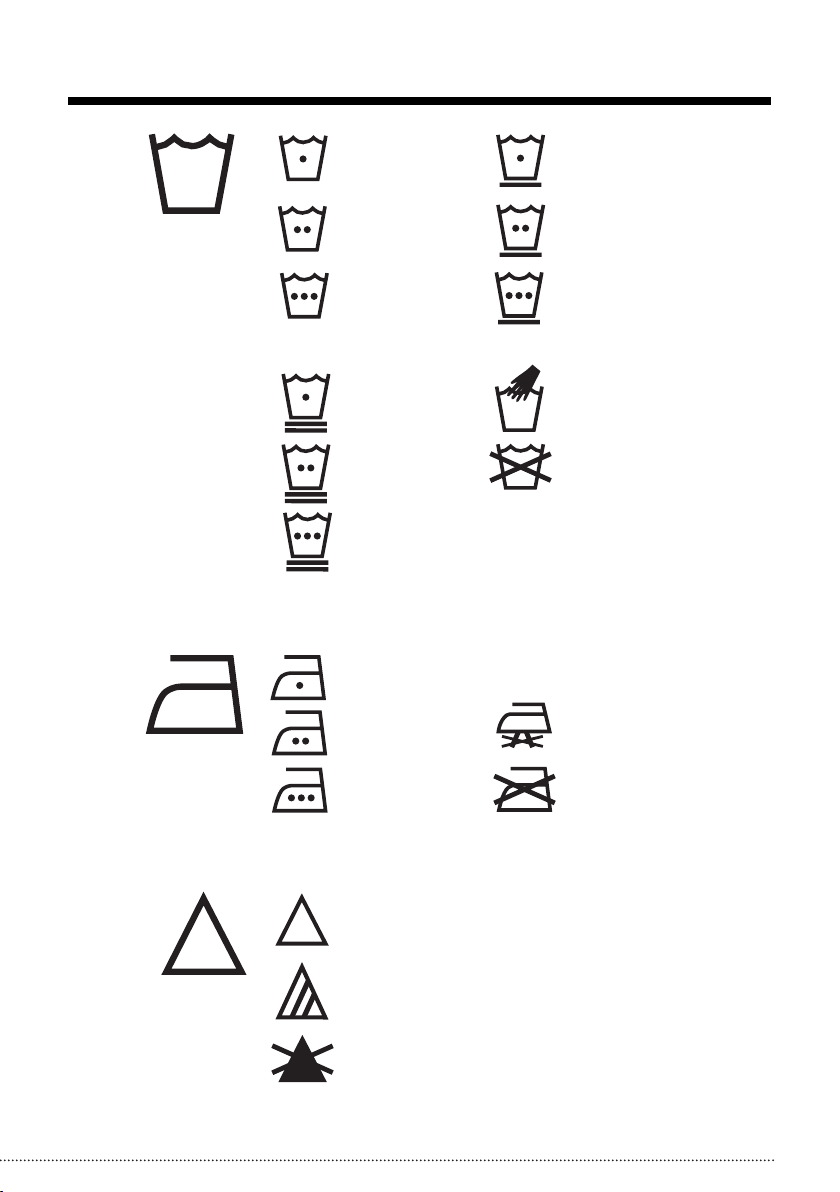
הסיבכ ינומיס
הסיבכ
ץוהיג
הנוכמ תסיבכ
הליגר תינכות
םירשופ םימ
הנוכמ תסיבכ
הליגר תינכות
םימימח םימ
הנוכמ תסיבכ
הליגר תינכות
םימח םימ
הנוכמ תסיבכ
הנידע תינכות
םירשופ םימ
הנוכמ תסיבכ
הנידע תינכות
םימימח םימ
הנוכמ תסיבכ
הנידע תינכות
םימח םימ
ץוהיג
ךומנ םוחב
ץוהיג
ינוניב םוחב
ץוהיג
הובג םוחב
הנוכמ תסיבכ
טמק לא תינכות
םירשופ םימ
הנוכמ תסיבכ
טמק לא תינכות
םימימח םימ
הנוכמ תסיבכ
טמק לא תינכות
םימח םימ
די תסיבכ
סבכל רוסא
ץוהיג
םידא אלל
ץהגל רוסא
הנבלה
תרתומ הנבלה
הלבגה אלל
תרתומ הנבלה
רולכ אלל
ןיבלהל רוסא
10
Page 11
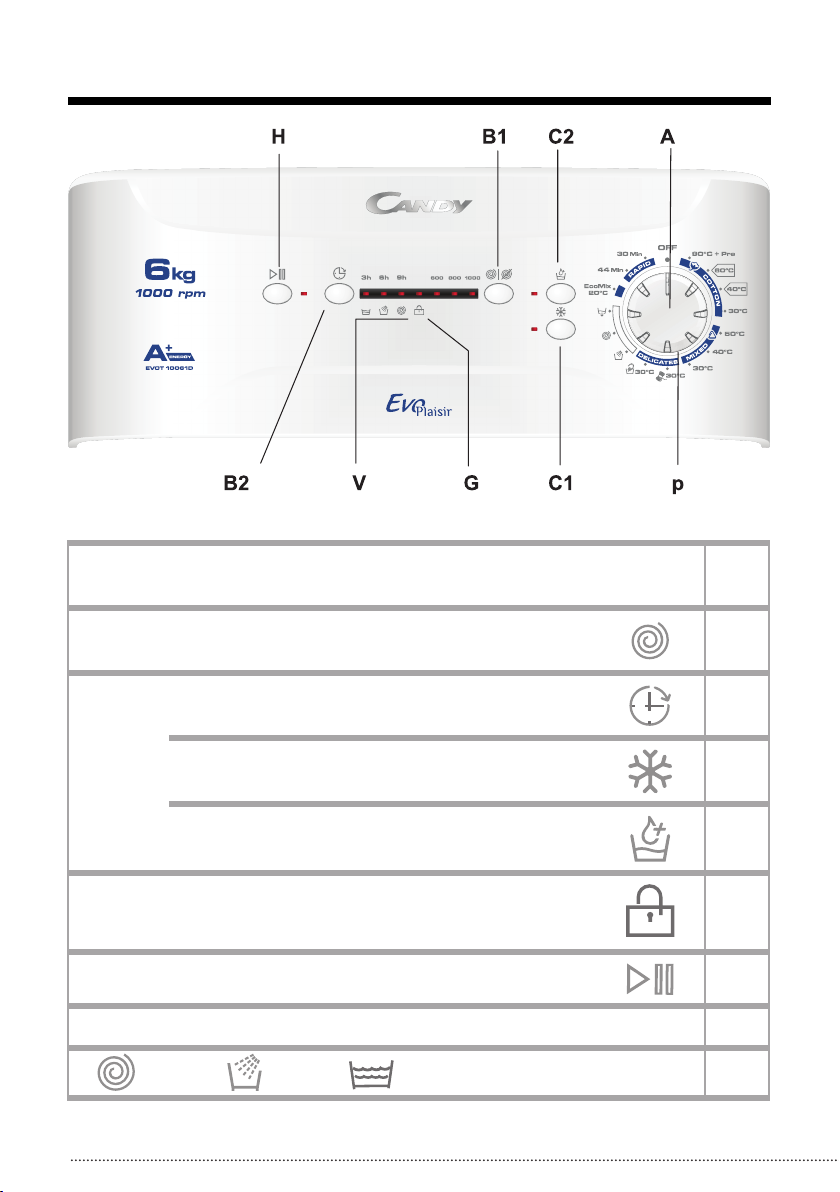
הרקבה חול
,השדח תינכת תלחתה ינפלו הנוכמה יוביכל .הסיבכה תינכות ררוב
.OFF יוביכ בצמל ררובה תא ובבוס
תא הטיאמ הציחל לכ) .הטיחסב ףותה בוביס תוריהמ
.(תוריהמה
תויורשפא
תופסונ
הריחבל
ינפל
הציחלה
רותפכ לע
.הלעפהה
תלדה תחיתפ .תלדה לש תיטמרה הליענ יוויח תירונ
. הטיחסו , הפיטש , הסיבכ :תינכותה יבלש יוויח תוירונ
תא הכיראמ הציחל לכ) תיהשומ הלעפה
.(הייהשהה
םיסנכנה םימה םומיח אלל) הרק הסיבכ
.(הנוכמל
הסיבכ ירמוח תויראש תתחפהל) םימ תפסות
.(שיגר רוע ילעבל עירפהל םילולעה
.תוחיטב ימעטמ תוקד 2 תיהשומ
.הסיבכה תינכות לש הריצע/הלעפה רותפכ
הסיבכה תינכות יוויח
A
B1
B2
C1
C2
G
H
P
V
11
Page 12

לועפת
רשאכ .הנוכמה ףותל תורישי ךופשל ץלמומ הסיבכ תקבא .הסיבכה
תשולשב שמתשהל ץלמומ ,תילמיסכמה הסיבכה תומכמ תיצחמ םיסבכמ
.הסיבכה רמוח תומכ יעבר
.למשחל התוא ורבחו הסיבכה תנוכמל םימה תקפסא
.הרחבנש
ררובה תא ובבוס ,לטבל ידכ .תיהשומ הלחתהל תינרוחא ןמזה תריפס תא
.OFF יוביכ בצמל
1 ..הסיבכה תא וניימ
2 ..םימיאתמ יוקינ ירמוח תועצמאב השק ךולכל ימתכ וריסה
3 ..הנוכמל הסיבכה תא תוריהזב וסינכהו הנוכמה תלד תא וחתפ
4 . ירמוח תרגמל תומיאתמה תויומכב םיצוחנה יוקינה ירמוח תא וסינכה
5 . זרב תא וחתפ !קולד הרוגס תלד יוויחש ואדוו הנוכמה תלד תא ורגס
6 ..הסיבכה תינכות ררוב תועצמאב היוצרה הסיבכה תינכותב ורחב
7 . תינכותל המאתהה תורשפאו ךרוצה יפ לע תופסונ תויורשפאב ורחב
8 ..הסיבכה תוינכות לכב תונימז תופסונה תויורשפאה לכ אל !בל ומיש
9 . וא הרחבנש הסיבכה תינכות תלועפ תא ליחתהל ידכ רותפכ לע וצחל
תותלד תא וחתפ ןכמ רחאלו םימה זרב תא ורגס ,למשחהמ הנוכמה
.הסיבכה תא הנממ ואיצוהו הנוכמה
10 . תא וקתנ ,OFF יוביכ בצמל ררובה תא ובבוס,הסיבכה תינכות םויסב
12
Page 13

לועפת
:ףותה תריגסו תחיתפ ןפוא
.תינוציחה תלדה תא ףוסה דע ומירהו וחתפ .א
ףותה תותלדב תחא דיב וזחא ,ףותה תחיתפל .ב
רותפכ לע הטמ וצחל הינשה דיבו וזוזי אלש
.החיתפה
ףותה תותלד תא וז יפלכ וז ורגס ,ףותה תריגסל .ג
ואדוו .תירוחאה הירחאו תימדקה הליחת -
בטיה
ורגסו וז יבג לע וז ,םוקמב בוט וספתנש
.תינוציחה תלדה תא
13
'סכמ תומכ
הקבאל
'סכמ תומכ
לזונל
הסיבכ ירמוח יולימ
'סכמ תומכ
הסיבכ םדקל
תומכ
תצלמומ
'סכמ תומכ
הסיבכ ךכרמל
Page 14

הסיבכ ם ַדְק ללוכ םידימע םידבו הנבל הנתוכ19590°10006●●●●●
םוחב דימע עבצ םע וא הנבל הנתוכ18060°10006●●●●
םוחב דימע עבצ םע וא הנבל הנתוכ15540°10006●●●●
םוחב דימע תוחפ עבצ םע תינועבצ הנתוכ11030°10006●●●●
םוחב דימע עבצ םע םיברועמ םידבו תינועבצ הנתוכ9050°תגצומ3●●●●
דימע תוחפ עבצ םע םיברועמ םידבו תינועבצ הנתוכ
םוחב
ץוהיג תוכירצמה תוצלוח7 030°תגצומ3●●●●
הסיבכה תוינכות
תינכות למסרובע
םיברועמו םידימע םידב
םיברועמו םידימע םידב3030°תגצומ2●●●
רמצ ידב4530°תגצומ1●●●
די תסיבכ5030°תגצומ1●●●
דבלב הפיטש25-תגצומ●●
דבלב הטיחס9-1000
דבלב ןוקיר4-
םיברועמ םידבל תינוכסח10820°תגצומ6●●●●
הריהמ הסיבכ
תא םינייצמ םירפסמה)
(תוקדב תינכותה ןמז ךשמ
.יפוריאה ןקתה יפל תוינקת תוינכות **
ןידע
תודחוימ תוינכות
14
Page 15

Page 16

ןויקנו הקוזחת
םילולע םישק םימ .ךכרמ רמוח ףיסוהל וא םימה ךוכירל ןנסמ ןיקתהל בל ומיש
.הניקת אל הלועפל םורגל
ירמוח תרגמ תא דחוימבו עובק ןפואב ץוחבמו םינפבמ הנוכמה תא תוקנל ץלמומ
.הסיבכה
הקתנל שי ,הכורא הפוקת הנוכמב שמתשהל םינווכתמ אל םא
!םימה יפדוע תא זקנלו התוקנל ,למשחהמ
ןנסמה תא תיתפוקת וקנ
.םירותפכו תועבטמ :לשמל .זוקינה חתפ תא םותסל םילולעה םימצע דכול ןנסמה
1 ..םימה יפדוע תגיפסל תבגמ וחינה
2 ..הסכמה תא וחתפ
3 ..ןועשה ןוויכ דגנ ןנסמה הסכמ תא ובבוס
4 ..ותוא וקנו ןנסמה תא הצוחה ופלש
5 ..(ךופה תולועפ רדסב) םוקמל לכה וריזחה
16
Page 17

ןויקנו הקוזחת
הסיבכה ירמוח לכמ יוקינ
תא וכשמו הסיבכה ירמוח לכמ תיזחבש לודגה רותפכה לע תולק וצחל
.הצוחה לכמה
םייניש תשרבמ :לשמל) המיאתמ תשרבמב ורזעה
ורבטצהש הסיבכ ירמוח תויראש תוקנל ידכ (הנשי
.תורוניצבו תונפודה יבג לע
1 .
2 . .םימ זרב תחת הסיבכה ירמוח לכמ תא ופטש
3 . .ומוקמב הרזח הסיבכה ירמוח לכמ תא וביכרה
17
Page 18

תוצופנ תויעב ןורתפ
היעבהתוירשפא תוביס
הלחתהה רותפכ
הלחתהה רותפכ
.למשחל בוט תרבוחמ הניא הנוכמה
.עקשל למשח העיגמ אל
.בוט הרוגס הניא תלדה
וניא הסיבכה רוזחמ
.ץחלנ אל
.רוגס םימה זרב
.זרבל רבוחמ וניא םימה רוניצ
.ףפוכמ םימה רוניצ
.רוגס םימה זרב
.םימ תקספה שי
.םימ ץחל ןיא
.ץחלנ אל
.הפצרהמ מ"ס 50 הבוגב וניא םימה זוקינ רוניצ
.םימב עוקש זוקינה רוניצ הצק
.ותוא וקנ - "םותס" ןנסמה
.םימב תאלמתמ
.םימה זוקינב הייעב
הניא הנוכמה
.תלעופ
.ליחתמ
הניא הנוכמה
.ףפוכמ זוקינה רוניצ
.ץחל רורחשל רורווא חתפ רסח וא םותס בויבה
.הטיחס ןיא .התוא ורשפא - הלטוב הטיחסה
18
Page 19

תוצופנ תויעב ןורתפ
.הנקתהה ךלהמב בוט ןזוא אל ףותה
ידמ תדעור הנוכמה
.תסלופמ הניא הסיבכה תנוכמ
.תנזואמ הניא הסיבכה
.ףפור םימה רוניצל רוביחה
.הטיחסה ךלהמב
.םותס הסיבכה ירמוח לכמ
.ףפור זוקינה רוניצל רוביחה
!הנוכמב שומישל םיאתמ וניא הסיבכה רמוח
.הסיבכ רמוח לש ידמ הלודג תומכ הסנכוה
.תפלוד הנוכמה
.הנוכמב ףצק רצונ
19
Page 20

Introduction
Read this manual carefully as it offers practical
advice to help you get the most from your washing
machine.
This «Instruction and Installation Manual» contains
everything you need to know about the everyday
running of your machine.
Please refer to this manual for installation and
maintenance instructions. The manual also contains
information about possible working problems,
advice about sorting clothes for washing, an
explanation of label symbols and hints about how to
remove stubborn stains.
1.- CONTROL PANEL 2.- LID 3.- DRUM
4.- DETERGENT DISPENSER 5.- PLINTH PANEL
6.- FILTER
Table of contents
Page
Safety measures 20
Setting up – Installation 22
Preparing the wash. Opening/ closing the drum 23
Detergent load 24
Electronically-controlled variable load- Fuzzy Logic 24
Description of controls 25
Special programmes 29
General recommendations 30
Troubleshooting 32
Washing hints 33
Safety measures
Appliance complies with European Directives 2006/95/EC (LVD), 2004/108/EC
(EMC), 2009/125/EC (ErP), 2011/65/EU (RoHS) and subsequent amendments.
This appliance can be used by children aged from 8 years and above and persons with
reduced physical, sensory or mental capabilities or lack of experience and knowledge if
they have been given supervision or instruction concerning use of the appliance in a safe
way and understand the hazards involved. Children shall not play with the appliance.
Cleaning and user maintenance shall not be made by children without supervision.
This appliances is intended to be used in household and similar applications such as:
- Staff kitchen areas in shops , offices and other working environments and farm houses;
- By clients in hotels
different use of this appliance from household environment or from typical housekeeping
A
f
unctions, as commercial use by expert or trained users, is excluded even in the above applications.
bed and breakfast, motels and other residential type environments;
20
Page 21

A
ny damage to the appliance or other damage or loss arising through use that is not consistent
w
ith domestic or household use ( even if located in a domestic or household environment) shall
n
ot be accepted by the manufacturer to the fullest extent permitted by law.
If the appliance is used in a manner inconsistent with this it may reduce the life of the
appliance and may void the manufacturer’s warranty.
ATTENTION: FOR ALL CLEANING AND MAINTENANCE WORK
• Remove the plug.
• Turn off the water inlet tap after each wash.
• The manufacturer fits all the machines with an earth connection.
Ensure that the electrical installation has an earth connection and that it is connected; if
not, call a qualified Service Center.
he earth connection is essential for user safety as it elimi-nates the risk of electrical discharge
T
Power sockets should be in easily accessible places so that the washing
•
machine can be unplugged in case of any problems.
.
• If the electric cable is damaged replace with an original set (cable and plug) supplied by
the manufacturer or official aftersales service.
note:
In the event that it is necessary to replace the power cable, make sure that you comply
with the following colour-code chart during the wiring:
Blue neutral ; brown phase ; Yellow-green earth
The manufacturer accepts no responsibility for any damage to people or things resulting
from the failure to comply with the appliance’s installation and safety regulations.
o not touch the appliance with wet hands or feet. Do not use the appliance when bare-footed.
• D
• U
se extension cords only with extreme care. Do not use adapters or multiple plugs.
o not pull on the power cord or the appliance itself to remove the plug from the socket.
• D
o not leave the appliance outdoors or exposed to the atmospheric elements (rain, sun, etc.).
• D
• Do not cover the appliance with cloth or plastic while it is working.
• Do not install the appliance in damp places or anywhere where it could be sprayed by
the shower.
• Do not install the appliance on a surface which obstructs the space between the floor
and the base of the machine.
• Keep all packaging out of the reach of children as it could constitute a health hazard.
The OFF condition is reached by placing the reference mark on the programmes
control/knob in the vertical position. Any other different position of such control sets the
machine in ON condition.
To consult the product fiche please refer to the manufacturer website.
TTENTION:DURING A WASH CYCLE THE WATER CAN REACH HIGH TEMPERATURES
A
21
Page 22

Setting up - Installation
• Unpack the appliance.
• Remove the 4 screws (A) from
both clamps and the 4
screws (B).
• Replace the 4 screws (A) and
fit the trims provided (D).
ATTENTION: DO NOT TURN THE TAP ON
• The washing machine should be connected
to the water mains via the new tube supplied
with the appliance (inside the drum). Do not
use the old tube for this purpose.
• Connect one end of the water inlet pipe with the elbow bend to the
electrovalve (top rear part of the machine) and the other end to a tap or a
plumbed-in 3/4" gas threaded connection.
• Place the washing machine close to the wall, ensuring that there are no
bends or kinks anywhere in the tube. Hook the outlet pipe to the edge of
the sink or preferably to a fixed drainage outlet of a diameter greater than
that of the outlet pipe and at a height of min. 50 cm. and a maximum of 75
cm. from the floor.
If necessary, use the curved accessory to attach and support the outlet
pipe more securely.
If your model offers this function:
• To move the washing machine easily, turn the trolley lever to the right.
Once you have finished moving the machine, return the lever to its original
position.
• Level the machine by adjusting the front feet.
a) Turn the nut clockwise to release the screw on the foot.
b) Raise or lower the foot by rotating it until it stands firmly on the floor.
c) Lock the foot in position by turning the nut anticlockwise until it comes
up against the bottom of the washing machine.
Check that the appliance is properly levelled.
Check that the washing machine does not rock by trying to move two
diagonally opposite top corners at the same time.
• If you move the washing machine from one place to another, you must
level the feet again afterwards.
22
Page 23

Preparing the wash. Opening/ closing the drum
(A)
ATTENTION:
IT IS IMPORTANT TO MAKE SURE THAT
THE DRUM IS CAREFULLY OPENED AND
CLOSED, OTHERWISE THE MACHINE OR
LAUNDRY COULD GET DAMAGED.
ENSURE THAT THE DOORS FIT
TOGETHER PERFECTLY AND ARE
PROPERLY CLOSED.
Loading
1.
Open the washing machine lid.
2.
Open the drum by pressing the button with one hand while
pressing down on the opposite door with the other.
3.
Place clothes in the drum one item at a time, and without
squashing. Do not exceed the load limits recommended in
the “programme table”. An overloaded washing machine
will not wash properly, and will leave clothing wrinkled.
4.
To close the drum, place the doors so that the one with
the (A) button is below the other and they fit together
perfectly.
23
Page 24

Detergent load
II I
Maximum Main wash
washing powder
Maximum Main wash
washing liquid
The detergent dispenser is divided into 3 compartments:
.- Compartment I is for the pre-wash detergent.
.- Compartment II is for the main wash detergent.
.- The compartment
blueing, etc.
The detergent dispenser has two reference marks:
.- Recommended (lower reference mark). This indicates the recommended level for the pre-wash and
main wash compartments.
.- Max. This indicates the maximum level, which should never be exceeded.
Important:
- Do not use liquid detergent for programs with a prewash cycle and/or timed start.
When the clothes present stains that need treatment with bleaches liquids products, you can proceed
-
to their preliminary cleaning in the washing machine. For that: Introduce the bleach product in the
"compartment II", and set the rinse program
add the rest of the laundry, and proceed with a normal was program.
is for fabric conditioners, scenting agents and special additives such as starch,
. Once finished set the programmer to the OFF position,
Maximum pre-wash
washing powder
recommended
Maximum scenting agent
Electronically- controlled Variable Load – Fuzzy Logic
This machine has electronics that automatically process all stages of the wash to ensure exceptional
results and at the same time save you time and money.
Once a programme has been selected, the machine optimises the following elements depending on
the wash load and type of fabric:
- quantity of water and power consumption
- wash time
- rinse efficiency
The washing machine also:
- detects suds and increases the amount of rinse water if necessary
- adjusts spin speed according to load distribution, thus forestalling any imbalance in the mechanism.
24
Page 25

Description of controls
H B1 C2 A
B2 V G C1 p
A PROGRAMME/TEMPERATURE SELECTOR
Use this control to select the desired wash programme. Turn the selector (it
can be turned in both directions) so that the programme is opposite the
reference indicator (p). The temperature selected will depend on the
programme. (See the Programme
Table).
B1 SPIN SPEED SELECTOR
B2 DELAYED START KEY
1 COLD WASH
C
2 AQUAPLUS (SENSITIVE KEY)
C
G DOOR LOCK LAMP
H START/PAUSE KEY
p CONTROL POSITION INDICATOR
V PROGRAMME PHASES LAMPS
25
Page 26

Programme table mod EVOT 10061D
max.
temp.
setting
programme programme for
Fast coloureds with prewash 90º 1000 6
* Fast coloureds 60º 1000
COTTONS
MIXED
SYNTHETICS
DELICATES
SPECIAL
* Cotton wash programme requirements according to (EU) 1015/2010 e nº 1061/2010 regulations
60°C Cotton wash programme
* Fast coloureds 40º 1000
Delicate coloureds 30º 1000
Fast coloureds
Delicate coloureds
Delicate coloureds
Woollens
Hand wash
Gentle rinse
Gentle spin
Empty
EcoMix 20ºC 20º display 6
Rapid 44 40º display 3
Rapid 30 30º display 2
ºC
50º display 3
40º display 3
30º display 3
30º display
30º display
display
1000
spin
speed
rpm/min
washing powder
max.
load
Kg.
6
6
6
1
1
load
I II
40°C Cotton wash programme
These wash programmes are recommended for soiled cotton fabrics and are the most effective in terms of
both energy efficiency and water consumption.
These programmes have been designed to comply with the recommended wash temperatures specified
on the labelling: the specified temperature may differ slightly from that indicated on the wash cycle.
Recommendations on the use of detergent at various temperatures.
When washing heavily soiled whites, we recommend using cotton programs of 60°C or above and a
normal washing powder (heavy duty) that contains bleaching agents that at medium/high temperatures
provide excellent results.
For washes between 40°C and 60°C the type of detergent used needs to be appropriate for the type of
fabric and level of soiling.
Normal powders are suitable for “white” or colour fast fabrics with high soiling, while liquid detergents or
“colour protecting” powders are suitable for coloured fabrics with light levels of soiling.
For washing at temperatures below 40°C we recommend the use of liquid detergents or detergents
specifically labeled as suitable for low temperature washing.
For washing wool or silk, only use detergents specifically formulated for these fabrics.
For dosage amounts please follow the instructions on the detergent package label.
Programme load time spin. Energy cons. Water cons.
Cotton 60°C
Cotton 40°C
Synthetics 40ºC
Woollens 30ºC
Mains
voltage
220-230V.
50Hz.
6 kg / 3 kg 180min. /120min.
3 kg 130min. 0,63kWh 34 l 62%
1000Rpm
1,05kWh /0,79kWh 49 l /34 l 62%
3 kg 105min display 0,42kWh 58 l 50%
1 kg 45min display 0,28kWh 50 l 40%
Power consumption of the off-mode and of the left-on mode: 0,4W / 0,5W
Pump
Wash
power
rating
175 W. 340 W. 30 W. 1300 W. 1500 W. 10 A.
Spin
Power
rating
Power
rating
Motor
Heating
element
power
rating
Max.
Power
input
Mains
Fuse
Amp.
rating
Water
consumption
pressure
0,05-0,8 Mpa
IMPORTANT:
- Do not use liquid detergent for programs with a prewash cycle and/or time delay.
option keys
C
Remaining
moisture
Water
*prog.
EN60456
49 L. 1,05 Kw.
Energy
consumption
*prog.
EN60456
*prog.EN60456
26
Page 27

programme phases
Wash
Rinse
Spin-drain
PREPARING THE WASH CYCLE
1.- Once the washing is loaded, ensure that the drum doors are properly closed.
2.- Add detergent and additives, not exceeding the maximum level indicator.
detergent for pre-wash I
detergent for wash programme II
fabric conditioner
SELECTING THE DESIRED PROGRAMMES AND OPTIONS
3.- Turn the programme selector (A) to the desired programme.
4.- Press the key or keys for any options desired (C1, C2,).
.- It is advisable to select the required options before pressing the Programme Start key (H).
.- Remember that if the programme has already passed the stage at which an option is activated, that
option will not be implemented.
C1 cold wash key
By pressing this button it is possible to transform every programme into a cold washing one, without
modify other characteristics (water level, times, rythmes, etc..).
Curtains, small carpets, man made delicate fabrics, non coulor fast garments can be safely washed thanks
to this new device.
C2 aquaplus (sensitive key)
Thanks to the new SENSOR ACTIVA SYSTEM, by pressing the key it is possible to run a special washing
cycle applicable to all programs and types of fabric, caring for their fibres and the delicate skin of the users
who use them.
Taking on much more water, together with the new combined action of drum rotation cycles and taking on
and discharging water allow you to obtain perfectly clean, rinsed clothes. More water is used in the wash
to dissolve the detergent completely, ensuring an effective washing action. The water in the rinses has
also been increased to eliminate all trace of detergent in the fibres.
This function has been specifically studied for people with delicate, sensitive skin, who can suffer irritation
or allergy from the slightest detergent residue.
It is also advisable to use this function for children's clothes and delicate fabrics in general, especially for
washing bathrobes, whose fibres tend to retain detergent.
This option is not available for the wool program.
B1 spin selector key
You can use this key to select final spin speed, but only within the range of speeds of the programme
selected. These speeds are displayed via the corresponding lamp. Press the button and keep pressed
until the three speed indicator lights go out ().
You can select the desired speed at any time during the programme.
5.- Once you have selected the desired options, press the START/PAUSE key (H). The washing machine
will start up and one of the time remaining lamps /programme phase (V) will come on. This lamp indicates
approximately how much time is left before the wash programme is completed or the programme phase: it
will change as the programme progresses. To cancel an option after setting, just press the option key
again (the indicator lamp will go out).
B2 Time delay key
The washing machine can be set to start the programme selected 3, 6, or 9 hours after setting. To do this,
proceed as follows:
- Select the desired programme via the programme selector A.
- Press the time delay key until the desired delay indicator lamp lights up.
(
- Press the start/pause key
H).
- The washing machine will start up after the time selected.
If you prefer to cancel the programmed start-up time, press the (B2) key again until all the delay lights
have switched off.
27
Page 28

Time remaining to end of cycle or programme phase display (V).
Models with this feature display the APPROXIMATE time remaining to the end of the programme in
minutes, or the current wash phase of the programme set. The programme times may vary depending on
the temperature selected, ambient temperature, mains water pressure, the quantity and type of washing.
“Door lock” lamp (G)
The door lamp flashes when a wash programme starts, and then burns steadily. From that moment on the
door is locked (DOOR LOCK).
The DOOR LOCK lamp remains on during the whole wash cycle, thus preventing the door from opening.
At the end of the wash cycle, the safety devices are deactivated, the light goes out and the door can then
be opened.
Cancel-change programs
Once you have started a program, and wish to change or cancel it, you should proceed in the following
manner,
- Put the program selector in the OFF position. At that instant, you have cancelled the program
and can if you wish to do so, select a new one.
- Select the new program.
- Press the
The washing machine will perform the new selected program.
Programme Pause
To pause the wash programme so that more washing can be added, proceed as follows:
- Press the (H) key until the lights on the option keys and the programme phase light have turned on.
- When the Door Lock lamp goes out (after approx. 2 minutes), open the door and put the additional
washing into the drum.
- Close the drum door and the lid properly.
- Press the start key
with the programme.
At the end of the programme, all the programme phase lights will be lit up, and safety door light will shut
off.
START/PAUSE
.
(H) key until one of the programme phase lights turns on.
START/PAUSE
(H), the time remaining lamp will light up and the machine will continue
For your own safety, set the programme selector to OFF
28
Page 29

RINSE
Specific / special programmes
SPECIAL RINSE PROGRAMME
Programme rinse runs 3 rinses with spins at 800 rpm (this speed may be reduced or
spin cancelled using the appropriate button). It works for all fabrics and can be used,
e.g. after garments are hand washed.
SPIN
DRAIN
SPECIAL HIGH-SPEED SPIN PROGRAMME
Programme spin
DRAIN
Programme drain empties the water from the machine.
HAND WASH : The programme runs a complete wash cycle for garments intended to
HAND WASH
be hand washed. It washes at no more than 30 ºC and finishes with three rinses and a
delicate spin.
ActivEco20ºC/EcoMix20ºC: This innovative programme, allows you to wash different
ActivEco20ºC
EcoMix20ºC
fabrics and colours together, such as cottons, synthetics and mixed fabrics at only
20°C and provides an excellent cleaning performance.
Consumption on this program is about 40% of a conventional 40°C cottons wash.
RAPID PROGRAMMES
44´ MINUTE RAPID PROGRAMME
RAPID
30´ MINUTE RAPID PROGRAMME
These programmes run a complete wash cycle at 40/50 ºC for up to 3.5 kg of washing in
44 or 30 minutes.
REMARKS
1. For heavily soiled washing we recommend loads of no more than 3 kg.
2. The machine is designed to apply fabric softener automatically in the last rinse of
all wash cycles.
runs a spin at the speed indicated in the programme table.
29
Page 30

General recommendations
CLEANING AND MAINTENANCE OF THE MACHINE
Do not use abrasives, spirits or solvents when cleaning the exterior of the washing machine. It is sufficient
to use a damp cloth.
The washing machine requires very little maintenance.
• Drying the rubber seal of the drum.
• Cleaning the dispenser and its compartments.
• Cleaning the filter.
• Cleaning prior to removals or when the machine is to stand idle for long periods.
To help conserve the washing machine, dry the rubber seal and leave the door open when the
cycle ends.
CLEANING THE FILTER
The washing machine comes with a special filter, located behind the machine’s front plinth panel, that
collects larger objects (coins, buttons, etc.) which could even block the pump.
It is advisable to clean the filter whenever the machine fails to rinse the clothes as well as it should
or when it fails to drain properly.
When it is necessary to clean the filter, proceed as follows:
• Use a basin to collect the water coming out.
• Remove the filter and clean it.
• Once the filter is clean, replace it by following the above mentioned pro in reverse.
30
Page 31

A
II
S
B
C
CLEANING THE DETERGENT DISPENSER AND ITS COMPARTMENTS
I
.- It is advisable to clean the three compartments of the
detergent dispenser (pre-wash, wash, and fabric conditioner)
from time to time. To do this, remove the detergent dispenser
and after cleaning it, fit it back in place.
To remove and fit the detergent dispenser, follow the steps
indicated in the images.
removing
.- Press button A
.-Hold down the button and pull the detergent dispenser
outwards
.- Remove the dispenser and clean it
.- In the case of the pre-wash (I) and wash (II) compartments,
it is advisable to remove any dried-in remains of detergent
which obstruct the flow of the detergent to the drum.
.- In the fabric conditioner compartment, the trap (S) located at
the rear part of the dispenser should be removed by pulling
them out.
Remove any solid residue which could block the holes in the
compartments.
fitting
.- Fit in the tabs as shown
.- Push the detergent dispenser towards the housing (C) in the
door until the tab clicks into place.
31
Page 32

Troubleshooting
FAULT CAUSE SOLUTION
1.- No programme works • The appliance is not plugged
2.- The appliance does not
load water
3.- The water does not drain • The filter is clogged.
4.- The spin function does not
work
5.- Strong vibrations during
spin cycle
6.- The high-speed spin does
not work
in.
• The general switch is discon nected.
• There is no electricity.
• The fuses in the electric insta llation are damaged.
• The door is open.
• See causes for 1.
• The tap is turned off.
• The outlet pipe is bent.
• The washing machine has not
yet drained the water.
• The “Spin Exclusion” option is
activated.
• The washing machine is not
correctly levelled.
• The anchoring device for trans-
port has not been removed.
• The wash load is not evenly
distributed.
• The wash load is not evenly
distributed within the drum.
If the problem or malfunctioning persists, disconnect the
machine, turn off the tap and do not try to repair.
For all repairs contact an Official Technical Assistance centre
(consult the European guarantee sheet) and always insist on the
use of original parts. Failure to do so may compromise the safety
of your machine.
When contacting a Technical Assistance Centre always refer to
the model (see also control panel) and the registration and serial
numbers indicated on the plate at the bottom front of the
machine behind the plinth panel or on the guarantee certificate.
That is to say, everything that appears in the box.
Providing this information will ensure a faster and more efficient
service.
• Plug it in.
• Activate the general switch.
• Check.
• Check.
• Close the door.
• Check.
• Turn on the tap.
• Check the filter.
• Straighten the outlet pipe.
• Wait a few minutes for the was hing machine to drain.
• Enable the spin option.
• Adjust the feet.
• Remove the transport support.
• Distribute it evenly.
• Distribute the wash load evenly
in the drum.
32
Page 33

Hints on the most economical, most environmentally friendly way to use your washing machine.
Washing hints
HINTS ON USING YOUR WASHING MACHINE
Wait until you have a full load before using the machine: this will avoid the use of more water and power
than necessary.
We recommend using the full load capacity: this could save you up to 50% in power consumption. Wash a
single full load rather than two light loads.
WHEN IS PRE-WASHING NECESSARY?
Only when washing heavily soiled clothes.
With clothes that are not especially dirty, you can save between 5 and 15% by not using this option.
WHAT WASH TEMPERATURE SHOULD I USE?
Applying a stain remover before placing clothes in the machine will eliminate the need for wash
temperatures of more than 60 ºC.
When loading a wash into the drum, we recommend that you:
• For specially delicate garments we recommend the use of a protective net.
• Empty all pockets and ensure that they do not contain metal objects (paperclips, safety pins, pins,
coins,etc.).
• Fasten pillow slips, close all zips and fastenings, and tie any loose ribbons or belts from dresses.
• Remove all runners (metal and plastic) from curtains and net curtains. We recommend that the ribbon be
gathered into a ball and tied with its own cord.
• Unfold all items to be washed.
• Be careful not to exceed the recommended load for each programme.
• When washing rugs, bedspreads and other highly absorbent items, cancel the spin option.
• In order to be able to wash woollens in the washing machine they must carry the “Pure New Wool”
symbol as well as the information “does not become matted” or “machine washable”.
• If possible, do not wash only towels. Mix them with your regular washing.
• Ensure that no item becomes trapped between the drum doors.
LABEL SYMBOLS
Labels are usually sown into the collar or side seams. The symbols which appear on them indicate the
following:
• Maximum WASH temperature.
• Appropriate and inappropriate washing methods.
• Appropriate and inappropriate washing products.
The symbols are as follows:
WASH
Washing instructions always appear as a basin with different indications:
• Do not wash.
• Can be washed both by hand or in the washing machine. The figures in the basin indicate the
maximum wash temperature.
• Hand wash only.
When the hand is half submerged in the water, this means that the item should be tumbled only
gently during washing. If it is fully submerged in the water, this means that the garment should
only be washed by hand.
• The line under the basin means that the item should be washed on a gentle cycle.
• Do not spin.
BLEACH
Bleach is widely used to whiten fabrics, although in some cases it can cause irreparable damage. There
are various symbols which refer to its use.
• Bleach can be used.
• Do not use bleach.
33
Page 34

WEEE
This appliance is marked according to the European directive 2002/96/EC on Waste Electrical and
Electronic Equipment (WEEE).
By ensuring this product is disposed of correctly, you will help prevent potential negative consequences for
the environment and human health, which could otherwise be caused by inappropriate waste handling of
this product.
The symbol on the product indicates that this product may not be treated as household waste. Instead it
shall be handed over to the applicable collection point for the recycling of electrical and electronic
equipment
Disposal must be carried out in accordance with local environmental regulations for waste disposal.
For more detailed information about treatment, recovery and recycling of this product, please contact your
local city office, your household waste disposal service or the shop where you purchased the product.
EN The manufacturer declines all responsibility in the event of any printing
mistakes in this booklet. The manufacturer also reserves the right to make
appropriate modifications to its products without changing the essential
characteristics.
34
Page 35

35
Page 36

 Loading...