

Page 1
INSTRUCTION BOOK
Condenser Tumble Dryer
EVOC 780NBT
English
Italiano
Français
Dutch
Polski
2
14
26
38
50
Page 2
INDEX
Introduction
Delivery Information
Unpacking the Product
Safety Reminders
Use
Installation
The Laundry
Environmental Issues
Gias Service
Installation
Electrical Requirements
Adjusting the Feet
Ventilation
Drain Hose Kit: Fitting Instructions
Preparing the Load
Clothes Preparation
Do Not Tumble Dry
Energy Saving
Sorting the Load
Drying Guide
Controls and Indicators
Selecting the Programme
Door and Filter
Opening the Door
Filter
Filter Care Indicator
Water Container
To Remove the Container
Condenser
To Remove the Condenser
Operation
Delay Start Function
Cancelling and Resetting the Programme
Cleaning and Routine Maintenance
Cleaning the Dryer
Technical Specifications
Troubleshooting
Customer Service
Spares
Gias Service
3
3
3
3
3
4
4
4
4
5
5
5
5
6
7
7
7
7
7
7
8
9
10
10
10
10
10
10
11
11
11
12
12
12
12
12
13
13
13
13
EN 2
Page 3
INTRODUCTION
Please read and follow these instructions carefully and operate the machine accordingly. This
booklet provides important guidelines for safe use, installation, maintenance and some useful
advice for best results when using your machine.
Keep all documentation in a safe place for future reference or for any future owners.
Delivery Information
Please check that the following items are
delivered with the appliance:
● Instruction manual
● Guarantee card
● Energy label
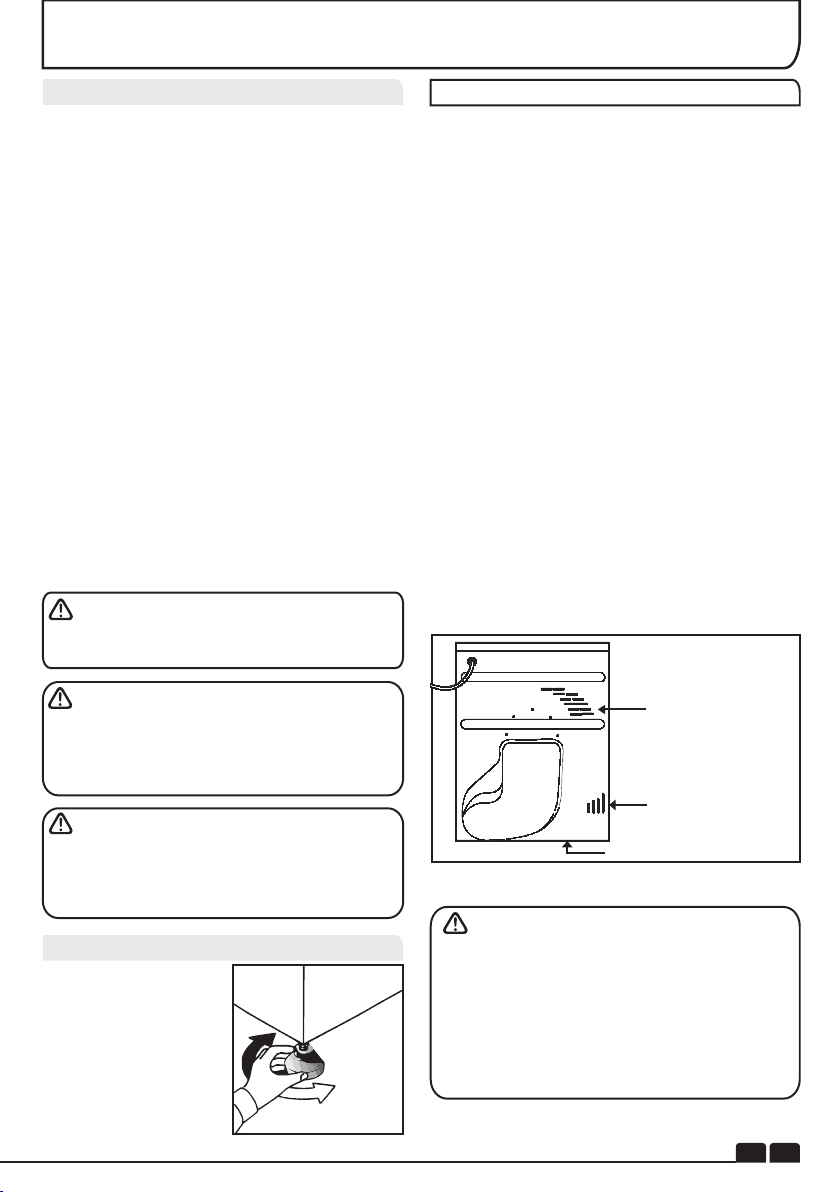
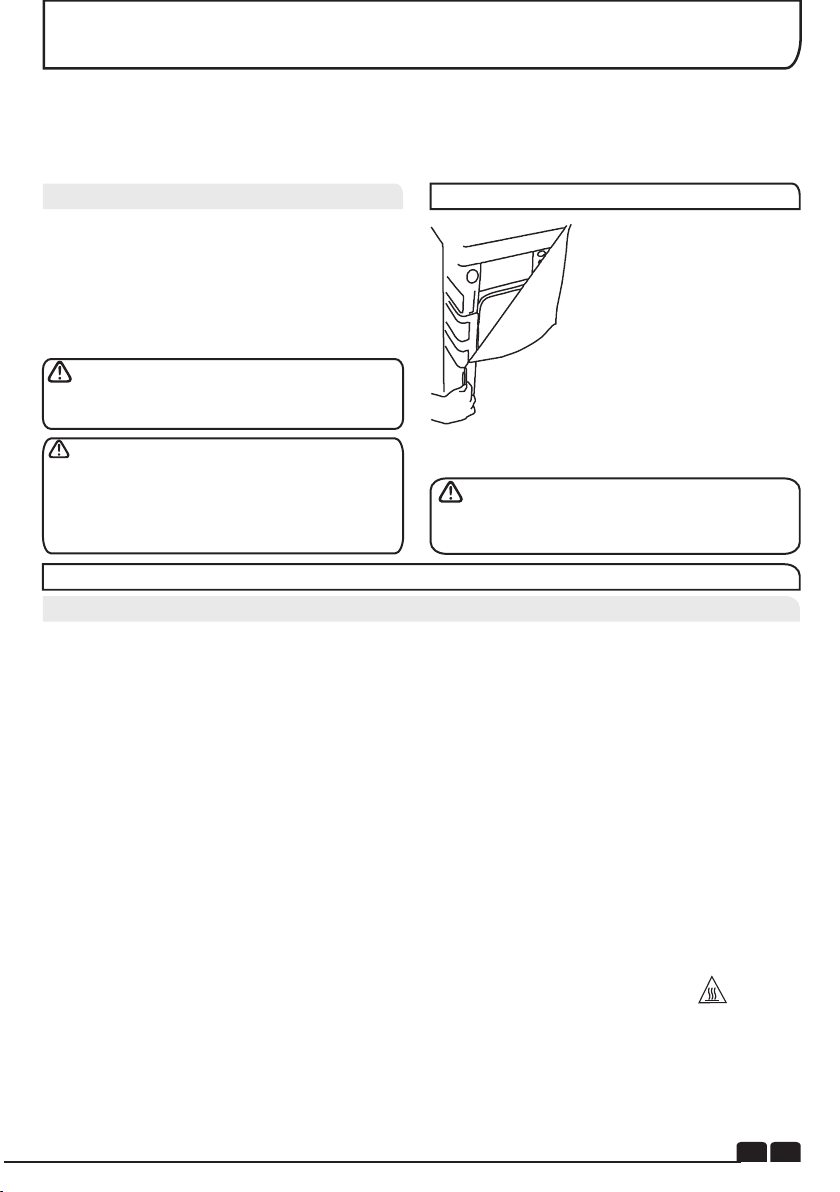
UNPACKING THE PRODUCT
Remove the machine from
its packaging close to the
f i n a l l o c a t i o n o f t h e
machine.
1- Cut carefully around the
base of the packaging and
up one corner.
Check that no damage has occurred to the
machine during transit. If it has, call for service
by GIAS.
Failure to comply with the above can
compromise the safety of the appliance. You
may be charged for a service call if a problem
with your machine is caused by misuse.
Dispose of the packaging safely. Make
sure it is out of the reach of children,it is a
potential source of danger.
2- Remove the polythene
sleeve and lift the dryer off
the polystyrene base.
SAFETY REMINDERS
Use
● This appliance is not intended for use by persons (including children) with reduced physical,
sensory or mental capabilities,or lack of experience and knowledge, unless they have been given
supervision or instruction concerning use of the appliance by a person responsible for their safety.
● Children should be supervised to ensure that they do not play with the appliance.
● WARNING Misuse of a tumble dryer may create a fire hazard.
●This machine is solely for domestic use, i.e. to dry household textiles and garments.
●This machine should only be used for its intended purpose as described in this manual. Ensure
that the instructions for installation and use are fully understood before operating the appliance.
● Do not touch the appliance when hands or feet are damp or wet.
● Do not lean on the door when loading the machine or use the door to lift or move the machine.
●Do not allow children to play with the machine or its controls.
● WARNING Do not use the product if the fluff filter is not in position or is damaged; fluff could be
ignited.
● WARNING Where the hot surface symbol is located the temperature rise during operation
of the tumble dryer may be in excess of 60 degrees C.
● Remove the plug from the electricity supply. Always remove the plug before cleaning the
appliance.
● Do not continue to use this machine if it appears to be faulty.
● Lint and fluff must not be allowed to collect on the floor around the outside of the machine.
● The drum inside may be very hot. Always allow the dryer to complete the cool down period before
removing the laundry.
EN 3
Page 4
SAFETY REMINDERS
Installation
● Check that the product has no visible signs of
damage before use. If damaged do not use and
please call GIAS Service.
● Do not use adapters, multiple connectors
and/or extensions.
● Never install the dryer against curtains and be
sure to prevent items from falling or collecting
behind the dryer.
● The appliance must not be installed behind a
lockable door, a sliding door or a door with a
hinge on the opposite side to that of the tumble
dryer.
The Laundry
●Do not dry unwashed items in the tumble dryer.
● WARNING Do not tumble dry fabrics treated
with dry cleaning fluids.
●WARNING Foam rubber materials can, under
certain circumstances, when heated become
ignited by spontaneous combustion. Items
such as foam rubber (latex foam), shower caps,
waterproof textiles, rubber backed articles and
clothes or pillows fitted with foam rubber pads
MUST NOT be dried in the tumble dryer.
● Always refer to the laundry care labels for
directions on suitability for drying.
● Clothes should be spin dried or thoroughly
wrung before they are put into the tumble dryer.
Clothes that are dripping wet should not be put
into the dryer.
● Lighters and matches must not be left in
pockets and NEVER use flammable liquids
near the machine.
● Glass fibre curtains should NEVER be put in
this machine. Skin irritation may occur if other
garments are contaminated with the glass
fibres.
● Items that have been soiled with substances
such as cooking oil, acetone, alcohol, petrol,
kerosene, spot removers, turpentine, waxes
and wax removers should be washed in hot
water with an extra amount of detergent before
being dried in the tumble dryer.
● Fabric softeners, or similar products, should
be used as specified by the fabric softener
instructions.
Environmental Issues
● All packaging materials used are
environmentally-friendly and recyclable.
Please help dispose of the packaging via
environmentally-friendly means. Your local
council will be able to give you details of current
means of disposal.
● To ensure safety when disposing of an old
tumble dryer disconnect the mains plug from
the socket, cut the mains power cable and
destroy this together with the plug. To prevent
children shutting themselves in the machine
break the door hinges or the door lock.
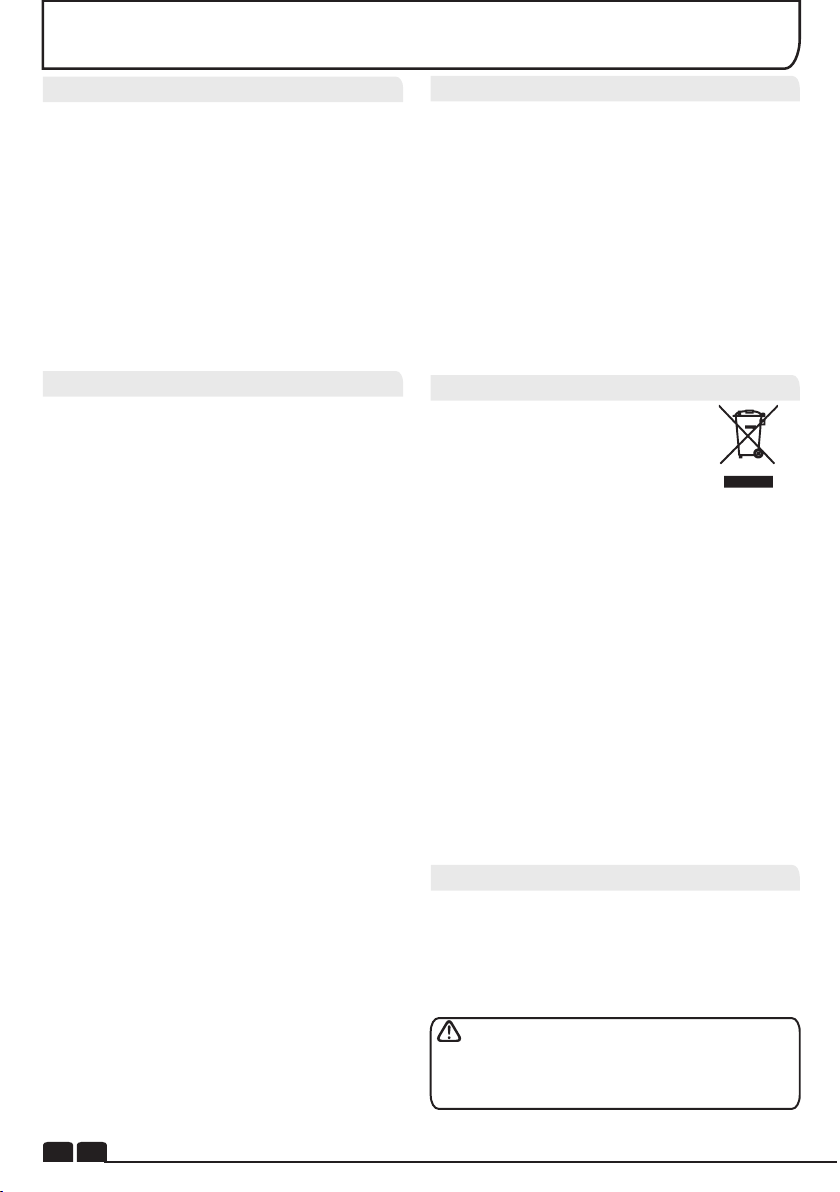
European Directive 2002/96/EC
This appliance is marked according
t o the E u r o p e a n dir ec ti ve
2002/96/EC on Waste Electrical and
Electronic Equipment (WEEE).
By ensuring this product is disposed of correctly,
you will help prevent potential negative
consequences for the environment and human
health, which could otherwise be caused by
inappropriate waste handling of this product.
The symbol on the product indicates that this
product may not be treated as household waste.
Instead it shall be handed over to the applicable
collection point for the recycling of electrical and
electronic equipment.
For more detailed information about treatment,
recovery and recycling of this product, please
contact your local city office,your household
waste disposal service or the shop where you
purchased the product. Disposal must be
car ried out i n accor dance wi th local
environmental regulations for waste disposal.
GIAS Service
● To ensure the continued safe and efficient
operation of this appliance we recommend that
any servicing or repairs are only carried out by
an authorised GIAS service engineer.
If the appliance is not running properly or
breaks down, switch it off and disconnect the
plug from the socket. Consult GIAS Service for
possible repair.
EN 4
Page 5
INSTALLATION
Electrical Requirements
Tumble dryers are supplied to operate at a
voltage of 220-240V, 50 Hz single phase. Check
that the supply circuit is rated to at least 10A
Electricity can be extremely dangerous.
This appliance must be earthed.
The socket outlet and the plug on the
appliance must be of the same type.
Do not use multiple adapters and/or
extension leads.
The plug should be a ccessible for
disconnection after the appliance has been
installed.
CE Appliance complies with European Directive
2004/108/EC, 2006/95/EC and subsequent
amendments.
You may be charged for a service call if a
problem with your machine is caused by
incorrect installation.
VENTILATION
Adequate ventilation must be provided in the
room where the tumble dryer is located to
prevent gases from appliances burning other
fuels, including open fires, being drawn into the
room during operation of the tumble dryer.
● Exhaust air must not be discharged into a flue
which is used for exhausting fumes from
appliances burning gas or other fuels.
● Check regularly that the air flowing through
the dryer is not restricted.
● Check the fluff filter after use, and clean, if
necessary.
●The inlet and outlets should be kept free from
obstructions. To ensure adequate ventilation
the space between the bottom of the machine
and the floor must not be obstructed. There
should be a gap of at least 12mm between the
machine and any obstructions.
● Prevent items from falling or collecting behind
the dryer as these may obstruct the air inlet and
outlet.
● NEVER install the dryer up against curtains.
If the mains cord on this appliance is
damaged, it must be replaced by a special cord
which is ONLY obtainable from the spares
service. It must be installed by a competent
person.
Do not plug the machine in and switch it
on at the mains until the installation is
completed.For your safety, this dryer must be
correctly installed. If there is any doubt about
installation, call GIAS Service for advice.
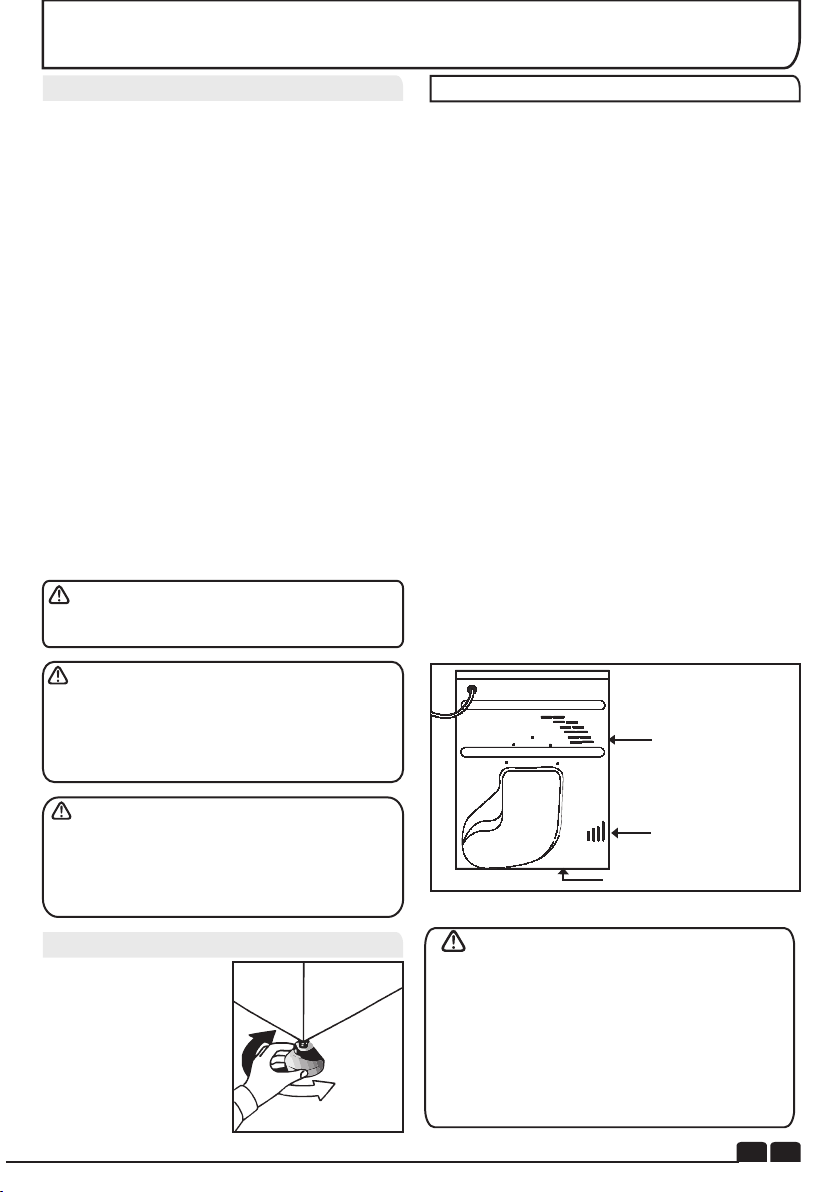
Adjusting the Feet
Once the machine is in
place the feet should
be adjusted to ensure
that the machine is
level.
Air Inlent Vents
Air Outlets
Air Outlets in the Base
Do not install the product in a low temperature room
or in a room where there is a risk of frost occurring. At
temperature around freezing point the product may not be
able to operate properly: there is a risk of damage if the
water is allowed to freeze in the hydraulic circuit (valves,
hoses, pumps). For a better product performance the
ambient room temperature must be between +2°C and
+35°C. Please note that operating in cold condition
(between +2 and +15°C) might imply some water
condensation and water drops on floor.
EN 5
Page 6
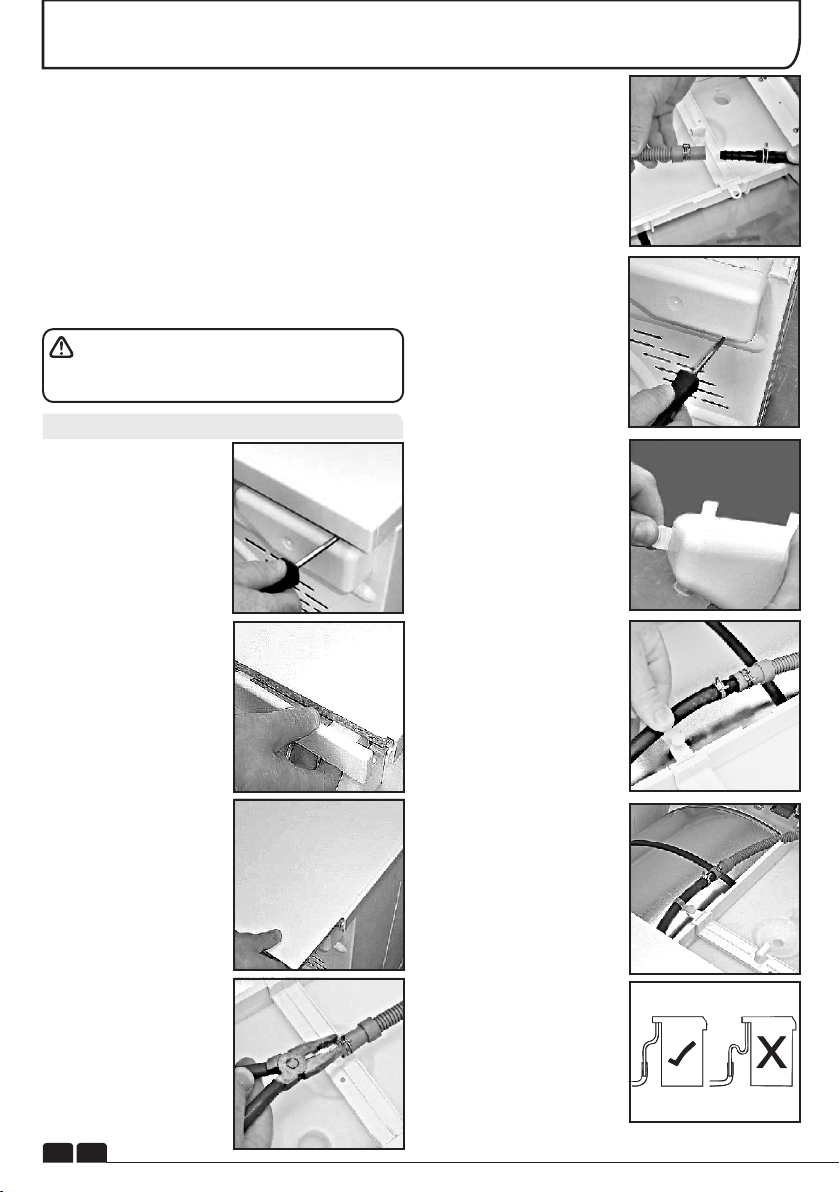
DRAIN HOSE KIT: FITTING INSTRUCTIONS
To avoid having to empty the water container
after each drying cycle, the water normally
collected during the drying cycle can be
discharged directly to a waste water drain pipe
(the same drainage system as household
sinks).Water Bye-Laws prohibit connection to
a surface water drain. The waste water drain
pipe system should be located adjacent to the
tumble dryer.
The kit is composed: 1 hose, 1 straight
hose connector, 1 pipe clip and 1 plastic tie.
WARNING! Switch off and remove the
tumble dryer plug from the electricity supply
before carrying out any work.
Fit the Kit as Follows:
1 . U n s c r e w a n d
remove the 3 screws,
at the rear of the
machine, retaining the
worktop trim.
2. Remove the rear
worktop trim and the
worktop surface by
carefully sliding it
towards the rear of the
machine.
3. The waste water
container is situated at
the right-hand side of
the machine (viewed
from the rear). A grey
hose connects to the
bridge above the water
container. Using pliers,
r e m o v e t h e p ipe
retaining clip from the
bridge.
4. Pull the hose off the
bridge connection.
5. Attach the hose from
the k it, usi ng the
connector and pipe
clips supplied, to the
hose removed from the
bridge connection.
6. Take off the water
container cover from
the rear of the machine
by removing the two
screws and unclipping
the cover.
7. Break off the tab on
the side of the cover
and replace the cover
on the machine, refit
the screws. You should
now have revealed a
hole in the back of the
cabinet next to the
Cover.
8. Feed the drain hose
through the hole in the
cabinet.
9. Locate the grey pipe
in the cutout of the tray
and secure the pipe
assembly to the bridge
with the plastic tie.
10. Carefully slide the
wor ktop back into
position ensuring that
the hose is not trapped
a n d r ep l a c e t he
worktop rear trim with
the 3 screws.
11. Connect the new
drain hose to the waste
water pipe. Make sure
that the new hose does
not kink when pushing
the tumble dryer into
position. Ensure that
the g uide line s, as
shown, are followed
when routing the new
external hose.
12. Connect to the
m a in s e le c tr i ci t y
supply.
13. After emptying the
waste water container
switch the machine ON
(and press the 'START'
button on electronic
models) to commence
w it h t h e d r y i n g
program.
EN 6
Page 7
PREPARING THE LOAD
Before using the tumble dryer for the first time:
● Please read this instruction book thoroughly.
● Remove all items packed inside drum.
● Wipe the inside of the drum and door with a
damp cloth to remove any dust which may
have settled in transit.
Clothes Preparation
Make sure that the laundry you are going to dry
is suitable for drying in a tumble dryer, as shown
by the care symbols on each item.
Check that all fastenings are closed and that
pockets are empty. Turn the articles inside out.
Place clothes loosely in the drum to make sure
that they don't get tangled.
Do Not Tumble Dry:
Woollens, silk, delicate fabrics, nylon stockings,
delicate embroidery, fabrics with metallic decorations, garments with PVC or leather
trimmings, training shoes, bulky items such as
sleeping bags, etc.
IMPORTANT: Do not dry articles which
have been treated with a dry cleaning fluid or
rubber clothes (danger of fire or explosion).
During the last 15 minutes the load is always
tumbled in cool air.
Energy Saving
Only put into the tumble dryer laundry which
has been thoroughly wrung or spin-dried. The
drier the laundry the shorter the drying time thus
saving electricity.
ALWAYS
● Try to dry the maximum weight of laundry, this
will save time and electricity.
● Check that the filter is clean before every
drying cycle.
NEVER
● Exceed the maximum weight, this will waste
time and electricity.
● Put dripping wet items into the tumble dryer,
this may damage the appliance.
Maximum Drying Weight
● Cottons Max. 8 kg
● Synthetics Max. 4 kg
Do not overload the drum, large items
when wet can exceed the maximum admissible
clothes load (for example: sleeping bags,
duvets).
Sort the Load as Follows
● By care symbols
These can be found on the collar or inside seam:
Suitable for tumble drying.
. .
Tumble drying at high temperature.
.
Tumble drying at low temperature only.
Do not tumble dry.
If the item does not have a care label it must be
assumed that it is not suitable for tumble drying.
● By amount and thickness
Whenever the load is bigger than the dryer
capacity, separate clothes according to
thickness (e.g. towels from thin underwear).
● By type of fabric
Cottons/linen: Towels, cotton jersey, bed and
table linen.
Synthetics: Blouses, shirts, overalls, etc. made
of polyester or polyamid, as well as for cotton/synthetic mixes.
● By drying level
Sort into: iron dry, cupboard dry, etc. For delicate
articles press the Delicates button to select low
drying temperature.
Drying Guide
The table shows approximate drying times,depending on
the type of fabric and dampness of the clothes.
FABRIC
COTTON
SYNTHETICS
ACRYLIC
HEAT
SETTING
HIGH
LOW
LOW
HEAVY
LOAD
140-165min
MEDIUM
LOAD
70-80min
70-80min---
50-65min
---
LIGHT
LOAD
50-65min
40-55min
30-40min
EN
7
Page 8
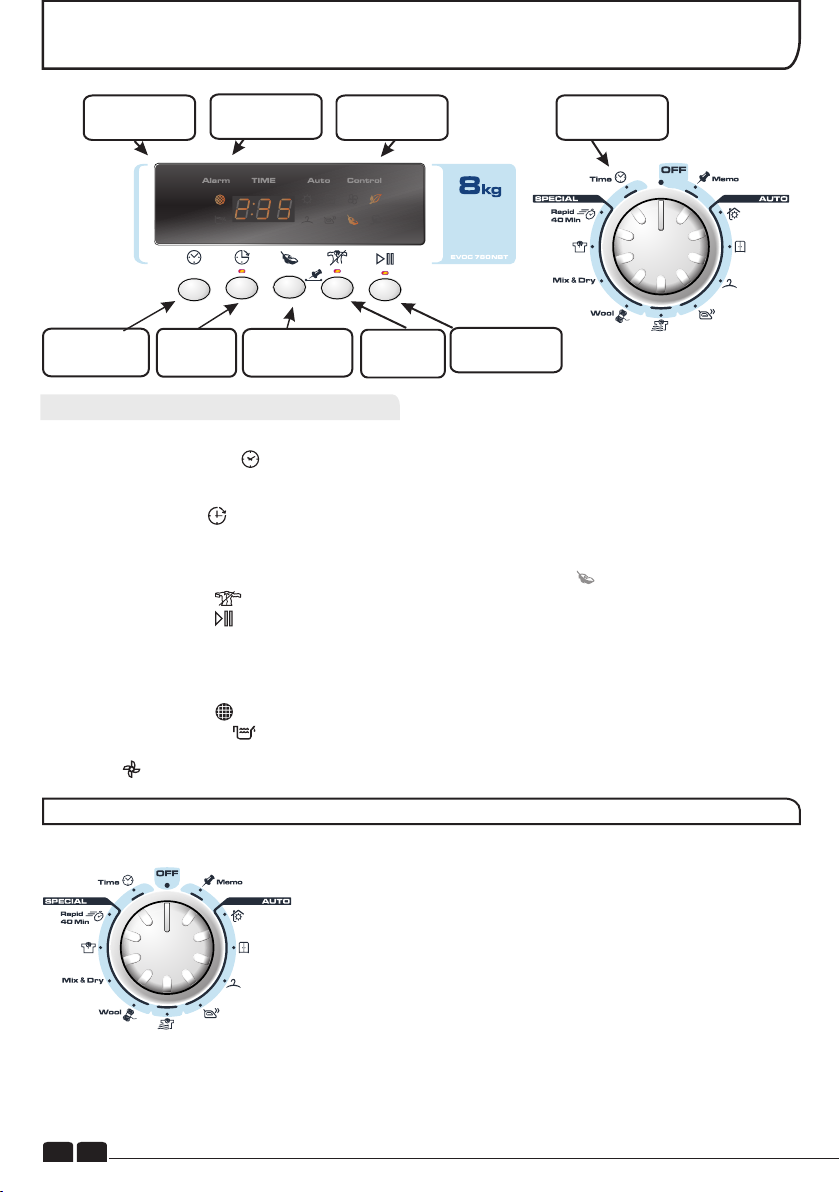
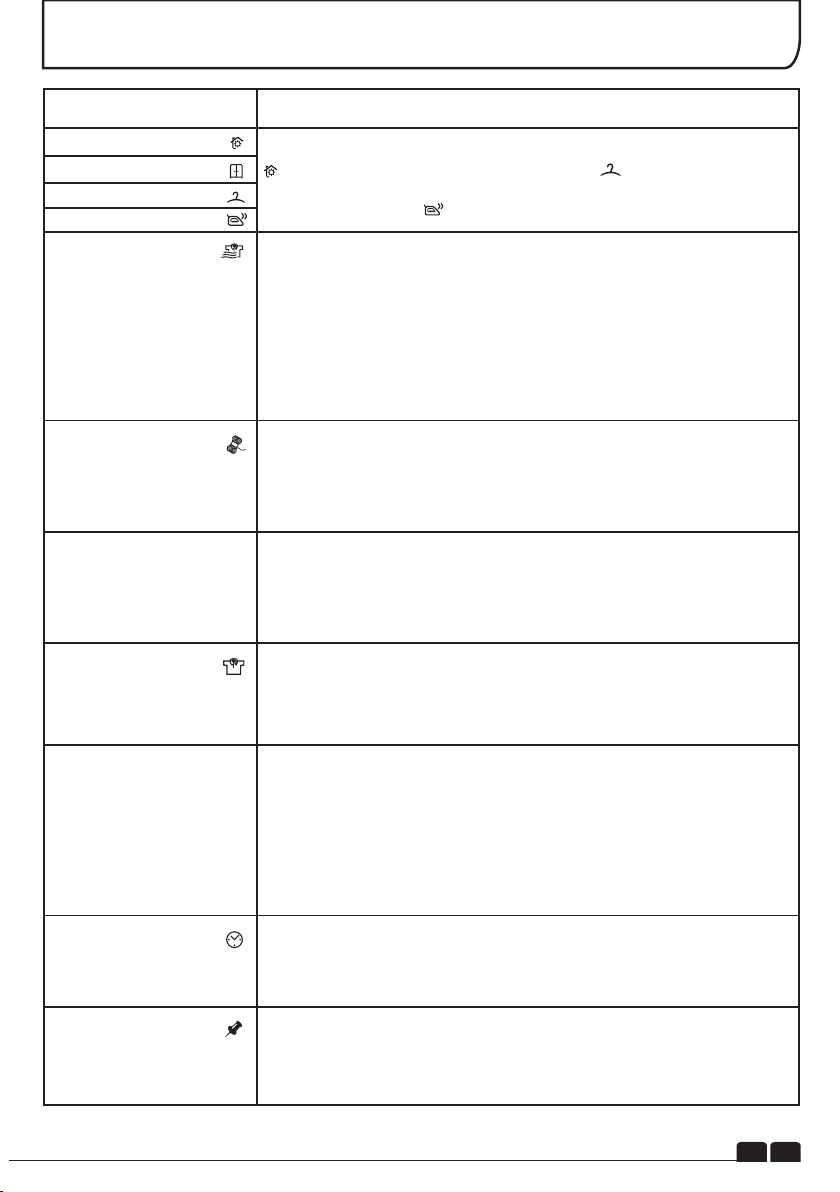
CONTROLS AND INDICATORS
Button
Filter Care
Indicator
Acrylic Synthetic
Button
Programme
Display
Anti-Crease
Button
Start/Pause
Button
Programme
Selector
Water Tank
Indicator
Time Selection
Button
Delay Start
Control Panel and Indicator Lights
Programme Selector – Select the required programme.
Time Selection Button – Allows the user to change duration of the programme selected by
Programme Selector. It can be used only with the selection of: Mix&Dry, Shirts and Time
Programmes.
Delay Start Button – Allows the user to delay the start of the drying cycle (see details of
Operation ).
Acrylic and Synthetic Button –
Press to select the type of fabrics to dry Acrylic and synthetics,
when pressed Acrylic Synthetics option is activated and the indicator lights up.
Anti- Crease Button – Allows the user to select a post drying anti-crease cycle.
Start/Pause Button – Press to commence/ to pause the selected drying programme.
Memo Button – Allows user to record the programme by pressing simultaneously the Anti-
Crease and the Acrylic Synthetic buttons for 3 seconds, after 2 minutes duration of the chosen
programme/option.
Filter Care indicator – Lights when the filter needs cleaning.
Empty Water indicator – Lights when the water container is full.
Program Display – Related indicator lights when a auto programme has been selected.
Refresh – The indicator lights up when the programme starts the cool down stage.
SELECTING THE PROGRAMME
8
EN
The Candy Sensor Dry machine gives many options for drying the
laundry to suit all circumstances. The table on the next page lists
the programmes and the function of each programme.
Note:
The sensor may not detect a small load of small articles. For small
loads and separate items or pre-dried fabrics with low moisture
content, use the timed programmes.
If the sensor does not detect the item the dryer will only operate for
10 minutes before going into cooldown.
If the load is too large or too wet to tumble dry the dryer will
automatically go into cooldown after approximately 3 hours.
In these cases we advise to use a time cycles between 30 and
75minutes depending on the load size and dryness required, and
select high or low heat depending upon the fabric type.
Page 9
SELECTING THE PROGRAMME
PROGRAMME
Perfect Home
Store Dry
Hang Dry
Iron Dry
No Crease
Wool Finish
Mix & Dry
Shirts
DESCRIPTION
Select the degree of dryness that you require. This range from
for bath towels and bathrobes, through for items that will be
put away without ironing, to the programme that leaves the laundry
suitable for ironing.
The programme provides a conditioning and anticrease function.
The dryer will heat the load for 9 minutes followed by a 3 minute cool
down period and is especially good for garments which may have
been left for some time prior to ironing, in a linen basket for
example. Garments may also become stiffened when dried outside
on a washing line or inside on radiators.
This programme relaxes the creases in the fabric making ironing
quicker and easier.
A gentle programme specially created to get woollens softer after
air-drying.This delicate warm air cycle, lasting 12 minutes, can
also be used to get woollens 'refreshed' after being stored in the
wardrobe.
This is a special timed program for a maximum load of 4kg (117
min). The default duration is 99 minutes and allows to dry up to 3kg.
With this program you can dry together cotton and synthetic
fabrics.
This is a special timed program for shirts of max load of 3kg (78
minutes). For synthetic shirts you have to press the Acrylic
Synthetic button. The default duration is 60 minutes and allows to
dry up to 2kg.
Rapid 40'
Time
Memo
The Rapid 40' programme allows a drying cycle to be completed
quickly. This is an ideal programme for having dry, refreshed and
ready-to-wear clothes in less than 40'. This special programme
constantly monitors the temperature in the drum. The maximum load
is 2 kg and the programme is suitable for all types of fabrics where
tumble drying is appropriate.
Time selection includes all the manual time programs: from 30
minutes to 180 minutes. The 20 minutes selection time in only cool
air ventilation (Refresh)
Memo Program allows to re-perform a program that the user has
saved before, without selecting the correct sequence of program
selector positions and option buttons for that particular program.
EN 9
Page 10
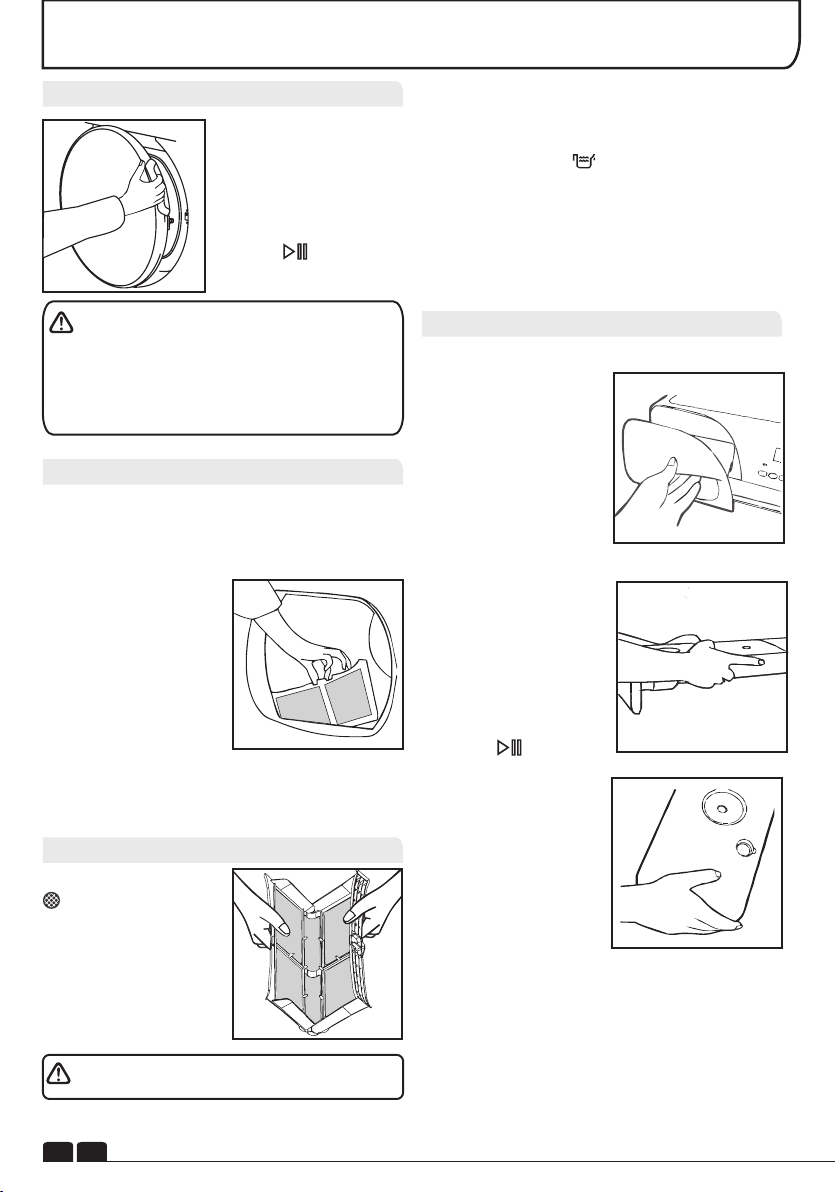
DOOR and FILTER
Opening the Door
Pull on handle to open
the door.
To restart the dryer,
close the door and
press .
WARNING! When the tumble dryer is in
use the drum and door may be VERY HOT.
Never stop a tumble dryer before the end of the
drying cycle unless all items are quickly
removed and spread out so that the heat is
dissipated.
Filter
IMPORTANT: To maintain the efficiency of the
dryer check that the fluff filter is clean before
each drying cycle.
1 . P u ll t h e f il te r
upwards.
2. Open filter as shown.
3.Gently remove lint
using a soft brush or
your fingertips.
4 . S n a p t h e f i l t e r
together and pus h
back into place.
Filter Care Indicator
Lights when the
filter needs cleaning.
If the laundry is not
drying check that the
filter is not clogged.
DO NOT USE WATER TO CLEAN THE FILTER.
The water removed from the laundry during
the drying cycle is collected in a container
inside the door of the dryer. When the
container is full the indicator on the control
panel will light, and the container MUST be
emptied. However, we recommend that the
container is emptied after each drying cycle.
NOTE: Very little water will collect during the
first few cycles of a new machine as an internal
reservoir is filled first.
To Remove the Container
1. Gently pull out the
t r a y u n t i l i t i s
completely removed.
Support the tray with
both hands. When it is
full the water container
will weigh about 4kg.
2 . Ti l t t h e w a t e r
container to empty the
water out through the
rear hole.
When emptyslide the
water container back
into position.
PUSH FIRMLY INTO
PLACE.
3. Press to restart
the cycle.
NOTE: If you have the
option of drainage near
the dryer it is possible
to use the discharge kit
to provide a permanent
drain for the water
collected by the dryer.
This will remove the
need to empty the
wate r tray. Al l th e
i n f o r m a t i o n f o r
assembly of the kit is
contained in the kit
envelope.
EN 10
Page 11

CONDENSER
Important: Always switch off and remove the
plug from the electricity supply before cleaning
the condenser.
To maintain the efficiency of the dryer regularly
check that the condenser is clean.
To Remove the Condenser
1 . R e m o v e t h e
kickplate.
2. Turn the two locking
levers anti-clockwise
a n d p u l l o u t th e
condenser.
3 . P u l l o u t t h e
condenser unit.
4. Gently remove any
dust or fluff with a cloth,
then wash the unit by
holding it under a
running tap turning it
so that water flows
between the plates, to
remove any dust or
fluff.
5. Refit the condenser
ensuring it is in the
c o r r ec t w a y ( a s
indicated by the arrow)
and pushed firmly into
place. Lock the two
levers by turning them
clockwise.
6. Refit the kickplate.
OPERATION
1. Open the door and load the drum with
laundry. Ensure that garments do not hinder
closure of the door.
2. Gently close the door pushing it slowly until
you hear the door 'click' shut.
3. Turn the Programme Selector dial to select
the req u ired dry i ng progr a mme (see
Programme Guide).
4. If drying synthetics, acrylics or delicate items,
press the button to reduce the heat level.
The light next to the push button will light up
when the machine is in low heat setting. To
deselect in the first few minutes of the
programme, press the button, after this
time reset the machine to change the setting.
5. Press the button. The dryer will start
automatically and the DRY indicator will be
continuously lit.
6. If the door is opened during the programme to
check the laundry, it is necessary to press
to recommence drying after the door has
been closed.
7. When the cycle is nearing completion the
machine will enter the cool down phase, the
clothes will be tumbled in cool air allowing the
load to cool down.
8. When the programme is complete the
END indicator will light.
9. Following the completion of the cycle the
drum will rotate intermittently to minimize
creasing. This will continue until the machine is
switched OFF or the door is opened.
EN 11
Page 12
TROUBLESHOOTING
Delay Start Function
The Delay Start Function allows the user to delay the start of the drying cycle by 1 to 24 hours.
When the function is first selected the display will show a delay of 1 hour, subsequent presses of
the button will increase the delay with 1 hour steps.
To commence the programme press and the appliance will complete the drying cycle at the
end of this time. The indicator light will flash to indicate that the start delay is in progress.
Cancelling and Resetting the Programme
To cancel a programme press the button for 3 seconds. In the TIME CONTROL display 0:00
Light will flash to indicate that it has been reset.
CLEANING AND ROUTINE MAINTENANCE
Cleaning the Dryer
● Clean the filter and empty the water
container after every drying cycle.
● Regularly clean the condenser.
● After each period of use, wipe the inside of
the drum and leave the door open for a while to
allow circulation of air to dry it.
● Wipe the outside of the machine and the
door with a soft cloth.
● DO NOT use abrasive pads or cleaning
agents.
● To prevent the door sticking or the build up
of fluff clean the inner door and gasket with a
damp cloth after every drying cycle.
WARNING! The drum, door and load may
be very hot.
Technical Specifications
Drum capacity 115 litres
Maximum load 8 kg
Height 85 cm
Width 60 cm
Depth 60 cm
Energy Label Band B
Information for Test Laboratory
EN 61121 Programme
-DRY COTTON
-IRON DRY COTTON
-EASY-CARE TEXTILE
IMPORTANT Always switch off and
remove the plug from the electricity supply
before cleaning this appliance.
For electrical data refer to the rating label
on the front of the dryer cabinet (with the door
open).
Programme To Use
-HANG DRY
-IRON DRY
-HANG DRY+ SYNTHETIC
EN 12
Page 13
What Might be the Cause of...
Defects you can remedy yourself
Before calling GIAS Service for technical
advice please run through the following
checklist. A charge will be made if the machine
is found to be working or has been installed
incorrectly or used incorrectly.
If the problem persists after completing the
recommended checks, please call GIAS
Service, they may be able to assist you over the
telephone.
Time display to end could change during
dr ying c y cle . T he tim e t o end is
continuously checked during the drying
cycle and the time is adjusted to give the
best estimation time. The displayed time
may increase or decrease during the cycle
and this is normal.
Drying time is too long/clothes are not dry
enough…
● Have you selected the correct drying
time/programme?
● Were the clothes too wet? Were the clothes
thoroughly wrung or spindried?
● Does the filter need cleaning?
● Is the dryer overloaded?
● Has the option been selected from a
previous cycle?
TROUBLESHOOTING
The dryer is noisy…
● Switch off the dryer and contact GIAS Service
for advice.
The Indicator is on…
● Does the filter need cleaning?
The Indicator is on…
● Does the water container need emptying?
CUSTOMER SERVICE
Should there still be a problem with your dryer
after completing all the recommended checks,
please call GIAS Service for advice.
They may be able to assist you over the
telephone or arrange for a suitable appointment
for an engineer to call under the terms of your
guarantee. However, a charge may be made if
any of the following applies to your machine:
● Is found to be in working order.
● Has not been installed in accordance with the
installation instructions.
● Has been used incorrectly.
The dryer does not operate…
● Is there a working electricity supply to the
dryer? Check using another appliance such as
a table lamp.
● Is the plug properly connected to the mains
supply?
● Is there a power failure?
● Has the fuse blown?
● Is the door fully closed?
● Is the dryer switched on, both at the mains
supply and at the machine?
● Has the drying time or the programme been
selected?
● Has the machine been switched on again after
opening the door?
Spares
Always use genuine spares, available direct
from GIAS Service.
GIAS Service
For service and repairs call your local GIAS
Service engineer.
The manufacturer declines all responsibility
in the event of any printing mistakes in this
booklet. The manufacturer also reserves the
right to make appropriate modifications to
its products without changing the essential
characteristics.
EN 13
Page 14

INDICE
Introduzione
Informazioni Sulla Consegna
Estrazione Del Prodotto Dall’imballaggio
Consigli di Sicurezza
Utilizzo
Installazione
La Biancheria
Tutela Dell’ambiente
Servizio Gias
Installazione
Requisiti Elettrici
Regolazione dei Piedini
Ventilazione
d d
Kit i Montaggio Tubo i Scarico: Istruzioni Per il Montaggio
Preparazione della Biancheria
Preparazione dei Capi
Evitare di Asciugare
Risparmio Energia
Selezione della Biancheria
Guida Ad una Corretta Asciugatura
Comandi e Spie Di Segnalazione
Selezione del Programma
Portellone e Filtro
Apertura del Portellone
Filtro
Spia di Pulizia Filtro
Vaschetta Dell’acqua
Per Togliere La Vaschetta
Condensatore
Per Togliere Il Condensatore
Funzionamento
Partenza Ritardata
Annullamento e Azzeramento del Programma
Pulizia e Manutenzione Ordinaria
Pulizia Dell’asciugatrice
Specifiche Tecniche
Ricerca Guasti
Servizio Assistenza Clienti
Ricambi
Servizio Assistenza Gias
15
15
15
15
15
16
16
16
16
17
17
17
18
19
19
19
19
19
19
19
20
21
22
22
22
22
22
22
23
23
23
24
24
24
24
24
25
25
25
25
14
IT
Page 15
INTRODUZIONE
Leggere attentamente le istruzioni per un corretto funzionamento della macchina. Questo
opuscolo fornisce importanti linee guida per una manutenzione,un uso e un'installazione sicuri.
Esso contiene inoltre utili consigli che consentiranno di sfruttare al meglio le potenzialità di questa
macchina.
Conservare la documentazione in un luogo sicuro per eventuali riferimenti o per futuri proprietari.
Informazioni sulla Consegna
Controllare che al momento della consegna
la macchina sia dotata dei seguenti
componenti:
● Libretto di istruzioni
● Certificato di garanzia
● Etichetta efficienza energetica
Verificare che durante il trasporto la
macchina non abbia subito danni. In caso
contrario, rivolgersi al Centro Assistenza GIAS.
La mancata osservanza di tale procedura
potre b b e comprome t t e r e la sic u r e z za
dell’apparecchio. La chiamata può essere
soggetta a pagamento se le cause di
malfunzionamento della ma cchina sono
attribuibili a un uso improprio.
CONSIGLI DI SICUREZZA
Utilizzo
● Questo apparecchio non è destinato all'uso da parte di persone (inclusi i bambini) con capacità
fisiche, sensorie o mentali ridotte, o con una mancanza di esperienza e conoscenza,a meno che esse
non abbiano ricevuto supervisione o istruzione sull'uso dell'apparecchio da parte di una persona
responsabile della loro sicurezza.
● I bambini dovrebbero essere controllati per garantire che essi non giochino conl'apparecchio.
●ATTENZIONE L’uso improprio dell’asciugatrice può provocare rischio di incendio.
● Questa macchina è prevista unicamente per uso domestico, ovvero per l’ asciugatura di capi e
indumenti per la casa.
●La macchina qui descritta deve essere utilizzata esclusivamente per lo scopo al quale è destinata
secondo quanto illustrato nel presente libretto. Prima di attivare la macchina, accertarsi di avere letto
attentamente e compreso le istruzioni d’uso e di installazione.
● Non toccare l’asciugatrice con mani o piedi umidi o bagnati.
● Non appoggiarsi al portellone per caricare la macchina; non utilizzare il portellone per sollevare o
spostare la macchina.
● Non consentire ai bambini di giocare con la macchina o con i suoi comandi.
● ATTENZIONE Non utilizzare il prodotto se il filtro antifilacce non è correttamente posizionato o
risulta danneggiato; il filtro non è ignifugo.
● ATTENZIONE Se è esposto il simbolo indicante il riscaldamento della superficie ,quando
l’asciugatrice è in funzione la temperatura può essere superiore a 60 gradi C.
● Staccare la spina dalla presa elettrica. Prima di pulire la macchina, staccare sempre la spina.
● Se si presume che la macchina sia guasta, non continuare ad usarla.
●Evitare che sul pavimento attorno alla macchina si raccolgano filacce e pelucchi.
● Dopo il ciclo di asciugatura, l’ interno del cestello può essere molto caldo. Prima di estrarre la
biancheria è pertanto opportuno lasciar raffreddare completamente la macchina.
Estrazione Del Prodotto Dall’imballaggio
E s t r a r r e l a m ac c h i n a
dall’imballaggio vicino al
p u n t o p r e v i s t o p e r
l’installazione.
1. Con cautela, eseguire un
taglio lungo il perimetro
della base dell’imballaggio e
un altro verso l’alto, in
corrispondenza di un angolo.
2.Togli e re la f a scia i n
p o l i t e ne e s o l l e va r e
l’asciugatrice togliendola
dalla base di polistirolo.
Smaltire l’imballaggio in maniera sicura.
Accertarsi che sia fuori dalla portata dei bambini,
in quanto fonte potenziale di rischio.
IT 15
Page 16
CONSIGLI DI SICUREZZA
Installazione
● Prima dell’uso, controllare che il prodotto non
presenti segni visibili di danni. Non usare in caso
di danni e contattare il Servizio Assistenza GIAS.
●Non utilizzare adattatori, connettori multipli e/o
prolunghe.
● Non installare l’asciugatrice vicino ai tendaggi
e rimuovere tempestivamente eventuali oggetti
caduti dietro la macchina.
● L'apparecchio non deve essere installato
dietro una porta che può essere chiusa a chiave,
una porta scorrevole o una porta i cui cardini
siano sul lato opposto rispetto a quelli
dell'asciugatrice.
La Biancheria
● Non asciugare capi non lavati nell'asciugatrice.
● ATTENZIONE Evitare di asciugare articoli
trattati con prodotti di pulizia a secco.
● ATTENZIONE In determinate circostanze, i
materiali in gomma possono essere soggetti ad
autocombustione se riscaldati. Articoli in
gommapiuma (lattice), cuffie da doccia, tessuti
impermeabili, articoli in caucciù e vestiti o cuscini
imbottiti con gommapiuma NON VANNO
asciugati nell'asciugatrice.
● Leggere attentamente le etichette con le
istruzioni di lavaggio per conoscere le
caratteristiche dell’asciugatura idonea.
● Gli indumenti devono essere introdotti nell’
asc i u gat r i c e s o l o do p o ess e r e st a t i
opportunamente centrifugati in lavatrice o
strizzati a mano. EVITARE di caricare nel cestello
indumenti ancora gocciolanti.
● Controllare accuratamente che nelle tasche
degli indumenti da asciugare non siano presenti
a c c e n d i n i o f i a m m i f e r i e d E VITARE
ASSOLUTAMENTE l’uso di prodotti infiammabili
in prossimità della macchina.
● Evitare ASSOLUTAMENTE di asciugare tende
in fibra di vetro. La contaminazione dei capi con le
fibre di vetro può infatti dar luogo a fenomeni
d’irritazione cutanea.
● I capi che sono stati macchiati con sostanze
come olio da cucina, acetone, alcol, petrolio,
cherosene, smacchiatori, acquaragia, cere e
sostanze per rimuovere le cere dovrebbero
essere lavati in acqua calda con una quantità
extra di detergente prima di essere asciugati
nell'asciugatrice.
● Gli ammorbidenti o prodotti simili dovrebbero
essere utilizzati come specificato nelle rispettive
istruzioni
16
IT
Tutela dell’ambiente
● Tutti i materiali utilizzati per l’imballaggio sono
ecologici e riciclabili. Smaltite l’imballaggio con
metodi ecologici. Presso il comune di residenza
si potranno reperire ulteriori informazioni sui
metodi di smaltimento.
● Per garantire la sicurezza al momento dello
smaltimento di una asciugatrice, scollegare la
spina dell’alimentazione dalla presa, tagliare il
cavo dell’alimentazione di rete e distruggerlo
insieme alla spina. Per evitare che i bambini
possano rimanere intrappolati all'interno della
lavatrice, rompere i cardini o la chiusura
dell’oblò.
Direttiva Europea 2002/96/CE
Questo elettrodomestico è marcato
con f ormeme nte all a Dirett i va
Europea 2002/96/CE sui rifiuti da
apparecchiature elet tric he ed
elettroniche (WEEE).
Assicurandovi che questo prodotto sia smaltito
correttamente, aiuterete ad evitare possibili
conseguenze negative all’ambiente e alla salute
delle persone, che potrebbero verificarsi a causa
d’un errato trattamento di questo prodotto giunto a
fine vita.Il simbolo sul prodotto indica che questo
apparecchio non può essere trattato come un
normale rifiuto domestico; dovrà invece essere
consegnato al punto più vicino di raccolta per il
riciclo delle apparecchiature elettriche ed
elettroniche. Lo smaltimento deve essere
effettuato in accordo con le regole ambientali
vigenti per lo smaltimento dei rifiuti.
Per informazioni più dettagliate sul trattamento,
recupero e riciclo di questo prodotto, per favore
contattare l’ufficio pubblico di competenza (del
dipartimento ecologia e ambiente), o il vostro
servizio di raccolta rifiuti a domicilio, o il negozio
dove avete acquistato il prodotto.
Servizio GIAS
Ai fini della durata e del buon funzionamento
della macchina, per gli eventuali interventi di
assistenza o riparazione consigliamo di
rivolgersi esclusivamente al servizio assistenza
autorizzato GIAS.
Nel caso in cui la macchina non funzioni
correttamente o sia fuori uso, spegnere e
staccare la spina dalla presa. Per la riparazione,
rivolgersi al Centro Assistenza GIAS.
Page 17
INSTALLAZIONE
Requisiti Elettrici
Le asciugatrici sono state progettate per
funzionare ad una tensione di 220-240V, 50 Hz
mon o f a s e . C o n t r o l l are che i l c i r c u i t o
dell’alimentazione sia idoneo per valori di corrente
di almeno 10A.
L’elettricità p uò essere estremamente
pericolosa
L’apparecchio deve essere opportunamente
collegato a terra.
La presa e la spina dell’apparecchio devono
essere dello stesso tipo.
No n util izzar e adat tator i mult ipli e /o
prolunghe.
Una volta completata l’installazione, la spina
deve risultare accessi bile e facilmente
scollegabile.
L’apparecchio con marchio CE è conforme alle
direttive europee 2004/108/EC, 2006/95/EC
e successive modifiche.
La chiamata può essere soggetta a pagamento,
se le cause di malfunzionamento della macchina
sono attribuibili a un’installazione non corretta.
VENTILAZIONE
Il locale in cui viene installata l’asciugatrice deve
essere adeguatamente ventilato onde evitare
che i gas provenienti da apparecchiature
funzionanti con altri combustibili, comprese
fiamme libere, siano aspirati nel locale dove
l’asciugatrice è in funzione.
● Non scaricare l’ aria nella canna fumaria
utilizzata per lo scarico di fumi provenienti da
attrezzature funzionanti a gas o altri combustibili.
● Controllare periodicamente che attorno
all’asciugatrice vi sia una buona circolazione
d’aria, senza impedimenti di sorta.
● Dopo l’uso ispezionare il filtro antifilacce e, se
necessario, pulirlo.
●Verificare costantemente che presa e sfiati non
siano ostruiti. Per assicurare un’idonea
ventilazione è essenziale che lo spazio tra il
fondo macchina e il pavimento non sia ostruito.
Tra la macchina ed eventuali ostacoli si
dovrebbe lasciare uno spazio di almeno 12mm.
●Rimuovere tempestivamente eventuali oggetti
caduti, dietro/sotto la macchina in quanto
potrebbero ostruire le prese e gli sfiati dell’aria.
● EVITARE ASSOLUTAMENTE d’ installare la
macchina contro tendaggi.
Nel caso risulti danneggiato, il cavo di
alimentazione dell’apparecchio dev’essere
prontamente sostituito con apposito cavo
reperibile ESCLUSIVAMENTE presso il servizio di
ricambi. L’installazione deve essere effettuata da
persone competenti.
Non inserire la spina nella presa e non accendere la macchina finché l’installazione non sarà
stata completata. Ai fini della sicurezza personale è
essenziale che l’asciugatrice venga installata
correttamente. In caso di dubbi sull’installazione,
rivolgersi al Servizio Assistenza GIAS.
Regolazione dei Piedini
Una volta posizionata la
macchina, si dovrebbe
p r o c e d e r e a l l a
regolazione dei piedini,
pe r g ar a n t ir e u na
perfetta messa in bolla.
PRESE ARIA
SFIATI ARIA
SFIATI ARIA NELLA BASE
Non installare il prodotto in luoghi freddi o dove vi
sia il rischio di formazione di ghiaccio. Alla
temperatura di congelamento dell'acqua il
prodotto potrebbe non funzionare correttamente.
Se l'acqua del circuito idraulico ghiaccia sono
possibili danni a componenti quali: valvole,
pompe, tubi. Per garantire le prestazioni del
prodotto la temperatura della stanza deve essere
compresa tra +2°C e +35°C. Nel caso l'asciugatrice venga
utilizzata in ambienti con basse temperature (tra +2°C e
+1 5°C ) è po ss i bi le c h e ca pi tin o fe nom eni di
condensazione e di piccole perdite d'acqua sul pavimento.
17
IT
Page 18

KIT DI MONTAGGIO TUBO DI SCARICO: ISTRUZIONI PER IL MONTAGGIO
Per non dover svuotare il contenitore dell’acqua
dopo ogni ciclo di asciugatura, si può convogliare
l’acqua normalmente raccolta durante il ciclo di
asciugatura direttamente in un tubo di scarico
delle acque di scolo (lo stesso sistema di scarico
usato nei lavandini di Casa).
Le leggi locali sullo smaltimento delle acque
vietano la connessione ai canali a cielo aperto. Il
sistema di scarico delle acque di scolo va
collocato accanto all’asciugatrice.
Il kit è composto: 1 tubo flessibile, 1 connettore
per tubo flessibile dritto, 1 morsetto per tubo e una
fascetta di plastica.
AVVERTENZA! Prima di eseguire qualsiasi
operazione, spegnere l’asciugatrice e staccare
la spina dalla presa principale.
Montare i Componenti del Kit Come di Seguito Riportato:
1.Svitare e rimuovere le 3
vi t i s u l r e t ro d e ll a
macchina, mante-nendo
in posizione il bordino di
finitura del piano di lavoro.
2. Rimuovere il bordino di
finitura del piano di lavoro
posteriore, poi rimuovere
anche il piano di lavoro
sup e riore , fac e ndolo
scorrere con delicatezza
verso i l r e tro della
macchina.
3 . I l c o n t e n i t o r e
dell’acqua di scolo è
posto sul lato destro della
macchina (guardando dal
retro).
Sop r a il cont e nitor e
dell’acqua è posto un tubo
grigio flessibile, fissato a
un collegamento a ponte.
Utilizzando una pinza,
rimuovere dal ponte il
morsetto di bloccaggio
del tubo.
4. Rimuovere il tubo
flessibile dal ponte.
5. Col leg are il t ubo
flessibile del kit al tubo
flessibile rimosso dal
pon t e, ut ilizz a ndo i l
connettore e I morsetti per
il tubo forniti.
6. Rimuovere il coperchio
del contenitore dell’acqua
Posto sul retro della
macchina, rimuovendo le
due viti e sganciandolo.
18
IT
EN 5
.7. Rompere la linguetta
p o s ta s u l l a to d e l
coperchio, riposizio-nare
i l c op er c hi o s u l la
macchina e fissare
nuovamente le viti. A
questo punto si dovrebbe
vedere un foro sul retro
del mobile, accanto al
coperchio.
8. Far passare il tubo
fle s sibile di sc a r ico
at tra ver so il f oro di
entrata nel mobile.
9. Collocare il tubo grigio
nello spazio libero della
vaschet t a e fissare
l’intero blocco del tubo al
ponte, utilizzand o la
fascetta di plastica.
10. Ricollocare il piano di
lavoro facendolo scorrere
di nuovo nella posizione
d i p a r t e n z a , e
accertandosi che il tubo
f l e s si b i l e n o n s i a
incastrato. Ricollocare
in posizione anche il
bordino di finitura del
p i a n o d i l a v o r o
posteriore, utilizzando le
3 viti.
11. Collegare il nuovo
tubo flessibile di scarico
al tubo dell’acqua di
scolo. Accertarsi che il
nuovo tubo flessibile non
si pieghi quando si spinge
i n p o s i z i o n e
l’asciugatrice. Accertarsi
di rispettare le linee
guida, come mostrato,
qua n d o si fiss a l a
posizione del nuovo tubo
flessibile esterno.
1 2 . E f f e t t u a r e i l
collegamento alla presa
di rete principale.
13. Dopo avere svuotato
il contenitore dell’acqua
di scarico, per dare inizio
a l p r o g r a m m a d i
asciuga t u r a b a sterà
accendere la macchina
con il ta s to ON (e
premere nel caso dei
mo delli ele ttro nici il
pulsante ‘START’).
Page 19
PREPARAZIONE DELLA BIANCHERIA
Prima di utilizzare l’asciugatrice per la prima
volta:
● Leggere attentamente il presente libretto
d’istruzioni.
● Togliere tutti gli articoli presenti all’ interno del
cestello.
● Pulire l’interno del cestello e il portellone con un
panno umido in modo da eliminare l’eventuale
polvere depositata durante il trasporto.
Preparazione dei Capi
Verificare che la biancheria da asciugare sia
idonea per l’asciugatura meccanica, come
indicato dai simboli sull’etichetta di lavaggio dei
vari articoli.
Controllare che le chiusure siano chiuse e le
tasche vuote. Girare i capi con il rovescio
all’esterno. Introdurre i capi nel cestello uno ad
uno, in modo che non si aggroviglino.
Evitare Di Asciugare:
Articoli di lana, seta, tessuti delicati, calze di
nylon,ricami delicati, tessuti con decorazioni
metalliche, indumenti con guarnizioni in PVC o
in pelle, scarpe da ginnastica, articoli pesanti
come sacchi a pelo ecc.
IMPORTANTE: Evitare di asciugare
articoli preventivamente trattati con prodotti di
pulizia a secco o capi in gomma (pericolo
d’incendio o esplosione).
Nel corso degli ultimi 15 minuti, il carico viene
sempre asciugato con aria fredda.
Risparmio Energia
Introdurre nell’asciugatrice solo biancheria
accuratamente strizzata a mano o centrifugata a
macchina. Quanto più asciutta è la biancheria,
tanto più rapido è il tempo richiesto per
l’asciugatura, con conseguente risparmio di
consumo elettrico.
COSA FARE SEMPRE
● Cercare sempre di far lavorare la macchina a
pieno carico di biancheria: si risparmia tempo ed
elettricità.
● Prima di ogni ciclo di asciugatura verificare
SEMPRE che il filtro sia pulito.
COSA NON FARE MAI
● Non superare mai il peso massimo: si perde
tempo e si consuma più elettricità.
● Evitare di caricare capi ancora gocciolanti: si
rischia di rovinare la macchina.
Peso Massimo di Asciugatura
● Capi in cotone Max. 8 kg
● Capi sintetici Max. 4 kg
Non sovraccaricare il cestello, in quanto I
capi ingombranti, a caldo, possono superare il
carico massimo consentito. (per esempio sacchi
a pelo e piumoni)
Selezionare La Biancheria Nel Modo Seguente:
● In base ai simboli delle etichette di lavaggio
Le etichette di lavaggio sono apposte sul collo o
sulle cuciture interne:
Articolo idoneo per l’asciugatura
meccanica.
. .
Asciugatura ad alta temperatura.
.
Solo asciugatura a bassa temperatura.
Articolo non idoneo all’asciugatura
meccanica.
Se il capo è sprovvisto di etichetta di lavaggio, si
deve p r e s u m e r e c h e non s i a i d o n e o
all’asciugatura meccanica.
● In base al quantitativo ed alla pesantezza
Se il carico è superiore alla capacità della
macchina, separare i capi in base alla pesantezza
(p. es., separare gli asciugamani dalla biancheria
leggera).
● In base al tipo di tessuto
Articoli di cotone/lino: Asciugamani, jersey di
cotone, biancheria da tavola/letto.
Articoli sintetici: Camicette, camicie, tute ecc. in
poliestere o poliammide e misti cotone/sintetici.
● In base al grado di asciugatura
Selezionare tra: capi asciutti da stirare, capi pronti
da riporre ecc. Per i capi delicati premere il
pulsante ,impostando una temperatura di
asciugatura ridotta.
Guida Ad Una Corretta Asciugatura
In tabella sono riportati i tempi di asciugatura indicativi in
funzione del tipo di tessuto e del grado di umidità dei capi.
TESSUTO
COTONE
SINTETICI
ACRILICI
SELEZIONE
TEMPE.
ELEVATA
BASSA
BASSA
CARICO
PESANTE
140-165min
CARICO
MEDIO
70-80min
70-80min---
50-65min
---
CARICO
LEGGERO
50-65min
40-55min
30-40min
IT 19
Page 20

COMANDI E SPIE DI SEGNALAZIONE
Spia Elimina
Pulsante Selezione
Tempo
Acqua
Pulsante Partenza
Ritardata
Spia Pulizia
Filtro
Pulsante
Delicati
Display
Pulsante
Anti Piega
Tasto
Avvio/pausa
Selettore
Programmi
Pannello di Comando e Spie Luminose
Selettore dei programmi – Consente di selezionare il programma desiderato.
Pulsante Selezione Tempo – Consente di modificare la durata del programma scelto. Può
essere usato solo con il programma : Mix&Dry, Camicie e con i Programmi a tempo.
Tasto Partenza Ritardata – Consente all'utente di ritardare la partenza del ciclo di asciugatura
(
vedere i dettagli nella sezione specifica).
Pulsante Acrilici/Sintetici –
l'opzione Acrilici/Sintetici e si accenderà la spia
Premere questo tasto per asciugare fibre delicate. Si attiverà
.
Pulsante Anti Piega – Consente all'utente di programmare un ciclo anti piega a fine ciclo.
Pulsante Avvio/Pausa –Per dare inizio o fermare il programma selezionato.
Pulsante Memo – Dopo 2 minuti di avvio di un programma ed eventuali opzioni, è possibile
premendo simultaneamente per 3 secondi i pulsanti Anti Piega e Acrilici/Sintetici, memorizzare il
programma preferito.
Spia di pulizia filtro – Si accende quando il filtro necessita di essere pulito.
Spia elimina acqua – Si accende quando il contenitore dell'acqua di condensa è pieno.
Display Programmi Automatici – Le relative spie luminose di accendono quando un programma
automatico è stato selezionato.
Refresh – La spia si accende quando il programma inizia la fase di raffreddamento.
SELEZIONE DEL PROGRAMMA
La macchina dotata di sensore di asciugatura, offre opzioni di
asciugatura in grado di rispondere alle più svariate esigenze.
Nella tabella che segue viene riportato un elenco dei programmi con la
relativa funzione.
Nota: il sensore potrebbe non essere in grado di individuare un carico
ridotto di articoli di piccole dimensioni. Per carichi ridotti e articoli
separati o per tessuti pre-asciugati leggermente umidi, selezionare i
programmi a tempo.
Impostare il tempo del programma tra 30 e 75 minuti in base alla
quantità del carico e al grado di asciugatura richiesto.
Successivamente, selezionare la temperatura alta o bassa in base al
tipo di tessuto.
Se il sensore non rileva la presenza del capo, l’asciugatrice funziona
solo per 10 minuti,prima di passare alla fase di raffreddamento.
Se il carico è troppo abbondante o troppo bagnato per essere asciugato,
l’asciugatrice passa automaticamente alla fase di raffreddamento dopo
circa 3 ore.
20
IT
Page 21

SELEZIONE DEL PROGRAMMA
PROGRAMMA
Perfect Home
Capi Extra Asciutti
Capi Asciutti Da Riporre
Capi Asciutti Da Stirare
No Crease
Lana
Mix & Dry
Camicie
DESCRIZIONE
Selezionare il grado di asciugatura desiderato. Le possibilità
disponibili comprendono l’opzione , ideale per asciugamani e
accappatoi, l’opzione , per i capi che non è necessario stirare, e i
programmi che lasciano la biancheria pronta per la stiratura
Il programma assicura una funzione di trattamento antipiega.
La macchina effettua un ciclo di riscaldamento della biancheria per
9 minuti, seguito da 3 minuti di raffreddamento. Si tratta di una
funzione particolarmente utile quando si prevede di riporre la
biancheria (ad esempio, nel cesto della biancheria) per un periodo
di tempo prima della stiratura. I capi possono “seccarsi”
eccessivamente anche quando vengono fatti asciugare all’aperto
sul filo o vengono posti su radiatori. Il Ciclo attenua le pieghe sul
tessuto rendendo più facile e più rapida la stiratura.
Un programma delicato creato appositamente per ottenere capi
in lana più soffici dopo l’asciugatura ad aria.
Questo ciclo delicato con aria calda, della durata di 12 minuti, si
può utilizzare anche per infrescare i capi in lana dopo averli
tenuti in guardaroba.
Questo è uno speciale programma a tempo per l’asciugatura di
massimo 4 Kg di bucato (117 minuti). Di base, la durata di
asciugatura suggerita è di 99 minuti e permette di asciugare 3 Kg.
C o n q ue s to p r o g ra m ma è p os s ib i l e a sc i ug a r e
contemporaneamente fibre in cotone e fibre sintetiche.
Questo è uno speciale programma a tempo per l’asciugatura di
camicie con un carico massimo di 3 Kg (78 minuti). Per camicie o
maglie sintetiche è possibile pressare il pulsante Acrilici/Sintetici.
Di base la durata del ciclo suggerito dalla macchina è di 60 minuti e
consente di asciugare fino a 2 kg di carico.
Rapid 40'
Time
Memo
Con il programma Rapid 40’, il ciclo di asciugatura è completato
rapidamente. E’ ideale se si vogliono capi asciutti, rinfrescati e pronti
da indossare in circa 40 minuti. Questo speciale programma
monitora continuamente la temperatura nel cesto. Il massimo carico
consentito è 2 Kg e il programma è adatto a qualsiasi tipo di fibra che
in genere può essere asciugata con questo apparecchio.
Include tutti i programmi a tempo manuali: da 30 a 180 minuti. La
selezione del programma a tempo di 20 minuti prevede solo un
ciclo di ventilazione con aria fredda (Refresh).
Con sent e d i r ipro porr e u n p rogr a mma che è stat o
precedentemente memorizzato, senza il bisogno di ri-selezionarlo
sulla manopola e di scegliere una eventuale opzione con uno dei
pulsanti.
IT
21
Page 22

PORTELLONE e FILTRO
Apertura del Portellone
Tirare la maniglia per
aprire lo sportello.
P e r a v v i a r e l a
macchina, richiudere
i l p or t e l l o n e e
premere il tasto.
AVVERTENZA! Si ricorda che quando la
macchina è in funzione il cestello e il portellone
possono essere MOLTO CALDI. Non arrestare
mai l'asciugatrice prima della fine del ciclo di
asciugatura a meno che tutti i capi in essa
contenuti non vengano rimossi rapidamente e
stesi in modo da dissipare il calore.
Filtro
IMPORTANTE: Ai fini della massima efficacia
della macchina, prima di ogni ciclo di
asciugatura è essenziale verificare la pulizia
del filtro antifilacce.
Importante: Non utilizzare l'asciugabiancheria
senza I filtri. I filtri intasati possono allungare il
tempo di asciugatura e causare danni con
conseguenti costosi interventi di pulizia.
1. Tirare il filtro verso l’alto.
2. Aprire il filtro come
illustrato.
3 . R i m u o v e r e
delicatamente le
Filacce con la punta delle
dita o aiutandosi con uno
spazzolino morbido.
4. Richiudere il filtro e
reinserirlo in sede.
Spia Di Pulizia Filtro
Si accende segnalando
la necessità di pulire il filtro.
Procedere con la verifica
ed eventuale pulizia del
filtro principale e dei filtri
allocati nella parte inferiore
del Dryer.
Se la biancheria non si
asciuga verificare che il
filtro non sia intasato.
NON USARE ACQUA PER PULIRE IL FILTRO
22
IT
VASCHETTA DELL’ACQUA
L’acqua eliminata dalla biancheria durante il
ciclo di asciugatura viene raccolta in una
vaschetta posta in fondo alla macchina. Quando
la vaschetta è piena si accende la spia sul
pannello dei comandi, segnalando che si DEVE
vuotare la vaschetta. Tuttavia, si consiglia di
svuotare la vaschetta dopo ogni ciclo di
asciugatura.
NOTA: Nei primi cicli, quando la macchina è
nuova, si raccoglie poca acqua in quanto si
riempie prima il serbatoio interno.
Per Togliere La Vaschetta
1 . E s t r a r r e c o n
d e l i c a t e z z a l a
vaschetta, finché non
viene completamente
rimossa. Sostenere la
v a s c h e t t a c o n
entrambe le mani. Da
piena, la vaschetta
dell’acqua pesa circa 4
kg.
2.Inclinare la vaschetta
f a c e nd o d e f l u ir e
l ' ac qu a d a l f o r o
posteriore. Quando è
vuota, far scivolare di
nuovo la vaschetta
nell'apposi ta sede .
S P I N G E R E C O N
DECISIONE IN SEDE.
3 . Pe r a vv i ar e la
macchina, premere il
tasto.
NOTA: se c’è uno
s c a r i c o v i c i n o
all’asciugatrice, si può
usare l’apposito kit per
f a r s c a r i c a r e
costantemente l’acqua
r a c c o l t a d a l l a
m a c c h i n a . C o s ì
facendo si eviterà di
svuotare la vaschetta
dell’acqua. Tutte le
in formazioni per il
m o n t a g g i o s o no
a l l ’i nt er no d e l l a
confezione del kit di
scarico.
Page 23

CONDENSATORE
IMPORTANTE: Prima di procedere alla pulizia
de l conde nsa tore, d isattiva re se mpre
l’apparecchio e staccare la spina dalla presa
elettrica.
Ai fini delle prestazione dell’apparecchio, è
opportuno verificare regolarmente lo stato di
pulizia del condensatore.
Per Togliere Il Condensatore
1 . R i m u o v e r e l o
zoccolo.
2. Agire sulle due leve
di bloccaggio in senso
antiorario e estrarre il
condensatore.
3.Estrarre il modulo
condensatore.
4.Servendosi di un
p a n n o , e l i m i n a r e
delicatamente polvere
e filacce, poi lavare il
modulo t e nendolo
sotto l’acqua corrente
e facendolo girare in
modo che l’acqua
circoli tra le piastre fino
a perfetta eliminazione
delle impurità
5 . R i m o n t a r e i l
c o n d e n s a t o r e
rispettando il verso
giusto (come indicato
d a l l a f r e c c i a ) e
accertandosi che sia
perfettamente inserito
in sede. Bloccare le
due leve ruotandole in
senso orario.
6 . R i m o n t a r e l o
zoccolo.
FUNZIONAMENTO
1. Aprire il portellone e caricare la biancheria
nel cestello. Verificare che i capi non
impediscano la chiusura del portellone.
2. Chiudere delicatamente il portellone
spingendolo lentamente fino ad avvertirne lo
scatto di chiusura.
3. Ruotare il selettore dei programmi
selezionando il programma di asciugatura
desiderato (si veda Guida ai programmi).
4. Per ridurre il grado di calore con capi delicati,
sintetici o acrilici, premere il tasto .
La spia vicino al tasto si accende quando è
impostata la funzione bassa temperatura. Per
annullare l’impostazione durante i primi minuti
del programma, premere il tasto , quindi
re settare l a macchin a per mo dif ica re
l’impostazione.
5. Premere il pulsante . L’asciugatrice partirà
automaticamente e la spia DRY resterà accesa.
6. Se si apre il portellone per controllare la
biancheria mentre il programma è in funzione,
per riattivare l’operazione di asciugatura è
necessario chiudere il portellone e premere
nuovamente il tasto .
7. Quando il ciclo sta per terminare, la
macchina entra in fase di raffreddamento. In
questa fase, I capi si raffreddano in quanto
vengono asciugati con aria fredda.
8. Una volta completato il programma, si
accenderà la spia END.
9. Dopo il completamento del ciclo, il cestello
ruo t e r à i n m a n iera interm i t tente per
minimizzare la formazione di pieghe. Questo
movimento continua fino alla disattivazione
della macchina o all’apertura del portellone.
IT 23
Page 24

FUNZIONAMENTO
Partenza Ritardata
La funzione Partenza Ritardata consente all’utente di ritardare la partenza del ciclo di
asciugatura da 1 a 24 ore.
Agendo la prima volta sul tasto di questa funzione, comparirà sul display un ritardo di 1 ora, a ogni
successiva pressione del tasto, si aggiungerà un ulteriore ritardo di 1 ora.
Successivamente, premere il tasto e trascorso il tempo di ritardo selezionato, il ciclo di
asciugatura verrà avviato. La spia luminosa lampeggerà indicando che count down è iniziato.
Annullamento e Azzeramento Del Programma
Per cancellare il programma premere il pulsante per 3 secondi. Nel display “TIME CONTROL”
lampeggerà 0:00 indicando che è stato azzerato il programma.
PULIZIA E MANUTENZIONE ORDINARIA
Pulizia dell’asciugatrice
● Si consiglia di pulire il filtro e di svuotare la
vaschetta dell’acqua dopo ogni ciclo di
asciugatura.
● Pulire regolarmente il condensatore.
● Dopo l’ uso, pulire l’ interno del cestello e
lasciare aperto il portellone per un certo
periodo di tempo in modo che circoli aria e si
asciughi.
● Pulire l’esterno della macchina e il portellone
con un panno morbido.
● NON usare spugnette abrasive né prodotti di
pulizia.
●Pre evitare che si accumuli della lanuggine e
che l'oblò abbia difficoltà ad aprirsi/chiudere, a
fine di ogni ciclo d'asciugatura pulire con un
panno umido la parte interna dell'oblò e la
guarnizione.
AVVERTENZA! Il cestello, il portellone e il
carico possono essere molto caldi.
Specifiche Tecniche
Capacità del cestello 115 litri
Carico massimo 8 kg
Altezza 85 cm
Larghezza 60 cm
Profondità 60 cm
Efficienza Energetica B
Informazıonı per Test dı Laboratorıo
EN 61121 Programmı
-Cotone Asciutto
-Cotone Asciutto da Stirare
-Tessuti Delicati
IMPORTANTE Prima di procedere alla
pulizia, disattivare sempre la macchina e
staccare la spina dalla presa a muro.
Per i dati elettrici vedere la targhetta dei dati
posta sul davanti del mobile della macchina (con
portellone aperto).
Programmı da uare
-Capi Asciutti da Riporre
-Capi Asciutti da Stirare
-Capi Asciutti da Riporre
+Sintetico
24
IT
Page 25

What Might be the Cause of...
Defects you can remedy yourself
Before calling GIAS Service for technical
advice please run through the following
checklist. A charge will be made if the machine
is found to be working or has been installed
incorrectly or used incorrectly.
If the problem persists after completing the
recommended checks, please call GIAS
Service, they may be able to assist you over the
telephone.
Time display to end could change during
dr ying c y cle . T he tim e t o end is
continuously checked during the drying
cycle and the time is adjusted to give the
best estimation time. The displayed time
may increase or decrease during the cycle
and this is normal.
Drying time is too long/clothes are not dry
enough…
● Have you selected the correct drying
time/programme?
● Were the clothes too wet? Were the clothes
thoroughly wrung or spindried?
● Does the filter need cleaning?
● Is the dryer overloaded?
● Has the option been selected from a
previous cycle?
TROUBLESHOOTING
The dryer is noisy…
● Switch off the dryer and contact GIAS Service
for advice.
The Indicator is on…
● Does the filter need cleaning?
The Indicator is on…
● Does the water container need emptying?
CUSTOMER SERVICE
Should there still be a problem with your dryer
after completing all the recommended checks,
please call GIAS Service for advice.
They may be able to assist you over the
telephone or arrange for a suitable appointment
for an engineer to call under the terms of your
guarantee. However, a charge may be made if
any of the following applies to your machine:
● Is found to be in working order.
● Has not been installed in accordance with the
installation instructions.
● Has been used incorrectly.
The dryer does not operate…
● Is there a working electricity supply to the
dryer? Check using another appliance such as
a table lamp.
● Is the plug properly connected to the mains
supply?
● Is there a power failure?
● Has the fuse blown?
● Is the door fully closed?
● Is the dryer switched on, both at the mains
supply and at the machine?
● Has the drying time or the programme been
selected?
● Has the machine been switched on again after
opening the door?
Spares
Always use genuine spares, available direct
from GIAS Service.
GIAS Service
For service and repairs call your local GIAS
Service engineer.
The manufacturer declines all responsibility
in the event of any printing mistakes in this
booklet. The manufacturer also reserves the
right to make appropriate modifications to
its products without changing the essential
characteristics.
25
IT
Page 26

INDEX
Introduction
Informations Sur La Livraison
Déballage Du Produit
Rappels De Sécurité
Utilisation
Installation
Le Linge
Protection De L'environnement
Service Gias
Installation
Besoins Électriques
Ajustement Des Pieds
Ventilation
Kit Tuyau D’évacuation : Instructions de Montage
Préparation De La Charge
Préparation Des Vêtements
Tri De La Charge
Ne Séchez Pas En Machine
Économies D’énergie
Guide De Séchage
Commandes Et Indicateurs
Sélection Du Programme
Porte Et Filtre
Ouverture De La Porte
Filtre
Indicateur Entretien Filtre
Réservoir D’eau
Pour Retirer Le Réservoir
Condenseur
Pour Retirer Le Condenseur
Fonctionnement
Départ Différé
Annulation Et Réinitialisation Du Programme
Nettoyage Et Entretien De Routine
Nettoyage Du Sèche-linge
Spécifications Techniques
Dépistage De Pannes
Service Clientèle
Pièces De Rechange
Service Gias
27
27
27
27
27
28
28
28
28
29
29
29
29
30
31
31
31
31
31
32
33
34
34
34
34
34
35
35
36
36
36
36
36
37
37
37
37
37
37
37
FR
26
Page 27

INTRODUCTION
Veuillez lire et suivre ces instructions avec soin et utiliser la machine en conséquence. Ce livret
contient des instructions importantes sur la sécurité d'utilisation, l'installation et l'entretien de la
machine, ainsi que des conseils utiles pour obtenir les meilleurs résultats possibles lors de son
utilisation. Conservez toute la documentation dans un endroit sûr pour pouvoir vous y reporter à une
date ultérieure ou la transmettre aux prochains propriétaires
Informations Sur La Livraison
Vérifiez que les articles suivants ont bien été
livrés avec l’appareil :
● Manuel d'utilisation
● Carte de garantie
● Étiquette d'énergie
Vérifiez que la machine ne s'est pas
détériorée en transit. Si c'est le cas, contactez
GIAS pour une opération de dépannage.
Le non-respect de ces instructions peut
compromettre la sécurité de votre appareil. Un
appel de service peut vous être facturé si la
défaillance de votre appareil est causée par une
mauvaise utilisation.
RAPPELS DE SÉCURITÉ
Utilisation
● Cet appareil ne doit pas être utilisé par des personnes (notamment des enfants) jouissant de
capacités mentales, sensorielles ou physiques réduites ou d'un manque d'expérience ou de
connaissances, sauf si elles sont surveillées ou ont reçu des instructions concernant l'utilisation de cet
appareil par une personne responsable de leur sécurité.
● Les enfants doivent être surveillés afin de s'assurer qu'ils ne s'amusent pas avec l'appareil.
● ATTENTION La mauvaise utilisation d’un sèche-linge risque de causer un d’incendie.
● Cette machine est conçue uniquement pour usage domestique, à savoir pour sécher le linge
domestique et les vêtements.
● Cette machine ne doit être utilisée que pour l’emploi auquel elle est destinée et qui est décrit dans ce
manuel. Assurez-vous d'avoir bien compris les instructions d'installation et d'utilisation avant de faire
fonctionner la machine.
● Ne touchez pas la machine si vous avez les mains ou les pieds mouillés ou humides.
● Ne vous appuyez pas sur la porte lorsque vous chargez la machine et n'utilisez pas la porte pour
soulever ou déplacer la machine.
● Ne laissez pas des enfants jouer avec la machine ou avec ses commandes.
● ATTENTION N’ utilisez pas cette machine si le filtre à peluches n’ est pas en place ou s’ il est
endommagé ; les peluches risquent en effet de s’allumer.
● ATTENTION L’augmentation de température pendant le fonctionnement du sèche-linge peut être
supérieure à 60°C là où se trouve le symbole de surface chaude .
● Débranchez du courant de secteur. Retirez toujours la prise avant de nettoyer la machine.
● Cessez d’utiliser la machine si elle semble défectueuse.
● Veillez à ce que les peluches ne puissent pas s’accumuler sur le sol, à l’extérieur de la machine.
● Il se peut que l’intérieur du tambour soit très chaud. Veillez à ce que le sèche-linge termine
son cycle de refroidissement avant d’en sortir le linge.
DÉBALLAGE DU PRODUIT
Retirez la machine de
l’emballage, à proximité de
son emplacement définitif.
1. Coupez délicatement
au to ur de la base de
l'emballage en remontant
vers l'angle supérieur.
2. Retirer le manchon en
polyéthylène et sortez le
sèche-linge de la base en
polystyrène.
Mettez l'emballage au rebut en toute
sécurité. Conservez hors de portée des enfants
car il représente une source de danger
potentielle.
27
FR
Page 28

RAPPELS DE SÉCURITÉ
Installation
● Vérifiez que la machine ne présente aucun
signe visible de détérioration avant de l’utiliser.
En cas de détérioration, assurez-vous de ne
pas l’utiliser et de contacter le service GIAS.
● N'utilisez pas d'adaptateurs, de multi-prises
et/ou de rallonges.
● Veillez à ne pas installer le sèche-linge contre
des rideaux et assurez-vous que rien ne pourra
tomber ou s’accumuler derrière le sèche-linge.
● Cet appareil ne doit pas être installé derrière
une porte verrouillable, une porte coulissante
ou une porté munie de gonds placée en face de
la porte du sèche-linge.
Le Linge
● Ne séchez pas des vêtements non lavés dans le
sèche-linge.
● ATTENTION NE séchez PAS les tissus qui ont
été traités avec des liquides de nettoyage à sec.
● ATTENTION Quand elles sont chauffées, les
mousses alvéolaires peuvent dans certains cas
brûler par combustion sponta-née. Les articles
tels que le caoutchouc mousse (mousse de latex),
les bonnets de douche, le textile imperméable, les
articles caoutchoutés et les vêtements ou
coussins rembourrés de caoutchouc mousse NE
DOIVENT PAS être séchés dans le sèche-linge.
● Reportez-vous toujours aux étiquettes d’
entretien du linge pour vérifier le mode de séchage
recommandé.
● Les vêtements doivent être essorés en machine
ou à la main avant d’ être placés dans le sèchelinge. Les vêtements qui dégoulinent NE
DOIVENT PAS être mis dans le sèche-linge.
● Enlevez les briquets et les allumettes des
poches et veillez à ne JAMAIS utiliser de liquides
inflammables à proximité de la machine.
● Les rideaux en fibres de verre ne doivent
JAMAIS être placés dans cette machine. La
contamination d’autres vêtements par les fibres de
verre peut entraîner des irritations de la peau.
● Les articles qui ont été souillés par des
substances telles que huile de cuisson, acétone,
alcool, pétrole, kérosène, produit anti-taches,
térébenthine, cire et décapant pour cire doivent
être lavés à l'eau chaude avec une quantité
supplémentaire de déter-gent avant d'être séchés
dans le sèche-linge.
● Les agents adoucissants, et autres produits
similaires, doivent être utilisés conformément aux
instructions fournies par le fabricant du produit.
Protection De L'environnement
● Tous les matériaux de conditionnement
utilisés sont écologiques et recyclables.
Veuillez les éliminer de manière écologique.
Votre municipalité pourra vous donner le détail
exact des méthodes d’élimination en vigueur.
● Pour assurer la sécurité lors de l’élimination
d’un vieux sèche-linge, veuillez débrancher la
fiche du courant de secteur, couper le câble
d’alimentation et le détruire avec la fiche. Pour
empêcher que les enfants ne s’enfer-ment
dans la machine, cassez les charnières de la
porte ou son dispositif de verrouillage.
Directive Européenne 2002/96/CE
Cet appareil est commercialisé en
accord avec la directive européenne
2002/96/CE sur les déchets des
éq u i p em e n ts é lec t r iqu e s e t
électroniques (DEEE).
En vous assurant que ce produit est correctement recyclé, vous participez à la prévention
d e s c o n s é q u e n ce s n ég at i v e s s u r
l’environnement et la santé publique qui pourrait
être causé par une mise au rebut inappropriée
de ce produit. Le symbole sur ce produit indique
qu’il ne doit pas être traité comme un déchet
ménager. Il doit être rapporté jusqu’à un point de
rec yclage d es déche ts électr iques et
électroniques. La collecte de ce produit doit se
faire en accord avec les réglementations
environnementales concernant la mise au rebut
de ce type de déchets. Pour plus d’information
au sujet du traitement, de la collecte et du
recyclage de ce produit, merci de contacter votre
mairie, votre centre de traitement des déchets ou
le magasin où vous avez acheté ce produit.
Service GIAS
● Pour veiller au fonctionnement efficace et
sans risque de cet appareil, nous vous
recommandons de faire exclusivement appel à
un technicien GIAS agréé pour son entretien
ou sa réparation éventuelle.
Si l’appareil ne fonctionne pas correctement
ou s’il tombe en panne, mettez-le à l’arrêt et
débranchez-le du courant de secteur. Consultez
le service GIAS pour prévoir une éventuelle
réparation.
FR
28
Page 29

INSTALLATION
Besoins Électriques
Les sèche-linges sont prévues pour une
tension monophasée de 220-240 V, 50 Hz.
Vérifiez que la tension nominale du circuit
d'alimentation est réglée sur 10 A minimum.
L’électricité peut être extrêmement
dangereuse.
Cet appareil doit être mis à la terre.
La prise de courant et la fiche de la machine
doivent être du même type.
N'utilisez pas de multi-prises et/ou de
rallonges.
La f ich e doit êt re ac ces sib le po ur
débrancher l’appareil une fois qu’il a été
installé.
La machine est conforme aux directives
européennes 2004/108/EC, 2006/95/EC et à
leurs modifications ultérieures.
Un appel de service peut vous être facturé
si la défaillance de votre appareil est causée
par une installation incorrecte.
Si le cordon électrique de cet appareil
estendommagé, il doit être remplacé par un
cordon spécial qui est UNIQUEMENT disponible
auprès du service des pièces de rechange. Il doit
être installé par une personne compétente.
VENTILATION
La pièce où se trouve le sèche-linge doit avoir
une ventilation adéquate de manière à ce que
les gaz des appareils qui brûlent d’autres
combustibles, y compris les cheminées, ne
soient pas attirés dans la pièce pendant que le
sèche-linge est en marche.
● L’air d’échappement ne doit pas être évacué
par un conduit qui est également utilisé pour
évacuer les fumées d’échappement d’appareils
qui brûlent du gaz ou d’autres combustibles.
● Vérifiez régulièrement que l’ air peut circuler
librement autour du sèche-linge.
● Vérifiez le filtre à peluches après usage, et
nettoyez-le le cas échéant.
● Les entrées et sorties doivent être libres
d’obstructions. Pour veiller à une ventilation
adéquate, l’espace entre le bas de la machine
et le sol ne doit pas être obstrué. Il doit y avoir un
espace d’au moins 12 mm entre la machine et
d'éventuelles obstructions.
● Veillez à ce que rien ne puisse tomber ou
s’accumuler entre les côtés et l’arrière du
sèchelinge, afin de ne pas obstruer l'entrée et la
sortie d’air.
● N’installez JAMAIS le sèche-linge contre des
rideaux.
ENTREES D’AIR
Ne branchez pas l'appareil et ne mettez pas
en marche l'interrupteur de secteur tant que
l'installation n'est pas terminée. Par mesure de
sécurité, veillez à installer ce sèche-linge
correctement. En cas de doute concernant son
installation, veuillez demander conseil à GIAS
Service.
Ajustement Des Pieds
Lorsque la machine est
en place, les pieds
doivent être ajustés
pour mettre la machine
de niveau.
PRISES D'AIR
PRISES D'AIR DANS LA BASE
Do not install the product in a low temperature room
or in a room where there is a risk of frost occurring. At
temperature around freezing point the product may not
be able to operate properly: there is a risk of damage if
the water is allowed to freeze in the hydraulic circuit
(valves, hoses, pumps). For a better product
performance the ambient room temperature must be
between +2°C and +35°C. Please note that operating in
cold condition (between +2 and +15°C) might imply
some water condensation and water drops on floor.
29
FR
Page 30

KIT TUYAU D’ÉVACUATION : INSTRUCTIONS DE MONTAGE
Afin d’éviter d’avoir à vider le réservoir d’eau après
chaque cycle de séchage, l’eau qui est
normalement recueillie pendant le cycle de
séchage peut être évacuée directement par un
tuyau d’évacuation d’eaux sales (le même
système de vidange que celui des éviers
domestiques). Les arrêtés municipaux en matière
d’évacuation d’eau interdisent la connexion à un
égout d’eau de surface. Le système de vidange
d’eaux sales doit être placé à proximité du sèchelinge.
ATTENTION ! Éteignez la machine et
retirez la prise du sèche-linge de l’alimentation
électrique secteur avant d’entreprendre tout
travail.
Le kit est composé: 1 tuyau, 1 connecteur de tuyau
droit, 1 étrier de tuyau et une attache en plastique.
Installez le Kit En Suivant les Instructions ci-après :
1.Dévissez et retirez les
trois vis placé es à
l’arrière de la machine
e n c on s er v a nt l a
garniture du plan de
travail.
2. Retirez la garniture
arrière du plan de travail
et le plan de travail en le
f a i s a n t g l i s s e r
d é l i ca t eme n t v e rs
l’arrière de la machine.
3. Le réservoir d’eaux
sales se trouve du côté
droit de la machine (vue
de l’arrière). Un tuyau
gris est branché sur le
ra c c or d p la c é au dessus du réservoir. À
l’ai d e d’ une pin c e ,
retirez l’étrier de fixation
du tuyau du raccord.
4. Retirez le tuyau du
raccord..
5. Fixez le tuyau du kit
e n u t i l i s a n t l e
connecteur et les étriers
de tuyau fournis au
tuya u d é m onté d u
raccord.
6. Retirez le couvercle
du réservoir de l’arrière
de la m a c h i n e en
dévissant les deux vis et
e n d éc li p s a n t l e
couvercle.
30
FR
7. Brisez l’onglet placé
sur le côté du couvercle
et replacez le couvercle
sur la machine puis
refixez les vis. Vous
devez maintenant avoir
mis à jour un orifice à
l’arrière de l’armoire à
côté du couvercle.
8. Glissez le tuyau de
vidange par l’orifice de
l’armoire.
9. Repérez le tuyau gris
dans la découpe du
réservoir et fixez le bloc
tuyau au raccord avec
l’attache en plastique.
1 0 . Fa i t es g li s s er
délicatement le plan de
travail dans sa position
d’ o ri gi n e en v ou s
assurant que le tuyau
n’est pas coincé puis
remettez en place la
garniture arrière du plan
de travail à l’aide des
trois vis.
1 1 . B r a n c h e z l e
nou v e a u tu y a u de
vidange au tuyau d’eaux
sales. Assure z-v ous
que le nouveau tuyau ne
forme pas un coude
lorsque vous repoussez
le sèche-linge dans sa
po s it i on d ’o r ig i n e.
Assurezvous
que l e s dir e c t ives
i n d i q u é e s s o n t
respectées lors de la
mise e n place d u
nouveau tuyau externe.
1 2 . R a c c or de z l a
machine à l’aliment a ti o n é l e ct ri q u e
secteur.
13. Après avoir vidé le
réservoir d’eau sale,
allumez la machine (et
appuyez sur le bouton
“MARC H E ” s u r l es
modèles électroniques)
p o u r l a n c e r l e
p r o g r a m m e d e
séchage.
Page 31

PRÉPARATION DE LA CHARGE
Avant d’utiliser le sèche-linge pour la première
fois :
● Veuillez lire ce manuel d’instruction en détail.
● Retirez tous les articles qui se trouvent à
l’intérieur du tambour.
● Essuyez l’intérieur du tambour et de la porte
avec un chiffon humide pour éliminer la
poussière éventuelle qui aurait pu s’y infiltrer en
transit..
Préparation Des Vêtements
Vérifiez sur les étiquettes comportant les
symboles d’entretien que le linge que vous
souhaitez sécher convient au séchage en
machine.
Vérifiez que toutes les fermetures sont fermées
et queles poches sont vides. Mettez les articles
à l’envers. Placez les vêtements en vrac dans le
tambour en veillant à ce qu’ils ne s’emmêlent
pas les uns avec les autres.
Ne séchez pas en machine :
Les lainages, la soie, les tissus délicats, les bas
de nylon, les broderies délicates, les tissus
ayant des décorations métalliques, les
vêtements avec des bordures en PVC ou en
cuir, les chaussures de sport, les articles
volumineux comme les sacs de couchage, etc.
IMPORTANT : Ne séchez pas les articles
qui ont été traités avec un liquide de nettoyage
à sec ou les vêtements en caoutchouc (risque
d’incendie ou d’explosion).
Pendant les 15 dernières minutes (approximativement), les vêtements sont toujours
échés à l'air froid.
Économies D’énergie
Ne mettez que du linge essoré en machine ou à la
main dans le sèche-linge. Plus le linge est sec,
plus le temps de séchage sera court, ce qui
économisera de l’énergie.
TOUJOURS
● Essayez de sécher le poids de linge
maximum,pour économiser du temps et de
l’électricité.
● Vérifiez que le filtre est propre avant chaque
cyclede séchage.
JAMAIS
● Ne dépassez pas le poids maximum pour ne
pas gaspiller du temps ou de l’électricité.
● Ne mettez pas d'articles dégoulinant d’eau
dans le sèche-linge pour ne pas endommager
l’appareil.
Poids De Séchage Maximum
● Coton 8 kg maxi
● Synthétiques 4 kg maxi
Ne surchargez pas le tambour ; lorsqu’ils
sont mouillés, les grands articles peuvent
dépasser le poids de maximum admissible (ex :
sacs de couchage, couettes).
Triez La Charge Comme Suit :
● Par symbole de soin d’entretien
Vous les trouverez sur le col ou la couture intérieure :
Convient pour séchage en machine.
. .
Séchage à haute température.
Séchage à basse température
.
uniquement.
Ne séchez pas en machine.
Si le vêtement ne comporte aucune étiquette de
conseils de lavage, considérez qu'il ne convient pas
pour le séchage en machine.
● Par quantité et épaisseur
Lorsque la charge est plus importante que la
capacité du sèche-linge, séparez les vêtements
selon leur épaisseur (ex : les serviettes des
sousvêtements fins).
● Par type de tissu
Coton/toile de lin : Serviettes, jersey en coton,
linge de lit ou de table.
Synthétiques : Chemisiers, chemises, blouses etc.
en polyester ou polyamide, ainsi que pour les
mélanges de coton/synthétique.
● Par degré de séchage
Triez selon : sec pour repassage, sec pour
rangement, etc. Pour les articles délicats, appuyez
sur le bouton pour sélectionner une température
de séchage basse.
Guide De Séchage
Ce tableau indique les temps de séchage approxi-matifs,
selon le type de tissu et le degré d’humidité des
vêtements.
TISSUS
COTON
SYNTHÉTIQUES
ACRYLIQUE
PUISSANCE
DE SÉCHAGE
HAUT
BAS
BAS
PLEINE
CHARGE
140-165min
---
½
CHARGE
70-80min
70-80min---
50-65min
PETITE
CHARGE
50-65min
40-55min
30-40min
FR
31
Page 32

COMMANDES et INDICATEURS
Voyant vidage
réservoir d'eau
Bouton Sélection
temps
entretien filtre
Bouton départ
différé
Voyant
Acryliques /
Synthétiques
Display
Bouton
Défroissage
Bouton
Début/Pause
Sélecteur de
programmes
Panneau de commande et témoins indicateurs
Sélecteur de programmes - Permet de sélectionner le programme souhaité.
Bouton Temps de Séchage -Permet de modifier la durée du programme choisi. Il peut être utilisé
uniquement avec les programmes Mix&Dry, Chemises et avec les programmes minutés.
Bouton départ différé - Permet de différer le départ du cycle de séchage (voir les explications
détaillées dans la section prévue à cet effet).
Bouton Séchage Délicat - Drücken, um das Bekleidungsmaterial zu wählen (Acryl, Synthetik). Ist die
Schontrocknen-Option gewählt, leuchtet die Anzeige auf.
Bouton Défroissage - Permet de programmer un cycle défroissage à la fin du cycle choisi.
Bouton Marche/Arrét - Permet de démarrer ou stopper le programme sélectionné.
Bouton Mémo - 2 minutes après le lancement d'un programme et des éventuelles options, il est
possible de mémoriser le programmé préféré en appuyant simultanément pendant 3 secondes les
boutons Défroissage et Acryliques / Synthétiques.
Voyant entretien filtre - Le voyant s'allume lorsque le filtre a besoin d'être nettoyé .
Voyant vidage réservoir d'eau - Le voyant s'allume lorsque le réservoir d'eau est plein.
Display progammes automatiques - Les voyants lumineux respectifs à chaque programme
s'allument lorsque un programme automatique est sélectionné.
- Le voyant s'allume lorsqu'un programme écologique est sélectionné.
Ventilation - Le voyant s'allume lorsque le programme commence sa phase de ventilation à froid.
SÉLECTION DU PROGRAMME
La machine Hoover Sensor Dry propose diverses options de
séchage du linge répondant à tous les besoins. Le tableau ciaprès répertorie les programmes et leurs fonctions
correspondantes.
Note : Il se peut que le capteur ne détecte pas les petites
charges de petits articles. Pour les petites charges et les articles
individuels ou les tissus pré-séchés ayant une faible teneur en
humidité, utilisez les programmes à durée déterminée. Réglez le
programme entre 30 et 75 minutes selon la taille de la charge et
le degré de séchage voulu, et sélectionnez une température
haute ou basse selon le type de tissu.
Si le capteur ne détecte pas l'article, le sèche-linge ne
fonctionnera que pendant 10 minutes avant de se mettre en
mode refroidissement.
Si la charge est trop importante ou trop mouillée, le sèche-linge
se met automatiquement en mode refroidis-sement après
environ 3 heures.
32
FR
Page 33

SÉLECTION DU PROGRAMME
PROGRAMME
Perfect Home
Sec
Pr t ranger é à
Pr t repasser é à
No Crease
Laine
Mix & Dry
DESCRIPTION
Sélectionner le dégré de séchage désiré. Les possibilités
disponibles comprennent l'option , idéale pour les serviettes et
peignoirs, l'option est idéale pour du linge de tous les jours,pour
les vêtements qui n'ont pas besoin d'être repassés, et l'option
pour du linge prêt à repasser.
Le programme Relax assure une fonction de traitement anti-plis.
L'appareil effectue un cycle de séchage à chaud des vêtements
pendants 9 minutes, suivi de 3 minutes à froid. Il s'agit d'une fonction
particulièrement utile lorsque les vêtements ont été laissés un certain
temps avant le repassage, dans le panier à linge par exemple. Les
vêtements peuvent sécher excessivement et se raidir lorsqu'ils sont
placés sur une corde à linge ou sur des radiateurs. Ce programme
Anti-plis atténue les plis sur les tissus et rend le repassage plus facile
et plus rapide.
Un programme délicat crée pour avoir des vêtements en laine plus
souples après un séchage à l'air. Ce cycle délicat à air chaud et d'une
durée de 12 minutes, peut également être utilisé pour rafraîchir les
vêtements en laine après qu'ils soient restés trop longtemps dans
l'armoire.
Programme spécial minuté pour sécher jusqu'à 4kg de linge
maximum (117 minutes).Par défaut, la durée de séchage suggérée
est de 99 minutes et permet de sécher jusqu'à 3kg. Avec ce
programme il est possible de sécher simultanément des fibres en
coton et des fibres synthétiques.
Chemises
Rapide 40'
Temps
Memo
Programme minuté spécialement étudié pour le séchage de
chemises avec une charge maximum de 3Kg (78 minutes). Pour
des chemises ou des pulls synthétiques, il est possible d'utiliser le
bouton Acryliques/Synthétiques.
Par défaut, la durée du cycle est de 60 minutes et permet de sécher
jusqu'à 2Kg de linge.
Le programme Rapide 40' est idéal pour obtenir des vêtements secs,
rafraîchis et prêts à porter, le tout en 40 minutes seulement. Ce
programme spécial, vérifie constamment la température dans le
tambour. La charge maximale est de 2kg et le programme est adapté
à tout type de tissus pouvant être séché dans un sèche-linge.
Inclus tous les programmes de séchage minutés : de 30 à 180
minutes. Le programme minuté 20 minutes prévoit uniquement un
cycle de ventilation à l'air froid.
Permet de proposer de nouveau un programme mémorisé
précédemment, sans avoir besoin de le sélectionner de nouveau
ou de choisir une option en sélectionnant les boutons.
33
FR
Page 34

PORTE et FILTRE
Ouverture De La Porte
Tirez sur la poignée
pour ouvrir la porte.
Pour reme t t r e l e
s è c h e - l i n g e e n
marche, fermez la
porte et appuyez .
ATTENTION ! Lorsque le sèche-linge est
en cours d’utilisation, il se peut que le tambour
et la porte soient TRES CHAUDS. N'arrêtez
jamais le sèche-linge avant la fin du cycle de
séchage sauf si tous les articles sont
rapidement retirés et étendus de façon à
dissiper la chaleur.
Filtre
IMPORTANT : Pour assurer l’efficacité du
sèche-linge, vérifiez que le filtre à peluches est
propre avant chaque cycle de séchage.
1. Tirez le filtre vers le
haut.
2. Ouvrez le filtre,
comme illustré.
3. Retirez doucement
les peluches à l’aide
d’une brosse douce ou
du bout des doigts.
4. Réenclenchez le
filtre et poussez-le en
place.
Indicateur Entretien Filtre
s’allume lorsqu’il
faut nettoyer le filtre.
Si le linge ne sèche
pas, vérifiez que le
filtre n’est pas colmaté.
NE PAS NETTOYER LE FILTRE À L'EAU
34
FR
RÉSERVOIR D’EAU
L’eau récupérée du linge pendant le cycle de
séchage est recueillie dans un bac situé en bas
du sèche-linge. Quand le réservoir est plein,
l’indicateur s’allume sur le panneau de
commande et le réservoir DOIT ABSOLUMENT êtr e vidé. Cep endant, nous
recommandons de vider le réservoir après
chaque cycle de séchage.
NOTE : Il n'y a que très peu d'eau qui est
récupéré pendant les premiers cycles d'une
nouvelle machine, car le réservoir intérieur est
rempli en premier.
Pour Retirer Le Réservoir
1. Tirez doucement le
r é s e r v o i r j u s q u ' à
l'extraire complètement.
Tenez-le fermement à
deux mains.
Lorsque le réservoir est
plein, il pèse environ 4
kg.
2. Inclinez le réservoir
d'eau pour vidanger
l'eau par le trou arrière.
Une fois vidé, remettez
le réservoir d'eau dans
sa position d'origine.
P O U S S E Z - L E
F E R M E M E N T E N
PLACE.
3.Appuyer sur la touche
de départ pour lancer le
cycle.
N O T E : S i v o us
disposez d'une bouche
d'évacuation proche du
sè c h e - l ing e , i l e s t
possible d'installer le kit
d'évacuation de façon
p e r m a n e n t e p o u r
v i d a n g e r l ' e a u
acc u m ulée da n s l e
sèche-linge. Il n'y aura
ainsi plus besoin de
vider le réservoir d'eau.
Toutes les informations
d'assemblage du kit sont
fournies avec celui-ci.
Page 35

Important : Coupez toujours le courant et
débranchez la prise avant de nettoyer le
condenseur.
Pour maintenir l’efficacité du sèche-linge,
véri fiez régu lièreme nt la propr eté du
condenseur.
Pour Retirer Le Condenseur
CONDENSEUR
FONCTIONNEMENT
1.Ouvrir la porte et charger le linge dans le
tambour.Vérifier qu'aucun vêtement n'entrave
la fermeture de la porte.
2. Fermer doucement la porte en la poussant
jusqu'à ce que vous entendiez un déclic.
1. Retirez la plaque de
protection
2. Tournez les deux
leviers de blocage
dans le sens contraire
des aiguilles d’une
montre et retirez le
condenseur.
3. Tirez l’ensemble du
c o nd e n s eu r ve r s
l’extérieur.
4. Retirez doucement
la poussière ou les
pel uches avec un
chiffon, puis lavez-le
en le tenant sous un
robinet d’eau pour que
l’eau coule entre les
plaques afin d’enlever
la poussière ou les
peluches éventuelles.
5.Remettez correctement le condenseur en
place (en suivant la
flèche) en le poussant
fermement. Bloquez
les deux leviers en
p o s i t i o n e n l e s
tournant dans le sens
des aiguilles d’une
montre.
6. Remettez la plaque
de protection en place.
3. Tournez le sélecteur de programme et choisir
le programme de séchage souhaité (consultez
le guide de programmation pour de plus amples
détails)
4. Pour sécher des articles délicats,
synthétiques ou acryliques,appuyez sur le
bouton pour diminuer la température de
séchage. Le voyant s'allume lorsque vous
sélectionnez cette option. Pour désactiver ce
mode, appuyez de nouveau et programmez de
nouveau l'appareil.
5. Appuez sur le bouton . Le sèche-linge
démarre automatiquement et le voyant situé au
dessus du bouton s'allume.
6. Si vous ouvrez la porte pendant le cycle de
séchage pour vérifier le linge, il est nécessaire
d'appuyer sur le bouton , pour recommencer
le séchage une fois la porte refermée.
7. Lorsque le cycle est bientôt terminé, la phase
de ventilation à froid commence. Les
vêtements sont séchés avec de l'air froid afin de
les refroidir.
8. Lorsque le programme est terminé, le voyant
END s'allume sur le display.
9. A la fin du cycle, le tambour continuera à
tourner de manière intermittente afin de
minimiser les plis. Cette opération se poursuit
jusqu'à ce que la porte s'ouvre.
Afin d'assurer un séchage efficace dans les
meilleures conditions, ne pas ouvrir la porte lors
des cycles de séchage automatiques.
FR
35
Page 36

FONCTIONNEMENT
Départ Différé
La fonction départ différé permet de différé le départ du cycle de séchage de 1 à 24 heures.
Lorsque cette fonction est selectionnée pour la première fois, l'afficheur indique un délai d'une
heure. Il convient d'appuyer plusieurs fois sur le bouton pour repousser successivement le
démarrage d'heure en heure, et ce jusqu'à 24H maximum.
Pour démarrer le programme, appuyez sur . Le voyant lumineux clignotera et l'afficheur
indiquera le temps restant du cycle.
Annulation et Réinitialisation du Programme
Pourt annuler le programme, appuyez sur la touche pendant 3 secondes. La machine
indiquera qu'elle à été réinitialisée par le clignotement de 0:00 sur l'afficheur.
NETTOYAGE ET ENTRETIEN DE ROUTINE
Nettoyage Du Sèchelinge
● Nettoyez le filtre et videz le réservoir d’ eau
après chaque cycle de séchage.
● Nettoyez le condenseur à intervalles
réguliers.
● Après chaque période d’utilisation, essuyez
L’intérieur du tambour et laissez la porte
ouverte pendant un moment pour qu’il puisse
sécher grâce à la circulation d’air.
● Essuyez l’extérieur de la machine et la porte
avec un chiffon doux.
● N’UTILISEZ PAS de tampons ou d’ agents
de nettoyage abrasifs.
●Pour empêcher que la porte n'adhère ou que
les peluches s'accumulent, nettoyez après
chaque fin de cycle la surface intérieure et le
joint de la porte avec un chiffon humide.
ATTENTION! Il est possible que le
tambour, la porte et la charge soient très
chauds.
Spécifications Techniques
Capacité du tambour 115 litres
Charge maximale 8 kg
Hauteur 85 cm
Largeur 60 cm
Profondeur 60 cm
Étiquette d'énergie B
Information pour Laboratoire d'essai
EN 61121 Programme
Programme
Pour utiliser
-
-Coton Sec
-Coton Sec Au Fer
-Les Tissus Délicats
IMPORTANT Coupez toujours le courant et
débranchez la fiche de l’alimentation électrique
avant de nettoyer cet appareil.
Pour les données électriques, veuillez
consulter l’étiquette des valeurs nominales qui
se trouve à l’avant de l’armoire du sèche-linge
(avec la porte ouverte).
Pr t ranger é à
-
Pr t repasser é à
-
Pr t ranger é à
+ Délicat
FR
36
Page 37

DÉPISTAGE DE PANNES
Qu'est-ce qui peut être à l'origine de...
Défauts que vous pouvez rectifier vousmême
Avant d’appeler le service GIAS pour obtenir des
conseils, veuillez suivre la liste des vérifications
ci-dessous. L’intervention sera facturée si la
machine fonctionne correctement ou si elle a été
installée ou utilisée de manière incorrecte. Si le
problème persiste alors que vous avez terminé
les vérifications recommandées, veuillez appeler
le service GIAS qui pourra peut-être vous aider
par téléphone.
Le temps restant affiché peut varié pendant le
cycle de séchage. Le temps est constamment
ajusté au cours du cycle afin de donner la
meilleure estimation possible. Le fait que le
temps restant augmente ou diminue pendant
le cycle est normal.
La période de séchage est trop longue/les
vêtements ne sont pas suffisamment secs…
●Avez-vous sélectionné le temps de séchage/le
programme qui convient ?
● Les vêtements étaient-ils trop mouillés ? Les
vêtements avaient-ils été adéquatement essorés
en machine ou à la main ?
● Le filtre doit-il être nettoyé ?
● Faut-il nettoyer le condenseur ?
● Le sèche-linge est-il surchargé ?
● Les entrées, sorties et la base du sèche-linge
sont-elles libres d'obstructions ?
● Avez-vous sélectionné le bouton au cours
d’un cycle précédent ?
Le sèche-linge ne fonctionne pas…
● Le sèche-linge est-il branché sur une
alimentation électrique adéquate ? Vérifiez à
l’aide d’un autre appareil, par exemple une lampe
de chevet.
● La fiche est-elle bien branchée sur
l’alimentation de secteur ?
● Y a-t-il une panne de courant ?
● Le fusible a-t-il sauté ?
● La porte est-elle bien fermée ?
● Le sèche-linge est-il en position de marche, au
niveau du courant de secteur et de la machine ?
● La période de séchage ou le programme a-t-il
été sélectionné ?
● La machine a-t-elle été remise en marche après
l’ouverture de la porte ?
● Le sèche-linge s’est-il arrêté parce que le
réservoir d’eau est plein et qu’il faut le vider ?
Le sèche-linge est bruyant…
● Arrêtez le sèche-linge et contactez le service
GIAS pour obtenir des conseils.
L'indicateur est allumé…
● Le filtre doit-il être nettoyé ?
● Faut-il nettoyer le condenseur ?
L'indicateur est allumé…
● Le réservoir d’eau doit-il être vidé ?
SERVICE CLIENTÈLE
En cas de problème après avoir effectué toutes
les inspections recommandées, veuillez
contacter le Service. Il pourra vous aider par
téléphone ou organiser la visite d'un technicien,
en vertu des conditions de votre garantie.
Cependant, vous serez facturé dans l’un des
cas suivants :
● Si la machine est en bon état de marche.
● Si la machine n’a pas été installée
conformément aux instructions d’installation.
● Si la machine a été utilisée incorrectement.
Pièces De Rechange
Utilisez toujours des pièces de rechange du
fabricant, disponibles auprès du service GIAS.
Service GIAS
Pour les entretiens et les réparations, contactez
votre technicien local du service GIAS.
Le constructeur décline toute responsabilité
en cas d’erreurs d’impression dans le
présent document. Le constructeur se
réserve le droit d’apporter les modifications
nécessaires à ses produits sans en changer
les caractéristiques de base.
37
FR
Page 38

INDEX
Inleiding
Afleveringsinformatie
Uitpakken Van Het Product
Veiligheidsaanwijzingen
Gebruik
Installatie
De Was
Het Milieu
Gias-service
Installatie
Elektrische Vereisten
De Voeten Verstellen
Montageset Voor Afvoerslang: Montage Instructies
De Lading Voorbereiden
Voorbereiding Van De Kleren
Sorteren Van Het Wasgoed
Niet In De Droogtrommel Doen
Energie Besparen
Richtlijnen Voor Het Drogen
Bediening & Indicatielampjes
Het Programma Kiezen
Deur En Filter
De Deur Openen
Filter
Filter Schoonmaken Indicatielampje
Watercontainer
Om Het Reservoir Te Verwijderen
Condensator
De Condensator Verwijderen
Bediening
Het Programma Annuleren En Resetten
Start Uitstel Functie
Schoonmaken En Onderhoudsbeurten
Schoonmaken Van De Droger
Technische Specificaties
Problemen Oplossen
Klantenservice
Reserveonderdelen
Gias-service
39
39
39
39
39
40
40
40
40
41
41
41
42
43
43
43
43
43
43
44
45
46
46
46
46
46
46
47
47
47
48
48
48
48
48
49
49
49
49
NL 38
Page 39

INLEIDING
Lees deze instructies zorgvuldig door en gebruik deze machine op basis van deze aanwijzingen. Dit
boekje geeft u naast belangrijke richtlijnen voor het veilige gebruik de veilige installatie en het veilige
onderhoud van de machine ook enkele nuttige tips over hoe u de beste resultaten bekomt wanneer u met
deze machine wast.
Bewaar alle documentatie op een veilige plek zodat u of de toekomstige eigenaars van de machine ze in de
toekomst opnieuw kunnen raadplegen.
Afleveringsinformatie
Controleer dat de volgende items samen met de
wasmachine werden geleverd:
● Handleiding
● Garantiekaart
● Energiekeurmerk
Controleer of de machine schade heeft
opgelopen tijdens het vervoer. Indien dit het
geval is, neem dan contact op met GIAS.
Als u de bovenstaande aanwijzingen niet
opvolgt, kan de veiligheid van de machine niet
worden gegarandeerd. Indien het probleem met
uw machine wordt veroorzaakt door misbruik,
kunnen de kosten van de onderhoudsbeurt aan u
worden doorberekend.
VEILIGHEIDSAANWIJZINGEN
Gebruik
● Deze machine is niet bedoeld voor gebruik door personen (waaronder kinderen) met een verminderd
fysiek, motorisch of mentaal vermogen, of personen zonder ervaring en kennis, tenzij zij onder toeziend oog
staan of instructies hebben gekregen over de machine door een persoon die verantwoordelijk is voor hun
veiligheid.
● Kinderen moeten in de gaten gehouden worden, om erop toe te zien dat ze niet spelen met de machine.
● WAARSCHUWING Misbruik van een droogtrommel kan brand veroorzaken.
● Deze machine is alleen voor huishoudelijk gebruik, m.a.w. voor het drogen van huishoudelijk textiel en
kleding.
● Dit apparaat mag uitsluitend gebruikt worden voor het doel waarvoor het vervaardigd is, zoals dat in deze
handleiding beschreven wordt. Verzeker u ervan dat u de instructies voor de installatie en het gebruik
volledig begrijpt voordat u de machine gebruikt.
● Raak de machine niet aan als uw handen of voeten nat of vochtig zijn.
● Leun niet tegen de deur als u de machine laadt en gebruik de deur niet om de machine op te tillen of te
verplaatsen.
● Sta niet toe dat kinderen met de machine of de bediening ervan spelen.
● WAARSCHUWING Gebruik het apparaat niet als de pluizenfilter niet geplaatst of beschadigd is; pluis kan
ontbranden.
● WAARSCHUWING Op de plaats van het symbool voor warm oppervlak kan de temperatuur tijdens
het drogen tot meer dan 60 graden C stijgen.
● Haal de stekker uit het stopcontact. Haal altijd de stekker uit het stopcontact voordat u de machine
schoonmaakt.
● Blijf deze machine niet gebruiken als ze een gebrek lijkt te hebben.
● Pluizen of dons mogen zich niet op de grond rondom de buitenkant van de machine ophopen.
● De trommel kan vanbinnen erg heet worden. Wacht altijd met het uithalen van het wasgoed tot de
afkoelingsperiode van de droger voorbij is.
UITPAKKEN VAN HET PRODUCT
Verwijder de machine uit de
verpakking op de plek waar
u de machine wilt plaatsen.
1. Snij voorzichtig rond de
voet van de verpakking en
langs een hoek omhoog.
2. Verwijder de hoes van
polyethyleen en til de droger
van de polystyrene voet.
Gooi de verpakking veilig weg. Zorg dat
de verpakking buiten bereik van kinderen blijft,
het vormt een potentieel gevaar.
39
NL
Page 40

VEILIGHEIDSAANWIJZINGEN
Installatie
● Controleer het apparaat op zichtbare
beschadigingen vooraleer u het gebruikt.
Gebruik het niet als het beschadigd is maar
neem contact op met GIAS-Service.
● Gebruik geen adapters, meervoudige stekkers
en/of verlengsnoeren.
● Installeer de droger nooit tegen gordijnen aan
en zorg ervoor dat er geen artikelen achter de
droger kunnen vallen en zich daar kunnen
ophopen.
● De machine mag niet worden geïnstalleerd
achter een afsluitbare deur, een schuifwand of
een deur met een klink aan de andere zijde van
de deur t.o.v. de droogtrommel.
De Was
● Geen ongewassen wasgoed in de droogtrommel
drogen.
● WAARSCHUWING Geen st offen in de
droogtr omme l do en di e met chem isch e
reinigingsvloeistoffen zijn behandeld.
● WAARSCHUWING Materialen uit schuimrubber
kunnen onder bepaalde omstandigheden,
wanneer ze verhit worden, spontaan ontbranden.
Artikelen zoals schuimrubber (latexschuim),
douchekapjes, waterproef textiel, artikelen met
een rubberzijde en kleding of kussens met
schuimrubberen pads MOGEN NIET in de
droogtrommel worden gedroogd.
● Bekijk altijd de wasvoorschriften op het wasgoed
om te controleren of u het in de droger mag drogen.
● Kleren moeten gecentrifugeerd of grondig
uitgewrongen worden, vo ordat zij in de
droogtrommel gestopt worden. Druipnatte kleren
mogen NIET in de droger gestopt worden.
● Aanstekers en lucifers mogen niet in zakken
blijven zitten en gebruik NOOIT ontvlambare
vloeistoffen in de buurt van het apparaat.
●Glasvezelgordijnen mogen NOOIT in dit apparaat
worden gestopt. Er kunnen zich huidirritaties
voordoen als andere kledingstukken met de
glasvezels in aanraking geweest zijn.
● Wasgoed dat is verontreinigd met substanties,
zoals kookolie, aceton, alcohol, petroleum,
kerosine, vlekverwijderaars, terpetine, wax en
waxverwijderaars, moeten in heet water gewassen
worden met extra wasmiddel voordat ze in de
droogtrommel worden gedroogd.
● Wasverzachters en vergelijkbare producten
moeten worden gebruikt volgens de Aanwijzingen
die op de wasverzachter staan vermeld.
Het Milieu
● Al l e ve r pa k k i ng s m a te r ia l e n z i j n
milieuvriendelijk en recycleerbaar. Doe de
v e r p a k k i n g s m a t e r i a l e n o p e e n
milieuvriendelijke manier van de hand. Uw
gemeente kan u informeren over de beste
manier om deze materialen weg te ruimen.
● Wanneer u een oude wasmachine van de
hand doet, moet u voor alle veiligheid de
stekker uit het stopcontact halen, het
stroomsnoer afknippen en dit samen met de
stekker vernietigen. Om te voorkomen dat
kinderen zichzelf in de machine opsluiten,
breekt u de scharnieren of het slot van de deur.
Europese Richtlijn 2002/96/EC
Di t apparaat vold oet a an de
Europese richtlijnen 2002/96/EC
voor elektrische en elektronische
afval.
Door dit apparaat correct te verwijderen, helpt u
het potentiële negatieve gevolg voor de omgeving
en menselijke gezondheid te voorkomen, welke
anders door onjuiste verwijdering zou kunnen
worden veroorzaakt.
Het symbool op het product duidt aan dat dit
pr od uct ni et b ehandel d zal word en als
huishuidelijk afval. In plaats daarvan zal het
apparaat naar het verzamelpunt voor de recycling
van elektrische en elektronische uitrusting gaan.
De verwijdering moet in overeenstemming met
p l a a t s e l i jk e m i l i e u v o o r s c h r i f t e n v o o r
afvalverwerking uitgevoerd worden. Voor meer
gedetailleerde informatie over de verwijderingvan
dit product, neemt u contact op met uw
gemeenlijke reinigingsdienst of de dealer waar u
het apparaat heeft gekocht.
GIAS-Service
● Om te zorgen voor een continue veilige en
efficiënte werking van dit apparaat, bevelen wij
Aan dat servicing of reparaties alleen worden
ui tgev oerd do or een bevoegde GIAS
onderhoudsmonteur.
Als de machine niet correct functioneert of
kapot gaat, schakelhet dan uit en haal de stekker
uit het stopcontact. Wendt u tot GIAS-Service
voor reparaties.
NL 40
Page 41

INSTALLATIE
Elektrische Vereisten
Drogers worden geleverd om te kunnen werken op
een voltage van 220-240V, 50 Hz monophase.
Controleer of het voedingscircuit ten minste 10A
bedraagt.
Elektriciteit kan erg gevaarlijk zijn.
Deze machine moet geaard zijn.
Het stopcontact en de stekker van de machine
moeten van hetzelfde soort zijn.
Gebruik geen meervoudige adapters en/of
verlengsnoeren.
Nadat het apparaat is geïnstalleerd, moet de
stekker bere ik ba ar blijven om uit h et
stopcontact te halen.
CE apparaat voldoet aan de Europese richtlijn
200 4 /108 / EC, 2 006/ 9 5/EC e n vo l g end e
aanvullingen.
Indien het probleem met uw machine wordt
Veroorzaakt door een verkeerde installatie,
kunnen de kosten van de onderhoudsbeurt aan
u worden doorberekend.
VENTILATIE
De kamer waarin de droger geplaatst wordt, moet
voldoende geventileerd worden om te voorkomen
dat gassen van mechanismen die werken via
brandstofverbranding, zoals een open haard, in de
kamer gezogen worden wanneer de droger in
werking is.
● Afzuiglucht mag niet in een via een afvoer
waarlangs uitlaatstoffen van mechanismen die
gas of andere brandstoffen verbranden, worden
afgevoerd.
● Controleer regelmatig dat de lucht die door de
droger stroomt, niet geblokkeerd wordt.
● Controleer na gebruik de pluizenfilter en maak
die indien nodig schoon.
● De aanvoeren en afvoeren moeten vrij
gehouden worden van obstructies. Om te zorgen
voor voldoende ventilatie moet de ruimte tussen
de onderkant van de machine en de vloer vrij
blijven. Er moet een opening van ten minste 12
mm zijn tussen de machine en enig obstakel.
● Voorkom dat artikelen achter de droger vallen of
zich daar ophopen omdat deze de luchtaanvoer
en afvoer kunnen belemmeren.
● Installeer de droger NOOIT tegen gordijnen aan.
Als de stroomkabel van het toestel
beschadigd is, dan moet hij vervangen worden
door een speciaal snoer dat ALLEEN bij de dienst
Reserveondelen verkrijgbaar is. De kabel moet
door een bekwaam persoon worden geïnstalleerd.
Sluit de machine niet aan en start deze niet
voordat de installatie is voltooid. Voor uw veiligheid
moet deze droger op de juiste manier worden
geïnstalleerd. Als er ook maar enige twijfel bestaat
over de installatie, bel dan de GIASService voor
advies.
De Voeten Verstellen
Als de machine is
geplaatst, moeten de
voeten worden versteld
zoda t de machine
waterpas staat.
Air Inlent Vents
Air Outlets
Air Outlets in the Base
Installeer het apparaat niet in een erg koude ruimte
of in een ruimte waar het kan vriezen. Bij een
temperatuur rond het vriespunt kan de droger mogelijk
niet goed functioneren: er is een kans op schade
indien het water gaat bevriezen in het hydraulisch
systeem (leidingen, kleppen, pomp). Voor een betere
prestatie van het product moet de temperatuur van de
ruimte tussen +2°C en +35°C graden zijn. Gelieve er
rekening mee te houden dat werking van de droger in
koude omstandigheden (tussen +2 en +15°C)
condenswater en waterdruppels op de vloer kan
veroorzaken.
41
NL
5
Page 42

Afvoerslang kit: Montage-instructies
Om te voorkomen dat het waterreservoir moet
worden geleegd na elk droogcyclus, kan het
water dat normaal gesproken wordt verzameld
tijdens het droogproces direct worden afgevoerd
naar een afvalwaterafvoerpijp (Hetzelfde
afvoersysteem als bij huishoudelijke wastafels).
Gemeenschappelijke water regelgeving verbiedt
het aansluiten op het oppervlaktewater. De
afvoerslang moet naast de droger worden
geplaatst.
De kit bestaat uit: een slang, een rechte pijp-
aansluiting, een pijpbeugel en plastic tie-rap. .
WAARSCHUWING! Schakel eerst de
machine uit en trek de stekker uit het
stopcontact, voor uw de droger gebruikt.
Bevestig de kit als volgt::
1 . D r a a i d e d r i e
sch r o e ven a a n de
ach t e rzijde v a n de
m a c h i n e l o s e n
ve rwijder deze met
b e h o u d v a n h e t
werkblad (worktop trim).
2.V e r w i j d e r h e t
achterste werkblad
(worktop trim) en het
bove n s t e werkb l a d
(worktop surface) door
het voorzichtig naar de
achterk a n t v a n de
machine te schuiven.
3.De afvoerbak bevindt
zich aan de rechterkant
van de machine (gezien
vanaf de achterkant).
Een grijze slang is
verbonden met de brug
boven de watertank.
Ve r w i j d e r d e oude
pijpbeugel met behulp
van een tang van de
brug.
4. Koppel de slang van
de brug-verbinding.
5. Bevestig de slang uit
de kit, met behulp van
de geleverde brug en
pijpbeugels, aan de
verwijderde slang van
de brug-verbinding.
NL
42
6. Verwijder de deksel van
het waterreservoir aan de
a c h t er k a n t v a n d e
machine door de twee
schroeven te verwijderen
en de deksel open te
klikken
.
7. Breek het lipje aan de
zijkant van de deksel af en
plaats de deksel weer op
de m ac hi n e, p la a ts
vervolgens de schroeven.
U zou nu een gat moeten
zien aan de achterkant
van de kast naast het
deksel.
8. Plaats de afvoerslang
door de opening van de
kast.
9. Verbindt de grijze slang
en bevestig de slang aan
de brug met behulp van de
plastic tie-rap.
10. Schuif voorzichtig het
werkblad terug op zijn
plaats en bevestig deze
met de 3 schroeven. Zorg
ervoor dat de slang niet
geknelt raakt.
11 . S l u i t d e n i euw e
afvoerslang aan op de
waterslang. Zorg ervoor
dat de nieuwe slang niet
verstrengeld raakt als u de
droogtrommel op zij n
plaats schuift en volg de
h i e r b e s c h r e v e n
instructies bij de installatie
van de nieuwe externe
slang.
12. Sluit de machine aan
op de voeding.
13. Schakel de machine
na het legen van de
afvoerbak op AAN(of druk
op de 'START' knop bij
elektronische modellen)
om het droogprogramma
te starten.
Page 43

HET WASGOED VOORBEREIDEN
Alvorens de droogtrommel voor de eerste keer te
gebruiken:
● Lees deze handleiding a.u.b. aandachtig door.
● Verwijder alle artikelen die in de trommel zijn
Gepakt.
● Veeg de binnenkant van de trommel en de deur
met een vochtige doek af om alle stof te verwijderen
dat zich tijdens het vervoer kan hebben verzameld.
Voorbereiding van de Kleren
Zorg ervoor dat het wasgoed dat u wilt drogen,
geschikt is voor het drogen in een droogtrommel,
zoals wordt aangegeven door de wasvoorschriften
op ieder artikel.
Controleer dat alle sluitingen dicht zijn en dat de
Zakken leeg zijn. Keer de kleren binnenstebuiten.
Leg de kleren losjes in de trommel om ervoor te
zorgen dat ze niet in elkaar verward raken.
Niet In De Droogtrommel Drogen:
Wol, zijde, fijn goed, nylon kousen, fijn
borduurwerk, stoffen met metalen versieringen,
kledingstukken met pvc of leren randen,
trainingsschoenen, artikelen met een groot
volume zoals slaapzakken, enz.
BELANGRIJK: Stop geen artikelen in de
droogtrommel, die zijn behandeld met een
chemische reinigingsvloeistof en ook geen rubber
kleren (gevaar voor brand of explosie).
Tijdens de laatste 15 minuten (ongeveer) draait
de was in koude lucht.
Energiebesparing
Stop alleen wasgoed in de droogtrommel dat
grondig is uitgewrongen of gecentrifugeerd.
Hoe droger het wasgoed, hoe korter de
droogtijd waardoor elektriciteit wordt bespaard.
ALTIJD
● Probeer altijd om het maximale gewicht aan
wasgoed te drogen, zo bespaart u tijd en
elektriciteit.
● Controleer altijd voor iedere droogcyclus of de
filter schoon is.
NOOIT
● Stop nooit meer dan het maximale gewicht in
de droger, dit is verspilling van tijd en
elektriciteit.
● Stop nooit druipnat wasgoed in de
droo g t r ommel, dit kan het apparaat
beschadigen.
Maximaal te Drogen Gewicht
● Katoen Max. 8 kg
● Synthetische stoffen Max. 4 kg
Overlaadt de trommel niet. Grote stukken
kunnen wanneer ze nat zijn de maximaal
to e g ela t e n w a s la d i ng o v er s c h ri j d en
(bijvoorbeeld: slaapzakken, donsdekens).
Sorteer Het Wasgoed Als Volgt:
● Op wasvoorschrift
Deze vindt u in de kraag of in de binnennaad:
Kan in de droogtrommel gedroogd
worden.
. .
Drogen in de droogtrommel op hoge
temperatuur.
.
Drogen in de droogtrommel alleen op
lage temperatuur.
Niet in de droogtrommel drogen.
Als de stof geen wasvoorschrift heeft, kunt u er
van uitgaan dat het niet geschikt is voor de
droogtrommel.
● Op hoeveelheid en dikte
Altijd wanneer de hoeveelheid wasgoed groter is
dan de capaciteit van de droger, sorteer de
kleren op dikte (b.v. handdoeken apart van dun
ondergoed).
● Op type stof
Katoen/linnen: Handdoeken, jersey katoen,
beden tafellinnen.
Synthetische stoffen: Blouses, overhemden,
overalls, enz. gemaakt van polyester of
p o l y am i d e , e v ena l s v o o r g e men g d
katoen/synthetisch.
● Op de temperatuur van het drogen
Sorteer op: strijkdroog, kastdroog, enz. Voor fijn
goed druk op de -knop om een lage
droogtemperatuur in te stellen.
Drying Guide
The table shows approximate drying times,depending on
the type of fabric and dampness of the clothes.
FABRIC
COTTON
SYNTHETICS
ACRYLIC
HEAT
SETTING
HIGH
LOW
LOW
HEAVY
LOAD
140-165min
MEDIUM
LOAD
70-80min
70-80min---
50-65min
---
LIGHT
LOAD
50-65min
40-55min
30-40min
NL
43
Page 44

BEDIENINGSKNOPPEN EN INDICATIELAMPJES
Watercontainer
Legen indicatielampje
Tijds Instelling
Toets
Bedieningspaneel / Indicatielampjes
Startkeuze
Knop
Filter Schoonmaken
Indicatielampje
Acryl
Synthetisch Toets
Anti- Kreuk
Programma
Toets
Display
Start/Pause
Toets
Programmakeu
zeschakelaar
Programma Keuze knop - Kies het gewenste programma
Tijds instelling toets – Hiermee kunt u de tijdsduur van een programma aanpassen It can
be used only with the selection of: Mix&Dry, Shirts and Time Programs
Uitgestelde start – Hiermee kun u de aanvangstijd van de droogcyclus instellen.
Acryl/Synthetisch Toets – Wanneer u hierop drukt zal de standaard indicator vervagen en
de zal oplichten.
Anti- Kreuk toets – Hiermee selecteerd u een anti kreuk programma.
Start/Pause toets – Druk om het gekozen droogprogramma te starten of pauzeren
Memo Toets– Hiermee kunt u en programma opnemen, door tegelijk de Anti-kreuk en de Acryl /
Synthetisch toets gedurende 3 seconden in te drukken, 2 minuten na het gekozen
droogprogramma.
Filter reinigen indicator – Brandt wanneer de filter schoongemaakt moet worden
Water Reservoir legen – Brandt wanneer de watercontainer vol is
Programma Display – De bijbehorende lampjes branden bij het gekozen programma.
- Indicator zal branden als de eco-programma is geselecteerd
Refresh – Brandt als het programma begint met de koelfase.
HET PROGRAMMA KIEZEN
De Hoover Sensor Wasdroger biedt veel opties voor het gewenste
drogen van de was. In de onderstaande tabel staan de
programma's en functie van ieder programma Vermeld.
Opmerking: De sensor zal misschien een kleine lading artikelen
niet ontdekken. Gebruik imerprogramma’s voor kleine ladingen en
aparte artikelen of voorgedroogde stoffen met een laag
vochtgehalte. Stel het programma tussen 30 en 75 minuten
afhankelijk van de grootte van de lading en de vereiste droogte en
slecteer een hoge of lage temperatuur afhankelijk van het soort
stof.
Als de sensor het artikel niet waarneemt, zal de droger slechts 10
minuten draaien, waarna het op afkoelen overgaat.
Als de lading te groot of te nat is om te drogen, zal de droger na
ongeveer 3 uur Automatisch op afkoelen overgaan.
NL 44
Page 45

HET PROGRAMMA KIEZEN
PROGRAMMA
Perfect Home
Extradroog
Kastdroog
Strijkdroog
No Crease
Wol Finish
Mix & Dry
Shirts
BESCHRIJVING
Kies de droogtegraad die u wenst.
Dit varieert van voor handdoeken en badjassen, naar voor
artikelen die zonder strijken opgeborgen worden, tot Het
programma dat het wasgoed strijkklaar maakt.
Het programma biedt een verzorgende en anti-kreuk functie. De
droger zal de lading gedurende 9 minuten verwarmen en
vervolgens 3 minuten afkoelen en is vooral bedoeld voor kleding
die enige tijd voorafgaand aan het strijken zijn blijven liggen.
Kledingstukken kunnen ook stug zijn door het buiten drogen of op
de verwarming. Dit programma ontspant de kreuken in de stof,
waardoor het strijken sneller en makkelijker gaat.
Een voorzichtig programma speciaal gemaakt om wol zachter te
maken na lucht-droging. Dit delicate warme lucht programma
duurt 12 minuten, kan ook gebruikt worden om wol "op te
frissen" als het langere tijd in de kast heeft gelegen.
Dit is een speciaal programma met een maximale belasting van 4
kg (117 min). De standaard duur is 99 minuten en maakt het
mogelijk om tot 3 kg te drogen. Met dit programma kunt u katoen en
synthetische stoffen samenvoegen.
Dit is een speciaal programma voor shirts met een maximale
belading van 3kg (78 minuten). Voor synthetische shirts moet u de
Acryl/Synthetische toets indrukken. De standaard duur is 60
minuten en maakt het mogelijk om te drogen tot 2 kg.
Rapid 40'
Tiid
Memo
Het Rapid 40 'programma is een snel droogprogramma. Dit is een
ideaal programma voor het hebben van droge, frisse en direct
draagbare kleding in minder dan 40 min. Dit speciale programma
controleert voortdurend de temperatuur in de trommel. De maximale
belasting is 2 kg en het programma is geschikt voor alle stoffen welke
geschikt zijn voor de droogautomaat.
Tijd keuze omvat alle handmatige tijdsprogramma's: van 30
minutes tot 180 minutes. De 20 minuten is alleen koude lucht
ventilatie (Opfrissen).
Memo-programma maakt het mogelijk om het laatst gekozen
programma dat is opgeslagen, opnieuw uit te voeren.
45
NL
Page 46

De Deur Openen
Trek aan de hendel
om de deur te openen.
O m d e d r o g e r
opnieuw te starten,
doet u de deur dicht
en drukt u op .
WAARSCHUWING! Wanneer de droger in
gebruik is, kunnen de trommel en de deur ERG
WARM worden. De droger nooit uitzetten voor
het einde van de droogcyclus, tenzij het
wasgoed snel uit de droger wordt gehaald en
uitgespreid om de hitte af te voeren.
Filter
BELANGRIJK: Controleer, om ervoor te
zorgen dat de droger efficiënt blijft werken, voor
iedere droogcyclus of de pluizenfilter schoon is.
1. Trek de filter omhoog.
2. Open de filter zoals
getoond wordt.
3. Haal de pluizen met
een zacht borsteltje of
met uw vingertoppen
voorzichtig weg.
4. Klik de filter samen en
duw hem terug op zijn
Plaats.
Filter Schoonmaken Indicatielampje
brandt wanneer het
filter schoongemaakt
moet worden.
Als het wasgoed niet
d r o o g w o r d t ,
controleer dan of de
filter verstopt is.
Geen water gebruiken om het filter te reinigen!
DEUR en FILTER
Het water dat tijdens de droogcyclus uit de was
wordt verwijderd, wordt verzameld in een
re servoir onderaan de d roogmach ine .
Wanneer de container vol is zal het
indicatielampje op het regelpaneel gaan
branden en MOET de container worden
geleegd. Maar, we raden aan dat de container
na iedere droogcyclus wordt geleegd.
OPMERKING: Tijdens de eerste cycli van een
nieuwe machine wordt er weinig water
verzameld in het reservoir.
Om het reservoir te verwijderen
1. T r e k d e l a d e
voorzichtig naar buiten
tot het helemaal is
v e r w i j d e r d .
Ondersteun de lade
met tw ee handen.
W a n n e e r d e
watercontainer vol is,
zal deze ongeveer 4kg
wegen.
2.H o u d d e
watercontainer schuin,
zodat het water door
het gat achterin kan
wegstromen.
Als de watercontainer
leeg is, schuift u deze
weer op zijn Plaats.
DRUK GOED OP ZIJN
PLAATS.
3. Druk om de
cyclus te herstarten
O P M E R K I N G :
W a n n e e r u e e n
afvoermogelijkheid bij
de droger heeft, kunt u
de afvoerset gebruiken
w a a r m e e e e n
permanente afvoer
ontstaat voor het door
de droger verzamelde
water. Hierdoor hoeft
de waterlade niet meer
geleegd te worden. U
vindt alle informatie
over de montage van
de set in de verpakking
van de set.
NL 46
Page 47

CONDENSATOR
Belangrijk: Zet het apparaat altijd uit en trek
de stekker uit het stopcontact alvorens u de
condensator schoonmaakt.
Controleer regelmatig of de condensator
schoon is om de efficiëntie van de droger te
handhaven.
To Remove the Condenser
1 . R e m o v e t h e
kickplate.
2. Turn the two locking
levers anti-clockwise
a n d p u l l o u t th e
condenser.
3 . P u l l o u t t h e
condenser unit.
4. Gently remove any
dust or fluff with a cloth,
then wash the unit by
holding it under a
running tap turning it
so that water flows
between the plates, to
remove any dust or
fluff.
BEDIENING
1. Doe de deur open en laad de trommel met
wasgoed. Zorg ervoor dat de kledingstukken
het sluiten van de deur niet belemmeren.
2. Doe de deur voorzichtig dicht u hoort dan
een 'klik'.
3. Draai de programma knop naar het door u
gewenste programma(zie programma Gids).
4. Voor synthetische, acryl of fijne artikelen
drukt u de toets om de temperatuur te
verlagen. Het indicatie lampje gaat branden als
de temp. is verlaagd. Om uit te schakelen
tijdens de eerste paar minuten van het prog.
druk de toets. Na deze periode moet u de
machine resetten om deze instelling te
wijzigen.
5. Druk op de toets. De droger zal
automatisch starten en de indicator boven deze
toets zal gaan branden.
6. Als de deur geopend is geweest tijdens de
cyclus moet u opnieuw op deze toets
drukken om het programma te hervatten, zorg
dat de deur gesloten is.
7. Als de cyclus bijna ten einde is zal de
machine een koelfase ingaan om de kleding af
koelen.
5. Refit the condenser
ensuring it is in the
c o r r ec t w a y ( a s
indicated by the arrow)
and pushed firmly into
place. Lock the two
levers by turning them
clockwise.
6. Refit the kickplate.
8. Als het programma klaar is zal het END
indicatielampjeop het display gaan branden.
9. Nadat de cyclus is afgerond, zal de trommel
met tussenpozen draaien om kreukelvorming
te minimaliseren. Er zal een signaal klinken, dit
stopt als u de machine uitgeschakeld of de deur
opent.
Om een goede droging te verkrijgen de de
deur niet openen tijdens een programma.
47
NL
Page 48

BEDIENING
Start Uitstel
Uitgestelde start functie geeft de mogelijkheid de start van de droogcyclus uit te stellen van 1
to 24 uur.
Wanneer de functie is gekozen, toont het bedieningspaneel een uitstel van 1 uur. Iedere volgende
druk op de knop zal de uitgestelde start met 1 uur verlengen.
Om de uitstel te bevestigen druk op en zal na het verstrijken van die tijd de droogcyclus
starten. Het lampje zal gaan knipperen om aan te geven dat de startuitstel is geactiveerd.
Het Programma Annuleren En Resetten
Om een programma te stoppen gedurende 3 sec. indrukken. In het TIJD display 0:00
Lampje gaat knipperen om aan te geven dat het programma is gereset.
SCHOONMAKEN EN ONDERHOUDSBEURTEN
Schoonmaken Van De Droger
● Maak het filter schoon en leeg het
waterreservoir na iedere droogcyclus.
● Maak de condensator regelmatig schoon.
● Veeg na iedere gebruiksperiode de
binnenkant van de trommel af en laat de deur
een poosje open zodat ze kan drogen door de
circulatie van de lucht.
● Veeg de buitenkant van de machine en de
deur af met een zachte doek.
● G E E N s c h u u r s p o n s j e s o f
schoonmaakmiddelen gebruiken.
● Om te voorkomen dat de deur plakt of pluis
zich ophoopt, moet u de binnend eur
regelmatig schoonmaken met een natte doek.
WAARSCHUWING! De trommel, de deur
en het wasgoed kunnen erg warm zijn.
Technische Specificaties
Trommelcapaciteit 115 liter
Maximale lading 8 kg
Hoogte 85 cm
Breedte 60 cm
Diepte 60 cm
Energieniveaugroep B
Testspecificaties
EN 61121 Programma
-Katoen drogen
-Strijkdroog Katoen
-Delicate kleding
BELANGRIJK Voor u dit apparaat
schoonmaakt, moet u het altijd uitschakelen en
de stekker uit het stopcontact halen.
De elektrische gegevens vindt u op het
kwalificatieetiket op de voorkant van de droger
(met de deur open).
Programmakeuze
-Kastdroog
-Strijkdroog
-Kastdroog + Synthetisch
NL 48
Page 49

PROBLEMEN OPLOSSEN
Wat Zou De Reden Kunnen Zijn Voor...
Defecten die u zelf kunt oplossen
Voordat u de GIAS-Service voor technisch
advies belt, kunt u de volgende controlelijst
afgaan. Er zullen kosten worden aangerekend
als blijkt dat de machine werkt of dat de machine
niet juist werd geïnstalleerd of gebruikt. Als het
probleem zich na de aanbevolen controles nog
steeds voordoet, belt u GIAS-Service, zodat zij
u telefonisch kunnen helpen.
De weergegeven tijd in het display kan
wijzigen tijdens het drogen. De droogtijd
wordt continue aangepast tijdens de cyclus
en geeft een geschatte tijd weer. De tijd zal
tijdens het drogen meer of minder worden
dit is heel normaal.
De droogtijd is te lang/kleren zijn niet droog
genoeg…
● Hebt u de juiste droogtijd/het juiste
programma gekozen?
● Waren de kleren te nat? Waren de kleren
grondig uitgewrongen of gecentrifugeerd?
● Moet het filter schoongemaakt worden?
● Moet de condensator schoongemaakt
worden?
● Is de droger te vol geladen?
● Worden de aan- en afvoeren en het onderstuk
van de droger niet geblokkeerd?
● Is de -knop geselecteerd voor een
voorgaande cyclus?
De droger werkt niet…
● Staat er spanning op het elektriciteitssnoer
van de droger? Controleer dit door het met een
ander apparaat te gebruiken, zoals een
tafellamp.
● Is de stekker op de juiste manier verbonden
met de netspanning?
● Is de stroom uitgevallen?
● Is de zekering doorgeslagen?
● Is de deur helemaal dicht?
● Staat de droger aan, zowel bij de netspanning
als bij de machine?
● Is de droogtijd of het programma ingesteld?
● Is de machine opnieuw ingeschakeld nadat de
deur open is geweest?
● Is de droger gestopt omdat het waterreservoir
vol is en geleegd moet worden?
De droger maakt herrie…
● Schaker de droger uit en neem contact op met
GIAS-Service voor advies.
Het indicatielampje staat aan…
● Moet het filter schoongemaakt worden?
● Moet de condensator schoongemaakt
worden?
Het indicatielampje staat aan…
● Moet het waterreservoir geleegd worden?
KLANTENSERVICE
Als er nog steeds een probleem mocht zijn met
uw droger nadat u alle aanbevolen controles
hebt uitgevoerd, bel dan a.u.b. de GIASService voor advies. Zij kunnen u misschien
aan de telefoon helpen of volgens de
bepalingen van de garantie een afspraak
maken met een technicus die u komt opzoeken.
Er kunnen evenwel kosten in rekening worden
gebracht als een van de volgende punten op uw
machine van toepassing is:
● De machine blijkt goed te werken
● Ze is niet ge Installatievoorschriften.
● Ze is op een onjuiste manier gebruikt.
Reserveonderdelen
Gebruik altijd originele reserveonderdelen.
Deze zijn direct beschikbaar via GIAS-Service.
GIAS - Service
Voor onderhoud en reparaties belt u met uw
locale GIAS onderhoudsmonteur.
De fabrikant aanvaardt geen verantwoordelijkheid voor drukfouten in dit boekje.
De fabrikant behoudt ook hetrecht voor om
de producten waar nodig aan te passen
zonder de hoofdkenmerken te veranderen.
NL
49
Page 50

SPIS TREŚCI
Wprowadzenie
Informacja O Dostarczonym Zestawie
Rozpakowywanie Produktu
Bezpieczeństwo
Używanie
Instalacja
Pranie
Ochrona Środowiska
Serwis Gias
Instalacja
Wymagania Odnośnie Elektryczności
Regulacja Nóżek
Wentylacja
Wąż Odpływowy: Instrukcja Montażu
Przygotowanie Ładunku Prania
Przygotowanie Ubrania
Sortowanie Ładunku
Porady Dotyczące Suszenia
Nie Suszyć W Suszarce Bębnowej
Oszczędność Energii
Pokrętła I Lampki
Wybór Programu
Drzwiczki I Filtr
Otwieranie Drzwiczek
Filtr
Lampka Sygnalizacyjna Filtra
Pojemnik Na Wodę
Wyjmowanie Pojemnika
Kondensator
Wyjmowanie Kondensatora
Działanie
Anulowanie I Resetowanie Programu
Funkcja Opóźnionego Uruchomienia
Czyszczenie I Konserwacja
Czyszczenie Suszarki
Dane Techniczne
Wykrywanie I Usuwanie Usterek
Obsługa Klienta
Części Zamienne
Serwis Gias
51
51
51
51
51
52
52
52
52
53
53
53
53
54
55
55
55
55
55
55
56
57
58
58
58
58
58
58
59
59
59
60
60
60
60
60
61
61
61
61
PL 50
Page 51

WPROWADZENIE
PROSZĘ dokładnie zapoznać się z instrukcją i zgodnie z nią użytkować pralkę. Niniejszy poradnik
zawiera ważne informacje dotyczące bezpiecznej instalacji, użytkowania, konserwacji oraz porady,
jak osiągnąć najlepsze wyniki podczas korzystania z urządzenia.
Dokumentacja urządzenia powinna być zabezpieczona na wypadek konieczności skorzystania z
niej w przyszłości, jak i dla kolejnych jej posiadaczy
Informacja O Dostarczonym Zestawie
PROSZĘ sprawdzić, czy następujące pozycje
zostały dostarczone wraz z urządzeniem:
● Instrukcja obsługi
● Karta gwarancyjna
● Informacja o zużyciu energii
Sprawdzić, czy nie nastąpiło uszkodzenie
urządzenia podczas transportu. Jeżeli tak się
stało, należy wezwać serwis GIAS.
Niezastosowanie się do powyższego może
wpłynąć na bezpieczeństwo korzystania z
susza r k i . Jeżeli pro b l e m związany z
urz ą d zeniem w y nika z n i ewłaści w ego
użytkowania, za wezwanie serwisu może zostać
pobrana opłata.
BEZPIECZEŃSTWO
Używanie
Urządzenie nie jest przeznaczone dla osób (w tym dzieci) o obniżonych zdolnościach fizycznych,
●
zmysłowych i umysłowych oraz nieposiadających odpowiedniego doświadczenia i wiedzy, chyba że
używają go pod nadzorem lub po otrzymaniu wskazówek od osoby odpowiedzialnej za ich
bezpieczeństwo.
● Należy dopilnować, aby dzieci nie bawiły się urządzeniem.
● OSTRZEŻENIE Nieprawidł owe użytkowanie suszarki bębnowej może spowodować
niebezpieczeństwo pożaru.
● Urządzenie służy do zastosowań w gospodarstwie domowym, do suszenia tkanin I odzieży.
● Urządzenie powinno być użytkowane zgodnie z jego przeznaczeniem opisanym w instrukcji. Przed
rozpoczęciem obsługi urządzenia należy upewnić się, że instrukcje instalacji i eksploatacji zostały
dobrze zrozumiane.
● Nie dotykać urządzenia wilgotnymi rękami lub nogami.
● Nie opierać się o drzwiczki podczas ł adowania urządzenia, nie podnosić ani nie przesuwać
urządzenia przez pociąganie za drzwiczki.
● Nie dopuszczać, aby dzieci bawiły się urządzeniem oraz jego pokrętłami.
● OSTRZEŻENIE Nie używać wyrobu jeśli filtr kł aczków jest nie na swoim miejscu lub uszkodzony;
kłaczki mogą spowodować zapalenie.
● OSTRZEŻENIE Tam gdzie umieszczony jest symbol gorącej powierzchni może nastąpić wzrost
temperatury powyżej 60°C podczas pracy suszarki bębnowej.
● Wyjąć wtyczkę ze źródła zasilania. Zawsze wyjmować wtyczkę przed czyszczeniem urządzenia.
● Jeżeli urządzenie nie pracuje prawidłowo, nie należy kontynuować posługiwania się nim
● Na podłodze wokół urządzenia nie powinny znajdować się drobne zanieczyszczenia czy kurz.
● Bęben znajdujący się wewnątrz może być bardzo nagrzany. Przed usunięciem prania suszarka
powinna całkowicie ostygnąć.
ROZPAKOWYWANIE PRODUKTUT
W y ją ć u r z ą d ze n ie z
opa kowa n ia w pob l iżu
p l a n ow a n e g o m i e j s ca
eksploatacji.
1. P r z e c i ąć o s t r o ż n i e
o p a k o w a n i e w o k ó ł
podstawy i w górę wzdłuż
jednej krawędzi bocznej.
2. Z d j ą ć o p a k o w a ni e
pol i e t y l e n o w e i z d jąć
suszarkę ze styropianowej
podstawy.
Zachować ostrożność przy wyrzucaniu
elementów opakowania. Dzieci nie powinny
mieć dostępu do części opakowania, które
mogą stwarzać niebezpieczeństwo.
PL
51
Page 52

BEZPIECZEŃSTWO
Instalacja
● Przed użyciem sprawdzić, czy nie ma
widocznych oznak uszkodzenia wyrobu. W
przypadku uszkodzenia nie używać i wezwać
serwis GIAS.
● Nie używać przejściówek, rozgałęźników ani
przedłużaczy.
● Suszarka nie powinna być instalowana w
pobliżu zasłon i należy upewnić się, aby żadne
przedmioty nie spadały pod, czy zbierały się za
suszarką.
● Zabronione jest ustawianie urządzenia za
drzwiami z możliwością zamknięcia, drzwiami
przesuwnymi oraz drzwiami z zawiasami po
stronie przeciwnej względem suszarki.
Pranie
● W suszarce bębnowej nie należy suszyć ubrań
niewypranych.
● OSTRZEŻENIE Nie suszyć tkanin pranych pł
ynami do czyszczenia chemicznego.
● OSTRZEŻENIE Materiał y z gumy piankowej
mogą w pewnych okolicznościach, wskutek
n a g r z a n ia , s a m o r z u t ni e s i ę z a p a l i ć .
ZABRONIONE JEST suszenie w suszarce
bębnowej takich rzeczy, jak gumy piankowe
(pianki lateksowe), czepki pod prysznic, materiały
wodoodporne, ubrania podgumowane oraz
ubrania i poduszki z wkładkami z gumy
Piankowej.
● Przy suszeniu należy zawsze kierować się
zaleceniami nt. prania odzieży.
● Ubranie powinno być odwirowane lub dokładnie
wykręcone przed umieszczeniem w suszarce.
NIE wkładać ubrań ociekających wodą do
suszarki.
● Nie należy pozostawiać w kieszeniach
zapalniczek czy zapałek oraz NIE używać łatwo
palnych płynów w pobliżu suszarki.
● Zasłony z włókna sztucznego NIE powinny być
wkł adane do tego urząd zenia. Odzież
zanieczyszczona włóknem szklanym może
powodować podrażnienie skóry.
● Rzeczy, które został y zabrudzone takimi
su bst anc jami, jak olej j ada lny , aceton,
al koh ol,b enz yna , ke rose n, o dpl ami acz e ,
terpentyna, woski i środki usuwające wosk,
powinny przed rozpoczęciem suszenia zostać
wyprane w gorącej wodzie z dużą ilością
detergentów.
●Środki zmiękczające tkaniny i podobne produkty
należy stosować zgodnie z instrukcjami.
PL 52
Ochrona Środowiska
● Wszystkie elementy opakowania są wykonane
z materiałów przyjaznych środowisku i nadają się
do odzysku. Prosimy o pozbywanie się
opakowania w sposób przyjazny środowisku.
Informacje o aktualnych szczegółach odnośnie
do pozbywania się zużytych urządzeń można
uzyskać u lokalnych władz.
● W celu zapewnienia bezpieczeństwa przy
wyrzucaniu starej suszarki, wyłącz wtyczkę z
gniazdka, odłącz kabel zasilania i zniszcz go
wraz z wtyczką. W celu zapobieżenia zamknięciu
się dzieci w starej pralce, wyłamać zawiasy lub
zamek drzwiczek.
Dyrektywa Europejska 2002/96/CE
To urządzenie elektryczne jest
oznakowane zgodnie z Dyrektywą
Europejską 2002/96/CE dotyczącą
śmieci tworzonych przez zużyty sprzęt
elektryczny i elektroniczny (WEEE).
Zapewniając właściwą utylizację tego sprzętu
elektrycznego przyczynicie się do uniknięcia
szkodliwych dla zdrowia ludzi i środowiska
naturalnego konsekwencji, wynikających z
niewłaściwej utylizacji takiego sprzętu. Symbol
umieszczony na urządzeniu oznacza, że sprzet ten
nie może być traktowany tak samo jak inne śmieci
domowe. Musi zostać oddany do najbliższego
punktu zbiórki i utylizacji zużytych
urządzeń elektrycznych i elektronicznych.
Utylizacja musi być wykonana zgodnie z
aktualnymi przepisami o utylizacji tego typu śmieci.
Aby uzyskać dokładne informacje na temat
postępowania w sprawie tego typu śmieci proszę
skontaktować się z odpowiednim biurem w
departamencie Ministerstwa Ochrony Środowiska
lub z Zakładem Oczyszczania Miasta w waszym
miejscu zamieszkania, lub też ze sklepem w
którym sprzęt został zakupiony.
Serwis GIAS
● W celu zapewnienia bezpiecznego i
wydajnego użytkowania tego urządzenia
zaleca się przeprowadzać wszelkiego rodzaju
serwis, czy naprawy przez autoryzowanego
serwisanta GIAS.
Jeżeli urządzenie działa nieprawidłowo lub
przestaje działać, należy wyłączyć zasilanie i
wyjąć wtyczkę z gniazda zasilania. W sprawie
ewentualnych napraw należy zgłosić się do
serwisu GIAS.
Page 53

INSTALACJA
Wymagania Odnośnie Elektryczności
Suszarki bębnowe są przygotowane do pracy z
prądem 220 240V, 50 Hz. Należy upewnić się,
że natężenie prądu w obwodzie wynosi
przynajmniej 10 A.
Napięcie elektryczne może być skrajnie
niebezpieczne.
Urządzenie to musi być uziemione.
Gniazdko i wtyczka urządzenia muszą być
tego samego typu.
Nie używać przejściówek ani przedłużaczy.
Po zainstalowaniu urządzenia wtyczka
powinna być dostępna do odłączenia.
Urządzenie z oznaczeniem CE spełnia wymogi
dyrektyw 2004/108/WG i 2006/95/WG z
późniejszymi zmianami.
Jeżeli problem z urządzeniem wynika z
niewłaściwej instalacji, za wezwanie serwisu
może zostać pobrana opłata.
Jeżeli przewód zasilający urządzenie
ulegnie uszkodzeniu, należy go zastąpić
sp e c ja l n ym p r ze w od e m , d o stę p n ym
WYŁĄCZNIE w serwisie części zamiennych.
Insta l a c j ę taką m u s i przep r o w a d z ić
upoważniona osoba.
WENTYLACJA
● W pomieszczeniu umiejscowienia suszarki
bębn ow ej należ y za pe wnić o dp owiednią
wentylację, aby podczas pracy suszarki gazy
powstałe przy spalaniu innych paliw, np. z
kominków nie mogły dostać się do tego
pomieszczenia.
● Usuwane powietrze nie powinno dostać się do
kanału wentylacyjnego, przeznaczonego do
usuwania wyziewów z urządzeń spalających gaz
lub inne paliwa.
● Sprawdzać regularnie, czy jest swobodny
przepł yw powietrza przechodzącego przez
suszarkę.
● Sprawdzić filtr kł aczków po jego użyciu I
wyczyścić, jeśli to konieczne.
● Wejścia i wyjścia powinny być drożne. W celu
za bezp iec zen ia odpowi edn iej w ent ylac ji
przestrzeń pomiędzy dolną częścią urządzenia,
a podłogą musi być wolna od przeszkód. Odstęp
między urządzeniem a jakimkolwiek innym
przedmiotem powinien wynosić przynajmniej 12
mm.
● Uważać, aby za suszarką nie gromadził y się
przedmioty, ponieważ mogą one blokować wlot i
wylot powietrza.
● NIGDY nie ustawiać suszarki bezpośrednio
przy zasłonach.
Otwory Wlotowe
Powietrza
Nie podłączać urządzenia ani nie włączać
Zasilania do czasu zakończenia instalacji. Dla
zapewnienia bezpieczeństwa suszarka musi
być prawidłowo zainstalowana. W przypadku
jakichkolwiek wątpliwości odnośnie do
instalacji należy skontaktować się telefonicznie
z serwisem GIAS.
Regulacja Nóżek
P o u s t a w i e n i u
urządzenia na miejscu
należy upewnić się, że
u r z ą d z e n i e j e s t
wypoziomowane.
Otwory Wylotowe
Powietrza
Otwory Wylotowe
Powietrza W Podstawie
Nie instalować urządzenia w pomieszczeniach o
niskiej temperaturze lub w miejscach, gdzie może
wystapić ryzyko zamarzania. Przy temperaturach bliskich
granicy zamarzania u rządzenie m oż e prz es ta ć
funkcjonować poprawnie: istnieje bowiem poważne
ryzyko uszkodzenia, jeżeli dojdzie do zamarznięcia wody
w przewodach hydraulicznych (zawory, węże, pompy). Dla
zagwarantowania lepszego działania, temperatura
otoczenia musi być pomiędzy +2°C a +35°C. Zwracamy
uwagę, że używanie suszarki w niskich temperaturach (od
+2°C do +15°C) może skutkować skraplaniem się wody i
okapywaniem wody na podłogę.
PL 53
Page 54

WĄŻ ODPŁYWOWY: INSTRUKCJA MONTAŻU
Aby uniknąć konieczności opróżniania
zbiornika na wodę po każdym cyklu suszenia,
możemy odprowadzać zebraną wodę do
kanalizacji ściekowej (tej samej której
używamy do odprowadzania wody z innych
urządzeń AGD). Wlot kanalizacji powinien
znajdować się w sąsiedztwie suszarki.
UWAGA ! Wyłączyć suszarkę i wyjąć
wtyczkę zasilająca z gniazda elektrycznego
przed przystąpieniem do montażu!
W skład zestawu wchodzi: 1 wąż, 1 łącznik , 1
zacisk, 1 opaska plastikowa.
Etapy Montażu:
1.Odkręcić i usunąć 3
śruby z tyłu urządzenia
mocujące tylną ramkę
blatu.
2.Zdjąć tylną ramkę
baltu i wyjąć blat
wysuwając go do tyłu .
3.Zbiornik na wodę jest
umie j s cowi o n y p o
p r a w e j s t r o n i e
urządzenia (patrząc od
tyłu). Wąż w kolorze
szarym podłączony
j e s t d o k r ó ć c a
zbiornika na wodę. Za
pomocą kombinerek
zdjąć zacisk z węża.
4.Odłączyć wąż od
zbiornika.
5.Do odł ą c zon e g o
węża podłączyć wąż z
zestawu za pomocą
łą c zn i k a i d w ó c h
zacisków.
6.Z d j ą ć o s ł o n ę
zbiornika na wodę z
t y ł u u r z ą dz e n i a ,
wykręcając uprzednio
2 śruby.
PL 54
7.Wyłamać zaślepkę w
b o k u o s ł o n y i
zamontować osłonę w
suszarce - będzie
widoczny otwór z tyłu
urządzenia z bo ku
osłony.
8.Przeprowadzić wąż
o d p ł y w o w y p r z e z
otwór.
9.Szary wąż ułożyć w
suszarce jak pokazano
n a r y s u n k u i
z a m o c o w a ć z a
p o m o c ą o p a s k i
zawartej w zestawie.
10.Zamontować blat
zwracając uwagę aby
nie przyciąć węża i
przykręcić ramkę.
11.Podłą czyć nowy
wąż odpływowy do
kanalizacji. Sprawdzić
czy wąż nie załamuje
się lub nie przycina
p r z y d o s u w a n i u
urządzenia do ściany
or a z cz y b i eg n i e
zgodnie z zaleceniami
p o k a z a n y m i n a
rysunku.
12.P o d ł ą c z y ć
urządzenie do sieci
elektrycznej.
13.Po opr ó ż nie n i u
zbiornika na wodę,
włączyć urządzenie
przyciskiem ON ( w
m o d e l a c h
e l e k t r o n i c z n y c h
wcisnąć START) w
celu urucho m i e n ia
programu suszenia.
Page 55

PRZYGOTOWANIE ŁADUNKU
Przed pierwszym użyciem suszarki:
● Dokładnie zapoznać się z instrukcją.
● Usunąć wszystkie przedmioty zapakowane w
bębnie.
● Wytrzeć wnętrze bębna i drzwiczki wilgotną
ściereczką, aby usunąć kurz, który mógł się
zebrać podczas transportu.
Przygotowanie Ubrań
Sprawdzić, czy pranie przeznaczone do
suszenia może być suszone w suszarce
bębnowej, zgodnie z etykietkami na każdym
wyrobie.
Sprawdzić, czy wszystkie zapięcia są
zamknięte, a kieszenie puste. Odwrócić
wszystkie wyroby na lewą stronę. Umieścić
ubranie w bębnie luźno, aby się nie poplątało.
Nie Suszyć W Suszarce Bębnowej:
Jedwab, tkaniny delikatne, pończochy
nyl onowe, d e likat ne hafty, tka n iny z
metalowymi ozdobami, odzież z ozdobami z
tworzywa sztucznego lub skóry, buty sportowe,
przedmioty przestrzenne, takie jak śpiwory itp.
UWAGA: Nie suszyć wyrobów, które były
traktow a n e p ł y n ami do c z y s z c z e n i a
chemicznego lub rękawic gumowych (niebezpieczeństw o pożaru lub wybuchu).
Podczas ostatnich 15 minut (w przybliżeniu)
wsad jest zawsze suszony chłodnym powietrzem.
Oszczędność Energii
Wkładać do suszarki bębnowej tylko takie
pranie, które zostało dokładnie wykręcone lub
odwirowane. Im bardziej suche pranie, tym
krótszy czas jego suszenia i dzięki temu oszczędność energii elektrycznej.
ZAWSZE
● Suszyć jak największą ilość prania;
oszczędza to czas i energię elektryczną.
● Przed każdym cyklem czyszczenia sprawdzić
czystość filtra.
NIGDY
● Nie należy przekraczać maksymalnego
ciężaru; spowoduje to stratę czasu i energii elektrycznej.
● Nie wkładać do suszarki prania ociekającego
wodą,może to doprowadzić od uszkodzenia urządzenia.
Maksymalny Ciężar Przy Suszeniu
● Maks. ciężar wyrobów z bawełny 8 kg
● Maks. ciężar wyrobów syntetycznych 4 kg
Nie przeładowywać bębna; duże sztuki
mogą po namoknięciu spowodować przekroczenie maksymalnego dopuszczalnego
Obciążenia (np.śpiwory, kołdry).
Sortować Ładunek Jak Następuje:
● Ze względu na symbole użytkowania
Mo żna je znaleźć na ko łni erz yku bądź
wewnętrznym szwie:
Nadaje się do suszenia w suszarce
bębnowej.
Suszenie w suszarce bębnowej przy
. .
wysokiej temperaturze.
.
Suszenie w suszarce bębnowej tylko przy
niskiej temperaturze.
Nie suszyć w suszarce bębnowej.
Jeżeli na odzieży nie ma wskazówek dotyczących
prania, należy założyć, że tkanina nie nadaje się
do suszenia w suszarce.
● Według ilości i grubości
W przypadku ładunku większego niż pojemność
suszarki, oddzielić ubranie w zależności od jego
grubości (np. ręczniki od bielizny).
● Według typu tkaniny
Bawełna, bielizna: ręczniki, bluzy bawełniane,
bielizna pościelowa i stołowa.
Tkani n y s y n t e t y c z n e : B l u z ki, koszule,
kombinezony itp., wykonane z poliestru lub
poliamidu, jak również mieszanki bawełny z
włóknem syntetycznym.
● Pod względem stanu wysuszenia
Podzielić według grup: do wysuszenia żelazkiem,
do wysuszenia w ciepłym pomieszczeniu itp. W
przypadku delikatnych tkanin naciśnij przycisk W
celu wybrania niskiej temperatury suszenia.
Drying Guide
The table shows approximate drying times,depending on
the type of fabric and dampness of the clothes.
FABRIC
COTTON
SYNTHETICS
ACRYLIC
HEAT
SETTING
HIGH
LOW
LOW
HEAVY
LOAD
140-165min
MEDIUM
LOAD
70-80min
70-80min---
50-65min
---
LIGHT
LOAD
50-65min
40-55min
30-40min
PL 55
Page 56

STEROWANIE I WSKAŹNIKI
Zbiornik na
Wodę
Czas
Suszenia
Panel Sterowania i Wskaźniki
Opóźniony
Start
Filtr
Akrylowe
Syntetyczne
Program
Automatyczny
Ochrona Przed
Gnieceniem
Wybór
programu
Start/Pauza
Wybór Programu - Wybierz odpowiedni program.
Wybór Czasu - Pozwala użytkownikowi zmienić czas trwania programu wybranego poprzez
Wybór Programu. Można go użyć tylko przy wyborze programów: Mix&Dry, Koszule i Czasowego.
Opóźniony Start - Pozwala użytkownikowi opóźnić start cyklu suszenia (patrz szczegóły
Użytkowania).
Akrylowe i Syntetyczne - Naciśnij by wybrać suszenie materiałów akrylowych i syntetycznych.
Po naciśnięciu opcja jest aktywowana i wskaźnik zapala się.
Funkcja antyzagnieceniowa - Pozwala użytkownikowi wybrać cykl przeciwdziałający
pognieceniom.
Start/Pauza - Naciśnij, by rozpocząć/wstrzymać wykonywanie wybranego programu.
Memo - Pozwala użytkownikowi zapisać program poprzez jednoczesne przyciśnięcie
przycisków Anti-Crease oraz Akrylowe i Syntetyczne przez 3 sekundy po upłynięciu 2 minut od
rozpoczęcia programu.
Filtr - Pojawia się, kiedy filtr należy wyczyścić.
Zbiornik na wodę - Pojawia się, kiedy zbiornik na wodę jest pełny.
Program automatyczny - Odpowiedni symbol pojawia się po wyborze automatycznego
programu.
Schładzanie - Pojawia się, kiedy program rozpoczyna etap schładzania.
SELECTING THE PROGRAMME
Suszarka Sensor Dry oferuje wiele możliwości suszenia prania,
zależnie od określonych wymagań. Poniższa tabela zawiera listę
programów wraz z opisem.
Uwaga: Czujnik może nie wykryć małego ładunku małych
wyrobów. Dla małych ładunków i poszczególnych wyrobów lub
tkanin przed suszeniem o małej wilgotności stosować programy z
ustawionym czasem.
Ustawić program od 30 do 75 minut w zależności od rozmiaru
ładunku i wymaganej suchości i wybrać wysoką lub niską
temperaturę w zależności od rodzaju tkaniny.Jeżeli czujnik nie
wykryje prania, suszarka będzie działać tylko przez 10 minut, a
następnie przejdzie do fazy ochładzania.
Jeżeli ładunek jest zbyt duży lub zbyt mokry, suszarka
automatycznie przejdzie do fazy ochładzania po 180 minutach.
PL 56
Page 57

WYBÓR PROGRAMU
PROGRAM
Perfect Home
Do Szafy
Na Wieszak
Do Prasowania
No Crease
Wełna
Mix & Dry
Koszule
OPIS
Wybierz wymagany stopień suchości. Zaczynając od dla
ręczników i szlafroków, poprzez do rzeczy przeznaczonych do
odłożenia bez prasowania, aż do programu, który przygotowuje
pranie do prasowania.
Ten program służy do prostowania zagnieceń oraz odświeżania.
Suszarka rozgrzewa wsad przez 9 minut potem schładza przez 3
minuty. Ten program jest przeznaczony do odzieży zbyt długo
oczekującej na prasowanie, na przykład w płóciennym koszu, lub
odzieży, która zesztywniała podczas suszenia na sznurku albo na
kaloryferze. Ten program wygładza zagniecenia tkanin czyniąc
prasowanie szybszym i prostszym.
Delikatny program stworzony z myślą o zmiękczaniu wełny
suszonej na powietrzu. Ten delikatny i ciepły cykl powietrzny, który
trwa 12 minut, może również służyć do odświeżania wełny
przechowywanej przez dłuższy czas w szafie.
To program specjalnie przygotowany do suszenia wsadu 4 kg
(117min). Czas standardowego suszenia to 99 minut i pozwala
wysuszyć do 3 kg. Ten program umożliwia wspólne suszenie
tkanin bawełnianych i sztucznych.
To specjalny program dla koszul przy maksymalnym wsadzie 3 kg
(78 minut). W przypadku koszul z tkanin sztucznych należy użyć
przycisku Akrylowe i Syntetyczne. Domyślny czas trwania cyklu to
60 minut i można w nim suszyć maks. 2kg wsadu.
Rapid 40'
Czas
Memo
Program Rapid 40' pozwala na szybkie wykonanie cyklu suszenia.
To idealny program, aby uzyskać suche, odświeżone i gotowe do
założenia ubrania w czasie krótszym niż 40 minut przy maks.
wsadzie 2kg. Ten specjalny program stale monitoruje temperaturę w
bębnie i jest odpowiedni dla wszystkich rodzajów tkanin, które
można suszyć przez wirowanie.
Wybór czasu uwzględnia wszystkie możliwe ręczne ustawienia: od
30 do 180 minut. Wybór 20 minut jest możliwy tylko w programie
wietrzenia chłodnym powietrzem.
Program Memo pozwala powtórzyć program zapisany wcześniej
przez użytkownika bez konieczności dokonywania ponownego
wyboru ustawień dla danego programu.
PL 57
Page 58

DRZWICZKI I FILTR
Otwieranie Drzwiczek
Pociągnąć za uchwyt,
a b y o t w o r z y ć
drzwiczki.
Zamknąć drzwiczki i
nacisnąć , aby
ponownie uruchomić
suszarkę.
OSTRZEŻENIE! Podczas użytkowania
suszarki bębnowej bęben i drzwiczki mogą być
BARDZO GORĄCE. W żadnym wypadku nie
należy wyłączać suszarki przed zakończeniem
cyklu suszenia, chyba że wszystkie rzeczy
zostaną szybko wyjęte I rozłożone w celu
rozproszenia ciepła.
Filtr
UWAGA: Aby suszarka pracowała wydajnie,
przed każdym cyklem suszenia należy
sprawdzić, czy filtr Kłaczków jest czysty.
1. Wyciągnąć filtr do
góry.
2. Otworzyć filtr, tak jak
pokazano.
3. Delikatnie usunąć
kłaczki przy użyciu
miękkiej
s z c z o t e c z k i l u b
palców.
4. Zatrzasnąć filtr i
wsu n ą ć n a s w oje
miejsce.
Lampka Sygnalizacyjna Filtra
zapala się, jeżeli filtr
wymaga czyszczenia.
Jeżeli pranie nie jest
suszone, sprawdzić,
cz y f i l t r n ie je s t
zatkany.
Nie używać wody do czyszczenia filtra.
POJEMNIK NA WODĘ
Woda, która jest usuwana z tkanin w trakcie
procesu suszenia, zbiera się w pojemniku w
górnej części suszarki. Kiedy pojemnik
wypełnia się, na panelu zapala się lampka ;
NALEŻY wówczas opróżnić pojemnik. Zaleca
się jednak opróżnianie pojemnika po każdym
cyklu suszenia.
UWAGA: Podczas pierwszych kilku cykli w
nowym urządzeniu nie gromadzi się dużo wody,
ponieważ najpierw wypełniany jest zbiornik
wewnętrzny.
Wyjmowanie Pojemnika
1. Delikatnie wyciągnąć
pojemnik do końca.
Przytrzymać pojemnik
o b i e m a r ę k a m i .
Pojemnik wypełniony
wodą waży około 4 kg.
2. Przechyl zbiornik
wody, aby opróżnić go
p o pr z ez o t wó r w
ści a n i e t y l n ej. P o
opr ó ż n i eni u , wsu ń
zbiornik na pozycje
pierwotną. POPCHNIJ,
ABY WPASOWAĆ.
3. Naciśnij przycisk
,by uruchom i ć
ponownie cykl.
UWA G A : J e ż e l i w
p o b l i ż u s us za rk i
znajduje się odpływ
w o d y , m o ż n a
skorzystać z węża do
odprowadzania wody,
umożliwiając w ten
sposób stały odpływ
wody gromadzącej się
w suszarce. Nie będzie
wówczas konieczne
opróżnianie pojemnika.
Informacje na temat
montażu węża można
z n a l e ź ć w j e g o
opakowaniu.
PL 58
Page 59

KONDENSATOR
Uwaga: Przed czyszczeniem kondensatora
urządzenie powinno być wyłączone, a
wtyczka usunięta z gniazdka zasilania.
Wydajność suszarki osiągana jest przez
r e gu l ar n e s pr a wd z an i e c z y st o śc i
kondensatora.
Wyjmowanie Kondensatora
1 . D e l i k a t n i e
pociągnąć za dolną
c z ę ś ć p ł y t k i
zab ezpie czają cej i
odchylić ją. Wyjąć
płytkę, zdejmując jej
g ó r n ą c z ę ś ć z
zawiasów.
2. Przekręcić dwie
dźwignie blokujące w
kierunku przeciwnym
do ruchu wskazówek
z e g a r a i w y j ą ć
kondensator.
3. Wyciągnąć zespół
kondensatora.
4. Delikatnie zetrzeć
szmatką kurz i kłaczki,
a nas tępni e umyć
k o n d e n s a t o r ,
trzymaj ą c go pod
b i e ż ą c ą w o d ą i
obracając tak, aby
woda p r z e pływała
między płytkami.
5. Ponownie założyć
kondensator, upewnić
się, że kondensator
jest właściwie ułożony
(zgodnie ze strzałką), i
docisnąć do oporu.
Za b l o ko w a ć d w ie
dźwignie obracając je
w kierunku zgodnym z
ruchem wskazówek
zegara.
6. Umieścić blachę
zabezpieczającą na
swoim miejscu.
DZIAŁANIE
1. Otwórz drzwiczki i załaduj pranie do bębna.
Upewnij się, że odzież nie blokuje zamknięcia
drzwiczek.
2. Delikatnie zamknij drzwiczki pchając je
powoli, aż usłyszysz "kliknięcie".
3. Ustaw pokrętło programu na wymaganej
pozycji (patrz Przewodnik Programów).
4. Jeśli suszysz tkaniny sztuczne, akrylowe,
delikatne, naciśnij przycisk , aby osłabić
moc grzania. Kontrolka zapali się, gdy maszyna
działa w trybie słabego grzania. Aby wyłączyć
ten tryb w pierwszych minutach programu,
naciśnij . Po upłynięciu żądanego czasu
przywróć m a s z y n ę do poprzedniego
ustawienia.
5. Naciśnij przycisk . Suszarka wystartuje
automatycznie a kontrolka nad przyciskiem
będzie stale zapalona.
6. Jeśli drzwi zostaną otwarte w trakcie
suszenia w celu sprawdzenia prania, należy
nacisnąć przycisk po zamknięciu
drzwiczek, by wznowić suszenie.
7. Kiedy cykl zbliży się ku końcowi, maszyna
wejdzie w tryb schładzania i ubrania będą
wirowane w chłodnym powietrzu.
8. Po zakończeniu programu na wyświetlaczu
zapali się napis END.
9. Po zakończeniu cyklu, bęben będzie się
ob racał co jak iś cza s, aby zapobiec
pognieceniu ubrań do momentu, gdy maszyna
zostanie wyłączona lub drzwiczki będą
zamknięte.
Nie otwieraj drzwi podczas trwania programu
automatycznego - może to zakłócić proces
suszenia.
PL 59
Page 60

DZIAŁANIE
Funkcja Opóźnienia Startu
Funkcja pozwala użytkownikowi na opóźnienie pracy suszarki od 1 do 24 godzin. Po
pierwszym naciśnięciu klawisza, wyświetlacz pokaże domyślne opóźnienie pracy suszarki o
godzinę.
Powtórne naciśnięcie klawisza spowoduje opóźnienie o kolejne godziny. Aby rozpocząć program,
należy nacisnąć przycisk a suszarka zakończy cykl suszenia zgodnie ze wskazanym
opóźnieniem startu. Podświetlenie wskaźników wskaże czy rozpoczęło się suszenie z
opóźnieniem startu.
Anulowanie Programu
Aby anulować program przytrzymaj wciśnięty przycisk przez 3 sekundy. Na wyświetlaczu
pojawią się migające cyfry 0:00, które oznaczają anulowanie programu.
CZYSZCZENIE I KONSERWACJA
Czyszczenie Suszarki
● Po każdym cyklu suszenia należy oczyścić
filtr I opróżnić pojemnik na wodę.
● Czyścić kondensator regularnie.
● Po każdym użytkowaniu wytrzeć wnętrze
bębna I pozostawić otwarte drzwiczki przez
pewien czas, aby poz wo lić cyrkulacji
powietrza wysuszyć go.
● Wytrzeć urządzenie z zewnątrz i drzwiczki
przy pomocy miękkiej szmatki.
● NIE używać ostrych czyścików ani
szorujących środków czyszczących.
● Aby zapobiec przywieraniu drzwiczek I
nagromadzeniu kłaczków, należy od czasu do
czasu czyścić wewnętrzną stronę drzwiczek i
uszczelkę mokrą szmatką.
OSTRZEŻENIE! Bęben, drzwiczki i
ładunek mogą być bardzo gorące.
Dane Techniczne
Pojemność bębna 115 litrów
Maksymalny ładunek 8 kg
Wysokość 85 cm
Szerokość 60 cm
Głębokość 60 cm
Pasmo poziomu energetycznego B
Informacje dla laboratoriów badawczych
EN 61121 Program
-SUSZENIE BAWEŁNY
-SUSZENIE BAWEŁNY
DO PRASOWANIA
-TKANINY ŁATWE DO
RANIA I PRASOWANIA
UWAGA Przed czyszczeniem urządzenie
powinno być wyłączone, a wtyczka wyjęta z
gniazdka zasilania.
Odnośnie danych elektrycznych, patrz
etykietka wartości znamionowych na przedniej
części suszarki (przy otwartych drzwiczkach).
Programy do zastosowania
-NA WIESZAK
-DO PRASOWANIA
- +
NA WIESZAK
TKANINY SYNTETYCZNE
PL 60
Page 61

WYKRYWANIE I USUWANIE USTEREK
Przyczyny Usterek...
Usterki, które można naprawić samemu
Przed zwróceniem się po pomoc techniczną do
serw i s u G I A S nale ż y s p r a wdzić l i s t ę
następu jących pr oblemów. W przypadk u
stwierdzenia, że urządzenie pracuje prawidłowo,
zostało nieprawidłowo zainstalowane lub jest
niewłaściwie użytkowane, koszt wezwania
serwisanta poniesie użytkownik. Jeżeli problem z
urządzeniem nadal istnieje po sprawdzeniu
pon i ż s z ych p u n k t ów, najp i e r w nale ż y
skontaktować się z serwisem GIAS telefonicznie.
Czas do końca cyklu zmienia się zgodnie z
postępem suszenia. Czas do końca cyklu, jaki
wskazuje wyświetlacz urządzenia, jest
wskazaniem szacunkowym wynikającym ze
sprawdzania przez przez suszarkę poziomu
wysuszenia tkaniny. Czas do końca suszenia
jaki wskazuje wyświetlacz może się zwiększać
lub zmniejszać i jest to normalne.
Czas suszenia zbyt długi/ odzież nie jest
wystarczająco sucha…
● Czy został wybrany prawidłowy czas/ program
suszenia?
● Czy odzież była zbyt mokra? Czy była dokładnie
wykręcona lub odwirowana?
● Czy filtr wymaga czyszczenia?
● Czy kondensator wymaga czyszczenia?
● Czy suszarka nie jest przepełniona?
● Czy wloty, wyloty i podstawa suszarki są wolne
od przeszkód?
● Czy opcja została wybrana z poprzedniego
cyklu?
Suszarka nie działa…
● Czy jest prawidłowe zasilanie elektryczne do
suszarki? Sprawdzić posługując się innym
urządzeniem, jak np. lampka stołowa.
● Czy wtyczka jest prawidłowo podłączona do
źródła zasilania?
● Czy nie ma przerwy w dopływie prądu?
● Czy bezpiecznik nie jest przepalony?
● Czy drzwiczki są całkowicie zamknięte?
● Czy suszarka jest włączona zarówno do źródła
prądu, jak i na urządzeniu?
● Czy został wybrany czas suszenia lub program?
● Czy urządzenie zostało włączone ponownie po
otwarciu drzwiczek?
● Czy suszarka przestała działać z powodu
zapełnienia korytka na wodę, które wymaga
Opróżnienia?
Suszarka głośno pracuje…
● Wyłączyć suszarkę i skontaktować się z
serwisem GIAS w celu uzyskania pomocy
technicznej.
Wskaźnik jest włączony…
● Czy filtr wymaga czyszczenia?
●Czy kondensator wymaga czyszczenia?
Wskaźnik jest włączony…
● Czy pojemnik na wodę nie wymaga
opróżnienia?
OBSŁUGA KLIENTA
Jeżeli po sprawdzeniu wszystkich punktów
problem nadal występuje, należy zwrócić się o
pomoc do serwisu GIAS.
Możliwe jest uzyskanie pomocy drogą
telefoniczną lub zamówienie wizyty serwisanta
zgodnie z warunkami gwarancji. Przy
zaistnieniu jakiejkolwiek z wymienionych
sytuacji użytkownik może zostać obciążony
kosztami serwisu:
● Suszarka pracuje prawidłowo.
● Nie została zainstalowana zgodnie z
instrukcją odnośnie instalacji.
● Była nieprawidłowo użytkowana.
Części Zamienne
Należy zawsze korzystać z oryginalnych części
Zamiennych, dostępnych bezpośrednio w
serwisie GIAS.
Serwis GIAS
W sprawie serwisowania i napraw należy
kontaktować się z serwisantem GIAS.
Producent nie ponosi odpowiedzialności za
błędy drukarskie w niniejszym poradniku.
Producent zastrzega sobie również prawo
do dokonania odpowiednich zmian produktu
bez zmiany zasadniczych jego cech.
PL 61
Page 62

40007849
 Loading...