

Page 1
INSTRUCTION BOOK
Condenser Tumble Dryer
EVOC 5810NB
English
Français
Slovensko
2
14
26
Page 2

INDEX
Introduction
Delivery Information
Unpacking the Product
Safety Reminders
Use
Installation
The Laundry
Environmental Issues
Gias Service
Installation
Electrical Requirements
Adjusting the Feet
Ventilation
Drain Hose Kit: Fitting Instructions
Preparing the Load
Clothes Preparation
Do Not Tumble Dry
Energy Saving
Sorting the Load
Drying Guide
Controls and Indicators
Selecting the Programme
Door and Filter
Opening the Door
Filter
Filter Care Indicator
Water Container
To Remove the Container
Condenser
To Remove the Condenser
Operation
Delay Start Function
Cancelling and Resetting the Programme
Cleaning and Routine Maintenance
Cleaning the Dryer
Technical Specifications
Troubleshooting
Customer Service
Spares
Gias Service
3
3
3
3
3
4
4
4
4
5
5
5
5
6
7
7
7
7
7
7
8
9
10
10
10
10
10
10
11
11
11
12
12
12
12
12
13
13
13
13
EN 2
Page 3
INTRODUCTION
Please read and follow these instructions carefully and operate the machine accordingly. This
booklet provides important guidelines for safe use, installation, maintenance and some useful
advice for best results when using your machine.
Keep all documentation in a safe place for future reference or for any future owners.
Delivery Information
Please check that the following items are
delivered with the appliance:
● Instruction manual
● Guarantee card
● Energy label
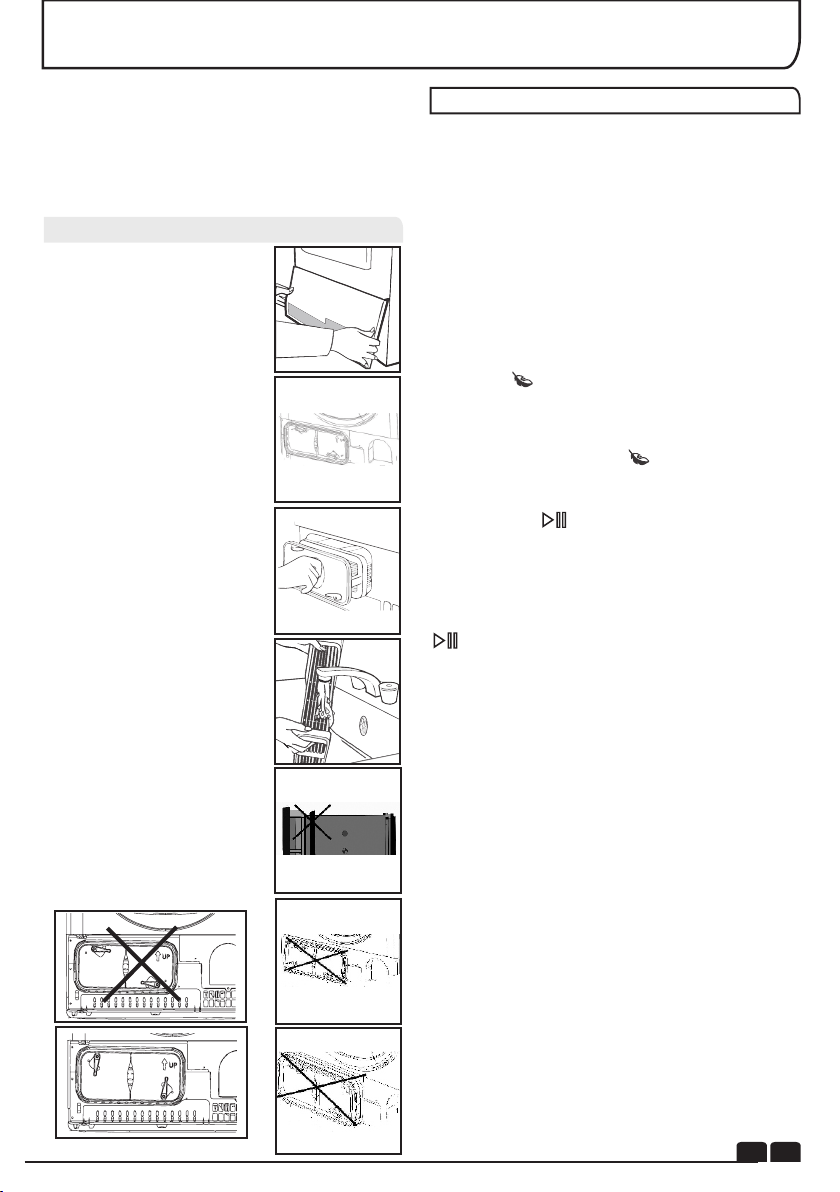
UNPACKING THE PRODUCT
Remove the machine from
its packaging close to the
f i n a l l o c a t i o n o f t h e
machine.
1- Cut carefully around the
base of the packaging and
up one corner.
Check that no damage has occurred to the
machine during transit. If it has, call for service
by GIAS.
Failure to comply with the above can
compromise the safety of the appliance. You
may be charged for a service call if a problem
with your machine is caused by misuse.
Dispose of the packaging safely. Make
sure it is out of the reach of children,it is a
potential source of danger.
2- Remove the polythene
sleeve and lift the dryer off
the polystyrene base.
SAFETY REMINDERS
Use
● This appliance is not intended for use by persons (including children) with reduced physical,
sensory or mental capabilities,or lack of experience and knowledge, unless they have been given
supervision or instruction concerning use of the appliance by a person responsible for their safety.
● Children should be supervised to ensure that they do not play with the appliance.
● WARNING Misuse of a tumble dryer may create a fire hazard.
●This machine is solely for domestic use, i.e. to dry household textiles and garments.
●This machine should only be used for its intended purpose as described in this manual. Ensure
that the instructions for installation and use are fully understood before operating the appliance.
● Do not touch the appliance when hands or feet are damp or wet.
● Do not lean on the door when loading the machine or use the door to lift or move the machine.
●Do not allow children to play with the machine or its controls.
● WARNING Do not use the product if the fluff filter is not in position or is damaged; fluff could be
ignited.
● WARNING Where the hot surface symbol is located the temperature rise during operation
of the tumble dryer may be in excess of 60 degrees C.
● Remove the plug from the electricity supply. Always remove the plug before cleaning the
appliance.
● Do not continue to use this machine if it appears to be faulty.
● Lint and fluff must not be allowed to collect on the floor around the outside of the machine.
● The drum inside may be very hot. Always allow the dryer to complete the cool down period before
removing the laundry.
EN 3
Page 4
SAFETY REMINDERS
Installation
● Check that the product has no visible signs of
damage before use. If damaged do not use and
please call GIAS Service.
● Do not use adapters, multiple connectors
and/or extensions.
● Never install the dryer against curtains and be
sure to prevent items from falling or collecting
behind the dryer.
● The appliance must not be installed behind a
lockable door, a sliding door or a door with a
hinge on the opposite side to that of the tumble
dryer.
The Laundry
●Do not dry unwashed items in the tumble dryer.
● WARNING Do not tumble dry fabrics treated
with dry cleaning fluids.
●WARNING Foam rubber materials can, under
certain circumstances, when heated become
ignited by spontaneous combustion. Items
such as foam rubber (latex foam), shower caps,
waterproof textiles, rubber backed articles and
clothes or pillows fitted with foam rubber pads
MUST NOT be dried in the tumble dryer.
● Always refer to the laundry care labels for
directions on suitability for drying.
● Clothes should be spin dried or thoroughly
wrung before they are put into the tumble dryer.
Clothes that are dripping wet should not be put
into the dryer.
● Lighters and matches must not be left in
pockets and NEVER use flammable liquids
near the machine.
● Glass fibre curtains should NEVER be put in
this machine. Skin irritation may occur if other
garments are contaminated with the glass
fibres.
● Items that have been soiled with substances
such as cooking oil, acetone, alcohol, petrol,
kerosene, spot removers, turpentine, waxes
and wax removers should be washed in hot
water with an extra amount of detergent before
being dried in the tumble dryer.
● Fabric softeners, or similar products, should
be used as specified by the fabric softener
instructions.
Environmental Issues
● All packaging materials used are
environmentally-friendly and recyclable.
Please help dispose of the packaging via
environmentally-friendly means. Your local
council will be able to give you details of current
means of disposal.
● To ensure safety when disposing of an old
tumble dryer disconnect the mains plug from
the socket, cut the mains power cable and
destroy this together with the plug. To prevent
children shutting themselves in the machine
break the door hinges or the door lock.
European Directive 2002/96/EC
This appliance is marked according
t o the E u r o p e a n dir ec ti ve
2002/96/EC on Waste Electrical and
Electronic Equipment (WEEE).
By ensuring this product is disposed of correctly,
you will help prevent potential negative
consequences for the environment and human
health, which could otherwise be caused by
inappropriate waste handling of this product.
The symbol on the product indicates that this
product may not be treated as household waste.
Instead it shall be handed over to the applicable
collection point for the recycling of electrical and
electronic equipment.
For more detailed information about treatment,
recovery and recycling of this product, please
contact your local city office,your household
waste disposal service or the shop where you
purchased the product. Disposal must be
car ried out i n accor dance wi th local
environmental regulations for waste disposal.
GIAS Service
● To ensure the continued safe and efficient
operation of this appliance we recommend that
any servicing or repairs are only carried out by
an authorised GIAS service engineer.
If the appliance is not running properly or
breaks down, switch it off and disconnect the
plug from the socket. Consult GIAS Service for
possible repair.
EN 4
Page 5

INSTALLATION
Electrical Requirements
Tumble dryers are supplied to operate at a
voltage of 220-240V, 50 Hz single phase. Check
that the supply circuit is rated to at least 10A
Electricity can be extremely dangerous.
This appliance must be earthed.
The socket outlet and the plug on the
appliance must be of the same type.
Do not use multiple adapters and/or
extension leads.
The plug should be a ccessible for
disconnection after the appliance has been
installed.
CE Appliance complies with European Directive
2004/108/EC, 2006/95/EC and subsequent
amendments.
You may be charged for a service call if a
problem with your machine is caused by
incorrect installation.
VENTILATION
Adequate ventilation must be provided in the
room where the tumble dryer is located to
prevent gases from appliances burning other
fuels, including open fires, being drawn into the
room during operation of the tumble dryer.
● Exhaust air must not be discharged into a flue
which is used for exhausting fumes from
appliances burning gas or other fuels.
● Check regularly that the air flowing through
the dryer is not restricted.
● Check the fluff filter after use, and clean, if
necessary.
●The inlet and outlets should be kept free from
obstructions. To ensure adequate ventilation
the space between the bottom of the machine
and the floor must not be obstructed. There
should be a gap of at least 12mm between the
machine and any obstructions.
● Prevent items from falling or collecting behind
the dryer as these may obstruct the air inlet and
outlet.
● NEVER install the dryer up against curtains.
If the mains cord on this appliance is
damaged, it must be replaced by a special cord
which is ONLY obtainable from the spares
service. It must be installed by a competent
person.
Do not plug the machine in and switch it
on at the mains until the installation is
completed.For your safety, this dryer must be
correctly installed. If there is any doubt about
installation, call GIAS Service for advice.
Adjusting the Feet
Once the machine is in
place the feet should
be adjusted to ensure
that the machine is
level.
Do not install the product in a low temperature room or
in a room where there is a risk of frost occurring. At
temperature around freezing point the product may not be
able to operate properly: there is a risk of damage if the
water is allowed to freeze in the hydraulic circuit (valves,
hoses, pumps). For a better product performance the
ambient room temperature must be between +2°C and
+35°C. Please note that operating in cold condition
(between +2 and +15°C) might imply some water
condensation and water drops on floor.
EN 5
Page 6
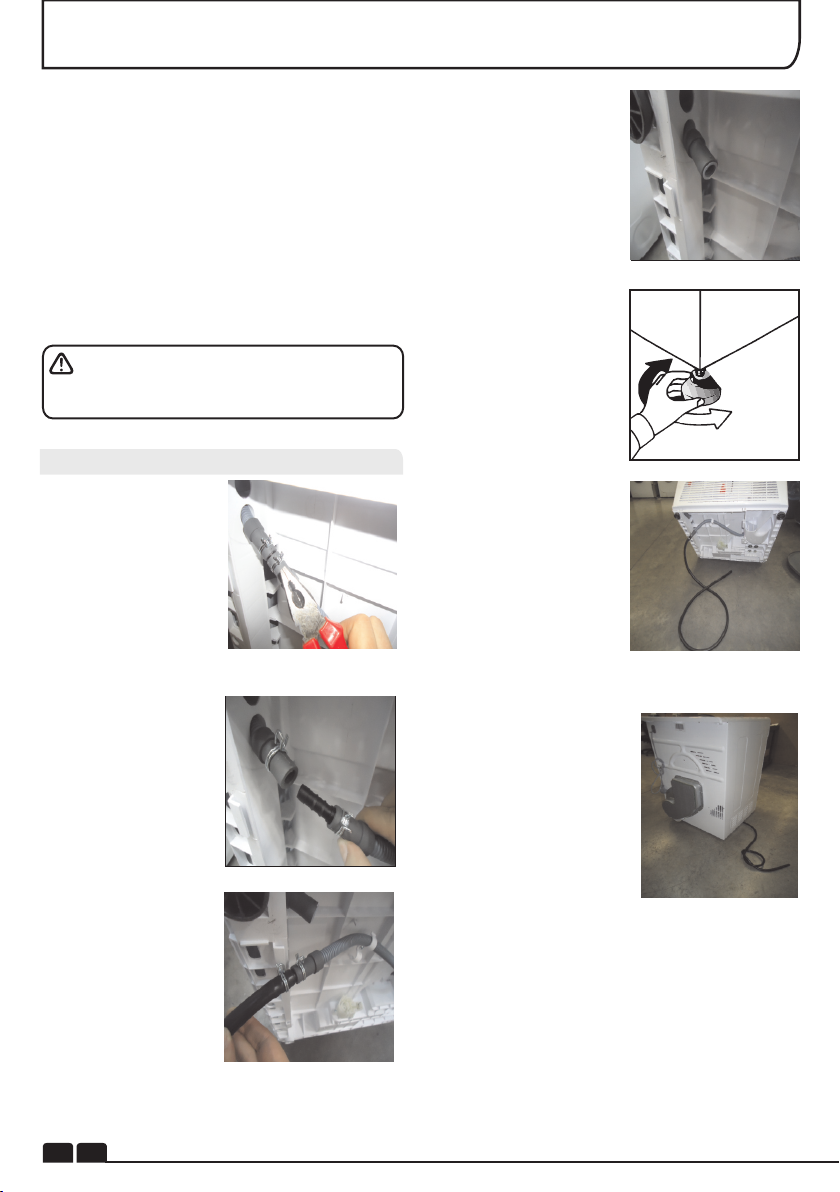
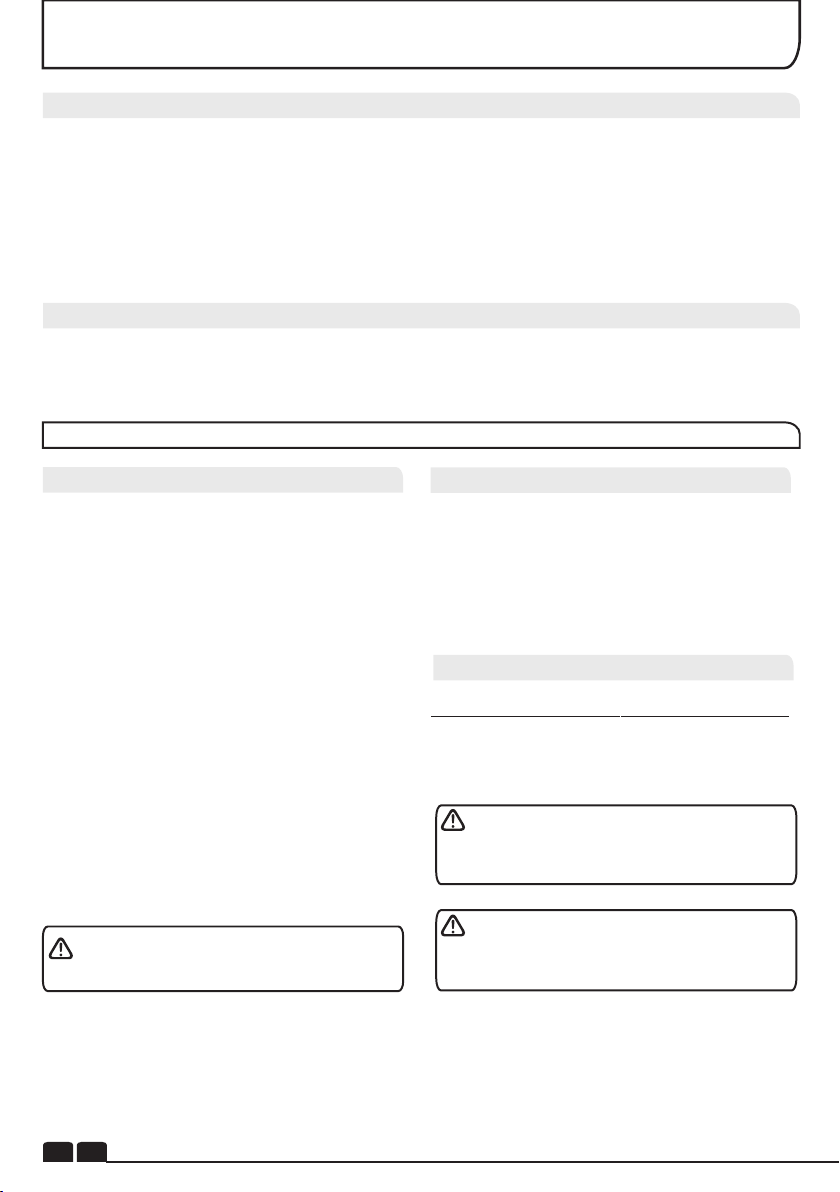
DRAIN HOSE : FITTING INSTRUCTIONS
To avoid emptying the water container after
each drying cycle, the water can be
discharged directly to a waste water drain pipe
(the same drainage system as household
sinks). Water Bye-Laws prohibit connection to
a surface water drain. The waste water drain
pipe should be located adjacent to the tumble
dryer.
The kit consists of:1 hose and 1 tap.
WARNING! Switch off and remove the
tumble dryer plug from the electricity supply
before carrying out any work.
5. Pl a c e t h e t a p
supplied by the kit to
cl ose the re main g
hose.
.
6. Once the machine is
in place the feet should
be adjusted to ensure
that the new hose does
not kink when pushing
the tumble dryer into
position.
Fit the Hose as Follows:
1.Ti lt the ma chi ne
backwards.
2. The waste water
pipe is situated at the
right-hand side of the
machine (see t h e
picture). A grey hose
connects to the bridge
at the left hand side of
the machine. Using
pliers, remove the pipe
retaining clip from the
bridge.
3. Pull the hose off the
bridge connection.
4. Attach the black
hose from the kit,
(using the connector
a n d p i p e c l i p s
supplied), to the hose
rem oved from the
bridge connection.
7. Connect the new
drain hose to the waste
Water pipe.
8. Connect to the
m a in s e le c tr i ci t y
supply.
EN 6
Page 7
PREPARING THE LOAD
Before using the tumble dryer for the first time:
● Please read this instruction book thoroughly.
● Remove all items packed inside drum.
● Wipe the inside of the drum and door with a
damp cloth to remove any dust which may
have settled in transit.
Clothes Preparation
Make sure that the laundry you are going to dry
is suitable for drying in a tumble dryer, as shown
by the care symbols on each item.
Check that all fastenings are closed and that
pockets are empty. Turn the articles inside out.
Place clothes loosely in the drum to make sure
that they don't get tangled.
Do Not Tumble Dry:
Woollens, silk, delicate fabrics, nylon stockings,
delicate embroidery, fabrics with metallic
decorations, garments with PVC or leather
trimmings, training shoes, bulky items such as
sleeping bags, etc.
IMPORTANT: Do not dry articles which
have been treated with a dry cleaning fluid or
rubber clothes (danger of fire or explosion).
During the last 15 minutes (roughly) the
load is always tumbled in cool air
Energy Saving
Only put into the tumble dryer laundry which
has been thoroughly wrung or spin-dried. The
drier the laundry the shorter the drying time thus
saving electricity.
ALWAYS
● Try to dry the maximum weight of laundry, this
will save time and electricity.
● Check that the filter is clean before every
drying cycle.
NEVER
● Exceed the maximum weight, this will waste
time and electricity.
● Put dripping wet items into the tumble dryer,
this may damage the appliance.
Maximum Drying Weight
● Cottons Max. 8 kg
● Synthetics Max. 4 kg
Do not overload the drum, large items when
wet can exceed the maximum admissible clothes
load (for example: sleeping bags, duvets).
Sort the Load as Follows
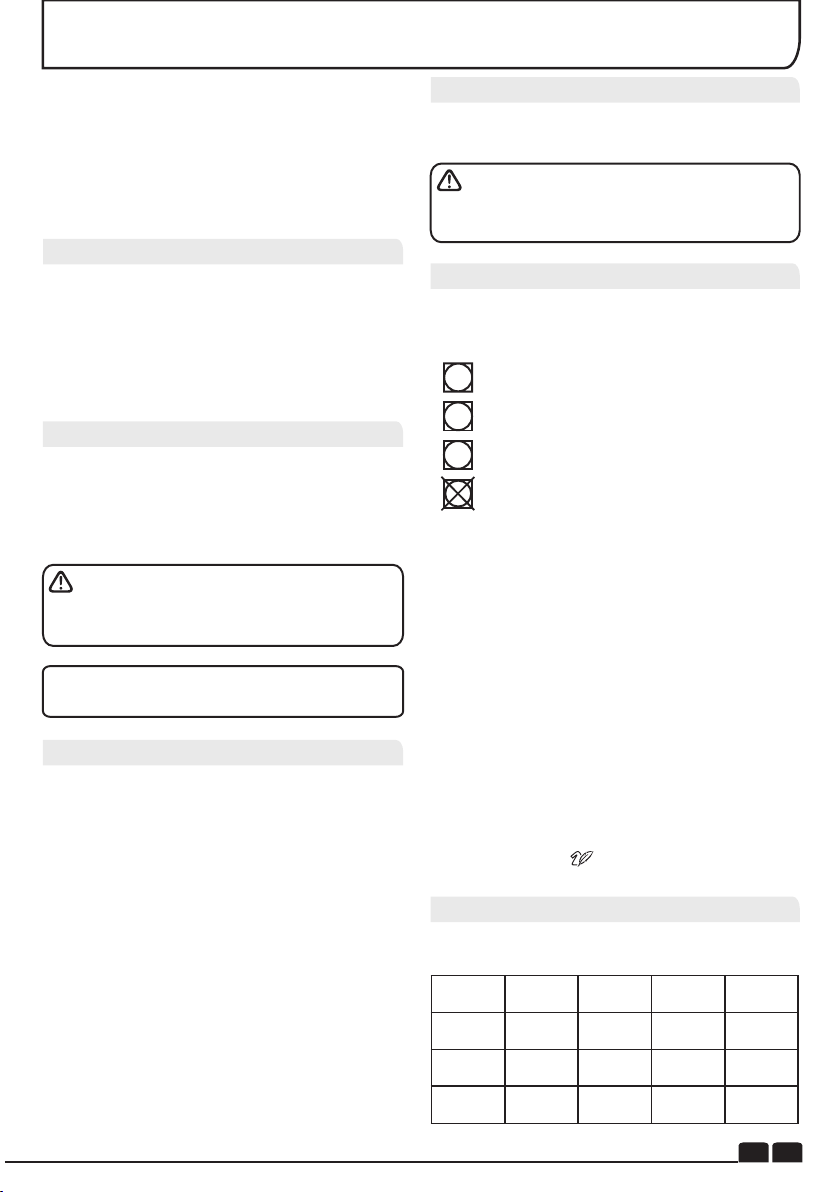
● By care symbols
These can be found on the collar or inside seam:
Suitable for tumble drying.
. .
Tumble drying at high temperature.
.
Tumble drying at low temperature only.
Do not tumble dry.
If the item does not have a care label it must be
assumed that it is not suitable for tumble drying.
● By amount and thickness
Whenever the load is bigger than the dryer
capacity, separate clothes according to
thickness (e.g. towels from thin underwear).
● By type of fabric
Cottons/linen: Towels, cotton jersey, bed and
table linen.
Synthetics: Blouses, shirts, overalls, etc. made
of polyester or polyamid, as well as for
cotton/synthetic mixes.
● By drying level
Sort into: iron dry, cupboard dry, etc. For delicate
articles press the button to select low drying
temperature.
Drying Guide
The table shows approximate drying times,depending on
the type of fabric and dampness of the clothes.
FABRIC
COTTON
SYNTHETICS
ACRYLIC
HEAT
SETTING
HIGH
LOW
LOW
HEAVY
LOAD
140-165min
MEDIUM
LOAD
70-80min
70-80min---
50-65min
---
LIGHT
LOAD
50-65min
40-55min
30-40min
EN
7
Page 8
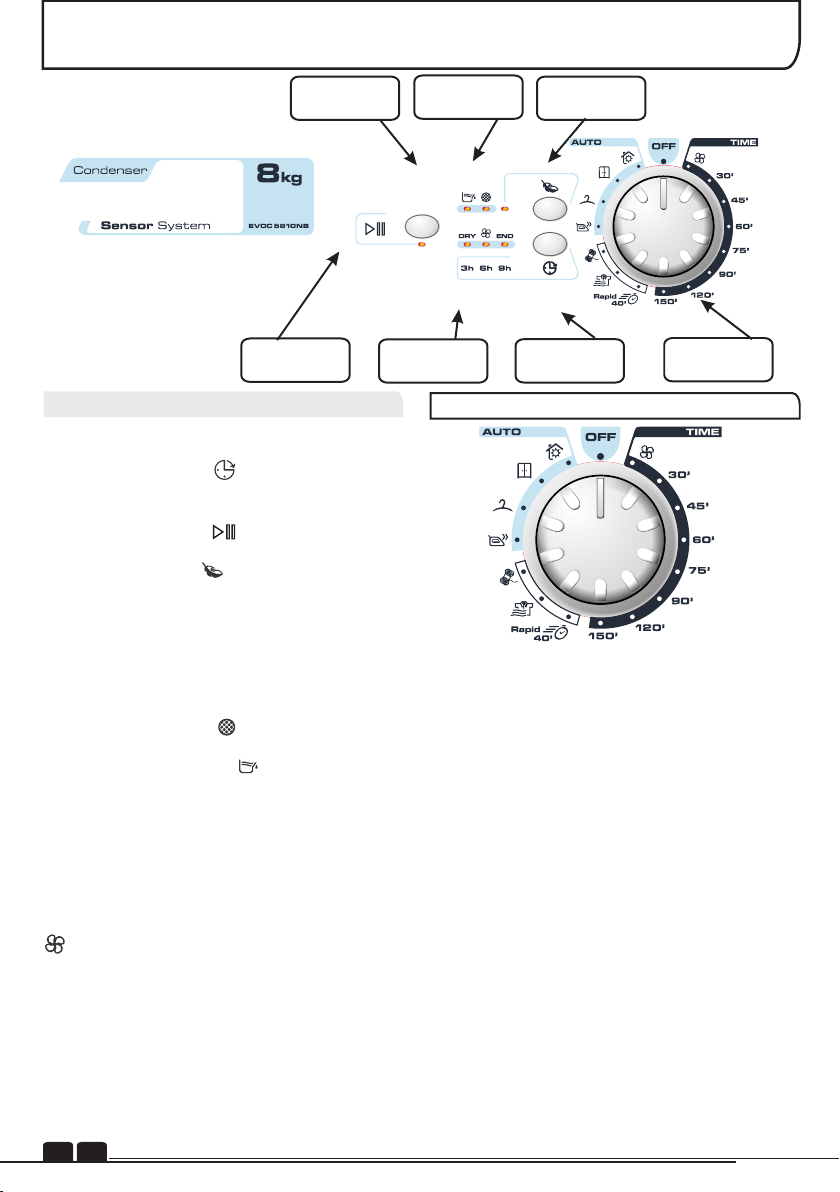
CONTROLS AND INDICATORS
Water Tank
Indicator
Filter Care
Indicator
Delicates
Button
Start/Pause
Button
Control Panel and Indicator Lights
Programme Selector – Select the required
programme
Delay Start button – Allows the user to
delay the start of the drying cycle (see details
of Operation on page 10)
Start/Pause button – Press to
commence the selected drying programme
Delicates button – Press to reduce
the heat level for delicate items, the indicator
above the button will light up. To change the
heat setting the programme must be reset
Low Heat – Indicator light ON
High Heat – Indicator light OFF
Filter Care indicator – lights when the
filter needs cleaning
Empty Water indicator – lights when the
water container is full
Progress display
DRY – When the programme is selected the
DRY indicator will flash, when the programme
starts the DRY indicator will light up.
– Indicator lights when there is a short time
left until completion of the programme. At this
stage of the drying cycle the machine enters the
Cool Down phase.
The length of the Cool Down phase varies
between 10 and 15 minutes depending on the
programme.
END – Indicator lights when the programme is
finished.
8
EN
Progress
Display
SELECTING THE PROGRAMME
Delay Start
Button
Programme
Selector
The Candy Sensor Dry machine gives many
options for drying the laundry to suit all
circumstances.
The table on the next page lists the
programmes and the function of each
programme.
Note: The sensor may not detect a small load of
small articles. For small loads and separate
items or pre-dried fabrics with low moisture
content, use the timed programmes.
Set the programme between 30 and 75 minutes
depending on the load size and dryness
required, and select high or low heat depending
upon the fabric type.
If the sensor does not detect the item the dryer
will only operate for 10 minutes before going
into cooldown.
If the load is too large or too wet to tumble dry
the dryer will automatically go into cooldown
after approximately 3 hours.
Page 9
SELECTING THE PROGRAMME
PROGRAMME
Perfect home
Extra Dry
Cupboard Dry
Iron Dry
Wool Finish
No Crease
40' Rapid
DESCRIPTION
Select the degree of dryness that you require. This ranges from
for bath towels and bathrobes, through for items that will be
put away without ironing, to the programme that leaves the laundry
suitable for ironing.
A gentle programme specially created to get woollens softer after
air-drying.This delicate warm air cycle, lasting 12 minutes, can
also be used to get woollens 'refreshed' after being stored in the
wardrobe.
The No crease programme provides a conditioning and
anticrease function. The dryer will heat the load for 9 minutes
followed by a 3 minute cool down period and is especially good for
garments which may have been left for some time prior to ironing,
in a linen basket for example. Garments may also become
stiffened when dried outside on a washing line or inside on
radiators.
This programme relaxes the creases in the fabric making ironing
quicker and easier.
The 40’ Rapid programme allows a drying cycle to be completed
quickly. This is an ideal programme for having dry, refreshed and
ready-to-wear clothes in less than 40'. This special programme
constantly monitors the dryness and temperature in the drum
thanks to the sensor using, using the exact time and energy you
need! The machine finishes the cycle when the cupboard dry level
is reached. The stated cycle length could vary according to fabric
types, load size and residual moisture in the garments.The
maximum load is 2kg and the programme is suitable for all types of
fabric where tumble drying is appropriate.
150'
120'
90'
75'
60'
45'
30'
Refresh
150' minutes of drying
120' minutes of drying
90' minutes of drying
75' minutes of drying
60' minutes of drying
45' minutes of drying
30' minutes of drying
Tumbling the laundry in cool air for 20 minutes
EN 9
Page 10
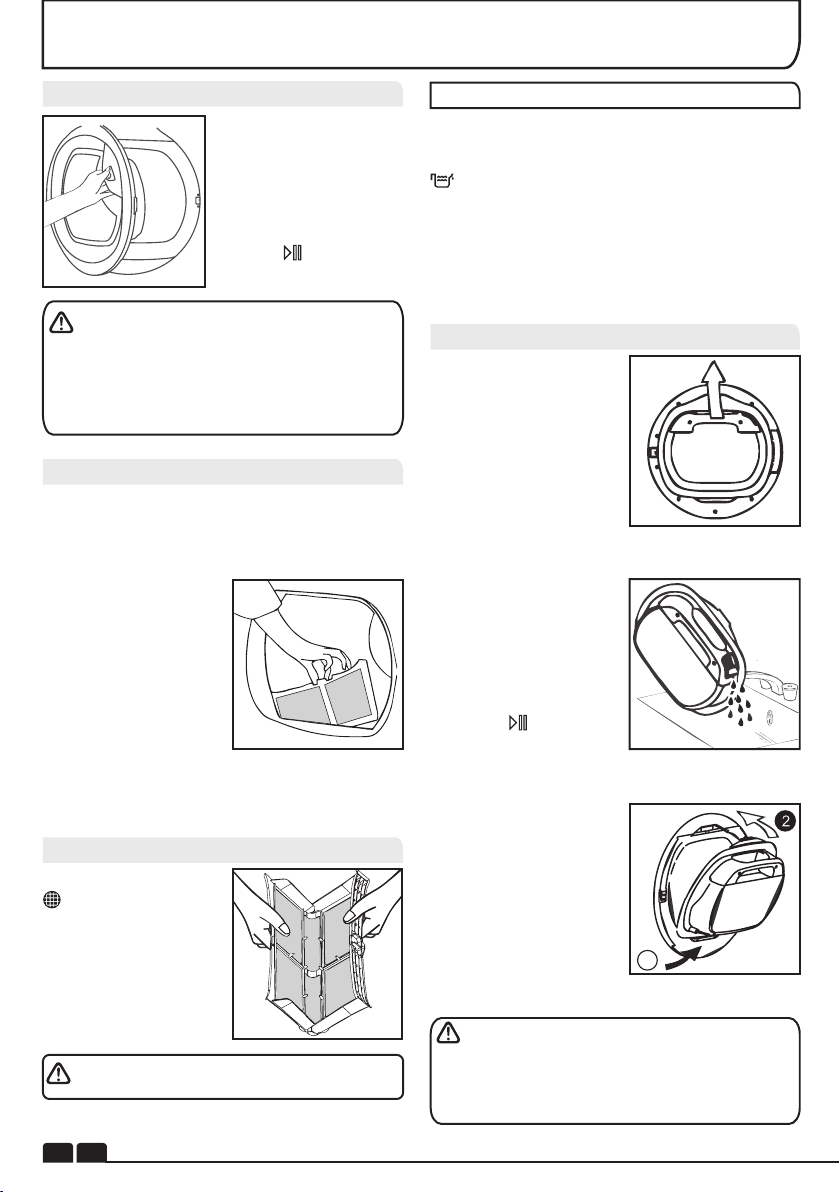
DOOR and FILTER
Opening the Door
Pull on handle to open
the door.
To restart the dryer,
close the door and
press .
WARNING! When the tumble dryer is in
use the drum and door may be VERY HOT.
Never stop a tumble dryer before the end of the
drying cycle unless all items are quickly
removed and spread out so that the heat is
dissipated.
Filter
IMPORTANT: To maintain the efficiency of the
dryer check that the fluff filter is clean before
each drying cycle.
1 . P u ll t h e f il te r
upwards.
2. Open filter as shown.
3. Gently remove lint
using a soft brush or
your fingertips.
4 . S n a p t h e f i l t e r
together and pus h
back into place.
Filter Care Indicator
Lights when the
filter needs cleaning.
If the laundry is not
drying check that the
filter is not clogged.
DO NOT USE WATER TO CLEAN THE FILTER.
WATER CONTAINER
The water removed from the laundry during the
drying cycle is collected in a container inside the
door of the dryer. When the container is full the
indicator on the control panel will light, and
the container MUST be emptied. However, we
recommend that the container is emptied after
each drying cycle.
NOTE: Very little water will collect during the
first few cycles of a new machine as an internal
reservoir is filled first.
To Remove the Container
1. Gently pull out the
w a t e r c o n t a i n e r
holding the handle.
When it is full the
water container will
weigh about 6 kg.
2 . Ti l t t h e w a t e r
container to empty the
water out through the
spout.
When empty, replace
the water container
back as shown; first
insert the base of the
container into position
as shown then gentle
pus h t he top into
position.
3. Press Button to
restart the cycle.
NOTE: If you have the
option of drainage near
to the dryer you can
use the discharge kit to
provide a permanent
drainage for the water
c o l l e c t ed i n t h e
container of the dryer.
This means that you
don't have to empty the
1
water container.
WARNING! If you open the door mid cycle,
before the cool-down cycle has completed,the
handle may be hot. Please use extreme caution
when attempting to empty the water reservoir
during the cycle.
EN 10
Page 11
CONDENSER
Important: Always switch off and remove the
plug from the electricity supply before cleaning
the condenser.
To maintain the efficiency of the dryer regularly
check that the condenser is clean.
To Remove the Condenser
1.Remove the kickplate.
2. Turn the two locking levers
anti-clockwise and pull out
the condenser.
3.Pull out the condenser
unit.
4. Gently remove any dust or
fluff with a cloth, then wash
the unit by holding it under a
running tap turning it so that
water flows between the
plates, to remove any dust or
fluff.
5.Check the gasket position
after cleaning.Fit the gasket
in to the groove if it is
misaligned.
6.Refit the condenser ensuring
it is in the correct way (as
indicated by the arrow) and
pushed firmly into place. Lock
the two levers by turning them
c l oc kw i s e. B e s ur e t h a t
condenser unit fixed to the
basement tightly.
7. Refit the kickplate.
OPERATION
1. Open the door and load the drum with
laundry. Ensure that garments do not hinder
closure of the door.
2. Gently close the door pushing it slowly until
you hear the door 'click' shut.
3. Turn the Programme Selector dial to select
the req u ired dry i ng progr a mme (see
Programme Guide).
4. If drying synthetics, acrylics or delicate items,
press the button to reduce the heat level.
The light next to the push button will light up
when the machine is in low heat setting. To
deselect in the first few minutes of the
programme, press the button, after this
time reset the machine to change the setting.
5. Press the button. The dryer will start
automatically and the DRY indicator will be
continuously lit.
6. If the door is opened during the programme to
check the laundry, it is necessary to press
to recommence drying after the door has
been closed.
7. When the cycle is nearing completion the
machine will enter the cool down phase, the
clothes will be tumbled in cool air allowing the
load to cool down.
8. When the programme is complete the
END indicator will light.
9. Following the completion of the cycle the
drum will rotate intermittently to minimize
creasing. This will continue until the machine is
switched OFF or the door is opened.
EN 11
Page 12
OPERATION
Delay Start Function
The Delay Start Function allows the user to delay the start of the drying cycle by 3, 6 or 9 hours.
When the function is first selected the display will show a delay of 3 hours, subsequent presses of
the button will increase the delay to 6 or 9 hours.
To commence the programme press Start/Pause and the appliance will complete the drying cycle
at the end of this time. The 3, 6 or 9 hour indicator light will flash to indicate that the start delay is in
progress.
Cancelling and Resetting the Programme
To cancel a programme press the Start/Pause button for 3 seconds. The DRY light will flash to
indicate that it has been reset.
CLEANING AND ROUTINE MAINTENANCE
Cleaning the Dryer
● Clean the filter and empty the water
container after every drying cycle.
● Regularly clean the condenser.
● After each period of use, wipe the inside of
the drum and leave the door open for a while to
allow circulation of air to dry it.
● Wipe the outside of the machine and the
door with a soft cloth.
● DO NOT use abrasive pads or cleaning
agents.
● To prevent the door sticking or the build up
of fluff clean the inner door and gasket with a
damp cloth after every drying cycle.
WARNING! The drum, door and load may
be very hot.
Technical Specifications
Drum capacity 115 litres
Maximum load 8 kg
Height 85 cm
Width 60 cm
Depth 60 cm
Energy Label Band B
Information for Test Laboratory
EN 61121 Programme
-DRY COTTON
-IRON DRY COTTON
-EASY-CARE TEXTILE
IMPORTANT Always switch off and
remove the plug from the electricity supply
before cleaning this appliance.
For electrical data refer to the rating label
on the front of the dryer cabinet (with the door
open).
Programme To Use
-HANG DRY
-IRON DRY
-HANG DRY+ SYNTHETIC
EN 12
Page 13

What Might be the Cause of...
Defects you can remedy yourself
Before calling GIAS Service for technical
advice please run through the following
checklist. A charge will be made if the machine
is found to be working or has been installed
incorrectly or used incorrectly.
If the problem persists after completing the
recommended checks, please call GIAS
Service, they may be able to assist you over the
telephone.
Time display to end could change during
dr ying c ycle. The time to end is
continuously checked during the drying
cycle and the time is adjusted to give the
best estimation time. The displayed time
may increase or decrease during the cycle
and this is normal.
Drying time is too long/clothes are not dry
enough…
● Have you selected the correct drying
time/programme?
● Were the clothes too wet? Were the clothes
thoroughly wrung or spindried?
● Does the filter need cleaning?
● Is the dryer overloaded?
● Has the option been selected from a
previous cycle?
TROUBLESHOOTING
The dryer is noisy…
● Switch off the dryer and contact GIAS Service
for advice.
The Indicator is on…
● Does the filter need cleaning?
The Indicator is on…
● Does the water container need emptying?
CUSTOMER SERVICE
Should there still be a problem with your dryer
after completing all the recommended checks,
please call GIAS Service for advice.
They may be able to assist you over the
telephone or arrange for a suitable appointment
for an engineer to call under the terms of your
guarantee. However, a charge may be made if
any of the following applies to your machine:
● Is found to be in working order.
● Has not been installed in accordance with the
installation instructions.
● Has been used incorrectly.
The dryer does not operate…
● Is there a working electricity supply to the
dryer? Check using another appliance such as
a table lamp.
● Is the plug properly connected to the mains
supply?
● Is there a power failure?
● Has the fuse blown?
● Is the door fully closed?
● Is the dryer switched on, both at the mains
supply and at the machine?
● Has the drying time or the programme been
selected?
● Has the machine been switched on again after
opening the door?
Spares
Always use genuine spares, available direct
from GIAS Service.
GIAS Service
For service and repairs call your local GIAS
Service engineer.
The manufacturer declines all responsibility
in the event of any printing mistakes in this
booklet. The manufacturer also reserves the
right to make appropriate modifications to
its products without changing the essential
characteristics.
EN 13
Page 14

INDEX
Introduction
Informations Sur La Livraison
Déballage Du Produit
Rappels De Sécurité
Utilisation
Installation
Le Linge
Protection De L'environnement
Service Gias
Installation
Besoins Électriques
Ajustement Des Pieds
Ventilation
Préparation De La Charge
Préparation Des Vêtements
Tri De La Charge
Ne Séchez Pas En Machine
Économies D’énergie
Guide De Séchage
Commandes Et Indicateurs
Sélection Du Programme
Porte Et Filtre
Ouverture De La Porte
Filtre
Indicateur Entretien Filtre
Réservoir D’eau
Pour Retirer Le Réservoir
Condenseur
Pour Retirer Le Condenseur
Fonctionnement
Départ Différé
Annulation Et Réinitialisation Du Programme
Nettoyage Et Entretien De Routine
Nettoyage Du Sèche-linge
Spécifications Techniques
Dépistage De Pannes
Service Clientèle
Pièces De Rechange
Service Gias
15
15
15
15
15
16
16
16
16
17
17
17
18
19
19
19
19
19
19
19
20
21
22
22
22
22
22
22
23
23
23
24
24
24
24
24
25
25
25
25
FR
14
Page 15

INTRODUCTION
Veuillez lire et suivre ces instructions avec soin et utiliser la machine en conséquence. Ce livret
contient des instructions importantes sur la sécurité d'utilisation, l'installation et l'entretien de la
machine, ainsi que des conseils utiles pour obtenir les meilleurs résultats possibles lors de son
utilisation. Conservez toute la documentation dans un endroit sûr pour pouvoir vous y reporter à une
date ultérieure ou la transmettre aux prochains propriétaires
Informations Sur La Livraison
Vérifiez que les articles suivants ont bien été
livrés avec l’appareil :
● Manuel d'utilisation
● Carte de garantie
● Étiquette d'énergie
Vérifiez que la machine ne s'est pas
détériorée en transit. Si c'est le cas, contactez
GIAS pour une opération de dépannage.
Le non-respect de ces instructions peut
compromettre la sécurité de votre appareil. Un
appel de service peut vous être facturé si la
défaillance de votre appareil est causée par une
mauvaise utilisation.
RAPPELS DE SÉCURITÉ
Utilisation
● Cet appareil ne doit pas être utilisé par des personnes (notamment des enfants) jouissant de
capacités mentales, sensorielles ou physiques réduites ou d'un manque d'expérience ou de
connaissances, sauf si elles sont surveillées ou ont reçu des instructions concernant l'utilisation de cet
appareil par une personne responsable de leur sécurité.
● Les enfants doivent être surveillés afin de s'assurer qu'ils ne s'amusent pas avec l'appareil.
● ATTENTION La mauvaise utilisation d’un sèche-linge risque de causer un d’incendie.
● Cette machine est conçue uniquement pour usage domestique, à savoir pour sécher le linge
domestique et les vêtements.
● Cette machine ne doit être utilisée que pour l’emploi auquel elle est destinée et qui est décrit dans ce
manuel. Assurez-vous d'avoir bien compris les instructions d'installation et d'utilisation avant de faire
fonctionner la machine.
● Ne touchez pas la machine si vous avez les mains ou les pieds mouillés ou humides.
● Ne vous appuyez pas sur la porte lorsque vous chargez la machine et n'utilisez pas la porte pour
soulever ou déplacer la machine.
● Ne laissez pas des enfants jouer avec la machine ou avec ses commandes.
● ATTENTION N’ utilisez pas cette machine si le filtre à peluches n’ est pas en place ou s’ il est
endommagé ; les peluches risquent en effet de s’allumer.
● ATTENTION L’augmentation de température pendant le fonctionnement du sèche-linge peut être
supérieure à 60°C là où se trouve le symbole de surface chaude .
● Débranchez du courant de secteur. Retirez toujours la prise avant de nettoyer la machine.
● Cessez d’utiliser la machine si elle semble défectueuse.
● Veillez à ce que les peluches ne puissent pas s’accumuler sur le sol, à l’extérieur de la machine.
● Il se peut que l’intérieur du tambour soit très chaud. Veillez à ce que le sèche-linge termine
son cycle de refroidissement avant d’en sortir le linge.
DÉBALLAGE DU PRODUIT
Retirez la machine de
l’emballage, à proximité de
son emplacement définitif.
1. Coupez délicatement
au to ur de la base de
l'emballage en remontant
vers l'angle supérieur.
2. Retirer le manchon en
polyéthylène et sortez le
sèche-linge de la base en
polystyrène.
Mettez l'emballage au rebut en toute
sécurité. Conservez hors de portée des enfants
car il représente une source de danger
potentielle.
FR 15
Page 16

RAPPELS DE SÉCURITÉ
Installation
● Vérifiez que la machine ne présente aucun
signe visible de détérioration avant de l’utiliser.
En cas de détérioration, assurez-vous de ne
pas l’utiliser et de contacter le service GIAS.
● N'utilisez pas d'adaptateurs, de multi-prises
et/ou de rallonges.
● Veillez à ne pas installer le sèche-linge contre
des rideaux et assurez-vous que rien ne pourra
tomber ou s’accumuler derrière le sèche-linge.
● Cet appareil ne doit pas être installé derrière
une porte verrouillable, une porte coulissante
ou une porté munie de gonds placée en face de
la porte du sèche-linge.
Le Linge
● Ne séchez pas des vêtements non lavés dans le
sèche-linge.
● ATTENTION NE séchez PAS les tissus qui ont
été traités avec des liquides de nettoyage à sec.
● ATTENTION Quand elles sont chauffées, les
mousses alvéolaires peuvent dans certains cas
brûler par combustion sponta-née. Les articles
tels que le caoutchouc mousse (mousse de latex),
les bonnets de douche, le textile imperméable, les
articles caoutchoutés et les vêtements ou
coussins rembourrés de caoutchouc mousse NE
DOIVENT PAS être séchés dans le sèche-linge.
● Reportez-vous toujours aux étiquettes d’
entretien du linge pour vérifier le mode de séchage
recommandé.
● Les vêtements doivent être essorés en machine
ou à la main avant d’ être placés dans le sèchelinge. Les vêtements qui dégoulinent NE
DOIVENT PAS être mis dans le sèche-linge.
● Enlevez les briquets et les allumettes des
poches et veillez à ne JAMAIS utiliser de liquides
inflammables à proximité de la machine.
● Les rideaux en fibres de verre ne doivent
JAMAIS être placés dans cette machine. La
contamination d’autres vêtements par les fibres de
verre peut entraîner des irritations de la peau.
● Les articles qui ont été souillés par des
substances telles que huile de cuisson, acétone,
alcool, pétrole, kérosène, produit anti-taches,
térébenthine, cire et décapant pour cire doivent
être lavés à l'eau chaude avec une quantité
supplémentaire de déter-gent avant d'être séchés
dans le sèche-linge.
● Les agents adoucissants, et autres produits
similaires, doivent être utilisés conformément aux
instructions fournies par le fabricant du produit.
Protection De L'environnement
● Tous les matériaux de conditionnement
utilisés sont écologiques et recyclables.
Veuillez les éliminer de manière écologique.
Votre municipalité pourra vous donner le détail
exact des méthodes d’élimination en vigueur.
● Pour assurer la sécurité lors de l’élimination
d’un vieux sèche-linge, veuillez débrancher la
fiche du courant de secteur, couper le câble
d’alimentation et le détruire avec la fiche. Pour
empêcher que les enfants ne s’enfer-ment
dans la machine, cassez les charnières de la
porte ou son dispositif de verrouillage.
Directive Européenne 2002/96/CE
Cet appareil est commercialisé en
accord avec la directive européenne
2002/96/CE sur les déchets des
éq u i p em e n ts é lec t r iqu e s e t
électroniques (DEEE).
En vous assurant que ce produit est correctement recyclé, vous participez à la prévention
d e s c o n s é q u e n ce s n ég at i v e s s u r
l’environnement et la santé publique qui pourrait
être causé par une mise au rebut inappropriée
de ce produit. Le symbole sur ce produit indique
qu’il ne doit pas être traité comme un déchet
ménager. Il doit être rapporté jusqu’à un point de
rec yclage d es déche ts électr iques et
électroniques. La collecte de ce produit doit se
faire en accord avec les réglementations
environnementales concernant la mise au rebut
de ce type de déchets. Pour plus d’information
au sujet du traitement, de la collecte et du
recyclage de ce produit, merci de contacter votre
mairie, votre centre de traitement des déchets ou
le magasin où vous avez acheté ce produit.
Service GIAS
● Pour veiller au fonctionnement efficace et
sans risque de cet appareil, nous vous
recommandons de faire exclusivement appel à
un technicien GIAS agréé pour son entretien
ou sa réparation éventuelle.
Si l’appareil ne fonctionne pas correctement
ou s’il tombe en panne, mettez-le à l’arrêt et
débranchez-le du courant de secteur. Consultez
le service GIAS pour prévoir une éventuelle
réparation.
FR
16
Page 17

INSTALLATION
Besoins Électriques
Les sèche-linges sont prévues pour une
tension monophasée de 220-240 V, 50 Hz.
Vérifiez que la tension nominale du circuit
d'alimentation est réglée sur 10 A minimum.
L’électricité peut être extrêmement
dangereuse.
Cet appareil doit être mis à la terre.
La prise de courant et la fiche de la machine
doivent être du même type.
N'utilisez pas de multi-prises et/ou de
rallonges.
La fiche doit être ac cessible pour
débrancher l’appareil une fois qu’il a été
installé.
La machine est conforme aux directives
européennes 2004/108/EC, 2006/95/EC et à
leurs modifications ultérieures.
Un appel de service peut vous être facturé
si la défaillance de votre appareil est causée
par une installation incorrecte.
Si le cordon électrique de cet appareil
estendommagé, il doit être remplacé par un
cordon spécial qui est UNIQUEMENT disponible
auprès du service des pièces de rechange. Il doit
être installé par une personne compétente.
VENTILATION
La pièce où se trouve le sèche-linge doit avoir
une ventilation adéquate de manière à ce que
les gaz des appareils qui brûlent d’autres
combustibles, y compris les cheminées, ne
soient pas attirés dans la pièce pendant que le
sèche-linge est en marche.
● L’air d’échappement ne doit pas être évacué
par un conduit qui est également utilisé pour
évacuer les fumées d’échappement d’appareils
qui brûlent du gaz ou d’autres combustibles.
● Vérifiez régulièrement que l’ air peut circuler
librement autour du sèche-linge.
● Vérifiez le filtre à peluches après usage, et
nettoyez-le le cas échéant.
● Les entrées et sorties doivent être libres
d’obstructions. Pour veiller à une ventilation
adéquate, l’espace entre le bas de la machine
et le sol ne doit pas être obstrué. Il doit y avoir un
espace d’au moins 12 mm entre la machine et
d'éventuelles obstructions.
● Veillez à ce que rien ne puisse tomber ou
s’accumuler entre les côtés et l’arrière du
sèchelinge, afin de ne pas obstruer l'entrée et la
sortie d’air.
● N’installez JAMAIS le sèche-linge contre des
rideaux.
Ne branchez pas l'appareil et ne mettez pas
en marche l'interrupteur de secteur tant que
l'installation n'est pas terminée. Par mesure de
sécurité, veillez à installer ce sèche-linge
correctement. En cas de doute concernant son
installation, veuillez demander conseil à GIAS
Service.
Ajustement Des Pieds
Lorsque la machine est
en place, les pieds
doivent être ajustés
pour mettre la machine
de niveau.
Ne pas installer le produit dans une pièce à la
température basse où le risque de formation de glace est
possible. A la température de congélation de l'eau, le
produit risque de ne pas fonctionner correctement. Si l'eau
du circuit hydraulique se glace, les composants suivants
risquent d'être endommagés : soupape, pompe, tubes. Afin
de garantir les meilleures prestations du produit, la
température de la pièce doit être comprise entre +2°C et
+35°C. Veuillez noter que l'utilisation à des températures
basses (entre 2° et 15°C) peut entraîner une condensation
de l'eau et des gouttes sur le sol.
FR
17
Page 18

KIT TUYAU D'ÉVACUATION : INSTRUCTIONS DE MONTAGE
Afin d'éviter d'avoir à vider le réservoir d'eau
après chaque cycle de séchage, l'eau qui est
normalement recueillie dans ce même
réservoir pendant le cycle le séchage peut être
évacuée d i r e c t e m e n t par u n tuyau
d'évacuation d'eau sales (le même système
de vidange que celui des éviers domestiques).
Les arrêt é s mun i c i paux en m atière
d'évacuation d'eau interdisent la connexion à
un égout d'eau de surface. Le système de
vidange d'eaux sales doit être placé à
proximité du sèche-linge.
Le Kit contient : 1 tuyau et 1 étrier de tuyau.
ATTENTION ! Avant d'entreprendre tout
travail, éteignez le sèche-linge et retirez la prise
de l'alimentation électrique secteur.
Installez le Kit Suivant les Instructions:
1. Inclinez la machine
vers l'arrière.
4. Fixez le tuyau noir
du kit (en utilisant le
conne c t e u r e t les
é t ri e r s d e t uy a u
four n i s ) au t u y a u
démonté du raccord.
5. Placez le robinet
fourni dans le kit pour
fermer le tuyau.
6. Une fois la machine
en place, ajustez les
pieds de façon à ce
que le tuyau de se
coince pas sous la
machine.
2. Le tuyau d'eau sales
se trouve du côté droit
de la machine (voir cicontre). Un tuyau gris
est branché sur le
raccord sur le côté
gauche. A l'aide d'une
pince, retirez l'étrier de
fixation du tuyau de
raccord.
3. Retirez le tuyau du
raccord.
18
IT
18
FR
7 . C o n n e c t e z l e
n o u v e a u t u y a u
d'évacuation au tuyau
d'eau sales.
Page 19

PRÉPARATION DE LA CHARGE
Avant d’utiliser le sèche-linge pour la première
fois :
● Veuillez lire ce manuel d’instruction en détail.
● Retirez tous les articles qui se trouvent à
l’intérieur du tambour.
● Essuyez l’intérieur du tambour et de la porte
avec un chiffon humide pour éliminer la
poussière éventuelle qui aurait pu s’y infiltrer en
transit.
Préparation Des Vêtements
Vérifiez sur les étiquettes comportant les
symboles d’entretien que le linge que vous
souhaitez sécher convient au séchage en
machine.
Vérifiez que toutes les fermetures sont fermées
et que les poches sont vides. Mettez les articles
à l’envers. Placez les vêtements en vrac dans le
tambour en veillant à ce qu’ils ne s’emmêlent
pas les uns avec les autres.
Ne séchez pas en machine :
Les lainages, la soie, les tissus délicats, les bas
de nylon, les broderies délicates, les tissus
ayant des décorations métalliques, les
vêtements avec des bordures en PVC ou en
cuir, les chaussures de sport, les articles
volumineux comme les sacs de couchage, etc.
IMPORTANT : Ne séchez pas les articles
qui ont été traités avec un liquide de nettoyage
à sec ou les vêtements en caoutchouc (risque
d’incendie ou d’explosion).
Pendant les 15 dernières minutes (approximativement), les vêtements sont toujours
échés à l'air froid.
Économies D’énergie
Ne mettez que du linge essoré en machine ou à la
main dans le sèche-linge. Plus le linge est sec,
plus le temps de séchage sera court, ce qui
économisera de l’énergie.
TOUJOURS
● Essayez de sécher le poids de linge
maximum,pour économiser du temps et de
l’électricité.
● Vérifiez que le filtre est propre avant chaque
cyclede séchage.
JAMAIS
● Ne dépassez pas le poids maximum pour ne
pas gaspiller du temps ou de l’électricité.
● Ne mettez pas d'articles dégoulinant d’eau
dans le sèche-linge pour ne pas endommager
l’appareil.
Poids De Séchage Maximum
● Coton 8 kg maxi
● Synthétiques 4 kg maxi
Ne surchargez pas le tambour ; lorsqu’ils
sont mouillés, les grands articles peuvent
dépasser le poids de maximum admissible (ex :
sacs de couchage, couettes).
Triez La Charge Comme Suit :
● Par symbole de soin d’entretien
Vous les trouverez sur le col ou la couture intérieure :
Convient pour séchage en machine.
. .
Séchage à haute température.
Séchage à basse température
.
uniquement.
Ne séchez pas en machine.
Si le vêtement ne comporte aucune étiquette de
conseils de lavage, considérez qu'il ne convient pas
pour le séchage en machine.
● Par quantité et épaisseur
Lorsque la charge est plus importante que la
capacité du sèche-linge, séparez les vêtements
selon leur épaisseur (ex : les serviettes des
sousvêtements fins).
● Par type de tissu
Coton/toile de lin : Serviettes, jersey en coton,
linge de lit ou de table.
Synthétiques : Chemisiers, chemises, blouses etc.
en polyester ou polyamide, ainsi que pour les
mélanges de coton/synthétique.
● Par degré de séchage
Triez selon : sec pour repassage, sec pour
rangement, etc. Pour les articles délicats, appuyez
Sur le bouton pour sélectionner
une température de séchage basse.
Guide De Séchage
Ce tableau indique les temps de séchage approxi-matifs,
selon le type de tissu et le degré d’humidité des
vêtements.
TISSUS
COTON
SYNTHÉTIQUES
ACRYLIQUE
Séchage Délicat
PUISSANCE
DE SÉCHAGE
HAUT
BAS
BAS
PLEINE
CHARGE
140-165min
½
CHARGE
70-80min
70-80min---
50-65min
---
PETITE
CHARGE
50-65min
40-55min
30-40min
FR 19
Page 20

COMMANDES et INDICATEURS
Indicateur
Réservoir Plein
Bouton
Marche/Pause
Panneau de commande et témoins indicateurs
Sélecteur de programmes – sélectionnez le
programme requis
Bouton Départ Différé – permet à
l'utilisateur de différer le démarrage du cycle
de séchage (voir les détails de fonctionnement
en page 87)
Bouton Marche/Pause – appuyez sur ce
bouton pour lancer le programme de
séchage sélectionné
Bouton Séchage Délicat – appuyez pour
réduire la température pour les articles
délicats ; l'indicateur situé au-dessus du
bouton s'allume. Pour modifier le réglage de la
température, le programme doit être
programme.
Basse température–témoin lumineux ALLUME
Haute température–témoin lumineux ETEINT
Indicateur Réservoir Plein – s’allume
lorsque le réservoir d’eau est plein
Indicateur d’entretien du filtre – s'allume
lorsqu'il est nécessaire de nettoyer le filtre
Afficheur Progress
DRY – Le témoin de DRY clignote lorsque le
programme est sélectionné et reste allumé
lorsqu'il se met en marche.
– Le témoin lumineux clignote lorsque le
programme est sur le point de se terminer. A
ce stade du cycle de séchage, la machine se
met en mode Refroidissement.
La longueur de la phase de Refroidissement
varie de 10 à 15 minutes en fonction du
programme.
END – ce témoin s'allume lorsque le
programme est terminé.
FR
réinitialisé.
20
Indicateur
d’entretien du filtre
Afficheur
Progress
SÉLECTION DU PROGRAMME
Départ Différé
Bouton Séchage
Bouton
Délicat
Sélecteur de
programmes
La machine Candy Sensor Dry propose
diverses options de séchage du linge
répondant à tous les besoins.
Le tableau ci-après répertorie les programmes
et leurs fonctions correspondantes.
Note : Il se peut que le capteur ne détecte pas
les petites charges de petits articles. Pour les
petites charges et les articles individuels ou les
tissus pré-séchés ayant une faible teneur en
humidité, utilisez les programmes à durée
déterminée. Réglez le programme entre 30 et
75 minutes selon la taille de la charge et le
degré de séchage voulu, et sélectionnez une
température haute ou basse selon le type de
tissu.
Si le capteur ne détecte pas l'article, le sèchelinge ne fonctionnera que pendant 10 minutes
avant de se mettre en mode refroidissement.
Si la charge est trop importante ou trop
m o u i l lé e , l e s èc h e - l i n ge s e m e t
automatiquement en mode refroidis-sement
après environ 3 heures.
Page 21

SÉLECTION DU PROGRAMME
PROGRAMME
Sec
Prêt à Ranger
Prêt à Repasser
Laine
Anti plis
40' Rapid
150'
120'
90'
75'
60'
45'
30'
Défroissage
DESCRIPTION
Sélectionnez le degré de séchage souhaité. Celui-ci s'étend de
pour le linge de bain et les peignoirs, à pour les articles qui
seront rangés sans être repassés, et comprend également le
programme séchant le linge qui sera repassé.
Un programme délicat spécialement créé pour rendre les lainages
plus doux après le séchage à l'air. Ce cycle délicat à l'air chaud,
d'une durée de 12 minutes, permet aussi de ‘rafraîchir’ les lainages
rangés depuis un certain temps dans votre armoire.
Le programme Anti plis comporte une fonction assouplissant
et antifroissement. Le sèche-linge chauffera la charge pendant 9
minutes et le refroidira ensuite pendant 3 minutes, ce qui est
particulièrement utile pour les vêtements qui ont été laissés
pendant un certain temps avant le repassage, dans le sac à linge
par exemple. Les vêtements peuvent également raidir lorsqu’ils
sont séchés en plein air sur une corde à linge ou à l’intérieur sur
des radiateurs. Le programme détend les froissements du tissu
pour rendre le repassage plus rapide et plus facile.
Le programme 40' Rapid permet au cycle de séchage de se
produire plus rapidement. C'est le programme idéal pour avoir des
habits secs, rafraîchis et prêts à porter en moins de 40'. Ce
programme spécial contrôle en permanence au moyen d'un
détecteur l'humidité et la température à l'intérieur du tambour, pour
ne pas utiliser d'énergie plus longtemps que nécessaire. La
machine met fin au cycle dès qu'elle a atteint un niveau où il y fait
aussi sec qu'à l'intérieur d'un placard de rangement. La durée du
cycle dépend du type de tissu, du volume de la charge et de
l'humidité résiduelle à l'intérieur des vêtements.
La charge maximum est de 2 kg et le programme convient à tous les
types de textiles appropriés pour passer au sèchelinge.
150' minutes de séchage
120' minutes de séchage
90' minutes de séchage
75' minutes de séchage
60' minutes de séchage
45' minutes de séchage
30' minutes de séchage
Séchage de linge dans de l’air froid pendant 20 minutes
FR
21
Page 22

PORTE et FILTRE
Ouverture De La Porte
Tirez sur la poignée
pour ouvrir la porte.
Pour reme t t r e l e
s è c h e - l i n g e e n
marche, fermez la
port e et appuy e z
Bouton Marche/Arrét.
ATTENTION ! Lorsque le sèche-linge est
en cours d’utilisation, il se peut que le tambour
et la porte soient TRES CHAUDS. N'arrêtez
jamais le sèche-linge avant la fin du cycle de
séchage sauf si tous les articles sont
rapidement retirés et étendus de façon à
dissiper la chaleur.
Filtre
IMPORTANT : Pour assurer l’efficacité du
sèche-linge, vérifiez que le filtre à peluches est
propre avant chaque cycle de séchage.
1. Tirez le filtre vers le
haut.
2. Ouvrez le filtre,
comme illustré.
3. Retirez doucement
les peluches à l’aide
d’une brosse douce ou
du bout des doigts.
4. Réenclenchez le
filtre et poussez-le en
place.
Indicateur Entretien Filtre
s’allume lorsqu’il
faut nettoyer le filtre.
Si le linge ne sèche
pas, vérifiez que le
filtre n’est pas colmaté.
NE PAS NETTOYER LE FILTRE À L'EAU
22
FR
RÉSERVOIR D’EAU
L'eau éliminée lors du cycle de séchage est
collectée dans un bac à condensation situé à
l'interieur de la porte du sèche-linge.
Lorsque le bac est plein , le voyant lumineux
s'allume sur le bandeau de commandes. Il
signale alors qu'il faut vider le bac. Toutefois, il
est conseillé de vider le bac après chaque cycle
de séchage.
NOTE : Lors des premiers cycles, lorsque le
séche-linge est neuf, il n'y a que très peu d'eau
qui est récupérée car le réservoir intérieur est
rempli en premier.
Pour Retirer Le Réservoir
1. Retirez délicatement
le réservoir en le tenant
par la poignée. Lorsqu'il
est plein, le réservoir
d'eau pèse environ 6Kg.
2. Incliner le réservoir et
videz-le par le trou prévu
à cet effet. Lorsque le
réservoir est vide, le
replacer dans la porte
comme indiqué ; il faut
d'abord inséré la base
p u i s d él i c a r e m e nt
p o us s e r l a p ar t i e
s u p é r i e u r e d a n s
l'encoche.
3. Appuyer sur le bouton
Ma r c h e/A r r ét p o ur
relancer le cycle
Note : Si vous disposez
d ' u n e b o u c h e
d'évacuation proche du
sè c h e - l ing e , i l e s t
possible d'installer le kit
d'évacuation de façon
p e r m a n e n t e p o u r
v i d a n g e r l ' e a u
acc u m ulée da n s l e
sèche-linge. Il n'y aura
ainsi plus besoin de
vider le réservoir d'eau.
ATTENTION ! Si la porte du sèche-linge est
ouverte lors du cycle ou avant que la phase de
refroidissement soit complétée, la poignée du
réservoir peut être très chaude. Il faut donc faire
très attention et manipuler le réservoir avec
précaution lors de son vidage.
1
Page 23

Important : Coupez toujours le courant et
débranchez la prise avant de nettoyer le
condenseur.
Pour maintenir l’efficacité du sèche-linge,
véri fiez régu lièreme nt la propr eté du
condenseur.
Pour Retirer Le Condenseur
1.Retirez la plaque de protection
2.Tournez les deux leviers de
blocage dans le sens contraire
des aiguilles d’une montre et
retirez le condenseur.
3 .T i r e z l ’ e n se m b l e d u
condenseur vers l’extérieur.
R e t ir e z d ou ce m e nt l a
4 .
poussière ou les peluches avec
un chiffon, puis lavez-le en le
tenant sous un robinet d eau
pour que l eau coule entre les
pla ques afin d enleve r la
poussière ou les peluches
éventuelles.
’
’
’
CONDENSEUR
FONCTIONNEMENT
1.Ouvrir la porte et charger le linge dans le
tambour.Vérifier qu'aucun vêtement n'entrave
la fermeture de la porte.
2. Fermer doucement la porte en la poussant
jusqu'à ce que vous entendiez un déclic.
3. Tournez le sélecteur de programme et choisir
le programme de séchage souhaité (consultez
le guide de programmation pour de plus amples
détails).
4. Pour sécher des articles délicats,
synthétiques ou acryliques,appuyez sur le
bouton pour diminuer la
température de séchage. Le voyant s'allume
lorsque vous sélectionnez cette option. Pour
désactiver ce mode, appuyez de nouveau et
programmez de nouveau
Délicat
5. Appuez sur le bouton . Le
sèche-linge démarre automatiquement et le
voyant situé au dessus du bouton s'allume.
Séchage Délicat
Bouton Séchage
l'appareil.
Marche/Arrét
5.Vérifiez la position du joint
après le nettoyage.
.
6 Remettez correctement le
condenseur en place
(en suivant la flèche) en le
poussant fermement. Bloquez
les deux leviers en position en
les tournant dans le sens des
a i g u i l l e s d u n e
montre.
dans la gorge si il est mal aligné.
7.R e mette z la p l aque d e
protection en place.
’
Repositionnez le joint
6. Si vous ouvrez la porte pendant le cycle de
séchage pour vérifier le linge, il est nécessaire
d'appuyer sur le bouton , pour
Marche/Arrét
recommencer le séchage une fois la porte
refermée.
7. Lorsque le cycle est bientôt terminé, la phase
de ventilation à froid commence. Les
vêtements sont séchés avec de l'air froid afin de
les refroidir.
8. Lorsque le programme est terminé, le voyant
END s'allume sur le display.
9. A la fin du cycle, le tambour continuera à
tourner de manière intermittente afin de
minimiser les plis. Cette opération se poursuit
jusqu'à ce que la porte s'ouvre.
Afin d'assurer un séchage efficace dans les
meilleures conditions, ne pas ouvrir la porte lors
des cycles de séchage automatiques.
FR 23
Page 24

FONCTIONNEMENT
Départ Différé
La fonction de temporisation permet à l'utilisateur de différer le démarrage du cycle de
séchage dans 3, 6 ou 9 heures.
Lorsque cette fonction est sélectionnée pour la première fois, l'afficheur indique un démarrage
différé de 3 heures ; en appuyant successivement dessus, le démarrage sera différé de 6 ou de 9
heures.
Pour lancer le programme, appuyez sur . Le cycle de séchage débutera à l'issue de ce délai.
Le témoin lumineux de 3, 6 ou 9 heures clignote alors pour indiquer que la temporisation est
activée.
Annulation et Réinitialisation du Programme
Pour annuler un programme, appuyez sur le bouton pendant 3 secondes. Le témoin DRY se
met à clignoter pour indiquer qu'il a été réinitialisé.
NETTOYAGE ET ENTRETIEN DE ROUTINE
Nettoyage Du Sèche Linge
● Nettoyez le filtre et videz le réservoir d’ eau
après chaque cycle de séchage.
● Nettoyez le condenseur à intervalles
réguliers.
● Après chaque période d’utilisation, essuyez
l’intérieur du tambour et laissez la porte
ouverte pendant un moment pour qu’il puisse
sécher grâce à la circulation d’air.
● Essuyez l’extérieur de la machine et la porte
avec un chiffon doux.
● N’UTILISEZ PAS de tampons ou d’ agents
de nettoyage abrasifs.
●Pour empêcher que la porte n'adhère ou que
les peluches s'accumulent, nettoyez après
chaque fin de cycle la surface intérieure et le
joint de la porte avec un chiffon humide.
ATTENTION! Il est possible que le
tambour, la porte et la charge soient très
chauds.
Spécifications Techniques
Capacité du tambour 115 litres
Charge maximale 8 kg
Hauteur 85 cm
Largeur 60 cm
Profondeur 60 cm
Étiquette d'énergie B
Information pour Laboratoire d'essai
EN 61121 Programme Programme Pour utiliser
-
-Coton Sec
-Coton Sec Au Fer
-Les Tissus Délicats
IMPORTANT Coupez toujours le courant et
débranchez la fiche de l’alimentation électrique
avant de nettoyer cet appareil.
Pour les données électriques, veuillez
consulter l’étiquette des valeurs nominales qui
se trouve à l’avant de l’armoire du sèche-linge
(avec la porte ouverte).
Sec
-
Pr t repasser é à
-
Sec
+ Délicat
FR
24
Page 25

DÉPISTAGE DE PANNES
Qu'est-ce qui peut être à l'origine de...
Défauts que vous pouvez rectifier vousmême
Avant d’appeler le service GIAS pour obtenir des
conseils, veuillez suivre la liste des vérifications
ci-dessous. L’intervention sera facturée si la
machine fonctionne correctement ou si elle a été
installée ou utilisée de manière incorrecte. Si le
problème persiste alors que vous avez terminé
les vérifications recommandées, veuillez appeler
le service GIAS qui pourra peut-être vous aider
par téléphone.
Le temps restant affiché peut variér pendant
le cycle de séchage. Le temps est
constamment ajusté au cours du cycle afin de
donner la meilleure estimation possible. Le
fait que le temps restant augmente ou
diminue pendant le cycle est normal.
La période de séchage est trop longue/les
vêtements ne sont pas suffisamment secs…
●Avez-vous sélectionné le temps de séchage/le
programme qui convient ?
● Les vêtements étaient-ils trop mouillés ? Les
vêtements avaient-ils été adéquatement essorés
en machine ou à la main ?
● Le filtre doit-il être nettoyé ?
● Faut-il nettoyer le condenseur ?
● Le sèche-linge est-il surchargé ?
● Les entrées, sorties et la base du sèche-linge
sont-elles libres d'obstructions ?
● Avez-vous sélectionné le bouton
Délicat
au cours d’un cycle précédent ?
Le sèche-linge ne fonctionne pas…
● Le sèche-linge est-il branché sur une
alimentation électrique adéquate ? Vérifiez à
l’aide d’un autre appareil, par exemple une lampe
de chevet.
● La fiche est-elle bien branchée sur
l’alimentation de secteur ?
● Y a-t-il une panne de courant ?
● Le fusible a-t-il sauté ?
● La porte est-elle bien fermée ?
● Le sèche-linge est-il en position de marche, au
niveau du courant de secteur et de la machine ?
● La période de séchage ou le programme a-t-il
été sélectionné ?
● La machine a-t-elle été remise en marche après
l’ouverture de la porte ?
● Le sèche-linge s’est-il arrêté parce que le
réservoir d’eau est plein et qu’il faut le vider ?
Séchage
Le sèche-linge est bruyant…
● Arrêtez le sèche-linge et contactez le service
GIAS pour obtenir des conseils.
L'indicateur est allumé…
● Le filtre doit-il être nettoyé ?
● Faut-il nettoyer le condenseur ?
L'indicateur est allumé…
● Le réservoir d’eau doit-il être vidé ?
SERVICE CLIENTÈLE
En cas de problème après avoir effectué toutes
les inspections recommandées, veuillez
contacter le Service. Il pourra vous aider par
téléphone ou organiser la visite d'un technicien,
en vertu des conditions de votre garantie.
Cependant, vous serez facturé dans l’un des
cas suivants :
● Si la machine est en bon état de marche.
● Si la machine n’a pas été installée
conformément aux instructions d’installation.
● Si la machine a été utilisée incorrectement.
Pièces De Rechange
Utilisez toujours des pièces de rechange du
fabricant, disponibles auprès du service GIAS.
Service GIAS
Pour les entretiens et les réparations, contactez
votre technicien local du service GIAS.
Le constructeur décline toute responsabilité
en cas d’erreurs d’impression dans le
présent document. Le constructeur se
réserve le droit d’apporter les modifications
nécessaires à ses produits sans en changer
les caractéristiques de base.
25
FR
Page 26

INDEX
Uvod
Podatki o Dobavi
Odstranjevanje Embalaže
Opombe za Varnost
Uporaba
Namestitev
Perilo
Varovanje Okolja
Pooblaščeni Servis
Namestitev
Zahteve za Električno Napeljavo
Nastavitev Nivelirnih Nog
Pretok Zraka
Priprava na Polnjenje Stroja
Priprava Oblačil
Sortiranje Perila
V Sušilnem Stroju Ne Sušiti
Varčevanje z Energijo
Navodila za Sušenje
Tipke za Upravljanje In Signalne Lučke
Izbira Programa
Vrata in Filter
Odpiranje Vrat
Filter
Signalna Lučka za Stanje Filtra
Posoda za Vodo
Da Odstranite Posodo
Kondenzator
Da Odstranite Kondenzator
Obratovanje
Preklic in Ponastavitev Programa
Funkcija Zakasnitve Vklopa
Čiščenje in Vzdrževanje
Čiščenje Sušilnega Stroja
Tehnični Podatki
Odpravljanje Napak
Pomoč Strankam
Nadomestni Deli
Pooblaščeni Servis
27
27
27
27
27
28
28
28
28
29
29
29
29
30
31
31
31
31
31
32
33
34
34
34
34
34
35
35
36
36
36
36
36
37
37
37
37
37
37
37
SL
26
Page 27

UVOD
Prosimo vas, da ta navodila pozorno preberete in stroj uporabljate v skladu z njimi. Ta knjižica
vsebuje pomembna navodila za varno uporabo, namestitev in vzdrževanje vašega stroja ter tudi
uporabne napotke za doseganje najboljših rezultatov.
Vso dokumentacijo, ki ste jo dobili s strojem, skrbno shranite, saj jo boste morda še potrebovali ali pa
jo boste Predali drugemu lastniku.
Podatki o Dobavi
Prosimo, preverite, ali ste s strojem dobili tudi
naslednje:
ODSTRANJEVANJE EMBALAŽE
Stroj vzemite iz embalaže v
bližini prostora, kamor ga
boste namestili.
● navodila za uporabo
● garancijski list
● nalepko o energijski varčnosti
Prepričajte se, da med. prevozom stroj ni
bil poškodovan. Če se je poškodoval, pokličite
pooblaščeni servis.
Če ne boste upoštevali zgornjih navodil,
lahko ogrozite varnost naprave. Če bi napaka
na stroju nastala zaradi nepravilne uporabe,
vam lahko zaračunamo klic servisne službe.
Embalažo varno odvrzite v smeti. Pazite, da
ne pride v roke otrokom, saj je lahko nevarna.
1. Previdno zarežite okoli
embalaže po dnu škatle in
po eni od stranic navzgor.
2. Odstranite politensko
folijo in dvignite sušilni stroj
s podstavka iz stiropora.
OPOMBE ZA VARNOST
Uporaba
● Ta naprava ni namenjena temu, da bi jo uporabljale osebe (vključno z otroki), ki imajo slabše
fizične, čutilne ali duševne zmožnosti ali nimajo izkušenj ali znanja, razen če jih pri uporabi
nadzoruje ali o uporabi naprave pouči oseba, odgovorna za njihovo varnost.
● Otroke morate nadzorovati, da se ne bi igrali z napravo.
● OPOZORILO: Napačna uporaba sušilnega stroja lahko povzroči požar.
● Ta naprava je namenjena izključno uporabi v gospodinjstvih, z njo lahko sušite le gospodinjski
tekstil in oblačila.
● Stroj se sme uporabljati le za namen, ki je opisan v tem priročniku. Pred uporabo stroja se
prepričajte, ali ste popolnoma razumeli navodila za namestitev in uporabo.
● Stroja se ne dotikajte, če imate vlažne oziroma mokre roke ali noge.
● Med polnjenjem stroja se ne naslanjajte na njegova vrata in jih nikoli ne uporabljajte za dviganje
ali premikanje stroja.
● Nikoli ne dovolite otrokom, da bi se igrali s strojem ali njegovimi tipkami.
● OPOZORILO: Stroja ne uporabljajte, če filter za puh ni pravilno nameščen ali če je poškodovan;
puh se lahko vžge.
● OPOZORILO: Na mestih, kjer je simbol za vročo površino ,se lahko temperatura med
delovanjem sušilnega stroja dvigne na več kot 60 stopinj Celzija.
● Izvlecite vtič iz električne vtičnice. Pred čiščenjem stroja vtič vedno izvlecite iz vtičnice.
● Če se vam zdi, da stroj ne deluje pravilno, ga prenehajte uporabljati.
● Na tleh v okolici stroja se ne smejo nabirati nitke ali puh.
● Boben v stroju se lahko zelo segreje. Preden začnete perilo jemati iz stroja, vedno počakajte, da
sušilni stroj konča fazo hlajenja.
SL
27
Page 28

OPOMBE ZA VARNOST
Namestitev
● Preden stroj uporabite, se prepričajte, da ni
vidno poškodovan. Če je poškodovan, ga ne
uporabljajte, temveč pokličite pooblaščeni
servis.
● Ne uporabljajte adapterjev, razdelilcev in/ali
podaljškov.
● Nikoli ga ne postavite ob zavese in pazite, da
predmeti ne bodo mogli pasti za sušilni stroj ali
se za njim nabirati.
● Naprave ne smete namestiti za vrati, ki se
dajo zakleniti, drsnimi vrati ali vrati, ki imajo
tečaje na nasprotni strani kot sušilni stroj.
Perilo
● V sušilnem stroju ne sušite kosov, ki niso bili
oprani.
● OPOZORILO: Nikoli ne sušite tkanin,
obdelanih s tekočinami za kemično čiščenje.
● OPOZORILO: Materiali iz penaste gume
lahko včasih pri segrevanju (pod posebnimi
pogoji) zagorijo zaradi samovžiga. Predmetov
iz penaste gume (lateks pena), kap za prhanje,
proti vodi odpornih tkanin, izdelkov in oblačil z
gumijasto podlogo in blazin z vložki iz penaste
gume NE SMETE sušiti v sušilniku za perilo.
● Da izveste, ali je material primeren za
sušenje, vedno poglejte etiketo na tekstilu.
● Preden daste oblačila v sušilni stroj, morajo
biti ožeta ročno ali s centrifugo v pralnemstroju.
V sušilni stroj se NE SME dajati oblačil, iz
katerih še kaplja.
● Pazite, da v žepih ni vžigalnikov ali vžigalic, in
v bližini sušilnega stroja NIKOLI ne uporabljajte
gorljivih tekočin.
● V stroju NIKOLI ne smete sušiti zaves iz
steklenih vlaken. Če steklena vlakna pridejo na
druga oblačila, lahko pride do draženja kože.
● Kose, ki so se umazali s snovmi, kot so na
primer jedilno olje, aceton, alkohol, bencin,
kerozin, odstranjevalec madežev, terpentin,
vosek ali odstranjevalec voska, morate najprej
oprati v vroči vodi z nekaj več detergenta,
preden jih začnete sušiti v sušilnem stroju.
● Mehčalce perila in podobne izdelke uporabite,
kot je navedeno v navodilih za uporabo
Mehčalca.
Varovanje Okolja
● Vsi materiali, iz katerih je izdelana embalaža,
so okolju prijazni in jih je mogoče reciklirati.
Prosimo, odvrzite embalažo na okolju prijazen
način. Na vaši občini ali komunalni službi vam
bodo lahko podrobno povedali več o
odstranjevanju odpadkov.
● Ko boste sušilni stroj odvrgli, varnost
zagotovite tako, da stroj izključite iz vtičnice ter
nato prerežete električni kabel in ga skupaj z
vtičem uničite. Da preprečite, da bi se otroci
zaprli v stroj, odlomite tečaje vrat ali ključavnico
na vratih.
European Directive 2002/96/EC
Ta naprava je označena v skladu z
Direktivo 2002/96/ES Evropskega
parlamenta in Sveta o odpadni
električni in elektronski opremi
(OEEO).
S tem, ko poskrbite, da bo ta izdelek pravilno
odvržen, boste pripomogli k preprečevanju
morebitnih negativnih posledic za okolje in
zdravje, ki bi sicer lahko nastale pri nepravilnem
ravnanju z odpadkom.
Simbol na napravi prikazuje, da je ne moremo
obravnavati kot gospodinjski odpadek. Namesto
tega ga je treba odložiti na primernem odpadu,
kjer reciklirajo električno in elektronsko opremo.
Stroj morate odvreči v skladu z lokalno
okoljevarstveno zakonodajo o odpadkih.
Za podrobnejše informacije o obdelavi, obnovitvi
in recikliranju tega izdelka se, prosimo, obrnite
na svojo lokalno občino, Podjetje za odvoz
odpadkov ali na trgovino, kjer ste stroj kupili.
Pooblaščeni Servis
● Zaradi zagotavljanja stalnega varnega in
učinkovitega delovanja stroja priporočamo, da
Vse servisne storitve in vsa popravila izvaja le
pooblaščeni serviser.
Če naprava ne deluje pravilno ali če se
pokvari, jo izključite, vtič pa iztaknite iz vtičnice.
Za morebitno popravilo pokličite pooblaščeni
servis.
SL
28
Page 29

NAMESTITEV
Zahteve za Električno Napeljavo
Sušilni stroji delujejo na enofazni izmenični tok
s 50 Hz in napetostjo 220-240 V. Prepričajte se,
da je nazivna zmogljivost priključka vsaj 10A.
Električni tok je lahko zelo nevaren.
Ta naprava mora biti ozemljena.
Vtičnica električne napeljave in vtič morata
biti iste vrste.
Ne uporabljajte več adapterjev in/ali
podaljškov.
Vtič mora biti po namestitvi stroja na
dostopnem mestu, da ga lahko po porabi
iztaknete.
Naprava CE je v skladu z direktivama Sveta
2004/108/GS, 2006/95GS in njunimi dopolnili.
Če napaka na stroju nastane zaradi
nepravilne namestitve, vam lahko klic servisne
Službe zaračunamo.
PRETOK ZRAKA
V prostoru, kjer stoji sušilni stroj, je treba
zagotoviti zadostno zračenje, zato da stroj med
delovanjem v prostor ne bi potegnil plinov, ki jih
pri izgorevanju izločajo nekatere naprave, na
primer kamini.
● Zrak, ki izhaja iz stroja, ne sme biti speljan v
dimnik, na katerega so priključene naprave, ki
za zgorevanje uporabljajo plin ali druga goriva.
● Redno preverjajte, ali ima zrak, ki teče skozi
sušilni stroj, prosto pot.
● Po uporabi preverite, ali se je v filtru nabral
puh, in filter po potrebi očistite.
● Dovodne in odvodne odprtine ne smejo biti
ovirane Zaradi zagotavljanja primernega
zračenja med dnom stroja in tlemi ne sme biti
ovir. Med strojem in kakršno koli oviro mora biti
vsaj 12 mm prostora.
● Preprečite, da bi predmeti padali za stroj ali se
nabirali za njim, saj bi lahko ovirali pretok zraka
(vhode in izhode za zrak).
● NIKOLI ne namestite sušilnega stroja ob
zavesah.
Če je električni kabel poškodovan, ga je
treba nadomestiti s posebnim kablom, ki ga
lahko dobite SAMO pri pooblaščenem
prodajalcu nadomestnih delov. Namestiti ga
mora za to usposobljena oseba.
Stroja ne priključujte in ne vklapljajte,
dokler ni popolnoma nameščen. Zaradi vaše
varnosti je treba sušilni stroj namestiti pravilno.
Če imate kakršne koli dvome o nameščanju
stroja, pokličite pooblaščeni servis, kjer vam
bodo z veseljem svetovali.
Nastavitev Nivelirnih Nog
Ko boste stroj postavili
na želeno mesto, je
tre b a na s t a viti š e
nivelirne noge, da stroj
stoji vodoravno.
Nast a v ite vse štiri
nivelirne noge tako, da
st roj st oji trdno in
vodoravno.
Aparata ne smete namestiti v prostoru, kjer je nizka
temperatura oziroma obstaja tveganje za pojav zmrzali.
Pri temperaturah okoli ledišča aparat morda ne bo pravilno
deloval: obstaja tveganje za poškodbe, saj bi lahko voda v
hidravličnem tokokrogu zamrznila (ventili, cevi, črpalke).
Za učinkovito delovanje mora biti temperatura v prostoru
med +2 in +35°C. Upoštevajte, da lahko med delovanjem
pri nizkih temperaturah (med +2 in +15°C) pride do
kondenzacije vode in posledično kapljic vode na tleh.
29
SL
Page 30

ODTOČNA CEV: NAVODILA ZA PRIKLJUČITEV
Če ne želite po vsakem programu sušenja
prazniti posode za vodo, lahko napeljete vodo
neposredno v odtočno cev (enak system kot
pri pomivalnih koritih). Odtok mora biti ob
sušilnem stroju.
V kompletu sta 1 cev in 1 čep.
OPOZORILO! Najprej izklopite sušilni
stroj in potegnite vtikač iz vtičnice.
Cev Priključite Na Naslednji Način:
1. Nagnite stroj nazaj.
2. Cev za odtekanje
vode je na desni strani
stroja (glej sliko). Siva
cev je priključena na
mostiček na levi strani
st roja. S kleš čami
snemite sponko, s
katero je pritrjena na
mostiček.
5 . S čepom, ki je bil
priložen v kompletu,
zamašite preostalo
cev.
6. Ko postavite stroj
s p e t p o k o n c i ,
prilagodite višino nog,
da se nova cev pri
potiskanju stroja v
pravilen položaj ne bi
zapognila.
7. Priključite novo
odtočno cev na odtok.
8. Priključite stroj na
električno omrežje.
3. Odklopite cev od
spoja na mostičku.
4. Priključite črno cev,
ki ste jo dob ili v
kompletu (uporabite
konektor in priložene
sponke), na cev, ki ste
jo ločili od spoja na
mostičku.
30
SL
Page 31

PRIPRAVA NA POLNJENJE STROJA
Preden prvič uporabite sušilni stroj:
● Skrbno preberite navodila za uporabo;
● Odstranite vse dele, ki so v bobnu;
● Z vlažno krpo obrišite notranjost bobna in vrat,
da odstranite prah, ki se je nabral med
prevozom.
Priprava Oblačil
Prepričajte se, ali je perilo, ki ga nameravate
dati v sušilni stroj, primerno za strojno sušenje;
to je prikazano na opozorilnih simbolih na
vsakem kosu perila.
Preverite, ali so vsi gumbi, zadrge in podobno
zapeti in ali so žepi prazni. Obrnite oblačila
navzven. Oblačila položite v boben narahlo (ne
natrpajte jih), da se ne bodo prepletla.
V Sušilnem Stroju ne Sušite:
Svile, občutljivega blaga, najlonskih nogavic,
občutljivih vezenin, blaga s kovinskimi okraski,
oblačil z dodatki iż PVC ali usnja, športnih
čevljev in velikih kosov, kot so spalne vreče ipd.
POMEMBNO: Ne sušite predmetov, ki so
bili obdelani s tekočinami za kemično čiščenje,
ali gumijastih oblačil (nevarnost požara ali
eksplozije).
Zadnjih 15 minut cikla se perilo vedno suši s
Hladnim zrakom.
Varčevanje z Energijo
V sušilni stroj polagajte le perilo, ki ste ga
strojno ali ročno oželi. Čim bolj suho je perilo,
tem krajši bo čas sušenja, kar pomeni manjšo
porabo električne energije.
VEDNO
● Sušite čim bolj napolnjen stroj, tako boste
prihranili čas in električno energijo.
● Pred sušenjem preverite, ali je filter očiščen.
NIKOLI
● Ne prekoračite najvišje dovoljene teže; s tem
bi porabili več časa in električne energije.
● Ne napolnite stroja s tako mokrimi oblačili, da
z njih še kaplja; tako bi lahko stroj poškodovali.
Maksimalna Teža za Sušenje
● Bombaž največ 8 kg
● Sintetika največ 4 kg
Bobna ne smete preveč napolniti, saj lahko
z velikimi kosi, ko so mokri, prekoračite najvišjo
dovoljeno težo perila (na primer: spalne vreče,
prešite odeje).
Perilo Sortirajte po Naslednjem Zaporedju:
● Po etiketah na oblačilih
Najdete jih na ovratniku ali notranjem šivu:
Primerno za sušenje v sušilnem stroju.
. .
Sušenje v stroju pri visokih temperaturah.
.
Sušenje v stroju le pri nizkih temperaturah.
Ne sušite v sušilnem stroju.
Če oblačilo nima etikete, ga raje ne sušite
Strojno.
● Po količini in gostoti blaga
Kadar koli je količina materiala za sušenje večja
od zmogljivosti sušilnega stroja, razdelite obleke
po debelini materiala (npr. ločite brisače od
tankega spodnjega perila).
● Po vrsti materiala
Bombažne/lanene tkanine: brisače, bombažni
jersey, posteljno in namizno perilo.
Sintetika: bluze, srajce, delovne halje itd.,
Izdelane iz poliestra ali poliamida; velja tudi za
mešanice iz bombaža in sintetike.
● Po tem, kako močno jih želite posušiti
Razdelite na: popolnoma suho, primerno za
zlaganje itd. Za občutljivo blago pritisnite tipko ,
da izberete sušenje pri nizki temperaturi.
Navodila za Sušenje
Tabela prikazuje približen čas sušenja za različne vrste
Materialov in vlažnosti oblačil.
VRSTA
TKANINE
BOMBAŽ
SINTETIKA
AKRIL
NASTAVITEV
TEMPERATURE
VISOKA
NIZKA
NIZKA
ZELO
NAPOLNJEN
140-165min
---
SREDNJE
NAPOLNJEN
70-80min
70-80min---
50-65min
MALO
NAPOLNJEN
50-65min
40-55min
30-40min
SL
31
Page 32

TIPKE ZA UPRAVLJANJE IN SIGNALNE LUČKE
Indikator za
vodo
Tipka
Start/Pavza
Stikalna Plošča In Kontrolne Lučke
Stikalo za izbiranje programov - omogoča
izbiranje ustreznega programa.
Tipka za zamik vklopa -omogoča, da
nastavite časovni zamik vklopa sušenja.
Podrobnejši opis je v nadaljevanju teh
navodil na strani 120.
Tipka start/pavza – s pritiskom
zaženete izbrani program sušenja
Tipka za občutljivo perilo - s to tipko
znižate temperaturo sušenja pri sušenju
občutljivih tkanin; kontrolna lučka nad tipko
se osvetli. Če želite spremeniti nastavitev
temperature, morate resetirati program.
Nizka temperatura: kontrolna lučka tipke je
osvetljena .
Visoka temperatura: kontrolna lučka tipke
ni osvetljena.
Opozorilni indikator za filter – osvetli
se, ko je treba očistiti filter.
Opozorilni indikator za posodo za vodo
osvetli se, ko je posoda za vodo polna.
Potek programa
SUŠENJE: ko izberete program, indikator
utripa, ko začne stroj izvajati program, se
indikator osvetli.
Indikator se osvetli pred koncem
programa in ko začne stroj izvajati fazo
ohlajanja perila.
Ta faza traja 10 do 15 minut, odvisno od
izbranega programa.
Indikator KONEC PROGRAMA se osvetli, ko
je program zaključen.
Indikator za
filter
Prikaz avto
Programa
Tipka za
Akril-sint
Tipka za
Zamik
Gump za
Programe
Sušilni stroj Sensor Dry vam ponuja veliko
možnosti sušenja perila za vse okoliščine.
V spodnji razpredelnici so našteti programi in
njihove funkcije.
Opomba: Tipalo morda ne bo zaznalo majhnih
količin majhnih kosov tekstila v stroju. Za
majhne količine perila, Ločene kose ali tkanine,
ki so že bile delno posušene, raje uporabite
programe s časovnikom. Program nastavite na
čas med 30 in 75 minutami, odvisno od količine
perila in tega, kako močno ga želite posušiti,
izberite še visoko ali nizko temperaturo,
primerno za vrsto tkanine.
Če tipalo perila v stroju ne zazna, bo sušilni stroj
deloval le 10 minut, nato se bo začel cikel
sušenja s hladnim zrakom.
Če je perila preveč ali če je premokro za strojno
sušenje, bo sušilni stroj po 185 minutah
samodejno začel cikel Hladnega sušenja.
SL
32
Page 33

IZBIRA PROGRAMA
PROGRAM
Perfect home
Zelo suho
Za v omaro
Za likanje
Za volno
No Crease
40' hitro sušenje
OPIS
Izberite, kako suho perilo želite. Na voljo so vam možnosti od
Izjemno suho za npr. brisače, Za v omaro za oblačila, ki jih
boste shranili brez likanja, ter program, po katerem je perilo ravno
prav suho za likanje.
Nežen program, namensko zasnovan za mehčanje volne po
sušenju na zraku. Ta kratki 12-minutni nežni program za sušenje
s toplim zrakom lahko uporabite tudi za osvežitev kosov iz volne,
ki so bili dlje časa shranjeni v omari.
Ta program poskrbi za oplemenitenje perila in preprečevanje
mečkanja. 9-minutnem segrevanju perila sledi 3-minutna faza
hlajenja, kar je predvsem primerno za perilo, ki je kar nekaj časa
čakalo na likanje. Perilo je pogosto po sušenju na vrvi ali na
radiatorjih trdo.
Program odpravi trdovratne gube na perilu in omogoča hitro in
lahko likanje.
40-minutni hitri program zagotavlja hitro sušenje. To je idealen
program za hitro sušenje in osvežitev perila, ki ga želite takoj
ponovno uporabiti, in traja manj kot 40 minut. Stopnja suhosti in
temperatura v bobnu sta nenehno pod nadzorom senzorja, kar
zagotavlja, da porabite točno toliko časa in energije, kolikor je nujno
potrebno. Dolžina sušenja se spreminja glede na vrsto tkanine,
količino perila in preostanek vlage v perilu.
Sušite lahko največ 2 kg perila, program pa je primeren za vse vrste
tkanin, primernih za sušenje v stroju.
150'
120'
90'
75'
60'
45'
30'
Osvežitev perila
Program traja 150 minut.
Program traja 120 minut.
Program traja 90 minut.
Program traja 75 minut.
Program traja 60 minut.g
Program traja 45 minut.
Program traja 30 minut.
;Zračenje perila s hladnim zrakom – program traja 20 minut.
SL
33
Page 34

VRATA IN FILTER
Odpiranje Vrat
Za odp iranj e v rat
potegnite ročico.
Za ponovni zagon
s u ši l ne g a s t r oj a
z a pr i te v r at a in
pritisnite tipko
OPOZORILO! Med delovanjem sušilnega
stroja se lahko boben in vrata ZELO
SEGREJEJO! Sušilnega stroja nikoli ne
zaustavljajte pred koncem sušilnega cikla,
razen če nameravate hitro odstraniti vse perilo,
tako da se lahko Stroj ohladi.
Filter
POME M BNO:Zara d i zago t avljanja in
ohranjanja učinkovitosti sušilnega stroja pred
vsakim sušenjem Preverite, ali je filter za puh
čist.
1 . P o t e gni t e f i lte r
navzgor.
2. Filter odprite, kot je
prikazano.
3. Z mehko krtačko ali
k o n i c a m i p r s to v
narahlo o d s tranite
nitke.
4. Filter zaprite nazaj in
ga vstavite nazaj na
njegovo Mesto.
Signalna Lučka za Stanje Filtra
se prižge, ko je
treba filter očistiti.
Če se perilo ne suši
pravilno, preverite, da
ni filter Zamašen.
POSODA ZA VODO
Voda, ki se med sušenjem izloči iz perila, se
zbira v posodi v vratih sušilnega stroja. Ko se
posoda napolni, se osvetli indikator na
stikalni plošči. Takrat MORATE izprazniti
posodo za vodo. Priporočamo pa, da posodo za
vodo izpraznite po vsakem programu sušenja.
OPOMBA: Ko začnete uporabljati stroj, se bo
po nekaj programih sušenja v nabralo zelo malo
vode, saj se mora najprej napolniti rezervoar v
notranjosti stroja.
Praznjenje Posode Za Vodo
1. Primite za ročaj
posode za vodo in jo
nežno izvlecite. Polna
posoda teheta približno
6 kg.
2 . Nagnite posodo za
vodo, da iz nje izteče
voda. Prazno posodo
za vodo names tite
nazaj v stroj, kot je to
prikaza no na sliki:
najprej namestite dno
posode v p r a v i l e n
položaj, nato pa nežno
potisnite še zgornji del v
pravilen položaj.
3. S pritiskom na tipko
ponovno zaženite
program sušenja.
OPOMBA: Če je v
bližini sušilnega stroja
odtok, lahko uredite
stalno odtekanje vode
iz sušilnega stroja s
pomočjo ustreznega
k o mp l e ta . V t e m
primeru vam ne bo
treba prazniti posode
za vodo.
OPOZORILO! V kolikor odprete vrata sredi
cikla sušenja, preden je na vrsti faza ohlajanja, je
ročaj posode lahko zelo vroč. V primeru, da ste
se kljub temu odločili izprazniti posodo z vodo,
bodite pri rokovanju izjemno previdni.
1
SL
34
Page 35

Pomembno: Pred čiščenjem kondenzatorja
vedno izklopite stroj in izvlecite kabel iz
vtičnice.
Da ohranite učinkovitost sušilnega stroja,
redno preverjajte, Ali je kondenzator očiščen.
Da Odstranite Kondenzator:
1. nežno potegnite spodnjo ploščo
tako, da se odpne s sušilnega
stroja. Zgornji predel lahko potem
snamete s tečajev tako, da je
mogoče odstraniti celotno spodnjo
ploščo.
2.Oba vzvoda, ki zadržujet a
kondenzator, obrnite v
nasprotni smeri urnega kazalca in
izvlecite kondenzator.
3.Izvlecite enoto kondenzatorja.
4.Nežno odstranite morebiten prah
ali puh najprej s krpo, potem pa
enoto sperite pod tekočo vodo. Pri
tem jo držite tako, da voda teče med
ploščami tertako odstrani prah in
puh.
Po čiščenjupreveritepoložajtesnila.
5.
Četesnilo je postrani, ganamestitetočno v
utor.
6.Kondenzator ponovno namestite,
pri tem pa pazite,da je pravilno
obrnjen (kot kaže puščica) ter da ga
trdno potisnete na njegovo mesto.
Oba vzvoda ponovno zaprite tako,
da ju obrnete v smeri urnega
k az a l c a .
d e s n oz ap a h n it eo b e r oč ic i .
P r e p r i č a j t e s e , d a j e
k o n d e n z a t o r t r d n o v
podnožju.
Z o b r a č a n j em v
7.Ponovno namestite spodnjo
ploščo
KONDENZATOR
UPORABA SUŠILNEGA STROJA
1.Odprite vrata in potisnite perilo v boben.
Prepričajte se, da ne ovira zapiranje vrat.
2.Nežno zaprite vrata – pritisnite jih, da se
slišno zaprejo.
3.Obrnite stikalo za izbiranje programov na
ustrezen p r o g r a m (gl. r a z p r e d e l n i c o
programov).
4.Če sušite sintetiko, akril ali drugo perilo iz
občutljivih tkanin, pritisnite na ustrezno tipko ,
da znižate temperaturo sušenja. Ob tem se
osvetli lučka ob tipki, kar pomeni, da je
temperatura sušenja znižana. Če si tekom prvih
nekaj minut premislite, znova pritisnite na isto
tipko , da zvišate temperaturo sušenja. Če
želite to storiti pozneje, pa morate program
resetirati.
5.Pritisnite na tipko . Stroj začne sušiti,
indikator SUŠENJE je osvetljen.
6.Če med izvajanjem programa odprete vrata,
da preverite stanje perila, po ponovnem
zapiranju vrat znova pritisnite na tipko .
7.Proti koncu programa se vklopi faza ohlajanja
– perilo se v hladnem zraku ohladi.
8.Ko je program zaključen, se osvetli indikator
KONEC PROGRAMA.
9.Boben se v presledkih obrača, da bi se perilo
kar najmanj zmečkalo – dokler ne izklopite
stroja oz. dokler ne odprete vrata.
Med izvajanjem samodejnih programov ne
odpirajte vrat stroja, saj bo le v tem primeru
možno pravilno sušenje.
35
SL
Page 36

Obratovanje
Časovni Zamik Vklopa
Funkcija časovnega zamika vklopa uporabniku omogoča, da za 3, 6 ali 9 ur zamakne začetek
izvajanja programa. Ob prvem pritisku na tipko za zamik vklopa bo izbran zamik 3 ur, ob
naslednjem pa 6 in nato 9 ur.
Ob. pritisku na tipko se začne odštevanje časa. Po preteku nastavljenega časovnega zamika
začne stroj sušiti. Med odštevanjem utripa indikator 3, 6 ali 9, kar opozarja, da se odšteva
nastavljeni časovni zamik.
Preklic In Resetiranje Programa
Če želite resetirati program, 3 sekunde pritiskajte na tipko . Lučka SUŠENJE se osvetli, kar
pomeni, da je program resetiran.
ČIŠČENJE IN VZDRŽEVANJE
Čiščenje Sušilnega Stroja
● Očistite filter in izpraznite posodo za vodo po
vsakem sušenju.
● Redno čistite kondenzator.
● Po vsaki uporabi obrišite notranjost bobna in
pustite vrata nekaj časa odprta, da zrak kroži
po bobnu in ga posuši.
● Zunanjost stroja in vrata obrišite z mehko
krpo.
● NE UPORABLJAJTE grobih gobic, krpic ali
čistil.
● Da bi preprečili nabiranje delcev tkanin in
oteženo odpiranje/zapiranje vrat po vsakem
zaključenem programu sušenja obrišite
notranjo stran vrat in tesnilo z vlažno krpo.
OPOZORILO! Boben, vrata in perilo so
lahko zelo vroči!
Tehnični Podatki
Prostornina bobna 115 litrov
Največja obremenitev 8kg
Višina 85 cm
Širina 60 cm
Globina 60 cm
Nalepka o energetski varčnosti B
Informacije za testne laboratorije
Program EN 61121
-Bombaž, suho
-Bombaž, za likanje
-Tkanine za lahko vzdrževanje
POMEMBNO: Preden začnete stroj čistiti,
ga vedno ugasnite in izvlecite električni vtič iz
vtičnice.
Podatke o električnih delih najdete na
nalepki, ki je na sprednji strani ohišja sušilnega
stroja (ko so vrata odprta).
Ustrezni Program
Za v omaro
-
-
Za likanje
-
Za v omaro + sintetika
SL
36
Page 37

ODPRAVLJANJE NAPAK
Kaj je Lahko Vzrok, da ...
Napake, ki jih lahko odpravite sami
Preden pokličete pooblaščeni servis za nasvet,
vas prosimo, da pregledate ta seznam. Če bi se
izkazalo, da stroj dela ali da je bil nepravilno
uporabljen ali nameščen, vam bomo morali
storitve servisa zaračunati. Če težave ne
morete odpraviti z nasveti po tem seznamu,
prosimo, pokličite pooblaščeni servis, saj vam
bodo morda lahko pomagali po telefonu.
Če sušenje traja predolgo oz. če oblačila
niso dovolj suha:
● Ste izbrali pravi program/čas sušenja?
● So bile obleke preveč mokre? Ste oblačila
temeljito ročno ali strojno oželi?
● Je treba očistiti filter?
● Je treba očistiti kondenzator?
● Je sušilni stroj preobremenjen?
● Ali kaj ovira dno sušilnega stroja ali dovodne
in odvodne odprtine?
● Ste pri prejšnjem ciklu izbrali možnost ?
Sušilni stroj ne deluje ...
● Ali je stroj pod napetostjo? V vtičnico
priključite drugo napravo, da preverite, ali
vtičnica deluje.
● Je vtič pravilno vključen v vtičnico?
● Je prišlo do napake pri oskrbi z električnim
tokom?
● Je pregorela varovalka?
● So vrata pravilno zaprta?
● Ali je sušilni stroj vklopljen in vključen v
vtičnico?
● Ste izbrali čas sušenja ali program sušenja?
● Ste po odprtju vrat stroj vklopili ponovno?
● Je stroj prenehal delovati, ker je posoda za
zbiranje vode polna in jo je treba izprazniti?
POMOČ STRANKAM
Če vaš sušilni stroj še vedno ne dela niti potem,
ko ste preverili vse točke na tem seznamu, vas
prosimo, da za nasvet pokličete pooblaščeni
servis. Morda vam bodo lahko pomagali po
telefonu ali pa se boste dogovorili za primeren
čas serviserjevega klica skladno z določili
garancije. Vendar pa vam lahko v naslednjih
primerih servisne storitve tudi zaračunamo:
● če stroj deluje;
● če stroj ni bil nameščen v skladu z navodili za
Namestitev;
●če ste stroj uporabljali narobe.
Nadomestni Deli
Vedno uporabljajte originalne nadomestne
dele, ki so na voljo pri pooblaščenem servisu.
Pooblaščeni Servis
Če potrebujete servisne storitve ali popravilo
stroja, pokličite najbližji pooblaščeni servis.
Sušilni stroj je zelo glasen ...
● Izključite stroj in za nasvet pokličite
pooblaščeni servis.
Signalna lučka je prižgana ...
● Je treba očistiti filter?
● Je treba očistiti kondenzator?
Signalna lučka je prižgana ...
● Je treba izprazniti posodo za vodo?
Izdelovalec ne odgovarja za morebitne
ti skarske napa ke v te m pri ročniku .
Proizvajalec si pridržuje pravico do
primernih sprememb svojih naprav, tako da
ne spreminja njihovih osnovnih značilnosti.
37
SL
Page 38

40008018
 Loading...