

Page 1
FUZZY LOGIC CONTROL
FULLY AUTOMATIC WASHING MACHINE
Model: CT75-L75Y
CONTENTS
1. SAFETY WARNING.....................................1
2. PARTS IDENTIFICATION............................2
3. ACCESSORIES...........................................2
4. CONTROL PANEL......................................3
5. SPECIFICATIONS.......................................3
6. INSTALLATION...........................................4
7. DETERGENT CONTAINER.........................7
8. PROGRAMS...............................................8
9. OPERATION............................................... 9
10. MAINTENANCE....................................... 13
11. TROUBLE SHOOTING.............................14
12. ELECTRICAL G DIAGRAM......................15
13. MANUFACTURER WARRANTY...............16
INSTRUCTION MANUAL
Please read instructions carefully before using
Page 2

SAFETY WARNING
Never use the plug as
shown.
Do not put hands into the
rotating tub.
Do not only hold the cord
while pulling out the plug.
Do not clean the body of
washer with volatile solvent
such as petrol and methane.
Also, do not pour these
solvents into the tub for
washing or drying purposes.
WARNING!
Do not let children to play
with the machine.
Keep the washing
machine away from fire or
heat source.
WARNING!
Do not expose washing
machine to direct
sunlight or rain.
NOTE!
Make sure the lid is closed
especially during spin.
Do not place the washing
machine in a damp place
and do not pour water onto
the control panel.
WARNING!
The highest point of the
drain hose must be in the
height of 0.7m~1.2m above
floor level.
Never use water above
60℃.
70 C
WARNING!
Don't switch on the
power if the water
pressure is lower than
0.05MPa and higher
than 0.5MPa.
0.5
0.8 0.2
NOTE!
NOTE! NOTE!
-1-
Page 3
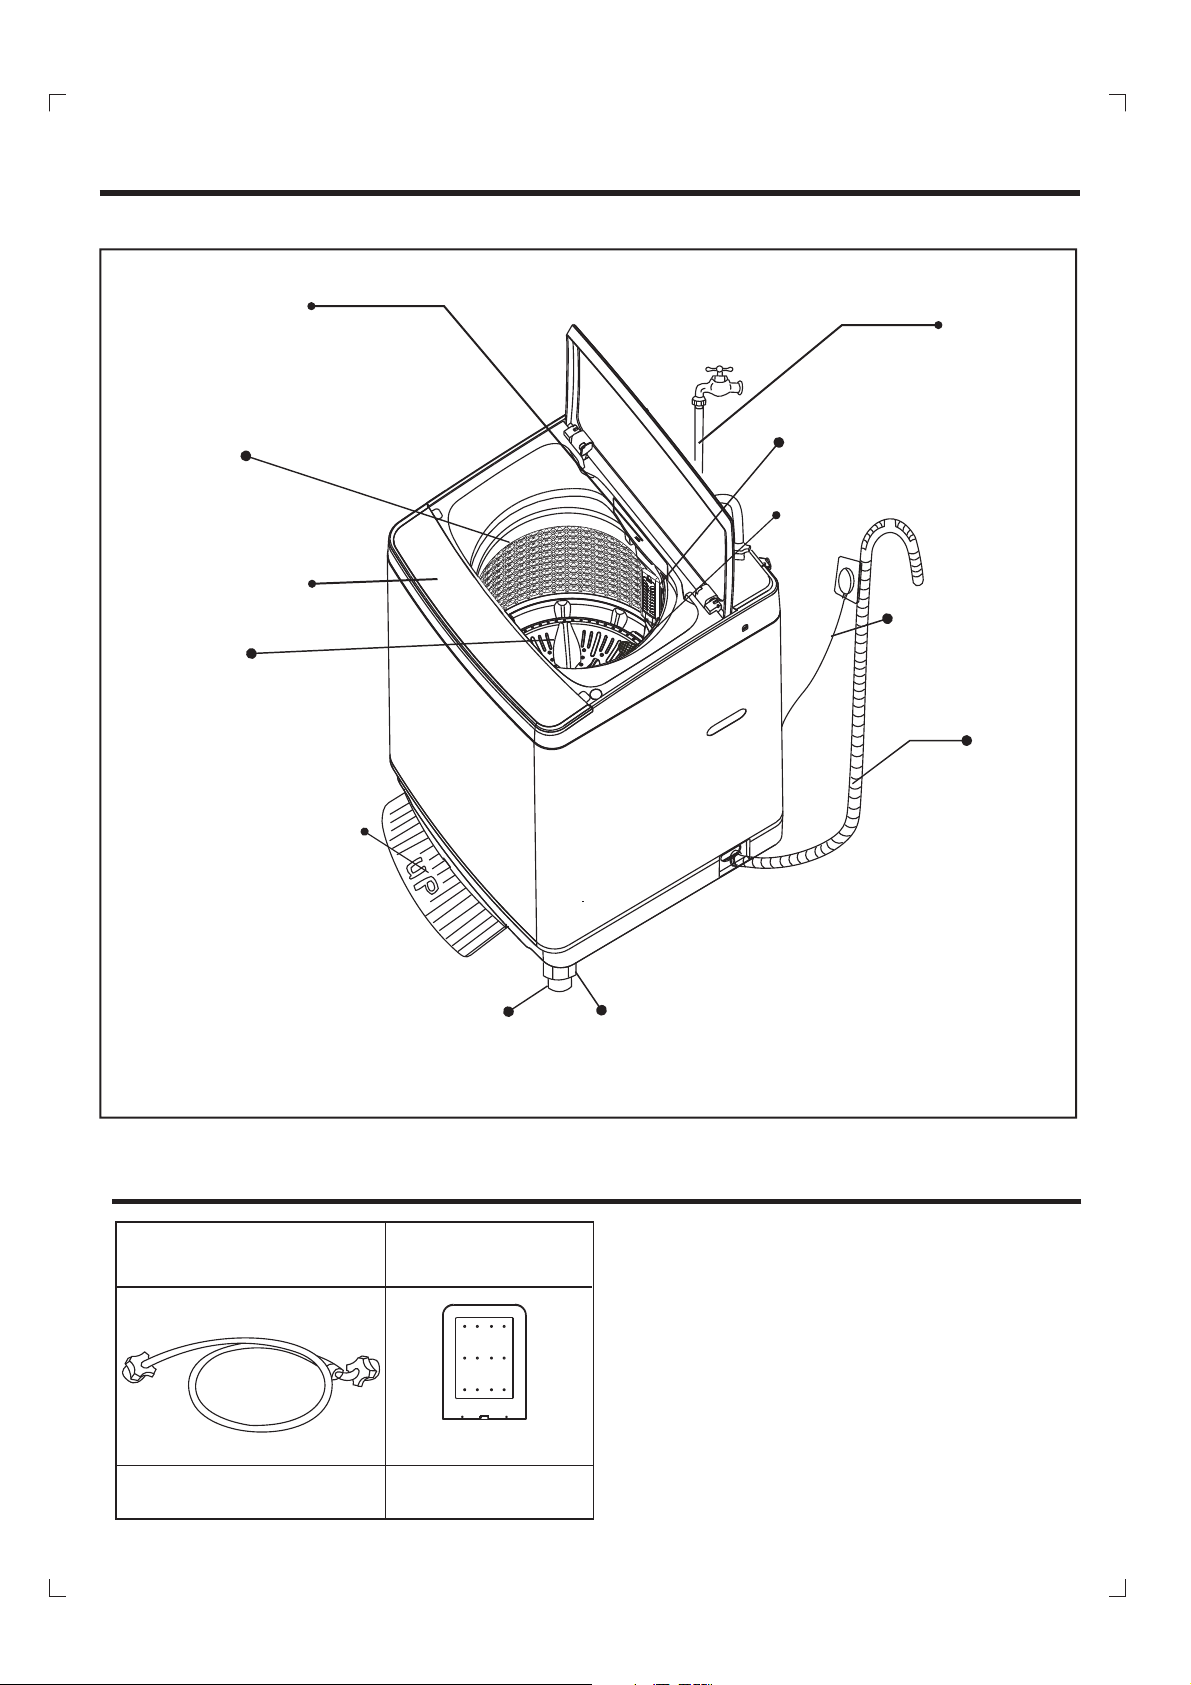
PARTS IDENTIFICATION
Detergent box
Inlet hose
(Please turn off the
tab after using)
Inner tub
Control panel
Pulsator
Noise and mice-proof
plate
(It is inserted into the
base to reduce noise
and keep the mice
away.)
Magic lint filter
Lint filter
Power cord
Drain hose
Adjustable foot
Nut
ACCESSORIES
Inlet hose
2PC
Note:
The washing machine is to be connected to the water mains using new hose-sets supplied with the
appliance are to be used and old hose-sets should not be re-used.
Noise and mice-
proof plate
UP
(2set screws)
1PC
-2-
Page 4

CONTROL PANEL
1.1
HOT
WARM
COLD
Water Supply
1
2.1
09 10
07 08
05 06
03 04
01 02
Water Level
2
Water supply button
1
Water supply indicator
1.1
2
Water level button
3.1
12mins
9mins
6mins
Wash
3
4.1
3times
2times
1times
Rinse
4
5.1
Spin
5
9mins
5mins
3mins
1mins
7
RemainingRemaining
ProtectionProtection
Delay
6
5
Spin button
5.1
Spin indicator
Delay button
6
8.1
Program
8
10
Power
Start
Pause
9
Water level indicator
2.1
3
Wash button
Wash indicator
3.1
4
Rinse button
Rinse indicator
4.1
SPECIFICATIONS
Rated voltage Rated frequency
Rated input power
Rated wash and spin
capacity
220-240V~
480W
7.5kg
Rated water volume
Net weight
7
Indicating window
Program button
8
8.1
Program indicator
9
Start/PAUSE button
Power button
10
50Hz
144L
38kg
960mm
Water pressure
Dimension
0.05MPa-0.5MPa
569mmX583mmX960mm
-3-
569mm
583mm
Page 5

INSTALLATION
Insert the noise-proof plate into the washing machine base
1. Take out the noise-proof
plate.
4. Lay down the washing
machine, fasten the two
screws.
2. The entrance is in the front
of the base.
3. Insert the noise-proof plate
into the base.
Place the washing machine
Place the washing machine on a firm and level surface, use the level adjustment knob to regulate
the adjustable foot until the washing machine is stable.
Place the washing machine
at least 5cm away from the
wall.
-4-
Alternation of adjustable foot
Use the adjustable foot to level the
machine with the floor:
1) Turn the nut clockwise to release the
screw adjuster on the foot.
2) Rotate the foot to raise or lower it
until it stands firmly on the ground.
3) Lock the foot in position by turning
the nut anti-clockwise until it comes
up against the bottom of the
machine.
3
2
1
Nut
Screw adjuster
Adjustable foot
Page 6

INSTALLATION
Connection of the drain hose
Change the direction of the drain hose
Unfasten the fixed screw of
the drain hose joint.
Lead out the drain hose from
the opening to the other side.
Connection of the drain hose
Insert the end of the drain hose into the hook shelf, and
hang the drain hose over a drain outlet (bath tub, sink,
etc.) or connect onto the special inlet point of the S trap.
Note: The highest point of the drain hose must be
between height of 0.7m~1.2m above floor level,
otherwise, the washer can not work normally.
Fasten up the screw to fix
the drain hose.
Water supply requirements
Water Temperature
Cold :
Recommended cold water temperature is 10~24℃.
Hot :
Recommended hot water temperature is 50~60℃.
Warm:
Mixture of hot and cold water. (Warm water temperature is dependent upon the water
temperature and the pressure of both the hot and cold water supply lines.)
IMPORTANT:
Owner should turn off water supply whenever there will be an extended period of non-use.
Water Pressure
Do not operate the washer when the water pressure is lower than 0.05MPa or higher than
0.5MPa() to avoid damage of the inlet system.
-5-
Page 7

INSTALLATION
Faucet:
The faucet must be with G3/4" standard screw thread. If not , it is
impossible to connect the inlet hose properly.
Connection of the inlet hose
NOTE: water supply faucets should be readily accessible to
permit turning them off when washer is not being used.
Installation and connection of the Inlet hose
Note:
The washing machine is to be connected to the water mains using new
hose-sets supplied with the appliance, old hose-sets should not be reused.
Refer to Section on Water Supply Requirements before connecting water inlet
hoses.
Ⅰ. About faucet
1. Connect the water inlet hose to the connector by turning the connecting nut.
. About washing machine
A: If you just have one water supply line (cold or hot water), connect the inlet hose to
the cold water connector. Do not u
nscrew the lid of hot water connector.
IMPORTANT:
In this situation you can not set wash temperature to WARM OR HOT.
HOT WATER
CONNECTOR
RUBBER RING
CONNECTOR
RUBBER RING
CONNECTING
NUT
COLD WATER
CONNECTOR
CONNECTING
NUT
ELBOW
WATER INLET HOSE
COLD
HOT
LID OF HOT WATER
To prevent water leakage, please ensure the connecting nut is tightened
securely. If water leakage, check the nut whether it is filled with rubber ring.
-6-
Page 8

INSTALLATION
1
2
4
3
Connection of the power cord
The groundwire which is indicated by yellow and
green colour must be firmly connected to a special
groundwire. Please call the technician to assemble.
The socket should have assembled the 5A fuse.
NOTE:
Never try to connect the groundwire of the washing
machine together with that of gas pipe or water pipe,
telephone cord or lightening rod.
Do not use the damaged cord because it could
cause electricity leakage and fire.
In case cord is damaged, please contact the local
service company, because it is removed and
replaced with special tools.
DETERGENT CONTAINER
Compositive detergent and softener for laundry
Draw out the detergent box.
Add the suitable quantity detergent into the
detergent dispenser.
Add the suitable quantity softener into the
softener dispenser before wash.
Push detergent box into completely.
Note:
Dilute concentrated softener with triplicate water.
If softener needed, do not open the wash lid when spin, or else the softener will be premature
used and the effect will be worse.
Water
level
Low
Mid
High
Detergent dosage
Slight dirty
12-20g
18-33g
27-36g 48-70g
Dirty
25-38g
35-56g
-7-
Page 9

DETERGENT CONTAINER
Softener for laundry
Note:
Softener dosage
Normal 14Concentrated
20
25
30
36
Inject softener into the softener dispenser before
washing, At the last time for rinse, the softener
will be infused into the rinsing automatically.
Dilute concentrated softener with triplicate
water.
If softener needed, do not open the wash lid
when spinning, or else the softener will be
prematurely used and the effect will be awful.
Water
level
1-2
3-4
5-6
7-8
9-10
PROGRAM
Program
Microcomputer controlled board assembly saved up 7 kinds of washing programs,
please refer to the following washing program form.
Washing program form
5
7
10
13
16
FUNCTION
PROGRAM
FUZZY
NORMAL
GENTLE
STRONG
SPEEDY
WOOL
ECONOMY
MINI
ANTI-CREASES
TUB CLEA N
SOAK
(MIN)
Select the time acc ording to the quantit y and quality of the wa sh l aundry itself.
24
WASH
(MIN)
20
12
12 2
3
6
6
3
12
2
RINSE
(CYCLE)
1
2
1
2
1
1
2
SPIN
(MIN)
3
5
5
1
3
1
30
Note: 1.The total operating time may vary according to water volume, tolerance is permitted.
2.In case the unbalance of laundry trigger the safety switch into action when spinning,
the machine will automatically refill water to adjust the balance.
Note: The following program settings were used for energy performance testing
according to AS/NZS 2040. The Normal program, with water supply=”warm”,
water level=”10”, wash=soak+12mins, rinse=1, and spin=3mins.
-8-
Page 10

OPERATION
Preparation
1.2.Connect the water inlet
hose to the water faucet.
Turn on the water faucet.
3.Plug in the power supply
cord.
4.I
nsert the end of the drain
hose into the hook shelf, and
hang the drain hose over a
drain outlet.
0.7m~1.2m
5.Put suitable wash load
into the inner tub.
6.Add suitable detergent
according to the wash
load volume into the box
of powder laundry
detergent .
Operation
Step one: Switch on the power supply.
Press the POWER button, the indicator will glow, it means that the machine is in
auto-enter fuzzy program.
The fuzzy program can select the suitable water level and program itself according to the
POWERPOWER
quantity and material of the clothes you put into the machine.
If you press the start button, the machine will run the fuzzy program at once, if you don't
want to use the fuzzy program, follow next step.
7.Close wash lid completely.
(or else, it will not to spin and
will sound alarm.)
switched on, and it will shut down itself at once when the program finished.
Step two: Choose w
ash programs.
You can choose the optimization program or edit the program yourself
and also combine the program as you need.
A: Choose the optimization program.
Press the "PROGRAM" button to Choose the desired function and then the corresponding
PROGRAMPROGRAM
indicator will blink.
Note: Press the "PROGRAM" button continuously all options of water flow will circulate as
figure.
FUZZY
TUB CLEAN
NORMAL GENTLE SPEEDY
ANTI-CREASES
STRONG
ECONOMYMINI
WOOL
-9-
Page 11

OPERATION
1
2
3
4
1
2
3
4
B: Edit program yourself.
09 10
07 08
HOT
WARM
COLD
Water Supply
Press the "PROGRAM" button to choose the desired program and then the corresponding indicator will
05 06
03 04
01 02
Water Level
12mins
9mins
6mins
Wash
3times
2times
1times
Rinse
9mins
5mins
3mins
1mins
Spin
RemainingRemaining
ProtectionProtection
Delay
Fuzzy
Normal
Gentle
Strong
Speedy
Program
Wool
Economy
Mini
Anti-creases
Tub clean
Power
Start
Pause
blink.
Press the "WASH" button
to choose the suitable wash time.
Note: Press the "WASH" button continuously, all functions of water flow will circulate as below.
9 minutes
6 minutes
12 minutes
No wash(all indicators are off )
If you choose the "SOAK" functions, the washing machine will process a soak program
(20 minutes) before washing.
Press the "RINSE" button to choose the rinse times and mode.
Note: Press the "RINSE" button, all kinds of rinse times and mode will circulate as figure
below.
3 times
Press the "SPIN" button to choose the spin time you needed.
no rinse(all indicators are off )
1 time2 times
Note: Press the "SPIN" button continuously, all options of Spin time will circulate as figure
below.
5 minute
9 minute
3 minute
1 minute
no spin(all indicators lights are off )
-10-
Page 12

OPERATION INSTRUCTIONS
C: Combine the program
1. Wash program only
1) Press the "PROGRAM" button to choose the desired function and then the
corresponding indicator will blink.
2) Press the "WASH" button continuously to choose wash time.
3) Press the "RINSE" button until all the indicators of "RINSE" are off.
4) Press the "SPIN" button until all the indicators of "SPIN" are off.
2. Wash and rinse program
1) Press the "PROGRAM" button to choose the desired function and then the
corresponding indicator will blink.
2) Press the "WASH" button to choose the suitable wash time you need.
3) Press the "RINSE" button
4) Press the "SPIN" button until all the indicators of "SPIN" are off.
3. Rinse and spin program
1) Press the "WASH" button until all the indicators of wash are off.
2) Press the "RINSE" button
3) Press the "SPIN" button to choose the spin time you need.
to choose the rinse times and mode.
to choose the rinse times and mode.
4. Spin program only
1) Press the "WASH" button until all the indicators of wash are off.
2) Press the "RINSE" button until all the indicators of rinse are off.
3) Press the "SPIN" button to choose the spin time you needed.
Step three: Choose the water level.
Choose appropriate water level according to wash
quantity and the corresponding indicator will blink.
Step four:Choose wash temperature
Press the water supply button, you can choose to inlet cold water, warm water or
HOT
WARM
COLD
NOTE:
The washing machine will provide a cold rinse in all TEMPERATURE setting.
IMPORTANT:
There is not heating element in the washing machine. A single hose system does not allow
the washing machine to automatically (choose)regulate incoming water temperatures to
match those listed on the control panel such WARM or HOT.
hot water.
Note:
Hot water only: Hot water can result in better cleaning effects. But it is not
suitable for all articles. It is best for washing whites and colorfast articles,
heavily soiled articles and diapers.
Warm water only: Warm water can reduce the chance of fading. It suits for
washing light and moderate soils clothes, dark color clothes, silks, woolens,
nylon, and acrylic.
Cold water only: Cold water is less effective in cleaning compared with hot or
warm water, but it does minimize wrinkling and fading. Use it for washing extra
sensitive clothes and for the rinse.
-11-
Page 13

OPERATION INSTRUCTIONS
Fuzzy
Normal
Gentle
Strong
Speedy
Special functions
1. Delay function
RemainingRemaining
ProtectionProtection
After choosing the program above-mentioned,press the "DELAY “
button (before press the "START/PAUSE" button) continuously the
digital indicator indicates the desired time to finish wash. (Example: If
the preset time is 5 hours, press the button until the digital indicator
displays .)
2. Children proof function
Children proof function can prevent children from falling into the inner tub of washing
machine. If you choose this function, the program will pause and give out sound if the wash lid
is opened and the washing machine will drain water and sound alarm if the wash lid does not
close within 10 seconds.
After choosing
press the "START/PAUSE" button, the program start
and give out musical sound, the indicator window
shows " " and blink at the same time for about 5
the program above-mentioned,
RemainingRemaining
ProtectionProtection
Fuzzy
Normal
Gentle
Strong
Speedy
Wool
Economy
Mini
Anti-creases
Tub clean
Children proof
indicator
seconds, if you press the "PRESET" button in this
period, the indicator (a little dot) will "on", then the
Children proof function
was chosen, the program go on
after buzz. If you do not press the "PRESET" button in
this period, the indicator (a little dot) will not go on, and
the will not be chosen.
Children proof function
Wool
Economy
Mini
Anti-creases
Tub clean
RemainingRemaining
ProtectionProtection
Step five: Start the washing machine
Note:
If you want to change the program when the washing machine is running, you must press
"START/PAUSE" to pause at first.
the
The water level can be changed when the washing machine is running. If you change the
water level to the higher one when the washing machine is running, the washing machine
will stop running and fill water to the level you choose and then begin running again
automatically.
Press "START/PAUSE" button, the washing machine will buzz and run automatically,
and the digital indicator will show the remaining time of the whole precess.
Please close the wash lid completely (otherwise, the machine will stop when it
goes to the spin program and will sound alarm.)
-12-
Page 14

MAINTENANCE
Clean the filter in the water inlet valve
1.
Unplug the power supply cord first.
2.Take off
filter with a brush.
Clean the lint filter
1.Pull upward to remove the
lint filter.
Clean the magic lint filter
1.Press the handle of the to remove the
the water inlet hose and clean the
2.Clean and rinse the lint filter
thoroughly.
magic lint filter from the container as
show below.
Body maintenance
Clean the surface of the washing machine
with a soft cloth regularly.
After spinning each time, please clean the
inner tub to avoid deposit.
3.Reinstall.
1.Open the back cover of the the magic
lint filter as show below. Clean and rinse
the magic lint filter.
handle
container
magic lint filter
handle
1
2
3.Close the back cover and fix the magic lint
filter into the container.
back cover
back cover
-13-
Page 15

TROUBLE SHOOTING
Indicators and roubles
Unable to drain
If the draining time passes 10
min, the washing machine will
buzz and indicate "E1".
Spin malfunction
If the machine does not spin
after draining, it will buzz and
indicate "E2".
Unable to Spin
The machine will attempt to
spin three times, if
unsuccessful it will buzz and
indicate "E3".
Is the lid closed
completely?
Is the load uneven?
Checklist
Is the highest point of the drain pipe
0.7m to 1.2m above floor level?
0.7-1.2m
Is the machine
installed on an
uneven surface?
Is the drain frozen or blocked?
Please call the technician to check
whether the safety switch is damaged or
not.
Please call the
technician to check
whether the safety switch
is damaged or not.
Failed to fill with
water
When water filling passes 20
min. It will buzz and indicate
"E4".
Lid opened
When the child protection
function is applied and the lid
is opened, after 10 seconds
the machine will buzz and
indicate "E5".
The machine gives
alarm for about 10
seconds when the
start / hold button
be pressed.
Please open the lid when the machine buzz, and get rid of the problem according to the above situation,
then close the lid, the machine will work again.
Is the tap turned off?
Is there no water supply?
Is the water flow too
slow?
Call technician to check whether the connection of water
level sensor loosened or the sensor damaged.
Is the filter in the
tap connector or
inlet valve
blocked?
Check the wash load and re-close the
lid, press the "START/HOLD" button to
resume the wash.
Please call the
technician to check
whether the inlet valve
is damaged or not.
-14-
Page 16

ELECTRICAL DIAGRAM
Microcomputer Programmer
y
y
br
bl/w
br/w
g
p
p
b
r
b
rr
r
bl
S
water
level
sensor
plug
y/gr
b-blue bl-black br-brown g-gray gr-green r-red y-yellow p-purple w-white
C-capacitor L-inductance IV-inlet valve Ms-drain water motor assembly
cold water
safety
switch
C
b
motor
L
r
y
bl
Ms
y
CAUTION:
If this appliance is supplied with a cord extension set or and electrical portable
outlet device, the cord extension set or electrical portable device must be
positioned so that it is not subject to splashing or ingress or moisture.
The appliance is not intended for use by young children or infirm persons
without supervision;
Young children should be supervised to ensure that they do not play with the
appliance.
The power supply cord must be unplugged after use.
Please use low foam powdered laundry detergent.
If the supply cord is damaged,it must be replaced by the manufacturer, its
service agent or similarly qualified persons in order to avoid a hazard.
The openings shall not obstructed by carpet.
-15-
 Loading...