

Page 1

INSTRUCTIONS FOR STEAM OVEN INSTALLATION
AND USE
INSTRUCCIONES DE INSTALACIÓN Y USO DEL
HORNO A VAPOR
INSTRUÇÕES PARA A INSTALAÇÃO E O USO DO
FORNO A VAPOR
ISTRUZIONIPER L' INSTALLAZIONE E L'USO
DEL FORNO A VAPORE
INSTALLATIONS-UND GEBRAUCHSANWEISUNG
DES DAMPFBACKOFENS
MANUEL D' INSTALLATION ET D'EMPLOI
DU FOUR A VAPEUR
Mod. CSO 989 X
Page 2

Page 3

Contents
INTRODUCTION
OVE
N DESCRIPTION
WARNINGS
INSTALLATION
Connection to the main
...........................................................................................................................................
...................................................................................................................................
.....................................................................................................................................................
.............................................................................................................................................7
s power supply ............................................................................................7
Replacement of the power cord:...................................................................................................7
Terminal box ................................................................................................................................7
Oven preparation and pre-use.......................................................................................................8
CLEANING AND MAINTEN
INSTRUCTIONS FOR COR
TECHNICAL DATA
ANCE OF OVEN AND ACC
RECT INSTALLATION
.....................................................................................................................................9
ESSORIES
.............................................................................9
...................................................8
Oven dimensions............................................................................................................................10
DESCRIPTION OF THE O
VEN AND ACC
ESSORIES
..........................................................................11
DESCRIPTION of the CONTROL PANEL..................................................................................12
Description of the keys...............................................................................................................12
FIRST START-UP
HOW TO TURN THE OVEN
HOW TO TURN THE OVEN
COOKING CYCLES AVAIL
HOW TO SELECT A COOK
USING A COOKING FUNC
USING A COOKING FUNC
HOW TO CHANGE THE CO
HOW TO START THE COO
HOW TO USE THE ALARM
HOW TO DISPLAY OR CHANGE THE ALARM STATUS
.........................................................................................................................................13
ON
...............................................................................................................13
OFF
.............................................................................................................13
ABLE
............................................................................................................14
ING FUNCTION
TION THAT INCLUDES S
TION THAT DOES NOT I
OKING CHAMBER TEMPER
KING
............................................................................................................16
FUNCTION
.........................................................................................15
................................................................................................16
TEAM
.............................................................15
NCLUDE STEAM
ATURE
.................................................................. 17
..........................................15
..................................................16
How to reset the alarm function.....................................................................................................17
HOW TO PROGRAM THE O
HOW TO SET OR CHANGE
HOW TO CANCEL A COOK
HOW TO PROGRAM THE S
HOW TO CANCEL AN OVE
COOKING FINISHED MODE....................................................................................................................18
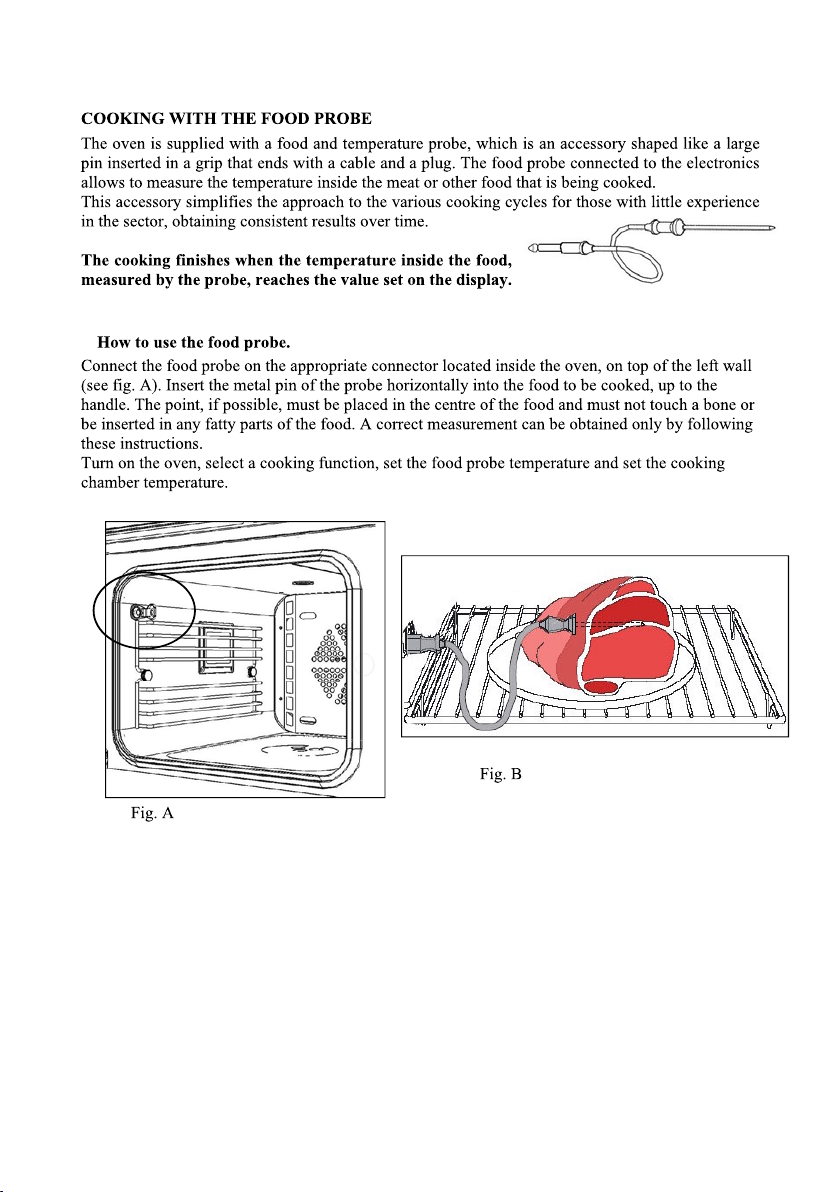
COOKING WITH THE FOO
VEN
............................................................................................................17
THE COOKING TIME
ING TIME
TART AND STOP
N START/STOP PROGRAM
D PROBE
..................................................................................................17
.....................................................................................................19
.............................................................................17
OF THE OVEN
.........................................................18
................................................................... 18
How to use the food probe. ............................................................................................................19
HOW TO CHANGE THE FO
USING THE FOOD PROBE
HOW TO PROGRAM THE S
SAVING A COOKING CYCLE..................................................................................................................21
HOW TO SAVE A COOKIN
HOW TO ADD STEAM IN
HOW TO MOVE AROUND I
MENU STRUCTURE FLOW-CHART
OD PROBE TEMPERATURE
AS A THERMOMETER
TART OF THE OVEN USI
G CYCLE
THE HOT AIR + ST
NSIDE THE MENU
.....................................................................................................21
EAM COOKING MODE
...................................................................................23
.......................................................................................................24
.................................................................20
............................................................................20
NG THE FOOD PROBE
............................20
..........................................22
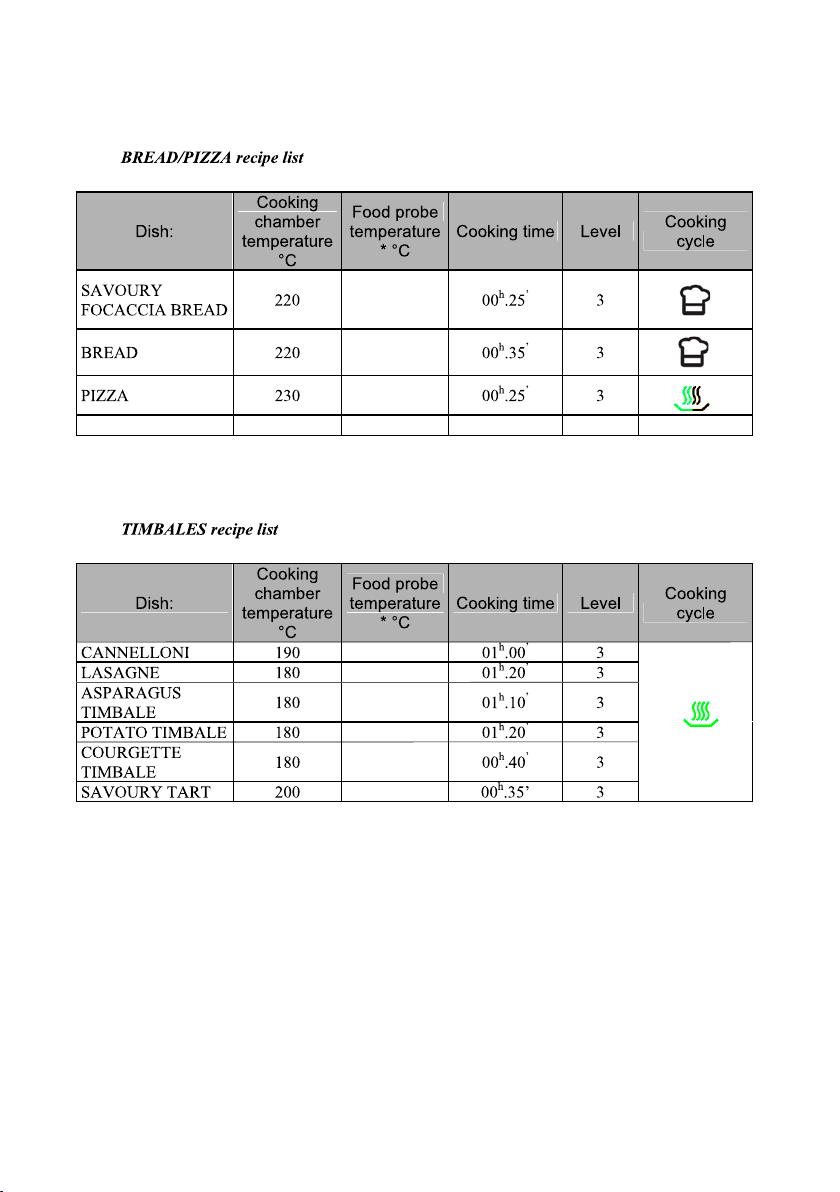
BREAD/PIZZA recipe list.........................................................................................................25
TIMBALES recipe list...............................................................................................................25
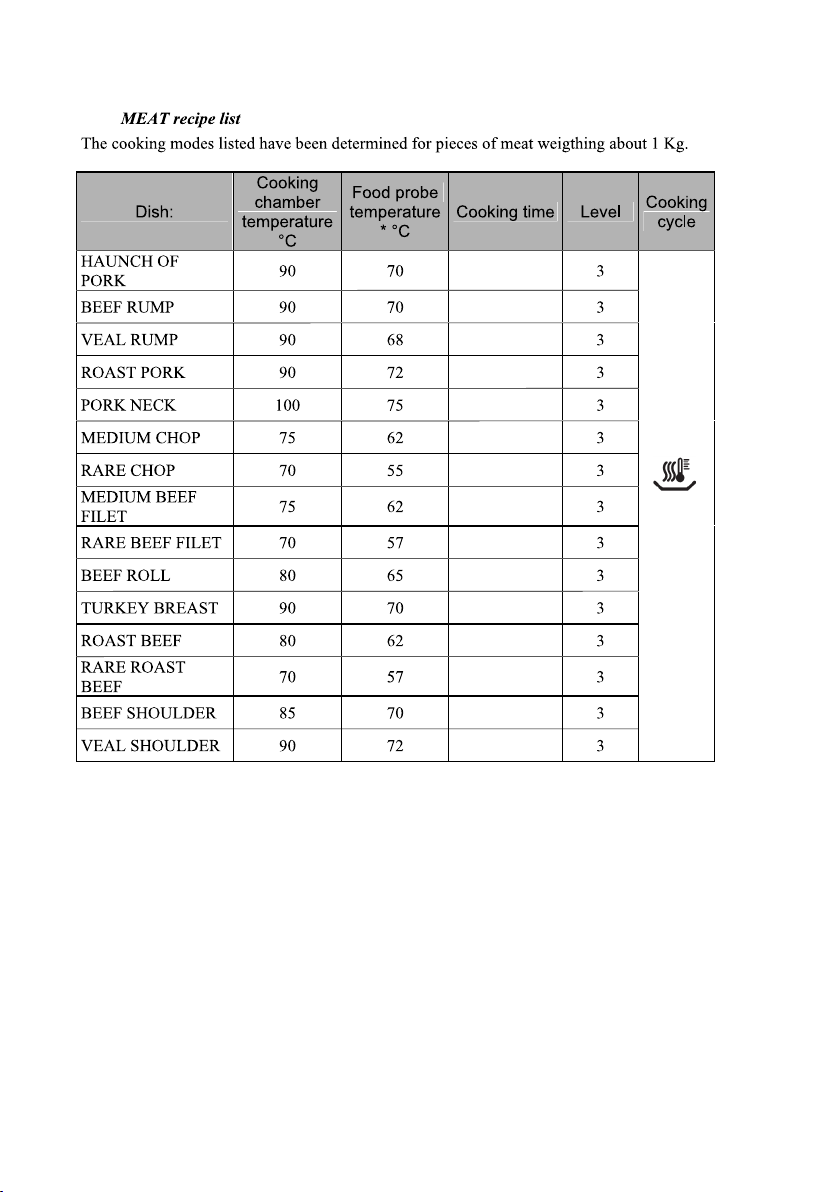
MEAT recipe list........................................................................................................................26
FISH recipe list...........................................................................................................................27
VEGETABLES recipe list .........................................................................................................27
DESSERTS recipe list................................................................................................................28
5
5
6
Page 4

HOW TO PERSONALIZE T
HOW TO LOAD YOUR OWN
HOW TO DELETE YOUR OWNRECIPE
PRACTICAL COOKING SU
ACCESSORIES
Drip p
.............................................................................................................................................30
an......................................................................................................................................30
HE RECIPE LIST
RECIPE
GGESTIONS
....................................................................................................28
...............................................................................................28
...............................................................................................30
.......................................................................................28
Grill ............................................................................................................................................30
Perforated drip pan.....................................................................................................................30
FOOD probe...............................................................................................................................31
HOW TO PERSONALIZE Y
SETTING THE CLOCK
SETTING KEYPAD LOCK:
HOW TO DEACTIVATE TH
KEYPAD LOCK DETAILS
BUZ
ZER
LIGHTING
WATER HARDNESS
START CLEANING CYCLE
.........................................................................................................................................................33
.....................................................................................................................................................33
OUR OVEN
...............................................................................................................................31
........................................................................................................................32
E KEYPAD LOCK
.........................................................................................................................33
.................................................................................................................................... 33
.......................................................................................................................34
..................................................................................................31
.....................................................................................32
COOKING CHAMBER.................................................................................................................34
BOILER DESCALING..................................................................................................................34
Suitable descaler:............................................................................................................................34
INSTRUCTIONS for boiler descaling process:.............................................................................35
Boiler wash.....................................................................................................................................35
RESET SET
OVEN OFF MODE
COOKING FINISHED MODE....................................................................................................................37
WHAT TO DO IN
WHAT TO DO IN CASE O
ERROR CODES TABLE
HOW TO DISASSEMBLE T
HOW TO REASSEMBLE TH
HOW TO CHANGE THE OV
TINGS
.......................................................................................................................................36
.......................................................................................................................................37
CASE OF AN ANOMALY
F A BLACK-OUT
..............................................................................................................................39
HE SIDE GRILLS
E SIDE GRILLS
EN LIGHT BULB
...........................................................................................38
..........................................................................................38
.......................................................................................40
........................................................................................40
......................................................................................41
Instruction for changing the light bulb:......................................................................................41
HOW TO CHANGE THE COOKING CHAMBER SEAL
HOW TO DISASSEMBLE T
HOW TO REASSEMBLE TH
OVEN DETAILS
Touch-
...........................................................................................................................................43
Control Keypad...............................................................................................................43
HE OVEN DOOR
E OVEN DOOR
........................................................................................42
.........................................................................................43
.......................................................................41
Keypad command inactivity.......................................................................................................43
Beep Signal..............................................................................................................................43
Cooling fan.................................................................................................................................43
Golden colour of the cooking chamber......................................................................................43
SYSTEM WARNINGS:
................................................................................................................................44
CHECK THAT THERE IS WATER IN THE PITCHER.............................................................44
INSERT THE PITCHER ...............................................................................................................44
CONNECT FOOD PROBE...........................................................................................................44
DISCONNECT FOOD PROBE.....................................................................................................44
CLOSE THE DOOR......................................................................................................................44
BOILER EMPTYING....................................................................................................................44
WAIT .........................................................................................................................................44
DISPOSAL
.....................................................................................................................................................45
Packaging .......................................................................................................................................45
Oven: ..............................................................................................................................................45
Customer assistance service...........................................................................................................45
Page 5

OVEN DESCRIPTION
Combination oven suitable for cooking food in ordinary homes for non-professional purposes
combining, in a single product, traditional cooking with the
results for each meat, fish, vegetable and dessert dish while at the same time retaining the taste,
freshness, aromas and above all the nutritional properties of the food. This oven is not suitable for
other purposes.
Install and use the appliance in rooms with temperatures that do not fall below 5°C.
EC DECLARATION OF CONFORMITY
This appliance, in the parts that are to come into contact with food substances, is compliant with
provisions of directive EEC
25/01/92.
T
hisapplianceiscompliant wi
respectively by 2006/95/CE and 204/108/EC and subsequent modifications
WARNINGS
This appliance is designed to be used by adults who are familiar with these user instructions.
Make sure that the power cord of the electrical appliances is not crushed by the oven door.
The electrical insulation could be damaged.
If the power cord has been damaged, it must be replaced by customer service to prevent
danger.
This appliance is not intended for use by persons (including children) with reduced physical,
sensory or mental capabilities, or lack of experience and knowledge, unless they have been
given sepervision or instruction concerning use of the appliance by a person responsible for
their safety.
Children should be supervised to ensure that they do not play with the appliance.
During use, the accessible parts of the oven may become very hot. Keep children away from
the oven until the appliance has cooled.
When opening the oven door during or upon completion of the cooking phase, be
careful of the fl
Step
back or to the side to avoid burns.
It is advisable to use distilled water in order to reduce the formation of scale.
Install and use the appliance in rooms with temperatures that do
Do not use the oven to heat the room.
Before closing the oven door, make sure there are no foreign objects or pets inside the oven.
Do not store flammable materials or temperature
vacuum packed c
risk.
Preserve this manual carefully and keep it handy so that you can consult it whenever
necessary. If you sell or give the appliance to another person, do not forget to attach th
manual to the appliance.
As soon as an operating problem is discovered, the oven must be unplugged.
89/109
and the legislative decree of implementation
th European Directives
ow of hot air and/or steam coming out of the cooking chamber.
ontainers, canned food, etc. in the oven. This presents a fire / explosion
advantages of steam to obtain excellent
N° 108
dated
73/23/
EEC
and
89/336/
-sensitive objects such as cleansers, sprays,
..
not f
all below 5°C.
EEC,
replaced
is
5
Page 6
Hot grease and fat catch fire easily. It is dangerous to heat oil in the oven to cook meat and
this should be avoided. Never try to put out a grease fire using water (there may be an
explosion). Suffocate the flames with wet cloths.
The grill, plates and cooking containers become very hot. When inserting or removing them,
use oven gloves or pot holders which are completely dry.
When using or cleaning the oven, be careful not to place your fingers in the door hinges or
in the door itself in order to avoid crushing or injuries. Be especially careful of this when
children are present.
Leave the oven door open in the supported position only.
When the door i
Do not sit or lean on the oven door, and do not use it as a work surface.
For maintenance, moving, installation and cleaning of the appliance, use suitable prevention
and protection equipment (gloves
Lifting and moving of appliances weighing more than 25 kg must be carried out using
proper equipment, or by two persons, in order to avoid risks or injuries.
Any work on the appliance must be done with the appliance disconnected from the electrica
power supply.
It is not permitted to modify, tamper with or attempt repairs on the appliance, especially
with tools (screwdrivers and the like), either inside or outside the appliance.
Repairs must only be carried out by authorized personnel, especially on the electrical parts.
Inappropriate repair work may cause serious accidents, damage the appliance and equipment
and lead to improper operation.
Appliances repaired in technical service centres must undergo routine testing, especially
concerning the eart
Use only the food / temperature probe included in the oven accessories. If the food probe
breaks or becomes lost, contact your nearest Authorized Service Centre.
s open, there is a risk of tripping or crushing fingers.
, etc.).
l
h circuit continuity.
T
he manufacturer shall not be held liable for damage to persons or
property due to poor or incorrect maintenance of the appliance.
The manufacturing company declines all responsibility if the safety
standards are not observed.
The manufacturer reserves th
products which it feels are necessary or useful without any advance
notice.
e right to make any modifications to its
6
Page 7
INSTALLATION
Remove the appliance from the package
and check that the product and power cord
are NOT damaged.
Otherwise, contact the retailer before
operating the appliance.
Do not lift the product by the door handle.
Packaging (e.g. paper, polystyrene) may be
hazardous to children (danger
of suffocation).
Keep packaging out of the reach of children.
The product must be installed and connected
correctly to the mains power supply,
following the manufacturer's instructions and
only by
QUALIFIED PERSONNEL.
Before performing any type of work,
it must
be verified that the appliance is
DISCONNECTED
from the mains power
supply.
Connection to the mains power supply
Make sure the voltage matches that
indicated on the typeplate which can be
viewed by opening the oven door.
Check whether there is
an omnipolar
switch available on the domestic line
which is compliant with current standards
(3 mm minimum opening distance
between contacts) and if it is able to
support the load of the appliance (see the
typeplate). Otherwise place a device,
easily reach
able, between the appliance
and the electricity line with the described
specifications.
CAUTION: Check whether your
electrical system is equipped with an
efficient earth connection according to
current standards and legal provisions.
N.B. The earth connect
ion is required by
law.
The yellow/green earth cable must not be
interrupted by the switch and must be 2
-3
cm longer than the other cables.
Do not position the power cord near
sources of heat or at temperatures more
than 50° above the room temperature.
If
the appliance is lacking the power cord,
the oven must be connected to the mains
power supply with a cable having a
minimum section of 1.5mm2.
If a plug is to be used, it must be a
standard plug suitable for the load and
the power outlet.
Replacement of
the power cord:
If the power cord needs to be replaced, use
cables of the following type only:
H05 RR-F, H05V2V2-F(T-90)
Wire sections 3x1.5mm
2
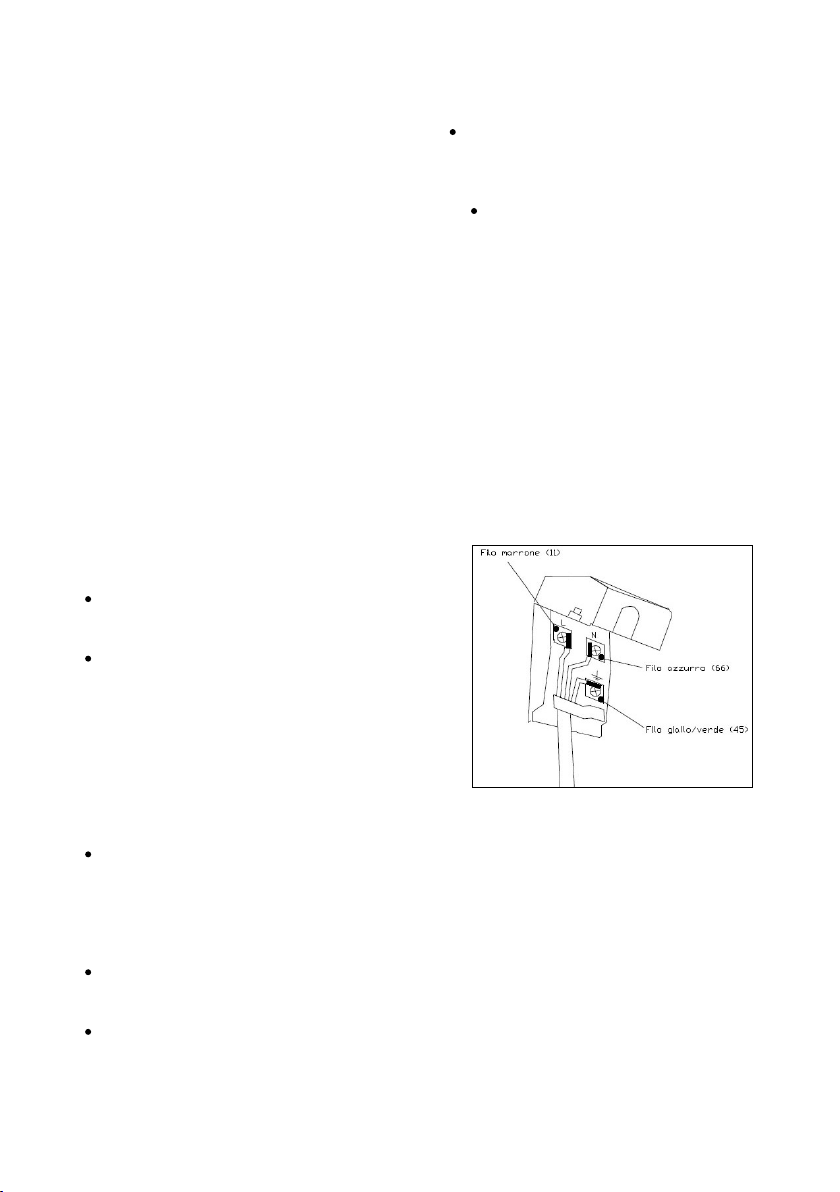
Terminal box
The oven is equipped with a terminal box set
up for operation with a singleVac 50
Hz supply voltage.
Picture of the open terminal box showing the
connected wires.
phase 220
-240
7
Page 8

Oven preparation and pre-
N.B. Disconnect the oven from the mains power, or move the omnipolar switch to OFF, before
cleaning the oven.
Before using the oven, thorough
dampened with warm water and washing
tracks.
Turn on the oven, see page 14
the temperature to 230°C. Operate the oven empty for about 30 minutes in order to remove any
residues of manufacturing oil or grease which can produce unpleasant odours during cooking
Air the room during this operation.
use
ly clean the inside using a soft cloth or non
select the "Professional Coo
-
up liquid. Insert the grill and drip pan in their respective
king" function , see page 16
-abrasive sponge
and set
.
CLEANING AND MAINTEN
To facilitate the cooking chamber cleaning operations, it is advisable to use the automatic
process described on page 34.
Then it is ad
Use a damp sponge to remove any residues from the chamber walls after each use.
Do not use steam cleaners to clean the oven.
Do not use coarse abrasive material such as scourers, metal scraper
the glass of the oven door in order to avoid scratches that may cause the glass to shatter.
DO NOT WASH THE FOOD PROBE IN THE DISHWASHER.
The grill, pitcher and drip pan can be washed in the dishwasher.
Empty the water pitcher afte
After cooking, and when the oven has cooled sufficiently, use a soft cloth to dry any liquid
remaining on the bottom of the cooking chamber.
vised to disconnect the appliance from the mains power supply.
ANCE OF OVEN AND ACC
r each use for hygiene reasons.
ESSORIES
s or steel wool to clean
8
Page 9

INSTRUCTIONS FOR CORRECT INSTALLATION
TECHNICAL DATA
Water tray capacity:
Usable volume (cooking chamber):
Gross volume (cooking chamber):
Connection voltage:
Maximum pickup voltage:
1.2 L
27 L
31 L
220-
240V
2.2 kW
50Hz
9
Page 10

Oven dimensions
10
Page 11
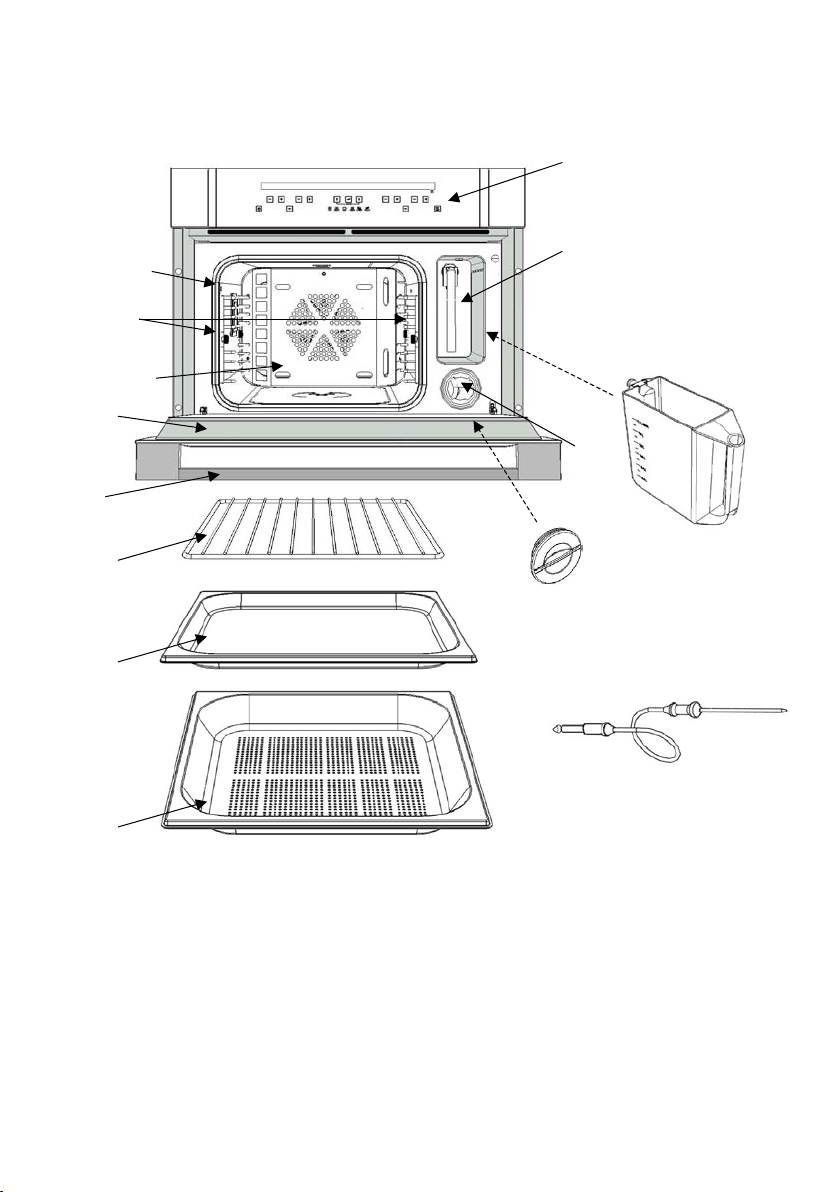
DESCRIPTION OF THE O
14
13
12
11
10
VEN AND ACCESSORI
ES
1
2
4
9
8
7
1 Control panel and data display
2 Pitcher compartment
8 Drip pan
9 Grill
3 Pitcher 10 Handle
4 Filter compartment
5 Filter cap
6 Food
or temperature probe
7 Perforated drip pan
11 Door
12 Cooking chamber
13 Side grills
14 Food probe connector
3
5
6
11
Page 12

DESCRIPTION OF THE CONTROL PANEL
9
1
Description of the keys
1.
Keys for setting the cooking chamber temperature
indication
( + to increase,
page 14
2.
3.
4.
5.
6.
7.
8.
9.
)
Keys for setting the food probe temperature and display area for the food prob
indication
( + to increase,
Keys for programming timed events and display area for timing indication
Keys for programming the alarm or setting the clock and display area for clock / alarm
indication
Cooking c
Oven on / off key
Cooking function selection keys
Selection confirmation key
Keys for scrolling the menu items
2
-
to decrease, min. 30°
-
to decrease, min. 30°-max.90°)
hamber light on / off key
8
7
and display area for the temperature
-
max.230° * depending on the cycle selected, see
3
4
65
e temperature
12
Page 13
FIRST START-UP
When the oven is connected to the mains power supply for the first time, a wait message ( WAIT )
and
some product identification information appear on the display.
Do not touch the keypad during this brief period.
N.B. It is normal that the Tangential Fan turns on and then shuts off after a few moments.
When the following message appears: LANGUAGE
select the desired language by pressing one of the keys
Confirm the selection with key
Then set the clock using the keys
to reach the current time.
Confirm the setting by pressing key (8)
HOW TO TURN THE OVEN
Press the key
The writing <<ON
message appears:
SELECT COOKING
N.B.
Deactivate the keypad lock if it is active.
See section
T
he oven will turn off automatically, after 5 m
HOW TO TURN THE OVEN
Press the key
The writing <<
The oven will go into stand
(6) for at least 1 sec.
>> appears on the display, the oven light turns on and then the following
HOW TO DEACTIVATE THE KEYPAD LOCK
(6).
OFF
>> appears on the display.
(8)
(4) individually
ON
MENU
OFF
-
by mode, see section
inutes, if no selection is made.
oven off mode
ENGLISH
(4)
on page 32.
page 37.
13
Page 14

COOKING CYCLES AVAIL
Function name
and symbol
STEAM COOKING
REGENERATION
PROFESSIONAL
COOKING
HOT AIR
COOKING
HOT AIR + STEAM
LOW
TEMPERATURE
During steam cooking, the steam coming from the boiler flows
into the cooking ch
The steam heats the cooking chamber and cooks the food.
This cooking mode is ideal for cooking any type of vegetables,
and it preserves the colour, taste and above all the organoleptic
properties of the food.
Steam a
nd hot air contribute to heating the cooking chamber. The
heating of the food is thus quick and homogeneous, preventing it
from becoming dry.
The element that heats the air is the CIRCULAR heating element.
The radial fan distributes the heat uniformly.
Th
is mode is suitable for heating previously cooked food
(leftovers), precooked food or frozen products.
Cooking carried out in several phases.
When started, in the first phase, the food is steam cooked.
After an auto
switches to the HOT AIR cooking mode.
This cooking system is ideal for rising any type of dough or for
cooking dough, bread or focaccia bread.
This type of cooking, however, cannot be performed several
times
in a row, otherwise the results will be less than ideal.
The oven must be allowed to cool between two professional
cooking cycles. Only in this manner will the new steam phase be
carried out properly.
The air inside the
heating element located behind the rear wall of the appliance.
The radial fan helps to move the air in a uniform manner. This
system, also known as ventilated cooking, cooks the food on
every side.
This cooking mode is equivalent to the hot air cooking mode
described previously but also allows the possibility to produce
steam, at any time, in the cooking chamber by pressing the key
(8)
. The production of steam in
automatically deactivated 10 minutes after its start, or it can be
deactivated even earlier, at any time, by pressing the key
again.
Ideal for cooking roasts.
Low-temperature c
periods. Ideal for cooking meat, producing a tender and delicate
meat dish.
The air inside the cooking chamber is heated by the circular
heating element located behind the rear wall of the appliance and
distributed un
radial fan. The cooking must be carried out using the food probe
supplied with the oven.
ABLE
Function description
amber.
matically determined period of time, the cooking
cooking chamber is heated by the circular
the cooking chamber is
ooking system for relatively long time
iformly thanks to the ventilation produced by the
(8)
Min-Max.
Chamber
temp.
T default
40
100
100
60 130
110
100 230
205
40 230
175
230
80
175
60-100
90
Food
probe T
default
70
70
70
70
70
70
14
Page 15

HOW TO SELECT A COOK
y
s
ING FUNCTION
Press one of the two direction keys:
function explanation in the table above. (cooking cycles available)
N.B. If no selection is made within 5 minutes, the oven will turn off automatically. See section
off mode
USING A COOKING FUNC
USING A COOKING FUNC
When the oven is used with a cycle that doe
without compromising the cooking result.
page 37
TION THAT INCLUDES STEAM
Fill the water container (pitcher) with distilled water or, if this is unavailable, drinking
water.
Fill the container up to the mark ( 1.2 L.). N.B. NEVER fill the pitcher completely,
otherwise the water pumped back into the pitcher at the end of the cooking cycle may
overflow.
Insert the pitcher into its seat.
Push the pitcher down completely to ensure a perfect seal between the tube located in the
pitcher and the hydraulic circuit
Always insert the NON-perforated drip pan under the perforated drip pan to collect the
condensation, juices or parts of food that may fall.
TION THAT DOES NOT I
(7) to select the des
inside the oven.
NCLUDE STEAM
s not include steam, the container may remain in its seat
ired cooking cycle. See
oven
N.B.
In order for the STEAM REGENERATION or PROFESSIONAL cookin
be carried out successfully, the oven must be allowed to cool sufficiently if it was
previousl
used for a similar cooking proces
g modes to
15
Page 16
HOW TO CHANGE THE CO
OKING CHAMBER TEMPER
ATURE
Press one of the two keys
The cooking ch
N.B.
The degree symbol
achieved. Otherwise, it is always on in all the other cases, such as for example: tem
the oven is maintaining the temperature already achieved, and cooling, when the oven must reach a set
temperature lower than the starting value.
amber temperature is always displayed on the left side of the letter
°
HOW TO START THE COO
The activation of the selected cooking function, with the sett
the selection is confirmed with key
The following message appears on the display:
(1) to change, with steps of
+/
-
5°C, the preset temperature.
t .
flashes during the oven preheating period until the set temperature is
KING
ings shown on the display, occurs when
(8).
ACTIVATE CYCLE
perature control, when
MENU
N.B. The oven turns off automatically after 5 minutes if the start of the cooking process is not
confirmed.
The phrase
COOKING IN PROGRESS
MENU
will appear on the display when the cooking
is activated.
Pressing the key
settings or store the data of the cooking in progress. See section
OVEN
on page 17.
HOW TO US
Press one of the two keys
The symbol
(9) accesses a menu which allows the user to perform semiautomatic cooking
HOW TO PROGRAM THE
E THE ALARM FUNCTION
(4) to activate the function.
begins to flash and the display shows the message:
ALARM and the digits 00.00 appear.
Use the keys
The maximum time t
(4) individually to set the desired time.
hat can be set is 23 hours and 59 minutes.
After a few moments (5 sec.), the timer begins, the oven returns to displaying the current time and
the symbol remains constantly lit.
At the end of the set time period, a buzzer sounds and the following message is displayed:
ALARM
00.00
and the symbol
(the last two flashing).
Press any key to stop the buzzer.
Note
CAUTION:
16
: The buzzer is automatically deactivated after 5 minutes.
The alarm function does NOT interact with the operation of the oven, and it is
available regardless of the oven state.
always
Page 17
HOW TO DISPLAY OR CH
ANGE THE ALARM STATU
S
Press one of the two keys
regarding the time status of the alarm.
The symbol
Press
one of the two keys (4) to set a new time for the alarm.
How to reset the alarm function
Press the keys
function.
The symbol
HOW TO PROGRAM THE O
HOW TO SET OR
Turn the oven on and select a cooking function.
Use the keys
The initial display of the time is set in mm.ss, then hh.mm.
(h=hours, m= minutes, s=seconds)
The maximum time that can be set is 10 hours.
Then activate the cooking, see section
The time displayed begins to decrease, and when it reaches zero the oven will go into cooking
finished mode, see on
begins to flash.
(4) simultaneously to reset the time previously programmed for this
will turn off.
CHANGE THE COOKING TIME
(3) to set the cooking time.
page 37.
(4) and the display immediately shows the information
VEN
how to start the cooking
on page 16.
HOW TO CANCEL A COOK
Press the keys
function.
The cooking time is set to zero.
(3) simultaneously to cancel the time previously programmed for this
ING TIME
17
Page 18

HOW TO PROGRAM THE S
Turn on t
Use the keys
The maximum time that can be set is 10 hours.
Then press the key:
When the message SET TIME appears, use the keys
set the END OF COOKING time, within the next 23 hours 59 minutes.
Confirm the setting with the key
he oven, select a cooking function and set the desired cooking temperature.
(3) to set the cooking time.
TART AND STOP OF THE
(9), select the item
(8).
OVEN
END OF COOKING
(3) to
with key
(8).
The oven will go into delayed start mode. It will be automat
and will stop at the programmed end of cooking time.
A clear message:
at 15 sec. intervals will be displayed to show the time remaining before the oven is turned on.
It is pos
sible, however, to recall the information on the display at any time by pressing one of the
two keys
HOW TO CANCEL AN OVE
Press the keys
The oven will automatically
MENU
COOKING FINISHED MOD
The oven turns off all the heating elements.
The display shows the message:
The buzzer signal can be turned off by pressing any key.
Press the key
cooking cycle.
N.B. In steam cooking cycles, two minutes before the cooking time ends the steam discharge vent
opens in order to discharge as much steam as possible form the cooking chamber.
OVEN TO BE TURNED ON IN .. ..
(3)
N START/STOP PROGRAM
(3) simultaneously to cancel the oven start/stop program.
activate and display the message:
E
COOKING FINISHED
to turn off the oven o
r press one of the two keys
ically activated later for a set duration
COOKING IN PROGRESS
accompanied by a buzzer signal.
(7) to select a new
18
Page 19
19
Page 20

HOW TO CHANGE THE FO
OD PROBE TEMPERATURE
Press one of the two keys
Maximum temperature that can be set:
Minimum temperature that can be set:
(2) to change, with steps of
90°C
30°C
+/
-
1°C, the food probe temperature.
The food probe temperature value is displayed with the following graphic symbol to the left:
Notes:
The chamber temperature must be higher than the food
probe temperature. Otherwise, the
display of the chamber temperature will flash to indicate an incorrect setting.
It is not possible to set a cooking time using the food probe or vice versa.
USING THE FOOD PROBE
Press the two keys
instantaneous value measured by the probe.
the
AS A THERMOMETER
(2) simultaneously and the probe temperature display will show
The maximum and minimum temperature that can be measured is 250°C- 20°C.
HOW TO PROGRAM THE START OF THE OVEN USI
Connect
the food probe to the appropriate connector (see fig. A, page 19
NG THE FOOD PROBE
). Turn on the oven,
select a cooking function and set the desired cooking temperature.
Then press the key:
When the message SET TIME appears, use the keys
(9) and select the item
START COOKING with key
(3) to set
(8).
the START COOKING time, within the next 23 hours 59 minutes.
Confirm the setting with the key
(8).
The oven will go into delayed start mode.
stop at the end of cooking, i.e., when the food temperature reaches the value set for the probe
and
It will activate automatically at the programmed time
temperature.
A clear message:
at 15 sec. intervals will be disp
OVEN TO BE TURNED ON IN .. ..
layed to show the time remaining before the oven is turned on.
It is possible, however, to recall the information on the display at any time by pressing one of the
two keys
(3)
20
Page 21

SAVING A COOKING CYC
The oven electronics offers the possibility to sto
areas. This information may be retrieved at a later time in order to cook with the same previous
settings, obtaining consistent and unfailing results.
The following can be stored in the memory:
cooking cycle
cooking chamber temperature
food probe temperature
It is not possible to store:
Start cooking time
End of cooking time
LE
or alternatively
re your cooking settings in appropriate memory
cooking time
HOW TO SAVE A COOKIN
After turning on the oven and carrying out all the necessary cooking settings,
(9) repeatedly until the following text appears:
Press key:
Select one of the 10 available records using the scrolling keys:
Confirm the saving of the data in
When the data has been saved, the system responds with
Notes:
Menu functions
Recipes :
recipes) that allows a quick setting of the oven (recommended parameters) based on the item
selected in order to obtain the correct cooking.
The followin
Settings:
oven based on your own needs.
See the list on page 32
(8) to confirm that you would like to save the data.
It is advisable to write down the number of the cooking cycle along with
dish for which it is used in a notebook. This will help in the future when you would like to
call up the cooking cycle to be used for this particular dish.
If the system does not display the writing "DONE", this means that all the availabl
records have been used. To save another cooking cycle, you must delete one or more
records. See section
Recipes
Settings
Ex
it
. The system has a stored list of dishes (meat, bread/pizza, desserts, timbales, your own
g pages provide the tables and parameters of the food stored in the memory.
In this menu it is possible to carry out a series of settings that allow to personalize the
G CYCLE
SAVE COOKING CYCLE
COOKING CYCLE NO.
how to delete your own recipe
with key
DONE
on page 28
press key
(9) or
(8)
the name of the
e memory
21
Page 22

HOW TO ADD STEAM IN
The hot air + steam cooking cycle allows the user to add steam at any time during the cooking. In
this manner the right degree of humidity inside the cooking chamber is reached or maintained in
order to obtain a more tender dish.
Once the cycle has been selected and activated, the following message appears at regular intervals:
PRESS
TO ADD STEAM
THE HOT AIR + STEAM
COOKING MODE
Pressing the key (8) turns on the symbol: that indicates activation
After a few moments, steam will begin to flow into the cooking chamber. The steam is introduced
into the chamber at constant intervals separated by brief pauses for a maximum period of about 15
min. at the end of which the steam gen
The introduction of the steam can also be deactivated manually at any time with key
The message shown on the display
reminds the user of this possibility.
erator and the indicator
PRESS
TO
STOP STEAM
of the steam generator.
turn off.
(8) .
preceded by a beep signal
22
Page 23
HOW TO MOVE AROUND INSIDE THE MENU
Turn on the oven. When the following message is displayed:
SELECT COOKING
MENU
press the key:
To view the menu structure:
press the key:
press the key:
Press the key:
EX
IT allows to return at any time to the initial item displayed when the oven was turned on.
Pressing the keys
time. (go back function <<< )
(9) to dis
(9) to scroll down the list
(9) to scroll up the list
(8) to select the item shown
play the first item in the list:
simultaneously allows to go back to the previous item one step at a
RECIPES
23
Page 24

MENU STRUCTURE FLOW-CHART
242526
Page 25
Page 26
Page 27
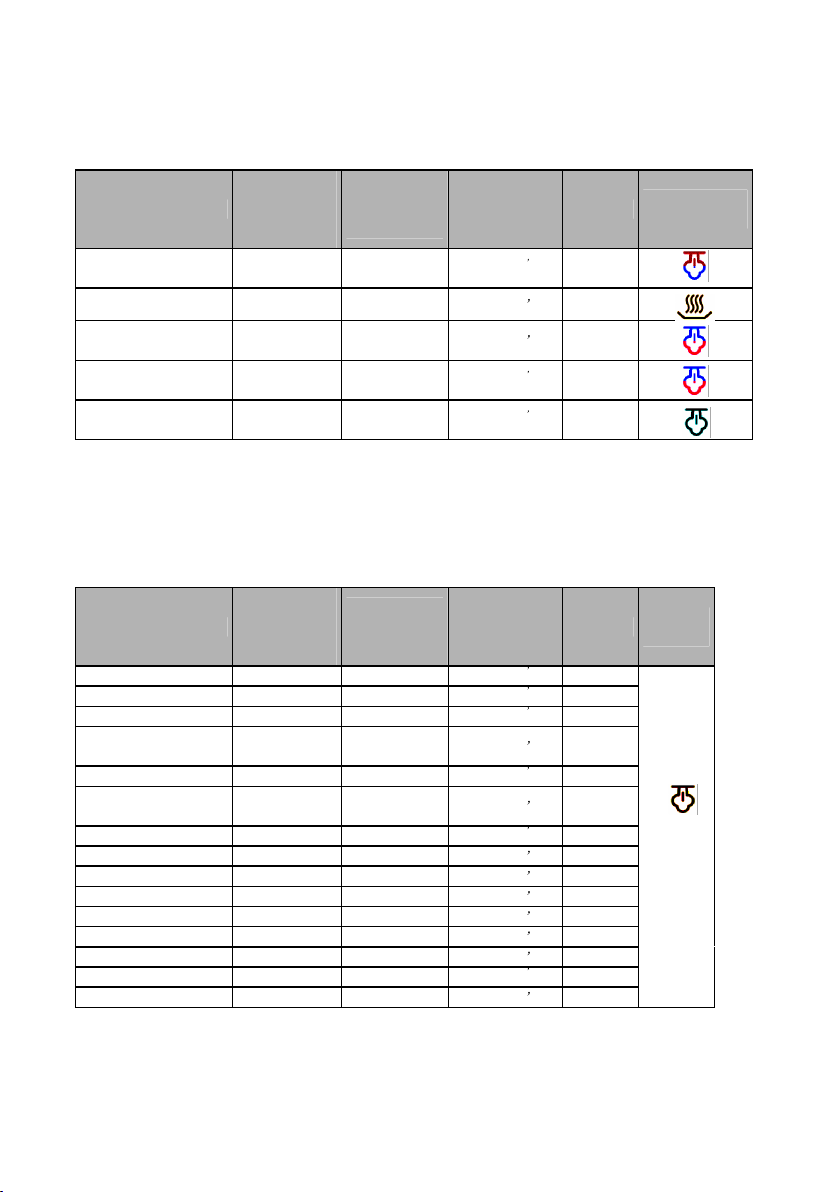
FISH recipe list
Cooking
Dish:
chamber
temperature
°C
MUSSELS AND
CLAMS
PLAICE FILLET
SCORPION FISH
FILLET
PRAWNS AND
FLAT LOBSTER
TROUT
100
220
80
100
100
VEGETABLES recipe list
Cooking
Dish:
chamber
temperature
°C
ASPARAGUS 100
BROCCOLI
CARROTS
BRUSSELS
100
100
100
SPROUTS
CAULIFLOWER
SWISS CHARD
100
100
STALKS
GREEN BEANS
FENNEL
POTATOES
PEPPERS
LEEKS
RICE
CELERY
SPINACH
ZUCCHINI
100
100
100
100
100
100
100
100
100
Food probe
temperature
* °C
Food probe
temperature
* °C
Cooking time
h
.30
00
h
.10
00
h
.30
00
h
.30
00
h
.35
00
Cooking time
h
.35
00
h
.30
00
h
.35
00
h
00
.35
h
.40
00
h
00
.35
h
.40
00
h
.40
00
h
.50
00
h
.25
00
h
.40
00
h
.35
00
h
.35
00
h
.20
00
h
.30
00
Level
3
3
3
3
3
Level
3
3
3
3
3
3
3
3
3
3
3
3
3
3
3
Cooking
cycle
Cooking
cycle
The cooking times have been determined for average sized dishes.
Cooking times may vary depen
ding on the size of the dish.
27
Page 28

DESSERTS recipe list
Cooking
Dish:
BISCUITS
YOGURT
BISCUITS
PLUM CAKE
SOUFFLES
APPLE PIE
SPONGE CAKE
NOTE:
The settings listed in the tables (temperature, cooking time) may be changed to create personalized
cooking better suited to your needs. New data can be entered to overwrite the
memory by following the instructions provided below.
HOW TO PERSONALIZE T
Select an item from the list and set the data according to your own needs. Remember that it is
possible to cook by time (cooking time) or with the f
Activate the cooking, then press the key
COOKING CYCLE
Press key:
The system displays
HOW TO LOAD YOUR OWN
(8) to confirm and store the new settings.
chamber
temperature
°C
150 00h.35
170 00h.15
170 01h.00
200 00h.35 3
170 01h.00 3
170 00h.40 3
DONE
when the saving is finis
Food probe
temperature
* °C
HE RECIPE LIST
(9) repeatedly until the following text appears:
RECIPE
Cooking time
ood probe.
hed.
Level
3
3
3
data stored in the
Cooking
cycle
SAVE
Select menu and select the recipes item, with key
Scroll the items with key
Confirm the selection with key
When the following message appears: LOAD COOKING CYCLE press key
The system displays the recipes that have been stored.
Use the key
Confirm the selection by pressing key
N.B. If the memory area is empty because no personalized recipes have been stored, the system
responds with EXIT.
HOW TO DELETE YOUR O
Select menu and select the recipes item, with key
(9) or
(9) or key
(8)
(9) to select the desired cooking cycl
WN RECIPE
(9) until the text YOUR OWN RECIPES is displayed.
(8).
(8).
(8)
e.
(8).
28
Page 29

Scroll the items with key
Confirm the selection with key
Use one of the two keys
DELETE COOKING CYCLE.
Press key
Select the cooking cycle that you would like to delete, scrolling the items with one of the two keys
When the cooking cycle has been deleted, the system responds with
(8) to enter the submenu.
(9), and confirm the deletion with the key
(9) or key
(8)
(
9) to scroll the items until the following text is displayed:
(9) until the text YOUR OWN RECIPES is displayed.
(8).
DONE
29
Page 30
PRACTICAL COOKING SUGGESTIONS
All cooking must be carried out with the door closed.
Always use completely dry oven gloves or pot holders to remove the hot dishes from the
oven.
Use containers able to withstand maximum temperatures of 250°C or higher.
During or at the end of the cooking phase, be careful of the hot air that escapes from the oven
when the d
oor is opened.
Never rest the dishes directly in contact with the bottom of the oven. Use the appropriate
accessories.
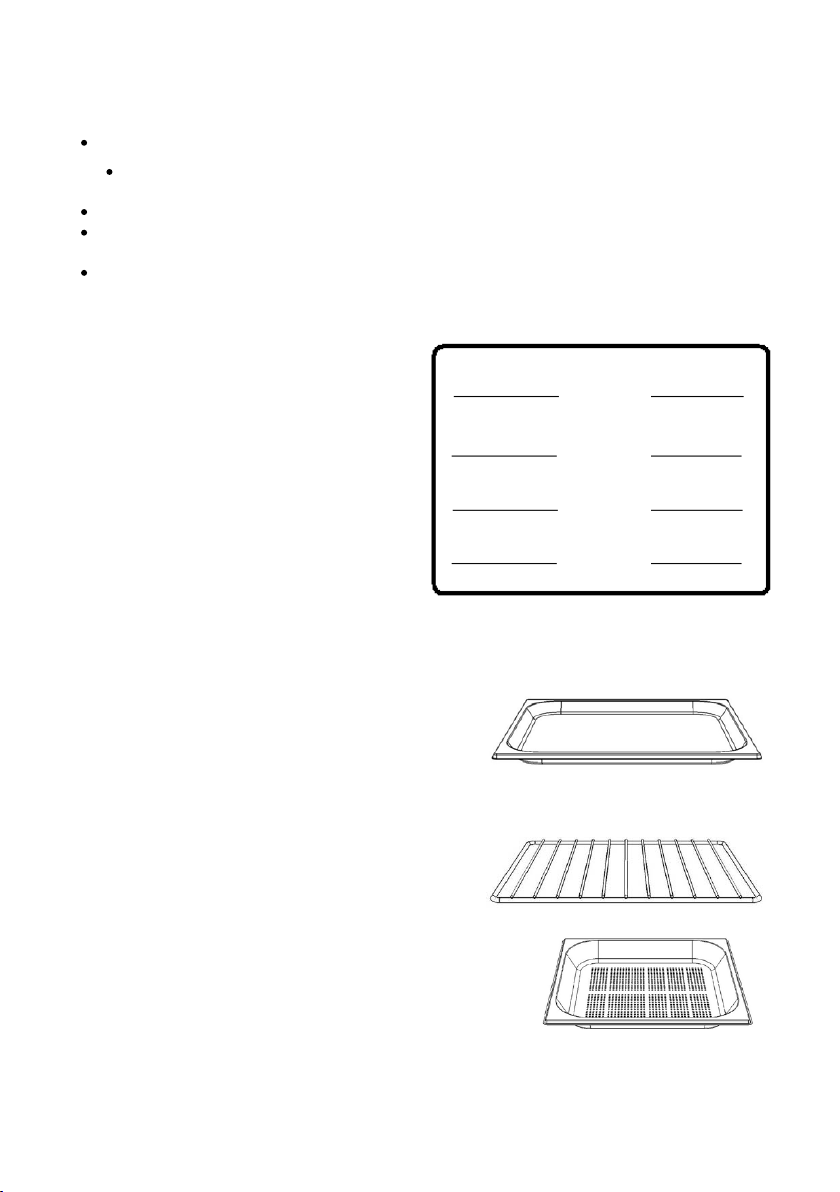
ACCESSORIES
The accessories supplied with the oven increase
the number of cooking modes and possibilities.
The drip pan and grill acce
ssories can be placed
on various levels of the slide guide located
inside the oven. This allows the user to set the
Level 4
Level 3
most suitable height (levels) depending on the
cooking to be carried out. See the recipe list on
page 25.
Level 2
Level 1
Drip pan
Tray with raised edges used as a support surface for any single-level or bain-marie cooking
container.
Container for collecting juices or drippings of fat during the cooking process, used together with the
main grill or the perforated drip pan.
When cooking fatty dishes, it is recommended to place a bit of
water in the drip pan to prevent the fat from burning and
producing unpleasant odours or smoke.
Support surface for the food (biscuits, etc.)
Grill
Used mainly as a support surface.
Recommend
ed position: level 2 / 3 / 4
Perforated drip pan
Used mainly for steam cooking (fresh or frozen vegetables, fish).
Position the perforated drip pan on level 2 or 3 and immediately
insert the drip pan to collect the liquid released from the food.
30
Page 31

FOO
D probe
See section
N.B.
If the food probe temperature display is flashing with the value of 30°C, this means that the dish
selected from those listed i
recommended to disconnect the food probe and cook according to the set mode or set a food probe
temperature best suited to your expectations.
HOW TO PERSONALIZE Y
Turn
press the key:
Press the key
Move around inside the SETTINGS submenu using the procedures described in section how to
move around inside the menu
To change the type of
The new setting must, of course, be confirmed with the
The message
Use the MENU STRUCTURE diagram to help you become fam
LANGUAGE
Menu languages:
COOKING WITH THE FOOD PROBE
n the recipe list lacks an ideal probe temperature value. In this case, it is
OUR OVEN
on the oven. When the following message is displayed:
SELECT COOKING
(9) to display the first item in the list:
(9) and confirm the selection
setting, press one of the two keys
DONE
: allows to set the display of the messages in the language best suited to the user.
ENGLISH,
ITALIAN,
GERMAN,
FRENCH,
SPANISH
is displayed as confirmation of the new selection.
MENU
on page 23
.
page 19
RECIPES
SETTINGS with key
(4).
enter key
iliar with the items.
.
(8)
(8).
Use the keys
SETTING THE CLOCK
Move around in this submenu and select the item to be personalized using the procedures already
described. See section how to move around inside the menu how t
on page 23
The variable parameters are displayed in flashing mode and can be changed using the keys
.
(4).
(4). to scroll the list items and key
(8) t
o confirm the desired language.
o move around inside the menu
31
Page 32

SET TIME
Allows to set the current time.
Keep one of the two keys mentioned previousl
y pressed down to scroll faster.
CLOCK DISPLAYED
If NO is selected, the current time is not displayed when the oven is off.
NIGHT MODE
Default setting = NO
If the setting is changed to YES, when the oven is off, during the time between 22.00 and 06.59.59
the clock digits are displayed with a low light intensity. During the remaining daytime hours, the
maximum intensity returns to ensure proper display in case of reflection.
SETTING KEYPAD LOCK:
This option allows to select the mode in which the keypad l
ock is set: manual or automatic. It is
recommended to select the automatic mode (YES), especially if there are children present.
AUTOMATIC KEYPAD LOCK YES
The keys are locked automatically when the keypad remains inactive for 1 minute.
AUTOMATIC KEYPA
The keypad lock is activated by simultaneously pressing the key on the far left
D LOCK NO
and the key on
the far right
In both cases, when the keypad lock is activated the display shows the message: KEYPAD LOCK
ACT
IVATED followed,
if the oven is off
, by the key symbol
to remind the user that the
function is activated.
If the keypad lock is activated manually or automatically during a cooking process, the display,
after the message: KEYPAD LOCK ACTIVATED
, returns to displaying the cooking
information. If someone attempts to perform new settings, the system responds to pressure on any
key with a message that reminds the user to deactivate the protection first.
See the next section.
HOW TO DEACTIV
If the key symbol
UNLOCK KEYS
Press simultaneously the key on the far left
The message : KEYPAD LOCK DE
ATE THE KEYPAD LOCK
is shown on the display, or the following message appears:
The two arrows on the sides pointing downwards remind the user of the key combination
and the key on the far right
ACTIVATED confirms that the appliance's normal control
)
functions have been restored.
32
Page 33

KEYPAD LOCK DETAILS
The key
The key allows to
BUZZER
Allows to select one of the 3 levels (low, medium, high) for the intensity of the buzzer that sounds
during a warning. Default setting: MEDIUM
LIGHTING
Allows to select the criteria for turning off the light once it has been t
Select NO for the item: LIGHT OFF AUTOMATICALLY to use the manual mode. Once the light
has been turned on, it must always be turned off by pressing the appropriate key
The automatic function (YES) allows the electronics t
after it was turned on.
WATER HARDNESS
The water hardness basically expresses the quantity of magnesium and calcium salts present in the
water. The hardness is generally expressed in French degrees (°fH).
The
oven is equipped with an automatic system that determines the appropriate moment to perform
a boiler descaling cycle.
Remember that it is advisable to use distilled water in order to reduce the formation of scale.
There are three adjustment ranges for the
French degrees ( °fH) / German degrees (°dH) equivalence table
WATER HARDNESS °fH
16-
35° fH AVERAGE WATER
0-
15° fH VERY SOFT WATER
36-
50° fH
allows to turn on / off the light in the cooking chamber regardless of the oven state.
turn the oven off.
urned on.
again.
o turn the light off automatically 5 minutes
water hardness.
WATER HARDNESS °dH
0-
8° dH AVERAGE WATER
9-
20° dH VERY SOFT WATER
VERY HARD WATER
21-
28° dH VERY HARD WATER
The default system is positioned on the average value (line1 in the table).
To change the setting, see on page 24
To enter into the option and then use one of the two keys
Once the selection has been made, confirm with key
See also the section: BOILER DESCALING on page 34
, select water hardness, press the confirmation key (8).
(4).
(8).
33
Page 34

START CLEANING CYCL
Menu items:
COOKING CHAMBER
BOILER DESCALING
COOKING CHAMBER
The purpose is to facilitate the removal of any residue of food, grease, etc. after a cooking process.
The oven fills the cooking chamber with a certain quantity of steam for a fixed period of
min.).
Activate the cooking chamber cleaning cycle with key
on the display.
When the cycle is finished and the following message appears:
COOKING CHAMBER CLEANING CYCLE COMPLETE USE A CL
DIRT
E
time (10
(8) and follow the instructions provided
OTH TO REMOVE
use a soft cloth or non
corrosive substances or liquids, do not use iron or pointed utensils.
BOILER DESCALING
This is a particular cleaning cycle suitable for removing
Depending on the water hardness, a certain quantity of scale forms inside the boiler or steam
generator that increases with the hardness of the water. See the section
page 33.
It
is recommended that the descaling be performed as soon as the following warning message is
displayed:
It is recommended that CITRIC ACID MONOHYDRATE be used, which can be found at any
ordinary pharmacy.
Follow the safety and dosing instructions. Do not use vinegar or vinegar-based products.
DESCALING CYCLE RECOMMENDED FOR BOILER
CAUTION: THE CYCLE HAS A FIXED DURATION OF 12 HOURS. THUS, IT IS
Suitable descaler:
-
abrasive sponge dampened with water to clean the oven. Do not use
the scale inside the boiler.
WATER HARDNESS
ADVISABLE TO PERFORM THE CYCLE DURING THE NIGHT
.
on
34
Page 35

INSTRUCTIONS for boiler descaling process:
Dosing
: fill the pitcher with water up to the 0.6 L mark , add 5 teaspoons of citric acid monohydrate
and dissolve.
Insert the pitcher in the appropriate seat and start the descaling process with key
The appliance will display the ti
When finished, a boiler wash and rinsing process will be carried out. See the section Boiler wash
Boiler wash
When finished, the system performs a boiler wash cycle and empties the dirty water into the
It will then be necessary to assist the appliance which will guide you step by step through the
operations to be carried out.
In summary, the necessary operations will be to empty the contents of the pitcher, rinse and fill the
pitcher with clean
Water may drip from the filter container. Dry and clean with a cloth or small sponge.
Pay attention to the white gaskets; make sure that they are present on the inner part of the filter
contain
er, otherwise position them correctly as shown below.
water. This operation will have to be repeated several times.
me remaining until the end of the descaling process.
(8).
pitcher.
Cap
Filter
Filter container
2 Gaskets
35
Page 36

RESET SETTINGS
This function is used to reset the system in case of problems.
Caution: All the system variables are returned to the original values and your own recipes
deleted.
Select the item :
the display.
RESET SETTINGS
with key
(8) and follow the instructions provided on
are
36
Page 37

OVEN OFF MODE
All the heating elements are deactivated, including the fan inside the cooking chamber and the light.
The coo
ling fan and the fan located inside the cooking chamber deactivate a few minutes after the
oven is turned off in order to allow rapid cooling of the oven. (Maximum cooling time: 20 min.)
The keypad is deactivated except for the on/off key
COOKING FINISHED MOD
The control unit sounds a buzzer and deactivates all the heating elements, including the fan inside
the cooking chamber and the light.
The display shows the message:COOKING FINISHED
Press any key to stop the buzzer, cancel the message and return the system to the ON
conditions.
Or press the On/Off key to turn the oven off. (see oven off mode)
Otherwise the oven will turn off automatically after
E
and the ALAR
5
minutes.
M function keys (see on page 16).
37
Page 38

WHAT TO DO
IN CASE OF AN ANOMAL
Y
PROBLEM
The oven does not work.
The light inside the cooking chamber does
not turn on.
The display shows Err and a number.
The system requires the time to be set.
The draining of the water from the boiler
occurs a long time after the end of a cooking
process.
Steam comes out of the oven during
operation.
The system displays a food probe temperature
dur
ing operation without the food probe
connected.
SOLUTION
Check whether the omnipolar switch or any
residual-current circuit breaker (cut-out) of the
electrical system is off. In case of problems with the
electrical system, consult a qualified elect
the oven still does not work after resetting the
omnipolar switch and/or residual
breaker, contact an Authorized Service Centre.
See the instructions on how to change the ov
bulb on page 41
This combination indicates a failure.
See the error codes table on page 39 .
Probable electrici
current time. See page 13
For safety reasons the water
pumped away only when the temperature has
dropped below 90°C.
The time necessary for the water to cool determines
the pause before the draining starts.
(this may last up to 20 min.)
During this time, another cooking process can be
star
ted.
Check whether the door is closed correctly.
Check whether the seal is damaged with cracks, etc.
In the second case, contact an Authorized Service
Centre.
Check the seal of the food probe connector cap
inside the cooking chamber. If the cap is unstable, it
must be replaced.
Contact an Authorized Service Centre.
ty failure (Black
or page 31
from the boiler is
rician. If
-
current circuit
-
out). Set the
en light
WHAT TO DO IN CASE O
In the case
current time.
The stored settings or recipes are not lost.
If the black
If a descaling or boiler cleanin
aborted. When the electricity is restored, it will be necessary to drain the solution of water
and citric acid monohydrate contained in the boiler. Follow the instructions shown on the
display
of the appliance. See the section
38
F A BLACK-OUT
of a black-out, when the electricity is restored it may be necessary to reset the
-out occurs during a cooking process, the process cannot continue.
g process was in progress before the black
Boiler wash
page 35.
-
out, the process is
Page 39

ERROR CODES TABLE
The electronic system continually performs a series of diagnostic tests. If some parameters are
incorrect, the
control unit deactivates the functions and displays an error code (Err followed by
three numerical digits); all the heating elements are turned off, including the fan inside the cooking
chamber. The cooling fan remains on.
Take note of the error code and
Error Code
Err 001
Err 002
Err 003
Err 004
Err 005
Err 006
Err 007
Err 008
Err 009
Cause
BOILER overheat
The causes of this alarm are:
The fill pump does not pour the water from
the pitcher to the boiler.
The causes may be:
a
empty pitche
b
a leak in the hydraulic circuit
c
broken pump
d
electronic failure in the power circuit
(relay or relay control)
Boiler protection alarm.
The system de-energizes the GEN. relay
in advance, and thus all the loads
connected to it.
Replace the power card
Power card overheat: threshold value
>=85°
PT1000 cooking chamber sensor
Cause: interruption or short circuit of the
sensor or cables.
-
Replace the PT1000
Food sensor
Cause: interruption or short circuit of
sensor or cables.
-
Check the electrical connections.
Replace the food probe.
Boiler thermocouple failure Cause: open
circuit or short to earth.
-
Replace the BOILER.
Cooking chamber steam presence
thermocouple failure Cause: open circuit
or short to earth.
-
Replace the TC1.
Cooking cham
-
Replace the power card
Failure of the ntc sensor on the power
card Cause: open circuit or short.
-
Replace the power card
contact an Authorized Service Centre, specifying the error code.
SOLUTION
Check that there is water in the
pitcher.
Turn the oven off and on again.
If the failure repeats, take note of
r
the error code and con
tact an
Authorized Service Centre,
specifying the error code.
Take note of the error code and
contact a
n Authorized Service
Centre, specifying the code.
Check whether the oven is
embedded in the furniture
according to the
instructions in this
handbook.Check whether the
tangential fan is operating
cor
rectly.
If the failure repeats, take
note of the error code and con
an Authorized Service Centre,
specifying the error code.
Contact an Authorized Service
Centre, specifying the code.
Contact an Authorized Service
the
Centre, specifying the code.
Contact an
Authorized Service
Centre, specifying the code.
Contact an Authorized Service
Centre, specifying the code.
ber overheat
Contact an Authorized Service
Centre, specifying the code.
Contact an Authorized Service
Centre, specify
ing the code.
tact
39
Page 40

HOW TO DISASSEMBLE T
1.
Unscrew (turning anti
2.
Extract, one at a time, the side grills (G).
G
D
HE SIDE GRILLS
-
clockwise) the front knurled nuts (D).
D
HOW TO REASSEMBLE TH
Insert the support grills on
Pay attention to the index on the grill. This must be inserted on the rear knurled nut inside the
cooking chamber.
Screw on the knurled nuts (D).
E SIDE GRILLS
e at a time. (G)
40
Page 41

HOW TO CHANGE THE OVEN LIGHT BULB
Disconnect the appliance from the power supply or plac
Check that the oven is at room temperature, otherwise wait for it to cool.
The oven light bulb must have the following characteristics:
Supply voltage 220
power 25 W.
Base type: E
Maximum ope
Instruction for changing the light bulb:
1.
Unscrew the knurled nut of the left-side support
grill, see the previous page.
2.
Extract the support grill.
3.
Unscrew the 4 cross screws located on the
corners of the glass support (see drawing
side).
4.
Place the frame, with glass and seal to protect the lamp,
on a support surface.
-
240 V (50/60 Hz)
-14
rating temperature 300°C
5.
6.
7. Reassemble the frame assembly with glass and
8.
9.
10.
11. Reconnect power.
e the omnipolar switch in the OFF position.
Rubber seal
to the
Unscrew the burnt
Insert and screw in the new light bulb.
seal.
Screw in the 4 screws.
Reassemble the side grill.
Screw on the knurled nut of the side grill.
-
out bulb.
frame
glass
HOW TO CHANGE THE CO
The seal located around the cooking chamber must be replaced if it has any cracks.
For safety reasons, the seal must be changed by an
OKING CHAMBER SEAL
Authorized Service Centre technician.
41
Page 42

HOW TO DISASSEMBLE T
1.
Open the oven door completely.
2.
Locate the hinges (C) , see the
drawing to the side:
3.
Tip back the brackets (A) on the two
hinges (C).
4.
Grip the door on t
the door of the appliance.
5.
Lift the door upwards.
6. Extract the door by rotating the lower part backwards. The brackets must come out of their
seats. See the drawing below.
HE OVEN DOOR
C
A
he two sides and close it slowly halfway, the brackets (A) will hook onto
42
Page 43

HOW TO REASSEMBLE TH
1. Insert the two brackets into the appropriate openings,
keeping the door semi
2. Open the door completely.
Tip over the two hinges (C) moving them forward.
3.
OVEN DETAILS
Touch-Control Keypad
This is a pa
enough to apply light pressure on the point of the keypad where the symbol corresponding to the
instruction is located.
After 5 m
option, the oven turns off automatically.
rticular type of keypad which is touch-
Keypad command inactivity
inutes without confirmation of a cooking cycle activation or without confirmation of an
E OVEN DOOR
-closed.
sensitive. To give a command to the oven, it is
Signal
Beep
A brief acoustic signal is emitted every time a key is pressed.
Cooling fan
The oven is equipped with a coolin
the external surfaces of the oven.
The fan is always active during the cooking process, and it is possible to feel the jet of air that
comes out between the front panel and the door of the oven.
Golden colour of the cooking chamber
After a certain period of oven use, the cooking chamber takes on a golden colouring. This colouring
of the stainless steel, due to natural causes, has no effect at all on the cooking characteristics.
g fan to ensure proper operation and reduce the temperature of
43
Page 44

SYSTEM WARNIN
The meaning of some warning messages.
CHECK THAT THERE IS WATER IN THE PITCHER
Generally 1L. of water in the pitcher is sufficient for a steam cooking process, nevertheless the
message in question may be displayed for two reasons:
The water in the pi
The pitcher is not inserted completely in its seat.
Open the oven door in both cases, being careful of any steam that may come out.
Add max.1L. of distilled or drinking water, if necessary. (N.B. NEVER fill the pitcher
completely, other
end of the cooking cycle, may overflow from the container.)
Insert the pitcher into its seat.
Push the pitcher down completely to ensure a perfect seal between the tube located in t
pitcher and the hydraulic circuit inside the oven.
INSERT THE PITCHER
This message is displayed when the system must drain the water contained inside the boiler but the
pitcher is not present in the appropriate seat.
CONNECT FOOD PROBE
This message is
recipe which requires use of the food probe, and only if the latter is not already connected on the
appropriate connector.
DISCONNECT FOOD PROBE
This message is displayed if
only if the latter is connected.
GS:
tcher has finished.
wise the water pumped by the steam generator back into the pitcher, at the
he
displayed upon selection of the low temperature cooking cycle or a personalized
the setting of the selected recipe does not require the food probe and
CLOSE THE DOOR
This message is displayed to indicate that the selected process or the process previously in progress
can start only when the door is pr
The door
cycles.
This indication is used to ensure the user that certain processes are active, monitored and managed
automatically by the system even when the oven is turned off. (E.G. "Boiler wash cycles").
Other indications will be displayed at the end of the process or the oven will turn off automatically.
-
open condition determines the interruption of a cooking process or steam controlled
BOILER EMPTYING
WAIT
operly closed.
44
Page 45

DISPOSAL
Packaging
The parts of the oven packaging (cardboard, EPS expanded pol
should be disposed of in compliance with environmental regulations and using appropriate
separated collection channels.
Oven:
Disconnect the oven from the outlet or, in case of fixed installations, contact an authorized
electric
ian to request uninstallation.
Before scrapping the appliance, make it unusable by cutting the power cord.
This appliance is marked in compliance with European Directive 2002/96/EC, Waste Electrical and
Electronic Equipment (WEEE). By making sure that thi
contributes to preventing potential environmental and health damage.
s product is properly disposed of, the user
ystyrene, PE plastic bags)
The symbol
product must not be considered as domestic waste.
collection centres for the recycling of electrical and electronic equipment.
Dispose of it in accordance with local standards for waste disposal.
For further information on the treatment, recovery and recycling o
local authority, the domestic waste collection service or the retailer where the product was
purchased.
CUSTOMER ASSISTANCE SERVICE
If you cannot identify the cause of the operating anomaly: switch off the appliance (do not subject it
to rought treatment) and contact the Assistance Service.
PRODUCT SERIAL NUMBER. Where can I find it?
It is important y
(a 16 character code which begins with the number 3); this can be found on the guarantee certificate
or
on the data plate located on the appliance.
This will help to avoid wasted journerys to technicians, thereby (and most significantly) saving
the corresponding callout charges.
on the product, or on the documentation that goes with it, indicates that this
It must instead be turned over to suitable
f this product, contact the proper
ou to inform the Assistance Service of your product code and its serial number
45
Page 46

Índice y sumario
PRESENTACIÓN
DESCRIPCIÓN DEL HORNO......................................................................................................................
ADVERTENCIAS
INSTALACIÓN
............................................................................................................................................
...........................................................................................................................................
............................................................................................................................................... 51
Conexión a la red eléctrica...............................................................................................................51
cambio del cable de alimentación:...............................................................................................51
Bornera.........................................................................................................................................
Preparación del horno
LIMPIEZA Y MANTENIMIENTO DEL HORNO Y DE
INSTRUCCIONES PARA U
DATOS TÉCNICOS
y operaciones previas...............................................................................
NA CORRECTA INSTALAC
......................................................................................................................................53
SUS ACCESORIOS
IÓN EN
EL MUEBLE
.......................................52
..............................53
Medidas del horno..........................................................................................................................54
DESCRIPCIÓN
DEL HORNO Y DE LOS ACCESORIOS
.....................................................................55
DESCRIPCIÓN DEL PANEL de CONTROL..............................................................................56
Descripción de las teclas............................................................................................................56
PRIMERA PUESTA EN FUNCIONAMIENTO
CÓMO ENCENDER EL HORNO...............................................................................................................57
CÓMO APAGAR EL HORNO
CICLOS DE COCCIÓN DI
CÓMO SELECCIONAR UNA
USO DE UNA FUNCIÓN D
USO DE UNA FUNCIÓN D
CÓMO MODIFICAR LA
CÓMO ACTIVAR LA COCC
CÓMO USAR LA FUNCIÓN
CÓMO VISUALIZAR O MO
....................................................................................................................57
SPONIBLES:
FUNCIÓN DE COCCIÓN
E COCCIÓN QUE INCLUY
E COCCIÓN QUE NO INC
TEMPERATURA DE LA CÁMARA DE COCCIÓN
IÓN
..............................................................................................................60
DE CRONÓMETRO DE CO
DIFICAR LA FUNCIÓN C
........................................................................................57
..................................................................................................58
......................................................................59
E VAPOR
LUYE VAPOR
RONÓMETRO DE COCCIÓN
......................................................59
...............................................59
..................................60
CCIÓN
......................................................60
..................61
Cómo restablecer la función de cronómetro de cocción................................................................61
CÓMO PROGRAMAR EL HORNO
CÓMO PROGRAMAR O MOD
CÓMO C
CÓMO PROGRAMAR EL EN
CÓMO CANCELAR UN PRO
MODALIDAD DE COCCIÓN
COCINAR CON LA SONDA
ANCELAR UN TIEMPO DE
..........................................................................................................61
IFICAR UN TIEMPO DE
COCCIÓN
CENDIDO Y EL APAGADO
GRAMA DE ENCENDIDO/APAGADO DEL HORNO
TERMINADA
PARA ALIMENTOS
...........................................................................................62
COCCIÓN
..................................................................................61
DEL HORNO
..................................................................................63
.................................................61
........................................62
.......................62
Cómo usar la sonda para alimentos................................................................................................63
CÓMO MODIFICAR LA TE
UTI
LIZACIÓN DE LA SONDA
CÓMO PROGRAMAR EL EN
GUARDAR UN CICLO DE COCCIÓN
CÓMO GUARDAR UN CICL
CÓMO AÑADIR VAPOR EN
CÓMO MOVERSE POR EL INTERIOR DEL MENÚ.............................................................................67
DIAGRAMA PANORÁMICO
MPERATURA DE LA SOND
PARA ALIMENTOS COMO
CENDIDO USANDO LA SONDA PARA ALIMENTOS
O DE COCCIÓN
LA MODALIDAD DE COC
DE LA ESTRUCTURA DEL
.....................................................................................................65
........................................................................................65
A PARA ALIMENTOS
TERMÓMETRO
CIÓN POR AIRE CALIEN
MENÚ
.....................................................68
................................64
...........................64
....................64
TE+VAPOR66
Lista de recetas PAN/PIZZA......................................................................................................69
Lista de recetas de PÚDINES....................................................................................................69
Lista d
e recetas de CARNE........................................................................................................70
Lista de recetas de PESCADO...................................................................................................71
Lista de recetas de VERDURAS................................................................................................71
Lista de recetas de POSTRES....................................................................................................72
48
48
49
51
52
46
Page 47

CÓMO PERSONALIZAR EL
CÓMO CARGAR UN
CÓMO BORRAR UNA RECE
CONSEJOS PRÁCTICOS P
LOS ACCESORIOS
......................................................................................................................................74
RECETARIO
A RECETA PERSONAL
TA PERSONAL
ARA COCINAR
............................................................................................72
........................................................................................72
........................................................................................73
............................................................................................74
La bandeja..................................................................................................................................74
La rejilla .....................................................................................................................................74
Bandeja perforada......................................................................................................................74
Sonda PARA ALIMENTOS......................................................................................................75
CÓMO PERSONALIZAR SU
CONFIGURACIÓN DEL RE
CONFIGURACIÓN DEL BL
CÓMO DESACTIVAR EL B
PARICULARIDADES DEL
SEÑAL ACÚSTICA
ILUMINACIÓN
DUREZA DEL AGUA
ACTIVACIÓN DEL CICLO
......................................................................................................................................77
.............................................................................................................................................77
HORNO
LOJ
OQUEO DEL TECLADO:
LOQUEO DEL TECLADO
BLOQUEO DEL TECLADO
...................................................................................................................................78
DE LIMPIEZA
......................................................................................................75
...............................................................................................................75
......................................................................... 76
........................................................................ 76
......................................................................77
............................................................................................78
CÁMARA DE COCCIÓN.............................................................................................................78
DESCALCIFICACIÓN DE LA CALDERA.................................................................................78
Descalcificante apto:......................................................................................................................78
INSTRUCCIONES para el proceso de descalcificación de la caldera:........................................79
Lavado de la caldera.......................................................................................................................79
RESTABLECER C
MODALIDAD DE HORNO A
MODALIDAD DE COCCIÓN
CÓMO ACTUAR EN CASO
CÓMO ACTUAR EN CASO
TABLA DE CÓDIGOS DE ERROR
CÓMO DESMONTAR LAS R
CÓMO VOLVER A MONTAR
CÓMO CAMBIAR LA BOMB
ONFIGURACIÓN
PAGADO
TERMINADA
DE UNA ANOMALÍA
DE APAGÓN
EJILLAS LATERALES
LAS REJILLAS LATERA
ILLA DEL HORNO
........................................................................................................79
....................................................................................................80
...........................................................................................80
................................................................................ 81
...............................................................................................81
...........................................................................................................82
...........................................................................83
LES
.................................................................................84
.............................................................83
Instrucciones para la sustitución:...............................................................................................84
CÓMO CAMBIAR LA JUNT
CÓMO DESMONTAR LA PU
CÓMO VOLVER A MONTAR
PARTICULARIDADES DEL
A DE LA CÁMARA DE C
ERTA DEL HORNO
LA PUERTA DEL HORNO
HORNO:
.....................................................................................................86
................................................................................ 85
OCCIÓN
........................................................84
.................................................................. 86
Teclado Touch-Control..............................................................................................................86
inactividad de los controles del teclado......................................................................................86
Señal "Beep"...............................................................................................................................86
Ventilador de enfriamiento.........................................................................................................86
Coloración dorada
AVISOS DEL SISTEMA:
de la cámara de cocción...............................................................................86
.............................................................................................................................87
COMPROBAR PRESENCIA DE AGUA EN EL JARRO...........................................................87
INTRODUCIR EL JARRO............................................................................................................87
CONECTAR SONDA ALIMENTOS...........................................................................................87
DESCONECTAR SONDA ALIMENTOS....................................................................................87
CERRAR LA PUERTA.................................................................................................................87
VACIADO DE LA CALDERA.....................................................................................................87
ESPERE... ......................................................................................................................................87
ELIMINACIÓN
.............................................................................................................................................88
Embalaje.........................................................................................................................................88
Horno:.............................................................................................................................................88
Servicio de asistencia al cliente........................................................................................................88
47
Page 48

DESCRIPCIÓN DEL HORN
Horno
combinado idóneo para la cocción de alimentos en viviendas corrientes con fines no
profesionales que conjuga, en un único producto, la cocción tradicional y las ventajas del vapor, con
óptimos resultados para todo tipo de platos, ya sean de carne, pescado
manteniendo al mismo tiempo el gusto, la frescura, los aromas y, sobre todo, las propiedades
nutritivas de los alimentos. No apto para fines diferentes.
Instale y utilice el aparato en ambientes con temperaturas no inferiores a 5°C.
O
, verduras o postres,
DECLARACIÓN DE CONFOR
Las partes de este aparato destinadas a entrar en contacto con productos alimentarios
a lo establecido por la
Ap
arato conforme a las Direc
respectivamente por la
dir.
2006/95/CE y la
MIDAD
CEE 89/109.
tivas Europeas 73/23/CEE y
CE
204/108/CE,
89/336/CEE,
y modificaciones posteriores
reemplazadas
.
son conformes
48
Page 49

ADVERTENCIAS
El aparato ha sido proyectado para ser utilizado por adultos informados de las presentes
instrucciones de uso.
Asegúrese de que el cable de conexión de los aparatos eléctricos no quede aplastado en la
puerta del horno puesto que de ser
Cuando el cable de conexión haya sufrido daños, deberá ser cambiado por el servicio de
asistencia al cliente para evitar situaciones potencialmente peligrosas.
Este aparato no está concebido para ser usado por personas (incluidos los niños) con
discapacidades físicas, sensoriales o mentales, o que carezcan de la experiencia y los
conocimientos necesarios, a menos que una persona responsable de su seguridad les
proporcione supervisión u
Se deberá vigilar a los niños para garantizar que no jueguen con el aparato
Durante el uso, las partes accesibles del horno pueden calentarse mucho. Mantenga a los
niños a distancia ha
En el momento de la apertura de la puerta del horno, durante la fase de cocción o al
finalizar esta, tenga cuidado con la corriente de aire caliente y el posible vapor que
salen de la cámara de cocción.
Se aconseja utilizar agua destilada para limitar la formación de cal.
Instale y utilice el aparato en ambientes con temperaturas
No utilice el horno para calentar el ambiente.
Antes de cerrar la puerta del horno,
cuerpo extraño ni animales domésticos.
No guarde en la cámara de cocción objetos inflamables o sensibles de alguna manera a las
altas temperaturas como por ej. detergentes, sprays, recipientes al vacío,
etc. ya que existe el peligro de incendio / explosión.
Conserve con cuidado el presente manual y guárdelo de manera que se pueda consultar con
facilidad cada vez que sea necesario. En caso de venta o cesión del aparato a terceros, no
ol
vide adjuntar al aparato este manual.
Nada más detectar un problema de funcionamiento, es necesario desconectar el horno de la
red eléctrica.
La grasa o los aceites sobrecalentados pueden prender fuego con facilidad. Es peligroso
calentar aceite en la cámara de cocción para cocinar la carne, por lo que es necesario
evitarlo. No intente nunca apagar con agua el fuego producido por aceite o grasa ardiendo
(peligro de explosión); sofoque las llamas utilizando paños mojados.
La rejilla, las placas y los contenedores de cocción de calientan considerablemente: use
guantes de protección o agarradores para ollas que no estén mojados o húmedos.
orientación acerca del uso del aparato
sta que se enfríe el aparato.
así el aislamiento eléctrico podría resultar dañado.
.
.
Póngase a un lado o bie
compruebe que en la cámara de cocción no haya ningún
n retroceda un paso.
no inferiores a 5°C
latas de conserva,
.
49
Page 50

Durante el uso y el mantenimiento del horno, tenga cuidado de no meter los dedos en las
La Casa Fabricante declina toda responsabilidad en caso de que no s
bisagras de la puerta o en la propia puerta, para evitar aplastamientos o heridas. Ponga
especial cuidado en este sentido sobre todo cuando haya niños presentes.
Para dejar la puerta del horno abierta, hágalo solo de forma que quede apoyada.
Con la puerta abierta existe el peligro de tro
No se siente ni se apoye en la puerta del horno. No la utilice tampoco como superficie de
trabajo.
Para el mantenimiento, el transporte, la instalación y la limpieza del aparato, use medios de
protección y prevención de acc
Para elevar o transportar aparatos de peso superior a 25 Kg, o de un tamaño que no permita
sujetarlo con comodidad, es obligatorio usar los medios idóneos o realizar la operación entre
dos personas para evitar riesgos o d
Todas las operaciones deben efectuarse con el aparato desconectado de la fuente de
alimentación eléctrica.
No está permitido llevar a cabo modificaciones, manipulaciones o intentos de reparación de
las partes externas o internas del aparato, sobre todo usando utensilios como
destornilladores, etc.
Las reparaciones, especialmente de las partes eléctricas, deben ser efectuadas
exclusivamente por personal especializado. Las reparaciones inapropiadas pueden provocar
graves accidentes, dañar el apar
Los aparatos reparados en los centros de asistencia deben ser sometidos a las pruebas
rutinarias de rigor, en particular a la prueba de continuidad del circuito de tierra.
Utilice únicamente la sonda de
del horno.
asistencia autorizado.
En caso de pérdida o rotura de la sonda para alimentos, diríjase a un centro de
identes adecuados (guantes, etc.).
ato y el equipo y provocar un funcionamiento anómalo.
temperatura o para alimentos incluida entre los accesorios
pezar o de aplastarse los dedos.
ificultades.
El fabricante declina toda responsabilidad por los daños a personas o
cosas que puedan derivar de un mantenimiento incorrecto o
inadecuado del aparato.
respeten las normas de prevención de accidentes.
El fabricante se reserva el derecho de aportar las mo
considere necesarias a sus productos sin obligación de preaviso.
50
dificaciones que
Page 51

INSTALACIÓN
Tras sacar el aparato del embala
je,
compruebe que el aparato y el cable de
alimentación NO estén dañados.
De lo contrario, póngase en contacto con su
distribuidor antes de poner en funcionamiento
el aparato.
No levante el producto por el tirador de la
puerta.
Los componentes del embalaje (como el
papel, poliestireno, etc.) pueden resultar
peligrosos para los niños (peligro de asfixia).
Mantenga los componentes del embalaje fuera
del alcance de los niños.
El producto debe ser instalado y conectado a
la red eléctrica correctamente, siguie
ndo las
indicaciones de la Casa Fabricante y
solamente por
CUALIFICADO
PERSONAL
.
Antes de cualquier intervención, es necesario
comprobar si el aparato esta
DESCONECTADO
de la red eléctrica.
Conexión a la red eléctrica
Asegúrese de que el voltaje se
corre
sponda con el indicado en la placa
indicativa que se puede ver al abrir la
puerta del horno.
Compruebe si la línea eléctrica de la
vivienda cuenta con un interruptor
omnipolar conforme a las normas vigentes
(distancia mínima de apertura entre los
contactos
de 3 mm) y si es capaz de
soportar la carga del aparato (vea la placa
indicativa). De no ser así interponga entre
el aparato y la línea eléctrica un
dispositivo, de fácil acceso y con las
características descritas.
ATENCIÓN: compruebe si su instalación
el
éctrica está dotada de una conexión a
tierra eficiente según las normas y
disposiciones de ley vigentes.
Nota: la conexión de tierra es obligatoria
por ley.
El cable amarillo/verde de tierra no debe
ser interrumpido por el interruptor y debe
ser entre 2
y 3 cm más largo que los
demás cables.
No coloque el cable de alimentación
cerca de fuentes de calor y no lo exponga
a temperaturas que superen en 50°C la
temperatura ambiente.
Si el aparato se halla desprovisto del
cable de alimentación, debe conectarse a
la red eléctrica mediante un cable con una
sección mínima de 1,5 mm2.
Si se prevé interponer un enchufe, este
debe ser normalizado y adecuado a la
carga y a la toma de corriente.
cambio del cable de alimentación:
Si se debe sustituir el cable de alimenta
ción,
use solo cables del tipo:
H05 RR
-
Sección de los hilos 3x1,5mm
F, H05V2V2
-
F(T-90)
2
Bornera
El horno está dotado de una bornera
predispuesta para su funcionamiento con una
tensión de alimentación de 220-240 V ca
monofásica y 50 Hz.
Imagen de la bo
hilos a la vista
rnera abierta con conexión de
51
Page 52

Preparación del horno y operaciones previas
Nota: desconecte el horno de la red eléctrica, o ponga en estado OFF el interruptor omnipolar,
antes de efectuar la limpieza del horno.
Antes de utilizar el horn
(no abrasiva) humedecidos con agua tibia y líquido lavavajillas. Introduzca la rejilla y la bandeja
sus guías correspondientes.
en
Encienda el horno (vea la pág. 57), seleccione la función "Cocción Profesional" (vea la pág. 58
póngalo a 230°C de temperatura. Deje funcionar el horno vacío durante unos 30 minutos, para
y
eliminar los posibles restos de grasas o aceites artificial
desagradables durante la cocción.
Ventile la habitación durante esta operación.
o, limpie cuidadosamente su interior usando un paño o una esponja suave
es, que pueden producir olores
)
LIMPIEZA Y MANTENIMI
Para facilitar las operaciones de limpieza de la cámara de cocción, se aconseja utili
proceso automático descrito en la pág. 78.
A continuación, se aconseja desconectar el aparato de la red eléctrica.
Utilice una esponja húmeda para eliminar los posibles residuos de las paredes de la cavidad
después de c
No use limpiadoras de vapor para limpiar el horno.
No utilice materiales ásperos abrasivos como estropajos, rascadores metálicos o lanas de
acero para limpiar el cristal de la puerta del horno, para evitar arañazos que podrían causar
la fragme
NO LAVE LA SONDA PARA ALIMENTOS EN EL LAVAVAJILLAS.
Pueden lavarse en el lavavajillas la rejilla, el jarro y las bandejas.
Vacíe de agua el jarro tras cada uso por motivos de higiene.
Tras la cocción, y con el horno suficientemente enf
que pueda quedar en el fondo de la cámara de cocción.
ada cocción.
ntación del cristal.
ENTO DEL HORNO Y DE
riado, seque con un paño suave el líquido
SUS ACCESORIOS
zar el
52
Page 53

INSTRUCCIONES PARA U
NA CORRECTA INSTALAC
IÓN EN EL MUEBLE
DATOS TÉCNICOS
Capacidad del recipiente para agua:
Volumen útil (cámara de cocció
Volumen bruto (cámara de cocción):
Tensión de conexión:
Potencia de arranque máxima:
n):
1,2 L.
27 L.
31 L.
220-
240 V / 50 Hz
2,2 KW.
53
Page 54

Medidas del horno
54
Page 55

DESCRIPCIÓN DEL HORNO Y DE LOS ACCESORIO
14
13
12
11
10
S
1
2
4
9
8
7
1 Panel de control y visualización de datos
2 Compartimento para el jarro
3 Jarro
4 Compartimento del filtro
5 Tapón del filtro
6 Sonda para alimentos o de temperatura
7 Bandeja perforada
3
5
6
8 Bandeja
9 Rejilla
10 Tirador
11 Puerta
12 Cámara de cocción
12 Rejillas laterales
14 Conector de sonda para alimentos
55
Page 56

DESCRIPCIÓN DEL PANEL DE CONTROL
9
1
Descripción de las teclas
1.
Tecla
s para la programación de la temperatura de la cámara de cocción y zona de indicación
de la temperatura en la pantalla.
( + para aumentar, - para disminuir, mín. 30° - máx. 230° * en función del ciclo elegido; vea
la pág. 58
2.
Teclas para la programación de la temperatura de la sonda para alimentos y zona de
indicación de la temperatura de la sonda para alimentos en la pantalla
(+ para aumentar,
3. Teclas para la programación de funciones po r tiempo y zona de indicación de las
temporizaciones en la pantalla.
4.
Teclas para la programación del cronómetro de cocción o del reloj y zona de indicación del
reloj / cronómetro de cocción en la pantalla
5.
Tecla de encendido / apagado de la luz de la cámara
6.
Tecla de encendido / apagado del horno
7.
Teclas de selección de funciones de cocción
8.
Tecla de confirmación de selección
9.
Teclas de desplazamiento de las opciones del menú.
)
2
-
para disminuir, mín. 30° - máx. 90°)
8
7
de cocción
3
4
65
56
Page 57

PRIMERA PUESTA EN FU
NCIONAMIENTO
Cuando se conecta el horno a la red el
espera ( ESPERAR ) y algunas indicaciones identificativas del producto.
de
Se recomienda no tocar el teclado durante este breve período.
Nota: El encendido del Ventilador Tangencial y su apagado tr
predeterminado.
Cuando vea el mensaje:
seleccione el idioma deseado, pulsando una de las teclas
Confirme la selección con la tecla
A continuación ajuste el reloj utilizando solo las teclas
para llegar a la hora actual.
Confi
rme la configuración con la tecla
CÓMO ENCENDER EL HOR
Mantenga pulsada durante al menos 1 seg. la tecla
En pantalla aparece el mensaje <<ON>>, se enciende la luz del horno y a continuación se muestra
el mensaje:
SELECCIONAR COCCIÓN
Nota:
desactive el bloqueo del teclado si está activo.
Vea el cap. cómo desactivar el bloqueo del teclado,
TECLADO pág.
LANGUAGE ENGLISH
76.
éctrica por primera vez, se muestra en pantalla un mensaje
as unos instantes es un proceso
(4)
(8)
(4)
(8)
NO
(6).
MENÚ
CÓMO DESACTIVAR EL BLOQUEO DEL
si no se efectúa ninguna selección, tras cinco minutos el horno se pone automáticamente en
modalidad horno apagado.
CÓMO APAGAR EL HORNO
Pulse la tecla
En pantalla aparece el mensaje <<
El horno se pone en modalidad stand
(6).
OFF
>>
-by,
vea el cap.
modalidad de horno apagado
pág. 80.
57
Page 58

CICLOS DE COCCIÓN DISPONIBLES:
Nombre de la
función y símbolo
COCCIÓN AL
VAPOR
REGENERACIÓN
COCCIÓN
PROFESIONAL
COCCIÓN POR
AIRE CALIENTE
AIRE CALIENTE +
VAPOR
BAJA
TEMPERATURA
Durante la cocción al vapor, el vapor procedente de la caldera fluye
hacia el interior de la cámara de cocción.
El vapor calienta la cámara de cocción y cocina los alimentos.
Esta modalidad de cocción resu
de verdura y preserva el color, el sabor y sobre todo las propiedades
organolécticas.
Vapor y aire caliente contribuyen a calentar la cámara de cocción.
Así, el calentamiento de los ali
homogénea, evitando que se sequen.
El elemento que contribuye a calentar el aire es la resistencia:
CIRCULAR. El ventilador radial distribuye uniformemente el calor.
Apto para calentar alimentos cocinados con anterioridad (
alimentos precocinados o productos congelados.
Cocción realizada en varias fases
Tras el encendido, en una primera fase, se cocinan los alimentos al
vapor.
Tras un periodo de tiempo determinado, la cocción c
automáticamente a la modalidad cocción por AIRE CALIENTE.
Este sistema de cocción es ideal para leudar todo tipo de masa o para
cocer pasta, pan, focaccias, etc.
(Este tipo de cocción no puede realizarse varias veces consecutivas,
ya que de lo contra
Entre dos ciclos de cocción, el horno debe poder enfriarse. Solo así
se hace posible el correcto desarrollo de la nueva fase de vapor.
El aire del interior de la cámara
resistencia circular situada detrás de la pared posterior del aparato.
El ventilador radial contribuye a mover el aire de manera uniforme.
Este sistema, también llamado cocción ventilada, permite cocinar
los alimentos por tod
Esta modalidad de cocción es similar a la cocción por aire caliente
descrita previamente, pero con la posibilidad de añadir vapor a la
cámara de cocción en cualquier momento, pulsando la tecla
La desactivación del suministro de vapor a la cámara de cocción, se
produce automáticamente tras 10 minutos desde el momento de su
activación; también puede desactivarse en cualquier momento
anterior, pulsando la tecla
Id
eal para la cocción de asados.
Sistema de cocción a baja temperatura, para periodos de tiempo
relativamente largos. Ideal para la cocción de carne; el resultado es
una carne delicada y tierna.
El aire del interior de la
resistencia circular situada detrás de la pared posterior del aparato, y
distribuido uniformemente por el ventilador radial. La cocción debe
realizarse con la sonda para alimentos suministrada.
Descripción de la función
rio los resultados dejan de ser óptimos).
os sus lados.
cámara de cocción es calentado por la
lta ideal para cocinar cualquier tipo
mentos ocurre de manera rápida y
restos),
ambia
de cocción es calentado por la
(8)
.
(8)
mín-máx
40
60
100
40
.
80
Temp.
en
Cámara
T. por
defecto
100
100
130
110
230
205
230
175
230
175
60-100
90
T. son
da
para
alimentos
por
defecto
70
70
70
70
70
70
58
Page 59

CÓMO S
c
ELECCIONAR UNA FUNCI
ÓN DE COCCIÓN
Pulse una de las dos teclas de dirección:
deseado. Vea la explicación de la función en el cuadro de arriba. (Ciclos de cocción disponibles)
Nota: si no se efectúa ninguna s
modalidad de apagado. Vea el cap.
USO DE UNA FUNCIÓN D
Llen
e el recipiente del agua (jarro) con agua destilada o, en su defecto, con agua potable.
Llene el recipiente hasta la marca ( 1,2 L.). Nota: no llene NUNCA el jarro completamente,
ya que al final del ciclo de cocción el agua rebombeada al recipiente podría desbordarse.
Introduzca el jarro en su alojamiento correspondiente.
Empuje el jarro hasta el fondo, para garantizar una perfecta estanqueidad entre el tubito del
jarro y el circuito hidráulico situado en el interior del horno.
Introduzca siempre la bandeja
condensación, los jugos o las partes de los alimentos que puedan caer.
USO DE UNA FUNCIÓN DE COCCIÓN QUE NO INC
durante el uso del horno con un ciclo que no incluye vapor, el jarro puede pe
alojamiento, sin que ello perjudique el resultado de la cocción.
elección, tras 5 minutos el horno se pone automáticamente en
modalidad de horno apagado
E COCCIÓN QUE INCLUY
NO
perforada bajo la bandeja perforada, para recoger la
(7) para seleccionar el ciclo de cocción
pág. 80.
E VAPOR
LUYE VAPOR
rmanecer en su
Nota:
Para que una cocción con VAPOR, REGENERACIÓN o PROFESIONAL se reali
de manera óptima, debe
de que con anterioridad se haya realizado una cocción similar.
permitirse que el horno se enfríe suficientemente, en caso
59
Page 60

CÓMO MODIFICAR LA TE
MPERATURA DE LA CÁMA
RA DE COCCIÓN
Pulse una de las dos teclas con símbolo
temperatura predeterm
inada.
El valor de temperatura de la cámara de cocción se muestra siempre a la derecha de la letra
Nota:
El símbolo de los grados "
hasta que este alcanza la temperatura programada.
como por ejemplo: la regulación, es decir, cuando el horno está manteniendo la temperatura ya alcanzada, y
el enfriamiento, cuando el horno debe alcanzar una temperatura programada inferior al valor
CÓMO ACTIVAR LA COCC
°
" parpadea durante el periodo de precalentamiento del horno, es decir,
IÓN
(1) para modificar, con incrementos de
+/
-
5°C, la
t.
En cambio, se mantiene fijo para todos los demás casos,
inicial.
La activación de la función de cocción seleccionada, con las configuraciones mostradas en pantalla,
se produce tras confirmarla con la tecla
Verá el mensaje en pantalla:
ACTIVAR CICLO
(8).
MENÚ
Nota: si no se confirma el inicio del proceso de cocción, el horno se apaga automáticamente tras 5
minutos.
MENÚ
En la pantalla aparecerá la frase: "
COCCIÓN EN DESARROLLO
" una vez se active la
cocción.
Pulsando la tecla
(9) se accede a un menú que permite efectuar configuraciones de cocción
semiautomáticas o memorizar los datos de la cocción actual. Vea el cap. cómo programar el
horno
CÓMO PROGRAMAR EL HO
CÓMO USAR LA FUNCIÓN
Pulse una de las dos teclas
El símbolo
comienza a parpadear y en la pantalla se muestra el mensaje:
RNO
en la pág. 61.
DE CRONÓMETRO DE CO
(4) para activar la función.
CCIÓN
CRONÓMETRO DE COCCIÓN y aparecen las cifras 00.00
Utilice in
dividualmente las teclas
(4) para programar el tiempo deseado.
El tiempo máximo que se puede programar es de 23 horas y 59 minutos.
Tras algunos instantes (5 seg.), empieza la cuenta, el horno vuelve a mostrar la hora actual y el
símbolo permanece ilumin
ado con luz fija.
Al finalizar el periodo de tiempo programado, se dispara una señal acústica y se muestra el mensaje:
CRONÓMETRO DE COCCIÓN
00.00
y el símbolo
(estas últimas en
modalidad parpadeante)
Para interrumpir la señal sonora, pulse cualquier
botón.
Nota:
ATENCIÓN:
60
la señal sonora se desactiva automáticamente tras 5 minutos.
La función de cronómetro de cocción NO interfiere con el funcionamiento del horno, y está
siempre disponible, independientemente del estado del horno.
Page 61

CÓMO VISUALIZA
R O MODIFICAR LA FUN
CIÓN CRONÓMETRO DE C
OCCIÓN
Pulse uno de las dos teclas
temporal del cronómetro de cocción.
El símbolo
Pulse una de las dos teclas
cocción.
Cómo restablecer la función de cronómetro de cocción
Pulse simultáneamente las teclas
anterioridad para esta función.
El símbolo
CÓMO PROGRAMAR EL HO
CÓMO PROGRAMAR O MOD
Encienda el horno y seleccione una función de cocción.
Utilice las teclas
La visualización inicial del tiempo está configurada en mm.ss, y desp
(h=horas, m= minutos, s=segundos)
Tiempo máximo programable: 10 horas.
A continuación, active la cocción; vea el cap. cómo activar la cocción
El tiempo mostrado com
cocción terminada; vea la pág. 62.
comienza a parpadear.
se apaga.
(3) para programar un tiempo de duración de la cocción.
ienza a disminuir y, una vez agotado, el horno se pone en modalidad de
(4); en la pantalla se muestra inmediatamente el estado
(4); puede programa
(4) para restablecer el tiempo programado con
RNO
IFICAR UN TIEMPO DE
rse una nueva hora de cronómetro de
COCCIÓN
ués en hh.mm.
pág. 60
CÓMO CANCELAR UN TIE
Pulse simultáneamente las teclas
para esta función.
El tiempo de duración de la cocción se pone a cero.
MPO DE COCCIÓN
(3) para cancelar el tiempo programado con anteri
oridad
61
Page 62

CÓMO PROGRAMAR EL EN
Encienda el horno, seleccione una función de cocción y programe la temperatura de cocción
deseada.
Para programar un tiempo
Tiempo máximo programable: 10 horas.
A continuación, pulse la tecla:
(8).
Cuando vea el mensaje: CONFIGURACIÓN TIEMPO
programar la hora de FINAL COCCIÓN, dentro de las próximas 23 horas y 59 minutos.
Confirme la programación con la tecla
CENDIDO Y EL APAGADO
de duración de cocción, utilice las teclas
(9) y seleccione la opción:
, utilice las teclas
(8)
DEL HORNO
FINAL COCCIÓN
(3)
con la tecla
(3) para
El horno se pone en modalidad de inicio retardado. A continuación se activará aut
durante el tiempo especificado, y se detendrá a la hora de fin de cocción programada.
Un claro mensaje
aparecerá a intervalos de 15 seg. para mostrar el tiempo restante antes del encendido.
De to
dos modos, se puede hacer aparecer en pantalla la información en cualquier momento,
pulsando una de las dos teclas
CÓMO CANCELAR UN PRO
Pulse simultáneamente las teclas
horno.
El horno se activa automáticamente, mostrando el mensaje:
MENÚ
MODALIDAD DE COCCIÓN
El horno desactiva todos los elementos de calentamiento.
En la pantalla se muestra el mensaje: "
de aviso.
Puede apagarse la señal sonora pulsando una tecla cualquiera.
Pulsando la tecla
seleccionar un nuevo ciclo de cocción.
Nota: En las cocciones al vapor, dos minutos antes de que se agote el tiempo de fin de cocción, se
abre la purga de vapor,
ENCENDIDO DEL HORNO PREVISTO EN .. .."
(3)
GRAMA DE ENCENDIDO/A
(3) para cancelar el programa de encend
TERMINADA
COCCIÓN TERMINADA
se apaga el horno; pulsando una de las dos teclas
para evacuar la mayor cantidad posible de vapor de la cámara de cocción.
PAGADO DEL HORNO
COCCIÓN EN DESARROLLO
" acompañado de una señal sonora
omáticamente
ido/apagado del
(7) se puede
62
Page 63

63
Page 64

CÓMO MODIFICAR LA TE
MPERATURA DE LA SOND
A PARA ALIMENTOS
Pulse una de las dos teclas con símbolo
temperatura de la sonda para alimentos.
Temperatura máxima programable:
Temperatura mínima programable:
El valor de temperatura de la sonda para alimentos se muestra a la derecha del símbolo gráfico
Notas:
La temperatura de la cámara debe ser mayor que temperatura de la sonda para alimentos. De
lo contrario, la temperatura de la cámara mostrada parpadeará para indicar el error de
programación.
Si se usa la sonda para alimentos, no se puede progra
UTILIZACIÓN DE LA SO
Pulsando simultáneamente las dos teclas
relativa a la temperatura, el valor medido por la sonda en ese precis
Temperaturas máxima y mínima medibles: 250°C - 20°C
CÓMO PROGRAMAR EL EN
Conecte la sonda para alimentos a su conector correspondiente (vea la fig. A, pág. 63). Encienda
el horno, seleccione una función de cocción y programe la temperatura de cocción deseada.
A continuación, pulse la tecla:
tecla
Cuando vea el mensaje: PROGRAMACIÓN
programar la hora de INICIO DE COCCIÓN prevista, dentro de las próximas 23 horas y 59
minutos.
(8)
90°C
30°C
NDA PARA ALIMENTOS C
CENDIDO USANDO LA SO
(9) y seleccione la opción:
(2) pa
ra modificar, con incrementos de
mar un tiempo de cocción, y viceversa.
OMO TERMÓMETRO
(2), se puede leer, en la parte de la pantalla
DE TIEMPO, utilice las teclas
o instante.
NDA PARA ALIMENTOS
INICIO DE COCCIÓN
+/- 1
°C, la
:
mediante la
(3) para
Confirme la programación con la tecla
El horno se pone en modalidad de inicio retardado. Se acti
programada y se detendrá al final de la cocción, que coincide con el momento en el que la
temperatura de los alimentos alcanza el valor fijado para la temperatura de la sonda.
Un claro mensaje
aparecerá a intervalos de 15 seg. para mostrar el tiempo restante antes del encendido.
De todos modos, se puede hacer aparecer en pantalla la información en cualquier momento,
pulsando una de las dos teclas
ENCENDIDO DEL HORNO PREVISTO EN
(8)
vará automáticamente a la hora
.. .."
(3)
64
Page 65

GUARDAR UN CICLO DE
Los componentes electrónicos del horno le ofrecen la posibilidad de memorizar su propia
configuración de cocción en áreas de memoria dispuestas a tal fin. Esta información puede
recuperarse más tarde para cocinar con la misma configuración anterior, co
resultados constantes y seguros.
Pueden archivarse en la memoria:
ciclo de cocción
temperatura de la cámara de cocción
temperatura de la sonda para alimentos
No se pueden memorizar:
hora de inicio de
hora del final de la cocción.
CÓMO GUARDAR UN CICLO DE COCCIÓN
Tras encender el horno y una vez realizadas todas las programaciones de cocción necesarias, pulse
la tecla:
(9) repetidas veces, hasta que aparezca el texto:
Pulse la tecla:
Elija un registro de entre los 10 disponibles con la tecla de desplazamiento:
Confirme el guardado de los
Una vez completado el guardado, el sistema responde con el mensaje "
Notas:
se aconseja anotar en un cuaderno el número asociado al ciclo de cocción memorizado,
asignándolo al nomb
ciclo que se desea usar para esta determinada cocción.
Si el sistema no procesa el guardado con el mensaje: "HECHO", quiere decir que todos los
registros disponibles de la memoria están
borrar al menos un registro.
(8) para confirmar la decisión de guardar los datos.
COCC
IÓN
n lo que se obtienen
, o bien la
la cocción
datos en el
re del plato. Así se agilizará en un futuro el proceso de recuperar el
CICLO COCCIÓN Nº
Vea el cap.
ocupados. Para poder volver a guardar, se debe
Cómo borrar una receta personal
duración de la cocción
GUARD
AR CICLO DE COCCIÓN
con la tecla
HECHO
(9), o bien
(8)
"
, pág. 73.
Funciones del menú
Recetas
Configuración
Salir
Recetas :. El sistema tiene en memoria una lista de tipos de platos (carne, pan/pizza, pescado,
postres, púdines, recetas personales) que permiten, en función de la opción elegida, configurar
rápidamente el horno (parámetros aconsejados) para obtener una cocción
En las páginas siguientes se indican los cuadros y los parámetros de los alimentos introducidos en la
memoria.
Configuración: dentro de este menú se puede configurar una serie de parámetros que le permiten
personalizar el horno según sus exigenc
Vea la lista de la pág. 69.
ias.
correcta.
65
Page 66

CÓMO AÑADIR VAPOR EN
CALIENTE+VAPOR
El ciclo de cocción por aire caliente+vapor permite al usuario añadir vapor en cualquier momento
de la cocción. Así se au
cocción, para obtener un plato más tierno.
Una vez seleccionado el ciclo y activado, se muestra el siguiente mensaje a intervalos regulares:
PULSAR
PARA AÑADIR VAPOR
LA MODALIDAD DE COC
menta o mantiene el nivel de humedad en el interior de la cámara de
CIÓN POR AIRE
Pulsando la tecla
generador de vapor.
Tras algunos instantes comenzará a fluir vapor hacia la cámara de cocción. Este es introducido en l
cámara a intervalos constantes, con breves pausas entre ellos, y durante un periodo aproximado de
15 min., tras los cuales el generador de vapor y el indicador luminoso
También puede desactivarse manualmente la introducción de vapor, mediant
(8).
El mensaje mostrado en pantalla
breve señal sonora recuerda esta posibilidad al usuario.
(8) se enciende el símbolo serigrafiado: , que señala la activación del
se apagan.
e la misma tecla
PULSAR
PARA
INTERRUMPIR VAPOR
precedido de una
a
66
Page 67

CÓMO MOVERSE POR EL
encienda el horno. Cuando vea el mensaje:
SELECCIONAR COCCIÓN
INTERIOR DEL MENÚ
MENÚ
pulse la tecla:
Verá la estructura del menú:
pulse la tecla:
pulse la tecla: (9) para mover el menú hacia arriba.
pulse la tecla:
SALIR permite volver a la opción inicial mostrada cuando se enciende el horno.
Pulsando simultáneamente las teclas
cada v
ez. (función go back <<< )
(9); se muestra la primera opción de la lista: "
(9) para mover el menú hacia abajo
(8) para seleccionar la opción visualizada
se puede volver a la opción anterior, un paso de
RECETAS
"
67
Page 68

DIAGRAMA PANORÁMICO
DE LA ESTRUCTURA DEL
MENÚ
68
Page 69

Lista de recetas PAN/PIZZA
Plato:
FOCACCIA
SALADA
PAN
PIZZA
Lista de recetas de PÚDINES
Plato:
CANELONES
LASAÑAS
PUDIN DE
ESPÁRRAGOS
PUDIN DE
PATATAS
PUDIN DE
CALABACÍN
TARTA SALADA
Temperatura
de la cámara
de cocción
°C
220 00h.25
220 00h.35
230 00h.25
Temperatura
de la cámara
de cocción
°C
190 01h.00
180 01h.20 3
180 01h.10 3
180 01h.20 3
180 00h.40
200 00h.35
Temperatura
de la sonda
para
alimentos *
°C
Temperatura
de la sonda
para
alimentos *
°C
Tiempo de
Duración de
la Cocción
Tiempo de
Duración de
la Cocción
Nivel
3
3
3
Nive
3
3
3
l
Ciclo de
cocc
ión
Ciclo de
cocción
69
Page 70

Lista de recetas de CARNE
Las modalidades
de cocción enumeradas han sido determinadas cocinando piezas de carne de 1 Kg
aproximadamente.
Temperatura
de la sonda
para
alimentos *
°C
Tiempo de
Duración de
la Cocción
h
.20
Nivel
Plato:
PATA DE CERD
PATA DE
NOVILLO
PATA DE
TERNERA
Temperatura
de la cámara
de cocción
°C
O90 70 04
90 70 03h.50
90 68 04h.00
ASADO DE CERDO 90 72 040h.30 3
LOMO DE CERDO
ENTRECOT EN SU
PUNTO
ENTRECOT POCO
HECHO
100 75 04h.00 3
75 62 03h.20
70 55 03h.20 3
FILETE DE
NOVILLO EN SU
75 62 03h.20
PUNTO
FILETE DE
NOVILLO POCO
70 57 03h.30
HECHO
REDONDO DE
NOVILLO
PECHUGA DE
PAVO
ROSBIF
ROSBIF POCO
HECHO
PALETILLA DE
NOVILLO
PALETILLA DE
TERNERA
80 65 03h.30
90 70 03h.40
80 62 03h.00 3
70 57 03h.30 3
85 70 03h.30
90 72 04h.00
Ciclo de
cocción
3
3
3
3
3
3
3
3
3
3
70
Page 71

Lista de recetas de PESCADO
Temperatura
Plato:
de la cámara
de cocción
°C
MEJILLONES Y
ALMEJAS
FILETE DE S
OLLA
FILETE DE
GALLINETA
GAMBAS Y
CIGALAS
TRUCHA
100
220
80
100
100
Lista de recetas de VERDURAS
Temperatura
Plato:
de la cámara
de cocción
°C
ESPÁRRAGOS
BRÓCOLI
ZANAHORIAS
COLES DE
100
100
100
100
BRUSELAS
COLIFLOR
PENCAS DE
100
100
ACELGA
HABAS
HINOJOS
PATATAS
PIMIENTOS
PUERROS
ARROZ
APIO
100
100
100
100
100
100
100
ESPINACAS 100
CALABACINES
100
Temperatura
de la sonda
para
alimentos *
°C
Temperatura
de la sonda
para
alimentos *
°C
Tiempo de
Duración de
la Cocción
h
.30
00
h
.10
00
h
.30
00
h
.30
00
h
.35
00
Tiempo de
D
uración de
la Cocción
h
.35
00
h
.30
00
h
.35
00
h
00
.35
h
.40
00
h
00
.35
h
.40
00
h
.40
00
h
.50
00
h
.25
00
h
.40
00
h
.35
00
h
.35
00
h
.20
00
h
.30
00
Nivel
3
3
3
3
3
Nivel
3
3
3
3
3
3
3
3
3
3
3
3
3
3
3
Ciclo de
cocción
Ciclo de
cocción
Tiempos de cocción determinados con plato de dimensiones med
ias.
Los tiempos de cocción pueden variar según las dimensiones del plato cocinado.
71
Page 72

Lista de recetas de POSTRES
Temperatura
Plato:
GALLETAS
GALLETAS AL
YOGUR
PLUM CAKE
SOUFFLÉS
TARTA DE
MANZANA
TARTA CUATRO
CUARTOS
NOTA:
Los parámetros enumerados en los cuadros, temperatu
una cocción personalizada que le convenga. Pueden sobrescribirse los datos en memoria con los
nuevos, mediante las siguientes instrucciones:
CÓMO PERSONALIZAR EL
Elija una opción de entre las de la li
recuerda que es posible cocinar por tiempo (duración de cocción) o bien con la sonda para
alimentos.
Active la cocción y a continuación pulse la tecla
texto:
GUARDAR CICLO DE COCCIÓN
Pulse la tecla:
El sistema muestra el mensaje
de la cámara
de cocción
°C
150 00h.35
170 00h.15
170 01h.00 3
200 00h.35
170 01h.00
170 00h.40 3
(8) para confirmar la memorización de la nueva configuración.
Temperatura
de la sonda
para
alimentos *
°C
RECETARIO
sta y configure los datos según sus propias necesidades. Se
HECHO
cuando se ha completado el guardado.
Tiempo de
Duración de
la Cocción
ra y tiempo de duración pueden variarse para
(9) repetidas veces, hasta q
Nivel
3
3
3
3
ue aparezca el
Ciclo de
cocción
CÓMO CARGAR UNA RECE
Elija men
Deslice las opciones con la tecla
RECETAS PERSONALES. Confirme la selección con la tecla
Cuando vea el mensaje: CARGAR CICLO COCCIÓN pulse la tecla
El sistema mostrará las recetas memorizadas.
Utilice la tecla
La confirmación se realiza con la tecla
Nota: Si el área de memoria no contiene recetas personales memorizadas, el sistema responde con el
mensaje SALIR.
ú y seleccione la opción de recetas con la tecla
(9) o la tecla
TA PERSONAL
(8).
(9) o con la tecla
(9) para seleccionar el ciclo de cocción deseado.
(8)
(9) hasta que aparezca el mensaje
(8)
(8).
72
Page 73

CÓMO BORRAR UNA RECE
TA PERSONAL
Elija menú y seleccione la opción de recetas con l
Deslice las opciones con la tecla
RECETAS PERSONALES. Confirme la selección con la tecla
Utilice una de las dos teclas
BORRAR CICLOS COCCIÓN
Pulse la tecla
Seleccione el ciclo de cocción que se desea borrar, deslizando las opciones con una de
(9), y confirme el borrado de la receta pulsando la tecla
Una vez realizado el borrado, el sistema responde con el mensaje
(8) para entrar en el submenú.
(9) o con la tecla
(9) para deslizar las opciones hasta ver el texto:
a tecla
(8).
(9) hasta que aparezca el mensaje
(8)
(8).
HECHO
las dos teclas
73
Page 74

CONSEJOS PRÁCTICOS P
Todas las cocciones d
Utilice siempre guantes o agarradores que no estén mojados o húmedos para sacar del horno
los platos calientes.
Utilice recipientes capaces de resistir temperaturas de 250°C o superiores.
Al finalizar la fase de cocci
sale del horno en el momento de la apertura de la puerta.
No apoye nunca los platos directamente en contacto con el fondo del horno. Utilice los
accesorios correspondientes.
ARA COCINAR
eben realizarse con la puerta cerrada.
ón o durante ella, tenga cuidado con la corriente de aire caliente que
LOS ACCE
Los accesorios suministrados con el horno
aumentan las posibilidades y las modalidades
de cocción.
Los accesorios denominados bandeja y rejilla
pueden colocarse sobre los diversos niveles
de la guía deslizante situada dentro del horno.
Esto permite
apropiada en función de la cocción que se va
a realizar. Vea la lista de recetas de la pág. 69.
Bandeja de bordes realzados utilizada como superficie de apoyo de cualquier recip
sobre un solo nivel y al baño María.
Contenedor de recogida de los jugos o posibles derrames de grasa durante la cocción; debe
combinarse con la rejilla principal o con la bandeja perforada. Al cocinar platos grasos, se
recomienda verter
para evitar que las grasas se quemen y produzcan malos
olores o humo.
Superficie de apoyo para los alimentos (galletas, etc.)
Se utiliza principalmente como superficie de apoyo.
Posición recomendada: nive
SORIOS
establecer la altura (niveles) más
La bandeja
iente de cocción
siempre un poco de agua en la bandeja
La rejilla
les 2 / 3 / 4
Bandeja perforada
Utilizada principalmente para cocciones al vapor (verdura fresca
o congelada, pescado).
Coloque la bandeja perforada en los niveles 2 ó 3 e introduzca
inmediatamente la bandeja para recoger el líquido expulsado por
los
alimentos.
74
Page 75

Sonda PARA ALIMENTOS
Vea el cap.
Nota:
Si se muestra la temperatura de la sonda de manera parpadeante con valor de 30°C, quiere de
el plato seleccionado de entre los del recetario no posee un valor óptimo de temperatura de sonda.
En este caso se aconseja desconectar la sonda para alimentos y cocinar en la modalidad
predeterminada o bien programar un valor para la sonda más aco
CÓMO PERSONALIZAR SU
encienda el horno. Cuando vea el mensaje:
pulse la tecla:
Vuelva a pulsar la tecla
Desplácese por el interior del conjunto CONFIGURACIÓN según el criterio expuesto en el cap.
cómo moverse por el int
Para cambiar el tipo de configuración, pulse una de las dos teclas
Debe confirmarse la nueva configuración con la tecla "enter"
Se
Ayúdese del esquema ESTRUCTURA DEL MENÚ para la orientación de las opciones.
IDIOMA
Idiomas del menú
COCINAR CON LA SONDA PARA ALIMENTOS
HORNO
SELECCIONAR COCCIÓN
(9); se muestra la primera opción de la lista: "
(9) y confirme la selección "CONFIGURACIÓN" con la tecla
erior del menú
muestra el mensaje "
: permite configurar la visualización de los mensajes en el idioma que más le convenga.
INGLÉS,
ITALIANO,
ALEMÁN,
FRANCÉS,
ESPAÑOL,
:
HECHO
" como validación de la nueva selección.
MENÚ
en la pág. 67.
, pág. 63
rde a sus expectativas.
RECETAS
(8).
"
(4)
cir que
(8)
Use las teclas
el idioma que prefiera.
CONFIGURACIÓN DEL RE
Desplácese por este conjunto y seleccione la op
expuestos. Vea el cap.
Los parámetros variab
teclas
(4). para deslizar las opciones de la lista y la tecla
LOJ
cómo moverse por el interior del menú
les se muestran de manera parpadeante y se pueden modificar utilizando las
(4).
(8) para confirmar
ción que desea personalizar con los criterios ya
de la pág. 67.
75
Page 76

REGULAR HORA
permite configurar la hora actual.
Para acelerar el movimiento, mantenga pulsada una de las dos teclas indicadas previamente.
RELOJ MOSTRADO
Si se sele
cciona NO, no se muestra la hora actual cuando el horno está apagado.
MODALIDAD NOCTURNA
Configuración base = NO
Si se cambia la configuración a SÍ, cuando el horno está apagado, durante la franja horaria 22:00
06:59:59, las cifras del reloj se muestran c
on una intensidad luminosa baja. Durante el resto del día,
la intensidad vuelve a ser la máxima para una mejor visualización en caso de deslumbramiento.
-
CONFIGURACIÓN DEL BL
Esta opción permite elegir la modalidad de activación del bloq
OQUEO DEL TECLADO:
ueo del teclado entre manual o
automático. Se recomienda elegir la modalidad automática (SÍ), sobre todo cuando haya niños
presentes.
BLOQUEO AUTOMÁTICO DEL TECLADO SÍ
Las teclas se bloquean automáticamente tras 1 minuto de inactividad del teclado.
BL
OQUEO AUTOMÁTICO DEL
TECLADO NO
El bloqueo del teclado de activa pulsando simultáneamente el botón del extremo de la izquierda
y el botón del extremo de la derecha
En ambos casos, cuando se activa el bloqueo del teclado, en la pantalla
BLOQUEO DE TECLADO ACTIVADO seguido del símbolo de la llave
apagado
, para recordar que la función está activa.
Si el bloqueo del teclado se activa manual o automáticamente durante una cocción, tras e
se muestra el mensaje
si el horno está
l mensaje:
"BLOQUEO DE TECLADO ACTIVADO", vuelve a mostrarse en pantalla la información de la
cocción. En caso de que se intenten efectuar nuevas configuraciones, presionando una tecla
cualquiera el sistema responde con un mensaje que recuerda la necesidad
de desactivar antes la
protección.
Vea el cap. siguiente
CÓMO DESACTIVAR EL B
Si se muestra en la pantalla el símbolo de la llave
DESBLOQUEAR TECLADO
las teclas
)
Pulse simultáneamente el botón del extremo de la izquierda
LOQUEO DEL TECLADO
o si aparece el mensaje:
Las dos flechas a los lados orientadas hacia abajo recuerdan la combinación de
y el botón del extremo de la
derecha
El mensaje: BLOQUEO DE TECLADO NO HABILITADO confirma el
restablecimiento de las
funciones normales de los controles del aparato.
76
Page 77

PARICULARIDADES DEL
BLOQUEO DEL TECLADO
la tecla
estado del horno.
la tecla
SEÑAL ACÚSTICA
Permite ajustar, eligiendo entre 3 niveles (bajo, medio o alto), la intensidad de la señal acústica
emitida durante un estado de aviso. Configuración por defecto: MEDIO
ILUMINACIÓN
Permite elegir el
Elija NO para la opción APAGADO DE LUZ EN AUTOMÁTICO si desea la modalidad manual.
Una vez encendida la luz, para apagarla es necesario volver a pulsar la tecla
La función automática (SÍ)
su encendido.
DUREZA DEL AGUA
La dureza del agua expresa principalmente la cantidad de sales de calcio y magnesio contenida en el
agua. La dureza se expresa generalmente en grados fran
El horno está dotado de un sistema automático que determina el momento oportuno para realizar un
ciclo de descalcificación de la caldera.
Se recuerda que es recomendable usar agua destilada para limitar la formación de cal.
Existen tres campos
permite encender o apagar la luz de la cámara de cocción, independientemente del
permite apagar el horno.
criterio de apagado de la luz una vez encendida.
.
permite al aparato apagar automáticamente la luz tras 5 minutos desde
ceses (°fH)
de regulación de la dureza del agua
Cuadro de equivalencia de grados franceses ( °fH) / grados alemanes (°dH)
DUREZA DEL AGUA °fH
16-
35° fH AGUA MEDIA
0-
15° fH AGUA MUY SUAVE
36-
50° fH AGUA MUY DURA
Por defecto, el sistema está configurado en el valor medio (línea 1 del cuadro).
Para cambiar la configuración vea la pág. 68, seleccione la dureza del agua,
confirmación
(4)
Una vez realizada la selección, confírmela con la tecla
Vea también el párrafo: DESCALCIFICACIÓN DE LA CAL
(8) para entrar en las opciones y a continuación use una de las dos teclas
DUREZA DEL AGUA °dH
0-
8° dH AGUA MEDIA
9-
20° dH AGUA
21-
28° dH AGUA MUY DURA
(8)
DERA, pág. 78.
MUY SUAVE
pulse la tecla de
77
Page 78

ACTIVACIÓN DEL CICLO
DE LIMPIEZA
Opciones del menú:
CÁMARA DE COCCIÓN
DESCALCIFICACIÓN DE LA CALDERA
CÁMARA DE COCCIÓN
Su finalidad es facilitar la eliminación de posibles residuos de alimentos, grasas, etc.
tras una
cocción. El horno suministra una cierta cantidad de vapor a la cámara de cocción durante un
periodo de tiempo determinado (10 min.).
Active el ciclo de limpieza de la cámara de cocción con la tecla
most
radas en la pantalla.
(8) y siga las indicaciones
Cuando se señale el final del ciclo con el mensaje:
CICLO DE LIMPIEZA DE LA CÁMARA DE COCCIÓN ACABADO, USAR UN PAÑO
PARA ELIMINAR LA SUCIEDAD
para efectuar la limpieza, use un paño o una esponja suave (no abrasiva), humedecida con a
use sustancias o líquidos corrosivos; no utilice utensilios de hierro o puntiagudos.
No
gua.
DESCALCIFICACIÓN DE LA CALDERA
Ciclo de lavado especial, idóneo para la eliminación de la cal del interior de la caldera.
Dependiendo de la dureza del agua, en e
cierta cantidad de cal, que será mayor cuanto más dura sea el agua. Vea el párr..
l interior de la caldera o generador de vapor se forma una
DUREZA AGUA,
pág. 77.
Se aconseja realizar la descalcificación en cuanto se muestre la
DE CALDERA ACONSEJADO
ATENCIÓN:
EL CICLO TIENE UNA DURACIÓN FIJA DE 12 HORAS. SE ACONSEJA
advertencia:
CICLO DE LIMPIEZA
EFECTUARLO DURANTE LA NOCHE.
Descalcificante apto:
Se aconseja usar ÁCIDO CÍTRICO MONOHIDRATO, disponible en cualquier farmacia.
éngase a los consejos sobre seguridad y dosificación. No use vinagre ni productos basados en el
At
vinagre.
78
Page 79

INSTRUCCIONES para el proceso de descalcificación de la caldera:
Dosificación
(cucharilla de café) de ácido cítrico monohidrato; a continuación disuelva la sal.
Introduzca el jarro en su compartimento y ponga en marcha el proceso de descalcificación con la
tecla
El aparato mostrará el tiempo res
Una vez finalizado, se realizará un proceso de limpieza y aclarado de la caldera. Vea el pár.
Lavado de la caldera
Lavado de la caldera
Al finalizar, el sistema realizar un ciclo de lavado de la caldera y transvasa el agua sucia al jarro.
Así pues, será necesario asistir al aparato, que le guiará paso a paso durante las operaciones que se
deben efectuar.
En resumen, las operaciones necesarias serán vaciar el contenido del jarro, aclararlo y volver a
llenarlo con agua limpia. Esta serie de operaciones debe llevarse a cabo un par de veces.
Del recipiente del filtro pueden salir gotas de agua. Seque y limpie con un paño o esponja.
Tenga cuidado con las juntas blancas: asegúrese de que se encuentran en la
recipiente del filtro. De lo contrario, colóquelas correctamente según se muestra en las siguientes
imágenes.
: llene de agua el jarro hasta la marca de 0,6 L. y añada al agua 5 cuc
(8).
tante para el final del proceso de descalcificación.
.
haradas pequeñas
parte interior del
tap
ón
RESTABLECER CONFIGUR
Esta función sirve para reiniciar el sistema en caso de problemas.
Atención: se de
personales que haya.
Seleccione la opción: "
instrucciones mostradas en la pantalla.
filtro
ACIÓN
volverán todas las variables del sistema a su estado original y se borrarán las recetas
RESTABLECER CONFIGURACIÓN
" con la tecla
(8) y siga las
79
Page 80

(véa la pag. 62)
80
Page 81

CÓMO ACTUAR EN CASO
DE UNA ANOMALÍA
PROBLEMA
El horno no funciona
La luz situada en el interior de la cámara de
cocción no se enciende
En la pantalla aparece Err aso
número
El sistema requiere la regulación de la hora
La evacuación del agua de la caldera se
produce mucho tiempo después de terminar el
proceso de cocción.
Durante el funciona
Durante el funcionamiento sin sonda
alimentos, el sistema muestra una temperatura
de la sonda.
miento sale vapor del horno
ciado a un
para
SOLUCIÓN
Compruebe si el interruptor omnipolar o los posibles
interruptores diferenciales (salvavidas) de la
instalación eléctrica están desactivados. En caso de
avería en la instalación eléctrica, consulte con un
electricista cualificado. Si aun tras la reactivación del
interruptor omnipolar y/o diferencial el horno no se
pusiese en funcionamiento, póngas
un Centro de Asistencia Autorizado.
Vea las instrucciones para cambiar la bombilla del
horno en la pág. 84.
Esta combinación indica una avería.
Vea el cuadro de códigos de error de la pág. 82.
Probable interrupción de la red eléctrica (apagón).
Ajuste la hora actual. Ve
Por motivos de seguridad, el agua de la caldera se
evacúa s
olo cuando su temperatura desciende de 90°C.
El tiempo necesario para su enfriamiento es el tiempo
de pausa antes del inicio de la evacuación.
(puede durar hasta 20 min.)
Durante este periodo intermedio se permite iniciar otra
cocción.
Compruebe si la puerta está correctamente cerrada
Compruebe si la junta está dañada, por ejemplo con
grietas. En este último caso, póngase en contacto con
un Centro de Asistencia Autorizado.
Compruebe la estanqueidad del tapón de cobertura del
conector de la sonda situado dentro de la cámara de
cocción. Si el tapón no está estable, debe sustituirse.
Póngase en contacto con un Cen
Autorizado.
a la pág. 57
e en contacto con
o bien la pág. 75.
tro de Asistencia
CÓMO ACTUAR EN CASO
En el caso de una interrupción del suministro eléctrico, cuando este se restablezca podría ser
necesario reajustar la hora actual.
No se perderán la configuración o las recetas memorizadas.
Si se produjese la interrupción del suministro eléctrico durante una cocción, esta no podrá
continuar.
Si antes del corte de la energía eléctrica se estaba realizando un proceso de descalcificación
o limpieza de la caldera, este será cancelado. Cuando se
necesario vaciar la solución de agua y ácido cítrico monohidrato contenida en la caldera.
Siga las instrucciones mostradas en la pantalla del aparato. Vea el párr.
, pág 37
c
aldera
DE APAGÓN
restablezca la energía eléctrica será
Lavado de la
81
Page 82

Tabla de Códigos de Error
El sistema electrónico realiza constantemente una serie de pruebas de diagnóstico. Si algún
parámetro no es correcto, la unidad de control desactiva las funciones y muestra un códig
o de error
(Err seguido de tres cifras); se apagan todos los elementos de calentamiento, incluido el ventilador
del interior de la cámara de cocción. El ventilador de enfriamiento permanece encendido.
Tome nota del código de error y póngase en contacto co
n un Centro de Asistencia Autorizado,
especificando el código de error.
Código de Error
Err 001
Err 002
Err 003
Err 004
Err 005
Err 006
Err 007
Err 008
Err 009
Causa
Temperatura excesiva en la CALDERA
Las causas de esta alarma son:
La bomba de llenado no transvasa el agua
desde el jarro a la caldera.
Las
causas pueden ser:
a- jarro sin agua
b- pérdida en el circuito hidráulico
c- bomba averiada
d- avería electrónica en el circuito de
potencia (relé o control de este)
Alarma de la protección de la caldera
Como prevención, el sistema corta la
alimentación al relé GEN. y por tanto a todas
las cargas conectadas a él.
Sustituya la tarjeta de potencia
-
Temperatura excesiva de la tarjeta de
potencia; val
Sensor de la cámara de cocción PT1000
Causa: interrupción o cortocircu
o cables
-
Sustituya el PT1000
Sonda para alimentos
Causa: interrupción o cortocircuito de sensor
o cables
-
Compruebe las conexiones eléctricas
-
Sustituya la sonda para alimentos
Avería en el termopar de la caldera.
circuito abierto o corto a masa
-
Sustituya la CALDERA
Avería en el termopar con presencia de
vapor en la cámara de cocción.
circuito abierto o corto a masa
-
Sustituya el termopar 1
Temperatura excesiva en la cámara de
cocción
-
Sustituya la tarjeta de potencia
Avería en el sensor ntc de la tarjeta de
potencia. Causa: circuito abierto o corto
-
Sustituya la tarjeta de potencia
or de umbral fijado >=85°
ito de sensor
Causa:
Causa:
SOLUCIÓN
Compruebe la presencia de agua en
el jarro
Apague y vuelva a encender el
horno.
Si la
avería persiste, tome nota del
código de error y póngase en
contacto con un Centro de Asistencia
Autorizado, especificando el código.
Tome nota del código de error y
póngase en contacto con un Centro
de Asistencia Autorizado,
especificando el código.
Compruebe si el horno está encajado
en el mueble según las instrucci
indicadas en este libreto.
si el ventilador tangencial funciona
Si la
avería persiste, tome nota del
ones
Compruebe
.
código de error y póngase en
contacto con un Centro de Asistencia
Autorizado, especificando el código.
póngase en contacto con un Centro
de Asistencia Autorizado,
especificando el código.
póngase en contacto con un Centro
de Asistencia Autorizado,
especificando el código.
póngase en contacto con
un Centro
de Asistencia Autorizado,
especificando el código.
póngase en contacto con un Centro
de Asistencia
Autorizado,
especificando el código.
póngase en contacto con un Centro
de Asistencia Autorizado,
especificando el código.
póngase en contacto con un Centro
de Asistencia Autorizado,
especificando el código.
82
Page 83

CÓMO DESMONTAR LAS R
EJILLAS LATERALES
Desenrosque (girando en sentido contr
1.
las tuercas grafiladas (D) anteriores
2.
Extraiga las rejillas laterales, una de cada vez (G)
G
D
CÓMO VOLVER A MONTAR
Introduzca las rejillas de apoyo, una de cada vez. (G)
Po
nga atención al indicador ondulado de la rejilla. Sobre este debe acoplarse la tuerca grafilada
situada en el fondo de la cámara de cocción.
Enrosque las tuercas grafiladas (D)
LAS REJILLAS LATERA
ario al de las agujas del reloj)
D
LES
83
Page 84

CÓMO CAMBIAR LA BOMB
Desconecte el aparato de la red eléctr
Compruebe si el horno está a temperatura ambiente; de lo contrario espere a que se enfríe.
La lámpara del horno debe tener las siguientes características:
tensión de alimentación 220-
pote
ncia 25 W.
Conexión típica: E
Temperatura máxima de funcionamiento 300°C
Instrucciones para la sustitución:
1.
desenrosque la tuerca grafilada de la rejilla de
apoyo lateral de la izquierda (vea la pág.
anterior).
2.
extraiga la rejilla de apoyo
3.
desenrosque
en las esquinas del soporte del cristal (vea las
imágenes al lado)
4.
ponga el marco con cristal y la junta, colocadas para proteger la lámpara,
sobre una superficie de apoyo.
ILLA DEL HORNO
ica o ponga en estado OFF el interruptor omnipolar.
240 V (50/60Hz)
-14
los 4 tornillos de estrella situados
5.
desenrosque la bombilla averiada
6.
intr
oduzca y enrosque la nueva bombilla
7.
vuelva a montar el marco con cristal y la junta
8.
enrosque los 4 tornillos
9.
vuelva a montar la rejilla lateral
10.
enrosque la tuerca grafilada de la rejilla lateral
11.
restablezca la corriente eléctrica
Junta de goma
marco
cristal
CÓMO CAMBIAR LA JUNTA DE LA CÁMARA DE COC
Si la junta situada alrededor del compartimento de cocción está agrietada, debe sustituirse.
Por motivos de seguridad, la junta debe ser cambiada por un técnico de un Centro de Asistencia
Autorizado.
CIÓN
84
Page 85

CÓMO DESMONTAR LA PU
1.
Abra completamente la puerta del
horno
2.
Identifique las bisagras (C) (vea las
imágenes al lado):
3.
Vuelque hacia atrás las bridas (A) de
las dos bisagras (C)
ERTA
DEL HORNO
C
A
4.
Sujete firmemente la puerta por los dos extremos laterales y ci
mitad de su recorrido; las bridas (A) se engancharán a la puerta del aparato.
5. Levante la puerta hacia arriba.
6. Extraiga la puerta, rotándola sobre el eje transversal de manera que la parte inferior
descienda y la parte superior ascienda. Las dos bridas deben salir de sus alojamientos. Vea
la imagen abajo.
érrela lentamente hasta la
85
Page 86

CÓMO VOLVER A MONTAR
1.
Introduzca las dos bridas en las aberturas correspondientes,
manteniendo la puerta entornada.
2.
Abra completamente la puert
Vuelque hacia adelante las dos bisagras (C).
3.
LA PUERTA DEL HORNO
a
PARTICULARIDADES DEL
Teclado Touch-Control
es un tipo especial de teclado sensible al tacto. Cuando se desea dar una orden al horno, basta con
iejercer una ligera presión sobre el
correspondiente a la orden.
inactividad de los controles del teclado
Si no se confirma la activación del ciclo de cocción u otra opción, después de 5 minutos el horno se
apaga automáticamente.
l "Beep"
Seña
Se emite una señal acústica cada vez que se pulsa una tecla.
Ventilador de enfriamiento
Para un correcto funcionamiento y para reducir la temperatura de las superficies externas del horno,
este esta dotado de un ventilador de enfriamiento.
Durant
e la cocción, el ventilador está siempre activo y se puede oír un chorro de aire que sale entre
el panel de control y la puerta del horno.
Coloración dorada de la cámara de cocción
Durante el uso del horno, tras un cierto periodo, la cámara de cocción adq
dorada. Esta coloración, debida a propiedades naturales del acero inoxidable, no influye en lo más
mínimo sobre las características de cocción.
HORNO:
punto del teclado en el que está el símbolo serigrafiado
uiere una coloración
86
Page 87

AVISOS DEL SISTEMA:
Significado de algunos mensajes de aviso
COMPROBAR PRESENCIA DE AGU
Generalmente, 1L. de agua en el jarro es suficiente para un proceso de cocción al vapor; sin
embargo, podría mostrarse este mensaje por dos motivos:
No queda agua en el jarro
Jarro no introducido completamente en su alojamiento
En ambos caso
Si es necesario, añada como máximo 1L de agua destilada o potable. (Nota: no llene
NUNCA el jarro del todo, ya que el agua bombeada desde el generador de vapor hacia el
jarro al
Introduzca el jarro en su alojamiento correspondiente.
Empuje el jarro hasta el fondo, para garantizar una perfecta estanqueidad entre el tubito del
jarro y el circuito hidráulico situado en el interior de
INTRODUCIR EL JARRO
Este mensaje se muestra cuando el sistema debe realizar la evacuación del agua contenida en la
caldera y el jarro no se encuentra en su alojamiento.
CONECTAR SONDA ALIMENTOS
Se muestra al seleccionar el ciclo de cocción a baj a temperatura o una receta personalizada que
requiere el uso de la sonda para alimentos, y solamente si esta no está conectada al conector
correspondiente.
DESCONECTAR SONDA ALIMENTOS
Mensaje mostrado si la configuración de la receta seleccionada no requi
y solamente si esta está conectada.
CERRAR LA PUERTA
Este mensaje se muestra para indicar que el proceso seleccionado o en curso previamente se iniciará
solo cuando se cierre la puerta.
La condición de puerta abierta implica
suministro de vapor.
s, abra la puerta del horno, teniendo cuidado con la posible salida de vapor.
final del ciclo podría desbordarse del recipiente)
A EN EL JARRO
l horno.
ere la sonda para alimentos,
la interrupción de un proceso de cocción o ciclos con
VACIADO DE LA CALDERA
ESPERE...
Esta indicación sirve para asegurar al usuario que determinados procesos están activos, controlados
y gestionados automáticamente por el sistema, in cluso con el horno apagado. Ej.: ciclos de lavado
de la caldera.
Se mostrarán otras indicaciones al final del proceso, o bien se apagará automáticamente el horno.
87
Page 88

ELIMINACIÓN
Embalaje
Las partes que componen el embalaje del horno (cartón, poliestireno
PE) deben desecharse respetando el medio ambiente usando los métodos adecuados de
separación de residuos.
Horno:
Desconecte el horno de la toma de corriente en caso de instalaciones fijas; acuda a un
electricista autorizado para solicitar una desinstalación.
Antes de proceder al desguace del aparato, inutilícelo cortando el cable de alimentación.
Este aparato está marcado según las disposiciones de la Directiva Europea 2002/96/EC, Waste
Electrical and Electronic Equipment (WEEE).
manera idónea, el usuario contribuye a prevenir las potenciales consecuencias negativas que una
eliminación inadecuada del mismo podría causar en el ambiente y en la salud.
Asegurándose de que el producto sea eliminado de
EPS, sobres de plástico
La presencia del símbolo
que no puede tratarse como un desecho doméstico, sino que debe ser entregado en un punto de
recogida idóneo para el reciclaje de equipos eléctricos y electrónicos.
Deséchelo según las normativas locale
Si necesita más información sobre el tratamiento, la recuperación y el reciclaje de este producto,
póngase en contacto con la oficina local correspondiente, con el servicio de recogida de desechos
domésticos o con el esta
SERVICIO DE ASISTENCIA
Si no logra identificar la causa del funcionamiento defectuoso: apague el aparato (sin maltratarlo) y
póngase en contacto con el Servicio de Asistencia.
NÚMERO DE SERIE DEL PRODUCTO.
Es importante que comunique al Servi
(un código de 16 caracteres que comienza con el número); se encuentra en el certificado de garantía
o en la placa de datos colocada en el aparato.
Esto evitará que los técnicos hagan viajes en v
costes de intervención relativos.
blecimiento comercial en el que ha adquirido el producto.
en el
producto o en la documentación que lo acompaña indica
s para la eliminación de residuos.
AL CLIENTE
¿Dónde puedo encontrarlo?
cio de Asistencia el código del producto y su número de serie
ano y, lo que es más importante, se ahorrarán los
88
Page 89

Índice e sumário
APRESENTAÇÃO
DESCRIÇÃO DO FORNO
AVISOS
INSTALAÇÃO
............................................................................................................................................................92
..........................................................................................................................................91
.............................................................................................................................91
.................................................................................................................................................94
Ligação à rede eléctrica....................................................................................................................94
substituição do cabo de alimentação:...........................................................................................94
Régua de bornes...........................................................................................................................94
Preparação do forno e primeira utilização....................................................................................95
LIMPEZA E MANUTENÇÃO
INSTRUÇÕES PARA UMA
DADOS TÉCNICOS
......................................................................................................................................96
FORNO E ACESSÓ
INSTALAÇÃO CORRECTA
RIOS
.........................................................................95
NO MÓVEL
..............................................96
Medidas do forno...........................................................................................................................97
DESCRIÇÃO DO FORNO E
DOS ACESSÓRIOS
................................................................................... 98
DESCRIÇÃO PAINEL de COMANDO........................................................................................99
Descrição das teclas....................................................................................................................99
PRIMEIRO FUNCIONAMENTO...............................................................................................................100
COMO ACENDER O FORNO
COMO DESLIGAR O FORNO...................................................................................................................100
CICLOS DISPONÍVEIS D
COMO SELECCIONAR UM
USO DE UMA FUNÇÃO DE
USO DE UMA FUNÇÃO DE COZEDURA QUE NÃO PR
COMO ALTERAR A TEMPE
COMO ACTIVAR A COZED
COMO USAR A FUNÇÃO D
COMO VISUALIZAR OU A
Como restaurar a fun
COMO PROGRAMAR O FORNO.............................................................................................................104
COMO CONFIGURAR OU A
COMO ANULAR UM TEMPO
COMO PROGRAMAR A LIG
COMO A
MODALIDADE COZEDURA
COZINHAR COM A SONDA
NULAR UM PROGRAMA DE
....................................................................................................................100
E COZEDURA:
A FUNÇÃO DE COZEDURA
COZEDURA QUE PREVÊ
RATURA DA CÂMARA DE
URA
ESPERTADOR
LTERAR O ESTADO DE F
...............................................................................................101
.............................................................................................................103
............................................................................................103
................................................................... 102
VAPOR
........................................................102
EVÊ VAPOR
COZEDURA
UNÇÃO DESPERTADOR
...............................................102
............................................103
..........................104
ção despertador.............................................................................................104
LTERAR UM TEMPO DE C
DE COZEDURA
AÇÃO E O DESLIGAMENT
TERMINADA
ALIMENTO
..................................................................................... 104
LIGA/DESLIGA FORNO
...........................................................................................105
...............................................................................................106
OZEDURA
O DO FORNO
...............................................104
.........................................105
......................................................105
Como usar a sonda alimento..........................................................................................................106
COMO ALTERAR A TEMPE
UTIL
IZAÇÃO DA SONDA ALIMENTO COMO TERMÓMETRO
COMO PROGRAMAR A LIG
GRAVAR UM CICLO DE C
COMO GRAVAR UM CICLO
COMO ADUZIR VAPOR NA
COMO MOVIMENTAR-SE D
FLOW-CHART PANORÂMIC
Lista de
receitas PÃO/PIZZA....................................................................................................112
RATURA DA SONDA ALIM
AÇÃO DO FORNO USANDO
OZE
DURA
DE COZEDURA
MODALIDADE DE COZED
ENTRO DO MENU
O ESTRUTURA MENU
....................................................................................................108
......................................................................................108
..................................................................................110
ENTO
.......................................................107
......................................................107
A SONDA ALIMENTO
URA AR QUENTE+VAPOR
.........................................................................111
.......................107
.................1
09
Lista das receitas DESENFORMADOS....................................................................................112
Lista de receitas CARNE...........................................................................................................113
Lista de receitas PEIXE..............................................................................................................114
Lista de receitas VERDURAS...................................................................................................114
Lista de receitas DOCES............................................................................................................115
89
Page 90

COMO PERSONALIZAR A
COMO CARREGAR UMA RE
COMO APA
CONSELHOS PRÁTICOS P
OS ACESSÓRIOS
GAR UMA RECEITA PESS
.........................................................................................................................................116
LISTA DE RECEITAS
CEITA PESSOAL
ARA COZINHAR
OAL
..........................................................................................116
........................................................................................116
...............................................................................115
....................................................................................115
A pingadeira...............................................................................................................................116
A grelha......................................................................................................................................116
Pingadeira perfurada...................................................................................................................116
Sonda ALIMENTO....................................................................................................................117
COMO PERSONALIZAR O PRÓPRIO FORNO
CONFIGURAÇÃO RELÓGIO
CONFIGURAÇÃO BLOQUEI
COMO DESINSERIR O BL
PARTICULARIDADE DO B
SINAL ACÚSTICO
ILUMINAÇÃO
DUREZA ÁGUA
ACTIVAÇÃO CICLO LIMP
.......................................................................................................................................120
..............................................................................................................................................120
............................................................................................................................................120
....................................................................................................................117
O TECLADO:
OQUEIO TECLADO
LOQUEIO TECLADO
EZA
...............................................................................................................121
.....................................................................................117
...........................................................................................118
....................................................................................118
................................................................................119
CÂMARA COZEDURA................................................................................................................121
DESCALCIFICAÇÃO BOILER...................................................................................................121
Descalcificante apropriado:............................................................................................................121
INSTRUÇÕES processo de descalcificação boiler:.......................................................................122
Lavagem do boiler..........................................................................................................................122
RESTABELECIMENTO CON
MODALIDADE FORNO APA
MODALIDADE COZEDURA
COMO PROCEDER NO CAS
COMO COMPORTAR-SE NO
TABELA CÓDIGOS DE ERRO..................................................................................................................125
COMO DESMONTAR AS GR
COMO REMONTAR AS GRE
COMO TROCAR A LÂMPAD
FIGURAÇÕES
GADO
.........................................................................................................123
TERMINADA
O DE UMA ANOMALIA
CASO
ELHAS LATERAIS
LHAS LATERAIS
A DO FORNO
.........................................................................................122
...........................................................................................123
DE UM BLACK OUT
...........................................................................................127
.........................................................................124
................................................................
..................................................................................126
....................................................................................126
.124
Instruções para a substituição:....................................................................................................127
COMO TROCAR A GUARNIÇÃO DA CÂMARA DE COZ
COMO DESMONTAR A POR
COMO REMONTAR A PORT
CARACTERÍSTICAS ESPE
TA DO FORNO
A DO FORNO
CIAIS DO FORNO
........................................................................................128
...........................................................................................129
......................................................................................129
EDURA
....................................................127
Teclado Touch-Control..............................................................................................................129
inactividade comandos teclado...................................................................................................129
Beep ................................................................................................................................129
Sinal
Ventilador de resfriamento.........................................................................................................129
Coloração dourada da câmara de cozedura................................................................................129
AVISOS DO SISTEMA:
VERIFIQUE A PRESENÇA DE ÁGUA NA JARRA.................................................................
...............................................................................................................................130
.130
INTRODUZIR A JARRA..............................................................................................................130
LIGAR SONDA COMIDA............................................................................................................130
DESPRENDER SONDA ALIMENTO.........................................................................................130
FECHAR A PORTA......................................................................................................................130
ESVAZIAMENTO BOILER.........................................................................................................130
ESPERAR ................................................................................................................................. . 130
ELIMINAÇÃO
...............................................................................................................................................131
Embalagem.....................................................................................................................................131
Forno:.............................................................................................................................................131
90
Page 91

DESCRIÇÃO DO FORNO
Forno combinado idóneo à cozedura de alimentos den
profissional que junta, num só produto, a cozedura tradicional às vantagens do vapor, com
resultados excelentes para cada prato da carne, ao peixe, às verduras, aos doces, e mantendo ao
mesmo tempo o gosto, o fresc
idóneo para outros fins.
Instale e utilize o aparelho em ambientes com temperaturas não inferiores a 5°C.
or, aromas e, sobretudo, as propriedades nutritivas dos alimentos. Não
tro de moradias comuns com finalidade não
DECLARAÇÃO DE CONFOR
Este aparelho, nas partes que entrarão em contacto com substâncias alimentares, é conforme à
prescrição da directiva
Aparelho conforme às Directivas Europeia
por 2006/95/CE e 204/108/CE, e sucessivas alterações.
CEE 89/109 e ao Decreto-lei de regulamentação N° 108 de 25/01/92.
MIDADE CE
s 73/23/CEE e 89/336/CEE, substituídas respectivamente
91
Page 92

AVISOS
O aparelho é previsto para ser usado por adultos que conhecem
uso.
Assegure-se que o cabo de ligação dos aparelhos eléctricos não seja esmagado na porta do
forno: o isolamento eléctrico poderia ser danificado.
Quando o cabo de ligação estiver danificado, deve ser substituído pelo serviço d
clientes para evitar situações de perigo.
Este aparelho não foi fabricado para ser utilizado por pessoas (inclusive crianças) com
capacidades físicas, sensoriais ou mentais reduzidas, o
não ser que as mesmas estejam sob vigilância ou instruídas com relação ao uso do aparelho
por uma pessoa responsável pela sua segurança.
As crianças devem ser vigiadas para garantir que as mesmas não brinquem com o apa
Durante o uso as partes acessíveis do
crianças à distância até a aparelhagem ficar fria.
No momento da abertura da porta do forno, durante a fase de cozedura ou no fim da
mesma, preste atenção no fluxo de ar quente e porventura o vapor que sair da
de cozedura.
Recomenda
Instale e utilize o aparelho em ambientes com temperaturas
Não use o forno par
Antes de fechar a porta do forno assegure
estranhos ou animais domésticos.
Na câmara de cozedura não se deve guardar objectos inflamáveis ou que sejam sensíveis à
temperatura, como por e
incêndio / explosão.
Guarde com cuidado este manual e num lugar fácil para ser consultado todas as vezes que
for necessário. No caso de venda ou cessão do aparelho a terceiros, não esqueç
presente manual ao aparelho.
Tão logo for detectado um problema de funcionamento, o forno deve ser desligado da rede
eléctrica.
As gorduras e os óleos sobreaquecidos pegam fogo facilmente. É perigoso aquecer o óleo na
câmara de cozedura para cozinhar a carne e deve ser evitado. Nunca tente apagar com água
o óleo ou gordura que estiverem a arder (perigo de explosão); abafar as chamas com panos
molhados.
A grelha, as chapas e os recipientes de cozedura tornam-se muito quentes, para introduzir as
mesmas ou extraí-las use luvas de protecção ou panos para panelas, não molhados ou
húmidos.
Afaste-se na lateral ou recue de um passo.
-se de utilizar água destilada com a finalidade de limitar a formação de calcário
a aquecer o ambiente.
x. detergentes, spray, recipientes a vácuo, latarias, etc. perigo de
forno podem ficar muito quentes. Mantenha as
-
se que na câmara de cozedura não existam corpos
as presentes instruções de
u sem conhecimento e experiência, a
não inferiores a 5°C.
e assistência
relho.
câmara
a de anexar o
92
Page 93

Durante o uso e a limpeza do forno prestar atenção para não colocar os dedos nas dobradiças
da porta e na própria porta, para evitar esmagamentos ou feridas. Preste atenção a isto
sobretudo na presença de crianças.
Deixe a porta do forno aberta somente na posição apoiada.
Se a porta estiver aberta há perigo de tropeçar ou de esmagamento dos dedos.
Não sente e não se apoie na porta do forno e não utilize a mesma
trabalho.
Para a manutenção, a movimentação, a instalação e a limpeza do aparelho, use meios de
prevenção e protecção apropriados (luvas, etc.).
O levantamento e a movimentação de aparelhos com peso >25kg ou com medidas que não
permite
m ser agarrados com facilidade deve ser efectuado com o uso de meios idóneos ou
com a intervenção de duas pessoas a fim de evitar riscos ou dificuldades.
Qualquer tipo de intervenção deve ser efectuada com o aparelho electricamente desligado.
Não é permitido realizar alterações, violações ou tentativas de reparação, em particular com
o uso de ferramentas (chave de fenda, etc..), internamente ou externamente ao aparelho.
As reparações, especialmente aquelas das partes eléctricas, podem ser feitas exclusivame
por pessoal especializado. As reparações não apropriadas podem provocar graves acidentes,
danificar o aparelho e o equipamento e provocar interferências no funcionamento.
Nos aparelhos reparados pelos centros de assistência devem ser feitos os ensaios
em particular o ensaio de continuidade do circuito de terra.
Utilize somente a sonda de temperatura do alimento incluída entre os acessórios do forno.
Eventualmente no caso de extravio ou quebra da sonda de alimento dirija
assist
ência autorizado.
como superfície de
de rotina,
-
se ao centro de
nte
O fabricante exime
pessoas e aos objectos, devidos a uma má ou imprópria manutenção
do aparelho.
O fabricante exim
protecção contra acidentes não forem respeitadas.
O fabricante reserva-se o direito de efectuar nos próprios produtos
alterações consideradas necessárias e úteis sem nenhum aviso prévio.
-
se de todas as responsabilidades por danos às
e-
se de qualquer responsabilidade se as normas de
93
Page 94

INSTALAÇÃO
Após ter retirado a aparelhagem da
embalagem, verifique que o produto e o
cabo de alimentação NÃO estejam
danificados.
Caso contrário, contacte o revendedor antes
de colocar o aparelho em funcionamento.
Não levante o produto pela m
açaneta da
porta.
As partes da embalagem (p. ex. folhas,
isopor) podem ser perigosas para as crianças
(perigo de sufocamento).
Deixe as partes da embalagem fora do alcance
das crianças.
O produto deve ser instalado e ligado à rede
eléctrica, correctament
indicaçõ
es do Fabricante e somente por
PESSOAL QUALIFICADO
e, seguindo as
.
Antes de qualquer intervenção é necessário
verificar se o aparelho consta
DESLIGADO
da rede eléctrica.
Ligação à rede eléctrica
Verifique que a voltagem corresponde
àquela indic
ada na placa de sinalização
visível abrindo a portado do forno.
Verifique se na linha doméstica está
presente um interruptor unipolar conforme
às normas em vigor (distância mínima de
abertura entre os contactos mínima de
3mm) e se é capaz de suportar a car
ga da
aparelhagem, (ver a placa de sinalização)
caso contrário intercale entre a
aparelhagem e a linha eléctrica um
dispositivo, fácil de alcançar, com as
características descritas.
ATENÇÃO: Verifique se a sua instalação
eléctrica é munida com ligação à te
rra
eficaz segundo as normas e disposições de
lei em vigor.
N.B. Atenção: a ligação a terra é
obrigatória por norma de lei.
O cabo amarelo/verde, de terra, não deve
ser interrompido pelo interruptor e deve
ser mais comprido em relação aos outros
cabos de
2-
3 cm.
Não posicione o cabo de alimentação
próximo a fontes de calor ou a
temperaturas acima de 50°C em relação
àquela ambiente.
Se o aparelho tiver o cabo de
alimentação, o forno deve ser ligado à
rede eléctrica, com um cabo de secção
mínima de 1,5mm2.
Se for prevista a interposição de uma
ficha esta deve ser normalizada,
idónea à carga e adequada à tomada de
corrente.
substituição do cabo de alimentação:
No caso de substituição do cabo de
alimentação use somente cabos do tipo:
H05 RR-F,
Secção fios 3x1,5mm
H05V2V2-F(T-90)
2
Régua de bornes
O forno é equipado com uma régua de bornes
predisposta para o funcionamento com uma
tensão de alimentação de 220-240 Vac
monofásica
Imagem da régua de bornes aberta com vista da
ligação de fios
50 Hz.
94
Page 95

Preparação do forno
N.B. Desligue o forno da rede eléctrica ou coloque o interruptor unipolar em estado OFF, antes de
efectuar uma limpeza do forno.
Antes de utilizar o forno, limpe minuciosamente a parte interna usando um pano ou uma esponja
macia (não
pingadeira nas respectivas guias.
Acenda o forno veja pág. 100
a temperatura a 230°C. Faça o forno funcionar vazio durante cerca de 30 minutos, para eliminar
eventuais resíduos de gorduras, óleo de fabricação, que podem causar odores desagradáveis durante
a cozedura. Ventile o local durant
abrasiva) humedecida com água morna e detergente para loiças. Introduza a grelha e a
e primeira utilização
seleccione a função "Cozedura Profissional" veja pág. 101 e configure
e esta operação.
LIMPEZA E MANUTENÇÃO
Para facilitar as operações de limpeza da câmara de cozedura recomenda
processo automático descrito na pág. 121.
Sucessivamente recomenda-
Utilize uma esponja húmida para eliminar eventuais resíduos das paredes da cavidade depois
de cada cozedura.
Não use limpadores a vapor para a limpeza do forno.
Não utilize materiais ásperos abrasivos como palhas de a
aço para limpar o vidro da porta do forno a fim de evitar riscos que poderão ser a causa de
eventuais fragmentações do vidro.
NÃO LAVE A SONDA DO ALIMENTO NA LAVAÈ permitido lavar a grelha, a jarra e as pingadei
Esvazie a jarra da água depois de cada uso por motivos de higiene.
Após uma cozedura, e com o forno bem frio, seque com um pano macio o eventual líquido
que ficou no fundo da câmara de cozedura.
FORNO E ACESSÓRIOS
se de desli
gar a aparelhagem da rede eléctrica.
ras na lava-loiças.
-se de utilizar o
ço, raspadores metálicos ou lãs de
LOIÇAS.
95
Page 96

INSTRUÇÕES PARA UMA
INSTALAÇÃO CORRECTA
NO MÓVEL
DADOS TÉCNICOS
C
apacidade da vasilha de água:
Volume útil (câmara cozedura):
Volume útil (câmara cozedura):
Tensão de ligação: 220-
Potência máxima de ignição:
96
1.2 L.
27 L.
31 L.
240V
2,2 KW.
50
Hz
Page 97

Medidas do forno
97
Page 98

DESCRIÇÃO DO FORNO E
14
13
12
11
10
DOS ACESSÓRIOS
1
2
4
9
8
7
1 Painel de comando e visualização dos
2 Compartimento da jarra
3 Jarra
4 Compartimento do filtro
5 Tampa do filtro
6 Sonda alimento ou de temperatura
7 Tabuleiro per
furado
98
dados
3
5
6
8 Pingadeira
9 Grelha
10 Maçaneta
11 Porta
12 Câmara de cozedura
13 Grelhas laterais
14 Conector sonda alimento
Page 99

DESCRIÇÃO PAINEL DE
COMANDO
9
1
Descrição das teclas
1.
Teclas configuração temperatura câmara cozedu
( + para aumentar, -para diminuir, min. 30°
pág. 101).
2.
Teclas configuração temperatura sonda alimento e área ecrã indicação de temperatura de
sonda alimento
( + para aumentar, - para diminuir, min. 30°-max.90°)
3. teclas para programação eventos por tempo e área do ecrã indicação temporizações.
4. teclas para a programação despertador ou configuração do relógio e área do ecrã de
indicação relógio / despertador
5.
tecla liga / desliga luz na câmara de cozedura
6. tecla liga / desliga do forno
7. teclas de selecção das funções de cozedura
tecla de confirmação selecção
8.
9.
teclas de rolagem itens do menu.
2
8
7
ra e área do ecrã indicação da temperatura.
-max.230° * em função do ciclo escolhido ver
3
4
65
99
Page 100

PRIMEIRO FUNCIONAMEN
Quando o forno for conectado à rede eléctrica pela primeira vez, é visualizada no ecrã uma
m
ensagem de espera ( WAIT ) e algumas indicações de identificação do produto.
Recomenda
N.B. A ligação do Ventilador Tangencial e seu desligamento após alguns instantes é um processo
determinado.
Ao vi
seleccione, carregando uma entre as teclas
Confirme a escolha com a tecla
-
se de não tocar o teclado durante este breve período.
sualizar a mensagem: LANGUAGE ENGLISH
TO
(4), a língua desejada
(8)
Sucessivamente configure o relógio utilizando singularmente as teclas
para chegar à hora corrente.
Confirme a configuração carregando a tecla
COMO ACENDER O FORNO
Carregar no mínimo 1 seg. a tecla
No ecrã aparece a escrita <<ON
SELECCIONAR COZEDURA
n.b.
desactive o bloqueio teclado se o mesmo estiver activo.
Veja cap.
A
nenhuma escolha.
COMO DESLIGAR O FORN
Carregue a tecla
No ecrã aparece a escrita <<
O forno entra na modalidade stand
como
desinserir
utomaticamente, após 5 minut
o bloqueio
(6).
OFF
(6).
>>,
a luz do forno acende e em seguida é visualizada a mensagem:
teclado
os, o forno entra na modalidade forno desligado se não for efectuada
O
>>
-by ver cap.
(8)
MENU
pág. 118.
modalidade forno apagado
(4)
pág. 123.
100
 Loading...