

Page 1
ENFRDEITNLPTES
Page 2
Index
Please read and follow these instructions
carefully and operate the machine
accordingly. This booklet provides important
gu ide lin es for sa fe u se, ins tallation,
maintenance and some useful advice for best
results when using your machine.
Keep all documentation in a safe place for
future reference or for any future owners.
Please check that the following items are
delivered with the appliance:
● Instruction manual
● Guarantee card
● Energy label
By placing the mark on this product,
we are confirming compliance to all relevant
European safety, health and environmental
requirements which are applicable in
legislation for this product.
Check that no damage has occurred to
the machine during transit. If it has, call for
service by GIAS. Failure to comply with the
above can compromise the safety of the
appliance. You may be charged for a service
call if a problem with your machine is caused
by misuse.
1. SAFETY REMINDERS
2. DRAIN HOSE KIT: FITTING
INSTRUCTIONS
3. PREPARING THE LOAD
4. CLEANING AND ROUTINE
MAINTENANCE
5. WATER CONTAINER
6. DOOR AND FILTER AND CONDENSER
7. CONTROLS AND INDICATORS
8. SELECTING THE PROGRAMME AND
SET THE FUNCTION
9. TROUBLESHOOTING CUSTOMER
SERVICE
2
Page 3

1.
SAFETY REMINDERS
●
This appliance can be used by
children aged from 8 years and
above and persons with
reduced physical,sensory or
mental capabilities or lack of
experience and knowledge if they
have been given supervision or
instruction concerning use of the
appliance in a safe way and
un der s tan d t he haz a rds
involved.Children shall not play
with the appliance. Cleaning and
user maintenance should not be
made by children without
supervision.Children of less than
3 years should be kept away
unless continuously supervised.
●
WARNING Misuse of a tumble
dryer may create a fire hazard.
This appliances is intended to be
●
used in household and similar
applications such as:
- Staff kitchen areas in shops ,
offices and other working
environments;
- Farm houses
- By clients in hotels, motels and
o t he r r e s i de nt i al t y p e
environments;
- Bed and breakfast type
environments" A different use of
this appliance from house hold
environment or from typical
housekeeping functions,as
commercial use by ex p ert or
trained users, is excluded even in
the above applications.
If the appliance is used in a
manner inconsistent with this it
may reduce the life of the
appliance and may void the
manufacturer’s warranty.
Any damage to the appliance
or other damage or loss
arising through use that is not
consistent with domestic or
household use ( even if
located in a domestic or
household environment)
shall not be accepted by the
manufacturer to the fullest
extent permitted by law.
●
This machine should only be
used for its intended purpose
as described in this manual.
Ensure that the instructions
for installation and use are
fully understood before
operating the appliance.
●
Do not touch the appliance
when hands or feet are damp
or wet.
Do not lean on the door when
●
loading the machine or use
the door to lift or move the
machine.
Do not allow children to play
●
with the machine or its
controls.
EN
3
Page 4
●
WARNING Do not use the
product if the fluff filter is not in
position or is damaged; fluff
could be ignited.
●
WARNING Where the hot
surface symbol is located
the temperature rise during
operation of the tumble dryer
may be in excess of 60 degrees
C.
●
Remove the plug from the
electricity supply. Always
remove the plug before cleaning
the appliance.
●
Do not continue to use this
machine if it appears to be faulty.
Lint and fluff must not be
●
allowed to collect on the floor
around the outside of the
machine.
The final part of a tumble dryer
●
cycle occurs without heat (cool
down cycle) to ensure that the
items are left at a temperature
that ensures that the items will
not be damaged.
The tumble dryer is not to be
●
used if industrial chemicals have
been used for cleaning.
WARNING: Never stop a tumble
●
dryer before the end of the
drying cycle unless all items are
quickly removed and spread out
so that the heat is dissipated.
Maximum load drying weight:
●
see energy label.
Installation
●
Do not use adapters, multiple
connectors and/or extensions.
●
Never install the dryer against
curtains and be sure to prevent
items from falling or collecting
behind the dryer.
●
The appliance must not be
installed behind a lockable door,
a sliding door or a door with a
hinge on the opposite side to
that of the tumble dryer.
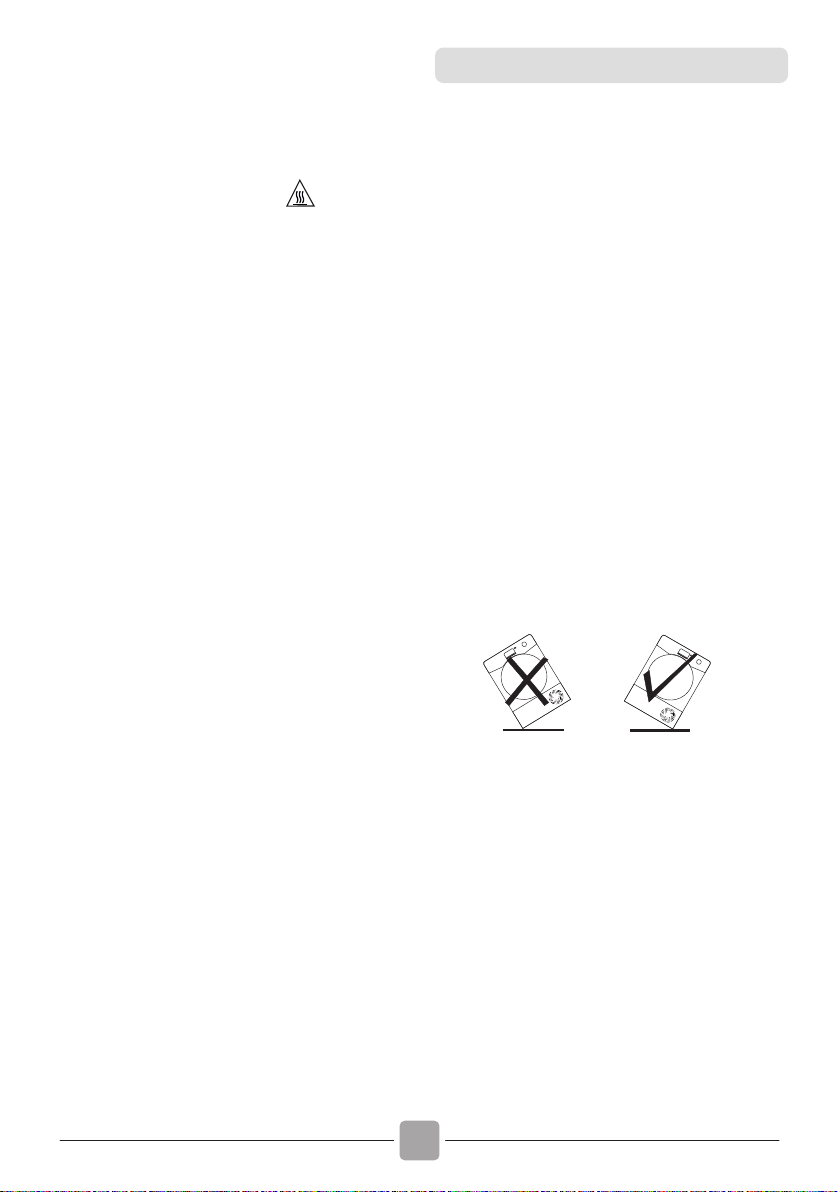
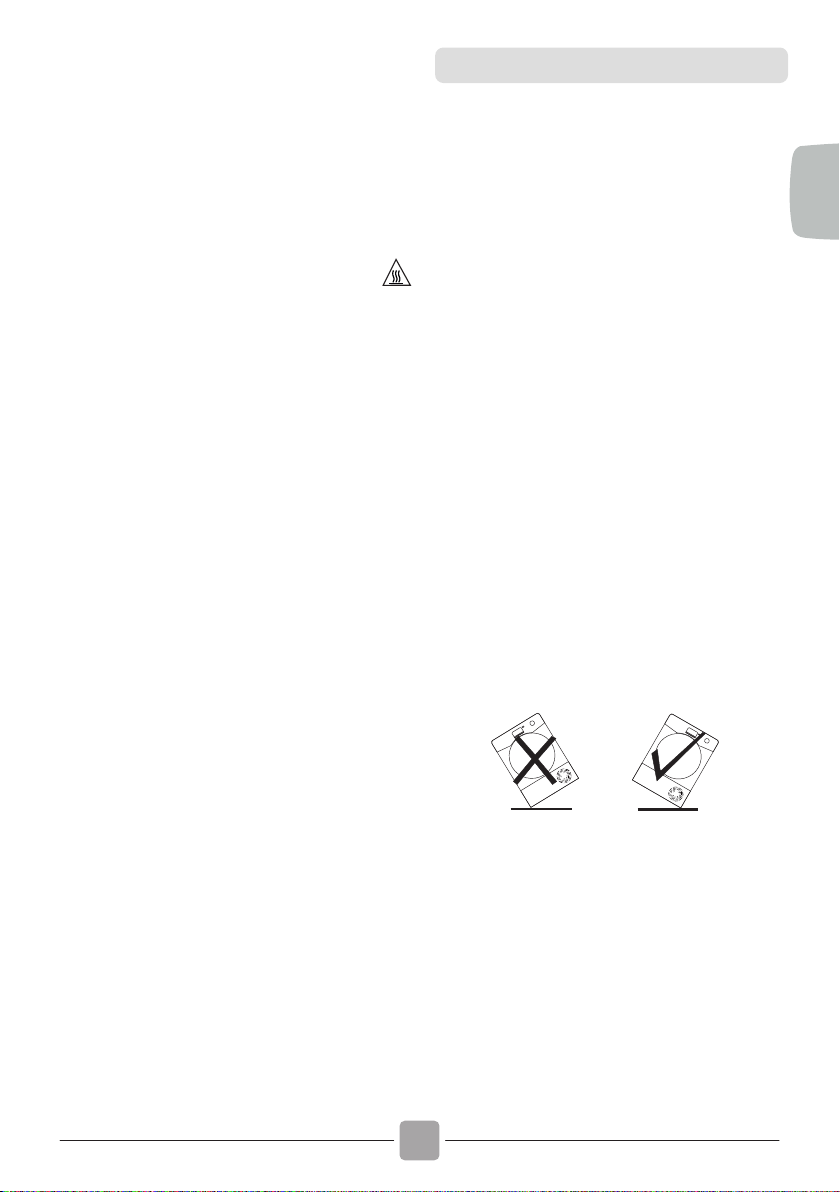
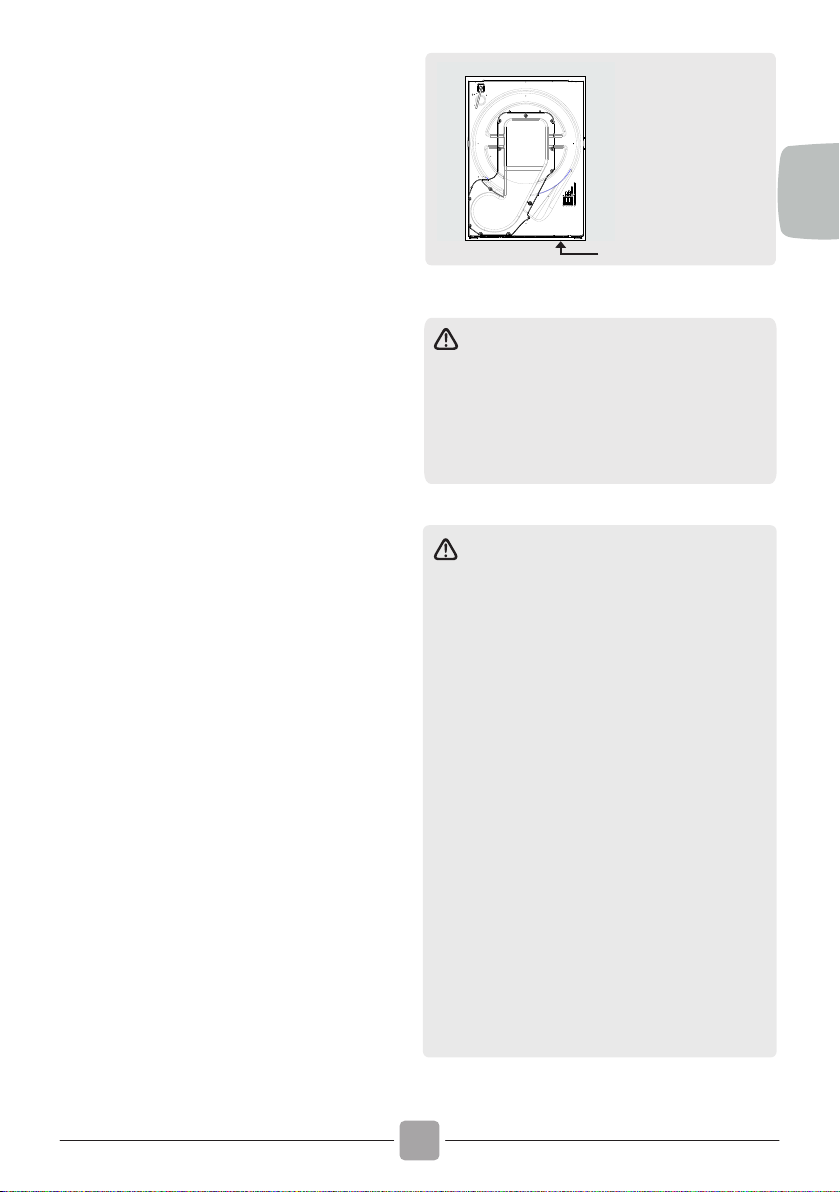
Important: During transport
ensure that the dryer is in an
upright position, if it's necessary
you can only flip in the side shown;
Caution: If the product is in
different side, wait at least 4 hours
before switching on so that the oil
c a n f l o w b a c k i n t o t h e
compressor. Failure to do this
could result in damage to the
compressor.
4
Page 5

The Laundry
Do not dry unwashed items in
●
the tumble dryer.
WARNING
● Do not tumble dry
fabrics treated with dry cleaning
fluids.
WA R N IN G
● Fo a m r u b b e r
materials can, under certain
circumstances, when heated
b e c o m e i g n i t e d b y
spo nta neo u s c o mb u st i on .
Items such as foam rubber
(latex foam), shower caps,
waterproof textiles, rubber
backed articles and clothes or
pillows fitted with foam rubber
pads MUST NOT be dried in the
tumble dryer.
● Always refer to the laundry care
la b e l s f o r d i re c ti o ns o n
suitability for drying.
● Clothes should be spin dried or
thoroughly wrung before they
are put into the tumble dryer.
Ɣ
5HPRYH DOO REMHFWV IURP
SRFNHWV VXFK DV OLJKWHUV DQG
PDWFKHV
Clothes that are dripping wet
●
should not be put into the dryer.
● Lighters and matches must not
be left in pockets and NEVER
use flammable liquids near the
machine.
● Glass fibre curtains should
NEVER be put in this machine.
Skin irritation may occur if other
garments are contaminated
with the glass fibres.
● Items that have been soiled
with substance s s u ch as
cooking oil, acetone, alcohol,
pe t ro l, ke ro s en e, sp ot
removers, turpentine, waxes
and wax removers should be
washed in hot water with an
extra amount of detergent
before being dried in the
tumble dryer.
●
Fabric softeners, or similar
products, should be used as
specified by the fabric
softener instructions.
Ventilation
Adequate ventilation must be
●
provided in the room where
the tumble dryer is located to
p r e v e n t g a s e s f r o m
appliances burning other
fuels, including open fires,
being drawn into the room
during operation of the
tumble dryer.
● Installing the rear of the
appliance close to a wall or
vertical surface.
● There should be a gap of at
least 12 mm between the
m a c h i n e a n d a n y
obstrubtions.The inlet and
outlet should be kept clear of
o b s t r u c t i o n . To e n s u r e
adequate ventilation the
space between the bottom of
the machine and the floor
must not be obstructed.
● Check regularly that the air
flowing through the dryer is not
restricted.
5
EN
Page 6
Check frequently the fluff filter
●
after use, and clean, if necessary.
● Prevent items from falling or
collecting behind the dryer as
these may obstruct the air inlet
and outlet
● NEVER install the dryer up
against curtains.
●
In cases where the dryer is
installed on top of a washing
machine, a suitable stacking kit
must be used according to the
configuration of your appliance:
- Stacking kit "standard size":
for washing machine with
minimum depth of 44 cm;
Air Outlets in the Base
,IWKHVXSSO\FRUGLVGDPDJHG
LW PXVW EH UHSODFHG E\ WKH
PDQXIDFWXUHULWVVHUYLFHDJHQWRU
VLPLODUO\ TXDOLILHG SHUVRQV LQ
RUGHUWRDYRLGDKD]DUG
- Stacking kit "slim size":
for washing machine with
minimum depth of 40 cm.
The stacking kit shall be
Ɣ
obtainable from
our spare
service.
The instructions for installation
and any fixing attachments, are
provided with the stacking kit.
Ɣ
7KHSOXJVKRXOGEHDFFHVVLEOHIRU
GLVFRQQHFWLRQ DIWHU WKH DSSOLDQFH
KDVEHHQLQVWDOOHG
WARNING: the appliance
must not be supplied through
an external switching device,
such as a timer, or connected
to a circuit that is regularly
switched on and off by a utility.
Do not install the product in a
low temperature room or in a
room where there is a risk of frost
occurring. At temperature around
freezing point the product may
not be able to operate properly:
there is a risk of damage if the
water is allowed to freeze in the
hydraulic circuit (valves, hoses,
pumps). For a better product
performance the ambient room
temperature must be between
5-35°C . Please note that
operating in cold condition
(between +2 and +5°C) might
simply some water condensation
and water drops on floor.
6
Page 7

WARNING:
Fire hazard / Flammable
materials.
The appliance contains R290,
an eco-sustainable refrigerating
gas flammable. is that
Keep open flames and sources
of ignition away from the
appliance.
Check there is no visible
damage on the appliance. Do
not use the appliance if it is
damaged.
WARNING:
ensure that the openings on
the appliance and the
openings of the compartment
the appliance is fitted in (for
built-in models) are clear of
obstructions.
WARNING:
do not damage the refrigerating
circuit.
Any repairs or interventions on
the appliance must be carried
out only by an authorised
assistance service.
Disposing of the device
incorrectly could cause fires or
poisoning.
EN
Should there be any kind of
problem, please contact your
specialised retailer or one of
our customer support centres.
Dispose of the device correctly
and do not damage the pipes
used for the circulation of the
refrigerating fluid.
7
Page 8
Environmental Issues
●
All packaging materials used are
environmentally-friendly and recyclable.
Please help dispose of the packaging via
environmentally-friendly means. Your
local council will be able to give you details
of current means of disposal.
●
To ensure safety when disposing of an old
tumble dryer disconnect the mains plug
from the socket, cut the mains power cable
and destroy this together with the plug. To
prevent children shutting themselves in
the machine break the door hinges or the
door lock.
European Directive 2012/19/EU
This appliance is marked according
to the European directive 2012/19/EU
on Waste Electrical and Electronic
Equipment (WEEE).
WEEE contains both polluting substances
(which can cause negative consequences for
the environment) and basic components (which
can be re-used). It is important to have WEEE
subjected to specific treatments, in order to
remove and dispose properly all pollutants, and
recover and recycle all materials.
Individuals can play an important role in
ensuring that WEEE does not become an
environmental issue; it is essential to follow
some basic rules:
- WEEE should not be treated as household
waste.
- WEEE should be handed over to the relevant
collection points managed by the municipality or
by registered companies. In many countries, for
large WEEE, home collection could be present.
Electrical Requirements
Tumble dryers are supplied to operate at a
voltage of 220-240V, 50 Hz single phase.
Check that the supply circuit is rated to at least
6 A.
Electricity can be extremely dangerous.
This appliance must be earthed.
The socket outlet and the plug on the
appliance must be of the same type.
Do not use multiple adapters and/or
extension leads.
The plug should be accessible for
disconnection after the appliance has
been installed.
You may be charged for a service
call if a problem with your machine is
caused by incorrect installation.
If the mains cord on this appliance
is damaged, it must be replaced by a
special cord which is ONLY obtainable
from the spares service. It must be
installed by a competent person.
Do not plug the machine in and
switch it on at the mains until the
installation is completed.For your safety,
this dryer must be correctly installed. If
there is any doubt about installation, call
GIAS Service for advice.
In many countries, when you buy a new
appliance, the old one may be returned to the
retailer who has to collect it free of charge on a
one-to-one basis, as long as the equipment is of
equivalent type and has the same functions as
the supplied equipment.
GIAS Service
●
To ensure the continued safe and efficient
operation of this appliance we recommend
that any servicing or repairs are only carried
out by an authorised GIAS service engineer.
Adjusting the Feet
Once the machine is
in place the feet
should be adjusted to
en s u r e t h a t t h e
machine is level.
8
Page 9
2.
DRAIN HOSE : FITTING
INSTRUCTIONS
To avoid emptying the water container after
each drying cycle, the water can be discharged
directly to a waste water drain pipe (the same
drainage system as household sinks). Water
Bye-Laws prohibit connection to a surface
water drain. The waste water drain pipe should
be located adjacent to the tumble dryer.
The kit consists of:1 hose and 1 tap.
WARNING! Switch off and remove the
tumble dryer plug from the electricity supply
before carrying out any work.
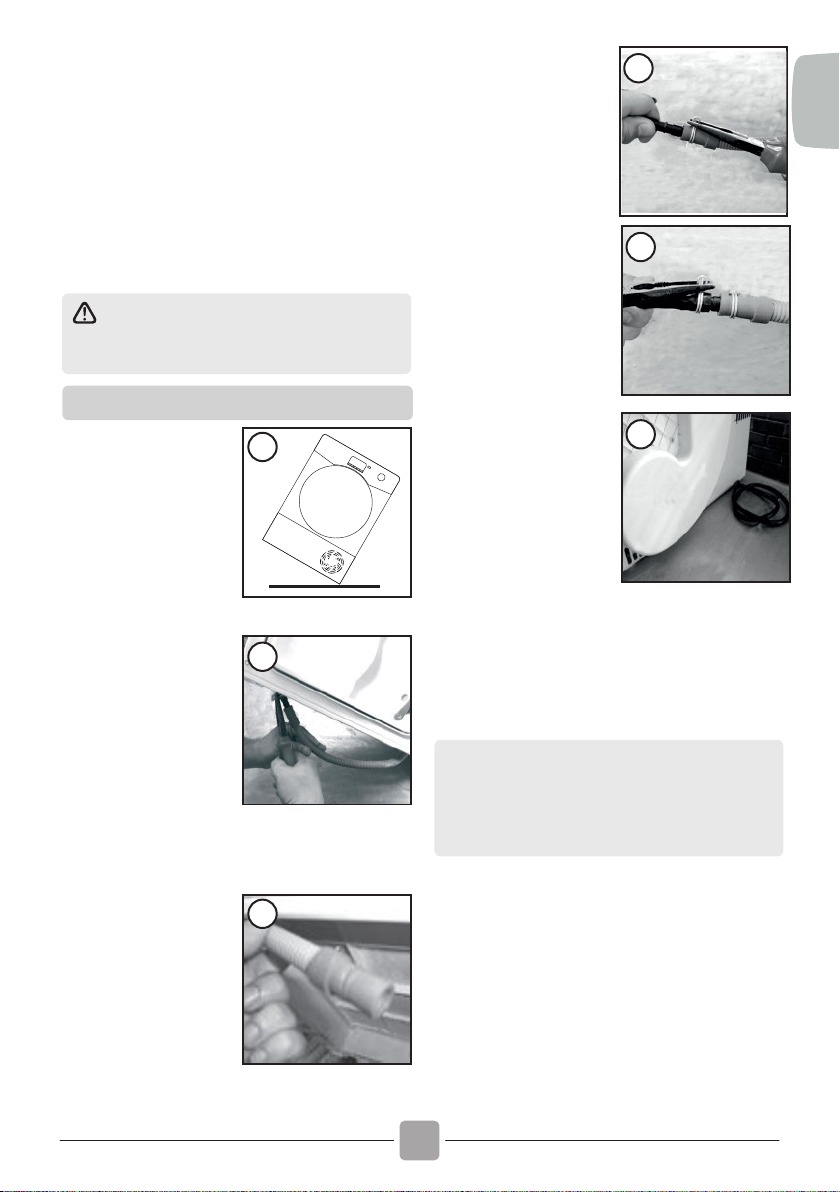
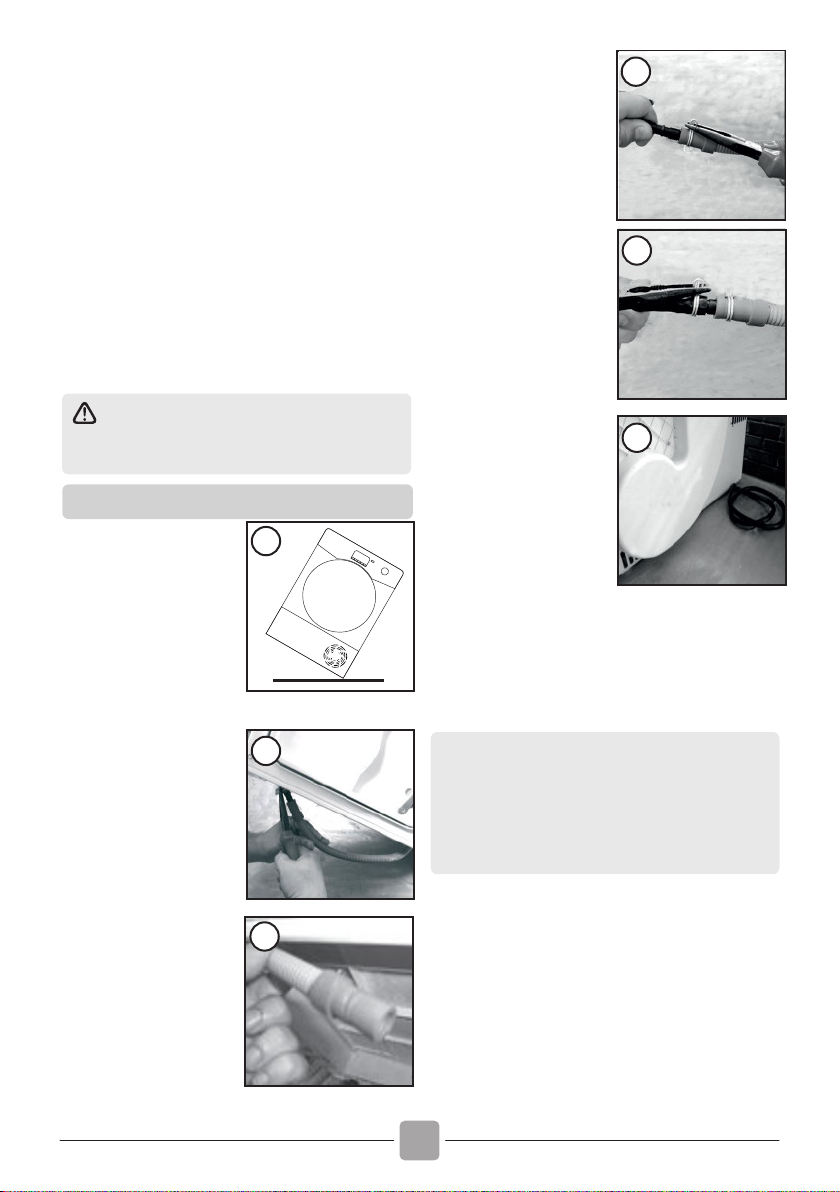
4. Attach the black
hose from the kit,
(using the connector
a n d p i p e c l i p s
supplied), to the hose
re moved from the
bridge connection.
5. Connect the new
drain hose to the waste
Water pipe.
4
EN
5
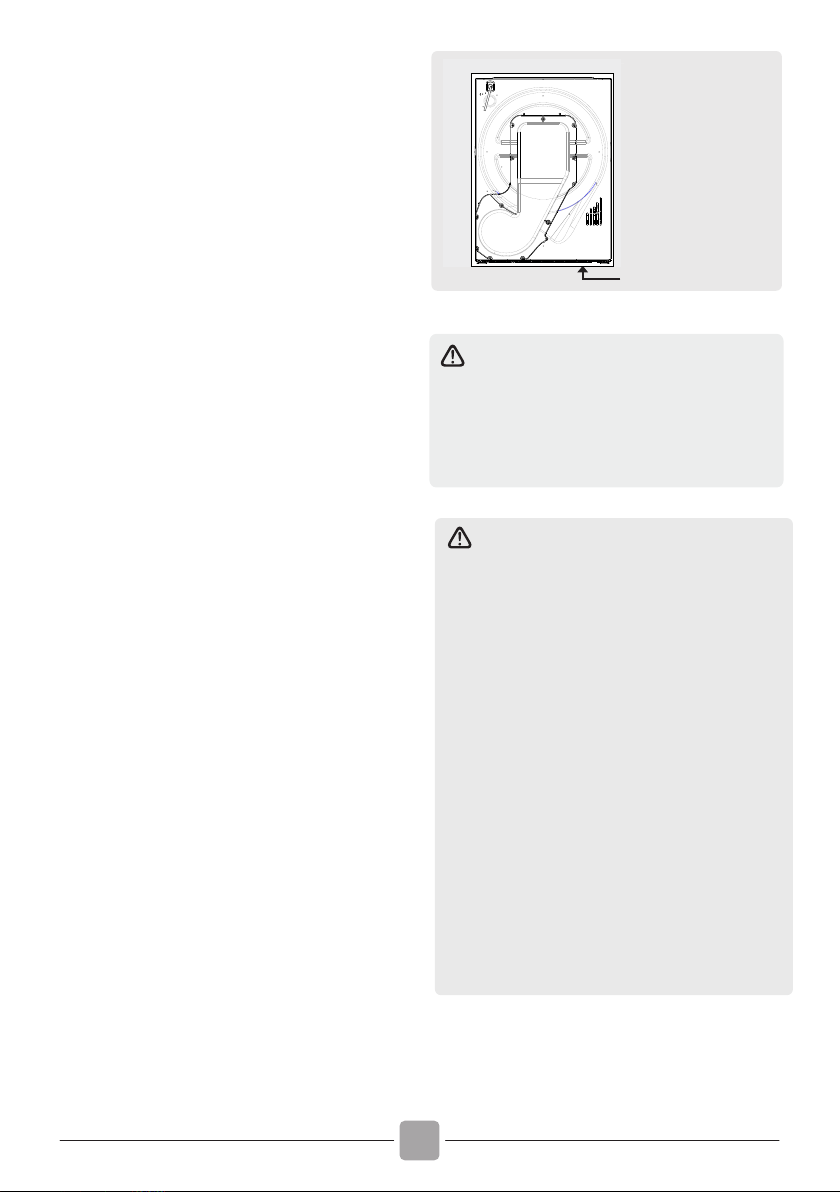
Fit the Hose as Follows:
1. Flip the machine
slowly to the right
side.
2. The waste water
pipe is situated at the
right-hand side of the
machine (see the
picture). A grey hose
connects to the bridge
at the left hand side of
the machine. Using
pliers, remove the
pipe retaining clip
from the bridge.
1
2
3
3. Pull the hose off the
bridge connection.
6. Once the machine is
in place, check the
bottom to ensure that
the new hose does not
kink when pushing the
tumble d r y e r into
position.
Connect to the mains
electricity supply.
Caution: If the product is in different side,
wait at least 4 hours before switching on so
that the oil can flow back into the
compressor. Failure to do this could result
in damage to the compressor.
6
9
Page 10
3.
PREPARING THE LOAD
Before using the tumble dryer for the first time:
● Please read this instruction book thoroughly.
● Remove all items packed inside drum.
● Wipe the inside of the drum and door with a
damp cloth to remove any dust which may have
settled in transit.
Clothes Preparation
Make sure that the laundry you are going to
dry is suitable for drying in a tumble dryer, as
shown by the care symbols on each item.
Check that all fastenings are closed and that
pockets are empty. Turn the articles inside out.
Place clothes loosely in the drum to make sure
that they don't get tangled.
Do Not Tumble Dry:
Silk, nylon stockings, delicate embroidery,
fabrics with metallic decorations, garments
with PVC or leather trimmings.
IMPORTANT: Do not dry articles which
have been treated with a dry cleaning fluid or
rubber clothes (danger of fire or explosion).
During the last 15 minutes the load is always
tumbled in cool air.
Energy Saving
Only put into the tumble dryer laundry which has
been thoroughly wrung or spin-dried. The drier
the laundry the shorter the drying time thus
saving electricity.
ALWAYS
● Check that the filter is clean before every
drying cycle.
NEVER
● Put dripping wet items into the tumble dryer,
this may damage the appliance.
If the item does not have a care label it must
be assumed that it is not suitable for tumble
drying.
● By amount and thickness
Whenever the load is bigger than the dryer
capacity, separate clothes according to
thickness (e.g. towels from thin underwear).
● By type of fabric
Cottons/linen: Towels, cotton jersey, bed
and table linen.
Synthetics: Blouses, shirts, overalls, etc.
made of polyester or polyamid, as well as
for cotton/synthetic mixes.
Do not overload the drum, large items
whe n wet ex ceed th e maxi m um
admissible clothes load (for example:
sleeping bags, duvets).
4.
CLEANING AND ROUTINE
MAINTENANCE
Cleaning the Dryer
● Clean the filter and empty the water
container after every drying cycle.
● Regularly clean the condenser.
● After each period of use, wipe the inside
of the drum and leave the door open for a
while to allow circulation of air to dry it.
● Wipe the outside of the machine and the
door with a soft cloth.
●
DO NOT use abrasive pads or cleaning
agents.
● To prevent the door sticking or the build
up of fluff clean the inner door and gasket
with a damp cloth after every drying cycle.
WARNING! The Drum, door and load
may be very hot.
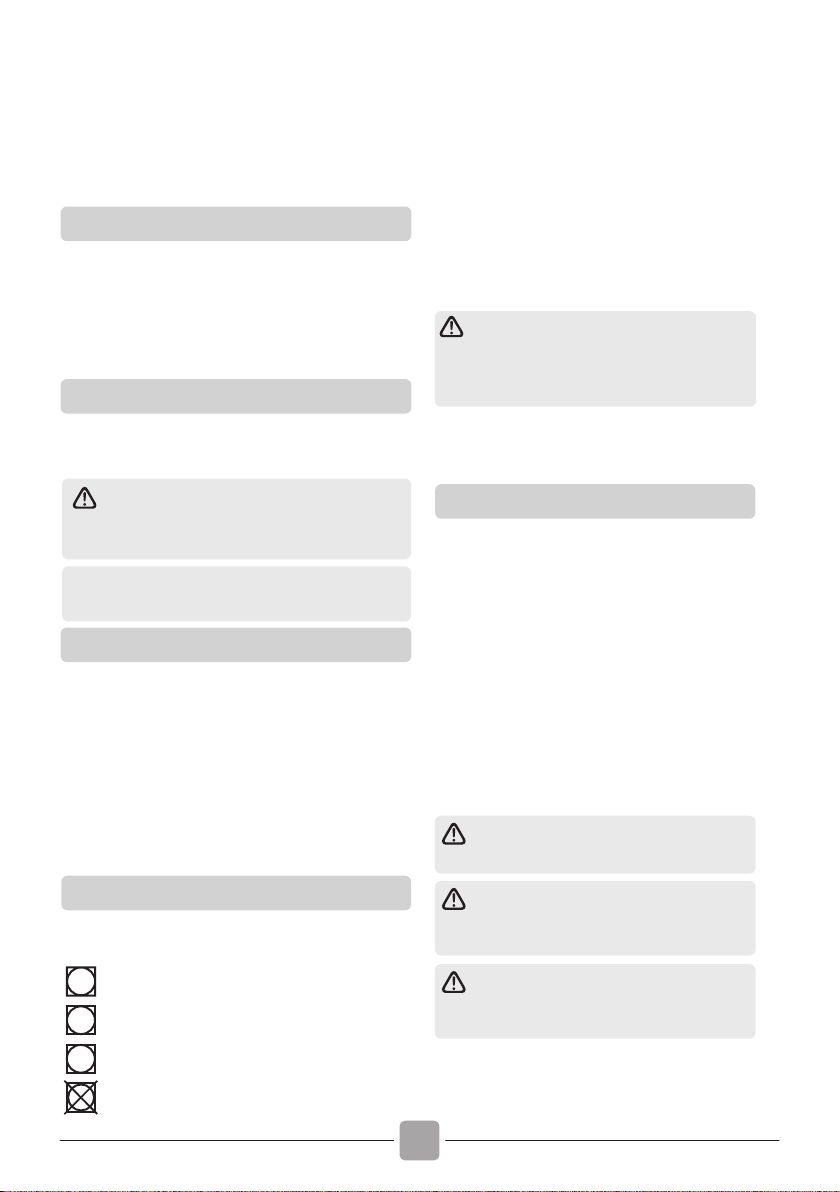
Sort the Load as Follows
● By care symbols
These can be found on the collar or inside seam:
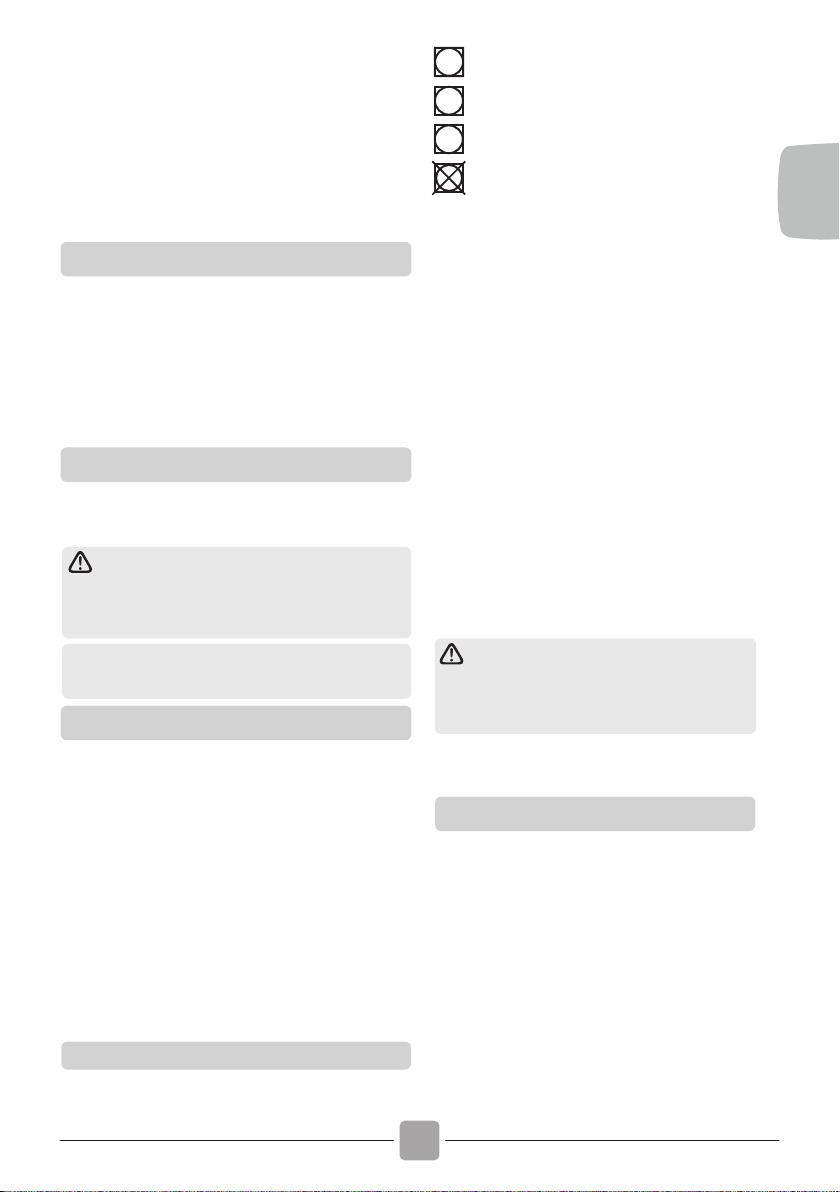
Suitable for tumble drying.
. .
Tumble drying at high temperature.
.
Tumble drying at low temperature only.
Do not tumble dry.
IMPORTANT Always switch off and
remove the plug from the electricity supply
before cleaning thisappliance.
For electrical data refer to the rating
label onthe front of thedryer cabinet (with
the door open).
10
Page 11
5.
WATER CONTAINER
The water removed from the laundry during
the drying cycle is collected in a container
inside the door of the dryer. When the
container is full the indicator on the
control panel will light, and the container
MUST be emptied. However, we recommend
that the container is emptied after each
drying cycle.
NOTE: Very little water will collect during the
first few cycles of a new machine as an
internal reservoir is filled first.
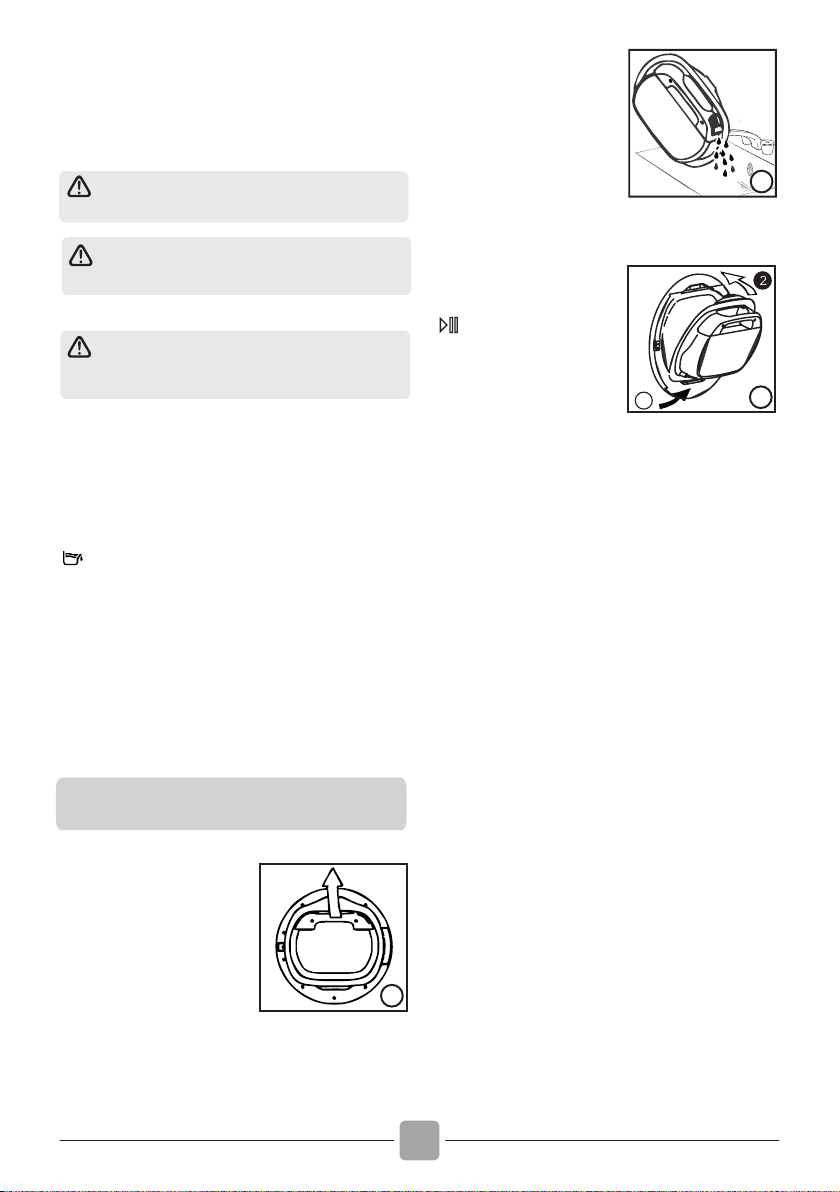
To remove the container
tank in door drawer
1. Gently pull out the
water container holding
the handle. (A)
When it is full the
water container will
weigh about 6 kg.
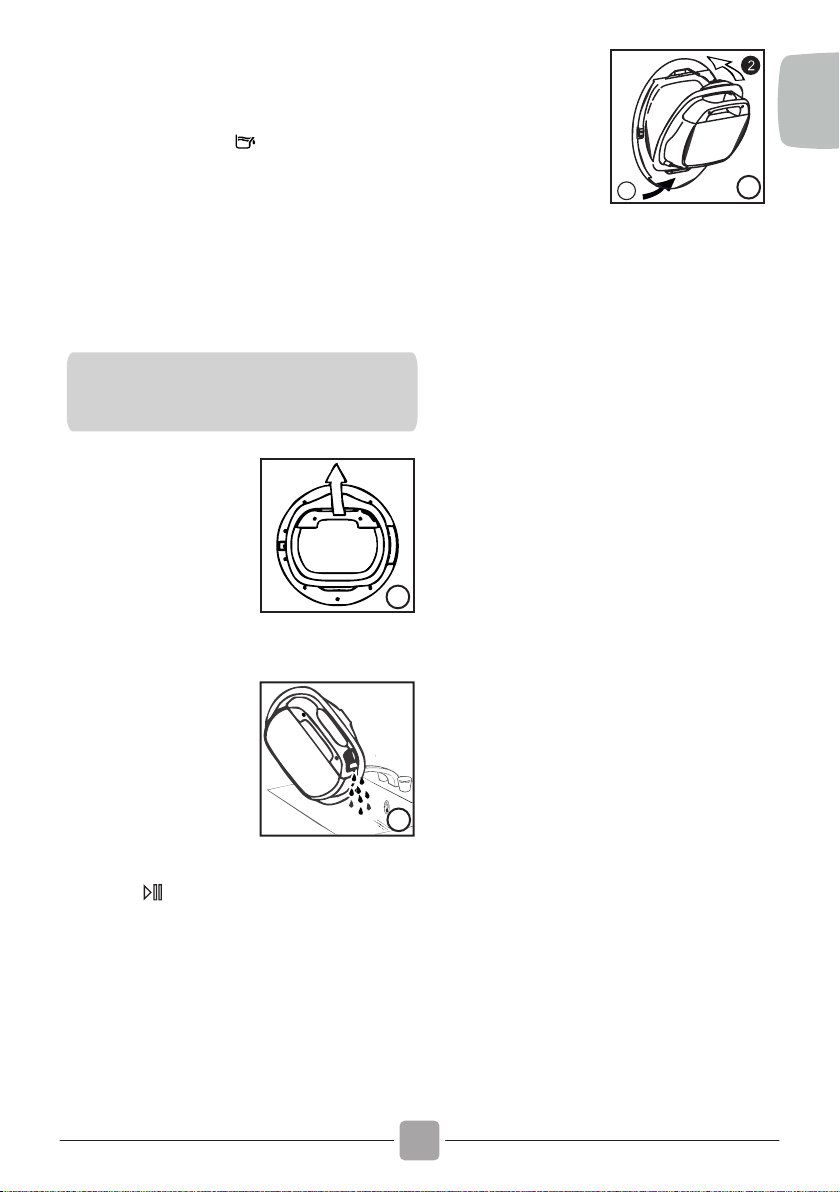
2. T i l t t h e w a t e r
container to empty the
water out through the
spout. (B)
A
NOTE: If you have
the option of drainage
near to the dryer you
c a n u s e t h e
di s c h ar g e k i t t o
provide a permanent
drainage for the water
co l l e c t e d i n t he
container of the dryer.
This means that you
don't have to empty
the water container.
EN
1
C
When empty, replace
the water container
back as shown; (C) first
insert the base of the
container into position
as shown (1) then
gentle push the top into
position (2).
3. Press Button to
restart the cycle.
B
11
Page 12
6.
DOOR and FILTER
Pull on handle to open the door.
To restart the dryer, close the door and press
Start / Pause button.
WARNING! When the tumble dryer is in
use the drum and door may be VERY HOT.
Filter
IMPORTANT: To maintain the efficiency of
the dryer check that the fluff filter is clean
before each drying cycle.
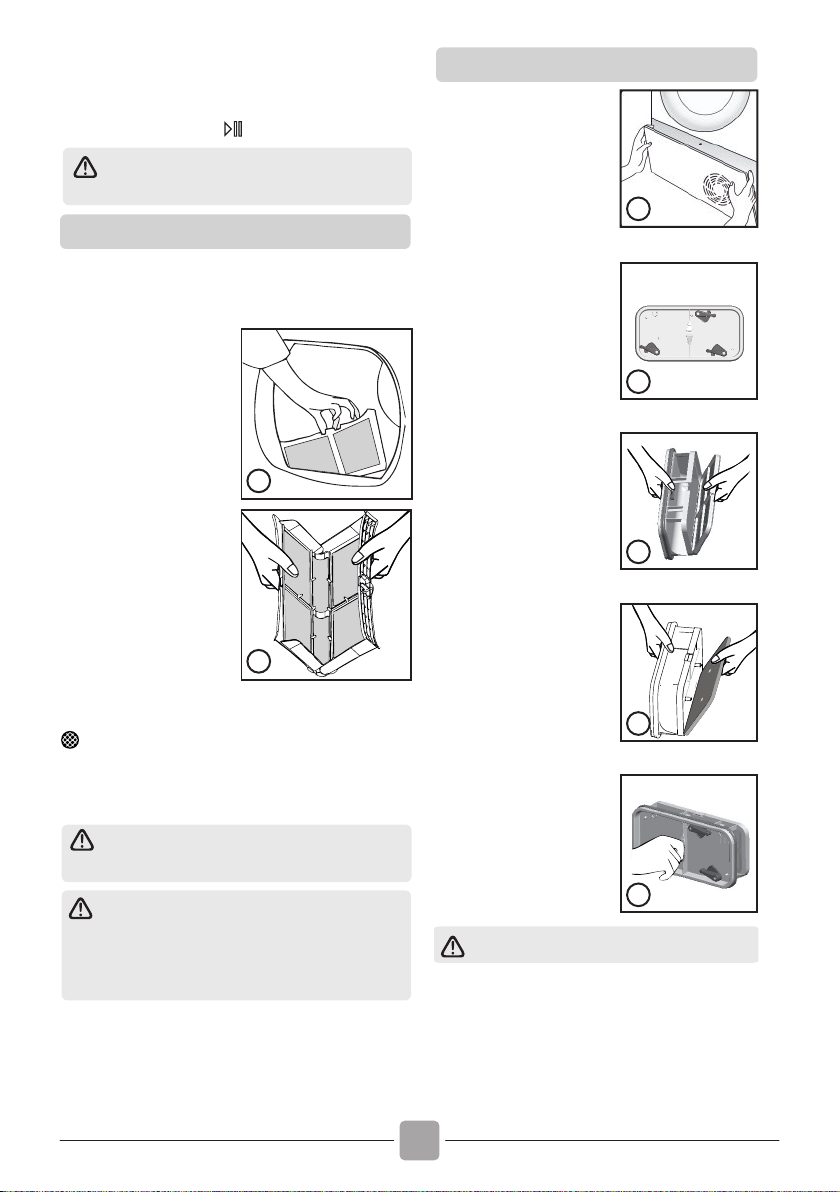
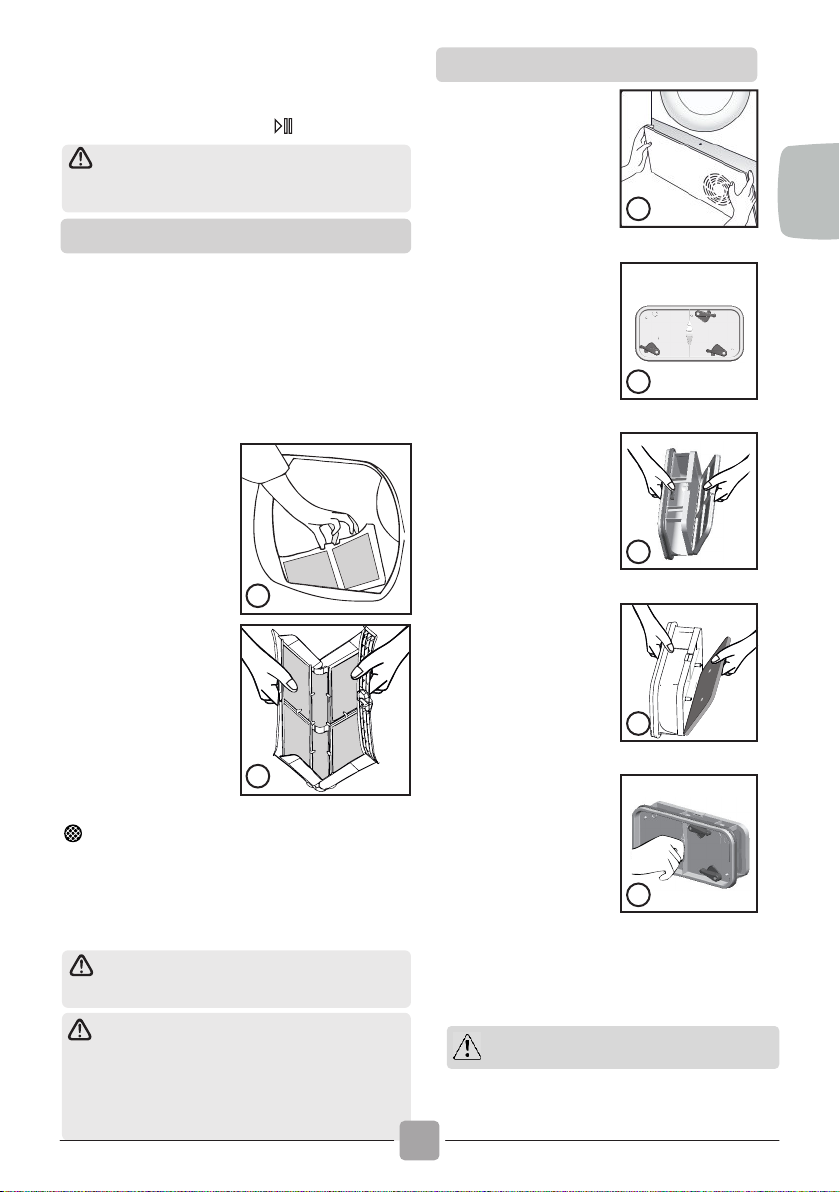
To Clean the Condenser Filter
1. R e m o v e t h e
kickplate.
2. Turn the two locking
levers anti-clockwise
and pull out the front
cover.
1
1. P u l l t h e f i l te r
upwards.
2. Open filter as shown.
1
3. Gently remove lint
using a soft brush or
your fingertips.
4. Sn a p t h e f i l t e r
together and push
back into place.
2
Filter Care Indicator
Lights when the filter needs cleaning.
If the laundry is not drying check that the filter
is not clogged.
IF YOU CLEAN FILTER UNDER
WATER, REMEMBER TO DRY IT.
WARNING! If you open the door mid
cycle, before the cool-down cycle has
completed,the handle may be hot. Please use
extreme caution when attempting to empty
the water reservoir during the cycle.
3. Gently remove the
filter frame and clean
any dust or fluff with a
cloth from the filter. Do
not use water to clean
the filter.
4. Remove the sponge
gently from its place
and then wash the
sponge by holding it
under a running tap
turning it so to remove
any dust or fluff.
5. Refit the front cover
ensuring it is in the
c o rr e c t w a y ( a s
indicated by the arrow)
and pushed firmly into
place. Lock the two
levers by turning them
clockwise
6. Refit the kickplate.
Clean the filters before every cycle.
2
3
4
5
12
Page 13
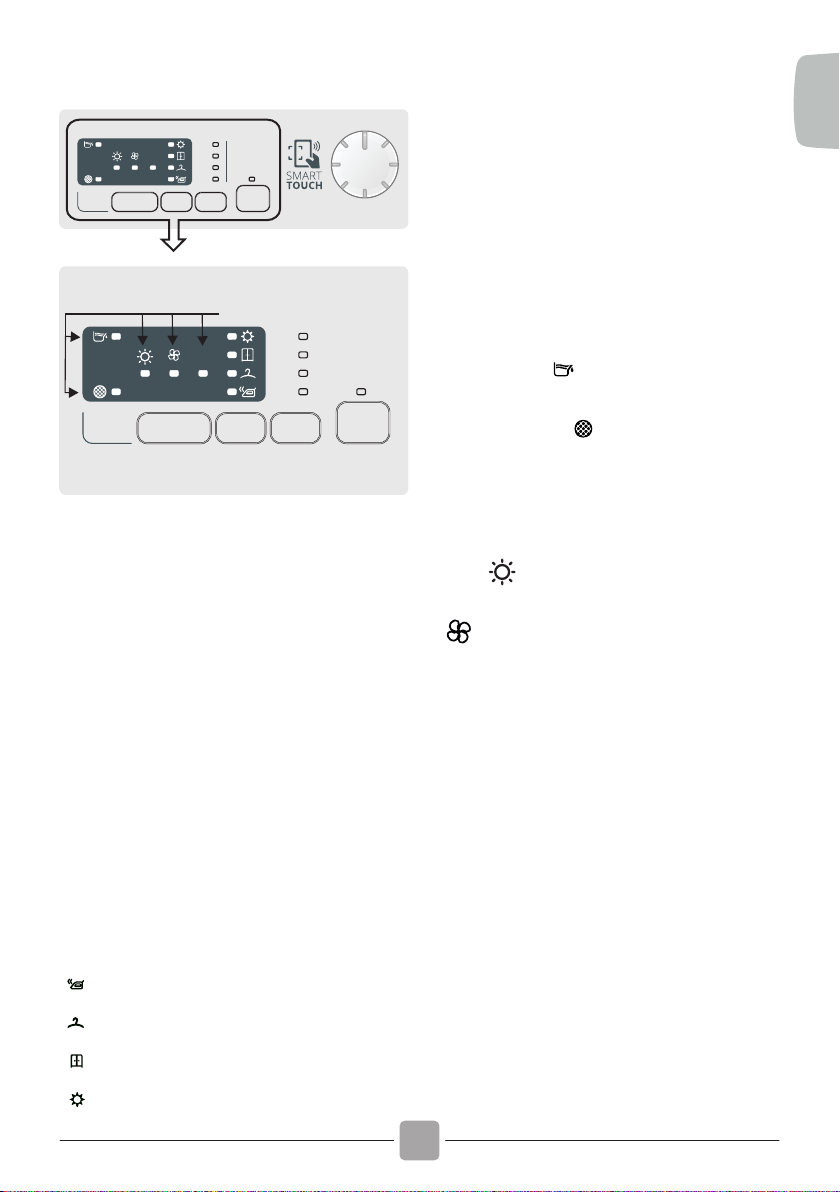
7.
CONTROLS AND
INDICATORS
220'
END
120'
90'
6h
3h
3h
60'
9h
END
6h
9h
B
4
C
This appliances is equipped with Drying
Manager Function. On automatic cycles,
each level of intermediate drying, prior to the
reaching the selected one, is indicated by
flashing the light indicator corresponding to
EN
the degree of drying reached.In case of
A
incompatibility, all LEDs flash quickly for 3
times.
D
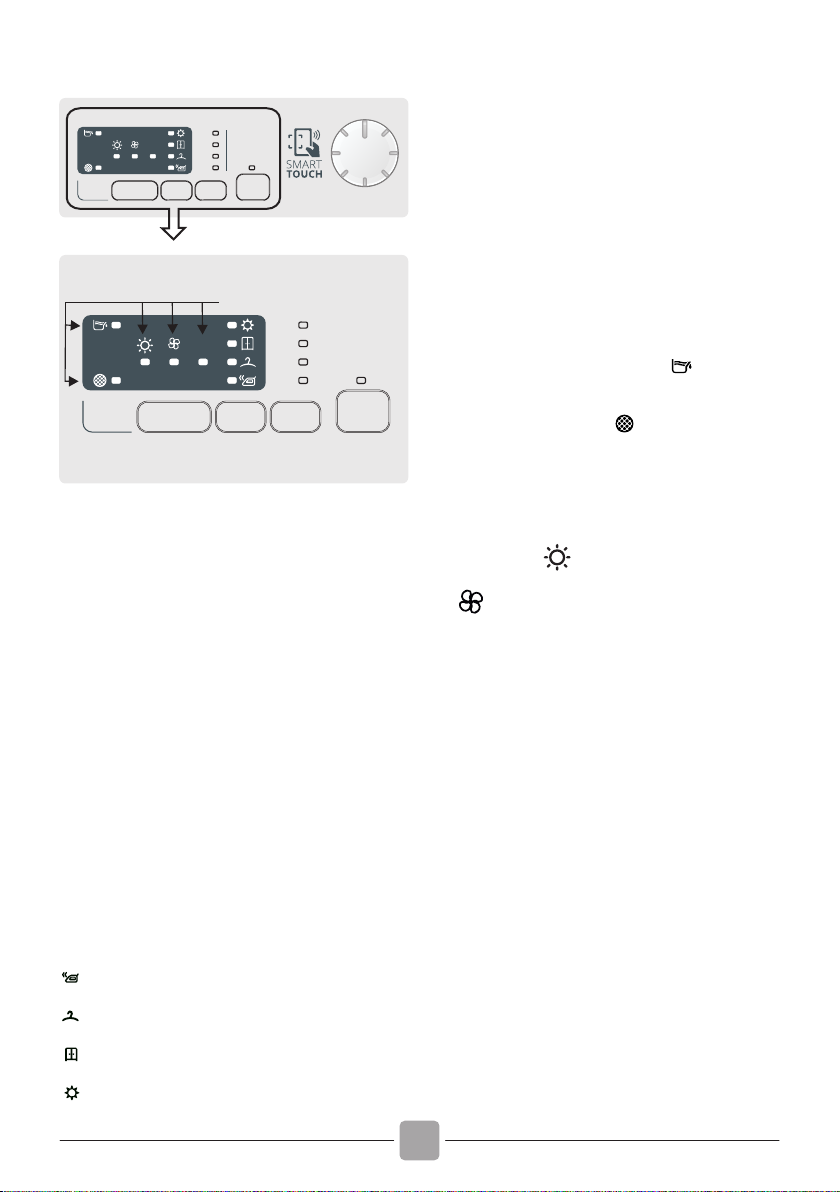
4.Delay Start Button
To postpone the start of the programm for 3h,
6h, or 9h. Opening of the porthole with
delayed start set, after re-closing the porthole,
press start again to resume the counting.
220'
120'
90'
60'
C- Led
Water tank - It lights up when it's
necessary to empty the condensate water
tank.
Filter cleaning - It lights up when the
3
2
1
cleaning of the filters is requested (the door
and the lower filter).
A-Programme Selector -
Rotating the knob in both directions it's
possible to select the desired drying
program. To cancel the selections or switch
off the dryer rotate the knob on OFF.
B-Buttons -
1.Start/Pause Button
To start the selected program and/or
suspend it.
2.Time cycle selection
It's possible switch a cycle from automatic to
timed , up to 3 minutes after the start of the
cycle. After this selection to reset the
automatic drying functioning is necessary to
switch off the dryer.In case of incompatibility,
all LEDs flash quickly for 3 times.
3.Drying Selection Button
It allows to set the desired dryness level
editable option up to 5 minutes after the
starting of the cycle:
- Ready to Iron : It leaves the garments
slightly wet to facilitate ironing.
- Dry Hanger : To get garment ready to
be hang.
- Dry wardrobe : For laundry that can be
directly stored.
-Extra-dry : To get completely dry
garments, ideal for full load.
These control lights, light up for indicate the
drying phase:
-DRY / It lights up when the drying cycle is
running.
- It light up when the cycle is in the
cooling phase.
-END: It light up when the cycle is done.
D-
SMART TOUCH area - pressing the
START/PAUSE button allows to a previously
downloaded cycle to start whilst the Touch
position is selected on the programme knob
(for downloading cycles from the App see the
relevant section of this user manual).
13
Page 14
The wool drying cycle of
this machine has been
a p p r o v e d b y T h e
Woolmark Company for
the drying of machine
washable wool products
provided that the products
are washed and dried according to the
instructions on the garment label and those
issues by the manufacturer of this machine.
M1530.
In UK, Eire, Hong Kong and India the
Woolmark trade mark is a Certification trade
mark.
Maximum Drying Weight
Cottons
Synthetics or Delicates
Max.capacity declared
Max.4 Kg
Drying Guide
The standard cycle COTTON DRY ( ) is
the most energy efficient and best suited for
drying normal wet cotton laundry.
The table in last page shows the
approximate time and energy consumption
of the main drying programmes.
Power consumpton of off-mode 0,40 W
Power consumpton of on-mode 0,75 W
Technical Specifications
OPERATION
1. Open the door and load the drum
with laundry. Ensure that garments do
not hinder closure of the door.
2. Gently close the door pushing it
slowly until you hear the door 'click'
shut.
3. Turn the Programme Selector dial to
select the required drying programme
(see Programme Guide).
4. Press the button. The dryer will
start automatically and the indicator
above the button will be continuously
lit.
5. If the door is opened during the
programme to check the laundry, it is
necessary to press to recommence
drying after the door has been closed.
6. W h en t h e c y c l e i s n e a r in g
completion the machine will enter the
cool down phase, the clothes will be
tumbled in cool air allowing the load to
cool down.
7. Following the completion of the
cycle the drum will rotate intermittently
to m i n i mize c r e asing. T h i s will
continue until the machine is switched
OFF or the door is opened.
8.When the programme is complete
the END indicator will light.
Do not open the door during the automatic
programs in order to obtain a proper drying.
Drum capacty 125
Maxmum load See energy label
Heght 85 cm
Wdth 60 cm
Depth 60 cm
Energy class See energy label
Information for Test Laboratory
EN 61121 Programme To Use
-DRY COTTON
-IRON DRY COTTON
-EASY-CARE TEXTILE
- COTTON OR
-COTTON OR WHITES
-DELICATES OR SYNTHETIC
Clean the filters before every cycle
ONLY FOR 10 KG CAPACITY TUMBLE
DRYER: CONNECT THE DRAIN HOSE FOR
RECOVERING CONDENSER WATER
ACCORDING TO INSTRUCTION AT
CHAPTER 2
The real duration of drying cycle
depends by the starting humidity level of
the laundry due to spin speed, type and
amount of load, cleanliness of filters and
ambient temperature.
14
Page 15
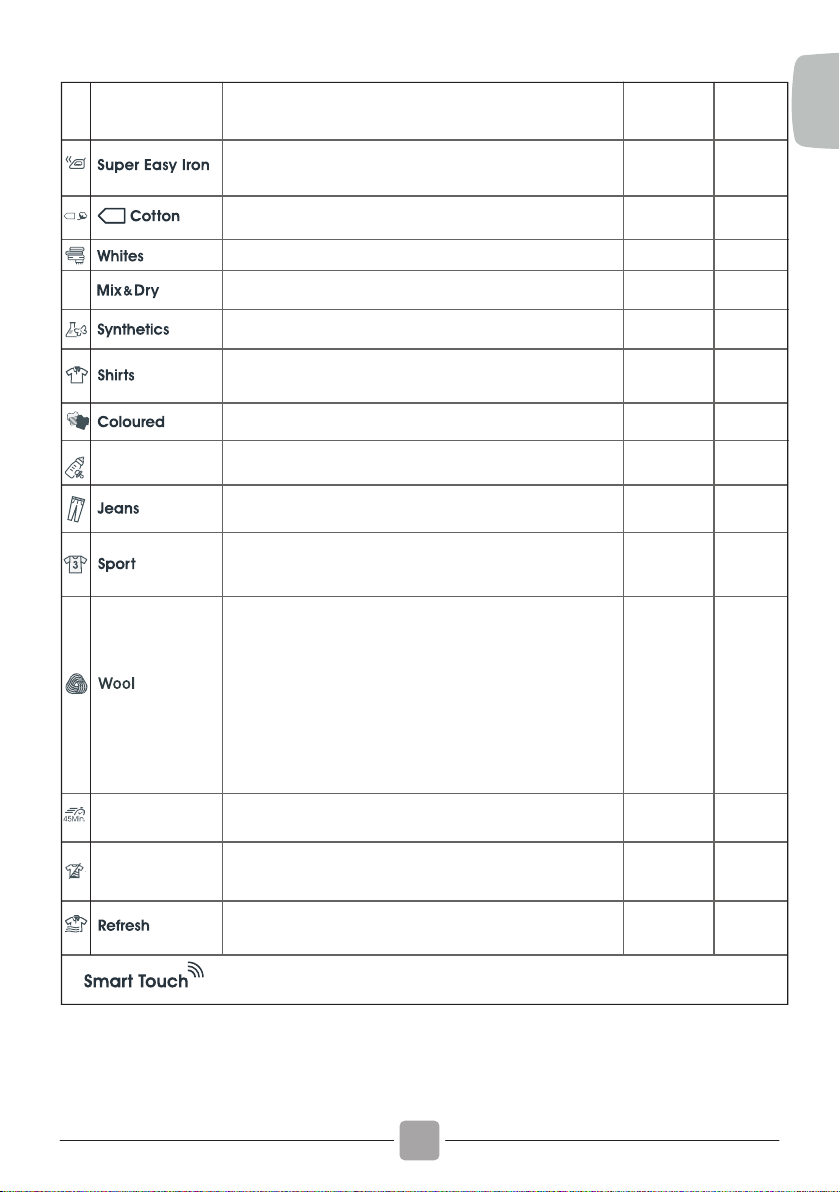
8.
SELECTING THE PROGRAMME AND SET THE FUNCTION
PROGRAM
Baby
Rapid 45'
PROGRAM DESCRIPTION
A comfortable solution to dry laundry of mixed fabrics minimazing
folds, delivering the perfect humidity to iron in the easier way.
Before drying it's better to shake off the linens.
Program Eco normative (hang dry) drying. The most efficient
program in energy consumption. Suitable for cottons and linens.
The right cycle to dry cottons, sponges and towels.
To dry all together different kind of fabrics as cotton ,linen,
mix, synthetics.
To dry delicate and synthetic fabrics that need an accurate
and specific treatment.
This specifics cycle has been conceived to dry shirts minimizing
tangles and folds thanks specific movements of the drum. It's
recommended to take out the linens immediately after drying cycle.
A delicate and specific cycle to dry dark or colour cotton or
syntethics garments.
This cycle is perfect for baby clothes, when an high hygiene level
is expected.
Dedicated to dry uniformly fabrics like jeans or denim. It's
recommended flip over the garments before drying.
Dedicated to technical garments for sport and fitness, drying
gently with special care to avoid shrinking and deterioration
of elastic fibers.
Woolen clothes: the program can be used to dry up to 1 kg of
laundry (around 3 jumpers). It is recommended to reverse all
clothes before drying. Timing can change due to dimensions
and thickness of load and to spinning chosen during
washing. At the end of the cycle, clothes are ready to be
worn, but if they are heavier, edges can be a bit wet: it is
suggested to dry them naturally. It is recommended to
unload clothes at the very end of the cycle. Attention: felting
process of wool is irreversible; please dry exclusively clothes
with symbol (symbol "ok tumble"); this program is not
indicated for acrylic clothes.
Perfect to dry quickly up to 2 kg load . It's racommended to
spin at high speed before drying.
CAPACITY
(kg)
2
Full
Full
4
4
2.5
4
4
4
4
1
1
DRYING
TIME
(min)
*
*
*
*
*
*
*
150’
*
*
70’
*
EN
Relax creases
* The real duration of drying cycle depends by the starting humidity level of the laundry due to spin speed, type
and amount of load, cleanliness of filters and ambient temperature.
This is a warm cycle that in only 12 minutes helps to relaxe folds
and creases.
The perfect cycle to remove the bad smells from the linens
smoothing creases.
Customizable setting that interacts with the App on your android smartphone and to download
the cycles (see the dedicated section). The factory sets the default programme Auto-Hygiene,
which will sanitize the machine.
15
2.5
2.5
12’
*
Page 16
SMART TOUCH
This appliance is equipped with Smart Touch
technology that allows you to interact, via the
App, with smartphones based on Android
operating system and equipped with NFC
(Near Field Communication) function.
● Download on your smartphone the Candy
simply-Fi App.
● Smart Care – -Smart Check-up and a
troubleshooting guide.
● My Statistics – Drying statistics and
tips for a more efficient use of your
machine.
Get all the details of the Smart Touch
functions, browsing the App in DEMO
mode or go to:
www.candysmarttouch.com
The Candy simply-Fi App is available
for devices running both Android
and iOS, both for tablets and for
smartphones. However, you can
interact with the machine and take
advantage of the potential offered by
Smart Touch only with Android
smartphones equipped with NFC
technology, according to following
functional scheme:
Android smartphone
with NFC technology
Android smartphone
without NFC technology
Android Tablet
Apple iPhone
Apple iPad
Interaction with the
machine + contents
Contents only
Contents only
Contents only
Contents only
FUNCTIONS
The main functions available using the App
are:
● Voice Assistant – A guide to help you
choose the ideal cycle with only three voice
inputs (clothes/fabrics, colour, drying level).
HOW TO USE SMART TOUCH
FIRST TIME - Machine registration
Enter the "Settings" menu of your
Android smartphone and activate the
NFC function inside the "Wireless &
Networks" menu.
Depending on the smartphone model
and its Android OS version, the
process of the NFC activation may be
different. Refer to the smartphone
manual for more details.
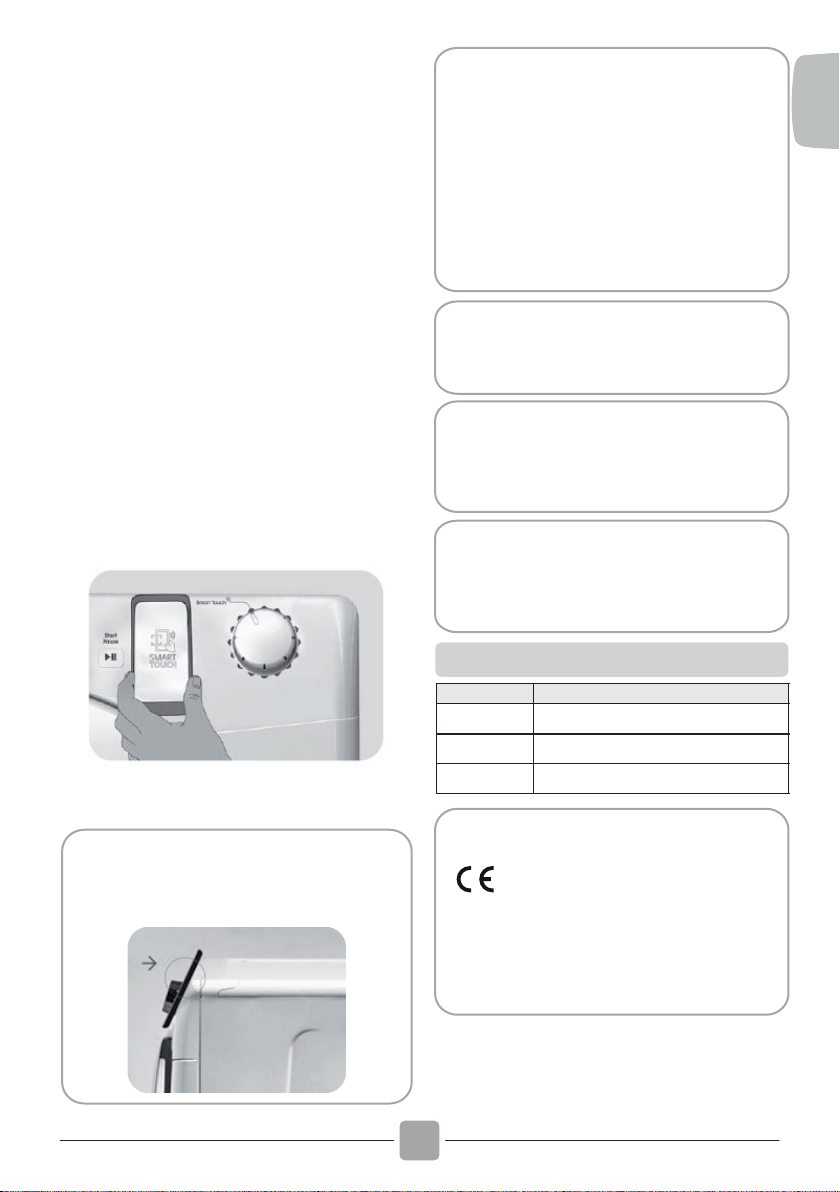
● Turn the knob to the Smart Touch
position to enable the sensor on the
dashboard.
● Open the App, create the user profile
and register the appliance following the
instructions on the phone display or the
"Quick Guide" attached on the machine.
More information, F.A.Q. and the video
for an easy registration are available
on:
www.candysmarttouch.com/how-to
● Cycles – To download and launch new
drying programmes.
16
Page 17
NEXT TIME – Regular usage
● Every time you want to manage the
machine through the App, first you have to
enable the Smart Touch mode by turning
the knob to the Smart Touch indicator.
● Make sure you have unlocked your phone
(from stand-by mode) and you have
activated the NFC function; then, follow the
steps mentioned earlier.
If you do not know the position of your NFC
antenna, slightly move the smartphone in a
circular motion over the Smart Touch logo
until the App confirms the connection. In
order for the data transfer to be successful,
it is essential TO KEEP THE SMARTPHONE
ON THE DASHBOARD DURING THE
FEW SECONDS OF THE PROCEDURE; a
message on the device will inform about the
correct outcome of the operation and advise
you when it is possible to move the
smartphone away.
EN
● If you want to start a dry cycle, load
the laundry and close the door.
● Select the desired function in the App (e.g.:
starting a programme, the Smart Check up cycle, update statistics, etc…).
● Follow the instructions on the phone
display, KEEPING IT ON the Smart Touch
logo on the machine dashboard, when
requested to do so by the App.
NOTES:
Place your smartphone so that the NFC
antenna on its back matches the position
of the Smart Touch logo on the appliance
(as illustrated below).
Thick cases or metallic stickers on your
smartphone could affect or prevent the
transmission of data between machine
and telephone. If necessary, remove them.
The replacement of some components of
the smartphone (e.g. back cover, battery,
etc...) with non-original ones, could result
in the NFC antenna removal, preventing
the full use of the App.
The management and the control of the
machine via App is only possible "by
proximity": it is therefore not possible to
perform remote operations (e.g.: from
another room; outside of the house).
WIRELESS PARAMETERS
Parameter
Wireless Standard
Frequency band
Magnetic field limit
With this the Candy Hoover Group Srl,
declares that this appliance marked with
complies with the essential
requirements of the Directive 2014/53/EU.
To receive a copy of the declaration of
c o nfo r m i ty, p lea s e c o nta c t t h e
manufacturer at:
www.candy-group.com
Specifications
ISO/IEC 14443 Type A and NFC Forum Type 4
13,553-13,567 MHz (centre frequency 13,560 MHz)
< 42dBμA/m (at 10 meters)
17
Page 18

TROUBLESHOOTING
9.
FOR SMART TOUCH MODELS
The Candy simply-Fi app has a Smart Check-up function that allows you to confirm the
functionality and status of the product at any time. To use the Candy simply-Fi APP you will need
an Android smartphone with NFC technology.
More info can be found on the App.
If the display of the machine is showing an error (by a code or blinking LEDs), you should turn on the
App on your Android smartphone, with NFC on, selecting "Read the error" on the "Help on line"
menu place your smart phone against the Smart Touch logo on the control panel. You should now
be able to read the fault directory to solve the issue.
What Might be the Cause of...
Defects you can remedy yourself
Before calling service for technical advice please
run through the following checklist. A charge will
be made if the machine is found to be working or
has been installed incorrectly or used incorrectly.
If the problem persists after completing the
recommended checks, please call Service, they
may be able to assist you over the telephone.
Time display to end could change during
drying cycle. The time to end is continuously
checked during the drying cycle and the time
is adjusted to give the best estimation time.
The displayed time may increase or decrease
during the cycle and this is normal.
Drying time is too long/clothes are not dry
enough…
● Have you selected the correct drying
time/programme?
● Were the clothes too wet? Were the clothes
thoroughly wrung or spindried?
● Does the filter need cleaning?
● Is the dryer overloaded?
The dryer does not operate…
● Is there a working electricity supply to the
dryer? Check using another appliance such as a
table lamp.
● Is the plug properly connected to the mains
supply?
● Is there a power failure?
● Has the fuse blown?
● Is the door fully closed?
● Is the dryer switched on, both at the mains
supply and at the machine?
● Has the drying time or the programme been
selected?
● Has the machine been switched on again after
opening the door?
The dryer is noisy…
● Switch off the dryer and contact GIAS
Service for advice.
The Indicator is on…
● Does the filter need cleaning?
The Indicator is on…
● Does the water container need
emptying?
CUSTOMER SERVICE
Should there still be a problem with your
dr y er a ft e r c om p le t in g al l t h e
recommended checks, please call
service for advice.
They may be able to assist you over the
telephone or arrange for a suitable
appointment for an engineer to call under
the terms of your guarantee. However, a
charge may be made if any of the
following applies to your machine:
● Is found to be in working order.
● Has not been installed in accordance
with the installation instructions.
● Has been used incorrectly.
Spares
Always use genuine spares, available
direct from service.
Service
For service and repairs call your local
service engineer.
The manuf a cturer declin es all
responsibility in the event of any
printing mistakes in this booklet. The
manufacturer also reserves the right
to make appropriate modifications to
its products without changing the
essential characteristics.
18
Page 19
Index
Veuillez lire et suivre ces instructions avec
soin et utiliser la machine en conséquence.
Ce livret contient des instructions importantes
sur la sécurité d'utilisation, l'installation et
l'entretien de la machine, ainsi que des
conseils utiles pour obtenir les meilleurs
résultats possibles lors de son utilisation.
Conservez toute la documentation dans un
endroit sûr pour pouvoir vous y reporter à une
date ultérieure ou la transmettre aux
prochains propriétaires
Vérifiez que les articles suivants ont bien été
livrés avec l’appareil :
● Manuel d'utilisation
● Carte de garantie
● Étiquette d'énergie
En utilisant le symbole sur ce produit,
no u s d é cl a ro n s s ur n ot r e p ro p re
responsabilité que ce produit est conforme à
toutes les normes européennes relatives à la
sécurité, la santé et à l'environnement.
1. RAPPELS DE SÉCURITÉ
2. KIT TUYAU D'ÉVACUATION:
INSTRUCTIONS DE MONTAGE
3. PRÉPARATION DE LA CHARGE
4. NETTOYAGE ET ENTRETIEN DE
ROUTINE
5. RÉSERVOIR D’EAU
6. PORTE ET FILTRE
7. COMMANDES ET INDICATEURS
8. SÉLECTION DU PROGRAMME
9. DÉPISTAGE DE PANNES & SERVICE
CLIENTÈLE
FR
Vérifiez que la machine ne s'est pas
détériorée en transit. Si c'est le cas, contactez
GIAS pour une opération de dépannage. Le
non-respect de ces instructions peut
compromettre la sécurité de votre appareil. Un
appel de service peut vous être facturé si la
défaillance de votre appareil est causée par
une mauvaise utilisation.
19
Page 20

1.
RAPPELS DE SÉCURITÉ
●
Cet appareil peut être utilisé par
des enfants âgés de 8 ans et
plu s, ou des person ne s
pr é sen t ant un han d icap
physique, moteur ou mental, et
manquant de connaissance sur
l’utilisation de l’appareil, si elles
sont sous la surveillance d’une
per s o n n e , d o n n a n t d e s
instructions pour une utilisation
en toute sécurité de l’appareil.
Les enfants ne doivent pas
jouer avec l'appareil.
Le nettoyage et l’entretien de
l’appareil ne doit pas être fait
p a r d e s e nf a nt s s a n s
surveillance d’un adulte.
●
ATTENTION La mauvaise
utilisation d’ un sèche-linge
risque de causer un incendie.
●
Le produit est conçu pour être
u t i l i s é d a n s u n f o y e r
domestique, comme - Le coin
cuisine dans des magasins ou
des lieux de travail,
- Employés et clients dans un
hôtel, un motel ou résidence de
ce type,
- Dans des bed and breakfast,
- Service de stock ou similaire,
mais pas pour de la vente au
détail.
La durée de vie de l’appareil
peut être réduite ou la garantie
du fab ric ant ann ulé e si
l’appareil n’est pas utilisé
correctement.
Tout domm age ou perte
résultant d'un usage qui n'est
pas conforme à un usage
domestique (même s'ils sont
s i t u é s d a n s u n
environnement domestique
ou un ménage) ne sera pas
acceptée par le fabricant
dan s toute l a m esure
permise par la loi.
●
Cette machine est conçue
uniquement pour usage
domestique, à savoir pour
sécher le linge domestique
et les vêtements.
Cette machine ne doit être
●
utilisée que pour l’ emploi
auquel elle est destinée et
qui est décrit dans ce
manuel.
Assurez-vous d'avoir bien
compris les instructions
d'installation et d'utilisation
avant de faire fonctionner la
machine.
●
Ne touchez pas la machine
si vous avez les mains ou les
pieds mouillés ou humides.
●
Ne vous appuyez pas sur la
porte lorsque vous chargez
la machine et n'utilisez pas la
porte pour soulever ou
déplacer la machine.
●
Ne laissez pas des enfants
jouer avec la machine ou
avec ses commandes.
●
ATTENTION N’ utilisez pas
cette machine si le filtre à
peluches n’ est pas en place
ou s’ il est endommagé ; les
peluches risquent en effet de
s'enflammer.
20
Page 21
●
ATTENTION L’augmentation de
te m p é r a t u r e p endant le
fonctionnement du sèche-linge
peut être supérieure à 60°C là
où se trouve le symbole de
surface chaude .
Débranchez le courant du
●
secteur. Retirez toujours la prise
avant de nettoyer la machine.
●
Cessez d’utiliser la machine si
elle semble défectueuse.
Veillez à ce que les peluches ne
●
puissent pas s’accumuler sur le
sol, à l’extérieur de la machine.
●
Il se peut que l’intérieur du
tambour soit très chaud. Veillez
à ce que le sèche-linge termine
son cycle de refroidissement
avant d’en sortir le linge.
●
La dernière partie du cycle
s'effectue à froid (cycle de
refroidissement)pour garantir la
préservation des textiles.
●
AVERTISSEMENT: Le sèchelinge ne doit pas être utilisé si le
lavage a été effectué avec des
produits chimiques.
●
AVERTISSEMENT: Ne jamais
arrêter le sèche-linge avant la fin
du cycle de séchage à condition
que les éléments sont retirés
rapidement et répartis de telle
sorte que la chaleur puisse se
dissiper.
Installez l'arrière de l'appareil
près d'un mur ou d'une surface
verticale.
●
Charge maximum pour le
séchage:Se reporter à l'étiquette
énergétique.
Installation
●
N'utilisez pas d'adaptateurs, de
multi-prises et/ou de rallonges.
●
Veillez à ne pas installer le
sèche-linge contre des rideaux
et assurez-vous que rien ne
puisse tomber ou s’accumuler
derrière le sèche-linge.
●
Cet appareil ne doit pas être
installé derrière une porte
verrouillable, u n e p o r t e
coulissante ou une porté munie
de gonds placée en face de la
porte du sèche-linge.
Im por t ant : Pe n dan t le
transport, l’appareil doit être
stocké dans sa position normale
d’utilisation. Si nécessaire,
l’appareil peut être incliné
comme montré ci-dessous.
Attention : Si le produit est
tr a nsp o r té d i ff é r emm e nt,
attendez au moins 4 heures
avant d’allumer l’appareil, ceci
afin que le gaz liquide retourne
dans le compresseur. En cas de
non respect de cette procédure,
le compresseur pourrait être
endommagé
FR
21
Page 22

Le Linge
●
Ne séchez pas des vêtements non
lavés dans le sèche-linge.
ATTENTION NE séchez PAS les
●
tissus qui ont été traités avec des
liquides de nettoyage à sec.
●
ATTENTION Quand elles sont
c h a u f f é e s , l e s mo u s s e s
alvéolaires peuvent dans certains
cas brûler par combustion
spontanée Les articles en mousse
caoutchouc (mousse de latex), les
bonnets de douche, le textile
imp er méabl e, les arti cl es
caoutchoutés et les vêtements ou
coussins rembourrés de mousse
caoutchouc NE DOIVENT PAS
être séchés dans le sèche-linge.
Reportez-vous toujours aux
●
étiquettes d’entretien du linge pour
vérifier le mode de séchage
recommandé.
●
Les vêtements doivent être
essorés en machine ou à la main
avant d’être placés dans le sèche-
linge. Les vêt eme nts qui
dégoulinent NE DOIVENT PAS
être mis dans le sèche-linge.
●
Enlevez les briquets et les
allumettes des poches et veillez à
ne JAMAIS utiliser des liquides
inflammables à proximité de la
machine.
●
Les rideaux en fibres de verre ne
doivent JAMAIS être placés dans
cette machine. La contamination
d’autres vêtements par les fibres
de verre peut entraîner des
irritations de la peau.
●
Les articles qui ont été souillés par
des substances telles que huile de
cuisson, acétone, alcool, pétrole,
kérosène, produit anti-taches,
térébenthine, cire et décapant pour
cire doivent être lavés à l'eau
chaude avec une quantité
supplémentaire de détergent
avant d'être séchés dans le
sèche-linge.
●
Les agents adoucissants, et
autres produits similaires,
d o i v e n t ê t r e u t i l i s é s
conformément aux instructions
fournies par le fabricant du
produit.
Ventilation
●
La pièce où se trouve le sèchelinge doit avoir une ventilation
adéquate de manière à ce que
les gaz des appareils qui
brûlent d’autres combustibles,
y compris les cheminées, ne
soient pas attirés dans la pièce
pendant que le sèche-linge est
en marche
●
Installez l'arrière de l'appareil
près d'un mur ou d'une surface
verticale.
●
Il doit y avoir un espace
minimum de 12 mm entre la
machine et quelcon que
obstacle. L'entrée et la sortie
d'air doivent être dégagées.
Pour assurer une ventilation
adéquate, l'espace entre le
bas de la machine et le sol ne
doit pas être obstrué.
●
L’ air d’ échappement ne doit
pas être évacué par un conduit
qui est également utilisé pour
é v a c u e r l e s f u m é e s
d’échappement d’appareils
qui brûlent du gaz ou d’autres
combustibles.
22
Page 23
●
éviter les risques.
é é è ’
V rifiez r guli rement que l air
librement autour du
peut circuler
sèche-linge.
Contrôlez régulièrement le filtre à
●
peluch es aprè s usage et
nettoyez-le si nécessaire.
●
Veillez ce que rien ne puisse
tomber ou
côtés et l’arrière du
afin de ne pas obstruer l'entrée et
la sortie d’air.
●
N installez JAMAIS le s che
lingecontredes
à
s’accumuler entre les
sèche-linge
’ è -
rideaux.
• Quand le sèche-linge est installé
sur le lave-linge, il faut utiliser un
kit de superposition adapté à la
configuration de votre
électroménager:
- Kit de superposition "taille
standard": pour lave-linge d'une
profondeur minimum de 44 cm;
- Kit de superposition "taille fine":
pour lave-linge d'une profondeur
minimum de 40 cm.
• Vous pouvez obtenir le kit de
superposition en vous adressant
à notre service pièces
détachées. Les instructions pour
l’installation et les éléments de
fixation sont fournis avec le kit
de superposition.
• La prise doit être accessible
pour la déconnexion après
l'installation de l'appareil.
ATTENTION: l'appareil ne doit
pas être alimenté par un
dispositif de commutation
externe, comme une minuterie,
ou connecté à un circuit qui est
allumé et éteint régulièrement.
Air Outlets in the Base
Si le câble d'alimentation
est endommagé, il doit être
remplacé par le fabricant, un
technicien de maintenance ou
une personne qualifiée pour
Ne pas installer le produit
dans une pièce à la température
basse où le risque de formation
de glace est possible. A la
température de congélation de
l'eau, le produit risque de ne pas
fonctionner correctement. Si l'eau
du circuit hydraulique se glace,
les composants suivants risquent
d'être endommagés : soupape,
pompe, tubes. Afin de garantir les
meilleures du
performances
produit, la température de la
pièce doit être comprise entre
+5°C et +35°C. Veuillez noter que
l'utilisation à des températures
basses (entre 2° et 5°C) peut
entraîner une condensation de
l'eau et des gouttes sur le sol.
FR
23
Page 24

ATTENTION:
Risque d'incendie / Matériaux
inflammables.
L’appareil contient du R290, un
gaz réfrigérant éco-durable qui
est inflammable.
N’approchez jamais de
l’appareil ni flammes nues ni
sources d'inflammation.
Vérifiez s’il y a des dégâts
visibles sur l’appareil. N’utilisez
pas l’appareil s’il est
endommagé.
En cas de problème, quel qu’il
soit, veuillez contacter votre
revendeur spécialisé ou l'un de
nos centres d’assistance à la
clientèle.
ATTENTION:
vérifiez que les ouvertures sur
l’appareil et les ouvertures du
compartiment dont l’appareil
est équipé (pour les modèles
encastrés) ne présentent
aucune obstruction.
ATTENTION:
n’endommagez pas le circuit
réfrigérant.
Les réparations ou les
interventions sur l’appareil ne
doivent être effectuées que par
un service d’assistance agréé.
L’élimination incorrecte du
dispositif peut provoquer des
incendies ou des empoisonnements.
Jetez le dispositif correctement
et n’abîmez pas les tuyaux
utilisés pour la circulation du
fluide réfrigérant.
24
Page 25
Protection de l'environnement
●
Tous les matériaux de conditionnement
utilisés sont écologiques et recyclables.
Veuillez les éliminer de manière écologique.
Votre municipalité pourra vous donner le
détail exact des méthodes d’élimination en
vigueur.
●
Pour assurer la sécurité lors de l’élimination
d’un vieux sèche-linge, veuillez débrancher la
fiche du courant de secteur, couper le câble
d’alimentation et le détruire avec la fiche. Pour
empêcher que les enfants ne s’enfer-ment
dans la machine, cassez les charnières de la
porte ou son dispositif de verrouillage.
Directive européenne 2012/19/CE
Cet appareil est commercialisé en
accord avec la directive européenne
2012/19/CE sur les déchets des
équip e m e n t s élec t r i q u es et
électroniques (DEEE).
Les déchets des équipements
électriques et électroniques (DEEE)
contiennent des substances polluantes (ce
qui peut entraîner des conséquences
négatives pour l'environnement) et des
composants de base (qui peuvent être
réutilisés). Il est important de traiter ce type
de déchets de manière appropriée afin de
pouvoir éliminer correctement tous les
polluants et de recycler les matériaux.
Les particuliers peuvent jouer un rôle
important en veillant à ce que les DEEE ne
d e v i e n n e n t p a s u n p r o b l è m e
environnemental. Il est essentiel de suivre
quelques règles simples :
-Les DEEE ne doivent pas être traités comme
les déchets ménagers.
-Les DEEE doivent être remis aux points de
collecte enregistrés. Dans de nombreux pays,
la collecte des produits gros électroménagers
peut être effectuée à domicile.
Dans de nombreux pays, lorsque vous
achetez un nouvel appareil, l'ancien peut être
retourné au détaillant qui doit collecter
gratuitement sur la base un contre un.
L'équipement repris doit être équivalent ou
bien avoir les mêmes fonctions que le produit
acquis.
Service GIAS
●
Pour veiller au fonctionnement efficace et sans
ri s q u e de cet app a r ei l , no us vou s
recommandons de faire exclusivement appel à
un technicien GIAS agréé pour son entretien ou
sa réparation éventuelle.
Besoins Électriques
Les sèche-linges sont prévus pour une
tension monophasée de 220-240 V, 50 Hz.
Vérifiez que la tension nominale du circuit
d'alimentation est réglée sur 6 A minimum.
L’électricité peut être extrêmement
dangereuse.
Cet appareil doit être mis à la terre.
La prise de courant et la fiche de la
machine doivent être du même type.
N'utilisez pas de multi-prises et/ou de
rallonges.
La fiche doit être accessible pour
débrancher l’appareil une fois qu’il a
été installé.
Vous pourrez être facturé en cas
d'appel du service après vente si le
problème sur le sèche-linge est causé
par une mauvaise installation.
Si le câble électrique de l'appareil
est endommagé, il doit être remplacé
par un câble spécifique, qui peut être
obtenu UNIQUEMENT via le service
des pièces détachées. Il doit être
installé par une personne compétente.
Ne branchez pas la machine et ne
l'allumez pas avant que l'installation soit
entièrement effectuée. Pour votre
sécurité, le sèche-linge doit être
correctement installé. Si vous avez un
doute quelconque sur l'installation,
appeler le service GIAS qui sera apte à
vous conseiller.
Ajustement Des Pieds
Lorsque la machine
est en place, les
pieds doivent être
ajustés pour mettre la
machine de niveau.
25
FR
Page 26
2.
KIT TUYAU D'ÉVACUATION:
INSTRUCTIONS DE MONTAGE
Afin d'éviter d'avoir à vider le réservoir d'eau
après chaque cycle de séchage, l'eau qui est
normalement recueillie dans ce même réservoir
pendant le cycle le séchage peut être évacuée
directement par un tuyau d'évacuation d'eaux
usées (le même système de vidange que celui
des éviers domestiques).
Les arr ê t é s munic i p a ux en mati è r e
d'évacuation d'eau interdisent la connexion à
un égout d'eau de surface. Le système de
vidange d'eaux sales doit être placé à proximité
du sèche-linge.
Le Kit contient : 1 tuyau et 1 étrier de tuyau.
4. Attacher le tuyau
nor du kt (en utlsant
le connecteur et les
clps fourns), au tuyau
retré de la connecton
en pont.
5.Placez le robinet
fourni dans le kit pour
fermer le tuyau.
4
5
ATTENTION ! Avant d'entreprendre tout
travail, éteignez le sèche-linge et retirez la
prise de l'alimentation électrique secteur.
Installez le Kit Suivant les Instructions:
1. Inclinez lentement
l’appareil sur le côté
droit.
2 . L e t u y a u
d’évacuation d'eau
sale se trouve du côté
droit de la machine
(voir ci contre). Un
tuyau gris est branché
sur le raccord sur le
côté gauche. A l'aide
d'une pince, retirez
l'étrier de fixation du
tuyau de raccord.
3. Retirez le tuyau du
raccord.
1
2
3
6. Une fois la machine
en place, ajustez les
pieds de façon à ce
que le tuyau de se
coince pas sous la
machine.
Connectez le nouveau
tuyau d'évacuation au
tuyau d'eau sales.
Attention : Si le produit est transporté
différemment, attendez au moins 4 heures
avant d’allumer l’appareil, ceci afin que le
gaz liquide retourne dans le compresseur.
En cas de non respect de cette procédure,
le compresseur pourrait être endommagé.
6
26
Page 27
3.
PRÉPARATION DE LA CHARGE
Avant d’utiliser le sèche-linge pour la
première fois :
Veuillez lire ce manuel d’instruction en détail.
●
Retirez tous les articles qui se trouvent à
●
l’intérieur du tambour.
Essuyez l’intérieur du tambour et de la porte
●
avec un chiffon humide pour éliminer la
poussière éventuelle qui aurait pu s’y infiltrer
en transit.
Préparation des vêtements
Vérifiez sur les étiquettes comportant les symboles
d’entretien que le linge que vous souhaitez sécher
convient au séchage en machine.
Vérifiez que toutes les fermetures sont fermées et
que les poches sont vides. Mettez les articles à
l’envers. Placez les vêtements en vrac dans le
tambour en veillant à ce qu’ils ne s’emmêlent pas
les uns avec les autres.
Ne séchez pas en machine :
Soie, nylon, broderies délicates, textiles avec
fibres métalliques, textiles avec PVC ou
bandes de cuir.
IMPORTANT: ne séchez pas de textiles
qui ont été traités avec un produit de
nettoyage à sec ou contenant du caoutchouc
(risque de départ de feu ou d'explosion)
Convient pour séchage en machine.
Séchage à haute température.
. .
Séchage à basse température
.
uniquement.
Ne pas sécher pas en machine.
Si le vêtement ne comporte aucune
étiquette de conseils de lavage,
considérez qu'il ne convient pas pour le
séchage en machine.
Par quantité et épaisseur
●
Lorsque la charge est plus importante
que la capacité du sèche-linge, séparez
les vêtements selon leur épaisseur (ex :
des serviettes, des sous-vêtements fins).
Par type de tissu
●
Coton/toile de lin : Serviettes, jersey en
coton, linge de lit ou de table.
Synthétiques : Chemisiers, chemises,
blouses etc.
en polyester ou polyamide, ainsi que
pour les mélanges de coton/synthétique.
Par degré de séchage
●
Triez selon : sec pour repassage, sec
pour rangement, etc. Pour les articles
délicats, appuyez sur le bouton Séchage
Dél i cat p o u r sé l e ct i o nn e r une
température de séchage basse.
FR
Durant les 15 dernière minutes du cycle, l'air
injecté à l'intérieur du tambour est toujours frais.
Économie d'énergie
Ne mettez que du linge essoré en machine ou
à la main dans le sèche-linge. Plus le linge est
sec, plus le temps de séchage sera court, ce
qui économisera de l’énergie.
TOUJOURS
Essayez de sécher le poids de linge
●
maximum pour économiser du temps et de
l’électricité.
Vérifiez que le filtre est propre avant chaque
●
cycle de séchage.
JAMAIS
Ne dépassez pas le poids maximum pour ne
●
pas gaspiller du temps ou de l’électricité.
Ne mettez pas d'articles dégoulinant d’eau
●
dans le sèche-l i n g e p o u r n e p a s
endommager l’appareil.
Triez la charge comme suit :
● Par symbole de soin d’entretien
Vous les trouverez sur le col ou la couture
intérieure :
Ne surchargez pas le tambour ; lorsqu’ils
sont mouillés, les grands articles peuvent
dépasser le poids maximal admissible (ex :
sacs de couchage, couettes).
4.
NETTOYAGE ET ENTRETIEN
DE ROUTINE
Nettoyage du sèche-linge
Nettoyez le filtre et videz le réservoir
●
d’eau après chaque cycle de séchage.
Nettoyez le condenseur à intervalles
●
réguliers.
Après chaque période d’utilisation,
●
essuyez l’intérieur du tambour et laissez
la porte ouverte pendant un moment
pour qu’il puisse sécher grâce à la
circulation d’air.
Essuyez l’extérieur de la machine et la
●
porte avec un chiffon doux.
N’UTILISEZ PAS de tampons ou
●
d’agents de nettoyage abrasifs.
27
Page 28
●
Pour empêcher que la porte n'adhère ou que
les peluches s'accumulent, nettoyez après
chaque fin de cycle la surface intérieure et le
joint de la porte avec un chiffon humide.
ATTENTION! Il est possible que le
tambour, la porte et la charge soient très chauds.
IMPORTANT: toujours éteindre et
débrancher la prise avant de nettoyer l'appareil
Pour les données électriques, veuillez
vous référer à l'étiquette de classification sur
le devant de l'appareil (avec la porte ouverte)
5.
RÉSERVOIR D’EAU
L'eau éliminée lors du cycle de séchage est
collectée dans un bac à condensation situé à
l'interieur de la porte du sèche-linge.
Lorsque le bac est plein , le voyant lumineux
s'allume sur le bandeau de commandes. Il
signale alors qu'il faut vider le bac. Toutefois, il
est conseillé de vider le bac après chaque cycle
de séchage.
2. Penchez le bac de
récupération d'eau pour
vider l'eau
Lorsque le bac est vide, le
replacer comme montré;
(C) commen c ez par
insérer la base du bac
dans la position montrée
( 1 ) p u i s p l a c e r
doucement le dessus du
bac en position (2)
3. Appuyez sur le bouton
pour redémarrer le
cycle.
Note: Ne pas ouvrir la
p o r t e d u r a n t l e s
p r o g r a m m e s
a u to m at i q ue s af i n
d'obtenir un séchage
p e r f o r m a n t
B
1
C
NOTE : Lors des premiers cycles, lorsque le
séche-linge est neuf, il n'y a que très peu d'eau
qui est récupérée car le réservoir intérieur est
rempli en premier.
Pour retirer le réservoir d'eau de la porte
1. Retirer doucement le
bac de récupération
d'eau en tenant la
poignée. (A) Lorsqu'il est
p l e i n , l e b a c de
récupération d'eau pèse
environ 6 kg.
A
28
Page 29
6.
PORTE et FILTRE
Tirez sur la poignée pour ouvrir la porte.
Pour remettre le sèche-linge en marche,
fermez la porte et appuyez .
Attention! Lorsque le sèche-linge est en
fonctionnement la porte peut être TRES
CHAUDE
Filtre
IMPORTANT: Pour garder une efficacité
constante du sèche-linge, vérifiez que le filtre
soit propre avant chaque cycle de séchage
Nettoyage du condenseur
1. Enlever la plaque de
protection
2.Tourner les deux
leviers de blocage
d a n s l e s e n s
c o n t r a i r e d e s
a i g u il l e s d ’u n e
montre et retirer la
porte.
1
FR
Ne pas utiliser le sèche-linge sans le filtre.
Un filtre encrassé peut augmenter la durée
de séchage et causer des dégâts qui
peuvent entraîner des coûts de réparation
importants.
1. Tirez le filtre vers le
haut.
2. Ouvrez le filtre,
comme illustré.
3. Retirez doucement
les peluches à l’aide
d’une brosse douce
ou du bout des doigts.
4. Réenclenchez le
filtre et remettez-le en
place.
1
2
Indicateur Entretien Filtre
Vérifiez et nettoyez le filtre situé dans la
porte ainsi que le condenseur situé derrière
la plaque de protection, en bas du sèchelinge.
Si le linge n’est pas sec, vérifiez que le filtre
ne soit pas encrassé.
SI VOUS NETTOYEZ LE FILTRE SOUS
L'EAU, N'OUBLIEZ PAS DE LE SECHER
ATTENTION! Si vous ouvrez la porte en
cours de cycle, avant que le cycle de
refroidissement n'ai eu lieu, la poignée peut
être chaude. Veuillez faire attention en
manipulant la porte et en sortant le bac de
récupération d'eau pendant le cycle
3. Retirez doucement
la poussière ou les
peluches avec un
ch i ffo n. N e p as
utiliser d’eau pour
n e t t o y e r l e
condenseur.
4.Enlever délicatement
l’ép o n g e d e s on
em p l a c e m e n t e t
laver l’éponge en la
passant sous un filet
d’eau afin d’enlever
t o u t r e s t e d e
pou s sière ou de
peluches.
5 . R e m e t t e z
co r r e c t em e n t l e
condenseur en place
(en suivant la flèche)
e n l e p o u s s a n t
fermement. Bloquez
les deux leviers en
p o s i tio n e n le s
to urnant dans le
sens des aiguilles
d’une montre.
6. Remettez la plaque
de protection en
place.
Nettoyez les filtres avant chaque cycle
29
2
3
4
5
Page 30
7.
COMMANDES ET
INDICATEURS
220'
END
120'
90'
6h
3h
3h
60'
9h
END
6h
9h
B
4
C
pleines Cette machine est équipée de la
fonction "Drying Manager". Sur les cycles
automatiques, chaque degré de séchage est
indiqué par un voyant lumineux clignotant qui
permet de connaître le niveau de séchage
A
atteint.En cas d'erreur, toutes les LED
clignotent rapidement 3 fois.
D
4. Départ différé
Pour différer le départ du programme de 3h,
6h ou 9h. Ouverture du hublot avec un départ
différé programmé : après la fermeture du
hublot, appuyez de nouveau sur le bouton
démarrage pour reprendre le décompte du
220'
120'
90'
60'
temps restant.
C- Leds
Bac de récupération d'eau - Une LED
s'allume lorsque le bac de récupération d'eau
doit être vidé.
Nettoyage des filtres - Une LED s'allume
3
2
1
lorsque les filtres doivent être nettoyés (filtres
de porte et du bas).
A-Sélecteur de cycle -
La manette de sélection des programmes est
bi-directionnelle. Pour annuler la sélection
ou éteindre le sèche-linge, tournez la
manette de sélection sur ARRET.
B-Boutons -
1.Démarrer-Pause
Pour démarrer ou suspendre le programme
sélectionné.
2.Sélection de la durée du cycle
Il est possible de changer la durée d'un cycle
automatique à programmé, jusqu'à 3 minute
après le début du cycle. Après cette
manipulation, afin de re-paramétrer le
séchage en mode automatique, il est
nécessaire d'éteindre le sèche-linge.
En cas d'erreur, toutes les LED clignotent
rapidement 3 fois.
3.Sélection du niveau de séchage
Permet de sélectionner le niveau de séchage:
cette option est paramétrable jusqu'à 5
minutes après le début du cycle:
- Prêt à repasser: garde les vêtements
humides pour faciliter le repassage
- Prêt à suspendre: les vêtements sont
prêt à être accrochés sur un cintre
- Prêt à ranger: les vêtements peuvent
être rangés directement en penderie
- Extra sec: pour avoir un résultat de
séchage complet, idéal pour les charges
Ces LEDS s'allument pour indiquer la phase
de séchage:
- SECHAGE / S'allume lorsque le cycle de
séchage est en cours.
- : S'allume pendant le cycle de
refroidissement.
- FIN: S'allume lorsque le cycle est terminé.
DZone SMART TOUCH
- Appuyez sur le bouton
DEMARRER/PAUSE et positionnez la
manette sur le programme Touch. Cette
manipulation permet de lancer directement
un programme téléchargé en amont. (Pour
télécharger de nouveaux programmes sur
l'application, voir la notice d'utilisation)
30
Page 31

Le cycle de séchage
incluida la
Esta función le permite guardar las
configuraciones de los dos programas
personalizados preferidos, incluida la
elegida.
Tecla MEMORIA
Laine de cette machine a
été approuvé par The
Woolmark Company pour
le séchage des produits
en laine lavables en
machine, a condition que
les produits soient lavés et séchés selon les
instructions données sur l'étiquette du
vêtement et celles émises par le fabricant de
cette machine. M1530.
Au Royaume-Uni, en Irlande, à Hong Kong et
en Inde la marque Woolmark est une marque
de certification.
Poids De Séchage Maximum
Coton
Synthétiques ou Délicats
Capacité max. déclarée
Max.4 Kg
Guide De Séchage
Le cycle normatif COTON ECO ( ) est le
plus économe et le plus approprié pour le
séchage des textiles cotons. Le tableau sur
la dernière page vous montre les durées et la
co n s o mm a t i o n a p pr o x i ma ti v e d e s
principaux programmes de séchage.
Consommation d'électricité en mode éteint
Consommation d'électricité en mode veille
Spécifications Techniques
Capacté du tambour 125
Charge maxmale
Hauteur
Largeur 60 cm
Profondeur
Étquette d'énerge
Se reporter à l'étquette énergétque
85 cm
60 cm
Se reporter à l'étquette énergétque
Information pour le laboratoire de test
EN 61121 Programme à utiliser
-COTON EXTRA SEC
-COTON PRÊT A REPASSER
-TEXTILE DELICAT
La durée réelle du cycle de séchage
dépend du niveau d'humidité initiale du
linge due à la vitesse de rotation, du type et
de la quantité du chargement, de la
propreté des filtres et de la température
ambiante.
COTON OU
COTON OU BLANC
-DELICATS OU SYNTHETIQUES
0,40 W
0,75 W
FONCTIONNEMENT
1.Ouvrez la porte et chargez le linge dans
le tambour.Vérifiez qu'aucun vêtement
n'entrave la fermeture de la porte.
2. Fermez doucement la porte en la
poussant jusqu'à ce que vous entendiez un
déclic.
3. Tournez le sélecteur de programme et
choisissez le programme de séchage
souh a i t é (con s u l tez le gu i d e de
programmation pour de plus amples
détails)
4. Appuyez sur le bouton Le sèche-
linge démarre automatiquement et le
voyant situé au dessus du bouton s'allume.
5. Si vous ouvrez la porte pendant le cycle
de séchage pour vérifier le linge, il est
nécessaire d'appuyer sur le bouton ,
pour recommencer le séchage une fois la
porte refermée.
6. Lorsque le cycle est presque terminé, la
phase de ventilation à froid commence. Les
vêtements sont séchés avec de l'air froid
afin de les refroidir.
7. Lorsque le programme est terminé, le
voyant END s'allume sur le bandeau de
commande.
8. A la fin du cycle, le tambour continuera à
tourner de manière intermittente afin de
minimiser les plis. Cette opération
continuera jusqu'à ce que l'appareil soit
éteint ou que la porte soit ouverte.
Ne pas ouvrir la porte durant les
programmes automatiques afin d'obtenir un
séchage performant
Nettoyez les filtres avant chaque cycle
UNIQUEMENT POUR SECHE-LINGE DE
10 KG DE CAPACITE RACCORDEZ LE
TUYAU FLEXIBLE DE VIDANGE POUR
RECUPERER L'EAU DU CONDENSATEUR
CONFORMEMENT AUX INSTRUCTIONS DU
CHAPITRE 2
31
FR
Page 32

8.
SÉLECTION DU PROGRAMME
PROGRAMME
Mixtes - Facile à
repasser
Coton Eco
Blanc / Coton
Mix & Dry
Délicats
Chemises
Couleurs
Bébé coton
Jeans
Sport
Laine
Rapide 45 min
Défroissage
Rafraîchir
DESCRIPTION DU PROGRAMME
Un programme adapté au séchage des textiles mixtes. Les plis
sont minimisés grâce à une humidité optimale du linge pour
faciliter le repassage. Secouer le linge avant séchage.
Programme de séchage normatif économique. Le programme le
moins énergivore. Convient aux vêtements en coton et lin.
Le cycle adapté au linge en coton ainsi qu'aux tissus spongieux
et les serviettes.
Pour sécher tous les différents types de tissus comme le
coton, le lin, le mixte, les matières synthétiques.
Cycle conçu pour sécher les tissus délicats et synthétiques
qui nécessitent un traitement précis et spécifique
Ce cycle est spécialement dédié au séchage des chemises et
minimise les plis grâce aux mouvements spécifiques du tambour. Il
est recommandé de sortir le linge directement après la fin du cycle.
Un cycle délicat spécifique pour sécher les vêtements en coton
foncé ou coloré.
Cycle dédié aux vêtements pour bébé qui ont besoin d'être
hygiénisés.
Cycle dédié aux textiles en jean ou denim. Il est recommandé de
mettre les vêtements sur l'envers avant de les sécher.
Cycle pour les vêtements techniques de sport et de fitness.
Sèche en douceur et respecte les fibres élastiques en
empêchant les plis et la détérioration des textiles.
Grâce à la certification Woolmark, ce programme permet de sécher
jusqu'à 1kg de vêtements délicats en laine (environ 3 pulls). Il est
conseillé de mettre les vêtements sur l'envers avant de les sécher.
La durée du cycle peut varier en fonction des dimensions du linge,
du poids de la charge et du niveau d'essorage choisi durant le
lavage. A la fin du cycle, les vêtements sont prêts à être portés.
Cependant si le textile est plus lourd, les extrémités peuvent être
encore humides. Laissez les alors sécher naturellement. Il est
recommandé de décharger le linge tout à la fin du cycle. Attention:
le feutrage de la laine est irreversible ; ne sécher que les vêtements
avec le symbole ("séchage autorisé en sèche-linge"). Ce
programme n'est pas conçu pour les vêtements en acrylique.
Programme parfait pour sécher rapidement une charge de linge
ne dépassant pas 2Kg. Il est recommandé d'essorer à haute
vitesse avant le séchage.
Il s'agit d'un cycle chaud qui en seulement 12 minutes aide à
détendre les plis.
Le cycle idéal pour éliminer les mauvaises odeurs et défroisser le
linge.
Il s’agit de programmes supplémentaires que vous pouvez télécharger depuis votre Smartphone
grâce à l’application Simply-Fi (pour plus d’information voir la partie Smart Touch de la notice). Le
programme Auto-nettoyage est installé par défaut pour entretenir votre machine.
CAPACITE
(kg)
2
MAX
MAX
4
4
2.5
4
4
4
4
1
1
2.5
2.5
TEMPS DE
SECHAGE
(min)
*
*
*
*
*
*
*
150’
*
*
70’
*
12’
*
* La durée réelle du cycle dépend du niveau d'humidité du linge en sortie d'essorage, du type de linge, de la
charge, de la propreté des filtres et de la température ambiante.
32
Page 33

SMART TOUCH
Cet appareil est équipé de la technologie Smart
Touch qui permet de nouvelles interactions via
so n app lica tion, compatib le avec les
Smartphones Android équipés de la technologie
NFC.
● Télé chargez sur vot r e smart phone
l’application Candy simply-Fi.
● Entretient SMART – Permet de lancer
un diagnostic de l’appareil qui vous
indiquera les différentes possibilités
d’entretien à effectuer.
● Mes statistiques – Retrouvez toutes
vos consommations énergétiques ainsi
que des trucs & astuces pour une
utilisation plus efficace de votre appareil.
FR
L’application Candy Simply-Fi est
disponible pour les tablettes,
smartphones équipés d’IOS et
d’A n dro i d. Cep e nda n t, pou r
bénéficier de tout le potentiel de la
téchnologie Smart Touch, il est
néc e ss a ir e de po s sé d er u n
smartphone équipé d’Android et de
la technologie NFC.
Smartphone Android équipé
de la technologie NFC
Smartphone Android
sans la technologie NFC
Tablette Android Sans NFC
iPhone Apple Sans NFC
iPad Apple Sans NFC
Le contrôle et le lancement de cycle de
lavage est possible uniquement en étant à
proximité du lave-linge. Il n’est pas
possible d’effectuer ce type d’opérations
depuis une autre pièce.
Interaction avec le
lave-linge + contenus
Contenus uniquement
Contenus uniquement
Contenus uniquement
Contenus uniquement
FONCTIONS
Les principales fonctions disponibles via
l’application sont:
● Assistant vocal SMART – Un guide qui
vous permet de choisir le programme le plus
adapté en trois échanges vocaux (type de
vêtements, couleur et degré de salissure).
● Cycles – Permet de télécharger et de lancer
de nouveaux programmes de lavage.
Retrouvez tous les détails des
fonctions Smart Touch dans le mode
démo de l’application Simply-Fi ou sur:
www.candysmarttouch.com
COMMENT UTILISER SMART
TOUCH
P R E M I E R E U TI L I S AT I O N –
Enregistrement de votre appareil
Entrez dans le menu "Configuration" de
votre Smartphone Android et activez la
fon c t ion NFC d ans s ous - men u
"Réseaux Sans fil".
Selon le modèle de votre smartphone
et de la version Android, le processus
d’activation du NFC peut être différent.
Référez-vous à la notice de votre
Smartphone pour plus de détails.
● Tournez le sélecteur bi-directionnel
jusqu’à la position Smart Touch pour
activer le capteur NFC.
● Lancez l’application simply-Fi, et créez
un profile en suivant les instructions
données sur le smartphone ou sur le
"Guide Rapide" fournit avec l’appareil.
Plus d’informations ainsi qu’un guide
et des vidéos pour un enregistrement
facile sont disponibles sur:
www.candysmarttouch.com/how-to
33
Page 34

USAGES FRÉQUENTS
● Lorsque vous souhaitez utilisez votre
appareil via votre smartphone, vous devez
systématiquement activer le mode Smart
Touch en choisissant la position homonyme à
l’aide du sélecteur bi-directionnel.
● Assurez-vous d’avoir débloqué l’écran de
votre smartphone et que vous avez activé la
connectivité NFC. Autrement suiviez les
indications mentionnées précédemment.
● Si vous souhaitez lancer un cycle de lavage,
chargez le tambour, ajoutez votre lessive et
fermez la porte.
● Sélectionnez la fonction désirée dans
l’application (exemple: lancer un programme,
lancer un auto-diagnostique, mettre à jour les
statistiques etc.).
● Suivez les instructions indiquées sur votre
smartphone. APPOSEZ votre smartphone sur
le logo Smart Touch lorsque l’application
Simply-Fi vous le demande.
● Afin de relancer un cycle de lavage qui a déjà
été téléchargé, placez le sélectionneur de
programme sur la position Smart Touch puis
appuyez simultanément sur les boutons
DEPART/PAUSE et OPTIONS afin de lancer
le programme.
NOTES:
Placer votre smartphone de telle manière
à ce que l’antenne, située à l’arrière du
telephone soit proche du logo Smart
Touch (cf image ci-dessous).
Si vous ne savez pas où se situe l’antenne
NFC sur votre smartphone, faites de lents
mouvements circulaires autour du logo
Smart Touch jusqu’à ce que l’application
Simply-Fi confirme la connexion. Afin de
garantir une connexion stable, il est
important de GARDER LE SMARTPHONE
SUR LE LOGO Smart Touch PENDANT LA
PROCÉDURE D’APPAIRAGE ET PENDANT
LE PHASES DE SYNCHRONISATION.
L’application Simply-Fi vous avertira
lorsque vous pourrez retirer votre
smartphone du logo Smart Touch.
Des housses de protection épaisse ou des
autocollants métalliques peuvent altérer la
transmission de données entre le lavelinge et votre smartphone. Si cela est
nécessaire, retirez-les.
Le remplacement de certains composants
de votre smartphone (coque arrière,
batterie etc) par d’autres non certifiés par
la marque de votre smartphone peut
entraîner un dysfonctionnement de
l’antenne NFC altérant l’utilisation de
l’application simply-Fi.
La gestion et le contrôle de la machine via
l'application est uniquement possible à proximité
de l'appareil : Par conséquent, il est impossible
d'effectuer des opérations à distance (par exemple:
depuis une autre pièce, à l'extérieur de la maison).
PARAMETRES SANS FIL
Paramètres
Sans fil standard
Bande de fréquence
Limite du champs magnétique
Le groupe Candy Hoover Srl déclare que
cet appareil répond aux exigences de la
Directive 2014/53/EU. Pour recevoir
une copie de la déclaration de conformité,
veuillez contacter le fabricant : www.candygroup.com
ISO/IEC 14443 Type A and NFC Forum Type 4
13,553-13,567 MHz (centre frequency 13,560 MHz)
< 42dBμA/m (à 10 mètres)
Spécifications
34
Page 35

DÉPISTAGE DE PANNES
9.
UNIQUEMENT POUR LES MODELS SMART TOUCH
Grâce à la fonction Smart Touch de votre application Simply-Fi, vous pouvez à n’importe
quel moment vérifier le bon fonctionnement de votre lave-linge. Vous devez avoir un
smartphone équipé de la technologie NFC. Plus d’informations sont disponibles sur
l’application.
Si l’affichage de votre lave-linge montre une erreur (à l'aide d’un code ou en clignotant)
vous pouvez lancer l’application et approcher votre smartphone du bandeau du lave-linge.
Vous pouvez dès lors lancer un auto-diagnostique pour résoudre le problème.
Qu'est-ce qui peut être à l'origine de...
Défauts que vous pouvez rectifier vous-même
Avant d’appeler le service GIAS pour obtenir des
conseils, veuillez suivre la liste des vérifications cidessous. L’intervention sera facturée si la machine
fonctionne correctement ou si elle a été installée ou
utilisée de manière incorrecte. Si le problème persiste
alors que vous avez terminé les vérifications
recommandées, veuillez appeler le service GIAS qui
pourra peut-être vous aider par téléphone.
Le temps restant affiché peut varier pendant le cycle
de séchage. Le temps est constamment ajusté au
cours du cycle afin de donner la meilleure estimation
possible. Le fait que le temps restant augmente ou
diminue pendant le cycle est normal.
La période de séchage est trop longue/les
vêtements ne sont pas suffisamment secs…
● Avez-vous sélectionné le temps de séchage/le
programme qui convient ?
● Les vêtements étaient-ils trop mouillés ? Les
vêtements avaient-ils été adéquatement essorés en
machine ou à la main ?
● Le filtre doit-il être nettoyé ?
● Faut-il nettoyer le condenseur ?
● Le sèche-linge est-il surchargé ?
● Les entrées, sorties et la base du sèche-linge sontelles libres d'obstructions ?
● Avez-vous sélectionné le bouton Séchage Délicat
au cours d’un cycle précédent ?
Le sèche-linge ne fonctionne pas…
● Le sèche-linge est-il branché sur une alimentation
électrique adéquate ? Vérifiez à l’aide d’un autre
appareil, par exemple une lampe de chevet.
● La fiche est-elle bien branchée sur l’alimentation de
secteur ?
● Y a-t-il une panne de courant ?
● Le fusible a-t-il sauté ?
● La porte est-elle bien fermée ?
● Le sèche-linge est-il en position de marche, au
niveau du courant de secteur et de la machine ?
● La période de séchage ou le programme a-t-il été
sélectionné ?
● La machine a-t-elle été remise en marche après
l’ouverture de la porte ?
● Le sèche-linge s’est-il arrêté parce que le réservoir
d’eau est plein et qu’il faut le vider ?
Le sèche-linge est bruyant…
● Arrêtez le sèche-linge et contactez le
service GIAS pour obtenir des conseils.
L'indicateur est allumé…
● Le filtre doit-il être nettoyé ?
● Faut-il nettoyer le condenseur ?
L'indicateur est allumé…
● Le réservoir d’eau doit-il être vidé ?
SERVICE CLIENTÈLE
En cas de problème persistant même après
avoir effectué toutes les inspections
recommandées, veuillez contacter le
Service. Il pourra vous aider par téléphone
ou organiser la visite d'un technicien, en
vertu des conditions de votre garantie.
Cependant, vous serez facturé dans l’un
des cas suivants :
● Si la machine est en bon état de marche.
● Si la machine n’a pas été installée
c o nf o rm é me n t au x in s t ru c ti o ns
d’installation.
● Si l a m a ch i ne a ét é u t i li s é e
incorrectement.
Pièces De Rechange
Utilisez toujours des pièces de rechange
du fabricant, disponibles auprès du
service GIAS.
Service GIAS
Pour les entretiens et les réparations,
contactez votre technicien local du
service GIAS.
Le c onstructe u r déclin e toute
responsabilité en cas d’erreurs
d’impression dans le p r é s e n t
document. Le constructeur se réserve
le droit d’apporter les modifications
nécessaires à ses produits sans en
changer les caractéristiques de base.
35
FR
Page 36

Index
Bitte lesen Sie diese Anleitung sorgfältig durch
und richten Sie sich bei der Bedienung der
Wäschetrockner an die Anleitung. Dieses
Handbuch enthält wichtige Hinweise für die
sichere Installation, Anwendung und Wartung
sowie einige nützliche Hinweise für optimale
Ergebnisse beim Gebrauch Ihrer Maschine.
Heben Sie diese Dokumentation an einem
sicheren Ort auf, um jederzeit wieder darauf
zurückgreifen zu können bzw. um sie an
zukünftige Besitzer weitergeben zu können
Zum Lieferumfang Ihrer Waschmaschine
gehören folgende Dokumentation und
Zusatzteile:
● Bedienungsanleitung
● Garantieschein
● Energieeffizienzklasse
Mit der Anbringung des -Zeichens am
Gerät zeigen wir an, dass wir sämtliche für
dieses Produkt geltenden und notwendigen
europäischen Sicherheits-, Gesundheitsund Umweltstandards einhalten und hierfür
haftbar sind.
1. SICHERHEITSHINWEISE
2. ABLAUFSET – MONTAGEANLEITUNG
3. VORBEREITUNG DER FÜLLUNG
4. REINIGUNG UND ROUTINEWARTUNGEN
5. WASSERTANK
6. TÜR und SIEB
7. SCHALTERBLENDE UND ANZEIGEN
8. AUSWÄHLEN DES PROGRAMMS
9. TROUBLESHOOTING KUNDENDIENST
Kontrollieren Sie,ob die Maschine durch
den Transport beschädigt wurde.Falls dies
der Fall ist, wenden Sie sich an den
GIASService. Die Sicherheit des Geräts kann
beeinträchtigt werden, wenn Sie sich nicht an
diese Sicherheitshinweis e halten. Falls ein
P r o b l e m mi t I h r e r Mas c hin e d u r c h
Zweckentfremdung verursacht wird, müssen Sie
Reparaturarbeiten möglicherweise selbst
bezahlen.
36
Page 37

1.
SICHERHEITSHINWEISE
●
Kinder unter 8 Jahren sowie
Personen, die aufgrund ihrer
physischen, sensorischen oder
geistigen Fähigkeiten oder ihrer
Unerfahrenheit oder Unkenntnis
nicht in der Lage sind, die
Wäschetrockner sicher zu
b e d i e n e n , d ü r f e n d i e
Wäschetrockner nicht ohne
Aufsicht oder Anweisung durch
eine verantwortliche Person
benutzen, sich in der Nähe
aufhalten oder das Gerät
saubermachen.
Kinder sollten nicht mit dem
Gerät spielen. Reinigung und
Benutzerwartung sollten nicht
von Kindern ohne Einführung,
ausgeführt werden.
Dieses Gerät ist ausschließlich
●
für den Haushaltsgebrauch
kon z i p i e r t b z w. f ü r d e n
haushaltsnahen Gebrauch, wie
z.B:
-Teeküchen für das Personal
von Büros, Geschäften oder
ähnlichen Arbeitsbereichen;
- Ferienhäuser;
- Gäste von Hotels, Motels und
anderen Wohneinrichtungen;
- G ä s t e v o n
Apartments/Ferienwohnungen,
B e d a n d B r e a k f a s t
Einrichtungen
Eine andere Nutzung als die
normale Haushaltsnutzung, wie
z . B. g e w e rb l i c h e o d e r
professionelle Nutzung durch
Fachpersonal, ist auch im Falle
d e r o b e n e r w ä hn te n
E i n r i c h t u n g e n
ausgeschlossen.
Sollte das Gerät entgegen
d i e s e n Vo r s c h r i f t e n
betrieben werden, kann dies
di e L e b e ns d a u e r de s
Gerätes beeinträchtigen und
de n G a r antie a n s p ruch
gegenüber dem Hersteller
verwirken.
Eventuelle Schäden am
Gerät oder andere Schäden
oder Verluste, die durch eine
n i c h t h a u s h a l t s n a h e
Nut zu ng he rvorgerufen
werden sollten (selbst wenn
sie in einem Haushalt
erfolgen), werden, so weit
vom Gesetz ermöglicht, vom
Hersteller nicht anerkannt.
WARNUNG
●
Zweckentfremd ung de s
T r o c k n e r s k a n n z u
Brandgefahr führen.
Diese Maschine dient als
●
H a u s h a l t s g e r ä t
a u s s c h l i e ß l i c h z u m
T r o c k n e n v o n
Ha u sha l tste x til i en un d
Kleidungsstücken.
Verwenden Sie dieses Gerät
●
nur für die vorgesehenen
Z w e c k e g e m ä ß d e r
Anleitung. Lesen Sie die
G e b r a u c h s a n l e i t u n g
sorgfältig durch, bevor Sie
das Gerät i n B e t r i e b
nehmen.
●
Berühren Sie das Gerät nicht
mit feuchten oder nassen
Händen oder Füßen.
DE
37
Page 38

●
Lehnen Sie sich nicht gegen die
Tür, wenn Sie die Maschine
beladen, und fassen Sie die
Maschine nicht an der Tür,
wenn Sie sie hochheben oder
verschieben.
Lassen Sie Kinder nicht mit der
●
Maschine oder den Schaltern
spielen.
WARNUNG Verwenden Sie
●
das Produkt nicht, wenn das
Fl u sen s i eb n i cht r i cht i g
eingebaut oder beschädigt ist;
Flusen könnten Feuer fangen.
WARNUNG An der Stelle, an
●
der sich das Symbol für heiße
Flächen befindet ,kann die
Temperatur während des
Trocknerbetriebs auf über 60°C
steigen.
●
Ziehen Sie den Stecker aus der
Steckdose! Ziehen Sie vor dem
Reinigen des Geräts immer
den Stecker heraus!
●
Fusseln und Flusen dürfen sich
nicht auf dem Fußboden im
Bereich um die Maschine
ansammeln.
Die Trommel in dem Gerät kann
●
sehr heiß werden. Lassen Sie
den Trockner stets vollständig
bis zum Ende der Abkühlphase
laufen, bevor Sie die Wäsche
herausnehmen.
Verwenden Sie die Maschine
●
bei vermuteten Störungen
nichtweiter
Max. füllmenge (Mischwäsche):
●
s. Energielabel
Installation
●
Verwenden Sie keine Adapter,
Mehrfachsteck dosen und/oder
Verlängerungskabel.
●
Stellen Sie den Trockner nie in
der Nähe von Vorhängen auf.
Achten Sie darauf, dass keine
Ge gen s tän d e hi n ter d en
Trockner fallen oder sich dort
ansammeln können.
●
Das Gerät darf nicht hinter einer
verschließ baren Tür, einer
Schiebetür oder einer Tür mit
Scharnier an der dem Trockner
entgegen gesetzten Seite
installiert werden.
Wi c h t i g : D a s G e rät soll
möglichst stehend transportiert
werden. Bei Bedarf kann es nur in
die gezeigte Richtung geneigt
werden.
Achtung: Wenn das Gerät in
eine andere Lage transportiert
wurde, warten Sie mindestens 4
S t un d e n , b e v or S i e e s
einschalten, damit sich die
Flüssigkeit im Kompressor
wieder stabilisieren kann. Tun Sie
es nicht, können Schäden am
Kompressor die Folge sein.
38
Page 39

Die Wäsche
Trocknen Sie keine
●
ungewaschenen Gegenstände
im Trockner.
WARNUNG AUF KEINEN
●
FALL Stoffe in der Maschine
trocknen, die mit chemischen
Reinigungs mitteln behandelt
wurden.
WARNUNG Wenn Schaum-
●
gummimaterialien heiß werden,
können sie sich unter
bestimmten Bedingungen
plötzlich entzünden.
Gegenstände wie Schaumgummi
(Latex - schaumstoff),
Duschhauben, wasserab
weisende Textilien, mit Gummi
verstärkte Produkte sowie
Kleidung ü
Kissensst cke o de r
mit Schaumstoffpolster sind für
den Wäschetrockner NICHT
GEEIGNET.
Sehen Sie immer auf den
●
Pflegeetiketten nach, ob das
Material für das Trocknen
geeignet ist.
Textilien vor dem Einfüllen in
●
den Trockner erst schleudern
oder gründlich auswringen.
Füllen Sie KEINE tropfnassen
Textilien in den Trockner.
Entfernen Sie alle Gegenstände,
●
wie Feuerzeuge und Streichhölzer
aus Ihren Taschen.
Feuerzeuge und Streichhölzer
●
unbedingt aus den Taschen
entfernen und AUF KEINEN
FALL mit feuergefährlichen
Flüssigkeiten in der Nähe der
Maschine hantieren.
KEINE Vorhänge aus
●
Glasfasermaterial in die
Maschine füllen. Kommen
andere Textilien mit
Glasfasern in Berührung, so
kann dies zu Hautreizungen
führen.
Gegenstände, die mit
●
Substanzen wie Speiseöl,
Azeton, Alkohol, Benzin,
Kerosin, Fleckenentferner,
Terpentin, Wachsen und
Wachsentferner getränkt sind,
sollten mit einer zusätzlichen
Menge Waschpulver in
heißem Wasser gewaschen
werden, bevor sie im Trockner
getrocknet werden.
Weichspüler oder ähnliche
●
Produkte sollten wie in der
Gebrauchanleitung des
Weichspülers angegeben
verwendet werden.
Entlüftung
In dem Raum, in dem sich der
●
Trockner befindet, muss eine
ausreichende Entlüftung
vorhanden sein, um zu
verhindern, dass Gase aus
der Verbrennung anderer
Brennstoffe, zum Beispiel
offene Feuer, während des
Trocknerbetriebs in den Raum
gesogen werden.
Hinweis zur Aufstellung des
●
Gerätes an Wänden oder in
Nischen.
Der Mindestabstand zwischen
●
Gerät und sämtlichen
angrenzenden Oberflächen
beträgt 12 mm. Die Luftzufuhr
– und Auslassöffnungen
müssen immer großräumig
freigehalten werden. Den Platz
zwischen Geräteunterseite
und Boden ebenfalls rundum
freihalten.
Die Abluft darf nicht in einen
●
Kaminschacht geleitet
werden, der für das Ableiten
von Rauch aus der
5
39
DE
Page 40

Verbrennung von Gas oder
anderen Brennstoffen
verwendet wird.
Prüfen Sie regelmäßig die
reibungslose Luftzirkulation im
Trockner.
Bitte alle Filter regelmäßig
prüfen und ggf. reinigen.
Achten Sie darauf, dass keine
Gegenstä
Seitenteilen und der Rück-seite
des Trockners herunterfallen
und sich dort ansammeln, da
hierdurch die Ansaug- und
Abluftanschlüsse blockiert
werden können. Der Trockner
darf AUF KEINEN FALL in der
unmittelbaren Nähe von
Vorhängen aufgestellt werden.
nde zwischen beiden
Falls der Wäschetrockner
auf einer Waschmaschine
aufgestellt werden soll,
muss ein passender
Aufbaumontagesatz verwendet
werden, der für Ihr Gerät
geeignet ist:
-
Aufbaumontagesatz in der
Standardgröße:
für Waschmaschinen mit
einer Mindesttiefe von 44 cm;
-
Aufbaumontagesatz in der
Größe Slim:
für Waschmaschinen mit
einer Mindesttiefe von 40 cm.
Der Aufbaumontagesatz ist
über unseren Ersatzteilservice
erhältlich. Anweisungen zum
Aufbau und zur Befestigung
eventueller Elemente sind im
Lieferumfang des
Aufbaumontagesatzes enthalten.
Der Stecker muss nach der
Installation des Gerätes
zugänglich sein.
WARNUNG: Das Gerät darf
nicht mit einem externen
Schaltgerät wie etwa einem
Timer betrieben werden oder
an einen Stromkreis
-
regelmäßig ein
geschaltet
werden.
Sollte das Netzkabel
beschädigt sein, so muss dieses
vom Hersteller, einem seiner
Servicetechniker oder von
qualifizierten Personal
ausgetauscht werden, um
Risiken zu vermeiden.
Bitte das Gerät keinesfalls in
einem Raum mit zu niedriger
Raumtemperatur, außerhalb
geschlossener Räume oder im
Freien in Betrieb nehmen. Bei
40
diesen Umgebungsbedingungen
ist der ordnungsgemäße Betrieb
des Gerätes nicht gewährleistet
bzw. das Gerät könnte Schaden
nehmen (Flüssigkeiten im
Hydraulikkreislauf können zu zäh
werden oder gar einfrieren und
dadurch Bauteile wie Ventile oder
Schläuche beschädigt werden).
Die Raumtemperatur sollte
immer im Bereich zwischen +5°C
u n d + 3 5° C l i eg e n. I m
Temperaturbereich zwischen
+2°C und +5°C könnte sich
Kondenswasser am Gerät oder
im Raum bilden.
wird
und
angeschlossen
Air Outlets in the Base
aus-
der
Page 41

WARNUNG:
Brandgefahr/Brennbares Material
Das Gerät enthält R290, ein
umweltverträgliches Kühlgas,
das brennbar ist.
Halten Sie offenes Feuer und
Zündquellen daher vom Gerät
fern.
Überprüfen Sie das Gerät auf
sichtbare Beschädigungen.
Betreiben Sie das Gerät nicht,
wenn es beschädigt ist.
Kontaktieren Sie bei Proble-
men Ihren Fachhändler oder
eins unserer Kundendienstzentren.
WARNUNG:
Sicherstellen, dass die
Gehäuseöffnungen am Gerät
und die Öffnungen der
Einbauschränke, in die das
Gerät (nur Einbaumodelle)
eingebaut wurde, frei sind.
WARNUNG:
Den Kühlkreislauf nicht
beschädigen.
Alle Reparaturen oder Eingriffe
am Gerät müssen von einem
autorisierten Kundendienst
durchgeführt werden.
Eine falsche Entsorgung des
Geräts kann Brände verursachen und zu Umweltverschmutzungen führen.
Entsorgen Sie das Gerät
ordnungsgemäß, und achten
Sie darauf, dass die Rohre und
Leitungen mit der Kühlflüssigkeit nicht beschädigt werden.
DE
41
Page 42

Umweltschutz
●
Das gesamte Verpackungsmaterial besteht
a u s u m w e l t - f r e u n d l i c h e n ,
wiederverwertbaren Materialien. Bitte helfen
Sie mit, diese umwelt - freundlich zu
entsorgen. Ihre Stadtverwaltung kann Sie
ü b e r E nt s o r g u n g s mö gl i c h k e i t en
informieren.
●
Ziehen Sie den Stecker aus der Steckdose,
zerschneiden Sie das Netzkabel und werfen
Sie Netzkabel und Netzstecker getrennt in den
Müll, bevor Sie Ihren alten Trockner entsorgen.
Zerstören Sie Scharniere und die Türverriegelung, damit sich Kinder nicht versehentlich in
der Waschmaschine einsperren können.
Europäische Vorschrift 2012/19/EU
Dieses Gerät ist entsprechend der
europäischen Richtlinie 2012/19/EU
als elektrisches / elektronisches
Altgerät (WEEE) gekennzeichnet.
Elektrische und el e k t r o n i s c h e
Altgeräte enthalten vielfach noch wertvolle
Materialien. Sie enthalten aber auch schädliche
Stoffe, die für ihre Funktion und Sicherheit
notwendig waren. Im Restmüll oder bei falscher
Behandlung können diese der menschlichen
Gesundheit und der Umwelt schaden. Es ist
daher sehr wichtig, dass elektrische und
el ektr onis che Al tger äte (WEE E) einer
speziellen Verwertung zugeführt werden, damit
die schädlichen Stoffe ordnungsgemäß
entfernt und entsorgt werden bzw. wertvolle
Rohstoffe der Wiederverwertung zugeführt
werden können
Sie können mit der Beachtung der folgenden
simplen Hinweise einen wichtigen Beitrag dazu
leisten, dass elektrische und elektronische
Altgeräte (WEEE) de r m e n s c h l i c h e n
Gesundheit und der Umwelt nicht schaden:
- Elektrische- und elektronische Altgeräte
(WEEE) sollten keinesfalls wie Rest- oder
Haushaltsmüll behandelt werden.
- Nutzen Sie stattdessen die an Ihrem Wohnort
eingerichteten kommunalen oder gewerblichen
Sammelstellen zur Rückgabe und Verwertung
elektrischer und elektronischer Altgeräte
(WEEE). Informieren Sie sich, ob ggf. in Ihrem
Land bzw. Ihrer Region für große/sperrige
elektrische und elektronische Altgeräte
(WEEE) eine Abholung angeboten wird.
Sorgen Sie in jedem Falle dafür, dass Ihr
Altgerät bis zum Abtransport kindersicher
aufbewahrt wird.
I n e in i ge n Lä n de r n si n d Hä n dl e r
unterbestimmten Voraussetzungen beim
Geräteneukauf auch zur Rücknahme des
Altgerätes verpflichtet, wenn das Altgerät dem
neuen Fabrikat in der Funktion entspricht.
GIAS Service
●
Um einen sicheren und einwandfreien
Betrieb dieses Geräts zu gewährleisten,
empfehlen wir, alle Wartungs- und
Re para tur- arbeiten nur vo n einem
zu gela ssenen GIAS Kun dend iens ttechniker durchführen zu lassen.
Elektrische Anforderungen
Dieser Trockner ist für eine Netzspannung von
220-240 V und 50 Hz (Einphasenstrom)
ausgelegt. Stellen Sie sicher, dass der
Stromkreis eine Nennleistung von 6A hat.
Strom kann lebensgefährlich sein.
Dieses Gerät muss an eine geerdete
Steckdose mit Schutzkontakt angeschlossen werden. Die Steckdose und der
Stecker am Gerät müssen vom selben Typ
s e in . V e r we n d e n S i e k ei n e
M e h r f a c h s t e c k e r u n d / o d e r
Verlängerungskabel. Der Stecker sollte so
angebracht werden, dass er nach der
Installation des Geräts leicht aus der
Steckdose zu ziehen ist.
Ein Service-Anruf kann Ihnen in
Rechnung gestellt werden, ,falls ein Problem
mit Ihrer Maschine durch eine inkorrekte
Installation verursacht wurde.
Falls das Stromkabel dieses Geräts
beschädigt ist, muss es durch ein spezielles
Kabel ersetzt werden, das Sie NUR vom
Ersatzteil-Service erhalten. Es muss von
einem Fachmann installiert werden.
Schließen Sie die Maschine nicht an
die Netzstromversorgung an und schalten
Sie sie nicht ein, bevor die Installation
abgeschlossen ist. Zu Ihrer Sicherheit
muss dieser Trockner ordnungsgemäß
installiert werden. Falls Sie Zweifel haben,
rufen Sie den GIAS-Service an, um
Ratschläge einzuholen.
Einstellen der Füße
S o ba l d si c h d i e
M a s c h i n e a m
e n d gü lt ig en O r t
befindet, sollten die
Füße so eingestellt
werd e n , dass di e
Maschine eben steht.
42
Page 43

2. ABLAUFSET – MONTAGEANLEITUNG
Damit der Kondenswasserbehälter nicht nach
jeder Nutzung des Gerätes geleert werden
muß, kann das Wasser auch über ein Ablaufset
(op t io n a le s Z u be h ö r) d i r ek t in de n
H a u s ab w a s se ra n s c hl uß ( n or m a l e r
Hausabwasseranschluß, wie etwa der der
Spüle) abgeleitet werden. Eine Ableitung des
Wassers ohne festen Anschluß (etwa in eine
Sickergruße) ist nicht möglich.
Der Abwasseranschluß sollte sich in der Nähe
des Wäsc h etroc kners befind en (ma x.
Entfernung = Länge des im Set gelieferten
Standardschlauchs, eine Verlängerung ist nicht
möglich) Das Ablaufset besteht aus folgenden
Komponenten: 1 Schlauch sowie 1 Zubehörteil
zum Schließen eines verbeibenden Schlauchs.
ACHTUNG! Bitte unbedingt das Gerät
abschalten und den Stecker vom Stromnetz
trennen, bevor Sie mit den nachfolgend
beschriebenen Montageschritten beginnen.
Bitte das Kondenswasserablaufset wie
Folgt Montieren:
1 . D e n T r o c k n e r
vorsichtig zur rechten
Seite neigen.
1
4. Nun den schwarzen
S c h l a u c h d e s
Ablaufsets mit dem
g r a u e n S c hl auc h
verbinden und gut mit
der Klemme fixieren,
so dass dieser nicht
v e r s e h e n t l i c h
abrutschen kann.
5. Nachdem das Gerät
wieder a u f gestell t
worden ist, stellen Sie
sicher, dass der neue
S c h l a u c h n i c h t
geknickt wird, wenn
der Trockner wieder an
seinen Platz gerückt
wird.
6 . D a s a n d e r e ,
v e r b l e i b e n d e
Schlau c h ende m i t
de m mitg elieferten
Stöpsel schließen.
D e n s c h w a r z e n
Ablaufschlauch an das
Abwasserrohrsystem
anschließen.
4
5
DE
6
2. Der Anschluss für
das Ablaufset befindet
sich auf der rechten
Seite des Gerätes
(siehe Bild). Ein grauer
Schlauch führt dort
zueinem.Verbindungs
stück an der linken
Seite des Gerätes. Mit
Hilfe einer Zange
l ö s e n S i e d i e
Fixierungsklemme des
Schlauchs.
3. Den Schlauch vom
Ver b i nd ung s s t ü c k
abziehen.
2
3
Achtung: Wenn das Gerät auf eine andere
Seite geneigt wurde, warten Sie mindestens
4 Stunden, bevor Sie es einschalten, damit
sich die Flüssigkeit im Kompressor wieder
stabilisieren kann. Tun Sie es nicht, können
Schäden am Kompressor die Folge sein.
43
Page 44

VORBEREITUNG DER FÜLLUNG
3.
Bevor Sie den Trockner das erste Mal benutzen:
Lesen Sie die Gebrauchsanleitung bitte
●
sorgfältig durch!
Entfernen Sie alle in der Trommel befindlichen
●
Gegenstände!
●
Wischen Sie die Innenseiten der Trommel und
Tür mit einem feuchten Tuch aus, um den beim
Transport eventuell dort angesammelten Staub
zu entfernen.
Vorbereitung der Textilien
Vergewissern Sie sich anhand der Pflegeanleitungssymbole in jedem Wäschestück, dass die
Wäsche, die Sie trocknen wollen, für eine
Trocknung im Trockner geeignet ist.
Überprüfen Sie, ob alle Verschlüsse zu und die
Taschen entleert sind. Wenden Sie die Innenseiten der Textilien nach außen. Füllen Sie die
Kleidungsstücke locker in die Trommel, so dass
diese sich nicht verheddern.
Nicht Für Den Trockner Geeignet:
Se i d e , N y lo n st r üm p fe , e m p f i nd l ic h e
Stick e r e i en, Stoffe mi t m e t a llisc h e n
Verzierungen, Kleidungsstücke mit PVC oder
Lederbesätzen
WICHTIG: Trocknen Sie keine Produkte,
die mit einer chemischen Reiniguntg-sflüssigkeit
behandelt wurden und keine Kleidungsstücke
aus Gummi (Gefahr eines Brandes oder einer
Explosion).
Während der letzten 15 Minuten wird die
Wäsche immer mit kalter Luft getrocknet.
Energiesparen
Füllen Sie nur gründlich ausgewrungene oder
geschleudert e Wäsche in den Trockner. Je
trockener die Wäsche, desto kürzer ist die
Trocknungszeit, was sich energiesparend
auswirkt.
IMMER
Es ist wirtschaftlicher, IMMER die maximale
●
Füllmenge zu trocknen.
Kont r o l l ieren Si e IM M E R vo r jedem
●
Trocknungsvorgang, ob das Sieb sauber ist.
NIE
Üb ersc hrei ten Sie NIE die max imal e
●
Füllmenge,denn dies ist zeitaufwendig und
Energieverschwendung.
Füllen Sie AUF KEINEN FALL tropfnasse
●
Kleidungs-stücke in den Wäschetrockner; dies
kann zu Schäden am Gerät führen.
Sortieren Sie die Füllung folgendermaßen:
●
Anhand der Pflegeanleitungssymbole Diese
finden Sie am Kragen oder der Sauminnenseite:
Für Trockner geeignet.
Im Trockner bei hoher Temperatur.
. .
Im Trockner nur bei geringer
.
Temperatur.
Nicht für den Trockner geeignet.
Falls ein Wäschestück keine Pflegeanleitung
hat, muss angenommen werden, dass es nicht
für das Trocknen im Trockner geeignet ist.
Nach Menge und Volumen
●
Ist die Füllmenge größer als das Fassungsvermögen des Trockners, sortieren Sie die
Wäsche nach Stoffdicke (trennen Sie z.B.
Handtücher von dünner Unterwäsche).
Nach Stoffart
●
Ba u m wo l le /L e i ne n : Ha nd t üc h er,
Baumwolljersey,
Bett- und Tischwäsche.
Textilien aus Kunstfaser: Blusen, Hemden,
Overalls, usw. aus Polyester oder Polyamid
und auch Baumwoll/ Synthetikgemische.
Überladen Sie die Trommel nicht, große
Teile können, wenn sie nass sind, die maximal
zulässige Wäscheladung überschreiten (zum
Beispiel Schlafsäcke, Bettdecken).
4.
REINIGUNG UND
ROUTINEWARTUNGEN
Reinigung des Trockners
Reinigen Sie nach jedem Trocknungsvor-gang
●
das Flusensieb und leeren Sie den
Kondenswasser- Behälter.
Reinigen Sie alle Filter in regelmäßigen
●
Abständen.
Wischen Sie nach jeder Anwendungs-phase die
●
Innenseite der Trommel aus und lassen Sie die
Tür einige Zeit offen stehen, damit sie durch die
Luftzirkulation getrocknet wird.
Reinigen Sie die Außenseite der Maschine und
●
der Tür mit einem weichen Tuch.
AUF KEINEN FALL Scheuerschwämme oder
●
Scheuermittel benutzen.
Wir empfehlen, dass Sie die Tür, die Türdichtung
●
sowie das Geräteäußere nach jedem Gebrauch
kurz mit einem feuchten Tuch reinigen.
WARNUNG! Trommel, Tür und die
Wäsche selbst können sehr heiß sein.
WICHTIG! Schalten Sie diese
Maschine vor dem Reinigen immer aus
und ziehen Sie den Netzstecker heraus.
Die Daten für die Elektrik finden Sie
auf dem Typenschild auf der Vorderseite
der Trocknertrommel (bei geöffneter Tür).
44
Page 45

5.
WASSERTANK
D a s b e i m T r o c k n e n ent s t eh en de
Kondenswasser wird im dafür vorgesehenen
Behälter in der Tür gesammelt. Wenn der
Behälter voll ist, leuchtet die Anzeige auf
und der Behälter MUSS geleert werden. Es
w i r d j e d o c h e m p f o h l e n , d e n
Kon denswas serbehäl ter nach jed em
Trockenvorgang zu leeren.
WI C H T IG : E in g e r i ng e r Te i l d e s
Kondenswassers verbleibt bei den ersten
Trockenvorgängen eines Neugerätes im
Leitungssystem.
Entfernen des Behälters
1. Z iehen Sie den
W a s s e r b e h ä l t e r
vorsichtig heraus und
halten Sie dabei den
Griff fest. (A) Wenn der
Wasserbehälter voll ist,
wiegt er ca. 6 kg.
A
3.Drücken Sie die
-Taste, um den
Zyklus wi e d e r in
Gang zu setzen.
F ü r E i n e
or dn un gs ge mä ß e
Trocknung öffnen Sie
die Tür während der
a u t o m a t i s c h
a b l a u f e n d e n
Pro gramme n icht.
1
C
DE
2. Kippen Sie den
Wasserbehälter, um
das Wasser durch die
A u s g u s s ö f f n u n g
auszuleeren. (B)
W e n n d e r
Wasserbehälter leer ist,
setzen Sie ihn wie
dargestellt wieder ein;
(C) Bringen Sie zuerst,
wie dargestellt, die
U n t e r s e i t e d e s
Behälters in Position (1)
u n d d rü c ke n S ie
a n s c h l i e ß e n d d e n
oberen Teil vorsichtig in
Position (2).
B
45
Page 46

6.
TÜR und SIEB
Ziehen Sie am Griff, um die Tür zu öffnen.
Um den Trocknungs-vorgang wieder in Gang zu
setzen, schließen Sie die Tür und drücken .
WARNUNG! Wenn der Wäschetrockner
in Betrieb ist, könnten die Trommel und die
Tür SEHR HEISS werden.
Sieb
WICHTIG: Damit der Wäschetrockner immer
optimale Leistung erbringen kann, überprüfen
Sie vor jedem Trocknungsvorgang, ob das
Flusensieb sauber ist.
Benutzen Sie den Trockner nicht ohne Filter.
Durch verstopfte Filter kann sich die
Trocknungsdauer verlängern oder es können
S c h ä d e n v e r u r s a c h t w e r d en , d i e
kostenpflichtige Reparaturen mit sich ziehen.
1. Ziehen Sie das Sieb
nach oben.
2. Öffnen Sie das Sieb
wie auf der Abbildung.
3. Entfernen Sie die
1
Flusen sanft mit einer
weichen Bürste oder
den Fingerspitzen.,
4. Klappen Sie das
Sieb zusammen und
setzen Sie es wieder
an seinen Platz ein.
2
Flusensieb-Anzeige
leuchtet auf, wenn das Sieb gesäubert
werden muss.
Wenn die Wäsche nicht trocknet, kontrollieren Sie, ob das Sieb verstopft ist.
WENN SIE DIE FILTER ZUR REINIGUNG
IN WASSER GEBEN, VERGESSEN SIE NICHT,
SIE ANSCHLIESSEND ZU TROCKNEN.
WARNUNG! Wenn Sie die Tür mitten in
einem Zyklus öffnen, bevor der Abkühlzyklus
beendet ist, könnte der Griff heiß sein. Gehen
Sie beim Entleeren des Wasserbehälters
während eines Zyklus mit äußerster Vorsicht vor.
Filter vor jedem Durchgang reinigen
Reinigung des Kondensatorfilters
1.Entfernen Sie die
Wartungsklappe.
2. Drehen Sie die zwei
Ve r sch l u ssh e b el
g e g e n d e n
Uhrzeigersinn und
1
ziehen Sie d e n
Kondensatordeckel
heraus.
3 . N e h m e n S i e
v o r s i c h t i g d en
F i l t e r r a h m e n
h e r a u s u n d
e nt f e r n e n S i e
2
etw a ige n St a u b
o d e r F l u s e n
vorsichtig mit einem
Tuch. Reinigen Sie
den Filter nicht mit
Wasser.
4.Entfernen Sie den
3
Schaumgummifilter
und reinigen Sie ihn
unter fließendem
Wasser, wobei Sie
es dr e h e n , u m
Flusen und Staub
v o l ls t än d ig z u
entfernen.
4
5.Passen Sie den
Kondensatordeckel
w i e d e r e i n
( R ic h tu n g w i rd
dur c h d en Pfeil
ang egeben) und
stellen Sie sicher,
dass er fest an
5
s e i n e n P l a t z
g e d rü c k t w ir d .
Schließen Sie die
z w e i
Ve r sch l u ssh e b el
durch eine Drehung
im Uhrzeigersinn.
6.S e tz e n S i e d i e
War t un g s k la p p e
wieder ein.
46
Page 47

7.
SCHALTERBLENDE UND
ANZEIGEN
220'
120'
END
90'
6h
3h
60'
9h
A
D
C
220'
END
6h
3h
9h
120'
90'
60'
B
3
4
2
A-Auswahlanzeige -
Durch Drehen des Drehknopfes in beide
Richtungen ist es möglich, das gewünschte
Trocknungsprogramm auszuwählen. Um die
Auswahl abzubrechen oder den Trockner
auszuschalten, drehen Sie den Drehknopf auf
OFF.
1
direkt in den Schrank geräumt werden
-Ex t ra-troc k en: zu m volls t ändigen
Trocknen von Kleidungsstücken, ideal für volle
Ladungen.
Dieses Gerät besitzt eine Funktion „TrockungsManager“. Bei automatischen Zyklen werden
die einzelnen Zwischengrade der Trocknung vor
Erreichen des ausgewählten Grades durch
Blinken der jeweiligen Anzeigelampe angezeigt,
di e d e m er r ei c h te n Tr o ck n un g s gr a d
entspricht.Im Falle einer Inkompatibilität blinken
alle LEDs rasch 3 Mal.
4. Start verzögern
Um den Start des Programms für 3 std., 6 std.
oder 9 std. zu verschieben. Öffnen des
Bullaugen mit Startzeitvorwahl Start-Set, nach
erneutem Schließen des Bullaugen, drücken Sie
Start, um die Zählung fortzusetzen
C- Leds
Wasserbehälter - Leuchtet auf, wenn der
Kondenswasserbehälter entleert werden
muss.
Filter reinigen - Leuchtet auf, wenn eine
Reinigung der Filter erforderlich ist (der Tür
und des unteren Filters).
DE
B-Taste -
1. Start-Pause
Um das ausgewählte Programm zu starten
und/oder zu unterbrechen
2. Zeit Zyklus-Wahl
Ein Zyklus kann von automatisch auf
programmiert umgeschaltet werden, bis zu
3 Minuten nach dem Start des Zyklus.
Nach Wahl dieser Option muss der Trockner
zur Rückstellung auf die automatische
Trocknungsfunktion ausgeschaltet werden
Im Falle einer Inkompatibilität blinken alle LEDs
rasch 3 Mal.
3. Einstellung des Trocknungsgrades
Ermöglicht die Einstellung des gewünschten
Trocknungsgrades: die Wahl kann bis
5 Minuten nach Beginn des Zyklus geändert
werden:
- Bügeltrocken: Die Kleidungsstücke
bleiben leicht nass, um das Bügeln zu
erleichtern.
- Aufhängtrocken: Die Kleidungsstücke
können aufgehängt werden
- Schranktrocken: Die Wäsche kann
Diese Kontrolllampen leuchten, um die
Trocknungsphase anzuzeigen:
- Dr y / l e u ch t et w ä hr e n d de s
Trocknungszyklus.
- :leuchtet wenn der Zyklus sich in der
Kühlphase befindet.
- ENDE : leuchtet wenn der Zyklus beendet ist.
DSMART TOUCH - Bereich - das Drücken der
START-/PAUSE-Taste ermöglicht den Start
eines vorab heruntergeladenen Zyklus,
wäh r end die Touc h -Positio n auf de m
Programmknopf ausgewählt wird (beziehen Sie
sich zum Herunterladen von Zyklen mittels der
App auf den relevanten Abschnitt dieses
Benutzerhandbuchs).
47
Page 48

Da s Wo l l p r og ra m m
Cómo memorizar un programa por
primera vez:
1)
Seleccione el programa y las
opciones que quiere.
2)
Presione la tecla MEMORIA, elija M1
o M2. Ha de elegir M1 si es el primer
durante unos 3 segundos
guardar la combinación en la posición
elegida.
dieses Wäschetrockners
wurde von The Woolmark
C o mp an y f ü r d a s
T r o c k n e n v o n
maschinenwaschbaren
Produkten aus Wolle
genehmigt, vorausgesetzt, daß die Produkte
entsprechend den Pflegehinweisen auf dem
Einnäh-Etikett und der Anleitung des
Herstell ers dies es Wäsch etrockners
gewaschen und getrocknet werden. M1530.
Großbritannien, Irland, Hong Kong und Indien
ist das Warenzeichen Woolmark ein
eingetragenes Warenzeichen.
Maximales Fassungsvermögen
Cottons
Synthetik oder Feinwäsche
Max. Kapazität
Max.4 Kg
Trocknungswerte
Die St a ndardardp r ogramme für die
Ermittlung der Werte auf dem Energielabel
BAUMWOLLE ECO ( ) bieten die besten
Energieverbrauchswerte und eignen sich zur
T r oc kn un g v on no rm al fe uc ht e n
Baumwolltextilien. Die Tabelle auf der letzten
Seite gibt die ungefähren Programmdauern
und Energie verbrauchswerte in den
Hauptrockenprogrammen an.
Leistungsaufnahme im Aus-Zustand
Leistungsaufnahme im unausgeschalteten Zustand
Technische Daten
Trommelnhalt 125
Maxmales
Höhe
Brete
Tefe
Energeeffzenzklasse
S. Energelabel
85 cm
60 cm
60 cm
S. Energelabel
Information für Prüflabor
EN 61121 anwendbares Programm
- DRY COTTON
- IRON COTTON
- EASY-CARE TEXTILE
- COTTON ODER
-COTTON ODER WEISSWÄSCHE
- DELICATES ODER SYNTHETIK
0,40 W
0,75 W
BETRIEB
1. Öffnen Sie die Tür des Gerätes und
füllen d i e Tr o m mel mi t d er zu
trocknenden Wäsche. Vergewissern Sie
sich, dass heraushängende Wäsche
nicht das Schließen der Tür verhindern
kann.
2. Schließen Sie langsam die Tür, bis Sie
ein „Klick“ hören.
3. Drehen Sie den Programmwähler auf
das gewünschte Programm (hierzu bitte
die Programmempfehlungen in dieser
Anleitung beachten).
4. Drücken Sie die taste . Der Trockner
startet automatisch und die Anzeige über
der Taste leuchtet durchgängig.
5. Sollte einmal die Tür während des
Programms geöffnet werden müssen,
drücken Sie erneut die taste , um die
Trocknung fortzuführen.
6. Neigt sich die Trocknung dem Ende zu,
beginnt kurz zuvor die Abkühlphase, um
di e Luft u nd damit die W äsche
abzukühlen.
7. Ist das Programm beendet, dreht die
Tromm e l w e it e r b i s d a s Ge r ät
ausgeschaltet wird oder die Tür geöffnet
wird. Dies dient dazu, dass die Wäsche
durch Stoppen der Trommel nicht
verknittert.
Bitte öffnen Sie die Tür nicht in
sensorgesteuerten Programmen, um eine
optimale Trocknung zu ermöglichen.
Filter vor jedem Durchgang reinigen
MENGE: DEN ABLAUFSCHLAUCH ZUM ABLASSEN DES KONDENSWASSERS WIE IN
KAPITEL 2 BESCHRIEBEN ANSCHLIESSEN
48
Die tatsächliche Dauer des Trockenvorgangs
hängt davon ab, wie nass die Wäsche nach
dem Schleudern ist, um welche Textilien es
sich handelt und wie schwer die Waschladung
ist. Ferner tragen die Sauberkeit
und die Umgebungstemperatur zur
Programmdauer bei.
KG FÜLLNUR FÜR TROCKNER MIT 10
der Filter
-
Page 49

8.
AUSWÄHLEN DES PROGRAMMS
PROGRAMME
Superleichtes
Bügeln von
Mischgeweben
Baumwolle Eco
Weißwäsche oder
Baumwolle
Mx&Dry
Synthetik
Hemden
Dunkle & bunte
Kleidungsstücke
Babywäsche
Jeans
Sport
Wollsiegel
Rapid 45'
Knitterschutz
Auffrischen
* Die tatsächlich zum Trocknen benötigte Zeit hängt davon ab, wie nass die Wäsche nach dem Schleudervorgang
noch ist sowie von der Art der Wäsche, der Lademenge, der Sauberkeit der Filter und der Umgebungstemperatur.
ÜBERSETZUNG
Eine praktische Lösung zum Trocknen von Wäsche aus
unterschiedlichen Stoffen, bei der die Verknitterung minimiert
und die Feuchtigkeit zum einfachen Bügeln optimiert wird. Es
wird empfohlen, die Stoffe vor dem Trocknen auszuschütteln
Programm Eco Normales Trocknen (Bugeltrocken). Das
effizienteste Programm für den Energieverbrauch. Geeignet für
Baumwolle und Bettzeug.
Der richtige Zyklus zum Trocknen von Baumwolle, Schwämmen
und Handtüchern
Zum Trocknen für verschiedene Stoffe wie Baumwolle,
Weißwäsche, Mischgewebe, Synthetik.
Zum Trocknen von Feinwäsche und Synthetik, da diese
Stoffe eine genaue und spezielle Behandlung erfordern
Dieser spezielle Zyklus dient dem Trocknen von Hemden, wobei
das Verknittern dank spezieller Bewegungen der Trommel
minimiert wird. Es wird empfohlen, die Kleidungsstücke direkt nach
Ende des Trocknens aus dem Gerät zu nehmen.
Ein sanfter und spezieller Zyklus zum Trocknen dunkler oder
bunter Kleidungsstücke aus Baumwolle oder Synthetik.
Dieser Zyklus eignet sich perfekt für Babywäsche, für die ein
hohes Maß an Hygiene erforderlich ist
Zum gleichmäßigen Trocknen von Stoffen wie Jeans und ähnlichen
Geweben. Es wird empfohlen, die Kleidungsstücke vor dem
Trocknen auf links zu drehen.
Speziell für technische Kleidungsstücke für Sport und Fitness,
sanftes, schonendes Trocknen, um Schrumpfen und Verschleiß
elastischer Fasern zu vermeiden
Wollstoffe: dieses Programm kann zum Trocknen von bis zu 1 kg
Wäsche (ca. 3 Pullover) verwendet werden. Es wird empfohlen, die
Wäschestücke vor dem Trocknen umzudrehen. Die benötigte Zeit
kann aufgrund der Größe und des Umfangs der Wäsche und auch
je nach gewähltem Schleudergang variieren. Nach Beendigung
des Zyklus können die Kleidungsstücke sofort getragen werden,
allerdings können die Ränder bei schwereren Teilen noch etwas
nass sein: es wird empfohlen, diese an der Luft trocknen zu lassen.
Es wird empfohlen die Kleidungsstücke ganz am Ende des Zyklus
aus dem Gerät zu entnehmen. Achtung: ein Verfilzen von Wolle läßt
sich nicht mehr rückgängig machen; trocknen Sie ausschließlich
Kleidungsstücke mit dem entsprechenden Symbol („Trocknen ok”);
dieses Programm eignet sich nicht für Kleidung aus Acryl.
Perfekt zum schnellen Trocknen von Ladungen bis 2 kg. Es wird
empfohlen die Wäsche vor dem Trocknen mit hoher
Geschwindigkeit zu schleudern.
Dieser Vorgang dauert mit angewärmter Wäsche nur 12 Minuten
und hilft gegen Falten und Knittern.
Der perfekte Zyklus zum Entfernen schlechter Gerüche aus
Stoffen sowie zum Glätten von Falten
Anpassbare Einstellung des Knopfes, den Sie auszuwählen haben, um mit der App für Smartphones
interagieren und die Waschgänge herunterladen zu können (siehe den entsprechenden Abschnitt).
Die Werkseinstellung des Selbstreinigungsprogramm reinigt die Waschmaschine.
KAPAZITÄT
(kg)
Full
Full
2.5
2.5
2
4
4
2.5
4
4
4
4
1
1
TROCKNEN
ZEIT (min)
*
*
*
*
*
*
*
150’
*
*
70’
*
12’
*
DE
49
Page 50

SMART TOUCH
Dieses Gerät ist mit Smart Touch
Technologie ausgestattet. Damit können Sie
mit Smartphones, die mit Android arbeiten
und NFC (Near Field Communication)
unterstützen, über die App darauf direkt
zugreifen.
● Laden Sie die Candy simply-Fi App. auf Ihr
Smartphone .
Die Candy simply-Fi App funktioniert
mit Android und auch mit iOS auf
Tablets und Smartphones. Sie
können mit dem Gerät interagieren,
a l l e r din g s kö n nen Sie die
Möglichkeiten, die Ihnen Smart
Touch bietet, nur auf AndroidSmartphones mit NFC Technologie
n u t z e n, wi e a n f o lg e n d e m
Funktionsschema dargestellt:
Android smartphone
with NFC technology
Android smartphone
without NFC technology
Android Tablet
Apple iPhone
Apple iPad
Interaktion mit dem
Gerät + Ansicht der
Funktionen
Nur Ansicht der
Funktionen
Nur Ansicht der
Funktionen
Nur Ansicht der
Funktionen
Nur Ansicht der
Funktionen
FUNKTIONEN
Dies sind die wichtigsten Funktionen der
App:
● Meine Statistiken - Statistiken zu den
einzelnen Wäschen und Tipps für eine
effizientere Nutzung der Maschine.
Schauen Sie sich alle Details der
Smart Touch Funktionen an, holen Sie
sich die App im Demo-Modus oder
gehen Sie zu:
www.candysmarttouch.com
ARBEITEN MIT SMART TOUCH
ALS ERSTES - das Gerät registrieren
Gehen Sie auf "Einstellungen" in Ihrem
Android Smartphone und aktivieren Sie
im Menü "Wireless & Networks" die
NFC Funktion.
Je nach Smartphone Model und
Android Version, kann die Aktivierung
der NFC verschieden ausfallen.
Schauen Sie für Näheres in das
Handbuch Ihres Smartphones.
● Stellen Sie den Programmschalter auf
Smart Touch, um den Sensor auf dem
Bedienelement zu aktivieren.
● Starten Sie die App, legen Sie ein
Benutzerprofil an und registrieren Sie
das Gerät. Folgen Sie den Anweisungen
auf dem Display Ihres Smartphones oder
der "Kurzanleitung" des Gerätes.
More information, F.A.Q. and the video
for an easy registration are available on:
www.candysmarttouch.com/how-to
● VoiceAssistant - Eine Anleitung, um den
passenden Waschgang mit lediglich drei
Eingaben auszuwählen (Kleidung/Stoffe,
Farbe, Grad der Verschmutzung).
● Waschgänge - Herunterladen und
Anwenden neuer Waschprogrmme.
● SmartC a r e – S m a r tCheckUp und
Selbstreinigungsprogramm sowie eine
Anleitung zur Fehlerbehebung.
50
Page 51

BEIM NÄCHSTEN MAL - Die normale
Anwendung
● Immer, wenn Sie das Gerät über die App
steuern möchten, müsse Sie zunächst den
Smart Touch Modus aktivieren, indem Sie
ihn an die entsprechende Stelle drehen.
● Stellen Sie sicher, dass die Standby Funk t i on n i cht a ktiv i ert i s t, d e r
Sperrbildschirm nicht aktiv ist und die
NFC-Funktion eingeschalte ist; anderfalls
den vorher beschriebenen Anweisungen
folgen.
● Zum Starten eines Programms legen Sie
die Wäsche ein, geben das Waschmittel
dazu und schließen die Tür.
● Wählen Sie die gewünschte Funktion in
der App (z.B.: Programm, SmartCheckUp,
Aktualisierung der Statistiken, etc. …).
● Folgen Sie den Anweisungen auf dem
Telefondisplay und halten das Gerät
UNMITTELBAR VOR das Smart Touch Logo an der Bedienblende wenn Sie dazu
aufgefordert werden.
Wenn Sie die genaue Position der NFCAntenne in Ihrem Smartphone nicht kennen,
bewegen Sie das Telefon mit kreisenden
Bewegungen vor dem Smart Touch-Logo
auf der Bedienblende, bis die Verbindung in
der Ap p b e s t ä t i g t w i r d . U m d e n
ordnungsgemäßen Datentransfer zu
gewährleisten, ist es wichtig, das
SMARTPHONE FÜR EINIGE SEKUNDEN
VOR DIE BEDIENBLENDE ZU HALTEN;
nach erfolgtem Datenautausch wird eine
entsprechende Nachricht in der App
angezeigt, dass das Smartphone entfernt
werden kann.
Falls Sie eine dicke Schutzhülle benutzen
oder Aufkleber aus Metall am Smartphone
angebracht haben, könnte dies die DatenÜbertragung zw i s c h e n G e r ä t und
Smartphone beeinträchtig e n oder
verhindern. Falls erforderlich, entfernen
Sie diese.
Der Austausch bestimmter Teile des
Smartphones (z.B. Abdeckungen, Covers,
Akku etc.) gegen Nicht- Originalteile kann
zum Verlust der NFC-Empfangsfähigkeit
führen und damit zu Fehlfunktionen in der
App.
Managen und Kontrollieren des Gerätes
durch die App funktioniert nur " aus der
Nähe": eine Fernbedienung ist nicht
möglich (z.B. aus einem anderen Zimmer
oder außer Haus).
DE
ANMERKUNGEN:
Halten Sie hr Smartphone so, dass die
NFC Antenne auf der Rückseite sich am
Logo von Smart Touch befindet (siehe
Abbildung hier unten).
WIRELESS-PARAMETER
Parameter
Wireless-Norm
Frequenzbereich
Magnetfeldgrenze
Hiermit erklärt die Candy Hoover Group Srl,
dass dieses mit gekennzeichnete
Gerät die wesentlichen Anforderungen der
Richtlinie 2014/53/EU erfüllt.
Für eine Kopie der Konformitätserklärung
setzen Sie sich bitte mit dem Hersteller in
Verbindung:
www.candy-group.com
51
Spezifikationen
ISO/IEC 14443 Typ A und NFC Forum Typ 4
13.553-13.567 MHz (Mittenfrequenz 13.560 MHz)
< 42dBμA/m (bei 10 Metern)
Page 52

FEHLERSUCHE
9.
NUR FÜR GERÄTE MIT SMART TOUCH.
Mit der Funktion SmartCheckUp Ihrer Candy simply-Fi-App können Sie jederzeit prüfen, ob Ihr
Gerät ordungsgemäß arbeitet. Sie benötigen nur ein Android Smartphone mit NFC Technologie.
Weitere Infos finden Sie der App.
Wenn das Gerät eine Störung anzeigt (durch einen Code oder aufblinkende LED), schalten Sie
bitte Ihre App ein, und halten Ihr Android Smartphone mit NFC an das Smart Touch-Logo auf dem
Bedienerfeld. Sie können jetzt direkt in der Anwendung nach dem Problem suchen.
Mögliche Ursache/ Fehler...
Fehler, die Sie selbst beheben können
Prüfen Sie alle Punkte in der folgenden Checkliste,
bevor Sie sich an den GIAS-Service wenden.
Sollte die Waschmaschine funktionstüchtig sein
oder unsachgemäß installiert oder verwendet
worden sein, wird Ihnen der Besuch des
Kundendien-sttechnikers inRechnung gestellt.
Wenn das Problem weiterhin besteht, nachdem
Sie die Checkliste durchgegangen sind, wenden
Sie sich bitte an den GIAS-Service, der Ihnen evtl.
telefonisch weiterhelfen kann.
Die Restzeitanzeige auf dem Display könnte sich
während des Trocknungsgangs ändern. Die
Restzeit wird kontinuierlich während der
Trocknung überprüft und die Zeit wird angepasst,
um eine bestmögliche Schätzung der Restdauer
zu geben. Es ist daher ganz normal, dass die
angezeigte Restzeit sich vergrößern oder
verkleinern kann
Die Trocknungszeit ist zu lang/die Textilien
sind nicht trocken genug…
Haben Sie die richtige Trocknungszeit/das richtige
●
Programm gewählt?
●
Waren die Textilien zu nass? Wurden die Textilien
sorgfältig ausgewrungen oder geschleudert?
Muss das Sieb gereinigt werden?
●
●
Muss der Kondensator gereinigt werden?
Ist der Trockner überladen?
●
●
Sind die Luftansaug- und Abluftanschlüsse sowie
die Fläche unter dem Sockel des Trockners frei?
Der Trockner funktioniert nicht…
Ist der elektrische Netzanschluss für den Trockner
●
in Ordnung? Kontrollieren Sie diesen mit einem
anderen Gerät, wie z.B. einer Tischlampe.
●
Befindet sich der Stecker korrekt in der
Steckdose?
Gibt es einen Stromausfall?
●
Ist die Sicherung herausgesprungen?
●
Ist die Tür richtig geschlossen?
●
●
Ist der Trockner sowohl am Netzanschluss als
auch an der Maschine angestellt?
Ist die Trocknungszeit oder das Programm
●
gewählt worden?
Ist die Maschine nach dem Türöffnen wieder
●
angestellt worden?
Hat der Trockner den Betrieb eingestellt, weil der
●
Kondenswasser-Behälter voll ist und entleert
werden muss?
Der Trockner ist zu laut…
●
Schalten Sie den Trockner aus und wenden
Sie sich an den GIAS-Service.
Die leuchtet…
●
Muss das Sieb gereinigt werden?
●
Muss der Kondensator gereinigt werden?
Die leuchtet…
●
Muss der Kondenswasser-Behälter geleert
werden?
KUNDENDIENST
Sollten trotz obengenannter Kontrollen
weiterhin Störungen bei Ihrem Trockner
auftreten, wenden Sie sich bitte an den
GIAS-Service, der Sie beraten kann. Der
Kunden-dienst kann Sie möglicherweise
telefonisch
beraten oder mit Ihnen einen geeigneten
Termin für einem Techniker im Rahmen der
Garantie vereinbaren.Ihnen wird jedoch
eventuell eine Gebühr berechnet, wenn
sich herausstellt, dass Ihre Maschine:
funktionsfähig ist.
●
●
Nicht gemäß der Installationsanweisung
installiert worden ist.
●
unsachgemäß benutzt wurde.
Ersatzteile
Verwenden Sie i m m e r O r i g i n a l Ersatzteile, die Sie direkt beim GIASService erhalten.
GIAS - Service
Wenden Sie sich für Wartungs- und
Repara-turarbeiten an Ihren GIASServicetechniker.
Der Hersteller übernimmt keine
Verantwortung für etwaige Druckfehler
in dieser Bedienungsanleitung. Der
Hersteller behält sich das Recht vor,
seine Produkte ggf. anzupassen, ohne
wesentliche Eigenschaften zu
verändern.
52
Page 53

Indice
Leggere attentamente le istruzioni per un
corretto funzionamento della macchina.
Questo opuscolo fornisce importanti linee
guida per una manutenzione,un uso e
un'installazione sicuri. Esso contiene inoltre
utili consigli che consentiranno di sfruttare al
meglio le potenzialità di questa macchina.
Conservare la documentazione in un luogo
sicuro per eventuali riferimenti o per futuri
proprietari.
Controllare che al momento della consegna
la macchina sia dotata dei seguenti
componenti:
● Libretto di istruzioni
● Certificato di garanzia
● Etichetta efficienza energetica
Apponendo la marcatura su questo
prodotto, dichiariamo, sotto la nostra
responsabilità, di ottemperare a tutti i
requisiti relativi alla tutela di sicurezza,
salute e ambiente previsti dalla legislazione
europea in essere per questo prodotto.
Verificare che durante il trasporto la
macchina non abbia subito danni. In caso
contrario, rivolgersi al Centro Assistenza
GIAS.La mancata osservanza di tale procedura
po trebb e co mprom etter e la sic urez z a
dell’apparecchio. La chiamata può essere
soggetta a pagamento se le cause di
malfunzionamento della macchina sono
attribuibili a un uso improprio.
1. CONSIGLI DI SICUREZZA
2. KIT ACCESSORIO TUBO FLESSIBILE
DI SCARICO:
ISTRUZIONI PER IL MONTAGGIO
3. PREPARAZIONE DELLA BIANCHERIA
4. PULIZIA E MANUTENZIONE
ORDINARIA
5. VASCHETTA DELL’ACQUA
6. PORTELLONE e FILTRO
7. CONTROLLI E INDICATORI
8. SELEZIONE DEL PROGRAMMA E
IMPOSTAZIONE DELLA FUNZIONE
9. RICERCA GUASTI SERVIZIO
ASSISTENZA CLIENTI
IT
53
Page 54

1.
CONSIGLI DI SICUREZZA
●
Questo apparecchio può essere
utilizzato da bambini di 8 anni e
oltre e da persone con capacità
fisiche, sensoriali o mentali
ridotte o con mancanza di
esperienza e di conoscenza a
patto che siano supervisionate o
che siano date loro istruzioni in
merit o al l’ ut il iz zo s icuro
de l l ’ a p pa r e c c h io e c h e
capiscano i pericoli del suo
utilizzo.
Evitare che i bambini giochino
con o che si
l'apparecchio
occupino della sua pulizia e
m a n u t e n z i o n e s e n z a
supervisione.
●
ATTENZIONE L’uso improprio
dell’asciugatrice può provocare
rischio di incendio.
●
Q u e s t o a p p a r e c c h i o è
destinato ad uso in ambienti
domestici e simili come per
esempio:
- aree di ristoro di negozi, uffici o
altri ambienti di lavoro;
- negli agriturismo;
- dai clienti di hotel, motel o altre
aree residenziali simili;
- nei bed & breakfast.
Un utilizzo diverso da quello
tipico dell’ambiente domestico,
come l’uso professionale da
parte di esperti o di persone
addestrate, è escluso anche
dagli ambienti sopra descritti.
Un utilizzo non coerente con
quello riportato, può ridurre la
vita del prodotto e può
invalidare la garanzia del
costruttore. Qualsiasi danno
all’apparecchio o ad altro,
derivante da un utilizzo
diverso da quello domestico
( a n c h e q u a n d o
l’apparecchio è installato in
un ambiente domestico) non
s a r à a m m e s s o d a l
costruttore in sede legale.
●
Questa macchina è prevista
u n ic a m en t e p e r u s o
domest ico, ovve ro per
l’asciugatura di capi e
indumenti per la casa.
●
La macchina qui descritta
deve essere utilizzata
esclusivamenteperloscopo
alqualeè destinata secondo
quanto illustrato nel presente
libretto. Prima di attivare la
macchina, accertarsi di
avere letto attentamente e
compreso le istruzioni d’uso
e di installazione.
●
Non toccare l’asciugatrice
con mani o piedi umidi o
bagnati.
●
N o n a p p o g g i a r s i a l
portellone per caricare la
macchina; non utilizzare il
portellone per sollevare o
spostare la macchina.
●
Non consentire ai bambini di
giocare con la macchina o
con i suoi comandi.
54
Page 55

●
ATTENZIONE Non utilizzare il
prodotto se il filtro antifilacce
n o n è c o r r e t t a m e n t e
p o s i z i o n a t o o r i s u l t a
danneggiato; il filtro non è
ignifugo.
●
ATTENZIONE Se è esposto il
si m b o l o i n d i c ante il oo o
riscaldamento della superficie
,quando l’asciugatrice è in
funzione la temperatura può
essere superiore a 60 gradi C.
●
Staccare la spina dalla presa
elettrica. Prima di pulire la
macchina, staccare sempre la
spina.
●
Se si presume che la macchina
sia guasta, non continuare ad
usarla.
●
Evitare che sul pavimento
attorno alla macchina si
raccolgano filacce e pelucchi.
Dopo il ciclo di asciugatura,
●
l’interno del cestello può essere
molto caldo. Prima di estrarre la
b i an c he ri a è p e r t a nt o
opportuno lasciar raffreddare
completamente la macchina.
L'ultima parte del ciclo di
●
asciugatura viene fatta senza
calore (ciclo freddo) per
assicurare che i capi siano
lasciati ad una temperatura che
non li danneggi.
●
L'asciugatrice non dev'essere
usata se sono stati usati
prodotti chimici per il lavaggio
●
ATTENZIONE: mai fermare un'
asciugatrice prima della fine del
ciclo di asciugatura senza che
tutti i capi siano rimossi
velocemente e separati in modo
che il calore si dissolva
Massimo carico di asciugatura:
●
vedere etichetta energetica.
Installazione
●
Non utilizzare adattatori,
c o n n e t t o r i m u l t i p l i e / o
prolunghe.
●
Non installare l’asciugatrice
vicino ai tendaggi e rimuovere
tempestivamente eventuali
og g e t t i c a d u t i d ietro la
macchina.
●
L'apparecchio non deve essere
installato dietro una porta che
può essere chiusa a chiave, una
porta scorrevole o una porta i cui
cardini siano sul lato opposto
r i s p e t t o a q u e l l i
dell'asciugatrice.
Importante: durante il trasporto
mantenere in posizione verticale
l'asciugabiancheria. Se necessario
ribaltarla esclusivamente nel lato
indicato in figura.
Attenzione: se il prodotto è stato
ribaltato non correttamente prima
di avviarlo attendere almeno 4 ore
in modo tale che l'olio possa
s c o r r e r e nu o v a m e n t e ne l
compressore. In caso contrario il
compressore può subire danni.
IT
55
Page 56

La Biancheria
●
Non asciugare capi non lavati
nell'asciugatrice.
●
ATTENZIO N E
Evit ar e di
asciugare articoli trattati con
prodotti di pulizia a secco.
●
ATTENZIONE
In determinate
circostanze, i materiali in
go mma p oss o no e s se r e
soggetti ad autocombustione
se riscaldati. Art ic ol i i n
gommapiuma (lattice), cuffie da
doccia, tessuti impermeabili,
articoli in caucciù e vestiti o
c u s c i n i i m b o t t i t i c o n
gommapiuma NON VANNO
asciugati nell'asciugatrice.
●
Leggere atte ntamente le
etichette con le istruzioni di
lavaggio per conoscere le
caratteristiche dell’asciugatura
idonea.
●
Gli indumenti devono essere
introdotti nell’ asciugatrice solo
d o p o e s s e r e s t a t i
opportunamente centrifugati in
lavatrice o strizzati a mano.
●
EVITARE di caricare nel
cestello indumenti ancora
gocciolanti.
Rimuovi tutti gli oggetti dalle
tasche come accendini e
fiammiferi.
●
Controllare accuratamente che
nelle tasche degli indumenti da
asciugare non siano presenti
accendini o fiammiferi ed
EVITARE ASSOLUTAMENTE
l’uso di prodotti infiammabili in
prossimità della macchina.
●
Evitare ASSOLUTAMENTE di
asciugare
tende in fibra di
vetro. La contaminazione dei
capi con le fibre di vetro può
infatti dar luogo a fenomeni
d’irritazione cutanea.
●
I ca pi che sono st ati
macchiati con sostanze
co m e ol i o da cu c ina ,
acetone, alcol, petrolio,
cherosene, smacchiatori,
acquaragia, cere e sostanze
per rimuovere le cere
dovrebbero essere lavati in
ac q ua c a lda c on u n a
quantità extra di detergente
prima di essere asciugati
nell'asciugatrice.
●
Gli ammorbidenti o prodotti
simili dovrebbero essere
utilizzati come specificato
nelle rispettive istruzioni.
Ventilazione
●
Il locale in cui viene installata
l’asciugatrice deve essere
adeguatamente ventilato
onde evitare che i gas
p r o v e n i e n t i d a
apparecchiature funzionanti
co n alt ri com bus tib ili ,
comprese fiamme libere,
siano aspirati nel locale dove
l’asciugatrice è in funzione.
●
Installare il retro della
macchina vicino al muro o ad
una parete verticale
●
Ci dovrebbe essere uno
spazio di almeno 12 mm tra la
macchina e q ua l s i a s i
ostruzione. La valvola interna
ed esterna dovrebbe essere
tenuta lontana da ostacoli. Per
assicurare un'adeguata
ventilazione lo spazio tra la
parte inferiore della macchina
56
Page 57

e il pavimento non dev'essere
ostruito.
●
Non scaricare l’ aria nella canna
fumaria utilizzata per lo scarico di
fumi provenienti da attrezzature
funzionanti a gas o altri
combustibili.
●
Controllare periodicamente che
attorno all’asciugatrice vi sia una
buona circolazione d’aria, senza
impedimenti di sorta.
●
Dopo l’uso ispezionare il filtro
antifilacce necessario, pulirlo.
●
Rimuovere tempestivamente
e, se
eventu ali o ggetti caduti ,
dietro/sotto la macchina in
quanto potrebbero ostruire le
prese e gli sfiati dell’aria.
●
EVITARE ASSOLUTAMENTE
d’installare la macchina contro
tendaggi.
●
Nel caso in cui l'asciugatrice
fosse installata sopra una
lavatrice, dev'essere usato
un accessorio
pa ra rli,
su misura per se-
a seconda della
confi-
gurazione del proprio apparecchio:
- Kit misura "standard": per lavatrice profonda almeno 44 cm;
- Kit misura "slim": per lavatrice
profonda almeno 40 cm.
●
Il kit deve essere uno di
quelli sopra indicati, ottenibile dal
nostro servizio ricambi. Le
istruzioni per l'installazione della
macchina e di tutti gli accessori,
sono fornite con il kit.
La spina deve essere accessibile
per la disconnessione dopo
l'installazione dell'apparecchio.
ATTENZIONE:
l'apparecchio non deve
essere alimentato tramite un
dispositivo di commutazione
esterno, come un temporizzatore, o connesso ad un
circuito che viene regolarmente acceso e spento.
Air Outlets in the Base
Se il cavo di alimentazione
è danneggiato, deve essere
sostituito dal produttore, da un
tecnico dell'assistenza o da
personale qualificato, per evitare
rischi.
Non installare il prodotto in
luoghi freddi o dove il rischio
vi sia
di formazione di ghiaccio. Alla
temperatura di congelamento
dell'acqua il prodotto potrebbe
non funzionare correttamente.
Se l'acqua del circuito idraulico
ghiaccia sono possibili danni a
componenti quali: valvole,
pompe, tubi. Per garantire le
prestazioni del prodotto la
temperatura della stanza deve
essere compresa tra +5°C e
+35°C. Nel caso l'asciugatrice
venga utilizzata in ambienti con
basse temperature (tra +2°C e
+5°C) è possibile che capitino
fenomeni di condensazione e di
piccole perdite d'acqua sul
pavimento.
57
IT
Page 58

assicurarsi che le aperture
da incasso anche quelle nel
non danneggiare il circuito
hio deve essere
eseguito unicamente da un
Uno smaltimento scorretto può
provocare incendi o essere
Smaltire l'apparecchio in modo
corretto e non danneggiare i
tubi per la circolazione del gas
ATTENZIONE:
ATTENZIONE:
Rischio di incendio / Materiali
infiammabili.
L'apparecchio contiene l'R290,
un gas refrigerante ecosostenibile,
ma infiammabile. Tenere fonti
di ignizione e fiamme libere
lontano dall'apparecchio.
Controllare che non vi siano
danni visibili sull'apparecchio.
Non mettere in funzione
l'apparecchio se danneggiato.
Se si dovessero presentare
problemi di qualsiasi tipo,
contattare il proprio rivenditore
specializzato oppure il nostro
servizio di assistenza clienti.
sull'apparecchio e per i modelli
vano di installazione non siano
ostruite.
ATTENZIONE:
refrigerante.
Qualsiasi riparazione o intervento
sull'apparecc
servizio di assistenza autorizzato.
causa di avvelenamenti.
refrigerante.
58
Page 59

Tutela dell’ambiente
●
Tutti i materiali utilizzati per l’imballaggio
sono ecologici e riciclabili. Smaltite
l’imballaggio con metodi ecologici. Presso
il comune di residenza si potranno reperire
ulteriori informazioni sui metodi di
smaltimento.
Per garantire la sicurezza al momento dello
●
smaltimento di u n a a s c i u g a trice,
scollegare la spina dell’alimentazione dalla
presa, tagliare il cavo dell’alimentazione di
rete e distruggerlo insieme alla spina. Per
evitare che i bambini possano rimanere
intrappolati all'interno del ,
l' asciugatrice
rompere i cardini o la chiusura dell’oblò.
Direttiva Europea 2012/19/EU
Questo elettrodomestico è marcato
conformemente alla Direttiva Europea
2012/19/EU sui Rifiuti da Apparecchiature
Elettriche ed Elettroniche (RAEE).
I RAEE contengono sia sostanze
inquinanti (che possono cioè avere un
impatto negativo anche molto pesante
sull'ambiente) sia materie prime (che possono
essere riutilizzate). E' perciò necessario sottoporre i
RAEE ad apposite operazioni di trattamento, per
rimuovere e smaltire in modo sicuro le sostanze
inquinanti ed estrarre e riciclare le materie prime.
Ogni cittadino può giocare un ruolo decisivo
nell'assicurare che i RAEE non diventino un
problema ambientale; basta seguire qualche
semplice regola:
Requisiti Elettrici
Le asciugatrici sono state progettate per
funzionare ad una tensione di 220-240V,
50 Hz monofase. Controllare che il circuito
dell’alimentazione sia idoneo per valori di
corrente di almeno 6A.
ŸL’elettricità può essere estremamente
pericolosa
Ÿ L ’a pp a re c c h io d ev e es s er e
opportunamente collegato a terra.
ŸLa presa e la spina dell’apparecchio
devono essere dello stesso tipo.
ŸNon utilizzare adattatori multipli e/o
prolunghe.
ŸUna volta completata l’installazione,
la spina deve risultare accessibile e
facilmente scollegabile.
IT
La chiamata può essere soggetta a
p a ga m e n t o , s e l e c a u s e d i
malfunzionamento della macchina sono
attribuibili a un’installazione non corretta.
Nel caso risulti danneggiato, il cavo
di alimentazione dell’apparecch io
dev’essere prontamente sostituito con
a p p o s i t o c a v o r e p e r i b i l e
ESCLUSIVAMENTE presso il servizio di
ricambi. L’installazione deve essere
effettuata da persone competenti.
- i RAEE non vanno mai buttati nella
spazzatura indifferenziata.
- i RAEE devono essere consegnati ai Centri di
Raccolta (chiamati anche isole ecologiche,
riciclerie, piattaforme ecologiche …) allestiti dai
Comuni o dalle Società di igiene urbana; in molte
località viene anche effettuato il servizio di ritiro a
domicilio dei RAEE ingombranti.
In molte nazioni, quando si acquista una nuova
apparecchiatura, si può consegnare il RAEE al
negoziante, che è tenuto a ritirarlo gratuitamente
(ritiro "uno contro uno") a patto che il nuovo
apparecchio sia dello stesso tipo e svolga le
stesse funzioni di quello reso.
GIAS Service
Ai fini della durata e del buon funzionamento della
macchina, per gli eventuali interventi di assistenza
o ripar a zione con s igliam o di riv o lgers i
esclusivamente al servizio assistenza autorizzato
GIAS.
Non inserire la spina nella presa e non
accendere la m a c c h i na finché
l’installazione non sarà stata completata.
Ai fini della sicurezza personale è
essenziale che l’asciugatrice venga
installata correttamente. In caso di dubbi
sull’installazione, rivolgersi al Servizio
Assistenza GIAS.
Regolazione dei Piedini
Una volta posizionata
l a ma c c hi na , si
dovrebbe procedere
alla regolazione dei
piedini, per garantire
una perfetta messa in
bolla.
59
Page 60

2.
KIT ACCESSORIO TUBO
FLESSIBILE DI SCARICO:
ISTRUZIONI PER IL MONTAGGIO
4.Fissare il raccordo
n e r o d e l s e t
( u t i l i z z a n d o i l
connettore e i ganci
per tubi forniti) al
raccordo rimosso dal
collegamento a ponte.
4
Montare il Kit Come Indicato di Seguito:
1 . I n c l i n a r e
l e n t a m e n t e l a
macchina verso il lato
destro.
2. Il tubo di scarico
dell'acqua è situato
sul lato destro della
m a cc hi na ( v e d i
immagine). Un tubo
grigio è collegato al
raccordo sulla sinistra
d e ll a m a cc h in a .
Usare le pinze per
rimuovere la clip di
fissaggio del tubo al
raccordo.
3. Estrarre il raccordo
dal collegamento a
ponte.
1
2
3
5.Una volta che la
m a c c h i n a è i n
posizione, verificare
all'estremità inferiore
che il nuovo raccordo
n o n s i at t o rc i gl i
quando si riposiziona
l'essiccatrice.
6 . P os iz io na re il
rubinetto fornito con il
set per chiudere il
raccordo rimanente.
Collegare alla rete
elettrica principale.
Attenzione: se il prodotto si trova in una
posizione diversa, attendere almeno 4 ore
prima dell'accensione in modo che l'olio
possa penetrare nel compressore. La
mancata osservanza potrebbe provocare
danni al compressore.
5
6
60
Page 61

3.
PREPARAZIONE DELLA BIANCHERIA
Prima di utilizzare l’asciugatrice per la prima volta:
● Leggere attentamente il presente libretto d’istruzioni.
●Togliere tutti gli articoli presenti all’interno del cestello.
● Pulire l’interno del cestello e il portellone con un
panno umido in modo da eliminare l’eventuale polvere
depositata durante il trasporto.
Preparazione dei Capi
Verificare che la biancheria da asciugare sia
idonea per l’asciugatura meccanica, come indicato
dai simboli sull’etichetta di lavaggio dei vari articoli.
Controllare che le chiusure siano chiuse e le
tasche vuote. Girare i capi con il rovescio
all’esterno. Introdurre i capi nel cestello uno ad
uno, in modo che non si aggroviglino.
Evitare Di Asciugare:
Articoli di seta, calze di nylon,ricami delicati, tessuti
con decorazioni metalliche, indumenti con
guarnizioni in PVC o in pelle
IMPORTANTE: Evitare di asciugare
articoli preventivamente trattati con prodotti di
pulizia a secco o capi in gomma (pericolo
d’incendio o esplosione).
Durante gli ultimi 15 minuti (approssimativamente)
i capi sono sempre asciugati con aria fredda.
Risparmio Energia
Introdurre nell’asciugatrice solo biancheria
accuratamente strizzata a mano o centrifugata a
macchina. Quanto più asciutta è la biancheria, tanto
più rapido è il tempo richiesto per l’asciugatura, con
conseguente risparmio di consumo elettrico.
COSA FARE SEMPRE
● Cercare sempre di far lavorare la macchina a
pieno carico di biancheria: si risparmia tempo ed
elettricità.
● Prima di ogni ciclo di asciugatura verificare
SEMPRE che il filtro sia pulito.
COSA NON FARE MAI
● Non superare mai il peso massimo: si perde
tempo e si consuma più elettricità.
● Evitare di caricare capi ancora gocciolanti: si
rischia di rovinare la macchina.
Selezionare La Biancheria Nel Modo Seguente:
● In base ai simboli delle etichette di lavaggio
Le etichette di lavaggio sono apposte sul collo o
sulle cuciture interne:
Articolo idoneo per l’asciugatura
meccanica.
. .
Asciugatura ad alta temperatura.
61
.
Solo asciugatura a bassa temperatura.
Articolo non idoneo all’asciugatura
meccanica.
Se il capo è sprovvisto di etichetta di lavaggio,
si deve presumere che non sia idoneo
all’asciugatura meccanica.
● In base al quantitativo ed alla pesantezza
Se il carico è superiore alla capacità della
macchina, separare i capi in base alla
pesantezza (p. es., separare gli asciugamani
dalla biancheria leggera).
● In base al tipo di tessuto
Articoli di cotone/lino: Asciugamani, jersey
di cotone, biancheria da tavola/letto.
Articoli sintetici: Camicette, camicie, tute
ecc. in poliestere o poliammide e misti
cotone/sintetici.
Non sovraccaricare il cestello, in
quanto I capi ingombranti, a caldo, possono
superare il carico massimo consentito. (per
esempio sacchi a pelo e piumoni)
4.
PULIZIA E MANUTENZIONE
ORDINARIA
Pulizia dell’asciugatrice
● Si consiglia di pulire il filtro e di svuotare la
vaschetta dell’acqua dopo ogni ciclo di
asciugatura.
● Pulire regolarmente il filtro.
● Dopo l’uso, pulire l’interno del cestello e
lasciare aperto il portellone per un certo periodo
di tempo in modo che circoli aria e si asciughi.
● Pulire l’ esterno della macchina e il portellone
con un panno morbido.
● NON usare spugnette abrasive né prodotti di
pulizia.
● Per evitare che si accumuli della lanuggine e
che l'oblò abbia difficoltà ad aprirsi/chiudere, a
fine di ogni ciclo d'asciugatura pulire con un
panno umido la parte interna dell'oblò e la
guarnizione.
AVVERTENZA! Il cestello, il portellone
e il carico possono essere molto caldi.
IMPORTANTE: Prima di procedere
alla pulizia, disattivare sempre la macchina
e staccare la spina della presa a muro.
Per i dati elettrici vedere la targhetta
dei dati posta sul davanti del mobile della
macchina (con portellone aperto)
IT
Page 62

5.
VASCHETTA DELL’ACQUA
L’acqua eliminata dalla biancheria durante il
ciclo di asciugatura viene raccolta in una
vaschetta posta all’interno della porta della
macchina. Quando la vaschetta è piena si
accende la spia sul pannello dei
comandi, segnalando che si DEVE vuotare la
vaschetta dopo ogni ciclo di asciugatura.
NOTA: Nei primi cicli, quando la macchina è
nuova, si raccoglie poca acqua in quanto si
riempie prima il serbatoio interno.
Per rimuovere la vaschetta
1 . E s t r a r r e c o n
delicatezza la vaschetta
af f er ra n d o l a d a l l a
maniglia. (A) Da piena,
la vaschetta dell'acqua
pesa circa 6 kg.
2. Inclinare la vaschetta
facendo defluire l'acqua
dal beccuccio. (B)
dalla porta
A
3. Premere il pulsante
per riavviare il ciclo.
Non aprire la porta
d u r a n t e i c i c l i
a u t o m a t i c i p e r
ottenere una corretta
asciugatura.
1
C
Quando è vuota, riporre
l a v a s c h e t t a
ne l l ' al lo g g i o c om e
in dicato; (C) prima
inserire la base della
v a s c h e t t a c o m e
m o s t r a t o ( 1 ) ,
s u c c e s si v a m e n t e
premere gentilmente la
p a r t e s u p e r i o r e
nell'apposita sede (2).
.
B
62
Page 63

PORTELLONE e FILTRO
6.
Tirare la maniglia per aprire lo sportello.
Per avviare la macchina, richiudere il
portellone e premere il tasto.
AVVERTENZA! Quando l'asciugatrice è
in funzione, il cestello e il portellone possono
essere molto caldi.
Filtro
IMPORTANTE: Ai fini della massima efficacia
della macchina, prima di ogni ciclo di
asciugatura è essenziale verificare la pulizia del
filtro antifilacce.
Importante: Non utilizzare l'asciugabiancheria
senza I filtri. I filtri intasati possono allungare il
tempo di asciugatura e causare danni con
conseguenti costosi interventi di pulizia.
1. Tirare il filtro verso l’alto.
Pulizia Filtro
1.Rimuovere lo zoccolo
2.G i ra r e in sen s o
antiorario I ganci e
r i m u o v e r e i l
coperchio supporto
filtri
3 . R i m u o v e r e
de li ca ta me n t e i l
telaio agendo sul
gancio superiore a
pulire la rete filtrante
da residui o depositi.
Non usare acqua.
1
2
IT
2. Aprire il filtro come
illustrato.
3 . R i m u o v e r e
delicatamente le Filacce
con la punta delle dita o
ai u ta nd os i co n u n o
spazzolino morbido.
4. Richiudere il filtro e
reinserirlo in sede.
Spia Di Pulizia Filtro
Si accende segnalando la necessità di pulire il
filtro.
Procedere con la verifica ed eventuale pulizia del
filtro principale e dei filtri allocati nella parte
inferiore del Dryer.
Se la biancheria non si asciuga verificare che il
filtro non sia intasato.
SE SI PULISCE IL FILTRO SOTTO
L'ACQUA, RICORDARSI DI ASCIUGARLO.
AT T E N Z I O N E ! S e l a p o r t a
dell'asciugabiancheria viene aperta durante il
ciclo, prima quindi che sia completata la fase di
raffreddamento, la maniglia della vaschetta può
essere molto calda. Fare attenzione e usare la
massima cautela se la si vuole svuotare.
1
2
4 . R i m u o v e r e
delicatamente il filtro
a spugna dalla sede a
lavarlo sotto acqua
3
c o r r e n t e p e r
rimuovere residui o
depositi.
5.Rimontare i filtri e
p o s i z i o n a r e i l
coperchio supporto
4
filtri nella corretta
posizione indicata
d a l l a f r e c c i a
(po s iz i o ne v er s o
l'alto). Bloccare il
coperchio con i ganci.
6. R i m o n t a r e l o
zoccolo.
Pulire i filtri prima di effettuare ogni ciclo.
5
63
Page 64

7.
CONTROLLI E INDICATORI
END
6h
3h
9h
220'
120'
90'
60'
A
- Asciutto No Stiro: per capi da
appendere direttamente dopo l'asciugatura,
senza stirarli.
- Asciutto Armadio: per capi che
possono essere direttamente riposti.
D
C
END
6h
3h
9h
220'
120'
90'
60'
B
3
4
2
A- Manopola -
Ruotando la manopola in entrambe le
direzion i è possi bile sel ezionare il
programma di asciugatura desiderato. Per
annullare il programma selezionato o
spegnere l'asciugatrice, ruotare la manopola
in posizione OFF.
B-Pulsanti
1.Avvio/Pausa
Serve per dare inizio al programma
selezionato o bloccare il ciclo.
1
- E x t r a - a s c i u t t o : p e r c a p i
completamente asciutti, ideale a pieno carico.
Questo apparecchio è dotato della funzione di
Drying Manager. Nei cicli automatici, ogni
livello intermedio di asciugatura, prima di
raggiungere il livello selezionalo, viene
segnalato con un indicatore luminoso
lampeggiante che corrisponde al grado di
as c i u ga tu r a r a g gi u n t o , t u tt i i le d
lampeggeranno velocemente per 3 volte.
4.Partenza ritardata
Questo pulsante permette di ritardare la
partenza di 3, 6 o 9 ore. In caso di apertura
dell'oblò a partenza ritardata attivata, è
necessario, una volta richiuso l'oblò, premere
il pulsante di START per riprendere il conto
alla rovescia.
C- Spie luminose
Tanica Acqua - Questa spia si accende
per ricordare di svuotare la tanica dell'acqua
di condensa.
Pulizia Filtro - Quando si accende questa
spia, è necessario pulire il filtro.
Queste spie si accendono per indicare la fase
di asciugatura:
2.Selezione tempo
E' possibile trasformare un ciclo da
automatico a programmato, fino a 3 minuti
dall'avvio del ciclo. Per tornare al ciclo
automa t i c o è n e c e s sario spegnere
l'asciugatrice.
In caso di incompabibilità, tutti i led
lampeggeranno velocemente per 3 volte.
3.Selezione livello di asciugatura
Permette di selezionare il livello di
a s c i u ga tur a d e sid e r ato ( o p zi one
modificabile fino a 5 minuti dopo la partenza
del ciclo):
- Pront o Stir o : l a s c i a i p a n n i
leggermente umidi, per facilitare la stiratura.
-DRY / Si accende quando il ciclo di
asciugatura è attivo.
- : Si accende quando il ciclo è nella fase
finale di raffreddamento.
- END :Si accende quando il ciclo è terminato.
DSMART TOUCH area - premendo il pulsante
START/PAUSE è possibile avviare un ciclo
precedentemente scaricato nonostante la
posizione Touch è selezionata dalla
m a no p o l a ( p e r s c a r i c ar e i c ic l i
dall'applicazione vedere la sezione dedicata
in questo manuale).
64
Page 65

Il programma "ciclo lana"
ambientale
d i q u e s t a
asciugabiancheria è stato
a p pr o v a to d a T h e
Woolmark Company per
l’asciugatura dei capi in
lana etichettati "lavabili in
lavatrice”, purchè i capi siano lavati e asciugati
seguendo le istruzioni riportate sull'etichetta
cucita al capo e le indicazioni fornite dal
fabbricante della macchina. M1530
Nel Regno Unito, nell’Eire, a Hong Kong e in
India il marchio Woolmark è un marchio
certificato.
Massima capacità di asciugatura
Cotoni
Sintetici o Delicati
Massima capacità dichiarata
Max.4 Kg
Guida Ad Una Corretta Asciugatura
Il ciclo standard COTONE ( ) è quello a
maggior efficienza energetica e il più adatto per
un'asciugatura di un normale bucato bagnato
in cotone.
La tabella nell'u l tima pa g ina mo s tra
approssimatamente tempi e consumo di
energia dei programmi principali.
Consumo di energia modalità "spento"
Consumo di energia modalità "stand-by»
0,40 W
0,75 W
Specifiche Tecniche
Capactà del cestello 125
Carco massmo
Altezza
Larghezza
Profondtà
Effcenza Energetca
vedere etchetta energetca
85 cm
60 cm
60 cm
vedere etchetta energetca
FUNZIONAMENTO
1. Aprire la porta e caricare la
biancheria nel cesto. Assicurarsi che i
capi non si incastrino nella porta.
2. Chiudere gentilmente la porta fino a
sentire un “click”.
3. Ruotare il selettore programmi e
scegliere il programma di asciugatura
desiderato (per dettagli, guardare la
Guida Programmi).
4. Premere il pulsante .
L ’ a s c i u g a b i a n c h e r i a i n i z i a
automaticamente e la spia luminosa
sopra il tasto resta accesa.
5. Se si apre la porta durante il ciclo per
controllare la biancheria, è necessario
successivamente richiudere la porta e
premere il pulsante , il ciclo di
asciugatura ricomincerà nuovamente.
6. Quando il ciclo è prossimo alla fine,
inizia una fase di raffreddamento. I capi
vengono asciugati con aria fredda al fine
di raffreddarli.
7. Quando il programma è terminato, la
spia END si illumine sul display.
8. A seguito della fine del ciclo, il cesto
effettuerà delle rotazioni ad intermittenza
per minimizzare le pieghe. Continuerà
fino a quando la porta verrà aperta.
Non aprire la porta durante i cicli di
asciugatura automatici per avere
un'asciugatura sempre efficace.
Pulire i filtri prima di effettuare ogni ciclo.
IT
Informazioni per Test di Laboratorio
EN 61121 Programmi
-Cotone asciutto
-Cotone asciutto da stirare
-Tessuti Delicati
- COTONE O
-COTONE O BIANCHI
-DELICATI O SINTETICI
SOLO PER ASCIUGABIANCHERIA CON
CAPACITA’ DI 10 KG COLLEGARE IL KIT
PER RECUPERARE L’ACQUA DI
CONDENSA SECONDO LE ISTRUZIONI AL
CAPITOLO 2.
La reale durata del ciclo di asciugatura
dipende dal livello di umidità di partenza del
pu dalla
65
velocità
temperatura lizia dei filtri e
di centrifuga,carico a causa della
dalladalla quantità del carico, dal tipo e
Page 66

8.
SELEZIONE DEL PROGRAMMA
PROGRAMMA
La soluzione ideale per asciugare tessuti misti, permettendo
Stira facile
Eco Cotone
Bianchi
Mix&Dry
Sintetici
Camicie
Scuri e colorati
Colorati
Baby
Jeans
Sport
Wool
Rapido 45'
un'azione di rilassamento delle pieghe ed il raggiungimento del
grado di umidità ideale per una stiratura più agevole.
E' consigliato sbattere i capi prima di introdurli nell'asciugatrice.
Programma Eco normativo (hang dry) ideale per capi in cotone. Il
più efficiente in termini di consumo energetico per l'asciugatura
di questi tessuti.
Ciclo ideale per asciugare capi in cotone, spugne e asciugamani.
Consente di asciugare insieme capi di tessuti differenti come
cotone, lino, sintentici e misti.
Ciclo studiato per asciugare tessuti sintetici e delicati.
Programma dedicato all'asciugatura di camicie, limitando la
formazione di pieghe e grovigli tramite opportune movimentazioni
del cesto. E' consigliabile rimuovere i capi appena il ciclo di
asciugatura è terminato.
Il ciclo ideale per asciugare capi colorati in cotone o sintetici.
Un ciclo specifico per i vestiti dei più piccoli. Particolarmente
adatto per esigenze igieniche elevate.
Un ciclo studiato per asciugare uniformemente tessuti come
jeans o Denim.
E' consigliato rovesciare i capi prima dell'asciugatura.
Ciclo studiato per l'asciugatura di tessuti tecnici, preservando
l'elasticità delle fibre.
Ciclo Woolmark per capi in lana: il programma può essere utilizzato
per asciugare fino a 1kg di biancheria (circa 3 maglioni). Si consiglia
di rovesciare i capi prima di asciugarli. Il tempo può variare a
seconda delle dimensioni e della densità del carico e della
centrifuga scelta per il lavaggio. A fine ciclo i capi sono pronti per
essere indossati, ma nel caso di indumenti più pesanti i bordi
potrebbero risultare leggermente umidi: si suggerisce di farli
asciugare naturalmente. Si consiglia di estrarre subito i capi al
termine del ciclo di asciugatura. Attenzione: il processo di
ristringimento della lana è irreversibile; asciugare
esclusivamente i capi con simbolo (simbolo "ok tumble"); questo
programma non è indicato per capi acrilici.
Un ciclo pensato per asciugare fino a 1 kg di carico. E' consigliato
selezionare un alto numero di giri di centrifuga prima di utilizzare il
ciclo di asciugatura
IDEALE PER
CAPACITA'
(kg)
2
Full
Full
4
4
2.5
4
4
4
4
1
1
TEMPO DI
ASCIUGATURA
(min)
*
*
*
*
*
*
*
150’
*
*
70’
*
Meno Pieghe
Rinfresca
* La reale durata del ciclo di asciugatura dipende dal livello di umidità di partenza del bucato dovuta alla velocità di
rotazione, tipologia e quantità di carico, pulizia del filtro e temperatura ambientale.
Ciclo a caldo che in 12 minuti consente diridurre la formazione di
pieghe e facilitare la stiratura.
Il ciclo ideale per eliminare i cattivi odori dai capi e ridurre le
pieghe.
Posizione "riscrivibile" della manopola da selezionare per interagire con l'App per
smartphone e trasferire i cicli download (fare riferimento al paragrafo dedicato). In fabbrica
viene caricato il ciclo Auto-Clean, studiato per la sanificazione della macchina.
66
2.5
2.5
12’
*
Page 67

SMART TOUCH
Questo apparecchio è equipaggiato di
tecnologia Smart Touch che consente di
interagire, tramite App, con gli smartphone
basati sul sistema operativo Android e dotati
de l l a fu n z i o n e NFC ( N e a r Fi e l d
Communication).
● Scaricare l'App Candy simply-Fi sul
proprio smartphone.
L’App Candy simply-Fi è disponibile
sia per dispositivi con sistema
operativo Android che per iOS, sia
per tablet che per smartphone; è
tuttavia possibile interagire con la
macchina e sfruttare le potenzialità
offerte da Smart Touch solo con
smartphone Android dotati di
tecnologia NFC, secondo il seguente
schema:
Smartphone Android
con tecnologia NFC
Smartphone Android
senza tecnologia NFC
Tablet Android
Apple iPhone
Apple iPad
Interazione con la
macchina + contenuti
Solo contenuti
Solo contenuti
Solo contenuti
Solo contenuti
FUNZIONI
Le principali funzioni attivabili mediante l’App
sono:
● Voice Assistant – Guida alla scelta del
ciclo ideale tramite inserimento di tre input
vocali (capi/tessuti, colore, grado di sporco).
Per scoprire tutti i dettagli delle
funzioni Smart Touch, esplora i menu
accedendo in modalità DEMO o
andare su:
www.candysmarttouch.com
COME USARE SMART TOUCH
PRI MA VOLTA – Regist razione
macchina su App
Accedere al menu "Impostazioni" del
proprio smartphone Android e attivare la
funzione NFC all’interno di "Wireless e
Reti".
In relazione al mo d e l l o d e l l o
smartphone impiegato e alla versione
del sistema operativo Android, il
processo di attivazione della funzione
NFC potrebbe essere differente.
Consultare il relativo manuale per
maggiori dettagli.
● Ruotare la manopola nella posizione
Smart Touch per abilitare il sensore sul
cruscotto.
● Aprire l’App, creare il profilo utente e
registrare l'elettrodomestico seguendo le
indicazioni sul display del telefono o la
procedura descritta nella "Quick Guide"
allegata alla macchina.
Ulteriori informazioni, le F.A.Q. ed il
video per una facile registrazione del
prodotto sono disponibili su:
www.candysmarttouch.com/how-to
IT
● Cycles – Possibilità di scaricare e avviare
nuovi programmi di lavaggio.
● Smart Care – Cicli di Smart Check-up, Auto-
Clean e guida alla risoluzione dei problemi.
● My Statistics – Statistiche di lavaggio e
suggerimenti per un utilizzo più efficiente della
macchina.
67
Page 68

VOLTE SUCCESSIVE – Utilizzo
abituale
Ogni volta che si intende operare con
●
l’App sulla macchina, occorre prima
abilitare la modalità Smart Touch
ruotando la manopola nell’omonima
posizione.
Assicurarsi di avere sbloccato lo schermo
●
del telefono (acceso e senza codice) e
attivata la funzione NFC; in caso contrario,
seguire la procedura descritta in
precedenza.
●
Se si vuole avviare un ciclo di lavaggio,
caricare la biancheria, il detersivo e
chiudere l'oblò.
Selezionare la funzione desiderata
●
sull’App (es: avvio di un programma,
Smart C h eck-u p , aggior n a mento
statistiche, ecc…).
Seguire le istruzioni sul display del
●
telefono, APPOGGIANDOLO al logo
Smart Touch quando indicato dall'App.
Se non si conosce la posizione dell'antenna
NFC, spostare leggermente lo smartphone
con movimento circolare sul logo Smart
Touch fino a quando l’App segnala
l’avvenuta connessione.
Affinchè il trasferimento di dati vada a buon
fine è fondamentale MANTENERE IL
T EL E F ON O A P P OG G I AT O S U L
CR USCOT TO DU RANTE TUTTA LA
PROCEDURA (pochi secondi); una
schermata sul dispositivo informerà
sull’esito dell’operazione e quando sarà
possibile allontanare lo smartphone.
Custodie spesse o adesivi metallici sullo
smartphone potrebbero influenzare o
impedire la trasmissione dei dati fra macchina
e telefono. Se necessario, rimuoverli.
La sostituzione di alcuni componenti dello
smartphone (es: cover posteriore,
batteria, ecc…) con altri non originali,
potrebbe comportare la rimozione
dell’antenna NFC, impedendo l'utilizzo
completo dell’App.
La gestione ed il controllo della macchina
tramite App avviene solo “per prossimità”:
non è quindi possibil e es e g u i r e
un’operazione da remoto (es: da un'altra
stanza, fuori casa).
NOTE:
Posizionare lo smartphone in modo che
l’antenna NFC sul retro dello stesso sia in
corrispondenza del logo Smart Touch sul
cruscotto della macchina.
PARAMETRI WIRELESS
Parametro
Standard Wireless
Banda di frequenza
Limite Campo magnetico
Con questo il gruppo Candy Hoover Group
Srl, dichiara che questo apparecchio è
marcato conformemente alla Direttiva
Europea 2014/53 / UE.
Per ricevere una copia della dichiarazione
di conformità, contattare il produttore
all'indirizzo:
www.candy-group.com
68
Specifiche
ISO/IEC 14443 Type A e NFC Forum Type 4
13,553-13,567 MHz (centre frequency 13,560 MHz)
< 42dBμA/m (a 10 metri)
Page 69

9.
RICERCA GUASTI
SOLO PER I MODELLI DOTATI DI TECNOLOGIA SMART TOUCH
Grazie al ciclo Smart Check-up all'interno dell'App Candy simply-Fi e con uno
smartphone Android dotato di tecnologia NFC, è possibile verificare in ogni momento
la corretta funzionalità della macchina. Maggiori dettagli sull'App.
In caso di errore sul display della macchina (segnalato tramite codice o lampeggio
delle spie), aprendo l'App e appoggiando lo smartphone Android dotato di NFC al logo
Smart Touch sul cruscotto, è possibile avviare la guida alla risoluzione del problema.
Quale Può Essere La Causa...
Problemi che può risolvere l’utente
Prima di rivolgersi al Centro Assistenza GIAS,
consultare la seguente checklist. La chiamata
verrà addebitata all'utente nel caso in cui risulti che la
macchina funziona o è stata installata o utilizzata in
maniera errata. Se il problema persiste anche dopo
aver eseguito i controlli consigliati, rivolgersi al
servizio di assistenza GIAS che sarà a disposizione
per suggerire eventuali soluzioni per telefono.
Il tempo di asciugatura residuo può variare durante il
ciclo. Il tempo infatti viene costantemente
aggiornato per migliorarne la stima. E' per tanto
normale che durante il ciclo, il tempo mostrato
sul display possa aumentare o diminuire.
Tempo di asciugatura eccessivamente
lungo/capi non sufficientemente asciutti…
● Il programma/tempo di asciugatura selezionato è
corretto?
●I capi sono stati introdotti eccessivamente bagnati?
Si è provveduto a strizzare o centrifugare
adeguatamente i capi prima d’introdurli nella
macchina?
● Si deve pulire il filtro?
● Si deve pulire il condensatore?
●L’asciugatrice è stata caricata eccessivamente?
● Vi sono ostruzioni a livello delle prese, degli sfiati e
della base dell’asciugatrice?
L’asciugatrice non funziona…
● L’alimentazione elettrica cui è collegata la
macchina è attiva? Controllare provando con un altro
apparecchio (ad esempio, lampada da tavolo).
● La spina di alimentazione è stata collegata
correttamente all’alimentazione elettrica?
● Manca la corrente?
● Fusibile bruciato?
● Il portellone è stato chiuso perfettamente?
●La macchina è stata opportunamente attivata (sia
collegata all’alimentazione sia attivata localmente)?
●È stato selezionato il tempo o il programma di
asciugatura?
●La macchina è stata riattivata dopo aver aperto il
portellone?
●La macchina ha smesso di funzionare perché la
vaschetta dell’acqua è piena e deve essere
svuotata?
L’asciugatrice fa molto rumore…
●Spegnere l’asciugatrice e rivolgersi al
Servizio Assistenza GIAS.
La spia di segnalazione è accesa…
● Si deve pulire il filtro?
● Si deve pulire il condensatore?
La spia di segnalazione è accesa…
● Si deve svuotare la vaschetta dell’acqua?
SERVIZIO ASSISTENZA CLIENTI
Se il problema persiste anche dopo aver
effettuato tutti i controlli consigliati,
rivolgersi al Servizio Assistenza GIAS.
Sarà a disposizione per suggerire
eventuali soluzioni per telefono o per
fissare la visita del tecnico in base alle
condizioni di garanzia. Si ricorda che
l’intervento del tecnico può essere
soggetto a pagamento nel caso la
macchina:
● risulti perfettamente funzionante.
● non sia stata installata secondo quanto
indicato nelle istruzioni d’installazione.
● sia stata utilizzata in modo improprio.
Ricambi
Utilizzare sempre ricambi originali,
disponibili direttamente presso il Servizio
Assistenza GIAS.
Servizio GIAS
Per assistenza e riparazioni, rivolgersi al
tecnico del Servizio Assistenza GIAS più
vicino.
Il pro d ut t or e d e c l i n a o g n i
responsabilità in caso di eventuali
errori di stampa nel presente
opuscolo. Il produttore si riserva il
diritto di apportare le necessarie
modifiche ai propri prodotti, senza
alterarne le caratteristiche essenziali.
69
IT
Page 70

Index
Lees deze instructies zorgvuldig door en
gebruik deze machine op basis van deze
aanwijzingen. Dit boekje geeft u naast
belangrijke richtlijnen voor het veilige gebruik
de veilige installatie en het veilige onderhoud
van de machine ook enkele nuttige tips over
hoe u de beste resultaten bekomt wanneer u
met deze machine wast.
Bewaar alle documentatie op een veilige plek
zodat u of de toekomstige eigenaars van de
machine ze in de toekomst opnieuw kunnen
raadplegen.
Controleer dat de volgende items samen met
de wasmachine werden geleverd:
● Handleiding
● Garantiekaart
● Energiekeurmerk
Door het plaatsen van de markering op
dit product, verklaren wij, op onze eigen
ver antwoo rdelijk heid, all e Europe se
veiligheids -, gezondheids - en milieu - eisen
na te leven opgesteld in de regelgeving
geldig voor dit product.
Controleer of de machine schade heeft
opgelopen tijdens het vervoer. Indien dit het
geval is, neem dan contact op met GIAS.Als u
de bovenstaande aanwijzingen niet opvolgt,
kan de veiligheid van de machine niet worden
gegarandeerd. Indien het probleem met uw
machine wordt veroorzaakt door misbruik,
kunnen de kosten van de onderhoudsbeurt
aan u worden doorberekend.
1. VEILIGHEIDSAANWIJZINGEN
2. AFVOERSLANG KIT:
MONTAGE-INSTRUCTIES
3. HET WASGOED VOORBEREIDEN
4. SCHOONMAKEN EN
ONDERHOUDSBEURTEN
5. WATERCONTAINER
6. DEUR en FILTER
7. BEDIENINGSKNOPPEN EN
INDICATIELAMPJES
8. HET PROGRAMMA KIEZEN
9. PROBLEMEN OPLOSSEN
KLANTENSERVICE
70
Page 71

1.
VEILIGHEIDSAANWIJZINGEN
●
Dit apparaat kan worden
gebruikt door kinderen van 8
jaar en ouder en personen met
verminderde lichamelijke,
zintuiglijke of verstandelijke
vermogens of gebrek aan
ervaring en kennis als ze onder
toezicht staan of instructies
krijgen over het gebruik van het
apparaat op een veilige manier
en de gevaren begrijpen.
Kinderen mogen niet met het
apparaat spelen. Reiniging en
onderhoud door de gebruiker
wordt niet ged aa n d oo r
kinderen zonder toezicht.
●
WAARSCHUWING Misbruik
van een droogtrommel kan
brand veroorzaken.
●
Deze apparaten zijn bedoeld
voor gebruik in huishoudelijke
en soortgelijke toepassingen
zoals:
-Kantines voor medewerkers,
in winkels, kantoren en andere
werkomgevingen;
- Boerderijen;
-Door klanten in hotels, motels
en andere residentiële soort
omgevingen;
- B e d a n d b r e a k f a s t
omgevingen.
Een ander gebruik van dit
t o e s t e l d a n b i n n e n d e
huishoudelijke omgeving
o f v a n d e t y p i s c h e
huishoudelijke functies, zoals
commercieel gebruik door
de sku n dig e n of e rva r en
gebruikers, wordt uitgesloten,
zelfs in de bovenstaande
to epa ssi n gen . A ls h et
apparaat wordt gebruikt op
een wijze die onverenigbaar
i s m e t d e z e k a n d e
levensduur van het apparaat
en de garantie van de
f a b r i k a n t v e r v a l l e n .
Eventuele schade aan het
apparaat of andere schade
of verlies ontstaan door
g e b r u i k d a t n i e t i n
overeenstemming is met
huishoudelijk gebruik (ook
als ze gelokaliseerd is in een
huishoudelijk milieu) worden
niet geaccepteerd door de
fabrikant in de ruimste mate
toegestaan door de wet.
●
Deze machine is alleen voor
huishoudelijk gebruik, m.a.w.
vo o r h e t dro g e n v a n
huishoudelijk textiel en
kleding.
●
Dit apparaat mag uitsluitend
gebruikt worden voor het
d o e l w a a r v o o r h e t
vervaardigd is, zoals dat in
d e z e h a n d l e i d i n g
beschreven wordt. Verzeker
u ervan dat u de instructies
voor de installatie en het
gebruik volledig begrijpt
voordat u de machine
gebruikt
●
Raak de machine niet aan
als uw handen of voeten nat
of vochtig zijn.
●
Leun niet tegen de deur als u
de machine laadt en gebruik
de deur niet om de machine
op te tillen of te verplaatsen
NL
71
Page 72

●
Sta niet toe dat kinderen met de
machine of de bediening ervan
spelen.
●
WAARSCHUWING Gebruik
het apparaat niet als de
pluizenfilter niet geplaatst of
beschadigd is; pluis kan
ontbranden.
WAARSCHUWING Op de
●
plaats van het symbool voor
warm oppervlak kan de
temperatuur tijdens het drogen
tot meer dan 60 graden C
stijgen
●
Haal de stekker uit het
stopcontact. Haal altijd de
stekker uit het stopcontact
v o o r d a t u d e m a c h i n e
schoonmaakt.
●
Bl ij f de ze m ach ine nie t
gebruiken als ze een gebrek
lijkt te hebben.
●
Pluizen of dons mogen zich niet
op de grond rondom de
buitenkant van de machine
ophopen.
●
De trommel kan vanbinnen erg
heet worden. Wacht altijd met
het uithalen van het wasgoed
tot de afkoelingsperiode van de
droger voorbij is.
●
Het laatste deel van een
droogcyclus verloopt zonder
warmte (koelcyclus) om ervoor
te zorgen dat de artikelen niet
worden beschadigd.
●
De wasdroger mag niet worden
gebr u i k t a l s i n d u s t r i ë l e
chemicaliën zijn gebruikt voor
het reinigen.
●
WAARSCHUWING: Stop nooit
een wasdroger voor het einde
van de droogcyclus, tenzij alle
artikelen snel verwijderd en
uitgehangen worden, zodat de
hitte wordt verdreven.
●
Maximaal gewicht voor het
drogen: zie energielabel.
Installatie
●
G e b r u i k g e e n a d a p t e r s ,
meervoudige stekkers en/of
verlengsnoeren.
Installeer de droger nooit tegen
●
gordijnen aan en zorg ervoor dat
er geen artikelen achter de droger
kunnen vallen en zich daar
kunnen ophopen.
●
De machine mag niet worden
ge ï n s t a l l e e r d achter e e n
afsluitbare deur, een schuifwand
of een deur met een klink aan de
andere zijde van de deur t.o.v. de
droogtrommel.
Belangrijk: Het apparaat moet in
een rechtopstaande positie worden
vervoerd. Indien nodig, mag de
droger alleen worden gedraaid
volgens getoonde zijde;
Let op: Als het apparaat in een
andere positie werd vervoerd,
wacht dan ten minste vier uur
voordat u het apparaat aanzet,
zodat de vloeistof in de compressor
zich kan stabiliseren. Als u dit na laat
kan dit leiden tot schade aan de
compressor.
72
Page 73

De Was
●
Geen ongewassen wasgoed in
de droogtrommel drogen.
●
WAARSCHU W I N G Ge e n
stoffen in de droogtrommel
doen die met chemische
reinigingsvloeistoffen zijn
behandeld.
●
WAARSCHUWING Materialen
uit schuimrubber kunnen onder
bepaalde omstandigheden,
wanneer ze verhit worden,
spontaan ontbranden. Artikelen
z o a l s s c h u i m r u b b e r
(latexschuim), douchekapjes,
waterproef textiel, artikelen met
een rubberzijde en kleding of
kussens met schuimrubberen
pads MOGEN NIET in de
droogtrommel worden gedroogd.
Bekijk altijd de wasvoorschriften
●
op het wasgoed om te
controleren of u het in de
droger mag drogen.
Kleren moeten gecentrifugeerd
of grondig uitgewrongen
worden, voordat zij in de
droogtrommel gestopt worden.
●
Druipnatte kleren mogen NIET in
de droger gestopt worden.
●
Aanstekers en lucifers mogen
niet in zakken blijven zitten en
gebruik NOOIT ontvlambare
vloeistoffen in de buurt van het
apparaat.
Glasvezelgordijnen mogen
●
NOOIT in dit apparaat worden
gestopt. Er kunnen zich
huidirritaties voordoen als
andere kledingstukken met de
glasvezels in aanraking geweest
zijn.
●
Wasgoed dat is verontreinigd
met substanties, zoals
kookolie, aceton, alcohol,
p e t r o l e u m , k e r o s i n e ,
vlekverwijderaars, terpetine,
wax en waxverwijderaars,
moe ten in heet wa ter
gewassen worden met extra
wasmiddel voordat ze in de
dr o o g t r o mme l w or d e n
gedroogd.
●
W a s v e r z a c h t e r s e n
vergelijkbare producten
moeten worden gebruikt
volgens de Aanwijzingen die
op de wasverzachter staan
vermeld.
Ventilatie
●
De kamer waarin de droger
ge pla ats t wordt , mo et
voldoende geventileerd
worden om te voorkomen dat
gassen van mechanismen
die werken via brandstofverbranding, zoals een open
haard, in de kamer gezogen
worden wanneer de droger in
werking is.
●
De achterkant van het
apparaat installeren dichtbij
een muur of een verticale
oppervlakte
●
Afzuiglucht mag niet in een
via een afvoer waarlangs
u i t l a a t s t o f f e n v a n
mechanismen die gas of
a n d e r e b r a n d s t o f f en
v e r b r a n d e n , w o r d e n
afgevoerd.
●
Controleer regelmatig dat de
lucht die door de droger
73
NL
Page 74

stroomt, niet geblokkeerd
wordt.
Controleer regelmatig de
●
pluizenfilter na gebruik en
maak proper indien nodig.
Er dient een minimale afstand
●
van 12 mm te zijn tussen de
m a c h i n e e n e v e n t u e l e
belemmeringen. De in- en
uitlaat moeten vrij zijn van
obstakels. Bewaar voldoende
ventilatieruimte tussen de
bodem van de machine en de
vloer.
●
Voorkom dat artikelen achter
de droger vallen of
zich daar
ophopen omdat deze de
luchtaanvoer en afvoer kunnen
belemmeren.
●
Installeer de droger NOOIT
tegen gordijnen aan.
• Wanneer de droogtrommel
bovenop een wasmachine wordt
geïnstalleerd, moet een geschikte
stapelkit worden gebruikt, in
overeenstemming met de
configuratie van uw apparaat:
- Stapelkit "standaard grootte":
voor wasmachine met een
minimale diepte van 44 cm;
- Stapelkit "slim grootte": voor
wasmachine met minimale diepte
van 40 cm.
• U kunt deze stapelkit bij
onze dienst reserveonderdelen
verkrijgen. De instructies voor het
installeren en eventuele
bevestigingen worden samen bij
de stapelkit geleverd.
• Na installatie van het apparaat
moet de stekker bereikbaar zijn
zodat het apparaat kan worden
losgekoppeld.
WAARSCHUWING: het
apparaat mag niet via een extern
schakelsysteem, bijvoorbeeld via
een timer, worden gevoed, of
aangesloten zijn op een circuit
dat regelmatig door een
nutsvoorziening wordt aan en
uitgeschakeld.
beschadigd is, moet het door
de fabrikant, diens
onderhoudstechnicus of
gelijkaardig gekwalificeerd
personeel worden vervangen,
om risico's te vermijden.
een erg koude rumte of n een
rumte waar het kan vrezen. Bj
een temperatuur rond he t
vrespunt kan de droger mogeljk
net goed functoneren: er s een
kans op schade nden het water
gaat bevrezen n het hydraulsch
systeem (ledngen, kleppen,
pomp). Voor een betere prestate
van het prod uct moet de
temperatuur van de rumte tussen
+5°C en +35°C graden zjn.
Geleve er rekenng mee te
houden dat werkng van de
droger n koude omstandgheden
( t u s s e n + 2 e n + 5 ° C )
condenswater en waterdruppels
op de vloer kan veroorzaken.
74
Air Outlets in the Base
Als het voedingssnoer
Installeer het apparaat net n
Page 75

WAARSCHUWING:
Brandgevaar/brandbare materialen.
Het apparaat bevat R290, een
milieuvriendelijk koelgas dat
brandbaar is.
Houd open vuur en ontstekingsbronnen ver verwijderd
van het apparaat.
Controleer of er geen zichtbare
schade is aan het apparaat.
Gebruik het apparaat niet
wanneer deze beschadigd is.
Mocht er een probleem zijn,
neem dan contact op met uw
gespecialiseerde verkooppunt
of met een van onze
klantenservicecentra.
WAARSCHUWING:
zorg ervoor dat de openingen
op het apparaat en de openingen van het compartiment
waar het apparaat op bevestigd is (voor inbouwmodellen)
vrij zijn van obstakels.
WAARSCHUWING:
beschadig het koelcircuit niet.
Reparaties of interventies op
het apparaat mogen alleen
worden verricht door een
bevoegde assistentieservice.
Het incorrect weggooien van
het apparaat kan brand of
vergiftiging veroorzaken.
Het apparaat op correcte wijze
weggooien en leidingen gebruikt voor de circulatie van de
koelvloeistof niet beschadigen.
NL
75
Page 76

Het Milieu
●
A l le v e rp a kk i ng s ma t er i al e n z i jn
milieuvriendelijk en recycleerbaar. Doe de
v e rp ak k i n g s m a t e r i al en o p e e n
milieuvriendelijke manier van de hand. Uw
gemeente kan u informeren over de beste
manier om deze materialen weg te ruimen.
Wanneer u een oude wasmachine van de
●
hand doet, moet u voor alle veiligheid de
stekker uit het stopcontact halen, het
stroomsnoer afknippen en dit samen met de
stekker vernietigen. Om te voorkomen dat
kinderen zichzelf in de machine opsluiten,
breekt u de scharnieren of het slot van de deur.
Europese Richtlijn 2012/19/EC
Dit apparaat is voorzien van het
merkteken volgens de Europese
ri chtli jn 2012/1 9 / EU inzake
A f g e da n k t e e l ek tr i s c h e e n
elektronische apparaten (AEEA).
AEEA bevat zowel verontreinigende
stoffen (die negatieve gevolgen voor het milieu
kunnen veroorzaken) en basiscomponenten
(die kunnen worden hergebruikt). Het is
belangrijk AEEA te onderwerpen aan specifieke
behandelingen, teneinde afval en alle
verontreinigende stoffen op een correcte wijze
te verwijderen en alle andere materialen te
hergebruiken en recycleren.
Individuen kunnen een belangrijke rol spelen bij
de garantie dat AEEA geen milieu-issue wordt;
het is essentieel om een aantal basisregels te
volgen:
-AEEA mag niet worden behandeld als
huishoudelijk afval.
-AEEA moet worden overgedragen aan de
desbetreffende inzamelpunten beheerd door
de gemeente of door geregistreerde bedrijven.
In veel landen, voor grote AEEA, kan
thuisophaling aanwezig zijn.
In veel landen, als u een nieuw apparaat koopt,
kunnen de oude worden teruggegeven aan de
dealer die het kosteloos moet afhalen op een
één-op-één-basis, zolang het apparatuur een
gelijkwaardig type betreft en dezelfde functies
heeft als de geleverde apparatuur.
GIAS Service
●
Om te zorgen voor een continue veilige en
efficiënte werking van dit apparaat, bevelen
wij Aan dat servicing of reparaties alleen
worden uitgevoerd door een bevoegde GIAS
onderhoudsmonteur.
Elektrische Vereisten
Drogers worden geleverd om te kunnen
werken op een voltage van 220-240V, 50Hz
m o n o p h as e . C on tr ol ee r o f he t
voedingscircuit ten minste 6A bedraagt.
Elektriciteit kan erg gevaarlijk zijn. Deze
machine moet geaard zijn.
Het stopcontact en de stekker van de
machine moeten van hetzelfde soort
zijn.
Gebruik geen meervoudige adapters
en/of verlengsnoeren.
Nadat het apparaat is geïnstalleerd,
moet de stekker bereikbaar blijven om
uit het stopcontact te halen.
Er kan een kost worden aangerekend
voor een service call als er een probleem is
is met uw machine door onjuiste installatie.
Indien het snoer van dit apparaat
beschadigd is, moet het worden
vervangen door een speciaal snoer dat
alleen verkrijgbaar is bij de onderdelen
service. Het moet worden geïnstalleerd
door een bevoegd persoon.
Sluit de machine niet aan op het
stopcontact en start het niet op totdat de
installatie compleet is. Voor uw
veiligheid, moet deze droger correct
geïnstalleerd worden. Als er enige twijfel
over de installatie is, bel dan GIAS
Dienst voor advies.
De Voeten Verstellen
Als de machine is
geplaatst, moeten de
v o e t e n w o r d e n
versteld zodat de
machine waterpas
staat.
76
Page 77

2.
AFVOERSLANG KIT:
MONTAGE-INSTRUCTIES
Om te voorkomen dat u de waterbak na elke
droogcyclus moet legen, kan het tijdens het
droogprogramma verzamelde water via een
afvoerslang worden afgevoerd(hetzelfde
afvoersysteem als bij een gootsteen).
Waterverordeningen verbieden aansluiting op
e e n o p p e r v l a k t e w a t e r r i o o l . H e t
waterafvoersysteem dient direct bij de
wasdroger te worden geplaatst .
De set bestaat uit: 1 slang, 1 rechte
slangaansluiting, 1 buisklem en een plastic clip.
WAARSCH U W I N G ! Schakel het
apparaat uit en koppel de stekker van de
wasdroger los van het stopcontact, voordat u
aan de werkzaamheden begint.
Ga Als Volgt Te Werk:
1. Kantel het toestel
langzaa m o p z'n
rechterzijde.
1
4. Bevestig de zwarte
slang uit de kit (met
b e h u l p v a n d e
geleverde brug en de
g e l e v e r d e
pijpbeugels), aan de
verwijderde slang van
de brug-verbinding..
5 . W a n n e e r u
demachine terug op
z i jn p l a a t s z e t,
c o n t r o l e e r d a n
devoet s t e unen e n
zorgervoor dat de
ni e u w e sla ng n i e t
geplooid wordt onder
het toestel..
6. Plaat s de kraan
(geleverd in de kit) om
de slang te sluiten.
Sluit de machine aan
op de voeding.
4
5
6
NL
2.De slang met het
vuile water bevindt
z i c h a a n d e
rechterzijde van het
toestel (zie tekening).
Een grijze slang is
verbonden met de
b r u g a a n d e
linkerzijde. Verwijder
de oude pijpbeugel
van de brug met
behulp van een tang.
3. Koppel de slang los
van de brug-verbindin.
2
Opgelet : Als h e t p r o d u c t w e r d
getransporteerd op z'n linkerzijde, wacht
t e n m i n s t e 4 u u r v o o r
het in s c hakele n z o dat d e o lieka n
terugstromenin t hecom pres sor.
Doet u dit niet dan kan dat leiden tot
beschadigingvan de compressor.
3
77
Page 78

3.
HET WASGOED VOORBEREIDEN
Alvorens de droogtrommel voor de eerste keer te
gebruiken:
● Lees deze handleiding a.u.b. aandachtig door.
● Verwijder alle artikelen die in de trommel zijn
geplakt.
● Veeg de binnenkant van de trommel en de deur
met een vochtige doek af om alle stof te
verwijderen dat zich tijdens het vervoer kan
hebben verzameld.
Voorbereiding van de Kleren
Zorg ervoor dat het wasgoed dat u wilt drogen,
geschikt is voor het drogen in een droogtrommel,
zoals wordt aangegeven door de wasvoorschriften
op ieder artikel.
Controleer dat alle sluitingen dicht zijn en dat de
zakken leeg zijn. Keer de kleren binnenstebuiten.
Leg de kleren losjes in de trommel om ervoor te
zorgen dat ze niet in elkaar verward raken.
Niet In De Droogtrommel Drogen:
Zijde, nylon kousen, fijn borduurwerk, stoffen met
metalen versieringen, kledingstukken met pvc of
leren randen
BELANGRIJK: Droog geen voorwerpen
di e z i j n be h a nd el d me t ee n d r o ge
reinigingsvloeistof of rubberenkleren (gevaar
voor brand of explosie).
Tijdens de laatste 15 minuten wordt de was altijd
getuimeld in koele lucht.
Energiebesparing
Stop alleen wasgoed in de droogtrommel dat
grondig is uitgewrongen of gecentrifugeerd. Hoe
droger het wasgoed, hoe korter de droogtijd
waardoor elektriciteit wordt bespaard.
ALTIJD
● Probeer altijd om het maximale gewicht aan
wasgoed te drogen, zo bespaart u tijd en
elektriciteit.
● Controleer altijd voor iedere droogcyclus of de
filter schoon is.
NOOIT
● Stop nooit meer dan het maximale gewicht in de
droger, dit is verspilling van tijd en elektriciteit.
●Stop nooit druipnat wasgoed in de droogtrommel,
dit kan het apparaat beschadigen.
Sorteer de lading als volgt
● Op wasvoorschrift Deze vindt u in de kraag of in
de binnennaad:
Kan in de droogtrommel gedroogd worden.
Drogen in de droogtrommel op hoge
. .
temperatuur.
78
Drogen in de droogtrommel alleen op
.
lage temperatuur.
Niet in de droogtrommel drogen.
Als de stof geen wasvoorschrift heeft, kunt u er
van uitgaan dat het niet geschikt is voor de
droogtrommel.
● Op hoeveelheid en dikte
Wanneer de hoeveelheid wasgoed groter is
dan de capaciteit van de droger, sorteer de
kleren dan altijd op dikte (b.v. handdoeken
apart van dun ondergoed).
●Optypestof
Katoen/linnen: Handdoeken, jersey katoen,
beden tafellinnen.
Synthetische stoffen: Blouses, overhemden,
overalls, enz. gemaakt van polyester of
poly a m i d e, even a l s v o o r g e m e n gd
katoen/synthetisch.
Overlaadt de trommel niet. Grote stukken
kunnen wanneer ze nat zijn de maximaal
to egela ten wasl adin g ov ersc hrijd en
(bijvoorbeeld: slaapzakken, donsdekens).
4.
SCHOONMAKEN EN
ONDERHOUDSBEURTEN
Schoonmaken Van De Droger
Maak de filter schoon en leeg het
●
waterreservoir na iedere droogcyclus.
●
Maak de filters regelmatig schoon.
●
Veeg na iedere gebruiksperiode de
binnenkant van de trommel af en laat de
deur een poosje open zodat ze kan drogen
door de circulatie van de lucht.
●
Veeg de buitenkant van de machine en de
deur af met een zachte doek.
●
G E E N s c h u u r s p o n s j e s o f
schoonmaakmiddelen gebruiken.
●
Om te voorkomen dat de deur plakt of pluis
zich ophoopt, moet u de binnendeur
regelmatig schoonmaken met een natte
doek.
WAARSCHUWING! De trommel, de
deur en het wasgoed kunnen erg warm zijn.
BELANGRIJK Schakel altijd de
machine uit en trek de stekker uit het
stopcontact voordat u dit apparaat
schoonmaakt.
Voor elektrische gegevens, bekijk het
typeplaatje op de voorkant van de droger
(met de deur open).
Page 79

5.
WATERCONTAINER
Het water dat tijdens de droogcyclus uit de
was wordt verwijderd, wordt verzameld in
een reservoir in de droger. Als het reservoir
vol is brandt dit lampje en dan moet het
reservoir leeggemaakt worden. Wij raden
aan om het reservoir na elke droog cyclus
leeg te maken.
LET OP tijdens de eerste cycli van een
nieuwe machine wordt het water eerst
verzameld in het interne reservoir, daarna in
de container.
Om het reservoir in de deur te verwijderen
1. Trek zachtjes het
waterreservoir uit aan
het handvat. (A) De
wa t e r t a nk w e e gt
o n g e v e e r 6 k g
wanneer het vol is.
A
3. Duw op de knop om
de cyclus te herstarten.
Open de deur niet
t i j d e n s d e
a u t o m a t i s c h e
programma's om een
goe d e d r og i ng t e
behouden.
1
C
NL
2. K a n t e l h e t
waterreservoir om het
reservoir via de gietbek
leeg te maken (B)
Wanneer leeg, plaats
het waterr e s e r v oir
terug zoals getoond;
(C) Plaats eerst de
onderkant van de tank
in de stand zoals
weergegeven (1) en
d u w v e r v o l g e n s
zachtjes het bovenste
deel op zijn plaats (2).
B
79
Page 80

DEUR en FILTER
3)
MEMORIA
6.
Trek aan de hendel om de deur te openen.
Om de droger opnieuw te starten, doet u de
deur dicht en drukt u op .
WAARSCHUWING! Wanneer de droger
in gebruik is, kunnen de trommel en de deur
erg heet zijn.
Filter
BELANGRIJK:Om ervoor te zorgen dat de
droger efficiënt blijft werken, controleer voor
iedere droogcyclus of de pluizenfilter schoon
is.
1. Trek de filter omhoog.
2. Open de filter zoals
getoond wordt.
1
3. Haal de pluizen met
een zacht borsteltje of
met uw vingertoppen
voorzichtig weg.
4. Klik de filter samen
en duw hem terug op
zijn Plaats.
2
Filter Schoonmaken Indicatielampje
brandt wanneer het filter schoongemaakt
moet worden.
Als het wasgoed niet droog wordt, controleer
dan of de filter verstopt is.
ALS U DE FILTER ONDER WATER
SCHOONMAAKT, vergeet dan niet om
deze te drogen.
WAARSCHUWING! Als u de deur
halverwege de cyclus opent, voordat de
koelcyclus is voltooid, kan het handvat heet
zijn. Wees uiterste voorzichtig bij een poging
om het waterreservoir te legen tijdens de
cyclus.
De Condens Filter Schoonmaken
1. V e r w i j d e r d e
schopplaat.
1
2. D r a a i d e t w e e
sluithendels tegen de
klok in en haal
de condensator uit de
machine.
3. Haal de condens-unit
uit de machine en haal
2
voorzichtig alle stof of
pluizen met een doek
weg. Gebruik geen
wa ter om de filter
schoon te maken
4. Verwijder voorzichtig
de spons van zijn plaat
3
en was hem daarna
door hem onder een
stromende kraan te
houden en hem zo te
draaien dat alle stof of
plu i zen v erw i jde r d
worden
4
5. P l a a t s d e
condensator opnieuw.
Zorg ervoor dat u hem
in de juiste richting
plaatst (volgens de pijl)
en druk hem stevig aan.
Draai de twee hendels
weer met de klok mee
5
aan.
6. Breng de schopplaat
weer op haar plaats.
Reinig de filters vóór elke cyclus
80
Page 81

7.
BEDIENINGSKNOPPEN EN
INDICATIELAMPJES
220'
120'
END
90'
6h
3h
60'
9h
A
D
C
END
6h
3h
9h
220'
120'
90'
60'
B
3
4
2
A- Cycli selecteren -
U kan de knop in beide richtingen draaien om
het g e wens t e dro o g prog r amma t e
selecteren. Om de selectie te annuleren of
om de droger stop te zetten, draait u de knop
op OFF.
1
klaar te maken om op te hangen
- Droog kleerkast: voor wasgoed dat
direct kan worden opgeborgen
- Extra droog: voor volledig droge
kleding, ideaal voor volle beladen cycli.
Deze apparatuur is uitgerust met een Droog
Manager functie. Op automatische cyclus zal
op elk niveau van tussentijds drogen,
alvorens de geselecteerde droogfunctie te
bereiken, de graad van drogen worden
aangegeven met een knipperend licht.In
geval van onverenigbaarheid, gaan alle
LED's snel 3 keer knipperen.
4.Uitgestelde start
Met deze functie kan u het starten uitstellen
met 3u, 6u of 9u. Duw opnieuw op start om
deze functie te laten verder tellen indien u de
deur hebt geopend en opnieuw gesloten.
C- Leds
Water tank - Het licht op wanneer het nodig
is om het condens waterreservoir te legen.
Reinig filters - Het licht op wanneer de
filters nodig moeten gereinigd worden (de
deur en de onderste filter).
NL
B-Toetsen -
1.Start-Pauze
Om het geselecteerde programma te starten
en / of te onderbreken.
2.Tijd cycli selectie
“Het is mogelijk om een automatische cyclus
te veranderen in een geprogrammeerde
cyclus tot 3 minuten na het begin van de
cyclus. Na deze selectie is het nodig om de
automatische droog functie te resetten om
de droger uit te schakelen. In geval van
onverenigbaarheid, gaan alle LED's snel 3
keer knipperen.
3.Knop drogen selecteren
"Deze maakt het mogelijk om het gewenste
droogniveau in te stellen: tot 5 minuten
aanpasbaar na het starten van de cyclus:
- Klaar om te strijken: de kleding blijft
een beetje vochtig om het strijken te
vergemakkelijken.
- Droog ophangen: Om kledingstukken
81
Deze controlelampen lichten op om de
droogfase aan te geven:
-DROOG / Dit licht op wanneer de
droogcyclus wordt uitgevoerd
- Dit licht op wanneer de cyclus zich in de
afkoelfase bevindt
- EINDE: Dit licht op wanneer de cyclus
gedaan is”
DSMART TOUCH gebied - de START /
PAUZE-knop maakt het mogelijk om een
eerder gedownloade cyclus te beginnen,
terwijl de Touch positie is geselecteerd op de
programmaknop (voor het downloaden van
cycli in de App, zie het betreffende hoofdstuk
van deze handleiding).
Page 82

Het wol programma van
3)
MEMORIA
primera vez:
1)
2)
, elija M1
o M2. Ha de elegir M1
deze droger is door The
Wo o l ma rk C o m pa ny
goedgekeurd voor het
drogen van machine
wasbare producten uit wol,
m i t s d e p r o d u c t e n
gewassen en gedroogd worden volgens de
onderhoudsinstructies op het etiket en de
gebruiksaanwijzing van deze droger. M1530.
In het Verenigd Koninkrijk, Ierland, Hong Kong
en India is het Woolmark handelsmerk een
Certificatie handelsmerk.
Maximum gewicht drogen
Cottons
Synthetisch en Delicaat
Max. capaciteit bereikt
Max.4 Kg
Drogen gids
'De standaard cyclus KATOEN ( ) is de meest
energie-efficiënte en het best geschikt voor het
drogen van normaal vochtig katoenen wasgoed.
De tabel op de laatste pagina geeft de gemiddelde
duurtijd en ener gieverbruik aan van de
belangrijkste droogprogramma's.
Effektforbrug i slukket tilstand
Effektforbrug i stand by-tilstand
Technische Specificaties
Trommelcapactet 125
Maxmale ladng
Hoogte
Breedte
Depte
Energenveaugroep
ze energelabel
85 cm
60 cm
60 cm
ze energelabel
Informatie voor Test Laboratorium
EN 61121 Programma gebruiken
-DROOG KATOEN
-STRIJK KATOEN
-GEMAKKELIJK SCHOON
TE MAKEN TEXTIEL
- KATOEN OF
- KATOEN OF WIT
-DELICAAT OF SYNTHETISCH
0,40 W
0,75 W
BEDIENING
1. Doe de deur open en laad de trommel
met wasgoed. Zorg ervoor dat de
kledingstukken het sluiten van de deur
niet belemmeren.
2. Doe de deur voorzichtig dicht u hoort
dan een 'klik'.
3. Draai de programma knop naar het
do or u gew enste programma(zie
programma Gids).
4. Druk op de toets. De droger zal
automatisch starten en de indicator
boven deze toets zal gaan branden.
5. Als de deur geopend is geweest tijdens
de cyclus moet u opnieuw op deze
toets drukken om het programma te
hervatten, zorg dat de deur gesloten is.
6. Als de cyclus bijna ten einde is zal de
machine een koelfase ingaan om de
kleding af koelen.
7. Als het programma klaar is zal het END
indicatielampje op het display gaan
branden.
8. Nadat de cyclus is afgerond, zal de
trommel met tussenpozen draaien om
kreukelvorming te minimaliseren. Er zal
een signaal klinken, dit stopt als u de
machine heeft uitgeschakeld of de deur
opent.
De deur niet openen tijdens een
programma zodoende een goede droging te
verkrijgen
Reinig de filters vóór elke cyclus
ALLEEN VOOR DROGERS MET CAPA-
SLANG VOOR HET OPVANGEN VAN HET
CONDENSWATER AAN VOLGENS DE
INSTRUCTIES IN HOOFSTUK 2
cyclus hangt af van het startvochtigheidsniveau van het wasgoed omwille van
centrifugeersnelheid, type en hoeveelheid
lading, properheid van filters en omgevingstemperatuur.
82
De werkelijke duur van een droog-
SLUIT DE AFVOERCITEIT VAN 10 KG:
-
Page 83

8.
HET PROGRAMMA KIEZEN
PROGRAMMA
Makkelijk te strijken
Mix
Eco Katoen
Wit of Katoen
Mix & Dry
Synthetische stoffen
Overhemden
Donkere kleuren &
Gekleurd
Baby
Jeans
Sport
Wool
Snel 45'
Een comfortabele oplossing om wasgoed van gemengde stoffen
te drogen met zo weinig mogelijk plooien, om zo de perfecte
luchtvochtigheid te leveren voor gemakkelijker te strijken. Vóór
het drogen, best het beddengoed eens schudden.
Programma Eco Katoen (hangdroog) drogen. Het meest
efficiënte programma omtrent energieverbruik Geschikt voor
katoen en linnen.
De juiste cyclus voor katoen, sponzen en handdoeken te drogen.
Om allemaal verschillende soorten stoffen zoals katoen,
linnen, gemengde en synthetische stoffen te drogen.
Om synthetische en fijne stoffen te drogen.
Deze specifieke cyclus is ontworpen om shirts te drogen met zo
weinig mogelijk klitten en plooien dankzij specifieke bewegingen
van de trommel. Het is aanbevolen het wasgoed onmiddellijk na
het drogen uit de trommel te nemen.
Een gevoelige en specifieke cyclus om donker of gekleurd
katoen of syntethische kledingstukken te drogen.
Deze cyclus is perfect voor babykleertjes, wanneer een hoog
hygiënisch niveau wordt verwacht.
Programma om gelijktijdig stoffen zoals jeans of denim te
drogen. Het is aanbevolen om de kleding binnenstebuiten te
keren voor het drogen.
Programma voor technische kleding voor sport en fitness, droogt
zachtjes met speciale zorg om krimpen en beschadiging van de
elastische vezels te voorkomen.
Wollen kleding: het programma kan worden gebruikt om tot 1 kg
wasgoed te drogen (ongeveer 3 jumpers). Het wordt aanbevolen
om alle kleren binnenstebuiten te keren voor het drogen. De duur
kan veranderen als gevolg van de afmetingen, de dikte van de
lading en de gekozen centrifugesnelheid tijdens het wassen. Aan
het einde van de cyclus, zijn de kleren klaar om gedragen te
worden, maar als ze zwaarder zijn, kunnen de randen een beetje
nat zijn: we stellen voor om ze natuurlijk te drogen. Het wordt
aanbevolen om kleren aan het einde van de cyclus uit de trommel
te halen. Opgelet: vilten van wol is onomkeerbaar; droog uitsluitend
kleding met symbool (symbool "ok droogtrommel"); dit programma
is niet voor acryl kleding.
Perfect om snel te drogen tot 2 kg belasting. Het is aanbevolen om
de was te centrifugeren met hoge snelheid alvorens te drogen.
OMSCHRIJVING PROGRAMMA
CAPACITEIT
(kg)
2
Full
Full
4
4
2.5
4
4
4
4
1
1
DROOGTIJD
(min)
*
*
*
*
*
*
*
150’
*
*
70’
*
NL
Opfrissen & Ontkreuken
Anti-kreuk
* De werkelijke duur van de droogcyclus is afhankelijk van de vochtigheidsgraad bij de start van het wasgoed als
gevolg van centrifugesnelheid, soort en hoeveelheid wasgoed, netheid van de filters en omgevingstemperatuur.
Dit is een warme cyclus die slechts in 12 minuten helpt om plooien
te ontspannen.
De perfecte cyclus om slechte geuren uit de lakens te halen en
plooien glad te strijken.
Instelbare functie van de knop die u moet selecteren om te communiceren met de
smartphone-App en om de wasprogramma’s te downloaden (zie ook het corresponderende
hoofdstuk). In de fabriek wordt het standaardprogramma Auto-Clean (Automatisch
Schoonmaken) ingesteld; het programma om de machine schoon te houden.
83
2.5
2.5
12’
*
Page 84

SMART TOUCH
Dit apparaat is uitgerust met Smart Touch
technologie, waardoor het, door middel van
de smartphone-App, kan communiceren met
smartphones die beschikken over een
Android- b e s turingss y s t e em en een
NFCfunctie (Near Field Communication).
● Download de Candy simply-Fi-applicatie
op uw smartphone.
De C a ndy s impl y - Fi App is
beschi k b a a r voor tablets en
smartphones met zowel Android als
iOS. Maar alleen met Androidapparaten met NFC-technologie kunt
u het maximale uit de Smart Touch
technologie halen. Zie onderstaand
schema:
Android-smartphone
met NFC-technologie
Android-smartphone
zonder NFC-technologie
Android Tablet
Apple iPhone
Apple iPad
Interactie met het
apparaat + inhoud
Alleen inhoud
Alleen inhoud
Alleen inhoud
Alleen inhoud
V o o r i n f o r m a t i e o v e r d e
mogelijkheden van Smart Touch en
een DEMO van de App kijkt u op:
www.candysmarttouch.com
SMART TOUCH GEBRUIKEN
EERSTE GEBRUIK – Registreren
apparaat
Zoek en activeer de NFC-functie in het
menu "Wireless & Netwerken" in het
" I n s t e l l i n ge n " - m e n u va n u w
Androidsmartphone.
Het activeerproces van de NFC-functie
verschilt per model en per versie van
Android. Raadpleeg de handleiding
van uw smartphone voor meer
informatie.
● Zet de knop van het apparaat op de
Smart Touch-positie om de sensor op het
dashboard in te schakelen.
● O p e n d e A p p , m a a k e e n
gebruikersprofiel aan en registreer uw
apparaat door de instructies op het
scherm of de "Snelgids"-handleiding op
de machine te volgen.
FUNCTIES
Dit zijn de belangrijkste functies van de App:
● Stem assistentie – Helpt bij de keuze van
het juiste wasprogramma met slechts drie
spraakcommando’s (kleren/stof, kleur,
vlekkenniveau)
● Cycli – Voor het downloaden en gebruiken
van nieuwe programma’s.
● Smart Care – Speciale programma’s voor
controle apparaat, Auto-Clean-functie en hulp
bij problemen oplossen.
● Mijn statistieken – Wasstatistieken en tips
voor efficiënter gebruik van de machine.
Meer informatie, veelgestelde vragen,
en een video over registreren vindt u op:
www.candysmarttouch.com/how-to
84
Page 85

NA HET EERSTE GEBRUIK
● Wanneer u het apparaat wilt beheren met
de App moet u altijd de Smart Touchmodus
inschakelen door de knop naar de juiste
stand te draaien.
● Wees zeker dat u uw GSM heeft
ontgrendeld (voor een mogelijke stand-by
modus) en dat u uw NFC-functie geactiveerd
heeft; anders volgt u de vorige aangehaalde
stappen.
Als u de positie van uw NFC-antenne niet
weet, beweeg de smartphone in een
cirkelvormige beweging over het Smart
Touch-logo totdat de App de verbinding
bevestigt. Om de overdracht van data
succesvol te laten verlopen is HET
ESSENTIEEL OM UW SMARTPHONE OP
HET BEDIENINGSPANEEL TE HOUDEN
TIJDENS DE PAAR SECONDEN VAN DE
PROCEDURE; een bericht op het toestel zal
u informeren over de juiste uitkomst van de
operatie en adviseren wanneer het mogelijk
is om de smartphone weg te halen.
● Wanneer u gaat wassen: doe was en
wasmiddel in de machine en sluit de deur.
● Selecteer de gewenste functie in de App
( bv . : e e n p r o g r a m m a s t a r t e n ,
controleprogramma laden, statistieken
bijhouden, etc…).
● Volg de instructies op uw GSM-display,
HOUD, zoals gevraagd door de app UW
GSM OP het Smart Touch logo dat zich op
het bedieningspaneel bevindt.
OPMERKINGEN:
Plaats uw smartphone met de NFC sensor
op de achterkant ter hoogte van het Smart
Touch-logo op uw apparaat (zie afbeelding
hieronder).
Telefoonhoesjes of metalen stickers op uw
s m a r t p h o n e k u n n e n d e
gegevensverbinding tussen apparaat en
telefoon beïnvloeden. Verwijder deze
indien nodig.
De vervanging van enkele onderdelen van
uw smartphone (bvb. Achterkant, batterij,
etc…) met niet originele stukken zou
kunnen resulteren in een NFC antenne
verwijdering, waardoor het volledig
gebruik van de App voorkomen wordt.
De bediening en het beheer van het apparaat
d.m.v. de App is alleen mogelijk als u in de
buurt bent van het apparaat: bediening op
afstand is niet mogelijk (bv.: vanuit een
andere kamer of van buiten het huis).
DRAADLOZE PARAMETERS
Parameter
Draadloos Standaard
Frequency band
Magnetic field limit
Met deze parameter, verklaart Candy Hoover
Group Srl, dat dit product gemarkeerd is
en voldoet aan de essentiële eisen van de
richtlijn 2014/53 / EU.
Om een kopie van de verklaring te ontvangen
gelieve contact op te nemen met de fabrikant
op: www.candy-group.com
Specificaties
ISO/IEC 14443 Type A en NFC Forum Type 4
13,553-13,567 MHz (centre frequency 13,560 MHz)
< 42dBμA/m (op 10 meter)
NL
85
Page 86

PROBLEMEN OPLOSSEN
9.
ALLEEN VOOR SMART TOUCH-MODELLEN.
Met het Controleprogramma van de Candy simply-Fi-App kunt u op ieder moment het
functioneren van het apparaat controleren. Het enige dat u nodig heeft is een Android
smartphone met NFC-technologie. Meer informatie vindt u in de App.
Bij een foutmelding op het scherm van het apparaat (een code of knipperende lampjes)
opent u de App en houdt u uw smartphone met NFC tegen het Smart Touch-logo op het
dashboard. Nu kunt u de map openen waarin informatie staat over de oplossing van
het probleem.
Wat Zou De Reden Kunnen Zijn Voor...
Defecten die u zelf kunt oplossen
Voordat u de GIAS-Service voor technisch advies
belt, kunt u de volgende controlelijst afgaan. Er
zullen kosten worden aangerekend als blijkt dat
de machine werkt of dat de machine niet juist
werd geïnstalleerd of gebruikt. Als het probleem
zich na de aanbevolen controles nog steeds
voordoet, belt u GIAS-Service, zodat zij u
telefonisch kunnen helpen.
De weergegeven tijd in het display kan wijzigen
tijdens het drogen. De droogtijd wordt continue
aangepast tijdens de cyclus en geeft een
geschatte tijd weer. De tijd zal tijdens het drogen
meer of minder worden dit is heel normaal.
De droger maakt herrie…
●Schaker de droger uit en neem contact op
met GIAS-Service voor advies.
Het indicatielampje staat aan…
●Moet het filter schoongemaakt worden?
●Moet de condensator schoongemaakt
worden?
Het indicatielampje staat aan…
● Moet het water reservoir geled igd
worden?
KLANTENSERVICE
Als er nog steeds een probleem mocht zijn
met uw droger nadat u alle aanbevolen
controles hebt uitgevoerd, bel dan a.u.b. de
GIAS-Service voor advies. Zij kunnen u
De droogtijd is te lang/kleren zijn niet droog
genoeg…
Hebt u de juiste droogtijd/het juiste programma
●
gekozen?
Waren de kleren te nat? Waren de kleren grondig
●
uitgewrongen of gecentrifugeerd?
Moet de filter schoongemaakt worden?
●
Moet de condensator schoongemaakt worden?
●
Is de droger te vol geladen?
●
Worden de aan- en afvoeren en het onderstuk
●
van de droger niet geblokkeerd?
De droger werkt niet…
Staat er spanning op het elektriciteitssnoer van de
●
droger? Controleer dit door het met een ander
apparaat te gebruiken, zoals een tafellamp.
Is de stekker op de juiste manier verbonden met
●
de netspanning?
Is de stroom uitgevallen?
●
Is de zekering doorgeslagen?
●
●
Is de deur helemaal dicht?
Staat de droger aan, zowel bij de netspanning als
●
bij de machine?
●
Is de droogtijd of het programma ingesteld?
Is de machine opnieuw ingeschakeld nadat de
●
deur open is geweest?
●
Is de droger gestopt omdat het waterreservoir vol
is en moet worden leeggemaakt?
misschien aan de telefoon helpen of
volgens de bepalingen van de garantie een
afspraak maken met een technicus die u
komt opzoeken. Er kunnen evenwel kosten
in rekening worden gebracht als een van de
volgende punten op uw machine van
toepassing is:
● De machine blijkt goed te werken.
● Ze is niet geinstalleerd volgens de
installatievoorschriften.
● Ze is op een onjuiste manier gebruikt.
Reserveonderdelen
G e b r u i k a l t i j d o r i g i n e l e
reserveonderdelen. Deze zijn direct
beschikbaar via GIAS-Service.
GIAS - Service
Voor onderhoud en reparaties belt u met
uw locale GIAS onderhoudsmonteur.
De fabrikant aanvaardt geen verantwoordelijkheid voor drukfouten in dit
boekje. De fabrikant behoudt ook het
recht voor om de producten waar
nodig aan te passen zonder de
hoofdkenmerken te veranderen.
86
Page 87

Índice
Por favor leia e siga estas instruções
cuidadosamente antes de pôr a máquina a
funcionar. Este manual fornece-lhe instruções
importantes para proceder em segurança à
utilização, instalação e manutenção, assim
como conselhos úteis para obter melhores
resultados da utilização da máquina.
Guarde todos os documentos num lugar
seguro para referência futura ou para ceder
aos eventuais futuros proprietários.
Verifique se os seguintes artigos estão
incluídos na máquina:
● Manual de instruções
● Cartão de garantia
● Kit de ventilação e instruções
● Etiqueta de energia
Vao colocar o símbolo neste produto
declaramos, sob nossa responsabilidade, a
conformidade com todas as exigências de
segurança europeia, para com a saúde e os
requisitos ambientais estabelecidos na
legislação em relação a este produto.
Verifique se a máquina não sofreu
qualquer tipo de dano durante o transporte.
Cas o c ontrári o , solici t e
Assistência. inobservância do exposto
anterior-mentepode pôr em causa a
segurança da máquina. Pode ser-lhe cobrada
uma visita daassistência se o problema da
máquina se dever a uma utilização indevida..
Ser v i ço de
1. SEGURANÇA
2. TUBO DE DRENAGEM:
INSTRUÇÕES DE INSTALAÇÃO
3. PREPARAÇÃO DA CARGA
4. LIMPEZA E MANUTENÇÃO
DE ROTINA
5. DEPÓSITO DA ÁGUA
6. PORTA E FILTRO
7. CONTROLOS E INDICADORES
8. SELECÇÃO DO PROGRAMA
9. RESOLUÇÃO DE PROBLEMAS
SERVIÇO DE CLIENTES
PT
87
Page 88

1.
SEGURANÇA
●
Este electrodoméstico não deve
ser usado por crianças com
menos de 8 anos nem por
p e s s o a s c o m r e d u z i d a s
capacidades físicas, sensoriais ou
mentais ou pessoas que tenham
falta de experiência e não saibam
operar com o aparelho, a menos
sejam supervisionadas por
alguém com experiência e que
supervisione a sua segurança e
que entenda os riscos envolvidos.
As crianças não devem brincar
com o electrodoméstico. A
limpeza e manutenção também
não devem ser feitas por
crianças.
●
ATENÇÃO A má utilização de
uma máquina de secar pode
criar risco de incêndio
●
Este electrodomé sti co foi
concebido para ser utilizado
a p e n a s e m a m b i e n t e s
domésticos ou similares, tais
como:
-Pequenas cozinhas de staff em
lojas, escritórios e outros
ambientes de trabalho;
-Turismo rural ou de habitação;
-Por clientes alojados em hotéis,
motéis ou outro género de
residenciais e afins;
Alojamento tipo “cama e
pequeno-almoço” .
Uma utilização diferente deste
electrodoméstico em situações
que não sejam as tarefas
domé st ic as para que foi
concebido, tal como utilizações
comerciais ou profissionais,
estão excluídas das utilizações
e x p l i c i t a d a s e e m
conformidade. Se o aparelho
for utilizado para além das
situações previstas, isso pode
re d uz i r a vi da úti l do
electrodoméstico e anular a
garantia do fabricante, dado
que as utilizações não foram
as previstas em conformidade
com o uso a que o aparelho se
destina.Qualquer dano no
equipamento que seja devido
a utilizações não conformes
com o que é suposto com a
utilização doméstica e familiar
(mesmo que o aparelho esteja
localizado em casa), não são
cobertas pela garantia dada
por lei.
●
Esta máquina destina-se
apenas a uso doméstico, ou
seja, para secar têxteis e
vestuário domésticos.
Esta máquina deve apenas
●
ser utilizada para os fins para
os quais foi concebida,
conforme descrito neste
manual. Certifique-se de que
compreende perfeitamente as
instruções de instalação e
utilização antes de colocar a
máquina em funcionamento.
●
Não toque na máquina com as
mãos ou pés húmidos ou
molhados.
●
Não se apoie na porta ao
carregar a máquina ou utilize
a porta para erguer ou mover
a máquina.
88
Page 89

●
Não permita que as crianças
brinquem com a máquina ou os
respectivos controlos.
●
ATENÇÃO Não utilize o produto
se o filtro de cotão não estiver
bem posicionado ou se estiver
danificado; o cotão é inflamável.
●
ATENÇÃO O aumento de
t e mp e ra t ur a d u r a n t e o
funcionamento da máquina de
secar pode exceder os 60 graus
C, onde exista o símbolo de
superfície quente .
Retire a ficha da tomada de
●
corrente eléctrica. Faça o
mesmo antes de limpar a
máquina.
●
Não insista em utilizar a
máquina, se lhe parecer que
existe qualquer avaria.
Não deixe que se acumulem
●
partículas de fibras e cotão em
torno da máquina.
●
O interior do tambor pode estar
muito quente. Antes de retirar a
roupa, deixe sempre a máquina
de secar completar o período de
arrefecimento.
A parte final de um ciclo de
●
secagem ocorre sem calor (é o
ciclo de arrefecimento) para
assegurar que as peças ficam a
uma temperatura que assegure
que não são danificadas.
O secador de roupa não deve ser
●
utilizado para secar roupas que
tenha m sido limpas com
produtos químicos industriais.
●
AVI SO : Nunca par e um a
máquina de secar roupa antes
do fim do ciclo de secagem, a
menos que todas as peças de
roup a se jam rap idame nt e
removidas e espalhadas para
que o calor se dissipe.
Peso máximo de carga de
●
secagem: Consulte a etiqueta de
eficiência energética.
Instalação
●
Não utilize adaptadores, vários
conectores e/ou extensões.
Nunca instale a máquina junto a
●
cortinas e tenha o cuidado de
evitar a queda ou acumulação de
objectos atrás da mesma.
●
O equipamento não deve ser
instalado atrás de uma porta que
bloqueie, deslizante ou que tenha
uma dobradiça no lado oposto ao
do secador.
I m p o r t a n t e : D u r a n t e o
transporte assegure-se de que
o secador é mantido na vertical;
se necessário pode virá-lo
apenas para o lado indicado na
figura;
Cuidado: Se o produto estiver
deitado sobre outro lado,
aguarde, pelo menos, 4 horas,
antes de o ligar, para que o óleo
possa fluir novamente para o
compressor. Se não o fizer,
corre o risco de provocar danos
no compressor.
89
PT
Page 90

Tipos de roupa
●
Não seque itens não lavados no
secador.
●
ATENÇÃO Não pôr na
máquina de secar roupa
tecidos tratados com produtos
de limpeza a seco.
●
ATENÇÃO Os materiais de
borracha esponjosa podem,
em certas circunstâncias, ser
inflamáveis por combustão
espontânea quando aquecidos.
Itens como borracha esponjosa
(borracha látex), toucas de
banho, tecidos à prova de água,
artigos compostos por borracha
e r oup as o u alm of ada s
en c h i das com bo r r a cha
esponjosa NÃO PODEM ser
secados no secador.
●
Consulte sempre as indicações
das etiquetas de lavagem e
secagem.
●
A roupa deve ser centrifugada
ou bem torcida antes de ser
colocada na máquina de secar.
NÃO deve pôr na máquina
roupa ensopada e a pingar.
●
Não deixe isqueiros e fósforos
nos bolsos e NUNCA utilize
líquidos inflamáveis perto da
máquina.
●
NUNCA deverá utilizar-se esta
máquina para secar cortinas de
fibra de vidro. Se outras roupas
forem contaminadas com estas
fi b r a s , p o d e m p rovoc a r
irritações na pele.
●
Itens que foram sujos com
substâncias tais como óleo de
cozinha, acetona, álcool,
g a s o l i n a , q u e r o s e n e ,
produtos para a remoção de
nódoas, terebintina, ceras e
produtos para a remoção de
cera deverão ser lavados em
água quente com uma
q u a n t i d a d e e x t r a d e
detergente antes de serem
secos no secador de tambor.
●
Amaciadores de roupas ou
produtos similares deverão
s e r u s a d o s c o m o
especificado nas instruções
do amaciador.
Ventilação
●
A sala onde está localizada a
máquina de secar deve
possuir uma ventilação
adequada para evitar que os
gases provenientes dos
electrodomésticos queimem
o u t r o s c o m b u s t í v e i s ,
incluindo chamas vivas, que
sejam atraídos à sala
durante o funcionamento da
máquina de secar.
●
Instale a máquina com a
parte traseira do aparelho
perto de uma parede.
●
O ar de exaustão não pode
ser eliminado pelo
tubo de chaminé que é
utilizado para os fumos de
e x a u s t ã o d e
el ect rod omé sti cos que
queimem gás ou outros
combustíveis.
●
Verifique regularmente se
nada está a limitar o fluxo de
90
Page 91

ar na máquina.
Se o cabo de alimentação
estiver danificado, ele deve ser
substituído pelo fabricante, pelo
serviço de assistência técnica
ou profissionais qualificados a
fim de evitar acidentes.
Verifique com frequência a
limpeza do filtro, pois é natural
que este tenha cotão acumulado
após cada utilização.
Deve haver uma distância de,
pelo menos, 12 mm entre a
máquina e quaisquer
obstrucções, paredes, móveis
ou outros objectos. A zona de
carregamento e retirada da
roupa deve ser mantida livre de
obstrucções, bem como as
saídas de ar. Para garantir a
ventilação adequada não deve
existir nenhuma obstrução entre
a máquina e o chão onde esta
se encontra colocada.
Evite que caiam e se acumulem
objectos atrás e ao lado da
máquina, uma vez que podem
obstruir a entrada e saída de ar.
NUNCA instale a máquina junto
a cortinas.
Nos casos em que a máquina
de secar é instalada em cima
de uma máquina de lavar,
pode utilizar-se um kit de
empilhamento de acordo com
a configuração do seu aparelho:
- Kit de empilhamento "tamanho
standard": para máquina de
lavar com profundidade
mínima de 44 cm;
- Kit de empilhamento "tamanho
fino": para máquina de lavar com
profundidade mínima de 40 cm.
O kit de empilhamento deve
ser obtido a partir do nosso
serviço de peças
sobresselentes. As instruções
de instalação e os acessórios
de fixação necessários são
fornecidos com o kit de
empilhamento.
A tomada deve estar acessível
para ser ligada e desligada
após a instalação do aparelho.
ATENÇÃO: o aparelho não
deve ser ligado a um dispositivo
externo, temporizador ou
circuito que seja ligado e
desligado com frequência.
Air Outlets in the Base
Não nstale o produto numa
sala com baxas temperaturas ou
onde exsta o rsco de ocorrênca
de congelação. Com temperaturas
em torno do pontos de congelação,
o produto pode não ser capaz de
funconar correctamente: há o rsco
de danos no aparelho se a água
congelar no crcuto hdráulco
(válvulas, mangueras, tubos).
Para um melhor desempenho do
produto a temperatura ambente
da sala onde este está nstalado
deve estar entre os 5ºC e os 35ºC.
Por favor tome em consderação
q u e o f u n c o n a m e n t o e m
condções de temperaturas mas
baxas (entre os 2ºC e os 5ºC)
pode gerar alguma condensação
de água e pode acontecer que
alguma água escorra para o chão.
91
PT
Page 92

ATENÇÃO:
Perigo de incêndio / Materiais
inflamáveis.
O aparelho contém R290 um
gás refrigerante eco sustentável que é inflamável.
Mantenha as chamas desprotegidas e as fontes de ignição
afastadas do aparelho.
Verifique se não há danos
visíveis no aparelho. Não use o
aparelho se estiver danificado.
Se houver algum tipo de
problema, contacte o seu
retalhista especializado ou um
dos nossos centros de apoio
ao cliente.
ATENÇÃO:
certifique-se de que as
aberturas no aparelho e as
aberturas no compartimento
onde o aparelho está instalado
(para modelos encastrados)
estão desimpedidas de
obstruções.
ATENÇÃO:
Não danifique o circuito
refrigerante.
Quaisquer reparações ou
intervenções não autorizadas
no aparelho apenas devem ser
efetuadas por um serviço de
assistência autorizado.
A eliminação do dispositivo de
forma incorreta poderia provocar incêndios ou envenenamento.
Elimine o dispositivo correta-
mente e não danifique os tubos
utilizados para a circulação do
fluido refrigerante.
92
Page 93

Ambiente
●
Todos os materiais de embalagem utilizados
não são hostis ao ambiente e são recicláveis.
Ajude, desfazendo-se das embalagens por
meios não hostis ao ambiente. As autoridades
locais estarão em condições de o informar
sobre os meios actuais de recolha de lixo.
●
Para garantir as condições de segurança,
quando se desfizer de uma máquina de secar
velha, retire a ficha eléctrica da tomada de
corrente, corte o cabo de alimentação e destrua
ambos. Para evitar a eventualidade de alguma
criança ficar fechada dentro da máquina, parta
as dobradiças ou o fecho da porta.
Directiva Europeia 2012/19/EU
Este aparelho está classificado de
acordo com a Directiva Europeia
2012/19 /UE relativa aos Resíduos de
E q ui pa m en to s El é c tr ic o s e
Electrónicos (REEE).
REEE contém substâncias poluentes
(que podem trazer consequências negativas
para o meio ambiente) e componentes básicos
(que podem ser reutilizados). É importante ter
os RE E E submetidos a t ratamentos
específicos, a fim de remover e eliminar
a d e q u a d a m e n t e t o d o s o s
componentespoluentes e recuperar e reciclar
todos os materiais.
Os consumidores podem desempenhar um
papel importante no sentido de garantir que os
REEE não se tornem num problema ambiental.
Para isso é essencial seguir algumas regras
básicas:
- REEE não devem ser tratadas como lixo
doméstico.
-REEE devem ser entregues nos pontos de
coleta próprios geridos pelo município ou por
empresas especializadas para o efeito. Em
alguns países a recolha de REEE de grandes
dimensões podem ser alvo de recolha ao
domicílio.
Em muitos países, quando se adquire um novo
aparelho, o antigo pode ser devolvido na loja ou
recolhido pelo retalhista sem custos para o
consumidor, desde que o equipamento seja de
um género semelhante.
Serviço de Assistência
●
Para assegurar continuadamente as
operações seguras e eficientes desta
máquina, recomendamos que os serviços
de manutenção ou reparação sejam
executados apenas por um técnico
autorizado.
Requisitos eléctricos
As máquinas de lavar são concebidas
para funcionarem com uma corrente
monofásica de 220-240 volts e 50 Hz.
Verifique se o circuito de corrente está
classificado a, pelo menos, 6A.
A e l e c t r i c i d a d e p o d e s e r
extremamente perigosa.
Esta máquina deve estar ligada à
terra.A tomada de corrente e a ficha da
máquina devem ser do mesmo tipo.
Não utilize vários adaptadores e/ou
extensões.A ficha deve ficar acessível
para se poder desligar a máquina
após a sua instalação.
Poderá ser cobrado um serviço de
assistência se ligar para os serviços
pelo facto da máquina ter sido
instalada de forma incorrecta, pois isso
não é responsabilidade da marca.
Se o cabo de alimentação deste
aparelho estiver danificado, deve ser
substituído por um cabo especial que
só pode ser obtido a partir do serviço
té c ni c o o f i ci a l e c o m p eç a s
sobressalentes da marca. Deve ser
instalado por uma pessoa competente.
Não ligue a máquina à corrente
eléctrica até a instalação estar
completa. Para a sua segurança, este
se ca d o r d e r o u p a de ve ser
corretamente instalado. Se houver
qualquer dúvida sobre a instalação,
entre em contato com o Serviço de
Assistência Técnica oficial da marca
para obter aconselhamento.
Ajustar os Pés
Depois de a máquina
estar devidamente
posicionada, os pés
devem ser ajustados
para assegurar que a
m á q u i n a e s t á
nivelada.
93
PT
Page 94

2.
TUBO DE DRENAGEM:
INSTRUÇÕES DE
INSTALAÇÃO
Para evitar esvaziar o recipiente de água
após cada ciclo de secagem, a água pode
ser descarregada directamente para um
tubo de drenagem e escoamento de águas
residuais (o mesmo sistema de drenagem
das pias). Há regras e legislação que proíbe
conexão com um dreno de água de
superfície. O tubo de drenagem de águas
residuais deve ficar localizado em local
adjacente ao secador. O kit é composto por
uma mangueira e uma torneira
4. Encaixe a mangueira
pr e ta do co n j u nt o
(usando a ligação e os
c l i p e s d o t u b o
f o r n e c i d o s ) n a
mangueira removida da
peça de suporte.
5. Tire a mangueira da
lig ação à peça de
suporte.
4
5
ATENÇÃO! Desligue e retire a ficha do
secador da corrente eléctrica antes de
realizar qualquer acção.
Coloque a mangueira como demonstrado:
1. Incline o secador
lentamente para o lado
direito.
2. O tubo da água
servida está situado do
lado direito do secador
(vide a figura). Uma
mangueira cinzenta
liga à peça de suporte
do lado esquerdo do
secador. Utilizando
alicates, remova o
clipe de retenção dos
tubos da dita peça.
3. Tire a mangueira da
peça de suporte.
1
2
3
6. Uma vez o secador
instalado, verifique o
fundo para se assegurar
d e q u e a n o v a
mangueira não se dobra
quando e m p u r ra o
secador de roupa para a
respectiva posição final.
L i g u e à r ed e d e
alimentação de energia.
Cuidado: Se o produto estiver deitado
sobre outro lado, aguarde, pelo menos, 4
horas, antes de o ligar, para que o óleo
possa fluir novamente para o compressor.
Se não o fizer, corre o risco de provocar
danos no compressor.
6
94
Page 95

3.
PREPARAÇÃO DA CARGA
Lãs, sedas, tecidos delicados, meias de nylon,
bordados delicados, tecidos com decoração
metálica, vestuário com guarnições de PVC ou
couro, ténis, artigos volumosos, tais como sacoscama, etc.
Preparação Da Roupa
Certifique-se de que a roupa que vai secar é apropriada
para secagem por máquina de secar, conforme indicado
nos símbolos das etiquetas, representativos dos
cuidados a ter com cada um dos artigos.
Certifique-se de que todos os fechos estão fechados e
os bolsos vazios. Vire os artigos do avesso. Coloque a
roupa livremente no tambor de modo a não se
emaranhar.
Não pôr na máquina de secar:
Seda, meias de nylon, bordados delicados,
tecidos com decorações metálicas, vestuário com
PVC ou apliques de pele.
IMPORTANTE: Não secar artigos que
tenham sido tratados com líquido de limpeza
a seco ou roupas de borracha (há perigo de
incêndio ou explosão).
Durante os últimos 15 minutos a carga é
sempre seca com ar frio.
Economia De Energia
Ponha somente na máquina de secar roupa as
peças que tenham sido bem torcidas ou
centrifugadas. Quanto mais seca estiver a roupa,
menor será o tempo de secagem, resultando
numa economia de electricidade.
SEMPRE
● Tente secar o peso máximo de roupa, o que
origina economia de tempo e de electricidade. ●
Verifique se o filtro está limpo antes de cada ciclo
de secagem.
NUNCA
● Exceda o peso máximo recomendado, o que
pro v ocará desp e rdício de temp o e de
electricidade.
● Ponha na máquina artigos ensopados e a pingar,
o que pode danificar a máquina.
Secagem apenas a baixa temperatura.
.
Não pôr na máquina de secar roupa.
Se o artigo não possuir uma etiqueta de
cuidados, deve assumir-se que não se
adequa à máquina de secar.
● Por quantidade e volume
Sempre que a carga for superior à capacidade
da máquina, separe a roupa de acordo com o
volume (por exemplo, toalhas e roupa
interior).
● Por tipo de tecido
Algodões/linho: Toalhas, camisolas de
algodão,
lençóis e toalhas de mesa.
Sintéticos: Blusas, camisas, fatos-macacos,
etc., de poliéster ou poliamida, assim como
misturas de algodão/fibras sintéticas.
Não sobrecarregue o tambor, os artigos
de grandes dimensões podem exceder a
carga máxima admissível de roupa quando
molhados (por exemplo: sacos-cama,
edredões).
4.
LIMPEZA E MANUTENÇÃO
DE ROTINA
Limpeza Da Máquina
●
Após cada ciclo de secagem, limpe o filtro e
esvazie o recipiente da água.
●
Limpe regularmente os filtros.
●
Após cada utilização, limpe o interior do
tambor e deixe a porta aberta por alguns
instantes, de modo a permitir que a
circulação do ar o seque.
●
Limpe o exterior da máquina e a porta com
um pano macio.
●
NÃO usar produtos ou discos de limpeza
abrasivos.
●
Para evitar a acumulação de cotão e que a
porta tenha dificuldades em abrir/fechar,
limpe a porta interior e o selo plástico com
um pano húmido após cada ciclo de
secagem.
ATENÇÃO! O tambor, a porta e a
carga podem estar muito quentes.
PT
Separe A Carga Como Se Segue:
● Por símbolos de cuidados de secagem
Podem ser encontrados no colarinho ou na
costura interna:
Pode ser seco em máquina de secar.
. .
Secagem a alta temperatura.
IMPORTANTE Desligue sempre e
retire a ficha da tomada antes de limpar
este aparelho.
Para informação sobre dados elétricos,
consulte a etiqueta na parte frontal do óculo
do secador (parte de dentro da porta).
95
Page 96

5.
DEPÓSITO DA ÁGUA
A água removida da roupa durante o ciclo de
s e c a g e m é r ec ol h i d a pa ra um
recipiente/depósito que se encontra dentro da
porta do secador. Quando o recipiente estiver
cheio o indicador no painel de controlo vai
acender-se e o recipiente deve ser esvaziado.
No entanto, recomendamos que o recipiente
seja despejado após cada ciclo de secagem.
NOTA: nos primeiros ciclos de uma nova
máquina muito pouca água vai ser recolhida
no reservatório.
Para remover o depósito
1. Cuid adosamante
puxe o depósito da
água pela pega. (A)
Quando cheio de água,
o depósito vai pesar
cerca de 6 kg.
A
2. Esvazie o recipiente,
despejando toda a água
(B)
3. Pressione o
b o t ã o p a r a
restabelecer o ciclo.
Não abra a porta
durante os programas
automáticos, pois isso
p o d e a f e t a r a
q u a l i d a d e d a
secagem.
1
C
Quando estiver vazio,
reponha o depósito de
á g u a c o m o
d e m o n s t r a d o n a
imagem (C) primeiro
inserindo a base como
demonstrado (1) depois
e m p u r r a n d o
delicadamente o topo
para a posição correta
(2).
B
1
C
96
Page 97

6.
PORTA E FILTRO
Puxe o manípulo para abrir a porta.
Para reiniciar a máquina de secar, feche a
porta e prima .
AVISO! Quando o secador está em
funcionamento a porta está muito quente.
Filtro
IMPORTANTE: Para manter a eficiência da
máquina, verifique se o filtro do cotão está limpo
antes de cada ciclo de secagem.
Não ponha o secador a funcionar sem os filtros.
Os filtros entupidos podem aumentar o tempo
de secagem e provocar danos, que podem
resultar em custos de reparação dispendiosos
1. Puxe o filtro para
cima.
2. Abra o filtro como
ilustrado.
3. Retire com cuidado
os resíduos de tecido,
usando uma escova
macia ou a ponta dos
dedos.
4. Junte e feche entre
si as duas metades do
filtro e volte a montá-lo
no seu lugar.
Indicador de Controlo do Estado do Filtro
Acende-se quando o filtro precisa de ser
limpo.
Verifique e limpe o filtro principal, na porta, e
os filtros do condensador, localizados na
parte de baixo do secador. Se a roupa não
estiver a ficar seca, verifique se o filtro não
está entupido.
SE LAVAR O FILTRO DEBAIXO DE
ÁGUA, NÃO SE ESQUEÇA DE O SECAR BEM.
AVISO! Se abrir a porta a meio de um
ciclo, antes do ciclo de arrefecimento estar
concluído, a pega pode estar quente. Por
favor tenha cuidado no manuseamento .
1
2
Para Limpar o Filtro do Condensador
1. Retire o rodapé.
2. Ro d e a s d u a s
alavancas de bloqueio
no sentido contrário ao
d o s po n t ei ro s do
relógio e extraia a
tampa dianteira.
3 . R e t i r e
cui d ad o sa m e nt e a
moldura do filtro e limpe
todo o pó ou cotão do
filtro com um pano. Não
use água para limpar o
filtro.
4. Retire a esponja
cuidad osam ente do
seu lugar, e depois
la ve-a, mante ndo-a
debaixo da torneira
aberta, e virando-a,
para conseguir tirar
todo o pó ou cotão.
5. Volte a colocar a
t a m pa d i a n t e i r a ,
assegurando-se de que
o faz da forma correcta,
(tal como indicado pela
seta), e empurre-a
firmemente para o seu
lugar. Bloqueie as duas
alavancas, rodando-as
n o s e n t i d o d o s
ponteiros do relógio.
6. Volte a montar o
rodapé.
Limpe os filtros antes de cada ciclo
1
2
3
4
5
PT
97
Page 98

7.
CONTROLOS E
INDICADORES
220'
END
120'
90'
6h
3h
60'
9h
A
D
C
END
6h
3h
9h
220'
120'
90'
60'
B
3
4
2
A-Seletor de ciclos -
Girando o botão em ambos os sentidos, é
possível selecionar o programa de secagem
desejada. Para cancelar as seleções ou
fazer alterações, desligue o secador girando
o botão para a posição OFF.
1
su a s r ou p a s p r on t a s pa ra s e r em
penduradas.
- Roupa seca para guardar: Para roupa
que pode ser guardada imediatamente
- Extra-seco: para obter roupas
completamente secas, ideal para cargas
completas.
Este aparelho está equipado com a função de
gestão da secagem. Em ciclos automáticos,
cada nível de secagem intermédia, antes de
atingir o seleccionado, é indicado por meio do
indicador luminoso correspondente ao grau
de secagem atingido.Todos os LEDs piscam
rapidamente por 3 vezes.
4.Início diferido
Serve para adiar o início do programa por 3, 6
ou 9 horas. Aceda ao local onde existe o
comando de início diferido, programe e
feche. Volte a pressionar Start novamente.
C- Leds
Depósito de água - A luz acende quando é
necessário despejar o depósito de água.
Limpeza de filtros - A luz acende quando
é necessária a limpeza dos filtros (filtro da
porta e filtro inferior).
B-Botões -
1.Start-Pause
Para iniciar o programa selecionado ou
suspendê-lo.
2.Seleção do tempo do ciclo
É possível transformar um ciclo de
automático para um ciclo programado até 3
minutos após o início do ciclo.
Após esta seleção para reiniciar o
funcionamento automático é necessário
desligar o secador
Em caso de incompatibilidade, todos os
LEDs piscam rapidamente por 3 vezes.
3.Seleção do nível de secagem
Permite definir o nível de secagem desejado:
opção editável até 5 minutos após o início do
ciclo:
- Pronto para engomar: deixa as
roupas ligeiramente húmidas para facilitar o
engomar.
- Secagem para cabide: Para ter as
Estas luzes de controlo, acendem para
indicar a fase de secagem:
- DRY / Acende-se quando o ciclo de
secagem está em funcionamento.
- Acende-se quando o ciclo está na fase
de arrefecimento.
- END/FIM: Acende-se quando o ciclo está
concluído.
D-
SMART TOUCH area - pressione o botão
START/PAUSE que lhe permite descarregar
previamente os ciclos pretendidos através da
App - também pode consultar a área deste
manual dedicada ao assunto.
98
Page 99

O ciclo de secagem para
2)
configuraciones de los dos programas
personalizados preferidos,
primera vez:
1)
Seleccione el programa y las
lãs desta máquina foi
apr o va d o p e la T he
Woolmark Company para
a secagem de produtos
de lã laváveis à máquina.
Lavar e secar os produtos
de acordo com as instruções da etiqueta e
com as instruções do fabricante desta
máquina. M1530.
No Reino Unido, Irlanda, Hong Kong e Índia a
marca registada Woolmark é uma marca
registada de certificação.
Garga máxima para secar
Algodões
Sintéticos ou Delicados
Máx.capacidade
Max.4 Kg
Guia de secagem
O ciclo padrão COTTON ( ) é o mais
eficiente a nível energético e o mais adequado
para a secagem de roupas de algodão com um
nível de humidade normal.
A tabela da última página mostra o tempo
aproximado e os consumos de energia dos
principais programas de secagem.
Consumo de electricidad en modo apagado
Consumo de electricidad en modo "STAND BY
Especificações Técnicas
Capacdade do tambor 125
Carga máxma
Altura
Largura
Profunddade
Faxa da Etqueta de
Energa
Consulte a etqueta de efcênca energétca.
85 cm
60 cm
60 cm
Consulte a etqueta de efcênca energétca.
Informação para testes laboratoriais
EN 61121 Programa para utilização
-SECAGEM DE ALGODÃO
-ALGODÃO
-EASY-CARE TEXTILE
- ALGODÃO OU
- ALGODÕES OU ROUPAS
BRANCAS
- DELICADOS OU SINTÉTICOS
UTILIZAÇÃO
1. Abra a porta e carregue o tambor
com roupa. Assegure-se de que as
peças de roupa não impedem que a
porta feche..
2. Feche cuidadosamente a porta,
empurrando-a lentamente até a ouvir
fazer “click”.
3. Rode o botão selector do programa
para seleccionar o programa pretendido
para a secagem (veja o Guia de
Programas).
4. Prima o botão . O secador irá
arrancar automaticamente e o indicador
em cima da tecla ficará continuamente
aceso.
5. Se a porta for aberta durante o
programa, para verificar a roupa, é
necessário pressionar para
recomeçar a secagem, depois de a porta
ter sido fechada.
6. Quando o ciclo está perto do fim, o
secador entra na fase de arrefecimento e
a roupa gira em ar frio, permitindo assim
o arrefecimento da carga.
0,40 W
0,75 W
7. Depois de o ciclo ter sido concluído, o
tambor roda intermitentemente para
minimizar a formação de rugas e vincos.
Este movimento do secador de roupa
continua até que o dito secador seja
desligado ou até a porta ser aberta.
Não abra a porta durante os programas
automáticos, para conseguir obter uma
secagem adequada.
Limpe os filtros antes de cada ciclo
APENAS PARA SECADOR COM TAMBOR
GUEIRA DE DRENAGEM PARA RECUPERAR
ÁGUA DO CONDENSADOR DE ACORDO
COM A INSTRUÇÃO NO CAPÍTULO 2.
A verdadeira duração do ciclo de
secagem depende do nível de humidade
inicial da roupa devido a velocidade de
centrifugação, tipo e volume de carga,
limpeza dos filtros e temperatura ambiente.
10DE KGDE CAPACIDADE : LIGUE A MAN
99
PT
-
Page 100

8.
SELECÇÃO DO PROGRAMA
PROGRAMMA
Uma solução confortável para secar tecidos mistos minimizando
Engomar Super
Fácil Mix
Eco Cotton
Roupa branca ou Algodões
Mix & Dry
Sintéticos
Camisas
Darks&coloured
Coloured
Roupas de bebé
dobras e vincos, proporcionando a humidade perfeita para
passar a ferro da maneira mais fácil. Antes de secar
aconselhamos a que sacuda os lençóis
Programa Eco normativo (secar) secagem. O programa mais
eficiente em consumo de energia. Adequado para algodão e
roupa de cama.
O ciclo certo para secar algodões e atoalhados.
Para secar juntamente diferentes tipos de tecidos, como
algodões, linhos, tecidos mistos e sintéticos.
Para secar gentilmente sintéticos e tecidos delicados.
Este ciclo específico foi concebido para secar camisas
minimizando os vincos e rugas nos tecidos graças aos
movimentos específicos do tambor. Recomenda-se retirar os
lençóis imediatamente após o ciclo de secagem.
Um ciclo delicado e específico para secar roupa escura ou muito
colorida, bem como tecidos sintéticos.
Ciclo perfeito para roupas de bebé, que necessitam de um
elevado nível de higienização.
FUNÇÕES
CAPACIDADE
(kg)
2
Full
Full
4
4
2.5
4
4
TEMPO DE
SECAGEM
(min)
*
*
*
*
*
*
*
150’
Gangas
Sport
Wool
Rapid 45'
Anti vincos
Refresh
* A duração real do ciclo de secagem depende do nível de humidade que a roupa apresenta e da velocidade de
centrifugação usada, bem como do tipo e quantidade de roupa, estado delimpeza dos filtros e temperatura
ambiente.
Programa dedicado à secagem de gangas e tecidos muito
resistentes. É aconselhável virar as peças antes de as secar.
Programa dedicado a secar roupas técnicas de desporto e
fitness, seca gentilmente e com cuidado especial para evitar o
desgaste das fibras elásticas.
Roupas de lã: o programa pode ser usado para secar até 1 kg de
roupa (cerca de 3 camisolas). Recomendamos que vire as roupas
do avesso antes de as secar. O tempo pode ter que ser alterado
devido às dimensões e volume da carga de roupa, bem como nível
de humidade e programa escolhido. No final do ciclo, as roupas
estão prontas para serem usadas, mas se forem mais pesadas, as
extermidades ainda poderão estar um pouco molhadas: sugere-se
secar o resto naturalmente. Recomenda-se descarregar as roupas
no final do ciclo. Atenção: o processo de desgaste da lã é
irreversível; Por favor, seque exclusivamente roupa com símbolo
que significa que é permitida a secagem em máquinas. Este
programa não é indicado para roupas acrílicas.
Perfeito para secar rapidamente até 2 kg de roupa. É recomendada
velocidade de centrifugação alta antes deste ciclo de secagem.
É um ciclo quente de apenas 12 minutos, ideal para relaxar os
tecidos e reduzir vincos.
O ciclo perfeito para remover maus cheiros dos tecidos, é um ciclo
próprio para refrescar as peças de roupa.
Configuração personalizável do botão que tem que seleccionar para interagir com a APP no
smartphone e para descarregar os ciclos (veja a secção dedicada).A máquina define o
programa padrão Autolimpeza concebido para higienização da máquina.
2.5
2.5
4
4
1
1
*
*
70’
*
12’
*
100
 Loading...