

Page 1
F
GB
D
Instructions pour l’installation & l’utilisation
Hotte
Users- & Installation Instruction
Cooker Hood
Bedienungs- & Installationsanleitung
Dunstabzugshaube
MOD.
CMDG 919X
CONS71116
fi
Page 2

Instructions pour l’installation et l’utilisation
Hotte
SOMMAIRE
1………………………………….….. Remarque
2………………………………….….. Caractéristiques
3………………………………….….. Installation
4………………………………….….. Remarque sur l’installation
5………………………………….….. Avertissements de sécurité
6………………………………….….. Utilisation
7………………………………….….. Entretien
8………………………………….….. Service Après Vente
F
Page 3

1
REMARQUE
1. Merci d’avoir choisi notre hotte Candy. Veuillez lire attentivement ce manuel
avant utilisation.
2. L’installation de cette hotte doit être effectuée par une personne qualifiée et
compétente.
3. Le fabricant décline toute responsabilité en cas de dommage ou de blessure
causés par un non respect des instructions d’installation contenues dans ce
manuel.
Cette hotte fonctionne sur un branchement 220/240V, 50Hz.
2
CARACTERISTIQUES
1. Cette hotte au design sobre et élégant est composée de matériaux de
qualité.
2. Equipée d’un moteur électrique puissant, cette hotte produit une forte
aspiration tout en ayant un niveau sonore réduit. Dotée de filtre à graisse
métallique, cette hotte est également facile à nettoyer.
3. Avec le raccordement électrique isolé, 12vAC, les lumières fonctionnent en
toute sécurité.
L’efficacité de cette hotte est liée à la conception particulière de son
système de circulation d’air mais également à ces filtres à graisse. Les
particules en suspension seront rapidement piégée et l’air purifié.
3
INSTALLATION
La hotte peut être installée en mode recyclage ou en mode évacuation.
Mode recyclage (Fig. a) : la hotte aspire l’air de la cuisine saturé en odeurs et
en vapeurs, le purifie à travers les filtres à graisse et le filtre à charbon, et le
Page 4

rejette purifié dans la pièce. Pour une efficacité optimale, le filtre à charbon doit
être changé périodiquement.
Mode évacuation (Fig. b): la hotte aspire l’air de la cuisine saturé en odeurs et
en vapeurs. Celui-ci passe à travers le filtre à graisse et est expulsé vers
l’extérieur par le conduit. En mode évacuation, le filtre à charbon n’est pas requis.
Le mode évacuation garantit une meilleure performance d’aspiration.
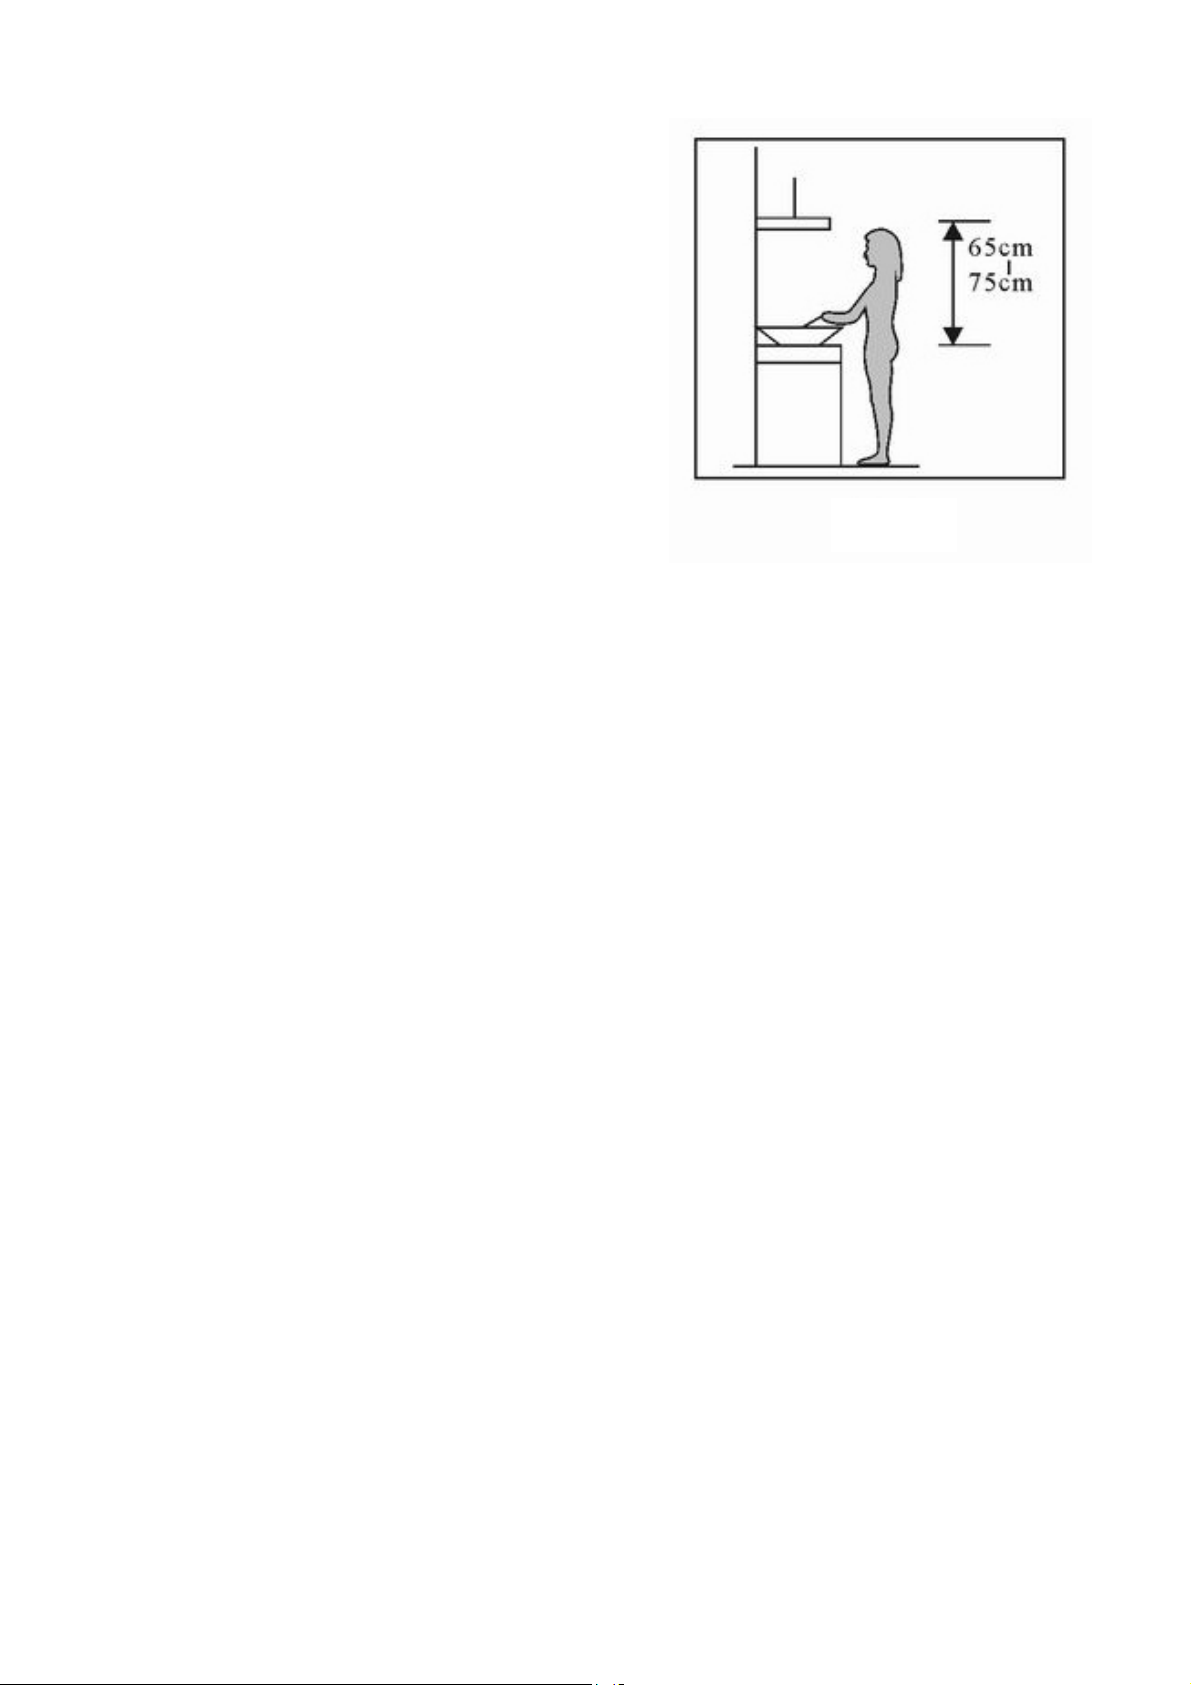
3.1 La hotte doit être placée à une distance comprise entre 65cm et 75 cm (pour
une plaque avec brûleur gaz) de la surface de cuisson pour une utilisation
optimale (Voir Fig. 1).
3.2 Pour fixer la hotte au mur, percer 3 trous de diamètre 8 mm espacés de 100
mm dans l’alignement de la barrette à crochets.
3.3 Insérer les vis dans les trous
3.4 Pour fixer les crochets au mur utiliser le gabarit de perçage. Voir pic2.
3.5 MODE EVALUATION
Ajouter le conduit d’évacuation au clapet anti-retour, et le faire sortir à l’extérieur.
(Voir Image 3).
MODE RECYCLAGE
Ne pas utiliser le conduit d’évacuation (Voir Image 5)
Les filtres à carbone doivent être utilisés uniquement en mode recyclage (Voir
mise en place Chap. 7.1)
Les filtres doivent être changes régulièrement (environ tous les 6 mois) en
fonction de l’utilisation de la hotte.
3.6 Placer la cheminée sur le corps de la hotte (Image 3A) et placer le verre
délicatement à l’emplacement prévu. Fixer le verre avec les 4 vis fournies à cet
effet (Image 3B). Calculer la hauteur finale de la cheminée puis en ajuster la
hauteur (Image 4). Pour finir percer 2 trous de Ø8 mm dans l’alignement de la
barrette de fixation. Répéter l’action décrite au point 3.3 (Image 4A).Fixer la
cheminée a la barrette et serrer les vis.
3.7 Pour le branchement
La tension électrique doit correspondre à la tension notée à l’intérieur de la hotte.
Page 5
La prise utilisée pour le branchement doit être facilement accessible et conforme à
la réglementation en vigueur. En cas de branchement direct au réseau (sans
prise), placer un interrupteur bipolaire normalisé à pas moins de 3mm de distance
(accessible) des contacts.
Hook= Barrette à crochets
Drilling template = gabarit de perçage
Soot tube = conduit flexible d’évacuation
Valve = Clapet
U-Shaped section = Cheminée
Plate = Barrette de fixation
Screw = vis
Version Evacuation
pic 2 pic 3
Version Recyclage (Pic 5)
Image 5
pic 2
pic 3
pic 4B
4
REMARQUE D’INSTALLATION
1. Avant installation, s’assurer que la surface est propre pour éviter toute
aspiration de morceaux de bois ou de poussière.
2. Ne pas partager le conduit d’évacuation avec tout autre appareil (tuyau de gaz,
circuit de chauffage, conduit d’air chaud, VMC…).
Page 6
3. L’inclinaison de la cheminée ne doit pas excéder 120°. La cheminée doit être
fixée au mur.
4. Après installation, s’assurer que la hotte est à niveau pour éviter une
accumulation de graisse d’un côté.
5
AVERTISSEMENTS DE SECURITE
• Ne pas laisser d’enfants utiliser l’appareil
• Cette hotte est dédiée à un usage domestique uniquement. Elle ne doit pas
être utilisée pour les barbecues, les rôtisseries ou toute autre activité
professionnelle ou commerciale.
• Confier l’installation à une personne qualifiée.
• La hotte et ses filtres doivent être nettoyés régulièrement pour en garantir
un bon état de fonctionnement.
• Couper le courant principal avant tout nettoyage.
• Respecter les consignes de ce manuel pour le nettoyage de la hotte.
ATTENTION : l’absence d’entretien de nettoyage régulier de la
hotte, peut entrainer un risque d’incendie.
• En cas de défaut de l’appareil, contacter le Service Clients.
Page 7
6
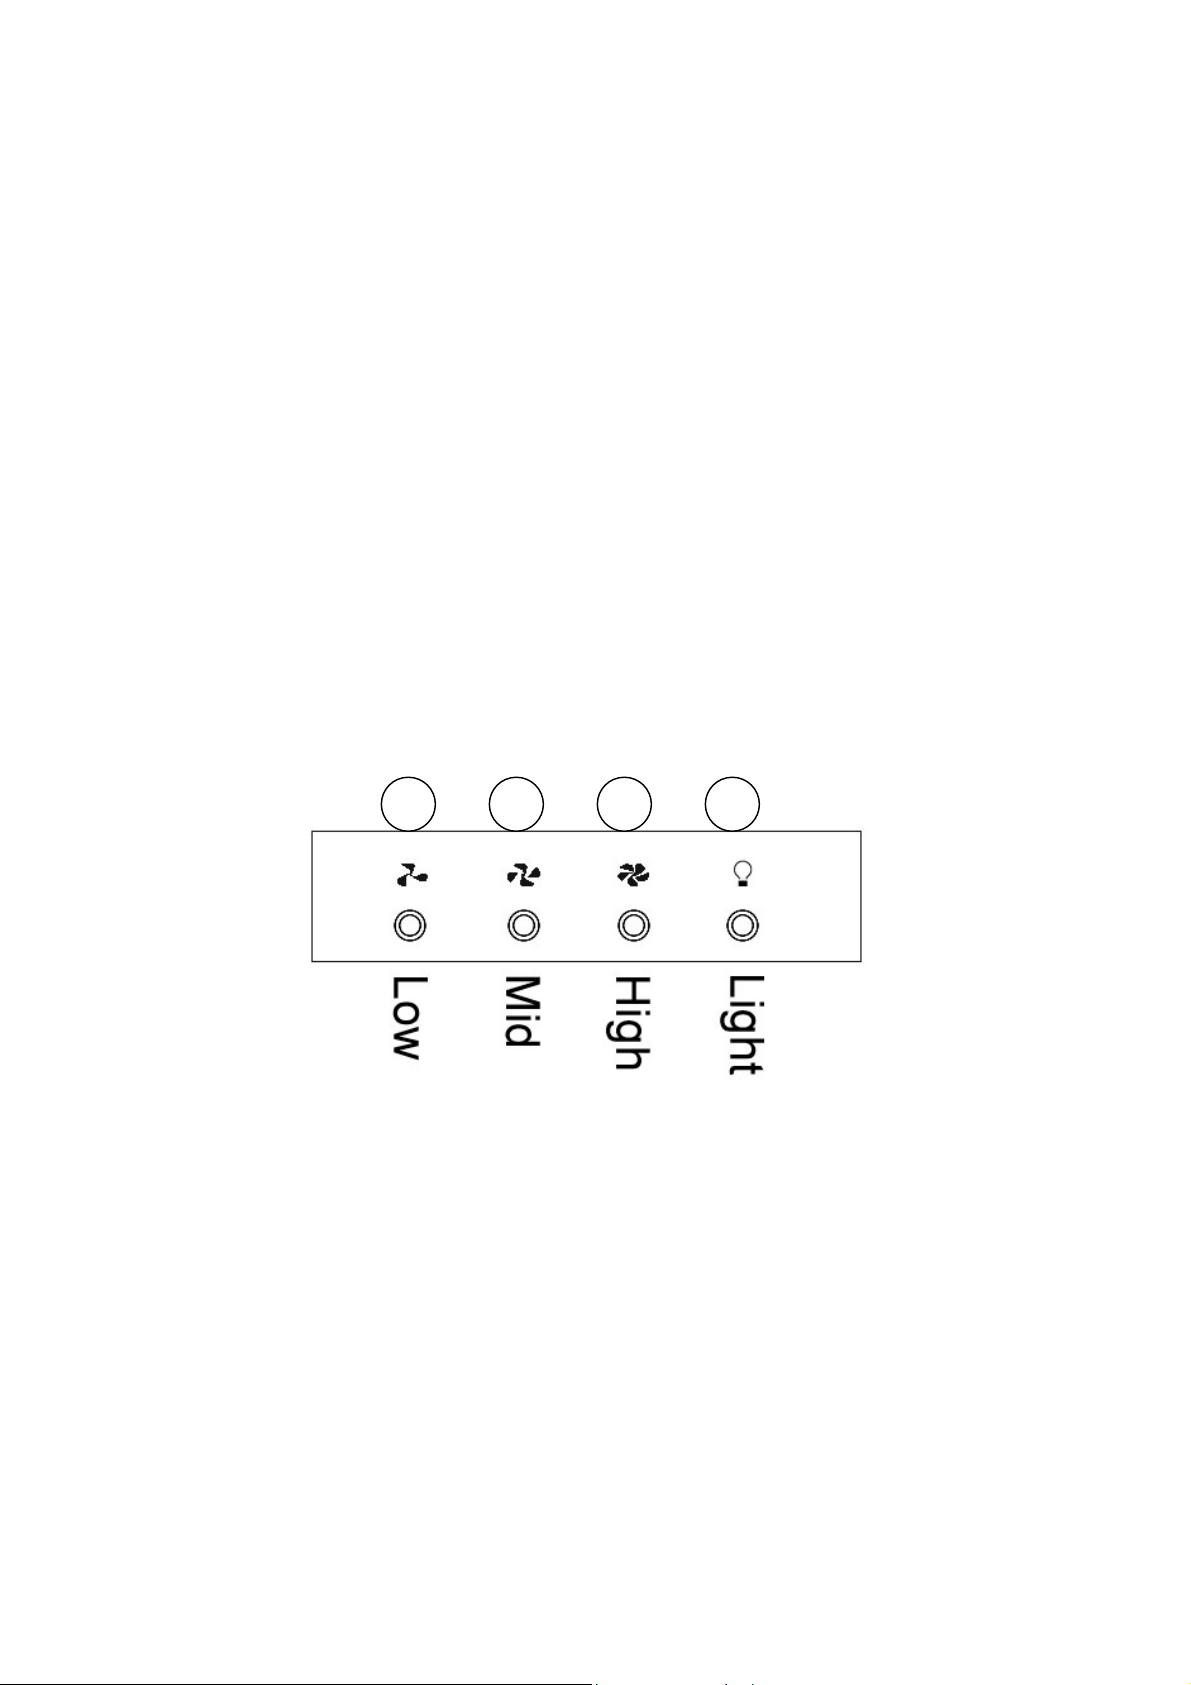
Réglage de la vitesse (voir figure)
1. Allumer la hotte. Le buzzer retentit 5 fois pour indiquer que la hotte est
branchée.
2. Appuyer sur la première vitesse « Low » , le bouton s’allume, le buzzer
sonne une fois et le moteur fonctionne en puissance minimale. Appuyer de
nouveau sur le bouton et le moteur s’arrête.
3. Appuyer sur la deuxième vitesse « Mid », le bouton s’allume, le buzzer
sonne une fois et le moteur fonctionne en puissance moyenne. Appuyer de
nouveau sur le bouton et le moteur s’arrête.
4. Appuyer sur la troisième vitesse « High », le bouton s’allume, le buzzer
sonne une fois et le moteur fonctionne en puissance maximale. Appuyer de
nouveau sur le bouton et le moteur s’arrête.
5. Appuyer sur le bouton lumière « Light ». Le bouton s’allume et les deux
lampes halogènes fonctionnent. Appuyer de nouveau sur le bouton et la
lumière s’éteint. A chaque fois, le buzzer sonne une fois.
7
MAINTENANCE
7.1 Le nettoyage du filtre à graisse
Le filtre à graisse métallique est composé d’inox haute densité. Ne pas utiliser de
détergent corrosif. Garder le filtre à graisse propre assure un bon fonctionnement
de l’appareil. Merci de suivre le guide ci-dessous :
Méthode 1 : mettre le filtre dans de l’eau propre à 40-50°C, verser un détergent
et laisser tremper pendant 2 à 3 minutes. Se protéger avec des gants et nettoyer
avec une brosse souple sans exercer trop de pression pour ne pas endommager le
filtre.
Méthode 2 : Dans le cas l’autorisant, le filtre peut être lavé au lave-vaisselle avec
une température autour de 60°C.
Page 8
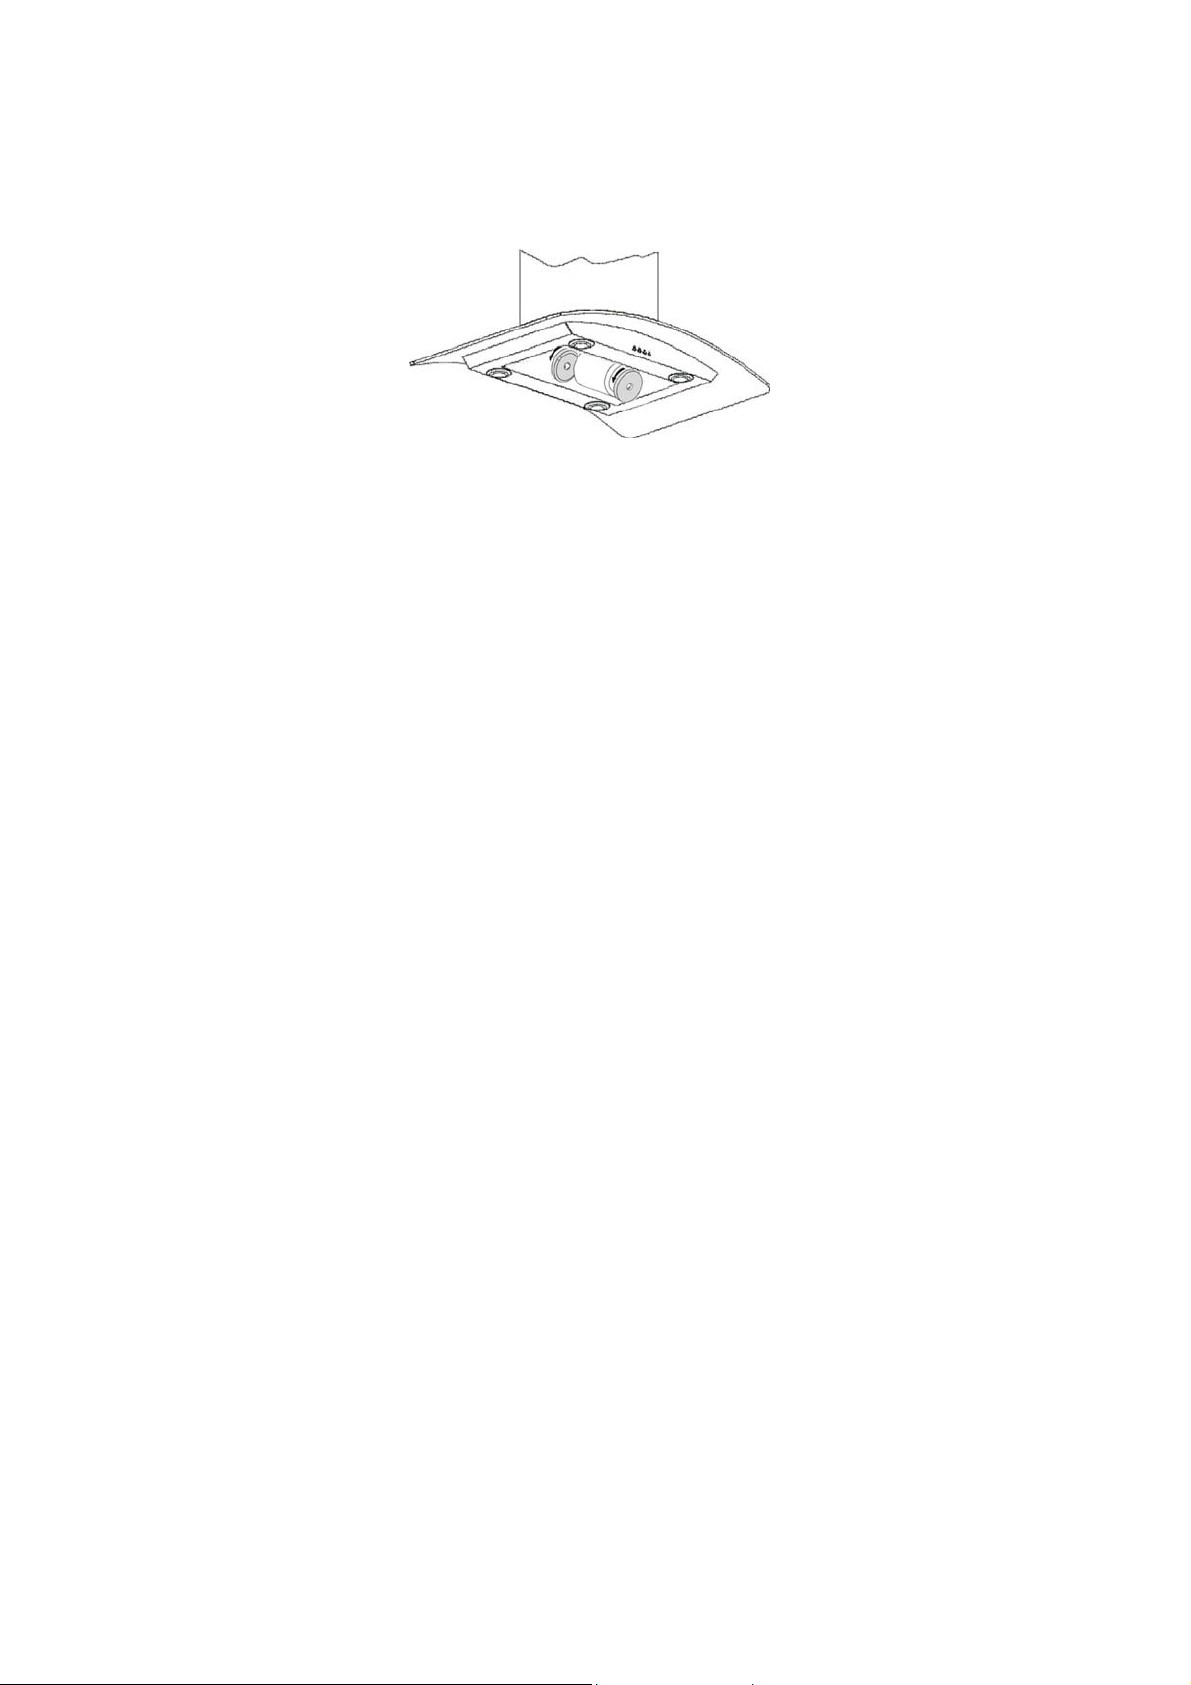
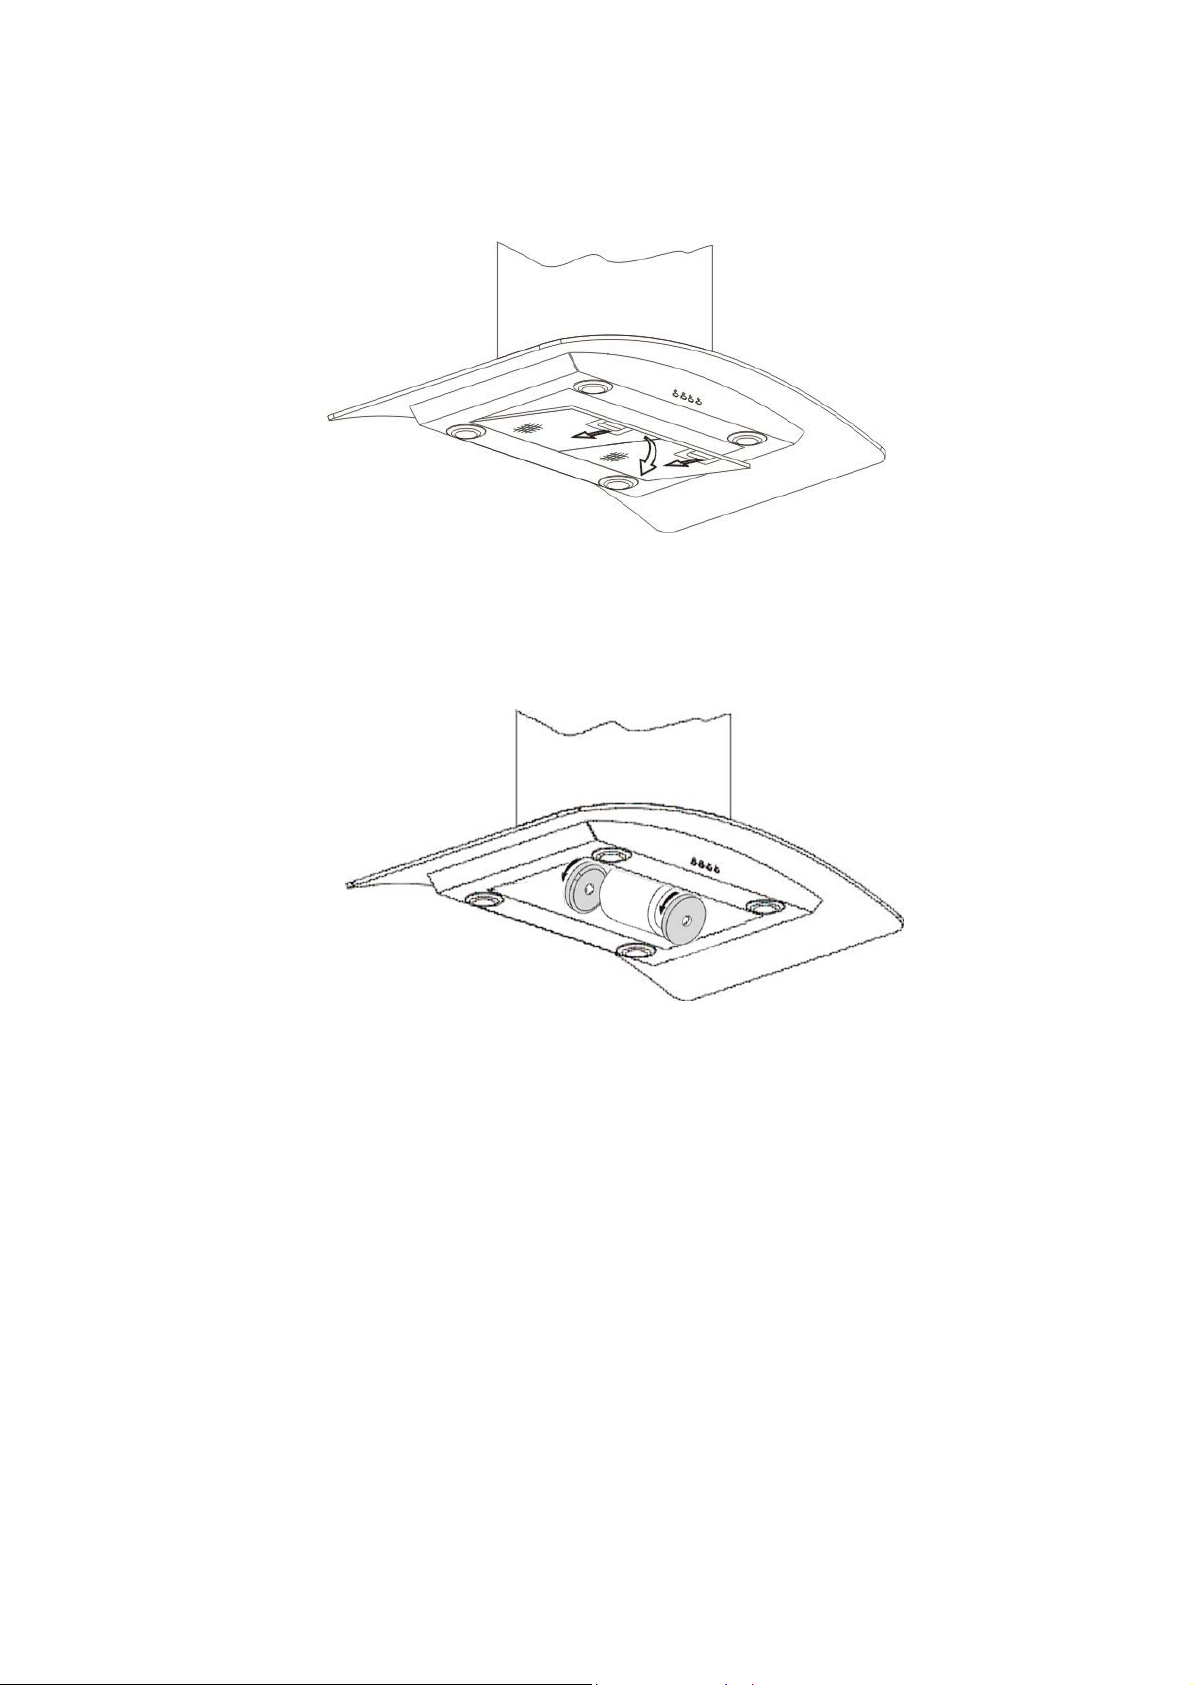
Remplacement du filtre à charbon : pour fixer ou remplacer le filtre à
charbon, retirer tout d’abord les filtres à graisse métalliques pour avoir accès au
moteur (voir figure ci-dessus), puis fixer le filtre à charbon en tournant en sens
inverse des aiguilles d’une montre (voir figure ci-dessous). Pour l’enlever tourner
dans l’autre sens.
7.2 Remplacement des lampes
Débrancher la hotte du réseau électrique
ATTENTION : avant de toucher les ampoules s’assurer d’un complet
refroidissement.
Retirer les ampoules et les remplacer par un modèle identique.
7.3 Instructions pour le nettoyage de la hotte
A. Couper le courant électrique avant de nettoyer
B. Pour protéger le corps principal contre la corrosion pour une longue période,
la hotte doit être nettoyée avec de l’eau chaude et un détergent non corrosif
tous les 2 mois.
C. Ne pas utiliser de détergent abrasif qui pourrait endommager le corps.
D. Ne pas mouiller le moteur ou toute autre pièce car cela pourrait
endommager l’appareil.
E. Le filtre à charbon ne doit pas être exposé à la chaleur.
F. Ne pas chercher à ouvrir le filtre à charbon.
G. Si le câble ou la prise électrique sont endommagés, le remplacer par un
câble souple.
8
SERVICE APRES VENTE
Avant d’appeler le Service Après Vente
Si la hotte ne fonctionne pas bien, avant d’appeler le Service Après Vente, nous
vous conseillons de :
- consulter le tableau de résolution des problèmes
- vérifier que la hotte est bien branchée au réseau électrique
Si après ces vérifications, le problème persiste, éteindre l’appareil, ne pas le
démonter et appeler le Service Après Vente.
Avant d’appeler le Service Après Vente, se munir du numéro de série
inscrit sur la plaque signalétique du produit.
Le certificat de garantie fourni garantit que la hotte sera réparée gratuitement par
le Service Après Vente.
Page 9
Cet appareil électroménager est produit conformément à la Directive Européenne
2002/69/CE concernant la mise au rebut des Déchets d’Equipements Electriques
et Electroniques.
Le fait que cet article ait été réalisé en conformité avec les normes en vigueur,
contribue à prévenir toute conséquence nuisible pour l’environnement et la santé,
la simple mise au rebut de cet appareil provoquerait en revanche de graves
dommages.
Ce symbole indique que ce produit ne peut en aucun cas être traité comme un
déchet ménager, il doit être remis à un centre de collecte chargé du recyclage des
équipements électriques et électroniques.
Pour obtenir de plus amples détails au sujet du traitement, de l’élimination et du
recyclage de cet appareil, contacter le service local de collecte des déchets ou
bien s’adresser au magasin dans lequel l’article a été acheté.
Page 10

.
Page 11

Users- & Installation Instruction
Cooker hood
CONTENT
1………………………………….….. Notice
2………………………………….….. Feature
3………………………………….….. Installation
4………………………………….….. Notice of installation
5………………………………….….. Safety Warning
6………………………………….….. Use
7………………………………….….. Maintenance
8………………………………….….. Service Centre
GB
Page 12

1
NOTICE
1. Thank you for choosing our cooker hood. Please read the
instruction manual carefully before use.
2. The installation work must be undertaken by a qualified and
competent fitter.
3. The manufacturer disclaims all liability for any damage or injury
caused as a result of not following instructions for installation
contained in the following text.
The cooker hood is used on 220/240v, 50Hz.
2
FEATURE
1. The cooker hood uses high quality materials, and is made with a
streamlined design.
2. Equipped with a large power low noise electric motor and
centrifugal leaf, it produces strong suction, low noise, non stick grease
filter and easy to clean.
3. With the isolated low voltage circuit board control, 12vAC input,
the lights are therefore safer.
4. Special wind tunnel construction and oil collector design, free dirt
will be absorbed in a second.
Page 13

3
INSTALLATION
The hood maybe installed in the filtering or the ducting version.
Filtering Version (Fig. a): The hood aspirates the kitchen air
saturated with fumes and odours, purifies it through the grease filters
and charcoal filter and returns clean air in to the room. For constant
efficiency, the charcoal filter must be replaced periodically.
Ducting Version (Fig. b): The hood aspirates the kitchen air
saturated with fumes and odours, passes it through the grease filters
and expels it to the outside through an outlet pipe. With this version the
charcoal filter are not required.
Decide from the beginning on the type of installation (Filtering or
Ducting). For best efficiency, the ducting version is recommended.
Page 14

3.1The cooker hoods should be placed
at a distance of 65-75cm from the
cooking surface for best effect. See
pic1.
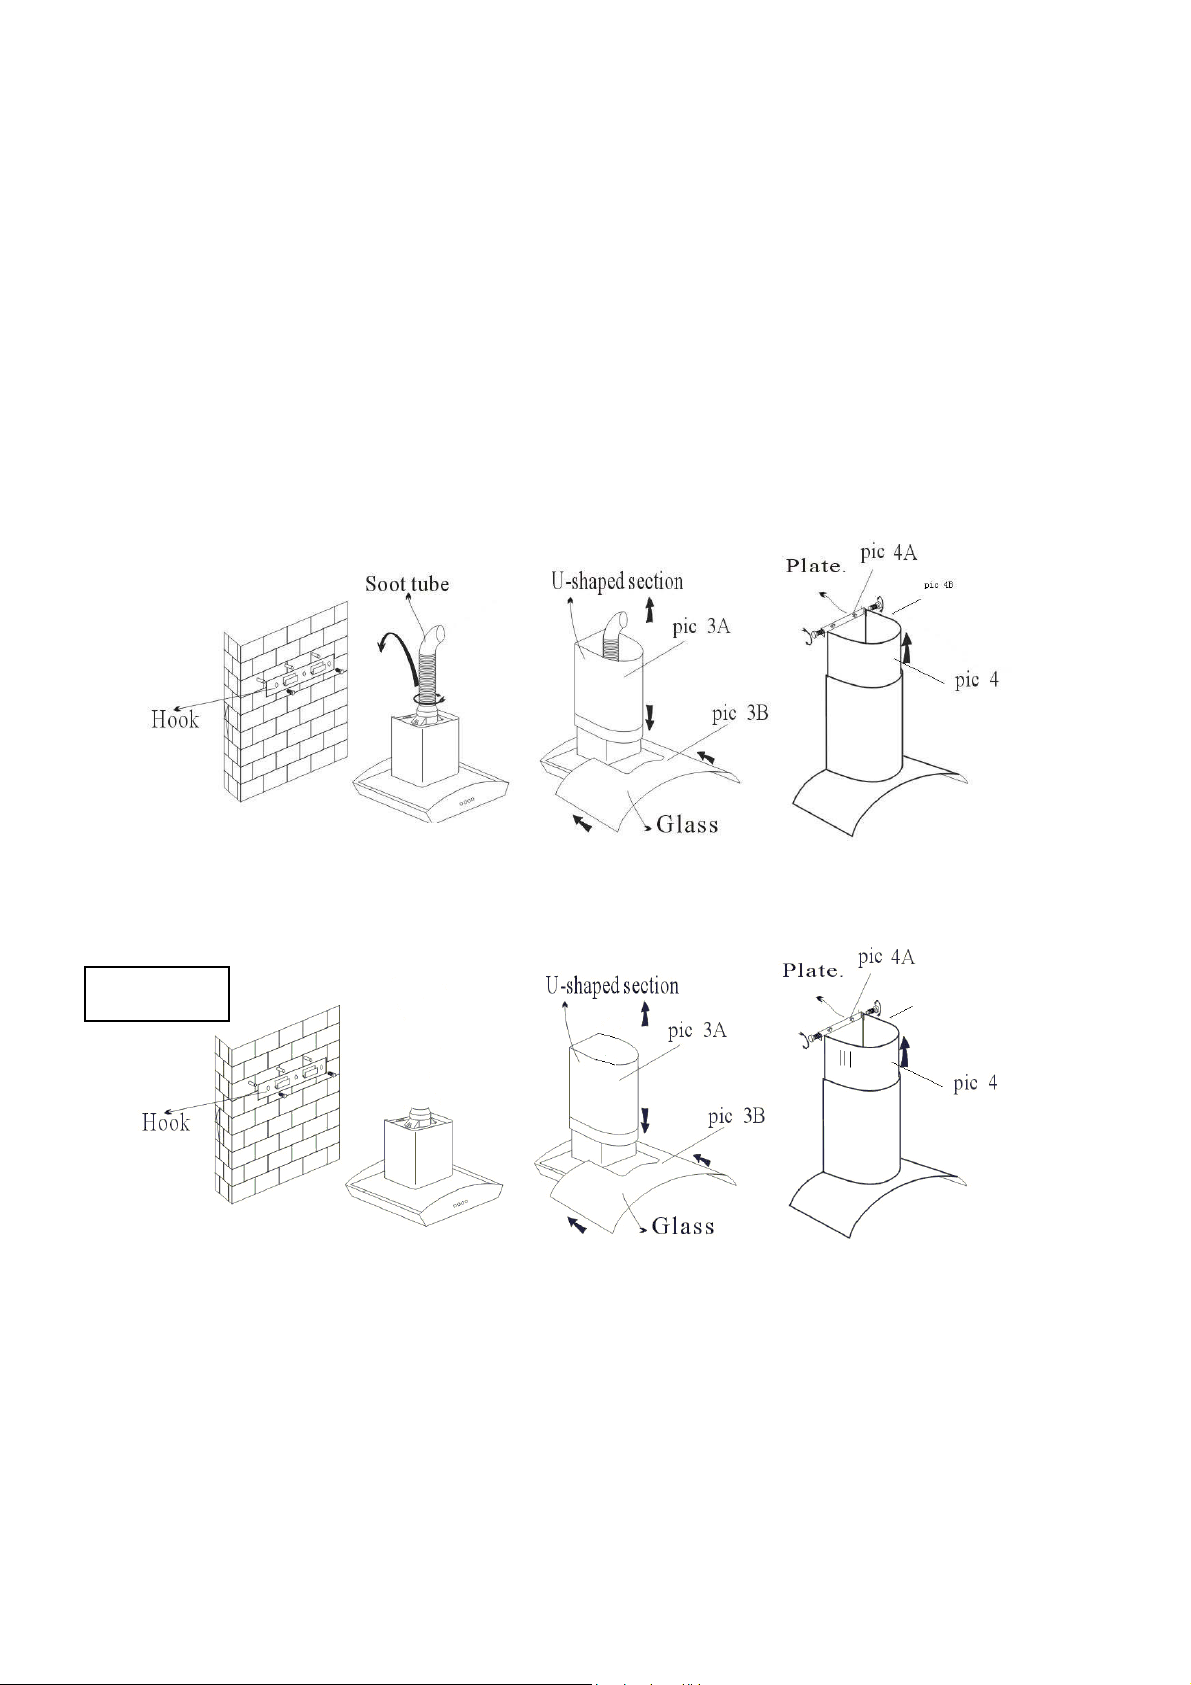
3.2 To install onto the wall every
100mm drill 3 holes of Ø8mm on a
suitable place in line with the hook on
the hood.
3.3 Insert expended screws into the
holes.
3.4 Fix the hook on the wall. See pic2.
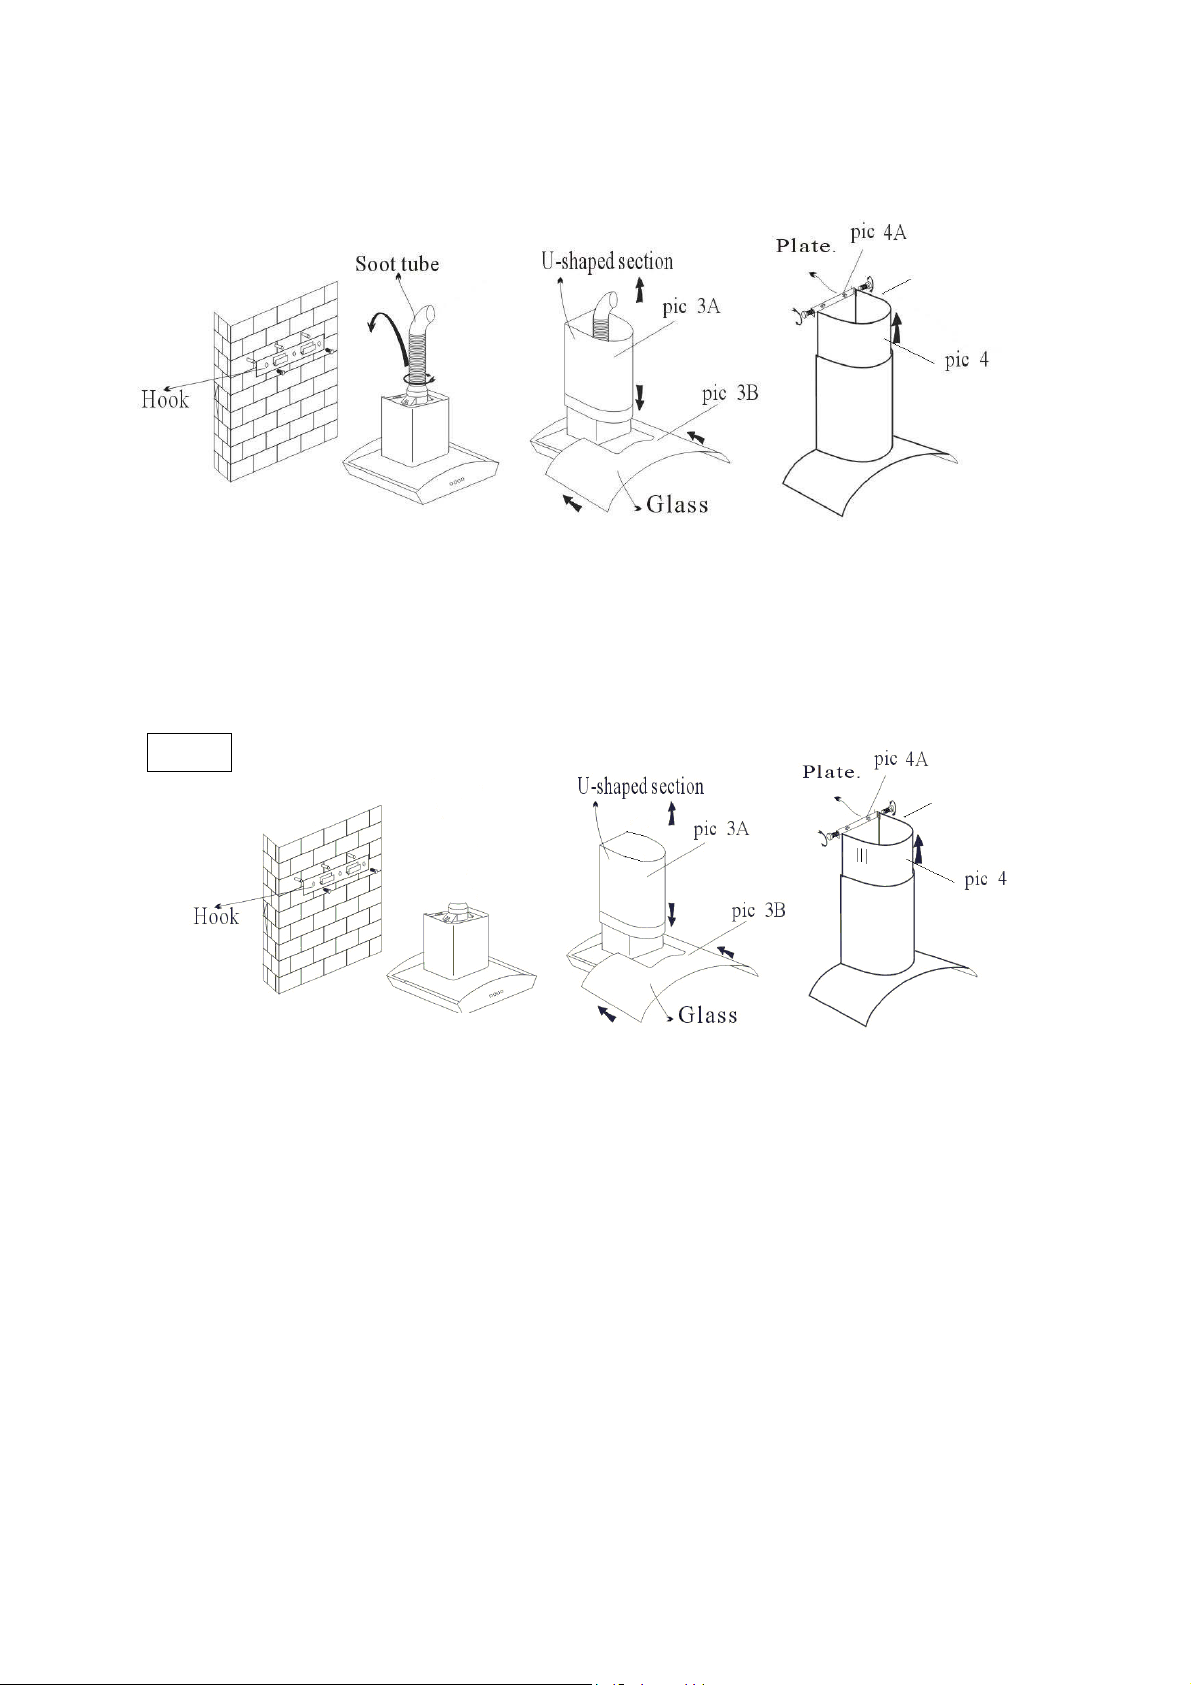
3.5 Exhaust mode:
Add the soot tube to the one way valve,
and put it outdoor. See pic3.
Circulation mode (no tube required, see pic 5):
Charcoal filter/s (optional accessories) must be used in the case of the
circulating mode (please see also chapter 7.1).
If necessary, proceed to fit as follows, depending on the model type
purchased:
- if the hood features round charcoal filters, fit the charcoal filter by
turning anti-clockwise.
- if the hood features square magnetic filter, put is in right position
and fix with gentle pressure.
Charcoal filter/s:
The charcoal filters must be periodically replaced depending on extent
of operation – on average every 6 months. To remove the charcoal
filters, proceed as follows, depending on the model purchased:
- if the hood features round charcoal filters, remove the charcoal
filter by turning clockwise.
- if the hood features square magnetic filter, pull gently to release.
3.6 Put the two U-shaped sections on the body (see pic 3A), then put
the glass in the lead way, use four screws to fix the glass (see pic3B),
then pull out the inside U-shaped section with a suitable height in the
lead way (see pic 4). Finally, drill 2 holes of Ø8mm on a suitable place
in line with the plate. Repeat 3.3(see pic4A), tighten the two screws
(see pic 4B).
Page 15
Ducting Version
p
p
p
p
pic 4B
ic 2
ic 3
Filtering Version
Pic 5
pic 4B
ic 2
ic 3
3.7 Electrical connection
The electrical tension must correspond to the tension noted on the label
placed inside the cooker hood. Connect the electrical plug, where
provided, to the an easily accessible outlet in conformity with local
standards in force.
Where an electrical plug is not provided (for direct connection to
electrical network) place a standards approved bipolar switch with an
aperture distance of not less then 3 mm (accessible) from the contacts.
Page 16
4
NOTICE OF INSTALLATION
1. Before installation, please ensure the area is clean to avoid
suction of the remaining bits of broken wood and dust.
2. It cannot share the same air ventilation tube with other appliance
such as gas tube, warmer tube, and hot wind tube.
3. The bending of ventilation tube should be≤ 120°, parallel or above
the start point and should be connected to the external wall.
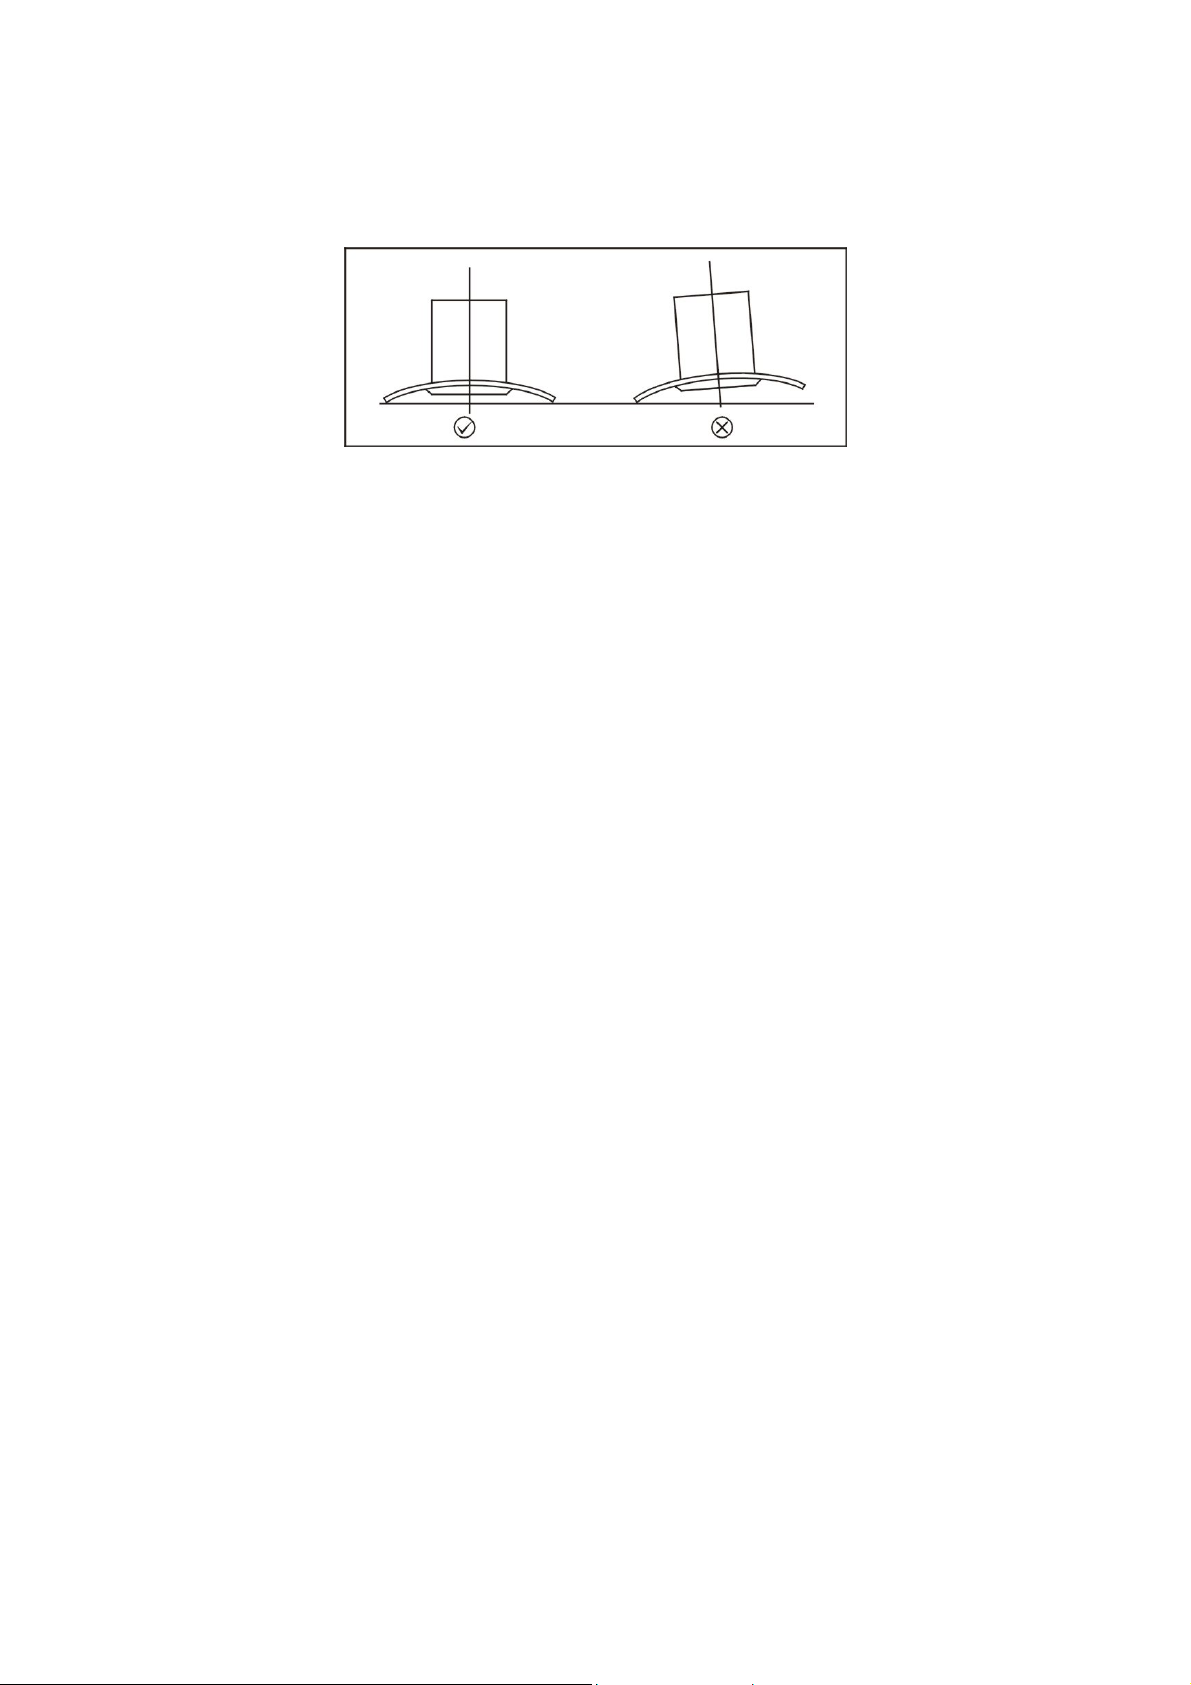
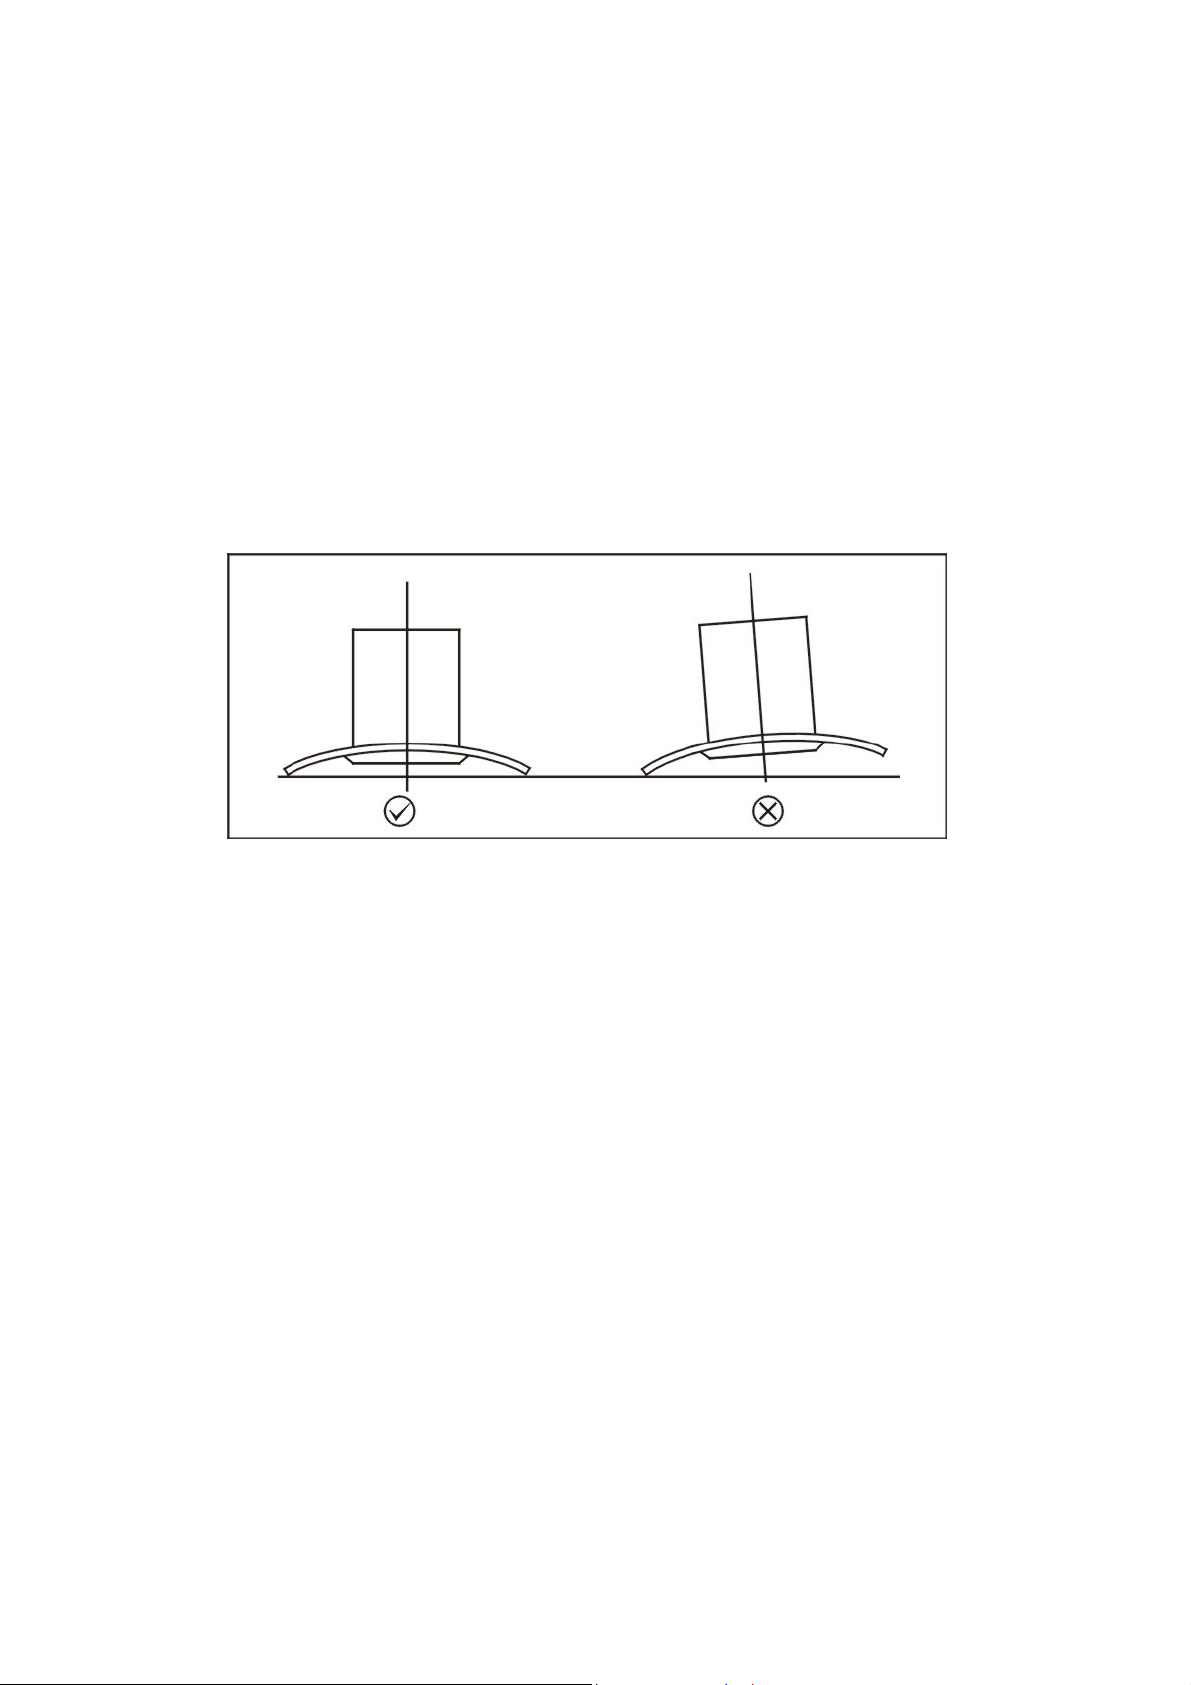
4. After installation, make sure that the extractor is level to avoid
grease collection at one end.
5
SAFETY WARNING
• Never let the children operate the machine
• The cooker hood is for home use only, not suitable for barbecue,
Roast shop and other commercial purpose.
• Please ask the technical person to do the assembling.
• The cooker hood and its filter mesh should be clean regularly in
order to keep in good working order.
• Before cleaning, please switch the power off at the main supply.
• Clean the cooker hood according to the instruction manual and
keep the cooker hood from the danger of burning.
• If there is any fault with the appliance, please call the service
department to arrange a service engineer.
Page 17
6
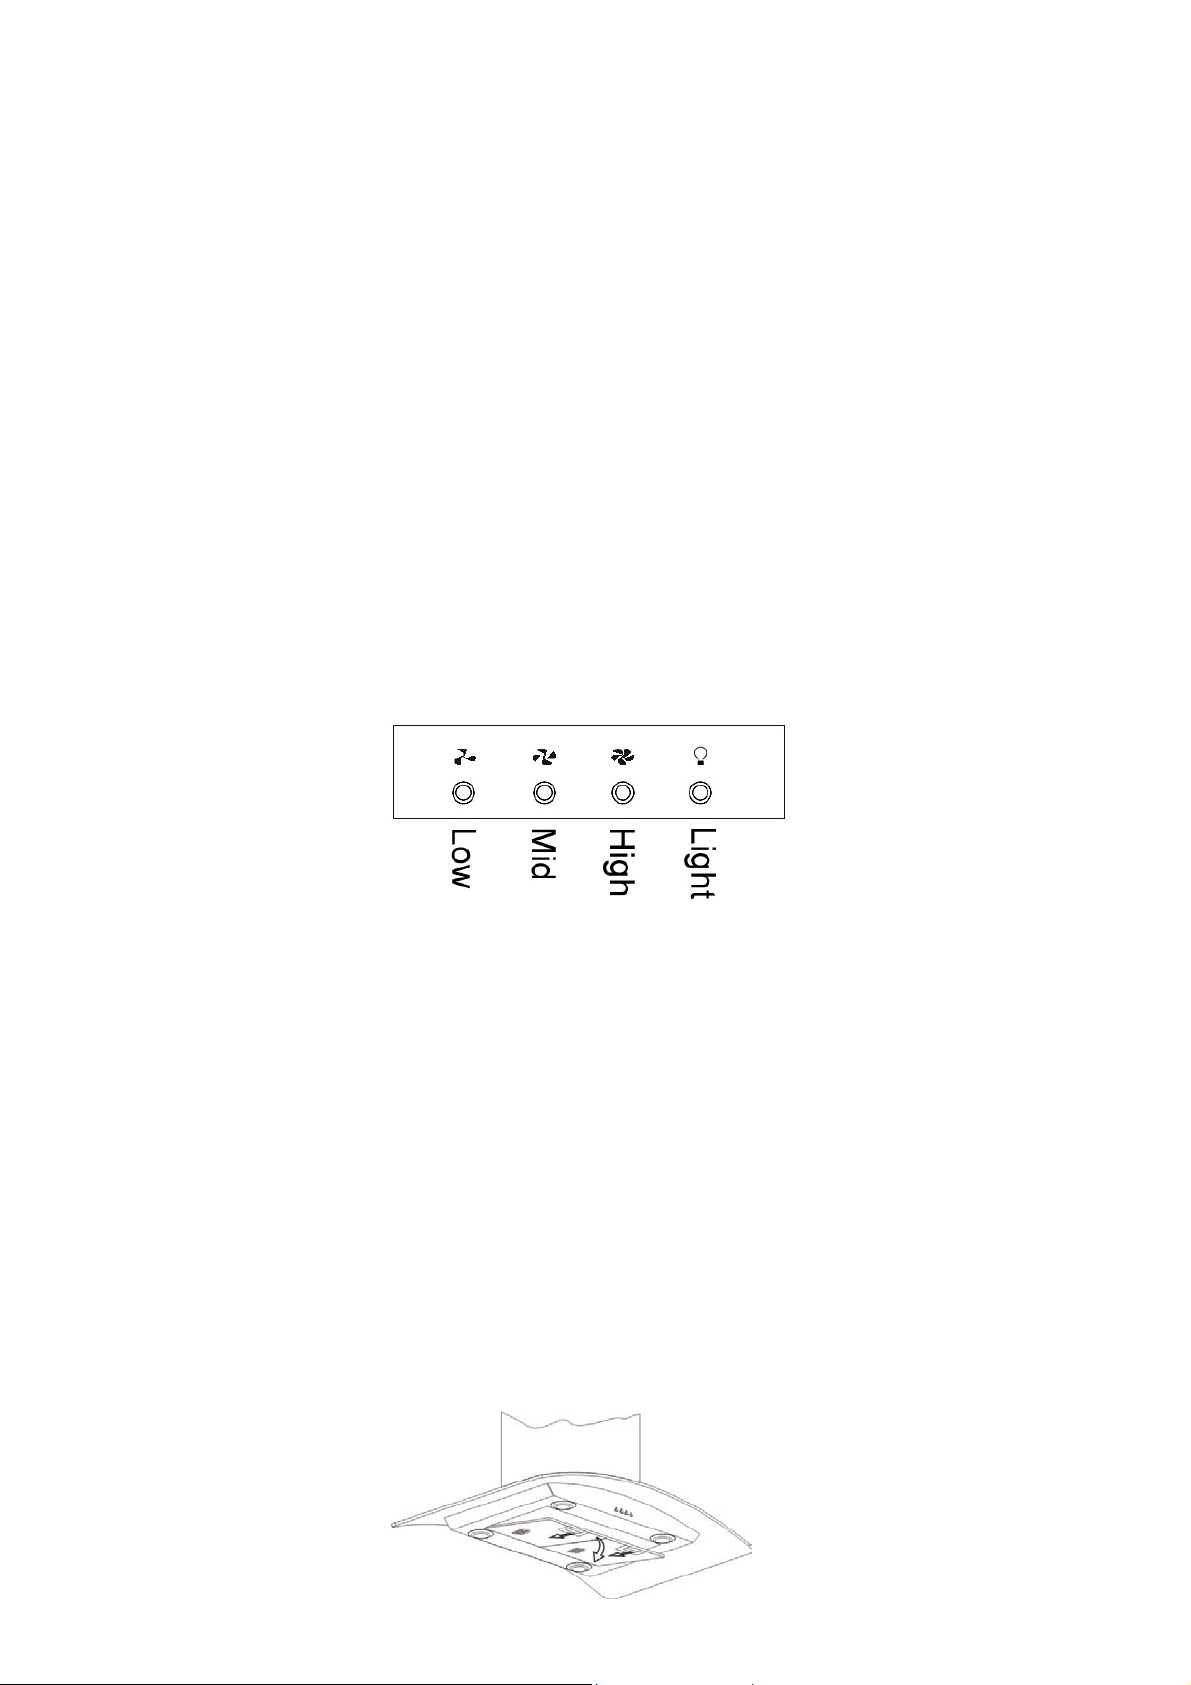
Speed adjustment (See picture)
1. Turn on the power; the buzzer will buzz five times. The sound
shows that the appliance is powered.
2. Touch the low button, the indicating light 1 on, the buzzer will
buzz once, and the motor runs at low speed. Touch it again and
the motor will stop.
3. Touch the middle button, the indicating light 2 on, the buzzer will
buzz once, and the motor runs at mid speed. Touch it again and
the motor will stop
4. Touch the high button, the indicating light 3 on, the buzzer will
buzz once, and motor runs on high speed. Touch it again and the
motor will stop
5. Touch the light button; the indicating light 4 on, and the two
lighting lamps will come on. Touch it again and the lamps will turn
off, with every push the buzzer will buzz one time.
1 2 3 4
7
MAINTENANCE
7.1 The cleaning of the carbon grease filter mesh
The filter mesh is made of high-density stainless steel. Please do not
use the corrosive detergent on it. Keeping this filter clean will keep the
appliance running correctly. Please strictly follow the guidelines below.
Method 1: Put the mesh into 40-50 c clean water, pour on detergent,
and soak for 2-3 minutes. Wear gloves and clean with a soft brush.
Please do not apply too much pressure, as the mesh is delicate and will
Page 18
damage easy.
Method 2: If instructed to do so, it can be put into a dishwasher, set the
temperature at around 60 degrees.
Charcoal filter replacement: To fit and to replace the charcoal filter
please remove first the aluminium cassette filters to have access to the
motor (see above picture), then fit the charcoal filter by turning anticlockwise as shown on the following picture. Turn clockwise to remove
it.
7.2 Replacing lamps
Disconnect the hood from the electricity.
Warning! Prior to touching the light bulbs ensure they are cooled down.
Slide out the light bulb to be replaced and replace with the same model.
7.3 Notice of cleaning cooker hood
A. To protect the main body from corrosion over a long period of
time, the cooker hood should be cleaned with hot water plus non
corrosive detergent every two months.
B. Please do not use abrasive detergent for it will damage the body.
C. Keep the motor and other spare parts free from water, as this will
cause damage to the appliance.
D. Before cleaning the appliance please remember to cut off power
E. The carbon filter shouldn’t be exposed to heat.
F. Please don’t tear open the fixed bar around the carbon filter
G. If the plug or cord is damaged, please replace it with special soft
cord.
Page 19

Rated Input 220-240V 50Hz
Rated Power 230W
Lighting Power 20W X 2
Motor Power 190W
Drive Mode Single motor
Speed Speed I Speed II Speed III
Air Tube Diameter 150mm
Air Pressure ≥ 250Pa
Noise ≤ 72Db (A)
8
SERVICE CENTRE
Before calling the Service Centre
If the hood is not working, we recommend that:
- you check that the cooker hood is properly plugged into supply
If the cause of the fault cannot be detected:
disconnect the hood from the mains, do not touch the hood the after
sales service.
Before calling the Service Centre remember to note the
serial number and model number of your appliance
(see rating plate inside of the hood)
The hood is supplied with a guarantee certificate that ensures
will be repaired free of charge at the Service Centre.
Page 20
This appliance is marked according to the European
directive 2002/96/EC on Waste Electrical and Electronic
Equipment (WEEE).
By ensuring this product is disposed of correctly, you will
help prevent potential negative consequences for the
environment and human health, which could otherwise be
caused by inappropriate waste handling of this product.
The symbol on the product indicates that this product may not be
treated as household waste. Instead it shall be handed over to the
applicable collection point for the recycling of electrical and electronic
equipment
Disposal must be carried out in accordance with local environmental
regulations for waste disposal.
For more detailed information about treatment, recovery and recycling
of this product, please contact your local city office, your household
waste disposal service or the shop where you purchased the product.
Page 21

Bedienungs- & Installationsanleitung
Kamin Dunstabzugshaube
INHALT
1………………………………….….. Notizen
2………………………………….….. Features
3………………………………….….. Installation
4………………………………….….. Installations Hinweise
5………………………………….….. Sicherheitswarnung
6………………………………….….. Bedienungsanleitung
7………………………………….….. Pflege
8………………………………….….. Service Zenter
D
Page 22

1
NOTIZEN
1. Wir beglückwünschen Sie zum Kauf unserer Dunstabzugshaube.
Bitte lesen Sie die Bedienugsanleitung vor der Montage und
Inbetriebnahme sorgfältig durch.
2. Die Installation der Haube darf nur durch qualifiziertes Fachpersonal
durchgeführt werden.
3. Der Hersteller lehnt jede Haftung für Schäden ab, welche durch
unsachgemässe Montage oder nicht Beachten der nachstehenden
Hinweise und Anleitungen entstehen.
Das Gerät ist für 220/240V, 50Hz. ausgelegt.
2
AUSSTATTUNG
1. Streamline Design mit hochwertiger Materialqualität.
2. Mit starkem Elektromotor und Geräuscharmem Zentrifugallüfter,
Geschirrspültauglichen Edelstahl Filterkassetten für mühelose
Reinigung
3. Beleuchtung mit isolierter 12 V Niederspannung für Ihre Sicherheit.
4. Durch besondere Windkanalkonstruktion mit wird Fett und Schmutz
in einer Sekunde absorbiert.
Page 23

3
INSTALLATION
Die Abzugshaube kann in zwei verschiedene Versionen in Betrieb
genommen werden. Umluft Filterversion oder Abluftversion.
Umluft Filter Version (Fig. A):
Die angesaugte Luft wird vom Fettfolter fettfrei gemacht , durch den
aktiv Kohlefilter vom unangenehmen Küchengerüchen befreit und dann
wieder in den Raum zurückgeblasen.
Abluft Version (Fig. B):
Die mit Fett und Küchengeruch gesättigte Luft wird vom Fettfilter
gereinigt und über den Abluftschlauch fettfrei ins Freie geführt.
In dieser Version ist der Einsatz von Aktiv Kohlefiltern nicht erforderlich.
Entscheiden Sie sich von Beginn an für eine Installationsvariante
(Umluft Filter oder Abluft)
Die höchste Effizienz wird mit der Abluft Version erzielt.
Page 24
3.1 Die Haube sollte Min. 65 cm bzw.
Max. 75cm über dem Kochfeld montiert
werden. Bei 65 cm Distanz wird der
höchste Wirkungsgrad erzielt Abb 1.
3.2 An der vorgesehenen Stelle alle
100mm ein Loch von 8 mm Ø in die
Wand bohren.
3.3 Dübel in die Bohrlöcher setzen.
3.4 Hakenschiene mit den Schrauben
an der Wand befestigen Abb. 2
3.5 Abluft Version:
Abluftschlauch am Einwegventil der
Haube befestigen und das andere
Schlauchende nach draussen führen.
Abb. 3
Umluft Filter Version: (Kein Abluftschlauch zu montieren Abb. 5):
Aktiv Kohlefilter (Optionales Zubehör) müssen eingesetzt werden.
(siehe auch Kapitel 7.1).
Wenn angesagt, je nach gekauftem Modell / Typ folgende Schritte
ausführen:
- Wenn runde Kohlefilter für Ihre Haube vorgesehen sind, diese durch
Drehung im Gegenuhrzeigersinn an der Filteraufnahme am Motor
montieren
- Wenn rechteckige Magnetik Filter für Ihre Haube vorgesehen sind,
diese an der richtigen Stelle fest andrücken.
Aktiv Kohlefilter:
Aktiv Kohlefilter müssen periodisch ersetzt werden. Je nach Gebrauch
durchschnittlichalle 6 Monate.
Um den Kohlefilter zu entfernen, je nach Modell wie folgt vorgehen:
- Runde Kohlefilter durch Drehen im Uhrzeigersinn vom Motor lösen
und wegnehmen.
- Rechteckige Magnetik Filter mit beiden Händen anfassen und
abziehen.
3.6 Den aus zwei ineinandergeschobenen Teilen bestehenden
Kaminschacht auf die Haube setzen (Abb. 3A)
Dann den Glasschirm vorsichtig über die Haube schieben und mit vier
Schrauben befestigen. (Abb. 3B).
Dann den inneren Teil des Kaminschachtes bis an die Decke ausziehen
um die Position der Schachtaufhängung festzulegen (Abb. 4).
Anschliessend an der richtigen Stelle 2 Löcher mit 8 mm Ø
Durchmesser für die Montage der Schachtaufhängung bohren, Dübel
setzen, die Schachtaufhängung fest an die Wand schrauben. (Abb. 4A)
Abb. 1
Page 25

Anschliessend den Kaminschacht mit zwei Schrauben an der
A
A
A
A
Schachtaufhängung befestigen (Abb. 4B).
Abluft Version
Schacht-
4A
bluftschlauch
Kaminschacht
ufhängung
3A
4B
HakenSchiene
bb. 2
Umluft Filter Version
Abb. 5
Haken-
Schiene
Einwegventil
bb. 4
3B
Glasschirm
Abb. 3
Schachtaufhängung
Glasschirm
3.7 Elekrischer Anschluss:
Die Spannung Ihrer elektrischen Hausanlage muss mit der auf dem
Typenschild Ihres Gerätes angegebenen Spannung übereinstimmen.
Der Gerätestecker (sofern vorhanden) muss mit einer Haussteckdose
fest verbunden werden.
Falls das Gerät nicht mit einem Stecker versehen ist, muss ein
zweipoliger, normgerechter, gut zugänglicher Schalter mit einer
Mindestkontaktöffnung von 3 mm durch eine autorisierte Fachkraft
eingebaut werden.
Page 26

4
INSTALLATIONS-HINWEISE
1. Vor der Installation die Umgebung gründlich reinigen, damit bei
der ersten Inbetriebnahme kein Staub oder Bauschutt angesaugt
werden kann.
2. Der Abluftschlauch darf nicht gemeinsam mit Gasrohren,
Heissluftrohren etc. durch einen Schacht geführt werden.
3. Der Abluftschlauch sollte möglichst gerade von der Haube
weggeführt bzw. mit einer maximalen Biegung von 120° nach
Aussen geführt und an der Aussenwand befestigt werden.
4. Um Fettansammlungen in einer Ecke zu vermeiden, stellen Sie
bei der Installation sicher, dass die Haube waagerecht hängt.
5
SICHERHEITS-HINWEISE
• Kleinkinder dürfen das Gerät nur unter Aufsicht von Erwachsenen
in Betrieb nehmen
• Das Gerät ist nur für den Bestimmungsgemäßen Gebrauch im
Haushalt verwendbar.
• Für korrekten Zusammenbau ziehen Sie am besten eine
technisch versierte Person zu Rate.
• Reinigen Sie das Gerät und die Fettfilter nach jedem Gebrauch
um dessen dauerhafte Funktion sicherzustellen.
• Für die Reinigung im Inneren muss das Gerät vom Stromnetz
getrennt werden (Sicherung herausschrauben oder ausschalten)
• Beachten Sie die Hinweise für Reinigung und Pflege 7.3
• Vermeiden Sie einen Haubenbrand.
• Rufen Sie den für Sie zuständigen Kundendienst, wenn Ihr Gerät
nicht richtig funktioniert.
Page 27

6
Einstellung der Lüftergeschwindigkeit (siehe Abbildung unten)
1. Gerät einschalten; 5 Pieptöne bestätigen dass das Gerät einge-
schaltet ist.
2. Taste “Low“ antippen; Taste 1 leuchtet, Piepton ertönt ein Mal
und der Motor läuft auf Stufe “Niedrig”. Um den Motor zu stoppen
Taste erneut antippen.
3. Taste “Mid” antippen; Taste 2 leuchtet, Piepton ertönt ein Mal und
der Motor läuft auf Stufe “Mittel”. Um den Motor zu stoppen Taste
erneut antippen.
4. Taste “High” antippen; Taste 3 leuchtet, Piepton ertönt ein Mal
und der Motor läuft auf Stufe “Hoch”. Um den Motor zu stoppen
Taste erneut antippen.
5. Taste “Light“ kurz antippen; Taste 4 leuchtet, Kochfeldbeleuch-
tung geht an. Um Kochfeldbeleuchtung auszuschalten, Taste
erneut antippen.
Bei jedem Antippen einer Taste ertönt ein Piepton
1 2 3 4
7
REINIGUNG UND PFLEGE
7.1 Reinigung der Fettfilterkassetten
Filterrahmen und –Geflecht sind aus hochwertigem Edelstahl.
Verwenden Sie für deren Reinigung keine korrosive Reiniger.
Saubere Fettfilter gewähren einen ordnungsgemäßen Betrieb.
Bitte nachstehende Hinweise strikte befolgen.
Methode 1: Fettfilter in 40 – 50°C Wasser legen, ein wenig Spülmittel
beigeben, 2-3 Min. einweichen lassen. Tragen Sie Handschuhe und
reinigen sie den Fettfilter mit einer weichen Bürste.
Page 28

Üben Sie bitte nur wenig Druck auf die Bürste aus, um das Filtergeflecht
nicht zu beschädigen.
Methode 2: Die meisten Edelstahl Fettfilter sind Geschirrspülertauglich
Wenn dies für Ihre Filter zutrifft, können diese im 60° Spülprogramm im
Geschirrspüler gereinigt werden.
Aktiv Kohlefilter ersetzen: Zum Einsetzen oder Ersetzen der
Kohlefilter die Fettfilterkassetten endfernen um Zugang zum Motor zu
bekommen. (siehe obige Abbildung)
Kohlefilter einsetzen: Durch Drehung im Gegenuhrzeigersinn am Motor
befestigen.
Kohlefilter entfernen: Durch Drehung im Uhrzeigersinn vom Motor
entfernen. (siehe Abbildung unten)
7.2 Lampen ersetzen
Gerät vom Stromnetz trennen
Achtung! Lampe erst berühren, wenn sie abgekühlt ist.
Drehen Sie die defekte Lampe im Gegenuhrzeigersinn heraus und
ersetzen Sie diese durch eine neue mit identischen Eigenschaften und
gleicher Wattage.
7.3 Hinweise zur Reinigung der Abzugshaube
A. Um den Haubenkörper langfristig vor Korrosion zu schützen
sollten Sie diesen regelmäßig bzw. alle zwei Monate mit heißem
Wasser, unter Zugabe eines nicht korrosiven Reinigungsmittels
reinigen
Page 29

B. Verwenden Sie keine Scheuermittel. Diese können den Hauben-
Körper beschädigen. Verwenden Sie bei mattschwarz lackierten
Hauben kein Benzin oder Benzolhaltiges Reinigungsmittel. Der
Lack kann verfärben.
C. Halten Sie den Motor und andere Teile im Inneren der Haube frei
von Wasser um Schäden am Gerät zu vermeiden.
D. Das Gerät ist vor jeder Reinigung vom Stromnetz zu trennen
E. Kohlefilter sollten keiner Hitze ausgesetzt werden, da sich deren
Gehäuse verformen könnte.
F. Bitte den Kohlefilter nicht aufreißen
G. Wenn der Gerätestecker oder das Gerätekabel defekt ist, bitte
sofort durch gleichwertige Teile ersetzen bzw. ersetzen lassen.
Volt / Frequenz 220-240V 50Hz
Aufnahmeleistung 230W
Beleuchtung 20W X 2
Motor Leistung 190W
Antrieb Single motor
Lüftergeschwindigkeiten 3, niedrig / mittel / hoch
Durchmesser Abluftschlauch 150mm
Luftleistung ≥ 250Pa
Geräuschentwicklung ≤ 72Db (A)
8
SERVICE CENTER
Bevor Sie das Service Center anrufen:
Wenn das Gerät nicht funktioniert empfehlen wir:
- Prüfung auf korrekten Anschluss an Ihr Stromnetz.
Wenn Sie den Fehler nicht selbst feststellen bzw. beheben können:
- Gerät vom Stromnetz trennen
- Seriennummer und Modellnummer des Gerätes notieren (siehe
Typenschild) und den Kundendienst anrufen.
Das Gerät wird mit einem Garantiezertifikat geliefert welches garantiert
dass es im Service Center kostenlos repariert wird.
Page 30

Dieses Gerät ist gemäss EU Direktive 2002/96/EC gekennzeichnet.
Durch Fachgerechte Entsorgung dieses Produkts helfen Sie potenzielle
negative Folgen für die Umwelt und die menschliche Gesundheit zu
verhindern, die sonst von ungeeigneter Verschwendungshandhabung
von diesem Produkt verursacht werden könnten.
Das Symbol auf dem Produkt zeigt an, dass dieses Produkt nicht in den
Haushaltmüll gehört.
Es soll zum zutreffenden Sammlungspunkt für die Wiederverwertung
elektrischer und elektronischer Geräte gebracht werden.
Die Entsorgung muss gemäß der örtlichen Umweltregelungen für
Abfallbeseitigung ausgeführt werden. Für detailliertere Informationen
über Behandlung Rückgewinnung und Wiederverwertung von diesem
Produkt, kontaktieren Sie bitte Ihr örtliche Stadtverwaltung, Ihre
Müllabfuhr oder Ihren Verkäufer.
 Loading...