

Page 1
Instruction Manual For Induction Hob
ENGLISH
Instruction Manual / Mode d’emploi
Индукционная варочная панель Руководство пользователя
MODEL: CJ2D46TKT
FRENCH
RUSSIAN
Thank you for purchasing the CANDY induction hob. Please read this instruction manual
carefully before using the hob and keep it in a safe place for future reference.
Page 2

EN-1
By placing the
mark on this product, we are
confirming compliance to all relevant European
safety, health and environmental requirements
which are applicable in legislation for this
product.
Safety Warnings
Your safety is important to us. Please read this
information before using your cooktop.
Installation
Electrical Shock Hazard
• Disconnect the appliance from the mains
electricity supply before carrying out any work
or maintenance on it.
• Connection to a good earth wiring system is
essential and mandatory.
• Alterations to the domestic wiring system must
only be made by a qualified electrician.
• Failure to follow this advice may result in
electrical shock or death.
Cut Hazard
• Take care - panel edges are sharp.
• Failure to use caution could result in injury or
cuts.
Important safety instructions
• Read these instructions carefully before
installing or using this appliance.
• No combustible material or products should be
Page 3

EN-2
placed on this appliance at any time.
• Please make this information available to the
person responsible for installing the appliance
as it could reduce your installation costs.
• In order to avoid a hazard, this appliance must
be installed according to these instructions for
installation.
• This appliance is to be properly installed and
earthed only by a suitably qualified person.
• This appliance should be connected to a circuit
which incorporates an isolating switch
providing full disconnection from the power
supply.
• Failure to install the appliance correctly could
invalidate any warranty or liability claims.
Operation and maintenance
Electrical Shock Hazard
• Do not cook on a broken or cracked cooktop. If
the cooktop surface should break or crack, switch
the appliance off immediately at the mains power
supply (wall switch) and contact a qualified
technician.
• Switch the cooktop off at the wall before
cleaning or maintenance.
• Failure to follow this advice may result in
electrical shock or death.
Health Hazard
• This appliance complies with electromagnetic
Page 4

EN-3
safety standards.
• However, persons with cardiac pacemakers or
other electrical implants (such as insulin
pumps) must consult with their doctor or
implant manufacturer before using this
appliance to make sure that their implants will
not be affected by the electromagnetic field.
• Failure to follow this advice may result in death.
Hot Surface Hazard
• During use, accessible parts of this appliance
will become hot enough to cause burns.
• Do not let your body, clothing or any item other
than suitable cookware contact the Induction
glass until the surface is cool.
• Metallic objects such as knives, forks, spoons
and lids should not be placed on the hob surface
since they can get hot
• Keep children away.
• Handles of saucepans may be hot to touch.
Check saucepan handles do not overhang other
cooking zones that are on. Keep handles out of
reach of children.
• Failure to follow this advice could result in
burns and scalds.
Cut Hazard
• The razor-sharp blade of a cooktop scraper is
exposed when the safety cover is retracted. Use
with extreme care and always store safely and
out of reach of children.
• Failure to use caution could result in injury or
cuts.
Page 5

EN-4
Important safety instructions
• Never leave the appliance unattended when in
use. Boilover causes smoking and greasy
spillovers that may ignite.
• Never use your appliance as a work or storage
surface.
• Never leave any objects or utensils on the
appliance.
• Do not place or leave any magnetisable objects
(e.g. credit cards, memory cards)or electronic
devices (e.g. computers, MP3 players) near the
appliance, as they may be affected by its
electromagnetic field.
• Never use your appliance for warming or
heating the room.
• After use, always turn off the cooking zones
and the cooktop as described in this manual (i.e.
by using the touch controls). Do not rely on the
pan detection feature to turn off the cooking
zones when you remove the pans.
• Do not allow children to play with the appliance
or sit, stand, or climb on it.
• Do not store items of interest to children in
cabinets above the appliance. Children climbing
on the cooktop could be seriously injured.
• Do not leave children alone or unattended in
the area where the appliance is in use.
• Children or persons with a disability which
limits their ability to use the appliance should
Page 6

EN-5
have a responsible and competent person to
instruct them in its use. The instructor should be
satisfied that they can use the appliance without
danger to themselves or their surroundings.
• Do not repair or replace any part of the
appliance unless specifically recommended in the
manual. All other servicing should be done by a
qualified technician.
• Do not use a steam cleaner to clean your
cooktop.
• Do not place or drop heavy objects on your
cooktop.
• Do not stand on your cooktop.
• Do not use pans with jagged edges or drag pans
across the Induction glass surface as this can
scratch the glass.
• Do not use scourers or any other harsh
abrasive cleaning agents to clean your cooktop,
as these can scratch the Induction glass.
• If the supply cord is damaged, it must be
replaced by the manufacturer, its service agent
or similarly qualified persons in order to avoid a
hazard.
•This appliance is intended to be used in
household and similar applications such as:
-staff kitchen areas in shops, offices and other
working environments; -farm houses; -by
clients in hotels, motels and other residential
type environments; -bed and breakfast type
environments.
•WARNING: The appliance and its accessible
parts become hot during use.
Page 7

EN-6
Care should be taken to avoid touching heating
elements.
Children less than 8 years of age shall be kept
away unless continuously supervised.
•This appliance can be used by children aged
from 8 years and above and persons with
reduced physical, sensory or mental capabilities
or lack of experience and knowledge if they have
been given supervision or instruction concerning
use of the appliance in a safe way and
understand the hazards involved.
•Children shall not play with the appliance.
Cleaning and user maintenance shall not be
made by children without supervision.
•WARNING: Unattended cooking on a hob with
fat or oil can be dangerous and may result in fire.
NEVER try to extinguish a fire with water, but
switch off the appliance and then cover flame e.g.
with a lid or a fire blanket.
•WARNING: Danger of fire: do not store items on
the cooking surfaces.
• Warning: If the surface is cracked, switch off
the appliance to avoid the possibility of electric
shock, for hob surfaces of glass-ceramic or
similar material which protect live parts
•A steam cleaner is not to be used.
•The appliance is not intended to be operated by
means of an external timer or separate
remote-control system.
Page 8

EN-7
CAUTION: The cooking process has to be
supervised. A short term cooking process has to
be supervised continuously.
WARNING: In order to prevent tipping of the
appliance, this stabilizing means must be
installed. Refer to the instructions for
installation.
WARNING: Use only hob guards designed by the
manufactuer of the cooking appliance or
indicated by the manufacture of the appliance in
the instruction for use as suitable or hob guards
incorporated in the appliance. The use of
inappropriate guards can cause accidents.
This appliance incorporates an earth connection
for functional purposes only.
Congratulations on the purchase of your new Induction Hob.
We recommend that you spend some time to read this Instruction / Installation
Manual in order to fully understand how to install correctly and operate it.
For installation, please read the installation section.
Read all the safety instructions carefully before use and keep this Instruction /
Installation Manual for future reference.
Page 9
EN-8
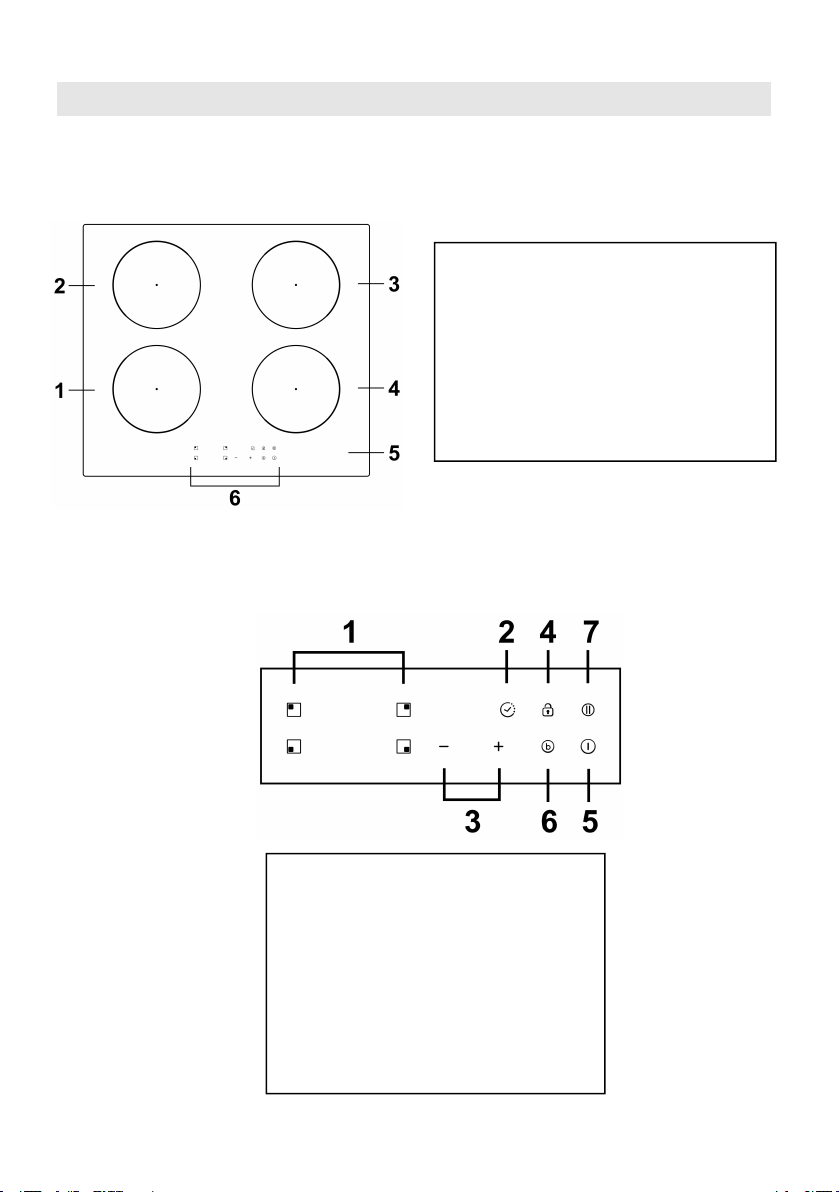
Product Overview
1.2000 W zone, boost to 2600W
2.1500 W zone, boost to 2000W
3.2000 W zone, boost to 2600w
4.1500 W zone, boost to 2000W
5. Glass plate
6. Control panel
1. Heating zone selection controls
2. Timer control
3. Power/Timer regulating key
4. keylock control
5. ON/OFF control
6. Boost function control
7. Stop and go function control
Top View
Control Panel
Page 10
EN-9
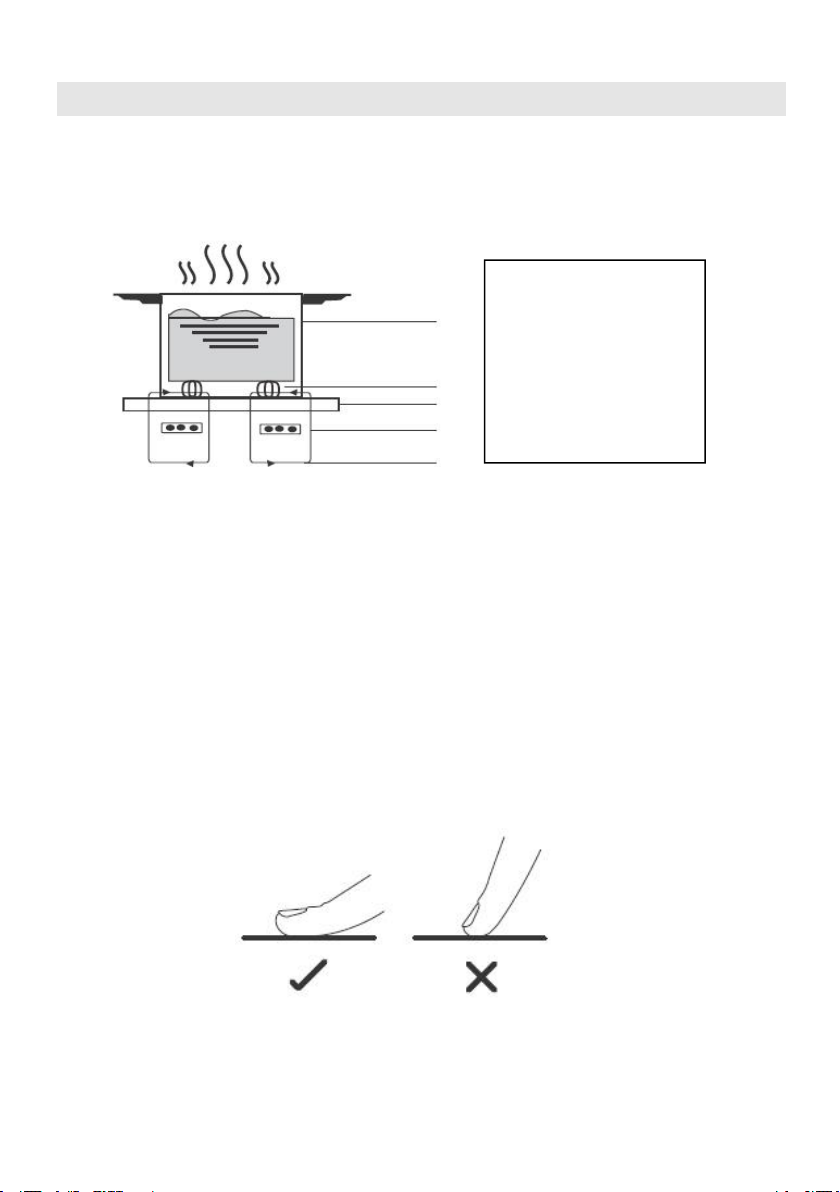
A Word on Induction Cooking
iron pot
magnetic circuit
ceramic glass plate
induction coil
induced currents
Induction cooking is a safe, advanced, efficient, and economical cooking
technology. It works by electromagnetic vibrations generating heat directly in the
pan, rather than indirectly through heating the glass surface. The glass becomes
hot only because the pan eventually warms it up.
Before using your New Induction Hob
• Read this guide, taking special note of the ‘Safety Warnings’ section.
• Remove any protective film that may still be on your Induction hob.
Using the Touch Controls
• The controls respond to touch, so you don’t need to apply any pressure.
• Use the ball of your finger, not its tip.
• You will hear a beep each time a touch is registered.
• Make sure the controls are always clean, dry, and that there is no object (e.g. a
utensil or a cloth) covering them. Even a thin film of water may make the
controls difficult to operate.
Page 11
EN-10
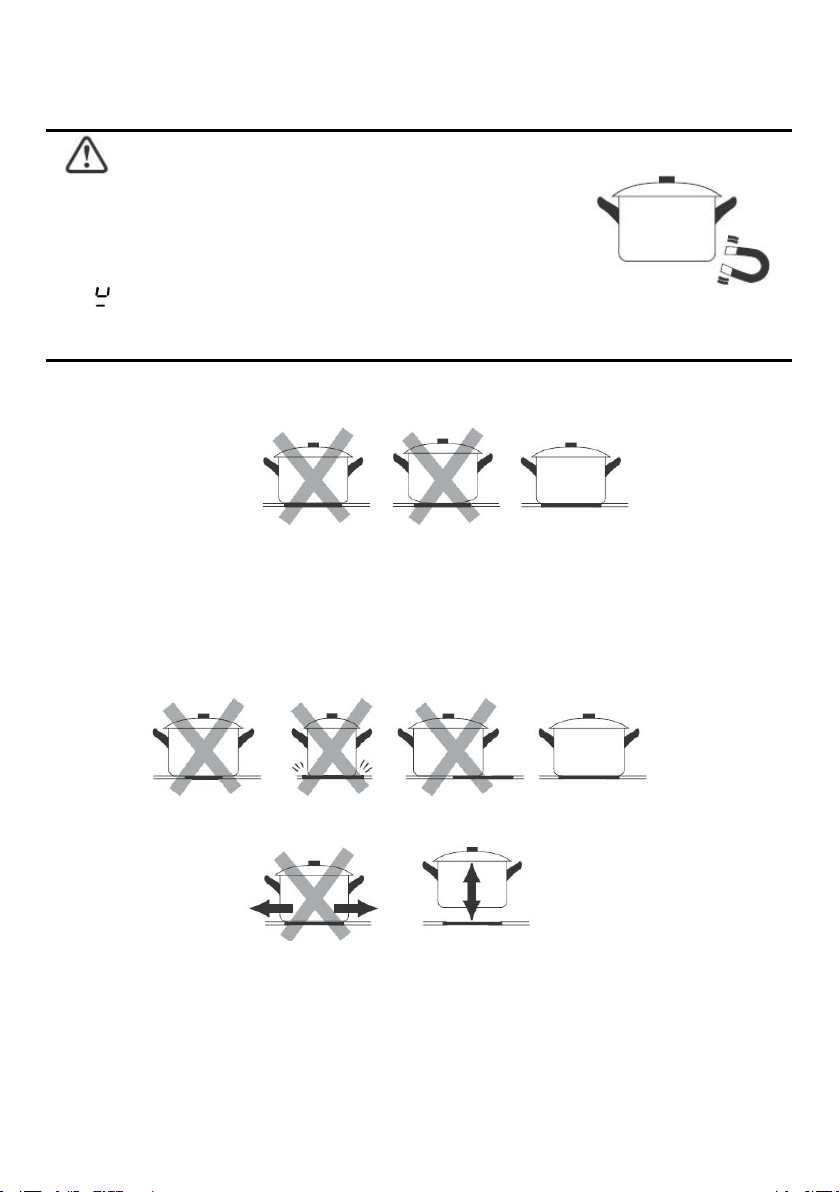
Choosing the right Cookware
• Only use cookware with a base suitable for induction
cooking. Look for the induction symbol on the
• You can check whether your cookware is suitable by carrying out
• If you do not have a magnet:
1. Put some water in the pan you want to check.
2. If does not flash in the display and the water is heating, the pan is suitable.
• Cookware made from the following materials is not suitable: pure stainless steel, aluminium or
copper without a magnetic base, glass, wood, porcelain, ceramic, and earthenware.
Do not use cookware with jagged edges or a curved base.
Make sure that the base of your pan is smooth, sits flat against the glass, and is
the same size as the cooking zone. Use pans whose diameter is as large as the
graphic of the zone selected. Using a pot a slightly wider energy will be used at its
maximum efficiency. If you use smaller pot efficiency could be less than expected.
Always centre your pan on the cooking zone.
packaging or on the bottom of the pan.
a magnet test. Move a magnet towards the base of the pan. If it
is attracted, the pan is suitable for induction.
Always lift pans off the Induction hob – do not slide, or they may scratch the glass.
Pan dimensions
The cooking zones are up to a limit, automatically adapted to the diameter of the
pan. However the bottom of this pan must have a minimum of diameter according
to the corresponding cooking zone. To obtain the best efficiency of your hob,
Page 12
EN-11
please place the pan in the centre of the cooking zone.
Cooking zone
Minimum (mm)
1, 2, 3, 4 (180mm)
120
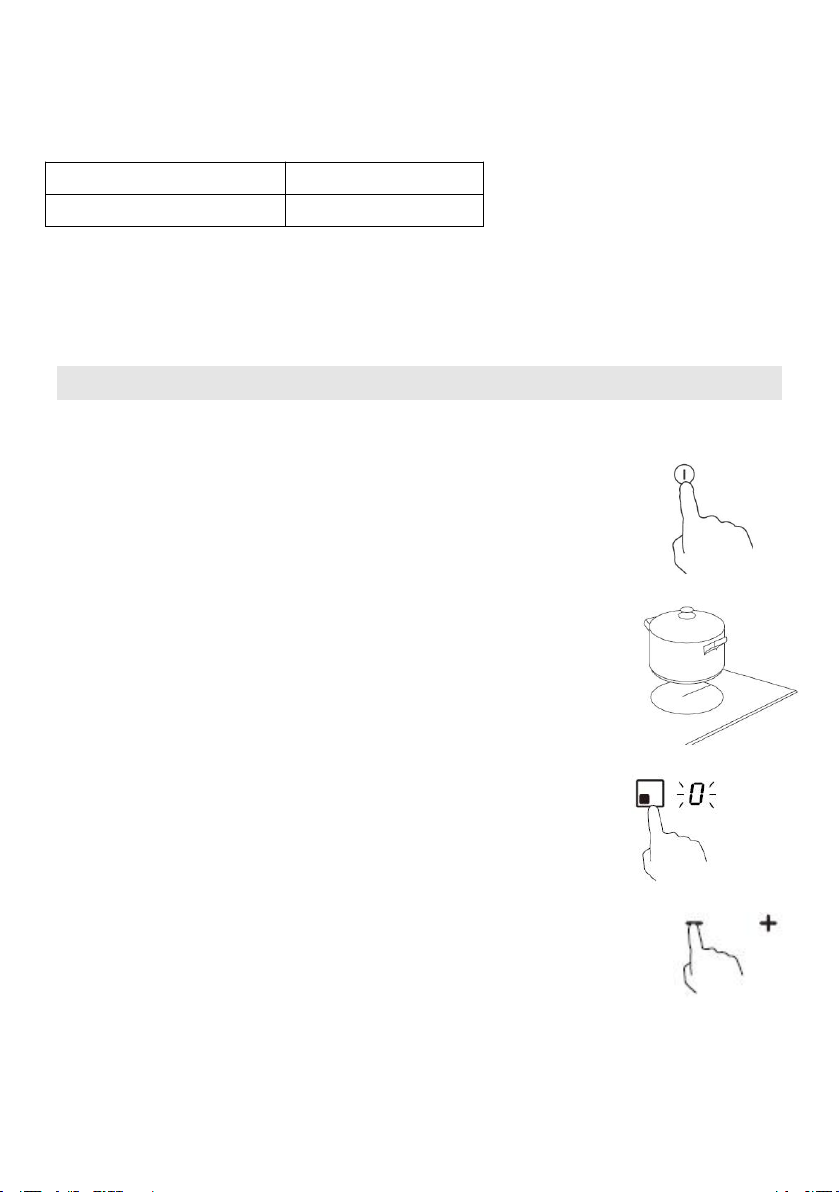
3. Touching the heating zone selection control, and
a indicator next to the key will flash.
4. Set a power level by touching the “-” or “+” control.
a. If you don’t select a heat zone within 1 minute, the induction
hob will automatically switch off. You will need to start again
The base diameter of induction cookware
The above may vary according to the quality of the pan used.
Using your Induction Hob
To start cooking
1. Touch the ON/OFF control.
After power on, the buzzer beeps once, all displays show
“ – “ or “ – – “, indicating that the induction hob has entered
the state of standby mode.
2. Place a suitable pan on the cooking zone that
you wish to use.
• Make sure the bottom of the pan and the surface
of the cooking zone are clean and dry.
at step 1.
b. You can modify the heat setting at any time during cooking.
Page 13
EN-12
If the display flashes alternately with the heat
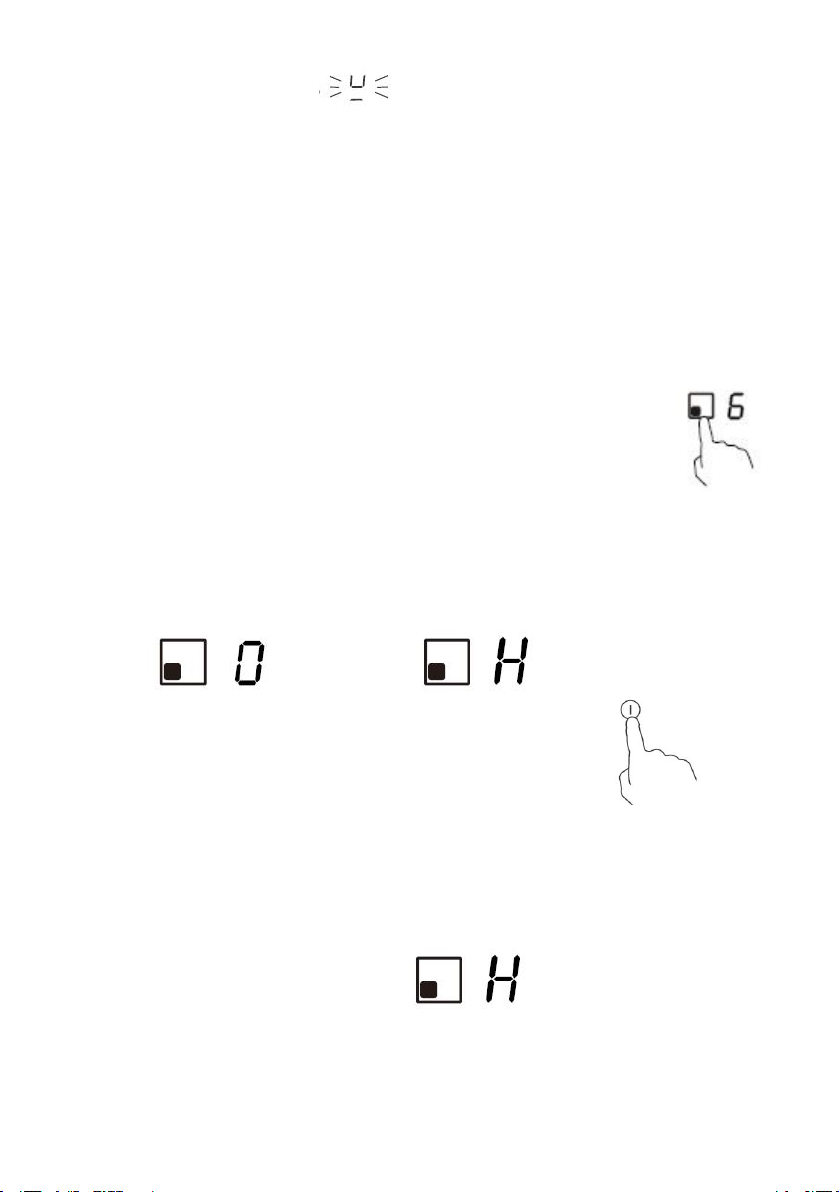
When you have finished cooking
1. Touching the heating zone selection control that you wish to
switch off.
and then
that is still hot.
setting
This means that:
• you have not placed a pan on the correct cooking zone or,
• the pan you’re using is not suitable for induction cooking or,
• the pan is too small or not properly centred on the cooking zone.
No heating takes place unless there is a suitable pan on the cooking zone.
The display will automatically turn off after 1 minutes if no suitable pan is placed
on it.
2. Turn the cooking zone off by touching the “-” and scrolling down to “0”, or
holding the “+” and “-” button at the same time for 1 second, it will cut down to ”0”
directly.
Make sure the power display shows “0”, then shows “H”.
3. Turn the whole cooktop off by touching the
ON/OFF control.
4. Beware of hot surfaces
‘H’ will show which cooking zone is hot to touch. It will disappear when the
surface has cooled down to a safe temperature. It can also be used as an
energy saving function if you want to heat further pans, use the hotplate
Page 14
EN-13
Using the Power Management
2. Touch the button “Stop + Go” and hold for 5 seconds. You can hear
the buzzer beeps one time.
Using power management you can set the total power to 2.5kW/ 3.0kW/ 4.5kW/
6.5kW and 7.4kW. The default total power setting is the maximum power level.
Setting the total power level to fit your requirement
1. Make sure the cooktop is turned off.
Note: you can only set power management when the cooktop is turned off.
3. After you hear the beep, touch “+” and “-” button at the same time and hold for
3 second, the timer indicator will show flashing previous total power level, e.g.
‘2.5’. Touch and hold ” +” and ”-” for 1 second again to switch to other power level,
for example 3.0. When the power that you want is flashing, touch the button
“Stop+Go” and hold for 5 seconds. The buzzer will beep 10 times. It means you
have finished the setting.
Note:
1. After step 2, you must touch the “+” and “-” within 3 seconds after you hear
the beep. Otherwise you will need to start again from step 2.
2. Once finish setting, wait till the end of 10 beeps. Do not touch any button during
this period. Otherwise the setting will be invalid.
Power management Rules
If total power exceeds the limitation of 2.5kw, 3.0kw, 4.5kw, 6.5kw (depending
on which level you’ve set), you are not able to increase power stage of any zone.
If you increase it by touching ‘+’, the cooktop will beep 3 times and indicator will
show a flashing ‘Pn’. Thus you need to decrease power stage of other zones before
increasing the power of objective zone.
Page 15
EN-14
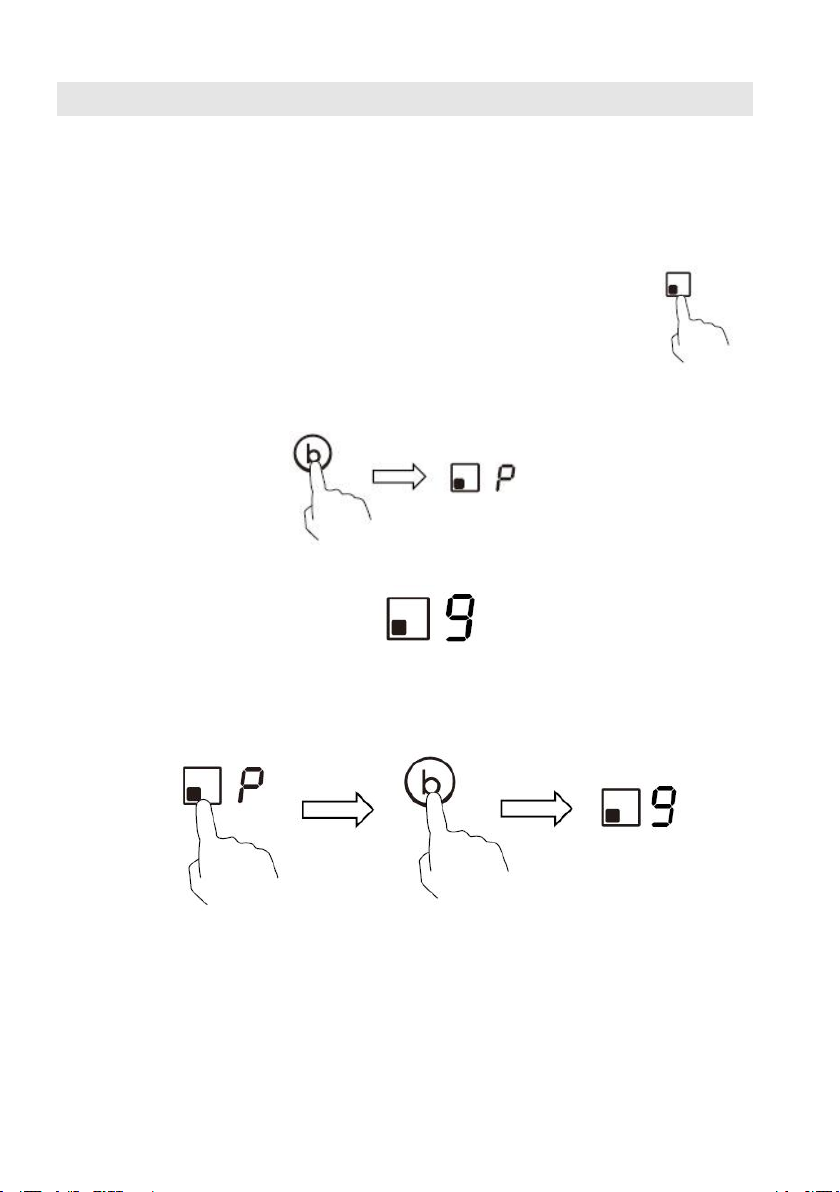
Using the Boost
1. Touch the heating zone selection button that you wish to
boost, an indicator next to the key will flash.
power stage 9.
Boost is the function that one zone rising to a larger power in one second and
lasting for 5 minutes. Thus you can get a more powerful and faster cooking.
Using the Boost to get larger power
2. Touch the Boost button, the heating zone will begin to work at Boost mode.
The power display will show “P” to indicate that the zone is boosting.
3. The Boost power will last for 5 minutes and then the zone will go back to the
4. If you want to cancel the Boost during this 5 minutes, touch the heating zone
selection button, an indicator next to the key will flash. And then touch the
Boost button, the heating zone will go back to the power stage 9.
Restrictions when using
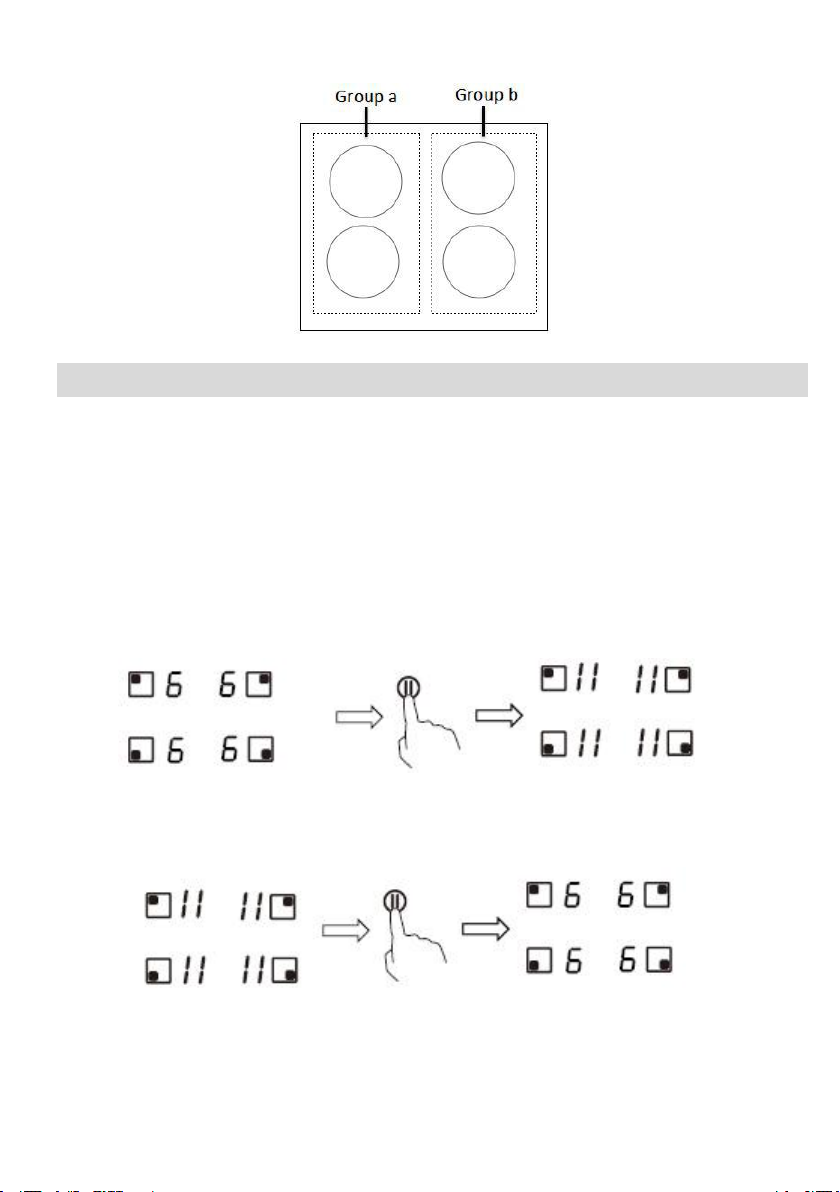
The four zones were divided into two groups. In one group, if use boost on one
zone, first make sure that the other zone is working on/below power level 5.
Page 16
EN-15
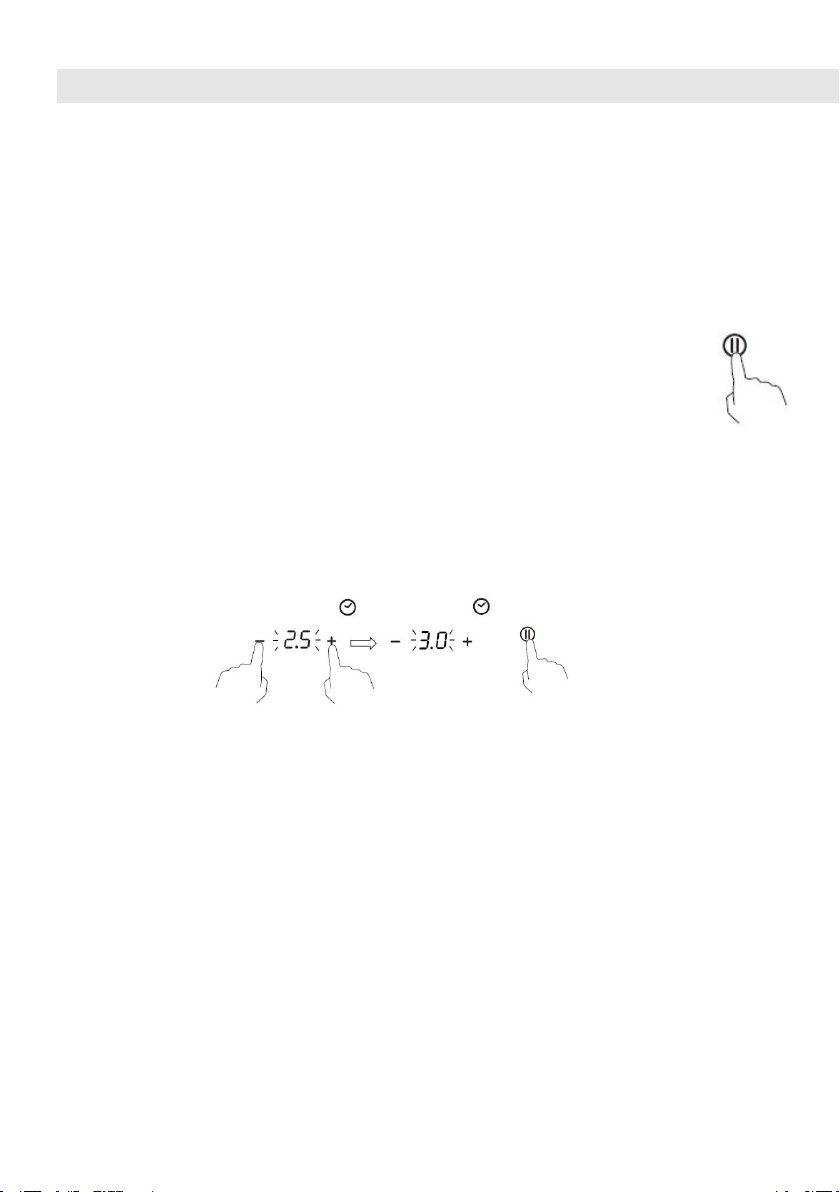
Using the Pause function- STOP+GO
Pause function can be used at any time during cooking. It allows to stop the
induction cooktop and come back to it.
1. Make sure the cook zone is working.
2. Touch the button STOP+GO, the cooking zone indicator will show “ll”.
And then the operation of the induction cooktop will be deactivate within the scope
of all cooking zones, except the STOP+GO, on/off and lock keys.
3. To cancel the pause status, touch the button STOP+GO , then the cooking zone
will go back to the power stage which you set before.
Page 17
EN-16
Locking the Controls
• You can lock the controls to prevent unintended use (for example children
accidentally turning the cooking zones on).
• When the controls are locked, all the controls except the ON/OFF control are
disabled.
To lock the controls
Touch the keylock control. The timer indicator will show “ Lo “
To unlock the controls
1. Make sure the Induction hob is turned on.
2. Touch and hold the keylock control for a while
3. You can now start using your Induction hob.
When the hob is in the lock mode, all the controls are disable except the ON/OFF,
you can always turn the induction hob off with the ON/OFF control in an emergency,
but you shall unlock the hob first in the next operation.
Over-Temperature Protection
A temperature sensor equipped can monitor the temperature inside the Induction
hob. When an excessive temperature is monitored, the Induction hob will stop
operation automatically.
Over-spillage Protection
Over-spillage protection is a safety protection function. It switch off the hob
automatically within 10s if the water flow to the control panel, while buzzer will
beep 1 second.
Detection of Small Articles
When an unsuitable size or non-magnetic pan (e.g. aluminium), or some other
small item (e.g. knife, fork, key) has been left on the hob, the hob automatically
go on to standby in 1 minute. The fan will keep cooking down the induction hob for
a further 1 minute.
Auto Shutdown Protection
Auto shut down is a safety protection function for your induction hob. It shut down
automatically if ever you forget to turn off your cooking. The default working times
for various power levels are shown in the below table:
Page 18
EN-17
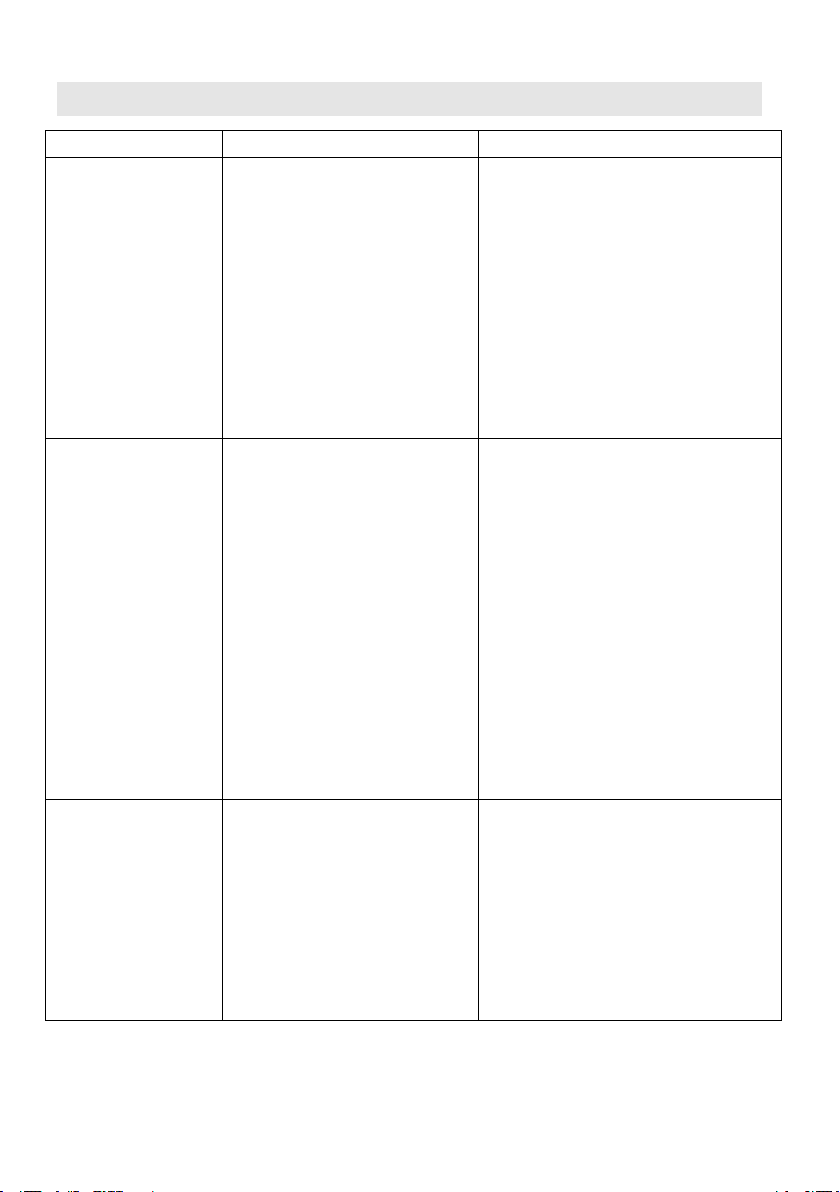
Power level
123456789
II
Default working timer
(hour)
888444222
2
When the pot is removed, the induction hob can stop heating immediately and the
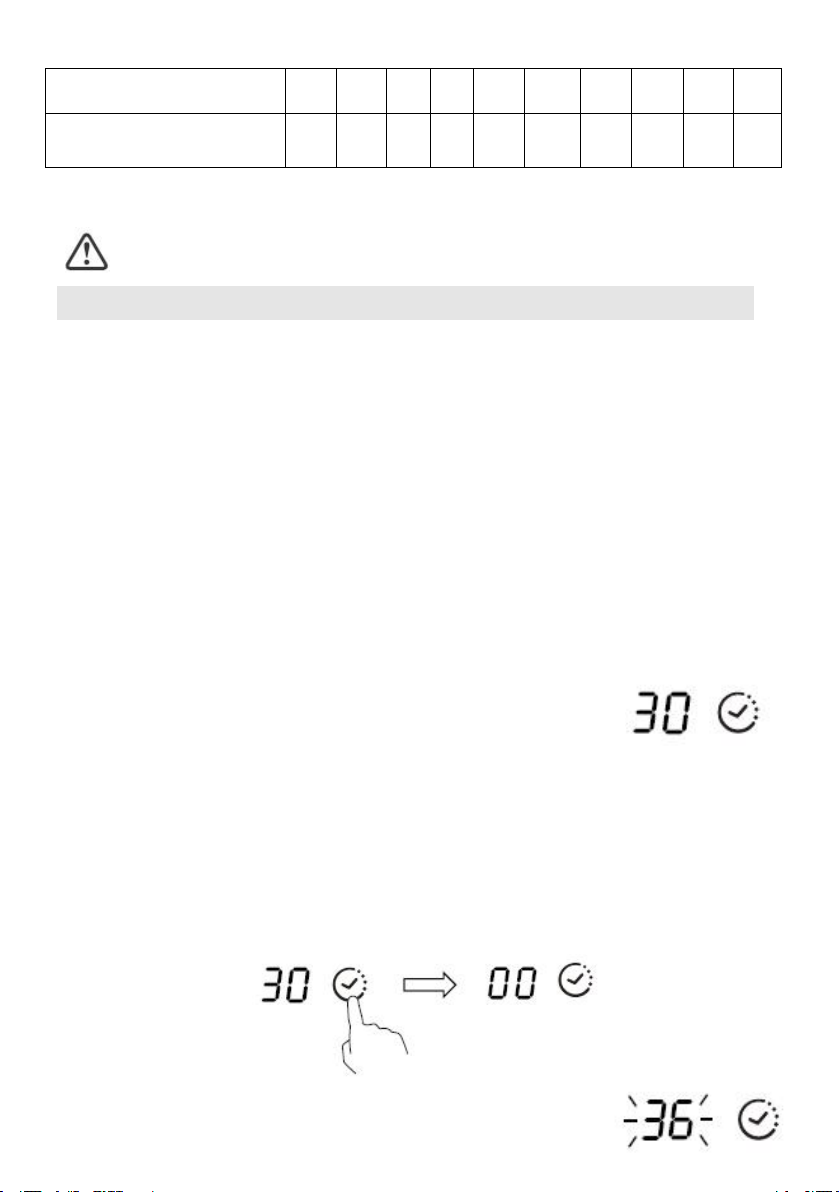
2. Touch timer control , The minder indicator
will start flashing and “30” will show in the
timer display.
minute display.
5. When the time is set, it will begin to count down
hob automatically switch off after 2 minutes.
People with a heart pace maker should consult with their doctor before
using this unit.
Using the Timer
You can use the timer in two different ways:
• You can use it as a minute minder. In this case, the timer will not turn any
cooking zone off when the set time is up.
• You can set it to turn one cooking zone off after the set time is up.
• You can set the timer up to 99 minutes.
Using the Timer as a Minute Minder
If you are not selecting any cooking zone
1. Make sure the cooktop is turned on.
Note: you can use the minute minder even if you’re not selecting any cooking
zone.
3. Set the time by touching the “-” or “+” control
Hint: Touch the “-” or “+”control once to decrease or increase by 1 minute.
Hold the “-” or “+” control of the timer to decrease or increase by 10
minutes.
4. Cancel the time by touching the timer control and the”00” will show in the
Page 19

EN-18
immediately. The display will show the remaining
6. Buzzer will beep for 30 seconds and the timer indicator
shows “- - “ when the setting time finished.
1. Touching the heating zone selection control that you want to set
the timer for. (e.g. zone 1#)
2. Touch timer control , The minder indicator will start
flashing and “30” will show in the timer display.
4. When the time is set, it will begin to count down
immediately. The display will show the remaining
time and the timer indicator flash for 5 seconds.
NOTE: The red dot next to power level indicator
will illuminate indicating that zone is selected.
6. When cooking timer expires, the corresponding
time and the timer indicator will flash for 5 seconds.
Setting the timer to turn one cooking zone off
Cooking zones set for this feature will:
3. Set the time by touching the “-” or “+” control.
Hint: Touch the “-” or “+” control once will decrease or increase by 1 minute.
Touch and hold the “-” or “+” control, the timer will decrease or increase
by 10 minutes.
If the setting time exceeds 99 minutes, the timer will automatically
return to 0 minute.
5.
To cancel the timer, touch the heating zone selection control, and then touch
the timer control, the timer is cancelled, and the “00” will show in the minute
display, and then “--”.
Page 20

EN-19
cooking zone will be automatically switch off and
(set to 6 minutes)
(set to 3 minutes)
automatically switch off and show “H”.
show “H”.
Other cooking zone will keep operating if they are turned on previously.
Setting the timer to turn more than one cooking zone
off
1. If use this function to more than one heating zone, the timer indicator will show
the shortest time.
(e.g. zone 1# setting time of 3 minutes, zone 2# setting time of 6 minutes,
the timer indicator shows “3”.)
NOTE: The flashing red dot next to power level indicator means the timer
indicator is showing time of the heating zone.
If you want to check the set time of other heating zone, touch the heating
zone selection control. The timer will indicate its set time.
2. When cooking timer expires, the corresponding heating zone will be
NOTE: If you want to change the time after the timer is set, you have to start
from step 1
Page 21
EN-20
Care and Cleaning
What?
How?
Important!
Everyday soiling on
glass (fingerprints,
marks, stains left by
food or non-sugary
spillovers on the
glass)
1. Switch the power to the
cooktop off.
2. Apply a cooktop cleaner
while the glass is still warm
(but not hot!)
3. Rinse and wipe dry with a
clean cloth or paper towel.
4. Switch the power to the
cooktop back on.
• When the power to the cooktop is
switched off, there will be no ‘hot
surface’ indication but the cooking
zone may still be hot! Take extreme
care.
• Heavy-duty scourers, some nylon
scourers and harsh/abrasive
cleaning agents may scratch the
glass. Always read the label to
check if your cleaner or scourer is
suitable.
• Never leave cleaning residue on the
cooktop: the glass may become
stained.
Boilovers, melts,
and
hot sugary spills on
the glass
Remove these immediately
with a fish slice, palette knife or
razor blade scraper suitable for
Induction glass cooktops, but
beware of hot cooking zone
surfaces:
1. Switch the power to the
cooktop off at the wall.
2. Hold the blade or utensil at a
30° angle and scrape the
soiling or spill to a cool area
of the cooktop.
3. Clean the soiling or spill up
with a dish cloth or paper
towel.
4. Follow steps 2 to 4 for
‘Everyday soiling on glass’
above.
• Remove stains left by melts and
sugary food or spillovers as soon
as possible. If left to cool on the
glass, they may be difficult to
remove or even permanently
damage the glass surface.
• Cut hazard: when the safety cover
is retracted, the blade in a scraper
is razor-sharp. Use with extreme
care and always store safely and
out of reach of children.
Spillovers on the
touch controls
1. Switch the power to the
cooktop off.
2. Soak up the spill
3. Wipe the touch control area
with a clean damp sponge or
cloth.
4. Wipe the area completely
dry
with a paper towel.
5. Switch the power to the
cooktop back on.
• The cooktop may beep and turn
itself off, and the touch controls
may not function while there is
liquid on them. Make sure you wipe
the touch control area dry before
turning the cooktop back on.
Page 22
EN-21
Hints and Tips
Problem
Possible causes
What to do
The induction hob
cannot be turned on.
No power.
Make sure the induction hob is
connected to the power supply
and that it is switched on.
Check whether there is a power
outage in your home or area. If
you’ve checked everything and the
problem persists, call a qualified
technician.
The touch controls are
unresponsive.
The controls are locked.
Unlock the controls. See section
‘Using your induction cooktop’ for
instructions.
The touch controls are
difficult to operate.
There may be a slight film of
water over the controls or you
may be using the tip of your
finger when touching the
controls.
Make sure the touch control area is
dry and use the ball of your finger
when touching the controls.
The glass is being
scratched.
Rough-edged cookware.
Unsuitable, abrasive scourer or
cleaning products being used.
Use cookware with flat and smooth
bases. See ‘Choosing the right
cookware’.
See ‘Care and cleaning’.
Some pans make
crackling or clicking
noises.
This may be caused by the
construction of your cookware
(layers of different metals
vibrating differently).
This is normal for cookware and
does not indicate a fault.
The induction hob
makes a low humming
noise when used on
a high heat setting.
This is caused by the technology
of induction cooking.
This is normal, but the noise should
quieten down or disappear
completely when you decrease the
heat setting.
Fan noise coming from
the induction hob.
A cooling fan built into your
induction hob has come on to
prevent the electronics from
overheating. It may continue to
run even after you’ve turned the
induction hob off.
This is normal and needs no action.
Do not switch the power to the
induction hob off at the wall while the
fan is running.
Pans do not become
hot and appears in the
display.
The induction hob cannot
detect the pan because it is not
suitable for induction cooking.
The induction hob cannot detect
the pan because it is too small
for the cooking zone or not
properly centred on it.
Use cookware suitable for induction
cooking. See section ‘Choosing the
right cookware’.
Centre the pan and make sure that its
base matches the size of the cooking
zone.
Page 23

EN-22
The induction hob or a
cooking zone has
turned itself off
unexpectedly, a tone
sounds and an error
code is displayed
(typically alternating
with one or two digits
in the cooking timer
display).
Technical fault.
Please note down the error
letters and numbers, switch
the power to the induction hob
off at the wall, and contact a
qualified technician.
Failure Display and Inspection
Problem
Possible causes
What to do
F3/F4
Temperature sensor of the
induction coil failure
Please contact the supplier.
F9/FA
Temperature sensor of the IGBT
failure.
Please contact the supplier.
E1/E2
Abnormal supply voltage
Please inspect whether power
supply is normal.
Power on after the power
supply is normal.
E3
High temperature of the induction
coil temperature sensor
Please contact the supplier.
E5
High temperature of the IGBT
temperature sensor
Please restart after the hob
cools down.
If an abnormality comes up, the induction hob will enter the protective state
automatically and display corresponding protective codes:
The above are the judgment and inspection of common failures.
Please do not disassemble the unit by yourself to avoid any dangers and damages
to the induction hob.
Page 24

EN-23
Technical Specification
Cooking Hob
CJ2D46TKT
Cooking Zones
4 Zones
Supply Voltage
220-240V~, 50-60Hz
Installed Electric Power
2.5kw:2250-2750W or
3.0 kw:2700-3300W or
4.5kw:4050-4950W or
6.5kw:5850-7150W or
7.4kw:6600-7400W
Product Size L×W×H(mm)
590X520X55
Building-in Dimensions A×B (mm)
560X490
L(mm)
W(mm)
H(mm)
D(mm)
A(mm)
B(mm)
X(mm)
590
5205551
560
490
50 mini
Weight and Dimensions are approximate. Because we continually strive to
improve our products we may change specifications and designs without prior
notice.
Installation
Selection of installation equipment
Cut out the work surface according to the sizes shown in the drawing.
For the purpose of installation and use, a minimum of 5 cm space shall be
preserved around the hole.
Be sure the thickness of the work surface is at least 30mm. Please select
heat-resistant work surface material to avoid larger deformation caused by the
heat radiation from the hotplate. As shown below:
Page 25
EN-24
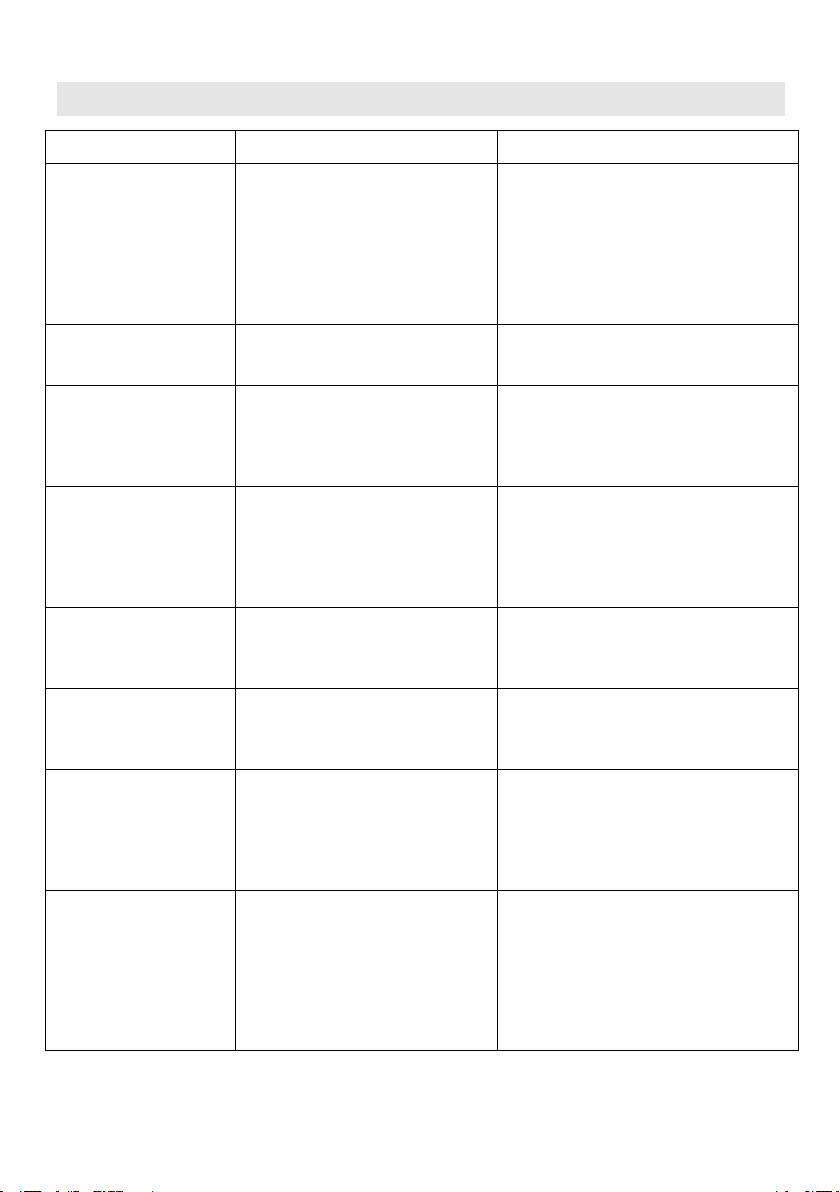
Under any circumstances, make sure the Induction cooker hob is well ventilated
A(mm)
B(mm)
C(mm)
D
E
760
50 mini
20 mini
Air intake
Air exit 5mm
and the air inlet and outlet are not blocked. Ensure the Induction cooker hob is in
good work state. As shown below
Note: The safety distance between the hotplate and the cupboard above
the hotplate should be at least 760mm.
Before you install the hob, make sure that
• the work surface is square and level, and no structural members interfere with
space requirements
• the work surface is made of a heat-resistant material
• if the hob is installed above an oven, the oven has a built-in cooling fan
• the installation will comply with all clearance requirements and applicable
standards and regulations
• a suitable isolating switch providing full disconnection from the mains power
supply is incorporated in the permanent wiring, mounted and positioned to
comply with the local wiring rules and regulations.
The isolating switch must be of an approved type and provide a 3 mm air gap
contact separation in all poles (or in all active [phase] conductors if the local
wiring rules allow for this variation of the requirements)
• the isolating switch will be easily accessible to the customer with the hob
installed
• you consult local building authorities and by-laws if in doubt regarding
installation
• you use heat-resistant and easy-to-clean finishes (such as ceramic tiles) for the
wall surfaces surrounding the hob.
Page 26
EN-25
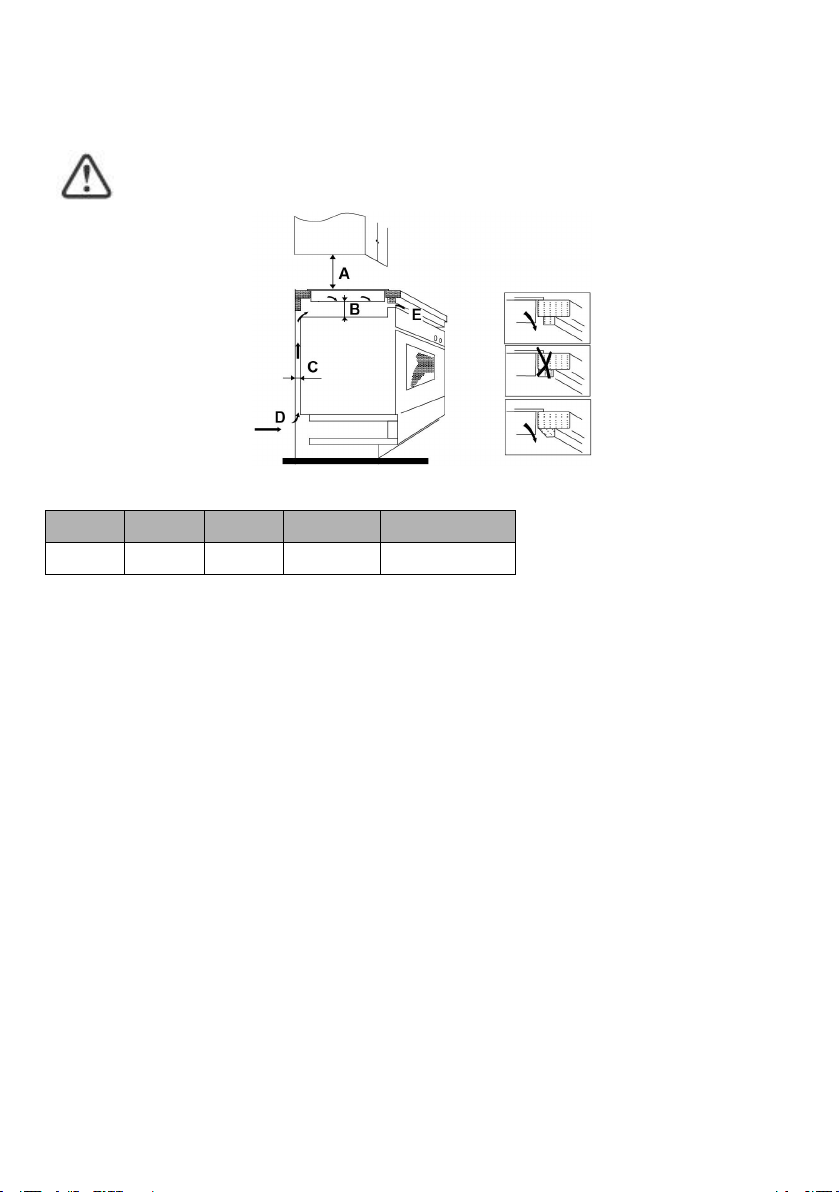
When you have installed the hob, make sure that
ABC
D
Screw
Bracket
Screw hole
Bottom case
• the power supply cable is not accessible through cupboard doors or drawers
• there is adequate flow of fresh air from outside the cabinetry to the base of the
hob
• if the hob is installed above a drawer or cupboard space, a thermal protection
barrier is installed below the base of the hob
• the isolating switch is easily accessible by the customer
Before locating the fixing brackets
The unit should be placed on a stable, smooth surface (use the packaging). Do not
apply force onto the controls protruding from the hob.
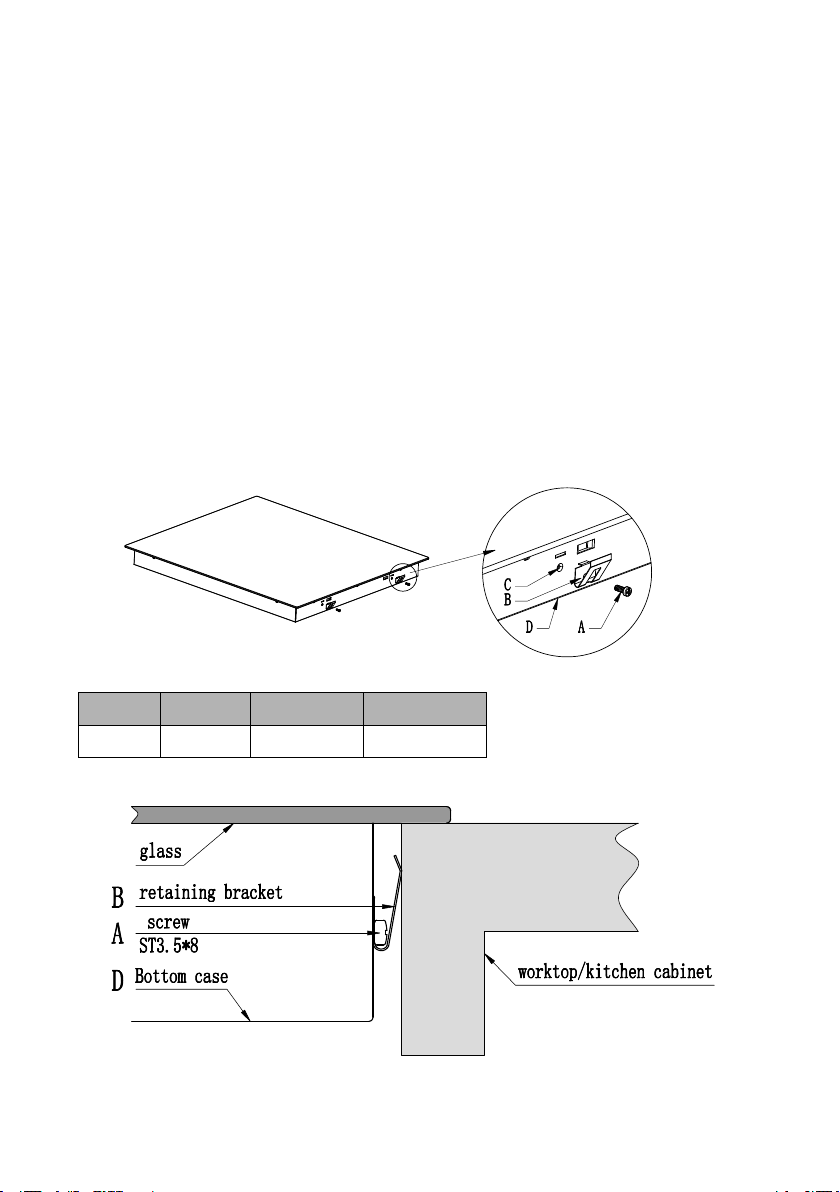
Adjusting the bracket position
Fix the hob on the work surface by screw 4 brackets on the bottom case of hob
(see picture) after installation.
Page 27

EN-26
Cautions
1. The induction hotplate must be installed by qualified personnel or technicians.
We have professionals at your service. Please never conduct the operation by
yourself.
2. The hob will not be installed directly above a dishwasher, fridge, freezer,
washing machine or clothes dryer, as the humidity may damage the hob
electronics
3. The induction hotplate shall be installed such that better heat radiation can be
ensured to enhance its reliability.
4. The wall and induced heating zone above the table surface shall withstand heat.
5. To avoid any damage, the sandwich layer and adhesive must be resistant to
heat.
Connecting the hob to the mains power supply
This hob must be connected to the mains power supply only by a suitably qualified person.
Before connecting the hob to the mains power supply, check that:
1. the domestic wiring system is suitable for the power drawn by the hob.
2. the voltage corresponds to the value given in the rating plate
3. the power supply cable sections can withstand the load specified on the rating plate.
To connect the hob to the mains power supply, do not use adapters, reducers, or branching
devices, as they can cause overheating and fire.
The power supply cable must not touch any hot parts and must be positioned so that its
temperature will not exceed 75˚C at any point.
Check with an electrician whether the domestic wiring system is suitable without alterations.
Any alterations must only be made by a qualified electrician.
The power supply should be connected in compliance with the relevant standard,
or a single-pole circuit breaker. The method of connection is shown below.
Page 28

EN-27
This appliance is labelled in accordance with European Directive 2012/19/EU
regarding electric and electronic appliances (WEEE). The WEEE contain both
polluting substances (that can have a negative effect on the environment) and
base elements (that can be reused). It is important that the WEEE undergo
specific treatments to correctly remove and dispose of the pollutants and
recover all the materials. Individuals can play an important role in ensuring
that the WEEE do not become an environmental problem; It is essential to
follow a few basic rules:
-the WEEE should not be treated as domestic waste;
-the WEEE should be taken to dedicated collection areas managed by the town council or a
registered company.
In many countries, domestic collections may be available for large WEEEs. When you buy a
new appliance, the old one can be returned to the vendor who must accept it free of charge as
a one-off, as long as the appliance is of an equivalent type and has the same functions as the
purchased appliance.
Input
Power Cord
220-240V~
N
L
Input
220-240V~
220-240V~
L1 L2 N1 N2
Blue
Grey
Black
Brown
Yellow/Green
Black
Brown
Grey
Power Cord
Blue
Yellow/Green
Input
Power Cord
220-240V~
220-240V~
400V~
L1 L2 N
Grey
Black
Brown
Blue
ellow/Green
Y
Input
Power Cord
Black
400V~
L2
L1
Blue
Grey
Brown
Yellow/Green
• If the cable is damaged or to be replaced, the operation must be carried out the
by after-sale agent with dedicated tools to avoid any accidents.
• If the appliance is being connected directly to the mains an omnipolar
circuit-breaker must be installed with a minimum opening of 3mm between
contacts.
• The installer must ensure that the correct electrical connection has been made
and that it is compliant with safety regulations.
• The cable must not be bent or compressed.
• The cable must be checked regularly and replaced by authorised technicians
only.
Page 29

EN-28
Product Information for Domestic Electric Hobs Compliant to Commission Regulation (EU) No
66/2014
Position
Symbol
Value
Unit
Model identification
CJ2D46TKT
Type of hob:
Electric Hob
Number of cooking
zones and/or areas
zones
4
areas
Heating technology
(induction cooking
zones and cooking
areas, radiant
cooking zones, solid
plates)
Induction cooking
zones
X
Induction cooking
cooking areas
radiant cooking
zones
solid plates
For circular cooking zones or areas:
diameter of useful surface area per
electric heated cooking zone, rounded to
the nearest 5mm
Rear left
Ø
18,0
cm
Rear central
Ø-cm
Rear right
Ø
18,0
cm
Central leftØ-
cm
Central
central
Ø-cm
Central right
Ø-cm
Front left
Ø
18,0
cm
Front central
Ø-cm
Front right
Ø
18,0
cm
For non-circular cooking zones or areas:
length and width of useful surface area
per electric heated cooking zone or area,
rounded to the nearest 5mm
Rear left
L
W
-
cm
Rear central
L
W
-
cm
Rear right
L
W
-
cm
Central left
L
W
-
cm
Page 30

EN-29
Central
centralLW
-
cm
Central right
L
W
-
cm
Front left
L
W
-
cm
Front central
L
W
-
cm
Front right
L
W
-
cm
Energy consumption for cooking zone or
area calculated per kg
Rear left
ECelectric
cooking
193,5
Wh/kg
Rear central
ECelectric
cooking
-
Wh/kg
Rear right
ECelectric
cooking
197.2
Wh/kg
Central left
ECelectric
cooking
-
Wh/kg
Central
central
ECelectric
cooking
-
Wh/kg
Central right
ECelectric
cooking
-
Wh/kg
Front left
ECelectric
cooking
192,3
Wh/kg
Front central
ECelectric
cooking
-
Wh/kg
Front right
ECelectric
cooking
195.6
Wh/kg
Energy consumption for the hob
calculated per kg
ECelectric
hob
194,7
Wh/kg
Standard applied : EN 60350-2 Household electric cooking appliances - Part 2: Hobs - Methods
for measuring performance
Suggestions for Energy Saving:
• Toobtain the best efficiency of your hob, please place the pan in the centre of the cooking zone.
• Using a lid will reduce cooking times and save energy by retaining the heat.
• Minimise the amount of liquid or fat to reduce cooking times.
• Start cooking on a high setting and reduce the setting when the food has heated through.
• Use pans whose diameter is as large as the graphic of the zone selected.
Page 31

FR-1
En plaçant la marque
sur ce produit, nous
confirmons la conformité à toutes les exigences
européennes concernant la protection de
l’environnement et de la santé, ainsi que la sécurité,
applicables selon la loi à ce produit.
Consignes de sécurité
Votre sécurité est importante pour nous. Veuillez lire
ces informations avant d’utiliser votre table de cuisson.
Installation
Risque de choc électrique
• Débranchez l’appareil du réseau électrique avant
d’effectuer tout travail ou entretien sur celui-ci.
• Le raccordement à un bon système de mise à la terre
est essentiel et obligatoire.
• Seul un électricien qualifié est habilité à effectuer des
modifications sur le système de câblage domestique.
• Le non-respect de ces consignes peut entraîner un
choc électrique ou le décès.
Risque de coupure
• Faites attention - les bords des panneaux sont
tranchants.
• Le non-respect de cette précaution peut entraîner
des blessures ou des coupures.
Consignes importantes de sécurité
• Veuillez lire les instructions avant d’installer ou
d’utiliser cet appareil.
• Aucun matériau ou produit combustible ne doit être
Page 32

FR-2
placé sur cet appareil, à aucun moment.
• Veuillez mettre ces informations à la disposition de la
personne responsable de l’installation de l’appareil
afin de réduire vos coûts d’installation.
• Afin d’éviter tout danger, cet appareil doit être installé
conformément aux présentes instructions
d’installation.
• Cet appareil doit être correctement installé et mis à la
terre uniquement par une personne qualifiée.
• Cet appareil doit être raccordé à un circuit
incorporant un sectionneur permettant une
déconnexion complète de l’alimentation électrique.
• L’installation incorrecte de l’appareil peut entraîner
l’annulation de toute garantie ou responsabilité.
Fonctionnement et entretien
Risque de choc électrique
• Ne pas cuisiner sur une table de cuisson cassée ou
fissurée. • En cas de rupture ou de fissuration de la
surface de la table de cuisson, éteignez
immédiatement l’appareil en coupant l’alimentation
électrique du réseau (interrupteur mural) et contactez
un technicien qualifié.
• Coupez l’alimentation réseau de la table de cuisson
avant le nettoyage ou l’entretien.
• Le non-respect de ces consignes peut entraîner un
choc électrique ou le décès.
Risque pour la santé
• Cet appareil est conforme aux normes de sécurité
Page 33

FR-3
électromagnétique.
• Toutefois, les personnes porteuses de pacemakers
ou d’autres implants électriques (tels que des
pompes à insuline) doivent consulter leur médecin ou
le fabricant de l’implant avant d’utiliser cet appareil
afin de s’assurer que leurs implants ne seront pas
affectés par le champs électromagnétique.
• Le non-respect de ces consignes peut entraîner le
décès.
Risque de surface chaude
• Pendant l’utilisation, les parties accessibles de cet
appareil deviennent suffisamment chaudes pour
causer des brûlures.
• Ne laissez pas votre corps, vos vêtements ou tout
autre objet autre qu’un ustensile de cuisine approprié
entrer en contact avec le verre à induction jusqu’à ce
que la surface soit froide.
• Les objets métalliques tels que couteaux, fourchettes,
cuillères et couvercles ne doivent pas être posés sur
la surface de la table de cuisson, car ils peuvent
devenir chauds.
• Tenir les enfants à l’écart.
• Les poignées des casseroles peuvent être chaudes
au toucher. Vérifiez que les poignées des casseroles
ne dépassent pas des autres foyers de cuisson qui
sont en fonction. Tenir les poignées hors de portée
des enfants.
• Le non-respect de ces consignes peut entraîner des
brûlures ou un choc électrique.
Page 34

FR-4
Risque de coupure
• Lorsque le couvercle de protection est rétracté, la
lame d’un racleur est tranchante comme un rasoir.
Utiliser avec une extrême prudence et toujours
stocker en toute sécurité et hors de portée des
enfants.
• Le non-respect de cette précaution peut entraîner
des blessures ou des coupures.
Consignes importantes de sécurité
• Ne laissez jamais l’appareil sans surveillance lorsqu’il
est utilisé. L’ébullition cause des vapeurs et des
débordements graisseux qui peuvent s’enflammer.
• N’utilisez jamais votre appareil comme surface de
travail ou de rangement.
• Ne laissez jamais d’objets ou d’ustensiles sur
l’appareil.
• Ne posez jamais ou ne laissez jamais d’objets
magnétisés (par ex. cartes de crédit, cartes mémoire)
ou d’appareils électroniques (par ex. ordinateurs,
lecteurs MP3) à proximité de l’appareil car ils
pourraient être affectés par son champ
électromagnétique.
• N’utilisez jamais votre appareil pour réchauffer ou
chauffer la pièce.
• Après utilisation, éteignez toujours les foyers de
cuisson et la table de cuisson comme décrit dans ce
manuel (c’est-à-dire en utilisant les touches tactiles).
Ne comptez pas sur la fonction de détection de
casserole pour éteindre les foyers de cuisson lorsque
Page 35

FR-5
vous retirez les casseroles.
• Ne permettez pas aux enfants de jouer avec
l’appareil, de s’asseoir, de se tenir debout ou de
monter dessus.
• Ne rangez pas d’objets d’intérêt pour les enfants
dans des armoires au-dessus de l’appareil. Les
enfants qui montent sur la table de cuisson peuvent
être gravement blessés.
• Ne laissez pas les enfants seuls ou sans surveillance
dans la zone où l’appareil est utilisé.
• Les enfants ou les personnes ayant un handicap qui
limite leur capacité d’utiliser l’appareil devraient avoir
une personne responsable et compétente pour les
instruire sur son utilisation. L’instructeur doit s’assurer
qu’il peut utiliser l’appareil sans danger pour
lui-même ou son environnement.
• Ne réparez ou ne remplacez aucune pièce de
l’appareil à moins que cela ne soit spécifiquement
recommandé dans le manuel. Tout autre entretien
doit être effectué par un technicien qualifié.
• N’utilisez pas un nettoyeur à vapeur pour les
opérations de nettoyage de la table de cuisson.
• Ne placez pas ou ne laissez pas tomber d’objets
lourds sur votre table de cuisson.
• Ne vous tenez pas debout sur votre table de cuisson.
• N’utilisez pas de casseroles avec des bords dentelés
et ne traînez pas de casseroles sur la surface de la
vitre à induction, car cela pourrait érafler le verre.
• N’utilisez pas d’éponges métalliques ou d’autres
Page 36

FR-6
produits abrasifs agressifs pour nettoyer votre table
de cuisson, car ils pourraient rayer la vitre à
induction.
• Si le câble d’alimentation est endommagé, il doit être
remplacé par le fabricant, son agent d’entretien ou
des personnes possédant le même type de
qualification, afin d’éviter tout risque.
• Cet appareil est destiné à un usage domestique et
autres applications similaires telles que : - espaces
cuisine du personnel dans des boutiques, bureaux et
autres espaces de travail ; - maisons de ferme ; - par
les clients dans des hôtels, motels et autres espaces
de type résidentiel ; - dans les espaces de type
chambre d’hôtes.
AVERTISSEMENT : L’appareil et ses parties
accessibles chauffent pendant l’utilisation.
Évitez de toucher les éléments chauffants.
Les enfants de moins de 8 ans doivent être tenus à
l’écart à moins d’être surveillés en permanence.
• Cet appareil peut être utilisé par des enfants âgés de
8 ans et plus, par des personnes dont les capacités
physiques, sensorielles ou mentales sont réduites ou
par des personnes dénuées d’expérience et de
connaissances, mais qui ont été informées sur la
manière d’utiliser l’appareil en toute sécurité, si elles
comprennent les risques impliqués.
Les enfants ne doivent pas jouer avec l’appareil.
L’entretien et le nettoyage ne doivent pas être
effectués par des enfants sans surveillance.
Page 37

FR-7
AVERTISSEMENT : Faire chauffer la table sans
surveillance avec de la graisse ou de l’huile peut être
dangereux et provoquer un incendie. N’essayez
JAMAIS d’éteindre un feu avec de l’eau, mais
éteignez l’appareil, puis couvrez la flamme avec un
couvercle ou une couverture anti-feu, par exemple.
AVERTISSEMENT : Risque d’incendie : ne pas
stocker d’éléments sur les surfaces de cuisson.
Avertissement : Si la surface est fissurée, éteignez
l’appareil pour éviter tout risque d’électrocution, pour
les tables de cuisson en vitrocéramique ou matériau
similaire qui protègent les pièces sous tension
• N’utilisez jamais de nettoyeur à vapeur.
• Cet appareil n’est pas conçu pour être actionné par
une minuterie externe ou un système de commande
à distance séparé.
ATTENTION : La cuisson doit être surveillée. Les
cuissons de courte durée doivent être surveillées en
permanence.
AVERTISSEMENT : Pour éviter tout basculement de
l’appareil, ces éléments de stabilisation doivent être
installés. Consultez les instructions d’installation.
AVERTISSEMENT : Utilisez uniquement le dispositif
de protection de votre table de cuisson conçu par le
fabricant de votre appareil ou un dispositif indiqué par
celui-ci comme étant compatible ou bien utilisez le
dispositif de protection fourni avec l’appareil.
L’utilisation d’un dispositif de protection non
approprié peut provoquer des accidents.
Page 38

FR-8
Cet appareil inclut un raccordement à la terre pour des
finalités fonctionnelles uniquement.
Nous vous félicitons de votre choix de la table de cuisson à induction.
Nous vous recommandons de prendre le temps de lire ce manuel d’instruction / d’installation
afin de bien comprendre comment l’installer et l’utiliser correctement.
Pour l’installation, veuillez lire la section installation.
Lisez attentivement toutes les consignes de sécurité avant utilisation et conservez ce
manuel d’instruction / d’installation pour référence ultérieure.
Page 39

FR-9
Vue d’ensemble du produit
1. Foyer 2000 W, augmenté à 2600 W
2. Foyer 1500 W, augmenté à 2000 W
3. Foyer 2000 W, augmenté à 2600 W
4. Foyer 1500 W, augmenté à 2000 W
5. Table de verre
6. Panneau de commande
1. Touches de sélection du foyer de cuisson
2. Touche du temporisateur
3. Touche de réglage de la puissance et du
temporisateur
4. Touche de verrouillage
5. Touche marche/arrêt
6. Touche Fonction Boost
7. Touche Fonction Pause
Vue de dessus
Panneau de commande
Page 40

FR-10
Un mot sur la cuisson à induction
casserole en fer
circuit magnétique
plaque de verre
céramique
bobine d’induction
La cuisson à induction est une technologie sûre, innovante, efficace et économique. Elle
fonctionne au moyen de vibrations électromagnétiques qui génèrent de la chaleur
directement dans la casserole plutôt qu’indirectement en chauffant la surface vitrée. La vitre
devient chaude uniquement parce que la casserole la chauffe.
Avant d’utiliser votre nouvelle table de cuisson à induction
• Lisez ce guide en prenant note de la section « Consignes de sécurité ».
• Enlevez tout film protecteur qui pourrait encore se trouver sur votre table de cuisson à
induction.
Utilisation des commandes tactiles
• Les commandes répondent au toucher, vous n’avez donc pas besoin d’appuyer fort.
• Utilisez le bout du doigt et non pas l’ongle.
• Vous entendrez un bip à chaque fois qu’une touche est enregistrée.
• Assurez-vous que les commandes sont toujours propres et sèches et qu’aucun objet (p.
ex. un ustensile ou un chiffon) ne les recouvre. Même un mince film d’eau peut rendre les
commandes difficiles à utiliser.
Page 41

FR-11
Choisir une bonne batterie de cuisine
• Utilisez uniquement une batterie de cuisine adaptée à la cuisson à
induction.
Recherchez le symbole de l’induction sur l’emballage ou sur le fond
de la casserole.
• Vous pouvez vérifier si votre batterie de cuisine est adaptée en
réalisant
un test magnétique. Rapprochez un aimant vers le fond de la
casserole. S’il est attiré, la casserole convient pour l’induction.
• Si vous n’avez pas d’aimant :
1. Mettez de l’eau dans la casserole que vous voulez tester.
2. Si
ne clignote pas sur le panneau et que l’eau chauffe, la
casserole est adaptée.
• Les batteries de cuisine fabriquées dans les matériaux suivants ne
sont pas adaptées : acier inoxydable pur, aluminium ou cuivre sans
base magnétique, verre, bois, porcelaine, céramique et grès.
N’utilisez pas d’ustensiles de cuisson dont les bords sont dentelés ou dont la base est
incurvée.
Assurez-vous que la base de votre poêle est lisse, qu’elle repose à plat contre le verre et
qu’elle est de la même taille que la zone de cuisson. Utilisez des casseroles dont le diamètre
est aussi grand que le graphique du foyer sélectionné. Si elle est un peu plus grande,
l’énergie sera exploitée au maximum. Si vous utilisez une casserole plus petite, l’efficacité
pourrait être moindre que prévu. Centrez toujours votre casserole sur le foyer de cuisson.
Soulevez toujours les casseroles de la table de cuisson à induction - ne les faites pas
glisser, sinon elles risquent d’érafler le verre.
Page 42

FR-12
Dimensions de la casserole
Zone de cuisson
Minimum (mm)
1, 2 , 3, 4(180mm)
120
1. Appuyez sur la touche Marche/Arrêt.
Après la mise en marche, l’avertisseur sonore retentit une fois et
toutes les touches affichent « – » ou « – – » pour signifier que la
table à induction est en mode de veille.
2. Posez la casserole sur le foyer de cuisson que vous souhaitez
utiliser.
• Veillez à ce que le fond de la casserole et la surface du foyer de
cuisson soient propres et secs.
3. En appuyant sur la touche de sélection du foyer de cuisson, un
témoin lumineux près de la touche commence à clignoter.
Les foyers de cuisson sont, dans une certaine limite, automatiquement adaptés au diamètre
de la casserole. Cependant, le fond de cette casserole doit avoir un diamètre minimum en
fonction du foyer de cuisson correspondant. Pour obtenir la meilleure efficacité de votre
table de cuisson, placez la casserole au centre du foyer de cuisson.
Le diamètre de base des ustensiles de cuisson à induction
La détection de la zone peut varier en fonction de la qualité du recipient utilisé.
Utilisation de votre table à induction
Comme commencer la cuisson
Page 43

FR-13
4. Réglez un niveaude puissance à l’aidedes touches« - » ou « +».
a. Si vous ne sélectionnez pas un réglage de cuisson dans un
délai d’une minute, la table à induction s’éteint
automatiquement. Vous devrez alors tout reprendre depuis
l’étape 1.
b. Vous pouvez changer le réglage choisi à n’importe quel
moment de la cuisson.
Si la touche
clignote en alternance avec l’indication du
1. Appuyez sur la touche de sélection du foyer de cuisson
que vous souhaitez éteindre.
2. Éteignez le foyer de cuisson en appuyant sur « - » et en réduisant jusqu’à « 0 » ou en
appuyant en même temps sur les touches « + » et « - » pendant 1 seconde, cela réglera
directement sur « 0 ».
Assurez-vous que la touche affiche « 0 » puis « H ».
puis
l’énergie, si vous devez faire chauffer une autre casserole, en la
plaçant sur le foyer de cuisson encore chaud.
réglage de puissance
Cela signifie que :
• vous n’avez pas posé la casserole sur le bon foyer ou
• la casserole que vous utilisez n’est pas prévue pour la cuisson à induction ou
• la casserole utilisée est trop petite ou n’est pas correctement placée au centre du foyer.
La fonction de chauffe ne démarre pas si aucune casserole adaptée n’est placée sur le foyer
de cuisson.
Si dans un délai de 1 minute, vous n’avez pas posé de casserole adaptée, la touche s’éteint
automatiquement.
Quand vous avez fini de cuisiner
3. Éteignez la table de cuisson en appuyant sur la touche Marche/Arrêt.
4. Prenez garde aux surfaces chaudes.
« H » indique un foyer de cuisson encore trop chaud pour être touché. Cette indication
disparaît dès que la surface du foyer a suffisamment refroidi. Vous pouvez économiser de
Page 44

FR-14
Utilisation du réglage de la puissance
2. Appuyez sur la touche « Pause » pendant 5 secondes. Vous entendrez un bip
sonore.
Remarque :
En utilisant le réglage de la puissance, vous pouvez régler la puissance totale sur 2,5 kW/
3,0 kW/ 4,5 kW/ 6,5 kW et 7,4 kW . Le réglage par défaut de la puissance totale est le
niveau de chauffe maximal.
Réglage du niveau de chauffe total pour répondre à vos
exigences
1. Vérifiez que la table de cuisson est éteinte.
Remarque : vous pouvez régler la puissance uniquement quand la table de cuisson est
éteinte.
3. Après le bip, appuyez sur « + » et « - » en même temps pendant 3 secondes ; l’indicateur
du temps clignotera en indiquant le niveau de puissance totale précédent, par ex. ‘2.5’.
Appuyez sur « + » et « - » pendant encore 1 seconde pour basculer vers un autre niveau de
puissance, par ex. 3.0. Lorsque la puissance souhaitée clignote, appuyez sur la touche
« Pause » pendant 5 secondes. Le bip retentira 10 fois. Cela signifie que vous avez terminé
le réglage.
1. Après l’étape 2, vous devez appuyer sur « + » et « - » dans les 3 secondes après avoir
entendu le bip sonore. Sinon, vous devrez tout reprendre depuis l’étape 2.
2. À la fin du réglage, attendez la fin des 10 bips sonores. Ne touchez aucun bouton pendant
cette période sinon le réglage sera invalide.
Règles de réglage de la puissance
Si la puissance totale dépasse la limite de 2,5 kW, 3,0 kW, 4,5 kW, 6,5 kW (en fonction du
niveau que vous avez réglé), vous ne pouvez augmenter la puissance sur aucun foyer. Si
vous l’augmentez à l’aide de la touche « + », la table de cuisson émettra 3 bips sonores et
l’indicateur clignotera en indiquant « Pn ». Vous devrez alors réduire la puissance d’autres
foyers de cuisson avant d’augmenter la puissance du foyer en question.
Page 45

FR-15
Utilisation de la fonction Boost
1. Appuyez sur la touche de sélection du foyer de cuisson que
vous souhaitez augmenter, un témoin lumineux près de la
touche commence à clignoter.
<<9>>.
La fonction Boost permet d’augmenter la puissance d’un foyer en une seconde et ce
pendant 5 minutes. De cette façon, la cuisson sera plus vive et plus rapide.
Utilisation de la fonction Boost pour augmenter la puissance
2. Appuyez sur la touche Boost, le foyer de cuisson commencera à fonctionner en mode
Boost. La touche affichera « P » pour indiquer que le foyer est en mode Boost.
3. La puissance Boost durera 5 minutes puis le foyer reviendra à la puissance <<9>>.
4. Si vous souhaitez supprimer le mode Boost au cours de ces 5 minutes, appuyez sur la
touche de sélection du foyer de cuisson ; un témoin lumineux près de la touche commence à
clignoter. Appuyez ensuite sur la touche Boost. Le foyer de cuisson reviendra à la puissance
Restrictions pendant l’utilisation
Les quatre foyers sont divisés en deux groupes. Dans un groupe, si vous utilisez le mode
Boost sur un foyer, assurez-vous d’abord que l’autre foyer fonctionne au maximum au
niveau 5.
Page 46

FR-16
Utilisation de la fonction Pause (STOP+GO)
La fonction Pause peut être utilisée à tout moment pendant la cuisson. Elle permet
d’éteindre puis de rallumer la table de cuisson à induction.
1. Assurez-vous que le foyer de cuisson fonctionne.
2. Appuyez sur la touche PAUSE, l’indicateur du foyer de cuisson indiquera « ll ».
Le fonctionnement de tous les foyers de la table de cuisson à induction sera désactivé, à
l’exception des touches PAUSE, Marche/Arrêt et des touches de verrouillage.
3. Pour supprimer la condition de pause, appuyez sur la touche PAUSE ; le foyer de cuisson
reviendra à la puissance qui était réglée avant le basculement en pause.
Page 47

FR-17
Verrouillage des touches de commande
• Vous avez la possibilité de verrouiller les touches de commande pour éviter leur utilisation
inappropriée (par des enfants, par exemple).
• Quand la touche de verrouillage est activée, toutes les touches de commande sont
verrouillées, sauf la touche marche/arrêt.
Verrouillage des touches de commande
Appuyez sur la touche de verrouillage. L’indicateur de temporisation affiche « Lo »
Déverrouillage des touches de commande
1. Vérifiez que la table de cuisson à induction est éteinte.
2. Appuyez longuement sur la touche de verrouillage.
3. Vous pouvez maintenant commencer à utiliser votre table de cuisson à induction.
Quand la table de cuisson est en mode verrouillage, toutes les touches de
commande sont désactivées sauf la touche marche/arrêt. Vous gardez la
possibilité d’éteindre la table à induction en utilisant la touche marche/arrêt en cas
d’urgence, mais, dans ce cas, vous devrez d’abord déverrouiller la table de cuisson
lors de l’utilisation suivante.
Protection contre la surchauffe
Un capteur de température intégré peut surveiller la température à l’intérieur de la table de
cuisson à induction. Lorsqu’une température excessive est détectée, la table de cuisson à
induction s’arrête automatiquement.
Protection en cas de débordement
La protection en cas de débordement est une fonction de protection de sécurité. Elle éteint
automatiquement la table de cuisson en 10 secondes si de l’eau se déverse sur le tableau
de commandes et un bip retentira pendant 1 seconde.
Détection d’ustensiles trop petits
Lorsqu’une casserole de taille inappropriée ou non-magnétique (par ex.en aluminium) ou
tout autre ustensile trop petit (par ex. couteau, fourchette, clé) a été laissé sur la table de
cuisson, cette dernière se met en veille automatiquement en 1 minute. Le ventilateur
maintiendra la table de cuisson éteinte pendant encore 1 minute.
Protection par arrêt automatique
L’arrêt automatique est une fonction de protection de sécurité pour votre table de cuisson à
induction. Elle s’éteint automatiquement si vous oubliez d’éteindre votre appareil. Les
durées d’utilisation par défaut des différents niveaux de chauffe sont indiquées dans le
tableau ci-dessous :
Page 48

FR-18
Niveau de chauffe
123456789
II
Minuterie de travail par
défaut (heure)
888444222
2
Lorsque la casserole est retirée, la table de cuisson à induction peut arrêter de chauffer
cuisson.
2. Appuyez sur la touche du temporisateur. L’indicateur de la
minuterie commence à clignoter et « 30 » s’affiche.
touche de la minuterie.
immédiatement et elle s’éteindra automatiquement après 2 minutes.
Les personnes porteuses d’un pacemaker doivent consulter leur médecin avant
d’utiliser cet appareil.
Utilisation du temporisateur
Vous pouvez utiliser le temporisateur de deux manières différentes :
• Vous pouvez l’utiliser en tant que minuteur. Dans ce cas, le temporisateur ne sert pas
à éteindre l’un des foyers de cuisson lorsque sa durée de cuisson est écoulée.
• Vous pouvez le régler pour éteindre un ou plusieurs foyers de cuisson une fois le
temps sélectionné écoulé.
• Vous pouvez régler le temporisateur jusqu’à 99 minutes.
Utilisation du temporisateur comme minuteur
Si vous ne souhaitez pas sélectionner un foyer de cuisson
1. Vérifiez que la table de cuisson est éteinte.
Remarque : vous pouvez utiliser le minuteur même sans sélectionner de foyer de
3. Réglez le temps à l’aide des touches « - » ou « + ».
Remarque : Appuyez sur « - » ou « + » une seule fois pour diminuer ou augmenter
d’une minute.
Maintenez appuyée la touche « - » ou « + » pour diminuer ou augmenter de 10
minutes en 10 minutes.
4. Supprimez la durée en appuyant sur le temporisateur
e
t « 00 » s’affiche sur la
Page 49

FR-19
5. Une fois le temps réglé, le décompte commence immédiatement.
La touche de temporisation affiche le temps restant et l’indicateur de
temporisation clignotera pendant 5 secondes.
6. L’avertisseur sonore retentit pendant 30 secondes et l’indicateur de
temporisation affiche « - -» quand le temps réglé est écoulé.
1. Appuyez sur la touche de sélection du foyer de cuisson
dont vous souhaitez régler le temps de cuisson. (par ex. foyer 1#)
clignoter et « 30 » s’affiche.
3. Réglez le temps à l’aide des touches « - » ou « + ».
4. Une fois le temps réglé, le décompte commence
immédiatement. La touche de temporisation affiche le temps
restant et l’indicateur de temporisation clignote pendant
REMARQUE : Le point rouge près de l’indicateur du niveau de
chauffe s’allume pour indiquer que le foyer est sélectionné.
Réglage du temporisateur pour éteindre une zone de cuisson
Les foyers de cuisson dotés de cette fonction permettront :
2. Appuyez sur la touche du temporisateur. L’indicateur de la minuterie commence à
Remarque : Appuyez sur « - » ou « + » une seule fois pour diminuer ou augmenter d’une
minute.
Maintenez appuyée la touche « - » ou « + » du temporisateur pour diminuer
ou augmenter de 10 minutes en 10 minutes.
Si le temps de réglage dépasse 99 minutes, la minuterie revient
automatiquement à 0 minute.
5 secondes.
5. Pour supprimer la minuterie, appuyez sur la touche de sélection du foyer de cuisson puis
sur la touche du temporisateur ; la minuterie est supprimée et « 00 » s’affiche, puis « -- ».
Page 50

FR-20
6. Quand le temps de cuisson est terminé, le foyer de cuisson
correspondant s’éteint automatiquement et la touche affiche « H ».
(Réglage à 6 minutes)
(Réglage à 3 minutes)
automatiquement et la touche affiche « H ».
Les foyers éventuellement allumés auparavant continuent de fonctionner
normalement.
Réglage du temporisateur pour éteindre plusieurs foyers de
cuisson
1. Si vous utilisez cette fonction pour plusieurs foyers de cuisson, l’indicateur du temps
affichera le temps restant le plus court.
(par ex. temps de 3 minutes réglé sur le foyer 1#, temps de 6 minutes réglé sur le foyer
2#, l’indicateur du temps affichera « 3 ».)
REMARQUE : Le point rouge clignotant près de l’indicateur de niveau de chauffe
signifie que l’indicateur de temps affiche le temps de ce foyer de cuisson.
Si vous voulez contrôler le temps de cuisson réglé sur un autre foyer de cuisson,
appuyez sur la touche de sélection du foyer de cuisson. Le temporisateur indiquera le
temps réglé.
2. Quand le temps de cuisson est terminé, le foyer de cuisson correspondant s’éteint
REMARQUE : Si vous voulez changer la durée après le réglage de la minuterie, vous
devez commencer à partir de l’étape 1.
Page 51

FR-21
Entretien et nettoyage
Quoi ?
Comment ?
Important !
Salissure quotidienne
sur le verre (traces de
doigts, marques,
taches laissées par les
aliments ou retombées
non sucrées sur le
verre).
1. Mettez la table de cuisson hors
tension.
2. Appliquez un nettoyant pour
plaque de cuisson alors que le
verre chauffe encore (sans qu’il
soit chaud !)
3. Rincez et essuyez avec un
chiffon propre ou un
essuie-tout.
4. Mettez la table de cuisson sous
tension.
• Lorsque l’alimentation de la table de
cuisson est coupée, il n’y a pas
d’indication « surface chaude » mais
la zone de cuisson est peut-être
encore chaude ! Soyez extrêmement
prudent.
• L’usage intensif d’éponges métalliques,
de certains racleurs en nylon et de
produits de nettoyage abrasifs peut
érafler le verre. Lisez toujours
l’étiquette pour vérifier si votre
nettoyeur ou éponge métallique
convient.
• Ne laissez jamais de résidus de
nettoyage sur la table de cuisson : la
vitre peut se tacher.
Débordements d’eau
bouillante, d’aliments
et
de sucre chaud sur
le verre
Retirez-les immédiatement à l’aide
d’une pelle large, d’une spatule ou
d’un racloir à lame adapté aux
surfaces de cuisson à induction,
mais méfiez-vous des surfaces
chaudes des foyers de cuisson :
1. Coupez l’alimentation réseau de
la table de cuisson.
2. Tenez la lame ou l’ustensile à un
angle de 30° et raclez la saleté
ou le déversement vers un
endroit frais de la table de
cuisson.
3. Nettoyez les salissures ou
déversements avec un torchon
ou un essuie-tout.
4. Suivez les étapes 2 à 4
ci-dessus pour « Salissure de
tous les jours sur verre ».
• Enlevez le plus rapidement possible
les taches laissées par les aliments
fondus et sucrés ou par les
débordements. Si on les laisse refroidir
sur le verre, ils peuvent être difficiles à
enlever ou même endommager la
surface du verre de façon permanente.
• Risque de coupure : lorsque le
couvercle de protection est rétracté, la
lame d’un racleur est tranchante comme
un rasoir. Utiliser avec une extrême
prudence et toujours stocker en toute
sécurité et hors de portée des enfants.
Déversements sur les
touches de commande
1. Mettez la table de cuisson hors
tension.
2. Absorbez le déversement
3. Essuyez la zone de commande
tactile avec une éponge ou un
chiffon propre et humide.
4. Essuyez la zone complètement
avec un essuie-tout.
5. Mettez la table de cuisson sous
tension.
• La table de cuisson peut émettre un bip
et s’éteindre d’elle-même, et les
commandes tactiles peuvent ne pas
fonctionner lorsqu’il y a du liquide
dessus. Veillez à essuyer la zone de
commande tactile avant de rallumer la
table de cuisson.
Page 52

FR-22
Conseils et astuces
Problème
Cause possible
Solution
La table de cuisson à
induction ne peut pas
être allumée.
Pas d’électricité.
Assurez-vous que la table de cuisson
à induction est branchée à
l’alimentation électrique et qu’elle est
allumée.
Vérifiez s’il y a une panne d’électricité
dans votre maison ou votre région. Si
vous avez tout vérifié et que le
problème persiste, appelez un
technicien qualifié.
Les commandes tactiles
ne répondent pas.
Les commandes sont verrouillées.
Déverrouillez les touches de
commande. Voir la section
« Utilisation de votre table de cuisson
à induction » pour les instructions.
Les commandes tactiles
sont difficiles à utiliser.
Il se peut qu’il y ait une fine pellicule
d’eau sur les commandes ou que
vous utilisiez l’extrémité de l’ongle
lorsque vous touchez la commande.
Assurez-vous que la zone de
commande tactile est sèche et
utilisez le bout de votre doigt lorsque
vous touchez les commandes.
Le verre est éraflé.
Batterie de cuisine à bords rugueux.
Utilisation d’éponges métalliques
abrasives ou de produits de
nettoyage inadéquats.
Utilisez des ustensiles de cuisine à
fond plat et lisse. Voir la section
« Choisir une bonne batterie de
cuisine ».
Voir la section « Entretien et
nettoyage ».
Certaines casseroles
font des craquements ou
des cliquetis.
Cela peut être dû à la construction
de votre batterie de cuisine
(couches de différents métaux
vibrant de manière différenciée).
Ceci est normal pour les ustensiles
de cuisine et n’indique pas un défaut.
La table de cuisson émet
un faible bourdonnement
lorsqu’elle est utilisée
à forte puissance.
Cela est dû à la technologie
de la table de cuisson à induction.
C’est normal, mais le bruit doit
baisser ou disparaître complètement
lorsque vous réduisez la puissance.
Bruit de ventilateur
provenant de la table de
cuisson à induction.
Un ventilateur de refroidissement
intégré dans la table de cuisson à
induction s’est déclenché pour
éviter une surchauffe des pièces
électroniques. Il peut continuer à
fonctionner même après que vous
aurez éteint la table de cuisson à
induction.
Cela est normal et ne nécessite
aucune intervention. Ne coupez pas
l’alimentation réseau de la table de
cuisson à induction lorsque le
ventilateur fonctionne.
Page 53

FR-23
Les casseroles ne
chauffent pas et apparait
sur la touche.
La table de cuisson à induction ne
peut pas détecter la casserole car
elle n’est pas adaptée à la cuisson à
induction.
La table de cuisson à induction ne
peut pas détecter la casserole car
elle est trop petite pour le foyer de
cuisson ou mal centrée.
Utilisez une batterie de cuisine
adaptée à la cuisson à induction. Voir
la section « Choisir une bonne
batterie de cuisine ».
Centrez la casserole et veillez à ce
que le fond corresponde à la taille du
foyer de cuisson.
La table de cuisson à
induction ou un foyer de
cuisson s’est éteint tout
seul de manière
inattendue, un bip a
retenti et un code
d’erreur est affiché
(généralement un ou
deux chiffres en
alternance sur la touche
du temporisateur).
Défaut technique.
Veuillez noter les lettres et chiffres du
code d’erreur, couper l’alimentation
réseau de la table de cuisson à
induction et contacter un technicien
qualifié.
Affichage et inspection des défaillances
Problème
Cause possible
Solution
F3/F4
Défaillance du capteur de température
de la bobine d’induction
Veuillez contacter le
fournisseur.
F9/FA
Défaillance du capteur de température
de l’IGBT
Veuillez contacter le
fournisseur.
E1/E2
Tension d’alimentation anormale
Veuillez vérifier si
l’alimentation électrique est
normale.
La mise sous tension après
l’alimentation est normale.
E3
Température élevée détectée par le
capteur de température de la bobine
d’induction
Veuillez contacter le
fournisseur.
E5
Température élevée détectée par le
capteur de température de l’IGBT
Veuillez rallumer la table de
cuisson à induction après
refroidissement.
Si des événements anormaux surviennent, la table de cuisson à induction entrera
automatiquement en condition de protection et affichera les codes de protection
correspondants :
Les éléments ci-dessus de détection et d’inspection concernent les défaillances communes.
Page 54

Ne démontez pas l’appareil vous-même afin d’éviter tout risque d’endommager la table de
cuisson à induction.
Spécifications techniques
Table de cuisson CJ2D46TKT
Zones de cuisson 4 Zones
Tension d’alimentation 220-240 V ~ 50-60Hz
Puissance électrique installée 2,5 kW : 2250-2750 W ou
3,0 kW : 2700-3300 W ou
4,5 kW : 4050-4950 W ou
6,5 kW : 5850-7150W ou
7,4 kW : 6600-7400 W
Dimensions du produit P×L×H (mm) 590X520X55
Dimensions d’encastrement A×B (mm) 560X490
Le poids et les dimensions sont approximatifs. Du fait que nous nous efforçons
continuellement d’améliorer nos produits, nous pouvons modifier les spécifications et les
conceptions sans préavis.
Installation
Choix du matériel d’installation
Découpez la surface de travail selon les dimensions indiquées sur le dessin.
Pour l’installation et l’utilisation, un espace d’au moins 5 cm doit être préservé autour du
trou.
Assurez-vous que l’épaisseur de la surface de travail est d’au moins 30 mm. Veillez à choisir
un matériau résistant à la chaleur pour éviter toute déformation due au rayonnement
thermique de la plaque à induction. Comme illustré ci-dessous :
L (mm) L (mm) H (mm) P (mm) A (mm) B (mm) X (mm)
590 520 55 51 560 490 50 min.
FR-24
Page 55

Assurez-vous que la table de cuisson à induction est correctement ventilée et que l’entrée et
la sortie d’air ne sont pas obstruées. Assurez-vous que la table de cuisson à induction est en
bon état de fonctionnement. Comme illustré ci-dessous
Remarque : La distance de sécurité entre la plaque de cuisson et le meuble
au-dessus doit être d’au moins 760 mm.
A (mm) B (mm) C (mm) D E
760 50 min. 20 min. Entrée d’air Sortie de l’air 5 mm
Avant d’installer la table de cuisson, assurez-vous que
• la surface de travail est d’équerre et de niveau, qu’aucune partie n’interfère avec l’espace
nécessaire
• le plan de travail est constitué d’un matériau résistant à la chaleur
• si la plaque est installée au-dessus d’un four, le four est équipé d’un système de ventilation
interne
• l’installation soit conforme à toutes les exigences de dégagement et aux normes et
réglementations en vigueur
• un interrupteur sectionneur de déconnexion complète du réseau d’alimentation est inclus
dans le circuit électrique et installé conformément aux règles et réglementations locales
en vigueur.
L’interrupteur sectionneur doit correspondre à la typologie requise et prévoir 3 mm d’air de
séparation sur tous les pôles (ou sur tous les conducteurs actifs [phase] si la
réglementation électrique locale l’autorise)
• le client pourra facilement accéder à l’interrupteur sectionneur quand la table de cuisson
sera installée
• vous consultez les organismes de réglementation du bâtiment et les arrêtés locaux si vous
avez des doutes concernant l’installation
• vous utilisez des matériaux de finition résistants à la chaleur et faciles à nettoyer (tels que
FR-25
Page 56

du carrelage en céramique) pour le revêtement des murs autour de la table de cuisson.
Une fois que la table de cuisson est installée, assurez-vous que
• le câble d’alimentation n’est pas accessible par les portes d’armoire ou les tiroirs
• un flux d’air frais circule entre l’extérieur du meuble inférieur et la base de la table de
cuisson
• si la table de cuisson est installée au-dessus d’un tiroir ou d’un placard, une barrière
thermique de protection est installée sous la base de la table de cuisson
• l’interrupteur sectionneur est facilement accessible par le client.
Avant d’installer les supports de fixation
L’appareil doit être posé sur une surface lisse et stable (vous pouvez utiliser l’emballage).
N’exercez aucune pression sur les boutons qui dépassent de la table de cuisson.
Réglage de la position du support
Fixez la table de cuisson sur le plan de travail en vissant 4 supports en bas de la table de
cuisson (voir illustration) après l’avoir installée.
A B C D
Vis Support trou de vis Face inférieure
verre
crochet de support
vis
ST3. 5*8
Face inférieure
FR-26
Plan de travail/meuble de cuisine
Page 57

FR-27
Attention
1. L’installation de la table de cuisson à induction doit être effectuée par du personnel
qualifié. Nous avons des professionnels à votre service. N’effectuez en aucun cas cette
installation vous-même.
2. La table de cuisson ne doit pas être installée directement au-dessus d’un lave-vaisselle,
réfrigérateur, congélateur, machine à laver ou sèche-linge, car l’humidité risquerait
d’endommager ses circuits électroniques.
3. La table de cuisson à induction doit être installée de manière à favoriser le rayonnement
thermique et garantir sa fiabilité.
4. Le mur et la zone de cuisson à induction à la surface de la table doivent être résistants à
la chaleur.
5. Pour éviter tout dommage, les différentes couches et la colle doivent être résistants à la
chaleur.
Connexion de la table de cuisson au réseau d’alimentation
Cette table de cuisson ne doit être connectée au réseau d’alimentation que par du
personnel qualifié.
Avant de connecter la table de cuisson au réseau d’alimentation, vérifiez que :
1. le circuit domestique est suffisant pour la puissance nécessaire à la table de
cuisson
2. la tension correspond à la valeur indiquée sur la plaque signalétique
3. les sections de câble d’alimentation peuvent supporter la charge indiquée sur la
plaque signalétique.
Pour raccorder la table de cuisson à l’alimentation du réseau, n’utilisez pas
d’adaptateurs, de réducteurs ou de dispositifs de dérivation, car ils peuvent
provoquer une surchauffe et un incendie.
Le câble d’alimentation ne doit toucher aucune partie chaude et doit être placé de
façon à ce que sa température ne dépasse jamais 75°C en tout point.
Consultez un électricien pour savoir si le système électrique domestique est adapté
ou s’il doit être modifié. Toute modification ne peut être réalisée que par un électricien
qualifié.
La prise d’alimentation doit être raccordée, conformément à la norme en vigueur, à un
disjoncteur unipolaire. La méthode de connexion est illustrée ci-dessous.
Page 58

FR-28
Cet appareil est étiqueté conformément à la directive européenne 2012/19/EU sur les
déchets des équipements électriques et électroniques (DEEE). La catégorie DEEE
recouvre à la fois les substances polluantes (pouvant avoir des retombées négatives sur
l’environnement) et les composants de base (pouvant être réutilisés). Il est important
que les DEEE subissent des traitements spécifiques pour éliminer et jeter correctement
les polluants et récupérer tous les matériaux. Chaque individu peut jouer un rôle
important en veillant à ce que les produits DEEE ne deviennent pas un problème pour
l’environnement. Pour cela, il est essentiel de suivre quelques règles de base :
- les DEEE ne doivent pas être traités comme des déchets ménagers ;
- les DEEE doivent être amenés à des zones de collecte spécifiques gérées par la municipalité ou une
société dûment enregistrée.
Dans de nombreux pays, des décharges domestiques peuvent être disponibles pour de grands DEEE.
Lorsque vous achetez un nouvel appareil, l’ancien peut être retourné au détaillant qui est en devoir de le
récupérer sans frais de manière individualisée, tant que l’équipement est de type équivalent et a les
mêmes fonctions que l’équipement fourni.
Entrée
Câble
Câble
Câble
Câble
Câble
Câble
Câble
Câble
d’alimentatio
d’alimentatio
220-240V~
L
Noir
Gris
Marron
N
Bleu
Entrée Entrée Entrée
Jaune / Vert
d’alimentatio
d’alimentatio
220-240V~
220-240V~
L1 L2 N1 N2
Gris
Noir
Marron
Bleu
Jaune / Vert
d’alimentatio
d’alimentatio
220-240V~
220-240V~
400V~
L1 L2 N
Gris
Noir
Marron
Bleu
Jaune / Vert
d’alimentatio
d’alimentatio
Noir
L1
400V~
Gris
Marron
L2
Bleu
Jaune / Vert
• Si le câble est endommagé ou s’il doit être remplacé, l’intervention doit être réalisée par un
technicien après-vente munis des outils appropriés, pour éviter tout accident.
• Si l’appareil est raccordé directement au réseau, un disjoncteur omnipolaire doit être
installé avec un espace minimum de 3 mm entre les contacts.
• L’installateur doit s’assurer que le raccordement électrique a été effectué et qu’il est
conforme aux règles de sécurité.
• Le câble ne doit pas être plié ou comprimé.
• Le câble doit être régulièrement contrôlé et remplacé uniquement par une personne
qualifiée.
Page 59

FR-29
Informations sur la table de cuisson électrique à usage domestique conforme aux normes de la Commission
(UE) n° 66/2014
Position
Symbole
Valeur
Unité
Identification du modèle
CJ2D46TKT
Type de table de cuisson :
Table de cuisson
électrique
Nombre de foyers et/ou
de zones de cuisson
foyers
4
zones
Technologie de chauffe
(foyers et zones de
cuisson par induction,
foyers à cuisson
rayonnante, plaques
massives)
Foyers de cuisson par
induction
X
Zones de cuisson par
induction
Foyers à cuisson
rayonnante
plaques solides
Pour les foyers ou zones de cuisson
circulaires : diamètre de la surface utile des
zones de cuisson électrique, arrondi à 5mm
près
Arrière gauche
Ø mm
18,0
cm
Arrière centre
Ø mm-cm
Arrière droite
Ø mm
18,0
cm
Centre gauche
Ø mm-cm
Centre centre
Ø mm-cm
Centre droite
Ø mm-cm
Avant gauche
Ø mm
18,0
cm
Avant centre
Ø mm-cm
Avant droite
Ø mm
18,0
cm
Pour les foyers ou zones de cuisson non
circulaires : longueur et largeur de la surface
utile des zones ou foyers à cuisson électrique,
arrondi à 5mm près
Arrière gauche
L
l
-
cm
Arrière centre
L
l
-
cm
Arrière droite
L
l
-
cm
Page 60

FR-30
Centre gauche
L
l
-
cm
Centre centre
L
l
-
cm
Centre droite
L
l
-
cm
Avant gauche
L
l
-
cm
Avant centre
L
l
-
cm
Avant droite
L
l
-
cm
Consommation d’énergie par zone ou foyer de
cuisson calculée par kg
Arrière gauche
Cuisson
électrique CE
193,5
kWh
Arrière centre
Cuisson
électrique CE
-
kWh
Arrière droite
Cuisson
électrique CE
197.2
kWh
Centre gauche
Cuisson
électrique CE
-
kWh
Centre centre
Cuisson
électrique CE
-
kWh
Centre droite
Cuisson
électrique CE
-
kWh
Avant gauche
Cuisson
électrique CE
192,3
kWh
Avant centre
Cuisson
électrique CE
-
kWh
Avant droite
Cuisson
électrique CE
195.6
kWh
Consommation d’énergie de la table de cuisson
calculée par kg
Table de
cuisson
électrique CE
194,7
kWh
Norme appliquée : EN 60350-2 pour les appareils de cuisson électriques à usage domestique - Partie 2 : Table
de cuisson - Méthodes de calcul des performances
Conseils pour des économies d’énergie :
• Pour obtenir la meilleure efficacité de votre table de cuisson, placez la casserole au centre du foyer de cuisson.
• L’utilisation d’un couvercle permet de réduire le temps de cuisson et d’économiser de l’énergie en conservant la
chaleur.
• Minimisez la quantité de liquide ou de graisse pour réduire le temps de cuisson.
• Commencez la cuisson à température élevée et réduisez-la lorsque les aliments sont bien chauds.
• Utilisez des casseroles dont le diamètre est aussi grand que le graphique du foyer sélectionné.
Page 61

RU-1
Нанесением маркировки
на данное изделие
изготовитель подтверждает его соответствие
применимым европейским стандартам
безопасности, охраны здоровья и окружающей
среды.
Меры предосторожности
Ваша безопасность очень важна для нас. Перед
началом использования панели внимательно
прочтите данную информацию.
Установка
Опасность поражения электрическим током
• Перед проведением любых работ или
технического обслуживания отсоединяйте
варочную панель от электрической сети.
• Подключение варочной панели к исправной
системе заземления является обязательным для
безопасной эксплуатации.
• Любые изменения подключения
электрооборудования в доме должны делаться
только квалифицированными электриками.
• Несоблюдение данного указания может привести
к поражению электрическим током, вплоть до
смертельного исхода.
Опасность порезов
• Будьте осторожны - края панели острые.
• Несоблюдение мер предосторожности может
привести к порезам.
Page 62

RU-2
Правила техники безопасности
• Перед установкой и использованием варочной
панели внимательно прочтите настоящее
руководство.
• Запрещается класть на панель горючие
материалы или продукты.
• Доведите данную информацию до лиц,
выполняющих установку варочной панели. Это
может уменьшить ваши затраты.
• Для предотвращения опасностей данная
варочная панель должна устанавливаться в
соответствии указаниями в настоящем
руководстве.
• Панель должна устанавливаться и подключаться к
электрической сети и системе заземления
квалифицированными специалистами.
• Для отключения от электрической сети на линии
питания панели должен быть установлен
выключатель.
• Неверная установка варочной панели приведёт к
немедленному аннулированию гарантии и
освобождает изготовителя от любой
ответственности.
Эксплуатация и уход
Опасность поражения электрическим током
• Запрещается готовить пищу на треснувшей или
лопнувшей панели. При появлении на
поверхности трещин немедленно отключите
Page 63

RU-3
варочную панель от электрической сети
(выключателем) и обратитесь в сервисный центр.
• Всегда отключайте варочную панель перед
проведением очистки и ухода.
• Несоблюдение данного указания может привести
к поражению электрическим током, вплоть до
смертельного исхода.
Опасности для здоровья
• Варочная панель отвечает требованиям
стандартов по электромагнитной безопасности.
• Однако лица, использующие кардиостимуляторы
или другие носимые медицинские электрические
устройства (например, инсулиновые помпы),
перед началом использования варочной панели
должны проконсультироваться с врачом или
изготовителем устройства.
• Несоблюдение данного указания может привести
к смертельному исходу.
Опасность ожогов
• При использовании варочной панели её части
нагреваются до температур, способных причинить
ожоги.
• Не прикасайтесь частями тела, одежды и другими
предметами, за исключением кухонной утвари, к
стеклянной поверхности панели до полного её
остывания.
• Не допускается помещение металлических
предметов: ножей, вилок, ложек, крышек и т.п. на
панель, т.к. они могут сильно нагреваться.
Page 64

RU-4
• Не подпускайте к горячей панели детей.
• Рукоятки сковород могут нагреваться до высокой
температуры. Следите за тем, чтобы они не
находились над другими конфорками во время их
работы. Не разрешайте детям баловаться с
варочной панелью.
• Несоблюдение данных указаний может привести к
серьёзным ожогам.
Опасность порезов
• При снятии защитной крышки можно порезаться об
острый край очистительного скребка. Используйте
скребок с предельной осторожностью и храните
его в месте, недоступном для детей.
• Несоблюдение мер предосторожности может
привести к порезам.
Правила техники безопасности
• Никогда не оставляйте работающую варочную
панель без присмотра. Выплёскивание пищи
может приводить к появлению дыма. Попавшие на
горячую поверхность масло и жир могут
воспламениться.
• Не используйте варочную панель в качестве стола
или места для хранения.
• Никогда не оставляйте на панели посторонние
предметы.
• Не оставляйте на панели или рядом с ней никакие
магнитные предметы (банковские карты, карты
памяти и т.п.) или электронные устройства
(ноутбуки, MP3-плейеры). Магнитное поле может
Page 65

RU-5
привести к выходу их из строя.
• Запрещается использовать варочную панель для
отопления помещения.
• После использования всегда выключайте
конфорки панели, как описано в руководстве (т.е.
сенсорными органами управления). Не
полагайтесь только на функцию автоматического
отключения конфорок после снятия кухонной
утвари.
• Не позволяйте детям баловаться с панелью,
залезать на неё или сидеть на ней.
• Не храните никакие детские игрушки или
лакомства в шкафах над панелью. При попытке
добраться до них дети могут получить серьёзные
травмы.
• Не оставляйте детей одних или без присмотра в
помещении, где работает варочная панель.
• Детей и лиц с психофизическими недостатками
необходимо хорошо обучить использованию
варочной панели. Лицо, проводящее обучение,
должно несколько раз убедиться в том, что дети и
указанные лица хорошо усвоили правила
обращения с варочной панелью и научились
выполнению основных операций.
• Не допускается замена или ремонт частей панели,
если данные работы не описаны в руководстве.
Все работы, не описанные в руководстве, должны
проводиться квалифицированным сервисным
персоналом.
Page 66

RU-6
• Не допускается использование отпаривателей и
паровых щёток для очистки варочной панели.
• Запрещается класть или бросать тяжёлые
предметы на панель.
• Запрещается залезать на варочную панель.
• Во избежание повреждения панели (царапания)
запрещается использовать посуду с острыми
углами.
• Запрещается использовать для очистки панели
стальные губки и другие абразивные материалы.
• При повреждении кабеля питания его замена
должна производиться изготовителем, сервисной
службой или квалифицированным
специализированным персоналом.
• Данная варочная панель предназначена для
бытового использования: - на кухнях в магазинах,
офисах и других рабочих заведениях; - в жилых
домах; - клиентами в отелях, гостиницах и других
жилых помещениях; - клиентами в мотелях,
хостелах и т.п.
ВНИМАНИЕ: Панель и её открытые части
нагреваются во время использования.
Будьте осторожны и не прикасайтесь к
конфоркам.
Не оставляйте детей возрастом менее 8 лет
рядом с варочной панелью без присмотра.
• Варочная панель может использоваться детьми
старше 8 лет и людьми с ограниченными
физическими, сенсорными или умственными
Page 67

RU-7
возможностями, а также без опыта и знаний, если
они находятся под присмотром или были
проинструктированы по безопасному
использованию панели и осознают возможные
риски.
• Детям запрещается играть с варочной панелью.
Без надлежащего присмотра детям запрещается
выполнять операции по очистке и уходу за
панелью.
ВНИМАНИЕ: Готовка с жиром или маслом на
варочной панели без присмотра может быть
опасной и может привести к возгоранию.
КАТЕГОРИЧЕСКИ ЗАПРЕЩАЕТСЯ тушить огонь
водой. Отключите панель от сети, после чего
накройте пламя крышкой или негорючим
материалом.
ВНИМАНИЕ: Опасность воспламенения!
Запрещается класть на панель горючие
предметы.
Внимание: При появлении на поверхности трещин
необходимо немедленно отключить панель от
электрической сети для предотвращения
поражения электрическим током через
металлическую посуду.
• Не допускается использование пароочистителей
для очистки панели.
• Варочная панель не рассчитана на управление
внешним таймером или отдельной системой
управления.
Page 68

RU-8
ВНИМАНИЕ: Не оставляйте без присмотра
готовящиеся блюда. Процесс приготовления пищи
должен находиться под постоянным контролем.
ВНИМАНИЕ: Для предотвращения падения
панель необходимо надёжно закрепить. Смотрите
указания по установке.
ВНИМАНИЕ: Используйте только крепления,
поставленные изготовителем панели, указанные в
руководстве пользователя или встроенные в
устройство. Использование неподходящих
креплений может стать причиной несчастного
случая.
Данный прибор имеет разъём заземления только
для функциональных целей.
Поздравляем вас с приобретением новой индукционной варочной панели
Для обеспечения правильной установки и эксплуатации варочной панели необходимо
внимательно прочесть настоящее руководство.
Для установки прочтите главу «Установка».
Уделите особое внимание мерам предосторожности и правилам техники безопасности.
Храните руководство для возможных справок в будущем.
Page 69

RU-9
Обзор продукта
1. Конфорка 2000 Вт, в режиме повышения
мощности до 2 600 Вт
2. Конфорка 1500 Вт, в режиме повышения
мощности до 2 000 Вт
3. Конфорка 2000 Вт, в режиме повышения
мощности до 2 600 Вт
4. Конфорка 1500 Вт, в режиме повышения
мощности до 2 000 Вт
5. Стеклянная плита
6. Панель управления
1. Кнопки выбора конфорки
2. Таймер
3. Кнопки выбора мощности/установки таймера
4. Кнопка блокировки панели управления
5. Кнопка ВКЛ/ВЫКЛ
6. Кнопка функции повышения мощности
7. Кнопка паузы
Вид сверху
Панель управления
Page 70

RU-10
Приготовление пищи на индукционной варочной панели
металлическая утварь
магнитный контур
стеклокерамическая плита
индукционная катушка
индукционный ток
Приготовление пищи на индукционной панели безопасно, эффективно и экономично.
Создаваемое электромагнитное поле нагревает утварь непосредственно, проходя
через стеклянную поверхность практически без потерь. Стекло нагревается только от
нагретой кухонной утвари.
Перед использованием новой индукционной варочной
панели
• Внимательно прочтите настоящее руководство, особенно раздел «Меры
предосторожности».
• Снимите с панели защитную плёнку.
Использование сенсорной панели
• Сенсорные кнопки управления реагируют на касание. Их не нужно нажимать.
• Для управления используйте подушечку пальца, а не ноготь.
• При каждом касании будет раздаваться сигнал.
• Поддерживайте органы управления сухими и чистыми. Не закрывайте их
посторонними предметами. Даже тонкая плёнка воды может нарушать работу
сенсорных кнопок.
Page 71

RU-11
Выбор кухонной утвари
• Используйте только кухонную утварь с основанием, пригодным
для готовки на индукционной варочной панели.
На днище или упаковке такой утвари должен быть
соответствующий знак.
• Можно проверить пригодность утвари простым методом с
помощью магнита.
Поднесите магнит к днищу утвари. Если магнит примагнитится,
значит, утварь можно использовать для готовки.
• Если магнита нет:
1. Налейте в утварь, которую нужно проверить, немного воды.
2. Включите
варочную панель. Если индикатор не замигает, а
вода нагреется, значит, утварь можно использовать для готовки.
• Не допускается использование утвари из следующих
материалов: чистая нержавеющая сталь, алюминий или медь без
магнитного основания, стекло, дерево, фарфор, керамика.
Не используйте кухонную утварь с острыми углами или выпуклым днищем.
Убедитесь в том, что дно утвари ровное, плотно прилегает к стеклу и по размеру
совпадает с конфоркой. Используйте утварь, диаметр дна которой превышает
диаметр окружности конфорки. Если диаметр дна утвари немного больше диаметра
конфорки, энергия будет использоваться с максимальной эффективностью. Если
диаметр дна утвари меньше диаметра конфорки, эффективность нагрева будет
меньше указанной. Всегда ставьте утварь строго по центру конфорки.
При съёме всегда поднимайте утварь вверх для предотвращения царапания
поверхности.
Page 72

RU-12
Диаметры конфорок
Конфорка
Минимальный диаметр утвари (мм)
1, 2 , 3, 4(180mm)
120
1. Коснитесь кнопки включения.
После включения раздастся звуковой сигнал, на дисплее
появится «–» или «– –», указывая на то, что варочная панель
находится в дежурном режиме.
2. Поставьте подходящую утварь на нужную конфорку.
• Убедитесь в том, что дно утвари и поверхность конфорки
чистые и сухие.
3. Коснитесь кнопки нужной конфорки. Индикатор кнопки
замигает.
Вплоть до максимального размера конфорки автоматически подстраиваются к
диаметру дна утвари. Однако диаметр дна утвари не должен быть меньше
минимально допустимого диаметра для используемой конфорки. Для достижения
максимальной эффективности нагрева утварь необходимо ставить строго по центру
конфорки.
Диаметры индукционных конфорок
Вышеуказанное может варьироваться в зависимости от качества используемой
сковороды.
Использование индукционной варочной панели
Для запуска приготовления
Page 73

RU-13
4. Установите мощность нагрева кнопками «+» и «-».
a. Если мощность нагрева не будет задана в течение 1
минуты, панель автоматически выключится. Придётся
повторить всё сначала, начиная с шага 1.
b. Мощность нагрева можно изменить в любой момент
готовки.
Если на дисплее попеременно мигает индикатор
и уровень нагрева.
1. Коснитесь кнопки конфорки, которую необходимо
выключить.
2. Выключите конфорку уменьшением мощности до «0» кнопкой «-» или
одновременным касанием на 1 секунду кнопок «+» и «-». При этом мощность
автоматически будет уменьшена до «0».
Убедитесь в том, что на дисплее появляется «0» затем «H».
а затем
подогревая пищу на остывающей панели.
Это означает следующее:
• утварь не была поставлена на конфорку или была поставлена на другую конфорку;
• утварь непригодна для готовки на индукционной варочной панели;
• утварь слишком маленькая или поставлена не по центру конфорки.
Нагрев не начнётся, пока на конфорке не будет подходящей утвари.
Если подходящая утварь не будет установлена, дисплей автоматически выключится
через 1 минуты.
После завершения готовки
3. Выключите всю панель кнопкой включения.
4. Не прикасайтесь к горячей поверхности
Индикатор «H» будет гореть, пока поверхность панели не остынет до безопасной
температуры. После охлаждения поверхности до безопасной температуры данный
индикатор погаснет. Можно использовать это время для экономии энергии,
Page 74

RU-14
Управление мощностью
2. Коснитесь кнопки паузы и держите её 5 секунд. Раздастся звуковой
сигнал.
3. После сигнала коснитесь одновременно кнопок «+» и «-» и держите
Можно увеличить общую мощность конфорок до 2,5/3,0/4,5/6,5/7,4. Стандартный
общий уровень мощности является максимальным.
Выбор подходящей мощности
1. Убедитесь в том, что панель отключена
Примечание: мощность можно изменять только на выключенной панели.
их 3 секунды. Индикатор таймера начнёт мигать, показывая общую предыдущую
мощность, напр. «2,5». Касание и удержание кнопок «+» и «-» в течение 1 секунды
приведёт к увеличению мощности до следующего значения, например «3,0». Когда на
дисплее замигает требуемая мощность, коснитесь и держите кнопку паузы 5 секунд.
Раздастся 10 коротких сигналов. Настройка завершена.
Примечание:
1. После шага 2 необходимо коснуться кнопок «+» и «-» в течение 3 секунд после
сигнала. В противном случае придётся повторить всё, начиная с шага 2.
2. После завершения настройки дождитесь окончания 10 сигналов. Не касайтесь
кнопок в это время. В противном случае настройка будет отменена.
Правила выбора мощности
Если общая мощность превышает предел 2,5/3,0/4,5/6,5 кВт (в зависимости от
заданного уровня), увеличения мощности не произойдёт. При касании кнопки «+»
раздастся 3 сигнала и на дисплее появится мигающая надпись «Pn». Это значит, что
нужно уменьшить мощность других конфорок перед увеличением мощности
выбранной конфорки.
Page 75

RU-15
Функции повышения мощности
Использование функции повышения мощности
1. Коснитесь кнопки конфорки, мощность которой необходимо увеличить.
Индикатор кнопки замигает.
Повышение мощности — функция позволяющая увеличить мощность конфорки на 5
минут одним касанием. Это позволит быстрее приготовить или подогреть пищу.
2. Коснитесь кнопки повышения мощности. На дисплее появится индикатор «P»,
указывающий на повышение мощности конфорки.
3. Функция повышения мощности работает 5 минут, после чего отключается и
конфорка возвращается к уровню мощности «9».
4. Для отмены функции повышения мощности до истечения 5 минут коснитесь кнопки
выбора конфорки. Индикатор кнопки замигает. Затем коснитесь кнопки повышения
мощности. Конфорка вернётся к уровню мощности «9».
Page 76

RU-16
Ограничения при использовании
Четыре конфорки разделены на две группы. В одной группе при использовании
повышения мощности на одной конфорке сначала убедитесь в том, что другая
конфорка работает с уровнем мощности меньше 5.
Использование функции паузы
Данной функцией можно воспользоваться в любое время. Функция позволяет
приостановить готовку и продолжить её позже.
1. Убедитесь в том, что конфорка работает.
2. Коснитесь кнопки паузы. На дисплее загорится индикатор «ll».
Все конфорки будут отключены. Останутся активными только кнопки паузы,
выключения и блокировки.
3. Для завершения паузы нажмите кнопку паузы ещё раз. На конфорку будет подана
первоначально заданная мощность.
Page 77

RU-17
Блокировка панели управления
• Можно заблокировать панель управления для предотвращения случайного
изменения (например, включения всех конфорок детьми).
• При блокировке все кнопки за исключением кнопки включения будут отключены.
Блокировка кнопок
Коснитесь кнопки блокировки. На дисплее появится индикатор «Lo».
Разблокировка кнопок
1. Убедитесь в том, что индукционная варочная панель включена.
2. Коснитесь и держите кнопку разблокировки
3. Теперь можно пользоваться варочной панелью.
Если панель управления заблокирована, все кнопки кроме кнопки включения
будут отключены. Можно в любой момент отключить варочную панель
кнопкой включения, однако для выполнения другой операции потребуется
сначала разблокировать панель управления.
Защита от перегрева
Встроенный датчик температуры может контролировать температуру варочной панели.
При обнаружении перегрева варочная панель будет автоматически отключена.
Защита от пролива
Защита от пролива — предохранительная функция. Она автоматически отключает
варочную панель в течение 10 с при обнаружении воды на панели управления. Об
этом также просигнализирует 1 секундный сигнал.
Обнаружение мелких предметов
При использовании утвари недостаточного размера или с немагнитным основанием
(например, алюминиевой), или оставлении на поверхности посторонних мелких
предметов (столовых приборов), варочная панель автоматически переключится в
дежурный режим через 1 минуту. После этого вентилятор продолжит охлаждение
панели примерно ещё 1 минуту.
Автоматическое отключение
Автоматическое отключение предотвращает повреждения индукционной варочной
панели. Панель отключится автоматически даже если забыть отключить её.
Стандартное время автоматического отключения в зависимости от мощности указано
в таблице ниже:
Page 78

RU-18
Мощность нагрева
123456789
II
Стандартное время до
отключения (часы)
888444222
2
При снятии утвари индукционная варочная панель автоматически прекращает нагрев,
2. Коснитесь кнопки таймера.
Индикатор таймера начнёт мигать, и на дисплее появится
значение «30».
после чего автоматически отключается через 2 минуты.
Перед использованием варочной панели лицам, использующим
кардиостимуляторы, необходимо проконсультироваться с врачом.
Таймер
Таймер можно использовать двумя различными способами:
• Можно использовать его как счётчик минут. В этом случае таймер не будет
отключать конфорки при включении.
• Можно использовать его как выключатель одной или нескольких конфорок по
истечении заданного времени.
• Таймер можно настроить максимум на 99 минут.
Использование таймера для обратного отсчёта
Если ни одна конфорка не выбрана
1. Убедитесь в том, что варочная панель включена.
Примечание: в качестве счётчика минут таймер можно использовать, даже
если ни одна конфорка не выбрана.
3. Установите время кнопками «+» и «-»
Полезные советы: Касание кнопок «-» или «+» уменьшает или увеличивает
время на 1 минуту, соответственно.
Длительное касание кнопок «-» или «+» уменьшает или
увеличивает время на 10 минут, соответственно.
4. Для сброса времени коснитесь кнопки таймера. На дисплее появится «00».
Page 79

RU-19
5. После ввода времени сразу же начнётся обратный отсчёт.
На дисплее будет показано оставшееся время, а индикатор
таймера будет мигать 5 секунд.
6. По истечении времени таймера на 30 секунд загудит зуммер,
а на дисплее будет отображаться «- -».
Для использования данной функции:
1. Нажмите кнопку выбора конфорки нагрева, для которой нужно
настроить таймер (например, конфорка 1)
2. Коснитесь кнопки таймера. Индикатор таймера начнёт мигать,
и на дисплее появится значение «30».
3. Установите время кнопками «+» и «-».
4. После ввода времени сразу же начнётся обратный отсчёт. На
дисплее будет показано оставшееся время, а индикатор
таймера будет мигать 5 секунд.
ПРИМЕЧАНИЕ: Красная точка возле индикатора уровня мощности
загорится, указывая на выбор конфорки.
Настройка таймера для отключения конфорок
Полезные советы: Касание кнопок «-» или «+» уменьшает или увеличивает
время на 1 минуту, соответственно.
Длительное касание кнопок «-» или «+» уменьшает или
увеличивает время на таймере на 10 минут, соответственно.
После «99» время на таймере изменится на 0 минут.
5. Для сброса таймера коснитесь кнопки выбора конфорки, затем кнопки таймера.
Таймер сбросится, на дисплее сначала появится «00», затем «--».
Page 80

RU-20
6. По истечении времени готовки соответствующая конфорка отключится
автоматически и на дисплее появится «H».
(установлено на 6 минут)
(установлено на 3 минуты)
автоматически и на дисплее появится «H».
Другие работающие конфорки продолжат работу.
Настройка таймера для отключения нескольких конфорок
1. При использовании таймера для отключения нескольких конфорок на дисплее
будет отображаться меньшее время отключения.
(например, для конфорки 1 таймер настроен на 3 минуты, для конфорки 2 — на
6 минут; на дисплее будет «3».)
ПРИМЕЧАНИЕ: Мигающая красная точка возле индикатора уровня мощности
указывает на то, что таймер показывает оставшееся время работы конфорки.
Для проверки таймеров других конфорок коснитесь кнопки нужной конфорки. На
индикаторе будет показано время.
2. По истечении времени готовки соответствующая конфорка отключится
ПРИМЕЧАНИЕ: Для изменения времени после запуска таймера необходимо
повторить все шаги, начиная с 1.
Page 81

RU-21
Очистка и уход
Что?
Как?
Важно!
Ежедневная очистка
стекла (отпечатки
пальцев, разводы,
пятна от пищи и
несладких продуктов
на стекле)
1. Выключите варочную панель.
2. Нанесите немного моющего
средства на стекло, когда оно
остынет (будет тёплым, но не
горячим!)
3. Протрите стекло влажной
губкой, а затем вытрите
насухо сухим полотенцем или
салфетками.
4. Включите варочную панель.
• При отключении питания на
варочной панели не будет
индикации «H», хотя стекло может
быть горячим. Будьте предельно
осторожны.
• Отдельные чистящие салфетки,
губки, средства могут поцарапать
стекло. Всегда проверяйте
пригодность средств по указаниям в
инструкциях к ним.
• Не оставляйте загрязнения на
панели: они могут прочно пристать к
стеклу.
Проливы, застывшие
остатки пищи и
сахаросодержащих
продуктов на стекле
Немедленно удаляйте данные
загрязнения ножом для рыбы
или специальным скребком для
керамических поверхностей,
помня о том, что поверхность
может быть горячей.
1. Отключите варочную панель
выключателем на стене.
2. Скребком под углом около 30°
удалите загрязнения и
переместите их на холодный
участок панели.
3. Удалите загрязнения кухонным
или бумажным полотенцем.
4. При ежедневной очистке
варочной панели выполняйте
пп. 2-4, описанные выше.
• Удаляйте остатки пищи и
сахаросодержащих продуктов при
первой возможности. После
застывания удалить их со стекла
будет тяжело и чревато
повреждениями.
• Опасность порезов: При снятии
защитной крышки острое лезвие
скребка представляет опасность
пореза. Используйте скребок с
предельной осторожностью и храните
его в месте, недоступном для детей.
Проливы на панель
управления
1. Выключите варочную панель.
2. Удалите пролив
3. Протрите панель управления
чистой чуть влажной губкой
или полотенцем.
4. Вытрите панель насухо
чистым кухонным или бумажным
полотенцем.
5. Включите варочную панель.
• При попадании жидкости на панель
управления варочная панель может
издать сигнал и отключиться. Кнопки
управления могут перестать работать,
пока на панели управления будет
оставаться вода. Перед включением
варочной панели убедитесь в том, что
панель управления сухая.
Page 82

RU-22
Полезные советы
Код ошибки
Возможная причина
Способ устранения
Индукционная
варочная панель не
включается
Отсутствует напряжение.
Убедитесь в том, что варочная
панель подсоединена к
электрической сети и её настенный
выключатель включён.
Убедитесь в наличии напряжения в
сети. Если всё в порядке, а панель
не включается, обратитесь в
сервисный центр.
Панель управления не
реагирует на кнопки.
Панель заблокирована.
Разблокируйте панель. Смотрите
раздел «Использование
индукционной варочной панели».
Кнопки плохо работают.
Наличие тонкой плёнки воды на
панели управления. Попытка
управлять ногтем вместо
подушечки пальца.
Убедитесь в том, что панель
управления сухая и используйте
подушечки пальцев для
прикосновения к кнопкам.
Стекло поцарапано.
Посуда с острыми краями и
углами.
Использование ненадлежащих
абразивных чистящих средств.
Используйте кухонную утварь с
ровным гладким днищем.
Смотрите раздел «Выбор кухонной
утвари».
Смотрите раздел «Уход и очистка».
Некоторые виды утвари
издают треск или
другие неприятные
звуки
Это может быть вызвано
конструкцией утвари (различное
термическое расширение разных
металлов).
Это нормально для кухонной
утвари и не является проблемой.
При работе с большой
мощностью
индукционная варочная
панель может издавать
едва слышный писк.
Он обусловлен самой
технологией индукционного
нагрева.
Это нормально. Устранить писк
можно просто уменьшением
мощности нагрева.
Кроме того, при работе
варочной панели может
быть слышен шум
вентилятора.
Встроенный в панель вентилятор
охлаждения предотвращает
перегрев электроники. Он может
продолжать работать даже после
выключения нагрева.
Это нормально и не требует
никаких действий. Не отключайте
варочную панель от электрической
сети внешним выключателем, пока
вентилятор работает.
Page 83

RU-23
Пища не нагревается,
индикации на дисплее
нет.
Варочная панель не
обнаруживает утварь из-за её
непригодности для индукционной
готовки.
Варочная панель не
обнаруживает утварь из-за её
малого размера или неверной
установки на конфорку.
Используйте утварь,
предназначенную для
индукционных варочных панелей
Смотрите раздел «Выбор кухонной
утвари».
Убедитесь в том, что размер
утвари подходящий и установите
её точно по центру конфорки.
Варочная панель или
конфорка неожиданно
отключились, раздался
звуковой сигнал и на
дисплее появился код
ошибки (обычно
чередующийся с одной
или двумя цифрами).
Техническая неисправность.
Запишите код ошибки, отключите
варочную панель от электрической
сети и обратитесь в сервис.
Определение причин неполадок в работе по кодам ошибок.
Код ошибки
Возможная причина
Способ устранения
F3/F4
Неисправность датчика температуры
индукционной катушки
Свяжитесь с поставщиком.
F9/FA
Неисправность датчика температуры
IGBT-сборки
Свяжитесь с поставщиком.
E1/E2
Неправильное напряжение питания.
Проверьте напряжение
питания.
Включите панель после
восстановления
электроснабжения.
E3
Перегрев индукционной катушки
Свяжитесь с поставщиком.
E5
Перегрев IGBT-сборки
Дайте варочной панели остыть
и включите её снова.
При возникновении аномалии срабатывает защита варочной панели, панель
выключается, а на дисплее отображается код выявленной ошибки.
Выше приведены наиболее распространённые неисправности и их причины.
Во избежание повреждения варочной панели её самостоятельный ремонт
пользователем запрещается.
Page 84

RU-24
Технические характеристики
Индукционная варочная панель
CJ2D46TKT
Конфорки
4
Напряжение питания
220-240 В~, 50-60 Гц
Установленная электрическая мощность
2,5 кВт: 2250-2750 Вт или
3,0 кВт: 2700-3300 Вт или
4,5 кВт: 4050-4950 Вт или
6,5 кВт: 5850-7150 Вт или
7,4 кВт: 6600-7400 Вт
Размеры Д×Ш×В (мм)
590×520×55
Размеры отверстия для установки A×B
(мм)
560×490
Размеры и масса являются приблизительными. В связи с постоянной работой по
усовершенствованию продукции изготовитель оставляет право внесения изменений в
документацию и конструкцию изделий без предварительного уведомления.
Установка
Выбор оборудования для монтажа
Вырежьте в столешнице отверстие размерами, указанными на рисунке
Для установки и использования вокруг отверстия под панель должно быть минимум
5 см свободного места.
Толщина столешницы или плиты для установки должна быть не менее 30 мм.
Столешница должна быть из термо- и огнестойкого материала для предотвращения
деформаций, вызванных нагревом от панели. Как показано ниже:
Page 85

RU-25
L (мм)
W (мм)
H (мм)
D (мм)
A (мм)
B (мм)
X (мм)
590
5205551
560
490
мин. 50
Следите за тем, чтобы входное и выходное вентиляционные отверстия индукционной
A (мм)
B (мм)
C (мм)
D
E
760
мин. 50
мин. 20
Вход воздуха
Выход воздуха 5 мм
варочной панели никогда не закрывались. Убедитесь в том, что варочная панель
находится в хорошем состоянии. Как показано ниже:
Примечание: Безопасное расстояние от рабочей поверхности панели до ящика
или вытяжки сверху должно быть не менее 760 мм.
Перед установкой индукционной варочной панели
необходимо проверить следующее:
• поверхность столешницы ровная, горизонтальная; установке панели ничего не
мешает
• столешница сделана из термостойкого материала
• при установке варочной панели над духовым шкафом последний должен иметь
встроенный вентилятор охлаждения
• все установочные зазоры и расстояния отвечают требованиям действующих норм
Page 86

RU-26
• Поблизости от варочной панели в хорошо доступном месте, в соответствии с
ABC
D
Шуруп
Крепление
Отверстие
Корпус варочной панели
требованиями действующих норм установлен выключатель, полностью
отключающий печь от питающей электрической сети.
Выключатель должен быть сертифицированным с расстоянием между
разомкнутыми контактами не менее 3 мм на всех полюсах (или только на фазных
полюсах, если это допускается действующими нормами).
• Выключатель должен быть легко доступным пользователю
• При необходимости по поводу установки выключателя следует проконсультироваться
у специалистов.
• Расположенные рядом с варочной панелью стены и поверхности сделаны из
термостойких и хорошо моющихся материалов (например, керамической плитки)
После установки варочной панели необходимо проверить
следующее:
• кабель питания не может быть повреждён дверьми или выдвижными ящиками
мебели
• в месте установки варочной панели имеется надлежащая вентиляция
• если варочная панель устанавливается над выдвижными ящиками или полками,
нижняя сторона панели должна быть термоизолирована
• выключатель варочной панели легкодоступен пользователю
Перед установкой креплений
Плиту необходимо установить на прочную ровную поверхность (можно использовать
упаковкой). Не следует применять силу к выступающим из корпуса панели кнопкам.
Регулировка положения креплений
Прикрепите варочную панель к столешнице 4 креплениями, как показано на рисунке.
Page 87

Стекло
Крепление
шуруп
ST3. 5*8
Корпус варочной
Тумба
Внимание!
1. Индукционная варочная панель должна устанавливаться квалифицированным
персоналом. У нас есть такие специалисты. Никогда не выполняйте эту работу
самостоятельно.
2. Не допускается установка варочной панели рядом с раковиной, холодильником,
морозильником, посудомоечной машиной, сушилкой белья, т.к. влага может
привести к выходу электроники из строя.
3. Во избежание сбоев в работе место установки панели должно быть защищено от
прямых солнечных лучей.
4. Стена и смежные элементы мебели должны выдерживать тепло, выделяемое
варочной панелью.
5. Во избежание повреждений материалы столешницы (покрытие, клей, основа)
должны быть термостойкими.
Подключение варочной панели к электрической сети
Варочная панель должна подключаться к электрической сети только квалифицированным
электриком.
Перед подключением варочной панели к электрической сети необходимо проверить следующее:
1. электропроводка и система питания пригодны для подключения варочной панели
2. напряжение в сети соответствует указанном на паспортной табличке варочной панели
3. сечение кабеля питания достаточное для потребляемого варочной панелью тока.
При подключении варочной панели к электрической сети не допускается использование
переходников, адаптеров, разветвителей и т.п. из-за опасности перегрева и воспламенения.
Кабель питания не должен касаться никаких нагревающихся элементов и должен располагаться
так, чтобы его температура не превысила 75°C.
Электрик должен убедиться в том, что проводка пригодна для подключения варочной панели и
не требует изменений. Любые изменения должны делаться только квалифицированным
электриком.
RU-27
Page 88

Подключение к электрической сети должно производиться в соответствии с
Данное устройство имеет маркировку в соответствии с директивой 2012/19/ЕС,
касающейся утилизации электрических и электронных компонентов (WEEE).
Данные компоненты содержат загрязняющие вещества (которые могут оказывать
негативное воздействие на окружающую среду) и безвредные элементы (которые
можно использовать повторно). Поэтому такие отходы подвергают специальной
обработке для отделения вредных компонентов от безвредных. Люди могут играть
важную роль в обеспечении того, чтобы данные отходы не стали экологической
проблемой. Для этого необходимо соблюдать следующие простые правила:
Чёрный
Коричнев
Серый
Кабель
Чёрный
Чёрный
Чёрный
Коричнев
Коричнев
Коричнев
Серый
Серый
Серый
Кабель
Кабель
требованиями действующих норм. На линии питания варочной панели необходимо
установить выключатель. Схема подключения показана ниже.
Вход
220-240V~
L
Вход Вход Вход
N
220-240V~
220-240V~
L1 L2 N1 N2
220-240V~
220-240V~
400V~
L1 L2 N
400V~
L2
L1
Синий
Жёлто-зелёны й
o
Синий
Жёлто-зелёны й
Синий
Жёлто-зелёны й
Кабель
Синий
Жёлто-зелёны й
• Ремонт или замена повреждённого кабеля питания должны проводиться только
специалистами сервисного центра.
• При подключении варочной панели непосредственно к электрической сети на линии
питания следует установить многополюсный выключатель с зазором между
разомкнутыми контактами не менее 3 мм.
• Лицо, проводящее подключение, должно удостовериться в том, что все работы
выполнены в строгом соответствии с положениями действующих норм.
• Не допускается перегиб или пережим кабеля питания.
• Кабель должен регулярно проверяться квалифицированным специалистом и
заменяться при необходимости.
- нельзя смешивать отходы электрического и электронного оборудования с бытовым мусором
- отходы электрического и электронного оборудования должны сдаваться в специализированные
организации для надлежащей утилизации.
В большинстве стран для такого мусора устанавливают специальные контейнеры. Кроме того, при
покупке нового устройства старое можно вернуть продавцу, который должен принять его без
оплаты при условии покупки другого аналогичного изделия.
RU-28
Page 89

RU-29
Информация о бытовых электрических индукционных варочных панелях в соответствии с регламентом ЕС № 66/2014
Положение
Обозначение
Значение
Единица
измерения
Модель
CJ2D46TKT
Тип варочной панели:
Электрическая
Количество конфорок
4
Способ нагрева
(индукционные конфорки,
излучательные зоны
нагрева, обычные
конфорки)
Индукционные конфорки
X
Индукционные конфорки
Излучательные зоны
нагрева
Обычные конфорки
Для круглых конфорок: диаметр полезной площади
на конфорку с округлением до ближайших 5 мм.
Задняя левая
Ø
18,0
см
Задняя
центральная
Ø-см
Задняя правая
Ø
18,0
см
Центральная
левая
Ø-см
Центральная
посередине
Ø-см
Центральная
правая
Ø-см
Передняя левая
Ø
18,0
см
Передняя
центральная
Ø-см
Передняя
правая
Ø
18,0
см
Для конфорок некруглой формы: длина и ширина
конфорки и/или зоны нагрева с округлением до
ближайших 5 мм.
Задняя левая
Д
Ш
-
см
Задняя
центральная
Д
Ш
-
см
Задняя правая
Д
Ш
-
см
Центральная
леваяДШ
-
см
Page 90

RU-30
Центральная
посередине
Д
Ш
-
см
Центральная
праваяДШ
-
см
Передняя левая
Д
Ш
-
см
Передняя
центральная
Д
Ш
-
см
Передняя
праваяДШ
-
см
Потребление энергии конфоркой или зоной нагрева
на кг
Задняя левая
ECelectric
cooking
193,5
В·ч/кг
Задняя
центральная
ECelectric
cooking
-
В·ч/кг
Задняя правая
ECelectric
cooking
197.2
В·ч/кг
Центральная
левая
ECelectric
cooking
-
В·ч/кг
Центральная
посередине
ECelectric
cooking
-
В·ч/кг
Центральная
правая
ECelectric
cooking
-
В·ч/кг
Передняя левая
ECelectric
cooking
192,3
В·ч/кг
Передняя
центральная
ECelectric
cooking
-
В·ч/кг
Передняя
правая
ECelectric
cooking
195.6
В·ч/кг
Энергопотребление варочной панели на кг
ECelectric hob
194,7
В·ч/кг
Применимый стандарт: EN 60350-2 Приборы электрические кухонные - Часть 2: Встраиваемые варочные панели - Методы
измерения характеристик
Рекомендации по экономии энергии
• Для достижения максимальной эффективности нагрева утварь необходимо ставить строго по центру конфорки.
• Использование крышки уменьшает время готовки и, благодаря удерживанию тепла, экономит энергию.
• Для уменьшения времени готовки используйте меньше воды или жира.
• Начинайте готовку с высоким уровнем мощности и понижайте его по мере нагрева пищи.
• Используйте утварь, диаметр дна которой превышает диаметр окружности конфорки.
 Loading...