

Page 1
GB
FREEZER
INSTRUCTION MANUAL
Page 2

GB
Dear customer,
Before placing your new freezer into operation please read these operating instructions carefully.
They contain important information for safe use, for installation and for care of the appliance.
Please keep these operating instructions for future reference. Pass them on to possible new ow-
ners of the appliance.
Notes which are important for your safety or for the proper functioning of the appliance are stres-
sed with a warning triangle and/or with signal words (Warning!, Caution!, Important! ). Please ob-
serve the following carefully.
Supplementary information regarding operation and practical applications of the appliance appear
after this symbol.
Tips and notes concerning economical and environmentally sound use of the appliance are mar-
ked with the cloverleaf.
The operating instructions contain instructions for the correction of possible malfunctions by the
user in the section @Trouble shooting@. If these instructions should not be sufficient, contact yo-
ur local Service Force Center.
Printed on paper manufactured with environmentally sound processes he who thinks ecologically
acts accordingly...
1
Page 3

GB
Contents
Important safety instructions
Remove transport packaging
Installation
Building in
Positioning
Description of the appliance
Starting up and temperature regulation
Thermostat control
Using the freezer
Defrosting
Switching off the appliance
Cleaning and Care
Trouble shooting
Noises during Operation
........................................................
........................................................
........................................................
.................................................
...................................................
.........................................................
.................................................
...................................................
.........................................
........................................
.........................................
..........................................
............................................
................................
3
5
5
6
10
10
10
11
13
13
14
14
15
17
Disposal of the appliance
...........................................
17
2
Page 4

GB
Important safety instructions
These warnings are provided in the interests of your safety. Ensure you fully understand them be-
fore installing or using the appliance.
Your safety is of paramount importance. If you are unsure about the meaning of these warnings
contact the Customer Care Department for assistance.
Intended use
The freezer is intended for use in the home.It is suitable for the storage of food at low temperature.
If the appliance is used for purposes other than those intended or used incorrectly,no liability can
be accepted by the manufacturer for any damage that may be caused.
Alterations or changes to the refrigerator are not permitted for reasons of safety.
If you use the refrigerator in a commercial application or for purposes other than the cooling of
foods, the manufacturer accepts no liability for any damages that may occur.
Prior to initial start-up
Check the appliance for transport damage. Under no circumstances should a damaged appliance
be plugged in. In the event of damage, please contact your supplier.
Refrigerant
The refrigerant isobutene is contained within the refrigerant circuit of the appliance,a nat-
ural gas with a high level of environmental compatibility, which is nevertheless flammable.
During transportation and installation of the appliance, be certain that none of the components of
the refrigerant circuit become damaged.
If the refrigerant circuit should become damaged:
avoid open flames and sources of ignition, thoroughly ventilate the room in which the appliance is
situated.
The instructions shall include the warnings:
WARNING—Keep ventilation openings,in the appliance enclosure or in the built-in structure,clear
of obstruction.
(R600a)
WARNING—Do not use mechanical devices or other means to accelerate the defrosting process,
other than those recommended by the manufacturer.
WARNING—Do not damage the refrigerant circuit.
WARNING—Do not use electrical appliances inside the food storage compartments of the reco-
mmended by the manufacturer.
3
Page 5

GB
WARNING—This appliance is not intended for use by young children or infirm persons unless
they have been adequately supervised by a responsible person to ensure that they can use the
appliance safely .Young children should be supervised to ensure that they do not play with the
appliance.
WARNING—This appliance is not intended for use by persons (including children) with reduced
physical, sensory or mental capabilities, or lack of experience and knowledge, unless they have
been given supervision or instruction concerning use of the appliance by a person responsible for
their safety. Children should be supervised to ensure that they do not play with the appliance.
WARNING—Please keep the appliance away from substance, which can cause ignition.
WARNING—if the supply cord is damaged, it must be replaced by a special cord or assembly
available from the manufacturer or its service agent.
WARNING—before obtaining access to terminals, all supply circuits must be disconnected.
WARNING—Please remove the door before you dispose your refrigerant.
Safety of children
Packaging (e.g. wraps, polystyrene) can be dangerous for children.
There is a risk of suffocation! Keep packaging material away from children!
Make old appliances unusable prior to disposal.Pull out the mains plug, cut off the mains cable,
break or remove spring or bolt catches, if fitted.By doing this you ensure that children cannot lock
themselves in the appliance when playing (there is risk of suffocation!) or get themselves into other
dangerous situations.
Often children cannot recognize the hazards present in household appliances. It is therefore imp-
ortant that you ensure adequate supervision and never let children play with the appliance!
Daily Operation
Containers with flammable gases or liquids can leak at low temperatures.There is a risk of an ex-
plosion! Do not store any containers with flammable materials such as spray cans,fire extinguisher
refill cartridges etc in the freezer.
Do not operate any electrical appliances in the freezer (e.g. electric ice cream makers, mixers etc.).
Before cleaning the appliance,always switch off the appliance and unplug it,or pull the house fuse
or switch off the circuit breaker.
When unplugging always pull the plug from the mains socket, do not pull on the cable.
4
Page 6
t
GB
In case of malfunction
If a malfunction occurs on the appliance,please look first in the“Trouble shooting”section of these
instructions. If the information given there does not help,please do not perform any further repairs
yourself.
Under no circumstance should you attempt to repair the appliance yourself. Repairs carried out
by inexperienced persons may cause injury or serious malfunctioning. Contact your local AEG
Service Force Center.
Remove transport packaging
The appliance and the interior fittings are protected for transportation. Pull off the adhesive tape
on the left and right side of the door. You can remove any remnants of adhesive using white spirit.
Remove all adhesive tape and packing pieces from the interior of the appliance.
Installation
Installation Location
Before installing,carefully read the instruction in the end in order to avoid a certain number of
problems.If you want to move your freezer, hold it by the sides or by the base. You should never
lift it by its top.Install the appliance in a dry,well-ventilated room,away from all source of heat.Lea-
ve a minimum gap of 10cm between the top of the freezer and any wall-mounted kitchen units.
If this is impossible, leave 5cm above the appliance and 2.5cm on each side of the appliance.
Make sure that the air vents on your freezer are not covered or blocked.
Electrical connection
Connector characteristics: with earth.
Avoid using adapters or extension leads.
Avoid the cable coming into contact with the compressor.
Avoid trapping the cable under the appliance.
The appliance's electrical installation is earthed. For your safety, connect the appliance to a power
outlet with effective earthing (in conformity with current electrical installation safety standards).
220-240V
The manufacture declines all liability for damage caused by the absence of an earth connection.
Warning: to avoid a hazard due to instability of the appliance, it must be fixed according to
instructions:
5
Page 7
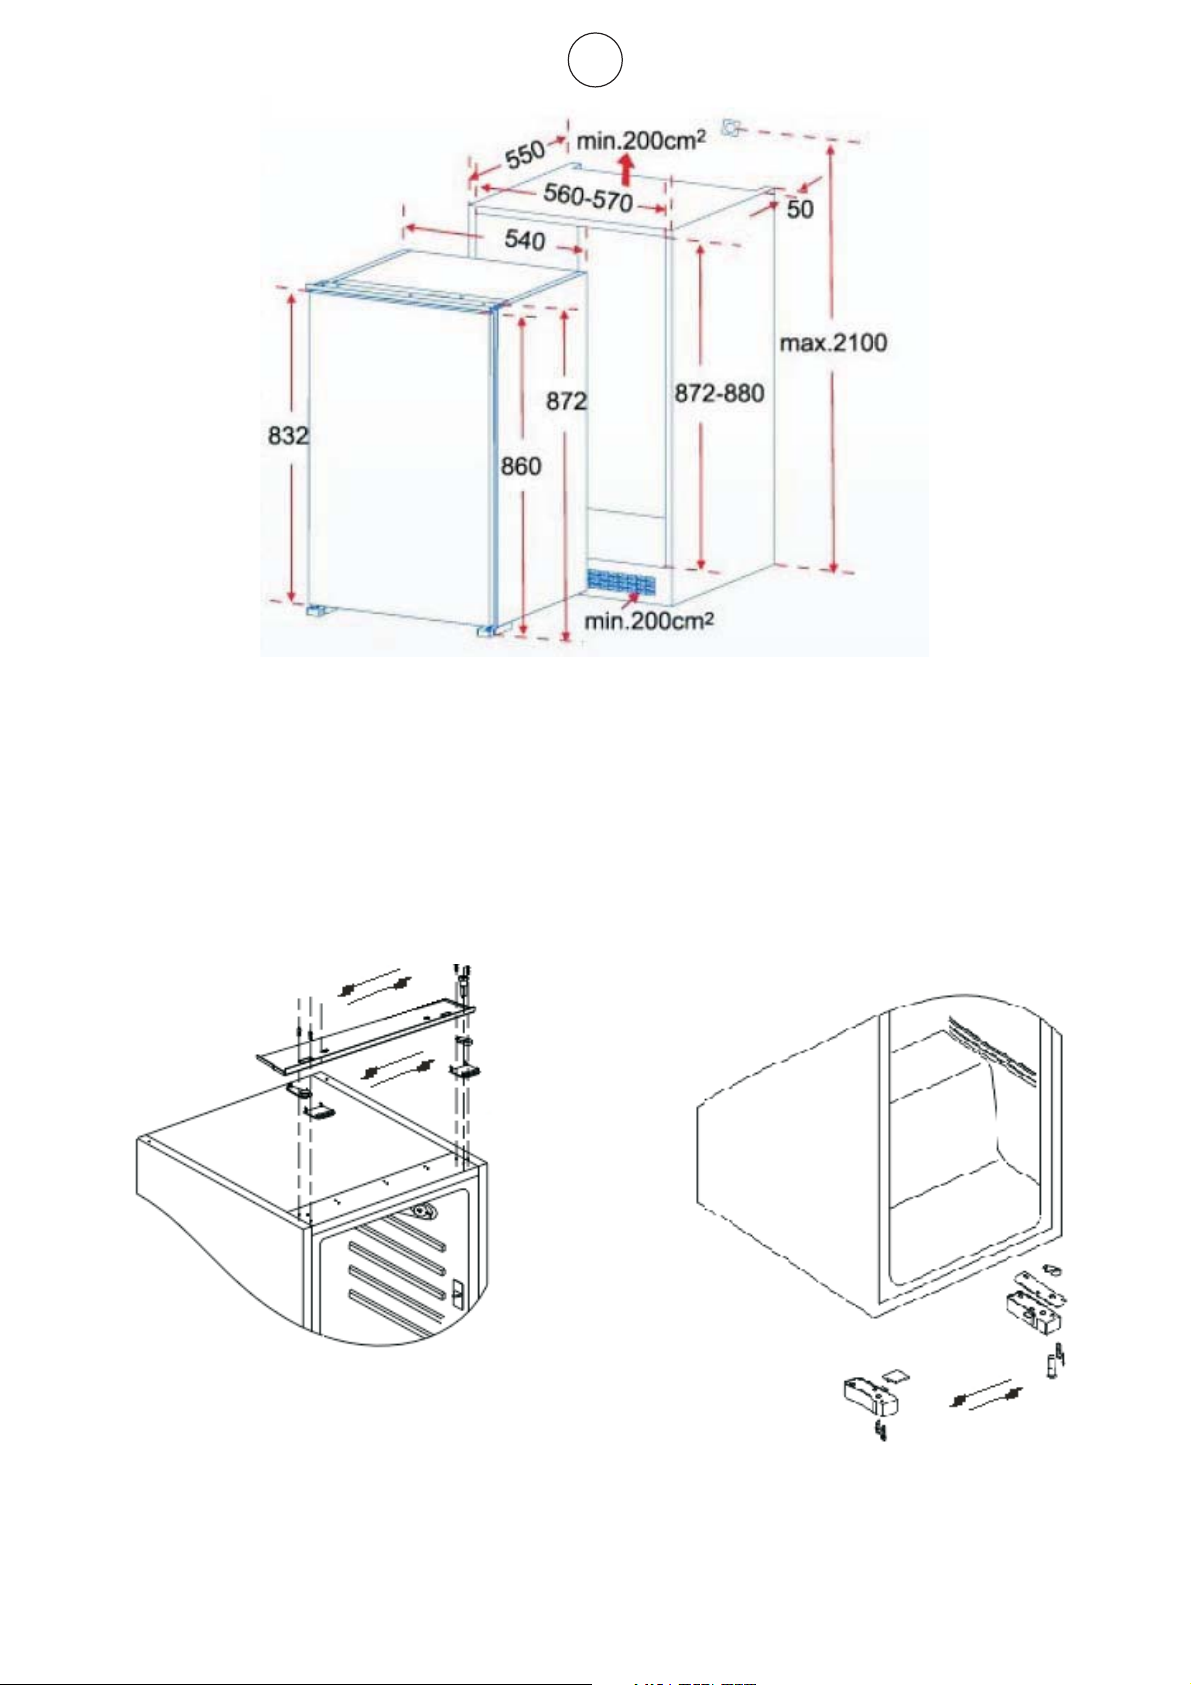
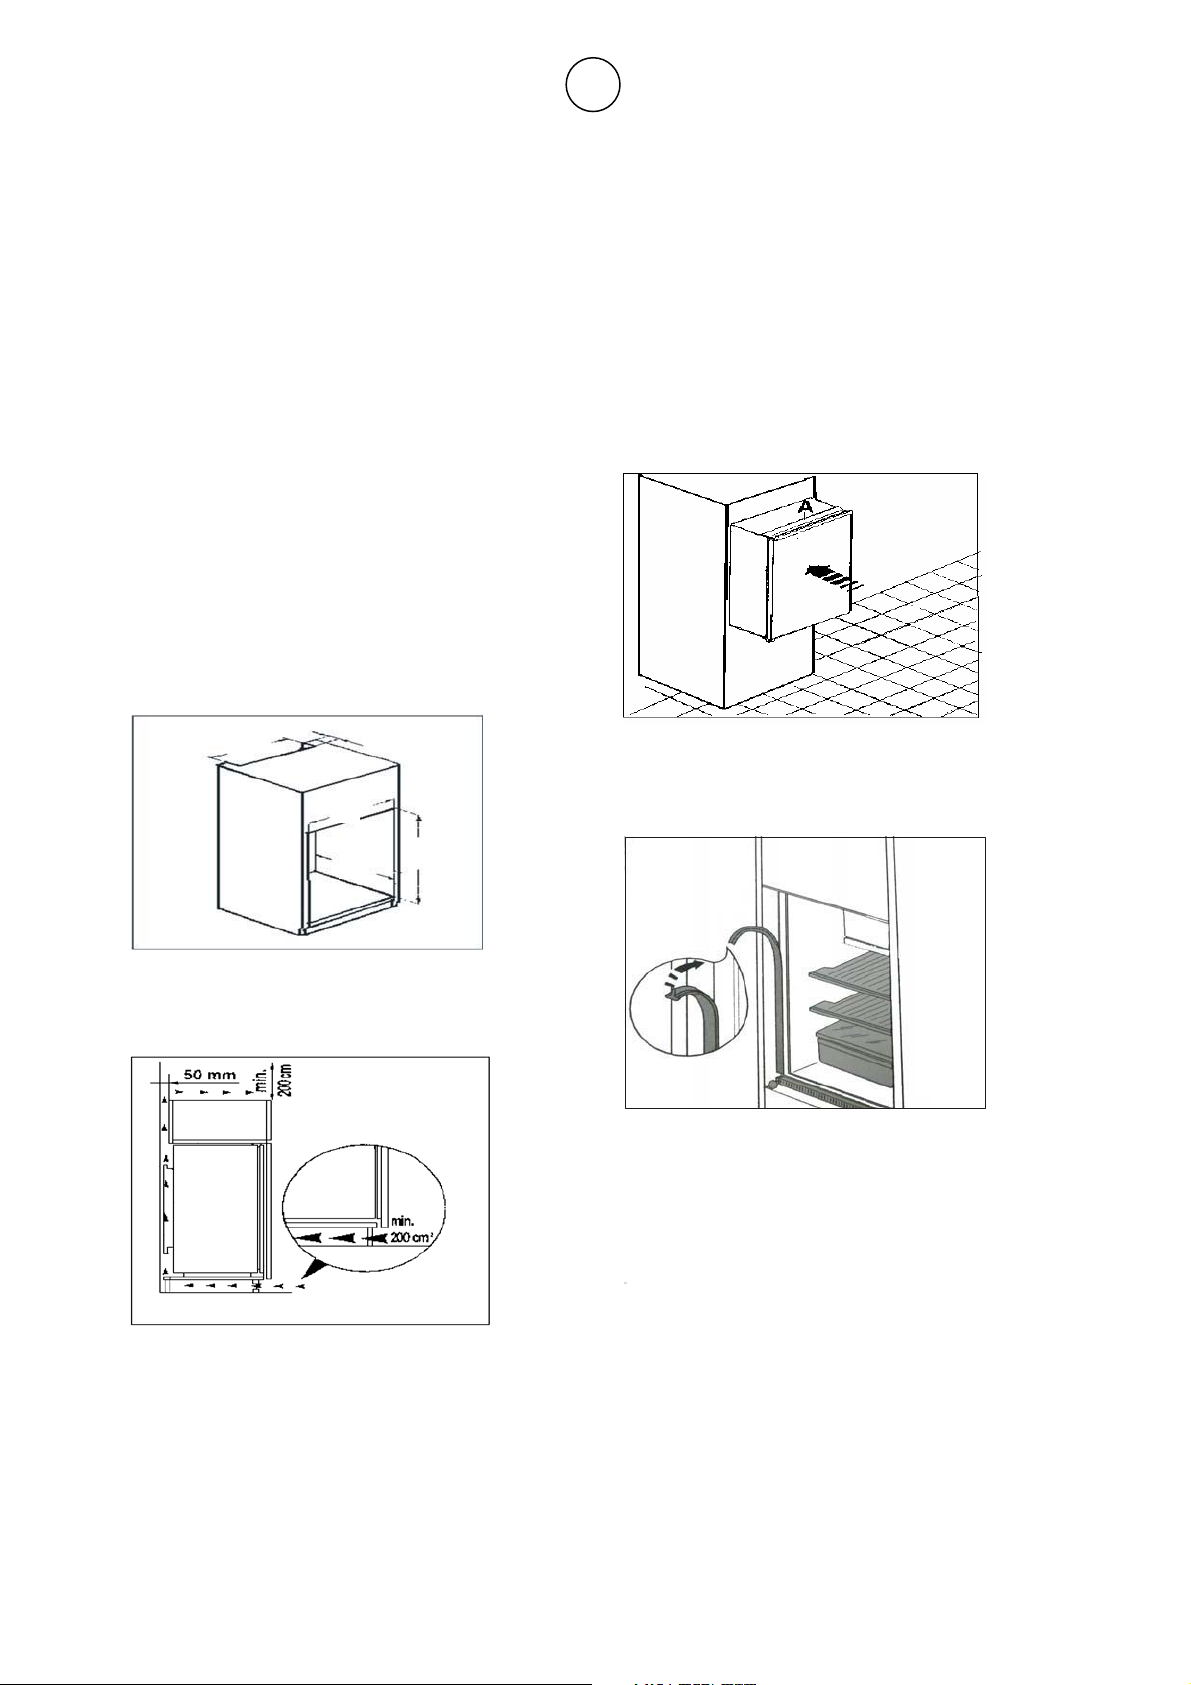
Building in
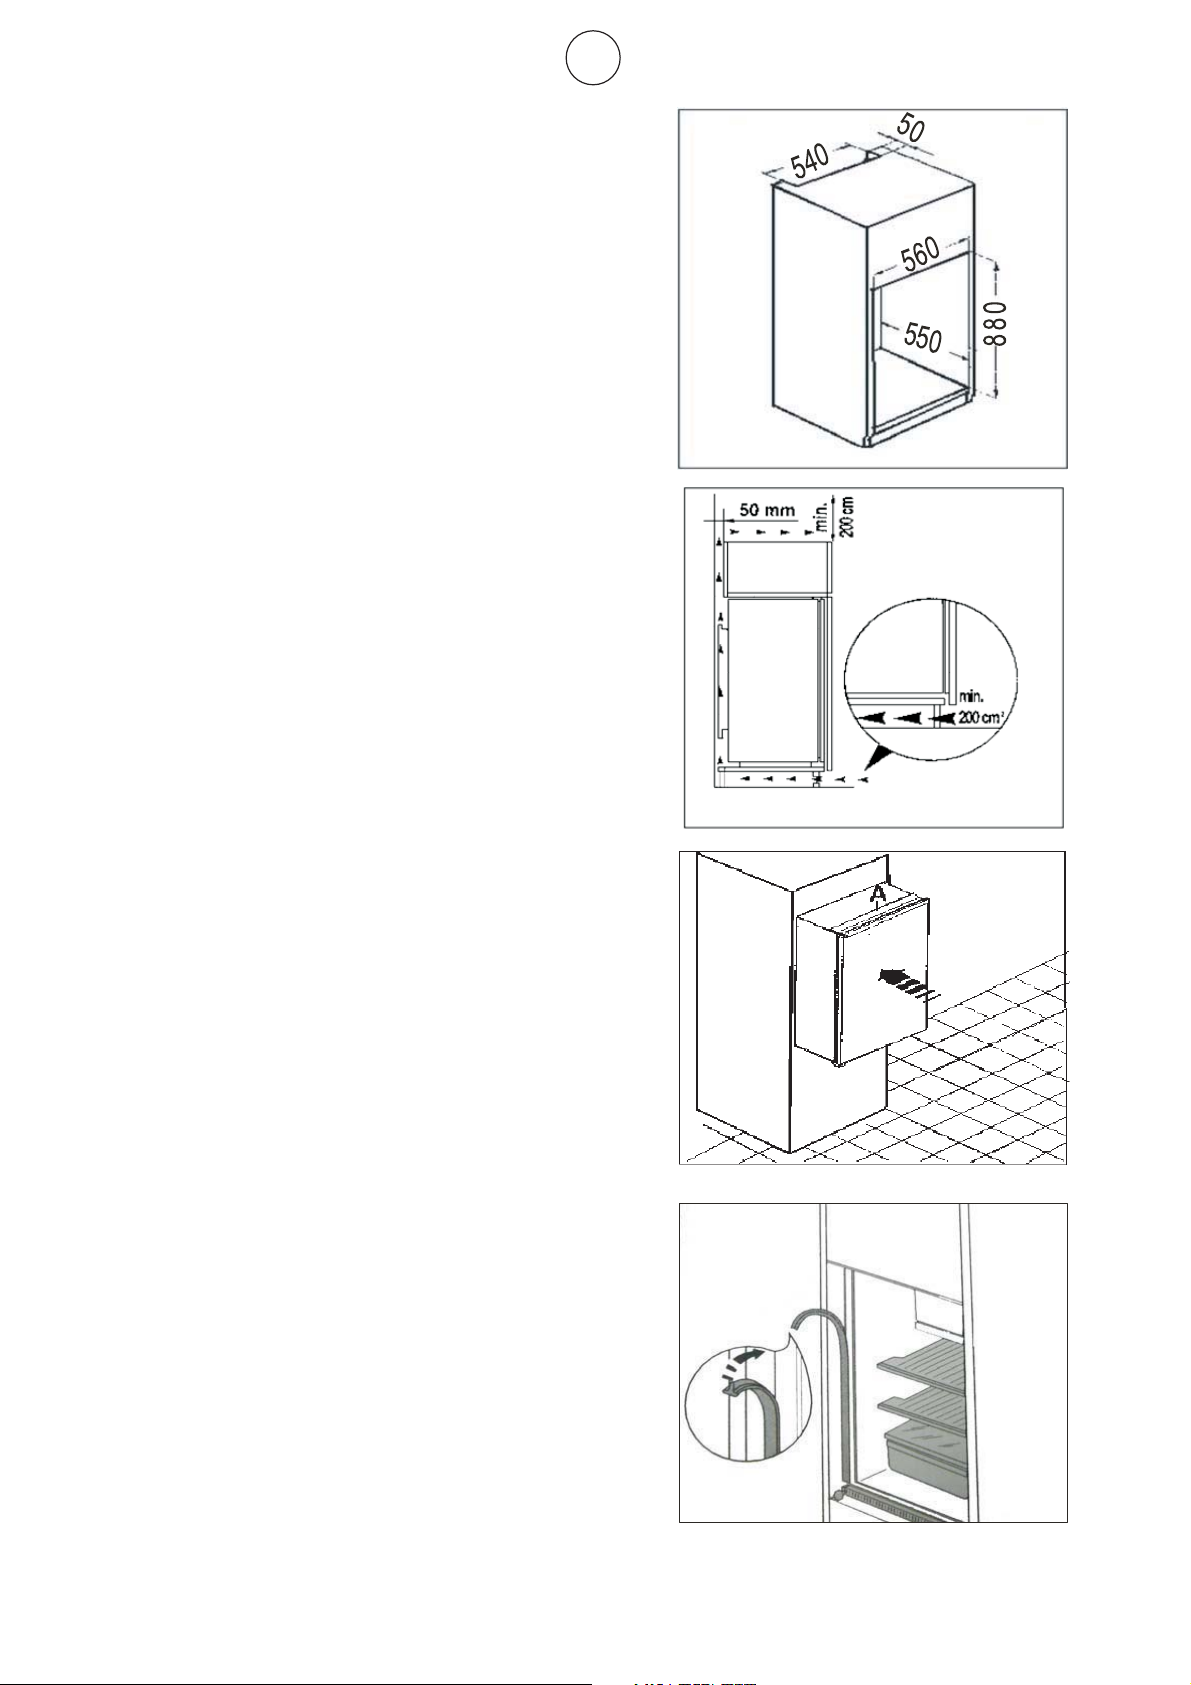
Dimensions of the recess
Height of housing mm 880
Depth of housing mm 550
Width of housing mm 560
It is necessary that the cabinet has a ventilati-
on recess with the following dimensions :
Depth 50mm
Width 540 mm
GB
For appropriate venting, follow indications in
the figure.
1.Push the appliance into the housing until
stop strip (A) touches the kitchen unit.
2.Press in the joint covers between the appli-
ance and the kitchen furniture (only on the si-
de without hinge)
6
Page 8
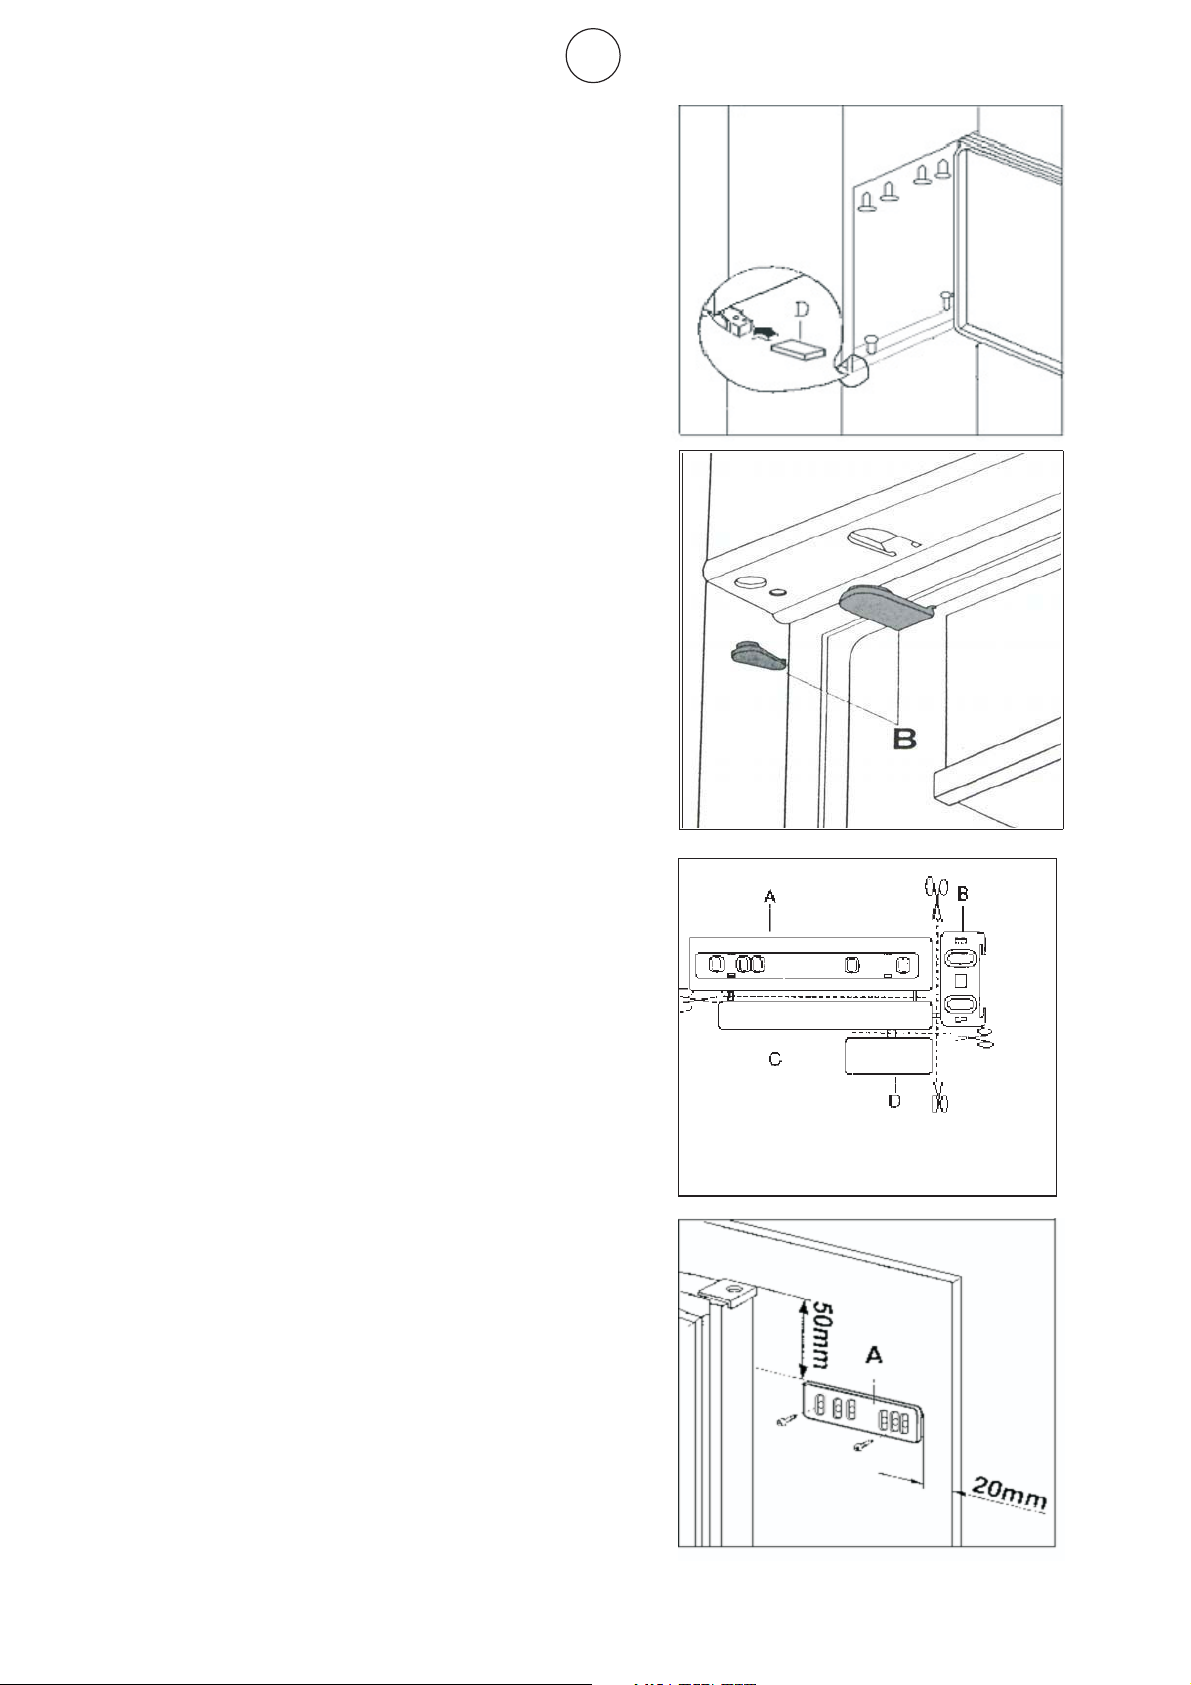
3. Open the door and push the appliance ag-
ainst the side of kitchen furniture opposite to
that of appliance hinges.Fasten the appliance
with 6 screws provided in the kit included with
the appliance. Snap hinge cover (D) into posi-
tion.
GB
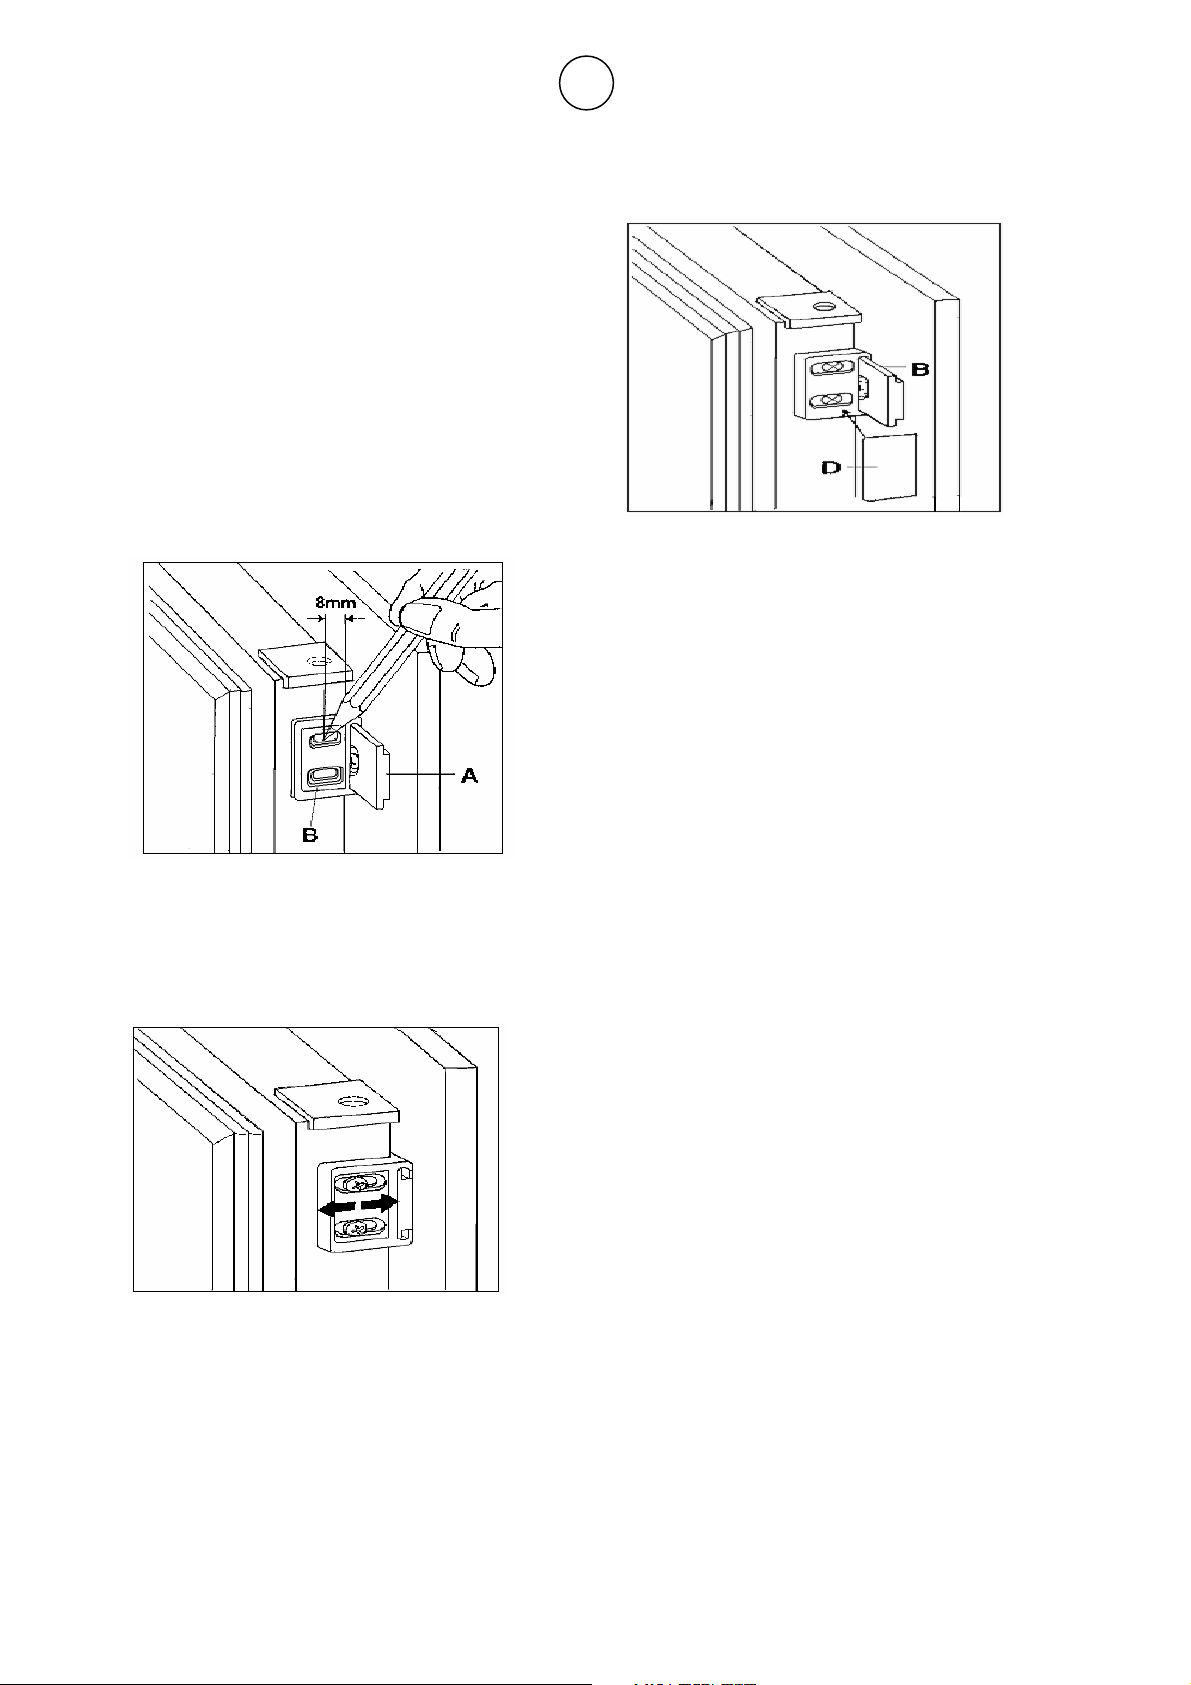
4.Apply blanking covers (B) as indicated.
5. Separate parts A,B,C,D as shown in the
figure.
6. Place guide (A) on the side part of the furn-
iture door,up and down as shown in the figure
and mark the position of external holes. After
having drilled holes, fix the guide with the scr-
ews supplied.
7
Page 9
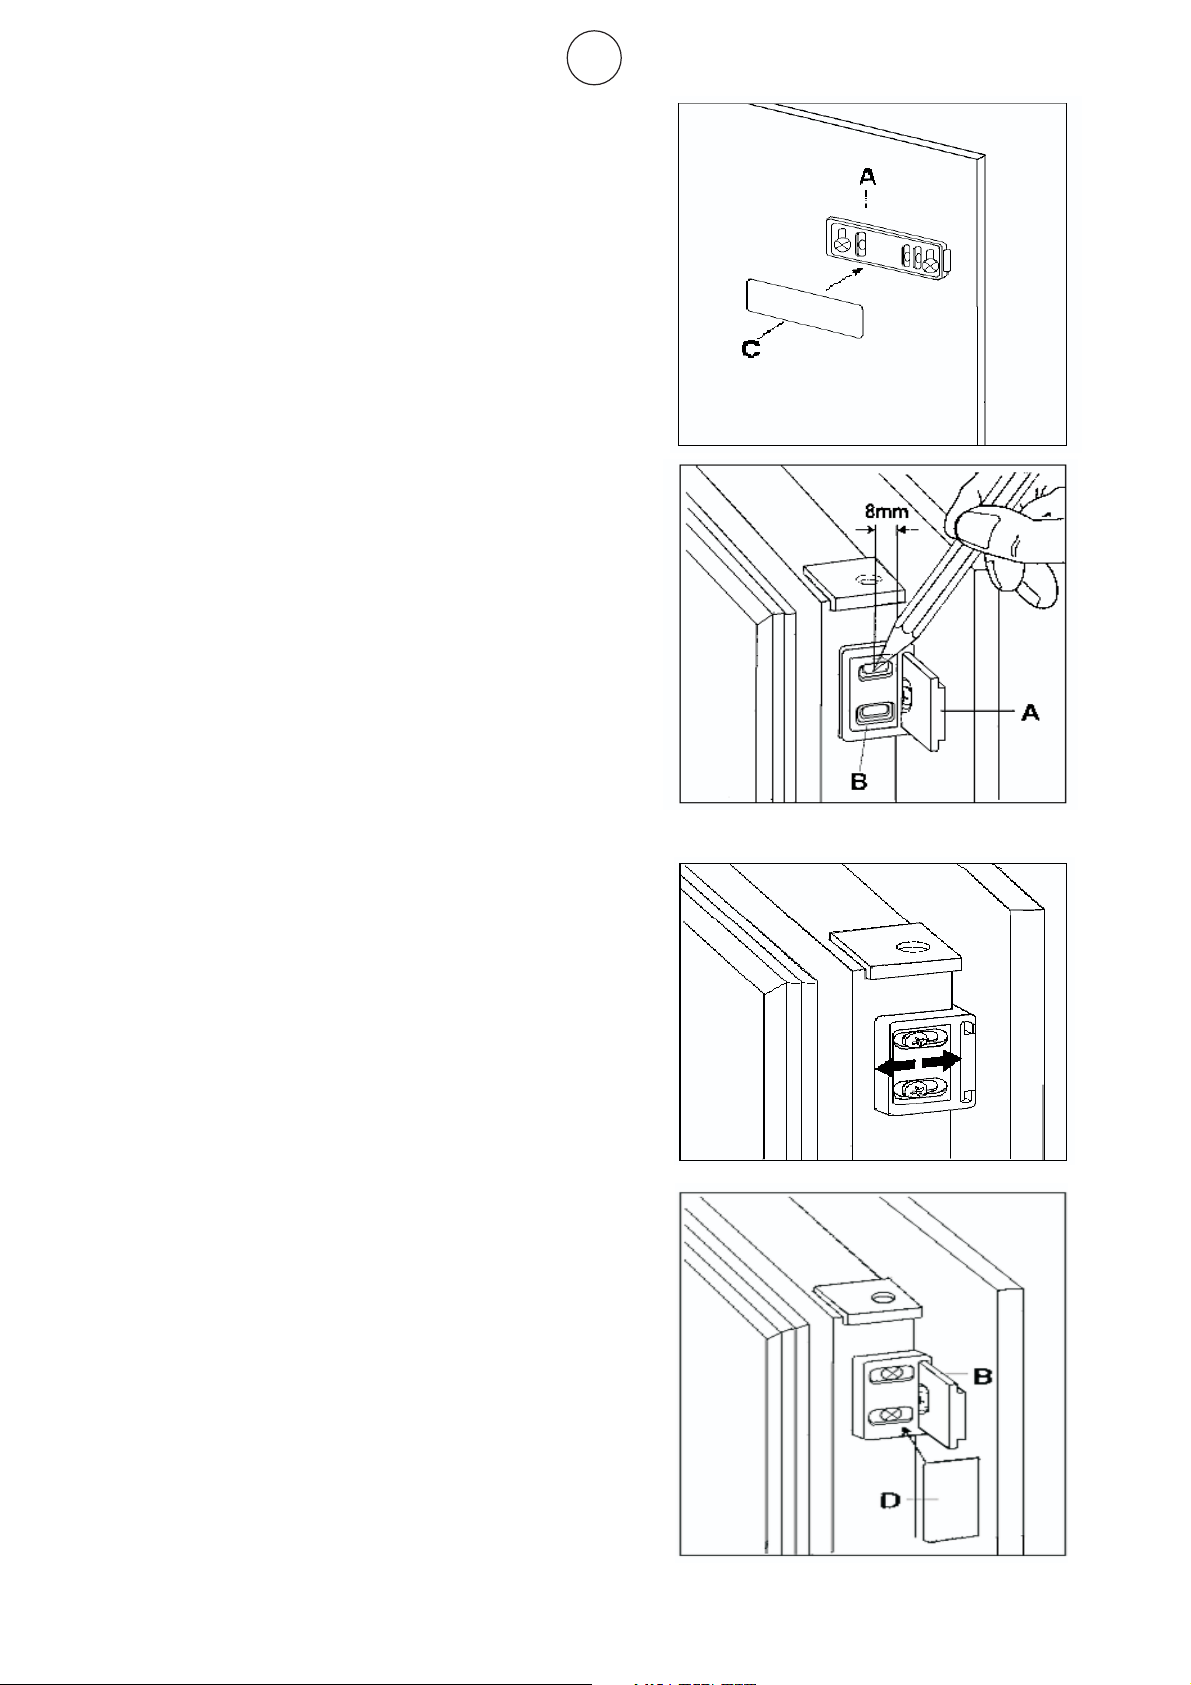
7. Fix cover ( C ) on guide (A) until it clips into
place.
8. Open the appliance door and the furniture
door at 90°.Insert the small square (B) into
guide (A) .Push together the appliance door
and the furniture door and mark the holes as
indicated in the figure remove the squares and
GB
drill holes with φ2 mm at 8 mm from the outer
edge of the door .Place the small square on
the guide again and fix it with the screws sup-
plied.
9. Should the lining up of the furniture door be
necessary , use the clearance of slots .At the
end of operations, it is necessary to check the
door of the furniture closes properly.
10. Fix cover (D) on guide (B) until it clips into
place.
8
Page 10
GB
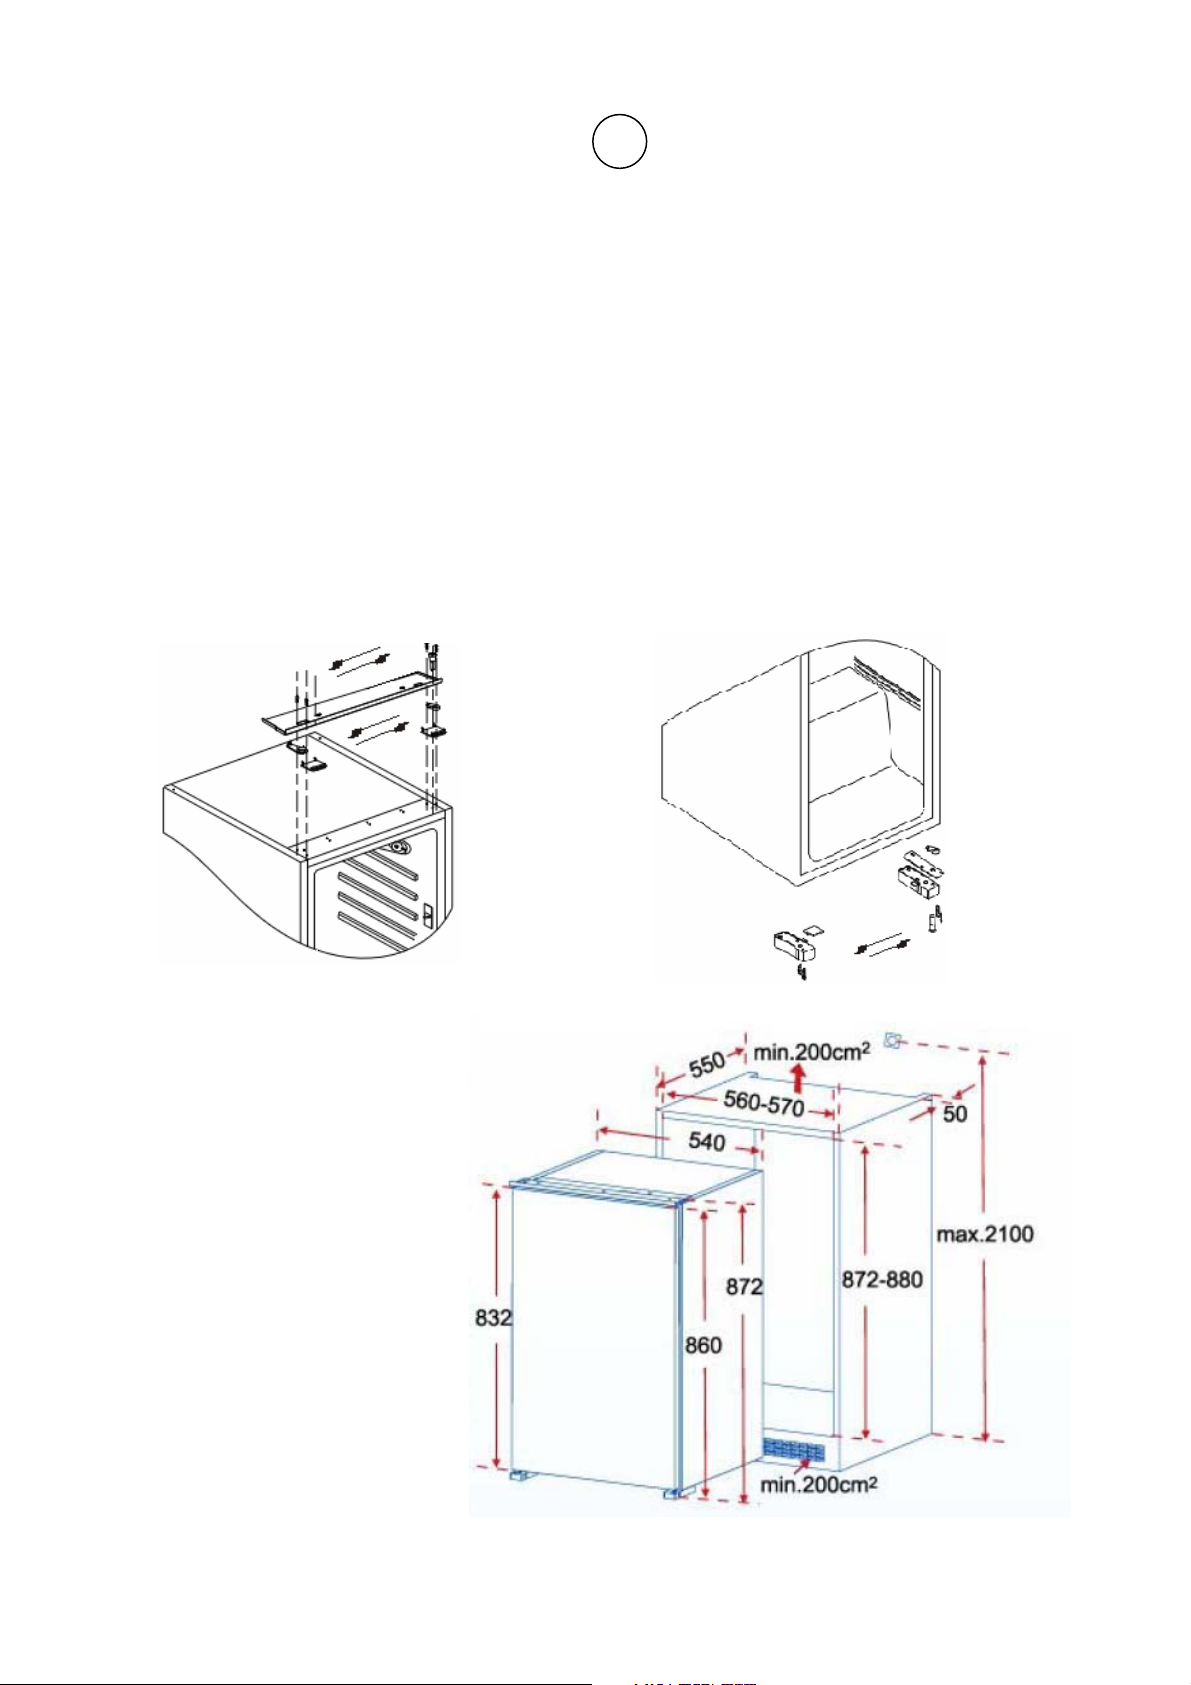
Reversing the door
The side at which the door opens can be changed from the right side (as supplied) to the left side,
if the installation site requires. Tilt the appliance slightly towards the rear and prop it securely. Un-
screw the door hinge screws and remove the hinge pin bracket. Open the door a little way and
take it out downwards.
Unscrew the upper pin and screw it into place on the opposite side.Fit the door into the upper pin
and close it. Screw the hinge pin bracket securely into place on the opposite side using the screws.
Warning!
When changing the side at which the door opens, the appliance must not be connected to the
mains. Remove plug from the mains beforehand.
9
Page 11
GB
Positioning
Position the appliance away from sources of heat such as stoves, radiators, direct sunlight etc.
Maximum performance and safety are guaranteed by maintaining the correct indoor temperature
for the class of unit concerned, as specified on the rating plate. This application perform well from
SN to ST.
Climate class
Ambient temperature
+
+
+
+
10
16
16
16
SN
N
ST
T
Appliances must not be exposed to rain.Sufficient air must be allowed to circulate in the lower rear
section of appliances, as poor air circulation can affect performance. Built-in appliances should be
positioned away from heat sources such as heaters and direct sunlight.
C
C
C
C
to
to
to
to
+
+
+
+
32
32
38
43
C
C
C
C
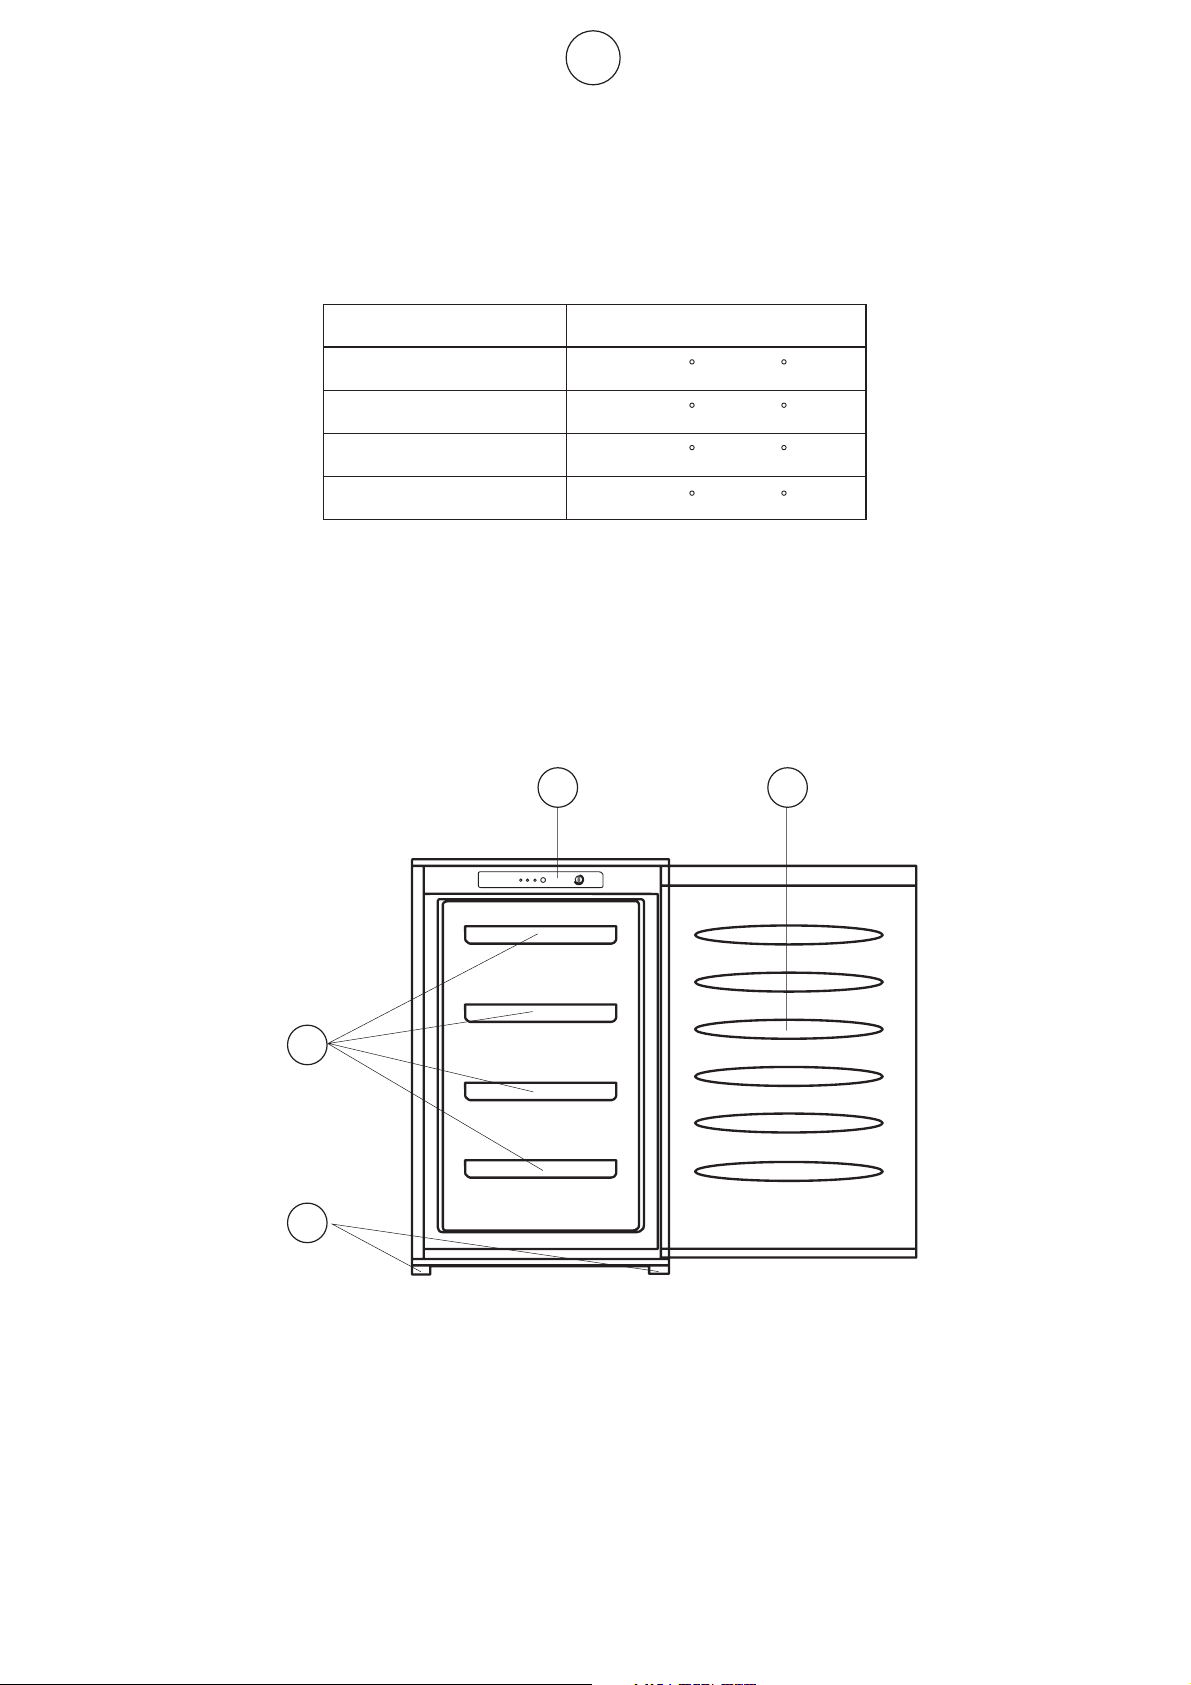
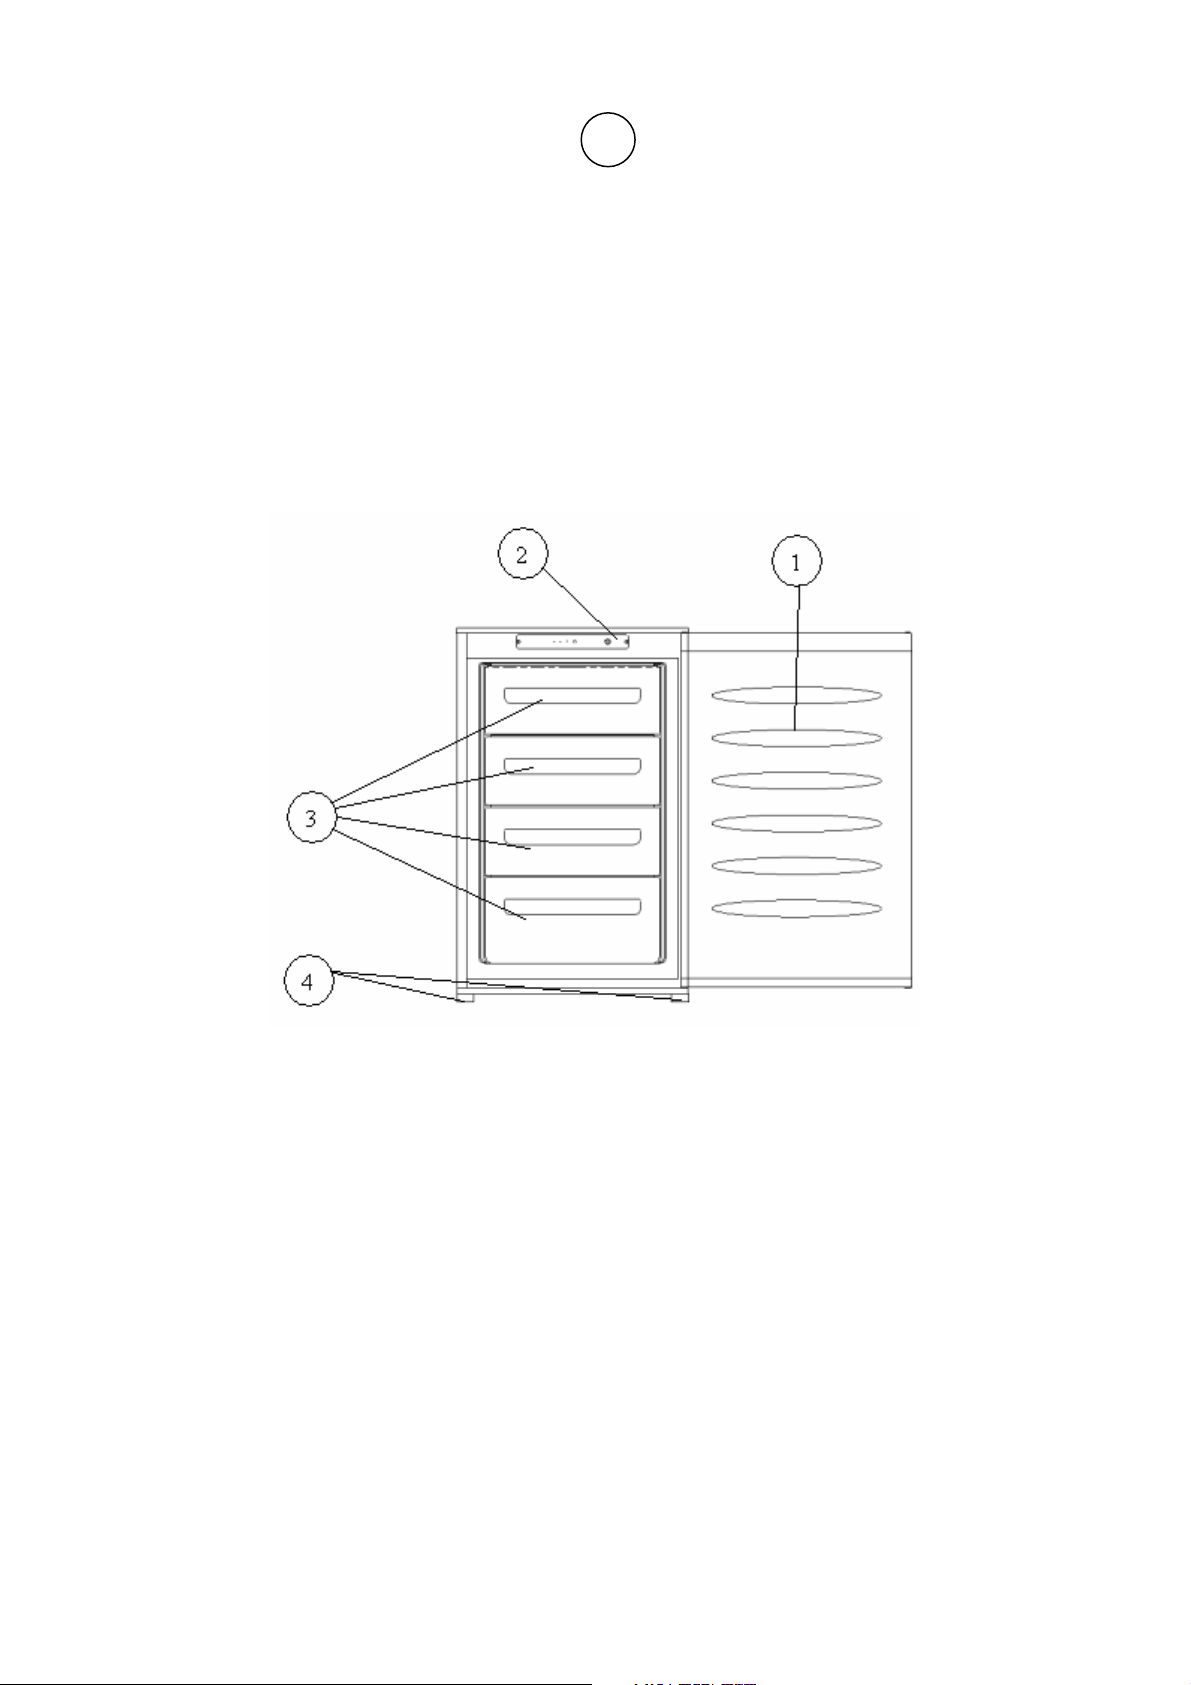
Description of the appliance
View of the appliance
1.Door
2.Thermostat
3.Freeze drawers
12
4.Regulating legs
3
4
Starting up and temperature regulation
This appliance is designed for domestic use only, specifically for the storage of edible foodstuffs.
This appliance is designed to operate in ambient temperature (surrounding air temperature) bet-
ween 16°Cand 38°C.If these temperatures are exceeded i. e., colder or warmer, the appliance will
not operate correctly. Should the ambient temperatures be exceeded for long periods, the temp-
erature in the freezer section will rise above -18°C and food spoilage may occur
10
Page 12
GB
Before use
Remove all securing tapes. Wash the inside of the appliance with lukewarm water with a little bi-
carbonate of soda added (5ml. to 0.5 liter of water).Do not use soap or detergent as the smell may
linger. Dry the appliance thoroughly.
To start the appliance
1. Allow the appliance to stand for 2 hours after installation.
2. Plug in the appliance and switch on at the mains supply.
3. Turn the thermostat control to the required setting. A midway setting is usually suitable for no-
rmal operation (see thermostat control).
4. Leave the appliance for approximately 4 hours for the correct temperature to be reached before
placing food inside.
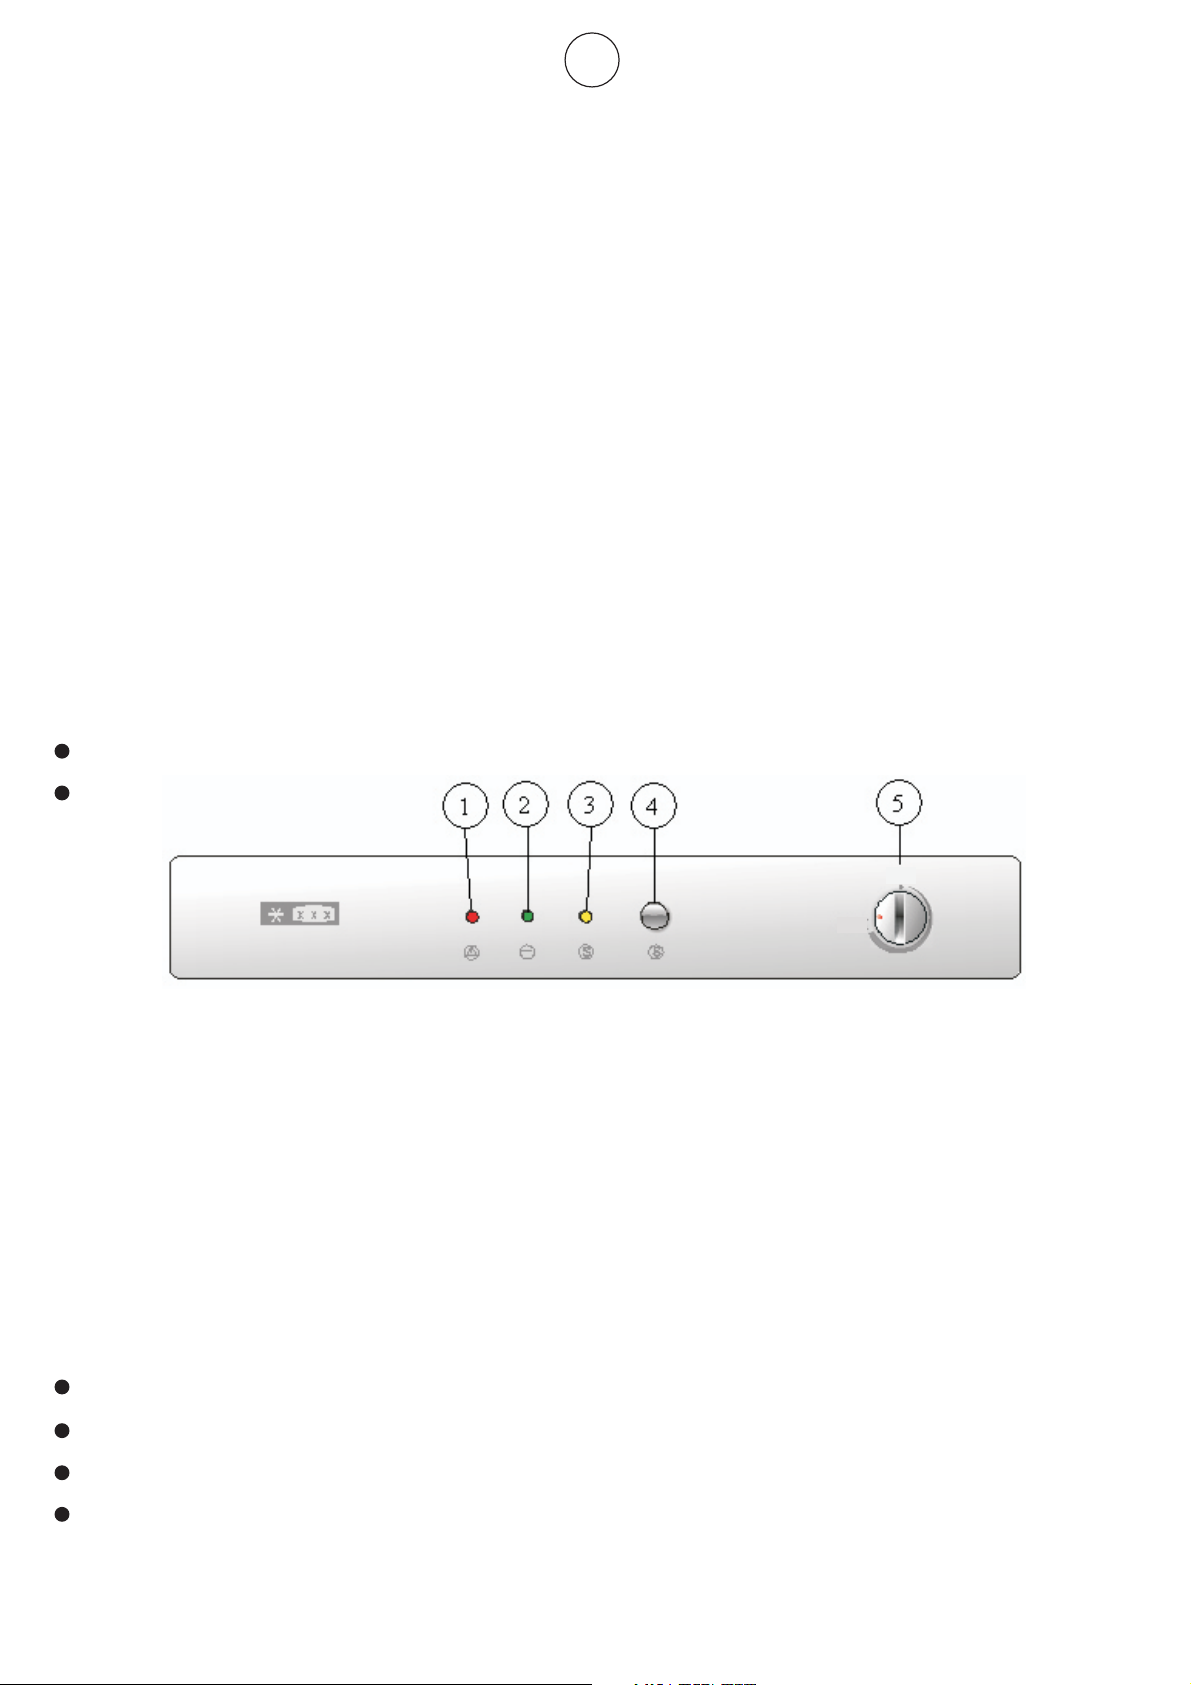
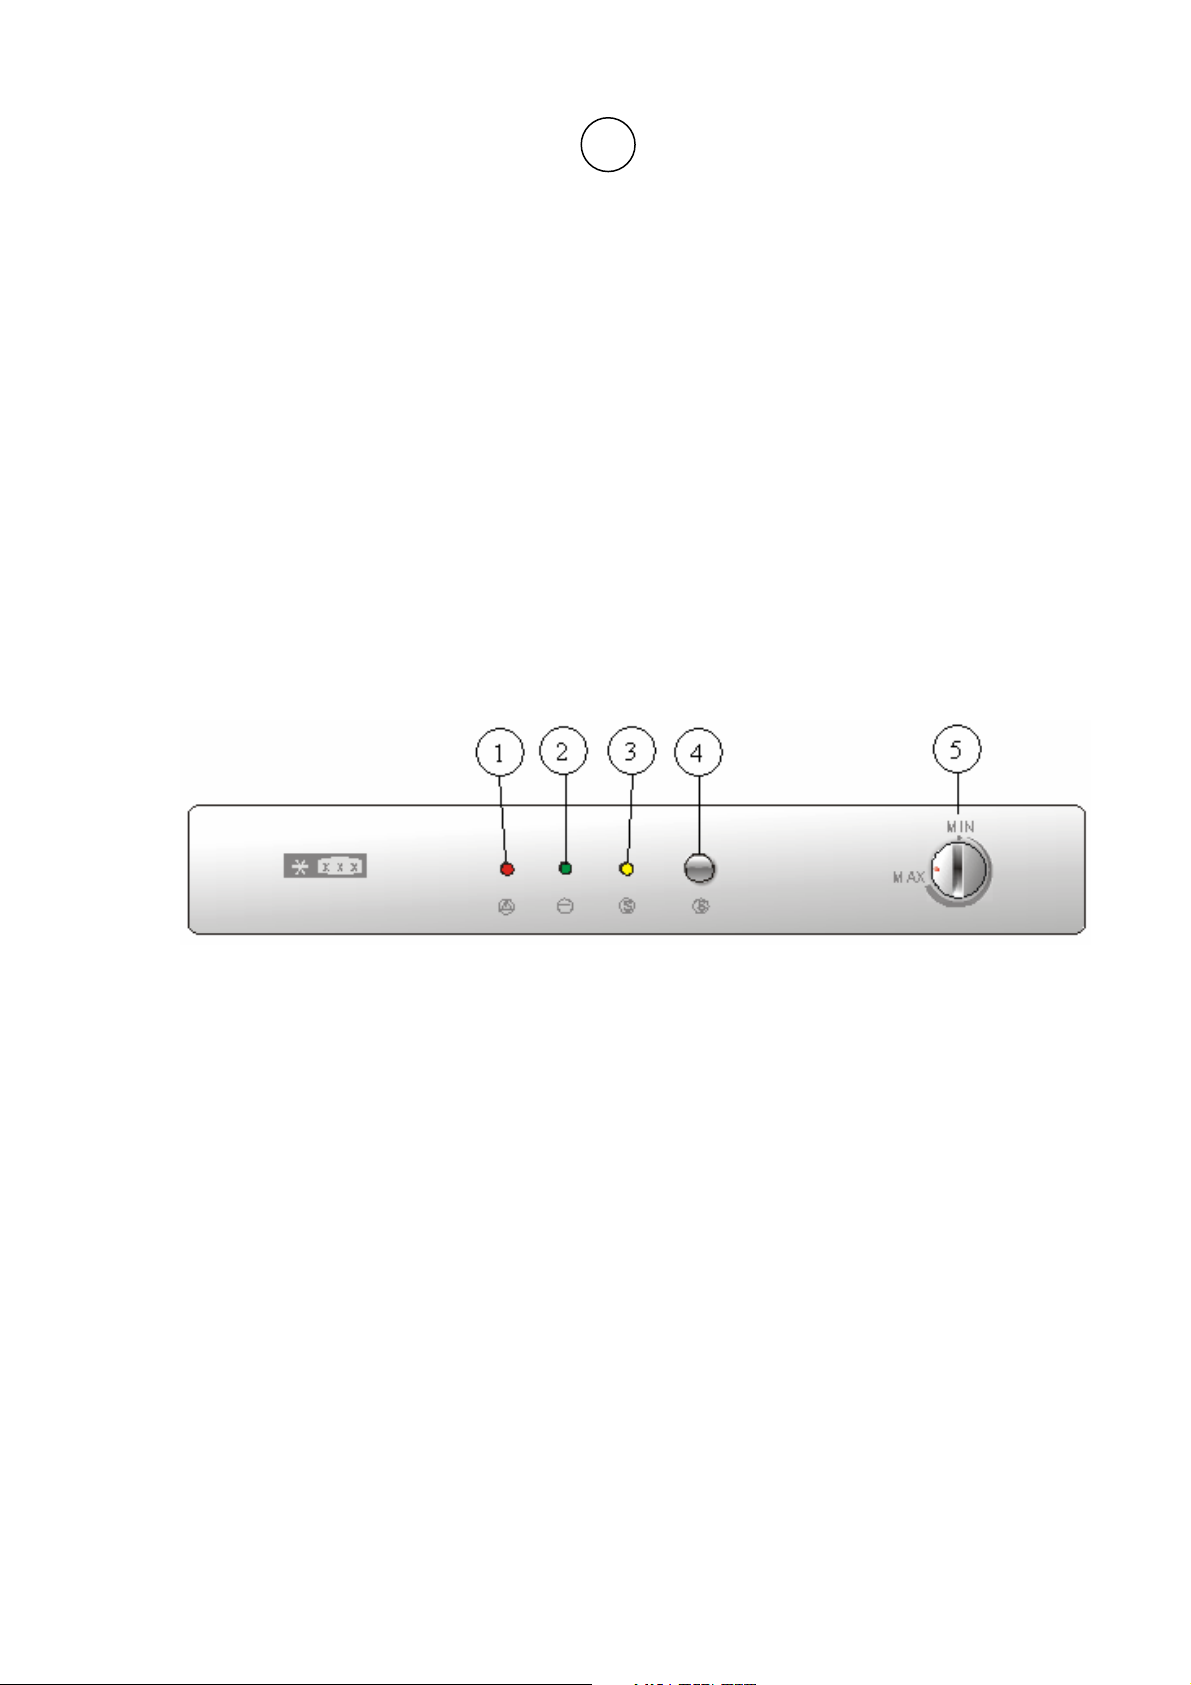
Thermostat control
The thermostat control situated in the control panel regulates the temperature of the freezer
compartment.
Position “MIN” Cold.
Position “MAX” Coldest.
MIN
MAX
1.Warning light (red)
2.Pilot light (green)
3.Fast freeze indicator light (yellow)
4. Push button for Fast freeze
5. Thermostat control knob
When the push the fast freeze button, the compressor works continuously to fast freeze much
hot food.
The temperature will be affected by:
Room temperature
How often the door is opened
How much food is stored
Position of the appliance
11
Page 13

GB
In determining the correct temperature control setting,all these factors have to be considered and
some experimentation may be necessary.Do not all children to tamper with the controls or play
with the product.
The freezer compartment
The symbol means that your freezer will store frozen food at -18°C (-0.4F) or colder all-
owing for long term frozen food storage and freezing of fresh food.The freezer temperature is co-
ntrolled automatically by the thermostat situated in the control panel. Due to the different installa-
tions, methods of usage and weather conditions,adjustments to the temperature settings may be
required. These are best assessed against a temperature reading on a thermometer buried in the
frozen food. The reading must be taken quickly as the thermometer temperature will rise rapidly
after removal.
Freezing fresh food
The maximum quantity of food you can freeze in 24 hours is 4kg. Place the fresh food on the top
freezer shelf. Food may need rearranging to achieve this. During the freezing process the tempe-
rature of fresh food should be reduced quickly so that ice crystals are kept as small as possible to
prevent damaging the structure of food. If freezing takes place slowly large ice crystals form and
these will affect the quality of food once it has defrosted.
Switch the fast freeze switch to“on”24 hours before loading the food.After loading the food return
the switch to “off”. Existing frozen foods should be rearranged to leave space on the top two sh-
elves for freezing. The packets to be frozen should be placed on the shelf in contact with the shelf
surface as far as possible and spaced apart to allow cold air to circulate between them. They sh-
ould not touch existing packets.
If there is a room.Transfer the food you have frozen to the baskets or drawer to allow you to freeze
a further load on the top shelf. No harm will result if you forger to turn off the fast freeze switch after
24 hours, but for reasons of economy, try to remember to turn it off when freezing is complete.The
“Fast freeze” light should remind you of this. Exceptionally large items can be stored by removing
the upper basket. Frozen food should not be refrozen once it has thawed out. Do not remove it-
ems from the freezer if your hands are damp/wet, as this could cause skin abrasions or “frost/
freezer burns”.
For safety reasons,the freezer baskets are fitted with stops but are readily removed by pulling them
forward to the stop, then lifting the front and pulling all the way out. Re-fit by reversing this proce-
dure.
12
Page 14

GB
Using the freezer
This appliance is designed to conserve frozen foods, to freeze fresh food and to make ice cubes.
Do not freeze a large quantity of food at any one time (maximum of 4kg/24h),as the faster an item
is frozen, the more it will keep its qualities.Similarly,make sure that you wrap your foodstuffs before
freezing, so that they retain their full flavour and do not spoil on the packaging.
Never place hot food in your freezer. Never place bottles or drinks cans in it either, as they can
burst when their contents freeze.
Highly carbonated drinks can even explode! Never keep lemonade, fruit juice, beer, wine,champ-
agne, etc…in the freezer compartment.
De-icing
The freezer de-icing system is manual.You can from time to time remove the layer of ice that forms,
using a scraper or other plastic instrument.
Never use a metal instrument of electrical device to de-ice the freezer.
The freezer must always be de-iced when the layer of frost reaches a thickness of about 4mm. In
any case, this compartment should be de-iced at least once a year.
1.Switch off and disconnect the freezer.
2.Remove the ice with a plastic scraper. De-icing can be made quicker by placing bowls of hot
water in the freezer and closing the door.
3.Once de-icing is completed, then you can clean your appliance.
Tips:
Food in the freezer should always be covered or packaged, to prevent drying and tainting of other
food.
The following are suited for packaging:
Polyethylene airtight bags and wraps,
Plastic containers with lids;
Special plastic covers with elastic,
Aluminum foil.
Defrosting
1.Wrap any food in layers of newspaper or blankets.
2.Switch the appliance off at the wall socket and remove the plug.
3.Open the freezer door.
4.Place a suitable container to collect the water from the thawing frost.
13
Page 15

GB
Switching off the appliance
To switch off the appliance, turn the temperature regulator to position ”Min”.If the appliance is not
going to be used for an extended period:Remove all refrigerated packages.Switch off the applia-
nce by turning the temperature regulator to position “Min”.Remove the mains plug or switch off or
disconnect the electricity supply.Clean thoroughly (see section: Cleaning and Care).Leave the door
open to avoid the build up of odors.
Cleaning and Care
For hygienic reasons the appliance interior,including interior accessories,should be cleaned regularly.
Warning!
The appliance may not be connected to the mains during cleaning. Danger of electrical shock!
Before cleaning switch the appliance off and remove the plug from the mains, or switch off or turn
out the circuit breaker or fuse.
Never clean the appliance with a steam cleaner.Moisture could accumulate in electrical compon-
ents, danger of electrical shock! Hot vapors can lead to the damage of plastic parts.
The appliance must be dry before it is placed back into service.
Important!
Ethereal oils and organic solvents can attack plastic parts, e.g.lemon juice or the juice from orange
peel, butyric acid, cleanser that contain acetic acid.
Do not allow such substances to come into contact with appliance parts.
Do not use any abrasive cleansers.
Remove the food from the refrigerator. Store it in a cool place, well covered.
Switch the appliance off and remove the plug from the mains, or switch off or turn out the circuit
breaker or fuse.
Clean the appliance and the interior accessories with a cloth and lukewarm water. Commercially
available dish washing detergents may also be used.
After cleaning wipe with fresh water and rub dry.
Accumulation of dust at the condenser increases energy consumption.
For this reason carefully clean the condenser at the back of the appliance once a year with a soft
brush or a vacuum cleaner.
Check the water drain hole on the rear wall of the fridge.
Clear a blocked drain hole with the aid of the green peg in the pack of accessories included with
the appliance.
After everything is dry place appliance back into service.
14
Page 16

GB
Energy Saving tips
1. Do not place warm foods into the appliance. Allow warm foods to cool first. Do not install the
appliance near cookers,radiators or other sources of warmth.High ambient temperatures cause
longer, more frequent operation of the compressor
2. In order to make the cooling system work efficiently,please make sure the side plates and back
plate of the product are with some distance from the wall. It is strongly recommended that the
distance should be more than 50mm.
3. When the product works, please do not open the door too often or leave the door open any
longer than necessary.
4. Do not set temperature any colder than necessary.
5. The direct cooling refrigerator (with a freezer) needs to be defrosted when necessary.
6. The sketch map shows the right combination of the drawers, baskets and shelves which can
lead to the more energy efficiency.If users adjusted the combination,it would result the energy-
consuming.
Trouble shooting
Correcting Malfunctions
A malfunction may be caused by only a minor fault that you can rectify yourself using the following
instructions. Do not perform any other work on the appliance if the following information does not
provide assistance in your specific case.
Important!
Repairs to freezers may only be performed by competent service engineers. Improper repairs can
give rise to significant hazards for the user. If your appliance needs repairing, please contact your
specialist dealer or your local Service Force Center.
15
Page 17

GB
Symptom
Appliance is not switched on.
Mains plug is not plugged in or
is loose.
Appliance does not work.
Fuse has blown or is defective.
Appliance cools too much. Temperature is set too cold.
Temperature is not properly
adjusted.
The food is too warm.
A large quantity of warm food
was placed in the appliance
within the last 24 hours.
ossible Cause
Socket is defective.
Door was open for an
extended period.
Remedy
Switch on the appliance.
Insert mains plug.
Check fuse, replace if necessary.
Mains malfunctions are to be
corrected by an electrician.
Turn the temperature regulator
to a warmer setting temporarily.
Please look in the “initial Start
Up” section.
Open the door only as short
as necessary.
Turn the temperature regulation
to a colder setting temporarily.
The appliance is near a heat
source.
Interior lighting does not work. Light bulb is defective.
Heavy build-up of frost, possibly
also on the door seal.
Unusual noises.
Door seal is not air-tight(possibly
after reversing the door)
Appliance is not level.
The appliance is touching the
wall or other objects.
A component, e.g. a pipe, on
the rear of the appliance is
touching another part of the
appliance or the wall.
Please look in the “installation
location” section.
Please look in the “changing
the Light Bulb “section.
Carefully warm the leaking
sections of the door seal with a
hair dryer(on a cool setting). At
the same time shape the warmed door seal by hand such
that it sits correctly.
Readjust the feet.
Move the appliance slightly.
If necessary, carefully bend the
component out of the way.
The compressor does not start
immediately after changing the
temperature setting.
Water on the floor or storage
shelves.
This is normal, no error has
occurred.
Water drain hole is blocked.
16
The compressor starts after a
period of time.
See the “cleaning and care”
section.
Page 18
GB
Noises during Operation
The following noises are characteristic of refrigeration appliances:
Clicks
Whenever the compressor switches on or off, a click can be heard.
Humming
As soon as the compressor is in operation, you can hear it humming.
Bubbling
When refrigerant flows into thin tubes, you can hear bubbling or splashing noises.
Splashing
Even after the compressor has been switched off, this noise can be heard for a short time.
Regulations, Standards, Guidelines
This appliance is in accordance with the following EU guidelines:
-73/23/EEC low voltage guidelines.
-89/336/EEC EMC Directive
-643/2009 ecodesign requirements for household refrigerating appliances.
-2009/125/EC framework for the settting of ecodesign requirements for energy-using
Disposal of the appliance
It is prohibited to dispose of this appliance in domestic household waste.
For disposal there are several possibilities:
a) The municipality has established collection systems ,where electronic waste can be disposed
of at least free of charge to the user.
b) The manufacturer will take back the old appliance for disposal at least free of charge to the user.
c) As old products contain valuable resources ,they can be sold to scrap metal dealers.
Wild disposal of waste in forests and landscapes endangers your health when hazardous substa-
nces leak into the ground-water and fin their way into the food chain .
Meaning of crossed out wheeled dustbin:Do not dispose of electrical appliances as unsorted Municipal waste, use separate collection facilities.Contact
your local government for the information regarding the collection systems
available.If electrical appliances are disposed of in landfills or dumps, hazardous substances can leak into the groundwater and get into the foodchain,
damaging your health and well-being This symbol on the product or in the
instructions mean that your electrical and electronic equipment should be
disposed at the end of life separately from your household waste. There are
separate collection systems for recycling in the EU. For more information,
please contact the local authority or your retailer where you purchased the
product.
17
Page 19

FR
CONGELATEUR ENCASTRABLE
Notice d’utilisation
Page 20

FR
Cher client,
Cette notice contient des informations importantes relatives à l'installation, à
l'utilisation et à la maintenance de votre nouveau réfrigérateur. Nous vous
recommandons de la lire attentivement de manière à optimiser l'utilisation de votre
appareil en toute sécurité.
Conservez ce document et n'oubliez pas de le confier à l'acquéreur en cas de
revente.
Veuillez noter que pour une meilleure lecture de cette notice, les principes de
fonctionnement importants sont précédés par les termes Important !, Attention !
Ces termes sont destinés à vous alerter sur l’importance d’une information pour votre
sécurité. Assurez-vous d’avoir bien compris tous les avertissements signalés dans
cette notice.
1
Page 21

FR
Sommaire
Important ! Instructions de sécurité......................................3
Comment enlever le packaging de protection ?..................4
Installation de votre appareil..................................................5
Encastrement de votre appareil.............................................5
Inversion du sens d’ouverture de la porte............................8
Comment positionner votre appareil ?..................................9
Description de l’appareil.........................................................10
Démarrer et régler la température..........................................10
Utilisation du congélateur.......................................................12
Dégivrage..................................................................................13
Comment nettoyer votre appareil ?........................................14
Conseils divers..........................................................................14
Dysfonctionnements éventuels................................................15
Bruits pendant le fonctionnement............................................15
Normes........................................................................................16
Mise hors d’usage de l’appareil................................................16
2
Page 22

FR
IMPORTANT : INSTRUCTIONS DE SECURITE
Ces avertissements vous sont donnés dans la cadre de votre sécurité. Assurezvous d'avoir tout compris avant d'installer et d'utiliser votre appareil. N'hésitez pas à
contacter votre revendeur si un doute relatif à la compréhension de ces
avertissements subsiste.
Usage habituel:
Cet appareil est exclusivement destiné à un usage domestique dans le cadre de la
conservation de produits alimentaires comestibles à basse température. Si le
congélateur est utilisé à d'autres fins, tel que dans un cadre commercial, ou mal
utilisé, le constructeur ne peut être tenu responsable des dommages
éventuellement causés.
Pour des raisons de sécurité, ne cherchez en aucun cas à modifier les paramètres
techniques de votre appareil.
Avant toute utilisation:
Après avoir déballé votre appareil, vérifiez son bon état. Il ne doit en aucun cas être
branché s'il est endommagé. Signalez toute anomalie à votre revendeur.
Réfrigérant:
Le réfrigérant isobutane (R600a) est contenu dans le circuit de votre appareil. Il
s'agit d'un gaz naturel respectueux de l'environnement, qui est cependant
inflammable. Assurez-vous qu'aucun composant du circuit de réfrigération ne vienne
à être endommagé lors du transport ou de l'installation de l'appareil.
Si le circuit réfrigérant venait à être endommagé :
- tenez l'appareil à l'écart de toutes flammes et sources inflammables;
- ventilez au maximum la pièce dans laquelle se trouve l'appareil.
/!\ Autres points d'alerte:
ATTENTION - Maintenir les ventilations ouvertes et libres de toute obstruction, à
l'extérieur comme à l'intérieur de l'appareil.
ATTENTION - N'utilisez aucun dispositif mécanique ou tout autre moyen en vue
d'accélérer le processus de dégivrage autre que ceux recommandés par le fabricant.
ATTENTION - N'endommagez pas le circuit de réfrigération.
ATTENTION - N'utilisez pas d'appareil électrique à l'intérieur des compartiments du
réfrigérateur.
ATTENTION - L'appareil ne doit pas être utilisé par les enfants sans la présence
d'un adulte.
ATTENTION - Les jeunes enfants doivent être surveillés afin qu'ils ne jouent pas
avec l'appareil.
ATTENTION - Ne vous débarrassez pas de votre appareil ailleurs que chez un
spécialiste autorisé. Retirez la porte avant de vous en débarrasser.
3
Page 23

FR
ATTENTION - Si le fil électrique est abîmé, il doit impérativement être remplacé par
le fabricant, un réparateur agréé ou une personne qualifiée dans le but d'éviter tout
danger.
ATTENTION – Gardez éloigné de l’appareil toute substance qui pourrait causer le
départ d’une étincelle.
Pour la sécurité des enfants:
L'emballage peut-être dangereux pour les enfants (risque de suffocation). Gardez-le
à l'écart des enfants!
Prenez vos dispositions pour mettre hors d'usage votre ancien appareil :
débranchez-les prises et les autres connections et retirez les vis s'il était fixé.
Assurez-vous que les enfants ne puissent pas s'enfermer dans l'appareil en jouant (il
y a un risque de suffocation) ou qu'ils ne puissent se mettre en danger, n'étant eux
mêmes pas toujours conscients des dangers des appareils électroménagers. Par
conséquent, il est très important que les parents surveillent de près leurs enfants s'ils
viennent à jouer avec l'appareil.
L'utilisation quotidienne:
Les composants contenant des gaz inflammables ou des liquides peuvent fuir à
basse température. Un risque d'explosion existe! Ne jamais mettre aucun produit
inflammable (comme des produits en spray), ni d'appareil électrique (ex : mixers, etc.)
dans votre réfrigérateur.
Avant de nettoyer votre appareil, pensez toujours à l'éteindre ou à le débrancher.
En cas de dysfonctionnement:
Si un dysfonctionnement apparaît, reportez-vous s'il vous plait en premier lieu à la
section "dysfonctionnements éventuels" de cette notice. Si les informations fournies
dans cette dernière ne suffisent pas, demandez de l'aide à votre revendeur.
N'entreprenez en aucun cas de réparer votre appareil vous même.
Comment enlever le packaging de protection?
L’appareil et l’aménagement intérieur sont protégés pour le transport.
Retirez l’adhésif qui se trouve sur les côtés droit et gauche de la porte. Vous pouvez
retirer tout reste d’adhésif en utilisant du White Spirit. Retirez tous les adhésifs et les
protections des pièces intérieures.
4
Page 24
FR
Installation de votre appareil
Avant d’installer votre appareil, veuillez lire attentivement et entièrement la
notice d’installation afin d’éviter tout problème.
Attention: pour éviter tout risqué dû à une mauvaise installation de l’appareil,
ce dernier doit être fixé selon les instructions présentées ci-dessous.
Encastrement
Dimensions d’encastrement
Hauteur mm min 880
Profondeur mm min 550
Largeur mm min 560
Il est nécessaire que le caisson soit équipé
d’une niche d’aération aux dimensions
suivantes :
Profondeur 50mm
Largeur 540 mm
5
0
560
3
550
2
1
880
54
0
1. Placer l’appareil dans le caisson
jusqu’à ce que la lamelle (A) touché le
caisson.
2. Placer les joints entre l’appareil et le
caisson de la cuisine (seulement sur le
côté sans charnière)
Pour une aération appropriée, veuillez
suivre les indications ci-dessous sur le
dessin.
5
Page 25

FR
3. Ouvrir la porte et pousser l’appareil
contre le côté du caisson de cuisine
oppose aux charnières de la cuisine.
Fixer l’appareil avec les 6 écrous
prévus à et effet dans le kit inclus dans
l’appareil. Repositionner la charnière
(D) dans sa position.
4. Positionnez les plaques de protection
(B) comme indiqué ci-dessous.
6. Placez la glissière (A) sur le côté
intérieur de la porte de cuisine, aux
distances indiquées dans le dessin cidessous, et marquez les positions des
trous. Après avoir percé les trous, fixez
la glissière avec les vis fournies.
7. Placez le cache (C) sur la charnière (C)
jusqu’à ce qu’il se clipse.
5. Séparez les parties A, B, C, D comme
montré dans le dessin ci-dessous.
6
Page 26
FR
8. Ouvrir la porte de l’appareil et la porte
de la cuisine à 90°C. Insérer la petite
pièce carrée (B) dans la charnière (A).
Poussez ensemble la porte de
l’appareil et celle de la cuisine et faîte
les marques pour les trous comme
indiqué dans le dessin ci-dessous. Z
des trous de ij 2mm de diamètre à
8mm de la tranche de la porte. Placez
une nouvelle fois la petite pièce carrée
dans la charnière et fixez la avec les
vis fournies.
10. Fixez le cache (D) sur la charnière (B)
jusqu’à ce qu’il se clipse.
9. Afin d’aligner la porte de la cuisine,
aidez vous de l’ajustement des
encoches. A la fin de l’opération, il est
nécessaire de vérifier que la porte de
la cuisine ferme correctement.
7
Page 27
FR
INVERSION DU SENS D'OUVERTURE DES PORTES
Votre réfrigérateur vous est livré avec les charnières de la porte montées à
droite. Voici les instructions à suivre si vous désirez changer le sens
d'ouverture de la porte.
Attention!
Votre appareil ne doit pas être branché lorsque vous changez le sens
d'ouverture de la porte.
Penchez légèrement l’appareil vers l’arrière et appuyez-le contre un mur avec
précaution.
Dévissez la charnière de la porte et retirez les attaches de la charnière.
Ouvrir légèrement la porte et retirez-la de haut en bas.
Dévissez la charnière supérieure et vissez-la du côté opposé.
Placez la porte sur la charnière supérieure et fermez-la.
Vissez attentivement les attaches de la charnière sur le côté opposé en utilisant les
vis fournies.
Schéma d’encastrement
8
Page 28
FR
COMMENT POSITIONNER VOTRE APPAREIL?
L'appareil doit être placé dans une pièce sèche et bien ventilée. La
performance et la consommation d'énergie de votre appareil pouvant être
affectées par la température ambiante, assurez-vous que les conditions
suivantes sont bien réunies :
- ne pas exposer l'appareil aux rayons du soleil ;
- ne pas installer l'appareil à proximité d'un radiateur, d'un appareil de cuisson
ou de toute autre source de chaleur ;
- placer l'appareil dans un endroit où la température ambiante correspond à la
classe climatique de l'appareil. Vous pouvez trouver la classe climatique sur
la plaque de données de l'appareil située dans le coin en haut à gauche. La
table suivante résume cette classification climatique et la correspondance
avec la température ambiante :
Classe climatique Température ambiante
SN 10~32°C
N 16~32°C
ST 16~38°C
T 16~43°C
Cet appareil fonctionne de manière optimale dans la classe climatique SN à
ST.
Alimentation électrique
L'appareil est seulement compatible avec une prise de 220-240V, (50±1)Hz.
Cordon d'alimentation
Le fil ne doit pas être plié quand l'appareil est en service ni rallongé. Par
ailleurs, il est important de veiller à ce que le fil ne soit pas proche ou ne
touche pas le compresseur à l'arrière de l'appareil car il peut chauffer lorsqu'il
fonctionne et l'isolant peut ainsi s'altérer et provoquer une fuite électrique.
Protection de l'humidité
Il est nécessaire d'éviter de placer l'appareil dans une pièce où il y a un fort
taux d'humidité afin de minimiser la possibilité qu'une pièce métallique ne
rouille. Il est également impératif de veiller à ce que l'appareil ne soit pas
éclaboussé d'eau, cela pourrait impacter le pouvoir d'isolation et causer une
perte d'énergie.
La surface au sol
La surface sur laquelle le réfrigérateur est positionné doit être parfaitement
plate et solide. Il ne doit absolument pas être posé sur une surface instable.
Les pieds de l'appareil vous permettent d'ajuster sa hauteur à souhait.
Protection de la chaleur
Le réfrigérateur ne doit pas être exposé à une source de chaleur ni aux
rayons du soleil.
9
Page 29
FR
Eviter tout danger
Il est déconseillé de placer le réfrigérateur à proximité d'un quelconque
combustible tel que du gaz, de l'essence, de l'alcool… Ces derniers ne
doivent pas non plus être stockés dans votre appareil.
Déplacer l'appareil
Ne coucher pas l'appareil horizontalement ou à un angle inférieur à 45°
lorsque vous le déplacez.
Description de l’appareil
Vue de l’appareil
1. Porte
2. Thermostat
3. Tiroirs à congélation
4. Pieds
Démarrer et régler la température
Cet appareil est destine à un usage domestique uniquement spécifiquement pour le
stockage d’aliments comestibles. Cet appareil est destiné à fonctionner dans une
température ambiante entre 16°C et 38°C. Si la température ambiante va au-delà de
cette fourchette 16-38°C, ie celle-ci est plus froide ou plus chaude, l’appareil ne
fonctionnera pas correctement. Si la température venait à dépasser cette fourchette
pendant un période prolongée, la température du congélateur dépassera les – 18°C
et les aliments peuvent être avariés.
10
Page 30
FR
Avant utilisation
Retirez tous les rubans adhésifs. Nettoyez l’intérieur de l’appareil avec un chiffon
humide. N’utilisez pas de savon ou de détergent car l’odeur pourrait subsister.
Séchez avec précaution.
Pour démarrer l’appareil
1. Laissez l’appareil reposer 2 heures après son installation.
2. Branchez l’appareil.
3. Réglez le thermostat à la température souhaitée. Un réglage à la position
« moyenne » est habituellement suffisant pour une utilisation normale (cidessous pour le réglage du thermostat).
4. Laissez l’appareil fonctionner environ 4 heures pour que la température
souhaitée soit atteinte avant d’y placer des aliments.
Réglage du thermostat
Le contrôle du thermostat situé sur le panneau de contrôle régule la température du
congélateur.
- Position « MIN » signifie un réglage à une température froide
- Position « MAX » signifie un réglage à la position la plus froide
1. Voyant d’alarme (rouge)
2. Voyant de fonctionnement (vert)
3. Voyant de congélation rapide (jaune)
4. Appuyez sur le bouton pour une congélation rapide
5. Manette pour le contrôle du thermostat
Lorsque vous appuyez sur le bouton de congélation rapide, le compresseur
fonctionne de manière continue pour accélérer la congélation des aliments.
La température du congélateur sera affectée par :
- La température de la pièce
- La fréquence d’ouverture de la porte
- La quantité d’aliments stockés
- La position de l’appareil
En déterminant la position de la température, tous ces facteurs doivent être pris en
considération et quelques tests peuvent être nécessaires. Ne pas laisser les enfants
manipuler le réglage de la température ou jouer avec le produit.
11
Page 31

FR
Le compartiment Congélateur
Le symbole signifie que votre congélateur peut stocker des aliments
congelés à 18°C ou à une température encore plus froide, permettant ainsi le
stockage sur une longue période d’aliments congelés ou congeler des produits frais.
La température du congélateur se contrôle par le thermostat situé sur le panneau de
commandes. Dû aux différents types d’installation ou d’utilisation et les conditions
climatiques, des ajustements de la température peuvent être nécessaires.
Congeler des aliments frais
La quantité maximum d’aliments que vous pouvez congeler en 24 heures est de 4kg.
Placez les aliments dans le tiroir du haut. Pour ce faire, vous aurez peut-être à
réorganiser le rangement des aliments déjà placés dans les tiroirs. Durant le procédé
de congélation, la température des aliments frais doit baisser rapidement pour que
les cristaux de glace soient aussi petits que possible et prévenir ainsi tout dommage
à la structure même des aliments. Si la congélation se fait lentement, de gros
cristaux de glace vont se former et cela altérera la qualité de la nourriture une fois
décongelée.
Actionner la fonction Congélation Rapide 24 heures avant le stockage d’aliments.
Après avoir stockés les aliments, vous pouvez stopper cette fonction. Il n’y a pas de
danger à laisser plus longtemps cette fonction actionnée mais pour des raisons
d’économies d’énergie, essayez de vous en rappeler. Le voyant « Congélation
Rapide » devrait vous y aider.
Les aliments déjà congelés dans les tiroirs peuvent devoir être réorganisés pour
laisser de la place dans les tiroirs les plus hauts. Les aliments devant être congelés
devraient être placés dans le tiroir, le plus au contact du tiroir et placés à part pour
permettre à l’air de bien circuler entre les aliments. Ils ne devraient pas toucher les
aliments déjà congelés et stockés dans le tiroir.
De manière exceptionnelle, vous pouvez stocker de gros articles en retirant le tiroir
du haut.
Des aliments congelés ne devraient pas être recongelés une fois ces derniers
décongelés.
Ne pas retirer des articles du congélateur si vos mains sont humides, car cela
pourrait engendrer des brûlures de peau.
Pour des raisons de sécurité, les tiroirs du congélateur sont équipés d’un « stop
tiroir » mais il est aisé de retirer le tiroir en les tirant jusqu’au « stop » et en soulevant
le devant du tiroir pour ainsi le retirer entièrement.
Pour réinstaller le tiroir, faire la manipulation inverse.
Important !
Les températures ambiantes élevées (ie pendant les jours d’été) et un réglage sur
une basse température (position 6 ou 7) peut provoquer un fonctionnement continu
du compresseur.
La raison: lorsque la température ambiante est élevée, le compresseur doit
fonctionner de façon continue pour maintenir la basse température de l’appareil.
Utilisation du congélateur
L’appareil est destiné à conserver des aliments congelés, à congeler des aliments
frais et à faire des glaçons.
Ne pas congeler une quantité trop importante d’aliments en même temps (maximum
4kg/24h), car plus un aliment est congelé rapidement, plus les qualités du produit
12
Page 32

FR
sont conservées. De même, veuillez à bien envelopper les aliments avant de les
congeler, pour que les saveurs soient bien conservées.
Ne jamais placer d’aliments chauds dans le congélateur.
Important !
Ne jamais y placer de bouteilles ou des cannettes car elles peuvent exploser lorsque
leur contenant congèle. Les boissons à haute teneur en carbone peuvent exploser
également ! Ne jamais conserver de limonade, jus de fruit, bière, vin, champagne
etc… dans un congélateur.
Dégivrage
Le dégivrage du congélateur est manuel. Vous pouvez de temps en temps retirer la
couche de glace qui se forme, en utilisant un grattoir en plastique ou tout autre
instrument en plastique.
Ne jamais utiliser d’instrument métallique électrique pour dégivrer le
congélateur.
Le congélateur doit toujours être dégivré lorsque la couche de glace atteint une
épaisseur de 4mm. Dans tous les cas, les compartiments doivent être dégivrés au
moins une fois par an.
1. Retirer tous les aliments du congélateur en les enveloppant dans du papier
journal ou des serviettes.
2. Eteindre l’appareil et le débrancher.
3. Retirer la glace avec un grattoir en plastique. Le dégivrage peut être rendu
plus aisé en plaçant des bols d’eau chaude dans le congélateur et en fermant
la porte.
4. Placer un contenant pour collecter le surplus d’eau issu de la fonte de la
glace.
5. Une fois le dégivrage accompli, vous pouvez nettoyer l’appareil.
Conseils :
Pensez toujours à couvrir et à bien emballer la nourriture qui se trouve dans votre
appareil, afin de prévenir le dessèchement et la coloration entre les aliments.
Les emballages suivants conviennent à la conservation :
- sacs et pochettes hermétiques en polyéthylène
- les boîtes en plastique avec couvercle
- les sachets en plastique spécifiques
- feuilles d'aluminium
Mise en hors service de l’appareil.
Afin d’éteindre l’appareil, réglez la température sur la position «MIN».
Si l’appareil est destine à ne pas être utilisé pour une période prolongée :
Retirez du congélateur tous les emballages congelés.
Eteindre l'appareil en réglant la température sur la position «MIN».
Débrancher la prise et couper l’arrivée d’électricité.
Nettoyer soigneusement (voir le chapitre “Comment nettoyer votre appareil?”)
Laissez la porte ouverte pour éviter l’apparition d’odeurs de renfermé.
13
Page 33

FR
Comment nettoyer votre appareil ?
Pour des raisons d’hygiène, l’appareil, y compris les accessoires intérieurs, doit être
nettoyé régulièrement.
Attention!
L’appareil ne doit pas être connecté pendant le nettoyage car il y a danger
d’électrocution ! Avant de nettoyer l’appareil, éteindre l’appareil et débrancher la
prise (ou couper l’arrivée d’électricité).
Ne jamais nettoyer l’appareil avec un appareil à vapeur. L’humidité pourrait
endommager les composants électriques (risque d’électrocution). Les vapeurs
chaudes peuvent endommager les parties en plastique.
L’appareil doit être séché avant de le remettre en service.
Important!
> Les solvants organiques peuvent endommager les parties en plastique (par
exemple le jus de citron ou le jus d’une orange).
> Ne pas utiliser de nettoyants abrasifs.
> Retirez la nourriture du réfrigérateur. La placer dans un endroit frais, bien
enveloppée.
> Eteindre l’appareil et débrancher la prise ou couper l’arrivée d’électricité.
> Nettoyer l’appareil et les accessoires intérieurs avec un chiffon humide.
> Un nettoyant spécifique réfrigérateur peut être aussi utilisé.
> L’accumulation de poussière sur le condenseur induit une augmentation de la
consommation d’énergie.
C’est pour cette raison que nous vous recommandons de bien nettoyer le
condenseur situé à l’arrière de l’appareil une fois par an.
> Vérifiez régulièrement la gouttière d’évacuation d’eau située dans le fond du
réfrigérateur.
Nettoyez si cette dernière si elle est bouchée à l’aide de la pointe verte dans les
accessoires fournis avec l’appareil.
> Une fois que tout est sec, remettre l’appareil en service.
Conseils divers
Ne pas placer l'appareil à proximité des sources de chaleur comme une cuisinière,
un lave-vaisselle ou un radiateur. S'assurer que l'appareil est placé dans une pièce
qui soit bien ventilée de manière à ce que l'air soit renouvelé et circule correctement.
Eviter de laisser la porte ouverte trop longtemps et inutilement afin que l'air chaud
n'entre pas et que l'air froid ne s'échappe pas de l'appareil, ce qui serait source de
gaspillage d'énergie.
S'assurer qu'aucun n'objet n'empêche la bonne fermeture de la porte.
14
Page 34

FR
Dysfonctionnements éventuels
Important!
La réparation de l'appareil doit exclusivement être effectuée par les services d'une
personne qualifiée. Un réparateur non qualifié pourrait provoquer un danger pour les
utilisateurs. Si votre appareil a besoin d'être réparé, contactez votre revendeur.
PROBLEME CAUSE POSSIBLE SOLUTION
Le réfrigérateur ne
fonctionne pas
L’appareil refroidit trop Le réglage de la température est
La nourriture est tiède.
Bruits inhabituels
Le compresseur ne
démarre pas
automatiquement
immédiatement après avoir
réglé la température.
Vérifier qu'il est bien branché. Brancher l’appareil.
La prise est mal branchée. Brancher la prise.
Le fusible ou que le disjoncteur
ont sauté.
La prise électrique est
défectueuse.
trop bas.
La température n’est pas
correctement ajustée.
La porte était ouverte pendant
une période prolongée.
Une large quantité de nourriture
tiède a été placée dans l’appareil
depuis les dernières 24h.
L’appareil se situe près d’une
source de chaleur.
L’appareil n’est pas à niveau. Réajuster les pieds
L’appareil touche le mur ou autre
chose.
Un composant, par exemple un
tuyau, à l’arrière de l’appareil
touche une autre partie de
l’appareil ou le mur.
C’est normal. Le compresseur démarre
Vérifier le fusible et le
changer si besoin.
Vous adresser à une
personne agréée.
Changer la température pour
un réglage plus élevé.
Veuillez regarder dans le
chapitre « Démarrer et régler
la température ».
N’ouvrir la porte que pour le
temps nécessaire.
Régler la température à un
niveau plus bas.
Veuillez regarder dans le
chapitre «Installation de votre
appareil»
Déplacer avec précaution
l’appareil.
Déplacer doucement
l’appareil ou si nécessaire
faire dévier le composant.
après un certain temps.
Bruits pendant le fonctionnement
Les bruits suivants sont caractéristiques des appareils réfrigérés :
« Click »
Dès que le compresseur démarre ou s’arrête de fonctionner, un « click » se fait
entendre.
« Ronronnement »
Dès que l’appareil est en fonctionnement, vous pouvez l’entendre « ronronner ».
« Barbotage »
Lorsque le liquide réfrigérant s’infiltre dans les tuyaux, vous pouvez entendre du
« barbotage » ou des bruits de dégagement de bulles.
« Clapotis »
Même après que le compresseur soit éteint, ce bruit de “clapotis” peut être audible
pendant un court moment.
15
Page 35

FR
Normes
Cet appareil est en accord avec les normes européennes suivantes :
-2006/95/EC faible voltage normes.
-2004/108/EC EMC Directive
Mise hors d’usage de l’appareil
Cet appareil ne doit pas être traité comme un déchet ménager. Il doit être rapporté
jusqu'à un point de recyclage des déchets électriques et électroniques en accord
avec la réglementation en vigueur (DEEE).
Le réfrigérant isobutane (R600a) est contenu dans le circuit de votre appareil. Il s'agit
d'un gaz naturel respectueux de l'environnement, qui est cependant inflammable.
Assurez-vous qu'aucun composant du circuit de réfrigération ne vienne à être
endommagé.
En vous assurant que ce produit est correctement recyclé, vous participez à la
prévention des conséquences négatives sur l’environnement et la santé publique qui
pourraient être causées par une mise au rebut inappropriée du produit.
16
Page 36

DE
BEDIENUNGSANLEITUNG
Page 37

DE
Sehr geehrter Kunde,
Bitte lesen Sie diese Bedienungsanleitung vor der ersten Benutzung aufmerksam
durch. Diese beinhaltet wichtige Informationen für den sicheren Gebrauch, die
Installation und die Pflege des Gerätes.
Bitte bewahren Sie die Anleitung auch für zukünftig auftretende Fragen auf und
geben sie gegebenenfalls an den nächsten Besitzer des Gerätes weiter.
Anmerkungen, die zu Ihrer Sicherheit oder für das korrekte Arbeiten des Gerätes
wichtig sind, werden mit Signalwörtern (Warnung!Achtung!Wichtig!)
hervorgehoben.
Die Bedienungsanleitung beinhaltet im Abschnitt Störungssuche Instruktionen bei
möglichen Störungen. Wenn diese Anweisungen nicht genügen, um den Fehler zu
beheben, setzen Sie sich bitte mit dem Kundendienst in Verbindung.
1
Page 38

DE
INHALT
WICHTIGE SICHERHEITSHINWEISE.................................................................... 2
INSTALLATION...........................................................................................................5
POSITIONIERUNG.....................................................................................................8
WECHSEL DES TÜRANSCHLAGS........................................................................9
GERÄTEBESCHREIBUNG ....................................................................................10
TEMPERATUREINSTELLUNG..............................................................................10
REINIGUNG UND PFLEGE....................................................................................12
PROBLEMLÖSUNGEN...........................................................................................13
GERÄUSCHE............................................................................................................ 15
ENTSORGUNG.........................................................................................................15
WICHTIGE SICHERHEITSHINWEISE
Diese Warnungen dienen Ihrer Sicherheit. Bitte stellen Sie vor der Installation
oder der ersten Benutzung des Gerätes sicher, dass Sie diese komplett
verstanden haben.
Gebrauch
Das Gerät ist für den Haushaltsgebrauch konzipiert und dient der Aufbewahrung von
Lebensmitteln. Sollte das Gerät anders oder zweckentfremdet verwendet werden, so
kann durch den Hersteller für mögliche, entstehende Schäden keine Haftung
übernommen werden.
Änderungen am Gerät oder den mitgelieferten Komponenten sind aus
Sicherheitsgründen nicht erlaubt.
Dieses Elektrohaushaltsgerät ist entsprechend der EU-Richtlinie
2002/96/CE über Elektro- und Elektronik-Altgeräte (WEEE) gekennzeichnet.
2
Page 39

DE
Vor der ersten Inbetriebnahme
Bitte überprüfen Sie das Gerät vor der ersten Inbetriebnahme auf mögliche
Transportschäden. Bitte unter keinen Umständen ein beschädigtes Gerät in Betrieb
nehmen. Im Falle eines Schadens wenden Sie sich bitte an den Händler, bei dem
Sie das Gerät bezogen haben.
Kühlmittel
Das Kühlmittel des Gerätes zirkuliert innerhalb des Kühlmittelkreislaufs.
Vergewissern Sie sich bitte vor Inbetriebnahme, dass keine der Komponenten des
Kühlmittelkreislaufs während des Transportes oder der Installation beschädigt
wurden.
- WARNUNG- Vermeiden Sie in der Nähe des Gerätes offene Flammen und
andere Entzündungsquellen. Bitte lüften Sie den Raum, in dem das Gerät
aufgestellt ist, regelmäßig und gründlich.
- WARNUNG- Halten Sie die Ventilationsöffnungen bei einem Einbau in
Küchenmöbel unbedingt frei, damit entstehende Abwärme entweichen kann.
- WARNUNG- Verwenden Sie beim Abtauen keine anderen Geräte/Werkzeuge,
als in dieser Anleitung empfohlen.
- WARNUNG- Beschädigen Sie nicht den Kühlmittelkreislauf.
- WARNUNG- Verwenden Sie keine elektrischen Geräte im Innern des
Lebensmittelfachs, ausgenommen jene Geräte, die dem Gerät beiliegen oder
in unseren Kundendienstzentren erhältlich sind.
- WARNUNG- Lassen Sie Minderjährige und Kinder nicht unbeaufsichtigt,
wenn diese das Gerät benutzen oder in der Nähe des Gerätes spielen.
- WARNUNG- Ist das Stromversorgungskabel defekt oder beschädigt, muss es
nur durch einen autorisierten Kundendienst ersetzt werden.
- WARNUNG- Ziehen Sie stets den Stecker aus der Steckdose, wenn Sie das
Reinigungsarbeiten am Gerät vornehmen oder die Glühlampe im
Geräteinneren (bei Modellen, die damit ausgestattet sind) wechseln.
3
Page 40

DE
Sicherheit für Kinder
Verpackungsmaterial (z.B. Folie oder Styropor) kann für Kinder gefährlich sein. Es
besteht ein Erstickungsrisiko. Halten Sie Kinder daher unbedingt von
Verpackungsmaterialien fern.
Machen Sie das Gerät vor der Entsorgung unbrauchbar. Ziehen Sie dafür das
Stromversorgungskabel, entfernen die Tür und die Schraubbolzen. Dadurch
verhindern Sie, dass sich Kinder aus Versehen selbst im Gerät einschliessen, in
andere gefährliche Situationen geraten oder zu ersticken drohen.
Häufig können Kinder die Gefahren nicht erkennen, die von den Haushaltsgeräten
ausgehen. Es ist folglich wichtig, dass Sie eine ausreichende Beaufsichtigung
sicherstellen und Kinder nie unbeaufsichtigt mit dem Gerät spielen lassen!
Täglicher Betrieb
Behälter mit feuergefährlichen Gasen oder Flüssigkeiten können bei niedrigen
Temperaturen lecken. Daraus kann das Risiko einer Explosion entstehen. Lagern Sie
daher keine Behälter mit feuergefährlichen Materialien wie (z.B. Spraydosen usw.) im
Kühl- und/oder Gefrierraum. Nutzen Sie keine elektrischen Geräte (z.B. elektrische
Eiscremehersteller, Mixer usw.). im Kühlraum und/oder im Gefrierraum. Vor der
Reinigung des Gerätes, schalten Sie das Gerät bitte immer aus und ziehen den
Netzstecker. Wenn Sie die Stromversorgung trennen, ziehen Sie bitte immer am
Stecker selbst und nicht am Kabel.
Fehlfunktionen
Liegt eine Fehlfunktion des Gerätes vor, beachten Sie bitte zunächst den Abschnitt
Problemlösungen dieser Bedienungsanleitung.
Helfen Ihnen die Anweisungen, die dort gegeben werden, nicht weiter, so führen Sie
keine weiteren Reparaturen selbst durch.
Unter keinen Umständen sollten Sie versuchen das Gerät selbst zu reparieren.
Reparaturen durch unerfahrene Personen können Verletzungen und weitere
Folgeschäden verursachen. Setzen Sie sich dann bitte mit dem Kundendienst in
Verbindung.
Beseitigen der Transportverpackungen
Das Gerät und die Innenausstattung werden für den Transport geschützt. Bitte
entfernen Sie die Klebestreifen am Geräteäußeren komplett. Sie können mögliche
Reste des Klebers mit milder Seifenlauge und lauwarmen Wasser entfernen.
Entfernen Sie dann alle Klebestreifen- und Verpackungsstücke aus dem Innenraum
des Gerätes.
4
Page 41

DE
INSTALLATION
Aufstellort
Warnung: um mögliche Gefahren zu vermeiden, montieren Sie das Gerät bitte
unbedingt entsprechend dieser Anweisungen.
Elektrischer Anschluss
Bevor Sie das Gerät an das Stromnetz anschließen, stellen Sie sicher, dass
Spannung und Frequenz Ihrer Hausinstallation den Anforderungen auf dem
Matrikelschild entsprechen.
WICHTIG! Das Gerät muss gemäß den geltenden Sicherheitsnormen an einer
geerdeten Steckdose angeschlossen werden. Der Stecker ist zu diesem Zweck mit
einem eigenen Erdleiter ausgestattet.
Der Hersteller lehnt jegliche Verantwortung für Schäden ab, die aufgrund der
Nichtbeachtung der Sicherheitsvorschriften hervorgerufen werden sollten.
Stellen Sie nach der Aufstellung sicher, dass das Gerät nicht auf dem Netzkabel
steht.
Wichtig: Sollte das Netzkabel beschädigt sein, muss es durch ein anderes Kabel
gleichen Typs von einem qualifizierten Techniker des Kundendienstes ausgetauscht
werden.
Während des Betriebs werden der Kondensator und der Kompressor auf der
Rückseite des Gerätes naturgemäß heiß. Aus Sicherheitsgründen sollte die
Rückseite des Gerätes möglichst so an einer Wand angrenzen, dass die
Luftzirkulation jederzeit gewährleistet ist.
Achtung: Stellen Sie sicher, dass die Lüftungsöffnungen nicht versperrt oder
verstopft sind.
Anschluss: 220-240V.
•Vermeiden Sie die Verwendung von Verlängerungskabeln
•Vermeiden Sie die Berührung des Kabels mit dem Kompressor.
•Vermeiden Sie, das Kabel unter dem Gerät einzuklemmen.
5
Page 42

DE
Einbau
Maße der Aussparung
Höhe mm min 880
Tiefe mm min 550
Breite mm min 560
Es ist notwendig, dass eine
Ventilationsaussparung mit den folgenden
Maßen existiert:
Tiefe: 50mm
Breite 540 mm
5
0
560
3
550
2
1
880
54
0
Für die bestmögliche Belüftung des Gerätes,
bauen sie es bitte entsprechend der
Abbildung ein.
2. Drücken Sie die gemeinsamen
Abdeckungen zwischen dem Gerät und den
Küchemöbeln ein (nur auf der Seite ohne
Scharnier).
3. Bitte öffnen Sie die Tür. Drücken Sie das
Gerät gegen die Seite der Küchenmöbel
gegenüber dem der Gerätescharniere.
Befestigen Sie das Gerät mit 6 Schrauben, die
im Installationssatz enthalten sind und dem
Gerät beigefügt sind. Bringen Sie die
Scharnierabdeckung (D) in Position
1. Drücken Sie das Gerät in die Nische, bis
Endstreifen (A) das Gehäuse berührt.
4.Montieren Sie die Verschlusskappen (B) wie
angezeigt.
6
Page 43

DE
5. Separieren sie die Teile A, B, C, D, wie in
der Abbildung gezeigt.
6. Setzen Sie die Führung (A) auf das
seitliche Teil der Möbeltür, wie in der
Abbildung gezeigt und markieren Sie die
Position der Löcher. Löcher anschließend
entsprechend der Markierungen bohren und
die Führung mit den gelieferten Schrauben
fixieren.
Möbeltür zusammen und markieren Sie die
Löcher des Plättchens. Entfernen Sie das
Plättchen und bohren sie die Löcher mit ¶2
mm in 8 mm Abstand vom äußeren Rand der
Tür. Platzieren Sie das Plättchen erneut und
fixieren Sie nun die Schrauben.
9. Wenn das Ausrichten der Möbeltür
notwendig ist, verwenden Sie die Toleranz der
Schlitze (8mm). Am Ende der Installation, ist
es notwendig, zu überprüfen, ob die Möbeltür
richtig schließt.
7. Fixieren sie die Verschlusskappe ( C ) auf
der Führung (A) bis diese fest sitzt.
8. Öffnen Sie die Gerätetür um 90°.
Setzen Sie das Plättchen (B) in die Führung
(A) ein. Drücken Sie die Gerätetür und die
10. Fixieren Sie die Abdeckung (D) auf dem
Plättchen (B) bis diese fest sitzt.
7
Page 44

TECHNISCHE ZEICHNUNG
DE
POSITIONIERUNG
Stellen Sie das Gerät möglichst nicht in die Nähe von Wärmequellen (Boiler, Herd,
Heizung oder direkter Sonneinstrahlung) auf. Damit das Gerät korrekt funktionieren
kann, muss die Umgebungstemperatur je nach Klimaklasse des Gerätes geeignet
sein (s. Tabelle). Die Klimaklasse Ihres Gerätes ist auf dem Matrikelschild im
Geräteinneren angegeben.
Klimaklasse Umgebungstemperatur
SN 10~32°C
N 16~32°C
ST 16~38°C
T 16~43°C
Dieses Gerät arbeitet optimal bei Temperaturen im Bereich der Klimaklasse SN bis
ST.
Das Gerät darf auf keinen Fall Nässe oder Feuchtigkeit ausgesetzt werden. Die
Zufuhr von genügend Luft im unteren hinteren Abschnitt des Gerätes muss
unbedingt gewährleistet sein, da eine schlechte Luftzirkulation die Leistung des
Gerätes beeinflussen kann. Eingebaute Geräte sollten fern von Wärmequellen wie
Heizungen positioniert werden.
8
Page 45

DE
WECHSEL DES TÜRANSCHLAGS
Der Türanschlag kann von der rechten Seite (werksseitige Lieferung) auf die linke
Seite gewechselt werden.
WARNUNG!
Wenn ein Türanschlagswechsel vorgenommen wird, muss das Gerät vom
Stromnetz getrennt werden. Ziehen Sie also vorher den Stecker.
Kippen Sie das Gerät etwas nach hinten und stützen Sie es sicher ab. Schrauben
Sie die Türscharnierschrauben ab und entfernen Sie den Scharnierstifthaltewinkel.
Öffnen Sie die Tür und nehmen Sie diese abwärts heraus.
Schrauben Sie den oberen Stift ab und schrauben Sie ihn entsprechend auf der
gegenüberliegenden Seite an. Passen Sie die Tür in den oberen Stift ein. Schrauben
Sie den Scharnierstifthaltewinkel sicher auf der gegenüberliegenden Seite unter
Verwendung der Schrauben fest.
9
Page 46

GERÄTEBESCHREIBUNG
1. Tür
2. Thermostat
3. Gefrierschubladen
4. Justierbare Füße
DE
TEMPERATUREINSTELLUNG
Dieses Gerät ist nur für den häuslichen Gebrauch, spezifisch für die Lagerung
von Lebensmitteln bestimmt. Dieses Gerät ist konzipiert in einer
Umgebungstemperatur (umgebende Lufttemperatur) zwischen 16° und 38° c
zu funktionieren. Wenn diese Temperaturen überstiegen werden, funktioniert
das Gerät nicht optimal. Wenn die Umgebungstemperatur für lange
Zeitspannen überstiegen wird, steigt die Temperatur im Gefrierteil über -18°C
und Nahrungsmittelverlust kann auftreten.
Das Gerät muss gemäß den national geltenden Sicherheitsnormen an einer
geerdeten Steckdose angeschlossen werden. Der Stecker ist zu diesem Zweck mit
einem eigenen Erdleiter ausgestattet.
Vor der Nutzung
1. Lassen Sie das Gerät 2 Stunden lang nach der Installation stehen.
2. Schließen Sie das Gerät an.
3. Drehen Sie die Thermostatsteuerung auf die erforderliche Einstellung. Eine
mittlere Einstellung ist normalerweise für den Normalbetrieb geeignet (sehen
Sie Thermostatsteuerung).
4. Lassen Sie das Gerät ungefähr 4 Stunden lang in Betrieb, damit die korrekte
Temperatur erreicht werden kann, bevor Sie Lebensmittel einfüllen.
10
Page 47

DE
Das Bedienfeld bietet die Möglichkeit der Temperaturregulierung
1. Warnhinweis (rot)
2. Betriebsleuchte (grün)
3. Schnellgefrierleuchte (gelb)
4. Knopf für Schnellgefrieren
5. Temperaturbedienknopf
Der Knopf für Schnellgefrieren kann betätigt werden, so dass der Kompressor
ununterbrochen arbeitet, um schnellstmöglich ein grössere Menge Nahrung zu
gefrieren.
Die Temperatur wird beeinflusst durch:
•Raumtemperatur
•Wie oft die Tür geöffnet ist
•Menge der gelagerten Lebensmittel
•Position des Gerätes
Wenn man die korrekte Temperatur einstellen möchte, müssen alle diese Faktoren
betrachtet werden.
Gefrierteil
Das Symbol bedeutet, dass Ihr Gefrierschrank das Gefrieren von
Tiefkühlkost auf -18°c (- 0.4F) oder kälter zulässt. Die Gefriertemperatur wird
automatisch durch das Thermostat gesteuert, das sich im Kontrollbereich befindet.
Wegen der verschiedenen Installationen, der Methoden des Verbrauches und der
Wetterbedingungen, können Justagen der Temperatureinstellungen erforderlich sein.
Diese werden durch einen Temperaturmesswert auf einem Thermometer im
Gefrierteil festgesetzt.
Einfrieren frischer Lebensmittel
Die Höchstmenge der Lebensmittel, die Sie in 24 Stunden einfrieren können, ist 4kg.
Während des Gefrierprozesses sollte die Temperatur der Lebensmittel schnell
verringert werden, damit Eiskristalle so klein gehalten werden wie möglich, um eine
Schädigung der Lebensmittel zu verhindern. Hierzu schalten Sie den
Schnellgefrierschalte auf "ON" 24 Stunden, bevor Sie die Lebensmittel einfüllen.
11
Page 48

DE
Danach können Sie den Schalter auf "OFF" zurückschalten. Zwischen der
Tiefkühlkost sollte genügend Platz gelassen werden, um eine Kaltluftzirkulation zum
besseren Gefrieren zu ermöglichen.
Außergewöhnlich große Einzelteile können gelagert werden, indem man den oberen
Korb entfernt. Aufgetaute Tiefkühlkost sollte nicht mit nassen oder feuchten Händen
aus dem Gefrierschrank genommen werden, da Hautverletzungen oder Gefrierbrand
drohen.
WICHTIG!
Eine hohe Umgebungstemperatur (z.B. an heißen Sommertagen) und eine kalte
Einstellung auf dem Temperaturregler können den Kompressor veranlassen,
ununterbrochen zu laufen. Denn wenn die umgebende Temperatur hoch ist, muss
der Kompressor ununterbrochen laufen, um die niedrige Temperatur im Gerät
beizubehalten.
ABTAUEN
Der Gefrierschrank ist manuell abzutauen.
Sie können die Eisschicht unter Verwendung eines Schabers oder anderer
Plastikinstrumente gelegentlich entfernen. Benutzen Sie bitte nie ein
Metallinstrument, um die Gefriermaschine zu enteisen. Das Gefrierfach muss immer
enteist werden, wenn die Schicht des Frosts eine Stärke von ungefähr 4mm erreicht.
Auf jeden Fall sollte dieses Fach mindestens einmal jährlich enteist werden.
1. Schalten Sie das Gerät ab und trennen es vom Stromnetz.
2. Entfernen Sie das Eis mit einem Plastikschaber. Die Enteisung kann beschleunigt
werden, indem man Schüsseln Heißwasser in die Gefrierteil und legt.
3. 3. Sobald das Abtauen abgeschlossen wird, können Sie Ihr Gerät säubern.
Tips:
Die Lebensmittel sollten immer bedeckt oder verpackt werden, um ein Austrocknen
und Verderben zu verhindern.
REINIGUNG UND PFLEGE
Aus hygienischen Gründen sollte das Geräte und die Innenausstattung regelmäßig
gereinigt werden.
WARNUNG!
Das Gerät muss zur Reinigung ausgeschaltet und vom Stromnetz getrennt werden,
da sonst die Gefahr eines Stromschlags besteht.
Niemals ein Dampfreiniger zur Pflege/Reinigung benutzen.
Heiße Dämpfe können zu Beschädigung der Plastikteile führen. Das Gerät muss
trocken sein, bevor es wieder eingeschaltet wird.
WICHTIG!
Entfernen Sie vor Beginn der Reinigung die kompletten Lebensmittel aus dem
Kühlbereich. Säurehaltige Reinigungsmittel wie Zitronensaft oder Essigsäure,
können die Plastikteile im Gerät angreifen und sollten daher nicht zur Reinigung
verwendet werden. Bitte weiterhin keine Reinigungsmittel mit Schleif- und
Scheuermitteln verwenden. Reinigen Sie das Gerät bitte nur mit einem weichen Tuch
und lauwarmen Wasser, das ggf. mit milder Seifenlauge versetzt werden kann. Nach
12
Page 49

DE
der Reinigung das Gerät bitte gründlich abtrocknen. Ansammlungen von Staub am
Kondensator erhöhen ggf. den Energieverbrauch. Aus diesem Grund säubern Sie
den Kondensator an der Rückseite des Gerätes bitte mindestens einmal jährlich mit
einer weichen Bürste oder einem Staubsauger.
Überprüfen Sie das Tauwasserablaufloch an der hinteren Wand des Kühlraums.
Sollte es verstopft sein, können Sie es mit Hilfe des grünen Stöpsels, der mit dem
Gerät geliefert wurde, einfach reinigen.
Nach dem das Gerät vollständig getrocknet ist, können Sie es wieder in Betrieb
nehmen.
ENERGIESPARTIPS
Bringen Sie das Gerät nicht in der Nähe von Herden, Heizkörpern oder anderen
Wärmequellen an. Hohe Umgebungstemperaturen verursachen einen längeren,
häufigeren Betrieb des Kompressors.
Stellen Sie eine ausreichende Luftzirkulation sicher und decken Sie niemals die
Lüftungsöffnungen ab.
PROBLEMLÖSUNGEN
Ersatzteile:
Folgende Ersatzteile können vom Kundendienst geordert werden:
- Butter/Käse-Behälter
- Eierablage
- Türregale
- Obst- und Gemüse-Fächer
- Ablageböden
Eine Fehlfunktion kann durch eine kleine Störung verursacht werden, die Sie unter
Verwendung der folgenden Anweisungen korrigieren können. Führen Sie keine
weiteren Reparaturarbeiten als hier beschrieben durch, wenn diese Anweisungen
nicht hilfreich sind.
WICHTIG!
Reparaturen am Gerät können von den kompetenten Technikern durchgeführt
werden. Unsachgemäße Reparaturen können bedeutende Gefahren für den
Benutzer verursachen. Wenn Ihr Gerät repariert werden muss, treten Sie bitte Ihrem
Fachhändler oder mit Ihrem lokalen Kundendienst in Verbindung.
13
Page 50

DE
Problem Möglicher Grund Lösung
Gerät funktioniert nicht
Gerät kühlt zu stark Temperatureinstellung zu niedrig Wählen Sie bitte eine
Die Lebensmittel sind zu
warm
Innenbeleuchtung
funktioniert nicht
Starke Frostbildung Türdichtung ist nicht luftdicht
Gerät ist nicht eingeschaltet Schalten Sie das Gerät ein
Stromversorgung/ Stecker ist
nicht eingesteckt
Sicherung ist defekt Überprüfen und ersetzen
Die Temperatur ist nicht korrekt
eingestellt
Tür war für eine längere Zeit
geöffnet
In den letzten 24 Stunden wurden
warme Lebensmittel im Gerät
platziert
Das Gerät steht neben einer
Wärmequelle
Lampe ist defekt Bitte lesen Sie den Abschnitt
(möglich nach
Türanschlagswechsel)
Stecken Sie den Stecker in
die Stromversorgung
wärmere Temperaturstufe
Bitte lesen Sie den Abschnitt
Temperatureinstellung
Öffnen Sie die Tür bitte nur
solange wie nötig.
Wählen Sie bitte eine
niedrigere Temperatur
Bitte lesen Sie den Abschnitt
Installation
Auswechseln der Glühlampe
Erwärmen Sie bitte sorgfältig
die undichten Abschnitte der
Profildichtung mit einem
Haartrockner (auf einer
kühlen Einstellung). Formen
Sie gleichzeitig die gewärmte
Profildichtung eigenhändig
so, dass sie richtig sitzt.
Unübliche Geräusche
Der Kompressor springt
nicht sofort nach dem
Ändern der
Temperatureinstellung an.
Wasser auf dem Boden
oder den Ablageflächen
Gerät ist nicht waagerecht
ausgerichtet
Das Gerät berührt die Wand oder
andere Objekte
Ein Bestandteil, z.B. ein Rohr, auf
der Rückseite des Gerätes
berührt ein anderes Teil des
Gerätes oder die Wand.
Dies ist normal, keine
Fehlfunktion
Tauwasserablaufloch ist blockiert Bitte lesen Sie den Abschnitt
Justieren Sie bitte die Füsse
Positionieren Sie bitte das
Gerät anders
Bei Bedarf verbiegen Sie
sorgfältig den schwer
zugänglichen Bestandteil
Der Kompressor startet erst
nach einer gewissen Zeit
Reinigung und Pflege
14
Page 51

DE
GERÄUSCHE
Folgende Geräusche sind im laufenden Betrieb von Kühlgeräten charakteristisch und
beruhen nicht auf einer Störung/Fehlfunktion.
Klicken: Wann immer der Kompressor AN/AUS schaltet, kann ein Klicken zu hören
sein.
Summen Sobald der Kompressor einsetzt, können Sie ihn summen hören.
Sprudeln/Spritzen Wenn Kühlmittel in die dünnen Schläuche fließt, können Sie das
Sprudeln/Spritzen hören. Selbst nachdem der Kompressor ausgeschaltet worden ist,
können diese Geräusche für kurze Zeit gehört werden.
ENTSORGUNG
Das Gerät enthält keine umweltschädlichen Kühlgase - weder im Kühlsystem noch
im Isolierungsmaterial.
ACHTUNG: Das Gerät muss im Einklang mit der EU Richtlinie über die Entsorgung
von Elektro- und Elektronikgeräte (WEEE) entsorgt werden und gehört nicht in den
normalen Hausmüll.
Für nähere Informationen über die Entsorgung, Wiederverwertung und Recycling
dieses Produktes, wenden Sie sich bitte an Ihre kommunalen Einrichtungen
(Umweltamt) oder an die Abfallentsorgungsgesellschaft Ihrer Stadt oder an Ihren
Händler.
Die Entsorgung im Wald ist untersagt. Dies kann umweltschädigend und
gesundheitsgefährdend sein, da gefährliche Substanzen ins Grundwasser gelangen
und ihren Weg in die Nahrungskette finden.
Dieses Symbol auf dem Produkt oder in den Anleitungen
bedeutet, dass das Elektrogerät am Ende seiner
Lebensdauer separat entsorgt werden muss.
15
Page 52

IT
FREEZER
MANUALE D’ISTRUZIONI
Page 53

IT
Prima di mettere in funzione l’elettrodomestico, leggere per intero questo manuale e
conservarlo per il futuro. In esso sono contenute importanti informazioni
sull’installazione, sull’uso e sulla sicurezza.
1
Page 54

IT
CONTENUTI
Importanti istruzioni di sicurezza..............................3
Rimuovere il materiale di imballaggio...............................4
Installazione.................................................................5
Incasso...............................................................................6
Posizionamento............................................................8
Descrizione dell’apparecchio......................................9
Avvio e regolazione della temperatura.......................10
Controllo del Termostato.............................................10
Usare il congelatore………………………………………11
Sbrinamento………………………………………………..12
Sbrinamento...................................................................12
Spegnimento dell’apparecchio.....................................12
Manutenzione e Pulizia.................................................12
Suggerimenti per il risparmio energetico...................13
Risoluzione dei problemi…………………………………13
Rumori durante il funzionamento.................................14
Normative.......................................................................14
Smaltimentodell’apparecchio.......................................14
2
Page 55

IT
Importanti istruzioni di sicurezza
Queste avvertenze sono fornite nell'interesse della vostra sicurezza.
Assicurarsi di comprenderle appieno prima di installare o utilizzare
l'apparecchio. La vostra sicurezza è di fondamentale importanza. Se non siete
sicuri circa il significato di questi avvertimenti contattare il Centro Assistenza.
Destinazione d’uso
Il prodotto è progettato per il solo uso domestico. E’ adatto alla conservazione di cibo a
basse temperature.
utilizzato in modo non corretto, il produttore declina ogni responsabilità per gli eventuali
danni.
Alterazioni o modifiche al prodotto non sono ammesse per motivi di sicurezza.
Se si utilizza il prodotto in un'applicazione commerciale o per scopi diversi da quelli
per il raffreddamento degli alimenti, il produttore non si assume alcuna responsabilità
per eventuali danni che possono verificarsi.
Se l'apparecchio è utilizzato per scopi diversi da quelli indicati o
Prima di mettere in funzione l’apparecchio
Controllare che l’apparecchio non abbia subito danni da trasporto. In nessun caso un
prodotto danneggiato può essere collegato ad una presa di corrente.
In caso di danni, contattare il Centro Assistenza.
Refrigerante
L’ isobutano (R600a) che è contenuto all'interno del circuito refrigerante
dell'apparecchio, è un gas naturale con un elevato livello di compatibilità ambientale,
ma che è comunque infiammabile.
Durante il trasporto e l'installazione dell'apparecchio, assicurarsi che nessuno dei
componenti del circuito refrigerante sia danneggiato.
Se il circuito refrigerante ha subito danni:
evitare fiamme libere e fonti di accensione, ventilare la stanza in cui l'apparecchio si
trova.
ATTENZIONE— Non ostruire la ventilazione dell'apparecchio.
ATTENZIONE —
processo di sbrinamento diversi da quelli raccomandati dal costruttore.
ATTENZIONE —
ATTENZIONE — Non utilizzare apparecchi elettrici all'interno vani il cibo dei
raccomandati dal fabbricante.
ATTENZIONE —
bambini o persone inferme senza la supervisione di persone che abbiano preso
visione delle istruzioni d’uso e che siano direttamente responsabili della loro sicurezza.
non usare dispositivi meccanici o altri mezzi per accelerare il
Non danneggiare il circuito refrigerante.
Questo apparecchio non è destinato per l’ utilizzo da parte di
3
Page 56

IT
I bambini piccoli devono essere sorvegliati per assicurarsi che non giochino con
l'apparecchio .
ATTENZIONE — Si prega di tenere l'apparecchio lontano da sostanze che possono
provocare incendi.
ATTENZIONE —
dal fabbricante o da persone qualificate per evitare pericoli.
ATTENZIONE ---
Sicurezza dei bambini
Il materiale d’imballaggio (polistirolo, etc.) può essere pericoloso per i bambini.
Ci possono essere rischi di soffocamento, tenere quindi lontano dai bambini.
Rendere inutilizzabili I vecchi apparecchi prima dello smaltimento. Estrarre la spina,
tagliare il cavo di alimentazione e smontare la cerniera della porta.
se il cavo di alimentazione è danneggiato, deve essere sostituito
Si prega di rimuovere la porta prima di gettare il vostro frigorifero.
In questo modo si assicura che i bambini non rimangano intrappolati nell’apparecchio.
Spesso i bambini non sono in grado di riconoscere i pericoli presenti negli elettrodomestici.
E 'quindi importante assicurare un controllo adeguato e non lasciare che i bambini giochino
con l'apparecchio
Operazione quotidiana
Non riporre mai dei contenitori con materiali infiammabili come bombolette spray,
cartucce di ricarica estintore antincendio, ecc né apparecchi elettrici all’interno del
prodotto. Prima della pulizia, spegnere sempre l'apparecchio e staccare la spina o
spegnere l'interruttore.
Per staccare la spina dalla presa della corrente, non tirare il cavo
In caso di malfunzionamento
Se si verifica un malfunzionamento dell'apparecchio, consultare prima il "guasti" sezione di
queste istruzioni .
ulteriori interventi di riparazione da soli.
Riparazioni effettuate da persone inesperte possono causare danni o gravi
disfunzioni, contattare il Centro d’Assistenza.
Se le informazioni fornite non aiutano, si prega di non effettuare
Rimuovere il materiale di imballaggio
L'apparecchio e le finiture interne sono protette per il trasporto. Togliere il nastro
adesivo sul lato destro e sinistro della porta. Rimuovere i nastri adesivi e le parti di
imballaggio dall'interno dell'apparecchio
4
Page 57

IT
Installazione
Luogo di installazione
Prima di installare, leggere attentamente le istruzioni. Se si desidera spostare il
prodotto, tenerlo per i lati o dalla base. Non sollevarlo mai dalla parte superiore.
Installare l'apparecchio in un luogo asciutto, ben ventilato, lontano da fonti di calore.
Lasciare uno spazio minimo di 10 centimetri tra la parte superiore dell’apparecchio e
i pensili della cucina.
Se questo è impossibile, lasciare 5 centimetri sopra l'apparecchio e 2,5 centimetri su
ciascun lato dell'apparecchio.
Collegamento elettrico
• Caratteristiche Connettore: 220-240V.
• Evitare di usare adattatori o prolunghe.
• Evitare che il cavo entri in contatto con il compressore.
• Evitare che il cavo rimanga intrappolato sotto l'apparecchio.
Per la vostra sicurezza, collegare l'apparecchio a una presa elettrica con messa a
terra in buone condizioni (in conformità alle vigenti norme di sicurezza per gli impianti
elettrici).
La produzione declina ogni responsabilità per i danni causati dalla mancanza di un
collegamento a terra.
Avvertenza: per evitare pericoli, a causa dell'instabilità dell'apparecchio, fissarlo in
base alle istruzioni.
5
Page 58

IT
Incasso
Dimensioni della nicchia
Altezza della nicchia mm 880
Profondità della nicchia mm 550
Larghezza della nicchia mm 560
E’ necessario che il mobile abbia una
nicchia per la ventilazione con:
Profondità 50mm
Larghezza 540 mm
5
0
0
4
5
0
6
5
5
550
5
0
Per un’appropriata ventilazione seguire
le istruzioni:
880
2.Inserire le guarnizioni di gomma tra
l’apparecchio e il mobile della cucina
(solo sul lato senza cerniera)
3. Inserire l’apparecchio nella colonna,
accostandolo sul lato opposto alle
cerniere. Fissare l’apparecchio con 6 viti
fornite nel kit incluso nel prodotto.
Spezzare il tappo nella posizione (D).
1.Spingere il prodotto nell’alloggio fino
a che la linea di arresto(A) raggiunga il
il limite del mobile cucina.
4.Applicare il tappo di chiusura (B)
come indicato.
6
Page 59

IT
5. Separare le parti A,B,C,D come
mostrato nella figura.
6. Fissare la slitta (A) nella parte interna
della porta del mobile, e
contrassegnare la posizione dei fori.
Dopo aver effettuato i fori, fissare la
slitta con le viti in dotazione.
una punta da 2 mm a 8 mm dal bordo
esterno della porta. Fissare di nuovo la
squadretta sulla guida and fissarla con
le viti fornite.
9.Qualora necessario, allineare la porta
del mobile usando le guide sulla
squadretta.
Alla fine dell’operazione, è necessario
controllare che la porta del mobile si
chiuda correttamente.
7. Fissare il coperchio (C) sulla slitta (A).
8. Aprire la porta del prodotto e del
mobile a 90°. Inserire la squadretta (B)
nella guida (A) .Accoppiare la porta del
prodotto e del mobile e contrassegnare i
buchi come indicato in figura.
Rimuovere le squadrette e forare con
10. Fissare il coperchio (D) sulla guida
(B) .
7
Page 60

IT
DIMENSIONI DEL PRODOTTO E DEL VANO DA INCASSO
Posizionamento
Posizione l'apparecchio lontano da fonti di calore, come stufe, termosifoni, luce
diretta del sole, ecc Le massime prestazioni e sicurezza sono garantite dal
mantenimento di una giusta temperatura interna a seconda della classe interessata,
come specificato sulla targhetta.
Classi climatiche Temperatura Ambiente
SN 10~32°C
N 16~32°C
ST 16~38°C
T 16~43°C
L’ apparecchio non deve essere esposto alla pioggia. Deve essere garantita una
buona circolazione d’aria nella parte posteriore del prodotto.
INVERSIONE DEL SENSO DI APERTURA DELLE PORTE
Inclinare leggermente il prodotto. Svitare le viti della cerniera e rimuovere il perno
della traversa.
8
Page 61

IT
Rimuovere il perno inferiore con una chiave svitando il dado e riavvitare sul lato
opposto. Riavvitare poi il perno superiore.
Attenzione!
Durante l’operazione di reversibilità della
porta, il prodotto non deve essere collegato alla presa di corrente.
Descrizione dell’apparecchio
Vista del prodotto
1. Porta
2. Termostato
3. Cassetti Freezer
4. Piedini regolabili
9
Page 62

IT
Avvio e regolazione della temperatura
Questo apparecchio è destinato esclusivamente all’ uso domestico.
Questo apparecchio è progettato per funzionare ad una temperatura ambiente
compresa tra 16ć and 38ć. Al di sopra o al di sotto di queste temperature,
l’apparecchio non funzionerà correttamente.
Prima dell’uso
Rimuovere i nastri di fissaggio. Lavare l’interno dell’apparecchio con acqua tiepida e
con un po’ di bicarbonato di sodio (5ml. in 500ml di acqua). Non usare saponi né
detergenti. Asciugare accuratamente l’apparecchio.
Per avviare l’apparecchio
1. Dopo l’installazione, attendere 2 ore prima di metterlo in funzione.
2. Inserire la spina nella presa di corrente.
3. Regolare il termostato alla temperatura desiderata.
4. Attendere circa 4 ore dall’installazione prima di inserire del cibo all’interno del
prodotto per
permettere che esso raggiunga la corretta temperatura.
Controllo del Termostato
Il controllo del termostato, situato nel pannello di controllo, regola la temperatura
all’interno del prodotto.
gPosizione “MIN” Freddo.
gPosizione “MAX” Più freddo.
1. Spia d’allarme (rossa)
2. Spia di funzionamento (verde)
3. Spia di congelamento rapido (gialla)
4. Premere il pulsante per attivare il congelamento rapido
5. Manopola di controllo del termostato.
Quando viene premuto il pulsante di congelamento rapido, il compressore funziona
continuamente.
La temperatura sarà influenzata da:
x Temperatura del locale
x Quanto spesso viene aperta la porta
x Quantità di cibo conservato
x Posizione dell’apparecchio
10
Page 63

IT
Lo scompartimento freezer
Il simbolo significa che il freezer conserverà il cibo congelato ad una
temperatura di -18ć (-0.4F) o più fredda, permettendo una conservazione a lungo
termine del cibo congelato e il congelamento di quello fresco. La temperatura del
freezer è controllata automaticamente dal termostato situato nel panello di controllo.
Congelamento di cibo fresco
La quantità massima di cibo che può essere congelata in 24 ore è di 4 Kg.
Inserire il cibo fresco nel cassettone più alto del freezer.
Premere il pulsante del congelamento rapido 24 ore prima di inserire il cibo da
congelare nel prodotto. Dopo averlo inserito, disattivare il pulsante premendolo di
nuovo. I pacchetti di cibo devono essere posizionati ad una certa distanza fra loro
per permettere all’aria fredda di circolare in modo corretto.
Non vi è nessun rischio qualora vi dimenticaste di spegnere la funzione di
congelamento rapido dopo 24 ore, ma per ragioni di risparmio energetico, è
consigliato effettuare tale operazione quando il congelamento è completo.
La spia gialla del congelamento rapido ve lo segnalerà. Una volta scongelati gli
alimenti non devono essere più ricongelati. Non rimuovere gli oggetti dal congelatore
con le mani umide / bagnate, in quanto ciò potrebbe provocare abrasioni / ustioni.
Usare il congelatore
Questo apparecchio è stato progettato per conservare alimenti surgelati, congelare
gli alimenti freschi e per produrre cubetti di ghiaccio.
Assicurarsi che i cibi siano ben protetti e chiusi in modo da mantenere il loro sapore.
Non porre alimenti ancora caldi nel vostro congelatore. Non inserire mai bottiglie,
lattine, bibite gassate in quanto possono scoppiare o anche esplodere. Mai tenere
limonata, succhi di frutta, birra, vino, champagne, ecc ... nel congelatore.
11
Page 64

IT
Sbrinamento
Lo sbrinamento del freezer è manuale. E’ possible rimuovere di volta in volta lo strato
di brina con un raschietto o un qualsiasi strumento di plastica.
Non usare mai uno dispositivo elettrico di metallo per sbrinare il freezer.
Il freezer deve essere sempre sbrinato quando lo strato di brina raggiunge no pesso
re di 4mm. In ogni caso, questa operazione dovrebbe essere effettuata almeno na
volta l’anno.
1. Scollegare il cavo di alimentazione dalla presa di corrente.
2. Rimuovere il ghiaccio con un raschietto di plastica. Si può accelerare l’operazione
inserendo delle bacinelle d’acqua calda nel congelatore e chiudere la porta.
3. Una volta che lo sbrinamento completato, pulire l’apparecchio.
Consigli:
Il cibo nel congelatore deve essere sempre coperto o imballato per prevenirne la
disidratazione.
I seguenti materiali sono adatti per la conservazione:
Sacchetti di polietilene a chiusura ermetica
Contenitori di plastica con coperchi
Carta Alluminio
Sbrinamento
1. Rimuovere gli alimenti dal congelatore.
2. Scollegare il cavo di alimentazione
3. Aprire lo sportello del congelatore
4. Posizionare un contenitore adeguato per raccogliere l'acqua dello sbrinamento..
Spegnimento dell’apparecchio
Per spegnere l’apparecchio, girare il regolatore della temperatura nella posizione
‘Min’. Se l’apparecchio non verrà usato per un periodo lungo:
rimuovere tutti gli alimenti congelati dallo stesso.
Rimuovere la spina dalla presa di corrente.
Pulire accuratamente (vedere la sezione : Manutenzione e Pulizia)
Lasciare la porta aperta per evitare la formazione di cattivi odori.
Manutenzione e Pulizia
Per motivi igienici l'interno dell'apparecchio, compresi gli accessori interni, devono
essere puliti regolarmente.
Attenzione!
L'apparecchio può non essere collegato alla rete durante la pulizia. Pericolo di
scosse elettriche! Prima di pulire spegnere l'apparecchio e togliere la spina dalla
presa di corrente.
Non pulire l'apparecchio con un pulitore a vapore. Umidità potrebbe accumularsi nei
componenti elettrici, con il rischio di possibili scosse elettriche! Getti di vapore caldo
possono procurare alle parti in plastica.
L'apparecchio deve essere asciutto prima di essere rimesso in funzione.
Importante!
Oli essenziali e solventi organici possono danneggiare le parti in plastica, ad
esempio, succo di limone o il succo della buccia d'arancia, acido butirrico, detersivi
che contengono acido acetico.
Non permettere che tali sostanze vengano a contatto con le parti dell'apparecchio.
Non utilizzare alcun detergente abrasivo.
12
Page 65

L'apparecchio si trova vicino a
fonti di calore.
Page 66

IT
Rumori durante il funzionamento
I seguenti rumori sono normali:
Scatti
Ogni volta che il compressore parte o si arresta
Ronzii
Quando il compressore è in funzione , è possibile sentire ronzii
Gorgoglii
Il gas refrigerante interno può produrre gorgoglii
Normative
Questo apparecchio è conforme alle seguenti direttive Comunitarie:
-2006/95/EC sul basso voltaggio
-2004/108/EC Direttiva EMC
Smaltimento dell’apparecchio
E’ proibito smaltire questo apparecchio nel normale flusso dei rifiuti solidi urbani.
Gli apparecchi dismessi devono essere raccolti separatamente per ottimizzare il
tasso di recupero e riciclaggio dei materiali che li compongono ed impedire potenziali
danni per la salute e l’ambiente. Il simbolo del cestino barrato è riportato su tutti i
prodotti per ricordare gli obblighi di raccolta separata.
14
Page 67

ES
FRIGORÍFICO
MANUAL DE INSTRUCCIONES
Page 68

ES
Estimado cliente,
Antes de poner en funcionamiento su nuevo congelador lea detenidamente estas
instrucciones. Contienen información importante relativa a su seguridad, a la
instalación y el cuidado del electrodoméstico.
Guarde este manual de instrucciones para futuras consultas. Entrégueselas a los
posibles nuevos propietarios del electrodoméstico.
Las notas importantes para su seguridad y para el funcionamiento adecuado del
electrodoméstico están resaltadas con un triángulo de advertencia y/o con palabras
(¡Atención! ¡Precaución! ¡Importante!). Preste especial atención a esas
indicaciones.
Después de este símbolo se indicará información complementaria y aplicaciones
prácticas del electrodoméstico.
Los trucos y notas relacionadas con aspectos de ahorro y medioambientales se
señalan con un trébol.
Las instrucciones de funcionamiento contienen instrucciones para la corrección de
posibles fallos que puede solucionar el usuario consultando la sección “Guía de
Incidencias”. Si las instrucciones que se indican no son suficientes póngase en
contacto con el Centro de Atención al Cliente local.
1
Page 69

ES
Índice
Instrucciones de seguridad importantes......................... 3
Retirar el embalaje del transporte..................................... 5
Instalación ............................................................................... 5
Empotrado ............................................................................... 6
Diagramas Técnicos de Refrigeración Integrada.......... 8
Colocación............................................................................... 8
Descripción del electrodoméstico .................................... 9
Puesta en marcha y regulación de la temperatura ..... 10
Utilización del congelador................................................. 12
Descongelado....................................................................... 12
Desconexión del electrodoméstico ................................ 12
Limpieza y Cuidado............................................................. 13
Trucos para el ahorro energético .................................... 13
Guía de incidencias............................................................. 13
Ruidos durante el funcionamiento.................................. 15
Normativas, Estándares y Directrices............................ 15
Tirar el electrodoméstico................................................... 15
2
Page 70

ES
Instrucciones de seguridad importantes
Estas advertencias son por su seguridad. Asegúrese de que las comprende
antes de instalar o utilizar el electrodoméstico. Su seguridad es de máxima
importancia. Si no está seguro de lo que quiere decir algo o de alguna de las
advertencias, póngase en contacto con el Departamento de Atención al Cliente.
Objetivo
El congelador está diseñado exclusivamente para uso doméstico. Es adecuado para
almacenar alimentos a baja temperatura. Si el electrodoméstico se utiliza para fines
que no sean los pretendidos o se utiliza de forma incorrecta, el fabricante no se
responsabiliza de los daños que pueda provocar.
Por motivos de seguridad no se permiten modificaciones o cambios en el frigorífico.
Si utiliza el frigorífico en recintos comerciales o para otros fines que no sean el
enfriamiento de alimentos, el fabricante no se responsabiliza de los posibles daños
que pueda provocar.
Antes de la puesta en marcha inicial
Compruebe que el electrodoméstico no se ha dañado durante su traslado. Bajo
ninguna circunstancia deberá conectar un electrodoméstico dañado. En caso de que
detecte algún daño póngase en contacto con su proveedor.
Refrigerante
El circuito refrigerante del electrodoméstico contiene refrigerante isobutano (R600a),
un gas natural con un alto nivel de compatibilidad medioambiental que, sin embargo,
es inflamable.
Durante el traslado y la instalación del electrodoméstico, asegúrese de que ninguno
de los componentes del circuito ha resultado dañado.
Si el circuito de refrigeración estuviese dañado:
Evite acercar llama directa y ventile perfectamente la habitación en la que haya
colocado el electrodoméstico.
Las instrucciones han de incluir las advertencias siguientes:
ATENCIÓN— no obstruya las salidas de ventilación en el electrodoméstico o en la
estructura donde lo vaya a colocar.
ATENCIÓN —No utilice dispositivos mecánicos u otros para acelerar el proceso de
descongelado aparte de los recomendados por el fabricante.
ATENCIÓN —No dañe el circuito de refrigeración.
3
Page 71

ES
ATENCIÓN —No utilice dispositivos eléctricos dentro de los compartimentos de
almacenaje de alimentos que recomienda el fabricante.
ATENCIÓN —Este electrodoméstico no está diseñado para que lo utilicen niños o
personas con discapacidad salvo que lo hagan con la supervisión adecuada de un
responsable que asegure que pueden utilizarlo con seguridad. Los niños han de
estar vigilados para que no jueguen con el electrodoméstico.
ATENCIÓN —Este electrodoméstico no está diseñado para que lo utilicen personas
(incluidos niños) con capacidad física, sensorial o psíquica reducida, o que no lo
conozcan o no tengan experiencia, salvo que lo hagan con supervisión o con
instrucciones relacionadas con su utilización por parte de la persona responsable de
su seguridad. Los niños han de estar vigilados para asegurarse de que no juegan
con el electrodoméstico.
ATENCIÓN —Mantenga el electrodoméstico alejado de toda sustancia u objeto que
pueda provocar fuego.
ATENCIÓN —Si el cable eléctrico está dañado tiene que sustituirlo por un cable
especial o uno de empate del fabricante o del proveedor de servicio.
ATENCIÓN ---Antes de obtener el acceso a los terminales ha de desconectarse el
circuito eléctrico.
ATENCIÓN ---Extraiga la puerta antes de eliminar el refrigerante.
Seguridad de los niños
El embalaje (por ejemplo, envoltorios, polietileno) puede ser peligroso para los niños.
Existe riesgo de asfixia, así que aleje el material de embalaje del alcance de los
niños.
Deje inservible el electrodoméstico antes de deshacerse de él. Retire el enchufe
principal, corte el cable de suministro eléctrico, rompa o quite los muelles o los
tornillos de los cierres si los tuviere. Con esto lo que se consigue es asegurar que los
niños no se puedan quedar encerrados dentro del electrodoméstico si juegan con él
(existe riesgo de asfixia) o que se expongan a situaciones peligrosas.
Normalmente los niños no pueden ver los peligros que representan los
electrodomésticos del hogar. Por ello es importante que asegure una supervisión
adecuada y que nunca les permita jugar con él.
Funcionamiento diario
Los recipientes que contienen gases o líquidos inflamables pueden romperse a bajas
temperaturas, por lo que existe riesgo de explosión. No guarde recipientes con
materiales inflamables, tales como latas de espray, extintores, recargas, etc. en el
congelador.
No accione dispositivos eléctricos dentro del congelador (por ejemplo máquinas
eléctricas para hacer helados, batidoras, etc.)
Antes de limpiar el electrodoméstico apáguelo siempre y desenchúfelo, desconecte
la electricidad de la casa o apague el interruptor de corriente.
Cuando lo desenchufe tire del enchufe para sacarlo de la clavija, no del cable.
4
Page 72

ES
En caso de funcionamiento incorrecto
En caso de funcionamiento incorrecto del electrodoméstico, primero compruebe la
“Guía de Incidencias” que se incluye en estas instrucciones. Si la información
proporcionada no le resulta de ayuda, por favor, no intente hacer reparación alguna
por su cuenta.
Bajo ninguna circunstancia deberá intentar reparar el electrodoméstico por su cuenta.
Las reparaciones que realizan personas no autorizadas pueden provocar daños o
fallos graves. Póngase en contacto con el Servicio de Atención al Cliente local.
Retirar el embalaje del transporte
El electrodoméstico y los componentes internos están protegidos para su transporte.
Retire el adhesivo de protección de la puerta de izquierda a derecha. Puede retirar
los restos de adhesivo utilizando alcohol. Retire todos los adhesivos y elementos de
embalaje del interior del electrodoméstico.
Instalación
Instalación Colocación
Antes de instalarlo, lea detenidamente las instrucciones hasta el final para evitar
algunos problemas.
Si quiere mover el congelador sujételo por ambos lados o por la base. Nunca lo
levante por arriba.
Coloque el electrodoméstico en una habitación seca y con buena ventilación, lejos
de toda fuente de calor.
Deje un espacio mínimo de 10 cm entre la parte superior del congelador y los
dispositivos o muebles instalados en la cocina. Si no es posible, deje 5 cm encima
del electrodoméstico y 2,5 cm a cada lado.
Asegúrese de que las salidas de aire superiores del congelador no quedan cubiertas
o bloqueadas.
Conexión eléctrica
gCaracterísticas del conector: 220-240V con toma de tierra.
gEvite la utilización de adaptadores o prolongadores.
gEvite que el cable haga contacto con el compresor.
gEvite que el electrodoméstico machaque el cable.
La instalación eléctrica del electrodoméstico va conectada a la toma de tierra. Por su
seguridad, conecte el electrodoméstico a la corriente con una toma de tierra correcta
(de acuerdo con las normas actuales de seguridad en instalaciones eléctricas).
La desconexión puede lograrse mediante el enchufe disponible o incorporando un
interruptor en el cableado fijo según las normas de cableado.
El fabricante se exime de toda responsabilidad por daños causados por la
inexistencia de la toma de tierra.
Atención: para evitar los peligros propios de la inestabilidad del
electrodoméstico es obligatorio fijarlo siguiendo las instrucciones:
5
Page 73

ES
Empotrado
Dimensiones del hueco
Altura del hueco 880 mm
Fondo del hueco 550 mm
Ancho del hueco 560 mm
Es necesario que el hueco disponga de
una apertura de ventilación con las
dimensiones siguientes:
Fondo 50mm
Ancho 540 mm
5
0
0
4
5
0
6
5
5
550
5
0
880
2. Presione la goma de unión entre el
electrodoméstico y el mueble de la
cocina (sólo en el lado que no tiene
bisagra)
3. Abra la puerta y empuje el
electrodoméstico hacia el lateral
opuesto al de la bisagra. Fije el
electrodoméstico con los 6 tornillos que
se adjuntan con él. Encaje la cobertura
de la bisagra (D) en su sitio.
Para una ventilación adecuada siga las
indicaciones de la imagen.
1. Empuje el electrodoméstico dentro
del hueco hasta que la línea de stop (A)
toque el hueco de la cocina.
4. Coloque las cubiertas blancas (B)
como se indica.
6
Page 74

ES
5. Separe las piezas A,B,C,D como se
muestra en la imagen.
6. Coloque la guía (A) en la parte lateral
de la puerta del mueble, arriba y abajo,
como se muestra en la imagen y
marque la posición de los agujeros
externos. Una vez hechos los agujeros
fije la guía con los tornillos que se
adjuntan.
la imagen, retire los cuadrados y haga
los agujeros con un ¶de entre 2 mm y
8 mm desde la parte exterior de la
puerta. Coloque el cuadrado pequeño
en la guía y fíjelo con los tornillos que
se adjuntan.
9. En caso de que haya que nivelar la
puerta del mueble, utilice el hueco de la
ranura. Al final hay que comprobar que
la puerta del mueblo cierra
correctamente.
7. Fije la cobertura (C) en la guía (A)
hasta que encaje.
8. Abra la puerta del electrodoméstico y
la puerta del mueble 90 é .Inserte el
cuadrado pequeño (B) en la guía (A).
Empuje a la vez la puerta del
electrodoméstico y la del mueble y
marque los agujeros como se indica en
10. Fije la cubierta (D) con la guía (B)
hasta que encaje.
7
Page 75

ES
Diagramas Técnicos de Refrigeración Integrada
Colocación
Coloque el electrodoméstico lejos de fuentes de calor como estufas, radiadores, luz
solar directa, etc. El rendimiento máximo y la seguridad están garantizados si se
mantiene la temperatura interior correcta para el tipo de electrodoméstico
correspondiente, tal y como se especifica en la placa de información. Esta aplicación
rinde mejor de SN a ST.
Clasificación climática Temperatura ambiente
SN 10~32°C
N 16~32°C
ST 16~38°C
T 16~43°C
Los electrodomésticos no deben estar expuestos a la lluvia. Ha de permitirse la
circulación de aire suficiente en la parte posterior inferior de los electrodomésticos ya
que una ventilación insuficiente podría afectar al rendimiento. Los electrodomésticos
empotrados han de colocarse lejos de fuentes de calor como calentadores y la luz
directa del sol.
Invertir la puerta
El lado hacia el que se abre la puerta de puede cambiar de la derecha (como viene
de fábrica) a la izquierda si fuese necesario para su instalación. Incline el
electrodoméstico ligeramente hacia atrás y apóyelo. Desatornille los tornillos de la
puerta y retire la bisagra. Abra la puerta un poco y sáquela tirando hacia abajo.
Desatornille la parte superior y atorníllela en la parte superior contraria. Fije la puerta
8
Page 76

ES
con los enganches superiores y ciérrela. Atornille la bisagra en la parte contraria a la
inicial utilizando los tornillos..
¡Atención!
Cuando cambie la dirección de apertura de la puerta el electrodoméstico tiene que
estar desenchufado de la corriente. Antes de nada saque la clavija del enchufe.
Descripción del electrodoméstico
Vista del electrodoméstico
1. Puerta
2. Termostato
3. Cajones del congelador
4. Patras de regulación
9
Page 77

ES
Puesta en marcha y regulación de la temperatura
Este electrodoméstico está diseñado únicamente para uso doméstico, en concreto
para conservar determinado tipo de alimentos. Esta diseñado también para trabajar
a temperatura ambiente (temperatura del lugar en el que se encuentra) de entre
16ºC y 38ºC. Si se excede este intervalo, es decir, la temperatura es superior o
inferior, es posible que el electrodoméstico no funcione como debiera. En caso de
que el intervalo de temperatura se exceda durante demasiado tiempo, la
temperatura del congelador superaría los -18ºC y podrían estropearse los alimentos.
Antes de su utilización
Quite todas las Cintas de seguridad. Lave el interior del electrodoméstico con agua
templada y con un poco de bicarbonato (5ml para ½ litro de agua). No utilice jabón o
detergente ya que podría quedarse el olor. Seque minuciosamente el
electrodoméstico.
Puesta en marcha del electrodoméstico
1. Deje reposar en vertical al electrodoméstico 2 horas desde su instalación.
2. Enchufe el electrodoméstico y conecte la energía eléctrica general.
3. Gire el termostato hasta la configuración necesaria. La configuración media suele
ser la adecuada para un funcionamiento normal (véase termostato).
4. Antes de introducir alimentos dentro del electrodoméstico espere unas 4 horas
para que alcance la temperatura correcta.
Termostato
El termostato situado en el panel de control regula la temperatura del compartimento
del congelador.
gPosición “MIN” Frío.
gPosición “MAX” frío máximo.
1. Led de advertencia (rojo)
2. Luz del piloto (verde)
3. Luz indicadora de congelación rápida (amarilla)
4. Botón que hay que pulsar para una Congelación rápida
5. Termostato
Cuando se pulsa el botón de congelado rápido el compresor empieza a trabajar de
forma continua para así congelar más alimentos calientes.
La temperatura dependerá de:
gLa temperatura de la habitación
gLa frecuencia con la que se abre la puerta
gLa cantidad de alimentos almacenados
10
Page 78

ES
gLa colocación del electrodoméstico
A la hora de configurar el control de temperatura correcto han de tenerse en cuenta
todos estos factores y puede que haya que hacer varias pruebas. No deje que los
niños jueguen con los mandos o con el electrodoméstico.
El congelador
El símbolo
(-0,4F) o menos lo que permite un mayor período de conservación y el congelador
de alimentos frescos. La temperatura del congelador se controla automáticamente
gracias al termostato situado en el panel de control. Debido a las diferentes
instalaciones, métodos de utilización y condiciones ambientales, puede que sea
necesario ajustar la temperatura. Estos pueden ajustarse mejor según la
temperatura indicada en un termómetro que se ocupa de los alimentos congelados.
La lectura ha de hacerse de forma rápida pues la temperatura del termómetro
aumentará rápidamente cuando se extrae.
Congelado de alimentos frescos
La cantidad máxima de alimentos que puede congelarse en 24 horas es de 4 kg.
Coloque los alimentos frescos en la parte superior del congelador. Puede que para
ello tenga que recolocar las cosas que tenga almacenadas. Durante el proceso de
congelado la temperatura de los alimentos frescos debería reducirse con rapidez
para que los cristales de hielo que se formen sean lo más pequeños posible evitando
así dañas la estructura de los alimentos. Si el congelado es lento dará lugar a
cristales de hielo grandes y eso afectará a la calidad de los alimentos cuando se
descongelen.
Coloque el botón de congelación rápida en “on” 24 horas antes de meter los
alimentos. Una vez colocados vuelva a poner el botón en “off”. Los alimentos
congelados han de reubicarse dentro del congelador para dejar espacio en las dos
baldas superiores para congelación. Los sobres que se van a congelar han de
colocarse en la balda en contacto con la superficie en la mayor medida posible y
espaciados unos de otros para permitir la circulación del aire frío entre ellos. No
deberían tocarse entre ellos.
En una habitación. Pase los alimentos que tiene congelados a cestas o baldas para
que se pueda congelar una mayor cantidad de alimentos en los apartados
superiores. No pasa nada si se olvida de volver a poner en OFF el interruptor de
congelación rápida después de 24 horas, pero por economía, intente recordar volver
a ponerlo en off cuando se haya completado la congelación. La luz de “congelado
rápido” le servirá de recordatorio. En casos excepcionales se puede congelar
alimentos de gran dimensión quitando el cajón superior. Los alimentos congelados
no deben volver a congelarse una vez que ya han sido descongelados. No saque
nada del congelador si tiene las manos mojadas/húmedas, ya que podría provocarle
quemaduras o “ampollas por abrasión”.
significa que su congelador conservará los alimentos a -18ºC
Por motivos de seguridad los cajones del congelador disponen de topes pero que se
pueden quitar tirando de ellos hacia el tope, luego levantando la parte frontal y
tirando hacia fuera. Puede volver a colocarlos haciendo el proceso inverso.
¡Importante!
Temperaturas ambientales elevadas (por ejemplo, días calurosos de verano) y una
configuración fría en el regulador de temperatura puede provocar que el compresor
esté trabajando de forma continuada.
Motivo: cuando la temperatura ambiente es alta, el compresor tiene que
trabajar de forma continua para mantener la baja temperatura del
electrodoméstico.
11
Page 79

ES
Utilización del congelador
Este electrodoméstico está diseñado para conservar alimentos congelados, congelar
alimentos frescos y para hacer cubitos de hielo.
No congele una gran cantidad a alimentos de una sola vez (máximo 4kg/24h) ya que
cuando más rápido se congele un alimento, más tiempo conservará sus cualidades.
Igualmente asegúrese que los alimentos están bien embalados antes de congelarlos
ya que así conservarán todo el sabor y no se esparcirán por el congelador.
Nunca coloque alimentos calientes en el congelador. Tampoco guarde botellas o
latas de bebida ya que podrían explotar cuando se congele el contenido.
Las bebidas carbonatadas puedes explotar. No meta jamás limonada, zumo
de fruta, cerveza, vino, champán, etc…. en el congelador.
Deshielo
El sistema de deshielo del congelador es manual. De vez en cuando puede eliminar
la capa de hielo que se forme utilizando un rascador o un instrumento plástico.
Jamás utilice un instrumento metálico de dispositivos eléctricos para quitar el
hielo del congelador.
El congelador ha de descongelarse siempre que la capa de escarcha alcance un
grosor de unos 4 mm. En todo caso el compartimento deberá descongelarse una vez
al año mínimo.
1. Apague y desconecte el congelador.
2. Retire el hielo con un rascador plástico. El proceso de descongelación puede ser
más rápido si coloca boles con agua caliente en el congelador y cierra la puerta.
3. Una vez completado el proceso de descongelación puede proceder a la limpieza
del mismo.
Trucos:
Los alimentos del congelador siempre deben estar cubiertos o empaquetados para
evitar su deshidratación y que se peguen a otros alimentos.
Lo adecuado por su empaquetamiento es:
Bolsas y envoltorios a presión de polietileno;
Recipientes de plástico con tapadera;
Envoltorios especiales de plástico con elástico,
Papel de aluminio.
Descongelado
1. Envuelva los alimentos en papel de periódico o en folios.
2. Apague el electrodoméstico y desenchúfelo de la corriente.
3. Abra la puerta del congelador.
4. Coloque un recipiente adecuado para recoger el agua derivada de la escarcha
fundida.
Desconexión del electrodoméstico
Apagar el electrodoméstico, girar el regulador de temperatura a la posición “Min”.
Si el electrodoméstico no se va a utilizar durante un largo período:
Saque todo lo que tenga refrigerándose.
Apague el electrodoméstico girando regulador de temperatura a la posición “Min”.
Quiete el enchufe o apague o desconéctelo de la electricidad.
Límpielo (véase sección: Limpieza y Cuidado)
Deje la puerta abierta para evitar que se generen malos olores.
12
Page 80

ES
Limpieza y Cuidado
Por motivos de higiene han de limpiarse con cierta regularidad el interior del
electrodoméstico, así como todos los accesorios internos.
¡Atención!
El electrodoméstico no puede estar conectado a la red eléctrica durante la limpieza,
¡peligro de descarga! Antes de la limpieza apague el electrodoméstico y
desenchúfelo de la corriente o apáguelo o active el cortacircuito o el fusible.
Nunca limpie el electrodoméstico con limpiadores de vapor. Podría acumularse
humedad en los componentes eléctricos y habría peligro de descarga. El vapor
caliente podría dañar los componentes de plástico.
El electrodoméstico tiene que estar seco antes de volver aponerlo en funcionamiento.
¡Importante!
Los aceites etéreos y los disolventes orgánicos pueden dañar las piezas de plástico,
por ejemplo, el zumo de limón o el zumo de la piel de la naranja, el ácido butírico,
limpiadores que contengan ácido acético.
No permita que este tipo de sustancias entren en contacto con las piezas del
electrodoméstico.
No utilice limpiadores abrasivos.
Retire los alimentos del frigorífico. Colóquelos en un sitio frío y cubierto.
Apague el electrodoméstico y desenchúfelo o apáguelo y active el cortacircuitos o el
fusible.
Limpie el electrodoméstico y los accesorios internos con un paño y agua templada.
También se pueden utilizar los detergentes que se comercializan para la limpieza de
vajillas.
La acumulación de polvo en el condensador aumenta el consumo energético.
Por ello ha de limpiarse el condensador de la parte posterior del electrodoméstico
una vez al año con un cepillo suave o con una aspiradora.
Una vez que todo esté seco vuelva a poner en marcha el electrodoméstico.
Trucos para el ahorro energético
No coloque el electrodoméstico cerca de cocinas, radiadores u otras fuentes de calor.
Las temperaturas ambientales elevadas provocan un funcionamiento más
prolongado y frecuente del compresor.
Asegúrese de que la circulación de aire es suficiente en la base del electrodoméstico
y en la parte posterior del mismo. Nunca tape las salidas de aire de ventilación. No
coloque alimentos calientes dentro del electrodoméstico. Deje que los alimentos se
templen primero antes de congelarlos. Deje la puerta abierta sólo el tiempo
estrictamente necesario. No ponga la temperatura más baja de lo necesario. Tenga
siempre limpia la rejilla de metal que emite calor del condensador que hay en la
parte posterior del electrodoméstico.
Guía de incidencias
Corrección de fallos
Los fallos pueden estar provocados por un error menor que puede corregir usted
mismo guiándose por las instrucciones siguientes. No haga nada más que lo que se
le indica si la información proporcionada a continuación no le sirve de ayuda en su
caso específico.
¡Importante!
Las reparaciones de congeladores sólo las pueden hacer las personas del servicio
pertinente.
Las reparaciones inadecuadas pueden derivar en posibles peligros para el usuario.
Si hay que reparar el electrodoméstico póngase en contacto con su distribuidor o
13
Page 81

ES
con el Centro de Atención al Cliente local.
Síntoma Posible causa Solución
El electrodoméstico no
funciona.
El electrodoméstico enfría
demasiado.
Los alimentos están
demasiado calientes.
La luz interior no funciona. La bombilla es defectuosa. Véase la sección “Cambio de
Gran cantidad de escarcha,
posiblemente en la goma de
sellado de la puerta.
Ruidos extraños.
El compresor no empieza a
funcionar inmediatamente
una vez modificada la
configuración de la
temperatura.
Hay agua en el suelo o en los
cajones.
El electrodoméstico no está
enchufado.
El enchufe no está colocado o
está flojo.
El fusible está fundido o es
defectuoso.
El enchufe es defectuoso. Los fallos de electricidad ha
La temperatura configurada es
demasiado fría.
La temperatura no se ajustó de
forma adecuada.
La puerta estuvo demasiado
tiempo abierta.
Se colocó gran cantidad de
alimentos templados en el
electrodoméstico en las últimas
24 horas.
El electrodoméstico está cerca
de una fuente de calor.
El sellado de la puerta no hace
vacío (posiblemente después
de cambiar el sentido de
apertura de la puerta).
El electrodoméstico no está
nivelado.
El electrodoméstico está
tocando la pared o algún
objeto.
Un componente, por ejemplo,
una tubería, en la parte
posterior del electrodoméstico,
está tocando otra pieza del
electrodoméstico o de la pared.
Es normal, no es un fallo. El compresor se arranca
El agujero de drenaje está
obstruido.
Encienda el
electrodoméstico.
Coloque la clavija en el
enchufe.
Compruebe el fusible y
cámbielo si es necesario.
de solucionarlos un
electricista.
Gire el regulador de
temperatura para una
configuración más cálida de
forma temporal.
Véase la sección “Puesta en
marcha inicial”.
Abra la puerta solo el tiempo
necesario.
Gire la regulación de la
temperatura hasta una
configuración más fría de
forma temporal.
Véase la sección “instalación
colocación”.
la Bombilla”.
Temple con cuidado las
partes de fuga del sellado de
la puerta con un secador (con
aire frío). Al mismo tiempo
dele forma al sello de la
puerta calentado con la mano
para que encaje
perfectamente.
Reajuste los pies.
Mueva un poco el
electrodoméstico.
Si fuese necesario, aparte
con cuidado el componente
externo.
después de un tiempo.
Véase la sección “limpieza y
cuidado.
14
Page 82

ES
Ruidos durante el funcionamiento
Los ruidos siguientes son característicos de los electrodomésticos de enfriado:
Clicks
Cuando el compresor se conecta y se desconecta puede que se escuche un click.
Susurro
Cuando el compresor está funcionado se escucha un leve susurro.
Burbujas
Cuando el refrigerante pasa por tuberías delgadas pueden escucharse ruidos como
de burbujas o salpicaduras.
Salpicaduras
Aunque el compresor ya no esté en funcionamiento, puede seguirse escuchando
ruido de salpicaduras un ratito más.
Normativas, Estándares y Directrices
Este electrodoméstico cumple las directrices de la UE siguientes:
- Directrices de bajo voltaje 2006/95/EC.
-Directiva EMC 2004/108/EC
Tirar el electrodoméstico
Está prohibido tirar el electrodoméstico en el contenedor de basura doméstica.
Para su retirada existen varias posibilidades:
a) El municipio estableció sistemas de recogida mediante los cuales se pueden
eliminar los residuos electrónicos sin coste alguno para el usuario.
b) El fabricante se hará cargo del electrodoméstico antiguo sin cargo alguno para el
usuario.
c) Los productos antiguos tienen piezas de valor, pueden venderse a personas que
compren metal.
El abandono en bosques o lugares apartados supone un riesgo para su salud pues
las sustancias que se viertan pasarán al agua subterránea y pueden acabar en la
cadena alimenticia.
Significado de un cubo de basura tachado:
No deposite electrodomésticos eléctricos, utilice depósitos
independientes.
Póngase en contacto con la autoridad local competente
para informarse sobre los sistemas de recogida posibles.
Si los dispositivos eléctricos se dejan en campo abierto o
en vertederos puede que las sustancias peligrosas se
filtren y lleguen a las aguas subterráneas pudiendo acceder
así a la cadena alimenticia dañando su salud y bienestar.
Este símbolo en el producto o en las instrucciones quiere
decir que el equipo eléctrico y electrónico debería
separarse de la basura normal cuando se vaya a tirar en un
contenedor específico. Existen sistemas de recogida
independientes para su reciclaje en la UE. Si quiere más
información póngase en contacto con la autoridad local
competente o con el distribuidor donde haya adquirido el
producto.
15
Page 83

CZ
MRAZÁK
NÁVOD K POUŽITÍ
Page 84

CZ
Vážený zákazník,
PĜed uvedením Vašeho nového mrazáku do provozu si pĜeþtČte dĤkladnČ tyto
pokyny. Obsahují dĤležité informace pro bezpeþné použití, instalaci a údržbu
spotĜebiþe.
Odložte si tento návod pro použití v budoucnosti. Odevzdejte jej také pĜípadnému
novému majiteli spotĜebiþe.
Poznámky, které jsou dĤležité pro Vaší bezpeþnost nebo pro správnou funkþnost
spotĜebiþe jsou zvýraznČné trojúhelníkem nebo slovy (UpozornČní!, Pozor!,
DĤležité!). Dodržujte je dĤkladnČ.
Dodateþné informace týkající se provozu a praktických aplikací spotĜebiþe jsou
zobrazené po tomto symbolu.
Tipy a poznámky týkající se ekonomického a správného použití spotĜebiþe jsou
oznaþené lístkem.
Pokyny k použití obsahují pokyny o možných závadách odstranitelných uživatelem
v þásti @OdstranČní možných problémĤ@. Pokud tyto kroky nepostaþují, kontaktujte
místní autorizované servisní stĜedisko.
1
Page 85

CZ
Obsah
DĤležité bezpeþnostní pokyny ..............................................................................3
OdstraĖte obalový materiál....................................................................................5
Instalace.......................................................................................................................5
Vestavba ...................................................................................................................... 6
Nákres integrovaného spotĜebiþe ........................................................................ 8
Postavení.....................................................................................................................8
Popis spotĜebiþe .......................................................................................................9
Zapnutí a nastavení teploty..................................................................................10
Použití mrazáku....................................................................................................... 11
Rozmrazování ..........................................................................................................12
Vypnutí spotĜebiþe..................................................................................................12
ýištČní a údržba.......................................................................................................12
Tipy pro úsporu energie........................................................................................13
OdstranČní možných problémĤ...........................................................................13
BČžné provozní zvuky............................................................................................ 14
PĜedpisy, standardy, smČrnice ............................................................................ 14
Likvidace starého spotĜebiþe ..............................................................................14
2
Page 86

CZ
DĤležité bezpeþnostní pokyny
Tato varování jsou v zájmu Vaší bezpeþnosti. ZajistČte, zda jste jim porozumČli
pĜed instalací nebo použitím spotĜebiþe.
Vaše bezpeþnost je nejdĤležitČjší. Pokud nejste si jisti významem upozornČní,
kontaktujte autorizované servisní stĜedisko.
Úþel použití
Mrazák je urþený pro použití v domácnosti. Je vhodný ke skladování potravin pĜi
nízké teplotČ. Pokud spotĜebiþ používáte pro jiné úþely, než jsou uvedené v tomto
návodu, výrobce nenese žádnou odpovČdnost za poškození.
Z dĤvodu bezpeþnosti nejsou povolené žádné zmČny ani úpravy spotĜebiþe.
Pokud používáte spotĜebiþ ke komerþním úþelĤm nebo pro jiné úþely než chlazení
potravin, výrobce nenese žádnou odpovČdnost za poškození spotĜebiþe.
PĜed prvním zapnutím
Zkontrolujte, zda není spotĜebiþ poškozený. Za žádných okolností nepĜipojujte
poškozený spotĜebiþ. V pĜípadČ poškození kontaktujte dodavatele.
Chladící médium
Chladící izobutan (R600a
nezávadný zemní plyn, který je pĜesto hoĜlavý.
BČhem pĜepravy a instalace spotĜebiþe nepoškoćte žádný z komponentĤ chladícího
okruhu.
Pokud je poškozený chladící okruh:
vyhnČte se zdrojĤm s otevĜeným plamenem, dĤkladnČ vyvČtrejte místnost, ve které
se nachází spotĜebiþ.
UpozornČní:
UPOZORNċNÍ – Udržujte vČtrací otvory spotĜebiþe nebo vestavného nábytku bez
pĜekážek.
UPOZORNċNÍ – K urychlení procesu odmrazování nepoužívejte mechanická
zaĜízení, jiné než doporuþené výrobcem.
UPOZORNċNÍ – Nepoškoćte chladící okruh spotĜebiþe.
UPOZORNċNÍ – UvnitĜ chladícího prostoru nepoužívejte elektrické spotĜebiþe.
UPOZORNċNÍ – Tento spotĜebiþ není urþen pro použití osobami (vþetnČ
sníženými fyzickými, senzorickými nebo mentálními schopnostmi, nebo bez
dosta
teþných zkušeností a znalostí, dokud nejsou pod dohledem osoby odpovČdné
za jejich bezpeþnost. Nedovolte dČtem hrát si se spotĜebiþem.
) je obsažen v chladicím okruhu spotĜebiþe, je t
o
dČtí) se
3
Page 87

CZ
UPOZORNċNÍ – Tento spotĜebiþ není urþený pro použití dČtmi nebo nezpĤsobilými
osobami, dokud nebyly pouþeny o bezpeþném použití spotĜebiþe. Nedovolte dČtem
hrát si se spotĜebiþem.
UPOZORNċNÍ – Udržujte spotĜebiþ mimo zdrojĤ plamene.
UPOZORNċNÍ – Pokud je poškozený pĜívodní kabel, musí jej vymČnit servisní
technik za správný typ.
UPOZORNċNÍ - PĜed odkrytím konektorĤ odpojte pĜipojovací kabel od elektrické
sítČ.
UPOZORNċNÍ – PĜed likvidací starého spotĜebiþe demontujte dvíĜka.
Bezpeþnost dČtí
Obaly (napĜ. fólie, polystyrén) mohou být pro dČti nebezpeþné.
Hrozí riziko udušení! Udržujte obalové materiály mimo dosah dČtí!
PĜed vyhozením starého spotĜebiþe jej znefunkþnČte. VytáhnČte pĜipojo
odĜíznČte jej, demontujte zámky, pokud jsou. Tímto zajistíte, že se dČti neuzamknou
do spotĜebiþe (riziko udušení!).
DČti nevČdí urþit nebezpeþí z domácích spotĜebiþĤ. Proto je dĤležité, abyste zajistili
dostateþný dohled a nedovolte dČtem hrát si se spotĜebiþem!
Denní provoz
Nádoby s hoĜlavými plyny nebo tekutinami mohou pĜi nízkých teplotách vytéct. Hrozí
riziko exploze! Neskladujte žádné nádoby s hoĜlavými látkami jako jsou spreje, hasicí
pĜístroje apod. uvnitĜ mrazáku.
UvnitĜ spotĜebiþe nepoužívejte elektrická zaĜízení (napĜ. elektrické výrobníky zmrzliny,
mixéry, apod.).
PĜed þištČním spotĜebi
jistiþ.
PĜi odpojování tahejte za zástrþku, nikoli za pĜívodní kabel.
V pĜípadČ závady
Pokud se objeví závada spotĜebiþe, nejdĜíve si pĜeþtČte kapit
možných problémĤ“. Pokud tyto tipy nepomohou, neprovádČjte žádné opravy.
Za žádných okolností se nepokoušejte spotĜebiþ opravovat sami. Opravy provedené
neoprávnČnou osobou mĤže zpĤsobit zranČní. Kontaktujte autorizované servisní
stĜedisko.
þe jej vždy vypnČte a odpojte od elektrické sítČ nebo vypnČte
olu“OdstranČní
vací kabel,
4
Page 88

CZ
OdstraĖte obalový materiál
SpotĜebiþ a vnitĜní vybavení je chránČné pro provoz. OdstraĖte lepicí pásku z levé a
pravé strany dvíĜek. Zbytky lepidla odstraĖte bílým alkoholem. ZevnitĜ spotĜebiþe
odstraĖte lepicí pásky a obalové materiály.
Instalace
Místo instalace
PĜed instalací si pozornČ pĜeþtČte pokyny na konci pro zabránČní možným
problémĤm.
Pokud chcete mrazák pĜesouvat, uchopte ji ze stran nebo za dno. Nikdy jej
nezvedejte za horní þást.
Instalujte spotĜebiþ v suché, dobĜe vČtrané místnosti, mimo všech zdrojĤ tepla.
Nechte minimální volný prostor 10 cm mezi horní stČnou mrazáku a kuchyĖskou
linkou. Pokud to není možné, nechte 5 cm nad spotĜebiþem a 2.5 cm z každé strany.
Neblokujte vČtrací otvory.
PĜipojení k elektrické síti
·PĜipojení: 220-240V s uzemnČním.
·Nepoužívejte adaptéry nebo prodlužovaní kabely.
·ZabraĖte kontaktu kabelĤ s kompresorem.
·Nevećte kabel pod spotĜebiþ.
Instalace spotĜebiþe je uzemnČná. Pro Vaší bezpeþnost, pĜipojte spotĜebiþ
k elektrické zásuvce s funkþním uzemnČním (v souladu s platnými pĜedpisy).
Odpojení mĤžete dosáhnout ponecháním volnČ pĜístupné zásuvky nebo vþlenČním
pĜepínaþe v souladu s pĜedpisy.
Výrobce ne
spotĜebiþe.
nese žádnou odpovČdnost za poškození zpĤsobená neuzemnČním
UpozornČní: abyste zabránili riziku úrazu z dĤvodu nestabilnosti spotĜebiþe,
musíte jej upevnit podle pokynĤ:
5
Page 89

CZ
Vestavba
RozmČry výklenku
Výška skĜíĖky mm 880
Hloubka skĜíĖky mm 550
ŠíĜka skĜíĖky mm 560
Je nezbytné, aby skĜíĖka mČla vČtrací
otvory následujících rozmČrĤ:
Hloubka 50mm
ŠíĜka 540 mm
5
0
0
4
5
0
6
5
5
550
5
0
Pro správné vČtrání dodržujte pokyny
na obrázku.
880
2. Zatlaþte spojovací lišty mezi spotĜebiþ
a kuchyĖský nábytek (pouze na stranČ
bez závČsĤ)
3. OtevĜete dvíĜka a zatlaþte spotĜebiþ
k nábytku naproti závČsĤm. UpevnČte
spotĜebiþ 6 šrouby dodanými se
spotĜebiþem. UmístČte kryt závČsĤ (D)
na místo.
1. Zatlaþte spotĜebiþ do skĜíĖky, dokud
se pás (A) nedotkne kuchyĖské linky.
4. Nasaćte kryty (B).
6
Page 90

5. OddČlte díly A,B,C,D podle obrázku.
6. UmístČte vodítko (A) na boþní stranu
dvíĜek nábytku, nahoru a dolĤ podle
obrázku a poznaþte pozici externích
otvorĤ. Po vyvrtaní otvorĤ pĜipevnČte
vodítka pomocí dodaných šroubĤ.
CZ
þtverec a vyvrtejte otvory ij2 mm o
délce 8 mm z vnČjšího okraje dvíĜek.
Nasaćte þtverec opČt na vodítko a
upevnČte pomocí dodaných šroubĤ.
9. PĜi nastavení dvíĜek nábytku použijte
nastavovací otvory. Na konci postupu je
nutné zkontrolovat správní zavírání
dvíĜek nábytku.
7. PĜipevnČte kryt ( C ) na vodítko (A),
dokud nezacvakne na místČ.
8. OtevĜete dvíĜka spotĜebiþe a dvíĜka
nábytku do úhlu 90°. Vložte malý
þtverec (B) do vodítka (A). PĜitlaþte
spoleþnČ dvíĜka spotĜebiþe a dvíĜka
nábytku a poznaþte otvory. VyjmČte
10. PĜipevnČte kryt (D) na vodítko (B),
dokud nezacvakne na místČ.
7
Page 91

CZ
Nákres integrovaného spotĜebiþe
Postavení
Postavte spotĜebiþ mimo zdroje tepla, jako jsou kamna, radiátory, pĜímé sluneþní
záĜení, apod. Maximální úþinnost a bezpeþnost je zaruþená pĜi správné pokojové
teplotČ podle tĜídy spotĜebiþe, podle oznaþení na výrobním štítku.
Tento spotĜebiþ funguje nejlépe SN po ST
Klimatická tĜída Okolní teplota
SN 10~32°C
N 16~32°C
ST 16~38°C
T 16~43°C
SpotĜebiþ nevystavujte dešti. Ve spodní þásti spotĜebiþe musíte zajistit dostateþné
proudČní vzduchu, neboĢ nesprávné vČtrání mĤže ovlivnit správný provoz. VestavČné
spotĜebiþe musí být umístČné mimo zdroje tepla jako jsou ohĜívaþe a pĜímé sluneþní
záĜení.
ZmČna smČru otvírání dvíĜek
SmČr otevírání dvíĜek lze zmČnit z pravé strany (dodávané) na levou, pokud je to
nutné.
NakloĖte spotĜebiþ mírné dozadu a zajistČte jej. Odšroubujte šrouby závČsu dvíĜek a
vyjmČte kolík závČsu. OtevĜete dvíĜka a vysuĖte je dolĤ.
UvolnČte šrouby závČsĤ a sejmČte závČs. PootevĜete dvíĜka a sejmČte je dolĤ.
Odšroubujte horní závČs a našroubujte je na opaþnou stranu. Nasaćte dvíĜka na
horní závČs a zavĜete je. Našroubujte držák závČsu na místo na opaþnou stranu
pomocí šroubĤ.
8
Page 92

CZ
UpozornČní!
PĜi zmČnČ smČru otevírání dvíĜek nesmí být spotĜebiþ pĜipojený k elektrické síti. PĜed
postupem odpojte zástrþku od síĢové zásuvky.
Popis spotĜebiþe
Pohled na spotĜebiþ
1. DvíĜka
2. Termostat
3. Mrazicí pĜihrádky
4. Stavitelné nožiþky
9
Page 93

CZ
Zapnutí a nastavení teploty
SpotĜebiþ je navržený pouze pro použití v domácnosti, zejména pro skladování
potravin. Tento spotĜebiþ je navržený pro provoz pĜi okolní teplotČ (okolní teplota
vzduchu) mezi 16° a 38°. Pokud jsou tyto hodnoty pĜekroþené, napĜ. chladnČjší nebo
teplejší, spotĜebiþ nebude fungovat správnČ. Pokud okolní teplota pĜesahuje limity
dlouhou dobu, uvnitĜ mrazáku teplota stoupne nad -18° a mĤže se objevit roztátí
potravin.
PĜed použitím
OdstraĖte zajišĢovací pásky. OpláchnČte vnitĜek spotĜebiþe teplou vodou s trochou
jedlé sody (5ml. na 0.5 litru vody). Nepoužívejte mýdlo ani saponáty, neboĢ mohou
zanechat vĤni. SpotĜebiþ dĤkladnČ vysušte.
Zapnutí spotĜebiþe
1. Nechte spotĜebiþ odstát po dobu 2 hodin po instalaci.
2. PĜipojte spotĜebiþ k elektrické zásuvce.
3. Nastavte voliþ termostatu na požadované nastavení. VČtšinou je nejvhodnČjší
prostĜední nastavení pro standardní provoz (viz ovladaþ termostatu).
4. Nechte spotĜebiþ pĜib
vložením potravin.
ližnČ 4 hodiny bČžet pro dosažení správné teploty pĜed
Termostat
Termostat na ovládacím panelu slouží k nastavení požadované teploty mrazicího
prostoru.
·Pozice „MIN“ studená.
·Pozice „MAX“ nechladnČjší.
1. Varovná kontrolka (þervená)
2. Kontrolka provozu (zelená)
3. Kontrolka rychlého mrazení (žlutá)
4. Tlaþítko pro rychlé mrazení
5. Voliþ termostatu
Pokud stisknete tlaþítko rychlého mrazení, kompresor funguje nepĜetržitČ pro rychlé
zmražení velkého množství potravin.
Teplota je ovlivnČná:
·Teplotou v místnosti
·Frekvencí otvírání dvíĜek
·Množství uskladnČných potravin
·Pozicí spotĜebiþe
10
Page 94

CZ
PĜi volbČ správné teploty musíte brát v úvahu všechny tyto faktory a je nutná urþitá
zkušenost. Nedovolte dČtem manipulovat s ovládacími prvky.
Mrazicí prostor
Symbol
nebo nižší pro dlouhodobé skladování potravin. Teplota mrazáku je ovládána
automaticky termostatem umístČným na ovládacím panelu. Z dĤvodu rĤzných
instalací, zpĤsobu použití a povČtrnostních podmínek mĤže být nutné nastavení
teploty. Teplotu nejlíp urþíte pomocí teplomČru umístČného mezi mrazenými
potravinami. Odþítání teploty musíte provést rychle, neboĢ teplota se rychle zvýší po
vyjmutí teplomČru z mrazáku.
Zmrazování þerstvých potravin
Maximální množství potravin, které lze zmrazit za 24 hodin je 4 kg. Vložte þerstvé
potraviny do horní mrazicí pĜihrádky. BČhem procesu mrazení je nejvhodnČjší snížit
teplotu potravin co nejrychleji tak, aby byly ledové krystaly co nejmenší pro zabránČní
poškození struktury potravin. Pokud se potraviny zmrazují pomalu, vytvoĜí se velké
krystaly a tyto ovlivní kvality potravin po rozmrazení.
ZapnČte rychlé mrazení na 24 hodin pĜed vložením potravin. Po vložení potravin
pĜepínaþ rychlého mrazení vypnČte. Již zmrazené potraviny mĤžete pĜemístit tak,
abyste udČlali místo v horních dvou pĜihrádkách. Mrazené potraviny postavte na
pĜihrádky v kontaktu s povrchem pĜihrádky a co nejdál od sebe pro umožnČní
proudČní vzduchu mezi nimi. NemČly by se dotýkat již zmrazených potravin.
Nic se nestane, pokud zapomenete vypnout funkci rychlého mrazení po 24 hodinách,
ale z ekonomických dĤvodĤ, zkuste nezapomenout vypnout tuto funkci po dokonþení
mrazení. Kontrolka „Rychlé mrazení“ vám to pĜipomene. ExtrémnČ velké potraviny
lze skladovat vyj
Nedotýkejte se mrazených potravin mokrýma nebo vlhkýma rukama, neboĢ to mĤže
zpĤsobit úraz nebo „popálení mrazem ”.
Z bezpeþnostních dĤvodĤ jsou mrazicí koše vybavené stop pozicí, ale lze je snadno
vyjmout vytažením po stop pozici, poté mírné nadzvednČte a zcela vytáhnČte.
Opaþným postupem je zasuĖte na místo.
znamená, že mrazák skladuje potraviny pĜi teplotČ -18° (-0.4F)
mutím horního koše. Rozmražené pokrmy již opČtovnČ nezmrazujte.
DĤležité!
Vysoké okolní teploty (napĜ. bČhem horkých letních dní) a nižšího nastavení
termostatu mĤže kompresor bČžet nepĜetržitČ.
DĤvod: pokud je okolní teplota vysoká, kompresor musí nepĜetržitČ bČžet pro
udržení nízké teploty ve spotĜebiþi.
Použití mrazáku
Tento spotĜebiþ je navržený pro uchovávání mrazených potravin, k mrazení
þerstvých potravin a výrobČ ledových kostek.
Nezmrazujte najednou velké množství potravin (maximálnČ 4 kg/24 h), protože þím
rychleji se potraviny zmrazí, tím lepší kvalitu si zachovají. UjistČte se, zda jsou
potraviny dobĜe zabalené pĜed zmrazením, aby si zachovaly vĤni.
Do mrazáku nikdy nevkládejte horké potraviny. Nikdy nevkládejte uzavĜené láhve,
neboĢ mohou po zmrznutí prasknout.
Sycené nápoje mohou explodovat! Nikdy neskladujte v mrazáku limonády,
ovocné šĢávy, pivo, víno, apod….
Rozmrazování
Systém rozmrazování je manuální. Z þasu na þas mĤžete odstranit vrstvu námrazy,
pomocí škrabky nebo jiného plastového náþiní.
11
Page 95

CZ
Nikdy nepoužívejte kovové nástroje nebo elektrická zaĜízení k rozmrazování
mrazáku.
Mrazák je nutné odmrazit, pokud vrstva námrazy dosáhne tloušĢku pĜibližnČ 4 mm.
V jakémkoli pĜípadČ je nutné mrazák odmrazit minimálnČ jednou za rok.
1. VypnČte a odpojte spotĜebiþ od elektrické sítČ.
2. OdstraĖte led plastovou škrabkou. Odmrazování mĤžete urychlit postavením
nádoby s horkou vodou do mrazicího prostoru a zavĜít dvíĜka.
3. Po dokonþení odmrazování mĤžete spotĜebiþ vyþistit.
Tipy:
Potraviny v mrazáku je nutné dobĜe zabalit, abyste zabránili vysoušení a kontaminaci
dalších pokrmĤ.
K balení jsou vhodné:
Polyetylénové sáþky,
Plastové nádoby s víkem;
Speciální plastové nádoby,
Hliníková fólie.
Rozmrazování
1. Zabalte potraviny do nČkolik vrstev novin.
2. VypnČte spotĜebiþ a odpojte od elektrické sítČ.
3. OtevĜete dvíĜka mrazáku.
4. Vložte vhodnou nádobu k zachycení rozmrzené vody.
Vypnutí spotĜebiþe
K vypnutí spotĜebiþe nastavte voliþ termostatu do pozice „Min“.
Pokud nebudete spotĜebiþ delší dobu používat:
VyjmČte všechny potraviny.
SpotĜebiþ vypnČte nastavením voliþe termostatu do pozice „Min“.
Odpojte zástrþku od síĢové zásuvky.
DĤkladnČ vyþistČte (viz kapitola ýištČní a údržba)
Nechte dvíĜka pootevĜená pro zabránČní tvorby zápachĤ.
ýištČní a údržba
Z hygienických dĤvodĤ vnitĜku spotĜebiþe jej musíte pravidelnČþistit.
UpozornČní!
SpotĜebiþ pĜed þištČním odpojte od elektrické sítČ. Nebezpeþí úrazu elektrickým
proudem! PĜed þištČním spotĜebiþ vypnČte a odpojte pĜívodní kabel od zástrþky,
nebo vypnČte pojistky.
Nikdy neþistČte spotĜebiþ parním þistiþem. NahromadČná vlhkost na elektrických
komponentech mĤže zpĤsobit úraz elektrickým proudem! Horká pára mĤže poškodit
plastové díly.
PĜed uvedením spotĜebiþe do provozu jej dĤkladnČ vysušte.
DĤležité!
Éterické oleje a organické látky mohou poškodit plastové díly, napĜ. citrónová šĢáva
nebo šĢáva z pomeranþĤ, kyselina máslová, þisti
ZabraĖte ko
Nepoužívejte žádné drsné þistiþe.
Z mrazáku vyjmČte potraviny. Uložte je na chladném místČ, dobĜe zakryjte.
SpotĜebiþ vypnČte a odpojte zástrþku od síĢové zásuvky, nebo vypnČte pojistky.
SpotĜebiþ vyþistČte hadĜíkem a teplou vodou. MĤžete použít také mycí prostĜedky na
nádobí.
ntaktu tČchto látek se spotĜebiþem.
þe, které obsahují kyselinu octovou.
12
Page 96

CZ
Po vyþištČní jej opláchnČte þistou vodou a vysušte.
NahromadČní prachu na kondenzátoru zvyšuje spotĜebu elektrické energie.
Z tohoto dĤvodu vyþistČte kondenzátor na zadní stranČ spotĜebiþe jednou za rok
pomocí mČkkého kartáþe nebo vysavaþe.
Zkontrolujte odtokový otvor na zadní stČnČ chladniþky.
Zablokovaný otvor vyþistČte pomocí zeleného párátka z dodaného pĜíslušenství.
Po vysušení spotĜebiþe jej mĤžete opČt uvést do provozu.
Tipy pro úsporu energie
Neinstalujte spotĜebiþ do blízkosti sporákĤ, radiátorĤ nebo jiných zdrojĤ tepla.
Vysoká okolní teplota zpĤsobuje delší, þastČjší aktivací kompresoru. ZajistČte
dostateþné vČtrání kolem spotĜebiþe. Nikdy nezakrývejte vČtrací otvory. Nevkládejte
do chladniþky horká jídla. Nechte je nejdĜíve vychladnout. DvíĜka otevírejte pouze na
potĜebnou dobu. Nenastavujte nižší teplotu, než je nevyhnutnČ nutné. Udržujte
kondenzátor na zadní stČnČ spotĜebiþe þistý.
OdstranČní možných problémĤ
OdstranČní závad
Závada mĤže být zpĤsobená pouze pĜíþinou, kterou mĤžete odstranit sami pomocí
následujících pokynĤ. NeprovádČjte jiné, než popsané kroky.
DĤležité!
Opravy spotĜebiþe mĤže provádČt pouze kvalifikovaný servisní technik. Nesprávné
opravy mohou vést k znaþným nebezpeþným situacím. Pokud Váš spotĜebiþ
vyžaduje opravu, kontaktujte místní autorizované servisní stĜedisko.
Problém Možná pĜíþina ěešení
SpotĜebiþ nefunguje.
SpotĜebiþ pĜíliš chladí. Nastavení teploty je vysoké. Nastavte voliþ teploty na nižší
Pokrmy jsou pĜíliš teplé.
VnitĜní osvČtlení nefunguje. Vadná žárovka. Viz kapitola „výmČna
NahromadČní námrazy na
tČsnČní.
SpotĜebiþ není zapnutý. ZapnČte spotĜebiþ.
Zástrþka není pĜipojená. PĜipojte zástrþku.
Vadná pojistka. Zkontrolujte, pĜípadnČ
vymČĖte pojistku.
Zásuvka je vadná. Zásuvku smí opravovat
pouze kvalifikovaný technik.
stupeĖ.
Teplota není nastavená
správnČ.
DvíĜka byly dlouho otevĜené. DvíĜka otvírejte pouze na
Do spotĜebiþe jste vložili velké
množství teplých pokrmĤ za
posledních 24 hodin.
SpotĜebiþ je v blízkosti zdroje
tepla.
DvíĜka netČsní dostateþnČ po
výmČnČ smČru otvírání dvíĜek.
SpotĜebiþ nestojí rovnČ. Vyrovnejte spotĜebiþ.Neobyþejné zvuky.
SpotĜebiþ se dotýká stČn nebo
jiných pĜedmČtĤ.
Viz kapitola „první zapnutí“.
nevyhnutnou dobu.
Nastavte doþasnČ nižší
teplotu.
Viz kapitola „místo instalace“.
žárovky“.
OhĜejte tČsnČní fénem na
vlasy. PĜitom vytvarujte
tČsnČní do správného tvaru.
SpotĜebiþ mírnČ odsuĖte.
13
Page 97

CZ
Komponent, napĜ. trubka, na
zadní stranČ spotĜebiþe se
dotýká jiné þásti spotĜebiþe
nebo stČny.
Kompresor se nespustí
okamžitČ po zmČnČ
nastavení teploty.
Voda na podlaze nebo
v pĜihrádkách.
To je normální, nepĜedstavuje
to závadu.
Je zablokovaný odtokový otvor. Viz kapitola „þištČní a
BČžné provozní zvuky
Následující zvuky jsou charakteristické pro chladicí spotĜebiþe:
Cvaknutí
PĜi zapnutí a vynutí kompresoru uslyšíte cvaknutí.
Huþení
BČhem chodu kompresoru slyšíte huþení.
Bublání
Tok chladicího média zpĤsobuje bublání.
Šplouchání
Po vypnutí kompresoru mĤžete slyšet tento zvuk.
PĜedpisy, standardy, smČrnice
Tento spotĜebiþ je v souladu s následujícími EU smČrnicemi:
-2006/95/EC smČrnice o nízkém napČtí.
-2004/108/EC EMC smČrnice
Pokud je to nutné, opatrnČ
ohnČte komponent.
Kompresor se spustí po
urþité dobČ.
údržba“.
Likvidace starého spotĜebiþe
Tento spotĜebiþ se nesmí likvidovat spoleþnČ s domovním odpadem.
Pro likvidaci tohoto spotĜebiþe:
1. V místním sbČrném stĜedisku, kde bude spotĜebiþ zlikvidován bez výdavkĤ
spotĜebitele.
2. Výrobce pĜevezme starý spotĜebiþ k likvidaci bez výdavkĤ spotĜebitele.
3. Staré spotĜebiþe obsahují hodnotné zdroje, které lze opČtovnČ využít.
Nesprávná likvidace starých spotĜebiþĤ má nepĜíznivý vliv na životní prostĜedí a
lidské zdraví, spodní vodu a potraviny.
Význam symbolu pĜeškrtnuté nádoby:
Nevyhazujte elektrické zaĜízení jako netĜídČný domovní odpad,
použijte k tomu urþené sbČrné stĜedisko.
Kontaktujte místní správu pro informace týkající se možnosti
správné likvidace spotĜebiþe.
Pokud spotĜebiþ vyhodíte do pĜírody, mohou se uvolnit
nebezpeþné látky do spodní vody, což má nepĜíznivý vliv na
vaše zdraví.
Tento symbol na výrobku nebo v návodu znamená, že tento
spotĜebiþ nesmí být likvidován na konci své životnosti spoleþnČ
s domovním odpadem. Pro recyklaci jsou samostatné sbČrné
systémy v EU. Pro podrobnČjší informace kontaktujte místní
správu nebo prodejce, kde jste výrobek zakoupili.
14
Page 98

GR
ȀǹȉǹȌȊȀȉǾȈ
ȅǻǾīǿǼȈ ȋȇǾȈǼȍȈ
Page 99

GR
ǹȖĮʌȘIJȑ ʌİȜȐIJȘ,
ǻȚĮȕȐıIJİ ʌȡȠıİțIJȚțȐ IJȚȢ ȠįȘȖȓİȢ ʌȠȣ ĮȞĮȖȡȐijȠȞIJĮȚ ıİ ĮȣIJȩ IJȠ İȖȤİȚȡȓįȚȠ ʌȡȚȞ
ȕȐȜİIJİ ıİ ȜİȚIJȠȣȡȖȓĮ IJȠȞ țĮIJĮȥȪțIJȘ ıĮȢ.ȅȚ ȠįȘȖȓİȢ ʌȠȣ ĮțȠȜȠȣșȠȪȞ İȓȞĮȚ İȟĮȚȡİIJȚțȐ
ıȘȝĮȞIJȚțȑȢ ȖȚĮ IJȘȞ ĮıijĮȜȒ ȤȡȒıȘ, İȖțĮIJȐıIJĮıȘ țĮȚ IJȘ ıȦıIJȒ ıȣȞIJȒȡȘıȘ IJȘȢ
ıȣıțİȣȒȢ.
ĭȣȜȐȟIJİ IJȠ ȕȚȕȜȓȠ ȠįȘȖȚȫȞ ıİ ĮıijĮȜȑȢ ıȘȝİȓȠ ȖȚĮ ȞĮ IJȠ ıȣȝȕȠȣȜİȪİıIJİ ȩʌȠIJİ
ʌȡȠțȪȥİȚ ĮȞȐȖțȘ. ȆĮȡĮįȫıIJİ IJȠ
ȝİIJĮʌȦȜȒıİIJİ ıİ ȐȜȜȠ țĮIJĮȞĮȜȦIJȒ.
ȉĮ ıȘȝİȓĮ ʌȠȣ ʌİȡȚȑȤȠȣȞ ıȘȝĮȞIJȚțȑȢ ʌȜȘȡȠijȠȡȓİȢ ȖȚĮ IJȘȞ ĮıijȐȜİȚĮ ıĮȢ Ȓ ȖȚĮ IJȘ
ıȦıIJȒ ȤȡȒıȘ IJȘȢ ıȣıțİȣȒȢ İʌȚıȘȝĮȓȞȠȞIJĮȚ ȝİ IJȠ ıȤİIJȚțȩ IJȡȚȖȦȞȚțȩ ıȒȝĮ țĮȚ/Ȓȝİ
ȜȑȟİȚȢ ȩʌȦȢ (ȆȡȠıȠȤȒ!, ǼʌȚıȒȝĮȞıȘ !,ȈȘȝĮȞIJȚțȩ! ). ǼijĮȡȝȩıIJİ İʌȚȝİȜȫȢ IJȚȢ
ȠįȘȖȓİȢ ʌȠȣ ĮțȠȜȠȣșȠȪȞ.
ȈȣȝʌȜȘȡȦȝĮIJȚțȑȢ ʌȜȘȡȠijȠȡȓİȢ țĮȚ ʌȡĮțIJȚțȑȢ ȠįȘȖȓİȢ ʌȠȣ ĮijȠȡȠȪȞ ıIJȘȞ ıȣıțİȣȒ
ĮțȠȜȠȣșȠȪȞ ȝİIJȐ Įʌȩ ĮȣIJȐ IJĮ ıȪȝȕȠȜĮ.
ȕȚȕȜȓȠ ȠįȘȖȚȫȞ ȝİ IJȘ ıȣıțİȣȒ ĮȞ IJȘȞ
ȅįȘȖȓİȢ țĮȚ ȣʌȠįİȓȟİȚȢ ʌȠȣ ĮijȠȡȠȪȞ ıIJȘȞ ȠȚțȠȞȠȝȚțȒ țĮȚ ijȚȜȚțȒ ʌȡȠȢ IJȠ ʌİȡȚȕȐȜȜȠȞ
ȜİȚIJȠȣȡȖȓĮ IJȘȢ ıȣıțİȣȒȢ İʌȚıȘȝĮȓȞȠȞIJĮȚ ȝİ IJȠ İȚțȠȞȓįȚȠ İȞȩȢ IJȡȚijȣȜȜȚȠȪ.
ȈIJȚȢ ȠįȘȖȓİȢ ȜİȚIJȠȣȡȖȓĮȢ İȝʌİȡȚȑȤȠȞIJĮȚ ȠįȘȖȓİȢ ĮʌȠțĮIJȐıIJĮıȘȢ Įʌȩ IJȠȞ ȓįȚȠ IJȠ
ʌİȜȐIJȘ ʌȚșĮȞȫȞ įȣıȜİȚIJȠȣȡȖȚȫȞ IJȘȢ ıȣıțİȣȒȢ .ȅȚ ȠįȘȖȓİȢ ĮȣIJȑȢ ȕȡȓıțȠȞIJĮȚ ıIJȠ
țİijȐȜĮȚȠ ȝİ IJȓIJȜȠ ‘’@ǼʌȓȜȣıȘ ʌȡȠȕȜȘȝȐIJȦȞ@’’. ǼȐȞ ʌĮȡȩȜĮ ĮȣIJȐ ȠȚ ȠįȘȖȓİȢ ĮȣIJȑȢ
įİȞ İȓȞĮȚ İʌĮȡțİȓȢ ĮʌİȣșȣȞșİȓIJİ ıIJȠ ʌȜȘıȚȑıIJİȡȠ țȑȞIJȡȠ IJİȤȞȚțȒȢ ȣʌȠıIJȒȡȚȟȘȢ Gias
Service IJȘȜȞȠ 80111505050
1
Page 100

GR
ȆǼȇǿǼȋȅȂǼȃǹ
ȅįȘȖȓİȢ ĮıijĮȜȠȪȢ ȤȡȒıȘȢ...........................................................................3
ǼȖțĮIJȐıIJĮıȘ..................................................................................................5
ǼȞIJȠȚȤȚıȝȩȢ....................................................................................................7
ȈȤȑįȚȠ İȞIJȠȚȤȚıȝȠȪ IJȘȢ ıȣıțİȣȒȢ..............................................................10
ȉȠʌȠșȑIJȘıȘ IJȘȢ ıȣıțİȣȒȢ..........................................................................10
ȆİȡȚȖȡĮijȒ IJȘȢ ıȣıțİȣȒȢ............................................................................11
DzȞĮȡȟȘ ȜİȚIJȠȣȡȖȓĮȢ țĮȚ ȡȪșȝȚıȘ șİȡȝȠțȡĮıȓĮȢ.......................................12
ȋȡȒıȘ IJȘȢ ıȣıțİȣȒȢ...................................................................................14
ǹʌȩȥȣȟȘ.......................................................................................................14
ǻȚĮțȠʌȒ IJȘȢ ȜİȚIJȠȣȡȖȓĮȢ IJȘȢ ıȣıțİȣȒȢ ....................................................14
ȀĮșĮȡȚıȝȩȢ țĮȚ ıȣȞIJȒȡȘıȘ........................................................................15
ȅįȘȖȓİȢ İȟȠȚțȠȞȩȝȘıȘȢ İȞȑȡȖİȚĮȢ ............................................................15
ǼʌȓȜȣıȘ ʌȡȠȕȜȘȝȐIJȦȞ...............................................................................16
ĬȩȡȣȕȠȚ țĮIJȐ IJȘȞ įȚȐȡțİȚĮ IJȘȢ ȜİȚIJȠȣȡȖȓĮȢ..............................................17
ȀĮȞȠȞȚıȝȠȓ, ȈIJȐȞIJĮȡIJ, ȆȡȠįȚĮȖȡĮijȑȢ .......................................................17
ǹʌȠȝȐțȡȣȞıȘ ıȣıțİȣȒȢ ............................................................................17
2
 Loading...