

Page 1
Page 2

CONTENT
INSTALLATION AND USER’S MANUAL
INTRODUCTION.......................................................................3
SAFETY PRECAUTION..........................................................3-4
MOUNTING INSTALLATION.................................................... 5
INSTALLATION
(VENT INSIDE)............................................. 6
LAMP MODEL INSTALLATION........................................... 7-8
OPERATION........................................................................... 9
MAINTENANCE...................................................................... 10
TROUBLESHOOTING...............................................................11
ENVIRONMENTAL
PROTECTION............................................11
2
Page 3

INTRODUCTION
Thank you for choosing this cooker hood.
This instruction manual is designed to provide you with all required
instructions related to the installation, use and maintenance of the
appliance.
In order to operate the unit correctly and safety, please read this instruction
manual carefully before installation and usage.
The cooker hood use high quality materials, and is made with a
streamlined design. Equipped with large power electric motor and
centrifugal fan, it also provides strong suction power, low noise operation,
non-stick grease filter and easy assembly installation.
SAFETY PRECAUTION
•
Never let the children operate the machine.
•
The cooker hood is for home use only, not
suitable for barbecue, roast shop and other
commercial purpose.
The cooker hood and its filter should be
•
clean regularly in order to keep in good
working condition.
•
Clean the cooker hood according to the
instruction manual and keep the unit from
danger of burning. There is a fire risk if
cleaning is not carried out in accordance
with the instructions.
•
Forbid the direct baking from the gas
cooker.
•
Please keep the kitchen room a good
convection.
If the supply cord is damaged, it must be
replaced by the manufacturer, its service
agent or similarly qualified persons in order
to avoid a hazard.
•
There shall be adequate ventilation of the
room when the range hood is used at the
same time as appliances burning gas or
3
Page 4

other fuels;
•
The air must not be discharged into a flue
that is used for exhausting fumes from
appliances burning gas or other fuels;
Regulations concerning the discharge of air
have to be fulfilled.
•
This appliance can be used by children
aged from 8 years and above and persons
with reduced physical, sensory or mental
capabilities or lack of experience and
knowledge if they have been given
supervision or instruction concerning use of
the appliance in a safe way and understand
the hazards involved.
•
Children should be supervised to ens ure that
they
do not play with the appliance.
Cleaning and user maintenance shall not be
made by children without supervision.
•
Do
•
CAUTION: Accessible parts may become hot
not flame under the range hood.
when used with cooking appliance.
•
The warning shall be in the same part of the
instructions that include details of how to
mount the equipment.
Electrical Shock Hazard
Only plug this unit into a properly earthed outlet. If
•
in doubt seek advice from a suitably qualified
engineer.
•
Failure to follow these instructions can result in
death, fire, or electrical shock.
4
Page 5
MOUNTING INSTALLATION
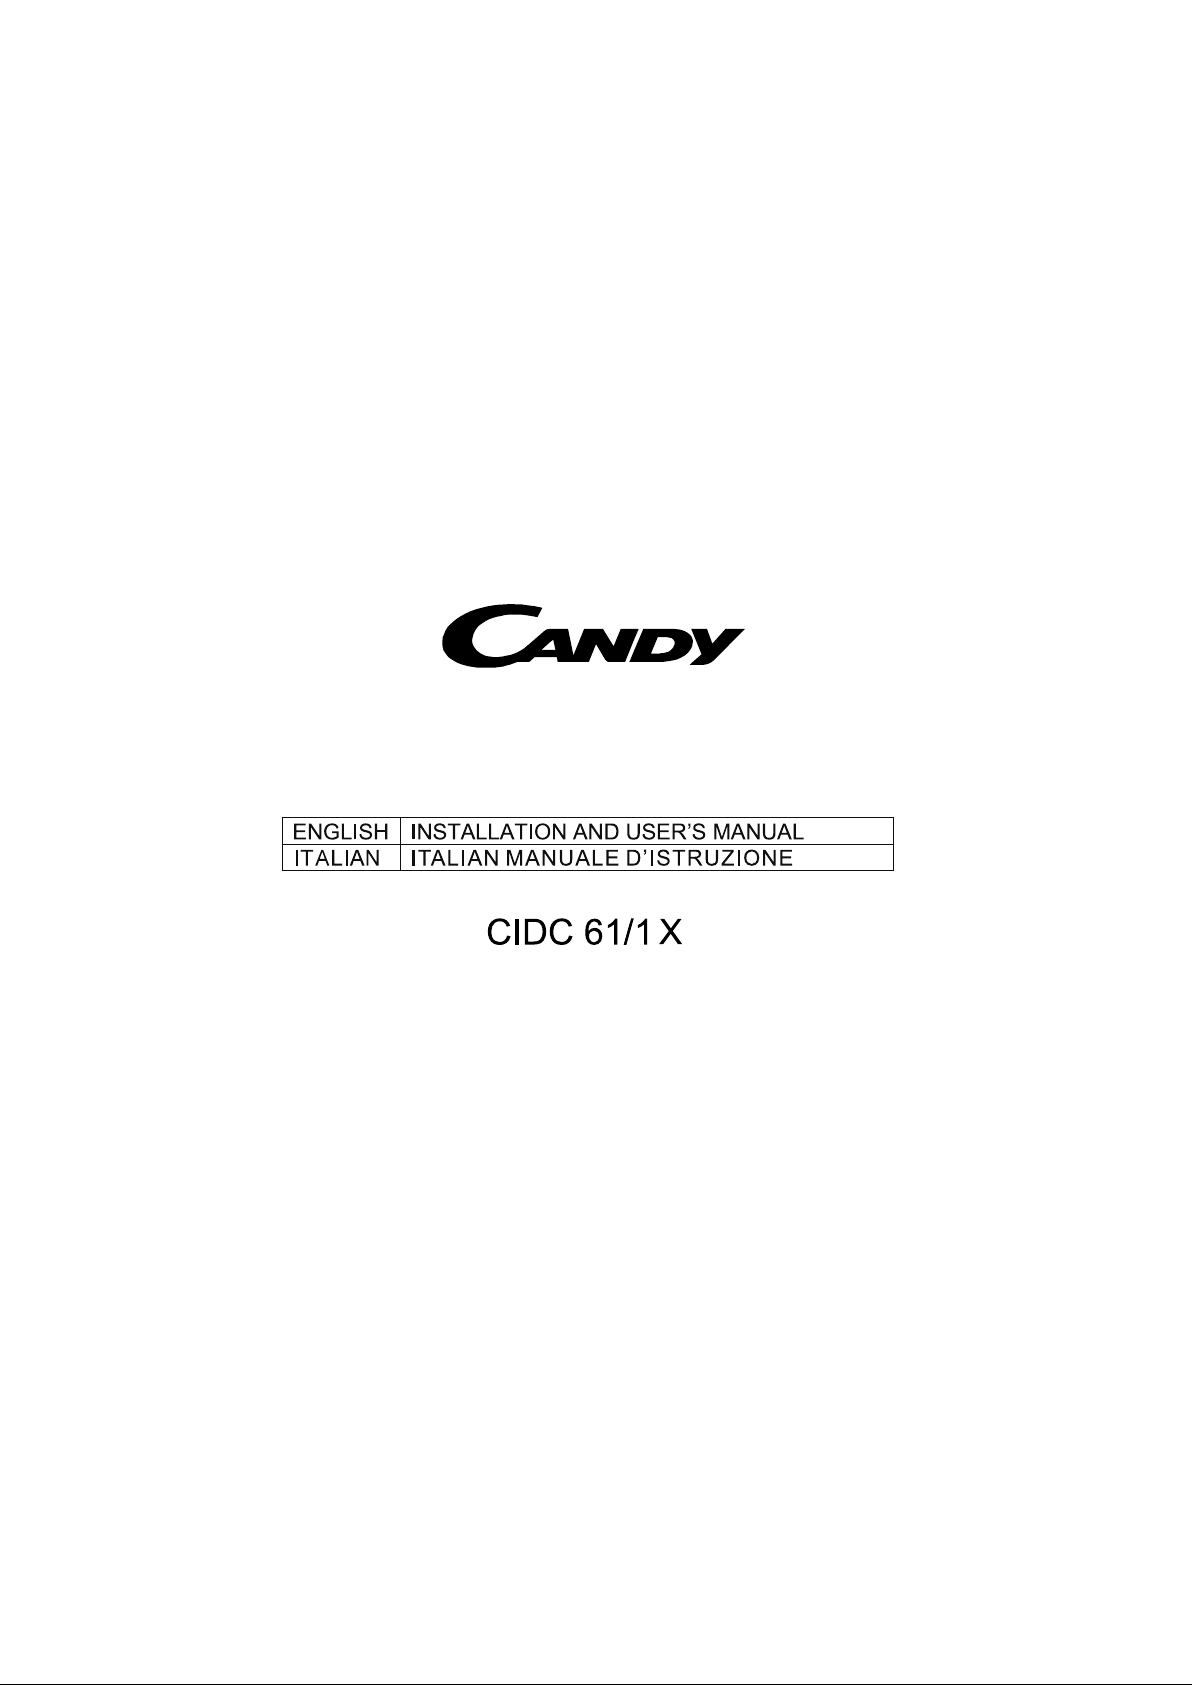
1. Prepare for installation:
a. Before installation, turn the unit off and unplug it from the outlet.
b. The cooker hood should be placed at a distance of 65~75cm above the
cooking plane for best effect.
5
Page 6

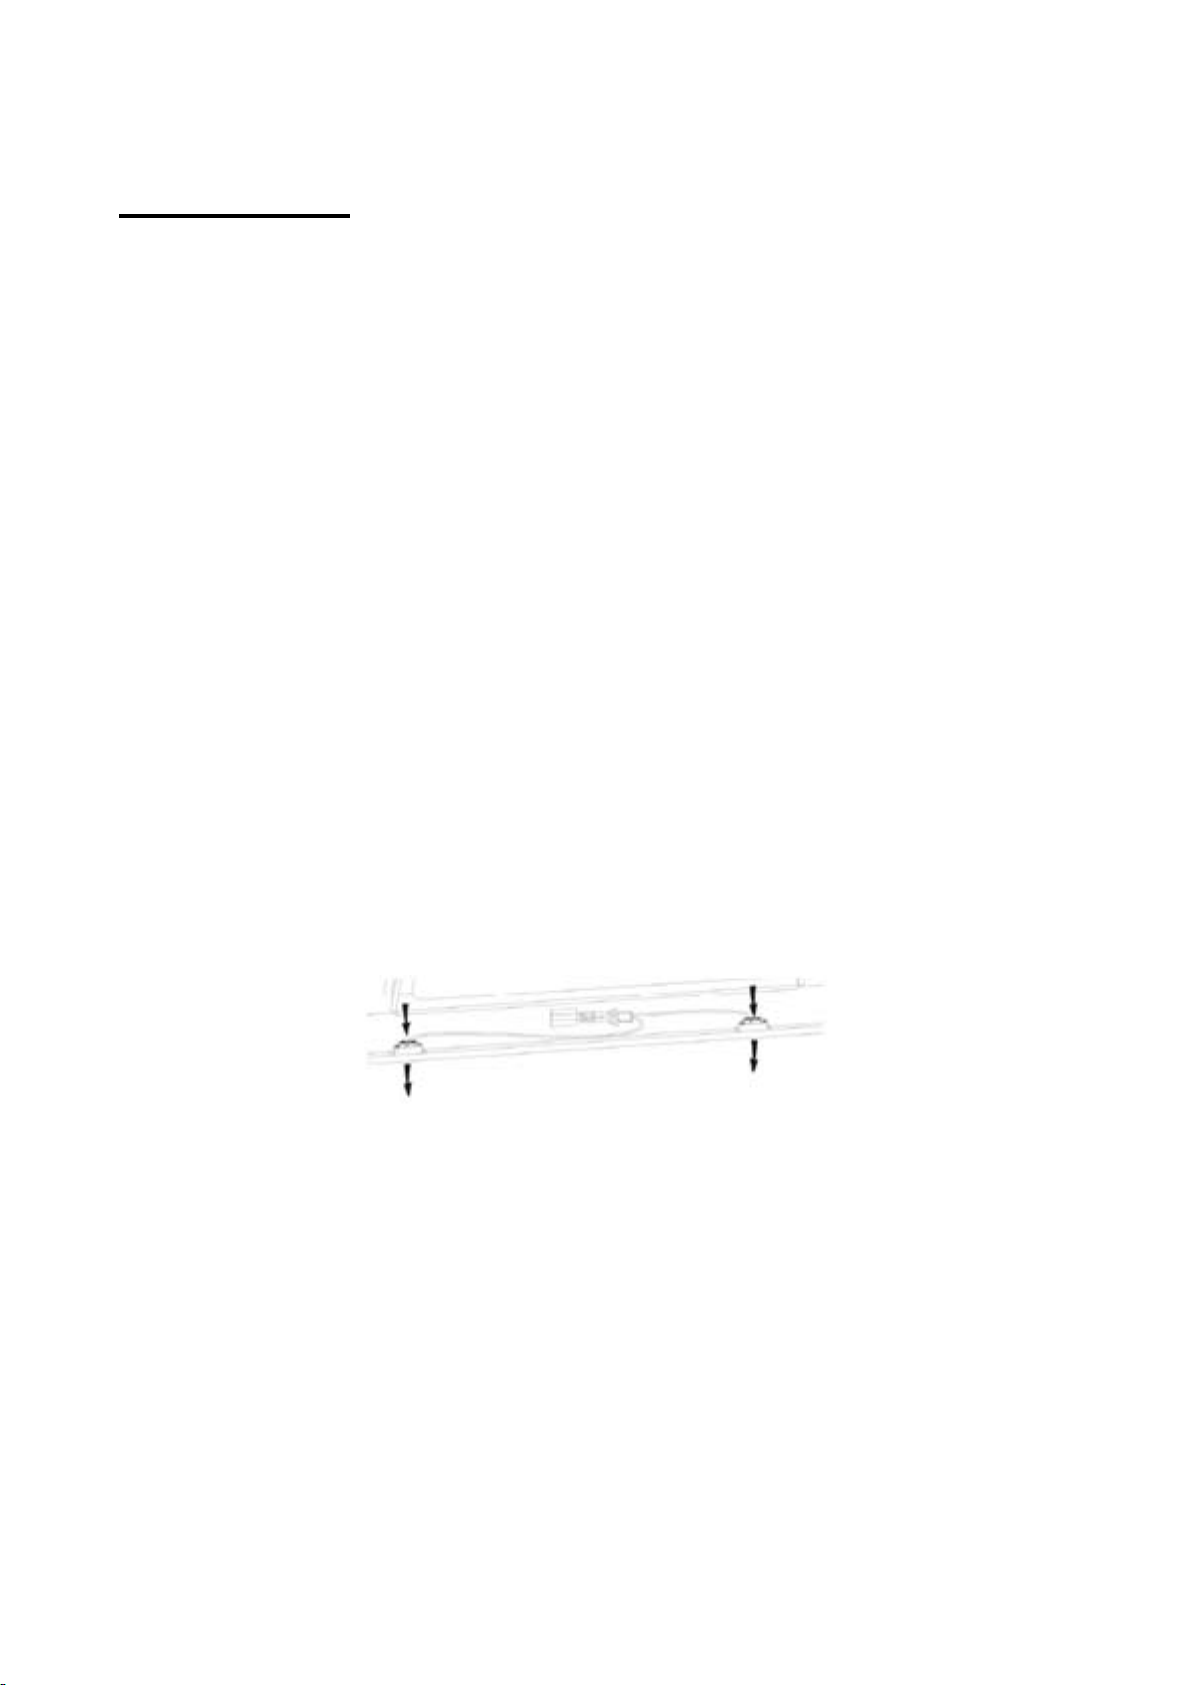
Installation (Vent inside)
If you do not have an outlet to the outside, exhaust pipe is not required and
the installation is similar to the one show in section
outside)
Activated carbon filter can be used to trap odors.
In order to install the activated carb on filter, the grease filter should be
detached first. Press the lock and pull it downward.
”.
“Installation (Vent
Plug the activated carbon filter into the unit and turn it in clockwise direction.
Repeat the same on the other side.
NOTE:
o Make sure the filter is securely locked. Otherwise, it would
loosen and cause dangerous.
o When activated carbon filter attached, the suction power will
be lower.
6
Page 7
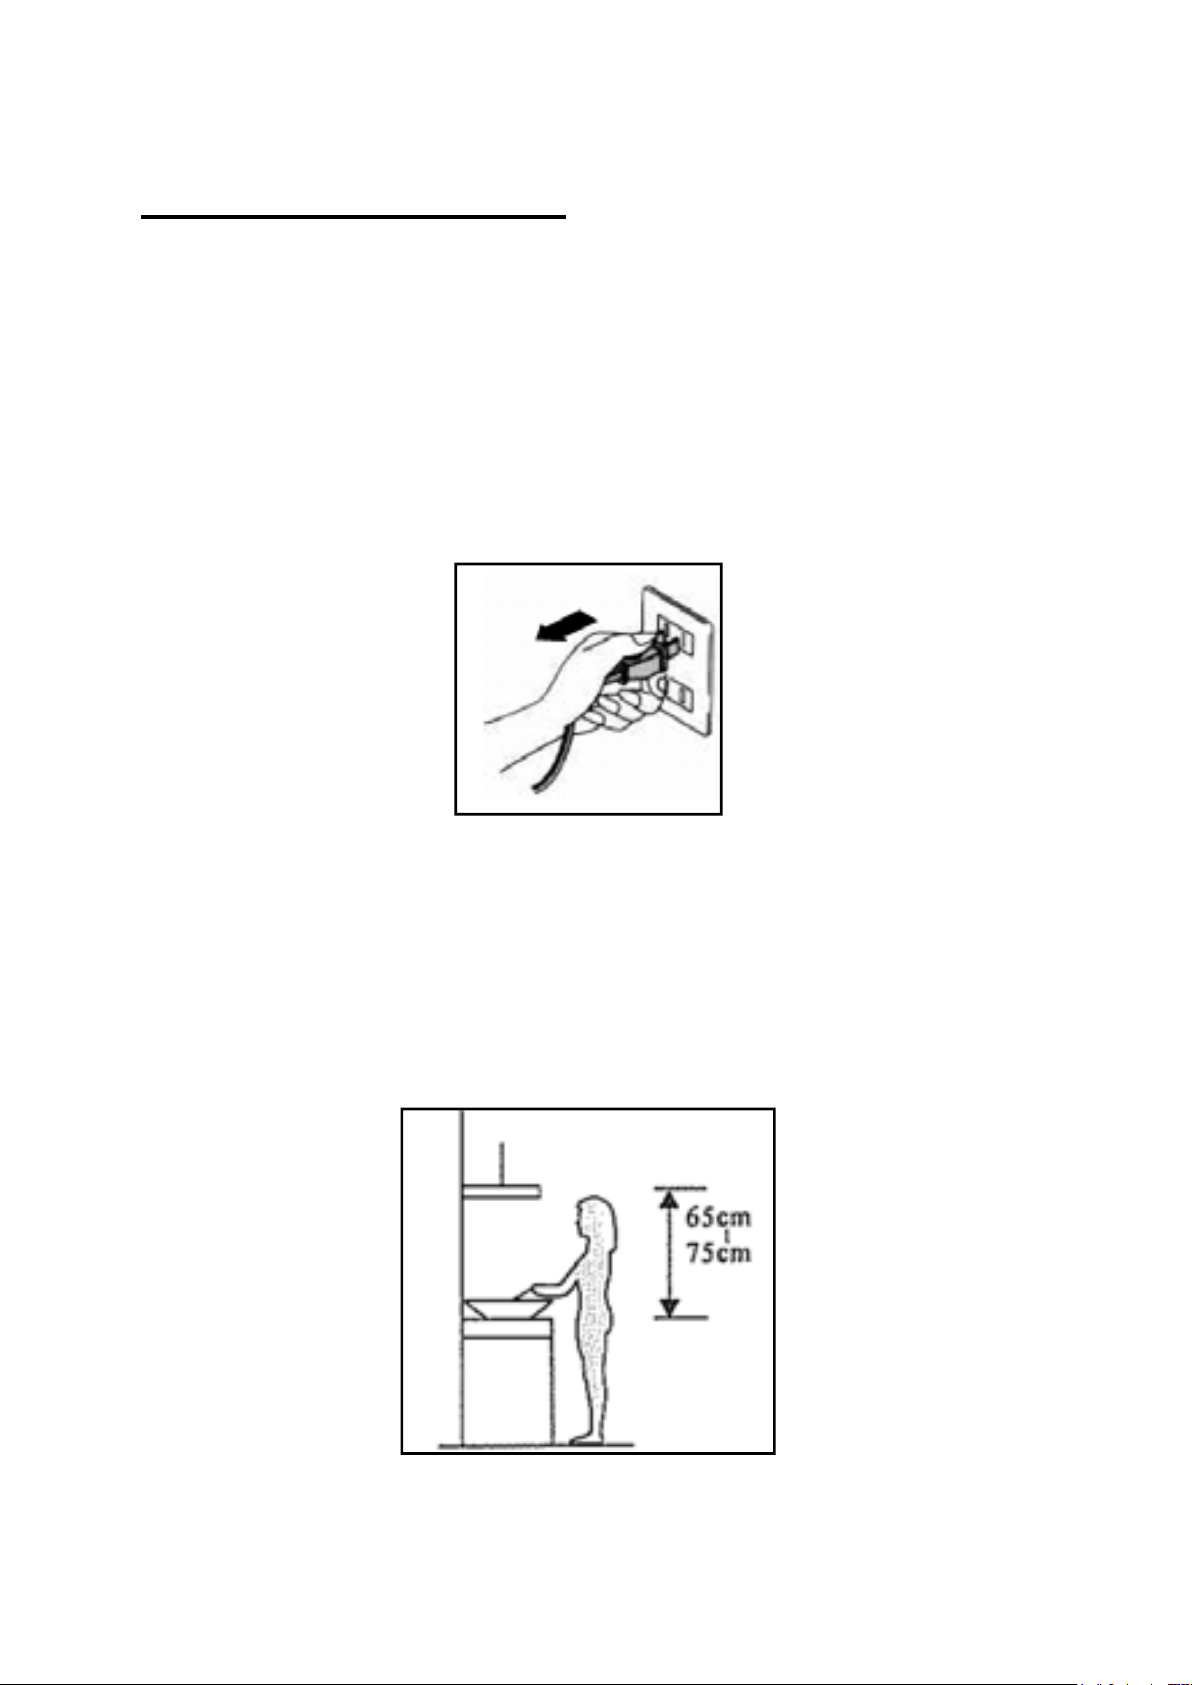
LAMP HOOD MODEL INSTALLATION
1) Loosen the six 4 x 8 tapping screw
and put down the lower chimney
2) Loosen the eight screw which fixing
on angle bar, and adjust the height of
the need to install, and lock the screw
again.
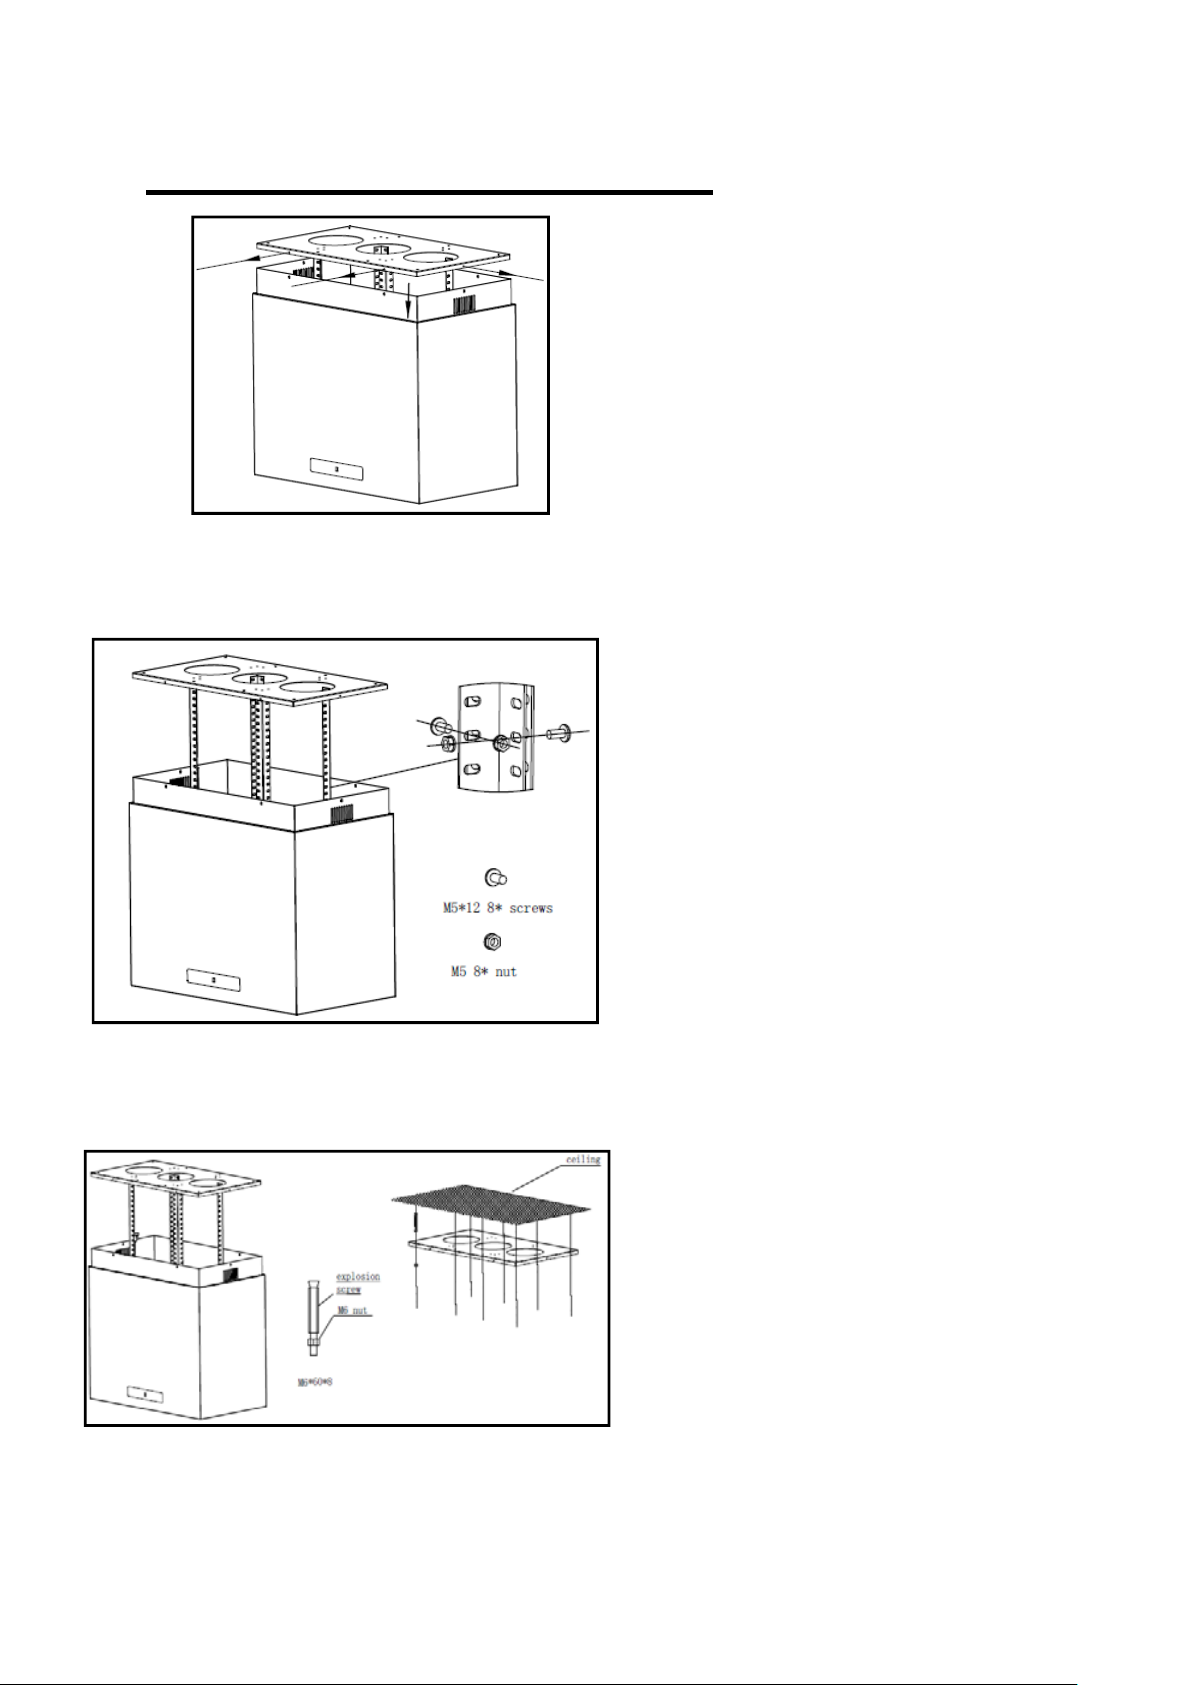
8 x M5 *12 screws
8 x M5 *12 nut
3) According to the hole location in
hanging panel to fix the explosion
screw on the ceiling, and put up the
cooker hood and lock it with the
explosion screw on the ceiling
8 x M6*60 screws
IMPORTANT: Make sure all
screws are tightly.
IMPORTANT: This stage of the
installation process MUST be
completed by two people.
7
Page 8
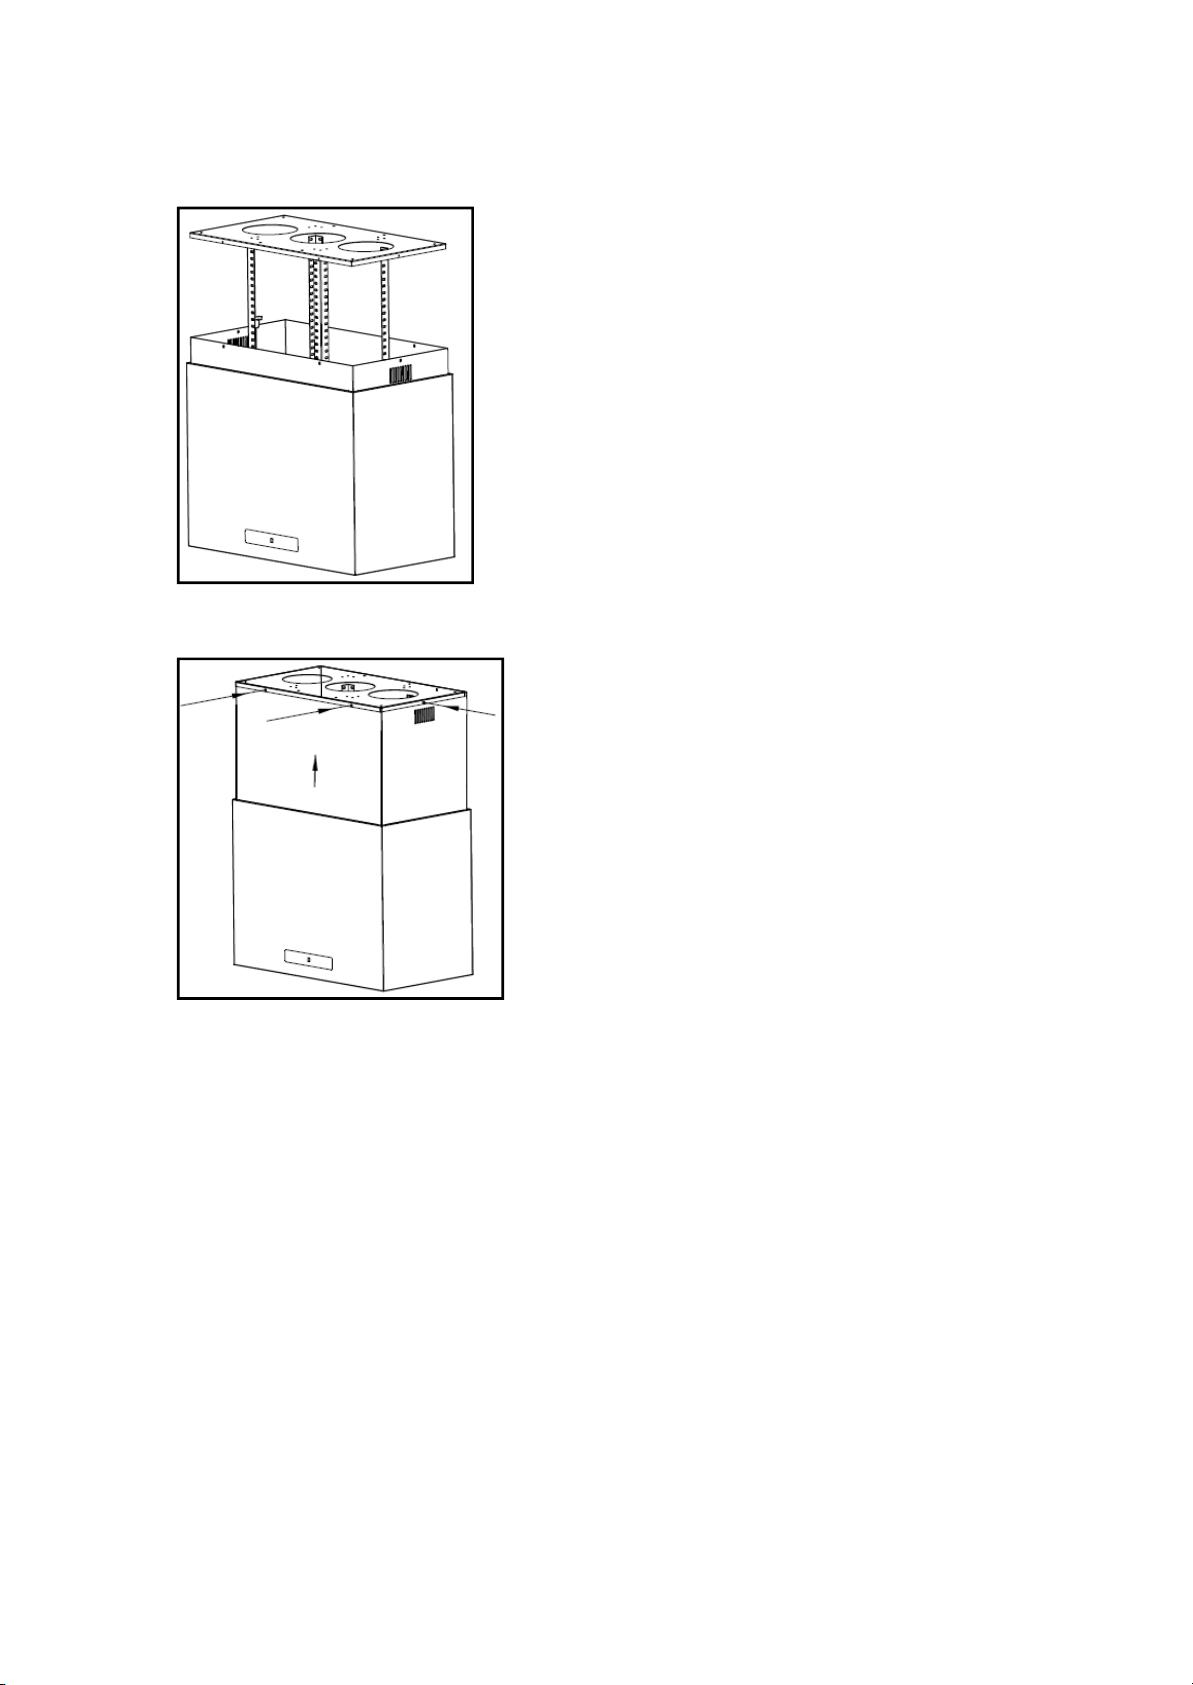
4) Put up the cooker hood and lock it
with the explosion screw on the ceiling
IMPORTANT: This stage of the
installation process MUST be
completed by two people.
5) Put up the upper chimney and fix by
six screws.
.
The electrical connection must correspond to the electrical requirement
noted on the rating plate, which is placed inside the cooker hood. The
appliance should now be connected to the electrical supply.
Check that the appliance is operating correctly by selecting each speed and
switching the light bulbs on and off.
Use a stainless steel cleaner and polish on the stainless steel sections of the
appliance.
you
If you are using the appliance in recirculation mode, then
the carbon filter. See the “fitting the carbon filter" section on page 6.
should now fit
NOTE: If Low / Medium / High speed buttons are press at the same
time, the unit will only operate at the highest speed.
8
Page 9
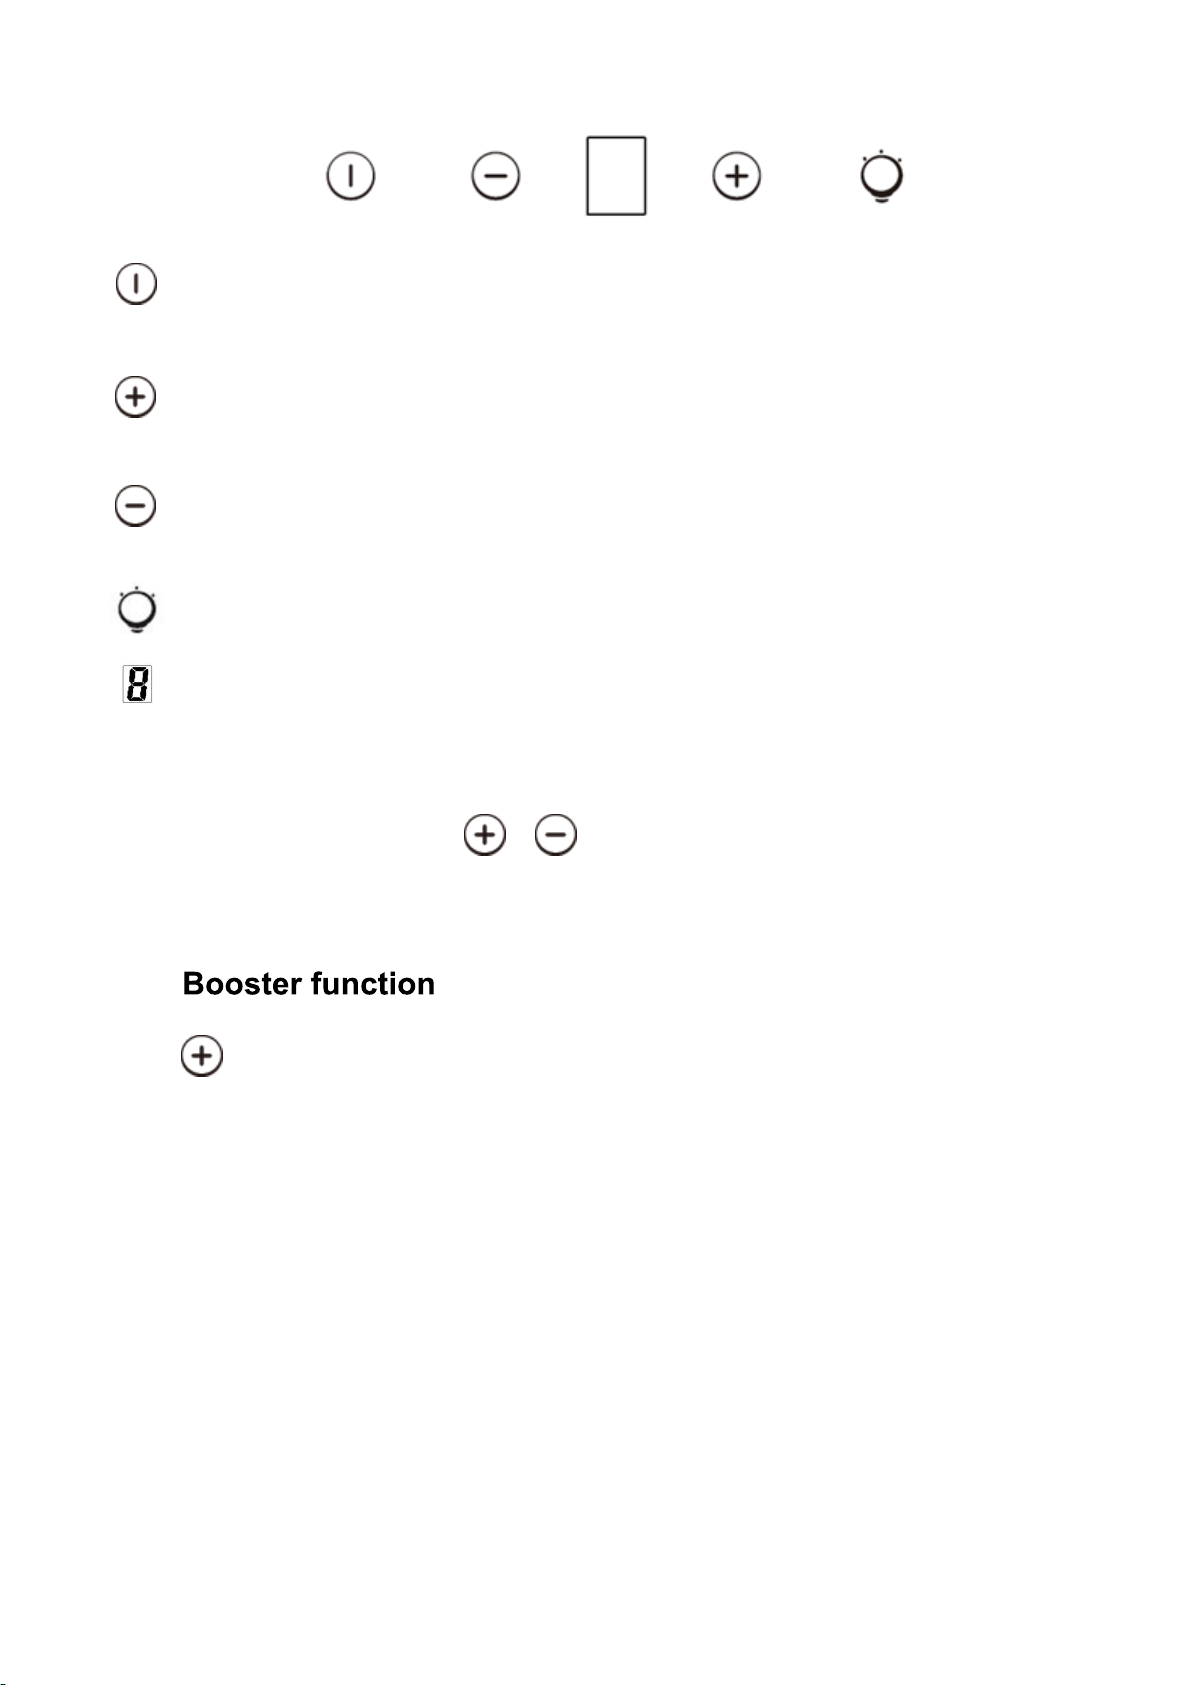
On/Off button
It’s used for turning on/off the fan.
Speed plus button
For increasing the speed of the fan
Speed decrease button
For decreasing the speed of the fan.
Light button
Digital display
Fan speed display:"1" for Low speed, "2" for Medium speed,
"3" for High speed, “4” for Booster function.
Quick timer: Press
& hold for 1 second, Digital display will
flashing & into 5 minutes count down, after 5 minutes motor & light
will turn off automatic & Buzzer sound for 1 second.
This hood has a booster function. To activate the booster, Press
to speed 4, enter into highest speed while the hood is in use
and it will increase speed for 5 minutes, before slowing down
again.
40
9
Page 10
MAINTENANCE
Before cleaning switch the unit off and pull out the plug.
I. Regular Cleaning
Use a soft cloth moistened with hand-warm mildly soapy water or household
cleaning detergent. Never use metal pads, chemical, abrasive material or stiff
brush to clean the unit.
II. Monthly Cleaning for Grease Filter
ESSENTIAL: Clean the filter every month can prevent any risk of fire.
The filter collects grease, smoke and dust…... so the filter is directly affecting
the efficiency of the cooker hood. If not cleaned, the grease residue (potential
flammable) will saturate on the filter. Clean it with household cleaning
detergent.
III. Annual Cleaning for Activated Carbon Filter
Apply SOLELY to unit that installed as a recirculation unit (not vented to the
outside). This filter traps odours and must be replaced at least once a year
depending on how frequent the cook
IV. Changing a light bulb
Remove the screws on the glass, take off the hood glass. Find the
bulb that requires replacement, you will find it located in the light
fixture which is inside the exposed section of the canopy.
er hood
used.
Disconnect the light wiring point and remove the bulb holders and
wiring from the hood. Important: It’s not possible to replace the bulbs
individually, it will be necessary to obtain the bulbs, bulb holders and
wiring as a complete part. (LED light: MAX 1.5W)
Fit the replacement bulbs, bulb holders and wiring in the same
manners as the originals. Then reconnect the light wiring point.
10
Page 11

TROUBLESHOOTING
Fault Cause Solution
Light on, but fan
does not work
The fan blade is jammed.
The motor is damaged.
Switch of the unit and repair by
qualified service personnel only.
Both light and
fan do not work
Serious
Vibration of the
unit
Suction
performance
not good
light bulb burn.
Power cord looses. Plug in to the power supply again.
The fan blade is
damaged.
The fan motor is not fixed
tightly.
The unit is not hung
properly on the bracket.
Too long distance
between the unit and the
cooking plane
Replace the bulb with correct rating.
Switch of the unit and repair by
qualified service personnel only.
Switch of the unit and repair by
qualified service personnel only.
Take down the unit and check
whether the bracket is in proper
location.
Readjust the distance to 65-75cm
ENVIRONMENTAL PROTECTION
Waste electrical products should not be disposed of with
household waste. Please recycle where facilities exist. Check
with your Local Authority or retailer for recycling advice.
This appliance is marked according to the European directive 2012/19/EU on
Waste Electrical and Electronic Equipment (WEEE).
By ensuring this product is disposed of correctly, you will help prevent potential
negative consequences for the environment and human health, which could
otherwise be caused by inappropriate waste handling of this product.
The symbol on the product indicates that this product may not be treated as
household waste. Instead it shall be handed over to the applicable collection
point for the recycling of electrical and electronic equipment
Disposal must be carried out in accordance with local environmental regulations
for
waste
disposal.
For more detailed information about treatment, recovery and recycling of this
product, please contact your local city office, your household waste disposal
service or the shop where you purchased the product
11
Page 12

INDICE
MANUALE D’ISTRUZIONE
INTRODUZIONE …………………………………….
AVVERTENZE PER LA SICUREZZA ……………..
INSTALLAZIONE E FISSAGGIO ………………….
INSTALLAZIONE (VENTOLA)……………………..
INSTALLAZIONE LAMPADINE…………………….
13
13-15
16
17
18-19
OPERAZIONI……………………………………….. 20
MANTENIMENTO…………………………………… 21
QUALCOSA NON FUNZIONA…………………….. 22
TUTELA AMBIENTALE…………………………….. 22-23
12
Page 13

INTRODUZIONE
Grazie per avere scelto questa cappa.
Questo libretto di istruzioni mira a fornirvi tutte le informazioni relative all'installazione,
all'uso e alla manutenzione dell'elettrodomestico. Per azionare l'elettrodomestico
correttamente e in piena sicurezza, si consiglia di leggere attentamente il presente libretto
di istruzioni prima dell'installazione e dell'uso.
Questa cappa usa materiali di alta qualità ed è costituita da un design
aerodinamico.Equipaggiata con motore elettric
centrifuga, offre anche una forte potenza di aspirazione, funzionamento a bassa
rumorosità, filtro antigrasso antiaderente e facile installazione.
o di grande potenza e una ventola
AVVERTENZE PER LA SICUREZZA
Non lasciare mai che i bambini azionino la
macchina
La cappa è progettata solo per uso domestico,
non è adatta per barbecue, rosticcerie e altri
scopi commerciali.
La cappa e i suoi filtri devono essere puliti
regolarmente per tenerle nelle ottimali
condizioni di funzionamento
Pulire l'elettrodomestico con regolarità
seguendo le istruzioni and tenerla lontana dal
pericolo di incendio. Ci può essere rischio di
incendio se la pulizia non è eseguita secondo
le istruzioni.
E’ vietata la cottura diretta dal forno a gas
Mantenere l’ambiente cucina con una buona
ventilazione
Se il cavo di aliment
azione è danneggiato,
deve essere sostituito dal produttore, da un
suo tecnico manutentore o da persone
13
Page 14

altrettanto qualificate, per evitare qualsiasi
rischio.
All'interno della stanza deve esserci
un'adeguata ventilazione quando la cappa
viene utilizzata insieme ad elettrodomestici a
combustione di gas o di altri combustibili
L'aria non deve essere scaricata in una canna
fumaria utilizzata per i gas di scarico degli
apparecchi che bruciano gas o altri
combustibili
Le norme relative allo scarico di aria devono
essere soddisfatte
L'elettrodomestico può essere utilizzato da
bambini di età superiore a 8 anni e da persone
con ridotte capacità fisiche, sensoriali o mentali,
oppure prive
di esperienza e conoscenza, che
siano state supervisionate o istruite riguardo
all’uso dell’elettrodomestico in sicurezza,
comprendendo i rischi che derivano dall'uso
dello stesso.
I bambini non devono giocare con
l’elettrodomestico.
La pulizia e la manutenzione non possono
essere effettuate da bambini senza
supervisione.
Non lasciare mai fiamme libere al di sotto della
cappa.
14
Page 15

ATTENZIONE: Le parti accessibili possono
surriscaldarsi quando utilizzate con
elettrodomestici di cottura.
L'elettrodomestico e le sue parti accessibili
possono surriscaldarsi durante il
funzionamento. Non toccare le parti calde. I
bambini al di sotto degli 8 anni devono
rimanere a distanza salvo i casi in cui si trovino
sotto una supervisione permanente.
Le avvertenze devono essere nella stessa
parte delle istruzioni che includono dettagli su
come montare l'apparecchiatura.
RISCHIO DI SHOCK ELETTRICO
• Collegare questa unità solo a una presa
correttamente collegata a terra. In caso di
dubbio, r
ivolgersi a un tecnico
adeguatamente qualificato.
• La mancata osservanza di queste istruzioni
può provocare morte, incendio o scosse
elettriche.
15
Page 16

INSTALLAZIONE (SFIATO ALL'ESTERNO)
1. Preparazione per l’installazione:
a. Prima dell'installazione, spegnere l'elettrodomestico e staccarlo dalla presa.
b. Perché possa garantire la massima efficacia, la cappa deve essere installata a una
distanza di 65÷75 cm dal piano cottura.
16
Page 17

INSTALLAZIONE (OPZIONALE PER SFIATO ALL'INTERNO)
Chiuso
Aperto
Se non avete uno sfiato verso l'esterno, il tubo di scarico non è necessario e l'installazione
è simile a quella descritta nella sezione "INSTALLAZIONE (SFIATO ALL'ESTERNO)”.
Filtro al carbone attivo
Il filtro al carbone attivo può essere utilizzato per intrappolare gli odori sgradevoli.
Per montare il filtro al carbone attivo, innanzitutto è necessario staccare il filtro anti-grasso
in metallo. Premere il fermo e tirarlo verso il basso.
Mettere il filtro al carbone attivo all'interno dell'elettrodomestico e fissarlo ruotandolo.
Ripetere la stessa operazione sul lato opposto.
NOTA:
o Accertarsi che il filtro sia bloccato saldamente. In caso contrario, potrebbe allentarsi
e danneggiare l'elettrodomestico.
o Quando il filtro al carbone attivo è collegato, la potenza d
i aspirazione diminuisce.
17
Page 18

INSTALLAZIONE MODELLO CAPPA LAMPADA
1) ALLENTARE LE SEI 4 X 8 VITI
SOPRA EABBASSARE IL
CAMINO INFERIORE
2) Allentare le otto viti che fissano la
barra angolare e regolare l'altezza
alla necessità di installazione e
bloccare nuovamente la vite
8 x M5 * 12 VITI
8x M5 * 12 DADI
3) Secondo la posizione del foro nel
pannello a pendolo per fissare la vite di
esplosione sul soffitto, e mettere la
cappa della cucina e bloccarla con la
vite di esplosione sul soffitto
8 x M6 * 60 VITI
IMPORTANTE: Assicurarsi che
tutte le viti siano ben serrate
IMPORTANTE: Questo step del
processo di installazione DEVE
essere completato da almeno due
persone
18
Page 19

4) Sfila la cappa e bloccala con la vite
di esplosione sul soffio
IMPORTANTE: Questo step del
processo di installazione DEVE
essere completato da almeno
due persone
5) Tira su il camino superiore e fissalo
con sei vi
La connessione elettrica deve corrispondereai requisiti segnalati nella rating
plate (targa dati) che è posizionata dentro la cappa. L’elettrodomestico dovrebbe
essere adesso connesso di nuovo alla corrente elettrica.
Verifica che la cappa stia funzionando correttamente selezionando ciascuna
velocità e accendendo/spegnendo la luce.
Usa un detergente e lucida sulle sezioni di acciaio inossidabile.
Se stai usando la cappa in modalità filtrante, adesso puoi inserire i filtri a
carbone. Guarda la sezione “inserire filtri carbone” nella pagina
corrispondente.
NOTA: Se i pulsanti della Bassa/ Media/ Alta velocità sono premuti
contemporaneamente, l’elettrodomestico opererà alla più alta velocità.
19
Page 20

FUNZIONAMENTO
Pulsante on/off
Premere questo pulsante per azionare/spegnere il funzionamento della ventola.
Velocità PIU’ del pulsante
Per aumentare la velocità della ventola
Velocità MENO del pulsante
Per diminuire la velocità della ventola
Pulsante LUCE
Display digitale
Velocità sul display: 1 per Bassa velocità, 2 per Media velocità, 3 per Alta velocità, 4 per
funzione Booster.
Timer rapido: tenere premuto per 1 secondo, il display digitale si illuminerà a
intermittenza e in 5 minuti and
rà in count down, dopo 5 minuti il motore e la luce si
spegneranno automaticamente & il suono buzzer suonerà per 1 secondo.
Funzione Booster:
Questa cappa ha la funzione Booster. Per attivarla, premere alla velocità 4, andrà
alla più alta velocità mentre la cappa è in funzione e aumenterà la velocità per 5 minuti,
prima di rallentare ancora.
20
Page 21

MANUTENZIONE
Prima della pulizia, spegnere l'elettrodomestico ed estrarre la spina.
I.Pulizia regolare
Utilizzare un panno morbido inumidito in acqua tiepida leggermente saponata o detergente
ad uso domestico. Non usare mai pagliette metalliche, prodotti chimici, materiali abrasivi o
spazzole rigide per pulire l'elettrodomestico.
II.Pulizia mensile del filtro metallico antigrasso.
ESTREMAMENTE IMPORTANTE: Pulire il filtro mensilmente permette di prevenire
qualsiasi rischio di incendi.
Il filtro raccoglie grasso, fumo e polvere, quindi influisce direttamente sull’eff
icienza della
cappa. Se non viene pulito, i residui di grasso (potenzialmente infiammabili) rischiano di
saturare il filtro. Pulirlo con un detergente per uso domestico.
III.Pulizia annuale del filtro al carbone attivo
Valida UNICAMENTE sugli elettrodomestici dotati di un'unità di ricircolo (senza
ventilazione verso l'esterno). Questo filtro intrappola gli odori sgradevoli e deve essere
sostituito almeno una volta all'anno a seconda della
frequenza con la quale viene utilizzata
la cappa.
IV. Sostituzione delle lampadine
1. Rimuovere le viti dal vetro, poi rimuovere il vetro della cappa. Trova la lampadina che
richiede la sostituzione, la troverai collocata nella lampada che si trova all'interno
della sezione esposta della copertura.
Scollegare il punto di cablaggio e rimuovere i portalampada e il cablaggio dalla cappa.
Importante: non è possibile sostituire le lampadine singolarmente, sarà necessa
rio
ottenere le lampadine, i portalampada e il cablaggio come parte completa. (Luce LED:
MAX 1,5 W).
montare le lampadine di ricambio, l’alloggio della lampadina e il cablaggio nella
stessa maniera originaria. Riconnettere il punto di cablaggio della luce.
21
Page 22

Anomalia
QUALCOSA NON FUNZIONA
Causa
Cosa fare
La pala della ventola
è inceppata.
Spegnere l'elettrodomestico.
qualificato.
Sostituire la lampadina con una
della potenza corretta.
Scosse dal cavo di
alimentazione
Inserire nuovamente
l’alimentazione.
Spegnere l’apparecchio e farla
qualificato
La ventola del
correttamente
Spegnere l’apparecchio e farla
qualificato
L’uapparecchio non
staffa
Performance di
buona
Troppa distanza tra
cottura
La luce è accesa,
ma la ventola non
funziona
Luce e ventola non
funzionano.
Serie vibrazioni
dell’elettrodomestico
aspirazione non
Il motore è
danneggiato.
Luce a LED bruciata.
La pala della ventola
è danneggiata
motore non è fissata
è appeso
correttamente sulla
la cappa e il piano
La riparazione può essere
effettuata unicamente da
personale di manutenzione
riparare solo da personale service
riparare solo da personale service
Rimuovi l’unità e verifica se la
staffa è nella corretta posizione
Risistema la distanza tra i 65-75
cm
TUTELA AMBIENTALE
:
Questo prodotto è contrassegnato dal simbolo della raccolta selettiva dei RAE.
Ciò significa che il prodotto non può essere smaltito con i rifiuti domestici ma
deve essere supportato da un sistema di raccolta selettiva in accordo con la
Direttiva 2012/19/UE sula WASTE ELECTRICAL AND ELECTRONIC
EQUIPMENT (WEEE).
Dovrà quindi essere riciclato o demolito in modo da ridurre al minimo gli impatti
sull'ambiente; i prodotti elettrici ed elettronici sono potenzialmente pericolosi per
mbiente e la salute dell'uomo a causa della presenza di sostanze tossiche.
l'a
Il simbolo sul prodotto indica che questo prodotto non dev’essere trattato come scarto
domestico. Invece bisognerà seguire i punti di collezione di riciclaggio degli apparecchi
elettrici ed elettronici.
Per ulteriori informazioni, contattare le proprie autorità locali o regionali, il servizio di
smaltimento dei rifiuti domestici o il posto in cui è stato acquistato il prodott
o.
22
Page 23

:
Nota
Le informazioni seguenti spiegano come ridurre l'impatto ambientale totale (ad esempio
l'uso dell'energia) del processo di cottura.
(1) Montare la cappa in un luogo appropriato, con ventilazione efficiente.
(2) Pulire con regolarità la cappa per non bloccare il passaggio dell'aria.
(3) Non dimenticarsi di spegnere la luce della cappa al termine della cottura.
(4) Non dimenticarsi di spegnere la cappa al termine della cottura.
Informazioni sulla demolizione
Non demolire l'elettrodomestico in modi diversi da quelli
indicati sul libretto d'uso.
L'elettrodomestico non può essere demolito dall'utente. Al termine della vita utile,
l'elettrodomestico non deve essere smaltito insieme ai rifiuti domestici. Consultare le
autorità locali o il rivenditore a proposito delle modalità di riciclaggio.
23
Page 24

ﺎﻬﺣﻼﺻﺇﻭ ﻝﺎﻁﻋﻷﺍ ﻑﺎﺷﻛﺗﺳﺍ
ﻝﻁﻌﻟﺍ ﺏﺑﺳﻟﺍ ﻝﺣﻟﺍ
ﺔﻣﺩﺧ ﻲﻧﻓ ﺔﻁﺳﺍﻭﺑ ﺎﻬﺣﻠﺻﺃﻭ ﺓﺩﺣﻭﻟﺍ ﻝﻳﻐﺷﺗ ﻑﻗﻭﺃ
.ﻁﻘﻓ ﻝﻫﺅﻣ
ﺔﻣﺩﺧ ﻲﻧﻓ ﺔﻁﺳﺍﻭﺑ ﺎﻬﺣﻠﺻﺃﻭ ﺓﺩﺣﻭﻟﺍ ﻝﻳﻐﺷﺗ ﻑﻗﻭﺃ
.ﻁﻘﻓ ﻝﻫﺅﻣ
ﺔﻣﺩﺧ ﻲﻧﻓ ﺔﻁﺳﺍﻭﺑ ﺎﻬﺣﻠﺻﺃﻭ ﺓﺩﺣﻭﻟﺍ ﻝﻳﻐﺷﺗ ﻑﻗﻭﺃ
.ﻁﻘﻓ ﻝﻫﺅﻣ
ﻲﻓ ﺔﻔﻳﺗﻛﻟﺍ ﺕﻧﺎﻛ ﺍﺫﺇ ﺎﻣ ﺹﺣﻓﺍﻭ ﺓﺩﺣﻭﻟﺍ ﻝﺯﻧﺃ ﻥﺎﻛﻣ
.ﻻ ﻡﺃ ﺢﻳﺣﺻ
ﻰﻟﺇ ﺔﻓﺎﺳﻣﻟﺍ ﻁﺑﺿ ﺩﻋﺃ65-75 ﻡﺳ
.ﺓﺭﻭﺷﺣﻣ ﺔﺣﻭﺭﻣﻟﺍ ﺓﺭﻔﺷ
.ﻑﻟﺎﺗ ﺭﻭﺗﻭﻣﻟﺍ
.ﻕﺭﺗﺣﻣ ﺓءﺎﺿﻹﺍ ﺡﺎﺑﺻﻣ .ﺔﺋﻔﻟﺍ ﺱﻔﻧ ﻥﻣ ﺭﺧﺂﺑ ﺡﺎﺑﺻﻣﻟﺍ ﻝﺩﺑﺗﺳﺍ
.ﻝﻭﺻﻔﻣ ﺔﻗﺎﻁﻟﺍ ﻙﻠﺳ .ﻯﺭﺧﺃ ﺓﺭﻣ ﺔﻗﺎﻁﻟﺍ ﺭﺩﺻﻣﺑ ﻝﻳﺻﻭﺗﻟﺎﺑ ﻡﻗ
.ﺔﻔﻟﺎﺗ ﺔﺣﻭﺭﻣﻟﺍ ﺓﺭﻔﺷ
.ﻡﺎﻛﺣﺈﺑ ﺔﺣﻭﺭﻣﻟﺍ ﺭﻭﺗﻭﻣ ﺕﻳﺑﺛﺗ ﻡﺗﻳ ﻡﻟ
ﺢﻳﺣﺻ ﻝﻛﺷﺑ ﺓﺩﺣﻭﻟﺍ ﻖﻳﻠﻌﺗ ﻡﺗﻳ ﻡﻟ
.ﺔﻔﻳﺗﻛﻟﺍ ﻰﻠﻋ
ﺓﺩﺣﻭﻟﺍ ﻥﻳﺑ ﺔﻳﺎﻐﻠﻟ ﺔﻠﻳﻭﻁ ﺔﻓﺎﺳﻣﻟﺍ
.ﻲﻬﻁﻟﺍ ﺢﻁﺳﻣﻭ
ﻥﻛﻟﻭ ،ءﻲﺿﻳ ﺡﺎﺑﺻﻣﻟﺍ
ﻻ ﺔﺣﻭﺭﻣﻟﺍﻝﻣﻌﺗ
ﺓءﺎﺿﻹﺍ ﻥﻣ ٌﻝﻛ
.ﻥﻼﻣﻌﻳ ﻻ ﺔﺣﻭﺭﻣﻟﺍﻭ
ﺭﻳﻁﺧ ﺯﺍﺯﺗﻫﺍ.ﺓﺩﺣﻭﻠﻟ
ﺍًﺩﻳﺟ ﺱﻳﻟ ﺹﺎﺻﺗﻣﻻﺍ ءﺍﺩﺃ
ﺔﻳﺋﻳﺑﻟﺍ ﺔﻳﺎﻣﺣﻟﺍ
ﺇ ءﺎﺟﺭﻟﺍ .ﺔﻳﻟﺯﻧﻣﻟﺍ ﺕﺎﻳﺎﻔﻧﻟﺍ ﻊﻣ ﺔﻳﺋﺎﺑﺭﻬﻛﻟﺍ ﺕﺎﺟﺗﻧﻣﻟﺍ ﻥﻣ ﺹﻠﺧﺗﻟﺍ ﻡﺩﻋ ﺏﺟﻳ ﺓﺩﺎﻋ
ﺹﺣﻓﺍ .ﻙﻟﺫﻟ ﺔﺻﺻﺧﻣﻟﺍ ﺕﺂﺷﻧﻣﻟﺍ ﺩﻭﺟﻭ ﻥﻛﺎﻣﺃ ﻲﻓ ﺭﻳﻭﺩﺗﻟﺍ ﺔﻳﻠﺣﻣﻟﺍ ﺕﺎﻁﻠﺳﻟﺍ ﻊﻣﺃ ﻭ
.ﺯﺎﻬﺟﻟﺍ ﺭﻳﻭﺩﺗ ﺓﺩﺎﻋﺇ ﻥﺄﺷﺑ ﺔﺋﺯﺟﺗﻟﺍ ﺭﺟﺎﺗ
ﻡﻗﺭ ﻲﺑﻭﺭﻭﻷﺍ ﻪﻳﺟﻭﺗﻠﻟ ﻪﺗﻘﺑﺎﻁﻣﺑ ﺯﺎﻬﺟﻟﺍ ﺍﺫﻫ ﻡﺳُﻭ2012/19/EU ﺔﻳﻧﻭﺭﺗﻛﻟﻹﺍﻭ ﺔﻳﺋﺎﺑﺭﻬﻛﻟﺍ ﺕﺍﺩﻌﻣﻟﺍ ﺕﺎﻳﺎﻔﻧ ﺹﻭﺻﺧﺑ
ﺔﺋﻳﺑﻟﺍ ﻰﻠﻋ ﺏﻗﺍﻭﻌﻟﺍ ﺏﻧﺟﺗ ﻲﻓ ﺩﻋﺎﺳﺗ ﻑﻭﺳ ،ﺢﻳﺣﺻ ﻝﻛﺷﺑ ﺞﺗﻧﻣﻟﺍ ﺍﺫﻫ ﻥﻣ ﺹﻠﺧﺗﻟﺍ ﻥﺎﻣﺿ ﻝﻼﺧ ﻥﻣ ،ﻥﺎﺳﻧﻹﺍ ﺔﺣﺻﻭ
.ﺞﺗﻧﻣﻟﺍ ﺍﺫﻬﻟ ﺔﺑﺳﺎﻧﻣﻟﺍ ﺭﻳﻏ ﺕﺎﻳﺎﻔﻧﻟﺍ ﺔﺟﻟﺎﻌﻣ ﺏﺑﺳﺑ ﻡﺟﻧﺗ ﺩﻗ ﻲﺗﻟﺍﻭ
ﻊﻳﻣﺟﺗ ﺔﻁﻘﻧ ﻰﻟﺇ ﻪﻣﻳﻠﺳﺗ ﺏﺟﻳ ﻙﻟﺫ ﻥﻣ ًﻻﺩﺑ .ﺔﻳﻟﺯﻧﻣ ﺕﺎﻳﺎﻔﻧﻛ ﺞﺗﻧﻣﻟﺍ ﺍﺫﻫ ﺔﻠﻣﺎﻌﻣ ﻡﺩﻋ ﻲﻐﺑﻧﻳ ﻪﻧﺃ ﺞﺗﻧﻣﻟﺍ ﻰﻠﻋ ﺯﻣﺭﻟﺍ ﺭﻳﺷﻳ
ﺔﻳﻧﻭﺭﺗﻛﻟﻹﺍﻭ ﺔﻳﺋﺎﺑﺭﻬﻛﻟﺍ ﺓﺯﻬﺟﻷﺍ ﺭﻳﻭﺩﺗ ﺓﺩﺎﻋﻹ ﺔﺻﺻﺧﻣ
ًﻘﻓﻭ ﺹﻠﺧﺗﻟﺍ ﺫﻳﻔﻧﺗ ﺏﺟﻳ.ﺕﺎﻳﺎﻔﻧﻟﺍ ﻥﻣ ﺹﻠﺧﺗﻠﻟ ﺔﻳﻠﺣﻣﻟﺍ ﺔﻳﺋﻳﺑﻟﺍ ﺢﺋﺍﻭﻠﻟ ﺎ
ﻭﺃ ،ﻲﻠﺣﻣﻟﺍ ﺔﻧﻳﺩﻣﻟﺍ ﺏﺗﻛﻣﺑ ﻝﺎﺻﺗﻻﺍ ءﺎﺟﺭﻟﺍ ،ﺞﺗﻧﻣﻟﺍ ﺍﺫﻬﻟ ﺭﻳﻭﺩﺗﻟﺍ ﺓﺩﺎﻋﺇﻭ ﺩﺍﺩﺭﺗﺳﻻﺍﻭ ﺔﺟﻟﺎﻌﻣﻟﺍ ﻝﻭﺣ ﺕﺎﻣﻭﻠﻌﻣﻟﺍ ﻥﻣ ﺩﻳﺯﻣﻟ
ﺞﺗﻧﻣﻟﺍ ﻪﻧﻣ ﺕﻳﺭﺗﺷﺍ ﻱﺫﻟﺍ ﺭﺟﺗﻣﻟﺍ ﻭﺃ ﻙﻳﺩﻟ ﺔﻳﻟﺯﻧﻣﻟﺍ ﺕﺎﻳﺎﻔﻧﻟﺍ ﻥﻣ ﺹﻠﺧﺗﻟﺍ ﺔﻣﺩﺧ
)WEEE.(
10
Page 25

ﺔﻧﺎﻳﺻﻟﺍ
.ﺱﺑﺎﻘﻟﺍ ﻉﺯﻧﺍﻭ ﺓﺩﺣﻭﻟﺍ ﻝﻳﻐﺷﺗ ﻑﻗﻭﺃ ،ﻑﻳﻅﻧﺗﻟﺍ ﻝﺑﻗ
ﻣﻟﺍ ﻑﻳﻅﻧﺗﻟﺍﻡﻅﺗﻧ
ﺕﺍﺩﺎﺑﻟ ﻡﺍﺩﺧﺗﺳﺍ ﺎًﻘﻠﻁﻣ ﺏﻧﺟﺗ .ﺔﻳﻟﺯﻧﻣﻟﺍ ﺽﺍﺭﻏﻸﻟ ﻑﻅﻧﻣ ﻭﺃ ﻝﺩﺗﻌﻣ ﻥﻭﺑﺎﺻﺑ ﺔﺋﻓﺍﺩ ﻩﺎﻳﻣﻭ ﺔﺑﻁﺭﻣ ﺔﻣﻋﺎﻧ ﺵﺎﻣﻗ ﺔﻌﻁﻗ ﻡﺩﺧﺗﺳﺍ
.ﺓﺩﺣﻭﻟﺍ ﻑﻳﻅﻧﺗﻟ ﺔﺑﻠﺻ ﺓﺎﺷﺭﻓ ﻭﺃ ﺔﻁﺷﺎﻛ ﻭﺃ ﺔﻳﺋﺎﻳﻣﻳﻛ ﺩﺍﻭﻣ ﻭﺃ ﺔﻳﻧﺩﻌﻣ
ﻡﻭﺣﺷﻟﺍ ﺭﺗﻠﻔﻟ ﻱﺭﻬﺷﻟﺍ ﻑﻳﻅﻧﺗﻟﺍ
ﻔﺗﻟ ﻙﻟﺫﻭ ؛ﺭﻬﺷ ﻝﻛ ﺭﺗﻠﻔﻟﺍ ﻑﻳﻅﻧﺗ ﻰﻠﻋ ﺹﺭﺣﺍ :ﻲﺳﺎﺳﺃ ﻝﻛﺷﺑ ﻡﻬﻣ.ﻖﻳﺭﺣ ﺏﻭﺷﻧﻟ ﺭﻁﺧ ﻱﺃ ﻱﺩﺎ
ﺭﺎﺑﻐﻟﺍﻭ ﻥﺎﺧﺩﻟﺍﻭ ﻡﻭﺣﺷﻟﺍ ﺭﺗﻠﻔﻟﺍ ﻊﻣﺟﻳ ...… ﻥﺈﻓ ،ﻪﻔﻳﻅﻧﺗ ﻡﺩﻋ ﺔﻟﺎﺣ ﻲﻓ .ﻲﻬﻁﻟﺍ ﺩﻗﻭﻣ ﺔﻧﺧﺩﻣ ﺓءﺎﻔﻛ ﻰﻠﻋ ﺓﺭﺷﺎﺑﻣ ﺭﺛﺅﻳ ﻪﻧﺈﻓ ﺍﺫﻟ
.ﺔﻳﻟﺯﻧﻣﻟﺍ ﺽﺍﺭﻏﻸﻟ ﻑﻅﻧﻣ ﻡﺍﺩﺧﺗﺳﺎﺑ ﻪﻔﻅﻧ .ﺭﺗﻠﻔﻟﺍ ﺩﺳﺗ ﻑﻭﺳ (ﻝﺎﻌﺗﺷﻻﺍ ﺔﻠﻣﺗﺣﻣ) ﻡﻭﺣﺷﻟﺍ ﺎﻳﺎﻘﺑ
ﻁﺷﻧﻟﺍ ﻥﻭﺑﺭﻛﻟﺍ ﺭﺗﻠﻔﻟ ﻱﻭﻧﺳﻟﺍ ﻑﻳﻅﻧﺗﻟﺍ
III .
ﺏﺟﻳﻭ ﺢﺋﺍﻭﺭﻟﺍ ﺭﺗﻠﻔﻟﺍ ﺍﺫﻫ ﻁﻘﺗﻠﻳ .(ﺝﺭﺎﺧﻠﻟ ﺎﻬﺗﻳﻭﻬﺗ ﻡﺩﻋ) ﺭﻳﻭﺩﺗ ﺓﺩﺎﻋﺇ ﺓﺩﺣﻭﻛ ﺎﻬﺑﻳﻛﺭﺗ ﻡﺗ ﻲﺗﻟﺍ ﺓﺩﺣﻭﻟﺍ ﻰﻠﻋ ﻁﻘﻓ ﺭﻣﻷﺍ ﺍﺫﻫ ﻖﺑﻁﻧﻳ
.ﻲﻬﻁﻟﺍ ﺩﻗﻭﻣ ﺔﻧﺧﺩﻣ ﻡﺍﺩﺧﺗﺳﺍ ﺭﺍﺭﻛﺗﻟ ﺎًﻌﺑﺗ ﻡﺎﻌﻟﺍ ﻲﻓ ﻝﻗﻷﺍ ﻰﻠﻋ ﺓﺭﻣ ﻪﻟﺍﺩﺑﺗﺳﺍ
ﺓءﺎﺿﻹﺍ ﺡﺎﺑﺻﻣ ﻑﻳﻅﻧﺗ
IV .
ﻋ ﺙﺣﺑﺍ .ﺝﺎﺟﺯﻟﺍ ﻉﺯﻧﻟ ،ﺝﺎﺟﺯﻟﺍ ﻰﻠﻋ ﻲﻏﺍﺭﺑﻟﺍ ﻙﻔﺑ ﺭﺩﺎﺑ ﺓءﺎﺿﻹﺍ ﺔﺑﻳﻛﺭﺗ ﻲﻓ ﻩﺩﺟﺗ ﻑﻭﺳ ،ﻪﻟﺍﺩﺑﺗﺳﺍ ﻡﺯﻠﻳ ﻱﺫﻟﺍ ﺡﺎﺑﺻﻣﻟﺍ ﻥ
.ﺔﻠﻅﻣﻠﻟ ﻑﻭﺷﻛﻣﻟﺍ ءﺯﺟﻟﺍ ﻝﺧﺍﺩ ﻲﻓ ﺓﺩﻭﺟﻭﻣﻟﺍ
I .
II .
ﺢﻳﺑﺎﺻﻣﻟﺍ ﻝﺍﺩﺑﺗﺳﺍ ﻥﻛﻣﻣﻟﺍ ﻥﻣ ﺱﻳﻟ :ﻡﻬﻣ .ﺔﻧﺧﺩﻣﻟﺍ ﻥﻣ ﻙﻼﺳﻷﺍﻭ ﺡﺎﺑﺻﻣﻟﺍ ﺕﻼﻣﺎﺣ ﻝﺯﺃﻭ ﺓءﺎﺿﻹﺍ ﻙﻠﺳ ﻝﻳﺻﻭﺗ ﺔﻁﻘﻧ ﻝﺻﻓﺍ
ﺻﻣﻟﺍ ﺕﻼﻣﺎﺣﻭ ﺢﻳﺑﺎﺻﻣﻟﺍ ﻰﻠﻋ ﻝﻭﺻﺣﻟﺍ ﻱﺭﻭﺭﺿﻟﺍ ﻥﻣ ﻝﺑ ،ﺎﻫﺩﺣﻭ ﺡﺎﺑﺻﻣ) .ﻝﻣﺎﻛﺗﻣ ءﺯﺟﻛ ﻙﻼﺳﻷﺍﻭ ﺢﻳﺑﺎLED ﻰﺻﻗﺃ :
ﺓﺭﺩﻗ1.5 (ﺕﺍﻭ
ﻙﻼﺳﺃ ﺔﻁﻘﻧ ﻝﻳﺻﻭﺗ ﺩﻋﺃ ﻡﺛ .ﺔﻳﻠﺻﻷﺍ ﺢﻳﺑﺎﺻﻣﻟﺍ ﻝﺛﻣ ﺔﻘﻳﺭﻁﻟﺍ ﺱﻔﻧﺑ ﻙﻼﺳﻷﺍﻭ ﺢﻳﺑﺎﺻﻣﻟﺍ ﺕﻼﻣﺎﺣﻭ ﺔﻠﻳﺩﺑﻟﺍ ﺢﻳﺑﺎﺻﻣﻟﺍ ﺏﻳﻛﺭﺗﺑ ﻡﻗ
.ﺓءﺎﺿﻹﺍ
9
Page 26

/ﻝﻳﻐﺷﺗ ﺭﺯﻝﻳﻐﺷﺗﻟﺍ ﻑﺎﻘﻳﺇ
.ﺔﺣﻭﺭﻣﻟﺍ ﻝﻳﻐﺷﺗ ﻑﺎﻘﻳﺇ /ﻝﻳﻐﺷﺗﻟ ﻡﺩﺧﺗﺳُﻳ
ﺔﻳﻓﺎﺿﺇ ﺔﻋﺭﺳ ﺭﺯ
ﺔﺣﻭﺭﻣﻟﺍ ﺔﻋﺭﺳ ﺓﺩﺎﻳﺯﻟ
ﺔﻋﺭﺳﻟﺍ ﺽﻳﻔﺧﺗ ﺭﺯ
ﺔﺣﻭﺭﻣﻟﺍ ﺔﻋﺭﺳ ﺽﻳﻔﺧﺗﻟ
ﺡﺎﺑﺻﻣﻟﺍ ﺭﺯ
ﺔﻳﻣﻗﺭﻟﺍ ﺔﺷﺎﺷﻟﺍ
":ﺔﺣﻭﺭﻣﻟﺍ ﺔﻋﺭﺳ ﺔﺷﺎﺷﻟ ﺔﺑﺳﻧﻟﺎﺑ1"ﻭ ،ﺔﺿﻔﺧﻧﻣﻟﺍ ﺔﻋﺭﺳﻠﻟ "2"ﻭ ،ﺔﻁﺳﻭﺗﻣﻟﺍ ﺔﻋﺭﺳﻠﻟ "3 ﺔﻋﺭﺳﻠﻟ "
"ﻭ ،ﺔﻳﻟﺎﻌﻟﺍ4 ".ﺯﺯﻌﻣﻟﺍ ﺔﻔﻳﻅﻭﻟ
ﻰﻠﻋ ﺭﺍﺭﻣﺗﺳﻻﺍ ﻊﻣ ﻁﻐﺿﺍ & ﺓﺩﺣﺍﻭ ﺔﻳﻧﺎﺛ ﺓﺩﻣﻟ1 ﻲﻟﺯﺎﻧﺗﻟﺍ ﺩﻌﻟﺍ ﺃﺩﺑﻳﻭ ﺔﻳﻣﻗﺭﻟﺍ ﺔﺷﺎﺷﻟﺍ ﺽﻣﻭﺗ ﻑﻭﺳ ،
ﻊﻳﺭﺳﻟﺍ ﺕﻗﺅﻣﻟﺍ :
ﻥﻣ5 ﺩﻌﺑﻭ ،ﻖﺋﺎﻗﺩ5 .ﺓﺩﺣﺍﻭ ﺔﻳﻧﺎﺛ ﺓﺩﻣﻟ ﺓﺭﻓﺎﺻ ﺕﻭﺻ ﺭﺩﺻﻳﻭ ﺎًﻳﺋﺎﻘﻠﺗ ﺓءﺎﺿﻹﺍﻭ ﺭﻭﺗﻭﻣﻟﺍ ﻝﻳﻐﺷﺗ ﻑﻗﻭﺗﻳ ﻑﻭﺳ ﻖﺋﺎﻗﺩ
ﻰﻠﻋ ﻁﻐﺿﺍ ،ﺯﺯﻌﻣﻟﺍ ﻁﻳﺷﻧﺗﻟ ﻰﻟﺇ ﺔﻋﺭﺳﻟﺍ ﺓﺩﺎﻳﺯﻟ4 ﻰﻠﻋﺃ ﻰﻟﺇ ﻝﻭﺧﺩﻟﺍﻭ ،
ﺓﺩﻣﻟ ﺔﻋﺭﺳﻟﺍ ﺩﺍﺩﺯﺗ ﻑﻭﺳﻭ ﻡﺍﺩﺧﺗﺳﻻﺍ ﺩﻳﻗ ﺔﻧﺧﺩﻣﻟﺍ ﻥﻭﻛﺗ ﺎﻣﻧﻳﺣ ﺔﻋﺭﺳ5 .ﻯﺭﺧﺃ ﺓﺭﻣ ءﺎﻁﺑﻹﺍ ﻝﺑﻗ ،ﻖﺋﺎﻗﺩ
.ﺯﺯﻌﻣﻟﺍ ﺔﻔﻳﻅﻭ ﻰﻠﻋ ﺔﻧﺧﺩﻣﻟﺍ ﻩﺫﻫ ﻱﻭﺗﺣﺗ
8
Page 27

ﺭﺎﻣﺳﻣﻟﺍ ﻊﻣ ﺎﻬﻠﻔﻗﺍﻭ ﻲﻬﻁﻟﺍ ﺩﻗﻭﻣ ﺔﻧﺧﺩﻣ ﺏﻳﻛﺭﺗﺑ ﻡﻗ
ﻑﻘﺳﻟﺍ ﻲﻓ ﻱﺭﺎﺟﻔﻧﻻﺍ
4 (
ﺏﻳﻛﺭﺗﻟﺍ ﻥﻣ ﺔﻠﺣﺭﻣﻟﺍ ﻩﺫﻫ ﻝﺎﻣﻛﺗﺳﺍ ﺏﺟﻳ :ﻡﻬﻣ
.ﻥﻳﺻﺧﺷ ﺔﻁﺳﺍﻭﺑ
.ﻲﻏﺍﺭﺑ ﺕﺳﺑ ﻪﺗﺑﺛﻭ ﻱﻭﻠﻌﻟﺍ ﺔﻧﺧﺩﻣﻟﺍ ﺩﻭﻣﻋ ﺏﻳﻛﺭﺗﺑ ﻡﻗ
5 (
ﺔﺣﻭﻟ ﻰﻠﻋ ﺔﺣﺿﻭﻣﻟﺍ ﺔﻳﺋﺎﺑﺭﻬﻛﻟﺍ ﺕﺎﺑﻠﻁﺗﻣﻟﺍ ﻊﻣ ﺔﻳﺋﺎﺑﺭﻬﻛﻟﺍ ﺕﻼﻳﺻﻭﺗﻟﺍ ﻖﻓﺍﻭﺗﺗ ﻥﺃ ﺏﺟﻳ ﻲﻓ ﺓﺩﻭﺟﻭﻣﻟﺍ ،ﻥﻳﻧﻘﺗﻟﺍ
.ﻲﺋﺎﺑﺭﻬﻛﻟﺍ ﺭﺎﻳﺗﻟﺍ ﺭﺩﺻﻣﺑ ﺯﺎﻬﺟﻟﺍ ﻝﻳﺻﻭﺗ ﻥﻵﺍ ﺏﺟﻳ .ﺩﻗﻭﻣﻟﺍ ﺔﻧﺧﺩﻣﻟ ﻲﻠﺧﺍﺩﻟﺍ ءﺯﺟﻟﺍ
ﺔﻋﺭﺳ ﻝﻛ ﺭﺎﻳﺗﺧﺍ ﻝﻼﺧ ﻥﻣ ﺢﻳﺣﺻ ﻝﻛﺷﺑ ﻝﻣﻌﻳ ﺯﺎﻬﺟﻟﺍ ﻥﺃ ﻥﻣ ﻖﻘﺣﺗ
.ﺎﻬﻠﻳﻐﺷﺗ ﻑﺎﻘﻳﺇﻭ ﺓءﺎﺿﻹﺍ ﺢﻳﺑﺎﺻﻣ ﻝﻳﻐﺷﺗﻭ
ﻠﺻﻟﺍ ﻥﻣ ﺔﻋﻭﻧﺻﻣﻟﺍ ءﺍﺯﺟﻷﺍ ﻰﻠﻋ ﺃﺩﺻﻠﻟ ﻡﻭﺎﻘﻣﻟﺍ ﺏﻠﺻﻟﺍ ﻊﻣﻠﻣﻭ ﻑﻅﻧﻣ ﻡﺩﺧﺗﺳﺍ.ﺯﺎﻬﺟﻟﺍ ﻲﻓ ﺏ
ﻥﻵﺍ ﺏﺟﻳ ﺫﺋﺩﻧﻋ ،ﺭﻳﻭﺩﺗﻟﺍ ﺓﺩﺎﻋﺇ ﻊﺿﻭ ﻲﻓ ﺯﺎﻬﺟﻟﺍ ﻡﺩﺧﺗﺳﺗ ﺕﻧﻛ ﺍﺫﺇ
ﺔﺣﻔﺻ ﻲﻓ "ﻥﻭﺑﺭﻛﻟﺍ ﺭﺗﻠﻓ ﺏﻳﻛﺭﺗ" ﻡﺳﻗ ﻊﺟﺍﺭ .ﻥﻭﺑﺭﻛﻟﺍ ﺭﺗﻠﻓ ﺏﻳﻛﺭﺗ6.
،ﺕﻗﻭﻟﺍ ﺱﻔﻧ ﻲﻓ ﺔﻳﻟﺎﻋ /ﺔﻁﺳﻭﺗﻣ /ﺔﺿﻔﺧﻧﻣ ﺔﻋﺭﺳ ﺭﺍﺭﺯﺃ ﻰﻠﻋ ﻁﻐﺿﻟﺍ ﺔﻟﺎﺣ ﻲﻓ :ﺔﻅﺣﻼﻣ
.ﻁﻘﻓ ﺔﻋﺭﺳ ﻰﻠﻋﺄﺑ ﺓﺩﺣﻭﻟﺍ ﻝﻣﻌﺗ ﻑﻭﺳﻓ
7
Page 28

ﺡﺎﺑﺻﻣﺑ ﺔﻧﺧﺩﻣﻟﺍ ﺯﺍﺭﻁ ﺏﻳﻛﺭﺗ
ﺑ
ﺻ
ﻲﻏﺭﺑ ﻙﻔﺑ ﻡﻗ ﺏﻘﺛﻟﺍ4 ×8 ﺏﻳﻛﺭﺗﺑ ﻡﻗﻭ
ﻲﻠﻔﺳﻟﺍ ﺔﻧﺧﺩﻣﻟﺍ ﺩﻭﻣﻋ
،ﺕﻳﺑﺛﺗﻠﻟ ﻡﺯﻼﻟﺍ ﻉﺎﻔﺗﺭﻻﺍ ﻁﺑﺿﺍﻭ ،ﺔﻳﻭﺍﺯﻟﺍ
.ﻯﺭﺧﺃ ﺓﺭﻣ ﻲﻏﺭﺑﻟﺍ ﻝﻔﻗﺍﻭ
ﻲﻏﺍﺭﺑ8 ×M5 *12
ﺔﻟﻭﻣﺎﺻ8 ×M5 *12
1 (
2 ( ﺏﻳﺿﻗ ﺕﺑﺛﺗ ﻲﺗﻟﺍ ﺔﻳﻧﺎﻣﺛﻟﺍ ﻲﻏﺍﺭﺑﻟﺍ ﻙﻔﺑ ﻡﻗ
ﻲﻏﺍﺭﺑM5*12 8*
ﻡﻗﻭ ،ﻑﻘﺳﻟﺍ ﻰﻠﻋ ﻱﺭﺎﺟﻔﻧﻻﺍ ﻲﻏﺭﺑﻟﺍ
ﻊﻣ ﺎﻬﻠﻔﻗﺃﻭ ﻲﻬﻁﻟﺍ ﺩﻗﻭﻣ ﺔﻧﺧﺩﻣ ﺏﻳﻛﺭﺗﺑ
ﻑﻘﺳﻟﺍ ﻲﻓ ﻱﺭﺎﺟﻔﻧﻻﺍ ﺭﺎﻣﺳﻣﻟﺍ
.ﻡﺎﻛﺣﺈﺑ ﻲﻏﺍﺭﺑﻟﺍ ﻊﻳﻣﺟ ﻁﺑﺭ ﻥﻣ ﺩﻛﺄﺗ :ﻡﻬﻣ
ﻥﻣ ﺔﻠﺣﺭﻣﻟﺍ ﻩﺫﻫ ﻝﺎﻣﻛﺗﺳﺍ ﺏﺟﻳ :ﻡﻬﻣ
.ﻥﻳﺻﺧﺷ ﺔﻁﺳﺍﻭﺑ ﺏﻳﻛﺭﺗﻟﺍ
ﺔﻟﻭﻣﺎﺻM5 8*
3 ( ﺕّﺑﺛ ،ﻖﻳﻠﻌﺗﻟﺍ ﺔﺣﻭﻟ ﻲﻓ ﺔﺣﺗﻔﻟﺍ ﻊﻗﻭﻣﻟ ﺎًﻌﺑﺗ
ﻱﺭﺎﺟﻔﻧﺍ ﻲﻏﺭ
ﻲﻏﺍﺭﺑ8 ×M6*60
ﺔﻟﻭﻣﺎ
M6
M6*60*8
6
Page 29

(ﺔﻳﻠﺧﺍﺩﻟﺍ ﺔﻳﻭﻬﺗﻟﺍ) ﺏﻳﻛﺭﺗﻟﺍ
ﻕﻼﻏﺇ
ﻥﺈﻓ ،ﺝﺭﺎﺧﻠﻟ ﻑﻳﺭﺻﺗ ﺫﻔﻧﻣ ﻙﻟ ﺭﻓﻭﺗﻳ ﻡﻟ ﺍﺫﺇ" ﻡﺳﻘﻟﺍ ﻲﻓ ﺢﺿﻭﻣﻟﺍ ءﺍﺭﺟﻺﻟ ًﻼﺛﺎﻣﻣ ﺏﻳﻛﺭﺗﻟﺍ ﻥﻭﻛﻳﻭ ﺏﻭﻠﻁﻣ ﺭﻳﻏ ﻡﺩﺎﻌﻟﺍ ﺏﻭﺑﻧﺃ ﺏﻳﻛﺭﺗﻟﺍ
(ﺔﻳﺟﺭﺎﺧﻟﺍ ﺔﻳﻭﻬﺗﻟﺍ)
."
.ﺢﺋﺍﻭﺭﻟﺍ ﺏﺣﺳﻟ ﻁﺷﻧﻣﻟﺍ ﻥﻭﺑﺭﻛﻟﺍ ﺭﺗﻠﻓ ﻡﺍﺩﺧﺗﺳﺍ ﻥﻛﻣﻳ
.ﻝﻔﺳﻷ ﻪﺑﺣﺳﺍﻭ ﻝﻔﻘﻟﺍ ﻰﻠﻋ ﻁﻐﺿﺍ .ﻡﻭﺣﺷﻟﺍ ﺭﺗﻠﻓ ﺔﻟﺍﺯﺇ ًﻻﻭﺃ ﺏﺟﻳ ،ﻁﺷﻧﻣﻟﺍ ﻥﻭﺑﺭﻛﻟﺍ ﺭﺗﻠﻓ ﺏﻳﻛﺭﺗ ﻝﺟﺃ ﻥﻣ
ﺭﻛﻟﺍ ﺭﺗﻠﻓ ﻝﺧﺩﺃ.ﺭﺧﻵﺍ ﺏﻧﺎﺟﻟﺍ ﻰﻠﻋ ﻪﺳﻔﻧ ءﺍﺭﺟﻹﺍ ﺭﺭﻛ .ﺔﻋﺎﺳﻟﺍ ﺏﺭﺎﻘﻋ ﻩﺎﺟﺗﺍ ﻲﻓ ﻩﺭﺩﺃﻭ ﺓﺩﺣﻭﻟﺍ ﻲﻓ ﻁﺷﻧﻣﻟﺍ ﻥﻭﺑ
.ﺓﺭﻭﻁﺧ ﻝﻛﺷﻳﻭ ﻰﻟﺩﺗﻳ ﺩﻗ ،ﻙﻟﺫ ﻑﻼﺧ .ﻡﺎﻛﺣﺈﺑ ﺭﺗﻠﻔﻟﺍ ﻝﻔﻗ ﻥﻣ ﺩﻛﺄﺗ
.ﺹﺎﺻﺗﻣﻻﺍ ﺓﻭﻗ ﺽﻔﺧﻧﺗ ﻑﻭﺳ ،ﻁﺷﻧﻣﻟﺍ ﻥﻭﺑﺭﻛﻟﺍ ﺭﺗﻠﻓ ﺏﻳﻛﺭﺗ ﺩﻧﻋ
:ﺔﻅﺣﻼﻣ
o
o
5
Page 30

ﺔﻳﺋﺎﺑﺭﻬﻛﻟﺍ ﺔﻣﺩﺻﻟﺍ ﺭﻁﺧ
ﻰﻠﻋ ﻝﻫﺅﻣ ﺱﺩﻧﻬﻣ ﻥﻣ ﺔﺣﻳﺻﻧﻟﺍ ﺏﻠﻁﺎﻓ ،ﺎًﻛﻛﺷﺗﻣ ﺕﻧﻛ ﺍﺫﺇ .ﺽﺭﻷﺎﺑ ﻝﺻﺗﻣ ﺏﺳﺎﻧﻣ ﺫﺧﺄﻣ ﻲﻓ ﺓﺩﺣﻭﻟﺍ ﻩﺫﻫ ﺱﺑﻗﺍ
.ﺏﺳﺎﻧﻣ ﻭﺣﻧ
.ﺔﻳﺋﺎﺑﺭﻬﻛ ﺔﻣﺩﺻﻟ ﺽﺭﻌﺗﻟﺍ ﻭﺃ ﻖﻳﺭﺣ ﺏﻭﺷﻧ ﻭﺃ ﺓﺎﻓﻭﻟﺍ ﻰﻟﺇ ﺕﺎﻣﻳﻠﻌﺗﻟﺍ ﻩﺫﻫ ﻉﺎﺑﺗﺍ ﻲﻓ ﻕﺎﻔﺧﻹﺍ ﻱﺩﺅﻳ ﺩﻗ
ﻖﻳﻠﻌﺗﻟﺎﺑ ﺏﻳﻛﺭﺗﻟﺍ
•
•
.ﺫﺧﺄﻣﻟﺍ ﻥﻋ ﺎﻬﺳﺑﺎﻗ ﻝﺻﻓﺍﻭ ،ﺓﺩﺣﻭﻟﺍ ﻝﻳﻐﺷﺗ ﻑﻗﻭﺃ ،ﺏﻳﻛﺭﺗﻟﺍ ﻝﺑﻗ
ﺔﻓﺎﺳﻣ ﻰﻠﻋ ﻲﻬﻁﻟﺍ ﺩﻗﻭﻣ ﺔﻧﺧﺩﻣ ﻊﺿﻭ ﺏﺟﻳ65~75 .ءﺍﺩﺃ ﻝﺿﻓﺃ ﻖﻳﻘﺣﺗﻟ ﻲﻬﻁﻟﺍ ﺢﻁﺳﻣ ﻕﻭﻓ ﻡﺳ
ﻡﻗ:ﺏﻳﻛﺭﺗﻠﻟ ﺯﻳﻬﺟﺗﻟﺎﺑ
1.
a.
b.
65 ﻡﺳ
75 ﻡﺳ
4
Page 31

ﺔﻣﺩﻘﻣ
.ﻩﺫﻫ ﻲﻬﻁﻟﺍ ﺩﻗﻭﻣ ﺔﻧﺧﺩﻣ ﺭﺎﻳﺗﺧﺍ ﻰﻠﻋ ﻙﺭﻛﺷﻧ
.ﻪﺗﻧﺎﻳﺻﻭ ﻪﻣﺍﺩﺧﺗﺳﺍﻭ ﺯﺎﻬﺟﻟﺍ ﺏﻳﻛﺭﺗﺑ ﺔﻘﻠﻌﺗﻣﻟﺍ ﺕﺎﻣﻳﻠﻌﺗﻟﺍ ﺔﻓﺎﻛ ﻙﻟ ﻡﺩﻘﻳﻟ ﺍﺫﻫ ﺕﺎﻣﻳﻠﻌﺗﻟﺍ ﻝﻳﻟﺩ ﻡﻣُﺻ
ﺭﻳﺑﻛ ﻲﺋﺎﺑﺭﻬﻛ ﺭﻭﺗﻭﻣﺑ ﺓﺩﻭﺯﻣ ﺎﻬﻧﺃ ﺎﻣﻛ .ﻲﺑﺎﻳﺳﻧﻻﺍ ﺎﻬﻣﻳﻣﺻﺗﻭ ﺓﺩﻭﺟﻟﺍ ﺔﻳﻟﺎﻋ ﺩﺍﻭﻣﻟ ﺎﻬﻣﺍﺩﺧﺗﺳﺎﺑ ﻲﻬﻁﻟﺍ ﺩﻗﻭﻣ ﺔﻧﺧﺩﻣ ﺯﻳﻣﺗﺗ
ﺓﺭﻳﺑﻛ ﺹﺎﺻﺗﻣﺍ ﺓﻭﻗ ﺎًﺿﻳﺃ ﺭﻓﻭﺗﻭ ،ﻱﺯﻛﺭﻣﻟﺍ ﺩﺭﻁﻟﺎﺑ ﻝﻣﻌﺗ ﺔﺣﻭﺭﻣﻭ ﻱﻭﻗﻭ ﺢﺷﺭﻣ ﺎﻬﺑﻭ ،ﻝﻳﻐﺷﺗﻟﺍ ءﺎﺿﻭﺿ ﺽﺎﻔﺧﻧﺍ ﻊﻣ ،
.ﺏﻳﻛﺭﺗﻟﺍ ﺔﻟﻭﻬﺳ ﻥﻋ ًﻼﺿﻓ ﻕﺎﺻﺗﻟﻻﺎﺑ ﺢﻣﺳﻳ ﻻ ﻡﻭﺣﺷ
ﺔﻣﻼﺳﻟﺍ ﺕﺎﻁﺎﻳﺗﺣﺍ
.ﺯﺎﻬﺟﻟﺍ ﻥﻭﻠﻐﺷﻳ ﺍًﺩﺑﺃ ﻝﺎﻔﻁﻷﺍ ﻙﺭﺗﺗ ﻻ
ﺕﺎﻳﻠﻘﻣﻟﺍ ﺭﺟﺎﺗﻣﻭ ﻭﻳﻛﺑﺭﺎﺑﻟﺍ ﺕﺍﺩﻌﻣﻟ ﺔﺑﺳﺎﻧﻣ ﺭﻳﻏﻭ ،ﻁﻘﻓ ﻲﻟﺯﻧﻣﻟﺍ ﻡﺍﺩﺧﺗﺳﻼﻟ ﻲﻬﻁﻟﺍ ﺩﻗﻭﻣ ﺔﻧﺧﺩﻣ ﺹﺻﺧُﺗ
ﺔﻳﺭﺎﺟﺗﻟﺍ ﺽﺍﺭﻏﻷﺍﻭ (ﺕﺳﻭﺭﻟﺍ).ﻯﺭﺧﻷﺍ
.ﺓﺩﻳﺟ ﻝﻣﻋ ﺔﻟﺎﺣ ﻲﻓ ﺎﻬﻳﻠﻋ ﻅﺎﻔﺣﻟﺍ ﻝﺟﺃ ﻥﻣ ﻡﺎﻅﺗﻧﺎﺑ ﺎﻬﺑ ﺹﺎﺧﻟﺍ ﺭﺗﻠﻔﻟﺍﻭ ﻲﻬﻁﻟﺍ ﺩﻗﻭﻣ ﺔﻧﺧﺩﻣ ﻑﻳﻅﻧﺗ ﺏﺟﻳ
ﻖﻳﺭﺣ ﺏﻭﺷﻧ ﺭﻁﺧ ﺔﻣﺛ .ﻕﺍﺭﺗﺣﻻﺍ ﺭﻁﺧ ﻥﻣ ﺓﺩﺣﻭﻟﺍ ﻰﻠﻋ ﻅﻓﺎﺣﻭ ﺕﺎﻣﻳﻠﻌﺗﻟﺍ ﻝﻳﻟﺩﻟ ﺎًﻘﻓﻭ ﻲﻬﻁﻟﺍ ﺩﻗﻭﻣ ﺔﻧﺧﺩﻣ ﻑّﻅﻧ
ﺕﺎﻣﻳﻠﻌﺗﻠﻟ ﺎًﻘﻓﻭ ﻑﻳﻅﻧﺗﻟﺍ ءﺍﺭﺟﺇ ﻡﺗﻳ ﻡﻟ ﺍﺫﺇ
ﻝﺟﺃ ﻥﻣ .ﻡﺍﺩﺧﺗﺳﻻﺍﻭ ﺏﻳﻛﺭﺗﻟﺍ ﻝﺑﻗ ﺔﻳﺎﻧﻌﺑ ﺍﺫﻫ ﺕﺎﻣﻳﻠﻌﺗﻟﺍ ﻝﻳﻟﺩ ﺃﺭﻗﺍ ،ﻥﺎﻣﺄﺑﻭ ﺢﻳﺣﺻ ﻝﻛﺷﺑ ﺓﺩﺣﻭﻟﺍ ﻝﻳﻐﺷﺗ
•
•
•
•
ﻣ ﺭﺷﺎﺑﻣ ﺯﺑﺧ ﻝﻣﻋ ﺭﻅﺣﻳ.ﺯﺎﻐﻟﺍ ﺩﻗﻭﻣ ﻥ
.ﺦﺑﻁﻣﻟﺍ ﺔﻓﺭﻏ ﻥﻣ ﺓﺩﻳﺟ ﺓﺭﻭﺻﺑ ﺓﺭﺍﺭﺣﻟﺍ ﻝﺎﻘﺗﻧﺍ ﻰﻠﻋ ﺔﻅﻓﺎﺣﻣﻟﺍ ءﺎﺟﺭﻟﺍ
ﻙﻟﺫﻭ ؛ﻥﻳﻠﻫﺅﻣ ﻥﻳﻳﻧﻓ ﺔﻓﺭﻌﻣﺑ ﻭﺃ ﻪﺗﺎﻣﺩﺧ ﻝﻳﻛﻭ ﻭﺃ ،ﻊ
؛ﺭﺧﺁ ﺩﻭﻗﻭ ﻭﺃ ﺯﺎﻐﻟﺍ ﻕﺭﺣﺑ ﻝﻣﻌﺗ ﺓﺯﻬﺟﺃ ﻥﻣ ﻡﺩﺎﻋ ﺓﺭﺧﺑﺃ ﻪﺑ ﺭﻣﺗ ﺔﻧﺧﺩﻣ ﺏﻭﺑﻧﺃ ﻰﻟﺇ ءﺍﻭﻬﻟﺍ ﻑﻳﺭﺻﺗ ﻡﺩﻋ ﺏﺟﻳ
ﻡﻬﺋﺎﻁﻋﺇ ﺔﻟﺎﺣ ﻲﻓ ﻙﻟﺫﻭ ﺔﻓﺭﻌﻣﻟﺍﻭ ﺓﺭﺑﺧﻟﺍ ﻲﻣﻳﺩﻋ ﺹﺎﺧﺷﻷﺍ ﻭﺃ ﺓﺩﻭﺩﺣﻣﻟﺍ ﺔﻳﻠﻘﻌﻟﺍ ﻭﺃ ﺔﻳﺳﺣﻟﺍ ﻭﺃ ﺔﻳﻧﺩﺑﻟﺍ ﺕﺍﺭﺩﻘﻟﺍ
.ﺔﻘﻠﻌﺗﻣﻟﺍ ﺭﻁﺎﺧﻣﻟﺍ ﻡﻬﻓﻭ ﺔﻧﻣﺁ ﺔﻘﻳﺭﻁﺑ ﺯﺎﻬﺟﻟﺍ ﻡﺍﺩﺧﺗﺳﺍ ﻥﺄﺷﺑ ﻡﻬﻳﻠﻋ ﻑﺍﺭﺷﻹﺍ ﻭﺃ ﺕﺎﻣﻳﻠﻌﺗﻟﺍ
.ﻑﺍﺭﺷﺇ ﺕﺣﺗ ﻻﺇ ﺯﺎﻬﺟﻟﺍ ﺍﺫﻫ ﺔﻧﺎﻳﺻ ﻭﺃ ﻑﻳﻅﻧﺗ ﻝﺎﻔﻁﻷﺍ ﻰﻠﻋ ﺭﻅﺣﻳ
ّ
ﻧﺻُﻣﻟﺍ ﺔﻓﺭﻌﻣﺑ ﻪﻟﺍﺩﺑﺗﺳﺍ ﻡﺗﺣﺗﻳ ،ﻑﻠﺗﻠﻟ ﺔﻳﺫﻐﺗﻟﺍ ﻝﺑﺎﻛ ﺽﺭﻌﺗ ﺍﺫﺇ
ِ
.ﺭﻁﺎﺧﻣ ﻱﻷ ﺎًﻳﺩﺎﻔﺗ
ﺔﻧﺧﺩﻣ ﻡﺍﺩﺧﺗﺳﺍ ﺩﻧﻋ ﺔﻓﺭﻐﻟﺍ ﻲﻓ ﺔﻳﻓﺎﻛ ﺔﻳﻭﻬﺗ ﺩﻭﺟﻭ ﻲﻐﺑﻧﻳ ﺯﺎﻐﻟﺍ ﻕﺭﺣﻳ ﻱﺫﻟﺍ ﺯﺎﻬﺟﻟﺍ ﻝﻳﻐﺷﺗ ﺕﻗﻭ ﺱﻔﻧ ﻲﻓ ﺩﻗﻭﻣﻟﺍ
؛ﺭﺧﺁ ﺩﻭﻗﻭ ﻭﺃ
.ءﺍﻭﻬﻟﺍ ﻑﻳﺭﺻﺗﺑ ﺔﻘﻠﻌﺗﻣﻟﺍ ﺩﻋﺍﻭﻘﻟﺍ ﺔﻳﺑﻠﺗ ﺏﺟﻳﻭ
ﻥﺳ ﻥﻣ ﻝﺎﻔﻁﻷﺍ ﺏﻧﺎﺟ ﻥﻣ ﺯﺎﻬﺟﻟﺍ ﺍﺫﻫ ﻡﺍﺩﺧﺗﺳﺍ ﻥﻛﻣﻳ8 ﻛﺃ ﺎﻣﻓ ﺕﺍﻭﻧﺳ ﻱﻭﺫ ﻥﻣ ﺹﺎﺧﺷﻷﺍ ﺏﻧﺎﺟ ﻥﻣﻭ ﺭﺑ
ﻣﺍﺩﺧﺗﺳﺍ ﻡﺩﻋ ﻥﺎﻣﺿﻟ ﻑﺍﺭﺷﻺﻟ ﻝﺎﻔﻁﻷﺍ ﻊﺿﺧﻳ ﻥﺃ ﻲﻐﺑﻧﻳ.ﺏﻌﻠﻟﺍ ﻲﻓ ﺯﺎﻬﺟﻟﺍ ﺍﺫﻬﻟ ﻡﻬ
.ﻲﻬﻁﻟﺍ ﺩﻗﻭﻣ ﺔﻧﺧﺩﻣ ﻝﻔﺳﺃ ﺍًﺭﺎﻧ ﻝﻌﺷﺗ ﻻ
•
•
•
•
•
•
•
•
.ﻲﻬﻁﻟﺍ ﺯﺎﻬﺟ ﻊﻣ ﻡﺍﺩﺧﺗﺳﻻﺍ ﺩﻧﻋ ﺔﻧﺧﺎﺳ ﻝﻭﺻﻭﻟﺍ ﺔﻠﻬﺳ ءﺍﺯﺟﻷﺍ ﺢﺑﺻﺗ ﺩﻗ :ﻪﻳﺑﻧﺗ
ﻝﻭﺣ ﻝﻳﺻﺎﻔﺗ ﻝﻣﺷﺗ ﻲﺗﻟﺍ ﺕﺎﻣﻳﻠﻌﺗﻟﺍ ﻥﻣ ءﺯﺟﻟﺍ ﺱﻔﻧ ﻲﻓ ﺭﻳﺫﺣﺗﻟﺍ ﻥﻭﻛﻳ ﻥﺃ ﺏﺟﻳ .ﺯﺎﻬﺟﻟﺍ ﺏﻳﻛﺭﺗ ﺔﻳﻔﻳﻛ
3
•
Page 32

ﻡﺩﺧﺗﺳﻣﻟﺍﻭ ﺏﻳﻛﺭﺗﻟﺍ ﻝﻳﻟﺩ
ﺕﺎﻳﻭﺗﺣﻣﻟﺍ
ﺔﻣﺩﻘﻣ .................................................................................................. 3
ﺕﺎﻁﺎﻳﺗﺣﺍ ﻟﺍﺔﻣﻼﺳ .................................................................................... 3
ﺏﻳﻛﺭﺗﻟﺍ ﻖﻳﻠﻌﺗﻟﺎﺑ ...................................................................................... 4
ﺏﻳﻛﺭﺗﻟﺍ )ﺔﻳﻭﻬﺗﻟﺍ ﺔﻳﻠﺧﺍﺩﻟﺍ( ........................................................................... 5
ﺏﻳﻛﺭﺗ ﺯﺍﺭﻁ ﺔﻧﺧﺩﻣﻟﺍ ﺡﺎﺑﺻﻣﺑ ...................................................................... 6
ﺔﻧﺎﻳﺻﻟﺍ ................................................................................................ 9
ﻑﺎﺷﻛﺗﺳﺍ ﻝﺎﻁﻋﻷﺍ ﺎﻬﺣﻼﺻﺇﻭ ..................................................................... 10
ﺔﻳﺎﻣﺣﻟﺍ ﺔﻳﺋﻳﺑﻟﺍ ....................................................................................... 10
2
Page 33

ﺔﻳﺑﺭﻌﻟﺍ ﺔﻐﻠﻟﺍ ﻡﺩﺧﺗﺳﻣﻟﺍﻭ ﺏﻳﻛﺭﺗﻟﺍ ﻝﻳﻟﺩ
CIDC 61/1 X
 Loading...