

Page 1

IT ISTRUZIONI DI INSTALLAZIONE E D'USO
CUCINE CON FORNO GAS
GB INTRUCTIONS FOR USE AND INSTALLATION
GAS COOKERS
CGG 650 J
CGG 650 SB CGG 650 SBX
CGG 660 A CGG 660 AX
CGG 660 SB CGG 660 SBX
CGG 660 S
93786434
1
Page 2

INDICE
Apertura imballo dell'apparecchio ............................................................. 3
Raccomandazioni...................................................................................... 3
Consigli di sicurezza ................................................................................. 4
• INSTALLAZIONE
Locale di installazione............................................................................... 5
Collegamento all'alimentazione................................................................. 5
Allacciamento............................................................................................ 6
Cambio di gas ........................................................................................... 7
Sostituzione degli iniettori ...................................................................... 7-8
Regolazione della fiamma
. del bruciatore del forno gas ............................................................... 8
Regolazione del minimo del bruciatore
. del bruciatore del piano di cottura...................................................... 9
. del bruciatore del forno gas ............................................................... 9
Collegamento elettrico ............................................................................ 10
• PRESENTAZIONE
Presentazione delle cucine ..................................................................... 11
• USO
IL PIANO COTTURA
I bruciatori a gas...................................................................................... 12
IL FORNO
Dotazione del forno ................................................................................. 13
Forno a gas con sicurezza
. accensione del forno gas ................................................................ 14
. il grill ................................................................................................ 15
. il girarrosto (opzionale).................................................................... 15
. il contaminuti sonoro ....................................................................... 15
Consigli di cottura .............................................................................. 16/17
MANUTENZIONE DELLA CUCINA
Il piano cottura......................................................................................... 18
Il forno ..................................................................................................... 18
• SCHEDA TECNICA ......................................................................... 20/21
2
Page 3
APERTURA IMBALLO DELL'APPARECCHIO
Una volta aperto l'imballo della cucina, troverete :
• un libretto d'istruzioni,
• un sacchettino contenente :
- nuovi iniettori per utilizzare la cucina con un tipo di gas differente da quello
predisposto all'origine. I nuovi iniettori permettono di adattare la cucina al Gas Butano
G 30 28-30 mbar o al Gas Propano G 31 37 mbar,
- una riduzione Gas naturale e una riduzione Gas butano o Propano con una
guarnizione per allacciamento con tubo di gomma,
- piedini regolabili per un perfetto livellamento dell'apparecchio.
RACCOMANDAZIONI
• Leggere attentamente le istruzioni incluse in questo libretto. Vi danno importanti
indicazioni sulla sicurezza d'installazione e d'impiego, per la manutenzione e la pulizia, ed
anche qualche consiglio per un ottimo utilizzo dell'apparecchio. Conservare con cura questo
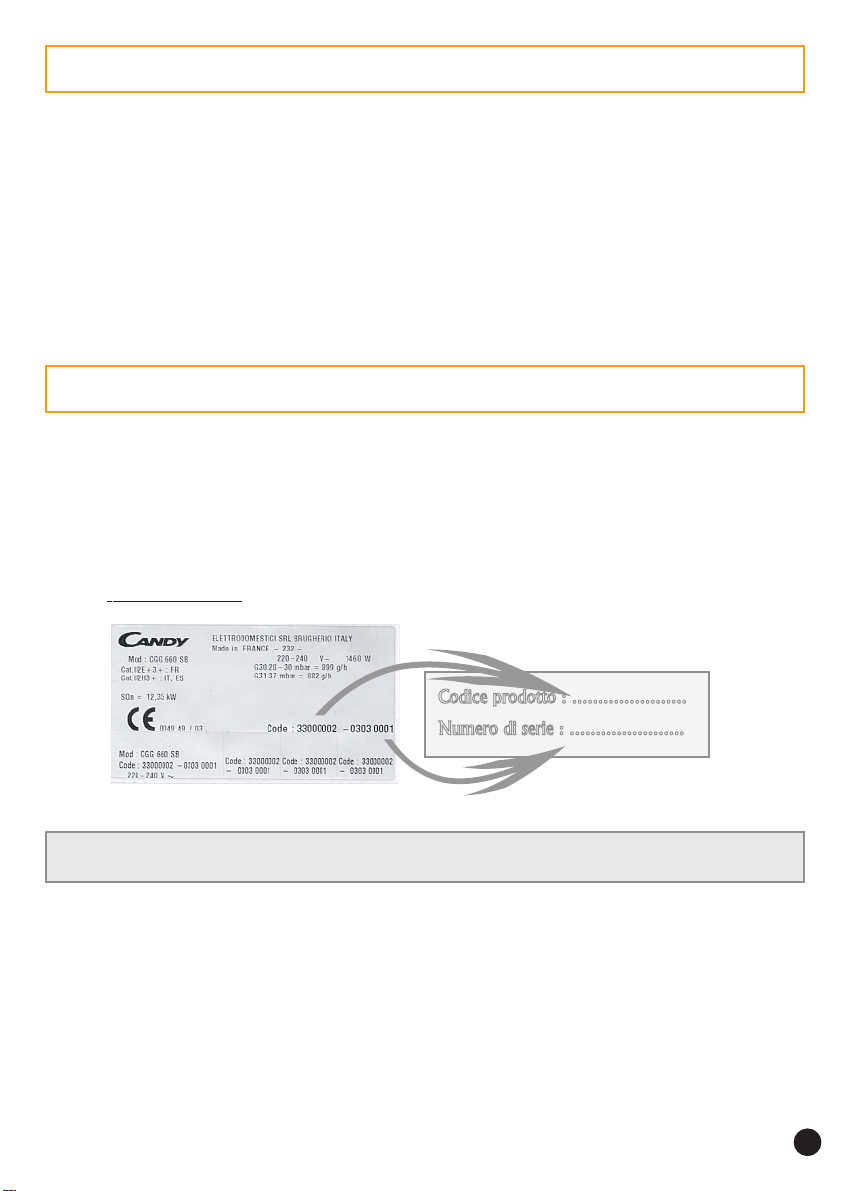
documento per ogni consultazione ulteriore ed annotare qui sotto, prima dell'installazione
della cucina, il numero di serie dell'apparecchio, nel caso di richiesta d'intervento del
servizio di assistenza.
.
Targa matricola (situata sulla traversa sotto il cassetto della cucina).
Il produttore declina ogni responsabilità nel caso di non rispetto delle istruzioni spiegate
nel presente libretto.
3
Page 4

CONSIGLI DI SICUREZZA
. L'installazione della cucina ed il collegamento gas ed elettrico dovranno essere effettuati
da un installatore qualificato.
. La cucina che avete appena acquistato possiede delle caratteristiche tecniche ben
definite e perció non potrete apportare modifiche.
. Tutte le p arti accessibili sono calde durante il funzionamento della cucina, tenere lont ano i
bambini.
. Dopo ogni utilizzo si raccomanda di pulire l'apparecchio, per evitare l'accumulo di sporcizie
e grassi. Questi infatti potrebbero originare fumi ed odori sgradevoli ad ogni uso successivo
dell'apparecchio.
. Non utilizzare mai macchine a vapore o ad alta pressione per la pulizia del forno.
. Se la cucina presentasse un qualsiasi difetto, staccatela dall'alimentazione generale e
chiamate direttamente un tecnico CANDY.
. Non mettere alcun prodotto da conservare o infiammabile nel cassetto della cucina.
. Non rivestire mai le pareti del forno con dell'alluminio. Si rischia di bruciare il foglio d'alluminio
e di danneggiare le pareti del forno.
. Non appoggiatevi e non lasciate che i bambini si siedano sulla porta del forno.
. Si consiglia di non utilizzare il forno ad alta temperatura per non rischiare di provocare
fumo e odori. É preferibile allungare il tempo di cottura e abbassare leggermente la
temperatura.
. Utilizzare gli appositi guanti da cucina, per introdurre od estrarre dal forno recipienti, cibi
ed accessori.
. I grassi di cottura o l'olio caldi provocano degli schizzi. Si consiglia di non allontanarsi
dall'apparecchio, poiché queste sostanze possono infiammarsi.
• Per un buon utilizzo del coperchio in cristallo del piano di cottura, prendere le seguenti
precauzioni:
. prima dell'uso del forno, il coperchio deve essere sempre aperto,
. É necessario eliminare tutti i residui causati da tracimazione dalla superficie del coperchio
prima di aprirlo.
. prima di chiudere il coperchio, attendere che tutte le parti dell'apparecchio si raffreddino.
. non lasciare appoggiati sul coperchio oggetti pesanti o metallici.
4
Page 5
INSTALLAZIONE
Il collegamento e la messa in funzione degli apparecchi elettrodomestici nel loro
ambiente è un'operazione delicata che, se non è effettuata corrett amente, può causare
delle conseguenze anche gravi per la sicurezza dei consumatori.
Per questo è importantissimo che l'operazione di collegamento venga svolta da un
professionista che dovrà attenersi alle norme tecniche in vigore.
Se nonostante questa raccomandazione il consumatore deciderà di realizzare
personalmente il collegamento, CANDY non sarà ritenuta responsabile per eventuali
incidenti tecnici sul prodotto, e neppure per eventuali incidenti a cose o persone.
• LOCALE DI INSTALLAZIONE
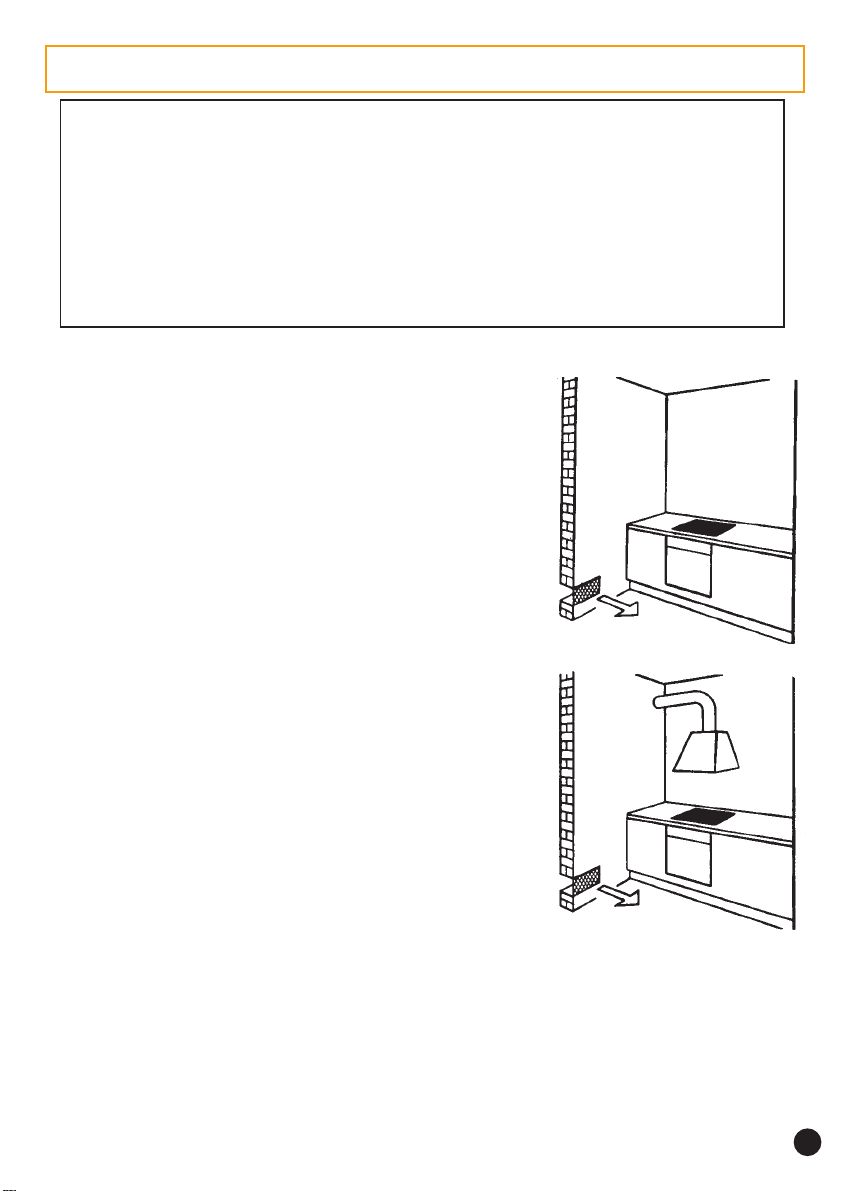
L'utilizzo di un apparecchio di cottura a gas produce
calore ed umidità nel locale in cui è installato. Vogliate
assicurare una buona aerazione del locale mantenendo
libere le aperture per la ventilazione naturale o
installando una cappa aspirante con condotto di
scarico (fig.1-2). Un utilizzo intensivo e prolungato
dell'apparecchio può richiedere un'aerazione
supplementare come per esempio l'apertura di una
finestra o un'aerazione piú efficace aumentando la
potenza di aspirazione meccanica se essa esiste. Nel
caso in cui l'apparecchio fosse sprovvisto di termocoppia
(dispositivo di sicurezza) la presa di ventilazione di fig.
1 dovrà essere di 200 cm² minimo.
In caso non sia possibile installare la cappa è necessario
l'impiego di un elettroventilatore applicato alla parete
esterna o alla finestra dell'ambiente purché esistano nel
locale le aperture per l'entrata di aria.
Questo elettroventilatore deve avere una portata tale
da garantire, per un ambiente cucina un ricambio orario
d'aria di 3-5 volte il suo volume. L'installatore deve
atternersi alle norme in vigore UNI-CIG 7129 e 7131.
• COLLEGAMENTO ALL'ALIMENT AZIONE
La cucina è isolata termicamente (secondo norma EN) e può essere installata vicino a pareti
che non superino in altezza il piano di lavoro se di tipo X (vedere riferimento al grado di
protezione nella tabella caratteristiche tecniche). La cucina può essere accostata ad altri
mobili purchè questi siano realizzati in materiale resistente ad una temperatura di 100°C.
Il collegamento dell'apparecchio alla tubazione o alla bombola del gas dovrà essere effettuato
come prescritto dalle Norme UNI-CIG 7129 e 7131, solo dopo essersi accertati che è regolato
per il tipo di gas con cui sarà alimentato. In caso contrario eseguire le operazioni indicate al
paragrafo "Sostituzione degli iniettori". Nel caso di alimentazione con gas liquido, da bombola,
utilizzare regolatori di pressione conformi alle Norme UNI-CIG 7432.
Fig. 1
Fig. 2
5
Page 6

INST ALLAZIONE : ALLACCIAMENT O
1) ALLACCIAMENTO CON TUBO DI GOMMA
Usare esclusivamente tubi conformi alle Norme UNI-CIG 7140. Alle estremità dei tubi di
gomma è necessario montare le apposite fasce stringitubo rispettando le Norme
UNI-CIG 7141. I tubi non devono essere sottoposti a sforzi di trazione o torsione e non
devono presentare curve eccessivamente strette o strozzature. Per il gas liquido eseguire il
collegamento alla bombola usando un apposito tubo di gomma calzato sulla riduzione per
GPL (contenuta nel sacchetto accessori) avvitata sul portagomma. Il tubo di gomma deve
essere accessibile per tutta la sua lunghezza.
La sua lunghezza non deve essere maggiore di 2 metri ed inoltre deve essere equipaggiato
di fascette di serraggio alle estremità. Il tubo deve essere disposto in modo da evitare il
contatto con le fiamme, con i gas di combustione, con le parti calde dell'apparecchio, con
liquidi o cibi caldi ed al sicuro dalla tracimazione di prodotti caldi.
Attenzione: l'allacciamento con il tubo in gomma non è ammesso per gli apparecchi
incorporati in modo fisso tra i mobili di cucina (installazione della cucina secondo le condizioni
della classe 2 sottoclasse 1).
2) ALLACCIAMENTO CON TUBO RIGIDO
L'allacciamento all'impianto del gas deve essere effettuato in modo da non provocare
sollecitazioni di alcun genere all'apparecchio. Sulla rampa di alimentazione dell'app arecchio
è presente un raccordo orientabile secondo le necessità.
3) ALLACCIAMENTO CON TUBO FLESSIBILE IN ACCIAIO
Noi vi consigliamo questo tipo di allacciamento. La messa in opera di questi tubi deve
essere effettuata in modo che la loro lunghezza, in condizioni di massima estensione, non
sia maggiore di 2 MT. Utilizzare esclusivamente tubi conformi alla Norma UNI-CIG 9891 e
guarnizioni di tenuta conformi alla Norma UNI-CIG 9264.
Importante: ad installazione ultimata controllare la perfetta tenuta di tutti i raccordi
utilizzando una soluzione saponosa e mai una fiamma. Assicurarsi inoltre che il tubo flessibile
non possa essere a contatto con una parte mobile del modulo da incasso (es. cassetto) e
che non sia situato in luoghi dove possa essere danneggiato o schiacciato.
6
Page 7
INSTALLAZIONE : CAMBIO DI GAS
saG 02G 52G03G13GodroccaR
enoisserP
AILATITI+3H2II
rabm02 rabm52rabm92rabm73
¤ ¤ XX ¤
¤ Regolazione d'origine : Gas Natural = G20-20 mbar/G25-25 mbar
XRegolazione possibile secondo l'installazione, Gas Butano G30-29 mbar o Gas Propano
G 31-37 mbar
CAMBIO DI GAS : gli apparecchi vengono regolati dalla casa produttrice per il
funzionamento con il tipo di gas indicato sull'imballo e riportato sull'etichetta applicata
sull'apparecchio.
In caso di funzionamento con un altro tipo di gas, è necessario adattare l'apparecchio.
Si devono pertanto sostituire gli iniettori di tutti bruciatori, correggere l'intensità della fiamma
del bruciatore del forno agendo sulla regolazione della portata d'aria, e regolare il minimo
agendo sulla vite del by-pass di tutti bruciatori.
SOSTITUZIONE DEGLI INIETTORI
Ogni iniettore è identificato da un numero di riconoscimento.
1-822
IROTAICURB
oirailisuaodipar-imesodiparodipar-artluodipar-artlu
saGrabm.nIWk.nIWk.nIWk.nIWk.nIWk.nIWk
* 02G 02 67 00,1 101 57,1 811 05,2 931 02,3 441 05,3 041 06,3
* 52G 52 67 09,0 101 06,1 811 03,2 931 00,3 441 02,3 041 04,3
03G920500,16657,10805,22902,34905,35906,3
13G730500,16657,10805,22902,34905,35906,3
erotaicurbledaznetop=Wk-erotteinIoremuN=.nI
* rabm52-52G-rabm02-02G:enigiro'denoizalogeR
erotaicurB
onrof
7
Page 8
INSTALLAZIONE : CAMBIO DI GAS
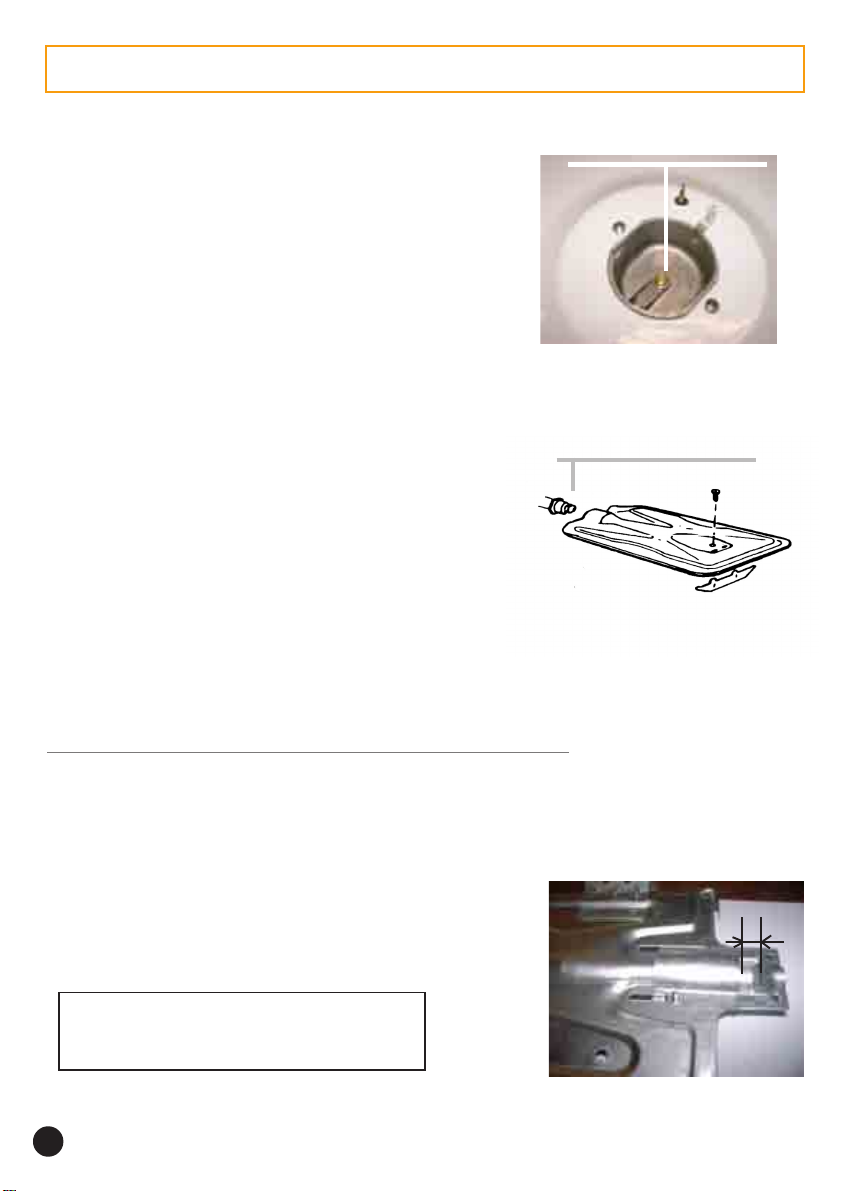
Iniettore dei bruciatori del piano
Per accedere agli iniettori, eseguire nell'ordine le
INIETTORE DEL BRUCIATORE
seguenti operazioni:
. sollevare il coperchio della cucina,
. asportare la griglia, lo spartifiamma ed il corpo del
bruciatore,
. introdurre una chiave per tubazioni (7) dentro il corpo
del bruciatore,
. svitare l'iniettore e sostituirlo con quello adatto al tipo
di gas disponibile.
I numeri marcati sugli iniettori sono indicati nella tabella
di pagina 7. Il rimontaggio si effettua ripetendo
l'operazione all'inverso.
Iniettore del forno gas
INIETTORE DEL BRUCIATORE
Il bruciatore forno è fissato posteriormente sul supporto
dell'iniettore. Anteriormente poggia su di un supporto
dotato di due incastri. Una vite centrale lo fissa al
supporto anteriore del forno.
Per smontare questo bruciatore:
. togliere la piastra di fondo del forno,
. dopo aver tolto la vite centrale, sollevare leggermente
la parte anteriore del bruciatore per liberarlo dai due
supporti,
. tirare il bruciatore in avanti per liberarlo dal supporto dell'iniettore,
. togliere l'iniettore e sostituirlo con quello adatto al gas da utilizzare.
Il rimontaggio si effettua ripetendo l'operazione all'inverso.
DEL PIANO
DEL FORNO
REGOLAZIONE DELLA FIAMMA DEL BRUCIATORE FORNO
La regolazione della portata d'aria é molto importante perchè permette di ottenere una
combustione corretta ed un rendimento ottimale del bruciatore. La tabella indica la quota "X"
in mm. Può risultare necessario affinare questa regolazione in un tratto di più o meno 1 mm
per ottenere una fiamma perfetta.
• Per accedere al regolatore della portata d'aria del forno si devono
compiere le seguenti operazioni:
. smontare il bruciatore, come descritto nel paragrafo
Bruciatore del forno
precedente (sostituzione degli iniettori - iniettore del
forno gas);
. allentare la vite di serraggio del regolatore d'aria;
Gas naturale : apertura 4,5 mm
Gas butano : apertura 5 mm
Gas propano : apertura 1 mm
Quota "X"
in mm
. riavvitare a fondo la vite del regolatore;
. rimontare il bruciatore all'interno del forno. Il rimontaggio si effettua ripetendo l'operazione
all'inverso.
8
Page 9
INSTALLAZIONE : MESSA A PUNTO
REGOLAZIONE DEL MINIMO DEL BRUCIATORE
Se la modifica del gas naturale è stata effettuata, la stabilità della fiamma in posizione di
minimo deve essere verificata ed aggiustata mediante la regolazione della vite del by-pass
di ciascun bruciatore, piano e forno.
1. Il piano di cottura: per accedere al by-pass dei bruciatori del piano cottura estrarre le
manopole. Tirare pertanto il dischetto in avanti e poi estrarre l'insieme dischetto-manopola.
Agire come segue:
a) gas naturale (metano):
. svitare la vite del by-pass di un giro,
. riposizionare l'insieme dischetto-manopola, accendere il bruciatore, posizionare la manopola
in posizione "minimo".
. estrarre di nuovo l'insieme dischetto-manopola, ed avvitare la vite del by-pass sino ad
avere una fiamma ridotta e stabile quando si ruota la manopola dalla posizione "massimo"
alla posizione "minimo".
b) butano- propano: la regolazione si ottiene avvitando fino a fondo la vite del by-pass il cui
orifizio calibrato assicura il flusso ridotto.
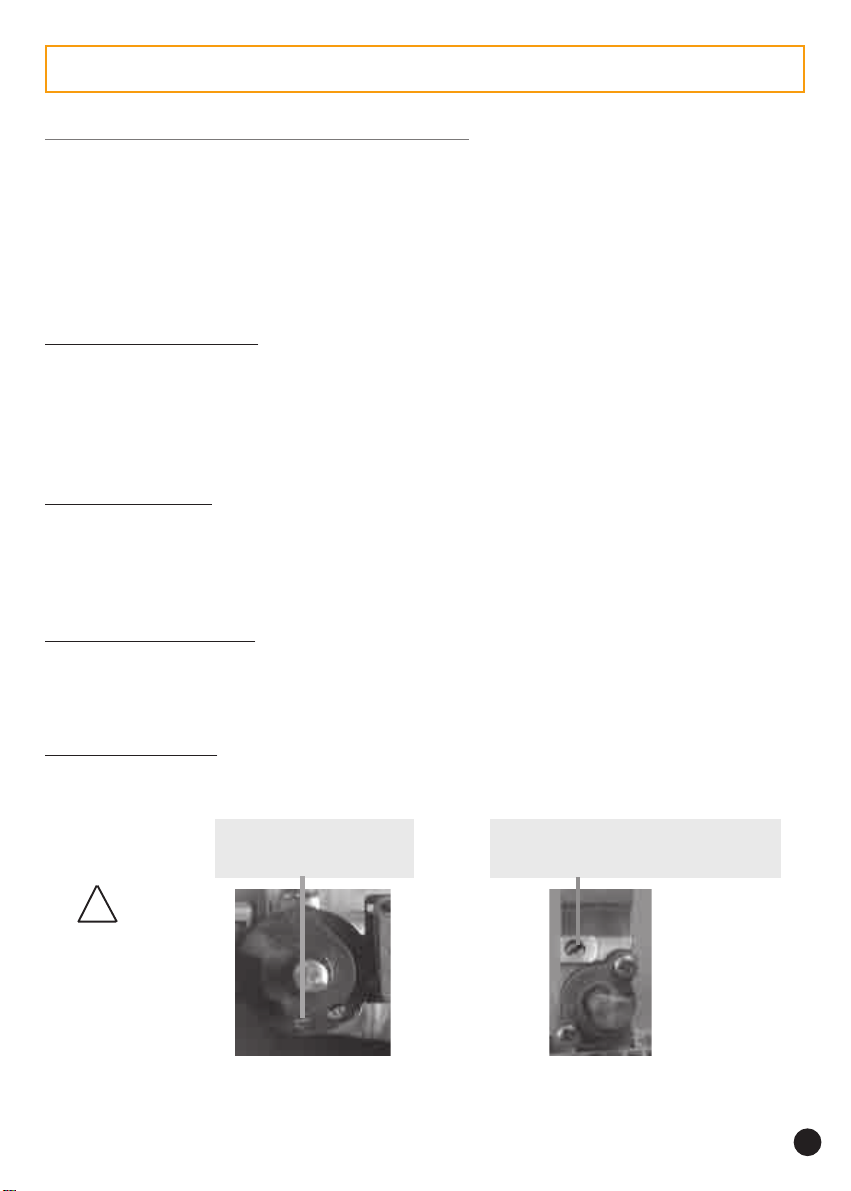
2. Il forno gas: per accedere al by-pass del forno, bisogna estrarre l'insieme dischettomanopola del forno. In seguito, regolare il by-pass, agendo sulla vite situata nella parte
anteriore del termostato con un cacciavite.
a) gas naturale (metano): per verificare se la regolazione del by-pass è corretta, comportarsi
nel modo seguente : accendendo il forno con la manopola sulla posizione "massimo" si
deve ottenere una fiamma bassa (2 mm) che resta stabile se si passa dalla posizione
"massimo" alla posizione "minimo".
Attenzione : un'erogazione del by-pass troppo forte neutralizza l'azione del termostato.
b) butano - propano: avvitare la vite a fondo senza bloccarla.
!
Non svitare mai
le altre viti !
Vite del by-pass Vite del by-pass
bruciatore forno bruciatore del piano cottura
9
Page 10

COLLEGAMENTO ELETTRICO
L'installazione di questo apparecchio deve essere effettuata in conformità alle Norme vigenti.
CANDY , in qualità di casa costruttrice, declina ogni responsabilità in caso di mancato rispetto
delle suddette norme.
Importante: la casa costruttrice resta sollevata da ogni responsabilità per eventuali danni
a persone o cose, derivanti sia da una errata regolazione dei bruciatori a gas, che dal mancato
allacciamento della linea di terra. Quando la cucina è collegata alle rete elettrica, alcune
parti sono sotto tensione.
Le cucine sono conformi ai requisiti di sicurezza previsti dalle norme e deve essere munita
di spina tripolare con polo di terra che assicura la completa messa a terra.
L'efficacia della sicurezza è comunque subordinata anche alla corretta messa a terra del
vostro impianto. Pertanto, prima di alimentare elettricamente la cucina accertarsi che la
presa abbia un corretto collegamento di messa a terra e che la portata amperometrica del
contatore elettrico risulti idonea per l'assorbimento indicato dai dati di targa dell'apparecchio.
NOT A: non dimenticate che l'app arecchio potrebbe aver bisogno di manutenzione da p arte
dell'assistenza tecnica. Ponete quindi la presa di corrente in una posizione facilmente
accessibile.
Questo apparecchio é venduto provvisto di cordone di alimentazione senza
presa di corrente e deve essere utilizzato esclusivamente con una tensione di
220-240 V monofase.
• Allacciarlo ad una presa di corrente da 10/16 Ampere.
Attenzione: nel caso si desideri realizzare una connessione fissa alla rete, si dovrà
interporre, tra l'apparecchio e la rete, un dispositivo omnipolare di interruzione con distanza
dei contatti di almeno 3 mm. Il cavo di terra non deve essere interrotto dall'interruttore.
FAR VERIFICARE L'EFFICIENZA DELL'IMPIANTO DI MESSA A TERRA.
La sostituzione del cordone di alimentazione deve essere effettuata dal servizio di assistenza
tecnica o da personale altamente qualificato, in conformità alle caratteristiche d'origine.
Prima di effettuare qualsiasi operazione di smontaggio, si deve staccare la spina dalla
presa di corrente o togliere corrente a mezzo dell'interruttore generale dell'impianto elettrico.
10
Page 11
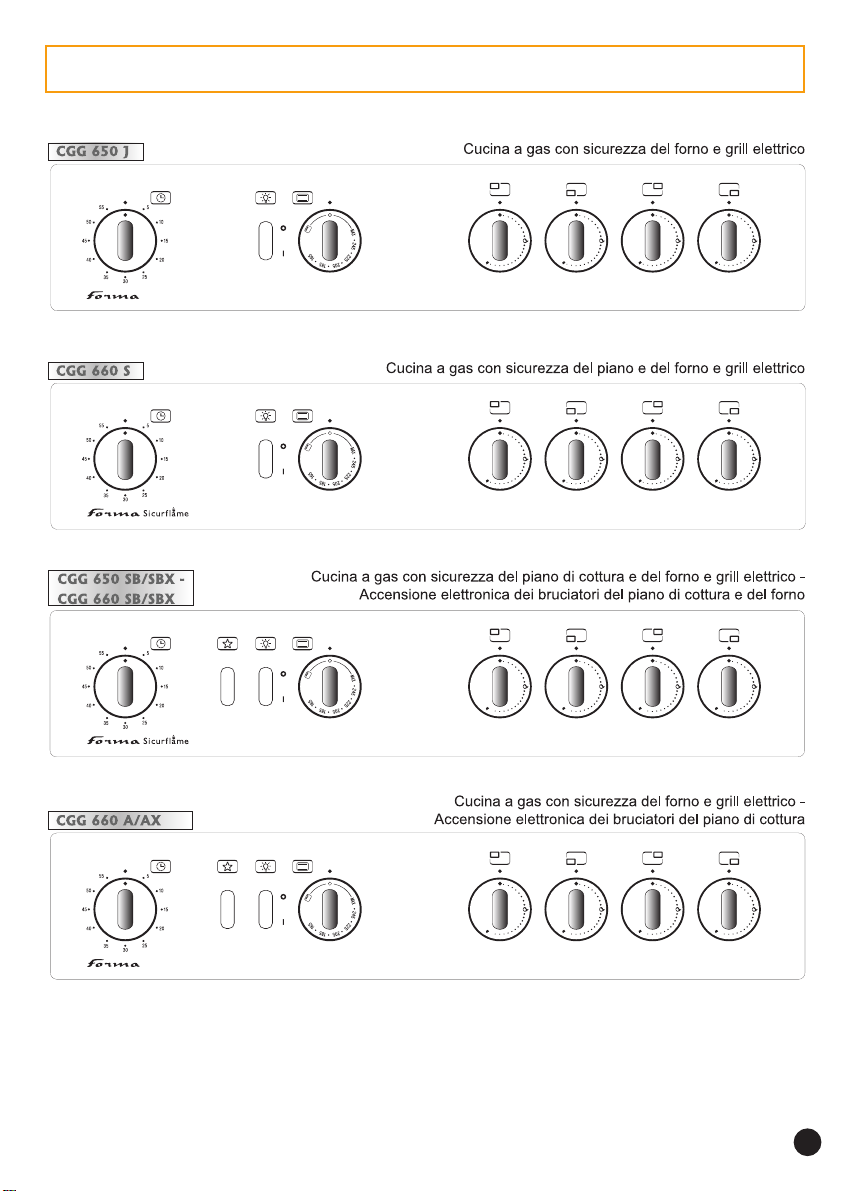
LE CUCINE CANDY CON FORNO A GAS
11
Page 12
PIANO DI COTTURA A GAS
ACCENSIONE :
. Aprire il rubinetto di alimentazione generale,
. Un simbolo accanto a ciascuna manopola permette di identificare il bruciatore comandato.
Piano di cottura senza accensione elettronica:
. Premere e girare la manopola verso sinistra sino al simbolo della grande fiamma
ed avvicinare una fiamma al bruciatore.
Piano di cottura con accensione elettronica:
. Premere e girare la manopola verso sinistra sino al simbolo della grande fiamma
e premere il tasto per l'accensione dei bruciatori.
Piano di cottura con accensione elettronica e con termocoppia di sicurezza:
La termocoppia di sicurezza rapida è un dispositivo che blocca automaticamente
l'afflusso del gas in caso di spegnimento accidentale della fiamma.
. Premere e girare la manopola verso sinistra sino al simbolo della grande fiamma
e premere il tasto per l'accensione dei bruciatori.
. Mantenere la manopola premuta a fondo per un tempo di circa 5-6 secondi.
Trascorso tale tempo, che dà la possibilità al dispositivo di sicurezza di inserirsi, la
fiamma risulterà permanente.
Ogni bruciatore ha una regolazione progressiva che permette una maggiore flessibilità di
regolazione tra il minimo e il massimo ed una facilità d'adattare la fiamma del bruciatore in
funzione del diametro delle pentole.
. Regolare la fiamma sulla posizione scelta per la cottura tenendo conto del diametro della
pentola.
Raccomandazione importante:
. Quando i bruciatori non sono in servizio, il rubinetto di alimentazione generale deve essere
sempre chiuso.
. Non chiudere il coperchio del piano quando i bruciatori sono ancora caldi.
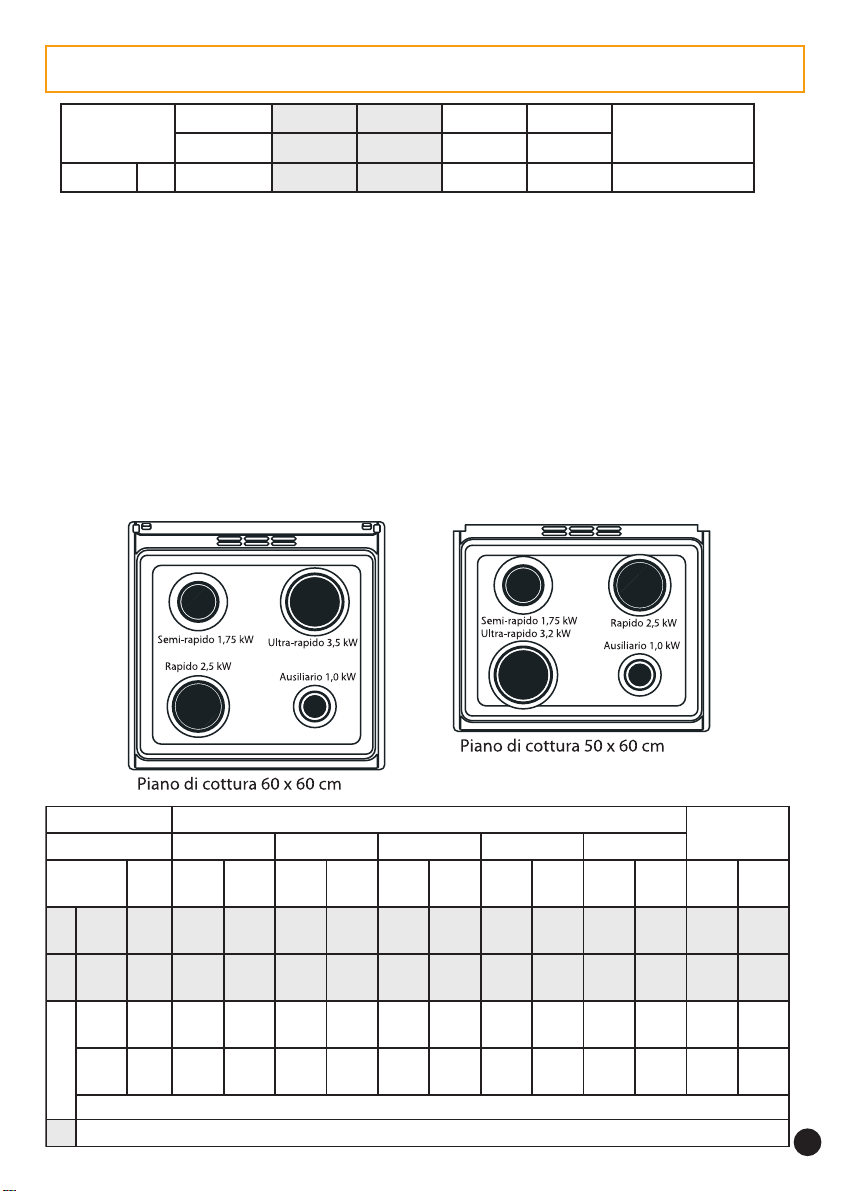
I BRUCIATORI: Il piano di cottura è dotato di bruciatori di dimensioni e portata dif ferenti. E'
necessario quindi trarre vantaggio dalle differenze di potenza che ne risultano.
CONSIGLI PER L'USO CORRETTO DEL PIANO DI COTTURA
• Utilizzare i bruciatori più potenti per portare a ebollizione liquidi, per carne ai ferri e, in
generale, per tutti gli alimenti che devono cuocere rapidamente.
• Utilizzare i bruciatori di potenza intermedia per i sughi e per cotture a fuoco lento.
• Utilizzare i bruciatori piccoli per le pentole piú piccole.
• Evitare le bolliture troppo intense. La bollitura violenta non cuoce più in fretta e peggiora il
gusto degli alimenti. Quando si è giunti all'ebollizione si consiglia pertanto di ridurre la fiamma
al minimo.
• Evitare le pentole con fondo curvo o deformato.
• La fiamma non deve superare i bordi del recipiente. In tale condizione infatti si spreca gas
inutilmente.
12
Page 13
DOTAZIONE DEL FORNO
• GLI ACCESSORI
Prima di utilizzare gli accessori del forno per la prima volta è necessario pulirli. Per questa
operazione si consiglia di utilizzare una spugna. Successivamente risciacquare ed asciugare
gli accessori.
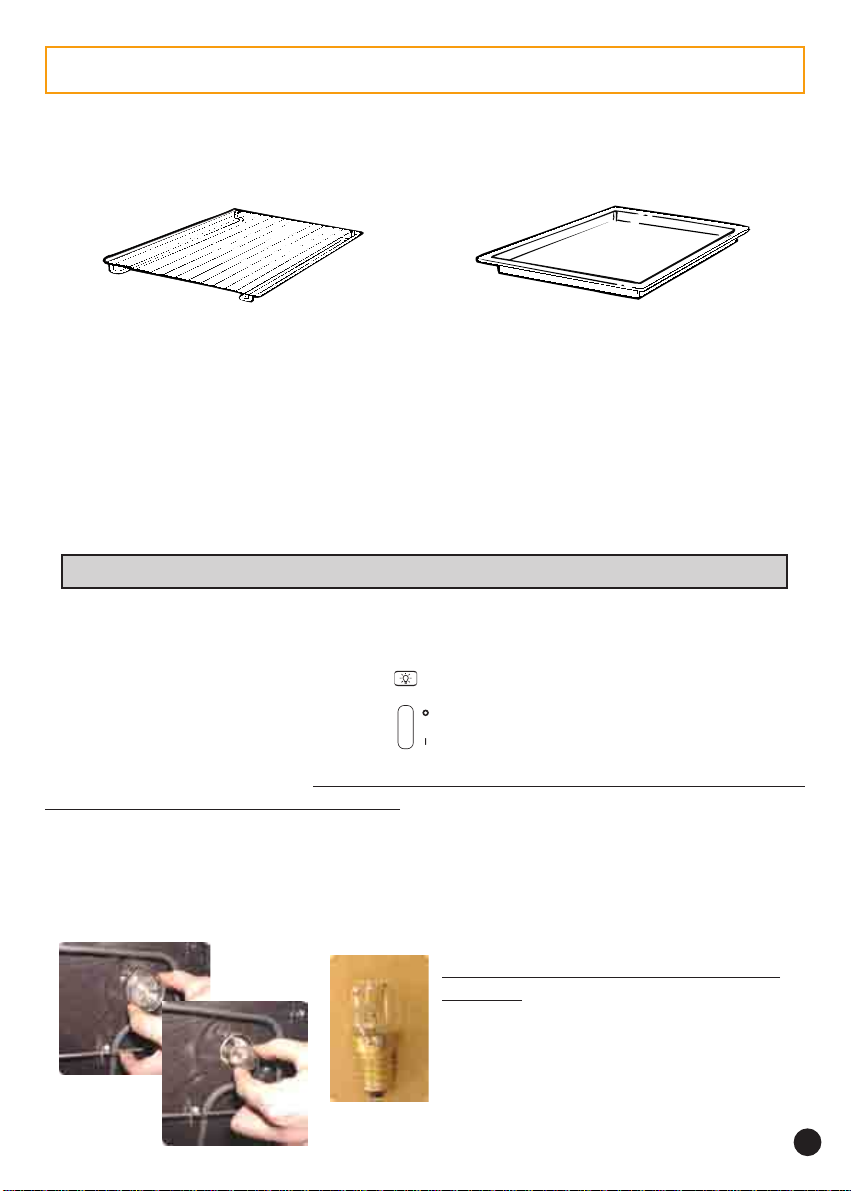
GRIGLIA LECCARDA
• LA GRIGLIA: serve da supporto per teglie, pirofile, stampi per i dolci. È inoltre
particolarmente indicata per le grigliate di carne, dato che è dotata di guide per sostenere
la leccarda che raccoglie i grassi che colano.
Grazie al suo profilo speciale, la griglia resta sempre in orizzontale, anche quando viene
estratta verso l'esterno. Non c'è nessun rischio quindi che i tegami scivolino o si ribaltino.
• LA LECCARDA: serve a raccogliere i grassi che colano durante la cottura con il grill.
Può essere inserita nelle apposite guide della griglia o, ancora, posta sul fondo del forno.
Non usare mai la leccarda per cuocere gli arrosti perché risulterebbe un eccessivo sviluppo
di fumo, vapori e il forno si sporcherebbe inutilmente.
Gli accessori devono essere tolti dal forno se non vengono utilizzati.
• LA LAMPADINA FORNO permette di controllare la cottura senza dovere aprire la porta del
forno.
• Premere il tasto della lampadina forno .
Ø
Sostituzione della lampadina:
di pulizia o di sostituzione della lampadina. Attendere il raffreddamento delle parti calde.
La lampadina e il bulbo protettivo sono realizzati con un materiale resistente alle alte
temperature.
Per la sostituzione della lampadina, è sufficiente smontare il bulbo in vetro, togliere la
lampadina, sostituirla con una lampadina identica e riavvitare il bulbo in vetro che serve
come protezione.
n
o
staccare la spina di alimentazione prima di ogni operazione
Caratteristiche tecniche della lampadina
del forno:
- 220-240V - attacco E 14 -
- 15 W - Temperatura 300°C
13
Page 14
IL FORNO A GAS CON SICUREZZA
• ACCENSIONE DEL BRUCIATORE A GAS DEL FORNO
Il coperchio del piano di cottura deve essere sempre aperto prima dell'uso del forno.
La cucina è per sua natura un apparecchio che diventa caldo, in modo particolare in
corrispondenza della porta. È buona norma quindi impedire che i bambini possano avvicinarsi
al forno quando è in funzione.
Alla prima accensione del forno può svilupparsi del fumo di odore acre, causato dal primo
riscaldamento del collante dei pannelli d'isolamento avvolgenti il forno. Si tratta di un fenomeno
assolutamente normale e, in caso si verificasse, occorre attendere la cessazione del fumo
prima di utilizzare il forno per cucinare.
Il bruciatore del forno è munito di un dispositivo di sicurezza controllato da una termocoppia
che blocca automaticamente l'afflusso del gas in caso di spegnimento accidentale della
fiamma.
Per accendere il forno compiere le seguenti operazioni:
- Aprire il rubinetto di alimentazione gas,
- Aprire la porta del forno,
- Premere e ruotare la manopola del forno verso sinistra su una temperatura qualsiasi.
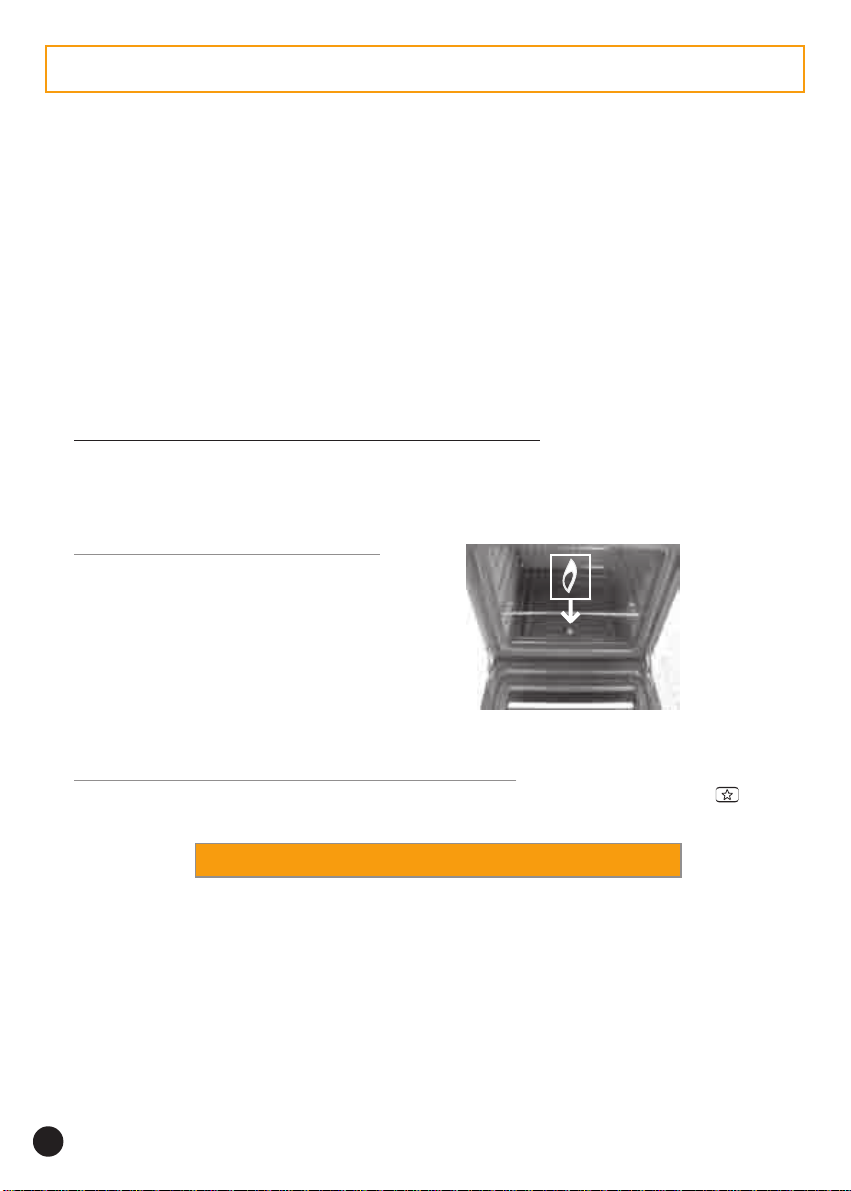
Forno senza accensione automatica
- Mantenere premuta la manopola e
contemporaneamente avvicinare una
fiamma al foro centrale situato nelle
parte anteriore.
Forno con accensione automatica del bruciatore gas
- Mantenere premuta la manopola e contemporaneamente premere il tasto per
l'accensione della fiamma del bruciatore forno.
ASSICURA TEVI DELLA CORRETTA ACCENSIONE.
- Mantenere la manopola premuta a fondo per un tempo di circa 5-6 secondi. T rascorso
tale tempo, che dà la possibilità al dispositivo di sicurezza di inserirsi, la fiamma risulterà
permanente.
- Regolare la manopola del forno sulla temperatura scelta.
- Per arrestare il funzionamento del forno a gas, ritornare la manopola alla posizione di
arresto.
Nota: Evitare di chiudere la porta in modo brusco perchè si rischierebbe di spegnere la
fiamma del forno.
14
Page 15

IL FORNO A GAS CON SICUREZZA
• IL GRILL ELETTRICO
Il grill utilizza unicamente la resistenza superiore del forno. Ideale per la carne alla griglia, gli
spiedini e le verdure gratinate. È necessario un preriscaldamento di circa cinque minuti per
portare la resistenza all'incandescenza.
Per il funzionamento del grill, ruotare la
manopola del forno sino alla posizione .
• IL GIRARROSTO
kit girarrosto.
Per la cottura con il girarrosto non si deve fare alcun preriscaldamento.
. Togliere dal forno gli accessori e porre la leccarda sul fondo,
. Infilare sullo spiedo la vivanda da cuocere centrandola tra le due forchette,
. Appoggiare lo spiedo sul supporto, infilare il tutto sul secondo livello del forno partendo dal
basso.
L'estremità dello spiedo si troverà a questo punto di fronte al foro quadrato dell'organo di
trascinamento.
. Inserire lo spiedo n
Per il funzionamento del girarrosto, ruotare
la manopola del forno sino alla posizione Grill .
TEMPI DI COTTURA CON IL FORNO GAS
Manzo (1 kg) 25/35 minuti
- E' fornito come opzione. E' possibile richiedere al proprio rivenditore il
el foro.
Agnello, montone (1 kg) 35/45 minuti
Vitello, pollame (1 kg) 65/75 minuti
Maiale (1 kg) 60/70 minuti
• IL CONTAMINUTI SONORO DA 0 A 60 MINUTI
Il contaminuti vi aiuterà a gestire il tempo durante la
preparazione delle vostre pietanze. Il funzionamento
è estremamente semplice: una suoneria vi avverte
quando il tempo programmato è terminato. Può essere
utilizzato non solo come promemoria per i tempi di
cottura, ma anche per altre esigenze casalinghe.
• Per selezionare il tempo prescelto, ruotare la
manopola di un giro completo, quindi ritornare con l'indice nella posizione corrispondente al tempo prescelto.
Allo scadere del tempo, entrerà in azione la suoneria
per alcuni secondi.
15
Page 16

CONSIGLI DI COTTURA COL FORNO A GAS
Sia le temperature che i tempi di cottura sono forniti a titolo di esempio, per semplificare la
conoscenza dell'apparecchio. L'esperienza personale permetterà in seguito di adattare le
regolazioni ai propri gusti ed abitudini.
CARNI
È preferibile salare le carni al termine della cottura perché il sale favorisce l'espulsione dei
grassi, quindi aumenta il grado di sporco all'interno del forno e la produzione di fumo.
Gli arrosti di carne bianca come vitello, agnello, maiale e pesce, possono essere inseriti nel
forno freddo. La cottura è più lunga che col forno preriscaldato, ma la propagazione del
calore verso il centro degli alimenti è più graduale dando migliori risultati di cottura.
Un adeguato preriscaldamento del forno garantisce buoni risultati di cottura delle carni rosse.
PER LE GRIGLIA TE
Togliere la carne dal frigorifero qualche ora prima di cuocerla. Si consiglia di posarla su dei
fogli di carta assorbente, in questo modo risulterà più tenera, saporita e non rischierà di
restare fredda all'interno. Aggiungere il pepe e le spezie prima di grigliare, non salare prima
della fine della cottura altrimenti la carne sarà meno tenera e gustosa.
Spenellare con cura tutte le parti con dell'olio di oliva, meglio se con un pennellino largo e
piatto.
Insaporire con pepe ed aromi.
Non perforare mai gli alimenti durante la cottura, nemmeno per girarli, altrimenti tutti i grassi
liquefatti coleranno e le carni risulteranno secche.
Le carni devono essere girate a metà cottura tranne che nella cottura con il girarrosto.
Attenzione: non cuocere ad una temperatura troppo elevata. In questo caso c'è il rischio
che si produca del fumo all'interno del forno. Nel caso ciò accada basterà abbassare la
temperatura.
PER LA P ASTICCERIA
Evitare di utilizzare degli stampi lucidi perchè questi riflettono il calore e possono bruciare
l'esterno del dolce. Se la doratura del dolce fosse troppo rapida, ricoprirlo con un foglio di
carta da forno o di alluminio.
Attenzione: usare il foglio d'alluminio dalla parte giusta, la parte lucida deve essere rivolta
verso il dolce altrimenti il calore sarà riflesso e non penetrerà all'interno dell'alimento.
Evitare di aprire la porta del forno durante i primi 20-25 min. di cottura altrimenti tutti i dolci
che richiedono una lievitazione durante la cottura come soufflés, brioches, etc. si sgonfieranno
immediatamente.
Per controllare la cottura, pungere il centro con una lama di coltello o la punta di uno spiedino,
se questo lo si riestrarrà pulito allora il dolce è cotto ed è possibile arrestare la cottura, nel
caso la lama rimanga umida, o con dei residui di pasta, continuare la cottura abbassando
leggermente la temperatura per evitare che il dolce si bruci esternamente.
16
Page 17

CONSIGLI DI COTTURA COL FORNO A GAS
eznateiPàtitnauQ
oiccuLgk1012itunim021
alogipS8052itunim511
otalasélffuoS
mc12Øapmats
eniarroLehciuQ
mc82Øapmats
ollengaidottoicsoCgk2042
otsorraolloP005gk1032
oznamidotsorrA
elaiamidotsorrAgk2032/02254h11
artanA005gk2012/00253h11
etanitargenihccuZenosrep4012lirglanim5+nim031
ineipirirodomoP
enosrep6/4002/091
enosrep6022/012
-gk1
002gk1
aidemid21
azzednarg
enoizisoP
otatsomret
052
042
aruttocidopmeT
nim5otnemadlacsirerp
aruttocidnim54+
nim5otnemadlacsirerp
aruttocidnim54+
nim5otnemadlacsirerp
aruttocidnim55+
nim5otnemadlacsirerp
aruttocidnim56+
nim5otnemadlacsirerp
aruttocidnim03+
nim5otnemadlacsirerp
aruttocidnim03+
onaipiR
enoizudortni'd
ailgirgalled
ossablad
2
1
1
1
1
1
ittocsiB
ekaCmulP
)orrefidopmatsni(
atinraugatroT
tnev-ua-loV21Øizzep4022/012
gniddupdaerB
onroflaeleM
ittocsib9
7Ø
005gk1002/091
Ø.srep6
03
21
inimaget
itturf61
aidemid
azzednarg
022/012
022/012itunim54/041
022/012
012
nim5otnemadlacsirerp
aruttocidnim01+
nim5otnemadlacsirerp
aruttocidnim09+
nim5otnemadlacsirerp
aruttocidnim02+
airamongaba
nim5otnemadlacsirerp
aruttocidnim52+
nim5otnemadlacsirerp
aruttocidnim54+
3
2
3
1
2
17
Page 18

MANUTENZIONE DELLA CUCINA
Prima di intraprendere qualsiasi operazione di pulizia manuale, attendere che l'apparecchio
si sia raffreddato.
Non usare mai i prodotti abrasivi, pagliette metalliche o oggetti taglienti che potrebbero
dannegiare lo smalto.
Usare semplicemente acqua saponota o prodotti a base di ammoniaca.
LE PAR TI IN ACCIAIO INOX: pulire le superficie in acciaio inox con acqua tiepida e sapone,
oppure con appositi prodotti in commercio, evitando assolutamente l'uso di polveri abrasive
che danneggerebbero le superfici e le parti estetiche.
• IL PIANO DI COTTURA
LE P ARTI SMALT A TE: non utilizzare mai prodotti abrasivi, spugne metalliche o oggetti affilati.
Lo smalto ne risulterebbe irrimediabilmente rovinato. Pulire semplicemente con acqua e
sapone quando l'apparecchio si è raffreddato ed asciugare con uno strofinaccio pulito ed
asciutto. Se si pulisce lo smalto a caldo, si rischia di farlo diventare opaco.
I BRUCIATORI GAS: per la pulizia, utilizzare acqua e sapone. Evitare accuratamente che
dell'acqua si infiltri all'interno dei bruciatori. Per rimuovere lo sporco più difficile, utilizzare
una piccola quantità di detersivo non abrasivo con una spugna e risciacquare.
Gli spartifiamma dei bruciatori sono semplicemente appoggiati. Dovrete solamente toglierli
e pulirli con una spugna umida e leggermente insaponata. Non metterli direttamente nell'acqua
fredda subito dopo averli utilizzati, per evitare che lo sbalzo termico provochi la rottura dello
smalto. L'utilizzazione di prodotti abrasivi è assolutamente da evitare perché corrodono lo
smalto e lo rendono opaco. Se i fori dovessero risultare ostruiti utilizzare una spazzola con
acqua e sapone ed asciugare con un panno pulito.
IL COPERCHIO: pulire semplicemente con acqua e sapone quando l'apparecchio si è
raffreddato ed asciugare con uno strofinaccio pulito ed asciutto. È necessario eliminare tutti
i residui causati da tracimazione dalla superficie del coperchio prima di aprirlo.
• IL FORNO
LA PORTA DEL FORNO: la pulizia della porta puó essere effettuata direttamente
sull'apparecchio o dopo averla smontata. Per smontare la porta procedere come segue :
. aprire completamente la porta,
. la cerniera si presenta come nella foto 1,
. alzare i gancetti delle cerniere (foto 2),
. tirare la porta verso l'alto, richiudendola parzialmente fino a che non si sganci.
Foto 1 : posizione iniziale
18
Foto 2 : alzare i ganci
Page 19

MANUTENZIONE DELLA CUCINA
Per rimontare la porta, prestare attenzione a riposizionare bene le cerniere: una tacca
posta sotto queste ultime vi permetterrà di posizionare correttamente le cerniere.
Il fissaggio definitivo si effettua riposizionando i gancetti delle cerniere nella loro posizione
iniziale, come nella foto 1.
LE PARTI IN VETRO: si consiglia di asciugare il vetro interno della porta forno con della
carta assorbente ogni volta che viene utilizzato il forno. Se lo sporco è molto, successivamente
usare una spugna inumidita con del detergente. Non usare mai prodotti abrasivi o oggetti
taglienti.
LE GRIGLIE: pulire con una spugna imbevuta d'acqua saponata. Risciacquare ed asciugare.
Non usare prodotti abrasivi.
LA LECCARDA: dopo aver grigliato, estrarre la leccarda dal forno. Abbiate cura di svuotarla
in un recipiente a parte, lavare e risciacquare con dell'acqua calda e una spugna imbevuta
di detersivo. Lasciarla a riposo con uno strato d'acqua e detergente per ammorbidire le
incrostazioni. Puó anche essere lavata in lavastoviglie o con prodotti reperibili in commercio.
Non lasciare mai la leccarda sporca all'interno del forno.
IL CASSETTO: non mettere alcun prodotto da conservare o infiammabile nel cassetto.
Esso deve essere utilizzato solo per stipare pentole, gli accessori del forno ed altri oggetti
resistenti al calore. Per la pulizia è sufficiente un colpo di spugna.
IL FORNO:
. Non usare mai per pulire il forno prodotti abrasivi, pagliette metalliche o oggetti taglienti
che potrebbero danneggiare lo smalto.
. Usare semplicemente acqua saponata o prodotti a base di ammoniaca.
. Non bisogna mai rivestire le pareti e soprattutto il fondo del forno con la carta di alluminio,
l'azione del calore concentrato potrebbe danneggiare lo smalto.
In caso di grandi macchie di sporco, utilizzare i prodotti in commercio per la manutenzione
dei forni.
19
Page 20

SCHEDA TECNICA
Tutte le caratteristiche sono fornite a titolo indicativo. Dati i continui miglioramenti
qualitativi dei suoi prodotti, CANDY potrà apportare delle modifiche ai suoi apparecchi
legate all'evoluzione tecnica nel rispetto delle norme vigenti.
Dichiarazione di conformità. Questa apparecchiatura, nelle parti destinate a venire a
contatto con sostanze alimentari, è conforme alla prescrizione della dir. CEE 89/109 e al
D.L. di attuazione n°108 del 25.01.92.
Apparecchio conforme alla direttiva 89/336/CEE, 73/23/CEE,
90/396/CEE É successive modifiche.
GGC
J056
enoizetorpidodarG6-2-53306NEodnocesXopiT 6-2-53306NEodnocesXopiT
airogetaCII.taC
oihccerappa'lledessalC1essalC)1-1-03NE(1essalcottos2essalC
ocirtteleotnemagelloC~V042-022~V042-022
inoisnemiD
oihccerappa'lled
otrepaoihcrepocazzetlAmc631-531mc341-241
aruttocidonaiP sagedirotaicurb4 sagedirotaicurb4
ortsederoiretnaWk00,1oirailisuaWk00,1oirailisua
ortsiniseroiretnaWk02,3odipar-artluWk05,2odipar
ortsederoiretsopWk05,2odiparWk05,3odipar-artlu
ortsiniseroiretsopWk57,1odipar-imesWk57,1odipar-imes
GGC
XBS056-BS056
TI:II.taC
+3H2
x15àtidnoforPx5,95azzehgraL
)mc(5,58azzetlA
GGC
XA066-A066
GGC
S066
TI:
+3H2
GGC
XBS066-BS066
x5,85àtidnoforPx5,95azzehgraL
)mc(5,58azzetlA
20
erotaicurbazzeruciSonrofonrof+onaiponrof
erotaicurbenoisneccAonrof+onaiponaiponrof+onaip
oronositunimatnoCisisisisis
+onaip
onrof
onrof+onaip
Page 21

SCHEDA TECNICA
GGC
MJ056-J056
onroF SAG SAG SAG SAG SAG
onrofledinoisnemiD
mcni
onrofledemuloVirtil05irtil05
ocitatsonrofaznetoPWk6,3Wk6,3
ocirttelellirgaznetoPWk44,1Wk44,1
sagelatotaznetoP
)nQS(
acirtteleelatotaznetoP W0641 W0641
sagonrofomusnoC
erenetnamrep
C°002iaro1
ilibasilitusagidopiT
enoizalogerodnoces
onatuBnQS
rabm03-8203G
onaporPnQS
rabm7313G
GGC
056-BS056
XBS
5,93àtidnoforPx5,24azzehgraL
03azzetlAX
Wk50,21 Wk53,21
JM58,4-Wk53,1JM58,4-Wk53,1
onaporP-onatuB-onateMsaGonaporP-onatuB-onatemsaG
h/g678h/g898
h/g168h/g288
GGC
XA066-A066
GGC
S066
03azzetlAx
GGC
066-BS066
XBS
5,93àtidnoforPx5,24azzehgraL
21
Page 22

CONTENTS
Unpacking the appliance......................................................................... 23
Recommendations .................................................................................. 23
Safety instructions................................................................................... 24
• INSTALLATION
Safety instructrions for installation .......................................................... 25
If modification of the factory gas setting,
Fitting the correct jets......................................................................... 26-27
Gas connection ....................................................................................... 28
If modification of the gas setting,
adjusting of the lower flame on the gas burners ..................................... 29
Electrical connection ............................................................................... 30
• PRESENTATION
Presentation of the control panel ............................................................ 31
• USE
THE HOB
The gas burners ...................................................................................... 32
THE OVEN
Oven equipment ...................................................................................... 33
Gas oven with safety device
. ignition ............................................................................................. 34
. the grill ............................................................................................. 35
. the rotisserie (in option) ................................................................... 35
. the timer/alarm ................................................................................. 35
. cooking tips................................................................................. 36/37
CLEANING AND MAINTENANCE OF THE COOKER
The hob ................................................................................................... 38
The oven ............................................................................................ 38/39
• TECHNICAL DATA .......................................................................... 40/41
22
Page 23

UNPACKING THE APPLIANCE
Inside the appliance, you will find :
• an instruction booklet,
• a bag containing :
- if you have to change the type of gas : new jets for the gas modifications,
Butane Gas G 30 28-30 mbar or Propane Gas G 31 37 mbar,
- for connection by soft rubber tube, an end piece for Natural Gas and an end piece
for Butane or Propane gas with a seal,
- adjustable feet for perfect levelling of the cooker on the floor.
RECOMMENDATIONS
• Read the instructions carefully to make the most of your appliance. We recommend you
keep the instructions for installation and use for later reference, and before installing
the cooker, note its serial number below in case you need to get help from the after sales
service.
.
Identification plate (located on the cross bar under the drawer of the cooker).
The company shall not be liable if the instructions provided in this document are not
complied with.
23
Page 24

SAFETY INSTRUCTIONS
. You should entrust the gas installation of your appliance and its electrical connection to an
approved installer or technician with similar qualifications.
. For safety reasons under no circumstances should any modifications be carried out to this
appliance.
• All the accessible p arts are hot when the cooker is in operation. Keep young children away
from the cooker when in use.
. After each use we recommend that some cleaning of the cooker is undert aken. This prevents
the accumulation of dirt and grease which gets re-cooked and burns, generating unpleasant
smells and smoke.
. Never use a steam or high pressure spray to clean the appliance.
. If your cooker shows even the smallest defect, do not connect it. Disconnect from the
power supply and immediately contact an approved CANDY service agent.
. Do not store flammable products in the cooker as they can catch fire if the cooker is
inadvertlantly switched on.
. Do not line the oven walls with aluminium foil or single-use oven protectors available
from some stores. Aluminium or any other protection, in direct contact with the hot enamel,
risks melting the enamel or causing deterioration to the inside.
. Do not lean on the oven doors or allow children to do so.
. In order to prevent excessive dirtying of your oven and the resulting strong smoky
smells, we recommend not using the oven at too high a temperature. It is better to extend
the cooking time and lower the temperature a little.
. Use oven gloves when placing or removing a dish from the oven.
. When cooking with fats or oils, always take care to watch the cooking process as heated
fats and oils can catch fire rapidly.
• The hob lid :
. while the cooker is in use, keep the lid in the upright position,
. before opening the lid, remove any items from it, to avoid any spillage,
. before closing the lid, let all the hot parts of the cooker cool down,
. do not store heavy or metallic objects on the lid.
24
Page 25

INSTALLATION
Installing a domestic appliance can be a complicated operation wich if not carried
out correctly, can seriously affect consumer safety.
It is for this reason that the task should be undertaken by a professionally qualified
person who will carry it out in accordance with the technical regulations in force.
In the event that this advice is ignored and the installation is carried out by an
unqualified person, CANDY declines all responsibility for any technical failure of
the product whether or not it results in damage to goods or injury to individuals.
• Before installing the appliance :
- Check the compatibility between the cooker and the gas installation.
The cooker is factory set for use with the gas type as stated on the packaging and repeated
on the rating plate affixed to the cooker.
Natural gas G 20-20 mbar / G 25-25 mbar : main gas
- If necessary, change the gas.
T o adapt the cooker fit suit able jets that provide the nominal flow rate and by adjusting the
air rings and the minimum flow of the burners on pages 26-27-28.
• For installation the technician must :
The cooker is Class 1 or Class2 - Sub class 1 ; furniture adjacent to the unit must not be
higher than the top of the cooker.
- The cooker has adjustable feet for perfect levelling on the floor.
- Do not remove the cooker spacers at the back.
- Make the gas connection to the installation according to the gas supply, page 28, by
connecting the gas supply pipe without forgetting to fit the seal.
- Connect the cooker electrically in compliance with the information given on page 30.
- If the gas type has been changed, adjust the minimum flow of each gas burner on page
29.
Any modification made to the gas setting should be noted on the rating plate
affixed to the cooker.
25
Page 26

INSTALLATION : CHANGING THE GAS
saG 02G 52G03G13GrotcennocsaG
noisserP
YLATITI+3H2II
rabm02 rabm52rabm92rabm73
¤ ¤ XX ¤
¤ Original setting : Natural gas = G20-20 mbar/G25-25 mbar
X Gas setting possible according to installation Butane gas G30-29 mbar or Propane gas
G 31-37 mbar
CHANGING THE GAS TYPE : the calorific capacity and pressure of the gas vary according
to the type of gas.
When changing the gas, you should successively : change the jets (hob and oven), correct
the flame apparance of the oven burner by adjusting the air ring and set the minimum flow of
all the gas burner tap (hob and oven).
CHANGING THE JETS - Each jet is identified with a mark.
1-822
SRENRUBBOH
yrailixuatsaf-imestsaftsaf-artlutsaf-artlu
saGrabmteJWkteJWkteJWkteJWkteJWkteJWk
* 02G 02 67 00,1 101 57,1 811 05,2 931 02,3 441 05,3 041 06,3
* 52G 52 67 09,0 101 06,1 811 03,2 931 00,3 441 02,3 041 04,3
03G920500,16657,10805,22902,34905,35906,3
13G730500,16657,10805,22902,34905,35906,3
renrubehtforewop=Wk
* rabm52-52G-rabm02-02G:gnitteslanigirO
26
nevO
renrub
Page 27

INSTALLATION : CHANGING THE GAS
Hob burner jets
To gain access to the jets :
. lift the hob lid,
. remove the top grills, caps and heads of all burners,
. use a tube spanner (7) inside the burner,
. according to the information given in the table, install
jets suitable for the burner type and gas type supplied.
For reinstallation, fit the heads, burner and top grills.
Oven burner jet
The flat burner is connected byt its neck to the jet support. At the front, it leans on a support which has two
grooves, a central screw fixes it to the oven bottom.
To remove this burner one must:
. take off the bottom plate of the oven,
. take off the central screw, lift gently the front part of
the burner to remove it from the jet support,
. pull the burner forwards to remove it from the injector
support,
. take off the jet and replace it with the new component
according to the type of gas available.
Reassemble the burner by carrying out the above
operation in reverse.
HOB BURNER JET
OVEN BURNER JET
ADJUSTING THE AIR RING OF THE OVEN BURNER
This lets you obtain correct combustion and maximum burner efficiency.
The table on page 26 gives the dimension "x" in mm ; it may be necesary to adjust this
setting in a range +/- 1 mm to improve the flame's appearance and quality.
• To access the burner air ring of the oven gas burner, follow the same instructions which
apply to the oven jet.
. unscrew the screw maintaining the air ring,
. return the oven gas burner,
. set the air ring are stated below:
Natural gas : opening 4,5 mm
Butane gas : opening 5 mm
Propane gas : opening 1 mm
lnstall the various parts again.
Quota "X"
in mm
Oven gas burner
27
Page 28

INSTALLATION : GAS CONNECTION
This must be done in compliance with the regulations in force in the installation country. In
all cases, on the gas feed pipe provide a stop cock, a regulator or regulator release device
for propane gas. Only use valves, regulators ends and flexible tubes, regulators with the
official mark of the installation country.
Gas connection according to installation :
Natural Rigid, Flexible hose with mechanical fittings (1) - Soft rubber tube (3)
Butane Rigid, Flexible hose with mechanical fittings (1) - Soft rubber tube (2)
Propane Rigid, Flexible hose with mechanical fittings (1) - Soft rubber tube (2-3)
1 - provided that flexible hose can be inspected for its entire length.
2 - provided the soft rubber tube can be inspected for its entire length, its length does not
exceed 1.5 metres and it is fitted wit suitable clamps at the ends.
1, 2 - soft tubes and flexible hoses with mechancial fittings must be arrange to be away
from any flames, and not deteriorated by the combustion gases, hot cooker parts or by
any spills of hot food.
THREE CONNECTION OPTIONS :
• RIGID PIPE CONNECTION
Connect directly to the manifold fittings.
• CONNECTION BY FLEXIBLE HOSE WITH MECHANICAL FITTINGS
We recommend this type of connection.
Screw the hose nuts directly onto the manifold fitting on the one hand and onto the stop
cock of the piping on the other hand.
• CONNECTION BY SOFT RUBBER
We do not recommend this type of connection.
To be reserved solely for old installations not enabling any other option
Screw the compliant end piece (2) Butane/Propane
Fit the soft tube to the end piece
on the one hand and to the
regulaotr or to the valve outlet
on the other hand.
(2) In all cases, make sure the seal is fitted. Following the connection operations, test
the leak tightness using soapy water,
28
Natural
testing by flame is strictly prohibited.
Page 29

INSTALLATION : SETTING THE IDDLE FLAME
REGULATION OF THE MINIMUM FLOW
If the gas type has been altered, the stability of the flame in the minimum flow must be
checked and set by adjusting the by-pass screw.
1. the hob : to access the top burner by-pass screw, remove the control panel knobs.
At first, pull the disc to the front and remove the combined control knob.
a) Natural gas :
. unscrew the bypass screw one turn,
. replace the combined control-knob, light the burner and set to low flame,
. remove the combined control-knob again, screw the by-pass screw until a reduced flame is
obtained, staying stable when going from high to low position.
. Replace the combined control-knob.
b) butane- propane gas : the setting is done by screwing right in (without forcing) the bypass screw whose calibrated hole provides the minimum flow.
2. The oven gas burner : to gain access to the oven by-pass, remove the combined oven
control knob. Then, regulate the screw placed in front of the thermostat as follows :
a) natural gas : to check whether the by-pass regulation is correct, proceed as follows :
light the oven placing the control knob on position maximum. You should obtain a small
flame (2 mm) which must remain the same when you turn the control knob from position
maximum to minimum. If the flame goes off, the by-pass flow is not sufficient. You must
unscrew the thermostat by-pass screw a little.
Careful : if the by-pass flow is too high, it neutralizes the thermostat action.
b) butane - propane : tighten the screw to the maximum without blocking it.
!
Never loosen the
others screws !
by-pass screw by-pass screw
oven burner hob burner
29
Page 30

ELECTRICAL CONNECTION
The mains electricity supply connected to the appliance should comply with the norms in
force in the country of installation.
CANDY does not accept any responsibility if this provision is not complied with.
Caution :
• before connecting, the technician must check the power supply voltage shown on
the meter, the circuit breaker setting, the fuse rating and the earth continuity of the
installation.
• Connection to the network must be by earthed socket outlet, or by means of a
multi-pole circuit-breaker setting having a distance between contacts of at least
3 mm.
If the appliance has a socket outlet, it must be installed so that the socket outlet
is accessible.
• The green/yelow protection wire must be linked to the earth terminals, of the
appliance on one side, and the installation on the other side.
• All work in relation to the power supply must be carried by the after sales service
or somenone with similar qualifications.
The appliance is supplied with a cord which is only suitable for connection to a
power supply of 220-240 V between 2 phases or on phase and neutral.
• Connect the appliance with a plug 10/16 Ampere.
• we decline any responsibility for any incident or its possible consequences that may arise
when an appliance is not connected to the earth, or connected to an earth whose continuity
is defective.
30
Page 31

PRESENTATION OF THE CONTROL PANEL
31
Page 32

HOB - USE THE GAS BURNERS
IGNITION :
. Open the gas tap,
. A symbol near each knob lets you see which burner is in use.
Hob without electronical ignition for burners :
. Press and turn the control knob to left until "high flame" position and ignite
the burner presenting a naked flame.
Hob with electronical ignition button for burners :
. Press and turn the control knob to left until "high flame" position and press
the electronical ignition button to produce sparks which in turn ignite the
burner.
Hob with electronical ignition and safety device for burners :
Each burner is fitted with a thermocouple safety device allowing the automatic cutoff of the gas in case the flame dies out accidentally.
. Press and turn the control knob to left until "high flame" position and press
the electronical ignition button to produce sparks which in turn ignite the
burner.
. Keep the pressure on the control knob 5-6 seconds to permit the releasing of the
safety device.
Each burner is controlled by a tap with progressive settings allowing a wider choice of
settings from the maximum position to the lowest and most precise one, easier flame
regulation according to the pan diameter.
. Set the flame according to your cooking requirements.
Recommendations :
. When the burners are not in service, the general gas tap supply tap should always be
turned off.
. To protect the lid from damage and in the interests of safety, the burners must be turned
off and the burner area must be cool before closing the lid down.
THE BURNERS : The hob has various burners with different sizes or gas flows. It is therefore
best to take advantage of these differences.
• Use the most powerful burner to boil liquids, to cook grilled steaks and generally any
foods that must be cooked quickly.
• Use the intermediate burner for stews and sauces.
• Use the small burner for small pans.
SOME TIPS .....
. Avoid boiling food too quickly. A "high boil" doesn't cook food any quicker, and as the
food is violently agitated this can cause it to loose its taste.
. Pans with curved, ridged or warped bottoms are not recommended.
. Flame should not lick out from the pan base, this just means you are wasting gas. Only the
base of the pan should be heated. Do not allow flames to project beyond this point. This
means gas is being wasted.
32
Page 33

OVEN EQUIPMENT
• ACCESSORIES
It is necessary to do an initial cleaning of the equipment before the first use of each of them.
Wash them with a sponge. Rinse and dry off.
SHELF DRIP TRAY
• THE SHELF : it is for holding dishes, plates, and meat joints when cooking with the
grill. It is fitted with rails into which can be slid the drip tray . Thanks to its special shape, the
shelf always remains horizontal, even when pulled to its fullest extent towards the front of
the oven, thus avoiding the risk of dishes sliding off or tipping over.
• THE DRIP TRAY : collects meat and grilling juices during roasting or grilling. It can be
put on the shelf, or slid under it. Unless used with the grill, the drip tray must not be stored in
the oven while in use.
Never use the drip tray as a roasting tray. This would cause smoke to be produced, fat to be
splashed and the oven would become rapidly stained.
When the oven is in use, any unused accessories should be removed from the oven.
• OVEN LIGHTING allows you to watch the food cooking without opening the door.
• Press the oven light button .
Ø
Replacing the bulb :
replace the lamp. Wait for the oven to cool down before doing any operation.
The bulb and its cover are made of material resistant to high temperatures.
To change a defective bulb, just unscrew the glass cover, unscrew the bulb, replace it with
the same type : see characteristics above, after replacing the defective bulb, screw back the
protective glass cover.
n
o
disconnect the power supply from the oven before attempting to
Bulb characteristics :
- 220-240V - E 14 base -
- 15 W - Temperature 300°C
33
Page 34

THE OVEN : "THE GAS OVEN WITH SAFETY DEVICE"
• IGNITION OF THE OVEN GAS BURNER
The hob lid should always be in the upright position before the oven is used.
The door and other accessible parts can become hot when the oven is being used. Keep
young children away from it.
Before cooking for the first time switch the oven on and allow it to heat up while empty.
At this point you may notice a slightly smoky odour, this is perfectly normal and occurs as the
protective covering which surrounds the insulating panels is gently removed. This covering
is designed for transit purposes only and its removal will not affect the performance of your
oven.
Prior to use simply wipe the oven interior with a damp cloth, it is then ready for cooking.
The oven burner is controlled by a tap with safety shut-off device wich automatically shuts
off the gas if the flame is extinguished.
- Turn on the gas supply tap,
- Open the door,
- Press and turn the oven control knob to the left.
Oven without electronical ignition
- keep pressed the control knob and
simultaneously present a naked flame
on the orifice of the bottom.
Oven with electronical ignition of the gas burner
- Keep pressed the control knob and simultaneously press the ignition button
This releases the ignition sparks.
CHECK THE BURNER IS PROPERLY IGNITED.
- Keep the knob pressed for 5-6 seconds. You will start the safety device.
- Set the flame according to your cooking requirements.
- To stop the operating of the oven, turn back the control knob.
Nota : Do not close the door too forcefully as the flame may be extinguished.
34
Page 35

THE OVEN : "THE GAS OVEN WITH SAFETY DEVICE"
• THE GRILL
The upper element only is operating. This guarantees excellent results for fillets of meat or
fish, skewered meat and gratins. 5 minutes preheating is required for the element to become
hot.
• Turn the control knob to the grill
position .
• THE ROTISSERIE
Preheating is not necessary when cooking with the rotisserie.
. Remove all accessories from the oven,
. Place the deep dish on the oven bottom,
. Skewer the food to be cooked and centre it between the two forks,
. Fit the skewer into the bracket and slide the bracket and skewer on to the second level.
The end of the skewer will then be facing the slot in the drive mechanism.
. Fit the skewer into the drive mechanism.
• Turn the oven control knob to the
Grill position .
COOKING TIMES with gas oven
Beef (1 kg) 25/35 minutes
Lamb, mutton (1 kg) 35/45 minutes
Veal, poultry (1 kg) 65/75 minutes
Pork (1 kg) 60/70 minutes
• THE TIMER ALARM from 0 to 60 minutes
It has no effect on the working of the oven or the
hob. Its job is simply to warn you when you
chosen cooking time is up.
(fitted in option).
• To set a time on the timer/alarm, turn the knob
clockwise up to the 55 minutes mark, then turn it
back to the required time.
35
Page 36

THE OVEN : "COOKING ADVICE"
The following instructions are for guidance only. You may wish to alter them according to
your own experience or your personal taste.
MEAT
It is better not to salt meats until after cooking as salt encourages the meat to spatter fat.
This will dirty the oven and make a lot of smoke.
Joints of white meat, pork, veal, lamb and fish can be put into the oven cold. The cooking
time is longer than in a preheated oven, but it cooks through to the centre better as the heat
has more time to penetrate the joint.
CORRECT PRE-HEA TING IS THE BASIS OF SUCCESSFUL RED MEAT COOKER Y.
GRILLS
Before loading the grill meat, remove the meat from the refrigerator a few hours before
grilling. Lay it on several layers of kitchen paper : this improves seizing, making it tastier and
avoids it staying cold at the centre.
Add pepper and spices to the meat before grilling, but add any salt after cooking. This way
it will seize better and stay juicy. Baste all the food to be cooked with a little oil. This is best
done with a wide flat basting brush. Then sprinkle with more pepper and herbs
(thyme, etc...).
Load the grill meat.
Caution : in order to prevent excessive dirtying of your oven and the resulting strong smoky
smells, we recommend not using the oven at too high a temperature. It is better to extend
the cooking time and lower the temperature a little.
PATISSERIE
Avoid using shiny moulds because they reflect heat and can spoil the cooking of a cake. If
your caked brown too quickly, cover them with a sheet of greaseproof paper or aluminium
cooking foil.
Caution : the correct way to use foil with cakes is with the shiny side inwards (dull side out).
If not the heat is reflected from the shiny surface and does not penetrate the cake.
Avoid opening the door during the first 20 to 25 minutes of cooking : sponge cake, soufflés,
brioche, etc., will tend to fall.
Y ou can check if cakes are done, by pricking to the centre with a knife blade or metal knitting
needle. If it comes out nice and dry , your cake is ready, and you can stop the cooking. If the
blade comes out moist or with bits of cake stuck to it, continue baking but lower the temperature
slightly so that it finishes cooking without burning.
36
Page 37

THE OVEN : "COOKING ADVICE"
epiceRytitnauQ
ekiPgk1012setunim021
telluM8052setunim511
eniwetihwnisrabdesiarBgk1052setunim021
yrtsaphtiw(étapotatoP
)seotatopwardna
niélffuoseseehC
hsidmc12
eniarroLehciuQ
hsidmc52ni
bmalfogeLgk2042
nekcihctsaoRgk5,1032
feebtsaoR
kroptsaoRgk2032/022snim54h11
kcuDgk5,2012/002snim53h11
settegruocdellirGsnosrep4012
seotamotdeffutS
hguorhtyaw2/1nrut(stiucsiB
)gnikooc
)nitlatemni(ekaC
repapfoorp-nevohtiwrevoc
gnikoochguorhtyaw2/1
eipelppA
ekacegnopShsidmc03ni002/091snim03/522
tnev-ua-loV
snosrep4
hsidmc72
snosrep6/4002/091
snosrep6022/012
-gk1
gk2,1
muidem21
dezis
niseceip9
hsidmc7
gk5,1002/091
nisnosrep6
hsidmc03
mc21ni4
hsid
noitisoP
bonkfo
032ruoh12
052
042
022/012
022/012snim54/041
022/012
erutarepmetgnikooC
gnitaeh-erpsnim5
gnikoocsnim54+
gnitaeh-erpsnim5
gnikoocsnim54+
gnitaeh-erpsnim5
gnikoocsnim55+
gnitaeh-erpsnim5
gnikoocsnim56+
gnitaeh-repsnim5
gnikoocsnim03+
snim5+snim03
llirgrednu
gnitaeh-erpsnim5
gnikoocsnim03+
gnitaeh-erpsnim5
gnikoocsnim01+
gnitaeh-erpsnim5
gnikoocsnim09+
gnitaeh-erpsnim5
gnikoocsnim02+
levelflehS
morfgnitrats
mottob
2
1
1
1
1
1
1
3
2
3
gniddupdaerBsnikemar21022/012
selppadekaB
-muidem61
selppadezis
eiramniabni
+gnitaeh-erpsnim5
gnikoocsnim52
012
gnitaeh-erpsnim5
gnikoocsnim54+
1
2
37
Page 38

CLEANING THE COOKER
Before carrying out any cleaning, you must disconnect the appliance from the electrical
supply and wait for all the hot parts to cool.
Never use abrasive cleaners, wire wool or sharp objects to clean the cooker.
• THE HOB
THE ENAMELLED PA RTS : simply clean the enamelled surface using non-abrasive products.
The enamel may be irreparably damaged if scouring pads or sharp objects are used. If you
clean the enamel when it is hot, you may tarnish it.
GAS BURNERS : use soapy water for cleaning. Be careful not to let any water into the
burners. To remove stubborn stains use a spot of non-abrasive cream and a sponge, then
rinse with clean water and dry.
The burners are simply placed on the burners. Just lift them off and clean with a damp,
slightly soapy sponge. Do not immerse the burners caps or burner support in cold water
immediately after use, to avoid cracking the enamel from the thermal shock. If the holes are
clogged, brush the caps using soapy water and dry with a clean cloth.
THE LID : clean it simply with water and soap when the cooker cools down. Before lifting the
lid, check that anything left from an overflow has been taken off.
• THE OVEN
THE OVEN DOOR : cleaning the oven can be done with the door on or off the oven. To
remove the door, carry out the following :
. open the door fully,
. the hook is as the drawing 1
. release the hook (see drawing 2),
. pull the door upwards, closing it partially, until it is free.
Drawing 1 : initial position
Drawing 2 : release the hook
To refit it, fix the hook in the original position (see drewing 1).
38
Page 39

CLEANING THE COOKER
THE OVEN DOOR : it is recommended to wipe the oven door glass with absorbent paper
after each cooking cycle. If there is heavy staining, the glass can be cleaned with a sponge
and cleaning agent.
THE SHELF : clean the shelf with an abrasive cleanser or steel wool. After cleaning, rinse
the shelf with clean water, rinse and dry.
THE DRIP TRAY : After grilling, remove the drip tray from the oven. Carefully pour out the
grease from the pan into a proper container . W ash and rinse the drip tray in hot water with a
soaked sponge or plastic scouring pad. If food has burned on, soak the pan in detergent and
water. The pan may also be cleaned with a commercial oven cleaner or cleaned in the
dishwasher. Do not store a soiled drip tray anywhere in the oven.
THE DRAWER : never place cleansers or inflammable products in the drawer. Use only the
drawer to store pans.
• THE OVEN
. Never use abrasive cleaners, scouring pads, harsh brushes or sharp object to clean your
oven. They could permanently damage the oven's enamel finish.
. Use only soapy water or ammonia-based products.
. Never cover the oven walls with aluminium foil, the concentrated action of the heat would
damage the enamel.
39
Page 40

TECHNICAL DA T A
In order to improve the quality of the products, CANDY may carry out modifications
linked to technical improvements.
Appliance meeting with the standard 89/336/CEE, 73/23/CEE
and 90/396/CEE.
GGC
J056
gnidliuB6-2-53306NEotgnidroccaXepyT 6-2-53306NEotgnidroccaXepyT
yrogetaCII.taC
ecnailppafossalC1ssalC)1-1-03NE(1ssalcbus2ssalC
noitcennoclacirtcelE~V042-022~V042-022
ehtfosnoisnemiD
ecnailppa
denepodilhtiwthgieHmc631-531mc341-241
BOH srenrubsag4 srenrubsag4
thgirtnorfWk00,1yrailixuaWk00,1yrailixua
tfeltnorfWk02,3tsaf-artluWk05,2tsaf
thgirkcabWk05,2tsafWk05,3tsaf-artlu
tfelkcabWk57,1tsaf-imesWk57,1tsaf-imes
+3H2
GGC
-BS056
XBS056
TI:II.taC
x15htpeDx5,95htdiW
)mc(5,58thgieH
GGC
XA066-A066
GGC
S066
TI:
+3H2
GGC
XBS066-BS066
x5,85htpeDx5,95htdiW
)mc(5,58thgieH
40
ecivedytefaSnevonevo+bohnevo
noitingilacinortcelEnevo+bohbohnevo+boh
mrala/remiTseyseyseyseysey
+boh
nevo
nevo+boh
Page 41

TECHNICAL DA T A
GGC
J056
nevO SAG SAG SAG SAG SAG
nevoehtfosnoisnemiD
mcni
yticapaCsertil05sertil05
rewopnevosaGWk6,3Wk6,3
rewopllirGlacirtcelEWk44,1Wk44,1
)nQS(rewopsaglatoT Wk50,21 Wk53,21
rewoplatotlacirtcelE W0641 W0641
noitpmusnocnevosaG
C°002tadlohot
ruoh1rof
gnidroccasaG
noitalugerot
enatuBnQS
rabm03-8203G
enaporPnQS
rabm7313G
GGC
-BS056
XBS056
5,93htpeDx5,24htdiW
03thgieHX
JM58,4-Wk53,1JM58,4-Wk53,1
enaporP-enatuB-larutaNenaporP-enatuB-larutaN
h/g678h/g898
h/g168h/g288
GGC
XA066-A066
GGC
S066
03thgieHx
GGC
-BS066
XBS066
5,93htpeDx5,24htdiW
41
Page 42

424344
Page 43

Page 44

CANDY ELETTRODOMESTICI S.R.L.
BRUGHERIO (MILANO)
ITALIA
 Loading...