

Page 1
FREE STANDING OVEN
50x55 / 50x60 / 60x60
Gas and electrical oven
Forno a gás e elétrico
MANUAL DO UTILIZADOR
H10-20-180-443 Rev 001
USER MANUAL
GB
PO
Page 2

GB
Dear user,
Our objective is to make this product provide you with the best output
which is manufactured in our modern facilities in a careful working
environment, in compliance with total quality concept.
Therefore, we suggest you to read the user manual carefully before
using the product and, keep it permanently at your disposal.
Note: This user manual is prepared for more than one model. Some of
the features specified in the manual may not be available in your
appliance.
All our appliances are only for domestic use, not for commercial use.
Products marked with (*) are optional.
“THIS APPLIANCE SHALL BE INSTALLED IN ACCORDANCE WITH THE
REGULATIONS FORCE AND ONLY USED IN A WELL VENTILATED SPACE. READ
THE INSTRUCTIONS BEFORE INSTALLING OR USING THIS APPLIANCE”
“Conforms with the WEEE Regulations."
2
Page 3

Contents
Important warnings 4
Electrical connection 15
Gas connection 16
Introduction of the appliance 21
Accessories 22
Technical features of your oven 23
Installation of your oven 26
Chain lashing illustration 28
Control panel 28
Using oven section 29
Using the grill 30
Using the chicken roasting 30
Using cooker section 31
Program types 33
Cooking time table 34
Maintenance and cleaning 35
Installation of the oven door 36
Cleaning and maintenance of the
Oven’s front door glass 37
Catalytic walls 37
Rack positions 38
Changing the oven lamp 38
Using the grill deector sheet 39
Troubleshooting 40
Handling rules 42
Recommendations for energy saving 42
Environmentally-friendly disposal 43
Package information 43
3
Page 4

GB
IMPORTANT WARNINGS
1. Installation and repair should always be performed
by “AUTHORIZED SERVICE”. Manufacturer shall not be
held responsible for operations performed by unauthorized
persons.
2. Please read this operating instructions carefully.
Only by this way you can use the appliance safely and
in a correct manner.
3. The oven should be used according to operating
instructions.
4. Keep children below the age of 8 and pets away
when operating.
5. WARNING: The accessible parts may be hot while using
the grill. Keep away from children.
6. WARNING: Fire hazard; do not store the materials on
the cooking surface.
7. WARNING: The appliance and its accessible parts are
hot during operation.
8. Setting conditions of this device are specied on
the label. (Or on the data plate)
9. The accessible parts may be hot when the grill is
used. Small children should be kept away.
10. WARNING: This appliance is intended for cooking. It
should not be used for other purposes like heating a room.
11. To clean the appliance, do not use steam cleaners.
12. Ensure that the oven door is completely closed
after putting food inside the oven.
4
Page 5

13. NEVER try to put out the re with water. Only shut
down the device circuit and then cover the ame with
a cover or a re blanket.
14. Children under 8 years of age should be kept away,
if they cannot be monitored continuously.
15. Touching the heating elements should be avoided.
16. CAUTION: Cooking process shall be supervised.
Cooking process shall always be supervised.
17. This device can be used by children over 8 years
of age, people with physical, hearing or mental challenges
or people with lack of experience or knowledge; as long
as control is ensured or information is provided regarding
the dangers.
18. This device has been designed for household use
only.
19. Children must not play with the appliance. Cleaning
or user maintenance of the appliance shall not be
performed by children unless they are older than 8
years and supervised by adults.
20. Keep the appliance and its power cord away from
children less than 8 years old.
21. Put curtains, tulles, paper or any ammable (ignitable)
material away from the appliance before starting to use
the appliance. Do not put ignitable or ammable materials
on or in the appliance.
22. Keep the ventilation channels open.
5
Page 6

GB
23. The appliance is not suitable for use with an external
timer or a separate remote control system.
24. Do not heat closed cans and glass jars. The pressure
may lead jars to explode.
25. Oven handle is not a towel drier. Do not hang towels,
etc. on the oven handle.
26. Do not place the oven trays, plates or aluminium
foils directly on the oven base. The accumulated heat
may damage the base of the oven.
27. While placing food to or removing food from the
oven, etc., always use heat resistant oven gloves.
28. Do not use the product in states like medicated
and/or under inuence of alcohol which may affect your
ability of judgement.
29. Be careful when using alcohol in your foods. Alcohol
will evaporate at high temperatures and may catch re to
cause a re if it comes in contact with hot surfaces.
30. After each use, check if the unit is turned off.
31. If the appliance is faulty or has a visible damage,
do not operate the appliance.
32. Do not touch the plug with wet hands. Do not pull
the cord to plug off, always hold the plug.
33. Do not use the appliance with its front door glass
removed or broken.
34. Place the baking paper together with the food into
a pre-heated oven by putting it inside a cooker or on an
oven accessory (tray, wire grill etc.).
6
Page 7

35. Do not put objects that children may reach on the
appliance.
36. It is important to place the wire grill and tray properly
on the wire racks and/or correctly place the tray on the
rack. Place the grill or tray between two rails and make
sure it is balanced before putting food on it.
37. Against the risk of touching the oven heater elements,
remove excess parts of the baking paper that hang over
from the accessory or container.
38. Never use it at higher oven temperatures than the
maximum usage temperature indicated on your baking
paper. Do not place the baking paper on the base of the
oven.
39. When the door is open, do not place any heavy
object on the door or allow children to sit on it. You
may cause the oven to overturn or the door hinges to be
damaged.
40. The packaging materials are dangerous for children.
Keep packaging materials away from the reach of children.
41. Do not use abrasive cleaners or sharp metal scrapers
to clean the glass as the scratches that may occur on
the surface of the door glass may cause the glass to
break.
42. Do not place the appliance on a surface covered
with carpets. Electric parts gets overheated since there
will be no ventilation from below. This will cause failure
of the appliance.
7
Page 8

GB
43. Do not hit glass surfaces of vitro-ceramic cookers
with a hard metal, resistance can get damaged. It may
cause an electric shock.
44. User should not handle the oven by himself.
45. Use shall be careful when cleaning gas burners.
It may cause personal injuries.
46. Food can spill when foot of oven is dismantled or
gets broken, be careful. It may cause personal injuries.
47. During usage, the internal and external surfaces
of the oven get hot. As you open the oven door, step
back to avoid the hot vapour coming out from the interior.
There is risk of burning.
48. Upper cover of the oven can be closed for a reason,
than cookware can trip over. Step back to avoid the hot
food coming on you. There is risk of burning.
49. Do not place heavy objects when oven door is open,
risk of toppling.
50. User should not dislocate the resistance during
cleaning. It may cause an electric shock.
51. Do not remove ignition switches from the appliance.
Otherwise, live electric cables can be accessed. It may
cause an electric shock.
52. Oven supply can be disconnected during any
construction work at home. After completing the work,
re-connecting the oven shall be done by authorized service.
53. Do not place metal utensils such as knife, fork, spoon
on the surface of the appliance, since they will get hot.
8
Page 9

54. To prevent overheating, the appliance should not
be installed behind of a decorative cover.
55. Turn off the appliance before removing the
safeguards. After cleaning, install the safeguards
according to instructions.
56. Cable xing point shall be protected.
57. WARNING: Don’t use oven and grill burners at same
time.
58. Please don’t cook the food directly on the tray /
grid. Please put the food into or on appropriate tools
before putting them in the oven.
59. Hot surface, leave for cooling before closing the
cover.
Electrical Safety
1. Plug the appliance in a grounded socket protected by
a fuse conforming to the values specied in the technical
specications chart.
2. Have an authorized electrician set grounding equipment.
Our company shall not be responsible for the damages
that shall be incurred due to using the product without
grounding according to local regulations.
3. The circuit breaker switches of the oven shall be
placed so that end user can reach them when the oven
is installed.
4. The power supply cord (the cord with plug) shall
not contact the hot parts of the appliance.
9
Page 10

GB
5. If the power supply cord (the cord with plug) is
damaged, this cord shall be replaced by the manufacturer
or its service agent or an equally qualied personnel to
prevent a hazardous situation.
6. Never wash the product by spraying or pouring water
on it! There is a risk of electrocution.
7. WARNING: To avoid electric shock, ensure that the
device circuit is open before changing the lamp.
8. WARNING: Cut off all supply circuit connections before
accessing the terminals.
9. WARNING: If the surface is cracked, turn off the appliance
to avoid risk of electric shock.
10. Do not use cut or damaged cords or extension
cords other than the original cord.
11. Make sure that there is no liquid or humidity in
the outlet where the product plug is installed.
12. The rear surface of the oven also heats up when
the oven is operated. Electrical connections shall not
touch the rear surface, otherwise the connections may
be damaged.
13. Do not tighten the connecting cables to the oven
door and do not run them over hot surfaces. If the cord
melts, this may cause the oven to short circuit and
even a re.
14. Unplug the unit during installation, maintenance,
cleaning and repair.
10
Page 11

15. If the power supply cable is damaged, it must be
replaced by its manufacturer or authorized technical
service or any other personnel qualied at the same
level, in order to avoid any dangerous situation.
16. Make sure the plug is inserted rmly into wall
socket to avoid sparks.
17. Do not use steam cleaners for cleaning the appliance,
otherwise electric shock may occur.
18. An omnipolar switch capable to disconnect
power supply is required for installation. Disconnection
from power supply shall be provided with a switch or
an integrated fuse installed on xed power supply
according to building code.
19. Appliance is equipped with a type ‘’Y’’ cord cable.
20. Fixed connections shall be connected to a power
supply enabling omnipolar disconnection. For appliances
with over voltage category below III, disconnection device
shall be connected to xed power supply according to
wiring code.
11
Page 12

GB
Gas Safety
1. This appliance is not connected to burning products
evacuation apparatus.This appliance must be connected
and installed according to the installation regulations in
force. Conditions regarding ventilation must be considered.
2. When a gas cooking appliance is used; humidity,
heat and burning products are generated in the room.
First of all, make sure the kitchen is well ventilated
when operating the appliance and maintain natural
ventilation openings or install a mechanical ventilation
equipment.
3. After using the appliance heavily for en extended
period of time, additional ventilation may be required.
For example open a window or adjust a higher speed for
mechanical ventilation, if any.
4. This appliance must be used only in well ventilated
locations in accordance with the regulations in force.
Please read the manual before installing or using this
product.
5. Before positioning the appliance, make sure local
network conditions (gas type and gas pressure) meets
appliance requirements.
6. The mechanism cannot be run for longer than 15
seconds. If the burner is not on after 15 seconds, stop
the mechanism and wait for at least one minute before
trying to ignite the burner again.
12
Page 13

7. All kinds of operations to be performed on gas
installation must be performed by authorized and
competent people.
8. This appliance is adjusted for natural gas (NG). If
you have to use your product with a different gas type,
you have to apply to authorized service for the conversion.
9. For proper operation, hood, gas pipe and clamp
should be replaced periodically accordint to manufacturer
recommendations and when required.
10. Gas should burn well in gas products. Well
burning gas can be understood from blue ame and
continuous burning. If gas does not burn sufciently,
carbon monoxide (CO) can be generated. Carbon monoxide
is a colourless, odourless and very toxic gas; even small
amounts have lethal effect.
11. Ask your local gas supplies about the phone numbers
for emergencies related to gas and the measures to be
taken upon gas odour is detected.
What To Do When Gas Odour Is Detected
1. Do not use naked ame, and do not smoke.
2. Do not operate any electrical switch.
(For example: lamp switch or doorbell)
3. Do not use telephone or mobile phone.
4. Open the doors and windows.
5. Close all valves on the appliances that utilize gas
and the gas counters.
13
Page 14

GB
6. Call re brigade from a telephone outside the home.
7. Check all hoses and their connections against leaks.
If you still smell gas, leave the house and warn your
neighbours.
8. Do not enter into the house until authorities clarify
it is safe.
Intended Use
1. This product is designed for home use. Commercial
use of the appliance is not permitted.
2. This appliance may only be used for cooking purposes.
It shall not be used for other purposes like heating a room.
3. This appliance shall not be used to heat plates under
the grill, drying clothes or towels by hanging them on
the handle or for heating purposes.
4. The manufacturer assumes no responsibility for any
damage due to misuse or mishandling.
5. Oven part of the unit may be used for thawing,
roasting, frying and grilling food.
6. Operational life of the product you have purchased
is 10 years. This is the period for which the spare parts
required for the operation of this product as dened is
provided by the manufacturer.
14
Page 15
Electrical Connection
1. Your oven requires 16 or 32 Ampere fuse according to the appliance’s
power. If necessary, installation by a qualied electrician is recommended.
2. Your oven is adjusted in compliance with 220-240V AC/380-415V
AC 50/60Hz.electric supply. If the mains are different from this specied
value, contact your authorized service.
3. Electrical connection of the oven should only be made by the sockets
with earth system installed in compliance with the regulations. If there
is no proper socket with earth system in the place where the oven will be
placed, immediately contact a qualed electrician. Manufacturer shall
never be responsible from the damages that will arise because of the
sockets connected to the appliance with no earth system. If the ends of
the electrical connection cable are open, according to the appliance type,
make a proper switch installed in the mains by which all ends can be
disconnected in case of connecting / disconnecting from / to the mains.
4. If your electric supply cable gets defective, it should denitely be
replaced by the authorized service or qualed electricians in order to
avoid from the dangers.
5. Electrical cable should not touch the hot parts of the appliance.
6. Please operate your oven in dry atmosphere.
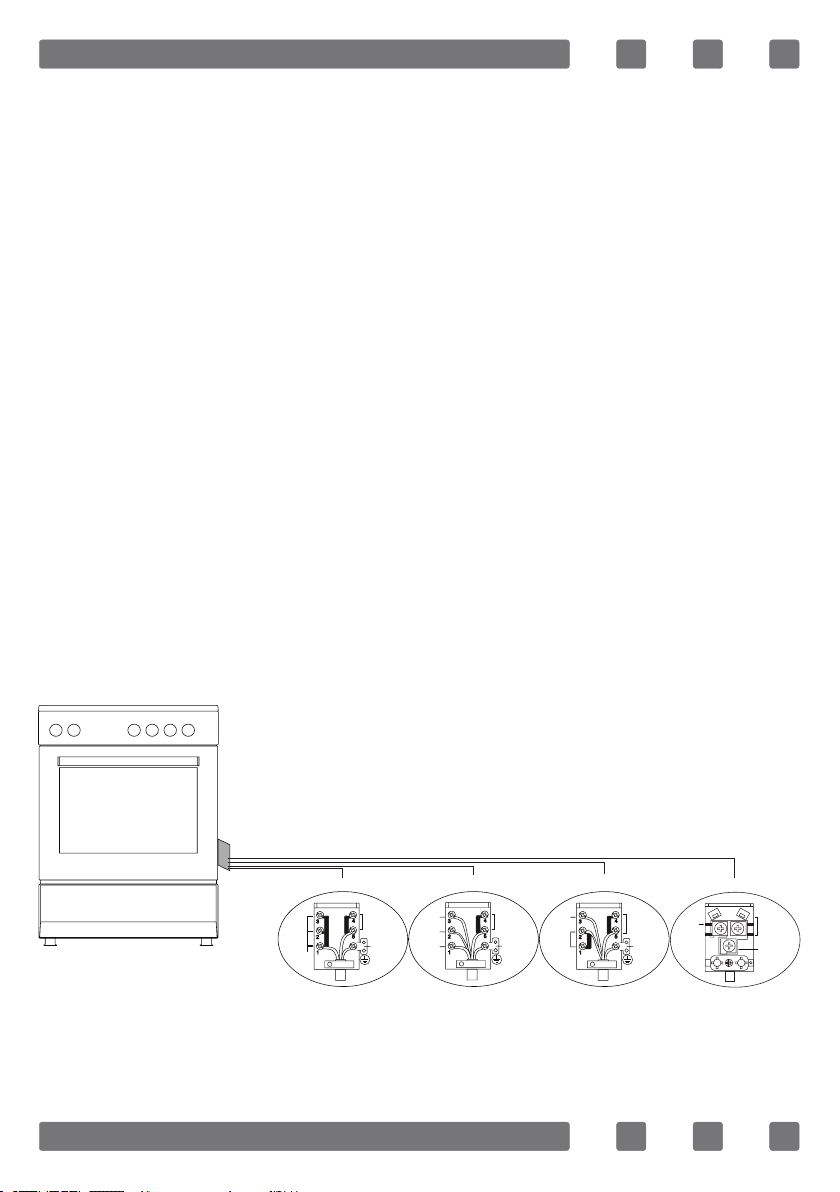
Electrical connection scheme
220-240V~50/60Hz 220-240V~50/60Hz
220-240V~50/60Hz 220-240V~50/60Hz
Live
Phase
H05 VV-F 3G 4 mm² H05 VV-F 5G 1.5 mm²
H05 VV-F 3G 4mm² H05 VV-F 5G 1.5mm² H05 VV-F 4G 1.5mm² H05 VV-F 3G 1.5mm²
380-415V 3N~50/60Hz
Neutral
Neutre
Earth
Terre
Erdung
15
400V 3N~50/60Hz 400V 2N~50/60Hz
L3
L2
L1
380-415V 2N~50/60Hz
Neutral
Neutre
Earth
Terre
Erdung
H05 VV-F 4G 1.5 mm²
L2
L1
Neutral
Neutre
Earth
Terre
Erdung
L1
H05 VV-F 3G 1.5 mm²
Neutral
Neutre
Earth
Terre
Erdung
Page 16
GB
Gas Connection
WARNING: Before starting any work related with gas installation, turn off
gas supply. Risk of explosion.
Please operate your oven in dry atmosphere.
1. Fit the clamp to the hose. Push one of the hose until it goes to the
end of the pipe.
2. For the sealing control; ensure that the buttons in the control panel are
closed, but the gas cylinder is open. Apply some soap bubbles to the
connection. If there is gas leakage, there will be foaming in the soaped area.
3. The oven should be using a well ventilation place and should be
install on at ground.
4. Re-inspect the gas connection.
5. When placing your oven to its location, ensure that it is at the counter
level. Bring it to the counter level by adjusting the feet if necessary.
6. Do not make gas hose and electrical cable of your oven go through theheated
areas, especially through the rear side of the oven. Do not move gas connected
oven. Since the forcing shall loosen the hose, gas leakage may occur.
7. Please use exible hose for gas connection.
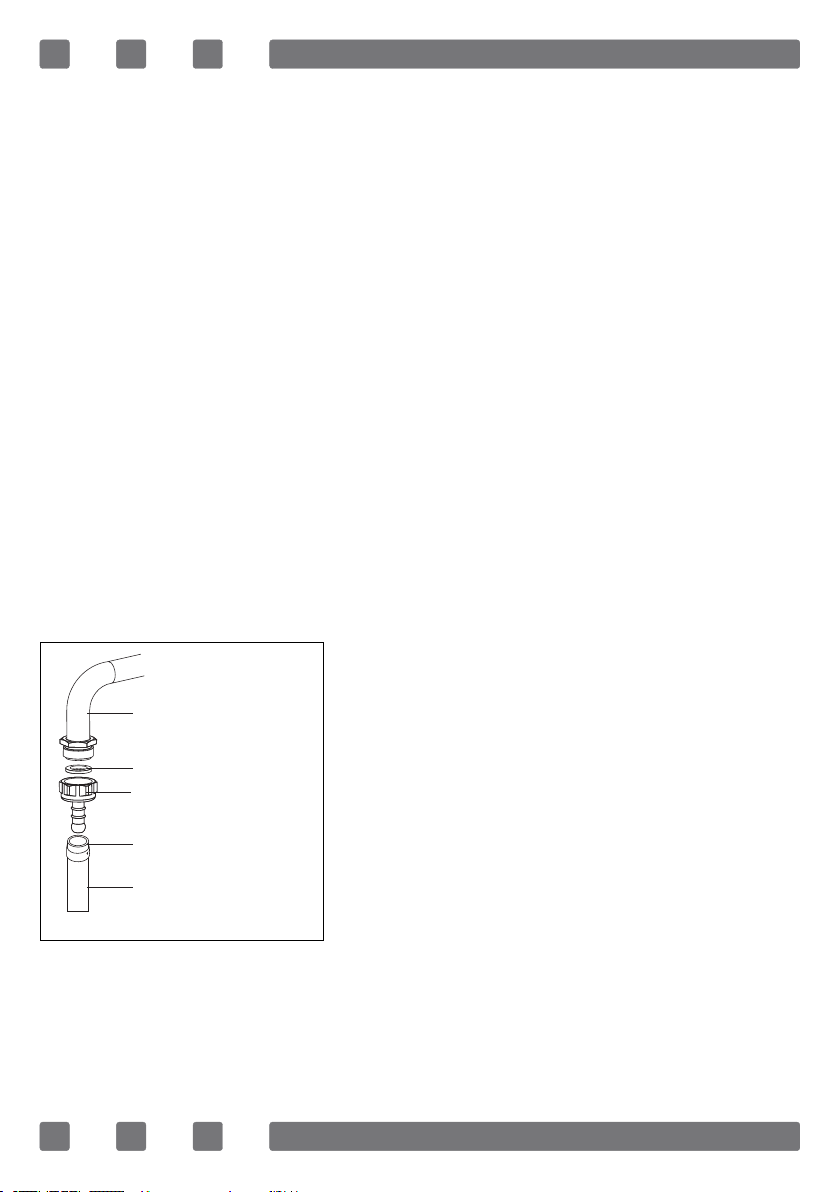
For LPG connection;
For LPG (cylinder) connection, afx metal
clamp on the hose coming from LPG
Main Gas Pipe
cylinder. Afx an edge of the hose on hose
inlet connector behind the appliance by
Gasket
Hose Inlet Connector
Metal Clamp
pushing to end through heating the hose
in boiled water. Afterward, bring the clamp
towards end section of the hose and tighten
it with screwdriver. The gasket and hose inlet
Lpg Connection Hose
connector required for connection is as the
picture shown below.
NOTE: The regulator to be afxed on LPG cylinder should have 300
mmSS feature.
16
Page 17
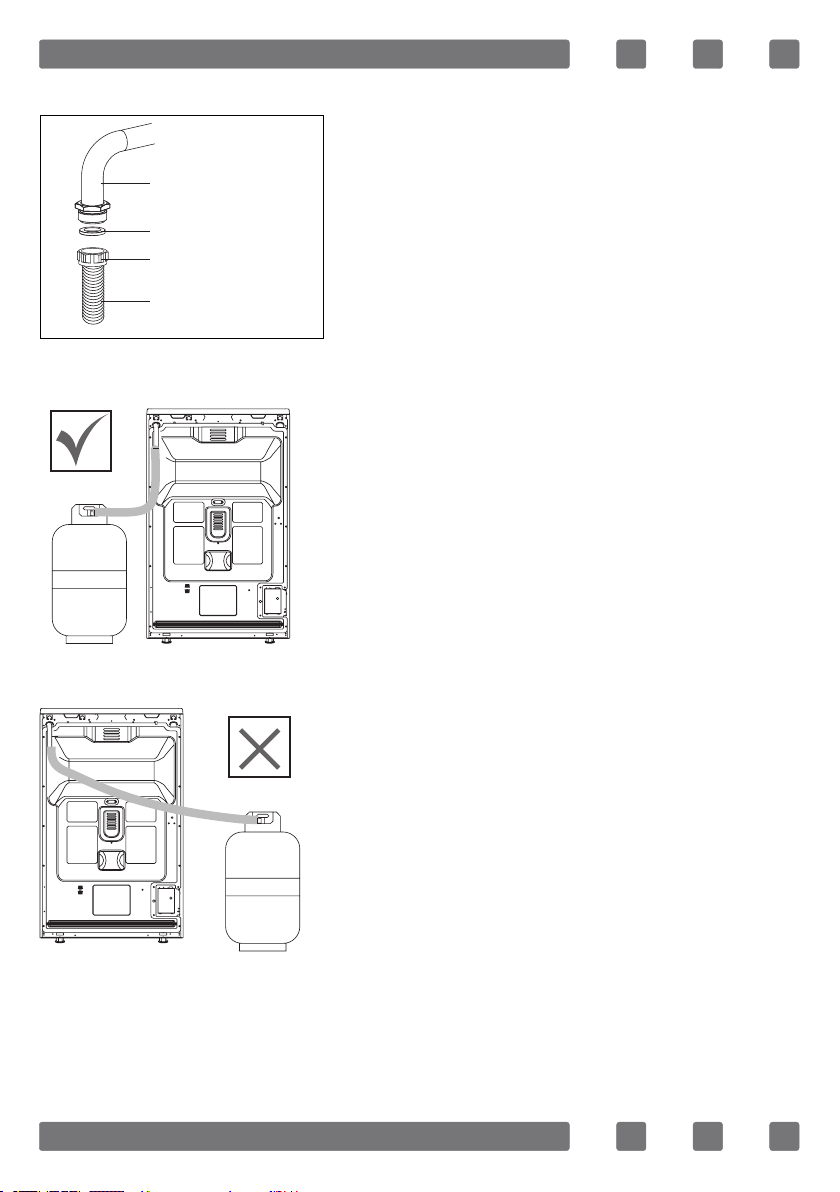
For natural gas connection;
Main Gas Pipe
Gasket
Nut
Natural Gas
Connection Hose
Gas hose passage way
Figure 1
Figure 2
WARNING: Natural gas connection should
be done by authorized service.
For natural gas connection, place gasket
in the nut at the edge of natural gas connection
hose. To install the hose on main gas pipe,
turn the nut. Complete the connection by
making gas leakage control.
Connect the appliance to the gas piping tap
in shortest possible route and in a way that
ensure no gas leakage will occur.
In order to carry on a tightness and sealing
safety check ensure that the knobs on the
control panel are closed and the gas cylindir is
open.
WARNING: While performing a gas leakage
check, never use any kind of lighter, match,
cigarette or similar burning substance.
Apply soap bubble on the connection points.
If there is any kind of leakage then it will
cause bubbling.
While inserting the appliance in place ensure
that it is on the same level with the worktop.
If required adjust the legs inorder the make
level with the worktop.
Use the appliance on a level surface and in a
well ventilated environment.
WARNING: Before placint the appliance, check that the local distribution
conditions (gas type and pressure) conform to the product settings.
17
Page 18
GB
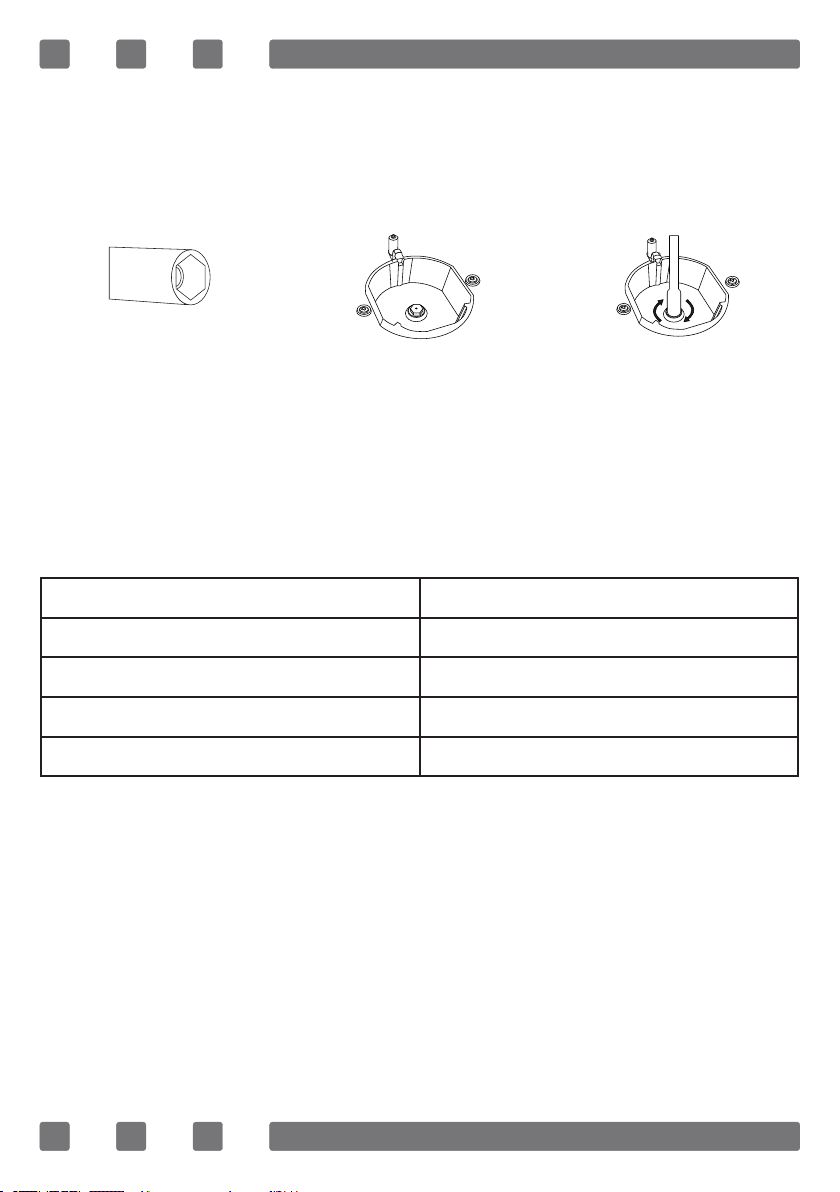
Nozzle change operation
1. Please use driver with special head for removed and install nozzle as.
(gure 3)
2. Please remove nozzle (gure 4) from burner with special nozzle driver
and install new nozzle. (gure 5)
Figure 3
Figure 4
Figure 5
Ventilation of room
The air needed for burning is received from room air and the gases emitted
are given directly in room. For safe operation of your product, good room
ventilation is a precondition. If no window or room to be utilized for room
ventilation is available, additional ventilation should be installed. However,
room has a door opening outside, it is no needed to vent holes.
Room size Ventilating opening
Smaller than 5 m³ min. 100 cm²
Between 5 m³ - 10 m³ min. 50 cm²
Bigger than 10 m³ no need
In basement or cellar min. 65 cm²
18
Page 19
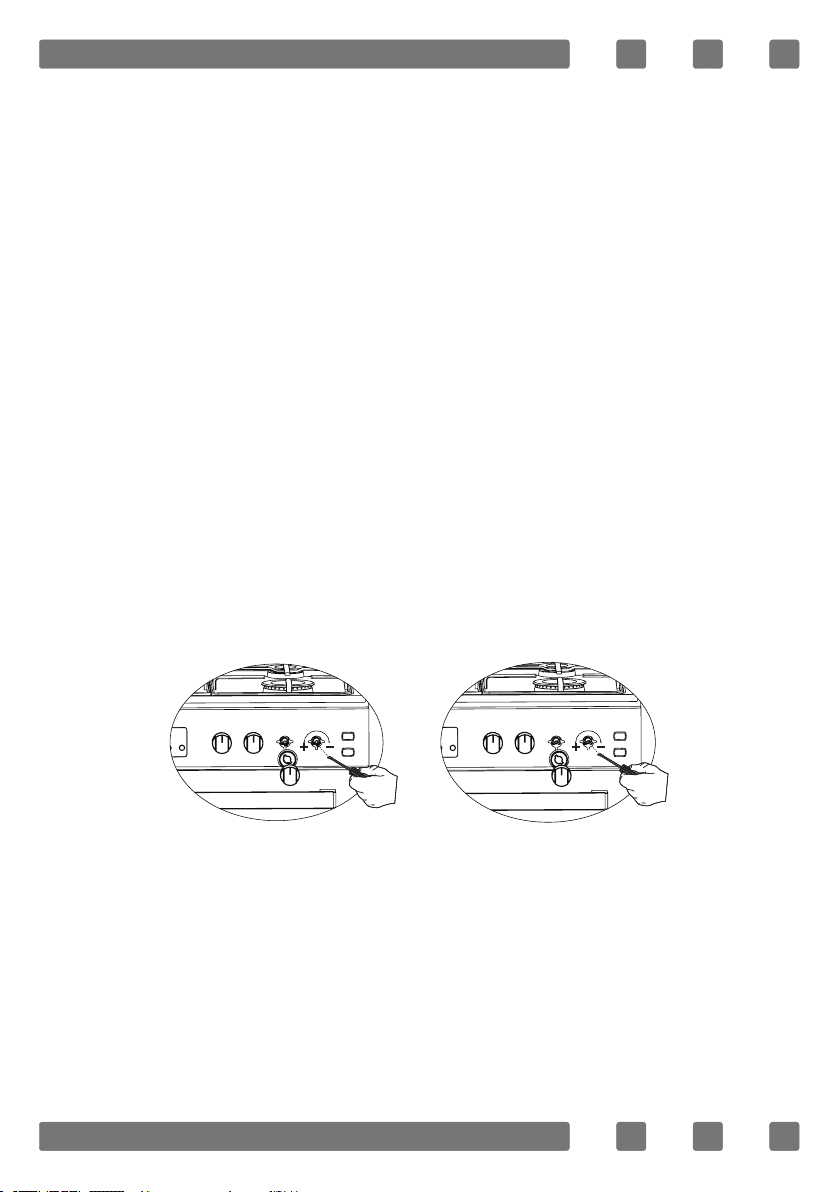
Reduced gas ow rate setting for hob taps
1. Ignite the burner that is to be adjustment and turn the knob to the
reduced position.
2. Remove the knob from the gas tap.
3. Use an appropriately sized screwdriver to adjust the ow rate adjustment
screw. For LPG (butane-pro pane) turn the screw clockwise. For the
naturel gas, you should turn the screw counter- clockwise once.
“The normal length of a straight ame in the reduced position should
be 6-7 mm.“
4. If the ame is higher then the desired position, turn the screw clockwise.
If it is smaller turn anticolockwise.
5. For the last control, bring the burner both to higt-ame and reduced
positions and check whether the ame is on or off.
Depending on the type of gas tap used in your appliance the adjustment
screw position may vary.
To adjust your oven acc. to the gas type, make the adjustment for
reduced ame carefully by turning with a small screwdriver as shown
below on the screw in the middle of the gas cocks as well as nozzle
changes. (gure 6 and 7)
Figure 6 Figure 7
19
Page 20
GB
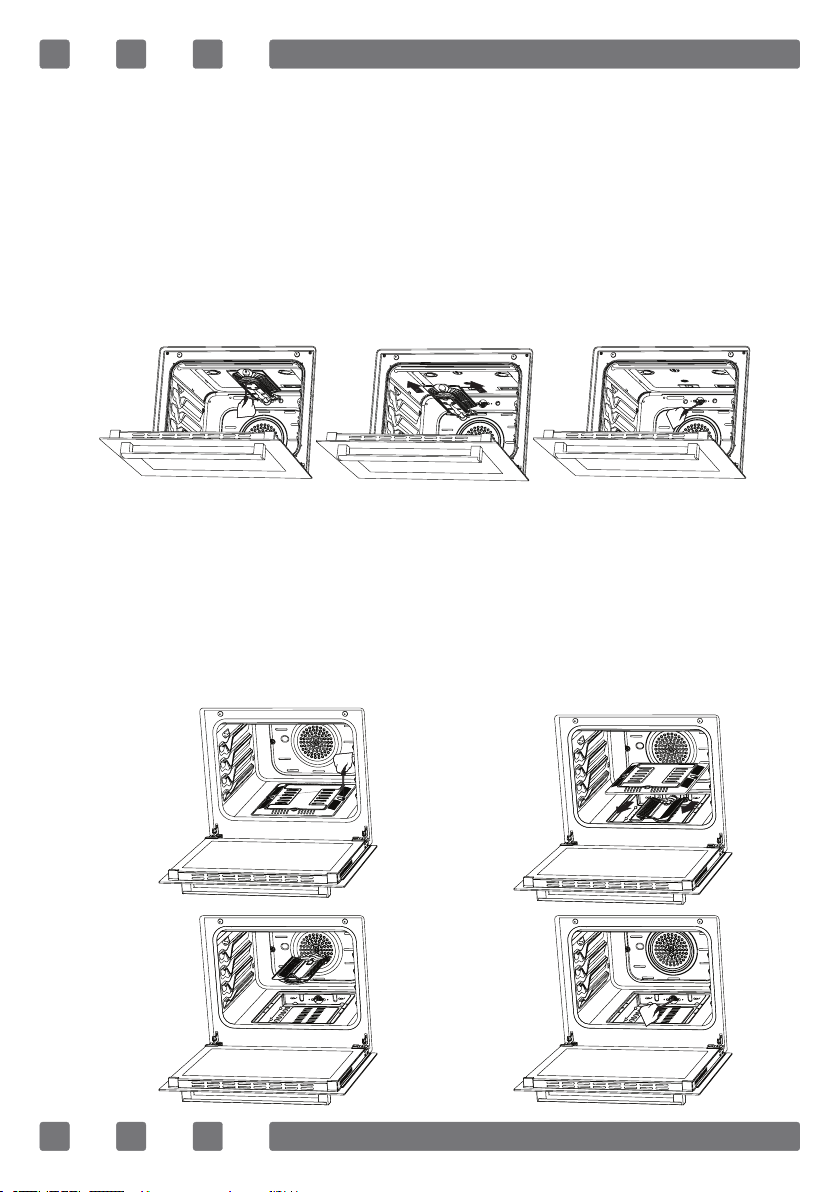
Removal of the lower and upper burner and installation of the injector to the
gas oven
Removal of the upper burner:
With the help of a screw driver, remove the screw as shown in gure 8.
As shown in gure 9, remove the burner from its place by pulling it to
yourself. As shown in gure 10, remove the injector in the bearing with a
socket wrench. In order to re-place the burner, apply the removal process
reversely.
Figure 8 Figure 9
Figure 10
Removal of the lower burner:
The lower burner door has been xed with two screws. As shown in
gure 11, remove it with the help of a screw driver. Remove the door by
pulling upwards as shown in gure 12. Remove the burner from its place
by pulling it to yourself as shown in gure 13. As shown in gure 14, remove
the injector in the bearing with a socket wrench. In order to replace the
burner, apply the removal process reversely.
Figure 11
Figure 13
Figure 12
Figure 14
20
Page 21
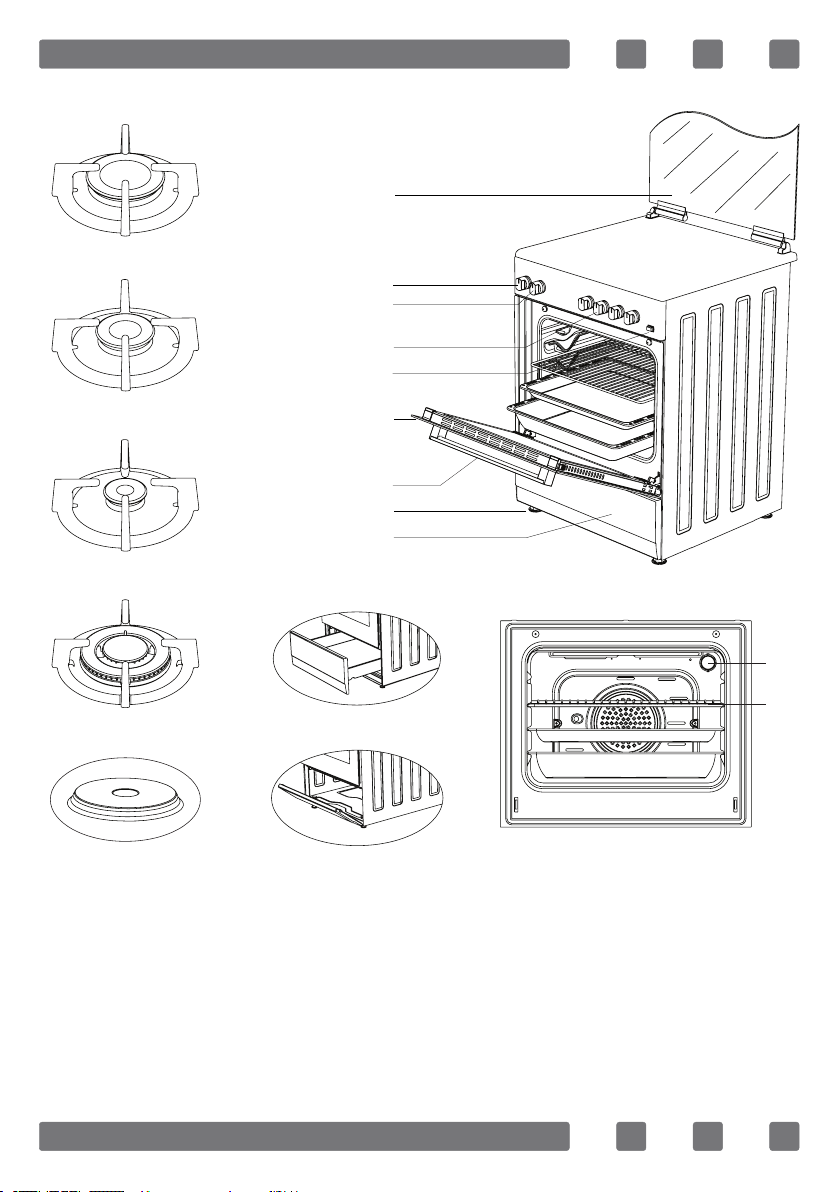
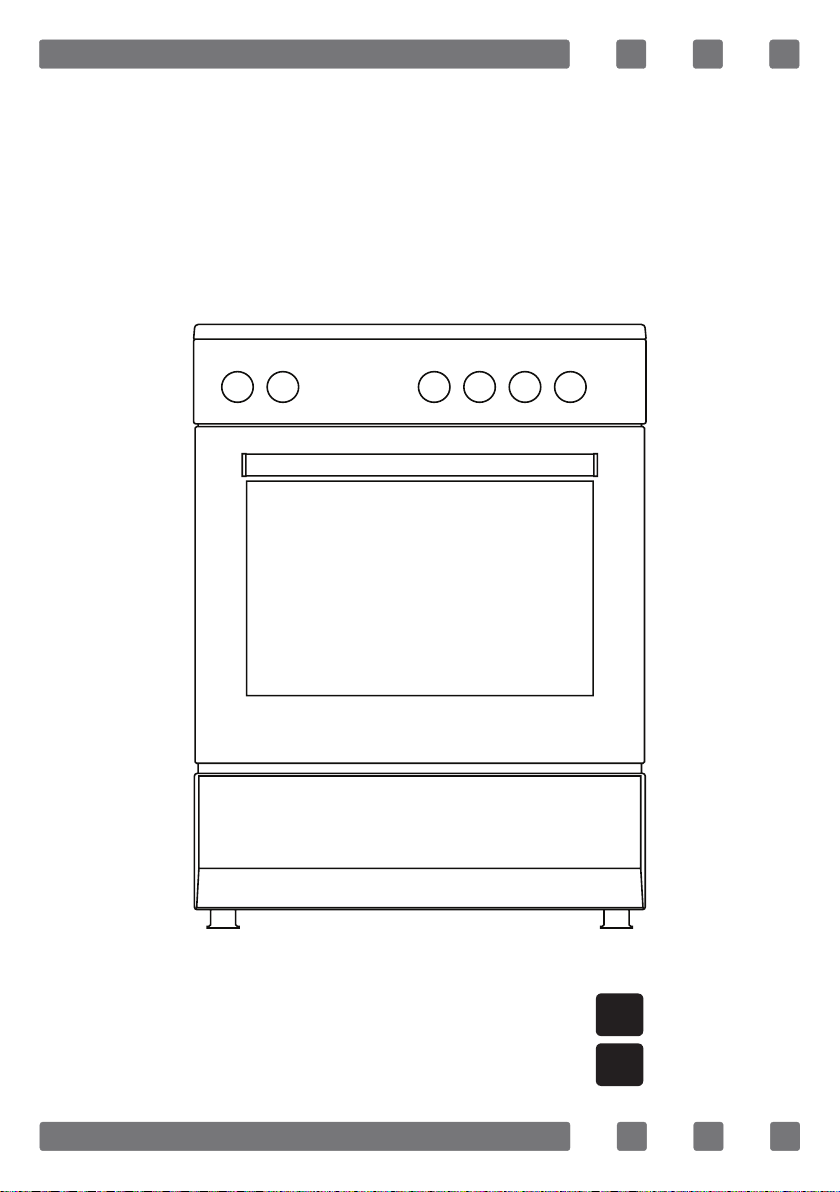
INTRODUCTION OF THE APPLIANCE
1
12
2
3
4
5
13
14
9.1
6
7
8
9
10
15
16
1. Glass door
(Sheet metal door)
2. Thermostat setting
3. Oven setting
4. Cooker section control
Switches
5. Push button lighter *
9.2
6. Door
7. Handle
8. Plastic leg
9. Lower cabinet door
9.1 Drawer *
9.2 Flap door *
10. Lamp
11
11. Grill
12. Large burner
13. Middle burner
14. Auxiliary burner
15. Wok burner *
16. Hot plate *
(Ø145 mm or Ø185 mm)
21
Page 22
GB
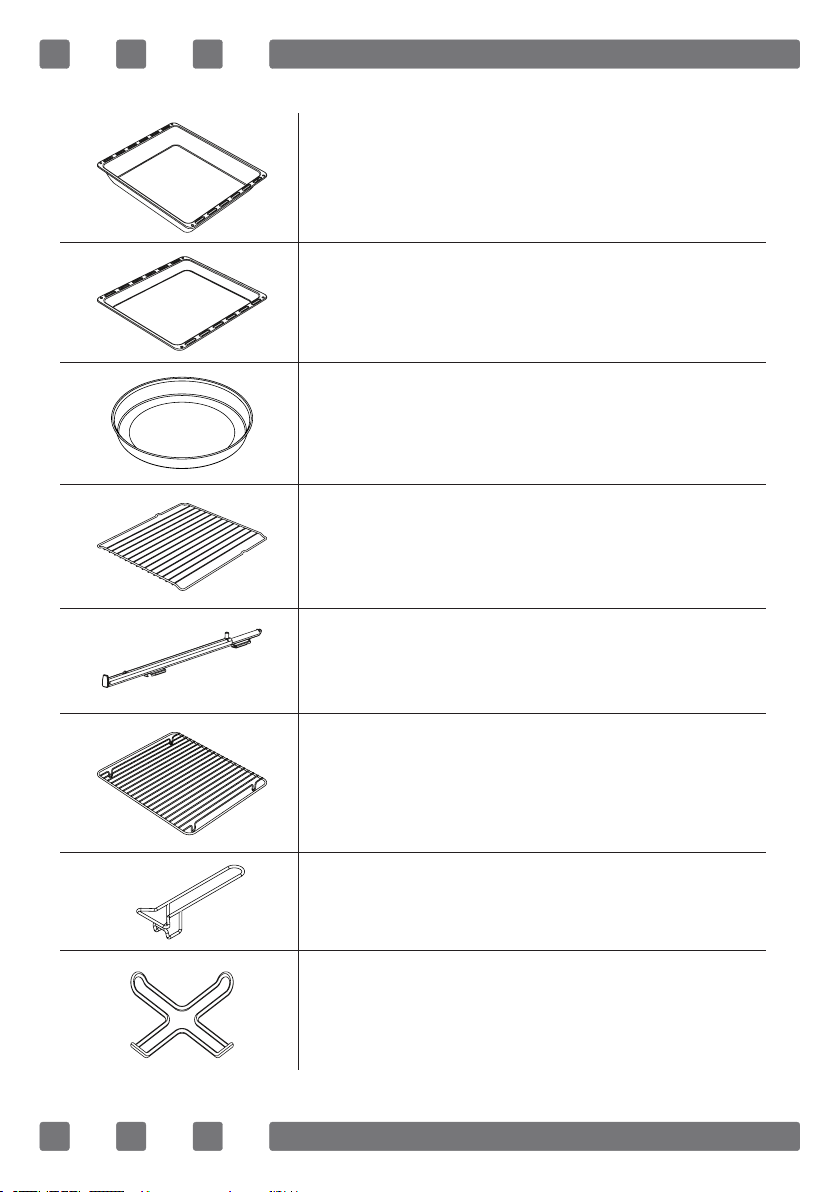
Accesories
Deep tray *
Used for pastry, big roasts, watery foods. It can also be
used as oil collecting container if you roast directly on grill
with cake, frozen foods and meat dishes.
Tray / Glass tray *
Used for pastry (cookie, biscuit etc.), frozen foods.
Circular tray *
Used for pastry frozen foods.
Wire grill
Used for roasting or placing foods to be baked, roasted
and frozen into desired rack.
Telescopic rail *
Trays and wire racks can be removed and installed easily
thanks to telescopic rails.
In tray wire grill *
Foods to stick while cooking such as steak are placed on
in tray grill. Thus contact of food with tray and sticking
are prevented.
Tray handle *
It is used to hold hot trays.
Coffee pot support unit *
Can be used for coffee pot.
22
Page 23
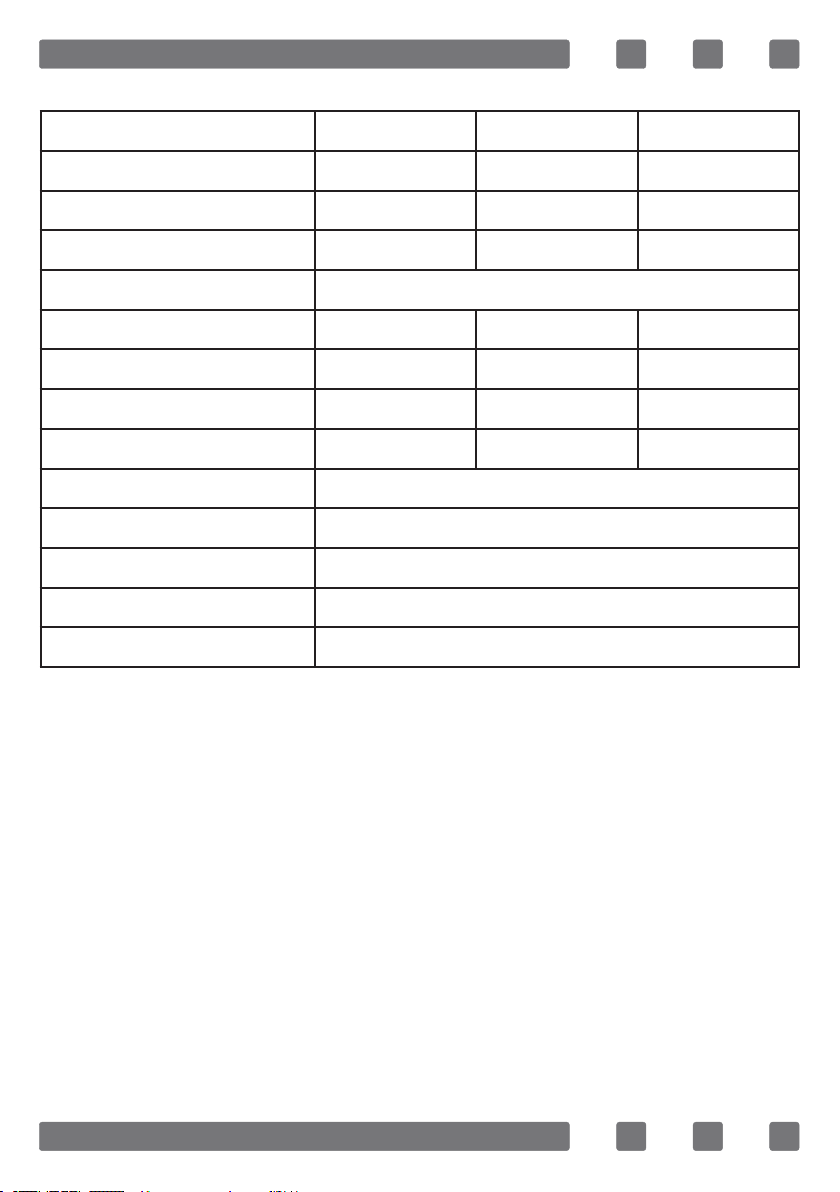
Technical Features Of Your Oven
Specications 50x55 50x60 60x60
Outer width 500 mm 500 mm 600 mm
Outer depth 565 mm 630 mm 630 mm
Outer height 855 mm 855 mm 855 mm
Lamp power 15-25 W
Bottom heating element 1000 W 1000 W 1200 W
Top heating element 800 W 800 W 1000 W
Turbo heating element ----- 1800 W 2200 W
Grill heating element 1500 W 1500 W 2000 W
Supply voltage 220-240V AC/380-415V AC 50/60 Hz
Hot plate 145 mm * 1000 W
Hot plate 180 mm * 1500 W
Hot plate rapid 145 mm * 1500 W
Hot plate rapid 180 mm * 2000 W
WARNING: For the modication to be done by authorized service, this
table should be considered. Manufacturer may not be held responsible for
any problems rising because of any faulty modication.
WARNING: In order to increase the product quality, the technical
specications may be changed without prior notice.
WARNING: The values provided with the appliance or its accompanying
documents are laboratory readings in accordance with the respective
standards. These values may differ depending on the use and ambient
conditions.
23
Page 24
GB
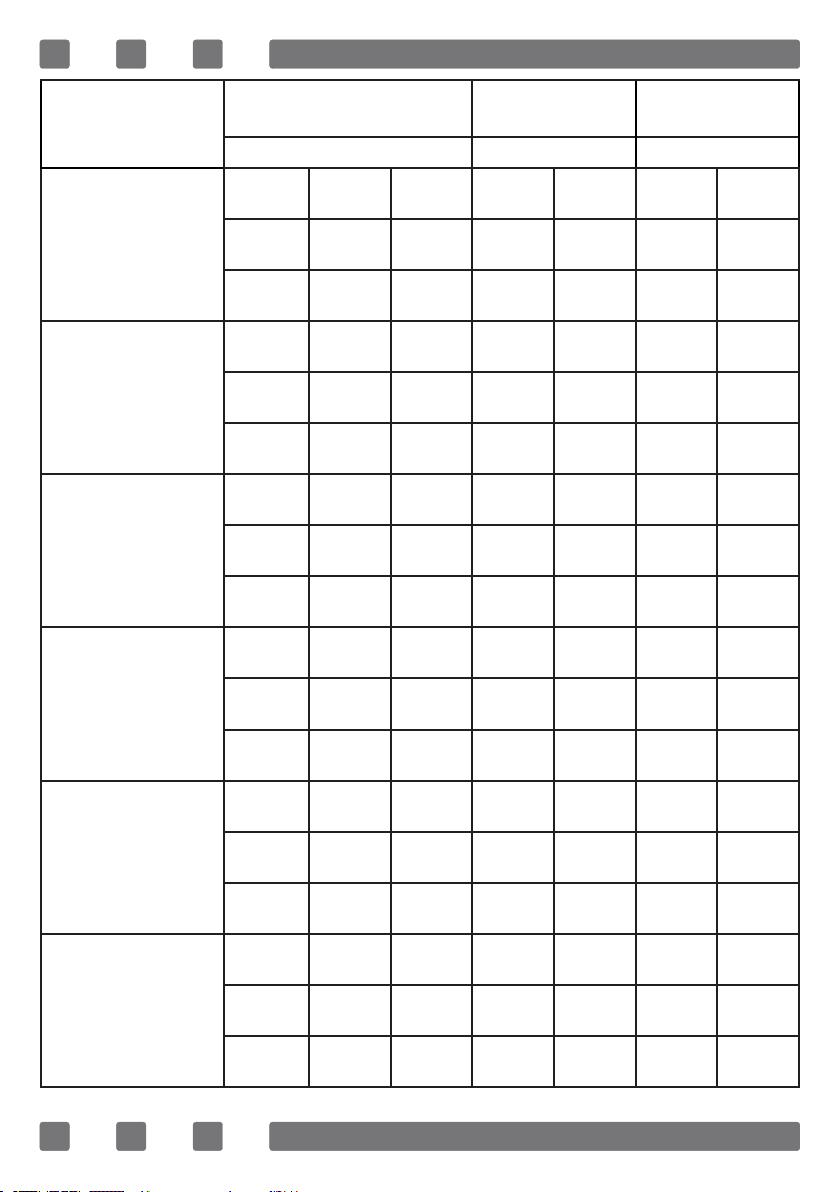
Burner
Specications
Wok
Burner
Rapid
Burner
Semi-Rapid
Burner
G20,20 mbar
G25,25 mbar
Gas natural Gas natural Gas natural
Injector 1,40 mm 1,28 mm 1,60 mm
Gas ow 0,333 m³/h 0,333 m³/h 0,333 m³/h
Power 3,50 kW 3,50 kW 3,50 kW
Injector 1,15 mm 1,10 mm 1,45 mm
Gas ow 0,276 m³/h 0,276 m³/h 0,276 m³/h
Power 2,90 kW 2,90 kW 2,90 kW
Injector 0,97 mm 0,92 mm 1,10 mm
Gas ow 0,162 m³/h 0,162 m³/h 0,162 m³/h
Power 1,70 kW 1,70 kW 1,70 kW
Injector 0,72 mm 0,70 mm 0,85 mm
G20,25 mbar G20,13 mbar
Auxiliary
Burner
Grill
Burner
Oven
Burner
Gas ow 0,96 m³/h 0,96 m³/h 0,96 m³/h
Power 0,95 kW 0,95 kW 0,95 kW
Injector 1,00 mm 0,92 mm 1,35 mm
Gas ow 0,196 m³/h 0,196 m³/h 0,196 m³/h
Power 2,00 kW 2,00 kW 2,00 kW
Injector 1,10 mm 1,00 mm 1,50 mm
Gas ow 0,235 m³/h 0,235 m³/h 0,235 m³/h
Power 2,50 kW 2,50 kW 2,50 kW
24
Page 25
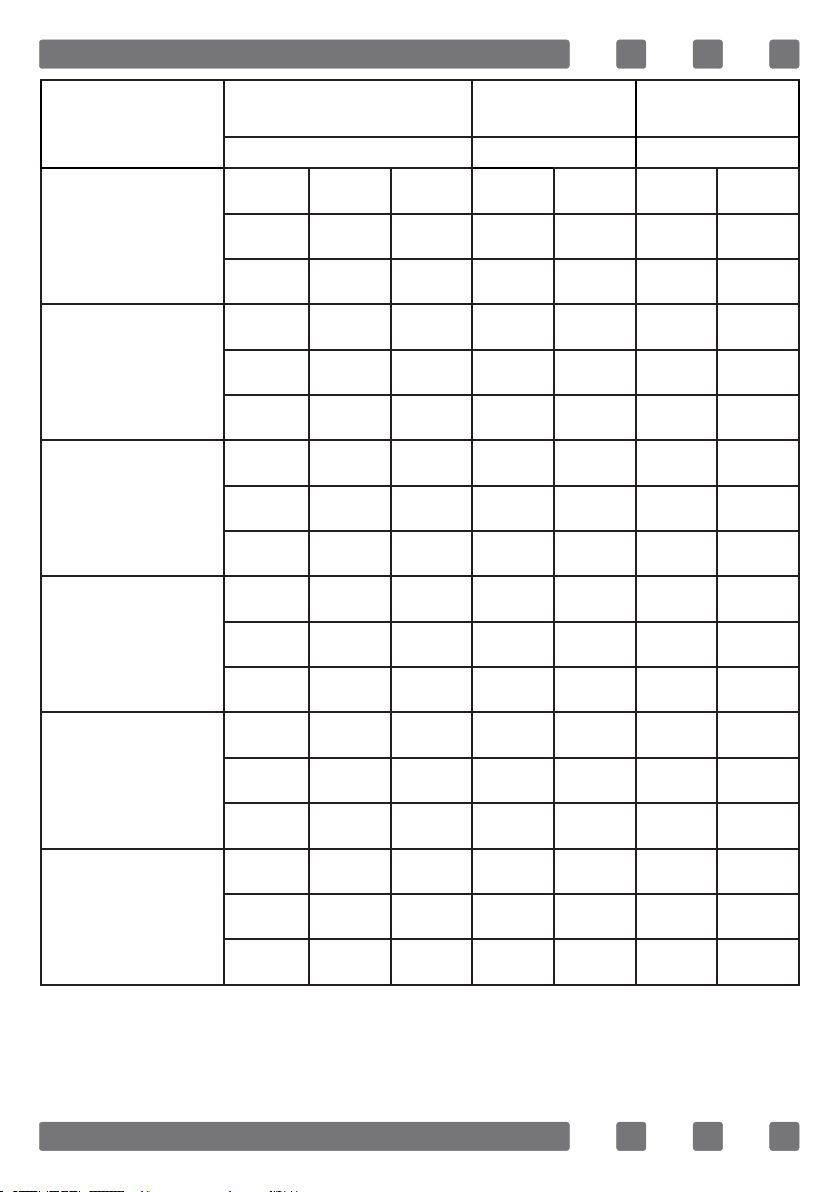
Burner
Specications
Wok
Burner
Rapid
Burner
Semi-Rapid
Burner
Auxiliary
Burner
G30,28-30 mbar
G31,37 mbar
LPG LPG LPG
Injector 0,96 mm 0,76 mm 0,96 mm
Gas ow 254 g/h 254 g/h 254 g/h
Power 3,50 kW 3,50 kW 3,50 kW
Injector 0,85 mm 0,75 mm 0,85 mm
Gas ow 211 g/h 211 g/h 211 g/h
Power 2,90 kW 2,90 kW 2,90 kW
Injector 0,65 mm 0,60 mm 0,65 mm
Gas ow 124 g/h 124 g/h 124 g/h
Power 1,70 kW 1,70 kW 1,70 kW
Injector 0,50 mm 0,43 mm 0,50 mm
Gas ow 69 g/h 69 g/h 69 g/h
Power 0,95 kW 0,95 kW 0,95 kW
G30,50 mbar G30,37 mbar
Injector 0,70 mm 0,60 mm 0,65 mm
Grill
Burner
Oven
Burner
Gas ow 145 g/h 145 g/h 145 g/h
Power 2,00 kW 2,00 kW 2,00 kW
Injector 0,75 mm 0,65 mm 0,70 mm
Gas ow 182 g/h 182 g/h 182 g/h
Power 2,50 kW 2,50 kW 2,50 kW
WARNING: Diameter values written on the injector are specied without
a comma. For example; The diameter of 1,70 mm is specied as 170 on
the injector.
25
Page 26

GB
INSTALLATION OF YOUR OVEN
Check if the electrical installation is proper to bring the appliance in
operating condition. If electricity installation is not suitable, call an
electrician and plumber to arrange the utilities as necessary. Manufacturer
shall not be held responsible for damages caused by operations
performed by unauthorized persons.
WARNING: It is customer's responsibility to prepare the location the
product shall be placed on and also to have the electrical installation
prepared.
WARNING: The rules in local standards about electrical installations
shall be followed during product installation.
WARNING: Check for any damage on the appliance before installing it.
Do not have the product installed if it is damaged. Damaged products
cause a risk for your safety.
Right Place For Installation And Important Warnings
Appliance feet should not stay on soft surfaces such as carpets. The
kitchen oor shall be durable to carry the unit weight and any other
kitchenware that may be used on the oven.
Appliance should be used with a clearance of minimum 400 mm over
the upper hob surfaces, and 65 mm from side surfaces inside a kitchen
furniture.
The appliance is suitable for use on both side walls, without any support,
or without being installed in a cabinet. If a hood or aspirator will be
installed above the cooker, follow the instructions of the manufacturer for
height of mounting. (min. 650 mm)
26
Page 27

400 mm min.
65 mm min. 65 mm min.
650 mm min.
WARNING: The kitchen furniture near the appliance must be heat
resistant.
WARNING: Do not install the appliance beside refrigerators or coolers.
Heat radiated by the appliance increases the energy consumption of cooling
devices.
WARNING: Do not use the door and/or handle to carry or move the appliance.
27
Page 28

GB
Chain lashing illustration
Before using the appliance, in order to ensure
safe use, be sure to x the appliance to the wall
using thechain and hooked screw supplied.
Ensure that the hook is screwed into the wall
securely.
CONTROL PANEL
0
1 2 3 4 5 6 7
1. Thermostat
2. Function selection button
3. Mechanical timer
5. Front left heater
6. Front right heater
7. Rear right heater
4. Rear left heater
WARNING: The control panel above is only for illustration purposes.
Consider the control panel on your device.
Thermostat: Used for determining the cooking temperature
of the dish to be cooked in the oven. After placing
the food inside the oven, turn the switch to adjust
desired temperature setting between 40-240 °C.
For cooking temperatures of different food, see cooking
table.
28
Page 29

Mechanical timer*: Used for determining the period
for cooking in the oven. When adjusted time is
expired, power to heaters is turned off and an audible
warnig signal is emitted. Mechanical timer can be
adjusted to desired period between 0-90 minutes.
For cooking periods, see cooking tables.
USING OVEN SECTION
Using Oven Burners
1. If your oven equipped with burners that operates with gas, appropriate
knob should be used in order to ignite the burners. Some models have
automatic ignition from the knob; it is easy to ignite the burner by turning
the knob. Also, burners can be ignited by pressing the ignition button or
they can be ignited with a match.
2. Do not continuously operate the igniter for more than 15 seconds. If
the burner does not ignite, wait minimum one minute before trying again.
If the burner is extinguished for of the any reason, close the gas control
valve and wait a minimum of one minute before trying again.
Using Oven Heating Elements
1. When your oven is operated rst time, an odor will be spread out
which will be sourced from using the heating elements. In order to get rid
of this, operate it at 240 °C for 45-60 minutes while it is empty.
2. Oven control knob should be positioned to desired value; otherwise
oven does not operate.
3. Kinds of meals, cooking times and thermostat positions are given in
cooking table. The values given in the cooking table are characteristic
values and were obtained as a result of the tests performed in our laboratory.
You can nd different avors suitable for your taste depending on your
cooking and using habits.
4. You can make chicken revolving in your oven by means of the
accessories.
5. Cooking times: The results may change according to the area voltage
and material having different quality, amount and temperatures.
29
Page 30

GB
6. During the time when cooking is being performed in the oven, the lid
of the oven should not be opened frequently. Otherwise circulation of the
heat may be imbalanced and the results may change.
Using The Grill
1. When you place the grill on the top rack, the food on the grill shall
not touch the grill.
2. You can preheat for 5 minutes while grilling. If necessary, you may
turn the food upside down.
3. Food shall be in the center of the grill to provide maximum air ow
through the oven.
To turn on the grill;
1. Place the function button over the grill symbol.
2. Then, set it to the desired grill temperature.
To turn the grill off;
Set the function button to the off position.
WARNING: Keep the oven door closed while grilling. (electrical grill)
WARNING: Keep the oven door opened while grilling. (gas grill)
Using The Chicken Roasting *
Figure 15
Place the spit on the frame. Slide turn spit
frame into the oven at the desired level.
Locate a dripping pan through the bottom
in order to collect the fast. Add some water
in dripping pan for easy cleaning.Do not
forget to remove plastic part from spit.
After grilling, screw the plastik handle to
the skewer and take out the food from oven.
30
Page 31

Using Cooker Section
Using gas burners
FFD
Flame cut-off safety device (FFD) *; operates instantly
when safety mechanism activates due to overown
liquid over upper hobs.
1. The valves controlling the gas cookers have special security mechanism.
In order to light the cooker always press on the switch forward and bring it
to ame symbol by turnin counter clockwise. All of the lighters shall operate
and the cooker you controlled shall light only. Keep the switch pressed
until ignition i performed. Press on the lighter button and turn the knob
counter clockwise.
2. Do not continuously operate the igniter for more than 15 seconds. If
the burner does not ignite, wait minimum one minute before try again.
3. In models with gas security system, when ame of the cooker is
extinguished, control valve cuts off the gas automatically. For operate
the burners with gas security system you must press the knob and turn
counter-clock-wise. After the ignition you must wait nearly 5-10 second
for gas security systems activation. If the burner is extinguished for of the
any reason, close the gas control valve and wait a minimum of one minute
before trying again.
4. Closed Fully open Half open
5. Before operating your hob please make sure that the burner caps are
well positioned. The right placement of the burner caps are shown as
below.
Figure 16 Figure 17
31
Page 32

GB
Using Hot Plates
Level 1 Level 2 Level 3 Level 4 Level 5 Level 6
Ø80 mm 200 W 250 W 450 W --- --- ---
Ø145 mm 250 W 750 W 1000 W --- --- ---
Ø180 mm 500 W 750 W 1500 W --- --- ---
Ø145 mm rapid 500 W 1000 W 1500 W --- --- ---
Ø180 mm rapid 850 W 1150 W 2000 W --- --- ---
Ø145 mm 95 W 155 W 250 W 400 W 750 W 1000 W
Ø180 mm 115 W 175 W 250 W 600 W 850 W 1500 W
Ø145 mm rapid 135 W 165 W 250 W 500 W 750 W 1500 W
Ø180 mm rapid 175 W 220 W 300 W 850 W 1150 W 2000 W
Ø220 mm 220 W 350 W 560 W 910 W 1460 W 2000 W
1. Electric hotplates have standard of 6 temperature levels. (as describe
herein above)
2. When using rst time, operate your electric hotplate in position 6 for
5 minutes. This will make the agent on your hotplate which is sensitive to
heat get hardened by burning.
3. Use at bottomed saucepans which fully contact with the heat as
much as you can, so that you can use the energy more productively.
Pot Sizes
50*55 50*60 60*60
Small burner 12-18 cm 12-18 cm 12-18 cm
Normal burner 18-20 cm 18-20 cm 18-20 cm
Big burner 22-24 cm 22-26 cm 22-26 cm
WOK burner 24-28 cm --- 24-26 cm
Incorrect Incorrect Incorrect Correct
32
Page 33

PROGRAM TYPES
0
Roast chicken Fan
Function Button: Used for determining the heaters
to be used for cooking the dish to be cooked in the
oven. Heater program types in this button and their
functions are described below. All heater types and
program types consisting of these heaters may not
be available at all models.
Lower and upper heating
elements
Lamp
Lower heating element and fan Grill and fan
Grill and roast chicken Grill
Grill and lamp Upper heating element
Electrical timer Lower heating element
Flame Ignition lighter
Turbo heating and fan
Lower-upper heating element
and fan
WARNING: All heater types and program types consisting of these heaters
may not be available at all models.
33
Page 34

GB
COOKING TIME TABLE
WARNING: Oven must be preheated for 10 minutes before placing the
food in it.
Foods
Cake (Tray / Mold) Static / Static+Fan 170-180 2 35-45
Small cakes Static / Turbo+Fan 170-180 2 25-30
Patty Static / Static+Fan 180-200 2 35-45
Pastry Static 180-190 2 25-30
Cookie Static 170-180 3 20-25
Apple pie Static / Turbo+Fan 180-190 2 50-70
Sponge cake Static 200/150 * 2 20-25
Pizza Static+Fan 180-200 3 20-30
Lasagna Static 180-200 2 25-40
Meringue Static 100 2 60
Chicken Static+Fan / Turbo+Fan 180-190 2 45-50
Cooking
function
Temperature
(°C)
Rack
position
Cooking
duration (min.)
Grilled chicken ** Grill 200-220 4 25-30
Grilled sh ** Grill+Fan 200-220 4 25-30
Sirloin steak ** Grill+Fan Max. 4 15-20
Grilled meat balls ** Grill Max. 4 20-25
* Without pre-heating. Half of the cooking should be 200°C and then
second half should be 150°C.
** During the half of cooking, meal should be turned around.
34
Page 35

MAINTENANCE AND CLEANING
1. Disconnect the plug supplying electricity for the oven from the socket.
2. While oven is operating or shortly after it starts operating, it is
extremely hot. You must avoid touching from heating elements.
3. Never clean the interior part, panel, lid, trays and all other parts of
the oven by the tools like hard brush, cleaning mesh or knife. Do not use
abrasive, scratching agents and detergents.
4. After cleaning the interior parts of the oven with a soapy cloth, rinse
it and then dry thoroughly with a soft cloth.
5. Clean the glass surfaces with special glass cleaning agents.
6. Do not clean your oven with steam cleaners.
7. Before opening the upper lid of the oven, clean spilled liquid off the
lid. Also, before closing the lid, ensure that the cooker table is cooled
enough.
8. Never use inammable agents like acid, thinner and gasoline when
cleaning your oven.
9. Do not wash any part of your oven in dishwasher.
10. In order to clean the front glass lid of the oven; remove the xing
screws xing the handle by means of a screwdriver and remove the oven
door. Than clean and rinse it thoroughly. After drying, place the oven
glass properly and re-install the handle.
Figure 18 Figure 19
35
Figure 20
Page 36

GB
Installation Of The Oven Door
Figure 21
Figure 21.1 Figure 21.2 Figure 22.1 Figure 22.2
Completely open
the oven door
by pulling it to
yourself. After
wards, perform
the unlocking
process by pulling
the hinge lock
upwards with the
help of a screw
driver as shown
in gure 21.1.
Bring the hinge
lock to the widest
angle as shown in
gure 21.2. Bring
both hinges
connecting the
oven door to
the oven to the
same position.
Afterwards, close
the oven door as to
lean on the hinge
lock as shown in
Figure 22
gure 22.1.
To remove the
oven door, pull it
upwards by holding
it with both hands
when close to the
closed position
as shown in
gure 22.2.
In order to re-place the oven door, perform the abovementioned steps in reverse.
36
Page 37

Cleaning And Maintenance Of The Oven’s Front Door Glass
Remove the prole by pressing the plastic latches on both left and right
sides as shown in gure 23 and pulling the prole towards yourself as
shown in gure 24. Then remove the inner-glass as shown in gure 25.
If required, middle glass can be removed in the same way. After cleaning
and maintenance are done, remount the glasses and the prole in reverse
order. Make sure the prole is properly seated in its place.
2
1
Figure 23 Figure 24 Figure 25
Catalytic Walls *
Catalytic walls are located on the left
and the right side of cavity under the
guides. Catalytic walls banish the bad
smell and obtain the best performance
from the cooker. Catalytic walls also
absorb oil residue and clean your oven
while it’s operating.
Figure 26
Removing the catalytic walls
In order to remove the catalytic walls; the guides must be pulled out.
As soon as the guides are pulled out, the catalytic walls will be released
automatically. The catalytic walls must be changed after 2-3 years.
37
Page 38

GB
Rack Positions
It is important to place the wire grill into
Rack 4
Rack 3
Rack 2
Rack 1
the oven properly. Do not allow wire rack to
touch rear wall of the oven. Rack positions
are shown in the next gure. You may place
a deep tray or a standard tray in the lower
and upper wire racks.
Installing and removing wire racks
To remove wire racks, press the clips shown with arrows in the gure,
rst remove the lower, and than the upper side from installation location.
To install wire racks; reverse the procedure for removing wire rack.
Changing The Oven Lamp
WARNING: To avoid electric shock, ensure that the appliance circuit is
open before changing the lamp. (having circuit open means power is off)
First disconnect the power of appliance and ensure that appliance is cold.
Remove the glass protection by turning as indicated in the gure. If
you have difculty in turning, then using plastic gloves will help you in
turning.
Then remove the lamp by turning, install the new lamp with same
specications.
Reinstall glass protection, plug the power cable of appliance into electrical
socket and complete replacement. Now you can use your oven.
Type G9 Lamp Type E14 Lamp
220-240 V, AC
15-25 W
Figure 27
38
220-240 V, AC
15 W
Figure 28
Page 39

Using The Grill Deector Sheet *
1. A safety panel is designed to protect control panel and the buttons
when the oven is in grill mode. (gure 29)
2. Please use this safety panel in order to avoid the heat to damage
control panel and the buttons when the oven is grill mode.
WARNING: Accessible parts may be hot when the grill in use. Young
children should be kept away.
3. Place the safety panel under control panel by opening the oven front
cover glass. (gure 30)
4. And then secure the safety panel in between oven and front cover by
gently closing the cover. (gure 31)
5. It is important for cooking to keep the cover open in specified
distance when cooking in grill mode.
6. Safety panel will provide an ideal cooking circumstance while
protecting control panel and buttons.
WARNING: If the cooker has the “closed grill functioned” option with
thermostat, you can keep the oven door closed during operation; in this
case the grill deector sheet will be unnecessary.
Figure 29 Figure 30 Figure 31
39
Page 40

GB
TROUBLESHOOTING
You may solve the problems you may encounter with your product by
checking the following points before calling the technical service.
Check Points
In case you experience a problem about the oven, rst check the table
below and try out the suggestions.
Problem Possible cause What to do
Power supply not available. Check for power supply.
Check if main gas valve is open.
Oven does not operate.
Oven stops during cooking.
Turns off during cooking.
Oven door is not opening properly.
Lighter not operating.
Electric shock when touching the
oven.
Check if gas pipe is bent or
Gas supply not available.
Plug comes out from the wall
socket.
Too long continuous operation.
More than one plugs in a wall
socket.
Food residues jammed between
the door and internal cavity.
Tips or body of ignition plugs are
clogged.
Gas burner pipes are clogged. Clean gas burner pipes.
No proper grounding.
Ungrounded wall socket is used.
kinked.
Make sure gas hose is connected
to the oven.
Check if suitable gas valve is
being used.
Re-install the plug into wall
socket.
Let the oven cool down after long
cooking cycles.
Use only one plug for each wall
socket.
Clean the oven well and try to
re-open the door.
Clean tips or body of ignition
plugs of gas burners.
Make sure power supply is
grounded properly.
40
Page 41

Problem Possible cause What to do
Water dripping.
Steam coming out from a crack on
oven door.
Water remaining inside the oven.
Water or steam may generate under
certain conditions depending on
the food being cooked. This is not
a fault of the appliance.
Oven door is open. Close the door and restart.
Let the oven cool down and than
wipe dry with a dishcloth.
Oven does not heat.
Smoke coming out during
operation.
When operating the oven burnt or
plastic odour coming out.
Oven does not cook well.
Oven controls not correctly
adjusted.
Fuse tripped or circuit breaker
turned off.
When operating the oven for the
rst time.
Food on heater.
Plastic or other not heat resistant
accessories are being used inside
the oven.
Oven door is opened
frequently during cooking.
Read the section regarding operation
of the oven and reset the oven.
Replace the fuse or reset the
circuit breaker. If this is repeating
frequently, call an electrician.
Smoke comes out from the heaters.
This is not a fault. After 2-3 cycles,
there will be no more smoke.
Let the oven to cool down and
clean food residues from the
heater.
At high temperatures,
use suitable glassware accessories.
Do not open oven door frequently,
if the food you are cooking does
not require turning. If you open the
door frequently internal temperature
drops and therefore cooking result
will be inuenced.
Internal light is dim or does not
operate.
Foreign object covering the lamp
during cooking.
Lamp might be failed.
41
Clean internal surface of the oven
and check again.
Replace with a lamp with same
specications.
Page 42

GB
HANDLING RULES
1. Do not use the door and/or handle to carry or move the appliance.
2. Carry out the movement and transportation in the original packaging.
3. Pay maximum attention to the appliance while loading/unloading and
handling.
4. Make sure that the packaging is securely closed during handling and
transportation.
5. Protect from external factors (such as humidity, water, etc.) that may
damage the packaging.
6. Be careful not to damage the appliance due to bumps, crashes, drops,
etc. while handling and transporting and not to break or deform it during
operation.
RECOMMENDATIONS FOR ENERGY SAVING
Following details will help you use your product ecologically and
economically.
1. Use dark coloured and enamel containers that conduct the heat better
in the oven.
2. As you cook your food, if the recipe or the user manual indicates that
pre-heating is required, pre-heat the oven.
3. Do not open the oven door frequently while cooking.
4. Try not to cook multiple dishes simultaneously in the oven. You may
cook at the same time by placing two cookers on the wire rack.
5. Cook multiple dishes successively. The oven will not lose heat.
6. Turn off the oven a few minutes before the expiration time of cooking.
In this case, do not open the oven door.
7. Defrost the frozen food before cooking.
42
Page 43

ENVIRONMENTALLY-FRIENDLY DISPOSAL
Dispose of packaging in an environmentally-friendly
manner.
This appliance is labelled in accordance with European
Directive 2012/19/EU concerning used electrical and
electronic appliances (waste electrical and electronic
equipment - WEEE). The guideline determines the frame
work for the return and recycling of used appliances as
applicable throughout to the EU.
PACKAGE INFORMATION
Packaging materials of the product are manufactured from recyclable
materials in accordance with our National Environment Regulations.
Do not dispose of the packaging materials together with the domestic
or other wastes. Take them to the packaging material collection points
designated by the local authorities.
43
Page 44

PO
Caro Utilizador,
O nosso objetivo é fazer com que este produto lhe forneça o melhor
do que é fabricado nas nossas modernas instalações num ambiente de
trabalho minucioso, em conformidade com o conceito de qualidade total.
Portanto, sugerimos que antes de usar o produto leia o manual do
utilizador com atenção e que o mantenha permanentemente à sua
disposição.
Nota: Este manual do utilizador está preparado para mais do que um
modelo. Algumas das funções especicadas no manual podem não estar
disponíveis no seu aparelho.
Todos os nossos aparelhos são apenas para uso doméstico, não para uso
comercial.
Os produtos marcados com (*) são opcionais.
“ESTE APARELHO DEVE SER INSTALADO DE ACORDO COM AS NORMAS EM
VIGOR E USADO APENAS NUM ESPAÇO VENTILADO. LER AS INSTRUÇÕES
ANTES DE INSTALAR OU USAR ESTE APARELHO”
“Em conformidade com a regulamentação REEE."
44
Page 45

Conteúdo
Advertências importantes 46
Ligação elétrica 58
Ligação do gás 59
Apresentação do aparelho 64
Acessórios 65
Funções técnicas do seu forno 66
Instalação do seu forno 69
Ilustração da xação da corrente 71
Painel de controlo 71
Usar a secção do forno 72
Usar o grelhador 73
Usar o assador de frango 73
Usar a secção do fogão 74
Tipos de programa 76
Tabela de tempo de cozedura 77
Manutenção e limpeza 78
Montagem da porta do forno 79
Limpeza e manutenção da porta de vidro na 80
Paredes catalíticas 80
Posições da grelha 81
Substituição da lâmpada do forno 81
Usar a chapa defletora do grelhador 82
Resolução de problemas 83
Regras de manuseamento 85
Recomendações de eciência energética 85
Eliminação amiga do ambiente 86
Informação sobre a embalagem 86
45
Page 46

PO
ADVERTÊNCIAS IMPORTANTES
1. A instalação e reparação devem ser sempre realizadas
por “ASSISTÊNCIA AUTORIZADA”. O fabricante não será
responsável pelas operações realizadas por pessoas não
autorizadas.
2. Deve ler cuidadosamente estas instruções de
funcionamento. Apenas desta forma pode usar o
aparelho em segurança e de forma correta.
3. O forno deverá ser usado de acordo com as instruções
de funcionamento.
4. Manter afastadas as crianças com menos de 8 anos
e os animais quando estiver a utilizar.
5. ADVERTÊNCIA: As partes acessíveis podem ficar quentes
enquanto usar o grelhador. Manter afastado de crianças.
6. ADVERTÊNCIA: Perigo de incêndio; não armazenar os
materiais sobre a superfície de cozedura.
7. ADVERTÊNCIA: O aparelho e as peças acessíveis
ficam quentes durante o funcionamento.
8. As condições de montagem deste dispositivo são
especificadas na etiqueta. (Ou na chapa de dados)
9. As partes acessíveis podem ficar quentes quando
o grelhador é usado. As crianças pequenas devem ser
mantidas afastadas.
10. ADVERTÊNCIA: Este aparelho é destinado para
cozinhar. Não deve ser usado para outros fins como para
aquecer uma sala.
46
Page 47

11. Não usar aparelhos de limpeza a vapor para limpar
o aparelho.
12. Assegurar que a porta do forno está completamente
fechada depois de colocar os alimentos dentro do forno.
13. NUNCA tentar apagar o fogo com água. Desligar
apenas o circuito do dispositivo e cobrir a chama com
uma cobertura ou uma manta corta-fogo.
14. Crianças menores de 8 anos de idade devem
ser mantidas afastadas, se não puderem ser vigiadas
continuamente.
15. Deve ser evitado tocar nos elementos de aquecimento.
16. CUIDADO: O processo de cozedura deve ser vigiado.
O processo de cozedura deve ser sempre vigiado.
17. Este dispositivo pode ser utilizado por crianças
com mais de 8 anos de idade, pessoas com problemas
físicos, auditivos ou mentais ou pessoas com falta de
experiência ou conhecimento; desde que o controlo
seja assegurado ou seja fornecida informação em relação
aos perigos.
18. Este dispositivo foi concebido apenas para uso
doméstico.
19. As crianças não devem brincar com o aparelho. A
limpeza ou manutenção do utilizador não deve ser feita
por crianças a menos que tenham mais de 8 anos e
sejam vigiadas por adultos.
20. Manter o aparelho e o respetivo cabo de alimentação
afastado das crianças com menos de 8 anos.
47
Page 48

PO
21. Colocar as cortinas, tules, papel ou qualquer
material inflamável (comburente) longe do aparelho
antes de começar a usar o aparelho. Não colocar
materiais comburentes ou inflamáveis sobre ou no
interior do aparelho.
22. Manter os canais de ventilação abertos.
23. O aparelho não é adequado para usar com um
temporizador externo ou sistema de controlo remoto
separado.
24. Não aquecer latas fechadas e frascos de vidro. A
pressão pode levar os frascos a explodir.
25. A pega do forno não é um secador de toalhas. Não
pendurar toalhas, etc. na pega do forno.
26. Não colocar os tabuleiros do forno, placas ou
folhas de alumínio diretamente sobre a base do forno.
O calor acumulado pode danificar a base do forno.
27. Ao colocar ou retirar alimentos do forno, etc., usar
sempre luvas de forno resistentes ao calor.
28. Não usar o produto em estados como sob influência
de medicamentos e/ou de álcool que possam afetar a
sua capacidade de discernimento.
29. Ter cuidado quando usar álcool nos seus alimentos.
O álcool irá evaporar a temperaturas elevadas e pode
incendiar-se provocando um incêndio, se entrar em
contacto com superfícies quentes.
30. Após cada utilização, verificar se a unidade está
desligada.
48
Page 49

31. Se o aparelho estiver defeituoso ou apresentar
danos visíveis, não utilizar o aparelho.
32. Não tocar na ficha com as mãos molhadas. Não
puxar o cabo para desligar, segurar sempre pela ficha.
33. Não usar o aparelho com o vidro da porta da frente
retirado ou partido.
34. Colocar o papel vegetal junto com o alimento num
forno pré-aquecido, colocando-o dentro de uma panela ou
num acessório de forno (tabuleiro, grelha de arame, etc.).
35. Não colocar sobre o aparelho objetos que as crianças
possam alcançar.
36. É importante colocar a grelha de arame e bandeja
corretamente nas prateleiras de arame e/ou colocar
corretamente o tabuleiro na prateleira. Colocar a
grelha ou o tabuleiro entre duas guias e verificar se
está equilibrada antes de colocar alimentos sobre ela.
37. Para evitar o risco de tocar nos elementos de
aquecimento do forno, remover as partes excedentes
do papel vegetal que ficar pendurado do acessório ou
recipiente.
38. Nunca o usar em temperaturas do forno mais
elevadas do que a temperatura máxima de uso indicada
no papel vegetal. Não colocar o papel vegetal na base
do forno.
39. Quando a porta estiver aberta, não colocar qualquer
objeto pesado sobre a porta ou permitir que as crianças
se sentem nela. Pode fazer com que o forno se vire ou
as dobradiças da porta fiquem danificadas.
49
Page 50

PO
40. Os materiais de embalagem são perigosos para as
crianças. Manter o material de embalagem afastado do
alcance das crianças.
41. Não usar produtos de limpeza abrasivos ou raspadores
metálicos afiados para limpar o vidro, pois os arranhões
que podem ocorrer na superfície do vidro da porta podem
provocar a quebra do vidro.
42. Não colocar o aparelho numa superfície coberta
com carpetes. As partes elétricas sobreaquecem, já
que não haverá ventilação a partir de baixo. Isto provocará
avaria do aparelho.
43. Não bater em superfícies de vidro de placas de
vitrocerâmica com um metal duro, a resistência pode
car danicada. Isso pode provocar um choque elétrico.
44. O utilizador não deve tratar do forno por si mesmo.
45. O uso deve ser cuidadoso ao limpar queimadores
a gás. Pode causar danos pessoais.
46. O alimento pode entornar quando o pé de forno é
desmontado ou partido, ter cuidado. Pode causar danos
pessoais.
47. Durante a utilização as superfícies interior e exterior
do forno cam quentes. Ao abrir a porta do forno, recuar
para evitar o vapor quente que sai do interior. Há risco
de queimadura.
48. A tampa superior do forno pode ser fechada por
um motivo, que não seja poder tropeçar nas panelas.
Recuar para evitar que os alimentos quentes lhe caiam
em cima. Há risco de queimadura.
50
Page 51

49. Não colocar objetos pesados quando a porta do
forno estiver aberta, risco de queda.
50. O utilizador não deve deslocar a resistência durante
a limpeza. Isso pode provocar um choque elétrico.
51. Não retirar os interruptores de ignição do aparelho.
Caso contrário, pode haver acesso a cabos elétricos ao
vivo. Isso pode provocar um choque elétrico.
52. A alimentação do forno pode ser desligada durante
qualquer trabalho de construção em casa. Depois de
concluir o trabalho, deve ser a assistência autorizada a
ligar de novo o forno.
53. Não colocar utensílios de metal, como faca,
garfo, colher sobre a superfície do aparelho, pois carão
quentes.
54. Para evitar o sobreaquecimento, o aparelho não
deve ser instalado atrás de uma cobertura decorativa.
55. Desligar o aparelho antes de retirar as proteções.
Depois de limpar, instalar as proteções de acordo com
as instruções.
56. O ponto de xação do cabo deverá ser protegido.
57. ADVERTÊNCIA: Não usar o forno e queimadores do
grelhador ao mesmo tempo.
58. Não deve cozinhar os alimentos diretamente sobre
o tabuleiro/grelha. Deve colocar os alimentos dentro ou
sobre ferramentas adequadas antes os pôr no forno.
59. Superfície quente, deixar arrefecer antes de fechar
a tampa.
51
Page 52

PO
Segurança elétrica
1. Ligar o aparelho a uma tomada com ligação à terra
protegida por um fusível, em conformidade com os
valores especificados no quadro de especificações
técnicas.
2. Pedir a um eletricista autorizado o equipamento de
ligação à terra. A nossa empresa não será responsável
pelos danos que serão incorridos devido ao uso do produto
sem ligação à terra de acordo com os regulamentos
locais.
3. Os interruptores do disjuntor do forno devem ser
colocados de forma que o utilizador final os possa
alcançar quando o forno estiver instalado.
4. O cabo de alimentação (o cabo com ficha) não deve
entrar em contacto com as partes quentes do aparelho.
5. Se o cabo de alimentação (o cabo com ficha)
estiver danificado, deve ser substituído pelo fabricante
ou pelo seu agente de assistência ou por pessoal igualmente
qualificado para evitar uma situação perigosa.
6. Nunca lavar o produto pulverizando-o ou deitando
água sobre o mesmo! Há um risco de eletrocução.
7. ADVERTÊNCIA: Para evitar choque elétrico, verificar
se o circuito do dispositivo está aberto antes de trocar a
lâmpada.
8. ADVERTÊNCIA: Desligar todas as ligações do circuito
de alimentação antes de aceder aos terminais.
9. ADVERTÊNCIA: Se a s8uperfície estiver partida, desligar
o aparelho para evitar risco de choque elétrico.
52
Page 53

10. Não usar cabos cortados ou danificados ou cabos
de extensão que não sejam o cabo original.
11. Assegurar que não há líquido ou humidade na tomada
onde a ficha do produto for instalada.
12. A superfície traseira do forno também aquece
quando o forno está a funcionar. As ligações elétricas
não devem tocar na superfície traseira, caso contrário
as ligações podem ficar danificadas.
13. Não apertar os cabos de ligação à porta do forno e
não os colocar sobre superfícies quentes. Se o cabo se
derreter, isto pode causar curto-circuito no forno e até
um incêndio.
14. Desligar a unidade da ficha durante a instalação,
manutenção, limpeza e reparação.
15. Se o cabo de alimentação estiver danificado, deve
ser substituído pelo fabricante ou pelo seu agente de
assistência ou uma pessoa igualmente qualificada de
modo a evitar alguma situação perigosa.
16. Assegurar que a ficha está firmemente inserida na
tomada de parede para evitar faíscas.
17. Não usar aparelhos de limpeza a vapor para limpar
o aparelho, caso contrário poderá ocorrer choque elétrico.
18. É necessária um interruptor unipolar capaz de
desligar a fonte de alimentação para a instalação. O
desligamento da fonte de alimentação deve ser fornecido
com um interruptor ou um fusível integrado instalado
na fonte de alimentação fixa de acordo com o código
do edifício.
53
Page 54

PO
19. O aparelho está equipado com um cabo de fio tipo “Y”.
20. As ligações fixas devem ser ligadas a uma fonte de
alimentação que permita desligamento unipolar. Para
aparelhos com categoria de sobretensão abaixo de III,
o dispositivo de desligamento deve ser ligado à fonte
de alimentação fixa de acordo com o código de fiação.
Segurança do gás
1. Este aparelho não está ligado a dispositivos de
exaustão de produtos de combustão. Este aparelho deve
ser ligado e instalado de acordo com os regulamentos de
instalação em vigor. Devem ser consideradas condições
referentes à ventilação.
2. Quando um aparelho de cozinhar a gás é utilizado;
são gerados produtos de humidade, calor e combustão
na divisão. Antes de mais nada, assegurar que a
cozinha é bem ventilada quando o aparelho funcionar
e manter as aberturas de ventilação natural ou instalar
um equipamento de ventilação mecânica.
3. Depois de usar o aparelho intensamente durante
um longo período de tempo, pode ser necessária
ventilação adicional. Por exemplo, abrir uma janela
ou ajustar uma velocidade superior para a ventilação
mecânica, se houver.
4. Este aparelho deve ser usado apenas em locais bem
ventilados de acordo com as normas vigentes. Deve ler
este manual antes de instalar ou usar este produto.
54
Page 55

5. Antes de posicionar o aparelho, assegurar que as
condições de rede locais (tipo de gás e pressão do gás)
cumpre os requisitos do aparelho.
6. O mecanismo não pode funcionar durante mais de
15 segundos. Se o queimador não estiver ligado após
15 segundos, parar o mecanismo e aguardar pelo menos
um minuto antes de tentar acender o queimador novamente.
7. Todos os tipos de operações a serem realizadas na
instalação de gás devem ser realizados por pessoas
autorizadas e competentes.
8. Este aparelho está ajustado para gás natural (GN).
Se precisar de usar o seu produto com um tipo de gás
diferente, terá que solicitar a assistência autorizada
para a conversão.
9. Para funcionamento adequado, o exaustor, o tubo
de gás e o grampo devem ser substituídos periodicamente de
acordo com as recomendações do fabricante e quando
necessário.
10. O gás deve queimar bem em produtos gasosos. O
gás bem queimado pode ser entendido a partir da chama
azul e da queima contínua. Se o gás não queimar
suficientemente, pode ser gerado monóxido de carbono
(CO). O monóxido de carbono é um gás incolor, inodoro e
muito tóxico; mesmo pequenas quantidades têm efeito letal.
11. Peça ao seu fornecedor de gás local os números
de telefone para emergências relacionadas com o gás e
as medidas a serem tomadas quando for detetado odor
a gás.
55
Page 56

PO
O que fazer quando for detetado odor a gás
1. Não usar chama livre e não fumar.
2. Não ligar nenhum interruptor elétrico.
(Por exemplo: interruptor da lâmpada ou campainha)
3. Não usar telefone ou telemóvel.
4. Abrir as portas e janelas.
5. Fechar todas as válvulas dos aparelhos que utilizam
gás e os contadores de gás.
6. Chamar os bombeiros de um telefone fora de casa.
7. Verificar todas as mangueiras e as suas ligações
contra fugas. Se ainda sentir cheiro a gás, sair de casa
e avisar os seus vizinhos.
8. Não entrar na casa até que as autoridades clarifiquem
se é seguro.
56
Page 57

Utilização prevista
1. Este produto é concebido para utilização doméstica.
Não é permitido o uso comercial do aparelho.
2. Este aparelho apenas deve ser usado para fins
culinários. Não deve ser usado para outros fins como
para aquecer uma sala.
3. Este aparelho não deve ser utilizado para aquecer
placas sob o grelhador, secar roupa ou toalhas
pendurando-as na pega ou para fins de aquecimento.
4. O fabricante não assumes responsabilidades por
qualquer dano devido a uso indevido ou inadequado.
5. Parte do forno da unidade pode ser usada para
descongelar, assar, fritar e grelhar alimentos.
6. A vida útil do produto que adquiriu é de 10 anos.
Este é o período para o qual as peças de reposição
necessárias para o funcionamento deste produto são
fornecidas pelo fabricante, conforme definido.
57
Page 58

PO
Ligação Elétrica
1. O seu forno necessita de 16 ou 32 amperes de acordo com a potência
do aparelho. Se necessário, é recomendada a instalação por um eletricista
qualicado.
2. O seu forno está ajustado de acordo com a alimentação elétrica de
220-240V CA/380-415V CA 50/60Hz. Se as redes forem diferentes deste
valor especicado, entrar em contacto com a assistência autorizada.
3. A ligação elétrica do forno só deve ser feita pelas tomadas com
sistema de terra instalado em conformidade com os regulamentos. Se
não houver nenhuma tomada adequada com o sistema de terra no local
onde o forno vai ser colocado, contactar imediatamente um eletricista
qualicado. O fabricante nunca será responsável pelos danos que surgirão
devido às tomadas ligadas ao aparelho sem sistema de ligação à terra.
Se as extremidades do cabo de ligação elétrica forem abertas, de acordo
com o tipo de aparelho, fazer um interruptor adequado instalado na rede
elétrica na qual todas as extremidades possam ser desligadas em caso de
ligação/desligamento de/para a rede elétrica.
4. Se o seu cabo de alimentação elétrica estiver com defeito, deve ser
substituído pela assistência autorizada ou eletricistas qualicados para
evitar perigos.
5. O cabo elétrico não deve tocar nas partes quentes do aparelho.
6. Deve ligar o seu forno numa atmosfera seca.
Esquema de ligação elétrica
220-240V~50/60Hz 220-240V~50/60Hz
220-240V~50/60Hz 220-240V~50/60Hz
Live
Phase
H05 VV-F 3G 4 mm² H05 VV-F 5G 1.5 mm²
H05 VV-F 3G 4mm² H05 VV-F 5G 1.5mm² H05 VV-F 4G 1.5mm² H05 VV-F 3G 1.5mm²
380-415V 3N~50/60Hz
Neutral
Neutre
Earth
Terre
Erdung
58
Neutral
Neutre
Earth
Terre
Erdung
H05 VV-F 4G 1.5 mm²
380-415V 2N~50/60Hz
L2
L1
Neutral
Neutre
Earth
Terre
Erdung
400V 3N~50/60Hz 400V 2N~50/60Hz
L3
L2
L1
L1
H05 VV-F 3G 1.5 mm²
Neutral
Neutre
Earth
Terre
Erdung
Page 59

Ligação Do Gás
ADVERTÊNCIA: Antes de iniciar qualquer trabalho relacionado com a
instalação de gás, desligar o fornecimento de gás. Risco de explosão.
Deve ligar o seu forno numa atmosfera seca.
1. Encaixe o grampo para a mangueira. Empurrar uma das mangueiras
até chegar ao nal do tubo.
2. Para o controlo de estanquidade; assegurar que os botões no painel
de controlo estão fechados, mas a garrafa de gás está aberta. Aplicar algumas bolhas de sabão na ligação. Se houver fuga de gás, haverá espuma
na área ensaboada.
3. O forno deve ser usado em local bem ventilado e deve ser instalado
sobre piso plano.
4. Voltar a inspecionar a ligação do gás.
5. Quando colocar o forno no local, assegurar que está ao nível do
contador. Colocá-lo ao nível do contador, ajustando os pés, se necessário.
6. Não fazer passar por áreas aquecidas as mangueira de gás e o cabo
elétrico do seu forno, especialmente pela parte de trás do forno. Não
deslocar o forno de gás ligado. Uma vez que ao forçar pode soltar a
mangueira, podendo ocorrer fuga de gás.
7. Deve usar mangueira exível para a ligação do gás.
Para ligação de GPL;
Para ligação GPL (garrafa), colocar abraçadeira de metal na mangueira proveniente
da garrafa de GPL. Colocar uma ponta
Tubo De Gás Principal
da mangueira no conector de entrada da
mangueira por trás do aparelho empur-
Vedante
Conector De Entrada
Da Mangueira
Abraçadeira De Metal
rando a extremidade depois de aquecer
a mangueira em água a ferver. Depois,
trazer a abraçadeira para o m da seção
na mangueira e apertá-la com chave de
Mangueira De Ligação GPL
fendas. O vedante e o conector de entrada
da mangueira, requeridos para a ligação,
são mostrados na imagem abaixo.
NOTA: O regulador a ser colocado na garrafa de GPL deve ter a caraterística
de 300 mmSS.
59
Page 60

PO
Para ligação de gás natural;
AVISO: A ligação de gás natural deve ser
feita por serviço autorizado. Para a ligação
Principal Gás
Vedante
Porca
Mangueira De Ligação
A Gás Natural
de gás natural, colocar vedante na porca
na ponta da mangueira de ligação de gás
natural. Para instalar a mangueira no tubo
de gás principal, rodar a porca. Completar
a ligação fazendo o teste de fuga de gás.
Mangueira de gás
Ligue o aparelho à torneira da canalização de
gás pelo caminho mais curto possível e de um
modo que garanta que não ocorrerá qualquer
fuga.
Para efetuar uma vericação de aperto e vedação
de segurança, certiquese de que os botões
no painel de controlo estão fechados e a botija
de gás está aberta.
AVISO: Ao efetuar uma vericação de fuga de
Figura 1
gás, nunca utilize qualquer espécie de isqueiro,
fósforo, cigarro ou substância combustível
semelhante.
Aplique espuma de sabão nos pontos de ligação.
Se existir qualquer tipo de fuga ocorrerá a
formação de bolhas.
Ao inserir o aparelho no local, assegurese de
que ele está ao mesmo nível da bancada. Se
necessário, ajuste as pernas de forma a nivelar
com a bancada.
Figura 2
Use o aparelho numa superfície nivelada e
num ambiente bem ventilado.
ADVERTÊNCIA: Antes de instalar o aparelho, verificar se as condições de
distribuição local (tipo de gás e pressão) estão de acordo com as definições
do produto.
60
Page 61

Operação de troca de bicos
1. Deve usar chave com cabeça especial para retirar e instalar os bicos.
(gura 3)
2. Deve retirar o bico (gura 4) do queimador com chave de bicos especial
e instalar o novo bico. (gura 5)
Figura 3
Figura 4
Figura 5
Ventilação do espaço
O ar necessário para queimar é recebido a partir do ar existente no
espaço e os gases libertados são diretamente libertados para o espaço.
Para um funcionamento seguro do seu produto, é condição essencial uma
boa ventilação do espaço. Se não for para ser utilizada uma janela para
ventilação do espaço, deve ser instalada ventilação adicional. No entanto,
se o espaço tiver uma porta a abrir para o exterior, não são necessários
orifícios de ventilação.
Dimensão do espaço Abertura de ventilação
Inferior a 5 m³ min. 100 cm²
Entre 5 m³ - 10 m³ min. 50 cm²
Superior a 10 m³ não é necessário
Em cave ou adega min. 65 cm²
61
Page 62

PO
Definição da taxa de fluxo de gás reduzida para as torneiras de fogão
1. Acender o queimador que deve ser ajustado e rodar o botão para a
posição reduzida.
2. Retirar o botão da torneira de gás.
3. Usar uma chave de fenda de tamanho apropriado para ajustar o parafuso
de ajuste da taxa de fluxo. Para GPL (butano-propano) rodar o parafuso
no sentido horário. Para gás natural, deve rodar uma vez o parafuso no
sentido anti-horário.
“O comprimento normal de uma chama reta na posição reduzida deve
ser de 6-7 mm.”
4. Se a chama estiver mais alta que a posição desejada, rodar o parafuso
no sentido horário. Se estiver mais baixa, rodar no sentido anti-horário.
5. Para o último controlo, levar o queimador para as posições de chama
alta e reduzida e verificar se a chama se mantém ou se apaga.
Dependendo do tipo de torneira usada no seu aparelho, a posição do
parafuso de ajuste pode variar.
Para ajustar o seu forno para o tipo de gás, fazer o ajuste para a chama
reduzida cuidadosamente rodando com uma chave de fenda pequena,
como mostrado abaixo, no parafuso no meio das torneiras de gás, bem
como trocar os bicos. (gura 6 e 7)
Figura 6 Figura 7
62
Page 63

Desmontagem do fundo do forno a gás e queimador superior e Instalação
do injetor
Desmontagem do queimador superior:
Remova o parafuso com uma chave de fendas, conforme se mostra na
gura 8. Puxeo queimador para si e remova-o da sua base, como pode ver
na gura 9. Usando uma chave tubular, retire o injetor como é mostrado
na gura 10. Siga os passos acima na ordem inversa para reinstalar o
queimador.
Figura 8
Figura 9
Figura 10
Desmontagem do queimador inferior
A tampa do queimador inferior é xada com 2 parafusos; remova-os,
conforme pode ver na gura 11. Puxe a tampa para cima e remova
conforme mostra a gura 12. Puxe o queimador para si e remova-o da
sua base, como pode ver na gura 13. Usando uma chave tubular, retire
o injetor como é mostrado na gura 14. Siga os passos acima na ordem
inversa para reinstalar o queimador.
Figura 11
Figura 12
Figura 13
Figura 14
63
Page 64

PO
APRESENTAÇÃO DO APARELHO
12
13
14
9.1
1
2
3
4
5
6
7
8
9
15
16
1. Porta de vidro
(Porta em chapa metálica)
2. Denição do termóstato
3. Denição do forno
4. Controlo da secção do
fogão Interruptores
5. Isqueiro do botão de
pressão
9.2
6. Porta
7. Pega
8. Pé de plástico
9. Porta do compartimento
inferior
9.1 Gaveta *
9.2 Porta de aba *
10. Lâmpada
64
10
11
11. Grelhador
12. Queimador grande
13. Queimador médio
14. Queimador auxiliar
15. Queimador WOK *
16. Placa de aquecimento *
(Ø145 mm ou Ø185 mm)
Page 65

Acessórios
Tabuleiro fundo *
Utilizado para produtos de pastelaria, grandes assados,
alimentos cozidos com água. Também pode ser utilizado
como recipiente de recolha de óleo se assar diretamente no
grelhador bolos, alimentos congelados e pratos de carne.
Tabuleiro / Tabuleiro vidro *
Utilizado para produtos de pastelaria (bolachas, biscoitos,
etc), alimentos congelados.
Tabuleiro redonda *
Utilizado para produtos de pastelaria alimentos congelados.
Grelha de arame
Utilizada para assar ou colocar alimentos que serão
assados, gratinados e congelados no rack pretendido.
Friso telescópica *
Os tabuleiros e racks de arame podem ser removidos e
instalados facilmente graças ao friso telescópico.
Grelha de arame sobre o tabuleiro *
Os alimentos que aderem ao cozinhar, como bifes, devem
ser colocados na grelha do tabuleiro. Desse modo impede
se o contacto do alimento com o tabuleiro.
Pega do tabuleiro *
É usada para segurar tabuleiros quentes.
Unidade de suporte da cafeteira *
Pode ser usada para cafeteiras.
65
Page 66

PO
Funções Técnicas Do Seu Forno
Especicações 50x55 50x60 60x60
Largura exterior 500 mm 500 mm 600 mm
Profundidade exterior 565 mm 630 mm 630 mm
Altura exterior 855 mm 855 mm 855 mm
Potência da lâmpada 15-25 W
Elemento de aquecimento inferior 1000 W 1000 W 1200 W
Elemento de aquecimento superior 800 W 800 W 1000 W
Elemento de aquecimento turbo ----- 1800 W 2200 W
Elemento de aquecimento do grelhador 1500 W 1500 W 2000 W
Tensão de alimentação 220-240V AC/380-415V AC 50/60 Hz
Placa de aquecimento 145 mm * 1000 W
Placa de aquecimento 180 mm * 1500 W
Placa de aquecimento rápida 145 mm * 1500 W
Placa de aquecimento rápida 180 mm * 2000 W
ADVERTÊNCIA: Deve ser considerada esta tabela para a modicação ser
feita pela assistência autorizada. O fabricante não pode ser responsabilizado
por qualquer problema que surja devido a qualquer modicação defeituosa.
ADVERTÊNCIA: Para aumentar a qualidade do produto, as especicações
técnicas podem ser alteradas sem aviso prévio.
ADVERTÊNCIA: Os valores fornecidos com o aparelho ou dos documentos
que a acompanham são leituras de laboratório em conformidade com as
respetivas normas. Estes valores podem diferir dependendo das condições
de utilização e ambientais.
66
Page 67

Queimador
Especicações
G20,20 mbar
G25,25 mbar
Gás natural Gás natural Gás natural
Injetor 1,40 mm 1,28 mm 1,60 mm
G20,25 mbar G20,13 mbar
Wok
Queimador
Rápido
Queimador
Semi-rápido
Queimador
Auxiliar
Queimador
Fluxo de
gás
Potência 3,50 kW 3,50 kW 3,50 kW
Injetor 1,15 mm 1,10 mm 1,45 mm
Fluxo de
gás
Potência 2,90 kW 2,90 kW 2,90 kW
Injetor 0,97 mm 0,92 mm 1,10 mm
Fluxo de
gás
Potência 1,70 kW 1,70 kW 1,70 kW
Injetor 0,72 mm 0,70 mm 0,85 mm
Fluxo de
gás
Potência 0,95 kW 0,95 kW 0,95 kW
Injetor 1,00 mm 0,92 mm 1,35 mm
0,333 m³/h 0,333 m³/h 0,333 m³/h
0,276 m³/h 0,276 m³/h 0,276 m³/h
0,162 m³/h 0,162 m³/h 0,162 m³/h
0,96 m³/h 0,96 m³/h 0,96 m³/h
Grelhador
Queimador
Forno
Queimador
Fluxo de
gás
Potência 2,00 kW 2,00 kW 2,00 kW
Injetor 1,10 mm 1,00 mm 1,50 mm
Fluxo de
gás
Potência 2,50 kW 2,50 kW 2,50 kW
0,196 m³/h 0,196 m³/h 0,196 m³/h
0,235 m³/h 0,235 m³/h 0,235 m³/h
67
Page 68

PO
Queimador
Especicações
Wok
Queimador
Rápido
Queimador
Semi-rápido
Queimador
Auxiliar
Queimador
G30,28-30 mbar
G31,37 mbar
GPL GPL GPL
Injetor 0,96 mm 0,76 mm 0,96 mm
Fluxo de
gás
Potência 3,50 kW 3,50 kW 3,50 kW
Injetor 0,85 mm 0,75 mm 0,85 mm
Fluxo de
gás
Potência 2,90 kW 2,90 kW 2,90 kW
Injetor 0,65 mm 0,60 mm 0,65 mm
Fluxo de
gás
Potência 1,70 kW 1,70 kW 1,70 kW
Injetor 0,50 mm 0,43 mm 0,50 mm
Fluxo de
gás
Potência 0,95 kW 0,95 kW 0,95 kW
254 g/h 254 g/h 254 g/h
211 g/h 211 g/h 211 g/h
124 g/h 124 g/h 124 g/h
69 g/h 69 g/h 69 g/h
G30,50 mbar G30,37 mbar
Injetor 0,70 mm 0,60 mm 0,65 mm
Grelhador
Queimador
Forno
Queimador
Fluxo de
gás
Potência 2,00 kW 2,00 kW 2,00 kW
Injetor 0,75 mm 0,65 mm 0,70 mm
Fluxo de
gás
Potência 2,50 kW 2,50 kW 2,50 kW
145 g/h 145 g/h 145 g/h
182 g/h 182 g/h 182 g/h
ADVERTÊNCIA: Os valores de diâmetro gravados no injetor são especicados
sem vírgula. Por exemplo; O diâmetro de 1,70 mm é especicado como
170 no injetor.
68
Page 69

INSTALAÇÃO DO SEU FORNO
Verificar se a instalação elétrica é adequada para colocar o aparelho
em condições de funcionamento. Se a instalação elétrica não for adequada,
contactar um eletricista e um canalizador para fazer as adequações
necessárias. O fabricante não será responsável por danos caudados por
operações realizadas por pessoas não autorizadas.
ADVERTÊNCIA: É responsabilidade do cliente preparar o local onde o
produto será colocado e também preparar a instalação elétrica.
ADVERTÊNCIA: Devem ser seguidas as regras das normas locais sobre as
instalações elétricas durante a instalação do produto.
ADVERTÊNCIA: Verificar se há algum dano no dispositivo antes de o instalar.
Não instalar o produto se estiver danificado. Produtos danificados causam
riscos à sua segurança.
Local correto para instalação e advertências importantes
Os pés do aparelho não devem car sobre superfícies macias, como
tapetes. O piso da cozinha deve ser durável para suportar o peso da
unidade e de qualquer outro utensílio de cozinha que possa ser usado no
forno.
O aparelho deve ser usado com uma folga mínima de 400 mm sobre as
superfícies superiores do fogão e a 65 mm das superfícies laterais dentro
de um móvel de cozinha.
O aparelho é adequado para uso em ambas as paredes laterais, sem
qualquer suporte, ou sem ser instalado numa estrutura. Se for instalado
um exaustor ou aspirador acima do fogão, seguir as instruções do
fabricante para a altura da montagem. (mín. 650 mm)
69
Page 70

PO
400 mm mín.
65 mm mín. 65 mm mín.
650 mm mín.
ADVERTÊNCIA: O mobiliário de cozinha perto do aparelho deve ser resistente
ao calor.
ADVERTÊNCIA: Não instale o aparelho ao lado de frigoríficos ou refrigeradores.
O calor irradiado pelo aparelho aumenta o consumo de energia dos
dispositivos de refrigeração.
ADVERTÊNCIA: Não usar a porta e/ou a pega para transportar ou mover
o aparelho.
70
Page 71

Ilustração Da Fixação Da Corrente
Antes de utilizar o aparelho, a m de garantir
uma utilização segura, certique-se deque
xou o aparelho à parede usando a corrente
e o parafuso em gancho que são fornecidos.
Certique-se de que o gancho é aparafusado
à parede de forma segura.
PAINEL DE CONTROLO
0
1 2 3 4 5 6 7
1. Termóstato
2. Botão de seleção de função
3. Temporizador mecânico
5. Queimador frontal esquerdo
6. Queimador frontal direito
7. Queimador traseiro direito
4. Queimador traseiro esquerdo
ADVERTÊNCIA: O painel de controlo acima é apenas para fins de ilustração.
Considerar o painel de controlo no seu dispositivo.
Termóstato: Usado para determinar a temperatura do
prato a ser cozinhado no forno. Depois de colocar o
alimento no interior do forno, rodar o interruptor para
ajustar a definição da temperatura pretendida entre
40-240 °C. Para temperaturas de cozedura de alimentos
diferentes, consultar a tabela de cozedura.
71
Page 72

PO
Temporizador mecânico*: Usado para determinar
o período para cozinhar no forno. Quando o tempo
ajustado terminar, a energia dos aquecedores é
desligada e é emitido um sinal sonoro de aviso. O
temporizador mecânico pode ser ajustado para o período
pretendido entre 0-90 minutos. Para os períodos de
cozedura, consultar as tabelas de cozedura.
USAR A SECÇÃO DO FORNO
Usar Os Queimadores Do Forno
1. Se seu forno estiver equipado com queimadores que funcionam a
gás, deve ser usado o botão apropriado para acender os queimadores.
Alguns modelos têm ignição automática a partir do botão; É fácil acender
o queimador rodando o botão. Além disso, os queimadores podem ser
acesos premindo o botão de ignição ou com um fósforo.
2. Não usar continuamente o acendedor durante mais de 15 segundos.
Se o queimador não acender, esperar um minuto no mínimo antes de
tentar de novo. Se o queimador se apagar por qualquer motivo, fechar
a válvula de controlo de gás e aguardar no mínimo um minuto antes de
tentar novamente.
Usar Os Elementos De Aquecimento Do Forno
1. Quando o forno funciona pela primeira vez, será espalhado um odor,
que será originado pelo uso dos elementos de aquecimento. Para se livrar
disto, ligá-lo a 240° C durante 45 a 60 minutos enquanto estiver vazio.
2. O botão de controlo do forno deve ser posicionado no valor pretendido;
caso contrário, o forno não funciona.
3. Tipos de refeições, tempos de cozedura e posições do termóstato são
dadas na tabela de cozedura. Os valores indicados na tabela de cozedura
são valores caraterísticos e foram obtidos como resultado dos ensaios
realizados no nosso laboratório. Pode encontrar diferentes sabores
adequados ao seu gosto, dependendo dos seus hábitos culinários e de uso.
4. Pode fazer frango rotativamente no seu forno através dos acessórios.
5. Tempos de cozedura: Os resultados podem mudar de acordo com a
tensão da zona e o material com qualidade, quantidade e temperaturas
diferentes.
72
Page 73

6. Enquanto a cozedura estiver a ser feita no forno, a tampa do forno
não deve ser aberta com frequência. Caso contrário, a circulação do calor
pode ser desequilibrada e os resultados podem alterar-se.
Usar O Grelhador
1. Quando colocar a grelha na prateleira superior, os alimentos na grelha
não devem tocar na grelha.
2. Pode pré-aquecer durante 5 minutos enquanto grelhar. Se necessário,
pode voltar os alimentos ao contrário.
3. Os alimentos devem estar no centro da grelha para fornecerem um
uxo máximo de ar através do forno.
Ligar o grelhador;
1. Colocar o botão de função sobre o símbolo do grelhador.
2. Em seguida, denir a temperatura do grelhador pretendida.
Desligar o grelhador;
Colocar o botão de função na posição desligado.
ADVERTÊNCIA: Manter a porta do forno fechada enquanto estiver a grelhar.
(Grelhador elétrico)
ADVERTÊNCIA: Manter a porta do forno aberta enquanto estiver a grelhar.
(Grelhador a gás)
Usar O Assador De Frango *
Figura 15
Colocar o espeto no suporte. Deslizar o
espeto rotativo no forno no nível pretendido.
Localizar uma caçarola no fundo para recolher
a gordura. Adicione um pouco de água na
caçarola para facilitar a limpeza. Não
esquecer de retirar a parte de plástico do
espeto. Depois de grelhar, enroscar a pega
de plástico no espeto e retirar os alimentos
do forno.
73
Page 74

PO
Usar A Secção Do Fogão
Usar os queimadores a gás
FFD
Dispositivo de segurança de corte de chama (FDD);
funciona instantaneamente quando o mecanismo
de segurança é ativado devido ao excesso de líquido
sobre as placas superiores.
1. As válvulas que controlam os fogões a gás possuem mecanismo de
segurança especiais. Para acender o fogão, premir sempre o interruptor
para a frente e levá-lo para o símbolo de chama, rodando no sentido
anti-horário. Devem funcionar todos os isqueiros e apenas acender-se o
queimador que está a controlar. Manter o interruptor premido até que a
ignição seja realizada. Premir o botão do isqueiro e rodar o botão no sentido
anti-horário.
2. Não usar continuamente o acendedor durante mais de 15 segundos.
Se o queimador não acender, esperar um minuto no mínimo antes de
tentar de novo. Se o queimador se apagar por qualquer motivo, fechar
a válvula de controlo de gás e aguardar no mínimo um minuto antes de
tentar novamente.
3. Nos modelos com sistema de segurança de gás, quando a chama do
queimador se extingue, a válvula de controlo corta o gás automaticamente.
Para operar os queimadores com sistema de segurança de gás, deve premir
o botão e rodar no sentido anti-horário. Após a ignição, deve esperar cerca
de 5 a 10 segundos para ativação dos sistemas de segurança de gás. Se
o queimador se apagar por qualquer motivo, fechar a válvula de controlo
de gás e aguardar no mínimo um minuto antes de tentar novamente.
4. Fechado Totalmente aberto Semi-aberto
5. Antes de usar o seu fogão, assegurar que as tampas dos queimadores
estão bem posicionadas. A colocação correta das tampas dos queimadores é mostrada abaixo.
Figura 16 Figura 17
74
Page 75

Usar Placas De Aquecimento
Nível 1 Nível 2 Nível 3 Nível 4 Nível 5 Nível 6
Ø80 mm 200 W 250 W 450 W --- --- ---
Ø145 mm 250 W 750 W 1000 W --- --- ---
Ø180 mm 500 W 750 W 1500 W --- --- ---
Ø145 mm rápido 500 W 1000 W 1500 W --- --- ---
Ø180 mm rápido 850 W 1150 W 2000 W --- --- ---
Ø145 mm 95 W 155 W 250 W 400 W 750 W 1000 W
Ø180 mm 115 W 175 W 250 W 600 W 850 W 1500 W
Ø145 mm rápido 135 W 165 W 250 W 500 W 750 W 1500 W
Ø180 mm rápido 175 W 220 W 300 W 850 W 1150 W 2000 W
Ø220 mm 220 W 350 W 560 W 910 W 1460 W 2000 W
1. As placas de aquecimento elétricas têm padrão de 6 níveis de
temperatura. (como descrito aqui acima)
2. Ao usar pela primeira vez, ligar a sua placa elétrica na posição
6 durante 5 minutos. Isto fará com que o agente na sua placa de
aquecimento, que é sensível ao calor, seja endurecido pela queima.
3. Usar panelas de fundo plano que contactam plenamente com o calor,
tanto quanto possível, para poder usar a energia de forma mais produtiva.
Dimensões Das Panelas
50*55 50*60 60*60
Queimador
pequeno
Queimador
normal
Queimador
grande
Queimador
WOK
12-18 cm 12-18 cm 12-18 cm
18-20 cm 18-20 cm 18-20 cm
22-24 cm 22-26 cm 22-26 cm
24-28 cm --- 24-26 cm
Incorreto Incorreto Incorreto Correct
75
Page 76

PO
TIPOS DE PROGRAMA
0
Espeto rotativo Ventoinha
Botão de função: Usado para determinar os aquecedores
que serão usados para cozinhar o prato a ser cozinhado
no forno. Os tipos de programa do aquecedor neste
botão e as suas funções são descritos abaixo. Todos os
tipos de aquecedores e tipos de programa compostos
por esses aquecedores podem não estar disponíveis
em todos os modelos.
Elementos de aquecimento
inferior e superior
Lâmpada
Ventoinha e elemento de
aquecimento inferior
Elemento de aquecimento do
grelhador
Grelhador e lâmpada
Temporizador
Chama Isqueiro de ignição
Ventoinha e aquecedor turbo
Ventoinha e elemento de
aquecimento superior-inferior
Grelhador e ventoinha
Grelhador
Elemento de aquecimento
superior
Elemento de aquecimento
inferior
ADVERTÊNCIA: Todos os tipos de aquecedores e tipos de programa
compostos por esses aquecedores podem não estar disponíveis em todos
os modelos.
76
Page 77

TABELA DE TEMPO DE COZEDURA
AVISO: O forno deve ser pré-aquecido por 10 minutos antes de se
introduzir o alimento.
Refeições
Bolo Estático / Estático+Ventilador 170-180 2 35-45
Pequenos bolos Estático/ Turbo+Ventilador 170-180 2 25-30
Empada Estático / Estático+Ventilador 180-200 2 35-45
Pastelaria Estático 180-190 2 25-30
Bolinhos Estático 170-180 3 20-25
Tarte de maçã Estático / Turbo+Ventilador 180-190 2 50-70
Pão de Ló Estático 200/150* 2 20-25
Pizza Estático+Ventilador 180-200 3 20-30
Lasagna Estático 180-200 2 25-40
Merengue Estático 100 2 60
Frango Estático+Ventilador / Turbo+Venti. 180-190 2 45-50
Função De
Cozedura
Temperatura
(°C)
Posição Da
Prateleira
Tempo
(Min.)
Frango grelhado ** Grade 200-220 4 25-30
Peixe grelhado ** Grade+Ventilador 200-220 4 25-30
Filé mignon ** Grade+Ventilador Max. 4 15-20
Almôndega ** Grade Max. 4 20-25
* Sem pré-aquecimento Metade da cozedura deve ser a 200 °C e, em
seguida, a segunda metade deve ser de 150 °C.
** Durante a metade da cozedura, a refeição deve ser voltada.
77
Page 78

PO
MANUTENÇÃO E LIMPEZA
1. Desligar da tomada a cha que fornece eletricidade ao forno.
2. Enquanto o forno estiver a funcionar ou pouco depois de começar a
funcionar, ca extremamente quente. Deve evitar tocar nos elementos de
aquecimento.
3. Nunca limpar a parte interior, o painel, a tampa, os tabuleiros e todas
as outras partes do forno com ferramentas como escova dura, malha de
limpeza ou faca. Não usar produtos de limpeza ou detergentes abrasivos.
4. Depois de limpar as partes interiores do forno com um pano com sabão,
lavá-lo e secá-lo bem com um pano macio.
5. Limpar as superfícies de vidro com substâncias de limpeza de vidro
especiais.
6. Não limpar o seu forno com equipamentos de limpeza a vapor.
7. Antes de abrir a tampa superior do forno, limpar o líquido derramado
para fora da tampa. Além disso, antes de fechar a tampa, assegurar que
a mesa do fogão está sucientemente fria.
8. Nunca usar agentes inamáveis como ácido, diluente e gasolina ao
limpar o seu forno.
9. Não lavar qualquer peça do seu forno na máquina de lavar loiça.
10. Para limpar a tampa frontal do vidro do forno; Retirar os parafusos
de xação que xam o manípulo com uma chave de fendas e retirar a
porta do forno. Em seguida, limpar e enxaguar bem. Depois de secar,
colocar o vidro do forno corretamente e voltar a instalar a pega.
Figura 18 Figura 19
Figura 20
78
Page 79

Montagem Da Porta Do Forno
Figura 21
Figura 22
Figura 21.1 Figura 21.2 Figura 22.1 Figura 22.2
Puxe a porta do
forno para si e abra
a completamente.
Em seguida, puxe
a fechadura em
dobradiça para cima,
conforme mostrado
na Figura 21.1,
usando uma chave
de fendas e abra
a fechadura.
Rode a fechadura em
dobradiça para o seu
ângulo mais amplo,
como mostra
a Figura 21.2
Coloque ambas as
dobradiças da porta
do forno na mesma
posição.
Em seguida, feche
a porta do forno
até que ela assente
sobre a fechadura em
dobradiça, conforme
mostra a Figura 22.1.
Para remover a porta
do forno, puxe a porta
para cima usando
as duas mãos, como
mostra a Figura 22.2
quando a porta atingir
uma posição perto da
posição fechada.
Para recolocar a porta do forno na posição, siga os passos acima na ordem inversa.
79
Page 80

PO
Limpeza E Manutenção Da Porta De Vidro Na Frente Do Forno
Remova o perl pressionando as patilhas de plástico dos lados esquerdo
e direito,como mostra a gura 23 e puxando o perl para si, como pode
ver na gura 24. Em seguida,retire o vidro interior conforme se vê na
gura 25. Se necessário, o vidro do meiopode ser removido da mesma
forma. Após a conclusão da limpeza e manutenção, voltea montar o vidro
e o perl pela ordem inversa.Certique-se de que o perl está devidamente
colocado no seu lugar.
2
1
Figura 23 Figura 24 Figura 25
Paredes Catalíticas *
As paredes catalíticas estão localizadas
à esquerda e à direita da cavidade sob a
guias. As paredes catalíticas erradicam
o mau cheiro e obtêm o melhor desempenho do fogão. As paredes catalíticas
também absorvem os resíduos de óleo e
limpam o seu fogão enquanto ele está a
funcionar.
Figura 26
Remover as paredes catalíticas
Para remover as paredes catalíticas, as guias têm de ser puxadas para
fora. Assim que as guias são puxadas para fora, as paredes catalíticas são
soltas automaticamente. As paredes catalíticas têm de ser mudadas ao
m de 2-3 anos.
80
Page 81

Posições Da Grelha
É importante colocar corretamente a grelha de arame no forno. Não permitir que
Prateleira 4
Prateleira 3
Prateleira 2
Prateleira 1
a grelha entre em contacto com a parede
traseira do forno. As posições da grelha são
mostradas na figura seguinte. Pode colocar
um tabuleiro fundo ou um tabuleiro normal
nas grelhas de arame inferior e superior.
Instalar e retirar as grelhas de arame
Para retirar as grelhas de arame, premir os clipes mostrados com setas
na gura, retirar primeiro o lado inferior e depois o superior do local de
instalação. Para instalar grelhas de arame; inverter o procedimento para
a remoção das grelhas de arame.
Substituição Da Lâmpada Do Forno
AVISO: Para evitar choques eléctricos, certifique-se que o circuito do
aparelho está aberto antes de trocar a lâmpada. (o circuito aberto significa
que a energia está desligada)
Primeiro, desligue a alimentação do aparelho e certifique-se que o mesmo
está arrefecido.
Remova o vidro de proteção rodando conforme indicado na figura do
lado esquerdo. Se tiver dificuldades para o rodar, utilize luvas de plástico
para a ajudar na tarefa.
Em seguida, remova a lâmpada rodando, instale a lâmpada nova com as
mesmas especificações.
Reinstale a proteção do vidro, ligue o cabo de alimentação do aparelho à
tomada elétrica e conclua a substituição. Agora pode utilizar o seu forno.
Lâmpada Tipo G9 Lâmpada Tipo E14
220-240 V, AC
15-25 W
Figura 27
81
220-240 V, AC
15 W
Figura 28
Page 82

PO
Usar A Chapa Deetora Do Grelhador *
1. Um painel de segurança é projetado para proteger o painel de controlo
e os botões quando o forno estiver no modo de grelhador. (gura 29)
2. Deve usar este painel de segurança para evitar que o calor danique
o painel de controlo e os botões quando o forno estiver no modo de
grelhador.
ADVERTÊNCIA: As partes acessíveis podem car quentes quando o
grelhador é usado. Manter as crianças afastadas.
3. Colocar o painel de segurança sob o painel de controlo abrindo o vidro
da tampa frontal do forno. (gura 30)
4. Em seguida, xar o painel de segurança entre o forno e a tampa frontal,
fechando suavemente a tampa. (gura 31)
5. É importante para cozinhar que mantenha a tampa aberta na distância
especicada quando cozinhar em modo de grelhador.
6. O painel de segurança fornecerá uma condição ideal para cozinhar,
protegendo o painel de controlo e os botões.
ADVERTÊNCIA: Se o fogão tiver a opção “Grelhador fechado funcionou”
com termóstato, pode manter a porta do forno fechada durante o funcionamento;
neste caso, a chapa defletora do grelhador será desnecessária.
Figura 29 Figura 30 Figura 31
82
Page 83

RESOLUÇÃO DE PROBLEMAS
Pode resolver os problemas que pode encontrar no seu produto verificando
os seguintes pontos antes de chamar a assistência técnica.
Pontos de verificação
Caso tenha algum problema com o forno, verificar primeiro a tabela
abaixo e experimentar as sugestões.
Problema Causa Possível O que fazer
Fonte de alimentação não disponível. Vericar a fonte de alimentação.
Vericar se a válvula principal do
gás está aberta.
O forno não funciona.
Fornecimento de gás não disponível.
Vericar se a mangueira de gás
está dobrada ou torcida.
Assegurar que a mangueira de gás
está ligada ao forno.
Vericar se está a ser usada a
válvula adequada do gás.
O forno para durante a cozedura. A cha sai da tomada da parede.
Funcionamento contínuo durante
muito tempo.
Desliga-se durante a cozedura.
Mais do que uma cha numa
tomada de parede.
A porta do forno não está a abrir
adequadamente.
Isqueiro não está a funcionar.
Choque elétrico quando tocar no
forno.
Resíduos alimentares presos entre
a porta e a cavidade interior.
Extremidades ou corpo das chas
de ignição estão entupidos.
Tubos dos queimadores de gás
estão entupidos.
Ligação à terra não adequada.
Está a ser usada tomada de parede
sem ligação à terra.
83
Voltar a instalar a cha na tomada
de parede.
Deixar o forno arrefecer após
longos ciclos de cozedura.
Usar apenas uma cha para cada
tomada de parede.
Limpar bem o forno e tentar
voltar a abrir a porta.
Limpar as extremidades ou o corpo
das chas de ignição dos queimadores a gás.
Limpar os tubos dos queimadores
de gás.
Assegurar que a alimentação está
ligada à terra adequadamente.
Page 84

PO
Problema Causa Possível O que fazer
Está a pingar água.
Vapor a sair de uma ssura na
porta do forno.
Água existente no interior do forno.
Sob certas condições, pode ser
gerada água ou vapor, dependendo
do alimento a ser cozinhado. Isto
não é uma avaria do aparelho.
Porta do forno está aberta. Fechar a porta e reiniciar.
Deixar o forno arrefecer e, em
seguida, secar com um pano da
loiça.
Forno não aquece.
Fum a sair durante o funcionamento.
Quando o forno funciona odor a
queimado ou plástico sai.
O forno não cozinha bem.
Controlos do forno não estão
ajustados corretamente.
Fusível desarmado ou disjuntor
desligado.
Quando o forno funcionar pela
primeira vez.
Alimento no aquecedor.
Estão a ser usados dentro do
forno acessórios de plástico ou
outros não resistentes ao calor.
Porta do forno é aberta.
Frequentemente durante a cozedura.
Ler a secção referente ao funcionamento do forno e reiniciar o forno.
Substituir o fusível ou reiniciar o
disjuntor. Se isto se repetir frequentemente, ligar a um eletricista.
Fumo sai dos aquecedores. Isto
não é uma avaria. Após 2-3 ciclos
já não haverá fumo.
Deixar o forno arrefecer e limpar
resíduos de alimentos do aquecedor.
A temperaturas elevadas, usar
acessórios de vidro adequados.
Não abrir frequentemente a porta
do forno se o alimento que estiver
a cozinhar não precisar de ser
rodado. Se abrir a porta frequentemente a temperatura interior cai
e consequentemente o resultado
da cozedura será inuenciado.
A luz interior está fraca ou não
funciona.
Objeto estranho que cobre a
lâmpada durante a cozedura.
A lâmpada pode estar fundida.
84
Limpar a superfície interior do
forno e vericar novamente.
Substituir por uma lâmpada com
as mesmas especicações.
Page 85

REGRAS DE MANUSEAMENTO
1. Não usar a porta e/ou a pega para transportar ou mover o aparelho.
2. Realizar a movimentação e transporte na embalagem original.
3. Prestar muita atenção ao aparelho durante o carregamento/
descarregamento e manuseio.
4. Assegurar que a embalagem está rmemente fechada durante o
manuseio e transporte.
5. Proteger de fatores externos (tais como humidade, água, etc.) que
possam danicar a embalagem.
6. Ter cuidado para não danicar o aparelho devido a colisões, choques,
quedas, etc. durante o manuseio e transporte e para não o partir ou
deformar durante a operação.
RECOMENDAÇÕES DE EFICIÊNCIA ENERGÉTICA
Os seguintes detalhes irão ajudar a utilizar o produto ecológica e
economicamente.
1. Usar recipientes de cor escura e esmalte que conduzam melhor o
calor no forno.
2. Ao cozinhar os seus alimentos, se a receita ou o manual do utilizador
indicar que o pré-aquecimento é necessário, pré-aqueça o forno.
3. Não abrir frequentemente a porta do forno enquanto cozinhar.
4. Tentar não cozinhar simultaneamente vários pratos no forno. Pode
cozinhar ao mesmo tempo colocando dois tabuleiros na grelha de arame.
5. Cozinhar vários pratos sucessivamente. O forno não perderá calor.
6. Desligar o forno alguns minutos antes de terminar o tempo de
cozedura. Neste caso, não abrir a porta do forno.
7. Descongelar os alimentos congelados antes de cozinhar.
85
Page 86

PO
ELIMINAÇÃO AMIGA DO AMBIENTE
Elimine a embalagem em condições amigas do ambiente
Este aparelho está etiquetado de acordo com a Diretiva
Europeia 2012/19/UE relativa a aparelhos elétricos e
eletrónicos usados (Resíduos de Equipamentos Elétricos
e eletrónicos REEE). As orientações determinam o
enquadramento para a devolução e reciclagem de aparelhos elétricos aplicável em toda a UE.
INFORMAÇÃO SOBRE A EMBALAGEM
Os materiais de embalagem do produto são fabricados a partir de materiais
recicláveis, de acordo com as nossas Normas Ambientais Nacionais. Não
elimine os materiais de embalagem junto com o lixo doméstico ou outros.
Leve-os aos pontos de recolha de material de embalagem indicados pelas
autoridades locais.
86
 Loading...