

Page 1

IT
Guida pratica all’uso
EN
User instructions
LAVASTOVIGLIE
DISHWASHER
Page 2

Complimenti,
con l'acquisto di questo elettrodomestico Candy, Lei ha dimostrato di non accettare compromessi: Lei vuole il meglio.
Candy è lieta di proporLe questa nuova lavastoviglie, frutto di anni di ricerche e di esperienze maturate sul mercato, a
contatto diretto con i Consumatori.
Lei ha scelto la qualità, la durata e le elevate prestazioni che questa lavastoviglie Le offre.
Candy Le propone inoltre una vasta gamma di elettrodomestici:
lavatrici, lavastoviglie, lavasciuga, cucine, forni a microonde, forni e piani di cottura, frigoriferi e congelatori.
Chieda al Suo Rivenditore il catalogo completo dei prodotti Candy.
La preghiamo di leggere attentamente le avvertenze contenute nel presente libretto in quanto forniscono importanti indicazioni
riguardanti la sicurezza di installazione, d'uso, di manutenzione ed alcuni utili consigli per il migliore utilizzo della lavastoviglie.
Conservi con cura questo libretto per ogni ulteriore consultazione.
Servizio Assistenza Clienti
CERTIFICATO DI GARANZIA CONVENZIONALE: cosa fare?
Il Suo prodotto è garantito, alle condizioni e nei termini riportati sul certificato inserito nel prodotto ed in base alle previsioni del
decreto legislativo 24/02, nonché del decreto legislativo 6 settembre 2005, n. 206, per un periodo di 24 mesi decorrenti dalla
data di consegna del bene.
Così come riportato nei testi dei Decreti Legislativi citati, il certificato di garanzia dovrà essere da Lei conservato, debitamente
compilato, per essere mostrato al Servizio Assistenza Tecnica Autorizzato, in caso di necessità, unitamente ad un documento
fiscalmente valido rilasciato dal rivenditore al momento dell’acquisto (bolla di consegna, fattura, scontrino fiscale, altro) sul quale
siano indicati il nominativo del rivenditore, la data di consegna, gli estremi identificativi del prodotto ed il prezzo di cessione.
Resta pure inteso che, salvo prova contraria, poiché si presume che i difetti di conformità che si manifestano entro sei mesi
dalla consegna del bene esistessero già a tale data, a meno che tale ipotesi sia incompatibile con la natura del bene o con la
natura del difetto di conformità, il Servizio di Assistenza Tecnica Autorizzato, verificato il diritto all’intervento, lo effettuerà senza
addebitare il diritto fisso di intervento a domicilio, la manodopera ed i ricambi. Per contro, nel successivo periodo di diciotto
mesi di vigenza della garanzia, sarà invece onere del consumatore che intenda fruire dei rimedi accordati dalla garanzia stessa
provare l’esistenza del difetto di conformità del bene sin dal momento della consegna; nel caso in cui il consumatore non fosse
in grado di fornire detta prova, non potranno essere applicate le condizioni di garanzia previste e pertanto il Servizio di
Assistenza Tecnica Autorizzato effettuerà l’intervento addebitando al consumatore tutti i costi relativi.
Le ricordiamo inoltre che sullo stesso certificato di garanzia convenzionale Lei troverà le informazioni ed i documenti
necessari per una copertura sino a 5 anni e così, in caso di guasto, non pagare il diritto fisso di intervento a domicilio, la
manodopera ed i ricambi.
Per qualsiasi informazione necessitasse, La preghiamo rivolgersi al numero telefonico del Servizio Clienti
ANOMALIE E MALFUNZIONAMENTI: a chi rivolgersi ?
Per qualsiasi necessità il centro assistenza autorizzato è a Sua completa disposizione per fornirLe i chiarimenti necessari;
comunque qualora il Suo prodotto presenti anomalie o mal funzionamenti, prima di rivolgersi al Servizio Assistenza
Autorizzato, consigliamo vivamente di effettuare i controlli indicati nel capitolo "Ricerca piccoli guasti".
UN SOLO NUMERO TELEFONICO PER OTTENERE ASSISTENZA.
Qualora il problema dovesse persistere, componendo il “Numero Utile” sotto indicato, sarà messo in contatto direttamente
con il Servizio Assistenza Tecnica Autorizzato che opera nella Sua zona di residenza.
Attenzione:
la chiamata è a pagamento; il costo verrà comunicato, tramite messaggio vocale, dal Servizio clienti dell’operatore telefonico
utilizzato. Dettagli sono presenti sul sito internet www.candy.it.
MATRICOLADEL PRODOTTO. Dove si trova?
E’ indispensabile che comunichi al Servizio Assistenza Tecnica Autorizzato la sigla del prodotto ed il numero di matricola (16
caratteri che iniziano con la cifra 3) che troverà sul certificato di garanzia oppure sulla targa matricola posta all'interno dello
sportello, sul bordo superiore destro. In questo modo Lei potrà contribuire ad evitare trasferte inutili del tecnico, risparmiando
oltretutto i relativi costi.
2
199 12 13 14
.
Page 3

INDICE
Norme generali di sicurezza
Alimentazione idrica
Caricare il sale
Regolazione del cesto superiore
Caricamento delle stoviglie
Informazioni per laboratori di prova
Caricamento detersivo
Tipi di detersivo
Caricamento brillantante
Pulizia filtri
Consigli pratici
Pulizia e manutenzione ordinaria
Descrizione dei comandi
Dati tecnici
Scelta dei programmi e funzioni particolari
Aquastop
Smart Fi
Elenco dei programmi
Impianto di decalcificazione
Ricerca piccoli guasti
pag. 4
pag. 7
pag. 9
pag. 10
pag. 11
pag. 13
pag. 14
pag. 15
pag. 16
pag. 17
pag. 18
pag. 19
pag. 20
pag. 20
pag. 21
pag. 25
pag. 26
pag. 28
pag. 30
pag. 31
Fig. A
5
1
4
3
La preghiamo di leggere attentamente le avvertenze contenute nel presente libretto, in
quanto forniscono importanti indicazioni riguardanti la sicurezza di installazione, d'uso,
di manutenzione ed alcuni utili consigli per utilizzare al meglio la propria nuova lavastoviglie.
Conservi con cura questo libretto per ogni ulteriore consultazione.
3
2
Page 4

NORME GENERALI DI
SICUREZZA
■ Questo apparecchio è destinato
ad un uso in ambienti domestici e
simili come per esempio:
scano i pericoli del suo utilizzo.
Evitare che i bambini giochino con
l’apparecchio o che si occupino
della sua pulizia e manutenzione
senza supervisione.
- nelle aree ristoro di negozi, uffici e
altri ambienti di lavoro;
- negli agriturismo;
- dai clienti negli hotels, motels e
altre aree residenziali simili;
- nei bed & breakfast.
Un utilizzo diverso da quello tipico
dell’ambiente domestico, come
l’uso professionale da parte di
esperti o di persone addestrate, è
escluso anche negli ambienti
sopra descritti.
Un utilizzo non coerente con quello riportato, può ridurre la vita del
prodotto e può invalidare la garanzia del costruttore.
Qualsiasi danno all’apparecchio o
ad altro, derivante da un uso
diverso da quello domestico
(anche quando l’apparecchio è
installato in un ambiente domestico), non sarà ammesso dal
costruttore in sede legale.
■ Questo apparecchio può essere
utilizzato da bambini di 8 anni e
oltre e da persone con capacità
fisiche, sensoriali o mentali ridotte
o con mancanza di esperienza e
di conoscenza a patto che siano
supervisionate o che siano date
loro istruzioni in merito all’utilizzo
sicuro dell’apparecchio e che capi-
■ I bambini dovrebbero essere
supervisionati per assicurarsi che
non giochino con l'apparecchio.
■ I bambini di età inferiore a 3 anni
devono essere tenuti lontano dalla
macchina, a meno che non vengano continuamente sorvegliati.
■ Qualora si rendesse necessaria la
sostituzione del cavo di alimentazione dell’apparecchio, rivolgersi
al Servizio di Assistenza Tecnica
Autorizzato.
■ L’apparecchio deve essere connesso alla rete idrica, solo con i
nuovi tubi di carico forniti in dotazione. I vecchi tubi di carico non
devono essere riutilizzati.
■ La pressione idrica deve essere
compresa tra un minimo di 0,08
MPa e un massimo di 0,8 MPa.
■ Nel caso si installi la macchina su
un pavimento ricoperto da tappeti
o con moquette, controllare che le
aperture di ventilazione alla base
dell'apparecchio non vengano
ostruite.
■ Dopo l’installazione, l’apparecchio
deve essere posizionato in modo
che la spina sia raggiungibile.
4
Page 5

■ Per il numero massimo di coperti
fare riferimento alla tabella "DATI
TECNICI".
ATTENZIONE!
Coltelli ed altri utensili con
l’estremità appuntite devono
essere collocati nel cesto con
le punte rivolte verso il basso
o in posizione orizzontale.
■ Non lasciare la porta aperta in
posizione orizzontale, al fine di
evitare potenziali pericoli (es.
inciampare).
■ Per ulteriori informazioni sul prodotto o per consultare la scheda
tecnica fare riferimento al sito
internet del produttore
■ In generale è sconsigliabile l'uso di
adattatori, prese multiple e/o prolunghe.
■ Non tirare il cavo di alimentazione,
o l'apparecchio stesso, per staccare la spina dalla presa di corrente.
■ Non esporre l'apparecchio ad
agenti atmosferici (pioggia, sole,
ecc.).
■ Appoggiarsi o sedersi sulla porta
aperta della lavastoviglie, può
causarne il ribaltamento.
■ La lavastoviglie è progettata per il
lavaggio di normali utensili domestici: oggetti contaminati da benzina, vernice, avanzi di acciaio o
ferro, prodotti chimici corrosivi,
acidi o alcalini non devono essere
lavati in lavastoviglie.
Prescrizioni di sicurezza
■ Assicurarsi che l’impianto elettrico
sia provvisto di messa a terra, in
caso contrario richiedere l’intervento di personale qualificato.
La società costruttrice resta
sollevata da ogni responsabilità per eventuali danni a persone o cose, derivanti dal mancato allacciamento della linea di
terra.
■ Fare attenzione che l'apparecchiatura non schiacci il cavo di alimentazione.
■ Se l'abitazione è dotata di impianto per addolcire l'acqua non è
necessario aggiungere sale nell'addolcitore della lavastoviglie.
■ In caso di guasto e/o di cattivo funzionamento dell'apparecchio, spegnerlo, chiudere il rubinetto dell'acqua e non manomettere l'elettrodomestico.
Per l'eventuale riparazione rivolgersi solamente ad un Centro di
Assistenza Tecnica e richiedere
l'utilizzo di ricambi originali.
Il mancato rispetto di quanto
sopra può compromettere la sicurezza dell'apparecchio e dell'utilizzatore.
5
Page 6

■ Qualora fosse necessario trasportare manualmente la macchina
disimballata, non impugnare la
porta in basso, ma aprire leggermente la porta e sollevare impugnando il ripiano superiore.
■ Per le modalità di installazione
degli apparecchi da incasso, fare
riferimento all'apposito capitolo o
alle istruzioni allegate al presente
libretto.
Apponendo la marcatura
su questo prodotto, dichiariamo,
sotto la nostra responsabilità,
di ottemperare a tutti i requisiti
relativi alla tutela di sicurezza,
salute e ambiente previsti
dalla legislazione europea in
essere per questo prodotto.
6
Page 7

ALIMENTAZIONE IDRICA
IMPORTANTE
L’apparecchio deve essere connesso
alla rete idrica, solo con i nuovi tubi
di carico forniti in dotazione. I vecchi
tubi di carico non devono essere riutilizzati.
■ I tubi di carico e scarico possono esse-
re orientati indifferentemente verso
destra o verso sinistra.
IMPORTANTE
La lavastoviglie può essere allacciata all'impianto dell'acqua fredda o
calda purchè non superi i 60°C.
1
■ La pressione idrica deve essere compre-
sa tra un minimo di 0,08 MPa e un massimo di 0,8 MPa.
■ E' necessario un rubinetto a monte del
tubo di carico per isolare la macchina
dall'impianto idrico quando non è in funzione (fig. 1 B).
■ La lavastoviglie è dotata di un tubo per la
presa d'acqua terminante con ghiera
filettata 3/4" (fig. 2).
■ Il tubo di carico “A” deve essere avvitato
ad un rubinetto dell'acqua “B” con
attacco da 3/4" assicurandosi che la
ghiera sia ben stretta.
■ Se necessario, si può allungare il tubo di
carico fino a 2,5 m. A tale scopo, contattare il Centro Assistenza Tecnica.
■ Se la macchina viene collegata a tuba-
zioni nuove o rimaste inutilizzate per
lungo tempo, è consigliabile far scorrere
l'acqua per alcuni minuti prima di allacciare il tubo di carico. In tal modo eviterete che depositi di sabbia o di ruggine
possano otturare il filtrino di ingresso
acqua.
2
7
Page 8
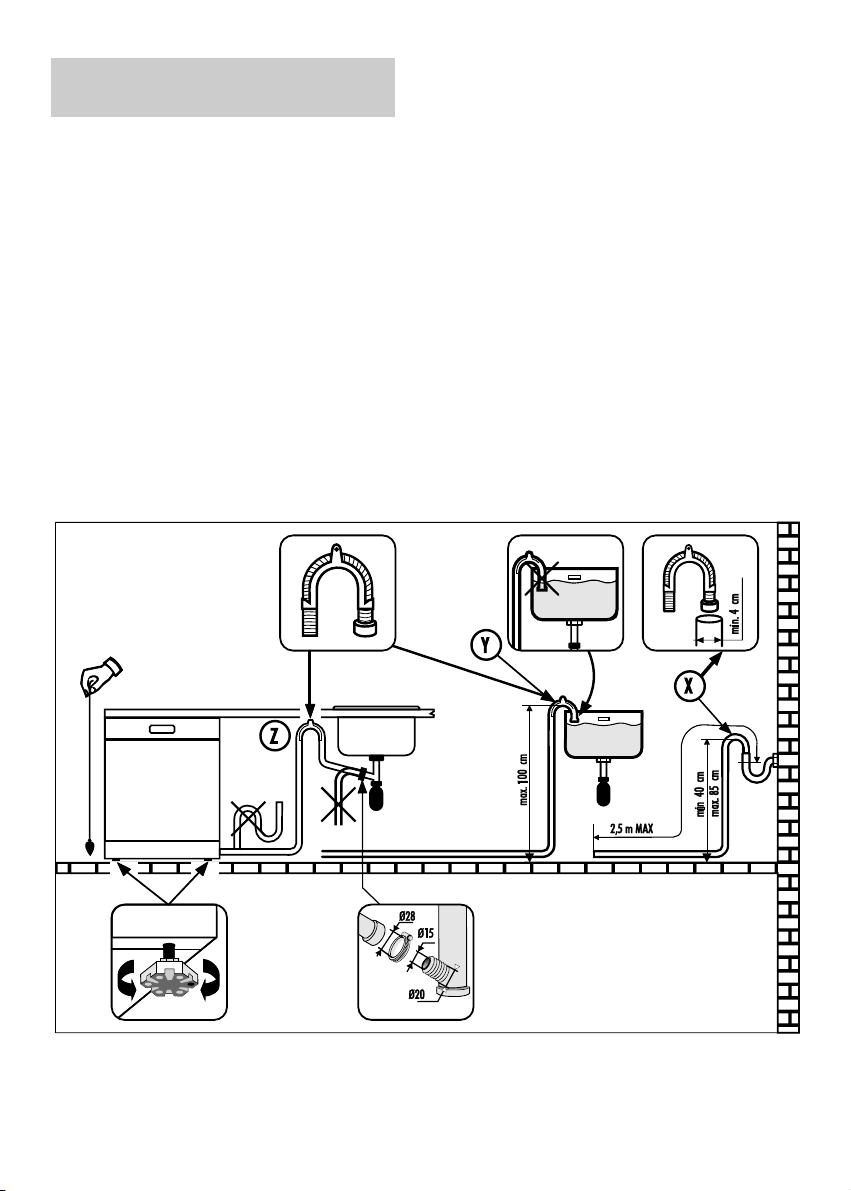
Collegamento allo scarico
d'acqua
■ Infilare il tubo nell'impianto di scarico,
senza creare pieghe (fig. 4).
■ Lo scarico fisso deve avere il diametro
interno di almeno 4 cm e dev'essere
posto ad una altezza minima di 40 cm.
■ Si raccomanda di predisporre il sifone
antiodore (fig. 4X).
■ Se necessario si può allungare il tubo di
scarico fino a 2,5 m, tenendolo però ad
una altezza massima di 85 cm dal pavimento. A tale scopo, contattare il Centro
Assistenza Tecnica.
4
■ L'estremità ricurva del tubo di scarico
può essere appoggiata al bordo di un
lavello, ma non deve rimanere immersa
nell'acqua, per evitare il risucchio
nell'apparecchio durante il programma di
lavaggio (fig. 4Y).
■ Nel caso di installazione sotto piano continuo, la curva deve essere fissata
immediatamente sotto il piano nel punto
più alto possibile (fig. 4Z).
■ Nell'installare la macchina, controllare
che i tubi di carico e scarico non siano
piegati.
8
Page 9
CARICARE IL SALE
■ La comparsa di macchie biancastre
sulle stoviglie è generalmente un indice
importante di mancanza del sale.
■ Sul fondo della macchina, è sistemato il
contenitore del sale che serve a rigenerare l'apparecchio decalcificatore.
■ È importante utilizzare esclusivamente
sale specifico per lavastoviglie, altri tipi
di sale contengono sensibili percentuali
di sostanze insolubili che potrebbero col
tempo rendere inefficiente l'impianto di
decalcificazione.
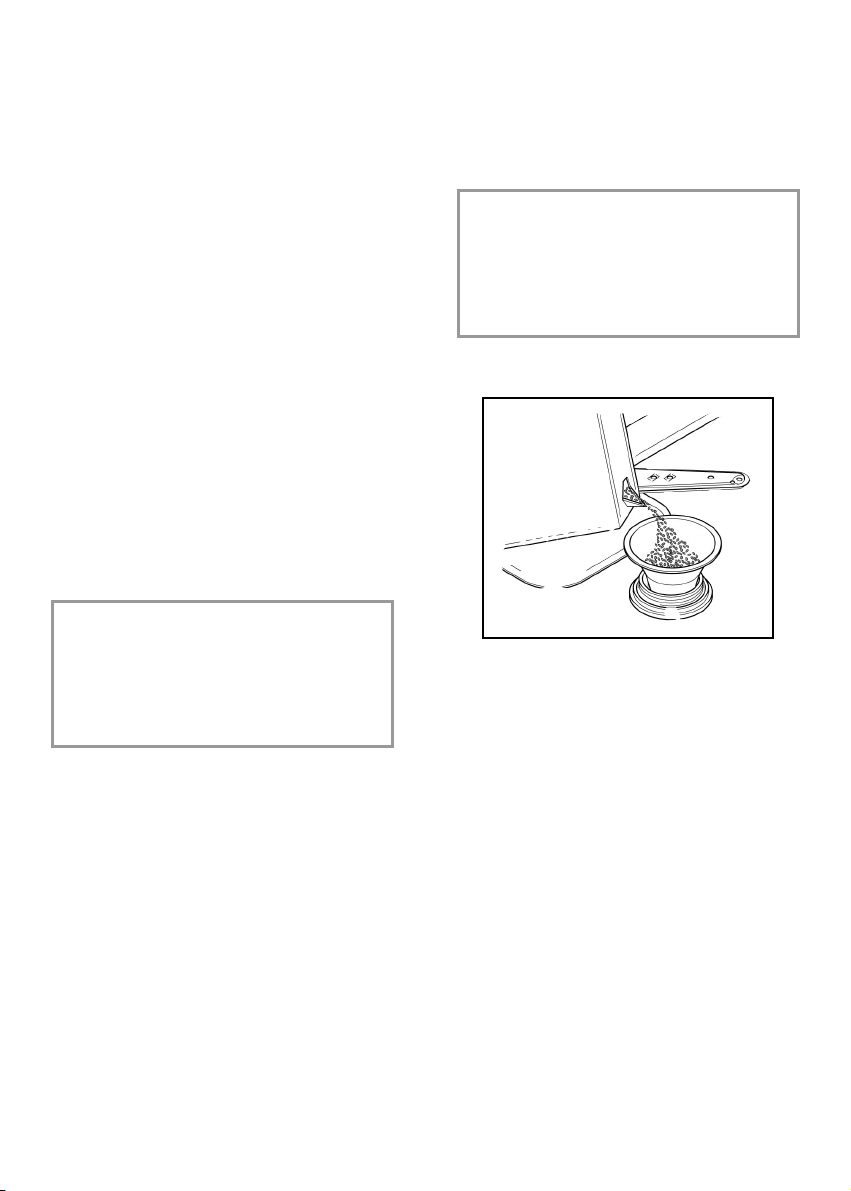
■ Per l'introduzione del sale, svitare il
tappo del contenitore che si trova sul
fondo.
■ Durante l'operazione un po' d'acqua trabocca; continuate in ogni caso a versare il sale fino al riempimento del contenitore, mescolando la miscela con un
cucchiaio. Ultimata l'operazione, pulire
la filettatura dai resti di sale e riavvitare
il tappo.
IMPORTANTE
Dopo ogni rifornimento di sale, È
NECESSARIO far eseguire alla macchina un ciclo di lavaggio completo,
oppure il programma AMMOLLO/
PRELAVAGGIO.
■ Il contenitore ha una capacità di circa
1,5÷1,8 kg di sale e, per una efficace
utilizzazione dell'apparecchio, è necessario riempirlo periodicamente a secondo della regolazione del proprio impianto di decalcificazione.
IMPORTANTE
Solo all'installazione della lavastoviglie, dopo aver riempito completamente il contenitore del sale, è
necessario aggiungere dell'acqua
fino al trabocco dal contenitore.
9
Page 10
a
b
a
b
REGOLAZIONE DEL
CESTELLO SUPERIORE
(solo nei modelli predisposti)
Utilizzando abitualmente piatti da 29 cm a
32,5 cm di diametro, caricarli nel cesto inferiore dopo aver spostato quello superiore
nella posizione più alta, procedendo nel
seguente modo (a seconda dei modelli):
Tipo “A”:
1. Ruotare i fermi anteriori “A” verso
l'esterno;
2. Sfilare il cesto e rimontarlo nella
posizione più alta;
3. Rimettere i fermi “A” nella posizione
originale.
Con questa operazione, nel cesto superiore
non si possono caricare stoviglie con diametro superiore a 14 cm e non si possono utilizzare i supporti mobili nella posizione alta.
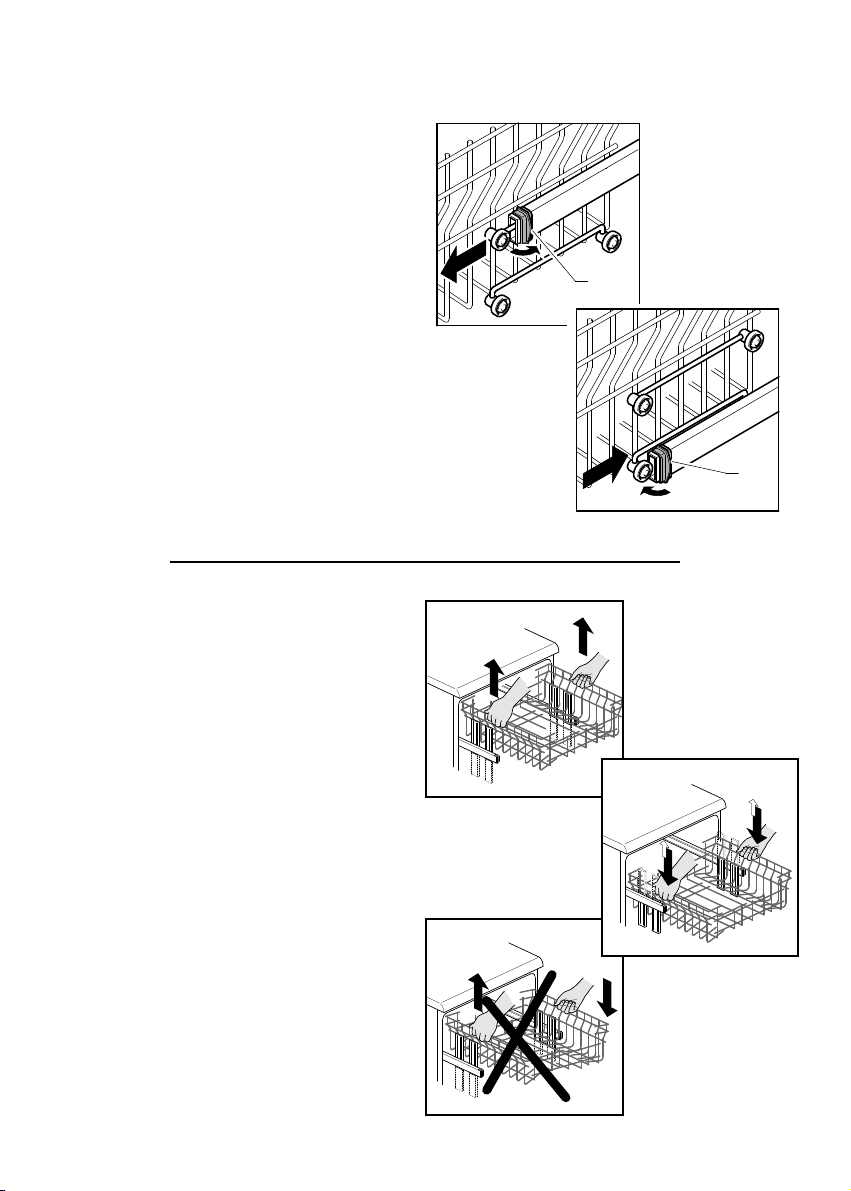
Tipo “B”:
1. Estrarre il cesto superiore;
2. Impugnare il cesto da entrambi i lati e
tirarlo verso l’alto (fig. 1).
Tipo “A”
A
A
Tipo “B”
1
Con questa operazione, nel cesto superiore
non si possono caricare stoviglie con diametro superiore a 14 cm e non si possono utilizzare i supporti mobili nella posizione alta.
PER RIPORTARE IL CESTO IN POSIZIONE BASSA:
1. Impugnare il cesto da entrambi i lati e
tirarlo leggermente verso l’alto (fig. 2a);
2. Lasciare lentamente ricadere il cesto
accompagnandolo (fig. 2b).
N. B. : NON SOLLEVARE O ABBASSARE MAI IL CESTO DA UN SOLO LATO
(fig. 3).
Attenzione :
si consiglia di effettuare la regolazione del
cestello prima del carico delle stoviglie.
2
3
10
Page 11
CARICAMENTO DELLE
STOVIGLIE
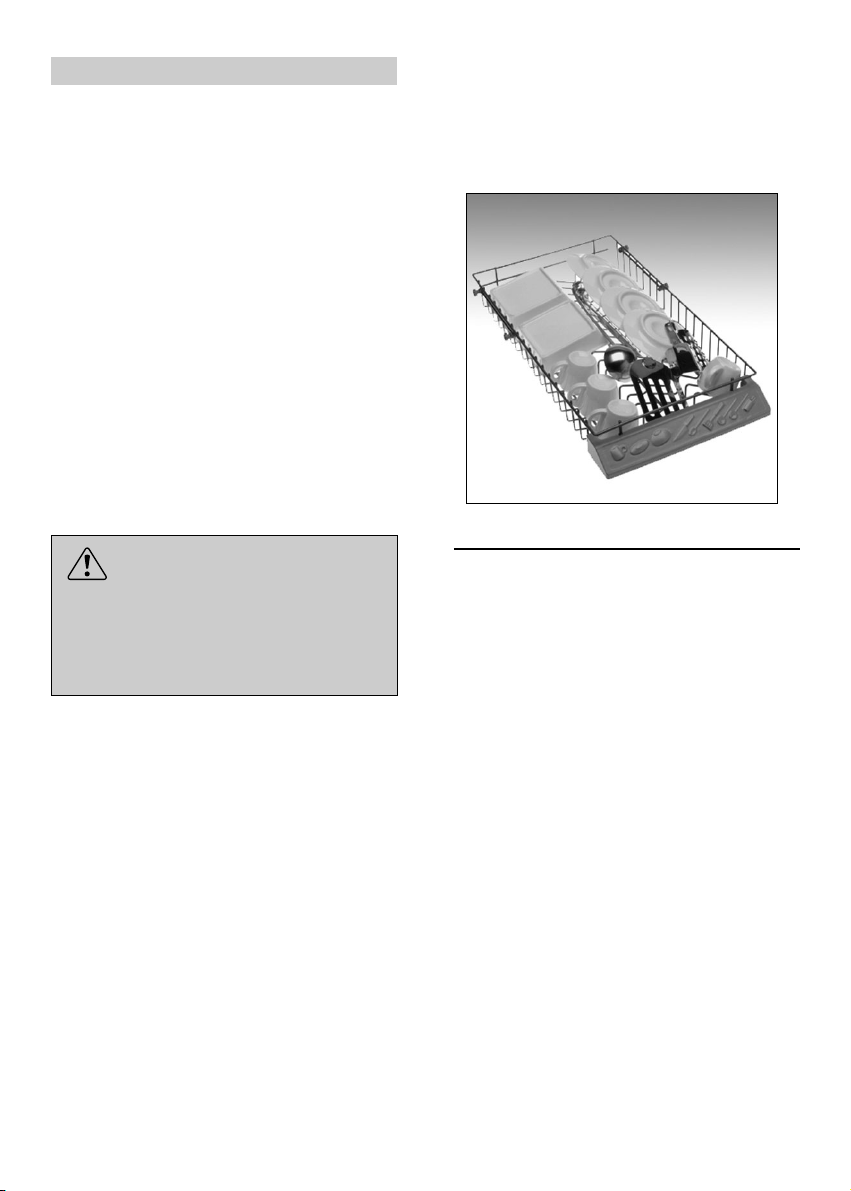
Utilizzo del cesto superiore
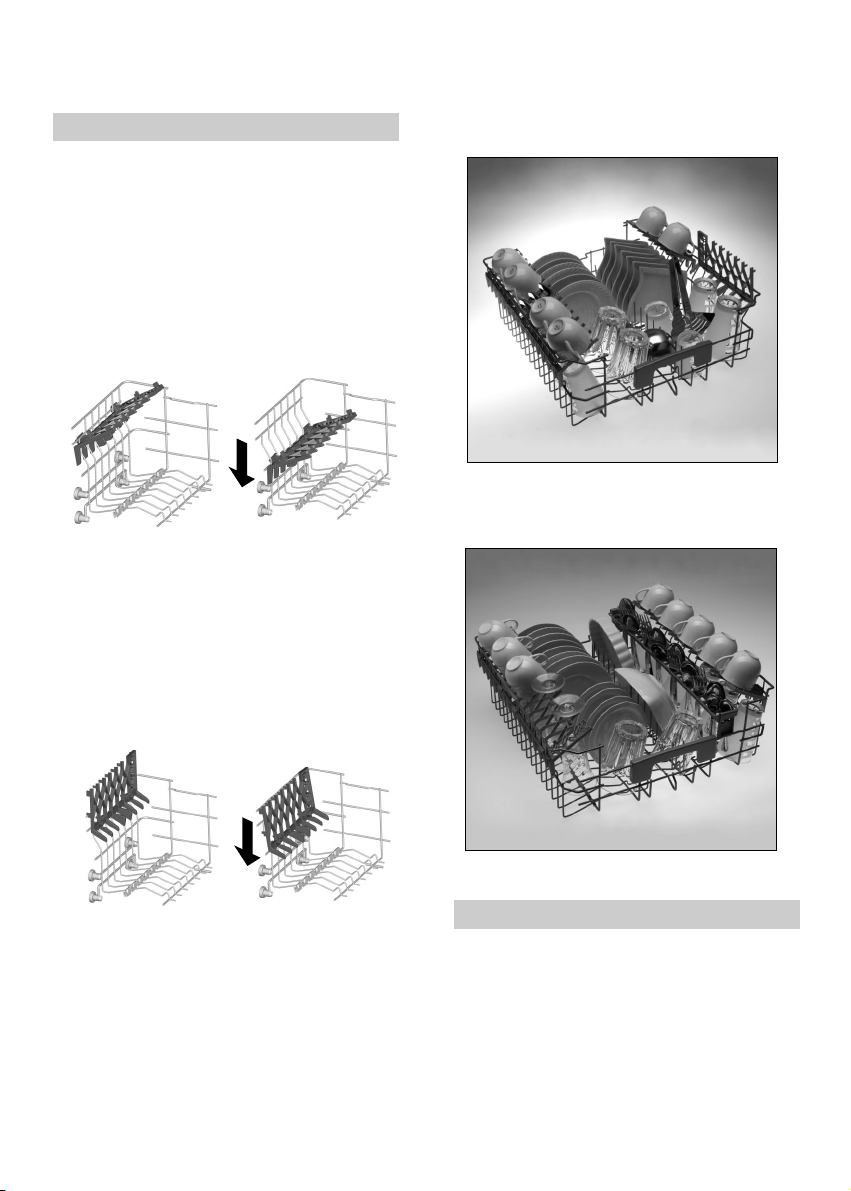
Un carico standard giornaliero è rappresentato nelle fig. 1 e 2.
Cesto superiore (fig. 1)
■ Il cesto superiore è dotato di supporti
mobili agganciati alla sponda laterale, in
grado di assumere 4 posizioni.
■ Nella posizione abbassata (A-A1) i sup-
porti servono per appoggiarvi tazze da
the, caffè, lunghi coltelli e mestoli. Sulle
estremità dei supporti stessi, si possono
appendere i bicchieri a forma di calice.
AA1
■ In posizione rialzata (B-B1) i supporti
permettono l'alloggiamento di piatti piani
e fondi (diametro massimo 19 cm).
Questi ultimi vanno sistemati in posizione verticale con la parte concava rivolta
verso il lato anteriore, avendo cura di
verificare che rimanga sempre uno spazio tra un piatto e l'altro, per consentire
all'acqua di passare liberamente.
1
Cesto superiore (fig. 2)
2
BB1
■ Si consiglia di posizionare i piatti di
dimensione maggiore, leggermente
inclinati verso il lato anteriore in modo da
favorire il facile inserimento del cesto
all'interno della macchina.
■ Il cesto superiore è stato studiato al fine
di offrire la massima flessibilità di utilizzo e
permette il carico ottimale di bicchieri,
tazze, piattini e contenitori di piccole
dimensioni.
Utilizzo del cesto inferiore
■ Nel cesto inferiore vengono alloggiate
pentole, padelle, zuppiere, insalatiere,
coperchi, piatti da portata, piatti piani e
piatti fondi.
■ Le posate vanno sistemate con il manico
verso il basso, nell'apposito contenitore
in plastica posizionato nel cesto inferiore
(fig. 6) assicurandosi che le posate stesse non impediscano la rotazione delle
rampe.
11
Page 12

■ Il cesto inferiore è dotato di una speciale
griglia mobile centrale (fig. 3 e 4) utile
per avere sempre il carico stabile e ottimale dei piatti, anche quando le dimensioni e/o la forma sono diverse da quelle
standard.
- POSIZIONE "A": per un carico di piatti
standard o per un carico esclusivo di
pentole, insalatiere, ecc…
- POSIZIONE "B": per piatti di forma par-
ticolare anche se di dimensioni standard
(fondine molto profonde, quadrate o
senza bordo, ecc…).
5
A
Un carico standard giornaliero è rappresentato nella fig. 6.
B
- POSIZIONE "C": per piatti piani più
grandi della media e/o di forma particolare (quadrati, esagonali, ovali, piatti per
pizza, ecc…).
3
B
A
4
C
A
■ I piatti di ridotte dimensioni, come ad
esempio quelli da dessert, possono
essere caricati anche nel cesto inferiore
come indicato in figura 5, con gli appositi supporti mobili posizionati verso
l' esterno ("B").
Per i piatti di normali o grandi dimensioni,
i supporti devono trovarsi in posizione
interna ("A").
Cesto inferiore (fig. 6)
6
La disposizione razionale e corretta delle
stoviglie è condizione essenziale per un
buon risultato di lavaggio.
IMPORTANTE
Il cesto inferiore è dotato di un dispositivo di fine corsa per rendere sicura
la sua estrazione anche a pieno carico.
Per le operazioni di carico sale, pulizia filtro e manutenzione ordinaria, è
necessaria l'estrazione completa del
cesto
ATTENZIONE!
Se i piatti piccoli vengono posizionati
senza il corretto utilizzo delle ribaltine,
il braccio lavante inferiore si blocca
interferendo con i piatti stessi.
Cesto posate
La parte superiore del cesto porta posate
può essere rimossa, così da poter offrire
diverse possibilità di carico
12
Page 13
Utilizzo del terzo cesto
■ Il terzo cesto è progettato per riporre al
suo interno tutti gli oggetti ruba-spazio,
quali stoviglie e utensili di piccole dimensioni oppure lunghi e piatti. Liberando i
cesti inferiori da questi oggetti, il carico
di stoviglie ingombranti risulta più agevole, permettendo ad esempio la sistemazione contemporanea di pentole e piatti
nel cesto inferiore.
■ Nel terzo cesto si possono caricare:
tazzine e piattini da caffè, ciotole da
dessert o gelato, contenitori bassi,
piattini per aperitivo e tutti gli utensili che
si utilizzano per cucinare, posate da
portata, coltelli e cucchiai lunghi,
forchettoni, palette, grattugie e accessori
piatti per piccoli elettrodomestici (ad es.
lame del frullatore).
Un carico standard giornaliero è rappresentato nella figura 7.
Terzo cesto (fig. 7)
7
ATTENZIONE!
Il terzo cesto NON è concepito per il
carico libero delle posate. L’assenza
di griglie fisse di supporto potrebbe
infatti comportare la caduta nei cesti
inferiori di tali oggetti.
■ Per ottenere le migliori prestazioni di
lavaggio, si consiglia di caricare gli
oggetti con la parte concava rivolta
verso il basso (ad es. piattini e ciotoline).
■ Il terzo cesto può facilmente essere
estratto dalla lavastoviglie, rimuovendo i
fermi di sicurezza collocati alle estremità
delle guide di scorrimento.
■ Il terzo cesto è stato studiato per offrire
massima flessibilità di utilizzo. Grazie
alla sua suddivisione in tre sezioni inclinate e all’assenza di griglie fisse, può
essere caricato secondo varie combinazioni: solo tazzine e piattini, solo utensili
piatti e lunghi (mestoli, forchettoni),
oppure carichi misti.
INFORMAZIONE PER I
LABORATORI DI PROVA
Richiedere le informazioni necessarie per
effettuare i test comparativi e le misure di
rumore, secondo le Norme EN, al seguente indirizzo:
testinfo-dishwasher@candy.it
Nella richiesta, si prega di specificare il
modello ed il numero di matricola della
lavastoviglie (vedere la targhetta dati).
13
Page 14
CARICAMENTO DETERSIVO
Il detersivo
IMPORTANTE
Utilizzare esclusivamente detersivi
in polvere, liquidi o in pastiglie specifici per lavastoviglie.
Detersivi non idonei (come quelli per il
lavaggio a mano) non contengono gli
ingredienti adatti al lavaggio in lavastoviglie
ed impediscono il corretto funzionamento
della macchina.
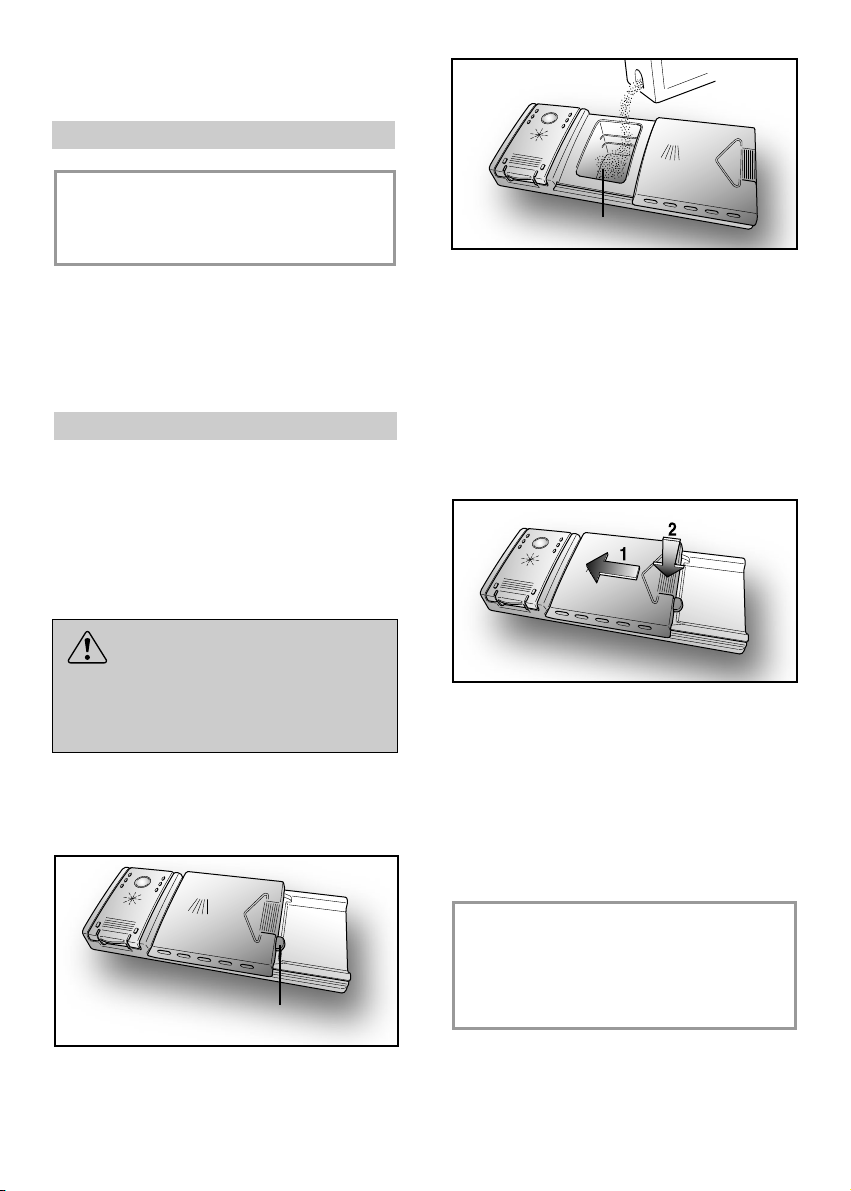
Caricare il detersivo
La vaschetta per il detersivo del lavaggio è
situata all'interno della porta (fig. A "2").
Se lo sportellino del contenitore risultasse
chiuso, per aprirlo basterà agire sul
pulsante di aggancio (A): al termine di
un qualsiasi programma di lavaggio lo
sportellino risulta sempre aperto, pronto
per il successivo impiego.
B
Dopo aver versato il detersivo nel
contenitore, richiudete lo sportellino, prima
spingendolo (1) ed infine premendo
leggermente su di esso (2) fino a sentire lo
scatto d'arresto.
ATTENZIONE!
Nel cesto inferiore, non caricare le
stoviglie in posizione tale da impedire
l'apertura dello sportellino o da non
permettere l'asportazione del detersivo.
La dose di detersivo può variare in funzione
del grado di sporco e del tipo di stoviglie. Si
consiglia di versare 20 ÷ 30 g di detersivo
nella vaschetta lavaggio (B).
A
Poichè i detersivi non sono tutti uguali,
consultate anche le istruzioni sulle confezioni.
Ricordiamo che quantità insufficienti di
detersivo provocano una incompleta
asportazione dello sporco, mentre un
eccesso di detersivo, oltre a non migliorare
i risultati di lavaggio, rappresenta uno spreco.
IMPORTANTE
Non eccedere nell'uso di detersivo
rappresenta un contributo al
contenimento dell'inquinamento
ambientale.
14
Page 15

TIPI DI DETERSIVO
Detersivi in pastiglie
I detersivi in pastiglie di differenti produttori
si sciolgono a velocità diverse, quindi nei
programmi brevi, alcune pastiglie
potrebbero non riuscire ad essere
pienamente efficaci non essendosi dissolte
completamente. Se si utilizzano questi
prodotti, si consiglia di scegliere programmi
più lunghi per garantire la completa
utilizzazione del detersivo.
IMPORTANTE
Per ottenere risultati di lavaggio
soddisfacenti, le pastiglie DEVONO
essere inserite nella vaschetta per
il detersivo di lavaggio e NON
direttamente in vasca.
e alle avvertenze indicate sulla confezione
del detersivo combinato che si intende
utilizzare;
■ l’efficacia dei prodotti che rendono non
necessario l’utilizzo del sale dipende
dalla durezza dell’acqua di alimentazione
dell’apparecchio. Verificare allo scopo
che la durezza dell’acqua sia compresa
nell’intervallo di funzionamento indicato
nelle istruzioni del detersivo.
Se con l'uso di questo tipo di prodotto si
ottenessero risultati di lavaggio non
soddisfacenti, rivolgersi al produttore
del detersivo.
L’utilizzo improprio di questi prodotti
potrebbe portare:
■ alla formazione di depositi di calcare
nell’apparecchio e sulle stoviglie;
Detersivi concentrati
I detersivi concentrati, a ridotta alcalinità e
con enzimi naturali, combinati con i
programmi di lavaggio a 50°C, permettono
di avere un minor impatto sull'ambiente e
salvaguardano le stoviglie rispettando
anche la lavastoviglie.
I programmi di lavaggio a 50°C sono stati
ideati appositamente per sfruttare in pieno
le proprietà di scioglimento dello sporco da
parte degli enzimi, permettendo quindi, con
l'utilizzo dei detersivi concentrati, di ottenere
gli stessi risultati dei programmi a 65°C già
ad una temperatura inferiore.
Detersivi combinati
I detersivi che contengono anche il
brillantante devono essere inseriti nella
vaschetta per il detersivo di lavaggio.
Il contenitore del brillantante deve essere
vuoto (se non fosse così, prima di utilizzare
i detersivi combinati, regolare al minimo il
dosatore del brillantante).
Detersivi combinati “ALLin 1”
Qualora si decida di utilizzare detersivi
combinati ("3 in 1"/"4 in 1"/"5 in 1”, ecc.)
che potrebbero rendere superfluo l’impiego
di sale e/o brillantante, si devono rispettare
scrupolosamente le seguenti avvertenze:
■ leggere attentamente ed attenersi
scrupolosamente alle istruzioni per l’uso
■ ad un degrado delle prestazioni di
asciugatura e/o di lavaggio.
IMPORTANTE
Nel caso di reclami che possono
essere legati direttamente all’impiego improprio di questi prodotti, non
verrà fornita alcuna prestazione in
garanzia.
Si ricorda che l'uso dei detersivi combinati “ALL in 1” rende superfluo l'uso
delle segnalazioni di mancanza sale e
brillantante (previsti solo in alcuni
modelli).
Nel caso in cui si verificassero problemi di
lavaggio e/o asciugatura si consiglia di
riprendere l’uso dei prodotti tradizionali
(sale, brillantante, detersivo in polvere).
In questo caso, si raccomanda di:
■ riempire nuovamente i contenitori del
sale e del brillantante;
■ eseguire un normale ciclo di lavaggio
senza carico.
Si evidenzia che ritornando all’utilizzo del
sale di tipo tradizionale, saranno necessari
alcuni cicli di lavaggio prima che il sistema
di decalcificazione dell’acqua ritorni a
funzionare in modo ottimale.
15
Page 16
CARICAMENTO BRILLANTANTE
Il brillantante
Questo additivo, che viene immesso
automaticamente nell'ultima fase di risciacquo,
favorisce una rapida asciugatura delle
stoviglie evitando il formarsi di macchie e
sedimenti opachi.
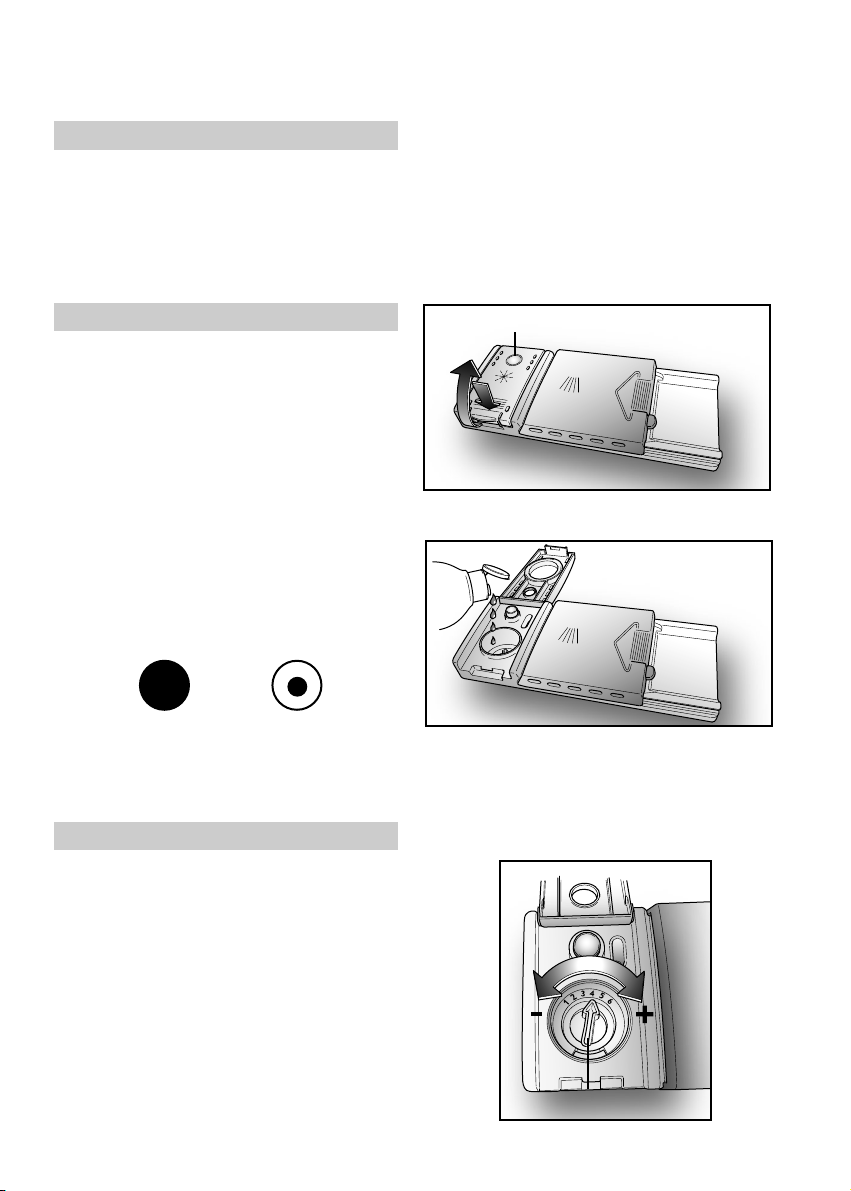
Caricare il brillantante
Alla sinistra della vaschetta del detersivo, si
trova il contenitore del brillantante
(fig. A "3").
Per aprire il coperchio, premere in
corrispondenza del riferimento posto su di
esso e contemporaneamente, tirare verso
l'alto la linguetta d'apertura.
Usare sempre additivi di risciacquo adatti a
lavastoviglie automatiche.
E' possibile controllare il livello del
brillantante per mezzo del visualizzatore
ottico (C) posto sul contenitore di erogazione.
PIENO VUOTO
riflesso scuro riflesso chiaro
Regolazione del brillantante da 1 a 6
Il regolatore (D) è posto sotto il coperchio
e si può ruotare con una moneta. La
posizione consigliata è 4.
Il contenuto in calcare dell'acqua influenza
notevolmente sia la presenza di incrostazioni
che il grado di asciugatura.
E' perciò importante regolare il dosaggio del
brillantante per ottenere prestazioni sempre
ottimali.
Nel caso le stoviglie presentino delle striature
al termine del lavaggio, diminuire la
regolazione di una posizione. Nel caso le
stoviglie presentino macchie o aloni biancastri
aumentare la regolazione di una posizione.
C
D
16
Page 17
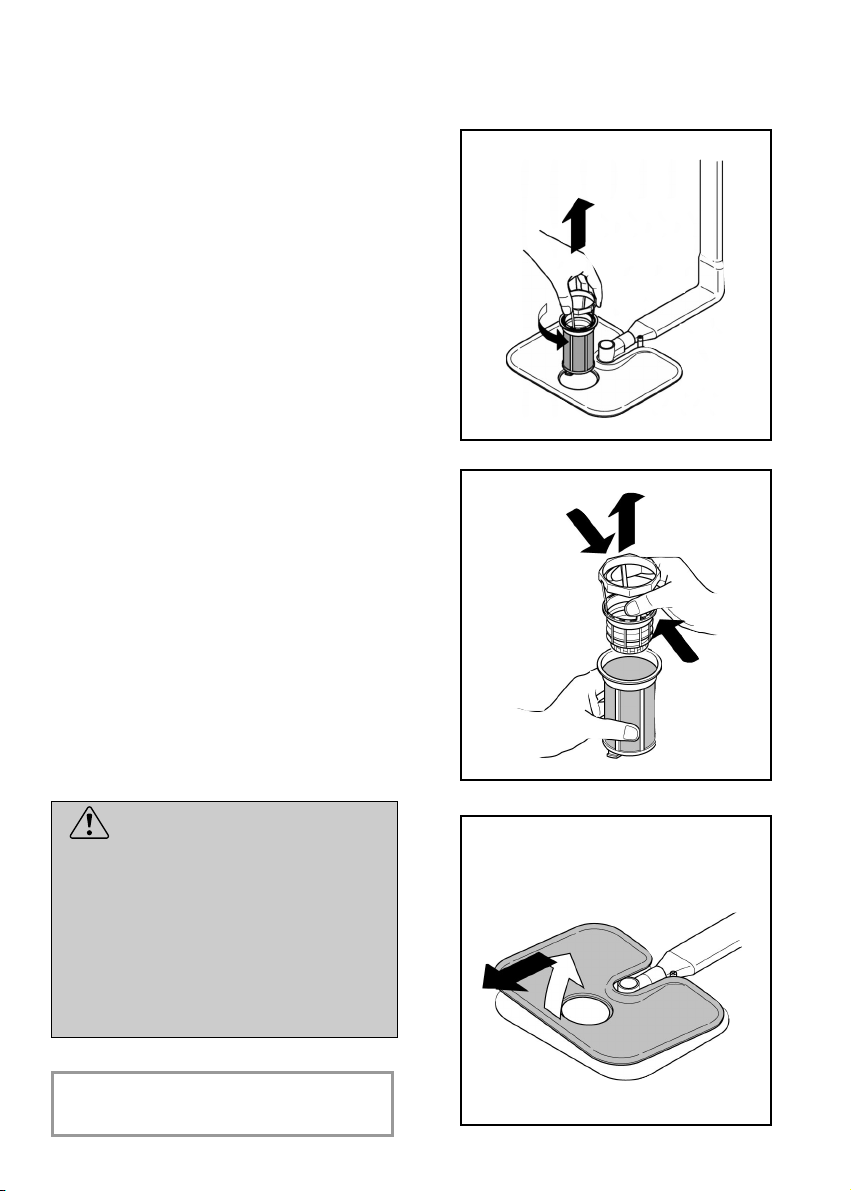
PULIZIA DEI FILTRI
Il sistema filtrante (fig. A "4") è costituito da:
Bicchierino centrale, che trattiene le parti-
celle più grosse di sporco;
Piastra, che filtra continuamente l'acqua di
lavaggio;
Microfiltro, posto sotto la piastra, che trat-
tiene anche le particelle di sporco più piccole assicurando un'ottimo risciacquo.
■ Per ottenere sempre ottimi risultati, è
necessario ispezionare e pulire i filtri
prima di ogni lavaggio.
■ Per estrarre il gruppo dei filtri, basta
impugnare il manico e ruotarlo in senso
antiorario (fig. 1).
■ Il bicchierino centrale è asportabile, per
facilitare le operazioni di pulizia (fig. 2).
■ Rimuovere la piastra filtro (fig. 3) e
lavare il tutto sotto un getto di acqua,
eventualmente aiutandosi con uno
spazzolino.
■ Con il Microfiltro Autopulente, la
manutenzione è ridotta e l'ispezione del
gruppo filtri può essere effettuata ogni
15 giorni. Tuttavia, è consigliabile controllare dopo ogni lavaggio che il bicchierino centrale e la piastra non siano
intasati.
1
2
ATTENZIONE!
Dopo aver pulito i filtri, assicurarsi
che siano fissati correttamente tra
loro e che la piastra sia inserita perfettamente sul fondo della lavastoviglie.
Avere cura di riavvitare, in senso
orario, il filtro nella piastra perchè un
inserimento impreciso del gruppo filtrante può pregiudicare il funzionamento della macchina.
IMPORTANTE
Non usare la lavastoviglie senza filtri.
3
17
Page 18

CONSIGLI PRATICI
Consigli utili per risparmiare
Consigli per ottenere ottimi
risultati di lavaggio
■ Prima di disporre le stoviglie nella macchina, asportare i residui di cibo (ossicini, lische, avanzi di carne o verdure,
residui di caffè, bucce di frutta, cenere
di sigaretta, stuzzicadenti ecc.) per evitare di intasare i filtri, lo scarico e gli
spruzzatori dei bracci lavanti.
■ Non è necessario risciacquare le stoviglie prima di collocarle nella macchina.
■ Qualora le pentole e padelle fossero
eccessivamente incrostate da residui di
cibo bruciati o arrostiti, si consiglia di
tenerle in ammollo in attesa del lavaggio.
■ Sistemare le stoviglie con l'apertura
rivolta verso il basso.
■ Se possibile evitare che le stoviglie stiano a contatto tra di loro, una corretta
sistemazione vi darà migliori risultati di
lavaggio.
■ Dopo aver sistemato le stoviglie, verificare che i bracci lavanti possano girare
liberamente.
■ Pentole ed altre stoviglie che presentano residui di cibo molto tenaci o bruciacchiati, dovranno essere messe in
ammollo con acqua e detersivo per
lavastoviglie.
■ Per il perfetto lavaggio di argenteria è
necessario:
a) sciacquarla appena dopo l'uso,
sopratutto se è stata impiegata per
maionese, uova, pesce, ecc.;
b) non cospargerla con detersivo;
■ Nel caso si volesse lavare a pieno carico, riponete le stoviglie nella macchina
appena terminati i pasti, sistemandole
in più riprese, effettuando eventualmente il programma AMMOLLO per ammorbidire lo sporco ed eliminare i residui
più grossi tra un carico e l'altro, in attesa di eseguire il programma di lavaggio
completo.
■ In presenza di sporchi poco consistenti
o cesti non molto carichi, selezionate un
programma ECONOMICO, seguendo
le indicazioni riportate nell'elenco programmi.
Cosa non lavare
■ È bene ricordare che non tutte le stoviglie sono adatte per essere lavate nella
lavastoviglie; evitare di utilizzare pezzi
in materiale termoplastico, posate con
manici di legno o di plastica, pentole
con manici di legno, stoviglie in alluminio, di cristallo o vetro piombato se non
specificatamente indicato.
■ Certe decorazioni possono tendere a
sbiadire, pertanto si consiglia di effettuare più volte il lavaggio in macchina di
un solo pezzo e solo dopo essere certi
che non si scolori, inserire il carico totale.
■ È consigliabile non lavare posate in
argento con posate in acciaio ossidabile, per evitare che si verifichi una reazione chimica tra esse.
IMPORTANTE
Quando si acquistano nuove stoviglie accertarsi sempre che siano idonee al lavaggio in lavastoviglie.
Suggerimenti al termine del
programma
c) non metterla a contatto con altri
metalli.
■ Per evitare eventuali sgocciolamenti dal
cestello superiore, estrarre prima il
cestello inferiore.
■ Se le stoviglie vengono lasciate per
qualche tempo nella macchina, aprire
leggermente lo sportello, per favorire la
circolazione d'aria e migliorare ulteriormente l'asciugatura.
18
Page 19

PULIZIA E MANUTENZIONE
ORDINARIA
■ Per pulire l'esterno della lavastoviglie
non si devono usare, né solventi (sgrassanti) né abrasivi, ma solo un panno
imbevuto di acqua tiepida.
■ La lavastoviglie non richiede alcuna
manutenzione speciale, poichè la vasca
di lavaggio è autopulente.
■ Pulire regolarmente la guarnizione in
gomma dello sportello con un panno
umido, eliminando accuratamente eventuali tracce di cibo, o brillantante.
■ Per meglio garantire la rimozione di piccoli depositi di calcare o di sporco, si consiglia di eseguire periodicamente un lavaggio con prodotti specifici per la pulizia e la
cura della lavastoviglie.
■ Se malgrado la normale pulizia dei filtri si
notano stoviglie o pentole insufficientemente lavate o sciacquate, controllare che tutti
gli spruzzatori dei bracci lavanti (fig. A "5")
siano liberi da residui di sporco.
Se ciò non fosse, procedere alla loro pulizia nel seguente modo:
1.togliere il braccio lavante superiore,
ruotandolo fino a portare in posizione il
fermo contrassegnato dalla freccia
(fig. 1b). Spingerlo verso l'alto (fig. 1) e,
mantenendolo premuto, svitare in senso
orario (per rimontarlo ripetere l'opera-
zione, ma ruotare in senso antiorario).
Il braccio lavante inferiore si estrae tirandolo semplicemente verso l'alto (fig. 2) ;
2.lavare i bracci rotanti sotto un getto d'ac-
qua, liberando dallo sporco gli spruzzatori otturati;
3.al termine dell'operazione, rimettere i
bracci lavanti nella identica posizione,
ricordando per quello superiore di portare in posizione il fermo e di avvitare a
fondo.
■ Sia la vasca che l'interno dello sportello
sono d'acciaio inossidabile. Se tuttavia
dovessero riscontrarsi formazioni di
macchie di ossido, ciò dovrà essere
imputato solo ad una forte presenza di
sali di ferro nell'acqua.
■ Per togliere le macchie si consiglia l'uso
di abrasivo a grana sottile; non usare
mai sostanze al cloro, pagliette d'acciaio, ecc.
1
1b
2
DOPO L'USO
Dopo ogni lavaggio chiudere il rubinetto
dell'acqua, per isolare la lavastoviglie dalla
rete idrica di alimentazione e disinserire il
tasto di avvio/arresto per isolare la
macchina dalla rete elettrica.
Se la macchina deve rimanere ferma a
lungo, consigliamo le seguenti operazioni:
1. eseguire un programma di lavaggio
senza stoviglie, ma con detersivo per
sgrassare la macchina;
2. togliere la spina;
3. chiudere il rubinetto dell'acqua;
4. riempire il contenitore del brillantante
per risciacqui;
5. lasciare la porta leggermente aperta;
6. lasciare l'interno della macchina pulito;
7. se la macchina viene lasciata in ambienti
dove la temperatura è inferiore a 0°C, l'acqua residua nelle condutture può gelare.
Assicurarsi perciò che la temperatura sia
sopra gli 0°C ed attendere circa 24 ore
prima di attivare la macchina.
19
Page 20
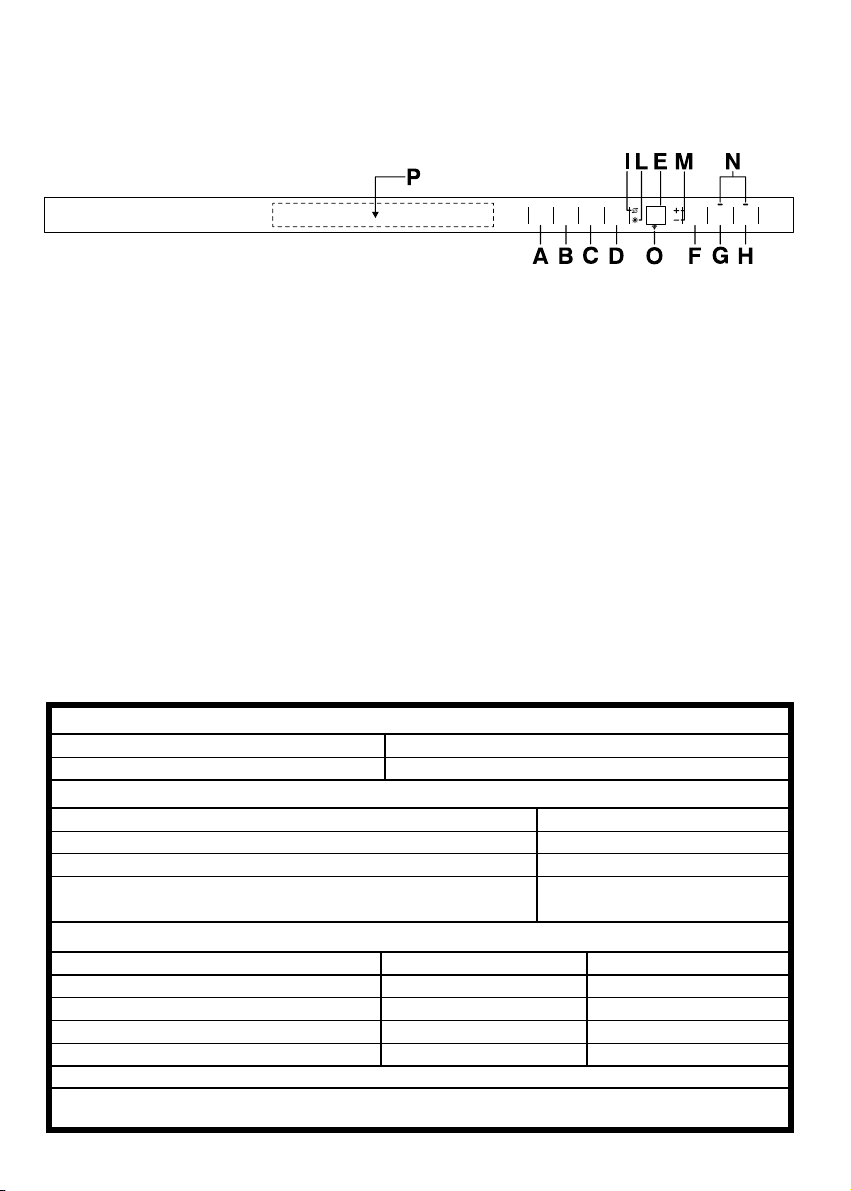
DESCRIZIONE DEI COMANDI
A
Pulsante
"AVVIO/ARRESTO"
H Pulsante opzione "ALL IN 1"
B Pulsante "SELEZIONE PROGRAMMA"
C
Pulsante "PARTENZA DIFFERITA
D
Pulsante "START"/"RESET"
(avvio/annullamento programma)
I Spia "ESAURIMENTO SALE"
"
L Spia "ESAURIMENTO BRILLANTANTE"
M Spie
"U WASH"
•
N Spie "SELEZIONE OPZIONE"
E Display digitale
O Spia Wi-Fi
F Pulsante
"U WASH"
•
P Legenda programmi
G Pulsante opzione "SMART DOOR"
DIMENSIONI
Larghezza x Altezza x Profondità (cm) 59,8 x 81,8 ÷ 89,8 x 55
Ingombro con porta aperta (cm) 117
DATI TECNICI
Coperti (EN 50242)
Capacità con pentole e piatti
Pressione nell'impianto idraulico (MPa)
Ampere fusibile / Potenza max. assorbita / Tensione d'alimentazione
CONSUMI (programmi principali)*
Programma Energia (kWh) Acqua (L)
INTENSIVO
UNIVERSALE
ECO
RAPIDO 24'
Consumo di energia nei modi spento e stand-by: 0,45 W / 0,45 W
*Valori misurati in laboratorio secondo la Norma Europea EN 50242 (nell’uso quotidiano, sono
possibili differenze).
2,07
1,46
0,77
0,59
Min. 0,08 - Max. 0,8
Vedere targhetta dati
16
9 persone
21
15
10
9
20
Page 21

SCELTA DEL PROGRAMMA
E FUNZIONI PARTICOLARI
Pulsante "U WASH"
Questo pulsante permette di variare l'intensità di lavaggio, a seconda del grado di
sporco delle stoviglie, modificando di conseguenza i parametri di durata del ciclo e la
sua temperatura.
Premere il pulsante per aumentare l'intensità di lavaggio (spia ) o per diminuirla
riducendo significativamente la durata del
ciclo (spia ).
L'associazione del pulsante ai 4 programmi
base consente di ottenere 8 cicli di lavaggio aggiuntivi (per un totale di 12 programmi di lavaggio).
IMPORTANTE
All'accensione della lavastoviglie
viene visualizzata l'ultima impostazione effettuata.
•
Impostazione dei programmi
■ Aprire lo sportello ed introdurre le stoviglie da lavare.
■ Premere il tasto "AVVIO/ARRESTO" .
Sul display verranno visualizzati due
trattini.
■ Scegliere un programma premendo il
pulsante "SELEZIONE PROGRAMMA"
("PROGR.").
■ Scegliere eventualmente il "GRADO DI
SPORCO" premendo il relativo pulsante.
■ Se lo si desidera, premere il pulsante
opzione (la spia corrispondente s'illuminerà).
■ Premere il pulsante "START". Il display
visualizzerà il tempo di durata del programma, alternando l'indicazione delle
ore a quella dei minuti [Es: 1 h (1 ora) /
25 (25 minuti)].
■ Chiudere lo sportello (dopo un segnale
acustico, il programma si avvierà automaticamente).
"Perfect Rapid zone"
Il "Perfect Rapid zone" garantisce prestazioni di lavaggio ottimali nei cicli rapidi e la
rimozione dello sporco più ostinato nei cicli
intensivi. Nella zona sinistra della vasca
sono montati due bracci lavanti supplementari che si attivano automaticamente
durante i programmi rapidi (Classe A 59’ e
Rapido 24’) ed i programmi U WASH +
(Igienizzante, Universale Plus, Eco
Plus). Le stoviglie posizionate in quella zona
potranno quindi beneficiare della forza lavante addizionale del "Perfect Rapid zone".
•
Programmi "AUTOMATICI"
La lavastoviglie è dotata di un sensore di
sporco, in grado di analizzare la torbidità
dell'acqua durante tutte le fasi dei programmi "AUTOMATICI" (vedi elenco pro-
grammi); grazie a questo dispositivo, i
parametri del ciclo di lavaggio vengono
adattati automaticamente, in base alla
reale quantità di sporco presente sulle stoviglie. Il grado di torbidità dell’acqua è
infatti correlato alla quantità di sporco presente sulle stoviglie. In questo modo viene
garantita il miglior lavaggio, ottimizzando i
consumi d'acqua e di energia.
Programmi "IMPULSE"
I programmi "IMPULSE" utilizzano una
tecnica di lavaggio ad impulsi, che riduce i
consumi, il rumore e migliora le prestazioni.
IMPORTANTE
Il funzionamento "intermittente"
della pompa di lavaggio NON è indice
di un malfunzionamento, ma è una
caratteristica particolare del lavaggio ad impulsi ed è quindi segnale
del corretto svolgimento del programma.
21
Page 22

Interruzione di un programma
Fine del programma
Sconsigliamo l’apertura dello sportello
durante lo svolgimento del programma, in
particolare durante la fase centrale del
lavaggio e del risciacquo finale caldo.
Tuttavia, se a programma avviato si apre lo
sportello (per esempio perché si vogliono
aggiungere delle stoviglie) la macchina si
ferma automaticamente e sul display viene
visualizzato lampeggiante il tempo rimanente alla fine del ciclo.
Richiudendo lo sportello, senza premere
alcun pulsante, il ciclo ripartirà dal punto
in cui era stato interrotto.
ATTENZIONE!
Se si apre lo sportello mentre la lavastoviglie è nella fase di asciugatura,
viene attivato un segnale acustico
per avvisare che il ciclo non è ancora
terminato.
Modifica di un programma in
corso
Se si vuole cambiare o annullare un programma già in corso, procedere nel
seguente modo:
■ Aprire lo sportello.
■ Tenere premuto per almeno 5 secondi il
pulsante "RESET". Sul display verrà
visualizzato "00" e verranno emessi dei
segnali acustici.
La fine del programma verrà indicata tramite
un segnale acustico (se non disattivato)
della durata di 5 secondi, ripetuto per 3
volte ad intervalli di 30 secondi.
IMPORTANTE
Se è attiva l'opzione "SMART DOOR",
durante la fase di asciugatura la
porta si aprirà automaticamente e
bisognerà attendere l'indicazione di
fine ciclo prima di prelevare le stoviglie.
Pulsanti opzione
Pulsante "SMART DOOR"
(APERTURA AUTOMATICA DELLA
PORTA)
Questa opzione aziona uno speciale
dispositivo che apre la porta di qualche
centimetro durante o alla fine del ciclo di
asciugatura (a seconda dei programmi)
favorendo una più naturale ed efficiente
asciugatura delle stoviglie. La durata del
ciclo selezionato verrà automaticamente
modificata, per permettere un'ottimizzazione delle temperature utilizzate nella fase di
risciacquo, in modo da consentire una
significativa riduzione del consumo di
energia.
L'apertura della porta nell'ultima fase dell'asciugatura permette di sfruttare il ricircolo dell'aria, eliminando il rischio della formazione di cattivi odori.
■ Il programma in corso verrà annullato. Sul
display verranno visualizzati due trattini.
■ A questo punto sarà possibile impostare
un nuovo programma.
ATTENZIONE!
Prima di far partire un nuovo programma, è bene accertarsi che non
sia già stato asportato il detersivo; se lo
fosse, ripristinare la dose nel contenitore.
Nel caso d’interruzione di corrente, la
lavastoviglie conserverà in memoria il
programma in fase di svolgimento che
verrà ripreso, dal punto in cui era stato
interrotto, non appena sarà ripristinata
l’alimentazione elettrica.
IMPORTANTE
Questa opzione sarà automaticamen-
te attiva nel programma "ECO". In
ogni caso, sarà possibile disattivarla.
La funzione "SMART DOOR" non è
disponibile nei programmi "RAPIDO
24’" e "PRELAVAGGIO".
ATTENZIONE!
con questa opzione selezionata, non
si deve in alcun modo impedire l'apertura della porta o forzarne la chiusura per non danneggiarne il meccanismo.
Lasciare libero lo spazio davanti alla
porta e prima di richiuderla, attendere il
rientro del dispositivo di apertura.
22
Page 23

Pulsante "ALL IN 1"
Questa opzione permette l'utilizzo ottimale
dei detersivi combinati “ALL in 1” ("3 in
1"/"4 in 1"/"5 in 1”, ecc.). Premendo questo
pulsante, il programma di lavaggio impostato viene modificato, in modo da ottenere la migliore prestazione dai detersivi
combinati; inoltre, viengono disattivati gli
indicatori di mancanza sale e brillantante.
ATTENZIONE!
Una volta selezionata, l'opzione resta
attiva (spia corrispondente accesa)
anche per successivi programmi di
lavaggio e potrà essere disattivata
(spia corrispondente spenta) solo
premendo nuovamente il relativo pulsante.
IMPORTANTE
L’uso di quest'opzione è raccomandato specialmente in caso di utilizzo
del programma RAPID 24', la cui
durata sarà prolungata di circa 15
minuti per consentire una migliore
azione del detersivo in pastiglie.
Alla fine del conteggio, il programma
partirà automaticamente e sul display verrà
visualizzata la durata del ciclo scelto.
Se si desidera annullare la partenza ritardata procedere nel seguente modo:
■ Tenere premuto per almeno 5 secondi il
pulsante "RESET". Sul display verrà
visualizzato "00" e verranno emessi dei
segnali acustici.
■ La partenza ritardata ed il programma
selezionato verranno annullati.
Sul display verranno visualizzati due
trattini.
■ A questo punto, se si desidera far partire
la lavastoviglie, sarà necessario impostare nuovamente il programma desiderato ed eventualmente selezionare i pulsanti opzione, come indicato nel paragrafo
"IMPOSTAZIONE DEI PROGRAMMI".
Pulsante
"PARTENZA DIFFERITA"
Questo pulsante permette di programmare
l'avvio del ciclo di lavaggio, con un ritardo
compreso tra 1 e 23 ore.
Per impostare la partenza ritardata procedere nel seguente modo:
■ Premere il pulsante "PARTENZA DIF-
FERITA" (sul display verrà visualizzata
la scritta"00").
■ Premere nuovamente il pulsante per
incrementare il ritardo in ore (ad ogni
pressione il ritardo viene incrementato di
1 ora, fino ad un massimo di 23).
■ Per avviare il conteggio, premere il pulsante "START".
Il display visualizzerà il tempo rimanente
alla partenza del programma.
Esclusione segnalazione
acustica di FINE PROGRAMMA
La segnalazione acustica di fine programma può essere disattivata nel seguente
modo:
IMPORTANTE
Iniziare la procedura SEMPRE dalla
condizione di lavastoviglie spenta.
1. Mantenere premuto il pulsante "SELEZIONE PROGRAMMA" e contempora-
neamente accendere la lavastoviglie
con il tasto "AVVIO/ARRESTO" (verrà
emesso un breve suono).
2. Continuare a tenere premuto il pulsante "SELEZIONE PROGRAMMA" per
almeno 15 secondi (durante questo
periodo si udiranno 2 segnali acustici).
23
Page 24

3. Rilasciare il pulsante nel momento in
cui verrà emesso il secondo segnale
acustico (nel display verrà visualizzato
"b1" che sta ad indicare che la suoneria è attivata).
4. Premere nuovamente lo stesso pulsante
(apparirà "b0" che sta ad indicare che la
suoneria è disattivata).
5. Spegnere la lavastoviglie premendo il
tasto "AVVIO/ARRESTO" per rendere
effettiva la nuova impostazione.
Per riattivare la suoneria, seguire la stessa
procedura.
Memorizzazione dell'ultimo
programma utilizzato
Per abilitare la memorizzazione dell'ultimo
programma utilizzato procedere nel
seguente modo:
4. Premere nuovamente lo stesso pulsante (sul
display verrà visualizzato "A1" che sta ad
indicare che la memorizzazione è attivata).
5. Spegnere la lavastoviglie premendo il
tasto "AVVIO/ARRESTO" per rendere
effettiva la nuova impostazione.
Per disattivare la memorizzazione, seguire
la stessa procedura.
IMPORTANTE
Questa lavastoviglie è dotata di un
dispositivo di sicurezza antitrabocco
che, in caso di anomalia, interviene
scaricando l’acqua in eccesso.
ATTENZIONE!
Per evitare l'intervento intempestivo
del dispositivo di sicurezza antitrabocco, si raccomanda di non muovere o inclinare la lavastoviglie durante
il funzionamento.
Nel caso sia necessario muovere o
inclinare la lavastoviglie, assicurarsi
prima che abbia completato il ciclo di
lavaggio e che non ci sia acqua nella
vasca.
IMPORTANTE
Iniziare la procedura SEMPRE dalla
condizione di lavastoviglie spenta.
1. Mantenere premuto il pulsante "SELEZIONE PROGRAMMA" e contempora-
neamente accendere la lavastoviglie
con il tasto "AVVIO/ARRESTO" (verrà
emesso un breve suono).
2. Continuare a tenere premuto il pulsante "SELEZIONE PROGRAMMA" per
almeno 30 secondi (durante questo
periodo si udiranno 3 segnali acustici).
3. Rilasciare il pulsante nel momento in
cui verrà emesso il TERZO segnale
acustico (sul display verrà visualizzato
"A0" che sta ad indicare che la memorizzazione è disattivata).
24
Page 25

La lavastoviglie è in grado di segnalare una serie di anomalie visualizzate sul display
SEGNALAZIONE AUTOMATICA DI ANOMALIE
ANOMALIA CAUSA RIMEDIO
Sul display compare E2
accompagnato da un breve
segnale acustico.
Mancanza acqua (rubinetto dell'acqua chiuso).
Spegnere la lavastoviglie, aprire il
rubinetto e reimpostare il ciclo.
Sul display compare
accompagnato da un breve
segnale acustico.
Sul display compare
accompagnato da un breve
segnale acustico.
Sul display compare
Ef
o EL, accompagnati da un
breve segnale acustico.
Sul display compare
accompagnati da un breve
segnale acustico.
E3
E4
E5,E6,E7,
E8 o Ei
La macchina non riesce a scaricare
l'acqua dalla vasca.
Perdita di acqua.
Guasto al controllo elettronico.
L'elemento riscaldante dell'acqua
non funziona correttamente o piastra
filtro intasata.
Verificare se il tubo di scarico è
piegato o il sifone otturato e se i filtri
sono intasati.
Se il difetto permane, rivolgersi al
Servizio Assistenza Tecnica.
Verificare se il tubo di scarico è
piegato o il sifone otturato e se
i filtri sono intasati.
Se il difetto permane, rivolgersi al
Servizio Assistenza Tecnica.
E' necessario rivolgersi al Servizio
Assistenza Tecnica.
Pulire piastra filtro.
Se il difetto permane, rivolgersi al
Servizio Assistenza Tecnica.
25
Page 26

SMART Fi
Questo apparecchio è equipaggiato di tecnologia SMART Fi che consente il controllo da remoto della macchina tramite App
grazie alla funzione Wi-Fi.
Arruolamento macchina su App
PARAMETRI WIRELESS
Parametro
Standard
di trasmissione
wireless
Specifiche
802.11 b/g/n
■ Scaricare l'App Candy simply-Fi sul
proprio dispositivo.
L’App Candy simply-Fi è disponibile
sia per dispositivi con sistema operativo Android che per iOS, sia per
tablet che per smartphone.
Per scoprire tutti i dettagli delle funzioni SMART Fi, esplora i menu
dell'App accedendo in modalità
DEMO.
■ Aprire l’App, creare il profilo utente e
arruolare l'elettrodomestico seguendo le
indicazioni sul display del dispositivo o la
procedura descritta nella "Quick Guide"
allegata alla macchina.
Utilizzo della macchina da remoto
tramite App
■ Dopo l’arruolamento, ogni volta che si
intende operare da remoto tramite App,
caricare le stoviglie ed il detersivo.
Accendere la macchina, selezionare il
programma "P0", premere AVVIO/
ARRESTO e chiudere la porta; da questo momento sarà possibile gestirla tramite i comandi dell’App.
Banda
di frequenza
Massima
potenza
di trasmissione
Minima
sensibilità in
ricezione
2,412 GHz. - 2,484 GHz.
802.11b (11Mbps)
+18,5 ± 2 dBm
802.11g (54Mbps)
+16 ± 2 dBm
802.11n (HT20, MCS7)
+14 ± 2 dBm
802.11b (11Mbps)
-93 dBm
802.11g (54Mbps)
-85 dBm
802.11n (HT20, MCS7)
-82 dBm
Con la presente la Candy Hoover
Group Srl, dichiara che questo apparecchio
marcato è conforme ai requisiti
essenziali dalla Direttiva 2014/53/EU.
Per ricevere copia della dichiarazione di
conformità, contattare il costruttore al
sito:
www.candy-group.com
26
Page 27

AQUASTOP-DISPOSITIVO DI BLOCCAGGIO DELL’ACQUA
Il tubo di carico dell’acqua è provvisto di un dispositivo di sicurezza che blocca
l’afflusso dell’acqua qualora il tubo di carico si deteriori. Questo fatto viene segnalato
dall’apparizione di una tacca rossa nella finestrella .
In questo caso il tubo di carico acqua dovrà essere necessariamente sostituito.
Se la lunghezza del tubo non è sufficiente per un corretto allacciamento, il tubo
stesso dovrà essere sostituito con uno di lunghezza adeguata. Richiedere il tubo
presso il Centro Assistenza Tecnica.
Dispositivo antisvitamento (premere per svitare la ghiera).
27
Page 28

ELENCO DEI PROGRAMMI
+
+
Lavaggio con prelavaggio
Per i programmi con prelavaggio, si consiglia di aggiungere una seconda dose di detersivo
(MAX. 10 grammi) direttamente nella lavastoviglie.
/( ) = LO SVOLGIMENTO DEI PROGRAMMI "AUTOMATICI" VIENE OTTIMIZZATO, GRAZIE ALL' INTER-
••
VENTO DEL SENSORE DI SPORCO CHE ADATTA I PARAMETRI DI LAVAGGIO IN FUNZIONE DEL GRADO DI
SPORCO DELLE STOVIGLIE.
= Programma per accedere alla funzione SMART Fi
Igienizzante
75°C
INTENSIVO
75°C
Forte & veloce
65°C
Universale plus
65-75°C
UNIVERSALE
50-60°C
Giornaliero
45-55°C
Eco Plus
55°C
ECO
45°C
Delicato
45°C
Ciclo con azione antibatterica, adatto a lavare ed
igienizzare stoviglie (anche particolarmente
incrostate) biberon, ecc…
Adatto al lavaggio di pentole e di tutte le altre
stoviglie particolarmente sporche.
Adatto al lavaggio rapido di stoviglie abbondantemente sporche.
Adatto al lavaggio di stoviglie di tutti i giorni. Due
risciacqui finali garantiscono un elevato livello
d'igiene e pulizia.
Adatto al lavaggio di stoviglie e pentole normalmente sporche.
Ciclo veloce, per stoviglie normalmente sporche,
adatto ai lavaggi frequenti e carichi normali.
Programma a media temperatura, per il lavaggio
di stoviglie e pentole normalmente sporche, utilizzando detersivi contenenti enzimi.
Programma per stoviglie normalmente sporche (il
più efficiente in termini di consumo combinato
d'acqua ed energia per il lavaggio di tali stoviglie).
Programma normalizzato EN 50242.
Adatto al lavaggio di stoviglie delicate e con decorazioni e cristalleria.Indicato anche per il lavaggio quotidiano
di stoviglie poco sporche, ad esclusione delle pentole.
Classe
A 59’
65°C
RAPIDO 24'
50°C
Prelavaggio
Adatto al lavaggio quotidiano, subito dopo l’uso, di
stoviglie e pentole normalmente sporche (MAX 8
coperti).
Ciclo superveloce da eseguire a fine pasto, indicato per un lavaggio di stoviglie fino a 4/6 coperti.
Breve prelavaggio per le stoviglie usate al mattino
o mezzogiorno, quando si vuole rimandare il lavaggio del carico completo.
28
Page 29

Operazioni da compiere Svolgimento del Programma
Detersivo prelavaggio
Detersivo lavaggio
Pulizia filtro e piastra
Controllo scorta
brillantante
Controllo scorta sale
Prelavaggio caldo
Prelavaggio freddo
Lavaggio
Primo risciacquo
freddo
Secondo
risciacquo freddo
•
•
•••
75°C
Durata
media in
Minuti
Risciacquo caldo con
brillantante
Con acqua fredda
(15°C)*-Tolleranza ± 10%-
140
Facoltative
Pulsante
“PARTENZA DIFFERITA”
SI SI
Funzioni
Pulsante “SMART DOOR”
Pulsante “ALL IN 1”
= "Perfect Rapid zone" attivo
SI
•
•
•
•
•
•••
•
•••
•
•••
( ) ( )
•
•••
•
•••
•
•••
•
•••
•
•••
( ) ( )
75°C
65°C
65°C/
75°C
50°C/
60°C
45°C/
55°C
55°C
45°C
45°C
( )
130
85
115/
125
100/
120
70/
80
190
205
85
SI SI
SI SI
SI SI
SI SI
SI SI
SI SI
SI SI
SI SI
SI
SI
SI
SI
SI
SI
SI
SI
= Programmi “IMPULSE” = Programmi “AUTOMATICI”
•
•
•••
•
•••
•
N.D.= OPZIONE NON DISPONIBILE
65°C
50°C
29
59
24
5
SI SI
SI N.D.
N.D.
SI
SI
SI
CON ACQUA CALDA IL TEMPO RESIDUO AL TERMINE DEL PROGRAMMA SI AGGIORNA AUTOMATICAMENTE DURANTE LO
SVOLGIMENTO DELLO STESSO.
*
Page 30

IMPIANTO DI DECALCIFICAZIONE
L'acqua contiene in misura variabile, a
seconda delle località, sali calcarei e minerali che si possono depositare sulle stoviglie
lasciando macchie e depositi biancastri.
Più elevato è il contenuto di questi sali, maggiore è la durezza dell'acqua.
La lavastoviglie è corredata di un decalcificatore che, utilizzando del sale rigenerante
specifico per lavastoviglie, fornisce acqua
priva di calcare (addolcita) per il lavaggio
delle stoviglie.
Potete richiedere il grado di durezza della
vostra acqua all'Ente erogatore di zona.
Regolazione del decalcificatore
Il decalcificatore può trattare acqua con
durezza fino a 90°fH (gradi francesi),
50°dH (gradi tedeschi) tramite 8 livelli di
regolazione.
I livelli di regolazione vengono riportati nella
tabella seguente con la relativa acqua di rete
da trattare.
La regolazione è stata impostata dalla
*
fabbrica al livello 4 (d4) in quanto questo
soddisfa la maggior parte dell'utenza.
A seconda del livello di appartenenza della
vostra acqua impostare il valore di decalcificazione nel seguente modo:
IMPORTANTE
Iniziare la procedura SEMPRE dalla
condizione di lavastoviglie spenta.
1. Mantenere premuto il pulsante "SELEZIONE PROGRAMMA" e contempora-
neamente accendere la lavastoviglie con
il tasto "AVVIO/ARRESTO" (verrà
emesso un breve suono).
2. Continuare a tenere premuto il pulsante
"SELEZIONE PROGRAMMA" per
almeno 5 secondi, rilasciandolo SOLO
dopo aver udito un segnale acustico. Nel
display verrà indicato il livello di decalcificazione corrente.
Durezza
dell'acqua
Livello
0
1
2
3
*4
5
6
7
°fH
(gradi
0-5
6-10
11-20
21-30
31-40
41-50
51-60
61-90
°dH
francesi)
0-3
4-6
7-11
12-16
17-22
23-27
28-33
34-50
(gradi
tedeschi)
Uso sale
rigenerante
NO
SI
SI
SI
SI
SI
SI
SI
Regolazione
decalcificazione
d0
d1
d2
d3
d4
d5
d6
d7
Indicatore di riempimento sale
Questo modello è dotato di una spia elettrica sul cruscotto che si accende quando
diviene necessario provvedere a riempire
il contenitore del sale.
3. Premere nuovamente lo stesso pulsante
per scegliere il livello di decalcificazione
voluto: ad ogni pressione del pulsante, il
valore aumenta di un grado. Dopo aver
raggiunto il valore "d7", l'indicatore salta
di nuovo al valore "d0".
4. Spegnere la lavastoviglie premendo il
tasto "AVVIO/ARRESTO" per rendere
effettiva la nuova impostazione.
ATTENZIONE!
Se per qualsiasi motivo non si riuscisse
a terminare la procedura, spegnere la
lavastoviglie premendo il tasto
"AVVIO/ARRESTO" e ripartire dall'inizio
(PUNTO 1).
IMPORTANTE
La comparsa di macchie biancastre
sulle stoviglie è generalmente un
indice importante di mancanza del
sale.
30
Page 31

RICERCA PICCOLI GUASTI
Se la Vostra lavastoviglie non funzionasse, prima di chiamare il Servizio Assistenza,
fare i seguenti controlli:
ANOMALIA CAUSA RIMEDIO
1 - Non funziona con qualsiasi
programma
2 - Non carica acqua
3 - Non scarica acqua
Spina corrente elettrica non inserita
nella presa
Tasto O/I non inserito
Sportello aperto
Manca energia elettrica
Vedi cause 1
E’ chiuso il rubinetto acqua
Programmatore non
correttamente posizionato
Il tubo di carico è piegato
Il filtrino del tubo di carico acqua è
intasato
Filtro sporco
Tubo di scarico piegato
La prolunga del tubo di scarico non
è corretta
Lo scarico a muro non ha
lo sfiato in aria
Inserire spina
Inserire tasto
Chiudere sportello
Controllare
Controllare
Aprire il rubinetto acqua
Posizionare correttamente il programmatore
Eliminate le pieghe del tubo
Pulite il filtrino posto
all’estremità del tubo di carico
Pulire filtro
Raddrizzare tubo di scarico
Seguite esattamente le
istruzioni per il collegamento
del tubo di scarico
Consultate un tecnico
qualificato
4 - Scarica acqua in continuazio-
ne
5 - Non si sentono ruotare
i bracci di lavaggio
6 - Nelle macchine elettroniche
senza display: una o più spie
lampeggiano rapidamente
Tubo di scarico in posizione troppo
bassa
Eccessivo dosaggio di detersivo
Oggetto del carico che impedisce la
rotazione dei bracci
Piastra filtrante e filtro
eccessivamente sporchi
Rubinetto dell'acqua chiuso
31
Alzare il tubo di scarico ad almeno
40 cm dal pavimento
Ridurre dose detersivo.
Utilizzare detersivo specifico
Controllare
Pulire piastra e filtro
Spegnere la macchina.
Aprire il rubinetto.
Reimpostare il ciclo.
Page 32

ANOMALIA CAUSA RIMEDIO
SERVIZIO ASSISTENZA TECNICA
☎
199. 123. 123
7 - Se il carico viene
parzialmente lavato
8 - Mancata o parziale
asportazione del detersivo
9 - Presenza di macchie
bianche sulle stoviglie
10 - Rumorosità durante
il lavaggio
11 - Le stoviglie non sono
perfettamente asciutte
Vedi cause 5
Fondo di pentole non
perfettamente lavato
Bordo di pentole non
perfettamente lavato
Spruzzatori parzialmente otturati
Le stoviglie non sono sistemate bene
L’estremità del tubo di scarico è
immersa nell’acqua
Il detersivo non è dosato
adeguatamente, è vecchio o
indurito
Il tappo del contenitore sale non è
chiuso bene
Il programma di lavaggio scelto è
troppo blando
Posate, piatti, pentole, ecc…
interferiscono con l'apertura dello
sportellino della vaschetta detersivo.
Acqua di rete con eccessiva durezza
Le stoviglie sbattono tra di loro
I bracci rotanti sbattono sulle stoviglie
Mancanza di circolazione d’aria
Mancanza brillantante
Controllare
Croste troppo tenaci, da ammorbidire
prima del lavaggio in lavastoviglie
Posizionare meglio la pentola
Smontare i bracci di lavaggio,
svitando le ghiere di fissaggio in
senso orario e lavare il tutto sotto un
getto d’acqua
Non addossate troppo le
stoviglie tra di loro
L’estremità del tubo di scarico non
deve toccare l’acqua scaricata
Aumentate la dose in funzione della
quantità di sporco o sostituite il
prodotto
Avvitatelo fino in fondo
Scegliete un programma più
energico
Caricare le stoviglie in modo che
non impediscano l'apertura dello
sportellino della vaschetta detersivo.
Controllare il livello del sale e del
brillantante e regolarne il dosaggio.
Se l’anomalia persiste, richiedere
intervento Assistenza Tecnica
Sistematele meglio nei cesti
Sistemate meglio le stoviglie
Lasciate socchiusa la porta della
macchina alla fine del
programma di lavaggio per
favorire l’asciugatura naturale
Utilizzare il brillantante
NOTA BENE: Qualora un inconveniente sopracitato provocasse un cattivo lavaggio o una insufficiente
sciacquatura, è necessario rimuovere manualmente lo sporco dalle stoviglie, in quanto la fase finale di
asciugatura provoca l’essicazione dello sporco che un secondo lavaggio in macchina non è in grado di
asportare.
Se il malfunzionamento dovesse persistere, si rivolga al Centro di Assistenza Tecnica comunicando il
modello di lavastoviglie, riportato sulla targhetta posta all’interno dello sportello nella parte superiore o sul
foglio di garanzia. Fornendo tali informazioni, otterrete un intervento più tempestivo ed efficace.
La Ditta costruttrice declina ogni responsabilità per eventuali errori di stampa contenuti nel presente libretto. Si riserva inoltre il diritto di apportare le modifiche che si renderanno utili ai propri
prodotti senza comprometterne le caratteristiche essenziali.
32
Page 33

Congratulations!
Thank you for choosing a Candy
appliance; quality dishwashers which
guarantee high performance and
reliability.
Candy manufacture a vast range
of domestic appliances: washing
machines, washer/dryers, cookers,
microwave ovens, ovens and hobs,
refrigerators and freezers.
Ask your dealer for the catalogue with
the complete range of Candy products.
Please read this booklet carefully as
it provides important information
regarding the safe installation, use,
and maintenance of the machine,
together with some useful advice on
how to achieve the best results from
your dishwasher.
For future reference please keep this
instruction booklet in a safe place.
CUSTOMER SERVICE AND
GUARANTEE
Your new appliance is fully guaranteed
by the manufacturer for 12 months
against electrical/mechanical breakdown excluding:
A. Any faults which occur due to bad
installation or misuse of the machine.
B. Any faults which occur due to repair
of, or interference with, the machine
by any person not authorised by the
manufacturer to carry out service.
C. Any faults which occur due to
any parts which are fitted to the
machine which are not the original
manufacturers parts.
D. Any faults arising from non-domestic
use or unusual or abnormal use of
the machine.
E. Any faults arising from operation at
incorrect voltage.
F. Any faults arising from incorrect
operation of the machine.
The guarantee applies to Gt Britain
and Northern Ireland only, and is an
addition to your statutory rights.
AFTER SALES SERVICE
For service and repairs call your local engineer on our national telephone number:
GIAS Service Tel: 0884 995599
Support Service (Eire 0818 200021)
33
Page 34

CONTENTS
General safety rules
Water connection
Loading the salt
Adjusting the upper basket
Loading the dishes
Information for test laboratories
Loading the detergent
Types of detergent
Loading the rinse aid
Cleaning the filters
Some practical hints
Routine cleaning and maintenance
Description of the control panel
Technical data
Programme selection and special functions
Smart Fi
Programme guide
Aquastop
Water softener unit
Identifying minor faults
pag. 35
pag. 38
pag. 40
pag. 41
pag. 42
pag. 44
pag. 45
pag. 46
pag. 47
pag. 48
pag. 49
pag. 50
pag. 51
pag. 51
pag. 52
pag. 56
pag. 58
pag. 60
pag. 61
pag. 62
Fig. A
5
1
4
3
Please read the instructions in this booklet carefully because they contain important
information on how to install, use and maintain your dishwasher safely as well as
containing useful tips on how to make the most of it.
Keep this booklet safe for future reference.
34
2
Page 35

GENERAL SAFETY RULES
■ This appliances is intended to be
used in household and similar
applications such as:
- staff kitchen areas in shops,
offices and other working
environments;
- farm houses;
- by clients in hotels, motels
and other residential type
environments;
- bed and breakfast type
environments.
A different use of this appliance
from household environment or
from typical housekeeping
functions, as commercial use by
expert or trained users, is
excluded even in the above
applications.
If the appliance is used in a
manner inconsistent with this
it may reduce the life of the
appliance and may void the
manufacturer’s warranty.
Any damage to the appliance or
other damage or loss arising
through use that is not consistent
with domestic or household use
(even if located in a domestic or
household environment) shall not
be accepted by the manufacturer
to the fullest extent permitted by
law.
■ This appliance can be used by
children aged from 8 years and
above and persons with reduced
physical, sensory or mental
capabilities or lack of experience
and knowledge if they have been
given supervision or instruction
concerning use of the appliance in
a safe way and understand the
hazards involved.
Children shall not play with the
appliance. Cleaning and user
maintenance shall not be made
by children without supervision.
■ Children should be supervised to
ensure that they do not play with
the appliance.
■ Children of less than 3 years
should be kept away unless
continuously supervised.
■ Should it be necessary to replace
the supply cord, call the After
Sales Service Centre.
■ The appliance must be connected
to the water mains using new
hose-sets. The old hose-sets
should not be reused.
■ Water pressure must be between
0,08 MPa and 0,8 MPa.
■ When the appliance is located on
a carpet floor, attention must be
paid to ensure that there is no
obstruction to the bottom vents.
■ After installation, the appliance
must be positioned so that the
plug is accessible.
35
Page 36

■ For the maximum place loading,
please refer to the "TECHNICAL
DATA" table/section.
WARNING !
Knives and other utensils with
sharp points must be loaded
in the basket with their points
down or placed in a horizontal
position.
■ The door should not be left in the
open position since this could present a potential hazard ( e.g. tripping ).
■ To consult the product fiche please refer to the manufacturer website.
■ In general it is not advisable to use
adaptors, multiple plugs and/or
extension cables.
■ Do not remove the plug from the
mains supply socket by pulling the
mains cable or the machine itself.
■ Do not leave the appliance exposed to the elements (rain, sun etc).
■ Leaning or sitting on the open
door of the dishwasher could
cause it to tip over.
■ The dishwasher is designed for
normal kitchen utensils.
Objects that have been contamined by petrol, paint, traces of steel
or iron, corrosive chemicals, acids
or alkalis must not be washed in
the dishwasher.
Safety instructions
■ Make sure the electrical system
is grounded. Otherwise, seek
qualified professional assistance.
Manufacturer declines all
responsibility for any damage
due to non-earthing of the
machine.
■ Ensure that the dishwasher does
not crush power cables.
■ If there is a water softening device
installed in the home there is no
need to add salt to the water softener fitted in the dishwasher.
■ If the appliance breaks down or
stops working properly, switch it
off, turn off the water supply and
do not tamper with it. Repair work
should only be carried out by an
approved service agent and only
genuine spare parts should be fitted. Any failure to follow the above
advice may have serious consequences for the safety of the
appliance.
36
Page 37

■ If it you need to move the machine after removing the packaging,
do not try to lift it by the bottom of
the door.
Open the door slightly and lift the
machine by holding on the top.
■ For the installation of built-in
appliances, please refer to the
specific chapter or to the instructions enclosed with the booklet.
By placing the mark on this
product, we are confirming
compliance to all relevant
European safety, health and
environmental requirements
which are applicable in legislation
for this product.
37
Page 38

WATER CONNECTION
IMPORTANT
The appliance must be connected to
the water mains using new hose-sets.
The old hose-sets should not be reused.
■ The inlet and drain hoses can be directed
to left or right.
IMPORTANT
The dishwasher can be connected to
either cold or hot water, as long as it
is no hotter than 60°C.
■ Water pressure must be between
0,08 MPa and 0,8 MPa.
■ The inlet hose must be connected to a
tap so that the water supply can be cut
off when the machine is not in use
(fig. 1 B).
■ The dishwasher is fitted with 3/4" threaded
connector (fig. 2).
■ Connect inlet hose “A” to water tap “B”
with a 3/4" attachment making sure that
it has been properly tightened.
1
2
■ If it is necessary, the inlet pipe can be
lengthened up to 2,5 m. The extension
pipe is available from the After Sales
Service Centre.
■ If the dishwasher is connected to new
pipes or to pipes which have not been in
use for a long time run water through for
a few minutes before connecting the
inlet hose. In this way no deposits of
sand or rust will clog up the water inflow
filter.
38
Page 39

Connecting the outlet hose
■ The outlet hose should disharge into a
standpipe, making sure that there are no
kinks (fig. 4).
■ The standpipe must be at least 40 cm
above floor level and it must have an
internal diameter of at least 4 cm.
■ It is advisable to fit an anti-odour air trap
(fig. 4X).
■ If necessary the outlet hose can be
extended up to 2,5 m, provided that it is
kept at a maximum height of 85 cm
above floor level. The extension pipe is
available from the After Sales Service
Centre.
4
■ The hose can be hooked over the side of
the sink, but it must not be immersed in
water, in order to prevent water from
being syphoned back to the machine
when this is in operation (fig. 4Y).
■ When installing the appliance under a
worktop the hose pipe clamp must be
attached to the wall in the highest possible
position under the worktop (fig. 4Z).
■ Check that there are no kinks in the inlet
and outlet hoses.
39
Page 40

LOADING THE SALT
■ The appearance of white stains on dishes
is generally a warning sign that the salt
container needs filling.
■ The salt dispenser has a capacity of
between 1.5 and 1.8 kg and, for efficient
use of the appliance, it should be refilled
from time to time according to the
regulation of the water softener unit.
■ On the bottom of the machine there is a
container for the salt for regenerating
the softener.
■ It is important to use only a salt that is
specifically designed for dishwasher.
Other types of salt contain small quantities
of insoluble particles which over a long
period of time may affect and deteriorate
the softener performance.
■ To add salt, unscrew the cap of the container on the bottom and then refill the
container.
■ During this operation a little water will
overflow; but keep adding salt until the
container is full. When the container is
full, clean the thread of salt residue and
retighten the tap.
■ After loading the salt, it is recommended
running a complete washing cycle,
or COLD RINSE programme.
IMPORTANT
After loading the salt, YOU
MUST run a complete washing
cycle, or the PRE-WASH/COLD
RINSE/REFRESH programme.
IMPORTANT
(Only for first start up)
When the appliance is used for the
first time, after completely filling the
salt container, it is necessary to add
water until the container overflows.
40
Page 41

a
b
a
b
ADJUSTMENT OF THE
UPPER BASKET
(some models only)
If 29 cm to 32,5 cm plates are normally
used, load them onto the lower basket after
the upper basket has been placed in its
upper position and proceed as detailed
below (According to the models):
Type “A”:
1. Turn the front stops “A” outwards;
2. Take out the basket and remount it in the
upper position;
3. Replace the blocks “A” in their original
position.
Dishes that are bigger than 14 cm in
diameter can no longer be loaded onto the
upper basket and the mobile supports
cannot be used when the basket is in the
upper position.
Type “B”:
1. Pull out the upper basket;
2. Then grasp the basket from both sides
and lift it upwards (fig. 1).
Type “A”
A
A
Type “B”
1
Dishes that are bigger than 14 cm in
diameter can no longer be loaded onto the
upper basket and the mobile supports
cannot be used when the basket is in the
upper position.
ADJUST BASKET TO THE LOWER
POSITION:
1. Grasp the basket from both sides and lift
slightly upwards (fig. 2a);
2. Then slowly release into the correct
position (fig. 2b).
N. B. : NEVER LIFT OR LOWER THE
BASKET BY ONE SIDE ONLY (fig.3).
Attention :
it is advisable to adjust the basket before
loading the dishes.
2
3
41
Page 42

LOADING DISHES
A standard daily load is represented in
figs. 1 and 2.
Using the upper basket
■ The upper basket is provided with
mobile racks hooked to the sides of the
basket, which can be regulated into 4
positions.
■ In the lowered position (A-A1) the racks
may be used for such items as: tea and
coffee cups, kitchen knives and ladles.
Also glasses with stems may be safely
hung on the ends of the racks.
AA1
■ In the upright position (B-B1) the racks
allow you to load dinner plates and soup
plates up to a maximum diameter of 19
cm. Plates should be loaded vertically
with the underside of the plate towards
the back of the dishwasher with a space
between each plate to allow water to
pass freely.
Upper basket (fig. 1)
1
Upper basket (fig. 2)
2
BB1
■ It is advisable to load large plates slightly
tilted towards the front to facilitate the
introduction of the basket into the
machine.
■ The upper basket has been designed to
offer maximum flexibility in use and can
be loaded with glasses, cups, small
plates and small-sized bowls.
Using the lower basket
■ Saucepans, oven dishes, tureens, salad
bowls, lids, serving dishes, dinner plates
and soup plates can be loaded into the
lower basket.
■ Place the cutlery in the plastic cutlery
holder with the handles pointing upwards
and place the cutlery holder on the lower
basket (fig. 6) making sure that the
cutlery does not get in the way of the
rotating arms.
42
Page 43

■ The lower basket is fitted with a special
adjustable central rack (fig. 3 and 4).
This permits stable and optimum
loading, even when the size and/or
shape of the dishes is non-standard.
- POSITION “A”: for a standard load, or
one that excludes pans, salad bowls and
the like.
5
- POSITION “B”: for dishes which,
although standard size, have a particular
shape (very deep bowls, square dishes
or ones without borders etc.).
- POSITION “C”: for larger than average
flat plates and/or ones with nonstandard shapes (square, hexagonal,
oval, pizza dishes etc.).
3
B
A
4
C
A
A
A standard daily load is represented in
fig. 6.
Lower basket (fig. 6)
B
6
Please load the dishwasher sensibly to
ensure the best wash results.
■ Smaller plates (used for dessert plates
for example), can also be placed into the
lower basket as shown in the figure 5,
with the support flap placed outwards
("B").
For normal or large plates the flap must
be in the position ("A").
WARNING!
If the small plates are placed in the
basket with the support flap in the
incorrect position, the plates will
interfere with the lower spraying arm
preventing it to rotate.
IMPORTANT
The lower basket has a safety-stop
device, for its safe extraction, also
especially useful with a full load.
For loading salt, cleaning filter and for
ordinary maintenance, the complete
extraction of the basket is necessary.
Cutlery basket
The top of cutlery basket can be removed,
for enable various loading options.
43
Page 44

Using the third basket
A standard daily load is represented in
fig. 7.
■ The third basket has been designed to
load items such as utensils of small
dimensions or flat and long shaped
items. By freeing the lower baskets from
these objects, loading big-size items
becomes more comfortable and easier,
making it possible for instance to load
plates and pots in the lower basket.
■ The third basket can be loaded with the
following items: coffee cups and side
plates, fruit or dessert cups, small bowls,
saucers, kitchen knives and forks, ladles
and large spoons, graters, and
accessories for small appliances (e.g.
food mixer blades).
ATTENTION!
The third basket is NOT designed for
loading cutlery. The absence of racks
for fixing cutlery could involve such
items being found in the lower
baskets.
■ In order to obtain optimum washing
results, it is advisable to load items with
their underside towards the ceiling of the
dishwasher (e.g. small plates and
bowls).
■ The third basket can be easily extracted
from the dishwasher, by removing the
front stops at the beginning of basket
tracks.
Third basket (fig. 7)
7
INFORMATION FOR THE TEST
LABORATORIES
Please ask information required for
comparison testing and measuring noise
levels, according to EN normative, to the
following address:
testinfo-dishwasher@candy.it
In the request, please specify model name
and number of the dishwasher (see rating
plate).
■ The third basket has been designed to
offer maximum flexibility in use. Due to
its partition in three tilted sections and
absence of fixed racks, it can be loaded
in numerous ways: only coffee cups and
side plates; or coffee cups mixed with
bowls and utensils; or again with side
plates, graters, and spoons.
44
Page 45

LOADING THE DETERGENT
The detergent
IMPORTANT
It is essential to use a detergent
that is specifically designed for
dishwashers either in powder, liquid
or tablet form.
Unsuitable detergents (like those for
washing up by hand) do not contain the
proper ingredients for use in a dishwasher,
and stop the dishwasher from working
correctly.
Filling the detergent container
The detergent container is inside the door
(fig. A “2”). If the lid of the container is
closed, press the button (A) to open.
At the end of every wash cycle the lid is
always open and ready for the next time
the dishwasher is used.
WARNING!
When loading the lower basket, please
ensure that the plates or others do not
obstruct the detergent dispenser.
B
After pouring the detergent into the container,
close the lid, firstly pushing (1) and then
pressing on it (2) until you hear the click.
Since not all detergents are the same the
instructions on the boxes of detergent can
vary. We should just like to remind users
that too little detergent does not clean the
dishes properly whilst too much detergent
will not produce better results and is also a
waste.
The amount of detergent to be used varies
according to how dirty the dishes are and
on the type of dishes to be washed.
We advise using 20÷30 g of detergent in the
wash section of detergent compartment (B).
A
IMPORTANT
Do not use an excessive amount of
detergent and help limit damage to
the environment at the same time.
45
Page 46

TYPES OF DETERGENT
Detergent tablets
Detergent tablets of different manufacturers
dissolve at different speeds, for this
reason, during short programmes, some
detergent tablets may be not fully effective,
because they are not completely dissolved.
If these products are used, is recommended
to choose longer programmes to guarantee
the complete use of the detergent.
IMPORTANT
To get satisfactory washing results,
the tablets MUST be placed in the
wash section of the detergent
container and NOT directly in the
tub.
Concentrated detergents
The concentrated detergents, with reduced
alkalinity and with natural enzymes, in
conjunction with 50°C wash programmes,
have a smaller impact on the environment
and they protect the dishes and the
dishwasher.
The 50°C wash programmes purposely
exploit the dirt-dissolving properties of the
enzymes, allowing therefore, with the use
of the concentrated detergents, to achieve
the same results of the 65°C programmes
but at a lower temperature.
■ the effectiveness of detergents containing
the built in water softener/salt depends
on the hardness of your water supply.
Check that the hardness of your water
supply is within the effective range given
on the detergent packaging.
If when using this type of product, you
don't get satisfactory washing results,
please contact the detergent
manufacturer.
In certain circumstances use of combined
detergents can cause:
■ limescale deposits on dishes or in the
dishwasher;
■ a reduction in washing and drying
performance.
IMPORTANT
Any problems which arise as a direct
result of the use of these products
are not covered by our warranty.
Please note that using the "ALL in 1"
combined detergents, the rinse aid and
salt indicator lights (only used on
selected models) are superfluous, so you
must ignore the lights.
Combined detergents
The detergents that also contain the rinse
aid must be placed in the wash section of
the detergent container. The rinse aid
container must be empty (if it is not empty,
set the rinse aid regulator to lowest position
before using combined detergents).
"ALL in 1" combined detergents
If you are planning to use “ALL in 1” (“3 in 1 “/
“4 in 1”/ “5 in 1”, etc.) combined detergents i.e.
those with built in salt and/or rinse agent,
we would advise the following:
■ read carefully and follow the manufacturer’s
instructions given on the packaging;
If washing and/or drying problems occur,
we recommend you return to use traditional
separate products (salt, detergent and
rinse agent). This will ensure that the water
softener in the dishwasher operates
correctly.
In this case, we recommends that you:
■ refill both the salt and rinse aid container;
■ run one normal washing cycle without a
load.
Please note that on return to the use of
conventional salt, a number of cycles will
be required before the system becomes
fully efficient again.
46
Page 47

LOADING THE RINSE AID
The rinse aid
The rinse aid, which is automatically
released during the last rinsing cycle, helps
the dishes to dry quickly and prevents
spots and stains forming.
Filling the rinse aid container
The rinse aid container can be found to the
left of the detergent container (fig. A "3").
To open the lid, push the reference mark
and, in the same time, pull the tab of
opening.
It is always advisable to use rinse aid that
is specifically designed for dishwasher.
Check the rinse aid level through the
indicator eye (C) which is located on the
dispenser.
FULL EMPTY
dark light
Regulating the rinse aid from 1 to 6
The regulator (D) is placed under the lid
and can be turned using a coin.
The recommended position is 4.
The limestone content of the water
considerably affects the formation of
limescale and the drying performance.
It is therefore important to regulate the
quantity of rinse aid to achieve good
washing results.
If, after the wash, streaks occur on the
dishes, decrease the amount by one
position. If whitish spots occur, increase the
amount by one position.
C
D
47
Page 48

CLEANING THE FILTERS
The filter system (fig.A “4”) consists of:
a central container that traps the larger
particles;
a flat gauze that continuously filters the
wash water;
a micro filter, located beneath the gauze,
that traps the tiniest particles ensuring a
perfect rinse.
■ To achieve excellent results every time,
the filters should be checked and
cleaned after each wash.
■ To remove the filter unit, simply turn the
handle anticlockwise (fig. 1).
1
■ For ease of cleaning, the central container
is removable (fig. 2).
■ Remove the gauze filter (fig.3) and
wash the whole unit under a jet of
water. If necessary a small brush can
be used.
■ With the Self-cleaning Micro filter,
maintenance is reduced and the filter
unit need only be checked every two
weeks. Nevertheless, after each wash it
is advisable to check that the central
container and the gauze filter are not
clogged.
WARNING!
After cleaning the filters, make sure
that they are correctly reassembled
and that the gauze filter is properly
positioned at the bottom of the
dishwasher.
Make sure that the filter is screwed
back, clockwise, into the gauze, as
poor seating of the filter unit could
have an adverse effect on the
efficiency of the appliance.
IMPORTANT
Never use the dishwasher without
the filters.
2
3
48
Page 49

PRATICAL HINTS
How to make savings
How to get really good wash
results
■ Before placing the dishes in the
dishwasher, remove any remaining
food (bones, shells, pieces of meat or
vegetables, coffee grounds, skin of fruit,
cigarette ash, tooth picks etc. to avoid
blocking the filters, water outlet and
washing arm nozzles.
■ Try not to rinse the dishes before
loading them into the dishwasher.
■ If saucepans and oven dishes are
encrusted with the remains of burnt or
roast food, it is advisable to leave them
to soak before washing.
■ Place the dishes face downwards.
■ Try to place the dishes in such a way
that they are not touching one another.
If they are loaded properly you will get
better results.
■ After loading the dishes check that the
washing arms can rotate freely.
■ Pans and other dishes that have
particularly stubborn food particles or
remnants of burnt food should be left to
soak in water with dishwasher
detergent.
■ To wash silver properly:
a) rinse the silver immediately after
use, especially if it has been used for
mayonnaise, eggs, fish etc.;
b) do not sprinkle detergent onto it;
c) keep it separate from other metals.
■ If you want the dishwasher to give a
complete wash, place the dishes in the
dishwasher at the end of each meal and
if necessary turn on the COLD RINSE
cycle to soften the food remains and
remove bigger particles of food from the
new load of dishes.
When the dishwasher is full start the
complete wash cycle programme.
■ If the dishes are not very dirty or if the
baskets are not very full select an
ECONOMY programme, following the
instructions in the program list.
What not to wash
■ It should be remembered that not all
dishes are suitable for washing in a
dishwasher.We advise against using
the dishwasher to wash items in
thermoplastic, cutlery with wooden or
plastic handles, saucepans with
wooden handles, items in aluminium,
crystal, leaded glass unless otherwise
stated.
■ Certain decorations may fade. It is
therefore a good idea before loading the
whole batch to wash just one of the
items first so as to be sure that others
like it will not fade.
■ It is a good idea not to put silver cutlery
with non-stainless steel handles into
the dishwasher as there could be a
chemical reaction between them.
IMPORTANT
When buying new crockery or
cutlery always make sure that they are
suitable for washing in a dishwasher.
Useful hints
■ In order to avoid any dripping from the
top rack, remove the lower rack first.
■ If the dishes are to be left in the
machine for some time, leave the door
ajar, to let some air circulate and to
improve the drying performance.
49
Page 50

CLEANING AND
MAINTENANCE
■ To clean the dishwasher outside, do not
use solvents (degreasing action) neither
abrasives, but only a cloth soaked with
water.
■ The dishwasher does not require special
maintenance, because the tank is
self-cleaning.
■ Regularly wipe the door gasket with a
damp cloth to remove any food remains
or rinse aid.
■ Dishwasher cleaning is recommended,
in order to remove limestone deposits or
dirt. We suggest you run a washing cycle
periodically with specialist dishwasher
cleaning products. For all cleaning
operations the dishwasher must be
empty.
■ If, in spite of the routine cleaning of the
filters, you notice that the dishes or pans
are not properly washed or rinsed, check
that all the spray heads on the rotor
arms (fig. A “5”) are clear.
1
1b
2
If they are blocked, clean them in the
following way:
1. to remove the upper rotor arm, turn it
until it lines up with the stop marked
by the arrow (fig. 1b). Push it upwards
(fig. 1) and, keeping it pushed in,
unscrew it in a clockwise direction
(to reassemble it repeat the same
operation, but turn it anticlockwise).
The lower rotor arm can be removed
simply by pulling it upwards (fig. 2);
2. wash the rotor arms under a jet of water
to clear any blockage in the spray
heads;
3. when you have finished, refit the rotor
arms in the same position, remembering
to re-align the arrow and screw into
position.
■ Both the door lining and the tank lining
are in stainless steel; however, should
spots caused by oxidation occur, this is
probably due to a high level of iron salts
presents in the water.
■ The spots can be removed with a mild
abrasive agent; never use chlorine
based materials, steel wool, etc.
WHEN CYCLE IS FINISHED
After every wash it is essential to turn off
water supply and to switch off the machine
by pressing the On/Off button to the off
position.
If the machine is not going to be used for
some time, it is advisable to follow these
rules:
1. do an empty wash with detergent in order
to clean the machine of any deposits;
2. pull out the electric plug;
3. turn off the water tap;
4. fill the rinse aid container;
5. Ieave the door ajar;
6. keep the inside of the machine clean;
7. If the machine is left in places where the
temperature is below 0°C any water left
inside the pipes may freeze. Wait until
the temperature rises above zero and
then wait for about 24 hours before
starting up the dishwasher.
50
Page 51

DESCRIPTION OF THE CONTROL PANEL
A "ON/OFF" button
B "PROGRAMME SELECTION" button
C "DELAY START" button
D "START"/"RESET" button
(start/cancelling programme)
H "ALL IN 1" option button
I "SALT EMPTY" light
L "RINSE AID EMPTY" light
M
"U WASH"
•
lights
N "OPTION SELECTION" lights
E DIGITAL DISPLAY
O Wi-Fi light
F
"U WASH"
•
button
P Programme guide
G "SMART DOOR" option button
DIMENSIONS
Width x Height x Depth (cm)
Depth with door open (cm)
TECHNICAL DATA
EN 50242 place load
Capacity with pans and dishes
Water supply pressure (MPa)
Fuse / Power input / Supply voltage
CONSUMPTION (main programmes)*
Programme Energy (kWh) Water (L)
INTENSIVE
UNIVERSAL
ECO
RAPID 24'
Power consumption of the off-mode and of the left-on mode: 0,45 W / 0,45 W
*Values are measured in a laboratory according to European Standard EN 50242 (consumption may
vary according to conditions of usage).
59,8 x 81,8 ÷ 89,8 x 55
117
2,07
1,46
0,77
0,59
16
9 persons
Min. 0,08 - Max. 0,8
See rating plate
21
15
10
9
51
Page 52

PROGRAMME SELECTION
AND SPECIAL FUNCTIONS
(Use in conjunction with programme guide)
"U WASH" button
•
This button allows you to modify the wash
intensity, according to how dirty your dishes
are, by modifying the wash time and
temperature.
Press the button to increase the intensity of
wash cycle ( indicator light) or to reduce
the intensity of wash, this also allows you to
decrease the wash length time ( indicator
light).
The combination of the button with the 4
main wash programmes enables to have 8
additional wash cycles (achieving a total of
12 programmes of washing).
Programme settings
■ Open the door and place the dirty dishes
inside the appliance.
■ Press the "ON/OFF" button . The
display will show two lines.
■ Choose a programme by pressing the
"PROGRAMME SELECTION" button
("PROGR.").
■ If you wish to choose the "DEGREE OF
SOILING", press the corresponding button.
■ If you wish to select an option, press the
option button (the corresponding indicator
light will light up).
■ Press the "START" button.
The length of the program will be shown on
the display alternating hours with minutes
[I.e.: 1 h (1 hour) / 25 (25 minutes)].
IMPORTANT
When the dishwasher is switched on,
the setting last used will be indicated.
"Perfect Rapid zone"
The "Perfect Rapid zone" is identified by
the left side of the tub, in which two extra
washing arms will be activated during
Rapid programs (A Class 59' and Ultra
Rapid 24') and U WASH + programs
(Hygienic, Universal Plus and Eco Plus)
to provide an extra washing force, more
water, in that zone.
•
■ Close the door (after an audible signal
has sounded, the programme will start
automatically).
“AUTOMATIC” programmes
The dishwasher is equipped with a dirt
sensor, able to analyse water murkiness
during all "AUTOMATIC" programme
phases (see programme list); thanks to
this sensor the washing cycle parameters
are automatically adapted to the real
quantity of dirt on dishes. Thus excellent
washing results are guaranteed while
optimising water and energy consumption.
"IMPULSE" programmes
The “IMPULSE” programmes use an
impluse washing technology, which reduces
consumption, noise and increases
performances.
IMPORTANT
The “intermittent” working of the
washing pump MUST NOT BE
considered a malfunction, it is a
characteristic of the impulse washing
so must be considered a normal
function of the programme.
52
Page 53

Programme interruption
Programme end
Opening the door when a programme is
running is not recommended especially
during the main wash and final hot rinse
phases. However, if the door is opened
while a programme is running (for example,
to add dishes) the machine stops
automatically and the display will flash the
remaining time before the end of the cycle.
Close the door, without pressing any
buttons. The cycle will start from where it
left off.
WARNING!
If you open the door during the
drying cycle, an audible audio signal
advises you that the drying cycle has
not yet finished.
Changing a running programme
Proceed as follows to change or cancel a
running programme:
■ Open the door.
■ Hold the "RESET" button down for at
least 5 seconds. "00" will appear on the
display and some audible signals will
sound.
A 5 second alarm will sound (if not muted)
3 times at 30 second intervals to signal that
the programme has ended.
IMPORTANT
If the "SMART DOOR" function is
activated, during the drying phase
the door will open automatically and
you will have to wait until the indication
of the end of cycle before removing
the dishes.
Option buttons
"SMART DOOR" button
(AUTOMATIC OPEN DOOR)
This option activiates a special device that
opens the door a few centimeters during or
at the end of the drying cycle (depending
on the programme). This ensures the natural
and efficient drying of dishes.
The duration of the selected cycle will
automatically change to allow an
optimiazation of temperatures used during
the rinse phase, this allows a significant
reduction of energy consumption. The
automatic door opening in the last phase of
drying enables the air to circulate,
removing the risk of bad odours.
■ The running programme will be cancelled.
The display will show two lines.
■ At this point a new programme can be set.
WARNING!
Before starting a new programme,
you should check that there is still
detergent in the dispenser.
If necessary, top up the dispenser.
If there is any break in the power supply
while the dishwasher is operating, a
special memory stores the selected
programme and, when the power is
restored, it continues where it left off.
IMPORTANT
This option is automatically activated
on the "ECO" programme, it is however
possible to disable it.
The function "SMART DOOR" is not
available in the programme "RAPID
24'" and "PRE-WASH".
ATTENTION
With this option selected, you must
not in any way prevent the door from
opening or force it shut, as this will
damage the mechanism.
Ensure that there is free space in
front of the door and before closing
wait for the return opening device.
53
Page 54

"ALL IN 1" button
This option optimises the use of "ALL in 1"
("3 in 1"/"4 in 1"/"5 in 1", ecc.) combined
detergents.
By pressing this button, the selected
washing programme is modified to get best
performance from combined detergents
(furthermore, the salt and rinse aid
shortage lights are de-activated).
WARNING!
Once selected, this option keeps
being on (light on) also for next
washing cycles and it can be de-activate
(light off) only by pressing the button
once again.
IMPORTANT
This option is recommended when
using the RAPID 24' program, the
duration of which will be extended for
about 15 minutes, allowing the
detergent tablets to achieve a better
performance.
At the end of the countdown, the programme
will automatically start and the length of the
selected cycle will be shown in the display.
Proceed as follows to cancel a delayed
start:
■ Hold the "RESET" button down for at
least 5 seconds. "00" will appear on the
display and some audible signals will
sound.
■ The delayed start and the selected
programme will be cancelled.
The display will show two lines.
■ At this point, a new programme and
option buttons must be set to start a
new programme as indicated in the
"PROGRAMME SETTINGS" section.
"DELAY START" button
Dishwasher start time can be set with this
button, delaying start from 1 to 23 hours.
Proceed as follows to set a delayed start:
■ Press the "DELAY START" button ("00"
will appear on the display).
■ Press the button again to increase the
delay in hours (each time the button is
pressed the delay is increased by 1 hour
to a maximum of 23).
■ To start the countdown, press the
"START" button.
The display will show the time remaining
to the begin of the programme.
Alarm mute for the PROGRAMME
END
The alarm for the programme end may be
muted as follows:
IMPORTANT
The dishwasher must ALWAYS be off
before start of this procedure.
1. Hold down the "PROGRAMME
SELECTION" button and at the same
time switch on the dishwasher by
pressing the "ON/OFF" button (a brief
audible signal will sound).
2. Keep the "PROGRAMME SELECTION"
button pressed for at least 15 seconds
(during this time, 2 audible signals will
sound).
54
Page 55

3. Release the button when the second
audible signal sounds ("b1" will appear on
the display to indicate that the alarm is on).
4. Press the same button again ("A1" will
appear on the display to indicate that the
memorization is on).
4. Press the same button again ("b0" will
appear on the display to indicate that the
alarm is off).
5. Turn off the dishwasher by pressing the
"ON/OFF" button to confirm the new
setting.
To turn the alarm on again, follow the same
procedure.
Memorization of the last
programme used
The last programme used can be
memorized by following the below:
5. Turn off the dishwasher by pressing the
"ON/OFF" button to confirm the new
setting.
To disable the memorization, follow the
same procedure.
IMPORTANT
This dishwasher is equipped with an
anti-overflow safety device which will
automatically discharge any excess
water should a problem occur.
WARNING!
To ensure the correct operation of
the anti-overflow safety device, we
recommend that the dishwasher is
not moved or tilted during operation.
If however it is necessary to tilt or
move the dishwasher, please ensure
that the washing cycle is complete
and that there is no remaining water
inside the dishwasher.
IMPORTANT
The dishwasher must ALWAYS be off
before start of this procedure.
1. Hold down the "PROGRAMME
SELECTION" button and at the same
time switch on the dishwasher by
pressing the "ON/OFF" button (a brief
audible signal will sound).
2. Keep the "PROGRAMME SELECTION"
button pressed for at least 30 seconds
(during this time, 3 audible signals will
sound).
3. Release the button when the THIRD
audible signal sounds ("A0 " will appear
on the display to indicate that the
memorization is off).
55
Page 56

The dishwasher is able to signal a series of faults in the display.
AUTOMATIC FAULT SIGNALS
FAULTS CAUSE SOLUTION
E2 appears on the display and
the alarm sounds.
E3 appears on the display and
the alarm sounds.
E4 appears on the display and
the alarm sounds.
E5,E6,E7,Ef or ELappears
on the display and the alarm
sounds.
E8 or Ei appear on the display
and the alarm sounds.
No water (inlet hose closed).
The machine cannot drain water.
Water leak
Electronic control fault.
The water heating element is not
working correctly or the filter plate is
clogged.
Turn off the dishwasher, open the
inlet hose and reset the cycle.
Check if the drain tube is bent or if
the siphon or filters are clogged.
If the problem persists, contact
Customer Service.
Check if the drain tube is bent or if
the siphon or filters are clogged.
If the problem persists, contact
Customer Service.
Contact Customer Service.
Clean the filter plate.
If the problem persists, contact
Customer Service.
56
Page 57

SMART Fi
This appliance is equipped with SMART Fi
technology that allows you to control it
remotely via App, thanks to Wi-Fi function.
Machine enrollment (on App)
WIRELESS PARAMETERS
Parameter
Wireless
Standard
Specifications
802.11 b/g/n
■ Download the Candy simply-Fi App on
your device.
The Candy simply-Fi App is available
for devices running both Android
and iOS, both for tablets and for
smartphones.
Get all the details of the SMART Fi
functions by browsing the App in
DEMO mode.
■ Open the App, create the user profile and
enroll the appliance following the
instructions on the device display or the
"Quick Guide" attached on the machine.
Enable remote control (via App)
■ After the machine enrollment, every time
you want to manage it remotely through
the App, firstly you have to load dishes
and detergent. Switch the appliance on,
select the "P0" programme, press the
START/RESET button and close the
door; from that moment on you can
manage it through the App commands.
Frequency
range
Max Trasmit
Power
Minimum
Receiving
Sensitivity
2,412 GHz. - 2,484 GHz.
802.11b (11Mbps)
+18,5 ± 2 dBm
802.11g (54Mbps)
+16 ± 2 dBm
802.11n (HT20, MCS7)
+14 ± 2 dBm
802.11b (11Mbps)
-93 dBm
802.11g (54Mbps)
-85 dBm
802.11n (HT20, MCS7)
-82 dBm
With this the Candy Hoover Group
Srl, declares that this appliance marked
with complies with the essential
requirements of the Directive
2014/53/EU. To receive a copy of the
declaration of conformity, please
contact the manufacturer at:
www.candy-group.com
57
Page 58

+
+
PROGRAMME GUIDE
Wash with prewash
For wash programmes with prewash, it is advisable to add a second dose of detergent (max.
10 g) directly in the machine.
/( ) = "AUTOMATIC" PROGRAMMES ARE OPTIMISED THANKS TO THE DIRT SENSOR THAT ADAPTS
••
WASHING PARAMETERS TO DISH DIRT LEVELS.
= is the program which allows you to access the SMART Fi functions
Hygienic
75°C
INTENSIVE
75°C
Strong & Fast
65°C
Universal plus
65 - 75°C
UNIVERSAL
50 - 60°C
Daily
45 - 55°C
Eco Plus
55°C
ECO
45°C
Delicate
45°C
An antibacterial cycle, intended for washing and
sterilising dishes (even heavily stained ones)
babies’ bottles etc.
Once a day - for heavily soiled pans and any
other items that have been left all day for
washing.
Intended for rapid washing of very dirty dishes.
Intended for everyday dishwashing. Two final
rinses ensure a high level of hygiene and
cleanliness.
Once a day - for normal soiled pans and any other
items that have been left all day for washing.
Fast cycle, for “normally” dirty dishes - intended
for frequent washes and normal loads.
A medium temperature programme, intended for
washing pans and dishes that are “normally” dirty,
using detergents which contain enzymes.
Programme for normally soiled tableware (the
most efficient in terms of its combined energy and
water consumption for that type of tableware).
Programme standardised to EN 50242.
Suitable for delicate crockery and glassware. Also
for less soiled items excluding pans.
Class 59’
A
65°C
RAPID 24'
50°C
Pre-wash
Suitable for heavily soiled items that are to be
washed straight after a meal (Max 8 place load).
Quick wash for dishes which are to be washed
immediately after the meal. Wash load of
4/6 persons.
Short cold pre-wash for items that are stored in
the dishwasher until you are ready to wash a full
load.
58
Page 59

Check list
Detergent for soaking
(Prewash)
Detergent for washing
Clean filter
Check rinse aid
dispenser
Check salt container
Programme contents
Hot pre-wash
Cold pre-wash
Main wash
First cold rinse
Second cold rinse
Avarage
duration
in minutes
Hot rinse with rinse aid
With cold water (15°C)*
-Tolerance ± 10%-
Special function
available
"DELAY START" button
buttons
"SMART DOOR" button
"ALL IN 1" button
•
•
•
•
•
•
•••
•
•••
•
•••
•
•••
( ) ( )
•
•••
•
•••
•
•••
•
•••
•
•••
( ) ( )
75°C
75°C
65°C
65°C/
75°C
50°C/
60°C
45°C/
55°C
55°C
45°C
45°C
( )
140
130
85
115/
125
100/
120
70/
80
190
205
85
YES
YES
YES
YES
YES
YES
YES
YES
YES
YES
YES
YES
YES
YES
YES
YES
YES
YES
YES
YES
YES
YES
YES
YES
YES
YES
YES
= "Perfect Rapid zone" switched on
= "IMPULSE" programmes = "AUTOMATIC" programmes
•
•
•••
•
•••
•
N/A = OPTION NOT AVAILABLE
65°C
50°C
59
59
24
5
YES
YES
YES
YES
N/A
N/A
YES
YES
WITH HOT WATER THE TIME REMAINING UNTIL THE END OF THE PROGRAMME IS AUTOMATICALLY DISPLAYED WHILE THE
PROGRAMME IS RUNNING.
*
Page 60

AQUASTOP-SYSTEM
The water-stop device protects against water damages caused by leaks on the fill
hose which could develop due to natural ageing of the hose.
In the water-stop system the leaking water fills the corrugated hose and activates a
stop valve which cuts off the water supply to the machine.
This fault is shown by a red sector on the window .
Would this occur, please refer to your Service Agent.
If the hose is not long enough for correct connection, it must be replaced with a longer
one. The hose can be obtained from your Service Agent.
Safety antitwist device (press and twist to remove the washer).
60
Page 61

WATER SOFTENER UNIT
Depending on the source of the supply,
water contains varying amounts of limestone
and minerals which are deposited on the
dishes leaving whitish stains and marks.
The higher the level of these minerals
present in the water, the harder the water is.
The dishwasher is fitted with a water
softener unit which, through the use of
special regenerating salt, supplies
softened water for washing the dishes.
The degree of hardness of your water can
be obtained from your water supply
company.
Regulating the water softener
The water softener can treat water with a
hardness level of up to 90°fH (French
grading) or 50°dH (German grading)
through 8 settings.
The settings are listed in the table below:
Water
hardness
salt
Water
Level
0
1
2
3
*4
5
6
7
°fH
0-5
6-10
11-20
21-30
31-40
41-50
51-60
61-90
°dH
(French)
0-3
4-6
7-11
12-16
17-22
23-27
28-33
34-50
Use of
regenerating
(German)
NO
YES
YES
YES
YES
YES
YES
YES
softener
d0
d1
d2
d3
d4
d5
d6
d7
setting
* The softener unit is set in the factory
at level 4 (d4) as this satisfies the
requirements of the majority of users.
Regulate the setting of your water softener
unit according to the degree of hardness
of your water as follows:
IMPORTANT
The dishwasher must ALWAYS be
off before start of this procedure.
1. Hold down the "PROGRAMME
SELECTION" button and at the same
time switch on the dishwasher by
pressing the "ON/OFF" button (a brief
audible signal will sound).
2. Keep the "PROGRAMME SELECTION"
button pressed for at least 5 seconds,
UNTIL a brief audible signal sounds.
The current water softener setting level
will be shown on the display.
3. Press the same button again to select
the required water softener level: each
time the button is pressed, the setting
will increase by one level. When you
have reached "d7", the display will go
back to "d0".
4. Turn off the dishwasher by pressing the
"ON/OFF" button to confirm the new
setting.
WARNING!
If any problem occurs, turn the
dishwasher off by pressing the
"ON/OFF" button and start the
procedure again from the beginning
(STEP 1).
Salt loading indicator
This model is provided with an indicator light
on the control panel which will light up
when it is necessary to reload the salt
container.
IMPORTANT
The appearance of white stains on
dishes is generally an important
sign that the salt container needs
filling.
61
Page 62

IDENTIFYING MINOR FAULTS
Should the dishwasher fail to operate, before contacting the Service Centre, make
the following checks:
FAULT CAUSE REMEDY
1 - Machine completely dead
2 - Machine does not
draw water
3 - Machine does not
discharge water
4 - Machine discharges
water continuously
5 - Spray arms are not heard
to rotate
6 - On electronic appliances
without a display: one or
more indicator lights
flashing quickly.
Plug is not connected to wall
socket
O/I button has not been pressed
Door is open
No electricity
See causes for no. 1
Water tap is turned off
Programme selector is not at
correct position
The inlet hose is bent
The inlet hose filter is not
correctly connected
Filter is dirty
Outlet hose is kinked
The outlet hose extension is
not correctly connected
The outlet connection on the
wall is pointing downwards not
upwards
Position of outlet hose is too
low
Excessive amount of detergent
Item prevents arms from rotating
Plate and cup filter very dirty
Water inlet tap turned off
Connect electric plug
Press button
Close door
Check the fuse in the plug and
the electricity supply
Check
Turn water tap on
Turn programme selector to
correct position
Eliminate the bends in the hose
Clean the filter at the end of the
hose
Clean filter
Straighten outlet hose
Follow the instructions for
connecting the outlet hose
carefully
Call a qualified technician
Lift outlet hose to at least 40 cm
above floor level
Reduce amount of detergent
Use suitable detergent
Check
Clean plate and cup filter
Switch off the appliance.
Turn on the tap.
Re-set the cycle.
62
Page 63

FAULT CAUSE REMEDY
7 - Load of dishes is only
partially washed
8 - Detergent not dispensed
or partially dispensed
9 - Presence of white spots
on dishes
10 -Noise during wash
11 -The dishes are not
completely dry
See causes for no. 5
Bottom of saucepans have not
been washed well
Edge of saucepans have not
been washed well
Spray arms are partially blocked
The dishes have not been
properly loaded
The end of the outlet hose is in
the water
The incorrect amount of
detergent has been measured
out; the detergent is old and hard
The wash programme is not
thorough enough
The lower basket dishes have
not been washed
Cutlery, dishes, pans, etc... stop
the detergent dispenser opening
Water is too hard
The dishes knock against one
another
The revolving arms knock against
the dishes
Inadequate air flow
Rinse aid missing
Check
Burnt on food remains must
be soaked before putting pans
in dishwasher
Reposition saucepans
Remove spray arms by
unscrewing ring nuts clockwise
and wash under running water
Do not place the dishes too
closely together
The end of the outlet hose
must not come into contact
with the outflow water
Increase the measure
according to how dirty the
dishes are and change detergent
Choose a more vigorous
programme
Depress half load button
Position dishes not to obstruct
the dispenser
Check salt and rinse aid level
and regulate amount.
Should the fault persist,
Contact Service Centre
Re-check loading of dishes in
the basket
Again re-check loading
Leave the dishwasher door ajar
at the end of the wash program
to allow the dishes to dry naturally
Fill the rinse aid dispenser
N.B.: Should any of the situations occur and should the machine give a bad wash performance,
it is necessary to remove the deposits from the dishes by hand since the final drying cycle hardens the
deposits which a second wash in the machine would not be able to remove.
If the malfunction continues contact a Service Centre quoting the serial number of the dishwasher.
This is found on the plaque on the inside of the dishwasher door at the top or on the guarantee.
This information will make it possible to take more effective action more quickly.
The manufacturers decline any responsibility for any printing mistakes in this instruction booklet.
They also reserve the right to modify their own appliances as necessary without altering the
essential characteristics.
63
Page 64

Questo elettrodomestico è marcato conformemente alla Direttiva Europea 2012/19/UE sui Rifiuti da Apparecchiature Elettriche
ed Elettroniche (RAEE).
I RAEE contengono sia sostanze inquinanti (che possono cioè avere un impatto negativo anche molto pesante sull’ambiente)
sia materie prime (che possono essere riutilizzate). E’ perciò necessario sottoporre i RAEE ad apposite operazioni di trattamento, per rimuovere e smaltire in modo sicuro le sostanze inquinanti ed estrarre e riciclare le materie prime.
Ogni cittadino può giocare un ruolo decisivo nell’assicurare che i RAEE non diventino un problema ambientale; basta seguire
qualche semplice regola:
- i RAEE non vanno mai buttati nella spazzatura indifferenziata;
- i RAEE devono essere consegnati ai Centri di Raccolta (chiamati anche isole ecologiche, riciclerie, piattaforme ecologiche
…) allestiti dai Comuni o dalle Società di igiene urbana; in molte località viene anche effettuato il servizio di ritiro a domicilio
dei RAEE ingombranti.
In molte nazioni, quando si acquista una nuova apparecchiatura, si può consegnare il RAEE al negoziante, che è tenuto a ritirarlo gratuitamente (ritiro "uno contro uno") a patto che il nuovo apparecchio sia dello stesso tipo e svolga le stesse funzioni di
quello reso.
This appliance is marked according to the European directive 2012/19/EU on Waste Electrical and Electronic Equipment
(WEEE).
WEEE contains both polluting substances (which can cause negative consequences for the environment) and basic components (which can be re-used). It is important to have WEEE subjected to specific treatments, in order to remove and dispose
properly all pollutants, and recover and recycle all materials.
Individuals can play an important role in ensuring that WEEE does not become an environmental issue; it is essential to follow
some basic rules:
- WEEE should not be treated as household waste;
- WEEE should be handed over to the relevant collection points managed by the municipality or by registered companies. In
many countries, for large WEEE, home collection could be present.
In many countries, when you buy a new appliance, the old one may be returned to the retailer who has to collect it free of
charge on a one-to-one basis, as long as the equipment is of equivalent type and has the same functions as the supplied
equipment.
La Ditta costruttrice declina ogni responsabilità per eventuali errori di stampa contenuti
nel presente libretto. Si riserva inoltre il diritto di apportare le modifiche che si
renderanno utili ai propri prodotti senza compromettere le caratteristiche essenziali.
Per consultare la scheda tecnica relativa al prodotto, fare riferimento al sito web del produttore.
The manufacturer declines all responsibility in the event of any printing mistakes in this
booklet. The manufacturer also reserves the right to make appropriate modifications to
its products without changing the essential characteristics.
To consult the product fiche, please refer to the manufacturer website.
- CELDI 3TF6 -
IT
EN
17.11 - 41904167
 Loading...