Candy CDH 30 User Manual

Ceramic Hob

Instruction Manual / Installation Manual

MODEL: CDH 30

Safety Warnings

Your safety is important to us. Please read this information before using your hob.

Installation

Electrical Shock Hazard

Disconnect the appliance from the mains electricity supply before carrying out any work or maintenance on it.

Connection to a good earth wiring system is essential and mandatory.

Alterations to the domestic wiring system must only be made by a qualified electrician.

Failure to follow this advice may result in electrical shock or death.

Cut Hazard

Take care - panel edges are sharp.

Failure to use caution could result in injury or cuts.

Important safety instructions

Read these instructions carefully before installing or using this appliance.

No combustible material or products should be placed on this appliance at any time.

Please make this information available to the person responsible for installing the appliance as it could reduce your installation costs.

In order to avoid a hazard, this appliance must be installed according to these instructions for installation.

This appliance is to be properly installed and earthed only by a suitably qualified person.

This appliance should be connected to a circuit which incorporates an isolating switch providing full disconnection from the power supply.

Failure to install the appliance correctly could invalidate any warranty or liability claims.

Operation and maintenance

Electrical Shock Hazard

Do not cook on a broken or cracked hob surface. If the hob surface should break or crack, switch the appliance off immediately at the mains power supply (wall switch) and contact a qualified technician.

Switch the hob off at the wall before cleaning or maintenance.

Failure to follow this advice may result in electrical shock or death.

Health Hazard

This appliance complies with electromagnetic safety standards.

Hot Surface Hazard

During use, accessible parts of this appliance will become hot enough to cause burns.

EN-1

Do not let your body, clothing or any item other than suitable cookware contact the Induction glass until the surface is cool.

Metallic objects such as knives, forks, spoons and lids should not be placed on the hob surface since they can get hot.

Keep children away.

Handles of saucepans may be hot to touch. Check saucepan handles do not overhang other cooking zones that are on. Keep handles out of reach of children.

Failure to follow this advice could result in burns and scalds.

Cut Hazard

The razor-sharp blade of a hob surface scraper is exposed when the safety cover is retracted.Use with extreme care and always store safely and out of reach of children.

Failure to use caution could result in injury or cuts.

Important safety instructions

Never leave the appliance unattended when in use. Boilover causes smoking and greasy spillovers that may ignite.

Never use your appliance as a work or storage surface.

Never leave any objects or utensils on the appliance.

Never use your appliance for warming or heating the room.

After use, always turn off the cooking zones and the hob as described in this manual (i.e. by using the touch controls).

Do not allow children to play with the appliance or sit, stand, or climb on it.

Do not store items of interest to children in cabinets above the appliance. Children climbing on the cooktop could be seriously injured.

Do not leave children alone or unattended in the area where the appliance is in use.

Children or persons with a disability which limits their ability to use the appliance should have a responsible and competent person to instruct them in its use. The instructor should be satisfied that they can use the appliance without danger to themselves or their surroundings.

Do not repair or replace any part of the appliance unless specifically recommended in the manual. All other servicing should be done by a qualified technician.

Do not use a steam cleaner to clean your hob.

Do not place or drop heavy objects on your hob.

Do not stand on your hob top.

Do not use pans with jagged edges or drag pans across the Induction glass surface as this can scratch the glass.

Do not use scourers or any other harsh abrasive cleaning agents to clean your cooktop, as these can scratch the Induction glass.

If the supply cord is damaged, it must be replaced by the manufacturer, its service agent or similarly qualified persons in order to avoid a hazard.

This appliance is designed for domestic use only.

WARNING: The appliance and its accessible parts become hot during use.

Care should be taken to avoid touching heating elements. Children less than 8 years of age shall be kept away unless continuously supervised.

EN-2

This appliance can be used by children aged from 8 years and above and persons with reduced physical,sensory or mental capabilities or lack of experience and knowledge if they have been given supervision or instruction concerning use of the appliance in a safe way and understand the hazards involved.

Children shall not play with the appliance. Cleaning and user maintenance shall not be made by children without supervision.

WARNING: Unattended cooking on a hob with fat or oil can be dangerous and may result in fire.NEVER try to extinguish a fire with water, but switch off the appliance and then cover flame e.g. with a lid or a fire blanket.

WARNING: Danger of fire: do not store items on the cooking surfaces.

Warning: If the surface is cracked, switch off the appliance to avoid the possibility of electric shock, for hob surfaces of glass-ceramic or similar material which protect live parts

A steam cleaner is not to be used.

The appliance is not intended to be operated by means of an external timer or separate remote-control system.

Congratulations on the purchase of your new Ceramic Hob.

We recommend that you spend some time to read this Instruction / Installation Manual in order to fully understand how to install correctly and operate it.

For installation, please read the installation section.

Read all the safety instructions carefully before use and keep this Instruction / Installation Manual for future reference.

Product Overview

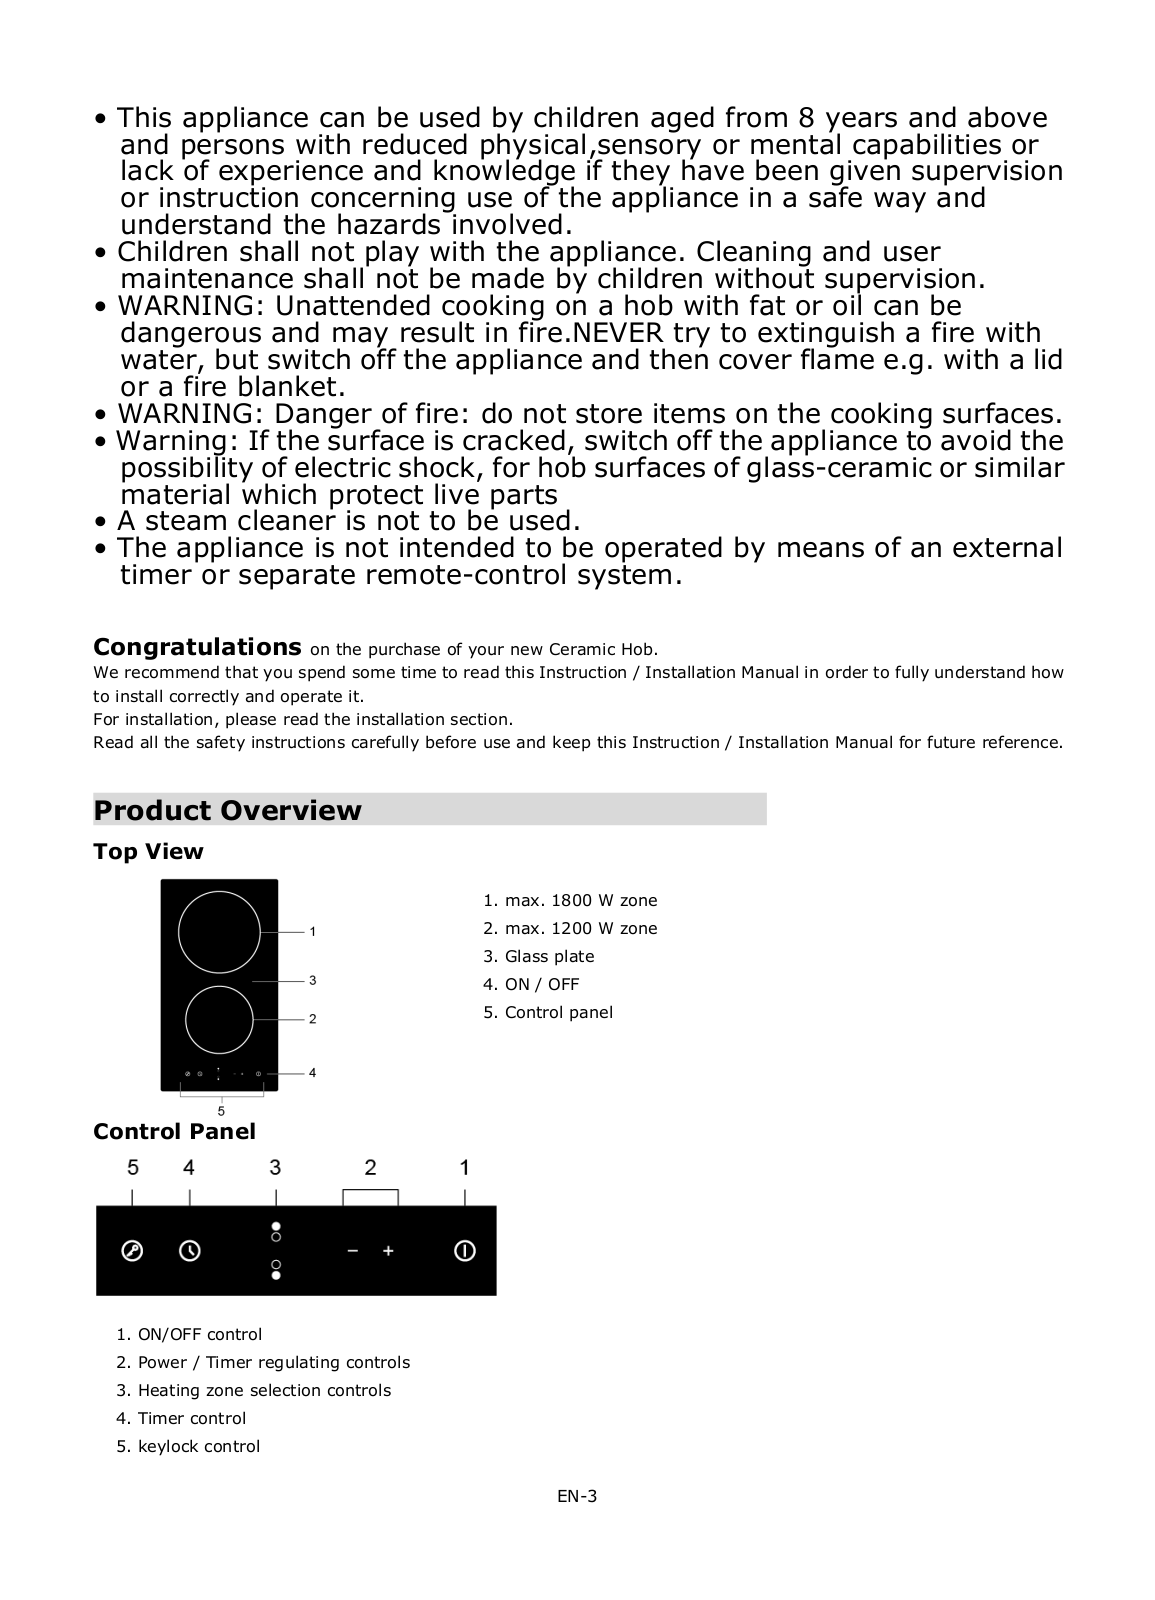
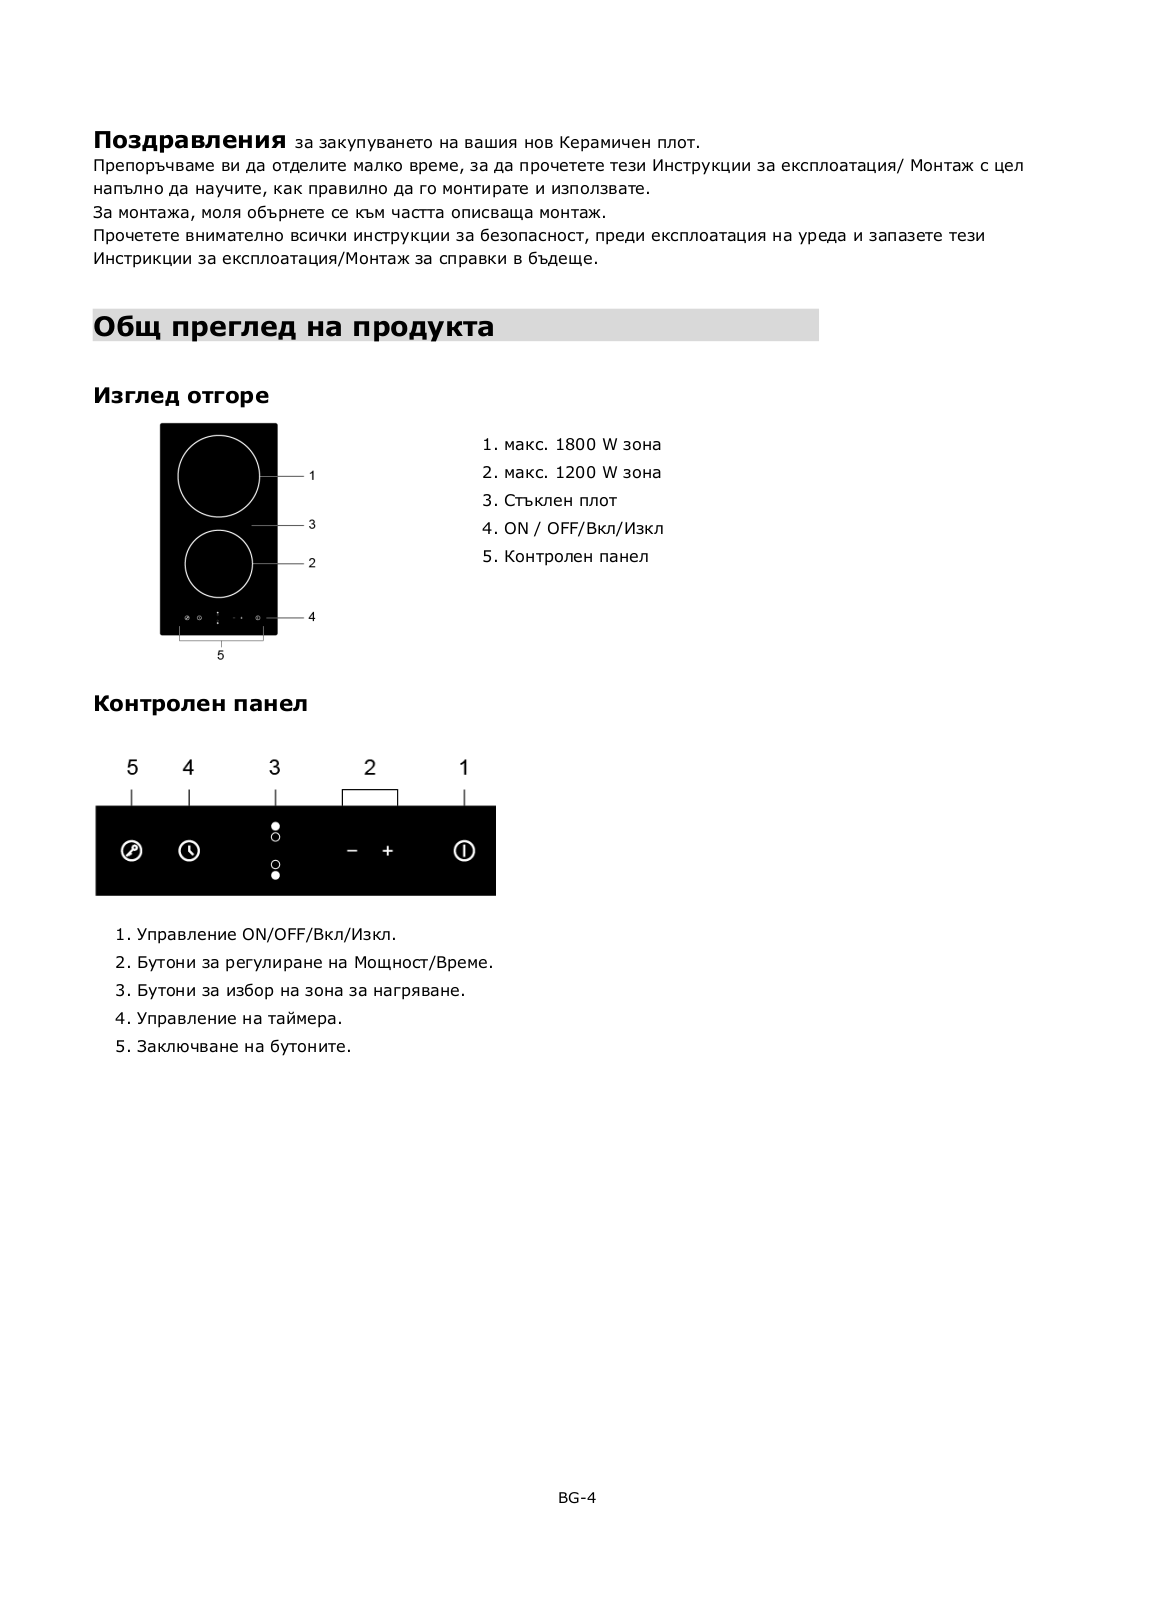
Top View

1.max. 1800 W zone

2.max. 1200 W zone

3.Glass plate

4.ON / OFF

5.Control panel

Control Panel

1.ON/OFF control

2.Power / Timer regulating controls

3.Heating zone selection controls

4.Timer control

5.keylock control

EN-3

Product Information

The microcomputer ceramic cooker hob can meet different kinds of cuisine demands because of resistance wire heating, micro-computerized control and multi-power selection, really the optimal choice for modern families.

The ceramic cooker hob centers on customers and adopts personalized design. The hob has safe and reliable performances, making your life comfortable and enabling to fully enjoy the pleasure from life.

Before using your New Ceramic Hob

Read this guide, taking special note of the „Safety Warnings‟ section.

Remove any protective film that may still be on your ceramic hob.

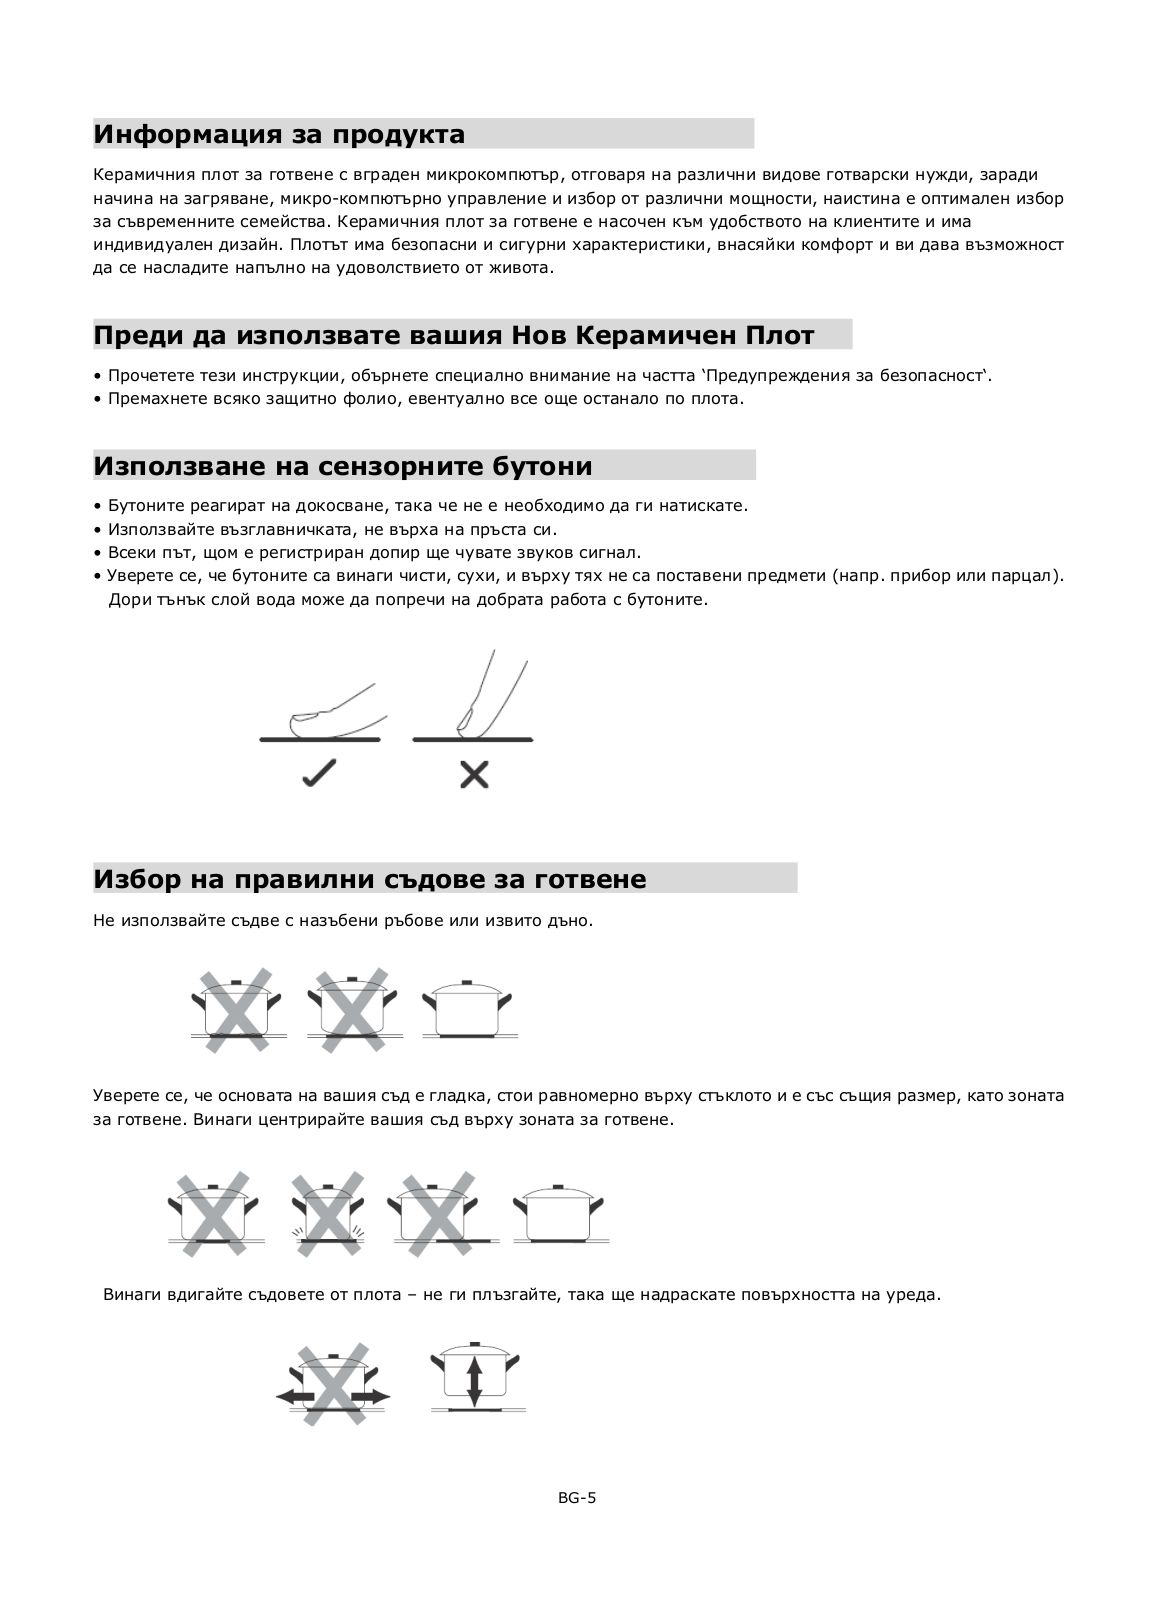
Using the Touch Controls

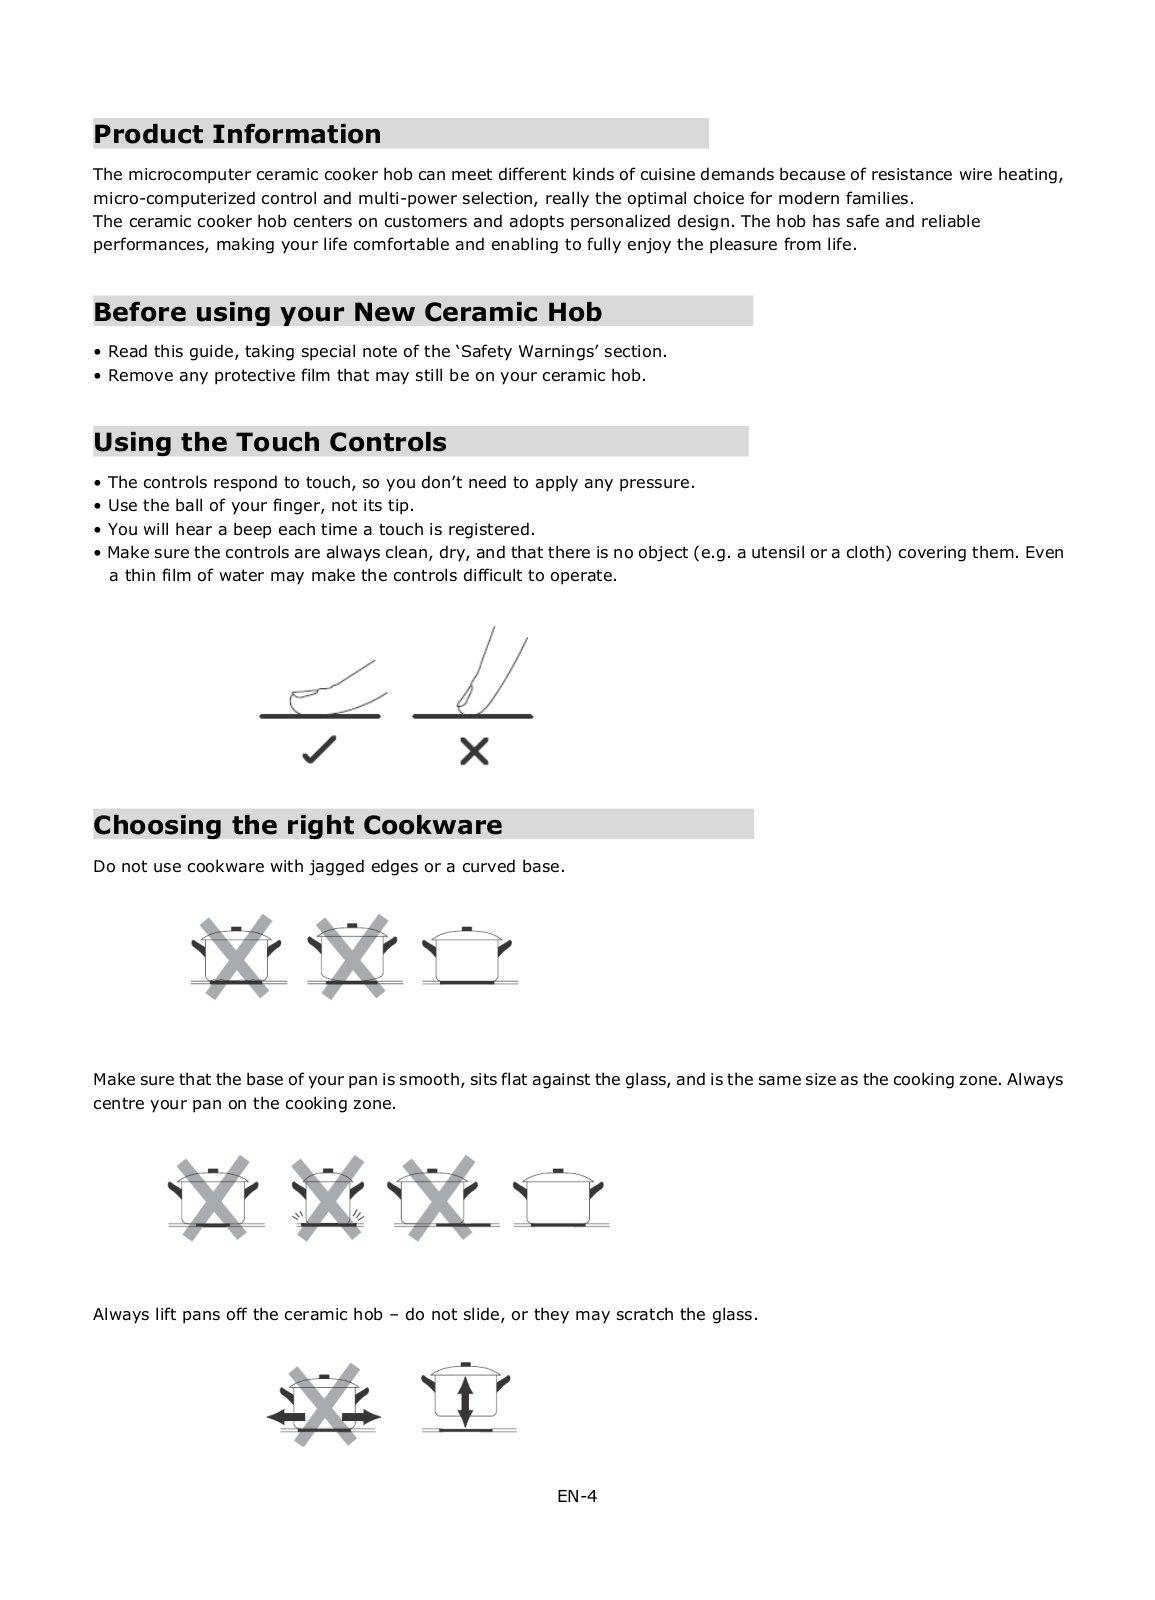
The controls respond to touch, so you don‟t need to apply any pressure.

Use the ball of your finger, not its tip.

You will hear a beep each time a touch is registered.

Make sure the controls are always clean, dry, and that there is no object (e.g. a utensil or a cloth) covering them. Even a thin film of water may make the controls difficult to operate.

Choosing the right Cookware

Do not use cookware with jagged edges or a curved base.

Make sure that the base of your pan is smooth, sits flat against the glass, and is the same size as the cooking zone. Always centre your pan on the cooking zone.

Always lift pans off the ceramic hob – do not slide, or they may scratch the glass.

EN-4

Using your Ceramic Hob

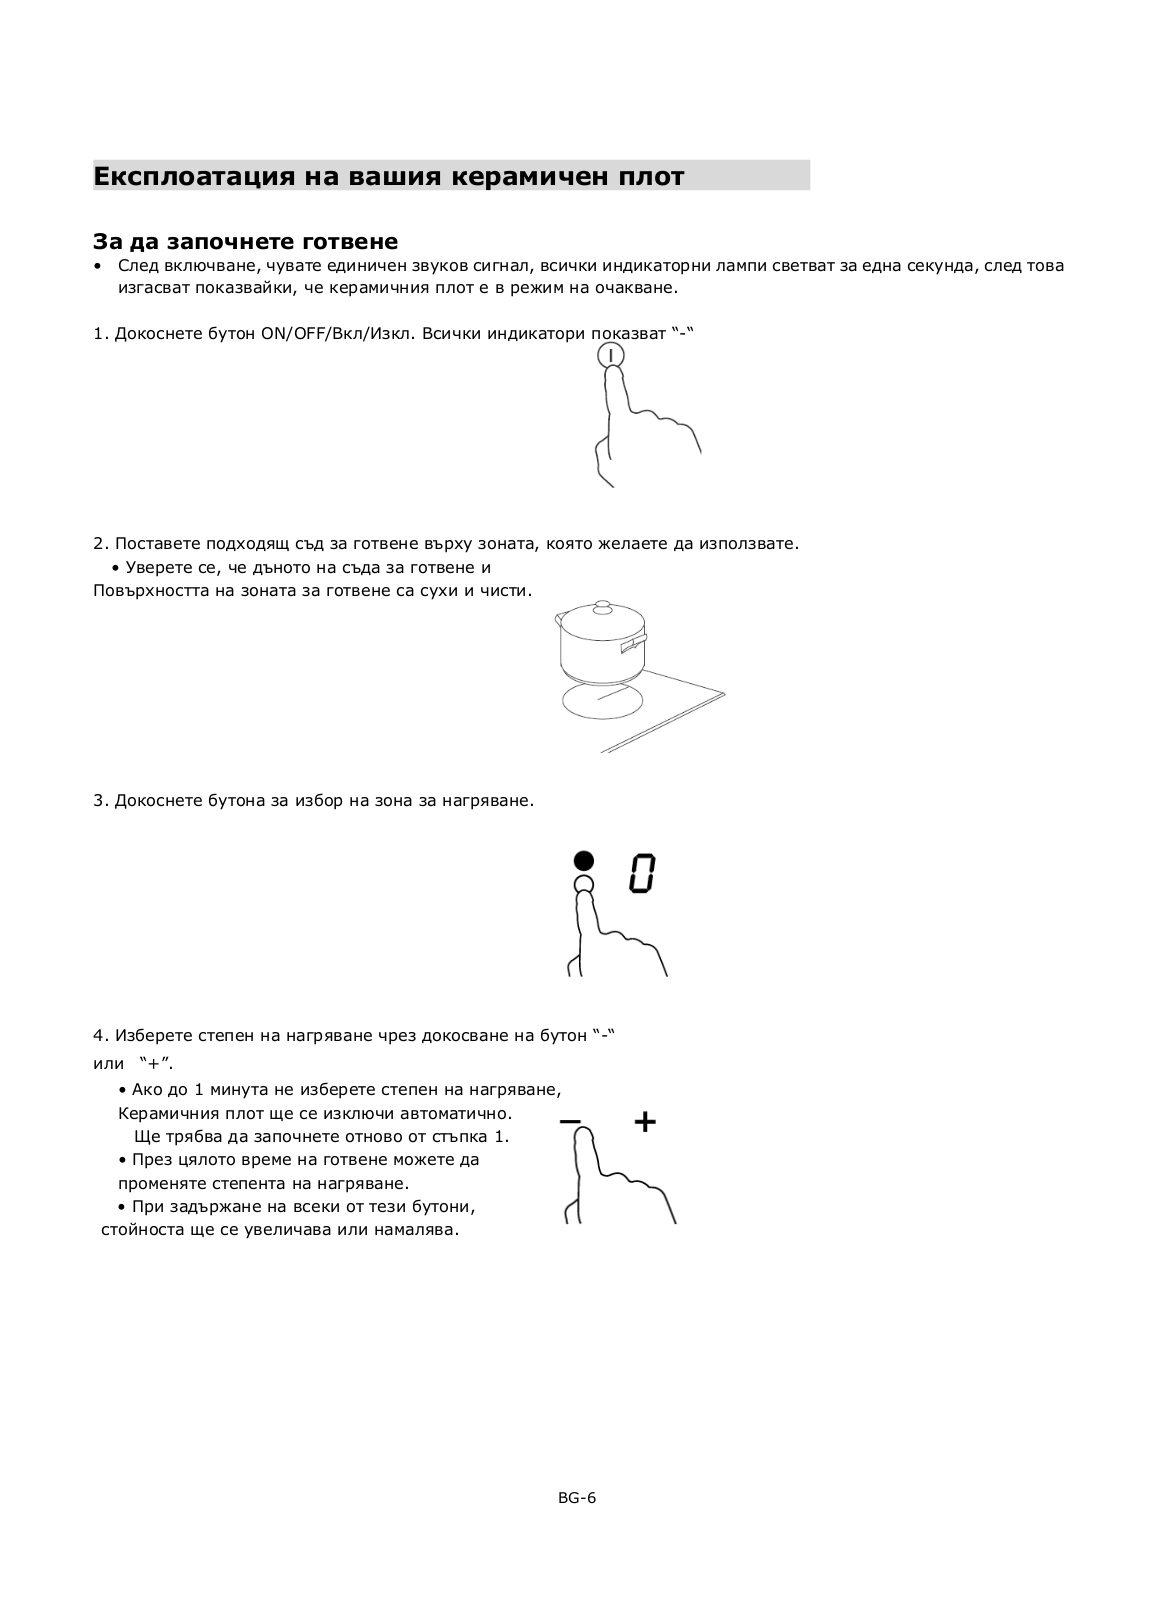
To start cooking

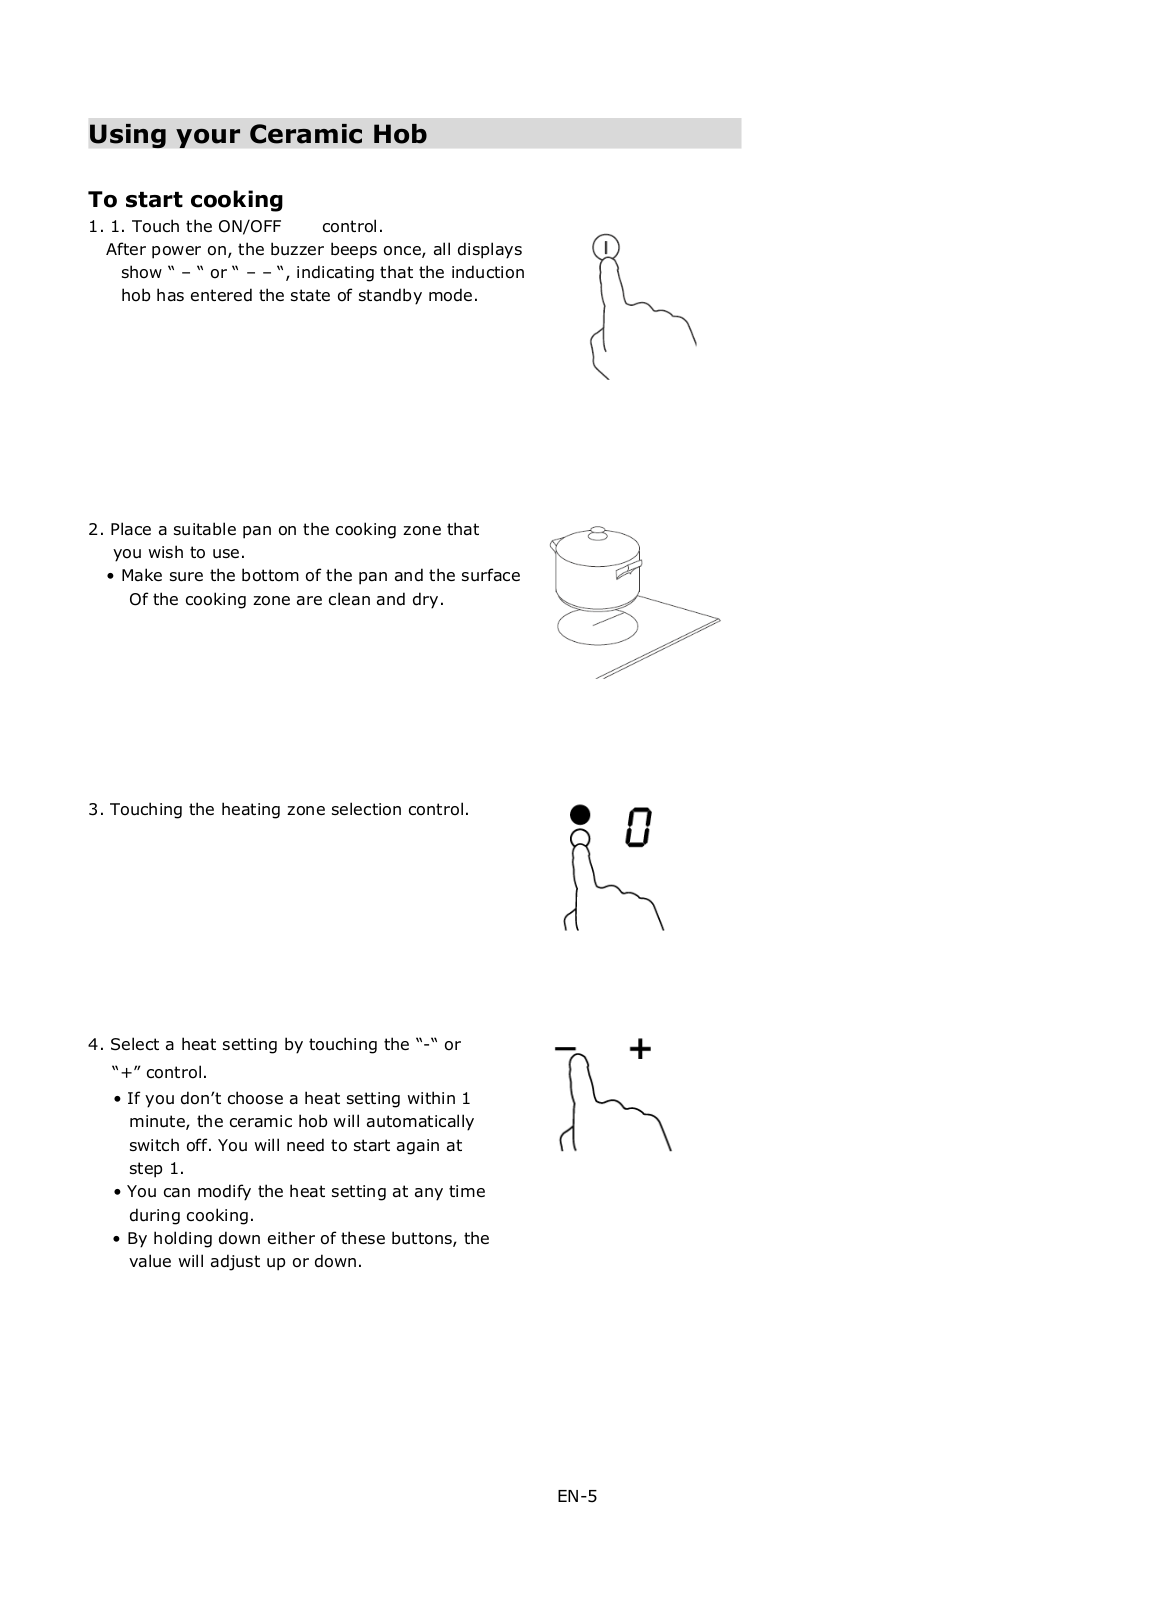
1. 1. Touch the ON/OFF control.

After power on, the buzzer beeps once, all displays show “ – “ or “ – – “, indicating that the induction hob has entered the state of standby mode.

2.Place a suitable pan on the cooking zone that you wish to use.

Make sure the bottom of the pan and the surface Of the cooking zone are clean and dry.

3. Touching the heating zone selection control.

4.Select a heat setting by touching the “-“ or “+” control.

If you don‟t choose a heat setting within 1 minute, the ceramic hob will automatically switch off. You will need to start again at step 1.

You can modify the heat setting at any time during cooking.

By holding down either of these buttons, the value will adjust up or down.

EN-5

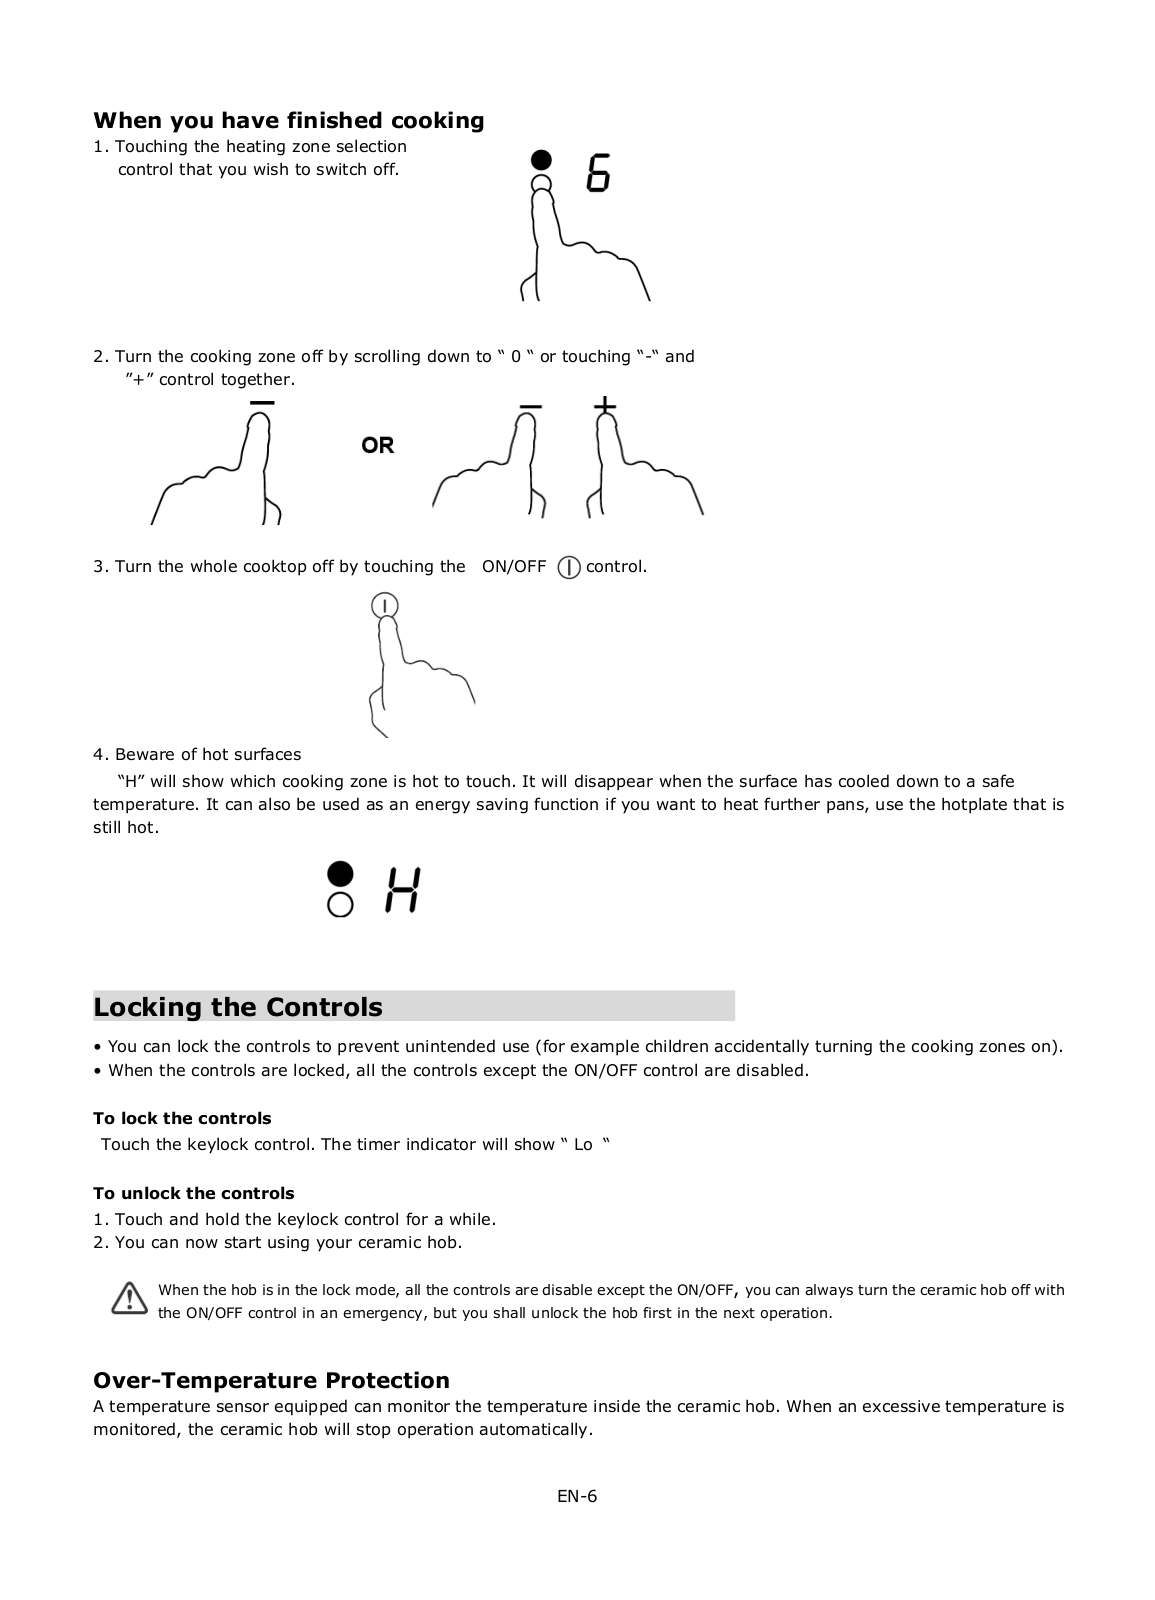
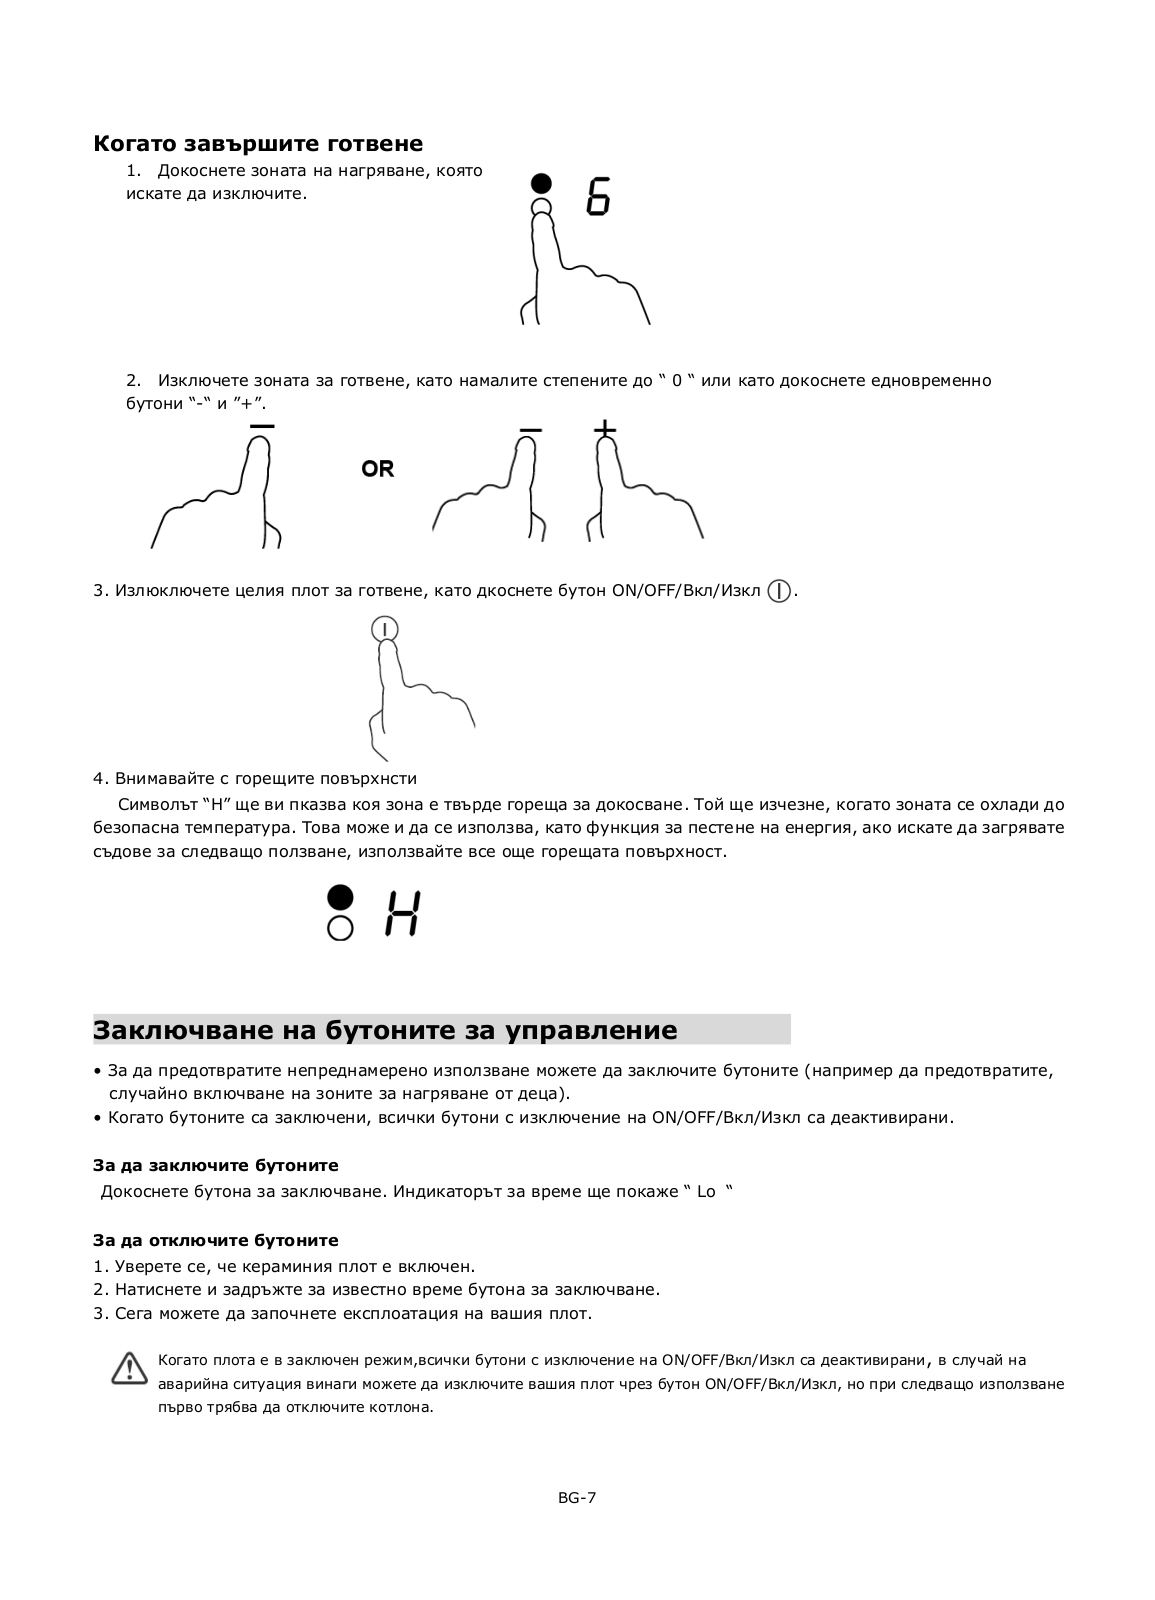
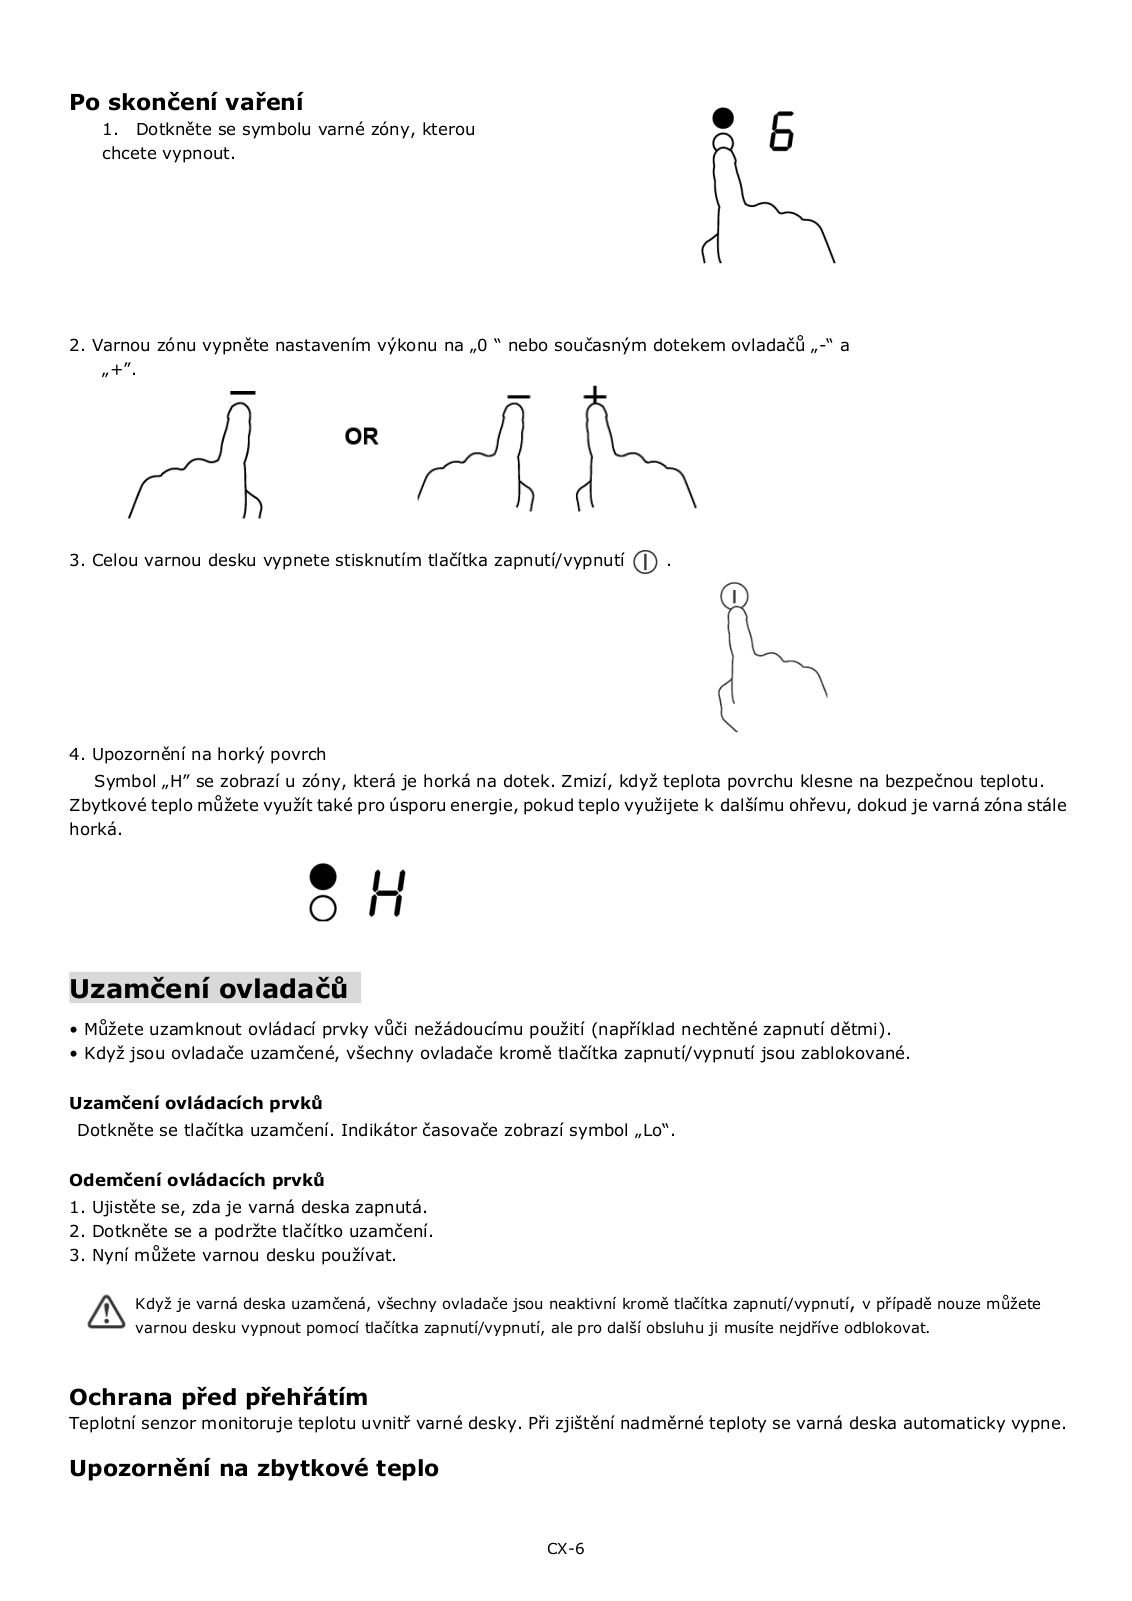
When you have finished cooking

1.Touching the heating zone selection control that you wish to switch off.

2. Turn the cooking zone off by scrolling down to “ 0 “ or touching “-“ and ”+” control together.

3. Turn the whole cooktop off by touching the ON/OFF

control.

4. Beware of hot surfaces

“H” will show which cooking zone is hot to touch. It will disappear when the surface has cooled down to a safe temperature. It can also be used as an energy saving function if you want to heat further pans, use the hotplate that is still hot.

Locking the Controls

You can lock the controls to prevent unintended use (for example children accidentally turning the cooking zones on).

When the controls are locked, all the controls except the ON/OFF control are disabled.

To lock the controls

Touch the keylock control. The timer indicator will show “ Lo “

To unlock the controls

1.Touch and hold the keylock control for a while.

2.You can now start using your ceramic hob.

When the hob is in the lock mode, all the controls are disable except the ON/OFF, you can always turn the ceramic hob off with the ON/OFF control in an emergency, but you shall unlock the hob first in the next operation.

Over-Temperature Protection

A temperature sensor equipped can monitor the temperature inside the ceramic hob. When an excessive temperature is monitored, the ceramic hob will stop operation automatically.

EN-6

Residual Heat Warning

When the hob has been operating for some time, there will be some residual heat. The letter “ H ”appears to warn you the cooking zone is still hot.

Auto Shutdown

Auto shut down is a safety protection function for your induction hob. It shuts down automatically if ever you forget to turn off your cooking. The default working times for various power levels are shown in the below table:

Power level

1

2

3

4

5

6

7

8

9

Default working timer (hour)

8

8

8

4

4

4

2

2

2

Using the Timer

You can use the timer in two different ways:

You can use it as a minute minder. In this case, the timer will not turn any cooking zone off when the set time is up.

You can set it to turn one cooking zone off after the set time is up.

You can set the timer for up to 99 minutes.

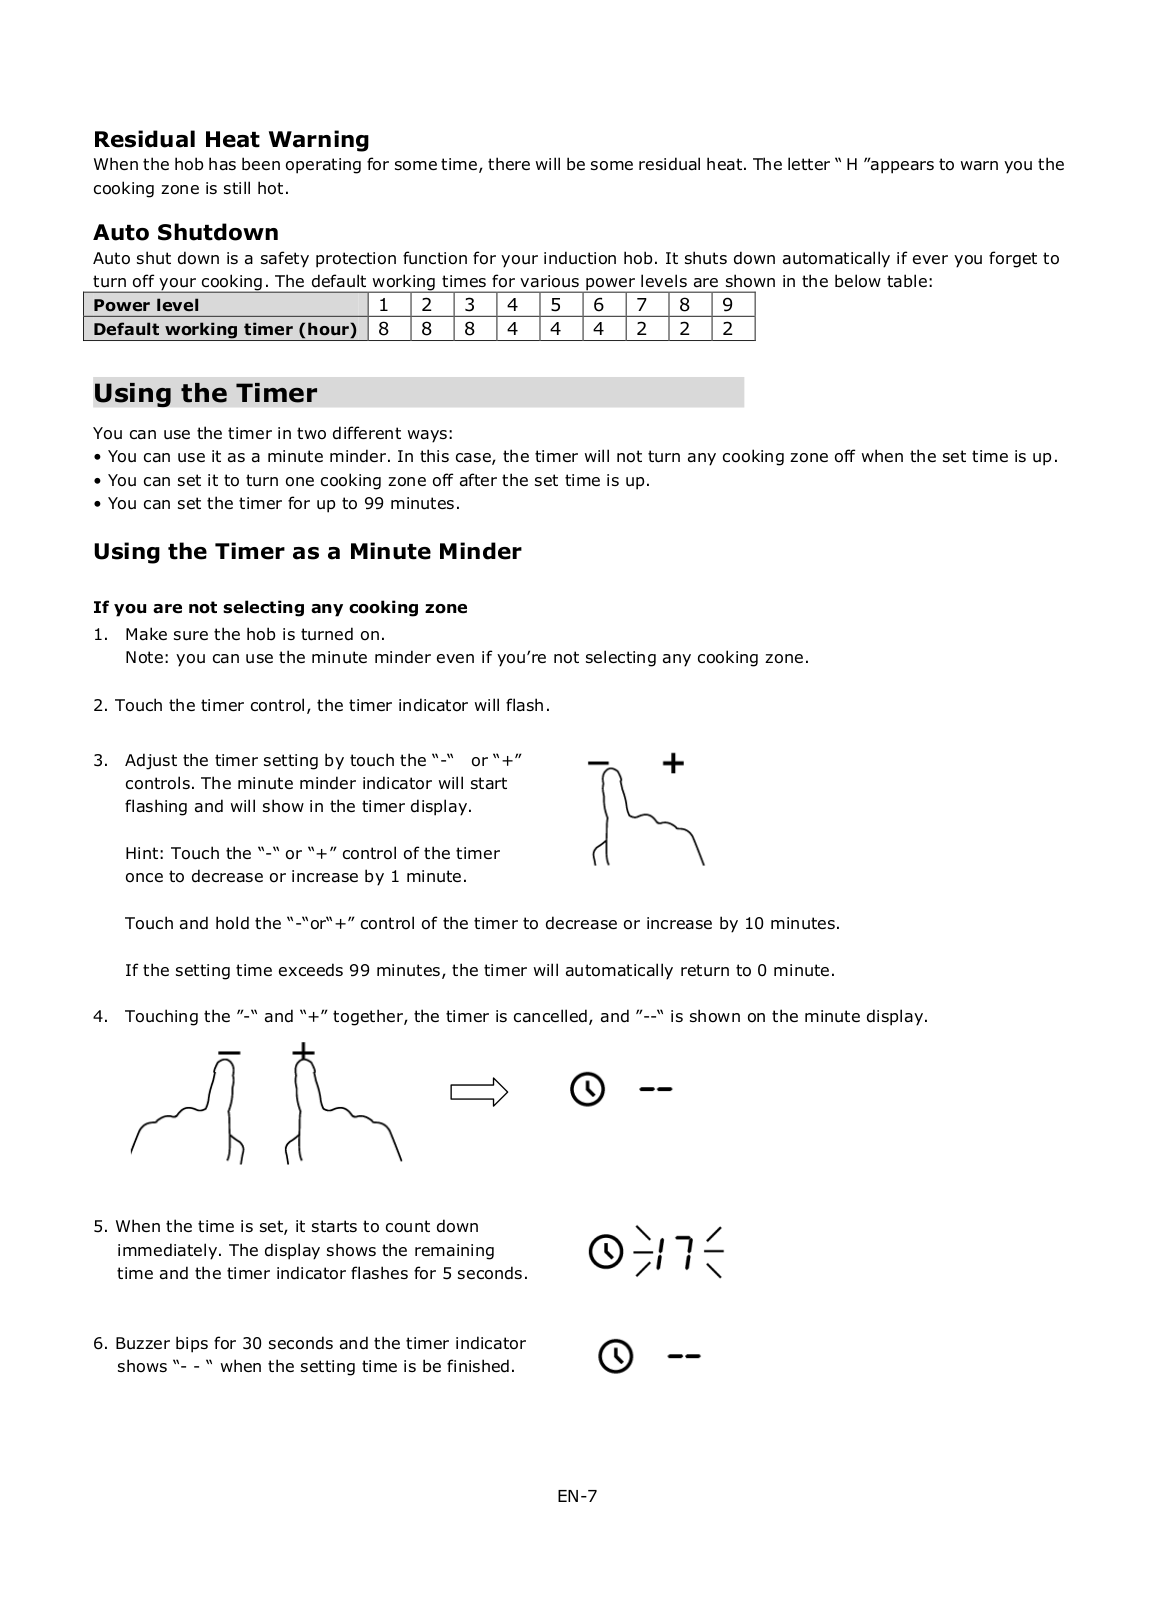
Using the Timer as a Minute Minder

If you are not selecting any cooking zone

1.Make sure the hob is turned on.

Note: you can use the minute minder even if you‟re not selecting any cooking zone.

2.Touch the timer control, the timer indicator will flash.

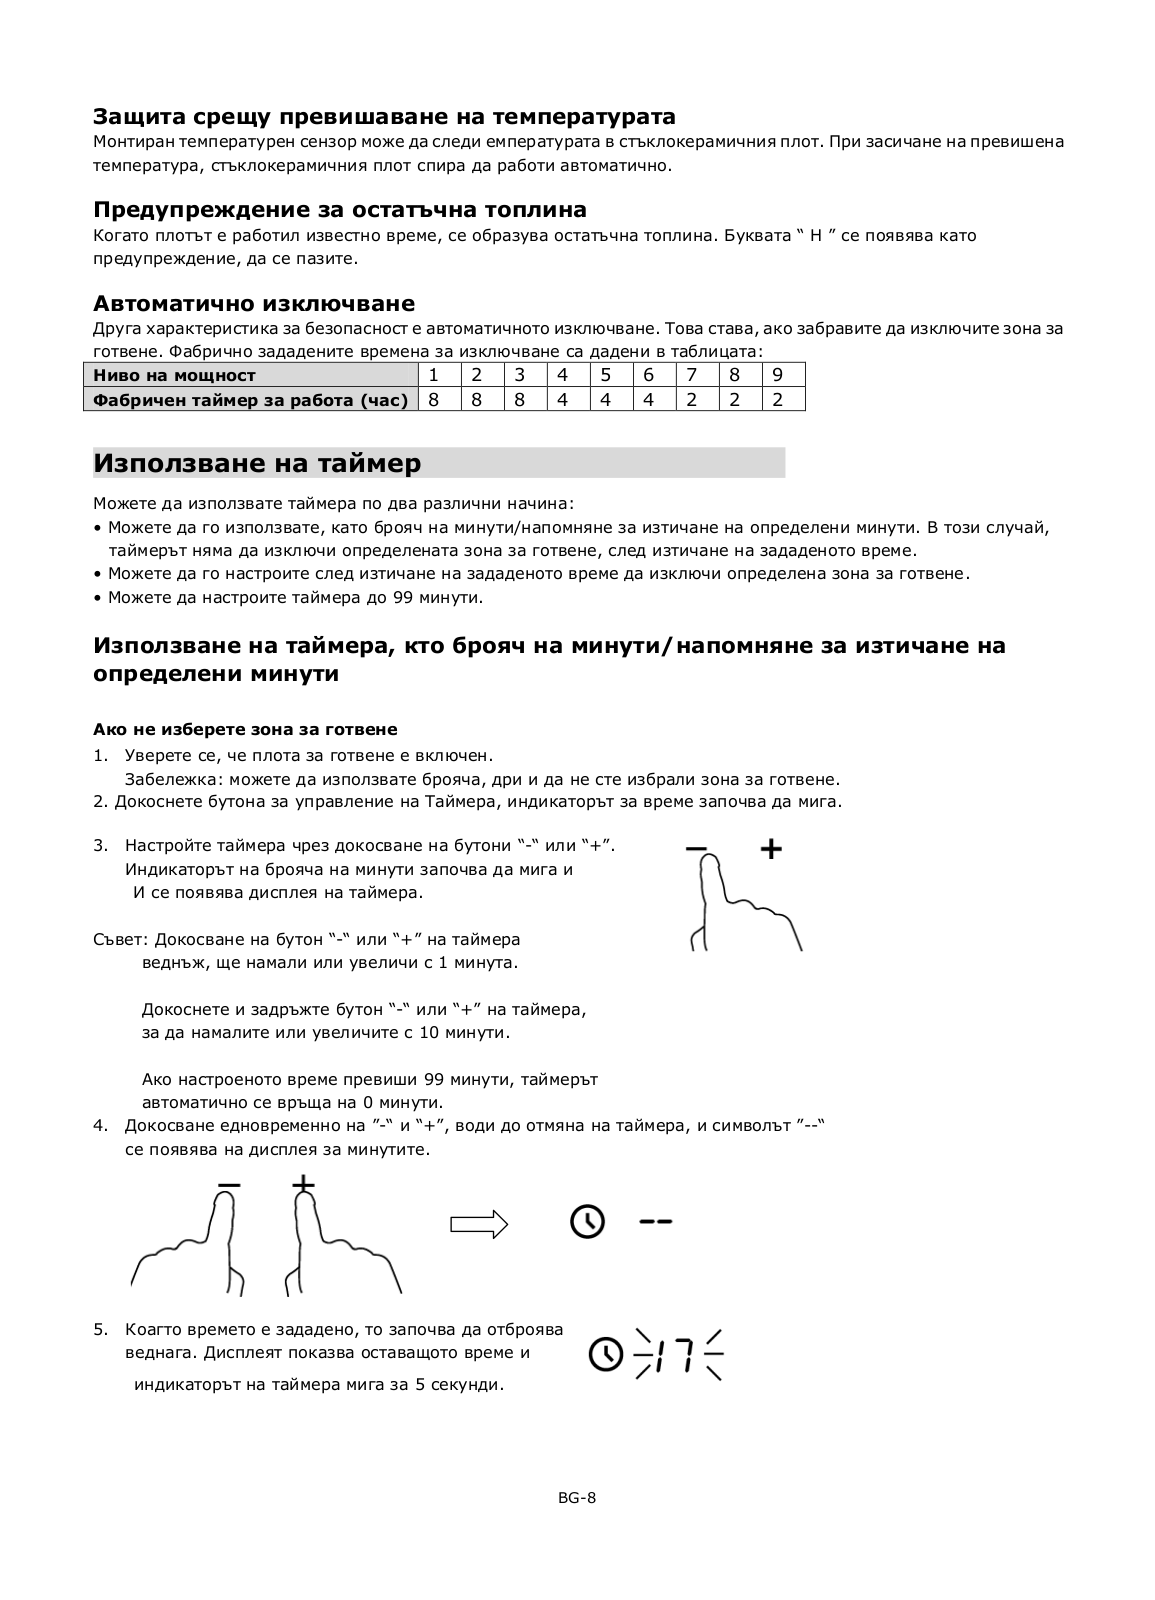
3. Adjust the timer setting by touch the “-“ or “+” controls. The minute minder indicator will start flashing and will show in the timer display.

Hint: Touch the “-“ or “+” control of the timer once to decrease or increase by 1 minute.

Touch and hold the “-“or“+” control of the timer to decrease or increase by 10 minutes.

If the setting time exceeds 99 minutes, the timer will automatically return to 0 minute.

4. Touching the ”-“ and “+” together, the timer is cancelled, and ”--“ is shown on the minute display.

5.When the time is set, it starts to count down immediately. The display shows the remaining time and the timer indicator flashes for 5 seconds.

6.Buzzer bips for 30 seconds and the timer indicator shows “- - “ when the setting time is be finished.

EN-7

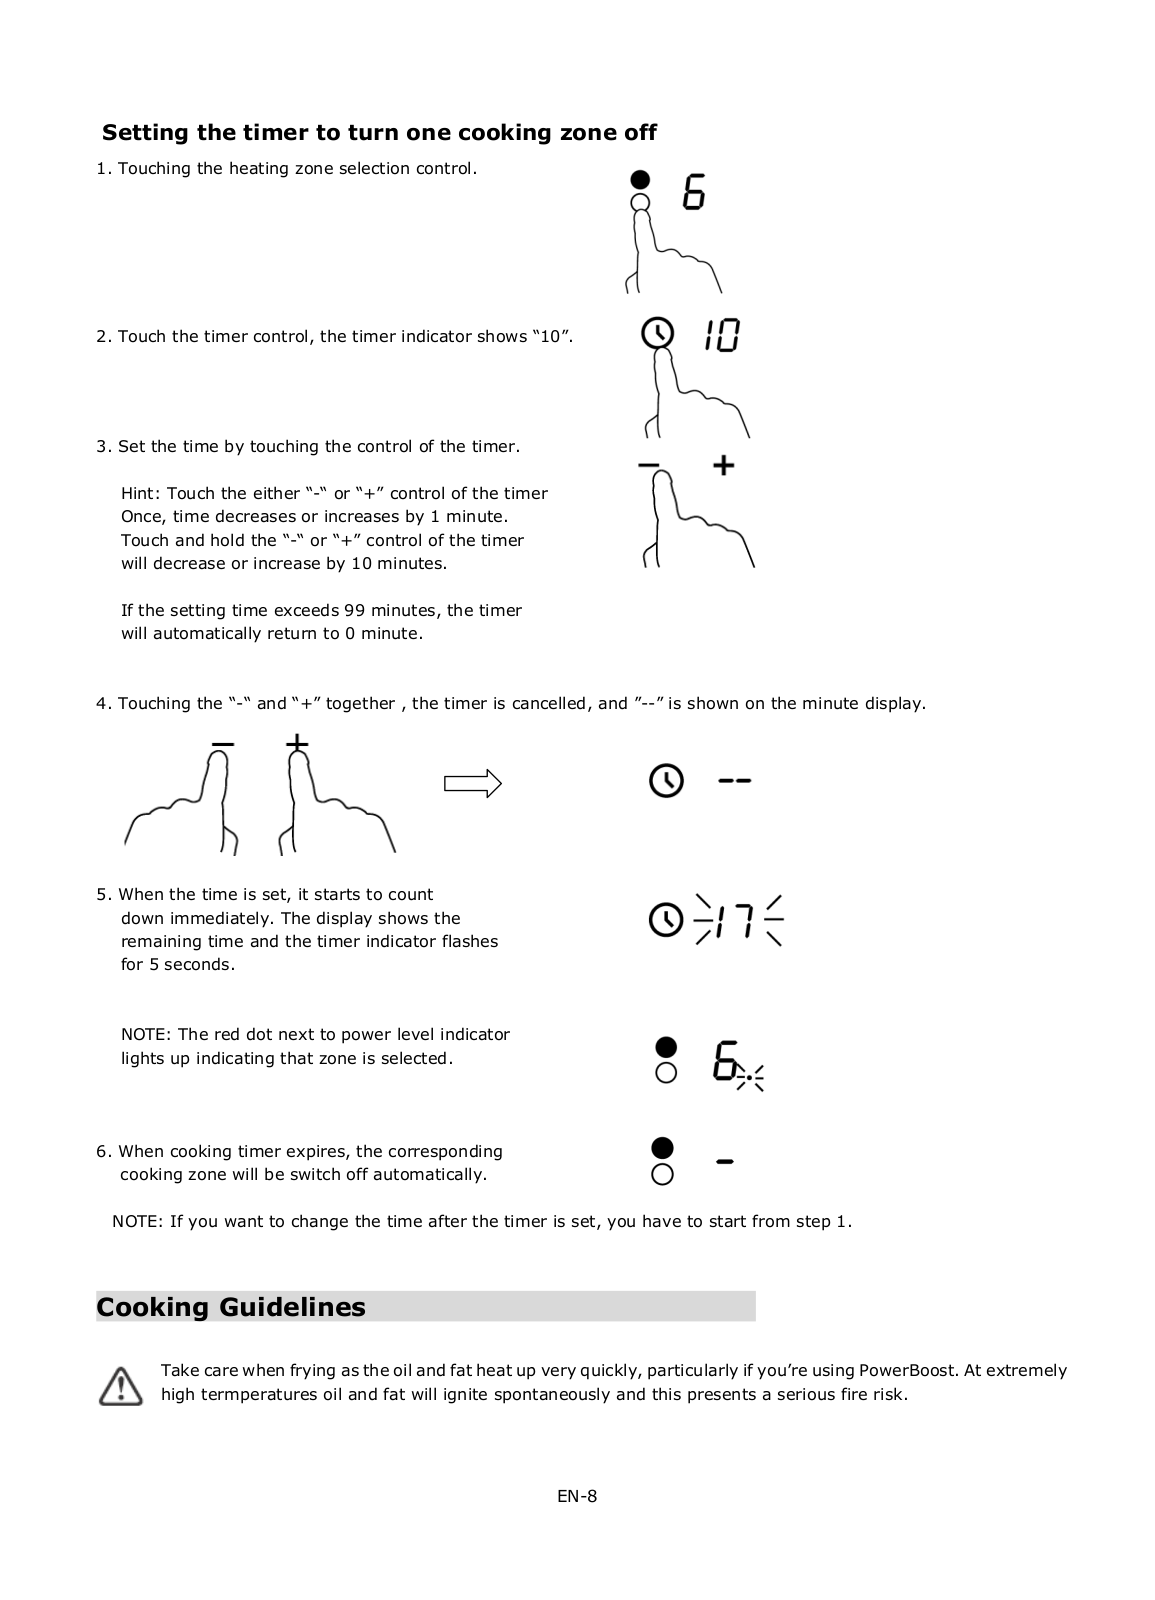
Setting the timer to turn one cooking zone off

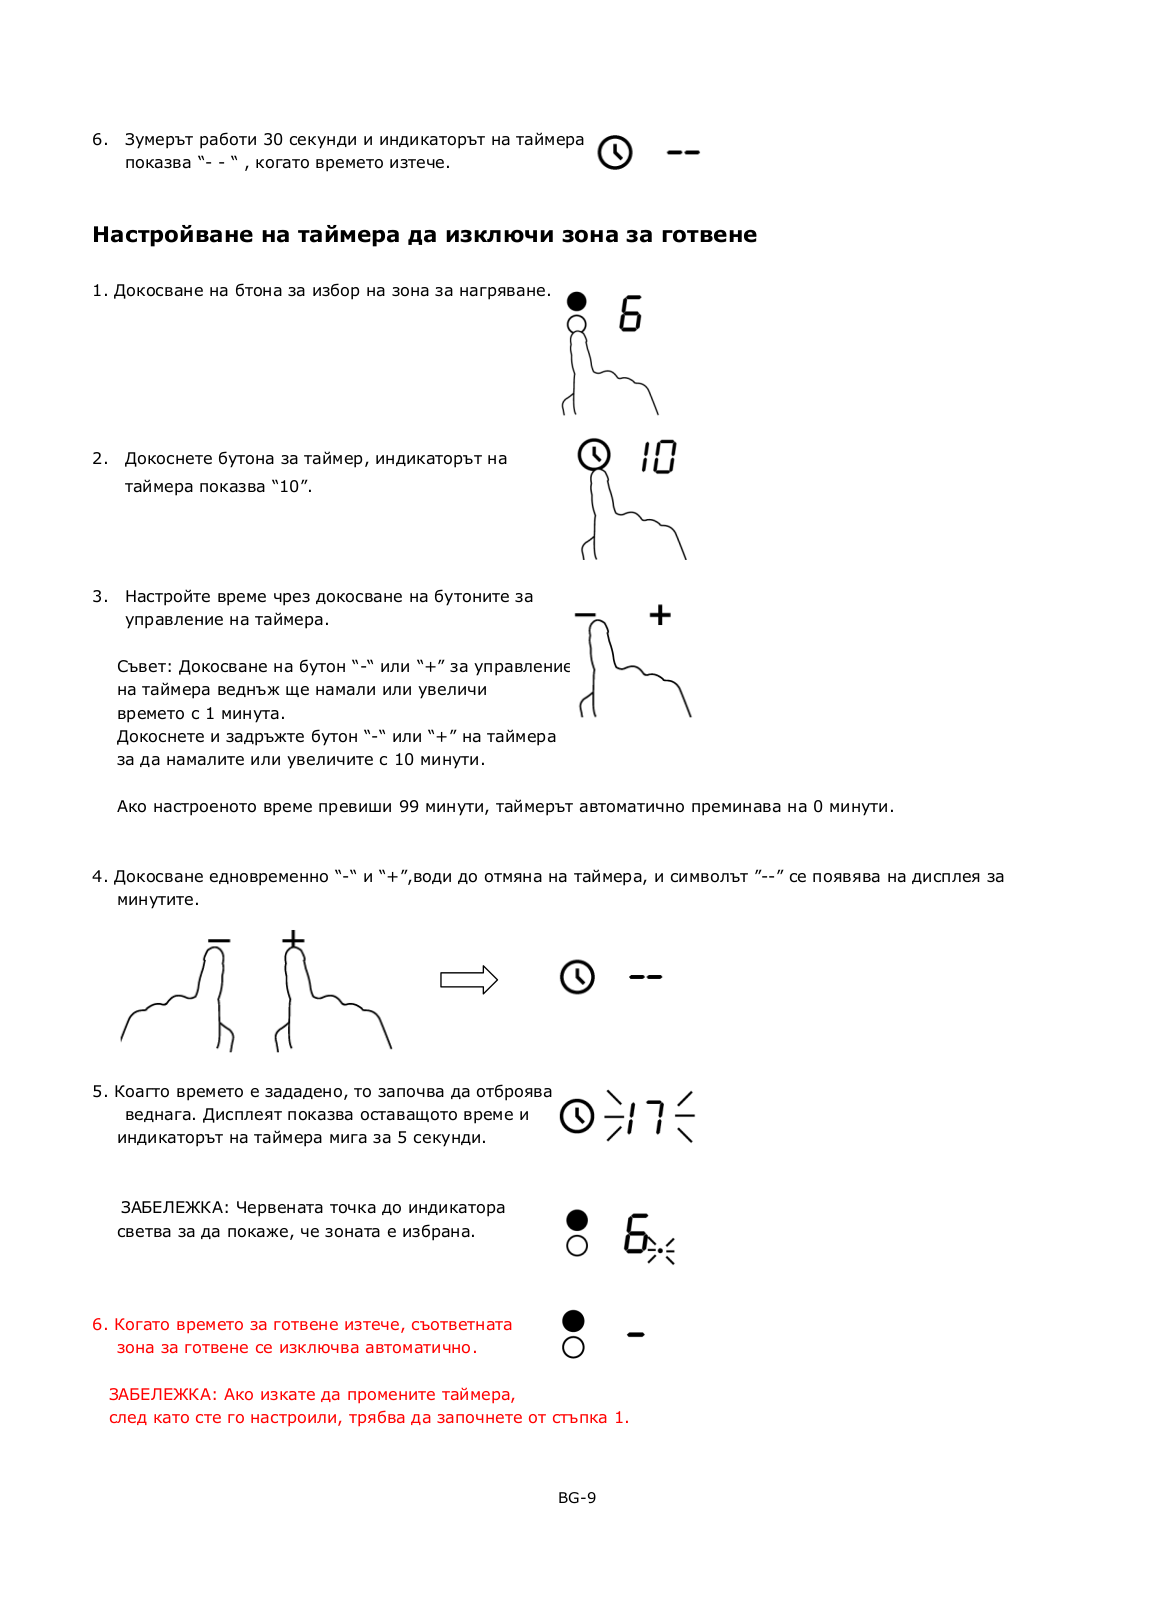
1.Touching the heating zone selection control.

2.Touch the timer control, the timer indicator shows “10”.

3.Set the time by touching the control of the timer.

Hint: Touch the either “-“ or “+” control of the timer Once, time decreases or increases by 1 minute. Touch and hold the “-“ or “+” control of the timer will decrease or increase by 10 minutes.

If the setting time exceeds 99 minutes, the timer will automatically return to 0 minute.

4. Touching the “-“ and “+” together , the timer is cancelled, and ”--” is shown on the minute display.

5.When the time is set, it starts to count down immediately. The display shows the

remaining time and the timer indicator flashes for 5 seconds.

NOTE: The red dot next to power level indicator lights up indicating that zone is selected.

6.When cooking timer expires, the corresponding cooking zone will be switch off automatically.

NOTE: If you want to change the time after the timer is set, you have to start from step 1.

Cooking Guidelines

Take care when frying as the oil and fat heat up very quickly, particularly if you‟re using PowerBoost. At extremely high termperatures oil and fat will ignite spontaneously and this presents a serious fire risk.

EN-8

Cooking Tips

When food comes to the boil, reduce the temperature setting.

Using a lid will reduce cooking times and save energy by retaining the heat.

Minimise the amount of liquid or fat to reduce cooking times.

Start cooking on a high setting and reduce the setting when the food has heated through.

Simmering, cooking rice

Simmering occurs below boiling point, at around 85˚C, when bubbles are just rising occasionally to the surface of the cooking liquid. It is the key to delicious soups and tender stews because the flavours develop without overcooking the food. You should also cook egg-based and flourthickened sauces below boiling point.

Some tasks, including cooking rice by the absorption method, may require a setting higher than the lowest setting to ensure the food is cooked properly in the time recommended.

Searing steak

To cook juicy flavoursome steaks:

1.Stand the meat at room temperature for about 20 minutes before cooking.

2.Heat up a heavy-based frying pan.

3.Brush both sides of the steak with oil. Drizzle a small amount of oil into the hot pan and then lower the meat onto the hot pan.

4.Turn the steak only once during cooking. The exact cooking time will depend on the thickness of the steak and how cooked you want it. Times may vary from about 2 – 8 minutes per side. Press the steak to gauge how cooked it is – the firmer it feels the more „well done‟ it will be.

5.Leave the steak to rest on a warm plate for a few minutes to allow it to relax and become tender before serving.

For stir-frying

1.Choose an ceramic compatible flat-based wok or a large frying pan.

2.Have all the ingredients and equipment ready. Stir-frying should be quick. If cooking large quantities, cook the food in several smaller batches.

3.Preheat the pan briefly and add two tablespoons of oil.

4.Cook any meat first, put it aside and keep warm.

5.Stir-fry the vegetables. When they are hot but still crisp, turn the cooking zone to a lower setting, return the meat to the pan and add your sauce.

6.Stir the ingredients gently to make sure they are heated through.

7.Serve immediately.

Heat Settings

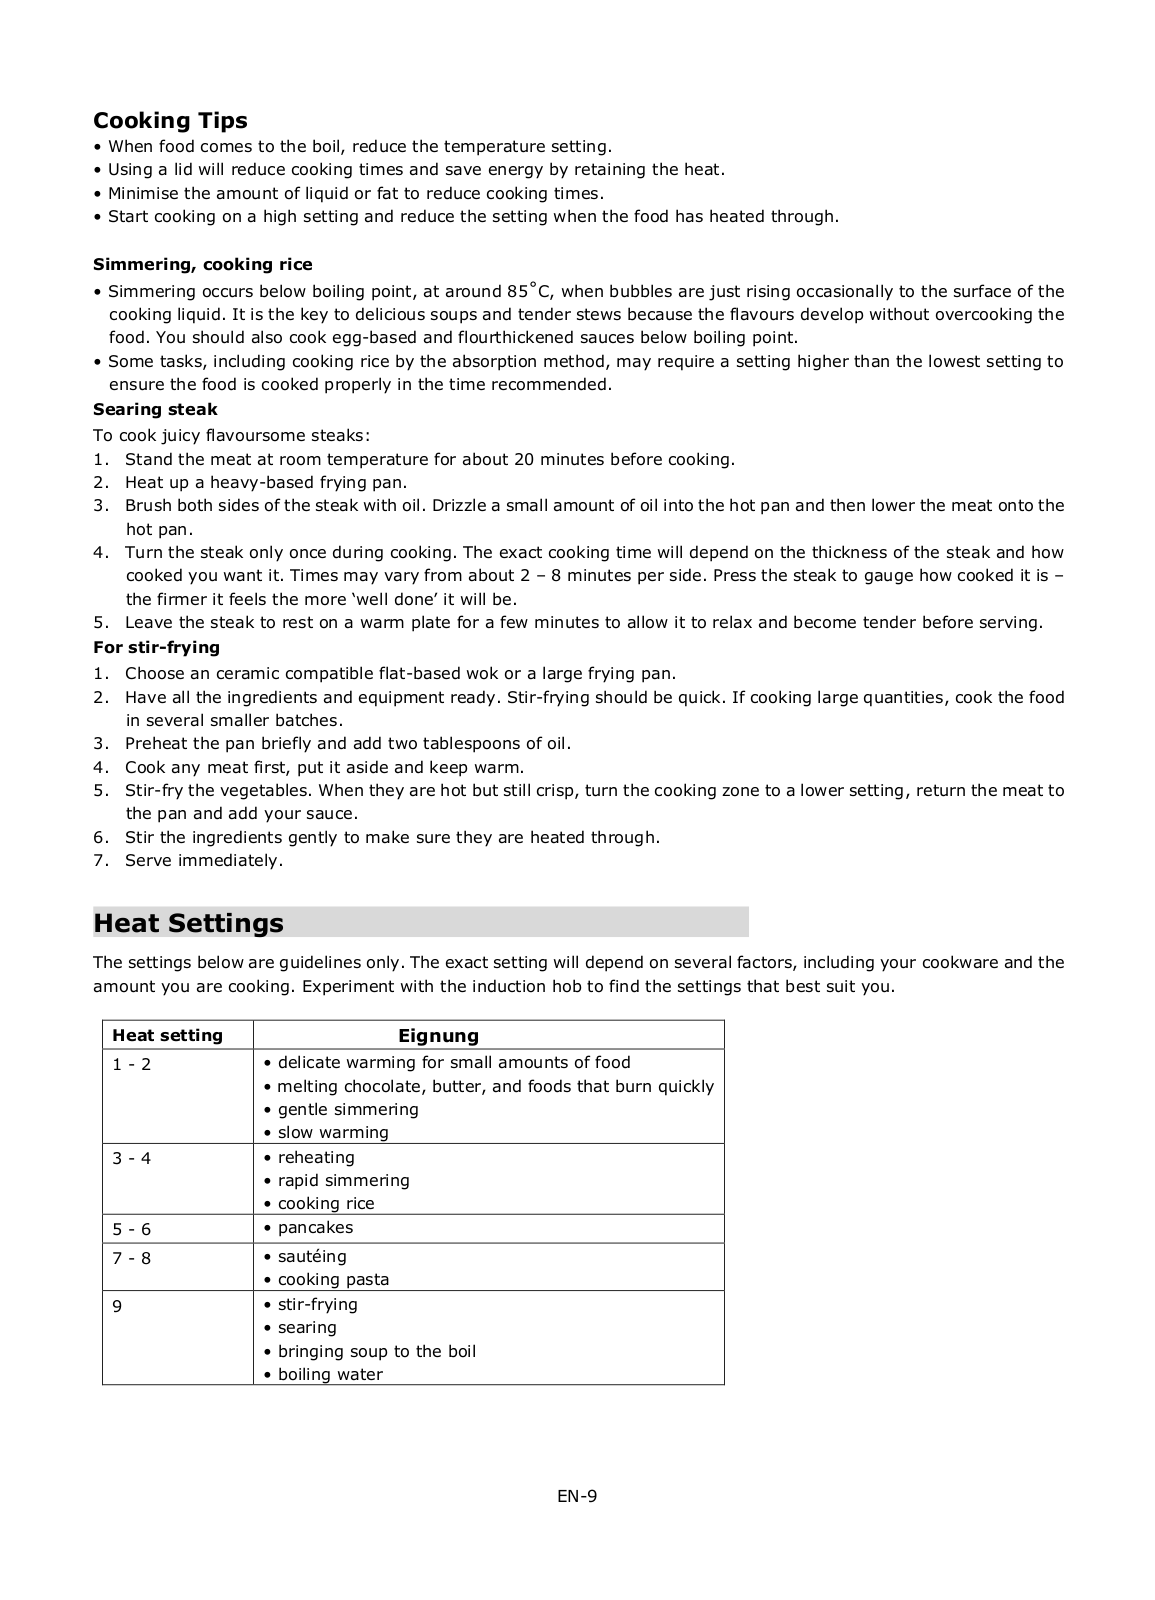
The settings below are guidelines only. The exact setting will depend on several factors, including your cookware and the amount you are cooking. Experiment with the induction hob to find the settings that best suit you.

Heat setting

Eignung


1 - 2

• delicate warming for small amounts of food


• melting chocolate, butter, and foods that burn quickly


• gentle simmering


• slow warming

3 - 4

• reheating


• rapid simmering


• cooking rice

5 - 6

• pancakes


7 - 8

• sautéing


• cooking pasta

9

• stir-frying


• searing


• bringing soup to the boil


• boiling water

EN-9

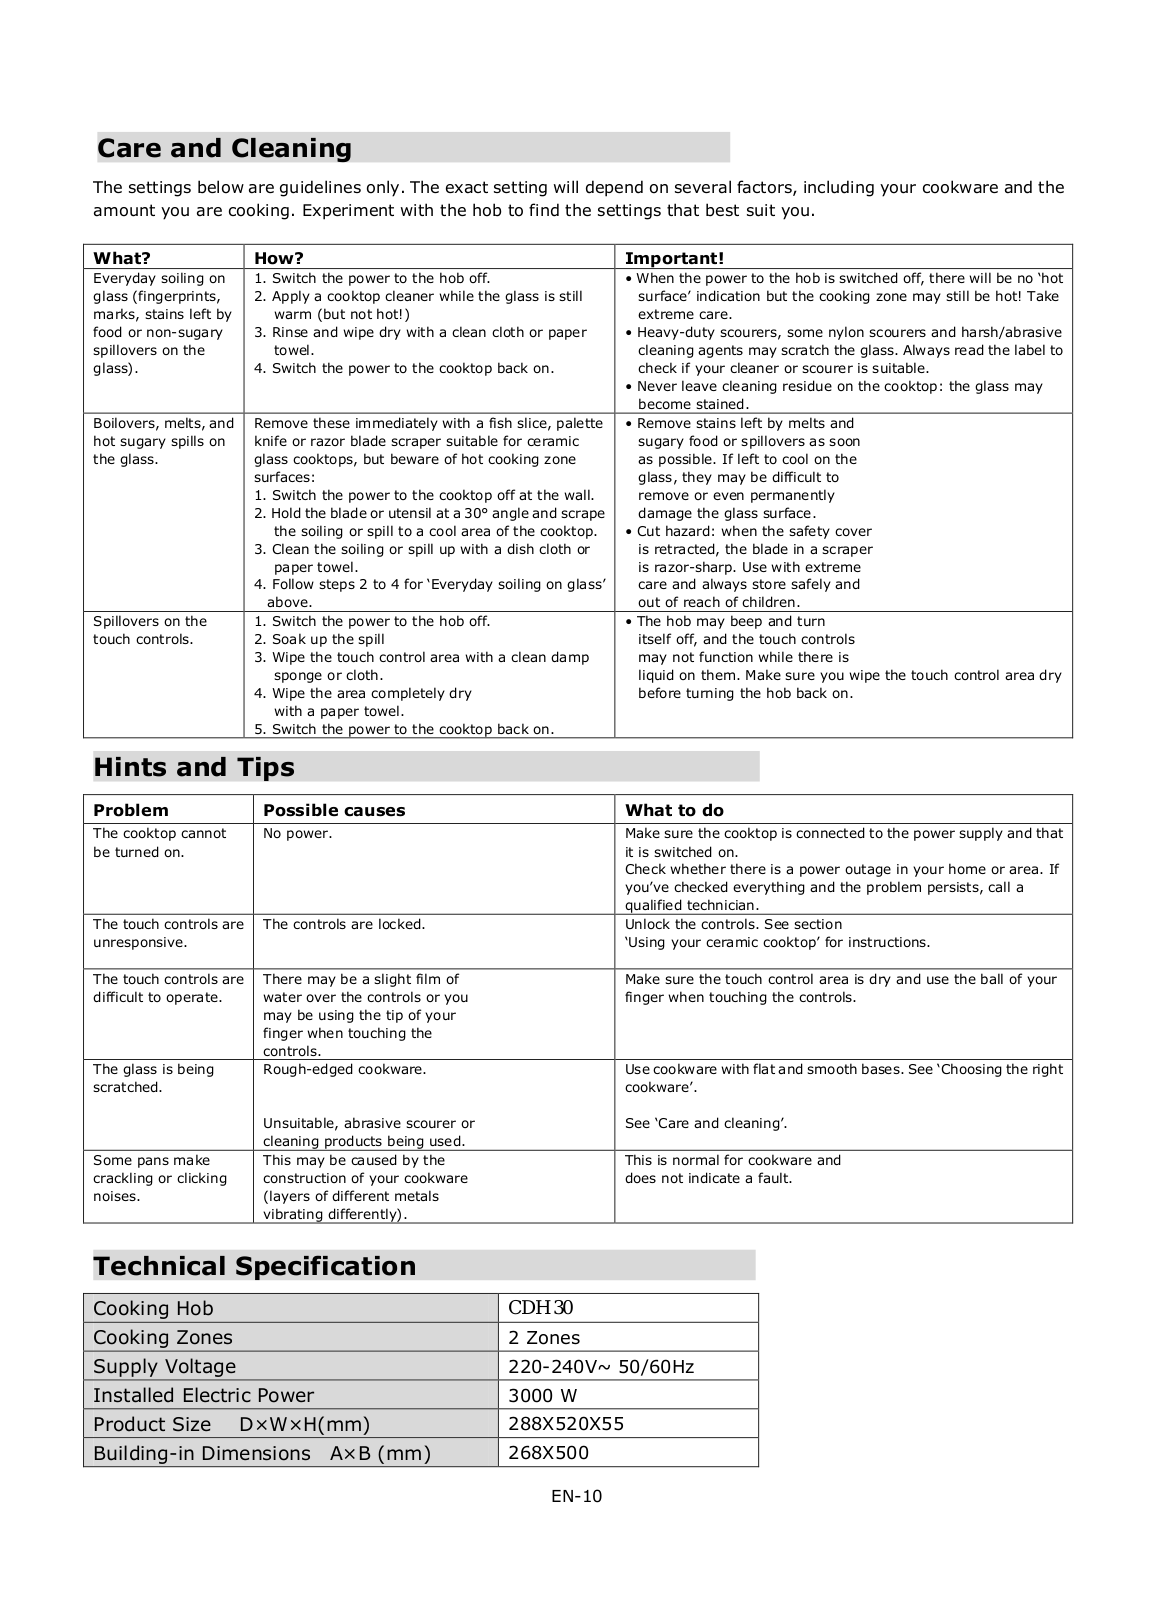
Care and Cleaning

The settings below are guidelines only. The exact setting will depend on several factors, including your cookware and the amount you are cooking. Experiment with the hob to find the settings that best suit you.

What?

Everyday soiling on glass (fingerprints, marks, stains left by food or non-sugary spillovers on the glass).

Boilovers, melts, and hot sugary spills on the glass.

Spillovers on the touch controls.

How?

1.Switch the power to the hob off.

2.Apply a cooktop cleaner while the glass is still warm (but not hot!)

3.Rinse and wipe dry with a clean cloth or paper towel.

4.Switch the power to the cooktop back on.

Remove these immediately with a fish slice, palette knife or razor blade scraper suitable for ceramic glass cooktops, but beware of hot cooking zone surfaces:

1.Switch the power to the cooktop off at the wall.

2.Hold the blade or utensil at a 30°angle and scrape the soiling or spill to a cool area of the cooktop.

3.Clean the soiling or spill up with a dish cloth or paper towel.

4.Follow steps 2 to 4 for „Everyday soiling on glass‟ above.

1.Switch the power to the hob off.

2.Soak up the spill

3.Wipe the touch control area with a clean damp sponge or cloth.

4.Wipe the area completely dry

with a paper towel.

5. Switch the power to the cooktop back on.

Important!

When the power to the hob is switched off, there will be no „hot surface‟ indication but the cooking zone may still be hot! Take extreme care.

Heavy-duty scourers, some nylon scourers and harsh/abrasive cleaning agents may scratch the glass. Always read the label to check if your cleaner or scourer is suitable.

Never leave cleaning residue on the cooktop: the glass may become stained.

Remove stains left by melts and sugary food or spillovers as soon as possible. If left to cool on the glass, they may be difficult to remove or even permanently damage the glass surface.

Cut hazard: when the safety cover is retracted, the blade in a scraper is razor-sharp. Use with extreme care and always store safely and out of reach of children.

The hob may beep and turn itself off, and the touch controls may not function while there is

liquid on them. Make sure you wipe the touch control area dry before turning the hob back on.

Hints and Tips

Problem

Possible causes

What to do

The cooktop cannot

No power.

Make sure the cooktop is connected to the power supply and that

be turned on.


it is switched on.


Check whether there is a power outage in your home or area. If


you‟ve checked everything and the problem persists, call a


qualified technician.

The touch controls are

The controls are locked.

Unlock the controls. See section

unresponsive.


„Using your ceramic cooktop‟ for instructions.

The touch controls are

There may be a slight film of

Make sure the touch control area is dry and use the ball of your

difficult to operate.

water over the controls or you

finger when touching the controls.


may be using the tip of your


finger when touching the


controls.


The glass is being

Rough-edged cookware.

Use cookware with flat and smooth bases. See „Choosing the right

scratched.


cookware‟.


Unsuitable, abrasive scourer or

See „Care and cleaning‟.


cleaning products being used.


Some pans make

This may be caused by the

This is normal for cookware and

crackling or clicking

construction of your cookware

does not indicate a fault.

noises.

(layers of different metals


vibrating differently).


Technical Specification

Cooking Hob

CDH 30

Cooking Zones

2 Zones

Supply Voltage

220-240V~ 50/60Hz

Installed Electric Power

3000 W

Product Size D×W×H(mm)

288X520X55

Building-in Dimensions A×B (mm)

268X500


EN-10

Candy CDH 30 User Manual

Weight and Dimensions are approximate. Because we continually strive to improve our products we may change specifications and designs without prior notice.

Installation

Selection of installation equipment

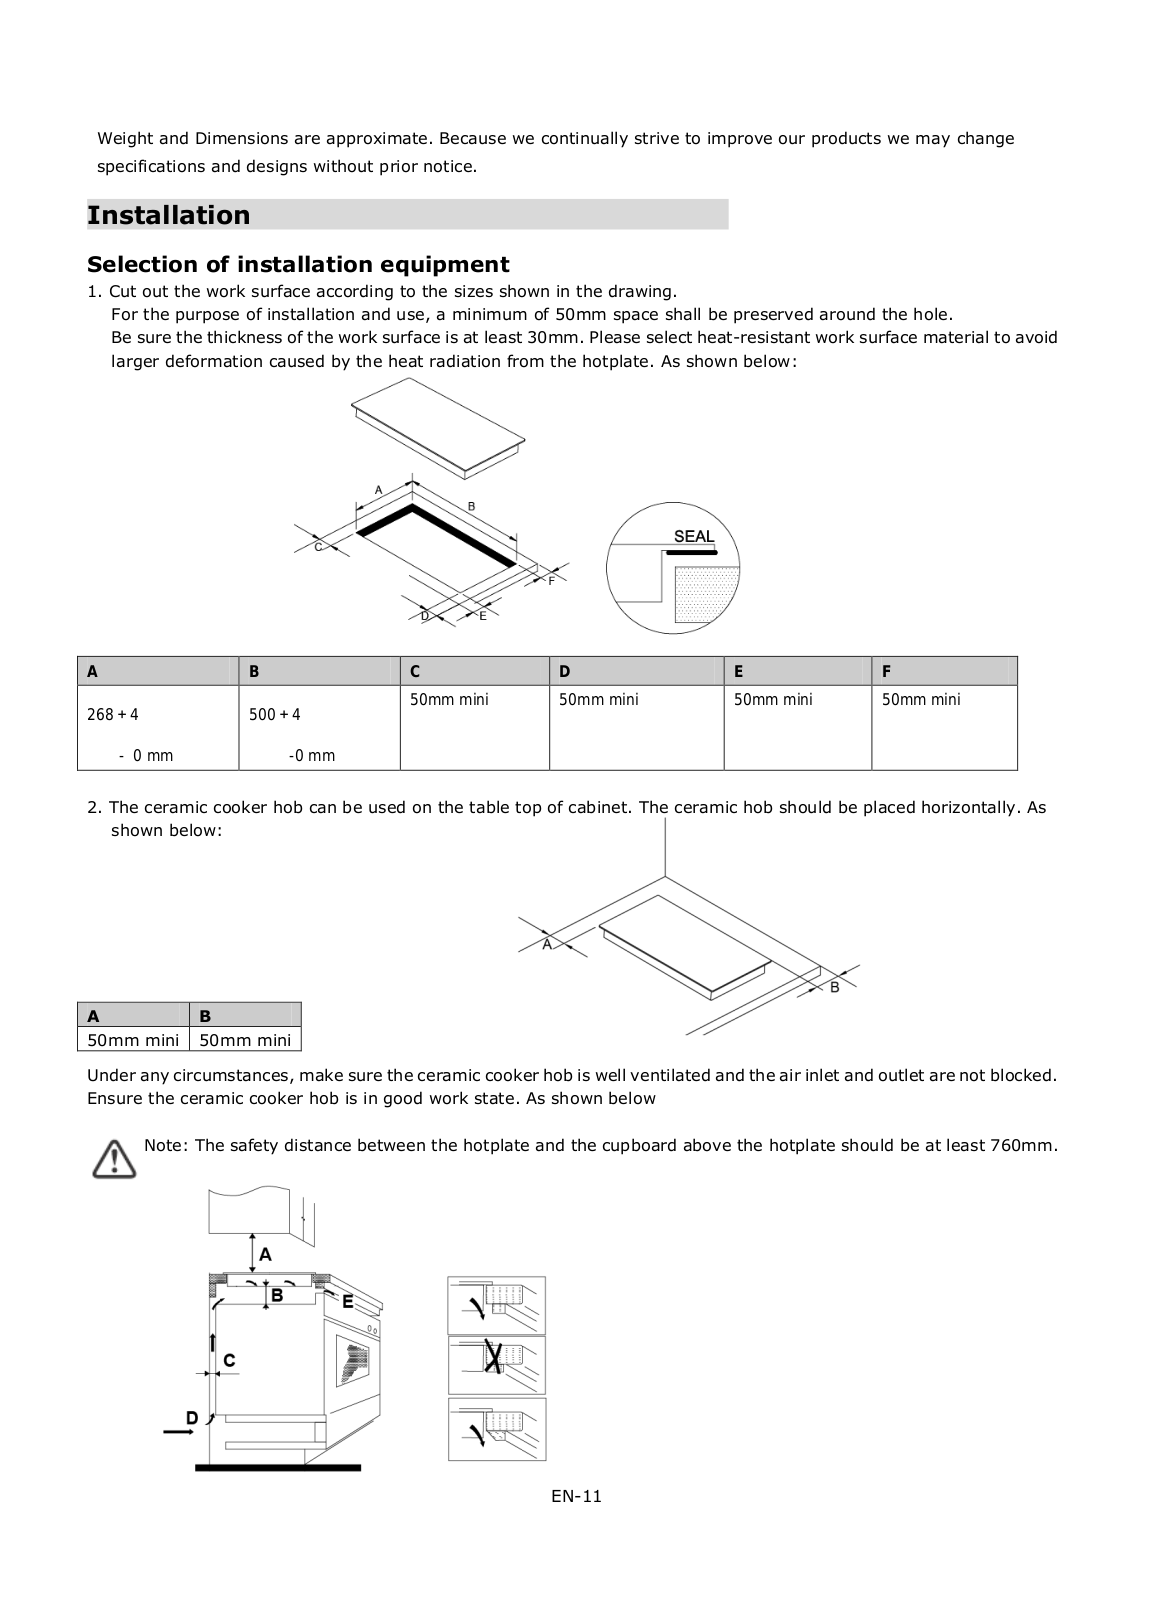
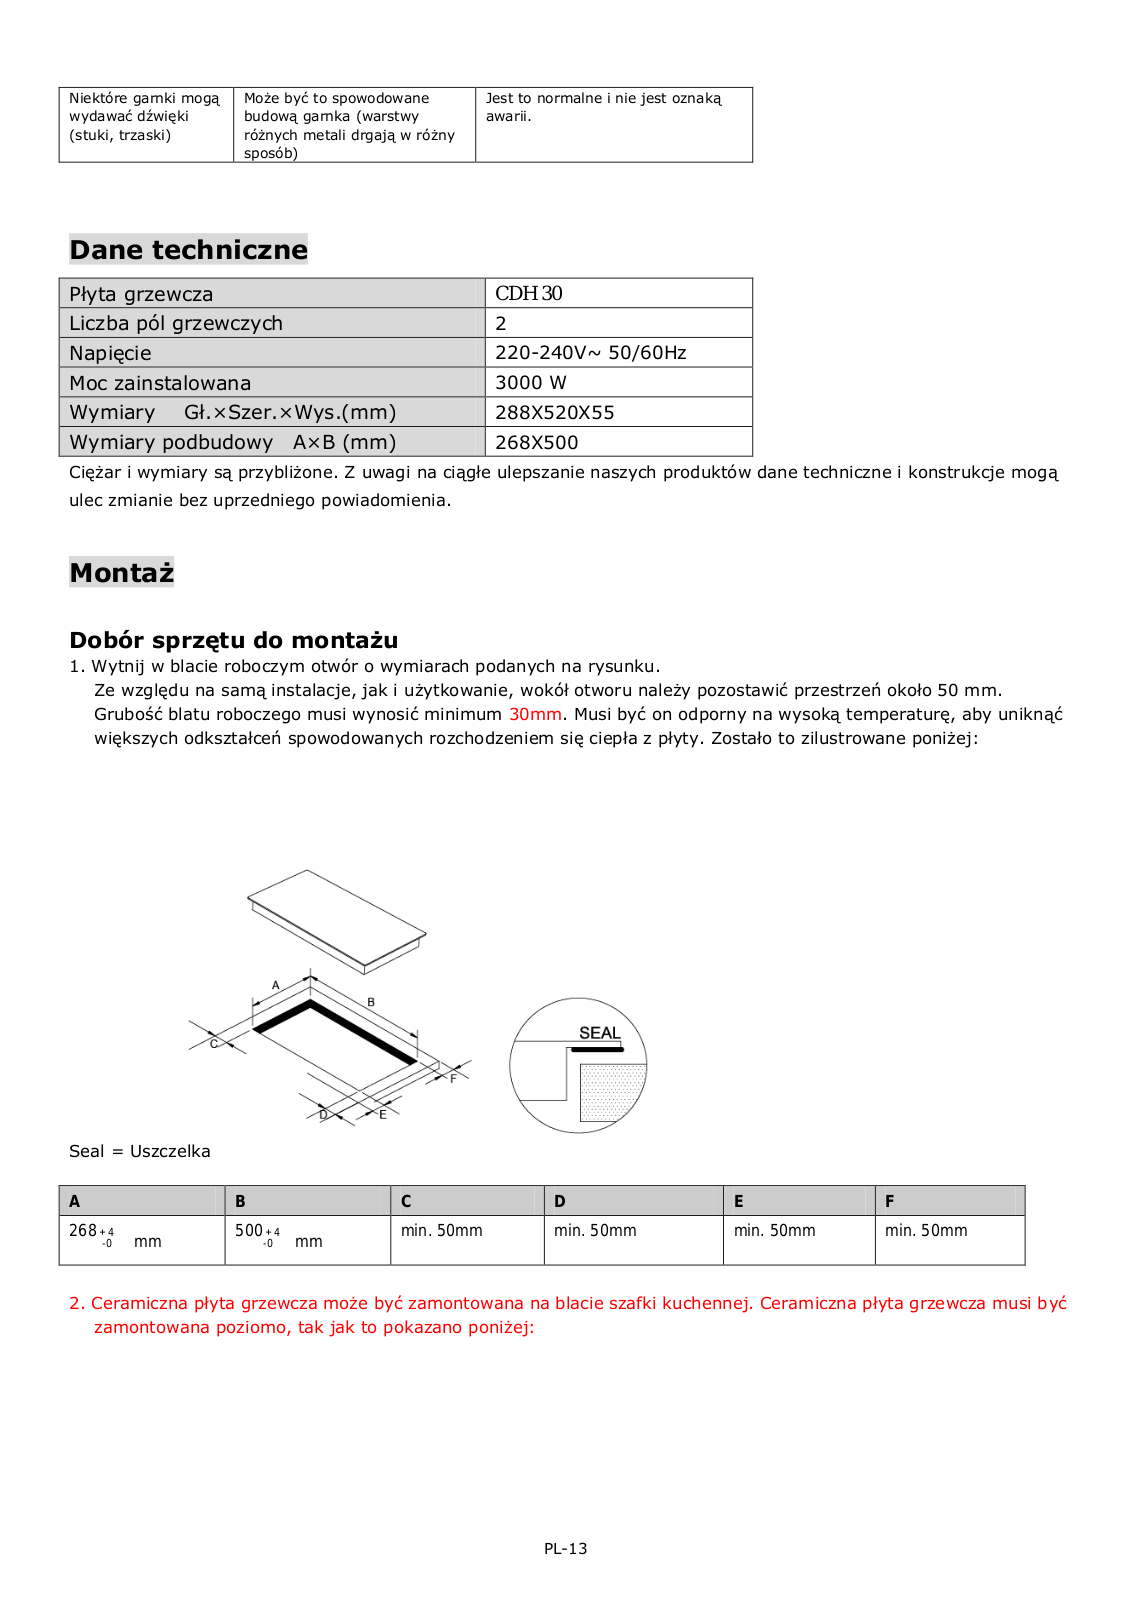
1. Cut out the work surface according to the sizes shown in the drawing.

For the purpose of installation and use, a minimum of 50mm space shall be preserved around the hole.

Be sure the thickness of the work surface is at least 30mm. Please select heat-resistant work surface material to avoid larger deformation caused by the heat radiation from the hotplate. As shown below:

A

B

C

D

E

F

268 4

500 4

50mm mini

50mm mini

50mm mini

50mm mini


- 0 mm

-0 mm


2.The ceramic cooker hob can be used on the table top of cabinet. The ceramic hob should be placed horizontally. As shown below:

A B

50mm mini 50mm mini

Under any circumstances, make sure the ceramic cooker hob is well ventilated and the air inlet and outlet are not blocked. Ensure the ceramic cooker hob is in good work state. As shown below

Note: The safety distance between the hotplate and the cupboard above the hotplate should be at least 760mm.

EN-11

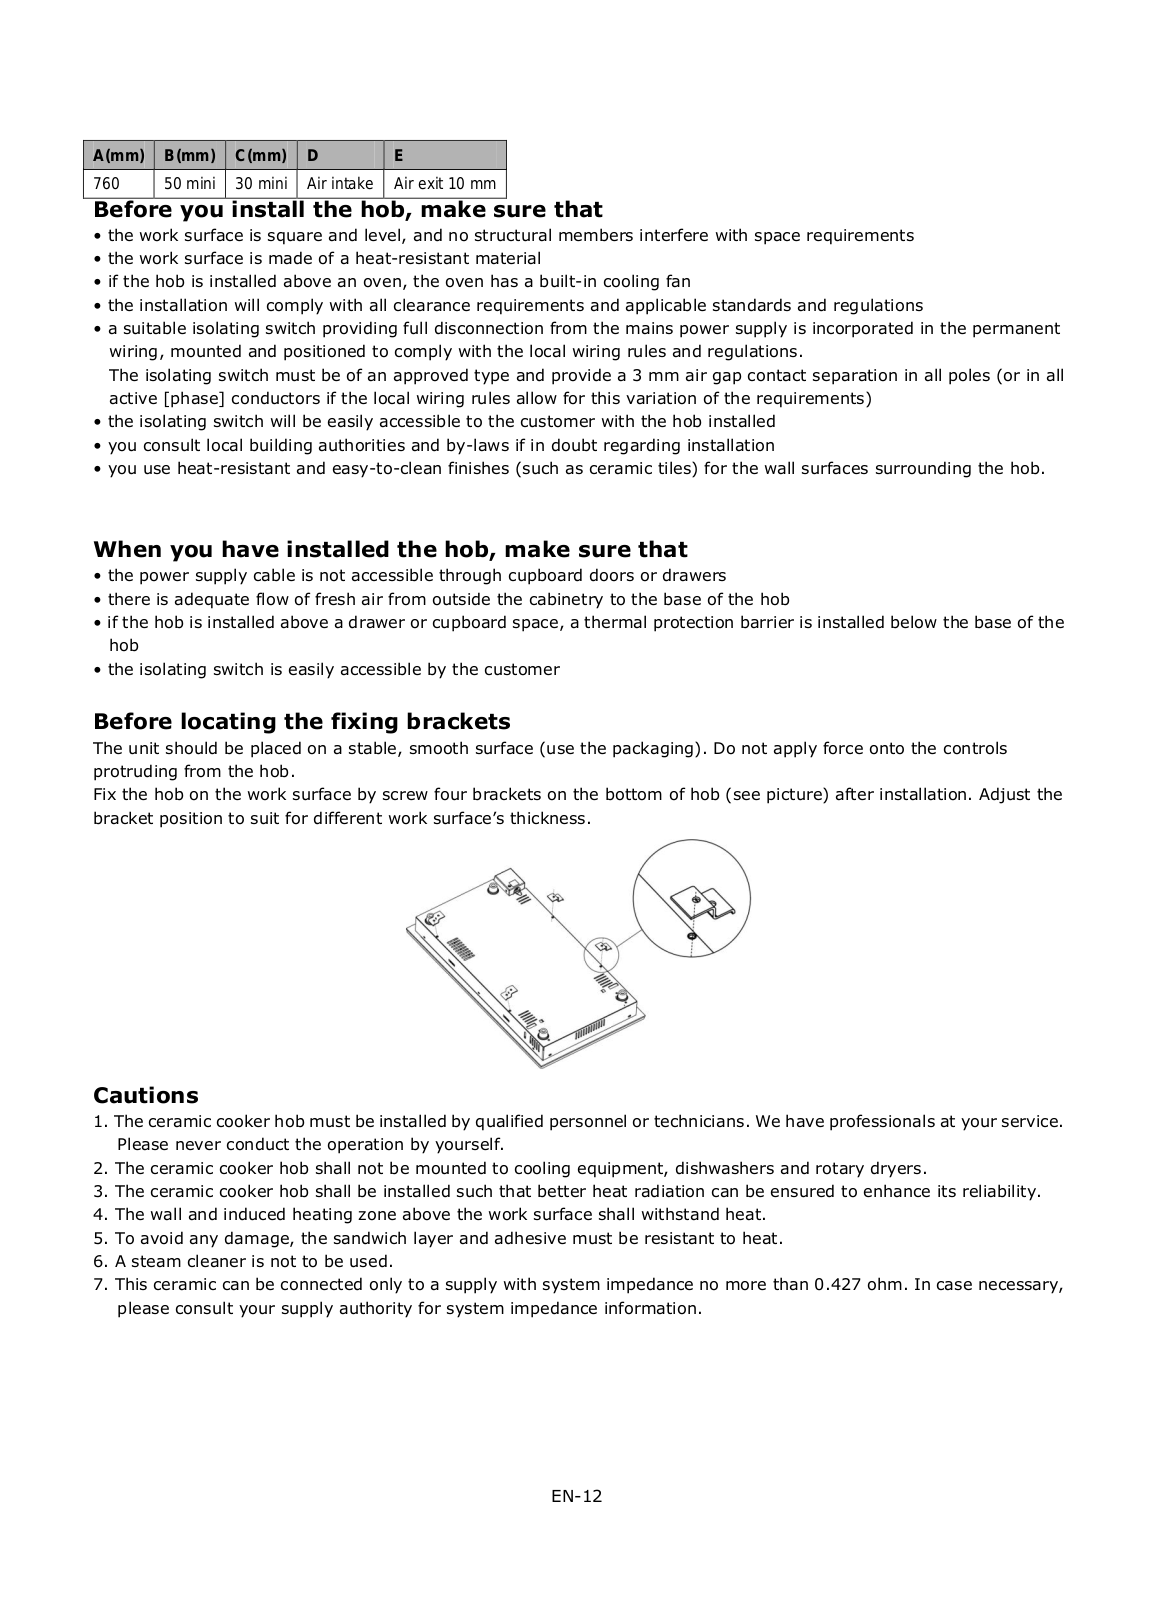
A(mm)

B(mm)

C(mm)

D

E

760

50 mini

30 mini

Air intake

Air exit 10 mm

Before you install the hob, make sure that

the work surface is square and level, and no structural members interfere with space requirements

the work surface is made of a heat-resistant material

if the hob is installed above an oven, the oven has a built-in cooling fan

the installation will comply with all clearance requirements and applicable standards and regulations

a suitable isolating switch providing full disconnection from the mains power supply is incorporated in the permanent wiring, mounted and positioned to comply with the local wiring rules and regulations.

The isolating switch must be of an approved type and provide a 3 mm air gap contact separation in all poles (or in all active [phase] conductors if the local wiring rules allow for this variation of the requirements)

the isolating switch will be easily accessible to the customer with the hob installed

you consult local building authorities and by-laws if in doubt regarding installation

you use heat-resistant and easy-to-clean finishes (such as ceramic tiles) for the wall surfaces surrounding the hob.

When you have installed the hob, make sure that

the power supply cable is not accessible through cupboard doors or drawers

there is adequate flow of fresh air from outside the cabinetry to the base of the hob

if the hob is installed above a drawer or cupboard space, a thermal protection barrier is installed below the base of the hob

the isolating switch is easily accessible by the customer

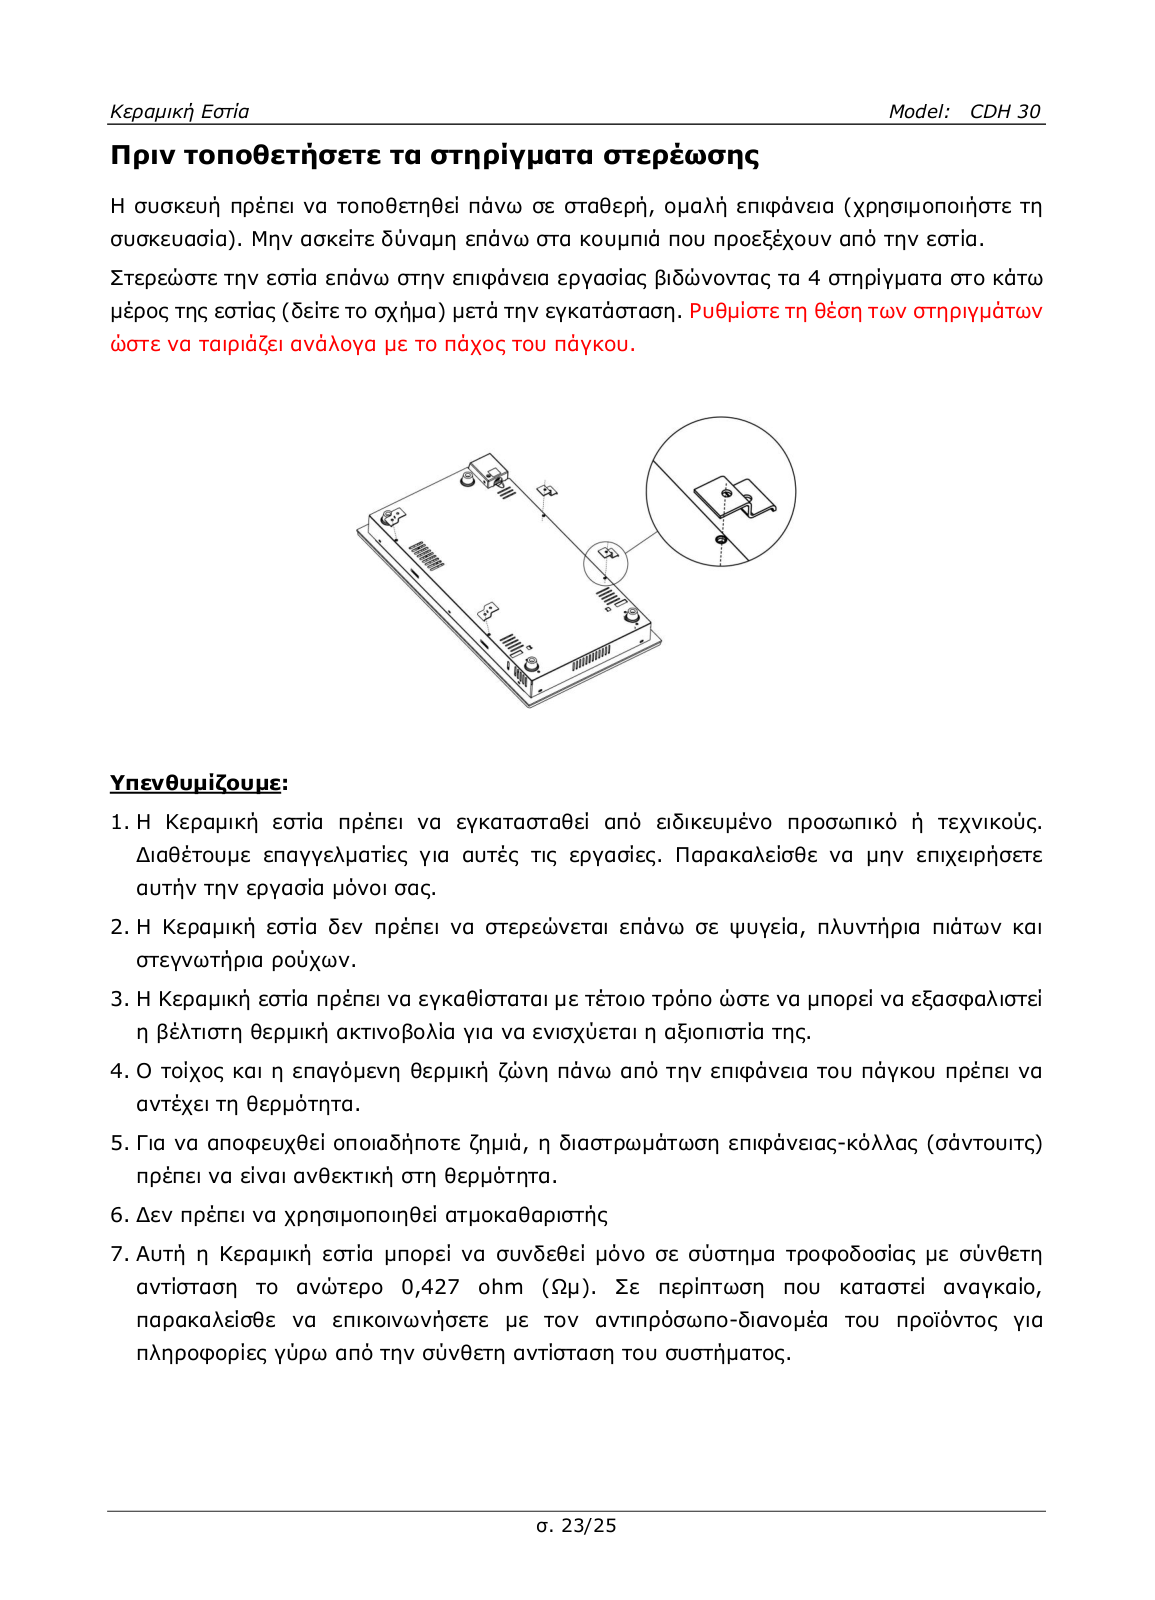
Before locating the fixing brackets

The unit should be placed on a stable, smooth surface (use the packaging). Do not apply force onto the controls protruding from the hob.

Fix the hob on the work surface by screw four brackets on the bottom of hob (see picture) after installation. Adjust the bracket position to suit for different work surface‟s thickness.

Cautions

1.The ceramic cooker hob must be installed by qualified personnel or technicians. We have professionals at your service. Please never conduct the operation by yourself.

2.The ceramic cooker hob shall not be mounted to cooling equipment, dishwashers and rotary dryers.

3.The ceramic cooker hob shall be installed such that better heat radiation can be ensured to enhance its reliability.

4.The wall and induced heating zone above the work surface shall withstand heat.

5.To avoid any damage, the sandwich layer and adhesive must be resistant to heat.

6.A steam cleaner is not to be used.

7.This ceramic can be connected only to a supply with system impedance no more than 0.427 ohm. In case necessary, please consult your supply authority for system impedance information.

EN-12

Connecting the hob to the mains power supply

This hob must be connected to the mains power supply only by a suitably qualified person. Before connecting the hob to the mains power supply, check that:

1.the domestic wiring system is suitable for the power drawn by the hob.

2.the voltage corresponds to the value given in the rating plate

3.the power supply cable sections can withstand the load specified on the rating plate.

To connect the hob to the mains power supply, do not use adapters, reducers, or branching devices, as they can cause overheating and fire.

The power supply cable must not touch any hot parts and must be positioned so that its temperature will not exceed 75˚C at any point.

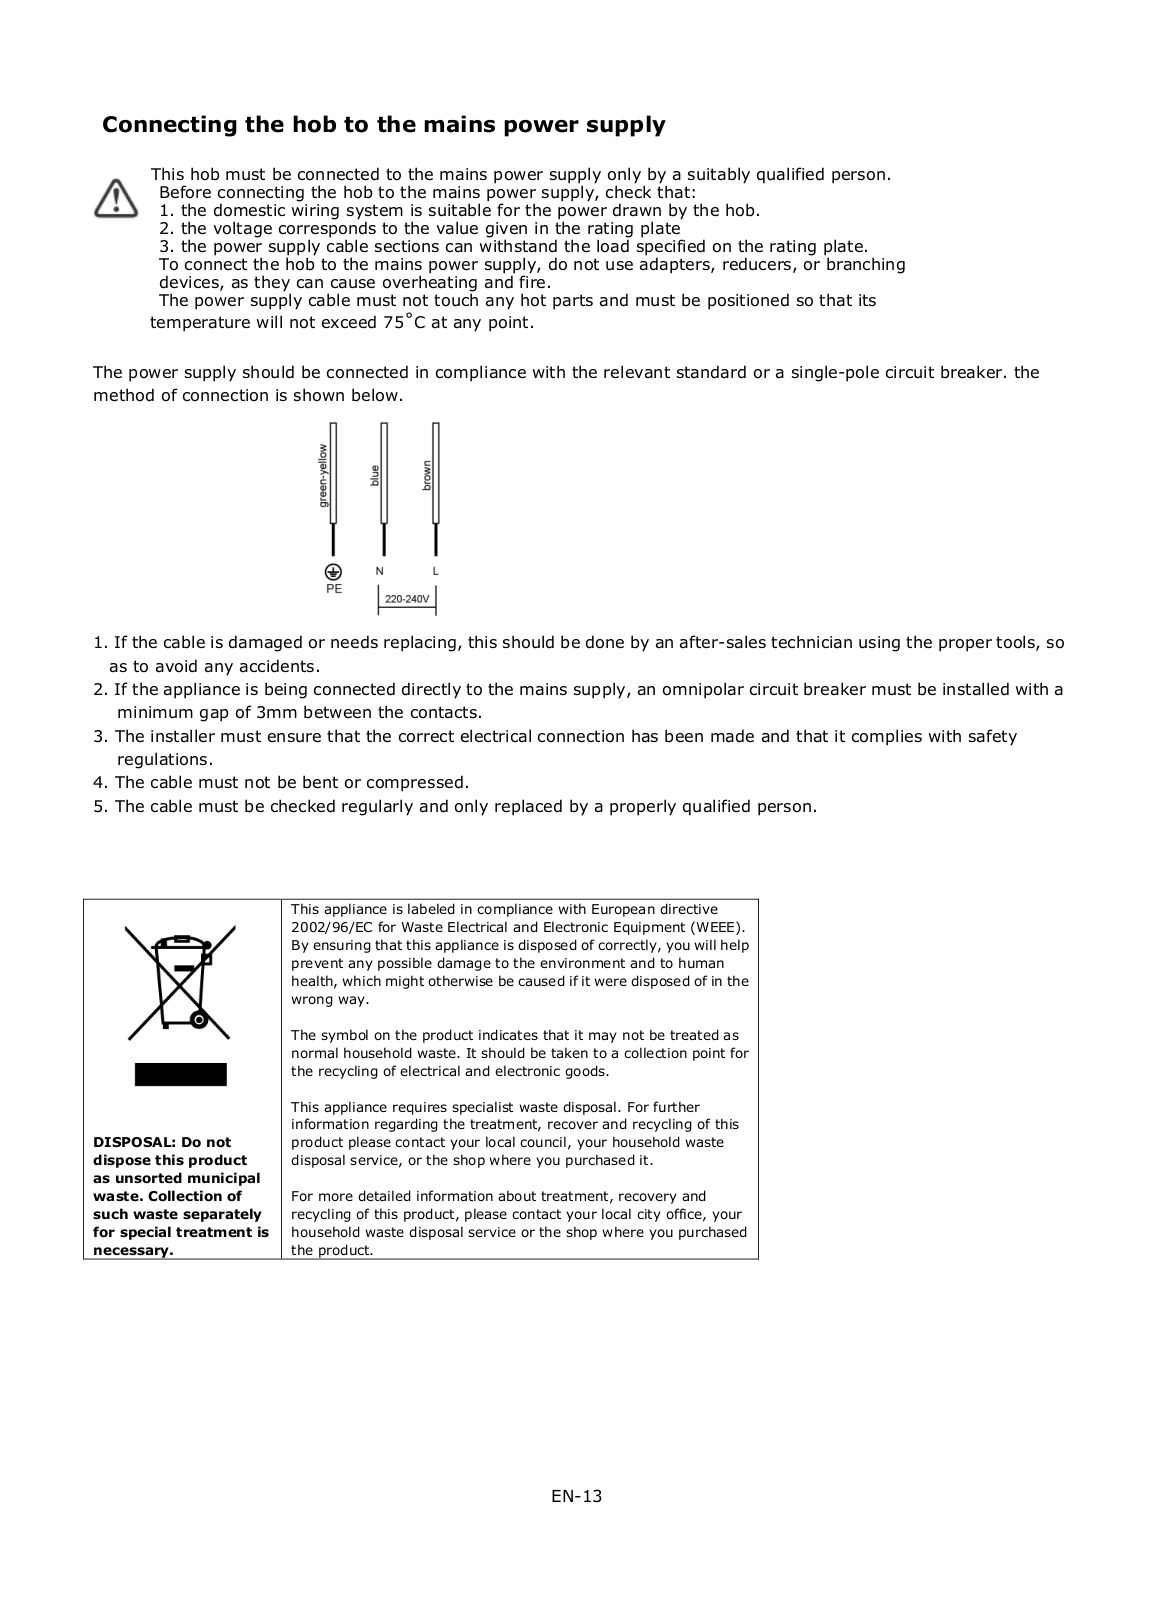
The power supply should be connected in compliance with the relevant standard or a single-pole circuit breaker. the method of connection is shown below.

1.If the cable is damaged or needs replacing, this should be done by an after-sales technician using the proper tools, so as to avoid any accidents.

2.If the appliance is being connected directly to the mains supply, an omnipolar circuit breaker must be installed with a minimum gap of 3mm between the contacts.

3.The installer must ensure that the correct electrical connection has been made and that it complies with safety regulations.

4.The cable must not be bent or compressed.

5.The cable must be checked regularly and only replaced by a properly qualified person.


This appliance is labeled in compliance with European directive


2002/96/EC for Waste Electrical and Electronic Equipment (WEEE).


By ensuring that this appliance is disposed of correctly, you will help


prevent any possible damage to the environment and to human


health, which might otherwise be caused if it were disposed of in the


wrong way.


The symbol on the product indicates that it may not be treated as


normal household waste. It should be taken to a collection point for


the recycling of electrical and electronic goods.


This appliance requires specialist waste disposal. For further


information regarding the treatment, recover and recycling of this

DISPOSAL: Do not

product please contact your local council, your household waste

dispose this product

disposal service, or the shop where you purchased it.

as unsorted municipal


waste. Collection of

For more detailed information about treatment, recovery and

such waste separately

recycling of this product, please contact your local city office, your

for special treatment is

household waste disposal service or the shop where you purchased

necessary.

the product.

EN-13

Керамичен котлон

Инструкции за експлоатация / Монтаж

MODEL: CDH 30

Предупреждения за безопасност

Вашата безопасност е важна за нас. Моля, прочетете информацията в тези инструкции преди да използвате вашия плот за готвене.

Монтаж Опасност от токов удар

Преди да извършвате някаква работа или поддръжка по уреда, го изключете от електрическата мрежа.

Свързването към изправна заземяваща система е важно и задължително.

Промени в домашната електрическа мрежа, трябва да се извършват само от квалифициран електротехник.

Неспазване на тези указания може да доведе до токов удар или смърт.

Опасност от порязване

Внимавайте-ръбовете на панела са остри.

Невнимателна работа може да доведе до нараняване или порязване.

Важни инструкции за безопасност

Преди да монтирате или използвате този уред прочетете тези инструкции внимателно.

По всяко време върху котлона могат да се поставят само негорими материали или продукти.

Моля, предоставете тази информация на разположение на лицето, отговорно за инсталиране на уреда, тъй като това може да намали вашите разходи за монтаж.

С цел избягване на опасност, този уред трябва да бъде монтиран в съответствие с тези инструкции за монтаж.

Този уред трябва да бъде правилно монтиран и заземен само от лице с подхдяща квалификация.

Този уред трябва да бъде свързан по схема включваща прекъсвач, който позволява напълно отделяне на уреда от ел. Захранване.

Неправилно мотиране на уреда водят до анулиране на гаранцията на уреда и искове за отговорност.

Експлоатация и поддржка Опасност от токов удар

Не говете на счупен или повреден готварски плот. Ако повърхността на плота се счупи или напука, веднага изключете уреда от ел. Захранване (от контакта) и се свържете с квалифициран техник.

Изключете уреда от контаката при почистване или поддръжка.

Неспазване на тези указания може да доведе до токов удар или смърт.

Опасност за здравето

Този уред отговаря на стандартите за електромагнетична безопасност.

Опасност от гореща повърхност

По време на използване открити части от уреда се нагряват достатъчно, че да предизвикат изгаряне.

Не позволявайте части от вашето тяло, облекло или други предмети, освен подходящи съдове за готвене, да се допират до индукционното стъкло, доато не се е охладило.

Метални предмети, като ножове, вилици, лъжици и капаци не трябва да се оставят върху повърхността на плота, тъй като могат да се нагреят.

BG-1

Пазете децата на далеч от уреда.

Дръжки на тенджери може да се нагреят прекалено за да могат да бъдат докосвани. Проверете, дали дръжките не са над други включени зони за готвене. Не позволявайте на деца да пипат дръките.

Неспазване на тези указания може да доведе до изгаряния и

опарвания.

Опасност от порязване

Когато е свален предпазния капак на стъргалка за плот, острието и е открито. Използвайте я изключително внимателно и след това я съхранявайте на недостъпно и безопасно за деца.

Невнимателно използване може да доведе до нараняване и порязвания.

Важни инструкции за безопасност

При работа с плота, никога не го оставяйте без надзор. Извирания на течност водят до образуване на дим и мазни петна, които могат да се запалят.

Нкога не използвайте уреда за работна повърхност или място за съхранение.

Никога не оставяйте предмети или посуда върху плота.

Никога не използвайте уреда за затопляне или загряване на помещението.

След използване, винаги изключвайте зоните за готвене и плота за готвене, както е описано в инструкциите (напр. Чрез използване на сензорните бутони).

Не позволявайте на деца да си играят с уреда или да сядат, стоят или качват върху него.

Не съхранявайте предмети представляващи интерес за деца, в шкафовете над готварския плот. Деца покатервайки се върху плота може да сериозно да се наранят.

Не оставяйте децата сами или без надзор в района на работещ плот.

Деца или хора с увреждания които ограничават техните способности да използват плота трябва да бъдат инструктирани от отговорен и компетентен човек, който да ги напъства и обучава в използванетио на уреда. Инструкторът трябва да се увери, че те могат да използват уреда без опасност за себе си или околните.

Не ремонтирайте или поденяйте части от уреда освен ако изрично не е описано в инструкциите. Всички сервизни дейности трябва да се извършват от квалифициран специалист.

Не използвайте пароструйка за почистване на уреда.

Не поставяйте или изпускайте тежки предмети върху плота.

Не стойте върху вашия плот за готвене.

Не използвайте съдове с остри, назъбени ръбове или не плъзгайте съдове по индукционната стъклена повърхност, тъй като това може

BG-2

да надраска стъклото.

• Не използвайте стъргалки или остри абразивни препарати за почистване на вашия плот за готвене, тъй като те могат да надраскат индукционното стъкло.

• Ако захранващия кабел е повреден, той трябва да бъде заенен от производтеля, негов сервизен техник или подходящо квалифициран специалист, за да се избегнат опасности.

•Уредът е предназначен за използване в битови условия и подобни приложения, като: -райони за кухненски персонал в магазини, офиси и други рабони среди; -ферми; -от клиенти на хотели, мотели и други видове жилищни среди ; -помещения за спане и закуска.

•ПРЕДУПРЕЖДЕНИЕ: Уредът и откритите му части се нагряват при работата му.

Трябва да се внимава, за да не се докосват горещи елементи.

Деца под 8 годишна възраст, трябва да се държат в страни от уреда, освен ако не се наблюдават постоянно.

•Този уред може да се използва от деца на и по-големи от 8 години и от хора с психични, сензитивни и умствени увреждания или с липса на опит и знания за използване на уреда, ако са под наблюдение или са инструктирани за работа с уреда и са в състояние да разберат възможните опасности при ползването му.

•Децата не трябва да си играят с уреда. Почистване и поддръжка на уреда не трябва да се извършва от деца, без да бъдат наблюдавани.

ПРЕДУПРЕЖДЕНИЕ:Готвене на кухненския плот с олио или мазнина, без надзор може да бъде опасно и да доведе до възникване на пожар. НИКОГА не се опитвайте да изгасите пожар с вода, а изключете уреда и покрийте пламъците напр. с капак или одеало против пожар.

ПРЕДУПРЕЖДЕНИЕ: Опасност от пожар: не съхранявайте предмети върху повърхностите за готвене.

ПРЕДУПРЕЖДЕНИЕ: Ако повърхността е счупена, изключете уреда, за да предотвратите евентуален токов удар, за поврхности на плот от стъклокерамично или подобно покритие отделящи открити електрически части на уреда.

•Не трябва да се използва уред на пара/пароструйка.

•Уредът не е предназначен за ползване с външен таймер или отделна система за дистанционно управление.

BG-3

Поздравления за закупуването на вашия нов Керамичен плот.

Препоръчваме ви да отделите малко време, за да прочетете тези Инструкции за експлоатация/ Монтаж с цел напълно да научите, как правилно да го монтирате и използвате.

За монтажа, моля обърнете се към частта описваща монтаж.

Прочетете внимателно всички инструкции за безопасност, преди експлоатация на уреда и запазете тези Инстрикции за експлоатация/Монтаж за справки в бъдеще.

Общ преглед на продукта

Изглед отгоре

1.макс. 1800 W зона

2.макс. 1200 W зона

3.Стъклен плот

4.ON / OFF/Вкл/Изкл

5.Контролен панел

Контролен панел

1.Управление ON/OFF/Вкл/Изкл.

2.Бутони за регулиране на Мощност/Време.

3.Бутони за избор на зона за нагряване.

4.Управление на таймера.

5.Заключване на бутоните.

BG-4

Информация за продукта

Керамичния плот за готвене с вграден микрокомпютър, отговаря на различни видове готварски нужди, заради начина на загряване, микро-компютърно управление и избор от различни мощности, наистина е оптимален избор за съвременните семейства. Керамичния плот за готвене е насочен към удобството на клиентите и има индивидуален дизайн. Плотът има безопасни и сигурни характеристики, внасяйки комфорт и ви дава възможност да се насладите напълно на удоволствието от живота.

Преди да използвате вашия Нов Керамичен Плот

Прочетете тези инструкции, обърнете специално внимание на частта „Предупреждения за безопасност„.

Премахнете всяко защитно фолио, евентуално все още останало по плота.

Използване на сензорните бутони

Бутоните реагират на докосване, така че не е необходимо да ги натискате.

Използвайте възглавничката, не върха на пръста си.

Всеки път, щом е регистриран допир ще чувате звуков сигнал.

Уверете се, че бутоните са винаги чисти, сухи, и върху тях не са поставени предмети (напр. прибор или парцал). Дори тънък слой вода може да попречи на добрата работа с бутоните.

Избор на правилни съдове за готвене

Не използвайте съдве с назъбени ръбове или извито дъно.

Уверете се, че основата на вашия съд е гладка, стои равномерно върху стъклото и е със същия размер, като зоната за готвене. Винаги центрирайте вашия съд върху зоната за готвене.

Винаги вдигайте съдовете от плота – не ги плъзгайте, така ще надраскате повърхността на уреда.

BG-5

Експлоатация на вашия керамичен плот

За да започнете готвене

След включване, чувате единичен звуков сигнал, всички индикаторни лампи светват за една секунда, след това изгасват показвайки, че керамичния плот е в режим на очакване.

1. Докоснете бутон ON/OFF/Вкл/Изкл. Всички индикатори показват “-“

2. Поставете подходящ съд за готвене върху зоната, която желаете да използвате.

• Уверете се, че дъното на съда за готвене и Повърхността на зоната за готвене са сухи и чисти.

3. Докоснете бутона за избор на зона за нагряване.

4. Изберете степен на нагряване чрез докосване на бутон “-“ или “+”.

Ако до 1 минута не изберете степен на нагряване, Керамичния плот ще се изключи автоматично.

Ще трябва да започнете отново от стъпка 1.

През цялото време на готвене можете да променяте степента на нагряване.

При задържане на всеки от тези бутони, стойноста ще се увеличава или намалява.

BG-6

Когато завършите готвене

1. Докоснете зоната на нагряване, която искате да изключите.

2. Изключете зоната за готвене, като намалите степените до “ 0 “ или като докоснете едновременно бутони “-“ и ”+”.

3. Излюключете целия плот за готвене, като дкоснете бутон ON/OFF/Вкл/Изкл .

4. Внимавайте с горещите повърхнсти

Символът “H” ще ви пказва коя зона е твърде гореща за докосване. Той ще изчезне, когато зоната се охлади до безопасна температура. Това може и да се използва, като функция за пестене на енергия, ако искате да загрявате съдове за следващо ползване, използвайте все още горещата повърхност.

Заключване на бутоните за управление

За да предотвратите непреднамерено използване можете да заключите бутоните (например да предотвратите, случайно включване на зоните за нагряване от деца).

Когато бутоните са заключени, всички бутони с изключение на ON/OFF/Вкл/Изкл са деактивирани.

За да заключите бутоните

Докоснете бутона за заключване. Индикаторът за време ще покаже “ Lo “

За да отключите бутоните

1.Уверете се, че кераминия плот е включен.

2.Натиснете и задръжте за известно време бутона за заключване.

3.Сега можете да започнете експлоатация на вашия плот.

Когато плота е в заключен режим,всички бутони с изключение на ON/OFF/Вкл/Изкл са деактивирани, в случай на аварийна ситуация винаги можете да изключите вашия плот чрез бутон ON/OFF/Вкл/Изкл, но при следващо използване първо трябва да отключите котлона.

BG-7

Защита срещу превишаване на температурата

Монтиран температурен сензор може да следи емпературата в стъклокерамичния плот. При засичане на превишена температура, стъклокерамичния плот спира да работи автоматично.

Предупреждение за остатъчна топлина

Когато плотът е работил известно време, се образува остатъчна топлина. Буквата “ H ” се появява като предупреждение, да се пазите.

Автоматично изключване

Друга характеристика за безопасност е автоматичното изключване. Това става, ако забравите да изключите зона за готвене. Фабрично зададените времена за изключване са дадени в таблицата:

Ниво на мощност

1

2

3

4

5

6

7

8

9

Фабричен таймер за работа (час)

8

8

8

4

4

4

2

2

2

Използване на таймер

Можете да използвате таймера по два различни начина:

Можете да го използвате, като брояч на минути/напомняне за изтичане на определени минути. В този случай, таймерът няма да изключи определената зона за готвене, след изтичане на зададеното време.

Можете да го настроите след изтичане на зададеното време да изключи определена зона за готвене.

Можете да настроите таймера до 99 минути.

Използване на таймера, кто брояч на минути/напомняне за изтичане на определени минути

Ако не изберете зона за готвене

1.Уверете се, че плота за готвене е включен.

Забележка: можете да използвате брояча, дри и да не сте избрали зона за готвене.

2.Докоснете бутона за управление на Таймера, индикаторът за време започва да мига.

3.Настройте таймера чрез докосване на бутони “-“ или “+”. Индикаторът на брояча на минути започва да мига и

Исе появява дисплея на таймера.

Съвет: Докосване на бутон “-“ или “+” на таймера веднъж, ще намали или увеличи с 1 минута.

Докоснете и задръжте бутон “-“ или “+” на таймера, за да намалите или увеличите с 10 минути.

Ако настроеното време превиши 99 минути, таймерът автоматично се връща на 0 минути.

4.Докосване едновременно на ”-“ и “+”, води до отмяна на таймера, и символът ”--“ се появява на дисплея за минутите.

5.Коагто времето е зададено, то започва да отброява веднага. Дисплеят показва оставащото време и

индикаторът на таймера мига за 5 секунди.

BG-8

6.Зумерът работи 30 секунди и индикаторът на таймера показва “- - “ , когато времето изтече.

Настройване на таймера да изключи зона за готвене

1.Докосване на бтона за избор на зона за нагряване.

2.Докоснете бутона за таймер, индикаторът на таймера показва “10”.

3.Настройте време чрез докосване на бутоните за управление на таймера.

Съвет: Докосване на бутон “-“ или “+” за управление на таймера веднъж ще намали или увеличи времето с 1 минута.

Докоснете и задръжте бутон “-“ или “+” на таймера за да намалите или увеличите с 10 минути.

Ако настроеното време превиши 99 минути, таймерът автоматично преминава на 0 минути.

4.Докосване едновременно “-“ и “+”,води до отмяна на таймера, и символът ”--” се появява на дисплея за минутите.

5. Коагто времето е зададено, то започва да отброява веднага. Дисплеят показва оставащото време и индикаторът на таймера мига за 5 секунди.

ЗАБЕЛЕЖКА: Червената точка до индикатора светва за да покаже, че зоната е избрана.

6.Когато времето за готвене изтече, съответната зона за готвене се изключва автоматично.

ЗАБЕЛЕЖКА: Ако изкате да промените таймера, след като сте го настроили, трябва да започнете от стъпка 1.

BG-9

Насоки за готвене

Внимавайте при пържене, тъй като олиото и мазнината се нагряват много бързо, особено ако използвате функция PowerBoost. При изключително високи температури олиото и мазнината се възпламеняват спонтанно и това представлява много голяма опасност.

Съвети за готвене

Когато храната заври, намалете зададената температурна настройка.

Използването на капак ще намали времето за готвене и ще спести енергия чрез запазване на топлината.

Намалете количеството течност или мазнина, за да намалите времето за готвене.

Започнете готвенето на висока настройка и след това я намалете, когато храната се е затоплила изцяло.

Варене на тих огън/къкрене, готвене на ориз

Варене на тих огън/къкрене, се осъществява преди точката на завиране, на около 85˚C, когато тъкмо започват да се появяват мехурчета в течността, която готвите. Това е ключа към приготвяне на вкусни супи и яхнии, тъй като вкуса се образува без да пресготвяте храната. Също трябва да приготвяте сосове с яйца или сгъстявани с брашно под точката на завиране.

Някой дейности, включително готвене на ориз чре зметода на абсорбиране, може да изисква настройка по-висока от най-ниската, за да се осигуриправилно сготвяне в препоръчаното време.

Запечатване на пържола

За приготвяне на сочни вкусни пържоли:

1.Преди готвене оставете месото да престои на стайна температура за около 20 минути.

2.Загрейте тиган за пържене с дебела основа.

3.Намажете двете страни на пържолата с олио. Напръскайте леко с олио дъното на нагорещения тиган, след което поставете месото в горещия тиган.

4.По време на готвене обърнете пържолата само веднъж. Времето за готвене зависи от това, колко е дебела

пържолата и колко добре искате да е сготвена. Времето варира от 2 – 8 минути на страна. Натсинете пържолата, за да определите, колко е сготвена – колкото е по-твърда, толкова по-добре е изпечена/ „well done‟.

5.Оставете пържолата да отпочине на топло място за няколко минути, за да позволите на месото да се отпусне и да стане пържолата по-мека преди да я сервирате.

При пържене с бъркане

1.Изберете подходящ за ползване върху керамичен плот тиган тип Уок с плоско дъно или голям тиган за пържене.

2.Подгответе всички съставки и необходимо оборудване. Пърженето с бъркане трябва да бъде бързо. Ако приготвяте големи количества, разделете храната на по-малки порции.

3.Загрявайте тигана за кратко и добавете две супени лъжици олио.

4.Първо пригответе месото, след това го оставете настрана и го поддържайте топло.

5.Изпържете зеленчуците. Когато са горещи но все още хрупкави, намалете настройката на зоната за готвене, върнете обратно месото в тигана и добавете сос.

6.Внимателно разбъркайте съставките, за да сте сигурни че всички са загряти равномерно.

7.Сервирайте веднага след готвене.

Настройки на топлината

Показаните по-долу настройки са само насочващи. Точната настройка ще зависи от няколко фактора, включително от вашите съдове за готвене и количеството храна, която ще приготвяте. Експериментирайте с индукционния котлон, за да определите кои настройки са най-подходящи за вас.

Настройка на

Подходяща за

топлина


1 - 2

• деликатно затопляне на малки количества храна;


• разтопяване на шоколад, масло и храни които бързо


прегарят;


• леко къкрене/варене;


• бавно затопляне.


BG-10

3 - 4

• претопляне;


• бързо завиране;


• готвене на ориз.

5 - 6

• палачинки.

7 - 8

• сотиране;


• готвене на паста.

9

• пържене с бъркане;


• запечатване на месо;


• завиране на супа;


• варене на вода

Поддръжка и почистване

Какво?

Как?

Важно!

Ежедневно

1. Изключете ел. захранването

• Когато ел. захранването на плота е

замърсяване на


към плота за готвене.

изключено, няма да има

стъклото

2.

Нанесете препарат за

индикация за „гореща

(отпечатаци от


почистване на плотове за

повърхност‟ , но зоната за готвене

пръсти, петна,


готвене, докато е все още

може все още да бъде гореща!

останки от храна


топъл (но не горещ!)

Действайте изключително

или или разливане

3.

Измийте и подсушете след

внимателно.

на не-сладки смеси


това с чист парцал или

• Стъргалки, пластмасови и остри

върху плота)


кухненска хартия.

абразивни препарати за


4.

Включете отново ел.

почистване може да надраскат


захранването към плота за

повърхността. Внаги четет


готвене.

етикета, зада определите дали


вашата стъргалка е подходяща за


почистване на плота.


• Никога не оставяйте остатъци от


почистването върху плота:


стъклото може да се оцвети за


постоянно.

Изливане от

Такива замърсявания

• Отстранявайте замърсявания от

варене,

отстранявайте веднага с паче

разливане, разтопяване или от

разтопяване, и

риба, мастихин или острието

слдаки смеси възможно най-скоро.

горещи разливания

на стъргалка подходяща за

Ако се остави да засъхне върху

от смеси със захар

почистване на

стъклото може да бъде много трудно

върху стъклото

стъклокерамични плотове, но

за почистване или дори да увреди


вимавайте за горещите

необратимо повърхността на


повърхности на зоните за

стъклото.


готвене:

• Опасност от порязване: когато е


1.

Изключете ел.

свален предпазния капак на


Захранването на плота за

стъргалката, оетрието и е много


готвене.

остро. Използвайте я изключително


2.

Дръжте остриет или

внимателно и след това я


прибора за почистване под

съхранявайте на недостъпно и


ъгъл 30°и изтържете

безопасно за деца място.


разливането или го


избутайте до студена част


на плота за готвене.


3.

Подсушете или забършете


замърсяването с кухненска


хартия или гъбичка.


4.

Следвайте стъпки 2 до 4 от


горното „Ежедневно


замърсяване на стъклото‟.


Разливане върху

1.

Изключете ел.

• Плотът може да издаде звуков

сензорните бутони


Захранването на плота за

сигнал и да се изключи сам и


готвене.

сензорните бутони може да не


2.

Подсушете разливането.

работят коректно, ако има


3.

Забършете зоната на

разливане върху тях. Уверете се, че


сензорните буони с чиста,

сте забърсали и подсушили добре


влажна гъбичка или

зоната на сензорните бутони преди


парцал.

да включите отново плота за


4.

Забършете напълно до

готвене.


подсушаване на зоната с


кухненска хартия.


5.

Включете отново ел.


захранването към плота за


готвене.


BG-11

Loading...
+ 59 hidden pages