

Page 1

User instructions
Mode d’emploi
Instrucciones para el uso
Instruções de utilização
CDF8 312 X
DISHWASHER
LAVE-VAISSELLE
LAVAVAJILLAS
MÁQUINA DE LAVAR LOIÇA
EN
FR
ES
PT
Page 2

3
2
Congratulations!
Thank you for choosing a Candy
appliance; quality dishwashers which
guarantee high performance and
reliability.
Candy manufacture a vast range
of domestic appliances: washing
machines, washer/dryers, cookers,
microwave ovens, ovens and hobs,
refrigerators and freezers.
Ask your dealer for the catalogue with
the complete range of Candy products.
Please read this booklet carefully as
it provides important information
regarding the safe installation, use,
and maintenance of the machine,
together with some useful advice on
how to achieve the best results from
your dishwasher.
For future reference please keep this
instruction booklet in a safe place.
CUSTOMER SERVICE AND
GUARANTEE
Your new appliance is fully guaranteed
by the manufacturer for 12 months
against electrical/mechanical breakdown excluding:
A. Any faults which occur due to bad
installation or misuse of the machine.
B. Any faults which occur due to repair
of, or interference with, the machine
by any person not authorised by the
manufacturer to carry out service.
C. Any faults which occur due to
any parts which are fitted to the
machine which are not the original
manufacturers parts.
D. Any faults arising from non-domestic
use or unusual or abnormal use of
the machine.
E. Any faults arising from operation at
incorrect voltage.
F. Any faults arising from incorrect
operation of the machine.
The guarantee applies to Gt Britain
and Northern Ireland only, and is an
addition to your statutory rights.
AFTER SALES SERVICE
For service and repairs call your local engineer on our national telephone number:
GIAS Service Tel: 08705 400 600
Support Service (Eire 018301 666)
CONTENTS
Safety advice
Setting up, installation
Water softener unit
Loading the salt
Adjusting the upper basket
Loading the dishes
Information for test laboratories
Loading the detergent
Types of detergent
Loading the rinse aid
Cleaning the filters
Some practical hints
Routine cleaning and maintenance
Description of the control panel
Technical data
Programme selection and special functions
Programme guide
The Watercontrol system
Identifying minor faults
pag. 4
pag. 5
pag. 10
pag. 11
pag. 12
pag. 13
pag. 15
pag. 16
pag. 17
pag. 18
pag. 19
pag. 20
pag. 21
pag. 22
pag. 22
pag. 23
pag. 26
pag. 28
pag. 29
Please read the instructions in this booklet carefully because they contain important
information on how to install, use and maintain your dishwasher safely as well as
containing useful tips on how to make the most of it.
Keep this booklet safe for future reference.
Fig. A
3
2
1
4
5
Page 3

5
4
SAFETY INSTRUCTIONS
There are certain basic safety rules
which are valid for any domestic
appliance.
Installation
■ Make sure that the plug fitted to the
machine is compatible with the power
supply socket. If it is not, get a suitably
qualified person to fit the correct type,
and to make sure that the cables to the
mains socket are able to cope with the
power rating of the appliance.
■ Ensure that the dishwasher does not
crush power cables.
■ In general it is not advisable to use
adaptors, multiple plugs and/or extension
cables.
■ Should it be necessary to replace the
supply cord, call the After Sales Service
Centre.
Safety
■ Never touch the appliance when your
hands or feet are wet or damp.
■ Do not use when your feet are bare.
■ Do not remove the plug from the mains
supply socket by pulling the mains cable
or the machine itself.
■ Do not leave the appliance exposed to
the elements (rain, sun etc).
■ This appliance is not intended for use by
persons (including children) with reduced
physical, sensory or mental capabilities,
or lack of experience and knowledge,
unless they have been given supervision
or instruction concerning use of the
appliance by a person responsible for
their safety.
Children should be supervised to ensure
that they do not play with the appliance.
■ Water left in the machine or on the
dishes at the end of the wash programme
should not be swallowed.
■ The door should not be left in the open
position since this could present a potential
hazard ( es. tripping ).
■ Leaning or sitting on the open door of
the dishwasher could cause it to tip over.
WARNING !
Knives and other utensils with sharp
points must be loaded in the basket
with their points down or placed in a
horizontal position.
Daily use
■ This appliance is be designed for domestic
use only.
■ The dishwasher is designed for normal
kitchen utensils.
Objects that have been contamined by
petrol, paint, traces of steel or iron,
corrosive chemicals, acids or alkalis
must not be washed in the dishwasher.
■ If there is a water softening device installed
in the home there is no need to add
salt to the water softener fitted in the
dishwasher.
■ Cutlery is washed best if it is placed in
the basket with the handles downwards.
■ If the appliance breaks down or stops
working properly, switch it of f, turn of f the
water supply and do not tamper with it.
Repair work should only be carried out
by an approved service agent and only
genuine spare parts should be fitted. Any
failure to follow the above advice may
have serious consequences for the safety
of the appliance.
Disposal
■ The dishwasher has been made from
materials which can be recycled so that it
can be disposed of in an environmentally
friendly way.
■ If you wish to dispose of an old dishwasher
be careful to remove the door to
eliminate the risk of children becoming
trapped inside it.
INSTALLATION
(Technical notes)
■ After unpacking, adjust the height of the
dishwasher. For the dishwasher to work
correctly it must be level. Adjust the feet
so that the machine does not tilt by more
than 2 degrees.
■ If it you need to move the machine after
removing the packaging, do not try to lift
it by the bottom of the door. Follow the
instructions in the figure below. Open the
door slightly and lift the machine by
holding on the top.
IMPORTANT
When the appliance is located on a
carpet floor, attention must be paid to
ensure that there is no obstruction to
the bottom vents.
Make sure that the plug on the
appliance remains accessible after
installation.
Electrical connection
This appliance complies with international
safety standards, and is fitted with a 3 pin
plug with earth connection to ensure
complete earthing of the product.
Before connecting the appliance to the
mains supply it is important to ensure:
1. that the supply socket is properly
earthed;
2. that your electricity supply is capable of
meeting the consumption requirements
listed on the rating plate of your
appliance.
WARNING!
Ensure that your product is properly
earthed.
In the absence of adequate earthing
you will notice that when touching
the metal parts of your appliance an
electrical dispersion can be felt, due
to the presence of a radio interference
suppressor.
Manufacturer declines all responsibility
for any damage due to non-earthing of
the machine.
Appliance complies with European
Directives 73/23/EEC and 89/336/EEC,
replaced by 2006/95/EC and
2004/108/EC, and subsequent
amendments.
Page 4
76
Electrical connection (for U.K. only)
Plug your dishwasher into the power
socket.
If the plug we supply does not fit :
■ CUT IT OFF AND DESTROY IT!
You can't use it on other appliances, and
the exposed wires could be dangerous if
anyone plugged it in.
■ Fit a suitable plug, as follows:
WARNING!
THIS APPLIANCE MUST BE EARTHED.
Fuses and plugs
This appliance should be used only on a
socket with a minimum rating of 13 Amp.
Our ready-fitted plug is already equipped
with a 13 amp fuse which is BS 1362 ASTA
approved.
Any replacement should be exactly the
same.
If the fuse cover is lost, do not use the plug
until it is replaced.
A correct replacement fuse cover (obtainable from your dealer or Electricity board)
must be the same colour as shown or
named on the insert on the base of the
plug.
Green and
yellow wire
Marked with the letter E,
OR marked with the Earth
symbol,
OR coloured green,
OR coloured green and
yellow.
Blue wire
Brown wire
Marked N,
OR coloured black.
Marked L,
OR coloured red.
Connect to the terminal in the plug
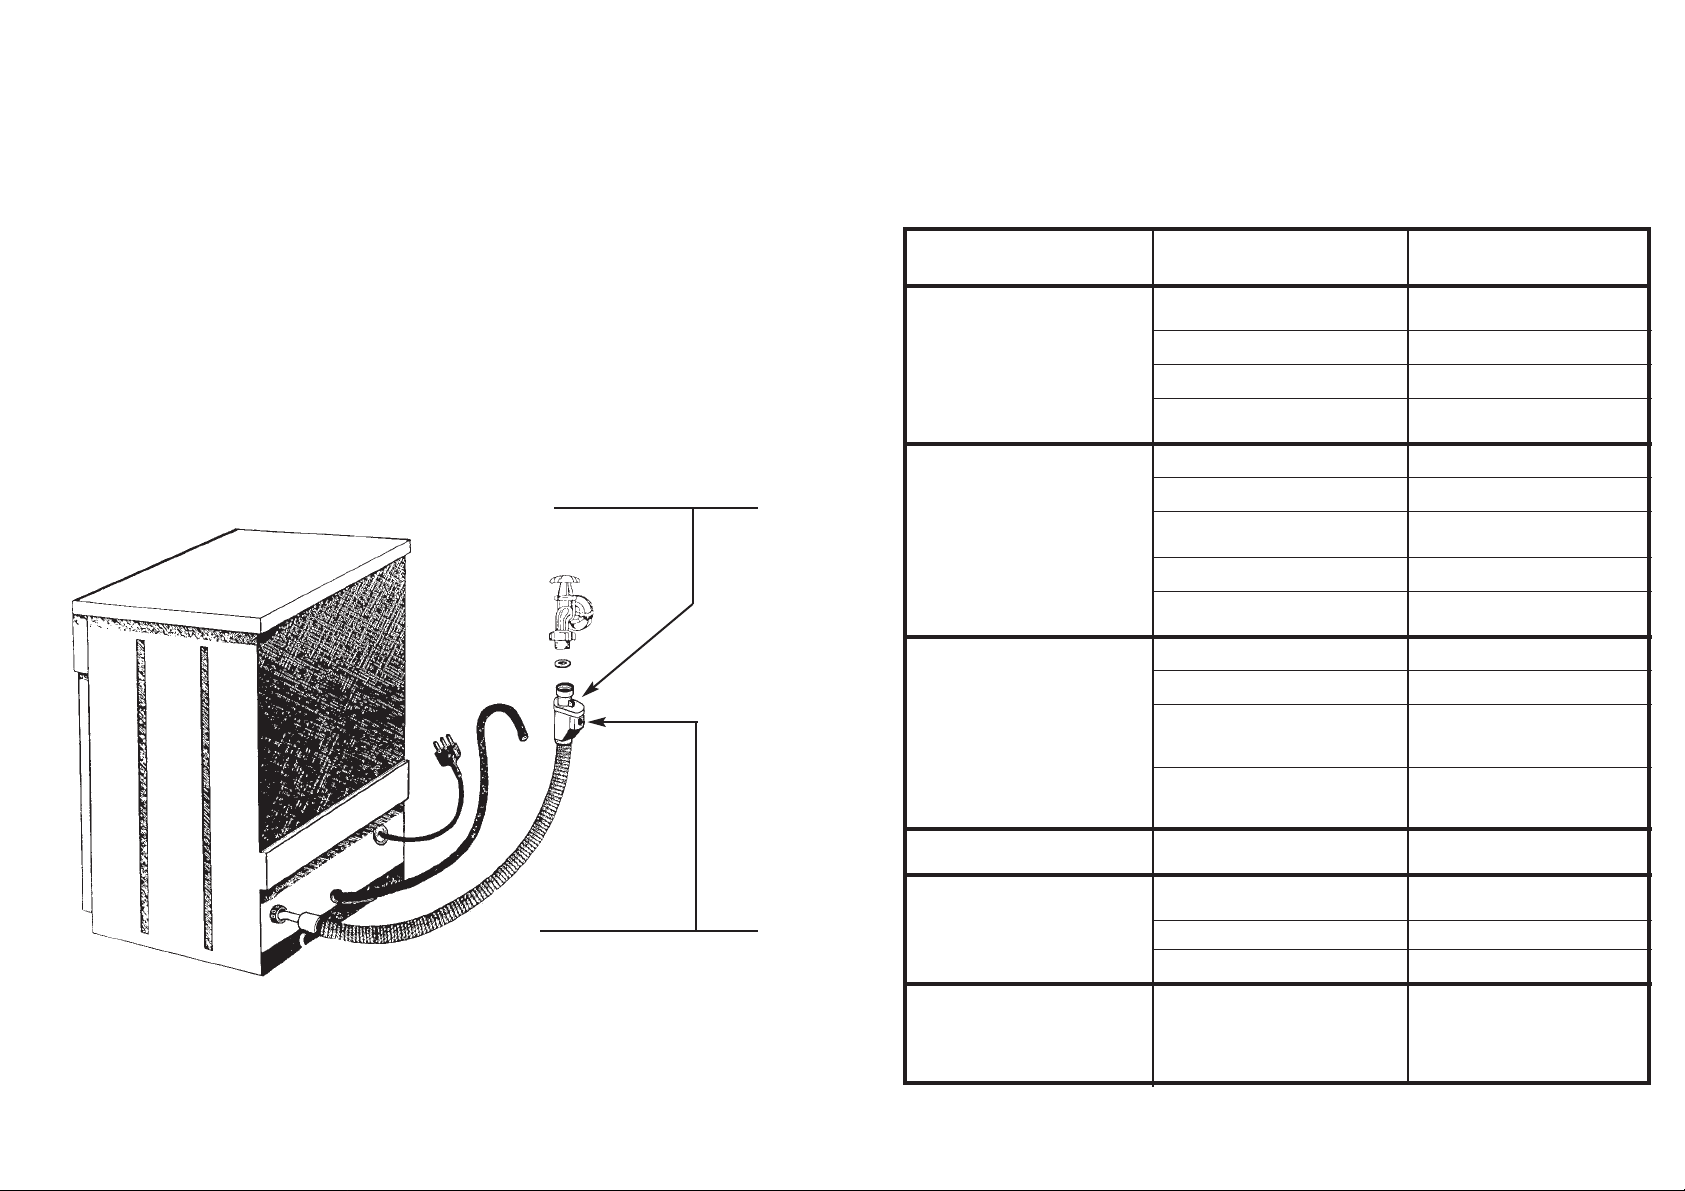
Water connection
IMPORTANT
The appliance must be connected to
the water mains using new hose-sets.
The old hose-sets should not be reused.
■ The inlet and drain hoses can be directed
to left or right.
IMPORTANT
The dishwasher can be connected to
either cold or hot water, as long as it
is no hotter than 60 °C.
■ Water pressure must be between
0,08 MPa and 0,8 MPa. If the pressure is
below the minimum consult our service
department for advice.
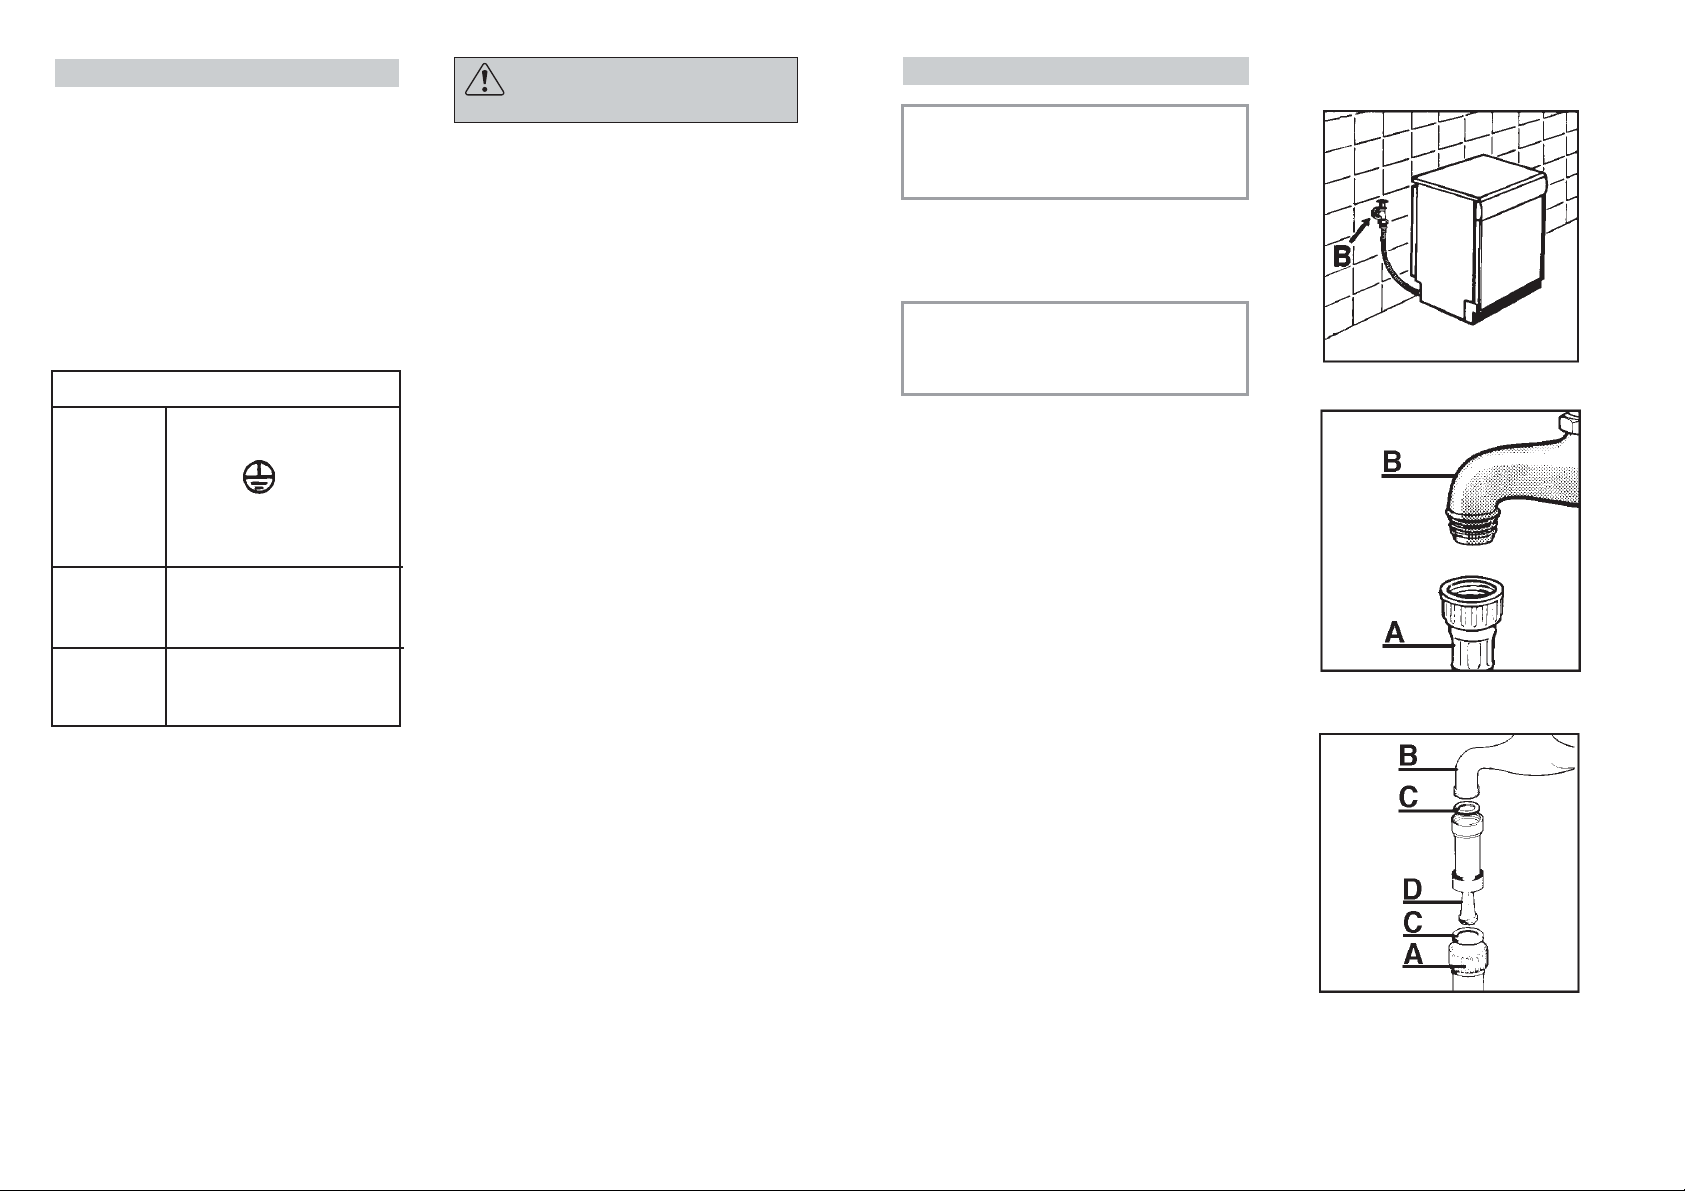
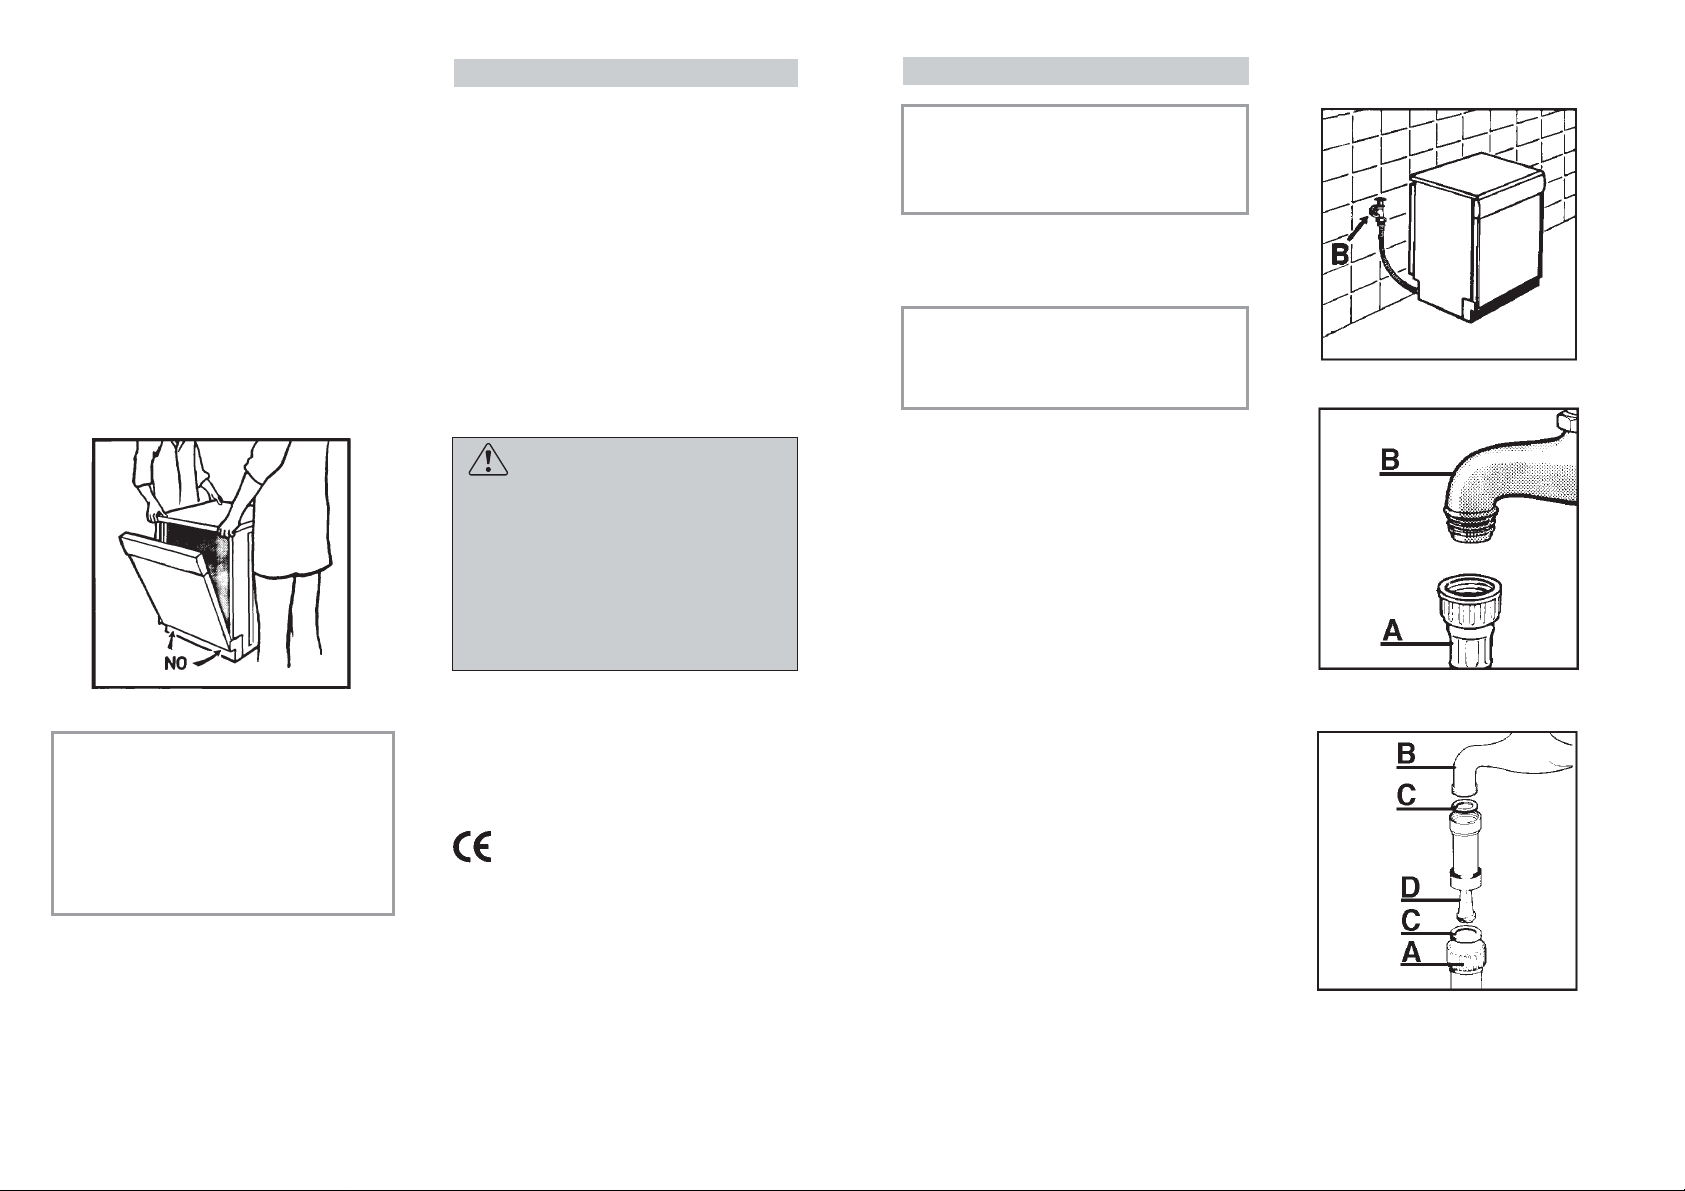
■ The inlet hose must be connected to a
tap so that the water supply can be cut
off when the machine is not in use
(fig. 1 B).
■ The dishwasher is fitted with 3/4" threaded
connector (fig. 2).
■ Connect inlet hose “A” to water tap “B”
with a 3/4" attachment making sure that
it has been properly tightened.
■ If it is necessary, the inlet pipe can be
lengthened up to 2,5 m. The extension
pipe is available from the After Sales
Service Centre.
■ If limescale deposits or sand are present
in the water, it is advisable to obtain the
appropriate filter, art. 9226085, from the
After Sales Service Centre (fig. 3). The
filter “D” must be inserted between the tap
“B” and the inlet hose “A”, remembering
to fit the washer “C”.
■ If the dishwasher is connected to new
pipes or to pipes which have not been in
use for a long time run water through for
a few minutes before connecting the
inlet hose. In this way no deposits of
sand or rust will clog up the water inflow
filter.
1
2
3
Page 5
9
8
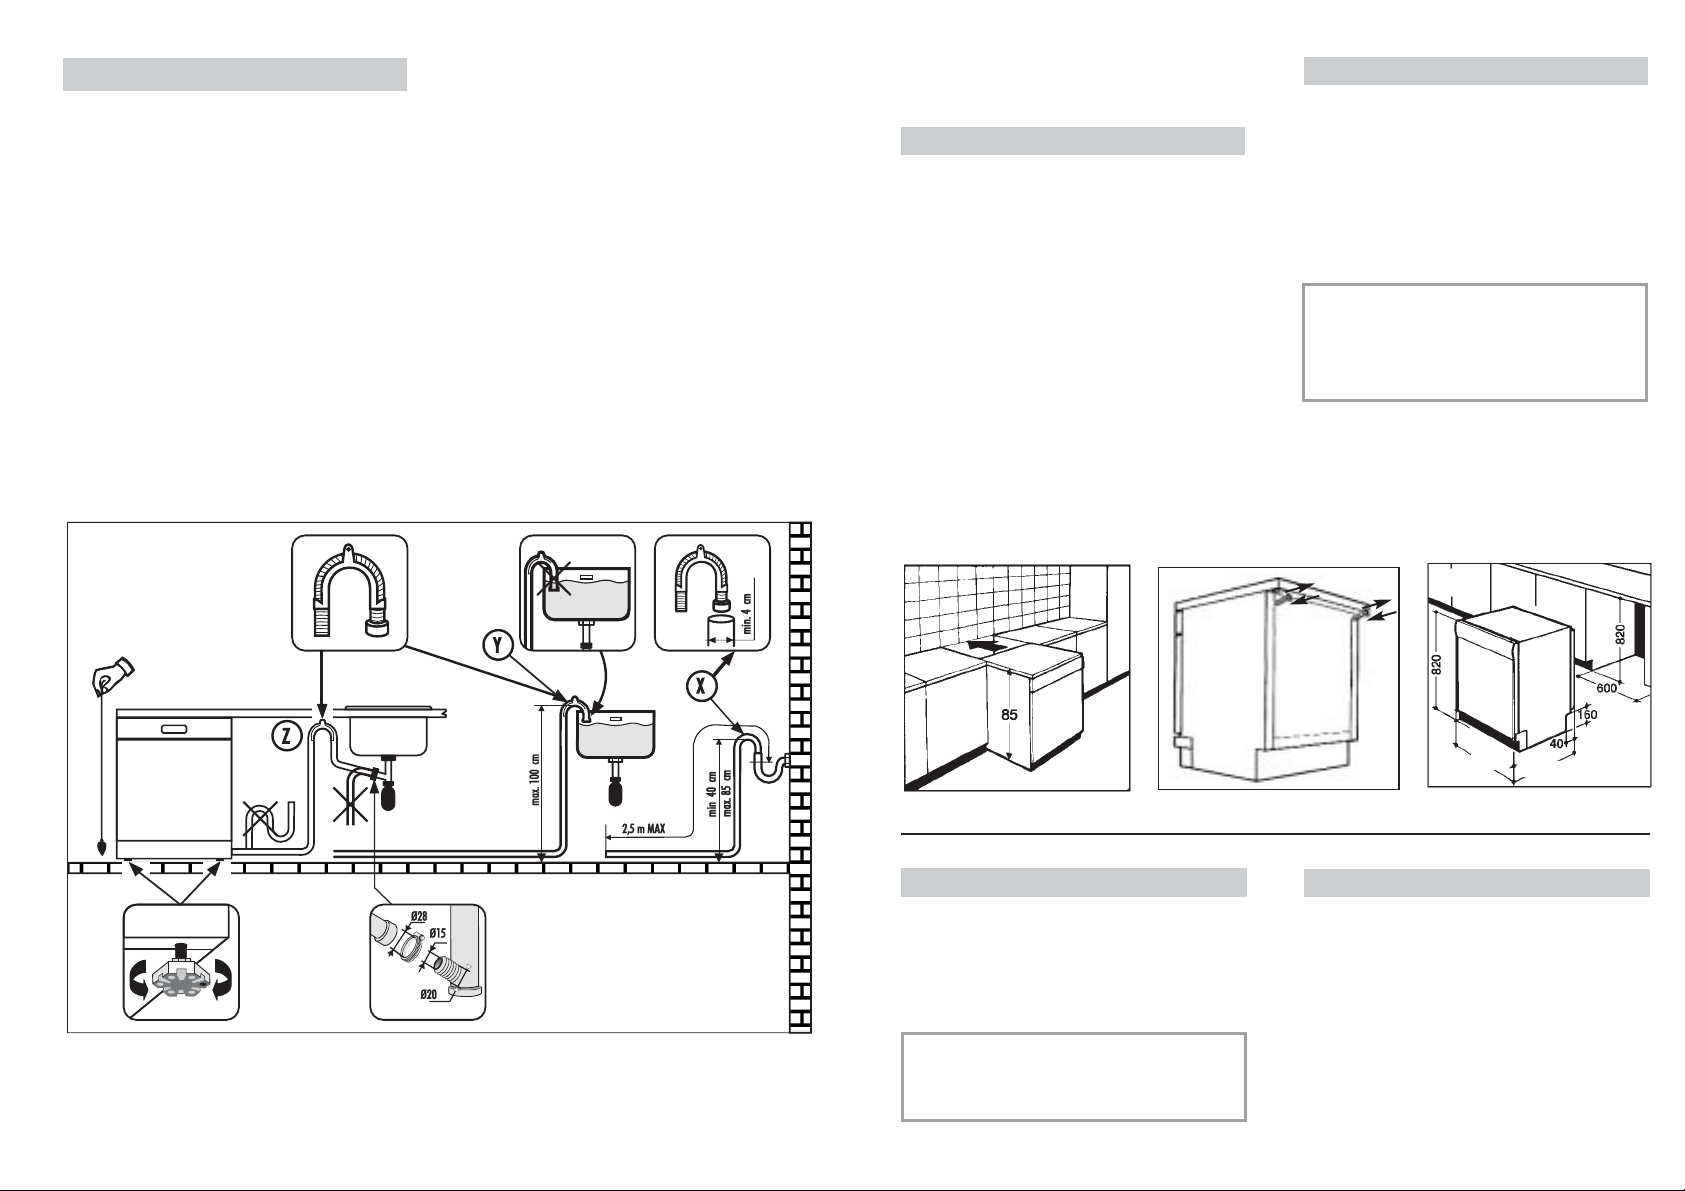
Connecting the outlet hose
■ The outlet hose should disharge into a
standpipe, making sure that there are no
kinks (fig. 4).
■ The standpipe must be at least 40 cm
above floor level and it must have an
internal diameter of at least 4 cm.
■ It is advisable to fit an anti-odour air trap
(fig. 4X).
■ If necessary the outlet hose can be
extended up to 2,5 m, provided that it is
kept at a maximum height of 85 cm
above floor level. The extension pipe is
available from the After Sales Service
Centre.
■ The hose can be hooked over the side of
the sink, but it must not be immersed in
water, in order to prevent water from
being syphoned back to the machine
when this is in operation (fig. 4Y).
■ When installing the appliance under a
worktop the hose pipe clamp must be
attached to the wall in the highest possible
position under the worktop (fig. 4Z).
■ Check that there are no kinks in the inlet
and outlet hoses.
4
7
598
556/573
5
INSTALLATION IN FITTED
KITCHENS
Fitting between existing cabinets
■ The height of the dishwasher, 85 cm, has
been designed in order to allow the
machine to be fitted between existing
cabinets of the same height in modern
fitted kitchens. The feet can be adjusted
so that correct height is reached.
■ The laminated top of the machine does
not require any particular care since it is
heatproof, scratchproof and stainproof
(fig. 5).
Opening the door
Put your hand into the recess and pull.
If the machine comes open while it is working,
an electrical safety device automatically
switches everything off.
IMPORTANT
For the machine to work properly,
the door should not be opened while
it is in operation.
Closing the door
Place the baskets in the machine.
Make sure that both the spray arms are
free to rotate and are not obstructed by
cutlery, crockery or pans. Close the door,
pressing on it to make sure it is firmly shut.
Underneath existing work top
(when fitting beneath a work top)
■ In most modern fitted kitchens there is
only one single work top under which
cabinets and electrical appliances are
fitted. In this case remove the work top
of the dishwasher by unscrewing the
screws under the rear edge of the top
(fig. 6a).
IMPORTANT
After removing the work top, the
screws MUST BE screwed again
under the rear edge of the top
(fig. 6b).
■ The height will then be reduced to 82 cm,
as scheduled by the International
Regulations (ISO) and the dishwasher
will fit perfectly under the kitchen
working top (fig. 7).
6
a
b
a
b
Page 6
11
10
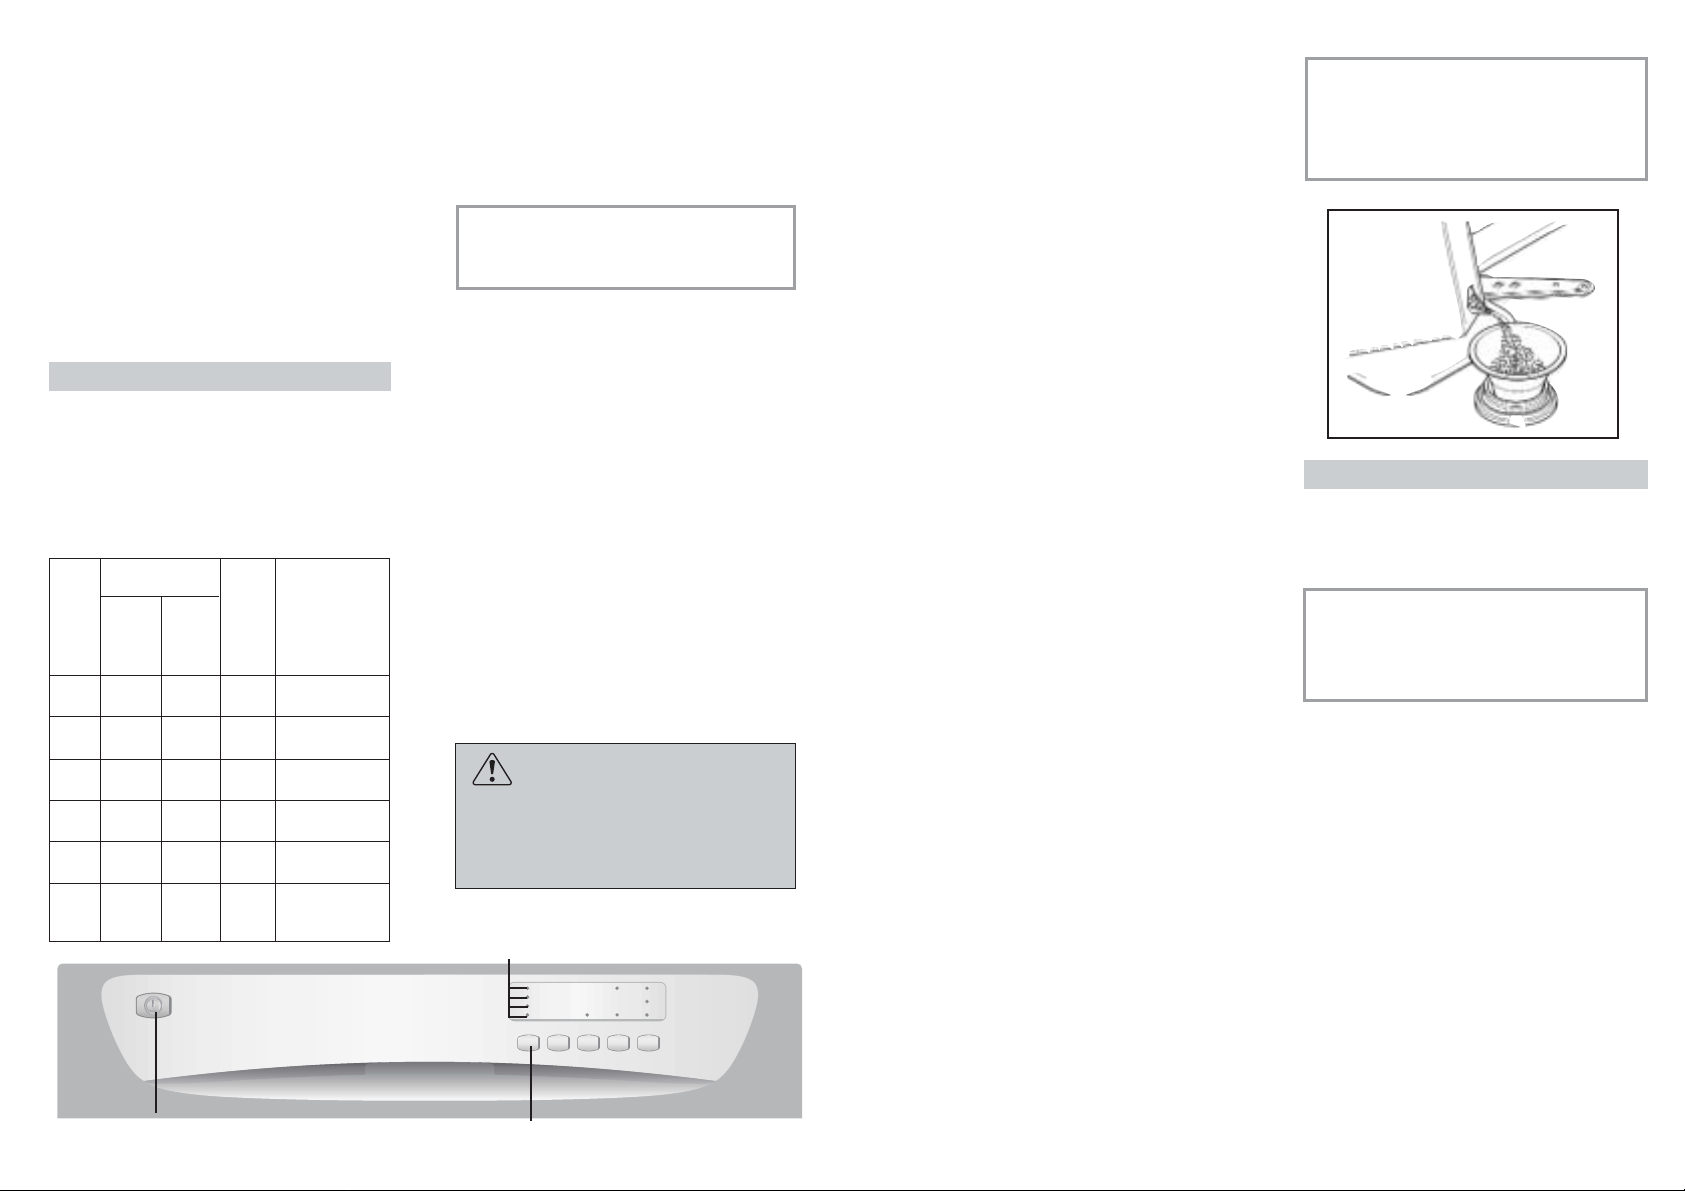
LOADING THE SALT
■ On the bottom of the machine there is a
container for the salt for regenerating
the softener.
■ It is important to use only a salt that is
specifically designed for dishwasher.
Other types of salt contain small quantities
of insoluble particles which over a long
period of time may affect and deteriorate
the softener performance.
■ To add salt, unscrew the cap of the container on the bottom and then refill the
container.
■ During this operation a little water will
overflow; but keep adding salt until the
container is full. When the container is
full, clean the thread of salt residue and
retighten the tap.
■ After loading the salt, it is recommended
running a complete washing cycle,
or COLD RINSE programme. The salt
dispenser has a capacity of between 1.5
and 1.8 kg and, for efficient use of the
appliance, it should be refilled from time
to time according to the regulation of the
water softener unit.
IMPORTANT
(Only for first start up)
When the appliance is used for the
first time, after completely filling the
salt container, it is necessary to add
water until the container overflows.
Salt loading indicator
This model is provided with an indicator light
on the control panel which will light up
when it is necessary to reload the salt
container.
IMPORTANT
The appearance of white stains on
dishes is generally an important
sign that the salt container needs
filling.
* The water softener unit is set in the
factory at level 3, as this is suitable for
the majority of users.
According to the degree of hardness of
your water, regulate the softener unit in the
following way:
IMPORTANT
The dishwasher must be ALWAYS
off before start this procedure.
1. When the dishwasher is off, OPEN
the door.
2. Hold down the FIRST and the
"THIRD" button (from the left) while
simultaneously pushing the "ON/OFF"
button.
3. Release the buttons when some
"PROGRAMME SELECTION" indicator
lights will come on and an acoustic
signal will sound.
4. Press the "PROGRAMME SELECTION"
button to select the required water
softener level (each time the button is
pressed a light will go on). For level 5,
the 4 "PROGRAMME SELECTION"
indicator lights will flash.
5. Turn off the dishwasher pressing the
"ON/OFF" button to confirm the new
setting.
WARNING!
If any problem occurs, turn the
dishwasher off by pressing the
"ON/OFF" button and start the
procedure again from the beginning
(STEP 1).
WATER SOFTENER UNIT
Depending on the source of the supply,
water contains varying amounts of limestone
and minerals which are deposited on the
dishes leaving whitish stains and marks.
The higher the level of these minerals
present in the water, the harder the water is.
The dishwasher is fitted with a water
softener unit which, through the use of
special regenerating salt, supplies
softened water for washing the dishes.
The degree of hardness of your water can
be obtained from your water supply
company.
Regulating the water softener
The softener unit can treat water with a
hardness of up to 90°fH (French grading)
or 50°dH (German grading) through 6
different settings.
The table below lists different degrees of
water hardness with the corresponding
setting for the softener unit.
Level
ºfH
(French
grading)
ºdH
(German
grading)
NO
YES
YES
YES
YES
YES
Indicator light
1
Indicator light
1
Indicator lights
1,2
Indicator lights
1,2,3
Indicator lights
1,2,3,4
Indicator lights
1,2,3,4
flashing
Water
hardness
Water
softener
setting
Use of
regenerating
salt
0
1
2
*3
4
5
0-5
6-15
16-30
31-45
46-60
61-90
0-3
4-9
10-16
17-25
26-33
34-50
“ON/OFF” button
“PROGRAMME SELECTION”
indicator lights
4
3
2
1
“PROGRAMME SELECTION” button
Page 7
13
12
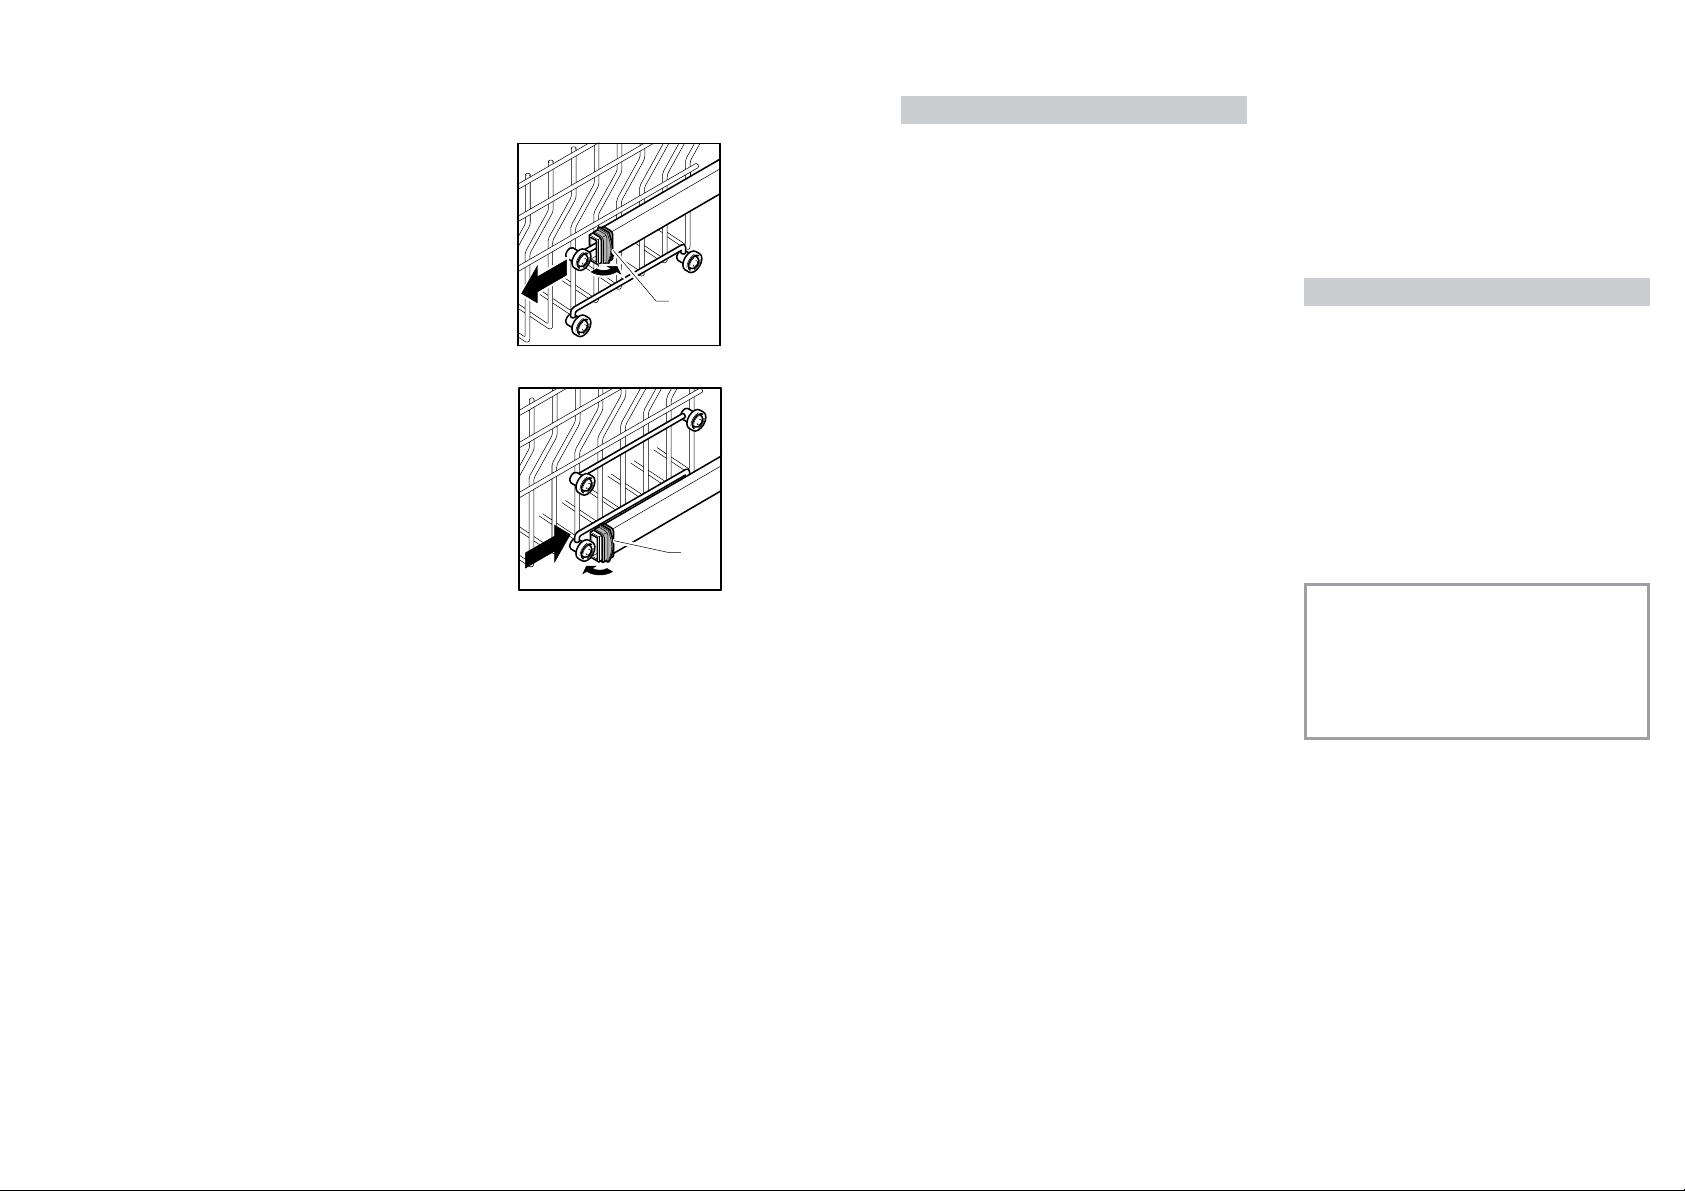
ADJUSTMENT OF THE
UPPER BASKET
If 27 cm to 31 cm plates are normally used,
load them onto the lower basket after the
upper basket has been placed in its upper
position and proceed as detailed below:
1. Turn the front stops “A” outwards;
2. Take out the basket and remount it in the
upper position;
3. Replace the blocks “A” in their original
position.
Dishes that are bigger than 20 cm in
diameter can no longer be loaded onto the
upper basket and the mobile supports
cannot be used when the basket is in the
upper position.
A
A
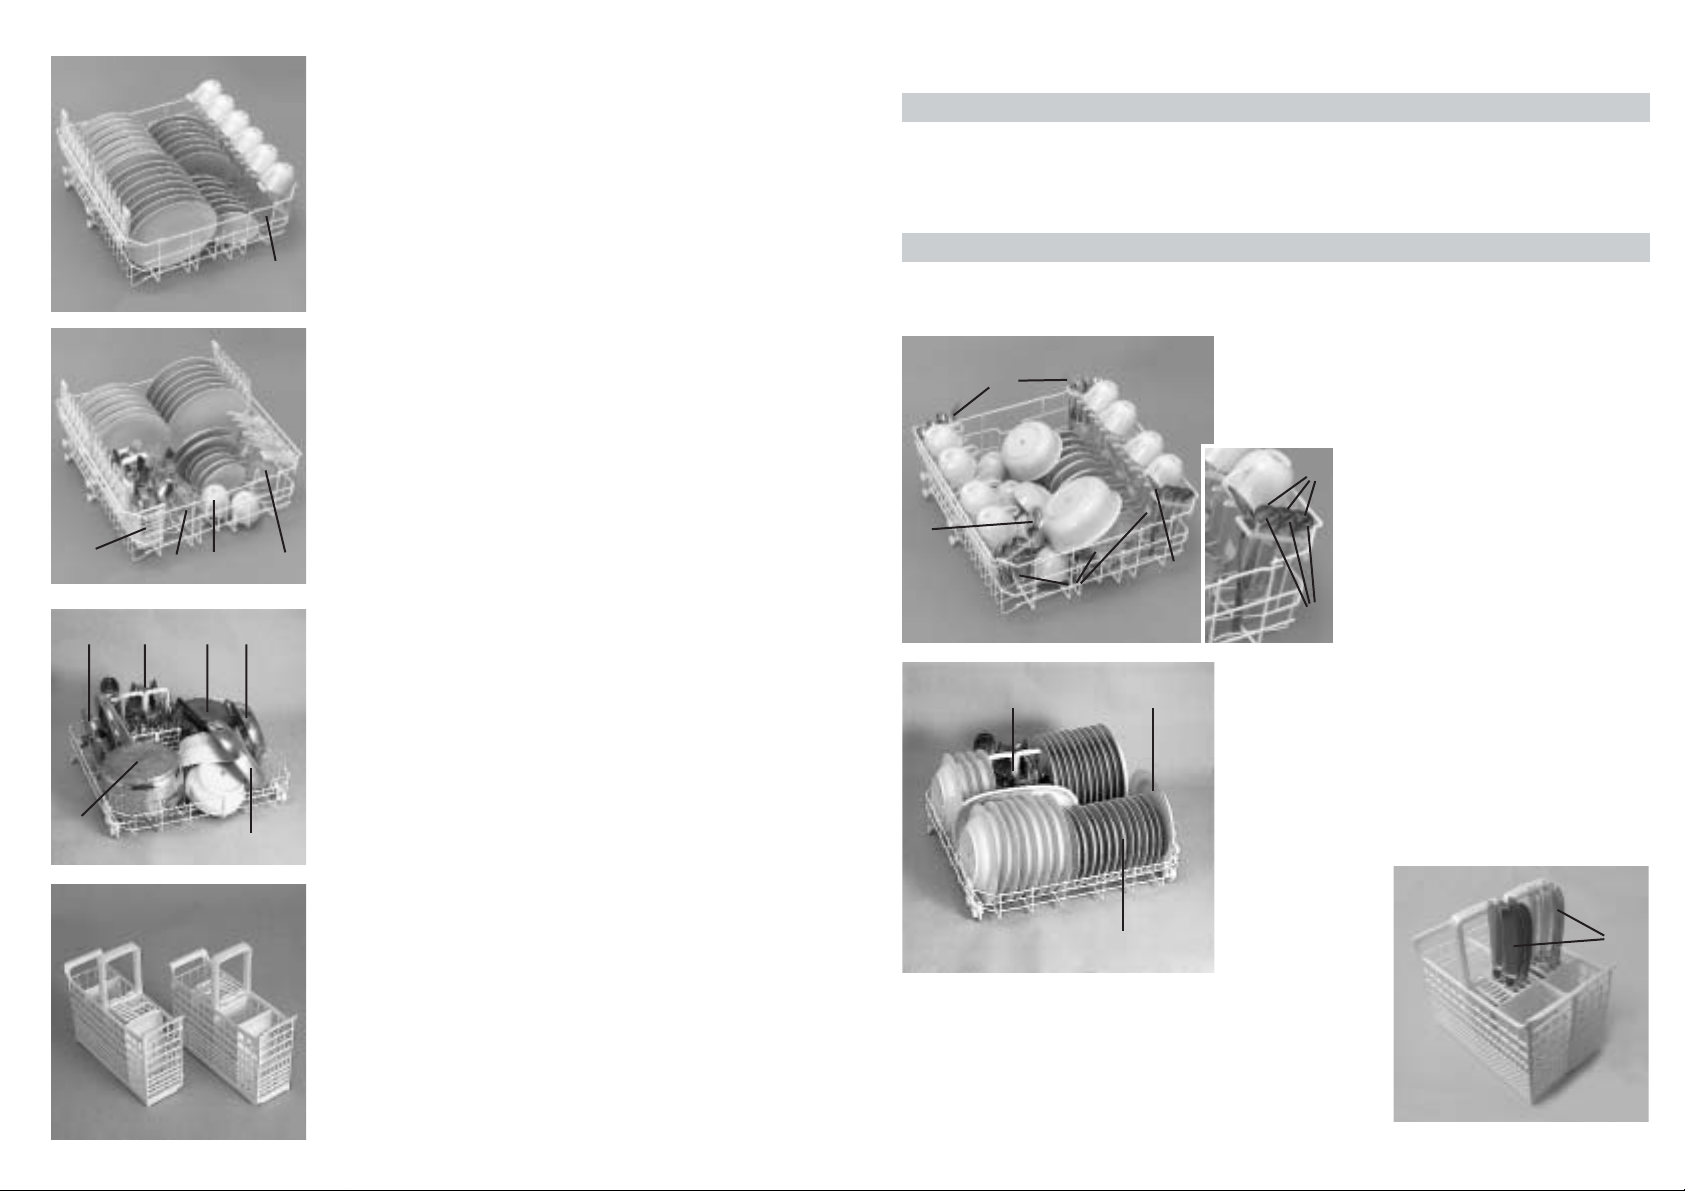
LOADING DISHES
Using the upper basket
■ The upper basket is provided with mobile racks hooked to the sides of the
basket which can be regulated in two
positions: upright and lowered. In the
lowered position the racks may be used
for tea and coffee cups, kitchen knives
and ladles. Glasses with stems may be
safely hung on the ends of the racks.
Glasses, cups, saucers and dessert
plates may be loaded under the racks.
■Soup plates and ordinary plates may be
loaded with the rack in the upright
position. Plates should be loaded
vertically with the underside of the plate
towards the back of the dishwasher with
a space between each plate to allow
water to pass freely.
■ It is advisable to load plates of the same
size together in order to utilize maximum
basket capacity.
■ Plates may be loaded in a single row
(fig. 1) or on both rows (fig. 2).
■ It is advisable to load large plates
(approx. 27 or more cm) slightly tilted
towards the rear to facilitate introduction
of the basket into the machine.
■ Salad bowls and plastic bowls may also
be loaded on the upper basket. It is
advisable to block these in place so that
the jets of water do not make them
overturn.
■ The upper basket has been designed to
offer maximum flexibility in use and can
be loaded with up to 24 plates on two
rows, up to 30 glasses on five rows or a
mixed load.
Using the lower basket
■ Saucepans, oven dishes, tureens, salad
bowls, lids, serving dishes, dinner
plates, soup plates and ladles can be
loaded on the lower basket.
■ Place the cutlery in the plastic cutlery
holder with the handles pointing
upwards.
■ Place the cutlery holder on the lower
basket (fig. 3), making sure that the
cutlery does not get in the way of the
rotating arms.
IMPORTANT
The lower basket has a safety-stop
device, for its safe extraction, also
especially useful with a full load.
For loading salt, cleaning filter and for
ordinary maintenance, the complete
extraction of the basket is necessary.
Page 8
14
15
Astandard daily load is represented in figs. 1, 2and 3.
Upper basket (fig. 1)
A = soup plates
B = dinner plates
C = dessert plates
D = saucers
E = cups
F =glasses
Upper basket (fig. 2)
A = soup plates
B = dinner plates
C = dessert plates
D = saucers
E = cups
F =glasses with stems
G = glasses
H =single section cutlery basket
Lower basket (fig. 3)
A = medium-sized saucepan
B = large saucepan
C = frying pan
D = lids
E = tureens, serving dishes
F = cutlery
G = oven dishes
Please load the dishwasher sensibly to ensure the
best wash results.
Cutlery basket (fig. 4)
The cutlery basket is made with two detachable
parts which will enable various loading options. The
two parts can be detached by sliding the left section
away from the right section.
D
FAG
E
B
C
3
4
1
A
B
C
D
E
F
A
B
C
D
FE
F
H
2
G
Lower basket (fig. 6)
M = 8 + 4 soup plates
N = 11 + 1 dinner plates
O = 12 dessert plates
P = serving dish
Q = cutlery
Upper basket (fig. 5)
A = 5 + 5 + 2 glasses
B = 12 saucers
C = 4 + 4 + 4 cups
D = small bowl
E = medium bowl
F = large bowl
G = 1 + 1 forks
H = 1 + 1 serving spoons
I = 3 + 3 + 3 + 3 dessert spoons
L = 3 + 3 + 3 + 3 teaspoons
INFORMATION FOR THE TEST LABORATORIES
General programme comparison (Ref. EN 50242 Standards)
(see programmes selection)
1. Upper basket position: low
2. Normal load
3. Shine setting: 6
12 international place load (Ref. EN 50242)
Correct loading is indicated, in fig. 5 for the upper basket, in fig. 6 for the lower
basket and in fig. 7 for the cutlery basket.
Cutlery basket (fig. 7)
Place the side racks in the lower position
and fill with 6 + 6 knives(R); in the spaces
left insert cutlery with the handles down.
Take care not to load more than two different
types of cutlery in the same compartment.
4. Amount of detergent:
- 8 g for pre-wash;
- 22 g for wash.
A
F
C
C
C
G
B
E
D
H
H
5
QN
M
P
O
M
N
L
I
6
R
7
Page 9
17
16
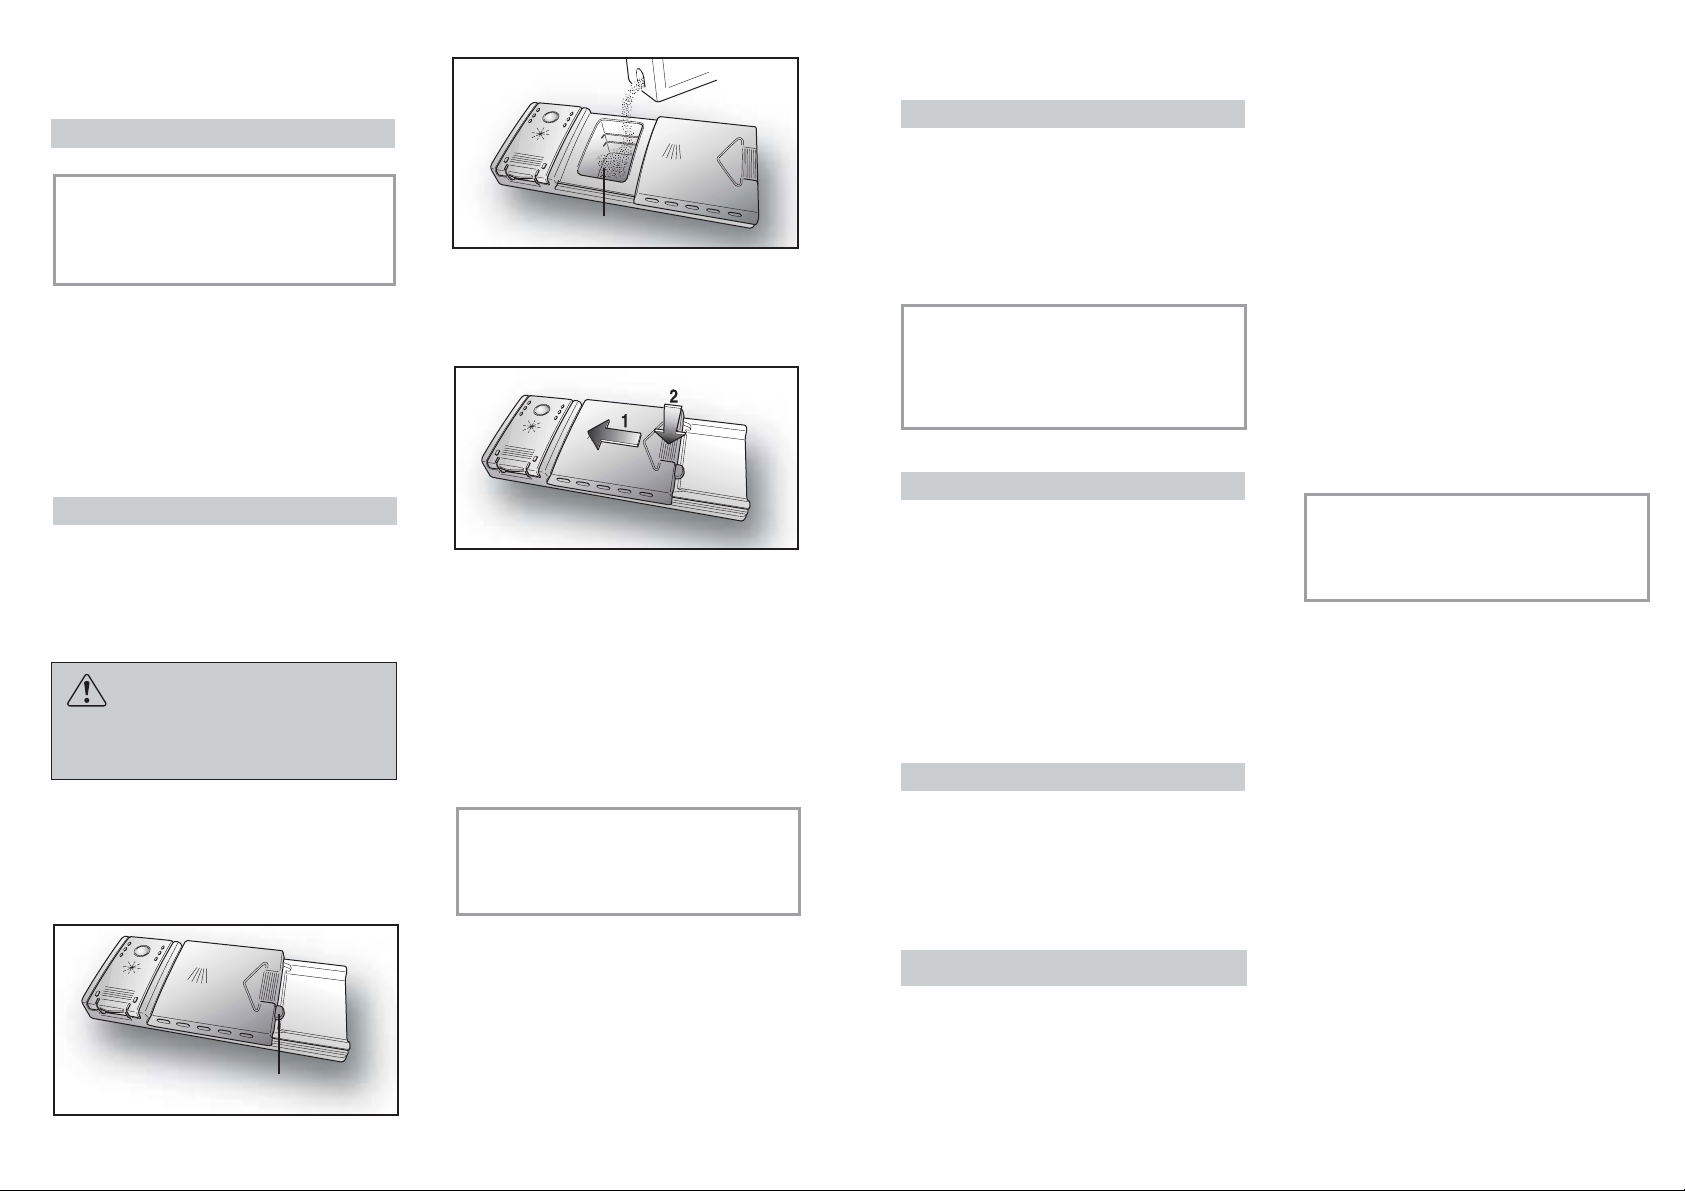
LOADING THE DETERGENT
The detergent
IMPORTANT
It is essential to use a detergent
that is specifically designed for
dishwashers either in powder, liquid
or tablet form.
“FINISH” gives very good results and can
be easily obtained.
Unsuitable detergents (like those for
washing up by hand) do not contain the
proper ingredients for use in a dishwasher,
and stop the dishwasher from working
correctly.
Filling the detergent container
The detergent container is inside the door
(fig. A “2”). If the lid of the container is
closed, press the button (A) to open.
At the end of every wash cycle the lid is
always open and ready for the next time
the dishwasher is used.
WARNING!
When loading the lower basket, please
ensure that the plates or others do not
obstruct the detergent dispenser.
The amount of detergent to be used varies
according to how dirty the dishes are and
on the type of dishes to be washed.
We advise using 20÷30 g of detergent in the
wash section of detergent compartment (B).
After pouring the detergent into the container,
close the lid, firstly pushing (1) and then
pressing on it (2) until you hear the click.
Since not all detergents are the same the
instructions on the boxes of detergent can
vary. We should just like to remind users
that too little detergent does not clean the
dishes properly whilst too much detergent
will not produce better results and is also a
waste.
IMPORTANT
Do not use an excessive amount of
detergent and help limit damage to
the environment at the same time.
A
B
TYPES OF DETERGENT
Detergent tablets
Detergent tablets of different manufacturers
dissolve at different speeds, for this
reason, during short programmes, some
detergent tablets may be not fully effective,
because they are not completely dissolved.
If these products are used, is recommended
to choose longer programmes to guarantee
the complete use of the detergent.
IMPORTANT
To get satisfactory washing results,
the tablets MUST be placed in the
wash section of the detergent
container and NOT directly in the
tub.
Concentrated detergents
The concentrated detergents, with reduced
alkalinity and with natural enzymes, in
conjunction with 50°C wash programmes,
have a smaller impact on the environment
and they protect the dishes and the
dishwasher.
The 50°C wash programmes purposely
exploit the dirt-dissolving properties of the
enzymes, allowing therefore, with the use
of the concentrated detergents, to achieve
the same results of the 65°C programmes
but at a lower temperature.
Combined detergents
The detergents that also contain the rinse
aid must be placed in the wash section of
the detergent container. The rinse aid
container must be empty (if it is not empty,
set the rinse aid regulator to lowest position
before using combined detergents).
"ALL in 1" combined detergents
If you are planning to use “ALL in 1” (“3 in 1 “/
“4 in 1”/ “5 in 1”, etc.) combined detergents i.e.
those with built in salt and/or rinse agent,
we would advise the following:
■ read carefully and follow the manufacturer ’s
instructions given on the packaging;
■ the effectiveness of detergents containing
the built in water softener/salt depends
on the hardness of your water supply.
Check that the hardness of your water
supply is within the effective range given
on the detergent packaging.
If when using this type of product, you
don't get satisfactory washing results,
please contact the detergent
manufacturer.
In certain circumstances use of combined
detergents can cause:
■ limescale deposits on dishes or in the
dishwasher;
■ a reduction in washing and drying
performance.
IMPORTANT
Any problems which arise as a direct
result of the use of these products
are not covered by our warranty.
Please note that using the "ALL in 1"
combined detergents, the rinse aid and
salt indicator lights (only used on
selected models) are superfluous, so you
must ignore the lights.
If washing and/or drying problems occur,
we recommend you return to use traditional
separate products (salt, detergent and
rinse agent). This will ensure that the water
softener in the dishwasher operates
correctly.
In this case, we recommends that you:
■ refill both the salt and rinse aid container;
■ run one normal washing cycle without a
load.
Please note that on return to the use of
conventional salt, a number of cycles will
be required before the system becomes
fully efficient again.
Page 10

1918
1
2
3
CLEANING THE FILTERS
The filter system (fig.A “4”) consists of:
a central container that traps the larger
particles;
a flat gauze that continuously filters the
wash water;
a micro filter, located beneath the gauze,
that traps the tiniest particles ensuring a
perfect rinse.
■ To achieve excellent results every time,
the filters should be checked and
cleaned after each wash.
■ To remove the filter unit, simply turn the
handle anticlockwise (fig. 1).
■ For ease of cleaning, the central container
is removable (fig. 2).
■ Remove the gauze filter (fig.3) and
wash the whole unit under a jet of
water. If necessary a small brush can
be used.
■ With the Self-cleaning Micro filter,
maintenance is reduced and the filter
unit need only be checked every two
weeks. Nevertheless, after each wash it
is advisable to check that the central
container and the gauze filter are not
clogged.
WARNING!
After cleaning the filters, make sure
that they are correctly reassembled
and that the gauze filter is properly
positioned at the bottom of the
dishwasher.
Make sure that the filter is screwed
back, clockwise, into the gauze, as
poor seating of the filter unit could
have an adverse effect on the
efficiency of the appliance.
IMPORTANT
Never use the dishwasher without
the filters.
LOADING THE RINSE AID
The rinse aid
The rinse aid, which is automatically
released during the last rinsing cycle, helps
the dishes to dry quickly and prevents
spots and stains forming.
Filling the rinse aid container
The rinse aid container can be found to the
left of the detergent container (fig. A "3").
To open the lid, push the reference mark
and, in the same time, pull the tab of
opening.
It is always advisable to use rinse aid that
is specifically designed for dishwasher.
Check the rinse aid level through the
indicator eye (C) which is located on the
dispenser.
Regulating the rinse aid from 1 to 6
The regulator (D) is placed under the lid
and can be turned using a coin.
The recommended position is 4.
The limestone content of the water
considerably affects the formation of
limescale and the drying performance.
It is therefore important to regulate the
quantity of rinse aid to achieve good
washing results.
If, after the wash, streaks occur on the
dishes, decrease the amount by one
position. If whitish spots occur, increase the
amount by one position.
FULL EMPTY
dark light
C
D
Page 11

20
21
PRATICAL HINTS
How to get really good wash
results
■ Before placing the dishes in the
dishwasher, remove any remaining
food (bones, shells, pieces of meat or
vegetables, coffee grounds, skin of fruit,
cigarette ash, tooth picks etc. to avoid
blocking the filters, water outlet and
washing arm nozzles.
■ Try not to rinse the dishes before
loading them into the dishwasher.
■ If saucepans and oven dishes are
encrusted with the remains of burnt or
roast food, it is advisable to leave them
to soak before washing.
■ Place the dishes face downwards.
■ Try to place the dishes in such a way
that they are not touching one another.
If they are loaded properly you will get
better results.
■ After loading the dishes check that the
washing arms can rotate freely.
■ Pans and other dishes that have
particularly stubborn food particles or
remnants of burnt food should be left to
soak in water with dishwasher
detergent.
■ To wash silver properly:
a) rinse the silver immediately after
use, especially if it has been used for
mayonnaise, eggs, fish etc.;
b) do not sprinkle detergent onto it;
c) keep it separate from other metals.
How to make savings
■ If you want the dishwasher to give a
complete wash, place the dishes in the
dishwasher at the end of each meal and
if necessary turn on the COLD RINSE
cycle to soften the food remains and
remove bigger particles of food from the
new load of dishes.
When the dishwasher is full start the
complete wash cycle programme.
■ If the dishes are not very dirty or if the
baskets are not very full select an
ECONOMY programme, following the
instructions in the program list.
What not to wash
■ It should be remembered that not all
dishes are suitable for washing in a
dishwasher.We advise against using
the dishwasher to wash items in
thermoplastic, cutlery with wooden or
plastic handles, saucepans with
wooden handles, items in aluminium,
crystal, leaded glass unless otherwise
stated.
■ Certain decorations may fade. It is
therefore a good idea before loading the
whole batch to wash just one of the
items first so as to be sure that others
like it will not fade.
■ It is a good idea not to put silver cutlery
with non-stainless steel handles into
the dishwasher as there could be a
chemical reaction between them.
IMPORTANT
When buying new crockery or
cutlery always make sure that they are
suitable for washing in a dishwasher.
Useful hints
■ In order to avoid any dripping from the
top rack, remove the lower rack first.
■ If the dishes are to be left in the
machine for some time, leave the door
ajar, to let some air circulate and to
improve the drying performance.
WHEN CYCLE IS FINISHED
After every wash it is essential to turn off
water supply and to switch off the machine
by pressing the On/Off button to the off
position.
If the machine is not going to be used for
some time, it is advisable to follow these
rules:
1. do an empty wash with detergent in order
to clean the machine of any deposits;
2. pull out the electric plug;
3. turn off the water tap;
4. fill the rinse aid container;
5. Ieave the door ajar;
6. keep the inside of the machine clean;
7. If the machine is left in places where the
temperature is below 0°C any water left
inside the pipes may freeze. Wait until
the temperature rises above zero and
then wait for about 24 hours before
starting up the dishwasher.
CLEANING AND
MAINTENANCE
■ To clean the dishwasher outside, do not
use solvents (degreasing action) neither
abrasives, but only a cloth soaked with
water.
■ The dishwasher does not require special
maintenance, because the tank is
self-cleaning.
■ Regularly wipe the door gasket with a
damp cloth to remove any food remains
or rinse aid.
■ It is advisable to remove limestone
deposits or dirt periodically, by doing an
empty wash; pour a glass of vinegar on
the bottom of the tank and select the
light wash.
■ If, in spite of the routine cleaning of the
filters, you notice that the dishes or pans
are not properly washed or rinsed, check
that all the spray heads on the rotor
arms (fig. A “5”) are clear.
If they are blocked, clean them in the
following way:
1. to remove the upper rotor arm, turn it
until it lines up with the stop marked
by the arrow (fig. 1). Push it upwards
(fig. 1b) and, keeping it pushed in,
unscrew it in a clockwise direction
(to reassemble it repeat the same
operation, but turn it anticlockwise).
The lower rotor arm can be removed
simply by pulling it upwards (fig. 2);
2. wash the rotor arms under a jet of water
to clear any blockage in the spray
heads;
3. when you have finished, refit the rotor
arms in the same position, remembering
to re-align the arrow and screw into
position.
■ Both the door lining and the tank lining
are in stainless steel; however, should
spots caused by oxidation occur, this is
probably due to a high level of iron salts
presents in the water.
■ The spots can be removed with a mild
abrasive agent; never use chlorine
based materials, steel wool, etc.
1
2
1b
Page 12

23
PROGRAMME SELECTION
AND SPECIAL FUNCTIONS
(Use in conjunction with programme guide)
IMPORTANT
The dishwasher has two very practical
functions:
- the "recommended" programme
(which is set in the factory and is
ideal for full-load daily use) for quick
and accurate selection;
- the memory function which saves
the last programme used, so that if
you regularly use the same washing
cycle, you do not have to re-set the
programme every time, thereby
saving time and effort.
"EXPRESS" button
This button offers a choice of 2 levels of
wash intensity, according to how dirty the
dishes are. It also reduces the time and
energy used.
Pressing the "EXPRESS" button enables
the user to reduce the wash intensity, by
changing the time cycle and temperature.
The use of this button together with the 4
programmes shown on the display panel,
offers the user a choice of 8 different wash
cycles.
IMPORTANT
Once selected, this button remains
active (with the corresponding
indicator light on) for successive
wash programmes, unless it is
pressed again (corresponding
indicator light goes off) or the cycle
in process is cancelled.
Programme settings
■ Open the door and place the dirty dishes
inside the appliance.
■ Press the "ON/OFF" button .
The indicator light for the "recommended"
programme or the indicator light for the
last programme used will flash.
■ To set another programme, press the
"PROGRAMME SELECTION" button.
■ If you wish, press the "EXPRESS"
button.
■ If you wish to select an option, press the
option button (the corresponding indicator
light will light up).
The option button can be selected or
deselected WITHIN one minute of the
programme commencing.
■ Press the "START" button (the selected
programme indicator light will stop
flashing and remain on.
■ When the door is shut, after an audible
signal has sounded, the programme will
start automatically.
WITHIN one minute of the programme
commencing, another programme
can be selected, simply by pressing
the "PROGRAMME SELECTION"
button (it is also possible to select or
deselect the "EXPRESS" button).
Programme interruption
Opening the door when a programme is
running is not recommended especially
during the main wash and final hot rinse
phases. However, if the door is opened
while a programme is running (for example,
to add dishes) the machine stops
automatically.
Close the door, without pressing any
buttons. The cycle will start from where it
left off.
IMPORTANT
A running program can be interrupted
without opening the door by
pressing the "ON/OFF" button. In
this case, simply press the "ON/OFF"
button again to restart the cycle from
where it left off.
WARNING!
If you open the door during the
drying cycle, an audible audio signal
advises you that the drying cycle has
not yet finished.
22
EN 50242 place load
Capacity with pans and dishes
Water supply pressure
Fuse
Power input
Supply voltage
12
8 persons
Min. 0,08 - Max 0,8 MPa
(see rating plate)
(see rating plate)
(see rating plate)
DESCRIPTION OF THE CONTROL PANEL
TECHNICAL DATA:
DIMENSIONS:
Height
Depth
Width
Depth with door open
cm
cm
cm
cm
with working top
85
60
60
120
without working top
82
57,3
59,8
117
A "ON/OFF" button
B "PROGRAMME SELECTION" button
C "START"/"RESET" button
(start/cancelling programme)
D "EXPRESS" button
E "ALL in 1" option button
F "DELAY START" button
G "PROGRAMME SELECTION" lights
H "EXPRESS" b utto n light
I "SALT EMPTY" light
L "OPTION SELECTION" light
M "PROGRAMME STATUS" lights/
"DELAY START" time lights
AB CD E F
H
I
M
L
G
Page 13

25
If countdown has not ended, whereby
the programme has not yet started, it is
possible to change or cancel the delayed
start and select another programme or to
select/deselect the option button, proceeding
as follows:
■ Hold the "RESET" button down for at
least 5 seconds.
The programme indicator lights will flash
and an acoustic signal will sound.
■ The selected programme will be cancelled
and the indicator light for the
"recommended" programme will start
to flash.
■ Press the "DELAY START" button to
set another delayed start time (the
corresponding indicator light will turn on).
■ A new programme can be set after a
delayed time has been changed or
cancelled or an option button has selected
or deselected.
Alarm mute for the PROGRAMME
END
The alarm for the programme end may be
muted as follows:
■ With the dishwasher off, hold down the
"ALL in 1" button for few seconds while
simultaneously pushing the "ON/OFF"
button, releasing them only after the
alarm sound.
■ Press the "ALL in 1" button again: the
relevant indicator light (turned on to
indicate that the alarm is activated) will
flash (to indicate that the alarm is off).
■ Wait for the alarm to sound to indicate
that the settings were saved.
■ To turn the alarm on again, follow the
same procedure.
Fault signals
If malfunctions or faults occur when a
programme is running the indicator light
that corresponds to the selected cycle
will flash rapidly and the alarm sounds.
In this event, turn the dishwasher off by
pressing the "ON/OFF" button.
After checking to make sure the water
inlet hose tap is open, that the drain
hose is not bent and that the siphon or
filters are not clogged, set the selected
programme again.
If the anomaly persists, contact Customer
Service Department.
IMPORTANT
This dishwasher is equipped with an
anti-overflow safety device which will
automatically discharge any excess
water should a problem occur.
WARNING!
To ensure the correct operation of
the anti-overflow safety device, we
recommend that the dishwasher is
not moved or tilted during operation.
If however it is necessary to tilt or
move the dishwasher, please ensure
that the washing cycle is complete
and that there is no remaining water
inside the dishwasher.
24
Changing a running programme
Proceed as follows to change or cancel a
running program:
■ Hold the "RESET" button down for at
least 5 seconds.
The programme indicator lights will flash
and an acoustic signal will sound.
■ The running programme will be cancelled
and the indicator light for the
“recommended” programme will start
to flash.
■ At this point a new programme can be set.
WARNING!
Before starting a new programme,
you should check that there is still
detergent in the dispenser.
If necessary, top up the dispenser.
If there is any break in the power supply
while the dishwasher is operating, a
special memory stores the selected
programme and, when the power is
restored, it continues where it left off.
Programme operations
When a programme is running the relevant
indicator light will remain on and the 3
“PROGRAMME STATUS” indicator lights
("WASH" , "DRY" , and "END" )
will light singularly and in sequence to
indicate the current phase.
Programme end
A5 second alarm will sound (if not muted)
3 times at 30 second intervals to signal that
the programme has ended.
The programme end indicator light will turn
on, while all the others indicator lights will
turn off.
Dishes can now be removed and the
dishwasher turned off by pressing the
"ON/OFF" button or dishes can be loaded
for new cycle
Option button
"ALL in 1" button
This option optimises the use of "ALL in 1"
("3 in 1"/"4 in 1"/"5 in 1", ecc.) combined
detergents.
By pressing this button, the selected
washing programme is modified to get best
performance from combined detergents
(furthermore, the salt aid shortage light is
de-activated).
WARNING!
Once selected, this option keeps
being on (light on) also for next
washing cycles and it can be de-activate
(light off) only by pressing the button
once again.
IMPORTANT
When this option is selected, the
"RAPID" cycle is 10 minutes longer.
"DELAY START" button
The dishwasher start time can be set with
this button, delaying the start by 3, 6 or 9
hours.
Proceed as follows to set a delayed start:
■ Press the "DELAY START" button (each
time the button is pressed the start
will be delayed by 3, 6 or 9 hours
respectively and the corresponding time
indicator light will illuminate).
■ To start the countdown, press the
"START" button (the selected programme
indicator light will come on, while the set
time indicator light will start to flash).
If a 9 hour delay is set, countdown will be
displayed by the 6h indicator light after 3
hours and the 3h indicator light after 6
hours.
At the end of the last 3 hours (at the end
of countdown) the 3h indicator light will
stop flashing and remain on to indicate the
washing phase and the programme will
start automatically.
Page 14

27
26
PROGRAMME GUIDE
Wash with prewash
For wash programmes with prewash, it is advisable to add a second dose of detergent (max. 10 g)
directly in the machine.
•••
•
•
•••
•
•
130
85
75°C
65°C
Once a day - for heavily soiled pans and any other
items that have been left all day for washing.
•••
•
•
•••
•
•••
•
•••
•
•••
•
•
Quick wash for dishes which are to be washed
immediately after the meal. Wash load of 4/6
persons.
Suitable for delicate crockery and glassware. Also
for less soiled items excluding pans.
Short cold pre-wash for items that are stored in
the dishwasher until you are ready to wash a full
load.
(“RECOMMENDED” PROGRAMME)
Once a day - for normal soiled pans and any other
items that have been left all day for washing.
Energy Saving Programme suitable for normal
soiled items. Using detergents with enzyme.
Programme standardised to EN 50242.
PROGR.
EXPRESS
INTENSIVE 75°C
Strong & Fast 65ºC
UNIVERSAL 65°C
Daily 55°C
ECO 45°C
Delicate 45°C
RAPID 32' 50°C
Pre-wash
PROGR.
EXPRESS
PROGR.
EXPRESS
PROGR.
EXPRESS
Intended for rapid washing of very dirty dishes.
Fast cycle, for “normally” dirty dishes - intended
for frequent washes and normal loads.
175
85
32
5
45°C
45°C
50°C
65°C
55°C
110
80
Check list
Avarage
duration
in
minutes
Special function
buttons
available
Detergent for soaking
(Prewash)
Detergent for washing
Clean filter
Check rinse aid
dispenser
Check salt container
Hot pre-wash
Cold pre-wash
Main wash
First cold rinse
Second cold rinse
Hot rinse with rinse aid
With cold water (15°C)
-Tolerance ± 10%-
"DELAYSTART" button
"ALL in 1" button
Programme contents
Programme
Description
+
YES
YES
YES
YES
YES
YES
YES
YES
YES
YES
YES
YES
YES
YES
YES
Page 15
29
28
The water-stop device protects against water damages caused by leaks on the fill
hose which could develop due to natural ageing of the hose.
In the water-stop system the leaking water fills the corrugated hose and activates a
stop valve which cuts off the water supply to the machine.
This fault is shown by a red sector on the window «A».
Would this occur, please refer to your Service Agent.
If the hose is not long enough for correct connection, it must be replaced with a longer
one. The hose can be obtained from your Service Agent.
WATERCONTROL-SYSTEM
Red button blocked
valve indicator
Safety antitwist device
(press and twist to
remove the washer)
A
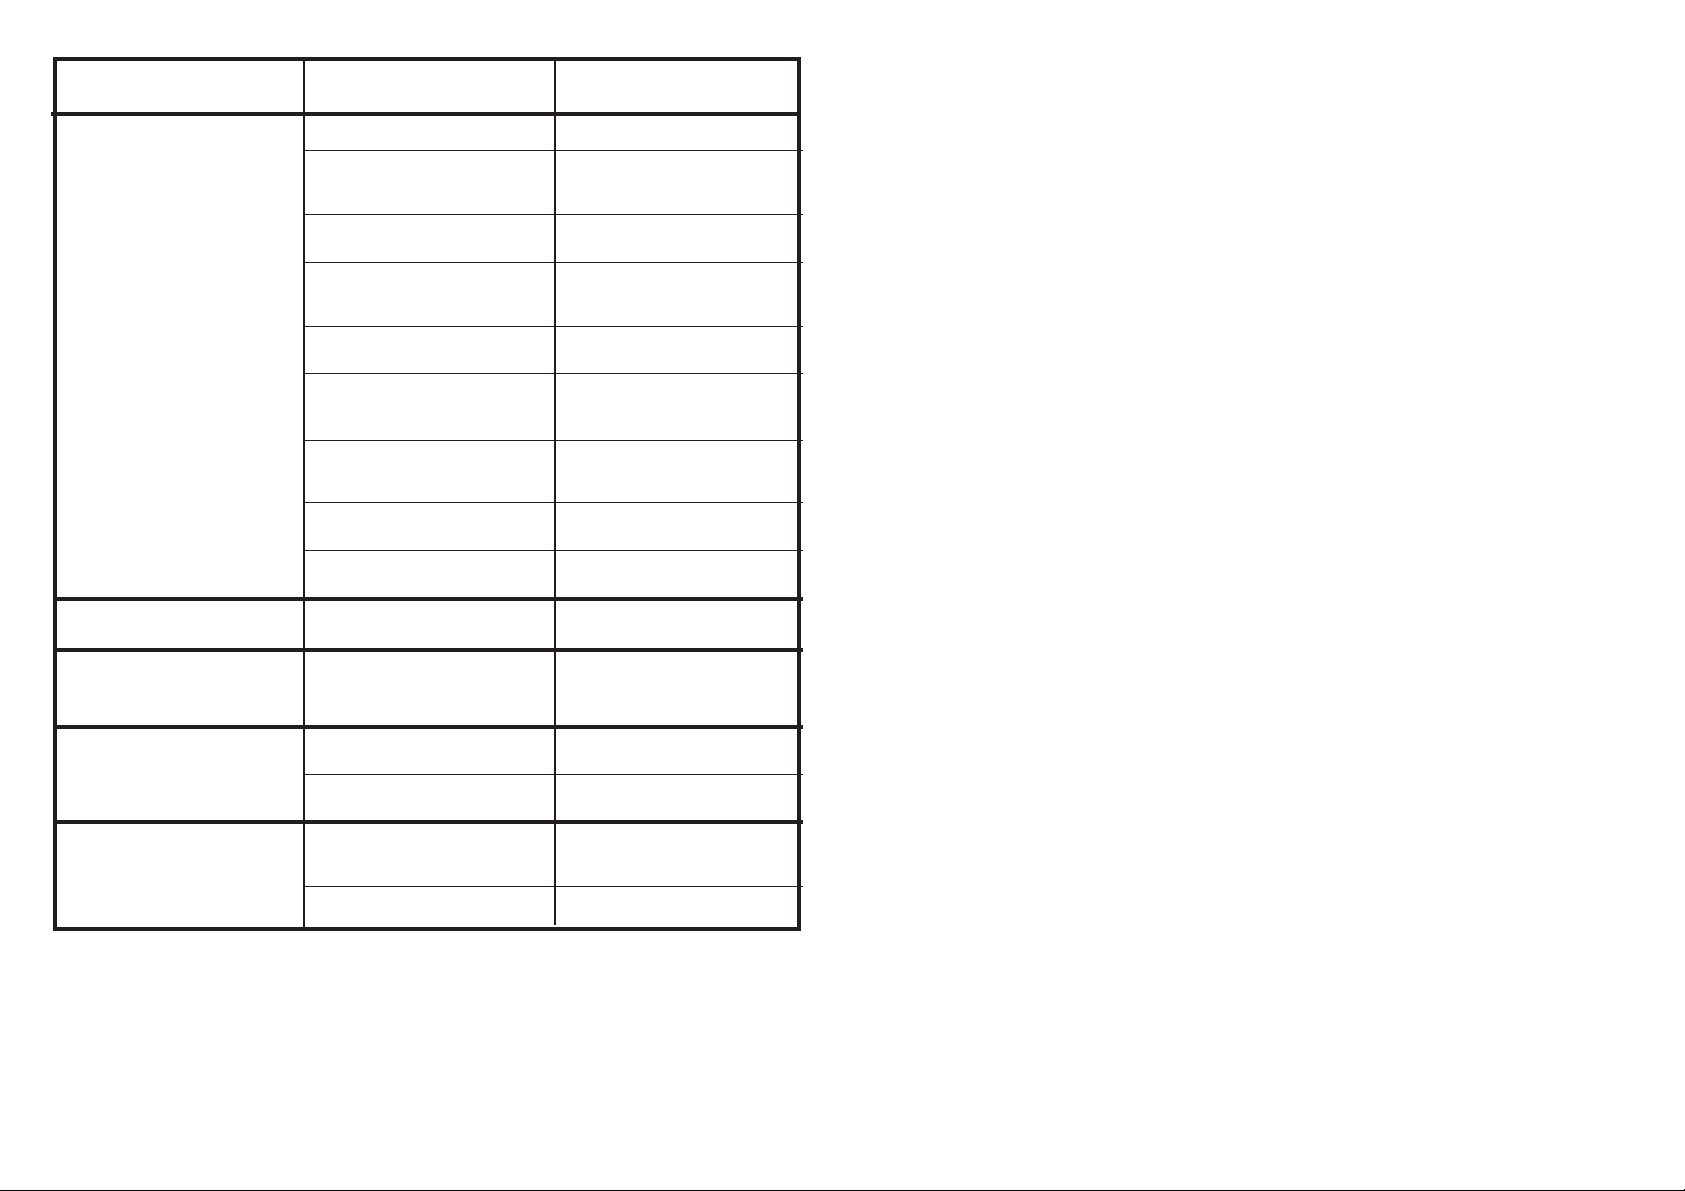
IDENTIFYING MINOR FAULTS
Should the dishwasher fail to operate, before contacting the Service Centre, make
the following checks:
FAULT CAUSE REMEDY
1 - Machine completely dead
2 - Machine does not
draw water
3 - Machine does not
discharge water
4 - Machine discharges
water continuously
5 - Spray arms are not heard
to rotate
6 - On electronic appliances
without a display: one or
more LED flashing quickly.
Plug is not connected to wall
socket
O/I button has not been pressed
Door is open
No electricity
See causes for no. 1
Water tap is turned off
Programme selector is not at
correct position
The inlet hose is bent
The inlet hose filter is not
correctly connected
Filter is dirty
Outlet hose is kinked
The outlet hose extension is
not correctly connected
The outlet connection on the
wall is pointing downwards not
upwards
Position of outlet hose is too
low
Excessive amount of detergent
Item prevents arms from rotating
Plate and cup filter very dirty
Water inlet tap turned off
Connect electric plug
Press button
Close door
Check the fuse in the plug and
the electricity supply
Check
Turn water tap on
Turn programme selector to
correct position
Eliminate the bends in the hose
Clean the filter at the end of the
hose
Clean filter
Straighten outlet hose
Follow the instructions for
connecting the outlet hose
carefully
Call a qualified technician
Lift outlet hose to at least 40 cm
above floor level
Reduce amount of detergent
Use suitable detergent
Check
Clean plate and cup filter
Switch off the appliance.
Turn on the tap.
Re-set the cycle.
Page 16
31
Compliments,
en ayant acheté un appareil
électroménager Candy, vous avez fait
preuve d’une très grande éxigence:
vous voulez le meilleur.
Candy est heureux de vous proposer
cette nouvelle machine, fruit d’années
de recherches et d’expériences
confirmées sur le marché. Vous avez
choisi la qualité, la fiabilité et les
prestations techniques élevées.
Candy vous propose de plus,
une gamme complète d’appareils
d’électroménagers: machines-à-laver,
lave-vaisselle, machines-à-laver
séchantes, séche-linge, four à
micro-ondes, fours et plaques de
cuisson, réfrigérateurs et congélateurs.
Demandez à votre Revendeur le
catalogue complet des produits Candy .
Nous vous prions de lire attentivement
les indications contenues dans ce
mode d’emploi. Vous y trouverez
d’importantes indications, sur la
sécurité d’installation, d’emploi, de
manutention et d’autres conseils utiles
pour le meilleur emploi du lave-vaisselle.
Conservez avec soin ce mode
d’emploi pour des consultations futures.
GARANTIE
Cette machine est livrée avec un
certificat de garantie qui permet de
contacter gratuitement l’assistance
technique.
Veuillez garder votre ticket d’achat et
le mettre dans un endroit sûr en cas de
besoin.
30
N.B.: Should any of the situations occur and should the machine give a bad wash performance,
it is necessary to remove the deposits from the dishes by hand since the final drying cycle hardens the
deposits which a second wash in the machine would not be able to remove.
If the malfunction continues contact a Service Centre quoting the serial number of the dishwasher.
This is found on the plaque on the inside of the dishwasher door at the top or on the guarantee.
This information will make it possible to take more effective action more quickly.
The manufacturers decline any responsibility for any printing mistakes in this instruction booklet.
They also reserve the right to modify their own appliances as necessary without altering the
essential characteristics.
FAULT CAUSE REMEDY
7 - Load of dishes is only
partially washed
8 - Detergent not dispensed
or partially dispensed
9 - Presence of white spots
on dishes
10 -Noise during wash
11 - The dishes are not
completely dry
See causes for no. 5
Bottom of saucepans have not
been washed well
Edge of saucepans have not
been washed well
Spray arms are partially blocked
The dishes have not been
properly loaded
The end of the outlet hose is in
the water
The incorrect amount of
detergent has been measured
out; the detergent is old and hard
The wash programme is not
thorough enough
The lower basket dishes have
not been washed
Cutlery, dishes, pans, etc... stop
the detergent dispenser opening
Water is too hard
The dishes knock against one
another
The revolving arms knock against
the dishes
Inadequate air flow
Rinse aid missing
Check
Burnt on food remains must
be soaked before putting pans
in dishwasher
Reposition saucepans
Remove spray arms by
unscrewing ring nuts clockwise
and wash under running water
Do not place the dishes too
closely together
The end of the outlet hose
must not come into contact
with the outflow water
Increase the measure
according to how dirty the
dishes are and change detergent
Choose a more vigorous
programme
Depress half load button
Position dishes not to obstruct
the dispenser
Check salt and rinse aid level
and regulate amount.
Should the fault persist,
Contact Service Centre
Re-check loading of dishes in
the basket
Again re-check loading
Leave the dishwasher door ajar
at the end of the wash program
to allow the dishes to dry naturally
Fill the rinse aid dispenser
Page 17

33
CONSEILS DE SÉCURITÉ
L'emploi de n'importe quel appareil
électrique comporte l'observation de
règles fondamentales.
Installation
■ Le socle ainsi que la prise mâle de
l'appareil doivent correspondre à la
puissance maximum absorbée par
l'appareil.
En cas de nécessité de remplacement
de l'un ou de l'autre de ces éléments,
faire effectuer la modification par un
professionel patenté.
■ S'assurer que l'appareil n'écrase pas le
fil électrique d'alimentation.
■ L'utilisation de prises multiples et/ou
rallonges est déconseillée et dégage le
constructeur de toutes responsabilités.
■ Si le remplacement du câble d'alimentation
s'avère nécessaire, l'opération doit être
réalisée par le Service Après-vente.
Sécurité
■ Ne pas toucher l'appareil avec les mains
ou pieds mouillés ou humides.
■ Ne pas utiliser l'appareil pieds nus.
■ Ne pas tirer sur le câble d'alimentation
de l'appareil pour débrancher la prise du
courant.
■ Ne pas laisser exposer l'appareil à des
agents atmosphériques (pluie, soleil
etc...).
■ Cet appareil n’est pas destiné à être
utilisé par des personnes (notamment
les enfants) incapables, irresponsables
ou sans connaissance sur l’utilisation du
produit, à moins qu’elles ne soient
surveillées, ou instruites sur l’utilisation
de l’appareil, par une personne
responsable de leur sécurité.
Surveillez les enfants pour être sûr qu’ils
ne jouent pas avec l’appareil.
■ A la fin du programme de lavage, l’eau
résiduelle dans l’appareil ou sur la
vaisselle, ne doit pas être consommée.
■ La porte ne doit pas rester en position
ouverte car cela pourrait occasionner
des accidents.
■ S’appuyer ou s’asseoir sur la porte
ouverte du lave vaisselle risque
d’entraîner son basculement.
ATTENTION!
Les couteaux et autres ustensiles
avec des parties pointues ou coupantes
doivent être rangés avec les pointes
en bas ou horizontalement.
Usage quotidien
■ Cet appareil devra être destiné
uniquement à l'utilisation à usage
domestique.
■ Le lave-vaisselle est conçu pour laver
des ustensiles domestiques normaux.
Les objets contaminés par de l'essence,
de la peinture, des restes d'acier ou de
fer, des produits chimiques corrosifs,
acides ou alcalins ne doivent pas être
lavés en machine.
■ S'il y a une installation d'adoucissement
de l'eau dans l'habitation, il n'est pas
nécessaire d'ajouter de sel dans
l'adoucisseur monté dans le
lave-vaisselle.
■ La coutellerie est mieux lavée si les
manches sont positionnés vers le bas
dans le panier à couverts.
■ En cas de panne et/ou de mauvais
fonctionnement de l'appareil, l'éteindre,
fermer le robinet d'arrivée d'eau et ne
pas ouvrir l'appareil.
Appelez le Service Après-vente de votre
revendeur en lui précisant bien le type
de votre appareil.
Le non respect des prescriptions
énoncées ci-dessus peut compromettre
la sécurité de l'appareil.
Mise au rebut
■ Cet appareil est fabriqué avec des
matériaux recyclables pour permettre de
les éliminer avec facilité.
■ Si l'on veut se débarrasser d'un vieux
lave-vaisselle, enlever le système de
fermeture de la porte pour que les
enfants ne puissent pas s'enfermer dans
la machine.
Coupez le cordon d’alimentation après
l’avoir retiré de la prise murale.
32
INDICE
Conseils de sécurité
Mise en marche, installation
Adoucisseur d’eau
Chargement du sel
Réglage du panier supérieur
Chargement de la vaisselle
Information pour les tests laboratoire
Chargement du produit de lavage
Types de produits de lavage
Chargement du produit de rinçage
Nettoyage des filtres
Quelques conseils pratiques
Entretien et nettoyage courants
Description de la machine
Données techniques
Sélection du programme et functions particulières
Liste des programmes
Watercontrol
Identification des anomalies mineures
pag. 33
pag. 34
pag. 38
pag. 39
pag. 40
pag. 41
pag. 43
pag. 44
pag. 45
pag. 46
pag. 47
pag. 48
pag. 49
pag. 50
pag. 50
pag. 51
pag. 54
pag. 56
pag. 57
Lire attentivement les instructions contenues dans ce livret car elles donnent
d'importantes indications sur la sécurité d'installation, d'utilisation et de maintenance
ainsi que quelques conseils utiles pour mieux utiliser le lave-vaisselle.
Conserver avec soin ce livret pour toute consultation ultérieure.
Fig. A
3
2
1
4
5
Page 18
35
1
2
3
Branchement Hydraulique
IMPORTANT
L'appareil doit être relié à l'arrivèe
d'eau, exclusivement avec le tuyaux
fournis.
Ne pas réutiliser les anciens tuyaux.
■ Les tuyaux de vidange et de remplissage
peuvent être orientés de façon
indifférente vers la droite ou vers la
gauche.
IMPORTANT
Le lave-vaisselle peut-être relié de
façon indifférente à l'eau froide ou
chaude à condition que la température
ne dépasse pas les 60°C.
■ La pression hydraulique doit être
comprise d'un minimum de 0,08 MPa à
un maximum de 0,8 MPa.
Pour des pressions inférieures, nous
vous conseillons de demander des
instructions à notre service Après-vente.
■ Il est nécessaire de prévoir un robinet en
amont du tube de chargement pour
isoler la machine du système
hydraulique, quand celle-ci ne fonctionne
pas (fig. 1B).
■ Le lave vaisselle est doté d'un tuyau pour
la prise d'eau avec un embout fileté 3/4"
(fig. 2).
■ Le tuyau d'alimentation "A" devra être
vissé à un robinet d'eau "B" à l'aide de
l'attache 3/4" en s'assurant que le collier
est bien serré.
■ Si nécessaire il est possible de rallonger
le tube de vidange jusqu'à 2,5 m. Cette
rallonge de tube est disponible auprès
du service après-vente.
■ Si des saletés ou du sable sont présents
dans l’eau, il est recommandé de
demander le filtre approprié, art.
9226085, auprès du service après-vente
(fig. 3). Le filtre "D" doit être placé entre
la prise d'eau 3/4" "B" et le tuyau
d'alimentation "A", ne pas oublier de
mettre les joints "C".
■ Si la machine est branchée à des
tuyauteries neuves, ou qui n'ont pas été
utilisées pendant une longue période,
faire couler l'eau pendant quelques
minutes avant de brancher le tuyau
d'alimentation. On évitera ainsi la
formation de dépôts de sable ou de
rouille qui pourraient boucher le filtre
d'entrée de l'eau.
34
INSTALLATION
(Remarques techniques)
■ Après le déballage, régler la hauteur du
lave-vaisselle.
Pour un fonctionnement parfait, il est
important que le lave-vaisselle soit à
niveau, en règlant les pieds de façon à
ce qu'une éventuelle inclinaison ne
dépasse pas 2 degrés.
■ Dans le cas où vous devez transporter
de façon manuelle la machine sans
emballage, ne pas prendre la porte par
le bas, mais faire comme dans le
schéma; ouvrir légèrement la porte et
soulever l'appareil en utilisant le top
supérieur.
IMPORTANT
Les ouvertures à la base de l'appareil
ne doivent en aucun cas être
obstruées par des tapis, moquette ou
autre objets.
À l'installation il est important de
verifier que la prise soit facilement
accessible.
Alimentation Electrique
L'appareil est conforme aux exigences de
sécurité prévues par les différents instituts
de Normes, et c'est la prise tripolaire avec
un pôle de terre qui assure la mise à la
terre complète de l'appareil.
Avant de brancher la machine sur le circuit
électrique s'assurer:
1. que la prise murale est correctement
reliée à la terre;
2. que le réglage du contacteur électrique
correspond bien à la puissance
absorbée indiquée sur la plaque
signalétique du lave-vaisselle.
ATTENTION!
L'efficacité de la sécurité est donc
subordonnée à la mise à la terre
correcte de votre propre installation.
En cas d'absence d'un branchement
efficace de la mise à la terre, il peut
subvenir une légère dispersion de
courant sur les parties métalliques
de la machine, due à la présence d'un
filtre antiparasite radio.
Le constructeur décline toute
responsabilité pour des dommages
éventuels survenus aux personnes et
aux biens imputables à un mauvais
raccordement de la ligne de terre.
Produit compatible avec les
Directives Européennes 73/23/EEC
et 89/336/EEC, remplacé par
2006/95/EC et 2004/108/EC, et les
amendements successifs.
Page 19

37
7
598
556/573
5
INSTALLATION DANS UN
ENSEMBLE DE CUISINE
MODERNE
Juxtaposition
■ Le lave-vaisselle a été étudié avec une
hauteur standard de 85 cm et peut être
ainsi placé entre des meubles de cuisine
moderne d'une même hauteur. Pour
obtenir un alignement parfait, agir sur les
pieds réglables.
■ Le plan supérieur est un vrai plan de
travail en plastique laminé de haute
résistance (fig. 5).
Ouverture de la porte
Mettre la main dans le creux, et tirer.
Si la porte s'ouvre durant le fonctionnement
de l'appareil, une sécurité électrique
permet d'interrompre automatiquement les
fonctions préétablies.
IMPORTANT
Pour une utilisation correcte ne pas
ouvrir la porte du lave-vaisselle
pendant son fonctionnement.
Fermeture de la porte
Mettre les paniers.
Vérifier que les plats ou casseroles ne
gênent pas les rampes avants et s'assurer
que celles-ci tournent librement.
Fermer la porte et la bloquer avec force.
Encastrement
(Installation sous un plan de travail)
■ Les ensembles de cuisine moderne ont
un plan de travail unique sous lequel
viennent s'insérer les meubles de base
et les appareils ménagers.
Dans ce cas, il suffit de retirer le plan de
travail en dévissant les vis qui se trouvent
au-dessous et à l'arrière (fig. 6a).
IMPORTANT
Après avoir retiré le plan de travail,
les vis DOIVENT être vissées de
nouveau (fig. 6b).
■ La hauteur est ainsi réduite à 82 cm
comme prévue dans la norme
internationale (ISO), et le lave-vaisselle
vient s'intégrer parfaitement sous le plan
(fig. 7).
6
a
b
a
b
36
Raccordement à la vidange
■ Pour la vidange, introduire le tuyau dans
l'installation de vidange, en prenant soin
de ne pas le plier car l'écoulement des
eaux s'en trouverait perturbé (fig. 4).
■ Le tuyau de vidange fixe doit avoir au
moins un diamètre intérieur de 4 cm et
doit être placé à une hauteur minimum
de 40 cm.
■ Pour éviter les odeurs, nous
recommandons de prévoir un siphon
(fig. 4X).
■ Si nécessaire il est possible de rallonger
le tube de vidange jusqu'à 2,5 mètres
en le maintenant cependant à une
hauteur maximum de 85 cm du sol.
Cette rallonge de tube est disponible
auprès du service après-vente.
■ L'extrémité recourbée du tuyau de
vidange peut être accrochée au bord
d'un évier, mais ne doit pas rester
immergée, pour éviter le siphonnage de
l'appareil pendant le programme de
lavage (fig. 4Y).
■ En cas d'installation sous un dessus
continu, le coude doit être fixé
immédiatement sous le dessus au point
le plus haut possible (fig. 4Z).
■ Pendant l'installation de la machine,
contrôler que les tubes de remplissage
et de vidange ne sont pas pliés.
4
Page 20

39
CHARGEMENT DU SEL
■ Sur le fond de la machine se trouve le
bac à sel pour la régénération de
l'adoucisseur d'eau.
■ Il est important de n’utiliser que le sel
spécifiquement prévu pour les lavevaisselle.
Autres types de sel contenant de
sensibles percentages de substances
insolubles qui pourraient avec le temps
rendre inèfficace le système de
l'adoucisseur.
■ Pour introduire le sel, dévisser le
bouchon du bac.
■ Pendant l'opération de remplissage un
peu d'eau débordera: continuez à
verser le sel jusqu'à ce que le réservoir
soit plein (mélanger à l'aide d'une
cuillère).
Après cette opération nettoyer le
filetage en enlevant les résidus de sel;
revisser le bouchon.
■ Après chargement du sel, il est
recommandé d’effectuer un cycle de
lavage complet ou de mettre en marche
le programme TREMPAGE (ou RINCAGE
A FROID).
Pour une utilisation optimale de
l’appareil, le réservoir à sel, dont
la capacité varie de 1,5 à 1,8 kg, doit
être rempli de temps en temps en fonction du réglage opéré sur l’adoucisseur
d’eau.
IMPORTANT
Ce n'est qu'au cours de la phase
d'installation de la machine à laver la
vaisselle qu'il faudra, après avoir
remplí complètement le bac à sel,
ajouter de l'eau jusqu'à ce qu'elle
déborde du bac.
Indicateur de remplissage
du sel
Ce modèle est pourvu de voyant
électrique sur le tableau de bord qui
s'allume quand il faut remplir le réservoir à
sel.
IMPORTANT
La vaisselle tachée de blanc est
généralement une indication
importante d'absence de sel.
38
*L’adoucisseur d’eau est réglé en
usine sur le niveau 3, adapté à la
majorité des cas.
Selon le degré de dureté de votre eau,
procédez au réglage de l’adoucisseur
d’eau comme suit:
IMPORTANT
Commencer TOUJOURS la procédure
avec le lave-vaisselle éteint.
1. Lave-vaisselle éteint, OUVRIR la
porte.
2. Maintenir enfoncées simultanément la
PREMIERE et la TROISIÈME touche (à
partir de la gauche), tout en appuyant
sur la touche "MARCHE/ARRÊT".
3. Relâcher les touches dès qu’un des
voyants "PROGRAMMES" s'éclairent et
qu’un signal sonore est émis.
4. Appuyer sur la touche "PROGRAMMES"
pour choisir le niveau d’adoucissement
d’eau voulu (le nombre de voyants qui
s’allumeront correspondent au niveau
choisi). Pour le niveau 5, les 4 voyants
"PROGRAMMES" clignoteront.
5. Éteindre le lave-vaisselle en appuyant
sur la touche "MARCHE/ARRÊT"
pour rendre effective la nouvelle
configuration.
ATTENTION!
Si, pour quelque raison que ce soit,
la procédure ne peut être terminée
avec succès, éteindre le lave-vaisselle
en appuyant sur la touche
"MARCHE/ARRÊT" et recommencer
depuis début (POINT 1).
ADOUCISSEUR D’EAU
Selon la source d’approvisionnement,
l’eau contient des quantités variables de
calcaire et de minéraux qui se déposent
sur la vaisselle en laissant des taches et
des marques blanchâtres.
Plus la densité de minéraux dans l’eau est
élevée, plus celle-ci est dure.
Le lave vaisselle est équipé d’un dispositif
d’adoucisseur d’eau qui, avec l’utilisation
du sel régénérant, fournit de l’eau douce
pour laver la vaisselle.
Le degré de dureté de votre eau peut vous
être communiqué par votre fournisseur
d’eau.
Réglage de l’adoucisseur d’eau
L’adoucisseur d’eau peut traiter de l’eau
d’une dureté allant jusqu’à 90°fH
(graduation française) ou 50°dH
(graduation germanique) à partir de six
positions de réglage différentes.
Dans le tableau ci-dessous sont indiqués
les différents degrés de dureté de l’eau
avec les positions de réglage de
l’adoucisseur correspondantes.
Niveau
ºfH
(France)
ºdH
(Allemagne)
N0
OUI
OUI
OUI
OUI
OUI
Voyant 1
Voyant 1
Voyants
1, 2
Voyants
1, 2, 3
Voyants
1, 2, 3, 4
Voyants
1, 2, 3, 4
clignotants
Dureté de l'eau
Réglage de
l'adoucisseur
d'eau
Utilisation de
sel régénérant
0-5
6-15
16-30
31-45
46-60
61-90
0-3
4-9
10-16
17-25
26-33
34-50
0
1
2
*3
4
5
Touche
"MARCHE/ARRÊT"
Voyants “PROGRAMMES”
4
3
2
1
Touche "PROGRAMMES"
Page 21

41
CHARGER LA VAISSELLE
Utilisation du panier supérieur
■ Le panier supérieur est pourvu de
supports mobiles accrochés au bord
latéral et pouvant occuper deux
positions: haute et basse. Sur la position
basse les supports servent pour recevoir
les tasses à thé, à café, les couteaux
longs et les louches. Aux extrémités des
supports, vous pouvez suspendre les
verres à pied.
En-dessous vous pouvez ranger les
verres, les tasses, les soucoupes et les
assiettes à dessert.
■ Quand les supports occupent la position
haute, ils permettent de placer les
assiettes plates et creuses.
Ayez soin de placer les assiettes
creuses verticalement et en tournant
leur partie concave vers l'avant de la
machine; laisser toujours de l'espace
entre chaque assiette pour que l'eau
circule librement.
■ Pour exploiter au maximum la capacité
du panier nous vous conseillons de
grouper les assiettes de même forme.
■ Les assiettes peuvent être placées sur
une seule rangée (fig. 1) ou sur les deux
rangées (fig. 2).
■ Nous vous conseillons de ranger les
plats de grande dimension, dont le
diamètre est d'environ 270 mm, légèrement inclinés vers l'avant de façon à
favoriser l'introduction du panier à l'intérieur de la machine.
■ Dans le panier supérieur vous pouvez
ranger différente vaisselle comme le
saladier et les bols en plastique qu'il vaut
mieux bloquer afin d'éviter que les jets
d'eau ne les renversent.
■ Le panier supérieur a été conçu pour
permettre une souplesse maximum
d'utilisation. Il peut n'être chargé qu'avec
des assiettes placées sur deux rangées,
24 pièces maximum, avec des verres
sur cinq rangées, 30 pièces maximum,
ou bien avec de la vaisselle mixte.
Utilisation du panier inférieur
■ Dans le panier inférieur vous placerez
les casseroles, les poêles, les
soupières, les saladiers, les couvercles,
les plats, les assiettes plates et creuses
et les louches.
■ Les couverts doivent être placés
manche vers le bas dans le panier à
couverts, que l'on placera à son tour
dans le panier inférieur (fig. 3) en
s'assurant qu'il n'entrave pas la rotation
des bras de lavage.
IMPORTANT
Le panier inférieur possède un dispositif
d’arrêt automatique permettant son
extraction en toute sécurité, très utile
aussi lors du chargement complet du
lave-vaisselle.
L’extraction total du panier inférieur
est nécessaire afin de charger le sel
ainsi que pour le nettoyage du filtre
et de l’entretien ordinaire de la
machine.
40
A
A
RÉGLAGE DU PANIER
SUPÉRIEUR
Quand on utilise habituellement des
assiettes de 27 à 31 cm de diamètre,
charger celles-ci dans le panier inférieur
après avoir mis le panier supérieur à sa
position la plus haute en procédant comme
suit:
1. Faire tourner les butées avant "A" vers
l'extérieur;
2. Dégager le panier et le remonter à sa
position la plus haute;
3. Remettre les butées "A" dans leur
position d'origine.
Cette opération permet de charger dans le
panier supérieur de la vaisselle d'un
diamètre de plus de 20 cm et ne permet
pas d'utiliser les supports mobiles en
position haute.
Page 22

43
Panier inférieur (fig. 6)
M = 8 + 4 assiettes creuses
N = 11 + 1 assiettes plates
O = 12 assiettes à dessert
P =plat
Q = couverts
Panier supérieur (fig. 5)
A = 5 + 5 + 2 verres
B = 12 soucoupes
C = 4 + 4 + 4 tasses
D = coupe petite
E = coupe moyenne
F = coupe grande
G = 1 + 1 fourchette
H = 1 + 1 cuillère à soupe
I = 3+3+3+3
cuillères à dessert
L = 3+3+3+3 cuillères à café
INFORMATION POUR LES ESSAIS EN LABORATOIRE
Programme comparatif général (selon norme EN 50242)
(voir liste des programmes de lavage)
1. Panier supérieur en position: bas
2. Chargement normalisé
3. Réglage du produit de rinçage sur index: 6
Chargement standard 12 couverts internationaux (selon norme EN 50242)
Le rangement correct du chargement est indiqué dans la fig. 5 pour le panier supérieur,
dans la fig. 6 pour le panier inférieur et dans la fig. 7 pour le panier à couverts.
Panier à couverts (fig. 7)
Disposer 6+6 couteaux (R) dans les grilles.
Dans les autres compartiments, mettre les
autres couverts manche vers le bas; éviter
de mettre plus de deux couverts identiques
dans le même compartiment.
4. Quantité de détergent:
- 8 g pour le prélavage;
- 22 g pour le lavage.
A
F
C
C
C
G
B
E
D
H
H
5
QN
M
P
O
M
N
L
I
6
R
7
42
Un chargement standard journalier est indiqué dans
les fig. 1, 2 et 3.
Panier supérieur (fig. 1)
A = assiettes creuses
B = assiettes plates
C = assiettes à dessert
D = soucoupes
E = tasses
F = verres
Panier supérieur (fig. 2)
A = assiettes creuses
B = assiettes plates
C = assiettes à dessert
D = soucoupes
E = tasses
F = verres à pied
G = verres
H = demi panier couverts
Panier inférieur (fig. 3)
A = casserole moyenne
B = casserole grande
C = poêle
D = couvercles
E = soupières, plats
F = couverts
G =plats à rôtis
Le rangement rationnel et correct de la vaisselle est
la condition essentielle pour obtenir un excellent
lavage.
Panier à couverts (fig. 4)
Le panier à couverts est formé de deux parties
offrant ainsi différentes possibilités de chargement .
La séparation en deux parties du panier se fait en
faisant glisser, dans le sens horizontal, les deux
parties l'une par rapport à l'autre et vice versa pour
les ré-enclencher.
D
FAG
E
B
C
3
4
1
A
B
C
D
E
F
A
B
C
D
FE
F
H
2
G
Page 23

45
TYPES DE PRODUITS DE
LAVAGE
Produits de lavage en tablettes
Les produits de lavage en tablettes des
différents producteurs se dissolvent à des
vitesses différentes. Donc dans les
programmes rapides, certaines tablettes,
ne se dissolvant pas complètement,
peuvent ne pas être totalement efficaces.
Avec les tablettes, il est donc conseillé de
sélectionner des programmes plus longs
afin de garantir la dissolution complète du
produit de lavage.
IMPORTANT
Pour obtenir des résultats de lavage
satisfaisants, les tablettes DOIVENT
être introduites dans le bac à produit
de lavage et PAS directement dans
la cuve.
Produits de lavage concentrés
Les produits de lavage concentrés, à
alcalinité réduite et avec enzymes naturelles,
combinés à des programmes de lavage à
50°C, permettent de réduire l’impact sur
l’environnement tout en respectant la
vaisselle et le lave-vaisselle.
Les programmes de lavage à 50°C ont été
spécialement pensés pour optimiser les
propriétés de dissolution de la saleté par
les enzymes, permettant ainsi d’obtenir,
avec les produits de lavage concentrés, les
mêmes résultats que des programmes à
65°C.
Produits de lavage combinés
Les produits de lavage qui contiennent
aussi le produit de rinçage doivent être
introduits dans le bac à produit de lavage.
Le bac à produit de rinçage doit être vide
(dans le cas contraire, régler le dosage du
produit de rinçage sur le minimum avant
d’utiliser des produits de lavage combinés).
Produits de lavage combinés
“Tout en un”
Si vous envisagez d’utiliser des produits
lessiviels combinés "Tout en un" ("3 en 1"/"4
en 1"/"5 en 1", etc.) par exemple ceux
composés de sel et/ou d’ agents de rinçage,
nous vous conseillons de:
■
lire attentivement et de suivre les
instructions du fabricant, notées sur les
emballages;
■
la performance de certains produits
lessiviels composés de sel/adoucisseur
d’eau dépend de la dureté de votre eau.
Vérifiez que le niveau de dureté de votre
eau est inclus dans l’échelle de
performance donnée sur l’emballage du
produit lessiviel.
Si l’utilisation de ce type de produits ne
donne pas de résultats de lavage
satisfaisants, s’adresser au producteur
du produit de lavage.
Dans certains cas l’utilisation de détergents
combinés peut occasionner:
■
dépots de calcaire sur la vaisselle ou
dans le lave-vaisselle;
■
une réduction des performances lors du
lavage et du séchage.
IMPORTANT
Tout problème dû au résultat direct
de l’utilisation de ces produits
combinés n’est pas couvert par
notre garantie.
Rappel: l’utilisation de produits de
lavage combinés “Tout en un” rend
superflue l’utilisation des témoins de
manque de sel et de produit de rinçage
(présents seulement sur certains
modèles).
En cas de problème de lavage et/ou de
séchage, il est conseillé de reprendre
l’utilisation des produits traditionnels (sel,
produit de lavage, produit de rinçage).
Dans ce cas, il est recommandé de:
■ remplir de nouveau les bac à sel et à
produit de rinçage;
■ exécuter un cycle de lavage normal à
vide.
NB: en revenant à l’utilisation de sel de
type traditionnel, plusieurs cycles de
lavage seront nécessaires avant que le
système d’adoucissement de l’eau soit de
nouveau optimal.
44
CHARGEMENT DU PRODUIT
DE LAVAGE
Le produit de lavage
IMPORTANT
Il est indispensable d'utiliser de la
lessive en poudre, liquide ou en
pastilles spécialement destiné aux
machines à laver la vaisselle.
"CALGONIT" donne les meilleurs résultats
de lavage et peut être obtenue facilement.
Les lessives non adaptées (comme cettes
pour le lavage à la main) ne contiennent
pas les ingrédients appropriés au
lavage en machine et empêchent le
fonctionnement correct de l'appareil.
Charger la lessive
La boîte à produits se trouve à l'intérieur de
la porte (fig. A "2"). Si le couvercle du
récipient est fermé, pour l'ouvrir il suffit
d'appuyer sur le bouton d'accrochage (A):
à la fin de chaque programme de lavage,
le couvercle est toujours ouvert, prêt pour
l'utilisation suivante.
ATTENTION!
Dans le panier inférieur, ne pas charger
d’assiette ou de couvert qui empêche
l’ouverture du couvercle du récipient à
lessive ou obstrue la dispersion de la
lessive.
Les doses de lessive peuvent varier selon
le degré de salissure et le type de
vaisselle. Nous conseillons de verser de 20
à 30 g de lessive dans le bac "lavage" (B).
Après le versement du détergent dans le
bac à lessive, fermer le couvercle, tout
d’abord en le glissant vers la gauche (1)
puis en appuyant dessus (2) jusqu’à ce
que vous entendiez un clic.
Comme les lessives ne sont pas toutes
de même nature, consulter aussi les
instructions sur les emballages.
Nous rappelons que des quantités
insuffisantes de lessive peuvent éliminer la
saleté de façon incomplète, tandis qu'une
dose excessive de lessive, non seulement
n'améliore pas les résultats de lavage,
mais est un gaspillage.
IMPORTANT
Ne pas exagérer dans l'utilisation de
la lessive, c'est contribuer à limiter
la pollution de l'environnement.
A
B
Page 24

47
1
2
3
NETTOYAGE DES FILTRES
Le système de filtrage (fig. A ’’4’’) est
constitué par:
un réservoir central qui retient les grosses
particules;
une plaque métallique qui filtre
continuellement l’eau de lavage;
un micro filtre autonettoyant, situé sous la
plaque métallique, qui piège les micro
salissures pour garantir un rinçage parfait.
■ Afin d’obtenir d’excellents résultats de
lavage dans le temps, les filtres doivent
être contrôlés et nettoyés après chaque
lavage.
■ Pour retirer le micro filtre, il vous suffit
de tourner la poignée dans le sens
contraire des aiguilles d’une montre
(fig.1).
■ Pour un entretien facilité, le réservoir
central est amovible (fig.2).
■ Retirer la plaque métallique (fig.3) et
laver l’ensemble du système de filtrage
sous le robinet d’eau.
Si nécessaire, une petite brosse peut
être utilisée.
■ L’entretien du micro filtre
autonettoyant est limité , un contrôle,
toutes les deux semaines d’utilisation,
est suffisant.
Néanmoins, après chaque lavage il est
recommandé de vérifier que le réservoir
central et la plaque métallique ne sont
pas obstrués.
ATTENTION!
Après le nettoyage des filtres,
assurez vous qu’ils sont
correctement replacés et que la
plaque métallique est correctement
mise au fond de la cuve du lave
vaisselle.
Assurez vous que le micro filtre est
bien revissé, dans le sens des
aiguilles d’une montre, car une
mauvaise mise en place peut
entraîner une perte d’efficacité de
l’appareil.
IMPORTANT
Ne jamais se servir de l’appareil sans
les filtres.
46
CHARGEMENT DU PRODUIT DE
RINÇAGE
Le produit de rinçage
Cet additif qui est introduit
automatiquement à la dernière opération
de rinçage, assure le séchage rapide de la
vaisselle et évite la formation sur celle-ci
de taches blanchâtres.
Charger le produit de rinçage
Ala gauche du bac à lessive se trouve le
réservoir du produit de rinçage (fig. A "3").
Pour ouvrir le couvercle, appuyer sur le
marquage prévu à cet effet et, en même
temps, tirer la languette vers le haut.
Utiliser toujours un produit de rinçage
adapté au lave-vaisselle automatique.
Il est possible de contrôler le niveau du
produit de rinçage au moyen du voyant
optique (C) placé sur le distributeur.
Réglage de dosage du
produit de rinçage de 1 à 6
Le réglage (D) est situé sous le couvercle
et peut être réglé au moyen d'une pièce de
monnaie. La position conseillée est 4.
La présence de calcaire dans l'eau se
manifeste soit par la présence
d'incrustation, soit par le degré de séchage.
C'est pourquoi il est important de régler le
débit du produit de rinçage pour obtenir
des prestations optimales.
Dans le cas où la vaisselle présente des
dépôts à la fin du lavage, diminuer le
réglage d'une position.
Dans le cas de vaisselle présentant des
marques ou auréoles blanchâtres,
augmenter le réglage d'une position.
PLEIN VIDE
Reflet sombre Reflet clair
C
D
Page 25

49
1
2
1b
APRES L'UTILISATION
Après chaque lavage, fermer le robinet
d'eau pour isoler le lave-vaisselle de
l'installation hydraulique d'alimentation et
appuyer sur la touche Marche/Arrêt pour
arrêter le fonctionnement de la machine.
Si la machine doit rester inutilisée un
certain temps, il est nécessaire de
procéder aux opérations suivantes:
1. Exécuter un programme de lavage sans
vaisselle avec lessive pour dégraisser la
machine.
2. Débrancher la prise électrique.
3. Fermer le robinet d'eau.
4. Remplir le réservoir du produit de rinçage.
5. Laisser la porte légèrement ouverte.
6. Laisser l'intérieur de la machine propre.
7. Si la machine est laissée dans des
pièces où la température est inférieure à
0°C, l'eau restant dans les tuyauteries
risque de geler. Par conséquent, porter
la température ambiante à plus de 0°C
et attendre environ 24 heures avant
d'activer la machine.
NETTOYAGE EXTERNE ET
ENTRETIEN
■ Pour le nettoyage externe de la machine,
ne pas utiliser de détergent ni d’abrasifs
mais uniquement un chiffon avec du
savon et de l’eau.
■ Le lave-vaisselle ne réclame aucun
entretien spécial car la cuve de lavage
est autonettoyante.
■ Nettoyer périodiquement le joint en
caoutchouc de la porte avec un chiffon
humide de façon à éliminer
éventuellement les traces de déchets ou
de produit de rinçage.
■ Pour mieux garantir l'évacuation des
petits dépôts de calcaire ou de déchets,
il est conseillé de procéder
périodiquement à un lavage complet en
versant auparavant un verre de vinaigre
dans le fond de la cuve et en
positionnant le bouton du programmateur
sur lavage délicat.
■ Si, malgré le nettoyage normal de la
plaque et du filtre vous notez que la
vaisselle ou les casseroles sont
insuffisamment lavées ou rincées,
contrôler que les orifices des bras
rotatifs (fig.A"5") sont propres.
Si cela est nécessaire, nettoyer les de la
façon suivante:
1. Pour démonter le bras supérieur,
tournez le jusqu’à ce qu’il s’aligne avec
le marquage stop inscrit sur la flèche
(fig.1b). Poussez le vers le haut (fig.1)
en le maintenant enfoncé puis dévissez
le dans le sens des aiguilles d’une montre
(pour le remonter procédez de la
même manière, mais en le vissant
dans le sens contraire des aiguilles
d’une montre).
Le bras de lavage inférieur peut être
démonté facilement en le tirant vers le
haut (fig.2).
2. Passez le bras de lavage sous un
robinet d’eau pour éliminer toute saleté.
3. Ensuite, replacez le bras de lavage dans
la même position, en pensant à
positionner le bras supérieur en face du
marquage stop.
■ La cuve, ainsi que la contre-porte sont
en acier inoxydable. Si toutefois vous
devez constater des taches d'oxydation,
celles-ci seraient imputables seulement
à une présence importante de sels de
fer en suspension dans l'eau.
■ Pour retirer les taches, il est conseillé
d'employer un abrasif à grains très fins.
Ne pas utiliser de substance chlorée ou
de laine d'acier. Le lave-vaisselle possède
un adoucisseur et il est conseillé l'usage
de sel pour éviter la formation de dépôt
blanchâtre sur la vaisselle.
En cas de présence de taches
blanchâtres, il est conseillé avant tout
d'intervenir sur le réglage du produit de
rinçage en l'augmentant d'une unité.
48
CONSEILS PRATIQUES
Que faire pour avoir
d'excellents résultats de lavage
■ Avant de ranger la vaisselle dans
la machine, enlever les résidus de
nourriture (os, arêtes, restes de viande
ou de légumes, résidus de café, é
pluchures de fruits, cendres de cigarettes,
curedents etc...) afin d'éviter d'obstruer
les filtres, la vidange et les gicleurs des
bras de lavage.
■ Eviter de rincer la vaisselle avant de la
placer dans la machine.
■ Si les poêles et les casseroles sont
excessivement incrustées de restes de
mets brûlés, nous vous conseillons de
les laisser tremper avant le lavage.
■ Ranger la vaisselle avec l'ouverture
tournée vers le bas.
■ Si possible, éviter que les différentes
pièces se touchent; une installation
correcte donnera de meilleurs résultats
de lavage.
■ Après avoir rangé la vaisselle, vérifier
que les bras de lavage tournent sans
obstacle.
■ Les casseroles et autre ustensiles qui
présentent des résidus de nourriture
très tenaces ou brûlés devront être mis
à tremper dans de l'eau avec de la
lessive pour lave-vaisselle.
■ Pour un lavage parfait de l'argenterie, il
faut:
a) la rincer dès qu'on a fini de l'utiliser,
surtout si on l'a utilisée avec de la
mayonnaise, des œufs, du poisson,
etc..;
b) ne pas l'asperger de lessive;
c) ne pas la mettre en contact avec
d'autres matériaux.
Que faire pour economiser
■ Au cas où l'on voudrait laver à pleine
charge, ranger la vaisselle dans le
lave-vaisselle dès que le repas est
terminé et en effectuant éventuellement
le programme TREMPAGE (ou RINCAGE
A FROID) pour ramollir la saleté et
éliminer les résidus les plus gros entre
chaque charge-ment en attendant
d'effectuer le programme de lavage
complet.
■ En présence de saleté peu consistante
ou de paniers peu chargés, sélectionner
le programme ECONOMIQUE en
suivant les instructions indiquées dans
la liste des programmes.
Ce qu'on ne doit pas laver
■ Il est bon de se rappeler que toute la
vaisselle n'est pas adaptée au lavage
en machine; nous déconseillons de
mettre des pièces en matériau
thermoplastique, des couverts à
poignée en bois ou en plastique, des
casseroles à poignée en bois, de la
vaisselle en aluminium, en cristal ou en
verre plombé si ce n'est pas
spécifiquement indiqué.
■ Certaines décorations tendent à
s'estomper, par conséquent nous
conseillons de laver plusieurs fois en
machine une seule pièce et, seulement
après s'être assuré qu'elle ne se décolore
pas, d'y mettre tout le chargement.
■ Nous conseillons de ne pas laver de
couverts en argent avec des couverts
en acier oxydable pour éviter qu'il ne se
produise de réaction chimique entre
eux.
IMPORTANT
Quand on achète de la vaisselle
neuve, s'assurer toujours qu'elle est
adaptée au lavage en machine.
Suggestions à la fin du
programme
■ Pour éviter d'éventuelles projections de
gouttelettes provenant du panier
supérieur, retirer d'abord le panier
inférieur.
■ Si vous laissez la vaisselle encore
quelques temps dans la machine,
ouvrez légèrement la porte pour favoriser
la circulation de l'air et améliorer encore
le séchage.
Page 26

50
51
SELECTION DES PROGRAMMES
ET FONCTIONS SPÉCIALES
IMPORTANT
Le lave-vaisselle dispose de deux
fonctions très utiles:
- le programme "conseillé" (pré-configuré
en usine et parfait pour l’utilisation
quotidienne à pleine charge)
permettant d’effectuer une sélection
plus rapide et sûre;
- la fonction "auto-apprentissage"
permet de proposer le dernier
programme utilisé et procure ainsi un
gain de temps en évitant de répéter
chaque fois la même programmation.
Touche "EXPRESS"
Cette touche permet de choisir entre 2
niveaux d’intensité de lavage, en fonction du
degré de salissure de la vaisselle, en
réduisant également la durée du cycle et ses
consommations d’énergie. En appuyant sur
la touche "EXPRESS" il est possible de
réduire l’intensité de lavage en modifiant les
paramètres de durée du cycle et sa température.
La combinaison de cette touche avec les
4 programmes de base présentés sur
le bandeau, permet d’obtenir jusqu’à 8
programmes de lavage différents.
IMPORTANT
Une fois sélectionnée, la touche reste
active pour les programmes suivants
(voyant correspondant allumé) à
moins que la touche ne soit de
nouveau pressée (voyant correspondant
éteint) ou que le cycle ne soit annulé
en cours de route.
Choix des programmes
■ Ouvrez la porte et rangez la vaisselle à laver .
■ Appuyez sur la touche "MARCHE/ARRÊT"
Le voyant correspondant au programme
"conseillé" ou celui correspondant au
dernier programme utilisé clignote.
■ Pour choisir un autre programme, appuyez
sur la touche "PROGRAMMES".
■ Appuyer éventuellement sur la touche
"EXPRESS".
■ Vous pouvez aussi appuyer sur la touche
option (le voyant correspondant s’éclaire).
Vous pouvez sélectionner ou
désélectionner la touche option DANS
UN DÉLAI de une minute après le
début du programme.
■ Appuyez sur la touche "START" (le
voyant du programme choisi cesse de
clignoter et s’éclaire fixement).
■ Avec la porte fermé, après que le signal
sonore ait retenti, le programme démarrera
automatiquement.
DANS UN DÉLAI de une minute
après le début du programme, vous
pouvez encore choisir un autre
programme, simplement en appuyant
sur la touche "PROGRAMMES" (il est
aussi possible d’activer ou de
désactiver la touche “EXPRESS”).
Interruption du programme
Nous vous déconseillons d’ouvrir la porte
pendant l’exécution du programme, surtout
pendant la phase centrale du lavage et celle
du rinçage chaud final.
Cependant, si vous ouvrez la porte lorsque le
programme est en cours (par exemple pour
ajouter de la vaisselle), la machine s’arrête
automatiquement.
Lorsque vous refermez la porte, le cycle
repart de l’endroit où il s’était interrompu
sans devoir appuyer sur une touche.
IMPORTANT
Vous pouvez interrompre le programme
en cours même sans ouvrir la porte,
en appuyant sur la touche
"MARCHE/ARRÊT". Dans ce cas,
pour que le cycle redémarre de
l’endroit où il s’est interrompu, il
suffit d’appuyer à nouveau sur la
touche "MARCHE/ARRÊT".
ATTENTION!
Si vous ouvrez la porte pendant que le
lave-vaisselle effectue son cycle de
séchage, un signal sonore vous alerte
que le cycle n’est pas achevé.
.
Couvert (EN 50242)
Capacité avec casseroles et assiettes
Pression admise pour l'installation hydraulique
Fusible
Puissance maximum absorbée
Tension
12
8 personnes
Min. 0,08 - Max 0,8 MPa
(voir plaque signalétique)
(voir plaque signalétique)
(voir plaque signalétique)
DONNÉES TECHNIQUES:
DIMENSIONS:
Hauteur
Profondeur
Largeur
Encombrement porte ouverte
cm
cm
cm
cm
avec plan de travail
85
60
60
120
sans plan de travail
82
57,3
59,8
117
A Touche "MARCHE/ARRÊT"
B Touche "PROGRAMMES"
C Touche "START"/"RESET"
(départ/annulation programme)
D Touche "EXPRESS"
E Touche option "ALL in 1"
F Touche "DEPART DIFFERE"
G Voyants "PROGRAMMES"
H Voyant touche "EXPRESS"
I Voyant "MANQUE DE SEL"
L Voyant "SÉLECTION D’OPTION"
M Voyants "PHASES DU CYCLE"/
Voyants de "DEPART DIFFERE"
DESCRIPTION DE LA MACHINE
AB CD E F
H
I
M
L
G
Page 27

53
52
Au terme des 3 dernières heures (à la fin du
décompte) le voyant 3h cesse de clignoter et
s’éclaire fixement pour signaler que la phase
de lavage et le programme se déclencheront
automatiquement.
Si le décompte n’est pas achevé et que le
programme n’est donc pas encore parti,
vous pouvez modifier ou annuler le départ
différé, choisir un autre programme ou
sélectionner/désélectionner la touche option,
en procédant de la manière suivante:
■ Enfoncez la touche "RESET" sans la
lâcher pendant au moins 5 secondes.
Les voyants des programmes clignoteront
et un signal sonore sera émis.
■ Le programme choisi s'annule et le
voyant correspondant au programme
"conseillé" commence à clignoter.
■ Appuyez sur la touche "DEPART
DIFFERE", pour configurer un autre
horaire de départ retardé (le voyant
correspondant au temps choisi s’éclaire
fixement).
■ Lorsque vous avez modifié ou annulé le
départ différé, vous pouvez configurer
un nouveau programme et vous pouvez
sélectionner ou désélectionner la touche
option.
Désactivation du signal acoustique
de FIN PROGRAMME
La fonction du signal acoustique à la fin du
programme peut être désactivée de la
manière suivante:
■ Après avoir éteint le lave-vaisselle,
enfoncez pendant quelques instants la
touche "ALL in 1" tout en appuyant sur
la touche "MARCHE/ARRÊT", en les
relâchant seul après le signal acoustique.
■ Appuyez encore sur la touche "ALLin 1":
le voyant correspondant cesse d'être
éclairé fixement (sonnerie activée) et
commence a clignoter (sonnerie
désactivée).
■ Attendez le signal acoustique indiquant
que la configuration est mémorisée.
■ Pour réactiver la sonnerie, suivez la
même procédure.
Signalisation des anomalies
Si un dysfonctionnement ou une anomalie
se manifeste pendant le déroulement d’un
programme, le voyant correspondant
au cycle choisi clignote très rapidement et
un signal sonore est émis.
Dans ce cas, éteignez le lave-vaisselle en
appuyant sur la touche "MARCHE/ARRÊT".
Contrôlez si le robinet d’eau est ouvert,
si le tuyau de vidange n’est pas plié,
si le siphon et les filtres ne sont pas
colmatés et configurez à nouveau le
programme choisi.
Si l’anomalie se répète, adressez-vous au
Service Après-Vente.
IMPORTANT
Ce lave-vaisselle est équipé d’un
système de sécurité anti-débordement
qui, en cas de problème, videra
automatiquement tout excès d’eau.
ATTENTION!
Pour éviter le déclenchement
intempestif du dispositif de sécurité
anti-débordement, il est recommandé
de ne pas remuer ou incliner le
lave-vaisselle pendant son
fonctionnement.
Au cas où il serait nécessaire de
remuer ou d’incliner le lave-vaisselle,
s’assurer d’abord que le cycle de
lavage est terminé et qu’il n’y a plus
d’eau dans la cuve.
Modification d’un programme
en cours
Pour modifier ou annuler un programme en
cours, procédez de la manière suivante:
■ Enfoncez la touche "RESET" sans la
lâcher pendant au moins 5 secondes.
Les voyants des programmes clignoteront
et un signal sonore sera émis.
■ Le programme en cours s’annule et le
voyant correspondant au programme
"conseillé" commence à clignoter.
■ Vous pouvez alors configurer un nouveau
programme.
ATTENTION!
Avant de démarrer un nouveau
programme, veuillez contrôler la
présence de lessive dans le compartiment.
Si nécessaire, remplir le compartiment.
En cas de coupure de courant pendant
un programme de lavage, une mémoire
spéciale restaure le programme
sélectionné et, lorsque le courant est
rétabli, reprend le cycle là où il s'est
arrêté.
Déroulement du programme
Pendant le déroulement du programme, le
voyant du cycle reste fixement éclairé et
les 3 voyants de visualisation "PHASES
DU CYCLE" (correspondants à
"LAV AGE" ,"SECHAGE" et
"FIN") s’éclairent séparément et en
séquence pour indiquer la phase en cours.
Fin du programme
La fin du programme est signalée par
un signal acoustique (s’il est activé) de
5 secondes, répété 3 fois toutes les
30 secondes.
Le voyant de fin du programme s'éclairera,
pendant que tous les autres voyants
s'éteindront.
Vous pouvez alors sortir la vaisselle propre
et éteindre le lave-vaisselle en appuyant sur
la touche "MARCHE/ARRÊT" ou effectuer
un nouveau chargement pour un nouveau
cycle de lavage.
Touche option
Touche "ALL in 1"
Cette option permet l'utilisation optimale de
produits de lavage combinés “Tout en un”
("3 en 1"/"4 en 1"/"5 en 1”, etc.). En appuyant
sur cette touche, le programme de lavage
sélectionné est modifié, de façon à obtenir
les meilleurs résultats des produits
combinés (de plus, le témoin de manque
de sel est désactivé).
ATTENTION!
Une fois sélectionnée, l'option reste
active (voyant correspondant allumé)
pour programmes de lavage suivants
et pourra être désactivée (voyant
correspondant éteint) simplement en
appuyant de nouveau sur la touche
appropriée.
IMPORTANT
Quand cette option est activée, la
durée du programme "RAPIDE" est
prolongée d'environ 10 minutes.
Touche "DEPART DIFFERE"
Cette touche permet de retarder le démarrage
du cycle de lavage de 3, 6 ou 9 heures.
Pour configurer le départ différé, procédez
de la manière suivante:
■ Appuyez sur la touche "DEP ART DIFFERE"
(à chaque pression correspond
respectivement la configuration retardée
de 3, 6 ou 9 heures et le voyant
correspondant au retard choisi s’éclaire
fixement).
■ Pour démarrer le décompte, appuyez
sur la touche "START" (le voyant du
programme choisi s'éclaire fixement,
tandis que celui de la durée configurée
cesse d’être éclairé fixement et
commence à clignoter).
Si vous configurez un départ différé de 9
heures, le décompte du temps est signalé par
les voyants 6h et 3h qui s’éclairent et
indiquent le temps restant.
Page 28

LISTE DES PROGRAMMES
Lavage précédé d'un prélavage
Pour les programmes précédés d'un prélavage, nous vous conseillons de mettre une seconde
dose de détergent (max. 10 grammes) directement dans le lave-vaisselle.
•••
•
•
•••
•
•
130
85
75°C
65°C
Conçu pour le lavage des casseroles et de toute
autre vaisselle particulièrement sale.
•••
•
•
•••
•
•••
•
•••
•
•••
•
•
Cycle trés rapide à effectuer à la fin du repas.
Recommandé pour un lavage de vaisselle jusqu'à
4/6 personnes.
Adapté au lavage de la vaisselle délicate décorée et
en cristal. Indiqué pour le lavage quotidien de la
vaisselle peu sale, à l'exclusion des casseroles.
Pour la vaisselle utilisée le matin ou à midi,
entreposée dans le lave-vaisselle jusqu'à ce que
vous soyez prêt à laver une charge pleine.
(PROGRAMME “CONSEILLÉ”)
Destiné au lavage de la vaisselle et casseroles
normalement sale.
Adapté au lavage de vaisselle et casseroles
normalement sales, avec utilisation de lessive à
base d’enzyme. Programme normalisé EN 50242.
PROGR.
EXPRESS
INTENSIF 75°C
Rapide & puissant 65°C
UNIVERSEL 65°C
Quotidien 55°C
ECO 45°C
Délicat 45°C
RAPID 32' 50°C
Rinçage
PROGR.
EXPRESS
PROGR.
EXPRESS
PROGR.
EXPRESS
Programme conçu pour le lavage rapide de vaisselle
très sale.
Programme rapide, destiné à la vaisselle
normalement sale, adapté aux lavages fréquents et
aux chargements normaux.
175
85
32
5
45°C
45°C
50°C
65°C
55°C
110
80
Opérations à accomplir Déroulement du programme
Durée
moyenne
en
minutes
Fonctions
facultatives
Lessive prélavage
Lessive lavage
Nettoyage plaque,
filtre
Contrôle provision
du produit de rinçage
Contrôle provision
Sel
Prélavage chaud
Prélavage froid
Lavage
Premier rinçage
à
froid
Second rinçage
à
froid
Rinçage chaud avec-
produit de rinçage
Avec eau froide (15°C)
(Tolerance ±10%)
Touche
“DEPART DIFFERE”
Touche “ALL in 1”
Programme
Description
+
OUI
OUI
OUI
OUI
OUI
OUI
OUI
OUI
OUI
OUI
OUI
OUI
OUI
OUI
OUI
55
54
Page 29

57
IDENTIFICATION D’ANOMALIES MINEURES
Si votre lave-vaisselle ne fonctionne pas, avant d’appeler votre revendeur faire les
contrôles suivants:
Brancher la prise
Appuyer sur la touche
Contrôler
Fermer la porte
Contrôler
Ouvrir le robinet
Positionner correctement le
programmateur
Déplier le tuyau
Nettoyer le filtre situé à
l’extremité du tuyau d’alimentation
Nettoyer le filtre
Redresser le tuyau
Suivre attentivement les
instructions pour le branchement
du tuyau de vidange
Consulter un technicien qualifié
Réhausser le tuyau de vidange à
40 cm.
Réduire la quantité de lessive
Contrôler
Nettoyer la plaque et le filtre
Arrêtez l'appareil
Ouvrir le robinet
Réactivez le cycle
ANOMALIES CAUSES REMEDES
1 - La machine ne fonctionne
sur aucun programme
2 - La machine ne prend
pas l’eau
3 - La machine ne vidange pas
4 - La machine vidange
en permanence
5 - Les bras de lavage ne
tournent pas
6 - Sur les appareils électroniques
sans afficheur:
un voyant ou plus clignotant
rapidement.
Prise de courant mal branchée
Touche M/A non appuyée
Pas de courant
Porte ouverte
Voir causes du N. 1
Robinet d’eau fermé
Programmateur mal positionné
Le tuyau d’alimentation est plié
Le filtre du tuyau d’alimentation est
bouché
Filtre bouché
Tuyau de vidange plié
La rallonge du tuyau de vidange
n’est pas la bonne
La vidange murale n’a pas
d’évent à air
Tuyau en position trop basse
Quantité excessive de lessive
Une pièce de vaisselle
empêche la rotation
La plaque filtrante et le filtre
sont bouchés par des impuretés
Arrivée d'eau fermée
56
Le tuyau d’alimentation, doublé d’une gaine, est équipé d’un dispositif de blocage de
l’eau.
Dans le cas où le tuyau se détériorerait (usure naturelle ou surpression), l’eau
s’écoulerait dans la gaine et actionnerait le dispositif de blocage de l’eau directement
au robinet.
Cet incident serait alors signalé par un témoin rouge situé dans la petite fenêtre “A”.
Dans ce cas, fermez le robinet d’eau et changez le tuyau.
Si le tuyau n’est pas assez long pour permettre un branchement correc t, il do it être
remplacé par un tuyau plus long. Le tuyau peut être fourni par votre service
après-vente.
WATERCONTROL - DISPOSITIF DE BLOCAGE DE L’EAU
Témoin
de valve bloquée
Dispositif
antidévissage
(appuyer pour
devisser l’embout)
A
Page 30

59
58
N.B.: Quand une anomalie citée ci-dessus provoque un mauvais lavage ou un rinçage insuffisant, il est
nécessaire de retirer manuellement les salissures de la vaisselle car l’opération finale provoque le
séchage des salissures qu’un second lavage en machine ne serait pas susceptible de nettoyer.
Si le mauvais fonctionnement persiste, s’adresser au Centre d’Assistance Technique en communiquant le
modèle du lave-vaisselle indiqué sur la plaquette placée à l’intérieur de la porte, dans la partie supérieure,
ou sur le certificat de garantie. Ces informations vous permettront d’obtenir une intervention plus rapide et
efficace.
Le fabricant décline toute responsabilité pour erreur d’impression contenue dans le présent livret.
Il se réserve en outre, le droit d’apporter les modifications qu’il jugerait utiles sur ses produits sans
en compromettre les caractéristiques essentielles.
ANOMALIES CAUSES REMEDES
7 - La vaisselle est
partiellement lavée
8 - Manque ou dispersion
partielle de la lessive
9 - Présence de tâches
blanches sur la vaisselle
10 - Bruit pendant le lavage
11 - La vaisselle n’est pas
parfaitement sèche
Voir causes du N. 5
Le fond des casseroles n’est
pas lavé parfaitement
Le bord des casseroles n’est
pas parfaitement lavé
Orifices partiellement bouchés
La vaisselle n’est pas bien rangée
L’extrémité du tuyau de vidange est
plongée dans l’eau
La lessive n’est pas bien dosé, est
vieux ou durci
Le bouchon du récipient du sel ne
ferme pas bien
Le programme de lavage choisi est
trop faible
Des couverts, des assiettes,
des casseroles, etc… empêchent
l'ouverture du couvercle du récipient
à lessive.
L’eau d’alimentation est
particulièrement dure
Les pièces de vaisselle se cognent
Les bras de lavage tournants
cognent contre la vaisselle
Manque de circulation d’air
Manque de produit de rinçage
Contrôler
Incrustations trop tenaces
qu’il faut enlever avant
le lavage dans la machine
Positionner mieux les
casseroles
Démonter les bras de lavage en
dévissant l’écrou moleté de
fixation dans le sens des
aiguilles d’une montre et les laver
sous un robinet
Ne pas trop serrer la vaisselle
L’extrémité du tuyau de
vidange ne doit pas toucher l’eau
de vidange
Augmenter la dose en fonction de
la quantité de saleté ou
remplacer le produit
Le visser à fond
Choisir un programme plus
énergique
Charger la vaisselle de telle manière
qu'elle n'empêche pas l'ouverture
du couvercle du récipient à lessive.
Contrôler le niveau du sel et du
produit de rinçage et régler le
dosage; si l’anomalie persiste,
demander l’intervention du SAV
Mieux les ranger dans les paniers
Mieux ranger la vaisselle
Laisser la porte de la machine
entrouverte à la fin du
programme de lavage pour
favoriser le séchage naturel
Utiliser du produit de rinçage
Enhorabuena,
con la compra de este electrodoméstico
Candy, Usted ha demostrado que no
acepta promesas: Usted desea lo
mejor.
Candy le ofrece este nuevo lavavajillas,
fruto de años de investigación y
experiencia en el mercado gracias al
contacto directo con los Consumidores.
Usted ha escogido la calidad, la
duración y las grandes prestaciones
que le ofrece este lavavajillas.
Candy le propone además una amplia
gama de electrodomésticos: lavadoras,
lavavajillas, lavadoras - secadoras,
cocinas, hornos microondas, hornos y
encimeras, frigorîficos y congeladores.
Pida a su Vendedor el catálogo
completo de los productos Candy.
Le rogamos que lea atentamente las
instrucciones que contiene este
manual ya que le proporcionarán
importantes indicaciones relacionadas
con la seguridad de la instalación, el
uso, el mantenimiento así como
ciertos consejos útiles para una mejor
utilización del lavavajillas.
Conserve este manual para consultarlo
siempre que lo necesite.
GARANTÍA
Su producto está garantizado por las
condiciones y términos especificados
en el certificado de garantía del
mismo.
La garantía deberá ser conservada,
debidamente rellenada, para ser
mostrada al Servicio de Asistencia
Técnica Autorizado, en caso de
intervención conjuntamente con la
factura o ticket de compra expedido
por el establecimiento vendedor.
* Rellenar la garantía que viene en
Castellano.
Page 31

6160
INSTRUCCIONES PARA UN
USO SEGURO
El uso de cualquier aparato eléctrico
comporta tener en cuenta algunas
reglas fundamentales.
Instalación
■ En caso de incompatibilidad entre la toma
de corriente y el enchufe del aparato,
sustituir
la toma por personal especializado.
Este último deberá comprobar que la
sección de los cables sea la idónea para
la potencia absorbida.
■ Tener cuidado que la instalación no aplaste,
roce o deteriore el cable de alimentación.
■ En general, no es aconsejable el uso de
adaptadores, tomas múltiples y/o alargos.
■ En caso que fuera necesaria la sustitución
del cable de alimentación del aparato,
dirijase al Servicio de Asistencia Técnica
autorizado.
Seguridad
■ No tocar el aparato con las manos o los
pies mojados o húmedos.
■ No utilizar el aparato con los pies
descalzos.
■ No estirar el cable de alimentación, o del
aparato, para desconectar el enchufe de
la toma de corriente.
■ No dejar expuesto el aparato a los agentes
atmosféricos (lluvia, sol, etc...).
■ Este aparato no esta destinado a ser
usado por niños, personas discapacitadas
o inexpertas en su uso a no ser que
sean vigiladas o instruidas sobre el uso
del aparato por una persona responsable
de su seguridad.
Vigile a los niños de manera que se
asegure que no juegan con el aparato.
■ No se debe beber el agua que resta en
el aparato en la vajilla al final de los
programas de lavado. Apoyarse o sentarse
sobre la puerta abierta del lavavajillas,
puede causar su vuelco.
■ No dejar la puerta abierta en posición
horizontal, con el fin de evitar posibles
accidentes (ej tropiezos).
■ Apoyarse o sentarse sobre la puerta
abierta del lavavajillas, puede causar su
vuelco.
ATENCIÓN!
Cuchillos y otros utensilios con punta
tienen que ser colocados hacia abajo
o en posición horizontal en alguna
otra zona de los cestos.
Utilización cotidiana
■ Este aparato deberá destinarse únicamente
al uso doméstico.
■ El lavavajillas está proyectado para el
lavado de utensilios domésticos normales.
Objetos contaminados de gasolina,
pintura, restos o virutas de hierro o
metálicas, productos químicos corrosivos,
ácidos o alcalinos no deben ser lavados
en el lavavajillas.
■ Si la instalación de la habitación está
provista con un descalcificador de agua no
es necesario añadir la sal en el contenedor
montado al efecto en el lavavajillas.
■ Los cuchillos y cubiertos, obtienen un
mejor lavado si se sitúan en el cesto con
los mangos hacia abajo.
■ En caso de daños y/o mal fúncionamiento
del aparato, desconectarlo, cerrar el grifo
del agua y no tocar el electrodoméstico.
Para eventuales reparaciones remitirse a
un Centro de Asistencia Técnica y solicitar
la utilización de recambios originales.
El no cumplimiento de todo lo arriba
indicado puede comprometer la seguridad
del aparato.
Fin de uso del aparato
■ Este aparato está fabricado con materiales
reciclables para permitir una correcta
chatarrización.
■ Si se quiere eliminar un lavavajillas viejo
se debe tener cuidado de eliminar el
cierre de la puerta para evitar que los
niños puedan quedar encerrados en la
máquina. Después de haber desenchufado
la clavija de la toma de corriente, es
importante cortar el cable de alimentación.
INDICE
Prescripciones de seguridad
Puesta en Marcha, instalación
Sistema de la regulación de la descalcificación del agua
Cargar la sal
Regulación del cesto superior
Carga del lavavajillas
Información para los laboratorios de pruebas
Carga de detergente
Tipo de detergente
Carga de abrillantador
Limpieza del filtro
Consejos prácticos
Limpieza y manutención ordinaria
Descripción de los mandos
Datos técnicos
Selección de los programas y funciones especiales
Relación de los programas
Watercontrol
Búsqueda de pequeñas anomalías
Fig. A
Le rogamos lea atentamente las advertencias contenidas en el presente libro porque
reportan importantes indicaciones en lo que respecta a la seguridad de instalación,
de uso, de mantenimiento y algunos consejos útiles para mejorar la utilización
del lavavajillas.
Conserve con cuidado este libro para cualquier ulterior consulta.
3
2
1
4
5
pág. 61
pág. 62
pág. 66
pág. 67
pág. 68
pág. 69
pág. 71
pág. 72
pág. 73
pág. 74
pág. 75
pág. 76
pág. 77
pág. 78
pág. 78
pág. 79
pág. 82
pág. 84
pág. 85
Page 32

6362
Alimentación hidráulica
IMPORTANTE
El aparado debe ser conectado a la
red idraulica sólo con los nuevos
tubos de carga disponibles en
dotación. Los viejos tubos de carga
no tienen que ser reutilizados.
■ Los tubos de carga y descarga pueden
ser orientados indistintamente hacia la
derecha o la izquierda.
IMPORTANTE
El lavavajillas puede ser conectado a la
instalación de agua fría o caliente,
siempre que ésta no supere a los 60°C.
■ La presíon hidráulica debe estar
comprendida entre un mínimo de 0,08
MPa y un máximo de 0,8 MPa. Para
presiones inferiores diríjarse al Centro
de Asistencia.
■ Es necesario un grifo en el extremo del
tubo de carga para aislar la máquina de
la red cuando no está en funcionamiento
(fig. 1 B).
■ El lavavajillas está dotado de un tubo
para la toma de agua que acaba en un
codo de 3/4" (fig. 2).
■ El tubo entrada agua "A" debe ser
enroscado a un grifo o toma de agua
"B" de rosca 3/4", asegurándose que la
tuerca esté bien apretada.
■ Si es necesario, se puede alargar el
tubo de carga hasta 2,5 m. Para tal fin
contactar con el Centro de Asistencia
Técnica.
■ Si el agua de la red presentase resíduos
calcáreos o arenilla, es aconsejable
colocar un filtro como accesorio
art. 9226085 (fig. 3).
Este filtro "D" va colocado entre la toma
de agua de 3/4" "B" y el tubo de
entrada "A". No olvidar de colocar la
guarnición "C".
■ Si la máquina va a ser conectada a una
nueva instalación o a una instalación
que ha estado inutilizada por largo
tiempo, es aconsejable dejar correr el
agua algunos minutos antes de colocar
el tubo de entrada de agua. De esta
manera, se evitará que los residuos
materiales o de óxido depositados en la
tubería obturen el filtro de entrada agua.
1
2
3
INSTALACION
(NOTAS TÉCNICAS)
■ Después del desembalaje, proceder a la
regulación en altura del lavavajillas.
Para un correcto funcionamiento es
importante que el lavavajillas esté bien
nivelado, regulando los pies de forma
que una eventual inclinación del aparato
no supere los 2 grados.
■ En caso de que fuera necesario
transportar manualmente la máquina
desembalada, no coger la puerta por la
parte inferior, proceder como en la
figura; abrir ligeramente la puerta y
elevar la máquina cogiéndola por la
parte superior.
IMPORTANTE
Si se va a instalar el aparato sobre
una alfombra o moqueta, es necesario
tener cuidado para evitar que se
obstruyan las rejillas de ventilación
situadas en la base del lavavajillas.
Asegurese de poder acceder al enchufe
del aparato incluso despues de la
instalacion.
Alimentación eléctrica
El aparato cumple las normas de seguridad
de la CEE y está provisto de clavija tripolar
que asegura su completa puesta a tierra.
Antes de conectar eléctricamente el
lavavajillas, verificar:
1. que la toma tenga una correcta
conexión a tierra;
2. que la capacidad amperimétrica del
contador eléctrico sea apta para la
absorción indicada en los datos de la
placa del lavavajillas.
ATENCIÓN!
La completa seguridad depende
también de la correcta puesta a tierra
de la instalación eléctrica de la casa.
La falta de una buena instalación
puede provocar una leve difusión de
corriente a través de las partes metálicas
del lavavajillas debido a la presencia
del filtro anti radiointerferencias.
La firma fabricante no se responsabiliza
de posibles daños a personas o cosas,
producidos por la falta de conexión de
la toma de tierra.
Aparato conforme a la Directiva
Europea 73/23/CEE e 89/336/CEE,
sustituida respectivamente de
2006/95/CE y 2004/108/CE, y
sucesivas modificaciones.
Page 33

6564
7
598
556/573
5
INSTALACIÓN EN COCINAS
MODULARES
Acoplamiento
■ El lavavajillas tiene la altura modular de
85 cm y por consiguiente puede ser
acoplado a los muebles de las modernas
cocinas modulares de análoga altura.
Para una perfecta alineación, maniobrar
en los pies regulables.
■ La tapa superior es de laminado de alta
resistencia que puede utilizarse sin
ninguna particular precaución ya que es
resistente al calor, a la abrasión y es
anti-manchas (fig. 5).
Apertura de la puerta
Introducir la mano en la cavidad de apertura
y tirar. Si la puerta se abre durante el
funcionamiento de la máquina, un sistema
de seguridad eléctrico hace que todas las
funciones se interrumpan automáticamente.
IMPORTANTE
Evitar abrir la puerta del lavavajillas
mientras éste funcione.
Para cerrar la puerta
Introducir los cestos.
Verificar que todas las aspas de lavado
puedan girar y no hayan cubiertos,
cacerolas o platos que impidan su rotación.
Cerrar la puerta y presionar con fuerza
hasta el cierre del dispositivo de seguridad.
Encastre
(Para su colocación debajo de la
encimera)
■ Las cocinas modulares más modernas
tienen un plano de trabajo único, bajo el
que son encastrados los muebles y los
electrodomésticos. En este caso basta
quitar la tapa superior, sacando los
tornillos que se encuentran bajo el
mismo en la parte posterior (fig. 6a).
IMPORTANTE
Después de haber quitado el plano
de trabajo, los tornillos HAN de ser
reposicionados en su sede (fig. 6b).
■ La altura se reduce de esta forma a
82 cm, tal como está previsto en
las Normas Internacionales (ISO) y el
lavavajillas se encastra perfectamente
bajo el plano contínuo de la cocina
(fig. 7).
6
a
b
a
b
Instalación salida de agua
■ Colocar el tubo en la instalación de salida,
evitando pliegues o arrugas (fig. 4).
■ El tubo de desague fijo debe tener un
diámetro interior de al menos 4 cm, y
debe estar colocado a una altura mínima
de 40 cm.
■ Se recomienda colocar un sifón contra
malos olores (fig. 4X).
■ Si fuera necesario, se puede alargar
el tubo de salida hasta 2,5 m, pero
manteniéndolo siempre a una altura
máxima de 85 cm del suelo. Para tal fin
contactar con el Centro de Asistencia
Técnica.
■ La extremidad curvada del tubo puede
ser apoyada en el borde de un lavadero,
pero no debe permanecer inmerso en
el agua, para evitar efectos de sifón
durante el lavado (fig. 4Y).
■ En el caso de una instalación bajo un
plano continuo, la curva debe ser fijada
inmediatamente debajo del citado plano,
en el punto más alto posible (fig. 4Z).
■ Al instalar la máquina, debe controlarse
que los tubos de carga y descarga no
estén doblados.
4
Page 34

6766
CARGAR LA SAL
■ En la parte inferior de la máquina esta
situado el depósito de la sal.
La sal sirve para regenerar el aparato
descalcificador.
■ Es importante utilizar exclusivamente sal
específico para lavavajillas, otros tipos de
sal contienen sensibles porcentajes de
sustancias insolubles que con el tiempo
podrían hacer ineficiente la instalación de
descalcificación.
■ Para la introducción de la sal, desenroscar
el tapón del depósito que se encuentra
en la parte inferior. Después llenar el
depósito.
■ Durante esta operación saldrá un poco
de agua, aun así continue echando sal
hasta llenarlo. Una vez lleno, limpiar la
rosca de granos de sal y roscar el
tapón.
■ Se aconseja que, después del rellenado,
se realice un ciclo de lavado completo,
o también el programa “REMOJO
FRÍO”.
El contenedor tiene una capacidad de
cerca de 1,5-1,8 kg de sal y, para
una eficaz utilización del aparato, es
necesario rellenarlo periódicamente
según la regulación del nivel de
descalcificación elegido.
IMPORTANTE
Después de haber instalado el
lavavajillas, y haber llenado el depósito
de sal, es necesario añadir agua hasta
llenar completamente el deposito. Esta
operación solo es preciso realizarla la
primera vez.
Indicador del llenado de sal
Este modelo está dotado de piloto eléctrico
en el cuadro de mandos, que se enciende
cuando es necesario rellenar el contenedor
de la sal.
IMPORTANTE
La aparición de manchas blanquecinas
en la vajilla es generalmente un índice importante de falta de sal.
* El descalcificador está regulado en el
nivel 3, en cuanto satisface a la
mayoría de usuarios.
Según el nivel de dureza de su agua debe
regular el descalcificador de la siguiente
manera:
IMPORTANTE
Iniciar el procedimiento SIEMPRE con
el lavavajillas apagado.
1. Con el lavavajillas apagado, ABRA la
puerta.
2. Mantenga presionadas la PRIMERA y
la TERCERA tecla (comenzando por la
izquierda) y simultáneamente presione
la tecla "MARCHA/PARO".
3. Suelte las teclas en el momento en que
la luz de algunos de los pilotos
"SELECCIÓN PROGRAMA" quede fija
y se emita una señal acústica.
4. Presione la tecla "SELECCIÓN
PROGRAMA" para elegir el nivel de
descalcificación deseado (se
encenderá un número de indicadores
luminosos correspondiente al nivel
elegido). Para el nivel 5, parpadearán
los 4 indicadores "SELECCIÓN
PROGRAMA".
5. Apague el lavavajillas presionando
la tecla "MARCHA/PARO" para
confirmar la nueva impostación.
ATENCIÓN!
Si por cualquier motivo no se lograse
finalizar el procedimiento, apage
el lavavajillas accionanto la tecla
"MARCHA/PARO" y comenzar de
nuevo (PUNTO 1).
SISTEMA DE REGULACIÓN
DE LA DESCALCIFICACIÓN
DEL AGUA
El agua contiene de forma variable, según
la localidad, sales calcáreas y minerales
que se depositan en la vajilla dejando
manchas blanquecinas.
Cuanto más elevado sea el contenido de
estas sales, mayor es la dureza del agua.
El lavavajillas contiene un descalcificador
que, utilizando sales regenerantes
especiales para lavavajillas, permite lavar
la vajilla con agua sin agentes clacáreos.
Puede solicitar el grado de dureza de su
agua al Ente distribuidor de su zona.
Regulación descalcificación
del agua con el descalcificador
El descalcificador puede tratar agua con una
dureza hasta 90°fH (grados franceses)
50°dH (grados alemanes) a través de
6 niveles de regulación.
En la siguiente tabla encontrará la
correspondencia entre la dureza del agua
de la red a tratar y el nivel de regulación
del descalcificador.
Nivel
ºfH
(grados
franceses)
ºdH
(grados
alemanes)
NO
SI
SI
SI
SI
SI
Piloto 1
Piloto 1
Pilotos
1, 2
Pilotos
1, 2, 3
Pilotos
1, 2, 3, 4
Pilotos
1, 2, 3, 4
parpadeantes
Dureza del agua
Regulación de
descalcificación
Uso Sal
Regenerante
0-5
6-15
16-30
31-45
46-60
61-90
0-3
4-9
10-16
17-25
26-33
34-50
0
1
2
*3
4
5
Tecla
"MARCHA/PARO"
Tecla "SELECCÍON PROGRAMA"
Pilotos "SELECCÍON PROGRAMA"
4
3
2
1
Page 35

6968
COLOCAR LA VAJILLA
Uso del cesto superior
■ El cesto superior esta dotado de unos
soportes móviles fijados al panel lateral,
y que pueden adoptar dos posiciones:
levantada y bajada. En posición bajada
los soportes sirven para poner tazas de
té, café, cuchillos largos y cucharones.
En los extremos de tales soportes se
pueden colgar los vasos con forma de
copa.
Por debajo de ellos, se pueden poner
los vasos pequeños, tazas, los platos de
las tazas y los de postre.
■En posición levantada, los soportes
permiten el alojamiento de los platos
llanos y hondos.
Estos ultimos se colocan en posición
vertical con el lado cóncavo dirigido
hacia el interior, y dejando siempre un
espacio entre plato y plato para que el
agua pueda pasar sin dificultad.
■ Para aprovechar al máximo la capacidad del cesto se aconseja reagrupar los
platos que sean iguales.
■ Los platos pueden colocarse en una
sola fila (fig. 1), o en las dos (fig. 2).
■ Es aconsejable colocar los platos
grandes, con un diámetro de unos
270 mm, un poco inclinados hacia el
interior y así poder meter el cesto sin
problemas.
■ En el cesto superior pueden colocarse
también elementos como ensaladeras y
cuencos de plástico, que se recomienda
fijar para que no se den la vuelta con la
presión de los chorros de agua.
■ El cesto superior ha sido estudiado para
poder ofrecer la máxima flexibilidad de
uso. Éste puede llenarse únicamente
con platos, colocados en doble fila hasta
un máximo de 24 piezas, únicamente
con vasos, en cinco filas hasta un
máximo de 30 piezas, o bien con una
carga mixta.
Uso del cesto inferior
■ En el cesto inferior se colocan las
cacerolas, sartenes, soperas, ensaladeras,
tapas, fuentes, platos planos, platos
hondos y cucharones.
■ Los cubiertos se colocarán con el mango
hacia abajo en el depósito contenedor
de plástico que después se introducirá
en el cesto inferior (fig. 3) asegurándose
que no bloqueen la rotación del rociador.
IMPORTANTE
El cesto inferior está dotado de un
dispositivo de “bloqueo de recorrido”
para obtener una segura operación de
extracción aún en el caso de cargas
plenas.
Para las operaciones de carga de sal,
limpieza del filtro y manutención
ordinaria se necesita la completa
extracción del cesto.
REGULACIÓN DEL CESTO
SUPERIOR
Utilizando habitualmente platos de 27 a
31 cm de diámetro cargarlos en el cesto
inferior después de haber colocado
el superior en la posición más alta,
procediendo del siguiente modo:
1. Girar el cierre anterior “A” hacia el
exterior;
2. Sacar el cesto y situarlo en la posición
más alta;
3. Volver el cierre “A” a la posición
original.
Con esta operación en el cesto superior
no se puede cargar vajilla con diámetro
superior a 20 cm y no se pueden utilizar los
soportes móviles en la posición alta.
A
A
Page 36

7170
Cesto inferior (fig. 6)
M = 8 + 4 platos hondos
N = 11 + 1 platos llanos
O = 12 platos de postre
P = fuentes
Q = cubiertos
Cesto superior (fig. 5)
A = 5 + 5 + 2 vasos
B = 12 platos para tazas
C = 4 + 4 + 4 tazas
D = copa pequeña
E = copa media
F = copa grande
G = 1 + 1 tenedores
H = 1 + 1 cucharas de servicio
I = 3 + 3 + 3 + 3
cucharas de postre
L = 3+3+3+3 cucharas de café
INFORMACIÓN PARA LABORATORIOS DE PRUEBA
Programa comparativo general (según normas EN 50242)
(ver tabla programas de lavado)
1. Posición cesto superior: baja
2. Carga normalizada
3. Posición regulador abrillantador: 6
Carga normalizada 12 cubiertos internacionales (según normas EN 50242)
La correcta disposición de la carga es la que se indica en la fig. 5 para el cesto
superior, en la fig. 6 para el cesto inferior y en la fig. 7 para el cesto de cubiertos.
Cesto de cubiertos (fig. 7)
En las dos rejillas abatibles bajadas introducir
n° 6 + 6 cuchillos (R); en los compartimentos
sobrantes alojar los cubiertos con los mangos hacia
abajo, teniendo cuidado de no introducir más de dos
cubiertos idénticos por compartimento.
4. Cantidad detergente:
– 8 g para el prelavado;
– 22 g para el lavado.
A
F
C
C
C
G
B
E
D
H
H
5
QN
M
P
O
M
N
L
I
6
R
7
Carga diaria estándar representada en las fig. 1, 2 y 3.
Cesto superior (fig. 1)
A = platos hondos
B = platos llanos
C = platos de postre
D = platos de las tazas
E = tazas
F = vasos
Cesto superior (fig. 2)
A = platos hondos
B = platos llanos
C = platos de postre
D = platos de las tazas
E = tazas
F = copas
G = vasos
H =1/2 cesto para los cubiertos
Cesto inferior (fig. 3)
A = cacerola media
B = cacerola grande
C = sartén
D = tapas
E = soperas, fuentes
F = cubiertos
G = cazuelas llanas, cazuelas de barro
Una posición racional y correcta de la vajilla es condición
esencial para un buen resultado en el lavado.
Cesto de cubiertos (fig. 4)
El cesto para los cubiertos está compuesto de dos
partes divisibles, para poder ofrecer distintas
posibilidades de carga.
La división en dos del cesto se obtiene haciendo
correr en sentido horizontal las dos partes, una
respecto de la otra y viceversa para reengancharlo.
D
FAG
E
B
C
3
4
1
A
B
C
D
E
F
A
B
C
D
FE
F
H
2
G
Page 37

7372
TIPO DE DETERGENTE
Detergentes en pastillas
Los detergentes en pastillas de diferentes
fabricantes, se disuelven a velocidades
diversas, por tanto en los programas
breves, algunas pastillas pudieran no ser
totalmente eficientes al no disolverse
completamente.
Si se utiliza este tipo de detergente se
recomienda seleccionar el programa mas
largo para garantizar la completa
disolución del mismo.
IMPORTANTE
Para obtener resultados de lavado
óptimos, las pastillas DEBEN ser
introducidas en el dispensador del
detergente, NO directamente en la
cuba.
Detergentes concentrados
Los detergentes concentrados, con reducida
alcalinidad y enzimas naturales, combinados
con programas de lavado a 50ºC, permiten
tener un menor impacto en el ambiente y
preservan los cubiertos y el propio
lavavajillas.
Los programas de lavado a 50ºC han sido
ideados para disfrutar completamente
de las propiedades de disolución de la
suciedad por parte de las enzimas,
permitiendo por tanto, con la utilización de
detergentes concentrados obtener los
mismos resultados de los programas a
65ºC pero a una temperatura inferior.
Detergentes combinados
Los detergentes que contienen además
abrillantador, deben ser introducidos en el
dispensador para el detergente de lavado.
El contenedor del abrillantador debe estar
vacio (si no fuera así antes de utilizar
detergentes combinados, regular al mínimo
el dosificador de abrillantador).
Detergentes combinados
“ALL in 1”
Si decide utililizar detergentes combinados
("3 en 1"/"4 en 1"/"5 en 1", etc.) que pudiera
dar como resultado un menor consumo de
sal o abrillantador, se deben respetar las
siguientes advertencias:
■
l
leer atentamente y abstenerse
escrupulosamente a las instrucciones
de uso y a las advertencias indicadas
en el envase del detergente combinado
que se va a utilizar;
■ la eficacia de los productos que dan
lugar a la no necesaria utilización de sal,
dependen de la dureza del agua de
alimentación del aparato. Verificar que la
dureza del agua se compensa con el
intervalo de funcionamiento indicado en
el paquete del detergente.
Si con el uso de este tipo de producto
se obtuvieran resultados de lavado no
sadisfactorios, dirijase al fabricante del
detergente.
La utilización inadecuada de estos productos
podría llevar a:
■ formación de depositos calcáreos en el
aparato y vajilla;
■ una empeoramiento del grado de
secado y/o lavado.
IMPORTANTE
En el caso de reclamaciones que
puedan estar ligadas a la utilización
imprópia de estos productos, no
serán validas las prestaciones especificadas en la garantia.
Se recuerda que el uso de los detergentes
combinados “ALL in 1” convierte en
superflua la señalación de falta de sal y
abrillantador (prevista en algunos
modelos).
En el caso que se dieran problemas de
lavado y/o secado se aconseja el uso de
productos tradicionales (sal, abrillantador,
detergente en polvo).
En este caso se aconseja que:
■ rellenar nuevamente el contenedor de
sal y abrillantador;
■ continuar con un normal ciclo de lavado
sin carga.
Se comunica que volviendo al uso de sal
tradicional, serán necesarios algunos
ciclos de lavado antes de que el sistema
de desclacificación del agua vuelva a
funcional de modo correcto.
CARGA DE DETERGENTE
El detergente
IMPORTANTE
Es indispensable utilizar un detergente
específico en polvo, líquido o en
pastillas para el lavado de vajillas.
"CALGONIT" asegura óptimos resultados
de lavado y lo encontrará fácilmente.
No deben emplearse detergentes para el
lavado de la ropa. Detergentes no idóneos
(como los de uso para lavado a mano), no
contienen los ingredientes adaptados al
lavado en lavavajillas e impiden el correcto
funcionamiento de la máquina.
Carga del detergente
La caja para el detergente de lavado está
situada en el interior de la puerta
(fig. A "2"). Si la tapa del contenedor
resultase cerrada, para abrirla basta
accionar sobre el pulsante de enganche
(A): al término de cualquier programa de
lavado la puerta debe estar siempre
abierta, y lista para su sucesiva utilización.
ATENCIÓN!
En el cesto inferior, no carge vajilla en
posición tal que impida la apertura de la
tapa del contenedor de detergentes y la
extracción del detergente.
La dosis de detergente puede variar en
función del grado de suciedad y tipo de
vajilla. Nosotros le aconsejamos utilizar de
20 ÷ 30 g de detergente en la cubeta
lavado (B).
Después de haber introducido el detergente
en el depósito, cerrar la tapa, primero
empujando (1) y después apretando
ligeramente el mismo (2) hasta escuchar
un sonido de cierre.
Puesto que los detergentes no son
todos iguales, consulte las instrucciones del
fabricante. Recordamos que una cantidad
insuficiente de detergente provoca una
incompleta eliminación de la suciedad,
mientras, un exceso de detergente, no sólo
no mejora el resultado del lavado, sino
además, representa un despilfarro.
IMPORTANTE
No excederse en el uso de detergente
representa una contribución al
mantenimiento del medio ambiente.
A
B
Page 38

7574
1
2
3
LIMPIEZA DEL FILTRO
El sistema filtrante (fig A “4”) está
constituido de:
Un contenedor central, que retiene las
particulas más gruesas de suciedad;
Una placa que filtra continuamente el
agua;
Un microfiltro situado debajo de la placa
que impide el paso de las partículas de
suciedad más pequeñas asegurando así
un alcarado perfecto.
■ Para lograr siempre los mejores
resultados hay que controlar la limpieza
de los filtros antes de cada lavado.
■ Para extraer el sistema filtrante basta
levantarlo estirando del mismo (fig. 1).
■ El contenedor central puede ser extraído
para facilitar las operaciones de limpieza
(fig. 2).
■ Extraer la placa (fig. 3) y lavarlo bajo
un chorro de agua ayudándose
eventualmente con un cepillo.
■ Con el microfiltro autolimpiante, la
manutención es mínimo y la revisión
del grupo de filtros puede realizarse
cada 15 días. No obstante se aconseja
controlar, después de cada lavado la
parte central para cerciorarse que no
quede atascada.
ATENCIÓN!
Una vez limpiados los filtros, debe
asegurarse que los mismos hayan
sido acoplados correctamente y que
la placa se encuentre perfectamente
colocada en el fondo del lavavajillas.
Tener la precaución de girar, en sentido
horario, el filtro en la rejilla superior
porque una inserción imprecisa del
grupo filtrante puede perjudicar el
correcto funcionamiento de la máquina.
IMPORTANTE
No usar el lavavajillas sin el filtro.
CARGA DE ABRILLANTADOR
El abrillantador
Este aditivo se introduce automáticamente
en la última fase del aclarado y favorece un
rápido secado de la vajilla evitando que se
formen manchas o sedimentos opacos.
Carga del abrillantador
A la izquierda del recipiente detergente se
encuentra el del abrillantador (fig. A "3").
Para abrir la tapa, apretar en la zona para
tal fin y simultáneamente tirar la lengüeta
de apertura.
Utilizar siempre aditivos especiales para
lavavajillas automáticos.
Es posible controlar el nivel del abrillantador
por medio del visualizador óptico (C) situado
sobre el distribuidor.
Regulación del abrillantador de 1 a 6
El regulador (D) está situado bajo el tapón
y se puede manipular con una moneda.
Se aconseja la posición 4.
El contenido calcáreo del agua repercute
notablemente tanto en la formación de
incrustaciones como en el grado de secado.
Es muy importante regular la dosificación
del abrillantador para conseguir óptimos
resultados.
En caso de que la vajilla presente estrías al
finalizar el lavado, disminuir la dosis en una
posición. Si la vajilla presenta manchas o
rastros blanquecinos, aumentarla un poco.
LLENO VACIO
reflejo oscuro reflejo claro
C
D
Page 39

7776
1
2
1b
DESPUES DEL USO
Después de cada lavado cerrar
perfectamente el grifo del agua, para aislar
el lavavajillas de la red hidráulica de
alimentación y desconectar el mando
paro/marcha para aislar la máquina de la
red eléctrica.
Si el lavavajillas debe permanecer parado
largo tiempo, aconsejamos las siguientes
operaciones:
1. realizar un programa de lavado sin
vajilla, pero con detergente, para
desengrasar la máquina;
2. desenchufar la toma corriente;
3. cerrar el grifo del agua;
4. rellenar el recipiente del abrillantador;
5. dejar la puerta ligeramente abierta;
6. dejar el interior de la máquina limpio;
7. si la máquina se encuentra en un
ambiente donde la temperatura es
inferior a 0°C, el agua residual de los
conductos puede congelarse. Por eso
se debe trasladar la máquina a un lugar
donde la temperatura ambiente sea
superior a 0°C y esperar 24 horas antes
de ponerla en marcha.
LIMPIEZA EXTERIOR Y
MANTENIMIENTO
■ Para limpiar el exterior del lavavajillas
no se deben usar, ni disolventes
(desengrasantes) ni abrasivos.
Unicamente un paño de agua tíbia.
■ El lavavajillas no requiere ningún
mantenimento especial, ya que la cuba
de lavado es autolimpiante.
■ Periódicamente limpiar la guarnición de
goma de la puerta, con un paño húmedo
eliminando cuidadosamente cualquier
resíduo de alimentos o abrillantador.
■ Para garantizar una mejor eliminación
de pequeños depósitos calcáceros o
de suciedad, se aconseja realizar
periódicamente un lavado completo
vertiendo previamente un vaso de
vinagre en el interior del lavavajillas y
hacer el programa delicado.
■ Si a pesar de la normal limpieza de
placa y filtro, se notasen vajillas o
cacerolas insuficientemente lavadas o
aclaradas, se debe controlar que todos
los rociadores de los brazos (fig. A “5”)
estén libres de restos de suciedad.
Si este no fuese el motivo, proceder a su
limpieza de la siguiente forma:
1.Para extraer el brazo superior, es
necesario girarlo hasta llevarlo a la
posición de “tope” señalada por la flecha
(fig. 1b). Empujarlo hacia arriba (fig. 1) y
manteniéndolo apretado girar en sentido
horario (para montarlo, repita la
operación, pero girando en sentido
contrario a las agujas del reloj).
El aspersor inferior, se extrae
simplemente estirando hacia arriba (fig. 2).
2.Lavar el aspersor bajo un chorro de agua
eliminando de suciedad los inyectores
obstruidos.
3.Al término de la operación, monte de nuevo
los aspersores en la idéntica posición.
■ Tanto la cuba como el interior de la
puerta son de acero inoxidable. Si se
produjeran manchas de óxido, ello se
debería únicamente a una fuerte
presencia de sales de hierro en el agua.
■ Para quitar estas manchas se aconseja
el uso de un abrasivo de grano fino. No
utilizar nunca substancias con cloro,
cepillos de acero, etc.
CONSEJOS PRÁCTICOS
Qué hacer para obtener
óptimos resultados de lavado
■ Antes de colocar la vajilla en la
máquina, eliminar los residuos de
comida más grandes (huesecillos,
espinas, residuos de carne o verdura,
residuos de café, peladuras de fruta,
ceniza de cigarrillos, palillos, etc.) para
evitar que se atasquen los filtros, el
desague y los rociadores de los brazos
de lavado.
■ Evitar enjuagar la vajilla antes de
colocarla en la máquina.
■ En caso de residuos de comida quemados
o asados muy incrustados, en cacerolas
y sartenes, se aconseja ponerlas en
remojo antes del lavado.
■ Colocar la vajilla con la boca vuelta
hacia abajo.
■ A ser posible evitar que la vajilla esté
en contacto una contra la otra, una
correcta colocación le dará mejores
resultados de lavado.
■ Después de haber colocado la vajilla,
verificar que los brazos de lavado
pueden girar libremente.
■ Las ollas y otra vajilla que presentan
residuos de comida muy tenaces o
requemadas, deberán ser puestas en
remojo con agua y detergente para
lavavajillas.
■ Para el perfecto lavado de la plata es
necesario:
a) aclarar apenas usada, sobre todo si
ha estado empleada para mayonesa,
huevos, pescados, etc.;
b) no rociarla con detergente;
c) no ponerla en contacto con otros
metales.
Qué hacer para ahorrar
■ En el caso que se desee lavar a plena
carga, reponer la vajilla en la máquina
apenas terminada la comida, poniendo
en marcha lo más pronto posible,
efectuando eventualmente el programa
REMOJO FRIO para reblandecer la
suciedad y eliminar los residuos
mayores entre una carga y otra en
espera de continuar el programa de
lavado completo.
■ En presencia de suciedad poco
consistente o del cesto no muy cargado
seleccionar un programa ECONOMICO
siguiendo las indicaciones de la lista de
programas.
Qué cosa no se debe lavar
■ Es bueno recordar que no todo tipo de
vajilla puede ser lavado en el lavavajillas;
se desaconseja introducir piezas en
material termoplástico, cubiertos con
mando de madera o plástico, pucheros
con asas de madera, vajilla de
aluminio, de cristal o vidrio aplomado si
no está específicamente indicado.
■ Ciertas decoraciones pueden tender a
decolorarse, por tanto, se aconseja
efectuar el lavado en máquina varias
veces de una sola pieza y sólo después
de comprobar que no se decolora, lavar
la totalidad de las piezas.
■ Es aconsejable no lavar cubiertos de
plata con cubiertos de acero para evitar
que se produzca una reacción química
entre ambas.
IMPORTANTE
Cuando se compre nueva vajilla
cerciorarse siempre que es idónea
para su lavado en lavavajillas.
Sugerencias para ahorrar
■ Para evitar posibles derrames del cesto
superior, sacar primero el cesto inferior.
■ Si se ha de dejar la vajilla en la
máquina durante un cierto tiempo,
entreabrir la puerta para favorecer la
circulación del aire y mejorar el ulterior
secado.
Page 40

7978
SELECCION DE LOS
PROGRAMAS Y FUNCIONES
ESPECIALES
IMPORTANTE
El lavavajillas dispone de dos
funciones muy útiles:
- el programa "aconsejado"
(preseleccionado de fábrica, es ideal
para el uso cotidiano a plena carga)
para una selección más rápida y
segura;
- la función de memorización del
último programa usado, que permite
a quien utiliza siempre el mismo ciclo
de lavado no tener que repetir cada
vez la programación, y por tanto
ahorrar tiempo.
Tecla "EXPRESS"
Esta tecla permite elegir 2 niveles de
intensidad de lavado, según el grado de
suciedad de la vajilla, reduciendo así
también el consumo de tiempo y de
energía. Presionando la tecla "EXPRESS"
es posible reducir la intensidad de lavado,
modificando los parámetros de duración
del ciclo y su temperatura.
Asociando la tecla con los 4 programas
expuestos en el frontal de la máquina,
obtendremos hasta 8 ciclos de lavado
diferentes.
IMPORTANTE
Una vez seleccionada, la tecla se
mantiene activa (indicador luminoso
correspondiente encendido) en los
sucesivos programas de lavado, a no
ser que se presione de nuevo
(indicador luminoso correspondiente
apagado) o se anule el ciclo en
ejecución.
Selección de los programas
■ Abrir la máquina e introducir los
utensilios a lavar.
■ Accionar la tecla "MARCHA/PARO" .
El indicador luminoso correspondiente al
programa "aconsejado" o al del último
programa usado comenzará a parpadear.
■ Si desea seleccionar otro programa, es
necesario presionar la tecla "SELECCIÓN
PROGRAMA".
■ Si es preciso presionar la tecla
"EXPRESS".
■ Si lo desea, accione la tecla opción (el
piloto correspondiente se iluminará).
La opción puede ser activada o
desactivada EN EL INTERVALO de 1
minuto desde el inicio del programa.
■ Accionar la tecla "START" (el indicador
luminoso correspondiente al programa
seleccionado pasará de luz intermitente
a fija).
■ Con la puerta cerrada, después de una
señal acústica el programa se iniciará
automáticamente.
EN UN INTERVALO DE TIEMPO NO
SUPERIOR A 1 minuto desde el inicio
del ciclo de lavado, es posible
elegir otro programa, simplemente
presionando la tecla "SELECCIÓN
PROGRAMA" (también es posible
activar o desactivar la tecla
"EXPRESS").
Interrupción de un programa
Se desaconseja la apertura de la puerta
durante el desarollo de los programas, en
particular, durante las fases centrales del
lavado y del aclarado caliente. La máquina, de todas formas, se para automáticamente con la apertura de la puerta.
Cerrando de nuevo la puerta, sin accionar
ninguna tecla el ciclo continuará desde el
momento en el que fue interrumpido.
IMPORTANTE
Es posible interrumpir el programa
sin necesidad de abir la puerta,
accionando la tecla "MARCHA/PARO".
En tal caso, para que el ciclo siga
lavando desde el punto en que se
interrumpió, será suficiente accionar
nuevamente la tecla "MARCHA/PARO".
ATENCION!
Si se abre la puerta mientras el
lavavajillas está en la fase de secado,
se activa una señal acústica para
avisar que el ciclo no ha finalizado.
Cubiertos (EN 50242)
Capacidad con cacerolas y platos
Presión admitida en la instalación eléctrica
Amperios fusibles
Potencia máxima absorbida
Tensión
12
8 personas
Min. 0,08 - Max 0,8 MPa
(véase placa de características)
(véase placa de características)
(véase placa de características)
DESCRIPCION DE LOS MANDOS
DATOS TÉCNICOS:
DIMENSIONES:
Altura
Profundidad
Ancho
Medida con puerta abierta
cm
cm
cm
cm
con plano de trabajo
85
60
60
120
sin plano de trabajo
82
57,3
59,8
117
A
Tecla "MARCHA/PARO
"
B Tecla "SELECCIÓN PROGRAMA"
C
Tecla "START"/"RESET"
(inicio/anulación del programa)
D Tecla "EXPRESS"
E
Tecla opción
"ALL in 1"
F
Tecla "INICIO DIFERIDO
"
G
Pilotos "SELECCIÓN PROGRAMA
"
H Piloto tecla "EXPRESS"
I
Piloto
"
FIN SAL
"
L
Piloto
"
SELECCIÓN OPCIÓN
"
M
Pilotos "FASES DE PROGRAMAS"/
Pilotos Tiempo
"
INICIO DIFERIDO
"
AB CD E F
H
I
M
L
G
Page 41

8180
Modificación del programa en
curso
Si se quiere cambiar o anular un programa en
curso, efectuar las siguientes operaciones:
■ Tener pulsada al menos durante 5
segundos la tecla "RESET".
Los indicadores luminosos de los
programas parpadearán y sonará una
señal acústica.
■ El programa en curso será anulado y el
piloto correspondiente al programa
"aconsejado" iniciará su intermitencia.
■ En este momento es posible realizar una
nueva programación.
ATENCION!
Antes de introducir un nuevo programa
es aconsejable comprobar la existencia
de detergente y, en caso contrario
rellenar el contenedor.
Si se interrumpiera la corriente durante
el funcionamiento del lavavajillas, una
especial memoria conservará la elección
efectuada. Al restablecimiento de la
corriente, el lavavajillas continuará en
el punto donde se paró.
Desarrollo del programa
Durante el desarrollo del programa, el
piloto del ciclo seleccionado se
quedará iluminado fijamente y los tres
pilotos de visualización "FASES DE
PROGRAMAS" (correspondientes a
"LAVO" , "SECO" y "FIN" ) se
iluminarán individualmente y secuencialmente
para indicar la fase en curso.
Final del programa
La finalización del programa se indicará
mediante una señal acústica (si no se ha
desactivado) de una duración de 5 segundos,
repetido durante 3 veces con intervalos de
30 segundos.
El indicador luminoso de fin de programa
se iluminará, a la vez que se apagarán el
resto de los indicadores.
Por tanto será posible retirar los utensilios
lavado y apagar el lavavajillas mediante la
tecla "MARCHA/PARO" o en su lugar
realizar una nueva carga de cubiertos para
otro programa de lavado, siguiendo las
operaciones anteriormente descritas.
Tecla opción
Tecla "ALL in 1"
Esta opción permite la utilización óptima de
los detergentes combinados "ALL in 1"
("3 en 1"/"4 en 1"/ "5 en 1", etc.).
Accionando esta opción, el programa de
lavado seleccionado se modifica, de
manera que se obtienen las mejores
prestaciones de los detergentes combinados
(además, se desactiva el indicador de falta
de sal).
ATENCION!
Una vez seleccionada, la opción queda
activada (indicador correspondiente
encendido) también para los
sucesivos programas de lavado y
podrá ser desactivada (indicador
correspondiente apagado) solamente
accionando de nuevo la tecla.
IMPORTANTE
Con esta opción seleccionada, la
duración del programa "RAPIDO" se
alarga alrededor de 10 minutos.
Tecla "INICIO DIFERIDO"
Esta opción permite programar el inicio del
ciclo de lavado con una antelación de 3,6 o
9 horas.
Para introducir el inicio diferido proceder
de la siguiente manera:
■ Accionar la tecla "INICIO DIFERIDO"
(para cada presión realizada se podrá
seleccionar respectivamente 3, 6 o 9
horas y el piloto correspondiente al tiempo
seleccionado se iluminará fijamente).
■ Para iniciar la cuenta atrás, accionar la tecla
"START" (el indicador correspondiente al
programa seleccionado se iluminará
fijamente, mientras que el correspondiente
al tiempo seleccionado pasará de luz fija a
intermitente).
En el caso de introducir un retraso de 9
horas, el descenso del tiempo hasta el
inicio se irá visualizando con el encendido
del piloto 6h transcurridas 3 horas y del
piloto 3h transcurridas 6 horas.
Al final de las últimas 3 horas (fin de la
cuenta atrás), el piloto 3h pasará de luz
intermitente a fija, indicando la fase
de lavado y el programa se iniciará
automáticamente.
Si la cuenta atrás no ha finalizado y
por tanto el programa no ha iniciado,
es posible cambiar o anular el inicio
diferido, seleccionar otro programa o
seleccionar/anular la tecla opción,
procediendo de la siguiente manera:
■ Tener pulsada al menos durante 5
segundos la tecla "RESET".
Los indicadores luminosos de los
programas parpadearán y sonará una
señal acústica.
■ El programa seleccionado será anulado
y el piloto correspondiente al programa
"aconsejado" iniciará su intermitencia.
■ Accionar la tecla "NICIO DIFERIDO",
para introducir otro tiempo de inicio
(el piloto correspondiente al tiempo
seleccionado se iluminará fijamente).
■ Después de haber cambiado o anulado
el inicio diferido, será posible introducir
un nuevo programa y seleccionar o anular
la tecla opción.
Exclusión alarma acústica de
FIN PROGRAMA
La función de alarma acústica de fin
programa puede ser desactivada del
siguiente modo:
■ Con el lavavajillas apagado, mantener
accionado por unos instantes la tecla
"ALL in 1" y simultáneamente accionar
la tecla "MARCHA/PARO".
Dejar de presionar solamente despues
de la señal acústica.
■ Accionar nuovamente la tecla "ALL in
1": el piloto correspondiente pasará de
luz fija (alarma activada) a intermitente
(alarma desactivada).
■ Esperar la señal acústica que indicará
que la modificación ha sido memorizada.
■ Para reactivar la alarma, seguir el
mismo procedimento.
Señalación anomalías
Si durante el desarrollo de un programa se
tuviera que verificar un malfuncionamiento
o una anomalía, el piloto correspondiente
al ciclo seleccionado iniciarán su
intermitencia de manera muy rápida y se
emitirá una señal acústica.
En este caso, apagar el lavavajillas
mediante la tecla "MARCHA/PARO".
Después de controlar que el grifo del
agua esté abierto, que el tubo de
descarga de agua no esté doblado y que
el sifón no esté obstruido o los filtros
mal colocados, introducir nuevamente
el programa seleccionado.
Si la anomalía persiste será necesario
contactar con el Servicio de Asistencia
Técnica (902 100 150).
IMPORTANTE!
Esta lavavajillas está dotado de
un dispositivo de seguridad
antidesbordamiento que, en caso de
anomalía, interviene vaciando el
agua en exceso.
ATENCION!
Para evitar que se dispare el dispositivo
de seguridad anti-desbordamiento,
se recomienda no mover o inclinar el
lavavajillas durante el funcionamiento.
En el caso que sea necesario mover
o inclinar el lavavajillas, asegurarse
primero que haya completado el ciclo
de lavado y que no quede agua en la
cuba.
Page 42

8382
RELACION DE LOS PROGRAMAS
Lavado con prelavado
Para los programas con prelavado se aconseja añadir una segunda dosis de detergente (máx. 10
gramos) directamente en el lavavajillas.
•••
•
•
•••
•
•
130
SI SI
85
SI SI
75°C
65°C
Apto para lavar cacerolas y toda la vajilla
especialmente sucia.
•••
•
•
•••
•
SI
SI
SI SI
SI SI
SI SI
SI SI
•••
•
•••
•
•••
•
•
Ciclo superrápido que se efectua al final de la
comida, indicado para un lavado de vajilla para
4/6 personas.
Apto para el lavado de vajillas delicada y/o
decorada, así como la cristalería. Indicado
también para el lavado cotidiano de vajilla
delicada poco sucia, a excepción de las sartenes.
Breve prelavado para la vajilla usada en la
mañana o al mediodía, cuando se quiere realizar
un sólo lavado completo.
(PROGRAMA “ACONSEJADO”)
Apto para lavar la vajilla y cacerolas con suciedad
normal.
Indicado para el lavado de vajillas y ollas con
suciedad normal, utilizando detergentes con enzimas.
Programa normalizado EN 50242.
PROGR.
EXPRESS
INTENSIVO 75°C
Fuerte & Rápido 65ºC
UNIVERSAL 65°C
Diario 55°C
ECO 45°C
Delicado 45°C
RAPIDO 32' 50°C
Pre-Lavado
PROGR.
EXPRESS
PROGR.
EXPRESS
PROGR.
EXPRESS
Para un lavado rápido de vajillas especialmente
sucias.
Ciclo rápido, para vajillas con suciedad normal,
recomendable en lavados frecuentes y con carga
normal.
SI
175
85
32
5
45°C
45°C
50°C
65°C
55°C
110
80
Operaciones a realizar
Duración
media en
minutos
Funciones
facultativas
Detergente prelavado
Detergente lavado
Limpieza filtro y placa
Control nivel del
abrillantador
Control nivel de la sal
Prelavado caliente
Prelavado frío
Lavado
Primer aclarado en frío
Segundo aclarado
en frío
Aclarado caliente con
abrillantador
Con agua fría (15°C)
-Tolerancia ± 10%-
Tecla "INICIO DIFERIDO"
Tecla "ALL in 1"
Desarrollo del programma
Programa
Descripción
+
Page 43

85
BÚSQUEDA DE PEQUEÑAS ANOMALÍAS
Si el lavavajillas no funcionase, antes de llamar al Servicio Asistencia Técnica, realizar
los siguientes controles:
ANOMALIA CAUSA REMEDIO
1 - No funciona en ningún
programa
2 - No entra agua
3 - No desagua
4 - Desagua
continuamente
5 - No se oye ruido del giro
de las aspas
6 - En los lavavajillas
electrónicos sin visor: una o
mas indicadores luminosos
en rápida intermitencia
Clavija no enchufada
Tecla O/I desconectada
Puerta abierta
Falta energía eléctrica
Ver causa 1
Grifo cerrado
Programador mal seleccionado
El tubo de entrada agua tiene un
pliegue
El filtro del tubo entrada agua está
sucio
Filtro sucio
Tubo desagüe doblado
La prolongación del tubo de
desagüe no es correcta
El desagüe de la pared no permite
un respiradero con el tubo de
desagüe de la máquina
Tubo desagüe en posición
demasiado baja
Excesiva carga detergente
Algún objeto que impide rotación
aspas
Placa filtrante y filtro sucios
Grifo del agua cerrado
Enchufar
Conectar
Cerrar puerta
Verificar
Verificar
Abrir
Seleccionar bien
Eliminar el pliegue del tubo
Limpiar el filtro colocado al extremo
del tubo
Limpiar filtro
Desdoblar
Seguir exactamente las
instrucciones para la instalación
del tubo de desagüe
Consultar a un técnico cualificado
Alzar tubo desagüe minimo
40 cm del suelo
Reducir dosis
Colocar bien
Limpiar placa y filtro
Apagar el lavavajillas
Abrir el grifo
Reintroducir el ciclo
84
El tubo de carga del agua se encuentra provisto de un dispositivo de seguridad que
bloquea el flujo del agua cuando el tubo de carga se deteriora.
En este caso, se observará una mancha roja en la ventanilla «A» y será necesario
sustituir el tubo de carga del agua.
Si la longitud del tubo no es suficiente para una correcta conexión, la totalidad del
tubo debe ser sustituido por uno de longitud adecuada. Solicite en este caso el tubo
al Servicio Técnico.
WATERCONTROL-DISPOSITIVO DE BLOQUEO DEL AGUA
Tecla roja (piloto)
de valvula bloqueada
Dispositivo de cierre
(presionar para
destornillar
la abrazadera)
A
Page 44

87
Parabéns,
Ao comprar este electrodoméstico Candy,
você mostrou ser uma pessoa exigente,
que só se satisfaz com o melhor.
A Candy oferece-lhe esta nova máquina
de lavar, fruto de anos de investigação e
de experiência de mercado, graças ao
contacto directo com os Consumidores.
Você escolheu a qualidade, a durabilidade
e as grandes vantagens que lhe pode
oferecer esta máquina de lavar loiça.
A Candy propõe-lhe também uma vasta
gama de electrodomésticos: máquinas de
lavar roupa, máquinas de lavar e de secar
roupa, máquinas de lavar loiça, fornos
micro-ondas, fornos e placas eléctricos,
fogões, frigoríficos e arcas congeladoras.
Peça ao seu agente da especialidade o
catálogo dos electrodomésticos Candy em
que estiver eventualmente interessada.
Pedimos-lhe que leia atentamente as
instruções contidas neste manual, pois
proporcionar-lhe-ão indicações importantes
relacionadas com a segurança da
instalação, a utilização, a manutenção,
assim como certos conselhos úteis para
uma melhor utilização das máquinas de
lavar loiça.
Conserve este manual para o consultar
sempre que tiver necessidade.
GARANTIA
Esta máquina vem acompanhada por um
certificado de garantia com as informações
necessárias sobre o Serviço de
Assistência Técnica.
Aconselhamos que guarde esse certificado.
Deverá ser guardado num local seguro e
apresentado ao profissional do Serviço de
Assistência Técnica, quando algum serviço
for solicitado.
86
NOTA: Si algún inconveniente de los citados provocase un mal lavado o un insuficiente aclarado, es
necesario remover manualmente la suciedad de la vajilla, ya que la fase final del secado provocaria el
desecado de la suciedad que, en un segundo lavado, la máquina no tiene la posibilidad de sacar.
Si la avería persiste llamar al centro de asistencia, comunicando el modelo de lavavajillas indicado sobre
la placa de características colocada en el interior de la puerta, en la parte superior o sobre la tarjeta de
garantía. Indicando toda la información obtendrá una intervención más rápida y eficaz.
El Fabricante declina cualquier responsabilidad por posibles errores de imprenta contenidos en el presente
libro. Se reserva, además, el derecho de de aportar modificaciones que sean útiles a los propios productos sin
comprometer las caracteristicas esenciales.
ANOMALIA CAUSA REMEDIO
7-Si lava solo parcialmente
8 - Falta o parcial uso del
detergente
9-Manchas blancas en la
vajilla
10 - Ruido durante el lavado
11 - La vajilla no está
perfectamente seca
Ver causa 5
Fondo de cacerolas no
perfectamente limpio
Borde cacerolas no perfectamente
limpio
Rociadores parcialmente
obturados
La vajilla no está colocada
correctamente
El extremo del tubo de desagüe está
inmerso en el agua
El detergente no está dosificado
adecuadamente, es viejo y/o está
endurecido
La tapa del contenedor de la sal no
está bien cerrada
El programa de lavado elegido es
muy suave
Vajillas cesto inferior no lavadas
Cubiertos, platos, cacerolas, etc.
interfieren con la apertura del
contenedor de detergentes
Agua de red con excesiva
dureza
La vajilla golpea entre sí
Los brazos girantes golpean sobre
la vajilla
Falta de circulación de aire
Falta abrillantador
Comprobar
Costras demasiado tenaces
Ablandar antes lavado
Colocar mejor
Desmontar y limpiar los brazos de
lavado
No acercar excesivamente la vajilla
una contra la otra
La extremidad del tubo desagüe no
debe tocar el agua
desaguada
Adecuar la dosis en función de la
cantidad de suciedad o sustituir el
producto
Enroscarla hasta el fondo
Elegir un programa más
enérgico
Desinsertar tecla media carga
Cargar la vajilla de manera que no
interfiera con la apertura del cajetín
detergente
Controlar nivel sal y abrillantador
y regular dosificacion
Si la anomalia persiste, solicitar
intervencion Asistencia Técnica
Adecuar mejor la vajilla en el cesto
Colocar mejor la vajilla
Dejar entreabierta la puerta de la
máquina al final del programa de
lavado para favorecer el secado
natural
Utilizar abrillantador
SERVICIO POST VENTA
☎
902.100.150
Page 45

89
INDICAÇÕES DE SEGURANÇA
Existem algumas regras de segurança
básicas a serem observadas durante
o manuseamento de qualquer
electrodoméstico.
Instalação
■ Certifique-se de que a ficha instalada no
cabo do seu electrodoméstico é compatível
com a tomada de alimentação de
corrente. Se não for, peça a uma pessoa
devidamente qualificada que instale
uma ficha do tipo correcto e que verifique
se os cabos de ligação à tomada de
alimentação de corrente se adequam à
potência nominal do equipamento.
■ Certifique-se que o aparelho não esteja
sobre o cabo de alimentação.
■ Evite recorrer a adaptadores, fichas
múltiplas e/ou cabos de extensão.
■ Em caso de necessidade de substitução
do cabo de alimentação, contacte o
Departamento de Manutenção.
Segurança
■ Nunca toque no equipamento com as
mãos ou os pés molhados ou húmidos.
■ Não utilize os seus electrodomésticos
quando estiver descalça.
■ Nunca puxe pelo cabo ou pelo próprio
electrodoméstico para desligar a ficha
do electrodoméstico da tomada.
■ Proteja o seu electrodoméstico dos
elementos atmosféricos (chuva, sol,
etc.).
■ Este aparelho não está indicado para
ser utilizado por crianças e por pessoas
incapazes ou inexperientes no que toca
à utilização do produto, excepto se
forem devidamente supervisionadas ou
instruídas sobre a utilização do aparelho
por uma pessoa responsável pela sua
segurança.
As crianças devem ser vigiadas de
modo a assegurar que não brinquem
com o aparelho.
■ A água que fica na máquina ou na loiça
a seguir à lavagem não deve ser bebida.
■A porta não deve ser deixada na posição
de abertura, pois pode causar algum
contratempo (ex. cair).
■ Nunca se encoste nem se sente na
porta da máquina, pois corre o risco de
a fazer tombar.
ATENÇÃO !
Facas e outros utensílios com lâminas
devem ser colocados no cesto com as
pontas para baixo ou colocados na
horizontal.
Modo de utilização
■ Este electrodomestico foi concebido
para uso doméstico.
■ A máquina de lavar loiça está protegida
para a lavagem normal dos utensílios
domésticos. Nesta máquina não podem
ser lavados objectos contaminados por
gasolina, verniz, resíduos de aço ou de
ferro, produtos químicos corrosivos,
ácidos ou alcalinos.
■ Se a sua casa estiver equipada com
uma instalação de descalcificação da
água não será necessário adicionar sal
ao dispositivo de descalcificação com
que a máquina está equipada.
■ Os talheres ficarão mais bem lavados se
forem colocados no respectivo cesto,
com os cabos para baixo.
■ Se a sua máquina se avariar ou deixar
de trabalhar correctamente desligue-a,
feche a alimentação de água e não tente
repará-la. Qualquer trabalho de
reparação deverá ser sempre feito por
um técnico autorizado, devendo sempre
ser instaladas peças sobressalentes
originais. O incumprimento desta norma
poderá acarretar sérias consequências
para a segurança dos equipamentos.
Disposição
■ Este aparelho é fabricado com materiais
recicláveis.
■ Sempre que se queira desfazer de uma
máquina de lavar loiça antiga, tenha o
cuidado de lhe retirar a fechadura da
porta antes, para evitar que crianças se
possam fechar na máquina.
88
ÍNDICE
Dispositivo de segurança
Regulação, instalação
Unidade amaciadora da água
Colocação do sal na máquina
Ajuste do cesto superior
Colocação da loiça na máquina
Informações para os laboratórios de ensaio
Colocação do detergente
Tipos de detergente
Colocação do abrilhantador
Limpeza dos filtros
Algumas sugestões práticas
Operações de limpeza e de manutenção de rotina
Descrição dos comandos
Dados técnicos
Selecção do programa e funções especiais
Tabela dos programas
Watercontrol
Detecção de pequenas avarias
Por favor leia atentamente o presente manual de instruções. Além de incluir alguns
conselhos úteis, ele contém instruções importantes sobre a segurança da instalação,
a utilização e a manutenção da máquina de lavar loiça.
Conserve este manual num lugar seguro e à mão para o poder consultar sempre que
necessário.
Fig. A
3
2
1
4
5
pág. 89
pág. 90
pág. 94
pág. 95
pág. 96
pág. 97
pág. 99
pág. 100
pág. 101
pág. 102
pág. 103
pág. 104
pág. 105
pág. 106
pág. 106
pág. 107
pág. 110
pág. 112
pág. 113
Page 46

91
Ligação à rede de alimentação
de água
IMPORTANTE
Os acessórios devem estar ligados à
torneira da água, usando mangueiras
novas.
As mangueiras não devem ser
reutilizadas.
■ As mangueiras de entrada e de esgoto
de água tanto podem ficar voltadas
para a esquerda, como para a direita.
IMPORTANTE
A máquina de lavar loiça tanto pode
ser ligada à rede de alimentação de
água fria, como de água quente,
desde que esta não atinja uma
temperatura superior a 60°C.
■ Apressão da água deve estar entre 0,08
e 0,8 MPa. Se a água estiver abaixo de
minimo, contacte o nosso serviço de
assistência técnica.
■ Amangueira de entrada de água deverá
ser ligada a uma torneira, de modo a ser
possível cortar a alimentação de água
sempre que a máquina não estiver em
funcionamento (fig. 1 B).
■ A máquina de lavar dispõe de um tubo
de ligação roscado de 3/4" (fig. 2).
■ A mangueira de admissão “A” deve ser
aparafusada à torneira de alimentação
de água “B” com uma ligação de 3/4".
Certifique-se de que o anel de aperto
fique bem apertado.
O tubo de ligação deverá ficar bem
apertado, a fim de evitar fugas de água.
■ Se for necessário prolongar a mangueira
de entrada de água deverá utilizar uma
peça de prolongamento com um
comprimento de 2,5 m. A extensão da
mangueira é fornecida pelo serviço Após
Venda.
■ Se a água da sua zona for muito
calcária (muito dura) recomendamos a
obtenção de um filtro “D” (número de
ref.a 9226085) junto dos Serviços de
Assistência Técnica, o qual deverá ser
montado entre a torneira de alimentação
de água “B” de 3/4" e a mangueira de
entrada de água “A”, de modo a que a
anilha de borracha “C” fique entre eles
(fig. 3).
1
2
3
■ Se a máquina for ligada a uma
instalação de alimentação de água nova
ou que tenha estado sem ser utilizada
durante um certo tempo, será
recomendável deixar correr a água
durante alguns minutos antes de ligar as
mangueiras de admissão de água da
máquina. Evita-se assim que eventuais
depósitos de areia ou de ferrugem
possam entupir o filtro de admissão de
água.
90
INSTALAÇÃO
(Observações técnicas)
■ Depois de desembalar a máquina de
lavar loiça regule a sua altura, voltando,
em seguida, a aparafusar a porca de
aperto até esta ficar encostada ao fundo
da máquina, bloqueando assim o
respectivo pé na posição ajustada.
Para que a sua máquina funcione em
condições, é condição essencial esta
estar perfeitamente nivelada, pelo que
deverá regular os pés acima referidos
de modo a que a máquina não apresente
uma inclinação superior a 2 graus.
■ Se precisar de mover a máquina depois
de lhe retirar a caixa, não tente levantá-la
pelo botão da porta. Siga as instruções
da figura. Abra a porta cuidadosamente
e levante-a, agarrando-a no topo.
IMPORTANTE
Se o electrodoméstico for instalado
num local alcatifado, deverá
assegurar-se de que as aberturas de
ventilação inferiores não fiquem
tapadas ou obstruídas.
Certifique-se que a tomada esteja
num local acessível após a
instalação da máquina de lavar
loiça.
Alimentação de corrente
Esta máquina está em conformidade com
as normas internacionais de segurança
emitidas pelas entidades normativas, e
está equipada com uma ficha de três
pólos, com pólo de terra, assegurando
desta forma uma total ligação à terra do
aparelho.
Antes de ligar a sua máquina à instalação
de alimentação eléctrica, deverá
assegurar-se de que:
1. a tomada está devidamente ligada à
terra;
2. a alimentação de corrente de que
dispõe é suficiente para fazer frente ao
consumo indicado na placa de
características da sua máquina.
ATENÇÃO !
Aeficácia da segurança fica, assim,
subordinada à correcta ligação à
terra da instalação eléctrica de sua
casa.
Em caso de ausência de uma ligação
adequada à terra, notará que,
quando tocar nas peças metálicas da
sua máquina, sentirá uma ligeira
descarga de energia eléctrica,
provocada pela presença de um
supressor de interferências rádio.
O fabricante declina toda e qualquer
responsabilidade por quaisquer danos
ou avarias provocados por uma ligação
incorrecta à terra da sua máquina.
Este aparelho está em conformidade
com as Directivas Europeias
73/23/EEC e 89/336/EEC, substituídas
pelas 2006/95/EC e 2004/108/EC, e
respectivas alterações posteriores.
Page 47

93
7
598
556/573
5
INSTALAÇÃO DA SUA
MÁQUINA EM COZINHAS
MODULARES
Justaposição
■ A altura desta máquina (85 cm) foi
estudada de modo a permitir a
justaposição perfeita da máquina entre
equipamentos já existentes, nas
modernas cozinhas modulares. A altura
dos pés da máquina pode ser regulada,
a fim de permitir o juste da posição
correcta.
■ O topo da máquina, feito de laminado de
alta resistência, não carece de qualquer
cuidado especial, pois é à prova de
calor, de nódoas e de abrasão (fig. 5).
Abertura da porta
Introduza a sua mão na cavidade e puxe.
Se a máquina for aberta durante o seu
funcionamento, é automaticamente activado
um dispositivo eléctrico de segurança que
suspende imediatamente todas as funções
da máquina.
IMPORTANTE
Para que a máquina possa funcionar
devidamente, dever-se-á evitar abrir
a porta da máquina durante o
funcionamento da mesma.
Fecho da porta da máquina
Introduza os cestos para a loiça na
máquina.
Assegure-se de que ambos os braços
rotativos de lavagem se podem movimentar
livremente, não ficando o seu movimento
obstruído por talheres, loiça ou tachos e
panelas. Feche a porta, exercendo uma
certa pressão sobre ela, de modo a ficar
bem fechada.
Incorporação
(Quando a máquina for instalada por
baixo de uma bancada de trabalho)
■ As cozinhas modernas dispõem
normalmente de uma bancada de
trabalho única, sob a qual se introduzem
os móveis básicos e os
electrodomésticos.
Nesse caso, basta retirar o topo
(bancada de trabalho) da sua máquina,
desaparafusando, para o efeito, os
parafusos situados por baixo da
extremidade posterior do topo (fig. 6a).
IMPORTANTE
Depois de remover a bancada, TEM
de voltar a aparafusar os parafusos
por baixo da borda traseira da
bancada (fig. 6b).
■ A máquina passará então a ter uma
altura de 82 cm, conforme estipulado
nas normas internacionais (ISO),
encastrando-se perfeitamente sob a
bancada de trabalho contínua da
cozinha (fig. 7).
6
a
b
a
b
92
Ligação ao sistema de esgoto
de água
■ Ligue a mangueira de esgoto de água
ao sistema de esgoto de água, tendo o
cuidado de não deixar que a mangueira
fique torcida (fig. 4).
■ O sistema de esgoto fixo deverá ter um
diâmetro interno de, pelo menos, 4 cm,
devendo ficar a uma altura mínima do
chão de 40 cm.
■ Recomendamos a utilização de sifões
anti-odores (fig. 4 X).
■ Se necessário, poderá prolongar a
mangueira de esgoto da água até ao
máximo de 2,5 m de comprimento,
tendo porém o cuidade de nunca colocar
a mangueira a uma altura superior a
85 cm do chão. Aextensão da mangueira
é fornecida pelo serviço Após Venda.
■ A extremidade curva da mangueira de
esgoto poderá ser apoiada à borda de
um lavatório (a fim de evitar o refluxo da
água durante o programa de lavagem,
deverá sempre certificar-se de que a
extremidade da mangueira não se
encontra dentro de água. Vide a
fig. 4 Y).
■ Sempre que a máquina seja instalada
sob uma bancada continua a curva
deverá ser fixada imediatamente abaixo
da bancada, num ponto o mais alto
possível (fig. 4 Z).
■ Ao proceder à instalação da máquina
certifique-se sempre de que nem a
mangueira de entrada de água nem a de
esgoto de água fiquem dobradas ou
torcidas.
4
Page 48

95
COLOCAÇÃO DO SAL
NA MÁQUINA
■ No fundo da máquina existe um
reservatório para o sal, que serve para
regenerar o sistema de descalcificação.
■ É importante que utilize apenas o sal
próprio para máquinas de lavar loiça,
outros tipos de sal contêm pequenas
quantidades de partículas insolúveis,
que a longo prazo podem afectar e
deteriorar a acção do amaciador.
■ Para colocar o sal no reservatório,
situado no fundo da máquina, deverá
desaparafusar a respectiva tampa, e
encher então o reservatório.
■ É natural que, durante esta operação,
transborde uma pequena quantidade
de água; continue a deitar o sal até o
reservatório ficar cheio, mexendo a
mistura com uma colher.
Isto feito, limpe eventuais restos de sal
que tenham ficado na rosca e volte a
aparafusar a tampa.
■ Depois de colocar o sal, é aconselhável
fazer um programa de lavagem completo,
ou um ENXAGUAMENTO AFRIO.
A capacidade do dispensador de sal
varia entre 1,5 e 1,8 kg e, para
assegurar uma prestação mais eficaz
da máquina, deverá acrescentar-lhe sal
de tempos a tempos, de acordo com a
regulação ajustada para a unidade
amaciadora da água.
IMPORTANTE
Quando a máquina é posta em
funcionamento pela primeira vez,
depois de ter enchido completamente
o reservatório de sal é necessário
juntar água até o conteúdo do
reservatório transbordar.
Esta operação, porém, só deverá ser
efectuada quando a máquina for
posta em funcionamento pela
primeira vez.
Indicador da quantidade de sal
Este modelo dispõe de um indicador
luminoso no painel de controlo que se
ilumina quando é necessário voltar a
colocar sal na máquina.
IMPORTANTE
Em geral, o aparecimento de
manchas brancas na loiça é um sinal
importante de que é necessário
colocar mais sal na máquina.
94
UNIDADE AMACIADORADA ÁGUA
Dependendo da origem da água
abastecida, esta poderá caracterizar-se
por diferentes teores de calcário e de
minerais, que se depositam na loiça,
deixando manchas e marcas esbranquiçadas.
Quanto mais elevado for o teor destes
minerais na água, tanto mais dura será a
água.
Amáquina de lavar loiça está equipada com
uma unidade amaciadora da água que,
mediante a utilização de um sal regenerador
especial, alimenta água previamente
amaciada à máquina, para a lavagem da loiça.
Para saber qual o grau de dureza da água
da sua zona, contacte a entidade
responsável pelo abastecimento da mesma,
a qual lhe poderá dar a informação pretendida.
Regulação do amaciador da água
A unidade amaciadora está apta a tratar
água com um grau de dureza de, no máximo, 90º fH (graduação francesa) ou de
50ºdH (graduação alemã), dispondo de 6
posições de regulação diferentes.
A tabela que se segue apresenta diversos
graus de dureza da água e a regulação da
unidade amaciadora indicada a cada grau
de dureza.
*A unidade amaciadora da água vem
regulada de fábrica para o nível 3, na
medida em que esta é a regulação
mais apropriada para uma maior
quantidade de utilizadores.
Dependendo do grau de dureza da água
que lhe é abastecida, deverá regular a
unidade amaciador da seguinte forma:
IMPORTANTE
TEM SEMPRE de desligar a máquina
de lavar loiça antes de efectuar esta
operação.
1. Depois de ter desligado a máquina
de lavar loiça, ABRA a porta.
2. Mantenha premidos a PRIMEIRA e a
TERCEIRA teclas (da esquerda para a
direita) ao mesmo tempo que prime a
tecla "LIGAR/DESLIGAR".
3. Liberte as teclas quando os indicadores
luminosos "SELECÇÃO DO PROGRAMA"
se acenderem e ouvir um sinal sonoro.
4. Prima a tecla "SELECÇÃO DO
PROGRAMA" tantas vezes quantas as
necessárias para regular o nível de
amaciamento da água pretendido (cada
pressão na tecla corresponde à
selecção do nível imediatamente
superior). Caso tenha seleccionado o
nível de amaciamento da água 5, os 4
indicadores luminosos "SELECÇÃO
DO PROGRAMA" ficam a piscar.
5. Prima a tecla "LIGAR/DESLIGAR"
para desligar a máquina e, desta forma,
confirmar a selecção feita.
ATENÇÃO!
Se surgir algum problema, prima a
tecla "LIGAR/DESLIGAR" para
desligar a máquina e volte a reiniciar
o processo de regulação desde o
início (PASSO 1).
Nível
°fH
(graduação
francesa)
°dH
(graduação
alemã)
NÃO
SIM
SIM
SIM
SIM
SIM
Indicador
luminoso 1
Indicador
luminoso 1
Indicadores
luminosos 1,2
Indicadores
luminosos 1,2,3
Indicadores
luminosos 1,2,3,4
Indicadores
luminosos 1,2,3,4
que piscam
Durezza da água
Regulação
do amaciador
da água
Utilização de
sal regenerador
0
1
2
*3
4
5
0-5
6-15
16-30
31-45
46-60
61-90
0-3
4-9
10-16
17-25
26-33
34-50
Tecla
"LIGAR/DESLIGAR"
Indicadores luminosos
"SELECÇÃO DO PROGRAMA"
4
3
2
1
Tecla "SELECÇÃO DO PROGRAMA"
Page 49

96
REGULAÇÃO DO CESTO
SUPERIOR
Se usa habitualmente pratos com um
diâmetro entre os 27 cm e os 31 cm,
coloque-os no cesto inferior, depois de ter
previamente colocado o cesto superior na
posição mais alta, para o que deverá
proceder da seguinte forma:
1. Rode os dispositivos de fixação
anteriores “A” para fora;
2. Retire o cesto e volte a montá-lo na
posição mais alta;
3. Volte a colocar os dispositivos de
fixação “A” na posição original.
Com o cesto superior nesta posição, não é
possível colocar no referido cesto loiça ou
utensílios de cozinha de diâmetro superior
a 20 cm. Além disso, e estando o cesto
superior nesta posição, também não será
possível utilizar os suportes móveis na
posição mais alta.
A
A
97
CARREGAMENTO DA
MÁQUINA
Como usar o cesto superior
■ O cesto superior dispõe de duas
prateleiras móveis, presas às partes
laterais do cesto, e que podem ser
colocadas em duas posições: ao alto ou
deitadas. Quando estão deitadas estas
duas prateleiras podem ser utilizadas
para colocar chávenas de chá ou de
café, facas e talheres de cozinha.
Os copos de pé podem ser pendurados
nas extremidades das prateleiras com
toda a segurança.
Por baixo destas prateleiras podem ser
colocados copos, chávenas, pires e
pratos de sobremesa.
■ Os pratos de sopa e os pratos rasos
poderão ser colocados com as
prateleiras ao alto.
Os pratos deverão ser colocados na
vertical, com a parte de trás virada para
o fundo da máquina, devendo ser
deixado espaço suficiente entre os
pratos para que a água circule
livremente.
■ A fim de tirar o melhor proveito possível
da capacidade do cesto será
aconselhável colocar os pratos do
mesmo tamanho uns ao pé dos outros.
■ Os pratos tanto poderão ser colocados
numa fila única (fig. 1) como em duas
filas (fig. 2).
■ Os pratos maiores (com um diâmetro de
aproximadamente 270 mm) deverão ser
colocados ligeiramente inclinados para
trás a fim de facilitar a introdução do
cesto na máquina.
■ As saladeiras e outras taças ou caixas
de plástico deverão também ser
colocadas no cesto superior. Convém
colocá-las de modo a que os jactos de
água não as virem.
■ O cesto superior foi concebido de modo
a proporcionar uma grande flexibilidade
de utilização, podendo levar o máximo
de 24 pratos em duas filas, o máximo de
30 copos em cinco filas ou uma carga
mista.
Como usar o cesto inferior
■ No cesto inferior deverão ser colocados
tachos e panelas, pratos de ir ao forno,
terrinas, saladeiras, tampas, travessas,
pratos rasos, pratos de sopa e talheres
de cozinha (conchas, colheres de pau,
etc.).
■ Arrume os talheres no respectivo
recipiente de plástico, com o cabo para
baixo.
Coloque o recipiente para os talheres no
cesto inferior da máquina (fig. 3),
assegurando-se de que não esteja a
impedir o movimento dos braços
rotativos.
IMPORTANTE
O cesto inferior tem um dispositivo
de segurança para prevenir a sua
extracção, especialmente quando
está cheio de loiça.
Deverá retirar esse cesto, quando
colocar o sal, ou quando limpar o
filtro numa manutenção regular.
Page 50

98
Um carregamento diário standard é representado
nas figuras 1, 2 e 3.
Cesto superior (fig. 1)
A = Pratos de sopa
B = Pratos rasos
C = Pratos de sobremesa
D = Pires
E = Chávenas
F = Copos
Cesto superior (fig. 2)
A = Pratos de sopa
B = Pratos rasos
C = Pratos de sobremesa
D = Pires
E = Chávenas
F = Copos com pé
G =Copos
H =Cesto de um compartimento para talheres
Cesto inferior (fig. 3)
A = Panela de tamanho médio
B = Panela de tamanho grande
C = Frigideira
D =Tampas
E = Terrinas, travessas
F =Talheres
G =Pratos de ir ao forno
Para se obterem os melhores resultados de
lavagem é condição essencial carregar a loiça na
máquina de forma correcta e racional.
Cesto para talheres (fig. 4)
O cesto para talheres é composto por duas partes
destacáveis que possibilitam vários tipos de
carregamento dos talheres. As duas partes podem
ser separadas deslizando a secção esquerda em
sentido contrário da secção direita.
D
FAG
E
B
C
3
4
1
A
B
C
D
E
F
A
B
C
D
FE
F
H
2
G
99
Cesto inferior (fig. 6)
M = 8 + 4 pratos de sopa
N = 11 + 1 pratos rasos
O = 12 pratos de sobremesa
P = Travessa
Q =Talheres
Cesto superior (fig. 5)
A =5 + 5 + 2 copos
B = 12 pires
C =4 + 4 + 4 chávenas
D =Taça pequena
E =Taça média
F =Taça grande
G =1 + 1 garfos
H =1 + 1 colheres grandes
I = 3+3+3+3 colheres de
sobremesa
L = 3+3+3+3 colheres de chá
INFORMAÇÕES PARA OS LABORATÓRIOS DE ENSAIO
Programa comparativo geral (Normas EN 50242)
(vide selecção de programas)
1. Posição do cesto superior: inferior
2. Carga normal
3. Regulação do abrilhantador: 6
12 Local geral de carga (Normas EN 50242)
O modo correcto de carregar é representado, na figura 5 para o cesto superior, na
figura 6 para o cesto inferior e na figura 7 para o cesto para talheres.
Cesto para talheres (fig. 7)
Coloque os compartimentos laterais na
posição inferior e encha-os com 6+6 facas
(R); no espaço restante coloque talheres,
com o cabo virado para baixo, tendo o
cuidado de não colocar dois diferentes tipos
de talheres no mesmo compartimento.
4. Quantidade de detergente:
- 8 g para a pré-lavagem;
- 22 g para a lavagem.
A
F
C
C
C
G
B
E
D
H
H
5
QN
M
P
O
M
N
L
I
6
R
7
Page 51

101
TIPOS DE DETERGENTE
Detergente em pastilhas
Os detergentes em pastilhas produzidos
por diferentes fabricantes caracterizam-se
por velocidades de dissolução também
diferentes pelo que, durante os programas
curtos, alguns detergentes em pastilhas
podem não ser totalmente eficazes por não
se dissolverem completamente. Se optar
por utilizar produtos deste tipo, o fabricante
da sua máquina de lavar loiça recomenda
que seleccione programas mais compridos,
para garantir uma utilização completa do
detergente.
IMPORTANTE
Para obter resultados de lavagem
satisfatórios, as pastilhas TÊM de
ser colocadas na secção de lavagem
do compartimento para o detergente,
NÃO DEVENDO ser directamente
colocadas na cuba.
Detergentes concentrados
Os detergentes concentrados, com uma
alcalinidade reduzida e com enzimas naturais,
em conjunto com os programas de lavagem
a 50°C, caracterizam-se por um impacto
mais reduzido no ambiente e protegem
tanto a loiça como a máquina de lavar
loiça.
Os programas de lavagem a 50°C exploram
de forma objectiva as propriedades de
dissolução da sujidade das enzimas,
permitindo assim, com a utilização de
detergentes concentrados, obter os
mesmos resultados que os programas de
lavagem a 65°C, mas a uma temperatura
mais baixa.
Detergentes combinados
Os detergentes que também incluem
abrilhantador têm de ser colocados na
secção de lavagem do compartimento para
o detergente. O compartimento para o
abrilhantador tem de estar vazio (se não
estiver vazio, regule o regulador do
abrilhantador para a posição mais baixa
possível antes de utilizar detergente
combinados).
Detergentes combinados
"TUDO em 1"
Se está a pensar usar detergentes
combinados “TUDO em 1” ("3 em 1"/"4 em
1"/"5 em 1", etc.), ou seja, os detergentes
com sal e/ou abrilhantador incluídos,
aconselhamos que proceda da seguinte forma:
■
leia cuidadosamente as instruções do
fabricante do detergente, inscritas na
embalagem do mesmo, e siga-as
escrupulosamente;
■
a eficácia dos detergentes com amaciador
da água/sal incluído depende da dureza da
água alimentada à máquina de lavar loiça.
Certifique-se de que a dureza da água
alimentada à sua máquina de lavar loiça
está compreendida dentro do intervalo de
eficácia indicado na embalagem do
detergente.
Sempre que utilizar este tipo de produto
e não obtiver resultados de lavagem
satisfatórios, entre em contacto com o
fabricante do detergente.
Em determinadas circunstâncias, a utilização
de um detergente combinado pode dar azo a:
■
depósitos de calcário na loiça ou na
máquina de lavar loiça;
■
uma redução no desempenho de lavagem
ou de secagem.
IMPORTANTE
Nenhum problema directamente resultante
da utilização destes produtos está
coberto pela garantia prestada pelo
fabricante da sua máquina de lavar loiça.
Agradecemos que tenha em atenção o
facto de, se optar por utilizar detergentes
combinados “TUDO em 1” os indicadores
luminosos do abrilhantador e do sal
(presentes apenas em alguns modelos)
se tornarem supérfluos, pelo que pode
ignorar o seu acendimento.
Se surgirem quaisquer problemas
relacionados com a lavagem ou com a
secagem, recomendamos que volte a
utilizar produtos separados tradicionais
(sal, detergente e abrilhantador). Estará
assim a garantir que o amaciador da água
da máquina de lavar loiça funciona da
forma correcta.
Neste caso, recomendamos que:
■ volte a encher os compartimentos para o
sal e para o abrilhantador;
■ execute um ciclo de lavagem normal
com a máquina de lavar loiça vazia.
Chamamos a sua atenção para o facto de,
quando recomeça a utilizar sal convencional,
ser necessário um certo número de ciclos
de lavagem até o sistema se voltar a caracterizar pela sua eficácia habitual.
100
COLOCAÇÃO DO
DETERGENTE
O detergente
IMPORTANTE
É de grande importância utilizar um
detergente específico para
máquinas de lavar loiça, quer seja
em pó, líquido ou em forma de
pastilhas.
Os detergentes que não são adequados
para as máquinas de lavar loiça (como, por
exemplo, os detergentes para a lavagem
de loiça à mão) não contêm os
ingredientes adequados à lavagem de
loiça na máquina e impedem o correcto
funcionamento da máquina.
Enchimento do compartimento
para o detergente
O recipiente para o detergente para a
lavagem encontra-se do lado de dentro da
porta (fig. A "2"). Se, por qualquer motivo,
a tampa do recipiente ficar fechada, para a
abrir basta agir sobre o botão de fecho (A).
No fim dos programas de lavagem a tampa
fica sempre aberta, pronta para a utilização
seguinte.
ATENÇÃO!
Quando colocar loiça no cesto inferior,
certifique-se que os pratos ou outras
peças de loiça não obstroem a gaveta
do detergente.
A dose de detergente pode variar em
função do grau de sujidade e do tipo de
loiça a lavar. Em geral, recomendamos a
utilização de 20 ÷ 30 g de detergente na
secção de lavagem do compartimento do
detergente (B).
Depois de colocar o detergente no seu
compartimento, feche a tampa, empurrando
primeiro (1) e depois pressionando para
baixo (2) até ouvir um ruído.
Como os detergentes não são todos
iguais, consulte também as instruções
inscritas na embalagem do detergente.
Recordamos que uma quantidade
insuficiente de detergente provoca uma má
remoção da sujidade, enquanto que uma
quantidade excessiva de detergente, além
de não melhorar os resultados da lavagem,
representa um desperdício.
IMPORTANTE
A utilização das quantidades
adequadas de detergente - nem
detergente em excesso nem
detergente a menos - representa um
contributo para a defesa do meio
ambiente.
A
B
Page 52

103
1
2
3
LIMPEZA DOS FILTROS
O conjunto de filtragem (fig. A “4”) é constituído
pelos seguintes elementos:
um recipiente central, que retém as partículas
de sujidade de maiores dimensões;
um crivo plano, que filtra continuamente a
água da lavagem;
um microfiltro, instalado por baixo do crivo,
que retém as partículas de dimensões mais
reduzidas, assegurando um enxaguamento
perfeito da loiça.
■ Para assegurar sempre a obtenção de
excelentes resultados da lavagem,
deverá verificar e limpar os filtro a seguir
a cada lavagem.
■ Para remover o conjunto de filtragem terá
apenas de rodar a respectiva pega no
sentido contrário ao dos ponteiros do
relógio (fig. 1).
■ Para maior facilidade de limpeza, o
recipiente central pode ser retirado (fig. 2).
■ Remova o crivo (fig. 3) e lave todo o
conjunto debaixo de um jacto de água
limpa. Se necessário, poderá servir-se de
uma escova pequena para limpar melhor
o filtro.
■ No caso dos modelos equipados com o
microfiltro autolimpante, a manutenção
do conjunto de filtragem torna-se ainda
mais simples, só sendo necessário verificar
este conjunto de filtragem de duas em
duas semanas. No entanto, a seguir a
cada lavagem será conveniente certificar-se
de que o recipiente central do conjunto de
filtragem e o crivo não estão entupidos.
ATENÇÃO!
Depois de limpar os diversos componentes
do conjunto de filtragem deverá sempre
certificar-se de que os voltou a montar
devidamente e de que o crivo ficou
correctamente instalado, de forma a ficar
perfeitamente encaixado, no fundo da
cuba da máquina.
Deverá igualmente certificar-se de que o
conjunto de filtragem ficou devidamente
aparafusado (não se esqueça de que, para
o aparafusar, terá de o rodar no sentido
dos ponteiros do relógio), na medida em
que uma instalação errada ou incorrecta
do conjunto de filtragem prejudica a
eficácia da máquina de lavar loiça.
IMPORTANTE
Nunca utilize a máquina de lavar loiça
sem os filtros estarem instalados.
102
COLOCAÇÃO DO
ABRILHANTADOR
O abrilhantador
O aditivo, que é automaticamente despejado
durante o último ciclo de enxaguamento,
contribui para uma secagem mais rápida da
loiça, prevenindo a formação de manchas e
a acumulação de resíduos opacos.
Enchimento do compartimento
para o abrilhantador
O compartimento para aditivos encontra-se
do lado esquerdo do compartimento para
detergente
(fig. A "3").
Para abrir a tampa, empurre a patilha, e em
simultâneo puxe a tampa. É sempre
importante utilizar os produtos específicos
para máquinas de lavar loiça.
O nível do aditivo pode ser controlado
através do visor
(C)
situado sobre o dispositivo.
Regulação do doseamento
do aditivo de 1 a 6
O regulador
(D)
encontra-se sob a tampa
(use uma moeda para o rodar). A posição
aconselhada é a 4.
O teor de calcário da água manifesta-se
quer através da presença de incrustações,
quer através do grau de secagem.
É fundamental regular o doseamento do
aditivo de forma conveniente, para que os
resultados sejam sempre os melhores.
Se a loiça parecer estar riscada, dever-se-á
seleccionar uma posição mais baixa, e, se a
loiça apresentar manchas ou resíduos
brancos, dever-se-á seleccionar uma posição
mais elevada.
CHEIO VAZIO
escuro claro
C
D
Page 53

105
1
2
1b
MANUTENÇÃO
Depois de concluído qualquer ciclo de
lavagem, é essencial fechar a alimentação de
água e desligar a máquina com a tecla de
ligar/desligar.
Se não pretender utilizar a sua máquina
durante algum tempo, é conveniente
observar as seguintes regras:
1. Execute um ciclo de lavagem com a
máquina vazia, mas com detergente, a fim
de limpar eventuais depósitos existentes
na máquina;
2. Desligue a ficha do cabo de alimentação
eléctrica da máquina da tomada de
alimentação de corrente;
3. Feche a tomeira de alimentação de água;
4. Encha o reservatório do aditivo de lavagem;
5. Deixe a porta aberta;
6. Deixe o interior da máquina limpo;
7. Sempre que a máquina ficar num ambiente
com temperaturas inferiores a 0°C, a água
que fica nas mangueiras e no interior dos
sistemas da máquina poderá congelar. Nesse
caso, e antes de colocar a máquina
novamente em funcionamento, deverá
fazer com que a temperatura ambiente
suba acima dos 0°C e esperar 24 horas
antes de ligar a máquina.
LIMPEZA E MANUTENÇÃO
■ Para limpar o interior da máquina de
lavar loiça não deev utilizar solventes
(acção desengordurante) nem abrasivos,
mas apenas um pano molhado com água.
■ A sua máquina de lavar loiça não requer
cuidados especiais de manutenção, pois
o seu interior é autolimpante.
■ Limpe regularmente a guarnição de
borracha da porta com um pano húmido,
a fim de remover eventuais restos de
comida ou de aditivo.
■ Recomenda-se que proceda à remoção
periódica de eventuais depósitos de
calcário ou de lixo, procedendo a uma
lavagem com a máquina vazia. Nesse
caso, deite um copo de vinagre no fundo
do interior da máquina, e seleccione um
programa de lavagem delicada.
■ Se, tendo procedido previamente à
limpeza do filtro, a loiça e as panelas
parecerem não ter sido devidamente
lavadas ou enxaguadas, verifique se
todos os orifícios dos braços rotativos de
lavagem (fig. A "5") se encontram
desobstruídos, isto é, se não estão
tapados por restos de comida.
Se os orifícios estiverem obstruídos,
proceda da seguinte forma:
1.Para remover o braço rotativo superior terá
de o rodar até ficar alinhado com a paragem
indicada pela seta (fig. 1b). Em seguida,
empurre-o para cima (fig 1) e, mantendo-o
empurrado para cima, rode-o no
sentido dos ponteiros do relógio para o
desaparafusar. Para o voltar a montar,
execute estas operações certificando-se
porém de que, desta vez, roda o braço
rotativo no sentido contrário ao dos
ponteiros do relógio (para o aparafusar).
Para remover o braço rotativo inferior
basta puxá-lo para cima (fig. 2).
2.Uma vez desmontados os braços rotativos,
lave-os debaixo de um jacto de água
limpa para eliminar qualquer obstrução
dos orifícios de pulverização de água.
3.Depois de os ter lavado, volte a colocar
os braços rotativos na mesma posição,
não se esquecendo de colocar o braço
rotativo superior na posição de paragem
e de o aparafusar completamente.
■ Tanto o revestimento interior da porta,
como o revestimento interior da máquina
são feitos de aço inoxidável; no entanto,
se surgirem manchas de oxidação, tal
ficará provavelmente a dever-se ao
elevado teor de sais de ferro da água.
■ As manchas poderão ser removidas com
um detergente ligeiramente abrasivo;
nunca utilize produtos à base de cloro, de
palha de aço, etc.
104
CONSELHOS PRÁTICOS
Como obter os melhores
resultados de lavagem
■ Antes de meter a loiça na máquina remova
os restos de comida (ossos, espinhas de
peixe, restos de carne ou de legumes,
resíduos de café, cascas de fruta, cinza
de cigarros, palitos, etc.) a fim de evitar
que os filtros, as saídas de despejo de
água e os orifícios dos braços rotativos de
lavagem fiquem bloqueados.
■ Evite passar a loiça por água antes de a
colocar na máquina.
■ Se os tachos, as panelas e os pratos de ir
ao forno se apresentarem muito sujos,
com restos de comida agarrados, será
aconselhável pô-los de molho antes de os
meter na máquina.
■ Coloque a loiça na máquina com as
aberturas voltadas para baixo.
■ Se possível, evite que as peças de loiça e
os utensílios fiquem encostados uns aos
outros. Uma arrumação correcta da loiça
contribuirá para a obtenção dos melhores
resultados possíveis.
■ Depois de meter a loiça na máquina,
assegure-se que os braços rotativos não
fiquem presos, podendo girar livremente.
■ Os tachos, as panelas e os outros
utensílos que apresentem restos de comida
muito agarrados ou queimados deverão
ser postos de molho com água e detergente
para a máquina.
■ Para que as pratas fiquem perfeitamente
lavadas na máquina será necessário:
a) passá-las por água imediatamente a
seguir a serem utilizadas, em especial
se tiverem sido utilizadas para servir ou
comer pratos com molhos (mayonnaise,
etc.), ovos, peixe, etc.;
b) não lhes deitar detergente
directamente para cima;
c) não as deixar entrar em contacto com
outros metais.
Como economizar água,
detergente e energia
■ Se só quiser lavar a loiça quando a
máquina estiver completamente cheia,
coloque a loiça na máquina a seguir a
cada refeição, até que a máquina fique
cheia. Se quiser, e para remover a maior
sujidade da loiça e não deixar os restos
de comida secarem até à lavagem,
efectue uma EXAGUAMENTO A FRIO.
Assim, só terá de programar a máquina
para uma lavagem completa quando ela
estiver cheia de loiça.
■ Se a loiça não estiver muito suja, ou se
quiser lavar a loiça sem que a máquina
esteja completamente cheia, opte pelo
programa ECONÓMICO. Reja-se pelas
indicações constantes da Tabela de
Programas.
Loiça e utensílios que não
devem ser lavados na máquina
■ É sempre bom recordar que nem todos os
tipos de loiça e de utensílios podem ser
lavados na máquina. Os objectos e utensílios
de termoplástico, que disponham de
pegas de madeira ou de plástico, os
tachos com pegas de madeira, os utensílios em alumínio, de cristal ou de vidro de
chumbo só poderão ser lavados na máquina
se o respectivo fabricante assim o indicar.
■ As decorações de alguns tipos de loiça
têm tendência para desaparecer na
máquina, será recomendável experimentar
primeiro lavar uma só peça desse serviço.
Só depois de se certificar de que a
decoração não sai ou não perde cor se a
loiça for lavada na máquina é que deverá
lavar todo o serviço na máquina.
■ Nunca lave objectos de prata em conjunto
com objectos de aço inoxidável: a reacção
química que se desencadeia pelo contacto
dos dois tipos de metal poderá danificar
irremediavelmente os ob jec to s.
IMPORTANTE
Antes de lavar pela primeira vez um objecto
ou utensílio novo na máquina deverá
certificar-se de que o mesmo pode realmente
ser lavado na máquina.
Sugestões úteis
■ Ao descarregar a máquina, comece por
descarregar a loiça do cesto inferior, pois
evitará assim que caiam eventuais gotas
do cesto superior para o inferior.
■ Se pretender deixar a loiça na máquina
durante algum tempo, abra ligeiramente a
porta, permitindo assim a circulação do ar
e favorecendo a secagem da loiça.
Page 54

107
SELECÇÃO DO PROGRAMA
E FUNÇÕES ESPECIAIS
IMPORTANTE
A máquina de lavar loiça está equipada
com duas funções extremamente práticas:
- a função programa "recomendado"
(que vem regulada de fábrica e que
corresponde ao programa ideal para
uma utilização diária da máquina
com a carga completa), para uma
selecção rápida e precisa;
- a função de memória, que guarda o
último programa utilizado, de modo
que, se utilizar regularmente o
mesmo ciclo de lavagem, não tem de
voltar a seleccionar esse programa
de cada vez que quer lavar a loiça, o que
lhe permite poupar tempo e trabalho.
Tecla "EXPRESS"
Esta tecla permite-lhe seleccionar 2 níveis
diferentes de intensidade de lavagem, em
função do grau de sujidade da loiça a lavar.
Além disso, também reduz o tempo e a
energia gastos com a lavagem.
Ao premir a tecla "EXPRESS", o utilizador
está a reduzir a intensidade de lavagem,
através da alteração do tempo e da
temperatura do ciclo de lavagem.
A utilização desta tecla em conjunto com os
4 programas mostrados no painel de
comando coloca 8 ciclos de lavagem
diferentes à disposição do utilizador.
IMPORTANTE
Uma vez activada (premida), esta tecla
mantém-se activa (ficando o respectivo
indicador luminoso aceso) para os
programas de lavagem seguintes, a
menos que volte a ser premida (o que
faz com que o respectivo indicador
luminoso se apague) ou que o ciclo em
curso seja cancelado.
Selecção de programas
■ Abra a porta e coloque a loiça suja no
interior da máquina.
■ Pressione a tecla "LIGAR/DESLIGAR" .
O indicador luminoso para o programa
"recomendado" ou o indicador luminoso
relativo ao último programa utilizado piscam.
■ Para seleccionar outro programa, prima
a tecla "SELECÇÃO DO PROGRAMA".
■ Se quiser, prima a tecla "EXPRESS".
■ Se desejar seleccionar a opção, pressione
a tecla da opção (o indicador luminoso
correspondente acender-se-à).
A opção pode ser seleccionada ou
cancelada NO TEMPO de 1 minuto
após o início do programa.
■ Prima a tecla "START" (o indicador
luminoso do programa seleccionado
deixa de piscar, ficando aceso fixo).
■ Se a porta estiver fechada, o programa
começa automaticamente a seguir à
emissão de um sinal sonoro.
Depois de um programa arrancar,
TEM UM MINUTO para seleccionar
outro programa, o que poderá fazer
premindo, simplesmente, a tecla
"SELECÇÃO DO PROGRAMA"
(também pode activar ou desactivar a
tecla "EXPRESS").
Interrupção do programa
Não é recomendado abrir a porta da
máquina enquanto um programa está a
decorrer, especialmente durante a fase de
lavagem principal e o enxaguamento final
a quente. Contudo, se a porta for aberta
durante o decorrer de um programa
(por exemplo, para colocar mais loiça) a
máquina pára automaticamente.
Feche a porta, sem pressionar nenhuma
tecla. O ciclo recomeçará onde parou.
106
Capacidade seg-norma EN 50242
Capacidade c/ tachos e pratos
Pressão admitida na instalação hidráulica
Fusível
Potência máxima absorvida
Tensão
15 pessoas
9 pessoas
Min. 0,08 - Max 0,8 MPa
(ver placa de características)
(ver placa de características)
(ver placa de características)
Altura
Profundidade
Largura
Profundidade com a porta aberta
cm
cm
cm
cm
com bancada
85
60
60
120
DESCRIÇÃO DOS COMANDOS
DADOS TÉCNICOS :
sem bancada
82
57,3
59,8
117
DIMENSÕES :
A Tecla "LIGAR/DESLIGAR"
B Tecla "SELECÇÃO DO PROGRAMA"
C Tecla "START"/"RESET"
(para iniciar ou cancelar o programa)
D Tecla "EXPRESS"
E Tecla de opção "ALL in 1"
F Tecla "INÍCIO DE FUNCIONAMENTO
RETARDADO"
G Indicador luminoso
"PROGRAMA SELECCIONADO"
H Indicador luminoso da tecla
"EXPRESS"
I Indicador luminoso "FALTA DE SAL"
L Indicador luminoso "OPÇÃO
SELECCIONADA"
M Indicadores luminosos
"FASES DO PROGRAMA"/ "INÍCIO
DE FUNCIONAMENTO RETARDADO"
AB CD E F
H
I
M
L
G
Page 55

109
■ Para dar início à contagem decrescente,
prima a tecla "START"; o indicador
luminoso do programa seleccionado
acende-se ao mesmo tempo que o indicador
luminoso do tempo programado começa
a piscar.
Se o início de lavagem foi adiado 9 horas,
passadas 3 horas acender-se-à o indicador
luminoso das 6h e passadas 6 horas
acender-se-à o indicador luminoso das 3h.
No final das últimas 3 horas (ou seja, no final
da contagem) o indicador luminoso das 3h
parará de piscar e manter-se-à aceso
indicando que o programa irá começar
automaticamente.
Se a contagem ainda não tiver terminado, ou
seja, se o programa ainda não começou, é
possível alterar ou cancelar o início de
funcionamento retardado e seleccionar outro
programa ou seleccionar/cancelar esta
opção, procedendo da seguinte forma:
■ Mantenha a tecla "RESET" premida
durante, pelo menos, 5 segundos.
Os indicadores luminosos do programa
ficam a piscar e é emitido um sinal sonoro.
■ O programa seleccionado será cancelado
e o indicador luminoso do programa
“recomendado” começará a piscar.
■ Pressione a tecla de "INÍCIO
DE FUNCIONAMENTO RETARDADO"
para seleccionar outro tempo de início
de funcionamento retardado (o indicador
luminoso do tempo seleccionado
acender-se-à).
■ Um novo programa pode ser seleccionado,
após a alteração ou cancelamento do
início de funcionamento retardado ou
uma tecla de opção pode ser seleccionada
ou cancelada.
Silenciamento do alarme de
FIM DE PROGRAMA
O alarme de fim de programa pode ser
silenciado da seguinte maneira:
■ Com a máquina de lavar loiça
desligada, pressione a tecla "ALL in 1"
e simultaneamente pressione a tecla
"LIGAR/DESLIGAR", deixando de
pressionar após a emissão do sinal
sonoro.
■ Pressione a mesma tecla "ALL in 1":o
indicador luminoso correspondente (que
estava aceso indicando que a emissão
de sinais sonoros estava activada) irá
piscar (indicando que está desactivada a
emissão de sinais sonoros).
■ A emissão de um sinal sonoro confirma
que a alteração foi memorizada.
■ Para voltar a activar a emissão de sinais
sonoros, proceda da mesma.
Falha
Se ocorrer alguma anomalia durante o
decurso do programa, o indicador luminoso
correspondente ao programa seleccionado
piscará rapidamente e será emitido um sinal
sonoro. Neste caso, desligue a máquina de
lavar loiça pressionando tecla de
"LIGAR/DESLIGAR". Após verificar se a
torneira da água está aberta, que a
mangueira de escoamento está bem
instalada e o filtro não está bloqueado,
seleccione o progama novamente.
Se a anomalia persistir, contacte os nossos
Serviços de Assistência Técnica.
IMPORTANTE
Esta máquina de lavar loiça está
equipada com um sistema de
segurança anti-inundação, que
bloqueia automáticamente qualquer
excesso de água, no caso de ocorrer
algum problema.
ATENÇÃO!
A fim de evitar que o dispositivo
de segurança contra inundações
seja inoportunamente activado,
recomenda-se que a máquina não
seja deslocada ou inclinada enquanto
estiver a funcionar.
Se for absolutamente necessário
deslocar ou inclinar a máquina
enquanto esta estiver a funcionar,
assegure-se primeiro de que o ciclo
de lavagem já terminou e que não há
água na cuba da máquina.
108
IMPORTANTE
Um programa pode ser interrompido sem
que a porta seja aberta, pressionando a
tecla "LIGAR/DESLIGAR".
Neste caso, basta pressionar a tecla
"LIGAR/DESLIGAR" para recomeçar o
ciclo de lavagem a partir do ponto em que
parou.
ATENÇÃO!
Caso abra a porta durante o ciclo de
secagem, um sinal sonoro indica-lhe
que este ciclo ainda não terminou.
Mudar um programa que já
começou
Proceda da seguinte forma para alterar ou
cancelar um programa já em decurso:
■ Mantenha a tecla "RESET" premida
durante, pelo menos, 5 segundos.
Os indicadores luminosos do programa
ficam a piscar e é emitido um sinal sonoro.
■ O programa em decurso será cancelado
e o indicador luminoso do programa
"recomendado" começará a piscar.
■ Um novo programa pode ser seleccionado.
ATENÇÃO!
Antes de iniciar um novo programa,
deve verificar se ainda há detergente
no reservatório. Se necessário,
encha novamente o reservatório.
Se existir uma quebra de energia
enquanto a máquina está a lavar, uma
memória especial memoriza o programa
seleccionado e, quando a energia é
reposta, a lavagem continua a partir
do ponto em que parou.
Fases do programa
Quando um programa está a decorrer o
respectivo indicador luminoso mantem-se
aceso e os 3 indicadores luminosos das
“FASES DO PROGRAMA”("LAVAGEM" ,
"SECAGEM" e "FIM" ) acendem-se
um a um e em sequência indicando a
fase do programa que está a ser
efectuada.
Fim de programa
É emitido um sinal sonoro de 5 segundos
(caso não tenha sido desactivada a
emissão de sinais sonoros), 3 vezes, em
intervalos de 30 segundos, indicando que
o programa chegou ao fim.
O indicador luminoso de fim do programa
acende-se, ao mesmo tempo que todos os
outros indicadores luminosos se apagam.
A loiça pode ser removida e a máquina de
lavar loiça desligada, pressionando a tecla
de "LIGAR/DESLIGAR".
Tecla de opção
Tecla "ALL in 1"
Esta opção optimiza a utilização de
detergentes combinados "TUDO em 1"
("3 em 1"/"4 em 1"/"5 em 1", etc.).
Quando prime esta tecla, o programa de
lavagem seleccionado é modificado de
modo a conseguir o melhor desempenho
de lavagem de detergentes combinados
(e, simultaneamente, o indicador luminoso
de falta de sal é desactivado).
ATENÇÃO!
Uma vez seleccionada, esta opção
manter-se-à activa (indicador luminoso
correspondente ligado) mesmo para
os ciclos de lavagem seguintes. A
opção pode ser desactiva (indicador
luminosos correspondente desligado)
premindo novamente a tecla.
IMPORTANTE
Com esta opção seleccionada, a
duração do programa “RÁPIDO” é
prolongada em cerca de 10 minutos.
Tecla "INÍCIO DE FUNCIONAMENTO
RETARDADO"
A hora de início de lavagem pode ser
determinada, adiando o início do programa
3, 6 ou 9 horas.
Proceda da seguinte forma, para adiar o
início do programa:
■ Pressione a tecla de "INÍCIO DE
FUNCIONAMENTO RET ARDADO" (cada
vez que o botão é pressionado o início é
adiado 3, 6 ou 9 horas, respectivamente,
e o indicador luminoso correspondente
acender-se-à).
Page 56

111110
•••
•
•
•••
•
•
130
85
75°C
65°C
•••
•
•
•••
•
•••
•
•••
•
•••
•
•
PROGR.
EXPRESS
PROGR.
EXPRESS
PROGR.
EXPRESS
PROGR.
EXPRESS
175
85
32
5
45°C
45°C
50°C
65°C
55°C
110
80
+
SIM
SIM
SIM
SIM
SIM
SIM
SIM
SIM
SIM
SIM
SIM
SIM
SIM
SIM
SIM
Apto para lavar a loiça e tachos muito sujos.
INTENSIVO 75°C
Forte e Rápido 65ºC
Para a lavagem rápida de loiça muito suja.
Ciclo super-rápido que se efectua no final da
refeição, indicado para cargas pequenas
(4/6 pessoas).
Adequado para lavar a loiça delicada e decorada,
assim como os cristais.
Indicado também para lavagem diária de loiça
pouco suja, exceptuando as frigideiras.
Pré-lavagem rápida para a loiça usada pela
manhã ou pelo almoço, quando se quer realizar
apenas uma lavagem depois do jantar.
(PROGRAMA “RECOMENDADO”)
Adequado para lavar a loiça e tachos com
sujidade normal.
Adequado para lavar a loiça e tachos com sujidade
normal, utilizando um detergente com enzimas.
Programa segundo normas EN 50242.
UNIVERSAL 65°C
Diário 55ºC
ECO 45°C
Delicado 45°C
RAPIDO 32' 50°C
Pré-lavagem
Ciclo rápido, para loiça “normalmente” suja; para
lavagens frequentes e cargas normais.
Lavagem com pré-lavagem
No caso dos programas de lavagem com pré-lavagem, é aconselhável adicionar uma
segunda dose de detergente (máximo de 10 g), a ser directamente colocada no interior da
máquina.
Programa
TABELA DOS PROGRAMAS
Desenvolvimento
do programa
Duração
média em
minutos
Detergente
pré-lavagem
Detergente lavagem
Limpeza do filtro
e placa
Controlo do nível
de abrilhantador
Controlo do nível de sal
Pré-lavagem a quente
Pré-lavagem a frio
Lavagem
Primero
enxaguamento a frio
Segundo
enxaguamento a frio
Enxaguamento a
quente com abrilhantador
Com água fría (15°C)
-Tolerância ± 10%-
Tecla "INÍCIO DE
FUNCIONAMENTO
RETARDADO"
Tecla "ALL in 1"
Operações a realizar
Descrição
Funções
especiais
Page 57

113
DETECÇÃO DE PEQUENAS AVARIAS
Se a sua máquina não funcionar em condições, ou se deixar totalmente de funcionar,
agradecemos que, antes de contactar os Serviços de Assistência Técnica, proceda às
seguintes verificações:
AVARIA CAUSA PROVÁVEL ACÇÃO NECESSÁRIA
1 - Amáquina não funciona
2 - Amáquina não mete água
3 - Amáquina não despeja água
4 - Amáquina despeja água
constantemente
5 - Não se ouvem os braços rot.
de lavagem rodar
6- Nas máquinas equipadas
com unidade electrónica
amaciadora sem mostrador:
um ou mais indicadores
luminosos brilhão lentamente
Amáquina não está ligada
à corrente
Atecla de ligar / desligar
não foi premida
Porta mal fechada
Falha de alimentação de
corrente
Vide ponto (1)
Torneira fechada
Selecção incorrecta de
programa
Mangueira de admissão
dobrada ou torcida
O filtro existente na mangueira de
admissão está entupido
Mangueira de esgoto dobrada
ou torcida
Filtro obstruído
Mangueira de descarga com
extensão incorrecta
O respiradouro do sistema de
descarga na parede não está ao ar
Mangueira de esgoto numa
posição demasiado baixa
Quantidade excessiva
de detergente
Movimento dos braços impedido
por algum objecto
Placa / parte central do filtro
muito sujos
Torneira de admissão
de água fechada
Ligue a máquina à corrente
Pressione a tecla
Feche a porta
Verifique
Verifique
Abra a torneira
Volte a seleccionar o programa
Endireite-a
Limpe o filtro colocado
na extremidade da mangueira
de admissão
Endireite a mangueira
Verifique filtro
Siga rigorosamente as instruções
relativas à ligação da mangueira de
descarga
Consulte um técnico qualificado
Amangueira tem de estar a uma
altura mínima de 40 cm
Reduza quantidade.
Use detergente próprio
Verifique
Verifique
Desligue a máquina.
Abra a torneira.
Volte a reiniciar o ciclo de lavagem.
112
Amangueira de admissão de água está equipada com um dispositivo de protecção
(válvula) que bloqueia a passagam da água se a mangueira de admissão de água
se danificar. Se este dispositivo for activado poder-se-á ver um pino vermelho
através do visor A. Nesse caso a mangueira de admissão de água deverá ser
obrigatoriamente substituída.
Se a mangueira não tiver o comprimento necessário para uma correcta ligação, terá
que ser substituida por uma mais comprida. Esta mangueira por ser adquirida num
agente mais próximo.
“WATERCONTROL” - DISPOSITIVO DE BLOQUEIA DA ÁGUA
Pino vermelho
à vista (no visor):
válvula de bloqueio
da passagem da
água activada.
Dispositivo de
segurança
anti-torção (carregue
e torça para remover
a mangueira).
A
Page 58

114
AVARIA CAUSA PROVÁVEL ACÇÃO NECESSÁRIA
N.B.: Se, em consequência de alguma das situações acima descritas, a máquina não lavar devidamente a loiça,
será necessário remover manualmente os depósitos eventualmente existentes na loiça, pois o ciclo final de
secagem endurece esses depósitos, sendo assim impossível serem removidos através de uma nova lavagem
na máquina.
Se, depois de efectuadas as verificações acima referidas, a máquina continuar a não trabalhar em devidas
condições ou continuar avariada, agradecemos que entre em contacto com o Centro de Assitência Técnica mais
próximo. Ao fazê-lo, deverá indicar o modelo da sua máquina, que consta quer da placa de características
colocada na parte de dentro da porta, em cima, quer do certificado de garantia ou da factura. O fornecimento
destas informações permite resolver mais rapidamente o seu problema.
Salvaguardam-se erros e alterações!
O fabricante declina toda e qualquer responsabilidade por quaisquer gralhas, incorrecções ou erros
deste manual de instruções. O fabricante reserva-se ainda o direito de proceder a quaisquer alterações
ou modificações nos aparelhos, conforme necessário, sem alterar as suas características essenciais.
7 - A loiça colocada na máqui-
na só está parcialmente
lavada
8 - Todo o detergente ou parte
dele fica dentro do
compartimento para o
detergente
9 - A loiça apresenta manchas
brancas
10 - A máquina faz muito
barulho durante a lavagem
11 -Aloiça não ficou bem seca
Vide ponto (5)
Fundo das panelas não foi
devidamente lavado
Bordas das panelas mal lavadas
Braços de lavagem
parcialmente obstruídos
Loiça mal arrumada
Extremidade da mangueira de
descarga imersa em água
Quantidade de detergente mal
doseada, detergente já velho ou
endurecido
A tampa do recipiente para o sal não
ficou bem fechada
O programa de lavagem
seleccionado é demasiado suave
Aloiça colocada no cesto
inferior não foi lavada
A abertura da tampa do
compartimento para o detergente
foi impedida por talheres, loiça,
tachos, etc.
Água demasiado dura
Os objectos a lavar batem uns
contra os outros
Os braços rotativos batem de
encontro à loiça
Má circulação de ar
Falta abrilhantador
Verifique
Restos de comida presos ao fundo
devem ser amolecidos antes da
lavagem
Coloque-as noutra posição
Retire braços, soltando porcas de
fixação e lavando-os sob jacto de
água
Não encoste os objectos uns aos
outros
A extremidade da mangueira de
descarga não deve ficar a tocar na
água que foi despejada
Aumente a quantidade de
detergente utilizada em função da
sujidade da loiça ou substitua o
detergente
Aparafuse a tampa até ao fim
Escolha um programa mais
enérgico
Prima a tecla de meia carga
Rectifique a posição da loiça
colocada na máquina, a fim de que
não impeça a abertura da tampa
Verifique o nível de sal e aditivo.
Caso as manchas não
desapareçam,
contacte os Serv. de Ass. Técnica
Arrume melhor a loiça
Arrume melhor a loiça
Abra ligeiramente a porta da
máquina no fim do programa a fim
de favorecer a circulação do ar
Encha o compartimento para o
abrilhantador com produto
Page 59

Page 60

The manufacturer declines all responsibility in the event of any printing mistakes in this
booklet. The manufacturer also reserves the right to make appropriate modifications to
its products without changing the essential characteristics.
Le constructeur décline toute responsabilité pour les éventuelles erreurs d’imprimerie
contenues dans le présent mode d’emploi. Il se réserve en outre le droit d’apporter
toutes modifications qui se révèleraient utiles à ses propes produits sans pour autant
en compromettre les caractéristiques essentielles.
El fabricante declina toda responsabilitad por los posibles errores de impresión que
puedan haber en este libreto. Asímismo, se reserva el derecho de efectuar las
modificaciones que se consideren ùtiles a sus propios productos sin comprometer las
caraterìsticas esenciales.
O modelo e caracteristicas indicados nesta folha podem ser alterados sem qualquer
aviso.
Page 61

08.06 - 41028238 - www.graficaestampa.it - Printed in Italy - Imprimé en Italie
EN
FR
ES
PT
This appliance is marked according to the European directive 2002/96/EC on Waste Electrical and Electronic
Equipment (WEEE).
By ensuring this product is disposed of correctly, you will help prevent potential negative consequences for the
environment and human health, which could otherwise be caused by inappropriate waste handling of this
product.
The symbol on the product indicates that this product may not be treated as household waste. Instead it shall
be handed over to the applicable collection point for the recycling of electrical and electronic equipment
Disposal must be carried out in accordance with local environmental regulations for waste disposal.
For more detailed information about treatment, recovery and recycling of this product, please contact your local
city office, your household waste disposal service or the shop where you purchased the product.
Cet appareil est commercialisé en accord avec la directive européenne 2002/96/CE sur les déchets des
équipements électriques et électroniques (DEEE).
En vous assurant que ce produit est correctement recyclé, vous participez à la prévention des conséquences
négatives sur l’environnement et la santé publique qui pourrait être causé par une mise au rebut inappropriée
de ce produit.
Le symbole sur ce produit indique qu’il ne doit pas être traité comme un déchet ménager.Il doit être rapporté
jusqu’à un point de recyclage des déchets électriques et électroniques.
La collecte de ce produit doit se faire en accord avec les réglementations environnementales concernant la
mise au rebut de ce type de déchets.
Pour plus d’information au sujet du traitement, de la collecte et du recyclage de ce produit, merci de
contacter votre mairie,votre centre de traitement des déchets ou le magasin où v ous av ez acheté ce pr oduit.
Este electrodomestico está marcado conforme a la directiva Europea 2002/96/CE sobre los residuos de
aparatos eléctricos y electrónicos (WEEE).
Asegurándose que este producto ha sido eliminado correctamente,ayudará a evitar posibles consecuencias
negativas en el ambiente y la salud de las personas, que pudiera verificarse por causa de un anómalo
tratamiento de este producto
El simbolo sobre el producto indica que este aparato no puede ser tratado como un residuo doméstico
normal, en su ligar deberá ser entregado al centro de recogidas para reciclaje de aparatos eléctricos y
electrónicos.
La eliminación debe ser efectuada de acuerdo con las reglas medioambientales vigentes para el
tratamiento de los residuos.
Para informacion más detallada sobre el tratamiento, recuperación y reciclaje de este producto, por favor
contacte con la oficina compentente (del departamento de ecología y mediomabiente), o su servicio de
recogida a domicilio si lo hubiera o el punto de venta donde compró el producto.
Este electrodoméstico está marcado de acordo com o disposto na directiva europeia 2002/96/CE relativa
aos resíduos de equipamentos eléctricos e electrónicos (REEE).
Ao assegurar que este produto seja correctamente eliminado, estará a prevenir eventuais consequências
negativas para o ambiente e para a saúde, que, de outra forma, poderiam resultar de um tratamento
incorrecto deste produto,quando eliminado.
O símbolo patente neste produto indica que ele não pode ser tratado como lixo doméstico.Em vez disso,
deve ser entregue no centro de recolha apropriado, para reciclagem do equipamento eléctrico e
electrónico.
A eliminação deste produto deve ser lev ada a cabo de acordo com os regulamentos localmente aplicáveis
à eliminação e ao tratamento de lixo e resíduos.
Para obter informações mais detalhadas sobre o tratamento,a recuperação e a reciclagem deste produto,
agradecemos que entre em contacto com a entidade municipal competente,com o serviço de eliminação
de lixos e resíduos ou com o estabelecimento comercial onde adquiriu o produto.
 Loading...