

Page 1

User instructions
Upute za kori‰tenje
Mode d’emploi
Uputstvo za upotrebu
CD 132
DISHWASHER
PERILICA POSUDJA
LAVE-VAISSELLE
MA·INA ZA PRANJE POSUDJA
EN
HR
FR
SR
Page 2

3
Congratulations!
Thank you for choosing a Candy
appliance; quality dishwashers which
guarantee high performance and
reliability.
Candy manufacture a vast range
of domestic appliances: washing
machines, washer/dryers, cookers,
microwave ovens, ovens and hobs,
refrigerators and freezers.
Ask your dealer for the catalogue with
the complete range of Candy products.
Please read this booklet carefully as
it provides important information
regarding the safe installation, use,
and maintenance of the machine,
together with some useful advice on
how to achieve the best results from
your dishwasher.
For future reference please keep this
instruction booklet in a safe place.
CUSTOMER SERVICE AND
GUARANTEE
Your new appliance is fully guaranteed
by the manufacturer for 12 months
against electrical/mechanical breakdown excluding:
A. Any faults which occur due to bad
installation or misuse of the machine.
B. Any faults which occur due to repair
of, or interference with, the machine
by any person not authorised by the
manufacturer to carry out service.
C. Any faults which occur due to
any parts which are fitted to the
machine which are not the original
manufacturers parts.
D. Any faults arising from non-domestic
use or unusual or abnormal use of
the machine.
E. Any faults arising from operation at
incorrect voltage.
F. Any faults arising from incorrect
operation of the machine.
The guarantee applies to Gt Britain
and Northern Ireland only, and is an
addition to your statutory rights.
AFTER SALES SERVICE
For service and repairs call your local engineer on our national telephone number:
GIAS Service Tel: 08705 400 600
Support Service (Eire 018301 666)
Page 3
5
SAFETY INSTRUCTIONS
There are certain basic safety rules
which are valid for any domestic
appliance.
Installation
■ Make sure that the plug fitted to the
machine is compatible with the power
supply socket. If it is not, get a suitably
qualified person to fit the correct type,
and to make sure that the cables to the
mains socket are able to cope with the
power rating of the appliance.
■ Ensure that the dishwasher does not
crush power cables.
■ In general it is not advisable to use
adaptors, multiple plugs and/or extension
cables.
■ Should it be necessary to replace the
supply cord, call the After Sales Service
Centre.
Safety
■ Never touch the appliance when your
hands or feet are wet or damp.
■ Do not use when your feet are bare.
■ Do not remove the plug from the mains
supply socket by pulling the mains cable
or the machine itself.
■ Do not leave the appliance exposed to
the elements (rain, sun etc).
■ This appliance is not intended for use by
persons (including children) with reduced
physical, sensory or mental capabilities,
or lack of experience and knowledge,
unless they have been given supervision
or instruction concerning use of the
appliance by a person responsible for
their safety.
Children should be supervised to ensure
that they do not play with the appliance.
■ Water left in the machine or on the
dishes at the end of the wash programme
should not be swallowed.
■ The door should not be left in the open
position since this could present a potential
hazard ( es. tripping ).
■ Leaning or sitting on the open door of
the dishwasher could cause it to tip over.
WARNING !
Knives and other utensils with sharp
points must be loaded in the basket
with their points down or placed in a
horizontal position.
Daily use
■ This appliance is be designed for domestic
use only.
■ The dishwasher is designed for normal
kitchen utensils.
Objects that have been contamined by
petrol, paint, traces of steel or iron,
corrosive chemicals, acids or alkalis
must not be washed in the dishwasher.
■ If there is a water softening device installed
in the home there is no need to add
salt to the water softener fitted in the
dishwasher.
■ Cutlery is washed best if it is placed in
the basket with the handles downwards.
■ If the appliance breaks down or stops
working properly, switch it of f, turn of f the
water supply and do not tamper with it.
Repair work should only be carried out
by an approved service agent and only
genuine spare parts should be fitted. Any
failure to follow the above advice may
have serious consequences for the safety
of the appliance.
Disposal
■ The dishwasher has been made from
materials which can be recycled so that it
can be disposed of in an environmentally
friendly way.
■ If you wish to dispose of an old dishwasher
be careful to remove the door to
eliminate the risk of children becoming
trapped inside it.
4
CONTENTS
Safety advice
Setting up, installation
Water softener unit
Loading the salt
Adjusting the upper basket
Loading the dishes
Information for test laboratories
Loading the detergent
Types of detergent
Loading the rinse aid
Cleaning the filters
Some practical hints
Routine cleaning and maintenance
Description of the control panel
Technical data
Programme selection and special functions
Programme guide
Identifying minor faults
pag. 5
pag. 6
pag. 11
pag. 12
pag. 13
pag. 14
pag. 16
pag. 17
pag. 18
pag. 19
pag. 20
pag. 21
pag. 22
pag. 23
pag. 23
pag. 24
pag. 26
pag. 28
Please read the instructions in this booklet carefully because they contain important
information on how to install, use and maintain your dishwasher safely as well as
containing useful tips on how to make the most of it.
Keep this booklet safe for future reference.
Fig. A
3
2
1
4
5
Page 4
7
Electrical connection (for U.K. only)
Plug your dishwasher into the power
socket.
If the plug we supply does not fit :
■ CUT IT OFF AND DESTROY IT!
You can't use it on other appliances, and
the exposed wires could be dangerous if
anyone plugged it in.
■ Fit a suitable plug, as follows:
WARNING!
THIS APPLIANCE MUST BE EARTHED.
Fuses and plugs
This appliance should be used only on a
socket with a minimum rating of 13 Amp.
Our ready-fitted plug is already equipped
with a 13 amp fuse which is BS 1362 ASTA
approved.
Any replacement should be exactly the
same.
If the fuse cover is lost, do not use the plug
until it is replaced.
A correct replacement fuse cover (obtainable from your dealer or Electricity board)
must be the same colour as shown or
named on the insert on the base of the
plug.
Green and
yellow wire
Marked with the letter E,
OR marked with the Earth
symbol,
OR coloured green,
OR coloured green and
yellow.
Blue wire
Brown wire
Marked N,
OR coloured black.
Marked L,
OR coloured red.
Connect to the terminal in the plug
6
INSTALLATION
(Technical notes)
■ After unpacking, adjust the height of the
dishwasher. For the dishwasher to work
correctly it must be level. Adjust the feet
so that the machine does not tilt by more
than 2 degrees.
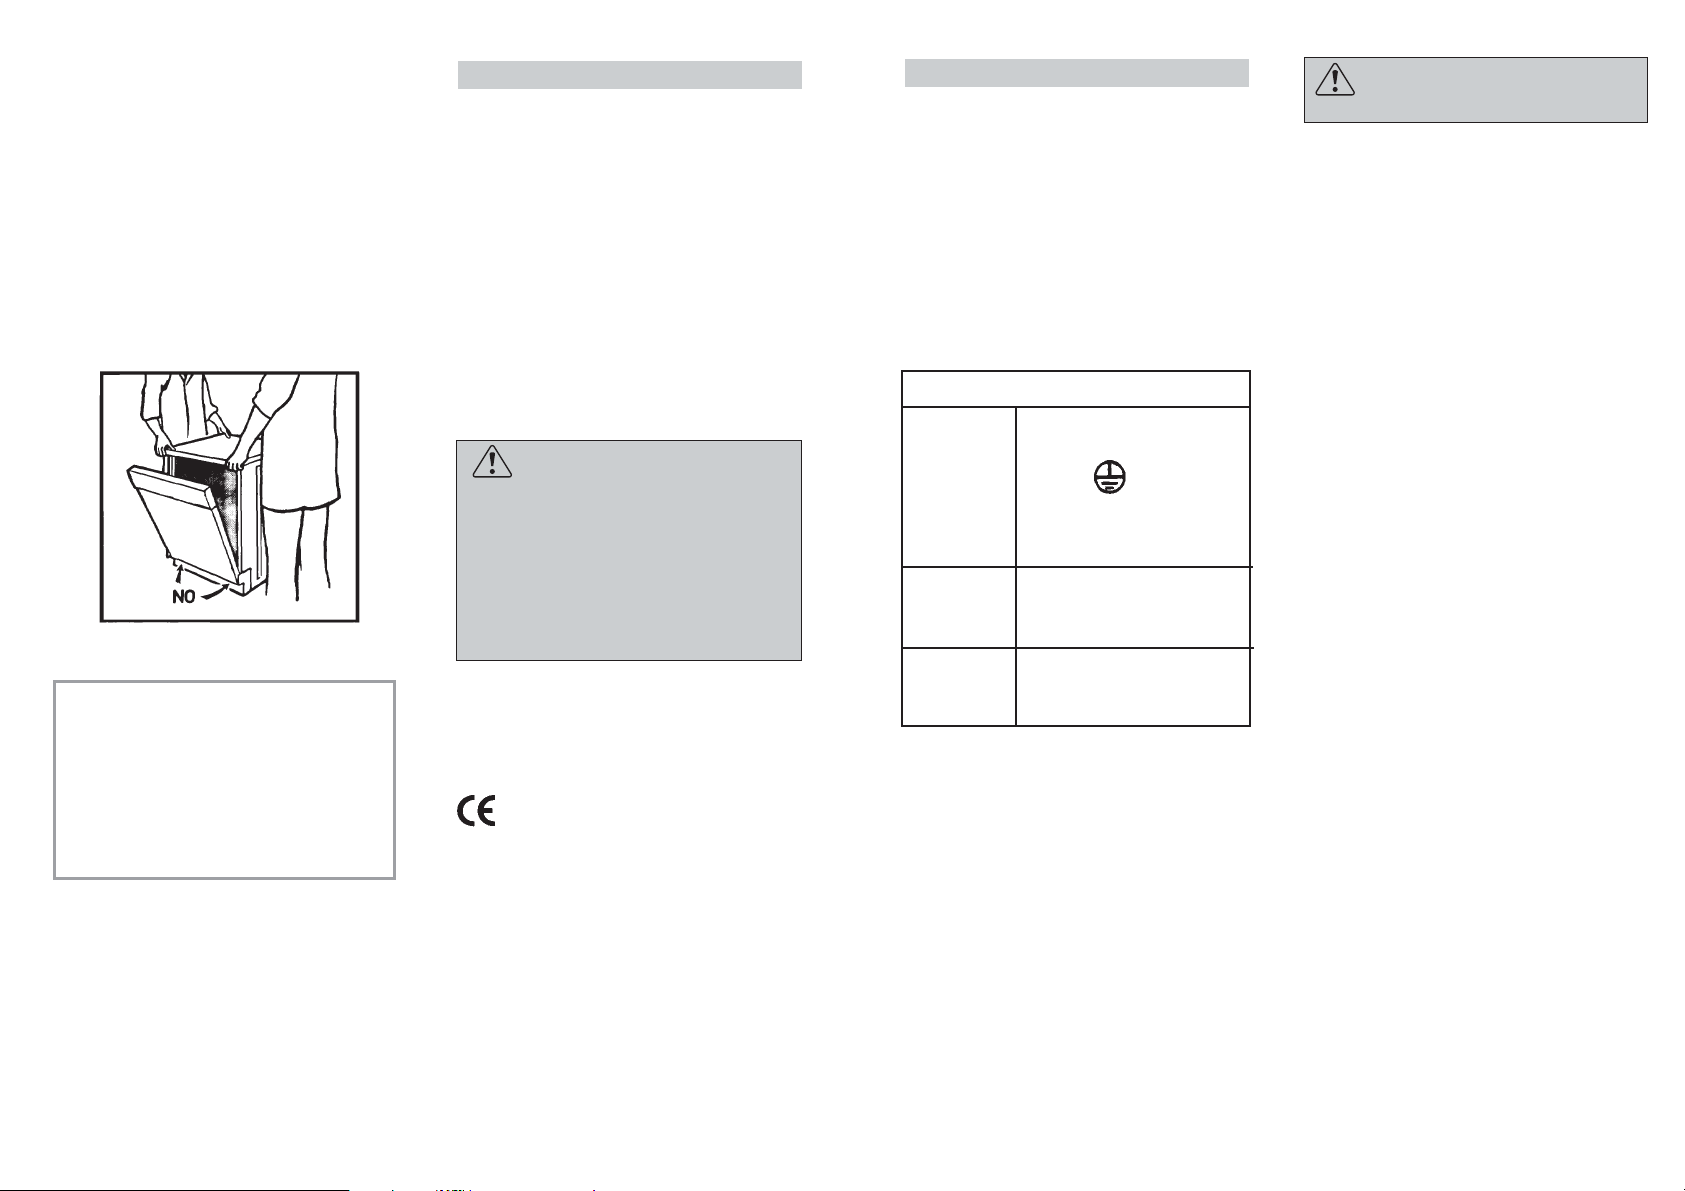
■ If it you need to move the machine after
removing the packaging, do not try to lift
it by the bottom of the door. Follow the
instructions in the figure below. Open the
door slightly and lift the machine by
holding on the top.
IMPORTANT
When the appliance is located on a
carpet floor, attention must be paid to
ensure that there is no obstruction to
the bottom vents.
Make sure that the plug on the
appliance remains accessible after
installation.
Electrical connection
This appliance complies with international
safety standards, and is fitted with a 3 pin
plug with earth connection to ensure
complete earthing of the product.
Before connecting the appliance to the
mains supply it is important to ensure:
1. that the supply socket is properly
earthed;
2. that your electricity supply is capable of
meeting the consumption requirements
listed on the rating plate of your
appliance.
WARNING!
Ensure that your product is properly
earthed.
In the absence of adequate earthing
you will notice that when touching
the metal parts of your appliance an
electrical dispersion can be felt, due
to the presence of a radio interference
suppressor.
Manufacturer declines all responsibility
for any damage due to non-earthing of
the machine.
Appliance complies with European
Directives 73/23/EEC and 89/336/EEC,
replaced by 2006/95/EC and
2004/108/EC, and subsequent
amendments.
Page 5
9
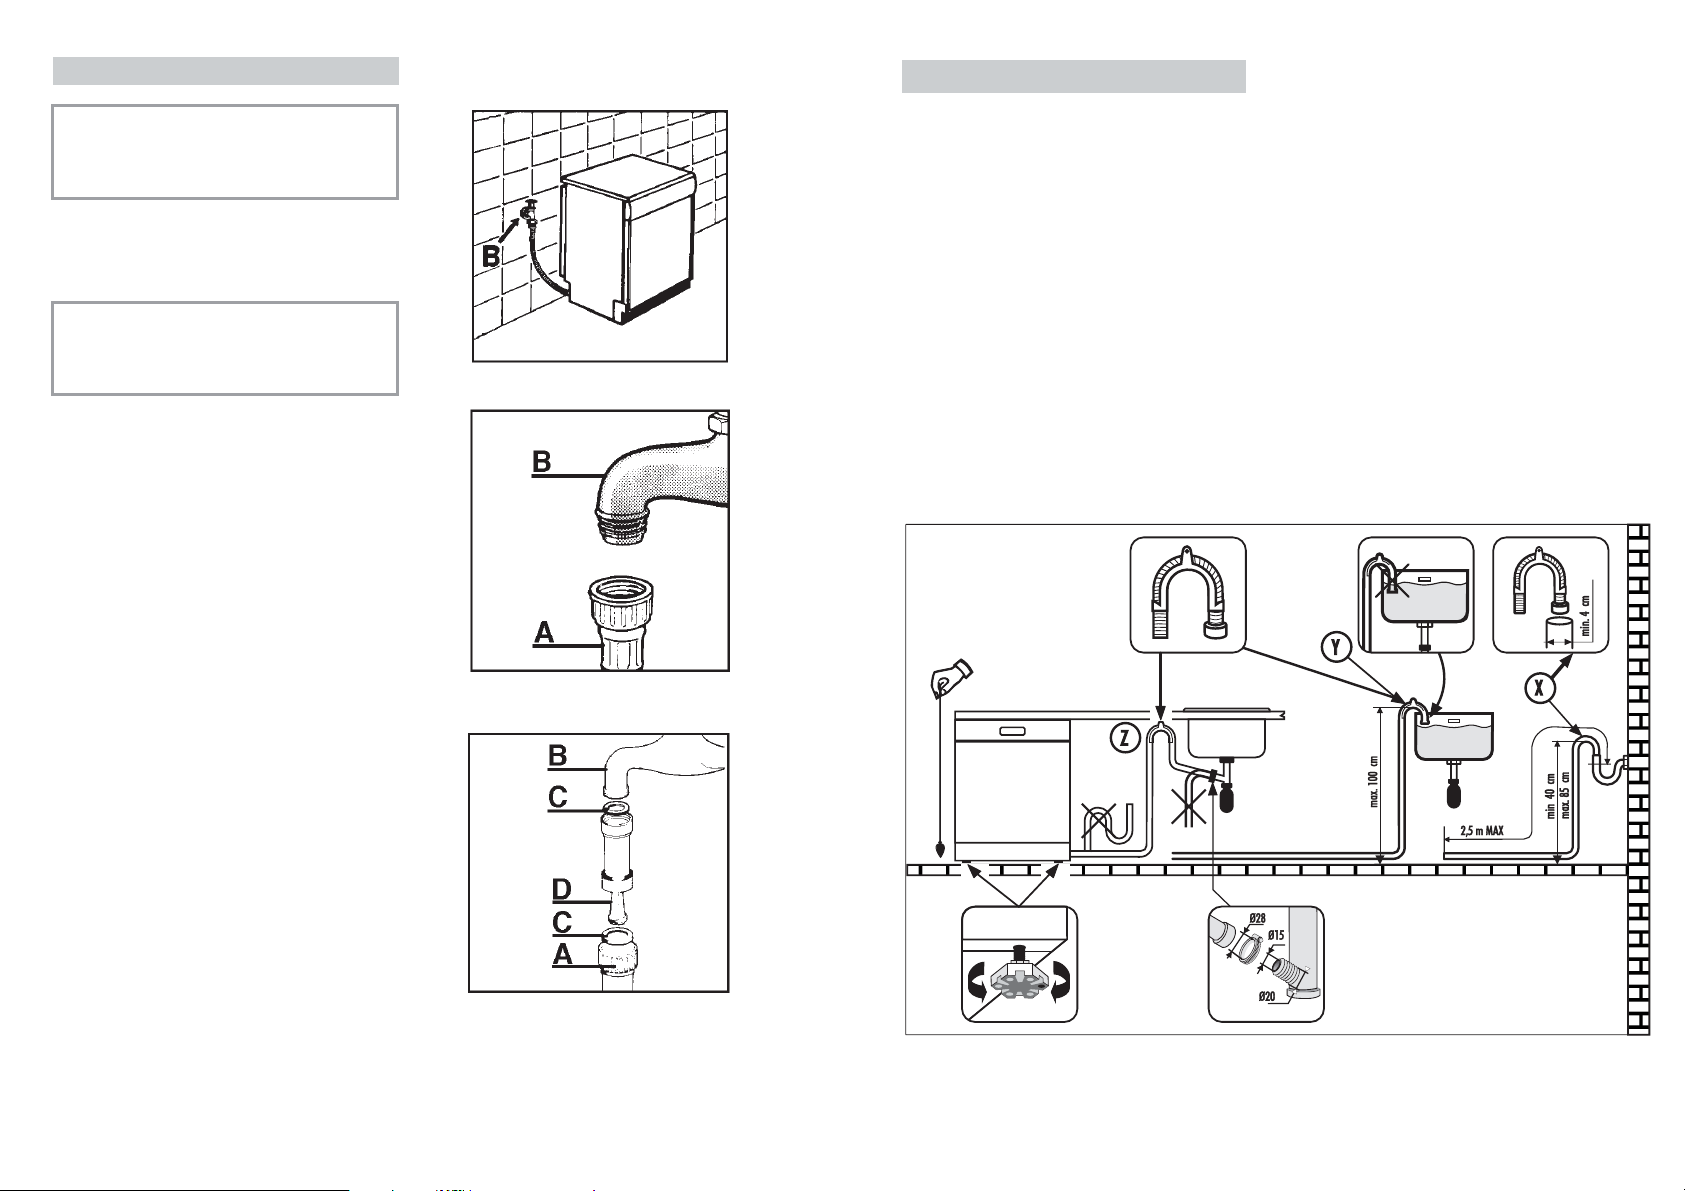
Connecting the outlet hose
■ The outlet hose should disharge into a
standpipe, making sure that there are no
kinks (fig. 4).
■ The standpipe must be at least 40 cm
above floor level and it must have an
internal diameter of at least 4 cm.
■ It is advisable to fit an anti-odour air trap
(fig. 4X).
■ If necessary the outlet hose can be
extended up to 2,5 m, provided that it is
kept at a maximum height of 85 cm
above floor level. The extension pipe is
available from the After Sales Service
Centre.
■ The hose can be hooked over the side of
the sink, but it must not be immersed in
water, in order to prevent water from
being syphoned back to the machine
when this is in operation (fig. 4Y).
■ When installing the appliance under a
worktop the hose pipe clamp must be
attached to the wall in the highest possible
position under the worktop (fig. 4Z).
■ Check that there are no kinks in the inlet
and outlet hoses.
4
8
Water connection
IMPORTANT
The appliance must be connected to
the water mains using new hose-sets.
The old hose-sets should not be reused.
■ The inlet and drain hoses can be directed
to left or right.
IMPORTANT
The dishwasher can be connected to
either cold or hot water, as long as it
is no hotter than 60 °C.
■ Water pressure must be between
0,08 MPa and 0,8 MPa. If the pressure is
below the minimum consult our service
department for advice.
■ The inlet hose must be connected to a
tap so that the water supply can be cut
off when the machine is not in use
(fig. 1 B).
■ The dishwasher is fitted with 3/4" threaded
connector (fig. 2).
■ Connect inlet hose “A” to water tap “B”
with a 3/4" attachment making sure that
it has been properly tightened.
■ If it is necessary, the inlet pipe can be
lengthened up to 2,5 m. The extension
pipe is available from the After Sales
Service Centre.
■ If limescale deposits or sand are present
in the water, it is advisable to obtain the
appropriate filter, art. 9226085, from the
After Sales Service Centre (fig. 3). The
filter “D” must be inserted between the tap
“B” and the inlet hose “A”, remembering
to fit the washer “C”.
■ If the dishwasher is connected to new
pipes or to pipes which have not been in
use for a long time run water through for
a few minutes before connecting the
inlet hose. In this way no deposits of
sand or rust will clog up the water inflow
filter.
1
2
3
Page 6

11
According to the degree of hardness of
your water, regulate the softener unit in the
following way:
IMPORTANT
The dishwasher must be ALWAYS
off before start this procedure.
1. When the dishwasher is off, OPEN
the door.
2. Turn the programme selector to the
"UNIVERSAL" programme position.
3. Press the "ON/OFF" button.
4. WITHIN 15 seconds, turn the dial (in a
anti-clockwise direction) to the "RESET"
position then go to the "UNIVERSAL"
programme position again, doing this
4 times (finishing with the programme
selector on the "UNIVERSAL" programme
position).
5. The indicator light "WASHING" will
flash 3 times and the alarm will sound
3 times, to indicate the factory water
softener setting (LEVEL 3).
6. Turn the programme selector to one of
the inclusive positions among 1 and 6 to
choose the required water softener level.
7. The indicator light "WASHING" will
flash and the alarm will sound some
times, according to the select level (for
example, 5 times for the LEVEL 5).
8. Turn off the dishwasher pressing the
"ON/OFF" button to confirm the new
setting.
WARNING!
If any problem occurs, turn the
dishwasher off by pressing the
"ON/OFF" button and start the
procedure again from the beginning
(STEP 1).
WATER SOFTENER UNIT
Depending on the source of the supply,
water contains varying amounts of limestone
and minerals which are deposited on the
dishes leaving whitish stains and marks.
The higher the level of these minerals
present in the water, the harder the water is.
The dishwasher is fitted with a water
softener unit which, through the use of
special regenerating salt, supplies
softened water for washing the dishes.
The degree of hardness of your water can
be obtained from your water supply
company.
Regulating the water softener
The softener unit can treat water with a
hardness of up to 90°fH (French grading)
or 50°dH (German grading) through 6
different settings.
The table below lists different degrees of
water hardness with the corresponding
setting for the softener unit.
* The water softener unit is set in the
factory at level 3, as this is suitable for
the majority of users.
Level
ºfH
(French
grading)
ºdH
(German
grading)
NO
YES
YES
YES
YES
YES
Position 6
Position1
Position 2
Position 3
Position 4
Position 5
Water
hardness
Water
softener
setting
Use of
regenerating
salt
0
1
2
*3
4
5
0-5
6-15
16-30
31-45
46-60
61-90
0-3
4-9
10-16
17-25
26-33
34-50
Level 1
Level 2
Level 3
Level 4
Level 5
("UNIVERSAL" programme)
Level 0
10
7
598
556/573
5
INSTALLATION IN FITTED
KITCHENS
Fitting between existing cabinets
■ The height of the dishwasher, 85 cm, has
been designed in order to allow the
machine to be fitted between existing
cabinets of the same height in modern
fitted kitchens. The feet can be adjusted
so that correct height is reached.
■ The laminated top of the machine does
not require any particular care since it is
heatproof, scratchproof and stainproof
(fig. 5).
Opening the door
Put your hand into the recess and pull.
If the machine comes open while it is working,
an electrical safety device automatically
switches everything off.
IMPORTANT
For the machine to work properly,
the door should not be opened while
it is in operation.
Closing the door
Place the baskets in the machine.
Make sure that both the spray arms are
free to rotate and are not obstructed by
cutlery, crockery or pans. Close the door,
pressing on it to make sure it is firmly shut.
Underneath existing work top
(when fitting beneath a work top)
■ In most modern fitted kitchens there is
only one single work top under which
cabinets and electrical appliances are
fitted. In this case remove the work top
of the dishwasher by unscrewing the
screws under the rear edge of the top
(fig. 6a).
IMPORTANT
After removing the work top, the
screws MUST BE screwed again
under the rear edge of the top
(fig. 6b).
■ The height will then be reduced to 82 cm,
as scheduled by the International
Regulations (ISO) and the dishwasher
will fit perfectly under the kitchen
working top (fig. 7).
6
a
b
a
b
Page 7

13
ADJUSTMENT OF THE
UPPER BASKET
If 27 cm to 31 cm plates are normally used,
load them onto the lower basket after the
upper basket has been placed in its upper
position and proceed as detailed below:
1. Turn the front stops “A” outwards;
2. Take out the basket and remount it in the
upper position;
3. Replace the blocks “A” in their original
position.
Dishes that are bigger than 20 cm in
diameter can no longer be loaded onto the
upper basket and the mobile supports
cannot be used when the basket is in the
upper position.
A
A
12
LOADING THE SALT
■ On the bottom of the machine there is a
container for the salt for regenerating
the softener.
■ It is important to use only a salt that is
specifically designed for dishwasher.
Other types of salt contain small quantities
of insoluble particles which over a long
period of time may affect and deteriorate
the softener performance.
■ To add salt, unscrew the cap of the container on the bottom and then refill the
container.
■ During this operation a little water will
overflow; but keep adding salt until the
container is full. When the container is
full, clean the thread of salt residue and
retighten the tap.
■ After loading the salt, it is recommended
running a complete washing cycle,
or COLD RINSE programme.
The salt dispenser has a capacity of
between 1.5 and 1.8 kg and, for efficient
Salt loading indicator
This model is provided with a blind cap. In
this case, the salt level must be checked
periodically, according to the regulation of
the water softener unit.
IMPORTANT
The appearance of white stains on
dishes is generally an important
sign that the salt container needs
filling.
use of the appliance, i t should be refilled
from time to time according to the
regulation of the water softener unit.
IMPORTANT
(Only for first start up)
When the appliance is used for the
first time, after completely filling the
salt container, it is necessary to add
water until the container overflows.
Page 8

15
Astandard daily load is represented in figs. 1, 2 and 3.
Upper basket (fig. 1)
A = soup plates
B = dinner plates
C = dessert plates
D = saucers
E = cups
F =glasses
Upper basket (fig. 2)
A = soup plates
B = dinner plates
C = dessert plates
D = saucers
E = cups
F = glasses
G =single section cutlery basket
Lower basket (fig. 3)
A = medium-sized saucepan
B = large saucepan
C = frying pan
D = lids
E =tureens, serving dishes
F = cutlery
G = oven dishes
Please load the dishwasher sensibly to ensure the
best wash results.
Cutlery basket (fig. 4)
The cutlery basket is made with two detachable
parts which will enable various loading options. The
two parts can be detached by sliding the left section
away from the right section.
The top of the cutlery basket can be removed, for
enable various loading options.
4
1
A
B
C
D
E
F
A
B
C
D
G
E
F
2
F
D
FAG
E
B
C
3
14
LOADING DISHES
Using the upper basket
■ The upper basket is provided with mobile racks hooked to the sides of the
basket which can be regulated in two
positions: upright and lowered. In the
lowered position the racks may be used
for tea and coffee cups, kitchen knives
and ladles. Glasses with stems may be
safely hung on the ends of the racks.
Glasses, cups, saucers and dessert
plates may be loaded under the racks.
■Soup plates and ordinary plates may be
loaded with the rack in the upright
position. Plates should be loaded
vertically with the underside of the plate
towards the back of the dishwasher with
a space between each plate to allow
water to pass freely.
■ It is advisable to load plates of the same
size together in order to utilize maximum
basket capacity.
■ Plates may be loaded in a single row
(fig. 1) or on both rows (fig. 2).
■ It is advisable to load large plates
(approx. 27 or more cm) slightly tilted
towards the rear to facilitate introduction
of the basket into the machine.
■ Salad bowls and plastic bowls may also
be loaded on the upper basket. It is
advisable to block these in place so that
the jets of water do not make them
overturn.
■ The upper basket has been designed to
offer maximum flexibility in use and can
be loaded with up to 24 plates on two
rows, up to 30 glasses on five rows or a
mixed load.
Using the lower basket
■ Saucepans, oven dishes, tureens, salad
bowls, lids, serving dishes, dinner
plates, soup plates and ladles can be
loaded on the lower basket.
■ Place the cutlery in the plastic cutlery
holder with the handles pointing
upwards.
■ Place the cutlery holder on the lower
basket (fig. 3), making sure that the
cutlery does not get in the way of the
rotating arms.
IMPORTANT
The lower basket has a safety-stop
device, for its safe extraction, also
especially useful with a full load.
For loading salt, cleaning filter and for
ordinary maintenance, the complete
extraction of the basket is necessary.
Page 9

17
LOADING THE DETERGENT
The detergent
IMPORTANT
It is essential to use a detergent
that is specifically designed for
dishwashers either in powder, liquid
or tablet form.
“FINISH” gives very good results and can
be easily obtained.
Unsuitable detergents (like those for
washing up by hand) do not contain the
proper ingredients for use in a dishwasher,
and stop the dishwasher from working
correctly.
Filling the detergent container
The detergent container is inside the door
(fig. A “2”). If the lid of the container is
closed, press the button (A) to open.
At the end of every wash cycle the lid is
always open and ready for the next time
the dishwasher is used.
WARNING!
When loading the lower basket, please
ensure that the plates or others do not
obstruct the detergent dispenser.
The amount of detergent to be used varies
according to how dirty the dishes are and
on the type of dishes to be washed.
We advise using 20÷30 g of detergent in the
wash section of detergent compartment (B).
After pouring the detergent into the container,
close the lid, firstly pushing (1) and then
pressing on it (2) until you hear the click.
Since not all detergents are the same the
instructions on the boxes of detergent can
vary. We should just like to remind users
that too little detergent does not clean the
dishes properly whilst too much detergent
will not produce better results and is also a
waste.
IMPORTANT
Do not use an excessive amount of
detergent and help limit damage to
the environment at the same time.
A
B
16
Lower basket (fig. 2)
H = 8 + 4 soup plates
I = 11 + 1 dinner plates
L = 12 dessert plates
M = serving dish
N = cutlery
Upper basket (fig. 1)
A = 5 + 5 + 2 glasses
B = 12 saucers
C = 4 + 6 + 2 cups
D = small bowl
E = medium bowl
F = large bowl
G = 1 + 1 serving spoons
INFORMATION FOR THE TEST LABORATORIES
General programme comparison (Ref. EN 50242 Standards)
(see programmes selection)
1. Upper basket position: low
2. Normal load
3. Shine setting: 6
12 international place load (Ref. EN 50242)
Correct loading is indicated, in fig. 1 for the upper basket, in fig. 2 for the lower
basket and in fig. 3 for the cutlery basket.
Cutlery basket (fig. 3)
Insert the cutlery as indicated in figure.
1 = knives
2 = forks
3 = dessert spoons
4 = teaspoons
5 = spoons
6 = ladle
7 = serving fork
4. Amount of detergent:
- 8 g directly in the dishwasher;
- 22 g in the detergent container.
A
F
C
C
B
E
D
G
G
1
C
A
A
3
1
23 355
1
23 3 5
1
23 3 5
1
24 4 5
1
24 4 5
1
24 4 5
1
24 4 5
1
24 4 5
1
24 4 5
1
23 3 5
1
23 3
5
1
23 376
NI
H
L
H
I
2
M
Page 10

19
LOADING THE RINSE AID
The rinse aid
The rinse aid, which is automatically
released during the last rinsing cycle, helps
the dishes to dry quickly and prevents
spots and stains forming.
Filling the rinse aid container
The rinse aid container can be found to the
left of the detergent container (fig. A "3").
To open the lid, push the reference mark
and, in the same time, pull the tab of
opening.
It is always advisable to use rinse aid that
is specifically designed for dishwasher.
Check the rinse aid level through the
indicator eye (C) which is located on the
dispenser.
Regulating the rinse aid from 1 to 6
The regulator (D) is placed under the lid
and can be turned using a coin.
The recommended position is 4.
The limestone content of the water
considerably affects the formation of
limescale and the drying performance.
It is therefore important to regulate the
quantity of rinse aid to achieve good
washing results.
If, after the wash, streaks occur on the
dishes, decrease the amount by one
position. If whitish spots occur, increase the
amount by one position.
FULL EMPTY
dark light
C
D
18
TYPES OF DETERGENT
Detergent tablets
Detergent tablets of different manufacturers
dissolve at different speeds, for this
reason, during short programmes, some
detergent tablets may be not fully effective,
because they are not completely dissolved.
If these products are used, is recommended
to choose longer programmes to guarantee
the complete use of the detergent.
IMPORTANT
To get satisfactory washing results,
the tablets MUST be placed in the
wash section of the detergent
container and NOT directly in the
tub.
Concentrated detergents
The concentrated detergents, with reduced
alkalinity and with natural enzymes, in
conjunction with 50°C wash programmes,
have a smaller impact on the environment
and they protect the dishes and the
dishwasher.
The 50°C wash programmes purposely
exploit the dirt-dissolving properties of the
enzymes, allowing therefore, with the use
of the concentrated detergents, to achieve
the same results of the 65°C programmes
but at a lower temperature.
Combined detergents
The detergents that also contain the rinse
aid must be placed in the wash section of
the detergent container. The rinse aid
container must be empty (if it is not empty,
set the rinse aid regulator to lowest position
before using combined detergents).
"ALL in 1" combined detergents
If you are planning to use “ALL in 1” (“3 in 1 “/
“4 in 1”/ “5 in 1”, etc.) combined detergents i.e.
those with built in salt and/or rinse agent,
we would advise the following:
■ read carefully and follow the manufacturer ’s
instructions given on the packaging;
■ the effectiveness of detergents containing
the built in water softener/salt depends
on the hardness of your water supply.
Check that the hardness of your water
supply is within the effective range given
on the detergent packaging.
If when using this type of product, you
don't get satisfactory washing results,
please contact the detergent
manufacturer.
In certain circumstances use of combined
detergents can cause:
■ limescale deposits on dishes or in the
dishwasher;
■ a reduction in washing and drying
performance.
IMPORTANT
Any problems which arise as a direct
result of the use of these products
are not covered by our warranty.
Please note that using the "ALL in 1"
combined detergents, the rinse aid and
salt indicator lights (only used on
selected models) are superfluous, so you
must ignore the lights.
If washing and/or drying problems occur,
we recommend you return to use traditional
separate products (salt, detergent and
rinse agent). This will ensure that the water
softener in the dishwasher operates
correctly.
In this case, we recommends that you:
■ refill both the salt and rinse aid container;
■ run one normal washing cycle without a
load.
Please note that on return to the use of
conventional salt, a number of cycles will
be required before the system becomes
fully efficient again.
Page 11
21
PRATICAL HINTS
How to get really good wash
results
■ Before placing the dishes in the
dishwasher, remove any remaining
food (bones, shells, pieces of meat or
vegetables, coffee grounds, skin of fruit,
cigarette ash, tooth picks etc. to avoid
blocking the filters, water outlet and
washing arm nozzles.
■ Try not to rinse the dishes before
loading them into the dishwasher.
■ If saucepans and oven dishes are
encrusted with the remains of burnt or
roast food, it is advisable to leave them
to soak before washing.
■ Place the dishes face downwards.
■ Try to place the dishes in such a way
that they are not touching one another.
If they are loaded properly you will get
better results.
■ After loading the dishes check that the
washing arms can rotate freely.
■ Pans and other dishes that have
particularly stubborn food particles or
remnants of burnt food should be left to
soak in water with dishwasher
detergent.
■ To wash silver properly:
a) rinse the silver immediately after
use, especially if it has been used for
mayonnaise, eggs, fish etc.;
b) do not sprinkle detergent onto it;
c) keep it separate from other metals.
How to make savings
■ If you want the dishwasher to give a
complete wash, place the dishes in the
dishwasher at the end of each meal and
if necessary turn on the COLD RINSE
cycle to soften the food remains and
remove bigger particles of food from the
new load of dishes.
When the dishwasher is full start the
complete wash cycle programme.
■ If the dishes are not very dirty or if the
baskets are not very full select an
ECONOMY programme, following the
instructions in the program list.
What not to wash
■ It should be remembered that not all
dishes are suitable for washing in a
dishwasher.We advise against using
the dishwasher to wash items in
thermoplastic, cutlery with wooden or
plastic handles, saucepans with
wooden handles, items in aluminium,
crystal, leaded glass unless otherwise
stated.
■ Certain decorations may fade. It is
therefore a good idea before loading the
whole batch to wash just one of the
items first so as to be sure that others
like it will not fade.
■ It is a good idea not to put silver cutlery
with non-stainless steel handles into
the dishwasher as there could be a
chemical reaction between them.
IMPORTANT
When buying new crockery or
cutlery always make sure that they are
suitable for washing in a dishwasher.
Useful hints
■ In order to avoid any dripping from the
top rack, remove the lower rack first.
■ If the dishes are to be left in the
machine for some time, leave the door
ajar, to let some air circulate and to
improve the drying performance.
20
1
2
3
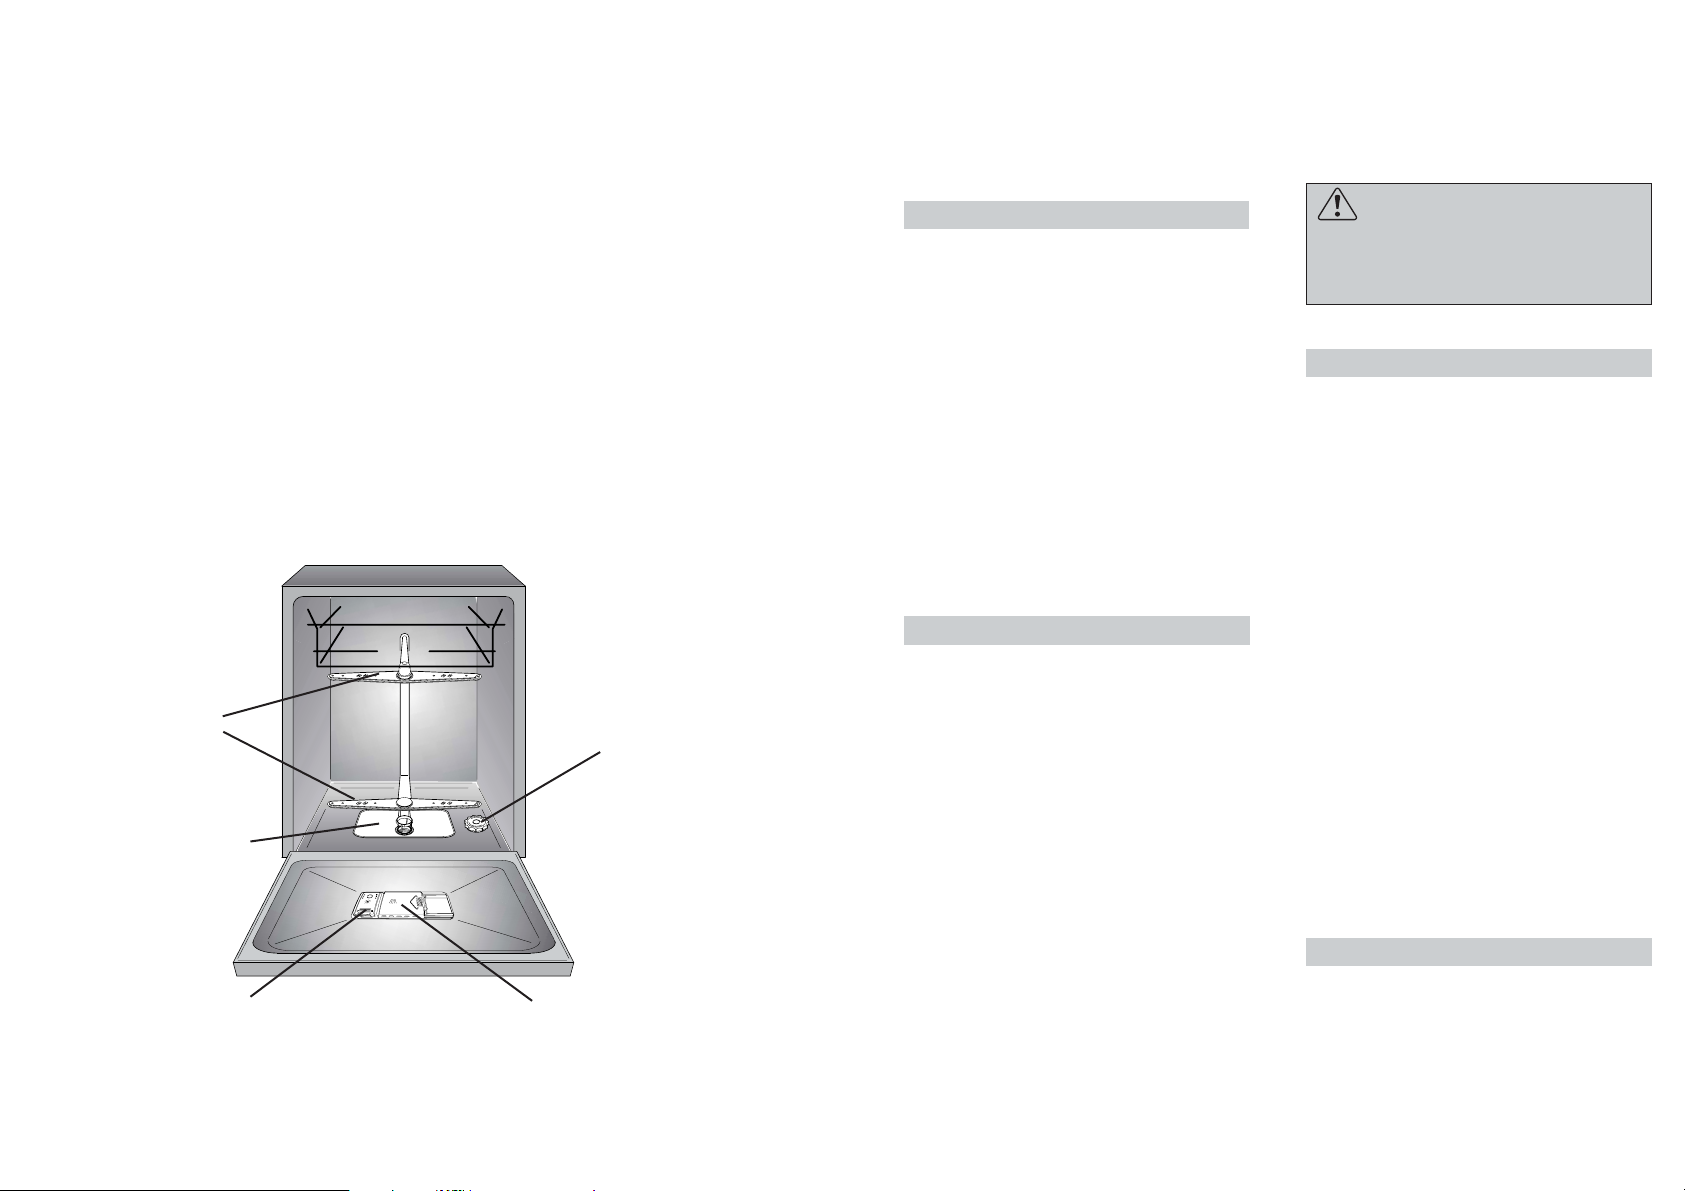
CLEANING THE FILTERS
The filter system (fig.A “4”) consists of:
a central container that traps the larger
particles;
a flat gauze that continuously filters the
wash water;
a micro filter, located beneath the gauze,
that traps the tiniest particles ensuring a
perfect rinse.
■ To achieve excellent results every time,
the filters should be checked and
cleaned after each wash.
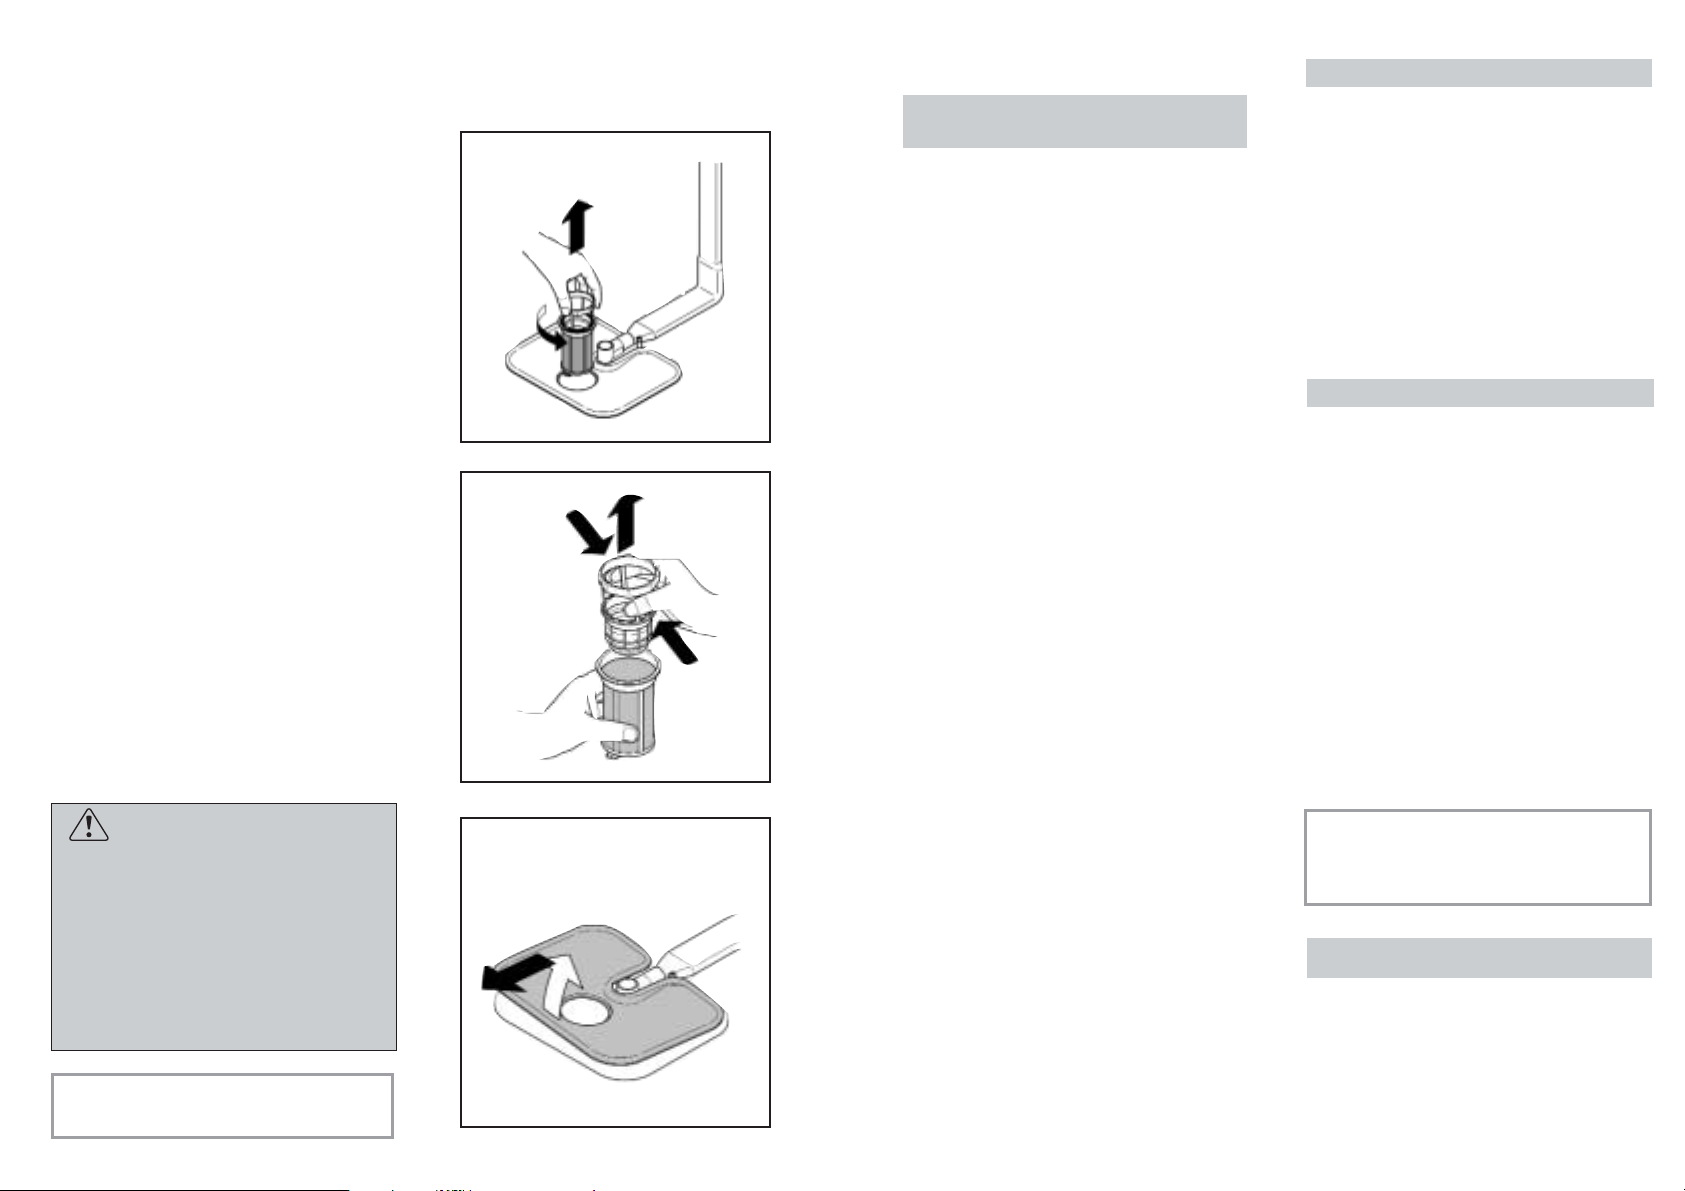
■ To remove the filter unit, simply turn the
handle anticlockwise (fig. 1).
■ For ease of cleaning, the central container
is removable (fig. 2).
■ Remove the gauze filter (fig.3) and
wash the whole unit under a jet of
water. If necessary a small brush can
be used.
■ With the Self-cleaning Micro filter,
maintenance is reduced and the filter
unit need only be checked every two
weeks. Nevertheless, after each wash it
is advisable to check that the central
container and the gauze filter are not
clogged.
WARNING!
After cleaning the filters, make sure
that they are correctly reassembled
and that the gauze filter is properly
positioned at the bottom of the
dishwasher.
Make sure that the filter is screwed
back, clockwise, into the gauze, as
poor seating of the filter unit could
have an adverse effect on the
efficiency of the appliance.
IMPORTANT
Never use the dishwasher without
the filters.
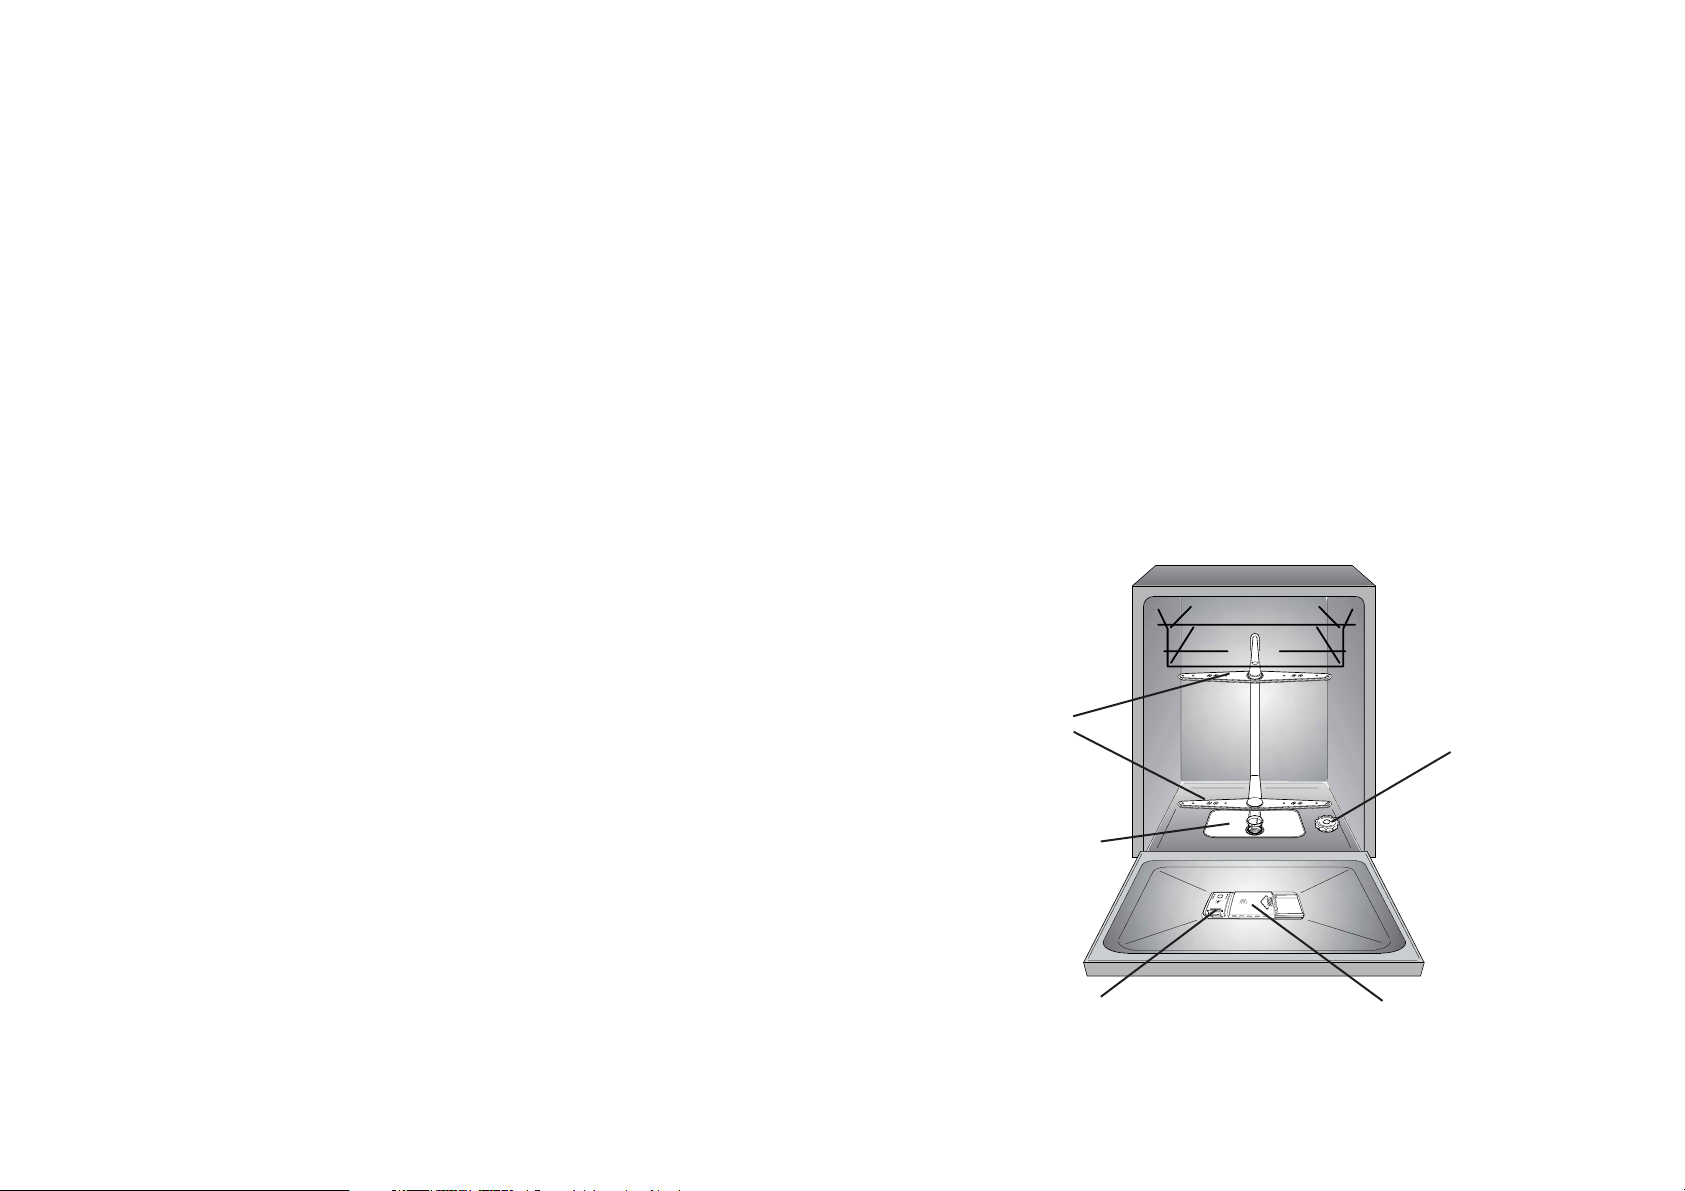
Page 12
23
EN 50242 place load
Capacity with pans and dishes
Water supply pressure
Fuse
Power input
Supply voltage
12
8 persons
Min. 0,08 - Max 0,8 MPa
(see rating plate)
(see rating plate)
(see rating plate)
D Programme selector
E Indicator light "WASHING"
TECHNICAL DATA:
AB C D
E
DIMENSIONS:
A "HALF LOAD" option button
B "ON/OFF" button
C Door handle
Height
Depth
Width
Depth with door open
cm
cm
cm
cm
with working top
85
60
60
120
without working top
82
56,3
59,8
117
DESCRIPTION OF THE CONTROL
22
WHEN CYCLE IS FINISHED
After every wash it is essential to turn off
water supply and to switch off the machine
by pressing the On/Off button to the off
position.
If the machine is not going to be used for
some time, it is advisable to follow these
rules:
1. do an empty wash with detergent in order
to clean the machine of any deposits;
2. pull out the electric plug;
3. turn off the water tap;
4. fill the rinse aid container;
5. Ieave the door ajar;
6. keep the inside of the machine clean;
7. If the machine is left in places where the
temperature is below 0°C any water left
inside the pipes may freeze. Wait until
the temperature rises above zero and
then wait for about 24 hours before
starting up the dishwasher.
CLEANING AND
MAINTENANCE
■ To clean the dishwasher outside, do not
use solvents (degreasing action) neither
abrasives, but only a cloth soaked with
water.
■ The dishwasher does not require special
maintenance, because the tank is
self-cleaning.
■ Regularly wipe the door gasket with a
damp cloth to remove any food remains
or rinse aid.
■ It is advisable to remove limestone
deposits or dirt periodically, by doing an
empty wash; pour a glass of vinegar on
the bottom of the tank and select the
light wash.
■ If, in spite of the routine cleaning of the
filters, you notice that the dishes or pans
are not properly washed or rinsed, check
that all the spray heads on the rotor
arms (fig. A “5”) are clear.
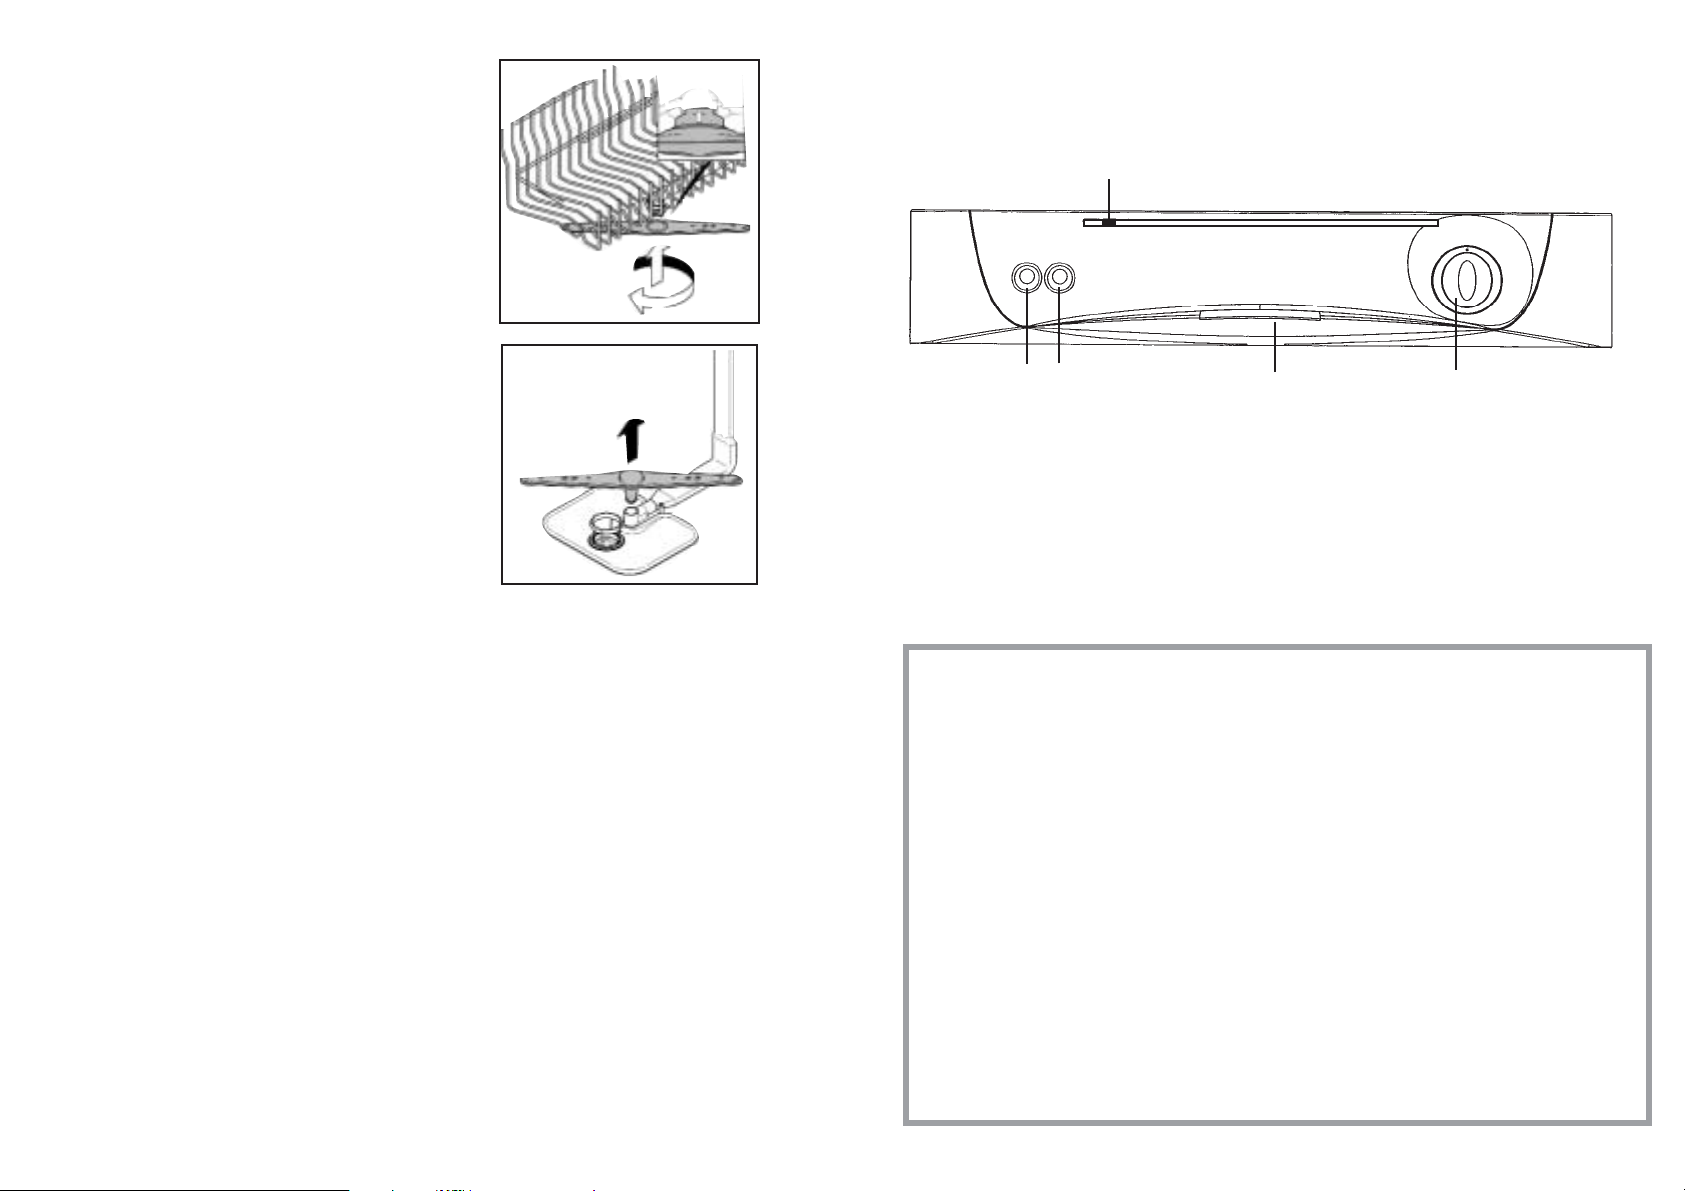
If they are blocked, clean them in the
following way:
1. to remove the upper rotor arm, turn it
until it lines up with the stop marked
by the arrow (fig. 1). Push it upwards
(fig. 1b) and, keeping it pushed in,
unscrew it in a clockwise direction
(to reassemble it repeat the same
operation, but turn it anticlockwise).
The lower rotor arm can be removed
simply by pulling it upwards (fig. 2);
2. wash the rotor arms under a jet of water
to clear any blockage in the spray
heads;
3. when you have finished, refit the rotor
arms in the same position, remembering
to re-align the arrow and screw into
position.
■ Both the door lining and the tank lining
are in stainless steel; however, should
spots caused by oxidation occur, this is
probably due to a high level of iron salts
presents in the water.
■ The spots can be removed with a mild
abrasive agent; never use chlorine
based materials, steel wool, etc.
1
2
1b
Page 13

25
Alarm mute for the
PROGRAMME END
The alarm for the programme end may be
muted as follows:
IMPORTANT
The dishwasher must be ALWAYS off
before start this procedure.
1. When the dishwasher is off, OPEN the
door.
2. Turn the programme selector to the
"RAPID" programme position.
3. Press the "ON/OFF" button.
4. WITHIN around 15 seconds, turn the
dial (in a clockwise direction) to the
"RESET" position and then go back to
the "RAPID" programme position again,
doing this 4 times (finishing with
programme selector on the "RAPID"
programme position).
5. The indicator light "WASHING" will
come on.
6. Turn the programme selector (in a
clockwise direction) to the "RESET"
position (the indicator light "WASHING"
will start to flash to indicate that the
alarm has been deactivated).
7. Turn off the dishwasher pressing the
"ON/OFF" button to confirm the new
setting.
To turn the alarm on again, follow the same
procedure from step 1 to 4 and when the
indicator light "WASHING" will come on,
turn the dishwasher off by pressing the
"ON/OFF" button to confirm the new
setting.
WARNING!
If any problem occurs, turn the
dishwasher off by pressing the
"ON/OFF" button and start the
procedure again from the beginning
(STEP 1).
Setting of new programme
Whenever you want to set a new programme,
you MUST turn the programme selector
to "RESET" position and wait for the
"WASHING" indicator light to go off.
Troubleshooting
While you are setting a programme, the
indicator light "WASHING" will start
flashing very quickly (and the alarm will
sound) if the electronics detect some
incorrect programming function.
In this event, turn the programme selector
to the "RESET" position, wait for the
"WASHING" indicator light to go off and
turn off the dishwasher pressing the
"ON/OFF" button.
After checking to make sure the water
inlet hose tap is open, that the drain
hose is not bent and that the siphon or
filters are not clogged, set the selected
programme again.
If the anomaly persists, contact Customer
Service Department.
IMPORTANT
This dishwasher is equipped with an
anti-overflow safety device which will
automatically discharge any excess
water should a problem occur.
WARNING!
To ensure the correct operation of
the anti-overflow safety device, we
recommend that the dishwasher is
not moved or tilted during operation.
If however it is necessary to tilt or
move the dishwasher, please ensure
that the washing cycle is complete
and that there is no remaining water
inside the dishwasher.
24
PROGRAMME SELECTION
AND SPECIAL FUNCTIONS
(Use in conjunction with programme guide)
Setting a programme
WARNING!
Before setting any programme, the
programme selector must be in the
"RESET" position and the indicator
light "WASHING"( ) must be off.
Make sure that the "ON/OFF" ( )
button is pressed in.
To set the programme, press the "ON/OFF"
button: then turn the dial (in a clockwise or
anti-clockwise direction) until the pointer
( ) is in line with the symbol of the required
programme.
After about 4 seconds, the indicator light
"WASHING" will come on.
After an audible signal has sounded, the
programme will start automatically.
WITHIN 2 minutes of the programme
commencing another programme can be
selected, simply turning the programme
selector to the required position.
IMPORTANT
While a programme is running, the
programme selector will remain in
the selected position, and will NOT
MOVE.
Option button
"HALF LOAD" button
In response to your everyday washing
requirement in addition to the normal wash
functions this dishwasher is equipped with
the “HALF LOAD” function. This function
enables the uses to wash a reduced
number of dishes yet retaining the freedom
of loading them both on the top and bottom
basket. When this function is activated the
dishwasher will automatically reduce the
water and energy consumption and the
wash time. When selecting the “HALF
LOAD” ensure a reduced amount of
detergent is used.
The option button can be selected or
deselected WITHIN 2 minutes of the
programme commencing.
Interrupting a programme
Opening the door is not recommended
while a programme is running, especially
during the main washing phase and final
drying.
However, the dishwasher will stop automatically
when the door is opened.
If the door is opened during a programme,
the indicator light "WASHING" will start
flashing, up to when you re-close the door.
At this point, the programme will restart
from where it had been interrupted.
WARNING!
If you open the door during the
drying cycle, an audible audio signal
advises you that the drying cycle has
not yet finished.
If you wish to change or cancel the
programme that is running, carry out
the following:
turn the programme selector to "RESET"
position. After a few seconds the indicator
light "WASHING" will go off.
A new wash setting can now be made.
WARNING!
Before starting a new programme,
you should check that there is still
detergent in the dispenser.
If necessary, top up the dispenser.
If there is any break in the power supply
while the dishwasher is operating, a
special memory stores the selected
programme and, when the power is
restored, it continues where it left off.
End of programme
A5 second alarm will sound (if not muted)
3 times at 30 second intervals to signal that
the programme has ended. The indicator
light "WASHING" will start to flash.
Turn the programme selector to "RESET"
position, wait until the indicator light
"WASHING" goes off and press the
"ON/OFF" button.
Page 14

26
27
Programme
PROGRAMME GUIDE
COLD PRE-WASH
INTENSIVE 75°C
UNIVERSAL 65°C
DAILY 70°C
ECO 45°C
DELICATE 45°C
RAPID 32’ 50°C
Short cold pre-wash for items that are
stored in the dishwasher until you are
ready to wash a full load.
Once a day - for heavily soiled pans and
any other items that have been left all day
for washing.
Once a day - for normal soiled pans and
any other items that have been left all day
for washing.
Suitable for heavily soiled items that are to
be washed straight after a meal.
(Max 8 place load)
Energy Saving Programme suitable for
normal soiled items. Using detergents with
enzyme.
Programme standardised to EN 50242.
Suitable for delicate crockery and glassware.
Also for less soiled items excluding pans.
Quick wash for dishes which are to be
washed immediately after the meal. Wash
load of 4/6 persons.
5
•
••
70°C
Check list
Avarage
duration
in
minutes
Special function
buttons
available
Detergent for soaking
(Prewash)
Detergent for washing
Clean filter
Check rinse aid
dispenser
Check salt container
Hot pre-wash
Cold pre-wash
Main wash
First cold rinse
Second cold rinse
Hot rinse with rinse aid
With cold water (15°C)
(Tolerance ± 10%)
“HALF LOAD” button
•
••••
••••
••••
••••
•••
45°C
50°C
60
85
32
••
••
••
••
65°C
115
••
YES
75°C
135
•• ••
••••
45°C
175
••
•
••
N/A
N/A
N/A = OPTION NOT AVAILABLE
••
••
••
Description
Wash with soaking cycle (Prewash)
If setting the INTENSIVE programme, a second dose of about 20 g of detergent (1table-spoon)
must be added directly in the dishwasher. For DAILY programme add 5 g.
YES
N/A
YES
YES
Programme contents
•
•
••
••
••
Page 15

28
29
IDENTIFYING MINOR FAULTS
Should the dishwasher fail to operate, before contacting the Service Centre, make
the following checks:
FAULT CAUSE REMEDY
1 - Machine completely dead
2 - Machine does not
draw water
3 - Machine does not
discharge water
4 - Machine discharges
water continuously
5 - Spray arms are not heard
to rotate
6 - On electronic appliances
without a display: one or
more LED flashing quickly.
Plug is not connected to wall
socket
O/I button has not been pressed
Door is open
No electricity
See causes for no. 1
Water tap is turned off
Programme selector is not at
correct position
The inlet hose is bent
The inlet hose filter is not
correctly connected
Filter is dirty
Outlet hose is kinked
The outlet hose extension is
not correctly connected
The outlet connection on the
wall is pointing downwards not
upwards
Position of outlet hose is too
low
Excessive amount of detergent
Item prevents arms from rotating
Plate and cup filter very dirty
Water inlet tap turned off
Connect electric plug
Press button
Close door
Check the fuse in the plug and
the electricity supply
Check
Turn water tap on
Turn programme selector to
correct position
Eliminate the bends in the hose
Clean the filter at the end of the
hose
Clean filter
Straighten outlet hose
Follow the instructions for
connecting the outlet hose
carefully
Call a qualified technician
Lift outlet hose to at least 40 cm
above floor level
Reduce amount of detergent
Use suitable detergent
Check
Clean plate and cup filter
Switch off the appliance.
Turn on the tap.
Re-set the cycle.
N.B.: Should any of the situations
occur and should the machine give a bad wash performance, it is necessary to remove the deposits from
the dishes by hand since the final drying cycle hardens the deposits which a second wash in the machine
would not be able to remove.
If the malfunction continues contact a Service Centre quoting the serial number of the dishwasher.
This is found on the plaque on the inside of the dishwasher door at the top or on the guarantee.
This information will make it possible to take more effective action more quickly.
The manufacturers decline any responsibility for any printing mistakes in this instruction booklet.
They also reserve the right to modify their own appliances as necessary without altering the
essential characteristics.
FAULT CAUSE REMEDY
7 - Load of dishes is only
partially washed
8 - Detergent not dispensed
or partially dispensed
9 - Presence of white spots
on dishes
10 -Noise during wash
11 - The dishes are not
completely dry
See causes for no. 5
Bottom of saucepans have not
been washed well
Edge of saucepans have not
been washed well
Spray arms are partially blocked
The dishes have not been
properly loaded
The end of the outlet hose is in
the water
The incorrect amount of
detergent has been measured
out; the detergent is old and hard
The wash programme is not
thorough enough
The lower basket dishes have
not been washed
Cutlery, dishes, pans, etc... stop
the detergent dispenser opening
Water is too hard
The dishes knock against one
another
The revolving arms knock against
the dishes
Inadequate air flow
Rinse aid missing
Check
Burnt on food remains must
be soaked before putting pans
in dishwasher
Reposition saucepans
Remove spray arms by
unscrewing ring nuts clockwise
and wash under running water
Do not place the dishes too
closely together
The end of the outlet hose
must not come into contact
with the outflow water
Increase the measure
according to how dirty the
dishes are and change detergent
Choose a more vigorous
programme
Depress half load button
Position dishes not to obstruct
the dispenser
Check salt and rinse aid level
and regulate amount.
Should the fault persist,
Contact Service Centre
Re-check loading of dishes in
the basket
Again re-check loading
Leave the dishwasher door ajar
at the end of the wash program
to allow the dishes to dry naturally
Fill the rinse aid dispenser
Page 16
30
31
âestitamo!
Zahvaljujemo Vam ‰to ste izabrali
Candy kuçanski uredjaj; kvalitetnu
perilicu sudja koja jamãi visoku
uãinkovitost i pouzdanost.
Candy proizvodi vrlo ‰iroki asortiman
kuçanskih uredjaja: perilice rublja,
perilice/su‰ilice rublja, ‰tednjake,
mikrovalne peçnice, ugradne peçnice
i ploãe za kuhanje, hladnjake i ledenice.
TraÏite od svog prodavaãa najnoviji i
cjeloviti katalog Candy proizvoda.
Molimo da paÏljivo proãitate upute
sadrÏane u ovoj knjiÏici. Oni çe Vam
pruÏiti vaÏne podatke ne samo glede
sigurnog postavljanja, kori‰tenja i
odrÏavanja perilice, veç i kako postiçi
najbolje rezultate u svakodnevnom
rukovanju perilicom sudja.
âuvajte paÏljivo ovu knjiÏicu, jer çe
Vam ubuduçe jo‰ trebati.
JAMSTVO
Prilikom kupnje uredjaja prodavaã Vam
mora izdati ispunjeni i potvrdjeni
jamstveni list.
Na poledjini jamstvenog lista nalazi se
popis i adrese servisera koji su
ovla‰jteni popravljati Candy uredjaje u
jamstvenom roku.
SADRÎAJ
Upute za sigurno kori‰tenje
Namje‰tanje i ugradnja
Uredjaj za omek‰avanje vode
Punjenje spremnika za sol
Namje‰tanje gornje ko‰are za sudje
Stavljanje sudja u perilicu
Podaci za laboratorijska ispitivanja
Punjenje deterdÏentom
Vrste deterdÏenta
Punjenje sredstvom za sjaj
âi‰çenje filtra
Praktiãni savjeti
âi‰çenje i odrÏavanje
Opis upravljaãke ploãe
Tehniãki podaci
Izbor programa i posebne funkcije
Odabir programa
Prepoznavanje manjih gre‰aka u radu
str. 32
str. 33
str. 37
str. 38
str. 39
str. 40
str. 42
str. 43
str. 44
str. 45
str. 46
str. 47
str. 48
str. 49
str. 49
str. 50
str. 52
str. 54
Molimo Vas da paÏljivo proãitate upute navedene u ovoj knjiÏici zato jer sadrÏe vaÏne
podatke koji se odnose na sigurno namje‰tanje i ugradnja perilice, njeno kori‰tenje i
odrÏavanje, te korisne savjete za ‰to bolju upotrebu.
PaÏljivo ãuvajte ovu knjiÏicu jer bi Vam i ubuduçe mogla zatrebati.
Slika A
3
2
1
4
5
Page 17

32 33
NAMJE·TANJE I UGRADNJA
(tehniãke napomene)
■ Nakon ‰to ste uklonili ambalaÏu, podesite
visinu perilice sudja. Da uredjaja ispravno
radi mora biti poravnat. Visinu uredjaja
poravnajte pomoçu okretljivih noÏica.
Uredjaj smije biti nagnut najvi‰e za 2°.
■ Ako morate raspakirani uredjaj pomaknuti
ruãno, ne smijete ga uhvatiti za donji
ruba vrata, veç u takvom sluãaju vrata
uredjaja djelomiãno otvorite i primite ga
za gornji rubu te ga pomaknite kako je
prikazano na slici.
ZNAâAJNO
Ako uredjaj postavite na pod prekrit
tapisonom ili tepihom, morate provjeriti
da otvori za ventilaciju na donjem
dijelu uredjaja nisu zaprijeãeni.
Budite sigurni da je nakon ugradnje
utikaã na uredjaju ostao dostupan.
Prikljuãivanje na elektriãnu mreÏu
Uredjaj odgovara svim medjunarodnim
sigurnosnim propisima, i ima ugradjen
tropolni utikaã sa uzemljenjem, koji
osigurava kompletno uzemljenje uredjaja.
Uspje‰nost sigurnog rada perilice, takodjer
ovisi i o pravilno uzemljenoj elektriãnoj
instalacijama u va‰oj kuçi ili stanu.
Zato prije nego ‰to prikljuãite perilicu na
elektriãnu mreÏu provijerite slijedeçe:
1. da li je utiãnica ispravno uzemljena;
2. da li elektriãno brojilo, osiguraãi i presjek
elektriãnih kablova odgovara prikljuãnim
vrijednostima elektriãnog uredjaja,
navedenim na tablici sa tehniãkim
podacima koja je priãvr‰çena na perilici.
UPOZORENJE!
Osigurajte da je va‰ elektriãni uredjaj
pravilno uzemljen.
U sluãaju da elektirãna instalacija
nije pravilno uzemljena, upozoravamo
Vas da moÏe doçi do disperzije
elektriãne energije po metalnim
djelovima elektriãnog kuçanskog
uredjaja, disperzija elektriãne energije
moÏe se osjetiti i zbog prisustva
uplitanja radio valova.
Proizvodjaã ne preuzima nikakvu
odgovornost za moguçe povrede ljudi ili
moguçe nastale materijalne ‰tete,
izazvane prikljuãivanjem uredjaja na
nepravilno uzemljenu elektriãnu instalaciju.
Uredjaj je u suglasnosti s
europskim direktivama 73/23/EEC
i 89/336/EEC koje zamijenjuju
2006/95/EC i 2004/108/EC i kasnije
dopune.
UPUTE ZA SIGURNO
KORI·TENJE
Ovdje su prikazana osnovna sigurnosna
pravila koja vrijede za sve elektriãne
kuçanske uredjaje i to kako slijedi.
Instalacija
■ U sluãaju da utikaãu na uredjaju ne
odgovara utiãnici u zidu, isti mora biti
zamijenjen odgovarajuçim i to od strane
za to osposobljene struãne osobe koja
istovremeno mora provijeriti da li presjek
kablova utiãnice odgovara prikljuãnoj
snazi elektriãnog uredjaja.
■ Obratite pozornost da uredjaj ne priti‰çe
prikljuãni kabel.
■ Opçenito se ne preporuãa prikljuãivanje
uredjaja na elektriãnu mreÏu preko
razliãitih ispravljaãa, vi‰estrukih utiãnica
ili produÏnih kablova.
■ Ako neophodno treba zamijeniti prikljuãni
kabel perilice, obratite se ovla‰tenom
sevisnom centru.
Sigurnost
■ Ne dodirujte uredjaj kada su Vam ruke ili
noge vlaÏne ili mokre.
■ Ne dodirujte uredjaj ako ste bosi.
■ Ne izvlaãite utikaã iz utiãnice tako da
povlaãite prikljuãni kabel ili cijeli uredjaj,
veç primite utikaã i izvadite ga iz utiãnice.
■ Elektriãni uredjaj ne izlaÏite razliãitim
atmosferskim utjecajima, kao na primjer:
ki‰i,suncu itd.
■ Ovaj uredjaj nije namijenjen za uporabu
osobama (ukljuãujuçi i djecu) sa
smanjenim fiziãkim, osjetilnim ili mentalnim
sposobnostima te osabama bez iskustva
i znanja, osim ako ih koriste uz nadzor
osobe odgovorne za njihovu sigurnost ili
od iste osobe dobiju pravilne upute za
kori‰tenje uredjaja.
Pazite i nadzirite djecu kao se nebi
igrala s uredjajem.
■ Vodu koja ostane u perilici sudja ili na
sudju na kraju programa pranja nije
potrebno brisati.
■ Vrata perilice sudja nije dobro ostavljati
otvorenima, buduçi da to predstavlja
moguçu opasnost (npr. spoticanje, udaranje).
■ Prislanjanjem ili sjedenjem na otvorenim
vratima perilice sudja moÏe uzrokovati
njihovo o‰teçenje.
UPOZORENJE!
NoÏeve i sliãan pribor s o‰trim toãkama
morate staviti u ko‰aricu za jedaçi
pribor s o‰tricama okrenutim prema
dole ili poloÏiti vodoravno.
Svakodnevno kori‰tenje
■ Ovaj uredjaj izradjen je iskljuãivo za
kori‰tenje u domaçinstvu.
■ Perilica sudja izradjena je za pranje
uobiãajenog kuhinjskog sudja koje se
koristi u domaçinstvima, u perilici nikako
ne smijete prati posudje ili predmete
uprljane benzinom, lakom, Ïeljeznim
ili ãeliãnim trunjem, nagrizajuçim
kemikalijama, kiselinama ili alkalima.
■ Ako je u stanu ili kuçi ugradjen uredjaj
za omek‰avanje vode, nije potrebno
dodavati sol u uredjaj za omek‰avanje
vode, koja je ugradjena u perilicu sudja.
■ Jedaçi pribor çe se najbolje oprati ako
ga stavite u ko‰aricu sa ruçicama
okrenutim prema dole.
■ Ako se perilica sudja pokvari ili prestane
ispravno raditi, iskljuãite je, zatvorite
vodu i nemojte je poku‰ati popraviti
sami. Popravke mora izvr‰iti smo
ovla‰teni serviser uz ugradnju iskljuãivo
originalnih rezervnih dijelova. Bilo koji
propust u gore navedenim savjetima
moÏe imati ozbiljne posljedice za sigurnost
uredjaja.
Odlaganje
■ Perilica sudja je izradjen od materijala
koji se mogu reciklirati, tako da je
se moÏete ispravno rije‰iti gledano sa
strane za‰tite okoli‰a.
■ Ako se Ïelite rije‰iti stare perilice sudja,
budite savjesni i demontirajte vrata
perilice kako bi sprijeãilo da se unutra
uvuku i zatvore djeca. Isto tako nakon
‰to odpojite utikaã iz zidne utiãnice,
prereÏite glavni kabel za elektriãno
napajanje.
Page 18

3534
Prikljuãivanje na vodovodnu mreÏu
ZNAâAJNO
Perilica sudja mora biti spojena na
vodovodnu mreÏu kori‰tenjem nove
garniture cijevi. Stare cijevi nije dobro
ponovno koristiti.
■ Cijevi za odvod i dovod vode na perilici
moÏete usmijeriti ili na lijevu ili na desnu
stranu.
ZNAâAJNO
Perilicu moÏete prikljuãiti na hladnu
ili toplu vodu, s time da ulazna
temperatura tople vode ne smije
prelaziti temperaturu od 60°C.
■ Dozvoljeni minimalni pritisak vode iznosi
0,08 MPa do maksimalno 0,8 MPa.
U sluãaju da je pritisak u vodovodnoj
mreÏi manji od 0,08 MPa, posavjetujte
se sa ovla‰tenim servisnim centrom.
■ Prikljuãnu cijev morate priãvrstiti na
slavinu navojem, tako da perilicu
moÏete odvojiti od vodovodne mreÏe
kada je ne koristite (slika 1 B).
■ Perilica je opremljena dovodnom cijevi
koja na zavr‰etku ima navoj promjera
3/4" (slika 2 ).
■ Spojite dovodnu cijev "A" na slavinu za
vodu "B" sa prikljuãkom 3/4" i provjerite
da je spoj dobro zabrtvljen.
■ Ako je neophodno, dovodna cijev moÏe
se produÏiti do 2,5 m. ProduÏna cijev
moÏe se nabaviti kod ovla‰tenog
servisera.
■ Ako je u vodi prisutan kamenac ili
pijesak, u tom sluãaju preporuãamo da u
servisnom centru kupite dodatni filtar
broj 9226085 (slika 3). Filtar “D” namjestite
izmedju slavine “B” i dovodne cijevi
“A”, a jo‰ prije umetnite brtvu “C”.
■ Ako perilicu prikljuãujete na novu vodovodnu
instalaciju ili na vodovodnu instalaciju
koja duÏe vrijeme nije bila kori‰tena,
pustite vodu da teãe nekoliko minuta da
se iz cijevi isperu moguçe neçistoçe (kao
na primjer pijesak, hrdja itd) prije nego
‰to perilicu sudja prikljuãite na cijev za
dovod vode. Na taj naãin izbjegavate
moguçe zaãepljenje filtra navedenim
neçistoçama. Dovodnu cijev prikljuãite
na slavinu za dotok vode tek kada je
voda sasvim ãista.
1
2
3
Prikljuãivanje odvodne cijevi
■ Zavr‰etak odvodne cijevi namjestite na
stalni odvod vode, te pazite da cijev ne
bude savinuta (slika 4).
■ Stalni odvod vode mora biti na visini
najmanje 40 cm i imati unutarnji promjer
‰irine najmanje 4 cm.
■ Preporuãujemo da namjestite i odgovarajuçi
sifon koji çe sprijeãiti ‰irenje neugodnih
mirisa (slika 4X ).
■ Ako je neophodno, odvodna cijev moÏe
se produÏiti do 2,5 m; osigurajte da stoji
na najvi‰e 85 cm visine od razine poda.
ProduÏna cijev moÏe se nabaviti kod
ovla‰tenog servisera.
■ Zaobljeni zavr‰etak odvodne cijevi
moÏete objesiti i na rub sudopera, ali
svakako morate pripaziti da zavr‰etak
cijevi nije potopljen u vodu koja se
moÏda nalazi u sudoperu, jer çe ona kod
ukljuãivanja uredjaja, uçi natrag u perilicu
(slika 4Y).
■ U sluãaju da isti zavr‰etak Ïelite
namjestiti ispod radne povr‰ine, morate
ga priãvrstiti neposredno ispod
radne plohe, na najvi‰oj moguçoj toãci
(slika 4Z).
■ Po zavr‰etku prikljuãivanja perilice na
vodovodnu mreÏu provjerite da cijevi za
odvod i dovod vode nigdje nisu savinute.
4
Page 19

3736
Prema stupnju tvrdoçe va‰e vode, uredjaj
za omek‰avnje vode regulirajte na
slijedeçi naãin:
ZNAâAJNO
Perilica posudja prije ovog postupka
UVIJEK mora biti iskljuãena.
1. Kada je perilica posudja iskljuãena,
OTVORITE vrata.
2. Okrenite gumb za izbor programa na
poloÏaj "UNIVERZALNI" programa.
3. Pritisnite tipku "UKLJUâIVANJE/
ISKLJUâIVANJE".
4. UNUTAR 15 sekundi, okrenite gumb (u
lijevo) na poloÏaj "RESET", zatim
ponovno okrenite gumb na poloÏaj
"UNIVERZALNI" programa, uãinite to
4 puta (zavr‰ite sa gumbom za izbor
programa na poloÏaju "UNIVERZALNI"
programa).
5. Svjetlosni pokazatelj "PRANJE" zatreptat
çe 3 puta i 3 puta oglasit çe se zvuãni
signal da oznaãe tvorniãku postavku
omek‰ivaãa vode (RAZINA 3).
6. Okrenite gumb za izbor programa na
jedan od prikazanih poloÏaja od 1 do 6
kao bi odabrali potrebnu razinu
omek‰avanja vode.
7. Svjetlosni pokazatelj "PRANJE" çe
treptati i oglasit çe se zvuãni signal,
toliki broj puta, zavisno o odabranoj
razini omek‰avanja vode (npr; 5 puta za
RAZINU 5).
8. Iskljuãite perilicu posudja pritiskom na tipku
"UKLJUâIVANJE/ISKLJUâIVANJE"
da potvrdite nove postavke.
UPOZORENJE!
Ako se pojavi bilo kakav problem u
radu perilice posudja, iskljuãite perilicu
pritiskom na tipku "UKLJUâIVANJE/
ISKLJUâIVANJE" i pokrenite postupak
ponovno od poãetka (KORAK 1).
UREDJAJ ZA
OMEK·AVANJE VODE
U razliãitim krajevima voda sadrÏi razliãite
koliãine kalcijevih soli i minerala koji se
tijekom pranja taloÏe na stijenkama
posudja i ostavljaju na njima mrlje i bjelkaste
naslage. Ako je ovih soli u vodi vi‰e, voda
je veçe tvrdoçe.
Perilica posudja opremljena je uredjajem
za odstranjivanje vapnenca koji
kori‰tenjem posebne vrste soli iz vode
izluãi vapnenac odnosno vodu omek‰a
tako da je prikladna za pranje posudja.
Podatke o stupnju tvrdoçe vode u Va‰oj
vodovodnoj mreÏi moÏete zatraÏiti od
podruãne uprave Vodovoda.
Reguliranje uredjaja za
omek‰avanje vode
Uredjaj ima 6-stupanjski regulator pomoçu
kojega moÏe omek‰avati vodu tvrdoçe do
90°fH (francuska ljestvica tvrdoçe)
odnosno 50°dH (njemaãka ljestvica tvrdoçe).
Na donjoj tabeli popisani su razliãiti
stupnjevi tvrdoçe vode sa odgovarajuçim
postavkama uredjaja za omek‰avanje
vode.
* Uredjaj za omek‰avanje vode
tvorniãki je pode‰en na 3. stupanj,
tako da je prikladan za veçinu
korisnika.
7
598
556/573
5
UGRADNJA U OPREMLJENU
KUHINJU
Namje‰tanje izmedju
postojeçih kuhinjskih ormariça
■ Visina perilice iznosi 85 cm, te zbog toga
moÏe biti postavljena u razinu s ostalim
kuhinjskim elementima sliãne visine.
Da bi visina perilice bila ista kao i visina
kuhinjskih elemenata, moguçe je istu
odrediti pomoçu pomiãnih noÏica perilice.
■ Gornja povr‰ina perilice moÏe biti
iskori‰tena u razliãite svrhe, jer je otporna
na visoke temperature, ogrebotine i mrlje
(slika 5).
Otvaranje vrata
Stavite va‰u ruku u utor i povucite.
U sluãaju da se vrata oma‰kom otvore za
vrijema rada perilice, posebni sigurnosni
sistem çe je automatski iskljuãiti.
ZNAâAJNO
Za pravilan rad perilice, vaÏno je da
vrata tijekom pranja ne otvarate.
Zatvaranje vrata
Zatim provijerite da li se mlaznice za
raspr‰ivanje vode mogu lako okretati, tj. da
li su tanjuri, pribor za jelo i ostalo posudje
postavljeni tako da ne ometaju okretanje
mlaznica.
Zatvorite vrata pritiskom prema uredjaju,
provjerite da su dobro zatvorena (sigurnosni
zatvaraã mora napraviti klik).
Ugradnja ispod postojeçe radne
povr‰ine
(namje‰tanje ispod radne povr‰ine)
■ Veçina modernog kuhinjskog namje‰taja
opremljena je i radnom povr‰inom, ispod
koje mogu biti umetnuti razliãiti kuhinjski
uredjaji. U navedenom sluãaju dovoljno
je odstraniti radnu povr‰inu perilice, tako
da odvrnete vijke, koji se nalaze sa
straÏnje strane (slika 6a).
ZNAâAJNO
Nakon ‰to uklonite radnu povr‰inu,
vijci MORAJU BITI ponovno uãvr‰çeni
ispod straÏnjeg ruba povr‰ine (slika. 6b).
■ Visina perilice smanjit çe se na 82 cm
kako je predvidjeno prema medjunarodnim
propisima (ISO) , pri çemu çete je moçi
umetnuti ispod radne povr‰ine (slika 7),
a s istom visinom savr‰eno çe se uklopiti
ispod postojeçih kuhinjskih elemenata.
6
a
b
a
b
Razina
°fH
(Francuska
skala)
°dH
(Duitse
weergave)
NE
DA
DA
DA
DA
DA
PoloÏaj 6
PoloÏaj 1
PoloÏaj 2
PoloÏaj 3
PoloÏaj 4
PoloÏaj 5
Tvrdoça vode
Pode‰enost
omek‰ivaãa
vode
Kori‰tenje
posebne soli
0
1
2
*3
4
5
0-5
6-15
16-30
31-45
46-60
61-90
0-3
4-9
10-16
17-25
26-33
34-50
Razina 1
Razina 2
Razina 3
("UNIVERZALNI" program)
Razina 4
Razina 5
Razina 0
Page 20

39
38
PUNJENJE SPREMNIKA ZA
SOL
■ Na dnu uredjaja nalazi se spremnik za sol,
pomoçu koje se obnavlja sredstvo za
odstranjivanje vapnenca.
■ Vrlo je vaÏno da koristite iskljuãivo sol
posebno namijenjenu za perilice sudja.
Ostali tipovi soli kao npr. kuhinjska sol,
sadrÏe visok postotak vapnenastih
sastojaka, te zbog prisutnosti istih, ne
moÏe doçi do proãi‰çavanja, te se
uredjaj moÏe zaãepiti.
■ Sol u uredjaj za omek‰avanje dodajete
tako da odvrnete poklopãiç na spremniku,
koji se nalazi na dnu perilice.
■ Pri navedenoj radnji ãesto se dogodi da
iz spremnika isteçe ne‰to vode, bez
obzira na to, slobodno usipajte sol u
spremnik sve dok nije potpuno pun. Da bi
lak‰e usipali sol u spremnik, tijekom
usipavanja je mije‰ajte npr. dr‰kom od
kuhaãe.
Po zavr‰etku punjenja, odstranite
ostatke soli i dobro priãvrstite poklopãiç.
■ Nakon ‰to ste u perilicu stavili sol,
preporuãljivo je pokrenuti kompletan
program pranja ili program za HLADNO
ISPIRANJE.
U spremnik za sol moÏete usipati oko 1,5
do 1,8 kg soli. Za ‰to bolje i uspje‰nije
kori‰tenje perilice potrebno je povremeno
obnoviti zalihu soli, ovisno o podacima
na tablici.
¨ ZNAâAJNO
(samo pri prvom pokretanju perilice)
Kada perilicu sudja koristite prvi
puta, nakon potpunog punjenja
spremnika za sol, neophodno je
dodati vode sve dok se ne prelije iz
spremnika.
A
A
NAMJE·TANJE GORNJE
KO·ARE
Za tanjure promjera od 27 cm do 31 cm,
preporuãujemo pranje u donjoj ko‰ari perilice,
ali tek nakon ‰to ste namjestili gornju
ko‰aru u najvi‰i poloÏaj i to na slijedeçi
naãin:
1. Okrenite prednje zatvaraãe “A” prema van;
2. Izvucite gornju ko‰aru i premjestite je u
gornji poloÏaj;
3. Ponovo postavite zatvaraãe u njihov
prvobitan poloÏaj.
Sudje koje je u promjeru veçe od 20 cm ne
moÏe se vi‰e stavljati u gornju ko‰aru, isto
tako kada je ko‰ara u gornjem poloÏaju ne
mogu se koristiti pomiãni nosaãi.
Pokazatelj zalihe soli
Spremnik za sol kod ovog modela perilice
sudja opremljen je “slijepim” poklopcem,
razina soli mora se povremeno provjeravati, zavisno o uredjaju za omek‰avanje
vode.
ZNAâAJNO
PokaÏu li se na sudju bjelkaste mrlje,
to je sigurnosni znak da u perilici
nedostaje soli.
Page 21

4140
STAVLJANJE SUDJA U
PERILICU
Kori‰tenje gornje ko‰are
■ Gornja ko‰ara opremljena je pomiãnim
stalkom prikavaãenim za boãni rub, pri
ãemu moÏe biti postavljena u dva
poloÏaja: vi‰i ili niÏi.
U niÏem poloÏaju, stalak se moÏe
koristiti za pranje ‰alica za ãaj ili
kavu,dugaãkih noÏeva i kuhaãa.
Na krajevima istog stalka moguçe je
objesiti vrãeve i pehare.
âa‰e, tanjuriçe od ‰alica i tanjure za
desert moÏete staviti ispod stalka.
■Duboki i plitki tanjuri mogu sa staviti sa
stalkom u okomiti poloÏaj.
Tanjure uvijek treba postavljajti okomito,
tako da su udubljene strane tanjura
okrenuta prema vratima perilice.
Uvijek obratite pozornost da ostane
dovoljno slobodnog prostora izmedju
jednog i drugog tanjura, kako bi voda
slobodno kolala za vrijeme pranja.
■ Uputno je da prvo tanjure iste veliãine
posloÏite zajedno u isti red da u cijelosti
iskoristite kapacitet ko‰are.
■ Tanjuri mogu biti posloÏeni ili svi u
jednom (slika 1) ili u dva reda (slika 2).
■ Tanjure veçih promjera od oko 27 cm,
lagano nagnite prema prednjoj strani,
kako bi lak‰e umetnuli ko‰aru u
unutarnjost perilice.
■ Na gornju ko‰aru takodjer moÏete
postaviti i zdjele za salatu i plastiãne
zdjelice, ali je preporuãljivo da ih uãvrstite
na mjesto jer se takvo posudje kod
raspr‰ivanja vode moÏe prevrnuti.
■ Gornja ko‰ara napravljena je tako da je
maksimalno moÏete iskoristiti, odnosno
da je napunite samo s tanjurima koje
postavite u dva reda i to do najvi‰e 24
komada, ili samo sa ãa‰ama koje
posloÏite u pet redova najvi‰e do 30
komada, ili sa razliãitim komadima
posudja.
Kori‰tenje donje ko‰are
■ U donju ko‰aru moÏete posloÏiti pladnjeve,
tave, zdjele za juhu, zdjele za salatu,
duboke i plitke tanjure, pribor za jelo i
kuhaãe.
■ Pribor za jelo posloÏite u plastiãnu
ko‰aricu (drÏaã) koja je za to namijenjena,
vrhovima ruãica okrenutim prema gore.
■ DrÏaã pribora za jelo stavite na donju
ko‰aru (slika 3) da Ïlice, vilice i noÏevi
ne iskliznuli kroz otvore na ko‰arici i
time blokiraju okretanje mlaznice za
raspr‰ivanje vode.
ZNAâAJNO
NiÏa ko‰ara ima uredjaj za sigurnosno
zaustavljanje koji je posebno koristan
za sigurno izvlaãenje potpuno pune
ko‰are.
Potpuno izvlaãenje ko‰are neophodno
je pri redovitom odrÏavanju, kada
punite sol i ãistite filtar.
Uobiãajeno dnevno punjenje perilice s posudjem
prikazano je na slikama 1, 2 i 3.
Gornja ko‰ara (slika 1)
A = duboki tanjuri
B = plitki tanjuri
C = tanjuri za desert
D = tanjuriçi od ‰alica za kavu
E = ‰alice za kavu
F = ãa‰e
Gornja ko‰ara (slika 2)
A = duboki tanjuri
B = plitki tanjuri
C = tanjuri za desert
D = tanjuriçi od ‰alica za kavu
E = ‰alice za kavu
F = ãa‰e
G = ko‰arica za jedaçi pribor
Donja ko‰ara (slika 3)
A = srednje velika zdjela
B = velika zdjela
C = velika tava
D = poklopci
E = zdjele za juhu, pladnjevi za serviranje
F = pribor za jelo
G = pladnjevi, tave
Pravilno i racionalno razmje‰tanje sudja u perilicu
rezultirat çe dobrim rezultatima pranja.
Ko‰arice za jedaçi pribor (slika 4)
Ko‰arica za jedaçi pribor napravljena je od dva
odvojena djela, te je zbog toga omoguçeno
punjenje razliãitim veliãinama jedaçeg pribora.
Dva dijela mogu biti zasebna tako da ih odvojitie
kliznim pomakom.
Vrh ko‰arice za jedaçi pribor moÏe se ukloniti da se
omoguçi stavljanje razliãitih predmeta.
4
1
A
B
C
D
E
F
A
B
C
D
G
E
F
2
F
D
FAG
E
B
C
3
Page 22

42
43
PUNJENJE DETERDÎENTOM
DeterdÏent
ZNAâAJNO
Za pranje posudja u perilici morate
upotrebljavati posebno sredstvo za
pranje, koje moÏe biti u tekuçem
stanju, odnosno prikladan pra‰ak ili
tablete.
“CALGONIT” daje vrlo dobre rezultate a
moÏe se nabaviti u trgovaãkoj mreÏi.
Neprikladna sredstva kao na primjer:
sredstva za ruãno pranje posudja, ne
sadrÏe sastojke pogodne za pranje
posudja u perilici, te ometaju pravilan rad
perilice.
Punjenje spremnika za deterdÏent
Spremnik za deterdÏent smje‰ten je na
unutarnjoj strani vrata (slika A “2”). Ako je
poklopac spremnika zatvoren, za otvaranje
pritisnite tipku (A).
Po zavr‰etku bilo kojeg programa pranja,
ostavite poklopac uvijek otvoren.
UPOZORENJE!
Kod punjenja donje ko‰are sa
posudjem, provjeriti da li posudje ne
smeta otvaranju spremnika za
deterdÏent.
Potrebna koliãina sredstva za pranje ovisi i
o stupnju prljav‰tine kao i o tipu posudja.
Preporuãujemo da odjeljak za pranje
spremnika za detrdÏent napunite sa 20-30
grama sredstva za pranje posudja (B).
Nakon ‰to ste stavili deterdÏent u spremnik,
zatvorite poklopac, prvo ga gurnite (1) a zatim
ga pritisnite (2) sve dok se ne zaãuje "klik".
Buduçi da sva sredstva za pranje, nemaju
istu snagu pranja, pridrÏavajte se uputa
proizvodjaãa.
Podsjeçamo i to, da nedovoljna koliãina
sredstva za pranje moÏe prouzroãiti
nepotpuno uklanjanje prljav‰tine. Dozirate
li preveliku koliãinu detrdÏenta, neçete
postiçi bolje rezultate pranja, veç samo
nepotreban tro‰ak.
ZNAâAJNO
Nemojte koristiti prekomjerne koliãine
sredstava za pranje jer time istodobno
pridonosite i za‰titi okoli‰a.
A
B
Donja ko‰ara (slika 2)
H = 8 + 4 dubokih tanjura
I = 11 + 1 plitkih tanjura
L = 12 tanjura za desert
M = tanjur za serviranje
N = pribor za jelo
Gornja ko‰ara (slika 1)
A = 5 + 5 + 2 ãa‰e
B = 12 tanjuriça od ‰alica za kavu
C = 4 + 6 + 2 ‰alica
D = mala zdjelica
E = srednje velika zdjela
F = velika zdjela
G = 1 + 1 Ïlice za posluÏivanje
PODACI ZA LABORATORIJSKA ISPITIVANJA
Opça usporedba programa pranja (Prema normi EN 50242)
(pogledajte izbor programa)
1. Postavljanje gornje ko‰are: niÏe
2. Klasiãno punjenje perilice posudjem
3. Namje‰tanje sredstva za sjaj: 6
Punjenje perilice sa 12 kompleta sudja (Prema normi EN 50242)
Ispravno stavljanje sudja u gornju ko‰aru prikazano je na slici 1 za gornju ko‰aru, na
slici 2 za donju ko‰aru a na slici 3 za ko‰aricu pribora za jelo.
Ko‰arica pribora za jelo (slika 3)
Jedaçi pribor umetnite kako je
prikazano na slici.
5 = Ïlice
6 = kutlaãa
7 =vilice za serviranje
1 = noÏevi
2 = vilica
3 = Ïlica za desert
4 = Ïlice za ãaj
4. Koliãina sredstva za pranje:
- 8 grama direkno u perilicu posudja;
- 22 grama u kutiju za deterdÏent.
A
F
C
C
B
E
D
G
G
1
C
A
A
3
1
23 355
1
23 3 5
1
23 3 5
1
24 4 5
1
24 4 5
1
24 4 5
1
24 4 5
1
24 4 5
1
24 4 5
1
23 3 5
1
23 3
5
1
23 376
NI
H
L
H
I
2
M
Page 23

44
45
PUNJENJE SREDSTVOM ZA SJAJ
Sredstvo za sjaj
Sredstvo za sjaj, koje se automatski ispu‰ta
tijekom zadnjeg ispiranja, pomaÏe da se
sudje brÏe osu‰i, spreãava nastajanje mrlja
i taloÏenje vodenog kamenca.
Punjenje spremnika sredstva za sjaj
Spremnik sredstva za sjaj nalazi se lijevo
od spremnika za deterdÏent (slika A "3").
Da otvorite poklopac spremnika, gurnite
oznaku za oãitavanje i u isto vrijeme,
povucite jeziãac za otvaranje. Preporuãljivo
je uvijek koristiti sredstvo za sjaj posebno
namijenjeno za perilice sudja.
Razinu sredstva za sjaj provjerite kroz
pokazno okno (C) koje je smje‰teno na
raspr‰ivaãu.
Reguliranje dodavanja sredstva za
sjaj od 1- 6
Regulator (D) je smje‰ten ispod poklopca i
moÏe se okretati pomoçu kovanice.
Preporuãeni poloÏaj je 4.
Koliãina vapnenca u vodi bitno utjeãe kako
na nastajanje vodenih mrlja tako i na
su‰enje posudja. Zato je veoma vaÏno
reguliranje koliãine sredstva za visoki sjaj,
da bi se postigli optimalni rezultati pranja.
U sluãaju da se po zavr‰etku pranja na
posudju pokaÏu tragovi tekuçine za sjaj
potrebno je regulator postaviti na niÏu
vrijednost, a na vi‰u vrijednost ako se na
posudju pokaÏu bjelkaste mrlje.
PUNO PRAZNO
tamno svijetlo
C
D
VRSTE DETERDÎENTA
DeterdÏent u tabletama
DeterdÏenti u tabletama razliãitih
proizvodjaãa ne otapaju se istom brzinom,
zbog toga tijekom kratkih programa pranja
neki deterdÏenti u tabletama ne mogu biti
potpuno uãinkoviti jer se ne otope u
potpunosti. Ako se koristi takav deterdÏent,
savjetujemo kori‰tenje duÏeg programa
pranja da se zajamãi potpuno djelovanje
deterdÏenta u tabletama.
ZNAâAJNO
Da se ispune dobri rezultati pranja,
tablete moraju biti stavljene u
odjeljak za pranje spremnika za
deterdÏent, NE izravno u kadu perilice
posudja.
Koncentrirani deterdÏenti
Koncentrirani deterdÏenti sa smanjenim
alkalinitetom i prirodnim enzimima, zajedno
sa programom pranja na 50°C, imaju manji
‰tetni uãinak na prirodni okoli‰ a ‰tite
posudje i perilicu posudja.
Programi pranja na 50°C namjerno
iskori‰tavaju svojstva prljav‰tine otpljene
enzimima i zato omoguçuju da se
kori‰tenjem koncentriranih deterdÏenata
postignu isti rezultati pranja kao sa
programima na 65°C ali sa niÏom
temperaturom pranja.
Kombinirani deterdÏenti
DeterdÏenti koji sadrÏe i sredstvo za sjaj
moraju biti stavljeni u odjeljak za pranje
spremnika za deterdÏent. Odjeljak sredstva
za sjaj mora biti prazan (ako nije prazan,
podesite regulator sredstva za sjaj na niÏi
poloÏaj prije kori‰tenja takvog deterdÏenta).
Kombinirani deterdÏenti “SVE u 1”
Ako namjeravate koristiti kombinirane
deterdÏente "SVE u 1" ("3 u 1"/"4 u 1"/
"5 u 1", itd.) tj. one koji sadrÏe i sol i
sredstvo za sjaj, savjetujemo sljedeçe:
■ paÏljivo proãitajte upute proizvodjaãa
otisnute na ambalaÏi;
■ uãinkovitost deterdÏenta koji sadrÏi i sol
zavisi o tvrdoçi vode u va‰oj vodovodnoj
mreÏi,
Provjerite da li je tvrdoça vode u va‰oj
vodovodnoj mreÏi unutar raspona
uãinkovitosti koja je prikazana na
ambalaÏi deterdÏenta.
Ako koristite takvu vrstu deterdÏenta a
niste zadovoljni sa rezultatima pranja,
molimo da se obratite proizvodjaãu
deterdÏenta.
U odredjenim okolnostima kori‰tenje
kombiniranih deterdÏenata moÏe izazvati:
■ taloÏenje vapnenca na posudju ili u
perilici posudja;
■ smanjeni radni uãinak pranja ili su‰enja.
ZNAâAJNO
Bilo koji problem koji se iskaÏe kao
izravan rezultat kori‰tenja takvog
deterdÏenta nije pokriven na‰im
jamstvom.
Molimo da zapamtite da pri kori‰tenju
kombiniranog deterdÏenta "SVE u 1",
svjetlosni pokazatelji za zalihu soli i
sredstva za sjaj (koji se nalaze samo na
odabranim modelima) postaju suvi‰ni,
tako da svjetlosne pokazatelje moÏete
zanemariti.
Ako se pojave problemi pri pranju i su‰enju
posudja, preporuãujemo da se vratite
kori‰tenju uobiãajenih odvojenih sredstava
(sol, deterdÏent u prahu i sredstvo za sjaj).
To çe osigurati da uredjaj za omek‰avanje
vode u perilici posudja radi ispravno.
U takvom sluãaju, preporuãujemo:
■ napunite sprmnike za sol i sredstva za
sjaj;
■ pokrenite uobiãajeni program pranja ali
bez umetnutog posudja.
Molimo da zapamtite da je nakon povratka
na kori‰tanje uobiãajene soli za perilicu
posudja, potreban odredjan broj ciklusa
pranja prije nego taj sustav ponovno bude
potpuno uãinkovit.
Page 24

4746
PRAKTIâNI SAVJETI
Kako postiçi zaista dobre
rezultate pranja
■ Prije stavljanja sudja u perilicu, uklonite
sve ostatke hrane (kosti, ljuske, komadiçe
mesa ili povrça, ostatke od kave, koÏu
voça, pepel cigareta, ãaãkalice itd.) kako bi
sprijeãili zaãepljenje filtra, odvodne cijevi ili
mlaznica za pranje.
■ Preporuãujemo da sudje ne ispirete
prije nego ‰to ga stavite u perilicu.
■ Ponekad su pladnjevi, tave i lonci jako
zaprljani i sadrÏe zagorene ili zapeãene
ostatke hrane, u tom sluãaju, takvo je
sudje potrebno namakati prije pranja.
■ Posudje smjestite u perilicu tako da je
okrenuto prema dolje.
■ Ako je ikako moguçe posudje u perilici
posloÏite tako da se medjusobno ne dodiruje.
Vrlo je vaÏno da posudje pravilno posloÏite u
perilicu jer to daje bolje rezultate pranja.
■ Nakon ‰to ste sudje posloÏili u perilicu,
prije poãetka pranja morate provjeriti da
li se mlaznice za raspr‰ivanje vode
slobodno okreçu.
■ Lonce i drugo posudje na kojima su
ostaci zagorene hrane do poãetka
pranja namaãite u otopini deterdÏenta
za pranje.
■ Kod pranja srebrnog sudja i pribora za
jelo pazite na slijedeçe:
a) isperite ga odmah po upotrebi,
posebno ako ste ga koristili za jaja,
majonezu, ribu ili sliãno;
b) nemojte izravno posuti deterdÏent
na takvo sudje ili pribor za jelo;
c) pazite da takvo sudje ne dodje u
dodir sa drugim metalima.
Kako u‰tedjeti
■ Ako Ïelite u potpunost iskoristiti prostor
u perilici sudja, stavljajte sudje u perilicu
nakon svakog jela i ako je potrebno
pokrenite ciklus HLADNO ISPIPRANJE
da se omek‰aju i uklone veçe ãestice
hrane sa novo umetnutog sudja. Kada
je perilica puna, pokrenite program za
cjelovito pranje.
■ Ako sudje nije jako prljavo i perilica nije
sasvim puna, izaberite ·TEDLJIVI
program pranja i slijedite pri tome sve
upute navedene u opisu programa.
·to se ne smije prati
■ Upamtite da svo sudje nije prikladno za
pranje u perilici sudja.
Savjetujemo da neke vrste sudja kao na
primjer: plastiku neotpornu na toplinu,
pribor za jelo sa plastiãnim ili drvenim
dr‰kama, aluminijsko posudje, kristalne
predmete, ãa‰e od olovnog stakla (ako
drugaãije nije napomenuto) ne perete u
perilici za sudje.
■ I ukrasi u boji na nekom sudju nisu
sasvim postojani. Zato je najbolje da
provjerite njihovu postojanost tako da u
perilici operete samo pojedini komad,
kako bi provjerili da li je prikladan za
pranje u perilici ili ne.
■ Ujedno ne zaboravite da istovremeno
ne smijete prati srebrni i obiãan metalni
pribor za jelo, jer medju njima moÏe
doçi do kemijske reakcije.
ZNAâAJNO
Prilikom kupnje novog sudja ili
pribora za jelo provjerite da li je
prikladno za pranje u perilici sudja.
Korisni savjeti
■ Da bi izbjegli sluãajno kapanje iz gornje
ko‰are, prvo izvadite posudje iz donje
ko‰are.
■ Ako po zavr‰etku pranja ostavite neko
vrijeme sudje u perilici, vrata perilice
morate samo pritvoriti, da zrak u
unutarnjosti moÏe slobodno kruÏiti. Na
taj çe naãin posudje biti bolje osu‰eno.
1
2
3
âI·åENIE FILTRA
Sustav filtriranja (slika A “4”) sastoji se od:
sredi‰njeg spremnika koji zadrÏava veçe
komadiçe;
ravne mreÏice koja neprekidno filtrira vodu
od pranja;
mikro filtra, smje‰tenog ispod mreÏice,
koji zadrÏava najsitnije komadiçe i osigurava
savr‰eno ispiranje.
■ Da bi svaki puta postigli savr‰ene rezultate
pranja, filtre treba provjeriti i ãistiti
nakon svakog pranja.
■ Da uklonite filtar, jednostavno okrenite
ruãicu u smjeru suprotnom kretanju
kazaljki na satu (slika 1).
■ Za lak‰e ãi‰çenje sredi‰nji spremnik
moÏe se ukloniti (slika 2).
■ Uklonite mreÏicu (slika 3) i operite je
pod mlazom vode, ako je potrebno
koristite i manju ãetku.
■ Sa samoãisteçim mikro filtrom,
odrÏavanje je svedeno na minimum i
sustav filtriranja potrebno je samo
provjeriti svaka dva tjedna. Ipak, nakon
svakog pranja preporuãujemo da
provjerite sredi‰nji spremnik i mreÏicu
da nisu zaãepljeni.
UPOZORENJE!
Nakon ãi‰çenja, uvjerite se da ja filtar
ponovo ispravno namje‰ten i da je
mreÏica ispravno usadjena na dno
perilice sudja.
Provjerite da li je filtar prilikom
vraçanja, u mreÏicu ispravno privinut
u smjeru kazaljki na satu, jer ako je
filtar slabo usadjen moÏe doçi
do ‰tetnih posljedica u vezi sa
uãinkovitosti perilice.
ZNAâAJNO
Nikada ne koristite perilicu sudja ako
je filtar izvadjen.
Page 25

49
48
NAKON ZAVR·ETKA
PROGRAMA PRANJA
Nakon svakog zavr‰etka pranja , uvijek
morate zatvoriti slavinu za dotok vode u
perilicu, kako dovodna cijev ne bi stalno
bila pod stalnim pritiskom. Isto tako morate
iskljuãiti tipku “ukljuãeno”/”iskljuãeno” kako
bi perilicu iskljuãili iz elektriãne mreÏe.
U sluãaju da perilicu neçete upotrebljavati
duÏe vrijeme, uãinite slijedeçe:
1. u praznu unutarnjost perilice stavite malo
detrdÏenta i ukljuãite jedan od programa
kako bi se unutra‰njost odmastila;
2. izvadite utikaã iz utiãnice;
3. zatvorite slavinu za dotok vode;
4. napunite spremnik sa sredstvom za sjaj;
5. vrata perilice ostavite pritvorenima;
6. unutarnjost perilice mora ostati ãista;
7. ako je perilica ostavljena u prostoriji
gdje je temperatura niÏa od 0°C, voda u
perilici moÏe se zalediti, u tom sluãaju
temperaturu prostorije morate povisiti i
priãekati 24 sata prije nego ‰to perilicu
ponovo Ïelite koristiti.
âI·åENJE I ODRÎAVANJE
■ Za ãi‰çenje vanjskih dijelova perilice
sudja koristite samo mokru krpu, ne
koristite o‰tra ili sredstva koja sadrÏe
otapala.
■ Perilica ne zahtjeva neko posebno
odrÏavanje, jer je unutarnjost perilice
samoãisteça.
■ Redovito morate ãistiti tjesnilo na vratima
i to sa vlaÏnom krpom, kako bi sa njega
odstranili moguçe ostatke hrane i sredstva
za visoki sjaj.
■ Povremeno je preporuãljivo iz unutarnjosti
perilice ukloniti kamenac ili prljav‰tinu;
ulijte ãa‰u octa na dno perilice i odaberite
program pranja za osjetljivo sudje; neka
perilica pere prazna.
■ Ako unatoã uobiãajenom ãi‰çenju filtra
primjetite da sudje ili tave nisu dobro
oprane i osu‰ene, provijerite da li su
otvori na okretnim mlaznicama za
raspr‰ivanje vode (slika A”5”) moÏda
zaãepljeni ostacima hrane.
Ako su zaãepljeni oãistite ih na slijedeçi
naãin:
1. Da uklonite gornju okretnu mlaznicu,
okrenite je sve dok se oznaka za
zaustavljanje ne poravna sa strelicom
(slika 1b). Potisnite je prema gore i
zadrÏite je povuãenom, odvijte je u
smjeru kazaljki na satu. Za ponovno
postavljanje, ponovite istu radnju ali
je okreçite suprotno kazaljkama na
satu. NiÏu okretnu mlaznicu uklonite
jednostavno tako da je povuãete prema
gore (slika 2);
2. operite mlaznice pod jakim mlazom vode
tako da oãistite svaki otvor za
raspr‰ivanje;
3. kada ste zavr‰ili, ponovno ih namjestite u
isti poloÏaj, zapamtite da gornju mlaznicu
poloÏite na oznaku za zaustavljanje i
potpuno zavijete u poãetni poloÏaj.
■ I unutarnjost perilice i unutarnja strana
vrata perilice izradjeni su od nehrdjajuçe
ãelika; ipak, mogu se pojaviti mrlje
uzrokovane oksidacijom, to je vjerovatno
od vode koja sadrÏi previ‰e Ïeljeznih
soli.
■ Ove mrlje odstranite laganim sredstvima
za poliranje nehrdjajuçeg ãelika, koje ne
smije sadrÏavati spojeve klora. Te mrlje
ni u kojem sluãaju ne smijete odstranjivati
ãeliãnom vunom ili drugim metalnim
sredstvima.
1
2
1b
OPIS UPRAVLJAâKE PLOâE
TEHNIâKI PODACI:
DIMENZIJE PERILICE:
Visina
Dubina
·irina
Dubina sa otvorenim vratima
cm
cm
cm
cm
sa radnom ploãom
85
60
60
120
bez radne ploãe
82
56,3
59,8
117
Broj kompleta za pranje prema normi EN 50242
Broj kompleta za pranje sa tavama i tanjurima
Pritisak vode
Snaga osiguraãa (a)
Maksimalna prikljuãna snaga
Napon
12
dla 8 osoba
Min 0,08 - maksimum 0,8 MPa
(pogledati natpisnu ploãicu)
(pogledati natpisnu ploãicu)
(pogledati natpisnu ploãicu)
C Ruãica vrata
D Biraã programa
E Svjetlosni pokazatelj “PRANJE”
AB C D
E
A Tipka za opcija "POLA
PUNJENJA"
B Tipka "UKLJUâIVANJE/
ISKLJUâIVANJE"
Page 26

50
51
IZBOR PROGRAMA I
POSEBNE FUNKCIJE
Izbor programa
UPOZORENJE!
Prije pode‰avanja bilo kojeg
programa, gumb za odabir programa
mora biti u poloÏaju “RESET” a
svjetlosni pokazatelj “PRANJE” ( )
mora biti iskljuãen. Budite sigurni da
je tipka "UKLJUâIVANJE/
ISKLJUâIVANJE" ( ) pritisnuta.
Da namjestite Ïeljeni program, pritisnite
tipku "UKLJUâIVANJE/ISKLJUâIVANJE",
zatim okrenite gumb za odabir programa
(u lijevo ili u desno) sve dok se pokazivaã ( )
ne poravna s oznakom Ïeljenog programa.
Nakon oko 4 sekunde, svjetlosni pokazatelj
"PRANJE" çe zasvjetliti.
Nakon ‰to se oglasi zvuãni signal, program
pranja pokrenut çe se automatski.
UNUTAR 2 minute od zapoãetog
programa moÏe biti odabran neki drugi
program, jednostavno okrenite gumb za
izbor programa na Ïeljeni poloÏaj.
ZNAâAJNO
Dok je program u radu, gumb za
odabir programa çe ostati u
odabranom poloÏaju i NEåE SE
MICATI.
Opcijska tipka
Tipka "POLA PUNJENJA"
Kao odgovor na va‰e savkodnevene
zahtjeve za pranjem posudja uz uobiãajeno
pranje ova perilica posudja opremljena je i
funkcijom “POLA PUNJENJA”. Ova funkcija
omoguçuje pranje manjeg broja posudja uz
zadrÏavanje slobode punjenja gornje i
donje ko‰are za posudje.
Kada je ova funkcija aktivna perilica
posudja automatski smanjuje potro‰nju
vode i energije a samim time i vrijeme
pranja. Kada odaberete “POLA
PUNJENJA” pazite da smanjite i koliãinu
deterdÏenta.
Opcijska tipka moÏe biti odabrana ili
poni‰tena UNUTAR 2 minute nakon ‰to
program pranja zapoãne s radom.
Prekid programa
Dok program radi nije preporuãljivo
otvarati vrata perilice, posebno tijekom
glavnog pranja i zavr‰nog su‰enja.
Kod svakog otvaranja vrata, doçi çe do
automatskog zaustavljanja rada perilice.
Ako se vrata perilice otvore tijekom rada
programa, svjetlosni pokazatelj “PRANJE”
çe treptati sve dok ponovno ne zatvorite
vrata perilice. Od tog trena, program çe
nastaviti s radom od mjesta gdje je bio
prekinut.
UPOZORENJE!
Ako otvorite vrata perilice tijekom
ciklusa su‰enje, glasan zvuãni signal
opomenut çe vas da ciklus su‰enje
nije zavr‰en.
Ako Ïelite promijeniti ili poni‰titi
program pranja koji je u radu, postupite
kako slijedi:
Okrenite gumb za odabir programa na
poloÏaj “RESET”. Nakon nekoliko sekundi
svjetlosni pokazatelj "PRANJE" çe se
iskljuãiti.
Sada moÏete izvesti novo pode‰avanje
pranja.
UPOZORENJE!
Prije pokretanja novog programa
pranja, potrebno je provjeriti ima li
deterdÏenta u spremiku za
deterdÏent. Ako je potrebno,
napunite spremnik.
Ako tijekom rada perilice sudja dodje do
bilo kakvog prekida elektriãnog napajanja,
podaci o izabranom programu pranja
pohranit çe se u posebnu memoriju i kada
se energija vrati program pranja çe
nastaviti s radom od toãke gdje je bio
prekinut.
Kraj programa
Zvuãni signal oglasit çe se na 5 sekundi
(ako nije iskljuãen) 3 puta u razmacima od
30 sekundi da oznaãi da je program pranja
zavr‰en.
Svjetlosni pokazatelj "PRANJE" poãet çe
treptati.
Okrenite gumb za odabir programa na
poloÏaj “RESET”, priãekajte sve dok
svjetlosni pokazatelj “PRANJE” prestane
svjetliti i zatim pritisnite tipku
"UKLJUâIVANJE/ISKLJUâIVANJE".
Iskljuãit çe se i zvuãni signal
za KRAJ PROGRAMA
Zvuãni signal za kraj programa moÏe se
iskljuãiti i to:
ZNAâAJNO
Perilica posudja prije ovog postupka
UVIJEK mora biti iskljuãena.
1. Kada je perilica posudja iskljuãena,
OTVORITE vrata.
2. Okrenite gumb programatora na poloÏaj
"BRZI" program.
3. Pritisnite tipku "UKLJUâIVANJE/
ISKLJUâIVANJE".
4. UNUTAR 15 sekundi, okrenite gumb (u
lijevo) na poloÏaj "RESET", zatim
natrag okrenite gumb na poloÏaj "BRZI"
programa, uãinite to 4 puta (zavr‰ite sa
gumbom za izbor programa na poloÏaju
"BRZI" programa).
5. Svjetlosni pokazatelj "PRANJE" çe
zasvjetliti.
6. Okrenite gumb programatora (u desno,
smjer kretanja kazaljki na satu) na
poloÏaj "RESET" (ponovno pokreni)
(svjetlosni pokazatelj "PRANJE" poãet
çe treptati da pokaÏe da je zvuãni signal
iskljuãen.
7. Iskljuãite perilicu pritiskom na tipku
"UKLJUâIVANJE/ISKLJUâIVANJE"
da potvrdite nove postavke.
Da ponovno ukljuãite zvuãni signal, slijedite
isti postupak od koraka 1 do 4 i kada se
svjetlosni pokazatelj "PRANJE" ukljuãi,
iskljuãite perilicu pritiskom na tipku
"UKLJUâIVANJE/ISKLJUâIVANJE" da
potvrdite nove postavke.
UPOZORENJE!
Ako se pojavi bilo kakav problem u
radu perilice posudja, iskljuãite perilicu
pritiskom na tipka "UKLJUâIVANJE/
ISKLJUâIVANJE" i pokrenite postupak
ponovno od poãetka (KORAK 1).
Namje‰tanje novog programa
Uvijek kada Ïelite namjestiti novi program,
gumb za odabir programa MORATE
okrenuti na poloÏaj “RESET” i priãekati da
svjetlosni pokazatelj “PRANJE” prestane
svjetliti.
Smetnje u radu
Ako za vrijeme dok namje‰tate program,
svjetlosni pokazatelj "PRANJE" poãne vrlo
brzo treptati (uz zvuãni signal) to znaãi da
je elektronika perilice otkrila neku neispravno
programiranu funkciju.
U tom sluãaju, okrenite gumb za izbor
programa na poloÏaj "RESET", priãekajte
da se svjetlosni pokazatelj "PRANJE"
iskljuãi i zatim iskljuãite perilicu pritiskom
na tipku "UKLJUâENO/ISKLJUâENO".
Nakon ‰to provjerite i budete sigurni da
je ãep na dovodnoj cijevi otvoren, da
odvodna cijev nije previ‰e savinuta ili
pritisnuta i da filtar ili sifon nisu
zaãepljeni, ponovno namjestite izabrani
program.
Ako se nepravilnosti u radu nastave,
obratite se ovla‰tenom servisu.
ZNAâAJNO
Ova perilica sudja je opremljena
sigurnosnim antipoplavnim uredjajem
koji çe ako se takav problem pojavi
automatski isprazniti svaku pretjeranu
koliãinu vode.
UPOZORENJE!
Da osigurate ispravan rad sigurnosnog
antipoplavnog uredjaja, preporuãujemo
da perilicu sudja ne pomiçete ili
naginjete tijekom rada.
Ako je perilicu sudja potrebno pomaknuti
ili nagnuti, budite sigurni da je ciklus
pranja zavr‰en i da u unutarnjosti
perilice nema vode.
Page 27

53
52
Program
ODABIR PROGRAMA
HLADNO
ISPIRANJE
INTENZIVNI 75°C
UNIVERZALNI 65°C
SVAKODNEVNI 70°C
ECO 45°C
DELIKATNI 45°C
BRZI 32’ 50°C
Kratko hladno prepranje za sudje koje je
stajalo u perilici sve dok je u potpunosti ne
napunite.
Prikladan za pranje tava i ostalog jako
zaprljanog sudja.
Prikladan za pranje uobiãajeno zaprljanog
sudja.
Prikladan za dnevno pranje uobiãajeno
zaprljanog sudja koje je potrebno oprati
neposredno nakon jela (MAKSIMALNO
punjenje sudjem, 8 mjesta).
Program koji ‰tedi energiju, prikladan za
uobiãajeno prljavo sudje, koristi deterdÏent
sa enzymima.
Program je normiran prema EN 50242.
Prikladan za osjetljivo keramiãko i stakleno
sudje kao i za dnevno pranje manje
zaprljanog sudja, izuzev‰i tave.
Program za brzo pranje sudja koje mora
biti oprano odmah nakon jela.
Punjenje perilice sudjem za najvi‰e 4/6
osoba.
5
•
••
70°C
Popis provjera
Prosjeãno
trajanje u
min.
Tipke sa
posebnim
funkcijama
•
••••
••••
••••
••••
•••
45°C
50°C
60
85
32
••
••
••
••
65°C
115
••
DA
75°C
135
•• ••
••••
45°C
175
••
•
••
N/A
N/A
N/A = NIJE DOSTUPNO
••
••
••
Opis
Pranje s predpranjem
Ako ste podesili INTENZIVNI program pranja, slijedeça koliãina od oko 20 g deterdÏenta
(1 velika Ïlica) mora biti dodana izravno u perilicu. Za SVAKODNEVNI program dodajte 5 g
deterdÏenta.
DA
N/A
DA
DA
SadrÏaj programa
•
•
••
••
••
DeterdÏent za
namakanje
DeterdÏent za pranje
â
i‰çenje filtra
Provjera sredstva
za sjaj
Provjera koliãine
soli
Vruçe predpranje
Hladno predpranje
Glavno pranje
Prvo hladno pranje
Drugo hladno pranje
Vruçe ispiranje sa
sredstvom za sjsj
Sa hladnom vodom 15° C
- Dopu‰teno
odstupanje
±
10% -
Tipka za
"POLA PUNJENJA"
Page 28

55
VAÎNO:
Ako posudje zbog nekog od gore navedenih razloga nije dobro oprano, morate ga ruãno
oprati. Ostaci hrane se tijekom su‰enja u perilici zasu‰e i ne moÏete ih odstraniti ponovnim
pranjem u perilici.
Ako kod provjeravanja pogre‰aka u radu perilice niste ustanovili niti jednu nepravilnost od
navedenih, molimo da nazovete jednog od na‰ih ovla‰tenih servisera.
Serviseru obvezatno navedite oznaku uredjaja ( navedena je na ploãici na uredjaju ili u
jamstvenom listu) i opi‰ite mu kvar. Time çete serviseru olak‰ati rad, a Va‰a perilica bit çe brÏe
popravljena.
Proizvodjaã neçe snositi odgovornost za eventualne pogre‰ke u tiskanju ove knjiÏice.
Proizvodjaã ujedno zadrÏava pravo na tehniãke izmjene svojih proizvoda, ali bez
promjene njihovih osnovnih svojstava.
PROBLEM MOGUåI UZROK KAKO UKLONITI PROBLEM
7. Posudje je samo djelomiãno
oprano
8. DeterdÏent se ne raspr‰uje
pravilno
9. Bijele mrlje na sudju
10. U toku pranja ãujete
lupkanje
11. Sudje nije dobro posu‰eno
Provjerite uzroke iz toãke 5.
Dno tava nije dobro oprano
Rubovi tava nisu dobro oprani
Mlaznice su djelomiãno
zaãepljene
Sudje nije ispravno umetnuto
Kraj odvodne cijevi je
potopljen u vodi
Neodgovarajuça koliãina
deterdÏenta ili je
deterdÏent prestar ili tvrd
Izabrani program pranja
pranja nije odgovarajuçi
Sudje na niÏoj ko‰ari
nije oprano
Posude, tave, lonci ili pribor za jelo
blokiraju otvor spremnika za
deterdÏent
Voda u vodovodnoj mreÏi je izuzetno
tvrda
Sudje udara jedno o drugo
Raspr‰ivaã udara po sudju
Zrak u perilici ne kruÏi pravilno
Nedostaje sredstvo za sjaj.
Provjerite
Namoãite tave prije pranja
Rasporedite tave bolje
Izvadite mlaznicu i isperite je
Ne stavljajte sudje preblizu
jedno drugom
Kraj odvodne cijevi ne smije biti
potopljen u vodi
Smanjite koliãinu deterdÏenta prema
zaprljanosti sudja ili promijenite
deterdÏent
Izaberite intenzivniji program
Iskljuãite tipku za pranje poloviãne
koliãine sudja
Postavite posudje tako da je otvor
spremnika za deterdÏent slobodan.
Provjerite koliãinu sredstva za sjaji
dodajte ga ako je potrebno, ako se
mrlje ponavljaju pozovite
ovla‰tenog servisera
Razvrstajte sudje ravnomjerno u obe
ko‰are
Razvrstajte sudje pravilnije
Nakon zavr‰etka pranja ostavite
vrata perilice pritvorena da bi
omoguçili prirodno su‰enje
Napunite spremnik sredstva za sjaj.
54
PREPOZNAVANJE MANJIH GRE·AKA U RADU
Ako primjetite da Va‰a perilica sudja radi neispravno, prije nego ‰to pozovete
ovla‰tenog servisera, prvo provjerite niÏe navedene uzroke:
Utaknite utikaã u utiãnicu
Provjerite
Ukljuãite tipku U/I
Zatvorite vrata uredjaja
Provjerite
Otvorite slavinu
Postavite gumb za izbor programa u
Ispravan poloÏaj
Ispravite dovodno crijevo
Spojite ispravno i po potrebi oãistite
Oãistite filtar
Ispravite odvodno crijevo
Pogledajte paÏljivo upute za
spajanje produÏnog odvodnog
crijeva
Pozovite kvalificiranu osobu
Namjestite odvodnu cijev na visinu
40 cm od poda
Smanjite koliãinu detrdÏenta
i upotreblavajte odgovarajuçi
Provjerite
Oãistite ploãu i filtar
Iskljuãite uredjaj, otvorite slavinu
ponovno pokrenite pranje
PROBLEM MOGUåI UZROK KAKO UKLONITI PROBLEM
1. Stroj u potpunosti ne radi
2. Voda ne dotiãe u uredjaj
3. Stroj ne izbacuje vodu
4. Perilica neprekidno izbacuje
vodu
5. U toku pranja ne ãujete vrtnju
mlaznica
6. Na elektronskim uredjajima bez
ekrana: jedno ili vi‰e LED
svjetlucanja.
Uredjaj nije prikljuãen na elektriãnu
mreÏu
Nema elektriãnog napona
Tipka U/I nije ukljuãena
Vrata uredjaja su otvorena
Provjerite uzroke pod 1
Slavina za dovod vode je zatvorena
Gumb za izbor programa
nije u ispravnom poloÏaju
Dovodno crijevo je savinuto
Filtar dovodne cijevi nije ispravno
spojen
Filtar je prljav
Crijevo za odvodnju vode je savinuto
ProduÏno crijevo za odvodnju
vode nije ispravno spojeno
Izlazni spoj u zidu je usmjeren
prema dolje a ne prema gore
Odvodna cijev je
prenisko namje‰tena
Dodali ste previ‰e detrdÏenta
Neki predmet u perilici
ometa vrtnju mlaznica
Sitasta ploãa filtra i filtar
su jako zaprljani
Slavina za dovod vode je zatvorena
Page 29

57
Lire attentivement les instructions contenues dans ce livret car elles donnent
d'importantes indications sur la sécurité d'installation, d'utilisation et de maintenance
ainsi que quelques conseils utiles pour mieux utiliser le lave-vaisselle.
Conserver avec soin ce livret pour toute consultation ultérieure.
Fig. A
3
2
1
4
5
INDICE
Conseils de sécurité
Mise en marche, installation
Adoucisseur d’eau
Chargement du sel
Réglage du panier supérieur
Chargement de la vaisselle
Information pour les tests laboratoire
Chargement du produit de lavage
Types de produits de lavage
Chargement du produit de rinçage
Nettoyage des filtres
Quelques conseils pratiques
Entretien et nettoyage courants
Description de la machine
Données techniques
Sélection du programme et functions particulières
Liste des programmes
Identification des anomalies mineures
pag. 58
pag. 59
pag. 63
pag. 64
pag. 65
pag. 66
pag. 68
pag. 69
pag. 70
pag. 71
pag. 72
pag. 73
pag. 74
pag. 75
pag. 75
pag. 76
pag. 78
pag. 80
56
Compliments,
en ayant acheté un appareil
électroménager Candy, vous avez fait
preuve d’une très grande éxigence:
vous voulez le meilleur.
Candy est heureux de vous proposer
cette nouvelle machine, fruit d’années
de recherches et d’expériences
confirmées sur le marché. Vous avez
choisi la qualité, la fiabilité et les
prestations techniques élevées.
Candy vous propose de plus,
une gamme complète d’appareils
d’électroménagers: machines-à-laver,
lave-vaisselle, machines-à-laver
séchantes, séche-linge, four à
micro-ondes, fours et plaques de
cuisson, réfrigérateurs et congélateurs.
Demandez à votre Revendeur le
catalogue complet des produits Candy .
Nous vous prions de lire attentivement
les indications contenues dans ce
mode d’emploi. Vous y trouverez
d’importantes indications, sur la
sécurité d’installation, d’emploi, de
manutention et d’autres conseils utiles
pour le meilleur emploi du lave-vaisselle.
Conservez avec soin ce mode
d’emploi pour des consultations futures.
GARANTIE
Cette machine est livrée avec un
certificat de garantie qui permet de
contacter gratuitement l’assistance
technique.
Veuillez garder votre ticket d’achat et
le mettre dans un endroit sûr en cas de
besoin.
Page 30

59
INSTALLATION
(Remarques techniques)
■ Après le déballage, régler la hauteur du
lave-vaisselle.
Pour un fonctionnement parfait, il est
important que le lave-vaisselle soit à
niveau, en règlant les pieds de façon à
ce qu'une éventuelle inclinaison ne
dépasse pas 2 degrés.
■ Dans le cas où vous devez transporter
de façon manuelle la machine sans
emballage, ne pas prendre la porte par
le bas, mais faire comme dans le
schéma; ouvrir légèrement la porte et
soulever l'appareil en utilisant le top
supérieur.
IMPORTANT
Les ouvertures à la base de l'appareil
ne doivent en aucun cas être
obstruées par des tapis, moquette ou
autre objets.
À l'installation il est important de
verifier que la prise soit facilement
accessible.
Alimentation Electrique
L'appareil est conforme aux exigences de
sécurité prévues par les différents instituts
de Normes, et c'est la prise tripolaire avec
un pôle de terre qui assure la mise à la
terre complète de l'appareil.
Avant de brancher la machine sur le circuit
électrique s'assurer:
1. que la prise murale est correctement
reliée à la terre;
2. que le réglage du contacteur électrique
correspond bien à la puissance
absorbée indiquée sur la plaque
signalétique du lave-vaisselle.
ATTENTION!
L'efficacité de la sécurité est donc
subordonnée à la mise à la terre
correcte de votre propre installation.
En cas d'absence d'un branchement
efficace de la mise à la terre, il peut
subvenir une légère dispersion de
courant sur les parties métalliques
de la machine, due à la présence d'un
filtre antiparasite radio.
Le constructeur décline toute
responsabilité pour des dommages
éventuels survenus aux personnes et
aux biens imputables à un mauvais
raccordement de la ligne de terre.
Produit compatible avec les
Directives Européennes 73/23/EEC
et 89/336/EEC, remplacé par
2006/95/EC et 2004/108/EC, et les
amendements successifs.
58
CONSEILS DE SÉCURITÉ
L'emploi de n'importe quel appareil
électrique comporte l'observation de
règles fondamentales.
Installation
■ Le socle ainsi que la prise mâle de
l'appareil doivent correspondre à la
puissance maximum absorbée par
l'appareil.
En cas de nécessité de remplacement
de l'un ou de l'autre de ces éléments,
faire effectuer la modification par un
professionel patenté.
■ S'assurer que l'appareil n'écrase pas le
fil électrique d'alimentation.
■ L'utilisation de prises multiples et/ou
rallonges est déconseillée et dégage le
constructeur de toutes responsabilités.
■ Si le remplacement du câble d'alimentation
s'avère nécessaire, l'opération doit être
réalisée par le Service Après-vente.
Sécurité
■ Ne pas toucher l'appareil avec les mains
ou pieds mouillés ou humides.
■ Ne pas utiliser l'appareil pieds nus.
■ Ne pas tirer sur le câble d'alimentation
de l'appareil pour débrancher la prise du
courant.
■ Ne pas laisser exposer l'appareil à des
agents atmosphériques (pluie, soleil
etc...).
■ Cet appareil n’est pas destiné à être
utilisé par des personnes (notamment
les enfants) incapables, irresponsables
ou sans connaissance sur l’utilisation du
produit, à moins qu’elles ne soient
surveillées, ou instruites sur l’utilisation
de l’appareil, par une personne
responsable de leur sécurité.
Surveillez les enfants pour être sûr qu’ils
ne jouent pas avec l’appareil.
■ A la fin du programme de lavage, l’eau
résiduelle dans l’appareil ou sur la
vaisselle, ne doit pas être consommée.
■ La porte ne doit pas rester en position
ouverte car cela pourrait occasionner
des accidents.
■ S’appuyer ou s’asseoir sur la porte
ouverte du lave vaisselle risque
d’entraîner son basculement.
ATTENTION!
Les couteaux et autres ustensiles
avec des parties pointues ou coupantes
doivent être rangés avec les pointes
en bas ou horizontalement.
Usage quotidien
■ Cet appareil devra être destiné
uniquement à l'utilisation à usage
domestique.
■ Le lave-vaisselle est conçu pour laver
des ustensiles domestiques normaux.
Les objets contaminés par de l'essence,
de la peinture, des restes d'acier ou de
fer, des produits chimiques corrosifs,
acides ou alcalins ne doivent pas être
lavés en machine.
■ S'il y a une installation d'adoucissement
de l'eau dans l'habitation, il n'est pas
nécessaire d'ajouter de sel dans
l'adoucisseur monté dans le
lave-vaisselle.
■ La coutellerie est mieux lavée si les
manches sont positionnés vers le bas
dans le panier à couverts.
■ En cas de panne et/ou de mauvais
fonctionnement de l'appareil, l'éteindre,
fermer le robinet d'arrivée d'eau et ne
pas ouvrir l'appareil.
Appelez le Service Après-vente de votre
revendeur en lui précisant bien le type
de votre appareil.
Le non respect des prescriptions
énoncées ci-dessus peut compromettre
la sécurité de l'appareil.
Mise au rebut
■ Cet appareil est fabriqué avec des
matériaux recyclables pour permettre de
les éliminer avec facilité.
■ Si l'on veut se débarrasser d'un vieux
lave-vaisselle, enlever le système de
fermeture de la porte pour que les
enfants ne puissent pas s'enfermer dans
la machine.
Coupez le cordon d’alimentation après
l’avoir retiré de la prise murale.
Page 31

61
Raccordement à la vidange
■ Pour la vidange, introduire le tuyau dans
l'installation de vidange, en prenant soin
de ne pas le plier car l'écoulement des
eaux s'en trouverait perturbé (fig. 4).
■ Le tuyau de vidange fixe doit avoir au
moins un diamètre intérieur de 4 cm et
doit être placé à une hauteur minimum
de 40 cm.
■ Pour éviter les odeurs, nous
recommandons de prévoir un siphon
(fig. 4X).
■ Si nécessaire il est possible de rallonger
le tube de vidange jusqu'à 2,5 mètres
en le maintenant cependant à une
hauteur maximum de 85 cm du sol.
Cette rallonge de tube est disponible
auprès du service après-vente.
■ L'extrémité recourbée du tuyau de
vidange peut être accrochée au bord
d'un évier, mais ne doit pas rester
immergée, pour éviter le siphonnage de
l'appareil pendant le programme de
lavage (fig. 4Y).
■ En cas d'installation sous un dessus
continu, le coude doit être fixé
immédiatement sous le dessus au point
le plus haut possible (fig. 4Z).
■ Pendant l'installation de la machine,
contrôler que les tubes de remplissage
et de vidange ne sont pas pliés.
4
1
2
3
60
Branchement Hydraulique
IMPORTANT
L'appareil doit être relié à l'arrivèe
d'eau, exclusivement avec le tuyaux
fournis.
Ne pas réutiliser les anciens tuyaux.
■ Les tuyaux de vidange et de remplissage
peuvent être orientés de façon
indifférente vers la droite ou vers la
gauche.
IMPORTANT
Le lave-vaisselle peut-être relié de
façon indifférente à l'eau froide ou
chaude à condition que la température
ne dépasse pas les 60°C.
■ La pression hydraulique doit être
comprise d'un minimum de 0,08 MPa à
un maximum de 0,8 MPa.
Pour des pressions inférieures, nous
vous conseillons de demander des
instructions à notre service Après-vente.
■ Il est nécessaire de prévoir un robinet en
amont du tube de chargement pour
isoler la machine du système
hydraulique, quand celle-ci ne fonctionne
pas (fig. 1B).
■ Le lave vaisselle est doté d'un tuyau pour
la prise d'eau avec un embout fileté 3/4"
(fig. 2).
■ Le tuyau d'alimentation "A" devra être
vissé à un robinet d'eau "B" à l'aide de
l'attache 3/4" en s'assurant que le collier
est bien serré.
■ Si nécessaire il est possible de rallonger
le tube de vidange jusqu'à 2,5 m. Cette
rallonge de tube est disponible auprès
du service après-vente.
■ Si des saletés ou du sable sont présents
dans l’eau, il est recommandé de
demander le filtre approprié, art.
9226085, auprès du service après-vente
(fig. 3). Le filtre "D" doit être placé entre
la prise d'eau 3/4" "B" et le tuyau
d'alimentation "A", ne pas oublier de
mettre les joints "C".
■ Si la machine est branchée à des
tuyauteries neuves, ou qui n'ont pas été
utilisées pendant une longue période,
faire couler l'eau pendant quelques
minutes avant de brancher le tuyau
d'alimentation. On évitera ainsi la
formation de dépôts de sable ou de
rouille qui pourraient boucher le filtre
d'entrée de l'eau.
Page 32

Selon le degré de dureté de votre eau,
procédez au réglage de l’adoucisseur
d’eau comme suit:
IMPORTANT
Commencer TOUJOURS la procédure
avec le lave-vaisselle éteint.
1. Lave-vaisselle éteint, OUVRIR la porte.
2. Tourner le sélecteur sur le programme
"UNIVERSEL".
3. Appuyer sur la touche
"MARCHE/ARRET".
4. Dans un DELAI de 15 secondes,
tourner le sélecteur (dans le sens
contraire des aiguilles d'une montre) sur
la position "RESET", puis revenir sur le
programme "UNIVERSEL", pour 4 fois
(en terminant avec le sélecteur sur le
programme "UNIVERSEL").
5. Le voyant "LAVAGE" clignotera 3 fois
et 3 signaux sonores seront émis, pour
indiquer le niveau de d’adoucissement
de l’eau réglé par l'usine (NIVEAU 3).
6. Tourner le sélecteur sur une des
positions comprises entre 1 et 6 selon le
niveau de décalcification voulu.
7. Le voyant "LAVAGE" clignotera le
nombre de fois correspondant au
niveau choisi (par exemple, 5 fois pour
le NIVEAU 5) et autant de signaux
sonores seront émis.
8. Éteindre le lave-vaisselle en appuyant
sur la touche "MARCHE/ARRÊT" pour
rendre effective la nouvelle configuration.
ATTENTION!
Si, pour quelque raison que ce soit, la
procédure ne peut être terminée avec
succès, éteindre le lave-vaisselle en
appuyant sur la touche
"MARCHE/ARRÊT" et recommencer
depuis début (POINT 1).
63
ADOUCISSEUR D’EAU
Selon la source d’approvisionnement,
l’eau contient des quantités variables de
calcaire et de minéraux qui se déposent
sur la vaisselle en laissant des taches et
des marques blanchâtres.
Plus la densité de minéraux dans l’eau est
élevée, plus celle-ci est dure.
Le lave vaisselle est équipé d’un dispositif
d’adoucisseur d’eau qui, avec l’utilisation
du sel régénérant, fournit de l’eau douce
pour laver la vaisselle.
Le degré de dureté de votre eau peut vous
être communiqué par votre fournisseur
d’eau.
Réglage de l’adoucisseur d’eau
L’adoucisseur d’eau peut traiter de l’eau
d’une dureté allant jusqu’à 90°fH
(graduation française) ou 50°dH
(graduation germanique) à partir de six
positions de réglage différentes.
Dans le tableau ci-dessous sont indiqués
les différents degrés de dureté de l’eau
avec les positions de réglage de
l’adoucisseur correspondantes.
*L’adoucisseur d’eau est réglé en
usine sur le niveau 3, adapté à la
majorité des cas.
Niveau
ºfH
(France)
ºdH
(Allemagne)
NO
OUI
OUI
OUI
OUI
OUI
Position 6
Position 1
Position 2
Position 3
Position 4
Position 5
Dureté
de l'eau
Réglage de
l'adoucisseur
d'eau
Utilisation de sel
régénérant
0-5
6-15
16-30
31-45
46-60
61-90
0-3
4-9
10-16
17-25
26-33
34-50
0
1
2
*3
4
5
Niveau 1
Niveau 2
Niveau 5
Niveau 3
(Programme "UNIVERSEL")
Niveau 4
Niveau 0
62
7
598
556/573
5
INSTALLATION DANS UN
ENSEMBLE DE CUISINE
MODERNE
Juxtaposition
■ Le lave-vaisselle a été étudié avec une
hauteur standard de 85 cm et peut être
ainsi placé entre des meubles de cuisine
moderne d'une même hauteur. Pour
obtenir un alignement parfait, agir sur les
pieds réglables.
■ Le plan supérieur est un vrai plan de
travail en plastique laminé de haute
résistance (fig. 5).
Ouverture de la porte
Mettre la main dans le creux, et tirer.
Si la porte s'ouvre durant le fonctionnement
de l'appareil, une sécurité électrique
permet d'interrompre automatiquement les
fonctions préétablies.
IMPORTANT
Pour une utilisation correcte ne pas
ouvrir la porte du lave-vaisselle
pendant son fonctionnement.
Fermeture de la porte
Mettre les paniers.
Vérifier que les plats ou casseroles ne
gênent pas les rampes avants et s'assurer
que celles-ci tournent librement.
Fermer la porte et la bloquer avec force.
Encastrement
(Installation sous un plan de travail)
■ Les ensembles de cuisine moderne ont
un plan de travail unique sous lequel
viennent s'insérer les meubles de base
et les appareils ménagers.
Dans ce cas, il suffit de retirer le plan de
travail en dévissant les vis qui se trouvent
au-dessous et à l'arrière (fig. 6a).
IMPORTANT
Après avoir retiré le plan de travail,
les vis DOIVENT être vissées de
nouveau (fig. 6b).
■ La hauteur est ainsi réduite à 82 cm
comme prévue dans la norme
internationale (ISO), et le lave-vaisselle
vient s'intégrer parfaitement sous le plan
(fig. 7).
6
a
b
a
b
Page 33

65
A
A
RÉGLAGE DU PANIER
SUPÉRIEUR
Quand on utilise habituellement des
assiettes de 27 à 31 cm de diamètre,
charger celles-ci dans le panier inférieur
après avoir mis le panier supérieur à sa
position la plus haute en procédant comme
suit:
1. Faire tourner les butées avant "A" vers
l'extérieur;
2. Dégager le panier et le remonter à sa
position la plus haute;
3. Remettre les butées "A" dans leur
position d'origine.
Cette opération permet de charger dans le
panier supérieur de la vaisselle d'un
diamètre de plus de 20 cm et ne permet
pas d'utiliser les supports mobiles en
position haute.
CHARGEMENT DU SEL
■ Sur le fond de la machine se trouve le
bac à sel pour la régénération de
l'adoucisseur d'eau.
■ Il est important de n’utiliser que le sel
spécifiquement prévu pour les lavevaisselle.
Autres types de sel contenant de
sensibles percentages de substances
insolubles qui pourraient avec le temps
rendre inèfficace le système de
l'adoucisseur.
■ Pour introduire le sel, dévisser le
bouchon du bac.
■ Pendant l'opération de remplissage un
peu d'eau débordera: continuez à
verser le sel jusqu'à ce que le réservoir
soit plein (mélanger à l'aide d'une
cuillère).
Après cette opération nettoyer le
filetage en enlevant les résidus de sel;
revisser le bouchon.
■ Après chargement du sel, il est
recommandé d’effectuer un cycle de
lavage complet ou de mettre en marche
le programme TREMPAGE (ou RINCAGE
A FROID).
Pour une utilisation optimale de
l’appareil, le réservoir à sel, dont
64
Indicateur de remplissage
du sel
Ce modèle est pourvu d’un couvercle
opaque, dans ce cas le niveau de sel doit
être contrôlé régulièrement, la consommation de sel dépendant du réglage opéré sur
l’adoucisseur d’eau.
IMPORTANT
La vaisselle tachée de blanc est
généralement une indication
importante d'absence de sel.
la capacité varie de 1,5 à 1,8 kg, doit
être rempli de temps en temps en fonction du réglage opéré sur l’adoucisseur
d’eau.
IMPORTANT
Ce n'est qu'au cours de la phase
d'installation de la machine à laver la
vaisselle qu'il faudra, après avoir
remplí complètement le bac à sel,
ajouter de l'eau jusqu'à ce qu'elle
déborde du bac.
Page 34

67
Un chargement standard journalier est indiqué dans
les fig. 1, 2 et 3.
Panier supérieur (fig. 1)
A = assiettes creuses
B = assiettes plates
C = assiettes à dessert
D = soucoupes
E = tasses
F = verres
Panier supérieur (fig. 2)
A = assiettes creuses
B = assiettes plates
C = assiettes à dessert
D = soucoupes
E = tasses
F = verres
G = demi panier couverts
Panier inférieur (fig. 3)
A = casserole moyenne
B = casserole grande
C = poêle
D = couvercles
E = soupières, plats
F = couverts
G =plats à rôtis
Le rangement rationnel et correct de la vaisselle est
la condition essentielle pour obtenir un excellent
lavage.
Panier à couverts (fig. 4)
Le panier à couverts est formé de deux parties
offrant ainsi différentes possibilités de chargement .
La séparation en deux parties du panier se fait en
faisant glisser, dans le sens horizontal, les deux
parties l'une par rapport à l'autre et vice versa pour
les ré-enclencher.
Le couvercle du panier à couverts peut être
retiré pour permettre différentes possibilités de
chargement.
4
1
A
B
C
D
E
F
A
B
C
D
G
E
F
2
F
D
FAG
E
B
C
3
66
CHARGER LA VAISSELLE
Utilisation du panier supérieur
■ Le panier supérieur est pourvu de
supports mobiles accrochés au bord
latéral et pouvant occuper deux
positions: haute et basse. Sur la position
basse les supports servent pour recevoir
les tasses à thé, à café, les couteaux
longs et les louches. Aux extrémités des
supports, vous pouvez suspendre les
verres à pied.
En-dessous vous pouvez ranger les
verres, les tasses, les soucoupes et les
assiettes à dessert.
■ Quand les supports occupent la position
haute, ils permettent de placer les
assiettes plates et creuses.
Ayez soin de placer les assiettes
creuses verticalement et en tournant
leur partie concave vers l'avant de la
machine; laisser toujours de l'espace
entre chaque assiette pour que l'eau
circule librement.
■ Pour exploiter au maximum la capacité
du panier nous vous conseillons de
grouper les assiettes de même forme.
■ Les assiettes peuvent être placées sur
une seule rangée (fig. 1) ou sur les deux
rangées (fig. 2).
■ Nous vous conseillons de ranger les
plats de grande dimension, dont le
diamètre est d'environ 270 mm, légèrement inclinés vers l'avant de façon à
favoriser l'introduction du panier à l'intérieur de la machine.
■ Dans le panier supérieur vous pouvez
ranger différente vaisselle comme le
saladier et les bols en plastique qu'il vaut
mieux bloquer afin d'éviter que les jets
d'eau ne les renversent.
■ Le panier supérieur a été conçu pour
permettre une souplesse maximum
d'utilisation. Il peut n'être chargé qu'avec
des assiettes placées sur deux rangées,
24 pièces maximum, avec des verres
sur cinq rangées, 30 pièces maximum,
ou bien avec de la vaisselle mixte.
Utilisation du panier inférieur
■ Dans le panier inférieur vous placerez
les casseroles, les poêles, les
soupières, les saladiers, les couvercles,
les plats, les assiettes plates et creuses
et les louches.
■ Les couverts doivent être placés
manche vers le bas dans le panier à
couverts, que l'on placera à son tour
dans le panier inférieur (fig. 3) en
s'assurant qu'il n'entrave pas la rotation
des bras de lavage.
IMPORTANT
Le panier inférieur possède un dispositif
d’arrêt automatique permettant son
extraction en toute sécurité, très utile
aussi lors du chargement complet du
lave-vaisselle.
L’extraction total du panier inférieur
est nécessaire afin de charger le sel
ainsi que pour le nettoyage du filtre
et de l’entretien ordinaire de la
machine.
Page 35

CHARGEMENT DU PRODUIT
DE LAVAGE
Le produit de lavage
IMPORTANT
Il est indispensable d'utiliser de la
lessive en poudre, liquide ou en
pastilles spécialement destiné aux
machines à laver la vaisselle.
"CALGONIT" donne les meilleurs résultats
de lavage et peut être obtenue facilement.
Les lessives non adaptées (comme cettes
pour le lavage à la main) ne contiennent
pas les ingrédients appropriés au
lavage en machine et empêchent le
fonctionnement correct de l'appareil.
Charger la lessive
La boîte à produits se trouve à l'intérieur de
la porte (fig. A "2"). Si le couvercle du
récipient est fermé, pour l'ouvrir il suffit
d'appuyer sur le bouton d'accrochage (A):
à la fin de chaque programme de lavage,
le couvercle est toujours ouvert, prêt pour
l'utilisation suivante.
ATTENTION!
Dans le panier inférieur, ne pas charger
d’assiette ou de couvert qui empêche
l’ouverture du couvercle du récipient à
lessive ou obstrue la dispersion de la
lessive.
Les doses de lessive peuvent varier selon
le degré de salissure et le type de
vaisselle. Nous conseillons de verser de 20
à 30 g de lessive dans le bac "lavage" (B).
69
Après le versement du détergent dans le
bac à lessive, fermer le couvercle, tout
d’abord en le glissant vers la gauche (1)
puis en appuyant dessus (2) jusqu’à ce
que vous entendiez un clic.
Comme les lessives ne sont pas toutes
de même nature, consulter aussi les
instructions sur les emballages.
Nous rappelons que des quantités
insuffisantes de lessive peuvent éliminer la
saleté de façon incomplète, tandis qu'une
dose excessive de lessive, non seulement
n'améliore pas les résultats de lavage,
mais est un gaspillage.
IMPORTANT
Ne pas exagérer dans l'utilisation de
la lessive, c'est contribuer à limiter
la pollution de l'environnement.
A
B
68
A
F
C
C
B
E
D
G
G
1
C
A
A
3
1
23 355
1
23 3 5
1
23 3 5
1
24 4 5
1
24 4 5
1
24 4 5
1
24 4 5
1
24 4 5
1
24 4 5
1
23 3 5
1
23 3
5
1
23 376
Panier inférieur (fig. 2)
H = 8 + 4 assiettes creuses
I = 11 + 1 assiettes plates
L = 12 assiettes à dessert
M =plat
N = couverts
Panier supérieur (fig. 1)
A = 5 + 5 + 2 verres
B = 12 soucoupes
C = 4 + 6 + 2 tasses
D = coupe petite
E = coupe moyenne
F = coupe grande
G =1 + 1 cuillère à soupe
INFORMATION POUR LES ESSAIS EN LABORATOIRE
Programme comparatif général (selon norme EN 50242)
(voir liste des programmes de lavage)
1. Panier supérieur en position: bas
2. Chargement normalisé
3. Réglage du produit de rinçage sur index: 6
Chargement standard 12 couverts internationaux (selon norme EN 50242)
Le rangement correct du chargement est indiqué dans la fig. 1 pour le panier supérieur,
dans la fig. 2 pour le panier inférieur et dans la fig. 3 pour le panier à couverts.
Panier à couverts (fig. 3)
Insérer le panier à couverts comme
indiqué sur le schéma.
1 = couteaux
2 = fourchettes
3 = cuillères à dessert
4 = cuillères à café
4. Quantité de détergent:
- 8 g directement dans le lave-vaisselle;
- 22 g dans le bac à lessive.
5 = cuillères
6 = louche
7 = fourchette à service
NI
H
L
H
I
2
M
Page 36

CHARGEMENT DU PRODUIT DE
RINÇAGE
Le produit de rinçage
Cet additif qui est introduit
automatiquement à la dernière opération
de rinçage, assure le séchage rapide de la
vaisselle et évite la formation sur celle-ci
de taches blanchâtres.
Charger le produit de rinçage
A la gauche du bac à lessive se trouve le
réservoir du produit de rinçage (fig. A "3").
Pour ouvrir le couvercle, appuyer sur le
marquage prévu à cet effet et, en même
temps, tirer la languette vers le haut.
Utiliser toujours un produit de rinçage
adapté au lave-vaisselle automatique.
Il est possible de contrôler le niveau du
produit de rinçage au moyen du voyant
optique (C) placé sur le distributeur.
Réglage de dosage du
produit de rinçage de 1 à 6
Le réglage (D) est situé sous le couvercle
et peut être réglé au moyen d'une pièce de
monnaie. La position conseillée est 4.
La présence de calcaire dans l'eau se
manifeste soit par la présence
d'incrustation, soit par le degré de séchage.
C'est pourquoi il est important de régler le
débit du produit de rinçage pour obtenir
des prestations optimales.
Dans le cas où la vaisselle présente des
dépôts à la fin du lavage, diminuer le
réglage d'une position.
Dans le cas de vaisselle présentant des
marques ou auréoles blanchâtres,
augmenter le réglage d'une position.
71
PLEIN VIDE
Reflet sombre Reflet clair
C
D
70
TYPES DE PRODUITS DE
LAVAGE
Produits de lavage en tablettes
Les produits de lavage en tablettes des
différents producteurs se dissolvent à des
vitesses différentes. Donc dans les
programmes rapides, certaines tablettes,
ne se dissolvant pas complètement,
peuvent ne pas être totalement efficaces.
Avec les tablettes, il est donc conseillé de
sélectionner des programmes plus longs
afin de garantir la dissolution complète du
produit de lavage.
IMPORTANT
Pour obtenir des résultats de lavage
satisfaisants, les tablettes DOIVENT
être introduites dans le bac à produit
de lavage et PAS directement dans
la cuve.
Produits de lavage concentrés
Les produits de lavage concentrés, à
alcalinité réduite et avec enzymes naturelles,
combinés à des programmes de lavage à
50°C, permettent de réduire l’impact sur
l’environnement tout en respectant la
vaisselle et le lave-vaisselle.
Les programmes de lavage à 50°C ont été
spécialement pensés pour optimiser les
propriétés de dissolution de la saleté par
les enzymes, permettant ainsi d’obtenir,
avec les produits de lavage concentrés, les
mêmes résultats que des programmes à
65°C.
Produits de lavage combinés
Les produits de lavage qui contiennent
aussi le produit de rinçage doivent être
introduits dans le bac à produit de lavage.
Le bac à produit de rinçage doit être vide
(dans le cas contraire, régler le dosage du
produit de rinçage sur le minimum avant
d’utiliser des produits de lavage combinés).
Produits de lavage combinés
“Tout en un”
Si vous envisagez d’utiliser des produits
lessiviels combinés "Tout en un" ("3 en 1"/"4
en 1"/"5 en 1", etc.) par exemple ceux
composés de sel et/ou d’ agents de rinçage,
nous vous conseillons de:
■
lire attentivement et de suivre les
instructions du fabricant, notées sur les
emballages;
■
la performance de certains produits
lessiviels composés de sel/adoucisseur
d’eau dépend de la dureté de votre eau.
Vérifiez que le niveau de dureté de votre
eau est inclus dans l’échelle de
performance donnée sur l’emballage du
produit lessiviel.
Si l’utilisation de ce type de produits ne
donne pas de résultats de lavage
satisfaisants, s’adresser au producteur
du produit de lavage.
Dans certains cas l’utilisation de détergents
combinés peut occasionner:
■
dépots de calcaire sur la vaisselle ou
dans le lave-vaisselle;
■
une réduction des performances lors du
lavage et du séchage.
IMPORTANT
Tout problème dû au résultat direct
de l’utilisation de ces produits
combinés n’est pas couvert par
notre garantie.
Rappel: l’utilisation de produits de
lavage combinés “Tout en un” rend
superflue l’utilisation des témoins de
manque de sel et de produit de rinçage
(présents seulement sur certains
modèles).
En cas de problème de lavage et/ou de
séchage, il est conseillé de reprendre
l’utilisation des produits traditionnels (sel,
produit de lavage, produit de rinçage).
Dans ce cas, il est recommandé de:
■ remplir de nouveau les bac à sel et à
produit de rinçage;
■ exécuter un cycle de lavage normal à
vide.
NB: en revenant à l’utilisation de sel de
type traditionnel, plusieurs cycles de
lavage seront nécessaires avant que le
système d’adoucissement de l’eau soit de
nouveau optimal.
Page 37

73
CONSEILS PRATIQUES
Que faire pour avoir
d'excellents résultats de lavage
■ Avant de ranger la vaisselle dans
la machine, enlever les résidus de
nourriture (os, arêtes, restes de viande
ou de légumes, résidus de café, é
pluchures de fruits, cendres de cigarettes,
curedents etc...) afin d'éviter d'obstruer
les filtres, la vidange et les gicleurs des
bras de lavage.
■ Eviter de rincer la vaisselle avant de la
placer dans la machine.
■ Si les poêles et les casseroles sont
excessivement incrustées de restes de
mets brûlés, nous vous conseillons de
les laisser tremper avant le lavage.
■ Ranger la vaisselle avec l'ouverture
tournée vers le bas.
■ Si possible, éviter que les différentes
pièces se touchent; une installation
correcte donnera de meilleurs résultats
de lavage.
■ Après avoir rangé la vaisselle, vérifier
que les bras de lavage tournent sans
obstacle.
■ Les casseroles et autre ustensiles qui
présentent des résidus de nourriture
très tenaces ou brûlés devront être mis
à tremper dans de l'eau avec de la
lessive pour lave-vaisselle.
■ Pour un lavage parfait de l'argenterie, il
faut:
a) la rincer dès qu'on a fini de l'utiliser,
surtout si on l'a utilisée avec de la
mayonnaise, des œufs, du poisson,
etc..;
b) ne pas l'asperger de lessive;
c) ne pas la mettre en contact avec
d'autres matériaux.
Que faire pour economiser
■ Au cas où l'on voudrait laver à pleine
charge, ranger la vaisselle dans le
lave-vaisselle dès que le repas est
terminé et en effectuant éventuellement
le programme TREMPAGE (ou RINCAGE
A FROID) pour ramollir la saleté et
éliminer les résidus les plus gros entre
chaque charge-ment en attendant
d'effectuer le programme de lavage
complet.
■ En présence de saleté peu consistante
ou de paniers peu chargés, sélectionner
le programme ECONOMIQUE en
suivant les instructions indiquées dans
la liste des programmes.
Ce qu'on ne doit pas laver
■ Il est bon de se rappeler que toute la
vaisselle n'est pas adaptée au lavage
en machine; nous déconseillons de
mettre des pièces en matériau
thermoplastique, des couverts à
poignée en bois ou en plastique, des
casseroles à poignée en bois, de la
vaisselle en aluminium, en cristal ou en
verre plombé si ce n'est pas
spécifiquement indiqué.
■ Certaines décorations tendent à
s'estomper, par conséquent nous
conseillons de laver plusieurs fois en
machine une seule pièce et, seulement
après s'être assuré qu'elle ne se décolore
pas, d'y mettre tout le chargement.
■ Nous conseillons de ne pas laver de
couverts en argent avec des couverts
en acier oxydable pour éviter qu'il ne se
produise de réaction chimique entre
eux.
IMPORTANT
Quand on achète de la vaisselle
neuve, s'assurer toujours qu'elle est
adaptée au lavage en machine.
Suggestions à la fin du
programme
■ Pour éviter d'éventuelles projections de
gouttelettes provenant du panier
supérieur, retirer d'abord le panier
inférieur.
■ Si vous laissez la vaisselle encore
quelques temps dans la machine,
ouvrez légèrement la porte pour favoriser
la circulation de l'air et améliorer encore
le séchage.
72
1
2
3
NETTOYAGE DES FILTRES
Le système de filtrage (fig. A ’’4’’) est
constitué par:
un réservoir central qui retient les grosses
particules;
une plaque métallique qui filtre
continuellement l’eau de lavage;
un micro filtre autonettoyant, situé sous la
plaque métallique, qui piège les micro
salissures pour garantir un rinçage parfait.
■ Afin d’obtenir d’excellents résultats de
lavage dans le temps, les filtres doivent
être contrôlés et nettoyés après chaque
lavage.
■ Pour retirer le micro filtre, il vous suffit
de tourner la poignée dans le sens
contraire des aiguilles d’une montre
(fig.1).
■ Pour un entretien facilité, le réservoir
central est amovible (fig.2).
■ Retirer la plaque métallique (fig.3) et
laver l’ensemble du système de filtrage
sous le robinet d’eau.
Si nécessaire, une petite brosse peut
être utilisée.
■ L’entretien du micro filtre
autonettoyant est limité , un contrôle,
toutes les deux semaines d’utilisation,
est suffisant.
Néanmoins, après chaque lavage il est
recommandé de vérifier que le réservoir
central et la plaque métallique ne sont
pas obstrués.
ATTENTION!
Après le nettoyage des filtres,
assurez vous qu’ils sont
correctement replacés et que la
plaque métallique est correctement
mise au fond de la cuve du lave
vaisselle.
Assurez vous que le micro filtre est
bien revissé, dans le sens des
aiguilles d’une montre, car une
mauvaise mise en place peut
entraîner une perte d’efficacité de
l’appareil.
IMPORTANT
Ne jamais se servir de l’appareil sans
les filtres.
Page 38

75
Couvert (EN 50242)
Capacité avec casseroles et assiettes
Pression admise pour l'installation hydraulique
Fusible
Puissance maximum absorbée
Tension
12
8 personnes
Min. 0,08 - Max 0,8 MPa
(voir plaque signalétique)
(voir plaque signalétique)
(voir plaque signalétique)
D Manette de sélection des
programmes
E Voyant "LAVAGE"
DESCRIPTION DE LA MACHINE
DONNÉES TECHNIQUES:
DIMENSIONS:
A Touche option "DEMI CHARGE"
B Touche "MARCHE/ARRET"
C Poignée d'ouverture du
lave-vaisselle
Hauteur
Profondeur
Largeur
Encombrement porte ouverte
cm
cm
cm
cm
avec plan de travail
85
60
60
120
sans plan de travail
82
56,3
59,8
117
AB C D
E
74
1
2
1b
APRES L'UTILISATION
Après chaque lavage, fermer le robinet
d'eau pour isoler le lave-vaisselle de
l'installation hydraulique d'alimentation et
appuyer sur la touche Marche/Arrêt pour
arrêter le fonctionnement de la machine.
Si la machine doit rester inutilisée un
certain temps, il est nécessaire de
procéder aux opérations suivantes:
1. Exécuter un programme de lavage sans
vaisselle avec lessive pour dégraisser la
machine.
2. Débrancher la prise électrique.
3. Fermer le robinet d'eau.
4. Remplir le réservoir du produit de rinçage.
5. Laisser la porte légèrement ouverte.
6. Laisser l'intérieur de la machine propre.
7. Si la machine est laissée dans des
pièces où la température est inférieure à
0°C, l'eau restant dans les tuyauteries
risque de geler. Par conséquent, porter
la température ambiante à plus de 0°C
et attendre environ 24 heures avant
d'activer la machine.
NETTOYAGE EXTERNE ET
ENTRETIEN
■ Pour le nettoyage externe de la machine,
ne pas utiliser de détergent ni d’abrasifs
mais uniquement un chiffon avec du
savon et de l’eau.
■ Le lave-vaisselle ne réclame aucun
entretien spécial car la cuve de lavage
est autonettoyante.
■ Nettoyer périodiquement le joint en
caoutchouc de la porte avec un chiffon
humide de façon à éliminer
éventuellement les traces de déchets ou
de produit de rinçage.
■ Pour mieux garantir l'évacuation des
petits dépôts de calcaire ou de déchets,
il est conseillé de procéder
périodiquement à un lavage complet en
versant auparavant un verre de vinaigre
dans le fond de la cuve et en
positionnant le bouton du programmateur
sur lavage délicat.
■ Si, malgré le nettoyage normal de la
plaque et du filtre vous notez que la
vaisselle ou les casseroles sont
insuffisamment lavées ou rincées,
contrôler que les orifices des bras
rotatifs (fig.A"5") sont propres.
Si cela est nécessaire, nettoyer les de la
façon suivante:
1. Pour démonter le bras supérieur,
tournez le jusqu’à ce qu’il s’aligne avec
le marquage stop inscrit sur la flèche
(fig.1b). Poussez le vers le haut (fig.1)
en le maintenant enfoncé puis dévissez
le dans le sens des aiguilles d’une montre
(pour le remonter procédez de la
même manière, mais en le vissant
dans le sens contraire des aiguilles
d’une montre).
Le bras de lavage inférieur peut être
démonté facilement en le tirant vers le
haut (fig.2).
2. Passez le bras de lavage sous un
robinet d’eau pour éliminer toute saleté.
3. Ensuite, replacez le bras de lavage dans
la même position, en pensant à
positionner le bras supérieur en face du
marquage stop.
■ La cuve, ainsi que la contre-porte sont
en acier inoxydable. Si toutefois vous
devez constater des taches d'oxydation,
celles-ci seraient imputables seulement
à une présence importante de sels de
fer en suspension dans l'eau.
■ Pour retirer les taches, il est conseillé
d'employer un abrasif à grains très fins.
Ne pas utiliser de substance chlorée ou
de laine d'acier. Le lave-vaisselle possède
un adoucisseur et il est conseillé l'usage
de sel pour éviter la formation de dépôt
blanchâtre sur la vaisselle.
En cas de présence de taches
blanchâtres, il est conseillé avant tout
d'intervenir sur le réglage du produit de
rinçage en l'augmentant d'une unité.
Page 39

77
Désactivation du signal acoustique
de FIN PROGRAMME
La fonction du signal acoustique à la fin du
programme peut être désactivée de la
manière suivante:
IMPORTANT
Commencer TOUJOURS la procédure
avec le lave-vaisselle éteint.
1. Lave-vaisselle éteint, OUVRIR la
porte.
2. Tourner le sélecteur sur le programme
"RAPIDE".
3. Appuyer sur la touche
"MARCHE/ARRET".
4. Avant un DELAI de 15 secondes,
tourner le sélecteur (dans le sens des
aiguilles d'une montre) sur la position
"RESET", puis revenir en arrière sur le
programme "RAPIDE", ceci 4 fois
(en terminant avec le sélecteur sur le
programme "RAPIDE").
5. Le voyant "LAVAGE" s'éclairera
fixement.
6. Tourner le sélecteur (dans le sens des
aiguilles d'une montre) sur la position
"RESET" (le voyant "LAVAGE"
commencera à clignoter pour indiquer
que la sonnerie a été désactivée).
7. Eteindre le lave-vaisselle en appuyant
sur la touche "MARCHE/ARRET" pour
rendre effective la nouvelle configuration.
Pour réactiver la sonnerie, suivez la même
procédure, des points 1 à 4 et quand le
voyant "LAVAGE" s'éclairera fixement,
éteindre le lave-vaisselle en appuyant sur
la touche "MARCHE/ARRET" pour rendre
effective la nouvelle configuration.
ATTENTION!
Si, pour quelque raison que ce soit, la
procédure ne peut être terminée avec
succès, éteindre le lave-vaisselle en
appuyant sur la touche
"MARCHE/ARRÊT" et recommencer
depuis début (POINT 1).
Selection d’un nouveau
programme
A chaque fois que vous souhaitez
sélectionner un nouveau programme, vous
devez tourner le sélecteur sur la position
"RESET" et attendre que le voyant
"LAVAGE" s’éteigne.
Dépistage des pannes
Lorsque vous sélectionnez un programme,
le voyant "LAVAGE" se mettra à clignoter
très rapidement (et un signal sonore sera
émis) si le système électronique détecte un
disfonctionnement.
Dans ce cas, tourner le sélecteur sur la
position "RESET", attendre que le voyant
"LAVAGE" s'éteigne et éteindre le
lave-vaisselle en appuyant sur la touche
"MARCHE/ARRÊT".
Contrôlez si le robinet d'eau est ouvert,
si le tuyau de vidange n'est pas plié, si
le siphon et les filtres ne sont pas
colmatés et configurez à nouveau le
programme choisi.
Si le disfonctionnement persiste, contactez
le service après-vente.
IMPORTANT
Ce lave-vaisselle est équipé d’un
système de sécurité anti-débordement
qui, en cas de problème, videra
automatiquement tout excès d’eau.
ATTENTION!
Pour éviter le déclenchement
intempestif du dispositif de sécurité
anti-débordement, il est recommandé de
ne pas remuer ou incliner le lave-vaisselle
pendant son fonctionnement.
Au cas où il serait nécessaire de
remuer ou d’incliner le lave-vaisselle,
s’assurer d’abord que le cycle de
lavage est terminé et qu’il n’y a plus
d’eau dans la cuve.
76
SELECTION DU PROGRAMME
ET FONCTIONS P ARTICULIERES
Choix des programmes
ATTENTION!
Avant de lancer un programme, le
sélecteur doit être sur la position
"RESET" et le voyant "LAVAGE” ( )
doit être éteint. Vérifier que la touche
"MARCHE/ARRET" ( ) est enclenché.
Pour lancer un programme, appuyer sur la
touche “MARCHE/ARRET” puis tourner le
sélecteur (vers la gauche ou la droite)
jusqu’à ce que le curseur ( ) soit en ligne
avec le symbole du programme requis.
Après environ 4 secondes, le voyant
"LAVAGE" s’allumera.
Après que le signal sonore ait retenti, le
programme démarrera automatiquement.
DANS UN DELAI de 2 minutes après le
début du programme, vous pouvez
choisir un autre programme, en
tournant simplement le sélecteur
jusqu'à la position voulue.
IMPORTANT
Pendant que le programme est en
marche, le sélecteur restera sur la
position sélectionnée et ne bougera
pas.
Touche option
Touche DEMI CHARGE
En réponse à vos attentes quotidiennes en
matière de lavage, ce lave-vaisselle est
équipé, en plus des programmes habituels,
d’une fonction "DEMI CHARGE".
Cette fonction permet aux utilisateurs de
laver un nombre réduit de vaisselle
pouvant se trouver indifféremment dans le
panier supérieur et/ou le panier inférieur de
l’appareil.
Quand cette fonction est activée, le
lave-vaisselle consomme automatiquement
moins d'eau et d'énergie et il réduit la
durée du cycle de lavage.
Dans ce mode "DEMI CHARGE", il convient
de réduire la quantité de détergent utilisé.
Vous pouvez sélectionner ou
désélectionner la touche option DANS
UN DÉLAI de 2 minutes après le début
du programme.
Interrompre un programme
Il n'est pas recommandé d'ouvrir la porte
en cours de programme, en particulier au
milieu de celui ci, ni durant le séchage
final. De toute façon, l'appareil s'arrête
automatiquement lorsque la porte est
ouverte.
Si la porte est ouverte pendant le
déroulement d’un programme, le voyant
"LAVAGE" se mettra à clignoter jusqu’à ce
que la porte soit refermée. Le programme
reprendra alors le cycle là où il a été
interrompu.
ATTENTION!
Si vous ouvrez la porte pendant que
le lave-vaisselle effectue son cycle
de séchage, un signal sonore vous
alerte que le cycle n’est pas achevé.
Si vous souhaitez changer ou annuler
un programme en cours, veuillez opérer
de la manière suivante:
tourner le sélecteur sur la position
“RESET”. Après quelques secondes, le
voyant "LAVAGE" s’éteindra.
Une nouvelle sélection peut maintenant
être faite.
ATTENTION!
Avant de démarrer un nouveau
programme, veuillez contrôler la
présence de lessive dans le
compartiment. Si nécessaire, remplir
le compartiment.
En cas de coupure de courant pendant
un programme de lavage, une mémoire
spéciale restaure le programme
sélectionné et, lorsque le courant est
rétabli, reprend le cycle là où il s'est
arrêté.
Fin du programme
La fin du programme est signalée par un
signal acoustique (s’il est activé) de
5 secondes, répété 3 fois toutes les
30 secondes.
Le voyant “LAVAGE” commencera à
clignoter. Tourner le sélecteur sur la
position "RESET", attendre jusqu’à ce que
le voyant "LAVAGE" s’éteigne puis
appuyer sur la touche "MARCHE/ARRET".
Page 40

78
Programme Description
LISTE DES PROGRAMMES
RINCAGE A FROID
INTENSIF 75°C
UNIVERSEL 65°C
QUOTIDIEN 70°C
ECO 45°C
DELICAT 45°C
RAPIDE 32’ 50°C
Pour la vaisselle utilisée le matin ou à midi,
entreposée dans le lave-vaisselle jusqu'à ce
que vous soyez prêt à laver une charge pleine.
Conçu pour le lavage des casseroles et de
toute autre vaisselle particulièrement sale.
Destiné au lavage de la vaisselle et casseroles
normalement sale.
Destiné au lavage quotidiende la vaisselle et
casseroles normalement sale.
Autiliser immédiatement après le repas.
(Max 8 couverts)
Adapté au lavage de vaisselle et casseroles
normalement sales, avec utilisation de
lessive à base d’enzyme.
Programme normalisé EN 50242.
Adapté au lavage de la vaisselle délicate
décorée et en cristal.
Indiqué pour le lavage quotidien de la
vaisselle peu sale, à l'exclusion des casseroles.
Cycle trés rapide à effectuer à la fin du
repas.
Recommandé pour un lavage de vaisselle
jusqu'à 4/6 personnes.
79
5
•
••
70°C
•
••••
••••
••••
••••
•••
45°C
50°C
60
85
32
••
••
••
••
65°C
115
••
OUI
75°C
135
•• ••
••••
45°C
175
••
•
••
N/A
N/A
••
••
••
OUI
N/A
OUI
OUI
Opérations à accomplir Déroulement du programme
Durée
moyenne
en
minutes
Fonctions
facultatives
Lessive prélavage
Lessive lavage
Nettoyage plaque,
filtre
Contrôle provision
du produit de rinçage
Contrôle provision
Sel
Prélavage chaud
Prélavage froid
Lavage
Premier rinçage
à
froid
Second rinçage
à
froid
Rinçage chaud avec-
produit de rinçage
Avec eau froide (15°C)
(Tolerance ±10%)
Touche
“DEMI CHARGE”
•
••
••
••
•
Lavage précédé d'un prélavage
Dans le cas où l'on utilise le programme INTENSIF il faut également mettre une dose de détergent,
20 grammes (1 cuillère à soupe) directement dans le lave-vaisselle. Pour le programme QUOTIDIEN
ajouter 5 grammes.
N/A = OPTION NON DISPONIBLE
Page 41

80
IDENTIFICATION D’ANOMALIES MINEURES
Si votre lave-vaisselle ne fonctionne pas, avant d’appeler votre revendeur faire les
contrôles suivants:
Brancher la prise
Appuyer sur la touche
Contrôler
Fermer la porte
Contrôler
Ouvrir le robinet
Positionner correctement le
programmateur
Déplier le tuyau
Nettoyer le filtre situé à
l’extremité du tuyau d’alimentation
Nettoyer le filtre
Redresser le tuyau
Suivre attentivement les
instructions pour le branchement
du tuyau de vidange
Consulter un technicien qualifié
Réhausser le tuyau de vidange à
40 cm.
Réduire la quantité de lessive
Contrôler
Nettoyer la plaque et le filtre
Arrêtez l'appareil
Ouvrir le robinet
Réactivez le cycle
ANOMALIES CAUSES REMEDES
1 - La machine ne fonctionne
sur aucun programme
2 - La machine ne prend
pas l’eau
3 - La machine ne vidange pas
4 - La machine vidange
en permanence
5 - Les bras de lavage ne
tournent pas
6 - Sur les appareils électroniques
sans afficheur:
un voyant ou plus clignotant
rapidement.
Prise de courant mal branchée
Touche M/A non appuyée
Pas de courant
Porte ouverte
Voir causes du N. 1
Robinet d’eau fermé
Programmateur mal positionné
Le tuyau d’alimentation est plié
Le filtre du tuyau d’alimentation est
bouché
Filtre bouché
Tuyau de vidange plié
La rallonge du tuyau de vidange
n’est pas la bonne
La vidange murale n’a pas
d’évent à air
Tuyau en position trop basse
Quantité excessive de lessive
Une pièce de vaisselle
empêche la rotation
La plaque filtrante et le filtre
sont bouchés par des impuretés
Arrivée d'eau fermée
81
N.B.: Quand une anomalie citée ci-dessus provoque un mauvais lavage ou un rinçage insuffisant, il est
nécessaire de retirer manuellement les salissures de la vaisselle car l’opération finale provoque le
séchage des salissures qu’un second lavage en machine ne serait pas susceptible de nettoyer.
Si le mauvais fonctionnement persiste, s’adresser au Centre d’Assistance Technique en communiquant le
modèle du lave-vaisselle indiqué sur la plaquette placée à l’intérieur de la porte, dans la partie supérieure,
ou sur le certificat de garantie. Ces informations vous permettront d’obtenir une intervention plus rapide et
efficace.
Le fabricant décline toute responsabilité pour erreur d’impression contenue dans le présent livret.
Il se réserve en outre, le droit d’apporter les modifications qu’il jugerait utiles sur ses produits sans
en compromettre les caractéristiques essentielles.
ANOMALIES CAUSES REMEDES
7 - La vaisselle est
partiellement lavée
8 - Manque ou dispersion
partielle de la lessive
9 - Présence de tâches
blanches sur la vaisselle
10 - Bruit pendant le lavage
11 - La vaisselle n’est pas
parfaitement sèche
Voir causes du N. 5
Le fond des casseroles n’est
pas lavé parfaitement
Le bord des casseroles n’est
pas parfaitement lavé
Orifices partiellement bouchés
La vaisselle n’est pas bien rangée
L’extrémité du tuyau de vidange est
plongée dans l’eau
La lessive n’est pas bien dosé, est
vieux ou durci
Le bouchon du récipient du sel ne
ferme pas bien
Le programme de lavage choisi est
trop faible
Des couverts, des assiettes,
des casseroles, etc… empêchent
l'ouverture du couvercle du
récipient à lessive.
L’eau d’alimentation est
particulièrement dure
Les pièces de vaisselle se cognent
Les bras de lavage tournants
cognent contre la vaisselle
Manque de circulation d’air
Manque de produit de rinçage
Contrôler
Incrustations trop tenaces
qu’il faut enlever avant
le lavage dans la machine
Positionner mieux les
casseroles
Démonter les bras de lavage en
dévissant l’écrou moleté de
fixation dans le sens des
aiguilles d’une montre et les laver
sous un robinet
Ne pas trop serrer la vaisselle
L’extrémité du tuyau de
vidange ne doit pas toucher l’eau
de vidange
Augmenter la dose en fonction de
la quantité de saleté ou
remplacer le produit
Le visser à fond
Choisir un programme plus
énergique
Charger la vaisselle de telle
manière qu'elle n'empêche pas
l'ouverture du couvercle du
récipient à lessive.
Contrôler le niveau du sel et du
produit de rinçage et régler le
dosage; si l’anomalie persiste,
demander l’intervention du SAV
Mieux les ranger dans les paniers
Mieux ranger la vaisselle
Laisser la porte de la machine
entrouverte à la fin du
programme de lavage pour
favoriser le séchage naturel
Utiliser du produit de rinçage
Page 42

82
83
pag. 84
pag. 85
pag. 89
pag. 90
pag. 91
pag. 92
pag. 94
pag. 95
pag. 96
pag. 97
pag. 98
pag. 99
pag.100
pag.101
pag.101
pag.102
pag.104
pag.106
SADRÎAJ
Uputstvo za sigurno kori‰çenje
Name‰tanje i ugradnja
Uredjaj za omek‰avanje vode
Punjenje posude za so
Name‰tanje gornje korpe za su‰enje
Stavljanje sudova u ma‰inu
Podaci za laboratorijska ispitivanja
Punjenje deterdÏentom
Vrste deterdÏenata
Punjenje sredstvom za ispiranje
âi‰çenje filtera
Praktiãni saveti
âi‰çenje i odrÏavanje
Opis kontrolne table
Tehniãki podaci
Pode‰avanje programa i specijalne funkcije
Tabela programa
Prepoznavanje manjih gre‰aka u radu
Molimo Vas da paÏljivo proãitate uputstva navedena u ovoj knjiÏici zato jer sadrÏe vaÏne
podatke koji se odnose na sigurno name‰tanje i ugradnju ma‰ine, njeno kori‰çenje i
odrÏavanje, kao i korisne savete za ‰to bolju upotrebu.
PaÏljivo ãuvajte ovu knjiÏicu jer bi Vam i ubuduçe mogla zatrebati.
Fig. A
3
2
1
4
5
âestitamo!
Zahvaljujemo Vam ‰to ste izabrali Candy
aparat za domaçinstvo; kvalitetnu ma‰inu
za pranje sudova koja garantuje visok
kvalitet i pouzdanost.
Candy proizvodi vrlo ‰iroki asortiman
aparata za domaçinstvo: ma‰ine za pranje
sudova, ma‰ine za pranje/su‰enje ve‰a,
‰porete, mikrotalasne rerne, ugradne rerne
i ploãe za kuvanje, friÏidere i zamrzivaãe.
TraÏite od svog prodavca najnoviji i
kompletan katalog Candy proizvoda.
Molimo da paÏljivo proãitate uputstva iz
sadrÏaja u ovoj knjiÏici. Oni çe Vam pruÏiti
vaÏne podatke ne samo radi sigurnog
postavljanja, kori‰çenja i odrÏavanja
ma‰ine, veç i kako postiçi najbolje
rezultate u svakodnevnom rukovanju
ma‰ine za pranje sudova.
GARANCIJA
Ovaj uredjaj ima garanciju koja
omoguçava besplatno
kori‰çenje servisnih usluga ovla‰çenog
servisa za vreme garantnog roka OD 24
MESECA OD DANA KUPOVINE OSIM U
SLEDEåIM SLUâAJEVIMA!!!.
A. Bilo koji kvarovi nastali usled lo‰e i
nestruãne instalacije od strane osobe
koja nije ovla‰çena.
B. Bilo koji kvarovi nastali usled popravke
uredjaja od strane nestruãne i/ili
neovla‰çene osobe.
C. Bilo koji kvarovi nastali usled kori‰çenja
rezervnih delova koji nisu originalni
delovi isporuãeni od strane proizvodjaãa.
D. Bilo koji kvarovi nastali kori‰çenjem
uredjaja van domaçinstva ili drugom
nenamenskom upotrebom uredjaja.
E. Bilo koji kvarovi nastali prikljuãenjem na
neadekvatan napon.
F. Bilo koji kvarovi nastali usled
nepravilnog kori‰çenja uredjaja.
CANDY SERVISNI CENTAR
BESPLATAN INFO TELEFON NA TERITORIJI SRBIJE
0800 303 304
Molimo da raãun od kupovine ovog uredjaja ãuvate na sigurnom mestu jer ga je potrebno
pokazati serviseru ako pozovete ovla‰çeni servis.
Page 43

84
85
NAME·TANJE I UGRADNJA
(tehniãke napomene)
■ Nakon ‰to ste uklonili ambalaÏu, podesite
visinu ma‰ine za sudove. Da bi uredjaj
ispravno radio, mora biti izravnan. Visinu
uredjaja izravnajte pomoçu okretljivih
noÏica. Uredjaj sme da bude nagnut
najvi‰e za 2°.
■ Ako morate da pomerate uredjaj prilikom
raspakivanja ruãno, ne smete ga hvatati
za donju ivicu vrata, veç u tom sluãaju
vrata uredjaja delimiãno otvorite i
uhvatite ga za gornju ivicu pa ga
pomerite kako je prikazano na slici
VAÎNO
Ako uredjaj postavite na pod pokriven
itisonom ili tepihom, morate proveriti
da otvori za ventilaciju na donjem
delu uredjaja nisu zapu‰eni.
Budite sigurni da je nakon ugradnje
utikaã na uredjaju ostao dostupan.
Prikljuãivanje na elektriãnu mreÏu
Uredjaj odgovara svim medjunarodnim
sigurnosnim propisima, i ima ugradjen
tropolni utikaã sa uzemljenjem, koji
osigurava kompletno uzemljenje uredjaja.
Uspe‰nost sigurnog rada ma‰ine, takodje
zavisi i od pravilnog uzemljenja elektriãnih
instalacija u va‰oj kuçi ili stanu.
Zato pre nego ‰to prikljuãite ma‰inu na
elektriãnu mreÏu proverite sledeçe:
1. da li je utiãnica ispravno uzemljena;
2. da li elektriãno brojilo, osiguraãi i presek
elektriãnih kablova odgovara
prikljuãnim vrednostima elektriãnog
uredjaja, navedenim na tablici sa
tehniãkim podacima koja je priãvr‰çena
na ma‰ini.
UPOZORENJE!
Osigurajte da je va‰ elektriãni uredjaj
pravilno uzemljen.
U sluãaju da elektirãna instalacija nije
pravilno uzemljena, upozoravamo Vas
da moÏe doçi do disperzije elektriãne
energije po metalnim delovima
elektriãnog aparata za domaçinstvo,
disperzija elektriãne energije moÏe
se osetiti i zbog prisustva uplitanja
radio talasa.
Proizvodjaã ne preuzima nikakvu
odgovornost za moguçe povrede ljudi ili
moguçe nastale materijalne ‰tete,
izazvane prikljuãivanjem uredjaja na
nepravilno uzemljenu elektriãnu instalaciju.
Ovaj aparat je izradjen u skladu sa
Evropskim Direktivama br.
73/23/EEC, 89/336/EEC, zamenjenim
s 2006/95/EC i 2004/108/EC i
daljnjim izmenama.
UPUTSTVO ZA SIGURNO
KORI·åENJE
Ovde su prikazana osnovna sigurnosna
pravila koja vaÏe za sve elektriãne
aparate za domaçinstvo i to kako sledi.
Instalacija
■ U sluãaju da utikaãu na uredjaju ne
odgovara utiãnica u zidu, isti mora biti
zamenjen odgovarajuçim i to od strane
za to osposobljene struãne osobe koja
istovremeno mora proveriti da li presek
kablova utiãnice odgovara prikljuãnoj
snazi elektriãnog uredjaja.
■ Obratite paÏnju da uredjaj ne pritiska
prikljuãni kabal.
■ Generalno se ne preporuãuje
prikljuãivanje uredjaja na elektriãnu
mreÏu preko razliãitih ispravljaãa,
vi‰estrukih utiãnica ili produÏnih kablova.
■ Ako neophodno treba zameniti prikljuãni
kabal ma‰ine, obratite se ovla‰çenom
servisnom centru.
Sigurnost
■ Ne dodirujte uredjaj kada su Vam ruke ili
noge vlaÏne ili mokre.
■ Ne dodirujte uredjaj ako ste bosi.
■ Ne izvlaãite utikaã iz utiãnice tako da
povlaãite prikljuãni kabal ili celi uredjaj,
veç uvatite samo utikaã i izvadite ga iz
utiãnice.
■ Elektriãni uredjaj ne izlaÏite razliãitim
atmosferskim uticajima, kao na primer:
ki‰i, suncu itd.
■ Ovaj uredjaj nije namenjen upotrebi od
strane osoba (ukljuãujuçi decu) sa
ograniãenim fiziãkim i mentalnim
sposobnostima, niti od strane osoba sa
ograniãenim iskustvom i znanjem, osim
ukoliko nisu obuãeni za kori‰çenje
uredjaja od osobe koja je odgovorna za
njihovu sigurnost.
Deca se ne smeju igrati ovim uredjajem.
■ Vodu koja ostane u ma‰ini za sudove ili
na sudovima na kraju programa pranja
nije potrebno brisati.
■ Vrata ma‰ine za pranje sudova nije
dobro ostavljati otvorenima, buduçi da
to predstavlja moguçu opasnost (npr.
saplitanje, udaranje).
■ Prislanjanjem ili sedenjem na otvorenim
vratima ma‰ine za pranje sudova moÏe
se uzrokovati njihovo o‰teçenje.
UPOZORENJE!
NoÏeve i sliãan pribor s o‰tricama
morate staviti u korpu pribora za jelo s
o‰tricama okrenutim prema dole ili
poloÏiti vodoravno.
Svakodnevno kori‰çenje
■ Ovaj uredjaj izradjen je iskljuãivo za
kori‰tenje u domaçinstvu.
■ Ma‰ina za pranje sudova izradjena je za
pranje uobiãajenog kuhinjskog posudja
koje se koristi u domaçinstvima, u
ma‰ini nikako ne smete prati sudove ili
predmete uprljane benzinom, lakom,
metalnim ili ãeliãnim trunjem,
nagrizajuçim hemikalijama, kiselinama ili
alkalima.
■ Ako je u stanu ili kuçi ugradjen aparat za
omek‰avanje vode, nije potrebno
dodavati so u odeljak za omek‰avanje
vode, koja je ugradjena u ma‰ini za
pranje sudova.
■ Pribor za jelo çe se najbolje oprati ako
ga stavite u korpu sa ruãicama okrenutim
prema dole.
■ Ako se ma‰ina pokvari ili prestane
ispravno da radi, iskljuãite je, zatvorite
vodu i ne poku‰avajte da je sami
popravite. Popravke mora izvr‰iti smo
ovla‰çeni serviser uz ugradnju iskljuãivo
originalnih rezervnih delova. Bilo koji
propust u gore navedenim savetima
moÏe imati ozbiljne posledice za
sigurnost uredjaja.
Odlaganje
■ Ma‰ina za pranje sudova izradjena je od
materijala koji se mogu reciklirati, tako
da se moÏe baciti bez bojazni po
zagadjenje Ïivotne sredine.
■ Ako se Ïelite re‰iti stare ma‰ine za
pranje sudova, budite savesni i
demontirajte vrata ma‰ine kako bi
spreãili da se unutra uvuku i zatvore
deca. Isto tako nakon ‰to odvojite utikaã
iz zida, presecite glavni kabal za
elektriãno napajanje.
Page 44

86 87
Prikljuãivanje odvodne cevi
■ Kraj odvodne cevi namestite na stalni
odvod vode, pa pazite da cev ne bude
savijena (slika 4).
■ Stalni odvod vode mora biti na visini
najmanje 40 cm i imati unutra‰nji promer
‰irine najmanje 4 cm.
■ Preporuãujemo da namestite i
odgovarajuçi sifon koji çe spreãavati
‰irenje neprijatnih mirisa (slika 4X).
■ Ako je neophodno, odvodna cev moÏe
se produÏiti do 2,5 m; osigurajte da stoji
na najvi‰e 85 cm visine od nivoa poda.
ProduÏna cev moÏe se nabaviti kod
ovla‰çenog servisera.
■ Zaobljeni kraj odvodne cevi moÏete
obesiti i na ivicu sudopere, ali svakako
morate pripaziti da kraj cevi nije
potopljen u vodu koja se moÏda nalazi u
sudoperi, jer çe ona kod ukljuãivanja
uredjaja, nazad oteçi u ma‰inu
(slika 4Y).
■ U sluãaju da isti kraj Ïelite namestiti
ispod radne povr‰ine, morate ga
priãvrstiti neposredno ispod radne ploãe,
na najvi‰oj moguçoj taãci (slika 4Z).
■ Po zavr‰etku prikljuãivanja ma‰ine na
vodovodnu mreÏu proverite da cevi za
odvod i dovod vode nigde nisu savijene.
4
Prikljuãivanje na vodovodnu mreÏu
VAÎNO
Ma‰ina za pranje sudova mora biti
spojena na vodovodnu mreÏu
kori‰çenjem nove garniture creva.
Stara creva nije dobro ponovo
koristiti.
■ Creva za odvod i dovod vode na
ma‰ini moÏete usmeriti ili na levu ili na
desnu stranu.
VAÎNO
Ma‰inu moÏete prikljuãiti na hladnu
ili toplu vodu, s tim da ulazna
temperatura tople vode ne sme da
prelazi temperaturu veçu od 60°C.
■ Dozvoljeni minimalni pritisak vode iznosi
0,08 MPa do maksimalno 0,8 MPa.
U sluãaju da je pritisak u vodovodnoj
mreÏi manji od 0,08 MPa, posavetujte se
sa ovla‰çenim servisnim centrom.
■ Prikljuãnu cev morate priãvrstiti na
slavinu navojem, tako da ma‰inu moÏete
odvojiti od vodovodne mreÏe kada je ne
koristite (slika 1 B).
■ Ma‰ina je opremljena dovodnom cevi
koja na kraju ima navoj promera 3/4
(slika 2).
■ Spojite dovodnu cev "A" na slavinu za
vodu "B" sa prikljuãkom 3/4 i proverite
da je spoj dobro zavrnut.
■ Ako je neophodno, dovodna cev moÏe
se produÏiti do 2,5 m. ProduÏna cev
moÏe se nabaviti kod ovla‰çenog
servisera.
■ Ako je u vodi prisutan kamenac ili pesak,
u tom sluãaju preporuãujemo da
u servisnom centru kupite dodatni filter
broj 9226085 (slika 3). Filter "D"
namestite izmedju slavine "B" i dovodne
cevi "A", a pre toga spojite sa taãkom "C".
■ Ako ma‰inu prikljuãujete na novu
vodovodnu instalaciju ili na vodovodnu
instalaciju koja duÏe vreme nije bila
kori‰çena, pustite vodu da teãe nekoliko
minuta da se iz cevi isperu moguçe
neãistoçe (kao na primer pesak, rdja itd)
pre nego ‰to ma‰inu za pranje sudova
prikljuãite na cev za dovod vode. Na taj
naãin izbeçiçete moguçe zaãepljenje
filtera navedenim neãistoçama.
Dovodnu cev prikljuãite na slavinu za
dotok vode tek kada je voda sasvim ãista.
1
2
3
Page 45

88
7
598
556/573
5
UGRADNJA U OPREMLJENU
KUHINJU
Name‰tanje izmedju postojeçih
kuhinjskih ormariça
■ Visina ma‰ine iznosi 85 cm, pa zbog
toga moÏe biti postavljena u nivou s
ostalim kuhinjskim elementima sliãne
visine.
■ Gornja povr‰ina ma‰ine moÏe biti
iskori‰çena u razliãite svrhe, jer je
otporna na visoke temperature, ogrebotine
i mrlje (slika 5).
Otvaranje vrata
Stavite va‰u ruku u Ïljeb i povucite.
U sluãaju da se vrata sluãajno otvore za
vrema rada ma‰ine, posebni sigurnosni
sistem çe je automatski iskljuãiti.
VAÎNO
Za pravilan rad ma‰ine, vaÏno je da
vrata tokom pranja ne otvarate.
Zatvaranje vrata
Zatim proverite da li se prskalice za
raspr‰ivanje vode lako okreçu, tj. da li su
tanjiri, pribor za jelo i ostalo posudje
postavljeni tako da ne ometaju okretanje
prskalica.
Zatvorite vrata pritiskom prema uredjaju,
proverite da su dobro zatvorena
(sigurnosni zatvaraã mora napraviti klik).
Ugradnja ispod postojeçe radne
povr‰ine
(name‰tanje ispod radne povr‰ine)
■ Veçina modernog kuhinjskog name‰taja
opremljena je i radnom povr‰inom, ispod
koje mogu biti umetnuti razliãiti kuhinjski
uredjaji. U navedenom sluãaju dovoljno
je da odstranite radnu povr‰inu ma‰ine,
tako da odvrnete ‰rafove koji se nalaze
sa zadnje strane (slika 6a).
VAÎNO
Nakon uklanjanja radne ploãe,
zavrtnji za uãvr‰çivanje se MORAJU
VRATITI na svoje mesto ispod zanje
ivice (slika 6b).
■ Visina ma‰ine smanjçe se na 82 cm kako
je predvidjeno prema medjunarodnim
propisima (ISO), pri ãemu çete je moçi
ugraditi ispod radne povr‰ine (slika 7), a
s istom visinom savr‰eno çe se uklopiti
ispod postojeçih kuhinjskih elemenata.
6
a
b
a
b
89
Nivo 2
Nivo 1
Nivo 3
Nivo 4
Nivo 5
("UNIVERZALNI" program)
Nivo 0
UREDJAJ ZA OMEK·AVANJE
VODE
U razliãitim krajevima voda sadrÏi razliãite
koliãine kalcijumskih soli i minerala koji se
tokom pranja taloÏe na sudovima i
ostavljaju na njima mrlje i beliãaste
naslage. Ako je ovih soli u vodi vi‰e, voda
je veçe tvrdoçe.
Ma‰ina za pranje sudova opremljena je
uredjajem za odstranjivanje kamenca koji
kori‰çenjem posebne vrste soli iz vode
uklanja kamenac, odnosno vodu omek‰ava
tako da je pogodna za pranje sudova.
Podatke o stepenu tvrdoçe vode u Va‰oj
vodovodnoj mreÏi moÏete zatraÏiti od
op‰tinske uprave Vodovoda.
Regulisanje uredjaja za
omek‰avanje vode
Uredjaj ima ‰estostepeni regulator pomoçu
kojeg moÏe omek‰avati vodu tvrdoçe do
90°fH (francuska skala tvrdoçe) odnosno
50°dH (nemaãka skala tvrdoçe).
Na donjoj tabeli popisani su razliãiti stepeni
tvrdoçe vode sa odgovarajuçim postavkama
uredjaja za omek‰avanje vode.
*
Uredjaj za omek‰avanje vode fabriãki
je pode‰en na 3. stepen, tako da je
pogodan za veçinu korisnika.
Prema tvrdoçi vode moÏete podesiti
potro‰nju soli za regeneraciju po sledeçem
postupku:
VAÎNO
Ma‰ina mora uvek biti ISKLJUâENA
pre poãetka ove procedure.
1. Dok je ma‰ina iskljuãena, OTVORITE
vrata.
2. Postavite dugme selektora na poziciju
"UNIVERZALNI" program.
3. Pritisnite dugme "UKLJUâENO/
ISKLJUâENO".
4. UNUTAR 15 sekundi, okrenite dugme
selektora (u smer suprotnom od kretanja
kazaljke na satu) do pozicije "RESET"
zatim vratite dugme na poziciju
"UNIVERZALNI" (u smeru kretanja
kazaljke na satu), ovo ponovite 4 puta
(zavr‰ite sa dugmetom na poziciji
"UNIVERZALNI" program).
5. Signalna lampica "PRANJE" çe zatreptati
3 puta i oglasiçe se zvuãni signal takodje
3 puta, da potvrdi fabriãki pode‰en nivo
omek‰ivaãa (NIVO 3).
6. Okrenite dugme selektora na jednu od
pozicija od 1 do 6 da bi ste izabrali
Ïeljeni nivi omek‰ivaãa.
7. Signalna lampica "PRANJE" çe zatreptati
nekoliko puta i oglasiçe se zvuãni signal
isto toliko puta, da potvrdi i pode‰en nivo
omek‰ivaãa (npr. 5 puta za NIVO 5).
8. Iskljuãite ma‰inu pritiskom na dugme
"UKLJUâENO/ISKLJUâENO" da
saãuvate novo pode‰avanje.
UPOZORENJE!
Ukoliko se pojavi bilo kakav problem
u toku pode‰avanja pritisnite dugme
"UKLJUâENO/ISKLJUâENO" i poãnite
postupak od poãetka (KORAK 1).
Nivo
Francuska
skala (°fH)
Nemaãka
skala (°dH)
NE
DA
DA
DA
DA
DA
Tvrdoça vode
Pode‰avanje
omek‰ivaãa
vode
Protiv
kamenca
0
1
2
*3
4
5
0-5
6-15
16-30
31-45
46-60
61-90
0-3
4-9
10-16
17-25
26-33
34-50
Pozicija 6
Pozicija 1
Pozicija 2
Pozicija 3
Pozicija 4
Pozicija 5
Page 46

91
NAME·TANJE GORNJE
KORPE
Za tanjire promera od 27 cm do 31 cm,
preporuãujemo donju korpu ma‰ine, ali tek
nakon ‰to ste namestili gornju korpu u
najvi‰i poloÏaj i to na sledeçi naãin:
1.Okrenite prednje graniãnike “A” na
spoljnu stranu;
2. Izvucite gornju korpu i premestite je u
gornji poloÏaj;
3. Ponovo postavite zatvaraãe u njihov
prvobitan poloÏaj.
Sudovi koji su u promeru veçi od 20 cm ne
mogu se vi‰e stavljati u gornju korpu, isto
tako kada je korpa u gornjem poloÏaju ne
mogu se koristiti pokretni nosaãi.
A
A
90
PUNJENJE POSUDE ZA SO
■ Na dnu uredjaja nalazi se posuda za so,
pomoçu koje se obnavlja sredstvo za
odstranjivanje kamenca.
■ Vrlo je vaÏno da koristite iskljuãivo so
posebno namenjenu za ma‰ine za
pranje sudova. Ostali tipovi soli kao npr.
kuhinjska so, sadrÏe visok postotak
kreãnjaãkih sastojaka, pa zbog
prisutnosti istih, ne moÏe doçi do
proãi‰çavanja, pa se aparat moÏe
zapu‰iti.
■ So u aparatu za omek‰avanje dodajete
tako da odvrnete poklopãiç na posudi,
koji se nalazi na dnu ma‰ine.
■ Pri navedenoj radnji ãesto se dogadja
da iz posude isteãe ne‰to vode, bez
obzira na to, slobodno sipajte so u
posudu sve dok nije potpuno puna. Da
bi lak‰e sipali so u posudu, tokom
sipanja je me‰ajte npr. dr‰kom od
varjaãe.
Na kraju punjenja, odstranite ostatke
soli i dobro priãvrstite poklopac.
■ Nakon ‰to ste u ma‰inu stavili so,
preporuãljivo je pokrenuti kompletan
program pranja ili program za HLADNO
ISPIRANJE.
U posudu za so moÏete sipati oko 1,5
do 1,8 kg soli. Za ‰to bolje i uspe‰nije
kori‰çnje ma‰ine potrebno je povremeno
obnoviti zalihu soli, u skladu sa
vrednostima datim na tabeli.
VAÎNO
(samo pri prvom pokretanju ma‰ine)
Kada ma‰inu za pranje sudova
koristite prvi put, nakon potpunog
punjenja posude za so, neophodno
je dodati vode sve dok se ne prelije
iz posude.
Pokazatelj zaliha soli
Ovaj model ima takozvani “slepi” poklopac,
pa je kod njega potrebno povremeno
proveravati kolicinu soli u ma‰ini, u
zavisnosti od pode‰enosti uredjaja za
omek‰avanje vode.
VAÎNO
Ako se na sudovima pojave bele
fleke, to je sigurni znak da u ma‰ini
nedostaje soli.
Page 47

92 93
Uobiãajeno dnevno punjenje ma‰ine s posudjem
prikazano je na slikama 1, 2 i 3.
Gornja korpa (slika 1)
A = duboki tanjiri
B = plitki tanjiri
C = tanjiri za desert
D = tanjiriçi od ‰oljica za kafu
E = ‰oljice za kafu
F = ãa‰e
Gornja korpa (slika 2)
A = duboki tanjiri
B = plitki tanjiri
C = tanjiri za desert
D = tanjiriçi od ‰oljica za kafu
E = ‰oljice za kafu
F = ãa‰e
G = korpa za escajg
Donja korpa (slika 3)
A = srednje velika ãinija
B = velika ãinija
C = veliki tiganj
D = poklopci
E = ãinije za supu, posluÏavnici za serviranje
F = pribor za jelo
G = posluÏavnici, tiganji
Pravilno i racionalno razme‰tanje sudova u ma‰ini
doprineçe dobrim rezultatima pranja.
Korpica pribora za jelo (slika 4)
Korpica pribora za jelo napravljena je od dva
odvojena dela pa je zbog toga omoguçeno punjenje
razliãitim veliãinama pribora za jelo.
Dva dela mogu biti zasebna tako ‰to ih odvojite
kliznim pomeranjem.
Gornji deo korpice pribora za jelo moÏe da se
ukloni, ‰to omoguçava razliãite kombinacije
punjenja.
STAVLJANJE SUDOVA
U MA·INU
Kori‰çenje gornje korpe
■ Gornja korpa opremljena je pokretnim
stalkom prikaãenim za boãnu ivicu, pri
ãemu moÏe biti postavljena u dva
poloÏaja: vi‰i ili niÏi.
U niÏem poloÏaju, stalak se moÏe
koristiti za pranje ‰oljica za ãaj ili kafu,
dugaãkih noÏeva i kutlaãa.
Na krajevima istog stalka moguçe je
obesiti ‰olje i bokale.
âa‰e, tanjiriçe od ‰oljica i tanjire za
desert moÏete staviti ispod stalka.
■Duboki i plitki tanjiri mogu sa staviti sa
stalkom u uspravan poloÏaj.
Tanjire uvek treba postavljajti uspravno,
tako da su udubljene strane tanjira
okrenute prema vratima ma‰ine.
Uvek obratite paÏnju da ostane dovoljno
slobodnog prostora izmedju jednog i
drugog tanjira, kako bi voda slobodno
kruÏila za vreme pranja.
■ PoÏeljno je da prvo tanjire iste veliãine
poslaÏete zajedno u isti red da u
potpunosti iskoristite kapacitet korpe.
■ Tanjiri mogu biti poredjani ili svi u jednom
(slika 1) ili u dva reda (slika 2).
■ Tanjire veçeg promera od oko 27 cm,
lagano nagnite prema prednjoj strani,
kako bi lak‰e stavili korpu u unutra‰njost
ma‰ine.
■ Na gornju korpu takodje moÏete poredjati
ãinije za salatu i plastiãne ãinijice, ali je
preporuãljivo da ih uãvrstite na mesto jer
se takvo posudje kod raspr‰ivanja vode
moÏe prevrnuti.
■ Gornja korpa napravljena je tako da je
maksimalno moÏete iskoristiti, odnosno
da je napunite samo s tanjirima koje
stavljate u dva reda i to do najvi‰e
24 komada, ili samo sa ãa‰ama koje
slaÏete u pet redova najvi‰e do
30 komada, ili sa razliãitim komadima
posudja.
Kori‰çenje donje korpe
■ U donju korpu moÏete poslagati tanjire,
tiganje, ãinije za supu, ãinije za salatu,
duboke i plitke tanjire, pribor za jelo i
kutlaãe.
■ Pribor za jelo poredjajte u plastiãnu
korpicu (drÏaã) koja je za to namenjena,
vrhovima ruãica okrenutim prema gore.
■ DrÏaã pribora za jelo stavite na donju
korpu (slika 3) da ka‰ike, vilju‰ke i
noÏevi ne iskliznu kroz otvore na korpici
i time blokiraju okretanje prskalice za
raspr‰avanje vode.
VAÎNO
Donja korpa ima uredjaj za
sigurnosno zaustavljanje koji je
posebno koristan za sigurno
izvlaãenje potpuno pune korpe.
Potpuno izvlaãenje korpe neophodno
je pri redovnom odrÏavanju, kada
punite so i ãistite filter.
4
1
A
B
C
D
E
F
A
B
C
D
G
E
F
2
F
D
FAG
E
B
C
3
Page 48

95
PUNJENJE DETERDÎENTOM
DeterdÏent
VAÎNO
Za pranje sudova u ma‰ini morate
upotrebljavati posebno sredstvo za
pranje, koje moÏe biti u teãnom
stanju, odnosno adekvatan pra‰ak ili
tablete.
“CALGONIT” daje vrlo dobre rezultate, a
moÏe se nabaviti u veçini prodavnica.
Neprikladna sredstva kao na primer:
sredstva za ruãno pranje sudova, ne
sadrÏe sastojke pogodne za pranje sudova
u ma‰ini, pa tako smetaju pravilnom radu
ma‰ine.
Punjenje posude za deterdÏent
Posuda za deterdÏent sme‰ten je na
unutra‰njoj strani vrata (slika A “2”). Ako
je poklopac posude zatvoren, za otvaranje
pritisnite taster (A).
Na kraju bilo kog programa pranja,
ostavite poklopac uvek otvoren.
UPOZORENJE!
Vodite raãuna da prilikom punjenja
donje korpe tanjitima I drugi mosudjem
ne blokirate posudu za deterdÏent.
Potrebna koliãina sredstva za pranje zavisi i
od stepena prljav‰tine kao i o tipu posudja.
Preporuãujemo da odjeljak za pranje
posude za detrdÏent napunite sa
20÷30 grama sredstva za pranje sudova (B).
Nakon ‰to ste stavili deterdÏent u posudu,
zatvorite poklopac, prvo ga gurnite (1) a
zatim ga pritisnite (2) sve dok se ne ãuje
"klik".
Buduçi da sva sredstva za pranje nemaju
istu snagu pranja, pridrÏavajte se uputstava
proizvodjaãa.
Podseçamo i to, da nedovoljna koliãina
sredstva za pranje moÏe prouzrokovati
nepotpuno uklanjanje prljav‰tine. Dozirate
li preveliku koliãinu detrdÏenta, neçete
postiçi bolje rezultate pranja, veç samo
nepotreban tro‰ak.
VAÎNO
Nemojte koristiti prekomerne koliãine
sredstava za pranje jer tako
istovremeno doprinosite i za‰titi
okoline.
A
B
94
Donja korpa (slika 2)
H = 8 + 4 dubokih tanjira
I = 11 + 1 plitkih tanjira
L = 12 tanjira za desert
M = tanjir za serviranje
N = pribor za jelo
Gornja korpa (slika 1)
A = 5 + 5 + 2 ãa‰e
B = 12 tanjiriça od ‰oljica za kafu
C = 4 + 6 + 2 ‰oljica
D = mala ãinija
E = srednje velika ãinija
F = velika ãinija
G = 1 + 1 ka‰ike za posluÏivanje
PODACI ZA LABORATORIJSKA ISPITIVANJA
Op‰te poredjenje programa pranja (Prema normi EN 50242)
(pogledajte izbor programa)
1. Postavljanje gornje korpe: niÏe
2. Klasiãno punjenje ma‰ine posudjem
3. Name‰tanje sredstva za sjaj: 6
Punjenje ma‰ine sa 12 kompleta sudova (Prema normi EN 50242)
Ispravno stavljanje sudova i gornju korpu prikazano je na slici 1 za gornju korpu, na
slici 2 za donju korpu, a na slici 3 za korpicu pribora za jelo.
4. Koliãina sredstva za pranje:
- 8 grama direktno u ma‰inu;
- 22 grama pozudu za dererdÏent.
A
F
C
C
B
E
D
G
G
1
C
A
A
3
1
23 355
1
23 3 5
1
23 3 5
1
24 4 5
1
24 4 5
1
24 4 5
1
24 4 5
1
24 4 5
1
24 4 5
1
23 3 5
1
23 3
5
1
23 376
NI
H
L
H
I
2
M
Korpica pribora za jelo (slika 3)
Ubacite pribor za jelo kako je prikazano
na slici.
5 = ka‰ike
6 = ka‰ika za serviranje
7 =vilju‰ka za serviranje
1 = noÏevi
2 = vilju‰ke
3 =ka‰ike za desert
4 = kafene ka‰iãice
Page 49

96
97
PUNJENJE SREDSTVOM ZA
ISPIRANJE
Sredstva za ispiranje
Sredstvo za ispiranje, koje se automatski
ispu‰ta tokom zadnjeg ispiranja, pomaÏe da
se sudovi brÏe osu‰e, spreãava nastajanje
mrlja i taloÏenje vodenog kamenca.
Punjenje rezervoara sredstva za
ispiranje “
SJAJ”
Posuda sredstva za ispiranje nalazi se levo
od posude za deterdÏent (slika A "3").
Da otvorite poklopac posude, gurnite
oznaku za oãitavanje i u isto vreme, povucite
jeziãak za otvaranje. Preporuãljivo je uvek
koristiti sredstvo za sjaj posebno namenjeno
za ma‰ine za pranje sudova.
Nivo sredstva za sjaj proverite na pokaznom
oknu (C) koje je sme‰teno na raspr‰ivaãu.
Regulisanje dodavanja teãnosti za
sjaj od 1- 6
Regulator (D) je sme‰ten ispod poklopca i
moÏe se okretati pomoçu novãiça.
Preporuãeni poloÏaj je 4.
Koliãina kamenca u vodi bitno utiãe kako na
nastajanje vodenih mrlja tako i na su‰enje
sudova. Zato je veoma vaÏno regulisanje
koliãine sredstva za visoki sjaj, da bi se
postigao optimalan rezultat pranja.
U sluãaju da se po zavr‰etku pranja na
sudovima pojave tragovi teãnosti za sjaj
potrebno je regulator postaviti na niÏu
vrednost, a na vi‰u vrednost ako se na
sudovima pokaÏu beliãaste mrlje.
PUNO PRAZNO
tamno svijetlo
C
D
VRSTE DETERDÎENATA
DeterdÏenti u tabletema
DeterdÏenti u tabletama od razliãitih
proizvodjaãa se rastvaraju razliãitom
brzinom. To moÏe dovesti do toga da neke
tablete ne mogu da postignu pun uãinak
pranja. Ako koristite ove proizvode koristite
duÏe programe i/ili programe koji peru na
vi‰im temperaturama.
VAÎNO
Za postizanje zadovoljavajuçih
rezultata pranja tablete MORAJU da
se stave u posudu za deterdÏent a
NIKAKO direktno u prostor za
pranje.
Koncentrovani deterdÏenti
Kori‰çenjem koncentrovanih deterdÏenata
sa smanjenom alkalno‰çu i sa prirodnim
enzimima kod programa na 50°C, postiÏe
se smanjeni uticaj na okolinu i ‰tite se
posudje i uredjaj
Program 50°C je namenski razvijen za
kori‰çenje koncentrovanih deterdÏenata sa
enzimima takoda je uãinak rastvaranja i
uklanjanja neãistoçe sa posudja kao kod
programa na 65°C sa klasiãnim
deterdÏentima.
Kombinovani deterdÏenti
DeterdÏenti koji sadrÏe i sredstvo za
ispiranje („sjaj“) takodje moraju da se stave
u posudu za deterdÏent. U tom sluãaju
potrebno je da rezervoar teãnosti za
ispiranje bude prazan. (Ukoliko rezervoar
teãnosti za ispiranje nije prazan postavete
regulator potro‰nje na najmanji podeok.)
"SVE u 1" kombinovani
deterdÏenti
Ako nameravate da upotrebljavate kombinovane
deterdÏente "SVE u 1" ("3 u 1"/"4 u 1"/"5 u
1", itd.), tj. one koji sadrÏe so i/ili sredstvo za
ispiranje, savetujemo Vam da uãinite
sledeçe:
■ paÏljivo proãitajte i pridrÏavajte se
uputstva proizvodjaãa koje se nalaze na
ambalaÏi;
■ delovanje deterdÏenata koji sadrÏe
sredstvo za omek‰ivanje vode/so zavisi
od tvrdoçe vode u va‰em vodovodu.
Proverite da li je tvrdoça vode iz va‰eg
vodovoda u skladu s podruãjem
delovanja koje se nalazi na ambalaÏi
deterdÏenta.
Ukoliko niste zadovolni rezultatima
kori‰çenja ove vrste proizvoda,
kontaktirajte proizvodjaãa.
Pod izvesnim okolnostima, upotreba
kombinovanih deterdÏenata moÏe
prouzrokovati:
■ talog kamenca na sudovima ili u ma‰ini
za pranje sudova;
■ slabiji rezultat pranja i su‰enja.
VAÎNO
Na‰a garancija ne pokriva nikakve
probleme koji su nastali kao direktan
rezultat upotrebe tih proizvoda.
Obratite paÏnju na sledeçe.
Kori‰çenjem "SVE u 1" kombinovanih
deterdÏenata u tabletama, signalne
lampice za so i sredstvo za ispiranje
(samo kod pojedinih modela) su
ukljuãene ali ne obraçajte paÏnju na njih
po‰to se so i sredstvo za ispiranje veç
nalaze u tabletama.
U tom sluãaju preporuãujemo upotrebu
tradicionalnih proizvoda koji imaju samo
jednu funkciju – so, deterdÏent i sredstvo
za ispiranje. To çe osigurati ispravan rad
aparat za omek‰avanje vode u ma‰ini.
U tom sluãaju preporuãujemo:
■ napunite rezervoare za so i sredstvo za
ispiranje;
■ pustite da ma‰ina „odradi“ jedan
univerzalni program bez punjenja
posudja.
Molimo imajte u vidu da nakon ‰to ponovo
poãnete da koristite konvencionalnu so za
ma‰inu, jo‰ çe morati da prodje ãitav niz
ciklusa pre nego ‰to uredjaj ponovo poãne
da ostvaruje besprekorne rezultate.
Page 50

98 99
PRAKTIâNI SAVETI
Kako postiçi zaista dobre
rezultate pranja
■ Pre stavljanja sudova u ma‰inu, sklonite
sve ostatke hrane (kosti, ljuske,
komadiçe mesa ili povrça, talog od
kafe, koÏu voça, pepeo cigareta, ã
aãkalice itd.) kako bi spreãili zaãepljenje
filtera, odvodne cevi ili mlaznica za
pranje.
■ Preporuãujemo da sudove ne ispirate
pre nego ‰to ga stavite u ma‰inu.
■ Ponekad su ovali, tiganji i lonci jako
zaprljani i sadrÏe zagorele ili zapeãene
ostatke hrane, u tom sluãaju, takve
sudove je potrebno nakvasiti pre pranja.
■ Sudove smestite u ma‰inu tako da je
okrenuto prema dole.
■ Ako je ikako moguçe sudove u ma‰inu
poredjajte tako da se medjusobno ne
dodiruje. Vrlo je vaÏno da posudje
pravilno sloÏite u ma‰inu jer to daje
bolje rezultate pranja.
■ Nakon ‰to ste sudove odloÏili u ma‰inu,
pre poãetka pranja morate proveriti da li
se prskalice za raspr‰ivanje vode
slobodno okreçu.
■ Lonce i drugo posudje na kojima su
ostaci zagorele hrane do poãetka
pranja natopite u rastvoru deterdÏenta
za pranje.
■ Kod pranja srebrnog posudja i pribora
za jelo pazite na sledeçe:
a) isperite ga odmah posle upotrebe,
posebno ako ste ga koristili za jaja,
majonez, ribu ili sliãno;
b) nemojte direktno da sipate
deterdÏent na takve sudove ili pribor
za jelo;
c) pazite da takvo posudje ne dodje u
dodir sa drugim metalima.
Kako u‰tedeti
■ Ako Ïelite da u potpunosti iskoristite
prostor u ma‰ini za pranje sudova,
stavljajte sudove u ma‰inu nakon
svakog jela i ako je potrebno pokrenite
ciklus HLADNO ISPIPRANJE da se
omek‰aju i uklone veçe ãestice hrane
sa naknadno dodatog posudja. Kada je
ma‰ina puna, pokrenite program za
kompletno pranje.
■ Ako sudovi nisu jako prljavi i ma‰ina
nije sasvim puna, izaberite
EKONOMIâAN program pranja i sledite
pri tome sva uputstva navedena u opisu
programa.
·ta se ne sme prati
■ Upamtite da nije svo posudje pogodno
za pranje u ma‰ini za sudove.
Savetujemo da neke vrste sudova kao
na primjer: plastiku neotporanu na
toplotu, escajg sa plastiãnim ili drvenim
dr‰kama, aluminijumsko posudje,
kristalne predmete, ãa‰e od olovnog
stakla (ako drugaãije nije napomenuto)
ne perete u ma‰ini za sudove.
■ I ukrasi u boja na nekom posudju nisu
sasvim postojani. Zato je najbolje da
proverite njihovu postojanost tako da u
ma‰ini operete samo pojedini komad,
kako bi proverili da li je pogodan za
pranje u ma‰ini ili ne.
■ Ujedno ne zaboravite da istovremeno
ne smete prati srebrni i obiãan metalni
pribor za jelo, jer medju njima moÏe
doçi do hemijske reakcije.
VAÎNO
Prilikom kupovine novog posudja ili
pribora za jelo proverite da li je
pogodono za pranje u ma‰ini za
sudove.
Korisni saveti
■ Da bi izbegli sluãajno kapanje iz gornje
korpe, prvo izvadite sudove iz donje
korpe.
■ Ako po zavr‰etku pranja ostavite neko
vreme sudove u ma‰ini, vrata ma‰ine
morate samo pritvoriti, da vazduh u
unutarnjosti moÏe slobodno da kruÏi.
Na taj naãin çe se sudovi bolje osu‰iti.
1
2
3
âI·åENJE FILTERA
Sastav filtriranja (slika A “4”) sastoji se od:
sredi‰nje posude koji zadrÏava veçe
komadiçe;
ravne mreÏice koja neprekidno filtrira vodu
od pranja;
mikro filtera, sme‰tenog ispod mreÏice, koji
zadrÏava najsitnije komadiçe i osigurava
savr‰eno ispiranje.
■ Da bi svaki put postigli savr‰ene
rezultate pranja, filtere treba proveriti i
ãistiti nakon svakog pranja.
■ Da uklonite filter, jednostavno okrenite
ruãicu u smeru suprotnom kretanju
kazaljki na satu (slika 1).
■ Za lak‰e ãi‰çenje moÏete ukloniti
sredi‰nju posudu (slika 2).
■ Uklonite mreÏicu (slika 3) i operite je
pod mlazom vode, ako je potrebno
koristite i manju ãetku.
■ Sa samoãisteçim mikro filterom,
odrÏavanje je svedeno na minimum i
sastav filtriranja potrebno je samo
proveriti svake dve nedelje. Ipak, nakon
svakog pranja preporuãujemo da
proverite sredi‰nju posudu i mreÏicu da
nisu zapu‰eni.
UPOZORENJE!
Nakon ãi‰çenja, uverite se da ja filter
ponovo ispravno name‰ten i da je
mreÏica ispravno usadjena na dno
ma‰ine.
Proverite da li je filter prilikom
vraçanja u mreÏicu pravilno
za‰rafljen u smeru kazaljke na satu,
jer ako je filter lo‰e postavljen moÏe
doçi do ‰tetnih posledica u vezi sa
uspe‰nim radom ma‰ine za pranje
sudova.
VAÎNO
Nikada ne koristite ma‰inu za pranje
sudova ako je filter izvadjen.
Page 51

101
100
EN 50242 kompleta
Kapacitet sa ‰erpama i ãinijama
Pritisak u vodovodnoj mreÏi
Jaãina osiguraãa (A)
Maksimalna prikljuãna snaga
Napon Napajanja
12
8 osoba
Min.0,08 – Max. 0,8 MPa
(pogledati fabriãku ploãicu)
(pogledati fabriãku ploãicu)
(pogledati fabriãku ploãicu)
A Opciono dugme "POLA PUNJENJA"
B Dugme "UKLJUâENO/ISKLJUâENO"
C Bravica
D Selektor Programa
E Signalna lampica "PRANJE"
Visina
Dubina
·irina
Dubina sa otvorenim vratima
cm
cm
cm
cm
sa radnom ploãom
85
60
60
120
TEHNIâKI PODACI:
bez radne ploãe
82
56,3
59,8
117
DIMENZIJE:
OPIS KONTROLNE TABLE
1
2
1b
NAKON ZAVR·ETKA
PROGRAMA PRANJA
Nakon svakog zavr‰etka pranja, uvek
morate zatvoriti slavinu za dotok vode u
ma‰inu, kako dovodna cev ne bi stalno bila
pod stalnim pritiskom. Isto tako morate
iskljuãiti taster “ukljuãeno”/”iskljuãeno” kako
bi ma‰inu iskljuãili iz elektriãne mreÏe.
U sluãaju da ma‰inu neçete upotrebljavati
duÏe vremena, uãinite sledeçe:
1. u praznu unutra‰njost ma‰ine stavite malo
detrdÏenta i ukljuãite jedan od programa
kako bi se unutra‰njost odmastila;
2. izvadite utikaã iz utiãnice;
3. zatvorite slavinu za dotok vode;
4. napunite posudu sa sredstvom za sjaj;
5. vrata ma‰ine ostavite pritvorenima;
6. unutra‰njost ma‰ine mora ostati ãista;
7. ako je ma‰ina ostavljena u prostoriji gde
je temperatura niÏa od 0°C, voda u ma‰ini
moÏe se zalediti, u tom sluãaju prostoriju
zagrejati i saãekati 24 sata pre nego ‰to
ma‰inu ponovo poãnete da koristite.
âI·åENJE I ODRÎAVANJE
■ Za ãi‰çenje spoljnih delova ma‰ine za
sudove koristite samo mokru krpu, ne
koristite o‰tra ili sredstva koja sadrÏe
rastvore.
■ Ma‰ina ne zahteva neko posebno
odrÏavanje, jer unutarnjost ma‰ine
poseduje sistem samoãi‰çenja.
■ Redovno morate ãistiti gumu na vratima
i to sa vlaÏnom krpom, kako bi sa nje
odstranili moguçe ostatke hrane i sredstva
za visoki sjaj.
■ Povremeno je preporuãljivo iz
unutra‰njosti ma‰ine ukloniti kamenac ili
prljav‰tinu; sipajte ãa‰u sirçeta na dno
ma‰ine i odaberite program pranja za
osjetljive sudove; neka ma‰ina pere
prazna.
■ Ako uprkos uobiãajenom ãi‰çenju filtera
primetite da sudovi ili tiganji nisu dobro
oprani i osu‰eni, proverite da li su otvori
na rotirajuçim prskalicama za
raspr‰ivanje vode (slika A”5”) moÏda
zapu‰eni ostacima hrane.
Ako su zapu‰eni oãistite ih na sledeçi
naãin:
1. Da biste uklonili gornju prskalicu,
okreçite je sve dok se oznaka za
zaustavljanje ne izravna sa strelicom
(slika 1b). Gurnite je prema gore i zadrÏite je povuãenom, odvijte je u smeru
kazaljke na satu. Za ponovno
postavljanje, ponovite istu radnju, ali
je okreçite suprotno kazaljkama na
satu. NiÏu rotirajuçu prskalicu sklonite
jednostavno tako da je povuãete prema
gore (slika 2);
2. operite prskalice pod jakim mlazom
vode tako da oãistite svaki otvor za
raspr‰ivanje;
3. kada ste zavr‰ili, ponovo ih namestite u
isti poloÏaj, zapamtite da gornju prskalicu
poloÏite na oznaku za zaustavljanje i
potpuno zavijete u poãetni poloÏaj.
■ I unutra‰njost ma‰ine i unutra‰nja strana
vrata ma‰ine izradjeni su od nerdjajuçeg
ãelika; ipak, mogu se pojaviti fleke
prouzrokovane oksidacijom, to je
verovatno od vode koja sadrÏi previ‰e
metala.
■ Ove fleke odstranite laganim sredstvom
za poliranje nerdjajuçeg ãelika, koje ne
sme da sadrÏi hlor. Te fleke ni u kom
sluãaju ne smete odstranjivati ãeliãnom
vunom ili drugim metalnim sredstvima.
AB C D
E
Page 52

102 103
PODE·AVANJE PROGRAMA
I SPECIJALNE FUNKCIJE
Ipode‰avanje programa
UPOZORENJE!
Pre pode‰avanja bilo kog programa
dugme selektora mora biti na poziciji
"RESET" i signalna lampica
"PRANJE" ( ) mora biti iskljuãena.
Uverite se da je dugme
"UKLJUâENO/ISKLJUâENO" ( )
pritisnuto.
Izaberite Ïeljeni program, pritisnite
dugme "UKLJUâENO/ISKLJUâENO"
zatim okrenite dugme selektora (u smeru
kazaljke ili obrnuto) tako da pokazivaã
pokazuje na simbol izabranog programa.
Nakon oko 4 ekunde upaliti çe se signalna
lampica "PRANJE". Nakon ‰to se oglasi
zvuãni signal, program çe poãeti da se
izvr‰ava.
UNUTAR 2 minute od poãetka programa
moguçe je promeniti program
pomeranjem dugmeta selektora na novi
poloÏaj.
VAÎNO
U toku izvr‰avanja programa, dugme
selektora ostaje na izabranoj poziciji,
i NEåE SE POMERATI.
Opciona dugmad
Dugme "POLA PUNJENJA"
Kao odgovor va‰im zahtevima svakodnevnog
pranja posudja kao dodatna funkcia
normalnim funkcijama, ova ma‰iniaima
moguçnost pranja pola kapaciteta. Ova
funkcija omoguçava ekonomiãno
kori‰çenje ma‰ine za pranje manje
koliãine (pola kapaciteta) posudja uz
moguçnost da se posudje rasporedi i u
gornjoj i u donjoj korpi. Aktiviranjem ove
funkcije ma‰ina çe automatski smanjiti
koliãinu vode za pranje, a time i potro‰nju
elektriãne energije i vremetrajanja
programa.
Za pranje manje koliãine posudja koristite
manju koliãinu deterdÏenta.
Opciona dugmad mogu biti ukljuãena ili
iskljuãena UNUTAR 2 minuta od
poãetka programa.
Prekid programa
Otvaranje vrata u toku trajanja programa
se ne preporuãuje, naroãito za vreme
glavnog pranja i toplog ispiranja.
U svakom sluãaju, kada otvorite vrata
ma‰ina çe se automatski zaustaviti.
Ukoliko vrata otvorite u toku izvr‰avanja
programa, signalna lampica "PRANJE" çe
poãeti da trepçe, sve dok ne zatvorite
vrata. Kada zatvorite vrata ma‰ina çe
nastaviti sa izvr‰avanjem programa od
trenutka u kojem je bio prekinut.
UPOZORENJE!
Ukoliko otvorite vrata u toku ciklusa
su‰enja, zvuãni signal çe vas
upozoriti da program nije zavr‰io!
Ukoiko Ïelite da promenite ili
otkaÏete-poni‰tite program koji se
izvr‰ava, uradite sledeçe:
okrenite dugme selektora na poziciju
"RESET". Nakon nekoliko sekundi signalna
lampica "PRANJE" çe se iskljuãiti.
Nakon toga moÏe da se podesi novi program.
UPOZORENJE!
Pre pokretanja novog programa
proverite posudu za pra‰ak i ako je
potrebno dopunite je.
Ukoiko za vreme pranja dodje do
prekida napajanja elektriãnom strujom,
specijalna memorija “pamti” gde se
program zaustavio i automatski
nastavlja program po ponovnom
uspostavljanju napajanja.
Kraj programa
Po zavr‰etku programa, oglasiçe se zvuãni
signal (ukoliko nije iskljuãen) u trajanju od 5
sekundi i ponoviçe se 3 puta u intervalu od
30 sekundi.
Poãeçe da trepçe signalna lampica
"PRANJE".
Okrenite dugme selektora na poziciju
"RESET", saãekajte da se signalna lampica
"PRANJE" ugasi a zatim pritisnite dugme
"UKLJUâENO/ISKLJUâENO" da iskljuãite
ma‰inu.
Iskljuãivanje zvuãnog signala za
KRAJ PROGRAMA
Zvuãni signal koji oznaãava kraj programa se
moÏe iskljuãiti na sledeçi naãin:
VAÎNO
Ma‰ina mora uvek biti ISKLJUâENA
pre poãetka ove procedure.
1. Dok je ma‰ina iskljuãena, OTVORITE
vrata.
2. Okrenite dugme selektora na poziciju
"BRZI" program.
3. Pritisnite dugme "UKLJUâENO/
ISKLJUâENO".
4. UNUTAR 15 sekundi, okrenite dugme
selektora (u smer suprotnom od kretanja
kazaljke na satu) do pozicije "RESET"
zatim vratite dugme na poziciju "BRZI "
(u smer kretanja kazaljke na satu), ovo
ponovite 4 puta (zavr‰ite sa dugmetom
na poziciji "BRZI " program).
5. Signalna lampica "PRANJE" çe se upaliti.
6. Okrenite dugme selektora (u smer
suprotnom od kretanja kazaljke na satu)
do pozicije "RESET" (signalna lampica
"PRANJE" çe poãeti da trepçe da
potvrdi da je zvuãni signal iskljuãen).
7. Iskljuãite ma‰inu pritiskom na dugme
"UKLJUâENO/ISKLJUâENO" da saãuvate
novo pode‰avanje.
Ako Ïelite da ponovo ukljuãite zvuãni signal
ponovite istu proceduru, korake od 1. do 4
.
Kada se upali signalna lampica "PRANJE"
(svetli konstantno) da potvrdi da je zvuãni
signal ukljuãen, iskljuãite ma‰inu pritiskom
na dugme "UKLJUâENO/ISKLJUâENO"
da saãuvate novo pode‰avanje.
UPOZORENJE!
Ukoliko se pojavi bilo kakav problem
u toku pode‰avanja pritisnite dugme
"UKLJUâENO/ISKLJUâENO" i poãnite
postupak od poãetka (KORAK 1).
Pode‰avanje novog programa
Kad god Ïelite da podesite novi program
MORATE da okrenete dugme selektora na
poziciju "RESET" i saãekate da se nakon
nekoliko sekundi iskljuãi signalna lampica
"PRANJE".
Nakon toga moÏe da se podesi novi
program.
Smetnje u rad
Ako za vreme dok name‰tate programa
svetlosni indikator "PRANJE" poãne vrlo
brzo da treperi (uz zvuãni signal) to znaãi
da je elektronika ma‰ine otkrila neku
gre‰ku odnosno neispravno programiranu
funkciju.
U tom sluãaju, okrenite dugme selektora
programa na poloÏaj "RESET" i svetlosni
indikator "PRANJE" ce prestati da svetli.
Iskljuãite ma‰inu, proverite da li je
pu‰tena voda na slavini dovodnog creva
i da li je odvodno crevo presavijeno
(„slomljeno“), da filter i sifon nisu
zaãepljeni. Ponovo namestite izabrani
program.
Ako se nepravilnost ponovi obratite se
ovla‰çenom serviseru.
VAÎNO
Ova ma‰ina za sudove je opremljena
sigurnosnim protiv-poplavnim
uredjajem koji çe, ako se takav
problem pojavi, automatski isprazniti
svaku preteranu koliãinu vode.
UPOZORENJE!
Da obezbedite ispravan rad
sigurnosnog protiv-oppoplavnog
uredjaja, preporuãujemo vam da
ma‰inu ne pomerate i ne naginjete
tokom rada. Ako je ma‰inu potrebno
pomeriti ili nagnuti, proverite da li je
ciklus pranja zavr‰en i da u
unutra‰njosti ma‰ine nema vode!
Page 53

Ispiranje posudja koje çe se oprati kasnije
istog dana.
Jedan put dnevno- za jako prljavo
posudje lonci, tiganji, vatrostalne posude
i posudje na kojem se zasu‰ila hrana.
Jedan put dnevno- za uobiãajeno
prljavo posudje: lonci, tanjiri, ãa‰ei
manje prljave tiganje, standardni dnevni
cikluspranja.
Pogodan za dnevno pranje uobiãajeno
zaprljanih sudova koje je potrebno oprati
neposredno nakon jela (Max. punjenje
sudova, 8 mesta).
Ekonomiãni program za manje prljavo
posudje: tanjire, ãa‰e, ‰oljice manje
prljave tiganje prilagodjen deterdÏentima sa
enzimima.
Standard EN 50242.
Pogodan za osetljive keramiãke i staklene
sudove kao i za dnevno pranje manje
zaprljanih sudova, izuzev tiganja.
Kratko pranje za posudje koje se pere
odmah nakon obroka. Za 4-6 osoba.
105
5
•
••
70°C
•
••••
••••
••••
••••
•••
45°C
50°C
60
85
32
••
••
••
••
65°C
115
••
DA
75°C
135
•• ••
104
••••
45°C
175
••
•
••
••
••
••
•
••
••
•
••
DA
NE
DA
DA
Pranje sa predpranjem
Ako koristite "INTENZIVNI" program, drugu dozu (oko 20g-1 supena ka‰ika) deterdÏenta
dodajte direktno u ma‰inu. Za "SVAKODNEVNI" program, dodajte 5 g.
NE = NIJE NA RASPOLAGANJU
Program
TABELA PROGRAMA
Opis
Proseãno
trajanje
programa u
minutima
Opciona
dugmad
DeterdÏent za
predpranje
DeterdÏent za pranje
âistoçu filterar
Teãnost za ispiranje
So za regeneraciju
vode
Toplo predpranje
Hladno predpranje
Glavno pranje
Prvo hladno ispiranje
Drugo hladno ispiranje
Toplo ispiranje
Temp vode (15°C)
- Tolerancija ±10% -
Dugme "POLA
PUNJENJA"
HLADNO ISPIRANJE
INTENZIVNI 75°C
UNIVERZALNI 65°C
SVAKODNEVNI 70°C
ECO 45°C
DELIKATNI 45°C
BRZI 32’ 50°C
NE
NE
Provera pre poãetka SadrÏaj programa
Page 54

107
VAÎNO:
Ako posudje zbog nekog od gore navedenih razloga nije dobro oprano, morate ga ruãno oprati. Ostaci
hrane se tokom su‰enja u ma‰ini zasu‰e i ne moÏete ih odstraniti ponovnim pranjem u ma‰ini.
Ako kod proveravanja gre‰aka u radu ma‰ine niste ustanovili ni jednu nepravilnost od navedenih, molimo
da nazovete jednog od na‰ih ovla‰çenih servisera.
Serviseru obvezatno navedite oznaku uredjaja (navedena je na ploãici na uredjaju ili u garantmom listu) i
opi‰ite mu kvar. Time çete serviseru olak‰ati rad, a Va‰a ma‰ina çe brÏe biti popravljena.
Proizvodjaã neçe snositi odgovornost za eventualne gre‰ke u ‰tampanju ove knjiÏice.
Proizvodjaã ujedno zadrÏava pravo na tehniãke izmene svojih proizvoda, ali bez promene njihovih
osnovnih karakteristika.
PROBLEM MOGUåI UZROK KAKO UKLONITI PROBLEM
7 - Posudje je samo djelimiãno
oprano
8 - DeterdÏent nije rastvoren ili
je delimiãno rastvoren
9 - Bele mrlje na sudju
10 - U toku pranja ãujete
lupkanje
11 - Sudje nije dobro osu‰eno
Proverite uzroke iz taãke 5.
Dno tiganja nije dobro oprano
Ivice tiganja nisu dobro oprani
Mlaznice su delimiãno zaãepljene
Sudje nije ispravno ubaãeno
Kraj odvodne cevi je potopljen u vodi
Neodgovarajuça koliãina deterdÏenta
ili je deterdÏent prestar ili tvrd
Izabrani program pranja pranja nije
odgovarajuçi
Sudje na niÏoj korpici nije oprano
Posudje ili pribor za jelo ometa
(blokira) otvaranje posude za
deterdÏent
Voda u vodovodnoj mreÏi je izuzetno
tvrda
Sudje udara jedno o drugo
Raspr‰ivaã udara po sudju
Vazduh u ma‰ini ne kruÏi pravilno
Nedostaje sredstvo za ispiranje
Proverite
Namoãite tiganje pre pranja
Rasporedite tiganje bolje
Izvadite mlaznicu i isperite je
Ne stavljajte sudje preblizu jedno
drugom
Kraj odvodne cevi ne sme biti
potopljen u vodi
Smanjite koliãinu deterdÏenta prema
zaprljanosti sudja ili promenite
deterdÏent
Izaberite intenzivniji program
Iskljuãite taster za pranje poloviãne
koliãine sudja
Razvrstajte sudje ravnomerno da ne
ometa pravilan rad posude za
deterdÏent.
Proverite koliãinu sredstva za sjaji
dodajte ga ako je potrebno.
Ako se mrlje ponavljaju pozovite
ovla‰çenog servisera
Razvrstajte sudje ravnomerno u
obe korpice
Razvrstajte sudje pravilnije
Nakon zavr‰etka pranja ostavite
vrata ma‰ine pritvorena da bi
omoguçili prirodno su‰enje
Napunite dozator sredstva za
ispiranje
106
PREPOZNAVANJE MANJIH GRE·AKA U RADU
Ako primetite da Va‰a ma‰ina radi neispravno, pre nego ‰to pozovete ovla‰çenog
servisera, prvo proverite niÏe navedene uzroke:
Utaknite utikaã u utiãnicu
Proverite
Ukljuãite tipku U/I
Zatvorite vrata uredjaja
Proverite
Otvorite slavinu
Postavite dugme za izbor
programa uspravan poloÏaj
Ispravite dovodno crevo
Oãistite filter na kraju creva
Oãistite filter
Ispravite odvodno crevo
Pogledajte paÏljivo uputstva za
spajanje produÏnog odvodnog creva
Pozovite kvalifikovanu osobu
Namestite odvodnu cev na visinu
40 cm od poda
Smanjite koliãinu detrdÏenta i
upotrebljavajte odgovarajuçi
Proverite
Oãistite ploãu i filter
Iskljuãite uredjaj, otvorite slavinu
ponovno pokrenite pranje
PROBLEM MOGUåI UZROK KAKO UKLONITI PROBLEM
1 - Ma‰ina u potpunosti ne radi
2 - Voda ne dotiãe u uredjaj
3 - Ma‰ina ne izbacuje vodu
4 - Voda neprekidno izbacuje u
perilicu
5 - U toku pranja ne ãujete
vrtenje mlaznica
6 - Na elektronskim uredjajima
bez ekrana: jedno ili vi‰e
LED svetlucanja.
Uredjaj nije prikljuãen na elektriãnu
mreÏu
Nema elektriãnog napona
Tipka U/I nije ukljuãena
Vrata uredjaja su otvorena
Proverite uzroke pod 1
Slavina za dovod vode je zatvorena
Dugme za izbor programanije u
ispravnom poloÏaju
Dovodno crevo je savijeno
Filter odvodnog creva nije ispravno
spojen
Filter je prljav
Crevo za odvod vode je savijeno
ProduÏno crevo za odvod vode nije
ispravno spojeno
Izlazni spoj u zidu je sastavljen
prema dole ne prema gore
Odvodna cev je prenisko name‰tena
Dodali ste previ‰e detrdÏenta
Neki predmet u ma‰ini ometa vrtenje
mlaznica
Sitasta ploãa filtera i filter su jako
zaprljani
Slavina za dovod vode je zatvorena
Page 55

Upozorenje!
Candy aparati za domaçinstvo, namenjeni su iskljuãivo za kori‰çenje u domaçinstvu. Ako Ïelite,
odnosno nameravate da upotrebljavate Candy aparate za domaçinstvo u profesionalne svrhe,
prethodno se posavetujte sa dobavljaãem!
Ma‰inu koristite samo prema uputstvima!
Sva su prava zadrÏana. Nijedan deo ovog izdanja ne sme biti reprodukovan ili prepisan u bilo
kom obliku odnosno na bilo koji naãin, bilo mehaniãki, fotokopiranjem ili na neki drugi naãin, bez
prethodnog odobrenja vlasnika autorskih prava (copyright).
Proizvodjaã ne odgovara za eventualne gre‰ke u ‰tampanju ovog uputstva.
Proizvodjaã zadrÏava pravo na odgovarajuçe izmene na proizvodu koje ne menjaju njegove
bitne karakteristike.
Besplatan info telefon iz bilo kog mesta u Srbiji
0800 303 304
108
Page 56

The manufacturer declines all responsibility in the event of any printing mistakes in this
booklet. The manufacturer also reserves the right to make appropriate modifications to
its products without changing the essential characteristics.
Proizvodjaã neçe snositi odgovornost za eventualne pogre‰ke u tiskanju ove knjiÏice.
Proizvodjaã ujedno zadrÏava pravo na tehniãke izmjene svojih proizvoda, ali bez
promjene njihovih osnovnih svojstava.
Le constructeur décline toute responsabilité pour les éventuelles erreurs d’imprimerie
contenues dans le présent mode d’emploi. Il se réserve en outre le droit d’apporter
toutes modifications qui se révèleraient utiles à ses propes produits sans pour autant
en compromettre les caractéristiques essentielles.
Proizvodjaã neçe snositi odgovornost za eventualne gre‰ke u ‰tampanju ove knjiÏice.
Proizvodjaã ujedno zadrÏava pravo na tehniãke izmene svojih proizvoda, ali bez
promene njihovih osnovnih karakteristika.
Page 57

09.05 - 41029547.A - www.graficaestampa.it - Printed in Italy - Imprimé en Italie
EN
HR
FR
SR
This appliance is marked according to the European directive 2002/96/EC on Waste Electrical and Electronic
Equipment (WEEE).
By ensuring this product is disposed of correctly, you will help prevent potential negative consequences for the
environment and human health, which could otherwise be caused by inappropriate waste handling of this
product.
The symbol on the product indicates that this product may not be treated as household waste. Instead it shall
be handed over to the applicable collection point for the recycling of electrical and electronic equipment
Disposal must be carried out in accordance with local environmental regulations for waste disposal.
For more detailed information about treatment, recovery and recycling of this product, please contact your local
city office, your household waste disposal service or the shop where you purchased the product.
Ovaj uredjaj je oznaãen u skladu s europskom smjernicom 2002/96/EZ-a o "otpadu elektriãne i
elektronske oprema" (WEEE).
Pravilnom i sigurnom odlaganju ovog proizvoda moÏete pomoçi i Vi te tako sprijeãiti potencijalne
negativne posljedice za okolinu i ljudsko zdravlje koje inaãe mogu biti uzrokovane neodgovarajuçim
odlaganjem ovog proizvoda.
Oznaka na proizvodu pokazuje da ovaj proizvod ne moÏe biti tretiran kao kuçni otpad.
Umjesto toga ovaj proizvod mora biti predan na odgovarajuçe sabirno mjesto za recikliranje
elektriãne i elektronske opreme.
Odlaganje mora biti izvr‰eno u skladu s lokalnim ekolo‰kim propisima za odlagali‰ta otpada.
Za op‰irnije informacije o tretmanu, recikliranju ili kori‰tenju ovog proizvoda kao otpada, molimo da
kontaktirate svoj lokalni gradski ured, sluÏbu va‰eg lokalnog odlagali‰ta otpada ili trgovinu gdje ste
kupili proizvod.
Cet appareil est commercialisé en accord avec la directive européenne 2002/96/CE sur les déchets des
équipements électriques et électroniques (DEEE).
En vous assurant que ce produit est correctement recyclé,vous participez à la prévention des conséquences
négatives sur l’environnement et la santé publique qui pourrait être causé par une mise au rebut
inappropriée de ce produit.
Le symbole sur ce produit indique qu’il ne doit pas être traité comme un déchet ménager. Il doit être
rapporté jusqu’à un point de recyclage des déchets électriques et électroniques.
La collecte de ce produit doit se faire en accord avec les réglementations environnementales concernant
la mise au rebut de ce type de déchets.
Pour plus d’information au sujet du traitement, de la collecte et du recyclage de ce produit, merci de
contacter votre mairie,votre centre de traitement des déchets ou le magasin où vous avez acheté ce produit.
Ovaj uredjaj je oznaãen u skladu sa evropskim standardima 2002/96/EZ-a o "otpadu elektriãne i elektronske oprema"
(WEEE). Pravilnom i sigurnom odlaganju ovog proizvoda moÏete pomoçi i Vi i tako spreãiti potencijalne negativne
posledice za okolinu i ljudsko zdravlje koje inaãe mogu biti prouzrokovane neodgovarajuçim odlaganjem ovog
proizvoda. Oznaka na proizvodu pokazuje da ovaj proizvod ne moÏe biti tretiran kao kuçni otpad. Umesto toga ovaj
proizvod mora biti predan na odgovarajuçe mesto za reciklaÏu elektriãne i elektronske opreme. Odlaganje mora biti
izvr‰eno u skladu sa lokalnim ekolo‰kim propisima za odlaganje otpada. Za op‰irnije informacije o tretmanu, reciklaÏi ili
kori‰çenju ovog proizvoda kao otpada, molimo da kontaktirate svoju komunalnu sluÏbu, sluÏbu va‰eg lokalnog otpada
ili prodavnicu gde ste kupili proizvod.
 Loading...