

Page 1

LANGUAGES
English 1
Čeština 17
Español 33
Français 50
Italiano 67
Nederlands 84
Polskie 100
Português 117
Slovák 133
Page 2

1
English
Thank you for purchasing this product.
Before using your refrigerator, please carefully read this instruction manual in order to maximize
its performance. Store all documentation for subsequent use or for other owners. This product is
intended solely for household use or similar applications such as:
- the kitchen area for personnel in shops, offices and other working environments
- on farms, by clientele of hotels, motels and other environments of a residential type
- at bed and breakfasts (B & B)
- for catering services and similar applications not for retail sale.
This appliance must be used only for purposes of storage of food, any other use is considered
dangerous and the manufacturer will not be responsible for any omissions. Also, it is recommended
that you take note of the warranty conditions.
SAFETY INFORMATION
Please read the operating and installation instructions carefully!
They contain important information on how to install, use and maintain the appliance.
The manufacturer is not liable if you fail to comply with the instructions and warnings.
Retain all documents for subsequent use or for the next owner.
Do not connect the appliance to the electricity supply until all
packing and transit protectors have been removed. Keep children
away from packaging and its parts.
Danger of suffocation from folding cartons and plastic film!
Leave to stand for at least 4 hours before switching on the product,
to allow compressor oil to settle if transported horizontally.
Make sure there is no transport damage.
Do not damage the refrigerant circuit.
Maintain the ventilation openings in the appliance enclosure or in
the built-in structure, free of obstruction.
Never use water to wash the compressor position, wipe it with a
dry cloth thoroughly after cleaning to prevent rust.
Handle the appliance always with at least two persons because it is
heavy.
Install and level the appliance in an area suitable for its size and
use.
Make sure that the electrical information on the rating plate agrees
with the power supply. If it does not, contact an electrician.
The appliance is operated by a 220-240 VAC/50 Hz power supply.
Abnormal voltage fluctuation may cause the appliance to fail to
start, or damage to the temperature control or compressor, or
there may be an abnormal noise when operating. In such case, an
automatic regulator shall be mounted.
Only for UK: The appliance’s power cable is fitted with 3-cord
Page 3

2
(grounding) plug that fits a standard 3-cord (grounded) socket.
Never cut off or dismount the third pin (grounding). After the appliance is installed, the plug should be accessible.
Make sure that mains cable is not caught under the appliance
during and after carrying/moving the appliance, to avoid the mains
cable becoming cut or damaged. If the supply cord is damaged, it
must be replaced by the manufacturer, its service agent or
similarly qualified person in order to avoid a hazard.
Do not install the appliance in humid, oily or dusty places, nor
expose it to direct sunlight and to water.
Do not install the appliance near heaters or inflammable materials.
FOR appliances with a freezer compartment: if there is a power
failure do not open the lid. Frozen food should not be affected if the
failure lasts for less than the hours indicated on the rating label
(Temperature rise time). If the failure is longer, then the food
should be checked and eaten immediately or cooked and then
refrozen.
If you find that the lid of the appliance is difficult to open just after
you have closed it, don’t worry. This is due to the pressure
difference which will equalize and allow the lid to be opened
normally after a few minutes.
Do not store medicines, bacteria or chemical agents in the
appliance. This appliance is a household appliance, it is not
recommended to store materials that require strict temperatures.
Do not excessively pull or fold the power cord or touch the plug
with wet hands.
Do not store products which contain flammable propellant (e.g.
spray cans) or explosive substances in the appliance. Risk of
explosion!
Do not place unstable articles (heavy objects, containers filled with
water) on top of the refrigerator, to ovoid personal injury caused
by falling or electric shock caused by contact with water.
Do not use electrical appliances inside the food storage
compartments, unless they are of the type recommended by the
manufacturer.
Do not touch internal cooling elements, especially with wet hands,
to avoid cracks or injuries.
At risk here are children, people who have limited physical, mental
or sensory abilities, as well as people who have inadequate
knowledge concerning safe operation of the appliance.
Check that children and vulnerable people have understood the
hazards. A person responsible for safety must supervise or instruct
children and vulnerable people who are using the appliance. Only
Page 4

3
children aged 8 years and above may use the appliance.
Children should not play with the appliance.
Children aged from 3 to 8 years are allowed to load and unload this
appliance.
FOR appliances with a freezer compartment: do not store bottled
or canned liquids (especially carbonated drinks) in the freezer
compartment. Bottles and cans may burst!
FOR appliances with a freezer compartment: never put frozen food
straight from the freezer compartment in your mouth. Risk of lowtemperature burns!
Keep plastic parts and the door seal free of oil and grease.
Otherwise, plastic parts and the door seal will become porous.
Before performing any operation, unplug the power cord from the
power socket.
Do not use mechanical devices or other means to accelerate the
defrosting process, other than those recommended by the
manufacturer.
Do not use pointed or sharp-edged objects such as knives or forks
to remove the frost.
Never use hairdryers, electrical heaters or other such electrical
appliances for defrosting.
It is recommended to keep the plug clean, any excessive dust
residues on the plug can be the cause fire.
Do not try to repair, disassemble or modify the appliance by
yourself. In case of repair please contact always our customer
service.
Supervise children while the appliance is being cleaned or
maintained.
Do not clean the cold glass shelves with hot water. Sudden
temperature change may cause the glass to break.
WARNING: The tubes of the refrigeration circuit convey a small
quantity of an environmentally friendly but flammable refrigerant
(R600a) and insulating gas (cyclopentane). It does not damage the
ozone layer and does not increase the greenhouse effect. If
refrigerant escapes, it may injure your eyes or ignite.
If the refrigerant circuit should be damaged:
- Switch off the appliance and pull out the mains plug,
- Keep naked flames and/or ignition sources away from the
appliance,
- Thoroughly ventilate the room for several minutes,
- Inform customer service.
WARNING: Do not damage the plug and/or the power cord; this
could cause electrical shocks or fires.
Page 5

4
WARNING: Do not use multiple portable socket-outlets or portable
power supplies. We do not recommend the use of extension leads
and multi-way adapters.
Do not attempt to sit or stand on the top of the appliance. You could
injure yourself or damage it. This appliance is not designed for
stacking with any other ones.
The product is designed and built for domestic household use only.
Only original parts supplied by the manufacturer may be used. The
manufacturer guarantees that only these parts satisfy the safety
requirements.
Opening the door for long periods can cause a significant increase
of the temperature in the compartments of the appliance.
- Clean regularly surfaces that can come in contact with food and
accessible drainage systems.
- Clean water tanks if they have not been used for 48h; flush the
water system connected to a water supply if water has not been
drawn for 5 days.
- Store raw meat and fish in suitable containers in the
refrigerator, so that it is not in contact with or drip onto other
food.
- Two-star frozen-food compartments(if they are presented in the
appliance) are suitable for storing pre-frozen food, storing or
making ice-cream and making ice cubes.
- One-, two- and three -star compartments, if present in the
appliance, are not suitable for the freezing of fresh food.
- If the appliance is left empty for long periods, switch off, defrost,
clean, dry and leave the door open to prevent mould developing
within the appliance.
FOR Wine Coolers: this appliance is intended to be used exclusively
for the storage of wine
FOR a free standing appliance: this refrigerating appliance is not
intended to be used as a built-in appliance
FOR appliances without a 4-star compartment: this refrigerating
appliance is not suitable for freezing foodstuffs
Page 6
5
Scrapping old appliances
This appliance is marked according to the European directive 2012/19/EU on Waste Electrical and
Electronic Equipment (WEEE).
WEEE contains both polluting substances (which can cause negative consequences for the
environment) and basic components (which can be re-used). It is important to have WEEE subjected
to specific treatments, in order to remove and dispose properly all pollutants, and recover and
recycle all materials.
Individuals can play an important role in ensuring that WEEE does not become an environmental
issue; it is essential to follow some basic rules:
- WEEE should not be treated as household waste;
- WEEE should be handed over to the relevant collection points managed by the municipality or by
registered companies. In many countries, for large WEEE, home collection could be present.
In many countries, when you buy a new appliance, the old one may be returned to the retailer who
has to collect it free of charge on a one-to-one basis, as long as the equipment is of equivalent type
and has the same functions as the supplied equipment.
Conformity
By placing the mark on this product, we are confirming compliance to all relevant European
safety, health and environmental requirements which are applicable in legislation for this product.
Guarantee
Minimum guarantee is: 2 years for EU Countries, 3 years for Turkey, 1 year for UK, 1 year for Russia,
3 years for Sweden, 2 years for Serbia, 5 years for Norway, 1 year for Morocco, 6 months for Algeria,
Tunisia no legal warranty required.
Energy Saving
For better energy saving we suggest :
Installing the appliance away from heat sources and not exposed to direct sunlight and in a
well ventilated roo.
Avoid putting hot food into the refrigerator to avoid increasing the internal temperature and
therefore causing continuos functionaliting of the compressor.
Do not excessively stuff foods so as to ensure proper air circulation.
Defrost the appliance in case there is ice to facilitate the transfer of cold.
In case of absence of electrical energy, it is advisable to keep the refrigerator door closed.
Open or keep the doors of the appliance open as little as possible
Avoid adjusting the setting to temperatures too cold.
Remove dust present on the rear of the appliance
Page 7
6
INSTALLATION INSTRUCTIONS
Before Using Your Wine cooler
Remove the exterior and interior packing.
Before connecting the Wine cooler to the power source, let it stand upright for
approximately 2 hours. This will reduce the possibility of a malfunction in the cooling system
from handling during transportation.
Clean the interior surface with lukewarm water using a soft cloth.
When disposing your appliance, please choose an authorized disposal site.
Installation of Your Wine Cooler
This appliance is designed to be for free standing installation or built-in (fully recessed)
(Refer to sticker location the back of this appliance).
This appliance is intended to be used exclusively for the storage of wine or beverages.
Place your Wine cooler on a floor that is strong enough to support it when it is fully loaded.
To level your Wine cooler, adjust the front leveling leg at the bottom of the Wine cooler.
This appliance is using flammability refrigerant.So never damage the cooling pipework
during the transportation.Locate the Wine cooler away from direct sunlight and sources of
heat (stove, heater, radiator, etc.). Direct sunlight may affect the acrylic coating and heat
sources may increase electrical consumption. Extreme cold ambient temperatures may also
cause the unit not to perform properly.
Avoid locating the unit in moist areas.
Plug the Wine cooler into an exclusive, properly installed-grounded wall outlet. Do not under
any circumstances cut or remove the third (ground) prong from the power cord. Any
questions concerning power and/or grounding should be directed toward a certified
electrician or an authorized Products service center.
Attention
Store wine in sealed bottles;
Do not overload the cabinet;
Do not open the door unless necessary;
Do not cover shelves with aluminum foil or any other shelf material which may prevent air
circulation;
Should the Wine cooler be stored without use for long periods it is suggested, after a careful
cleaning, to leave the door ajar to allow air to circulate inside the cabinet in order to avoid
possible formations of condensation, mold or odors.
Ambient Room Temperature Limits
This appliance is designed to operate in ambient temperatures specified by its temperature class
marked on the rating plate.
- extended temperate (SN): ‘this refrigerating appliance is intended to be used at ambient
temperatures ranging from 10 °C to 32 °C’;
- temperate (N): ‘this refrigerating appliance is intended to be used at ambient temperatures
ranging from 16 °C to 32 °C’;
- subtropical (ST): ‘this refrigerating appliance is intended to be used at ambient temperatures
ranging from 16 °C to 38 °C’;
Page 8
7
OPERATING YOUR WINE COOLER/BEVERAGE COOLER
AND SETTING THE TEMPERATURE CONTROL
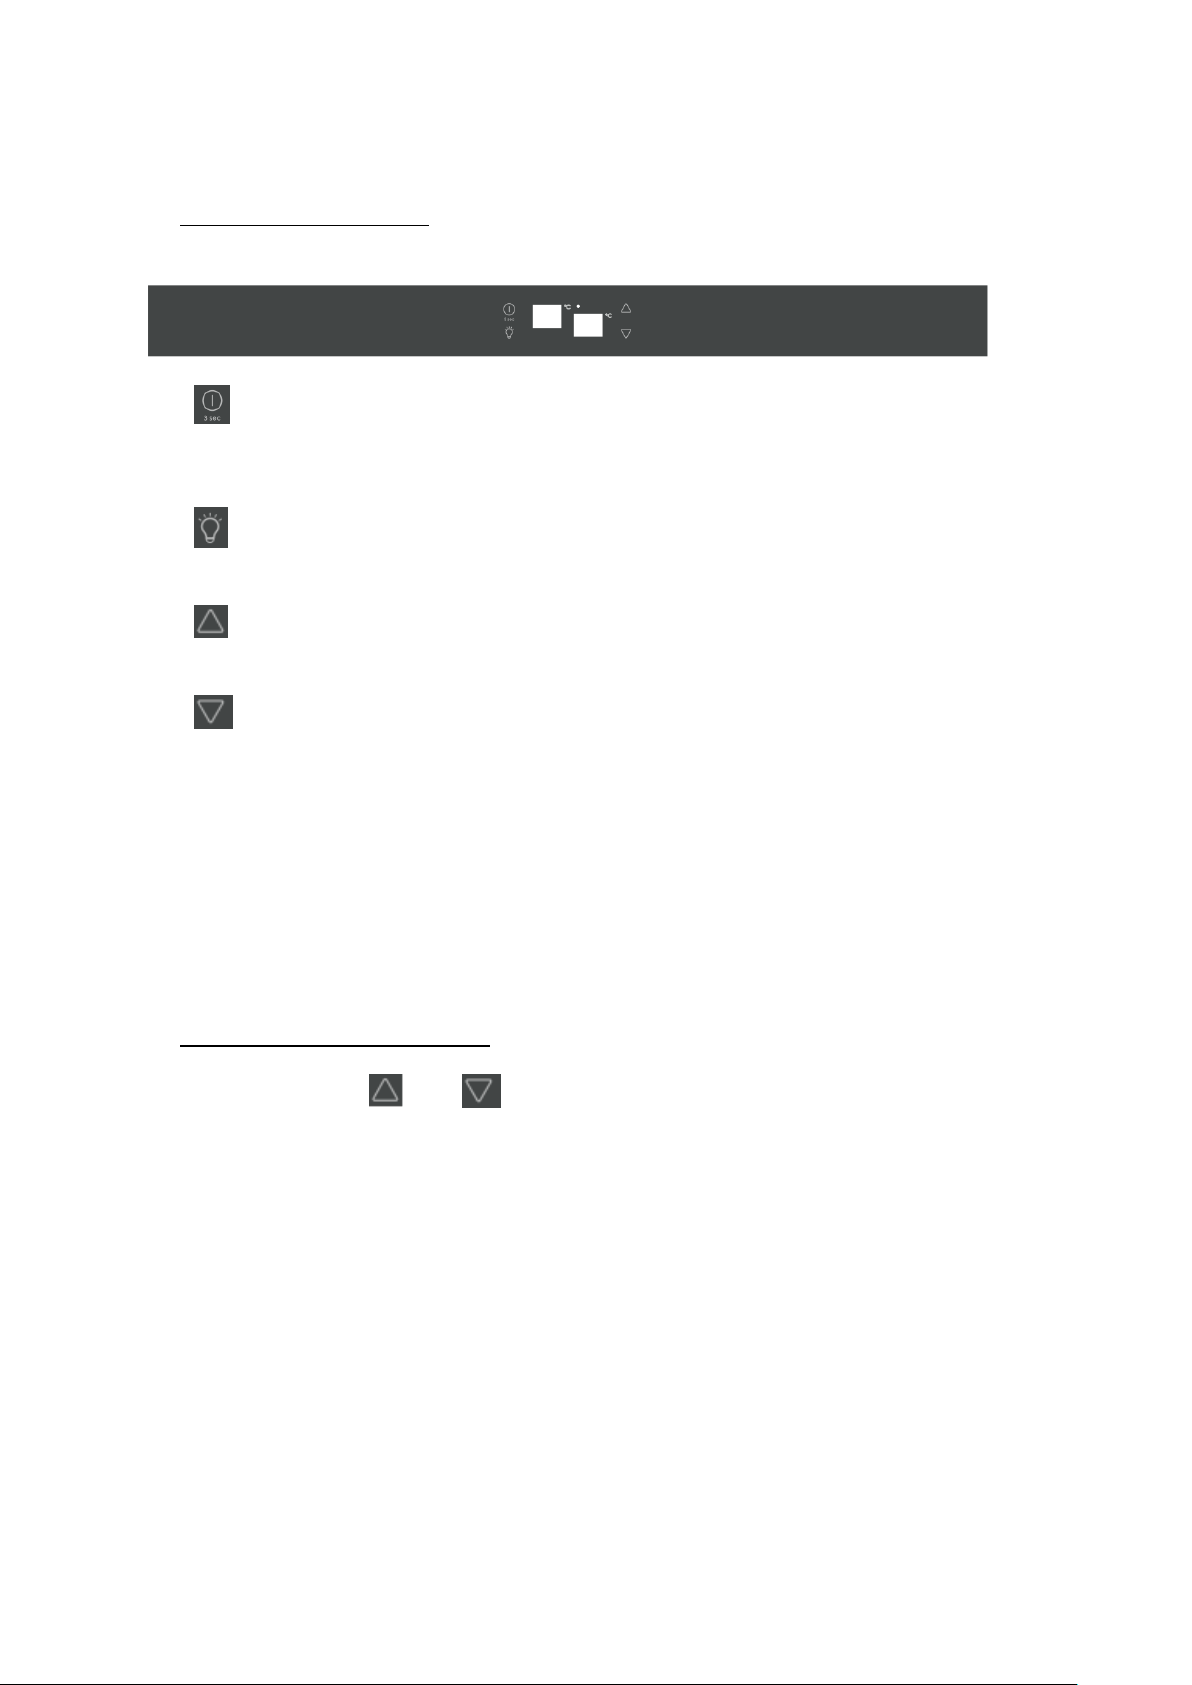
Control System Instruction
“ ” Button
To control this appliance turn on/off ( press and hold this buttons for approximately
3 seconds).
“ ” Button
To control the inner light turn on/off.
“ ” Button
To set the temperature of the upper chamber.
“ ” Button
To set the temperature of the lower chamber.
LED display window on the left
To set the temperature of the upper chamber.
LED display window on the right
To set the temperature of the lower chamber.
indicator light
Compressor in operation display.
Setting The Temperature Controls
When pressing “ ” or “ ” button, the system will be entering the set up mode in the
upper or lower compartment automatically. The LED will flashing and display the setting
temperature.
Press once the button, the temperature will decrease or increase 1 ℃. When exceeding the
minimum value that can be established, it will jump to the highest adjustable temperature value
automatically. After stopping pressing the button for 5 seconds, LED figure will stop flash, then
revert back to display the temperature of the upper or lower compartment.
After the unit is unplugged, the system will return to acquiescence temperature, which setting
by factory. The acquiescence temperature as below:
Upper compartment: 6 ℃
Lower compartment: 12 ℃
If want reveal every indoor setting temperature, please corresponding to press " Set Upper " or
" Set Lower " button, the LED will flash and display the setting temperature. After stopping
pressing the button for 5 seconds, LED figure will stop flash, then revert back to display the
actual temperature.
Upper compartment: The temperature setting can be adjusted from 5℃ to 10℃.
Lower compartment: The temperature setting can be adjusted from 10℃ to 18℃.
Page 9
8
Temperature Alarm
If the temperature inside is higher than 23 ℃, it will display "HI" on the display panel, and after one
hour after the alarm / buzzer will sound. This indicates that the temperature inside is too high. If the
temperature inside is lower than 0 ℃, it will display "LO" on the display panel and at the same time
the alarm also malfunction indicator is active
Temperature Recollection Function
In the event of a power interruption, wine chiller can remember the previous temperature settings,
and when the power is recovery, the cooler temperature will go back the same setting temperature
as power off.
Internal light
In order to reduce energy consumption, this wine cabinet will automatically switch off the LED lights
after 10 minutes.
If you want the LED light to remain on continuously, this is possible. Please press and hold the
"LIGHT" button for 5 seconds, the display will show "LP".After 4 seconds the display will revert back
to normal and the light will remain on until manually switched off.
If you want to revert back and conserve energy (recommended), please press and hold the "LIGHT"
button for 5 second, the display will show "LF",after 4 seconds the display will revert back to normal,
and the light will automatically switch off after 10 minutes.
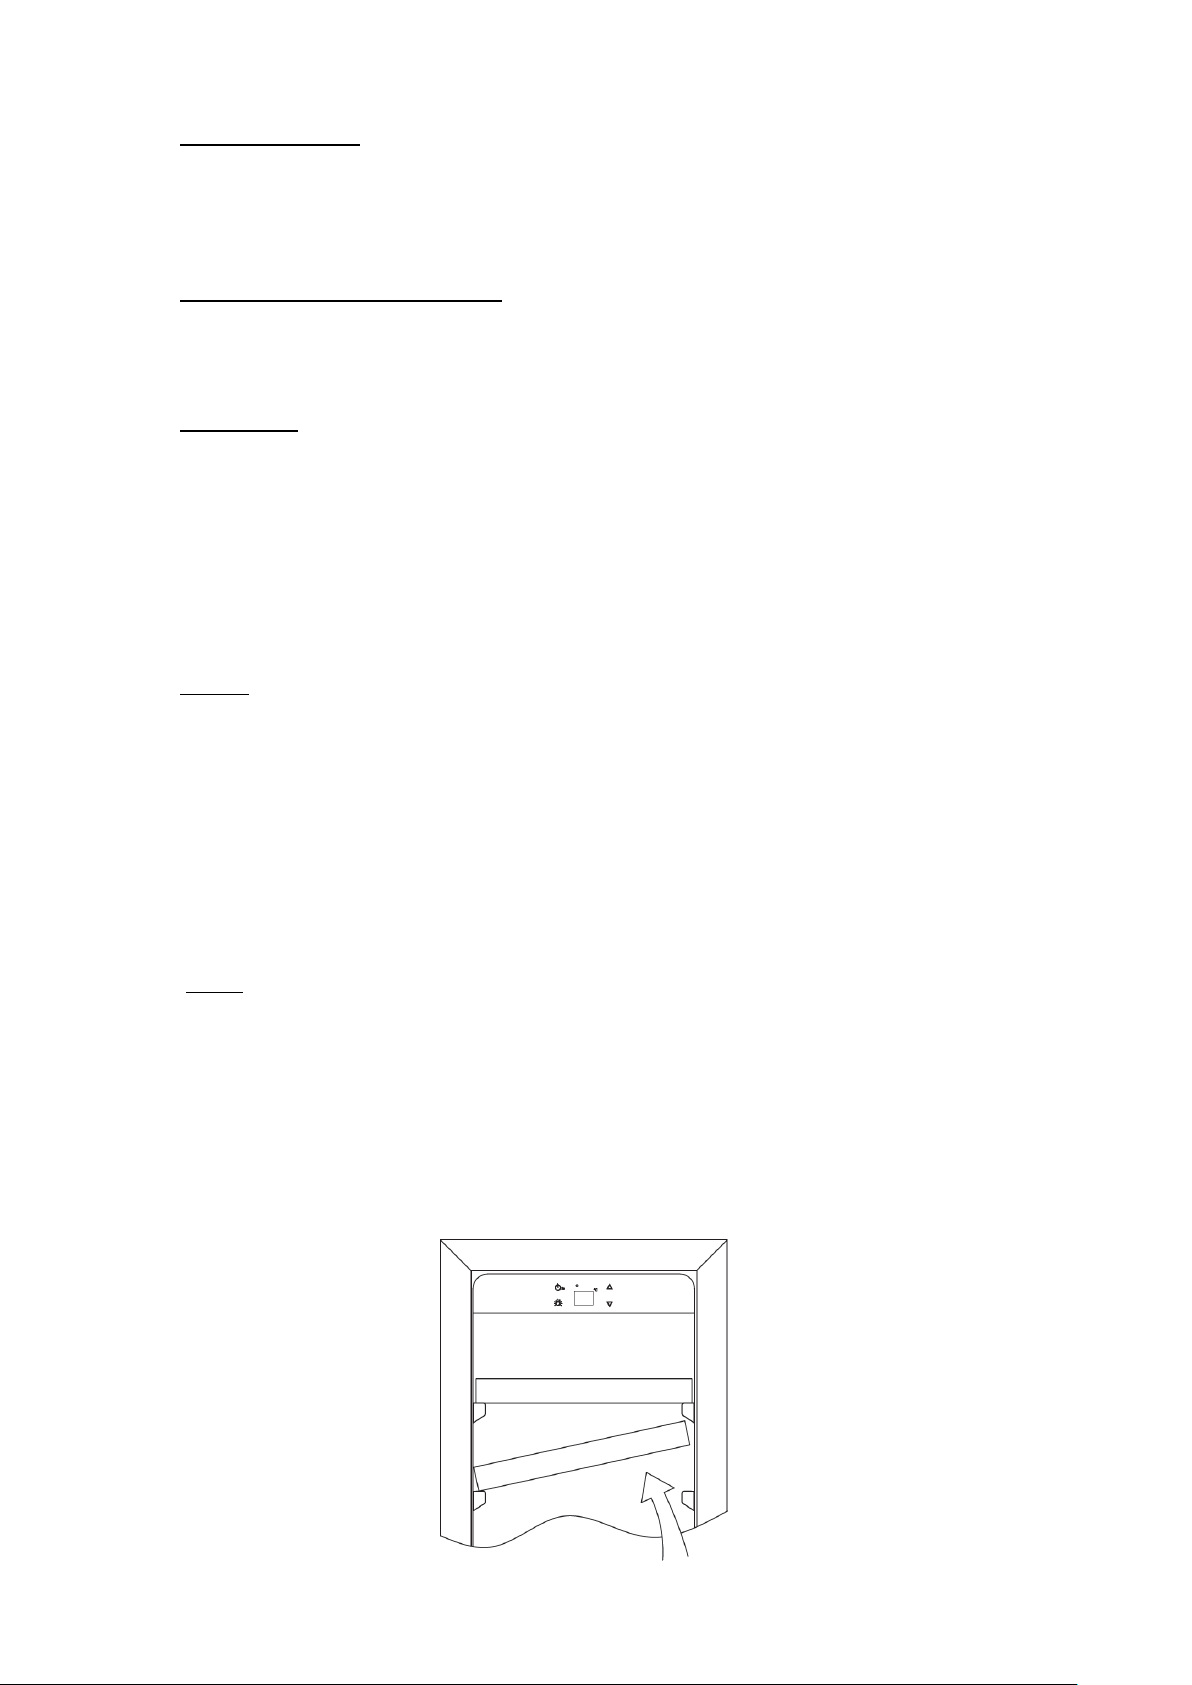
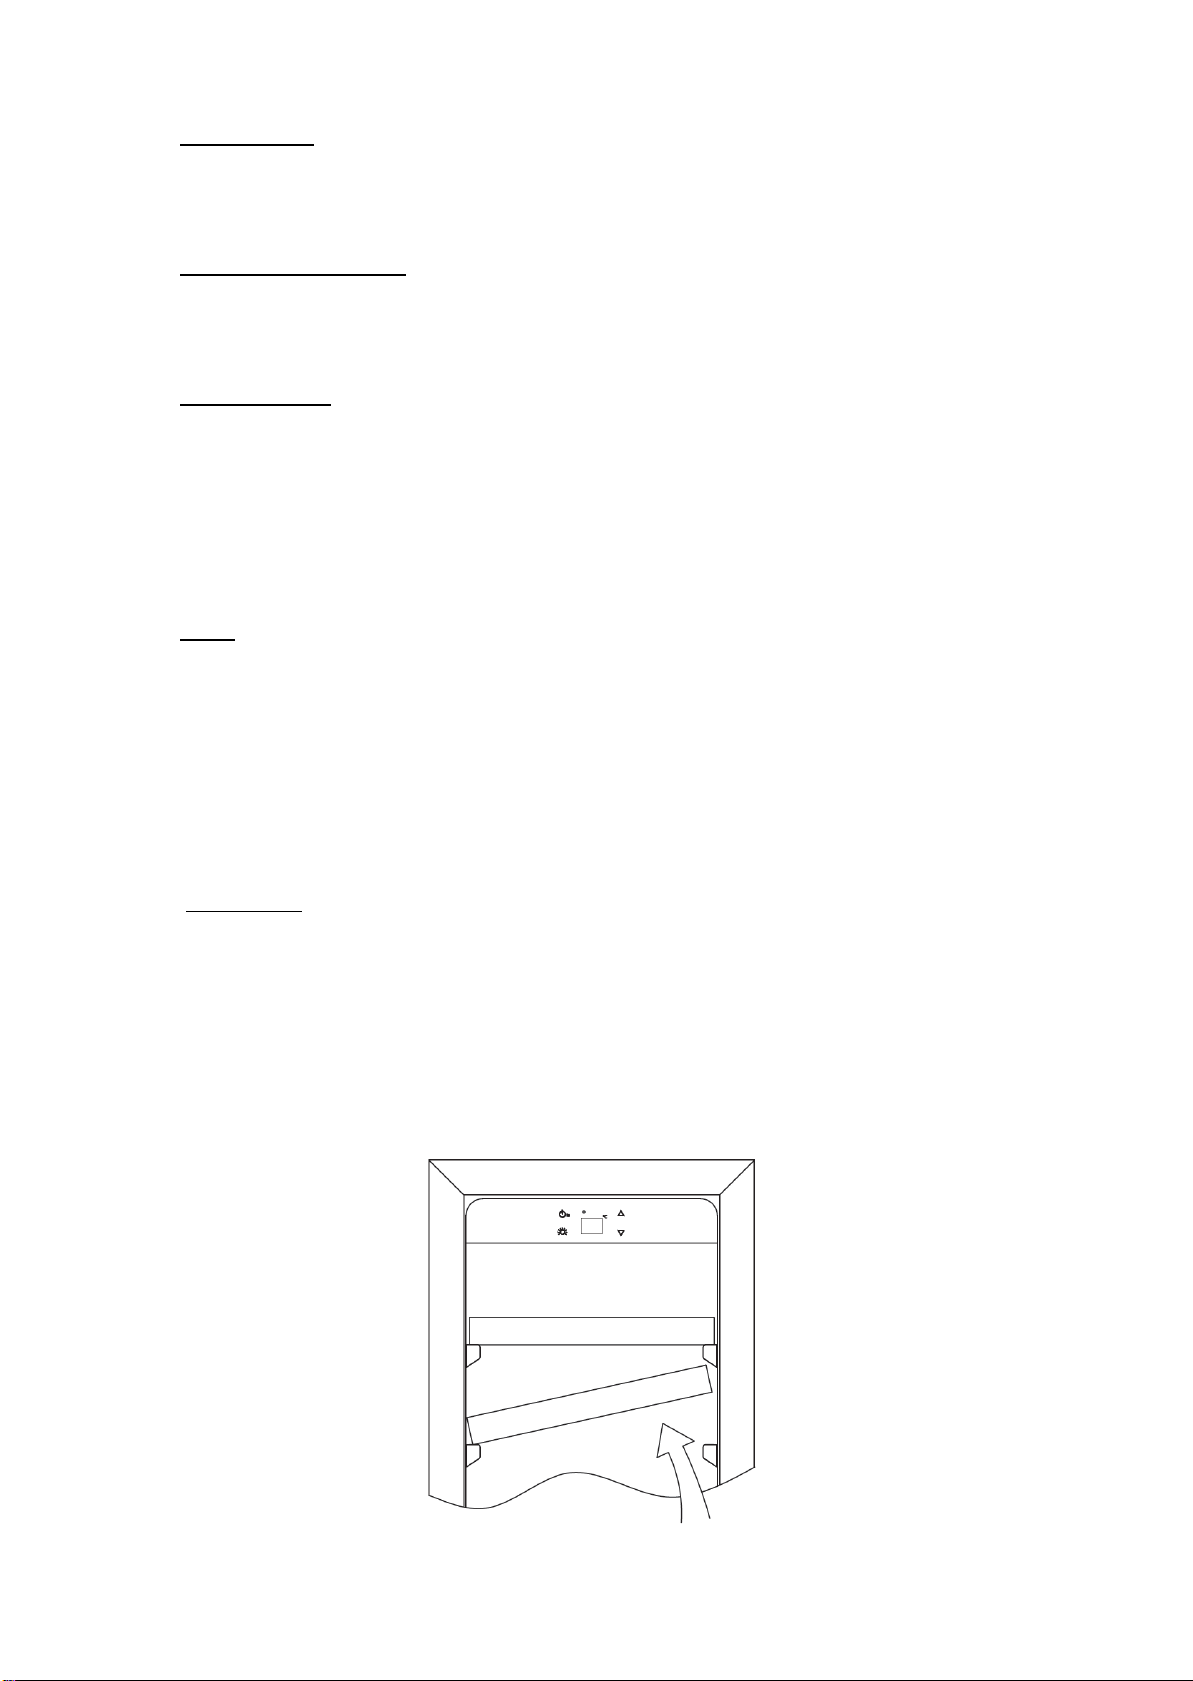
Shelves
To prevent damaging the door gasket, make sure to have the door all the way opened when
pulling shelves out of the rail compartment.
For easy access to the storage content, you must pull the shelves approximately 1/3 out of the
rail compartment, however this unit was designed with a notch on each sides of the shelf tracks
to prevent bottles from falling.
When removing any of these shelves out of the rail compartment, To fit or remove the shelf, tilt
the shelf as per the diagram and simply pull out, or push in the shelf until it sits on the support
brackets securely.
NOTE:
If the unit is unplugged, power lost, or turned off, you must wait 3 to 5 minutes before restarting
the unit. If you attempt to restart before this time delay, the Wine cooler/beverage cooler will
not start.
When you use the Wine cooler/beverage cooler for the first time or restart the Wine
cooler/beverage cooler after having been shut off for a long time, there could be a few degrees
variance between the temperature you select and the one indicated on the LED readout. This is
normal and it is due to the length of the activation time. Once the Wine cooler/beverage cooler
is running for a few hours everything will be back to normal.
Page 10
9
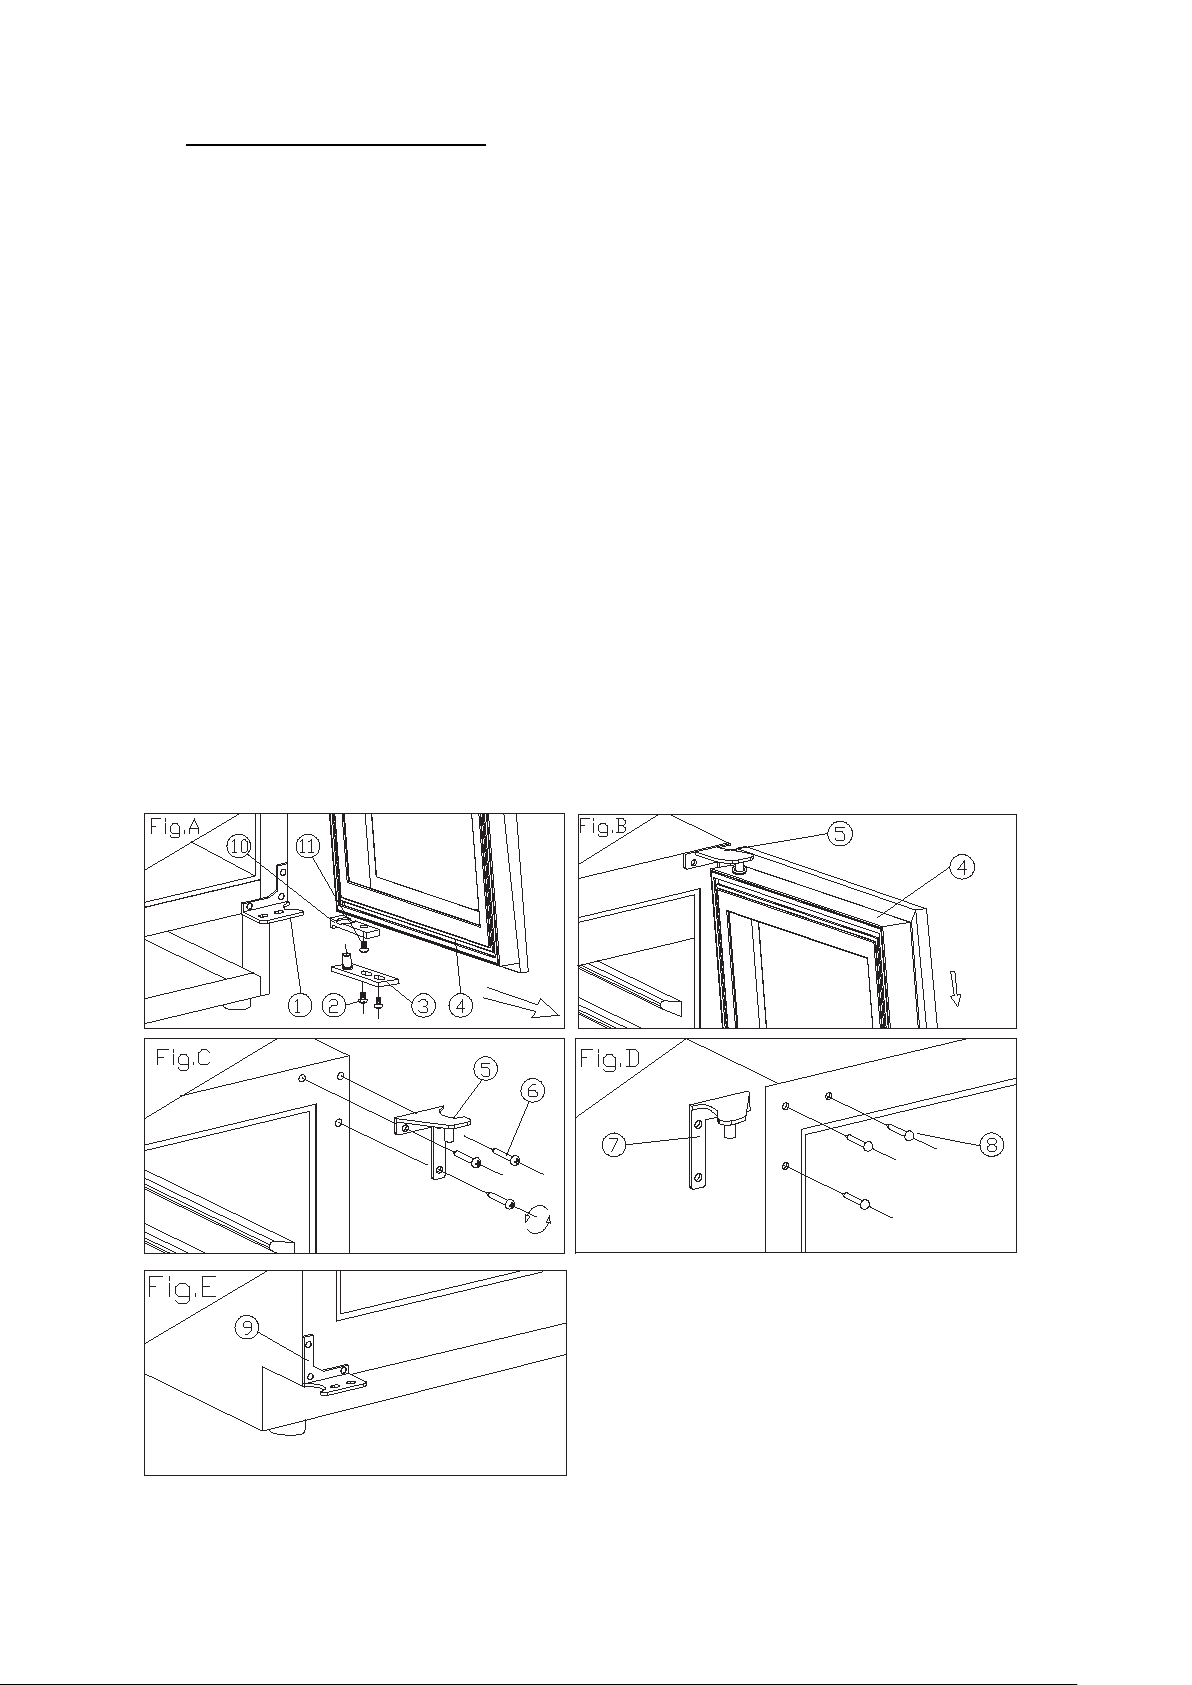
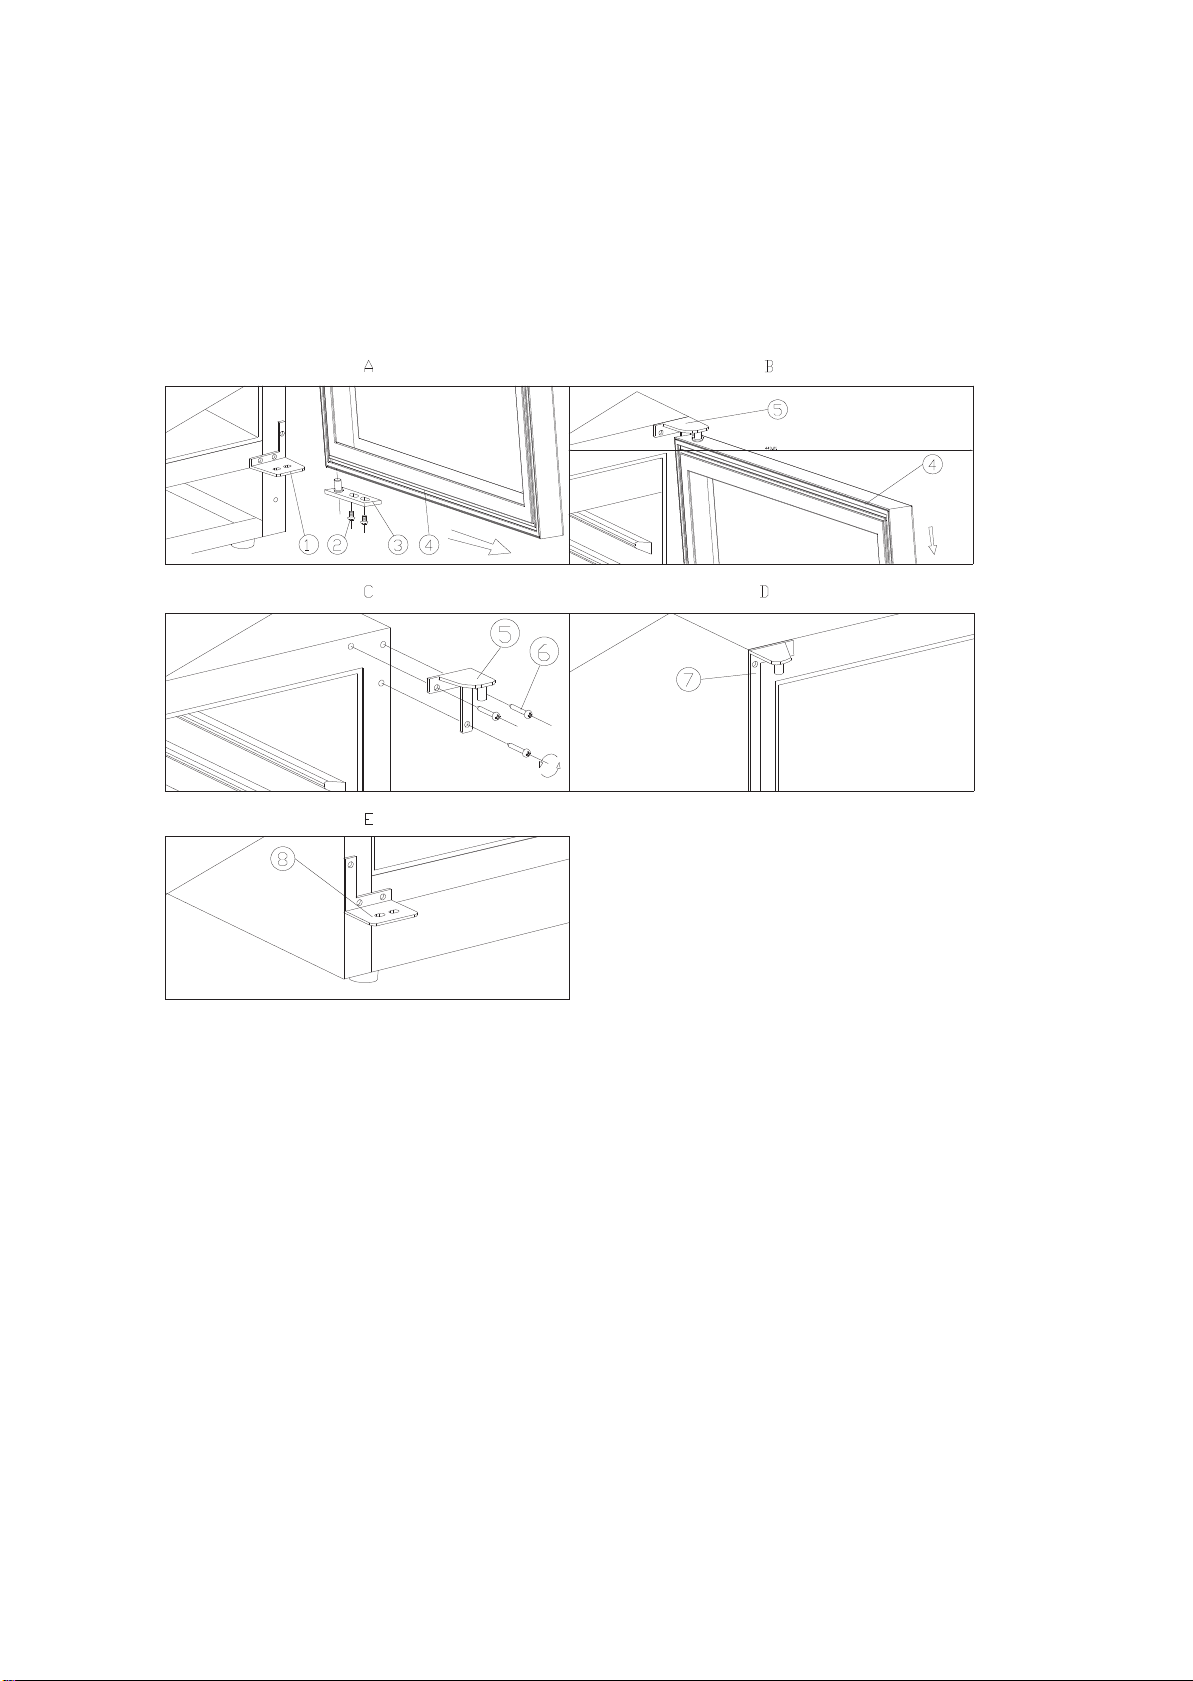
How to change the door opening
This appliance has reversible doors but is delivered with a right hinged door. The left hand hinge kit
comes with the unit (in the box), should you wish to reverse the hinge on your unit.
Type A (for full glass/stainless steel door)
1. Lower hinge (Right) 2 . Screws 3 .Door axis
4. Door 5. Top hinge (Right) 6. Hinge Screws
7. Top hinge (Left) 8. Hole cover 9. Lower hinge (Left)
10. Door limit device 11. Screw
1. Open the door to a 90 degrees angle, take out the 2 screws (2) from lower door axis (3), remove
the door (4), Remove the axis plate (3) from the door, (Fig. A).
2. Unscrew the screw (11) located underneath the doorframe and the limit device (10), and relocate
it at left end side of the door frame. (Fig. A/B)
3. Take out the 3 hinge screws (6) from the top hinge (right) (5) and remove it. (Fig. C)
4. Remove decorative nail (8) from left top of cabinet and install spare top hinge (Left) (7) at left top
of cabinet with 3 screws. (Fig. D)
5. Following the above procedure, install the spare lower hinge to the left (9). (Fig. E)
6. Install and aligned the door.
7. Insert the plastic caps to cover the holes(8)
Page 11
10
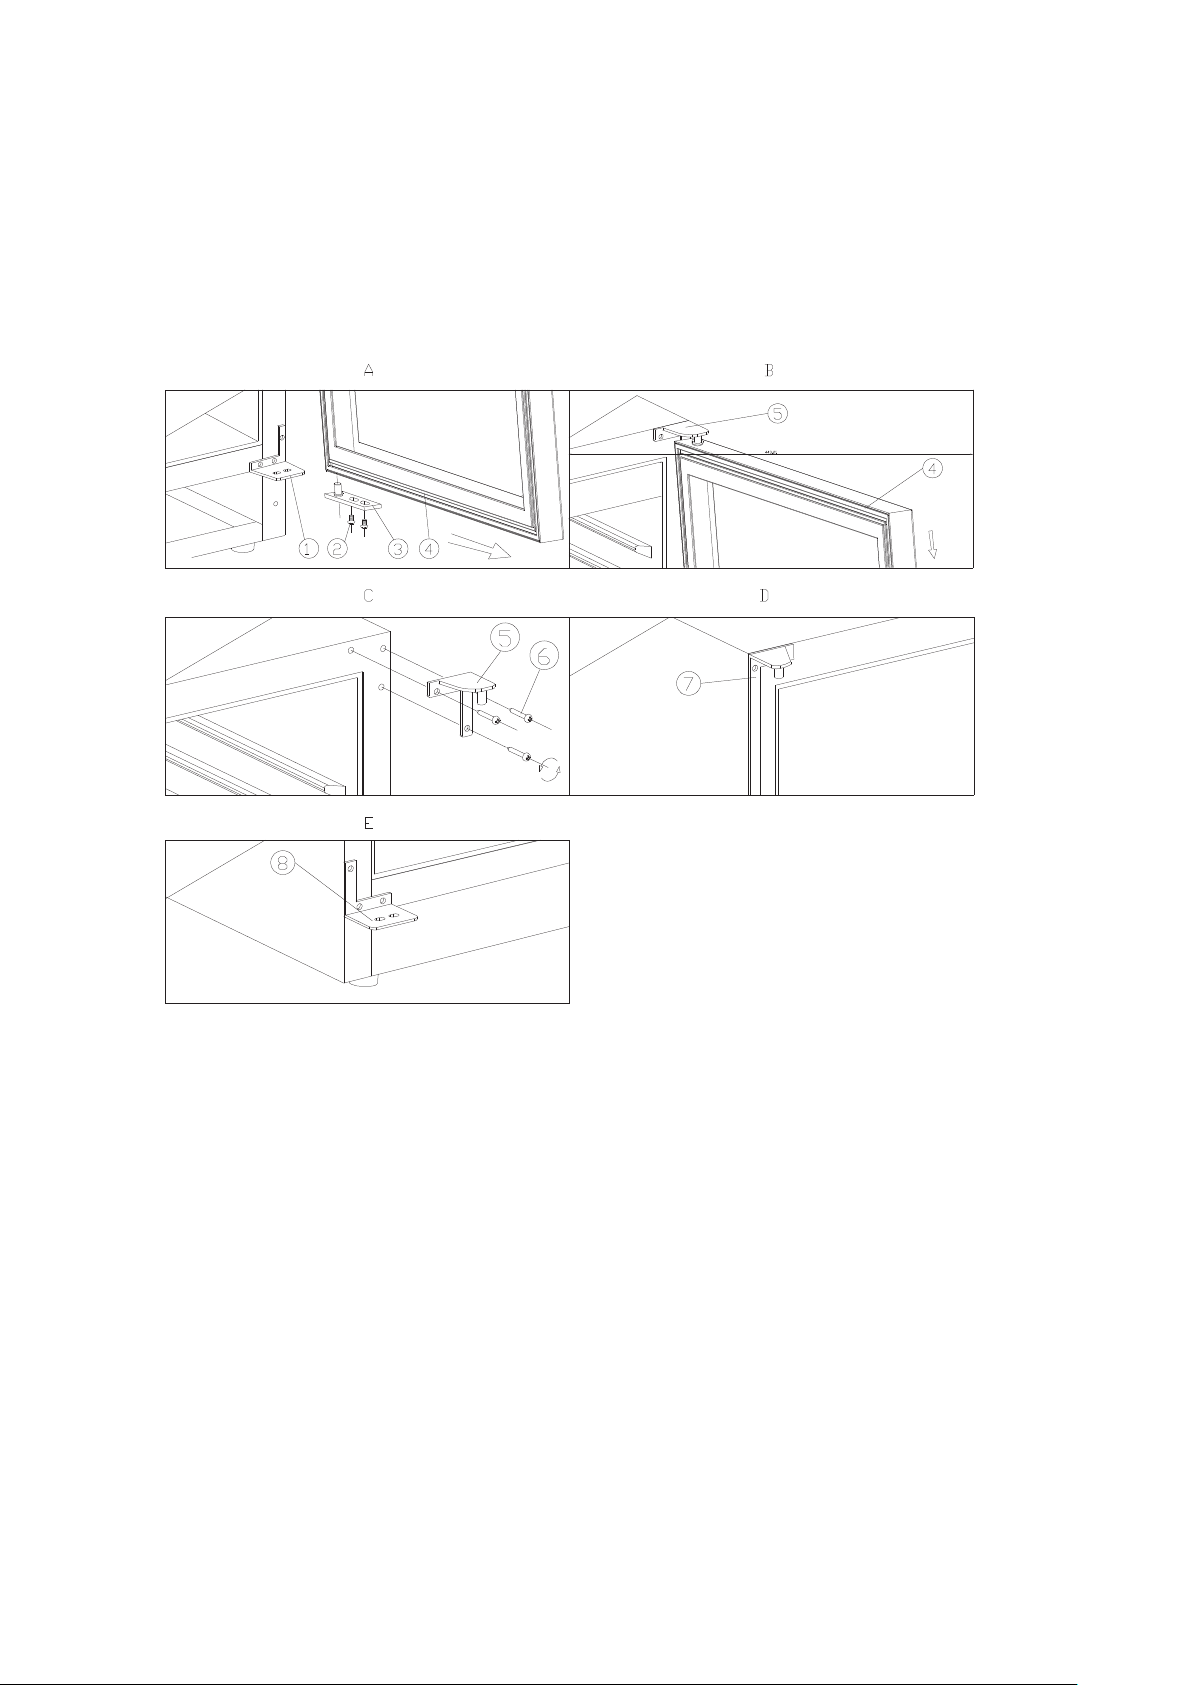
Type B (for slim stainless steel door)
1. Bottom hinge (Right)
2. Screws
3. Door axis
2. 4. Door
7. Top hinge(Left)
5. Top hinge(Right)
8. Bottom hinge (Left)
6. screws
1. Remove 2 screws(1), then pulldoor(4) as per arrowhead direction,Youwill remove the
door. Please removebottom hinge(Right) (1) as well for the assembly. (Fig.A & Fig.B)
2. To remove 3 screws(6) of right upper Hinge, then to remove right upper(5) & Right
bottom hinges(1). (See fig.C)
3. To use the screws which you removedFrom right side hinges to fix left upper& bottom
hinges(7)(8) .(See Fig.D & Fig.E)
4. To rotate door at 180 degrees,then assemble the door as per the reverse way of remove
Page 12
11
+
=
+
+
+
+
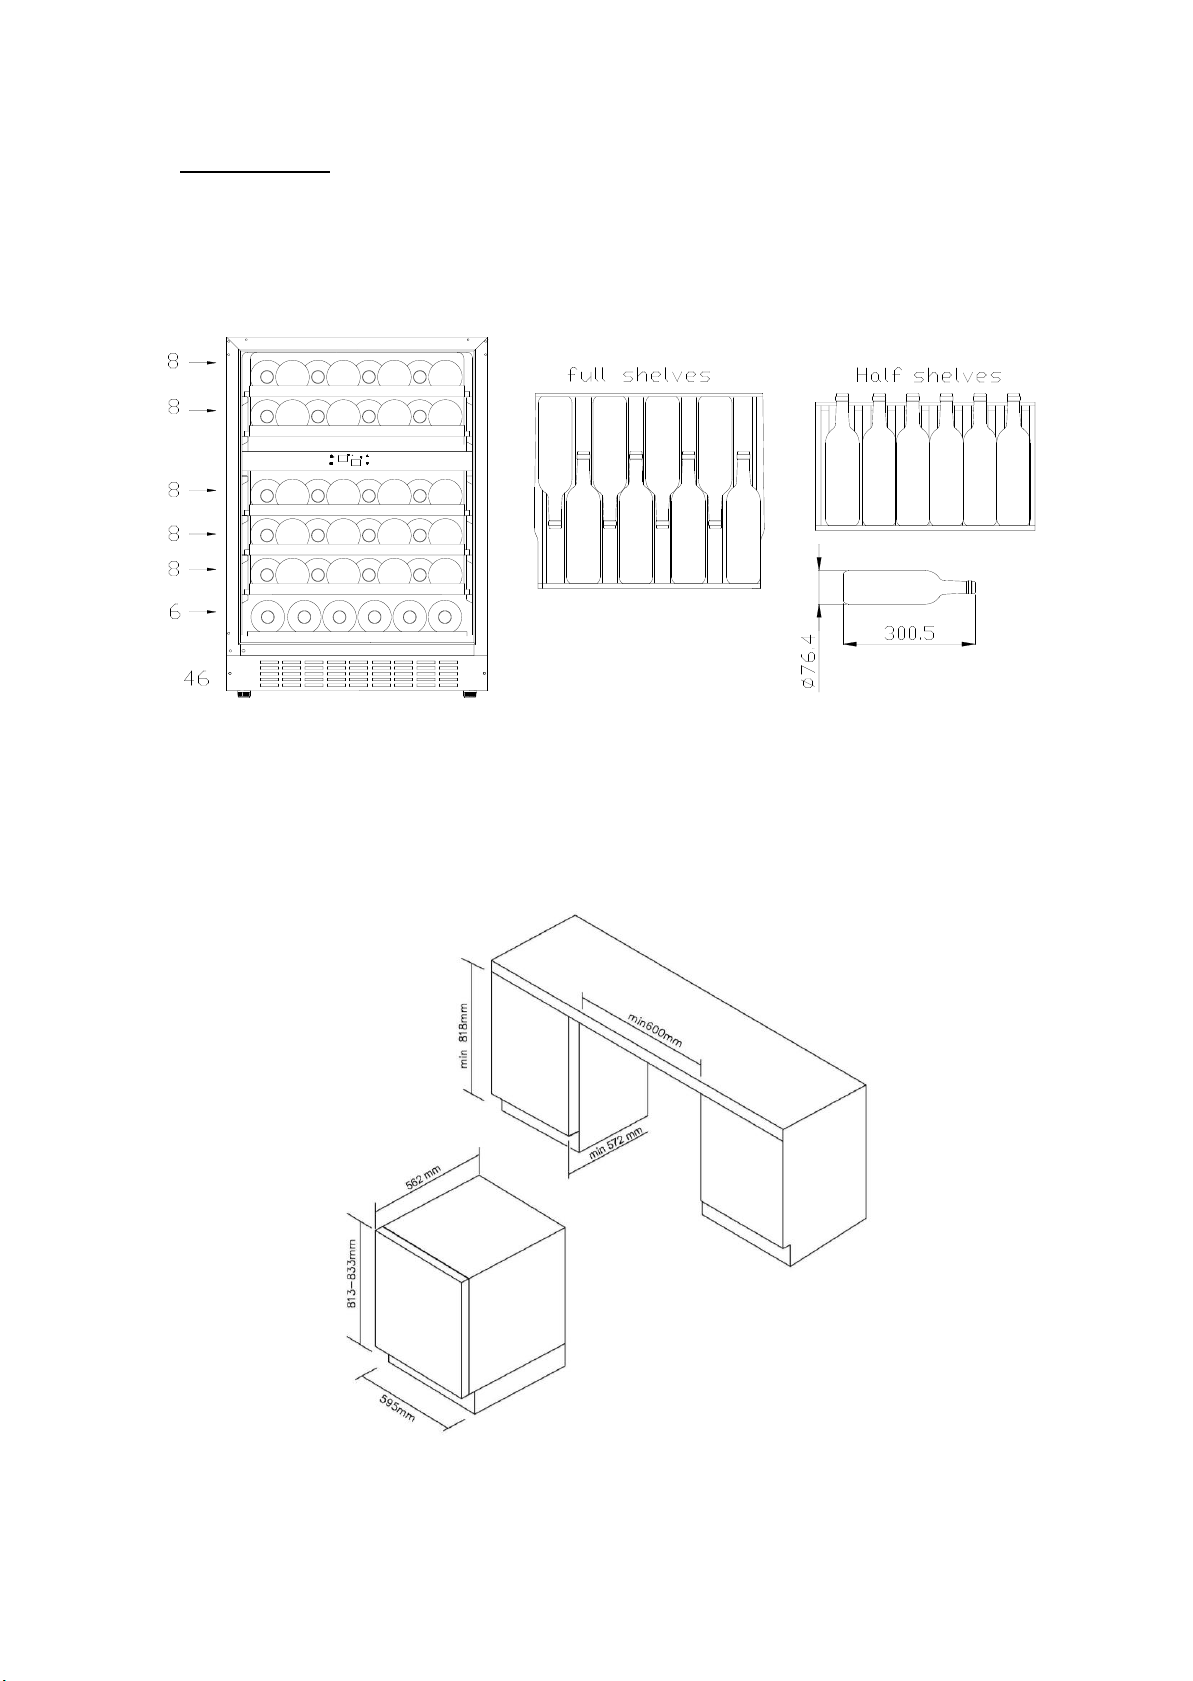
Storage diagram
According to the actual configuration of your product, please check the relative Storage diagram.
Total: 46 bottles (Max)
The most energy-saving configuration requires shelves to be positioned in the product, please refer
to the above pictures.
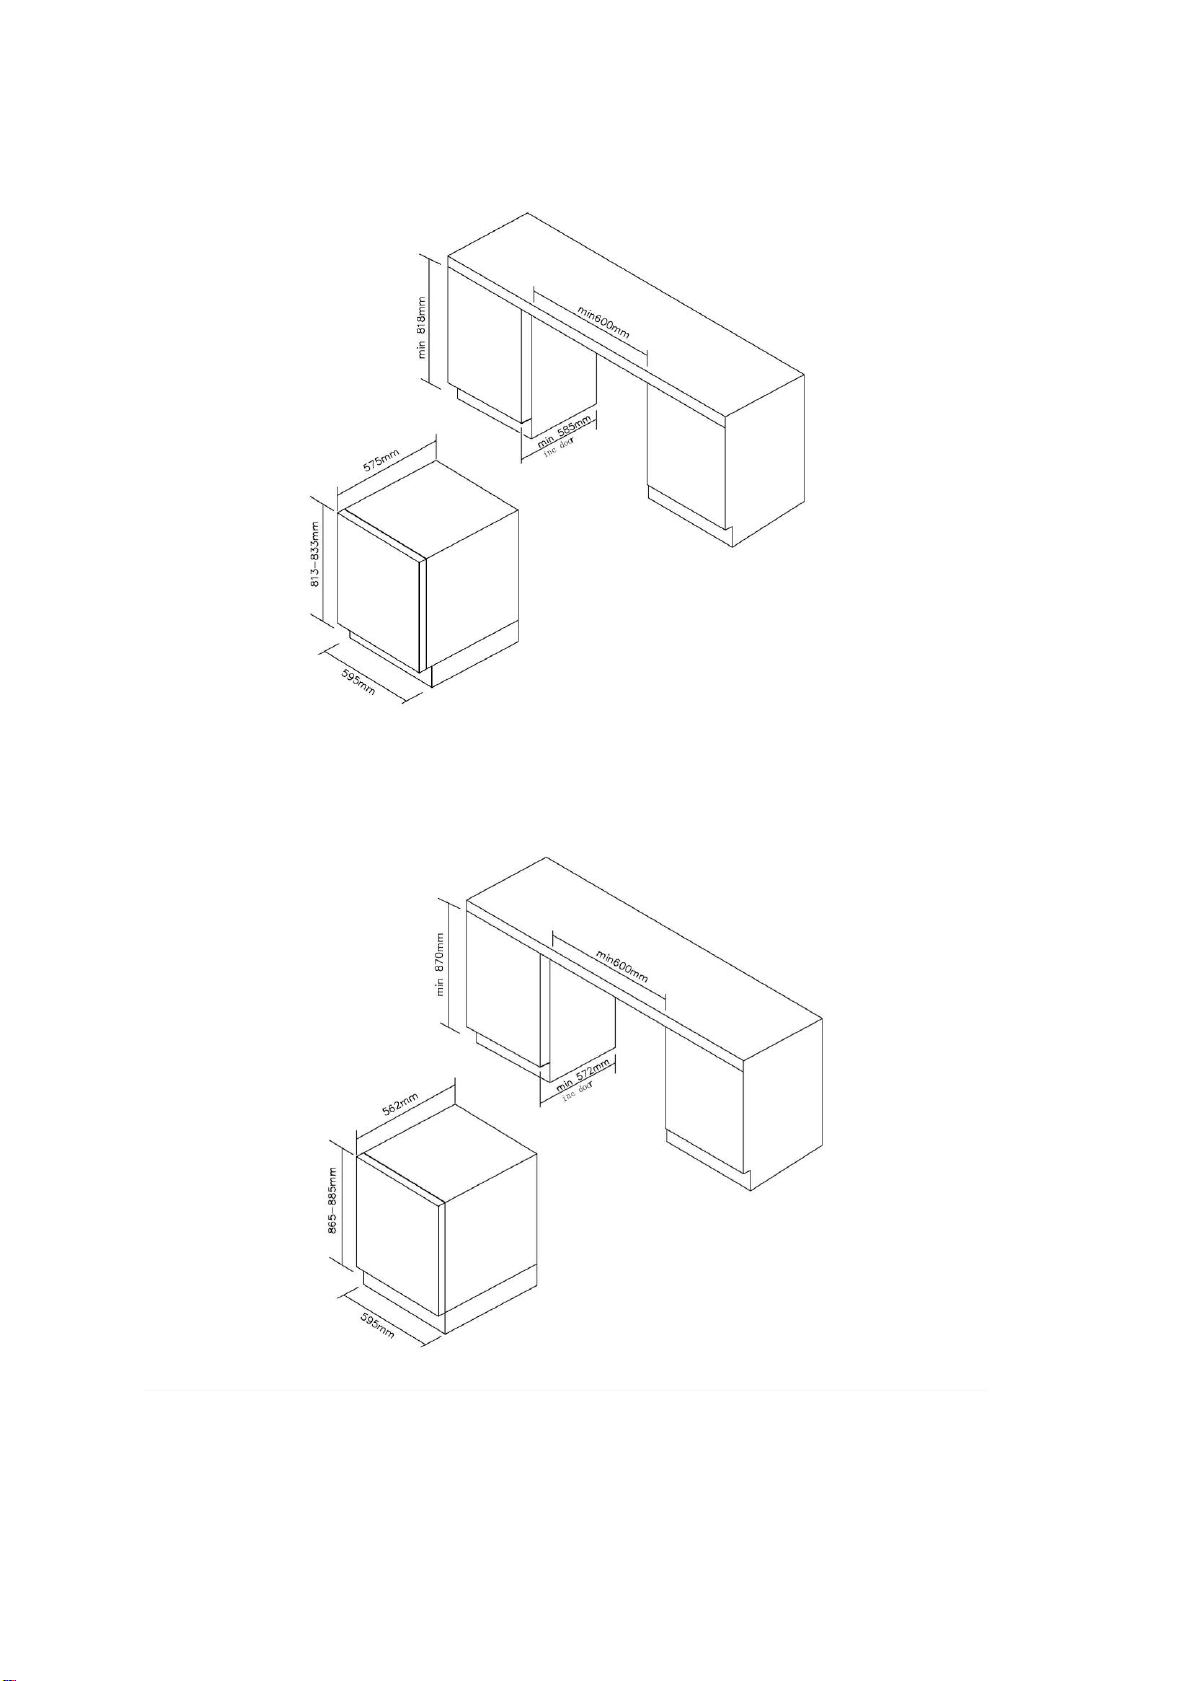
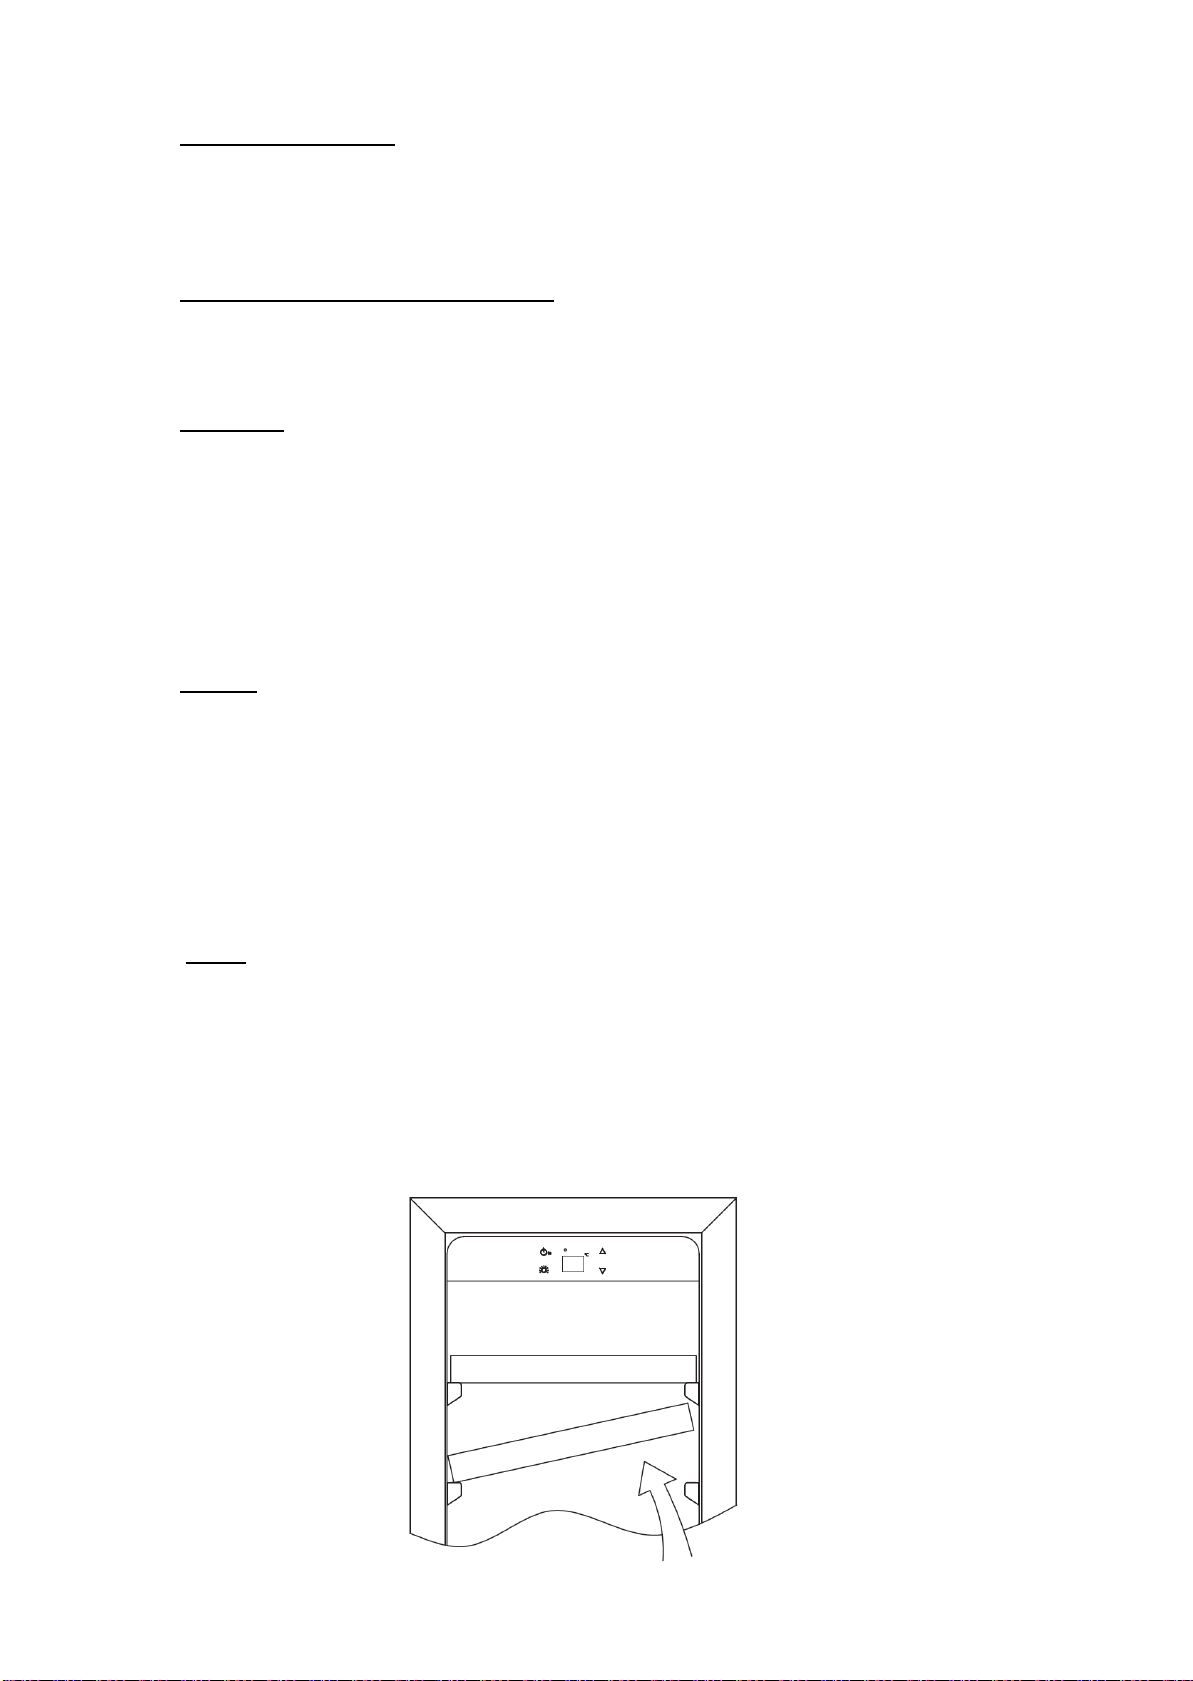
Installation specifications for built-in purposes
For height 813mm with full glass/stainless steel door
Page 13

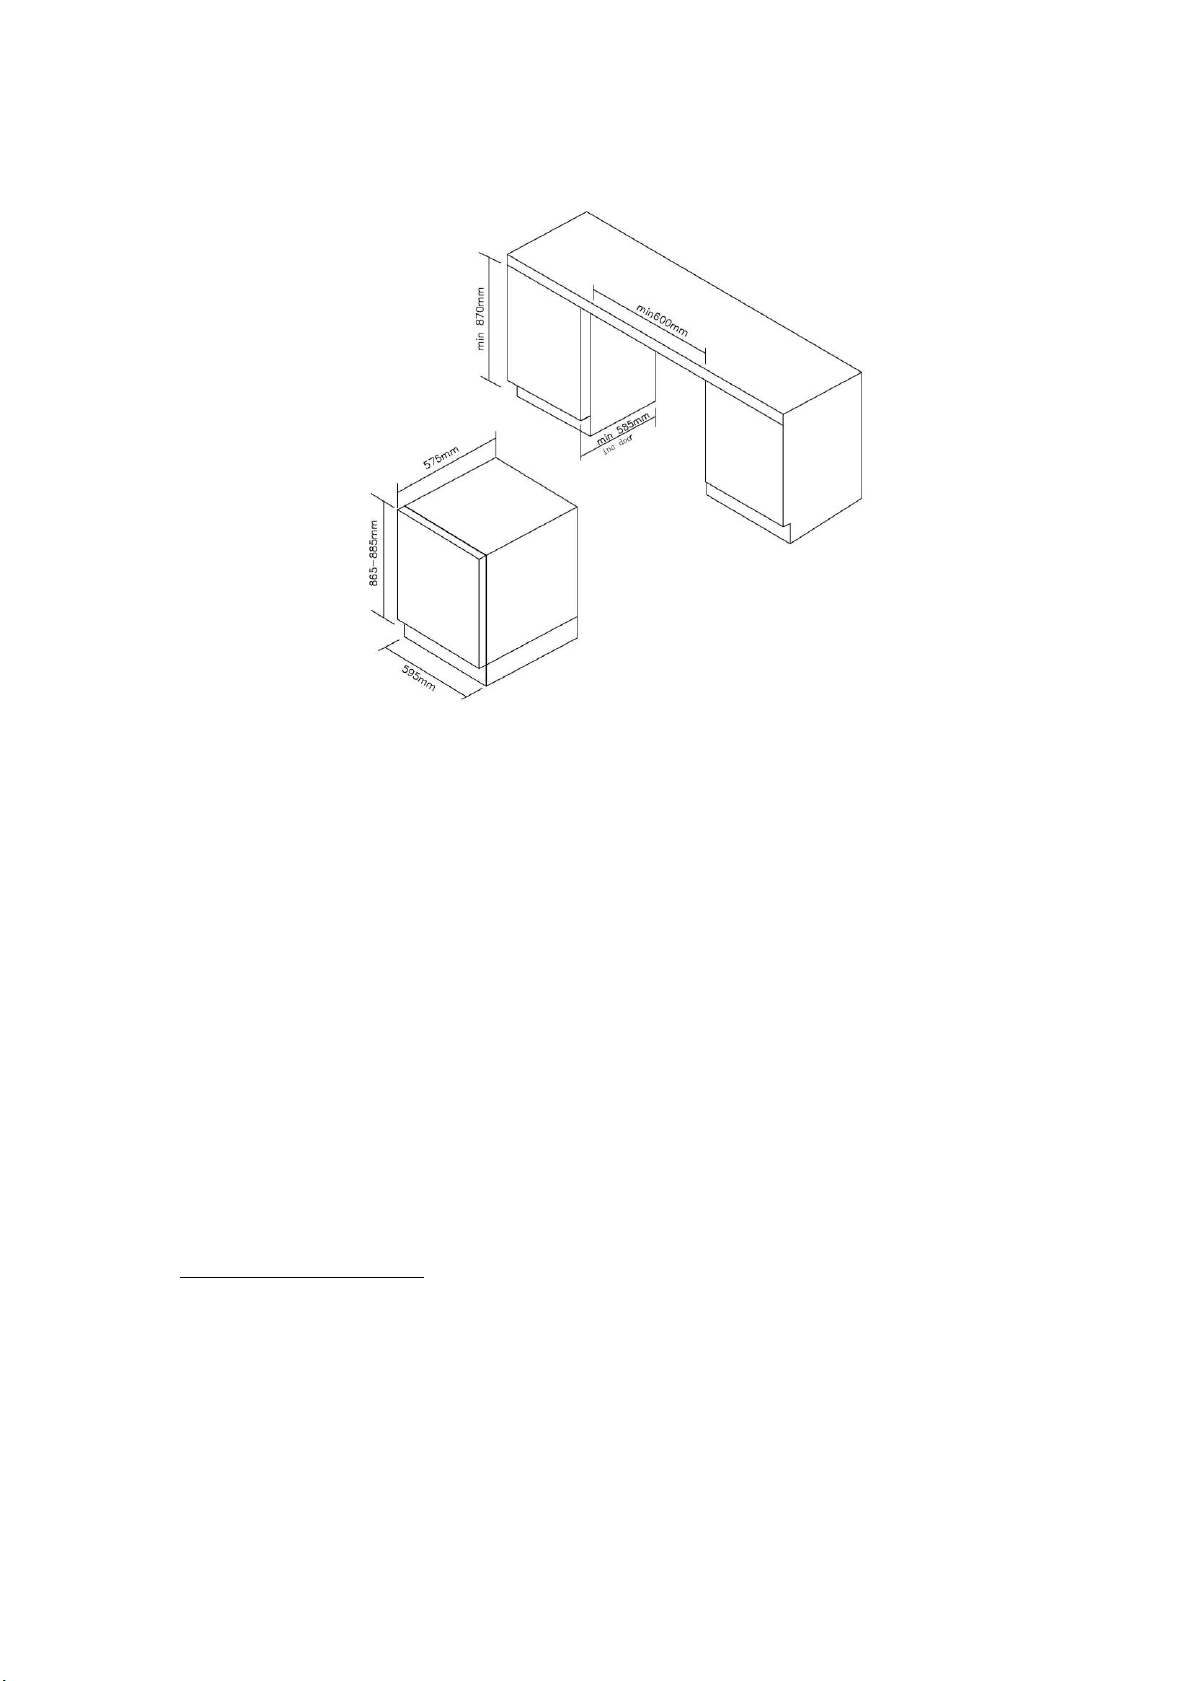
12
For height 813 with slim stainless steel door
For height 865mm with full glass/stainless steel door
Page 14
13
For height 865mm with slim stainless steel door
CARE AND MAINTENANCE
Cleaning Your Wine Cooler
Turn off the power, unplug the appliance, and remove all items including shelves and rack.
Wash the inside surfaces with a warm water and baking soda solution. The solution should
be about 2 tablespoons of baking soda to a quart of water.
Wash the shelves with a mild detergent solution.
Wring excess water out of the sponge or cloth when cleaning area of the controls, or any
electrical parts.
Wash the outside cabinet with warm water and mild liquid detergent. Rinse well and wipe
dry with a clean soft cloth.
Page 15
14
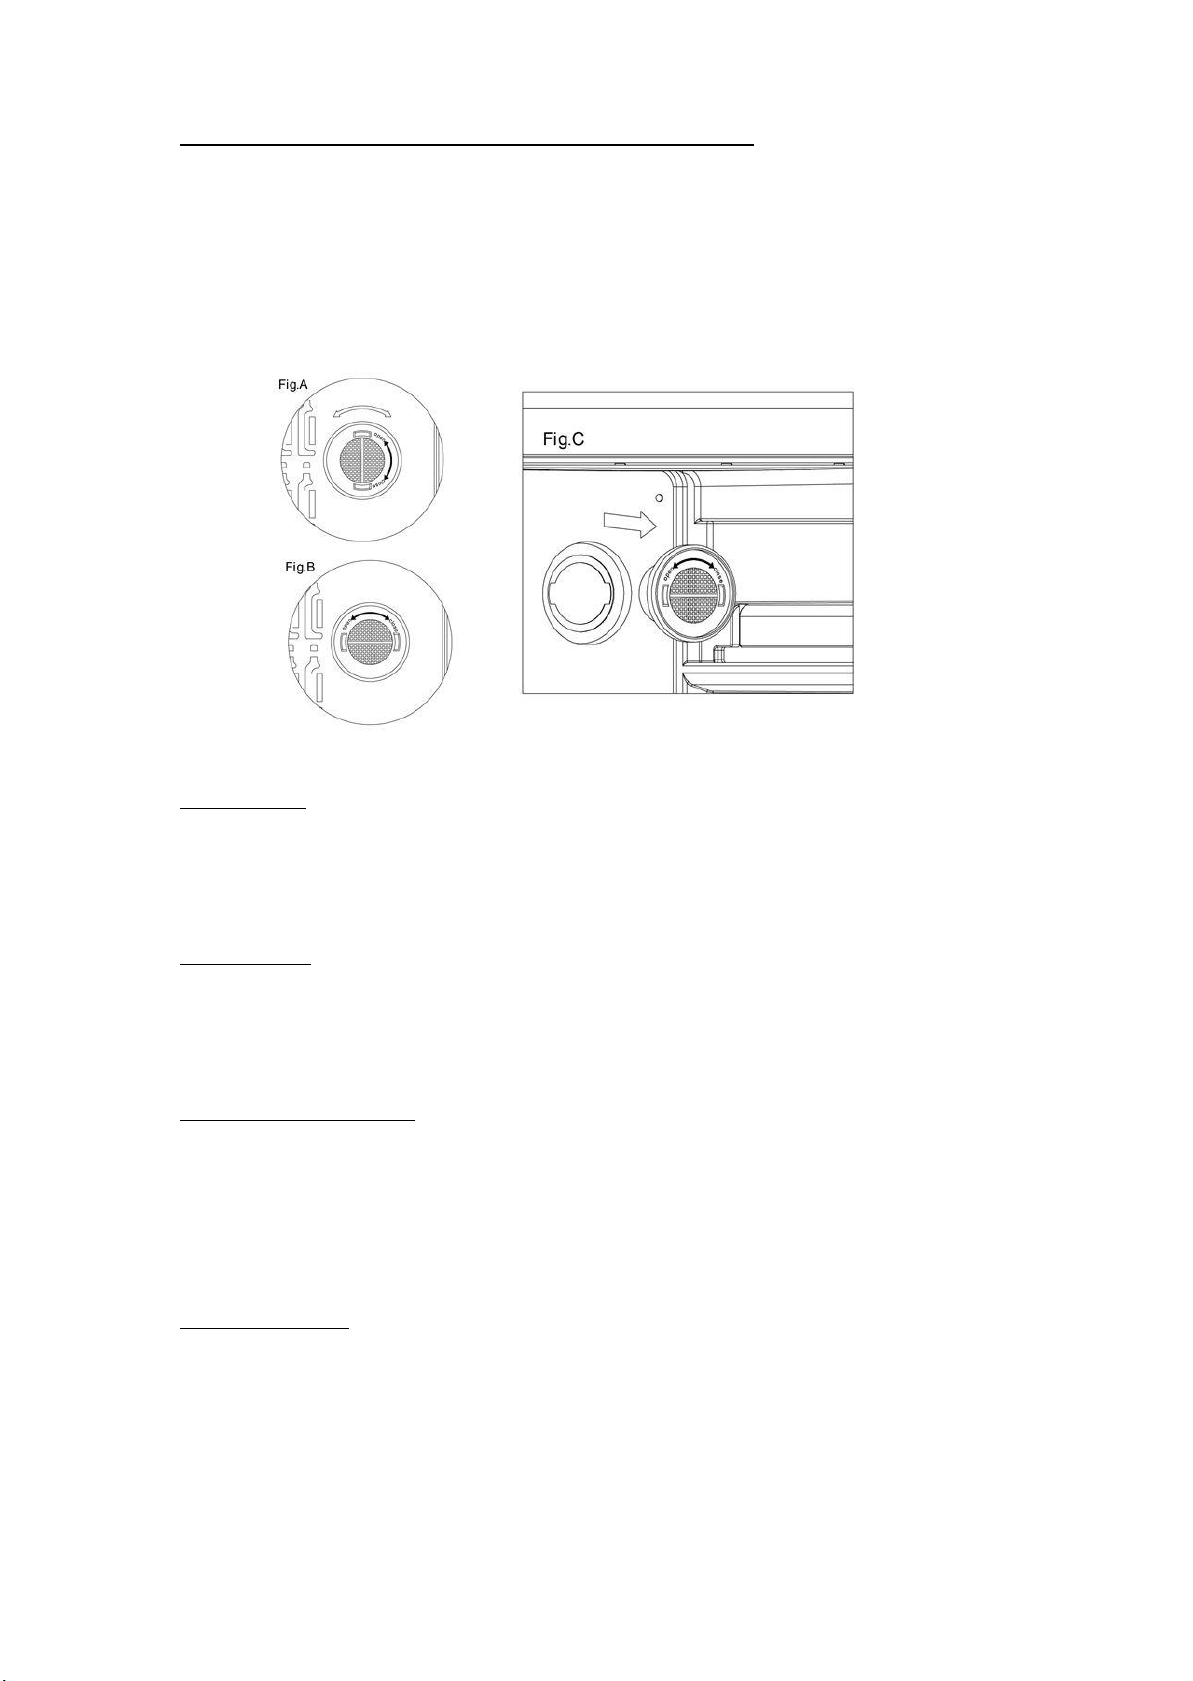
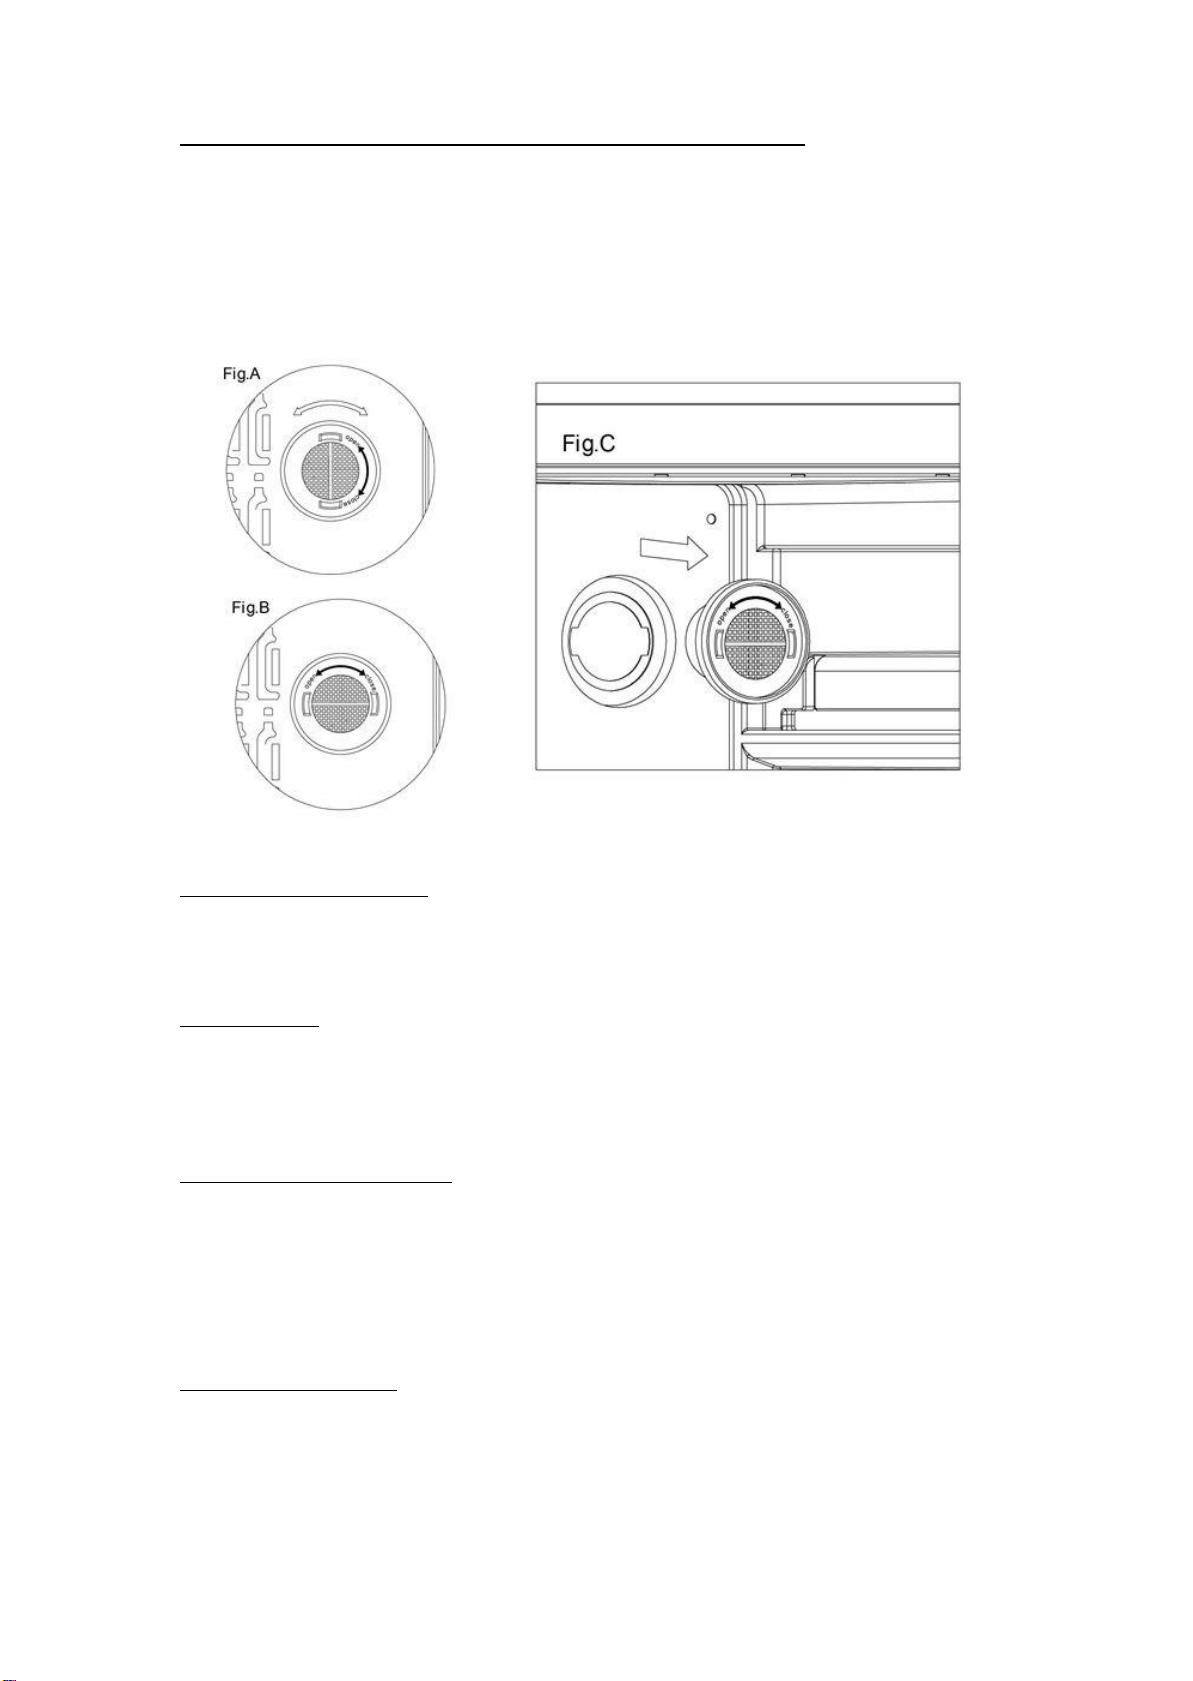
How to replace the charcoal filter (if present in your appliance)
Charcoal filters are located in the top right corner of each wine cabinet zone.
Open the door and remove the top 2 shelves (see removing the shelves).
Turn the filter as per Fig A.
As per Fig B, the filter should line up with the notches as shown.
Pull the filter out (Fig C).
Insert replacement filter and twist as per Fig A to lock into position.
Re-install the shelves.
Power Failure
Most power failures are corrected within a few hours and should not affect the
temperature of your appliance if you minimize the number of times the door is opened. If
the power is going to be off for a longer period of time, you need to take the proper steps to
protect your contents.
Vacation Time
Short vacations: Leave the Wine Cooler operating during vacations of less than three weeks.
Long vacations: If the appliance will not be used for several months, remove all items and turn
off the appliance. Clean and dry the interior thoroughly. To prevent odor and mold growth,
leave the door open slightly: blocking it open if necessary.
Moving Your Wine Cooler
Remove all items.
Securely tape down all loose items (shelves) inside your appliance.
Turn the adjustable leg up to the base to avoid damage.
Tape the door shut.
Be sure the appliance stays secure in the upright position during transportation. Also
protect outside of appliance with a blanket, or similar item.
Energy Saving Tips
The Wine Cooler should be located in the coolest area of the room, away from heat
producing appliances, and out of the direct sunlight.
Page 16
15
PROBLEMS WITH YOUR WINE COOLER/BEVERAGE COOLER?
PROBLEM
POSSIBLE CAUSE
Wine cooler/beverage cooler does not operate.
Not plugged in.
The appliance is turned off.
The circuit breaker tripped or a blown fuse.
Wine cooler/beverage cooler is not cold enough.
Check the temperature control setting.
External environment may require a higher
setting.
The door is opened too often.
The door is not closed completely.
The door gasket does not seal properly.
Turns on and off frequently.
The room temperature is hotter than normal.
A large amount of contents has been added to
the Wine cooler/beverage cooler.
The door is opened too often.
The door is not closed completely.
The temperature control is not set correctly.
The door gasket does not seal properly.
The light does not work.
Not plugged in.
The circuit breaker tripped or a blown fuse.
The bulb has burned out.
The light button is “OFF”.
Vibrations.
Check to assure that the Wine cooler/beverage
cooler is level.
The Wine cooler/beverage cooler seems to make
too much noise.
The rattling noise may come from the flow of the
refrigerant, which is normal.
As each cycle ends, you may hear gurgling
sounds caused by the flow of refrigerant in your
Wine cooler/beverage cooler.
Contraction and expansion of the inside walls
may cause popping and crackling noises.
The Wine cooler/beverage cooler is not level.
The door will not close properly.
The Wine cooler/beverage cooler is not level.
The door was reversed and not properly
installed.
The gasket is dirty.
The shelves are out of position.
You can solve many common Wine cooler/beverage cooler problems easily, saving you the cost of a
possible service call. Try the suggestions below to see if you can solve the problem before calling the
servicer.
TROUBLESHOOTING GUIDE
To contact the technical assistance, visit our website: https://corporate.haier-europe.com/en/
Under the section “website”, choose the brand of your product and your country. You will be
redirected to the specific website where you can find the telephone number and form to contact the
technical assistance
Page 17
16
Availability Of Spare Parts
Recommended temperature SETTINGS
For storing ALL TYPES OF WINES
12 °C to 14
°C
Recommended DRINKING temperature
Champagne NV, Sparkling
6 °C
Champagne Vintage
10 °C
Dry White Semillon, Sauvignon Blanc
8 °C
Dry White Gewürztraminer, Riesling
10 °C
Dry White Chardonnay
10 °C
Vintage Chardonnay
14 °C
Sweet White Sauternes Monbazillac, Late Harvest ice wine
10 °C
Sweet whites vintage Sauternes
14 °C
Beaujolais
13 °C
Red Pinot Noir
16 °C
Vintage Pinot Noir red
18 °C
Red Cabernet, Merlot, French, Australian, New Zealand, Chilean, Argentinean,
Italian, Spanish, Californian
18 °C
Red Grenache, Syrah
16 °C
Thermostats, temperature sensors, printed circuit boards and light sources are available
for a minimum period of seven years after placing the last unit of the model on the
market.
Door handles, door hinges, trays and baskets for a minimum period of seven years and door
gaskets for a minimum period of 10 year, after placing the last unit of the model on the
market.
For further information about the product, please consult https://eprel.ec.europa.eu/ or scan the
QR on the energy label supplied with the appliance
Page 18

17
Čeština
Děkujeme vám za zakoupení tohoto výrobku.
Před použitím chladničky si pozorně přečtěte tento návod k použití, abyste mohli maximálně
využít jejích možností. Uchovejte veškerou dokumentaci pro pozdější použití nebo pro další
majitele. Tento výrobek je určen výhradně pro použití v domácnosti nebo podobná využití, jako
jsou:
- kuchyňské kouty pro zaměstnance v obchodech, kancelářích a na dalších pracovištích,
- statky, hotely, motely a další ubytovací zařízení,
- v ubytovacích zařízeních typu B&B (ubytování se snídaní),
- pro stravovací služby a podobná využití nikoli pro maloobchodní prodej.
Tento spotřebič se smí používat pouze pro účely skladování potravin, přičemž jakékoli jiné použití
je považováno za nebezpečné a výrobce nenese odpovědnost za případné nedodržení pokynů.
Doporučujeme vám také, abyste se seznámili se záručními podmínkami.
BEZPEČNOSTNÍ INFORMACE
Pozorně si přečtěte pokyny pro provoz a instalaci! Obsahují důležité informace o tom, jak instalovat,
používat a udržovat spotřebič.
Jestliže nedodržíte pokyny a varování, výrobce neponese odpovědnost. Uschovejte všechny
dokumenty pro následné použití nebo pro nového vlastníka
Nepřipojujte spotřebič k elektrickému napájení, dokud nebudou
odstraněny všechny obaly a chrániče pro přepravu. Uchovávejte
obalový materiál a jeho součásti mimo dosah dětí. Hrozí nebezpečí
udušení skládacími krabicemi a plastovou fólií!
Před zapnutím nechte stát nejméně 4 hodiny, aby se kompresorový
olej mohl usadit, pokud byla přeprava prováděna v horizontální
poloze.
Při dodání zkontrolujte, zda produkt není poškozen a že všechny
součásti a příslušenství jsou v dokonalém stavu.
Nesmí dojít k poškození chladicího okruhu.
Větrací otvory ve skříni spotřebiče nebo ve vestavné konstrukci
musí zůstat volné.
Nikdy nepoužívejte vodu k mytí polohy kompresoru, po očištění jej
důkladně otřete suchým hadříkem, abyste zabránili korozi.
Se spotřebičem vždy manipulujte alespoň ve dvou osobách, protože
je těžký
Nainstalujte spotřebič na místo odpovídající jeho velikost a
používání a vyrovnejte ho
Ujistěte se, že parametry elektrického napájení se shodují s údaji na
typovém štítku. V opačném případě kontaktujte elektrikáře
Spotřebič pracuje s napájením 220–240 VAC/50 Hz. Nenormální
kolísání napětí může způsobit, že spotřebič se nespustí, nebo se
poškodí regulátor teploty či kompresor, případně se může za chodu
ozývat neobvyklý hluk. V takovém případě by se měl nainstalovat
automatický regulátor
Page 19

18
Pouze pro Spojené království: Napájecí kabel spotřebiče je vybaven
trojpólovou zástrčkou (s uzemněním), která se zapojuje do
standardní trojpólové zásuvky (s uzemněním). Nikdy
neodřezávejte ani nedemontujte třetí kolík (uzemnění). Zástrčka
by měla být přístupná po instalaci spotřebiče
Dbejte na to, aby během přepravy a po přepravě/přemisťování
spotřebiče nebyl síťový kabel zachycen pod spotřebičem, aby
nedošlo k přeseknutí nebo poškození síťového kabelu. Pokud je
napájecí kabel poškozen, musí být vyměněn výrobcem, jeho
servisním technikem nebo podobně kvalifikovanou osobou, aby se
zabránilo nebezpečí.
Neumisťujte spotřebič ve vlhkém, mastném nebo prašném
prostředí, ani jej nevystavujte přímému slunečnímu záření a
působení vody.
Neumisťujte spotřebič do blízkosti topných těles nebo hořlavých
materiálů.
PRO spotřebiče s mrazákem: pokud dojde k výpadku napájení,
neotevírejte víko. Jestliže trvá výpadek méně hodin, než je uvedeno
na typovém štítku (Doba vzrůstu teploty), nemělo by to ovlivnit
zmrazené potraviny. Jestliže trvá výpadek déle, je nutné potraviny
zkontrolovat a okamžitě zkonzumovat, nebo uvařit a potom opět
zmrazit
Pokud zjistíte, že víko spotřebiče se ihned po zavření obtížně otvírá,
nemějte obavy. Je to způsobeno rozdílem tlaku, který se vyrovná
a za několik minut budete moci víko normálně otevřít
Ve spotřebiči neskladujte léky, bakterie ani chemické látky. Tento
spotřebič je určen k použití v domácnosti, nedoporučuje se v něm
skladovat materiály, které vyžadují přesně stanovené teploty
Netahejte silou za přívodní kabel ani jej neskládejte a nedotýkejte se
zástrčky mokrýma rukama.
Ve spotřebiči neskladujte látky obsahující hořlavý hnací plyn (např.
aerosolové nádoby) nebo výbušné látky. Hrozí nebezpečí výbuchu!
Nepokládejte na horní stranu chladničky nestabilní předměty (těžké
předměty, nádoby naplněné vodou), aby se předešlo zranění
způsobenému pádem nebo elektrickým proudem v důsledku styku
s vodou
Nepoužívejte elektrické spotřebiče uvnitř úložných oddílů pro
potraviny ve spotřebiči, pokud nejsou tyto typy přímo doporučeny
výrobcem.
Nedotýkejte se vnitřních chladicích prvků, zejména mokrýma
rukama, aby nedošlo k prasknutí nebo zranění.
Nebezpečí hrozí dětem, osobám s omezenými fyzickými, smyslovými
nebo duševními schopnostmi, stejně jako osobám s nedostatečnými
Page 20

19
znalostmi o bezpečném používání spotřebiče. Zkontrolujte, zda děti
a ohrožené osoby chápou nebezpečí. Osoba zodpovědná za
bezpečnost musí dohlížet na děti a ohrožené osoby používající
spotřebič, nebo je musí poučit. Spotřebič mohou používat pouze
děti starší osmi let"
Děti si se spotřebičem nesmějí hrát.
Děti ve věku od 3 do 8 let mohou do tohoto spotřebiče vkládat a
vyjímat z něj věci.
PRO spotřebiče s mrazákem: neukládejte do mrazáku tekutiny v
láhvích nebo plechovkách (zejména nápoje sycené oxidem
uhličitým). Láhve a plechovky mohou prasknout!
PRO spotřebiče s mrazákem: nikdy nevkládejte do úst zmrazené
potraviny přímo z mrazáku. Hrozí nebezpečí vzniku omrzlin!
Chraňte plastové součásti a těsnění dveří před olejem a tukem. Jinak
by se na plastových součástech a těsnění dveří mohly vytvořit póry
Před provedením jakéhokoli úkonu odpojte napájecí kabel ze
zásuvky.
Nepoužívejte mechanické nástroje nebo jiné prostředky k urychlení
procesu odmrazování, pokud nejsou doporučeny výrobcem.
K odstranění námrazy nepoužívejte špičaté nebo ostré předměty,
jako jsou nože nebo vidličky. K odmrazování nikdy nepoužívejte
vysoušeče vlasů, elektrické ohřívače nebo jiné podobné elektrické
spotřebiče.
Doporučuje se udržovat zástrčku v čistotě, neboť nadměrný nános
prachu na zástrčce může být příčinou požáru.
Nepokoušejte se opravovat, rozebírat nebo upravovat spotřebič
vlastními silami. Je-li nutná oprava, vždy se obraťte na náš
zákaznický servis.
Během čištění nebo údržby spotřebiče dohlížejte na děti.
Nečistěte chladné skleněné police horkou vodou. Náhlá změna
teploty by mohla způsobit, že sklo praskne.
VAROVÁNÍ: V trubicích chladicího okruhu proudí malé množství
chladiva (R600a) a izolačního plynu (cyklopentanu); tyto látky jsou
šetrné k životnímu prostředí, ale hořlavé. Nepoškozují ozónovou
vrstvu a nezvyšují účinky skleníkového efektu. Pokud chladivo
unikne, mohlo by vám poškodit zrak, nebo by se mohlo vznítit.
Pokud dojde k poškození okruhu chladiva:
- Vypněte spotřebič a vytáhněte zástrčku ze zásuvky.
- Nepřibližujte se ke spotřebiči s otevřeným plamenem a/nebo
zdroji vznícení.
- Důkladně vyvětrejte místnost, větrejte několik minut.
- Informujte zákaznický servis.
Page 21

20
VAROVÁNÍ: Nepoškoďte zástrčku a/nebo napájecí kabel; mohlo by
to způsobit úraz elektrickým proudem nebo požár.
VAROVÁNÍ: Nepoužívejte přenosné rozbočovací zásuvky ani
přenosné zdroje napájení.
Nedoporučujeme používat prodlužovací kabely ani rozbočovací
adaptéry.
Nepokoušejte se sedat si nebo stoupat na horní stranu spotřebiče.
Mohli byste se zranit nebo poškodit spotřebič. Spotřebič není
konstruován pro umístění na jiné spotřebiče.
Produkt je navržen a vyroben pouze pro domácí použití v
domácnosti.
Lze používat pouze originální náhradní díly dodané výrobcem.
Výrobce zaručuje, že pouze takové díly splňují bezpečnostní
požadavky.
Otevírání dveří na dlouhou dobu může v oddílech spotřebiče
způsobit výrazné zvýšení teploty
Pravidelně čistěte povrchy, které mohou přijít do styku s
potravinami, a přístupné odvodňovací systémy
Vyčistěte nádržky na vodu, pokud nebyly použity po dobu 48 hodin;
pokud voda nebyla odebrána po dobu 5 dnů, propláchněte vodní
systém připojený k přívodu vody
Syrové maso a ryby skladujte ve vhodných nádobách v chladničce
tak, aby nepřicházely do kontaktu s jinými potravinami nebo aby z
nich nekapalo na jiné potraviny
Dvouhvězdičkové oddíly pro zmrazené potraviny (pokud se ve
spotřebiči nacházejí) jsou vhodné pro skladování předem
zmrazených potravin, skladování nebo výrobu zmrzliny a výrobu
kostek ledu
Jedno-, dvou- a tříhvězdičkové oddíly (pokud se ve spotřebiči
nacházejí) nejsou vhodné pro zmrazování čerstvých potravin
Pokud necháváte spotřebič dlouhou dobu prázdný, vypněte jej,
odmrazte, vyčistěte, vysušte a nechte dveře otevřené, aby se
zabránilo tvorbě plísní uvnitř spotřebiče
U spotřebičů pro uchovávání vína: Tento spotřebič je určen
výhradně k uchovávání vína
U volně stojícího spotřebiče: Tento chladicí spotřebič není určen k
vestavění
U spotřebičů bez prostoru označeného čtyřmi hvězdičkami: Tento
chladicí spotřebič není vhodný pro mražení potravin
Page 22
21
Likvidace starých spotřebičů
Tento spotřebič je označen v souladu s evropskou směrnicí 2012/19/EU o odpadních elektrických a
elektronických zařízeních (WEEE).
Spotřebič podléhající WEEE obsahuje znečišťující látky (které mohou mít negativní dopad na životní
prostředí) a základní součásti (které lze znovu použít). U spotřebiče podléhajícího WEEE je důležité
nechat provést zvláštní zpracování, aby všechny znečišťující látky byly odstraněny a řádně
zlikvidovány a aby všechny materiály byly obnoveny a zrecyklovány.
Jednotlivci mohou hrát důležitou roli při zajišťování toho, aby se spotřebič podléhající WEEE nestal
zátěží pro životní prostředí. Je nezbytné dodržovat několik základních pravidel:
- Spotřebič podléhající WEEE se nesmí likvidovat jako domovní odpad;
- Spotřebič podléhající WEEE se musí předat na příslušné sběrné místo pod správou obce nebo
autorizovaných společností. V mnoha zemích může být v případě velkých spotřebičů podléhajících
WEEE k dispozici domovní sběr.
V mnoha zemích, když si zakoupíte nový spotřebič, můžete starý spotřebič vrátit prodejci, který jej
musí přijmout zdarma na základě výměny kus za kus, pokud je zařízení stejného typu a má stejné
funkce jako dodané zařízení.
Shoda
Umístěním značky na tento produkt potvrzujeme shodu se všemi příslušnými evropskými
požadavky na bezpečnost, zdraví a životní prostředí, které se uplatňují dle právních předpisů pro
tento produkt.
Záruka
Minimální záruka je: 2 roky pro země EU, 3 roky pro Turecko, 1 rok pro Spojené království, 1 rok pro
Rusko, 3 roky pro Švédsko, 2 roky pro Srbsko, 5 let pro Norsko, 1 rok pro Maroko, 6 měsíců pro
Alžírsko, pro Tunisko není vyžadována žádná právní záruka.
Úspora energie
Pro lepší úsporu energie doporučujeme:
Instalujte spotřebič v dobře větrané místnosti, daleko od zdrojů tepla a nevystavujte jej
přímému slunečnímu záření.
Vyvarujte se vkládání horkých potravin do chladničky, abyste se vyhnuli nárůstu vnitřní teploty a
s tím spojenému nepřetržitému chodu kompresoru.
Neukládejte nadměrné množství potravin, aby bylo zajištěno dostatečné proudění vzduchu.
Odmrazujte spotřebič v případě výskytu ledu, abyste usnadnili přenos chladu.
V případě výpadku elektrické energie se doporučuje nechat dveře chladničky zavřené.
Otevírejte nebo ponechávejte dveře spotřebiče otevřené v co nejmenším možném rozsahu.
Vyvarujte se úpravě nastavení na příliš nízké teploty.
Odstraňujte prach ze zadní části spotřebiče.
Page 23

22
POKYNY K INSTALACI
Před použitím chladničky na víno
Odstraňte vnější a vnitřní obal.
Před připojením chladničky na víno ke zdroji napájení ji nechte stát přibližně 2 hodiny ve
vzpřímené poloze. Tím se sníží možnost závady chladicího systému manipulací při přepravě.
Očistěte vnitřní plochy měkkou utěrkou namočenou ve vlažné vodě.
Při likvidaci spotřebiče zvolte autorizované místo likvidace.
Instalace chladničky na víno
Tento spotřebič je určen k instalaci ve volném stoje nebo vestavěný (plně zapuštěný) (viz
umístění nálepky na zadní straně tohoto spotřebiče).
Tento spotřebič je určen výhradně pro skladování vína nebo nápojů.
Umístěte chladničku na víno na dostatečně pevnou podlahu, aby ji po plném naložení unesla.
Chcete-li vyrovnat chladničku na víno, nastavte přední vyrovnávací nohu ve spodní části
chladničky na víno.
Tento spotřebič používá hořlavé chladivo, takže během přepravy nikdy nepoškoďte chladicí
potrubí. Umístěte chladničku na víno mimo přímé sluneční světlo a zdroje tepla (sporák,
topení, radiátor atd.). Přímým slunečním osvitem by se mohl poškodit akrylový povrch a
blízké zdroje tepla by mohly zvýšit spotřebu elektrické energie. Extrémně nízká okolní teplota
může také vést k tomu, že spotřebič nebude fungovat správně.
Nedávejte jednotku do vlhkých míst.
Připojte chladničku na víno do vyhrazené, řádně uzemněné zásuvky. Za žádných okolností
neodřezávejte ani jinak neodstraňujte z dodané napájecí šňůry třetí (uzemňovací) kolík. Se
všemi otázkami ohledně napájení či uzemnění se obraťte přímo na kvalifikovaného
elektrikáře nebo autorizované servisní středisko výrobce.
Pozor
Skladujte víno v uzavřených lahvích;
Skříň nepřeplňujte;
Neotvírejte dvířka, pokud to není nutné;
Nezakrývejte police hliníkovou fólií nebo jiným materiálem, který by mohl bránit proudění
vzduchu;
Pokud je chladnička na víno skladována bez použití po dlouhou dobu, doporučuje se po
pečlivém vyčištění nechat dvířka otevřená, aby mohl vzduch cirkulovat uvnitř skříně, aby
nedocházelo k tvorbě kondenzace, plísní nebo zápachu.
Mezní hodnoty okolní teploty
Tento spotřebič je konstruován pro provoz při okolních teplotách stanovených jeho teplotní třídou
vyznačenou na jmenovitém štítku.
Rozšířené mírné pásmo (SN): „Tento chladicí spotřebič je určen k používání při teplotách
okolí od 10 °C do 32 °C.“
Mírné pásmo (N): „Tento chladicí spotřebič je určen k používání při teplotách okolí od 16 °C
do 32 °C.“
Subtropické pásmo (ST): „Tento chladicí spotřebič je určen k používání při teplotách okolí od
16 °C do 38 °C.“
Tropické pásmo(T): „Tento chladicí spotřebič je určen k používání při teplotách okolí od 16 °C
do 43 °C.“
Page 24

23
PROVOZ CHLADNIČKY NA VÍNO/CHLADNIČKY NA NÁPOJE
A NASTAVENÍ REGULACE TEPLOTY
Pokyny pro ovládací systém
Tlačítko „ “
Pro ovládání zapnutí/vypnutí tohoto spotřebiče (stiskněte a podržte tato tlačítka přibližně 3
sekundy).
Tlačítko „ “
Pro ovládání zapnutí/vypnutí vnitřního osvětlení.
Tlačítko „ “
Nastavení teploty horní komory.
Tlačítko „ “
Nastavení teploty spodní komory.
Okno LED displeje vlevo
Nastavení teploty horní komory.
Okno LED displeje vpravo
Nastavení teploty spodní komory.
Kontrolka
Kompresor na provozním displeji.
Nastavení regulace teploty
Stisknutím tlačítka „ “ nebo „ “ systém automaticky přejde do režimu nastavení v
horní nebo spodní přihrádce. LED indikátor bude blikat a zobrazí nastavenou teplotu.
Stisknutím tlačítka se teplota sníží nebo zvýší o 1 ℃. Při překročení minimální hodnoty, která
může být stanovena, automaticky přeskočí na nejvyšší nastavitelnou hodnotu teploty. Po
uvolnění tlačítka na 5 sekund LED obrázek přestane blikat, a poté se vrátí zpět a zobrazí se
teplota horní nebo spodní přihrádky.
Po odpojení jednotky se systém vrátí na souhlasnou teplotu, která je nastavena v továrně. Níže
uvedená souhlasná teplota:
Horní přihrádka: 6 °C
Spodní přihrádka: 12 °C
Chcete-li zobrazit každou vnitřní teplotu, stiskněte tlačítko „Set Upper“ (Nastavit horní) nebo
„Set Lower“ (Nastavit dolní), LED bude blikat a zobrazí nastavenou teplotu. Po uvolnění tlačítka
na 5 sekund LED obrázek přestane blikat, a poté se vrátí zpět a zobrazí se skutečná teplota.
Horní přihrádka: Teplotu lze nastavit od 5°C do 10 °C.
Spodní přihrádka: Teplotu lze nastavit od 10 °C do 18 °C.
Page 25
24
Teplotní alarm
Pokud je teplota uvnitř vyšší než 23 °C, na displeji se zobrazí „HI“ , a po jedné hodině zazní alarm /
bzučák. To znamená, že teplota uvnitř je příliš vysoká. Pokud je teplota uvnitř nižší než 0 °C, na
displeji se zobrazí „LO“ a současně je aktivní indikátor poruchy i alarmu.
Funkce obnovení teploty
V případě přerušení napájení si chladnička na víno může zapamatovat předchozí nastavení teploty a
při obnovení napájení se teplota chladničky vrátí na stejnou nastavenou teplotu jako při vypnutí
napájení.
Vnitřní osvětlení
Aby se snížila spotřeba energie, v této vinotéce se automaticky vypne LED osvětlení po 10 minutách.
Pokud chcete, aby LED osvětlení nepřetržitě svítilo, je to možné. Stiskněte a podržte tlačítko „LIGHT“
(OSVĚTLENÍ) po dobu 5 sekund, na displeji se zobrazí „LP“. Po 4 sekundách se displej vrátí do
normálu a osvětlení zůstane rozsvíceno, dokud se ručně nevypne.
Chcete-li se vrátit k původnímu nastavení a šetřit energii (doporučeno), stiskněte a podržte tlačítko
„LIGHT“ (OSVĚTLENÍ) po dobu 5 sekund, na displeji se zobrazí „LF“, po 4 sekundách se displej vrátí
zpět do normálu a osvětlení se automaticky vypne po 10 minutách.
Police
Aby nedošlo k poškození těsnění dvířek, ujistěte se, že jsou při vytahování polic z prostoru
kolejnice dvířka zcela otevřená.
Pro snadný přístup k uloženému obsahu je nutné vytáhnout police přibližně z 1/3 z prostoru
kolejnice, nicméně tato jednotka byla navržena se zářezem na obou stranách kolejí pro police,
aby se zabránilo pádu lahví.
Chcete li při vyjímání kterékoli z těchto polic z prostoru kolejnice vložit nebo vyjmout polici,
nakloňte polici podle schématu a jednoduše ji vytáhněte nebo zatlačte, dokud se bezpečně
neuloží na podpěrné konzoly.
POZNÁMKA:
Pokud je jednotka odpojena, dojde ke ztrátě nebo vypnutí napájení, musíte před restartováním
vyčkat 3 až 5 minut. Pokud se pokusíte restartovat před tímto zpožděním, chladnička na
víno/chladnička na nápoje se nespustí.
Při prvním použití chladničky na víno/chladničky na nápoje nebo restartování chladničky na
víno/chladničky na nápoje po dlouhém vypnutí může dojít k několika stupňům rozdílu mezi vámi
zvolenou teplotou a teplotou uvedenou na LED indikátoru. To je běžné a je to kvůli délce
aktivační doby. Jakmile bude chladnička na víno/chladnička na nápoje několik hodin v provozu,
vše se vrátí do normálu.
Page 26

25
Jak změnit otevírání dvířek
Tento spotřebič má reverzibilní dvířka, ale dodává se s dvířky zavěšenými vpravo. Sada levého
závěsu je dodávána s jednotkou (v krabici), pokud chcete změnit stranu závěsu na jednotce.
Typ A (pro celoskleněné / nerezové dveře)
1. Spodní závěs (pravý) 2. Šrouby 3. Osa dvířek
4. Dvířka 5. Horní závěs (pravý) 6. Závěsné šrouby
7. Horní závěs (levý) 8. Kryt otvoru 9. Spodní závěs (levý)
10. Omezovač dvířek 11. Šroub
1. Otevřete dvířka pod úhlem 90 stupňů, vyjměte 2 šrouby (2) z osy spodních dvířek (3), vyjměte
dvířka (4), vyjměte osovou destičku (3) ze dvířek, (obr. A).
2. Odšroubujte šroub (11) umístěný pod rámem dvířek a omezovačem (10) a přemístěte jej na levou
stranu rámu dvířek. (obr. A/B)
3. Vyberte 3 šrouby závěsu (6) z horního závěsu (pravý) (5) a vyjměte jej. (obr. C)
4. Odstraňte ozdobný hřebík (8) z levého horního okraje skříně a namontujte náhradní horní závěs
(levý) (7) v levém horním okraji skříně pomocí 3 šroubů. (obr. D)
5. Podle výše uvedeného postupu nainstalujte nalevo náhradní spodní závěs (9). (obr. E)
6. Namontujte a zarovnejte dvířka.
7. Vložte plastové uzávěry, abyste zakryli otvory (8).
Page 27
26
Typ B (pro tenké dveře z nerezové oceli)
1. Dolní závěs (vpravo) 2. Šrouby 3. Osa dvířek
4. Dvířka 5. Horní závěs (pravý) 6. Šrouby
7. Horní závěs (vlevo) 8. Dolní závěs (vlevo)
1. Demontujte 2 šrouby (2), poté zatáhněte za dvířka (4) podle směru šipky a dolní závěs (vpravo)
(1), také pro montáž. (Obr. A a obr. B)
2. Demontujte 3 šrouby (6) pravého horního závěsu a odstraňte pravý horní (5) a pravý dolní závěs
(1). (Viz obr. C)
3. Použijte šrouby, které jste odstranili z pravých bočních závěsů pro upevnění levých horních a
spodních závěsů (7) (8). (Viz obr. D a obr. E)
4. Otočte dvířka o 180 stupňů, a poté je namontujte opačným způsobem jako při demontáži.
Page 28

27
Schéma uložení
+
=
+
+
+
+
V závislosti od aktuální konfigurace vašeho produktu zkontrolujte příslušné schéma uložení.
Celkem: 46 lahví (max.)
Energeticky nejúspornější konfigurace vyžaduje, aby byly ve spotřebiči nainstalovány police, viz
obrázky výše.
Specifikace instalace pro zabudování
Pro výšku 813 mm s celoskleněnými / nerezovými dveřmi
Page 29
28
Pro výšku 813 mm s úzkými nerezovými dvířky
Pro výšku 865 mm s celoskleněnými / nerezovými dveřmi
Page 30

29
Pro výšku 865 mm s úzkými nerezovými dvířky
PÉČE A ÚDRŽBA
Čistění chladničky na víno
Vypněte napájení, odpojte spotřebič a odstraňte všechny položky, včetně polic a stojanu.
Vnitřní povrchy umyjte roztokem teplé vody s jedlou sodou. Pro vytvoření roztoku rozpusťte
2 polévkové lžíce v jednom litru vody.
Police umyjte jemným roztokem čisticího prostředku.
Při čištění oblasti ovládacích prvků nebo jakýchkoli elektrických částí odstraňte přebytečnou
vodu z houby nebo hadříku.
Vnější povrch umyjte teplou vodou a jemným tekutým čisticím prostředkem. Dobře
opláchněte a otřete do sucha čistým měkkým hadříkem.
Page 31
30
Jak vyměnit uhlíkový filtr (pokud jsou ve vašem spotřebiči přítomny)
Uhlíkové filtry jsou umístěny v pravý horní roh každé zóny vinotéky.
Otevřete dvířka a vyjměte 2 horní police (viz vyjmutí polic).
Otočte filtr podle obr. A.
Podle obr. B by měl být filtr zarovnán se zářezy, jak je znázorněno na obrázku.
Vytáhněte filtr (obr. C).
Vložte náhradní filtr a otočte jej podle obr. A, aby byl zajištěn.
Vložte police zpět.
Výpadek dodávky elektřiny
Většina výpadků napájení je vyřešena během několika hodin a neměla by ovlivnit
teplotu spotřebiče, pokud minimalizujete počet otevření dvířek. Při dlouhodobějším výpadku
proudu musíte přijmout opatření na ochranu vín v ní uložených.
Doba dovolené
Krátká dovolená: Během dovolené kratší než tři týdny nechte chladničku na víno v provozu.
Dlouhá dovolená: Pokud nebude spotřebič používán několik měsíců, odstraňte všechny položky
a vypněte jej. Vyčistěte a důkladně vysušte vnitřek spotřebiče. Abyste zabránili vzniku zápachu a
plísní, nechte dvířka mírně otevřené: v případě potřeby je zablokujte otevřená.
Přemístění chladničky na víno
Vyberte všechny položky.
Upevněte pečlivě všechny volné díly (police) uvnitř spotřebiče.
Nastavitelnou nohu otočte nahoru k základně, aby nedošlo k poškození.
Zajistěte dvířka páskou.
Během přepravy zajistěte, aby spotřebič zůstal ve vzpřímené poloze. Chraňte také vnější
povrch spotřebiče přikrývkou nebo podobným předmětem.
Tipy pro úsporu energie
Chladnička na víno by měla být umístěna v nejchladnější části místnosti, mimo dosah
spotřebičů produkujících teplo a mimo přímé sluneční světlo.
Page 32

31
PROBLÉMY S CHLADNIČKOU NA VÍNO/CHLADNIČKOU NA NÁPOJE?
PROBLÉM
MOŽNÁ PŘÍČINA
Chladnička na víno/chladnička na nápoje
nefunguje.
Není zapojená v zásuvce.
Spotřebič je vypnutý.
Vypadlý jistič nebo spálená pojistka.
V chladničce na víno/chladničce na nápoje není
dostatečný chlad.
Zkontrolujte nastavení regulace teploty.
Je možné, že je v daném prostředí nutno nastavit
nižší teplotu.
Dveře jsou otevírané příliš často.
Dveře nejsou řádně zavřené.
Dveřní těsnění netěsní.
Často se zapíná a vypíná.
Teplota v místností je vyšší než normálně.
Do chladničky na víno/chladničky na nápoje bylo
přidáno velké množství obsahu.
Dveře jsou otevírané příliš často.
Dveře nejsou řádně zavřené.
Ovladač teploty není správně nastavený.
Dveřní těsnění netěsní.
Světlo nesvítí.
Není zapojená v zásuvce.
Vypadlý jistič nebo spálená pojistka.
Žárovka je spálená.
Tlačítko osvětlení je „VYPNUTO“.
Vibrace.
Zkontrolujte, zda je chladnička na
víno/chladnička na nápoje vyrovnaná.
Zdá se, že chladnička na víno/chladnička na
nápoje vydává příliš velký hluk.
Hrčení může být způsobeno prouděním chladiva,
což je normální.
Jak každý cyklus končí, můžete slyšet bublání
způsobené průtokem chladiva v chladničce na
víno/chladničce na nápoje.
Kontrakce a rozšíření uvnitř stěn může způsobit
pukání a praskání.
Chladnička na víno/chladnička na nápoje není
vyrovnaná.
Dveře se nedají řádně zavřít.
Chladnička na víno/chladnička na nápoje není
vyrovnaná.
Dvířka byla obrácena a nebyla správně
nainstalována.
Těsnění je znečistěné.
Police nejsou na svém místě.
Mnoho běžných problémů s chladničkou na víno/chladničkou na nápoje můžete snadno vyřešit, čímž
ušetříte náklady na možný servisní hovor. Než zavoláte na servis, pokuste se problém vyřešit podle
níže uvedených doporučení.
PRŮVODCE ŘEŠENÍM PROBLÉMŮ
Chcete-li kontaktovat technickou pomoc, navštivte naše webové stránky: https://corporate.haiereurope.com/en/ . V sekci „ websites “ vyberte značku vašeho produktu a vaši zemi. Budete
přesměrováni na konkrétní webovou stránku, kde najdete telefonní číslo a formulář pro
kontaktování technické pomoci
Page 33
32
Dostupnost náhradních dílů
Doporučená NASTAVENÍ teploty
Pro skladování VŠECH DRUHŮ VÍN
12 °C to 14 °C
Doporučená PITNÁ teplot
Šampaňské neročníkové, šumivé
6 °C
Šampaňské ročníkové
10 °C
Suchý bílý semilon, Sauvignon Blanc
8 °C
Suchý bílý Gewürztraminer, Ryzlink
10 °C
Suché bílé Chardonnay
10 °C
Ročníkové Chardonnay
14 °C
Sladké bílé Sauternes Monbazillac, pozdní sklizeň ledového vína
10 °C
Sladké bílé ročníkové Sauternes
14 °C
Beaujolais
13 °C
Rulandské modré
16 °C
Ročníkové Rulandské modré
18 °C
Červený Cabernet, Merlot, francouzský, australský, novozélandský, chilský,
argentinský, italský, španělský, kalifornský
18 °C
Red Grenache, Syrah
16 °C
Termostaty, teplotní čidla, desky plošných spojů a zdroje světla, po dobu alespoň sedmi let
poté, co byl na trh uveden poslední kus daného modelu;
Dveřní kliky, dveřní závěsy, přihrádky a koše po dobu alespoň sedmi let a těsnění dveří po
dobu alespoň deseti let poté, co byl na trh uveden poslední kus daného model
Další informace o produktu naleznete na adrese https://eprel.ec.europa.eu/ nebo naskenujte QR
na energetickém štítku dodaném se zařízením
Page 34

33
Español
Gracias por comprar este producto.
Antes de utilizar el frigorífico, lea con atención el manual de instrucciones para aprovechar al
máximo sus prestaciones. Guarde toda la documentación para utilizarla más adelante o para otros
propietarios. Este producto es para uso doméstico o para aplicaciones similares exclusivamente;
por ejemplo:
- Cocina para el personal de tiendas, oficinas y otros lugares de trabajo
- Fincas rústicas, clientes de hoteles, moteles y otros entornos residenciales
- Habitaciones de huéspedes (Bed and Breakfasts)
- Servicios de catering y aplicaciones similares no destinadas a la venta al pormenor
Este electrodoméstico solo debe utilizarse para conservar alimentos, cualquier otro uso se
considera peligroso y el fabricante no se responsabilizará cuando se incumplan las instrucciones.
Asimismo, se recomienda tomar nota de las condiciones de la garantía.
INFORMACIÓN DE SEGURIDAD
¡Lea atentamente las instrucciones de funcionamiento e instalación! Contienen información
importante sobre cómo instalar, utilizar y mantener este electrodoméstico. El fabricante no se hace
responsable si no cumple las instrucciones y advertencias. Guarde todos los documentos para
consultas o propietarios futuros."
No conecte el electrodoméstico a la red eléctrica hasta retirar por
completo todos los embalajes y protectores para el transporte.
Mantenga a los niños alejados del embalaje y de sus partes. ¡Los
cartones plegables y el film plástico suponen un peligro de asfixia!"
Si el electrodoméstico se ha transportado en horizontal, espere al
menos 4 horas antes de encenderlo para que el aceite del
compresor se asiente.
Cuando reciba el electrodoméstico, compruebe que no está dañado
y que todos los componentes y accesorios se encuentran en
perfecto estado.
No dañe el circuito de refrigerante.
Mantenga despejadas las ranuras de ventilación de la carcasa del
electrodoméstico o de la estructura integrada.
No utilice agua para limpiar la zona del compresor; pase
meticulosamente un trapo seco después de limpiar para evitar que
se oxide.
Este electrodoméstico es pesado: manipúlelo con la ayuda de otra
persona.
Instale y nivele el electrodoméstico en un área adecuada para su
tamaño y uso.
Asegúrese de que la información eléctrica de la etiqueta de
características coincida con la fuente de alimentación. Si no es así,
póngase en contacto con un electricista.
Este electrodoméstico funciona mediante una fuente de
alimentación de 220-240 V CA/50 Hz. Una fluctuación anormal del
Page 35

34
voltaje puede provocar que el electrodoméstico no se ponga en
marcha, o que se dañe el control de temperatura o el compresor, o
que se oiga un ruido anormal durante el funcionamiento. En tal
caso, se deberá instalar un regulador automático.
Solo para el Reino Unido: El cable de alimentación de este
electrodoméstico está equipado con un enchufe de 3 cables (a
tierra) que se ajusta a una toma de corriente estándar de 3 cables
(a tierra). No corte ni desmonte la tercera patilla (toma de tierra).
Una vez instalado el electrodoméstico, el enchufe debe ser
accesible.
Asegúrese de que el cable eléctrico no quede atrapado debajo el
electrodoméstico durante y después de su transporte/traslado
para evitar cortes o daños en el cable. Para evitar riesgos, el
fabricante, su representante de servicio o cualquier otra persona
cualificada deben cambiar cualquier cable de alimentación que esté
dañado
No instale el electrodoméstico en lugares húmedos, con grasa o
polvo, ni lo exponga a la luz solar directa y al agua.
No instale el electrodoméstico cerca de calentadores o materiales
inflamables.
PARA electrodomésticos con compartimento congelador: en caso de
corte del suministro eléctrico, no abra la puerta. Los alimentos
congelados no deben verse afectados si el corte dura menos que las
horas indicadas en la etiqueta de valores máximos (tiempo de
aumento de la temperatura). Si el corte se prolonga durante más
tiempo, deberá procederse a la comprobación de los alimentos y
consumirse de inmediato; también se pueden cocinar y volver a
congelar.
Si le resulta difícil abrir la puerta del electrodoméstico justo
después de cerrarla, no se preocupe. Esto se debe a la diferencia de
presión que deberá ecualizarse para permitir que la puerta vuelva
a abrirse normalmente transcurridos unos minutos.
No almacene medicamentos, bacterias ni agentes químicos en el
electrodoméstico. Este aparato es un electrodoméstico: no se
recomienda almacenar materiales que requieran temperaturas
extremas.
No tire del cable ni doble demasiado; tampoco debe tocar el
enchufe con las manos mojadas.
No almacene productos que contengan propelentes inflamables
(p.ej.: aerosoles) o sustancias explosivas en el electrodoméstico. ¡
Peligro de explosión!
No coloque artículos inestables (objetos pesados, recipientes llenos
de agua) en la parte superior del frigorífico, a fin de evitar lesiones
Page 36

35
personales causadas por caídas o descargas eléctricas causadas por
el contacto con el agua.
No utilice aparatos eléctricos dentro de los compartimentos para la
conservación de alimentos del electrodoméstico, a menos que sean
del tipo que recomienda el fabricante.
Para evitar cortes o lesiones, no toque los elementos internos de
refrigeración, sobre todo con las manos húmedas.
Aquí están en riesgo los niños, las personas con capacidades físicas,
mentales o sensoriales limitadas y las personas con conocimientos
inadecuados sobre el funcionamiento seguro de este
electrodoméstico. Compruebe que los niños y las personas
vulnerables hayan entendido los riesgos. Una persona responsable
de la seguridad debe supervisar o instruir a los niños y a las
personas vulnerables que utilicen este electrodoméstico. Solo los
niños mayores de 8 años pueden usar este electrodoméstico.
Los niños no deben jugar con el electrodoméstico
Está permitido que los niños de 3 a 8 años de edad carguen o
descarguen este aparato.
PARA electrodomésticos con compartimento congelador: no
almacene líquidos embotellados o enlatados (especialmente
bebidas carbonatadas) en el congelador. ¡Las botellas y latas
pueden explotar!
PARA electrodomésticos con compartimento congelador: nunca se
ponga alimentos congelados en la boca directamente desde el
congelador. ¡Peligro de quemaduras por baja temperatura!
Mantenga las piezas de plástico y la junta de la puerta limpias de
aceite y grasa. De lo contrario, las partes plásticas y la junta de la
puerta se volverán porosas.
Antes de realizar cualquier operación, desconecte el cable eléctrico
de la toma de corriente.
No utilice aparatos mecánicos ni otros medios para acelerar el
proceso de descongelación y siga las recomendaciones del
fabricante.
No utilice objetos afilados o puntiagudos, como cuchillos o
tenedores, para quitar el hielo. Nunca utilice secadores de pelo,
calentadores eléctricos u otros aparatos eléctricos para
descongelar el electrodoméstico.
Se recomienda mantener limpio el enchufe. Cualquier acumulación
excesiva de polvo en el enchufe podría originar un incendio.
No intente reparar, desmontar o modificar este electrodoméstico
por su cuenta. En caso de necesitar reparación, póngase siempre en
contacto con nuestro servicio de atención al cliente.
Page 37

36
Supervise a los niños mientras se realizan tareas de limpieza o
mantenimiento en el electrodoméstico.
No limpie los estantes de cristal fríos con agua caliente. El cambio
repentino de temperatura puede causar que el vidrio se rompa.
ADVERTENCIA: Los tubos del circuito de refrigeración transportan
una pequeña cantidad de refrigerante ecológico pero inflamable
(R600a) y gas aislante (ciclopentano). No daña la capa de ozono y
no aumenta el efecto invernadero. Si se producen fugas de
refrigerante, este puede causar lesiones en los ojos o inflamarse.
En caso de producirse daños en el circuito de refrigerante:
- Apague el electrodoméstico y desenchúfelo de la red eléctrica.
- Mantenga las llamas abiertas y/o las fuentes de ignición alejadas
del electrodoméstico.
- Ventile la habitación durante varios minutos.
- Informe al servicio de atención al cliente.
ADVERTENCIA: No dañe el enchufe o el cable de alimentación; esto
podría provocar incendios o descargas eléctricas.
ADVERTENCIA: No utilice tomas de corriente múltiples portátiles ni
fuentes de alimentación portátiles. No recomendamos el uso de
cables prolongadores ni adaptadores con varias tomas.
No intente sentarse o ponerse de pie en la parte superior del
electrodoméstico. Esto podría dañarlo o sufrir lesiones personales.
Este electrodoméstico no se puede instalar apilado sobre otro.
El electrodoméstico es un producto diseñado y fabricado para el
uso doméstico.
Solo pueden usarse piezas originales suministradas por el
fabricante. El fabricante garantiza que solo estas piezas cumplen
los requisitos de seguridad.
Abrir la puerta durante un tiempo prolongado puede provocar un
aumento significativo de la temperatura en los compartimentos del
electrodoméstico
Limpie regularmente las superficies que puedan entrar en contacto
con alimentos y sistemas de drenaje accesibles
Limpie los depósitos de agua si no se han utilizado durante 48
horas. Enjuague el sistema de agua conectado al suministro de agua
si no se ha extraído agua durante 5 días
Guarde la carne y el pescado crudos en recipientes adecuados en el
frigorífico, para evitar que entren en contacto con otros alimentos o
goteen sobre ellos
Los compartimentos de congelación de dos estrellas (si el aparato
dispone de ellos) son adecuados para conservar alimentos
precongelados, guardar o hacer helados y producir cubitos de hielo
Page 38

37
Los compartimentos de una, dos y tres estrellas (si el aparato
dispone de ellos) no son adecuados para congelar alimentos frescos
Para evitar la aparición de moho, el aparato se debe apagar,
descongelar, limpiar y secar, además de dejar la puerta abierta,
cuando vaya a permanecer vacío durante largos periodos de tiempo
En el caso de los armarios para la conservación de vinos: Aparato
destinado a utilizarse exclusivamente para la conservación de vinos
En el caso de los aparatos de libre instalación: Este aparato no está
destinado a utilizarse como aparato encastrable
En el caso de los aparatos sin compartimento de cuatro estrellas:
Este aparato no es adecuado para la congelación de productos
alimenticios
Page 39

38
Desguace de electrodomésticos antiguos
Este electrodoméstico tiene la marca de conformidad con la Directiva europea 2012/19/UE sobre
residuos de aparatos eléctricos y electrónicos (RAEE).
Los RAEE contienen sustancias contaminantes (que pueden tener consecuencias negativas para el
medio ambiente) y componentes básicos (que pueden reutilizarse). Es importante someter los RAEE
a procedimientos específicos para eliminar y desechar de manera correcta todos los contaminantes,
además de recuperar y reciclar todos los materiales.
Todos personalmente somos importantes cuando se trata de garantizar que los RAEE no se
conviertan en un problema ambiental. Para esto, es fundamental respetar algunas reglas básicas:
- Los RAEE no deben tratarse como residuos domésticos.
- Los RAEE deben entregarse en los puntos de recogida pertinentes que gestionan los municipios o
las empresas autorizadas. En algunos países existe un servicio de recogida de RAEE de gran
tamaño.
En muchos países se puede entregar el electrodoméstico antiguo al comprar otro nuevo en el
establecimiento, que deberá recogerlo de forma gratuita siempre que se trate de un aparato
equivalente y que tenga las mismas funciones que el suministrado.
Conformidad
Al colocar la marca en este producto, declaramos, bajo nuestra propia responsabilidad, el
cumplimiento de todos los requisitos europeos en términos de seguridad, salud y medio ambiente,
establecidos en la legislación para este producto.
Garantía
La garantía mínima es: 2 años para los países de la UE, 3 años para Turquía, 1 año para el Reino
Unido, 1 año para Rusia, 3 años para Suecia, 2 años para Serbia, 5 años para Noruega, 1 año para
Marruecos y 6 meses para Argelia. En Túnez no se requiere garantía legal.
Ahorro energético
Para ahorrar más energía, recomendamos lo siguiente:
Instale el electrodoméstico en un lugar con buena ventilación, que esté lejos de fuentes de
calor y no quede expuesto a la luz solar directa.
Procure no guardar alimentos calientes en el frigorífico para evitar que la temperatura
interior aumente y el compresor funcione de manera continua.
No introduzca demasiados alimentos para garantizar una circulación de aire adecuada.
Descongele el electrodoméstico si tiene hielo para facilitar la transferencia del frío.
Si se corta la corriente eléctrica, es aconsejable mantener las puertas del frigorífico cerradas.
Abra las puertas o manténgalas abiertas lo menos posible.
Evite ajustar temperaturas demasiado bajas.
Elimine el polvo de la parte trasera del electrodoméstico.
Page 40

39
INSTRUCCIONES DE INSTALACIÓN
Antes de utilizar la cámara de vinos
Quite el embalaje exterior e interior.
Antes de conectar la cámara de vinos a la corriente, deje que repose en vertical durante 2
hora aproximadamente. Esto reducirá la probabilidad de que la manipulación durante el
transporte ocasione averías en el sistema de refrigeración.
Limpie las superficies interiores con un paño suave humedecido en agua templada.
Este electrodoméstico está diseñado para su uso en el hogar y en aplicaciones parecidas,
como:
- zonas de cocina para empleados en negocios, oficinas y otros entornos laborales;
- granjas y por clientes de hoteles, moteles y otros establecimientos de tipo residencial;
- otros establecimientos de hospedaje;
- servicios de catering y otras aplicaciones similares no minoristas.
Cuando deseche el electrodoméstico, hágalo en un centro autorizado.
Instalación de la cámara de vinos
Este electrodoméstico está diseñado para instalarse de manera autónoma o integrado
(completamente empotrado) (consulte la pegatina de la parte trasera de este
electrodoméstico).
Este aparato está diseñado para guardar vino o bebidas exclusivamente.
Coloque la cámara de vinos en el suelo, en un lugar que pueda soporte su peso cuando está
completamente lleno. Para nivelar la cámara de vinos, ajuste la pata delantera de la parte
inferior de la cámara.
Este electrodoméstico utiliza refrigerante inflamable. La tubería de refrigerante no debe
dañarse durante el transporte. Sitúe la cámara de vinos lejos de la luz solar directa y de
fuentes de calor (estufas, calentadores, radiadores, etc.). La luz del sol puede afectar al
revestimiento acrílico, mientras que las fuentes de calor pueden provocar un aumento del
consumo de electricidad. Una temperatura ambiente muy fría también puede hacer que el
aparato no funcione correctamente.
Evite instalar el aparato en zonas húmedas.
Conecte la cámara en una toma de pared correctamente conectada a tierra y exclusiva. Bajo
ninguna circunstancia deberá cortarse ni quitarse la tercera clavija del cable de alimentación.
Si tiene cualquier duda o pregunta sobre alimentación o tomas de tierra, consulte a un
electricista cualificado o a un centro de servicio técnico autorizado.
Atención
Guarde el vino en botellas herméticamente cerradas.
No sobrecargue el armario.
No abra la puerta a menos que sea necesario.
No cubra los estantes con papel de aluminio o cualquier otro material que pueda
obstaculizar la circulación del aire.
Cuando la cámara vaya a permanecer sin utilizar durante largos periodos de tiempo, se
recomienda dejar la puerta entreabierta después de efectuar una limpieza exhaustiva para
permitir la circulación de aire por el interior del armario con el fin de evitar que se genere
condensación, moho o malos olores.
Límites de temperatura ambiente del lugar
Este electrodoméstico está diseñado para funcionar a la temperatura ambiente especificada para la
clase de temperatura que se indica en la placa de características.
- Templada extendida (SN): «Aparato de refrigeración destinado a utilizarse a temperaturas
ambiente de entre 10 °C y 32 °C»
- Templada extendida (SN): «Aparato de refrigeración destinado a utilizarse a temperaturas
ambiente de entre 10 °C y 32 °C»
Page 41

40
- Subtropical (ST): «Aparato de refrigeración destinado a utilizarse a temperaturas ambiente
de entre 16 °C y 38 °C»
- Tropical (T): «Aparato de refrigeración destinado a utilizarse a temperaturas ambiente de
entre 16 °C y 43 °C»
USO DE LA CÁMARA DE VINOS/BEBIDAS
Y CONFIGURACIÓN DEL MANDO DE TEMPERATURA
Instrucciones del sistema de control
Botón “ ”
Para encender/apagar este aparato (mantenga pulsados estos botones durante
aproximadamente 3 segundos)
Botón “ ”
Para controlar el encendido/apagado de la luz interior
Botón “ ”
Para ajustar la temperatura de la cámara superior.
Botón “ ”
Para ajustar la temperatura de la cámara inferior.
Ventana de visualización LED de la izquierda
Para ajustar la temperatura de la cámara superior.
Ventana de visualización LED de la derecha
Para ajustar la temperatura de la cámara inferior.
Luz indicadora
Compresor en pantalla de operación
Ajuste de los mandos de temperatura
Al pulsar el botón “ ” o “ ”, el sistema entrará en el modo de configuración del
compartimento superior o inferior automáticamente. El LED parpadeará y mostrará el ajuste
de temperatura.
Pulse una vez el botón; la temperatura aumentará o se reducirá 1 °C. Cuando se supere el valor
máximo que puede establecerse, pasará automáticamente a la temperatura más alta que puede
configurarse. Tras pulsar el botón durante 5 segundos, la figura del LED dejará de parpadear y
volverá a mostrarse la temperatura del compartimento superior o inferior.
Tras desenchufar el aparato, el sistema recuperará el ajuste de temperatura de conformidad,
que el ajuste de fábrica. La temperatura de conformidad es la siguiente:
Compartimento superior: 6 °C
Compartimento inferior: 12 °C
Para conocer la temperatura interior, pulse el botón " Ajuste superior" o " Ajuste inferior ". El
LED parpadeará y mostrará el ajuste de temperatura. Cuando deje de pulsar el botón durante 5
segundos, la figura del LED dejará de parpadear y volverá a mostrarse la temperatura real.
Compartimento superior: La temperatura puede ajustarse entre 5 °C y 10 °C.
Compartimento inferior: La temperatura puede ajustarse entre 10 °C y 18 °C.
Page 42
41
Alarma de temperatura
Si la temperatura interior supera los 23 °C, aparecerá "HI" en el panel de visualización; después de
una hora sonará la alarma / zumbador . Esto indica que la temperatura interior es demasiado alta.
Cuando la temperatura interior es inferior a 0 °C, se mostrará "LO" en el panel de visualización y al
mismo tiempo se activarán la alarma y el indicador de mal funcionamiento .
Función de recuperación de temperatura
En caso de corte eléctrico, en enfriador de vinos puede recordar los ajustes de temperatura
anteriores. La temperatura del enfriador volverá a la configuración anterior cuando se restablezca la
corriente.
Luz Interior
Para reducir el consumo de electricidad, la luz LED del armario de vinos se apagará automáticamente
después de 10 minutos.
Si prefiere que la luz LED permanezca encendida continuamente, esto es posible. Mantenga pulsada
la parte inferior de “LUZ” durante 5 segundos; la pantalla mostrará “LP”. Después de 4 segundos, la
pantalla volverá a la normalidad y la luz permanecerá encendida hasta que se apague manualmente.
Si desea anular esto y ahorrar energía (recomendado), mantenga pulsado el botón “LUZ” durante 5
segundos; la pantalla mostrará “LF”. Después de 4 segundos, la pantalla volverá a la normalidad y la
luz se apagará automáticamente después de 10 minutos.
Estantes
Para evitar daños en la junta de la puerta, asegúrese de que la puerta esté completamente
abierta cuando saque los estantes del compartimento de guías.
Para facilitar el acceso al contenido almacenado, debe extraer el compartimento de guías
aproximadamente 1/3; no obstante, este aparato está diseñado con una muesca en cada lado de
los soportes de estantes para evitar que las botellas se caigan.
Cuando saque cualquier de los estantes del compartimento de guías (para instalarlo o quitarlo),
incline el estante según se indica en el diagrama y tire o empuje el estante hasta que encaje en
las abrazadera del soporte.
NOTA:
Si el aparato se desenchufa, se corta la corriente o se apaga, hay que esperar de 3 a 5 minutos
antes de encenderlo de nuevo. Si intenta ponerlo en marcha antes de que transcurra este
intervalo de tiempo, la cámara de vinos/bebidas no se encenderá.
Cuando utilice la cámara de vinos/bebidas por primera vez o la encienda después de tenerla
apagada durante mucho tiempo, puede producirse una diferencia de unos cuantos grados entre
la temperatura seleccionada y la indicada en el LED. Esto es normal y se debe a la duración del
tiempo de activación. La cámara de vinos/bebidas volverá a la normalidad después de una horas
funcionando.
Page 43

42
Cómo cambiar la apertura de la puerta
Este electrodoméstico tiene puertas reversibles, pero se suministra con las puertas a la derecha.
Con el electrodoméstico se suministra un kit para instalar las bisagras a la izquierda (en una caja) por
si desea cambiar el sentido de apertura.
Tipo A (para puerta de vidrio / acero inoxidable)
1. Bisagra inferior (derecha) 2 . Tornillos 3 .Eje de la puerta
4. Puerta 5. Bisagra superior (derecha) 6. Tornillos de
bisagras
7. Bisagra superior (izquierda) 8. Tapa de orificio 9. Bisagra inferior
(izquierda)
10. Dispositivo de tope de puerta 11. Tornillo
1. Abra la puerta 90 grados, quite los 2 tornillos (2) del eje de la puerta inferior (3), quite la puerta (4)
y retire la placa del eje (3) de la puerta (Fig. A).
2. Suelte el tornillo (11) situado debajo del marco de la puerta y el dispositivo de tope (10) e
instálelos en el lado izquierdo del marco de la puerta. (Fig. A/B)
3. Quite los 3 tornillos de bisagra (6) de la bisagra superior (derecha) (5) y desinstálela. (Fig. C)
4. Quite el clavo decorativo (8) de la parte superior izquierda del armario e instale la bisagra superior
de repuesto (izquierda) (7) en la parte superior izquierda del armario con 3 tornillos. (Fig. D)
5. Instale la bisagra inferior de repuesto en el lado izquierda (9) como se indica en el procedimiento
anterior. (Fig. E)
6. Instale y alinee la puerta.
7. Coloque las tapas de plásticos para cubrir los agujeros (8).
Page 44

43
Tipo B (para puerta delgada de acero inoxidable)
1. Bisagra inferior (derecha) 2. Tornillos 3. Eje de puerta
4. Puerta 5. Bisagra superior (derecha) 6. Tornillos
7. Bisagra superior (izquierda) 8. Bisagra inferior (izquierda)
1. Retire 2 tornillos (2) y luego tire de la puerta (4) según la dirección de la flecha y de la bisagra
inferior (derecha) (1), también para el montaje. (Fig.A y Fig.B)
2. Retire 3 tornillos (6) de la bisagra superior derecha y luego retire la bisagra superior derecha (5)
y la bisagra inferior derecha (1). (Ver fig.C)
3. Utilice los tornillos que retiró de las bisagras del lado derecho para fijar las bisagras superior e
inferior del lado izquierdo (7)(8). (Ver Fig.D y Fig.E)
4. Gire la puerta 180 grados y luego ensamble la puerta en orden contrario al de extracción.
Page 45

44
Diagrama de almacenamiento
+
=
+
+
+
+
Compruebe el diagrama de almacenamiento relacionado con la configuración real del producto.
Total: 46 botellas (máx.)
La configuración que ahorra más energía requiere colocar estantes en el producto. Consulta las
imágenes anteriores.
Especificacionesde instalación empotrada
Para altura de 813 mm con puerta de vidrio o acero inoxidable
Page 46
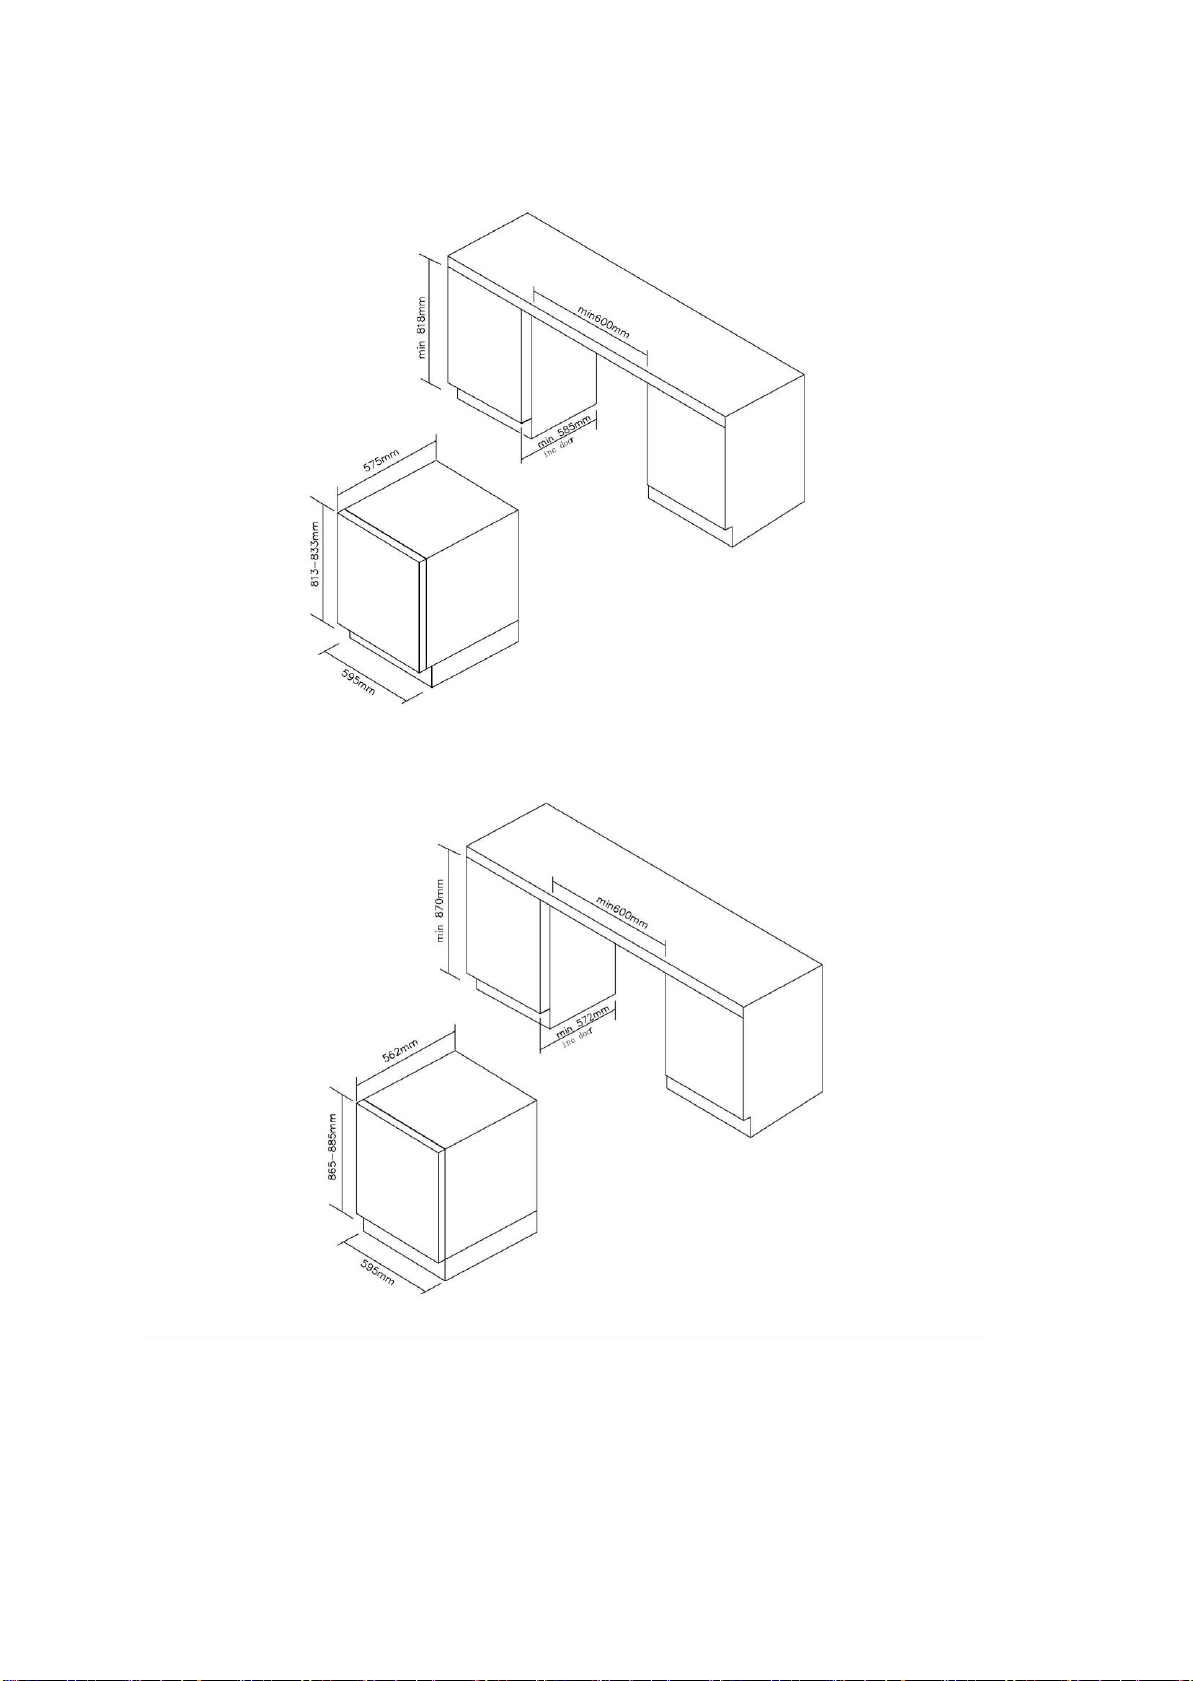
45
Para altura de 813 mm con puerta delgada de acero inoxidable
Para altura de 865 mm con puerta de vidrio o acero inoxidable
Page 47
46
Para altura de 865 mm con puerta delgada de acero inoxidable
CUIDADO Y MANTENIMIENTO
Limpieza de la cámara de vinos
Apague y desenchufe la cámara de vinos. A continuación, extraiga todos los elementos,
incluidos los estantes y la rejilla.
Limpie las superficies interiores con una solución de agua caliente y bicarbonato sódico. Para
preparar la solución deben utilizarse 2 cucharadas de bicarbonato por cada cuarto de litro de
agua.
Limpie los estantes con una solución de detergente suave.
Escurra bien la esponja o el trapo cuando limpie la zona de los mandos o cualquier
componente eléctrico.
Limpie el exterior del armario con agua caliente y detergente líquido suave. Aclare bien y
seque con un paño suave que esté limpio.
Page 48

47
Cómo sustituir el filtro de carbón vegetal (si está presente en su aparato)
Los filtros de carbón vegetal se encuentran en la esquina superior derecha de cada zona del
armario de vinos.
Abra la puerta y retire los 2 estantes superiores (consulte Retirar los estantes).
Gire el filtro según la Figura A.
Según la Figura B, el filtro debe alinearse con las muescas como se muestra.
Retire el filtro (Fig. C).
Inserte el filtro de reemplazo y gírelo según la Fig. A para bloquearlo en su posición.
Vuelva a instalar los estantes.
Corte de electricidad
La mayoría de los fallos eléctricos se solucionan en unas cuantas horas y no deberían afectar
a la temperatura del aparato si abre muy pocas veces la puerta. Si el suministro de
electricidad queda interrumpido durante un periodo de tiempo más largo, deberá tomar las
medidas necesarias para proteger los contenidos almacenados.
Vacaciones
Vacaciones cortas: deje la cámara de vinos encendida durante las vacaciones de menos de tres
semanas de duración.
Vacaciones largas: si el aparato no se va a utilizar durante varios meses, saque todos los
elementos y apáguelo. Limpie y seque meticulosamente el interior. Para evitar la aparición de
moho y malos olores, deje la puerta ligeramente entreabierta; bloquéela si fuera necesario.
Desplazamiento de la cámara de vinos
Extraiga todos los elementos.
Asegure con cinta todos los elementos sueltos (estantes) del interior del aparato.
Recoja la pata ajustable en la base para evitar daños.
Cierre la puerta con cinta.
Asegúrese de que el aparato permanece seguro en posición vertical durante el transporte.
Proteja también el exterior del aparato con una manta o similar.
Consejos para ahorrar energía
La cámara de vinos debe situarse en el lugar más fresco de la sala, lejos del calor que
generan los aparatos y de la luz solar directa.
Page 49

48
¿PROBLEMAS CON LA CÁMARA DE VINOS/BEBIDAS?
PROBLEMA
POSIBLE CAUSA
La cámara de vinos/bebidas no funciona.
No está enchufada.
El electrodoméstico está apagado.
Disyuntor desconectado o fusible quemado.
La cámara de vinos/bebidas no enfría lo
suficiente.
Compruebe el ajuste del mando de temperatura.
Dependiendo de las condiciones ambientales, es
posible que deba seleccionar una configuración
diferente.
La puerta se abre con demasiada frecuencia.
La puerta no está cerrada del todo.
La junta de la puerta no crea un cierre estanco.
Se enciende y se apaga con frecuencia.
La temperatura ambiente es más alta de lo
normal.
Se ha introducido una gran cantidad de cosas en
la cámara de vinos/bebidas.
La puerta se abre con demasiada frecuencia.
La puerta no está cerrada del todo.
El mando de temperatura no se ha configurado
correctamente.
La junta de la puerta no crea un cierre estanco.
La luz no funciona.
No está enchufada.
Disyuntor desconectado o fusible quemado.
La bombilla se ha quemado.
La luz está apagada.
Vibraciones.
Compruebe que la cámara de vinos/bebidas está
plana.
Parece que la cámara de vinos/bebidas hace
demasiado ruido.
Las vibraciones pueden deberse al flujo de
refrigerante, lo cual es normal.
Al final de cada ciclo, puede escuchar el sonido
que produce el flujo de refrigerante en la cámara
de vinos/bebidas.
La contracción y la expansión de las paredes
internas puede producir estallidos o chasquidos.
La cámara de vinos/bebidas no está nivelada.
La puerta no cierra correctamente.
La cámara de vinos/bebidas no está nivelada.
La puerta se ha cambiado de lado y se ha
instalado correctamente.
La junta está sucia.
Los estantes no están en su sitio.
Puede solucionar fácilmente muchos de los problemas comunes de la cámara de vinos/bebidas y
ahorrarse el coste de la llamada al servicio técnico. Antes de llamar al servicio técnico, intente
resolver el problema siguiendo las recomendaciones que se indican a continuación.
GUÍA DE SOLUCIÓN DE PROBLEMAS
Para ponerse en contacto con la asistencia técnica, visite nuestro sitio web: https://corporate.haiereurope.com/en/. En la sección "websites", elija la marca de su producto y su país. Serás redirigido al
sitio web específico donde podrás encontrar el número de teléfono y el formulario para contactar
con la asistencia técnica.
Page 50

49
DISPONIBILIDAD DE REPUESTOS
AJUSTES de temperatura recomendados
Para almacenar TODO TIPO DE VINOS
12 °C to 14 °C
Para almacenar TODO TIPO DE VINOS
Champán NV, espumoso
6 °C
Champán Vintage
10 °C
Blanco seco con semillón, Sauvignon Blanc
8 °C
Blanco Gewürztraminer seco, Riesling
10 °C
Blanco Chardonnay seco
10 °C
Chardonnay Vintage
14 °C
Vino dulce Sauternes Monbazillac, uvas heladas de cosecha tardía
10 °C
Vinos dulces origen Sauternes
14 °C
Beaujolais
13 °C
Pinot Noir
16 °C
Tinto Pinot Noir Vintage
18 °C
Tinto Cabernet, Merlot, francés, australiano, neozelandés, chileno,
argentino, italiano, español, californiano
18 °C
Tinto Garnacha, Syrah
16 °C
Termostatos, sensores de temperatura, placas de circuitos impresos y fuentes luminosas,
durante un período de, como mínimo, siete años tras la introducción en el mercado de la
última unidad del modelo.
Mangos de puerta, bisagras, bandejas y cestos, durante un período de, como mínimo, siete
años, y juntas de puerta durante un período de, como mínimo, diez años tras la introducción
en el mercado de la última unidad del modelo;
Para más información sobre el producto, consulte https://eprel.ec.europa.eu/ o escanee el QR en
la etiqueta energética suministrada con el aparato.
Page 51

50
Français
Nous vous remercions d'avoir acheté ce produit.
Avant d'utiliser votre réfrigérateur, veuillez lire attentivement ces instructions d'utilisation afin de
maximiser ses performances. Conservez cette documentation pour pouvoir vous y référer
ultérieurement ou pour les éventuels futurs propriétaires. Ce produit est destiné uniquement à un
usage domestique ou autres usages similaires tels que :
- l'espace cuisine réservé au personnel dans un magasin, des bureaux ou autres lieux de
travail,
- dans les fermes-auberges, pour la clientèle des hôtels, motels et autres lieux de type
résidentiel,
- dans les chambres d'hôtes,
- chez la restauration et autres services similaires, ce produit ne convient pas à la vente au
détail.
Cet appareil doit être utilisé uniquement pour conserver de la nourriture ; tout autre usage est
considéré comme dangereux et le fabricant ne sera pas tenu responsable en cas de mauvaise
utilisation. Il est donc recommandé de prendre connaissance des conditions de garantie.
INFORMATIONS DE SÉCURITÉ
Veuillez lire attentivement les instructions d'utilisation et d'installation ! Elles contiennent des
informations importantes sur l'installation, l'utilisation et l'entretien de l'appareil. Le fabricant n'est
pas responsable si vous ne respectez pas les instructions et avertissements.
Conservez tous les documents pour une utilisation ultérieure ou pour le propriétaire suivant.
Ne branchez pas l’appareil à l'alimentation électrique avant d’
avoir retiré tous les protecteurs d'emballage et de transport. Tenez
les enfants à l’écart de l'emballage et de ses parties. Risque de
suffocation provenant de cartons pliants et de film plastique !
Laisser reposer pendant au moins 4 heures avant la mise en
marche pour permettre à l'huile du compresseur de se déposer si le
compresseur même est transportée horizontalement.
À la livraison, vérifiez que le produit n'est pas endommagé et que
toutes les pièces et accessoires sont en parfait état.
N'endommagez pas le circuit réfrigérant.
N'obstruez pas les orifices d'aération dans l'appareil ou dans la
structure dans laquelle il est intégré.
Ne jamais utiliser d'eau pour laver la position du compresseur,
l'essuyer soigneusement avec un chiffon sec après le nettoyage
pour éviter la rouille.
Manipulez toujours l'appareil avec au moins deux personnes parce
qu'il est lourd.
Installez et mettez à niveau l'appareil dans une zone adaptée à sa
taille et à son utilisation.
Assurez-vous que les informations électriques figurant sur la
plaque signalétique sont conformes à l'alimentation électrique. Si
ce n'est pas le cas, contactez un électricien.
Page 52

51
L'appareil est alimenté par une alimentation de 220-240 VCA/50
Hz. Les variations anormales de tension peuvent provoquer l'arrêt
de l'appareil ou endommager le régulateur de température ou le
compresseur, ou il peut y avoir un bruit anormal lors du
fonctionnement. Dans ce cas, un régulateur automatique doit être
monté.
Uniquement pour le Royaume-Uni : Le cordon d'alimentation de
l'appareil est équipé d'une fiche 3 pôles (de mise à la terre) qui
s'adapte à une prise standard 3 pôles (de mise à la terre). Ne coupez
jamais ou ne démontez jamais la troisième broche (mise à la terre).
Une fois l'appareil installé, la fiche doit être accessible.
Veillez à ce que le câble de réseau ne soit pas coincé sous l'appareil
pendant et après le transport ou le déplacement de l'appareil, afin
d'éviter que le câble de réseau ne soit coupé ou endommagé. Si le
câble d’alimentation est endommagé, il doit être remplacé par le
fabricant, son agent d’entretien ou des personnes possédant le
même type de qualification, afin d’éviter tout risque.
N'installez pas l'appareil dans un endroit humide, graisseux ou
poussiéreux et ne l'exposez pas à la lumière directe du soleil ni à
l'eau.
N'installez pas l'appareil à proximité de sources de chaleur ou de
matériaux inflammables
POUR les appareils équipés d'un compartiment congélateur : en cas
de panne de courant, n’ouvrez pas le couvercle. Les aliments
congelés ne devraient pas être affectés si la panne dure moins que
les heures indiquées sur l'étiquette signalétique (temps de montée
en température). Si la panne dure plus longtemps, alors il convient
de vérifier les aliments et de les manger immédiatement ou bien de
les cuire et de les congeler à nouveau.
Si vous trouvez que le couvercle de l’appareil est difficile à ouvrir
juste après l’avoir fermé, ne soyez pas inquiet. Cela vient de la
différence de pression qui doit s'égaliser et permettre au couvercle
de s’ouvrir normalement après quelques minutes.
Ne conservez pas de médicaments, de bactéries ou d'agents
chimiques dans l'appareil. Cet appareil est un appareil
électroménager, il n'est pas recommandé de stocker des produits
qui nécessitent des températures strictes.
Ne tirez pas et ne pliez pas excessivement le cordon d'alimentation
et ne touchez pas la prise avec les mains mouillées.
Ne conservez pas des produits contenant des gaz propulseurs
inflammables (par ex. des bombes de pulvérisation) ou des
substances explosives dans l'appareil. Risque d'explosion !
Page 53

52
Ne placez pas d'objets instables (objets lourds, récipients remplis
d'eau) sur le dessus du réfrigérateur, pour éviter les blessures
corporelles causées par une chute ou une électrocution causée par
le contact avec de l'eau.
N'utilisez pas d'appareils électriques dans les compartiments de
conservation des aliments de l'appareil, excepté s'ils sont du type
recommandé par le fabricant.
Ne pas toucher les éléments de refroidissement internes, en
particulier avec les mains mouillées, pour éviter les fissures ou les
blessures.
Les enfants, les personnes qui ont des capacités physiques,
mentales ou sensorielles limitées, ainsi que les personnes qui ont
des connaissances insuffisantes en matière de sécurité d'utilisation
de l'appareil sont à risque. Vérifiez que les enfants et les personnes
vulnérables ont compris les dangers. Une personne responsable de
la sécurité doit surveiller les enfants et les personnes vulnérables
qui utilisent l'appareil ou leur expliquer son fonctionnement. Seuls
les enfants âgés de 8 ans et plus peuvent utiliser l'appareil.
Les enfants ne doivent pas jouer avec l’appareil.
Les enfants âgés de 3 à 8 ans sont autorisés à charger et à décharger
l’appareil
POUR les appareils avec compartiment congélateur : ne conservez
pas de liquides en bouteille ou en canette (surtout les boissons
gazeuses) dans le compartiment congélateur. Les bouteilles et les
canettes peuvent éclater !
POUR les appareils équipés d'un compartiment congélateur : ne
placez jamais d'aliments congelés dans votre bouche juste après les
avoir sortis du compartiment congélateur. Risque de brûlures à
basse température !
Gardez les pièces en plastique et le joint de porte exempt d'huile et
de graisse. Dans le cas contraire, les pièces en plastique et le joint
de porte deviendront poreux.
Avant toute intervention, débranchez le cordon d'alimentation de
la prise murale.
N'utilisez pas d'outils mécaniques ou autres équipements pour
accélérer le processus de dégivrage, autres que ceux recommandés
par le fabricant.
N'utilisez pas d'objets pointus ou tranchants tels que des couteaux
ou des fourchettes pour enlever le givre. N'utilisez jamais de sèchecheveux, de radiateurs électriques ou d'autres appareils
électriques de ce type pour le dégivrage.
Page 54

53
Il est recommandé de maintenir la prise propre ; les résidus
excessifs de poussière sur la prise peuvent provoquer un incendie.
N'essayez pas de réparer, démonter ou modifier l'appareil vous-
même. En cas de réparation, veuillez contacter notre service
clientèle.
Supervisez les enfants pendant le nettoyage ou l'entretien de
l'appareil.
Ne nettoyez pas les clayettes froides en verre à l'eau chaude. Un
changement soudain de température peut casser le verre.
AVERTISSEMENT : Les tubes du circuit de réfrigération
transportent une petite quantité d'un frigorigène respectueux de
l'environnement mais inflammable (R600a) et d'un gaz isolant
(cyclopentane). Il n'endommage pas la couche d'ozone et
n'augmente pas l'effet de serre. Si le réfrigérant s'échappe, il risque
de blesser vos yeux ou de s'enflammer.
En cas de dommages du circuit de réfrigérant :
- Éteignez l'appareil et retirez la prise secteur ;
- Tenez les flammes nues et/ou les sources d'inflammation loin de
l'appareil ;
- Ventilez complètement la pièce pendant plusieurs minutes ;
- Informez le service clientèle.
AVERTISSEMENT : N’endommagez pas la fiche et/ou le cordon
d'alimentation ; cela pourrait provoquer des chocs électriques ou
des incendies.
AVERTISSEMENT : N'utilisez pas des systèmes multiprises portatifs
ou des alimentations portatives. Nous ne recommandons pas
l'utilisation de rallonges et d’adaptateurs multiples.
N'essayez pas de vous asseoir ou de vous tenir debout sur le dessus
de l'appareil. Vous pourriez vous blesser ou endommager
l'appareil. Cet appareil n'est pas conçu pour être empilé avec d’
autres appareils.
L’appareil est conçu et construit pour un usage domestique
uniquement.
Seules les pièces d'origine fournies par le fabricant peuvent être
utilisées. Le fabricant garantit que seules ces pièces satisfont aux
exigences de sécurité.
L’ouverture prolongée de la porte peut entraîner une hausse
significative de la température dans les compartiments de l’
appareil.
Nettoyez régulièrement les surfaces entrant en contact avec les
aliments et les systèmes d’évacuation accessibles.
Page 55

54
Nettoyez les réservoirs d’eau s’ils n’ont pas été utilisés
pendant 48 h ; videz le circuit d’eau raccordé à une alimentation d
’eau si l’eau n’a pas été tirée pendant 5 jours.
Placez la viande et le poisson crus dans des récipients adaptés
avant de les mettre au réfrigérateur, afin qu’ils n’entrent pas en
contact avec d’autres aliments ou ne gouttent pas dessus.
Les compartiments de congélation « deux étoiles » (si présents dans
l’appareil) sont adaptés à la conservation des aliments précongelés, à la conservation et à la fabrication des crèmes glacées et
à la production des glaçons.
Les compartiments « une, deux et trois étoiles » (si présents dans l
’appareil) ne sont pas adaptés à la congélation des aliments frais.
Si l’appareil doit rester vide pendant des périodes prolongées,
mettez-le hors tension, dégivrez-le, nettoyez-le, séchez-le et laissez
la porte ouverte pour éviter la formation de moisissures à l’
intérieur
Autres appareils de stockage du vin: Cet appareil est destiné
uniquement au stockage du vin
Pour un appareil à pose libre: Cet appareil de réfrigération n’est
pas destiné à être utilisé comme un appareil intégrable
Pour les appareils sans compartiment «quatre étoiles»: Cet appareil
de réfrigération ne convient pas pour la congélation de denrées
alimentaire
Page 56

55
Mise au rebut des anciens appareils
Cet appareil comporte les symboles conformes à la directive européenne 2012/19/EU sur les
déchets des équipements électriques et électroniques (DEEE).
DEEE couvre à la fois les substances polluantes (pouvant avoir des retombées négatives sur
l'environnement) et les composants de base (pouvant être ré-utilisés). Il est important de soumettre
les déchets DEEE à des traitements spécifiques, afin d'enlever et éliminer tous les polluants de
manière adéquate et de récupérer et recycler tous les matériaux.
Toute personne peut jouer un rôle important en veillant à ce que les déchets DEEE ne deviennent
pas un problème environnemental ; pour cela, il est essentiel de suivre quelques règles de base :
- Les DEEE ne doivent pas être traités comme des déchets ménagers ;
- Les DEEE doivent être remis aux points de collecte appropriés gérés par la municipalité ou par des
sociétés reconnues. Dans de nombreux pays, pour des DEEE encombrants, la collecte à domicile
peut être organisée.
Dans de nombreux pays, lorsque vous achetez un nouvel appareil, l’ancien peut être retourné au
détaillant qui est en devoir de le récupérer sans frais de manière individualisée, tant que
l’équipement est de type équivalent et a les mêmes fonctions que l’équipement fourni.
Conformité
En apposant la marque sur ce produit, nous confirmons la conformité à toutes les obligations
européennes concernant la protection de l'environnement et de la santé et de la sécurité,
applicables selon la loi à ce produit.
Garantie
La garantie minimale est : 2 ans pour les pays de l’UE, 3 ans pour la Turquie, 1 an pour le RoyaumeUni, 1 an pour la Russie, 3 ans pour la Suède, 2 ans pour la Serbie, 5 ans pour la Norvège, 1 an pour le
Maroc, 6 mois pour l’Algérie, pas de garantie légale requise pour la Tunisie.
Économies d’énergie
Pour faire davantage d'économies d'énergie nous suggérons :
Installez l'appareil dans un endroit bien aéré, loin de sources de chaleur et ne l'exposez pas à
la lumière directe du soleil.
Évitez de mettre de la nourriture chaude dans le réfrigérateur pour éviter d'accroître la
température intérieure et, par conséquent, de faire fonctionner le compresseur en
permanence.
Ne tassez pas trop les denrées conservées de manière à garantir une circulation de l'air
correcte.
Si de la glace s'est formée, dégivrez l'appareil pour faciliter le transfert du froid.
En cas de coupure de l'alimentation électrique, il est conseillé de garder la porte du
réfrigérateur fermée.
Ouvrez ou laissez la porte du réfrigérateur ouverte le moins possible.
Évitez de régler le thermostat à des températures trop basses.
Retirez la poussière accumulée à l'arrière de l'appareil
Page 57

56
INSTRUCTIONS POUR L’INSTALLATION
Avant d’utiliser votre cave à vin
Retirez l'emballage extérieur et intérieur.
Avant de brancher votre cave à vin à la prise d'alimentation, laissez-le en position verticale
pendant environ 2 heures. Ceci réduira le risque d’un dysfonctionnement du système de
refroidissement suite à la manipulation pendant le transport.
Nettoyez les surfaces intérieures à l’eau tiède avec une éponge douce.
Lors de l'élimination de votre appareil, veuillez choisir un site d'élimination autorisé.
Installation de votre cave à vin
Cet appareil est conçu soit pour une installation autonome soit pour une installation
intégrée (entièrement encastré) (reportez-vous à l'autocollant à l'arrière de cet appareil).
Cet appareil est destiné à être utilisé exclusivement pour le stockage de vin ou de
boissons.
Placez votre cave à vin sur un sol suffisamment solide pour la supporter lorsqu'elle est
entièrement remplie. Pour niveler votre cave à vin, ajustez la jambe de nivellement avant au
bas de l'appareil.
Cet appareil utilise un réfrigérant inflammable. Ne jamais endommager la tuyauterie de
refroidissement pendant le transport. Installez votre cave à vin à l'écart de la lumière directe
du soleil et des sources de chaleur (poêle, chauffage, radiateur, etc.). Le rayonnement solaire
direct peut endommager le revêtement acrylique et les sources de chaleur sont susceptibles
d’augmenter la consommation d’énergie électrique. Un environnement très froid peut
également empêcher l’appareil de fonctionner correctement.
Évitez d'installer l'appareil dans des zones humides.
Branchez votre cave à vin dans une prise murale dédiée, correctement installée et mise à la
terre. Vous ne devez en aucun cas couper ou éliminer la troisième broche (de terre) de la
fiche du câble d'alimentation. Adressez-vous à un électricien qualifié ou à un centre
d’assistance agréé pour toute question sur l’alimentation et/ou la prise de terre.
Attention
Conservez le vin en bouteilles scellées ;
Ne surchargez pas l'armoire ;
N'ouvrez pas la porte, sauf si nécessaire ;
Ne couvrez pas les étagères avec une feuille d'aluminium ou tout autre matériau pouvant
empêcher la circulation de l'air ;
Si votre cave à vin est stockée sans être utilisée pendant de longues périodes, il est suggéré,
après un nettoyage minutieux, de laisser la porte entrouverte pour permettre à l'air de
circuler à l'intérieur de l'armoire et éviter la formation éventuelle de condensation, de
moisissures ou d'odeurs.
Limites de température ambiante
Cet appareil est conçu pour fonctionner aux températures ambiantes spécifiées par la classe de
température indiquée sur sa plaque signalétique.
Tempérée élargie (SN): «Cet appareil de réfrigération est destiné à être utilisé à des
températures ambiantes comprises entre 10 °C et 32 °C»
Tempérée (N): «Cet appareil de réfrigération est destiné à être utilisé à des températures
ambiantes comprises entre 16 °C et 32 °C»
Subtropicale (ST): «Cet appareil de réfrigération est destiné à être utilisé à des températures
ambiantes comprises entre 16 °C et 38 °C»
Tropicale (T): «Cet appareil de réfrigération est destiné à être utilisé à des températures
ambiantes comprises entre 16 °C et 43 °C»
Page 58
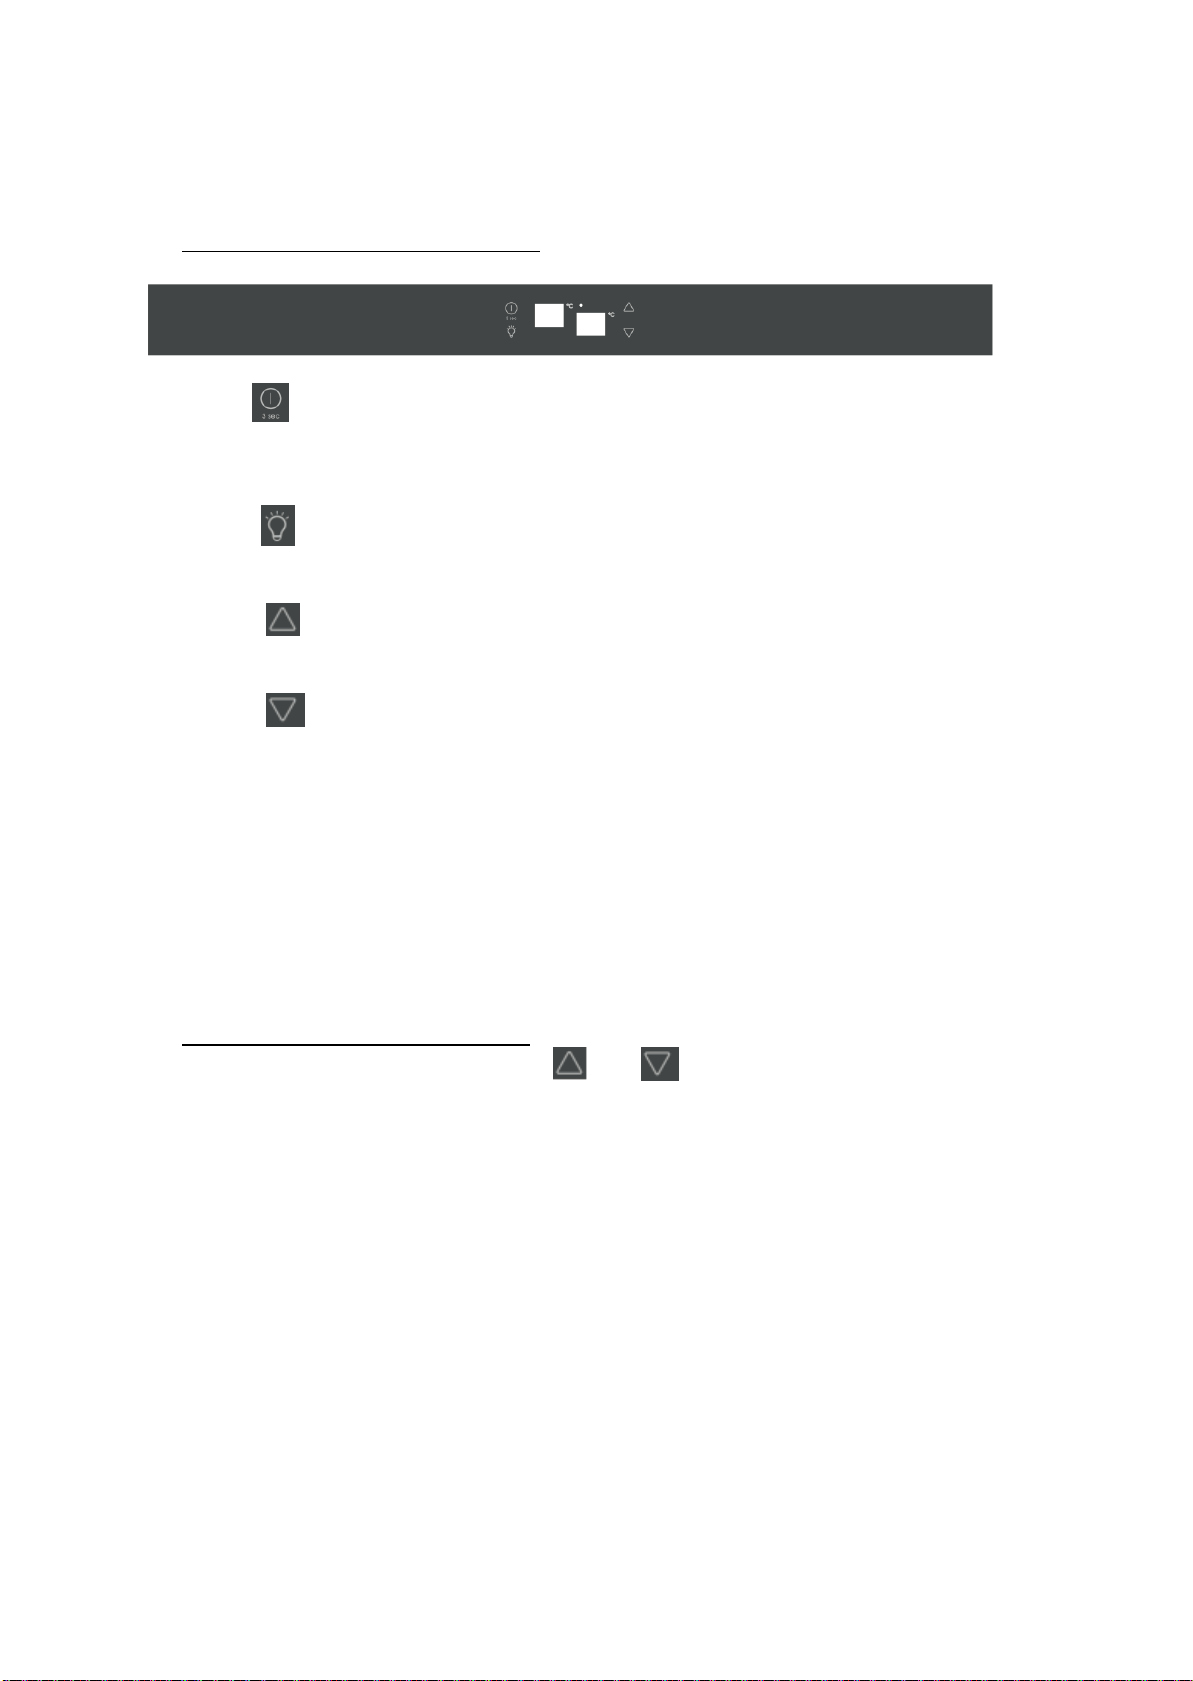
57
FONCTIONNEMENT DE VOTRE CAVE À VIN/REFROIDISSEUR DE BOISSONS
ET RÉGLAGE DU CONTRÔLE DE LA TEMPÉRATURE
Mode d'emploi du système de contrôle
Bouton ”
Pour allumer/éteindre cet appareil (appuyez et maintenez ces boutons enfoncés pendant
environ 3 secondes).
Bouton “ ”
Pour allumer/éteindre l'éclairage interne.
Bouton “ ”
Pour régler la température de la chambre supérieure.
Bouton “ ”
Pour régler la température de la chambre inférieure.
Fenêtre d'affichage LED à gauche
Pour régler la température de la chambre supérieure.
Fenêtre d'affichage LED à droite
Pour régler la température de la chambre inférieure.
voyant lumineux
Affichage du compresseur en fonctionnement.
Réglage des contrôles de température
Lorsque vous appuyez sur la touche “ ” ou “ ”, le système passe automatiquement en
mode de réglage de la température dans le compartiment supérieur ou inférieur. Le voyant
clignote et affiche la température de réglage.
Appuyez une fois sur le bouton, la température diminuera ou augmentera de 1°C. Lors du
dépassement de la valeur minimale qui peut être établie, le système passe automatiquement à
la valeur de température réglable la plus élevée. Après avoir appuyé sur le bouton pendant 5
secondes, le voyant LED cessera de clignoter, puis reviendra en arrière pour afficher la
température du compartiment supérieur ou inférieur.
Une fois l'appareil débranché, le système revient à la température par défaut, qui est réglée en
usine. La température par défaut est la suivante :
Compartiment supérieur : 6°C
Compartiment inférieur : 12°C
Si vous souhaitez visualiser la température intérieure réglée, veuillez appuyer sur la touche
"Augmenter" ou "Diminuer-", la LED clignotera et affichera la température réglée. Après avoir
arrêté d'appuyer sur le bouton pendant 5 secondes, le voyant LED arrêtera de clignoter, puis
reviendra afficher la température courante.
Compartiment supérieur : Le réglage de la température peut être compris entre 5°C et 10 °C
Compartiment inférieur : Le réglage de la température peut être compris entre 10°C et 18°C.
Page 59

58
Alarme de température
Si la température à l'intérieur est supérieure à 23 °C, il sera affiché "HI" sur le panneau d'affichage, et
au bout d'une heure après l'alarme / l'avertisseur sonore retentira. Cela indique que la température
à l'intérieur est trop élevée. Si la température à l'intérieur est inférieure à 0 °C, il sera affiché "LO"
sur le panneau d'affichage et dans le même temps l'alarme de dysfonctionnement sera activée.
Fonction de récupération de température
En cas de coupure de l'alimentation, la cave à vin peut se souvenir des réglages de température
précédents, et lorsque l'alimentation est rétablie, la température de la cave à vin revient au même
réglage de la température que lorsque l'appareil est mis hors tension.
Éclairage interne
Afin de réduire la consommation d'énergie, cette armoire à vin éteint automatiquement les lampes à
LED au bout de10 minutes.
Si vous souhaitez que les lampes à LED restent allumées en continu, cela est possible. Appuyez et
maintenez le bouton "ÉCLAIRAGE" enfoncé pendant 5 secondes, l'écran affichera "LP". Après 4
secondes, l'écran reviendra à la normale et le voyant restera allumé jusqu'à ce qu'il soit éteint
manuellement.
Si vous souhaitez revenir en arrière et économiser de l'énergie (recommandé), appuyez et maintenez
le bouton "ÉCLAIRAGE" enfoncé pendant 5 secondes, l'écran affichera "LF", après 4 secondes, l'écran
reviendra à la normale et la lumière s'éteindra automatiquement au bout de 10 minutes.
Clayettes
Pour éviter d'endommager le joint de porte, assurez-vous que la porte est complètement
ouverte lorsque vous tirez les clayettes hors des rails du compartiment.
Pour un accès facile au contenu de stockage, vous devez retirer les clayettes hors des rails du
compartiment d'environ 1/3. Cet appareil a été conçu avec une encoche de chaque côté des rails
des clayettes pour empêcher les bouteilles de tomber.
Lorsque vous retirez l'une des clayettes des rails du compartiment : pour monter ou retirer la
clayette, inclinez-la conformément au schéma et tirez simplement ou poussez la clayette jusqu'à
ce qu'elle repose solidement sur les supports
REMARQUE :
Si l'appareil est débranché, hors tension ou éteint, vous devez attendre 3 à 5 minutes avant de
redémarrer l'appareil. Si vous tentez de redémarrer avant ce délai, votre cave à vin/refroidisseur
de boissons ne démarrera pas.
Lorsque vous utilisez votre cave à vin/refroidisseur de boisson pour la première fois ou
redémarrez votre cave à vin/refroidisseur de boisson après qu'il soit resté éteint pendant une
longue période, il pourrait y avoir un écart de quelques degrés entre la température que vous
sélectionnez et celle indiquée sur l'inscription du voyant LED. C'est normal et cela est dû à la
durée du temps d'activation. Une fois que la cave à vin/refroidisseur de boissons aura fonctionné
pendant quelques heures, tout reviendra à la normale.
Page 60
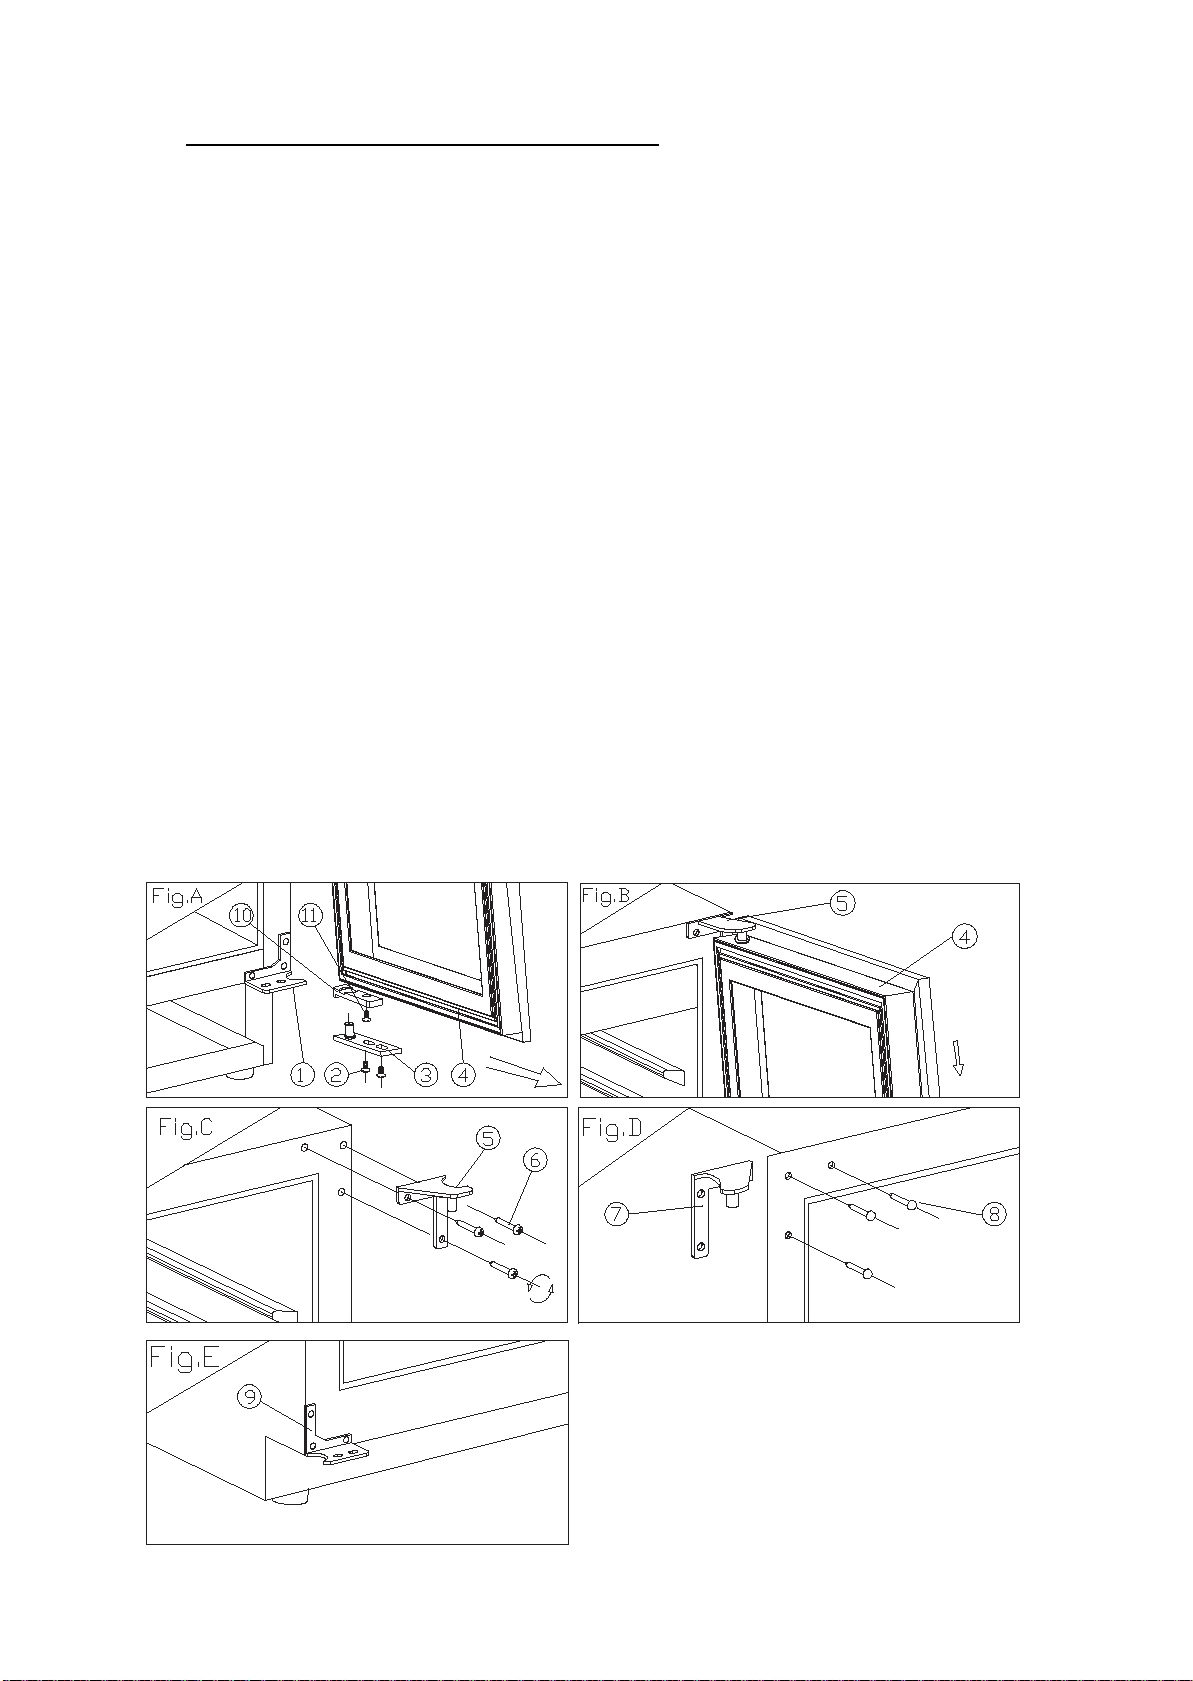
59
Comment changer le sens de l'ouverture de la porte
Cet appareil a des portes réversibles mais il est livré avec une porte ayant une charnière à droite. Un
kit de charnière côté gauche est livré avec l'unité (dans l'emballage), si vous souhaitez inverser la
charnière sur votre appareil.
Type A (pour porte plein verre / acier inoxydable)
1. Charnière inférieure (côté droit) 2. Vis 3. Axe de porte
4. Porte 5. Charnière supérieure (côté droit)
6. Vis à charnière 7. Charnière supérieure (côté gauche)
8. Cache du trou 9. Charnière inférieure (côté gauche)
10. Dispositif de limitation de la porte 11. Vis
1. Ouvrez la porte à un angle de 90 degrés, retirez les 2 vis (2) de l'axe de la porte inférieure (3),
retirez la porte (4), retirez la plaque de l'axe (3) de la porte, (Fig. A).
2. Dévissez la vis (11) située sous le cadre de la porte et le dispositif de limitation (10), et replacez-la
du côté de l'extrémité gauche du cadre de porte. (Fig. A/B).
3. Retirez les 3 vis (6) de la charnière supérieure (côté droit) (5) et retirez celle-ci. (Fig. C).
4. Retirez les clous décoratifs (8) en haut à gauche de l'armoire et installez la charnière supérieure de
rechange (côté gauche) (7) en haut à gauche de l'armoire avec 3 vis. (Fig. D)
5. En suivant la procédure ci-dessus, installez la charnière inférieure de rechange côté gauche (9).
(Fig. E)
6. Installez et alignez la porte.
7. Insérez les caches en plastique pour couvrir les trous (8).
Page 61

60
Type B (pour porte mince en acier inoxydable)
1 Charnière inférieure
(côté droit)
4 Porte
7 Charnière supérieure
(côté gauche)
2 Vis
5 Charnière supérieure
(côté droit)
8 Charnière inférieure
(côté gauche)
3 Axe de porte
6 Vis
1. Retirez 2 vis (2), puis tirez sur la porte (4) selon la direction de la flèche et de la charnière
inférieure (côté droit) (1), comme pour l'assemblage. (Fig.A et Fig.B)
2. Retirez les 3 vis (6) de la charnière supérieure côté droit, puis retirez les charnières supérieure
côté droit (5) et inférieure côté droit (1). (Voir Fig.C)
3. Utilisez les vis que vous avez retirées des charnières latérales côté droit pour fixer les charnières
supérieure et inférieure côté gauche (7) (8). (Voir Fig.D et Fig.E)
4. Tournez la porte à 180 degrés, puis remontez la porte selon les mêmes opérations dans le sens
inverse.
Page 62
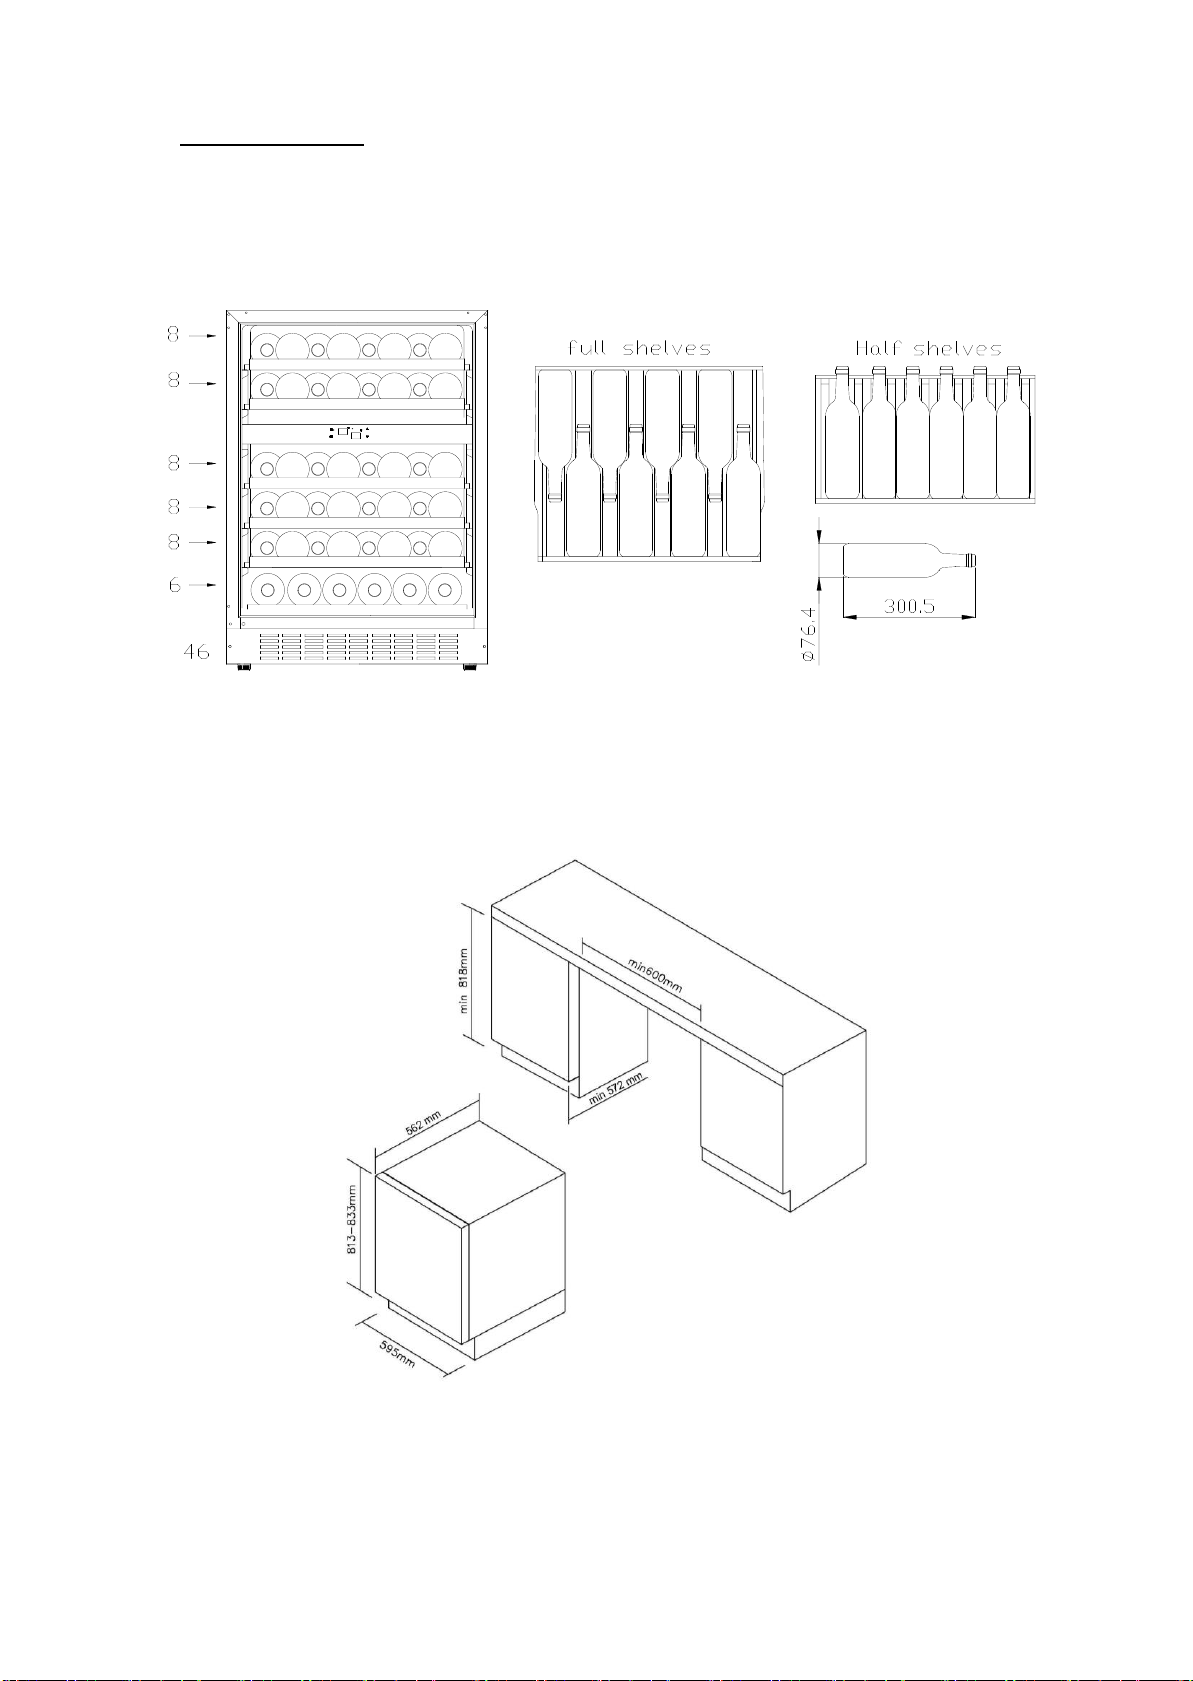
61
Schéma de stockage
+
=
+
+
+
+
En fonction de la configuration courante de votre appareil, veuillez vérifier le schéma de stockage
correspondant.
Total : 46 bouteilles (max.)
La configuration la moins énergivore nécessite que les clayettes soient positionnés dans le produit,
veuillez consulter les photos ci-dessus.
Consignes pour une installation intégrée
Pour une hauteur de 813 mm avec porte en verre ou en acier inoxydable
Page 63

62
Pour une hauteur de 813 mm avec porte mince en acier inoxydable
Pour une hauteur de 865 mm avec porte en verre ou en acier inoxydable
Page 64

63
Pour une hauteur de 865 mm avec porte mince en acier inoxydable
NETTOYAGE ET ENTRETIEN
Nettoyage de votre cave à vin
Éteignez l'alimentation, débranchez l'appareil et retirez tous les éléments, y compris les
clayettes et étagères.
Lavez les surfaces intérieures avec une solution d'eau tiède et de bicarbonate de soude. La
solution doit être d'environ 2 cuillères à soupe de bicarbonate de soude pour un quart de
litre d'eau.
Lavez les étagères avec une solution détergente non agressive.
Essuyez l'excès d'eau de l'éponge ou du chiffon de nettoyage au niveau de la zone des
commandes et de toute pièce électrique.
Lavez l'armoire extérieurement avec de l'eau tiède et un détergent liquide non agressif.
Rincez soigneusement et essuyez à l'aide d'un chiffon doux propre.
Page 65

64
Comment remplacer le filtre à charbon de bois (si présent dans votre appareil)
Les filtres Charcoal sont situés dans le coin supérieur droit de chaque cave à vin.
Ouvrez la porte et retirez les 2 étagères supérieures (voir Retrait des étagères).
Tournez le filtre comme sur la Fig.A.
Comme sur la Fig.B, le filtre doit s’aligner sur les encoches comme indiqué.
Retirez le filtre (Fig.C).
Insérez le filtre de remplacement et tournez-le conformément à la Fig.A pour le bloquer en
position.
Réinstallez les étagères.
Panne de courant
La plupart des pannes de courant sont résolues en quelques heures et ne devraient donc pas
affecter la température de votre appareil, si vous minimisez le nombre de fois où la porte est
ouverte. Si la panne de courant doit durer plus longtemps, vous devrez prendre les mesures
nécessaires pour protéger le contenu de l’appareil.
Période des vacances
Vacances courtes : Laissez votre cave à vin fonctionner pendant vos congés de moins de trois
semaines.
Vacances longues : Si l'appareil ne sera pas utilisé pendant plusieurs mois, retirez tous les
éléments stockés et éteignez l'appareil. Nettoyez et essuyez soigneusement l’intérieur de
l’appareil. Pour éviter la formation d'odeurs et de moisissures, laissez la porte légèrement
ouverte : bloquez-la si nécessaire.
Manutention de votre cave à vin
Retirez tous les éléments stockés.
Utilisez de la bande adhésive pour coller solidement tous les éléments non fixés(étagères) à
l'intérieur de votre appareil.
Vissez le pied réglable jusqu'à la base pour éviter tout dommage.
Fermez la porte.
Assurez-vous que l'appareil reste en position verticale pendant son transport. Protégez
également l'extérieur de l'appareil avec une couverture ou un article semblable.
Conseils pour l'économie d’énergie
La cave à vin doit être installée dans la zone la plus fraîche de la pièce, loin des appareils de
production de chaleur et à l'abri de la lumière directe du soleil.
Page 66

65
DES PROBLÈMES AVEC VOTRE CAVE À VIN/REFROIDISSEUR DE BOISSONS ?
PROBLÈME
CAUSE POSSIBLE
La cave à vin/le refroidisseur de
boissons ne fonctionne pas.
L'appareil n’est pas branché.
L'appareil est éteint.
Le disjoncteur s'est déclenché ou un fusible a grillé.
La cave à vin/le refroidisseur de
boissons n'est pas assez froid.
Vérifiez le réglage de la température.
L’environnement extérieur demande un réglage de la
température supérieur.
La porte est ouverte trop souvent.
La porte n’est pas complètement fermée.
Le joint de la porte n’est pas entièrement étanche.
L'appareil s'allume et s'éteint
fréquemment.
La température de la pièce est plus chaude que la normale.
Une grande quantité de bouteilles a été ajoutée dans la cave
à vin/le refroidisseur de boissons.
La porte est ouverte trop souvent.
La porte n’est pas complètement fermée.
Le dispositif de contrôle de la température n’est pas
correctement réglé.
Le joint de la porte n’est pas entièrement étanche.
La lumière ne fonctionne pas.
L'appareil n’est pas branché.
Le disjoncteur s'est déclenché ou un fusible a grillé.
L’ampoule a grillé.
Le voyant lumineux est “ÉTEINT”.
Vibrations.
Vérifiez que la cave à vin/le refroidisseur de boissons est de
niveau.
La cave à vin/le refroidisseur de
boissons semble faire trop de bruit.
Le bruit de cliquetis peut provenir du flux du réfrigérant, ce
qui est normal.
À la fin de chaque cycle, vous pouvez entendre des bruits de
gargouillement causés par le flux de réfrigérant dans votre
cave à vin/refroidisseur de boissons.
La contraction et l'expansion des parois intérieures peuvent
provoquer des bruits de claquement et de crépitement.
La cave à vin/le refroidisseur de boissons n'est pas de niveau.
La porte ne se fermera pas
complètement.
La cave à vin/le refroidisseur de boissons n'est pas de niveau.
La porte a été inversée et mal installée.
Le joint est sale.
Les étagères ne sont pas dans la bonne position.
Vous pouvez résoudre facilement de nombreux problèmes courants concernant votre cave à
vin/refroidisseur de boisson et économiserez les frais d'un appel d'assistance. Consultez les
suggestions ci-dessous pour voir si vous pouvez résoudre votre problème avant d’appeler le service
d’assistance.
GUIDE DE DÉPANNAGE
Pour contacter l'assistance technique, visitez notre site Internet: https://corporate.haier-
europe.com/en/ . Dans la section «websites», choisissez la marque de votre produit et votre pays.
Vous serez redirigé vers le site Web spécifique où vous pouvez trouver le numéro de téléphone et le
formulaire pour contacter l'assistance technique
Page 67

66
Disponibilité des pièces de rechange
RÉGLAGES conseillés de la température
Pour stocker TOUS LES TYPES de VINS
12 °C to 14 °C
Température conseillée pour les BOISSONS
Champagne NV, pétillant
6 °C
Champagne de cuvée
10 °C
Sémillon blanc sec, Sauvignon Blanc
8 °C
Gewürztraminer blanc sec, Riesling
10 °C
Chardonnay blanc sec
10 °C
Chardonnay de cuvée
14 °C
Sauternes Monbazillac blanc doux, vin de glace de vendanges tardives
10 °C
Sauternes de cuvée blanc doux
14 °C
Beaujolais
13 °C
Pinot noir rouge
16 °C
Pinot noir de cuvée rouge
18 °C
Cabernet rouge, Merlot, français, australien, néo-zélandais, chilien,
argentin, italien, espagnol, californien
18 °C
Grenache rouge, Syrah
16 °C
Les thermostats, les capteurs de température, les cartes de circuit imprimé et les sources
lumineuses sont disponibles pour une période minimale de sept ans à compter de la mise sur
le marché de la dernière unité du modèle;
Les poignées de porte, gonds de porte, plateaux et bacs, sont disponibles pour une période
minimale de sept ans, et les joints de porte sont disponibles pour une période minimale de
10 ans à compter de la mise sur le marché de la dernière unité du modèle;
Pour plus d'informations sur le produit, veuillez consulter https://eprel.ec.europa.eu/ ou scannez
le QR sur l'étiquette énergétique fournie avec l'appareil
Page 68

67
Italiano
Vi ringraziamo per aver scelto questo nostro prodotto.
Prima di utilizzare il frigorifero, leggere il presente manuale di istruzioni per massimizzare le
prestazioni del prodotto. Riporre tutta la documentazione per utilizzo futuro o per i successivi
proprietari. Questo apparecchio è destinato unicamente in ambiente domestico o per applicazioni
simili quali:
- La zona cucina destinata al personale di negozi, uffici e altri ambienti lavorativi
- Di beauty farm, alla clientela di hotel, motel e altri ambienti di tipo residenziale
- Nei Bed&Breafast (B&B)
- Per servizi di catering ed applicazioni simili esclusa la vendita al dettaglio.
Questo elettrodomestico deve essere utilizzato unicamente per la conservazione degli alimenti;
qualsiasi altro uso è considerato pericoloso e il produttore non è ritenuto responsabile per
eventuali omissioni. Si consiglia anche di leggere con attenzione le condizioni di garanzia.
INFORMAZIONI DI SICUREZZA
Leggere attentamente le istruzioni per l'uso e l'installazione. Le istruzioni contengono informazioni
importanti relative all'installazione, all'uso e alla manutenzione dell'elettrodomestico. Il produttore
non è responsabile del mancato rispetto delle istruzioni e delle avvertenze. Conservare tutta la
documentazione per future consultazioni o per i proprietari successivi.
Collegare l'elettrodomestico all'alimentazione elettrica solo
dopo aver rimosso l'imballo e le protezioni per il trasporto. Tenere
lontani i bambini dall'imballo e dai relativi componenti.
I cartoni pieghevoli e la pellicola di plastica potrebbero causare il
soffocamento.
Lasciare riposare per almeno 4 ore prima dell'accensione per
consentire all'olio del compressore di depositarsi se trasportato
orizzontalmente
Al momento della consegna, verificare che il prodotto non sia
danneggiato e che tutte le parti e gli accessori siano in perfette
condizioni
Non danneggiare il circuito del refrigerante
Mantenere libere da qualsiasi ostruzione le aperture di
ventilazione nel luogo in cui si trova l'elettrodomestico o nella
struttura nella quale è incassato
Non usare mai acqua per lavare la zona del compressore, pulire
accuratamente con un panno asciutto dopo la pulizia per evitare la
formazione di ruggine
L'elettrodomestico deve essere maneggiato sempre da almeno
due persone perché è pesante.
Installare l'elettrodomestico a livello in un'area adatta alle
dimensioni e all'uso.
Accertarsi che i dati elettrici sulla targhetta siano conformi
all'alimentazione elettrica. In caso contrario, rivolgersi a un
elettricista.
Page 69

68
L'elettrodomestico funziona con corrente elettrica 220-
240 Vca / 50 Hz. Oscillazioni anomale della tensione possono
causare il mancato avvio dell'elettrodomestico, danni al controllo
della temperatura o al compressore oppure rumori anomali
durante il funzionamento. In tal caso, è opportuno montare un
regolatore automatico.
Solo per il Regno Unito: il cavo di alimentazione
dell'elettrodomestico è dotato di una spina a 3 conduttori
(collegata a terra) adatta a una presa standard a 3 conduttori
(collegata a terra). Non tagliare né smontare mai il terzo
conduttore (collegamento a terra). Dopo l'installazione
dell'elettrodomestico, la spina deve essere accessibile.
Accertarsi che il cavo di rete non sia impigliato sotto
l'elettrodomestico durante e dopo il trasporto/spostamento, per
evitare che il cavo di rete venga tagliato o danneggiato. Se il cavo di
alimentazione dell’elettrodomestico dovesse essere danneggiato,
farlo sostituire dal produttore, dal suo servizio tecnico o da un
tecnico qualificato, per evitare rischi
Non montare l'elettrodomestico in ambienti polverosi, in
presenza di olio o umidità, non esporlo alla luce solare diretta e
all'acqua
Non montare l'elettrodomestico vicino a stufe o materiali
infiammabili
PER gli elettrodomestici dotati di vano congelatore, non aprire il
coperchio in caso di interruzione della corrente. Gli alimenti
surgelati non dovrebbero guastarsi se l'interruzione
dell'alimentazione dura meno delle ore indicate sull'etichetta della
classificazione (tempo di aumento della temperatura). Se
l'interruzione dell'alimentazione dura di più, controllare gli
alimenti e consumarli immediatamente o ricongelarli solo dopo
averli cotti.
Se il coperchio dell'elettrodomestico non si riapre facilmente
subito dopo che è stato chiuso, non si tratta di un problema, in
quanto tale condizione dipende dalla differenza di pressione che si
bilancerà entro pochi minuti consentendo nuovamente l'apertura
del coperchio.
Non conservare medicinali, batteri o sostanze chimiche
nell'elettrodomestico. Questo elettrodomestico è destinato ad
ambienti residenziali, per cui si sconsiglia di conservare materiali
che richiedono temperature rigide.
Non piegare troppo o tirare il cavo di alimentazione e non
toccare la spina con le mani bagnate
Page 70

69
Non conservare nell'elettrodomestico prodotti contenenti
propellenti infiammabili (ad es. bombolette spray) o sostanze
esplosive. Pericolo di esplosione!
Non collocare elementi instabili (oggetti pesanti, contenitori
pieni d'acqua) sopra il frigorifero, per evitare lesioni personali
dovute a cadute o scosse elettriche causate dal contatto con l'acqua.
Non usare apparecchi elettrici all’interno degli scomparti per
la conservazione degli alimenti dell'elettrodomestico, se questi non
sono del tipo consigliato dal produttore
Non toccare gli elementi interni di raffreddamento,
specialmente con le mani bagnate, per evitare crepe o lesioni
Sono a rischio i bambini, le persone affette da limitazione delle
capacità fisiche, mentali o sensoriali, nonché le persone che non
conoscono perfettamente il funzionamento sicuro
dell'elettrodomestico. Accertarsi che i bambini e le persone
vulnerabili siano consapevoli dei pericoli. Una persona
responsabile della sicurezza deve sorvegliare o istruire i bambini e
le persone vulnerabili che adoperano l'elettrodomestico.
L'elettrodomestico non deve essere utilizzato da bambini di età
inferiore a 8 anni.
I bambini non devono giocare con l’elettrodomestico
I bambini dai 3 agli 8 anni possono riempire e svuotare questo
elettrodomestico
PER gli elettrodomestici dotati di vano congelatore: non
conservare liquidi in bottiglia o in lattina (specialmente bevande
gassate) nel vano congelatore. Le bottiglie e lattine possono
scoppiare!
PER gli elettrodomestici dotati di vano congelatore: non mettere
mai in bocca alimenti surgelati subito dopo averli estratti dal vano
congelatore. Pericolo di ustioni dovute alla bassa temperatura!
Accertarsi sempre che i componenti di plastica e la guarnizione
dello sportello siano privi di olio e grasso. In caso contrario, i
componenti di plastica e la guarnizione dello sportello
diventeranno porosi.
Prima di ogni intervento occorre disinserire l’alimentazione
elettrica all’elettrodomestico
Non usare dispositivi meccanici o altri strumenti artificiali per
accelerare il processo di sbrinamento, diversi da quelli consigliati
dal produttore
Non utilizzare oggetti appuntiti o acuminati come coltelli o
forchette per rimuovere il ghiaccio. Non utilizzare mai
Page 71

70
asciugacapelli, riscaldatori elettrici o altri elettrodomestici per lo
sbrinamento
Si consiglia di mantenere pulita la spina: eventuali residui di
sporco sulla spia possono provocare incendi
Non cercare di riparare, smontare o modificare personalmente
l'elettrodomestico. Per le riparazioni rivolgersi sempre
all'assistenza clienti.
Sorvegliare i bambini durante la pulizia o la manutenzione
dell'elettrodomestico.
Non pulire i ripiani di vetro freddi con acqua calda.
Un'improvvisa variazione della temperatura può causare la rottura
del vetro.
AVVERTENZA: i tubi del circuito di refrigerazione trasportano
una lieve quantità di refrigerante ecologico ma infiammabile
(R600a) e di gas isolante (ciclopentano). Questi prodotti non
danneggiano lo strato di ozono e non aumentano l'effetto serra. Se
il refrigerante fuoriesce, può lesionare gli occhi o incendiarsi.
Se il circuito di refrigerazione è visibilmente danneggiato:
- Spegnere l'elettrodomestico e staccare la spina dalla rete
elettrica.
- Tenere lontano dall'elettrodomestico fiamme libere e/o fonti di
ignizione.
- Ventilare accuratamente il locale per alcuni minuti.
- Informare l'assistenza clienti.
AVVERTENZA: per scongiurare il rischio di incendi o scosse
elettriche, non danneggiare la spina e/o il cavo di alimentazione.
AVVERTENZA: non adoperare prese multiple o alimentatori
portatili. Si sconsiglia l'uso di prolunghe e prese multiple.
Non tentare di sedersi o stare in piedi sulla parte superiore
dell'elettrodomestico, per evitare lesioni personali o danni
all'elettrodomestico. Questo elettrodomestico non può essere
impilato con altri elettrodomestici.
Il prodotto è progettato e costruito solo per uso domestico
È possibile utilizzare solo componenti originali forniti dal
produttore. Il produttore garantisce che solo questi componenti
soddisfano i requisiti di sicurezza.
L'apertura prolungata della porta può causare un significativo
aumento della temperatura nei vani dell'elettrodomestico
Pulire regolarmente le superfici che possono venire a contatto
con gli alimenti e i sistemi di scarico accessibili
Pulire i serbatoi dell'acqua se non sono stati utilizzati per 48
ore; sciacquare l'impianto idrico collegato alla rete idrica se l'acqua
non è stata prelevata per 5 giorni
Page 72

71
Conservare la carne e il pesce crudo in appositi contenitori in
frigorifero, in modo che non vengano a contatto con altri alimenti o
che non gocciolino su di essi
Gli scomparti per surgelati a due stelle (se presenti
nell'elettrodomestico) sono adatti alla conservazione di alimenti
pre-congelati, alla conservazione o alla preparazione di gelati e alla
produzione di cubetti di ghiaccio
Gli scomparti a una, due e tre stelle (se presenti
nell'elettrodomestico) non sono adatti al congelamento di alimenti
freschi
Se l'elettrodomestico viene lasciato vuoto per lunghi periodi di
tempo, spegnere, sbrinare, pulire, asciugare e lasciare la porta
aperta per evitare che si formi muffa all'interno
Per i frigoriferi cantina: Apparecchio destinato esclusivamente
alla conservazione del vino
Per gli apparecchi a libera installazione: Apparecchio di
refrigerazione non destinato ad essere utilizzato come apparecchio
da incasso
Per gli apparecchi senza uno scomparto a 4 stelle: Apparecchio
di refrigerazione non idoneo al congelamento di alimenti
Page 73

72
Smaltimento degli elettrodomestici usati
Questo elettrodomestico dispone di contrassegno ai sensi della direttiva europea 2012/19/UE sui
rifiuti di apparecchiature elettriche ed elettroniche (RAEE).
La direttiva RAEE riguarda le sostanze inquinanti (che possono causare conseguenze negative per
l'ambiente) e i componenti principali (che possono essere riutilizzati). È importante che i RAEE siano
sottoposti a trattamenti specifici in modo da togliere e smaltire in modo corretto gli inquinanti,
nonché recuperare e riciclare tutti i materiali.
Spetta ai singoli individui garantire che i RAEE non diventino un problema a livello ambientale.
Esistono alcune regole specifiche da rispettare:
- I RAEE non devono essere trattati come rifiuti domestici;
- I RAEE devono essere affidati agli speciali centri di raccolta gestiti dai comuni o da società
autorizzate. In molti stati è disponibile anche un servizio di raccolta porta a porta per i RAEE.
In caso di acquisto di nuovi elettrodomestici, quelli vecchi possono essere affidati al venditore che li
deve ritirare gratuitamente in numero corrispondente agli elettrodomestici acquistati, a condizione
che i singoli elettrodomestici siano di tipo simile e con le stesse funzioni di quelli acquistati.
Conformità
Apponendo il marchio su questo prodotto, confermiamo la conformità a tutti i requisiti di legge
europei in materia di sicurezza, salute e tutela ambientale applicabili per legge a questo prodotto.
Garanzia
La garanzia minima è: 2 anni per i Paesi UE, 3 anni per la Turchia, 1 anno per il Regno Unito, 1 anno
per la Russia, 3 anni per la Svezia, 2 anni per la Serbia, 5 anni per la Norvegia, 1 anno per il Marocco,
6 mesi per l'Algeria, la Tunisia nessuna garanzia legale richiesta.
Risparmio energetico
Per un maggiore risparmio di energia si consiglia di procedere come segue:
Installare l'elettrodomestico lontano da fonti di calore, al riparo dall’irradiazione diretta dei
raggi solari e in un ambiente ben ventilato.
Evitare di conservare alimenti caldi nel frigorifero per evitare di aumentare la temperatura
interna, provocando un funzionamento continuo del compressore.
Non riempirlo eccessivamente in modo tale da garantire una corretta circolazione dell'aria.
Sbrinare l'elettrodomestico in presenza di ghiaccio per facilitare il trasferimento del freddo.
In caso di mancanza di energia elettrica, si consiglia di lasciare chiusa la porta del frigorifero.
Aprire o tenere aperte le porte dell'elettrodomestico il meno possibile.
Evitare di regolare il termometro a temperature troppo basse.
Togliere la polvere presente nella parte posteriore dell'elettrodomestico.
Page 74
73
ISTRUZIONI DI MONTAGGIO
Prima di utilizzare la cantinetta per vino
Togliere l'imballo esterno ed interno.
Prima di collegare la cantinetta per vino all'alimentazione, lasciarla in posizione verticale per
circa 2 ore. Questo serve a ridurre la possibilità di un malfunzionamento nell'impianto di
raffreddamento durante la manipolazione del trasporto.
Pulire la superficie interna con acqua tiepida utilizzando un panno morbido.
Al momento di smaltire l'elettrodomestico, si prega di scegliere un centro di smaltimento
Installazione della cantinetta per vino
Avvertenza
Limiti di temperatura ambiente
Questo elettrodomestico è progettato per funzionare a temperature ambiente specificate dalla
classe di temperatura indicata sulla targhetta.
autorizzato.
Questo elettrodomestico è progettato per l'installazione libera o ad incasso (completamente
incassato) (Fare riferimento alla posizione dell'adesivo sul retro dell'elettrodomestico).
Questo elettrodomestico è destinato ad essere utilizzato esclusivamente per la
conservazione di vino o bevande.
Collocare la cantinetta per vino su un pavimento sufficientemente robusto da sostenerlo a
pieno carico. Per livellare la cantinetta per vino, regolare la gamba di livellamento anteriore
nella parte inferiore della cantinetta.
Questo elettrodomestico utilizza refrigerante antideflagrante, quindi non danneggiare mai le
tubazioni di raffreddamento durante il trasporto. Posizionare la cantinetta per vino lontano
dalla luce diretta del sole e da fonti di calore (stufa, riscaldamento, radiatore, ecc.). La luce
solare diretta può influenzare il rivestimento acrilico e le fonti di calore possono aumentare il
consumo elettrico. Anche temperature ambiente estremamente basse possono causare il
malfunzionamento dell'elettrodomestico.
Evitare di collocare l'elettrodomestico in luoghi umidi.
Collegare la cantinetta per vino ad una presa a muro dedicata con messa a terra. Non
rimuovere per alcuna ragione il puntale di terra (terzo) dal cavo di alimentazione. Eventuali
domande relative all'alimentazione e/o alla messa a terra devono essere rivolte a un
elettricista certificato o a un centro assistenza prodotti autorizzato.
Conservare il vino in bottiglie sigillate;
Non sovraccaricare il mobiletto;
Non aprire la porta più del necessario;
Non coprire i ripiani con fogli di alluminio o qualsiasi altro materiale che possa impedire la
circolazione dell'aria;
Nel caso in cui la cantinetta per vino venga conservata senza essere utilizzata per lunghi
periodi si consiglia, dopo un'accurata pulizia, di lasciare socchiusa la porta per permettere
all'aria di circolare all'interno del mobiletto al fine di evitare possibili formazioni di condensa,
muffe o odori.
Temperata estesa (SN): «Apparecchio di refrigerazione destinato a essere utilizzato a una
temperatura ambiente compresa tra 10 °C e 32 °C»
Temperata (N): «Apparecchio di refrigerazione destinato a essere utilizzato a una
temperatura ambiente compresa tra 16 °C e 32 °C»
Subtropicale (ST): «Apparecchio di refrigerazione destinato a essere utilizzato a una
temperatura ambiente compresa tra 16 °C e 38 °C»
Tropicale (T): «Apparecchio di refrigerazione destinato a essere utilizzato a una temperatura
ambiente compresa tra 16 °C e 43 °C»
Page 75
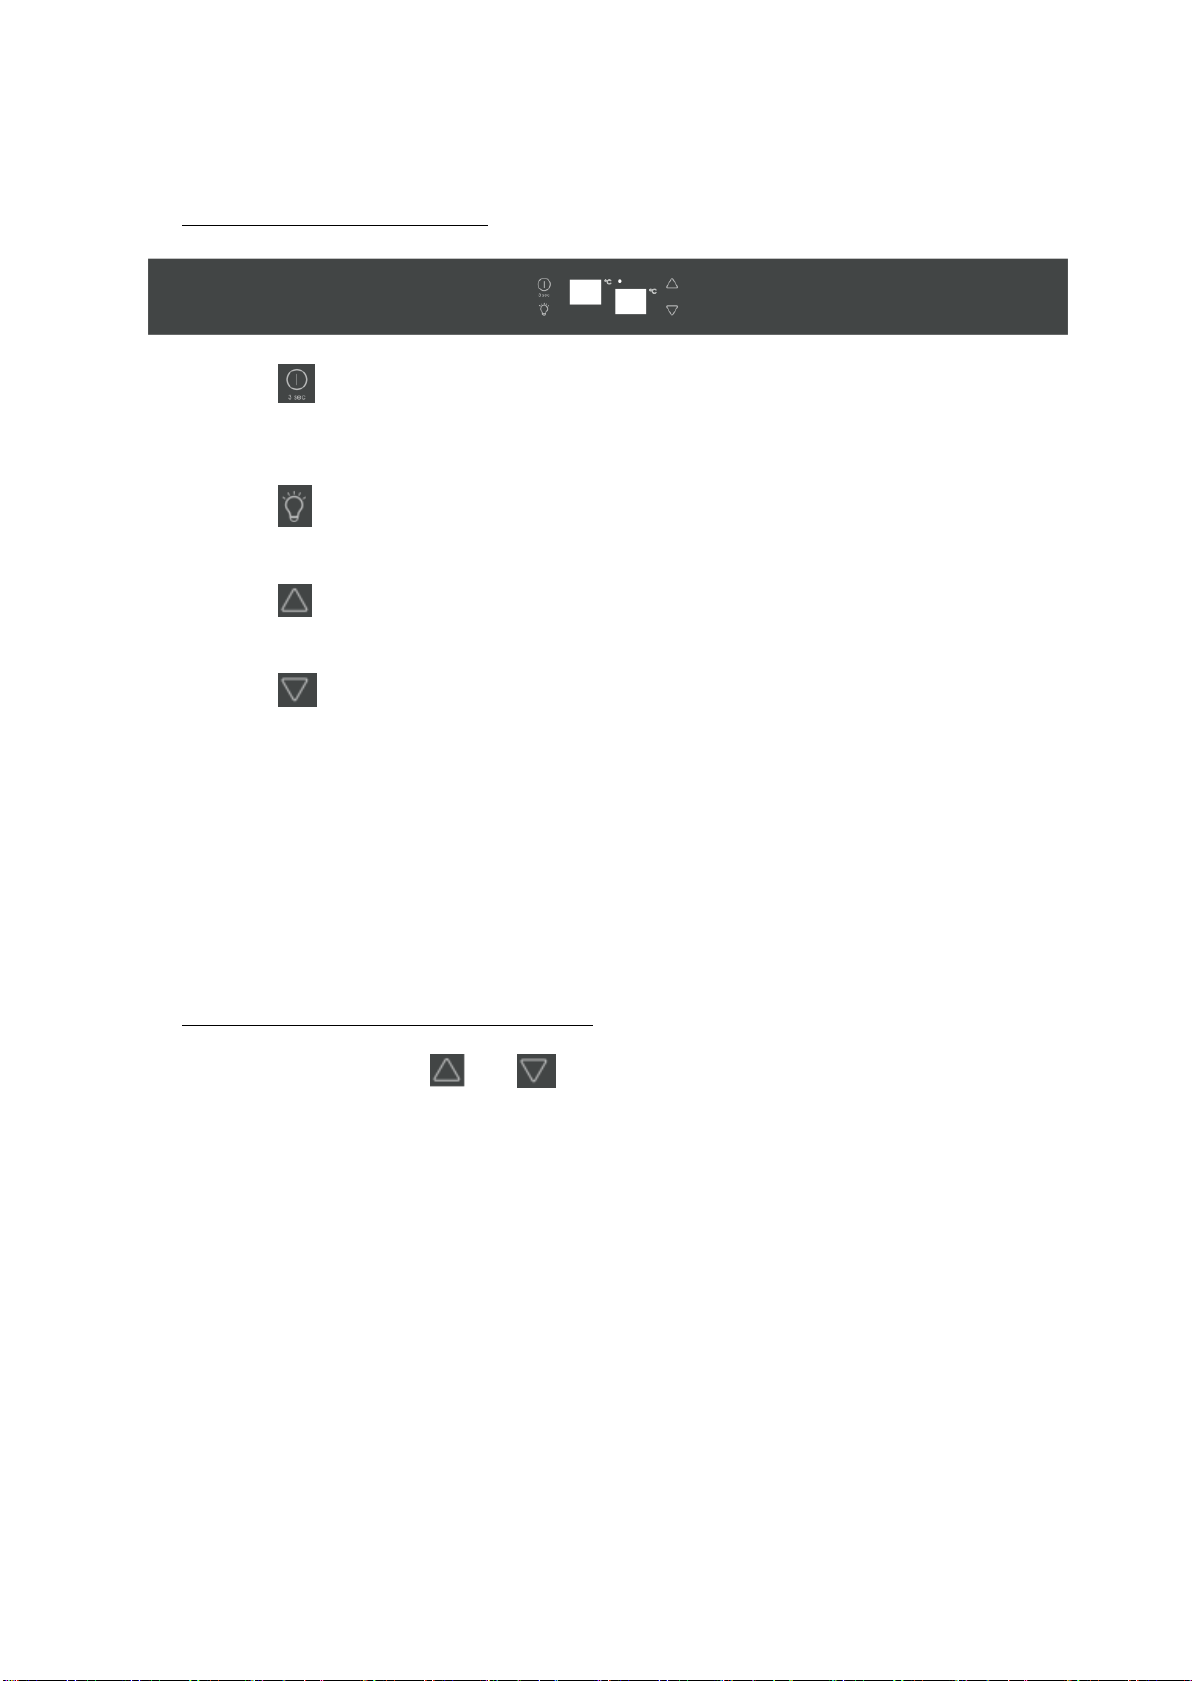
74
FUNZIONAMENTO DELLA CANTINETTA PER VINO/PER LE BEVANDE
E IMPOSTAZIONE DEL CONTROLLO DELLA TEMPERATURA
Istruzioni del sistema di comando
Pulsante " "
Per controllare l'accensione/spegnimento di questo elettrodomestico tenere premuto questo
tasto per circa 3 secondi.
Pulsante " "
Per controllare l'accensione e lo spegnimento della luce interna.
Pulsante " "
Per impostare la temperatura della cella superiore.
Pulsante " "
Per impostare la temperatura della cella inferiore.
Finestra di visualizzazione a LED a sinistra
Per impostare la temperatura della cella superiore.
Finestra di visualizzazione a LED a destra
Per impostare la temperatura della cella inferiore.
Indicatore luminoso
Display del compressore in funzione.
Impostazione dei comandi della temperatura
Premendo il pulsante " " o " ", il sistema entra automaticamente nella modalità di
impostazione del vano superiore o inferiore. Il LED lampeggia e visualizza la temperatura
impostata.
Premere una volta il pulsante, la temperatura diminuirà o aumenterà di 1°C. Quando si supera il
valore minimo che può essere stabilito, si passa automaticamente al valore di temperatura più
alto regolabile. Dopo aver smesso di premere il pulsante per 5 secondi, la cifra del LED smette di
lampeggiare, poi ritorna a visualizzare la temperatura del vano superiore o inferiore.
Dopo aver scollegato l'elettrodomestico, il sistema tornerà alla temperatura di default, che
viene impostata in fabbrica. La temperatura di default è la seguente:
Vano superiore: 6°C
Vano inferiore: 12°C
Se si vuole ottenere ogni temperatura interna di impostazione, premere il pulsante
corrispondente "Set Upper" o "Set Lower": il LED lampeggerà e visualizzerà la temperatura di
impostazione. Dopo aver smesso di premere il pulsante per 5 secondi, la cifra del LED smette di
lampeggiare, poi ritorna a visualizzare la temperatura effettiva.
Vano superiore: L'impostazione della temperatura può essere regolata tra 5°C e 10°C.
Vano inferiore: L'impostazione della temperatura può essere regolata tra 10°C e 18°C
Page 76

75
Allarme temperatura
Se la temperatura interna è più alta di 23°C, visualizzerà "HI" sul pannello del display, e dopo un'ora
si attiverà l'allarme / il cicalino. Ciò indica che la temperatura interna è troppo alta. Se la
temperatura interna è inferiore a 0°C, sul pannello del display viene visualizzato "LO" e insieme
all'allarme è attivo anche l'indicatore di malfunzionamento.
Funzione di richiamo della temperatura
In caso di interruzione dell'alimentazione, la cantinetta per vino può ricordare le impostazioni di
temperatura precedenti e, quando l'alimentazione viene ripristinata, la temperatura della cantinetta
torna alla stessa impostazione di temperatura che aveva al momento dello spegnimento.
Illuminazione interna
Per ridurre il consumo di energia, questa cantinetta per vino spegne automaticamente le luci a LED
dopo 10 minuti.
Se si vuole che la luce a LED rimanga accesa in modo continuo, è possibile farlo. Tenere premuto il
tasto "LUCE" per 5 secondi, il display visualizzerà "LP". Dopo 4 secondi il display tornerà alla
visualizzazione normale e la luce rimarrà accesa fino allo spegnimento manuale.
Se si desidera tornare indietro e risparmiare energia (procedura consigliata), tenere premuto il
pulsante "LUCE" per 5 secondi, il display mostrerà "LF". Dopo 4 secondi il display tornerà alla
visualizzazione normale e la luce si spegnerà automaticamente dopo 10 minuti.
Ripiani
Per evitare di danneggiare la guarnizione della porta, assicurarsi che la porta sia completamente
aperta quando si estraggono i ripiani dal vano con il binario.
Per un facile accesso al contenuto del ripiano, è necessario estrarre i ripiani per circa 1/3 dal
vano con il binario. Tuttavia, l'elettrodomestico è stato progettato con una tacca su ogni lato dei
binari del ripiano per evitare la caduta delle bottiglie.
Quando si rimuove uno di questi ripiani dal vano con il binario, per montare o togliere il ripiano è
necessario inclinare il ripiano come indicato sullo schema e quindi estrarlo semplicemente,
oppure spingerlo fino a quando non si appoggia saldamente sulle staffe di supporto.
NOTA:
Se l'elettrodomestico non è collegato alla presa, non è più alimentato oppure è spento, è
necessario aspettare da 3 a 5 minuti prima di riattivarlo. Se si cerca di riattivarlo prima di questo
intervallo di tempo, la cantinetta per vino/bevande non parte.
Quando si utilizza la cantinetta per vino/bevande per la prima volta o la si riavvia dopo essere
stata spenta per un lungo periodo di tempo, potrebbe esserci una variazione di alcuni gradi tra la
temperatura selezionata e quella indicata sul display a LED. Questo è normale ed è dovuto alla
lunghezza del tempo di attivazione. Una volta che la cantinetta per vino/bevande sarà in
funzione per qualche ora, tutto tornerà alla normalità.
Page 77
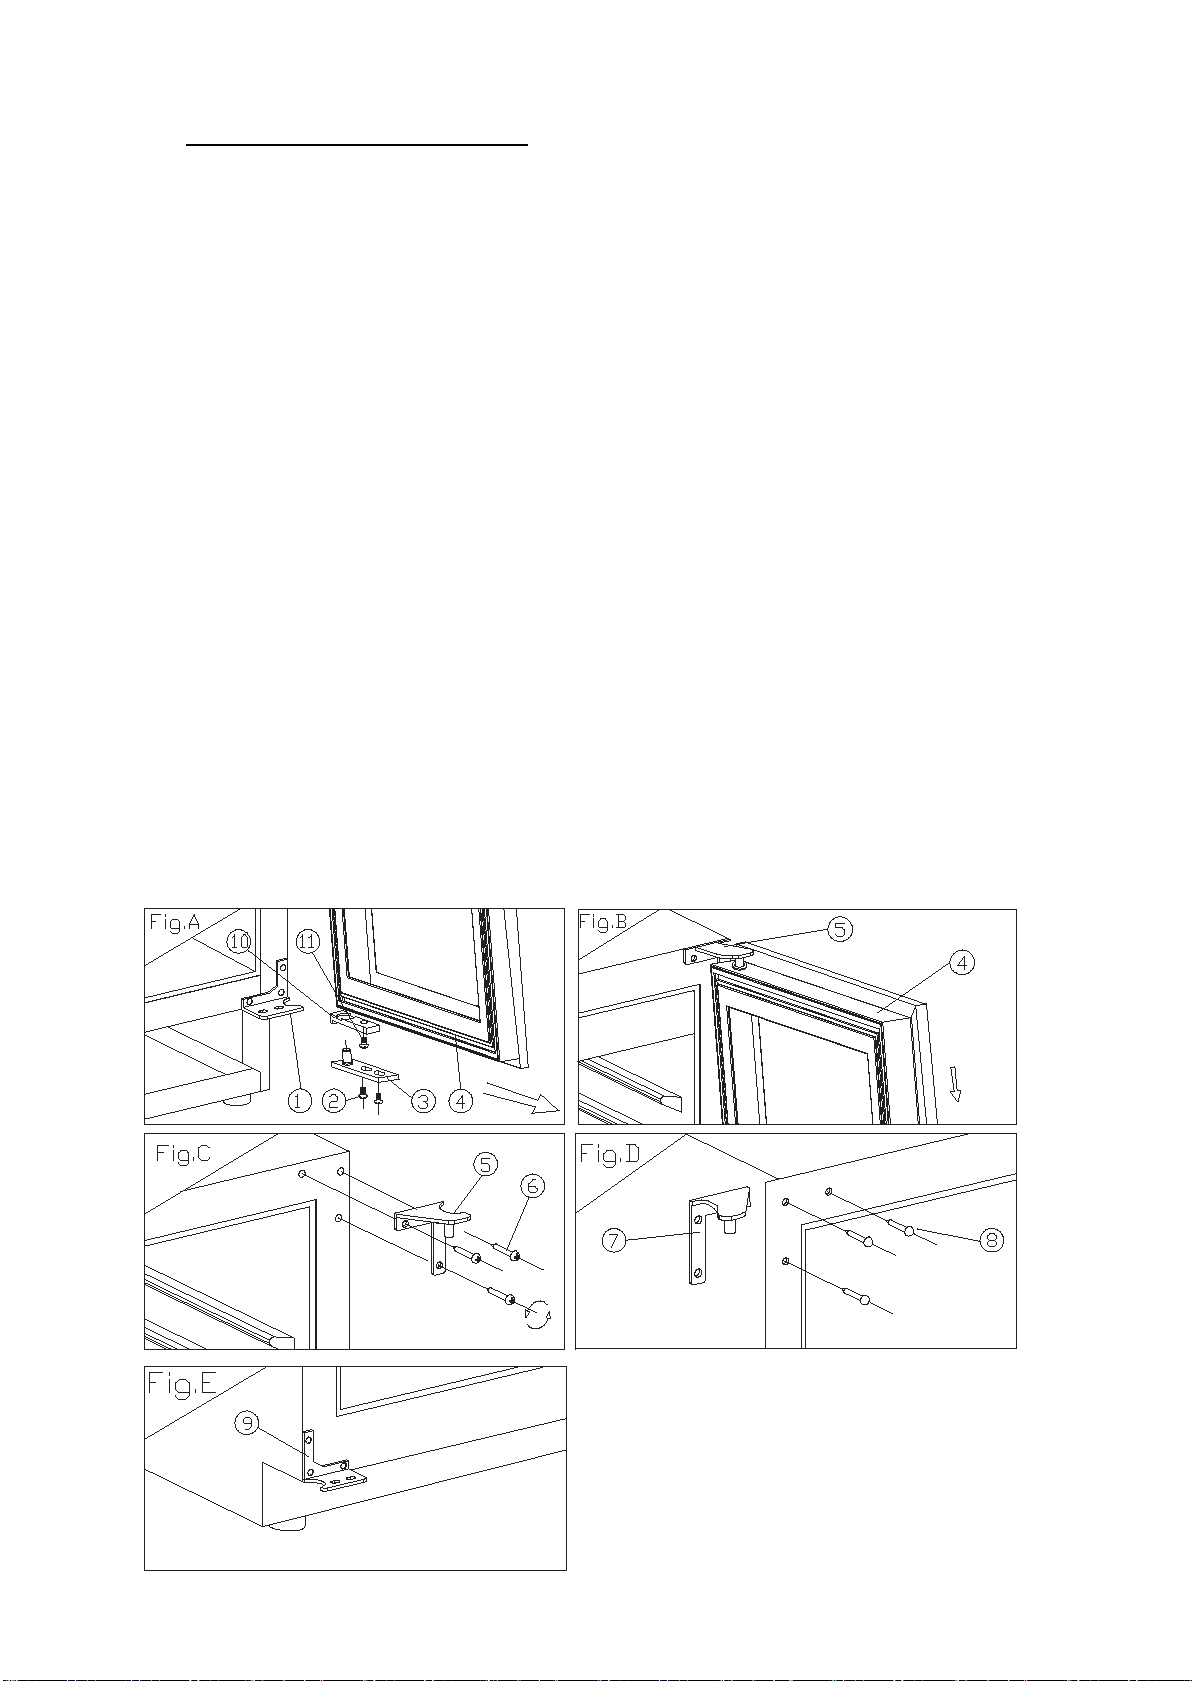
76
Come cambiare l'apertura della porta
Questo elettrodomestico è dotato di porte reversibili ma viene fornito con una porta incernierata a
destra. Il kit con cerniera sinistra viene fornito con l'elettrodomestico (nella scatola), se si desidera
invertire la cerniera dell'elettrodomestico stesso.
Tipo A (per porta tutto vetro / acciaio inox)
1. Cerniera inferiore (destra) 2. Viti 3. Asse della porta
4. Porta 5. Cerniera superiore (destra) 6. Viti della cerniera
7. Cerniera superiore (sinistra) 8. Copertura del foro 9. Cerniera inferiore
(sinistra)
10. Fermo della porta 11. Vite
1. Aprire la porta ad un angolo di 90 gradi, togliere le 2 viti (2) dall'asse inferiore della porta (3),
rimuovere la porta (4), rimuovere la piastra dell'asse (3) dalla porta, (Fig. A).
2. Svitare la vite (11) situata sotto il telaio della porta e il fermo (10) e riposizionarla sul lato sinistro
del telaio della porta. (Fig. A/B)
3. Estrarre le 3 viti della cerniera (6) dalla cerniera superiore (destra) (5) e toglierla. (Fig. C)
4. Togliere il chiodo decorativo (8) dalla parte superiore sinistra del mobiletto e montare la cerniera
superiore di ricambio (sinistra) (7) nella parte superiore sinistra del mobiletto con 3 viti. (Fig. D)
5. Seguendo la procedura sopra descritta, montare la cerniera inferiore di ricambio a sinistra (9). (Fig.
E)
6. Montare e allineare la porta.
7. Inserire i tappi di plastica per coprire i fori (8).
Page 78

77
Tipo B (per porta sottile in acciaio inossidabile)
1 Cerniera inferiore (destra)
4 Porte
7 Cerniere superiori
(sinistra)
2 Viti
5 Cerniere superiori (destra)
8 Cerniere inferiori (sinistra)
3 Perni porta
6 Viti
1. Togliere 2 viti (2), quindi tirare la porta (4) come da direzione della freccia e la cerniera inferiore
(destra)(1) come per il montaggio. (Fig. A e Fig. B)
2. Togliere 3 viti (6) della cerniera superiore destra, quindi togliere la cerniera superiore destra (5) e
la cerniera inferiore destra (1). (Vedere Fig. C)
3. Utilizzare le viti tolte dalle cerniere di destra per fissare le cerniere di sinistra superiore e
inferiore (7)(8). (Vedere Fig. D e Fig. E)
4. Ruotare la porta a 180 gradi, quindi montare la porta seguendo la procedura inversa rispetto allo
smontaggio.
Page 79
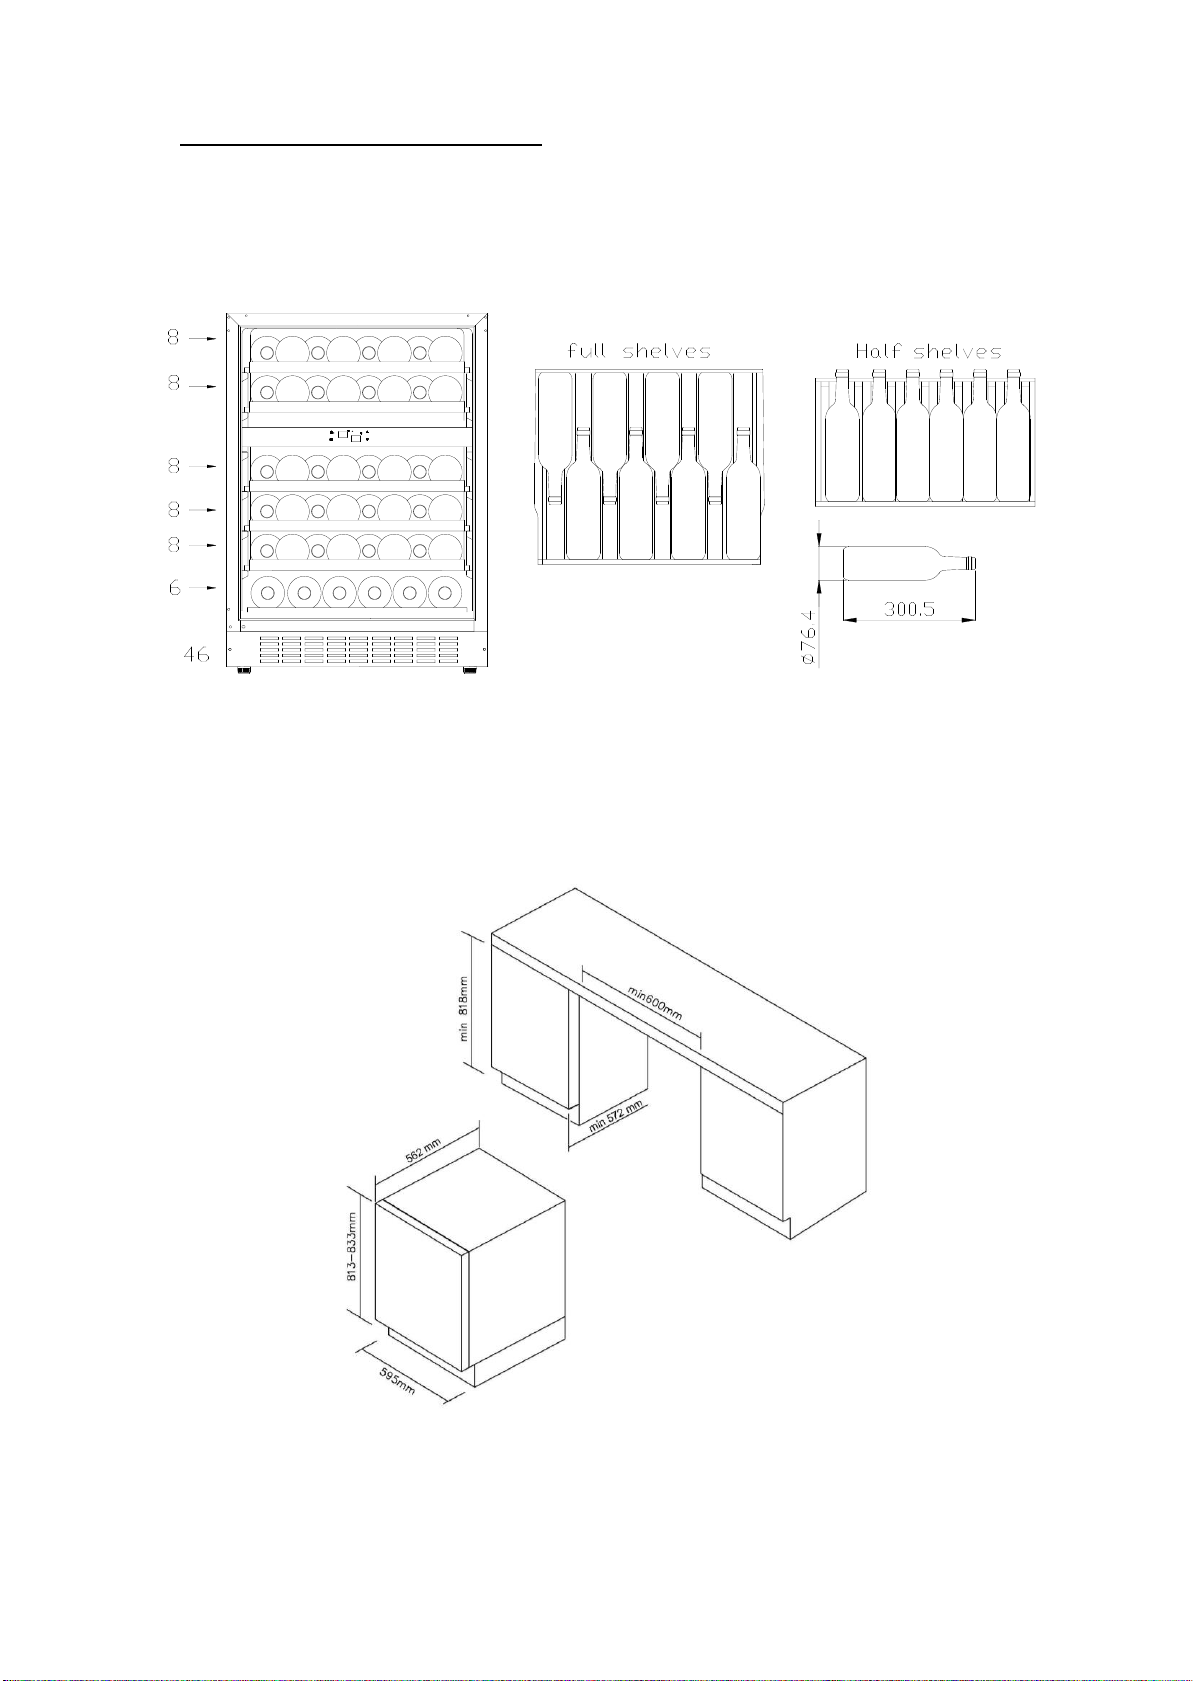
78
Schema di conservazione vino/bevande
+
=
+
+
+
+
In base alla configurazione effettiva del vostro prodotto, si prega di controllare il relativo schema di
conservazione.
Totale: massimo 46 bottiglie
La configurazione che consente il maggiore risparmio energetico richiede il posizionamento dei
ripiani nel prodotto; fare riferimento alle immagini precedenti.
Specifiche di montaggio per incasso
Per altezza 813 mm con porta tutto vetro / acciaio inox
Page 80

79
Per altezza 813 con porta in acciaio inox sottile
Per altezza 865 mm con porta tutto vetro / acciaio inox
Page 81

80
Per altezza 865 con porta in acciaio inox sottile
PULIZIA E MANUTENZIONE
Pulizia della cantinetta per vino
Togliere alimentazione, scollegare l'elettrodomestico e rimuovere tutti gli oggetti, compresi i
ripiani e la griglia.
Lavare le superfici interne con acqua calda e una soluzione di bicarbonato di sodio. La
soluzione dovrebbe essere di circa 2 cucchiai di bicarbonato di sodio in un quarto d'acqua.
Lavare i ripiani con una soluzione detergente delicata.
Strizzare l'acqua in eccesso dalla spugna o dal panno quando si pulisce l'area dei comandi, o
qualsiasi parte elettrica.
Lavare il mobiletto esterno con acqua calda e detergente liquido delicato. Sciacquare bene e
asciugare con un panno morbido pulito.
Page 82

81
Come sostituire il filtro a carbone (se presente nel vostro apparecchio)
I filtri al carbone si trovano nell'angolo in alto a destra di ogni zona della cantinetta.
Aprire lo sportello e togliere i 2 ripiani superiori (vedere smontaggio dei ripiani).
Ruotare il filtro come da Fig. A.
Come indicato in Fig. B, il filtro deve allinearsi con le tacche come mostrato in figura.
Estrarre il filtro (Fig. C).
Inserire il filtro di ricambio e ruotare come da Fig. A per bloccarlo in posizione.
Rimontare i ripiani.
Mancanza di alimentazione
La maggior parte delle interruzioni di corrente vengono risolte nel giro di poche ore e non
dovrebbero influire sulla temperatura dell'elettrodomestico se si riduce al minimo il numero
di aperture della porta. Se l'alimentazione viene interrotta per un periodo di tempo
prolungato, è necessario adottare le misure adeguate per proteggere il contenuto.
Periodi di vacanza
Assenze brevi: Lasciare la cantinetta per vino in funzione in caso di assenze inferiori alle tre
settimane.
Assenze prolungate: Se l’elettrodomestico non verrà utilizzato per diversi mesi, rimuovere il
contenuto e staccare la spina. Pulire e asciugare accuratamente l’interno dell'elettrodomestico.
Per impedire la formazione di odori e di muffa, lasciare la porta leggermente aperta, se
necessario bloccarla.
Spostamento della cantinetta per vino
Rimuovere tutti gli elementi.
Fissare saldamente con nastro tutti gli elementi sfusi (ripiani) all'interno
dell'elettrodomestico.
Ruotare la gamba regolabile fino alla base per evitare danni.
Chiudere la porta con nastro adesivo.
Assicurarsi che l'elettrodomestico rimanga in posizione verticale durante il trasporto.
Proteggere anche l'esterno dell'elettrodomestico con una coperta o un oggetto simile.
Accorgimenti per il risparmio energetico
La cantinetta per vino deve essere posizionata nel punto più fresco della stanza, lontano da
elettrodomestici che producono calore e al riparo dalla luce diretta del sole.
Page 83
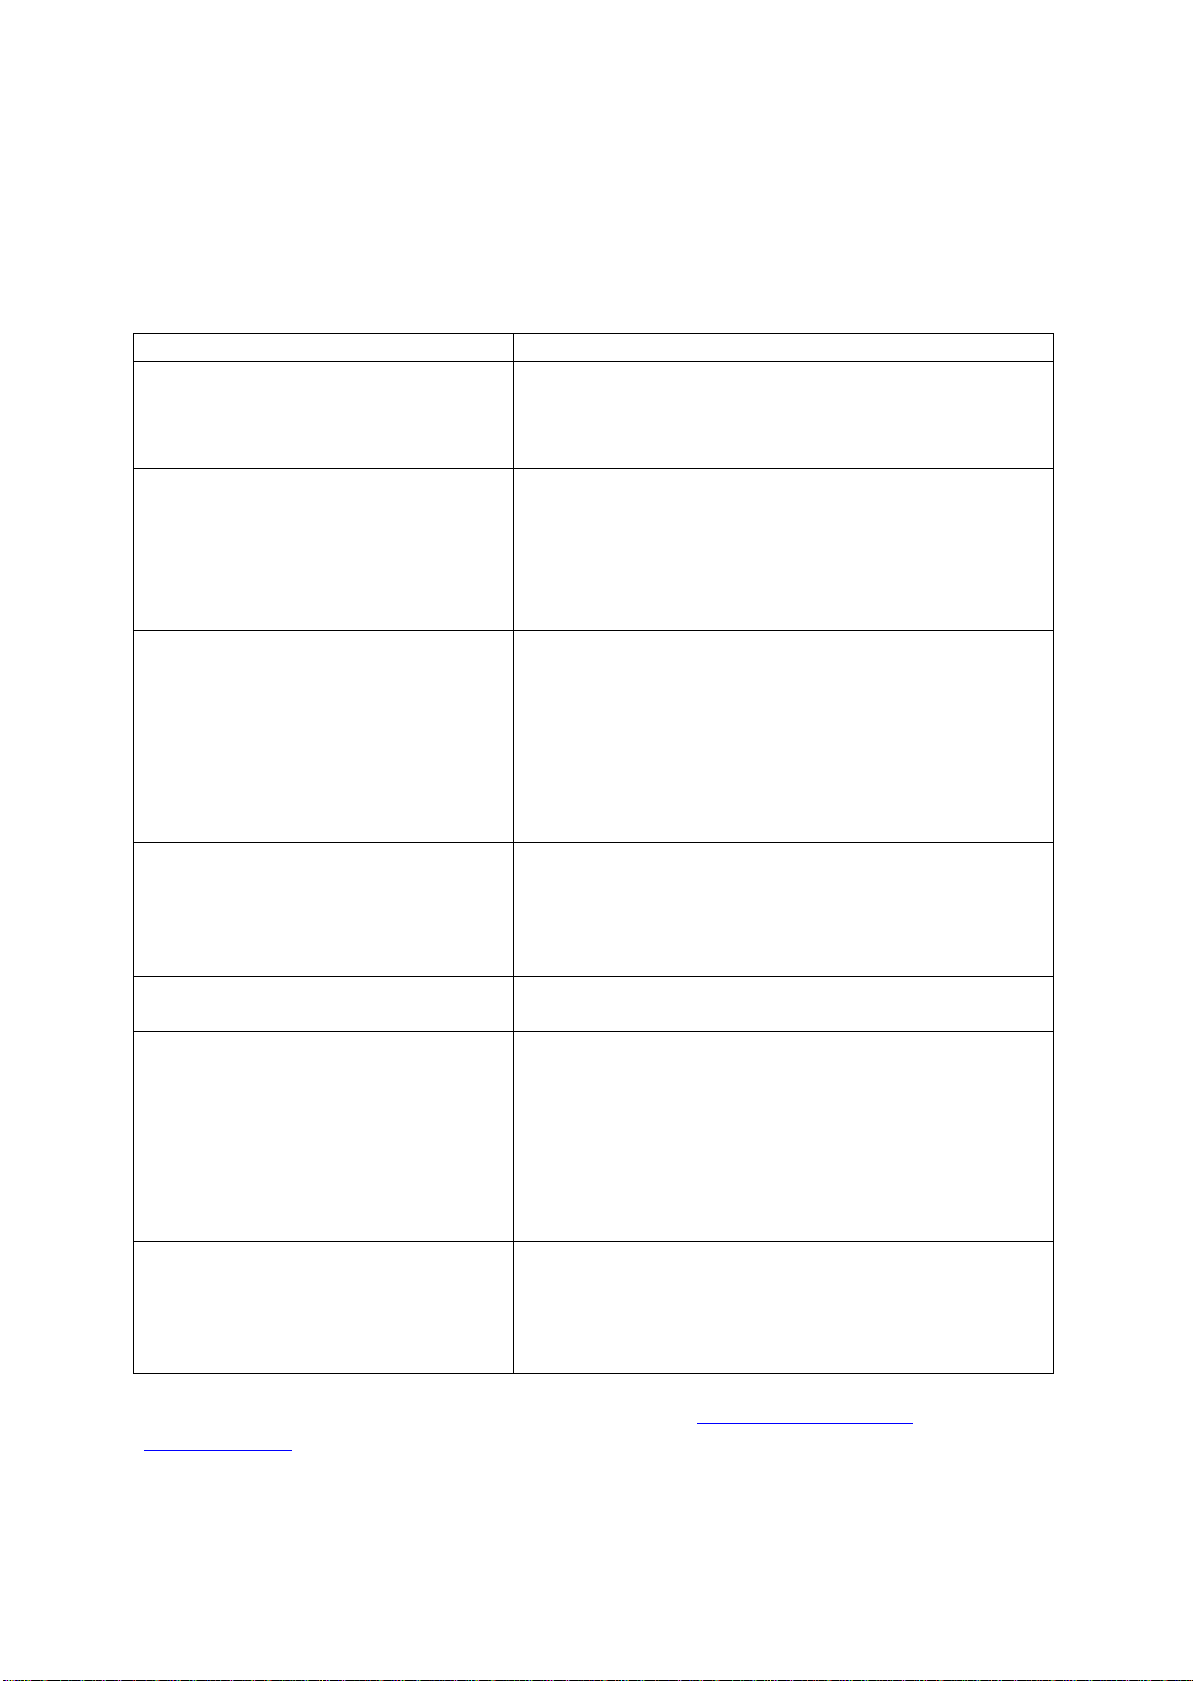
82
PROBLEMA DELLA CANTINETTA PER VINO/BEVANDE?
PROBLEMA
POSSIBILE CAUSA
La cantinetta per vino/bevande non
funziona.
Non collegata.
L'elettrodomestico è spento.
L'interruttore automatico è scattato o il fusibile è
bruciato.
La cantinetta per vino/bevande non è
sufficientemente fredda.
Verificare l'impostazione del controllo della temperatura.
L'ambiente esterno può richiedere un'impostazione più
elevata.
La porta viene aperta con troppa frequenza.
La porta è chiusa male.
La guarnizione della porta non sigilla correttamente.
Si accende e spegne frequentemente.
La temperatura ambiente è più calda del normale.
Una grande quantità di contenuto è stata aggiunta alla
cantinetta per vino/bevande.
La porta viene aperta con troppa frequenza.
La porta è chiusa male.
Il controllo della temperatura non è impostato
correttamente.
La guarnizione della porta non sigilla correttamente.
La luce non funziona.
Non collegata.
L'interruttore automatico è scattato o il fusibile è
bruciato.
La lampadina è bruciata.
Il pulsante della luce è spento.
Vibrazioni.
Controllare che la cantinetta per vino/bevande sia in
piano.
La cantinetta per vino/bevande sembra
essere troppo rumorosa.
Il rumore di battito può provenire dal flusso del
refrigerante, che è normale.
Al termine di ogni ciclo, potreste sentire dei gorgoglii
causati dal flusso di refrigerante nella vostra cantinetta
per vino/bevande.
La contrazione e l'espansione delle pareti interne
possono causare rumori di scoppiettio e crepitio.
La cantinetta per vino/bevande non è in piano.
La porta non chiude in modo corretto.
La cantinetta per vino/bevande non è in piano.
La porta è stata invertita e non è stata installata
correttamente.
La guarnizione è sporca.
I ripiani non sono in posizione.
È possibile risolvere molti problemi più comuni della cantinetta per vino/bevande, risparmiando il
costo di una possibile chiamata di servizio. Provare i suggerimenti riportati di seguito per verificare
se è possibile risolvere il problema prima di chiamare il servizio di assistenza.
GUIDA ALL’INDIVIDUAZIONE DEI PROBLEMI
Per contattare l'assistenza tecnica, visitare il nostro sito Web: https://corporate.haier-
europe.com/en/ . Nella sezione "websites", scegli la marca del tuo prodotto e il tuo paese. Verrai
reindirizzato al sito specifico dove potrai trovare il numero di telefono e il modulo per contattare
l'assistenza tecnica
Page 84

83
Disponibilita’ dei ricambi
IMPOSTAZIONI DI TEMPERATURA consigliate
Per conservare TUTTI I TIPI DI VINI
12 °C to 14 °C
Per conservare TUTTI I TIPI DI VINI
Champagne Sans Année
6 °C
Champagne millesimato
10 °C
Semillon bianco secco, Sauvignon Blanc
8 °C
Gewürztraminer bianco secco, Riesling
10 °C
Chardonnay bianco secco
10 °C
Chardonnay millesimato
14 °C
Bianchi dolci (Sauternes, Monbazillac), ice wine di vendemmia tardiva
10 °C
Sauternes millesimati (bianco dolce)
14 °C
Beaujolais
13 °C
Pinot Noir rosso
16 °C
Pinot Noir rosso millesimato
18 °C
Cabernet rosso, Merlot, francese, australiano, neozelandese, cileno,
argentino, italiano, spagnolo, californiano
18 °C
Grenache rosso, Syrah
16 °C
Termostati, sensori di temperatura, schede a circuiti stampati e sorgenti luminose sono
disponibili per un periodo minimo di sette anni dall’immissione sul mercato dell’ultima unità
del modello;
Maniglie e cerniere delle porte, vassoi e cesti sono disponibili per un periodo minimo di sette
anni e guarnizioni delle porte per un periodo minimo di dieci anni dall’immissione sul
mercato dell’ultima unità del modello;
Per ulteriori informazioni sul prodotto, consultare https://eprel.ec.europa.eu/ o eseguire la
scansione del QR sull'etichetta energetica fornita con l'apparecchio
Page 85

84
Nederlands
Dank u voor de aanschaf van dit product.
Voordat u de koelkast gaat gebruiken dient u deze gebruiksaanwijzing aandachtig te lezen om de maximale prestaties van het apparaat
te bereiken. Bewaar alle documentatie voor latere raadpleging of voor andere eigenaars. Dit product is uitsluitend bedoeld voor
huishoudelijk gebruik of soortgelijke toepassingen, zoals:
- de personeelskeuken in winkels, kantoren en andere werkomgevingen
- op landbouwbedrijven, door cliënten in hotels, motels en andere woonomgevingen
- in Bed and Breakfasts (B&B)
- voor cateringservices en vergelijkbare toepassingen die niet voor retailverkoop zijn bedoeld.
Dit apparaat mag alleen worden gebruikt om voedsel te conserveren, elk ander gebruik wordt gevaarlijk geacht en de fabrikant
aanvaardt geen aansprakelijkheid voor eventuele problemen. Verder adviseren wij u om de garantievoorwaarden te lezen.
VEILIGHEIDSINFORMATIE
Lees de bedienings- en installatieinstructies zorgvuldig door! Ze bevatten belangrijke informatie over de
installatie, het gebruik en het onderhoud van het apparaat. De fabrikant is niet aansprakelijk als u zich niet aan
de instructies en waarschuwingen houdt. Bewaar alle documenten voor volgend gebruik of voor de volgende
eigenaar.
• Sluit het apparaat niet aan op de elektriciteitsvoorziening voordat
alle verpakkingen en transportbeschermers zijn verwijderd. Houd
kinderen uit de buurt van verpakkingen en onderdelen. Gevaar
voor verstikking van vouwdoosjes en plastic folie!
• Laat het apparaat minstens 4 uur staan voordat u het inschakelt,
zodat de compressorolie kan bezinken na horizontaal transport
• Controleer bij levering of het product niet beschadigd is en of alle
onderdelen en accessoires in perfecte staat zijn
• Beschadig het koelmiddelcircuit niet.
• Zorg dat de ventilatieopeningen in de omkasting van het apparaat
of in de inbouwconstructie nooit verstopt raken of afgedekt worden
• Gebruik nooit water om de compressor te wassen, veeg deze na het
reinigen grondig schoon met een droge doek om roestvorming te
voorkomen
• Verplaats het apparaat altijd met ten minste twee personen, het is
namelijk zwaar.
• Installeer het apparaat waterpas op een plaats die geschikt is voor
de grootte en het gebruik ervan.
• Controleer of de elektrische informatie op het typeplaatje
overeenkomt met de stroomvoorziening. Als dat niet het geval is,
neem dan contact op met een elektricien.
• Het apparaat wordt gebruikt met een voeding van 220-240 VAC/50
Hz. Abnormale spanningsschommelingen kunnen ertoe leiden dat
het apparaat niet start of dat de temperatuurregeling of de
compressor beschadigd raakt of dat er tijdens het gebruik een
abnormaal geluid optreedt. In dat geval moet er een automatische
regelaar worden gemonteerd.
• Alleen voor Groot-Brittannië: Het netsnoer van het apparaat is
voorzien van een 3-pins (geaarde) stekker die past op een
Page 86

85
standaard 3-pins (geaard) stopcontact. De derde pin (aarding) mag
nooit worden afgesneden of gedemonteerd. Nadat het apparaat is
geïnstalleerd, moet de stekker bereikbaar zijn.
• Zorg ervoor dat het netsnoer tijdens en na het dragen/verplaatsen
van het apparaat niet onder het apparaat blijft vastzitten, om te
voorkomen dat het netsnoer doorgesneden of beschadigd wordt.
Als het netsnoer beschadigd is, moet het worden vervangen door de
fabrikant, zijn servicevertegenwoordiger of andere bevoegde
personen om gevaarlijke situaties te voorkomen
• Zet het apparaat niet op vochtige, olieachtige of stoffige plaatsen en
stel het niet rechtstreeks bloot aan zonlicht en water
• Installeer het apparaat niet in de buurt van verwarmingen of
ontvlambare materialen
• VOOR apparaten met een vriesvak: het deksel niet openen als er
een stroomstoring is. Bevroren voedsel mag niet worden beïnvloed
als de storing minder lang duurt dan de uren die op het etiket
worden vermeld (Stijgtijd temperatuur). Als de storing langer
duurt, moet het voedsel worden gecontroleerd en onmiddellijk
worden geconsumeerd of bereid en daarna opnieuw ingevroren.
• Maakt u zich geen zorgen als het deksel van de diepvrieskist
meteen nadat u hem heeft gesloten moeilijk te openen is. Dit komt
door het drukverschil, dat gewoonlijk na enkele minuten verdwijnt
waardoor het deksel gewoon kan worden geopend.
• Bewaar geen geneesmiddelen, bacteriën of chemische middelen in
het apparaat. Dit apparaat is een huishoudelijk apparaat, het wordt
niet aanbevolen om materialen op te slaan die strikte
temperaturen vereisen.
• Trek niet aan het snoer en knik het niet; raak het niet met natte
handen aan
• Bewaar geen producten die ontvlambare drijfgassen (bijv.
spuitbussen) of explosieve stoffen bevatten in het apparaat. Risico
op explosie!
• Plaats geen onstabiele voorwerpen (zware voorwerpen, containers
gevuld met water) bovenop de koelkast, om persoonlijk letsel door
vallen of elektrische schokken door contact met water te
voorkomen.
• Gebruik geen elektrische apparaten in de bewaarvakken voor
voedingsmiddelen van het apparaat, tenzij ze van het door de
fabrikant aanbevolen type zijn
• Raak de interne koelelementen niet aan, vooral niet met natte
handen, om scheuren of verwondingen te voorkomen
• Kinderen, mensen met beperkte lichamelijke, mentale of
zintuiglijke vermogens, en mensen die onvoldoende kennis hebben
Page 87

86
over de veilige bediening van het apparaat lopen een groter risico.
Controleer of kinderen en kwetsbare mensen de gevaren hebben
begrepen. Een persoon die verantwoordelijk is voor de veiligheid
moet toezicht houden op of instructies geven aan kinderen en
kwetsbare personen die het apparaat gebruiken. Alleen kinderen
van 8 jaar en ouder mogen het apparaat gebruiken.
• Kinderen mogen niet met het apparaat spelen
• Kinderen van 3 tot 8 jaar mogen dit apparaat in- en uitladen
• VOOR apparaten met een vriesvak: bewaar geen vloeistoffen in
flessen of blik (vooral geen koolzuurhoudende dranken) in het
vriesvak. Flessen en blikken kunnen barsten!
• VOOR apparaten met een vriesvak: plaats bevroren voedsel nooit
rechtstreeks uit het vriesvak in uw mond. Risico op vrieswonden!
• Houd plastic onderdelen en de afdichting van de deur vrij van olie
en vet. Anders zullen plastic onderdelen en de deurafdichting
poreus worden.
• Haal de stekker uit het stopcontact voordat u welke handeling dan
ook op het apparaat gaat verrichten
• Gebruik geen mechanische apparaten of andere middelen om het
ontdooien te versnellen, behalve degene die worden aanbevolen
door de fabrikant
• Gebruik geen puntige of scherpe voorwerpen zoals messen of
vorken om de ijsafzettingen te verwijderen. Gebruik nooit föhnen,
elektrische verwarmingstoestellen of andere dergelijke elektrische
apparaten om te ontdooien
• Geadviseerd wordt om de stekker schoon te houden, stof op de
stekker kan de oorzaak zijn van brand
• Probeer het apparaat niet zelf te repareren, te demonteren of te
wijzigen. In geval van reparatie kunt u altijd contact opnemen met
onze klantenservice.
• Houd tijdens het schoonmaken of onderhouden van het apparaat
toezicht op kinderen.
• Reinig de koude glazen planken niet met heet water. Door
plotselinge temperatuurveranderingen kan het glas breken.
• WAARSCHUWING: De leidingen van het koelcircuit transporteren
een kleine hoeveelheid milieuvriendelijk maar ontvlambaar
koelmiddel (R600a) en isolatiegas (cyclopentaan). Het is niet
schadelijk voor de ozonlaag en vergroot het broeikaseffect niet. Als
het koelmiddel ontsnapt, kan het letsel aan uw ogen veroorzaken of
ontbranden.
• Als het koelcircuit beschadigd raakt:
- Schakel het apparaat uit en trek de stekker uit het stopcontact.
Page 88

87
- Houd open vlammen en/of ontstekingsbronnen uit de buurt van het
apparaat.
- Ventileer de ruimte enkele minuten grondig.
- Breng de klantenservice op de hoogte.
• WAARSCHUWING: Beschadig de stekker en/of het netsnoer niet; dit
kan elektrische schokken of brand veroorzaken.
• WAARSCHUWING: Gebruik geen meerdere draagbare
stopcontacten of draagbare voedingen. We raden het gebruik van
verlengsnoeren en multi-adapters niet aan."
• Probeer niet op de bovenkant van het apparaat te zitten of staan. U
kunt uzelf verwonden of het apparaat beschadigen. Dit apparaat is
niet ontworpen om op andere apparaten te stapelen.
• Het product is uitsluitend ontworpen en gebouwd voor
huishoudelijk gebruik
• Alleen originele onderdelen die door de fabrikant worden geleverd,
mogen worden gebruikt. De fabrikant garandeert dat alleen deze
onderdelen aan de veiligheidseisen voldoen.
• Het langdurig openen van de deur kan leiden tot een aanzienlijke
verhoging van de temperatuur in de compartimenten van het
apparaat
• Reinig regelmatig oppervlakken die in contact kunnen komen met
levensmiddelen en toegankelijke afvoersystemen
• Reinig waterreservoirs als ze 48 uur niet zijn gebruikt; spoel de
waterinstallatie door als er gedurende 5 dagen geen water is
aangezogen
• Bewaar rauw vlees en vis in geschikte recipiënten in de koelkast,
zodat deze niet in contact komen met of druipen op ander voedsel
• De diepvriesvakken met twee sterren (als ze in het apparaat
aanwezig zijn) zijn geschikt voor het bewaren van vooringevroren
levensmiddelen, het bewaren of maken van ijs en het maken van
ijsblokjes
• Een-, twee- en drie-sterren compartimenten (als ze in het apparaat
aanwezig zijn) zijn niet geschikt voor het invriezen van verse
levensmiddelen
• Als het apparaat gedurende lange tijd leeg is, moet u het
uitschakelen, ontdooien, reinigen, drogen en de deur open laten om
schimmelvorming in het apparaat te voorkomen
• Voor wijnbewaarkasten: Dit apparaat is uitsluitend bedoeld voor
het bewaren van wijn
• Voor een vrijstaand apparaat: Dit koelapparaat is niet bedoeld om
te worden gebruikt als inbouwapparaat
• Voor apparaten zonder 4-sterrencompartiment: dit koelapparaat is
niet geschikt voor het invriezen van levensmiddelen
Page 89

88
Afdanken van oude apparaten
Dit apparaat is voorzien van een merkteken in overeenstemming met de Europese richtlijn
2012/19/EU inzake Afgedankte Elektrische en Elektronische Apparatuur (AEEA).
AEEA bevat vervuilende stoffen (die negatieve gevolgen voor het milieu kunnen hebben) en
basisonderdelen (die hergebruikt kunnen worden). Het is belangrijk om AEEA specifieke
behandelingen te laten ondergaan, teneinde alle vervuilende stoffen te verwijderen of op de juiste
manier af te voeren en alle materialen terug te winnen en te recyclen.
Personen kunnen een belangrijke rol spelen om ervoor te zorgen dat AEEA niet in het milieu terecht
komt; hiervoor moeten enkele elementaire regels worden gevolgd:
- AEEA mag niet worden behandeld als gewoon huisvuil;
- AEEA moet naar een speciaal gemeentelijk inzamelpunt of naar geregistreerde bedrijven worden
gebracht. In veel landen wordt grote AEEA thuis opgehaald.
Wanneer u een nieuw apparaat koopt, kunt u in veel landen uw oude apparaat inleveren bij de
leverancier, die het gratis meeneemt, zolang de apparatuur van hetzelfde type is en dezelfde
functies heeft als de geleverde apparatuur.
Naleving
Door het aanbrengen van de
verantwoordelijkheid dat dit product in overeenstemming is met alle Europese wettelijke
voorschriften met betrekking tot de vereisten inzake veiligheid, gezondheid en milieu.
Garantie
Minimumgarantie is: 2 jaar voor EU-landen, 3 jaar voor Turkije, 1 jaar voor het Verenigd Koninkrijk, 1
jaar voor Rusland, 3 jaar voor Zweden, 2 jaar voor Servië, 5 jaar voor Noorwegen, 1 jaar voor
Marokko, 6 maanden voor Algerije, Tunesië geen wettelijke garantie vereist.
Energiebesparing
Voor meer energiebesparing adviseren we het volgende:
• Plaats het apparaat uit de buurt van warmtebronnen en niet blootgesteld aan direct
zonlicht, in een goed geventileerde ruimte.
• Vermijd het plaatsen van warm voedsel in de koelkast om te voorkomen dat de interne
temperatuur stijgt en dat de compressor dus continu in werking blijft.
• Zet niet te veel voedsel in het apparaat, want er moet voldoende lucht kunnen circuleren.
• Ontdooi het apparaat als er zich ijs gevormd heeft, om de koudeoverdracht te bevorderen.
• Als de stroom uitvalt, is het raadzaam de koelkastdeur gesloten te houden.
• Open de deuren van het apparaat zo weinig mogelijk en houd ze zo kort mogelijk open
• Zet de thermostaat niet op te lage temperaturen.
• Verwijder het stof van de achterkant van het apparaat
-markering op dit product, verklaren wij onder onze eigen
Page 90
89
INSTALLATIE-INSTRUCTIES
Voordat u uw wijnkoeler gebruikt
• Verwijder de buiten- en binnenverpakking.
• Laat de wijnkoeler ongeveer 2 uur rechtop staan voordat u deze aansluit op de netvoeding.
Dit verkleint de mogelijkheid van een storing in het koelsysteem door hantering tijdens het
transport.
• Reinig de binnenkant met lauw water en een zachte doek.
• Kies bij het afdanken van uw apparaat voor een geautoriseerde afvoerlocatie.
Installatie van uw wijnkoeler
• Dit apparaat is ontworpen voor vrijstaande installatie of ingebouwde (volledig verzonken)
installatie (raadpleeg de sticker aan de achterkant van dit apparaat).
• Dit apparaat is uitsluitend bedoeld voor het bewaren van wijn of dranken.
• Plaats uw wijnkoeler op een vloer die sterk genoeg is om hem te ondersteunen wanneer hij
volledig volgeladen is. Om uw wijnkoeler waterpas te zetten, stelt u de nivelleringspoot aan
de voorzijde aan de onderkant van de wijnkoeler af.
• Dit apparaat gebruikt brandbaar koudemiddel. Beschadig de koelleidingen dus nooit tijdens
het transport. Plaats de wijnkoeler uit de buurt van direct zonlicht en warmtebronnen
(fornuis, verwarming, radiator enz.). Direct zonlicht kan de acrylcoating beïnvloeden en
warmtebronnen kunnen het elektriciteitsverbruik verhogen. Extreme koude
omgevingstemperaturen kunnen er ook voor zorgen dat het apparaat niet goed werkt.
• Plaats het apparaat niet in vochtige ruimtes.
• Sluit de wijnkoeler aan op een apart, correct geïnstalleerd stopcontact. Verwijder de derde
(aard)pin nooit, onder geen enkele omstandigheid, uit de stekker van het netsnoer. Alle
vragen met betrekking tot de stroomvoorziening en/of aarding dienen te worden gericht aan
een erkende elektricien of een erkend productenservicecenter.
Let op
• Bewaar wijn in verzegelde flessen;
• Laad de kast niet te vol;
• Open de deur niet, tenzij nodig;
• Bedek schappen niet met aluminiumfolie of enig ander materiaal dat de luchtcirculatie kan
verhinderen;
• Als de wijnkoeler langdurig zonder gebruik wordt bewaard, wordt aanbevolen om na een
zorgvuldige reiniging de deur op een kier te laten staan zodat er lucht in de kast kan
circuleren, om mogelijke vorming van condens, schimmel of geuren te voorkomen.
Omgevingstemperatuurlimieten
Dit apparaat is ontworpen om te werken bij omgevingstemperaturen die worden gespecificeerd
door de temperatuurklasse die op het typeplaatje is aangegeven.
• Uitgebreid gematigd (SN): “dit koelapparaat is bedoeld voor gebruik bij
omgevingstemperaturen van 10 °C tot 32 °C”
• Gematigd (N): “dit koelapparaat is bedoeld voor gebruik bij omgevingstemperaturen van
16 °C tot 32 °C”
• Subtropisch (ST): “dit koelapparaat is bedoeld voor gebruik bij omgevingstemperaturen van
16 °C tot 38 °C
• Tropisch (T): “dit koelapparaat is bedoeld voor gebruik bij omgevingstemperaturen van 16 °C
tot 43 °C”
Page 91

90
BEDIENEN VAN UW WIJN-/DRANKENKOELER
EN INSTELLEN VAN DE TEMPERATUURREGELING
Instructie bedieningssysteem
• Knop “
”
Het apparaat in-/uitschakelen (houd deze knoppen ongeveer 3 seconden ingedrukt).
• Knop “
”
De binnenverlichting in-/uitschakelen.
• Knop “
”
De temperatuur van het bovenste compartiment instellen.
• Knop “
”
De temperatuur van de onderste compartiment instellen.
• LCD-scherm links
De temperatuur van de bovenste compartiment instellen.
• LCD-scherm rechts
De temperatuur van de onderste compartiment instellen.
• indicatielampje
Compressor in bedrijf.
De temperatuurregelingen instellen
• Wanneer u op de knop “ ” of “ ” drukt, gaat het systeem automatisch naar de
instelmodus voor het bovenste of onderste compartiment. De LED knippert en geeft de
ingestelde temperatuur weer.
Druk eenmaal op de knop om de temperatuur met 1°C te verlagen of te verhogen. Bij
overschrijding van de in te stellen minimumwaarde zal deze automatisch naar de hoogst
instelbare temperatuurwaarde springen. Na 5 seconden op de knop te hebben gedrukt, stopt de
LED met knipperen en geeft vervolgens de temperatuur van het bovenste of onderste
compartiment weer.
Nadat de stekker uit het stopcontact is gehaald, keert het systeem terug naar de
rusttemperatuur, die in de fabriek is ingesteld. De rusttemperatuur is als volgt:
Bovenste compartiment: 6°C
Onderste compartiment: 12°C
Als u de ingestelde binnentemperaturen wilt zien, druk dan op de knop "Instellen bovenste
compartiment" of "Instelling onderste compartiment". De LED knippert en geeft de ingestelde
temperatuur weer. Na 5 seconden op de knop te hebben gedrukt, stopt de LED met knipperen
en geeft vervolgens de werkelijke temperatuur weer.
Bovenste compartiment: De temperatuurinstelling kan worden aangepast van 5°C tot 10°C.
Onderste compartiment: De temperatuurinstelling kan worden aangepast van 10°C tot 118°C.
Page 92
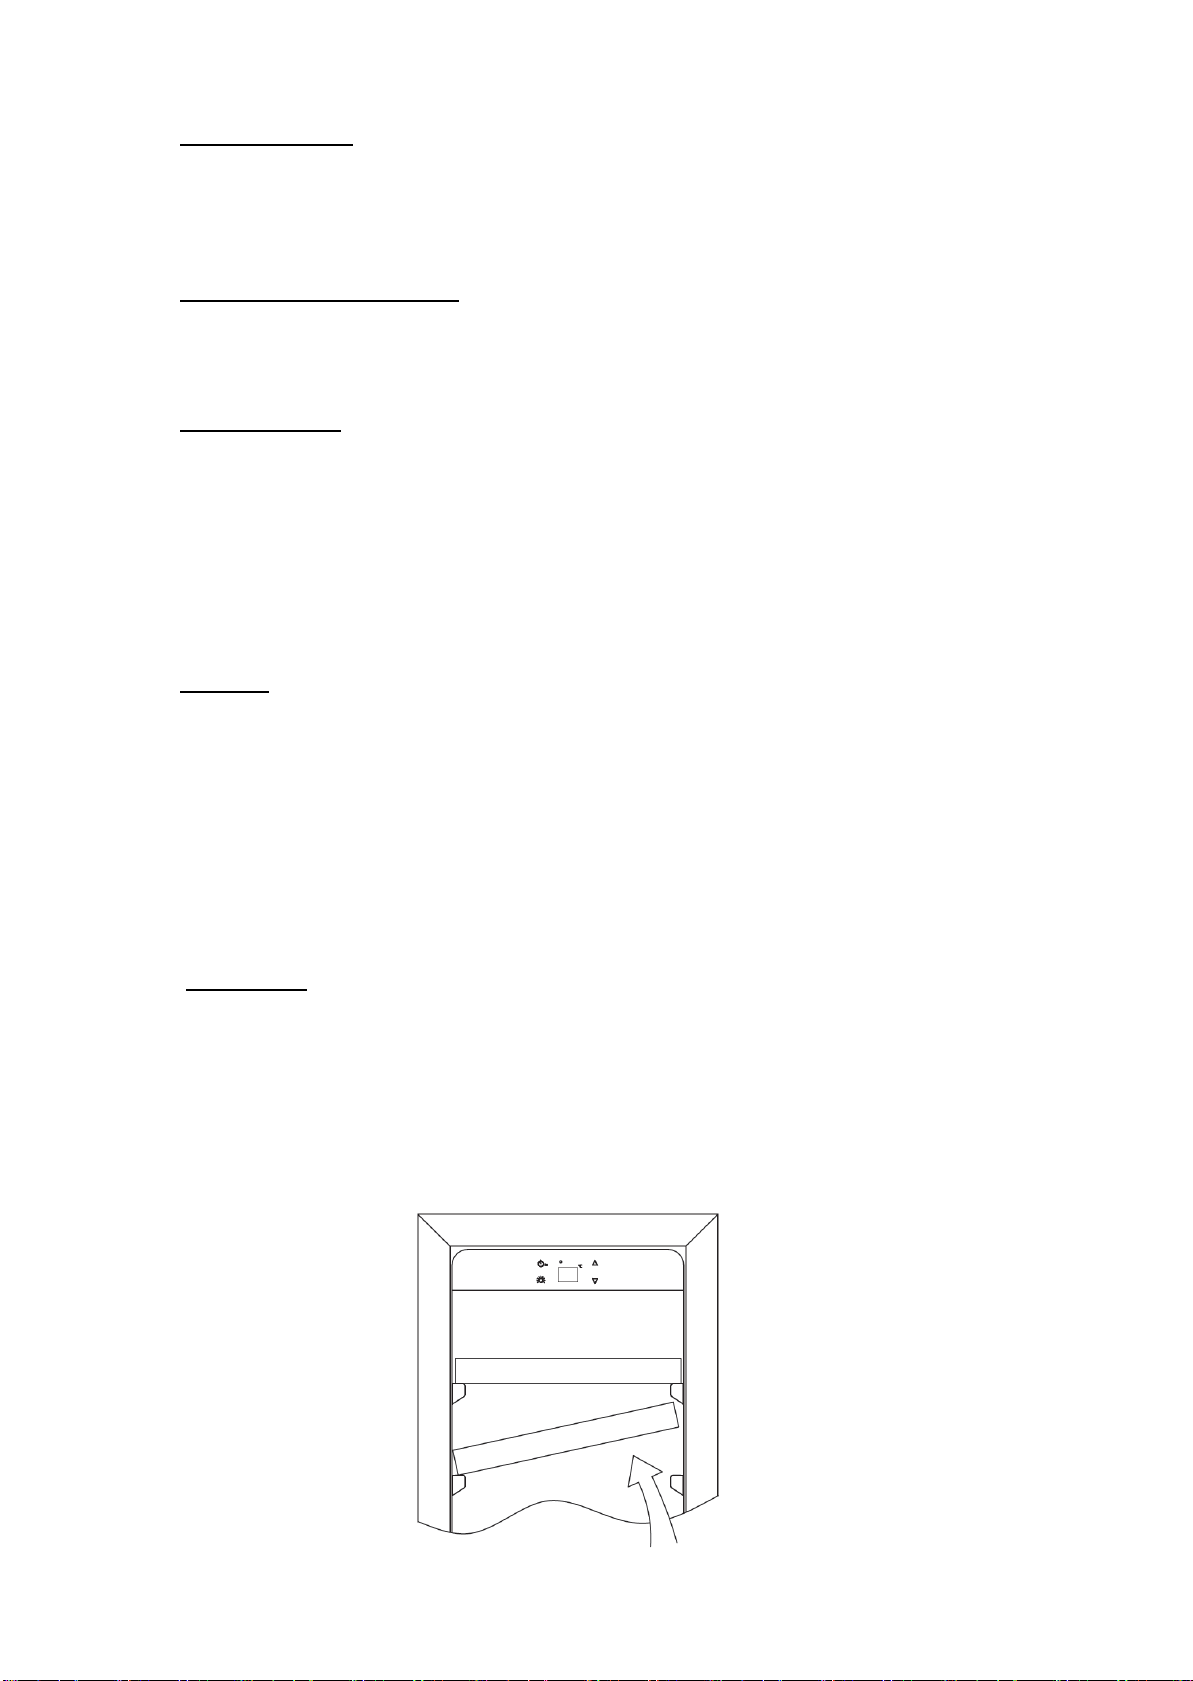
91
Temperatuuralarm
Als de binnentemperatuur hoger is dan 23°C, wordt "HI" weergegeven op het display. Na één uur
gaat het alarm / zoemer af. Dit geeft aan dat de binnentemperatuur te hoog is. Als de
binnentemperatuur lager is dan 0°C, wordt "LO" weergegeven op het display. Tegelijk worden het
alarm en de storingsindicator geactiveerd.
Functie temperatuurgeheugen
In het geval van een stroomonderbreking kan de wijnkoeler de vorige temperatuurinstellingen
onthouden. Wanneer de stroom wordt hersteld, zal de koelertemperatuur terugkeren naar dezelfde
insteltemperatuur als toen de stroom werd onderbroken.
Binnenverlichting
Om het energieverbruik te verminderen, schakelt deze wijnkast na 10 minuten automatisch de LEDlampjes uit.
Als u wilt dat het LED-lampje continu blijft branden, is dit mogelijk. Houd de "LAMP"-knop 5
seconden ingedrukt, het display geeft "LP” weer. Na 4 seconden zal het scherm weer normaal
worden en zal het licht blijven branden totdat het handmatig wordt uitgeschakeld.
Als u terug wilt keren en energie wilt besparen (aanbevolen), houd dan de "LAMP"-knop 5 seconden
ingedrukt; het display geeft "LF" weer. Na 4 seconden zal het scherm weer normaal worden en
wordt de verlichting automatisch uitgeschakeld na 10 minuten.
Schappen
• Om schade aan de deurpakking te voorkomen, moet u ervoor zorgen dat de deur helemaal open
is wanneer u schappen uit het railcompartiment trekt.
• Voor gemakkelijke toegang tot de inhoud moet u de schappen ongeveer 1/3 uit het
railcompartiment trekken. Dit apparaat is ontworpen met een inkeping aan beide zijden van de
reksteunen om te voorkomen dat flessen vallen.
• Verwijderen van een van deze schappen uit het railcompartiment: om een schap te plaatsen of
te verwijderen, kantelt u het schap volgens de afbeelding en trekt u het eruit, of duwt u het
schap erin totdat het stevig op de steunbeugels rust
OPMERKING:
• Als het apparaat is losgekoppeld, de stroom is uitgevallen of uitgeschakeld, moet u 3 tot 5
minuten wachten voordat u het apparaat opnieuw opstart. Als u voor deze tijdsvertraging
probeert opnieuw op te starten, zal de wijnkoeler/drankenkoeler niet starten.
• Wanneer u de wijnkoeler/drankkoeler voor het eerst gebruikt of de wijnkoeler/drankenkoeler
opnieuw opstart nadat deze lange tijd uitgeschakeld is geweest, kan er een paar graden verschil
zijn tussen de temperatuur die u selecteert en de temperatuur die wordt aangegeven op het
LCD-scherm. Dit is normaal en komt door de duur van de activeringstijd. Zodra de
wijnkoeler/drankkoeler een paar uur in werking is, is alles weer normaal.
Page 93
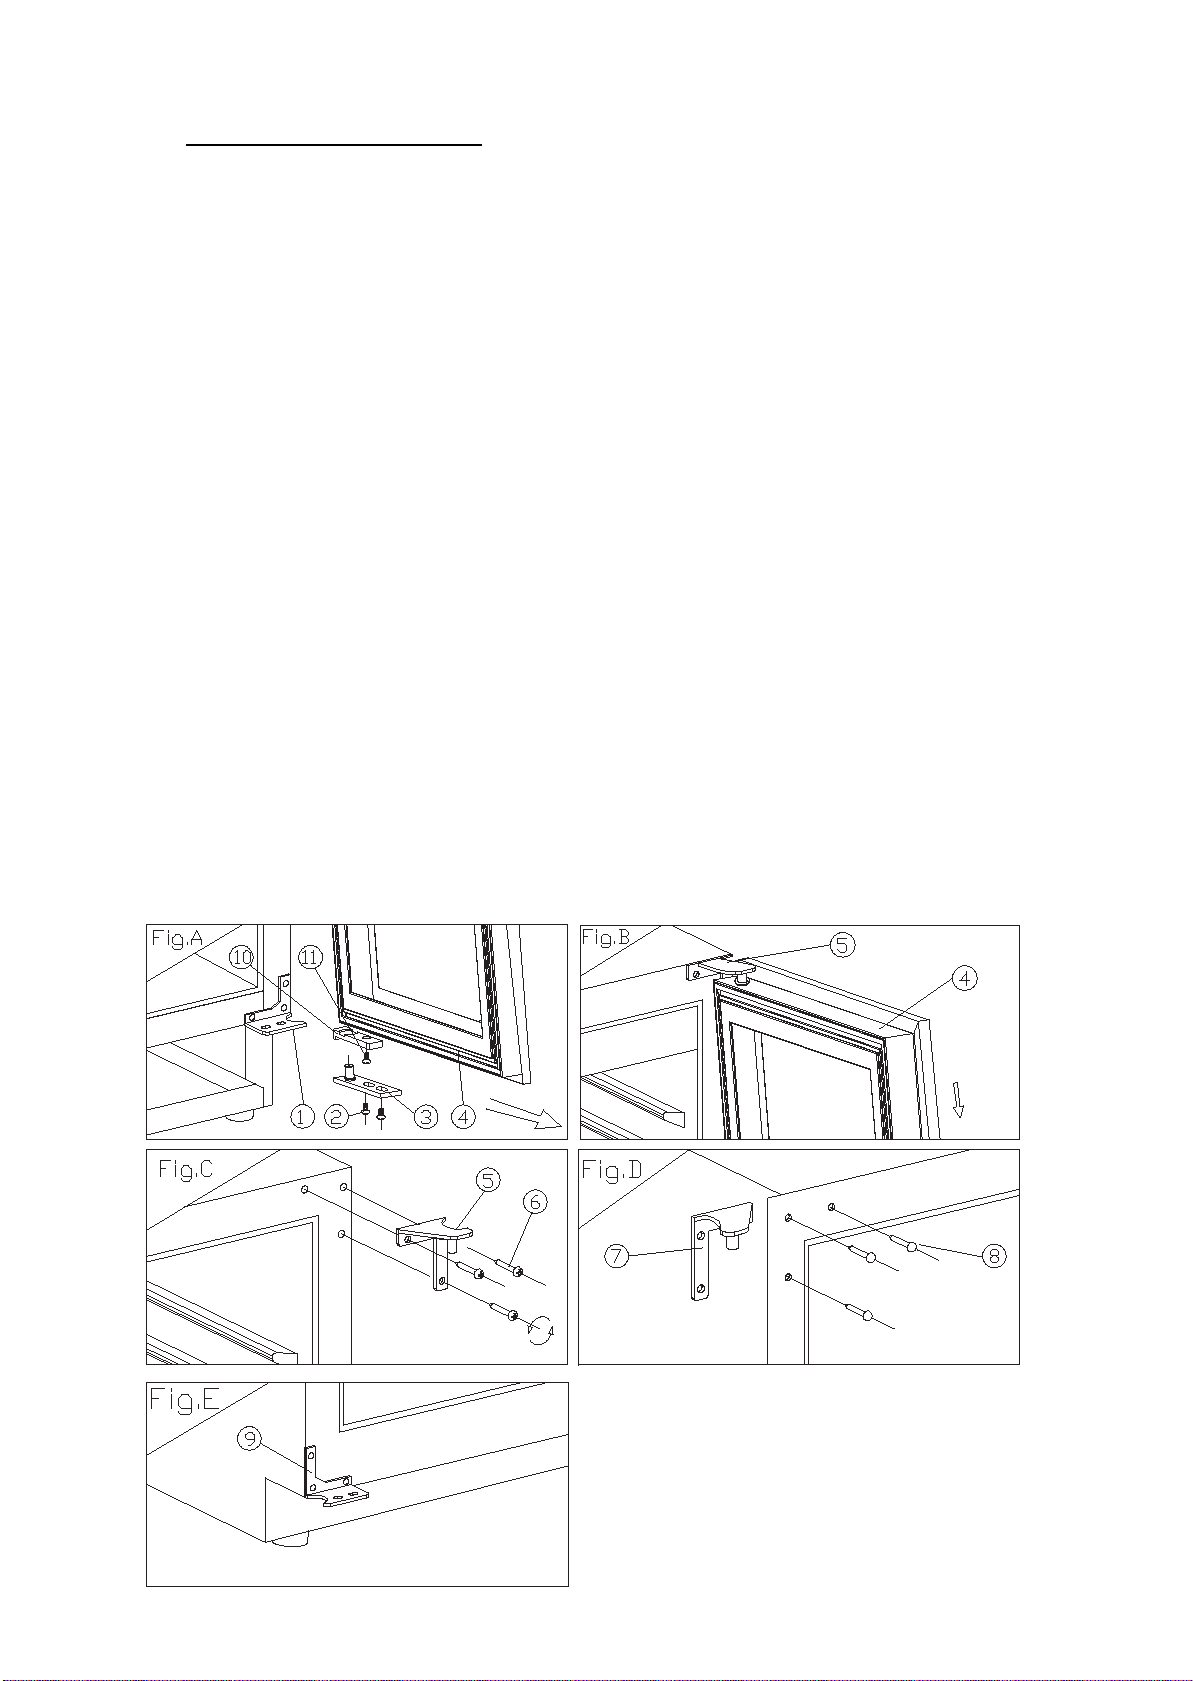
92
Veranderen van de deuropening
t apparaat heeft omkeerbare deuren, maar wordt geleverd met een naar rechts openende deur.
Di
De linker scharnierkit wordt meegeleverd met de unit (in de doos), mocht u het scharnier op uw unit
willen omdraaien.
Ty
pe A (voor volledig glazen / RVS deur)
1. Ond
erste scharnier (rechts) 2 . Schroeven 3. Deuras
4. Deur 5. Bovenste scharnier (rechts) 6. Scharnierschroeven
7. Bovenste scharnier (links) 8. Plastic doppen 9. Onderste
scharnier
(links)
10. Deurbegrenzer 11. Schroef
1. Open
de deur onder een hoek van 90 graden, haal de 2 schroeven (2) uit de onderste deuraras (3),
verwijder de deur (4), verwijder de asplaat (3) uit de deur (Afb. A).
2. Draai de schroef (11) onder het deurframe en de begrenzer (10) los en plaats deze aan de
linkerkant van het deurframe. (Afb. A/B)
3. Haal de 3 scharnierschroeven (6) uit het bovenste scharnier (rechts) (5) en verwijder deze. (Afb. C)
4. Verwijder de siernagel (8) van de linkerbovenkant van de kast en installeer het reservescharnier
(links) (7) aan de linkerbovenkant van de kast met 3 schroeven. (Afb. D)
5. Installeer volgens de bovenstaande procedure het onderste reservescharnier aan de linkerkant
(9). (Afb. E)
6. Installeer de deur en lijn hem uit.
7. Plaats de plastic doppen om de gaten (8) af te sluiten.
Page 94

93
Type B (voor slanke roestvrijstalen deur)
1 Onderste scharnier
(rechts)
4 Deur
7 Bovenste scharnier
(links)
2 Schroeven
5 Bovenste scharnier
(rechts)
8 Onderste scharnier
(links)
3 Deuras
6 Schroeven
1. Verwijder 2 schroeven (2), trek vervolgens deur (4) in de richting van de pijl en het onderste
scharnier (rechts)(1) zoals voor de montage. (Afb.A en Afb.B)
2. Verwijder 3 schroeven (6) van het scharnier rechtsboven en verwijder vervolgens de scharnieren
rechtsboven (5) en rechtsonder (1). (Zie afb.C)
3. Gebruik de schroeven die u hebt verwijderd van de scharnieren aan de rechterkant om de
scharnieren linksboven en -onder (7) (8) te bevestigen. (Zie Afb.D & Afb.E)
4. Draai de deur 180 graden en monteer de deur door de demontagehandelingen omgekeerd uit te
voeren.
Page 95
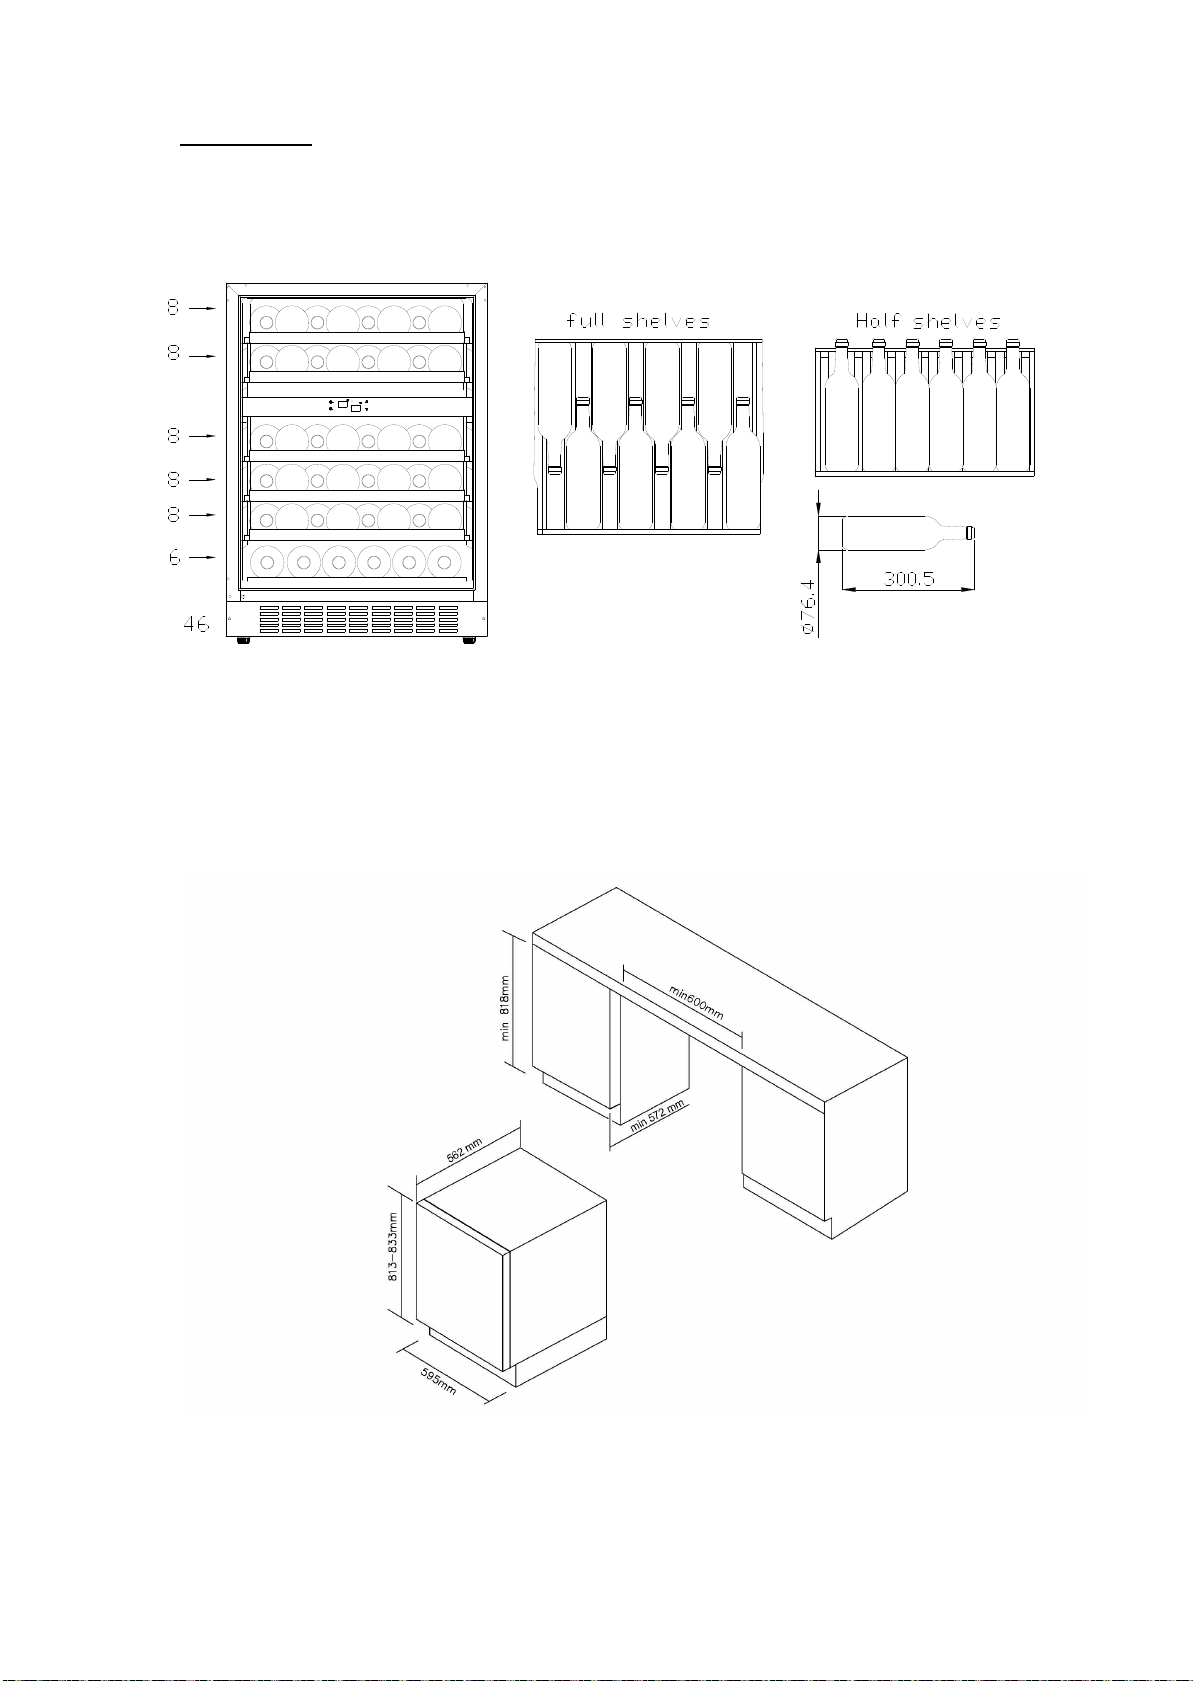
94
Opslagschema
+
=
+
+
+
+
Controleer het opslagschema op basis van de configuratie van uw product.
Totaal: 46 flessen (max.)
De meest energiebesparende configuratie vereist dat planken in het product worden geplaatst, zie
de bovenstaande afbeeldingen.
Installatiespecificaties voor ingebouwde apparaten
Voor hoogte 813 mm met volledig glazen of roestvrijstalen deur
Page 96

95
Voor hoogte 813 mm met smalle roestvrijstalen deur
Voor hoogte 865 mm met volledig glazen of roestvrijstalen deur
Page 97

96
Voor hoogte 865 mm met smalle roestvrijstalen deur
VERZORGING EN ONDERHOUD
Uw wijnkoeler schoonmaken
• Schakel de stroom uit, trek de stekker uit het stopcontact en verwijder alle items, inclusief
schappen en rek.
• Was de binnenste oppervlakken met een sopje van warm water en soda. De oplossing moet
ongeveer 2 eetlepels soda op een kwart liter water zijn.
• Was de schappen met een mild sopje.
• Wring overtollig water uit de spons of doek bij het reinigen van het gebied van de
bedieningselementen of elektrische onderdelen.
• Was de buitenkant van de kast met warm water en mild vloeibaar reinigingsmiddel. Goed
afspoelen en droogmaken met een schone zachte doek.
Page 98

97
Het koolfilter vervangen (indien aanwezig in uw apparaat)
• In de rechterbovenhoek van elke wijnkastzone bevinden zich koolfilters.
• Open de deur en verwijder de bovenste 2 schappen (zie De schappen verwijderen).
• Draai het filter zoals op Afb. A.
• Zoals weergegeven op Afb. B moet het filter op één lijn staan met de inkepingen.
• Trek het filter eruit (Afb C).
• Plaats het vervangingsfilter en draai het zoals op Afb. A om het in positie te vergrendelen.
• Plaats de schappen terug.
Stroomuitval
• De meeste stroomstoringen worden binnen enkele uren hersteld en hebben geen
invloed op de temperatuur van uw apparaat, als u het aantal keren dat de deur wordt
geopend tot een minimum beperkt. Als de stroom voor langere tijd wordt uitgeschakeld,
moet u de juiste maatregelen nemen om uw inhoud te beschermen.
Vakantieperiode
• Korte vakanties: Laat de wijnkoeler ingeschakeld tijdens vakanties van korter dan drie weken.
• Lange vakanties: Als het apparaat meerdere maanden niet gebruikt gaat worden, verwijder dan
alle items en schakel het apparaat uit. Maak de binnenkant grondig schoon en droog. Om geuren schimmelgroei te voorkomen, laat u de deur op een kier: blokkeer deze indien nodig.
De wijnkoeler verplaatsen
• Verwijder alle items.
• Zet alle losse voorwerpen (schappen) met tape stevig vast in uw apparaat.
• Draai de stelpoot omhoog naar de basis om schade te voorkomen.
• Plak de deur dicht met tape.
• Zorg ervoor dat het apparaat tijdens het transport rechtop blijft staan. Bescherm ook de
buitenkant van het apparaat met een deken of iets dergelijks.
Tips voor energiebesparing
• De wijnkoeler moet in het koelste gedeelte van de kamer worden geplaatst, uit de buurt van
warmteproducerende apparaten en buiten direct zonlicht.
Page 99

98
PROBLEMEN MET UW WIJNKOELER/DRANKENKOELER?
PROBLEEM
MOGELIJKE OORZAAK
Wijnkoeler/drankenkoeler werkt niet.
De stekker zit niet in het stopcontact.
gesprongen.
Wijnkoeler/drankenkoeler is niet koud
Controleer de temperatuurinstelling.
De pakking van de deur is niet goed afgedicht.
De compressor gaat regelmatig aan en
De kamertemperatuur is warmer dan normaal.
De pakking van de deur is niet goed afgedicht.
Het licht functioneert niet.
De stekker zit niet in het stopcontact.
De lichtknop is “UIT”.
Trillingen.
Controleer of de wijnkoeler/drankenkoeler waterpas
staat.
De wijnkoeler/drankenkoeler lijkt te
Het rammelende geluid kan afkomstig zijn van de
De wijnkoeler/drankenkoeler staat niet waterpas.
De deur sluit niet goed.
De wijnkoeler/drankenkoeler staat niet waterpas.
U kunt veel voorkomende problemen met wijnkoelers/drankenkoelers gemakkelijk oplossen,
waardoor u de kosten van een mogelijk servicebezoek bespaart. Probeer de onderstaande suggesties
om te zien of u het probleem kunt oplossen voordat u de servicemonteur belt.
PROBLEMEN OPLOSSEN
Het apparaat is uitgeschakeld.
De stroomonderbreker is geactiveerd of zekering is
genoeg.
uit.
veel lawaai te maken.
De externe omgeving kan een hogere instelling vereisen.
De deur te vaak wordt geopend.
De deur is niet volledig gesloten.
Er is een grote hoeveelheid flessen in de
wijnkoeler/drankenkoeler geplaatst.
De deur te vaak wordt geopend.
De deur is niet volledig gesloten.
De temperatuurregeling is niet juist ingesteld.
De stroomonderbreker is geactiveerd of zekering is
gesprongen.
De lamp is doorgebrand.
stroming van het koelmiddel, dit is normaal.
Aan het einde van elke cyclus kunt u gorgelende geluiden
horen die worden veroorzaakt door de stroom
koudemiddel in uw wijnkoeler/drankenkoeler.
Het krimpen en uitzetten van de binnenwanden kan
piepende en krakende geluiden veroorzaken.
Ga naar onze website om contact op te nemen met de technische ondersteuning:
https://corporate.haier-europe.com/en/
en uw land. U wordt doorgestuurd naar de specifieke website waar u het telefoonnummer en
formulier kunt vinden om contact op te nemen met de technische assistentie
De deur is omgedraaid en niet goed geïnstalleerd.
De pakking is vuil.
De schappen zitten niet goed op hun plaats.
.Kies onder de sectie "website" het merk van uw product
Page 100

99
Beschikbaarheid van reserveonderdelen
Aanbevolen TEMPERATUURINSTELLINGEN
Voor het bewaren VAN ALLE SOORTEN WIJN
12 °C to 14 °C
Aanbevolen DRINKTEMPERATUUR
Champagne NV, mousserend
6 °C
Vintage champagne
10 °C
Droge witte semillon, sauvignon blanc
8 °C
Droge witte gewürztraminer, riesling
10 °C
Droge witte chardonnay
10 °C
Vintage chardonnay
14 °C
Zoete witte sauternes Monbazillac, "late oogst" ijswijn
10 °C
Zoete witte vintage sauternes
14 °C
Beaujolais
13 °C
Rode pinot noir
16 °C
Rode vintage pinot noir
18 °C
Rode cabernet, merlot, Frans, Australisch, Nieuw-Zeelands, Chileens,
Rode Grenache, Syrah
16 °C
• Thermostaten, temperatuursensoren, printplaten en lichtbronnen, voor een
minimumperiode van zeven jaar nadat het laatste exemplaar van het model op de markt is
gebracht;
• Deurklinken, deurscharnieren, bladen en manden voor een minimumperiode van zeven jaar
en deurafdichtingen voor een minimumperiode van tien jaar, nadat het laatste exemplaar
van het model op de markt is gebracht;
Argentijns, Italiaans, Spaans, Californisch
Voor meer informatie over het product, raadpleeg https://eprel.ec.europa.eu/
op het energielabel dat bij het apparaat is geleverd
18 °C
of scan de QR-code
 Loading...