

Page 1

1
2
3
4
CKCD -E01-G
A A
重 要 度
[B
]
技术要求
1.颜色要 求 :封面: 黑 白印刷
内页:黑 白 印刷;
B
批量时要 求 统一,不 能 有明显色 差 ,
2.版面内 容 :封二保 留 空白,
图案与文 字 应印刷清 晰 、规范, 不 能有印刷 缺 陷;
3.页面印 刷 :双面印 刷 ;
4.成型方 式 :胶装;
5.成品尺 寸 :A5(1 4 0X21 0 ),
尺寸公差 按G B/T 18 0 4-c;
6.批量生 产 前须送样 确 认。
B
C
D
C
D
E
借(通)用件登记
出图审查
日 期
标志
设计
制图
审核
工艺
1
处
数
更改文件 号 签 名
黄金玉
何思琴
会签
标准化
批准
日期
刘金利
李梅方
2017 -8 -8
2
日 期
封面:10 5 g双铜
内页:70 g双 胶
重 量
共 1 张 第 1 张
视角符号
比 例
3
广东奥马 电 器股份有 限 公司
说明书
F
CKCD-E01-G
4
Page 2
WINE CELLAR
Vinkøleren
Viinikaappi
Cave à vin
WEINKÜHLER
CANTINETTA
Vinskapet
WIJNKOELER
CHàODZIARKA DO WINA
Vinotéka
APARATULUI
Vinska omara
BODEGA DE VINO
Vinkylaren
BO
RH ĥTė
INSTRUCTION MANUALINST
RUCTION MANUAL
Pleas
e r ead th is i nst ruction b ook let car efully be fore us ing yo ur C and y Wine C ooler
Page 3

Page 4
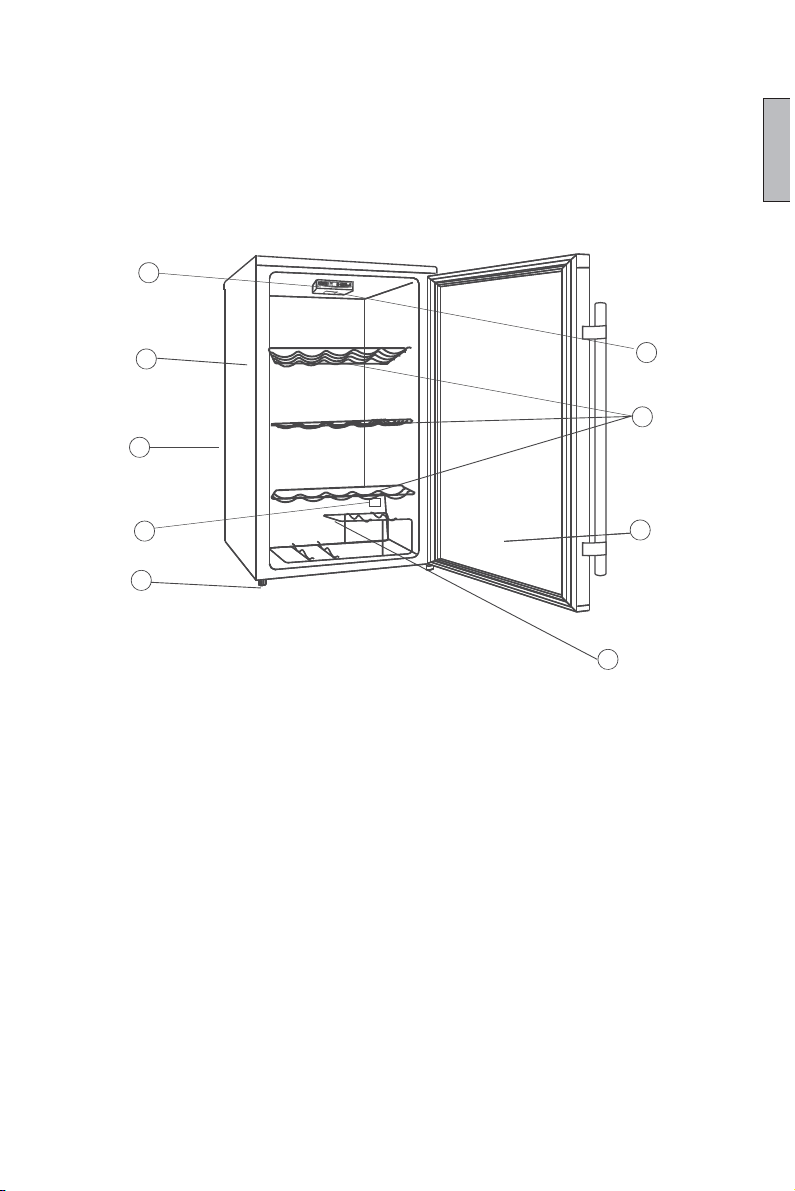
PARTS
1
AND
FEA
TURES
INGLESE
1. Operation and Display Panel
2. Cabinet
3. Levelling Leg
4. Wine Rack
5. Glass Door
6. Chrome Shelves
7. Interior Lamp
8.
Electrical Control Assembly (at the back)
9. Temperature Sensor
Page 5

ou for purchasing this product.
2
Thank y
Before using your refrigerator, please carefully read this instruction manual in
order to maximize its performance. Store all documentation for subsequent usage or other
owners. This product is intended solely for household use or similar applications such as:
the kitchen area f
-
arm
on f
s, by cl
-
-
at bed and break
For catering services
-
This appliance must be used only for purposes of storage of food, any other use is considered
dangerous and the manufacturer will not b e responsible for any omissions. Also, it is recommended that
you take note of the warranty conditio ns.
or personnel in shops, offices and other working environments
ient
hotels, motels
ele of
fasts (B & B)
and similar applications not for retail sale.
d ot
an
her environments
of a residential type
SAFETY INFOR
MATION
The refrigerator contains a refrigerant gas (R600a:
isobutene) and insulating gas (cyclopentane), with high
compatibility with the environment, that are, however,
inflammable.
We recommend that you follow the following regulations
so as to avoid situations dangerous to you:
Before performing any
x
operation, unplug the power cord
from the power socket.
The refrigeration sy
x
stem positioned behind and inside
the appliance contains refrigerant. Therefore, avoid
damaging the tubes.
If in the refrigeration system
x
a leak is noted, do not
touch the wall outlet and do not use open flames. Open
the window and let air into the room. Then call a service
center to ask for repair.
Do not scrape wi
x
th a knife or sharp object to remove
frost or ice that occurs. With these, the refrigerant
circuit can be damaged, the spill from which can cause a
fire or damage your eyes.
x Do not install the appliance i
n humid, oily or dusty
places, nor expose it to direct sunlight and to water.
Page 6

Do not install the appliance near heaters or inflammabl
3
x
e
materials.
Do not use extension cords or adapters.
x
Do not
x
plug w
Do not damage the plug and/or the pow
x
excessi
ith we
t hands.
vel
y
pul
l or
fold
the powe
r cord or touch
the
er cord; this could
cause electrical shocks or fires.
It is rec
x
dust res
Do not use mechanical de
x
ommended to kee
idues on the
plug c
p the
an b
plug cl
e
the cause fire.
ean, any e
xcessive
vices or other equipment to
hasten the defrosting process.
Absolutel
x
y avoid the use of open flame or electrical
equipment, such as heaters, steam cleaners, candles, oil
lamps and the like in order to speed up the defrosting
phase.
Do not use or store infla
x
mmable sprays, such as spray
paint, near the appliance, it could cause an explosion or
fire.
Do not use electrical appliance
x
s inside the food storage
compartments, unless they are of the type
recommended by the manufacturer.
Do not place or store inflammable and highly
x
volatile
materials such as ether, petrol, LPG, propane gas,
aerosol spray cans, adhesives, pure alcohol, etc. These
materials may cause an explosion.
x
Do not store medicine or re
search materials in the
appliance. When the material that requires a strict
control of storage temperatures is to be stored, it is
possible that it will deteriorate or an uncontrolled
reaction may occur that can cause risks.
Maintain the ventilation ope
x
nings in the appliance
enclosure or in the built-in structure, free of obstruction.
x
Do not place objects and/or c
ontainers filled with water
on the top of the appliance.
x Do not perform repairs on this appl
iance. All
interventions must be performed solely by qualified
Page 7
personnel.
4
This appliance can be used b
x
y children aged from 8
years and above and by persons with reduced physical,
sensory or mental capabilities or with a lack of
experience and knowledge; provided that they have
been given adequate supervision or instruction
concerning how to use the appliance in a safe way and
understand the hazards involved.
Children should not pla
x
y with the appliance. Cleaning
and user maintenance should not be made by children
without supervision
This appliance is marked according to the European directive 2012/19/EU on Waste
Electrical and Electronic Equipment (WEEE).
WEEE contains both polluting substances (which can cause negative consequences
for the environment) and basic components (which can be re-used). It is important to
properly all pollutants, and recover and recycle all materials.
Individuals can play an important role in ensuring that WEEE does not become an environmental
issue; it is essential to follow some basic rules:
- WEEE should not be treated as household waste;
- WEEE should be handed over to the relevant collection points managed by the municipality or
by registered companies. In many countries, for large WEEE, home collection could be present.
In many countries, when you buy a new appliance, the old one may be returned to the retailer who
has to collect it free of charge on a one-to-one basis, as long as the equipment is of equivalent type
and has the same functions as the supplied equipment.
have WEEE subjected to specific treatments, in order to remove and dispose
ing the mark on this product, we are confirming compliance to all relevant
By plac
European safety, health and environmental requirements which are applicable in legislation
for this product.
Page 8
Energy Saving
5
For better energy saving we suggest :
Installing tge appliance away from heat sources and not exposed to direct sunlight and in a
well ventilated roo.
Avoid putting hot food into the refrigerator to avoid increasing the internal temperature and
therefore causing continuos functionaliting of the compressor.
Do not excessively stuff foods so as to ensure proper air circulation.
Defrost the appliance in case there is ice to facilitate the transfer of cold.
In case of absence of electrical energy, it is advisable to keep the refrigerator door closed.
Open or keep the doors of the appliance open as little as possible
Avoid adjusting the setting to temperatures too cold.
Remeve dust present on the rear of the appliance
Important Safety Instructions
Read all instructions before using the appliance.
Child entrapment and suffocation are not problems of the past. Junked or
abandoned appliances are still dangerous... even if they will "just sit in
the garage a few days."
Before you throw away your old wine cooler:
take off the door, leave the shelves in place, so that children may not
easily climb inside.
Never allow children to operate, play with, or crawl inside the appliance.
Never clean appliance parts with flammable fluids. The fumes can create
a fire hazard or explosion.
Do not store or use gasoline or any other flammable vapors and liquids
in the vicinity of this or any other appliance. The fumes can create a
fire or explosion.
INSTALLATION INSTRUCTIONS
Before Using Your Wine Cooler
Remove the exterior and interior packing, including protective foam on
door panels .
Check to be sure the following parts are included:
3 slide out shelves
1 wine rack
1 Instruction manual
Before connecting the appliance to the power source, let it stand
upright for approximately 2 hours. This will reduce the possibility
of a malfunction in the cooling system from handling during
transportation.
Clean the interior surface with lukewarm water using a soft cloth.
Page 9

Installation of Your Wine Cooler
6
Place your appliance on a floor that is strong enough to support the
appliance when it is fully loaded. T
o level your appliance, adjust the
legs at the front of the appliance.
Allow 5 inches of space between the back and sides of the appliance
,which allows the proper air circulation to cool the compressor.
Locate the appliance away from direct sunlight and sources of heat
(stove, heater, radiator, etc.). Direct sunlight may affect the acrylic
coating and heat sources may increase electrical consumption.
Extreme cold ambient temperatures may also cause the appliance
not to perform properly.
Avoid locating the appliance in moist areas. Too much moisture in
the air will cause frost to form quickly on the evaporator.
Plug the appliance into an exclusive properly installed-grounded wall
outlet. Do not under any circumstances cut or remove the third
(ground) prong from the power cord. Any questions concerning power
and or grounding should be directed toward a certified electrician or an
authorized Candy Products service center.
Improper use of the grounded plug can result in the risk of electrical
shock. If the power cord is damaged, have it replaced by an
authorized Candy Products service center.
Page 10

Reversing the Door Swing of Your Wine Cooler
7
This wine cooler has the capability of either opening the door from the left
or right side. The unit is delivered to you with the door opening from the
left side. Should you desire to reverse the opening direction, please
follow these instructions.
NOTE:
Before reversing the door ,the power must be shut off.
All parts removed must be saved to do the reinstallation of the door.
This wine cellar has been built with the door hinges on the right. If you wish
to change the opening direction, follow the instructions below:
1. Remove the upper hinge cover(6) first
2. Remove the two screws (1) that hold the upper hinge (5) (right side) to the
frame. Take away the upper hinge (5).
3. Lift the door and place it on a padded surface to prevent scratching it.
4. Remove the two screws(8) that hold the lower hinge(2) and Make sure to
Remove the lower hinge(2).
5. Remove the left front leg (4) and transfer it to the right side.
6. Remove the hole cover plate(7) to the right side.
Before placing this lower hinge(2), remove the bolt-pin (9) and reverse
7.
the direction of the lower hinge(2). Then install the lower hinge (2) onto
the left side of the lower frame with two screws (8).
8. Insert the bolt-pin(9) to the lower hinge (2).
9. Set the door to its place making sure the door seat at the lower hinge(2).
10.While holding the door in the closed position secure the upper hinge (5) in the
top frame of left side with two screws (1). Please remember that do not tighten
the two screws(1) until the top of the door is levelled with the counter top.
11. Install the upper hinge cover(6) on the upper hinge..
12. Changing the door handle from the left side to the right side .
7
7
7
7
7
7
7
7
7
7
7
7
7
7
7
7
7
7
7
7
7
7
7
7
7
7
7
7
7
7
7
7
7
7
7
7
7
7
7
7
7
7
7
7
7
7
7
7
7
7
7
7
7
7
7
7
7
7
7
7
7
7
7
7
7
7
7
7
7
7
7
7
7
7
7
7
7
7
7
7
7
7
7
7
7
7
7
7
7
7
7
7
7
7
7
7
7
7
7
7
7
7
7
7
7
7
7
7
7
7
7
7
7
7
7
7
7
7
7
7
7
7
7
7
7
7
7
7
7
7
7
7
7
7
7
7
7
7
7
7
7
7
7
7
7
7
7
7
7
7
7
7
7
7
7
7
7
7
7
7
7
7
7
7
7
7
7
7
7
7
7
7
7
7
7
7
7
7
7
7
7
7
7
7
7
7
7
7
7
7
7
7
7
7
7
7
7
7
7
7
7
7
7
7
7
7
7
7
7
7
7
7
7
7
7
7
7
7
7
7
7
7
7
7
7
7
7
7
7
7
7
7
7
7
7
7
7
7
7
7
7
7
7
7
7
7
7
7
7
7
7
7
7
7
7
7
7
7
7
7
7
7
7
7
7
7
7
7
7
7
7
7
7
7
7
7
7
7
7
7
7
7
7
7
7
7
7
7
7
7
7
7
7
7
7
7
7
7
7
7
7
7
7
7
7
7
7
7
7
7
7
7
7
7
7
7
7
7
7
7
7
7
7
7
7
7
7
7
7
7
7
7
7
7
7
7
7
7
7
7
7
7
7
7
7
7
7
7
7
7
7
7
7
7
7
7
7
7
7
7
7
7
7
7
7
7
7
7
7
7
7
7
7
7
7
7
7
7
7
7
7
7
7
7
7
7
7
7
7
7
7
7
7
7
7
7
7
7
7
7
7
7
7
7
7
7
7
7
7
7
7
7
7
7
7
7
7
7
7
7
7
7
7
7
7
7
7
7
7
7
7
7
7
7
7
7
7
7
7
7
7
7
7
7
7
7
7
7
7
7
7
7
7
7
7
7
7
7
7
7
7
7
7
7
7
7
7
7
7
7
7
7
7
7
7
7
7
7
7
7
7
7
7
7
7
7
7
7
7
7
7
7
7
7
7
7
7
7
7
7
7
7
7
7
7
7
7
7
7
7
7
7
7
7
7
7
7
7
7
7
7
7
7
7
7
7
7
7
7
7
7
7
7
7
7
7
7
7
7
7
7
7
7
7
7
7
7
7
7
7
7
7
7
7
7
7
7
7
7
7
7
7
7
7
7
7
7
7
7
7
7
7
7
7
7
7
7
7
7
7
7
7
7
7
7
7
7
7
7
7
7
7
7
7
7
7
7
7
7
7
7
7
7
7
7
7
7
7
7
7
7
7
7
7
7
7
7
7
7
7
7
7
7
7
7
7
7
7
7
7
7
7
7
7
7
7
7
7
7
7
7
7
7
7
7
7
7
7
7
7
7
7
7
7
7
7
7
7
7
7
7
7
7
7
7
7
7
7
7
7
7
7
7
7
7
7
7
7
7
7
7
7
7
7
7
7
7
7
7
7
7
7
7
7
7
7
7
7
7
7
7
7
7
7
7
7
7
7
7
7
7
7
7
7
7
7
7
7
7
7
7
7
7
7
7
7
7
7
7
7
7
7
7
7
7
7
7
7
7
7
7
7
7
7
7
7
7
7
7
7
7
7
7
7
7
7
7
7
7
7
7
7
7
7
7
7
7
7
7
7
7
7
7
7
7
7
7
7
7
7
7
7
7
7
7
7
7
7
7
7
7
7
7
7
7
7
7
7
7
7
7
7
7
7
7
7
7
7
7
7
7
7
7
7
7
7
7
7
7
7
7
7
7
7
7
7
7
7
7
7
7
7
7
7
7
7
7
7
7
7
7
7
7
7
7
7
7
7
7
7
7
7
7
7
7
7
7
7
7
7
7
7
7
7
1111
656565656565656565656565656565656565656565656565656565656565656
5
101010101010101010101010101010101010101010101010101010101010101010101010101010101010101010101010101010101010101010101010101010
1111
5
7777
656565656565656565656565656565656565656565656565656565656565656
10
2
2
2
2
2
2
2
2
2
2
2
2
2
2
2
2
2
2
2
2
2
2
2
2
2
2
2
2
2
2
2
2
2
2
2
2
2
2
2
2
2
2
2
2
2
2
2
2
2
2
2
2
2
2
2
2
2
2
2
2
2
2
2
2
2
2
2
2
2
2
2
2
2
2
2
2
2
2
2
2
2
2
2
2
2
2
2
2
2
2
2
2
2
2
2
2
2
2
2
2
2
2
2
2
2
2
2
2
2
2
2
2
2
2
2
2
2
2
2
2
2
2
2
2
2
2
2
2
2
2
2
2
2
2
2
2
2
2
2
2
2
2
2
2
2
2
2
2
2
2
2
2
2
2
2
2
2
2
2
2
2
2
2
2
2
2
2
2
2
2
2
2
2
2
2
2
2
2
2
2
2
2
2
2
2
2
2
2
2
2
2
2
2
2
2
2
2
2
2
2
2
2
2
2
2
2
2
2
2
2
2
2
2
2
2
2
2
2
2
2
2
2
2
2
2
2
2
2
2
2
2
2
2
2
2
2
2
2
2
2
2
2
2
2
2
2
2
2
2
2
2
2
2
2
2
2
2
2
2
2
2
2
2
2
2
2
2
2
2
2
2
2
2
2
2
2
2
2
2
2
2
2
2
2
2
2
2
2
2
2
2
2
2
2
2
2
2
2
2
2
2
2
2
2
2
2
2
2
2
2
2
2
2
2
2
2
2
2
2
2
2
2
2
2
2
2
2
2
2
2
2
2
2
2
2
2
2
2
2
2
2
2
2
2
2
2
2
2
2
2
2
2
2
2
2
2
2
2
2
2
2
2
2
2
2
2
2
2
2
2
2
2
2
2
2
2
2
2
2
2
2
2
2
2
2
2
2
2
2
2
2
2
2
2
2
2
2
2
2
2
2
2
2
2
2
2
2
2
2
2
2
2
2
2
2
2
2
2
2
2
2
2
2
2
2
2
2
2
2
2
2
2
2
2
2
2
2
2
2
2
2
2
2
2
2
2
2
2
2
2
2
2
2
2
2
2
2
2
2
2
2
2
2
2
2
2
2
2
2
2
2
2
2
2
2
2
2
2
2
2
2
2
2
2
2
2
2
2
2
2
2
2
2
2
2
2
2
2
2
2
2
2
2
2
2
2
2
2
2
2
2
2
2
2
2
2
2
2
2
2
2
2
2
2
2
2
2
2
2
2
2
2
2
2
2
2
2
2
2
2
2
2
2
2
2
2
2
2
2
2
2
2
2
2
2
2
2
2
2
2
2
2
2
2
2
2
2
2
2
2
2
2
2
2
2
2
2
2
2
2
2
2
2
2
2
2
2
2
2
2
2
2
2
2
2
2
2
2
2
2
2
2
2
2
2
2
2
2
2
2
2
2
2
2
2
2
2
2
2
2
2
2
2
2
2
2
2
2
2
2
2
2
2
2
2
2
2
2
2
2
2
2
2
2
2
2
2
2
2
2
2
2
2
2
2
2
2
2
2
2
2
2
2
2
2
2
2
2
2
2
2
2
2
2
2
2
2
2
2
2
2
2
2
2
2
2
2
2
2
2
2
2
2
2
2
2
2
2
2
2
2
2
2
2
2
2
2
2
2
2
2
2
2
2
2
2
2
2
2
2
2
2
2
2
2
2
2
2
2
2
2
2
2
2
2
2
2
2
2
2
2
2
2
2
2
2
2
2
2
2
2
2
2
2
2
2
2
2
2
2
2
2
2
2
2
2
2
2
2
2
2
2
2
2
2
2
2
2
2
2
2
2
2
2
2
2
2
2
2
2
2
2
2
2
2
2
2
2
2
2
2
2
2
2
2
2
2
2
2
2
2
2
2
2
2
2
2
2
2
2
2
2
2
2
2
2
2
2
2
2
2
2
2
2
2
2
2
2
2
2
2
2
2
2
2
2
2
2
2
2
2
2
2
2
2
2
2
2
2
2
2
2
2
2
8
8
8
8
8
8
8
8
8
8
8
8
8
8
8
8
8
8
8
8
8
8
8
8
8
8
8
8
8
8
8
8
8
8
8
8
8
8
8
8
8
8
8
8
8
8
8
8
8
8
8
8
8
8
8
8
8
8
8
8
8
8
8
8
8
8
8
8
8
8
8
8
8
8
8
8
8
8
8
8
8
8
8
8
8
8
8
8
8
8
8
8
8
8
8
8
8
8
8
8
8
8
8
8
8
8
8
8
8
8
8
8
8
8
8
8
8
8
8
8
8
8
8
8
8
8
8
8
8
8
8
8
8
8
8
8
8
8
8
8
8
8
8
8
8
8
8
8
8
8
8
8
8
8
8
8
8
8
8
8
8
8
8
8
8
8
8
8
8
8
8
8
8
8
8
8
8
8
8
8
8
8
8
8
8
8
8
8
8
8
8
8
8
8
8
8
8
8
8
8
8
8
8
8
8
8
8
8
8
8
8
8
8
8
8
8
8
8
8
8
8
8
8
8
8
8
8
8
8
8
8
8
8
8
8
8
8
8
8
8
8
8
8
8
8
8
8
8
8
8
8
8
8
8
8
8
8
8
8
8
8
8
8
8
8
8
8
8
8
8
8
8
8
8
8
8
8
8
8
8
8
8
8
8
8
8
8
8
8
8
8
8
8
8
8
8
8
8
8
8
8
8
8
8
8
8
8
8
8
8
8
8
8
8
8
8
8
8
8
8
8
8
8
8
8
8
8
8
8
8
8
8
8
8
8
8
8
8
8
8
8
8
8
8
8
8
8
8
8
8
8
8
8
8
8
8
8
8
8
8
8
8
8
8
8
8
8
8
8
8
8
8
8
8
8
8
8
8
8
8
8
8
8
8
8
8
8
8
8
8
8
8
8
8
8
8
8
8
8
8
8
8
8
8
8
8
8
8
8
8
8
8
8
8
8
8
8
8
8
8
8
8
8
8
8
8
8
8
8
8
8
8
8
8
8
8
8
8
8
8
8
8
8
8
8
8
8
8
8
8
8
8
8
8
8
8
8
8
8
8
8
8
8
8
8
8
8
8
8
8
8
8
8
8
8
8
8
8
8
8
8
8
8
8
8
8
8
8
8
8
8
8
8
8
8
8
8
8
8
8
8
8
8
8
8
8
8
8
8
8
8
8
8
8
8
8
8
8
8
8
8
8
8
8
8
8
8
8
8
8
8
8
8
8
8
8
8
8
8
8
8
8
8
8
8
8
8
8
8
8
8
8
8
8
8
8
8
8
8
8
8
8
8
8
8
8
8
8
8
8
8
8
8
8
8
8
8
8
8
8
8
8
8
8
8
8
8
8
8
8
8
8
8
8
8
8
8
8
8
8
8
8
8
8
8
8
8
8
8
8
8
8
8
8
8
8
8
8
8
8
8
8
8
8
8
8
8
8
8
8
8
8
8
8
8
8
8
8
8
8
8
8
8
8
8
8
8
8
8
8
8
8
8
8
8
8
8
8
8
8
8
8
8
8
8
8
8
8
8
8
8
8
8
8
8
8
8
8
8
8
8
8
8
8
8
8
8
8
8
8
8
8
8
8
8
8
8
8
8
8
8
8
8
8
8
8
8
8
8
8
8
8
8
8
8
8
8
8
8
8
8
8
8
8
8
8
8
8
8
8
8
8
8
8
8
8
8
8
8
8
8
8
8
8
8
8
8
8
8
8
8
8
8
8
8
8
8
8
8
8
8
8
8
8
8
8
8
8
8
8
8
8
8
8
8
8
8
8
8
8
8
8
8
8
8
8
8
8
8
8
8
8
8
8
8
8
8
8
8
8
8
8
8
8
8
8
8
8
8
8
8
8
8
8
8
8
8
8
8
8
8
8
8
8
8
8
8
8
8
8
8
8
8
8
8
8
8
8
8
8
8
8
8
8
8
8
8
8
8
8
8
8
8
8
8
8
8
8
8
8
8
8
8
8
4
4
4
4
4
4
4
4
4
4
4
4
4
4
4
4
4
4
4
4
4
4
4
4
4
4
4
4
4
4
4
4
4
4
4
4
4
4
4
4
4
4
4
4
4
4
4
4
4
4
4
4
4
4
4
4
4
4
4
4
4
4
4
4
4
4
4
4
4
4
4
4
4
4
4
4
4
4
4
4
4
4
4
4
4
4
4
4
4
4
4
4
4
4
4
4
4
4
4
4
4
4
4
4
4
4
4
4
4
4
4
4
4
4
4
4
4
4
4
4
4
4
4
4
4
4
4
4
4
4
4
4
4
4
4
4
4
4
4
4
4
4
4
4
4
4
4
4
4
4
4
4
4
4
4
4
4
4
4
4
4
4
4
4
4
4
4
4
4
4
4
4
4
4
4
4
4
4
4
4
4
4
4
4
4
4
4
4
4
4
4
4
4
4
4
4
4
4
4
4
4
4
4
4
4
4
4
4
4
4
4
4
4
4
4
4
4
4
4
4
4
4
4
4
4
4
4
4
4
4
4
4
4
4
4
4
4
4
4
4
4
4
4
4
4
4
4
4
4
4
4
4
4
4
4
4
4
4
4
4
4
4
4
4
4
4
4
4
4
4
4
4
4
4
4
4
4
4
4
4
4
4
4
4
4
4
4
4
4
4
4
4
4
4
4
4
4
4
4
4
4
4
4
4
4
4
4
4
4
4
4
4
4
4
4
4
4
4
4
4
4
4
4
4
4
4
4
4
4
4
4
4
4
4
4
4
4
4
4
4
4
4
4
4
4
4
4
4
4
4
4
4
4
4
4
4
4
4
4
4
4
4
4
4
4
4
4
4
4
4
4
4
4
4
4
4
4
4
4
4
4
4
4
4
4
4
4
4
4
4
4
4
4
4
4
4
4
4
4
4
4
4
4
4
4
4
4
4
4
4
4
4
4
4
4
4
4
4
4
4
4
4
4
4
4
4
4
4
4
4
4
4
4
4
4
4
4
4
4
4
4
4
4
4
4
4
4
4
4
4
4
4
4
4
4
4
4
4
4
4
4
4
4
4
4
4
4
4
4
4
4
4
4
4
4
4
4
4
4
4
4
4
4
4
4
4
4
4
4
4
4
4
4
4
4
4
4
4
4
4
4
4
4
4
4
4
4
4
4
4
4
4
4
4
4
4
4
4
4
4
4
4
4
4
4
4
4
4
4
4
4
4
4
4
4
4
4
4
4
4
4
4
4
4
4
4
4
4
4
4
4
4
4
4
4
4
4
4
4
4
4
4
4
4
4
4
4
4
4
4
4
4
4
4
4
4
4
4
4
4
4
4
4
4
4
4
4
4
4
4
4
4
4
4
4
4
4
4
4
4
4
4
4
4
4
4
4
4
4
4
4
4
4
4
4
4
4
4
4
4
4
4
4
4
4
4
4
4
4
4
4
4
4
4
4
4
4
4
4
4
4
4
4
4
4
4
4
4
4
4
4
4
4
4
4
4
4
4
4
4
4
4
4
4
4
4
4
4
4
4
4
4
4
4
4
4
4
4
4
4
4
4
4
4
4
4
4
4
4
4
4
4
4
4
4
4
4
4
4
4
4
4
4
4
4
4
4
4
4
4
4
4
4
4
4
4
4
4
4
4
4
4
4
4
4
4
4
4
4
4
4
4
4
4
4
4
4
4
4
4
4
4
4
4
4
4
4
4
4
4
4
4
4
4
4
4
4
4
4
4
4
4
4
4
4
4
4
4
4
4
4
4
4
4
4
4
4
4
4
4
4
4
4
4
4
4
4
4
4
4
4
4
4
4
4
4
4
4
4
4
4
4
4
4
4
4
4
4
4
4
4
4
4
4
4
4
4
4
4
4
4
4
4
4
4
4
4
4
4
4
4
4
4
4
4
4
4
4
4
4
4
4
4
4
4
4
4
4
4
4
4
4
4
4
4
4
4
4
4
4
4
4
4
4
9
9
9
9
9
9
9
9
9
9
9
9
9
9
9
9
9
9
9
9
9
9
9
9
9
9
9
9
9
9
9
9
9
9
9
9
9
9
9
9
9
9
9
9
9
9
9
9
9
9
9
9
9
9
9
9
9
9
9
9
9
9
9
9
9
9
9
9
9
9
9
9
9
9
9
9
9
9
9
9
9
9
9
9
9
9
9
9
9
9
9
9
9
9
9
9
9
9
9
9
9
9
9
9
9
9
9
9
9
9
9
9
9
9
9
9
9
9
9
9
9
9
9
9
9
9
9
9
9
9
9
9
9
9
9
9
9
9
9
9
9
9
9
9
9
9
9
9
9
9
9
9
9
9
9
9
9
9
9
9
9
9
9
9
9
9
9
9
9
9
9
9
9
9
9
9
9
9
9
9
9
9
9
9
9
9
9
9
9
9
9
9
9
9
9
9
9
9
9
9
9
9
9
9
9
9
9
9
9
9
9
9
9
9
9
9
9
9
9
9
9
9
9
9
9
9
9
9
9
9
9
9
9
9
9
9
9
9
9
9
9
9
9
9
9
9
9
9
9
9
9
9
9
9
9
9
9
9
9
9
9
9
9
9
9
9
9
9
9
9
9
9
9
9
9
9
9
9
9
9
9
9
9
9
9
9
9
9
9
9
9
9
9
9
9
9
9
9
9
9
9
9
9
9
9
9
9
9
9
9
9
9
9
9
9
9
9
9
9
9
9
9
9
9
9
9
9
9
9
9
9
9
9
9
9
9
9
9
9
9
9
9
9
9
9
9
9
9
9
9
9
9
9
9
9
9
9
9
9
9
9
9
9
9
9
9
9
9
9
9
9
9
9
9
9
9
9
9
9
9
9
9
9
9
9
9
9
9
9
9
9
9
9
9
9
9
9
9
9
9
9
9
9
9
9
9
9
9
9
9
9
9
9
9
9
9
9
9
9
9
9
9
9
9
9
9
9
9
9
9
9
9
9
9
9
9
9
9
9
9
9
9
9
9
9
9
9
9
9
9
9
9
9
9
9
9
9
9
9
9
9
9
9
9
9
9
9
9
9
9
9
9
9
9
9
9
9
9
9
9
9
9
9
9
9
9
9
9
9
9
9
9
9
9
9
9
9
9
9
9
9
9
9
9
9
9
9
9
9
9
9
9
9
9
9
9
9
9
9
9
9
9
9
9
9
9
9
9
9
9
9
9
9
9
9
9
9
9
9
9
9
9
9
9
9
9
9
9
9
9
9
9
9
9
9
9
9
9
9
9
9
9
9
9
9
9
9
9
9
9
9
9
9
9
9
9
9
9
9
9
9
9
9
9
9
9
9
9
9
9
9
9
9
9
9
9
9
9
9
9
9
9
9
9
9
9
9
9
9
9
9
9
9
9
9
9
9
9
9
9
9
9
9
9
9
9
9
9
9
9
9
9
9
9
9
9
9
9
9
9
9
9
9
9
9
9
9
9
9
9
9
9
9
9
9
9
9
9
9
9
9
9
9
9
9
9
9
9
9
9
9
9
9
9
9
9
9
9
9
9
9
9
9
9
9
9
9
9
9
9
9
9
9
9
9
9
9
9
9
9
9
9
9
9
9
9
9
9
9
9
9
9
9
9
9
9
9
9
9
9
9
9
9
9
9
9
9
9
9
9
9
9
9
9
9
9
9
9
9
9
9
9
9
9
9
9
9
9
9
9
9
9
9
9
9
9
9
9
9
9
9
9
9
9
9
9
9
9
9
9
9
9
9
9
9
9
9
9
9
9
9
9
9
9
9
9
9
9
9
9
9
9
9
9
9
9
9
9
9
9
9
9
9
9
9
9
9
9
9
9
9
9
9
9
9
9
9
9
9
9
9
9
9
9
9
9
9
9
9
9
9
9
9
9
9
9
9
9
9
9
9
9
9
9
9
9
9
9
9
9
9
9
9
9
9
9
9
9
9
9
9
9
9
9
3
3
3
3
3
3
3
3
3
3
3
3
3
3
3
3
3
3
3
3
3
3
3
3
3
3
3
3
3
3
3
3
3
3
3
3
3
3
3
3
3
3
3
3
3
3
3
3
3
3
3
3
3
3
3
3
3
3
3
3
3
3
3
3
3
3
3
3
3
3
3
3
3
3
3
3
3
3
3
3
3
3
3
3
3
3
3
3
3
3
3
3
3
3
3
3
3
3
3
3
3
3
3
3
3
3
3
3
3
3
3
3
3
3
3
3
3
3
3
3
3
3
3
3
3
3
3
3
3
3
3
3
3
3
3
3
3
3
3
3
3
3
3
3
3
3
3
3
3
3
3
3
3
3
3
3
3
3
3
3
3
3
3
3
3
3
3
3
3
3
3
3
3
3
3
3
3
3
3
3
3
3
3
3
3
3
3
3
3
3
3
3
3
3
3
3
3
3
3
3
3
3
3
3
3
3
3
3
3
3
3
3
3
3
3
3
3
3
3
3
3
3
3
3
3
3
3
3
3
3
3
3
3
3
3
3
3
3
3
3
3
3
3
3
3
3
3
3
3
3
3
3
3
3
3
3
3
3
3
3
3
3
3
3
3
3
3
3
3
3
3
3
3
3
3
3
3
3
3
3
3
3
3
3
3
3
3
3
3
3
3
3
3
3
3
3
3
3
3
3
3
3
3
3
3
3
3
3
3
3
3
3
3
3
3
3
3
3
3
3
3
3
3
3
3
3
3
3
3
3
3
3
3
3
3
3
3
3
3
3
3
3
3
3
3
3
3
3
3
3
3
3
3
3
3
3
3
3
3
3
3
3
3
3
3
3
3
3
3
3
3
3
3
3
3
3
3
3
3
3
3
3
3
3
3
3
3
3
3
3
3
3
3
3
3
3
3
3
3
3
3
3
3
3
3
3
3
3
3
3
3
3
3
3
3
3
3
3
3
3
3
3
3
3
3
3
3
3
3
3
3
3
3
3
3
3
3
3
3
3
3
3
3
3
3
3
3
3
3
3
3
3
3
3
3
3
3
3
3
3
3
3
3
3
3
3
3
3
3
3
3
3
3
3
3
3
3
3
3
3
3
3
3
3
3
3
3
3
3
3
3
3
3
3
3
3
3
3
3
3
3
3
3
3
3
3
3
3
3
3
3
3
3
3
3
3
3
3
3
3
3
3
3
3
3
3
3
3
3
3
3
3
3
3
3
3
3
3
3
3
3
3
3
3
3
3
3
3
3
3
3
3
3
3
3
3
3
3
3
3
3
3
3
3
3
3
3
3
3
3
3
3
3
3
3
3
3
3
3
3
3
3
3
3
3
3
3
3
3
3
3
3
3
3
3
3
3
3
3
3
3
3
3
3
3
3
3
3
3
3
3
3
3
3
3
3
3
3
3
3
3
3
3
3
3
3
3
3
3
3
3
3
3
3
3
3
3
3
3
3
3
3
3
3
3
3
3
3
3
3
3
3
3
3
3
3
3
3
3
3
3
3
3
3
3
3
3
3
3
3
3
3
3
3
3
3
3
3
3
3
3
3
3
3
3
3
3
3
3
3
3
3
3
3
3
3
3
3
3
3
3
3
3
3
3
3
3
3
3
3
3
3
3
3
3
3
3
3
3
3
3
3
3
3
3
3
3
3
3
3
3
3
3
3
3
3
3
3
3
3
3
3
3
3
3
3
3
3
3
3
3
3
3
3
3
3
3
3
3
3
3
3
3
3
3
3
3
3
3
3
3
3
3
3
3
3
3
3
3
3
3
3
3
3
3
3
3
3
3
3
3
3
3
3
3
3
3
3
3
3
3
3
3
3
3
3
3
3
3
3
3
3
3
3
3
3
3
3
3
3
3
3
3
3
3
3
3
3
3
3
3
3
3
3
3
3
3
3
3
3
3
3
3
3
3
3
3
3
3
3
3
3
3
3
3
3
3
3
3
3
3
3
3
3
Door opening from left side
2
2
2
2
2
2
2
2
2
2
2
2
2
2
2
2
2
2
2
2
2
2
2
2
2
2
2
2
2
2
2
2
2
2
2
2
2
2
2
2
2
2
2
2
2
2
2
2
2
2
2
2
2
2
2
2
2
2
2
2
2
2
2
2
2
2
2
2
2
2
2
2
2
2
2
2
2
2
2
2
2
2
2
2
2
2
2
2
2
2
2
2
2
2
2
2
2
2
2
2
2
2
2
2
2
2
2
2
2
2
2
2
2
2
2
2
2
2
2
2
2
2
2
2
2
2
2
2
2
2
2
2
2
2
2
2
2
2
2
2
2
2
2
2
2
2
2
2
2
2
2
2
2
2
2
2
2
2
2
2
2
2
2
2
2
2
2
2
2
2
2
2
2
2
2
2
2
2
2
2
2
2
2
2
2
2
2
2
2
2
2
2
2
2
2
2
2
2
2
2
2
2
2
2
2
2
2
2
2
2
2
2
2
2
2
2
2
2
2
2
2
2
2
2
2
2
2
2
2
2
2
2
2
2
2
2
2
2
2
2
2
2
2
2
2
2
2
2
2
2
2
2
2
2
2
2
2
2
2
2
2
2
2
2
2
2
2
2
2
2
2
2
2
2
2
2
2
2
2
2
2
2
2
2
2
2
2
2
2
2
2
2
2
2
2
2
2
2
2
2
2
2
2
2
2
2
2
2
2
2
2
2
2
2
2
2
2
2
2
2
2
2
2
2
2
2
2
2
2
2
2
2
2
2
2
2
2
2
2
2
2
2
2
2
2
2
2
2
2
2
2
2
2
2
2
2
2
2
2
2
2
2
2
2
2
2
2
2
2
2
2
2
2
2
2
2
2
2
2
2
2
2
2
2
2
2
2
2
2
2
2
2
2
2
2
2
2
2
2
2
2
2
2
2
2
2
2
2
2
2
2
2
2
2
2
2
2
2
2
2
2
2
2
2
2
2
2
2
2
2
2
2
2
2
2
2
2
2
2
2
2
2
2
2
2
2
2
2
2
2
2
2
2
2
2
2
2
2
2
2
2
2
2
2
2
2
2
2
2
2
2
2
2
2
2
2
2
2
2
2
2
2
2
2
2
2
2
2
2
2
2
2
2
2
2
2
2
2
2
2
8
8
8
8
8
8
8
8
8
8
8
8
8
8
8
8
8
8
8
8
8
8
8
8
8
8
8
8
8
8
8
8
8
8
8
8
8
8
8
8
8
8
8
8
8
8
8
8
8
8
8
8
8
8
8
8
8
8
8
8
8
8
8
8
8
8
8
8
8
8
8
8
8
8
8
8
8
8
8
8
8
8
8
8
8
8
8
8
8
8
8
8
8
8
8
8
8
8
8
8
8
8
8
8
8
8
8
8
8
8
8
8
8
8
8
8
8
8
8
8
8
8
8
8
8
8
8
8
8
8
8
8
8
8
8
8
8
8
8
8
8
8
8
8
8
8
8
8
8
8
8
8
8
8
8
8
8
8
8
8
8
8
8
8
8
8
8
8
8
8
8
8
8
8
8
8
8
8
8
8
8
8
8
8
8
8
8
8
8
8
8
8
8
8
8
8
8
8
8
8
8
8
8
8
8
8
8
8
8
8
8
8
8
8
8
8
8
8
8
8
8
8
8
8
8
8
8
8
8
8
8
8
8
8
8
8
8
8
8
8
8
8
8
8
8
8
8
8
8
8
8
8
8
8
8
8
8
8
8
8
8
8
8
8
8
8
8
8
8
8
8
8
8
8
8
8
8
8
8
8
8
8
8
8
8
8
8
8
8
8
8
8
8
8
8
8
8
8
8
8
8
8
8
8
8
8
8
8
8
8
8
8
8
8
8
8
8
8
8
8
8
8
8
8
8
8
8
8
8
8
8
8
8
8
8
8
8
8
8
8
8
8
8
8
8
8
8
8
8
8
8
8
8
8
8
8
8
8
8
8
8
8
8
8
8
8
8
8
8
8
8
8
8
8
8
8
8
8
8
8
8
8
8
8
8
8
8
8
8
8
8
8
8
8
8
8
8
8
8
8
8
8
8
8
8
8
8
8
8
8
8
8
8
8
8
8
8
8
8
8
8
8
8
8
8
8
8
8
8
8
8
8
8
8
8
8
8
8
8
8
8
8
8
8
8
8
8
8
8
8
8
8
8
8
8
8
8
8
8
8
8
8
8
8
8
8
8
8
8
8
8
8
8
8
8
8
8
8
8
8
8
8
8
8
8
8
8
8
8
8
8
8
8
8
8
8
8
8
8
8
4
4
4
4
4
4
4
4
4
4
4
4
4
4
4
4
4
4
4
4
4
4
4
4
4
4
4
4
4
4
4
4
4
4
4
4
4
4
4
4
4
4
4
4
4
4
4
4
4
4
4
4
4
4
4
4
4
4
4
4
4
4
4
4
4
4
4
4
4
4
4
4
4
4
4
4
4
4
4
4
4
4
4
4
4
4
4
4
4
4
4
4
4
4
4
4
4
4
4
4
4
4
4
4
4
4
4
4
4
4
4
4
4
4
4
4
4
4
4
4
4
4
4
4
4
4
4
4
4
4
4
4
4
4
4
4
4
4
4
4
4
4
4
4
4
4
4
4
4
4
4
4
4
4
4
4
4
4
4
4
4
4
4
4
4
4
4
4
4
4
4
4
4
4
4
4
4
4
4
4
4
4
4
4
4
4
4
4
4
4
4
4
4
4
4
4
4
4
4
4
4
4
4
4
4
4
4
4
4
4
4
4
4
4
4
4
4
4
4
4
4
4
4
4
4
4
4
4
4
4
4
4
4
4
4
4
4
4
4
4
4
4
4
4
4
4
4
4
4
4
4
4
4
4
4
4
4
4
4
4
4
4
4
4
4
4
4
4
4
4
4
4
4
4
4
4
4
4
4
4
4
4
4
4
4
4
4
4
4
4
4
4
4
4
4
4
4
4
4
4
4
4
4
4
4
4
4
4
4
4
4
4
4
4
4
4
4
4
4
4
4
4
4
4
4
4
4
4
4
4
4
4
4
4
4
4
4
4
4
4
4
4
4
4
4
4
4
4
4
4
4
4
4
4
4
4
4
4
4
4
4
4
4
4
4
4
4
4
4
4
4
4
4
4
4
4
4
4
4
4
4
4
4
4
4
4
4
4
4
4
4
4
4
4
4
4
4
4
4
4
4
4
4
4
4
4
4
4
4
4
4
4
4
4
4
4
4
4
4
4
4
4
4
4
4
4
4
4
4
4
4
4
4
4
4
4
4
4
4
4
4
4
4
4
4
4
4
4
4
4
4
4
4
4
4
4
4
4
4
4
4
4
4
4
4
4
4
4
4
4
4
4
4
4
4
4
4
4
4
4
4
4
4
4
4
4
4
4
4
4
4
4
4
4
4
4
4
4
4
4
9
9
9
9
9
9
9
9
9
9
9
9
9
9
9
9
9
9
9
9
9
9
9
9
9
9
9
9
9
9
9
9
9
9
9
9
9
9
9
9
9
9
9
9
9
9
9
9
9
9
9
9
9
9
9
9
9
9
9
9
9
9
9
9
9
9
9
9
9
9
9
9
9
9
9
9
9
9
9
9
9
9
9
9
9
9
9
9
9
9
9
9
9
9
9
9
9
9
9
9
9
9
9
9
9
9
9
9
9
9
9
9
9
9
9
9
9
9
9
9
9
9
9
9
9
9
9
9
9
9
9
9
9
9
9
9
9
9
9
9
9
9
9
9
9
9
9
9
9
9
9
9
9
9
9
9
9
9
9
9
9
9
9
9
9
9
9
9
9
9
9
9
9
9
9
9
9
9
9
9
9
9
9
9
9
9
9
9
9
9
9
9
9
9
9
9
9
9
9
9
9
9
9
9
9
9
9
9
9
9
9
9
9
9
9
9
9
9
9
9
9
9
9
9
9
9
9
9
9
9
9
9
9
9
9
9
9
9
9
9
9
9
9
9
9
9
9
9
9
9
9
9
9
9
9
9
9
9
9
9
9
9
9
9
9
9
9
9
9
9
9
9
9
9
9
9
9
9
9
9
9
9
9
9
9
9
9
9
9
9
9
9
9
9
9
9
9
9
9
9
9
9
9
9
9
9
9
9
9
9
9
9
9
9
9
9
9
9
9
9
9
9
9
9
9
9
9
9
9
9
9
9
9
9
9
9
9
9
9
9
9
9
9
9
9
9
9
9
9
9
9
9
9
9
9
9
9
9
9
9
9
9
9
9
9
9
9
9
9
9
9
9
9
9
9
9
9
9
9
9
9
9
9
9
9
9
9
9
9
9
9
9
9
9
9
9
9
9
9
9
9
9
9
9
9
9
9
9
9
9
9
9
9
9
9
9
9
9
9
9
9
9
9
9
9
9
9
9
9
9
9
9
9
9
9
9
9
9
9
9
9
9
9
9
9
9
9
9
9
9
9
9
9
9
9
9
9
9
9
9
9
9
9
9
9
9
9
9
9
9
9
9
9
9
9
9
9
9
9
9
9
9
9
9
9
9
9
9
9
9
9
9
9
9
9
9
9
9
9
9
3
3
3
3
3
3
3
3
3
3
3
3
3
3
3
3
3
3
3
3
3
3
3
3
3
3
3
3
3
3
3
3
3
3
3
3
3
3
3
3
3
3
3
3
3
3
3
3
3
3
3
3
3
3
3
3
3
3
3
3
3
3
3
3
3
3
3
3
3
3
3
3
3
3
3
3
3
3
3
3
3
3
3
3
3
3
3
3
3
3
3
3
3
3
3
3
3
3
3
3
3
3
3
3
3
3
3
3
3
3
3
3
3
3
3
3
3
3
3
3
3
3
3
3
3
3
3
3
3
3
3
3
3
3
3
3
3
3
3
3
3
3
3
3
3
3
3
3
3
3
3
3
3
3
3
3
3
3
3
3
3
3
3
3
3
3
3
3
3
3
3
3
3
3
3
3
3
3
3
3
3
3
3
3
3
3
3
3
3
3
3
3
3
3
3
3
3
3
3
3
3
3
3
3
3
3
3
3
3
3
3
3
3
3
3
3
3
3
3
3
3
3
3
3
3
3
3
3
3
3
3
3
3
3
3
3
3
3
3
3
3
3
3
3
3
3
3
3
3
3
3
3
3
3
3
3
3
3
3
3
3
3
3
3
3
3
3
3
3
3
3
3
3
3
3
3
3
3
3
3
3
3
3
3
3
3
3
3
3
3
3
3
3
3
3
3
3
3
3
3
3
3
3
3
3
3
3
3
3
3
3
3
3
3
3
3
3
3
3
3
3
3
3
3
3
3
3
3
3
3
3
3
3
3
3
3
3
3
3
3
3
3
3
3
3
3
3
3
3
3
3
3
3
3
3
3
3
3
3
3
3
3
3
3
3
3
3
3
3
3
3
3
3
3
3
3
3
3
3
3
3
3
3
3
3
3
3
3
3
3
3
3
3
3
3
3
3
3
3
3
3
3
3
3
3
3
3
3
3
3
3
3
3
3
3
3
3
3
3
3
3
3
3
3
3
3
3
3
3
3
3
3
3
3
3
3
3
3
3
3
3
3
3
3
3
3
3
3
3
3
3
3
3
3
3
3
3
3
3
3
3
3
3
3
3
3
3
3
3
3
3
3
3
3
3
3
3
3
3
3
3
3
3
3
3
3
3
3
3
3
3
3
3
3
3
3
3
3
3
3
Door opening from right side
Page 11

IMPORTANT SAFEGUARDS
8
Do not store food in wine cooler, as interior temperature may not get cool
enough to prevent spoilage. As a natural result of condensation, in summer
months or area of high humidity, the glass door may built up moisture on
the outside. Just wipe it away.
OPERATING YOUR WINE COOLER
It is recommended you install the wine cooler in a place where the ambient
temperature is between 22-25 degree Celsius .If the ambient temperature
in above or below the recommended temperature, conditions may cause the
interior temperature to fluctuate.
If the interior light is left on, the temperature inside the wine cooler will be higher.
Recommended Temperatures for chilling Wine
Red wines: 15.5-18.5 C
Dry/White Wines 10-15 C
Sparkling Wines 7.2-9.5 C
Rose Wines 9.5-10.5 C
The above temperatures may fluctuate depending on whether or not the interior
bulb is on or off or whether the bottles are located on the lower/middle or lower
section.
HOW TO USE THE BUTTONS ON THE DISPLA
Y PANEL:
You can set the temperature as you desire by pushing the button or . When
you push the two buttons for first time, the LED readout will show the original
temperature set at previous time(the temperature preset at the factory is 50 F)
.The temperature that you desire to set will increase 1 F or 1 C if you
push the once, on the contray the temperature will decrease 1 F or 1 C if
you push the once.
Page 12

When you store mostly red wines, the temperature which you control by
9
pushing the above two buttons needs to be set between 15.5 to 18.5 C and
the LED lamp beside "RED"will be lit red.
When you store mostly white wines, the temperature needs to be set
at between 10 to 15 C and the RED lamp beside "WHITE" will be lit green.
When you store mostly sparkling wines the temperature needs to be set at
between 7.2 to 9.5 C and the LED lamp beside "SPARKLING" will be lit amber
You can select temperature display setting from Fahrenheit to Celsius degree
by pushing the button marked F/C.Fahrenheit degree indicator will appear
in red color in the display marked F and the Celsius degrees indicator will
appear in yellow color in the display marked C.
You can turn the interior light on or of
f by pushing the button marked ON/OFF
symbol.
Shelves
Shelving is chrome plated. T
o accommodate different size bottles, they
can be moved up or drown by sliding them out of the tracks. The shelves
are designed to accommodate the maximum amount of bottles.
Wine Rack
There is an additional wine rack at bottom section of the unit where you
can store up to 6 wine bottles. This rack is removable for cleaning purpose.
.
NOTE:
When you use the wine cooler for the first time or restart the wine cooler
after it has been turned off for long time , there could be a few degrees
variance between the temperature you select and the one indicated on
the LED readout. This is normal and it is due to the length of the activation
time . Once the wine cooler is running for a few hours everything will be
back to normal.
Also, there is a 4 to 6 C variance between the top and bottom shelves of the
wine chiller. Therefore, If you have set the wine cellar for red wine only and
the temperature reads 16 C and you want to place a mix of white and red
wines, you should place the wine bottles on the bottom shelves and the red
wines on the top shelves.
Page 13
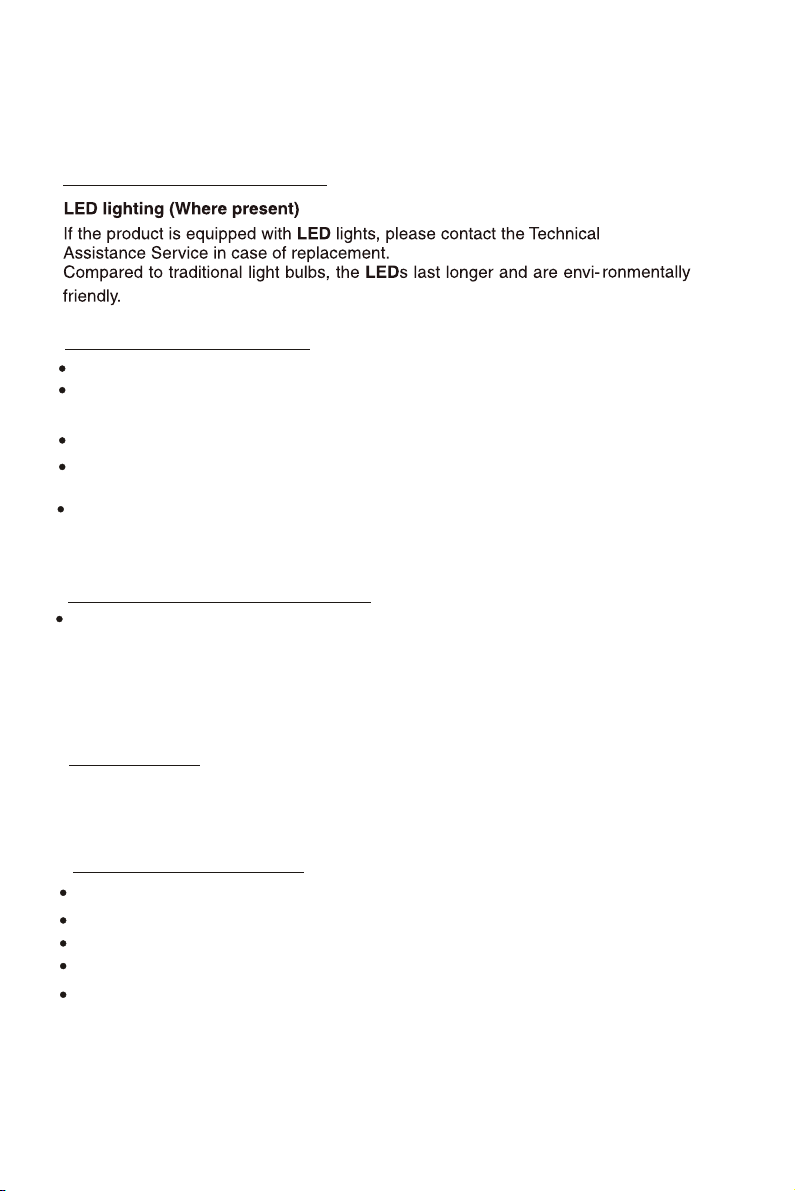
CARE AND MAINTENANCE
10
CHANGING THE LIGHT BULB
Cleaning Your Wine Cooler
Unplug the wine cooler, and remove the bottles.
Wash the inside with a warm water and baking soda solution. The solution
should be about 2 tablespoons of baking soda to a quart of water.
Wash the shelves and trays with a mild detergent solution.
The outside of the wine cooler should be cleaned with mild detergent and
warm water.
It may also be necessary to periodically wipe the bottom part of the storage
area, as the wine cooler is designed to retain humidity, and condensation
may collect there.
Maintenance of Your Wine Cooler
Power Failure
Most power failures are corrected within a few hours and should not
affect the temperature of your wine cooler if you minimize the number
of times the door is opened. If the power is going to be off for a longer
period of time, you need to take the proper steps to protect your contents.
Vacation Time
During long absences, remove all the bottles; unplug your wine cooler, clean
your wine cooler, and leave the door open slightly to avoid possible formation
of condensation, mold, or odors.
Moving Your Wine Cooler
Remove all the bottles.
Securely tape down all loose items inside your wine cooler.
Turn the levelling screws up to the base to avoid damage.
T
ape the doors shut.
Be sure the wine cooler stays in the upright position during transportation.
Page 14

Troubleshooting
11
You can solve many common wine cellar problems easily
cost of a possible service call. Try the suggestions below to see if you can
solve the problem before calling the servicer.
TROUBLESHOOTING GUIDE
PROBLEM
Wine cooler does
not operate.
Wine cooler is
not cold enough.
Compressor
on and off
The light does
not work.
turns
frequently
Not plugged in.
The circuit breaker tripped or blown fuse.
Check to be sure the temperature control setting.
External environment may require a higher setting.
The door is opened too often.
The door is not closed completely.
The door gasket does not seal properly.
The wine cooler does not have the correct clearances.
The room temperature is hotter than normal.
A large amount of warm wine has been added to the
wine cooler.
The door is opened too often.
The door is not closed completely.
The temperature control is not set correctly.
The door gasket does not seal properly.
The wine cooler does not have the correct clearances.
The home circuit breaker or fuse has tripped.
The wine cooler is unplugged.
The bulb has burned out(see maintenance section for
the replacement procedure).
The switch is in the "OFF" position.
POSSIBLE CAUSE
, saving you the
Page 15
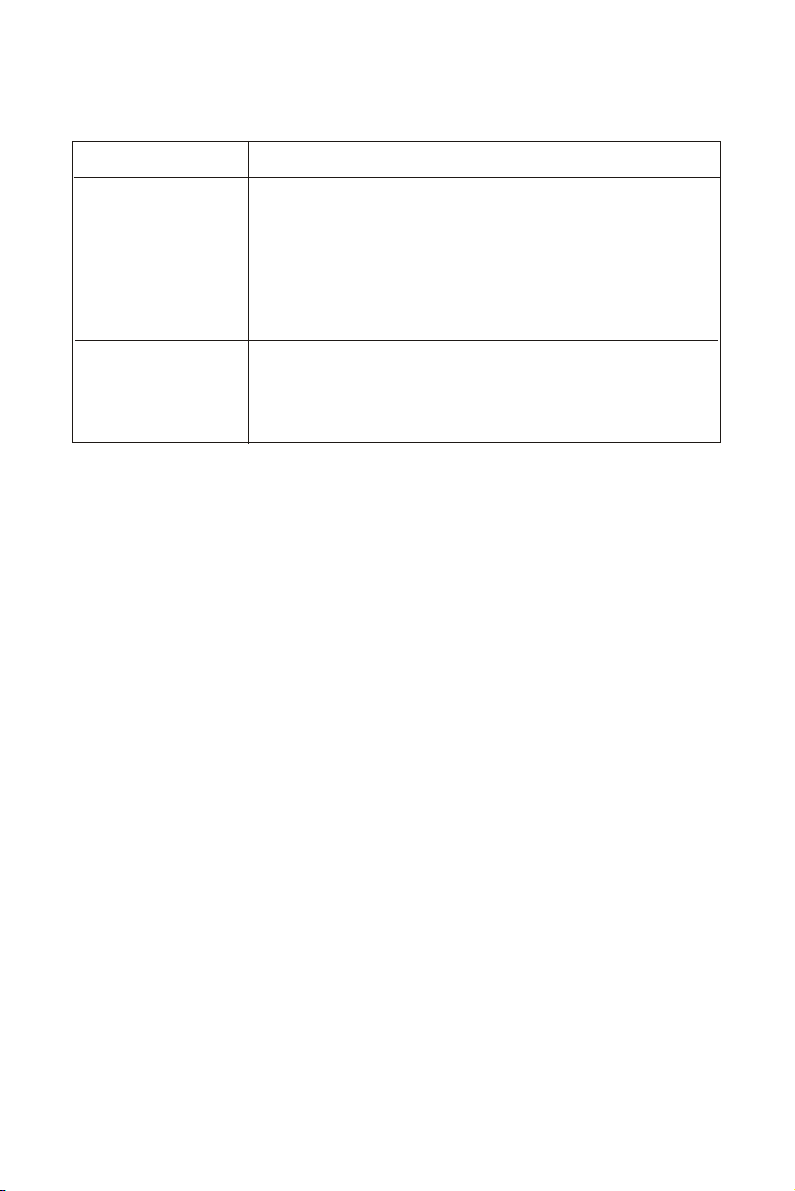
Vibrations.
12
Check to assure that the wine cooler is level.
The wine cooler
seems to make
too much noise.
The rattling noise may come from the flow of the
refrigerant,which is normal.
As each cycle ends, you may hear gurgling sounds
caused by the flow of refrigerant in your wine cooler.
Contraction and expansion of the inside walls may
cause popping and crackling noises.
The wine cooler is not level.
The door will not
close properly.
The wine cooler is not level.
The doors were reversed and not properly installed.
The gasket is dirty.
The shelves are out of position.
Technical Specifications:
For detailed specifications, please refer to the nameplate at the back of the wine
Cellar. The specifications are subject to change without prior notice due to products
Improvement.
Page 16
Bottle loading scheme
13
40 bottles
BOTTLES
13
11
10
6
Assembling instruction for Spacer
Page 17
BRUGSVEJLEDNING
14
Du kan selv løse mange af
de mest almindelige problemer med vinkøleren og spare
udgifterne til et eventuelt servicebesøg. Prøv at løse problemet ved hjælp af
nedenstående forslag, inden du tilkalder service.
FEJLFINDINGSVEJLEDNING
PROBLEM MULIG ÅRSAG
Vinkøleren
fungerer ikke.
Vinkøleren
ikke tilstrækkelig
kold.
Fejlstrøm
Stikket er ikke sat i.
er
Der er ikke tilstrækkelig plads omkring vinkøleren.
Dørpakningen slutter ikke tæt. Døren er ikke lukket helt.
Døren åbnes for ofte. Den omgivende temperatur kan
srelæet er aktiveret, eller sikringen er sprunget.
nødvendiggøre en lavere indstilling. Kontroller
temperaturvælgerens indstilling.
Kompressoren
kører ofte.
Der er ikke tils
trækkelig plads omkring vinkøleren.
Dørpakningen slutter ikke tæt. Temperaturvælgeren er ikke
indstillet korrekt. Døren er ikke lukket helt. Døren åbnes for
ofte. Der er placeret en stor mængde varm vin i vinkøleren.
Den omgivende temperatur er højere end normalt.
DANIMARCA
Lyset
ikke.
fungerer
Kontakten står på "OFF". Pæren er sprunget (se oplysninger
kiftning i afsnittet om
omuds
vedligeholdelse).
Vinkøleren er
ikke tilsluttet. Fejlstrømsrelæet er aktiveret, eller sikringen er
sprunget.
Page 18
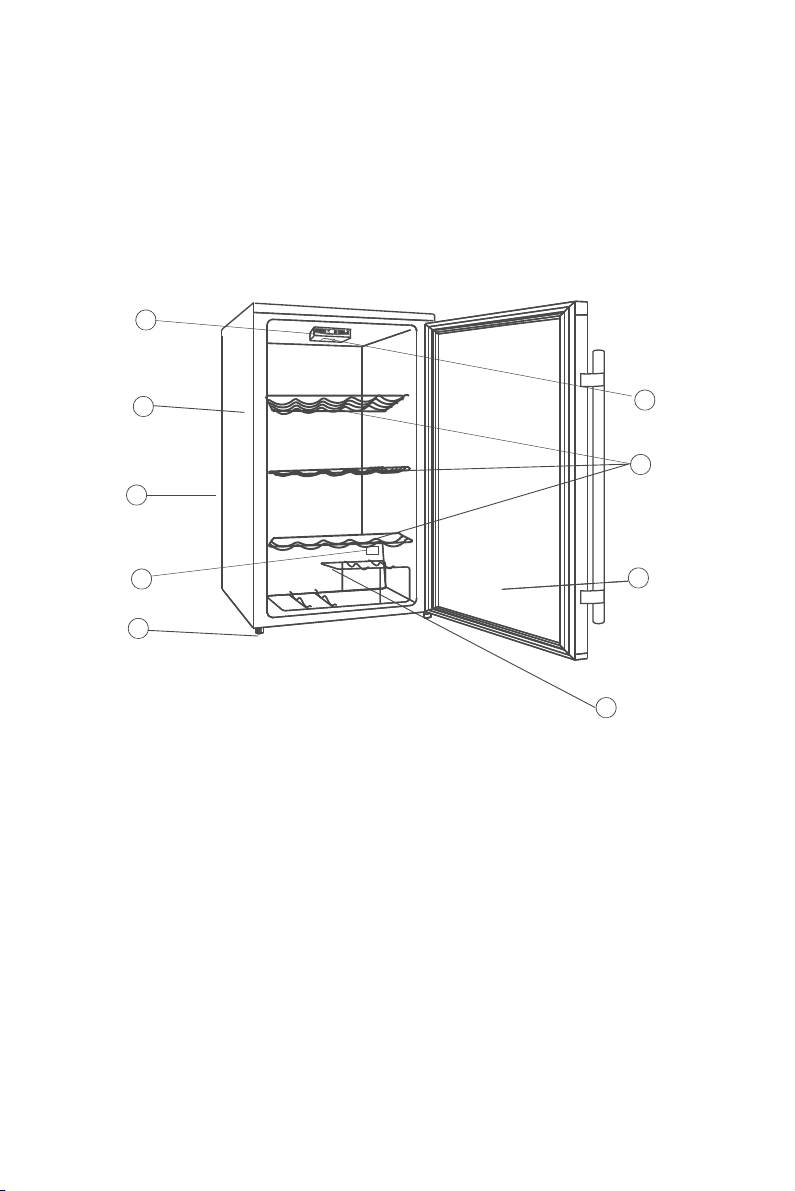
Betjenings- og displaypanel
15
1. Kabinet
2. Justerbare fødder
3. Vinstativ
4. Glasdør
5. Forkromede hylder
6. Indvendigt lys
7. Elektrisk styreenhed (på bagsiden)
8. T
emperatursensor
Page 19

Tak for dit køb af dette produkt.
16
Før du benytter dit køleskab, bedes du læse denne betjeningsvejledning for at
få mest ud af dets ydeevne. Gem alle dokumenter til senere brug eller andre
ejere. Dette produkt er udelukkende beregnet til husholdningsbrud eller
lignende anvendelser såsom:
-køkkenområdet for personale i forretninger, kontorer og andre arbejdsmiljøer
-på gårde, af klientel på hoteller, moteller og andre beboelsesmiljøer
-på bed and breakfast (B & B)
-til cateringservice og lignende anvendelser, som ikke er detailhandel.
Dette apparat må udelukkende benyttes til opbevaring af fødevarer. Alle andre
anvendelser betragtes som farlige, og producenten vil ikke stå til ansvar for
udeladelser. Det anbefales desuden, at du bemærker garantibetingelserne.
SIKKERHEDSINFORMATION
Køleskabet indeholder en kølegas (R600a:
isobuten) og en isoleringsgas (cyklopentan),
som har en høj forenelighed med miljøet,
men som dog er brændbare.
Vi anbefaler, at du følger de følgende
regulativer for at undgå farlige situationer:
Tag strømledningen ud af stikkontakten
før nogen form for betjening.
Kølesystemet befinder sig bag på, og
kølemidlet findes inden i apparatet. Undgå
derfor at beskadige slangerne.
Hvis der opdages en lækage i kølesystemet,
Page 20

må der ikke røres ved stikkontakten eller
17
anvendes åben ild. Åbn vinduet, og luk luft
ind i rummet. Ring derefter til et
servicecenter, og bed om en reparation.
Undlad at skrabe med en kniv eller en
skarp genstand for at fjerne eventuel frost
eller is. Disse kan skade kølekredsløbet, og
udslip fra dette kan forårsage brand eller
øjenskade.
Undlad at installere apparatet i fugtige,
olieholdige eller støvede omgivelser samt at
udsætte det for direkte sollys eller vand.
Undlad at installerede apparatet i nærheden
af varmeapparater eller brandfarlige
materialer.
Undlad at bruge forlængerledninger eller
adaptere.
Undlad at trække voldsomt i eller folde
strømledningen eller berøre stikket med
våde hænder.
Undlad at beskadige stikke og/eller
strømledningen; dette kan forårsage
elektrisk stød eller brand.
Det anbefales at holdes stikket rent, da for
meget støv på stikket kan forårsage brand.
Brug ikke mekaniske enheder eller andet
udstyr til at fremskynde afrimningen.
Undgå på alle måder brug af åben ild eller
Page 21

elektrisk udstyr, såsom varmeapparater,
18
damprensere, stearinlys, olielamper og
lignende, til at fremskynde afrimningen.
Undlad at bruge eller opbevare
brandfarlige sprays, såsom spraymaling, i
nærheden af apparatet, da det kan
forårsage eksplosion eller brand.
Undlad at bruge elektriske apparater inden
i opbevaringsrummene til fødevarer,
medmindre de er af en type, der anbefales
af producenten.
Undlad at anbringe eller opbevare
brandfarlige og yderst flygtige materialer,
såsom æter, benzin, LPG, propangas,
spraydåser, klæbemidler, ren alkohol osv.
Disse materialer kan forårsage en
eksplosion.
Undlad at opbevare medicin eller
forskningsmaterialer i apparatet. Når
materiale, der kræver en streng kontrol af
opbevaringstemperaturerne, skal
opbevares, kan det muligvis gå til grunde,
eller der kan opstå en ukontrolleret
reaktion, som kan føre til risici.
Vedligehold ventilationsåbningerne i
apparatets kabinet eller i den indbyggede
struktur fri for tilstopninger.
Undlad at anbringe genstande og/eller
Page 22

beholdere fyldt med vand oven på
19
apparatet.
Undlad at udføre reparationer på dette
apparat. Alle indgreb skal udelukkende
foretages af kvalificeret personale.
Dette apparat kan bruges af børn i alderen
fra 8 år og derover og af personer med
nedsatte fysiske, sensoriske eller mentale
evner eller manglende erfaring og viden,
hvis de er under tilstrækkeligt tilsyn eller
har modtaget vejledning i brugen af
apparatet på en sikker måde og forstår de
involverede risici.
Børn bør ikke lege med apparatet.
Rengøring og brugervedligeholdelse bør
ikke foretages af børn uden opsyn
AFSKAFFELSE AF GAMLE APPARATER
Dette apparat er mærket i henhold til det europæiske direktiv 2012/19/EU om
affald af elektrisk og elektronisk udstyr (WEEE).
Affald af elektrisk og elektronisk udstyr (WEEE) indeholder både
forurenende dele (som kan have negative konsekvenser for miljøet) og
grundkomponenter (som kan genanvendes). Det er vigtigt at underlægge affald af
elektrisk og elektronisk udstyr (WEEE) specifikke behandlinger for at fjerne og skaffe
sig af med alle forureningskilder på den rigtige måde og udvinde og genbruge alle
materialer.
Det enkelte individ kan spille en vigtig rolle i at sikre, at affald af elektrisk og
elektronisk udstyr (WEEE) ikke bliver et miljømæssigt problem; det er altafgørende, at
følge nogle grundlæggende regler:
- affald af elektrisk og elektronisk udstyr (WEEE) må ikke behandles som
husholdningsaffald.
Page 23
- affald af elektrisk og elektronisk udstyr (WEEE) skal afleveres til det relevante
20
indsamlingssted, som administreres af kommunen eller registrerede firmaer. Der
findes i mange lande afhentning ved husstanden af store affald af elektrisk og
elektronisk udstyr (WEEE)-produkter.
Når du køber et nyt apparat, er det i mange lande således, at det gamle apparat kan returneres
til forhandleren, som skal hente det gratis fra gang til gang, så længe apparatet er en lignende
type og har de samme funktioner, som det leverede apparat.
Konformitet
Ved at placere Mærket på dette produkt, erklærer vi, på eget ansvar,
overholdelse af alle europæiske sikkerhed, sundhed og miljø kravene i lovgivningen for
dette produkt.
Energibesparelse
- For bedre energibesparelse anbefaler vi:
- Installér apparatet væk fra varmekilder og ikke udsat for direkte sollys i et
velventileret rum.
- Undgå at komme varm mad i køleskabet for ikke at øge den interne temperatur og
derved forårsage kontinuerlig drift af kompressoren.
- Overfyld ikke med madvarer for at sikre ordentlig luftcirkulation.
- Afrim apparatet, hvis der er isdannelser for at lette overførslen af kulde.
- I tilfælde af strømsvigt er det tilrådeligt at holde køleskabsdøren lukket.
- Åbn og hold apparatets døre åbne så lidt som muligt
- Undgå at justere termostaten til for kølige temperaturer.
- Fjern støv på bagsiden af apparatet
Page 24

Læs hele vejledningen, før vinkøleren anvendes.
21
Børn kan lukke sig in
de i vinkøleren under leg og blive kvalt. Kasserede
husholdningsapparater er farlige, selvom de "blot skal stå i garagen et par dage".
Inden du bortskaffer den gamle vinkøler:
Tag døren af, men lad hylderne sidde i, så børn ikke kan kravle ind i vinkøleren.
Lad aldrig børn bruge, lege med eller kravle ind i vinkøleren.
Rengør aldrig vinkøleren med brandfarlige væsker. Dampene kan medføre brandog eksplosionsfare.
Opbevar og brug ikke benzin eller andre brandfarlige dampe og væsker i nærheden
af dette eller andre husholdningsapparater. Dampene kan medføre brand- og
eksplosionsfare.
INSTALLATIONSVEJLEDNING
Inden du tager vinkøleren i brug
Fjern den udvendige og indvendige emballage, herunder den beskyttende
skumgummi på dørpanelerne.
Kontroller, at følgende dele er inkluderet:
3 udtrækshylder
1 vinstativ
1 brugsvejledning
Inden du tænder for vinkøleren, skal den stå oprejst i ca. 2 timer. Dette reducerer
risikoen for driftsforstyrrelser i kølesystemet som følge af håndteringen under
transporten.
Rengør de indvendige flader med en blød klud vredet op i lunkent vand.
Installation af vinkøleren
Placer vinkøleren på et gulv, som er stærkt nok til at bære den, når den er fyldt helt
op. Juster fødderne på forsiden for at få vinkøleren til at stå vandret. Der skal være
10-15 cm afstand til bagsiden og siderne af vinkøleren, så luften kan cirkulere frit
Page 25

og afkøle kompressoren. Placer ikke vinkøl
22
eren i direkte sollys og i nærheden af
varmekilder (komfur, varmeapparat, radiator osv.). Direkte sollys kan ødelægge
akrylbelægningen, og varmekilderne kan få elforbruget til at stige. Ekstremt lave
omgivende temperaturer kan også bevirke, at apparatet ikke fungerer korrekt.
Undgå at placere vinkøleren i fugtige omgivelser. For høj luftfugtighed kan bevirke,
at der hurtigt dannes rim på fordamperen.
PLEJE OG VEDLIGEHOLDELSE
UDSKIFTNING AF PÆREN
Lysdioder
Hvis produktet er forsynet med lysdioder, bedes du kontakte Teknisk Service i
tilfælde af udskiftning.
Sammenlignet med traditionelle pærer varer lysdioder længere og er miljøvenlige.
Rengøring af vinkøleren
Tag stikket ud af stikkontakten, og tag flaskerne ud. Vask vinkøleren indvendigt
med varmt vand og en opløsning bestående af natriumbicarbonat og vand.
Opløsningen skal være i forholdet to spiseskefulde natriumbicarbonat til en liter
vand.
Vask hylder og bakker med en mild opløsning bestående af opvaskemiddel og vand.
Den udvendige side af vinkøleren skal ligeledes vaskes med en mild opløsning
bestående af opvaskemiddel og vand. Det kan også være nødvendigt regelmæssigt
at aftørre bunden af opbevaringsrummet, da vinkøleren er konstrueret til at holde på
fugtigheden, og der kan samles kondensvand her.
Vedligeholdelse af vinkøleren
Strømafbrydelse
Page 26

De fleste strømsvigt varer
23
nogle få timer og bør ikke påvirke temperaturen i
vinkøleren, hvis døren så vidt muligt holdes lukket. Hvis strømmen er afbrudt
gennem længere tid, skal du tage de nødvendige forholdsregler for at beskytte
indholdet i vinkøleren.
Ferie
Tag alle flasker ud ved længere tids fravær. Tag stikket ud af kontakten, rengør
vinkøleren, og lad døren stå på klem for at undgå, at der dannes kondens, mug eller
dårlig lugt.
Flytning af vinkøleren
x Tag alle flasker ud.
x Fastgør alle løse dele inde i vinkøleren med tape.
x Skru nivelleringsskruerne op i bunden for at undgå skader.
x Luk døren, og fastgør den med tape.
x Sørg for, at vinkøleren står oprejst under transporten.
Hvis du især opbevarer rødvin, skal temperaturen, som du styrer ved at trykke på de
to viste knapper, indstilles til mellem 15,5° C og 18,5° C. Indikatoren ud for "RED"
lyser rødt.
Hvis du især opbevarer hvidvin, skal temperaturen indstilles til mellem 10° C og
15° C, og indikatoren ud for "WHITE" lyser grønt. Hvis du især opbevarer
mousserende vin, skal temperaturen indstilles til mellem 7,2° C og 9,5° C, og
indikatoren ud for "SPARKLING" lyser gult.
Du kan vælge mellem Fahrenheit- og Celsius-temperaturindstilling ved at trykke på
knappen F/C. Fahrenheit-indikatoren vises som et rødt F i displayet, og
Celsius-indikatoren vises som et gult C i displayet. Du kan tænde eller slukke det
indvendige lys ved at trykke på knappen ON/OFF.
Page 27

Hylder
24
Hylderne er forkrome
de. Når du skal opbevare flasker af forskellig størrelse, kan du
flytte hylderne op eller ned ved at trække dem ud af skinnerne. Hylderne er
konstrueret, så de har plads til det størst mulige antal flasker.
Vinstativ
Der findes et ekstra vinstativ med plads til op til seks vinflasker i den nederste
sektion. Stativet kan tages ud i forbindelse med rengøring.
BEMÆRK!
Når du bruger vinkøleren første gang eller genstarter vinkøleren, efter at den har
været slukket i længere tid, kan der være nogle få graders forskel mellem den valgte
temperatur, og den temperatur, der er angivet i displayet. Dette er normalt og
skyldes aktiveringstiden. Efter nogle få timer kører vinkøleren normalt.
Der er en temperaturforskel på 4-6° C mellem de øverste og nederste hylder i
vinkøleren. Hvis du således har indstillet temperaturen kun til rødvin (f.eks. 16° C),
og du ønsker at opbevare både hvidvin og rødvin i vinkøleren, skal du placere
hvidvinen på de nederste hylder og rødvinen på de øverste.
Sæt apparatets stik i en separat stikkontakt, som er korrekt installeret og
jordforbundet. Fjern under ingen omstændigheder jordbenet fra stikket. Alle
spørgsmål vedrørende strøm eller jordforbindelse skal rettes direkte til en
autoriseret elektriker eller et autoriseret Kelvinator-servicecenter.
Forkert brug af stikket kan medføre risiko for elektrisk stød. Hvis netledningen er
beskadiget, skal den udskiftes af et autoriseret Kelvinator-servicecenter.
VIGTIGE SIKKERHEDSFORANSTALTNINGER
Opbevar ikke madvarer i vinkøleren, da temperaturen ikke altid er lav nok til at
forhindre, at maden fordærves. Som en naturlig følge af kondensering kan der
Page 28

dannes fugt udvendigt på
25
vinkøleren i sommermånederne eller i områder med høj
fugtighed. Denne fugt skal du blot tørre af.
BETJENING AF VINKØLEREN
Det anbefales at installere vinkøleren på et sted, hvor omgivelsestemperaturen
ligger mellem 22-25° C. Hvis temperaturen ligger over eller under det anbefalede
niveau, kan det få den indvendige temperatur til at svinge.
Hvis lyset i vinkøleren er tændt, er temperaturen inde i vinkøleren højere.
Anbefalede temperaturer til afkøling af vin
Rødvin: 15,5-18,5° C
Hvidvin (tør) 10-15° C
Mousserende vin 7,2-9,5° C
Rosévin 9,5-10,5° C
Ovennævnte temperaturer kan variere, afhængigt af om lyset i vinkøleren er tændt
eller slukket, eller om flaskerne er placeret i øverste/midterste eller nederste
sektion.
SÅDAN BRUGES KNAPPERNE PÅ DISPLAYPANELET:
Du kan indstille den ønskede temperatur ved at trykke på knappen eller .
Når du trykker på de to knapper første gang, vises den temperatur, der tidligere var
indstillet (den fabriksindstillede temperatur er 50° F).
Temperaturen sænkes 1° F eller 1° C, hvis du trykker én gang på , og den hæves 1°
F eller 1° C, hvis du trykker én gang på .
Page 29

Flaskeisætning
26
splan
Samlevejledning f
40 flask
or
afstandsplade
er
Flaske
13
11
10
6
Page 30

KÄYTTÖOHJE
27
oit ratkaista
V
monet viinikaappiin liittyvät tavalliset ongelmat helposti ja säästää
siten mahdollisen huoltokäynnin hinnan. Yritä ratkaista ongelma seuraavien
ohjeiden avulla ennen korjaajan kutsumista.
VIANMÄÄRITYSOPAS
ONGELMA MAHDOLLINEN SYY
FINLANDIA
Viinikaappi
ei
toimi.
Viinikaappi
ei ole
tarpeeksi kylmä.
Kompressori
me
nee toistuvasti
päälle ja pois
päältä.
Valoeipala.
Suojakatkaisin on lauennut tai sulake palanut. Kaappia ei ole
kytketty virtalähteeseen.
Viinikaapin ympärillä ei ole riittävästi vapaata tilaa. Oven
tiiviste ei ole tarpeeksi tiivis. Ovea ei ole suljettu kokonaan.
Ovi avataan liian usein. Huoneen lämpötila saattaa edellyttää
jäähdytyksen tehostamista. Tarkista varmuuden vuoksi
lämpötila-asetus.
Viinikaapin ympärillä ei ole riittävästi vapaata tilaa. Oven
tiiviste ei ole tarpeeksi tiivis. Lämpötila-asetus ei ole oikein.
Ovea ei ole suljettu kokonaan. Ovea avataan liian usein.
Viinikaappiin on lisätty paljon lämpimiä pulloja. Huoneen
lämpötila on tavallista korkeampi.
Katkaisin
on OFF-asennossa. Lam
ppu on palanut
Huolto-luvusta sen vaihto-ohje). Viinikaappia ei ole
pistorasiaan.
Asunnon suojakatkaisin on lauennut tai sulake
(katso
kytketty
on palanut.
Page 31

Käyttö- ja näyttöpaneeli
28
1. Kaappi
2. Tasausjalka
3. Viiniteline
4. Lasiovi
5. Kromihyllyt
6. Sisälam
ppu
7. Sähköiset hallintalaitteet (takana)
8. Lämpötila-anturi
Page 32

Kiitos, että ostit tämän tuotteen.
29
Lue tämä käyttöohje ennen jääkaapin käyttämistä, niin saat siitä parhaan
hyödyn. Säilytä kaikki asiakirjat myöhempää käyttöä tai myöhempiä
omistajia varten. Tämä tuote on tarkoitettu käytettäväksi yksinomaan
kotitalouksissa ja vastaavissa kohteissa, kuten
-myymälöiden, toimistojen ja muiden työpaikkojen henkilöstön keittiötiloissa
-maatiloilla sekä hotellien, motellien ja muiden asutustilojen asiakkaille
-majataloissa
-ateriapalveluissa ja vastaavassa käytössä, johon ei liity vähittäismyyntiä.
Tätä laitetta saa käyttää vain ruoan säilyttämiseen. Kaikkien muiden
käyttötarkoitusten katsotaan olevan vaarallisia, eikä valmistaja ole vastuussa
laiminlyönneistä. Lisäksi suosittelemme tutustumaan takuuehtoihin.
TURVALLISUUSTIETOJA
Jääkaappi sisältää jäähdytysainekaasua
(R600a: isobutaani) ja eristekaasua
(syklopentaani), jotka ovat hyvin
ympäristöyhteensopivia, mutta kuitenkin
palovaarallisia.
Suosittelemme seuraavien ohjeiden
noudattamista oman turvallisuutesi
takaamiseksi.
Irrota virtajohto pistorasiasta ennen
kaikenlaisten toimien tekemistä.
Laitteen takana ja sisällä sijaitseva
jäähdytysjärjestelmä sisältää
jäähdytysainetta. Varo vaurioittamasta
putkia.
Page 33

Jos havaitset vuotoa kylmäainepiirissä, älä
30
koske pistorasiaan kytkettyyn virtajohtoon.
Varmista, ettei tilassa ole avotulta. Avaa
ikkuna ja tuuleta tila hyvin. Soita huoltoon
ja tilaa laitteelle korjaus.
Älä poista huurretta tai jäätä raapimalla
laitteen pintoja veitsellä tai muulla
terävällä esineellä. Ne voivat vahingoittaa
kylmäainepiiriä, joka voi vuotaessaan
sytyttää tulipalon tai vahingoittaa silmiä.
Älä asenna laitetta kosteaan, öljyiseen tai
pölyiseen tilaan. Älä sijoita laitetta suoraan
auringonvaloon tai siten, että se voi kastua.
Älä asenna laitetta lämmityslaitteiden tai
palovaarallisten materiaalien lähelle.
Älä käytä jatkojohtoja tai sovittimia.
Älä vedä tai väännä virtajohtoa liikaa äläkä
koske pistokkeeseen märin käsin.
Älä vaurioita pistoketta tai virtajohtoa, sillä
vaurioituneet osat voivat aiheuttaa
sähköiskuja tai tulipaloja.
Pistoke on hyvä pitää puhtaana, sillä
pistokkeeseen kertyvä pöly voi aiheuttaa
tulipalon.
Älä käytä mekaanisia laitteita tai muita
apuvälineitä sulatuksen nopeuttamiseen.
Älä missään tapauksessa nopeuta
sulatusvaihetta avotulella tai
Page 34

sähkölaitteilla, kuten lämmittimillä,
31
höyrypesureilla, kynttilöillä, öljylampuilla
tai vastaavilla.
Älä käytä tai säilytä syttyviä suihkeita,
kuten spraymaaleja, laitteen lähellä, sillä
niistä voi aiheutua räjähdys tai tulipalo.
Älä käytä sähkölaitteita elintarvikkeiden
säilytyslokeroiden sisällä, elleivät ne ole
tyypiltään valmistajan suosittelemia.
Älä sijoita tai säilytä jääkaapissa
palovaarallisia ja herkästi haihtuvia
aineita, kuten eetteriä, petrolia,
nestekaasua, propaania, aerosolipurkkeja,
liimoja, puhdasta alkoholia jne. Nämä
aineet voivat aiheuttaa räjähdyksen.
Älä säilytä laitteessa lääkkeitä tai
tutkimusmateriaalia. Jos laitteessa
säilytetään materiaaleja, jotka vaativat
säilyäkseen erityisen tarkkaa ja vakaata
lämpötilaa, niiden laatu saattaa heikentyä.
Säilytys saattaa aiheuttaa myös
odottamattoman ja mahdollisesti
vaarallisen reaktion.
Pidä laitteen kotelossa olevat tai
sisäänrakennetut ilmanvaihtoaukot aina
vapaina.
Älä sijoita laitteen päälle vedellä täytettyjä
esineitä tai säiliöitä.
Page 35

Älä tee laitteeseen korjauksia. Vain
32
valtuutetut henkilöt saavat korjata laitetta.
Tätä laitetta voivat käyttää vähintään
8-vuotiaat lapset sekä henkilöt, joiden
fyysiset tai henkiset valmiudet eivät riitä
laitteen turvallisen käsittelyyn tai joilla ei
ole laitteen käytön edellyttämää kokemusta
tai tietoa, jos he toimivat toisen henkilön
valvonnassa tai ovat saaneet riittävän
ohjeistuksen laitteen käyttöön ja käyttö
tapahtuu turvallisella tavalla ja he
ymmärtävät laitteen käyttöön liittyvät
vaarat.
Älä anna lasten leikkiä laitteella. Lapset
eivät saa puhdistaa ja huoltaa laitetta
ilman valvontaa.
VANHOJEN LAITTEIDEN HÄVITTÄMINEN
Tämä laite on merkitty eurooppalaisen direktiivin sähkö- ja
elektroniikkalaiteromusta (WEEE) 2012/19/EU mukaisesti.
Sähkö- ja elektroniikkalaiteromu sisältää saastuttavia aineita (jotka voivat
aiheuttaa haittaa ympäristölle) ja peruskomponentteja (jotka voidaan
käyttää uudelleen). On tärkeää, että sähkö- ja elektroniikkalaiteromu toimitetaan
erikoiskäsittelyyn, jotta siitä voidaan poistaa kaikki saastuttavat aineet ja käsitellä ne
asianmukaisesti ja jotta kaikki materiaalit voidaan kerätä ja kierrättää.
Yksityishenkilöillä on tärkeä tehtävä varmistaa, että sähkö- ja elektroniikkalaiteromusta
ei tule ympäristöongelmaa. Seuraavien perussääntöjen noudattaminen on tärkeää:
- Sähkö- ja elektroniikkalaiteromua ei saa käsitellä kotitalousjätteenä.
- Sähkö- ja elektroniikkalaiteromu on toimitettava jätehuolto-organisaation tai
rekisteröityjen yhtiöiden ylläpitämiin asianmukaisiin keräyspisteisiin. Monissa
maissa on suurikokoisen sähkö- ja elektroniikkalaiteromun kotikeräyspalveluja.
Page 36

Monissa maissa voit uuden laitteen oston yhteydessä palauttaa vanhan laitteesi
33
jälleenmyyjälle, jonka on vastaanotettava veloituksetta yksi vanha laite yhtä uutta
laitetta kohden, mikäli laite on vastaavaa lajia ja vastaa toiminnoiltaan toimitettua
laitetta.
Vaatimustenmukaisuus
Tuotteessa oleva -merkintä vahvistaa, että tuote on kaikkien oleellisten,
sovellettavia lakeja noudattavien eurooppalaisten turvallisuus-, terveys- ja
ympäristövaatimusten mukainen.
Energiansäästö
Energian säästämiseksi suosittelemme seuraavaa:
Asenna laite etäälle lämmönlähteistä ja suorasta auringonvalosta hyvin ilmastoituun
huoneeseen.
Älä laita jääkaappiin kuumaa ruokaa, jotta sisälämpötila ei nouse ja kompressorin ei
tarvitse olla jatkuvasti päällä.
Älä pidä jääkaapissa liikaa ruokaa, jotta ilma pääsee kiertämään hyvin.
Sulata laite, mikäli siinä on jäätä, jotta kylmyys siirtyy tehokkaammin.
Mikäli sähkövirta on katkennut, jääkaapin ovi kannattaa pitää suljettuna.
Pidä laitteen ovia avattuina mahdollisimman vähän.
Älä säädä lämpötilaa liian kylmäksi.
Poista laitteen taakse kertynyt pöly.
Page 37

Lue ohjeet kokonaan ennen laitteen käyttöä.
34
Lapset saattavat e
delleenkin jäädä loukkuun kaapin sisälle ja tukehtua. Myös
poisheitetyt tai hylätyt laitteet ovat vaarallisia, vaikka tarkoitus onkin ”säilyttää
niitä autotallissa vain muutaman päivän ajan”.
Ennen kuin hävität vanhan viinikaapin:
irrota ovi, mutta jätä hyllyt paikoilleen, jotta lapset eivät pääsisi helposti
kiipeämään kaapin sisälle.
Älä koskaan anna lasten käyttää laitetta, leikkiä sillä tai ryömiä sen sisään.
Älä koskaan puhdista laitteen osia syttyvillä nesteillä. Höyryt voivat aiheuttaa
tulipalovaaran tai räjähdyksen.
Älä varastoi tai käytä bensiiniä tai muita syttyviä kaasuja ja nesteitä tämän tai
minkään muunkaan laitteen lähellä. Höyryt voivat aiheuttaa tulipalon tai
räjähdyksen.
ASENNUSOHJEET
Ennen kuin käytät viinikaappia
Poista ulko- ja sisäpuoliset pakkausmateriaalit, myös ovipaneeleissa oleva
suojavaahtomuovi.
Tarkista, että pakkaukseen kuuluvat seuraavat osat:
3 irrotettavaa hyllyä
1 viiniteline
1 käyttöohje
Ennen kuin kytket laitteen virtalähteeseen, anna sen olla pystyasennossa noin kaksi
tuntia. Tämä vähentää kuljetuksenaikaisen käsittelyn mahdollisesti aiheuttamia
häiriöitä jäähdytysjärjestelmässä.
Page 38

Puhdista sisäpinta haalealla vedellä ja pehmeällä liinalla.
35
Viinikaapin asennus
Aseta laite lattialle,
joka on tarpeeksi vahva kestämään täyden kaapin painon. Aseta
laite suoraan säätämällä laitteen etureunassa olevia jalkoja. Jätä noin 13 cm:n rako
laitteen taka- ja sivuseinien ympärille, jotta ilma kiertäisi kunnolla ja jäähdyttäisi
kompressoria. Sijoita laite siten, ettei auringonvalo osu siihen suoraan eikä se ole
lämmönlähteiden (esimerkiksi lieden, lämmityslaitteen tai lämpöpatterin) lähellä.
Suora auringonvalo voi vaikuttaa akryylipinnoitteeseen, ja lämmönlähteet voivat
lisätä sähkönkulutusta. Jos ympäristön lämpötila on hyvin alhainen, laite ei
välttämättä toimi kunnolla.
Älä sijoita laitetta kosteaan paikkaan. Jos ilmassa on liikaa kosteutta, haihduttimeen
muodostuu nopeasti huurretta.
HUOLTO-OHJEITA
LED-VALAISTUS
Jos tuotteessa on LED-valaistus, joka on vaihdettava, ota yhteyttä tekniseen tukeen.
Tavanomaisiin hehkulamppuihin verrattuna LED-valot kestävät pidempään ja ovat
ympäristöystävällisempiä.
Viinikaapin puhdistaminen
Irrota viinikaappi virtalähteestä ja poista pullot kaapista. Pese sisäpuoli lämpimällä
vedellä ja ruokasoodaliuoksella. Liuoksen vahvuuden pitäisi olla noin kaksi
ruokalusikallista ruokasoodaa vesilitraa kohti.
Page 39

36
Pese hyllyt ja telineet
miedolla pesuaineliuoksella. Viinikaapin ulkopinnan
puhdistukseen suositellaan mietoa puhdistusainetta ja lämmintä vettä. Myös
säilytysalueen alaosa olisi hyvä pyyhkiä säännöllisesti, sillä viinikaappi on
suunniteltu säilyttämään kosteutta, joten alaosaan saattaa kerääntyä tiivistynyttä
nestettä.
Viinikaapin huolto
Sähkökatko
Useimmat sähkökatkot korjataan muutaman tunnin kuluessa, joten niiden ei pitäisi
vaikuttaa viinikaapin lämpötilaan, jos ovea avataan mahdollisimman harvoin. Jos
virta on pois pidemmän aikaa, ryhdy tarvittaviin toimiin kaapin sisällön
suojaamiseksi.
Loma-aika
Poista kaikki pullot pitkän käyttökatkon ajaksi; irrota viinikaappi pistorasiasta,
puhdista viinikaappi ja jätä ovi hieman raolleen, jottei sinne tiivistyisi kosteutta tai
muodostuisi hometta tai hajua.
Viinikaapin siirtäminen
x Poista kaikki pullot.
x Kiinnitä kaikki viinikaapin sisällä olevat irralliset osat lujasti teipillä.
x Käännä tasausruuvit ylös pohjaa vasten vahinkojen välttämiseksi.
x Teippaa ovet kiinni.
x Varmista, että viinikaappi pysyy pystyasennossa kuljetuksen aikana.
Kun säilytät kaapissa lähinnä punaviinejä, lämpötilaksi, jota säädellään painamalla
kahta yllä olevaa painiketta, on asetettava 15,5í18,5 °C. RED-sanan vieressä oleva
punainen LED-lamppu syttyy.
Page 40

Kun säilytät kaapissa lähinnä val
37
koviinejä, lämpötilaksi on asetettava 10í15 °C.
WHITE-sanan vieressä oleva vihreä LED-valo syttyy. Kun säilytät kaapissa lähinnä
kuohuviinejä, lämpötilaksi on valittava 7,2í9,5 °C. SPARKLING-sanan vieressä
oleva keltainen LED-valo syttyy.
Voit valita, näytetäänkö lämpötila Fahrenheit- vai Celsius-asteina painamalla
F/C-painiketta. Jos valitset Fahrenheit-asteet, (F)-merkin viereen syttyy punainen
valo ja jos valitset Celsius-asteet, C-merkin viereen syttyy keltainen valo. Sisävalon
voi sytyttää ja sammuttaa painamalla ON/OFF-symbolilla merkittyä painiketta.
Hyllyt
Hyllyt on päällystetty kromilla. Jotta hyllyillä voisi varastoida erikokoisia pulloja,
hyllyjä voidaan siirtää ylemmäksi tai alemmaksi vetämällä ne ensin ulos urista.
Hyllyt on suunniteltu siten, että niille sopii mahdollisimman paljon pulloja.
Viiniteline
Kaapin alaosassa on ylimääräinen viiniteline, jonne voi varastoida enintään kuusi
viinipulloa. Telineen voi poistaa puhdistusta varten.
HUOMAUTUS:
Kun käytät viinikaappia ensimmäistä kertaa tai käynnistät viinikaapin uudelleen
pitkän käyttökatkon jälkeen, valitsemasi lämpötilan ja LED-näytöllä näkyvän
lämpötilan välillä saattaa olla muutaman asteen ero. Tämä on normaalia ja johtuu
pitkästä käynnistymisajasta. Ero häviää, kun viinikaappi on ollut päällä muutaman
tunnin ajan.
Viinikaapin ylä- ja alahyllyjen välinen lämpötilaero on 4–6 °C. Jos olet asettanut
lämpötilan vain punaviiniä varten, jolloin lämpötila on 16 °C, mutta haluatkin
säilyttää kaapissa sekä valko- että punaviinejä, aseta valkoviinipullot alahyllyille ja
punaviinipullot ylähyllyille.
Page 41

38
Kytke laite ja
kamattomaan, oikein asennettuun ja maadoitettuun seinäpistorasiaan.
Älä koskaan katkaise tai irrota virtajohdon pistokkeesta kolmatta piikkiä (jota
käytetään maadoitukseen). Sähköön ja maadoitukseen liittyvissä kysymyksissä on
käännyttävä hyväksytyn sähköasentajan tai valtuutetun huoltoliikkeen puoleen.
Maadoitetun pistokkeen väärinkäyttö voi aiheuttaa sähköiskun vaaran. Jos
virtajohto vaurioituu, anna valtuutetun huoltoliikkeen vaihtaa se.
TÄRKEITÄ VAROTOIMIA
Älä säilytä elintarvikkeita viinikaapissa, koska sisälämpötila ei ehkä ole tarpeeksi
alhainen estämään niiden pilaantumista. Tiivistymisen luonnollisena seurauksena
lasioven ulkopuolelle voi muodostua kosteutta kesäkuukausina tai hyvin kosteilla
alueilla. Pyyhi kosteus pois.
VIINIKAAPIN KÄYTTÖ
Viinikaappi olisi hyvä sijoittaa paikkaan, jossa ympäristön lämpötila on 22í25 °C.
Jos ympäristön lämpötila on suosituslämpötilan ylä- tai alapuolella, ympäröivät
lämpötilaolot voivat aiheuttaa sisälämpötilan vaihtelua.
Jos sisälamppu jätetään päälle, viinikaapin sisälämpötila on korkeampi.
Suositellut viininjäähdystyslämpötilat
Punaviinit: 15,5í18,5 °C
Kuivat- ja valkoviinit 10í15 °C
Kuohuviinit 7,2í9,5 °C
Roseeviinit 9,5í10,5 °C
Edellä mainitut lämpötilat saattavat vaihdella sen mukaan, onko sisälamppu päällä
Page 42

vai pois päältä ja sijaitsevatko pullot ylä-, keski- vai alatasolla.
39
KÄYTTÖPANEELIEN PAINIKKEIDEN KÄYTTÖ:
oit valita haluamasi lämpötilan painamalla [?]tai -painikkeita.
V
Page 43

40
40
13
11
10
6
Page 44

Composants et caractéristiques
41
FRANCIA
1. Bandeau de comm
ande
2. Caisse
3. Pieds réglables
4. Casier à bouteilles
5. Porte vitrée
6. Etagères chromées
7. Lumière
8. Branchement électrique
Page 45

Merci d’avoir acheté ce produit.
42
Avant d’utiliser votre réfrigérateur, lire attentivement ce manuel
d’instructions afin de l’utiliser au mieux.
Conserver toute la documentation pour pouvoir la consulter en cas de besoin
ou pour la transmettre à d’autres propriétaires.
Ce produit n’est destiné qu’à un usage individuel ou pour des applications
similaires comme par exemple :
-
la zone de cuisine destinée au personnel des magasins, bureaux et autres
lieux de travail ;
-
les fermes, chez les clients dans les hôtels, les motels et autres lieux de type
résidentiel ;
-
les chambres d’hôtes ;
-
les services de traiteur et les applications similaires ne relevant pas de la
vente au détail.
Cet appareil n’est destiné qu’à la conservation des aliments ; tout autre usage
doit être considéré comme dangereux et le fabricant n’est pas responsable
des éventuelles omissions.
Nous vous conseillons en outre de prendre connaissance des conditions de
la garantie.
INFORMATION SUR LA SÉCURITÉ
Le réfrigérateur contient un gaz
réfrigérant (R600a : isobutane) et un gaz
d’isolation (cyclopentane), extrêmement
compatibles avec l’environnement mais
néanmoins inflammables.
Il est conseillé de suivre les règles suivantes
pour éviter les situations de danger pour les
personnes :
•
Avant toute opération, débrancher le câble
d’alimentation de la prise de courant ;
•
Le système de réfrigération situé derrière
et à l’intérieur du réfrigérateur contient du
réfrigérant. Il faut donc éviter
d’endommager les tubes ;
Page 46

•
43
Si on remarque une fuite au niveau du
système de réfrigération, ne pas toucher la
prise murale et ne pas utiliser de flammes
nues. Ouvrir la fenêtre et aérer la pièce.
Puis s’adresser à un centre d’assistance
pour demander la réparation ;
•
Ne pas racler avec un couteau ou un objet
pointu pour éliminer le givre ou la glace
présente. Ceux-ci peuvent endommager le
circuit du réfrigérant, dont une fuite peut
provoquer un incendie ou blesser les yeux ;
•
Ne pas installer l’appareil électroménager
dans des endroits humides, gras ou
poussiéreux et ne pas l’exposer en plein
soleil ou aux intempéries ;
•
Ne pas installer l’appareil électroménager
à proximité de radiateurs ou de matériaux
inflammables ;
•
Ne pas utiliser de rallonges ni
d’adaptateurs ;
•
Ne pas tirer et ne pas plier excessivement le
câble d’alimentation et ne pas toucher la
fiche avec les mains mouillées ;
•
Ne pas endommager la fiche et/ou le câble
d’alimentation car cela pourrait
provoquer des décharges électriques ou
des incendies ;
•
Il est conseillé de faire en sorte que la fiche
Page 47

reste propre, les éventuels résidus excessifs
44
de poussière sur la fiche peuvent
provoquer un incendie ;
•
Ne pas utiliser de dispositifs mécaniques
ou d’autres appareils pour accélérer le
processus de dégivrage ;
•
Éviter impérativement l’utilisation de
flammes nues ou d’appareils électriques,
comme des appareils de chauffage, des
nettoyeurs vapeur, des bougies, des lampes
à pétrole et autres pour accélérer le
dégivrage ;
•
Ne pas utiliser et ne pas conserver de
sprays inflammables comme des peintures
en spray à proximité du réfrigérateur. Ils
pourraient provoquer des explosions ou
des incendies ;
•
Ne pas utiliser d’appareils électriques à
l’intérieur des compartiments pour la
conservation des aliments, si ceux-ci ne
sont pas du type recommandé par le
fabricant ;
•
Ne pas ranger et ne pas conserver de
matériaux inflammables et extrêmement
volatiles comme de l’éther, de l’essence, du
GPL, du gaz propane, des sprays, des
colles, de l’alcool pur, etc. Ces matériaux
pourraient provoquer des explosions ;
Page 48

•
45
Ne pas conserver de médicaments ni du
matériel de recherche dans le
réfrigérateur.
Quand le matériel ayant besoin d’un
contrôle strict des températures de
conservation est conservé, il est possible
qu’il se détériore ou bien une réaction
incontrôlée pouvant entraîner des risques
peut se produire ;
•
Faire en sorte que les ouvertures de
ventilation dans l’enveloppe de l’appareil
ou dans la structure encastrée ne soient
pas obstruées ;
•
Ne pas placer d’objets et/ou de récipients
remplis d’eau au-dessus de l’appareil
électroménager ;
•
Éviter d’effectuer des interventions sur ce
réfrigérateur.Toute intervention doit être
effectuée uniquement par du personnel
technique spécialisé ;
•
Cet appareil électroménager ne devra pas
être destiné à des personnes (y compris des
enfants) présentant des handicaps
physiques, sensoriels, mentaux ou
manquant d’expérience ou de
connaissance en matière d’utilisation, sans
la supervision de personnes qui aient lu le
mode d’emploi et qui soient directement
Page 49

responsables de leur sécurité.
46
Pour leur sécurité, vérifier que les enfants
ne jouent pas à proximité de l’appareil
électroménager.
Mise a la casse d'un appareil hors d'usage
Cet appareil est commercialisé en accord avec la directive européenne
2012/19/EU sur les déchets des équipements électriques et électroniques
(DEEE).
Les déchets des équipements électriques et électroniques (DEEE) contiennent des
substances polluantes (ce qui peut entraîner des conséquences négatives pour
l’environnement) et des composants de base (qui peuvent être réutilisés). Il est
important de traiter ce type de déchets de manière appropriée afin de pouvoir éliminer
correctement tous les polluants et de recycler les matériaux.
Les particuliers peuvent jouer un rôle important en veillant à ce que les DEEE ne
deviennent pas un problème environnemental. Il est essentiel de suivre quelques règles
simples:
- Les DEEE ne doivent pas être traités comme les déchets ménagers;
- Les DEEE doivent être remis aux points de collecte enregistrés. Dans de
nombreux pays, la collecte des produits gros électroménagers peut être
effectuée à domicile.
Dans de nombreux pays, lorsque vous achetez un nouvel appareil, l’ancien peut être
retourné au détaillant qui doit collecter gratuitement sur la base un contre un.
L’équipement repris doit être équivalent ou bien avoir les mêmes fonctions que le
produit acquis.
Conformit
é
En utilisant le symbol sur ce produit, nous déclarons sur notre propre
responsabilité que ce produit est conforme à toutes les normes Européennes relatives à
la sécurité, la santé et à l’environnement.
é
Économi
Pour accr
•
que la pièce soit bien aérée.
•
température à l’intérieur ce qui entraînerait un fonctionnement continu du compresseur.
•
•
froid.
•
•
•
•
oître vos économies d’énergie, nous vous conseillons de prendre ces précautions :
ler l’appareil loin de toute source de chaleur et ne pas le placer en plein soleil, vérifier
Instal
r de placer des aliments chauds à l’intérieur du réfrigéra- teur pour ne pas augmenter la
Évite
Ne pas ent
Dégivr
er l’appareil s’il y a de la glace (voir DÉGIVRAGE) pour faciliter la transmission du
En cas de panne de co
Ouvri
r et laisser les portes de l’appareil ouvertes le moins possible.
Évite
r de régler le thermostat sur des températures trop froides.
Élimi
ner la poussière présente au dos de l’appareil (voir NE- TTOYAGE).
nergie
es D’
asser trop d’aliments pour garantir une bonne circu- lation de l’air.
urant nous vous conseillons de ne pas ouvrir le réfrigérateur.
Page 50

Mesures de sécurité importantes
47
x Lisez toutes les instructions avant d’utiliser l'appareil.
x Ne permettez pas à vos enfants d’utiliser l'appareil pour jouer ou
pour s’y installer.
x Ne nettoyez jam
ais l'appareil avec des liquides inflammables.
Les gaz peuvent causer un incendie ou une explosion.
x Ne conservez ni n’utilisez de l'essence ou autre matériau
inflammable à proximité d’un appareil, celui-ci ou un autre. Les
gaz peuvent causer un incendie ou une explosion.
INSTRUCTIONS D'INSTALLATION
Avant d’utiliser la cave à vin
x Retirez l'emballage à l’intérieur et à l'extérieur de l’appareil, y
pris la feuille de protection de la porte.
com
x Vérifiez que les composants suivants sont présents :
o 3 étagères amovibles
o 1 casier à bouteilles amovible
o 1 notice d’utilisation
x Laissez reposer l'appareil en position debout pendant environ 2
heures avant de le raccorder au réseau d’électricité. Ceci réduit
le risque d’une défaillance du système de réfrigération liée au
déplacement
x Nettoyez l’intérieur de l’appareil à l'eau tiède et avec un chiffon
doux.
Installation de la cave à vin
x Placez votre cave à vin sur un sol suffisamment résistant que
pour supporter l'appareil lorsqu’il est entièrem
ent rempli. Vous
pouvez utiliser les pieds réglables pour ajuster la position de
l'appareil.
Page 51

x Prévoyez 12.5 cm à l'arrière et sur les flancs de l'appareil de
48
façon à garantir une circulation d’air suffisante pour le
refroidissem
ent du compresseur.
x N’exposez pas l'appareil au soleil ni à d’autres sources de
chaleur (poêle, chauffage, radiateur...). Le rayonnement du soleil
peut avoir un effet néfaste sur la couche de peinture acrylique et
les sources de chaleur font augmenter la consommation
d'électricité.
Les températures très basses peuvent également être la cause
d’un mauvais fonctionnement de l'appareil.
x Evitez de placer l'appareil dans un environnement humide. Trop
d'humidité l’air accélérera la formation de givre sur
l’évaporateur.
x Raccordez l'appareil à une prise de courant avec une bonne prise
de terre. N'éliminez ou ne coupez jamais le fil de terre du cordon.
Posez toutes vos questions concernant la mise à la terre à un
électricien ou à un centre service agréé Candy.
Avertissement : une utilisation inappropriée de la prise de courant
avec prise de terre comporte un risque de choc électrique. Si le
cordon d’alimentation est endommagé, faites-le remplacer par un
centre de service agréé Candy.
Page 52

INFORMATIONS IMPORTANTES
49
Ne conservez pas de nourriture dans le réfrigérateur à vin, car la
température peut être insuffisante pour maintenir les aliments en état de
fraîcheur. Com
me conséquence naturelle de la condensation, des
températures élevées au cours des mois d'été ou d’un environnement
très humide, la porte vitrée peut s’embuer sur sa surface extérieure. Il
vous suffira de l’essuyer.
UTILISATION DE VOTRE CAVE À VIN
Il est recommandé d’installer votre cave à vin dans un espace dont la
température moyenne se trouve entre 22°C et 25°C. Lorsque la
température moyenne est inférieure ou supérieure à la température
recommandée, la température à l’intérieur peut fluctuer.
Si l’éclairage intérieur reste allumé, la température dans la cave à vin
sera plus élevée.
Température recommandée chaque vin :
Vins rouges : 15,5 °C - 18,5 °C
Vins secs/blancs : 10 °C - 15 °C
Vins mousseux : 7,2 °C - 9,5 °C
Vins rosés : 9,5 °C - 10,5 °C
Les températures peuvent varier selon l’emplacement des bouteilles
(température plus froide en bas qu’en haut).
Page 53

Utilisation du thermostat
50
Vous pouvez régler la température souhaitée en appuyant sur les
touches Ÿ or ź. Si la prem
ière fois vous appuyez sur les deux touches,
la dernière température réglée s’affichera (la température pré-réglée à
l’usine est de 50°F). La température augmente d’1°F ou d’1°C en
appuyant sur la touche Ÿ et diminuera au contraire d’1°F ou d’1°C en
appuyant sur la touche ź.
Si vous conservez principalement des vins rouges, nous vous
recommandons un réglage de la température entre 15.5 et 18.5°C. Le
voyant situé au dessus de l’inscription RED (Rouge) s’allumera alors en
rouge.
Si vous conservez principalement des bouteilles de vin blanc, nous vous
recommandons alors un réglage de la température entre 10 et 15°C. Le
voyant situé au dessus de l’inscription WHITE (blanc) s’allumera alors
en vert.
Si vous conservez principalement des bouteilles de vin pétillant, nous
vous recommandons un réglage de la température entre 7.2 et 9.5°C. Le
voyant situé au dessus de l’inscription SPARKLING (pétillant)
s’allumera alors en orange.
Vous pouvez choisir un affichage en degrés Fahrenheit ou bien Celsius
en appuyant sur la touche marquée F/C. Les degrés fahrenheit
apparaissent sur le display en rouge suivis du signe °F et les degrés
Celsius apparaissent sur le display en jaune suivis du signe °C.
Vous pouvez allumer ou éteindre l’éclairage intérieure en appuyant sur
le bouton marqué ON/OFF.
Etagères
Les étagères sont en acier chromé. Pour ranger des bouteilles de
hauteurs différentes, déplacez-les plus haut ou plus bas en les extrayant
Page 54

de leurs rails. Les étagères sont conçues pour le rangement d’un
51
maximum
de bouteilles.
Casier à vin
Il y a un casier à bouteilles supplémentaire dans la partie inférieure de la
cave qui peut contenir jusqu’à six bouteilles. Ce casier peut être retiré
pour le nettoyage.
REMARQUE :
Lors de la première utilisation du produit, ou si vous rebranchez
l’appareil après une longue période d’absence, il peut y avoir un écart
de quelques degrés entre la température sélectionnée et celle affichée
sur le display. Ce tem
ps de latence est normal et après quelques heures
de fonctionnl
Il y a une différence de 4 °C à 6°C entre les étagères supérieures et
inférieures de la cave à vin. Si vous avez réglé la cave pour du vin
rouge et que vous désirez stocker une combinaison de vins rouges et
blancs, placez le vin blanc dans la partie basse et le vin rouge dans
la partie haute de l’appareil.
ENTRETIEN
REMPLACEMENT DE L’AMPOULE
Nettoyage de la cave à vin
Page 55

x Débranchez la cave à vin et retirez les bouteilles.
52
x Nettoyez l’intérieur à l’eau tiède et une solution de bicarbonate
de soude.
La formule optimale est de deux cuillérées de bicarbonate par
litre d’eau.
x Nettoyez les étagères avec un détergent doux.
x Nettoyez la surface extérieure du produit à l’eau et au détergent
doux.
x Il peut s’avérer nécessaire d’essuyer régulièrement la partie
inférieure du produit, car la cave à vin a été conçue pour retenir
idité et par conséquent la condensation peut s’accumuler à
l’hum
cet endroit.
Entretien de votre réfrigérateur à vin
x Coupure de courant
La plupart des coupures de courant sont réparées en quelques heures et
n’ont aucun effet sur la température de votre cave à vin à condition que
vous réduisiez le nombre d’ouvertures de la porte au mi
nimum. Lorsque
le courant est coupé pendant une période plus longue, prenez les
mesures adéquates pour protéger votre vin.
Pendant les vacances
Lors d’une longue absence, retirez toutes les bouteilles, débranchez
votre cave à vin, nettoyez-la et laissez la porte entrouverte afin d’éviter
la formation éventuelle de condensation, de moisissures et d’odeurs.
Problèm
es fréquents
Vous pouvez résoudre par vous-même de nombreux problèmes du
réfrigérateur et ainsi éviter d’appeler le centre de service. Essayez les
suggestions suivantes pour vérifier si pouvez résoudre le problème par
vous-même avant de faire appel au centre de service.
Page 56

Transporter la cave à vin
p
53
x Retirez toutes les bouteilles
x Scotchez soigneusement toutes les pièces amovibles à l’intérieur
de la cave
x Rentrez les pieds réglables au maxim
um afin d’éviter tout
dommage
x Fermez et scotchez soigneusement la porte
x Assurez-vous que la cave soit transportée à l’endroit en position
verticale.
Vous pouvez résoudre facilement la plupart des problèmes classiques
de la cave à vin, en vous économisant un appel au service après-vente.
PROBLEME CAUSE POSSIBLE
La cave à vin ne
fonctionne pas.
La cave ne refroidit pas
suffisamment.
Non branchée.
Disjoncteur sauté ou fusible grillé.
Vérifiez la position du therm
ostat.
L’environnement extérieur nécessite un réglage
plus fort.
La porte est ouverte trop fréquemment.
La porte n’est pas parfaitement fermée.
Le joint de la porte n’est pas étanche.
La cave à vin n’a pas assez d’espace autour
d’elle pour bien se refroidir.
Le compresseur
démarre et s’arrête
fréquemm
ent.
La température ambiante est plus élevée que la
normale.
Une grande quantité de bouteilles tièdes a été
ajoutée.
La porte est ouverte trop fréquemment.
La
orte n’est pas fermée hermétiquement.
Page 57

La température n’est pas réglée correctement.
54
Le joint de la porte n’est pas étanche.
La cave à vin n’a pas assez d’espace autour
d’elle pour bien se refroidir.
L’éclairage ne
fonctionne pas.
Disjoncteur sauté ou fusible grillé.
La cave n’est pas branchée.
L’ampoule est grillée.
Le bouton de marche/arrêt est en position ‘OFF’.
Vibrations Vérifiez que la cave est bien stable avec les
pieds réglables.
La cave semble trop
bruyante.
Le bruit provient de la circulation du gaz
réfrigérant et est normal.
Page 58

40
55
13
11
10
6
Page 59

BESTANDTEILE
56
UND
FUNKTIONEN
GERMANIA
1. Anzeige und Schaltbrett
2. Gehäuse
3. Einstellfüße
4. Flaschenablage
5. Glastür
6. Verchromte Weinregale
7. Innenbeleuchtung
8. Elektrische Steuerung (Rückseite)
9. Temperatursonde
Page 60

Wir dank
57
en Ihnen, dass Sie dieses Produkt gekauft haben.
Vor dem Gebrauch Ihres Kühlschranks lesen Sie bitte
diese Bedienungsanleitung aufmerksam durch, um seine Leistungen auf das Beste nutzen zu
können.
Bewahren Sie die gesamte Dokumentation für den späteren Gebrauch oder weitere Besitzer
auf.
Dieses Produkt ist nur für den Gebrauch im Haushalt oder ähnliche Verwendungen bestimmt, wie
z. B.:
den Küchenb
-
Betrieb
-
in Bed
-
Catering-D
-
Dieses Gerät ist ausschließlich zur Aufbewahrung von Lebensmitteln vorgesehen. Jeder andere
Verwendungszweck ist als gefährlich zu betrachten. Der Hersteller haftet nicht für eventuelle
Unterlassungen.
Wir empfehlen außerdem, die Garantiebedingungen zur Kenntnis zu nehmen.
ereich für da
sgebäude, den Gebrauch durch Gäste in Hotels, Motels und anderen Wohnumgebungen
and Breakfasts
ienste und ähnliche Verwendungen, die nicht dem Einzelhandel dienen.
Personal in Geschäften, Büros oder anderen Arbeitsumgebungen
s
SICHERHEITSHINWEISE
Der Kühlschrank enthäl
t ein Kühlgas (R600a: Isobutan)
und Isoliergas (Cyclopentan), die sehr umweltfreundlich
jedoch entzündlich sind.
Es wird empfohlen, die folgenden Regeln zu beachten,
um Gefahrensituationen für die eigene Person zu
vermeiden:
•
Vor jeglichen
Stec
kdose ziehen.
Das auf der Rüc
•
Eing
riffen
das Versorgungskabel aus der
kseite und im Inneren des
Kühlschranks befindliche Kühlsystem enthält
Kühlmittel. Vermeiden Sie daher ein Beschädigen der
Leitungen.
•
Sollte ein V
erlust im Kühlsystem festgestellt werden, die
Wandsteckdose nicht berühren und kein offenes Feuer
verwenden. Öffnen Sie das Fenster und lüften Sie das
Zimmer. Wenden Sie sich dann wegen der Reparatur
an ein Kundendienstzentrum.
•
Keine Messer oder spitz
en Gegenstände verwenden,
um Frost oder Eis im Kühlschrank zu entfernen. Mit
diesen Gegenständen kann der Kühlkreis beschädigt
werden, dessen Leckagen Brände verursachen oder
die Augen schädigen können.
Page 61

•
58
Elektr
ogeräte nicht an feuchten, fettigen oder staubigen
Orten aufstellen noch diese direkter
Sonneneinstrahlung oder Wasser aussetzen.
•
Das Elektroge
rät nicht in der Nähe von Heizgeräten
oder entzündlichen Materialien installieren.
Keine V
•
erlängeru
nge
n
oder
Adapte
r
verwenden.
Das Versorgungskabel
•
nicht übermäßig ziehen oder
biegen oder den Stecker mit nassen Händen berühren.
•
Den Steck
er und/oder das Versorgungskabel nicht
beschädigen, da dies Stromschläge oder Brände
verursachen könnte.
•
Es wird empf
ohlen, den Stecker sauber zu halten.
Eventuelle übermäßige Staubreste können Brände
verursachen.
Keine mechanische
•
n oder sonstige Gerät verwenden,
um den Abtauvorgang zu beschleunigen.
Die Ve
•
rwendung von offenem Feuer oder elektrischen
Geräten wie Heizgeräten, Dampfreinigern, Kerzen,
Petroleumlampen oder ähnlichem zum Beschleunigen
des Abtauvorgangs unbedingt vermeidn.
•
Keine entzündlichen
Sprays
wie Lacksprays
in der
Nähe des Kühlschranks aufbewahren oder verwenden.
Diese könnten Explosionen oder Brände verursachen.
Keine elekt
•
rischen Geräte im Inneren der Fächer zur
Aufbewahrung der Lebensmittel verwenden, wenn
diese nicht dem vom Hersteller empfohlenen Typ
entsprechen.
•
Keine entzündliche
n oder extrem flüchtigen
Materialien wie Äther, Benzin, LPG, Propangas,
Sprühflaschen, Klebstoffe, reinen Alkohol, etc.
unterbringen oder aufbewahren. Diese Materialien
könnten Explosionen verursachen.
•
Keine Arzneimitte
l oder Forschungsmaterialien im
Kühlschrank aufbewahren.
Page 62

Wenn
59
Material, das eine strenge Kontrolle der
Lagertemperatur verlangt, aufbewahrt wird, kann
dieses verderben oder eine unkontrollierte Reaktion
eintreten, die Risiken mit sich bringen kann.
•
Die Belüftu
de
oder
•
Keine mit
r
ngsöffnungen in der Außenhülle d
Einbaustr
uktur
cht ver
ni
decken.
es Ger
Wasser gefüllten Gegenstände und/oder
äts
Behälter auf dem Elektrogerät abstellen. • Eingriffe auf
diesem Kühlschrank vermeiden. Jegliche Eingriffe
dürfen nur von spezialisiertem Fachpersonal
ausgeführt werden.
Dieses Elektrogerät darf nicht vo
•
n Personen
(einschließlich Kindern) mit physischen,
sensorischen oder mentalen Behinderungen oder
mangelnder Erfahrung oder Kenntnis hinsichtlich
des Gebrauchs bedient werden, außer sie werden von
Personen beaufsichtigt, die die Bedienungsanleitung
gelesen haben und direkt für ihre Sicherheit
verantwortlich sind.
•
Vergewi
ssern Sie sich, dass keine Kinder in der Nähe
von Elektrogeräten spielen, um ihre Sicherheit zu
gewährleisten.
Dieses Ger
elektrisches / elektronisches Altgerät (WEEE) gekennzeichnet. Elektrische und
elektronische Altgeräte enthalten vielfach noch wertvolle Materialien. Sie enthalten
aber auch schädliche Stoffe, die für ihre Funktion und Sicherheit notwendig waren.
Im Restmüll oder bei falscher Behandlung können diese der menschlichen
Gesundheit und der Umwelt schaden. Es ist daher sehr wichtig, dass elektrische und elektronische
Altgeräte (WEEE) einer speziellen Verwertung zugeführt werden, damit die schädlichen Stoffe
ordnungsgemäß entfernt und entsorgt werden bzw. wertvolle Rohstoffe der Wiederverwertung
zugeführt werden können.
Sie können mit der Beachtung der folgenden simplen Hinweise einen wichtigen Beitrag dazu leisten,
dass elektrische und elektronische Altgeräte (WEEE) der menschlichen Gesundheit und der
Umwelt nicht schaden:
- Elektrische- und elektronische Altgeräte (WEEE) sollten keinesfalls wie Rest- oder
Haushaltsmüll behandelt werden.
ät ist entsprechend der europäischen Richtlinie 2012/19/EU als
Page 63

n Sie stattdessen die an Ihrem Wohnort eingerichteten kommunalen oder gewerblichen
60
- Nutze
Sammelstellen zur Rückgabe und Verwertung elektrischer und elektronischer Altgeräte
(WEEE). Informieren Sie sich, ob ggf. in Ihrem Land bzw. Ihrer Region für große/sperrige
elektrische und elektronische Altgeräte (WEEE) eine Abholung angeboten wird. Sorgen Sie in
jedem Falle dafür, dass Ihr Altgerät bis zum Abtransport kindersicher aufbewahrt wird.
In einigen Ländern sind Händler unterbestimmten Voraussetzungen beim Geräteneukauf auch zur
Rücknahme des Altgerätes verpflichtet, wenn das Altgerät dem neuen Fabrikat in der Funktion
entspricht.
der Anbringung des -Zeichens am Gerät zeigen wir an, dass wir
Mit
sämtliche für dieses Produkt geltenden und notwendigen europäischen Sicherheits-,
Gesundheits- und Umweltstandards einhalten und hierfür haftbar sind.
Energ
ieeinsparung
Für eine höhere Energieeinsparung empfehlen wir:
•
Das Gerät von Wärmequellen entfernt und in einem gut belüfte- ten Raum zu
installieren und keiner direkten Sonneeinstrahlung auszusetzen.
•
Vermeiden Sie es, warme Lebensmittel in den Kühlschrank zu stellen, um die
Innentemperatur nicht zu erhöhen und so einen kontinuierlichen Betrieb des
Kompressors zu verursachen.
•
Die Lebensmittel nicht zu eng übereinanderlegen, um eine ko- rrekte Luftzirkulation
zu
garantieren.
•
Das Gerät abtauen, sollte Eis vorhanden sein (siehe ABTAUEN), um die
Kälteübertragung
zu erleichtern.
•
Bei Stromausfall ist es empfehlenswert, die Kühlschranktür geschlossen zu halten.
•
Die Türen des Geräts so wenig wie möglich öffnen oder geöffnet lassen
•
Vermeiden, den Thermostat auf zu niedrige Temperaturen ein- zustellen.
•
Den Staub auf der Geräterückseite entfernen (siehe REINI- GUNG).
Page 64

Wichtige Sicherheitshinweise
61
Lesen Sie diese Anleitung aufmerksam durch, bevor Sie das Gerät in
Betrieb nehmen.
Ausgediente Geräte sind für Kinder immer eine Gefahrenquelle, selbst
wenn sie "nur ein paar T
age in der Garage stehen". Deshalb gilt:
Wenn Sie Ihen alten Weinkühler entsorgen:
Entfernen Sie die Tür und lassen Sie die Regale im Geräteinneren,
um zu vermeiden, dass Kinder hineinklettern können.
Verhindern Sie, dass Kinder mit dem Gerät spielen oder hineinklettern.
Reinigen Sie das Gerät niemals mit entzündlichen Flüssigkeiten. Die daraus
steigenden Dämpfe könnten einen Brand oder gar eine Explosion verursachen.
Lagern Sie oder verwenden Sie kein Benzin und keine anderen entzündlichen
Stoffe oder Flüssigkeiten in der Nähe dieses oder anderer Geräte. Die
Dämpfe könnten Feuer fangen oder eine Explosion verursachen.
INSTALLATIONSANWEISUNGEN
Vor der ersten Inbetriebnahme
Entfernen Sie die äußeren und inneren Verpackungsteile, einschließlich
des Schaumstoffschutzes auf der Tür.
Prüfen Sie nach, ob folgendes Zubehör mitgeliefert wurde:
3 Ausziehgitter
1 Flaschenablage
1 Bedienungsanleitung
Bevor Sie das Gerät an die Stromversorgung anschließen, lassen
Sie es mindestens 2 Stunden stehen. Dadurch wird gewährleistet,
dass das Kühlsystem nach den Erschütterungen des Transportes
sich stabilisieren kann und einwandfrei funktioniert.
Reinigen Sie die Innenflächen mit lauwarmem Wasser und
einem weichen Lappen.
Installation des Weinkühlers
Stellen sie das Gerät an eine Stelle, die in der Lage ist, das Gewicht des
voll beladenen Gerätes zu tragen. Richten Sie den Kühlschrank mit
Hilfe der einstellbaren Vorderfüße waagerecht aus.
Berücksichtigen Sie an Rückseite und Seitenwänden des Gerätes einen
Abstand von mind. 12 cm, damit die Luftzirkulation gewährleistet ist.
Stellen Sie das Gerät so auf, dass es vor direkter Sonneneinstrahlung
sowie anderer Wärmequellen (Heizung, Ofen, herd usw). geschützt ist.
Das Sonnenlicht könnte die Acrylverkleidung beschädigen, und Wärmequellen erhöhen den Stromverbrauch. Auch zu niedrige Umgebungstemperaturen sind für die richtige Funktion des Gerätes nicht zuträglich.
Vermeiden Sie es, das Gerät in Feuchträumen aufzustellen. Eine zu
hohe Luftfeuchtigkeit begünstigt die Frostbildung auf dem Verdampfer.
Page 65

Schließen Sie das Gerät ausschließlich an eine ordnungsgemäß
62
geerdete Steckdose an. Auf keinen Fall dürfen Sie Veränderungen am
Stecker des Netzkabels vornehmen. Für alle den Stromanschluss und/oder
die Erdung betreffenden Fragen wenden Sie sich an einen qualifizierten
Elektrofachmann oder an den autorisierten Werkskundendienst.
ACHTUNG: Ein unzulässiger Gebrauch des gerdeten Steckers kann
einen elektrischen Stromschlag zur Folge haben. Sollte das Netzkabel
beschädigt sein, lassen sie es durch den zuständigen autorisierten
Werkskundendienst austauschen.
Page 66

TÜRANSCHLAGWECHSEL
63
Der Türanschlag Ihres Weinkühlers kann beliebig nach rechts oder nach links
ausgerichtet werden. Werksseitig wird das Gerät mit Rechtsanschlag geliefert.
Sollten Sie den Türanschlag wechseln wollen, gehen Sie wie folgt vor:
HINWEIS:
Bevor Sie den Türanschlagwechsel vornehmen, trennen Sie das Gerät
von der Stromversorgung. Alle Teile, die Sie entfernen, müssen für
die Montage auf der anderen Türseite aufbewahrt werden.
Werksseitig sind die Türscharniere Ihres Weinkühlers auf der rechten Seite
des Gehäuses montiert. Zum Türanschlagwechsel gehen Sie wie folgt vor:
1. Entfernen Sie zuerst die obere Scharnierabdeckung (6)
2. Schrauben Sie die beiden Schrauben (1), welche das obere Scharnier (5)
befestigen, vom Rahmen ab und nehmen Sie das obere Scharnier (5) ab.
3. Heben Sie die Tür und legen Sie sie auf eine weiche Unterlage.
4. Entfernen Sie die zwei Befestigungsschrauben (
montieren Sie ihn auf der anderen Seite.
5. Enfernen Sie die zwei Befestigungsschrauben (8) des unteren Scharniers (2)
und nehmen Sie auch den unteren Scharnier (2) ab.
6. Entfernen Sie den linken Fuß (4) und versetzen Sie ihn an die andere Seite.
7. Versetzen Sie die Abdeckung der Öffnungen (7) an die rechte Seite.
8.
Bevor Sie das untere Scharnier (2) wieder montieren, entfernen Sie den Scharnierstift
(9) und drehen Sie das untere Scharnier (2) um. Montieren Sie dann das untere Schar-
nier an der linken Seite des unteren Rahmens mit den beiden Schrauben (8)
9. Befestigen Sie den Scharnierstift (9) am unteren Scharnier (2).
10. Montieren Sie die Tür wieder an ihren Platz und achten sie darauf, dass sie auf dem Scharnier
(2) sitzt
.
11.
Halten Sie die Tür geschlossen und befestigen Sie dabei das obere Scharnier (5)
am oberen Rahmen mit den Schrauben (1). Bitte denken Sie daran, die beiden
Schrauben (1) erst dann festzuziehen, wenn die Tür mit der
12.Bringen Sie die Abdeckung des oberen Scharniers (6) auf das Scharnier an.
11
7
7
7
7
7
7
7
7
7
7
7
7
6565656
5
10101010101010
10) des Griffs (11) und
Arbeitsplatte bündig ist.
7
11
5
7
6565656
10
2
2
2
2
2
2
2
2
2
2
2
2
8
8
8
8
8
8
8
8
8
8
8
8
4
4
4
4
4
4
4
4
4
4
4
4
9
9
9
9
9
9
9
9
9
9
9
9
3
3
3
3
3
3
3
3
3
3
3
3
Türaöffnung linke Seite
2
2
2
2
2
2
2
2
2
2
8
8
8
8
8
8
8
8
8
8
4
4
4
4
4
4
4
4
4
4
9
9
9
9
9
9
9
9
9
9
3
3
3
3
3
3
3
3
3
3
Türöffnung rechte Seite
Page 67

WICHTIGE SICHERHEITSVORKEHRUNGEN
64
Lagern Sie keine Lebensmittel in Ihrem Weinkühler: Die Innentemperatur könnte
nicht ausreichend kalt sein, um ein Verderben der Speisen zu verhindern. Als
natürliche Folge der Kondensation könnte das Türglas in den warmen Sommermonaten oder bei hoher Luftffeuchtigkeit von außen beschlagen. Wischen
Sie das Türglas einfach mit einem Tuch ab.
BEDIENUNGSANLEITUNG
Wir empfehlen Ihenn, den Weinkühler an einem Ort aufzustellen, dessen
Raumtemperatur zwischen 22° und 25°C beträgt. Sollte die Umgebungstemperatur
höher oder niederiger sein, kann dies zu Temperaturschwankungen im
Geräteinneren führen.
Wenn die Innenbeleuchtung eingschaltet bleibt, wird die Temperatur im
Weinkühler höher sein.
Empfohlene Lagertemperaturen:
Rotwein: 15,5°-18,5°C
Trockener Weißwein 10°
- 15°C
Schaumwein/Sekt 7,2°- 9,5°C
Rosé 9,
5°-10,5°C
Die oben angegebenen Temperaturen können variieren, je nachdem, ob die
Innenbeleuchtung ein oder aus ist, oder ob die Flaschen im oberen oder im
mittleren/unteren Bereich des Kühlschranks gelagert sind.
BEDIENELEMENTE - TEMPERATUR EINSTELLEN
Stellen Sie die gewünschte Temperatur durch Drücken der Tasten bzw. ein.
Wenn Sie diese Tasten zum ersten Mal drücken, erscheint im Display die
Temperatur, die ursprünglich eingestellt wurde (werksseitig ist eine Temperatur
von 10°C voreingestellt). DieTemperatur erhöht sich um je 1°C bei jedem Drücken
der Taste bzw. senkt sich um je 1°
C bei jedem Drücken der Taste .
Page 68

Wenn Sie vorwiegend Rotwein lagern, stellen Sie die Temperatur mit den
65
beiden Tasten zwischen 15,5°C und 18,5°C ein. Die Anzeige "RED" wird
rot aufleuchten.
Wenn Sie vorwiegend Weißwein lagern, muss die Temperatur zwischen 10°C
und 15°C eingestellt werden. Die Led-Anzeige "WHITE" leuchtet grün auf.
Wird vorwiegend Sekt oder Schaumwein gelagert, ist eine Temperatureinstellung
zwischen 7,2°C und 9,5°C zu empfehlen. Die LED-Anzeige "SPARKLING"
leuchtet bernsteinfarben auf.
Sie können die Temperaturanzeige in Fahrenheit oder Celsius wählen. Hierzu
drücken Sie die Taste F/C. Fahreheit-Grade werden rot angezeigt und erscheinen
im Display mit °F; Celsius-Grade dagegen werden gelb angezeigt und erscheinen
im Display mit der Angabe °C.
Die Innenbeleuchtung kann durch Drücken der Taste ON/OFF ein- bzw. ausgeschaltet werden.
Die Weinregale
Die Weinregale
Die Regale sind verchromt. Um Flaschen unterschiedicher Größen lagern zu können,
können die Regale durch Herausziehen aus den Schienen nach oben oder nach unten
verlegt werden. Die Regale sind für die Aufnahme der größtmöglichen Anzahl von
Flaschen ausgelegt.
Flaschenablage
Im unteren Bereich des Kühlschranks gibt es einen zusätzlichen Flaschenhalter, in
dem bis zu 6 Weinflaschen gelagert werden können. Diese Ablage kann zu Reini-
gungszwecken aus dem Kühlschrank herausgenommen werden.
HINWEIS:
Wenn Sie den Weinkühler erstmalig oder nach längerem Stillstand in Betrieb
nehmen, kann ein Temperaturunterschied von einigen Graden zwischen
der eingestellten und der angezeigten Temperatur der LED-Lampen bestehen.
Das ist völlig normal und hängt mit der nötigen Laufzeit zusammen, bis das
Gerät seine volle Kühlleistung erreicht. Nach wenigen Stunden Betrieb wird sich
alles wieder normalisieren.
Der Temperaturunterschied zwischen dem oberen und dem unteren Weinregal
des Weinkühlers beträgt ca. 4-6°C. Wenn Sie den Weinkühler für die Lagerung
von Rotweinen eingestellt haben, möchten jedoch eine Mischung aus Rot- und
Weißweinen lagern, sollten Sie die Weißweinflaschen in die unteren Regale,
die Rotweine dagegen in die oberen Regale einordnen.
Page 69

WARTUNG UND PFLEGE
66
INNENLAMPE WECHSELN
Reinigung
Ziehen sie den Netzstecker und entfernen Sie alle Flaschen.
Waschen Sie das Geräteinnere mit einer Lösung aus warmem Wasser und
Natronlauge im Verhältnis von ca. 2 EL Natron in einem Liter Wasser.
Reinigen Sie die Regale und den Flaschenahlter mit einem milden Reiniger.
Das Außengehäuse des Weinkühlers braucht nur mit Wasser und einem
milden Reinigungsmittel gewaschen zu werden.
Da der Weinkühler so konzipiert ist, dass die Luftfeuchtigkeit im Innenraum
festgehalten wird, kann sie u.U. am Boden kondensieren, so dass es ab un an
auch nötig werden kann, den Boden des Innenraums zu wischen.
Wartung
Stromausfall
Die meisten Stromausfälle werden innerhalb weniger Stunden behoben und be-
einträchtigen nicht die Temperatur des Weinkühlers, wenn Sie das Öffnen der
Tür auf ein Minimum reduzieren. Sollte einmal ein längerer Stromausfall vorkommen, sollten Sie Maßnahmen zum Schutz des Kühlschrankinhalts ergreifen.
Lange Betriebspause
Wenn Sie das Gerät für eine längere Zeit nicht benutzen, ziehen Sie den Netzstecker
aus der Wandsteckdose, entfernen Sie alle Flaschen und reinigen Sie das Gerät.
Lassen Sie die Tür leicht geöffnet, damit keine Feuchtigkeit, Schimmel oder Gerüche
sich bilden können.
Weinkühler transportieren
Entfernen Sie alle Flaschen
Befestigen Sie mit Klebeband alle beweglichen Teile im Innenraum.
Drehen Sie die Nivellierfüße bis zum Anschlag, um Schäden vorzubeugen
.
Halten Sie die Tür mit Klebeband geschlossen.
Achten Sie darauf, dass der Weinkühler aufrecht transportiert wird.
Page 70

Problemlösung
67
Sollten Ihnen beim Betrieb des Gerätes einmal Unregelmäßigkeiten auffallen,
lesen Sie bitte zunächst die nachfolgenden Anweisungen sorgfältig durch, bevor
Sie den Kundendienst anrufen. Viele Symptome lassen sich selbst beheben.
FEHLERSUCHE
STÖRUNG
Der Weinkühler
funktioniert nicht.
Der Stecker ist nicht in der Steckdose.
Die Sicherung ist herausgesprungen.
MÖGLICHE URSACHE
Die Temperatur
im Weinkühler
ist zu hoch.
Der Kompressor
schaltet sich häufig
an und ab.
Die Beleuchtung
funktioniert nicht.
Prüfen Sie die Temperatureinstellung. Die Außentemperatur
kann evtl. eine höhere Einstellung erfodern.
Die Tür wurde zu oft geöffnet.
Die Tür ist nicht richtig geschlossen.
Die Türdichtung liegt nicht richtig an.
Das Gerät hat nicht die erforderlichen Abstände.
Die Raumtemperatur ist höher als normal.
Eine größere Menge Flaschen wurde in den Kühlschrank gegeben.
Die Tür wurde zu oft geöffnet.
Die Tür ist nicht richtig geschlossen.
Die Temperatur ist nicht richtig eingestellt.
Die Türdichtung liegt nicht richtig an.
Das Gerät hat nicht die erforderlichen Abstände
Die Sicherung ist herausgesprungen.
Der Stecker ist nicht in der Steckdose.
Die Glühbirne ist verbrannt (siehe Kapitel "Wartung"
um sie zu ersetzen).
Der Schalter steht auf OFF.
.
Page 71

Vibrationen.
68
Prüfen Sie, ob der Weinkühler nivelliert ist.
Der Geräuschpegel
erscheint zu hoch.
Die Geräusche werden durch das Fließen der Kühlflüssigkeit erzeugt. Das ist völlig normal.
Gurgelgeräusche werden durch die Kühlflüssigkeit
im Kühlkreislauf erzeugt, was ebenfalls normal ist.
Die Expansion und Kontraktion der Innenwände kann
u.U. Knack- oder Knallgeräusche verursachen.
Der Weinkühler ist nicht waagerecht nivelliert.
Die Tür schließt
nicht richtig
Der Weinkühler ist nicht waagerecht nivelliert.
Der Türanschlag wurde gewechselt und die Tür nicht
richtig montiert.
Die Türdichtung ist verschmutzt.
Die Regale liegen nicht richtig.
Technische Daten:
Für nähere Informationen vergleichen Sie bitte das Matrikelschild an der
Rückseite des Gerätes. Wir behalten uns vor, technische Eigenschaften
aus Gründen der Produktverbesserung ohne vorheriges Ankündigen zu verändern.
KUNDENDIENST
Im Servicefall wenden Sie sich bitte an unseren autorisierten Werks-
kundendienst. Bitte wählen Sie für Deutschalnd aus dem Festnetz die
-625562 (0,14 Euro/Min,
bundesweit einheitliche Service-Nummer 0180
Stand Januar 200
kundendienst in Ihrer Nähe verbindet.
Für Österreich wählen Sie bitte aus dem Festnetz die Service-Nummer
0820-220 224 (0,15 Euro/Min, Stand Januar 2007).
Für die Schweiz wählen Sie die Service-Nummer
), die Sie automatisch mit dem zuständigen Werks-
7
5
0848-780780.
Page 72

40
69
13
11
10
6
Page 73

COMPON
70
ENTI E CARATTERISTICHE
ITALIA
1. Pannel
lo e display operativo
2. Vano
3. Gamba di livellamento
4. Porta-vini
5. Portello in vetro
6. Ripiani cromati
7. Luce interna
8. Impianto elettrico (sul retro)
9. Sensore temperatura
Page 74

Vi ringraz
71
Prima di utilizzare il vostro frigorifero, leggete per favore con attenzione questo manuale di istruzioni,
in modo da sfruttare al massimo le sue prestazioni.
Conservare tutta la documentazione per l’uso successivo o per altri proprietari.
Il presente prodotto è destinato al solo uso domestico o applicazioni simili quali:
la zona cucina destinata al personale di negozi, uffici e altri ambienti lavorativi
-le fattorie,dai clienti negli alberghi, nei motel e in altri ambienti di tipo residenziale
i bed and breakfast
i servizi catering e applicazioni simili non per la vendita al dettaglio. Questo apparecchio dovrà
essere destinato solo alla conservazione degli alimenti, ogni altro uso è da considerarsi pericoloso e
il
costruttore non é responsabile di eventuali omissioni.
Si consiglia inoltre di prendere visione delle condizioni di garanzia.
iamo per avere acquistato questo prodotto.
INFORMAZIONI SULLA
SICUREZZA
Il frigorifero contiene un gas refrigerante (R600a:
isobutano) e gas di isolamento (ciclopentano), ad alta
compatibilità con l’ambiente che tuttavia sono
infiammabili.
Si consiglia di seguire le seguenti regole per evitare
situazioni di pericolo per la propria persona:
Prima di qualsiasi operazione scollegare il cavo di
alimentazione dalla presa di corrente.
Il sistema di refrigerazione situato dietro e all’interno del
frigorifero contiene refrigerante. Evitare pertanto di
danneggiare i tubi.
Se nel sistema di refrigerazione si nota una perdita, non
toccare la presa a parete e non utilizzare fiamme
aperte.Aprire la finestra e lasciare entrare l’aria nella
Page 75

stanza. Rivolge
72
rsi quindi a un centro di assistenza per
richiedere la riparazione.
Non raschiare con un coltello o oggetto acuminato per
eliminare la brina o il ghiaccio presente. Con questi si può
danneggiare il circuito refrigerante, la cui fuoriuscita può
causare un incendio o danneggiare gli occhi.
Non installare l’elettrodomestico in luoghi umidi, unti o
polverosi né esporlo alla luce diretta del sole e all’acqua.
Non installare l’elettrodomestico vicino a stufette o
materiali infiammabili.
Non utilizzare prolunghe o adattatori.
Non tirare né piegare eccessivamente il cavo di
alimentazione o toccare la spina con le mani bagnate.
Non danneggiare la spina e/o il cavo di alimentazione,
questo potrebbe causare scosse elettriche o incendi.
Si consiglia di tenere pulita la spina, eventuali residui
eccessivi di polvere sulla spina possono essere causa di
incendio.
Non utilizzare dispositivi meccanici o altri apparecchi per
accelerare il processo di sbrinamento.
Evitare assolutamente l’uso di fiamma aperta o di
apparecchi elettrici, come apparecchi di riscaldamento,
pulitrici a vapore, candele, lampade a petrolio e simili per
accelerare la fase di sbrinamento.
Non utilizzare o conservare spray infiammabili, come
vernici spray vicino al frigorifero. Potrebbero causare
esplosioni o incendi.
Page 76

Non usare apparecchi ele
73
ttrici all’interno degli scomparti
per la conservazione dei cibi, se questi non sono del tipo
raccomandato dal costruttore.
Non riporre o conservare materiali infiammabili e
altamente volatili come etere, benzina, GPL, gas propano,
bombolette spray, collanti, alcool puro, ecc. Questi
materiali potrebbero provocare esplosioni.
Non conservare medicine o materiali di ricerca nel
frigorifero. Quando il materiale che necessita di un
controllo rigido delle temperature di conservazione viene
conservato, è possibile che si deteriori o si può
verificare una reazione incontrollata che può provocare
rischi.
Mantenere libere da ostruzioni le aperture di ventilazione
nell’involucro dell’apparecchio o nella struttura ad
incasso.
Non collocare oggetti e/o recipienti pieni d’acqua sopra
l’elettrodomestico,
Evitate di effettuare interventi su questo frigorifero. Ogni
intervento deve essere eseguito solo da personale tecnico
specializzato.
Questo elettrodomestico non dovrà essere destinato a
persone (compresi bambini) con handicap fisici,
sensoriali, mentali, o mancanti di esperienza o conoscenza
d’ uso, senza la supervisione di persone che abbiano
preso visione delle istruzioni d’uso e che siano
direttamente responsabili della loro sicurezza.
Accertarsi che i bambini non giochino vicino
all’elettrodomestico per preservare la loro sicurezza.
Page 77

elettrodom
74
Questo
2012/19/UE sui Rifiuti da Apparecchiature Elettriche ed Elettroniche (RAEE).
I RAEE contengono sia sostanze inquinanti (che possono avere un impatto negativo
sull’ambiente) sia materie prime (che possono essere riutilizzate). E’ perciò
necessario sottoporre i RAEE ad apposite operazioni di trattamento, per rimuovere e
smaltire in modo sicuro le sostanze inquinanti ed estrarre e riciclare le materie prime.
Ogni cittadino può giocare un ruolo decisivo nell’assicurare che i RAEE non diventino un problema
ambientale; basta seguire qualche semplice regola:
- i RAEE non vanno mai buttati nella spazzatura indifferenziata;
- i RAEE devono essere consegnati ai Centri di Raccolta (chiamati anche isole ecologiche, riciclerie,
piattaforme ecologiche …) allestiti dai Comuni o dalle Società di igiene urbana; in molte località
viene anche effettuato il servizio di ritiro a domicilio dei RAEE ingombranti.
In molte nazioni, quando si acquista una nuova apparecchiatura, si può consegnare il RAEE al
negoziante, che è tenuto a ritirarlo gratuitamente (ritiro "uno contro uno") a patto che il nuovo
apparecchio sia dello stesso tipo e svolga le stesse funzioni di quello reso.
estico è marcat
o c
ormemente
onf
alla Direttiva Europea
Apponendo la
marcatura su questo prodotto, dichiariamo, sotto la nostra
responsabilità, di ottemperare a tutti i requisiti relativi alla tutela di sicurezza, salute e
ambiente previsti dalla legislazione europea in essere per questo prodotto.
Risparm
io Energetico
Per un migliore risparmio energetico vi suggeriamo di:
•
Installare l'apparecchio lontano da fonti di calore e non esporlo alla luce solare diretta
e in un locale ben aerato.
•
Evitare di inserire cibi caldi all'interno del frigorifero per non aumentare la
temperatura
interna e quindi un funzionamento continuo del compressore.
•
Non stipare eccessivamente gli alimenti per garantire una corretta circolazione
•
Sbrinare l’apparecchio nel caso vi fosse del ghiaccio
(vedi SBRINAMENTO) per
dell’aria.
facilitare
la trasmissione del freddo.
ln caso di mancata energia elettrica è consigliabile non aprire la porta del rigorifero.
•
Aprire o tenere aperte le porte dell'apparecchio il meno possi- bile
•
Evitare di regolare il termostato su temperature troppo fredde.
•
Eliminare la polvere presente sul retro dell’apparecchio (vedi PULIZIA).
Page 78

importanti sulla sicurezza
75
Avvertenze
x Leggere attentamente tutte le istruzioni prima di usare l'unità.
x Il frigorifero pres enta rischi di intrappolamento e soffocamento per i bambini. La conser vazione di apparecchiature elettriche inuti lizzate
può presentare pericoli anche se tali app arecchiature vengono lasciate incustodite per qualche giorno.
x Prima di smaltire la cantinetta:
rimuovere lo sportello senza estrarre i ripiani, per evitare che i bam bini possano arrampicarsi all'interno.
x Non permettere a bambini di usare, giocare o entrare all'interno dell'unità.
x Non pulire mai l'unità con liquidi infiammabili. I fumi rilasciati da queste sostanze possono provocare incendi o esplosioni.
x Non conservare benzina o altri liquidi/vapori in fiammabili vic ino al frigorifero o ad altre unità sim ili. I fumi r ilasciati a queste sostan ze
possono provocare incendi o esplosioni.
ISTRUZIONI DI INSTALLAZIONE
Prima di usare la cantinetta
x Rimuover
x Verificare che siano presenti i seguenti componenti:
x Prima di collegare l'unità alla rete elettrica, collocarla in ver ticale e lasciarla in questa posizione per circa 2 ore, per limitare il rischio di
x Pulire le superfici interne con un panno morbido e acqua tiepida.
Installazione del la cantinetta
x Installare l'un
x Lasciare 5 pollici (12,5 cm) di spazio tra il retro e i lati dell'unità per consentire una corr etta circolazione dell'aria di raffreddamento del
x Non installare l'unità alla luce diretta del sole o in prossimità di fonti di calore ( stufe, termosifoni, radiatori, ecc.). La luce diretta del sole
x Non collocare l'unità in aree troppo umide. Una percentuale di umidità ec cessiva nell'aria accelera la form azione di ghiaccio
x Collegare la spina elettrica del frigorifero a una presa a muro dedicata con un'idonea messa a terra. Non tagliare o rimuovere per
Un uso improprio della spina con messa a terra può provocare sco sse elettriche. Ri volgersi a un centro di assistenza autor izzato
Candy per richiedere la sostituzione del cavo di alimentazione, se danneggiato.
e il m ateriale di imballaggio esterno ed interno comprese le imbottiture protettive applicate ai pannelli dello sportello.
- 3 ripiani estraibili
- 1 porta-vini
- 1 manuale d'uso
malfunzionamenti dovuti alla movimentazione in fase di trasporto.
anteriore.
compressore.
può danneggiare il rivestimento in acrilico, mentre la presenza di fonti di calore può aumentare i consumi elettrici. Temperature
ambientali troppo basse possono influire sul funzionamento corretto dell'unità.
sull'evaporatore.
nessun motivo il terzo polo (di terra) sul cavo di alimentazione. In caso di dubbi o dom ande sull'alimentazione o la messa a terra,
rivolgersi direttamente a un elettricista certificato o un centro di assistenza autorizzato Candy.
ità su una superficie in grado di sostenere il peso dell'unità a pieno carico. Per allineare l'unità, regolare le gambe sul lato
Page 79

RTENZE IMPORTANTI
76
AVVE
zzare la cantinetta per la conservazione di alimenti perché la temperatura potrebbe non essere sufficiente a prevenire possibili
Non utili
perdite. Se si nota la formazione di condensa sullo sportello in vetro, soprattutto nei mesi estivi o in presenza di valori di umidità molto elevati,
è possibile rimuoverla semplicemente con un panno.
USO D ELLA CANTINETTA
È generalmente
ambientale maggiore o inferiore a quella consigliata può provocare oscillazioni nella temperatura interna.
La luce interna può aumentare la temperatura interna della cantinetta, se lasciata accesa.
Temperature consigliate per la conservazione dei vini
Vini rossi: 15,5-18,5°C
Vini secchi/bianchi 10-15°C
Vini frizzanti 7,2-9,5°C
Vini rosé 9,5-10,5°C
Le temperature indicate possono variare leggermente, a seconda del f atto che la luce interna sia accesa o spenta o del fatto che le bottiglie
vengano collocate nello scomparto inferiore/centrale.
USO D EI PULSANTI SUL PANNELLO DEL DISPLAY
Per impostar
LED mostra la temperatura originale impostata in precedenza (la temperatura preimpostata in fabbr ica è 50°F) . Per incrementare la
temperatura di 1°F o 1°C, premere una volta
Se si pr
LED vicino all'indicazione "ROSSO" diventi rosso.
Se si prevede di conservare soprattutto vini bianchi, è necessario impostare una temperatura compresa tra 10 e 15°C e verificare che la spia
ROSSA accanto all'indicazione "BIANCO" diventi verde.
Se si prevede di conservare soprattutto vini frizzanti, è necessario impostare una temperatura compresa tra 7,2 e 9,5°C e verificare che il
LED accanto all'indicazione "FRIZZANTE" diventi giallo.
Per passare dalla visualizzazione in gradi Fahrenheit a quella in centigradi, premere il pulsante F/C. L'indicatore dei gradi Fahrenheit viene
visualizzato in rosso nella schermata F, mentre quello dei gradi centigradi viene visualizzato in giallo nella schermata C.
Per accendere o spegnere la luce interna, premere il pulsante con il simbolo ON/OFF.
Ripiani
iani sono cromati. Per configurare lo spazio in base alle dimensioni delle bottiglie, è possibile spostare i ripiani ver so l'alto o il basso,
I rip
estraendoli semplicemente dalla guida. I ripiani sono studiati per contenere il numero massimo di bottiglie.
Porta - vini
Nella s
pulizia.
NOTA
Quando si utilizza la cantinetta la prima volta o lo si riaccende dopo un lungo periodo di inutilizzo, è possibile che ci sia una
leggera differenza tra la temperatura selezionata e quella indicata dal LED. Questa condizione è normale e dipende dall'intervallo di
tempo necessario per l'attivazione. La temperatura torna normale dopo qualche ora d i funzionamento.
Inoltre, tra i ripiani superiori e inferiori c'è una differenza di temperatura di 4-6°C. Quindi, se la temperatura della cantinetta è stata
impostata su quella consigliata per i vini rossi, la temperatura visualizzata è pari a 16°C e si desidera conservare sia vini bianchi
che rossi, è neces sario collocare i vini bianchi sui ripiani inferiori e q uelli rossi su qu elli superiori.
consigliabile installare la cantinetta in aree in cu i la temperatura ambientale è compresa tra 22 e 25°C. Una temperatura
e la temperatura desiderata, è sufficiente premere il pulsante
, per r i
dur
la premere una volta
evede di conservare soprattutto vini rossi, è necessario impostare una temperatura compresa tra 15,5 e 18,5°C e verificare che il
ezione inferiore è presente anche un por ta-vini che può contenere un massimo di 6 bottiglie di vino e che può essere rimosso per la
o . Quando s
.
i premono i due pulsanti per la prima volta, il
Page 80

CURA E M ANUTENZIONE
77
SOSTITUZIONE DELLA LAMPADINA
a della cantinetta
Pulizi
x Scollegare
x Lavare l'interno del frigorifero con acqua calda e una soluzione di bi carbonato di sodio. Dilu ire circa 2 cucchiai da tavola di bicarbonato
x Lavare i ripiani e i vassoi con un detergente neutro.
x Pulire l'esterno del frigorifero per vini con un detergente neutro e acqua calda.
x Ad intervalli regolari è necessario anche pulire la sezione inferiore dell'area di conservazione poiché il frigorifero per vini tende a
Manutenzione della cantinetta
x Interruzione
Assenze
Se si pr
elettrica, pulirlo e lasciare lo sportello leggermente aperto per prevenire la formazione di condensa, muffa o od ori sgradevoli.
Spostamento della cantinetta
x Rimuover
x Fissare con del nastro tutte le parti interne del frigorifero che possono spostarsi.
x Riavvitare le viti di livellamento nella base per evitare di danneggiare il frigorifero.
x Chiudere gli sportelli e bloccarli con del nastro.
x Trasportare sempre il frigorifero in posizione verticale.
il frigorifero per vini dalla rete elettrica e rimuovere le bottiglie.
di sodio in un quarto di litro di acqua.
trattenere l'umidità ed è po ssibile quindi che in questo punto si formi condensa.
dell'alimentazione
Nella maggior parte dei casi l'alimentazione viene ripristinata nel giro di qualche ora, quindi un'eventuale interruzione dell'alimentazione
non ha alcun effetto sulla temperatura de l frigorifero, soprattutto se si evita di aprire lo sportello troppo spesso. Tuttavia, se si prevede
che l'interruzione nell'alimentazione possa durare qualche ora, è necessario prendere adeguate misure per proteggere il contenuto.
evede di non usare il frigorifero per vini per lunghi periodi di tempo, rimuovere tutte le bottiglie, scol legare il frigorifero dalla rete
e tutte le bottiglie.
Page 81

Risoluzione d
78
ei problemi
La maggior parte dei problemi del frigorifero per vini possono essere risolti direttamente senza
rivolgersi a un centro
prima di rivolgersi a un centro di assistenza.
di assistenza. Provare a
leggere e a seguire le istruzioni riportate di seguito
GUIDA ALLA RISOLUZIONE DEI PROBLEMI
PROBLEM
A CAUSA PROBABILE
igorifero per vini non funziona ll frigorifero non è collegato alla rete elettrica.
Il fr
La tem
peratura del frigorifero per vini non è
abbastanza bassa.
Il co
mpressore si accende e si spegne spesso La temperatura ambiente è più alta del
La lu
ce interna non funziona. Interruttore automatico scattato o fusibile
Vibraz
ioni. Verificare che il frigorifero sia allineato.
Il fr
igorifero per vini sembra molto rumoroso. Il rumore può derivare dal flusso di refrigerante,
tello non si chiude correttamente. Il frigorifero per vini non è allineato.
Lo spor
Interruttore automatico scattato o fusibile
bruciato.
Controllare la temperatura impostata.
Aumentare l'impostazione se le condizioni
dell'ambiente esterno lo richiedono.
Lo sportello viene aperto troppo
frequentemente.
Lo sportello non è chiuso correttamente.
La guarnizione dello sportello non garantisce
una buona tenuta.
Non è stato lasciato spa zio sufficiente intorno
al frigorifero.
normale.
Si è inserito un numero eccessivo di bottiglie di
vino caldo nel frigorifero per vini.
Lo sportello viene aperto troppo
frequentemente.
Lo sportello non è chiuso correttamente.
La temperatura impostata non è corretta.
La guarnizione dello sportello non garantisce
una buona tenuta.
Non è stato lasciato spa zio sufficiente intorno
al frigorifero.
bruciato.
Il frigorifero per vini è scollegato dalla rete
elettrica.
La lampadina si è bruciata. Per informazioni su
come sostituire la lampadina, vedere la sezione
relativa alla manutenzione.
L'interruttore principale è in posizione "OFF".
che rappresenta una condizione normale.
Al termine di ciascun ciclo è normalmente
sentire un gorgoglio, che dipende dal flusso di
refrigerante all'interno del frigorifero per vini.
La contrazione e la dilatazione delle pareti
interne può provocare rumori simili a
scoppiettii.
Il frigorifero per vini non è allineato.
Gli sportelli sono stati invertiti, ma montati in
modo errato.
La guarnizione è secca.
I ripiani non sono posizionati correttamente.
Dati tecni
ci
Per informazioni sui dati tecnici, vedere la targhetta sul retro del frigorifero per vini. I dati tecnic i
possono essere modificati senza
preavviso a s eguit o delle migliorie apportate al pr odotto .
Page 82

40
79
13
11
10
6
Page 83

BRUKERVEILEDNING
80
En del a
v feilene som kan oppstå, kan du løse uten å måtte ta kontakt med service.
Prøv forslagene nedenfor for å se om du kan løse problemene før du tilkaller
service.
FEILSØKING
PROBLEM MULIG ÅRSAK
NORVEGIA
Vinskapet virker
ikke.
Vinskapet er ikke
kaldt nok.
Komp
ressoren
slår seg ofte av og
på.
virker
Lyset
ikke.
Overbelastningsbryteren er løst ut eller s
ikringen er gått. Er
ikke koblet til.
inskapet har ikke god nok lufting. Dørpakningen er ikke
V
skikkelig tett. Døren er ikke skikkelig lukket. Døren åpnes
for ofte. Omgivelsene kan gjøre det nødvendig med høyere
innstilling. Kontroller temperaturinnstillingen.
Vinskapet har ikke
skikkelig
Temperaturinnstillingen er ikke riktig. Døren
tett.
god
nok
luft
ing. Dørpakningen er
ikke
er ikke skikkelig lukket. Døren åpnes for ofte. Det er satt inn
mange flasker med varm vin. Romtemperaturen er høyere
enn normalt.
Bryteren
står på "OFF". LED-pæren
er gått (se
vedlikeholdsavsnittet for utskifting av pæren). Ledningen er
ikke satt i. Overbelastningsbryteren er
t
ut, eller sikringen
løs
er gått.
Page 84

Driftspanel og display
81
1. Kabinett
2. Justeringsfot
3. Vinstativ
4. Glassdør
5. Hyller i krom
6. Innvendig lam
pe
7. Elektrisk kontrollenhet (på baksiden)
8. Temperatursensor
Page 85

Takk for at du kjøpte dette produktet.
82
Før du bruker kjøleskapet, bør du lese denne bruksanvisningen nøye for å
maksimere ytelsen. Oppbevar all dokumentasjon for senere bruk eller andre
eiere. Dette produktet er utelukkende beregnet for hjemmebruk eller lignende
bruksområder som:
-personalkjøkkenet i butikker, kontorer og i andre arbeidsmiljøer
-på gårder, med klientell av hoteller, moteller og andre miljøer av en boligtype
-på bed & breakfast (B & B)
-For cateringtjenester og lignende bruksområder som ikke er for detaljsalg.
Dette apparatet må kun brukes til formål for oppbevaring av mat, enhver annen
bruk anses som farlig, og produsenten vil ikke være ansvarlig for eventuelle
utelatelser. Dessuten anbefales det at du merker deg garantibetingelsene.
SIKKERHETSINFORMASJON
Kjøleskapet inneholder en kjølegass (R600a:
isobuten) og isolerende gass (cyklopentan),
med høy kompatibilitet med omgivelsene,
som er lett antennelig.
Vi anbefaler at du følger følgende regler for
å unngå situasjoner som er farlige for deg:
Før du utfører en operasjon, trekk ut
strømledningen fra stikkontakten.
Kjølesystemet som er plassert bak og inne i
apparatet inneholder kuldemedium. Du må
derfor unngå å skade rørene.
Hvis det oppdages en lekkasje i
kjølesystemet, ikke rør stikkontakten og
ikke bruk åpen ild. Åpne vinduet og slipp
Page 86

frisk luft inn i rommet. Ring deretter et
83
servicesenter for å be om reparasjon.
Ikke skrap med en kniv eller en skarp
gjenstand for å fjerne rim eller is som
oppstår. Disse kan skade kjølekretsen, og
slippe ut gass som kan føre til brann eller
føre til øyeskade.
Ikke monter apparatet i miljøer som er
fuktige, oljete eller støvete, det må heller
ikke utsettes for direkte sollys og vann.
Ikke monter apparatet i nærheten av
varmeovner eller brennbare materialer.
Ikke bruk skjøteledninger eller adaptere.
Ikke dra eller brett strømledningen for
hardt eller ta på støpselet med våte hender.
Ikke ødelegg støpselet og / eller
strømledningen; dette kan føre til elektrisk
støt eller brann.
Det anbefales å holde pluggen ren, for mye
støv på pluggen kan føre til brann.
Ikke bruk mekaniske enheter eller annet
utstyr for å fremskynde avrimingen.
Unngå all bruk av åpen flamme eller
elektrisk utstyr som ovner, damprensere,
stearinlys, oljelamper og lignende for å
fremskynde avrimingsfasen.
Ikke bruk eller oppbevar brennbare
sprayer, for eksempel spraymaling, i
Page 87

nærheten av apparatet, da det kan føre til
84
eksplosjon eller brann.
Ikke bruk elektriske apparater inne i
oppbevaringsrommet for mat, med mindre
de er av en type som anbefales av
produsenten.
Ikke plasser eller oppbevar brennbare og
svært flyktige materialer som eter, bensin,
LPG, propangass, aerosol-spraybokser,
lim, ren alkohol, etc. Disse materialene kan
føre til eksplosjon.
Ikke oppbevar medisin eller
forskningsmaterialer i apparatet. Når
materialer som krever en streng kontroll
av lagringstemperaturer skal lagres, kan
det hende at det forringes, eller at det
forekommer en ukontrollert reaksjon som
kan være farlige.
Sørg for at ventilasjonsåpningene i
apparatets kabinett eller i den innebygde
strukturen er åpne.
Ikke plasser gjenstander og / eller
beholdere fylt med vann på toppen av
apparatet.
Ikke utfør reparasjoner på dette apparatet.
Alle inngrep må utføres utelukkende av
kvalifisert personell.
Dette apparatet kan brukes av barn fra 8
Page 88

år og oppover, personer med redusert
85
fysisk, sensorisk eller mental evne, eller
mangel på erfaring og kunnskap, hvis de
har fått tilstrekkelig veiledning eller
instruksjoner i sikker bruk av apparatet,
og forstår risikoen ved bruk.
Barn bør ikke leke med apparatet.
Rengjøring og vedlikehold må ikke gjøres av
barn uten tilsyn.
AVHENDING AV BRUKTE KJØKKENAPPARATER
Dette produktet er merket i samsvar med det europeiske
2012/19/EU-direktivet om avfallshåndtering for elektriske og elektroniske
produkter («Avfall fra elektrisk og elektronisk utstyr» (WEEE)).
Avfall fra elektrisk og elektronisk utstyr (WEEE) omfatter både
forurensende stoffer (som kan skape negative konsekvenser for miljøet) og
grunnleggende komponenter (som kan resirkuleres). Det er viktig at avfall fra elektrisk
og elektronisk utstyr (WEEE) underlegges spesifikk behandling, for å fjerne og
avhende alle forurensende materialer riktig, og gjenvinne og resirkulere alle materialer.
Individer kan spille en viktig rolle når det kommer til å sikre at avfall fra elektrisk og
elektronisk utstyr (WEEE) ikke blir et miljøproblem. Det er helt essensielt å følge noen
grunnleggende regler:
- Avfall fra elektrisk og elektronisk utstyr (WEEE) skal ikke behandles som
husholdningsavfall.
- Avfall fra elektrisk og elektronisk utstyr (WEEE) skal leveres inn til
hensiktsmessige innsamlingspunkter som eies av kommunen eller av registrerte
firmaer. I mange land finnes det hjemmehenting for store artikler med avfall fra
elektrisk og elektronisk utstyr (WEEE).
I mange land vil gamle apparater returneres til forhandleren når du kjøper en ny, og
forhandleren er forpliktet til å samle slike inn gratis på en-til-en basis, så lenge
apparatet er av lik type og har samme funksjoner som det leverte utstyret.
Samsvar
Ved å plassere -merket på dette produktet bekrefter vi at det er i samsvar
med alle relevante europeiske krav til helse- miljø og sikkerhet som er lovbestemt for
dette produktet.
Page 89

Energisparing
86
For bedre energisparing, anbefaler vi følgende:
Installer kjøleskapet unna varmekilder og direkte sollys, og i et rom med god
ventilasjon.
Unngå å sette varm mat inn i kjøleskapet for å unngå innvendig temperaturøkning og
dermed tvinge kompressoren til sammenhengende drift.
Ikke plasser for mye mat i kjøleskapet for å sikre god luftsirkulasjon.
Avrim kjøleskapet hvis det oppstår is for å hjelpe overføringen av kulde.
Ved strømbrudd anbefales det at døren på kjøleskapet holdes lukket.
Åpne eller holde dørene på kjøleskapet åpne så lite som mulig.
Unngå å stille temperaturen på termostaten for lavt.
Fjern støv som befinner seg på baksiden av skapet.
Les instruksjonene før du tar i bruk vinskapet .
Det forekommer frem
ikke er i bruk. Slike apparater er fremdeles farlige – selv om de "bare skal stå i
garasjen et par dager".
Før du kaster det gamle vinskapet:
Ta av døren og la hyllene sitte i for å forhindre at barn kan krype inn i skapet.
Ikke la barn betjene skapet, leke med det eller krype inn i det.
Ikke rengjør skapets deler med brennbare væsker. Dampen kan utgjøre brannfare
eller forårsake eksplosjon.
Ikke oppbevar bensin eller andre brennbare damper og væsker i nærheten av dette
eller andre apparater. Dampen kan forårsake brann eller eksplosjon.
deles ulykker der barn stenges inne og kveles i apparater som
INSTALLERINGSINSTRUKSER
Før bruk
Fjern innvendig og utvendig emballasje samt beskyttende skum på dørpanelet.
Kontroller at følgende deler er inkludert:
3 uttrekkbare hyller
1 vinstativ
1 brukerveiledning
Page 90

La apparatet stå oppreist i 2 timer før det kobles til en stikkontakt. Dette vil redusere
87
muligheten for feil i kjølesystemet etter transporten.
Rengjør innvendige flater med lunkent vann og en myk klut.
Installere vinskapet
Plasser skapet på et gulv som er sterkt nok
til å tåle vekten av skapet når det er fullt.
Juster føttene foran på skapet slik at det står i vater. La det være ca. 10 cm plass
rundt skapet slik at det er nok luftsirkulasjon til å avkjøle kompressoren. Unngå at
skapet plasseres i direkte sollys eller i nærheten av varmekilder (komfyr, varmeovn,
radiator osv.). Direkte sollys kan skade lakken, og varmekilder kan føre til økt
strømforbruk. Ekstremt kalde temperaturer kan gjøre at skapet ikke virker som det
skal.
Unngå å plassere skapet i et fuktig rom. For høy luftfuktighet fører til at det dannes
rim på kjøleelementet.
STELL OG VEDLIKEHOLD
SKIFTE LYSPÆREN
LED-LAMPER
Hvis dette produktet er utstyrt med LED-LAMPER, ta kontakt med teknisk hjelpeservice
hvis de må skiftes.
Sammenlignet med vanlige lyspærer varer LED-lampene lengre, og er miljøvennlige.
Rengjøre vinskapet
Trekk ut støpselet og ta ut flaskene. Vask skapet innvending med varmt vann som er
tilsatt natron. Bruk to spiseskjeer natron per liter vann.
Vask hyller og stativ med et mildt rengjøringsmiddel. Vask utsiden av skapet med
varmt vann og et mildt rengjøringsmiddel. Av og til må du kanskje tørke ut av
bunnen av skapet ettersom skapet er utformet for å holde på fuktighet og dette kan
føre til kondens.
Vedlikehold av vinskapet
Page 91

Strømbrudd
88
Feilen utbedres som
oftest i løpet av et par timer og vil mest sannsynlig ikke virke
inn på temperaturen i vinskapet hvis ikke døren åpnes for ofte. Hvis strømbruddet
er langvarig, bør du oppbevare innholdet et annet sted.
Ferie
Når du er lenge borte, bør du ta ut alle flaskene, ta ut støpselet, rengjøre skapet og la
døren stå på gløtt for å unngå at det dannes kondens, mugg eller ubehagelig lukt i
skapet.
Flytte vinskapet
x Ta ut alle flaskene.
x Fest alle løse deler i skapet med teip.
x Skru opp føttene for å unngå at de blir skadet.
x Teip igjen døren.
x Pass på at vinskapet er i stående stilling under transporten.
Hvis du oppbevarer mest rødvin, anbefales det at du stiller temperaturen til mellom
15,5–18,5
C ved å trykke
på de to knappene over. LED-lampen ved siden av
o
"RED" lyser rødt.
o
Hvis du lagrer mest hvitvin, bør temperaturen stilles til 10–15
C, og LED-lampen
ved siden av "WHITE" lyser grønt. Hvis du lagrer mest musserende viner, bør
temperaturen stilles til 7,2–9,5
o
C, og LED-lampen ve
d siden av "SPARKLING"
lyser gult.
Du kan velge å vise gradene i Fahrenheit eller Celsius ved å trykke på knappen som
er merket med F/C. Grader i Fahrenheit vises med rødt i displayet merket med F, og
grader i Celsius vises med gult i displayet merket med C. Du kan slå lyset i
vinskapet på eller av ved å trykke på knappen som er merket med ON/OFF.
Page 92

Hyller
89
Hyllene er kr
ombelagt. De kan
tilpasses flasker i ulike størrelser ved at du flytter
dem opp eller ned ved å trekke dem ut av sporene. Hyllene er utformet for
oppbevaring av det maksimale antall flasker som er oppgitt.
Vinstativ
Det finnes også et vinstativ nederst i skapet hvor du kan oppbevare inntil seks
vinflasker. Stativet kan tas ut ved rengjøring.
NB:
Første gang du bruker vinskapet, eller hvis du slår det på etter at det har vært avslått
i lengre tid, kan det være en liten forskjell mellom temperaturen du har valgt, og den
som er angitt i LCD-displayet. Dette skyldes tiden vinskapet har vært slått av og er
helt normalt. Når vinskapet er vært i gang et par timer, virker
temperaturinnstilingen som normalt igjen.
Temperaturen i topp- og bunnhyllene varierer med 4–6 grader. Hvis du har stilt inn
skapet for rødvin og 16
C og du ønsker å ha både r
ødvin og hvitvin i skapet, bør du
o
plassere hvitvinsflaskene i de nederste hyllene og rødvinen i de øverste.
Skapet må kobles til en jordet stikkontakt. Jordingskabelen må ikke kuttes eller
fjernes. Spørsmål om strøm og jording bør rettes til en sertifisert elektriker eller et
autorisert Kelvinator-servicesenter.
Uriktig bruk av den jordede ledningen kan forårsake elektrisk støt. Hvis ledningen
blir skadet, må den byttes ut av et autorisert Kelvinator-servicesenter.
Page 93

VIKTIGE FORHOLDSREGLER
90
Ikke oppbevar m
at i vinskapet da temperaturen kanskje ikke er lav nok til å
forhindre at maten blir dårlig. På grunn av kondens som oppstår naturlig om
sommeren eller ved høy luftfuktighet, kan det dannes dugg på utsiden av glassdøren
som lett kan tørkes bort.
BETJENE VINSKAPET
Vi anbefaler at du plasserer vinskapet på et sted hvor temperaturen er mellom 22–25
grader. Ved høyere eller lavere romtemperatur kan temperaturen i skapet svinge.
Hvis lyset i skapet står på hele tiden, vil temperaturen stige.
Anbefalte temperaturer for kjøling av vin
o
Rødvin: 15,5–18,5
Tørre/hvite viner 10–15
Musserende vin 7,2–9,5
Rosévin 9,5–10,5
eraturene ovenfor kan variere avhengig om lyset i skapet står på eller om
Temp
C
o
C
o
C
o
C
flaskene er plassert i midten eller nederst i skapet.
BRUKE KNAPPENE PÅ DISPLAYPANELET:
Du kan stille temperaturen ved å trykke på knappen eller
Page 94

. Første gang du trykker på
91
disse to knappene, vil displayet vise de opprinnelige
temperaturene som ble innstilt på et tidligere tidspunkt (den forhåndsinnstilte
temperaturen er 50 ºF (10 ºC). Temperaturen du ønsker å angi, vil øke med 1 grad
når du trykker én gang på, og synke med 1 grad når du trykker på.
Vibrasjoner
Vinskapet bråker
mye
.
Døren lukkes ikke
skikkelig.
Tekniske spesifikasjoner:
Hvis du ønske
r detaljerte spesifikasjoner, kan du se merkeplaten som er plassert på
baksiden av vinskapet.
Kontroller at vinskapet står i vater.
Vinskapet står ikke i vater. Når skapets innvendige vegger
trekker seg sammen og utvides, vil det avgi litt lyd. Etter
kjølesyklusen høres kanskje en klukkelyd som forårsakes
av kjølevæsken i vinskapet. Raslelyden kan komme fra
kjølevæsken, som er helt normalt.
Hyllene er ikke riktig plassert. Dørpakningen er skitten.
Døren er snudd og er ikke riktig festet. Vinskapet står ikke
i vater.
Page 95

innlegging av flasker
92
40 flasker
flasker
13
11
10
6
montering av avstandsstykke
Page 96

PLAATS VAN DE ONDERDELEN
93
OLANDA
1. Afleesscherm en bedieningspaneel
2. Kast
3. Stelvoetje
4. Wijnrek
5. Glazen deur
6. Verchroomde legplanken
7. Verlichting
Elektrisch regelsysteem (aan de achterkant)
8.
9. Temperatuursensor
Page 97

94
Harteli
jk dank voor de aankoop van dit product.
Lees deze
maximaliseren.
Bewaar a
Dit pr
-
De keuken
-
Op
-
Bij bed &
Voor ca
-
Dit apparaat mag alleen worden gebruikt voor opslag van voedsel, ieder ander gebruik wordt als
gevaarlijk beschouwd en stelt de fabrikant niet verantwoordelijk voor eventuele vergetelheden.
Ook is het raadzaam dat u kennis van de garantievoorwaarden neemt.
handleiding aandachtig voordat u uw koelkast in gebruik neemt, om de prestaties te
lle documentatie voor later gebruik of voor andere eigenaren.
oduct is uitsluitend bedoeld voor huishoudelijk gebruik of vergelijkbare toepassingen, zoals:
voor het personeel in winkels, kantoren en andere werkomgevingen
r
derijen, door klanten van hotels, motels en andere omgevingen van een woon-type
boe
breakfasts (B & B)
tering en soortgelijke toepassingen, niet voor de verkoop.
VEILIGHEI
DSINFORM
ATIE
De koelkast bev
isolerend gas
milieuv
Wij rad
riendelijkheid, die echter ontvlambaar
en u aan de volgende regels te volgen om zo
gevaarlijke situaties
at een koelgas (R600a: isobutaan) en
(cyclopentaan), met hoge
zijn.
te voorko
men:
Voordat u
•
netsnoer uit het
Het koelsysteem achter en in de koelkast bevat
•
koelmiddel. Ve
•
Als in het koelsysteem een lek wordt opgemerkt, raak de
enige actie onderneemt, haalt u het
stopcontact.
rmijd daarom schade aan de buizen.
achterwand niet aan en gebruik geen open vlammen.
Open het venster en verlucht de kamer. Bel vervolgens
een service center voor herstelling.
Niet schrapen met een mes of een scherp voorwerp om
•
rijp of ijs die zi
ch voordoet te verwijderen. Hiermee kan het
koelcircuit worden beschadigd, het koelmiddel kan brand
veroorzaken of schade aan uw ogen berokkenen.
•
Plaats het apparaat niet in een vochtige, vette of stoffige
plaats, stel het ook niet bloot aan direct zonlic
Installeer het apparaat niet bij de ver
•
warming of brandbare
ht en water.
materialen.
•
Gebruik geen verlengsnoeren
of adapters.
Page 98

Vermijd hard trekken of vouwen van het netsnoer en raak
95
•
de stekker nooit aan met natte handen.
•
Beschadiging van de stekker en / of het netsnoer, kan
leiden tot elektrische schokken of brand.
Het wordt aanbevolen om de stekker schoon te houden,
•
elke overtollig restje op de stek
•
Gebruik geen mechanische apparaten of andere
appar
Vermijd absoluut het gebr
•
atuur om het ontdooiproces te versnellen.
ker kan brand veroorzaken.
uik van open vuur of elektrische
apparatuur, zoals kachels, stoomreinigers, kaarsen,
olielampen en dergelijke, om sneller te laten ontdooien.
•
Gebruik of bewaar geen ontvlambare sprays, zoals verf
, in
de buurt van de koelkast. Dit kan leiden tot een explosie of
brand.
•
Gebruik geen elektrische apparaten in de voedsel
opbergvakken, tenzij ze van het type zijn
dat wordt
aanbevolen door de fabrikant.
•
Plaats of bewaar geen ontvlambare en zeer vluchtige
stoffen zoals ether
, benzine, LPG, propaan gas,
spuitbussen, lijmen, zuivere alcohol, enz. Deze materialen
kunnen een explosie veroorzaken.
•
Bewaar geen geneesmiddelen of onderzoeksmaterialen
in
de koelkast. Wanneer het materiaal, dat een strikte
controle van opslag temperaturen vereist, wordt
opgeslagen, is het mogelijk dat het een slechte of een
ongecontroleerde reactie veroorzaakt.
Houd de ventilatie-openingen in het apparaat of in de
•
ingebouwde structuur, vrij van obstakels.
Plaats geen voorwerpen en /
•
of containers gevuld met
water op de bovenkant van het apparaat.
Voer geen reparaties aan de
•
koelkast. Alle interventies
moeten worden uitgevoerd uitsluitend door
gekwalificeerd personeel.
•
Dit apparaat mag niet gebr
uikt worden door personen
(inclusief kinderen) met fysieke, sensorische of mentale
handicaps, of een gebrek aan ervaring of kennis van het
Page 99

gebruik, zonder toezicht van per
96
sonen die de instructies
hebben gelezen voor gebruik en die direct
verantwoordelijk is voor hun veiligheid.
Zorg ervoor dat kinderen niet in de buurt spelen van het
apparaat om
hun veilig
heid te bewaren.
Dit apparaat is voorzien van het merkteken volgens de Europese richtlijn
2012/19/EU inzake Afgedankte elektrische en elektronische apparaten (AEEA).
AEEA bevat zowel verontreinigende stoffen (die negatieve gevolgen voor het
milieu kunnen veroorzaken) en basiscomponenten (die kunnen worden hergebruikt).
Het is belangrijk AEEA te onderwerpen aan specifieke behandelingen, teneinde afval en alle
verontreinigende stoffen op een correcte wijze te verwijderen en alle andere materialen te
hergebruiken en recycleren. Individuen kunnen een belangrijke rol spelen bij de garantie
dat AEEA geen milieu-issue wordt; het is essentieel om een aantal basisregels te volgen:
- AEEA mag niet worden behandeld als huishoudelijk afval;
- AEEA moet worden overgedragen aan de desbetreffende inzamelpunten beheerd door de
gemeente of door geregistreerde bedrijven. In veel landen, voor grote AEEA, kan thuisophaling
aanwezig zijn.
In veel landen, als u een nieuw apparaat koopt, kunnen de oude worden teruggegeven aan
de dealer die het kosteloos moet afhalen op een één-op-één-basis, zolang het apparatuur een
gelijkwaardig type betreft en dezelfde functies heeft als de geleverde apparatuur.
Door het plaatsen van de markering op dit product, verklaren wij, op onze eigen
verantwoordelijkheid, alle Europese veiligheids-, gezondheids- en milieu-eisen na te leven
opgesteld in de regelgeving geldig voor dit product.
(QHUJLHEHVSDULQJ
Voor een grotere energiebesparing adviseren we het volgende: Plaats het apparaat niet in
de buurt van warmtebronnen en niet op een plaats waar het blootstaat aan direct zonlicht,
in een goed geventileerd dak. Zet geen heet voedsel in de koelkast, want dan zou de
binnentemperatuur stijgen en de compressor continu blijven werken. Zet niet te veel voedsel
in het apparaat, want er moet voldoende lucht kunnen circuleren. Ontdooi het apparaat als er
zich ijs gevormd heeft, om de koudeoverdracht te bevorderen. Als de stroom uitvalt, is het
raadzaam de koelkastdeur gesloten te houden. Open de deuren van het apparaat zo min
mogelijk en doe ze zo snel mogelijk weer dicht Stel de temperaturen niet te laag in. Verwijder
het stof van de achterkant van het apparaat
Page 100

Belangrijke veiligheidsvoorschriften
97
x Lees de handleiding voordat u dit product gebruikt.
x Voorkom dat kinderen zich per ongeluk kunnen opsluiten en
daardoor stikken. Dat gevaar bestaat bij afgedankte of
achtergelaten koelkasten... zelfs als ze "maar een paar dagen
in de schuur staan."
x Handel als volgt voordat u de wijnkoeler afdankt:
verwijder de deur, maar laat de legplanken zitten zodat
kinderen zich niet gemakkelijk in de kast kunnen verbergen.
x Laat nooit kinderen dit apparaat gebruiken, er mee spelen of
er inkruipen.
x Maak de onderdelen van dit apparaat nooit schoon met
brandbare stoffen. Vluchtige dampen kunnen brand of een
explosie veroorzaken.
x Bewaar nooit benzine of een andere brandbare damp of
vloeistof in de buurt van dit apparaat of van een ander
apparaat. Vluchtige dampen kunnen brand of een explosie
veroorzaken.
INSTALLATIE-INSTRUCTIES
Voorbereidingen voor gebruik van de wijnkoeler
x Verwijder al het verpakkingsmateriaal dat in en om de koeler
zit, inclusief het piepschuim dat de deurpanelen beschermt.
x Controleer of de volgende onderdelen zijn meegeleverd:
o 3 uitschuifbare legplanken
o 1 wijnrek
o 1 gebruiksaanwijzing
x Laat dit apparaat circa 2 uur lang rechtop staan voordat u de
stekker in het stopcontact steekt. Dit verkleint de kans op
storingen in het koelsysteem vanwege schokken tijdens het
transport.
 Loading...