

Page 1
E Montaje y modo de empleo
P Instruções para montagem e utilização
F Prescriptions de montage et mode d’emploi
GB Instruction on mounting and use
D Montage- und Gebrauchsanweisung
NL Montagevoorschriften en gebruiksaanwiizing
RU
HR
GR
PL
Инструкция по монтажу у эксплуатации
I Istruzioni di montaggio e d’uso
Uputstva za montau i za uporabu
ПДЗГЙЕУ ФПРПИЕФЗУЗУ КБЙ ЧСЗУЗУ
INSTRUKCJA MONTA¿U I OBS³UGI
Page 2
Instalación - Instalação- Montage - Installation - Installierung - Installatie
Установка
- Installazione - Instaliranje -
ЕгкбфЬуфбуз -
Instalacja
9
9
15
1
6
7
7
2
2
3
5
3
11
16F
10
11
13A
12A
8
8
15
16F
12F
12F
13F
F
5
Modelo con cùpula (Versiòn Filtrante)
Modelo com cúpula (Versão filtrante)
Modèle avec chapeau (Version Filtrante)
Model with dome (Filter Version)
Modell mit Kuppel (Umlufthaube)
Model met Koepel (Filterversie)
Модель с зонтом
в фильтрующем режиме)
(
Modello con cupolino (Versione Filtrante)
Model sa kupolom (filtrirajucoj verziji)
МпнфЭлп ме кЬлхммб (МпнфЭлп ме
цйлфсЬсйумб)
Model z kopu³¹ (wersja z filtrem)
10
4b
11
4a
12
10
11
4a
13
13
Page 3

Montaje de repisas (opcionales):A la altura
deseada, clavar en los armarios adyacentes los
4 soportes laterales R y luego apoyar a ellos la
repisa S.
Opção da grelha de adorno: Nas paredes laterais do
móvel, fixar 4 suportes R e colocar a grelha S.
Option: montage des étagères: Sur les meubles
adjacents, fixer les 4 supports latéraux R aux dimension
voulues et poser les étagères S.
Fastening of shelves (optional): Fasten the four side
supports R to the adjacent cabinets and place the shelf
on the supports S.
Anbringung eventueller Regalbretter: An der
gewünschten Höhe die vier seitlichen Halter R an den
angrenzenden Schränken befestigen, und das
Ablagebrett darauflegen S.
Het aanbrengen van eventuele pannenrooster (naar
keuze): De 4 steunen R op de gewenste maat aan de
naastgelegen keukenkastjes aanbrengen en het rooster
S erop leggen.
Крепление полок (факультативное):
Прикрепите четыре боковые опорные
детали R к прилегающей мебели на
желаемой высоте, затем кладите на них
полку S.
Fissaggio mensole (optional):Fissare alla misura
voluta i quattro supporti laterali R ai mobili adiacenti ed
appoggiare la mensola S sopra di essi.
Postavljanje polica (po elji)
Prièvrstite na namjetaj R, na eljenoj visini,
èetiri boèna stalaka i postavite policu S.
УфесЭщуз сбцйюн (рспбйсефйкЬ):
Уфесеюуфе уфзн ерйихмзфЮ брьуфбуз фб
фЭууесб рлехсйкЬ хрпуфзсЯгмбфб R уфб
рспукеЯменб Эрйрлб кбй уфзсЯофе фп сЬцй S
ерЬнщ фпэт.
Opcjonalnie: Monta¿ pó³ek
Do s¹siaduj¹cych szafek zamocowaæ cztery boczne
wsporniki R i umieciæ pó³kê na wspornikach S.
f
b
a
g
C
e
d
c
3
2
1
O
G
O
N
Z1
Z2
C
G
K
M
CLOSED
J
CLOSED
OPEN
OPEN
L
L
S
R
E
E
P
Page 4

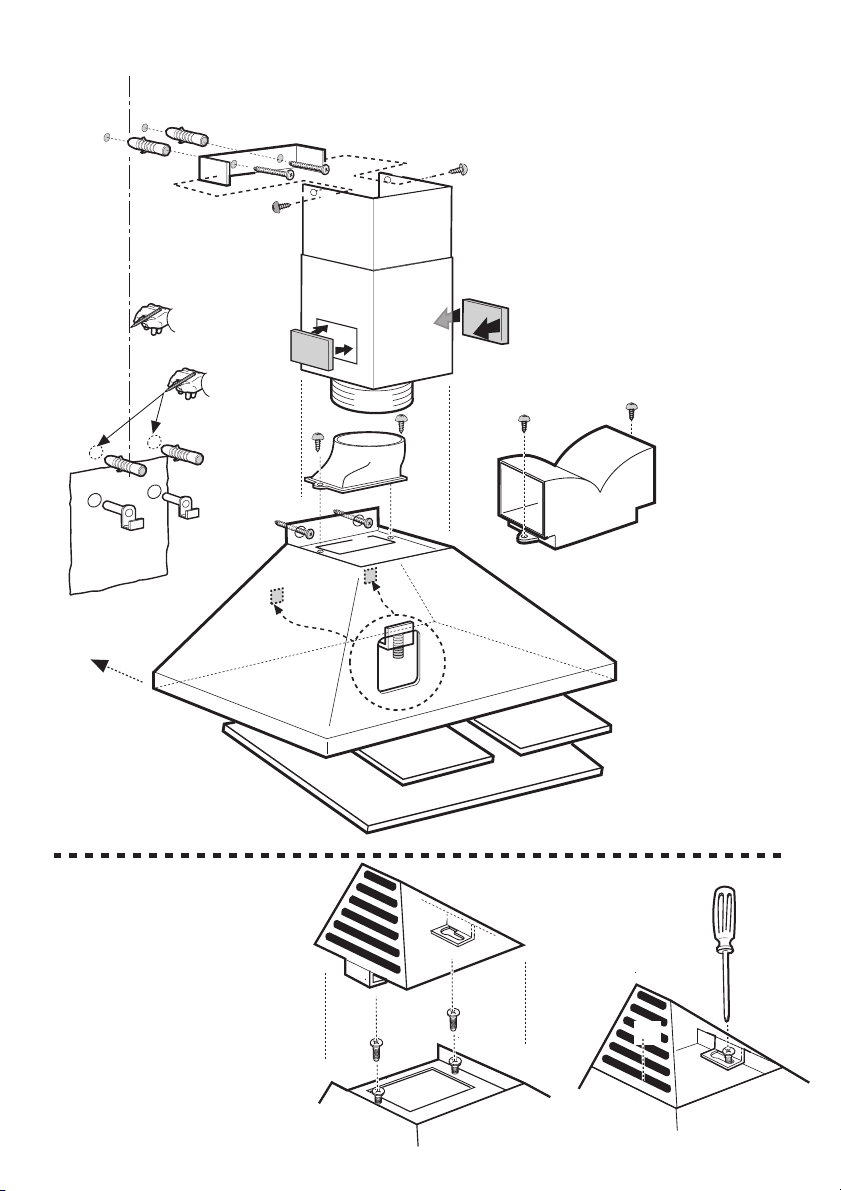
Instalación - sólo para el modelo con ojetes para la salida de los humos en versión filtrante, obtenidos directamente en la chimenea (sin rejillas de
plástico)
IInstalação – apenas para o modelo com fendas para a saída dos fumos na versão filtrante, realizadas directamente na chaminé (sem grades de
plástico).
Installation – uniquement pour modèle avec ouvertures pour l’évacuation des fumées dans la version filtrante, obtenues directement sur la cheminée
(sans grilles en plastique).
Installation - only for model with recirculation version fume outlet slots formed directly on the chimney (with no plastic grills)
Installation - nur für Modelle in Umluftversion mit direkt am Kamin herausgearbeiteten Abluftschlitzen (ohne Plastikgitter).
Installatie - alleen voor het model met uitsparingen voor de uitgang van de rook in de filterversie, rechtstreeks in de schouw (zonder kunststof roosters).
Установка только для модели с прорезями, сделанными на самом дымоходе (без пластмассовых решеток), для
выхода дыма из вытяжки в функции фильтрации.
Installazione - solo per modello con asole per l’uscita dei fumi in versione filtrante ricavate direttamente sul camino (senza griglie in plastica)
Montaa - samo za modele opremljene s kopèama za izbacivanje dima, u varijanti s filterom, ugraðenima direktno na dimnjaku
(bez plastiènih pregrada)
ЕгкбфЬуфбуз - мьнп гйб мпнфЭлп ме учйумЭт гйб фзн Эопдп фщн кбрнюн уфп мпнфЭлп ме цйлфсЬсйумб рпх хрЬсчпхн рЬнщ
уфзн кбмйнЬдб (чщсЯт рлбуфйкЭт гсЯлйет)
9
9
11
11
10
15
15
1
6
7
7
13A
12A
12F
12F
13F
F
2
2
3
3
8
5
8
5
4b
4a
4a
Page 5

GB
INSTRUCTION ON MOUNTING AND USE
Installation
The cooker hood must be placed at a minimum distance of 60 cm
from the cooking plane for electric cookers and 75cm for gas or
mixed cookers.
Use
The cooker hood is provided with an upper air exit B for discharging
fumes externally for models including chimney flue C ( Suction
Version A- exhaust pipe 13A not supplied).
In the instance where it is not possible to discharge cooking fumes
and vapours externally even if utilising the model with chimney flue
C, the cooker hood may be used in the filter version F by mounting
two active carbon filters E, the fumes and vapours are then recycled
via the upper grill G (depending on the model the grill may be directly
placed on the chimney flue or via the mounting of two small grills –
16F).
If in possession of a model with grill placed on chimney flue then two
H extensions must be placed on the deflector 13F.
The models provided with small dome D may only be used in the filter
version F.
The models without suction motor operate only in the suction version
and must be connected to a peripheral suction unit (not supplied).
Electrical connection
The electrical tension must correspond to the tension noted on the
label placed inside the cooker hood. Connect the electrical plug,
where provided, to the an easily accessible outlet in conformity with
local standards in force.
Where an electrical plug is not provided (for direct connection to
electrical network) place a standards approved bipolar switch with
an aperture distance of not less than 3mm (accessible) from the
contacts.
Operation
Push-button Model:
a. ON/OFF light button
b. OFF motor button
c. - d. - e. Suction speed 1 (c.), 2 (d.), 3 (e.),
Slide-button Model
f. ON/OFF light button
g. ON/OFF button and suction speed selection
Use the high suction speed in cases of concentrated kitchen
vapours. It is recommended that the cooker hood suction is switched
on for 5 minutes prior to cooking and to leave in operation during
cooking and for another 15 minutes approximately after terminating
cooking.
Cleaning
The cooker hood should be cleaned regularly internally and externally.
For cleaning use a cloth moistened with denatured alcohol or neutral
liquid detergents. Avoid abrasive detergents.
Failure to carry out the basic standards of the cleaning of the cooker
hood and replacement of the filters may cause fire risks.
Maintenance
Prior to any maintenance operation ensure that the cooker hood is
disconnected from the electrical outlet.
Anti-grease Filter –
If situated inside the support grill, it may be one of the following types:
Paper filter must be replaced once a month or if colouring appears
on upper side, in such cases the colouring is evident through the grill
openings.
Sponge filter should be washed with hot soapy water once a month
and replaced every 5 to 6 washes.
Metallic filter must be cleaned once a month, with non abrasive
detergents, by hand or in dishwasher on low temperature and short
cycle.
To obtain access to the grease filter J open the grill K via the hooks
L and free the grill from the stoppers M.
Some models are provided with a metal filter N without support
grill, this filter should be washed as instructions noted for metallic
filter above and is removed from its placing by pushing the handles
O towards the back and sliding the filter N downwards.
Carbon Filter
(2 pieces – only for filter version)
The active carbon filters E are not washable nor regenerative. The
active carbon filters capture unpleasant cooking odours.
Apply one on each side covering both grills protecting the motor
propeller, then turn the filter central handles P clockwise.
In order to dismantle turn the central handle P anti-clockwise for each
filter.
Replacing lightbulbs
Remove the anti-grease filter support grill or the anti-grease filter to
attain access to the lightbulb area. Remove the damaged lightbulb
and replace with an incandescent oval bulb max. 40W E14.
If the cooker-hood comes with a halogen light, take off its protection
by unscrewing (Z1) or by removing it (Z2 lifting with a small flat edged
screwdriver). Remove the damaged bulb and substitute it with a max
20W halogen bulb (G4).
Caution
This appliance is designed to be operated by adults. Children should
not be allowed to tamper with the controls or play with the appliance.
Do not use the cooker hood where the grill is not correctly fixed! The
suctioned air must not be conveyed in the same channel used for
fumes discharged by appliances powered by other than electricity.
The environment must always be adequately aerated when the
cooker hood and other appliances powered by other than electricity
are used at the same time. Flambé cooking with a cooker hood is
prohibited. The use of a free flame is damaging to the filters and may
cause fire accidents, therefore free flame cooking must be avoided.
Frying of foods must be kept under close control in order to avoid
overheated oil catching fire. Carry out fumes discharging in
accordance with the regulations in force by local laws for safety and
technical restrictions.
Consult the designs in the front pages referenced in the text by alphabet letters. Closely follow the instructions set out in this manual. All responsibility,
for any eventual inconveniences, damages or fires caused by not complying with the instructions in this manual, is declined.
 Loading...