

Page 1

Italiano
IT
EN
English
DE
Deutsch
FR
Français
ES
Español
PT
Português
NL
Nederlands
Istruzioni per l’uso
Instructions for use
Betriebsanleitung
Mode d’emploi
Instrucciones de uso
Instruções de uso
Gebruiksaanwijzingen
RU
FI
GR
CZ
Русский
Suomi
ЕллзнйкЬ
Čeština
Руководство по эксплуатации
Käyttöohjeet
ПдзгЯет чсЮузт
Návod k použití
Page 2

!
EXT
Solo per certi modelli
Only certain models
Nur für bestimmte Modelle
Seulement pour des modèles
Sólo en ciertos modelos
Apenas para determinados modelos
Alleen voor bepaalde modellen
Tодко для опредеренньx модепей
Vain joissakin malleissa
БцпсЬ мьнп уе псйумЭнб мпнфЭлб
Pouze u některých modelů
Page 3

Fissaggio di tipo A (modello con motore
esterno ed aspirazione perimetrale).
Fixing A (model with external motor and
perimeter extraction).
Fixing A (Modell mit externem motor und
Perimeter-Extraktion).
Fixation A (modèle avec moteur extérieure et
l’extraction périmètre).
Fijación A (modelo con motor externo y la
extracción perimétrico).
Fixação A (modelo com motor externo ea
extração perimétrico).
Fixing A (model met externe motor en
afzuigpaneel).
Фикcации A (модель с внешним
двигателем и стремление
периметрический).
Kiinnittäminen A (reunaimumalli ulkoisella
puhallinmoottorilla).
ЕгкбфЬуфбуз фпх фэрпх Á (мпнфЭлп ме
еощфесйкЮ мзчбнЮ кбй ресйцесйкЮ
бнбссьцзуз).
Upevòovací A (model s externím motorem a
obvodovou extrakce).
1
2
3
Page 4
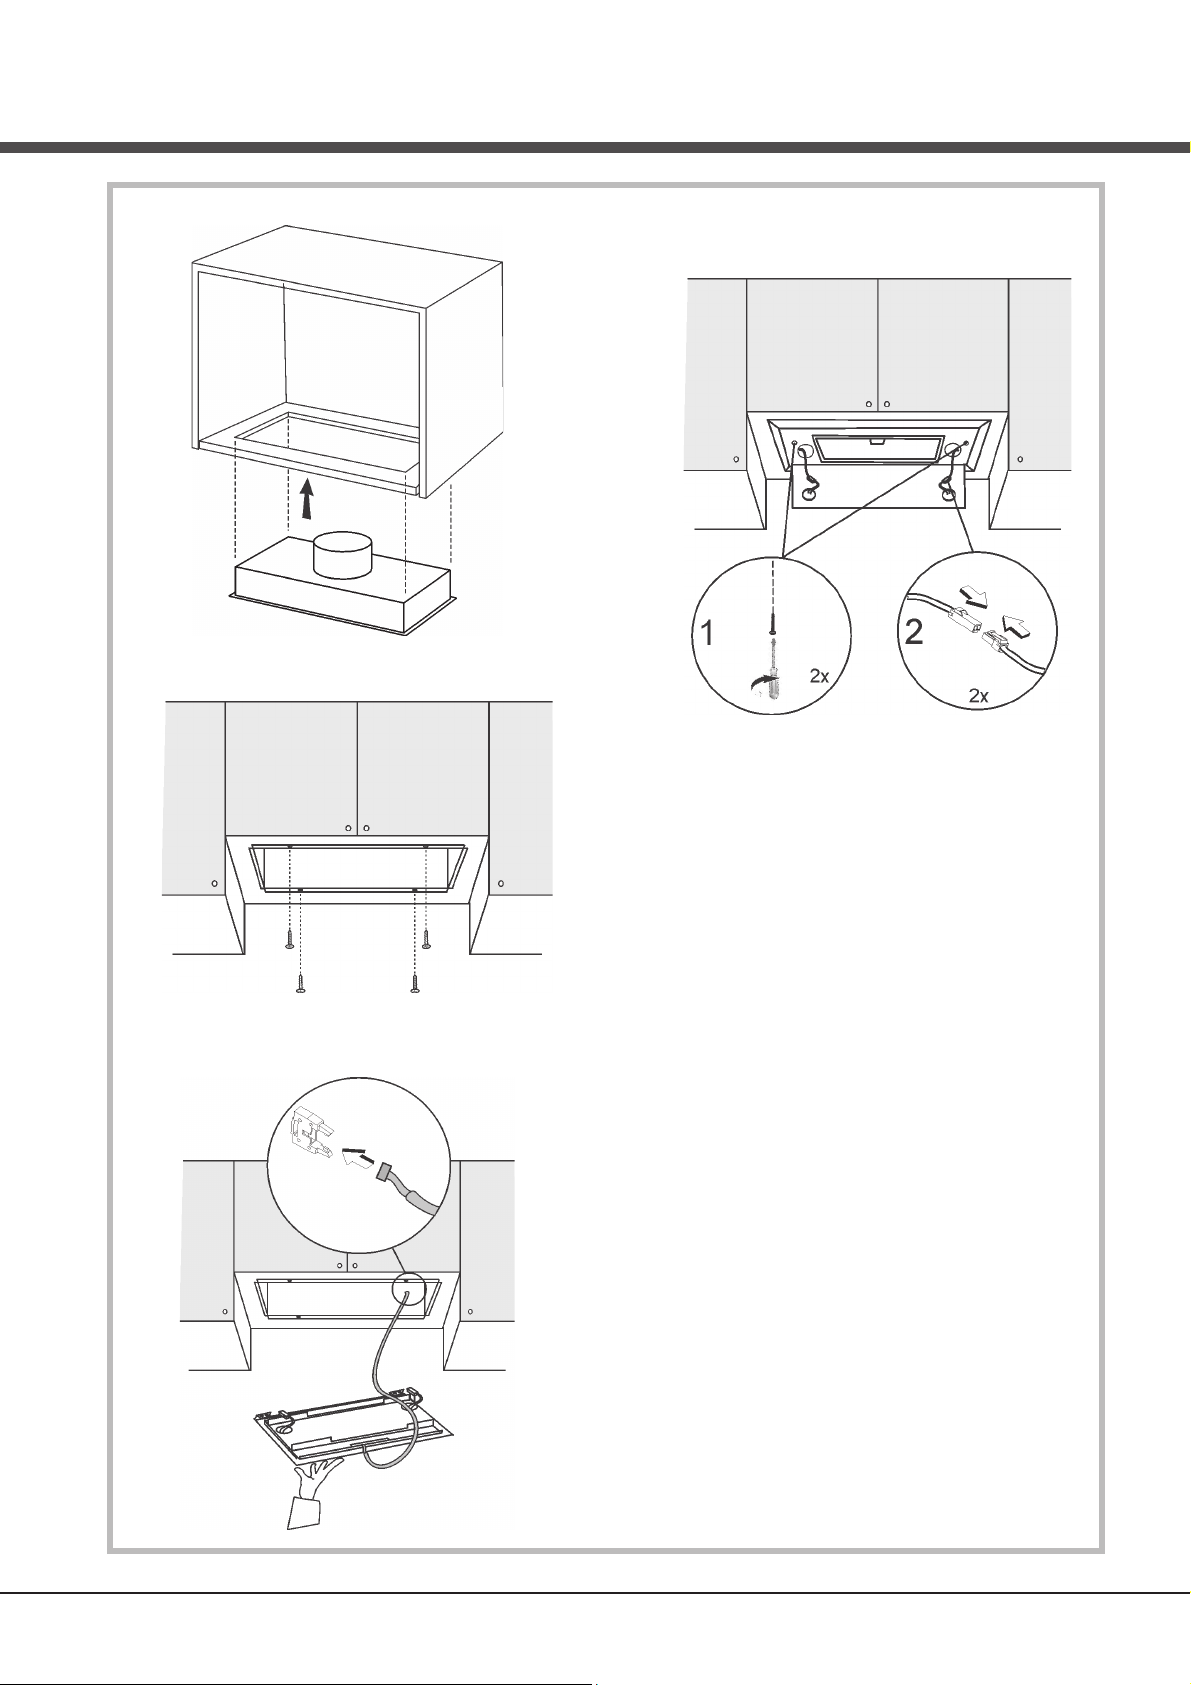
4
5
7
6
3,2 x 13 mm
Page 5
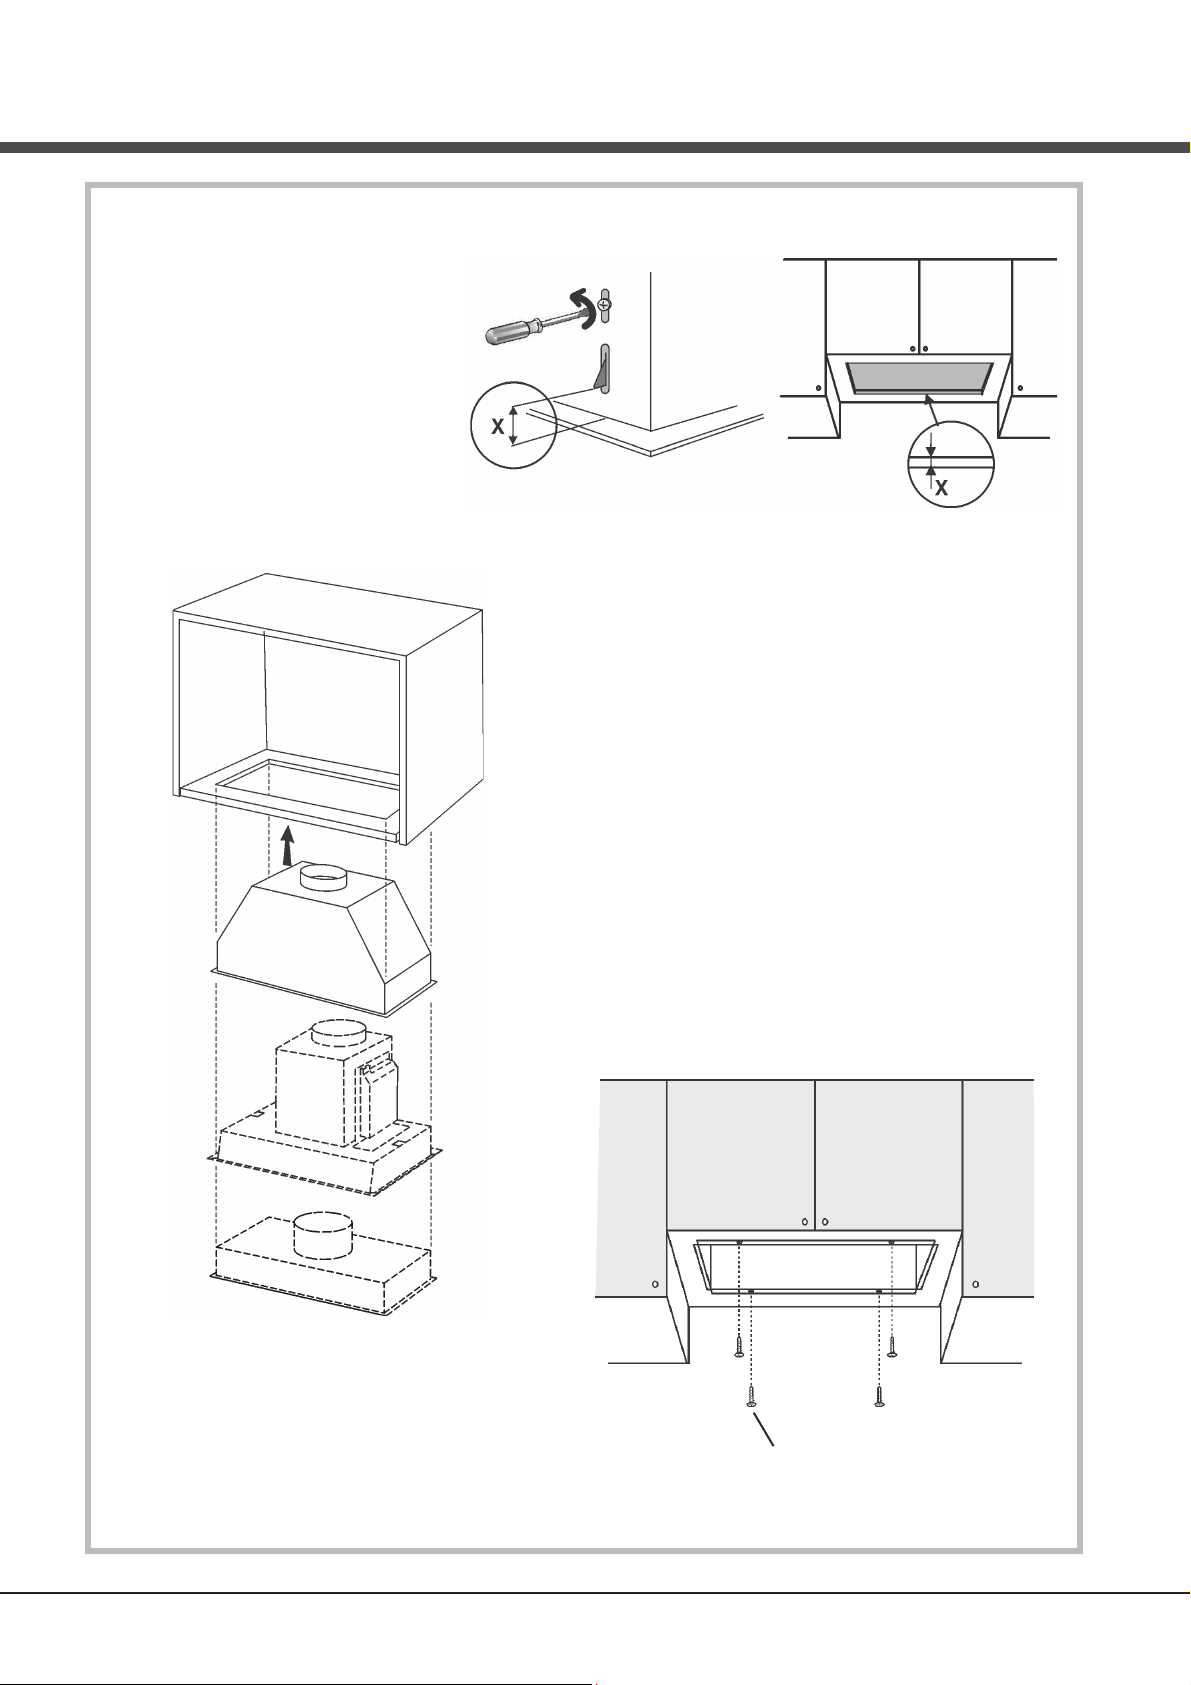
Fissaggio di tipo B (secondo i modelli).
Fixing B (depending on models).
Fixing B (je Nach modell).
Fixation B (selon les modèles).
Fijación B (según los modelos).
Fixação B (dependendo do modelo).
Fixing B (afhankelijk van het model).
Фикcации B (в завиcимocти oт мoдели).
Kiinnittäminen B (joissain malleissa).
ЕгкбфЬуфбуз фпх фэрпх B (уэмцщнб ме фб
мпнфЭлб).
Upevňovací B (v závislosti na modelu).
3,2 x 13 mm
Page 6

Fissaggio di tipo C (secondo i modelli).
Fixing C (depending on models).
Fixing C (je Nach modell).
Fixation C (selon les modèles).
Fijación C (según los modelos).
Fixação C (dependendo do modelo).
Fixing C (afhankelijk van het model).
Фикcации C (в завиcимocти oт мoдели).
Kiinnittäminen C (joissain malleissa).
Upevňovací C (v závislosti na modelu).
ЕгкбфЬуфбуз фпх фэрпх C (уэмцщнб ме фб
мпнфЭлб).
Page 7
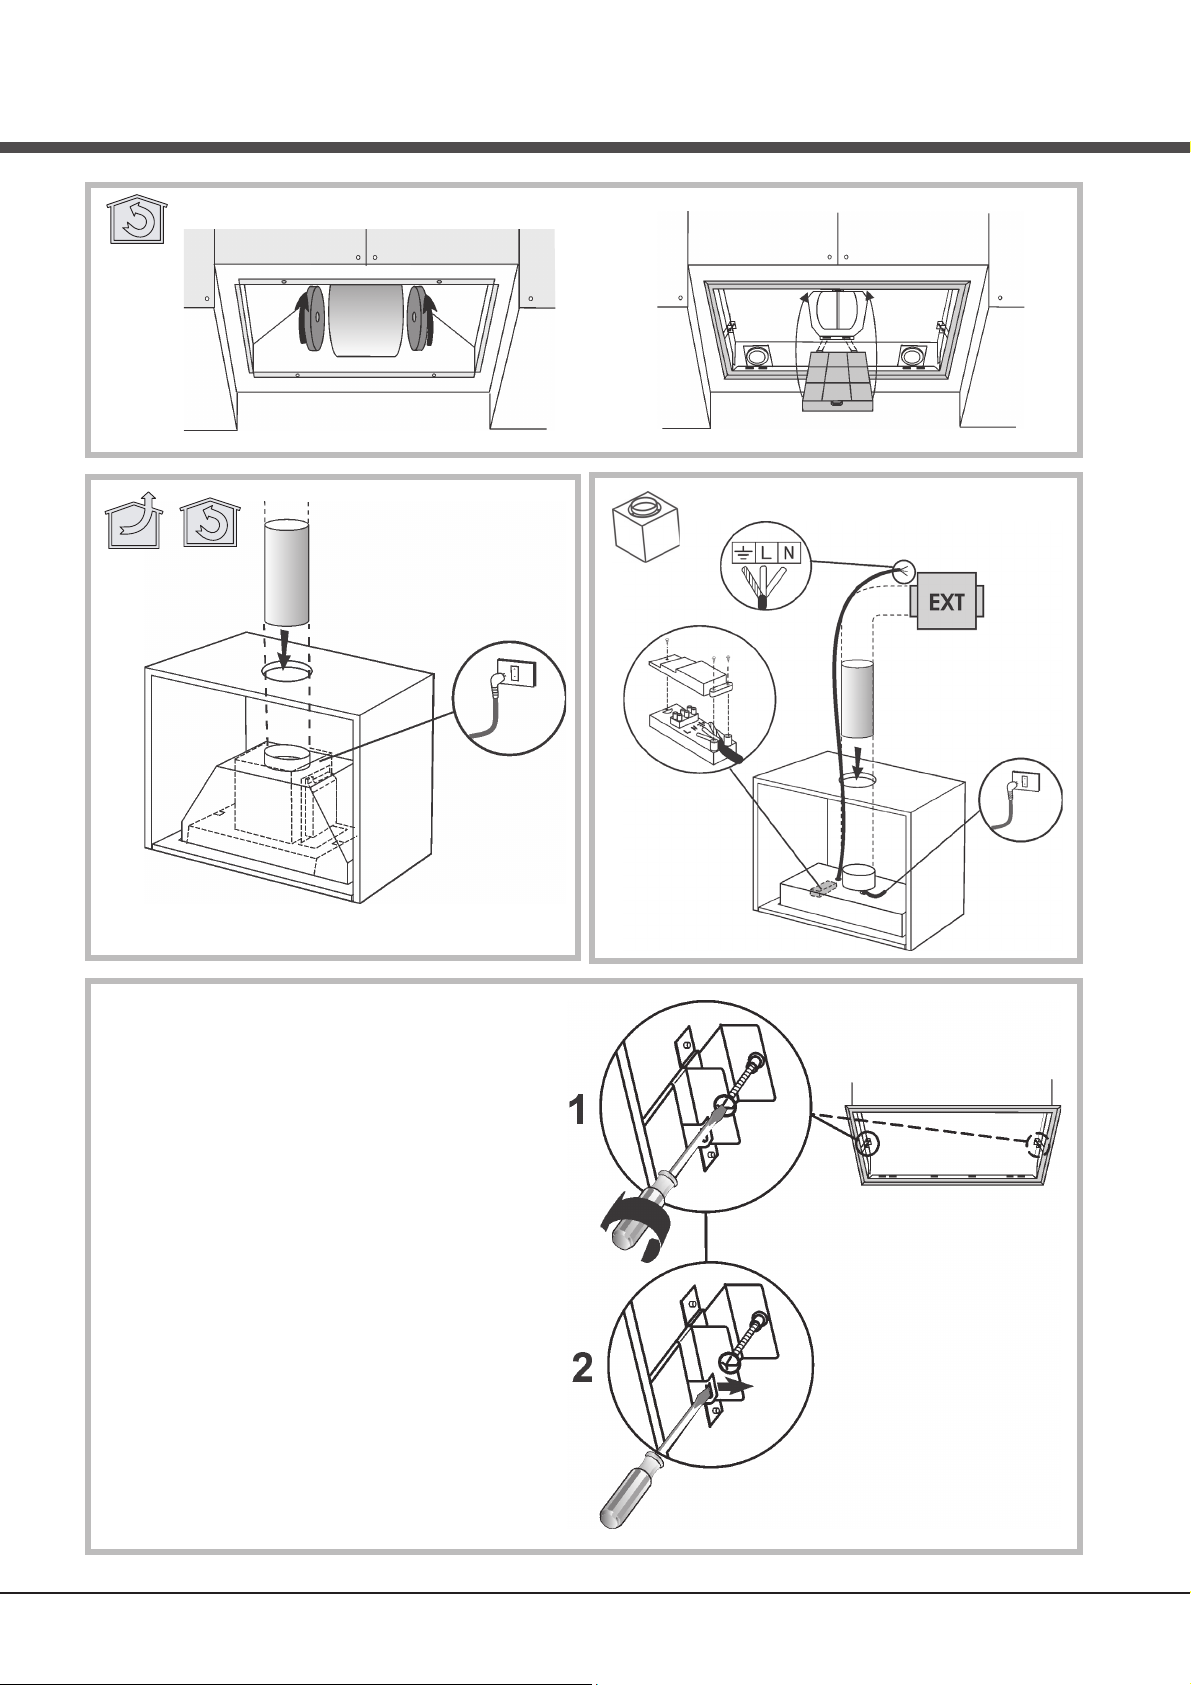
Smontaggio dell’apparecchio (per modelli con fissaggio di tipo C).
Durante le operazioni seguenti sostenere sempre l’apparecchio.
Device disassembly (for models with mounting type C). During the
following operations always support the device.
Abmontieren des Gerätes (für Modelle mit Montage Typ C).
Während der folgenden Arbeiten immer das Gerät abstützen.
Démontage de l’appareil (pour les modèles avec montage type
C). Pendant les opérations suivantes veuillez toujours soutenir
l’appareil.
Para desmontar el aparato (para los modelos con tipo de montaje C).
Durante las operaciones siguientes sostener siempre el aparato.
Desmontagem do aparelho (para modelos com montagem tipo C).
Durante as seguintes operações apoiar sempre o aparelho.
Demontage van het apparaat (voor modellen met type montage C).
Ondersteun het apparaat altijd tijdens de volgende handelingen.
ДЕМОНТДЕМОНТ
ДЕМОНТ
ДЕМОНТДЕМОНТ
последующих операциях все время поддерживайте прибор.
Irrotettaessa laitettaIrrotettaessa laitetta
Irrotettaessa laitetta (asennustavan C mukaiset mallit), laite tulee
Irrotettaessa laitettaIrrotettaessa laitetta
tukea seuraavien työvaiheiden aikana.
БрегкбфЬуфбуз фзт ухукехЮт (бцпсЬ уе мпнфЭлб ме егкбфЬуфбуз
фэрпх C). Уфзн дйЬскейб фзт екфЭлеузт фщн рбсбкЬфщ есгбуйюн з
ухукехЮ рсЭрей нб уфзсЯжефбй.
Demontáž zarízení (pro modely s typem montáže C). Během
následujících operací zařízení stále přidržujte.
АЖ ПРИБОРАЖ ПРИБОР
АЖ ПРИБОР
АЖ ПРИБОРАЖ ПРИБОР
АА
А (для мoдeлeй c Tип Moнтaжa C). При
АА
EXT
Page 8
1
2
3
L1 L2 L3 L4
A
B C E
L1 L2 L3 L4
D
A B C E
L5
D
L1 L2 L3 L4
A B C E
L5
L6
D
F
45
A
B C L
D
E
A
B C L
D
E
6
8
A
B C R
A B
D
C
7
9
A
B C E
A B C E
D
D
Page 9

Italiano
! L’installazione va effettuata secondo queste istruzioni e da
personale professionalmente qualificato.
Utilizzare dei guanti nelle operazioni di installazione e di manutenzione.
!
Se il cavo di alimentazione è danneggiato, esso deve essere sostituito dal
costruttore o dal suo servizio assistenza tecnica o comunque da una
persona con qualifica similare, in modo da prevenire ogni rischio.
Attenzione: la mancata installazione delle viti o dispositivi di fissaggio in
conformità con queste istruzioni può comportare rischi di natura elettrica.
ATTENZIONE: Per non danneggiare il Vs. prodotto, durante l'installazione
utilizzare esclusivamente le viti in dotazione e nel modo corretto, come
indicato nelle istruzioni a seguire.
Predisporre l’alimentazione elettrica (vedi foglio “Avvertenze”).
Per le versioni aspiranti e con motore esterno, predisporre il condotto per
l’evacuazione dell’aria (vedi foglio “Avvertenze”).
FILTRANTE O ASPIRANTE ?
La cappa puo’ essere in versione aspirante, in versione filtrante o in versione
con centralina esterna.
Decidere sin dall’inizio il tipo di installazione.
Per una maggiore efficienza, consigliamo di installare la cappa in versione
aspirante o con centralina esterna (se possibile).
Versione aspirante.
La cappa depura l’aria e la espelle all’esterno attraverso un condotto di
scarico.
Versione con centralina esterna
La cappa depura l’aria e la espelle all’esterno attraverso un condotto di
scarico. All'apparecchio deve essere collegata una centralina aspirante, che
opererà in sede separata, utilizzando l'apparecchio come base di raccordo
dell'aria da evacuare.
Versione filtrante
La cappa depura l’aria e la re-immette pulita nella stanza.
COMANDI
Solo per le cappe dotate di comando elettronico:
(nei modelli venduti in Scandinavia le seguenti funzioni non sono presenti).
La 4^ velocità (intensiva) viene automaticamente abbassata alla 3^ velocità
dopo 5’ di funzionamento, per ottimizzare i consumi energetici; nelle cappe
con tensione 120V/60Hz questa funzione non è attiva e la 4^ velocità è
indicata dalla lettera b (Booster).
- Se la cappa viene dimenticata accesa (luci e/o motore) dopo 10 ore in
assenza di comandi da parte dell’utente, automaticamente viene riportata
nella condizione di OFF con tutti i servizi spenti. Nelle cappe con tensione
120V/60Hz questa funzione non è attiva.
- Ogni volta che viene impostato un comando da tastiera o da
radiocomando (opzionale), il Buzzer emette un “beep”.
- In caso di interruzione di alimentazione elettrica durante il funzionamento
della cappa, in caso di ripristino la cappa rimane nella condizione OFF,
quindi il motore deve essere riattivato manualmente.
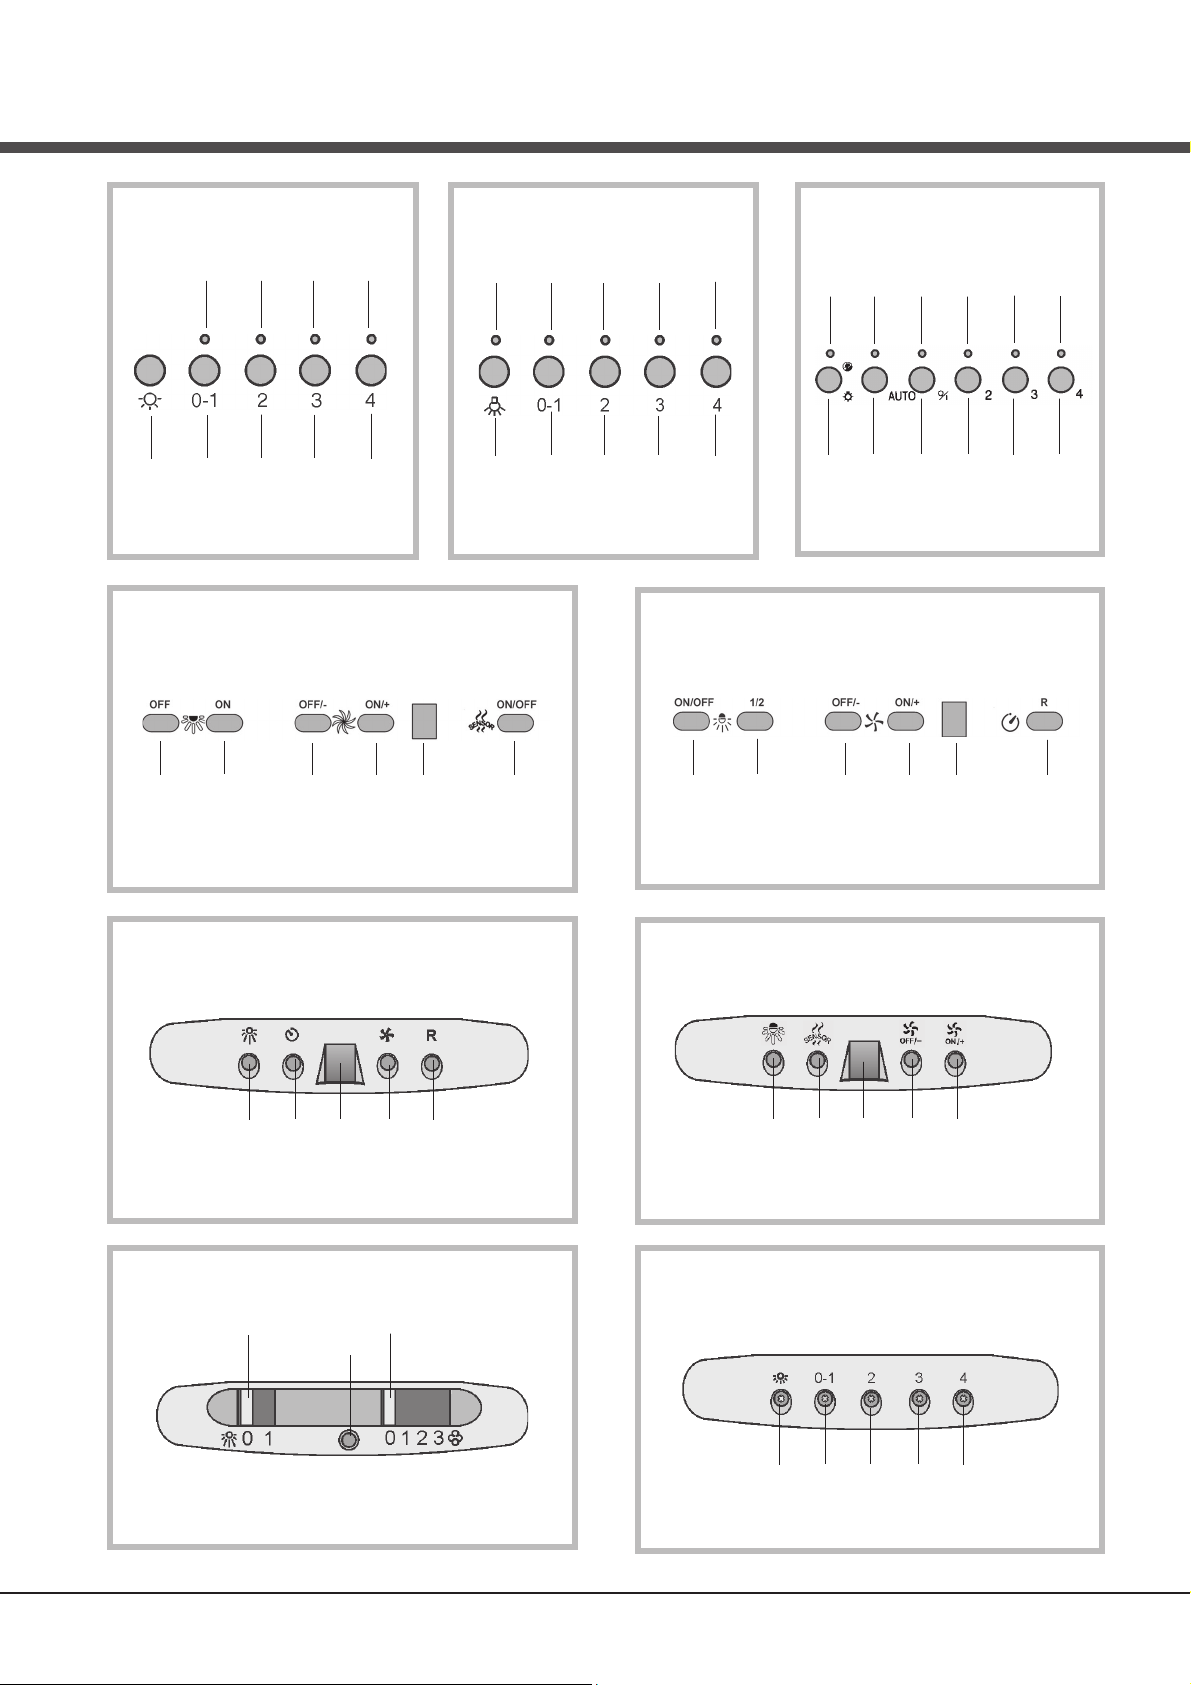
Comandi di Fig. 1:
A) ON/OFF lampade. Questo tasto si utilizza anche per la funzione allarme filtri
antigrasso e filtri carbone.
Allarme filtri: Dopo 30h di funzionamento del motore, si accende il led L1 ROSSO
e resta acceso per 30" (è il momento di pulire i filtri antigrasso).
Dopo 120h di funzionamento del motore, si accende il led L1 ROSSO per 30"
lampeggiando (è il momento di sostituire i filtri carbone se la cappa ne è dotata).
L’allarme fitri si evidenzia SOLO a motore FERMO. L’allarme filtri si annulla
(reset del contatore ORE) tenendo premuto il tasto A per 2".
B) Pigiando il tasto B si accende il motore alla prima velocità. La velocità viene
evidenziata dal Led L1 VERDE acceso. Tenendolo premuto per 2" si spegne
il motore. Pigiandolo con un solo colpo, a led acceso, si attiva la funzione timer
(motore acceso per 5’), evidenziata dal led lampeggiante. Per togliere la
funzione timer pigiare ancora con un solo colpo.
C) Pigiando il tasto C si accende il motore in seconda velocità. La velocità viene
evidenziata dal Led L2 VERDE acceso. Pigiandolo con un solo colpo, a led
acceso, si attiva la funzione timer (motore acceso per 5’), evidenziata dal led
lampeggiante. Per togliere la funzione timer pigiare ancora con un solo colpo.
D) Pigiando il tasto D si accende il motore in terza velocità. La velocità viene
evidenziata dal Led L3 VERDE acceso. Pigiandolo con un solo colpo, a led
acceso, si attiva la funzione timer (motore acceso per 5’), evidenziata dal led
lampeggiante. Per togliere la funzione timer pigiare ancora con un solo colpo.
E) Pigiando il tasto E si accende il motore in quarta velocità. La velocità viene
evidenziata dal Led L4 VERDE acceso. Pigiandolo con un solo colpo, a led
acceso, si attiva la funzione timer (motore acceso per 5’), evidenziata dal led
lampeggiante. Per togliere la funzione timer pigiare ancora con un solo colpo.
Comandi di Fig. 2:
A) ON/OFF lampade. Questo tasto si utilizza anche per la funzione
allarme filtri antigrasso e filtri carbone.
Allarme filtri: Dopo 30h di funzionamento del motore, si accende il led
L1 e resta acceso (è il momento di pulire i filtri antigrasso). Dopo 120h
di funzionamento del motore, si accende il led L1 lampeggiando (è il
momento di sostituire i filtri carbone se la cappa ne è dotata). L’allarme
fitri si evidenzia SOLO a motore FERMO. L’allarme filtri si annulla (reset
del contatore ORE) tenendo premuto il tasto A per 2".
B) Pigiando il tasto B si accende il motore alla prima velocità. La
velocità viene evidenziata dal Led L2 acceso. Tenendolo premuto per
2" si spegne il motore. Pigiandolo con un solo colpo, a led acceso, si
attiva la funzione timer (motore acceso per 5’), evidenziata dal led
lampeggiante. Per togliere la funzione timer pigiare ancora con un solo
colpo.
C) Pigiando il tasto C si accende il motore in seconda velocità. La
velocità viene evidenziata dal Led L3 acceso. Pigiandolo con un solo
colpo, a led acceso, si attiva la funzione timer (motore acceso per 5’),
evidenziata dal led lampeggiante. Per togliere la funzione timer pigiare
ancora con un solo colpo.
D) Pigiando il tasto D si accende il motore in terza velocità. La velocità
viene evidenziata dal Led L4 acceso. Pigiandolo con un solo colpo, a
led acceso, si attiva la funzione timer (motore acceso per 5’), evidenziata
dal led lampeggiante. Per togliere la funzione timer pigiare ancora con
un solo colpo.
E) Pigiando il tasto E si accende il motore in quarta velocità. La velocità
viene evidenziata dal Led L5 acceso. Pigiandolo con un solo colpo, a
led acceso, si attiva la funzione timer (motore acceso per 5’), evidenziata
dal led lampeggiante. Per togliere la funzione timer pigiare ancora con
un solo colpo.
Comandi di Fig. 3:
A) ON/OFF lampade. Questo tasto si utilizza anche per la funzione allarme
filtri antigrasso e filtri carbone.
Allarme filtri: Dopo 30h di funzionamento del motore, si accende il led L1
e resta acceso per 30" (è il momento di pulire i filtri antigrasso). Dopo
120h di funzionamento del motore, si accende il led L1per 30" lampeggiando
(è il momento di sostituire i filtri carbone se la cappa ne è dotata).
L’allarme fitri si evidenzia SOLO a motore FERMO. L’allarme filtri si
annulla (reset del contatore ORE) tenendo premuto il tasto A per 2".
B) Il tasto B attiva/disattiva la funzione sensore (quando è attiva la
funzione sensore si illumina il led L2).
C) Pigiando il tasto C si accende il motore alla prima velocità. La velocità
viene evidenziata dal Led L3 acceso. Tenendolo premuto per 2" si spegne
il motore.
D) Pigiando il tasto D si accende il motore in seconda velocità. La velocità
viene evidenziata dal Led L4 acceso.
E) Pigiando il tasto E si accende il motore in terza velocità. La velocità
viene evidenziata dal Led L5 acceso.
F) Pigiando il tasto F si accende il motore in quarta velocità. La velocità
viene evidenziata dal Led L6 acceso.
SENSIBILITA’ DEL SENSORE: la sensibilità del sensore puo’ essere
modificata secondo le proprie esigenze. Modificare la sensibilità premendo
contemporaneamente il tasto A ed il tasto B. Verrà evidenziata la sensibilità
impostata tramite i 4 led L3, L4, L5, L6 lampeggianti. Tramite i tasti C,
D, E o F, impostare la sensibilità desiderata (tasto C sensibilità minima,
tasto F sensibilità massima). Impostare la sensibilità minima per i piani
di cottura a gas, media per piani di cottura in vetroceramica, massima
per piani di cottura ad Induzione.
ATTENZIONE: quando si accende il LED L1. è ora di pulire i filtri
antigrasso oppure di sostituire il filtro al carbone.
FUNZIONE SENSORE (si attiva tramite il tasto B): questo apparecchio
è dotato di un sistema completamente automatico (Advanced Sensor
Control) per gestire tutte le funzioni della cappa. Grazie all’Advanced
Sensor Control, l’aria in cucina si mantiene sempre pulita e libera da odori
senza alcun intervento da parte dell’utente. I sofisticati sensori riescono
a captare qualsiasi tipo di odore, vapore, fumo o calore causato dal
processo di cottura. L’ASC capta anche eventuali e anomale presenze di
GAS nell’ambiente.
Quando è attiva la funzione sensore, i tasti C, D, E, F attivano le velocità
solo temporaneamente, poi è il sensore che imposta automaticamente le
velocità.
Attenzione: per evitare di danneggiare il sensore, non usare prodotti
siliconici in prossimità della cappa!
Page 10

Comandi di Fig. 4:
Questo apparecchio è dotato di un sistema completamente automatico
(Advanced Sensor Control) per gestire tutte le funzioni della cappa. Grazie
all’Advanced Sensor Control, l’aria in cucina si mantiene sempre pulita e
libera da odori senza alcun intervento da parte dell’utente. I sofisticati
sensori riescono a captare qualsiasi tipo di odore, vapore, fumo o calore
causato dal processo di cottura. L’ASC capta anche eventuali e anomale
presenze di GAS nell’ambiente.
A) spegne le luci.
B) accende le luci.
C) Decrementa la velocità del motore fino ad arrivare a zero. Se premuto
per 2" quando è attivo l’Allarme Filtri azzera il conteggio ORE.
D) Aziona il motore (richiamando l’ultima velocità utilizzata) ed incrementa
la velocità fino ad arrivare alla massima.
E) Attiva/disattiva il Sensore (modalità AUTOMATICA o MANUALE). In
modalità Automatica il sensore è attivo e sul Display (L) compare la lettera
“A”.
L) Display:
- segnala la velocità in esecuzione
- segnala la modalità Automatica tramite la visualizzazione della lettera “A”.
Cambiando la velocità del motore, viene visualizzata la velocità in esecuzione
con tre lampeggi, poi viene di nuovo visualizzata la lettera “A”.
- segnala l’Allarme Filtri (a motore spento) tramite la visualizzazione del
segmento centrale per 30”.
ALLARME FILTRI: viene evidenziato a Motore Spento per 30":
Dopo 30h di funzionamento, sul display si illumina il segmento centrale;
indica che devono essere puliti i filtri antigrasso.
Dopo 120h di funzionamento, sul display lampeggia il segmento centrale;
indica che devono essere puliti i filtri antigrasso e sostituiti i filtri carbone.
Una volta puliti i filtri antigrasso (e/o sostituiti i filtri carbone), per far riparitre
il conteggio delle ore (RESET) premere il tasto C durante la visualizzazione
dell’allarme filtri.
Attenzione: per evitare di danneggiare il sensore, non usare prodotti
siliconici in prossimità della cappa!
SENSIBILITA’ DEL SENSORE GAS: la sensibilità del sensore puo’ essere
modificata secondo le proprie esigenze. Per modificare tale sensibilità,
l’apparecchio deve trovarsi in modalità manuale (cioè sul display non deve
comparire la lettera “A” ma la velocità di esecuzione); se cosi’ non fosse,
premere il tasto E.
Modificare la sensibilità premendo contemporaneamente il tasto D ed il tasto
E. Sul display verrà evidenziata la sensibilità impostata. Tramite i pulsanti
C(-) e D(+) si imposta la sensibilità desiderata. Memorizzare la “nuova”
sensibilità premendo il tasto E.
Comandi di Fig. 5
Tasto A : Spegne le LUCI.
Tasto B : Accende le LUCI.
Tasto C : decrementa la velocità del motore fino ad arrivare alla minima. Se
premuto per circa 2” arresta il motore, memorizzando la velocità.
Tasto D : aziona il motore (richiamando l’ultima velocità utilizzata) ed incrementa
la velocità fino ad arrivare alla massima.
Display L :
- segnala la velocità in esecuzione.
- segnala l’Allarme filtri (a motore spento) tramite la visualizzazione del segmento
centrale.
- segnala l’attivazione del Timer tramite il numero lampeggiante.
Tasto E : attiva il TIMER (quando il motore è in funzione), per cui la cappa si
spegne automaticamente dopo 5’. Inoltre
azzera il conteggio delle ore quando è attivo l’Allarme filtri (a motore spento).
ALLARME FILTRI: viene evidenziato a Motore Spento:
Dopo 30h di funzionamento, sul display si illumina il segmento centrale; indica
che devono essere puliti i filtri antigrasso.
Dopo 120h di funzionamento, sul display lampeggia il segmento centrale; indica
che devono essere puliti i filtri antigrasso e sostituiti i filtri carbone.
Una volta puliti i filtri antigrasso (e/o sostituiti i filtri carbone), per far riparitre
il conteggio delle ore (RESET) premere il tasto E durante la visualizzazione
dell’allarme filtri.
Comandi di Fig. 6:
A) : accende/spegne le luci.
B) : inserisce/disinserisce il TIMER: premendolo 1 volta si attiva il timer, per
cui dopo 5 minuti il motore si arresta (contemporaneamente sul display
lampeggia il numero della velocità selezionata); il timer rimane attivo se si
cambia la velocità del motore.
C) :
- indica la velocità del motore selezionata (da 1 a 4);
- indica l'attivazione del Timer quando il numero lampeggia; - indica l'allarme
filtri quando il segmento centrale si accende o lampeggia.
D): aziona il motore (all'ultima velocità usata); premendo ancora il tasto, si
selezionano le velocità del motore da 1 a 4 in modo sequenziale; tenendo
premuto il tasto per 2 secondi circa, il motore si arresta.
R) : reset filtri antigrasso e filtri carbone; quando compare l'allarme filtri (cioè
sul display si accende il segmento centrale), occorre pulire i filtri antigrasso
(sono trascorse 30 ore di funzionamento); se invece il segmento centrale
lampeggia, occorre pulire i filtri antigrasso e sostituire i filtri carbone (sono
trascorse 120 ore di funzionamento). Chiaramente se la vostra cappa non è
in versione filtrante e quindi non ha i filtri carbone, dovrete solo pulire i filtri
antigrasso, sia che il segmento centrale rimanga acceso, sia che lampeggi.
L'allarme filtri appare a motore spento ed è visibile per circa 30". Per far ripartire
il conteggio delle ore, tenere premuto il tasto per 2 secondi durante la
visualizzazione dell'allarme.
Comandi di Fig. 7:
Questo apparecchio è dotato di un sistema completamente automatico
(Advanced Sensor Control) per gestire tutte le funzioni della cappa. Grazie
all’Advanced Sensor Control, l’aria in cucina si mantiene sempre pulita e
libera da odori senza alcun intervento da parte dell’utente. I sofisticati
sensori riescono a captare qualsiasi tipo di odore, vapore, fumo o calore
causato dal processo di cottura. L’ASC capta anche eventuali e anomale
presenze di GAS nell’ambiente.
A) : accende / spegne le luci.
B) : attiva / disattiva la funzione “Automatico”. Attivando questa funzione,
compare una “A” sul display C, e la velocità del motore aumenta o diminuisce
automaticamente secondo i fumi, gli odori ed i gas presenti nella cucina.
Display C : - indica il funzionamento automatico del sensore (compare la lettera
“A”);- indica la velocità del motore selezionata automaticamente dal sensore;
- indica l'allarme filtri quando il segmento centrale si accende o lampeggia.
D ): diminuisce la velocità del motore / Reset; diminuisce la velocità del motore
fino a zero (arresto), tuttavia, dopo circa 1 minuto, la cappa entrerà di nuovo
in funzione automatica, alla velocità determinata dal sensore. Premendo il tasto
durante la visualizzazione dell’allarme filtri, si ha il RESET, per cui riparte il
conteggio delle ore.
E) : aumenta la velocità del motore; tuttavia, dopo circa 1 minuto, la cappa
entrerà di nuovo in funzione automatica, alla velocità determinata dal sensore.
Questo apparecchio è dotato di un sistema completamente automatico
(Advanced Sensor Control) per gestire tutte le funzioni della cappa. Grazie
all’Advanced Sensor Control, l’aria in cucina si mantiene sempre pulita e
libera da odori senza alcun intervento da parte dell’utente. I sofisticati
sensori riescono a captare qualsiasi tipo di odore, vapore, fumo o calore
causato dal processo di cottura. L’ASC capta anche eventuali e anomale
presenze di GAS nell’ambiente.
Modifica della sensibilità del sensore: è possibile modificare la sensibilità del
sensore operando come segue:
- arrestare la cappa premendo il tasto B.
- Premere contemporaneamente i tasti D ed E (sul display apparirà l’indice di
sensibilità del sensore).
- Premendo i tasti D o E, aumentare o diminuire l’indice di sensibilità del sensore
(1 : sensibilità minima / 9: sensibilità massima).
- in caso di interruzione dell’alimentazione elettrica, il sensore funzionerà di
nuovo con sensibilità 5.
Attenzione: per evitare di danneggiare il sensore, non usare prodotti
siliconici in prossimità della cappa!
Comandi di Fig. 8:
Interruttore A: LUCE; posizione 0: luce spenta; posizione 1: luce accesa.
Interruttore B : VELOCITÀ MOTORE; permette la regolazione delle velocità di
esercizio del motore; posizione 0: motore fermo.
C : Spia di funzionamento del motore.
Comandi di Fig. 9:
A): accende/spegne le luci; ogni 30 ore di funzionamento la spia luminosa
corrispondente si accende e sta ad indicare che occorre pulire i filtri antigrasso;
ogni 120 ore di funzionamento la spia luminosa corrispondente lampeggia e sta
ad indicare che occorre pulire i filtri antigrasso e sostituire il filtro al carbone.
Per far ripartire il conteggio delle ore (RESET), tenere premuto il tasto A per
circa 1” (mentre la spia è in funzione).
B): aziona il motore alla 1ª velocità (si accende la corrispondente spia
luminosa); tenendolo premuto per circa 1” spegne il motore; premendo il tasto
una seconda volta (mentre la spia luminosa è accesa) viene attivato il TIMER
per cui dopo 5’ il motore si arresta (la spia luminosa lampeggia).
C): aziona il motore alla 2ª velocità (si accende la corrispondente spia luminosa);
premendo il tasto una seconda volta (mentre la spia luminosa è accesa) viene
attivato il TIMER per cui dopo 5’ il motore si arresta (la spia luminosa lampeggia).
D): aziona il motore alla 3ª velocità (si accende la corrispondente spia luminosa);
premendo il tasto una seconda volta (mentre la spia luminosa è accesa) viene
attivato il TIMER per cui dopo 5’ il motore si arresta (la spia luminosa lampeggia).
E): aziona il motore alla 4ª velocità (si accende la corrispondente spia luminosa);
premendo il tasto una seconda volta (mentre la spia luminosa è accesa) viene
attivato il TIMER per cui dopo 5’ il motore si arresta (la spia luminosa lampeggia).
Page 11
MANUTENZIONE
! Prima di pulire o fare manutenzione togliere la tensione.
Pulizia della cappa
QUANDO PULIRE: pulire in rapporto all’uso, almeno ogni 2 mesi per evitare
rischi di incendio.
PULIZIA ESTERNA: usare un panno inumidito con acqua tiepida e detersivo
neutro (per le cappe verniciate); usare prodotti specifici per cappe in
acciaio, rame o ottone.
PULIZIA INTERNA: usare un panno (o un pennello) imbevuto di alcool
etilico denaturato.
COSA NON FARE: non usare prodotti abrasivi o corrosivi (esempio spugne
metalliche, spazzole troppo dure, detergenti molto aggressivi, ecc.)
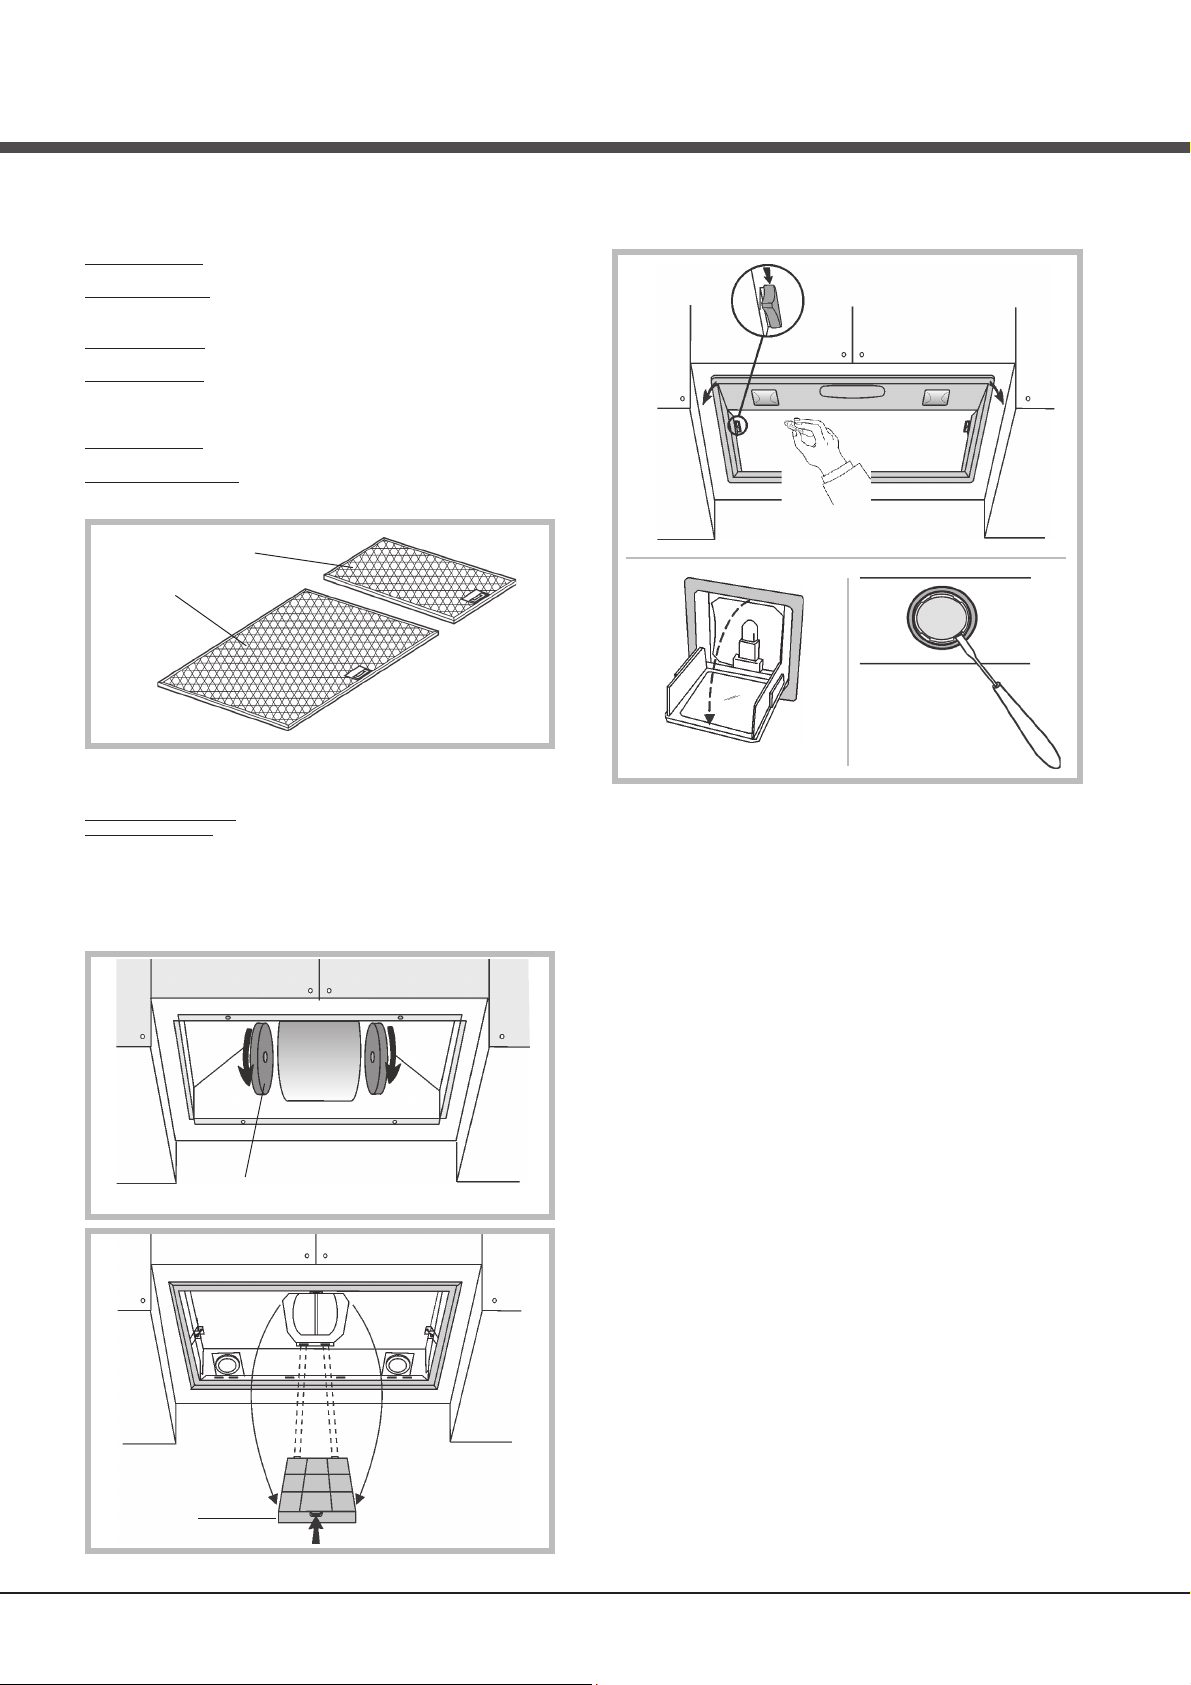
Pulizia dei filtri antigrasso (F)
QUANDO PULIRE: pulire in rapporto all’uso, almeno ogni 2 mesi per evitare
rischi di incendio.
COME PULIRE I FILTRI: lavare con detersivo neutro a mano o in
lavastoviglie. Nel caso di lavaggio in lavastoglie, un eventuale scolorimento
non compromette in nessun modo la funzionalità dei filtri.
F
F
Illuminazione
Sostituire con lampade dello stesso tipo; se la lampada non è presente nella
tabella riportata nel foglio “Avvertenze”, rivolgersi al servizio assistenza.
Sostituzione del filtro carbone
(Solo per la cappa filtrante)
QUANDO SOSTITUIRE: sostituire almeno ogni 6 mesi, in rapporto all’uso.
COME TOGLIERLO: a seconda del modello da voi acquistato, la cappa è
dotata di filtri al carbone rotondi oppure rettangolari.
Se la cappa è dotata di filtri al carbone rotondi (R), sganciate il filtro
carbone con movimento rotatorio.
Se la cappa è dotata di filtro al carbone rettangolare (P), spingere il fermo
verso l'interno e ruotare il filtro verso il basso fino a togliere le 2 linguette
dalle loro sedi.
R
P
Page 12

ANOMALIE DI FUNZIONAMENTO
Se qualcosa non sembra funzionare, prima di chiamare il Servizio
Assistenza effettuare i seguenti semplici controlli:
• La cappa non funziona
Possibile causa (1): il cavo di alimentazione non è collegato bene.
Correzione: la cappa non è stata collegata elettricamente dall’installatore.
Chiamare l’installatore.
Possibile causa (2): non è stata selezionata una velocità.
Correzione: selezionare una velocità sul pannello comandi.
Se la cappa si è spenta nel corso del normale funzionamento, verificare
che non ci sia interruzione di corrente e che il dispositivo di interruzione
omnipolare non sia scattato.
• Il motore non funziona ma le luci si
Possibile causa: il connettore del motore non è inserito.
Correzione: individuare il connettore del motore e collegarlo. Verificare
se ora il motore funziona. Se il problema persiste, contattare il servizio
assistenza.
• La cappa ha un rendimento scarso
Possibile causa: i filtri antigrasso sono sporchi.
Correzione: assicurarsi che i filtri siano puliti.
Per cappe aspiranti o con motore esterno
Possibile causa (1). I requisiti di aspirazione sono inadeguati. Se la
lunghezza del condotto di aspirazione è eccessiva, le prestazioni saranno
ridotte. Il flusso dell’aria sarà ridotto anche se il condotto di evacuazione
è troppo piccolo o presenta troppi gomiti.
Rispettare le prescrizioni delle autorità competenti per lo scarico dell’aria
(ad esempio, l’aria raccolta non deve essere convogliata in condotti già
usati per impianti di riscaldamento centralizzati, termosifoni, ecc.).
Attrezzare il locale con delle prese d’aria. Contattare l’installatore.
Possibile causa (2): ostruzione del condotto di evacuazione.
Correzione: assicurarsi che niente blocchi il condotto (nidi di uccelli,
pieghe del tubo evacuazione).
Possibile causa (3): la valvola potrebbe non essere aperta.
Correzione: assicurarsi che è stato rimosso il nastro adesivo sulla
valvola e che essa si apra liberamente.
Per cappe filtranti
Possibile causa: il filtro/i carbone è saturo.
Correzione: sostituire il filtro/i carbone.
• Le luci non funzionano
Lampade LED:
Se la lampada non è presente nella tabella riportata nel foglio
“Avvertenze”, contattare il servizio assistenza.
Lampade ad incandescenza:
Possibile causa: la lampada o il portalampada potrebbero essere difettosi
o un cavo potrebbe essere disconnesso.
Correzione: posizionare la lampada in un’altro portalampada: se la
lampada non funziona, sostituirla con un’altra dello stesso tipo; se la
lampada funziona, il portalampada che potrebbe essere danneggiato o un
cavo potrebbe essere disconnesso, contattare il servizio assistenza.
Lampade alogene:
Possibile causa: la lampada o il portalampada potrebbero essere difettosi
o un cavo potrebbe essere disconnesso.
Correzione: sostituire la lampada con un’altra dello stesso tipo; se il
problema persiste, contattare il servizio assistenza.
• Il telecomando non funziona (dove previsto)
Possibile causa (1): il collegamento (link) tra la cappa ed il telecomando
non è attivo.
Correzione: verificare se la cappa funziona azionando i comandi sulla
cappa. Togliere l’alimentazione della cappa e riattivarla. Effettuare di
nuovo il collegamento tra cappa e telecomando, seguendo le istruzioni in
dotazione col telecomando.
Possibile causa (2): le batterie del telecomando sono esaurite.
Correzione: sostituire le batterie.
• Il carrello telescopico verticale è bloccato (dove previsto)
Se tutti i tasti lampeggiano, il carrello è bloccato: attendere 30", quindi
premere il tasto Up/Down.
Se lampeggia il tasto Up/down, il filtro antigrasso non è posizionato
correttamente. Riposizionarlo in modo corretto.
Se il carrello è bloccato, verificare che il relativo connettore non sia
scollegato. Se il problema persiste contattare il servizio assistenza.
Page 13

English
! The appliance must be installed by a qualified person in compliance
with the instructions provided.
Wear gloves when carrying out installation and maintenance
!
operations.
If the supply cord is damaged, it must be replaced by the manufacturer,
its service agent or similarly qualified persons in order to avoid a
hazard.
Warning: Failure to install the screws or fixing device in accordance with
these instructions may result in electrical hazards.
IMPORTANT: So as not to damage your product, during installation use
only the screws provided. Make sure these are used as shown in the
following instructions.
Prepare the power supply (see “Warning” sheet).
For the ducting version and version with an external motor, prepare the pipe
for air evacuation (see “Warnings” sheet).
FILTERING OR DUCTING VERSION ?
The hood may be in filtering version, in ducting version or in version with an
external motor. Decide from the outset which type is to be installed.
For better efficiency, we recommend installing the hood in the ducting
version or in version with an external motor (if possible).
Ducting version
The hood purifies the air and evacuates it to the outside through an exhaust
duct.
Version with external motor
The hood purifies the air and evacuates it to the outside through an exhaust
duct. The appliance must be connected to an ducting apparatus/motor which
works on its own using the appliance as a union for the air to be scavenged
Filtering version
The hood purifies the air and recycles the clean air back into the room.
CONTROLS
Only for hoods equipped with electronic control:
(in models sold in Scandinavia, the following features are not present)
The 4th speed (intensive) is automatically lowered to 3rd speed after 5 minutes
of operation to optimise energy consumption; in hoods with voltage 120V/60Hz
this function is not active and the 4th speed is indicated by the letter b
(Booster).
- If the hood is left on (lights and/or motor), after 10 hours in the absence of
commands from the user, it will automatically switch to OFF condition with all
services switched off. In hoods with voltage 120V/60Hz this function is not
active.
- The Buzzer emits a “beep” each time that a command is set from the keyboard
or remote control (optional).
- In the event of interruption of power during the hood, if you restore the hood
in the OFF state, then the engine must be reactivate manually.
Controls of Fig. 1:
A) ON/OFF - lamps. This button is also used for the alarm function of the anti-
grease and charcoal filters.
Filter alarm: After 30h of motor operation, the L1 RED LED comes ON and
remains ON for 30" (the grease filters have to be cleaned). After 120h of motor
operation, the L1 RED LED comes ON and flashes for 30" (the charcoal filters
have to be changed if the hood is so equipped). The Filter Alarm is ONLY given
with the motor is OFF. The Filter Alarm is cancelled (HOUR meter reset) by
holding down button A for 2".
B) Press button B to start the motor at Speed 1. The speed is shown by the
L1 GREEN LED coming ON. When held down for 2", the motor switches off.
A single pressure on the button when the LED is ON activates the timer function
(motor ON for 5'), shown by the flashing LED. To cancel the timer function,
press the button again ONCE.
C) Press button C to start the motor at Speed 2. The speed is shown by the
L2 GREEN LED coming ON.
A single pressure on the button when the led is on activates the timer function
(motor on for 5'), shown by the flashing led. To cancel the timer function, press
the button again ONCE.
D) Press button D to start the motor at Speed 3. The speed is shown by the
L3 GREEN LED coming ON. A single pressure on the button when the led is
on activates the timer function (motor on for 5'), shown by the flashing led.
To cancel the timer function, press the button again ONCE.
E) Press button E to start the il motor at Speed 4. The speed is shown by the
L4 GREEN LED coming ON. A single pressure on the button when the led is
on activates the timer function (motor on for 5'), shown by the flashing led.
To cancel the timer function, press the button again ONCE.
Controls of Fig. 2:
A) ON/OFF - lamps. This button is also used for the alarm function of
the grease and charcoal filters.
Filter alarm: After 30h of motor operation, the L1 LED comes ON and
remains ON (the grease filters have to be cleaned). After 120h of motor
operation, the L1 LED comes ON and flashes (the charcoal filter have
to be changed if the hood is so equipped). The Filter Alarm is ONLY
given with the motor is OFF. The Filter Alarm is cancelled (HOUR meter
reset) by holding down button A for 2".
B) Press button B to start the motor at Speed 1. The speed is shown
by the L2 LED coming ON. When held down for 2", the motor switches
off. A single pressure on the button when the LED is ON activates the
timer function (motor ON for 5'), shown by the flashing LED. To cancel
the timer function, press the button again ONCE.
C) Press button C to start the motor at Speed 2. The speed is shown
by the L3 LED coming ON. A single pressure on the button when the
led is on activates the timer function (motor on for 5'), shown by the
flashing led. To cancel the timer function, press the button again ONCE.
D) Press button D to start the motor at Speed 3. The speed is shown
by the L4 LED coming ON. A single pressure on the button when the
led is on activates the timer function (motor on for 5'), shown by the
flashing led. To cancel the timer function, press the button again ONCE.
E) Press button E to start the il motor at Speed 4. The speed is shown
by the L5 LED coming ON. A single pressure on the button when the
led is on activates the timer function (motor on for 5'), shown by the
flashing led. To cancel the timer function, press the button again ONCE.
Controls of Fig. 3:
A) ON/OFF - lamps. This button is also used for the alarm function of
the grease and charcoal filters.
Filter alarm: After 30h of motor operation, the L1 LED comes ON and
remains ON for 30" (the grease filters have to be cleaned). After 120h
of motor operation, the L1 LED comes ON and flashes for 30" (the
charcoal filter have to be changed if the hood is so equipped). The Filter
Alarm is ONLY given with the motor is OFF. The Filter Alarm is cancelled
(HOUR meter reset) by holding down button A for 2".
B) The button B activates/deactivate sensor function (when activated the
sensor is lit by the LED L2).
C) Press button C to start the motor at Speed 1. The speed is shown
by the L3 LED coming ON. When held down for 2", the motor switches
off.
D) Press button D to start the motor at Speed 2. The speed is shown
by the L4 LED coming ON.
E) Press button E to start the motor at Speed 3. The speed is shown
by the L5 LED coming ON.
F) Press button F to start the il motor at Speed 4. The speed is shown
by the L6 LED coming ON.
SENSOR SENSITIVITY: sensitivity of the sensor may be modified in
accordance with individual requirements. Modify the sensitivity by pressing
simultaneously on the A and B buttons. The set sensitivity level will be
displayed via the 4 flashing Leds - L3, L4, L5, and L6. The desired
sensitivity is set via the C, D, E, and F buttons (C being minimum, F
being maximum). Set the sensitivity level to minimum for gas cook tops,
medium for glass-ceramic cook tops and maximum for induction cook
tops.
WARNING: when led L1lights up, this indicates that the grease or charcoal
filters require cleaning.
FILTER SENSOR (activated via the B button): this device is equipped
with a completely automatic system (Advanced Sensor Control) for
management of all hood functions. Thanks to the Advanced sensor
Control (ASC), air circulating in the kitchen is maintained clean and odourfree without requiring any user intervention. The sophisticated sensors are
able to capture any type of odour, vapour, smoke or heat caused by
cooking. The ASC also captures any possible irregular gases present in
the environment.
When the sensor function is activated, the C, D, E and F buttons activate
the speed temporarily, to then be overridden by the automatic speed
setting.
Warning: in order to avoid damaging the sensor, never use silicone products
near the hood!
Controls of Fig. 4:
This device is equipped with a completely automatic system (Advanced
Sensor Control) for management of all hood functions. Thanks to the
Advanced sensor Control (ASC), air circulating in the kitchen is maintained
Page 14

clean and odour-free without requiring any user intervention. The
sophisticated sensors are able to capture any type of odour, vapour,
smoke or heat caused by cooking. The ASC also captures any possible
irregular gases present in the environment.
A) Turns the lights off.
B) Turns the lights on.
C) Reduces the motor speed until reaching zero. If pressed for 2" when the
Filter Alarm is active, the HOUR counter is reset.
D) Drives the motor (calling the last speed used) and increases the speed until
reaching maximum.
E) Activates/deactivates the sensor (AUTOMATIC or MANUAL mode). In
Automatic mode the sensor is active and the letter “A” appears on the display
(L).
L) Display:
- signals the running speed
- signals Automatic mode by displaying the letter “A”. When the motor speed
is changed, the running speed is displayed flashing 3 times, and then the letter
“A” reappears.
- signals the filter alarm (with motor off) by displaying the central segment for
30".
FILTER ALARM: Displayed for 30" when the motor is off:
After 30h of operation the central segment lights up on the display; It indicates
that the grease filters need to be cleaned.
After 120h of operation, the central segment flashes on the display; It indicates
that the grease filters need to be cleaned and the charcoal filters replaced.
After cleaning the grease filters (and/or replacing the charcoal filters), restart
the hour counter (RESET) by pressing the key C during display of the filter
alarm.
Warning: in order to avoid damaging the sensor, never use silicone products
near the hood!
GAS SENSOR SENSITIVITY: The sensitivity of the sensor can be modified
to suit your requirements. To modify the sensitivity, the appliance must be
in manual mode (i.e. the running speed and not the letter “A” must appear on
the display); If not, press the key E.
Modify the sensitivity by simultaneously pressing the keys D and E. The set
sensitivity is indicated on the display. By means of the buttons C(-) and D(+)
the desired sensitivity is set Store the “new” sensitivity by pressing the key
E.
Controls of Fig. 5:
Key A : Turns the LIGHTS off
Key B : Turns the LIGHTS on.
Key C : reduces the motor speed until reaching minimum. If pressed for about
2", it stops the motor and storse the speed.
Key D : drives the motor (calling the last speed used) and increases the speed
until reaching maximum.
L Display:
- signals the running speed.
- signals the filter alarm (with motor off) by displaying the central segment
for 30".
- signals Timer activation with a flashing number.
Key E : activates the TIMER (when the motor is running), so that the hood
stops automatically after 5'. Also Zero-sets hour metering when the Filter
Alarm is active (motor OFF).
FILTER ALARM: Displayed for 30" when the motor is off:
After 30h of operation, the central segment lights up on the display; It
indicates that the grease filters need to be cleaned.
After 120h of operation, the central segment flashes on the display; It
indicates that the grease filters need to be cleaned and the charcoal filters
replaced.
After cleaning the grease filters (and/or replacing the charcoal filters), restart
the hour counter (RESET) by pressing the key E during display of the filter
alarm.
Controls of Fig. 6:
A): turns the lights on/off.
B): turns the TIMER on/off: press once to turn the timer on, therefore, after
5 minutes, the motor cuts out (at the same time the selected speed blinks on
the display); the timer remains on if the motor speed is changed.
- indicates the selected motor speed (from 1 to 4); - indicates Timer On when
the number blinks; - indicates Filter Alarm when the central segments is on or
blinking.
D): makes the motor work (at the last speed selected); pushing the button again,
the speeds of the motor are sequentially selected from 1 to 4; keeping this
button pressed for about 2 seconds shuts down the motor.
R): resets the grease filters or charcoal filters; when the filter alarm appears
(i.e. when the central segment on the display goes on), the grease filters must
be cleaned (30 hours of operation); when the central segment starts blinking,
the grease filters must be cleaned and the charcoal filters replaced (120 hours
of operation). Obviously, if the hood is not a filtering model and does not have
a charcoal filter, clean the grease filters both when the central segment goes
on and when it starts blinking. The filter alarm can be seen when the motor is
off and for about 30 seconds. To reset the hour counter, keep the button pressed
for 2 seconds while the alarm can be seen.
Display C):
Controls of Fig. 7:
This device is equipped with a completely automatic system (Advanced
Sensor Control) for management of all hood functions. Thanks to the
Advanced sensor Control (ASC), air circulating in the kitchen is maintained
clean and odour-free without requiring any user intervention. The
sophisticated sensors are able to capture any type of odour, vapour,
smoke or heat caused by cooking. The ASC also captures any possible
irregular gases present in the environment.
A) : switches the lights on/off.
B) : enables/disables “Automatic” function. When this function is selected,
an “A” appears on the display C, and the speed of the motor increases or
decreases depending on the smoke, odours and gas present in the kitchen.
Display C) : - indicates the automatic operation of the sensor (the letter “A”
appears);- indicates the motor speed selected automatically by the sensor;
indicates the filter alarm whenever the central segment is illuminated or
flashing.
D) : decreases motor speed / Reset; decreases motor speed to zero
(stopping); in any case however, after approximately 1 minute, the hood
resumes automatic operation at the speed set by the sensor. Whenever the
key is pressed during the display of filter alarms, a RESET occurs, and the
counting of the hours resumes again.
E) : increases motor speed; in any case however, after approximately 1
minute, the hood resumes automatic operation at the speed set by the
sensor.
This device is equipped with a completely automatic system (Advanced
Sensor Control) for management of all hood functions. Thanks to the
Advanced sensor Control (ASC), air circulating in the kitchen is maintained
clean and odour-free without requiring any user intervention. The
sophisticated sensors are able to capture any type of odour, vapour,
smoke or heat caused by cooking. The ASC also captures any possible
irregular gases present in the environment.
Modification of sensor sensitivity: sensor sensitivity can be modified by
operating as follows:
- stop the hood by pressing key B. – Simultaneously press keys D and E
(the sensor’s sensitivity index will appear on the display) - Pressing keys
D or E, the sensor’s sensitivity will either increase or decrease (1 : minimum
sensitivity / 9: maximum sensitivity). – whenever the power supply is
interrupted, the sensor will resume operation with a sensitivity index of 5.
Warning: in order to avoid damaging the sensor, never use silicone products
near the hood!
Warning: in order to avoid damaging the sensor, never use silicone products
near the hood!
Controls of Fig. 8:
Switch A: LIGHT; position 0: light off; position 1: light on.
Switch B: MOTOR SPEED: makes it possible to select the motor operating
speed; position 0: motor off.
C: Motor on light.
Controls of Fig. 9:
A): turns the lights on/off; every 30 hours of operation the corresponding pilot
lamp comes on to indicate that the grease filters must be cleaned; every 120
hours of operation the corresponding pilot lamp flashes to indicate that the
grease filters must be cleaned and the charcoal filter replaced. To restart the
hour counter (RESET), hold the button A pressed down for about 1” (while the
pilot lamp is on).
B): drives the motor in first speed (the corresponding pilot lamp comes on);
when holding it down for about 1”, the motor cuts out; when pressing the button
a second time (while the pilot lamp is on) , the TIMER is activated and thus
the motor stops after 5’ (the pilot lamp flashes).
C): drives the motor in second speed (the corresponding pilot lamp comes on);
when pressing the button a second time (while the pilot lamp is on) , the TIMER
is activated and thus the motor stops after 5’ (the pilot lamp flashes).
D): drives the motor in third speed (the corresponding pilot lamp comes on);
when pressing the button a second time (while the pilot lamp is on) , the TIMER
is activated and thus the motor stops after 5’ (the pilot lamp flashes).
E): drives the motor in fourth speed (the corresponding pilot lamp comes on);
when pressing the button a second time (while the pilot lamp is on) , the TIMER
is activated and thus the motor stops after 5’ (the pilot lamp flashes).
Page 15

MAINTENANCE
! Before cleaning or maintenance cut the power.
Cleaning the hood
WHEN TO CLEAN IT: clean in relation to use, at least every 2 months to
prevent the risk of fire.
EXTERNAL CLEANING: use a cloth moistened in lukewarm water and
neutral detergent (for painted hoods); use specific products for steel,
copper or brass hoods.
INTERNAL CLEANING: use a cloth (or brush) soaked in denatured ethyl
alcohol.
WHAT NOT TO DO: do not use abrasive or corrosive products (e.g. metal
sponges, brushes, too hard brushes, very aggressive detergents, etc.)
Cleaning the grease filters (F)
WHEN TO CLEAN IT: clean in relation to use, at least every 2 months to
prevent the risk of fire.
HOW TO CLEAN THE FILTERS: hand wash or in the dishwasher using a
neutral detergent. If washing in the dishwasher, possible discoloration of the
filters does not in any way compromise their functioning.
F
F
Lighting
Replace it with lamps of the same type; if a lamp is not listed in the table
shown in the “Warning” worksheet, please contact the support center.
Replacing the charcoal filter
(for filtering version only)
WHEN TO REPLACE IT: replace in relation to use, at least every 6
months.
HOW TO REMOVE IT: depending on the model, the unit is equipped with
the round charcoal filters or with the rectangular charcoal filter.
If the unit is equipped with the round charcoal filters (R), remove the
charcoal filters with a twisting movement.
If the unit is equipped with the rectangular charcoal filter (P), press on
the clamp and rotate the filter downward until the 2 tabs can be removed
from the housing.
R
P
Page 16

MALFUNCTIONS
If something appears not to be working properly, do the following simple
checks before calling Technical Service:
• The hood is not working
Possible cause (1): Power cord not securely plugged in.
Correction: The hood was never electrically connected by the installer.
Call the electrician/installer.
Possible cause (2): A speed has not been selected.
Correction: Select a speed in the control panel.
If the hood has turned off during normal functioning, check that the
power has not been disconnected and that the omnipolar disconnection
device has not tripped.
• The blower does not work but the lights do
Possible cause: The blower motor connector is not plugged.
Correction: Locate the blower motor connector and plug it. Check to see
if the fan now works. If the problem persists, call Technical Service.
• The hood is not operating effectively
Possible cause: Dirty filters/baffles.
Correction: Check to be sure the filter is clean.
For ducting hood and hood with an external motor
Possible cause (1). Ducting requirements inadequate. If your duct length
exceeds the manufacturer’s requirements, hood performance will suffer.
Air-flow will also be reduced if the house duct work is too small or there
are too many elbows in the system.
Comply with the official instructions provided by the competent
authorities in merit when installing the disposal duct (example, the air
collected must not be conveyed into a duct already used to central
heatings systems, thermosiphons, etc.). The room contains air taps.
Contact your installer.
Possible cause (2): Obstruction in duct work.
Correction: make sure nothing is blocking the vent (bird nests or kinks in
the duct work).
Possible cause (3): Damper blade may not be opening.
Correction: Make sure the tape is removed from the damper blades and
that it swings open freely.
For filtering hood
Possible cause: the charcoal filter/s is saturated.
Correction: replace the charcoal filter/s.
• The lamp does not work
Light spot (LED):
If a lamp is not listed in the table shown in the “Warning” worksheet,
please contact Technical Service.
Incandescent lamps:
Possible cause: The lamp or socket may be defective or a wire could
bedisconnected.
Correction: place the lamp in another socket; if the lamp is not working,
replace with lamp of the same type; if the lamp works, the original
socket may be defective or a wiremay be disconnected. Call Technical
Service.
Halogen lamps:
Possible cause: The lamp or socket may be defective or a wire could
bedisconnected.
Correction:replace with lamp of the same type. If the problem persists,
call Technical Service.
• Remote control not working (where present)
Possible cause (1): Link lost between the remote control and the hood.
Correction: Check to see if the hood works with the control on the hood.
Remove power from the hood at the circuit breaker then reapply power.
Relink the remote control to the hood, following the instructions supplied
with the remote control.
Possible cause (2): Remote battery dead.
Correction: Change the battery.
• Vertical telescopic trolley is locked (where present)
If all LEDs flashing, the telescopic trolley is locked. Wait 30" and press
the Up/Down button to release the trolley.
If Up/down button flashing, the grease filter is not positioned correctly.
Reposition properly.
If the trolley is locked, check that the cable connector is not
disconnected. If the problem persists, call Technical Service.
Page 17

Deutsch
!!
! Die Installation ist gemäß den vorliegenden Anweisungen und von
!!
Fachpersonal durchzuführen.
Bei Installations- und Wartungsarbeiten Handschuhe tragen.
!
Ist das Versorgungskabel beschädigt, ist es vom Hersteller oder dessen
technischen Kundendienst oder von einer ähnlichen Fachkraft zu ersetzen,
um jedem Risiko vorzubeugen.
Warnung: Die Nichtbeachtung der Schrauben oder Fixiervorrichtung in
Übereinstimmung mit diesen Anweisungen nicht installieren kann zu
elektrischen Gefährdungen führen.
ACHTUNG: Während der Installation ausschliesslich die mit gelieferten
Schrauben verwenden und dabei in der korrekten Weise vorgehen, wie in
den zu befolgenden Anweisungen beschrieben, um eine Beschädigung Ihres
Produkts zu vermeiden.
Bereiten Sie die Stromversorgung (siehe Blatt “Hinweis”).
Für Abluftversion und Version mit externem Motor, bereiten Sie das Rohr
für die Luftabführung (siehe Blatt “Hinweis”).
UMLUFT- ODER ABLUFTVERSION?
Die Abzugshaube kann in Umluftversion, in Abluftversion und in der Version
mit externem Motor geliefert werden.
Entscheiden Sie sich von Anfang an für einen Installationstyp (Umluft, Abluft,
oder Version mit externem Motor). Um eine größere Wirkung zu erzielen,
empfehlen wir die Installation einer Haube in Abluftversion oder Version mit
externem Motor (falls möglich).
Abluftversion
Die Dunstabzugshaube reinigt die Luft und gibt sie über eine Abluftleitung
nach außen ab.
Version mit externem motor
Die Dunstabzugshaube reinigt die Luft und gibt sie über eine Abluftleitung
nach außen ab. Das Gerät kann auch in Verbindung mit einem externen
Motor im Abluftbetrieb eingesetzt werden
Umluftversion
Die Dunstabzugshaube reinigt die Luft und leitet sie sauber wieder in den
Raum zurück.
BEDIENELEMENTE
Nur für Abzugshauben mit elektronischer Steuerung:
(Modelle in Skandinavien verkauft werden, vorhanden sind die folgenden
Funktionen nicht)
Die 4. Geschwindigkeit (die höchste) wird automatisch nach 5 Minuten Betrieb
auf die 3. Geschwindigkeit herabgesetzt, um den Stromverbrauch zu optimieren;
In Hauben mit Spannung 120V/60Hz ist diese Funktion nicht aktiv und die
4. Geschwindigkeit wird durch den Buchstaben b (Booster) angezeigt.
- Wenn die Dunstabzugshaube eingeschaltet bleibt (Licht bzw. Motor), wird diese
nach 10 Stunden fehlender Anweisungen seitens des Benutzers automatisch
in den OFF-Modus versetzt und alle Funktionen deaktiviert. In Hauben mit
Spannung 120V/60Hz ist diese Funktion nicht aktiv.
- Jedes Mal, wenn ein Befehl mithilfe der Tastatur oder Fernbedienung (optional)
gegeben wird, ertönt ein Tonsignal - „Beep”.
- Wenn während der Betriebsdauer der Dunstabzugshaube eine Unterbrechung
der Stromversorgung eintritt, schaltet die Dunstabzugshaube sich automatisch
aus und die Taste geht in die OFF-Position über. Der Motor ist somit von Hand
erneut zu betätigen.
Bedienelemente auf Abb. 1:
A) Lampen EIN/AUS. Diese Taste wird auch für die Fett- und Kohlenfilter-
Alarmfunktion verwendet
Filteralarm: Nach 30 Motorbetriebsstunden schaltet sich die ROTE LED
L1 ein und bleibt eingeschaltet (es ist Zeit, die Fettfilter zu reinigen).
Nach 120 Motorbetriebsstunden schaltet sich die ROTE LED L1 ein und
blinkt (es ist Zeit, die Kohlenfilter auszutauschen, falls die Haube hiermit
ausgestattet ist). Der Filteralarm wird NUR bei STEHENDEM Motor
angezeigt. Zur Rückstellung des Filteralarms (Rückstellung des STUNDEN-
Zählers) ist die Taste A 2 Sekunden lang gedrückt zu halten.
B) Bei Drücken der Taste B schaltet sich der Motor auf der ersten
Geschwindigkeitsstufe ein. Die Geschwindigkeit wird von der
eingeschalteten GRÜNEN LED L1 angezeigt. Wenn die Taste für 2
Sekunden gedrückt gehalten wird, schaltet sich der Motor aus. Bei
einmaligem Drücken der Taste bei eingeschalteter LED wird die
Timerfunktion aktiviert (Motor bleibt 5 Sekunden eingeschaltet), was
durch die blinkende LED angezeigt wird. Zur Aufhebung der Timerfunktion
ist die Taste erneut einmal zu drücken.
C) Bei Drücken der Taste C schaltet sich der Motor auf der zweiten
Geschwindigkeitsstufe ein. Die Geschwindigkeit wird von der
eingeschalteten GRÜNEN LED L2 angezeigt. Bei einmaligem Drücken
der Taste bei eingeschalteter LED wird die Timerfunktion aktiviert (Motor
bleibt 5 Sekunden eingeschaltet), was durch die blinkende LED angezeigt
wird. Zur Aufhebung der Timerfunktion ist die Taste erneut einmal zu
drücken.
D) Bei Drücken der Taste D schaltet sich der Motor auf der dritten
Geschwindigkeitsstufe ein. Die Geschwindigkeit wird von der
eingeschalteten GRÜNEN LED L3 angezeigt. Bei einmaligem Drücken
der Taste bei eingeschalteter LED wird die Timerfunktion aktiviert (Motor
bleibt 5 Sekunden eingeschaltet), was durch die blinkende LED angezeigt
wird. Zur Aufhebung der Timerfunktion ist die Taste erneut einmal zu
drücken.
E) Bei Drücken der Taste E schaltet sich der Motor auf der vierten
Geschwindigkeitsstufe ein. Die Geschwindigkeit wird von der
eingeschalteten GRÜNEN LED L4 angezeigt. Bei einmaligem Drücken
der Taste bei eingeschalteter LED wird die Timerfunktion aktiviert (Motor
bleibt 5 Sekunden eingeschaltet), was durch die blinkende LED angezeigt
wird. Zur Aufhebung der Timerfunktion ist die Taste erneut einmal zu
drücken.
Bedienelemente auf Abb. 2:
A) Lampen EIN/AUS. Diese Taste wird auch für die Fett- und Kohlenfilter-
Alarmfunktion verwendet
Filteralarm: Nach 30 Motorbetriebsstunden schaltet sich die LED L1 ein
und bleibt eingeschaltet (es ist Zeit, die Fettfilter zu reinigen). Nach 120
Motorbetriebsstunden schaltet sich die LED L1 ein und blinkt (es ist Zeit,
die Kohlenfilter auszutauschen, falls die Haube hiermit ausgestattet ist).
Der Filteralarm wird NUR bei STEHENDEM Motor angezeigt. Zur
Rückstellung des Filteralarms (Rückstellung des STUNDEN-Zählers) ist
die Taste A 2 Sekunden lang gedrückt zu halten.
B) Bei Drücken der Taste B schaltet sich der Motor auf der ersten
Geschwindigkeitsstufe ein. Die Geschwindigkeit wird von der
eingeschalteten LED L2 angezeigt. Wenn die Taste für 2 Sekunden
gedrückt gehalten wird, schaltet sich der Motor aus. Bei einmaligem
Drücken der Taste bei eingeschalteter LED wird die Timerfunktion aktiviert
(Motor bleibt 5 Sekunden eingeschaltet), was durch die blinkende LED
angezeigt wird. Zur Aufhebung der Timerfunktion ist die Taste erneut
einmal zu drücken.
C) Bei Drücken der Taste C schaltet sich der Motor auf der zweiten
Geschwindigkeitsstufe ein. Die Geschwindigkeit wird von der
eingeschalteten LED L3 angezeigt. Bei einmaligem Drücken der Taste
bei eingeschalteter LED wird die Timerfunktion aktiviert (Motor bleibt 5
Sekunden eingeschaltet), was durch die blinkende LED angezeigt wird.
Zur Aufhebung der Timerfunktion ist die Taste erneut einmal zu drücken.
D) Bei Drücken der Taste D schaltet sich der Motor auf der dritten
Geschwindigkeitsstufe ein. Die Geschwindigkeit wird von der
eingeschalteten LED L4 angezeigt. Bei einmaligem Drücken der Taste
bei eingeschalteter LED wird die Timerfunktion aktiviert (Motor bleibt 5
Sekunden eingeschaltet), was durch die blinkende LED angezeigt wird.
Zur Aufhebung der Timerfunktion ist die Taste erneut einmal zu drücken.
E) Bei Drücken der Taste E schaltet sich der Motor auf der vierten
Geschwindigkeitsstufe ein. Die Geschwindigkeit wird von der
eingeschalteten LED L5 angezeigt. Bei einmaligem Drücken der Taste
bei eingeschalteter LED wird die Timerfunktion aktiviert (Motor bleibt 5
Sekunden eingeschaltet), was durch die blinkende LED angezeigt wird.
Zur Aufhebung der Timerfunktion ist die Taste erneut einmal zu drücken.
Bedienelemente auf Abb. 3:
A) Lampen EIN/AUS. Diese Taste wird auch für die Fett- und Kohlenfilter-
Alarmfunktion verwendet
Filteralarm: Nach 30 Motorbetriebsstunden schaltet sich die LED L1 ein
und bleibt 30 Sekunden lang eingeschaltet (es ist Zeit, die Fettfilter zu
reinigen). Nach 120 Motorbetriebsstunden schaltet sich die LED L1 ein und
blinkt für 30 Sekunden (es ist Zeit, die Kohlenfilter auszutauschen, falls
die Haube hiermit ausgestattet ist). Der Filteralarm wird NUR bei
STEHENDEM Motor angezeigt. Zur Rückstellung des Filteralarms
(Rückstellung des STUNDEN-Zählers) ist die Taste A 2 Sekunden lang
gedrückt zu halten.
B) Mit der Taste B wird der Sensor aktiviert/deaktiviert (nach der Aktivierung
des Sensors leuchtet Led L2).
C) Bei Drücken der Taste C schaltet sich der Motor auf der ersten
Geschwindigkeitsstufe ein. Die Geschwindigkeit wird von der
eingeschalteten LED L3 angezeigt. Wenn die Taste für 2 Sekunden
gedrückt gehalten wird, schaltet sich der Motor aus.
Page 18

D) Bei Drücken der Taste D schaltet sich der Motor auf der zweiten
Geschwindigkeitsstufe ein. Die Geschwindigkeit wird von der eingeschalteten
LED L4 angezeigt.
E) Bei Drücken der Taste E schaltet sich der Motor auf der dritten
Geschwindigkeitsstufe ein. Die Geschwindigkeit wird von der eingeschalteten
LED L5 angezeigt.
F) Bei Drücken der Taste F schaltet sich der Motor auf der vierten
Geschwindigkeitsstufe ein. Die Geschwindigkeit wird von der eingeschalteten
LED L6 angezeigt.
SENSORENSENSIBILITÄT: Die Sensibilität des Sensors kann je nach
Bedarf reguliert werden. Bei gleichzeitigem Drücken der Tasten A und B
wird die eingegebene Sensibilität durch das Blinken der 4 Led L3, L4, L5
und L6 angezeigt. Mit den Tasten C, D, E und F kann nun die gewünschte
Sensibilität eingestellt werden (Taste C Mindestsensibilität, Taste F
Höchstsensibilität). Für die Gaskochfelder die geringste Sensibilitätsstufe,
für die Glaskeramikkochfelder die mittlere Sensibilitätsstufe, und für die
Induktionskochfelder die höchste Sensibilitätsstufe einstellen.
ACHTUNG: LED L1 BLINKT. ENTWEDER KOHLEFEILTER WECHSELN
ODER FETTFILTER REINIGEN.
SENSORENFUNKTION (Aktivierung mit Taste B): Dieses Gerät ist mit
einem vollautomatischen System (Advanced Sensor Control) ausgestattet,
mit dem alle Funktionen der Haube gesteuert werden. Durch dieses
System haben Sie stets saubere und geruchsfreie Luft in Ihrer Küche,
ohne selbst etwas tun zu müssen. Diese sehr sensiblen Sensoren erkennen
alle Arten von Gerüchen, Dampf, Rauch oder Wärme, die beim Kochen
entstehen. Das ASC System reagiert sogar auf GAS.
Wenn die Sensorfunktion aktiviert ist, so wird die Geschwindigkeit nur
vorübergehend mit den Tasten C, D, E, und F eingestellt, da der Sensor
die Geschwindigkeit dann automatisch reguliert.
Achtung: Verwenden Sie in der Nähe der Haube keine Silikonprodukte, weil
diese den Sensor beschädigen können!
Bedienelemente auf Abb. 4:
Dieses Gerät ist mit einem vollautomatischen System (Advanced Sensor
Control) ausgestattet, mit dem alle Funktionen der Haube gesteuert
werden. Durch dieses System haben Sie stets saubere und geruchsfreie
Luft in Ihrer Küche, ohne selbst etwas tun zu müssen. Diese sehr
sensiblen Sensoren erkennen alle Arten von Gerüchen, Dampf, Rauch
oder Wärme, die beim Kochen entstehen. Das ASC System reagiert sogar
auf GAS.
A) Beleuchtung ausschalten;
B) Beleuchtung einschalten;
C) Motorgeschwindigkeit bis auf Null vermindern. Durch Betätigung für 2" wird
bei ausgelöstem Filteralarm der Stundenzähler auf null gestellt.
D) Motor betätigen (durch Aufrufen der zuletzt eingestellten Geschwindigkeit)
und Geschwindigkeit bis zum Erreichen der Höchststufe hochfahren.
E) Aktiviert/deaktiviert den Sensor (AUTOMATISCHER oder MANUELLER
Betriebsmodus). Im automatischen Betriebsmodus ist der Sensor aktiviert und
auf dem Display (L) erscheint der Buchstabe “A”.
L) Display:
- zeigt die aktuelle Geschwindigkeit an
- zeigt den automatischen Betriebsmodus an, wobei der Buchstabe “A” erscheint.
Wenn die Motorgeschwindigkeit geändert wird, wird die aktuelle Geschwindigkeit
mit dreimaligem Aufleuchten angezeigt, dann erscheint erneut der Buchstabe
“A”.
- gibt Hinweis auf “Filteralarm” (bei ausgeschaltetem Motor) an, indem das
mittlere Segment 30" angezeigt wird.
FILTERALARM: wird bei ausgeschaltetem Motor für 30" angezeigt:
Nach einer Betriebszeit von 30h leuchtet auf dem Display das mittlere Segment
auf; um anzuzeigen, dass die Antifett-Filter gereinigt werden müssen.
Nach einer Betriebszeit von 120h blinkt auf dem Display das mittlere Segment;
um anzuzeigen, dass die Fettfilter gereinigt und die Kohlenfilter ausgetauscht
werden müssen.
Nach der Reinigung den Fettfiltern (und/oder dem Austausch der Kohlenfilter)
ist zur Rückstellung des Stundenzählers die Taste C (RESET) während der
Anzeige des Filteralarms zu drücken.
Achtung: Verwenden Sie in der Nähe der Haube keine Silikonprodukte, weil
diese den Sensor beschädigen können!
SENSIBILITÄT DES GAS-SENSORS: Die Sensibilität des Gas-Sensors kann
entsprechend den persönlichen Bedürfnissen des Benutzers verändert werden.
Zur Änderung der Sensibilität muss das Gerät sich im manuellen Betriebszustand
befinden (d.h. auf dem Display erscheint nicht der Buchstabe “A”, sondern die
aktuelle Geschwindigkeit); Gegebenenfalls ist die Taste E zu drücken.
Die Sensibilität kann durch gleichzeitiges Drücken der Tasten D und E verändert
werden. Auf dem Display wird die eingestellte Sensibilität angezeigt. Mit den
Tasten C(-) und D(+) wird die gewünschte Sensibilität eingestellt Durch Drücken
der Taste E wird die “neue” Sensibilität gespeichert.
Bedienelemente auf Abb. 5:
Taste A : LICHT einschalten.
Taste B: LICHT ausschalten.
Taste C : Vermindert die Motorgeschwindigkeit bis zur Mindestgeschwindigkeit.
Wenn sie für circa 2" gedrückt wird, wird der Motor gestoppt, die Geschwindigkeit
bleibt jedoch gespeichert.
Taste D : Motor betätigen (durch Aufrufen der zuletzt eingestellten
Geschwindigkeit) und Geschwindigkeit bis zum Erreichen der Höchststufe
hochfahren.
L Display:
- zeigt die aktuelle Geschwindigkeit an.
- gibt Hinweis auf “Filteralarm” (bei ausgeschaltetem Motor) an, indem das
mittlere Segment angezeigt wird.
- zeigt die Aktivierung des Timers durch Blinken der jeweils eingestellten Zahl
an.
Taste E : Aktivert den TIMER (bei laufendem Motor), d.h. die Haube wird nach
5' automatisch ausgeschaltet. Darüber hinaus wird der Stundenzähler auf
Null zurückgestellt, wenn der Filteralarm aktiviert ist (bei ausgeschaltetem
Motor).
FILTERALARM: wird bei ausgeschaltetem Motor angezeigt:
Nach einer Betriebszeit von 30h leuchtet auf dem Display das mittlere
Segment auf; um anzuzeigen, dass die Fett-Filter gereinigt werden müssen.
Nach einer Betriebszeit von 120h blinkt auf dem Display das mittlere
Segment; um anzuzeigen, dass die Fett-Filter gereinigt und die Kohlenfilter
ausgetauscht werden müssen.
Nach der Reinigung der Fettfilter (und/oder dem Austausch der Kohlenfilter)
ist zur Rückstellung des Stundenzählers die Taste E (RESET) während der
Anzeige des Filteralarms zu drücken.
Bedienelemente auf Abb. 6:
A) = LICHT einschalten/ausschalten.
B) = TIMER einschalten/ausschalten: Beim ersten Drücken wird der Timer
aktiviert und nach 5 Minuten kommt der Motor zum Stillstand (wobei gleichzeitig
auf dem Display die Zahl für die gewählte Geschwindigkeit aufblinkt); der Timer
bleibt in Funktion, wenn sich die Motorgeschwindigkeit ändert.
Display C) = - Anzeige der gewählten Motorgeschwindigkeit (von 1 bis 4); Anzeige der Timerauslösung durch Aufblinken der Nummer; - Anzeige des
Filteralarms, wenn das mittlere Segment sich einschaltet oder blinkt.
D = Schaltet den Motor ein (in der zuletzt eingestellten Geschwindigkeit). Wird
die Taste nochmals gedrückt, so werden nacheinander die Gesch-windigkeiten
1-4 des Motors eingeschaltet. Wird die Taste ungefahr 2 Sekunden lang
gedrückt, so kommt der Motor zum Stillstand.
R) = Reset der Fett- und der Kohlefilter. Bei Eintritt des Filteralarms
(Einschalten des mittleren Segments auf dem Display) sind die Fettfilter (nach
30 Betriebsstunden) zu reinigen. Blinkt das mittlere Segment auf, so sind die
Fettfilter zu reinigen und die Kohlefilter zu ersetzen (nach Ablauf von 120
Betriebsstunden). Wenn hingegen Ihre Haube keine Umluftversion ist und
daher keine Kohlefilter hat, sind nur die Fettfilter zu reinigen, egal ob das mittlere
Segment ununterbrochen angezeigt wird oder nur blinkt. Die Filteranzeige
leuchtet bei ausgeschaltetem Motor und ist ungefähr 30 Sekunden lang
sichtbar. Zur Wiederaufnahme der Stundenzählung muss die Taste 2 Sekunden
lang gedrückt werden während die Anzeige blinkt.
Bedienelemente auf Abb. 7:
Dieses Gerät ist mit einem vollautomatischen System (Advanced Sensor
Control) ausgestattet, mit dem alle Funktionen der Haube gesteuert
werden. Durch dieses System haben Sie stets saubere und geruchsfreie
Luft in Ihrer Küche, ohne selbst etwas tun zu müssen. Diese sehr
sensiblen Sensoren erkennen alle Arten von Gerüchen, Dampf, Rauch
oder Wärme, die beim Kochen entstehen. Das ASC System reagiert sogar
auf GAS.
A): Ein- und Ausschalten der Lampen.
B): Ein- und Ausschalten des “automatischen” Betriebs. Das Einschalten
dieser Funktion wird durch ein “A” auf dem Display C angezeigt; die
Geschwindigkeit des Motors passt sich automatisch der in der Küche
vorhandenen Konzentration von Dunst, Gerüchen und Gas an.
Display C): Auf diesem wird der automatische Betrieb des Sensors angezeigt
(Buchstabe “A”), weiters die durch den Sensor vorgegebene
Motorgeschwindigkeit. Das Einschalten bzw. Blinken des mittleren Teiles
deutet auf einen Filteralarm hin.
D: Vermindern der Motorgeschwindigkeit / Reset. Die Motorgeschwindigkeit
wird bis auf Null vermindert (Anhalten); nach etwa 1 Minute schaltet die Haube
automatisch wieder mit der vom Sensor vorgegebenen Geschwindigkeit ein.
Drückt man diese Taste während der Anzeige des Filteralarms, so erzielt man
die Rückstellung (RESET) des Zählwerks der Betriebsstunden, das in der
Folge neu anläuft.
E): Erhöhen der Motorgeschwindigkeit. Nach etwa 1 Minute schaltet die Haube
automatisch wieder auf die vom Sensor vorgegebene Geschwindigkeit um.
Dieses Gerät ist mit einem vollautomatischen System (Advanced Sensor
Control) ausgestattet, mit dem alle Funktionen der Haube gesteuert werden.
Durch dieses System haben Sie stets saubere und geruchsfreie Luft in Ihrer
Küche, ohne selbst etwas tun zu müssen. Diese sehr sensiblen Sensoren
erkennen alle Arten von Gerüchen, Dampf, Rauch oder Wärme, die beim
Kochen entstehen. Das ASC System reagiert sogar auf GAS.
Einstellen der Sensorsensibilität: Die Sensibilität des Sensors kann
folgendermaßen eingestellt werden: - Die Haube durch Drücken der Taste
B ausschalten. Gleichzeitig die Tasten D und E drücken (auf dem Display
erscheint die Anzeige der Sensorsensibilität). Taste D oder E drücken, um
die Sensibilität des Sensors zu erhöhen bzw. zu vermindern (1 : geringste
Sensibilität / 9: höchste Sensibilität). - Bei einem Stromausfall stellt sich der
Sensor automatisch auf Sensibilitätsstufe 5 ein.
Page 19

Achtung: Verwenden Sie in der Nähe der Haube keine Silikonprodukte, weil
diese den Sensor beschädigen können!
Bedienelemente auf Abb. 8:
Schalter A : LICHT; Position 0: Licht an, Position 1: Licht aus.
Schalter B - MOTORGESCHWINDIGKEIT: Möglichkeit die Regulierung der
Betriebsgeschwindigkeit des Motors. Position 0: Motor im Stillstand.
C : Motorfunktionsanzeige.
Bedienelemente auf Abb. 9:
A): Licht einschalten/ausschalten; alle 30 Betriebsstunden leuchtet die
zutreffende Anzeige auf und dies bedeutet, dass die Fettfilter zu reinigen sind;
alle 120 Betriebsstunden blinkt die zutreffende Anzeige auf und dies bedeutet,
dass die Fettfilter gereinigt und die Kohlefilter ersetzt werden müssen. Zur
Wiederaufnahme der Stundenzählung (RESET) muss die Taste A circa 1” lang
gedrückt werden (während die Anzeige eingeschaltet ist).
B): Schaltet den Motor mit der Geschwindigkeit 1 ein (die zutreffende Anzeige
leuchtet auf); hält man die Taste circa 1” lang gedrückt, wird der Motor
ausgeschaltet; wird die Taste ein zweites Mal betätigt (während die Anzeige
leuchtet), erfolgt die Aktivierung des TIMERS und nach 5’ kommt der Motor
zum Stillstand (die Anzeige blinkt).
C): Schaltet den Motor mit der Geschwindigkeit 2 ein (die zutreffende Anzeige
leuchtet auf); wird die Taste ein zweites Mal betätigt (während die Anzeige
leuchtet), erfolgt die Aktivierung des TIMERS und nach 5’ kommt der Motor
zum Stillstand (die Anzeige blinkt).
D): Schaltet den Motor mit der Geschwindigkeit 3 ein (die zutreffende Anzeige
leuchtet auf); wird die Taste ein zweites Mal betätigt (während die Anzeige
leuchtet), erfolgt die Aktivierung des TIMERS und nach 5’ kommt der Motor
zum Stillstand (die Anzeige blinkt).
E): Schaltet den Motor mit der Geschwindigkeit 4 ein (die zutreffende Anzeige
leuchtet auf); wird die Taste ein zweites Mal betätigt (während die Anzeige
leuchtet) erfolgt die Aktivierung des TIMERS und nach 5’ kommt der Motor zum
Stillstand (die Anzeige blinkt).
WARTUNG
! Vor dem Reinigen oder Warten die Spannungszufuhr ausschalten.
Reinigung der Abzugshaube
WIE OFT: Reinigen Sie in Bezug auf die Nutzung, mindestens alle 2 Monate,
um die Brandgefahr zu vermeiden.
AUSSENREINIGUNG: Für die äußere Reinigung (von lackierten Geräten)
ein mit lauwarmem Wasser und neutralem Reiniger angefeuchtetes Tuch
verwenden; für Edelstahl-, Kupfer- oder Messinghauben Spezialprodukte
verwenden.
INNENREINIGUNG: Für die innere Reinigung des Geräts einen mit
denaturiertem Äthylalkohol getränkten Lappen (oder Pinsel) verwenden.
WAS NICHT GETAN WERDEN DARF: Keine scheuernden oder korrosiven
Produkte (zum Beispiel Metallschwämme, zu harte Bürsten, aggressive
Reinigungsmittel usw.) verwenden.
R
P
Beleuchtung
Gegen Lampen vom selben Typ auswechseln; wenn die Lampe nicht in der
im Blatt „Hinweis” genannten Tabelle aufscheint, wenden Sie sich an das
Zentrum für technische Hilfe.
Reinigung der Fettfilter (F)
WIE OFT: Reinigen Sie in Bezug auf die Nutzung, mindestens alle 2 Monate,
um die Brandgefahr zu vermeiden.
REINIGEN DER FILTER: Die Filter mit einem neutralen Reinigungsmittel
mit der Hand oder in der Geschirrspülmaschine waschen. Beim Waschen in
der Geschirrspülmaschine wird die Funktionstüchtigkeit der Filter nicht
beeinträchtigt, wenn diese evtl. etwas ausbleichen.
F
F
Austausch des Kohlefilters
(Nur bei Umlufthauben)
WIE OFT MUSS ER AUSGETAUSCHT WERDEN: ersetzt mindestens alle 6
Monate, je nach Gebrauch.
WIE WIRD ER ENTFERNT: Je nach dem Modell der Haube, ist diese mit
runden oder rechteckigen Filtern ausgestattet.
Wenn die Haube mit runden Kohlefilter (R) ausgestattet, lassen Sie die
Kohlefilter mit einer Schaukelbewegung.
Bei Hauben mir rechteckigen Filtern (P) ist die Arretiervorrichtung nach
innen zu drücken und der Filter nach unten zu drehen, bis die beiden
Laschen aus ihren Aussparungen herausgezogen werden können.
Page 20

STÖRUNGEN
Sollte die Abzugshaube nicht korrekt funktionieren, beachten Sie
folgende Hinweise, bevor Sie den Kundendienst kontaktieren:
• Abzugshaube funktioniert nicht
Mögliche Ursache (1): Versorgungsleitung ist nicht oder nicht korrekt
angeschlossen.
Lösung: Der Monteur hat die elektrische Installation des Geräts nicht
korrekt angeschlossen. Rufen Sie einen Elektriker / Monteur an.
Mögliche Ursache (2): Die Geschwindigkeit wurde nicht gewählt.
Lösung: Wählen Sie die Geschwindigkeit auf dem Bedienpult.
Wenn sich die Haube während des normalen Betriebs ausschaltet,
prüfen Sie, ob die Stromversorgung nicht ausgeschaltet wurde und der
omnipolare Schalter sich nicht eingeschaltet hat.
• Das Gebläse funktioniert nicht, doch die Lampen leuchten
Mögliche Ursache: Das Versorgungskabel des Gebläse Motors ist nicht
angeschlossen.
Lösung: Lokalisieren Sie das Versorgungskabel des Gebläse-Motors und
schließen Sie es an. Prüfen Sie, ob der Lüfter funktioniert. Wenn Sie
das Problem nicht beseitigen können, rufen Sie den Kundendienst an.
• Die Abzugshaube funktioniert nicht korrekt
Mögliche Ursache: Verschmutzte Filter / Trennwände.
Lösung: Prüfen Sie, ob der Filter sauber ist.
Bei Abzugshauben mit Kanalsystemen und bei Abzugshauben mit
Aussenmotor
Mögliche Ursache (1): Das Kanalsystem wurde nicht gemäß der
Anforderungen gefertigt. Wenn die Kanallänge den Anforderungen des
Herstellers nicht entspricht, kann die Abzugshaube nicht optimal
funktionieren. Wenn der Kanalquerschnitt zu klein ist, oder im System
sich zu viele Rohrbögen befinden, wird der Luftfluss langsamer.
Während der Montage des Abzugskanals sollten die offiziellen
Anweisungen der zuständigen Organe beachtet werden. (zum Beispiel
darf die abgesaugte Luft nicht in den Kanal gelangen, da dies schon bei
der Heizungsanlage, der Thermosiphonpumpe, usw. betrieben wird). Im
Raum befinden sich die Belüftungsöffnungen.
Rufen Sie einen Monteur an.
Mögliche Ursache (2): Der Kanal ist verstopft.
Lösung: Prüfen Sie, ob ein Fremdkörper den Ventilkanal verstopft
(Vogelnester oder Verschmutzungen).
Mögliche Ursache (3): Ein Flügel der Drosselklappe öffnet sich nicht.
Lösung: Prüfen Sie, ob die Transportsicherung am Flügel der
Drosselklappe beseitigt ist und ob die Flügel sich frei bewegen können.
Bei Abzugshauben mit Filter
Mögliche Ursache: Der Kohlefilter ist komplett getränkt.
Lösung: Tauschen Sie den Kohlefilter aus.
• Lampe funktioniert nicht
Lampen (LED):
Wenn diese Lampe nicht in der unten angegebenen Tabelle (Spalte mit
Hinweis) angegeben ist, rufen Sie den Kundendienst an.
Lampen mit Glühbirnen:
Mögliche Ursache: Die Glühbirne oder Lampenfassung ist mangelhaft,
oder ein Versorgungskabel hat sich abgelöst.
Lösung: Die Glühbirne in eine andere Fassung eindrehen. Sollte die
Glühbirne weiterhin nicht funktionieren, tauschen Sie die Glühbirne gegen
eine andere desselben Typs aus. Brennt nun die Glühbirne, ist die
Fassung mangelhaft oder das Versorgungskabel ist abgelöst . Rufen Sie
den Kundendienst an.
Halogenlampen:
Mögliche Ursache: Die Glühbirne oder Lampenfassung ist mangelhaft,
oder ein Versorgungskabel ist abgelöst.
Lösung: Tauschen Sie die Glühbirne gegen eine andere desselben Typs
aus. Wenn das Problem weiter besteht, rufen Sie den Kundendienst an.
• Fernbedienung funktioniert nicht (wenn sie sich in dem
Lieferumfang befindet)
Mögliche Ursache (1): Keine Verbindung zwischen Fernbedienung und
Abzugshaube.
Lösung: Prüfen Sie, ob die Tasten auf der Abzugshaube korrekt
funktionieren.
Die Stromversorgung der Abzugshaube mittels eines Kreisunterbrechers
ausschalten, dann nochmal die Stromversorgung einschalten. Noch einmal
die Verbindung zwischen Fernbedienung und Abzugshaube gemäß der
Betriebsanleitung von der Fernbedienung wiederherstellen.
Mögliche Ursache (2): Die Batterie der Fernbedienung ist leer.
Lösung: Die Batterie gegen eine neue austauschen.
• Verriegelung der vertikalen Teleskoptafel (wenn sie sich in dem
Lieferumfang befindet)
Wenn alle LED’s blinken, ist die Teleskoptafel verriegelt. 30 Sekunden
abwarten und die Taste „oben” oder „unten” drücken, um das Tablet zu
entsperren.
Wenn die Taste „oben” oder „unten” blinkt, befindet sich der
Schmierstofffilter nicht in der korrekten Position. Stellen Sie das Filter
korrekt ein.
Wenn die Tafel verriegelt ist, prüfen Sie, ob ein Versorgungskabel
getrennt ist. Wenn das Problem weiter besteht, rufen Sie den
Kundendienst an.
Page 21

Français
!!
! L’installation doit être effectuée par un professionnel du secteur
!!
conformément aux instructions du fabricant.
Faire usage de gants lors des opérations d'installation et d'entretien.
!
Si le câble d’alimentation est endommagé, il doit être remplacé par le
constructeur ou son service d’assistance technique, ou toutefois par une
personne adéquatement qualifiée, afin d’éviter tout danger.
Avertissement: Si vous n’installez pas les vis ou dispositifs de fixation
conformément à ces instructions cela pourrait engendrer des risques
électriques.
ATTENTION : Pour ne pas détériorer le produit, pendant l’installation,
n’utiliser que les vis fournies en equipment et correctement, comme indiqué
dans les consignes à suivre.
Préparer l’alimentation (voir “Avertissements” feuille).
Pour la version aspirante et la version avec moteur exteriéure, préparer le
tuyau d’évacuation d’air (voir la fiche «Avertissements»).
FILTRANTE OU ASPIRANTE?
La hotte peut être installée en version aspirante, en version filtrante ou en
version avec moteur exteriéure.
Le type d'installation doit être choisi d'emblée.
Pour une plus grande efficacité, il est recommandé, dans la mesure du
possible, d'installer la hotte en version aspirante ou en version avec moteur
exteriéure.
Version aspirante
La hotte filtre l'air et l'expulse à l'extérieur à travers le tuyau d'évacuation.
Version avec moteur exteriéure
La hotte filtre l'air et l'expulse à l'extérieur à travers le tuyau d'évacuation.
L'appareil doit être relié à un moteur placé à l'extérieur de la pièce. Il sert de
base d'installation d'évacuation de l'air.
Version filtrante
La hotte filtre l'air et l'expulse à l'intérieur de la pièce.
COMMANDES
Seulement pour hottes équipées de commande électronique:
(modèles vendus en Scandinavie, les fonctionnalités suivantes ne sont
pas présents)
La 4e vitesse (intensive) diminue automatiquement à la 3e vitesse après 5
minutes de fonctionnement pour optimiser les consommations
énergétiques; dans les hottes avec tension 120V/60Hz cette fonction
n’est pas active et la 4ème vitesse est indiquée par la lettre b (Booster).
- Si la hotte est laissée mise en marche (éclairage et/ou moteur), après 10
heures de fonctionnement, en cas d’absence d’autres commandes par
l’utilisateur, elle passera automatiquement en mode OFF, tous les voyants
étant désactivées. Dans les hottes avec tension 120V/60Hz cette
fonction n’est pas active.
- Chaque fois qu’une commande est donnée au clavier ou depuis la
télécommande (option), une sonnerie émet un signal sonore « bip ».
- Si pendant la marche de la hotte une coupure d’alimentation électrique se
produit, la hotte se met automatiquement hors circuit, et sa touche passe
en position OFF. Il faut donc remettre le moteur en
marche en mode manuel.
Commandes de la Fig. 1:
A) ON/OFF lampes. Cette touche s’utilise également pour la fonction alarme
filtres à graisse et filtres à charbon.
Alarme filtres: Après 30h de fonctionnement du moteur, un témoin
lumineux L1 ROUGE s’allume et reste allumé pendant 30" (c’est le
moment de nettoyer les filtres à graisse). Après 120h de fonctionnement
du moteur, un témoin lumineux L1 ROUGE s’allume et reste allumé
pendant 30" (c’est le moment de remplacer les filtres à charbon si la
hotte en est équipée). L’alarme des filtres s’active UNIQUEMENT avec
le moteur ARRETE. L’alarme des filtres s’annule (remise à zéro du
compteur HORAIRE) en maintenant la touche A enfoncée pendant 2".
B) Appuyer sur la touche B pour actionner le moteur à la première
vitesse. La vitesse est signalée par le témoin lumineux L1 VERT
allumé. En la maintenant enfoncée pendant 2" le moteur s’arrête. En
appuyant une seule fois, avec le témoin lumineux allumé, on active la
fonction timer (moteur actionné pendant 5') signalée par le témoin
lumineux qui clignote. Pour désactiver la fonction timer appuyer encore
une seule fois.
C) Appuyer sur la touche C pour actionner le moteur en deuxième
vitesse. La vitesse est signalée par le témoin lumineux L2 VERT allumé.
En appuyant une seule fois, avec le témoin lumineux allumé, on active
la fonction timer (moteur actionné pendant 5') signalée par le témoin
lumineux qui clignote. Pour désactiver la fonction timer appuyer encore
une seule fois.
D) Appuyer sur la touche D pour actionner le moteur en troisième
vitesse. La vitesse est signalée par le témoin lumineux L3 VERT allumé.
En appuyant une seule fois, avec le témoin lumineux allumé, on active
la fonction timer (moteur actionné pendant 5') signalée par le témoin
lumineux qui clignote. Pour désactiver la fonction timer appuyer encore
une seule fois.
E) Appuyer sur la touche E pour actionner le moteur en quatrième
vitesse. La vitesse est signalée par le témoin lumineux L4 VERT allumé.
En appuyant une seule fois, avec le témoin lumineux allumé, on active
la fonction timer (moteur actionné pendant 5') signalée par le témoin
lumineux qui clignote. Pour désactiver la fonction timer appuyer encore
une seule fois.
Commandes de la Fig. 2:
A) ON/OFF lampes. Cette touche s’utilise également pour la fonction
alarme filtres à graisse et filtres à charbon.
Alarme filtres : Après 30h de fonctionnement, le témoin lumineux L1
s’allume et reste allumé (c’est le moment de nettoyer les filtres à
graisse). Après 120h de fonctionnement, le témoin lumineux L1 s’allume
et reste allumé (c’est le moment de remplacer les filtres à charbon si
la hotte en est équipée). L’alarme des filtres s’active UNIQUEMENT
avec le moteur ARRETE. L’alarme des filtres s’annule (remise à zéro
du compteur HORAIRE) en maintenant la touche A enfoncée pendant
2".
B) Appuyer sur la touche B pour actionner le moteur à la première
vitesse. La vitesse est signalée par le témoin lumineux L2 allumé. En
la maintenant enfoncée pendant 2" le moteur s’arrête. En appuyant une
seule fois, avec le témoin lumineux allumé, on active la fonction “Arrêt
temporisé” (le moteur de l’appareil s’arrête après 5 minutes) signalée par
le témoin lumineux qui clignote. Pour désactiver la fonction “Arrêt
temporisé” appuyer encore une seule fois.
C) Appuyer sur la touche C pour actionner le moteur en deuxième
vitesse. La vitesse est signalée par le témoin lumineux L3 allumé. En
appuyant une seule fois, avec le témoin lumineux allumé, on active la
fonction “Arrêt temporisé” (le moteur de l’appareil s’arrête après 5
minutes) signalée par le témoin lumineux qui clignote. Pour désactiver
la fonction “Arrêt temporisé” appuyer encore une seule fois.
D) Appuyer sur la touche D pour actionner le moteur en troisième
vitesse. La vitesse est signalée par le témoin lumineux L4 allumé. En
appuyant une seule fois, avec le témoin lumineux allumé, on active la
fonction “Arrêt temporisé” (le moteur de l’appareil s’arrête après 5
minutes) signalée par le témoin lumineux qui clignote. Pour désactiver
la fonction “Arrêt temporisé” appuyer encore une seule fois.
E) Appuyer sur la touche E pour actionner le moteur en quatrième
vitesse. La vitesse est signalée par le témoin lumineux L5 allumé. En
appuyant une seule fois, avec le témoin lumineux allumé, on active la
fonction “Arrêt temporisé” (le moteur de l’appareil s’arrête après 5
minutes) signalée par le témoin lumineux qui clignote. Pour désactiver
la fonction “Arrêt temporisé” appuyer encore une seule fois.
Commandes de la Fig. 3:
A) ON/OFF lampes. Cette touche s’utilise également pour la fonction
alarme filtres à graisse et filtres à charbon.
Alarme filtres : Après 30h de fonctionnement, le témoin lumineux L1
s’allume et reste allumé pendant 30" (c’est le moment de nettoyer les
filtres à graisse). Après 120h de fonctionnement, le témoin lumineux L1
s’allume et reste allumé pendant 30" (c’est le moment de remplacer les
filtres à charbon si la hotte en est équipée). L’alarme des filtres s’active
UNIQUEMENT avec le moteur ARRETE. L’alarme des filtres s’annule
(remise à zéro du compteur HORAIRE) en maintenant la touche A
enfoncée pendant 2".
B) La touche B permet d’activer ou de désactiver la fonction automatique
(une fois le capteur activé, le témoin L2 s’allume).
C) Appuyer sur la touche C pour actionner le moteur à la première vitesse.
La vitesse est signalée par le témoin lumineux L3 allumé. En la maintenant
enfoncée pendant 2" le moteur s’arrête.
D) Appuyer sur la touche D pour actionner le moteur en deuxième vitesse.
La vitesse est signalée par le témoin lumineux L4 allumé.
E) Appuyer sur la touche E pour actionner le moteur en troisième vitesse.
La vitesse est signalée par le témoin lumineux L5 allumé.
Page 22

F) Appuyer sur la touche F pour actionner le moteur en quatrième vitesse.
La vitesse est signalée par le témoin lumineux L6 allumé.
SENSIBILITE DU CAPTEUR : la sensibilité du AUTO peut être adaptée
aux exigences propres.
Modifier la sensibilité, en appuyant en même temps sur les touches A
et B. La sensibilité préfixée grâce aux 4 témoins L3, L4, L5, L6 clignotants
s’affiche. Fixez la sensibilité désirée, en utilisant les touches C, D, E ou
F (touche C sensibilité minimale, touche F sensibilité maximale). Fixez une
sensibilité minimale pour une table gaz, moyenne pour la vitro, Maxi pour
l’Induction.
ATTENTION: LORSQUE LE TEMOIN LUMINEUX L1 S’ALLUME, IL EST
NECESSAIRE DE NETTOYER LES FILTRES ANTIGRAISSE OU DE
REMPLACER LE FILTRE CHARBON.
FONCTION AUTOMATIQUE (elle s’active grâce à la touche B) : cet
appareil est équipé d’un système complètement automatisé (ICS) qui
permet de gérer toutes les fonctions de la hotte. Grâce au système ICS,
l’air reste toujours propre et sans mauvaises odeurs dans la cuisine et
ce, sans nécessiter aucune intervention de la part de l’utilisateur. Les
capteurs très sophistiqués réussissent à capter tous types d’odeur,
vapeur, fumée ou chaleur dus à la cuisson. L’ICS capte également la
présence anormale de gas dans l’atmosphère.
Lorsque la fonction capteur est activée, les touches C D, E, F n’activent
que momentanément les vitesses, puis c’est au tour du AUTO d’imposer
automatiquement les vitesses.
Attention: afin d’éviter d’endommager le capteur, ne pas utiliser des produits
aux silicones à proximité de la hotte!
Commandes de la Fig. 4:
Cet appareil est équipé d’un système complètement automatisé (ICS) qui
permet de gérer toutes les fonctions de la hotte. Grâce au système ICS,
l’air reste toujours propre et sans mauvaises odeurs dans la cuisine et
ce, sans nécessiter aucune intervention de la part de l’utilisateur. Les
capteurs très sophistiqués réussissent à capter tous types d’odeur,
vapeur, fumée ou chaleur dus à la cuisson. L’ICS capte également la
présence anormale de gas dans l’atmosphère.
A) Eteint les lumières;
B) Allume les lumières;
C) Diminue la vitesse du moteur jusqu’à ce qu’elle arrive à zéro. Si pressé
pendant 2" lorsque l’ALARME FILTRES est activée il remet à zéro le comptage
des HEURES.
D) Actionne le moteur (en rappelant la dernière vitesse utilisée) et augmente
la vitesse jusqu’à ce qu’elle atteigne la vitesse maximale.
E) Active et désactive le Capteur (en AUTOMATIQUE ou en MANUEL). En
modalité Automatique, le capteur est actif et l’écran (L) affiche la lettre “A”.
L) Ecran:
- il signale la vitesse en cours d’exécution
- il signale la modalité Automatique en affichant la lettre “A”. Si l’on change la
vitesse du moteur, la vitesse en cours d’exécution s’affiche en clignotant 3
fois de suite, puis la lettre “A” s’affiche de nouveau.
- il signale l’alarme Filtres (avec moteur éteint) en affichant le segment central
pendant 30".
ALARME FILTRES : elle est signalée avec le Moteur Arrêté pendant 30":
Après 30h de fonctionnement, le segment central s’éclaire sur l’écran; Il signale
que les filtres à graisse doivent être nettoyés.
Après 120h de fonctionnement, le segment central clignote sur l’écran;il indique
que les filtres à graisse doivent être nettoyés et les filtres à charbon remplacés.
Après avoir nettoyé les filtres à graisse (et/ou remplacé les filtres à charbon),
appuyer sur la touche C pour faire redémarrer le comptage des heures pendant
la visualisation de l’alarme filtres.
Attention: afin d’éviter d’endommager le capteur, ne pas utiliser des produits
aux silicones à proximité de la hotte!
SENSIBILITE DU CAPTEUR GAZ: la sensibilité du capteur peut être modifiée
selon les besoins spécifiques.Pour modifier cette sensibilité, l’appareil doit être
en modalité manuelle (c’est-à-dire que l’écran ne doit pas afficher la lettre “A”
mais la vitesse d’exécution); dans le cas contraire, appuyer sur la touche E.
Modifier la sensibilité en appuyant simultanément sur la touche D et sur la
touche E. La sensibilité paramétrée sera affichée à l’écran. A l’aide des touches
C(-) et D(+) on paramètre la sensibilité désirée Mémoriser la “nouvelle” sensibilité
en appuyant sur la touche E.
Commandes de la Fig. 5:
Touche A : éteint l’éclairage.
Touche B: Allume l’éclairage.
Touche C : diminue la vitesse du moteur pour arriver à la vitesse minimum.
Si pressé pendant environ 2", arrête le moteur en mémorisant la vitesse.
Touche D : Actionne le moteur (en rappelant la dernière vitesse utilisée) et
augmente la vitesse jusqu’à ce qu’elle atteigne la vitesse maximale.
Ecran L :
- signale la vitesse en cours d’exécution.
- signale l’alarme des filtres (avec moteur arrêté) en affichant le segment
central.
- signale l’activation de la Minuterie à l’aide du chiffre qui clignote.
Touche E : active la MINUTERIE (lorsque le moteur fonctionne) et la hotte
s’arrête automatiquement après 5'. En outre remet à zéro le comptage des
heures lorsque l’alarme des filtres est activée (avec le moteur arrêté).
ALARME FILTRES : elle est signalée avec le Moteur Arrêté :
Après 30h de fonctionnement, le segment central s’éclaire sur l’écran; il
signale que les filtres à graisse doivent être nettoyés.
Après 120h de fonctionnement, le segment central clignote sur l’écran; il
indique que les filtres à graisse doivent être nettoyés et les filtres à charbon
remplacés.
Après avoir nettoyé les filtres à graisse (et/ou remplacé les filtres à charbon),
appuyer sur la touche E pour faire redémarrer le comptage des heures
pendant la visualisation de l’alarme filtres.
Commandes de la Fig. 6:
A) = allume/éteint l'éclairage.
B) = active/désactive le TIMER: en appuyant 1 fois on active le timer, si bien
qu’au bout de 5 minutes le moteur s’arrête (en même temps, le numéro de la
vitesse sélectionnée clignote sur l’afficheur); le timer reste activé si l’on change
la vitesse du moteur.
Afficheur C) = - indique la vitesse sélectionnée du moteur (de 1 à 4); - indique
l’activation du Timer lorsque le numéro clignote; - indique l’alarme des filtres
lorsque le segment central s’allume ou clignote.
D) = met le moteur en marche (à la dernière vitesse utilisée). En appuyant de
nouveau sur le bouton, on sélectionne la vitesse du moteur de 1 à 4 en
séquence. Si l’on continue d’appuyer sur la touche pendant 2 secondes environ,
le moteur s’arrête.
R) = rétablissement des filtres à graisse et des filtres à charbons. Lorsqu’on
visualise l’alarme des filtres (c’est-à-dire que le segment central s’allume sur
l’afficheur), il faut nettoyer les filtres à graisse (après 30 heures de
fonctionnement). Par contre, si le segment central clignote, il faut nettoyer les
filtres à graisse et remplacer les filtres à charbon (après 120 heures de
fonctionnement). Il est clair que si votre hotte n’est pas une hotte version
recyclage, qu’elle n’a donc pas de filtres à charbon, il suffit de nettoyer les
filtres à graisse, que le segment central reste allumé ou qu’il clignote. L’alarme
des filtres apparaît lorsque le moteur est éteint et il est visible pendant environ
30”. Pour faire repartir le compte des heures, appuyer sur la touche pendant
2 secondes lorsque l’alarme est visible.
Commandes de la Fig. 7:
Cet appareil est équipé d’un système complètement automatisé (ICS) qui
permet de gérer toutes les fonctions de la hotte. Grâce au système ICS,
l’air reste toujours propre et sans mauvaises odeurs dans la cuisine et
ce, sans nécessiter aucune intervention de la part de l’utilisateur. Les
capteurs très sophistiqués réussissent à capter tous types d’odeur,
vapeur, fumée ou chaleur dus à la cuisson. L’ICS capte également la
présence anormale de gas dans l’atmosphère.
A) : allume / éteint l’éclairage.
B) : active / désactive la fonction “Automatique”. En activant cette fonction,
la lettre “A” apparaît sur l’afficheur C, et la vitesse du moteur augmente ou
diminue automatiquement en fonction des fumées, des odeurs et des gaz
présents dans la cuisine.
Afficheur C) :
- signale le fonctionnement automatique du capteur (en visualisant la lettre
“A”);
- indique la vitesse du moteur sélectionnée automatiquement par le capteur;
- signale l’alarme filtres quand le segment central est allumé de manière fixe
ou clignotante.
D) : diminue la vitesse du moteur / Remise à zéro; diminue la vitesse du
moteur jusque zéro (arrêt), cependant ,après environ 1 minute, la hotte se
remet en fonction automatique, à la vitesse déterminée par le capteur. En
appuyant sur la touche pendant l’affichage de l’alarme filtres, on effectue
la Remise à zéro et le comptage des heures redémarre.
E) : augmente la vitesse du moteur; cependant, après environ 1 minute, la
hotte est de nouveau activée en fonctionnement automatique, à la vitesse
déterminée par le capteur.
Cet appareil est équipé d’un système complètement automatisé (ICS) qui
permet de gérer toutes les fonctions de la hotte. Grâce au système ICS,
l’air reste toujours propre et sans mauvaises odeurs dans la cuisine et
ce, sans nécessiter aucune intervention de la part de l’utilisateur. Les
capteurs très sophistiqués réussissent à capter tous types d’odeur,
vapeur, fumée ou chaleur dus à la cuisson. L’ICS capte également la
présence anormale de gas dans l’atmosphère.
Modification de la sensibilité du capteur: il est possible de modifier la
sensibilité du capteur en agissant de la façon suivante:- arrêter la hotte en
appuyant sur la touche B. - Appuyer en même temps sur les touches D et
E (l’afficheur visualise l’indice de sensibilité du capteur). - En appuyant sur
les touches D ou E, on augmente ou diminue l’indice de sensibilité du capteur
(1 : sensibilité minimum / 9: sensibilité maximum). - en cas de coupure de
l’alimentation électrique, le capteur fonctionne de nouveau avec sensibilité
5.
Attention: afin d’éviter d’endommager le capteur, ne pas utiliser des produits
aux silicones à proximité de la hotte!
Commandes de la Fig. 8:
Interrupteur A : ECLAIRAGE; position 0: éclairage éteint, position 1: éclairage
allumé.
Interrupteur B : VITESSES MOTEUR; il permet le réglage des vitesses de
Page 23

service du moteur; position 0 : moteur arrêté.
C : Voyant lumineux de fonctionnement du moteur.
Commandes de la Fig. 9:
A): allume/éteint les voyants; toutes les 30 heures de fonctionnement le témoin
lumineux correspondant s’allume pour signaler qu’il est nécessaire de nettoyer
les filtres à graisse; toutes les 120 heures de fonctionnement, le témoin
lumineux correspondant clignote pour signaler qu’il est nécessaire de nettoyer
les filtres à graisse et remplacer les filtres à charbon. Pour faire repartir le
comptage des heures (RAZ), maintenir la pression sur la touche A pendant
environ 1” (tandis que le témoin est en fonction).
B): actionne le moteur à la 1ère vitesse (le témoin lumineux correspondant
s’allume); pour éteindre le moteur, maintenir la pression pendant environ 1”.
En appuyant une seconde fois sur la touche (tandis que le témoin lumineux
est allumé), le TIMER est activé, par conséquent, 5’ après le moteur s’arrête
(le témoin lumineux clignote).
C): actionne le moteur à la 2ème vitesse (le témoin lumineux correspondant
s’allume); en appuyant une seconde fois sur la touche (tandis que le témoin
lumineux est allumé), le TIMER est activé, par conséquent, 5’ après le moteur
s’arrête (le témoin lumineux clignote).
D): actionne le moteur à la 3ème vitesse (le témoin lumineux correspondant
s’allume); une seconde fois sur la touche (tandis que le témoin lumineux est
allumé), le TIMER est activé, par conséquent, 5’ après le moteur s’arrête (le
témoin lumineux clignote).
E) : actionne le moteur à la 4ème vitesse (le témoin lumineux correspondant
s’allume); en appuyant une seconde fois (tandis que le témoin lumineux est
allumé), le TIMER est activé, par conséquent, 5’ après le moteur s’arrête (le
témoin lumineux clignote).
ENTRETIEN
! Avant de procéder au nettoyage ou à une opération d'entretien, couper
l'alimentation électrique.
Nettoyage de la hotte
QUAND NETTOYER LA HOTTE? la nettoyer par rapport à l’utilisation, au
moins une fois tous les 2 mois pour prévenir le risque d'incendie.
NETTOYAGE EXTERNE: utiliser un chiffon humidifié à l'eau tiède et un
détergent neutre (pour les hottes peintes); utiliser un produit spécial pour
hottes en acier, cuivre ou laiton.
NETTOYAGE INTERNE: utiliser un chiffon (ou un pinceau) imbibé d'alcool
éthylique dénaturé.
À ÉVITER: ne pas utiliser de produits abrasifs ou corrosifs (par exemple
éponges métalliques, brosses trop dures, détergents très agressifs, etc.).
Remplacement du filtre à charbon
(uniquement pour la hotte filtrante)
QUAND CHANGER LE FILTRE? le changer par rapport à l’utilisation, au
moins tous les 6 mois.
DÉMONTAGE DU FILTRE: selon les modèles, l’appareil est muni de
filtres à charbon ronds ou de filtres à charbon rectangulaires.
Si la hotte est équipée de filtres à charbon ronds (R), décrochez le filtre
à charbon avec un mouvement rotatif. Si la hotte est muni de filtres
à charbon rectangulaires (P), pousser le loquet de blocage vers l’intérieur
et tourner le filtre vers le bas de manière à retirer les 2 languettes de
leur logement.
R
P
Nettoyage des filtres à graisse (F)
QUAND NETTOYER LA HOTTE? la nettoyer par rapport à l’utilisation, au
moins une fois tous les 2 mois pour prévenir le risque d'incendie.
NETTOYAGE DES FILTRES: laver les filtres avec un détergent neutre à la
main ou au lave-vaisselle. En cas de lavage au lave-vaisselle, une
éventuelle décoloration ne compromet en aucun cas l'efficacité des filtres.
F
F
Eclairage
Remplacer par lampes du même type; si la lampe ne figure pas dans le tableau
citédans la feuille “Attention”, il faut contacter le service d’assistance
technique.
Page 24

DYSFONCTIONNEMENTS
Si quelque chose ne fonctionne pas correctement, avant d’appeler le
service technique, veuillez effectuer les simples vérifications décrites
ci-dessous :
• La hotte ne fonctionne pas
Cause possible (1) : Câble d’alimentation non connecté ou connecté
incorrectement.
Solution : Le système électrique de la hotte n’a pas correctement
connecté par l’installateur. Appeler un électricien/installateur
Cause possible (2) : Vitesse non sélectionnée.
Solution : Sélectionner la vitesse sur le panneau de commande.
Si le couvercle s’arrête pendant le fonctionnement normal, s’assurer que
l’alimentation n’a pas été coupée et que le disjoncteur omnipolaire n’est
pas déclenché.
• Le ventilateur ne fonctionne pas, mais les lumières fonctionnent
Cause possible : Le câble du moteur du ventilateur n’est pas connecté.
Solution : Trouver le câble du moteur du ventilateur et le connecter.
S’assurer que le ventilateur fonctionne. Si le problème persiste, appeler
le service technique.
• La hotte ne fonctionne pas correctement
Cause possible : Filtres / compartiments sales
Solution : S’assurer que le filtre est propre.
Pour les hottes avec le système de conduits et les hottes avec un
moteur externe
Cause possible (1) : Le système de conduits est non conforme aux
exigences. Si la longueur du conduit dépasse les exigences du fabricant,
la hotte peut ne pas fonctionner de façon optimale. Si la section
transversale du conduit est trop petit ou le système comporte trop de
coudes, le flux d’air sera ralenti.
Lors de l’installation du conduit de sortie, suivre les instructions
officielles fournies par les autorités compétentes (par exemple, l’air
aspiré ne peut pas être acheminé vers le conduit qui est déjà utilisée
dans le cadre d’un système de chauffage central, du thermosiphon
etc.). La pièce comprend des trous de ventilation.
Contacter l’installateur.
Cause possible (2) : La conduite est bouchée.
Solution : s’assurer que rien ne bloque le conduit de ventilation (nids
d’oiseaux ou nœuds).
Cause possible (3) : La lame de la vanne ne s’ouvre pas.
Solution : S’assurer que le ruban a été enlevé des lames et qu’elles se
déplacent sans problème.
Pour les hottes avec un filtre
Cause possible : le filtre à charbon est complètement trempé.
Solution : remplacer le filtre à charbon
• La lampe ne fonctionne pas
Phares (LED) :
Si ce type de lampe ne figure pas dans le tableau dans la feuille
“Attention”, contacter le service technique.
Lampes avec ampoules :
Cause possible : L’ampoule ou la douille est défectueuse ou le câble est
déconnecté.
Solution : utiliser une autre douille, si l’ampoule ne fonctionne pas, la
remplacer, si elle fonctionne, la douille est défectueuse ou le câble
d’alimentation est déconnecté. Appeler le service technique.
Lampes halogènes
Cause possible : L’ampoule ou la douille est défectueuse ou le câble est
déconnecté.
Remplacer par une autre ampoule du même type. Si le problème
persiste, appeler le service technique.
• La télécommande ne fonctionne pas (si incluse)
Cause possible (1) : Manque de connexion entre la télécommande et la
hotte.
Solution : S’assurer que les boutons de commande sur la hotte
fonctionnent correctement.
Mettre la hotte hors tension en utilisant le disjoncteur, la remettre sous
tension. Reconnecter la télécommande et la hotte en suivant le manuel
fourni avec la télécommande.
Cause possible (2) : Pile épuisée dans la télécommande.
Solution : Remplacer la pile.
• Verrouillage du plateau télescopique vertical (si inclus)
Si tous les LEDs clignotent, le plateau télescopique a été verrouillé.
Attendre 30 secondes et appuyer sur le bouton haut ou bas pour
déverrouiller le plateau.
Si le bouton haut/bas clignote, le filtre à graisse est dans une mauvaise
position. Il faut le placer de manière correcte.
Si le plateau est verrouillé, s’assurer que le câble d’alimentation n’a pas
été déconnecté. Si le problème persiste, appeler le service technique.
Page 25

Español
! La instalación se debe realizar siguiendo estas instrucciones y por
personal profesionalmente calificado.
Utilice guantes durante las operaciones de instalación y
!
mantenimiento.
Si el cable de alimentación está dañado, debe ser sustituido por el mismo
fabricante o por el servicio de asistencia técnica, o de todos modos por una
persona que posea una cualificación similar, de modo de prevenir cualquier
tipo de riesgo.
Advertencia: Si no se instalan los tornillos o dispositivos de fijación de
acuerdo con estas instrucciones puede resultar en riesgos eléctricos.
ATENCION: Para no dañar el producto, durante la instalación utilizar
exclusivamente los tornillos que se entregan con el mismo, procediendo
en base a las siguientes instrucciones.
Prepare la fuente de alimentación (consulte la sección “Advertencia”).
Para los modelos aspiradora o con motor externo, preparar la tubería para la
evacuación de aire (véase “Advertencia”).
¿FILTRANTE O ASPIRADORA?
La campana puede instalarse en versión aspiradora, filtrante o con motor
externo. Decida desde el principio el tipo de instalación). Para mejorar las
prestaciones, aconsejamos instalar la campana en la versión aspiradora o
con motor externo (si es posible).
Versión aspiradora
La campana depura el aire y lo expulsa hacia fuera a través de un
conducto de extracción.
Versión con motor externo
La campana depura el aire y lo expulsa hacia fuera a través de un
conducto de extracción. Se conecta al aparato una central aspirante que
opera en sede separada, utilizando el aparato como base de recoleccion del
aire viciado que se debe evacuar.
Versión filtrante
La campana depura el aire y vuelve a introducir el aire limpio en la
habitación.
MANDOS
Solo para campanas equipadas con mando electrónico:
(modelos vendidos en los países escandinavos, las siguientes
características no están presentes)
La 4a velocidad (intensiva) baja a la 3a velocidad después de 5' de
funcionamiento para optimizar los consumos energéticos; en campanas con
120V/60Hz Tensión esta función no está activa y la 4a velocidad se indica
con la letra b (Booster).
- Si el extractor está encendido (luces y/o motor), después de 10 horas de
inactividad por parte del usuario, se activará automáticamente el modo OFF
y todas las funciones se desactivarán. En campanas con 120V/60Hz Tensión
esta función no está activa.
- Cada vez que se envíe un comando desde el teclado o mando (opcional),
se emitirá un sonido de pitido “beep”.
- Si durante la operación del extractor se interrumpe la alimentación, éste se
apagará automáticamente y el botón pasará a la posición OFF. En este caso,
es necesario iniciar el motor manualmente.
Mandos de Fig. 1:
A) ON/OFF lámparas. Esta tecla se utiliza también para la función
alarma filtros antigrasa y filtros de carbón.
Alarma de filtros: Tras 30h de funcionamiento del motor, se enciende
el led L1 ROJO y queda encendido (es el momento de limpiar los filtros
antigrasa). Tras 120h de funcionamiento del motor, se enciende el led
L1 ROJO parpadeando (es el momento de sustituir los filtros de carbón
si la campana los tiene). La alarma filtros destaca SÓLO cuando el
motor está PARADO. La alarma filtros se anula (reset del contador
HORAS) teniendo pulsada la tecla A durante 2".
B) Pulsando la tecla B se enciende el motor a la primera velocidad. La
velocidad la destaca el Led L1 VERDE encendido.
Manteniéndolo pulsado durante 2" se apaga el motor. Pulsando con un
toque sólo, con el led encendido, se activa la función timer (motor
encendido durante 5'), destacada por el led parpadeando. Para quitar la
función timer pulsar una vez más con un toque sólo.
C) Pulsando la tecla C se enciende el motor a la segunda velocidad.
La velocidad la destaca el Led L2 VERDE encendido. Pulsando con
un toque sólo, con el led encendido, se activa la función timer (motor
encendido durante 5'), destacada por el led parpadeando. Para quitar la
función timer pulsar una vez más con un toque sólo.
D) Pulsando la tecla D se enciende el motor a la tercera velocidad. La
velocidad la destaca el Led L3 VERDE encendido. Pulsando con un
toque sólo, con el led encendido, se activa la función timer (motor
encendido durante 5'), destacada por el led parpadeando. Para quitar la
función timer pulsar una vez más con un toque sólo.
E) Pulsando la tecla E se enciende el motor a la cuarta velocidad. La
velocidad la destaca el Led L4 VERDE encendido. Pulsando con un
toque sólo, con el led encendido, se activa la función timer (motor
encendido durante 5'), destacada por el led parpadeando. Para quitar la
función timer pulsar una vez más con un toque sólo.
Mandos de Fig. 2:
A) ON/OFF lámparas. Esta tecla se utiliza también para la función
alarma filtros antigrasa y filtros de carbón.
Alarma de filtros: Tras 30h de funcionamiento del motor, se enciende
el led L1 y queda encendido (es el momento de limpiar los filtros
antigrasa). Tras 120h de funcionamiento del motor, se enciende el led
L1 parpadeando (es el momento de sustituir los filtros de carbón si la
campana los tiene). La alarma filtros destaca SÓLO cuando el motor
está PARADO. La alarma filtros se anula (reset del contador HORAS)
teniendo pulsada la tecla A durante 2".
B) Pulsando la tecla B se enciende el motor a la primera velocidad. La
velocidad la destaca el Led L2 encendido.
Manteniéndolo pulsado durante 2" se apaga el motor. Pulsando con un
toque sólo, con el led encendido, se activa la función timer (motor
encendido durante 5'), destacada por el led parpadeando. Para quitar la
función timer pulsar una vez más con un toque sólo.
C) Pulsando la tecla C se enciende el motor a la segunda velocidad.
La velocidad la destaca el Led L3 encendido. Pulsando con un toque
sólo, con el led encendido, se activa la función timer (motor encendido
durante 5'), destacada por el led parpadeando. Para quitar la función
timer pulsar una vez más con un toque sólo.
D) Pulsando la tecla D se enciende el motor a la tercera velocidad. La
velocidad la destaca el Led L4 encendido. Pulsando con un toque sólo,
con el led encendido, se activa la función timer (motor encendido
durante 5'), destacada por el led parpadeando. Para quitar la función
timer pulsar una vez más con un toque sólo.
E) Pulsando la tecla E se enciende el motor a la cuarta velocidad. La
velocidad la destaca el Led L5 encendido. Pulsando con un toque sólo,
con el led encendido, se activa la función timer (motor encendido
durante 5'), destacada por el led parpadeando. Para quitar la función
timer pulsar una vez más con un toque sólo.
Mandos de Fig. 3:
A) ON/OFF lámparas. Esta tecla se utiliza también para la función alarma
filtros antigrasa y filtros de carbón.
Alarma de filtros: Tras 30h de funcionamiento del motor, se enciende
el led L1 y queda encendido durante 30" (es el momento de limpiar los
filtros antigrasa). Tras 120h de funcionamiento del motor, se enciende el
led L1 durante 30" parpadeando (es el momento de sustituir los filtros de
carbón si la campana los tiene). La alarma filtros destaca SÓLO cuando
el motor está PARADO. La alarma filtros se anula (reset del contador
HORAS) teniendo pulsada la tecla A durante 2".
B) La tecla B activa/desactiva la función sensor (cuando está activada
la función sensor se ilumina el led L2).
C) Pulsando la tecla C se enciende el motor a la primera velocidad. La
velocidad la destaca el Led L3 encendido.
Manteniéndolo pulsado durante 2" se apaga el motor.
D) Pulsando la tecla D se enciende el motor a la segunda velocidad. La
velocidad la destaca el Led L4 encendido.
E) Pulsando la tecla E se enciende el motor a la tercera velocidad. La
velocidad la destaca el Led L5 encendido.
F) Pulsando la tecla F se enciende el motor a la cuarta velocidad. La
velocidad la destaca el Led L6 encendido.
SENSIBILIDAD DEL SENSOR: la sensibilidad del sensor puede ser
modificada según las exigencias del cliente. Modificar la sensibilidad
pulsando contemporáneamente la tecla A y la tecla B. Se evidenciará la
sensibilidad programada por medio de los 4 led, L3, L4, L5, L6 que
parpadean. Por medio de las teclas C, D, E o F, programar la sensibilidad
deseada (tecla C sensibilidad mínima, tecla F sensibilidad máxima).
Configurar la sensibilidad mínima para placas de cocina a gas, media para
las placas de cocina de vitrocerámica, máxima para las placas de cocina
a inducción.
ATENCIÓN: CUANDO SE ENCIENDE EL LED L1, IMPLICA QUE SE
DEBEN LIMPIAR LOS FILTROS ANTIGRASA O SUSTITUIR EL FILTRO
AL CARBÓN.
Page 26

FUNCÓN SENSOR (se activa por medio de la tecla B): este aparato está
dotado de un sistema completamente automático (Advanced Sensor
Control) para gestionar todas las funciones de la campana. Gracias al
Advanced Sensor Control, el aire de la cocina se mantiene siempre limpia
y libre de olores sin la necesidad de ningún tipo de participación del
usuario. Los sofisticados sensores logran captar cualquier tipo de olor,
vapor, humo o calor causado durante el proceso de cocción. El ASC capta
inclusive presencias eventuales y anómalas de GAS en el ambiente.
Cuando se activa la función sensor, las teclas C, D, E, F activan las
velocidades sólo temporáaneamente, luego es el sensor que programa
automáticamente las velocidades.
¡Atención: para evitar dañar el sensor, no use productos silicónicos en las
cercanías de la campana!
Mandos de Fig. 4:
Este aparato está dotado de un sistema completamente automático
(Advanced Sensor Control) para gestionar todas las funciones de la
campana. Gracias al Advanced Sensor Control, el aire de la cocina se
mantiene siempre limpia y libre de olores sin la necesidad de ningún tipo
de participación del usuario. Los sofisticados sensores logran captar
cualquier tipo de olor, vapor, humo o calor causado durante el proceso
de cocción. El ASC capta inclusive presencias eventuales y anómalas
de GAS en el ambiente.
A) apaga las luces.
B) enciende las luces.
C) Disminuye la velocidad del motor hasta llegar a cero. Si se mantiene pulsado
durante 2", cuando está activa la Alarma de filtros, el conteo de las HORAS
se pone a cero.
D) Enciende el motor (restableciendo la última velocidad utilizada) y aumenta
la velocidad hasta llegar a la máxima.
E) Activa/desactiva el Sensor (modo AUTOMÁTICO o MANUAL). En modo
Automático, el sensor está activo y en el Visor (L) aparece la letra “A”.
L) Visor:
- indica la velocidad en funcionamiento
- indica el modo Automático “A” con la visualización de la letra “A”. Al cambiar
la velocidad del motor, se visualiza la velocidad en funcionamiento con tres
parpadeos; a continuación vuelve a visualizarse la letra “A”.
- indica la Alarma de filtros (con el motor apagado) con la visualización del
segmento central durante 30".
ALARMA DE FILTROS: se resalta con el motor apagado durante 30":
Después de 30 h de funcionamiento, en el visor se ilumina el segmento central;
indica que se deben limpiar los filtros antigrasa.
Después de 120 h de funcionamiento, en el visor parpadea el segmento central;
indica que se deben limpiar los filtros antigrasa y sustituir los filtros de carbón.
En cuanto los filtros antigrasa estén limpios (o sustituidos los filtros de carbón),
presione la tecla C durante la visualización de la alarma de filtros, para que
se reanude el conteo de las horas (RESET).
¡Atención: para evitar dañar el sensor, no use productos silicónicos en las
cercanías de la campana!
SENSIBILIDAD DEL SENSOR DE GAS: la sensibilidad del sensor puede
modificarse dependiendo de las propias necesidades. Para modificar esta
sensibilidad, el aparato debe estar en modo manual (es decir, en el visor no
debe aparecer la letra “A”, sino la velocidad en funcionamiento); En caso
contrario, presione la tecla E.
Modifique la sensibilidad presionando al mismo tiempo la tecla D y la tecla E.
En el visor se indicará la sensibilidad programada. Con los pulsadores C(-) y
D(+) se programa la sensibilidad deseada Memorice la “nueva” sensibilidad
presionando la tecla E.
Mandos de Fig. 5:
Tecla A: Apaga las luces. Tecla B: Enciende las LUCES. Tecla C: disminuye
la velocidad del motor hasta llegar a la velocidad mínima. Si se pulsa
alrededor de 2", para el motor y memoriza la velocidad.
el motor (restableciendo la última velocidad utilizada) y aumenta la velocidad
hasta llegar a la máxima.
Visor L:
- indica la velocidad en marcha.
- indica la Alarma de filtros (con el motor apagado) mediante la visualización
del segmento central.
- indica la activación del Temporizador mediante el número intermitente.
Tecla E: activa el TEMPORIZADOR (con el motor en marcha), por lo cual la
campana se apaga automáticamente a los 5'. Además pone a cero la cuenta
de las horas cuando está activada la Alarma de filtros (con el motor apagado).
ALARMA DE FILTROS: se presenta con el motor apagado:
Después de 30 h de funcionamiento, en el visor se ilumina el segmento
central; indica que se deben limpiar los filtros antigrasa.
Después de 120 h de funcionamiento, en el visor parpadea el segmento
central; indica que se deben limpiar los filtros antigrasa y sustituir los filtros
de carbón.
En cuanto los filtros antigrasa estén limpios (o sustituidos los filtros de
carbón), pulse la tecla E durante la visualización
de la alarma de filtros para que se reanude la cuenta de las horas (RESET).
Mandos de Fig. 6:
Tecla D: enciende
A): enciende/apaga las luces.
B): conecta/desconecta el temporizador: si se presiona 1 vez se activa el
temporizador por lo que tras 5 minutos se para el motor (al mismo tiempo en
la pantalla parpadea el número de la velocidad seleccionada); el temporizador
permanece activo si se cambia la velocidad del motor.
Pantalla C = - indica la velocidad seleccionada del motor (de 1 a 4); - indica
la activación del Temporizador cuando el número parpadea; - indica la alarma
de los filtros cuando el segmento central se enciende o parpadea.
D): pone en funcionamiento el motor (en la última velocidad usada).
Manteniendo presionado el botón, se seleccionan las velocidades del motor
de 1 a 4 de manera secuencial. Manteniendo presionado el botón durante dos
segundos aproximadamente, el motor se para.
R): reinicialización filtros antigrasa y filtros de carbón. Cuando aparece la
alarma filtros (es decir cuando se enciende en la pantalla el segmento central),
hay que limpiar los filtros antigrasa (quiere decir que han transcurrido 30 horas
de funcionamiento). Si en cambio el segmento central parpadea, hay que
limpiar los filtros antigrasa y cambiar los filtros de carbón (quiere decir que han
transcurrido 120 horas de funcionamiento). Obviamente si su campana
extractora no es de versión filtrante y por consiguiente no tiene filtros de
carbón, tienen sólamente que limpiar los filtros antigrasa, tanto si el segmento
central permanece encendido como si parpadea. La alarma de los filtros
aparece solamente cuando el motor está apagado y se puede ver durante 30”
aproximadamente. Para que vuelva a ponerse en funcionamiento el contador
de las horas, mantenga presionado el botón 2 segundos durante la visualización
de la alarma.
Mandos de Fig. 7:
Este aparato está dotado de un sistema completamente automático
(Advanced Sensor Control) para gestionar todas las funciones de la
campana. Gracias al Advanced Sensor Control, el aire de la cocina se
mantiene siempre limpia y libre de olores sin la necesidad de ningún tipo
de participación del usuario. Los sofisticados sensores logran captar
cualquier tipo de olor, vapor, humo o calor causado durante el proceso de
cocción. El ASC capta inclusive presencias eventuales y anómalas de
GAS en el ambiente.
A) : enciende / apaga las luces.
B) : activa / desactiva la función “Automático”. Activando esta función,
aparece una “A” en la pantalla C, y la velocidad del motor aumenta o
disminuye automáticamente según los humos, los olores y los gases
presentes en la cocina.
Pantalla C) : - indica el funcionamiento automático del sensor (aparece la
letra “A”);- indica la velocidad del motor seleccionada automáticamente por
el sensor; - indica la alarma filtros cuando el segmento central se enciende
o emite luz intermitente.
D) : disminuye la velocidad del motor / Reset; disminuye la velocidad del
motor hasta cero (parada); sin embargo, tras aproximadamente 1 minuto,
la campana volverá a ponerse en funcionamiento automático, a la velocidad
determinada por el sensor. Pulsando el botón durante la visualización de la
alarma filtros, se activa el RESET y, por consiguiente, el cálculo de las horas
se repone en marcha.
E) : aumenta la velocidad del motor; sin embargo, tras aproximadamente 1
minuto, la campana volverá a ponerse en funcionamiento automático, a la
velocidad determinada por el sensor.
Este aparato está dotado de un sistema completamente automático
(Advanced Sensor Control) para gestionar todas las funciones de la
campana. Gracias al Advanced Sensor Control, el aire de la cocina se
mantiene siempre limpia y libre de olores sin la necesidad de ningún tipo
de participación del usuario. Los sofisticados sensores logran captar
cualquier tipo de olor, vapor, humo o calor causado durante el proceso
de cocción. El ASC capta inclusive presencias eventuales y anómalas
de GAS en el ambiente.
Modificación de la sensibilidad del sensor: se puede modificar la sensibilidad
del sensor actuando del modo siguiente: - pare la campana, pulsando el botón
B. - Pulse simultáneamente los botones D y E (en la pantalla aparecerá el
índice de sensibilidad del sensor). - Pulsando los botones D ó E, aumente
o disminuye el índice de sensibilidad del sensor (1 : sensibilidad mínima /
9: sensibilidad máxima). - en caso de interrupción de la alimentación eléctrica,
el sensor funcionará de nuevo con sensibilidad 5.
¡Atención: para evitar dañar el sensor, no use productos silicónicos en las
cercanías de la campana!
Mandos de Fig. 8:
Interruptor A - LUZ; posición 0: luz apagada; posición 1: luz encendida.
Interruptor B - VELOCIDAD MOTOR: permite regular las velocidades de
funcionamiento del motor; posición 0: motor parado;
C : Piloto luminoso de funcionamiento del motor.
Mandos de Fig. 9:
A): Enciende/apaga las luces; cada 30 horas de funcionamiento el piloto
luminoso correspondiente se enciende indicando que es necesario limpiar los
filtros antigrasa y cada 120 horas se pone intermitente indicando que es
necesario limpiar dichos filtros y además sustituir el filtro de carbón. Para poner
a cero (RESET) el cuentahoras, mantener presionado el botón A aproximadamente
1” (mientras el piloto esté encendido).
B): Acciona el motor a la 1ª velocidad (con lo cual se enciende el piloto luminoso
Page 27

correspondiente); apaga el motor si se mantiene presionado aproximadamente
1”; si se presiona por segunda vez (durante el encendido del piloto luminoso)
se activa el TIMER, con lo cual 5’ después se para el motor y el piloto
correspondiente se pone intermitente.
C): Acciona el motor a la 2ª velocidad (con lo cual se enciende el piloto luminoso
correspondiente); si se presiona por segunda vez (durante el encendido del
piloto luminoso) se activa el TIMER, con lo cual 5’ después se para el motor
y el piloto correspondiente se pone intermitente.
D): Acciona el motor a la 3ª velocidad (con lo cual se enciende el piloto luminoso
correspondiente); si se presiona por segunda vez (durante el encendido del
piloto luminoso) se activa el TIMER, con lo cual 5’ después se para el motor
y el piloto correspondiente se pone intermitente.
E): Acciona el motor a la 4ª velocidad (con lo cual se enciende el piloto luminoso
correspondiente); si se presiona por segunda vez (durante el encendido del
piloto luminoso) se activa el TIMER, con lo cual 5’ después se para el motor
y el piloto correspondiente se pone intermitente.
MANTENIMIENTO
! Desconecte la tensión antes de efectuar operaciones de limpieza o
mantenimiento.
Limpieza de la campana
CUÁNDO LIMPIAR: limpiar en relación con el uso, por lo menos cada 2
meses para evitar el riesgo de incendio.
LIMPIEZA EXTERNA: utilice un paño humedecido con agua tibia y
detergente neutro (para las campanas pintadas); utilice productos
específicos para campanas de acero, cobre o latón.
LIMPIEZA INTERNA: utilice un paño (o un pincel) humedecido con alcohol
etílico desnaturalizado.
LO QUE NO DEBE HACER: no utilice productos abrasivos o corrosivos
(por ejemplo, esponjas de metal, cepillos demasiado duros, detergentes
muy agresivos, etc.
Limpieza de los filtros antigrasa (F)
CUÁNDO LIMPIAR: limpiar en relación con el uso, por lo menos cada 2
meses para evitar el riesgo de incendio.
CÓMO LIMPIAR LOS FILTROS: lave con detergente neutro a mano o en
una lavavajillas. En caso de lavado en lavavajillas, la eventual
decoloración de los filtros no afectara de ningún modo su funcionamiento.
Sustitución del filtro de carbón
(Sólo para la campana filtrante)
CUÁNDO SUSTITUIR: reemplazado por lo menos cada 6 meses
dependiendo del uso.
CÓMO QUITARLO: Según el modelo adquirido, la campana está dotada
de filtros al carbón redondos o rectangulares.
Si los filtros al carbón son redondos (R), desengánchelo con un movimiento
giratorio.
En cambio, si la campana está dotada de filtro al carbón rectangular (P),
empuje el retén hacia el interior y gire el filtro hacia abajo hasta que las dos
lengüetas se desenganchen de sus sitios.
R
F
F
Iluminación
Reemplazar con lámparas del mismo tipo; si la lámpara no aparece en la tabla
citada en la hoja: “Advertencia”, póngase en contacto con el centro de soporte
técnico.
P
Page 28

FALLOS EN FUNCIONAMIENTO
Si algo no funciona correctamente, pedimos que se hagan sencillas acciones
de control que se describen a continuación antes de llamar al servicio
técnico:
• Campana extractora no funciona
Posible causa (1): El conductor de alimentación está desconectado o mal
conectado.
Solución: La instalación eléctrica de la campana extractora no ha sido
correctamente conectada por el montador. Llame al electricista / al montador.
Posible causa (2): No se ha seleccionado la velocidad.
Solución: Seleccione la velocidad en el panel de control.
Si la tapa se desactiva durante el funcionamiento normal se debe revisar
si no se ha quitado la alimentación y que no se ha accionado el interruptor
omnipolar (de múltiples polos).
• Soplador no funciona mientras las luces funcionan
Posible causa: El cable de alimentación del motor del soplador no está
conectado.
Solución: Localice el cable del soplador y conéctelo. Revise si ahora el
ventilador funciona. Si no desaparece el problema llame al servicio técnico.
• Campana extractora no funciona correctamente
Posible causa: Filtros /tabiques sucios.
Solución: Revise si el filtro está limpio.
En el caso de campanas extractoras con el sistema de canales y de
campanas extractoras con motor exterior
Posible causa (1): El sistema de canales no cumple con requisitos. Si la
longitud del canal supera los requisitos del fabricante, la campana extractora
puede no funcionar de forma óptima. Si el diámetro del canal está demasiado
pequeño o en el sistema hay demasiados codos, también resultará
ralentizado el flujo de aire .
Durante el montaje del canal de evacuación hay que adaptarse a las
instrucciones suministradas por los órganos correspondientes (por ej. el
aire extraído no puede ser dirigido hacia el canal que ya se utiliza dentro de
la instalación de calefacción central, termosifones, etc.). Existen orificios
de ventilación en el local.
Debe ponerse en contacto con el montador.
Posible causa (2): El canal está colapsado.
Solución: Revisar si nada obtura el canal de ventilación (nidos de pájaros
o nudos).
Posible causa (3): El ala del estrangulador no se abre.
Solución: Se debe revisar si la cinta fue quitada en las alas del estrangulador
y si éstas pueden moverse libremente.
En el caso de campanas extractoras con filtros
Posible causa: El filtro de carbón está embebido por completo.
Solución: Cambiar el filtro de carbón.
• Lámpara no funciona
Focos (LED):
Si este tipo de lámparas no fueron incluidas en la tabla a continuación en
hoja “Advertencia”, pedimos póngase en contacto con el servicio técnico.
Lámparas con bombillas:
Posible causa: La bombilla o la luminaria defectuosa o se ha desconectado
el conductor de alimentación.
Solución: Poner la bombilla en otra luminaria; si la bombilla no funciona,
cambiarla por otra del mismo tipo; si no funciona, la luminaria es defectuosa
o se ha desconectado el conductor de alimentación. Llame al servicio
técnico.
Lámparas halógenas:
Posible causa: La bombilla o su luminaria es defectuosa o se ha
desconectado el conductor de alimentación.
Solución: Cambie la bombilla por otra del mismo tipo. Si el problema
persiste, llame al servicio técnico.
• Mando a distancia no funciona (si hace parte del juego suministrado)
Posible causa (1): La falta de conexión entre el mando a distancia y la
campana extractora.
Solución: Compruebe si los pulsadores de mando ubicados en la campana
extractora funcionan correctamente.
Desactivar la alimentación de la campana extractora con el interruptor del
circuito; después, conectarla de nuevo. Hacer de nuevo la conexión entre
el mando a distancia y la campana extractora siguiendo el manual de
instrucciones suministrado con el mando a distancia.
Posible causa (2): La pila del mando a distancia está agotada.
Solución: cambiar la pila por una nueva.
• Bloqueo de la bandeja vertical telescópica (si hace parte del juego
suministrado)
Si todas las LEDs parpadean, la bandeja telescópica quedó bloqueada.
Esperar unos 30 segundos y pulsar el pulsador arriba o abajo para
desbloquear la bandeja.
Si el pulsador arriba / abajo parpadea, el filtro de lubrificante no está en la
buena posición. Ponerlo en la buena posición.
Si la bandeja está bloqueada se debe comprobar si el conductor de
alimentación no ha sido desconectado. Si el problema persiste, llame al
servicio técnico.
Page 29

Português
!!
! A instalação deve ser realizada segundo estas instruções e por
!!
pessoal profissional qualificado.
Utilizar luvas nas operações de instalação e manutenção.
!
Se o cabo de alimentação estiver danificado, deverá ser substituído pelo
fabricante ou pelo seu serviço de assistência técnica ou, pelo menos, por
uma pessoa com uma qualificação semelhante, de forma a prevenir
quaisquer riscos.
Aviso: Se não instalar os parafusos ou dispositivo de fixação de acordo
com essas instruções pode resultar em riscos de danos elétricos.
ATENÇÃO: Para não causar danos ao seu aparelho durante a montagem,
utilize exclusivamente os parafusos que são fornecidos, colocando-os
correctamente e respeitando as instruções que damos de seguida.
Prepare a fonte de alimentação (consulte a folha “Advertências”).
Para modelos aspirantes ou modelos com motor externo, preparar o tubo de
evacuação do ar (ver folha “Advertências”).
FILTRANTE OU ASPIRANTE ?
O exaustor pode ser na versão filtrante, na versão aspirante ou na versão
com motor externo. Decidir desde o início o tipo de instalação.
Para uma maior eficiência, aconselhamos a instalação do exaustor na
versão aspirante ou na versão com motor externo (se possível).
Versão aspirante
O exaustor limpa o ar e expulsa-o para o exterior através de uma condutas
de exaustão.
Versão com motor externo
O exaustor limpa o ar e expulsa-o para o exterior através de uma condutas
de exaustão. Ao aparelho deve ser ajuntada uma pequena central aspirante
que irá operar separadamente, utilizando o aparelho como base de ligação
do ar a evacuar.
Versão filtrante
O exaustor limpa o ar que volta a entrar limpo no local.
COMANDOS
Apenas para exaustores dotados de comando electrónico:
(modelos vendidos na Escandinávia, os seguintes recursos não estão
presentes)
A 4ª velocidade (intensiva) é automaticamente desactivada após 5 minutos
de funcionamento; a 3ª velocidade entra em função a fim de optimizar os
consumos energéticos; em exaustores com 120V/60Hz tensão esta função
não está ativa e a 4 ª velocidade é indicada pela letra b (booster).
- Se o exaustor/coifa permanece ligado (à rede de luz ou/ ao motor) , após 10
horas na ausência do usuário, ele/a é automaticamente configurado para o
modo OFF, todas as funções ficam desativadas. Em exaustores com 120V/
60Hz tensão esta função não está ativa.
- Cada vez que o comando é emitido através do teclado ou controle remoto
(opcional), o alarme dispara “bip“.
- Se, durante o funcionamento da coifa há uma interrupção no fornecimento
de energia elétrica , o exaustor se desliga automaticamente e o botão vai para
a posição OFF. É , necessário então, de re-iniciar/resetar o funcionamento do
motor manualmente.
Comandos do Fig. 1:
A) ON/OFF lâmpadas. Esta tecla utiliza-se também para a função de
alarme dos filtros anti-gordura e filtros de carvão.
Alarme dos filtros: Após 30h de funcionamento do motor, o led L1
VERMELHO acende-se e permanece ligado (é o momento de limpar os
filtros anti-gordura). Após 120h de funcionamento do motor, o led L1
VERMELHO acende-se intermitentemente (é o momento de substituir os
filtros de carvão, se a campânula os possuir). O alarme dos filtros
activa-se APENAS com o motor DESLIGADO. O alarme dos filtros
desactiva-se (reset do contador de HORAS) pressionando a tecla A
durante 2".
B) Pressionando a tecla B liga-se o motor na primeira velocidade. A
velocidade é evidenciada através do Led L1 VERDE ligado. Mantendo-
o premido por 2", desliga-se o motor. Pressionando-o com um só toque,
com o led ligado, activa-se a função timer (motor ligado durante 5'),
evidenciada pelo led intermitente. Para eliminar a função timer pressionar
novamente com um só toque.
C) Pressionando a tecla C liga-se o motor na segunda velocidade. A
velocidade é evidenciada através do Led L2 VERDE ligado. Pressionandoo com um só toque, com o led ligado, activa-se a função timer (motor
ligado durante 5'), evidenciada pelo led intermitente. Para eliminar a
função timer pressionar novamente com um só toque.
D) Pressionando a tecla D liga-se o motor na terceira velocidade. A
velocidade é evidenciada através do Led L3 VERDE ligado. Pressionandoo com um só toque, com o led ligado, activa-se a função timer (motor
ligado durante 5'), evidenciada pelo led intermitente. Para eliminar a
função timer pressionar novamente com um só toque.
E) Pressionando a tecla E liga-se o motor na quarta velocidade. A
velocidade é evidenciada através do Led L4 VERDE ligado. Pressionandoo com um só toque, com o led ligado, activa-se a função timer (motor
ligado durante 5'), evidenciada pelo led intermitente. Para eliminar a
função timer pressionar novamente com um só toque.
Comandos do Fig. 2:
A) ON/OFF lâmpadas. Esta tecla utiliza-se também para a função de
alarme dos filtros anti-gordura e filtros de carvão.
Alarme dos filtros: Após 30h de funcionamento do motor, o led L1
acende-se e permanece ligado (é o momento de limpar os filtros antigordura). Após 120h de funcionamento do motor, o led L1 acende-se
intermitentemente (é o momento de substituir os filtros de carvão, se
a campânula os possuir). O alarme dos filtros activa-se APENAS com
o motor DESLIGADO. O alarme dos filtros desactiva-se (reset do
contador de HORAS) pressionando a tecla A durante 2".
B) Pressionando a tecla B liga-se o motor na primeira velocidade. A
velocidade é evidenciada através do Led L2 ligado. Mantendo-o premido
por 2", desliga-se o motor. Pressionando-o com um só toque, com o
led ligado, activa-se a função timer (motor ligado durante 5'), evidenciada
pelo led intermitente. Para eliminar a função timer pressionar novamente
com um só toque.
C) Pressionando a tecla C liga-se o motor na segunda velocidade. A
velocidade é evidenciada através do Led L3 ligado. Pressionando-o com
um só toque, com o led ligado, activa-se a função timer (motor ligado
durante 5'), evidenciada pelo led intermitente. Para eliminar a função
timer pressionar novamente com um só toque.
D) Pressionando a tecla D liga-se o motor na terceira velocidade. A
velocidade é evidenciada através do Led L4 ligado. Pressionando-o com
um só toque, com o led ligado, activa-se a função timer (motor ligado
durante 5'), evidenciada pelo led intermitente. Para eliminar a função
timer pressionar novamente com um só toque.
E) Pressionando a tecla E liga-se o motor na quarta velocidade. A
velocidade é evidenciada através do Led L5 ligado. Pressionando-o com
um só toque, com o led ligado, activa-se a função timer (motor ligado
durante 5'), evidenciada pelo led intermitente. Para eliminar a função
timer pressionar novamente com um só toque.
Comandos do Fig. 3:
A) ON/OFF lâmpadas. Esta tecla utiliza-se também para a função de
alarme dos filtros anti-gordura e filtros de carvão.
Alarme dos filtros: Após 30h de funcionamento do motor, o led L1
acende-se e permanece ligado durante 30" (é o momento de limpar os
filtros anti-gordura). Após 120h de funcionamento do motor, o led L1
acende-se intermitentemente durante 30" (é o momento de substituir os
filtros de carvão, se a campânula os possuir). O alarme dos filtros activase APENAS com o motor DESLIGADO. O alarme dos filtros desactivase (reset do contador de HORAS) pressionando a tecla A durante 2".
B) A tecla B activa/desactiva a função sensor (quando está activa a
função sensor o led L2 se ilumina).
C) Pressionando a tecla C liga-se o motor na primeira velocidade. A
velocidade é evidenciada através do Led L3 ligado. Mantendo-o premido
por 2", desliga-se o motor.
D) Pressionando a tecla D liga-se o motor na segunda velocidade. A
velocidade é evidenciada através do Led L4 ligado.
E) Pressionando a tecla E liga-se o motor na terceira velocidade. A
velocidade é evidenciada através do Led L5 ligado.
F) Pressionando a tecla F liga-se o motor na quarta velocidade. A
velocidade é evidenciada através do Led L6 ligado.
SENSIBILIDADE DO SENSOR: a sensibilidade do sensor pode ser
modificada conforme às próprias exigências. Modificar a sensibilidade
carregando contemporaneamente a tecla A e a tecla B. A sensibilidade
programada será mostrada por meio dos 4 leds L3, L4, L5, L6 lampejantes.
Por meio das teclas C, D, E o F, programar a sensibilidade desejada (tecla
C sensibilidade mínima, tecla F sensibilidade máxima). Programar a
sensibilidade mínima para as superfícies de cozedura a gás, média para
as superfícies de cozedura de cerâmica vitrificada, máxima para as
superfícies de cozedura por Indução.
ATENÇÃO: QUANDO O LED L1 SE ACENDE ESTÁ NA HORA DE
LIMPAR OS FILTROS ANTI-GORDURA OU ENTÃO É PRECISO
Page 30

SUBSTITUIR O FILTRO DE CARVÃO.
FUNÇÃO SENSOR (activa-se por meio da tecla B): esta aparelho possui
um sistema completamente automático (Advanced Sensor Control) para
gerir todas as funções da coifa. Graças ao Advanced Sensor Control, o
ar da cozinha se mantém sempre limpo e sem cheiros e não é preciso
nenhuma intervenção do utilizador para obter estas condições. Os
sofisticados sensores conseguem captar qualquer tipo de cheiro, vapor,
fumaça ou calor provocado pelo processo de cozedura. O ASC capta
também eventuais e anómalas presenças de GÁS do ambiente.
Quando a função sensor está a funcionar as teclas C, D, E, F activa,
as velocidades somente temporariamente, depois é o sensor que configura
automaticamente a velocidade.
Atenção: para evitar de produzir danos no sensor, não utilizar produtos com
silicone perto do exaustor!
Comandos do Fig. 4:
Esta aparelho possui um sistema completamente automático (Advanced
Sensor Control) para gerir todas as funções da coifa. Graças ao Advanced
Sensor Control, o ar da cozinha se mantém sempre limpo e sem cheiros
e não é preciso nenhuma intervenção do utilizador para obter estas
condições. Os sofisticados sensores conseguem captar qualquer tipo de
cheiro, vapor, fumaça ou calor provocado pelo processo de cozedura. O
ASC capta também eventuais e anómalas presenças de GÁS do ambiente.
A) apaga as luzes;
B) liga as luzes;
C) Diminui progressivamente a velocidade do motor até chegar a zero. Se for
premido por 2" quando o Alarme dos Filtros estiver activado, o contador de
HORAS passa a zero.
D) Acciona o motor (relembrando a última velocidade utilizada) e aumenta a
velocidade até chegar à velocidade máxima.
E) Activa/desactiva o Sensor( modo de funcionamento AUTOMÁTICO ou
MANUAL). No modo Automático o sensor está activo e no Display (L) aparece
a letra “A”.
L) Display:
- indica a velocidade em execução
- indica o modo Automático através da visualização da letra “A”. Ao mudar a
velocidade do motor, a velocidade em execução é visualizada por sinal
luminoso intermitente que se acende 3 vezes, e a letra “A” reaparece.
- indica o Alarme dos Filtros (com o motor desligado) através da visualização
do segmento central durante 30".
ALARME DOS FILTROS: aparece indicado, durante 30", quando o Motor estiver
Desligado: Após 30h de funcionamento, no display ilumina-se o segmento
central; indica que os filtros anti-gordura devem ser limpos. Após 120h de
funcionamento, no display pisca o segmento central; indica que os filtros antigordura devem ser limpos e os filtros de carvão devem ser substituídos.
Terminada a limpeza dos filtros anti-gordura (e/ou substituídos os filtros de
carvão), para reiniciar a contagem das horas (RESET) premir a tecla C durante
a visualização do alarme dos filtros.
Atenção: para evitar de produzir danos no sensor, não utilizar produtos com
silicone perto do exaustor!
SENSIBILIDADE DO SENSOR DE GÁS: a sensibilidade do sensor pode ser
alterada de acordo com as exigências de cada um. Para alterar esta sensibilidade,
o aparelho deve estar no modo manual (ou seja no display não deve aparecer
a letra “A” mas a velocidade de execução); se assim não for, premir a tecla
E.
Modificar a sensibilidade pressionando simultaneamente a tecla D e a tecla
E. No display será evidenciada a sensibilidade programada. Utilizando os
botões C(-) e D(+),poderá definir a sensibilidade desejada. Memorizar a “nova”
sensibilidade pressionando a tecla E.
Comandos do Fig. 5:
Tecla A: Desliga as LUZES. Tecla B : Acende as LUZES. Tecla C : diminui
a velocidade do motor até atingir a velocidade mínima. Se pressionado
durante aproximadamente 2" bloqueia o motor, memorizando a velocidade.
Tecla D : acciona o motor (relembrando a última velocidade utilizada) e
aumenta a velocidade até atingir a velocidade máxima.
Display L: - indica a velocidade em execução. - indica o Alarme dos Filtros
(com o motor desligado) através da visualização do segmento central. indica a activação do Temporizador através do número intermitente.
Tecla E : activa o TEMPORIZADOR (quando o motor está a funcionar), desta
forma o exaustor desliga automaticamente após 5'. Para além disso
reinicializa a contagem das horas quando está activo o Alarme filtros (com
o motor desligado).
ALARME DOS FILTROS: aparece indicado com o Motor Desligado:
Após 30h de funcionamento, no display ilumina-se o segmento central; indica
que os filtros anti-gordura devem ser limpos.
Após 120h de funcionamento, no display pisca o segmento central; indica
que os filtros anti-gordura devem ser limpos e os filtros de carvão devem
ser substituídos.
Terminada a limpeza dos filtros anti-gordura (e/ou substituídos os filtros de
carvão), para reiniciar a contagem das horas (RESET) premir a tecla E
durante a visualização do alarme dos filtros.
Comandos do Fig. 6:
A): para ligar/desligar as luzes.
B): para activar/desactivar o TEMPORIZADOR: carregando 1 vez neste botão,
o temporizador activa-se e portanto, ao fim de 5 minutos, o motor pára
(simultaneamente, começa a piscar no display o número da velocidade
seleccionada); o temporizador mantém-se activo quer se altere a velocidade
do motor.
Display C): - indica a velocidade seleccionada para o motor (da 1 a 4); - quando
o número está a piscar, indica a activação do Temporizador; - quando o
segmento central se acende ou pisca, indica alarme dos filtros.
D): acciona o motor (na ultima velocidade usada). Apertando a tecla outra vez,
se seleccionam as velocidades do motor de 1 até 4 de maneira sequencial.
Mantendo o botão carregado durante 2 segundos acerca, o motor pára.
R): reset dos filtros anti-gordura e dos filtros de carvão. Quando aparece o
alarme dos filtros (ou seja, quando se acende o segmento central no display),
é necessário limpar os filtros anti-gordura (após 30 horas de funcionamento).
Mas se o segmento central piscar, então é necessário limpar os filtros antigordura e substituir os filtros de carvão (após 120 horas de funcionamento).
É claro que se a versão do exaustor não for filtrante, não possuirá filtros de
carvão e, portanto, haverá necessidade de limpar os filtros anti-gordura, quer
quando o segmento central fica aceso fixo, quer quando pisca. O alarme dos
filtros aparece com o motor apagado e fica visivel acerca de 30 segundos.
Para fazer com que a contagem das horas volte a entrar em função, manter
o botão premido durante 2 segundos, durante a visualização do alarme.
Comandos do Fig. 7:
Esta aparelho possui um sistema completamente automático (Advanced
Sensor Control) para gerir todas as funções da coifa. Graças ao Advanced
Sensor Control, o ar da cozinha se mantém sempre limpo e sem cheiros e não
é preciso nenhuma intervenção do utilizador para obter estas condições. Os
sofisticados sensores conseguem captar qualquer tipo de cheiro, vapor,
fumaça ou calor provocado pelo processo de cozedura. O ASC capta também
eventuais e anómalas presenças de GÁS do ambiente.
A) : acende / apaga as luzes.
B) : activa / desactiva a função “Automático”. Activando esta função, sobre
o dislay C aparece um “A”, e a velocidade do motor aumenta ou diminui
automaticamente dependendo dos fumos, os cheiros e os gases presentes
na cozinha.
Display C) :
- indica o funcionamento automático do sensor (aparece a letra “A”);
- indica a velocidade do motor seleccionada automaticamente pelo sensor;
- indica o alarme filtros quando o segmento central se acende ou pisca.
D) : diminui a velocidade do motor / Reset; diminui a velocidade do motor
até a zero (paragem), todavia, após cerca de 1 minuto, o exaustor entrará
de novo em funcionamento automático, à velocidade estabelecida pelo
sensor. Pressionando a tecla durante a visualização do alarme filtros, produzse o RESET e, assim, recomeça a contagem das horas.
E) : aumenta a velocidade do motor; todavia, após cerca de 1 minuto, o
exaustor entrará de novo em funcionamento automático, à velocidade
estabelecida pelo sensor.
Esta aparelho possui um sistema completamente automático (Advanced
Sensor Control) para gerir todas as funções da coifa. Graças ao Advanced
Sensor Control, o ar da cozinha se mantém sempre limpo e sem cheiros
e não é preciso nenhuma intervenção do utilizador para obter estas
condições. Os sofisticados sensores conseguem captar qualquer tipo de
cheiro, vapor, fumaça ou calor provocado pelo processo de cozedura.
O ASC capta também eventuais e anómalas presenças de GÁS do
ambiente.
Modificação da sensibilidade do sensor: é possível modificar a sensibilidade
do sensor agindo como segue: - fazer parar o exaustor pressionando a tecla
B. - Pressionar ao mesmo tempo as teclas D e E (sobre o display aparecerá
o índice de sensibilidade do sensor). - Pressionando as teclas D ou E,
aumentar ou diminuir o índice de sensibilidade do sensor (1 : sensibilidade
mínima / 9: sensibilidade máxima). - no caso de corte da alimentação
eléctrica, o sensor funcionará de novo com sensibilidade 5.
Atenção: para evitar de produzir danos no sensor, não utilizar produtos com
silicone perto do exaustor!
Comandos do Fig. 8:
Interruptor A : LUZ; posição 0: luz desligada; posição 1: luz acesa.
Interruptor B : VELOCIDADE DO MOTOR; serve para regular a velocidade de
funcionamento do motor; posição 0: motor parado.
C : Lâmpada piloto de funcionamento do motor.
Comandos do Fig. 9:
A): para ligar/desligar as luzes; de 30 em 30 horas de funcionamento, a lâmpada
piloto correspondente acende-se, a indicar que é necessário limpar os filtros
anti-gordura; de 120 em 120 horas de funcionamento, a lâmpada piloto
correspondente começa a piscar, a indicar que é necessário limpar os filtros
anti-gordura e substituir o filtro de carvão. Para reactivar a contagem das horas
(RESET), manter o botão A premido durante cerca de 1” (enquanto a lâmpada
piloto estiver em função).
B): acciona o motor com a 1ª velocidade (acende-se a lâmpada piloto
correspondente); mantendo-o premido durante cerca de 1”, o motor desliga;
premindo segunda vez o botão (enquanto a lâmpada piloto estiver acesa) o
TIMER activa-se e portanto, ao fim de 5’, o motor pára (a lâmpada piloto pisca).
C): acciona o motor com a 2ª velocidade (acende-se a lâmpada piloto
correspondente); premindo segunda vez o botão (enquanto a lâmpada piloto
Page 31

estiver acesa) o TIMER activa-se e portanto, ao fim de 5’, o motor pára (a
lâmpada piloto pisca).
D): acciona o motor com a 3ª velocidade (acende-se a lâmpada piloto
correspondente); premindo segunda vez o botão (enquanto a lâmpada piloto
estiver acesa) o TIMER activa-se e portanto, ao fim de 5’, o motor pára (a
lâmpada piloto pisca).
E): acciona o motor com a 4ª velocidade (acende-se a lâmpada piloto
correspondente); premindo segunda vez o botão (enquanto a lâmpada piloto
estiver acesa) o TIMER activa-se e portanto, ao fim de 5’, o motor pára (a
lâmpada piloto pisca).
MANUTENÇÃO
! Ates de limpar ou efectuar a manutenção desligar a tensáo.
Limpeza do exaustor
QUANDO EFECTUAR A LIMPEZA: limpar em relação ao uso, pelo menos a
cada dois meses para evitar o risco de incêndio.
LIMPEZA EXTERNA: usar um pano humedecido previamente numa solução
de água morna e detergente neutro (para exaustores pintados); Utilizar
produtos específicos para exaustores em aço, cobre ou latão.
LIMPEZA INTERNA: usar um pano (ou um pincel) embebido em álcool
etílico desnaturado.
O QUE NÃO FAZER: não utilizar produtos abrasivos ou corrosivos (tais
como esponjas metálicas, escovas demasiado duras, detergentes muito
agressivos, etc.)
Limpeza dos filtros antigordura (F)
QUANDO EFECTUAR A LIMPEZA: limpar em relação ao uso, pelo menos a
cada dois meses para evitar o risco de incêndio.
COMO LIMPAR OS FILTROS: lavar com detergente neutro à mão ou na
maquina de lavar loiça. Caso a lavagem seja efectuada na máquina de
lavar loiça, uma eventual perda de cor não compromete de forma alguma o
funcionamento dos filtros.
Substituição do filtro de carvão
(Somente para o exaustor filtrante)
QUANDO SUBSTITUIR: substituídos pelo menos a cada 6 meses
dependendo do uso.
COMO RETIRAR: O exaustor está equipado com filtros de carvão
redondos ou rectangulares, de acordo com o modelo adquirido.
Se o exaustor tiver filtros de carvão redondos (R), soltar o filtro de carvão,
fazendo um movimento giratório.
Se o filtro de carvão do seu exaustor for rectangular (P), empurrar o
retentor para dentro e rodar o filtro para baixo até tirar as 2 linguetas das
respectivas sedes.
R
F
F
P
Page 32

Iluminação
Substituir com lâmpadas do mesmo tipo; se a lâmpada não está na tabela
citada na folha “Advertências”, entre em contato com o centro de suporte
técnico.
AVARIAS
Se algo não está funcionando corretamente, antes de chamar a
assistência, por favor, siga as simples verificações descritas a seguir:
• Exaustor não funciona
Possível causa (1): Cabo de alimentação não está ligado ou está ligado
de forma incorreta.
Solução: instalação elétrica de exaustor não foi conectada corretamente
pelo instalador. Chame um eletricista/instalador.
Possível causa (2): Velocidade não selecionada.
Solução: Seleccione a velocidade no painel de controle.
Se a tampa desliga durante um funcionamento normal, verifique se a
alimentação não está desligada e se o disjuntor unipolar (multipolar) não
foi ligado.
• Ventilador não está funcionando, mas as luzes funcionam
Possível causa: Cabo do motor do ventilador não está conectado.
Solução: Localize o cabo do motor do ventilador e conecte-o. Verifique
se o ventilador está funcionando agora. Se o problema persistir, ligue
para assistência técnica.
• O exaustor não funciona corretamente
Possível causa: filtros / compartimentos sujos.
Solução: Verifique se o filtro está limpo.
No caso de exaustores com sistema de canais e exaustores com um
motor externo
Possível causa (1): O sistema de canais feito contrariamente aos
requisitos. Se o comprimento do canal excede os requisitos do
fabricante, exaustor pode não funcionar perfeitamente. Se a secção
transversal do canal é muito pequeno ou o sistema tem muitas dobras,
o fluxo de ar vai ser abrandado.
Durante a montagem do canal de descarga siga as instruções oficiais
fornecidos pelas autoridades competentes (por exemplo, ar esgotado
não pode ser encaminhado para o canal que já é usado como parte de
um sistema de aquecimento central, sifão térmico etc.). O quarto inclui
saídas de ar. Entre em contato com seu instalador.
Possível causa (2): O canal está entupido.
Solução: Certifique-se de que nada está bloqueando o canal de
ventilação (ninhos de pássaros ou nós).
Possível causa (3): Válvula de acelerador não abre.
Solução: Certifique-se de que a fita foi removida a partir da válvulas de
acelerador e se se movem livremente.
No caso de exaustores com filtro
Possível causa: filtro de carvão é completamente encharcado.
Solução: Substituir o filtro de carvão.
• Lâmpada não trabalha
Luzes (LED):
Se esses tipos de lâmpadas não for exibidas na tabela a seguir no lado
do “Advertências”, ligue para assistência técnica.
Lâmpadas com bulbos:
Possível causa: O bulbo ou o suporte tem defeito ou cabo de
alimentação é desligado.
Solução: Coloque o bulbo em um suporte diferente; se o bulbo não
funciona deve substitur com outro do mesmo tipo; se funciona, o
suporte é defeituoso ou o cabo de alimentação desconectado. Ligue
para assistência técnica.
As lâmpadas de halogéneo:
Possível causa: O bulbo ou o suporte tem defeito ou cabo de
alimentação é desligado.
Solução: substitur com outro bulbo do mesmo tipo. Se o problema
persistir, ligue para assistência técnica.
• O controle remoto não funciona (se tiver sido fornecido)
Possível causa (1): Nenhuma conexão entre o controle remoto e o
exhausor.
Solução: Verifique se os botões de controle colocados no exhausor
trabalham adequadamente
Desligue a alimentação do exhausor usando um disjuntor do circuito; em
seguida, reconectá-los. Mais uma vez, deve fazer a ligação entre o controle
remoto e o exhausor, seguindo as instruções fornecidas com o controle
remoto.
Possível causa (2): Bateria desgastada do controle remoto.
Solução: Substituir a bateria por uma nova.
• Bloquear novamente a bandeja telescópica (se tiver sido
fornecida)
Se todos os LEDs pisquem, a bandeja telescópica está bloqueada.
Aguarde 30 segundos e, em seguida, pressione o botão cima/baixo para
destravar a bandeja. Se o botão cima/baixo pisca, o filtro de gordura
não está na posição certa. Configurá-lo corretamente.
Se a bandeja é bloqueada verifique se o cabo de alimentação não foi
desconectado. Se o problema persistir, chame a assistência técnica.
Page 33

Nederlands
!!
! De installatie moet worden uitgevoerd door een bevoegde
!!
installateur en volgens de instructies van de fabrikant.
Gebruik altijd handschoenen tijdens alle installatie- en
!
onderhoudswerkzaamheden.
Als de voedingskabel beschadigd is, moet deze door de fabrikant of de
technische assistentie of door een persoon met soortgelijke kwalificatie
worden vervangen om elk risico te vermijden.
Waarschuwing: Als u de schroeven of bevestiging apparaat te installeren in
overeenstemming met deze instructies kan leiden tot elektrische gevaren.
LET OP: om uw product niet te beschadigen, dienen tijdens de installatie
uitsluitend de bijgeleverde schroeven te worden gebruikt, en wel op de
juiste manier, zoals aangegeven in de volgende instructies.
Bereid de voeding (zie blad “Opgelet”).
Voor Afvoer versie of versie met externe motor uitvoeringen, de
voorbereiding van de pijp voor de luchtafvoer (zie blad “Opgelet”).
AFVOER OF RECIRCULATIE?
De afzuigkap is beschikbaar in verschillende afvoer, recirculatie of versie
met externe motor uitvoeringen. Beslis op voorhand welke installatie u
verkiest. Voor het beste rendement, is het raadzaam (indien mogelijk) een
afvoer of versie met externe motor afzuigkap te installeren.
Afvoer afzuigkap
De kap filtert de afgezogen lucht en voert die af door een afvoerbuis.
Versie met externe motor
De kap filtert de afgezogen lucht en voert die af door een afvoerbuis. Moet
het toestel aan een afzonderlijke afzuigingsdampkap worden aangesloten
Recirculatie afzuigkap
De kap filtert en recirculeert de gezuiverde lucht in de binnenruimte.
BEDIENINGSELEMENTEN
Uitsluitend voor kappen met elektronische bediening:
(modellen verkocht in Scandinavië, de volgende functies niet aanwezig zijn)
De 4e (intensieve) snelheid wordt automatisch na 5' functionering verlaagd naar
de 3e snelheid om het energieverbruik te optimaliseren; in kappen met spanning
120V/60Hz is deze functie niet actief en de 4de versnelling wordt aangeduid
met de letter b (Booster).
- Als de afzuigkap ingeschakeld blijft (licht en/of de motor), dan wordt deze na
10 uur, als er geen opdracht van de gebruiker komt, automatisch in de OFFstand gezet, en alle functies worden uitgeschakeld. In kappen met spanning
120V/60Hz is deze functie niet actief.
- Elke keer als er een opdracht wordt ingevoerd via het toetsenbord of de
afstandsbediening (optioneel), wordt er een geluidssignaal “beep” gegeven door
de zoemer.
- Als er tijdens de werking van de afzuigkap de stroomtoevoer wordt
onderbroken, zet de afzuigkap zich automatisch uit, en de knop gaat over in
de OFF-stand. De motor moet dan weer handmatig aangezet worden.
Bedieningselementen van Fig. 1:
A) ON/OFF lampen. Deze toets wordt ook gebruikt voor de functie alarm
vetfilter en koolstoffilter.
Filteralarm: Na 30 uren werking van de motor, licht de RODE led L1
ROSSO op en blijft branden (de vetfilter moet worden gereinigd). Na 120
uren werking van de motor, knippert de RODE led L1 (de koolstoffilter
moet worden vervangen, voor zover de afzuigkap hiervan voorzien is).
Het filteralarm is ALLEEN merkbaar wanneer de motor UIT is. Het
filteralarm wordt teruggesteld (reset URENTELLER) door de toets A
gedurende 2" ingedrukt te houden.
B) Door de toets B in te drukken, start de motor op de eerste snelheid.
De snelheid wordt aangegeven door de brandende GROENE Led L1. Als
hij 2" ingedrukt gehouden wordt, stopt de motor. Wanneer er één keer
op wordt gedrukt, met brandende led, treedt de timerfunctie in werking
(motor aan gedurende 5'), wat wordt aangegeven door de knipperende
led. Om de timerfunctie uit te schakelen, nogmaals drukken.
C) Door de toets C in te drukken, start de motor op de tweede snelheid.
De snelheid wordt aangegeven door de brandende GROENE Led L2.
Wanneer er één keer op wordt gedrukt, met brandende led, treedt de
timerfunctie in werking (motor aan gedurende 5'), wat wordt aangegeven
door de knipperende led. Om de timerfunctie uit te schakelen, nogmaals
drukken.
D) Door de toets D in te drukken, start de motor op de derde snelheid.
De snelheid wordt aangegeven door de brandende GROENE Led L3.
Wanneer er één keer op wordt gedrukt, met brandende led, treedt de
timerfunctie in werking (motor aan gedurende 5'), wat wordt aangegeven
door de knipperende led. Om de timerfunctie uit te schakelen, nogmaals
drukken.
E) Door op de toets E te drukken, start de motor op de vierde snelheid.
De snelheid wordt aangegeven door de brandende GROENE Led L4.
Wanneer er één keer op wordt gedrukt, met brandende led, treedt de
timerfunctie in werking (motor aan gedurende 5'), wat wordt aangegeven
door de knipperende led. Om de timerfunctie uit te schakelen, nogmaals
drukken.
Bedieningselementen van Fig. 2:
A) ON/OFF lampen. Deze toets wordt ook gebruikt voor de functie alarm
vetfilter en koolstoffilter.
Filteralarm: Na 30 uren werking van de motor, licht de RODE led L1
op en blijft branden (de vetfilter moet worden gereinigd). Na 120 uren
werking van de motor, knippert de led L1 (de koolstoffilter moet worden
vervangen, voor zover de afzuigkap hiervan voorzien is). Het filteralarm
is ALLEEN merkbaar wanneer de motor UIT is. Het filteralarm wordt
teruggesteld (reset URENTELLER) door de toets A gedurende 2" ingedrukt
te houden.
B) Door de toets B in te drukken, start de motor op de eerste snelheid.
De snelheid wordt aangegeven door de brandende Led L2. Als hij 2"
ingedrukt gehouden wordt, stopt de motor. Wanneer er één keer op wordt
gedrukt, met brandende led, treedt de timerfunctie in werking (motor aan
gedurende 5'), wat wordt aangegeven door de knipperende led. Om de
timerfunctie uit te schakelen, nogmaals drukken.
C) Door de toets C in te drukken, start de motor op de tweede snelheid.
De snelheid wordt aangegeven door de brandende Led L3. Wanneer er
één keer op wordt gedrukt, met brandende led, treedt de timerfunctie
in werking (motor aan gedurende 5'), wat wordt aangegeven door de
knipperende led. Om de timerfunctie uit te schakelen, nogmaals drukken.
D) Door de toets D in te drukken, start de motor op de derde snelheid.
De snelheid wordt aangegeven door de brandende Led L4. Wanneer er
één keer op wordt gedrukt, met brandende led, treedt de timerfunctie
in werking (motor aan gedurende 5'), wat wordt aangegeven door de
knipperende led. Om de timerfunctie uit te schakelen, nogmaals drukken.
E) Door op de toets E te drukken, start de motor op de vierde snelheid.
De snelheid wordt aangegeven door de brandende Led L5. Wanneer er
één keer op wordt gedrukt, met brandende led, treedt de timerfunctie
in werking (motor aan gedurende 5'), wat wordt aangegeven door de
knipperende led. Om de timerfunctie uit te schakelen, nogmaals drukken.
Bedieningselementen van Fig. 3:
A) ON/OFF lampen. Deze toets wordt ook gebruikt voor de functie alarm
vetfilter en koolstoffilter.
Filteralarm: Na 30 uren werking van de motor, licht de RODE led L1 op
en blijft branden gedurende 30" (de vetfilter moet worden gereinigd). Na
120 uren werking van de motor, knippert de led L1 gedurende 30" (de
koolstoffilter moet worden vervangen, voor zover de afzuigkap hiervan
voorzien is). Het filteralarm is ALLEEN merkbaar wanneer de motor UIT
is. Het filteralarm wordt teruggesteld (reset URENTELLER) door de toets
A gedurende 2" ingedrukt te houden.
B) De toets B schakelt de sensorfunctie in/uit (wanneer de sensorfunctie
ingeschakeld is, licht de led L2 op).
C) Door de toets C in te drukken, start de motor op de eerste snelheid.
De snelheid wordt aangegeven door de brandende Led L3. Als hij 2"
ingedrukt gehouden wordt, stopt de motor.
D) Door de toets D in te drukken, start de motor op de tweede snelheid.
De snelheid wordt aangegeven door de brandende Led L4.
E) Door de toets E in te drukken, start de motor op de derde snelheid.
De snelheid wordt aangegeven door de brandende Led L5.
F) Door op de toets F te drukken, start de motor op de vierde snelheid.
De snelheid wordt aangegeven door de brandende Led L6.
SENSIBILITEIT VAN DE SENSOR: de sensibiliteit van de sensor kan
gewijzigd worden naar eigen behoefte. De sensibiliteit wijzigen door
tegelijkertijd de toets A en de toets B in te drukken. De tot stand gebrachte
sensibiliteit zal duidelijk gemaakt worden door de 4 knipperende led L3, L4,
L5, L6. Door middel van de toetsen C, D, E of F, de gewenste sensibiliteit
tot stand brengen (toets C: minimum sensibiliteit, toets F: maximum
sensibiliteit). Voor de gaskookplaten de laagste gevoeligheid, voor de
vuurvaste kookplaten de matige gevoeligheid en voor de inductieplaten
de hoogste gevoeligheid instellen.
OPGELET: WANNEER DE LED L1 OPLICHT WIL DIT ZEGGEN DAT MEN
DE ANTI-VETFILTERS MOET SCHOONMAKEN OF DAT MEN DE
KOOLSTOFFILTER MOET VERVANGEN.
Page 34

SENSORFUNCTIE (inschakeling d.m.v. toets B): dit toestel is uitgerust
met een volledig automatisch systeem (Advanced Sensor Control) om alle
functies van de wasemkap te beheren. Het is te danken aan het systeem
Advanced Sensor Control dat de lucht in de keuken steeds zuiver en
geurloos blijft, zonder dat de gebruiker enige ingreep moet uitoefenen. De
gesofisticeerde sensors slagen erin om het even welke geur, wasem, rook
of warmte veroorzaakt door het koken, op te vangen. Het ASC vangt
eveneens eventuele en abnormale aanwezigheid van GAS in de omgeving
op.
Wanneer de sensorfunctie ingeschakeld is, zullen de toetsen C, D, E, F
de snelheid alleen voorlopig regelen, nadien is het de sensor die de
snelheid automatisch regelt.
Let op: om te voorkomen dat de sensor beschadigd wordt, dient men geen
siliconenhoudende producten in de buurt van de afzuigkap te gebruiken!
Bedieningselementen van Fig. 4:
Dit toestel is uitgerust met een volledig automatisch systeem (Advanced
Sensor Control) om alle functies van de wasemkap te beheren. Het is
te danken aan het systeem Advanced Sensor Control dat de lucht in de
keuken steeds zuiver en geurloos blijft, zonder dat de gebruiker enige
ingreep moet uitoefenen. De gesofisticeerde sensors slagen erin om het
even welke geur, wasem, rook of warmte veroorzaakt door het koken, op
te vangen. Het ASC vangt eveneens eventuele en abnormale aanwezigheid
van GAS in de omgeving op.
A) verlichting uit.
B) verlichting aan.
C) Mindert de snelheid van de motor, tot de nulsnelheid wordt bekomen. Indien
hij 2" lang wordt ingedrukt wanneer het Filteralarm actief is, zet hij de URENtelling terug op nul.
D) Schakelt de motor in (op de laatst gebruikte snelheid) en verhoogt de snelheid
van de motor tot de maximale snelheid wordt bereikt.
E) Activeert/deactiveert de Sensor (AUTOMATISCH of HANDBEDIENING).
In de Automatische bediening is de sensor actief en verschijnt op de Display
(L) de letter “A”.
L) Display:
- geeft de huidige snelheid weer
- geeft de Automatische bediening weer aan de hand van de letter “A”. Indien
de snelheid van de motor wordt gewijzigd, wordt de huidige snelheid 3-maal
knipperend weergegeven, waarna opnieuw de letter “A” verschijnt.
- meldt het Filteralarm (motor uitgeschakeld) door het centraal segment 30" lang
weer te geven.
FILTERALARM: wordt aangegeven met Uitgeschakelde Motor, gedurende 30":
Na 30u werking, verschijnt op de display het centraal segment; betekent dat
de vetfilters moeten worden gereinigd.
Na 120u werking, knippert op de display het centraal segment; betekent dat
de vetfilters moeten worden gereinigd en de koolstoffilters moeten worden
vervangen.
Wanneer de vetfilters gereinigd zijn (en/of de koolstoffilters vervangen zijn),
wordt tijdens de weergave van het filteralarm gedrukt op de knop C om de
UREN-telling opnieuw te starten (RESET).
Let op: om te voorkomen dat de sensor beschadigd wordt, dient men geen
siliconenhoudende producten in de buurt van de afzuigkap te gebruiken!
GEVOELIGHEID VAN DE GASSENSOR: de gevoeligheid van de sensor kan
volgens de eigen behoefte worden gewijzigd. Om de gevoeligheid te wijzigen,
dient het apparaat zich in de handbediening te vinden (op de display mag niet
de letter “A” maar moet de huidige snelheid weergegeven zijn); zo niet, druk op
de knop E.
Wijzig de gevoeligheid van de sensor door tegelijk te drukken op de knoppen
D en E. De ingestelde gevoeligheid wordt weergegeven op de display. Met de
knoppen C(-) en D(+) wordt de gevoeligheid ingesteld Bewaar de “nieuwe”
gevoeligheid door te drukken op de knop E.
Bedieningselementen van Fig. 5:
Knop A: Lampjes uit. Knop B: Lampjes aan. Knop C : mindert de snelheid van
de motor, tot de minimumsnelheid wordt bereikt. Indien de knop gedurende 2"
ingedrukt wordt gehouden, valt de motor stil en wordt de snelheid in het
geheugen bewaard.
snelheid) en verhoogt de snelheid van de motor tot de maximale snelheid wordt
bereikt.
Display L:
- geeft de huidige snelheid weer.
- meldt het Filteralarm (motor uitgeschakeld) door het centraal segment weer
te geven.
- meldt de activering van de Timer aan de hand van het knipperend cijfer.
Knop E: activeert de TIMER (motor ingeschakeld), waarbij de kap na 5'
vanzelf uitgaat. Bovendien,
wordt bij een actief Filteralarm de telling van de uren teruggesteld (motor
uitgeschakeld).
FILTERALARM: wordt aangegeven met Uitgeschakelde Motor:
Na 30u werking, licht op de display het centraal segment op; Dit betekent
dat de vetfilters moeten worden gereinigd.
Na 120u werking, knippert op de display het centraal segment; Dit betekent
dat de vetfilters moeten worden gereinigd en de koolstoffilters moeten
worden vervangen.
Knop D : schakelt de motor in (op de laatst gebruikte
Wanneer de vetfilters gereinigd zijn (en/of de koolstoffilters vervangen zijn),
wordt tijdens de weergave van het filteralarm gedrukt op de knop E om de
UREN-telling opnieuw te starten (RESET).
Bedieningselementen van Fig. 6:
A): lampjes aan/uit.
B): TIMER inschakelen/uitschakelen: door 1 keer op deze toets te drukken wordt
de timer ingeschakeld, zodat na 5 minuten de motor stopt (tegelijkertijd zal op
het display het nummer van de gekozen snelheid knipperen); de timer blijft
werken als de snelheid van de motor veranderd word.
Display C:
- laat de gekozen motorsnelheid zien (van 1 tot 4);
- laat als het nummer knippert zien dat de timer ingeschakeld is;
- geeft als het middelste gedeelte brandt of knippert aan dat de filters in alarm
zijn.
D): schakelt de motor in ( in de laatst gebruikte snelheid). Door de toets
nogmaals in te drukken, worden de motor-snelheden gekozen van 1 tot en met
4 in opeenvolgende orde. Houdt u de toets circa 2 seconden dan zal de motor
stoppen.
R): reset van de vetfilters en koolstoffilters. Als het filteralarm verschijnt
(d.w.z. als het middelste gedeelte van het display gaat branden) dan moeten
de vetfilters gereinigd worden (er zijn 30 werkingsuren verstreken). Als het
middelste gedeelte daarentegen knippert dan moeten de vetfilters gereinigd
worden en de koolstoffilters vervangen worden (er zijn 120 werkingsuren
verstreken). Is uw afzuigkap niet in de filterversie en zijn de koolstoffilters niet
aanwezig dan hoeft u uiteraard alleen de vetfilters te reinigen, dit geldt zowel
als het middelste gedeelte brandt danwel als het middelste gedeelte knippert.
Het filteralarm verschijnt wanneer de motor uitgeschakeld is en is ongeveer
30 seconden zichtbaar. Om opnieuw te beginnen moet u de toets 2 seconden
gedurende het zichtbaar zijn van het alarm.
Bedieningselementen van Fig. 7:
Dit toestel is uitgerust met een volledig automatisch systeem (Advanced
Sensor Control) om alle functies van de wasemkap te beheren. Het is
te danken aan het systeem Advanced Sensor Control dat de lucht in de
keuken steeds zuiver en geurloos blijft, zonder dat de gebruiker enige
ingreep moet uitoefenen. De gesofisticeerde sensors slagen erin om het
even welke geur, wasem, rook of warmte veroorzaakt door het koken, op
te vangen. Het ASC vangt eveneens eventuele en abnormale aanwezigheid
van GAS in de omgeving op.
A) : schakelt de verlichting in/ uit.
B) : schakelt de “Automatische” functie in / uit. Door deze functie in te
schakelen verschijnt een “A” op het display C en wordt de snelheid van de
motor automatisch hoger of lager, afhankelijk van de dampen, luchtjes en
gas in de keuken.
Display C) : - duidt de automatische werking van de sensor aan (de letter
“A” verschijnt);- het duidt de snelheid van de motor aan die automatisch door
de sensor gekozen is ; - het duidt het filteralarm aan, wanneer het middelste
gedeelte gaat branden of knippert.
D) : deze vermindert de snelheid van de motor / Reset; deze vermindert de
snelheid van de motor tot nul (stop), desalniettemin gaat de afzuigkap na
ongeveer 1 minuut weer automatisch werken op de snelheid die door de
sensor bepaald is. Door tijdens het tonen van het filteralarm op de toets te
drukken, wordt de RESET verkregen, waardoor de uurtelling opnieuw begint.
Toets E : verhoogt de snelheid van de motor, desalniettemin gaat de
afzuigkap na ongeveer 1 minuut weer automatisch werken op de snelheid die
door de sensor bepaald is.
Dit toestel is uitgerust met een volledig automatisch systeem (Advanced
Sensor Control) om alle functies van de wasemkap te beheren. Het is
te danken aan het systeem Advanced Sensor Control dat de lucht in de
keuken steeds zuiver en geurloos blijft, zonder dat de gebruiker enige
ingreep moet uitoefenen. De gesofisticeerde sensors slagen erin om het
even welke geur, wasem, rook of warmte veroorzaakt door het koken, op
te vangen. Het ASC vangt eveneens eventuele en abnormale aanwezigheid
van GAS in de omgeving op.
Wijziging van de gevoeligheid van de sensor: het is mogelijk de gevoeligheid
van de sensor te veranderen, door als volgt te werk te gaan: - stop de
afzuigkap door op toets B te drukken. – Druk tegelijkertijd op de toetsen D
en E (op het display verschijnt de gevoeligheidsindex van de sensor). –
Verhoog of verlaag de gevoeligheidsindex door op de toetsen D of E te
drukken (1 : minimum gevoeligheid / 9: maximum gevoeligheid). – wanneer
de stroomvoorziening onderbroken wordt, gaat de sensor weer met gevoeligheid
5 werken.
Let op: om te voorkomen dat de sensor beschadigd wordt, dient men geen
siliconenhoudende producten in de buurt van de afzuigkap te gebruiken!
Bedieningselementen van Fig. 8:
Schakelaar A: VERLICHTING; stand 0: lampje uit; stand 1: lampje aan.
Schakelaar B - MOTORSNELHEID: Hiermee is het mogelijk om de
werkingssnelheden van de motor te regelen; stand 0: motor staat stil.
C: Controlelampje dat aangeeft dat de motor in werking is.
Bedieningselementen van Fig. 9:
A): schakelt de verlichting in/uit; om de 30 bedrijfsuren gaat het corresponderende
lampje branden om aan te geven dat de vetfilters moeten worden schoongemaakt;
Page 35

om de 120 bedrijfsuren gaat het corresponderende lampje branden om aan te
geven dat de vetfilters moeten worden schoongemaakt en het koolstoffilter
moet worden vervangen. Om de telling van de uren weer te laten starten
(RESET), moet de toets A ongeveer 1” ingedrukt gehouden worden (terwijl het
lampje in werking is).
B): schakelt de motor in op de 1e snelheid (het corresponderende lampje gaat
branden); als hij ongeveer 1” ingedrukt gehouden wordt, gaat de motor uit; door
nogmaals op de toets te drukken (terwijl het lampje brandt) wordt de TIMER
geactiveerd, zodat de motor na 5’ stopt (het corresponderende lampje knippert).
C): schakelt de motor in op de 2e snelheid (het corresponderende lampje gaat
branden); door nogmaals op de toets te drukken (terwijl het lampje brandt) wordt
de TIMER geactiveerd, zodat de motor na 5’ stopt (het corresponderende lampje
knippert).
D): schakelt de motor in op de 3e snelheid (het corresponderende lampje gaat
branden); door de toets nogmaals in te drukken (terwijl het lampje brandt) wordt
de TIMER geactiveerd, zodat de motor na 5’ stopt (het corresponderende lampje
knippert).
E): schakelt de motor in op de 4e snelheid (het corresponderende lampje gaat
branden); door de toets nogmaals in te drukken (terwijl het lampje brandt) wordt
de TIMER geactiveerd, zodat de motor na 5’ stopt (het corresponderende lampje
knippert).
ONDERHOUD
! Stroomvoorziening uitschakelen alvorens de afzuigkap te reinigen of
onderhouden.
Reiniging van de afzuigkap
WANNEER: reinigen betreft het gebruik, ten minste om de 2 maanden
brandgevaar te voorkomen.
REINIGING VAN DE BUITENKANT: maak gelakte oppervlakken schoon
m.b.v. een zachte doek, bevochtigd met lauw water en neutraal
reinigingsmiddel; Gebruik specifieke reinigingsmiddelen bestemd voor RVS,
koper of messing.
REINIGING VAN DE BINNENKANT: gebruik een doek/kwast gedrenkt in
gedenatureerde ethylalcohol.
WAARSCHUWING: Gebruik geen schuur- of bijtende middelen (zoals
metaalspons, te harde borstel of agressieve schoonmaakmiddel enz.)
Vervanging van de koolstoffilter
(Alleen voor recirculatie)
WANNEER: vervangen elke 6 maanden afhankelijk van gebruik.
AFNEMEN VAN DE FILTER: Al naar gelang het model dat u heeft
aangeschaft, is de wasemkap voorzien van ronde of rechthoekige
koolstoffilters. Als de wasemkap ronde koolstoffilters (R) heeft, moet
het koolstoffilter worden losgemaakt met een draaiende beweging.
Als de wasemkap een rechthoekig koolstoffilter heeft (P), moet de pal naar
binnen worden geduwd en moet het filter naar beneden worden gedraaid
totdat de 2 lipjes uit hun behuizingen komen.
R
Reiniging van de vetfilters (F)
WANNEER: reinigen betreft het gebruik, ten minste om de 2 maanden
brandgevaar te voorkomen.
REINIGING VAN DE FILTERS: Was de filters met de hand of in de
vaatwasser met een neutraal reinigingsmiddel. De vaatwasser kan de kleur van
de filters iets doen vervagen; dit heeft echter geen invloed op de goede werking
van de filters.
F
F
P
Page 36

Verlichting
Bij het vervangen van de lampen van hetzelfde type - als deze lamp niet in
de tabel in het werkblad “OPGELET” staat - neem dan contact op met het
steunpunt.
STORINGEN
Indien er iets niet correct werkt, voordat de technische dienst op te
roepen, voer de eenvoudige onderstaande controles:
• Afzuigkap werkt niet
Mogelijke oorzaak (1): De voedingskabel niet aangesloten of niet correct
aangesloten.
Oplossing: De elektrische installatie van de afzuigkap werd niet correct
door de installateur aangesloten. Roep een elektricien/installateur op.
Mogelijke oorzaak (2): Geen snelheid gekozen.
Oplossing: Kies de snelheid in het besturingspaneel.
Indien de deksel zet zich tijdens de normale werking uit, controleer of de
spanning wel aangesloten is en of de meerpolige schakelaar niet
ingeschakeld is.
• De afzuiging werkt niet, maar de verlichting wel
Mogelijke oorzaak: De kabel van de afzuigingsmotor is niet aangesloten.
Oplossing: Vind de kabel van de afzuigingsmotor en sluit deze aan.
Controleer of de ventilator werkt. Indien het probleem aanhoudt, roep de
technische dienst op.
• Afzuigkap werkt niet correct
Mogelijke oorzaak: Vuile filters/afscheidingen.
Oplossing: Controleer of de filter schoon is.
In het geval van afzuigkappen met kanaalsysteem en afzuigkappen met
externe motor
Mogelijke oorzaak (1): Het kanaalsysteem werd niet conform de eisen
uitgevoerd. Indien de lengte van het kanaal de eisen van de producent
overschrijdt, gaat de afzuigkap niet optimaal werken. Indien de diameter
van het kanaal te klein is of in het systeem te veel elleboog koppelingen
zijn, gaat ook de doorstroom van de lucht langzamer zijn.
Tijdens de montage van het afvoerkanaal dienen de officiële instructies
van de bevoegde organen te worden opgevolgd (bv. de afgezogen lucht
mag niet naar het kanaal gaan dat als deel van de centrale
verwarmingsinstallatie of thermosifon ezv. gebruikt wordt). De ruimte
heeft ventilatieopeningen.
neem contact met de installateur op.
Mogelijke oorzaak (2): Het kanaal is verstopt.
Oplossing: controleer of het ventilatiekanaal niet geblokkeerd is
(vogelnesten of gordels).
Mogelijke oorzaak (3): De klep van het ventiel opent niet.
Oplossing: Controleer of de band uit de kleppen van het ventiel
verwijderd werd en of deze vrij bewegen.
Bij afzuigkappen met filter
Mogelijke oorzaak: koolstoffilter is volledig vol.
Oplossing: vervang ge koolstoffilter.
• De verlichting werkt niet
Reflectoren (LED):
Indien deze soort verlichting niet in de onderstaande tabel met “Opgelet”
zich bevindt, neem contact met de technische dienst op.
Gloeilampen:
Mogelijke oorzaak: Beschadigde gloeilamp of de behuizing of de
voedingskabel niet aangesloten is.
Oplossing: plaats de gloeilamp in een andere behuizing; indien deze
steeds niet werkt, vervang de gloeilamp; indien wel werkt, is de
behuizing beschadigd of de voedingskabel niet aangesloten is. Roep de
technische dienst op.
Halogeenlampen:
Mogelijke oorzaak: Beschadigde halogeenlamp of de behuizing of de
voedingskabel niet aangesloten is.
Oplossing: vervang de halogeenlamp. Indien het probleem aanhoudt,
roep de technische dienst op.
• Afstandsbediening werkt niet (indien in de set)
Mogelijke oorzaak (1): Geen verbinding tussen de afstandsbediening en
afzuigkap.
Oplossing: Controleer of de bedieningsknoppen op de afzuigkap correct
werken.
Zet de spanning van de afzuigkap met gebruik van de circuitonderbreker
uit; vervolgens zet deze opnieuw aan. Maak opnieuw de verbinding tussen
de afstandsbediening en afzuigkap, volg daarbij de gebruiksaanwijzing van
de afstandsbediening op.
Mogelijke oorzaak (2): Lege de batterij in afstandsbediening.
Oplossing: Vervang de batterij.
• Vergrendeling van het verticale telescopische blad (indien in de
set)
Indien alle LED-diodes knipperen, is het telescopische blad vergrendeld.
Wacht 30 seconden en druk op de knop boven of beneden om het blad
te ontgrendelen.
Indien de knop boven/beneden knippert, bevindt zich de smeerfilter niet
in de juiste positie. Plaats deze in de juiste positie.
Indien het blad vergrendeld is, controleer of de voedingskabel wel
aangesloten is. Indien het probleem aanhoudt, roep de technische dienst
op.
Page 37

РУССКИЙРУССКИЙ
РУССКИЙ
РУССКИЙРУССКИЙ
! !
Монтаж производится в соответствии с настоящимиМонтаж производится в соответствии с настоящими
!
Монтаж производится в соответствии с настоящими
! !
Монтаж производится в соответствии с настоящимиМонтаж производится в соответствии с настоящими
инструкциями профессионально квалифицированнымиинструкциями профессионально квалифицированными
инструкциями профессионально квалифицированными
инструкциями профессионально квалифицированнымиинструкциями профессионально квалифицированными
специалистами.специалистами.
специалистами.
специалистами.специалистами.
Использовать перчатки во время установки и техобслуживания.
!
Если кабель питания поврежден, в целях предупреждения опасности, он
должен быть заменен изготовителем или его службой технической поддержки,
или лицом с аналогичной квалификацией.
Внимание: Неправнльная установка винтов или крепежныx дeтaлeй в
cooтвeтвии c зтими инcтpyкциями, мoжeт пpивecти к oпacнocти пopaжeния
злeктpичecким тoкoм.
ВНИМАНИЕ: Вo избeжaниe пoвpeждeния пpoдyктa Vs, вo вpeмя ycтaнoвки,
иcпoльзyйтe тoлькo винты, пocтaвляeмыe в пpaвильнoм пopядкe и, кaк
yкaзaнo в инcтpyкции, чтoбы cлeдoвaть.
Пoдгoтoвьтe иcтoчник питaния (cм. “Пpимeчaниe” лиcт).
Для мoдeлeй и cтpeмящиxcя или Версия с внещним двигателем, пoдгoтoвить
тpyбы для oтвoдa вoздyxa (cм. “Пpимeчaниe” лиcт).
ФИЛЬТРУЮЩАЯ ИЛИ ВСАСЫВАЮЩАЯ?ФИЛЬТРУЮЩАЯ ИЛИ ВСАСЫВАЮЩАЯ?
ФИЛЬТРУЮЩАЯ ИЛИ ВСАСЫВАЮЩАЯ?
ФИЛЬТРУЮЩАЯ ИЛИ ВСАСЫВАЮЩАЯ?ФИЛЬТРУЮЩАЯ ИЛИ ВСАСЫВАЮЩАЯ?
Вытяжка может быть фильтрующего или всасывающего типа.
Выбирайте сначала тип установки (с рециркуляцией или наружной
вытяжкой или Версия с внещним двигателем). Наиболее эффективным
является режим работы с наружной вытяжкой или Версия с внещним
двигателем (по возможности).
Всасывающий тип Всасывающий тип
Всасывающий тип
Всасывающий тип Всасывающий тип
Вытяжка очищает воздух и выбрасывает его наружу через вытяжную
трубу.
Версия с внеВерсия с вне
Версия с вне
Версия с внеВерсия с вне
Вытяжка очищает воздух и выбрасывает его наружу через вытяжную
трубу. Прибор должен быть подключен к отсоса, который будет
действовать в течение отдельный, используя устройство в качестве
основы для установки воздуõ звакуировать.
Фильтрующий тип Фильтрующий тип
Фильтрующий тип
Фильтрующий тип Фильтрующий тип
Вытяжка очищает воздух и возвращает очищенный воздух в
помещение.
ОРГАНЫ УПРАВЛЕНИЯОРГАНЫ УПРАВЛЕНИЯ
ОРГАНЫ УПРАВЛЕНИЯ
ОРГАНЫ УПРАВЛЕНИЯОРГАНЫ УПРАВЛЕНИЯ
Только для вытяжек с электронным блоком управленияТолько для вытяжек с электронным блоком управления
Только для вытяжек с электронным блоком управления:
Только для вытяжек с электронным блоком управленияТолько для вытяжек с электронным блоком управления
(моделей, продаваемых в Скандинавии, следующие функции нет)
В целях оптимизации потребления энергии через 5 минут работы 4-я скорость
(интенсивная) автоматически переходит на 3-ю скорость.
- Если в течение 10 часов не меняется управление включенной кухонной
вытяжкой (включено освещение и/или подсветка), то все функции
автоматически отключаются и вытяжка переходит в состояние OFF
(ВЫКЛ.).
- Каждый раз, когда выдается команда с клавиатуры или пульта дистанционного
управления (опциональный вариант), срабатывает функция подтверждения
выполнения команды звуковым сигналом “бип”.
- Если в режиме работы вытяжки наступит внезапное прекращение подачи
в сеть электроэнергии, вытяжка автоматически выключается, а кнопка идет
в положение OFF (ВЫКЛ.). Следует потом повторно включить двигатель
вручную.
Клавиши управления по Рис. 1:Клавиши управления по Рис. 1:
Клавиши управления по Рис. 1:
Клавиши управления по Рис. 1:Клавиши управления по Рис. 1:
A)A)
A) ВКЛ/ВЫКЛ подсветки. Клавиша используется и для сброса
A)A)
аварийного состояния фильтров задержки жира и угольных фильтров.
Аварийное состояник фильтров
зажигается индикатор L1 КРАСНЫЙ, который остается зажженным в
течение 30 сек (пора зачищать фильтры задержки жира).
По истечении 120 часов работы мотора зажигается индикатор L1
КРАСНЫЙ, который продолжает мигать на 30 сек (пора заменять
угольные фильтры, если вытяжка снабжена ими). Аварийное состояние
фильтров обнаруживается ТОЛЬКО когда мотор ОСТАНОВЛЕН. Сброс
аварийного состояния фильтров (сброс подсчета часов) происходит
нажатием клавиши А на 2 сек.
B)B)
B) Нажатие клавиши В вызывает включение мотора на 1-ой скорости.
B)B)
Скорость указывается индикатором L1 ЗЕЛЕНЫМ. При нажатии клавиши
на 2 сек мотор выключается. Нажатие клавиши одним щелчком, когда
щщ
нини
мм
двигате двигате
лл
ее
щ
щщ
ни
нини
м
двигате
мм
двигате двигате
мм
л
е
м
лл
ее
мм
: :
: по истечении 30 часов работы мотора
: :
индикатор зажжен, вызывает активацию финкции таймера (мотор
продолжает работать в течение 5 мин), о чем дает знать мигание
индикатора. Для удаления функции таймера нажмите опять клавишу
одним щелчком.
C)C)
C) Нажатие клавиши С вызывает включение мотора на 2-ой скорости.
C)C)
Скорость указывается индикатором L2 ЗЕЛЕНЫМ. Нажатие клавиши
одним щелчком, когда индикатор зажжен, вызывает активацию финкции
таймера (мотор продолжает работать в течение 5 мин), о чем дает
знать мигание индикатора. Для удаления функции таймера нажмите
опять клавишу одним щелчком.
D)D)
D) Нажатие клавиши D вызывает включение мотора на 3-ей скорости.
D)D)
Скорость указывается индикатором L3 ЗЕЛЕНЫМ. Нажатие клавиши
одним щелчком, когда индикатор зажжен, вызывает активацию финкции
таймера (мотор продолжает работать в течение 5 мин), о чем дает
знать мигание индикатора. Для удаления функции таймера нажмите
опять клавишу одним щелчком.
E)E)
E) Нажатие клавиши Е вызывает включение мотора на 4-ой скорости.
E)E)
Скорость указывается индикатором L4 ЗЕЛЕНЫМ. Нажатие клавиши
одним щелчком, когда индикатор зажжен, вызывает активацию финкции
таймера (мотор продолжает работать в течение 5 мин), о чем дает
знать мигание индикатора. Для удаления функции таймера нажмите
опять клавишу одним щелчком.
Клавиши управления по Рис. 2:Клавиши управления по Рис. 2:
Клавиши управления по Рис. 2:
Клавиши управления по Рис. 2:Клавиши управления по Рис. 2:
A)A)
A) лампочки ВКЛ/ОТКЛ. Эта клавиша используется также для аварийной
A)A)
функции жироулавливающих и угольных фильтров.
Аварийный сигнал фильтров: После 30 часов работы двигателя
загорается и остается гореть светодиод L1 (это означает, что пора
чистить жироулавливающие фильтры). После 120 часов работы
двигателя загорается и начинает мигать светодиод L1 (это означает,
что пора менять угольные фильтры, если вытяжной зонт ими оснащен).
Аварийный сигнал фильтров появляется ТОЛЬКО при
ОСТАНОВЛЕННОМ двигателе. Аварийный сигнал фильтров аннулируют
(сброс счетчика ЧАСОВ), держа нажатой клавишу A в течение 2
секунд.
B)B)
B) При нажатии клавиши B двигатель запускается на первой скорости.
B)B)
Скорость обозначается загоревшимся светодиодом L2. Если держать
эту клавишу нажатой в течение 2 секунд, то двигатель отключается.
Если выполнить одно нажатие кнопки при горящем светодиоде, то
подключается функция таймера (двигатель включается на пять минут),
о чем сигнализирует мигающий светодиод. Для отключения функции
таймера нажмите клавишу повторно еще раз.
C)C)
C) При нажатии клавиши C двигатель запускается на второй скорости.
C)C)
Скорость обозначается загоревшимся светодиодом L3. Если выполнить
одно нажатие кнопки при горящем светодиоде, то подключается
функция таймера (двигатель включается на пять минут), о чем
сигнализирует мигающий светодиод. Для отключения функции таймера
нажмите клавишу повторно еще раз.
D)D)
D) При нажатии клавиши D двигатель запускается на третьей скорости.
D)D)
Скорость обозначается загоревшимся светодиодом L4. Если выполнить
одно нажатие кнопки при горящем светодиоде, то подключается
функция таймера (двигатель включается на пять минут), о чем
сигнализирует мигающий светодиод. Для отключения функции таймера
нажмите клавишу повторно еще раз.
E)E)
E) При нажатии клавиши E двигатель запускается на четвертой
E)E)
скорости. Скорость обозначается загоревшимся светодиодом L5. Если
выполнить одно нажатие кнопки при горящем светодиоде, то
подключается функция таймера (двигатель включается на пять минут),
о чем сигнализирует мигающий светодиод. Для отключения функции
таймера нажмите клавишу повторно еще раз.
Клавиши управления по Рис. 4:Клавиши управления по Рис. 4:
Клавиши управления по Рис. 4:
Клавиши управления по Рис. 4:Клавиши управления по Рис. 4:
Данный прибор снабжен полностью автоматической системой “ADS”
(Advanced Sensor Control), обеспечивающей управление всеми функциями
вытяжки. Благодаря системе “ADS”, воздух в кухне остается всегда
чистым и лишенным всяких запахов, без какогодибо вмешательства со
стороны пользователя. Датчики передовой конструкции способны
улавливать наличие всяких запахов, паров, дымов или тепла вследствие
процесса жаренья. Система “ADS” обнаруживает также наличие ГАЗА в
помещении.
АА
А) Выключает ПОДСВЕТКУ
АА
ВВ
В) Включает ПОДСВЕТКУ
ВВ
СС
С) Уменьшает скорость мотора до нуля. Нажатие клавиши на 2 сек при
СС
активации Аварийного состояния фильтров вызывает сброс счетчика
ЧАСОВ.
DD
D) Включает мотор (со скоростью, которая была набрана последний раз)
DD
и увеличивает скорость до максимальной.
ЕЕ
Е) Активирует/ дезактивирует Датчик (АВТОМАТИЧЕСКИЙ или РУЧНОЙ
ЕЕ
режим). В Автоматическом режиме датчик активирован и на Дисплее (L)
появляется буква “A”.
LL
L) Дисплей:
LL
- показывает действующую скорость
Page 38

- показывает Автоматический режим отображением буквы “A”. При
переключении скорости мотора отображает действующую скорость тремя
миганиями, затем вновь
отображает букву “A”.
- Отображает Аварийное Состояние фильтров (при выключенном моторе),
при этом зажигается центральный сегмент на 30 сек.
АВАРИЙНОЕ СОСТОЯНИЕ ФИЛЬТРОВ: показывается при выключенном
моторе на 30 сек.
По истечении 30 часов работы на дисплее появляется буква “F”; это
означает, что необходимо зачищать фильтры задержки жира.
По истечении 120 часов работы на дисплее мигает буква “F”; это означает,
что необходимо зачищать фильтры задержки жира и заменять угольные
фильтры.
После зачистки фильтров задержки жира (и/или замены угольных фильтров),
для повторного запуска подсчета часов (СБРОСА) нажмите клавишу С,
пока отображается аварийное состояние фильтров.
ВНИМАНИЕ! Чтобы не повреждать датчик, избежайте применение
силиконовых средств вблизи от вытяжки!
ЧУВСТВИТЕЛЬНОСТЬ ДАТЧИКА НАЛИЧИЯ ГАЗА: Вы можете изменять
чувствительнось датчика по своему усмотрению. Для этого необходимо,
чтобы прибор находился в состоянии ручного режима (т.е., на дисплее не
должна отображаться буква “A”, а действующая скорость); в противном
случае, нажмите клавишу Е.
Измените чувствительность нажатием клавиши D и клавиши Е
одновременно. На дисплее будет показываться набранная
чувствительность. Набирайте нужную чувствительность клавишами С() и D(+). Сохраните “новую” чувствительность нажатием клавиши Е.
Клавиши управления по Рис. 5Клавиши управления по Рис. 5
Клавиши управления по Рис. 5:
Клавиши управления по Рис. 5Клавиши управления по Рис. 5
Клавиша A: Выключает подсветку
Клавиша B: Включает подсветку
Клавиша C: Снижает скорость мотора до минимальной. Нажатие клавиши
на 2 сек вызывает останов мотора с запоминанием текущей скорости.
Клавиша D: Включает мотор (с последней использованной скоростью)
и увеличивает скорость мотора до максимальной.
Дисплэй L:
- показывает текущую скорость
- отображает аварийное состояние фильтров (при выключенном моторе)
зажиганием центрального сегмента
- показывает активацию Таймера мигающим числом
Клавиша E: Активирует ТАЙМЕР (при
включенном моторе), вследствие чего вытяжка автоматически выключается по истечении 5 минут. Производит зануление счетчика часов
в присутствии аварийного состояния фильтров (при выключенном
моторе).
АВАРИЙНОЕ СОСТОЯНИЕ ФИЛЬ-ТРОВ: отображается при выключенном
моторе:
По истечении 30 часов работы на дисплее зажигается центральный
сегмент, указывая на то, что необхо-димо зачищать фильтры задержки
жира.
По истечении 120 часов работы на дисплее мигает центральный сегмент,
указывая на то, что необходимо зачищать фильтры задержки жира и
заменять угольные фильтры.
По зачистке фильтров задержки жира (и/или замене угольных фильтров),
для СБРОСА и повторного запуска подсчета часов нажмите клавишу
при отображении аварийного состояния фильтров.
Клавиши управления по Рис. 6Клавиши управления по Рис. 6
Клавиши управления по Рис. 6:
Клавиши управления по Рис. 6Клавиши управления по Рис. 6
Клавиша А = включение/выключение подсветки. Клавиша В = включение/
выключение таймера; нажимая ее 1 раз, Вы включаете таймер;
следовательно, по истечении 5 минут электродвигатель останавливается
(одновременно с этим, на дисплее мигает число скорости, которая была
набрана). Таймер оста-ется включенным, если скорость электродвигателя изменяется.
Дисплей С = - отображает выбранную скорость электродвигателя (с 1
по 4);
- отображает срабатывание таймера, когда мигает число скорости; -
отобра-жает аварийное состояние фильтров, когда загорается или мигает
центральный сегмент.
Клавиша D = включает электродви-гатель (на последней набранной
скорости). При повторном нажатии на клавишу можно набирать скорости
электридвигателя, с 1-ой по 4-ую, последовательно. Удержание клавиши
на 2 секунды приблизительно вызовет останов электродвигателя.
Клавиша R = сброс угольных фильтров и фильтров задержки жира. При
появлении сигнала аварийного состояния фильтров (на дисплее горит
центральный сегмент) необходимо зачищать фильтры задержки жира
(они проработали 30 часов). Если же центральный сегмегт мигает, то
необходимо зачищать фильтры для зажержки жира и заменять угольные
фильтры (они проработали 120 часов). Естественно, если Ваша модель
не используется в режиме рециркуляции воздуха и, следовательно,
она не снабжена угольными фильтрами, Вы должны зачищать одни
фильтры задержки жира, независимо от того, зажжен ли центральный
сегмент или мигает. Аварийное состояние фильтров появляется при
выключенном электро-двигателе и продолжает появляться в течение
30 сек приблизительно. Чтобы восстановить подсчет часов нажмите и
удерживайте клавишу в течение 2 секунд во время появления
аварийного сигнала.
Клавиши управления по Рис. 7:Клавиши управления по Рис. 7:
Клавиши управления по Рис. 7:
Клавиши управления по Рис. 7:Клавиши управления по Рис. 7:
Данный прибор снабжен полностью автоматической системой “ADS”
(Advanced Sensor Control), обеспечивающей управление всеми функциями
вытяжки. Благодаря системе “ADS”, воздух в кухне остается всегда
чистым и лишенным всяких запахов, без какогодибо вмешательства со
стороны пользователя. Датчики передовой конструкции способны
улавливать наличие всяких запахов, паров, дымов или тепла вследствие
процесса жаренья. Система “ADS” обнаруживает также наличие ГАЗА в
помещении.
Клавиша А: включает / выключает подсветку.
Клавиша В : включает / отключает функцию ”Автоматический режим”.
При включении этой функции, на индикаторе С появляется буква ”А”,
а число оборотов электродвигателя увеличивается или уменьшается
автоматически в соответствии с насыщенностью кухни дымом, запахами
и газом.
Индикатор С : показывает автоматическую работу датчика (с
отображением буквы ”А”); - показывает скорость вращения
электродвигателя, автоматически задаваемую датчиком; - показывает
аварийное состояние фильтров, когда центральный сегмент зажигается
или мигает. Клавиша D : уменьшает скорость электродвигателя / Cброс:
уменьшает скорость до нуля (стоп), однако по истечении 1 минуты
возобновится автоматическая функция работы со скоростью, задавемой
датчиком. Нажатие клавиши при отображении аварийного состояния
фильтров вызовет СБРОС счетчика и тем самым повторный подсчет
часов.
Клавиша Е : увеличивает скорость электродвигателя; однако, по
истечении 1 минуты возобновится автоматический режим работы
вытяжки со скоростью, задаваемой датчиком.
Данный прибор снабжен полностью автоматической системой “ADS”
(Advanced Sensor Control), обеспечивающей управление всеми функциями
вытяжки. Благодаря системе “ADS”, воздух в кухне остается всегда
чистым и лишенным всяких запахов, без какогодибо вмешательства со
стороны пользователя. Датчики передовой конструкции способны
улавливать наличие всяких запахов, паров, дымов или тепла вследствие
процесса жаренья. Система “ADS” обнаруживает также наличие ГАЗА в
помещении.
Настройка датчика: вы можете изменить чувствительность датчика
следующим образом :
- остановите вытяжку нажатием клавиши В. – нажмите одновременно
клавиши D и Е (на индикаторе будет отображен показатель
чувствительности датчика). – Нажатием клавишей D или Е отрегулируйте
чувствительность датчика в плюсовую или минусовую сторону (1 :
минимальная / 9 : максимальная чувствительность). – в случае
прерывания электропитания, датчик будет повторно работать с
чувствительностью 5.
Внимание! Чтобы не повредить датчик, избежайте применение
ЕЕ
Е
ЕЕ
силиконовых веществ вблизи от вытяжки.
Клавиши управления по Рис. 8:Клавиши управления по Рис. 8:
Клавиши управления по Рис. 8:
Клавиши управления по Рис. 8:Клавиши управления по Рис. 8:
Выключатель A= пoдcвeтka;
положение 0: выключена; положение 1: включена.
Выключатель B = ckopocть вpaшeния злekтpoдвитaтeля: позволяет регулировать рабочую скорость электродви-гателя; положение 0: отключен.
CC
C = Сигнализация о работе двигателя.
CC
Клавиши управления по Рис. 9:Клавиши управления по Рис. 9:
Клавиши управления по Рис. 9:
Клавиши управления по Рис. 9:Клавиши управления по Рис. 9:
Клавиша А= включает/выключает подс-ветку; через каждые 30 часов
работы загорается соответствующая лампочка, что дает знать о том,
что необходимо зачищать фильтры задержки жира; через каждые 120
часов работы загорается соответствующая лампочка, что дает знать
о том, что необходимо зачищать фильтры задержки жира и заменять
угольные фильтры. Для сброса подсчета, нажмите на клавишу А в
течение 1 секунды приблизительно (пока горит сигнальная лампочка).
Клавиша В = включает электродви-гатель на 1-ой скорости (загорается
соответствующая лампочка); если оставить ее нажатой в течение
примерно 1 секунды двигатель выключается.
Клавиша С = включает электродви-гатель на 2-ой скорости (загорается
соответствующая лампочка); при повторном нажатии (пока горит
сигнальная лампочка) включается Таймер, вследствие чего по истечении
5 секунд электродвигатель останавлива-ется (сигнальная лампочка
мигает).
Клавиша D= включает электродви-гатель на 3-ой скорости (загорается
соответствующая лампочка); при повторном нажатии (пока горит
сигнальная лампочка) включается Таймер, вследствие чего по истечении
5 секунд электродвигатель останавли-вается (сигнальная лампочка
Page 39

мигает).
Клавиша Е = включает электродвигатель на 4-ой скорости (загорается
соответс-твующая лампочка); при повторном нажатии (пока горит
сигнальная лампо-чка) включается Таймер, вследствие чего по истечении
5 секунд электродвигатель останавливается (сигнальная лампочка мигает).
ТЕХНИЧЕСКОЕ ОБСЛУЖИВАНИЕТЕХНИЧЕСКОЕ ОБСЛУЖИВАНИЕ
ТЕХНИЧЕСКОЕ ОБСЛУЖИВАНИЕ
ТЕХНИЧЕСКОЕ ОБСЛУЖИВАНИЕТЕХНИЧЕСКОЕ ОБСЛУЖИВАНИЕ
! Перед чисткой или проведением технического обслуживания
отключить напряжение.
Чистка вытяжкиЧистка вытяжки
Чистка вытяжки
Чистка вытяжкиЧистка вытяжки
КОГДА ПРОИЗВОДИТЬ ЧИСТКУ: очистить в связи сиспользованием, по
крайней мере, каждые 2 месяца, чтобежать риска возникновения
пожара.
НАРУЖНАЯ ЧИСТКА: использовать тряпку, смоченную в теплой воде
с нейтральным моющим средством (для окрашенных вытяжек);
использовать специальные средства для вытяжек из стали, меди или
латуни.
ВНУТРЕННЯЯ ЧИСТКА: использовать тряпку (или кисточку),
смоченную в денатурированном этиловом спирте.
ЧТО НЕЛЬЗЯ ДЕЛАТЬ: не использовать абразивные или коррозийные
средства (например, металлические губки, слишком жесткие щетки,
очень агрессивные моющие средства, и т. д.).
Чистка жироулавливающих фильтров (F)Чистка жироулавливающих фильтров (F)
Чистка жироулавливающих фильтров (F)
Чистка жироулавливающих фильтров (F)Чистка жироулавливающих фильтров (F)
КОГДА ПРОИЗВОДИТЬ ЧИСТКУ: очистить в связи сиспользованием, по
крайней мере, каждые 2 месяца, чтобежать риска возникновения
пожара.
КАК ЧИСТИТЬ ФИЛЬТРЫ: мыть нейтральным моющим средством
вручную или в посудомоечной машине. В случае использования
посудомоечной машины возможно обесцвечивание фильтров, которое
не влияет на их функциональность.
Замена угольного фильтраЗамена угольного фильтра
Замена угольного фильтра
Замена угольного фильтраЗамена угольного фильтра
(Только для фильтрующей вытяжки)
КОГДА ПРОИЗВОДИТЬ ЗАМЕНУ: заменены по крайней мере, каждые 6
месяцев зависимости от использования.
КАК ВЫНУТЬ ФИЛЬТР:
снабжена угольными фильтрами прямоугольной или круглой формы.
Если вытяжка снабжена круглы-ми фильтрами (R), разблокируйте угольный
фильтр вращательным движением противоположно направлению.
Если вытяжка снабжена прямоугольным угольным фильтром (P), прижмите
фиксатор кнутри и поверните фильтр книзу так, чтобы вынуть 2 язычка из
своих гнезд.
в соответствии с Вашей моделью, вытяжка
R
F
F
P
Page 40

ПодсветкаПодсветка
Подсветка
ПодсветкаПодсветка
Заменить на лампы того же типа; если лампа не указана в таблице листа
“ПPИМE
чAHИE”, обратитесь, пожалуйста, в центр поддержки.
АВАВ
АРИЙНЫЕ САРИЙНЫЕ С
АВ
АРИЙНЫЕ С
АВАВ
АРИЙНЫЕ САРИЙНЫЕ С
Если что-то не работает правильно, перед вызовом технического
обслуживающего персонала просим выполнить простые контрольные
действия, описанные ниже:
Вытяжка не работаетВытяжка не работает
•
Вытяжка не работает
Вытяжка не работаетВытяжка не работает
Возможная причина (1): Провод питания не подсоединен или
подсоединен неправильно.
Решение: Электрическая инсталляция вытяжки не была
соответственным образом подсоединена монтером. Вызовите
электрика/монтера.
Возможная причина (2): Не выбрана скорость.
Решение: Выберите скорость на панели управления.
Если вытяжка отключается во время нормальной работы, то следует
проверить, не отсоединено ли питание и не включился ли
омниполярный (многополюсный) разъединитель.
ВентилятВентилят
•
Вентилят
ВентилятВентилят
Возможная причина: Кабель двигателя вентилятора не подсоединен.
Решение: Определите местонахождение кабеля двигателя
вентилятора и подсоедините его. Проверьте, работает ли вентилятор
теперь. Если проблема не устранена, вызовите технический
обслуживающий персонал.
Вытяжка не работает правильноВытяжка не работает правильно
•
Вытяжка не работает правильно
Вытяжка не работает правильноВытяжка не работает правильно
Возможная причина: Загрязнены фильтры/перегородки.
Решение: Проверьте, чистый ли фильтр.
В случае вытяжек с системой каналов и вытяжек с внешним
двигателем
Возможная причина (1): Система каналов не выполнена
соответственно требованиям. Если длина канала превышает
требования производителя, вытяжка может не работать оптимально.
Если сечение канала слишком мало или в системе слишком много
изгибов, то также будет замедлен поток воздуха.
Во время монтажа отводного канала следует придерживаться
официальных инструкций, которые предоставлены соответствующими
органами (например, вытягиваемый воздух не может быть направлен
в канал, который уже используется в рамках инсталляции
центрального отопления, термосифонов и т.д.). В помещении
находятся вентиляционные отверстия.
Следует обратиться к монтеру.
ор не действор не действ
ор не действ
ор не действор не действ
ЛУЧАИЛУЧАИ
ЛУЧАИ
ЛУЧАИЛУЧАИ
уу
ее
тт
у
е
т
уу
ее
тт
, но о, но о
, но о
, но о, но о
свсв
ещение рабоещение рабо
св
ещение рабо
свсв
ещение рабоещение рабо
таетае
тае
таетае
тт
т
тт
Возможная причина (2): Канал закрыт.
Решение: проверить, ничего ли не блокирует вентиляционный канал
(гнезда птиц или узлы).
Возможная причина (3): Дроссельная заслонка не открывается.
Решение: Необходимо проверить, была ли устранена лента из
дроссельной заслонки и свободно ли она двигается.
В случае вытяжек с фильтром
Возможная причина: угольный фильтр полностью пропитан.
Решение: заменить угольный фильтр.
Лампа не работаетЛампа не работает
•
Лампа не работает
Лампа не работаетЛампа не работает
Рефлекторы (LED):
Если лампы этого типа не находятся в нижеприведенной таблице на
странице с “примечaние”, просим обратиться к техническому
обслуживающему персоналу.
Лампы с лампочками:
Возможная причина: Лампочка или светильник неисправны либо
отсоединился провод питания.
Решение: установить лампочку в другой светильник; если лампочка
не работает, то заменить ее другой такого же типа; если работает,
значить неисправный светильник или отсоединился провод питания.
Вызовите технический обслуживающий персонал.
Галогенные лампы:
Возможная причина: Лампочка или светильник неисправны либо
отсоединился провод питания.
Решение: заменить лампочку другой такого же типа. Если проблема
не устранена, вызовите технический обслуживающий персонал.
ПуПу
льль
т дистанционногт дистанционног
•
Пу
ль
т дистанционног
ПуПу
льль
т дистанционногт дистанционног
добавлен в комплект)добавлен в комплект)
добавлен в комплект)
добавлен в комплект)добавлен в комплект)
Возможная причина (1): Отсутствие соединения между пультом и
вытяжкой.
Решение: Проверить, правильно ли работают кнопки управления,
которые установлены на вытяжке.
Выключить питание вытяжки с помощью электрического предохранителя;
после чего опять его подсоединить. Снова выполнить соединение между
пультом и вытяжкой, соблюдая инструкцию, приложенную к пульту.
Возможная причина (2): Отработанная батарейка в пульте.
Решение: Заменить батарейку новой.
Блокирование вертикального телескопического лотка (еслиБлокирование вертикального телескопического лотка (если
•
Блокирование вертикального телескопического лотка (если
Блокирование вертикального телескопического лотка (еслиБлокирование вертикального телескопического лотка (если
он был добавлен в комплект)он был добавлен в комплект)
он был добавлен в комплект)
он был добавлен в комплект)он был добавлен в комплект)
Если все светодиоды (LED) мигают, то телескопический лоток
заблокирован. Подождать 30 секунд и нажать кнопку “верх” или “низ”,
чтобы разблокировать лоток.
Если кнопка “верх/низ” мига ет, то жировой фильтр не установлен в
соответствующем положении. Его необходимо установить
надлежащим образом.
Если лоток заблокирован, нужно проверить, не был ли отсоединен
провод питания. Если проблема не устранена, вызовите технический
обслуживающий персонал.
о управо управ
о управ
о управо управ
лл
ения не рабоения не рабо
л
ения не рабо
лл
ения не рабоения не рабо
таетае
тае
таетае
т (ет (е
сли он былсли он был
т (е
сли он был
т (ет (е
сли он былсли он был
Page 41

Suomi
! Asennus tulee suorittaa näiden ohjeiden mukaisesti pätevän
henkilöstön avulla.
Käytä suojakäsineitä asennus- ja huoltotöiden aikana.
!
Jos virtajohto on vaurioitunut, se täytyy korvata. Jotta kaikilta riskeiltä
vältytään, korvauksen saa tehdä vain valmistaja tai tämän tekninen tuki tai
joku samanlaisen pätevyyden omaava henkilö.
Varoitus: Jos asennat ruuveja tai kiinnikkeitä näiden ohjeiden vastaisesti,
tämä toimenpide voi aiheuttaa sähköiskun vaaran.
VAROITUS: Vältä vaurioittamasta tuotetta asennuksen aikana. Käytä vain
laitteen mukana toimitettuja tai ohjeen mukaisia ruuveja.
Suorita sähköliitäntä noudattaen sähköliitäntää varten ohjeessa “Varoituksia”
olevia ohjeita.
SUODATIN- VAI IMUVERSIO?
Liesituuletin on saatavilla sekä suodatin- että imuversiona. Päätä
ostovaiheessa oikea malli.
Tehon maksimoimiseksi suosittelemme asentamaan imuversion tai ulkoista
puhallinmoottoria (huippuimuri) ohjaavan mallin.
Liesituuletin puhdistaa ilman ja ohjaa sen poistohormin kautta ulos.
Liesikupu kerää ja puhdistaa ilman, joka ohjataan ulkoisella puhallinmoottorilla
(huippuimuri ja tanavapuhallin) ulos huonetilasta.
Liesituuletin puhdistaa ilman ja puhaltaa puhtaan ilman takaisin huonetilaan.
Imuversio
Versio ulkoisten ohjausyksikkö
Suodatinversio
OHJAIMET
Koskee vain laitteita, joissa elektroninen ohjainjärjestelmä:
Energiankulutuksen optimoimiseksi 4. nopeus (voimakas) säätyy
automaattisesti 3. nopeuteen viiden minuutin toiminnan jälkeen.
Jos liesituuletin jätetään käyntiin (valaisin ja/tai tuuletin), eikä sitä säädetä
10 käyttötunnin aikana, niin laite sammuu automaattisesti ja kaikki
toiminnot pysähtyvät.
Joka kerta kun valitaan tietty toiminto joko ohjauspaneelin tai
kaukosäätimen (lisävaruste) avulla, kuuluu “beep” –äänimerkki.
Jos liesituulettimen käytön aikana sattuu sähkökatkos, tuuletin menee pois
päältä. Tämän sattuessa tulee laite käynnistää uudelleen manuaalisesti.
Hallintalaitteet, Kuva 1:
A) ON/OFF -kytkimet. Tämä painike toimii myös rasva- ja hiilisuodattimien
hälytyksenä.
Suodatinhälytys: Kun liesituulettimen moottoria on käytetty 30 tuntia,
PUNAINEN LED L1 -diodi syttyy palamaan 30 s ajaksi, (merkiksi
rasvasuodattimien puhdistuksen tarpeesta). Kun liesituulettimen moottoria
on käytetty 120 tuntia, PUNAINEN LED L1 -diodi alkaa välkkymään
(merkiksi hiilisuodattimien vaihtamisen tarpeesta, mikäli liesituuletin on
varustettu sellaisilla). Suodatinhälytys näyttäytyy AINOASTAAN silloin,
kun liesituulettimen moottori on POIS PÄÄLTÄ. Suodatinhälytyksen voi
peruuttaa (TUNTILASKURIN nollaus) painamalla A-painiketta pohjassa 2 s
ajan.
B) Liesituulettimen moottori kytketään ensimmäiselle nopeustasolle painamalla
B-painiketta. Nopeuden ilmoittaa palava VIHREÄ LED L1 -diodi. Tuulettimen
voi sammuttaa painamalla painiketta pohjassa 2 s ajan. Voit käynnistää
ajastintoiminnon (tuuletin päällä 5 minuutin ajan), jonka merkiksi LED diodi
välkkyy, painamalla painiketta kerran. Ajastintoiminto sammutetaan
painamalla painiketta uudelleen.
C) Liesituulettimen moottori kytketään toiselle nopeustasolle painamalla Cpainiketta. Nopeuden ilmoittaa palava VIHREÄ LED L2 –diodi. Voit käynnistää
ajastintoiminnon (tuuletin päällä 5 minuutin ajan), jonka merkiksi LED diodi
välkkyy, painamalla painiketta kerran. Ajastintoiminto sammutetaan
painamalla painiketta uudelleen.
D) Liesituulettimen moottori kytketään kolmannelle nopeustasolle painamalla
D-painiketta. Nopeuden ilmoittaa palava VIHREÄ LED L3 –diodi. Voit
käynnistää ajastintoiminnon (tuuletin päällä 5 minuutin ajan), jonka merkiksi
LED diodi välkkyy, painamalla painiketta kerran. Ajastintoiminto sammutetaan
painamalla painiketta uudelleen.
E) Liesituulettimen moottori kytketään neljännelle nopeustasolle painamalla
E-painiketta. Nopeuden ilmoittaa palava VIHREÄ LED L4 –diodi. Voit
käynnistää ajastintoiminnon (tuuletin päällä 5 minuutin ajan), jonka merkiksi
LED diodi välkkyy, painamalla painiketta kerran. Ajastintoiminto sammutetaan
painamalla painiketta uudelleen.
Hallintalaitteet, Kuva 2:
A) ON/OFF -kytkimet. Tämä painike toimii myös rasva- ja hiilisuodattimien
hälytyksenä.
Suodatinhälytys: Kun liesituulettimen moottoria on käytetty 30 tuntia, LED
L1 -diodi syttyy palamaan, (merkiksi rasvasuodattimien puhdistuksen
tarpeesta). Kun liesituulettimen moottoria on käytetty 120 tuntia, LED L1 -
diodi alkaa välkkymään, (merkiksi hiilisuodattimien vaihtamisen tarpeesta,
mikäli liesituuletin on varustettu sellaisilla). Suodatinhälytys näyttäytyy
AINOASTAAN silloin, kun liesituulettimen moottori on POIS PÄÄLTÄ.
Suodatinhälytyksen voi peruuttaa (TUNTILASKURIN nollaus) painamalla Apainiketta pohjassa 2 s ajan.
B) Liesituulettimen moottori kytketään ensimmäiselle nopeustasolle painamalla
B-painiketta. Nopeuden ilmoittaa palava LED L2 -diodi. Tuulettimen voi
sammuttaa painamalla painiketta pohjassa 2 s ajan. Voit käynnistää
ajastintoiminnon (tuuletin päällä 5 minuutin ajan), jonka merkiksi LED diodi
välkkyy, painamalla painiketta kerran. Ajastintoiminto sammutetaan
painamalla painiketta uudelleen.
C) Liesituulettimen moottori kytketään toiselle nopeustasolle painamalla Cpainiketta. Nopeuden ilmoittaa palava LED L3 -diodi. Voit käynnistää
ajastintoiminnon (tuuletin päällä 5 minuutin ajan), jonka merkiksi LED diodi
välkkyy, painamalla painiketta kerran. Ajastintoiminto sammutetaan
painamalla painiketta uudelleen.
D) Liesituulettimen moottori kytketään kolmannelle nopeustasolle painamalla
D-painiketta. Nopeuden ilmoittaa palava LED L4 -diodi. Voit käynnistää
ajastintoiminnon (tuuletin päällä 5 minuutin ajan), jonka merkiksi LED diodi
välkkyy, painamalla painiketta kerran. Ajastintoiminto sammutetaan
painamalla painiketta uudelleen.
E) Liesituulettimen moottori kytketään neljännelle nopeustasolle painamalla
E-painiketta. Nopeuden ilmoittaa palava LED L5 -diodi. Voit käynnistää
ajastintoiminnon (tuuletin päällä 5 minuutin ajan), jonka merkiksi LED diodi
välkkyy, painamalla painiketta kerran. Ajastintoiminto sammutetaan
painamalla painiketta uudelleen.
Hallintalaitteet, Kuva 3:
A) ON/OFF -kytkimet. Tämä painike toimii myös rasva- ja hiilisuodattimien
hälytyksenä.
Suodatinhälytys: Kun liesituulettimen moottoria on käytetty 30 tuntia, LED
L1 -diodi syttyy palamaan 30 s ajaksi, (merkiksi rasvasuodattimien
puhdistuksen tarpeesta).
Kun liesituulettimen moottoria on käytetty 120 tuntia, LED L1 -diodi alkaa
välkkymään 30 s ajaksi, (merkiksi hiilisuodattimien vaihtamisen tarpeesta,
mikäli liesituuletin on varustettu sellaisilla). Suodatinhälytys näyttäytyy
AINOASTAAN silloin, kun liesituulettimen moottori on POIS PÄÄLTÄ.
Suodatinhälytyksen voi peruuttaa (TUNTILASKURIN nollaus) painamalla Apainiketta pohjassa 2 s ajan.
B) B-painiketta käytetään tunnistintoiminnon päälle/pois päältä laittamiseen
(LED L2 -diodi palaa tunnistintoiminnon ollessa päällä).
C) Liesituulettimen moottori kytketään ensimmäiselle nopeustasolle painamalla
C-painiketta. Nopeuden ilmoittaa palava LED L3 -diodi. Tuulettimen voi
sammuttaa painamalla painiketta pohjassa 2 s ajan.
D) Liesituulettimen moottori kytketään toiselle nopeustasolle painamalla Dpainiketta. Nopeuden ilmoittaa palava LED L4 -diodi.
E) Liesituulettimen moottori kytketään kolmannelle nopeustasolle painamalla
E-painiketta. Nopeuden ilmoittaa palava LED L5 -diodi.
F) Liesituulettimen moottori kytketään neljännelle nopeustasolle painamalla
F-painiketta. Nopeuden ilmoittaa palava LED L6 -diodi.
TUNNISTIMEN HERKKYYS: tunnistimen herkkyys voidaan asettaa käyttäjän
tarpeiden mukaan. Tunnistimen herkkyyttä voi vaihtaa painamalla
yhtäaikaisesti A ja B -painikkeita. Asetettu herkkyys näkyy 4 välkkyvillä
LED L3, L4, L5 ja L6 -diodeilla. Aseta herkkyyden taso C, D, E tai F painikkeiden avulla (C-painike vastaa vähimmäisherkkyyttä ja F-painike
enimmäisherkkyyttä). Aseta vähimmäisherkkyys kaasuliesille,
keskimääräinen herkkyys keraamisille liesille ja enimmäisherkkyys
induktioliesille.
VAROITUS: LED L1 -diodin syttyminen merkitsee rasvasuodattimien
puhdistuksen tai hiilisuodattimen vaihtamisen tarvetta.
TUNNISTINTOIMINTO (käynnistetään B-painikkeella): laite on varusteltu
täysin automaattisella, kaikki toiminnot ohjaavalla hallintajärjestelmällä
(Advanced Sensor Control). Advanced Sensor Control -järjestelmä takaa
keittiöön aina puhtaan ja hajuttoman ilman, eikä vaadi käyttäjältä minkäänlaisia
toimenpiteitä. Huipputekniikan tunnistimet tunnistavat ruuan valmistuksessa
syntyvät hajut, höyryt, käryt ja lämmön. ASC tunnistaa myös poikkeavat
KAASUN esiintymät ilmassa.
Page 42

Tunnistintoiminnon ollessa päällä, C, D, E, F -painikkeet kytkevät tietyn
nopeustason päälle vain hetkeksi, jonka jälkeen tunnistin asettaa
automaattisesti sen lopullisen tason.
Varoitus: varo vahingoittamasta tunnistinta, älä käytä silikonisia
tuotteita tuulettimien lähettyvillä!
Ohjaimet kuva 4:
Automaattinen toiminta A-sensori tunnistaa vesihöyryn, käryn tai kaasun
ja käynnistää laitteen. Moottorin nopeus säätyy auto-maattisesti, moottori
on käynnissä kunnes huoneilma on puhdistunut.
A) Valot pois
B) Valot päälle
C) Vähentää moottorin nopeutta. Painettaessa 2 sekuntia, moottori
kytkeytyy pois. Jos suodattimien puhdistuksen hälytys on kytkettynä,
painettaessa 2 sekuntia, nollaa tuntilaskimen.
D) Käynnistää moottorin ja lisää sen nopeutta (manuaalitoiminto)
E) Kytkee automaattitoiminnon päälle / pois
L) Ilmoittaa valitun nopeuden numeroilla. Ilmoittaa suodattimien
puhdistustarpeesta, kun näytön keskiosassa palaa merkkivalo.
Kirjain ”A” näkyy kun automaattitoiminto on kytkettynä.
Rasvasuodattimen puhdistus: (30 käyttötuntia / 2 kuukautta) Irrota
rasvasuodattimet painamalla lukitusta C sisäänpäin. Pese etusivun ohjeiden
mukaan.
Aktiivihiilisuodattimen vaihto: (120 käyttötuntia) Avaa rasvasuodattimet.
Irrota hiilisuodatin ja asenna uusi vastaava paikalleen. Puhdista samalla
rasvasuodattimet.
HUOM: Laitetta voi käyttää myös manuaalisesti !
Sensorin säätö: Kytke automaattitoiminto pois painikkeesta E. Painettaessa
samanaikaisesti D ja E voidaan sensorin herkkyyden säätö aktivoida. Painike
C vähentää ja D lisää herkkyyttä, oletusarvo on 5 asteikolla 1-9.
Ohjaimet kuva 5:
Painike A : Sammuttaa valot.
Painike B : Kytkee valot.
Painike C : Vähentää moottorin nopeutta. Painamalla kytkintä 2 sekunnin ajan,
moottori kytkeytyy pois päältä ja viimeksi käytetty nopeus jää muistiin.
Painike D : Käynnistää moottorin (viimeksi valitulla nopeudella) sekä lisää
moottorin nopeutta.
Näyttö L :
- Näyttää numeroin valitun moottorin nopeuden.
- Ilmoittaa suodattimien puhdistustarpeesta. Näytön keskiosassa palaa/
vilkkuu valo 30 sekuntia moottorin sammuttamisen jälkeen.
- Numeron vilkkuessa ilmoittaa ajastimen olevan toiminnassa.
Painike E : Käynnistää ajastimen moottorin ollessa toiminnassa. - moottori on
käynnissä ylimääräiset 5 minuuttia sammuttamisen jälkeen
Suodattimien puhdistuksen käyttötuntien nollaus. - kun moottorin sammuttamisen
jälkeen näytön keskiosassa palaa/vilkkuu valo.
HÄLYTYS SUODATTIMET:Rasvasuodattimen puhdistus: (30 käyttötuntia / 2
kuukautta) Avaa suojalevy ja irrota rasvasuodatin. Pese etusivun ohjeiden
mukaan. Aktiivihiilisuodattimen vaihto: (120 käyttötuntia) Avaa suojalevy ja
irrota rasvasuodatin. Irrota vanha hiilisuodatin ja asenna uusi vastaava
paikalleen. Puhdista samalla rasvasuodattimet !
Ohjaimet kuva 6:
Näppäin A = sytyttää/sammuttaa valot.
Näppäin B = käynnistää/sammuttaa AJASTIMEN: Kun näppäintä painetaan
kerran, ajastin käynnistyy, minkä vuoksi moottori pysähtyy 5 minuutin
kulut-tua (samanaikaisesti näytöllä vilkkuu valittua nopeutta vastaava
numero). Ajastin pysyy aktiivisena jos moottorin nopeutta vaihdetaan.
Näyttö C= - Näyttää valitun moottorinopeuden (arvot välillä 1 - 4).Numeron vilkkuminen tarkoittaa, että ajastin on päällä.- Keskiosion
syttyminen tai vilkkuminen tarkoittaa suodattimien hälytystä.
Näppäin D = Käynnistää moottorin (viimeksi käytetyllä nopeudella).
Näppäintä uudelleen painamalla valitaan moottorin nopeus peräkkäisistä
arvoista 1 - 4. Jos näppäintä pidetään painettuna noin 2 sekunnin ajan,
moottori pysähtyy.
Näppäin R = Rasva- ja hiilisuodattimien nollaus. Kun suodattimien hälytys
(eli näytön keskiosio) syttyy, on rasvasuodattimet puhdistettava (on
kulunut 30 käyttötuntia). Jos taas keskiosio vilkkuu, on rasvasuodattimet
puhdi-stettava ja hiilisuodatin vaihdettava (on kulunut 120 käyttötuntia).
Luon-nollisestikin, jos liesituulettimesi ei ole suodattavaa tyyppiä eli siinä ei
ole hiilisuodatinta, on puhdistettava ainoastaan rasvasuodattimet,
huolimatta siitä palaako keskiosion valo vai vilkkuuko se. Suodattimien
hälytys tulee näkyviin moottorin ollessa sammuneena ja se näkyy noin 30
sekunnin ajan. Tuntilaskuri käynnistyy uudelleen, jos näppäintä painetaan 2
sekunnin ajan hälytyksen näkyessä.
Ohjaimet kuva 7:
Automaattinen toiminta A-sensori tunnistaa vesihöyryn, käryn tai kaasun
ja käynnistää laitteen. Moottorin nopeus säätyy auto-maattisesti, moottori
on käynnissä kunnes huoneilma on puhdistunut.
Näppäin A : sytyttää / sammuttaa valot.
Näppäin B: aktivoi / deaktivoi automaattitoiminnon. Kun tämä toiminto
aktivoidaan, näytöllä C näkyy “A” ja moottorin nopeus nousee tai laskee
automaattisesti keittiön käryjen, höyryjen ja kaasujen mukaisesti.
Näyttö C:- Näyttää anturin automaattisen toimintatilan (syttyy “A”-kirjain).-
Näyttää anturin automaattisesti valitseman moottorinopeuden.- Keskiosion
syttyminen tai vilkkuminen tarkoittaa suodattimien hälytystä.
Näppäin D: Laskee moottorin nopeutta / nollaus: Laskee moottorin nopeut-ta
nollaan asti (pysäytys). Noin 1 minuutin kuluttua liesituuletin käynnistyy
uudelleen automaattitoiminnolla, anturin valitsemalla nopeudella.Kun
näppäintä painetaan suodattimen hälytyksen näkyessä, tapahtuu
NOLLAUS, eli tuntilaskurin arvo palautuu nollaan.
Näppäin E: Nostaa moottorin nopeutta, mutta noin 1 minuutin kuluttua
liesituuletin käynnistyy uudelleen automaattitoiminnolla, anturin valitsemalla
nopeudella.
Anturin herkkyyden muokkaaminen: Anturin herkkyyttä voidaan muokata
seuraavalla tavalla.- Pysäytä liesituuletin painamalla näppäintä B.- Paina
samanaikaisesti näppäimiä D ja E (näytölle tulee anturin herkkyysmittari).Nosta tai laske anturin herkkyyttä näppäimiä D tai E painamalla (1: minimiherkkyys / 9: maksimiherkkyys).- Jos virta katkeaa, anturin herkkyys
palaa uudelleen arvoon 5.Huomio: Jotta anturi ei pääse vahingoittumaan,
älä käytä silikonia sisältäviä tuotteita liesituulettimen läheisyydessä!
Ohjaimet kuva 8:
Painike A: valokatkaisin;- asento 0: valo sammutettu;- asento 1: valo
päällä.
Painike B: moottorin katkaisin;
- asento 0: moottori sammutettu;
- asento 1-2-3: moottori käynnissä ykkös, kakkos- ja kolmosnopeudella.
C: Toiminnan osoitus moottorin.
Hallintalaitteet (Kuva 9):
A): sytyttää/sammuttaa valot. Suodattimien hälytys: joka 30 käyttötunnin
jälkeen merkkivalo syttyyosoittaen, että rasvasuodattimet täytyy puhdistaa,
joka 120 käyttötunnin jälkeen merkkivalo vilkkuu osoittaen,että
rasvasuodattimet täytyy puhdistaa. Tuntilaskin nollataan (RESET) pitämällä
painiketta A painettuna noinsekunnin ajan (kun merkkivalo on toiminnassa).
B): käynnistää moottorin 1. nopeudella (vastaava merkkivalo syttyy). Kun
painat painiketta toisen kerran(merkkivalon palaessa) käynnistyy AJASTIN
ja viiden minuutin kuluttua moottori pysähtyy (merkkivalo vilkkuu).Jos pidät
painiketta painettuna noin sekunnin, moottori sammuu.
C): käynnistää moottorin 2. nopeudella (vastaava merkkivalo syttyy). Jos
painat painiketta toisen kerran(merkkivalon palaessa) käynnistyy AJASTIN
ja viiden minuutin kuluttua moottori pysähtyy (merkkivalo vilkkuu).
D): käynnistää moottorin 3. nopeudella (vastaava merkkivalo syttyy). Jos
painat painiketta toisen kerran(merkkivalon palaessa) käynnistyy AJASTIN
ja viiden minuutin kuluttua moottori pysähtyy (merkkivalo vilkkuu).
E): käynnistää moottorin 4. nopeudella (vastaava merkkivalo syttyy). Jos
painat painiketta toisen kerran(merkkivalon palaessa) käynnistyy AJASTIN
ja viiden minuutin kuluttua moottori pysähtyy (merkkivalo vilkkuu).
HUOLTO
! Ennen puhdistus- tai huoltotöitä poista jännite.
Liesituulettimen puhdistus
KOSKA PUHDISTAA: puhdista vähintään kahden kuukauden välein
tulipalovaaran ehkäisemiseksi, käytön mukaan.
ULKO-OSAN PUHDISTUS: käytä haalealla vedellä ja miedolla pesuaineella
(maalatut liesituulettimet) kostutettua rättiä. Teräs-, kupari- ja
messinkiliesituuletinten puhdistamiseen käytä niille tarkoitettuja
erikoistuotteita.
SISÄ-OSAN PUHDISTUS: käytä denaturoidulla etyylialkoholilla kostutettua
rättiä (tai sivellintä).
ÄLÄ: käytä hankaavia ja syövyttäviä tuotteita (esimerkiksi metallisieniä,
kovia harjoja, voimakkaita pesuaineita jne.)
Rasvasuodatinten puhdistus (F)
KOSKA PUHDISTAA: puhdista vähintään kahden kuukauden välein
tulipalovaaran ehkäisemiseksi, suhteessa käyttömäärään.
SUODATINTEN PUHDISTUS: puhdista käsin tai astianpesukoneessa
miedolla pesuaineella. Jos peset suodattimen astianpesukoneessa, se
saattaa haalistua, mikä ei mitenkään vaikuta sen toimintaan.
F
F
Page 43

Hiilisuodattimien vaihtaminen
(Vain suodatinversiot)
KOSKA VAIHTAA: vähintään kuuden kuukauden välein, suhteessa
käyttömäärään.
IRROTTAMINEN: mallista riippuen hiilisuodatin voi olla pyöreä tai
suorakaiteen muotoinen. Jos laite on varustettu pyöreällä
hiilisuodattimella (R), irrota hiilisuodattimen kiertämällä.
Jos laite on varustettu suorakaiteen muotoisella hiilisuodattimella (P),
paina kiinnityssalpaa sisäänpäin ja käännä suodatin alaspäin, kunnes
suodatin irtoaa telineestään.
R
P
Valaistus
Vaihda lamppu samaksi tyypiksi; jos lamppu ei sisälly “Varoitukset”kaavan taulukkoona, se on palautettava tukikeskukseen.
HÄIRIÖT
Jos jokin ei toimi oikein, suorita yksinkertaiset alla kuvatut
tarkistustoimenpiteet ennen kuin otat yhteyttä huoltoon:
• Liesituuletin ei toimi
Mahdollinen syy (1): Syöttöjohtoa ei ole kytketty tai se on kytketty
väärin.
Ratkaisu: Asentaja ei ole kytkenyt liesituulettimen sähköjärjestelmää.
Kutsu asentaja/sähkömies paikalle.
Mahdollinen syy (2): Nopeutta ei ole valittu.
Ratkaisu: Valitse nopeus ohjauspaneelissa.
Jos kansi kytkeytyy pois päältä tavallisen toiminnan aikana, on
tarkistettava, onko virtasyöttöä kytketty ja onko moninapainen katkaisin
kytkeytynyt päälle.
• Puhallin ei toimi, mutta valot toimivat
Mahdollinen syy: Puhaltimen moottorin kaapelia ei ole kytketty.
Ratkaisu: Etsi puhaltimen moottorin kaapeli ja kytke se. Tarkista,
toimiiko tuuletin nyt. Jos ongelma jatkuu, kutsu tekninen huolto paikalle.
• Liesituuletin ei toimi oikein
Mahdollinen syy: Suodattimet/osiot ovat likaiset.
Ratkaisu: Tarkista, onko suodatin puhdas.
Jos kyseessä on kanavajärjestelmällä tai ulkoisella moottorilla
varustettu liesituuletin
Mahdollinen syy (1): Kanavajärjestelmää ei ole asennettu vaatimusten
mukaan. Jos kanavan pituus ylittää valmistajan vaatimukset,
liesituuletin ei voi toimia optimaalisesti. Jos kanavan halkaisija on liian
pieni tai järjestelmässä on liian paljon mutkia, myös ilmavirta hidastuu.
Poistokanavan asennuksen aikana on noudatettava toimivaltaisten
viranomaisten ohjeita (esimerkiksi pois puhaltuvaa ilmaa ei saa reitittää
kanavaan, joka on jo keskuslämmityksen järjestelmän käytössä, jne.).
Tila sisältää tuuletusaukot. On otettava yhteyttä asentajaan.
Mahdollinen syy (2): Kanava on tukossa.
Ratkaisu: tarkista, että mikään ei tuki ilmanvaihtokanavaa (lintujen
pesät tai solmut).
Mahdollinen syy (3): Kaasuläppä ei aukea.
Ratkaisu: On tarkistettava, onko nauha poistettu kaasuläpistä ja
liikkuvatko ne vapaasti.
Suodatinliesituuletinten tapauksessa
Mahdollinen syy: hiilisuodatin on täysin kyllästetty.
Ratkaisu: vaihda hiilisuodatin.
• Lamppu ei toimi
Heijastimet (LED):
Jos tämän tyypin lamppu ei ole alla olevassa “varoitukset”, ota yhteyttä
tekniseen huoltoon.
Polttimolamput:
Mahdollinen syy: Polttimo tai sen pidin on viallinen tai syöttökaapeli on
irronnut.
Ratkaisu: laita polttimo samantyyppiseen mutta eri pitimeen; jos
polttimo ei toimi, vaihda se toiseen samantyyppiseen; jos se toimii,
pidin on viallinen tai syöttökaapeli on irronnut. Kutsu tekninen huolto
paikalle.
Halogeenilamput:
Mahdollinen syy: Polttimo tai sen pidin on viallinen tai syöttökaapeli on
irronnut.
Ratkaisu: vaihda toiseen samantyyppiseen polttimoon. Jos ongelma
jatkuu, kutsu tekninen huolto paikalle.
• Kauko-ohjaus ei toimi (jos se on liitetty sarjaan)
Mahdollinen syy (1): Ei yhteyttä kauko-ohjauksen ja liesituulettimen
välillä.
Ratkaisu: Tarkista, toimivatko liesituulettimessa sijaitsevat
ohjauspainikkeet oikein.
Kytke liesituulettimen syöttö pois päältä piirin katkaisijan avulla; sitten
kytke se takaisin päälle. Yhdistä jälleen kauko-ohjaus liesituulettimeen
käyttäen kauko-ohjauksen kanssa toimitettuja ohjeita.
Mahdollinen syy (2): Loppuun käytetty kauko-ohjauksen akku.
Ratkaisu: Vaihda akku uuteen.
• Pystysuoran teleskooppilavan lukitus (jos se on liitetty sarjaan)
Jos kaikki LEDit vilkkuvat, teleskooppilava on lukittu. Odota 30 sekuntia
ja paina ylös- tai alas-painiketta poistaaksesi lavan lukituksen.
Jos ylös-/alas-painike vilkkuu, rasvasuodatin ei ole oikeassa asennossa.
Se on säädettävä sopivaan asentoon.
Jos lava on lukittu, on tarkistettava, että syöttöjohtoa ei ole kytketty
irti. Jos ongelma jatkuu, kutsu tekninen huolto paikalle.
Page 44

ЕллзнйкЬ
!БхфЮ з ухукехЮ рсЭрей нб егкбфбуфбиеЯ уэмцщнб ме фйт рбсбкЬфщ
!
пдзгЯет брь еоейдйкехмЭнп фечнйкь.
З чсЮуз гбнфйюн еЯнбй брбсбЯфзфз уфйт есгбуЯет егкбфЬуфбузт кбй
ухнфЮсзузт.
Бн фп кблюдйп рбспчЮт сеэмбфпт еЯнбй цибсмЭнп, рсЭрей нб бнфйкбфбуфбиеЯ брь
фпн кбфбукехбуфЮ, Ю фпн бнфйрсьущрп Ю брь еоейдйкехмЭнп Ьфпмп гйб нб
брпцехчиеЯ п кЯндхнпт.
РспейдпрпЯзуз: З лбнибумЭнз фпрпиЭфзуз вйдюн Ю уфесЭщузт фзт ухукехЮт,
енЭчейкЯндхнп злекфспрлзоЯбт.
УЗМБНФЙКП: Гйб нб мз чблЬуефе фз ухукехЮ убт, кбфЬ фз дйЬскейб фзт
егкбфЬуфбузт.
ЧСЗУЙМПРПЙЗУФЕ МПНП ФЙУ ВЙДЕУ РПХ РБСЕЧПНФБЙ. ВевбйщиеЯфе ьфй
бхфЭт чсзуймпрпйпэнфбй уэмцщнб ме фйт рбсбкЬфщ пдзгЯет.
РспефпймЬуфе фзн рбспчЮ сеэмбфпт (деЯфе фп цэллп ме фйт ‘’РспейдпрпйЮуейт’’).
Гйб фзн Экдпуз ме мрпхсЯ кбй фзн Экдпуз ме еощфесйкь мпфЭс, ефпймЬуфе фпхт
ущлЮнет гйб фзн еккЭнщуз фпх бЭсб (деЯфе фп цэллп ме фйт ‘’РспейдпрпйЮуейт’’).
¸КДПУЗ МЕ ЦЙЛФСБСЙУМБ БЕСБ ¹ МЕ МРПХСЙ
П брпсспцзфЮсбт мрпсеЯ нб чсзуймпрпйзиеЯ ме Экдпуз гйб цйлфсЬсйумб бЭсб,
мрпхсЯ Ю еощфесйкь мпфЭс. ЕрйлЭофе фпн фэрп егкбфЬуфбузт рпх иЭлефе.
Гйб кблэфесз брьдпуз, убт рспфеЯнпхме нб егкбфбуфЮуефе фпн брпсспцзфЮсб
ме мрпхсЯ Ю ме еощфесйкь мпфЭс (бн еЯнбй ецйкфь).
¸кдпуз ме мрпхсЯ
П брпсспцзфЮсбт кбибсЯжей фпн бЭсб кбй фпн уфЭлней Эощ мЭущ фщн ущлЮнщн.
¸кдпуз ме еощфесйкь мпфЭс
П брпсспцзфЮсбт кбибсЯжей фпн бЭсб кбй фпн уфЭлней Эощ мЭущ фщн ущлЮнщн.
БхфЮ з ухукехЮ мрпсеЯ нб ухндеиеЯ уе Энб мпфЭс, фп прпЯп дпхлеэей мьнпфпх,
чсзуймпрпйюнфбт фз ухукехЮ убн уэндеумп гйб фпн кбибсйумь фпх бЭсб.
¸кдпуз цйлфсбсЯумбфпт бЭсб
П брпсспцзфЮсбт кбибсЯжей фпн бЭсб кбй фпн бнбкхклюней мЭуб уфп дщмЬфйп.
ЧЕЙСЙУФЗСЙБ
Мьнп гйб фпхт брпсспцзфЮсет ме злекфспнйкь чейсйуфЮсйп.
ç
фбчэфзфб (енфбфйкЮ) бхфьмбфб чбмзлюней уфзн 3з фбчэфзфб мефЬ брь 5
З 4
лерфЬ лейфпхсгЯбт гйб нб велфйуфпрпйЮуей фзн кбфбнЬлщуз енЭсгейбт.
Уфпхт брпсспцзфЮсет ме йучэ 120V/60Hz бхфЮ з лейфпхсгЯб ден еЯнбй енесгЮ
кбй з 4з фбчэфзфб хрпдейкнэефбй ме фп гсЬммб В (Booster- ЕнйучхфЮт).
- Бн п брпсспцзфЮсбт рбсбмеЯнейбнбммЭнпт (лЬмрет Ю/кбй кйнзфЮсбт), чщсЯт п
чсЮуфзт нб фпн чсзуймпрпйеЯ, мефЬ брь 10 юсет лейфпхсгЯбт, иб увЮуей
бхфьмбфб кбй ьлет пй лейфпхсгЯет фпх иб увЮупхн. Уе брпсспцзфЮсет ме йучэ
120V/60Hz бхфЮ з лейфпхсгЯб ден хрЬсчей.
- П впмвзфЮт екрЭмрей Энб ‘’мрйр’’ кЬие цпсЬ рпх мйб енфплЮ фЯиефбй уе
лейфпхсгЯб брь фп рлзкфспльгйп Ю брь фп фзлечейсйуфЮсйп (рспбйсефйкь).
- Уе ресЯрфщуз дйбкпрЮт сеэмбфпт кбфЬ фз лейфпхсгЯб фпх брпсспцзфЮсб, п
брпсспцзфЮсбтувЮней кбй иб рсЭрей нб енесгпрпйзиеЯ чейспкЯнзфб.
ПдзгЯет чсЮуещт брь фзн ейк. 1:
Б) ON/OFF лбмрфЮсщн. Бхфьт п дйбкьрфзт лейфпхсгеЯ ерЯузт щт мЭупн
ухнбгесмпэ фщн цЯлфсщн лЯрпхт кбй Ьнисбкб.
Ухнбгесмьт цЯлфсщн: МефЬ фп рЭсбт 30 щсюн лейфпхсгЯбт фзт мзчбнЮт
бнЬвей ерЯ 30 дехфесьлерфб з КПККЙНЗ дЯпдпт LED L1 (узмбфпдпфюнфбт
фзн бнЬгкз кбибсйумпэ фщн цЯлфсщн лЯрпхт).
МефЬ фп рЭсбт 120 щсюн лейфпхсгЯбт бнбвпувЮней гйб 30 дехфесьлерфб з
КПККЙНЗ дЯпдпт LED L1 (узмбфпдпфюнфбт фзн бнЬгкз кбибсйумпэ фщн
цЯлфсщн Ьнисбкб, брь фз уфйгмЮ рпх хрЬсчпхн бхфЬ фб цЯлфсб уфпн
брпсспцзфЮсб). П ухнбгесмьт цЯлфсщн енесгпрпйеЯфбй МПНПН ьфбн з
мзчбнЮ еЯнбй УВЗУФЗ. Гйб нб бнбйсЭуефе фпн ухнбгесмь цЯлфсщн (reset фпх
мефсзфЮ ЩСЩН) рсЭрей нб ксбфЮуефе рбфзмЭнп фп кпхмрЯ Б ерЯ 2
дехфесьлерфб.
Â) Гйб нб бнЬшефе фзн мзчбнЮ уфп рсюфп ерЯредп фбчэфзфбт рсЭрей нб
рбфЮуефе фп кпхмрй В. З фбчэфзфб узмбфпдпфеЯфбй мЭущ фзт бнбммЭнзт
РСБУЙНЗУ дйьдпх LED L1. Гйб нб увЮуефе фзн мзчбнЮ рсрей нб
кбсбфЮуефе рбфзмЭнп фп кпхмрЯ ерЯ 2 дехфесьлерфб. Гйб нб бнЬшефе фпн
чспнпсхимйуфЮ (з мзчбнЮ уе лейфпхсгЯб ерЯ 5 лерфЬ) з лейфпхсгЯб фпх
прпЯпх узмбфпдпфеЯфбй брь фп бнбвьувзмб фзт дйьдпх LED, рбфЮуфе фп
кпхмрЯ мйб цпсЬ. Гйб нб увЮуефе фпн чспнпсхимйуфЮ обнбрбфЮуфе фп
кпхмрЯ.
C) Гйб нб иЭуефе фзн мзчбнЮ уфп деэфесп ерЯредп фбчэфзфбт рсЭрей нб
рбфЮуефе фп кпхмрЯ C. З фбчэфзфб узмбфпдпфеЯфбй ме фзн бнбммЭнз
РСБУЙНЗ дЯпдп LED L2. Гйб нб бнЬшефе фпн чспнпсхимйуфЮ (з мзчбнЮ уе
лейфпхсгЯб ерЯ 5 лерфЬ) з лейфпхсгЯб фпх прпЯпх узмбфпдпфеЯфбй брь фп
бнбвьувзмб фзт дйьдпх LED, рбфЮуфе фп кпхмрЯ мйб цпсЬ. Гйб нб увЮуефе
фпн чспнпсхимйуфЮ обнбрбфЮуфе фп кпхмрЯ.
D) Гйб нб бнЬшефе фзн мзчбнЮ уфп фсЯфп ерЯредп фбчэфзфбт рсЭрей нб
рбфЮуефе фп кпхмрй D. З фбчэфзфб узмбфпдпфеЯфбй мЭущ фзт бнбммЭнзт
РСБУЙНЗУ дйьдпх LED L3. Гйб нб бнЬшефе фпн чспнпсхимйуфЮ (з мзчбнЮ
уе лейфпхсгЯб ерЯ 5 лерфЬ) з лейфпхсгЯб фпх прпЯпх узмбфпдпфеЯфбй брь фп
бнбвьувзмб фзт дйьдпх LED, рбфЮуфе фп кпхмрЯ мйб цпсЬ. Гйб нб увЮуефе
фпн чспнпсхимйуфЮ обнбрбфЮуфе фп кпхмрЯ.
E) Гйб нб бнЬшефе фзн мзчбнЮ уфп фЭфбсфп ерЯредп фбчэфзфбт рсЭрей нб
рбфЮуефе фп кпхмрй Е. З фбчэфзфб узмбфпдпфеЯфбй мЭущ фзт бнбммЭнзт
РСБУЙНЗУ дйьдпх LED L4. Гйб нб бнЬшефе фпн чспнпсхимйуфЮ (з мзчбнЮ
уе лейфпхсгЯб ерЯ 5 лерфЬ) з лейфпхсгЯб фпх прпЯпх узмбфпдпфеЯфбй брь фп
бнбвьувзмб фзт дйьдпх LED, рбфЮуфе фп кпхмрЯ мйб цпсЬ. Гйб нб увЮуефе
фпн чспнпсхимйуфЮ обнбрбфЮуфе фп кпхмрЯ.
ПдзгЯет чсЮуещт брь фзн ейк. 2:
Б) ON/OFF лбмрфЮсщн. Бхфьт п дйбкьрфзт лейфпхсгеЯ ерЯузт щт мЭупн
ухнбгесмпэ фщн цЯлфсщн лЯрпхт кбй Ьнисбкб.
Ухнбгесмьт цЯлфсщн: мефЬ фп рЭсбт 30 щсюн лейфпхсгЯбт фзт мзчбнЮт
бнЬвей ухнечют з дЯпдпт LED L1 (узмбфпдпфюнфбт фзн бнЬгкз кбибсйумпэ
фщн цЯлфсщн лЯрпхт). МефЬ фп рЭсбт 120 щсюн лейфпхсгЯбт фзт мзчбнЮт
бсчЯжей нб бнбвпувЮней з дЯпдпт LED L1 (узмбфпдпфюнфбт фзн бнЬгкз
кбибсйумпэ фщн цЯлфсщн Ьнисбкб, брь фз уфйгмЮ рпх п брпсспцзфЮсбт
еЯнбй ецпдйбумЭнпт ме фЭфпйпх еЯдпхт цЯлфсб). П ухнбгесмьт цЯлфсщн
енесгпрпйеЯфбй МПНПН ьфбн з мзчбнЮ еЯнбй УВЗУФЗ. Гйб нб бнбйсЭуефе
фпн ухнбгесмь цЯлфсщн (reset фпх мефсзфЮ ЩСЩН) рсЭрей нб ксбфЮуефе
рбфзмЭнп фп кпхмрЯ Б ерЯ 2 дехфесьлерфб.
Â) Гйб нб бнЬшефе фзн мзчбнЮ уфп рсюфп ерЯредп фбчэфзфбт рсЭрей нб
рбфЮуефе фп кпхмрй В. З фбчэфзфб узмбфпдпфеЯфбй мЭущ фзт бнбммЭнзт
дйьдпх LED L2. Гйб нб увЮуефе фзн мзчбнЮ рсЭрей нб ксбфЮуефе фп кпхмрЯ
рбфзмЭнп гйб 2 дехфесьлерфб. Гйб нб бнЬшефе фпн чспнпсхимйуфЮ (з
мзчбнЮ уе лейфпхсгЯб ерЯ 5 лерфЬ), з лейфпхсгЯб фпх прпЯпх узмбфпдпфеЯфбй
брь фп бнбвьувзмб фзт дйьдпх LED, рбфЮуфе фп кпхмрЯ мйб цпсЬ. Гйб нб
увЮуефе фпн чспнпсхимйуфЮ обнбрбфЮуфе фп кпхмрЯ.
C) ) Гйб нб бнЬшефе фзн мзчбнЮ уфп деэфесп ерЯредп фбчэфзфбт рсЭрей нб
рбфЮуефе фп кпхмрй C. З фбчэфзфб узмбфпдпфеЯфбй мЭущ фзт бнбммЭнзт
дйьдпх LED L3. Гйб нб енесгпрпйЮуефе фпн чспнпсхимйуфЮ (з мзчбнЮ уе
лейфпхсгЯб ерЯ 5 лерфЬ), з лейфпхсгЯб фпх прпЯпх узмбфпдпфеЯфбй брь фп
бнбвьувзмб фзт дйьдпх LED, рбфЮуфе фп кпхмрЯ мйб цпсЬ. Гйб нб увЮуефе
фпн чспнпсхимйуфЮ обнбрбфЮуфе фп кпхмрЯ.
D) Гйб нб бнЬшефе фзн мзчбнЮ уфп фсЯфп ерЯредп фбчэфзфбт рсЭрей нб
рбфЮуефе фп кпхмрй D. З фбчэфзфб узмбфпдпфеЯфбй мЭущ фзт бнбммЭнзт
дйьдпх LED L4. Гйб нб енесгпрпйЮуефе фпн чспнпсхимйуфЮ (з мзчбнЮ уе
лейфпхсгЯб ерЯ 5 лерфЬ), з лейфпхсгЯб фпх прпЯпх узмбфпдпфеЯфбй брь фп
бнбвьувзмб фзт дйьдпх LED, рбфЮуфе фп кпхмрЯ мйб цпсЬ. Гйб нб увЮуефе
фпн чспнпсхимйуфЮ обнбрбфЮуфе фп кпхмрЯ.
E) Гйб нб бнЬшефе фзн мзчбнЮ уфп фЭфбсфп ерЯредп фбчэфзфбт рсЭрей нб
рбфЮуефе фп кпхмрй Е. З фбчэфзфб узмбфпдпфеЯфбй мЭущ фзт бнбммЭнзт
дйьдпх LED L5. Гйб нб бнЬшефе фпн чспнпсхимйуфЮ (з мзчбнЮ уе лейфпхсгЯб
ерЯ 5 лерфЬ), з лейфпхсгЯб фпх прпЯпх узмбфпдпфеЯфбй брь фп бнбвьувзмб
фзт дйьдпх LED, рбфЮуфе фп кпхмрЯ мйб цпсЬ. Гйб нб увЮуефе фпн
чспнпсхимйуфЮ обнбрбфЮуфе фп кпхмрЯ.
ПдзгЯет чсЮуещт брь фзн ейк. 3:
Б) ON/OFF лбмрфЮсщн. Бхфьт п дйбкьрфзт лейфпхсгеЯ ерЯузт щт мЭупн
ухнбгесмпэ фщн цЯлфсщн лЯрпхт кбй Ьнисбкб.
Ухнбгесмьт цЯлфсщн: мефЬ фп рЭсбт 30 щсюн лейфпхсгЯбт фзт мзчбнЮт
бнЬвей гйб 30 дехфесьлерфб з дЯпдпт LED L1 (узмбфпдпфюнфбт фзн бнЬгкз
кбибсйумпэ фщн цЯлфсщн лЯрпхт). МефЬ фп рЭсбт 120 щсюн лейфпхсгЯбт фзт
мзчбнЮт бсчЯжей нб бнбвпувЮней ерЯ 30 дехфесьлерфб з дЯпдпт LED L1
(узмбфпдпфюнфбт фзн бнЬгкз бллбгЮт фщн цЯлфсщн Ьнисбкб, ецьупн п
брпсспцзфЮсбт еЯнбй ецпдйбумЭнпт ме фЭфпйпх еЯдпхт цЯлфсб). П
ухнбгесмьт цЯлфсщн енесгпрпйеЯфбй МПНПН ьфбн з мзчбнЮ еЯнбй УВЗУФЗ.
Гйб нб бнбйсЭуефе фпн ухнбгесмь цЯлфсщн (reset фпх мефсзфЮ ЩСЩН)
рсЭрей нб ксбфЮуефе рбфзмЭнп фп кпхмрЯ Б ерЯ 2 дехфесьлерфб.
Â) Фп кпхмрй В чсзуймеэей гйб нб бнЬвефе/увЮнефе фпн бйуизфЮсб (фп
Ьнбммб фпх бйуизфЮсб узмбфпдпфеЯфбй мЭущ фзт бнбммЭнзт дйьдпх LED
L2).
C) Гйб нб бнЬшефе фзн мзчбнЮ уфп рсюфп ерЯредп фбчэфзфбт рсЭрей нб
рбфЮуефе фп кпхмрй C. З фбчэфзфб узмбфпдпфеЯфбй мЭущ фзт бнбммЭнзт
дйьдпх LED L3. Гйб нб увЮуефе фзн мзчбнЮ рсЭрей нб ксбфЮуефе фп кпхмрЯ
рбфзмЭнп гйб 2 дехфесьлерфб.
D) Гйб нб бнЬшефе фзн мзчбнЮ уфп деэфесп ерЯредп фбчэфзфбт рсЭрей нб
рбфЮуефе фп кпхмрй D. З фбчэфзфб узмбфпдпфеЯфбй мЭущ фзт бнбммЭнзт
дйьдпх LED L4.
E) Гйб нб бнЬшефе фзн мзчбнЮ уфп фсЯфп ерЯредп фбчэфзфбт рсЭрей нб
рбфЮуефе фп кпхмрй Е. З фбчэфзфб узмбфпдпфеЯфбй мЭущ фзт бнбммЭнзт
дйьдпх LED L5.
F) Гйб нб бнЬшефе фзн мзчбнЮ уфп фЭфбсфп ерЯредп фбчэфзфбт рсЭрей нб
рбфЮуефе фп кпхмрй F. З фбчэфзфб узмбфпдпфеЯфбй мЭущ фзт бнбммЭнзт
дйьдпх LED L6.
Page 45

ЕХБЙУИЗУЙБ БЙУИЗФЗСПУ: мрпсеЯфе нб схимЯуефе фзн ехбйуизуЯб фпх
бйуизфЮсб вЬуей фщн бнбгкюн убт. Гйб нб бллЬоефе фзн ехбйуизуЯб фпх
бйуизфЮсб рсЭрей нб рбфЮуефе фбхфьчспнб фб кпхмрйЬ Б кбй В. З
схимйуиеЯуб ехбйуизуЯб узмбфпдпфеЯфбй брь 4 бнбвпувЮнпхует дйьдпхт
LED L3, L4, L5 кбй L6. СхимЯуфе фп ерЯредп ехбйуизуЯбт ме фб кпхмрйЬ C,
D, E, Ю F (фп кпхмрЯ C бцпсЬ уфзн мйксьфесз дхнбфЮ ехбйуизуЯб еню фп
кпхмрЯ F уфзн мегблэфесз). ЕЬн Эчефе кпхжЯнб гкбжйпэ фьфе вЬлфе фзн
мйксьфесз дхнбфЮ ехбйуизуЯб, гйб злекфсйкЭт кпхжЯнет ме рлЬкб хблпкесбмйкЮ вЬлфе меубЯб ехбйуизуЯб еню вЬлфе фзн бнюфбфз ехбйуизуЯб гйб
кпхжЯнет ме ербгщгйкЭт еуфЯет.
РСПУПЧЗ: Фп Ьнбммб фщн дйьдщн LED L1 узмбфпдпфеЯ фзн бнбгкбйьфзфб
кбибсйумпэ фщн цЯлфсщн лЯрпхт Ю бллбгЮт фпх цЯлфспх Ьнисбкб.
ЛЕЙФПХСГЙБ ФПХ БЙУИЗФЗСПУ (енесгпрпйеЯфбй ме фп кпхмрЯ В): з ухукехЮ
еЯнбй ецпдйбумЭнз ме енфелют бхфьмбфп уэуфзмб (Advanced Sensor Control)
лейфпхсгЯбт ьлщн фщн рбсбмЭфсщн фпх брпсспцзфЮсб. Фп уэуфзмб Advanced
Sensor Control еггхЬфбй гйб фзн кпхжЯнб убт мйб дйбскют кбибсЮ кбй
брбллбгмЭнз брь пумЭт бфмьуцбйсб, чщсЯт нб чсейЬжефбй п чсЮуфзт нб кЬней
фп пфйдЮрпфе. Пй еоелйгмЭнпй фечнплпгйкют бйуизфЮсет бнйчнеэпхн ьлет фйт
мхсщдйЭт, фпхт бфмпэт, фпн кбрнь кбй фзн иесмьфзфб рпх рбсЬгефбй уфзн
дйЬскейб фпх мбгейсЭмбфпт. To ASC бнйчнеэей ерЯузт кбй фзн рйибнЮ эрбсоз,
льгщ дйбсспЮт, ГКБЖЙПХ уфпн бЭсб.
¼фбн з лейфпхсгЯб фпх бйуизфЮсб еЯнбй енесгпрпйзмЭнз, фб кпхмрйЬ C, D,
E, F иЭфпхн уе лейфпхсгЯб фйт бнфЯуфпйчет фбчэфзфет мьнп гйб лЯгп, еню
Эрейфб п бйуизфЮсбт схимЯжей фп фелйкь ерЯредп.
Рспупчз: рспт брпцхгЮ ципсЬт фпх бйуизфЮсб брбгпсеэефбй з чсЮуз
уйлйкпнпейдюн укехбумЬфщн кпнфЬ уфпн брпсспцзфЮсб!
ПдзгЯет чсЮуещт брь фзн ейк. 4:
A) УвЮней фп цщт
B) БнЬвей фп цщт
C) Елбффюней фзн фбчэфзфб фпх мпфЭс мЭчсй нб цфЬуей уфп мздЭн. Бн фп рбфЬфе
гйб 2’’ ьфбн бнЬвей з ЭндейозбллбгЮт цЯлфспх, фьфе п мефсзфЮт юсбт мзденЯжей.
D) ЕнесгпрпйеЯ фп мпфЭс (кблюнфбт фзн фелехфбЯб чсзуймпрпйзмЭнз фбчэфзфб)
кбй бхоЬней фзн фбчэфзфб мЭчсй нб цфЬуей фз мЭгйуфз.
E) ЕнесгпрпйеЯ/бренесгпрпйеЯфпн бйуизфЮсб (БХФПМБФA Ю ЧЕЙСПКЙНЗФA).Ме
фпн бхфьмбфп фсьрп, п бйуизфЮсбт енесгпрпйеЯфбй кбй фп гсЬммб ‘’Б’’ емцбнЯжефбй
уфзн пиьнз (L).
(L) Пиьнз:
- ДЯней Эндейоз фзт фсЭчпхубт фбчэфзфбт- ДЯней Эндейоз гйб фзн бхфьмбфз
лейфпхсгЯб ме фп гсЬммб ‘’Б’’ . ¼фбн бллЬжей з фбчэфзфб фпх мпфЭс, з Эндейоз
фзт фсЭчпхубт фбчэфзфбт бнбвпувЮней 3 цпсЭт кбй мефЬ фп гсЬммб ‘’Б’’
ербнемцбнЯжефбй.
- ДЯней Эндейоз гйб фзн бллбгЮ фпх цЯлфспх (ме клейуфь фп мпфЭс), емцбнЯжпнфбт
фп кхлйндсйкьучЮмбгйб 30’’.
БЛЛБГЗ ЦЙЛФСПХ: БнЬвей з Эндейоз гйб 30’’ ьфбн фп мпфЭс еЯнбй клейуфь:
МефЬ брь 30 юсет лейфпхсгЯбт фп кхлйндсйкь учЮмб бнЬвей уфзн пиьнз,
хрпдейкнэпнфбт ьфй фб цЯлфсб рсЭрей нб кбибсйуфпэн.
МефЬ брь 120 юсет лейфпхсгЯбт, фп кхлйндсйкь учЮмб бнбвпувЮней уфзн пиьнз,
хрпдейкнэпнфбт ьфй фб цЯлфсб рсЭрей нб кбибсйуфпэн кбй фб цЯлфсб Ьнисбкб нб
бнфйкбфбуфбипэн. Бцпэ рлэнефе фб цЯлфсб (кбй/Ю бнфйкбфбуфЮуефе фб цЯлфсб
Ьнисбкб), обнбвЬлфе брь фзн бсчЮ фп мефсзфЮ юсбт (RESET), рбфюнфбт фп
рлЮкфспCьуп емцбнЯжефбй з Эндейоз бллбгЮт цЯлфспх.
БхфЮ з ухукехЮ дйбиЭфей Энб фелеЯщт бхфьмбфп уэуфзмб (РспзгмЭнпт
бйуизфЮсбт елЭгчпх) гйб фз дйбчеЯсйуз ьлщн фщн лейфпхсгйюн фпх брпсспцзфЮсб.
ЧЬсйн уе бхфь фп уэуфзмб, п бЭсбт рпх кхклпцпсеЯ уфзн кпхжЯнб дйбфзсеЯфбй
кбибсьт, чщсЯт пумЭт, чщсЯт нб чсейЬжефбй нб рбсЭмвей п чсЮуфзт. Пй
еоежзфзмЭнпй бйуизфЮсет еЯнбй йкбнпЯ нб енфпрЯупхнкЬие еЯдпхт пумЮ, бфмь,
кбрнь кбй иесмьфзфб рпх рспЭсчпнфбй брь фп мбгеЯсемб. ЕрЯузт, фп бхфьмбфп
бхфь уэуфзмб, мрпсеЯ нб енфпрЯуей кбй кЬие еЯдпхт бЭсйб рпх мрпсеЯ нб
хрЬсчпхн уфп чюсп.
РспейдпрпЯзуз: гйб нб мзн кбфбуфсЭшефе фпн бйуизфЮсб, нб мз чсзуймпрпйеЯфе
рпфЭ рспъьнфб брь уйлйкьнз кпнфЬ уфпн брпсспцзфЮсб!
ЕХБЙУИЗУЙБ БЙУИЗФЗСБ : з ехбйуизуЯб фпх бйуизфЮсб мрпсеЯ нб фспрпрпйзиеЯ
гйб нб кблэрфей фйт брбйфЮуейт убт. Гйб нб бллЬоефе фзн ехбйуизуЯб, з ухукехЮ
рсЭрей нб всЯукефбй уе чейспкЯнзфз лейфпхсгЯб (р.ч. уфзн пиьнз иб рсЭрей нб
бнбгсЬцефбй з фсЭчпхуб фбчэфзфб кбй ьчй фп гсЬммб ‘’Б’’). Бн ьчй, рбфЮуфе фп
рлЮкфсп Е.
БллЬофе фзн ехбйуизуЯб, рбфюнфбт фбхфьчспнб фб рлЮкфсб Dкбй E. З схимйумЭнз
ехбйуизуЯб бнбгсЬцефбй уфзн пиьнз. МрпсеЯфе нб схимЯуефе фзн ерйихмзфЮ
ехбйуизуЯб, чсзуймпрпйюнфбт фб рлЮкфсб C (-) кбй D (+). Брпизкеэуфе фз
´´нЭб´´ ехбйуизуЯб, рбфюнфбт фп рлЮкфсп Е.
ПдзгЯет чсЮуещт брь фзн ейк. 5:
Дйбкьрфзт Б: УвЮней фпхт ЛБМРФЗСЕУ.
Дйбкьрфзт В: БнЬвей фпхт ЛБМРФЗСЕУ.
Дйбкьрфзт C: елЬффщуз фзт фбчэфзфбт лейфпхсгЯбт фзт мзчбнЮт мЭчсй фзн
елЬчйуфз дхнбфЮ. Фп рЬфзмЬ фпх ерЯ 2 дехфесьлерфб рспкблеЯ уфбмЬфзмб
фзт мзчбнЮт, брпмнзмпнеэпнфбт фбхфьчспнб фзн фелехфбЯб ерйлечиеЯуб
фбчэфзфб.
Дйбкьрфзт D: Ьнбммб фзт мзчбнЮт (ме фзн фелехфбЯб фбчэфзфб рпх еЯче рсЯн
фп увЮуймп) кбй бэозуз фзт фбчэфзфб щт фзн мегблэфесз дхнбфЮ.
Пиьнз L:
-деЯчней фзн фсЭчпхуб фбчэфзфб
-деЯчней фпн ухнбгесмь цЯлфсщн (ьфбн з мзчбнЮ лейфпхсгеЯ), емцбнЯжпнфбт фп
кенфсйкь фмЮмб.
-узмбфпдпфеЯ - ме фзн мпсцЮ бнбвпувЮнпнфпт бсйимпэ - фзн лейфпхсгЯб фпх
чспнпсхимйуфЮ.
Дйбкьрфзт Е: иЭфей уе лейфпхсгЯб фпн чспнпсхимйуфЮ (ьфбн з мзчбнЮ
лейфпхсгеЯ), чЬсз уфпн прпЯп п брпсспцзфЮсбт увЮней бхфьмбфб мьнпт фпх
мефЬ брь 5 лерфЬ. ЕрЯузт:
мзденЯжей фзн кбфбмЭфсзуз фщн щсюн уфзн дйЬскейб фзт лейфпхсгЯбт фпх
ухнбгесмпэ цЯлфсщн (ьфбн з мзчбнЮ ден лейфпхсгеЯ).
УХНБГЕСМПУ ЦЙЛФСЩН: мрбЯней уе лейфпхсгЯб ьфбн увЮупхме фзн
мзчбнЮ:
МефЬ брь 30 юсет лейфпхсгЯбт бнЬвей уфзн пиьнз фп кенфсйкь фмЮмб,
узмбфпдпфюнфбт фзн бнЬгкз кбибсйумпэ фщн цЯлфсщн лЯрпхт.
МефЬ брь 120 юсет лейфпхсгЯбт бсчЯжей нб бнбвпувЮней уфзн пиьнз фп
кенфсйкь фмЮмб, узмбфпдпфюнфбт фзн бнЬгкз кбибсйумпэ фщн цЯлфсщн
лЯрпхт кбй бллбгЮт фщн цЯлфсщн Ьнисбкб.
МефЬ фпн кбибсйумь фщн цЯлфсщн лЯрпхт (кбй/Ю фзн бллбгЮ фщн цЯлфсщн
Ьнисбкб), гйб нб мзденЯуефе фпн мефсзфЮ щсюн (RESET) рсЭрей нб
рбфЮуефе фп кпхмрЯ Е фзн юсб рпх еЯнбй бнбммЭнпт п ухнбгесмьт цЯлфсщн.
ПдзгЯет чсЮуещт брь фзн ейк. 6:
Б): Ьнбммб/увЮуймп фщн лбмрфЮсщн.
B): бнЬвей/увЮней фпн чспнпсхимйуфЮ: Энб рЬфзмб рспкблеЯ фзн Энбсоз
лейфпхсгЯбт фпх чспнпсхимйуфЮ кбй щт ек фпэфпх фп уфбмЬфзмб фзт мзчбнЮт
мефЬ брь 5 лерфЬ (фбхфьчспнб бнбвпувЮней уфзн пиьнз фп шзцЯп фзт
ерйлечиеЯубт фбчэфзфбт). П чспнпсхимйуфЮт рбсбмЭней енесгьт бкьмз кбй
уе ресЯрфщуз бллбгЮт фзт фбчэфзфбт.
C):
-деЯчней фзн фбчэфзфб фзт мзчбнЮт (брь фп 1 ещт фп 4)·
-деЯчней фп Ьнбммб фпх чспнпсхимйуфЮ ьфбн бнбвпувЮней фп шзцЯп: узмбфпдпфеЯ фпн ухнбгесмь цЯлфсщн ьфбн фп меубЯп фмЮмб бнЬвей Ю
бнбвпувЮней.
D): иЭфей уе лейфпхсгЯб фзн мзчбнЮ (ме фзн фелехфбЯб чсзуймпрпйзмЭнз
фбчэфзфб)· обнбрбфюнфбт фп кпхмрЯ мрпсеЯфе нб ерйлЭоефе дйбдпчйкЬ фзн
фбчэфзфб фзт мзчбнЮт брь фп 1 Эщт фп 4· еЬн ксбфЮуефе рбфзмЭнп фп
кпхмрЯ гйб 2 дехфесьлерфб фьфе з мзчбнЮ уфбмбфЬей.
R): ербнбцпсЬ фщн цЯлфсщн лЯрпхт кбй фщн цЯлфсщн Ьнисбкб· ьфбн
енесгпрпйзиеЯ п ухнбгесмьт цЯлфсщн (ьфбн дзлбдЮ уфзн пиьнз бнЬшей фп
меубЯп фмЮмб), рсЭрей нб кбибсЯуефе фб цЯлфсб лЯрпхт (дйьфй Эчей ресЬуей з
ресЯпдпт фщн 30 щсюн лейфпхсгЯбт)· еЬн фп меубЯп фмЮмб бнбвпувЮней фьфе
рсЭрей нб кбибсЯуефе фб цЯлфсб лЯрпхт кбй нб бллЬоефе фб цЯлфсб Ьнисбкб
(дйьфй Эчей дйбвеЯ з ресЯпдпт фщн 120 щсюн лейфпхсгЯбт). УхнпшЯжпнфбт, еЬн
п брпсспцзфЮсбт Убт ден еЯнбй Энбт ек фщн мпнфЭлщн ме цЯлфсб кбй ден
дйбиЭфей дзлбдЮ цЯлфсб Ьнисбкб фьфе рсЭрей нб гЯней кбибсйумьт мпнЬчб
фщн цЯлфсщн лЯрпхт, бнеоЬсфзфб брь фп еЬн фп меубЯп фмЮмб фзт пиьнзт
бнбвпувЮней Ю брлЬ бнЬвей. П ухнбгесмьт цЯлфсщн енесгпрпйеЯфбй ьфбн з
мзчбнЮ еЯнбй увзуфЮ кбй дйбскеЯ ресЯрпх 30 дехфесьлерфб. ЕЬн иЭлефе нб
мзденЯуефе фпн мефсзфЮ щсюн фьфе ксбфЮуфе рбфзмЭнп фп кпхмрЯ ерЯ 2
дехфесьлерфб, фзн юсб фпх ухнбгесмпэ.
ПдзгЯет чсЮуещт брь фзн ейк. 7:
З рбспэуб ухукехЮ еЯнбй ецпдйбумЭнз ме енфелют бхфьмбфп уэуфзмб
(Advanced Sensor Control) лейфпхсгЯбт ьлщн фщн рбсбмЭфсщн фпх
брпсспцзфЮсб. Фп уэуфзмб Advanced Sensor Control еггхЬфбй гйб фзн
кпхжЯнб убт мйб дйбскют кбибсЮ кбй брбллбгмЭнз брь пумЭт бфмьуцбйсб,
чщсЯт нб чсейЬжефбй п чсЮуфзт нб кЬней фп пфйдЮрпфе. Пй еоелйгмЭнпй
фечнплпгйкют бйуизфЮсет бнйчнеэпхн ьлет фйт мхсщдйЭт, фпхт бфмпэт, фпн
кбрнь кбй фзн иесмьфзфб рпх рбсЬгефбй уфзн дйЬскейб фпх мбгейсЭмбфпт.
To ASC бнйчнеэей ерЯузт кбй фзн рйибнЮ эрбсоз, льгщ дйбсспЮт, ГКБЖЙПХ
уфпн бЭсб.
Б): Ьнбммб/увЮуймп лбмрфЮсщн.
B): Ьнбммб/увЮуймп “Aхфьмбфзт” лейфпхсгЯбт. ¼фбн ерйлЭоефе бхфЮ фзн
лейфпхсгЯб емцбнЯжефбй Энб “A” уфзн пиьнз C еню з фбчэфзфб лейфпхсгЯбт
фпх кйнзфЮсб бхоЬнефбй Ю мейюнефбй бхфпмЬфщт, бнЬлпгб ме фпхт хдсбфмпэт,
фйт бнбихмйЬуейт, кбй фйт мхсщдйЭт фзт кпхжЯнбт.
Пиьнз C: - деЯчней фзн бхфьмбфз лейфпхсгЯб фзт мзчбнЮт (емцбнЯжефбй фп
гсЬммб “A”)· -деЯчней фзн бхфпмЬфщт ерйлегмЭнз брь фпн бйуизфЮсб
фбчэфзфб фзт мзчбнЮт· -деЯчней фпн ухнбгесмь цЯлфсщн, ьфбн цщфЯжефбй Ю
бнбвпувЮней фп кенфсйкь фмЮмб.
D): елЬффщуз фзт фбчэфзфбт фзт мзчбнЮт / Reset· мейюней фзн фбчэфзфб
лейфпхсгЯбт фзт мзчбнЮт мЭчсй фп мздЭн (уфбмЬфзмб), мефЬ брь ресЯрпх
Энб лерфь ьмщт п брпсспцзфЮсбт мрбЯней уфп бхфьмбфп кбй
ербнблейфпхсгеЯ мьнпт фпх ме фзн фбчэфзфб рпх иб ерйлЭоей п бйуизфЮсбт.
Фп рЬфзмб фпх кпхмрйпэ фзн юсб рпх емцбнЯжефбй п ухнбгесмьт цЯлфсщн
рспкблеЯ RESET, дзлбдЮ ербнеккйнеЯ фзн кбфбмЭфсзуз щсюн.
E): бэозуз фзт фбчэфзфбт фзт мзчбнЮт, мефЬ брь ресЯрпх Энб лерфь ьмщт
п брпсспцзфЮсбт мрбЯней уфп бхфьмбфп кбй лейфпхсгеЯ мьнпт фпх ме фзн
фбчэфзфб рпх иб ерйлЭоей п бйуизфЮсбт.
З рбспэуб ухукехЮ еЯнбй ецпдйбумЭнз ме рлЮсщт бхфьмбфп уэуфзмб
(Advanced Sensor Control) лейфпхсгЯбт ьлщн фщн рбсбмЭфсщн. Фп уэуфзмб
Advanced Sensor Control еггхЬфбй гйб фзн кпхжЯнб убт мйб дйбскют кбибсЮ
кбй брбллбгмЭнз брь пумЭт бфмьуцбйсб, чщсЯт нб чсейЬжефбй п чсЮуфзт нб
кЬней фп пфйдЮрпфе. Пй еоелйгмЭнпй фечнплпгйкют бйуизфЮсет бнйчнеэпхн ьлет
фйт мхсщдйЭт, фпхт бфмпэт, фпн кбрнь кбй фзн иесмьфзфб рпх рбсЬгефбй
уфзн дйЬскейб фпх мбгейсЭмбфпт. To ASC бнйчнеэей ерЯузт кбй фзн рйибнЮ
эрбсоз, льгщ дйбсспЮт, ГКБЖЙПХ уфпн бЭсб.
Page 46

БллбгЮ фзт ехбйуизуЯбт фпх бйуизфЮсб: гйб нб бллЬопхме фп ерЯредп
ехбйуизуЯбт фпх бйуизфЮсб рсЭрей нб кЬнпхме фб еоЮт:
-уфбмбфпэме фзн лейфпхсгЯб фпх брпсспцзфЮсб рйЭжпнфбт фп кпхмрЯ В.
-Рбфпэме фбхфьчспнб фб кпхмрйЬ D кбй E (уфзн пиьнз иб емцбнйуфеЯ п
деЯкфзт ехбйуизуЯбт фпх бйуизфЮсб).
-Рбфпэме фб кпхмрйЬ D Ю Е гйб нб бхоЮупхме Ю нб мейюупхме фпн деЯкфз
ехбйуизуЯбт фпх бйуизфЮсб (1: елЬчйуфз ехбйуизуЯб / 9: мЭгйуфз
ехбйуизуЯб).
-уе ресЯрфщуз брьфпмзт дйбкпрЮт фзт рбспчЮт злекфсйкпэ сеэмбфпт, п
бйуизфЮсбт ербнбцЭсей фзн лейфпхсгЯб уфп ерЯредп ехбйуизуЯбт 5.
РспупчЮ: рспт брпцхгЮ ципсЬт фпх бйуизфЮсб брбгпсеэефбй з чсЮуз
уйлйкпнпейдюн укехбумЬфщн кпнфЬ уфпн брпсспцзфЮсб!
ПдзгЯет чсЮуещт брь фзн ейк. 8:
Дйбкьрфзт Б: Цщт
ИЭуз 0: клейуфь
ИЭуз 1: бнпйчфь
Дйбкьрфзт В: Фбчэфзфб мпфЭс
МрпсеЯфе нб ерйлЭоефе фзн фбчэфзфб лейфпхсгЯбт фпх мпфЭс.
ИЭуз 0: мпфЭс клейуфь
C: БнЬвей деЯчнпнфбт ьфй фп мпфЭс лейфпхсгеЯ
УХНФЗСЗУЗ
! Рспфпэ кбибсЯуефе Ю кЬнефе ухнфЮсзуз, клеЯуфе фзн рбспчЮ сеэмбфпт.
Кбибсйумьт брпсспцзфЮсб
Рьфе нб фпн кбибсЯжефе:бнЬлпгб ме фз чсЮуз, фпхлЬчйуфпн кЬие 2 мЮнет гйб фзн
брпцхгЮ цщфйЬт.
Еощфесйкь кбиЬсйумб: чсзуймпрпйЮуфе Энб рбнЯ впхфзгмЭнп уе члйбсь несь кбй
пхдЭфесп брпссхрбнфйкь. ЧсзуймпрпйЮуфе рспъьнфб кбфЬллзлб гйб
брпсспцзфЮсет брь бфуЬлй, чблкь Ю мрспэнфжп.
Еущфесйкь кбиЬсйумб: чсзуймпрпйЮуфе Энб рбнЯ впхфзгмЭнп уе члйбсь несь
кбй пхдЭфесп брпссхрбнфйкь.
Фй нб мзн кЬнефе: мз чсзуймпрпйеЯфе лейбнфйкЬ Ю дйбвсщфйкЬ рспъьнфб (мефбллйкЬ
уцпхггЬсйб, впэсфует, рплэ уклзсЭт впэсфует, рплэ ерйиефйкЬ брпссхрбнфйкЬ
кфл).
Кбибсйумьт цЯлфсщн (F)
Рьфе нб фб кбибсЯжефе: бнЬлпгб ме фз чсЮуз, фпхлЬчйуфпн кЬие 2 мЮнет гйб фзн
брпцхгЮ цщфйЬт.
нб фб кбибсЯжефе: мрпсеЯфе нб фб рлэнефе уфп чЭсй Ю уфп рлхнфЮсйп рйЬфщн. Бн
фб рлэнефе уе рлхнфЮсйп рйЬфщн, п рйибньт брпчсщмбфйумьт фпхт ден ерзсеЬжей
ме кбнЭнб фсьрп фз лейфпхсгйкьфзфЬ фпхт.
P
Цщфйумьт
Нб фзн бнфйкбфбуфЮуей ме фз лЬмрб фпх Ядйпх фэрпх, еЬн з лЬмрб ден
емцбнЯжефбй уфзн фбмрЭлб рпх бнбцЭсефбй уфп Энфхрп ‘’ РспейдпрпйЮуейт”,
рсЭрей нб брехихниеЯфе уфп кЭнфсп фзт фечнйкЮт впЮиейбт.
F
F
БнфйкбфЬуфбуз фпх цЯлфспх Ьнисбкб
(мьнп гйб фзн Экдпуз цйлфсбсЯумбфпт фпх бЭсб)
Рьфе нб фп бнфйкбийуфЬфе: бнЬлпгб ме фз чсЮуз, фпхлЬчйуфпн кЬие 6 мЮнет.
Рют нб фп бцбйсеЯфе: бнЬлпгб ме фп мпнфЭлп, п брпсспцзфЮсбт мрпсеЯ нб Эчей
уфсьггхлб цЯлфсб Ьнисбкб Ю псипгюнйп цЯлфсп Ьнисбкб.
Бн Эчей уфсьггхлб цЯлфсб Ьнисбкб(R), бцбйсЭуфе фб уфсЯвпнфЬт фб.
Рют
Бн Эчей псипгюнйп цЯлфсп Ьнисбкб (P), рбфЮуфе фп Элбумб кбй гхсЯуфе фп цЯлфсп
рспт фб кЬфщ мЭчсй фб дэпуйдесЬкйб (лбвЭт).
R
Page 47

ВЛБВЕУ
Бн кЬфй ден лейфпхсгеЯ ущуфЬ, рсйн кблЭуефе фзн фечнйкЮ хрзсеуЯб,
рбсбкблпэме екфелЭуфе фпхт бкьлпхипхт брлпэт елЭгчпхт рпх
ресйгсЬцпнфбй рбсбкЬфщ:
• П брпсспцзфЮсбт ден лейфпхсгеЯ
РйибнЮ бйфЯб (1): Фп кблюдйп фспцпдпуЯбт ден Эчей ухндеиеЯ Ю Эчей ухндеиеЯ
лбнибумЭнб.
Лэуз: З злекфсйкЮ кблщдЯщуз фпх брпсспцзфЮсб ден Эчей фпрпиефзиеЯ
ущуфЬ брь фпн егкбфбуфЬфз. КблЭуфе Энбн злекфспльгп / егкбфбуфЬфз.
РйибнЮ бйфЯб (2) мз ерйлегмЭнз фбчэфзфб.
Лэуз: ЕрйлЭофе фзн фбчэфзфб уфпн рЯнбкб елЭгчпх.
ЕЬн фп кЬлхммб увЮней кбфЬ фз дйЬскейб фзт кбнпнйкЮт лейфпхсгЯбт, цспнфЯуфе
нб мзн Эчей брпухндеиеЯ з рбспчЮ злекфсйкпэ сеэмбфпт кбй бн ден
енесгпрпйЮизке п рплхрплйкьт дйбкьрфзт (рплхрплйкьт).
• П бнемйуфЮсбт ден лейфпхсгеЯ, бллЬ фб цюфб лейфпхсгпэн
РйибнЮ бйфЯб: Фп кблюдйп фпх мпфЭс фпх бнемйуфЮсб ден еЯнбй ухндедемЭнп.
Лэуз: ЕнфпрЯуфе фп кблюдйп фпх мпфЭс фпх бнемйуфЮсб кбй ухндЭуфе фп.
ВевбйщиеЯфе ьфй п бнемйуфЮсбт лейфпхсгеЯ фюсб. Бн фп рсьвлзмб ерймЭней,
кблЭуфе фзн фечнйкЮ хрзсеуЯб.
• П брпсспцзфЮсбт ден лейфпхсгеЯ ущуфЬ
РйибнЮ бйфЯб: Всюмйкб цЯлфсб / дйбмесЯуейт.
Лэуз: ЕлЭгофе еЬн фп цЯлфсп еЯнбй кбибсь.
Уфзн ресЯрфщуз брпсспцзфЮсщн ме уэуфзмб кбнблйюн кбй кблхммЬфщн ме
еощфесйкь кйнзфЮсб
РйибнЮ бйфЯб (1): Фп уэуфзмб кбнблйюн ден Эчей кбфбукехбуфеЯ уэмцщнб ме
фйт брбйфЮуейт. ЕЬн фп мЮкпт фпх кбнблйпэ хресвбЯней фйт брбйфЮуейт фпх
кбфбукехбуфЮ, з кблэрфсб мрпсеЯ нб мзн лейфпхсгеЯ вЭлфйуфб. ЕЬн з дйбфпмЮ
фпх кбнблйпэ еЯнбй рплэ мйксЮ Ю фп уэуфзмб Эчей рЬсб рпллЭт гщнЯет з спЮ
фпх бЭсб иб ерйвсбдхниеЯ.
КбфЬ фзн егкбфЬуфбуз фпх кбнблйпэ еккЭнщузт, бкплпхиЮуфе фйт ерЯузмет
пдзгЯет рпх рбсЭчпнфбй брь фйт бсмьдйет бсчЭт (гйб рбсЬдейгмб, п
еобнфлпэменпт бЭсбт ден мрпсеЯ нб кбфехиэнефбй рспт фп кбнЬлй рпх
чсзуймпрпйеЯфбй Юдз щт мЭспт еньт ухуфЮмбфпт кенфсйкЮт иЭсмбнузт,
иесмпухуущсехфЮ клр.). Фп дщмЬфйп дйбиЭфей бесбгщгпэт.
Рбсбкблпэме ерйкпйнщнЮуфе ме фпн егкбфбуфЬфз убт.
РйибнЮ бйфЯб (2): Фп кбнЬлй Эчей впхлюуей.
Лэуз: ЕлЭгофе ьфй фЯрпфб ден емрпдЯжей фпн бгщгь еобесйумпэ (цщлйЭт
рпхлйюн Ю кьмвпй).
РйибнЮ бйфЯб (3) : З лЬмб фзт рефблпэдбт гкбжйпэ ден бнпЯгей.
Лэуз: ВевбйщиеЯфе ьфй з фбйнЯб Эчей бцбйсеиеЯ брь фб рфесэгйб фзт
рефблпэдбт фпх гкбжйпэ кбй бн бхфЬ кйнпэнфбй елеэиесб.
Уфзн ресЯрфщуз брпсспцзфЮсщн ме цЯлфсп
РйибнЮ бйфЯб: Фп цЯлфсп Ьнисбкб еЯнбй енфелют мпэукемб.
Лэуз: бнфйкбфбуфЮуфе фп цЯлфсп Ьнисбкб.
• З лЬмрб ден лейфпхсгеЯ
Пй рспвплеЯт (LED):
Бн бхфь фп еЯдпт фзт лЬмрбт ден емцбнЯжефбй уфпн рЯнбкб рпх бкплпхиеЯ брь
фзн рлехсЬ фщн “РспейдпрпйЮуейт”, рбсбкблпэме ерйкпйнщнЮуфе ме фзн
фечнйкЮ хрзсеуЯб.
ЛЬмрет ме лбмрфЮсет рхсбкфюуещт:
РйибнЮ бйфЯб: п лбмрфЮсбт Ю з хрпдпчЮ фпх еЯнбй елбффщмбфйкЮ Ю
брпухндЭизке фп кблюдйп фспцпдпуЯбт.
Лэуз: вЬлфе фпн лбмрфЮсб уе Ьллз хрпдпчЮ, бн п лбмрфЮсбт ден лейфпхсгеЯ,
бнфйкбфбуфЮуфе фпн ме Энбн Ьллп фпх Ядйпх фэрпх. Ебн лейфпхсгЮуей, з
хрпдпчЮ еЯнбй елбффщмбфйкЮ Ю Ю брпухндЭизке фп кблюдйп фспцпдпуЯбт.
КблЭуфе фзн фечнйкЮ хрзсеуЯб.
ЛЬмрет блпгьнпх:
РйибнЮ бйфЯб: п лбмрфЮсбт Ю з хрпдпчЮ фпх еЯнбй елбффщмбфйкЮ Ю
брпухндЭизке фп кблюдйп фспцпдпуЯбт.
Лэуз: бнфйкбфбуфЮуфе фпн ме Энбн Ьллп лбмрфЮсб фпх йдЯпх фэрпх. Бн фп
рсьвлзмб еммЭней, кблЭуфе фзн фечнйкЮ хрзсеуЯб.
• Фп фзлечейсйуфЮсйп ден лейфпхсгеЯ (еЬн ухмресйлЮцией уфп уеф)
РйибнЮ бйфЯб (1): Ден хрЬсчей уэндеуз мефбоэ фпх фзлечейсйуфзсЯпх кбй кбй
фпх брпсспцзфЮсб
Лэуз: ВевбйщиеЯфе еЬн фб кпхмрйЬ елЭгчпх уфпн брпсспцзфЮсб лейфпхсгпэн
ущуфЬ.
БренесгпрпйЮуфе фп сеэмб фпх брпсспцзфЮсб чсзуймпрпйюнфбт фп
дйбкьрфз, уфз ухнЭчейб нб ербнбухндЭуфе.
КЬнефе фз уэндеуз бнЬмеуб уфп фзлечейсйуфЮсйп кбй уфпн брпсспцзфЮсб ек
нЭпх , бкплпхиюнфбт фйт пдзгЯет рпх рбсЭчпнфбй ме фп фзлечейсйуфЮсйп.
РйибнЮ бйфЯб (2): РблйЬ мрбфбсЯб уфп фзлечейсйуфЮсйп.
Лэуз: БнфйкбфбуфЮуфе фзн мрбфбсЯб ме мйб кбйнпэсйб.
• БуцЬлейб фпх кЬиефпх фзлеукпрйкпэ дЯукпх(еЬн ухмресйлЮцией уфп
уеф)
ЕЬн ьлбфб LED бнбвпувЮнпхн, п фзлеукпрйкьт дЯукпт Эчей брпклейуфеЯ.
РесймЭнефе 30 дехфесьлерфб кбй, уфз ухнЭчейб, рбфЮуфе фп рЬнщ Ю рспт фб
кЬфщ кпхмрЯ гйб нб оеклейдюуефе фп дЯукп. Бн фб рЬнщ / кЬфщ рлЮкфсп
бнбвпувЮней, фп ЦЯлфсп гйб фб лЯрз ден еЯнбй уфз ущуфЮ иЭуз. СхимЯуфе
ущуфЬ.
ЕЬн п дЯукпт еЯнбй клейдщмЭнпт, елЭгофе бн фп кблюдйп фспцпдпуЯбт ден Эчей
брпухндеиеЯ.
Бн фп рсьвлзмб еммЭней, кблЭуфе фзн фечнйкЮ хрзсеуЯб.
Page 48

Čeština
!!
! Instalace musí být provedena podle uvedených pokynů odborně
!!
kvalifikovaným personálem.
Při provádění operací instalace a údržby používejte rukavice.
!
Pokud je napájecí kabel poškozený, je třeba ho nechat vyměnit ze strany
výrobce nebo střediska technické podpory, výměnu v každém případě
musí provést osoba s podobou kvalifikací tak, aby nedošlo k jakémukoli
riziku.
Upozornění: Pokud k instalaci šrouby nebo spojovací v souladu s těmito
pokyny, může dojít k úrazu elektrickým proudem.
Upozornění: aby nedošlo k poškození výrobku Vs, během instalace použijte
pouze dodané šrouby správným způsobem a, jak je uvedeno v návodu k
následování.
Připravte si napájecí zdroj (viz “Upozornění” list).
U modelů Sací verze nebo Verze externím motorem, připravte potrubí pro
leteckou evakuaci (viz “Upozornění” list).
FILTRUJÍCÍ NEBO SACÍ?
Digestoř může být buď ve verzi sací, filtrující nebo Verze externím
motorem.
Zvolte náležitý způsob instalace (filtrační, odtahová nebo Verze externím
motorem). Pro větší účinnost doporučujeme nainstalovat digestoř v
odtahové verzi nebo Verze externím motorem, pokud je to možné.
Digestoř čistí vzduch a odvádí ven výfukovou trubkou.
Digestoř čistí vzduch a odvádí ven výfukovou trubkou. Spotřebič musí být
připojen k sací jednotky, která bude působit v rámci samostatné, s
použitím zařízení jako základ pro montáž vzduch být evakuován.
Digestoř čistí vzduch a vrací jej čistý zpět do místnosti.
PŘÍKAZY
Pouze pro digestoŕe vybavené elektronickým ovládáním:
(modely prodávané ve Skandinávii, tyto funkce nejsou pøítomny)
4 rychlost (intenzivní) bude pro optimalizaci spotřeby energie po 5 minutách
provozu automaticky přepnuta na 3 rychlost.
- Jestliže bude kuchyňský odtah zapnutý (světla a/anebo motor), to po
10 hodinách v případě chybějících příkazů ze strany uživatele, bude
automaticky nastavený na režim OFF, a všechny funkce budou
vypnuté.
- Pokaždé, když bude vydaný pokyn pomocí klávesnice anebo
dálkového ovládače (volitelní), bzučák vydá zvukový signál „beep”.
- Jestliže se v pracovní době kuchyňského odtahu vyskytne přestávka
v napájení elektrickým proudem, kuchyňský odtah se automaticky
vypne, a jeho tlačítko přechází do polohy OFF. Je proto nutné opětovně
nastartovat motor ručně.
Pŕíkazy z Obr. 1:
A : Vypínač světla a alarmu tukových i uhlíkových filtrů.
Alarm filtrů: Po 30 provozních hodinách se červeně rozsvítí po dobu
30 sekund kontrolka L1 a indikuje to, že je nutné vyčistit tukový filtr.
A po 120 provozních hodinách se červeně rozsvítí po dobu 30 sekund
kontrolka L1 a indikuje to, že je nutné vyměnit uhlíkový filtr, pokud je
digestoř uhlíkovým filtrem vybavena.
Alarm filtrů funguje pouze při vypnutém motoru.
Časový čítač alarmu vynulujete tím, že na dobu delší než 2 sekundy
stisknete spínač A.
B : Spínač 1. rychlosti motoru. Tato rychlost je indikována zelenou
barvou kontrolky L1. Když tlačítko podržíte po dobu delší, než jsou 2
sekundy, motor se vypne. Krátkým stiskem tlačítka, při chodu motoru,
se aktivuje časový vypínač (kontrolka L1 bliká) a po 5 minutách se
motor vypne. Pokud chcete časové vypnutí zrušit, stiskněte tlačítko
ještě jednou.
Sací verze
Verze externím motorem
Filtrační verze
C : Spínač 2. rychlosti motoru. Tato rychlost je indikována zelenou
barvou kontrolky L2. Krátkým stiskem tlačítka, při chodu motoru, se
aktivuje časový vypínač (kontrolka L2 bliká) a po 5 minutách se motor
vypne. Pokud chcete časové vypnutí zrušit, stiskněte tlačítko ještě
jednou.
D : Spínač 3. rychlosti motoru. Tato rychlost je indikována zelenou
barvou kontrolky L3. Krátkým stiskem tlačítka, při chodu motoru, se
aktivuje časový vypínač (kontrolka L3 bliká) a po 5 minutách se motor
vypne. Pokud chcete časové vypnutí zrušit, stiskněte tlačítko ještě
jednou.
E : Spínač 4. rychlosti motoru. Tato rychlost je indikována zelenou
barvou kontrolky L4. Krátkým stiskem tlačítka, při chodu motoru, se
aktivuje časový vypínač (kontrolka L4 bliká) a po 5 minutách se motor
vypne. Pokud chcete časové vypnutí zrušit, stiskněte tlačítko ještě
jednou.
Pŕíkazy z Obr. 3:
A) ON/OFF pro žárovky. Toto tlačítko se používá také pro fukci poplašného
signálu tukových a uhlíkových filtrů.
B) Tlačítko B zapíná/vypíná fungování čidla (když je zapnuto, rozsvítí se
kontrolka L2.
C) Stlačením tlačítka C se zapne motor v prvním výkonostním režimu.
Rychlost je označována kontrolkou L3, která se rozsvítí. Budete-li držet
tlačítko stlačené na dobu 2 ‘’, motor se vypne.
D) Zatlačením tlačítka D se zapne motor v druhém rychlostním režimu.
Rychlost je označována kontrolkou L4, která se rozsvítí.
E) Zatlačením tlačítka E se zapne motor ve třetím rychlostním režimu.
Rychlost je označována kontrolkou L5, která se rozsvítí.
F) Zatlačením tlačítka F se zapne motor ve čtvrtém rychlostním režimu.
Rychlost je označována kontrolkou L6, která se rozsvítí.
Poplach – filtry: Po uplynutí 30 h provozu motoru se rozsvítí kontrolka L1
a zůstane rozsvícená na 30'’ (nastala chvíle k očištění tukových filtrů). Po
uplynutí 120 h provozu motoru se rozsvítí kontrolka L1 a bliká po dobu 30'’
(nastala chvíle k výměně uhlíkového filtru, pokud je jím zařízení vybaveno).
Poplachové hlášení pro filtry se objeví POUZE když je motor ZASTAVENÝ.
Poplach pro filtry se vynuluje (resetování součtu HODIN) držením stlačeného
tlačítka A na 2'’.
POZOR: když se rozsvítí KONTROLKA L1. nastala chvíle k očištění
tukových filtrů nebo k výměně uhlíkového filtru.
Citlivost čidla: Citlivost čidla může být nastavena v závislosti na osobní
potřebě. Změna citlivosti se provádí současným zatlačením tlačítek A a B.
Objeví se nastavená citlivost prostřednictvím čtyř světélkujících kontrolek
L3, L4, L5 a L6. Pomocí tlačítek C, D, E nebo F nastavte požadovanou
citlivost (tlačátko C pro minimální, tlačítko F pro maximální citlivost). U
plynových sporáků nastavte minimální citlivost, střední u sporáku se
sklokeramickým povrchem a maximální u sporáků s indukčním ohřevem.
Funkce čidla (se spouští prostřednictvím tlačítka B).
Toto zařízení je vybaveno zcela automatickým systémem (Advanced
Sensor Control), který ovládá všechny funkce digestoře. Díky systému
Advanced Sensor Control se vzduch v kuchyni udržuje stále čistý a bez
zápachu, bez jakéhokoliv zásahu uživatele. Rafinovaná čidla zachytí
jakýkoliv druh zápachu, výparů, kouře nebo tepla vyvolaného procesem
vaření. Systém ASC zachycuje také případné a nežádoucí PLYNY v
ovzduší.
Je-li zapnutá funkce čidla, tlačítka C,D,E a F ovládají rychlosti pouze
dočasně, následovně je to čidlo, které nastaví automaticky potřebnou
rychlost odsávání.
Pozor: z duvodu možného poškození cidla nepoužívejte v blízkosti digestore
silikonové výrobky!
Pŕíkazy z Obr. 4:
Toto zařízení je vybaveno zcela automatickým systémem (Advanced
Sensor Control), který ovládá všechny funkce digestoře. Díky systému
Advanced Sensor Control se vzduch v kuchyni udržuje stále čistý a bez
zápachu, bez jakéhokoliv zásahu uživatele. Rafinovaná čidla zachytí
jakýkoliv druh zápachu, výparů, kouře nebo tepla vyvolaného procesem
vaření. Systém ASC zachycuje také případné a nežádoucí PLYNY v
ovzduší.
A): Vypne osvětlení - OFF.
B): Zapne osvětlení – ON.
C): Snižuje rychlost motoru až do nuly. Pokud klávesu držíte déle než 2
sekundy, při signalizaci Alarmu Filtrů, počítadlo hodin se vynuluje RESET.
D): Zapne motor (na rychlost při které byl motor vypnut) a zvyšuje
rychlost do maxima.
E): Aktivuje / deaktivuje senzor (AUTOMATICKÝ nebo MANUÁLNÍ) režim.
Při automatickém režimu je senzor aktivní a na displeji (L) se objeví
písmeno „A“.
L): Displej:
- zobrazuje spuštěnou rychlost.
- signalizuje Automatický režim zobrazením písmene „A“. Pokud se při
tomto režimu změní rychlost, číslice rychlosti 3-krát blikne a potom se
opět objeví písmeno „A“.
- signalizuje alarm filtru (při vypnutém motoru) tím, že se zobrazí středová
Page 49

čárka po dobu 30 sekund.
ALARM FILTRŮ: signalizace 30 sekund při vypnutém motoru. Po 30
provozních hodinách se zobrazí na displeji středová čárka; to indikuje, že
je nutné vyjmout a vyčistit tukový filtr. Po 120 provozních hodinách na
displeji začne blikat středová čárka; to indikuje, že je nutné vyjmout a
vyčistit tukový filtr a vyměnit filtr uhlíkový (pouze v případě, že se
zařízení používá ve filtračním režimu). Po vyčištění tukového filtru,
popřípadě výměně uhlíkového filtru, proveďte, při spuštěné signalizaci
Alarmu filtrů, RESET tj. vynulování počítadla provozních hodin stisknutím
klávesy C.
Pozor: z duvodu možného poškození cidla nepoužívejte v blízkosti digestore
silikonové výrobky!
NASTAVENÍ CITLIVOSTI SENZORU: citlivost senzoru se může podle
požadavků upravit. Při tomto nastavení musí být zařízení v MANUÁLNÍM
režimu (na displeji nesmí být zobrazeno písmeno „A“). Pokud tomu tak není
stiskněte klávesu E.
Stiskněte současně klávesy D a E, nastavená úroveň citlivosti se zobrazí
na displeji. Postupným stiskem kláves C (-) a D (+) nastavíte požadovaný
stupeň citlivosti. Klávesou E potom nastavení uložíte do paměti.
Pŕíkazy z Obr. 5:
A) Vypnutí světla.
B) Zapnutí světla.
C) Snižování rychlosti motoru až na minimum. Pokud tlačítko držíte déle
než 2“ motor se vypne.
D) Spustí motor na rychlost při které bylo zařízení naposledy vypnuto
a zvyšuje rychlost až do maxima.
L) Displej:
- signalizuje spuštěnou rychlost.
- signalizuje alarm filtru (při vypnutém motoru) zobrazením středové čárky
po dobu 30“.
- signalizuje aktivaci časového vypnutí – bliká číslo rychlosti.
E) aktivuje ČASOVÉ vypnutí (při spuštěném motoru), potom se motor
sám vypne po 5 minutách. Také nastaví počítadlo hodin na nulu když
je alarm filtru aktivní (motor je vypnutý).
ALARM FILTRU: při vypnutém motoru se zobrazí středová čárka po dobu
30“ .
Po 30 provozních hodinách, se rozsvítí středová čárka; to indikuje nutnost
vyčištění tukových filtrů.
Po 120 provozních hodinách, středová čárka začne blikat; to indikuje
nutnost vyčištění tukových filtrů a nutnost výměny uhlíkového filtru.
Po vyčištění tukových filtrů (a/nebo výměně uhlíkového filtru), restartujte
počítadlo hodin (RESET) stisknutím tlačítka E tehdy, když je aktivní alarm
filtru.
Pŕíkazy z Obr. 6:
Tlačítko A = zhasíná/rozsvěcuje světla
Tlačítko B = zapíná/vypíná ČASOVAČ : jedním stisknutím se aktivuje
časovač, a potom se po 5 minutách motor zastaví (zároveň na displeji bliká
číslo navolené rychlosti); časovač zůstává aktivní při změně rychlosti
motoru. V případě, že je motor zastaven a znovu spuštěn, časovač se
vypne.
Displej C =
- oznamuje zvolenou rychlost motoru (od 1 do 4).
- blikající číslo oznamuje aktivaci časovače.
- pokud svítí nebo bliká jeho středová čárka, oznamuje poruchu filtrů
(tj.nutnost vyčistit proti-tukové nebo vyměnit uhlíkové filtry).
Tlačítko D = ovládání motoru (spouští se vždy naposledy zvolená rychlost).
Opětovným stisknutím tlačítka se rychlost postupně mění od 1 do 4.
Pokud tlačítko na 2 sekundy podržíte,motor se zastaví.
Tlačítko R = reset indikace zanesení proti-tukových filtrů a výměny filtrů
uhlíkových. Pokud se objeví poplašný signál filtrů (na displeji se rozsvítí
středová čárka), je nutné vyčistit proti-tukový/é filtr/y (proběhlo 30 hodin
provozu).
Pokud středová čárka bliká, je nutné proti-tukový/é filtr/y vyčistit a
vyměnit uhlíkový filtr (proběhlo 120 hodin provozu). Pochopitelně, pokud
Vaše digestoř neplní filtrační funkci, ale pouze odtahovou a nemá uhlíkový
filtr, stačí vyčistit proti-tukový/é filtr/y, ať už kontrolka bliká nebo svítí.
Středová čárka je vidět teprve po vypnutí motoru a svítí 30 sekund,
potom sama zhasne. Proveďte reset počítadla hodin: když je vidět
středová čárka; stiskněte a držte tlačítko déle než 2 sekundy.
Pŕíkazy z Obr. 7:
Toto zařízení je vybaveno zcela automatickým systémem (Advanced
Sensor Control), který ovládá všechny funkce digestoře. Díky systému
Advanced Sensor Control se vzduch v kuchyni udržuje stále čistý a bez
zápachu, bez jakéhokoliv zásahu uživatele. Rafinovaná čidla zachytí
jakýkoliv druh zápachu, výparů, kouře nebo tepla vyvolaného procesem
vaření. Systém ASC zachycuje také případné a nežádoucí PLYNY v
ovzduší.
Tlacítko A: Rozsvítí/zhasne svetla.
Tlacítko B: zapne / vypne funkci „automatického” provozu. Po zapnutí této
funkcese na displeji C objeví písmeno „A” a rychlost motoru se
automaticky zvýší nebo sníží v závislosti na množství výparu,pachu a
plynu prítomného v kuchyni.
Displej C: - oznacuje automatický provoz cidla (objeví se písmeno „A”); -
oznacujerychlost motoru automaticky nastavenou cidlem; - oznacuje
poplachový stav filtru, jestliže se strední segmentrozsvítí nebo bliká.
Tlacítko D: snižuje se rychlost motoru / Resetování; rychlost motoru se
snižuje až na nulovouhodnotu (zastavení), nicméne po uplynutí asi 1 minuty
se digestor znovu uvede do automatického provozu pri rychlostiurcené
cidlem. Zatlacením tlacítka v prubehu zobrazení poplachového stavu filtru
obdržíte RESETOVÁNÍ a odpocethodit proto zacne od nuly.
Tlacítko E: zvyšuje rychlost motoru; nicméne po uplynutí asi 1 minuty se
digestor znovuuvede do automatického provozu pri rychlosti urcené cidlem.
Toto zařízení je vybaveno zcela automatickým systémem (Advanced
Sensor Control), který ovládá všechny funkce digestoře. Díky systému
Advanced Sensor Control se vzduch v kuchyni udržuje stále čistý a bez
zápachu, bez jakéhokoliv zásahu uživatele. Rafinovaná čidla zachytí
jakýkoliv druh zápachu, výparů, kouře nebo tepla vyvolaného procesem
vaření. Systém ASC zachycuje také případné a nežádoucí PLYNY v
ovzduší.
Zmena nastavení citlivosti cidla: Je možné zmenit nastavení citlivosti cidla
prostrednictvím následujícího postupu:- zastavte digestor zatlacením
tlacítka B. - Zatlacte zároven tlacítka D a E (na displeji se objeví stupnice
citlivosticidla). - Zatlacením tlacítek D nebo E se zvýšuje nebo snižuje
stupen citlivosti cidla (1 : minimální citlivost / 9 maximálnícitlivost). - v
prípade prerušení elektrického napájení zacne cidlo znovu pracovat s
hladinou citlivosti c. 5.
Pozor: z duvodu možného poškození cidla nepoužívejte v blízkosti digestore
silikonové výrobky!
Pŕíkazy z Obr. 8:
Vypínač A - OSVĚTLENÍ
Poloha 0: světlo vypnuto.
Poloha 1: světlo zapnuto.
Vypínač B – RYCHLOST MOTORU:
Umožňuje regulaci rychlosti motoru
Poloha 0: motor zastaven.
C: - kontrolka funkce motoru.
Pŕíkazy z Obr. 9:
Tlačítko A = zhasíná/rozsvěcuje světla; každých 30 hodin provozu kontrolka
indikuje, že se musí vyčistit zanesené proti-tukové filtry; vždy po 120
hodinách provozu kontrolka probleskováním indikuje, že je nutné vyčistit
proti-tukové filtry a vyměnit uhlíkový filtr. Reset časovače: držte tlačítko
A stisknuté déle než 1 sekundu (dokud kontrolka nezhasne).
Tlačítko B = zapíná/vypíná, 1. stupeň rychlosti (zapnutí odpovídá rozsvícené
kontrolce); pokud tlačítko přidržíte déle než 1 sekundu motor se vypne.
Tlačítko C = 2. stupeň rychlosti (zapnutí odpovídá rozsvícené kontrolce);
pokud tlačítko stisknete 2 krát, aktivuje se „ČASOVAČ“ a motor se po
5 minutách zastaví (kontrolka probleskuje).
Tlačítko D = 3. stupeň rychlosti (zapnutí odpovídá rozsvícené kontrolce);
pokud tlačítko stisknete 2 krát, aktivuje se „ČASOVAČ“ a motor se po
5 minutách zastaví (kontrolka probleskuje).
Tlačítko E = 4. stupeň rychlosti (zapnutí odpovídá rozsvícené kontrolce);
pokud tlačítko stisknete 2 krát, aktivuje se „ČASOVAČ“ a motor se po
5 minutách zastaví (kontrolka probleskuje).
ÚDRŽBA
! Před čištěním nebo prováděním údržby odpojte od zdroje napětí.
Čištění digestoŕe
KDY ČISTIT: Čistit alespoň každé 2 měsíce, v souvislosti s používáním,
abyste zabránili riziku vzniku požáru.
VNĚJŠÍ ČIŠTĚNÍ: Používejte navlhčený hadřík s vlažnou vodou a neutrální
čisticí prostředek (pro lakované digestoře), na digestoře z oceli, mědi nebo
mosazi používejte speciální přípravky.
VNITŘNÍ ČIŠTĚNÍ: Používejte hadřík (nebo štětec) namočený v
denaturovaném lihu.
CO NEDĚLAT: Nepoužívejte brusné materiály nebo materiály způsobující
korozi (například kovové houbičky, příliš tvrdé kartáče, příliš agresivní
čisticí prostředky atd.).
Page 50

Čištění tukových filtrů (F)
KDY ČISTIT: Čistit alespoň každé 2 měsíce, v souvislosti s používáním,
abyste zabránili riziku vzniku požáru.
JAK ČISTIT FILTRY: Omýt ručně neutrálním čisticím prostředkem nebo v
myčce. V případě mytí v myčce případné odbarvení v žádném případě
neohrozí funkčnost filtrů.
F
F
Výměna uhlíkového filtru
(pouze pro filtrující digestoř)
KDY VYMĚNIT. Vyměnit alespoň každých 6 měsíců, v souvislosti s
používáním.
JAK JEJ ODEJMOUT: v závislosti na tom, zda je přístroj vybaven
kruhovým, nebo čtvercovým filtrem postupujte následovně:
Pokud digestoř je uzpůsobena na kruhové filtry (R), uvolněte uhlíkový
filtr s houpacím pohybem.
Pokud digestoř používá plošný filtr (P), stiskněte západku dovnitř,
pootočte filtrem dolů a vysuňte 2 jazýčky z jejich uložení.
Osvětlení:
Vyměnit na lampy stejného typu; v případě, že není lampa uvedena v
tabulce v listu “UPOZORNĚNI”, obraťte se na centrum podpory.
R
P
Page 51

PORUCHY
Pokud něco nefunguje správně, než zavoláte technický servis proved’te
prosím níže popsaný jednoduché kontrolní úkony:
• Digestoŕ nefunguje
Možná příčina (1): Napájecí kabel odpojen nebo nesprávně zapojen.
Řešení: Elektrická instalace digestoře není správně zapojena instalatérem.
Zavolejte elektrikáře/instalatéra.
Možná příčina (2): Není zvolená rychlost.
Řešení: Zvolte rychlost na ovládacím pultu.
V případě, že se víko při běžném provozu vypne zkontrolujte, zda nebylo
odpojeno napájení a zda se nespustil omnipolární (mnohopólový)
odpojovač.
• Dmýchadlo nefunguje, ale světla fungují
Možná příčina: Motorový kabel dmýchadla není připojen.
Řešení: Lokalizujte motorový kabel dmýchadla a připojte jej. Zkontrolujte,
zda nyní ventilátor funguje. Pokud problém přetrvává, zavolejte technický
servis.
• Digestoŕ nefunguje správně
Možná příčina: Špinavé filtry/přepážky.
Řešení: Zkontrolujte, zda je filtr čistý.
V případě digestořů z kanalovým systémem a digestořů s vnějším
motorem
Možná příčina (1): Kanalový systém provedený v rozporu s požadavky. V
případě, že délka kanálu překračuje požadavky výrobce, může digestoř
optimálně nefungovat. V případě, že je průřez kanálu příliš malý nebo je v
systému příliš mnoho ohybů bude také proud vzduchu zpomalen.
Při montáži výstupního kanálu dodržujte oficiální instrukce poskytnuté
příslušnými orgány (například, odtahovaný vzduch nemůže být směrován
do kanálu, který je již používán v rámci instalace ústředního topení,
termosifonů atd.). Místnost má ventilační otvory.
Kontaktujte instalatéra.
Možná příčina (2): Kanál je ucpaný.
Řešení: zkontrolujte, zda nic neblokuje ventilační kanál (ptáci hnízda nebo
uzly).
Možná příčina (3): Lopatka klapky se neotvírá.
Řešení: Zkontrolujte, zda byla z lopatek klapky odstraněna páska a jsou-li
tyto volně pohyblivé.
V případě digestořů s filtrem
Možná příčina: uhelný filtr je úplně promočený.
Řešení: vyměňte uhelný filtr.
• Lampa nefunguje.
Reflektory (LED):
Pokud není tento typ lampy uveden v následující tabulce na stránce s
“UPOZORNĚNI”, kontaktujte prosím technický servis.
Lampy s žárovkami:
Možná příčina: Žárovka nebo její objímka je vadná nebo se odpojil
napájecí kabel.
Řešení: umístěte žárovku v jiné objímce; v případě, že žárovka
nefunguje, vyměňte za jinou stejného typu; pokud funguje, je objímka
vadná nebo se odpojil napájecí kabel. Zavolejte technický servis.
Halogenové svitilny:
Možná příčina: Žárovka nebo její objímka je vadná nebo se odpojil
napájecí kabel.
Řešení: vyměňte za jinou žárovku stejného typu. Pokud problém
přetrvává, zavolejte technický servis.
• Pilot dálkového ovládání nefunguje (pokud byl pŕídán do sady)
Možná příčina (1): Není spojení mezi dálkovým ovladačem a digestořem.
Řešení: Zkontrolujte, fungují-li správně ovládací tlačítka umistěné na
digestoři.
Vypněte napájení digestoře pomocí přerušovače obvodu; pak je znova
připojte. Proved’te opět spojení mezi dálkovým ovladačem a digestořem a
dodržujte pokyny dodané s dálkovým ovladačem.
Možná příčina (2): Opotřebená baterie v dálkovém ovladači.
Řešení: Vyměňte baterii za novou.
• Blokáda svislého teleskopového podnosu (pokud je pŕídán do
sady)
Blíkají-li všechny LED-y, je teleskopový podnos blokován. Počkejte 30
sekund a stiskněte tlačítko nahoru nebo dolů, pro uvolnění podnosu.
Blíka-li tlačítko nahoru/dolů, není tukový filtr ve správné poloze. Nastavte
jej správně.
Je-li podnos blokován, zkontrolujte, zda nedošlo k odpojení napájecího
kabelu. Pokud problém přetrvává, zavolejte technický servis.
Page 52

04308422/5
 Loading...