

Page 1

CanDo HD Diagnostic Tablet
Statement
This manual is designed for the use of CanDo HD Pro Tab diagnostic
tool and cannot be copied or stored in any form (electronic, mechanical,
photocopying, recording or otherwise) without prior written
permission being secured by CanDo International, Inc.
This manual is intended for professional vehicle repair technicians and
provides the operation methods for using CANDO products. CanDo
International, Inc. accepts no responsibility for the consequences
caused by abusing the operation methods on other equipment.
CanDo International, Inc. shall not undertake any responsibility for
accidents caused by the user personally or other people, costs and
expenses due to equipment damages and equipment loss that are
caused by the user’s abuses, misuses, arbitrary changes, repairs, or
operations of the equipment not in accordance with the manual
requirements. This manual is written in accordance with the existing
configuration and functions of the product, it’s subject to change
without notice if the product adds new configuration and functions.
CanDo International, Inc. has registered the CANDO trademark in
America. The company declares that the ownership of the registered
trademark, service mark, domain name, logo, and company name in
countries which they have not yet been registered belongs to CanDo
International, Inc.. The other products and their company name
trademarks mentioned in this manual belong to the original registered
company. The trademarks, service marks, domain names, logos, and
company names of CanDo International, Inc. or other companies
mentioned may not be used without prior written permission of the
owner.
Registered Trademark
CanDo International, Inc. has registered the trademark in America and
1
Page 2

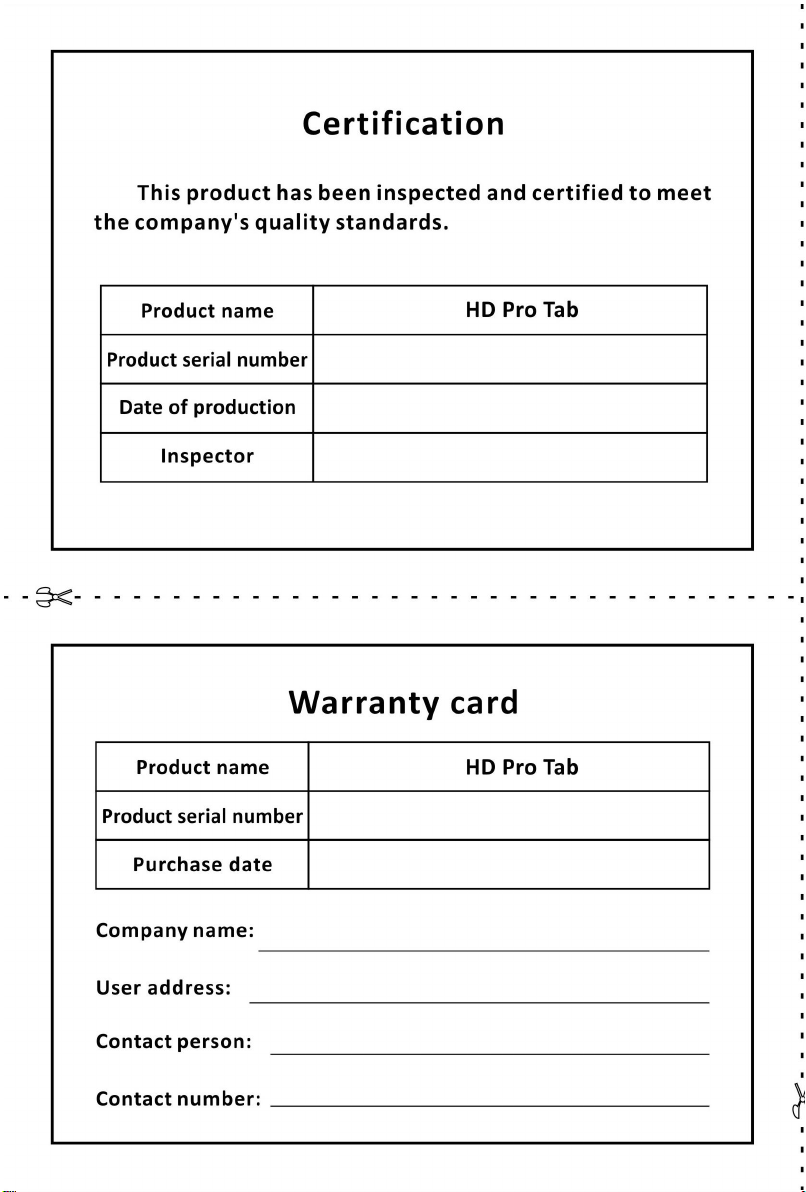
CanDo HD Diagnostic Tablet
several countries overseas. The company declares that the ownership of
the registered trademark, service mark, domain name, logo, and company
name in countries which they have not yet been registered belongs to
CanDo International, Inc.. The other products and their company name
trademarks mentioned in this manual belong to the original registered
company. The trademarks, service marks, domain names, logos, and
company names of CanDo International, Inc. or other companies
mentioned may not be used without prior written permission of the owner.
CANDO Product Manual Instructions
Please read this manual carefully before using the CANDO product.
This manual is written in accordance with the existing configuration
and functions of product and it’s subject to change without notice if
the product adds new configuration and functions. The new version of
the manual can be downloaded from CANDO official website, please
pay attention to "Note", "Remark" and "Instruction" in the manual to
make sure the safe and correct use.
CanDo International, Inc.
Tel: 1-909-CanDo-11(226-3611)
Office: 138 E. Lemon Ave., Monrovia, CA 91016 USA
Website: www.candointl.com
2
Page 3

Contents
CanDo HD Diagnostic Tablet
Statement
Contents
Chapter I Product Introduction
1.1 Product Overview
1.2 Product Features
1.3 Service and Maintenance
1.3.1 Storage Environment
1.3.2 Host Protection
1.3.3 Screen Maintenance
1.3.4 Precautions
1.4 Automobile Inspection Notes
1.5 Product Help
Chapter II Product Structure
2.1 Host Hardware Instruction
2.1.1 Host Diagram
2.1.2 Host Parameters
.............................................................................................................
...............................................................................................................
........................................................................
......................................................................................
........................................................................................
..........................................................................
............................................................................
.....................................................................................
.............................................................................
...........................................................................................
...............................................................................................
........................................................................
....................................................................
......................................................................................
.................................................................................
..................................................................
1
3
5
5
5
6
6
7
7
8
8
9
10
10
10
12
Chapter III VCI BOX Structure
Chapter IV Operation Manual
4.1 Connection of Power Supply & Main Testing Cable
4.1.1 Host Power Supply
4.1.2 Wiring Method
4.1.3 Startup and Shutdown
4.2 Start Interface Menu
.........................................................................
........................................................................
..............................................................................
...................................................................................
........................................................................
................................................................................
3
...........................
13
14
14
14
15
16
17
Page 4

CanDo HD Diagnostic Tablet
4.2.1 Main Interface
4.2.2 Vehicle Diagnosis
4.2.3 VCI Connection
4.2.4 Data Management
4.2.5 Remote Diagnosis
4.2.6 Update
4.2.7 Help
4.2.8 setup
.....................................................................................................
...................................................................................................
Chapter V Upgrade
Chapter VI Compliance Information
....................................................................................
................................................................................
...................................................................................
..............................................................................
...............................................................................
................................................................................................
.........................................................................................
..............................................................
17
17
18
19
19
20
20
21
25
26
Annex: Diagnostic Interface Definition and Description of Standard OBD-II..30
Chapter VII Warranty
......................................................................................
33
4
Page 5

CanDo HD Diagnostic Tablet
Chapter I Product Introduction
1.1 Product Overview
CanDo HD Pro Tab diagnostic tool is developed and promoted with
emphasis by CanDo International, Inc. Co., Ltd. Its comprehensive auto
diagnosis equipment on diesel electric control system detection are
applicable to large, medium and small repair enterprises, training
institutions, automakers, maintenance station and many more.
The product software configuration is all-round with complete vehicle
model data and materials. It fully meets the strict requirements in
diagnosis of customers. The software covers almost vehicle model data,
and provides strong repair material and help system that allows users to
deal with problems in practical work easily and quickly so as to improve
work efficiency and technical level.
The appearance design is luxury and comfortable with the large TFT
touch screen for operations. Mode setup function for multi working
conditions satisfies the working demands in different circumstances.
Adopting flexible drive technology, CanDo HD Pro Tab diagnostic tool with
good scalability fully meets requirements of various communication bus
tests for current automobile electronic control systems.
1.2 Product Features
All CanDo HD Pro Tab diagnostic tool core hardware adopts the
international advanced modular design concept, with high speed and
stabilization, accurate data acquisition and other excellent performances. It
also has the ability to resist high and low temperature difference.
CanDo HD Pro Tab diagnostic tool adopts the open structure design in
the program framework. Its independent operation system allows the
system software and diagnostic software to upgrade more conveniently.
Working power supply is from the automotive batteries, which is
5
Page 6

CanDo HD Diagnostic Tablet
widely adapted to the voltage changes between 9~27V. The internal power
supply uses the design of isolated power supply with the efficient
protection of machine from damages when automobile voltage is abnormal.
CanDo HD Pro Tab diagnostic tool has good scalability and the
communication interface adopts the flexible drive circuit. It not only meets
requirements of tests for current automotive bus, but also satisfies bus
automotive tests that may appear in the future. It has built-in high/low
speed CAN-BUS and satisfies electronic systems which adopt bus with
Can-Bus protocol, and it only needs one diagnostic connector to perform
the fault diagnosis on all automobiles that are equipped with CAN-BUS. It
also fully supports all OBD-II protocols.
With a USB port to connect the printer, CanDo HD Pro Tab diagnostic
tool host is convenient for the maintenance staff to record data and save
fault codes and other important information during the automobile fault
diagnosis.
The CanDo HD Pro Tab diagnostic tool host screen is the general
international standard LCD TFT industrial touch screen. It has features
such as the characters are clear in the strong sunshine, the touch-keys are
accurate, the interface is broad and the screen’s compressive strength is
high and many other advantages. Its working stability is also
advantageously guaranteed while using it in bad environments.
The CanDo HD Pro Tab diagnostic tool provides various versions and
languages in order to adapt to the use in different countries and districts.
1.3 Service and Maintenance
1.3.1 Storage Environment
1) Please store in a flat, dry place with suitable temperature when it’s not
in use.
2) Please do not put in direct sunlight or places near heating devices.
3) Please do not place in the range of the magnetic field.
6
Page 7

CanDo HD Diagnostic Tablet
4) Please do not put it in places with smoke, water or oil.
5) Please do not put it in places where is dusty, humid and high
temperature or easily to be shaken.
6) When the host is dirty, please turn off the power supply immediately,
and then wipe the housing case with a soft wet cloth.
7) Please regularly run the diagnostic tool host to protect it from damp
when it is not in use for extended periods.
1.3.2 Host Protection
1)Please handle the host with care as possible as you can to avoid
impacts.
2)When connecting the test cable and the automobile for diagnosis,
please plug carefully. And tighten the fastening screw when it’s in use
in order to protect the interface from being damaged in the process of
movement, please first loosen the screw after use and then unplug the
main testing cable to avoid that the diagnosis interface gets damaged.
3)After using the instrument, put the test cable, connectors and other
accessories back to the assembly case to avoid missing.
1.3.3 Screen Maintenance
1) The screen surface will absorb dust due to the static electricity. It’s
recommended to purchase the LCD special cleaning cloth to clean the
host screen and wipe it gently.
2) Do not wipe the dust with your fingers to avoid leaving fingerprints. Do
not use chemical cleaners to wipe the screen.
3) Please do not place the product near electric equipment that generates
electromagnetic wave interferences so as not to affect the display.
4) Please do not expose the screen in direct sunshine or ultraviolet
lighting for long time so as not to affect the life of the screen.
7
Page 8

CanDo HD Diagnostic Tablet
1.3.4 Precautions
1) It’s prohibited to frequently turn on/off the host, suddenly turn off the
power supply, and to provide unstable power supply or artificial
abnormal power supply.
2) If it’s not in use, please unplug the power supply connector to protect
the electrical components from aging when electrifying for long time.
3) Avoid using this product in an environment with air which has volatile
alkali chemical, so as to avoid host hardware corrosion.
4) Never clean the product with chemical solvent reagents like banana
water, engine cleaning agents, gasoline etc.
5) Do not put anything on the screen. To avoid any damage, please don’t
place objects on the screen.
6) Periodically start the CanDo main unit if not operated for a long time in
order to avoid moisture accumulation.
1.4 Automobile Inspection Notes
Please perform operations according to automobile repair industry
safety rules. Special attention should be paid to influences and damages
caused by acid and alkali, poison gas, high pressure and other
environmental factors.
There is sulfuric acid in the automobile battery. The sulfuric acid is
corrosive to the skin so please avoid direct contacts with the battery when
operating the product, especially do not splash it into eyes, and please keep
kindling materials far away.
There are various kinds of toxic compounds in the engine exhaust gas,
please do not breathe in the exhaust gas, please park the vehicle in
well-ventilated places during operations.
The temperature is relatively high when the engine drives, please do
not touch the water tank or exhaust pipe or other high-temperature
components.
8
Page 9

CanDo HD Diagnostic Tablet
Please apply the handbrake before starting the engine, put the shift
lever in the neutral gear (manual transmission) or P gear position
(automatic transmission) to avoid traffic accidents when starting the
engine.
Please apply the parking brake before performing the vehicle
maintenance. The transmission is engaged into the neutral gear or P gear
and to lower the driver’s side window glass.
If the engine can be started, please first warm up the vehicle to the
normal temperature (the water temperature is about 80 ℃), and turn off
auxiliary electronic equipments (e.g. A/C, light and audio).
Please find the diagnostic socket on the vehicle, check and confirm
that the diagnostic socket cable is in good condition, and then connect the
host to diagnose. Otherwise please do not perform the test in order to
protect the host from damages, or you can use the multimeter to measure
the diagnostic socket voltage if it is necessary.
1.5 Product Help
The CanDo HD Pro Tab diagnostic tool maintenance is simple and
convenient, and support services go with the host. Our marketing networks
all around the country could provide the most convenient and fastest
services in all aspects of purchase, use, upgrade and maintenance.
CanDo International, Inc. also provides online help function for users. If you
want to learn our latest products or automobile diagnostic information,
please visit www.candointl.com for comprehensive and detailed help
services.
9
Page 10
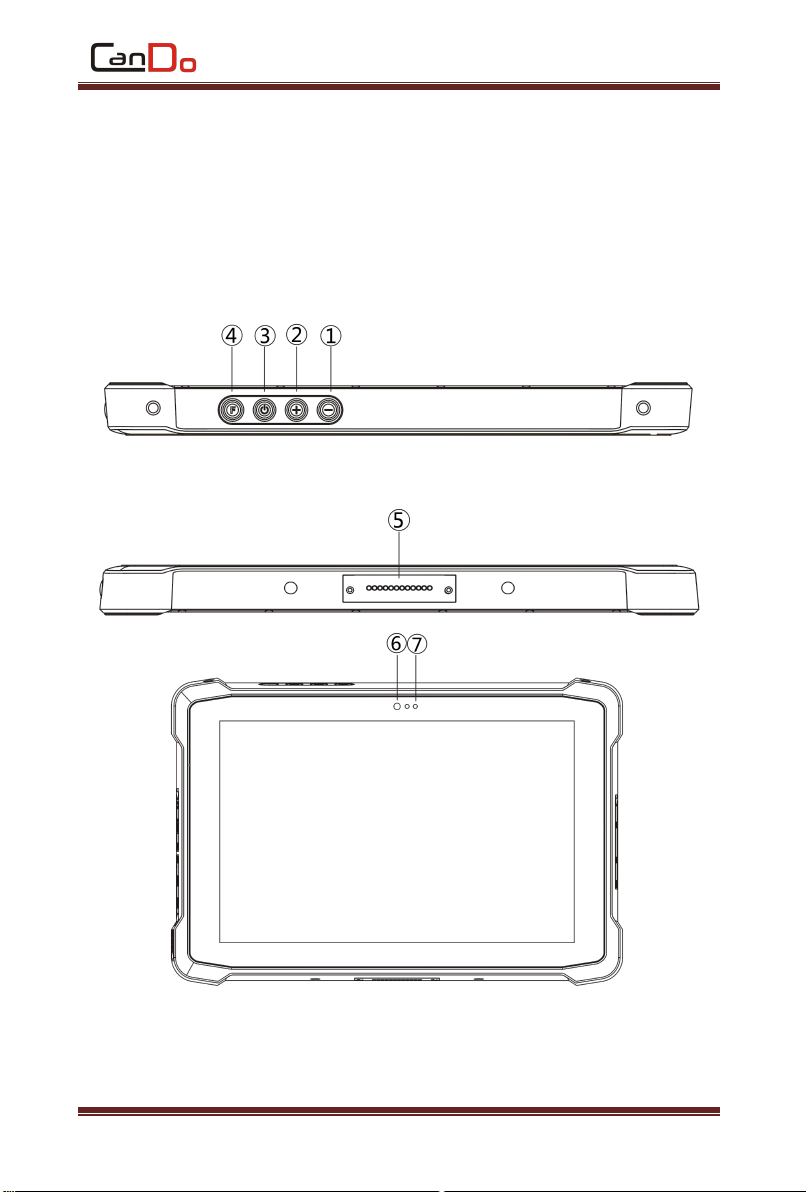
Chapter II Product Structure
2.1 Host Hardware Instruction
2.1.1 Host Diagram
Structure Diagram
CanDo HD Diagnostic Tablet
Structure Diagram
10
Page 11
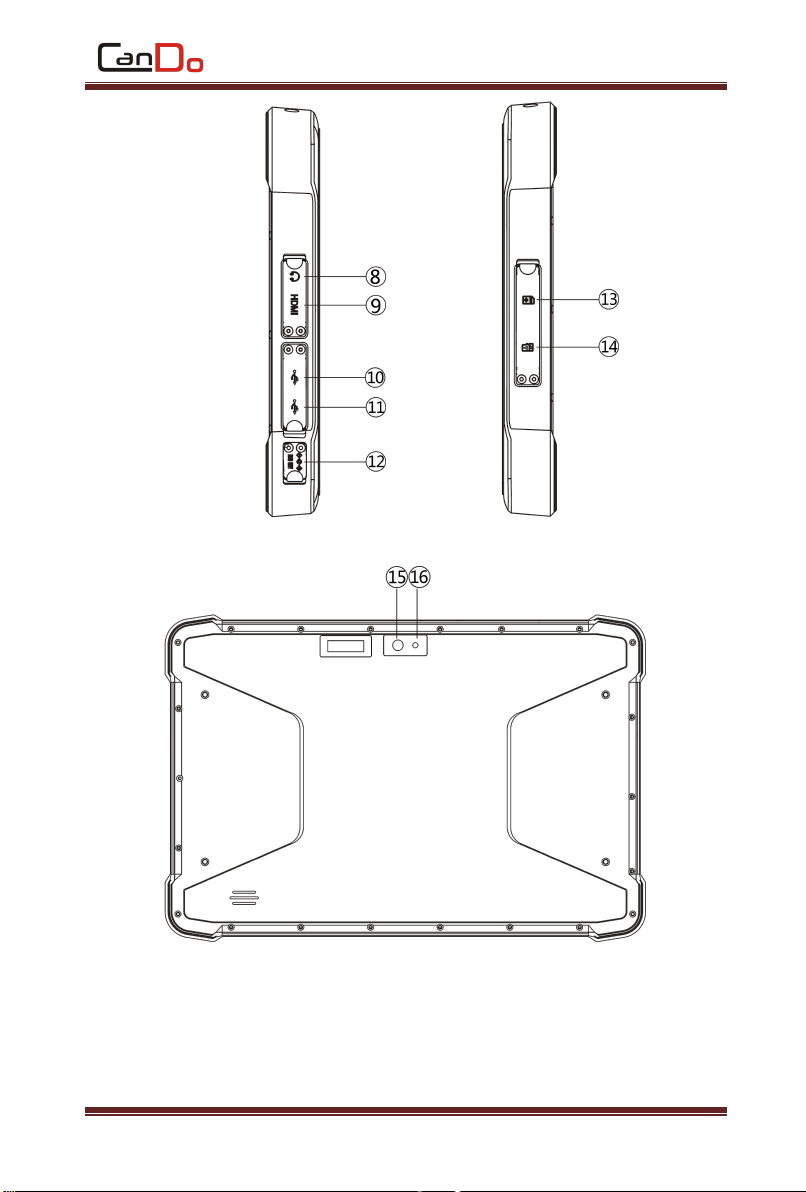
CanDo HD Diagnostic Tablet
Structure Diagram
11
Page 12
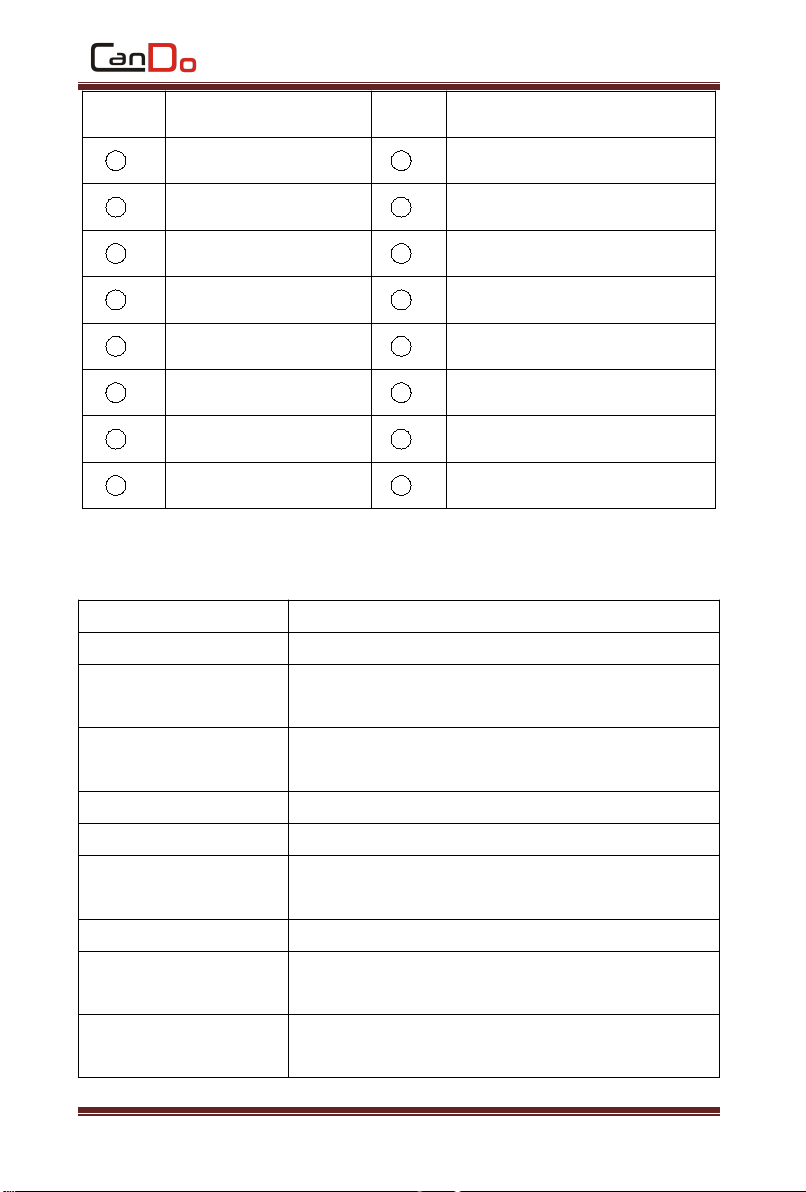
No.
Name
No.
Name
1
Volume -
2
Volume +
3
Power switch
4
Scan(reserved)
5
Docking port
6
Front camera
7
Sensor light
8
Audio interface
9
HDMI interface
10
OTG USB port
11
USB A port
12
Power charging interface
13
SIM card slot
14
TF Card slot
15
Rear camera
16
Flash light
2.1.2 Host Parameters
System version
Android 8.1
CPU
MTK 8735A quadcore,1.45GHZ
Display
10.1 inch 16:10 Resolution: 800*1280 IPS
screen
TouchScreen
5 points capacity TP,G+G,hardness over than
5H
RAM
2GB RAM & 32GB ROM
Capacity
3.7V/8000mAh
Connection
WIFI 802.11(a/b/g/n) frequency 2.4G+5.8G
dual-frequency WIFI
TF Card
support TF x1 pc, max:128G
Camera
Front 2.0MP; Rear 5.0MP, auto focus and flash
light
Interface
HDMI, USB2.0, TF card slot, SIM card slot,
earphone jack, DC jack
CanDo HD Diagnostic Tablet
12
Page 13
CanDo HD Diagnostic Tablet
power
DC 5V/2A
Weight
1000g
Working temperature
-10°C to 50°C
Storage temperature
-20°C to 60°C
Humidity
Humidity: 95% Non-Condensing
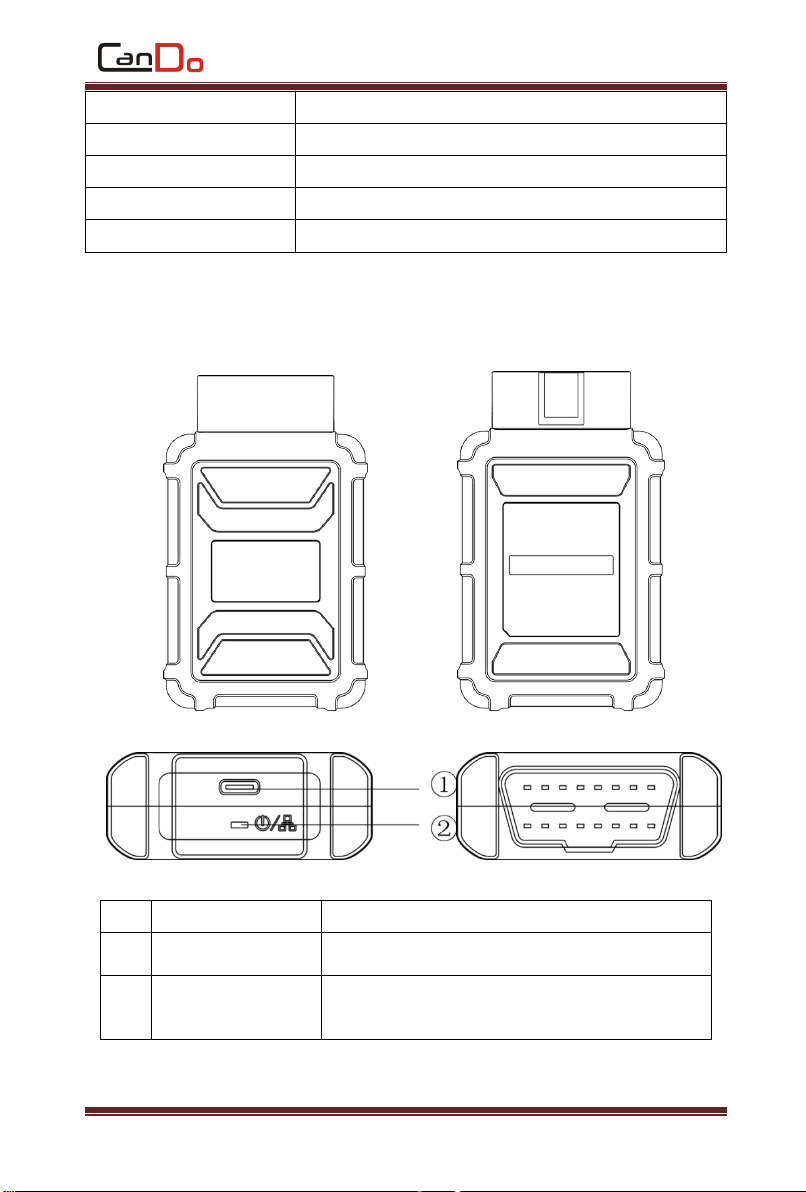
No.
Name
Description
①
USB interface
Connect to tablet PC or upgrade VCI box
②
Diagnostic light
Lights up when connected to vehicle
Lights up when connected to tablet PC
Chapter III VCI BOX Structure
13
Page 14
CanDo HD Diagnostic Tablet
Item
Description
Communications
Processor
Cortex-M3 Microcontroller
Frequency
72MHz
Processor Model
STM32F103CBT6
Flash Memory
128KB
RAM
20KB
Wireless Frequency
2.4 GHz
Input Voltage Range
8 V-36VDC
Supply Current
500 mA @ 12 VDC
OperatingTemperature
0°C to 40°C (ambient)
Storage Temperature
-20°C to 70°C (ambient)
Bluetooth
VCI Box Parameters
BLE USB 2.0
Supports Bluetooth4.0
CANDO series product operatios are similar. Here we take general
version as an example and the display content of the host in practical work
shall prevail.
4.1 Connection of Power Supply & Main Testing Cable
4.1.1 Host Power Supply
There are 2 ways to connect supply power and the CANDO main unit.
1 Connect the power adapter (power adapter)
2 Dock the CanDo main unit on docking station
Chapter IV Operation Manual
14
Page 15
CanDo HD Diagnostic Tablet
4.1.2 Wiring Method
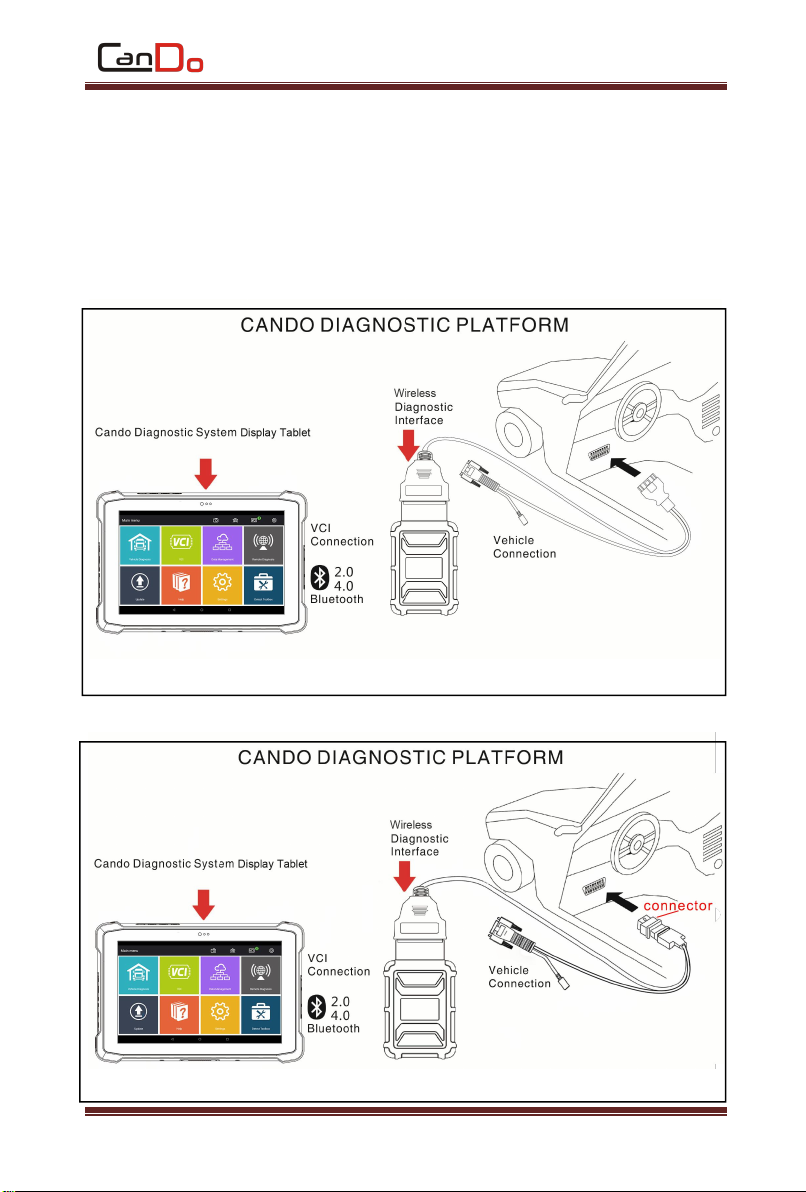
Selection of power supply:
If the diagnostic socket does not have power supply, please choose one
power supply connection method to provide power supply to the host.
If the diagnostic socket has power supply, connection to other power
supply cable is not necessary.
Connection of standard-OBD-II socket
Connection of non-OBD-II interface
15
Page 16

CanDo HD Diagnostic Tablet
Vehicle necessary conditions:
1. Please confirm the diagnostic socket position and its shape, then check
whether it needs external power supply or not.
2. Please select corresponding connectors according to the vehicle
models and the shape of diagnostic sockets.
3. One end of the main testing cable is connected to the VCI and the other
end is connected to the diagnostic connector.
4. Please insert the diagnostic connector that has been connected to the
main testing cable into the vehicle diagnostic socket.
5. Turn on the machine,Please confirm the host is connected to the VCI.
Remark: The automobile diagnostic interface is standard OBD-II interface
and two ends of the main testing cable are separately connected to the
OBD-II connector and the auto diagnostic tool. The process is completed
after inserting the OBD-II connector into the automobile diagnostic socket,
please identify it according to the actual vehicle configuration because not
all vehicles are standard OBD-II connectors.
4.1.3 Startup and Shutdown
Startup: Connect the host and power supply by any method mentioned
above, and then gently click the power supply button. The host will be
started.
Shutdown: After using the device, operate the touch screen and return to
the desktop, gently click the power button to turn off.
Remark: Generally it takes 5-7s to operate when users turn on or off the
machine. Pressing the power button for too long or with brute force would
lead to button failure.
16
Page 17
CanDo HD Diagnostic Tablet
4.2 Start Interface Menu
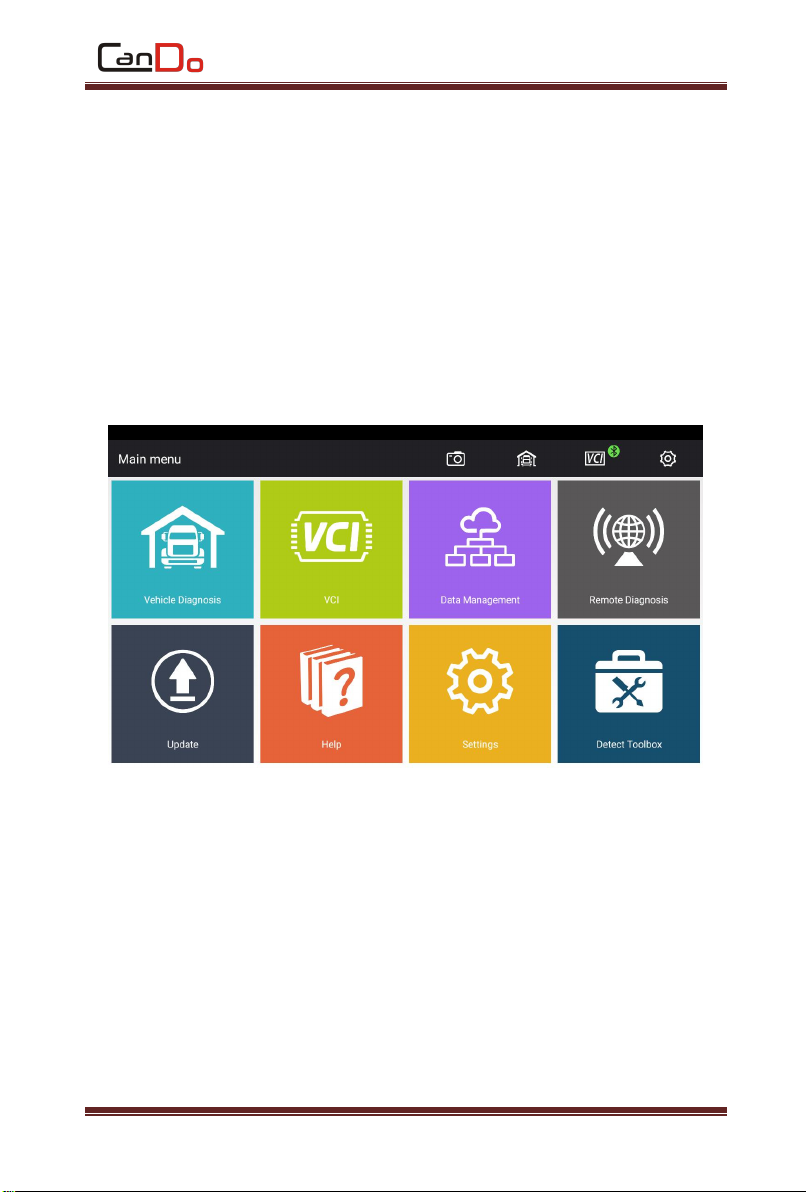
Power on the host (press for 5 seconds) through the power switch
mentioned above; then click the APP of HD Pro Tab to enter the main
interface:
4.2.1 Main Interface
There are differences between models, software systems and menu in
CANDO series models. The actual configuration displayed in the product
shall prevail and this manual only takes some models as examples. The
actual interface shall prevail.
4.2.2 Vehicle Diagnosis
After connecting to the vehicle diagnostic port and selecting the model
series, appropriate models of testing can be selected. After entering the
model, read fault code, erase fault code, read data stream, actuation test
and other advanced functions can be performed.
17
Page 18
CanDo HD Diagnostic Tablet
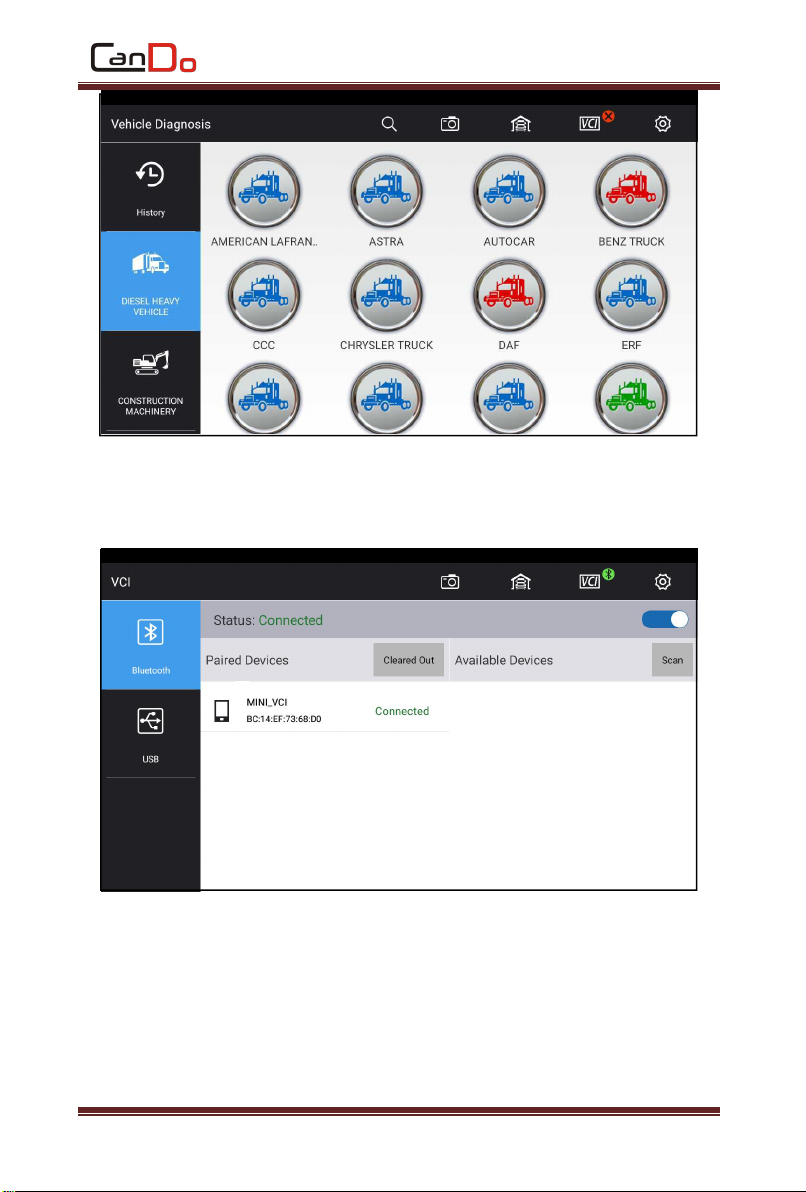
4.2.3 VCI Connection
1.[ Diagnostic connection method]-Bluetooth;
2. [Diagnostic connection method]-USB;
18
Page 19
CanDo HD Diagnostic Tablet
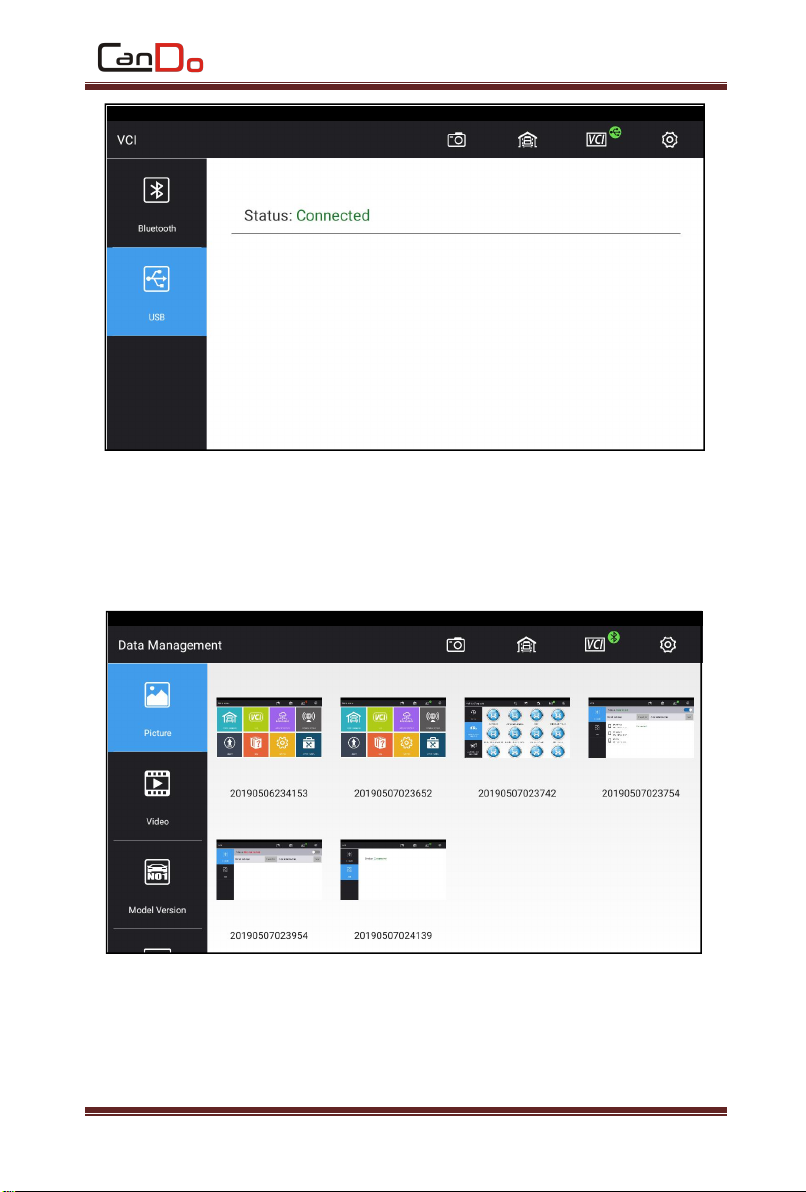
4.2.4 Data Management
Data management: storage location for picture,video,model version,
ect., for user’s reference.
4.2.5 Remote Diagnosis
This function allows our technical staff to connect to your host
through the network remotely to help you diagnose the vehicle.
19
Page 20
CanDo HD Diagnostic Tablet
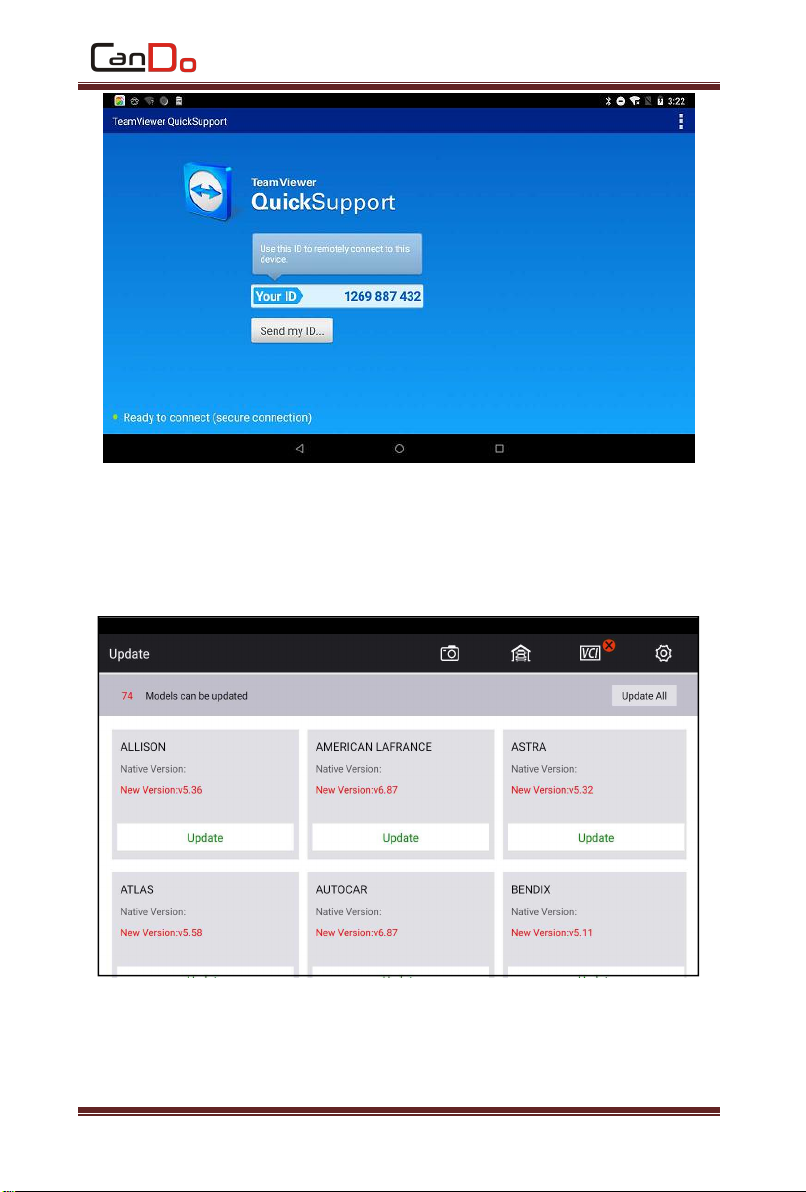
4.2.6 Update
When connected to the Internet via Wi-Fi to upgrade the diagnostic
software to improve the functions of the system.
4.2.7 Help
Here we have built-in machine instructions for the user to access.
20
Page 21
CanDo HD Diagnostic Tablet
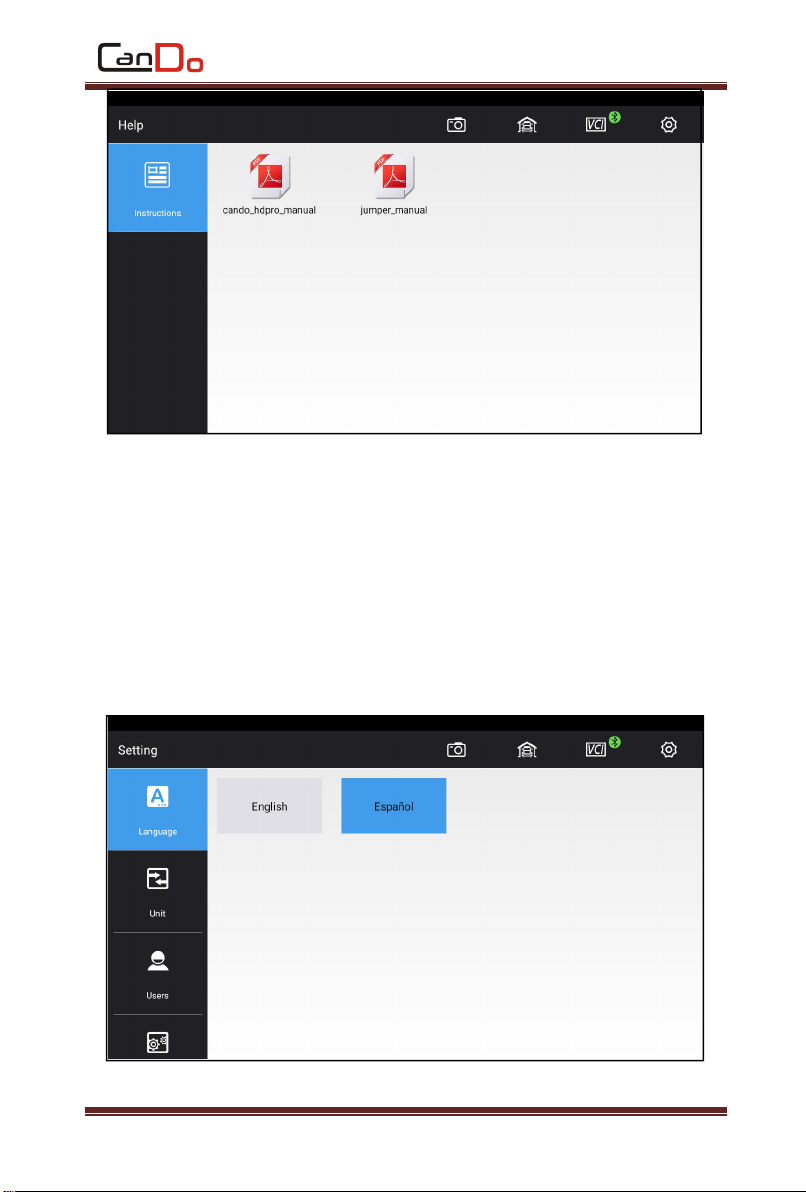
4.2.8 setup
Set the system Language, Unit, Users, Activation, About table and other
functions.
1.Language Settings
Our products support multiple languages. You can use the application
to reflect the languages you have purchased.
21
Page 22
CanDo HD Diagnostic Tablet
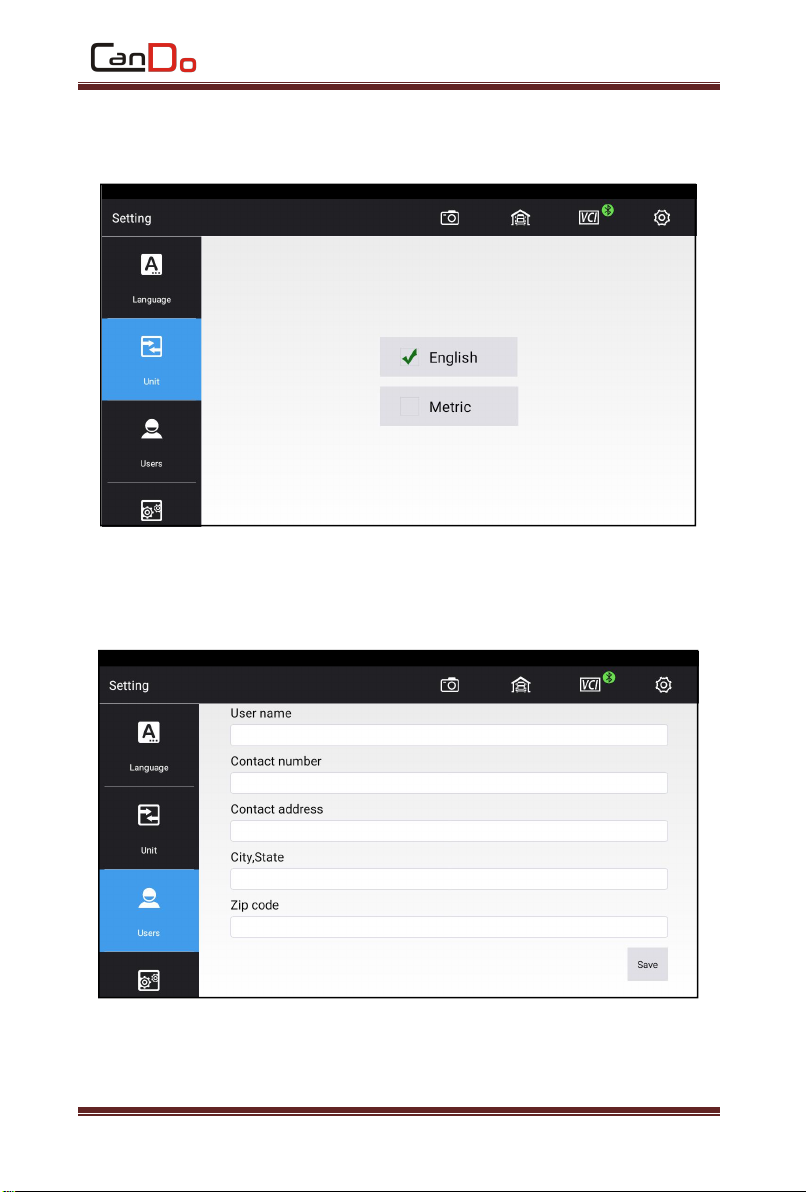
2. Unit
Set the live data unit in the diagnostic software. You can select Metric
or English as needed.
3. Users
Set your personal information: name, phone, email, address, and so on.
22
Page 23
CanDo HD Diagnostic Tablet
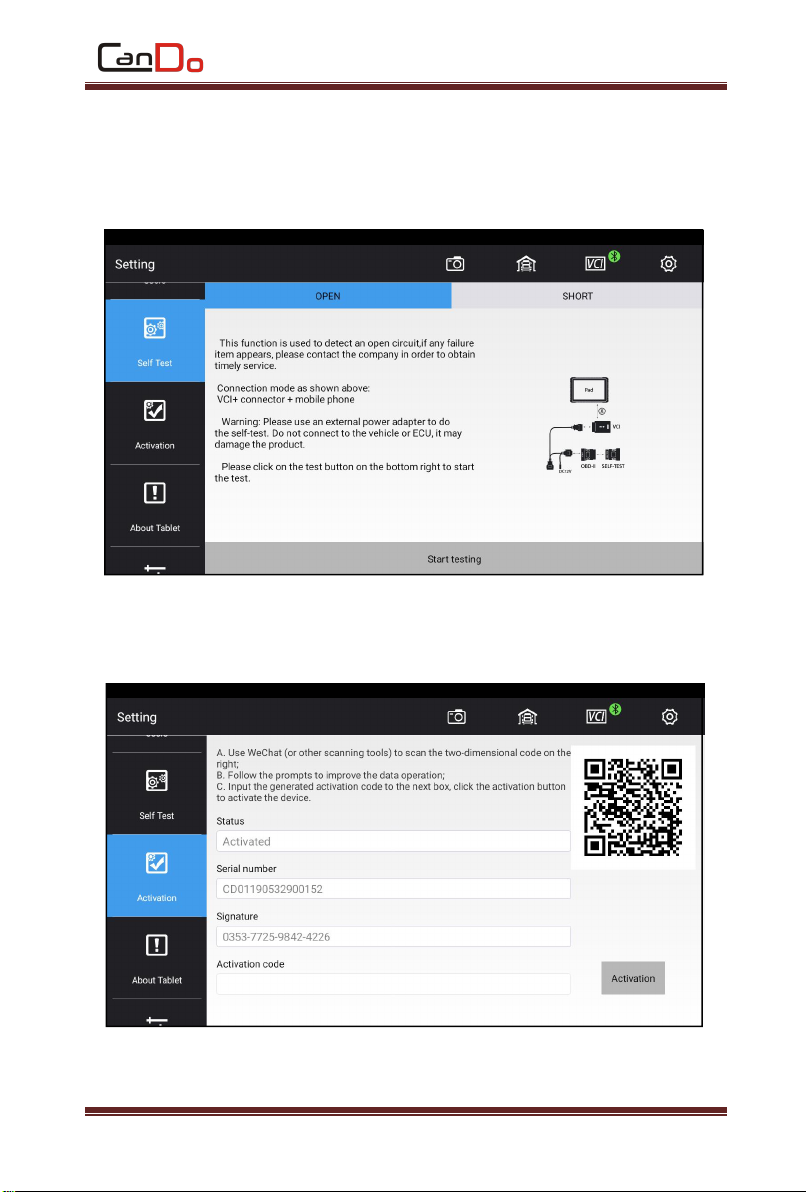
4 SELF TEST
Connect the device according to the screen icon, and click [Start
Testing] to check the open circuit and short circuit of the main test cable
and OBD-II connector to judge whether it is good or bad.
5.Activation
After your purchase, you can permanently activate the product.
23
Page 24
CanDo HD Diagnostic Tablet
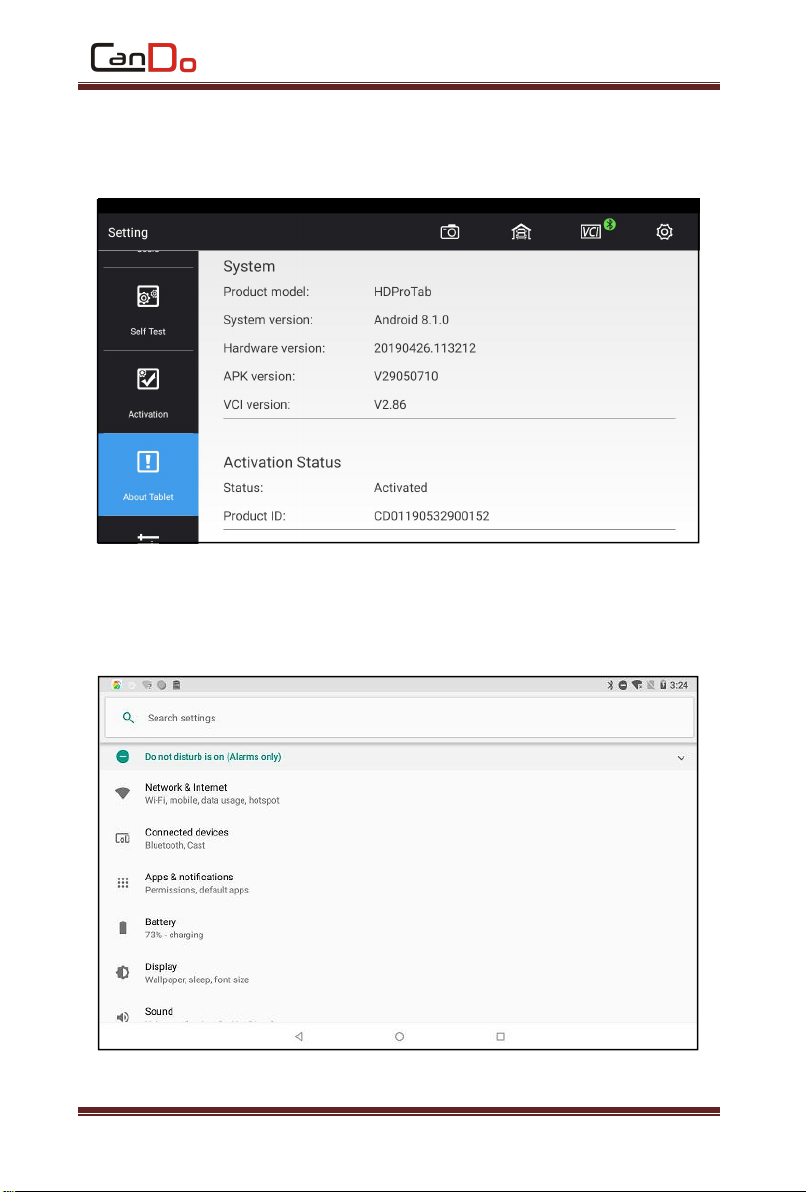
6. About Table
This screen shows system information, activation status, storage
status, etc.
6. System Settings
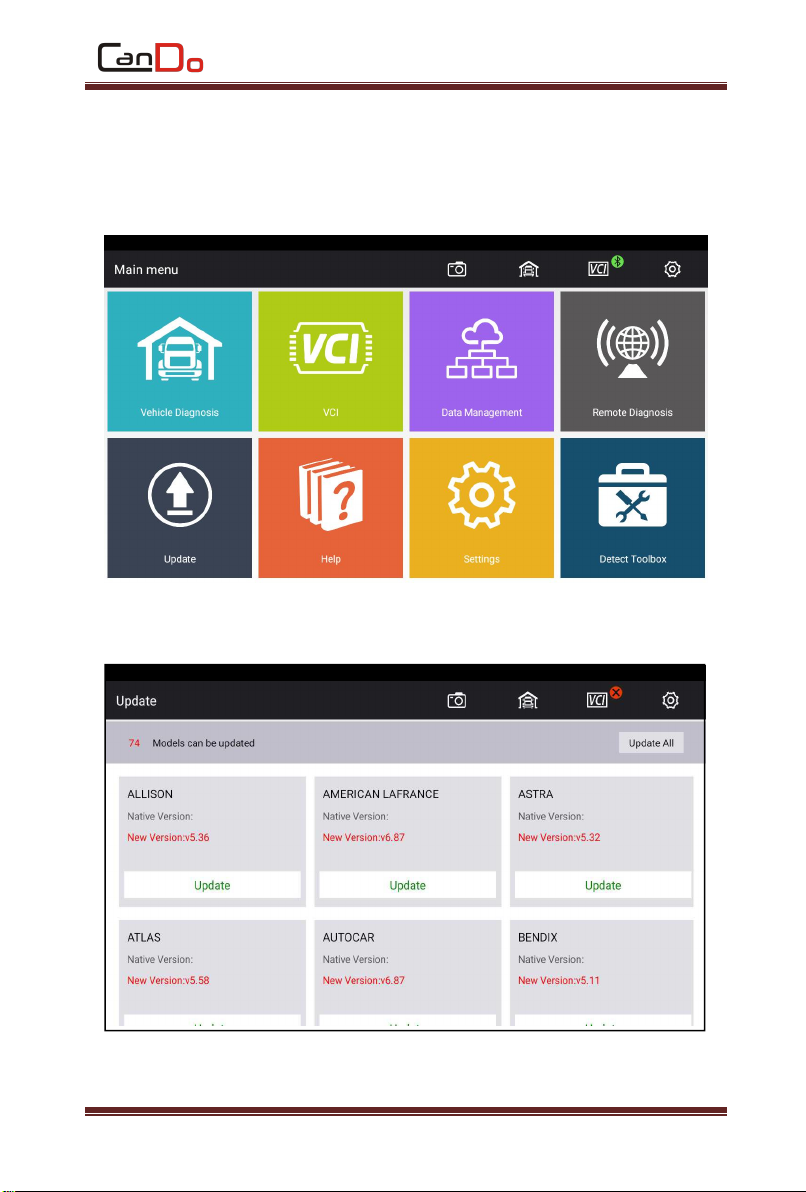
Set Android system.
24
Page 25
CanDo HD Diagnostic Tablet
Chapter V Upgrade
Customers who have purchased the CANDO product will need to
regularly upgrade it.
1.Click [Update].
2. Check whether a new model version is available.
25
Page 26
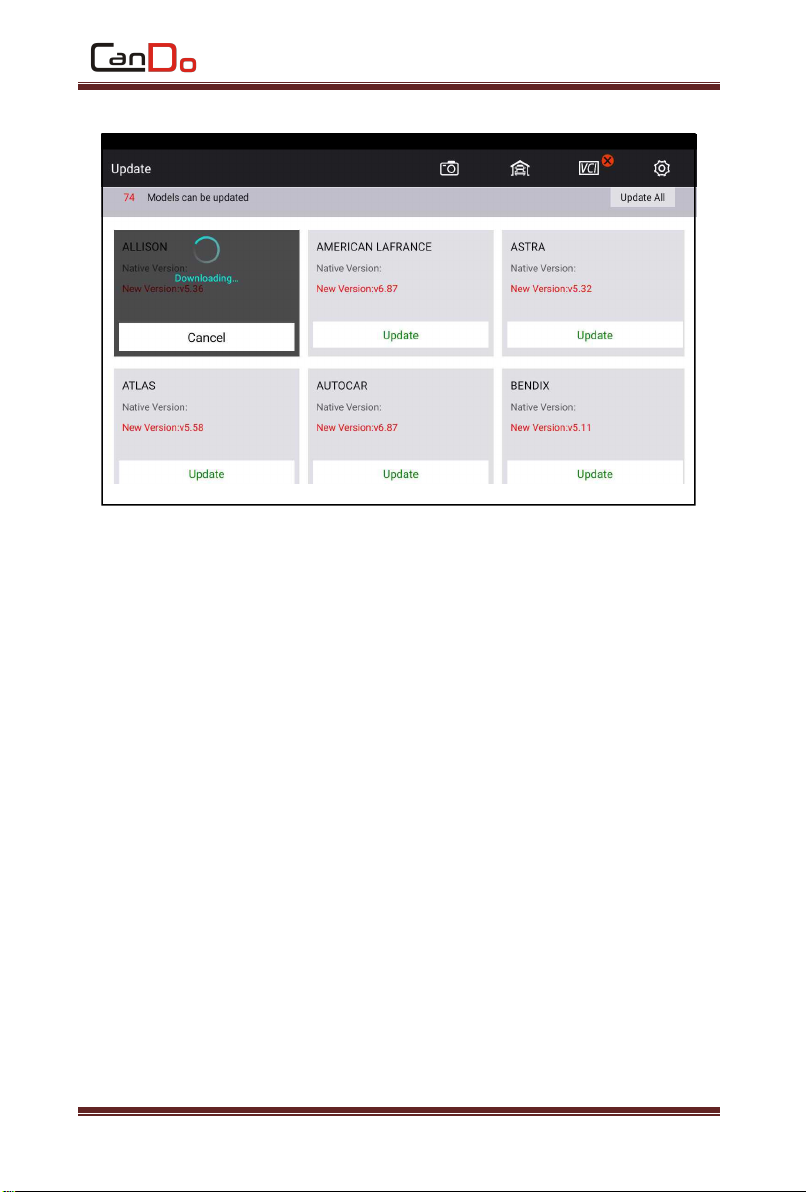
3. Click Update for the corresponding items.
Chapter VI Compliance Information
CanDo HD Diagnostic Tablet
FCC COMPLIANCE FCC ID: 2AKNY-IDSPROTAB2
FCC Statement
This equipment has been tested and found to comply with the limits
for a Class B digital device, pursuant to Part 15 of the FCC Rules. These
limits are designed to provide reasonable protection against harmful
interference in a residential installation. This equipment generates uses
and can radiate radio frequency energy and, if not installed and used in
accordance with the instructions, may cause harmful interference to radio
communications. However, there is no guarantee that interference will not
occur in a particular installation. If this equipment does cause harmful
interference to radio or television reception, which can be determined by
26
Page 27

CanDo HD Diagnostic Tablet
turning the equipment off and on, the user is encouraged to try to correct
the interference by one or more of the following measures:
-- Reorient or relocate the receiving antenna.
-- Increase the separation between the equipment and receiver.
-- Connect the equipment into an outlet on a circuit different from that
to which the receiver is connected.
-- Consult the dealer or an experienced radio/TV technician for help.
This device complies with part 15 of the FCC Rules. Operation is
subject to the following two conditions:
(1) This device may not cause harmful interference, and (2) this device
must accept any interference received, including interference that may
cause undesired operation.
Changes or modifications not expressly approved by the party
responsible for compliance could void the user's authority to operate the
equipment.
SAR tests are conducted using
standard operating positions accepted by the FCC with the MID
transmitting at its highest certified power level in all tested frequency
bands, although the SAR is determined at the highest certified power level,
the actual SAR level of the phone. While operating can be well below the
maximum value, in general, the closer you are to a Wireless base station
antenna, the lower the power output. Before a new model phone is a
available for sale to the public, it must be tested and certified to the FCC
that it does not exceed the exposure limit established by the FCC, Tests for
each phone are performed in positions and locations (e.g. at the ear and
worn on the body)as required by the FCC.
For body worn operation, this model MID has been tested and meets
the FCC RF exposure. Guidelines when used with an accessory designated
27
Page 28
CanDo HD Diagnostic Tablet
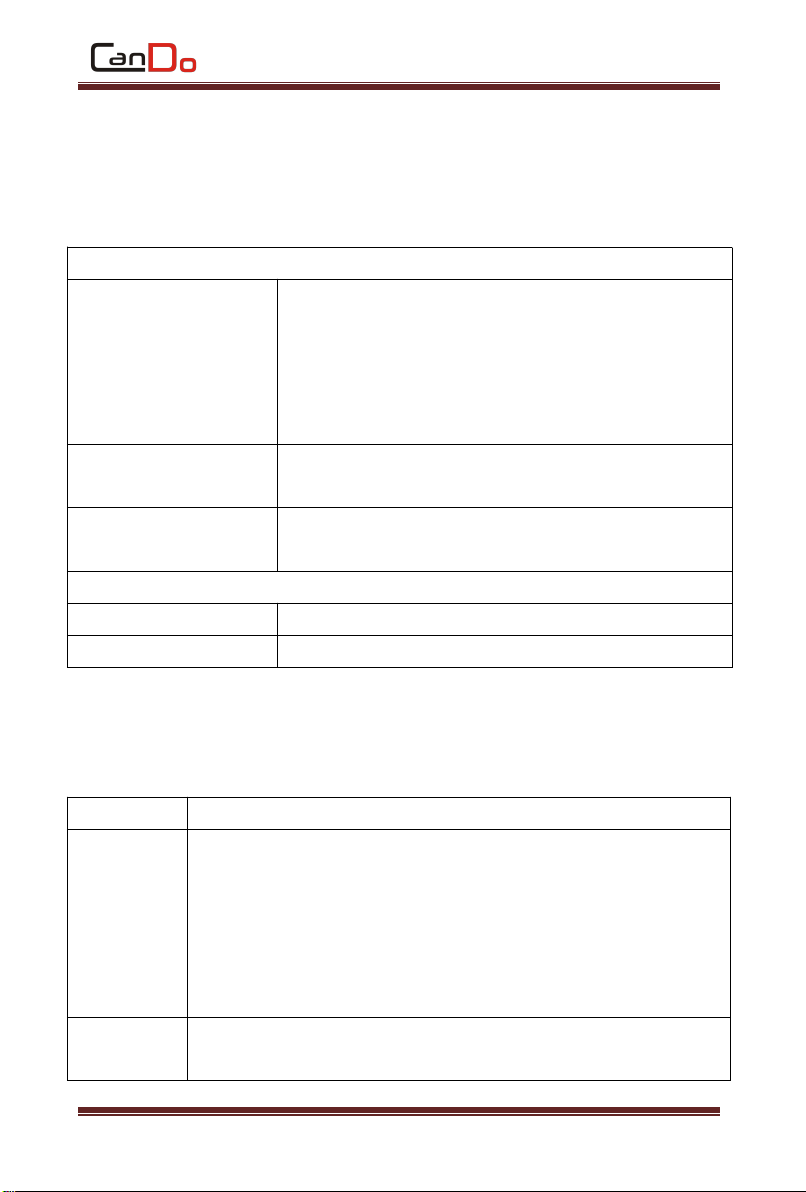
WIFI
Operation Frequency:
2412MHz~2472MHz
802.11b/802.11g/802.11n(H20)
2422MHz~2462MHz 802.11n(H40)
5180MHz ~ 5240MHz for 802.11a/802.11n(HT20);
5190MHz ~ 5230MHz for 802.11n(HT40)
Maximum
Power(2.4GHz):
Maximum
Power(5.2GHz):
5.8G SRD
Operation Frequency:
5745MHz ~ 5825MHz
Maximum Power:
Name
Information
USB Cable
Type:USB AM-MICRO2228
Parameter:USB Cable,Black,length 1000mm,connect USB
male connector,other ends connect Micro USB
Manufacturer:ShenZhen SONGYUANTAI Electronic Co., Ltd
Address:4th Floor, Building 12, Zhongwu Industrial Area,
Xixiang Street, Baoan District, Shenzhen
OTG
Tieline
Type:USB AF-MICRO
Parameter:OTG Tieline, length
for this product or when used with an accessory that Contains no metal
and that positions the handset a minimum of 0 cm from the body.
Non-compliance with the above restrictions may result in violation of
RF exposure guidelines.
17.08dBm
14.96dBm
14.41dBm
CanDo HD Pro Tab Main Accessories Information
28
:
Page 29
CanDo HD Diagnostic Tablet
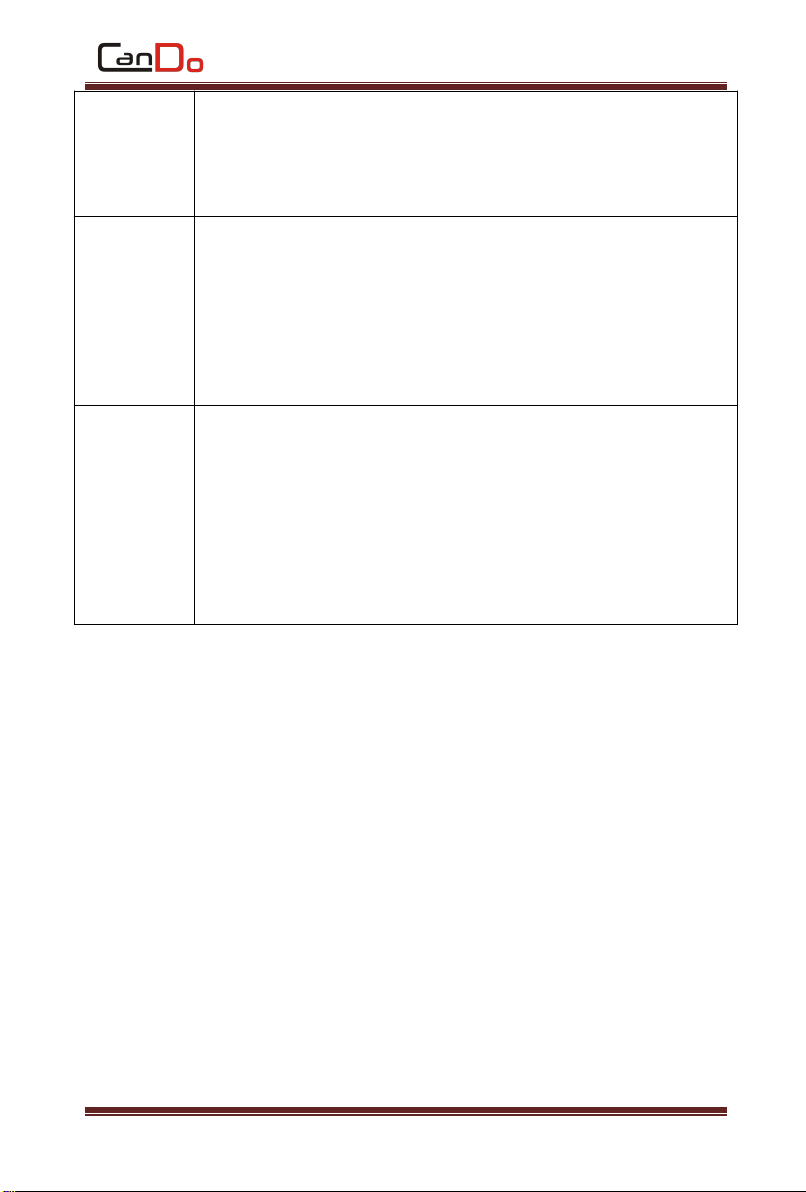
135mm OTG AF-MICRO 5P Black
Manufacturer:ShenZhen SONGYUANTAI Electronic Co., Ltd
Address:4th Floor, Building 12, Zhongwu Industrial Area,
Xixiang Street, Baoan District, Shenzhen
Battery
Type:7566122
Parameter:3.7V/8000mAh
Manufacturer:Guang Dong Sun New Energy Technology Co.,
Ltd
Address:No.2, Xiangnan Second Street, Huangjiang Town,
Dongguan City, Guangdong Province, P.R. China
Antenna
Type:SLEingB215850070
Parameter:Diameter 0.81mm, length 70mm,4th generation
terminal
Manufacturer:Dongguan City SLEing Intelligence Technology
Co., Ltd
Address:No. 6 Bldg. 402, Modern Enterprise Accelerator,
Songshan Lake Industrial East Road, Dongguan City
Software version:Android 8.1
Hardware version:EM_T86_MB_PCB_V13R3
Adapter
Model:AW018WR-xxxxyyywz
Input: AC100-240V; 50/60Hz; 0.5A
Output:12V 1.5A
Manufacturer/ Factory: Shen Zhen A-WIN Technology Co., Ltd
Address :Area A No. 3 Bldg. 4th Floor, Heng Chang Rong Industrial Park,
Shiyan, Shilong Community, Bao'an District, Shenzhen, Guangdong 518108,
P.R. China
29
Page 30

CanDo HD Diagnostic Tablet
CAUTION:
Adapter shall be installed near the equipment and shall be easily
accessible.
The users has to turn off the 5GHz WiFi in outdoor environment.
Risk of explosion if battery is replaced by an incorrect type. Dispose of
used batteries according to the instructions.
This product can be used across EU member states.
We declares that this device is in compliance with the essential
repuirements and other relevant provisions of Directive 2014/53/EU.
Annex: Diagnostic Interface Definition and Description of Standard
OBD-II
1. OBD-II General Introduction
OBD-II is the abbreviated name of ON-BOARD DIAGNOSTICS-II.The
first generation of diagnostic system is before 1993, and the diagnostic
socket, fault codes, diagnostic function of each manufacturer was all
different, which caused difficulties for repair personnel. American Society
of Automotive Engineers (SAE) developed a set of standards and this set of
standards certified by the "Environmental Protection Agency" (EPA) and
"California Resources Association" (CARB). This standard requires each
manufacturer to provide uniform diagnostic mode and sockets in
accordance with standard OBD-II. Since then diagnostic test can be
performed on variable vehicles by one instrument.
OBD-II is a standard stipulated by California,cars from Europe,
America, and Japan should all comply with the standard. At present,
mainland China and Taiwan also adopted this standard. As a result of
complying it, using instruments is simplified for technician. We should
understand the characteristics of OBD-II in-depth. According to the
30
Page 31
CanDo HD Diagnostic Tablet
development of automobile communication, the world's most models are
based on the OBD standards currently
2. OBD-II Features
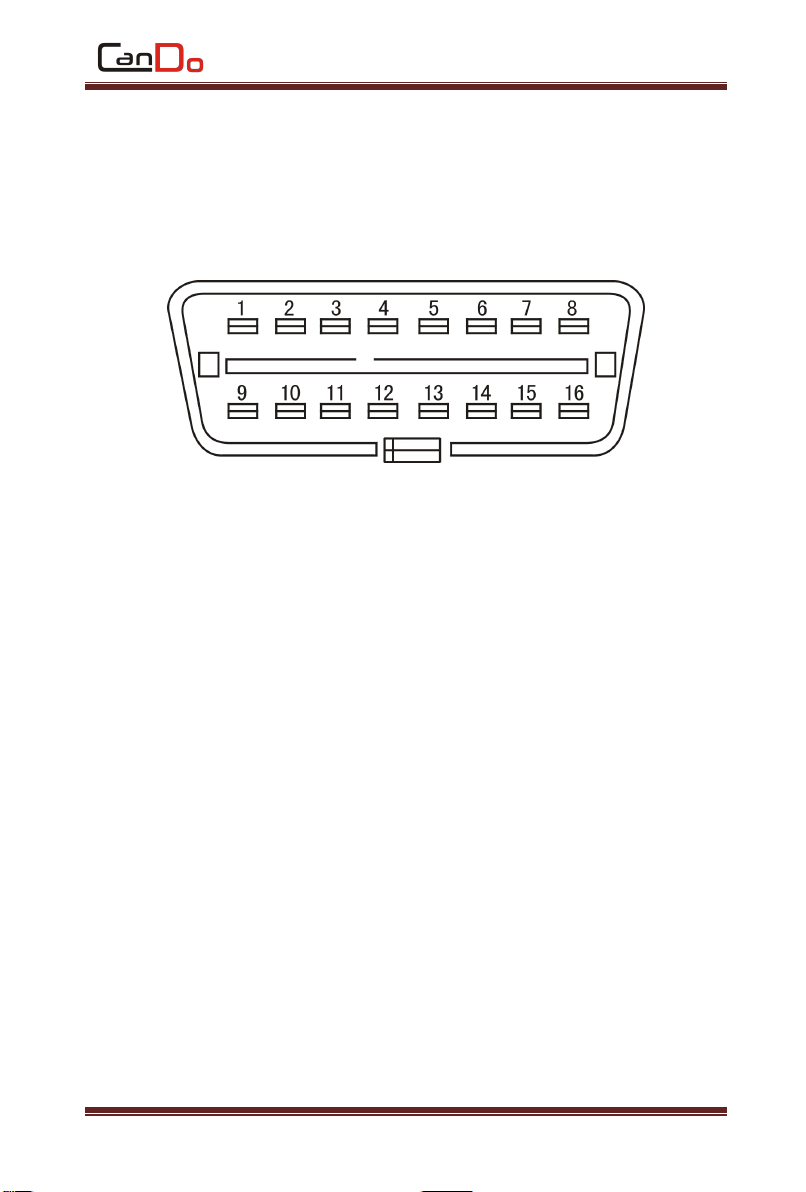
(1) Unified diagnostic socket shape is 16 PIN (needle), as shown
below.
(2) With a numerical analysis and data transmission function(DATA
LINK CONNECTOR-DLC).
(3) Unified fault codes and significance.
(4) With a driving recorder function.
(5) With a redisplay fault code memory function.
(6) Clear fault codes directly by the instrument function.
3. DLC (Data Transmission Connector) Diagnostic Socket Unified
Standard
(1) DLC diagnostic socket unified as standard 16PIN, mounted in the
cab, under the driver side instrument panel.
(2) There are two standard DLC pins: ISO - European standard
(INTERNATIONAL STANDARDS ORGANIZATION 9141-2), use 7#, 15# pin
to transfer data.
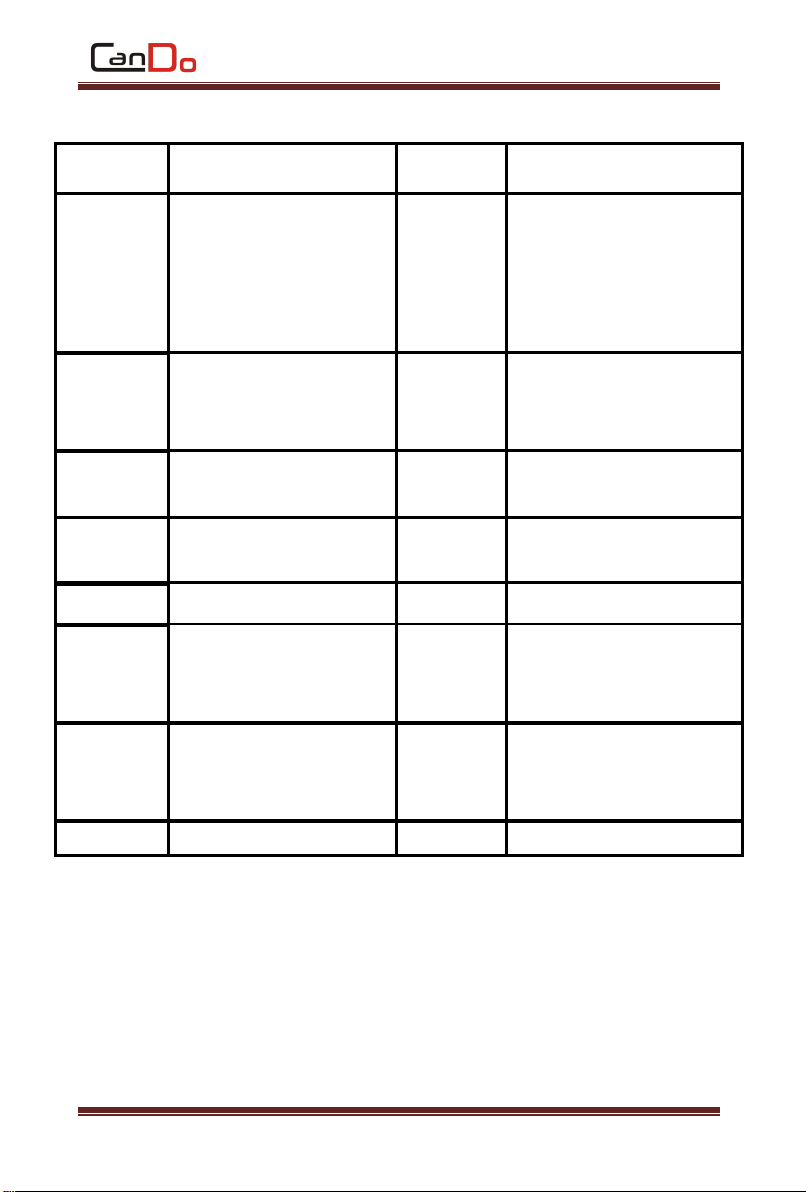
Each terminal function of OBD-II diagnostic blocks shown in Table 1.
31
Page 32
CanDo HD Diagnostic Tablet
Terminal
Function Description
Terminal
Function Description
1
SAE J2411, GM single
wire CAN,
GM single line CAN-BUS
9
when 7th pin is not
convenient to use,
enable *KWP1281 or
KWP2000 Protocol
diagnostic line (K line)
2
ISO11519-4 (Bus+)(SAE
J1850),and 10thpin
used simultaneously
10
ISO 11519-4 (Bus-)(SAE
J1850)
3
CCD-BUS network cable
H line
11
CCD-BUS network cable
L line
4
Car body directly
grounding
12
Factory retained
5
Signal circuit grounding
13
Factory retained
6
ISO 15765-4, CAN-BUS
high speed diagnostic
line (CAN-H line)
14
ISO15765-4, CAN-BUS
high speed diagnostic
line (CAN-L line)
7
KWP1281 or KWP2000
protocol diagnostic line
(K line)
15
KWP1281 or KWP2000
protocol diagnostic line
(L line)
8
Factory retained
16
Connect battery “+” pole
Table: OBD-II Terminal Function
For more product introduction and help, please visit CANDO official
website www.candointl.com.
32
Page 33

CanDo HD Diagnostic Tablet
Chapter VII Warranty
Dear CANDO users, welcome to choose CANDO products. In order to
make better use of the product, we recommend you to maintain your
product and use it according to the user manual each time. If requirements
are met, the product will serve you longer.
1. Under the premise that the following terms and conditions are met
and you have improved your real information via machine activation or
user registration, warranty services will be provided by CanDo
International, Inc. (hereinafter referred to as the " CANDO only") for a
defective product material or workmanship.
2. Confirm that you carefully read the product warranty terms, for
CanDo International, Inc. will regard you as accepted the terms of the
warranty by completing the information on CANDO official website.
3. Products must be purchased from reseller authorized by CanDo
International, Inc., if it is from irregular channels, buyers have to bear the
cost of product repair services.
4. The following are not covered by the warranty: Product manual,
inside and outside packaging, promotional gift items, printing supplies and
other consumable items.
5. Since the data of purchase (valid Proof-of-Purchase and warranty
card), you can choose to repair the product or replace it with same models
if non artificial damage of performance failure occurred in one month.
6. Any of the following cases, your product will not be able to enjoy
free warranty service.
1) Failure, defect or flaw that not belong to the quality of CanDo
International, Inc. products: including improper operations, crash, fall, self
disassembly, connection of improper accessories, damages owing to
improper transport or storage of the product, erosion and corrosion that
caused by infiltration of liquid or food.
2) The natural wear and tear of product: including but not limited to
cover, keypad, LCD touch screens and accessories.
33
Page 34

CanDo HD Diagnostic Tablet
3) Inconsistent of Product host serial number and warranty card
product serial number, product quality inspection tag or barcode removed,
altered or damaged.
4) Maintenance and modification without the approval of CanDo
International, Inc..
7. The product quality problem or failure occurred within the
warranty period, you can take the following measures.
1) You can perform self-test for the product according to products help
information. If there are no hardware quality problems, try to upgrade the
product program.
2) You can dial CanDo International, Inc. to obtain the correct service
information. This includes obtaining an RMA# (Return Materials
Authorization) prior to sending the unit in for repairs. Product received
without an RMA# will be rejected.
3) After obtaining the company's effective reply, the product must
mailed to our designated address (see full address on the official website of
CanDo International, Inc.) for repair and maintenance, otherwise your
product can not receive timely repair and maintenance. And you have to
take the lose of your product. Please make sure to mark the outside of the
box with the RMA# provided.
8. During the process of warranty service, you will bear the costs
associated with delivery or maile to CanDo International, Inc., including
product packaging, transportation, insurance and other expenses.
9. Enjoying your free warranty service under this warrant clause is the
only measure for the losses due to product defect within the product
warranty period. CanDo International, Inc. shall assume no responsibility
for your direct or indirect loss.
10. All warranty information, product features and specification
changes will be posted on CanDo International, Inc. latest promotional
materials and web site without further notice.
34
Page 35

CanDo HD Diagnostic Tablet
35
Page 36
CanDo HD Diagnostic Tablet
36
Page 37

FCC compliance statement
This device complies with part 15 of the FCC Rules. Operation is subject to the following two conditions:
(1) This device may not cause harmful interference, and
(2) this device must accept any interference received, including interference that may cause undesired
operation.
Note: This equipment has been tested and found to comply with the limits for a Class B digital device,
pursuant to part 15 of the FCC Rules. These limits are designed to provide reasonable protection against
harmful interference in a residential installation. This equipment generates uses and can radiate radio
frequency energy and, if not installed and used in accordance with the instructions, may cause harmful
interference to radio communications. However, there is no guarantee that interference will not occur in a
particular installation. If this equipment does cause harmful interference to radio or television reception,
which can be determined by turning the equipment off and on, the user is encouraged to try to correct the
interference by one or more of the following measures:
Reorient or relocate the receiving antenna.
Increase the separation between the equipment and receiver.
Connect the equipment to an outlet on a circuit different from that to which the receiver is connected.
Consult the dealer or an experienced radio/TV technician for help.
Important: Changes or modifications to this product not authorized by CanDo International, Inc. could void
the electromagnetic compatibility (EMC) and wireless compliance and negate your authority to operate the
product.
This product has demonstrated EMC compliance under conditions that included the use of compliant
peripheral devices and shielded cables between system components. It is important that you use compliant
peripheral devices and shielded cables between system components to reduce the possibility of causing
interference to radios, televisions, and other electronic devices.
SAR Statement:
This HD Diagnostic Tablet meets the government's requirements for exposure to radio waves. The
guidelines are based on standards that were developed by independent scientific organizations through
periodic and thorough evaluation of scientific studies. The standards include a substantial safety margin
designed to assure the safety of all persons regardless of age or health.
FCC RF Exposure Information and Statement the SAR limit of USA (FCC) is 1.6 W/kg averaged over one
gram of tissue. Device types: W51 (FCC ID: 2AKNY-IDSPROTAB2) has also been tested against this SAR
limit. This device was tested for typical body-worn operations with the back of the handset kept 0mm from
the body. To maintain compliance with FCC RF exposure requirements, use accessories that maintain a
0mm separation distance between the user's body and the back of the handset. The use of belt clips,
holsters and similar accessories should not contain metallic components in its assembly. The use of
accessories that do not satisfy these requirements may not comply with FCC RF exposure requirements,
and should be avoided.
Body-worn Operation
This device was tested for typical body-worn operations. To comply with RF exposure requirements, a
minimum separation distance of 0mm must be maintained between the user’s body and the handset,
including the antenna. Third-party belt-clips, holsters, and similar accessories used by this device should not
contain any metallic components. Body-worn accessories that do not meet these requirements may not
comply with RF exposure requirements and should be avoided. Use only the supplied or an approved
antenna.
Caution:
Operations in the 5.15-5.25GHz band are restricted to indoor usage only.
 Loading...