

Page 1

User’s Guide: CUA Interface
OMEGAMON II ® for DB2
Version 540
G251246500
August 2004
Candle Corporation
100 North Sepulveda Blvd.
Page 2

Registered trademarks and service marks of Candle Corporation: AF/OPERATOR, AF/REMOTE, Availability Command Center, Candle, Candle
CIRCUIT, Candle Command Center, Candle Direct logo, Candle eDelivery, Candle Electronic Customer Support, Candle logo, Candle Management Server,
Candle Management Workstation, CandleLight, CandleNet, CandleNet Command Center, CandleNet eBusiness Platform, CandleNet Portal,
CL/CONFERENCE, CL/SUPERSESSION, CommandWatch, CT, CT/Data Server, CT/DS, DELTAMON, DEXAN, eBA, eBA*ServiceMonitor,
eBA*ServiceNetwork, eBusiness at the speed of light, eBusiness Assurance, eBusiness Institute, ELX, EPILOG, ESRA, ETEWatch, IntelliWatch, IntelliWatch
Pinnacle, MQSecure, MQView, OMEGACENTER, OMEGAMON, OMEGAMON II, OMEGAMON Monitoring Agent, OMEGAMON Monitoring Agents,
OMEGAVIEW, OMEGAVIEW II, PQEdit, Response Time Network, Roma, SitePulse, Solutions for Networked Applications, Solutions for Networked
Businesses, TMA2000, Transplex, and Volcano.
Trademarks and service marks of Candle Corporation: AF/Advanced Notification, AF/PERFORMER, Alert Adapter, Alert Adapter Plus, Alert Emitter,
AMS, Amsys, AutoBridge, AUTOMATED FACILITIES, Availability Management Systems, Business Services Composer, Candle Alert, Candle Business Partner
Logo, Candle Command Center/SentinelManager, Candle CommandPro, Candle eSupport, Candle Insight, Candle InterFlow, Candle Managing what matters
most, Candle Service Suite, Candle Technologies, CandleNet, CandleNet 2000, CandleNet Conversion, CandleNet eBP, CandleNet eBP Access for S.W.I.F.T.,
CandleNet eBP Administrator, CandleNet eBP Broker Access for Mercator or MQSI, CandleNet eBP Configuration, CandleNet eBP Connector, CandleNet eBP
File Transfer, CandleNet eBP Host Connect, CandleNet eBP Object Access, CandleNet eBP Object Browser, CandleNet eBP Secure Access, CandleNet eBP
Service Directory, CandleNet eBP Universal Connector, CandleNet eBP Workflow Access, CandleNet eBusiness Assurance, CandleNet eBusiness Exchange,
CandleNet eBusiness Platform Administrator, CandleNet eBusiness Platform Connector, CandleNet eBusiness Platform Connectors, CandleNet eBusiness
Platform Powered by Roma Technology, CandleNet eBusiness Platform Service Directory, Candle Vision, CCC, CCP, CCR2, CEBA, CECS, CICAT,
CL/ENGINE, CL/GATEWAY, CL/TECHNOLOGY, CMS, CMW, Command & Control, Connect-Notes, Connect-Two, CSA ANALYZER, CT/ALS,
CT/Application Logic Services, CT/DCS, CT/Distributed Computing Services, CT/Engine, CT/Implementation Services, CT/IX, CT/Workbench, CT/Workstation
Server, CT/WS, !DB Logo, !DB/DASD, !DB/EXPLAIN, !DB/MIGRATOR, !DB/QUICKCHANGE, !DB/QUICKCOMPARE, !DB/SMU, !DB/Tools,
!DB/WORKBENCH, Design Network, e2e, eBA*SE, eBAA, eBAAuditor, eBAN, eBANetwork, eBAAPractice, eBP, eBusiness Assurance Network, eBusiness at
the speed of light, eBusiness at the speed of light logo, eBusiness Exchange, eBX, End-to-End, eNotification, ENTERPRISE, Enterprise Candle Command
Center, Enterprise Candle Management Workstation, Enterprise Reporter Plus, ER+, ERPNet, ETEWatch Customizer, HostBridge, InterFlow, Candle InterFlow,
Lava Console, Managing what matters most, MessageMate, Messaging Mastered, Millennium Management Blueprint, MMNA, MQADMIN, MQEdit,
MQEXPERT, MQMON, NBX, NC4, NetGlue, NetGlue Extra, NetMirror, NetScheduler, New Times, New Team, New Readiness, OMA, OMC Gateway, OMC
Status Manager, OMEGACENTER Bridge, OMEGACENTER Gateway, OMEGACENTER Status Manager, OMEGAMON/e, OMEGAMON Management
Center, OSM, PathWAI, PC COMPANION, Performance Pac, Powered by Roma Technology, PowerQ, PQConfiguration, PQScope, Roma Application
Manager, Roma Broker, Roma BSP, Roma Connector, Roma Developer, Roma FS/A, Roma FS/Access, RomaNet, Roma Network, Roma Object Access, Roma
Secure, Roma WF/Access, Roma Workflow Access, RTA, RTN, SentinelManager, Somerset, Somerset Systems, Status Monitor, The Millennium Alliance, The
Millennium Alliance logo, The Millennium Management Network Alliance, Tracer, Unified Directory Services, WayPoint, and ZCopy.
Trademarks and registered trademarks of other companies: AIX, DB2, MQSeries and WebSphere are registered trademarks of International Business
Machines Corporation. Citrix, WinFrame, and ICA are registered trademarks of Citrix Systems, Inc. Multi-Win and MetaFrame are trademarks of Citrix Systems,
Inc. SAP is a registered trademark and R/3 is a trademark of SAP AG. UNIX is a registered trademark in the U.S. and other countries, licensed exclusively
through X/Open Company Ltd. HP-UX is a trademark of Hewlett-Packard Company. SunOS is a trademark of Sun Microsystems, Inc. All other company and
product names used herein may be trademarks or registered trademarks of their respective owners.
Copyright © August 2004, Candle Corporation, a California corporation. All rights reserved. International rights secured.
Threaded Environment for AS/400, Patent No. 5,504,898; Data Server with Data Probes Employing Predicate Tests in Rule Statements (Event Driven
Sampling), Patent No. 5,615,359; MVS/ESA Message Transport System Using the XCF Coupling Facility, Patent No. 5,754,856; Intelligent Remote Agent for
Computer Performance Monitoring, Patent No. 5,781,703; Data Server with Event Driven Sampling, Patent No. 5,809,238; Threaded Environment for
Computer Systems Without Native Threading Support, Patent No. 5,835,763; Object Procedure Messaging Facility, Patent No. 5,848,234; End-to-End
Response Time Measurement for Computer Programs, Patent No. 5,991,705; Communications on a Network, Patent Pending; Improved Message Queuing
Based Network Computing Architecture, Patent Pending; User Interface for System Management Applications, Patent Pending.
NOTICE: This documentation is provided with RESTRICTED RIGHTS. Use, duplication, or disclosure by the Government is subject to restrictions set forth in
the applicable license agreement and/or the applicable government rights clause.
This documentation contains confidential, proprietary information of Candle Corporation that is licensed for your internal use only. Any unauthorized use,
duplication, or disclosure is unlawful.
2 OMEGAMON II for DB2 User’s Guide: CUA Interface, Version 540
Page 3

Contents
List of Figures . . . . . . . . . . . . . . . . . . . . . . . . . . . . . . . . . . . . . . . . . . . . . . . . . . . . . . . . . . . . . .5
Preface . . . . . . . . . . . . . . . . . . . . . . . . . . . . . . . . . . . . . . . . . . . . . . . . . . . . . . . . . . . . . .7
About This Book . . . . . . . . . . . . . . . . . . . . . . . . . . . . . . . . . . . . . . . . . . . . . . . . . . . . . . .8
Adobe Portable Document Format . . . . . . . . . . . . . . . . . . . . . . . . . . . . . . . . . . . . . . . . .9
Documentation Conventions. . . . . . . . . . . . . . . . . . . . . . . . . . . . . . . . . . . . . . . . . . . . .10
Candle Customer Service and Satisfaction . . . . . . . . . . . . . . . . . . . . . . . . . . . . . . . . . .12
What’s New . . . . . . . . . . . . . . . . . . . . . . . . . . . . . . . . . . . . . . . . . . . . . . . . . . . . . . . . . . . . .15
Chapter 1. Getting Started. . . . . . . . . . . . . . . . . . . . . . . . . . . . . . . . . . . . . . . . . . . . . . . . .19
Signing On . . . . . . . . . . . . . . . . . . . . . . . . . . . . . . . . . . . . . . . . . . . . . . . . . . . . . . . . . .20
Setting Logon Options. . . . . . . . . . . . . . . . . . . . . . . . . . . . . . . . . . . . . . . . . . . . . . . . . .22
Signing Off . . . . . . . . . . . . . . . . . . . . . . . . . . . . . . . . . . . . . . . . . . . . . . . . . . . . . . . . . .24
Panel Features . . . . . . . . . . . . . . . . . . . . . . . . . . . . . . . . . . . . . . . . . . . . . . . . . . . . . . . .25
Data Panels . . . . . . . . . . . . . . . . . . . . . . . . . . . . . . . . . . . . . . . . . . . . . . . . . . . . . . . . . .27
Action Bar . . . . . . . . . . . . . . . . . . . . . . . . . . . . . . . . . . . . . . . . . . . . . . . . . . . . . . . . . . .29
Action Codes. . . . . . . . . . . . . . . . . . . . . . . . . . . . . . . . . . . . . . . . . . . . . . . . . . . . . . . . .33
Function Keys . . . . . . . . . . . . . . . . . . . . . . . . . . . . . . . . . . . . . . . . . . . . . . . . . . . . . . . .34
Getting Help . . . . . . . . . . . . . . . . . . . . . . . . . . . . . . . . . . . . . . . . . . . . . . . . . . . . . . . . .36
Chapter 2. Customizing OMEGAMON II . . . . . . . . . . . . . . . . . . . . . . . . . . . . . . . . . . . . . .39
Introduction . . . . . . . . . . . . . . . . . . . . . . . . . . . . . . . . . . . . . . . . . . . . . . . . . . . . . . . . .40
Specifying Panel Preferences . . . . . . . . . . . . . . . . . . . . . . . . . . . . . . . . . . . . . . . . . . . . .41
Specifying Terminal Options . . . . . . . . . . . . . . . . . . . . . . . . . . . . . . . . . . . . . . . . . . . . .43
Setting Thresholds . . . . . . . . . . . . . . . . . . . . . . . . . . . . . . . . . . . . . . . . . . . . . . . . . . . . .46
Assigning User Authorities . . . . . . . . . . . . . . . . . . . . . . . . . . . . . . . . . . . . . . . . . . . . . . .48
Maintaining Profiles. . . . . . . . . . . . . . . . . . . . . . . . . . . . . . . . . . . . . . . . . . . . . . . . . . . .49
Setting Filtering Options for Near-Term Thread History . . . . . . . . . . . . . . . . . . . . . . . . .54
Specifying Save Options for SQL Text . . . . . . . . . . . . . . . . . . . . . . . . . . . . . . . . . . . . . .56
Using the Callable Interface . . . . . . . . . . . . . . . . . . . . . . . . . . . . . . . . . . . . . . . . . . . . . .57
Chapter 3. Using OMEGAMON II . . . . . . . . . . . . . . . . . . . . . . . . . . . . . . . . . . . . . . . . . . .65
Monitoring from the System Status Panel . . . . . . . . . . . . . . . . . . . . . . . . . . . . . . . . . . .66
System Status Components and Related Exceptions . . . . . . . . . . . . . . . . . . . . . . . . . . .69
Investigating an Active Threads Alert . . . . . . . . . . . . . . . . . . . . . . . . . . . . . . . . . . . . . . .77
Evaluating and Modifying Thresholds . . . . . . . . . . . . . . . . . . . . . . . . . . . . . . . . . . . . . .78
Reviewing Near-Term History Data . . . . . . . . . . . . . . . . . . . . . . . . . . . . . . . . . . . . . . . .80
Using the OMEGAMON II for DB2 Background Application Trace Facility . . . . . . . . . .82
Using the IFCID Trace Facility . . . . . . . . . . . . . . . . . . . . . . . . . . . . . . . . . . . . . . . . . . . .85
3
Page 4

Chapter 4. Using OMEGAMON II for DB2 with !DB/EXPLAIN . . . . . . . . . . . . . . . . . . . . .89
Background about !DB/EXPLAIN for DB2 . . . . . . . . . . . . . . . . . . . . . . . . . . . . . . . . . .90
Using OMEGAMON II and !DB/EXPLAIN Complementary Functions . . . . . . . . . . . . . .91
Using the OMEGAMON II for DB2 Callable Interface . . . . . . . . . . . . . . . . . . . . . . . . . .93
Moving Interactively between !DB/EXPLAIN and OMEGAMON II . . . . . . . . . . . . . . .102
Using the Copy-and-Paste Facility in OMEGAMON II . . . . . . . . . . . . . . . . . . . . . . . . .104
Accessing OMEGAMON II Trace Information from !DB/EXPLAIN. . . . . . . . . . . . . . . .106
Appendix A. Panel Navigation Flowcharts. . . . . . . . . . . . . . . . . . . . . . . . . . . . . . . . . . . . . .109
Flowchart Conventions . . . . . . . . . . . . . . . . . . . . . . . . . . . . . . . . . . . . . . . . . . . . . . . .110
Workloads Panels . . . . . . . . . . . . . . . . . . . . . . . . . . . . . . . . . . . . . . . . . . . . . . . . . . . .112
Resources Panels . . . . . . . . . . . . . . . . . . . . . . . . . . . . . . . . . . . . . . . . . . . . . . . . . . . . .115
Alerts Panels . . . . . . . . . . . . . . . . . . . . . . . . . . . . . . . . . . . . . . . . . . . . . . . . . . . . . . . .118
Installation Parameters Panels . . . . . . . . . . . . . . . . . . . . . . . . . . . . . . . . . . . . . . . . . . .120
Application Trace Facility Panels . . . . . . . . . . . . . . . . . . . . . . . . . . . . . . . . . . . . . . . . .122
Object Analysis Panels. . . . . . . . . . . . . . . . . . . . . . . . . . . . . . . . . . . . . . . . . . . . . . . . .124
Thread Detail GoTo Panels . . . . . . . . . . . . . . . . . . . . . . . . . . . . . . . . . . . . . . . . . . . . .126
Index . . . . . . . . . . . . . . . . . . . . . . . . . . . . . . . . . . . . . . . . . . . . . . . . . . . . . . . . . . . .129
4 OMEGAMON II for DB2 User’s Guide: CUA Interface, Version 540
Page 5

List of Figures
FIGURE 1. OMEGAMON II for DB2 System Status Panel . . . . . . . . . . . . . . . . . . . . . . . . . . . . . . .111
FIGURE 2. Workloads Panels (Realtime) . . . . . . . . . . . . . . . . . . . . . . . . . . . . . . . . . . . . . . . . . . . .113
FIGURE 3. Workloads Panels (Near-term history) . . . . . . . . . . . . . . . . . . . . . . . . . . . . . . . . . . . . .114
FIGURE 4. Resources Panels (Realtime) . . . . . . . . . . . . . . . . . . . . . . . . . . . . . . . . . . . . . . . . . . . .116
FIGURE 5. Resources Panels (Near-Term History) . . . . . . . . . . . . . . . . . . . . . . . . . . . . . . . . . . . . .117
FIGURE 6. Alerts Panels . . . . . . . . . . . . . . . . . . . . . . . . . . . . . . . . . . . . . . . . . . . . . . . . . . . . . . . .119
FIGURE 7. Installation Parameters Panels . . . . . . . . . . . . . . . . . . . . . . . . . . . . . . . . . . . . . . . . . . .121
FIGURE 8. Application Trace Facility Panels . . . . . . . . . . . . . . . . . . . . . . . . . . . . . . . . . . . . . . . . .123
FIGURE 9. Object Analysis Panels. . . . . . . . . . . . . . . . . . . . . . . . . . . . . . . . . . . . . . . . . . . . . . . . .125
FIGURE 10. Thread Detail GoTo Panels (Realtime). . . . . . . . . . . . . . . . . . . . . . . . . . . . . . . . . . . . .127
FIGURE 11. Thread History Detail GoTo Panels (Near-Term History) . . . . . . . . . . . . . . . . . . . . . . .128
5
Page 6

6 OMEGAMON II for DB2 User’s Guide: CUA Interface, Version 540
Page 7

P
This guide is an introduction to the CUA™ interface for OMEGAMON II® for DB2®,
Version 540. The CUA interface is based on IBM's Common User Access™ standards
designed to facilitate ease of learning and use. OMEGAMON II® for DB2 is a component
of OMEGAMON XE for DB2 on z/OS.
This manual is intended for data center personnel who are responsible for monitoring
DB2 performance, systems programmers and performance analysts who are responsible
for a DB2 subsystem, application programmers who wish to monitor their programs, and
database administrators.
This document covers basic information you need to get started using OMEGAMON,
including signing on and off, getting help, and customizing OMEGAMON II to meet the
requirements of your installation. It also provides an overview of the main navigation
paths in OMEGAMON in “Panel Navigation Flowcharts” on page 109.
Preface
Note: OMEGAMON II for DB2 also supports the classic interface, which allows you to
navigate in OMEGAMON using a menu system. If you are interested in learning
about the classic interface, refer to the OMEGAMON II for DB2 Tuning Guide,
Version 540.
7
Page 8

About This Book
About This Book
Who should read this book
This manual is intended for data center personnel who are responsible for monitoring
DB2 performance, systems programmers and performance analysts who are responsible
for a DB2 subsystem, application programmers who wish to monitor their programs, and
database administrators.
Documentation set information
I
OMEGAMON II for DB2 Users Guide: CUA Interface, Version 540
I
OMEGAMON II for DB2 Reference Manual: Classic Interface, Version 540
I
OMEGAMON II for DB2 Tuning Guide, Version 540
I
OMEGAMON II for DB2 Historical Reporting Guide, Version 540
I
OMEGAMON II for DB2 Configuration and Customization Guide, Version 540
I
Installation and Configuration of Candle Products on OS/390 and z/OS, Version 350
I
!DB/Tools Installation and Customization Guide, Version 510
I
Candle Products Messages Manual
Where to look for information
For more information related to this product, please see the
I
technical documentation CD-ROM that came with your product
I
technical documentation information available on the Candle Web site at
www.candle.com
I
online help provided with this product
8 OMEGAMON II for DB2 User’s Guide: CUA Interface, Version 540
Page 9

Adobe Portable Document Format
Introduction
Candle supplies documentation in the Adobe Portable Document Format (PDF). The
Adobe Acrobat Reader prints PDF documents with the fonts, formatting, and graphics in
the original document. To print a Candle document, do the following:
1. Specify the print options for your system. From the Acrobat Reader Menu bar, select
File > Print Setup... and make your selections. A setting of 300 dpi is highly
recommended as is duplex printing if your printer supports it.
2. To start printing, select File > Print on the Acrobat Reader Menu bar.
3. On the Print popup, select one of the Print Range options for
– a single page
–a range of pages
–all of the document
4. (Optional) To fit oversize pages to the paper size currently loaded on your printer,
select the Shrink to Fit option.
Adobe Portable Document Format
Printing problems?
Your printer ultimately determines the print quality of your output. Sometimes printing
problems can occur. If you experience printing problems, potential areas to check are:
I
settings for your printer and printer driver. (The dpi settings for both your driver and
printer should be the same. A setting of 300 dpi is recommended.)
I
the printer driver you are using. (You may need a different printer driver or the
Universal Printer driver from Adobe. This free printer driver is available at
www.adobe.com.)
I
the halftone/graphics color adjustment for printing color on black and white printers.
(Check the printer properties under Start > Settings > Printer. For more
information, see the online help for the Acrobat Reader.)
I
the amount of available memory in your printer. (Insufficient memory can cause a
document or graphics to fail to print.)
For additional information on printing problems, refer to the documentation for your
printer or contact your printer manufacturer.
9
Page 10

Documentation Conventions
Documentation Conventions
Introduction
Candle documentation adheres to accepted typographical conventions for command
syntax. Conventions specific to Candle documentation are discussed in the following
sections.
Panels and figures
The panels and figures in this document are representations. Actual product panels may
differ.
Required blanks
The slashed-b (!) character in examples represents a required blank. The following
example illustrates the location of two required blanks.
!!!!eBA*ServiceMonitor!!!!0990221161551000
Revision bars
Revision bars (|) may appear in the left margin to identify new or updated material.
Variables and literals in command syntax examples
In examples of command syntax for the OS/390, VM, OS/400, and NonStop Kernel
platforms, uppercase letters indicate actual values (literals) that the user should type;
lowercase letters indicate variables that represent data supplied by the user:
LOGON APPLID (cccccccc)
However, for the Windows and UNIX platforms, variables are shown in italics:
-candle.kzy.instrument.control.file=
-candle.kzy.agent.parms=
agent_control_file_name
instrumentation_control_file_name
Note: In ordinary text, variable names appear in italics, regardless of platform.
Symbols
The following symbols may appear in command syntax:
Table 1. Symbols in Command Syntax
Symbol Usage
| The “or” symbol is used to denote a choice. Either the argument
on the left or the argument on the right may be used. Example:
YES | NO
In this example, YES or NO may be specified.
10 OMEGAMON II for DB2 User’s Guide: CUA Interface, Version 540
Page 11

Table 1. Symbols in Command Syntax
Symbol Usage
[ ] Denotes optional arguments. Those arguments not enclosed in
square brackets are required. Example:
APPLDEST DEST [ALTDEST]
In this example, DEST is a required argument and ALTDEST is
optional.
{ } Some documents use braces to denote required arguments, or to
group arguments for clarity. Example:
COMPARE {workload} -
The workload variable is required. The REPORT keyword must be
specified with a value of SUMMARY or HISTOGRAM.
_ Default values are underscored. Example:
COPY infile outfile - [COMPRESS={YES
In this example, the COMPRESS keyword is optional. If specified,
the only valid values are YES or NO. If omitted, the default is YES.
Documentation Conventions
REPORT={SUMMARY | HISTOGRAM}
| NO}]
11
Page 12

Candle Customer Service and Satisfaction
Candle Customer Service and Satisfaction
Background
To assist you in making effective use of our products, Candle offers a variety of
easy-to-use online support resources. The Candle Web site provides direct links to a
variety of support tools that include these services:
eSupport allows you to create and update service requests opened with Customer
Service and Satisfaction (CSS).
eDelivery allows you to download products, documentation, and maintenance 24
hours a day, 7 days a week.
eNotification notifies you of product updates and new releases.
In addition, you can find information about training, maintenance plans, consulting and
services, and other useful support resources. Refer to the Candle Web site at
www.candle.com
Candle Customer Service and Satisfaction contacts
for detailed customer service information.
You will find the most current information about how to contact Candle CSS by
telephone or email on the Candle Web site. Go to the www.candle.com support section,
and choose the link to Support Contacts to locate your regional support center.
12 OMEGAMON II for DB2 User’s Guide: CUA Interface, Version 540
Page 13

13
Page 14

14 OMEGAMON II for DB2 User’s Guide: CUA Interface, Version 540
Page 15

W
This section identifies the enhancements for Version 540 of OMEGAMON II for DB2.
OMEGAMON II® for DB2 is a component of OMEGAMON XE for DB2 on z/OS, Version
300. The changes and additions in OMEGAMON II for DB2 provide new function in
addition to reflecting support for features in IBM DB2 Version 8.1. OMEGAMON II for
DB2 enables you to obtain additional information about the performance of your
systems. This additional information allows you more flexibility in managing various types
of threads. An overview of each new or changed function follows.
Note: With this version, OMEGAMON II for DB2 no longer supports IBM DB2 Version
5.
Historical Reporter redesign
What’s New
With OMEGAMON II for DB2, significant enhancements were made to the historical
reporting component. Some of these new features are:
I
Sequential output files are produced from the online collector.
I
All record types can be loaded into DB2 tables using either the LOAD utility or using
SQL INSERT.
I
Near term history collector for displays is configured separately from long term history
for reports.
I
New fields have been added to the Summarizer.
New IFCID-based reports
I
Numerous new IFCID-based reports are provided. See the OMEGAMON II for DB2
Historical Reporting Guide, Version 540, for a list of the supported IFCIDs. See the
README provided with this product for instructions on generating the IFCID-based
reports.
I
You can generate your own reports, based on the IFCIDS selected, using the
product-provided COBOL, C, and SAS record layouts. All instrumentation record
types (IFCIDs) are supported. The data are extracted from SMF, GTF or from the
Online Collector input.
15
Page 16

64-bit addressing support
Version 8 of DB2 UDB for z/OS supports 64-bit virtual storage. The zSeries 64-bit
architecture allows DB2 UDB for z/OS to move various storage areas above the 2-GB bar.
OMEGAMON II for DB2 Version 540 now provides the ability to display information from
above the 2-GB bar structures.
64-bit addressing support applies to the:
I
EDM pool
I
buffer pools
I
sort pools
I
RID pools
Long name support
OMEGAMON II for DB2 Version 540 includes support for long object names. New
displays are provided in support of this feature.
Unicode support
Unicode support includes character conversion from Unicode to EBCDIC for online
displays and batch reports.
Enclave support
New displays for stored procedures using Work Load Manager (WLM) enclaves include:
I
Enclave Token
I
Service Class Period
I
Performance Index
I
Service Class
I
WLM Environment Name
Stored procedure Address Spaces is being phased out in DB2 Version 8. All stored
procedures now use WLM.
New filtering for Near Term History display
These keywords are added to the Near Term History display:
I
COMMIT
I
CORRID
I
DB2 CPU TIME
I
DB2 ELAP TIME
I
DEADLK/TIMEOUT
I
I/O ELAP TIME
16 OMEGAMON II for DB2 User’s Guide: CUA Interface, Version 540
Page 17

I
GETPAGES
I
LOCK ESCAL
I
PACK AGE
See the OMEGAMON II for DB2 Reference Manual, Version 540, for descriptions of
these new fields.
New DSNZPARM fields
The DSNZPARM Thread Parameters panel now includes numerous new fields.
Distributed Thread display improvements
The Distributed Thread display improvements include the addition of these fields:
I
Host Name
I
Workstation identifier
I
End user ID on workstation
I
Transaction ID on workstation
17
Page 18

18 OMEGAMON II for DB2 User’s Guide: CUA Interface, Version 540
Page 19

1
Introduction
This chapter is intended to help you get started using the CUA interface for OMEGAMON
II for DB2 to monitor your DB2 subsystem.
Chapter Contents
Signing On . . . . . . . . . . . . . . . . . . . . . . . . . . . . . . . . . . . . . . . . . . . . . . . . . . . . . . . . . 20
Setting Logon Options . . . . . . . . . . . . . . . . . . . . . . . . . . . . . . . . . . . . . . . . . . . . . . . . 22
Signing Off . . . . . . . . . . . . . . . . . . . . . . . . . . . . . . . . . . . . . . . . . . . . . . . . . . . . . . . . . 24
Panel Features . . . . . . . . . . . . . . . . . . . . . . . . . . . . . . . . . . . . . . . . . . . . . . . . . . . . . . 25
Data Panels . . . . . . . . . . . . . . . . . . . . . . . . . . . . . . . . . . . . . . . . . . . . . . . . . . . . . . . . 27
Action Bar . . . . . . . . . . . . . . . . . . . . . . . . . . . . . . . . . . . . . . . . . . . . . . . . . . . . . . . . . 29
Action Codes . . . . . . . . . . . . . . . . . . . . . . . . . . . . . . . . . . . . . . . . . . . . . . . . . . . . . . . 33
Function Keys. . . . . . . . . . . . . . . . . . . . . . . . . . . . . . . . . . . . . . . . . . . . . . . . . . . . . . . 34
Getting Help. . . . . . . . . . . . . . . . . . . . . . . . . . . . . . . . . . . . . . . . . . . . . . . . . . . . . . . . 36
Getting Started
Getting Started 19
Page 20

Signing On
Signing On
Logging on to the application
You access the CUA interface for OMEGAMON II by logging on to a VTAM® application.
The name of the application (the applid) is defined at your site when the product is
installed. Depending on the system configuration at your site, you may be required either
to select the application from a menu, or issue a command.
To log on to the application: Select the application from the menu or issue the following
command from a VTAM terminal:
LOGON APPLID(
where applid is the application name.
Note: The Candle logo panel appears. The logo panel identifies the product by name
Sign On panel
To begin the sign-on, from the logo panel:
I
Press Enter
Result: The Sign On panel appears.
OMEGAMON II for DB2 - V540
Type the requested information, and press Enter.
Identification
Userid . . . . . .______
Password . . . . .
Change Password. . No + Yes/No
Additional Information
Group . . . . . .______
Account . . . . ._____________________________________________
F1=Help F3=Exit F4=Prompt F6=panel ID F11=Logon Options
applid
)
and version, and presents copyright information. Use this panel to verify that you
have logged on to the correct application.
D203-0330
Sign On panel
You are required by OMEGAMON II to enter information for only two fields on the
Sign-On Panel: Userid and Password. Other fields may be optional or required depending
on the security system at your site. Contact your security administrator for more
information.
When you complete your sign-on information, press Enter to display the System Status
panel. If this is the first time you are signing on to OMEGAMON, the Logon Options panel
will appear instead of the System Status panel.
Note: During the sign-on, you can display help by pressing F1. You can stop the sign-on
at any time by pressing F3.
20 OMEGAMON II for DB2 User’s Guide: CUA Interface, Version 540
Page 21
Sign On panel fields
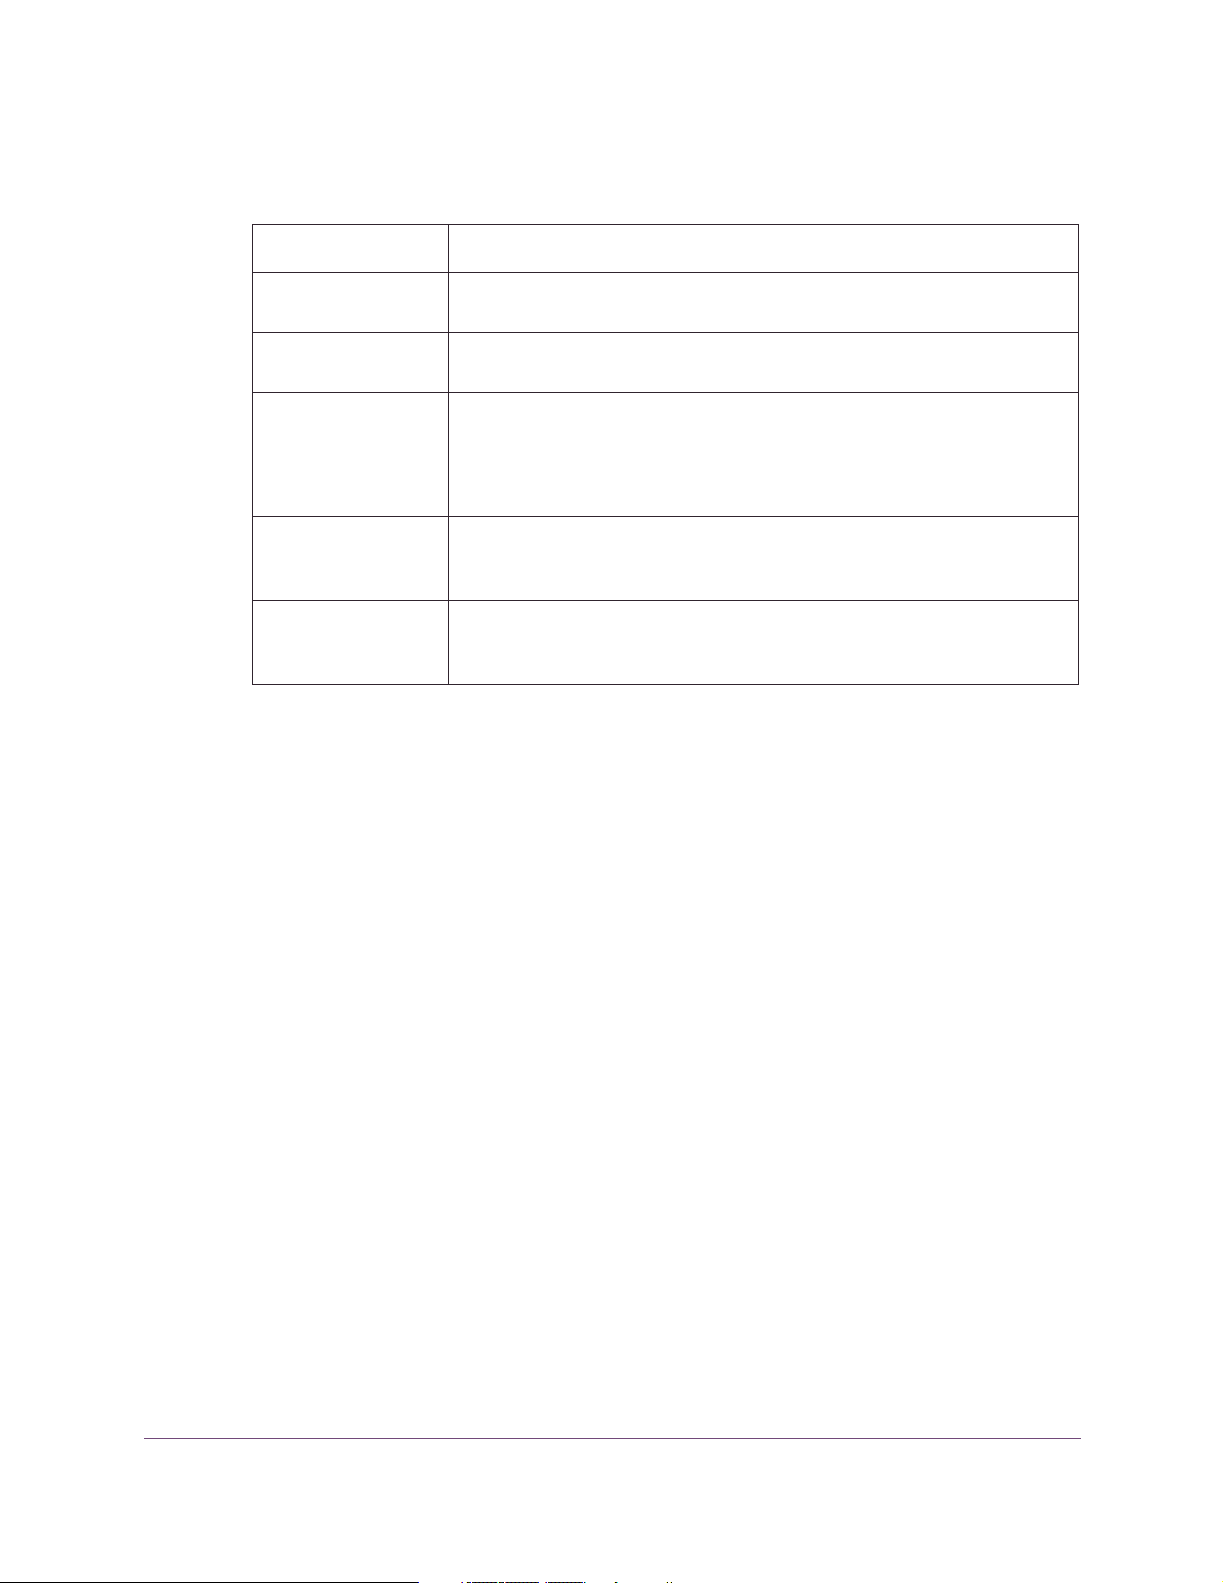
The fields of the Sign On Panel are defined in the table below.
Field Description
Userid Your 1–8 character user ID, which authorizes your access to
Password Your 1–8 character private password, which authorizes your access to
Change Password This field enables you to change your password.
Group Your product administrator may assign users who need to do the same
Account For auditing or security purposes, your product administrator may assign
Signing On
OMEGAMON II.
OMEGAMON II.
To leave your password unchanged, accept the default, No.
To change your password, type Yes . You are prompted for a new
password.
tasks or have the same authorization to a particular group. If you have a
group identifier, enter it here.
users to a particular account. If you have an account identifier, enter it
here.
Accessing OMEGAMON from OMEGAVIEW
To access OMEGAMON II from OMEGAVIEW, Candle’s centralized status manager,
select an OMEGAMON II for DB2 CUA status item. The panel that you zoom to will
depend on which status item you selected within OMEGAVIEW.
For information about creating a status item under OMEGAVIEW and defining zoom
destinations, see the OMEGAVIEW Configuration and Customization Guide.
Getting Started 21
Page 22

Setting Logon Options
Setting Logon Options
The Logon Options panel enables you to specify session characteristics that will be
applied each time you sign on to OMEGAMON II. It appears automatically the first time
you sign on as a new OMEGAMON II user. To modify your logon options at any time,
press F11 from the Sign On panel.
Logon Options
Type the correct values, then press Enter.
User Profile . . . . . . . . . $DEFAULT +
Subsystem Profile . . . . . . . $DEFAULT +
Application ID . . . . . . . .
DB2 Subsystem . . . . . . . . .
Logical Rows . . . . . . . . . 255 100-999
Migrate Profile from OMEGAMON . No + (Yes/No)
OMEGAMON Profile to Migrate . .
User Data . . . . . . . . . . .
ENTER F1=Help F4=Prompt F12=Cancel
Note: If you are zooming to OMEGAMON from OMEGAVIEW, this panel will not
appear. To specify these logon options, you must log on to the OMEGAMON for
CUA interface directly.
Logon Options panel fields
The following table describes the fields you can change on the Logon Options panel.
Field Description
User Profile The name of the user profile to be used for this session.
Subsystem Profile The name of your subsystem profile to be used for this session. Press
If you select $DEFAULT, OMEGAMON II uses the user profile
named with your user ID. Press F4 to view a list of available user
profiles.
If you enter the name of a nonexistent user profile, OMEGAMON II
creates the profile, using the name you specified and Candle’s
default settings.
F4 to view a list of available subsystem profiles.
If you select $DEFAULT, OMEGAMON II uses the subsystem profile
that has the same name as the DB2 subsystem ID you are
monitoring. You must select $DEFAULT in order to activate
automatic profile switching. This feature allows the subsystem profile
to switch automatically to one that matches the new DB2 subsystem
whenever you change the subsystem you are monitoring.
If you enter the name of a non-existent subsystem profile,
OMEGAMON II creates the profile, using the name you specified
and Candle’s default settings.
22 OMEGAMON II for DB2 User’s Guide: CUA Interface, Version 540
Page 23

Setting Logon Options
Field Description
Application ID The OMEGAMON II classic interface VTAM mode application
identifier.
DB2 subsystem The DB2 subsystem ID that you want to monitor.
Logical rows The number of logical rows (100–9999).
Migrate Profile from
OMEGAMON
OMEGAMON Profile to
Migrate
User Data Additional classic interface options, such as USER=cc.
Enter Yes if you want to migrate a classic interface user profile to a
CUA subsystem profile. Use this feature only to provide a set of
values to use as a starting point for customizing the CUA subsystem
profile.
When you migrate classic threshold values, they become CUA critical
values.
If a CUA exception is set to trip when it exceeds its threshold, then
the warning threshold is set to 80% of the critical threshold. If a CUA
exception is set to trip when it falls below its threshold, then the
warning threshold is set to 125% of the critical threshold.
For exceptions that are not associated with threshold values, the CUA
critical value is set to on, and the warning value is set to off. If the
classic STATE= value is ON, the CUA monitor value is YES. If the
value for STATE= is OFF, the monitor value is NO.
The suffix of the profile you want to migrate from the classic
OMEGAMON II system.
Note:
During normal operations, this field should be left blank.
Getting Started 23
Page 24
Signing Off
Signing Off
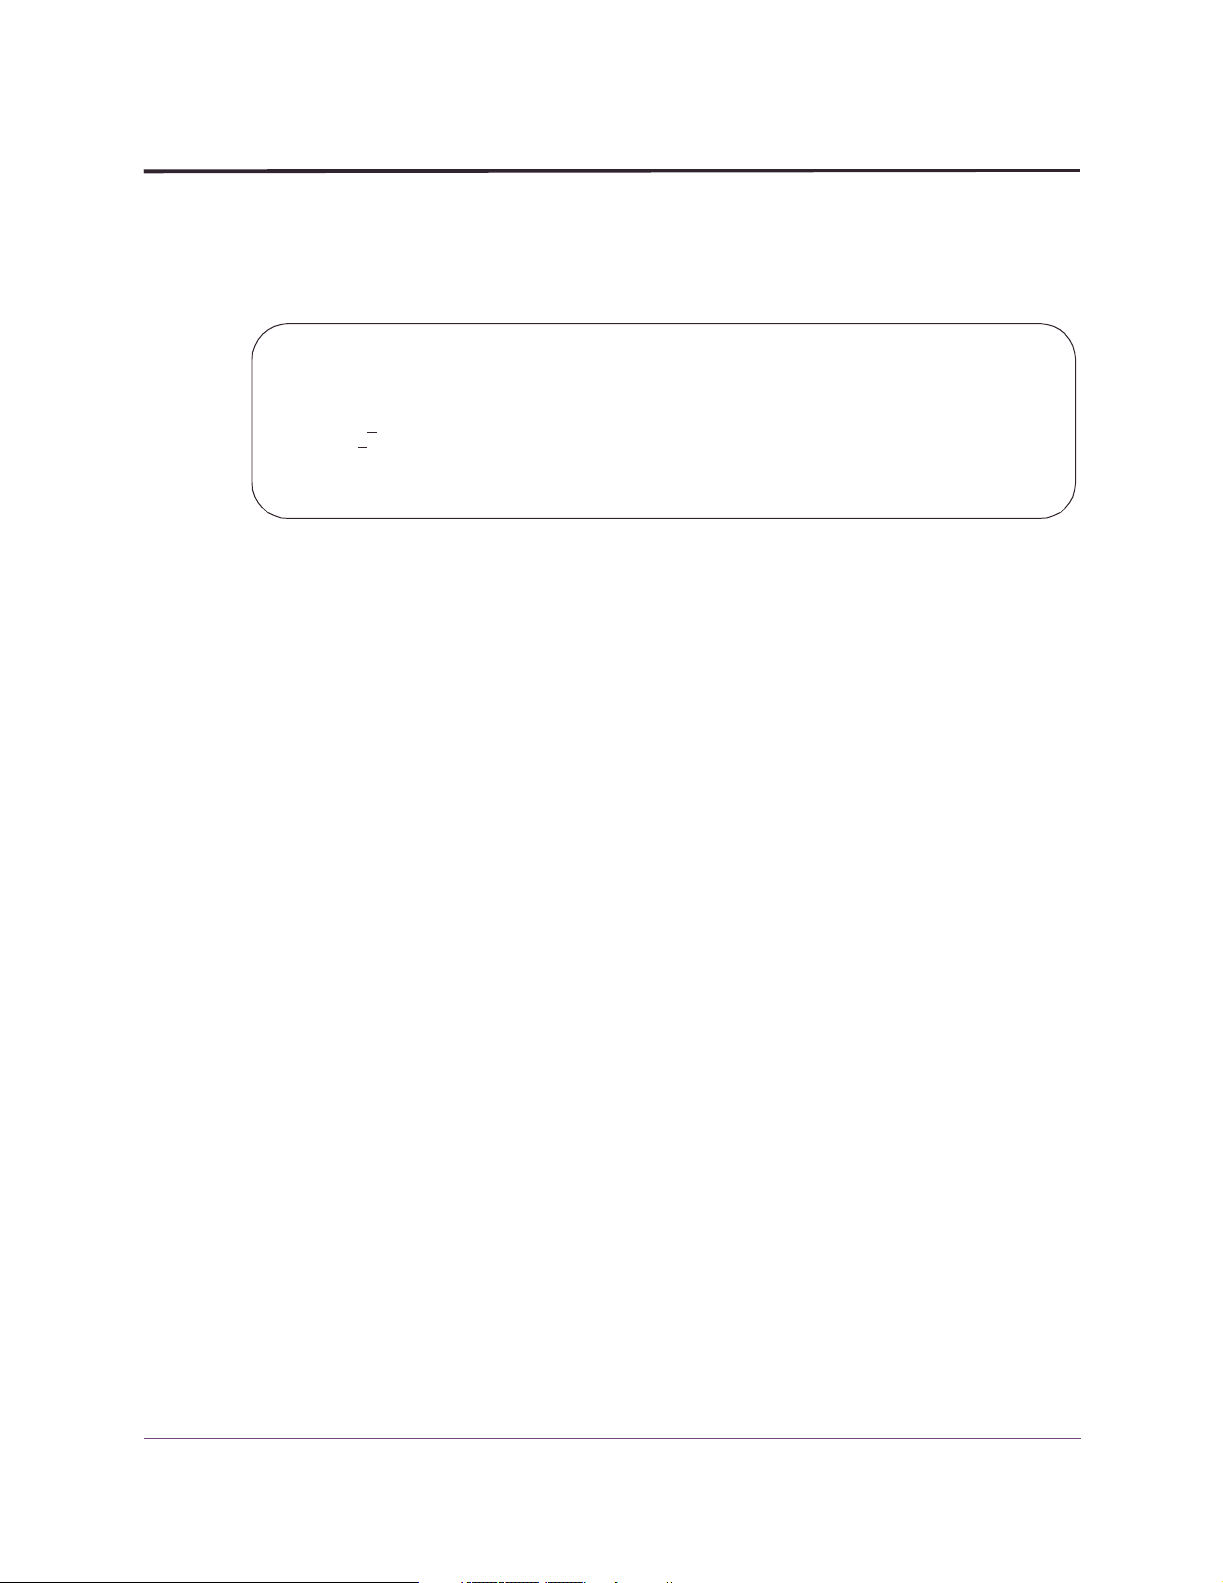
To sign off OMEGAMON II:
1. Press F3 from the System Status panel.
2. Exit OMEGAMON using any of these methods:
I
I
I
Result: The Exit Confirmation pop-up window appears.
Exit Confirmation
Select one of the following, then press ENTER.
_ 1. Ex
2. R
F12=Cancel
it from OMEGAMON II for DB2 F3
eturn to OMEGAMON II for DB2
press Enter
press F3
type x or 1 in the entry field, and press Enter
Returning to OMEGAVIEW from OMEGAMON
To return to OMEGAVIEW from OMEGAMON, use the trigger key you defined in
OMEGAVIEW. The default trigger key is PA2 and can be used from any panel.
24 OMEGAMON II for DB2 User’s Guide: CUA Interface, Version 540
Page 25

Panel Features
IOMEGAMON II panels share a number of common features. In the following section, we
use the System Status panel to show the panel features you will find throughout
OMEGAMON II.
1___ Actions GoTo Options Tools Help
------------------------------------------------------------ mm/dd/yy 16:13:49
OMEGAMON II for DB2 System Status
Select one component with a “/” or an action code.
4 S=Show details A=Analyze problems H=Near-term history L=Control
+-----------------------------------------------------------------------------+
5 Workloads | Resources | Alerts |
|-------------------------+-------------------------+-------------------------|
| _ CICS ==== | _ Buffer Mgr ==== | _ DB2 Activity ==== |
| _ IMS ==== | _ EDM Pool ==== | _ Active Threads ==== |
| _ TSO ==== | _ Lock Stats ==== | _ Inact. Threads ==== |
| _ Background ==== | _ Log Manager ==== | _ Locks ==== |
| _ Utility ==== | _ DDF Stats ==== | _ Active Traces ==== |
| _ Distributed ==== | | _ Volume Activity ==== |
| | _ Bind Stats ==== | _ Stored Procs ==== |
| _ All Connections ==== | _ SSS Stats ==== | _ Functions ==== |
| | _ SQL Stats ==== | _ Triggers ==== |
| | _ Open/Close Stat ==== | |
| | _ Command Stats ==== | _ DB2 Messages ==== |
+-----------------------------------------------------------------------------+
6 F1=Help F2=Keys F3=Exit F4=Prompt F5=Refresh F6=Console F10=Action Bar
F24=CUA/TSO
Panel Fe at ures
2 System: D41A+
3 N-T History
The System Status panel is the first panel you see when you sign on to OMEGAMON II.
Panel features
This table describes features common to all OMEGAMON II panels.
Part Feature Description
1
2
3
Action Bar Provides access to OMEGAMON II functions.
System Field Displays the DB2 subsystem that you are monitoring.
Collector Status
Field
Note:
Displays the status of the online data collector.
I
I
To begin monitoring a different DB2 subsystem, type the
new DB2 subsystem into the System field, and press
Enter. To display a selectable list of available DB2
subsystems, put the cursor in this field, and press F4.
N-T History indicates the collector is active and near-term
history data is available.
.Realtime indicates the collector is not active and near-term
history data is not available.
Getting Started 25
Page 26

Panel Features
Part Feature Description
4
5
6
Action Codes Displays available action codes.
Note: Action codes do not apply to every product panel.
Panel Body Displays performance data or status information. Highlighting or
color is used to indicate status.
Function Keys Provide navigation and various functions.
26 OMEGAMON II for DB2 User’s Guide: CUA Interface, Version 540
Page 27
Data Panels
Description
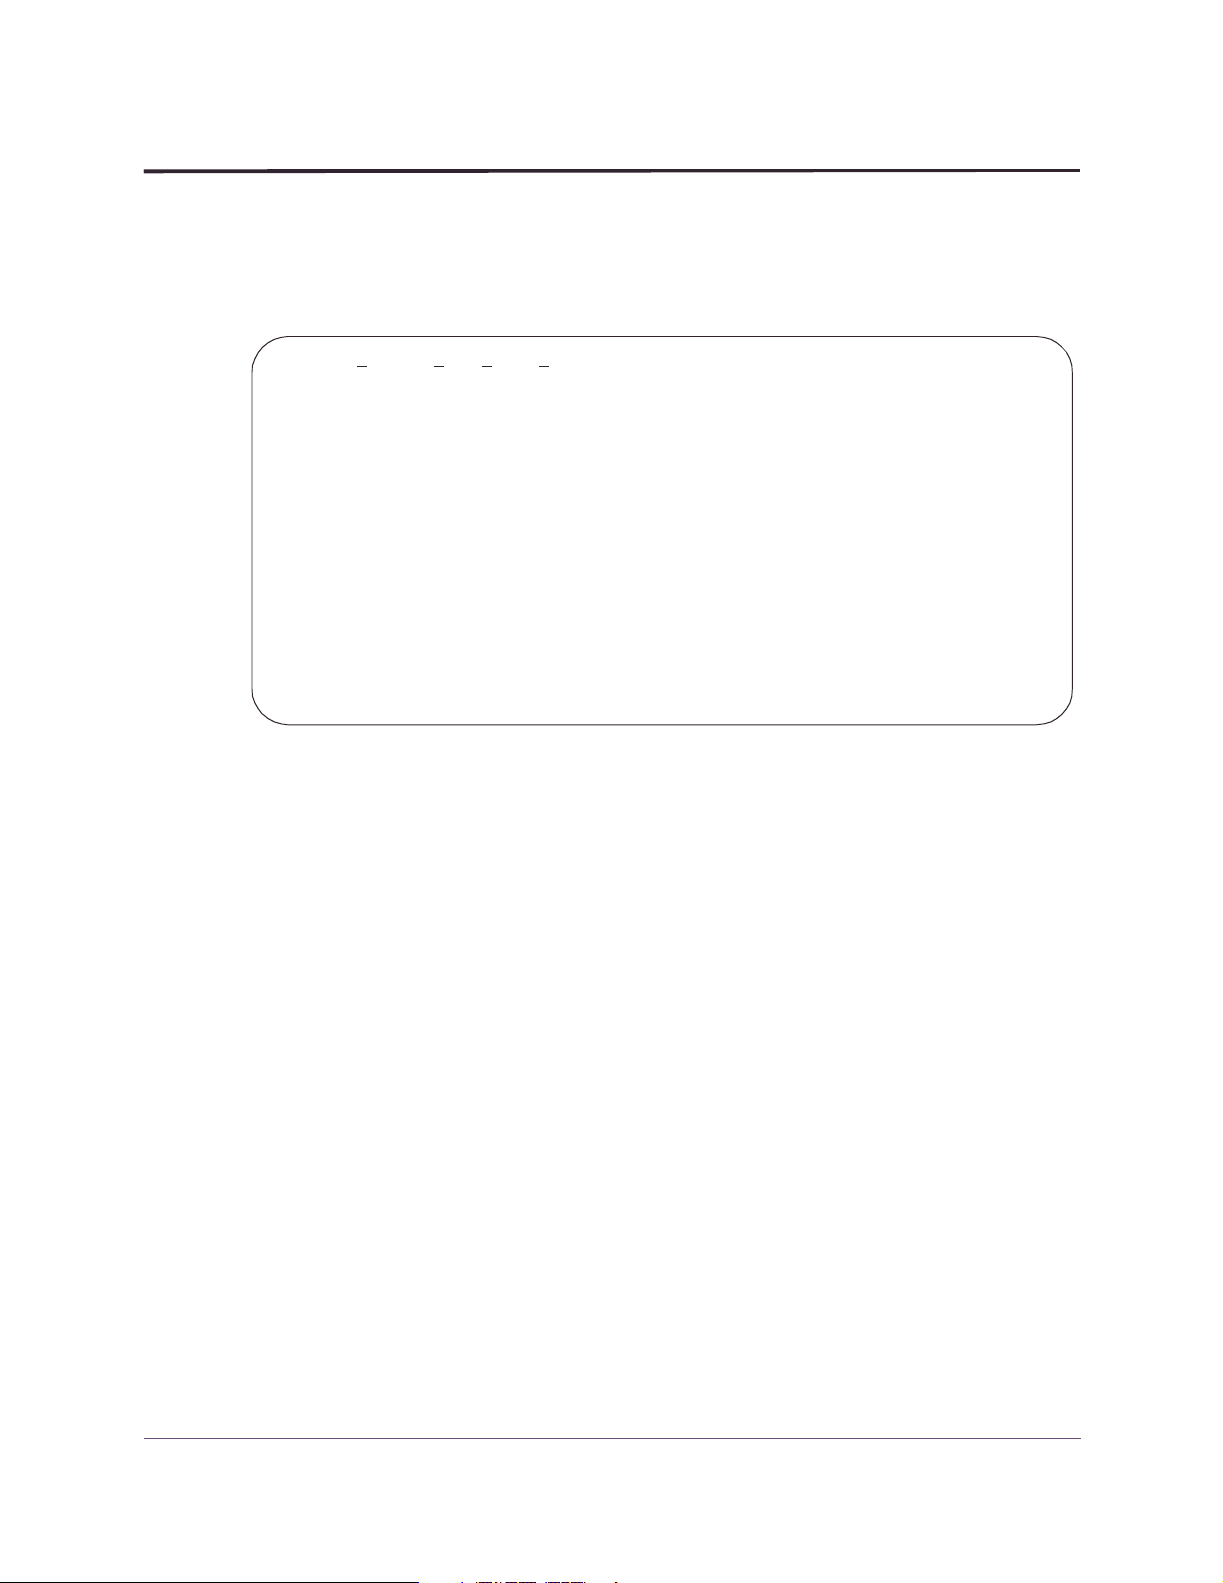
Unlike the System Status panel, most OMEGAMON II full-screen panels present
performance information in tabular format. Below, a sample data panel is shown.
Data Panels
____ Actions GoTo Tools Help
+----------------------------------------------------------- mm/dd/yy 8:01:00
| Log Manager Statistics System:D41B
|
+----------------------------------------------------------------------------+
| Collection Interval . . : REALTIME | Start . . . : 10/20 11:50:29 |
| Report Interval . . . . : 7 sec | End . . . : 10/20 11:50:36 |
+---------------------------------------------------------------------------+
| |
+----------------------------------------------------------------------------+
| Logging Mode . . . . : DUAL Archive Mode . . . . . : DUAL |
| No of Logs Defined . : 3 Number of Logs Available : 2 |
| Checkpoint Frequency : 5000 Records Until Checkpoint : 4329 |
| Input Buffer Size . . : 28K Output Buffer Size . . . : 400K |
| Write Thresholds . . : 20 Current Log Record RBA . :000035DC696C |
| |
| Primary Active Log . : TDDB241A.LOGCOPY1.DS02 |
| Secondary Active Log : TDDB241A.LOGCOPY2.DS02 |
+----------------------------------------------------------------------------+
( Stats ) < Reads > < Write > < Log > < Log DS >
F1=Help F2=Keys F3=Exit F5=Refresh F6=DB2 Console **=Bkwd **=Fwd
F10=Action Bar F15=System Status F24=CUA/TSO
Highlighted data fields
If a value in the data area of a panel exceeds a threshold, OMEGAMON II highlights that
value.
This feature allows you to identify the source of a performance problem without having to
read every line of data.
Note: This does not apply to the data panels that appear when you select Active Threads
from the System Status panel.
Scrolling
You can scroll from one panel of data to the next by using function keys, or scroll to a
specific line of data by specifying a beginning line number.
You can use F7 to scroll backward one panel and F8 to scroll forward.
You also can scroll through the data using the scroll indicator, which appears in the upper
right corner of the panel. For example:
Lines __23 to 51 of 117
The first two numbers show the beginning and ending lines currently displayed on the
panel; the third number shows the total number of lines available for display. You can
scroll through the data by entering the desired beginning line number in the field following
Line.
Getting Started 27
Page 28

Data Panels
Pushbuttons
OMEGAMON II provides pushbuttons as a way to navigate to panels that are closely
related to the current panel.
Pushbuttons appear between brackets < > or parentheses ( ) at the bottom of some
panels, directly above the function keys. Only selections in brackets < > are selectable.
The pushbutton for the current panel appears in parentheses ( ) and is not selectable.
To use a pushbutton, place the cursor on the phrase or word in brackets, and press Enter.
28 OMEGAMON II for DB2 User’s Guide: CUA Interface, Version 540
Page 29

Action Bar
The action bar appears as the top line of every panel. It has an entry field on the left side
and selectable keyword choices across the length of the line. When you select a choice
from the action bar, a pull-down menu appears. Then you can select a menu item to
navigate to other panels in the product.
The action bar keyword choices are as follows:
I
Actions
I
GoTo
I
View
I
Options
I
To ol s
I
Help
Selecting from the action bar
To select a keyword choice from the action bar:
Action Bar
1. Type the first letter of the choice in the action bar entry field, and press Enter.
Result: A pull-down menu appears from which you can make a selection. (When
selecting Actions from the action bar, you must first select an object on the panel body by
typing (/) in the entry field of the object.)
2. Type the number of the menu selection in the entry field, and press Enter.
Result: The selected panel appears.
Fast pathing from the action bar
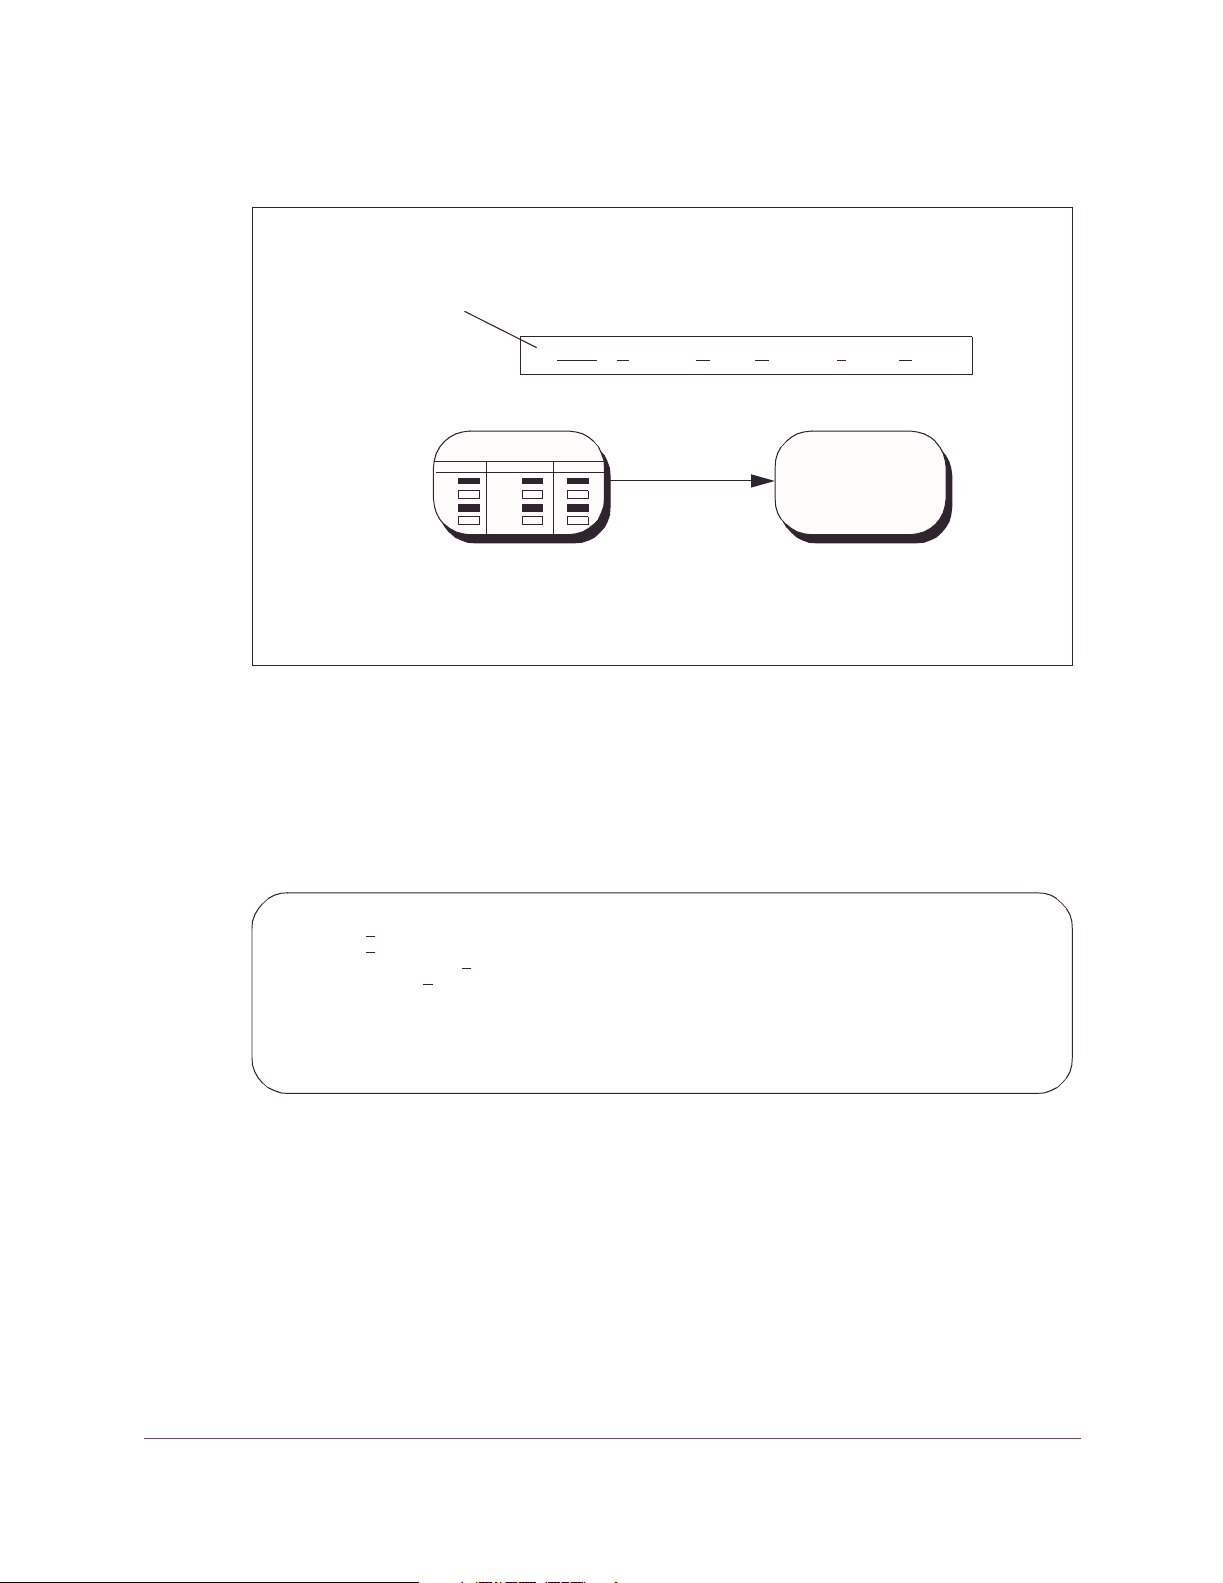
Fast pathing is a method of quickly navigating to OMEGAMON II panels from the action
bar without using menus and submenus.
For example, using fast pathing, you can access the DSNZPARM IRLM Parameters panel
directly by entering GDR on the action bar entry field of the System Status panel. This
Getting Started 29
Page 30
Action Bar
bypasses the GoTo menu and the DB2 Installation Parameters menu, and goes directly to
the DSNZPARM Parameters panel.
Enter GDR in the entry field on the action
bar of the System Status panel.
GDR Actions Goto Options Tools Help
System Status
DSNZPARM IRLM
Parameters
Using the fast path mnemonic brings you
directly to the DSNZPARM IRLM
Parameters panel.
The mnemonic character (G, D, R) for each selection is underlined on the panel or menu
on which it appears.
Actions pull-down
The Actions pull-down menu allows you to display more information about the selected
object on the panel body.
_ 1. Show details
2. Analyze Problems
3. Near term H
4. Control
5. Exit from OMEGAMON II for DB2 F3
F1=Help F12=Cancel
istory
30 OMEGAMON II for DB2 User’s Guide: CUA Interface, Version 540
Page 31
GoTo pull-down
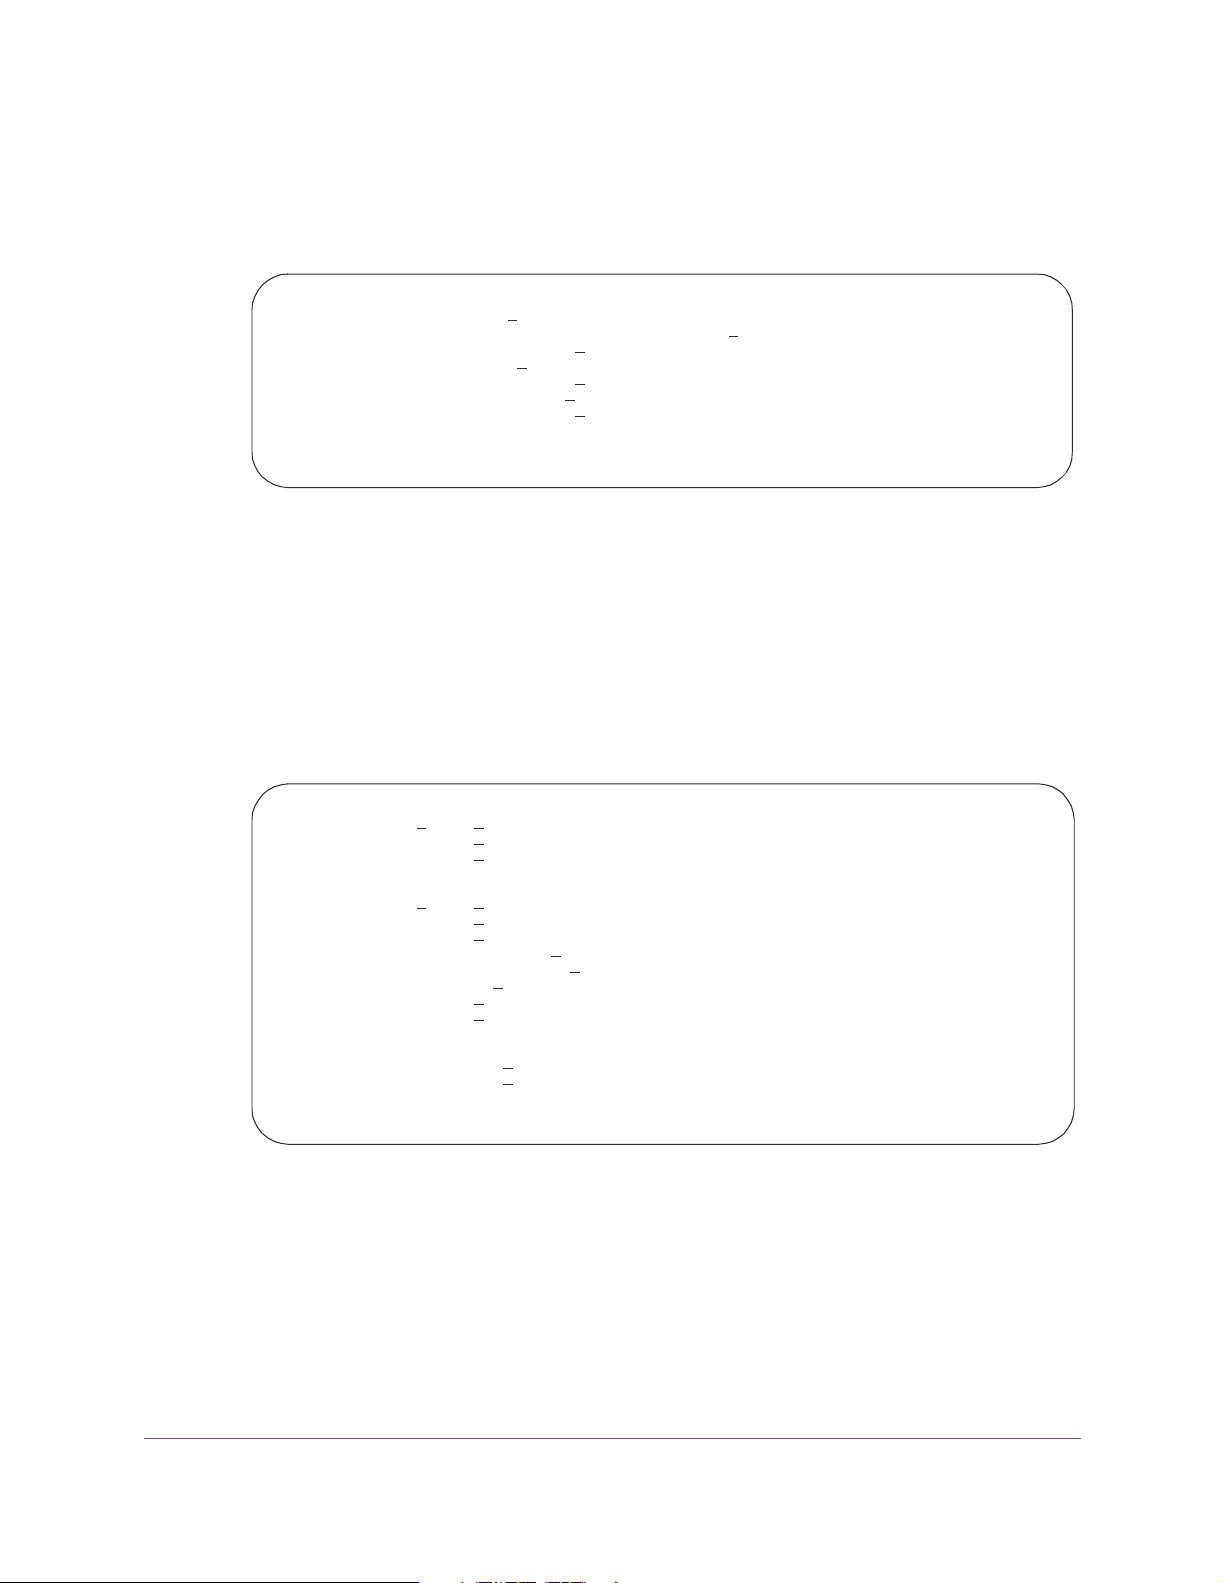
The GoTo menu enables you to quickly move to panels that are related to the current
panel, as well as to other product areas. The selections on this menu vary from panel to
panel.
You can also use the GoTo menu to
I
select the panel Index, which enables you to move to a wider selection of panels
I
navigate to the OMEGAMON classic interface
_ 1. DB2 Installation Parameters...
2. Address Space Info and OMEGAMON Commands Menu
3. Online C
4. IRLM Startup Options
5. Stored Procedure Startup Options
6. Panel I
7. OMEGAMON II for DB2 Classic Interface
F1=Help F12=Cancel
ollector Information...
ndex...
Action Bar
View pull-down
The View pull-down menu allows you to sort and display your panel data in a variety of
ways. You can display all fields, only fields with values that you specify, or only fields with
warning and critical status. The selections on the View menu vary.
Note: View is not available on all panels.
1 1. All
2. S
3. Problems
Sort by
1
2. Elapsed time
3. C
4. Current DB2 status
5. Number of getpages
6. Num
7. Number of commits
8. Jobname
Sort order
1 1. A
2. D
F12=Cancel
ome...
1. Plan name
urrent CPU percentage
ber of page updates
scending
escending
Getting Started 31
Page 32
Action Bar
Options pull-down
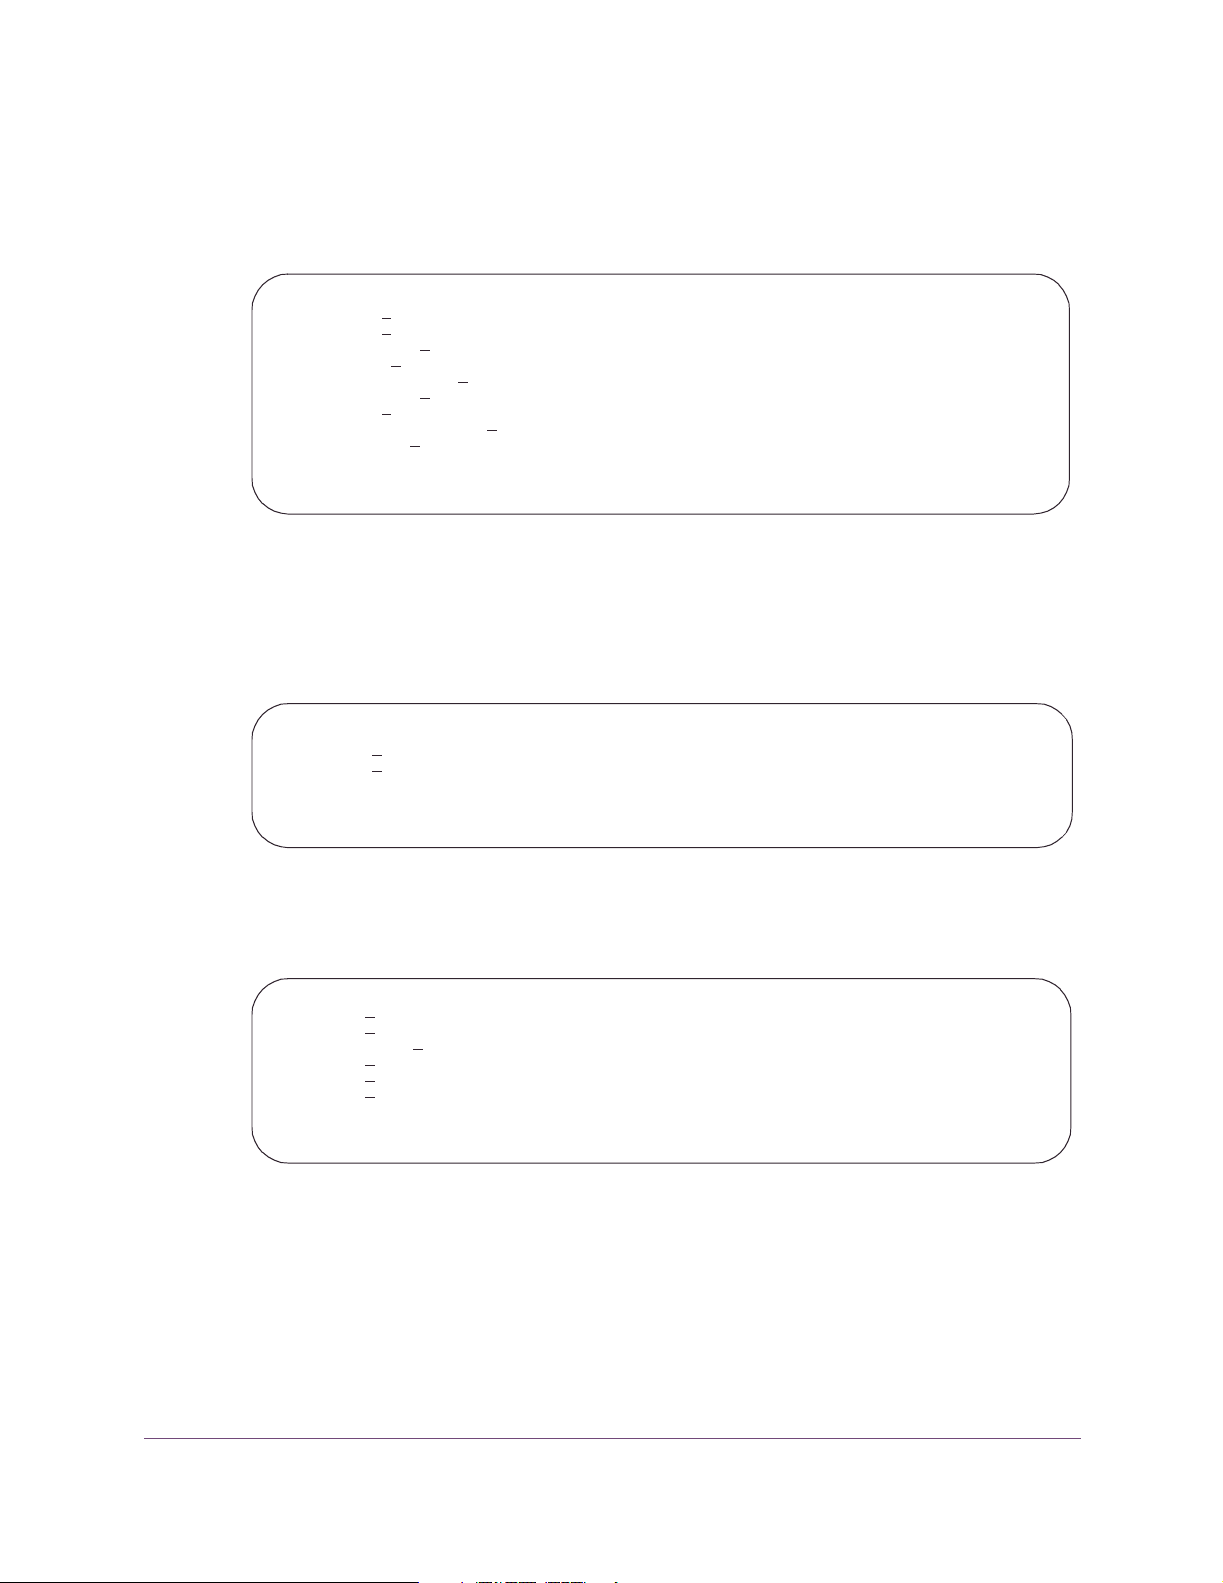
The Options pull-down menu enables you to customize OMEGAMON II. You can change
the panel display, select a different startup profile, set thresholds, and assign user
authorities.
1. Preferences...
2. C
3. Set t
4. Au
5. User Prof
6. Subsy
7. N
8. Save SQL Tex
9. D2/E
F1=Help F12=Cancel
Note: Additional options may be available from other panels.
Tools pull-down
The Tools pull-down menu allows you to access OMEGAMON II tool facilities. You can
select Application Trace or Object Analysis.
ontrols...
hresholds...
thority List...
ear-term Thread History Filter...
iles...
stem Profiles...
t Parameters...
xplain Parameters...
_ 1. Application Trace Facility
2. D
F1=Help F12=Cancel
Help pull-down
The Help pull-down menu provides access to the help facilities in OMEGAMON II.
_ 1. Help for help...
2. K
3. Help i
4. G
5. A
6. U
F1=Help F12=Cancel
B2 Object Analysis Facility
eys help...
ndex...
lossary...
bout...
ser Information...
32 OMEGAMON II for DB2 User’s Guide: CUA Interface, Version 540
Page 33

Action Codes
Action codes let you easily analyze the performance of your DB2 subsystem by allowing
you to get more information about or perform actions on panel objects. You can use
action codes as an alternative to using the Actions menu.
Available action codes
You can use these action codes in OMEGAMON II.
Action Code Description
Show Details S Shows more detail about the selected item.
Analyze Problems A Provides information about
Near-term History H Shows statistical data about recent DB2 activity.
I
causes of warning or critical conditions
I
existing threshold settings
I
current values which are compared to existing thresholds
Action Codes
Control L Allows you to change threshold values and turn on and off
Using an action code
To use an action code on a panel object:
I
Type the action code letter in the entry field of the panel object, and press Enter.
Result: Another data panel appears, depending on the action code you entered.
monitoring for specific exceptions.
Getting Started 33
Page 34

Function Keys
Function Keys
Function keys enable you to perform certain tasks in OMEGAMON II. These keys are
displayed along the bottom line of the panel. Each panel lists the available function keys
and their assignments for the current panel. If your panel does not display the function
keys, press F2 to turn on the display.
Function key assignments
The default function key assignments are listed below.
Function
Key
F1 Help Displays a help window for the current panel, pull-down menu,
F2 Keys Turns on (or off) the function key display at the bottom of the
F3 Exit Exits the current panel, saving all changes made to any of the
F4 Prompt Displays a list of valid selections for an input field, or toggles
F5 Refresh Updates the panel with current data.
F6 DB2 Console Goes to the DB2 or MVS console where you can issue DB2 or
F7 Backward Scrolls backward if there are more lines of information than can fit
F8 Forward Scrolls forward if there are more lines of information than can fit
Name Assignment
pop-up window, or field.
panel.
fields, and returns you to a previous panel.
From System Status panel, exits the product.
between two selections, such as ON/OFF. Promptable fields are
denoted with a plus (+) sign.
MVS commands.
on the screen. If you cannot scroll backward, two asterisks
(**=Bkwd) appear instead of this function key.
on the screen. If you cannot scroll forward, two asterisks
(**=Fwd) appear instead of this function key.
F9 Retrieve Retrieves the last command from the DB2 or MVS console.
F10 Action bar Moves the cursor back and forth between the action bar and the
panel body.
F11 Logon Options Displays the Logon Options panel. (Only available from the Sign
On panel.)
F12 Cancel Exits panel without saving any data that was entered since you last
pressed Enter. Backs up one panel at a time.
F15 System Status Returns to the System Status panel.
F20 Repeat Repeats the last command from the DB2 or MVS console.
34 OMEGAMON II for DB2 User’s Guide: CUA Interface, Version 540
Page 35

Function Keys
Function
Key
F21 Process SQL Copies SQL statements from the SQL Call Being Executed panel
F24 CUA/TSO Toggles between the CUA interface and a TSO session. (The
PA1 Switch Displays a selectable list of OMEGAMON sessions defined to
PA2 OMEGAVIEW Returns to the OMEGAVIEW status panel. Returns to the CUA
Name Assignment
or from the SQL Text panel and pastes them into a specified
destination. (This function key assignment may differ at your site.)
From the DB2 or MVS console, retrieves and executes the last
command.
assigned key may be different at your site.)
OMEGAVIEW.
interface, if you zoomed from CUA to the classic interface. (The
assigned key may be different at your site.)
Note: F5, F9, and F11 are assigned differently on Help panels. See “Help function keys”
on page 38 for a description of these keys.
Getting Started 35
Page 36
Getting Help
Getting Help
Help from a panel
Panel help is available for all panels. To obtain help for a panel:
I
Move the cursor to a non-input field, and press F1.
Result: The associated help panel appears.
The word More+, More-, or More-+ in the upper right corner of a help window
indicates that you can scroll. When you have finished viewing the help window, press F12
to return to the previous panel, or press F3 to exit Help.
Help from the action bar
The Help choice on the action bar provides a menu listing all the types of help
information available in OMEGAMON II.
To access help from the action bar:
I
Ty pe H in the action bar entry field, or move the cursor to the entry field next to Help,
and press Enter.
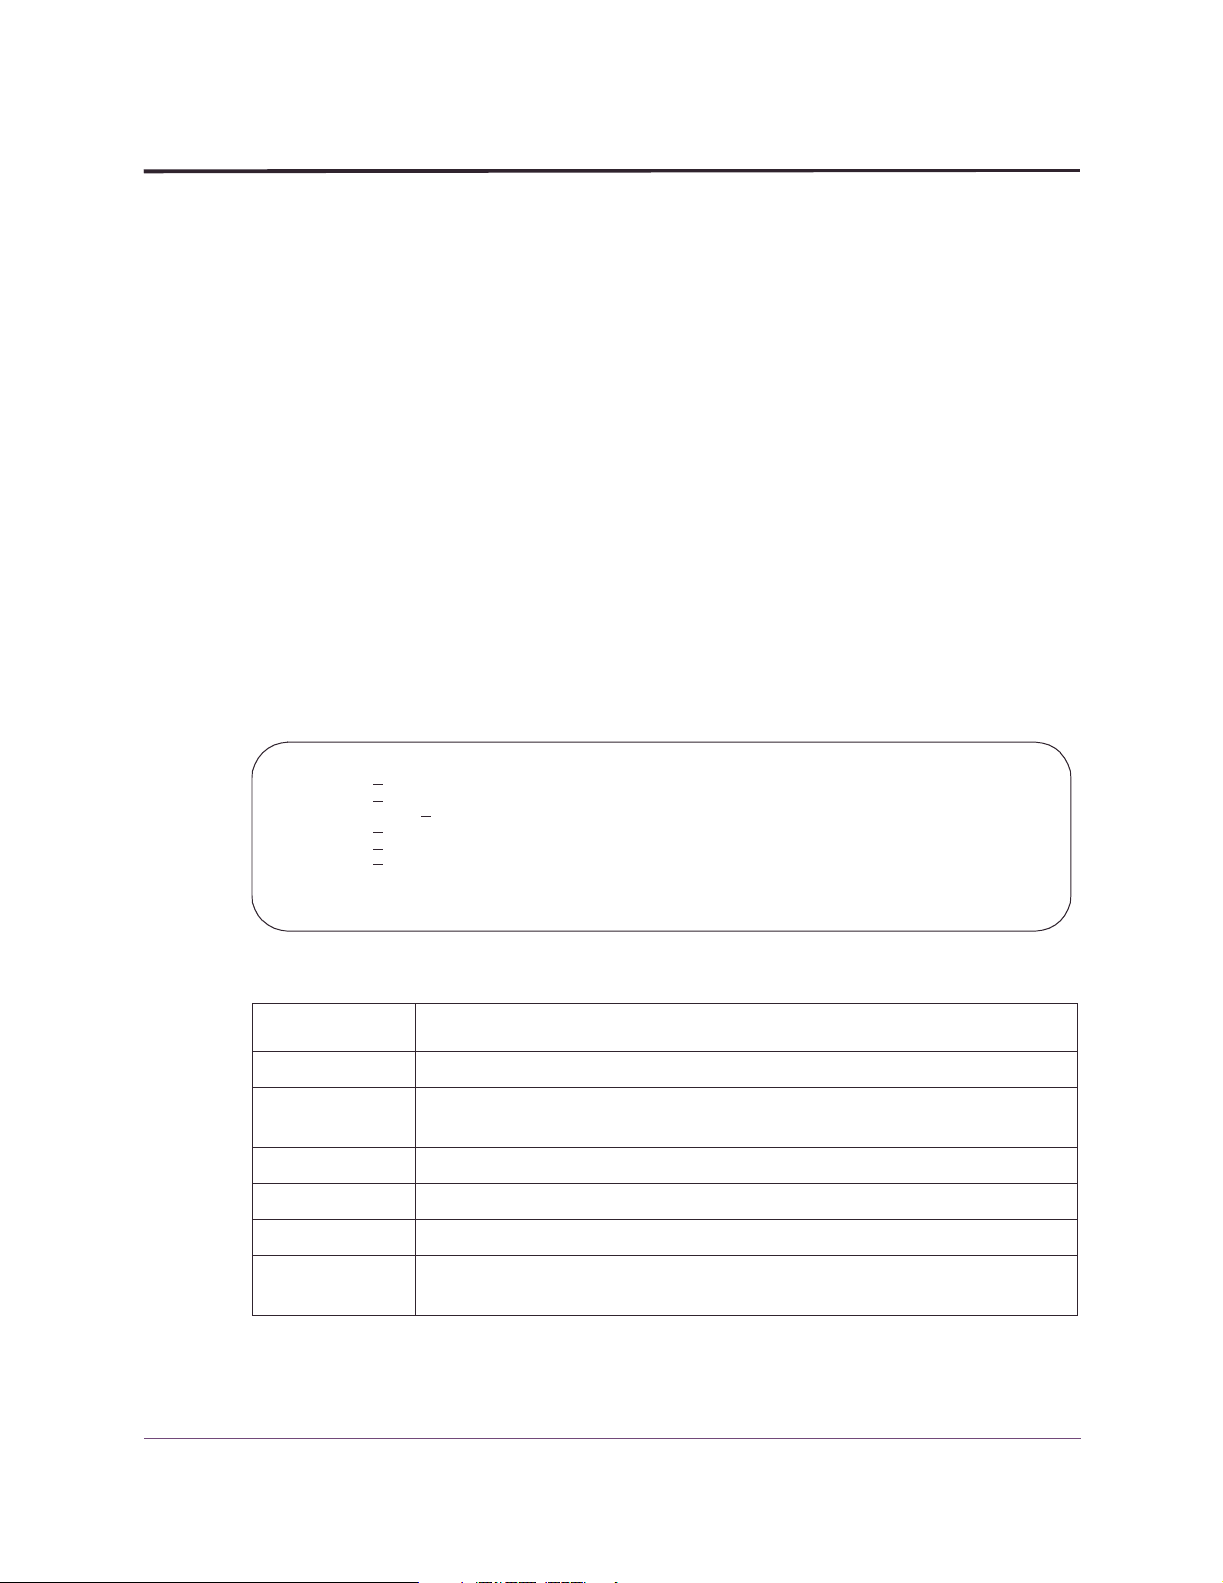
Result: The Help menu appears, as shown below.
_ 1. Help for help...
2. Keys help...
3. Help index...
4. G
5. About...
6. User Information...
F1=Help F12=Cancel
lossary...
The help menu provides the following selections:
Selection Description
Help for help Explains how to navigate through the OMEGAMON help panels.
Keys help Describes the function keys and special purpose keys used in the help
system.
Help index Provides an index of help information.
Glossary Defines words and phrases used in help panels.
About Shows logo, copyright, and product version information.
User information Shows information about your current session such as user ID, terminal ID,
system ID, VTAM logmode name, and current ACB name.
36 OMEGAMON II for DB2 User’s Guide: CUA Interface, Version 540
Page 37
Using the Glossary
The glossary contains definitions of terms used in OMEGAMON II. The glossary is
available from any help window or from any panel through the Help menu.
There are three ways to access the glossary.
IF you are... THEN...
on the action bar of any panel enter fast path hg to bypass the Help menu and go straight to
in a help window press F5
Getting Help
the glossary
in a help window containing a
highlighted phrase
Searching the glossary
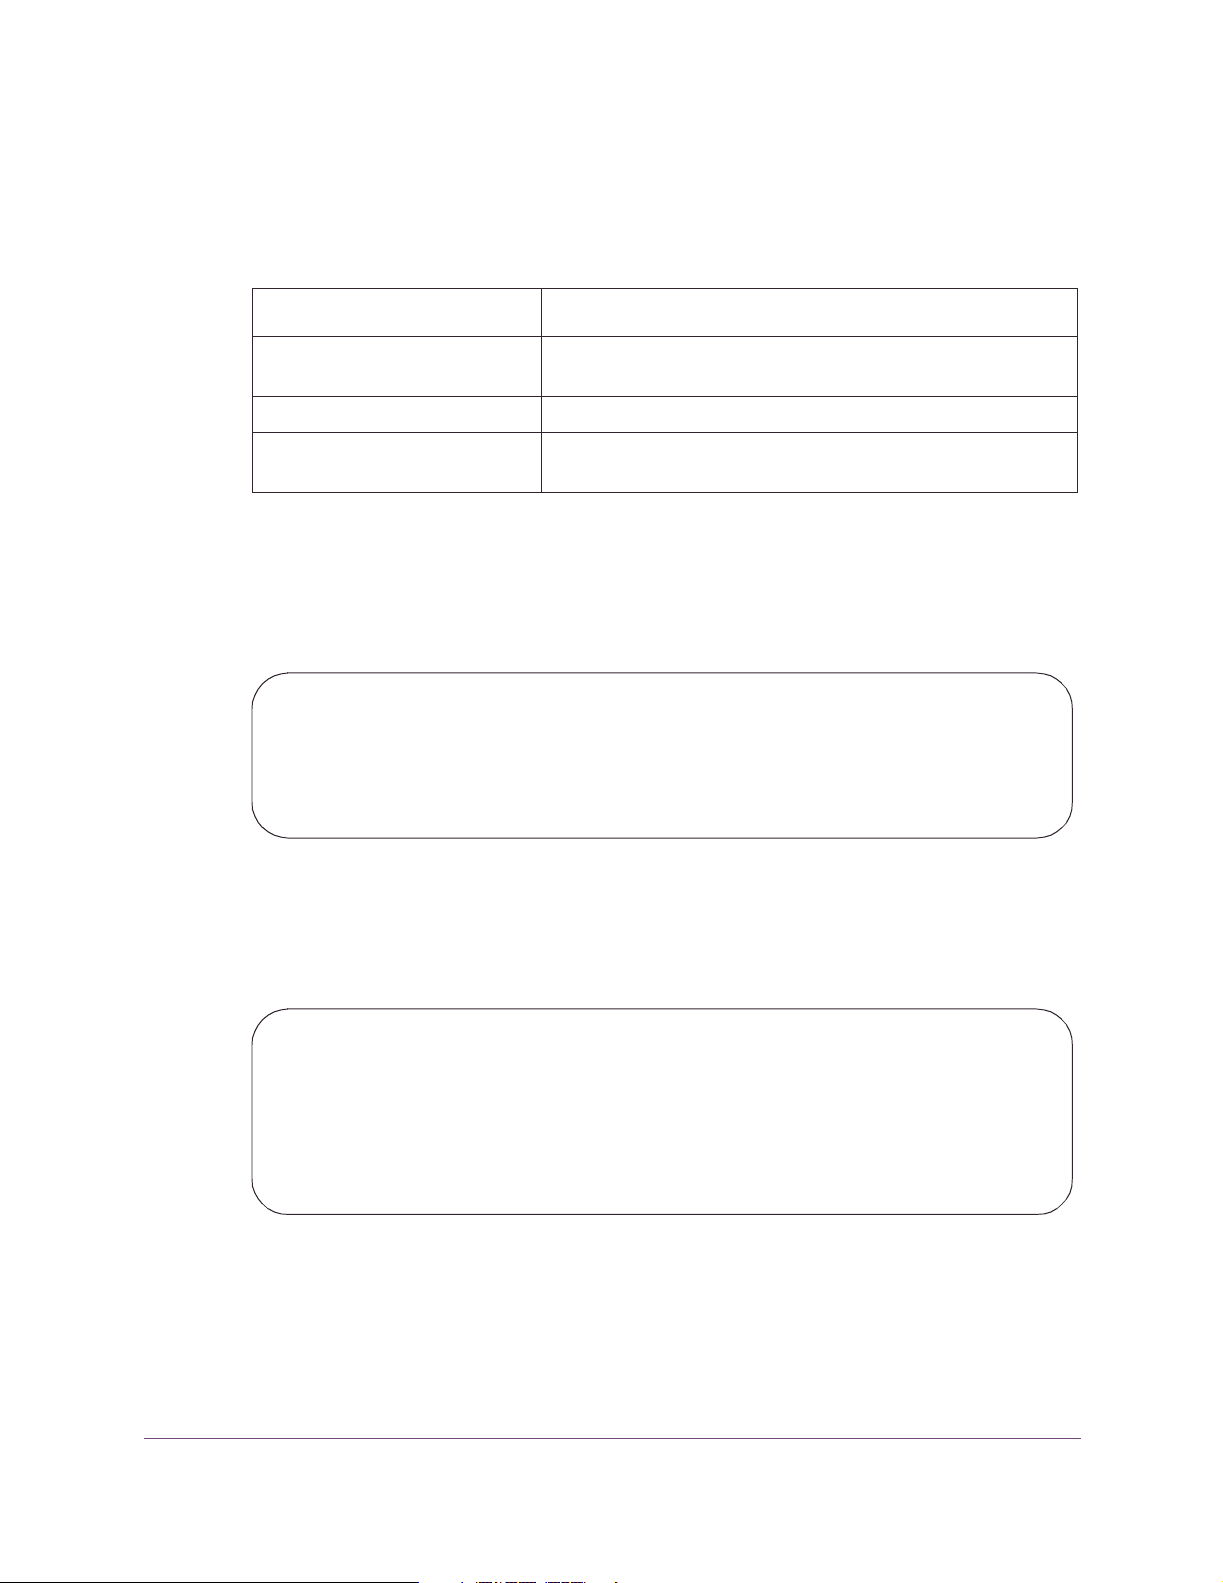
The glossary allows you to search for a specific term without scrolling through the list of
entries.
1. Press F6 to display the Search Glossary window.
Search Glossary
Type a search term, then press Enter.
Search term . . drain
F1=Help F3=Exit F12=Cancel
2. Type in the term that you want to find (drain, in the example), and press Enter.
Result: All glossary entries containing the word drain appear.
3. Select from the list, and press Enter.
Result: The glossary definition of drain appears, as shown in the figure below.
tab to the phrase, and press Enter
Glossary Term - Drain
To acquire a locked resource by quiescing access to
that object.
F1=Help F2=Ex Help F3=Exit F9=Keys F11=Index
F12=Cancel
Getting Started 37
Page 38

Getting Help
Help function keys
The following table describes how function keys work within the help system.
Function
Key
F1 Field level help Displays field-level help if pressed on an entry field. Displays
F2 Extended help Displays additional help information.
F3 Exit Exits the help system.
F5 Glossary Accesses the glossary.
F6 Search Enables you to search the glossary or help index for a
F7 Backward Scrolls backward.
F8 Forward Scrolls forward.
F9 Function keys help Describes the assignments for each function key.
F11 Index Displays the help index.
F12 Cancel Cancels the current window.
Name Assignment
panel-level help if pressed outside an entry field.
Note:
particular term or phrase.
Field-level help is not available for all entry fields.
38 OMEGAMON II for DB2 User’s Guide: CUA Interface, Version 540
Page 39

2
Chapter Contents
Introduction . . . . . . . . . . . . . . . . . . . . . . . . . . . . . . . . . . . . . . . . . . . . . . . . . . . . . . . . 40
Specifying Panel Preferences. . . . . . . . . . . . . . . . . . . . . . . . . . . . . . . . . . . . . . . . . . . . 41
Specifying Terminal Options. . . . . . . . . . . . . . . . . . . . . . . . . . . . . . . . . . . . . . . . . . . . 43
Setting Thresholds . . . . . . . . . . . . . . . . . . . . . . . . . . . . . . . . . . . . . . . . . . . . . . . . . . . 46
Assigning User Authorities . . . . . . . . . . . . . . . . . . . . . . . . . . . . . . . . . . . . . . . . . . . . . 48
Maintaining Profiles . . . . . . . . . . . . . . . . . . . . . . . . . . . . . . . . . . . . . . . . . . . . . . . . . . 49
Setting Filtering Options for Near-Term Thread History. . . . . . . . . . . . . . . . . . . . . . . . 54
Specifying Save Options for SQL Text . . . . . . . . . . . . . . . . . . . . . . . . . . . . . . . . . . . . 56
Using the Callable Interface . . . . . . . . . . . . . . . . . . . . . . . . . . . . . . . . . . . . . . . . . . . . 57
Customizing OMEGAMON II
Customizing OMEGAMON II 39
Page 40

Introduction
Introduction
You can adjust many features of the OMEGAMON environment to meet your work and
system requirements. All customization options are available from the Options pull-down
menu.
To a cc es s the Opt io ns me nu :
I
Select Options from the action bar.
Result: The Options menu appears.
1. Preferences...
2. C
3. Set thresholds...
4. Authority List...
5. User Prof
6. Subsy
7. N
8. Save SQL Tex
F1=Help F12=Cancel
ontrols...
iles...
stem Profiles...
ear-term Thread History Filter...
t Parameters...
40 OMEGAMON II for DB2 User’s Guide: CUA Interface, Version 540
Page 41
Specifying Panel Preferences
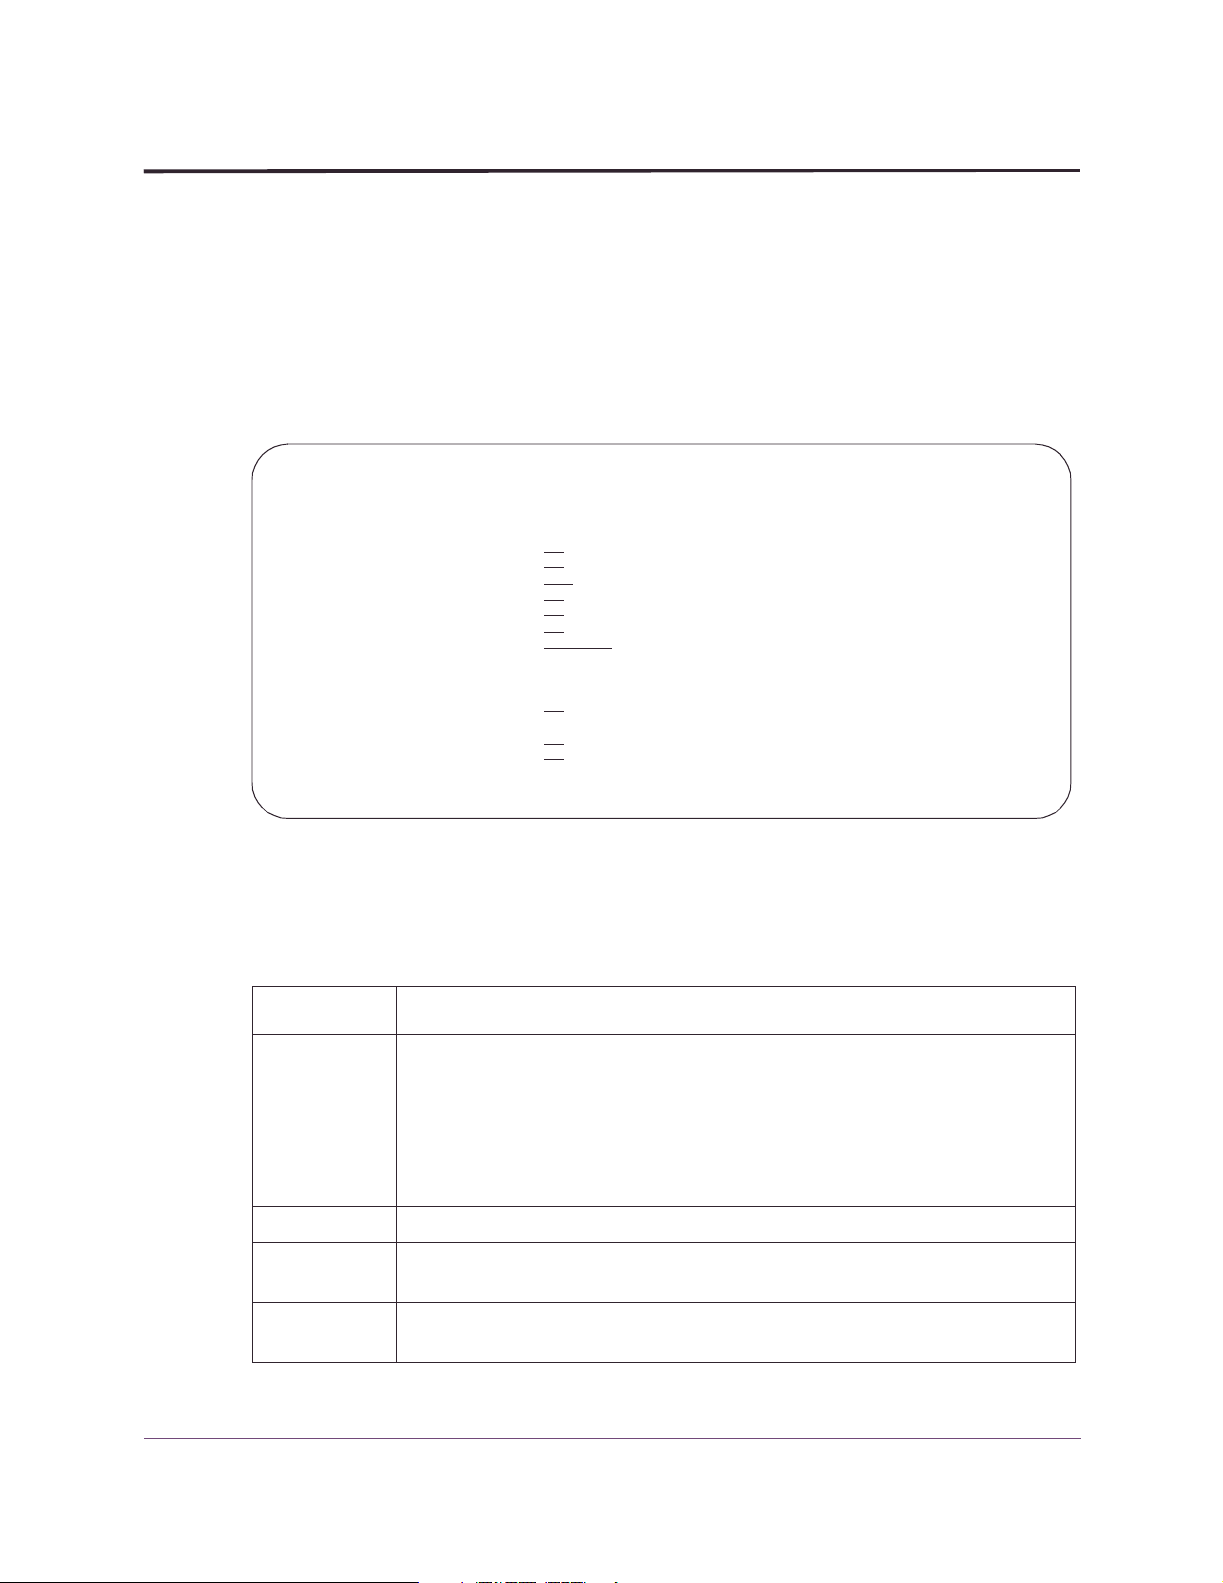
Use the Preferences pop-up window to customize the appearance of information on
OMEGAMON II panels.
Accessing the Preferences window
To access the Preferences pop-up window:
I
Select Preferences from the Options menu.
Result: The Preferences window appears.
Preferences
Type any changes, then press Enter.
Mnemonics . . . . . . . On
Beep . . . . . . . . . On
Panel ID. . . . . . . . Off + On/Off
Time/Date Display . . . On_ + On/Off
Function Key Area . . . On
Implicit Action . . . . On_ + On/Off
National Language . . . English_ +
Date Format . . . . . . mm/dd/yy +
Time
Format . . . . . . . 24
Separator character . :
Morning indicator . . AM
Afternoon indicator . PM
F1=Help F4=Prompt F12=Cancel
Specifying Panel Preferences
_ + On/Off
_ + On/Off
_ + On/Off
+ 12/24 hour
You are now ready to specify your preferences for OMEGAMON II panel features.
Using the Preferences window
The following table describes the fields on the Preferences pop-up window.
Field Description
Mnemonics Enables fast path access to the menus and submenus of the action bar choices.
For example, if you are at the System Status panel and want to go quickly to
the DB2 Installation Parameter panel, type GD (G for Goto, D for DB2
Installation Parameters) in the entry field of the action bar, and press Enter.
If you select Off, the action bar entry field does not appear and you must tab
to the choice, and press Enter.
Beep Enables the terminal to beep when OMEGAMON II detects invalid input.
Panel ID Displays the panel ID for the current panel in the upper-left portion of the
panel.
Time/Date
Display
Displays the time and date on the right side of the action bar separator line.
Customizing OMEGAMON II 41
Page 42

Specifying Panel Preferences
Field Description
Function Key
Area
Displays a list of the currently available function keys at the bottom of the
panel.
Implicit Action Allows for an implicit action for selectable items on a display panel. If you
select On, a default action occurs when you place the cursor on an entry field,
and press Enter.
If you select Off, you must type an action code in the entry field for an
action to occur.
National
Language
Date Format Specifies the date format you want to use for your session. For example,
Time Format Specifies the time format you want to use for your session.
Time
Separator
Character
Morning
indicator
Afternoon
indicator
Controls the language you want to use for your session.
mm/dd/yy or dd.mm.yy.
I
Type 12 to use the 12 hour format.
I
Type 24 to use the 24 hour format.
Specifies a character that is inserted between the hours, minutes, and seconds
portion of the time stamp.
Specifies the morning time indicator when you select the 12 hour format. You
can use any two characters.
Specifies the afternoon time indicator when you select the 24 hour format. You
can use any two characters.
42 OMEGAMON II for DB2 User’s Guide: CUA Interface, Version 540
Page 43

Specifying Terminal Options
Use the Terminal Options pop-up window to customize settings for the CUA interface.
Accessing the Terminal Options window
To access the Terminal Options pop-up window:
I
Select Controls from the Options menu.
Result: The Terminal Options window appears.
KD2PTRMP Terminal Options
Type a new setting or press Enter.
Auto Refresh Interval . . . OFF
Use Status Words . . . . . . YES
Critical Status Word . . . . Crit
Warning Status Word . . . . Warn
Normal Status Word . . . . . OK
Idle Status Word . . . . . . Idle
Display threads by: . . . . PLAN
SQL Process Level . . . . . Manual +
SQL Process PF Keys . . . . F21
CUA/TSO Toggle Key . . . . . F24 +
F1=Help F4=Prompt F12=Cancel
Specifying Terminal Options
Sec. (5-999 / Off)
+(Yes/No)
+
+
You are now ready to specify your preferences for the OMEGAMON II terminal options.
Using the Terminal Options window
The following table describes the fields on the Terminal Options pop-up window.
Field Description
Auto Refresh
Interval
Use Status Words On color terminals, color status bars represent the performance of status
Critical Status
Word
Warning Status
Word
Normal Status
Word
Amount of time between updates to panels that display performance
information. OMEGAMON II collects performance data continually and
displays the new data automatically at the frequency you enter in this field.
items. You also can specify a word or a series of characters to appear for
each level of status. The word or characters appear in a row within the
colored status bar. On noncolor terminals only the word, or characters,
appear.
Word you want to appear when OMEGAMON II displays a critical status
(red). For example: Crit.
Word you want to appear when OMEGAMON II displays a warning status
(yellow). For example: Warn.
Word you want to appear when OMEGAMON II displays a normal status
(green). For example: OK.
Customizing OMEGAMON II 43
Page 44

Specifying Terminal Options
Field Description
Idle Status Word Word you want to appear when OMEGAMON II is not monitoring an object
(turquoise). For example: Idle.
Display Threads
by:
SQL Process
Level
Values for the
SQL Process
Level are
described in the
following table.
To display plan names on thread summary displays, enter PLAN in this
field. To display package names on thread summary displays, enter PACK.
Options available for copying, pasting, and saving SQL text. You can copy
or save text by pressing the SQL Process PF Key.
You can process SQL from the following screens:
I
SQL Call being Executed (Thread Detail). See “EXPLAINing SQL
Code” on page 61
I
SQL Text (ATF). You can access the SQL Text screen through the
.
application trace facility. Select the SQL TEXT pushbutton from the
Application Trace SQL Detail screen.
I
Thread History Dynamic SQL Detail
SQL Process PF
Key
If you have set up !DB/EXPLAIN for direct access, pressing this PF key will
directly invoke !DB/EXPLAIN. Otherwise, it will invoke the SQL copy and
paste facility to perform the EXPLAIN.
CUA/TSO Toggle
Use to toggle between CUA and TSO sessions.
Key
The following table provides a list of fields and valid values for completing the SQL
Process Level field on the Terminal Options panel.
Values for SQL
Process Level
Description
MANUAL After you have selected the SQL text to be EXPLAINed, you must use the PF
key defined (SQL Process Key) to copy the SQL. Then switch to TSO/ISPF
(CUA/TSO toggle), and paste the SQL, again using the PF key you defined.
Note:
To use MANUAL or AUTO, a TSO/ISPF edit session must be
active in the background.
AUTO After selecting SQL text, use the SQL Process key to copy and automatically
insert the text into the member currently in use in the TSO/ISPF edit session.
The placement of SQL text depends on the cursor position within the
TSO/ISPF session.
Note:
To use MANUAL or AUTO, a TSO/ISPF edit session must be
active in the background.
SAVE After selecting the SQL text, use the SQL Process key to copy and
automatically save the SQL text to the partitioned dataset member defined
on the Save SQL Text Parameters panel. Text will either overwrite the
existing contents of the member or be appended to it, depending on the type
of save defined on the same panel. This option does not require a TSO/ISPF
edit session.
EXPLAIN This option invokes !DB/EXPLAIN, which produces a variety of
!DB/EXPLAIN reports. Use the pushbuttons to view the various report
sections. Complete the required options for the EXPLAIN option on the
!DB/EXPLAIN panel.
44 OMEGAMON II for DB2 User’s Guide: CUA Interface, Version 540
Page 45
Specifying Terminal Options
Values for SQL
Process Level
SAVE/EXPLAIN Use this option to perform SAVE and EXPLAIN functions. Complete the
required fields for the SAVE/EXPLAIN option.
Saving Terminal Options
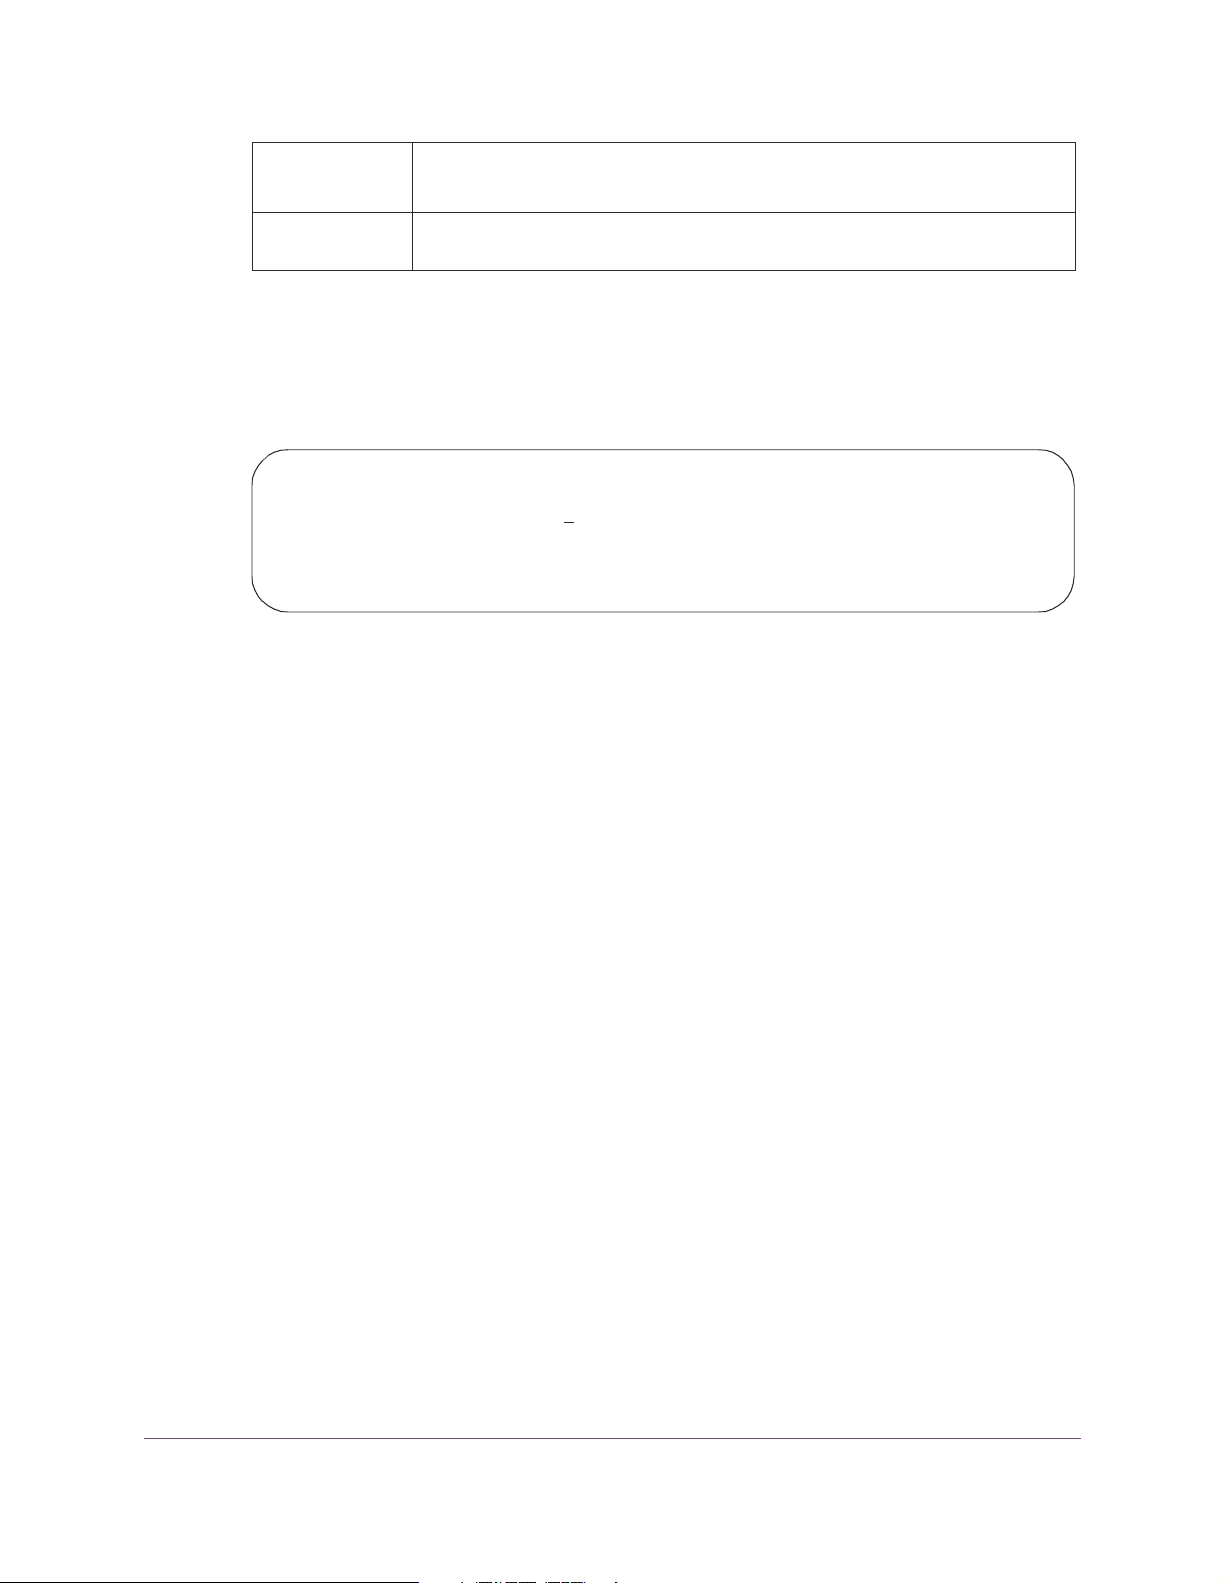
When you finish entering your terminal preferences:
I
Press Enter.
Result: The Save Profile Confirmation pop-up window appears.
Save Profile Confirmation
1.- Save values for this s
2.- Save values into profile
F12=Cancel
Saving for current session
To use the new terminal options only for the current session:
I
Select Save values for this session only.
Result: The new terminal options are used only for your current session, and the
active profile is not changed.
Description
ession only
Saving to a profile
If you own the currently active user profile or you have authorization, you can save the
new terminal options to the profile.
To save the new terminal options to the active profile:
I
Select Save values into profile, and press Enter.
Result: The new terminal options become active for the current session and are
saved in the user profile.
Note: If you do not have authorization, the Save values into profile option is not
available to you. See “Assigning User Authorities” on page 48.
Customizing OMEGAMON II 45
Page 46

Setting Thresholds
Setting Thresholds
Use the Set Thresholds option window to set performance standards for your subsystem.
Accessing the Thresholds window
To access the various thresholds windows using the Set Thresholds option, follow these
steps:
Step Action
1 Select Set Thresholds from the Options pull-down menu.
Result: The Threshold Index menu appears.
2 Select one of the following, and press Enter:
I
Workloads
Result: The Workloads Index menu appears.
I
Resources
Result: The Resource Index menu appears.
I
Alerts
Result: The Alerts Index menu appears.
3 Select the workload, resource, or alert whose threshold values you want to change,
and press Enter.
Result: A pop-up window with the setting for that selection appears. For example, if
you select Active Threads from the Alerts Index menu, the Active Threads Thresholds
pop-up window appears.
Using the thresholds windows
Follow these steps to change threshold values:
Step Action
1 Change any Warning or Critical threshold value as necessary.
2 Enter either Yes or No in the Monitor column to turn monitoring on or off for a
particular exception. If you turn off monitoring for all exceptions for the status item,
then the status is Idle, and the color bar on color terminals is turquoise.
46 OMEGAMON II for DB2 User’s Guide: CUA Interface, Version 540
Page 47
Saving threshold values
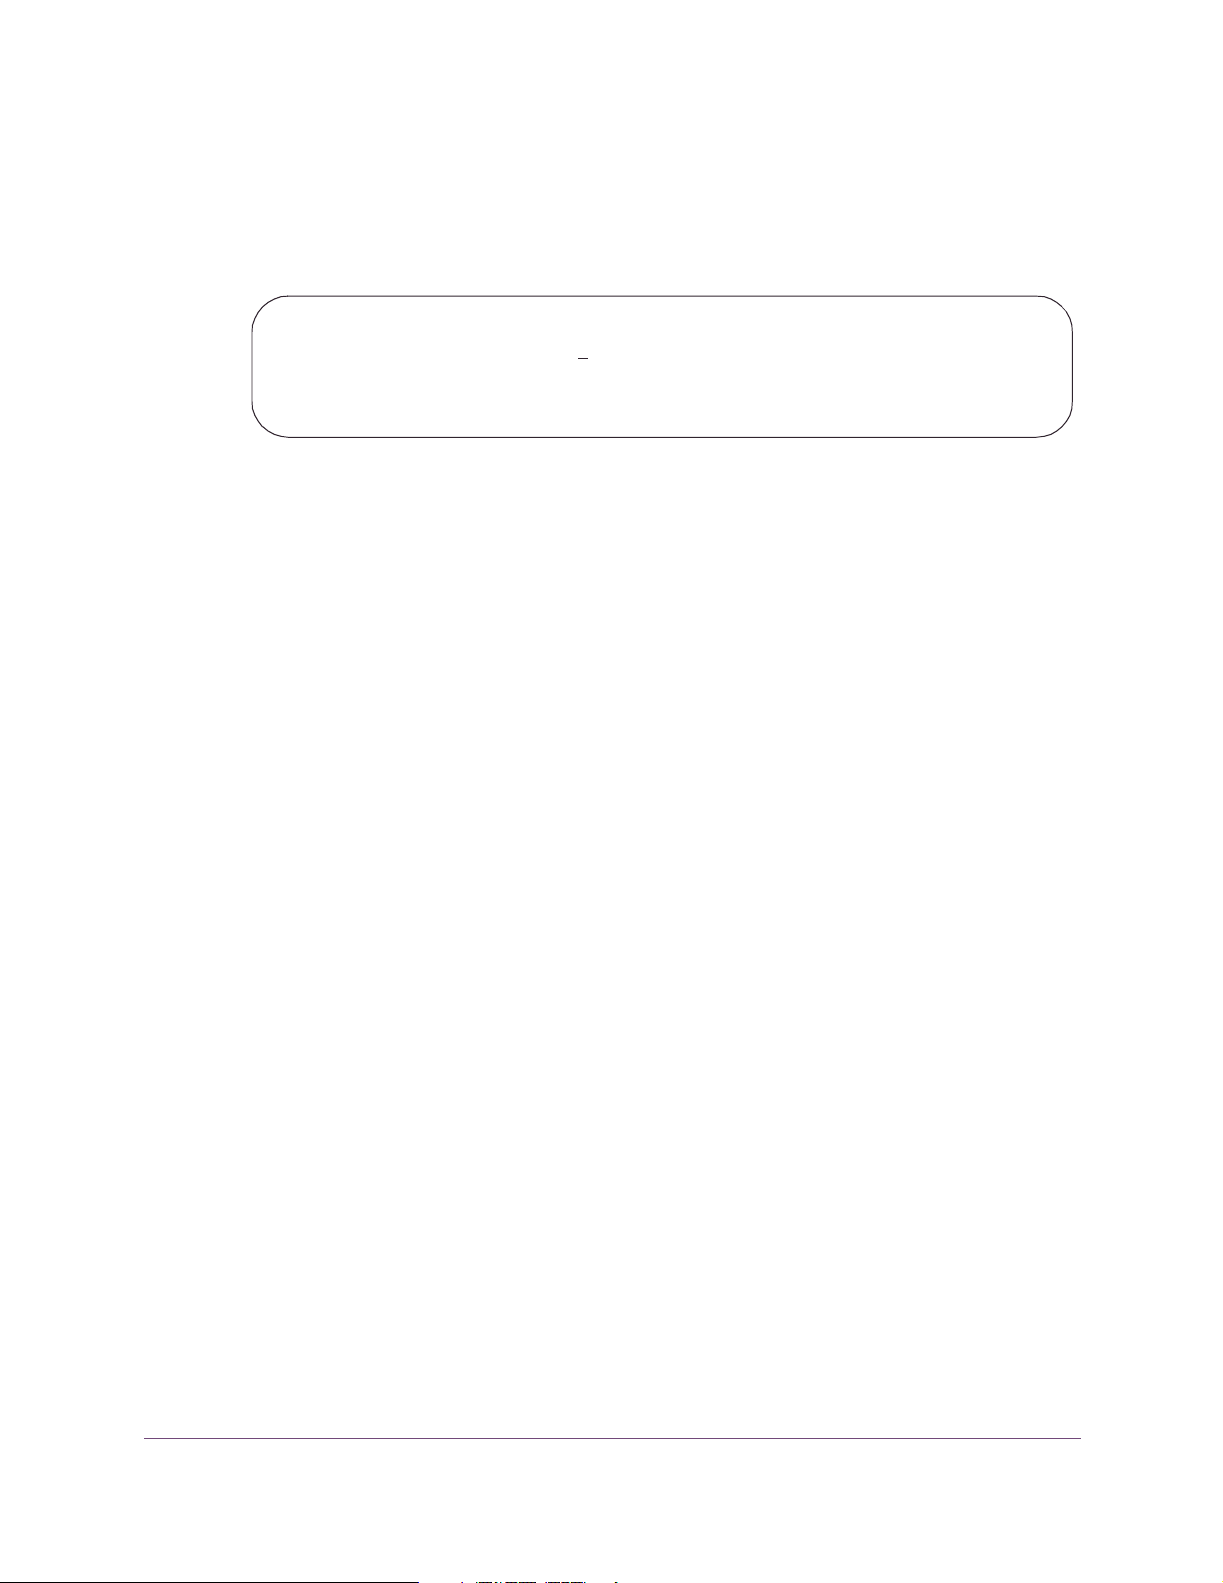
When you finish entering your threshold values:
I
Press Enter.
Result: The Save Profile Confirmation pop-up window appears.
1.- Save values for this session only
2.- Save values into profile
F12=Cancel
Saving for current session
To use the new threshold values only for the current session:
I
Select Save values for this session only, and press Enter.
Result: The new thresholds are used only for your current session, and the subsystem
profile is not changed.
Setting Thresholds
Saving to a profile
If you have authorization, you can save the new threshold values in the subsystem profile.
To save the new threshold values in the subsystem profile:
I
Select Save values into profile, and press Enter.
Result: The new threshold values become active for the current session and are
saved in the subsystem profile.
Note: If you do not have authorization, the Save values into profile
available to you. See “Assigning User Authorities” on page 48.
option is not
Customizing OMEGAMON II 47
Page 48

Assigning User Authorities
Assigning User Authorities
The system administrator at your site has access to all user and subsystem profile
maintenance functions and can perform profile maintenance functions for other users.
The system administrator also can authorize other users to perform profile maintenance
functions.
The ID of the first person to log on to the CUA interface of OMEGAMON II automatically
becomes an authorized user. This person then can add other user IDs to the list as
needed.
Accessing user authorities
To access the Specify User Authorities pop-up window:
I
Select User Authorities from the Options pull-down menu.
Result: The Specify User Authorities window appears. Unauthorized users can view
this list, but cannot make any changes.
Specify User Authorities
To add a new user type the ID, Comment and press ENTER.
D = Delete
Lines 1 to 4 of 4
ID Comments
-------- -------------------------------------------
________ ___________________________________________
TDMX07
TDO213
TDTDA3
TDTD88
F1=Help F12=Cancel **=Bkd **=Fwd
Adding a user
To assign user authority to an OMEGAMON II user:
I
Type the user ID and comment on the blank lines, and press Enter.
Result: The user ID is added to the list of users authorized to perform profile
maintenance functions for all profiles.
Deleting a user
To delete a user ID from the authorized user list:
I
Ty pe D next to the ID you want to delete, and press Enter.
Result: The user ID is deleted from the list. This user is no longer authorized to
perform profile maintenance functions for all profiles.
48 OMEGAMON II for DB2 User’s Guide: CUA Interface, Version 540
Page 49

Maintaining Profiles
OMEGAMON II allows you to switch, copy, delete, and modify user profiles and
subsystem profiles.
Profile types
OMEGAMON II uses three different profiles.
Profile Description
Startup Contains values specified on the Logon Options panel. Used during the logon
process. Startup profiles cannot be shared among users.
User Contains values specified on the Terminal Options panel. Although users should
have their own user profiles, profiles can be shared among users.
Subsystem Contains threshold values. Subsystem profiles can be shared among users. Each
DB2 subsystem should have its own customized subsystem profile, named with
the subsystem ID. If you enter $DEFAULT for the name of the subsystem profile,
OMEGAMON II automatically selects the subsystem profile that matches the ID of
the subsystem being monitored.
Maintaining Profiles
Accessing profile maintenance
You can perform profile maintenance as follows:
To access the User Profile Maintenance panel:
I
Select User Profiles from the Options menu, and press Enter.
Result: The User Profile Maintenance panel appears.
------------------------------------------------------------ mm/dd/yy 18:00:52
User Profile Maintenance System: D41B
+---------------------------------------------------------------------------+
|Current user profile : TDTDA3($DEFAULT) |
+---------------------------------------------------------------------------+
Type an action code and press Enter.
C=Copy D=Delete M=Modify description S=Switch a Profile
Lines 1 to 10 of 10
+---------------------------------------------------------------------------+
| Profile name | Description | Owner |
|--------------+---------------------------------------------------+--------|
| _ TDDB40 | user profile | TDDB40 |
| _ TDO213B | user profile | TDO213B|
| _ TDTD45 | user profile | TDTD45 |
| _ TDO214 | user profile | TDO214 |
| _ TDO210 | user profile | TDO210 |
| _ $DEFAULT | Automatic user profile selection | System |
| _ TDO213 | user profile | TDO213 |
| _ TDTDA3 | user profile | TDTDA3 |
| _ TDTD88 | user profile | TDTD88 |
+---------------------------------------------------------------------------+
F1=Help F2=Keys F3=Exit F5=Refresh F6=Console **=Bkwd F8=Fwd
F10=Action Bar F15=System Status F24=CUA/TSO
Customizing OMEGAMON II 49
Page 50
Maintaining Profiles
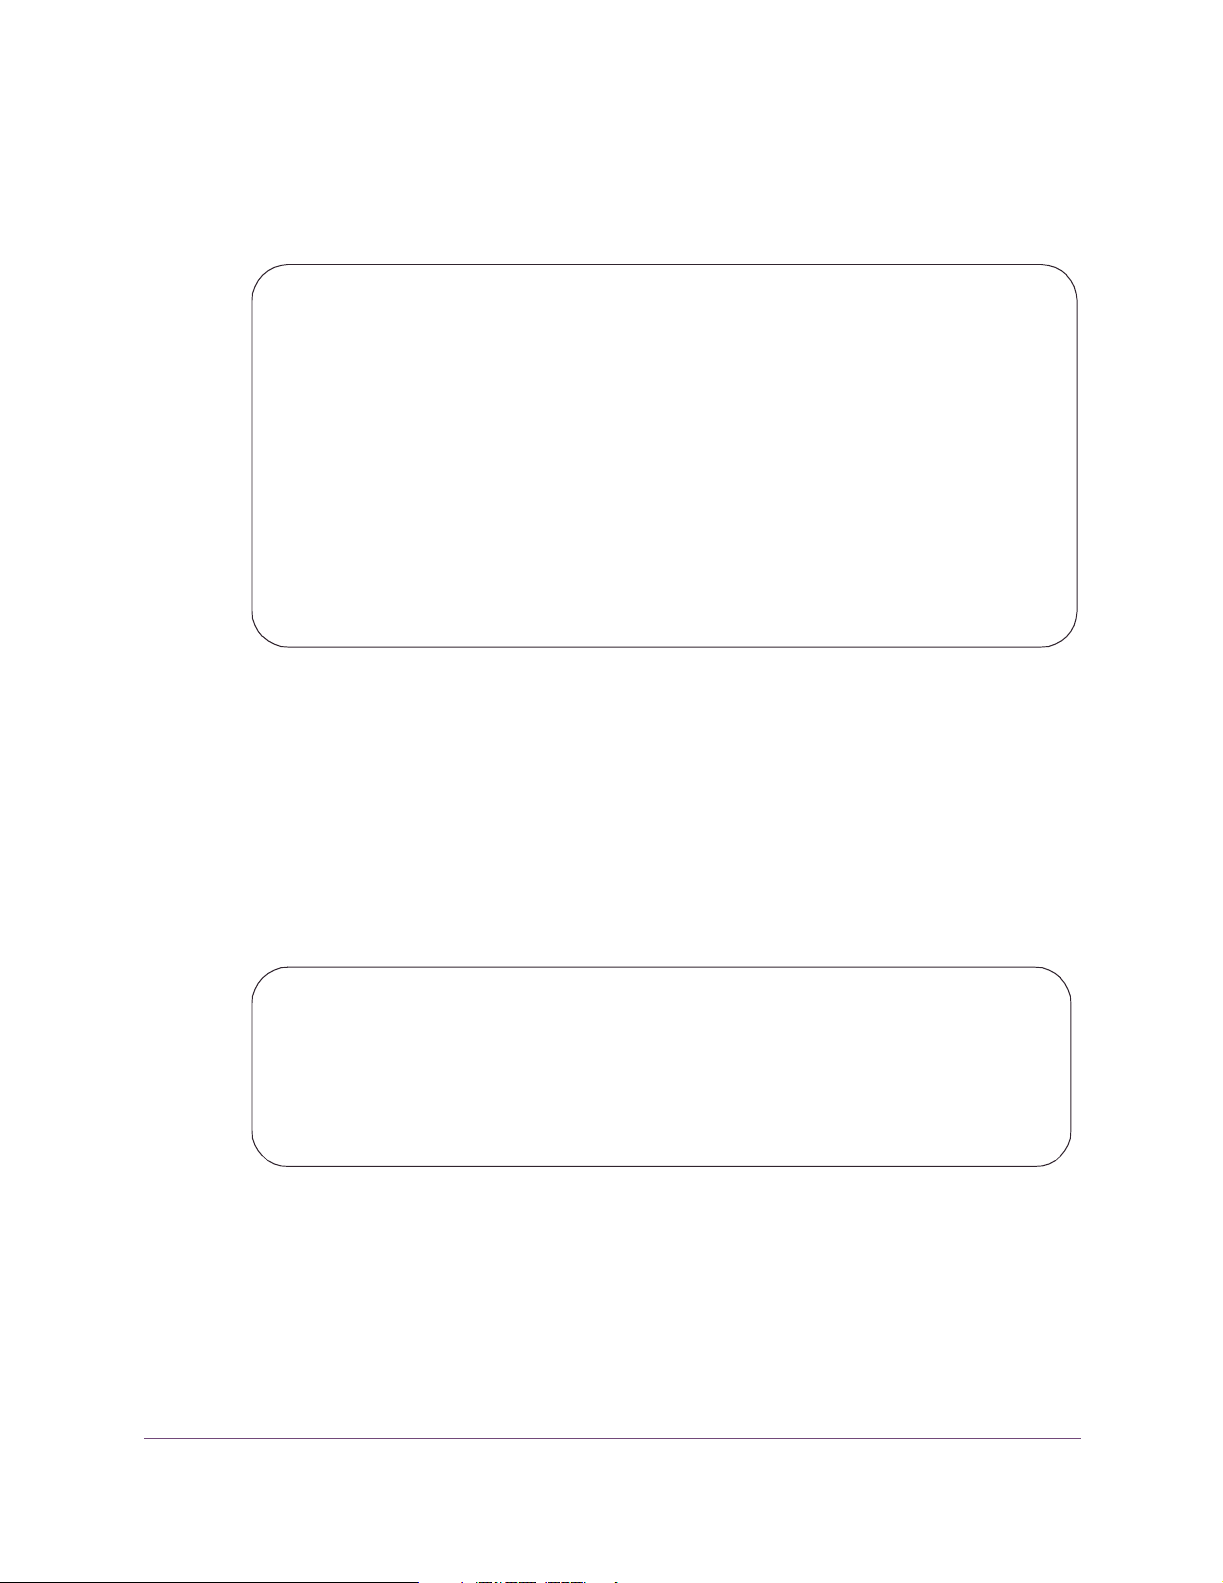
To access the Subsystem Profile Maintenance panel:
I
Select Subsystem Profiles from the Options menu, and press Enter.
Result: The Subsystem Profile Maintenance panel appears.
------------------------------------------------------------- mm/dd/yy 22:45:54
Subsystem Profile Maintenance System: D61B
+----------------------------------------------------------------------------+
|Current subsystem profile : D61A($DEFAULT) |
+----------------------------------------------------------------------------+
Type an action code and press Enter.
C=Copy I=Import a Profile S=Switch to a Profile M=Modify description
D=Delete X=Export a Profile E=Edit a Profile
Lines 1 to 3 of 3
+----------------------------------------------------------------------------+
| Profile name | Description | Owner |
|--------------+---------------------------------------------------+---------|
| _ $DEFAULT | Automatic subsystem profile selection & switching | System |
| _ D411 | subsystem profile for D23B | System |
| _ D61A | subsystem profile for D31A | System |
+----------------------------------------------------------------------------+
F1=Help F2=Keys F3=Exit F5=Refresh F6=Console **=Bkwd F8=Fwd
F10=Action
Copying a profile
You can create a new user or subsystem profile by copying an existing profile and giving
the copy a new name.
Note: If you copy a profile to an existing profile, the values in the existing profile are
To c op y a profile :
1. Typ e
2. Type the name of the new profile, and press the Tab key. (You cannot copy $DEFAULT.)
3. Type a description for the new profile, and press Enter.
C next to the profile you want to copy.
Result: The Copy a Profile window appears.
Copy a Profile
From: Profile . . . D41B
To: Profile . . . ________
Description . __________________________________
F1=Help F12=Cancel
Result: The new profile name and description, with your user ID identifying you as the
owner of the profile, are added to the profile maintenance panel.
overwritten.
50 OMEGAMON II for DB2 User’s Guide: CUA Interface, Version 540
Page 51
Importing a Profile
You can import a profile by copying the partitioned dataset member into the profile. The
MVS Modify command for importing a profile is as follows:
/F OMIIDB2,NTD KD2IMP ‘PDSNAME MEMBER PROFILE’
Where PDSNAME is the name of the source partitioned dataset, MEMBER is the source
partitioned dataset member, and PROFILE is the target profile.
Exporting a Profile
You can export a profile by copying the profile to the target partitioned dataset member.
The MVS Modify command for exporting a profile is as follows:
/F OMIIDB2,NTD KD2EXP ‘PDSNAME MEMBER PROFILE’
Where PDSNAME is the name of the target partitioned dataset, MEMBER is the target
partitioned dataset member, and PROFILE is the source profile.
Deleting a profile
If you own a profile or have authorization, you can delete a profile that is no longer
needed. If you delete a profile that is currently active, sessions that were started with that
profile are not affected.
Maintaining Profiles
To delete a profile:
1. Typ e
D next to the profile you want to delete, and press Enter.
Result: The Delete a Profile window appears.
Delete a Profile
1.- Delete Profile TDTDA3A
2.- Do not delete profile
F12=Cancel
2. Select Delete Profile profile name, and press Enter. (You can not delete $DEFAULT.)
Result: The profile is deleted from the Profile Maintenance panel.
Modifying a profile description
If you own a profile or have authorization, you can modify the description of a profile on
the Profile Maintenance panel.
Customizing OMEGAMON II 51
Page 52
Maintaining Profiles
To modify a profile description:
1. Type
Result: The Modify Description window appears.
Modify Description
Current : User Profile
New : _________________________________________
F1=Help F12=Cancel
2. Type the new description, and press Enter. (You cannot modify the description of
$DEFAULT.)
Result: The profile description is changed on the Profile Maintenance panel.
Switching profiles
At any time during an active session, you can activate a different user and subsystem
profile using the S (Switch) action code.
To switch profiles:
I
Enter S next to the profile you want to switch to, and press Enter.
Result: The profile you selected becomes the active profile. The name of the active
profile appears in the Current User/Subsystem Profile field.
M next to the profile whose description you want to modify and press Enter.
Note: If you select $DEFAULT for a user profile, OMEGAMON II automatically selects
the user profile that matches your ID. If you select $DEFAULT for a subsystem
profile, OMEGAMON II automatically selects the subsystem profile that matches
the ID of the subsystem being monitored.
Using the Dynamic Profile Update Facility
The Dynamic Profile Update Facility lets you dynamically import and export individual
OMEGAMON II profiles to and from a partitioned dataset by creating import and export
dialogs that are invoked externally through MVS.
Observe these considerations when using the import and export dialogs:
I
Invoke KD2EXP and KD2IMP by using the MVS Modify command.
I
Use KD2EXP to export a profile to a partitioned dataset and KD2IMP to import a
profile from a partitioned dataset.
I
When you export a profile, its data is written in a standard format to a partitioned
dataset member.
I
The partitioned dataset should be allocated as fixed blocked, LRECL of 80, and
BLKSIZE of 8880, with an appropriate number of directory blocks.
I
Make sure OMIIDB2, the OMEGAMON II for DB2 started task name, has write
authority to the partitioned dataset.
52 OMEGAMON II for DB2 User’s Guide: CUA Interface, Version 540
Page 53

I
Use importing to reverse the above process to recreate a profile based on the
exported information.
Example command for exporting a profile
The MVS Modify command for exporting a profile is as follows:
/F OMIIDB2,NTD KD2EXP ‘PDSNAME MEMBER PROFILE’
Where PDSNAME is the name of the target partitioned dataset, MEMBER is the target
partitioned dataset member, and PROFILE is the source profile.
Example command for importing a profile
The MVS Modify command for importing a profile is as follows:
/F OMIIDB2,NTD KD2IMP ‘PDSNAME MEMBER PROFILE’
Where PDSNAME is the name of the source partitioned dataset, MEMBER is the source
partitioned dataset member, and PROFILE is the target profile.
Maintaining Profiles
Customizing OMEGAMON II 53
Page 54

Setting Filtering Options for Near-Term Thread History
Setting Filtering Options for Near-Term Thread History
Use the Near-Term Thread History Filter Options pop-up to specify the reporting period
and filtering criteria for data that appears on near-term thread history panels.
Accessing the Filter Options window
To access the Filter Options pop-up window:
I
Select Near-term Thread History Filter from the Options menu.
Result: The Near-Term Thread History Filter window appears.
Near-Term Thread History Filter Options
Oldest Record Latest Record Total Records
--------------------------- --------------------------- -------------
02/15/2001 10:13:09.123456 02/15/2001 16:37:55.123456 45632
Specify options, then press ENTER.
START-DATE/TIME = __________ _____ (mm/dd/yyyy, dd.mm.yyyy, hh:mm)
END-DATE/TIME = __________ _____ (mm/dd/yyyy, dd.mm.yyyy, hh:mm)
RELATIVE-START = __ _____ ago (1-nn, MINS or HOURS)
RELATIVE-END = __ _____ from start (1-nn, MINS or HOURS)
REPORT-INTERVAL = __ minutes (5-60 MINS, in 5 min increments)
Field Operator Values
----- -------- ----------------------------------------------------
PLAN EQ + ________ ________ ________ ________ ________
AUTHID EQ + ________ ________ ________ ________ ________
CONNID EQ + ________ ________ ________ ________ ________
CONNTYPE filtering is accomplished by viewing via Workloads
F1=Help F4=Prompt F12=Cancel
Using the Filter Options window
The following table describes the fields on the Filter Options pop-up window.
Field Description
Start-Date/Time Specify the starting date and time that you want thread information to be
reported. Specify date and time as follows:
DATE mm/dd/yyyy
dd.mm.yyyy
yyyy-mm-dd
TIME hh:mm
hh.mm
End-Date/Time The end date and time of the thread information that is being reported.
54 OMEGAMON II for DB2 User’s Guide: CUA Interface, Version 540
Page 55

Setting Filtering Options for Near-Term Thread History
Field Description
Relative-Start The number of minutes or hours before the current time on which the
reporting period begins. You can specify a relative start instead of an
absolute start date and time.
Relative-End The number of minutes or hours after the start time on which the reporting
period ends. You can specify a relative end instead of an absolute end date
and time.
Report Interval The number of minutes by which the report period is partitioned. You
must specify a value that is a multiple of the subinterval value that is evenly
divisible into 60. The subinterval is the smallest allowable interval
(displayed in parentheses to the right of the input field).
Plan The plan names by which thread history displays are restricted.
Authid The authorization identifiers by which thread history displays are restricted.
Connid The connection identifiers by which thread history displays are restricted.
Conntype The types of workloads that can be connected: CICS, IMS, TSO,
Background, Utility, and Distributed.
Customizing OMEGAMON II 55
Page 56
Specifying Save Options for SQL Text
Specifying Save Options for SQL Text
Use the Save SQL Text Parameters pop-up window to specify options for saving SQL text
to a partitioned dataset.
Accessing the Save SQL Text Parameters window
To access the Save SQL Text Parameters pop-up window:
I
Select Save SQL Text Parameters from the Options window.
Result: The Save SQL Text Parameters Window appears.
Save SQL Text Parameters
SQL Statement PDS . . : _____________________
Member Name . . . . : _____________________
Type of Save. . . . : REPLACE +
F1=Help F4=Prompt F12=Cancel
Using the Save SQL Text Parameters window
The following table describes the fields on the SQL Text Parameters window.
Field Description
SQL Statement PDS The name of the partitioned dataset into which you want to save the
SQL statement text.
Member Name The name of the partitioned dataset member into which you want to
save the SQL statement text. If you do not specify a member name, a
system-generated name is used.
Type of Save The type of save process to use when saving SQL text to the specified
member in the SQL statement PDS.
Replace Overwrites the existing member with the name you
specified or creates the member if it does not exist.
This is the default.
Append Concatenates the new SQL text to the existing
member.
Prompt Prompts user at each instance for Replace or Append.
56 OMEGAMON II for DB2 User’s Guide: CUA Interface, Version 540
Page 57

Using the Callable Interface
Using the Callable Interface
The callable interface feature of OMEGAMON II for DB2, Version 500, lets you make
direct calls to the.EXP command on the OMEGAMON II commands panel without having
to first access TSO. Before using this feature, you should do the following:
1. Customize the Classic started task.
2. Set up
3. Set up the CUA options.
4. Set up the
Customizing the Classic Started Task to Implement the OMEGAMON II for DB2
Interface
Use the following procedure to customize the Classic started task.
Step Action
1 From the Define OMEGAMON II for DB2 Configuration Values menu, select option 1,
!DB/EXPLAIN
!DB/EXPLAIN options.
Realtime monitor interfaces.
--- DEFINE OMEGAMON II FOR DB2 CONFIGURATION VALUES /RTE RTE01-- OPTION ===>
Select the following options to configure OMEGAMON II for DB2.
1 Realtime monitor interfaces
2 DB2 specification/selection
F1=Help F3=End
Result: The Started Task and VTAM Information panel is displayed.
2 Press Enter.
Result: The OMEGAMON II for DB2 - Classic Interface - DB/EXPLAIN panel is
displayed.
3 Specify the appropriate information on the Classic Interface - DB/EXPLAIN panel and
press Enter.
Result: The system returns you to the Define OMEGAMON II for DB2 Configuration
Values menu.
4 Press the End function key.
Result: The system displays the Configure OMEGAMON II for DB2 menu.
5 From the Configure OMEGAMON II for DB2 menu, select option 3, Create runtime
members.
Result: The system displays the Install OMEGAMON II for DB2 Members menu.
Customizing OMEGAMON II 57
Page 58

Using the Callable Interface
Step Action
6 Use option 1, Realtime monitor interface members, to submit the job.
This job creates a started task in RKD2PAR. The name of this started task is D2TE or the
value entered on this panel for the parameter TESTC. Copy this started task to the JES2
procedure library for started tasks. This task dynamically allocates the !DB/EXPLAIN
profile dataset. Configuration options for !DB/EXPLAIN will be obtained from this
dataset.
Note:
Do not start this task. OMEGAMON II for DB2 starts this task whenever a
!DB/EXPLAIN function is performed and stops it when the function has
completed.
Setting Up !DB/EXPLAIN
Use the following procedure to set up !DB/EXPLAIN on the OMEGAMON II for DB2
Commands screen.
Step Action
1 Ensure that !DB/EXPLAIN V300 PSP 9602 (or greater) is installed on every DB2
subsystem where you want to EXPLAIN statements. For information on installing
!DB/EXPLAIN, see the !DB/Tools for DB2 Installation and Customization Guide.
2 Define Destination Plan_Tables. The Destination PLAN_TABLE will be the current
SQLID.PLAN_TABLE.
I
If the current SQLID.PLAN_TABLE does not exist, !DB/EXPLAIN attempts to
create the tablespace PLANTBLS in the !DB/TOOLS default database.
I
If the PLAN_TABLE cannot be created there, !DB/EXPLAIN attempts to create the
PLAN_TABLE in the database DSNDB04.
I
If it cannot create the table, !DB/EXPLAIN issues an error message indicating that
the EXPLAIN could not be performed.
The current SQLID is determined by:
I
whether EXP_POWERX is defined in the !DB/Tools profile dataset concatenation as
a non-blank value (for example, EXP_POWERX=SAMHILL), if so, the current
SQLID is the value specified for EXP_POWERX,
I
or the current SQLID is determined by the DB2 security exit.
Setting Up the CUA Options
Use the following procedure to set up CUA options and to use the new !DB/EXPLAIN
feature.
Step Action
1Log onto CUA.
58 OMEGAMON II for DB2 User’s Guide: CUA Interface, Version 540
Page 59
Using the Callable Interface
Step Action
2 From the main CUA panel, select Options from the task bar and press Enter. The
following pop-up appears.
1. Preferences...
2. Controls...
3. Set thresholds...
4. User authorities...
5. User Profiles...
6. Subsystem Profiles...
7. Near-term Thread History Filter...
8. D2/Explain Options...
F1=Help F12=Cancel
3 Select Option 2, Controls, from the pop-up and press Enter. Use the fields on the
Terminal Options panel, shown below, to specify preferences for terminal options. For
EXPLAIN, the key field on this panel is the SQL Process Level field. Type EXPLAIN or
SAVE/EXPLAIN in this field to enable the function.
For a list of the fields and valid values for completing the Terminal Options panel, see
“Using the Terminal Options window” on page 43.
Setting Up the D2/EXPLAIN Options
Use the following procedure to set up the D2/EXPLAIN options.
Step Action
1 If you are not already logged onto CUA, then do so now.
2 From the main CUA panel, select Options from the task bar and press Enter. The
following pop-up appears.
1. Preferences...
2. Controls...
3. Set thresholds...
4. User authorities...
5. User Profiles...
6. Subsystem Profiles...
7. Near-term Thread History Filter...
8. D2/Explain Options...
F1=Help F12=Cancel
Customizing OMEGAMON II 59
Page 60

Using the Callable Interface
Step Action
3 Select Option 8, D2/Explain Parameters, from this panel and press Enter. Use the
D2/EXPLAIN Options panel, shown below, to specify parameters required to invoke
!DB/EXPLAIN during your OMEGAMON session.
The following table provides a list of fields and valid values for completing the
D2/EXPLAIN Options panel.
D2/EXPLAIN Options
Extract Id . . . . . . : DB41
User Profile DSN . . . :
Group Profile DSN. . . :
SQL Statement PDS. . . :
Member Name. . . . . :
Type of Save . . . . : REPLACE +
Default Qualifier. . . : SYSIBM
Qualifier Option . . : PROMPT +
Gather Statistics. . . : YES +
Initial Report . . . . : EPATH+
F1=Help F4=Prompt F12=Cancel
Field Description
Extract ID 1- to 8-character field that identifies an extract of plans and packages. It
represents a logical grouping that typically identifies a DB2 subsystem
and an MVS system. An Extract ID must be configured within
!DB/EXPLAIN before it is used, but an actual extract is not required for
the EXPLAIN.
User Profile DSN Optional field names the dataset containing the !DB/EXPLAIN user
profile. Contains overrides to the !DB/EXPLAIN options specified in the
group profile and the system profile.
Group Profile DSN Optional field names the dataset containing the !DB/EXPLAIN group
profile. Contains overrides to the !DB/EXPLAIN options specified in the
system profile.
SQL Statement PDS Name of the dataset where the SQL statement is saved. Must be a PDS.
The SQL Process Level is specified on the Terminal Options panel under
the Options pull-down (fastpath O2). If SAVE, the text is saved but
!DB/EXPLAIN is not invoked. If SAVE/EXPLAIN, !DB/EXPLAIN saves
the text and invokes the EXPLAIN function.
Member Name Name to use when saving the SQL text into the SQL statement PDS. If
omitted, the system generates a name. When you define a member, the
system prompts for whether the member should be replaced or
appended.
60 OMEGAMON II for DB2 User’s Guide: CUA Interface, Version 540
Page 61

Using the Callable Interface
Field Description
Type of Save Type of save to be executed when saving SQL text to the member
specified within the SQL statement PDS. Values are REPLACE and
APPEND.
I
REPLACE writes over an existing member or creates the member if it
does not currently exist. System default.
I
APPEND concatenates the new SQL text to the existing number.
Default Qualifier Qualifier to use to qualify unqualified tables, views, and aliases in SQL
statements.
Qualifier Option Type of qualifier. Values are USE and PROMPT.
I
USE indicates the current Default Qualifier for unqualified SQL text.
I
PROMPT indicates you want to be prompted for a Qualifier
whenever an SQL statement is used.
I
Gather Statistics
Type YES to have !DB/EXPLAIN gather statistics.
I
Type NO to bypass.
Initial Report Type the name of the initial !DB/EXPLAIN report to be displayed:
ESTMT, EPATH, EPTBL, EOBJ, or ERECM.
I
ESTMT is the actual SQL statement text being explained. If there is
an SQL error, SQL error text also appears. Use the pushbuttons to
select from the other !DB/EXPLAIN report sections that follow.
I
EPATH is a narrative describing the access path for the SQL
statement.
I
EPTBL reports the plan table entries for the SQL statement in
tabular form.
I
EOBJ reports the DB2 catalog statistics for objects referenced by the
SQL statement. This section is available if you specified Yes for
Gather Statistics in the D2/EXPLAIN Options panel under the
Option pull-down (fastpath 08).
I
ERECM provides suggestions for optimizing the SQL statement.
For more information about !DB/EXPLAIN parameters, see the
!DB/EXPLAIN Reference Manual.
EXPLAINing SQL Code
Use the following procedure to EXPLAIN SQL.
Step Action
1Log onto CUA.
Customizing OMEGAMON II 61
Page 62

Using the Callable Interface
Step Action
2 From the main CUA panel, select Active Threads and press Enter. The Thread Connected to DB2
panel appears.
_____ Actions GoTo View Options Tools Help
+------------------------------------------------------------ mm/dd/yy 8:07:07
| All Threads Connected to DB2 (Some) System: D41
| Lines 1 to 4 of 4
+---------------+---------+-------+-------------+-------+------+------+--------+
| Planname | Elapsed | CPU % | Status | Getpg |Update|Commit|Jobname |
+---------------+---------+-------+-------------+-------+------+------+--------+
| DSNTEP41 | 31.4m | 05.3% | IN-SQL-CALL | 5153K| 61490| 0|DLKEX212|
| KO2400HP | 1.3d | 00.0% | NOT IN-DB2 | 0| 0| 0|TDO2S03 |
| KO2400HP | 2.1d | 00.1% | NOT IN-DB2 | 0| 0| 0|TDO2S44 |
| KTWPLNR | 1.0s | 00.0% º IN-SQL-CALL | 0| 0| 0|RBRIN3 |
+---------------+---------+-------+-------------+-------+------+------+--------+
F1=Help F2=Keys F3=Exit F5=Refresh F6=Console **=Bkwd F8=Fwd
F10=Action Bar F15=System Status F24=CUA/TSO
3 Select the PLANNAME you want and press Enter. The Thread Detail panel appears. If SQL calls are
being executed by the thread, the message (IN-SQL-CALL) also appears. The Thread Detail panel
shows detailed information about the activity of an individual thread or a parallel task, including
wait time information.
GoTo Options Tools Help
+------------------------------------------------------------ mm/dd/yy 8:09:18
| Thread Detail System: D41A
|
+--------------------------------------+---------------------------------------+
| Thread: Plan . . . . : KTWPLNR | Attach: TSO Userid . . : RBRIN3 |
| Connid . . . : DB2CALL | Region ASID . : 225 |
| Corrid . . . : RBRIN3 | |
| Authid . . . : RBRIN3 | |
| Collection . . : | Package . . . . . . . : |
| DB2 Status . . . . . : IN-SQL-CALL | MVS Status . . . . . . : USING CPU |
| Elapsed Time . . . . : 00:00:05.932 | CPU Utilization . . . : |
| Total CPU Time . . . : 00:00:03.586 | Total Parallel Tasks . : |
| Total Stored Proc CPU: 00:00:00.000 | Current Parallel Tasks : |
+--------------------------------------+---------------------------------------+
+--------------------------------------+-------------------+-------------------+
| IN-DB2 Times | Total | Current |
+--------------------------------------+-------------------+-------------------+
| Elapsed Time | 00:00:05.928 | 00:00:05 |
| CPU Time | 00:00:03.584 | 00:00:03 |
| Stored Procedure CPU Time | 00:00:00.000 | N/A |
+--------------------------------------+-------------------+-------------------+
( IN-DB2 Times ) < Waits > < Current Wait Resource >
F1=Help F2=Keys F3=Exit F5=Refresh F6=Console **=Bkwd **=Fwd
F10=Action Bar F15=System Status F24=CUA/TSO
4 Select Option 3, SQL Call Being Executed, from the GoTo pull-down menu.
62 OMEGAMON II for DB2 User’s Guide: CUA Interface, Version 540
Page 63

Step Action
5 Press the Process SQL key.
GoTo Options Tools Help
+------------------------------------------------------------ mm/dd/yy 8:47:27
| SQL Call Being Executed System: D41A
|
+--------------------------------------+--------------------------------------+
| Thread: Plan . . . . . : DSNESPCS | Attach: TSO Userid . . : RBRIN3 |
| Connid . . . . : TSO | Region ASID . : |
| Corrid . . . . : RBRIN3 | |
| Authid . . . . : RBRIN3 | |
+--------------------------------------+--------------------------------------+
| Lines 1 to 15 of 15 |
+-----------------------------------------------------------------------------+
|SQL call is active, call information is as follows : |
| |
|Thread Status = IN-SQL-CALL SQL Request Type = DYNAMIC |
|Total SQL Reqs = 2 SQL Call Type = OPEN CURSOR |
|SQL DBRM Name = DSNESM68 SQL Statement Number = 00193 |
|Collection ID = DSNESPCS |
| |
| SELECT A.PLNAME, SECTNO, STMTNO, CARD |
| FROM SYSIBM.SYSSTMT A, |
| SYSIBM.SYSPLAN B, |
| SYSIBM.SYSTABLES C |
| WHERE A.PLNAME = B.NAME |
| AND A.STMTNO > C.CARD |
| ORDER BY SECTNO DESC, STMTNO ASC |
| |
+-----------------------------------------------------------------------------+
Using the Callable Interface
Customizing OMEGAMON II 63
Page 64

Using the Callable Interface
64 OMEGAMON II for DB2 User’s Guide: CUA Interface, Version 540
Page 65

3
Introduction
This chapter describes how to use OMEGAMON II.
Chapter Contents
Monitoring from the System Status Panel . . . . . . . . . . . . . . . . . . . . . . . . . . . . . . . . . . 66
System Status Components and Related Exceptions. . . . . . . . . . . . . . . . . . . . . . . . . . 69
Investigating an Active Threads Alert . . . . . . . . . . . . . . . . . . . . . . . . . . . . . . . . . . . . . 77
Evaluating and Modifying Thresholds. . . . . . . . . . . . . . . . . . . . . . . . . . . . . . . . . . . . . 78
Reviewing Near-Term History Data. . . . . . . . . . . . . . . . . . . . . . . . . . . . . . . . . . . . . . . 80
Using the OMEGAMON II for DB2 Background Application Trace Facility . . . . . . . . . 82
Using the IFCID Trace Facility. . . . . . . . . . . . . . . . . . . . . . . . . . . . . . . . . . . . . . . . . . . 85
Using OMEGAMON II
Using OMEGAMON II 65
Page 66

Monitoring from the System Status Panel
Monitoring from the System Status Panel
The System Status panel provides a central point of control for monitoring your DB2
subsystem.
____ Actions GoTo Tools Help
------------------------------------------------------------ mm/dd/yy 16:13:49
OMEGAMON II for DB2 System Status System: D41A+
N-T History
Select one component with a “/” or an action code.
S=Show details A=Analyze problems H=Near-term history L=Control
+-----------------------------------------------------------------------------+
| Workloads | Resources | Alerts |
|-------------------------+-------------------------+-------------------------|
| _ CICS ==== | _ Buffer Mgr ==== | _ DB2 Activity ==== |
| _ IMS ==== | _ EDM Pool ==== | _ Active Threads ==== |
| _ TSO ==== | _ Lock Stats ==== | _ Inact. Threads ==== |
| _ Background ==== | _ Log Manager ==== | _ Locks ==== |
| _ Utility ==== | _ DDF Stats | _ Active Traces ==== |
| _ Distributed ==== | | _ Volume Activity ==== |
| | _ Bind Stats ==== | _ Stored Procs ==== |
| | _ SSS Stats ==== | _ Functions ==== |
| | _ SQL Stats ==== | _ Triggers ==== |
| _ All Connections ==== | _ Open/Close Stat ==== | |
| | _ Command Stats ==== | _ DB2 Messages ==== |
| | | |
+-----------------------------------------------------------------------------+
F1=Help F2=Keys F3=Exit F4=Prompt F5=Refresh F6=Console F10=Action Bar
F24=CUA/TSO
Through this panel, OMEGAMON II:
I
informs you via status lights of the realtime performance of each monitored DB2
component or application
I
allows you to obtain detailed performance data on any monitored DB2 component
DB2 subsystem components
The System Status panel body displays the three major components of the subsystem that
are monitored.
Workloads Information about threads, the links between allied agents and a DB2
subsystem.
Resource DB2 subsystem resource statistics.
Alerts Summary of DB2 activity, active and inactive threads connected to DB2,
locking conflicts, active traces, volume activity, and console messages.
Monitored objects
Each monitored object on the System Status panel has
I
a status indicator to its right, which reports its realtime performance
I
an entry field to its left, which allows you to select it for detailed analysis
66 OMEGAMON II for DB2 User’s Guide: CUA Interface, Version 540
Page 67

Status indicators
A status indicator is a color bar or a word (for example, Warn) that represents the
performance of your DB2 subsystem. Color terminals can display both colors and words;
noncolor terminals can display only words.
The meaning of the status indicator colors is shown in the following table.
Color Status
Green Satisfactory performance.
Yellow A potential problem exists. A warning threshold was met or exceeded.
Red A critical problem exists. A critical threshold was met or exceeded.
Turquoise Monitoring for this item is disabled. The Monitor field on the Thresholds panel is
Blue No exceptions apply to this item, so no performance data is being collected.
Alert notification
When you see a status indicator change for a monitored object, you know that
OMEGAMON II is alerting you to a change in performance. For example, when a status
indicator changes from green to red, you know that a condition for that object has
changed from normal to critical.
Monitoring from the System Status Panel
set to NO for all exceptions for this item.
The yellow and red color bars also are used on data panels to highlight the values that do
not meet performance standards.
Note: This does not apply to panels that appear when you select Active Threads from
the System Status panel.
Investigating an alert
When a status indicator turns yellow or red, you can begin to investigate the problem
from the System Status panel.
I
Move the cursor to the monitored object with the yellow or red status indicator, and
press Enter.
Result: A panel appears that provides more information about the object you
selected.
When you press Enter in an action entry field, a default action is invoked.
Using OMEGAMON II 67
Page 68

Monitoring from the System Status Panel
Performing actions from the System Status panel
You can investigate a change in status for a monitored object by entering one of these
action codes.
S Shows more detail.
A Shows which exceptions tripped, the current values for the tripped exceptions, and the
threshold values set for the exceptions.
H Shows near-term historical data.
L Shows all the exceptions that roll up to an object and allows you to change threshold
settings and rules.
Note: Not all action codes apply to every monitored object.
68 OMEGAMON II for DB2 User’s Guide: CUA Interface, Version 540
Page 69

System Status Components and Related Exceptions
System Status Components and Related Exceptions
OMEGAMON II monitors your DB2 subsystem by comparing the performance of your
subsystem against a set of performance standards. These standards are called thresholds.
When the performance of a workload or a resource exceeds a threshold, an exception
condition occurs.
The status indicators on the System Status panel summarize the status of the thresholds
that you set in OMEGAMON. When OMEGAMON detects that a threshold has been
exceeded, the status indicators for all panels that report on that threshold are affected,
including the System Status panel.
The following tables are a quick reference to the exceptions that affect the status indicators
for components on the System Status panel.
CICS exceptions
The following exceptions apply to threads related to CICS connections.
Description Code Explanation
Available pool thread % POLU The percentage of active CICS POOL threads to THRDA
exceeds the specified threshold. The THRDA value is
specified in the CICS resource control table (RCT).
CICS threadmax % CICT The percentage of active CICS threads to THRDMAX
exceeds the specified threshold. The THRDMAX value is
specified in the CICS RCT.
CICS transaction
waiting
ENTRY thread % ENTU The percentage of active threads that originate from a CICS
Pool overflow threads ENTO The number of POOL threads in use due to ENTRY thread
Pool thread waits POLW The number of CICS transactions waiting for a POOL
ENTW The number of CICS transactions waiting for a thread
exceeds the specified threshold. This exception detects
transactions that are waiting, because all threads defined for
use in the RCT ENTRY definition are already in use. This
exception limits its analysis to ENTRY definitions that
specify TWAIT=YES.
ENTRY definition to THRDA exceeds the specified
threshold. The THRDA value is specified in the resource
RCT.
overflow activity exceeds the specified threshold. This
exception limits its analysis to ENTRY definitions that
specify TWAIT=POOL and THRDA>0.
thread that originates from a CICS connection exceeds the
specified threshold.
Using OMEGAMON II 69
Page 70

System Status Components and Related Exceptions
IMS exceptions
The following exceptions apply to threads related to IMS connections.
Description Code Explanation
No dependent region IMND There are no IMS dependent regions defined to DB2 for the
IMSID.
Region connection
failed
TSO exceptions
The following exceptions apply to threads related to TSO connections.
Description Code Explanation
Foreground
connection %
Background exceptions
The following exceptions apply to threads related to background job connections.
Description Code Explanation
Background
connection %
Utility exceptions
IMCN The specified IMS dependent region for the IMSID failed to
connect to DB2 due to an error.
IDFR The percentage of active foreground connections to IDFORE
exceeds the specified threshold.
IDBK The percentage of active background connections to
IDBACK exceeds the specified threshold.
The following exceptions apply to threads related to utility job connections.
Description Code Explanation
Utility ID is stopped UTIS A DB2 utility was started but did not finish running due to
abnormal termination.
Distributed exceptions
The following exceptions apply to threads related to distributed connections.
Description Code Explanation
DBAT thread wait DWAT A distributed allied thread has been waiting for a response to
a remote SQL request for a period of time greater than the
specified threshold.
70 OMEGAMON II for DB2 User’s Guide: CUA Interface, Version 540
Page 71
System Status Components and Related Exceptions
Description Code Explanation
DDF bytes received TRCV The amount of data received by a requestor (allied) or server
(distributed) DB2 thread in response to SQL requests
exceeds the threshold.
DDF bytes sent TSND The amount of data sent by a requestor (allied) or server
(distributed) DB2 thread in response to SQL requests
exceeds the threshold.
DDF remote CPU
time
Active thread exceptions
The following exceptions apply to active threads.
Description Code Explanation
Archive log mount
needed
CPU utilization % TCPU CPU utilization for an address space that has DB2
Getpage/read ratio GETP The ratio of logical page read (getpage) requests to physical
In-DB2 CPU time IDBC The amount of CPU time used by DB2 to process a thread is
RCPU The amount of CPU time used by a distributed data access
thread exceeds the specified threshold.
ARCM Thread backout processing is waiting for an archive tape
mount.
DB2 requires the archive tape mount during abort
processing to backout changes made in the current unit of
recovery. The thread does not do any processing until the
tape is mounted. It holds DB2 resources until the abort
request is complete.
connections and threads exceeds the specified threshold.
page read (read I/O) requests is less than the specified
threshold.
greater than the specified threshold.
In-DB2 time IDBT The length of time that DB2 has been processing a thread is
greater than the specified threshold.
Page lock owned % LKUS The percentage of page locks owned by an active thread to
the total allowable number of held page locks exceeds the
specified threshold.
Page update rate PGUP The number of row updates per second on behalf of a
thread exceeds the specified threshold.
Resource limit
percent
Sequential prefetch
rate
Synch read I/O rate RIO The physical read I/O rate per second on behalf of a thread
RELM The ratio of the resource limit high water mark (CPU
seconds) to the resource limit in effect (CPU seconds) is
greater than the current threshold value of nn.n%.
PREF The number of sequential prefetch requests per second
exceeds the specified threshold.
exceeds the specified threshold.
Using OMEGAMON II 71
Page 72

System Status Components and Related Exceptions
Description Code Explanation
Thread elapsed time ETIM The elapsed time for a DB2 thread (from sign-on or create
thread) exceeds the specified threshold.
Thread terminated
indoubt
Update commit COMT The ratio of updates to commits for the thread exceeds the
Wait for archive log
mode
Wait for DB2 service WSRV The amount of time a thread has been waiting for a DB2
Wait for
thread-create
Stored procedure
wait
Inactive thread exceptions
The following exceptions apply to inactive threads. An inactive thread does not hold any
cursors or database resources, but remains connected to DB2.
Description Code Explanation
INDB The thread has terminated and is indoubt.
specified threshold.
WLGQ The amount of time that a thread has been suspended due
to ARCHIVE LOG MODE (QUIESCE) exceeds the specified
threshold value.
service to complete exceeds the specified threshold value.
CTHD An application is waiting for DB2 to create a thread.
WSPS The amount of time a thread has been waiting for an
available TCB to schedule a stored procedure exceeds the
specified threshold.
DBAT over maximum
wait
Buffer pool exceptions
The following exceptions apply to buffer pool resources.
Description Code Explanation
Buffer pool utilization BMTH Buffer pool nn has exceeded the specified threshold.
MDBW The number of distributed data access threads (DBAT)
waiting because the preset maximum has been reached
exceeds the specified threshold.
Queuing of conversations when the MAXDBAT limit is
reached can greatly impact response time.
72 OMEGAMON II for DB2 User’s Guide: CUA Interface, Version 540
Page 73

EDM pool exceptions
The following exceptions apply to EDM pool resources.
Description Code Explanation
EDM pool utilization EDMU The percentage of environmental descriptor manager
Lock statistics exceptions
The following exception applies to lock statistics resources.
Description Code Explanation
System Status Components and Related Exceptions
(EDM) pool pages in use to total pool size exceeds the
specified threshold.
Lock conflict
suspensions
Log manager exceptions
The following exceptions apply to log manager resources.
Description Code Explanation
Primary logs available LOGN The number of available primary active logs is less than or
Recovery log archive ARCV An active DB2 log is full and must be archived, and a tape
DDF statistics exceptions
The following exceptions apply to DDF resources.
Description Code Explanation
DBAT thread % MDBT The number of database access threads (DBAT) in use
SUSL The number of threads that are unable to continue
execution because of lock waits exceeds the specified
threshold.
equal to the specified threshold.
mount is outstanding for the archive log.
exceeds the specified threshold.
When the MAXDBAT limit is reached, conversations are
queued (waiting on DBAT allocation), which can greatly
increase response time.
DDF not active DDFS The distributed data facility was requested for this DB2
subsystem but it is not active. This could indicate that the
DDF terminated abnormally or that it was not started.
DDF receive rate DRCV The amount of data received by a requestor (local) or server
(remote) DB2 subsystem in response to SQL requests
exceeds the specified threshold.
Using OMEGAMON II 73
Page 74

System Status Components and Related Exceptions
Description Code Explanation
DDF send rate DSND The amount of data sent to a requestor (local) or server
(remote) DB2 subsystem exceeds the specified threshold.
Max logmode
conversations
DB2 activity exceptions
The following exceptions apply to DB2 activity alerts.
Description Code Explanation
Create-thread waits THDQ The number of users waiting for create thread processing
Indoubt threads INDT The number of terminated threads that are indoubt exceeds
Thread use % TMAX The percentage of active threads to the specified maximum
Lock exceptions
The following exceptions apply to lock alerts.
MCNV The number of conversations in use exceeds the specified
threshold. When the percentage reaches 100%, the
exception message displays the number of threads waiting
because the preset maximum is exceeded.
Queuing conversations can greatly increase response time.
exceeds the specified threshold.
the specified threshold.
exceeds the specified threshold.
Description Code Explanation
Resource wait time WTRE The amount of time a thread is waiting for a resource
exceeds the specified threshold.
Wait for drain lock WDLK The amount of time a thread has been waiting for a drain
lock exceeds the specified threshold.
Wait for drain of
claims
Global lock wait WGLK The amount of time a thread has been waiting for a global
74 OMEGAMON II for DB2 User’s Guide: CUA Interface, Version 540
WCLM The amount of time a utility has been waiting for claims to
be released after acquiring drain lock exceeds the specified
threshold.
lock exceeds the specified threshold.
Page 75

Active trace exceptions
The following exceptions apply to active trace alerts.
Description Code Explanation
System Status Components and Related Exceptions
DB2 global trace
active
Volume activity exceptions
The following exceptions apply to volume activity alerts.
Description Code Explanation
Volume DB2 I/O rate VDIO A DB2 I/O rate per second for the volume exceeded the
Volume extents per
DSN
Volume service time VSRV The service time for the volume exceeded the specified
Volume TL I/O rate VTIO The total I/O rate per second for the volume exceeded the
Volume utilization VUTL The utilization percentage for the volume exceeded the
GTRC The DB2 global trace is active. It should not be active unless
there is a specific purpose, such as diagnostic testing. The
DB2 global trace can increase performance overhead.
specified threshold.
VEDR The dataset-to-dataset extent ratio of a volume exceeded
the specified threshold.
threshold. The threshold is expressed in milliseconds and
must be an integer between 0–9999.
specified threshold. The threshold is the total number of
I/Os per second and must be an integer between 0–9999.
specified threshold. The threshold is a percentage and must
be an integer between 0–100.
Stored procedures exceptions
The following exceptions apply to stored procedures alerts.
Description Code Explanation
ASIDs executing
stored procedures
SPAC Indicates that the number of ASIDs executing stored
procedures exceeds the threshold. The threshold is
expressed as a count of address spaces capable of executing
stored procedures. It can be an integer from 0 to 99. Stored
procedures can be executed in a DB2 stored procedure
address space and in any WLM-managed stored procedure
address space. SPAC is a member of the DB2 system (SY)
group. The default threshold is 3 and the default state is On.
Using OMEGAMON II 75
Page 76

System Status Components and Related Exceptions
Description Code Explanation
Number of stored
procedures executing
Triggers exceptions
The following exceptions apply to alerts relating to triggers.
Description Code Explanation
Depth of largest
trigger stack
Number of triggers
executing
STPE Indicates that the number of stored procedures executing
exceeds the threshold. The threshold is expressed as a count
of stored procedures currently executing. It can be an
integer from 0 to 99. STPE is a member of the DB2 system
(SY) group. The default threshold is 10 and the default state
is On.
TRGD Indicates that the depth of the largest trigger stack exceeds
the threshold. The threshold is expressed as the number of
triggers in the largest trigger stack. The threshold can be an
integer from 0 to 99.TRGD is a member of the DB2 system
(SY) group. The default is 1 and the default state is On.
TRGE Indicates that the number of triggers executing exceeds the
threshold. The threshold is expressed as a count of triggers
currently executing. The threshold can be an integer from 0
to 99. TRGE is a member of the DB2 system (SY) group.
The default threshold is 10 and the default state is On.
User-defined functions exceptions
The following exceptions apply to user-defined functions.
Description Code Explanation
Number of
user-defined
functions executing
Number of ASIDS
executing user
functions
UDFE Indicates that the number of user-defined functions
UFAC Indicates that the number of ASIDs executing user functions
executing exceeds the threshold. The threshold is expressed
as a count of user functions currently executing. The
threshold can be an integer from 0 to 99. UDFE is a member
of the DB2 system (SY) group. The default threshold is 10
and the default state is On.
exceeds the threshold. The threshold is expressed as a count
of address spaces capable of executing user-defined
functions. It can be an integer from 0 to 99. User-defined
functions can be executed only from WLM-managed stored
procedure address spaces. UFAC is a member of the DB2
system (SY) group. The default threshold is 3 and the default
state is On.
76 OMEGAMON II for DB2 User’s Guide: CUA Interface, Version 540
Page 77

Investigating an Active Threads Alert
IntroductionThis is an example of how you might investigate a red light from the System
Status panel. You can use this information to help you understand how to use the features
of OMEGAMON to resolve other DB2 subsystem problems.
Active threads alert
In this example, the Active Threads alert on the System Status panel has turned red.
I
Select Active Threads with the A (Analyze Problems) action code, and press Enter.
Result: The Analyze Problems window appears.
KD2APROB Analyze Problems System D41B
For additional information move cursor to a threshold entry, then press Enter
Threshold Description Type Current Warning Critical Rule
---------------------- ----- ---------- --------- -------- --- Plan: DSNTIB31 Connid: BATCH Corrid: TDO214MI Authid: TDO214
Update commit COMT 0 0 1 None
In-DB2 time IDBT 18 s 5 s 6 s None
Synch read I/O rate RIO 12.5 s 10 s 12 s None
Plan: K02510HP Connid: DB2CALL Corrid: D2DB020 Authid: D2DB020
Update commit COMT 0 0 1 None
Thread elapsed time ETIM 4041 2 3 None
In-DB2 CPU time IDBC 4 0 1 None
F1=Help F3=Exit **=Bkwd F8=Fwd F10=Action Bar F15=System Status
Investigating an Active Threads Alert
The Analyze Problems panel shows the exceptions that tripped for Active Threads and
caused the status alert. The current value for each tripped exception is highlighted or
appears in either yellow (warning status) or red (critical status).
Note: You can use the A action code only for components with a warning or critical
status.
Exception recommendations
For an explanation of an exception that appears on the Analyze Problems window and for
a recommendation about how to resolve the problem that caused the exception to trip:
I
Move the cursor to the threshold description, and press F1.
Investigating the exception condition
To continue investigating a tripped exception:
I
Move the cursor to a threshold description, and press Enter.
Result: A panel appears showing information related to the tripped exception.
Using OMEGAMON II 77
Page 78

Evaluating and Modifying Thresholds
Evaluating and Modifying Thresholds
When you investigate a yellow or red status light from the System Status panel, you may
determine that the threshold values that caused the exception to trip did not really
indicate a problem in your DB2 subsystem. In this case, you need to change the current
threshold values for the exception to values that are appropriate for your site.
Displaying all exceptions
To display a list of exceptions and their threshold values for a monitored object on the
System Status panel:
I
Select a monitored object with the L (Control) action code, and press Enter.
Result: A pop-up window appears, which contains the exceptions and the threshold
values associated with the object. In this example, the Active Threads Thresholds
panel is shown.
Active Thread Thresholds
R=Rules
Threshold description Code Warning Critical Units Monitor
------------------------------------------------------------------------ _ Archive log mount need ARCM OFF + ON + (On/Off) Yes +
_ CPU utilization % TCPU 16 20 % Yes
_ Getpage/read ratio GETP 18 15 getpages Yes
_ In-DB2 CPU time IDBC 56 70 100th Yes
_ In-DB2 time IDBT 4 5 seconds Yes
_ Page locks owned % LKUS 64 80 % Yes
_ Page update rate PGUP 8 10 seconds Yes
_ Resource limit percent RELM 64 80 % Yes
_ Sequential prefetch rate PREF 8 10 /sec Yes
_ Synch read I/O rate RIO 8 10 /sec Yes
_ Thread elapsed time ETIM 480 600 seconds Yes
_ Thread terminated indoubt INDB OFF + ON + (On/Off) Yes
_ Update commit COMT 80 100 pag/comm Yes
_ Wait for Archive Log Mode WLGQ 48 60 seconds Yes
_ Wait for DB2 Service WSRV 24 30 seconds Yes
_ Wait for thread-create CTHD OFF + ON + (On/Off) Yes
F1=Help F4=Prompt **=Bkwd **=Fwd F12=Cancel
Modifying thresholds
To modify any threshold or status setting on a thresholds panel:
I
Move the cursor to the field you want to change and type in the new value.
Result: The Save Profile Confirmation pop-up appears. You can choose to save the
new setting for this session only or you can save them to a profile.
78 OMEGAMON II for DB2 User’s Guide: CUA Interface, Version 540
Page 79

Adding or modifying rules
You can specify rules for an exception condition to control how the thresholds are applied.
To add or modify a rule for an exception:
I
Select an exception with the R (Rules) action code, and press Enter.
Result: The Rules panel appears. You can add rules to an exception or change rules
from this panel.
Add Rule for ARCM Exception
Modify Parameters, than press Enter
Rule number. . 1
Plan name. . .
Auth Id. . . .
Conn type. . . +
CICS Parameters:
Tran Id. . . . Conn Id . . .
IMS Parameters:
PSB Name . . . IMS Id. . . .
Threshold Values:
Warning. . . . N/A Critical. . . N/A
Exclude. . . . No
F1=Help F4=Prompt F12=Cancel
Evaluating and Modifying Thresholds
Using OMEGAMON II 79
Page 80

Reviewing Near-Term History Data
Reviewing Near-Term History Data
Near-term history panels provide information about DB2 subsystem activity and about
completed thread executions. You can use near-term history panels to quickly gain some
historical perspective on system activity.
Note: To display near-term history data, the online data collector must be active.
Accessing near-term history data
To access near-term historical data from the System Status panel, you select a panel
object with the H (Near-term history) action code.
The following is an example of how to access near-term history data:
I
Select a connection type under Workloads with the H action code, and press Enter.
Result: The Thread History by Report Interval panel appears.
Thread activity for a reporting period
The Thread History by Report Interval panel provides an overview of DB2 thread activity
for a specified reporting period.
Note: The reporting period and reporting intervals are set on the Near-Term Thread
History Filter Options panel.
___ Actions GoTo View Options Tools Help
------------------------------------------------------------ mm/dd/yy 8:48:15
Thread History by Report Interval System:D31A
P=Plan A=Authid L=Plan,Authid U=Authid,Plan S=Thread Summary I=Subinterval
+------------------------------------------------------------------------------+
| Report Interval . .: 1 hour | Start . : 07/14 18:00:00.000000 |
| Report Filtered . .: YES | End . . : 07/14 13:59:59.999999 |
+------------------------------------------------------------------------------+
Lines 1 to 7 of 7
+------------------------------------------------------------------------------+
| | | | | |DLk/| In-DB2 | In-DB2| In-DB2| |GetP/|
| Time |Thrds|Commit|Abort| DML |TOut| Elap Tm| CPU Tm|Wait Tm|Getpage|RIO |
|---------+-----+------+-----+-----+----+--------+-------+-------+-------+-----|
| _ 13:00 | 4| 3| 1| 342| 0| 1213.8 | 1.77| 287.7| 2573| 6.9|
| _ 12:00 | 17| 21| 0| 6516| 0| 317.3 | 5.12| 189.4| 9609| 53.9|
| _ 11:00 | 132| 132| 0|45332| 1| 1245.4 | 80.34| 445.1| 73342|416.3|
| _ 10:00 | 140| 1157| 12| 8190| 7|13657.2 | 39.69|12031.3| 69301| 6.7|
| _ 09:00 | 89| 124| 7|11206| 0| 734.2 | 75.10| 76.0| 96763| 15.6|
| _ 08:00 | 12| 12| 0| 63| 0| 32.5 | 2.11| 4.9| 456| 50.3|
+------------------------------------------------------------------------------+
F1=Help F2=Keys F3=Exit F5=Refresh F6=DB2 Console **=Bkwd **=Fwd
F10=Action Bar F15=System Status F24=CUA/TSO
The Start and End dates and times show the beginning and end of the reporting period.
The Time column indicates the start of a report interval.
80 OMEGAMON II for DB2 User’s Guide: CUA Interface, Version 540
Page 81

Thread activity for a report interval
You also can view summarized information about thread activity for a single report
interval.
To access thread activity for a single interval:
I
Select an interval with the I (Subinterval) action code, and press Enter.
Result: The Thread History by Report Subinterval panel appears.
Reviewing Near-Term History Data
Using OMEGAMON II 81
Page 82

Using the OMEGAMON II for DB2 Background Application Trace Facility
Using the OMEGAMON II for DB2 Background Application Trace Facility
The background application trace facility provides
I
the ability to start an application trace to run in the background asynchronously to
your OMEGAMON II session. Use the panels available from the CUA component of
OMEGAMON II. Initiate the application trace and specify the values the application
trace to use during execution.
I
the ability to allocate trace datasets dynamically using the characteristics you specify
on an OMEGAMON II panel or the characteristics you specify at install time.
In order to make best use of this facility, you should be familiar with the existing functions
of the application trace facility. This information is provided in the OMEGAMON II for
DB2 Reference Manual, in the section entitled “Application Trace Facility”.
The panels for running an application trace in the background are similar to those used
for running an application trace in the foreground. Access the online help for the panel to
obtain detailed descriptions of the fields each panel contains.
Initiating a background application trace
The background application trace facility is available only from the CUA component for
OMEGAMON II for DB2. To initiate a background application trace follow these steps.
Step Action
1 On the OMEGAMON II for DB2 main panel, select Tools from the action bar or type T
on the command line.
Result: The Tools pull-down menu appears.
2 From the Tools pull-down menu, select option 1 for the application trace facility.
Result: OMEGAMON II displays a pop-up menu having both foreground and
background application trace options.
From this pop-up menu, you can access panels to start an application trace, either in
the foreground or background, review the data collected by a trace, stop a foreground
application trace, create a trace dataset, or view existing background traces.
3 From the pop-up menu, select option 5 to specify the collection options for a
background trace.
Specifying background application trace options
Selecting option 5 from the pop-up menu displays a panel on which you can specify the
options for your background trace. Three fields on this panel are required. These are
I
DB2 plan name. To specify tracing of all plans, type ALL in the field.
I
active time, the duration of the trace, to a maximum of 60 minutes.
I
the name of the dataset to which trace data is written.
All other fields on this panel are optional.
82 OMEGAMON II for DB2 User’s Guide: CUA Interface, Version 540
Page 83

Using the OMEGAMON II for DB2 Background Application Trace Facility
If you do not enter a start time for the background trace, OMEGAMON II informs you by
means of a pop-up panel that the trace will start immediately. You can choose to begin
the trace or to return to the previous panel to enter a start time.
If the dataset that you designate for the trace data is not preallocated, OMEGAMON II for
DB2 displays a warning message. You can dynamically allocate the dataset as explained
in “Identifying the dataset to which trace data is written” on page 83.
Identifying the dataset to which trace data is written
You can dynamically create a VSAM linear dataset to contain the output of an application
trace. Use either of these options.
I
Select option 7 from the pop-up panel displayed from the application trace main
menu.
I
Select option 4 from the pop-up actions displayed from the panel that lists the
background traces.
The Create Application Trace DSN panel contains three fields. All fields are required
unless your installation is using SMS for dataset allocation. In this case, you may omit the
Volume information.
DSN Name of the dataset you want to create
Size Size of the dataset in megabytes
Volume The identification (VOLSER) of the volume where the data is to be placed
Viewing the list of background traces
The Deferred Application Traces panel lists the traces you have defined to run
asynchronously to your online session and their status. To view the information collected
by an application trace, follow these steps.
Step Action
1 Return to the OMEGAMON II for DB2 main panel and select Tools from the
action bar or type T on the command line.
Result: The Tools pull-down menu appears.
2 From the Tools pull-down menu, select option 1 for the application trace facility.
Result: This results in OMEGAMON II displaying a pop-up menu having both
foreground and background application trace options.
3 From the pop-up menu, select option 6 to display a panel that lists the background
traces which you have defined to be started.
Result: OMEGAMON II displays the Deferred Application Traces panel.
Using OMEGAMON II 83
Page 84

Using the OMEGAMON II for DB2 Background Application Trace Facility
Activities you can perform in a background trace request
When you select a trace from the list of traces on the Deferred Application Traces panel,
OMEGAMON II displays a pop-up panel that permits you to perform these activities.
I
modify or cancel a deferred trace request (if the status of the trace is Waiting)
I
view summary data for a completed trace
I
create a linear dataset to hold the trace data
You can also perform the same actions by selecting Actions from the action bar. Select
the View pull-down from the action bar to sort the list of traces on any column.
84 OMEGAMON II for DB2 User’s Guide: CUA Interface, Version 540
Page 85

Using the IFCID Trace Facility
Overview
The IFCID Trace facility provides the ability to start an IFCID trace to run in the
background asynchronously to your OMEGAMON II session. You can initiate the IFCID
trace from the OMEGAMON II for DB2 System Status panel.
To access the IFCID Trace Facility, follow these steps:
1. On the OMEGAMON II for DB2 System Status panel, select T (Tools). The pull-down
menu shows IFCID Trace facility as option 3.
2. Select option 3 (IFCID Trace Facility). The pull-down menu displays the options to start,
display, and stop the IFCID trace.
Note: By pressing PF3 (Exit) from any IFCID Trace panel, the display returns to the
OMEGAMON II for DB2 System Panel with the Tools pull-down menu.
Starting an IFCID Trace
From Step 2 above, select option 1 (Start IFCID Trace). The IFCID Trace Start panel
displays. From this panel, you must enter a dataset name and select one or more trace
types. The dataset name identifies the dataset that will contain the trace data that is
collected. The dataset name is a required field. The dataset must have the following
characteristics:
I
physical sequential
I
variable length, blocked
I
logical record length =32756
I
block size =32760
Using the IFCID Trace Facility
You can select the IFCIDs to be traced by trace type (one-digit number), by trace class (a
two-digit number) or by individual IFCID records (three-digit number) within a trace class.
I
To select all IFCIDs associated with a trace type, enter S (Select all entries) next to the
trace type. You can select as many trace types as needed. After pressing Enter to
confirm your selections, the IFCID trace begins immediately for the trace type or types
selected.
I
To select particular IFCIDs within a trace type, enter D (Display subentries) next to the
trace type. OMEGAMON II for DB2 displays the list of trace classes within the trace
type. You can display the trace classes for only one trace type at a time.
– To select all IFCIDs in multiple trace classes, enter S next to each trace class. After
pressing Enter to confirm your selections, the IFCID trace begins immediately.
– To select particular IFCIDs within a trace class, enter D next to the trace class.
OMEGAMON II for DB2 displays a list of individual IFCID records. Enter an S
next to one or more IFCIDs to start the trace for those selected IFCIDs.
Using OMEGAMON II 85
Page 86

Using the IFCID Trace Facility
At the point when you enter option S to select the IFCIDs (whether by trace type, trace
class, or IFCID record) and to start the IFCID trace, OMEGAMON II for DB2 asks you to
confirm your selection. If you choose to alter your selection, you can enter option R (reset
selection). OMEGAMON II for DB2 then allows you to re-enter your selections.
Displaying IFCID Trace Data
To display the result of an IFCID trace, follow these steps:
I
enter option T (Tools) to display the Tools pull-down menu.
I
enter option 3 (IFCID Trace Facility) to display the IFCID Trace pull-down menu.
I
enter option 2 (Display IFCID Trace Counts) to view the Display IFCID Trace
Collection panel.
The Display IFCID Trace Collection panel provides the following fields:
Field Description
DSN The user-specified dataset name provided when starting the IFCID trace.
Trace Records
The number of trace records that could not be written to the dataset.
Lost
Status= The status of the IFCID trace facility. The status is either active or inactive.
Start time The timestamp when the IFCID trace started.
Run time The amount of time that the IFCID trace has been active.
ID The identification number associated with each IFCID record. The leading
zeroes are omitted.
Count The number of times the event or action associated with an IFCID record
took place.
Size The total amount of collected IFCID data in bytes.
Description A brief description of the IFCID record’s contents.
The header information for each IFCID Trace record is 64 bytes in length. The following
table describes each field in the header information, in the sequence in which they
appear.
Field Length (in bytes)
Record length 2 (hexadecimal)
QSAM fill characters 2 (hexadecimal)
Plan name 8 (character)
Date and time (in the form YYYYMMDDHHMMSSHH) 8 (hexadecimal)
Secondary authid (or primary authid) 8 (character)
Original authid 8 (character)
86 OMEGAMON II for DB2 User’s Guide: CUA Interface, Version 540
Page 87

Connection identifier 8 (character)
Correlation identifier 12 (character)
DB2 system identifier 4 (character)
IFCID number 2 (numeric)
Number of self-defining sections 2 (numeric)
Stopping an IFCID Trace
To stop the IFCID Trace facility, follow these steps:
I
enter option T (Tools) to display the Tools pull-down menu.
I
enter option 3 (IFCID Trace Facility) to display the IFCID Trace pull-down menu.
I
enter option 3 (Stop IFCID Trace). OMEGAMON II for DB2 prompts you to confirm
that you want to stop the IFCID trace.
I
Press Enter to confirm. A message displays indicating that the IFCID trace was
successfully stopped.
Using the IFCID Trace Facility
Using OMEGAMON II 87
Page 88

Using the IFCID Trace Facility
88 OMEGAMON II for DB2 User’s Guide: CUA Interface, Version 540
Page 89

Using OMEGAMON II for DB2
with !DB/EXPLAIN
4
Introduction
By integrating the two Candle products, OMEGAMON II for DB2 and !DB/EXPLAIN, you
create the most complete view possible for understanding and optimizing SQL and DB2
applications.
The combination of the OMEGAMON II for DB2 and !DB/EXPLAIN interfaces permits
you to
I
capture and analyze ad-hoc, dynamic SQL—SQL that is not stored in a place
accessible to !DB/EXPLAIN users
I
analyze executing SQL
I
access OMEGAMON II application trace and historical reporting information to
validate access path analysis
This chapter tells how to make optimum use of the functionality these products offer when
used together.
Chapter Contents
Background about !DB/EXPLAIN for DB2 . . . . . . . . . . . . . . . . . . . . . . . . . . . . . . . . . 90
Using OMEGAMON II and !DB/EXPLAIN Complementary Functions . . . . . . . . . . . . 91
Using the OMEGAMON II for DB2 Callable Interface. . . . . . . . . . . . . . . . . . . . . . . . . 93
Moving Interactively between !DB/EXPLAIN and OMEGAMON II . . . . . . . . . . . . . . 102
Using the Copy-and-Paste Facility in OMEGAMON II . . . . . . . . . . . . . . . . . . . . . . . . 104
Accessing OMEGAMON II Trace Information from !DB/EXPLAIN . . . . . . . . . . . . . . 106
Using OMEGAMON II for DB2 with !DB/EXPLAIN 89
Page 90

Background about !DB/EXPLAIN for DB2
Background about !DB/EXPLAIN for DB2
This section provides an overview of the !DB/EXPLAIN functionality.
Functions provided by !DB/EXPLAIN for DB2
!DB/EXPLAIN provides a window into the operation of DB2. !DB/EXPLAIN offers
benefits for
I
extracting DB2 data
You can extract all or a portion of the data in the DB2 catalog according to the criteria
you specify. This flexible technology lets you
– Extract and combine data from multiple PLAN_TABLES.
– Access data when DB2 is not active.
– Avoid contention on the DB2 catalog.
– Retain histories of plan, package, and DBRM catalog data and their EXPLAINs.
I
DB2 database administration
You can use !DB/EXPLAIN functions to review and improve SQL. These features let
you
– Review application code and monitor specific SQL performance to understand
the access paths and their relative costs.
– Store historical information to perform impact analysis, historical analysis, and
perform “what-if” analysis.
– Manage DB2 objects by viewing statement use by package or plan and DBRMs
and BIND, REBIND, or FREE DB2 objects.
– Facilitate migration to a newer version of DB2.
I
application development
You can use !DB/EXPLAIN to analyze your design and improve SQL. These features
let you
– Analyze SQL code within an ISPF session to obtain access path information.
– Identify potential trouble spots.
– Execute SQL code within a batch facility and obtain a report.
– Obtain direct access from the IBM Query Management Facility (QMF) to different
types of queries.
– Tune your SQL code efficiently by suggesting more efficient alternative
techniques.
90 OMEGAMON II for DB2 User’s Guide: CUA Interface, Version 540
Page 91

Using OMEGAMON II and !DB/EXPLAIN Complementary Functions
Using OMEGAMON II and !DB/EXPLAIN Complementary Functions
This section describes the functions of !DB/EXPLAIN and OMEGAMON II for DB2 that
work together to help improve DB2 performance, and suggests ways you can use them.
If you use Version 6 or Version 7 of DB2, refer to the !DB/Tools for DB2 Installation and
Customization Guide, Version 510, for information on installing !DB/EXPLAIN.
Assumptions
The activities in this chapter presume the following:
I
You have started a trace for the application you want to review and the results of that
trace are available. Application trace results can be kept in memory, or you can write
them to datasets for long-term retention.
Review your Application Trace Facility (ATF) information to ensure that
– It contains information about the plan or plans you want to study.
– It was run at a time that reflects the most current version of the plan or plans you
want to study.
I
By using the historical reporting capabilities of OMEGAMON II for DB2 from
!DB/EXPLAIN, you can determine the names of the VSAM datasets or DB2 tables
that contain the stored application trace data for OMEGAMON II. You can use the
OPTIONS command from the OMEGAMON II Historical Reporter to specify the
– input datasets
– DB2 table names to use for reporting
– report filtering selection criteria.
When to use the complementary functions
Using !DB/EXPLAIN together with OMEGAMON II for DB2 assists you in resolving
problems and making decisions related to the performance of an application.
Here are some example situations.
I
You are running OMEGAMON II for DB2 and observe performance problems in an
application. You want to analyze the SQL statements the application contains to
determine what the problem may be.
I
You are developing an application and want to
– obtain predictive access path information from !DB/EXPLAIN about the SQL
contained in the application
– obtain cost information from !DB/EXPLAIN about the SQL contained in the
application
– verify the predictive information from !DB/EXPLAIN with the real-time execution
information provided by the OMEGAMON II Application Trace Facility
I
You are testing your application by executing an SQL call within !DB/EXPLAIN and
want to review online performance information.
Using OMEGAMON II for DB2 with !DB/EXPLAIN 91
Page 92

Using OMEGAMON II and !DB/EXPLAIN Complementary Functions
I
In a review of an application, !DB/EXPLAIN highlights some potentially
poorly-performing access paths and you want more detail about actual execution.
92 OMEGAMON II for DB2 User’s Guide: CUA Interface, Version 540
Page 93

Using the OMEGAMON II for DB2 Callable Interface
Using the OMEGAMON II for DB2 Callable Interface
The callable interface feature of OMEGAMON II for DB2 lets you make direct calls to
!DB/EXPLAIN without first having to access TSO.
Before using this feature, you should do the following:
1. Customize the Classic started task.
2. Set up !DB/EXPLAIN.
3. Set up the CUA options.
4. Set up the OMEGAMON II for DB2/EXPLAIN options.
Customizing the Classic started task to implement the OMEGAMON II for DB2 interface
Use the following procedure to customize the Classic started task.
Note: You may have already completed this procedure during the installation of
OMEGAMON II for DB2.
Step Action
1 From the Configure OMEGAMON II for DB2 for Runtime Environment Default menu,
select option 2, Realtime Monitor Interfaces.
----- CONFIGURE OMEGAMON II FOR DB2 FOR RUNTIME ENVIRONMENT DEFAULT --- OPTION ===>
Select the following options to configure OMEGAMON II for DB2.
You may type ALL to update the entire configuration or you may update
specific sets of values by making selections from the list below.
1 DB2 Subsystem Information
2 Realtime Monitor Interfaces
3 Event Collection Manager and ATF configuration
4 Historical Components
F1=Help F3=End
Result: The system displays the Started Task and VTAM Information Panel.
Using OMEGAMON II for DB2 with !DB/EXPLAIN 93
Page 94

Using the OMEGAMON II for DB2 Callable Interface
Step Action
2 Press Enter.
Result: The system displays the Classic Interface - DB/EXPLAIN panel.
OMEGAMON II for DB2 ------- Classic Interface - DB/EXPLAIN -------- SSID:
DIRT
Option ===>
The following information will be used to customize the DB/EXPLAIN
interface.
Specify:
Configure? ===> Y (Y/N Y = Configure N= Do not configure)
Started Task Name:
TESTC ===> D2TE
Maximum concurrent DB/EXPLAIN users:
TEMAX ===> 10
Specify the following DB/TOOLS data set names:
Messages ===> TDKT.DBTOOLS.MSGS
Loadlib ===> TDKT.DBTOOLS.LOAD
System Profile ===> TDKT.DBTOOLS.SYSTEM.PROFILE
Group Profile ===> (Optional)
User Profile ===> TDKT.DBTOOLS.USER.PROFILE
(Optional)
Press: ENTER to continue END for previous panel HELP for more information
3 Specify the appropriate information on the Classic Interface - DB/EXPLAIN panel and
press Enter.
Result: The system returns you to the Configure OMEGAMON II for DB2 for Runtime
Environment Default Menu.
4 Press the End function key.
Result: The system displays the Configure OMEGAMON II for DB2 Menu.
5 Use option 4, Create Runtime Members, to submit the job.
This creates a started task in RKANPAR. The name of this started task is D2TE or the
value entered on this panel for the parameter TESTC. Copy this started task to the
JES2 procedure library for started tasks. This task dynamically allocates the
!DB/EXPLAIN profile dataset. Configuration options for !DB/EXPLAIN will be
obtained from this dataset.
Note:
Do not start this task. OMEGAMON II for DB2 starts this task whenever a
!DB/EXPLAIN function is performed and stops it when the function has
completed.
94 OMEGAMON II for DB2 User’s Guide: CUA Interface, Version 540
Page 95

Setting Up !DB/EXPLAIN
Use the following procedure to set up !DB/EXPLAIN for OMEGAMON II for DB2.
Step Action
1 Ensure that !DB/EXPLAIN V510 PSP is installed on every DB2 subsystem where you
want to EXPLAIN statements. For information on installing !DB/EXPLAIN, see the
!DB/Tools for DB2
2 Define Destination Plan_Tables. The Destination PLAN_TABLE will be the current
SQLID.PLAN_TABLE.
I
If the current SQLID.PLAN_TABLE does not exist, !DB/EXPLAIN attempts to
create the tablespace PLANTBLS in the !DB/TOOLS default database.
I
If the PLAN_TABLE cannot be created there, !DB/EXPLAIN attempts to create
the PLAN_TABLE in the database DSNDB04.
I
If it cannot create the table, !DB/EXPLAIN issues an error message indicating that
the EXPLAIN could not be performed.
The current SQLID is determined by:
I
whether EXP_POWERX is defined in the !DB/Tools profile dataset concatenation
as a non-blank value (for example, EXP_POWERX=SAMHILL), if so, the current
SQLID is the value specified for EXP_POWERX,
or
I
the current SQLID is determined by the DB2 security exit.
Using the OMEGAMON II for DB2 Callable Interface
Installation and Customization Guide, Version 510.
Setting Up the CUA Options
Use the following procedure to set up CUA options and to use the new !DB/EXPLAIN
feature.
Step Action
1 Log onto CUA.
2 From the main CUA panel (KD2001), select Options from the task bar and press Enter.
The following pop-up appears.
1. Preferences...
2. Controls...
3. Set thresholds...
4. User authorities...
5. User Profiles...
6. Subsystem Profiles...
7. Near-term Thread History Filter...
8. D2/Explain Options...
F1=Help F12=Cancel
Using OMEGAMON II for DB2 with !DB/EXPLAIN 95
Page 96

Using the OMEGAMON II for DB2 Callable Interface
Step Action
3 Select option 2, Controls, from the pop-up and press Enter. Use the fields on the
Terminal Options panel, shown below, to specify preferences for terminal options. For
EXPLAIN, the key field on this panel is the SQL Process Level field. Type EXPLAIN
or SAVE/EXPLAIN in this field to enable the function.
Terminal Options
Type a new setting or press Enter.
Auto Refresh Interval . . . OFF Sec. (5-999 / Off)
Use Status Words . . . . . . YES + (Yes/No)
Critical Status Word . . . . Crit
Warning Status Word . . . . Warn
Normal Status Word . . . . . OK
Idle Status Word . . . . . . Idle
SQL Process Level . . . . . EXPLAIN <--- Invokes Explain
SQL Process PF Key . . . . F21 + with PF21
CUA/TSO Toggle Key . . . . . F24 +
F1=Help F4=Prompt F12=Cancel
Using the Terminal Options Window
The following table describes the fields on the Terminal Options pop-up window.
Fields for Terminal
Options
Auto Refresh Interval Amount of time between updates to panels that display performance
information. OMEGAMON II for DB2 collects performance data
continually and displays the new data automatically at the frequency
you enter in this field.
Use Status Words On color terminals, color status bars represent the performance of status
items. You can also specify a word or a series of characters to appear for
each level of status. The word or characters appear in a row within the
colored status bar. On non-color terminals, only the word or characters
appear.
Critical Status Word Word you want to appear when OMEGAMON II for DB2 displays a
critical status (red). For example: Crit
Warning Status Word Word you want to appear when OMEGAMON II for DB2 displays a
warning status (yellow). For example: Warn
Normal Status Word Word you want to appear when OMEGAMON II for DB2 displays a
normal status (green). For example: OK
Idle Status Word Word you want to appear when OMEGAMON II for DB2 is not
monitoring an object (turquoise). For example: Idle
Description
96 OMEGAMON II for DB2 User’s Guide: CUA Interface, Version 540
Page 97

Using the OMEGAMON II for DB2 Callable Interface
Values for the SQL Process Level are described in the following table.
Fields for Terminal
Description
Options
SQL Process Level Type of processing to use for SQL text when pressing the SQL Process
function key.
You can process SQL from the following panels:
I
SQL Call being Executed (Thread Detail). See “EXPLAINing SQL
Code” on page 61
I
SQL Text (ATF). You can access the SQL Text panel through the
.
Application Trace Facility. Select the SQL TEXT pushbutton from the
Application Trace SQL Detail screen.
I
Thread History Dynamic SQL Detail
SQL Process PF Key If you have set up !DB/EXPLAIN for direct access, pressing this function
key directly invokes !DB/EXPLAIN. Otherwise, it invokes the SQL copy
and paste facility to perform the EXPLAIN.
CUA/TSO Toggle key Use to toggle between CUA and TSO sessions.
The following table provides a list of fields and valid values for completing the SQL
Process Level field on the Terminal Options panel.
Values for SQL
Process Level
Description
MANUAL After you have selected the SQL text to be EXPLAINed, you must use the
function key defined (SQL Process key) to copy the SQL. Then, switch to
TSO/ISPF (CUA/TSO toggle), and paste the SQL, again using the
function key you defined.
Note: To use MANUAL or AUTO, a TSO/ISPF edit session must be
active in the background.
AUTO After selecting SQL text, use the SQL Process key to copy and
automatically insert the text into the member currently in use in the
TSO/ISPF edit session. The placement of SQL text depends on the cursor
position within the TSO/ISPF session.
Note: To use MANUAL or AUTO, a TSO/ISPF edit session must be
active in the background.
SAVE After selecting the SQL text, use the SQL Process key to copy and
automatically save the SQL text to the partitioned dataset member
defined on the Save SQL Text Parameters panel. Text will either overwrite
the existing contents of the member or be appended to it, depending on
the type of save defined on this panel. This option does not require a
TSO/ISPF edit session.
EXPLAIN This option invokes !DB/EXPLAIN, which produces a variety of
!DB/EXPLAIN reports. Use the pushbuttons to view the various report
sections. Complete the required options for the EXPLAIN option on the
!DB/EXPLAIN panel.
Using OMEGAMON II for DB2 with !DB/EXPLAIN 97
Page 98
Using the OMEGAMON II for DB2 Callable Interface
Values for SQL
Process Level
SAVE/EXPLAIN Use this option to perform SAVE and EXPLAIN functions. Complete the
required fields for the SAVE/EXPLAIN option.
Setting Up the D2/EXPLAIN Options
Use the following procedure to set up the D2/EXPLAIN options.
Step Action
1 If you are not already logged onto CUA, then do so now.
2 From the main CUA panel (KD2001), select Options from the task bar and press
Enter. The following pop-up appears.
1. Preferences...
2. Controls...
3. Set thresholds...
4. User authorities...
5. User Profiles...
6. Subsystem Profiles...
7. Near-term Thread History Filter...
8. D2/Explain Options...
F1=Help F12=Cancel
Description
3 Select option 8, D2/Explain Options, from this panel and press Enter. Use the
D2/EXPLAIN Options panel, shown below, to specify parameters required to
invoke !DB/EXPLAIN during your OMEGAMON session.
D2/EXPLAIN Options
Extract Id . . . . . . : DB41
User Profile DSN . . . :
Group Profile DSN. . . :
SQL Statement PDS. . . :
Member Name. . . . . :
Type of Save . . . . : REPLACE +
Default Qualifier. . . : SYSIBM
Qualifier Option . . : PROMPT +
Gather Statistics. . . : YES +
Initial Report . . . . : EPATH+
F1=Help F4=Prompt F12=Cancel
98 OMEGAMON II for DB2 User’s Guide: CUA Interface, Version 540
Page 99

Using the D2/EXPLAIN Options Panel
The following table provides a list of fields and valid values for completing the
D2/EXPLAIN Options panel.
Field Description
Extract Id 1– to 8–character field that identifies an extract of plans and packages. It
represents a logical grouping that typically identifies a DB2 subsystem and
an MVS system. An Extract ID must be configured within !DB/EXPLAIN
before it is used, but an actual extract is not required for the EXPLAIN.
User Profile DSN Optional field names the dataset containing the !DB/EXPLAIN user
profile. Contains overrides to the !DB/EXPLAIN options specified in the
group profile and the system profile.
Group Profile DSN Optional field names the dataset containing the !DB/EXPLAIN group
profile. Contains overrides to the !DB/EXPLAIN options specified in the
system profile.
Using the OMEGAMON II for DB2 Callable Interface
SQL Statement
PDS
Name of the dataset where the SQL statement is saved. Must be a PDS.
The SQL Process Level is specified on the Terminal Options panel under
the Options pull-down (fastpath O2). If SAVE, the text is saved but
!DB/EXPLAIN is not invoked. If SAVE/EXPLAIN, !DB/EXPLAIN saves the
text and invokes the EXPLAIN function.
Member Name Name to use when saving the SQL text into the SQL statement PDS. If
omitted, the system generates a name. When you define a member, the
system prompts for whether the member should be replaced or appended.
Type of Save Type of save to be executed when saving SQL text to the member
specified within the SQL statement PDS. Values are REPLACE and
APPEND.
I
REPLACE writes over an existing member or creates the member if it
does not currently exist.
I
APPEND concatenates the new SQL text to the existing number.
Default Qualifier Qualifier to use to qualify unqualified tables, views, and aliases in SQL
statements.
Qualifier Option Type of qualifier. Values are USE and PROMPT.
I
USE indicates the current default qualifier for unqualified SQL text.
I
PROMPT indicates you want to be prompted for a qualifier whenever
an SQL statement is used.
Gather Statistics Type YES to have !DB/EXPLAIN gather statistics; type NO to bypass.
Using OMEGAMON II for DB2 with !DB/EXPLAIN 99
Page 100

Using the OMEGAMON II for DB2 Callable Interface
Field Description
Initial Report Type the name of the initial !DB/EXPLAIN report to be displayed: ESTMT,
EPATH, EPTBL, EOBJ, or ERECM.
I
ESTMT is the actual SQL statement text being explained. If there is an
SQL error, SQL error text also appears. Use the pushbuttons to select
from the other !DB/EXPLAIN report sections that follow.
I
EPATH is a narrative describing the access path for the SQL
statement.
I
EPTBL reports the plan table entries for the SQL statement in tabular
form.
I
EOBJ reports the DB2 catalog statistics for objects referenced by the
SQL statement. This section is available if you specified Yes for Gather
Statistics in the D2/EXPLAIN Options panel under the Option
pull-down (fastpath 08).
I
ERECM provides suggestions for optimizing the SQL statement.
EXPLAINing SQL Code
Use the following procedure to process SQL from the Thread Detail panel.
Step Action
1 Log onto CUA.
2 From the main CUA panel (KD2001), select Active Threads and press Enter.
Result: The system displays the All Threads Connected to DB2 panel.
Actions GoTo View Options Tools Help
+------------------------------------------------------------ mm/dd/yy
8:07:07
| All Threads Connected to DB2 (Some) System: D41
| Lines 1 to 4 of 4
+-----------+---------+-------+-------------+-------+------+------+-------+
| Planname | Elapsed | CPU % | Status | Getpg |Update|Commit|Jobname |
+-----------+---------+-------+-------------+-------+------+------+-------+
| DSNTEP41 | 31.4m | 05.3% | IN-SQL-CALL | 5153K| 61490| 0|DLKEX212|
| KO2400HP | 1.3d | 00.0% | NOT IN-DB2 | 0| 0| 0|TDO2S03 |
| KO2400HP | 2.1d | 00.1% | NOT IN-DB2 | 0| 0| 0|TDO2S44 |
| KTWPLNR | 1.0s | 00.0% ½ IN-SQL-CALL | 0| 0| 0|RBRIN3 |
+-----------+---------+-------+-------------+-------+------+------+-------+
F1=Help F2=Keys F3=Exit F5=Refresh F6=Console **=Bkwd F8=Fwd
F10=Action Bar F15=System Status F24=CUA/TSO
100 OMEGAMON II for DB2 User’s Guide: CUA Interface, Version 540
 Loading...