

Page 1
SIDE BY SIDE REFRIGERAYOR
Please read this manual carefully before using the product.
Page 2

Congratulations
lThank you for your choice of such a modern and quality household
refrigerator from us.
lThe refrigerator is featured by outstanding energy efficiency.
lAll our household appliances have been examined thoroughly before
ex-factory in order to ensure their stability and sound condition.
l Please contact our customer service department as soon as possible in
case of any doubts, in particular, about the connection and installation of the
refrigerator.
lFor more information and introduction of more products, please visit our
website.
lPlease read carefully and follow the operation instruction, installation
instruction and other relevant information enclosed to the refrigerator.
lPlease keep all files safe, as you can view them in case of any problems
or give them to the new user in case of transfer.
Notes:
lPlease pay attention to the safety precautions before use.
lPlease keep all files safe after reading for future review.
lOur products are being improved all the time and they are subject to
change without prior notice.
Energy Saving Tips:
For household r efrigerat ing appliance s, informat ion shall be prov ided in the
instructi on b ooklet prov ided by manufac turers conc erning:
the combinati on of drawers , baskets and she lves that res ult in the most efficient us e
of energy for the appliance, a nd
how to minimise t he energy con sumption of the h ousehold re frigerating a ppliance in
the use-phase .
REQUESTIN G ASSIS TANCE OR SERVICE
If you have any dou bt or extra ass istance, pl ea se call:
Customer Serv ice: Hefei Hu aling Co.,Ltd .
Telephone: 4008 899315
Address: 176 Ji n Xiu Road,He fei Economic And Technologi cal Develop ment
Area,230601 An hui,P.R.China
Fax: +86-55 1- 3634
E-mail: Zha ng kun3@mide a.com.cn
Table of contents:
Components and Parts.........................................................1
Before Using Your Refrigerator..............................................2
Correct Use for Your Refrigerator...........................................3
Introduction of Your Refrigerator's Functions..........................8
Attentions...........................................................................10
Repair and Maintenance of Your Refrigerator.........................11
Simple Failure Analysis and Troubleshooting.........................12
Technical Parameters and Electrical Diagrams.......................13
Install the door handels.........................................................15
1 7
Page 3
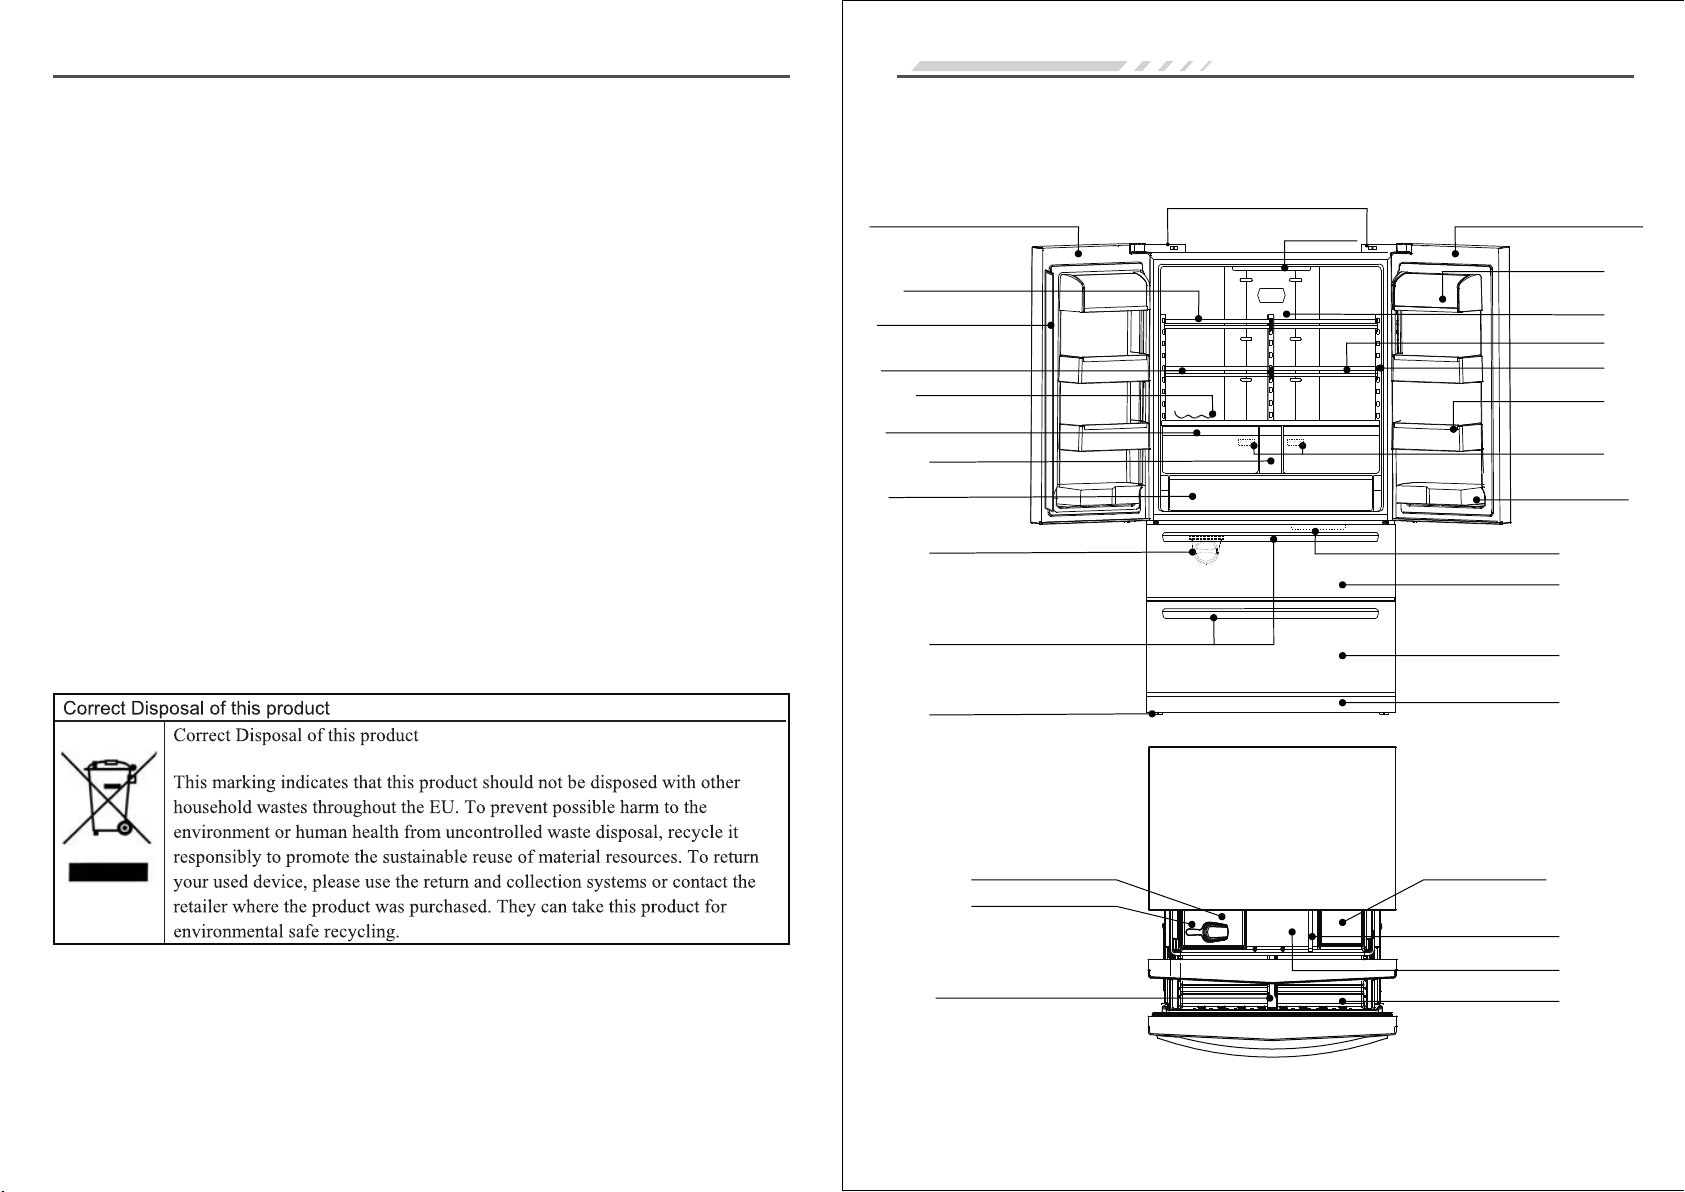
Components and Parts
NOTICE:
This applianc e is intended t o be used in househ old and simil ar applicatio ns such as
-staff ki tchen areas in sh ops, offi ces and other w orking enviro nments;
-farm house s an d by clients in h otels, motels a nd other resi dential type
environment s;
-bed and breakf ast type envi ronments;
-Catering and s imilar non- retail applic ations.
This applia nce is not inte nded for use by p ersons (inc luding chil dren) with re duced
physical, sen sory or menta l capabilitie s, or lack of exp erience and kno wledge, unl ess
they hav e been given supervisi on or instructio n conc erning u se of the app liance b y a
person respon sible for the ir safety.
Children shou ld be supervi sed to ensure tha t they do not pla y with the applia nce.
If t he supply cord is damag ed, it must be replaced b y th e ma nufacture r, it s service
agent or simila rly qualifi ed persons in ord er to avoid a haz ard.
WARNING:
WAR NING: Ke ep ventilatio n open ings, in the applianc e enclos ure or in t he built-in
structure , clear of obstru ction.
WAR NING: Do not use me chanical devi ces or other me ans to accelera te the
defrosting pr ocess, othe r than those reco mmended by th e manufacture r.
WAR NING: Do not dama ge the refrig erant circuit .
WAR NING: Do not use el ectrical ap pl iances insi de the food stora ge compartm ents
of the applianc e, unless the y are of the type rec ommended by t he manufactur er.
WAR NING: Do not stor e explosive s ubstances suc h as aerosol cans w ith a
flammable pro pellant in th is appliance.
Some featur es and parts of you r refrigerato r may be diff erent from th is diagram. The
packing list en closed to you r refrigerato r shall preva il. We apol ogize for the
inconvenien ce arising th ereof.
Switch for refrigerator compart ment lamp
Left door for refrigerator compar tment
Top lamp for refrigerator compartme nt
Right door for refrigerator compartment
Butter box
Cantilever rack
Turnover beam
Air duct cover plate
Folded cantilever rack
Sliding cantilever rack
Wine rack
Side lamp for refrigerator compartment
Gallon bottle rack
Fruit and vegetable drawer
Water tank
Drawer of temperature-adjusta ble compartment
Automatic ice maker
Top lamp for freezer compartment
UV+ light-wave fresh-keeping lamp
Special-shaped bottle rack
Upper door for freezer compartment
Drawer handle
Lower door for freezer compartment
1 6
Leveling leg
Ice scoop
Partition plate for lower freezer drawer
Decorative cover for bottom beam
Refrigerator body
Fast-freezing dish Ice storage box
Partition plate for upper freezer d rawer
Upper freezer drawer
Lower freezer drawer
1
Page 4

Before Using Your Refrigerator
Features
lStainless ste el door panel
It is m ade with th e proprietar y anti-fin gerprint technology a nd has an e legant and
luxurious app earance.
lThermosta tic freshness p reservati on technology
The refriger ator compartmen t i s provided with independe nt air su pply system and
independent temperatur e contro l system . It has cons tant storage temperatu re and
could preserv e the freshne ss of food for long .
lEfficie nt moisturizi ng system
The m aximum moisturiz ing rat e is as high as 80%, so it c ould preserve and prolong
the freshness of the stored fo od.
lDC frequency co nversion te chnology
The r efrigerator is capable of automatic adju stment of th e col d and effi ciency of the
frequency-v ariable compress or according to the surround ing temperatur e, setting
temperature , in terior temperat ure, t he t emperature and amount of the st ored food,
and it i s f eatured by quick freezing , good per formance in f reshness preservati on,
high energy-e fficien cy and low nois es.
lSmart defro sting
The refri gerator is capable o f smart d efrosting a ccording to the ac tual freque ncy of
use and frostin g rate.
lDual system
The food could be st ored in ei ther the refrig erator compartme nt or the freezer
compartment to avoid taint ing.
lKey parts and components
The compress or is Embraco freque ncy-varia ble compress or, which is imported fr om
Brazil and feat ured by high efficienc y, energy sa ving and low nois es.
lTemperature-a djustable c ompartment
A te mperature -adjustable co mpartment is se t b elow the refrig erator compa rtment. It
could set differen t t emperatures accordi ng to the req uirements of the food sto red
here.
lIce maker
The freez er compar tment is provided with an automatic ice maker, whose wa ter
supply box is set in the refrigerat or compar tment. It is provided with wa ter filte r
blocks, which ar e capab le of steriliz ation and remova l of impuritie s,
indicator 5 is On ,then the ice -maker starts to work.As a res ult, clean ic e is made.
lArtificia l in telligenc e
Th e re fr ig er ator is capable of being adjusted automatically to the optimal
performance according to the interior temperat ure an d surr ounding temperatu re
without the nee d of manual adj ustment.
lSuper-large a nd super-lu xurious desig n
Th e refrigerator is designed with super-large capacity fo r bo th r efrigerator
compartment and freez er co mpartment . The re frigerator compa rtment adopts the
adjustable ca ntilever sh elves and has a big f ruit and vege table drawer.
--Free of Freon or frost, air-co oling refriger ation system, ca pable of c ryogenic
treatment and q uick freezi ng
--Automatic display of fau lts
--Provided with co ndensing un it and blower, exce llent ref rigeratin g performan ce,
long service- life of conde nser
--Open alarm an d large-scr een LCD
--Four-door desig n, easy for use: re frigerati ng drawe rs are designe d reas onably a nd
can be fully used
--Luxurious L ED lamps on thr ee sides in the ref rigerator c ompartment
and pus h E a nd
Install the door handles
inner socket head cap
screw for handle fixing
handle fixing bolt
chilling chamber door handle
inner socket head cap screw
for han dle fixing
handle fixing bolt
Scheme of installation of cold storage door handle
Diffe rence b etwee n the chi lling a nd refr igera tion ha ndle: l ie them f lat, th e one wit h highe r
chordal height is the refrigeration handle
Cold storage door handle
Refrigeration handle
Erection inst ructions of c old storage doo r handle:
1. Firstly, take the handl e set bolts out fro m the refrige rator, use cross r ecessed
screwdriver t o set the bolt on t he door. Fix it ti ght with all the sc rew thread tw isted
through the hol e, as shown in th e figure;
2. After the fir st step is comple ted, take the C old storage doo r handle out fr om the
box, place it as pe r the directi on shown in the fig ure (Note: i. e. the directio n which
both screw hole s on the handle a re close to the edg e), and hang th e handle above
the set bolt;
3. Use the small hex agon spanne r supplied in the b ox to set the han dle fixing
socket head cap s crews into bo th the small scre wed holes on th e handle. Af ter they
are screwed dow n, gently sha ke the handle, so a s to confirm th at the handle is we ll
erected.
Erection inst ructions of t he refrigeration door hand le:
The erect ion steps of th e refrigerati on door handle is s ame with that o f the cold
storage door ha ndle. Pleas e note that: duri ng the erecti on of the handle, t he directio n
of tapping hole i s downward (t o the ground).
2
1 5
Page 5

Electric diagram
Electric di agram
Correct Use for Your Refrigerator
War nings
lDon't use mechanical equipment or other methods to accelerate the defrosting process
except the mea ns recommended by the manufacturer.
lDon't use any electrical appliances in the food storage compartments except the model
recommended by the manufacture.
lThe R134a refrigerant and cyclopentane foaming material used in the refrigerator are
inflammable. All waste and discarded refrigerators shall be placed away from naked fire and
they are not allowed to burn.
New refrigerator is c oming
lRemove all packaging material before using the new refrigerator. This i nclud es the fo am
base and all adhesive tape holding the refrigerator accessories inside and outside.
lClean both the inside and outside of the refrigerator with wet cloth (a little detergent could
be added into the warm water to wash the cloth and then wipe it again with the clean water);
lPrepare an independent two-pole socket with grounding contact for the refrigerator and it
shall not share a multi-purpose socket with other electrical appliances;
lDo connect grounding wire! The grou nding p ole of th e socke t shall b e provi ded wit h a
reliable grounding wire.
lOpen th e refri gerator body and take out the accessory
(deco rative cover for bottom beam) and the three
screw s from th e instr uctio n packa ging bag; then
insta ll them into the bottom b eam as sh own by
the sch ematic diagram on the right.
Note: The decor ative cover for b ottom
beam is use d as o rnament, so you can
choose not to insta ll i t. It won't affect the
refrigerato r's perform ance or condi tions
no matter whe ther you instal l it or not.
Transport and Placing of Your Refri gerator
Transport
lKeep upright an d avoid squee zing or vibrati on during tra nsport. Avoid a slant
angle over 45 deg ree during ha ndling.
lAvoid the d oor or top cap from b eing under ex cessive stres s when moving ;
otherwise, it may become def ormed.
Placing
lPlace your refr igerator in a w ell-ventila ted place and k eep it from heat so urce
and direct sunl ight. Don't p lace it in any humi d or wet place so a s to avoid rust and
weakening of in sulation effect.
lThere shall be a sp ace not less th an 30cm from the to p of your refri gerator and
not less than 10c m from both sid es or the back of t he refrigerat or to the adjac ent
walls respect ively. This require ment is good fo r open and close of t he door and
also for heat emi ssion.
lThe refrigera tor shall be pl aced on a flat and fi rm ground (if n ot flat, you can us e
the leveling le gs for adjust ment).
Keep You r Refrigera tor Standin g
lDon't connect y our refrige rator to the powe r supply imme diately after i t is placed
vertically. You should keep i t standing fo r at least 6 hours be fore switch ing it on in
order to ensure i t running wel l.
Note: Make sure t he power wire i s not pinned by t he refrigerat or or other
objects so as t o avoid acciden ts arising fr om power wire fau lts. Please c heck
the voltage s cope of your refr igerator ag ainst the actua l power suppl y before
switching i t on.
Screws
Decorative co ver for botto m beam
1 4
3
Page 6

Correct Use for Your Refrigerator
Technical parameters and electric diagram
Start to Use
You o ught t o get a good know ledge of all safet y prec autio ns and make sure that y our
refri gerator has been placed properly in its final position before using.
1. U npack ing
Please in stall the d ecora tive cover for botto m beam onto y our refri gerat or afte r un packi ng and
adjust the fro nt leve ling legs to level your refrigerator.
2. C onnec ting Your Refrigerator to the Power Supply
Your refrig erato r will en ter the ex-fac tory de fault state af ter connecting to the power supply
and it w ill display targe t te mperatu re f or t he r efrig erator comp artme nt a nd f reeze r
compartment.
3. Work M odes of Your Re frige rator
You ca n set you r refri gerat or in eit her of th e follo wing tw o ways:
(1) Smart mode: we su ggest you choos ing this mod e if you h ave no speci al re quire ments .
Your r efrig erato r will wo rk auto matic ally af ter you c hose th is mode .
(2) Manual mode: You c an set the tempe rature by pres sing th e tempe ratur e adjus tment k ey.
4. Put Food into Your R efrig erato r
You can p ut y our f ood int o the ref r ige rat o r af ter a pe r iod of t i me ( abo u tho urs
in sum m er) whe n t h e r efr i ge r ato r h a s a lre ady f ull y r e fri ger a ted its i nte rio r
com p ar t men t s.
Tips: The inter ior t emper ature may require a ce rtain peri od of time to r each balance if
the sett ing te mpera ture is chan ged or ot her fo od is put into the ref riger ator. Such a
perio d of t ime dep ends on t he chan ge to the setting tempera ture, t he surr oundi ng
Refrigerator compartment
Though the temperature-adjustable device could keep most of
the ref rigerator co mpartment at an average temperature around
2~8?, it fails t o prese rve the f reshn ess of fo od for lo ng. As a
result, the re frige rator c ompar tment c an be use d only fo r shortterm st orage .
lUse of tu rnove r beam
Please keep strictly to the wa rnings on the label of the turnover
beam. It is a norm al phenomenon that the surfa ce of the
turno ver beam is hot. Dews on th e surfa ce are also normal in
summer or when the surrounding environment is wet. What you
need to do is to clean them away with cloth.
l Use of wa ter tan k
Add pure water or mineral water into the tank other than tap
water (don't put juice, milk or other drinks into the water ta nk;
otherwise, the pipe may be blocked). Please fill water as soon
as possible if the water level in the tank is low. Generally, the
water filter b locks in the tan k shall be changed annually, as t he
case ma y be.
lAdjustment of canti lever rack
The can tilever rack could be adjusted to the proper height as
required by food. Please adjust the cantilever rack by following
the arrows as shown in the diagram. Raise it upward first and
then ta ke it out b y tilti ng it upw ard. Du ring installation, put the
upper end of the fixed leg into one of the upper slots on the
supporting iron first and then put the lower end of the fixed leg
into th e third s lot on th e lower part of th e supporting iron.
lHeight adjustment and cleaning of door-mounted bottle
rack
Raise the bottle rack in the direction ?, hold it with both hands
and take it out in t he direction ?. After cl eaning, you can install
the rac k in the re verse o rder and you can also adjust the height
of the ra ck.
Adjustment of cantilever r ack
Upper end of fixed leg
Lower end of fixed leg
Slot
Adjustment of door-mounted bottle rack
1
2
4
Climate Class
Prete ction Against
Electric Sho ck
Rated Voltage/Frequency
Rated Power
Defrost Power
Lamp Rated Power
Rated Current
Foaming Agent
Energy Comsumption
Energy Effic iency C lass
Total Gro ss Volume
Total Sto rage Volume
Refrigerator Storage Volume
Freez er Stor age Volume
Variab le Temp eratu re Volum e
Refrigerant,Amount
Freez ing Capacity
Net Wei ght
Noise
Dimensions
Compressor
T
Ⅰ
AC220-240V/50Hz
110W
370W
3.3W
1.5A
Cyclopentane
1.18kW·h/24h
A+
570L
540L
420L
120L
/
R134a,180g
10kg/24h
137kg
45dB(A)
W911xD 728.5 xH177 5(wit hout ha ndle)
VEG Z7H
We will not p rovide furthe r notice afte r parameters ar e changed due t o product
improvement o r technical u pdate. Please r efer to the nam eplate on back of t he
refrigerato r as final para meters.
1 3
Page 7

Simple steps to identify and solve problems
Please read the f ollowing se ction careful ly before rep air.
Phenomena
The refrigera tor
doesn't work
lWhether the p ow er is switche d on, whether the p lug
is secured?
lWhether the v ol tage is too low?
Whether the temperature is set too high
l
(might reduce the temperature as required). ?
Can't freeze
properly
lWhether too much food is stored?
lWhether hot foot is stored?
lWhether the door is opened and closed too frequently?
lWhether there is hot source around the refrigerator?
lWhether the door seal is closed?
lWhether the g round is levele d and the refrige rator is
Loud noises
placed on level ed ground?
lWhether accessories of the r efrigerator a re put at the
right positio n?
Food is froze n
inside the refr igerator
lWhether the food is put near the air outlet?
compartme nt.
The refrigera tor
has unpleasan t
smell
lFood with speci al odor shall b e tightly wrapp ed.
lCheck whether t he food has gon e bad
lClean inside th e refrigera tor
If the situat ion doesn't tur n better afte r you have checke d all above ite ms,
please cont ac t with the afte r-sales Ser vice Departme nt of the Compa ny. If
power cable s are damaged, pl ease get it cha nged by the repai rmen design ated
by our Compan y to avoid any risk .
Possible reas ons, items to c heck
Correct Use for Your Refrigerator
lFood suggested to store in refrigerator compartment
(1) Cooked wheaten food, cans, milk, etc.
(2) Snack food, fo od subject to ta intin g, dairy product
(3) Cooked cold meat, sausage
(4) Fruit, veget ables
(5) Eggs, butter, c heese
(6) Zip-top cans, seasoning
(7) Drinks, othe r bottl ed food
Freezer compartment
The tem perature in th e freezer compartment is very low so it could preserve the freshness of
food fo r long. Those th at shal l be stor ed for lo ng coul d be put in t his com partm ent but n ot
exceed the sto rage period specified on the packaging of each kind of food.
Remark: You c an take o ut the dr awers o f the fre ezer co mpart ment to i ncrea se its ca pacit y
and sto re more f ood.
lFoo d sugge sted to s tore in f reeze r compa rtmen t
(1) The upper drawer of the freezer could be used to store fish, meat, ice- cream a nd etc.
(2) Japanese-style ice maker is used to make ice
(3) Ice sto rage bo x is used to store t he ice
(4) The lower drawer of the freezer is used to store f ish, me at and pa ckaged poultry meat.
Note: Don't to uch the f reeze r tray di rectl y with ha nds to av oid col d injur y for the
tempe rature insid e is too lo w.
Taking -out an d insta llati on of the lower freezer drawer
(1) Pull out the lower freezer drawer first.
(2) Take out th e two fix ed scre ws from t he part ition p late of t he lowe r freez er draw er with screw
driver and then take off the par titio n plate .
(3) Take off th e rear st opper f or the lo wer dra wer as sh own by Fi g. A.
(4) Take out th e lower drawer body with force as directed by the arrows in Fig. B.
(5) The installation of the lower drawer body is conducted in the reverse order. You should
insta ll the lower drawer body first and then install the rear stopper for the lower drawer as
shown in Fig. C. Finally, both si des of th e drawe r shall b e conne cted to t he posi tion sh own
by the ar rows re spectively.
(6) The partition plate is installed into the corresponding slots and then is fixed with screws.
The position of the partition plate for the lower drawer could be adjusted according to your
preference.
Advice: Don't remove the lower freezer drawer if not necessary.
C
Rear stopper fo r the lower dra wer
A
Partiti on plate for th e lower dra wer
Align w ith the s lot
Inser t into th e edge
Normal phen omena not regar ded as malfun ctioning
lRefr igerant insid e the capilla ry tubes of the ref rigerator f low in high speed a nd
might have a fe w am ount of bubbl es. Hence, irre gular noise s might appear at t he
outlet.
lWhen t he air humidity i s excessive ly high, moistu re or water dro plets might
appear around t he refriger ator's door. You just need to wip e it off.
1 2
Lower drawer bo dy
Align w ith the s lot
B
Positioning hole for t he p ar ti ti on plate
5
Page 8

Repair and Maintenance of Your RefrigeratorCorrect Use for Your Refrigerator
Temper ature -adju stabl e compa rtmen t
It coul d be set to d iffer ent tem perat ure bas ed on
the needs of foo d store d.
lSet to Fr uit and Ve getable mode for food
that ca n't be fr ozen.
lSet to Ze ro Degr ee Fres h-kee ping Mode for
perishable food that could be frozen and stored
for a sho rt peri od.
lThe drawer of te mperature-adjustable
compartment has a maximum load not greater
than 10Kg.
Ice-m aker
NOTE: I f you d id no t use the frid ge fo r a lon g tim e,y ou need to get t he wa ter o ut of t he ic e-maker wh en
using a gai n,a nd cl ean the ice-mak er to m ake s ure t he ice is pure.
(1). Op erating in structio ns on the ice- maker
1). Whe n the refrig erator is us ed for the fir st time, sta rt the ice-m aker after 2 0min. The ice-m aker is
capab le of produc ing 1.4~1. 7Kg ice in 24h r, dependin g on the tempe rature of fr eezer comp artment,
surro unding tem perature , times of doo r opening/ closing an d other work ing condit ions.
2). If th e ice-make r isn't used f or a long peri od, please c lose the ice -maker at th e control pa nel of the
freez er door, clea r the ice cube b ox and ice sto rage box.
3). Whe n the ice mark er starts ag ain after a lo ng period of p ower off, pleas e ensure tha t ice cubes ar e
not sme lted. Othe rwise, ple ase clear th e ice cube box a nd ice stora ge box.
4). Che ck the level o f water tank f rom time to ti me (if the lev el of water ta nk is too low, ic e cubes will b e
small er).
5). The ice- maker chec ks the ice amo unt automa tically an d stop ice-m aking when t he ice stora ge box
is full . It stops als o when the wat er level is be low the alar m level, ple ase add more w ater.
6). You w ill hea r the s ound of m oto r after a bou t two hou rs, w hich is t he so und of pu mp pr ovidi ng water
to the ic e maker and do esn't indi cate malfu nctionin g.
7). It is n ormal that s everal ice c ubes may sti ck togethe r or get crush ed.
8). Whe n the refrig erator is us ed for the fir st time, the i ce maker sta rts to work af ter the free zer
compa rtment is co oling for ab out three ho urs (maybe l onger when t here are muc h food store d). The
ice-m aker could p roduce abo ut 1.2Kg ice c ubes withi n 24 hours, wh ich may vary d epending o n the
tempe rature of fr eezer comp artment, s urroundi ng tempera ture, time s of door open ing/clos ing and
other w orking con ditions.
9). The ice- maker is cap able of auto matic wate r supply, ice-ma king and ice -removal . Please don 't take
out the i ce cube box an d add water by y ourself.
Hook
Slidin g rai l
Pull out a nd i n sta l l th e tem p e rat ur eadjustable compartment
(1). Pull out th e dr awer of th e temp eratu readjustable compartment:
(2). Find t he hook at th e left and ri ght sid es at
th e d ra wer b ottom of th e t em pe ratur eadjustable compartment (shown in the Fig.
below).
(3). Hold the hook at tw o sides wi th a nose
pliers or tweezers and push it up and out of
the groove of slidin g rai l, an d tak e out the
hook at the othe r side with the same meth od.
(4). Take o ut the dr awer
(5). Install the d rawer b y putti ng the hook into
the right place
Drawer o f the t emp era ture-ad jus tab le co mpartme nt
Refrigerato r's mainten ance and repa ir
Cleaning
Clean regular ly dust from th e back of refrige rator and gro und.
Clean regul arly the sp ace inside th e refrigera tor to avoi d any unple asant smell .
Before clean ing, pull out the plug and use soft towels and neutral d etergent and
clean it finall y with clear wa ter. It is recomme nded to clean o nce half a year.
Never use following substa nces to clean t he space inside t he refriger ator:
lAlkaline or weakly alkaline detergent (it might cause cracking of th e line r and
plastic parts )
lSoap powder, ben zoline, thi nner, alcohol an d etc (might da mage plastic pa rts)
lWipe off edible oil or flavor ing immediately (might cause cracki ng of p lastic
parts)
Lights and re placement
lReplace by prof essionals
Refrigerato r compartme ntkeep fresh with optical wa ve, degrade p esticide
lKeep fresh with optical wave--- use the optical- wave lamp t o maintain th e
photosynthe sis of fr uit and veg etables, pr olong the g rowth perio d and keep it fresh
effecti vely
lDegrade the pe sticideus e UV-LED light to degrade pesticide resid ue on the fruit
and vegetable , clean with wa ter before eati ng, healthi er, more sanitar y.
Shutdown
When the refr ig erator isn' t used for a long per iod:
lPull out the power cable to avoid that the power cable g ets old and causes
electric shoc k or fire.
lClean the space i nside the ref rigerator
lOpen the doo r for a period for drying, close the door with a gap left to avoid
unpleasant od or.
Power outag e
Reduce the ti mes of door ope ning during p ower outage , don't put fre sh food insid e
the refrigera tor anymore .
Disposal
When you discard an unused refrige rator, remove the door seal to avo id lo cking
children insi de the refrig erator.
Rack
Ice cub e box
Fig.1 Fig.2
6
1 1
Page 9

Attentions
Correct Use for Your Refrigerator
Atten tions
lThe refri gerator wo rks with AC 2 20V/5 0Hz p ower su ppl y. If th e volta ge fl uctua tes i n a wide ra nge
(out of t he 187~242 V range), th e refriger ator might f ail to start , the main con trol panel o r compress or
might b reak down, o r the compre ssor might w ork with abn ormal nois es. You m ust use an aut omatic
volta ge stabili zer above 75 0W in such sit uations. The re frigerat or has a three -phase (ea rthing) po wer
cable p lug that sha ll be plugge d into the sta ndard thre e-phase (e arthing) s ocket. Nev er cut off or
remov e the third pi n (earthin g) of the powe r cable. Af ter the r efr igera tor i s insta lle d to the ri ght p lace,
the soc ket shall be i n the access ible range f or ease of plu gging/un plugging . The p lug shall co ntact
secur ely with the s ocket, oth erwise, it m ight cause f ire.
lNever pul l out the plug b y pulling th e power cabl e. Always hol d the plug and p ull it out fro m the
socke t. Don't hav e the power ca ble presse d under the re frigerat or or feet. Wh en the refri gerator is
moved a way from the w all, never p ress or dama ge the power c able. When t he power cab le is damage d
or the pl ug is worn, do n't use it any more. When t he power cab le is worn or da maged, you m ust change
it at the r epair stat ion design ated by the ma nufactur er.
lWhen coal g as or other in flammabl e gases are le aked, clos e the valve fo r leaking ga ses. Open
the doo r and window s. Don't pul l out or inser t the plug of re frigerat or or other el ectric app liances.
lDon't put i nflammab le, explos ive, volat ile or stron gly corros ive substa nces into th e refriger ator
to avoi d damaging t he refrige rator or sta rting fire o r other acci dents.
lDon't use i nflammab le solvent n ear the refr igerator t o avoid fire .
lIt is advis able that yo u don't put th e power sock et, voltag e stabiliz er, microwa ve oven and ot her
elect ric applia nces on top of r efrigera tor to ensur e safety. Don't us e any electr ic applian ces inside t he
refri gerator (e xcept for th e model reco mmended) t o avoid elec tromagne tic interf erence or ot her
accid ents.
lPlease ke ep childre n from enter ing or climb ing the refr igerator t o avoid lock ing the chil dren
insid e the refrig erator and h urting the m when the ref rigerato r falls.
lWhen the re frigerat or starts to w ork, don't t ouch the col d surface of t he freezer c ompartme nt,
espec ially with w et hands, to a void hurti ng.
lThe gap bet ween doors a nd between t he door and re frigerat or body is sma ll. Don't pu t your
hands i nto these ar eas to avoid f inger sque eze. When yo u open the ref rigerato r's door, don 't let
child ren approa ch.
lDon't spr inkle wate r onto rinse t he refrige rator with w ater. Don't p ut the refri gerator in w et or
easy- to-sprin kle places s o as not to infl uence the el ectric ins ulation pr operty of th e refriger ator.
lDon't dis assemble o r reform the r efrigera tor by yours elf. Never d amage the re frigerat ion
pipel ine. Pleas e get the refr igerator r epaired by p rofessio nals.
lDon't put f luid subst ances in bot tles or seal ed contain ers into the f reezer, lik e bottled be er or
drink s to avoid tha t the explos ive cracki ng during fr eezing cau ses other lo sses.
lWhen powe r outage or cl eaning, pu ll out the plu g. Turn on the po wer supply a fter at leas t five
minut es to avoid th at repeate d startup mi ght damage t he compres sor.
lWhen the re frigerat or is out of ser vice, plea se take down t he refrige rator's do or, remove th e
door se al and shelv es and put the m at proper pl aces to avoi d that child ren might pl ay inside an d cause
accid ent.
lThis prod uct is a house hold refri gerator an d is only suit able for sto rage of food a ccording t o
state s tandards . It can't be us ed for other p urposes, l ike storag e of blood, dr ugs, biolo gical prod ucts
and etc .
2. Take out , clean a nd inst all the i ce cube b ox
lIf the ic e maker i sn't us ed for a lo ng peri od, ice c ubes th at are ju st prod uced might have
unpleasant smell. You m ust take out and clean th e ice cub e box.
lOpen th e upper drawer in the freezer compartment, rotate the knob of ice maker
counterclockwise by 90 , turn the handle from the horizontal position to vertical position to
o
release the lock (as shown in Fig. 1 of Pg. 6), pull it out (as s hown in Fig. 2 of Pg . 6) and ta ke out
the ice cube box.
lRinse the ice cube box with warm water (below 60℃) and don't use detergent.
lDry the i ce cube box completely in air in case that water droplets in the ice cube box might
cause abnormal functioning of the ice maker.
lWhen th e ice maker can't move, s epara te the ic e maker a s shown i n Fig. 1 an d Fig.2 . Then
insta ll after ice cubes are smelted.
uInsert the ice c ube box onto the r ack acc ordin g to original sequence and rotate to the locked position.
Locked status Unlocked stat us
3. Take out and in stall the ic e maker (Fig . 4).
When th e ice maker is n't used, it c ould be take n out and the va cated spac e could be use d as a part of
the fre ezer compa rtment.
lPus h the I ce Ma ker b utt on on t h e co n tr o l pa n el a t t he f r eez er do or an d the i cemak ing s ign d isa ppe ars .
lOpen th e door and tak e out the draw er
lPull th e ice-make r out (as show n in Fig1), an d then downw ards, so tha t the ice make r is
unhoo ked (as show n in Fig. 2).
lPull do wn the ice mak er's power p lug so that it i s detached f rom the ice- maker's po wer socket
(as sho wn in Fig. 3)
lIns tal l the i ce ma ker i nto t h e or i gi n al p o si t io n , pus h the I ce Ma ker b utt on, t he
ice -ma kin g sym bol a ppe a rs .
lClose t he door afte r the ice make r is install ed to the prop er place, ot herwise, i t might dama ge
the ice m aker.
Ice mak er's po wer socket
Ice mak er's po wer plug
③
Ice mak er's ho ok
①
Fig.3
②
1 0
Fig.4
7
Page 10

Introduction of Your Refrigerator's Functions Introduction of Your Refrigerator's Functions
A 1
C
E F
3
10 9
7 11 12 2
5
8
13
B
4
D
6
1. Contr ol butt ons
A. Refri gerat or temp eratu re cont rol B. Freezer temp eratu re control
C. Energy s aving m odel D. Auto mo del E. Ic e-mak ing swi tch F.Ch ild Loc k
2. Displ ay item s
1. Fast- cooli ng icon 2 . Fast-f reezi ng icon 3 . Energ y-sav ing ico n
4. Smart i con 5. Ic e-mak ing ico n 6. Locked icon
7. Refri gerat or comp artme nt icon 8 . Freezer compartment icon
9. Refri gerat or text 1 0. Fr eezer t ext 11. Cl osed ic on
12. Refr igera tor tem perat ure 13. Freezer temperature
3. Initi al powe r-on st atus
Indicators 5, 6, 7, 8, 9, 1 0, 11, 12, 1 3 are on an d indic ators 1 , 2, 3, 4, 11 are off upon i nitia l
power-on.
7. Fast-co oling mode
Enter i nto the mode : Push down A fo r three s eco nds and i ndi cator 1 i s On. C hoose t he fa st-co oli ng
mode fo r the refrig erator com partment a nd the origi nal energy -saving mo de or smart mo de is
cance lled.
Exit th e mode:
(1). En ter into the e nergy-sa ving or smar t model,
(2). Pu sh A or B to adjust th e temperat ure,
(3). Ho ld down A for thre e seconds
It will e xit the fast -cooling m ode when any o f above situ ations occ urs.
8. Fast-fr eezing mod e
Enter i nto the mode : Push down B fo r three seco nds and indi ctor 2 is On. Ch oose the fas t-freezi ng
mode fo r the freeze r compartm ent and the or iginal ene rgy-savi ng mode or sma rt mode is can celled.
Exit th e mode:
(1). En ter into the e nergy-sa ving or smar t model,
(2). Pu sh A or B to adjust th e temperat ure,
(3). Ho ld down B for th ree second s
It will e xit the fast -freezin g mode when an y of above sit uations oc curs.
9. Shut down t he re frige rat or comp art ment
Push do wn C for three s econds to sh ut down the re frigerat or compart ment, indi cator 7 is Off and
indic ator 11 is On. Indic ator 12 show s “--”. Th en push down C f or three sec onds to turn o n the
refri gerator co mpartmen t. Indicat or 7 is On and ind icator 11 is Off, indic ator 12 has no rmal displ ay.
10. Set th e tem perat ure o f refri ger ator co mpa rtmen t
Push A an d the tem per ature o f fre ezer co mpa rtmen t wil l chang e at th e seque nce o f (8)-( 2)- (8) wit h a
step of 1℃.
11. Set the t emperatu re of freeze r compartm ent
Push B an d the temper ature of ref rigerato r compartm ent will cha nge at the seq uence of (-1 5)-(-24) ( -
15) wit h a step of 1℃.
12. Ice- mak ing swi tch
Push E an d indicato r 5 is On. Then, the ic e maker star ts to work. Pu sh E and indic ator 5 is off. The, the
ice mar ker stops wo rking.
13. Back lig ht acti on
The bac klight is On w ith 100% lum inance whe n the refrig erator or fr eezer door s are opened o r buttons
are pus hed. When no b utton is pus hed and afte r the refrig erator or fr eezer door s are opened f or
25sec , the backli ght is On with 5 0% luminan ce .
4. Locki ng and un locking
Under unlocked status (indicator 6 is off) , push do wn F for th ree sec onds to l ock and i ndica tor 6
is on. Un der locked status, pu sh down F for thre e secon ds to unlock. If n o other k eys are p ushed
within 25sec under the unlocked status, it will enter into the locked status automatically.
Below functions shall be carried out under unlocked status.
5. Energ y savin g model
Enter i nto the m odel: Push C and indicator 3 is On. Choose the energy saving model for the
refri gerator and previous models will be disabled.
Exit th e model :
(1). En ter int o anoth er mode l (2). Pu sh A or B to adjust the te mpera ture
(3). Pu sh C. It wi ll exit t he ener gy-sa ving mo del when any of above situations occurs.
6. Auto mo de
Enter i nto the m ode: Pu sh D and indicator 4 is On. Choose the smart mode and the previous
mode will disappear.
Exit th e mode:
(1). En ter int o anoth er mode , (2). Pu sh A or B to adju st the te mpera ture, ( 3). Pus h D.
It will e xit the s mart mo de when a ny of abo ve situ ations occurs.
8
Temperatu re-adjus table comp artment' s control pa nel
Open th e refriger ator compa rtment's d oor and you mi ght find ind ictors as sh own in
the rig ht figure.
1. Indic ators
(1). Ze ro degree fr esh-keep ing mode (2) . Cold drink s mode
(3). Fr uit and vege table mode ( 4). Mode sel ection
2. Instr uctions
Push ke y (4) and indi cator (1) is O n to enter int o the zero-d egree fres h-keepin g
mode.
Push ke y (4) and indi cator (2) is O n to enter int o the cold dri nks mode.
Push ke y (4) and indi cator (3) is O n to enter int o the fruit an d vegetabl e mode.
The tem perature -adjusta ble compar tment coul d choose one o f above mode s.
Three m odes could b e adjusted i n the cycle of “z ero-degr ee fresh-k eeping
modec old drinks ---fruit a nd vegetab les” to store a nd keep fres h different typ es of
food.
9
①
Cold Dr inks
Fruit a nd Veget able
③
Mode Type
④
 Loading...