


DW911ES
DW911ES / DW911EB
INSTRUCTION MANUAL
:
WWW.CAMPOMATIC.COM
Dishwasher

TABLE OF CONTENT
English __________________________________________
1
French
___________________________________________
25
German
___________________________________________
50
Italian
__________________________________________
72

Thisapplianceisintended to be u sed in household
andsimi lar applications such as:
-staff kitch en areas in shop s, offices an dother
worki ng env ironmen ts;
-farm house s;
-byclients in hotels, motels and otherresidentialtype
environments;
-bedandbreakfast typeenvironments.
Thisappliancecanbeuse dbychildren aged from8
yearsan dabove and personswith reduced physical,
sensory or me ntal capa bilities or lack of experie nce
andknowledge if they have beengivensupervision
or instruction concerning use of theapplian ceina
safe way and understandthe hazardsinvo lved.
Children shallnotplaywiththeappliance. Cleaning
andusermaintenance shallnotbe madeby children
withoutsupervision. ForEN60335-1
This applianc eis no tintend ed for use by p ersons
(including children)withreduced physical ,sensory
or me nta l c apa bi li ti es , or la ck o f e xp er ie nc e and
knowled ge ,unle ss they h ave be en give ns upervision
or instruction concerning use of theappliancebya
personresponsible for their safety. ForIEC60335-1
Thisapplianceis forindoor useonly, for household
useonly.
To pr otect agai nst th e risk o f ele ctrical sho ck, d o not
immerse the unit, cordor plug in wateroro ther liquid.
Pleaseunplug beforecleaningand maintenancethe
appliance .
Use a soft clothmoistenwith mild soap, andthenu se
adryclothtowipeitagain.
()
()
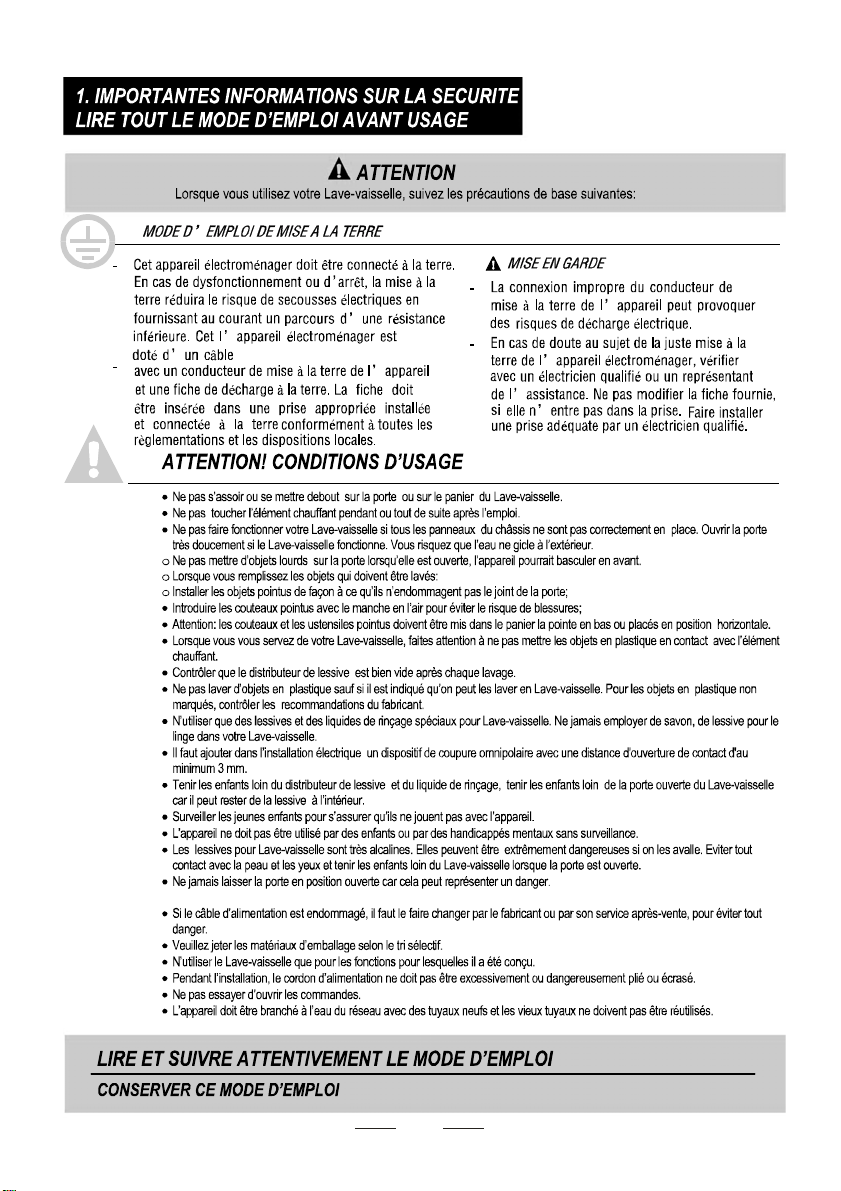
When using your dishw asher,
follow the precautions listed below:
1

This appliance must be earthed. In the event of a
malfunction or breakdown, earthing will reduce the risk
of anelectric shock by providing a path of least
resistance of electric current. This appliance is equipped
with a cord having an equipment-earthing conductor
and a grounding plug.
The plug must be plugged into an appropriate outlet that
is installed and earthed in accordance with all local
codes and ordinances.
Improper connection of the equipment-earthing
conductor can result in the risk of an electric shock.
Check with a qualified electrician or service
representative if you are in doubt whether the appliance
is properly grounded.
Do not modify the plug provided with the appliance;
If it does not fit the outlet.
Have a proper outlet installed by a qualified electrician.
Do not abuse, sit on, or stand on the door or dish rack of
the dishwasher.
Do not operate your dishwasher unless all enclosure
panels are properly in place.
Open the door very carefully if the dishwasher is
operating, there is a risk of water squirting out.
Do not place any heavy objects on or stand on the door
when it is open. The appliance could tip forward.
When loading items to be washed:
1) Locate sharp items so that they are not likely to
damage the door seal;
2

2) Warning: Knives and other utensils with sharp points
must be loaded in the basket with their points down or
placed in a horizontal position.
Check that the detergent powder is empty after
completion of the wash cycle.
Do not wash plastic items unless they are marked
dishwasher safe or the equivalent.
For plastic items n
ot so marked,
check the manufacturer's
recommendations.
Use only detergent and rinse additives designed for
an automatic dishwasher.
Never use soap, laundry detergent, or hand washing
detergent in your dishwasher.
Children should be supervised to ensure that they do not
play with the appliance.
The door should not be left open, since this could increase
the risk of tripping.
If the supply cord is damaged, it must be replaced by the
manufacturer or its service agent or a similarly qualified
person in order to avoid a hazard.
During installation, the power supply m ust not be
excessively or dangerously bent or flattened.
Do not tamper with controls.
The appliance is to be connected to the water mains using
new hose sets and that old hose-sets should not be reused.
The maximum number of place settings to be washed
is 14.
The maximum permissible inlet water pressure is 1MPa.
The minimum permissible inlet water pressure is 0.04MPa.
3
Dispose of the dishwasherpa ckaging material
correctly.
All packagingmaterialscan be recycled.
Plasticparts aremarkedwith thestandard
international abbreviations:
PE forpolyethylene,e.g. sheetwrappingmaterial
PS for pol ystyrene, e.g. p adding mate rial
POM polyo xymethylene, e.g . plasti c clips
PP poly propyl ene, e.g. Salt fill er
ABS Acrylo nitrile ButadieneStyrene, e.g. Control
Panel.
Packag ing mate rial could be d ange rous for c hildren!
Fordisposing of packageand theappliance please
go to a recycl ing ce ntre. Th erefo re cut o fft he p ower
supply cable a nd m ake the doo r closi ng dev ice
unusab le.
Cardbo ardpackagingis manufactured from recycled
paper a nd should be disposed in the waste pa per
collecti on for re cycling.
Byensuringthisproduct is disposedofcorrectly,you
willhelp preventpotentialnegativeconsequences
forthe environment andhumanhealth,which could
otherw ise be c aused by i nappro priate wa ste handling
of thi s p roduct.
Formore detailedinformation about recyclingof this
produc t, pl ease co ntact y our lo cal city o ffice a nd your
househ old wast edi sposal ser vice.
DISPOSAL: Do not dispose this product as unsorted
municipal waste. C ollectionof such waste separately
forspecialtreatment is necessary.
4
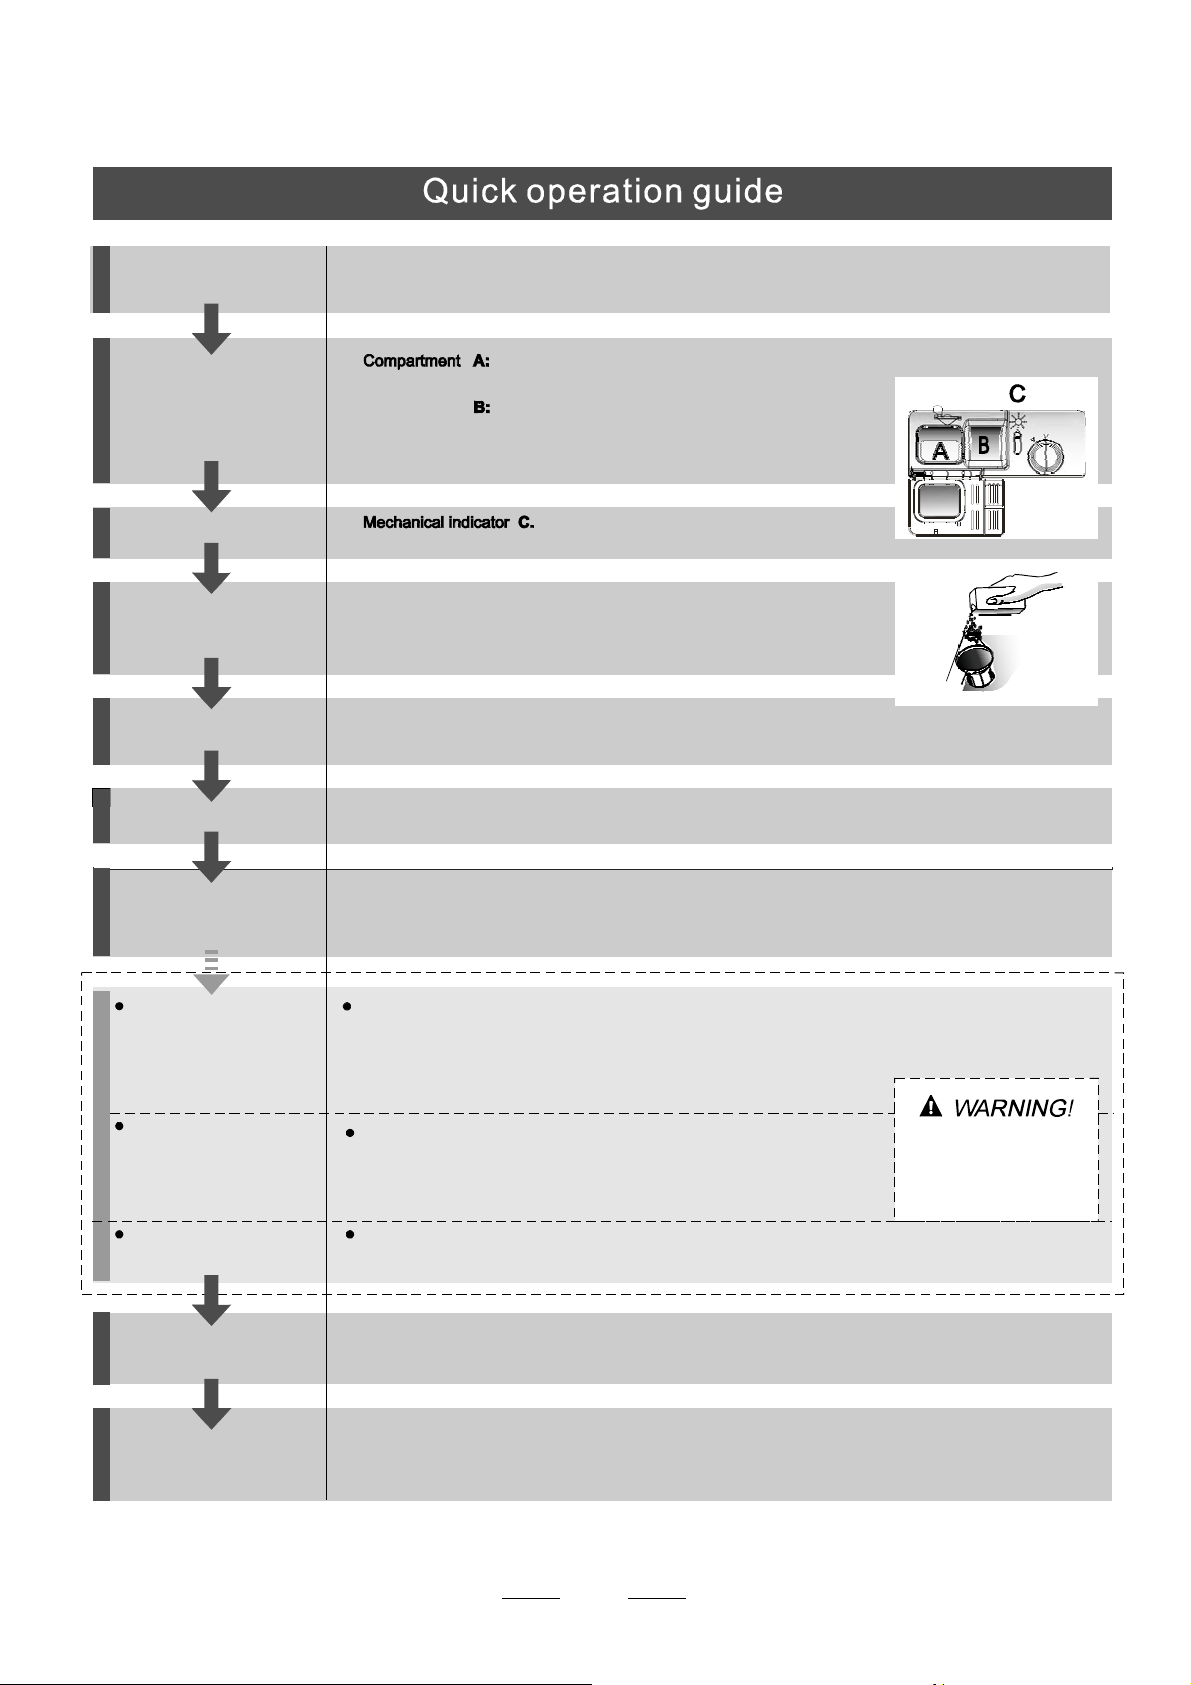
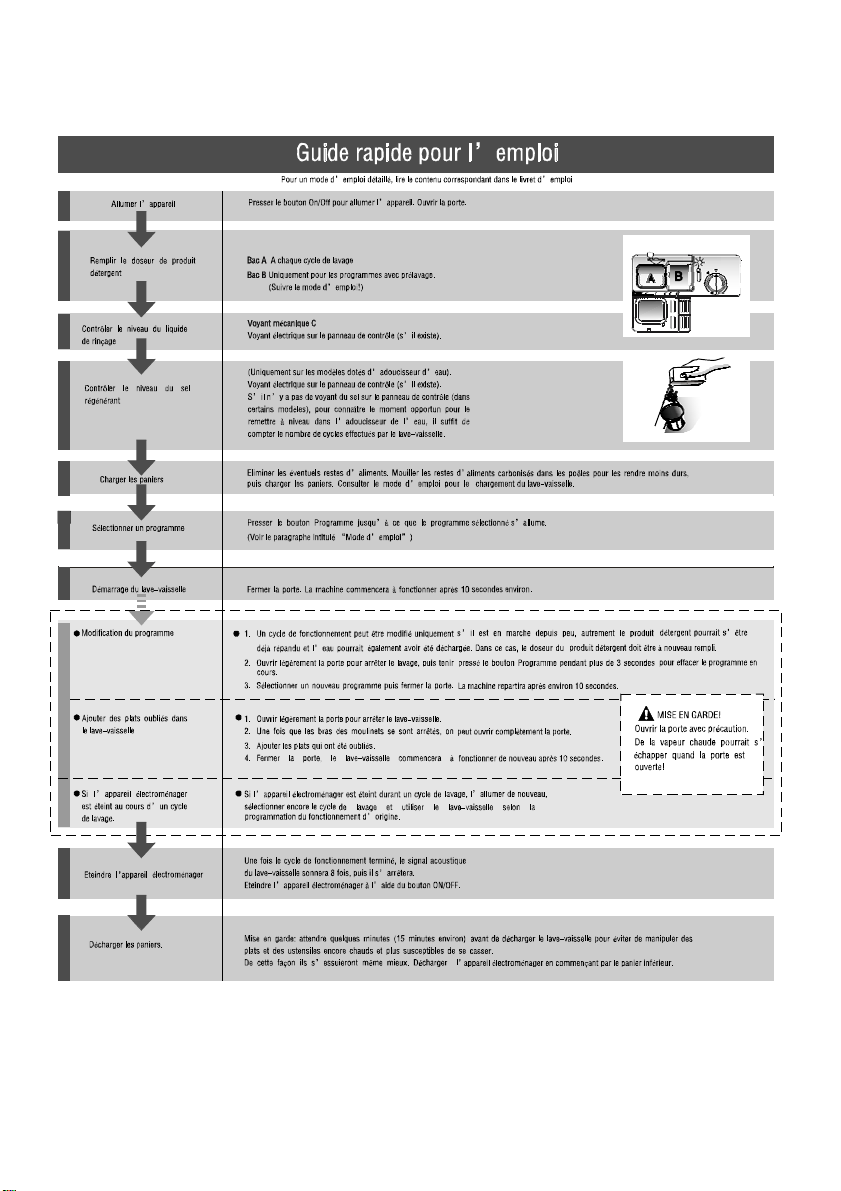
Witheachwashcycle.
Compartment
For programmes with pre-wash on ly.
(Follow the user instructions!)
Electric indicator on control panel(if pro vided).
Check the rinse aid level
(On models with water softener system only.)
Electricindicator on control panel (if provided).
If there is no salt warning light in the control panel
(for some models), you can estimate when to fill the salt into
the softener by thenumber of cycles the dishwasher has run.
Checkthe regeneration
salt level
Load the baskets
Select a programme
Close the door, turn on the water tap . The machine will start working after about 10 seconds.
Running the dishwasher
Switch offthe appliance
Turn off the water tap,
unload the baskets
Fill the detergent dispenser
Warning: wait a few minutes(about 15 minutes) beforeunloading the dishwasher toavoid handling
the dishes and utensils while they are still hot and more susceptible to break.
They will alsodry better.Unload t he appliance, startingfrom the lower basket.
Changing theprogramme
Add forgotten dishes in the
dishwasher.
Scrapeoff any largeamountof leftover food. Soften remnants ofburnt food inpans,
thenload the baskets. Refer to the dishwasherloadinginstructions.
Press the programme button until the selected programme lights up.
( Seethe section entitled Operationinstruction )“”
When the working cycle has finished, the buzzer of the
dishwasher will sound 8 times, then stop.
Turn off the appliance using the Power button.
If the appliance is switched
off during a wash cycle.
Open t he door carefully.
Hots team may esc ape
when the door is opened!
If the appliance is switched off during a wash cycle, when switched
on again, please re-select the washing cycle and operate the dishwasher
according to the original Power-on state ).
Switch on the appliance Open the door,Press the Power switch button to switch on the appliance.
1.Open the door slightly,.
2.Youcan open the door completely until the spray arms stop .
3.Add the forgotten dishes.
4.Close the door, thedishwasher will start running again after 10 seconds.
Fordetailed operatingmethod read thecorrespondingcontent on the instruction manual.
1.A running cycle canonly be modified if it has been runningfor ashort time. Otherwise the detergent
may have already been released and the water already drained. If this is the case, the detergent
dispenser must be refilled.
2. Open the door slightly ,then press the program button more than 3 seconds to cancel the
running programme.
3. Select a new programme.
4. Close the door, restart the dishwasher .
5
beforeusing itfo rthe first time.
To getthebest performance from yourdishwasher,r ead alloperating instructions
3
1
3
1
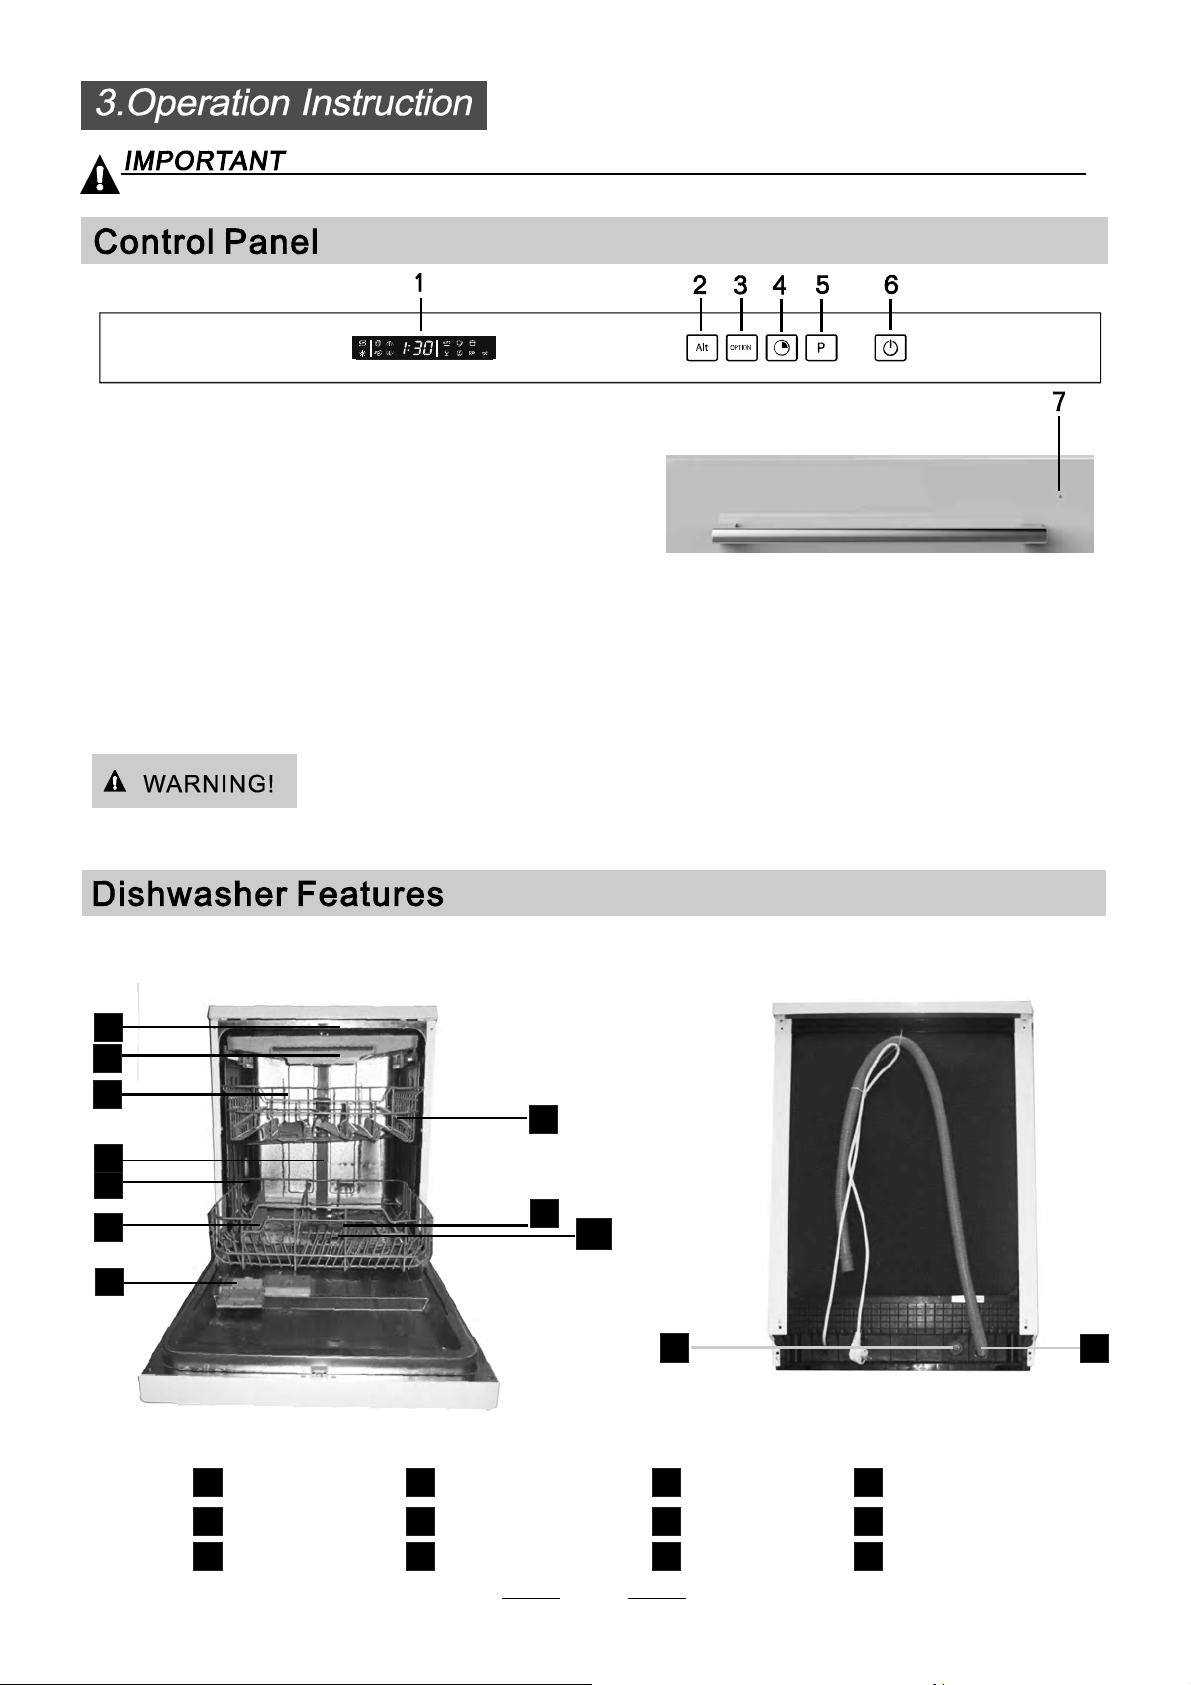
3. : to selec t option theExtraDr ying or
Express function withthem ain program being selected.
OptionButton
6. :Tot urn on/off the powersupply.
Power But to n
4. : To touch the buttontodelay, delay time willbe increased by discontinuous or continuous touch,
maximum 24 hours delaycanbe defined.
Dela y Butt on
5. : To Press the buttonto select
appropriate Program.
Progra m Butt o n
1. : tosho w the reminding time, programm
irons,salt andrinse aidwarning;
Display Screen
2.Alt Butt on: Dual zone washf unction, press thebutton
to select either upper basket or lower basket loaded, and
the response indicatorswilll ight on
7. : tosho w the stateo f dishwasher with the
door closing, itwillbe particularize d at paragraph 6.
State Indicator
Th e g l ass out e r door is breakable o r nament, please do n ot impact. And a broken door dishwa s her is ha rmful to
your family,please call for after service atonce .
11
12
Back Vie w
1
2
3
4
5
7
8
9
10
Front view
Lower basket
Salt cont aine r
Dispenser
Cup shelf
Spra y arms
Filter assembly
Inlet pipe conne cto r
Drainpipe
Upper basket
Cutleryrack
Top spray arm
1
Innerpipe
5
6
7
8
9
10
12
11
3
2
4
6
ECO
6
The waterso ftener must be setm anu ally,usin g the waterhardnessdial.
The waterso ftener is designed toremovemin erals and salts fromthewater, whichwouldh ave
a detrimentaloradvers e effect onthe operation of the appliance.
The highertheconte nt of thesemineralsandsalts , theharder yo ur water is.
The softenershould be adjusted according to the hardness oft he water inyourarea. Your local WaterAuthor ity
can advise you onthe hardness of the waterinyour ar ea.
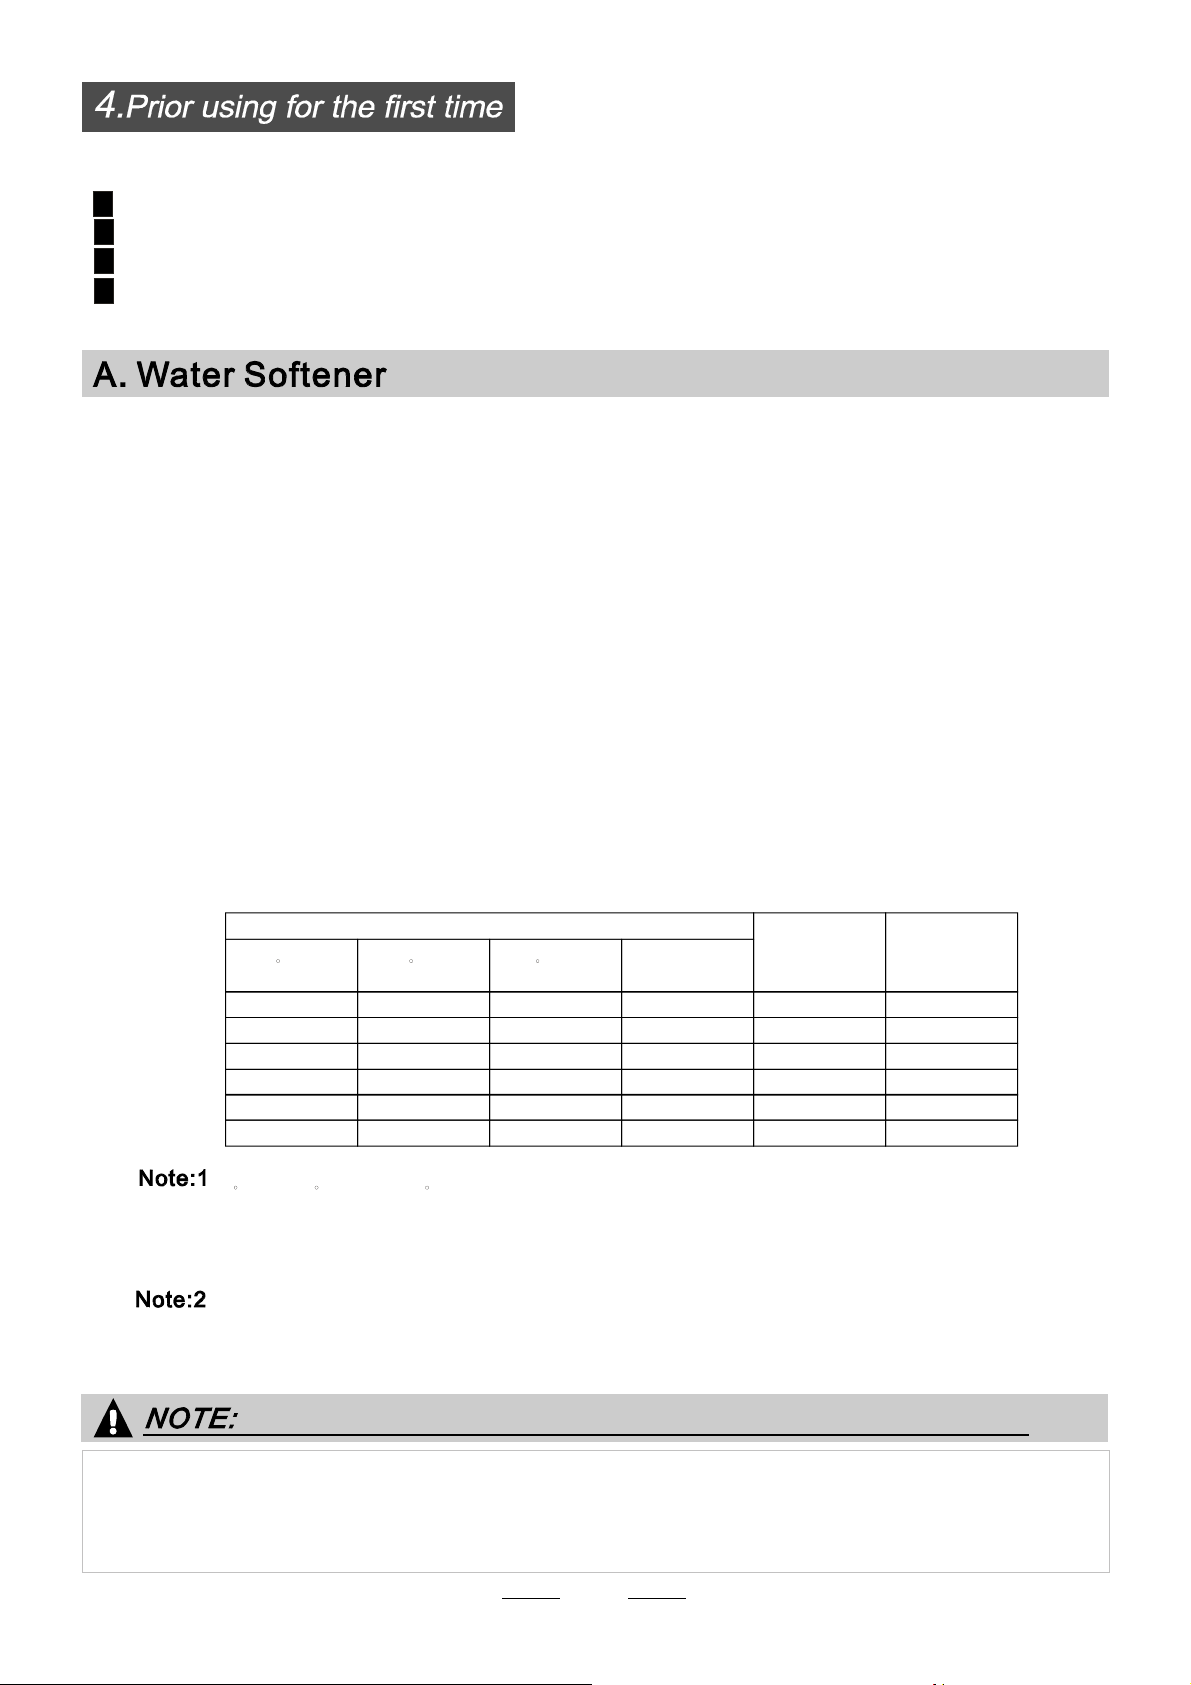
Adjusting Salt Consumption
The dishwasher isde signed to allow foradjustmentinthe amount of salt consumed based onthe ha rdness of
the waterused.Thisis intendedto op timiseand customise the levelo f saltconsumption.
WATER SOFTENER
Thehardnessofthe water varies fromplacet o place. If hardwater is used inthedi shwasher,depositswill
form on the dish esand utensils.
Theappliancei s equipped with asp ecial softener that uses asalt container specifically designed to eliminate
lime and minerals from the water.
Contact your localwaterbo ard for information onthehar dness of yourwatersu pply.
If your model does not have any wat er softener,youmayskipthis section.
Clark: British degree
fH: French degree
DH: Germ a n de gre e
dH=1.25Clarke=1.78 fH=0.178mmol/l
1
The manufactory setting: H4 (EN 50242)
Before usingyourdi shwasher for the firstti me:
A. Set the water soft ene r
B. Add 1.5Kgd ishw asher salt andt hen full fill thesaltcon tainer with water
C. Filltherinseaiddispenser
D. Fill in det e r gent
1. Open the door ,Switch ontheappl iance;
2. Press the Program button formore than5 s econd s to startthew ater softener
set model wit hin 60seconds after thea pplia nce was switched on(Th e Saltand
Rinseaid warning lights willbe on periodically when itg et inthe setmodel );
3. Press the Program button to selectthepr oper set according toy our local environment,
the setswill changein the following sequence: H1->H2->H3- >H4->H5-> H6;
4. Press the Power button to end these t up model.
Please followthestepsbelowfor adjustment in saltconsumption.
dH
mmol/l
0~90~5 0~0.94
H1
0
10-20
6-11
1.0-2.0 H2 9
21-30
12-17 2.1-3.0
H3
12
H4
20
fH
0~6
7-14
15-21
Clark e
WATER HARDNESS
Selector Position
Salt consumption
(gram/cycle )
18-22 31-40 22-28 3.1-4.0
41-60
23-34 4.1-6.0
H5
30
H6
60
29-42
35-55 61-98 43-69 6.1-9.8
7
1.Thesalt contai ner must onlybe ref illed when the saltwarningl ight in the controlpanelcom es on.
Depending on howw ell the salt dissolves, thesaltwarni ng light may stillbeon even though the
salt container isfill ed.
If thereisno salt warning light inthe control panel (for someModels),you cane stimate when to fill
the saltintothe softene r by thecyc les that thedishwasher hasrun.
2. If there arespillsofthe salt, a soakor a rapid program should berun to remove the excessivesa lt.
Always use thesaltint ended for use withdishwasher.
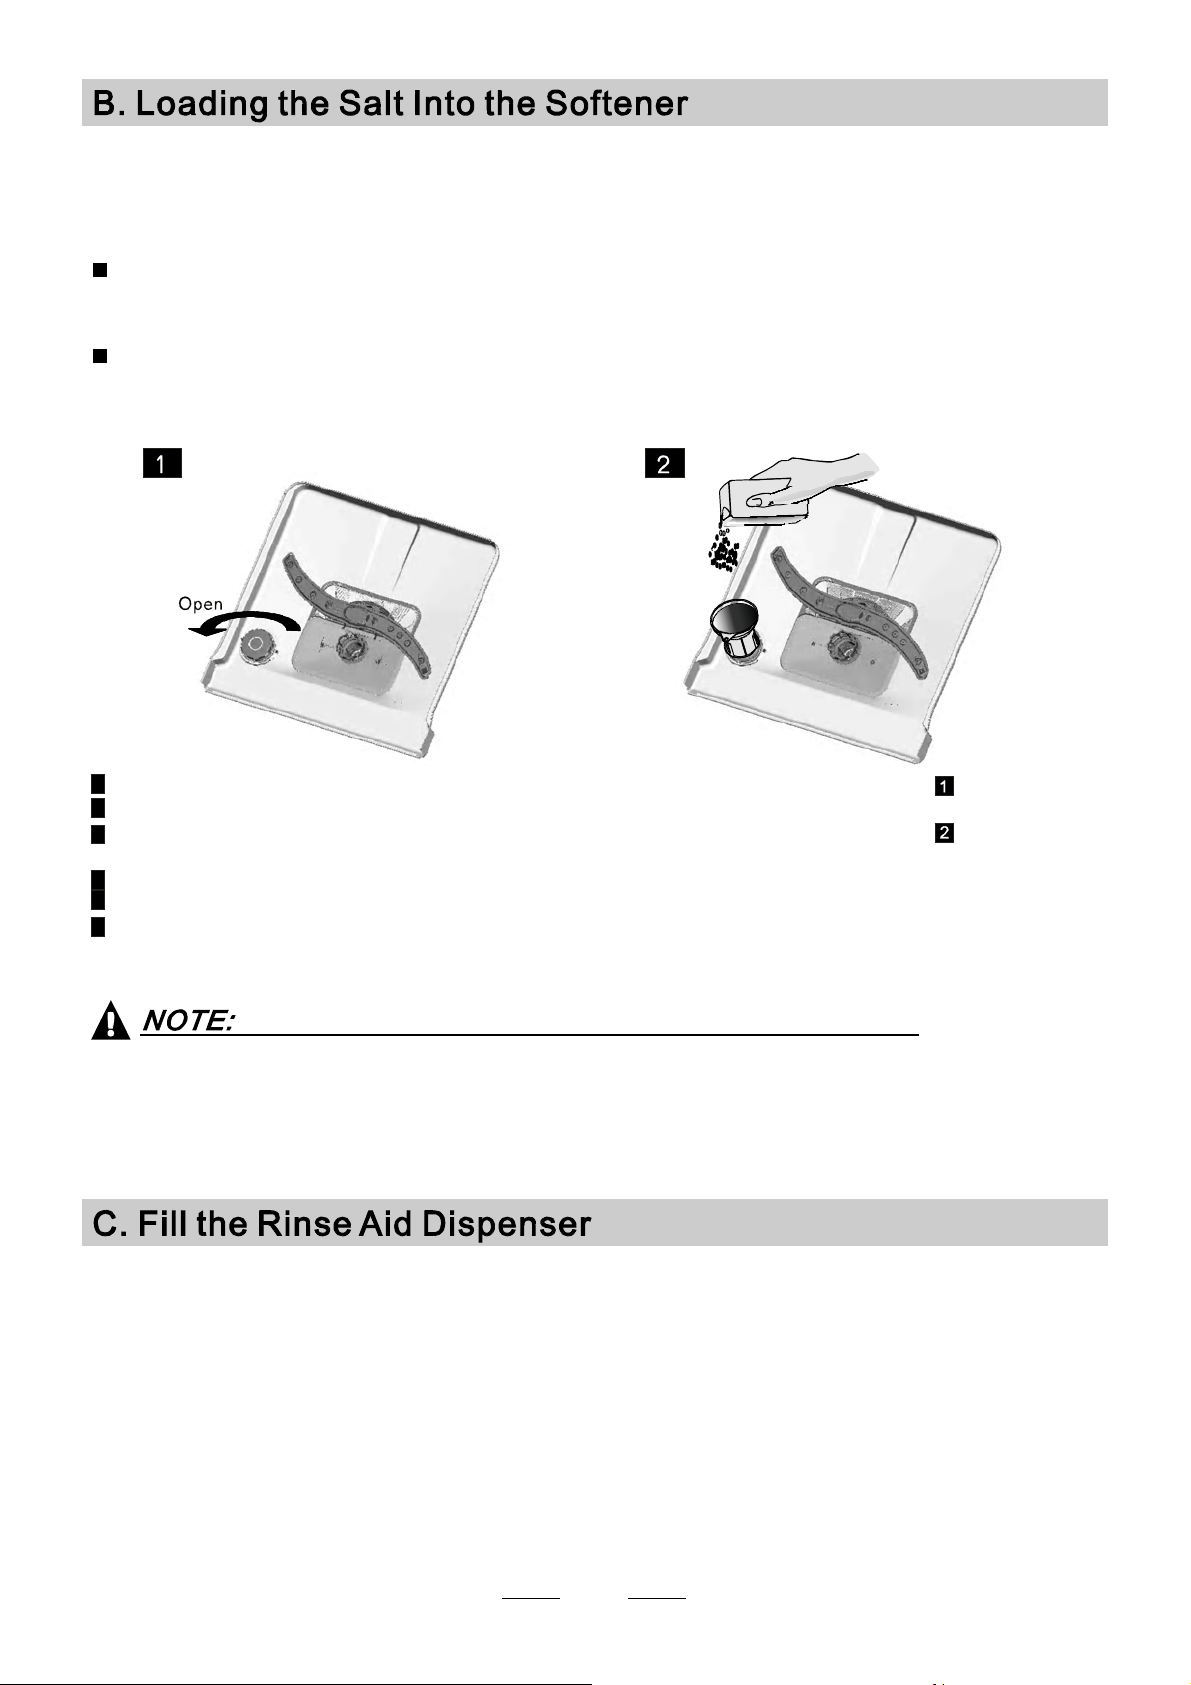
The saltc o ntainer is located beneath the lower basketandsh ould be filledase xplained
inthe following:
Attention!
Only usesaltspe cifically designed for the usei n dishwashers! Every othert ype of
salt not specificallydesigned fortheuse in ad ishwas her, especiallytable salt,will
damage thewater sof tener. In caseof damages caused by the useo f unsuitable
salt the ma nufact urer does notgiveanywarrant y nor is liableforany damages caused.
Only fillwi th salt justb efo re starting oneofth e complete washingprograms.
This will preventanyg rains of salt orsa lty water,wh ich may have been spilled,
remaining on the bottomo f the machine for anype riod oftime, which maycau se
corrosion.
The rinse aid isreleased during the final rinse to prevent water from for ming droplets o n your dishes, which can
leave spots andst reaks. It alsoimprov es drying by allow ing water tor oll offt he dishes. Your dishwasher is
designed to useliquidrinseaids.The rinse aiddispenser islocatedinsidethedoor next tothe detergentdispenser.
To fill the dispenser, open the cap and pourthe rinse aid into thedispenser until the level indi cator turn s completel y
black. Thev olume of the ri nse aidcontaineri s about 110ml .
RinseAid Dispenser
Function of Rin seAid
Rinse aid isaut oma tically added during the last rinse, ensuring thorough rinsing, and spot and streak free drying.
Attention!
Only use brandedrinse aidfor dishwasher. Neverfillthe rinse aid dispenserwithanyothersubstances
(e.g. Dishwasher cleaning agent, liqu id detergent). This would damage the appliance.
Full fill thesaltcont ainer with water,It is normal forasm all amount of water tocom e out of the
salt container.
A After the lower basket has been removed, unscrew andremovethecapfrom the salt container.
B Place the end of thefu nnel (suppli ed) into the hole andin trodu ce about 1.5kg of dishwasher salt.
C
D Afterfilling thecontainer ,screwth e cap tightly back clockwise.
E Thesaltwarning lightwill stop being afterthesa lt container has beenfilledwithsalt.
F Immedi ately after filling the salt into thesaltc ontain er, aw ashing program should be started
program Ot herwise the filter system, pump or other important parts ofthemachinemaybe damag ed
bysalty water. This isout ofwarranty.
(Wesuggest touse a short
).
8
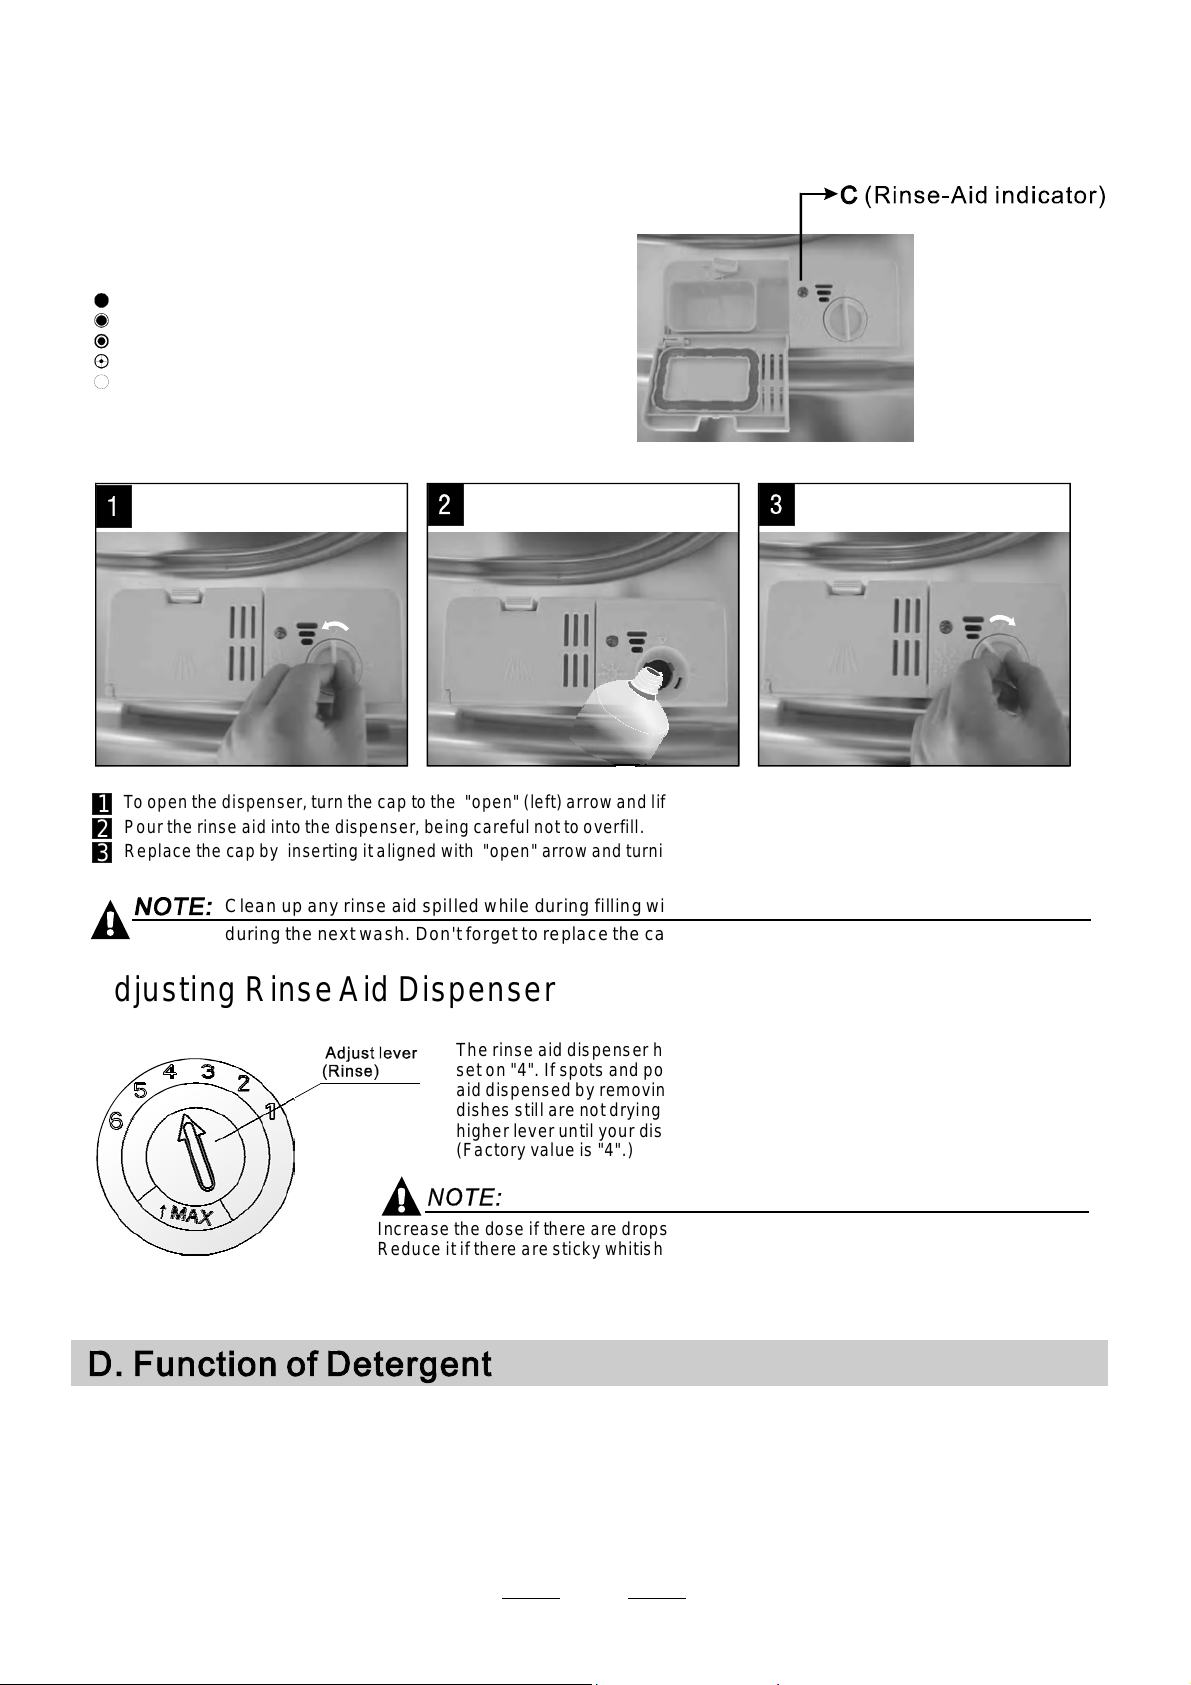
To open the dispens er, turn the cap tot he "open" (left ) arrow and lift it out.
Pour the rinse aid into the dispenser, being carefu l not to overfill .
Replace the capb y in serting it alignedwith " open" arrow andturningit to the closed(right)arrow.
Adjusti ng R inseA id Di spenser
The rinse aiddispenser hassi x or foursettings.Alw ays start with thedispenser
set on"4".I f spots andpoordryingare a p rob lem, increase the amount ofr inse
aid dispensed by removing thedi spenser lid and rotating thedialto "5". If the
dishes still are notdr ying properly or are showspots,a djust the dial tothenext
higher lever until your dishesa re spot-free. The recommended setting is "4".
(Factoryvalue is"4".)
Increasethe dose ifthere aredropsof wateror limespotson the dishes afterwashing.
Reduce it if there arestickywhitishstainsonyourdisheso r a bl uishfilm on glassware or
knifeblades.
1
2
3
Astheri nse aid diminishes, the sizeo f the blackdot
ontherinseaidlevel indicator changes, as illustrated below.
Full
3/4full
1/2full
1/ 4full-Should refill to eliminatespotting
Empty
WhentoRefilltheRinseAidDispenser
Iftherei s no rinse-aid warning light in the control panel, you can est imate the amount from th e colour
oftheop tical level indicator C loc ated next tothecap. When the rinse-aid container isf ull, the whole
indicator will bed ark .As ther inse-aid diminishes, the size ofthedar k dot de creases. You should never let
the r i nse aid l ev el fal l 1 / 4 full.
during the nextwash.
Don't forget tore place the capbefore youclos e dishwasher door.
Cl ean up any r inse aid spilled whi le dur i n g f illing with an abso rbent c loth to a v oid exc e ssive f oamin g
Detergents with its chemical ingredients are necessary to remove dirt, crush dirtandtransport itou t of thedishwasher.
Mostof thecommercial qu ality d eterge ntsare suitable forthispurpose.
""
ProperUse of Detergent
Useonlydet ergent specifical ly made fortheuse in dishwashers. Keep yourdetergent fresh anddry.
Don't put powdered detergent intothe dispenser untilyou'rereadytowash dishes.
Attention!
9

Amount of Detergentto Use
Based on theirchemical composition,detergentscanbe splitintwo basic types:
Detergent tablets of different brandsdissolve atdifferentspeeds. Forthisreasonsome
detergent tablets cannot dissolvean d develop theirf ul l cleaning powerdurings hort
programs. Therefore pleaseusel ong programs when usingdetergenttablets,to
ens ure the c ompl et e r e mova l of dete r g ent residuals.
The dispenserm ust be refilled before thes tart of eachwashcy cle following the instructions
provided int he wash cycle table .Yourdis hwa sher uses lessde tergent and rinse aidthan
Conventional dishwasher. Generally,onlyone tablespoon of detergentis neededfor
anormalwashload.Moreheavily soiled items need more detergent.Alwaysaddthe
detergen t just before star ting the dish was her, otherwis e it could get damp and will not
dissolv e prope r ly.
Concentr ated Deterge nt
DetergentTablets
Detergent Dispenser
conventional, alkalinedetergents w ith caus tic components
lo w alkali ne co nc entrated d et ergents wi t h natur a l e nzymes
Normally newpulverised detergent iswith out phosphate. Thus thewate r softener function of
phosphate is not gi ven. In this c ase we recomme nd to fill salt in th e salt co ntain er even when
the hardnesso f water is only6 dH. If detergents without phosphate are usedin the case ofhard wat er
often whites pots appear on dishesandglasses.In this case please addmored etergent to reach
better re sults . Deter gent s wi thou t chlorine do only bleach a lit tle. S tr o ng and coloured spo t s will no t
beremoved completely. In thiscasepleasec hoos eap rogram with ahigher temperature.
°
Deterg ents
There are 3 s orts of d eterge nts
1.Withphosphateand with chlorine
2.Withphosph ate and without chlorine
3.Withoutph osphate and without chlorine
Always add thedete rgent just beforestar ting each wash cycle.
Only usebranded detergentaidfor dishwasher.
If thel id is closed: pressreleasebutt on. Thelidwillspring open.
Dishwasher detergent is corrosive!
Takecaretokeepitoutofreachofchildren.
10

Fillthed etergent dispenser with detergent.
The m arking indi c ates th e dosing levels , as
illus t ra ted on the right:
The placeofmain wash cycle detergent placed.
The placeofpr e-wash cycle detergentplaced.
Pleaseobservethem anufactur ers dosing andsto rage
Recommendations as statedon thedetergent packaging.
Closethe lidand pressuntili t locksin place.
If the d i shes a r e h eavily soil ed, place an ad diti o nal
detergent doseinthe pre-wash detergent chamber. Thisd etergent will take effectd uring the pre-wash phase.
A
B
Fillin Detergent
Youfind informatio n about theamo unt of detergent forth e single programme ont he last page.
Please aware, that accordingtothe lev el soiling andthespec ific hardness of wat er differences arepossible.
Please observe the manufacturer's recommendationson the detergentpackaging.
A
B
11
Cutlery withw ooden,horn china or
mother-of-pearl handle s
Plastic items that aren ot heat resistant
Older cutlery with glued pa rts that aren ot
temperature resistant
Bonded cutlery items or dishes
Pewter or cooperitems
Crystal glass
Steel items subject tor usting
Wooden platters
Items made from syntheticfibres
Some types ofgl asses can become
dull afteralarg e number ofwashes
Silver and aluminum pa rts have a
tendencyto discolour duringwashing
Glazed patterns mayfade if machine
washed frequently
Are n otsu itable
Are of limited suitability
Dishes anditems of cutlerymustnot lie ins ide oneanother, or covereachother.
To avoid damage to glasses, theym ust not touch.
Load large itemswhichar e most difficult toc lean into thelowerbask et.
The upper basketisde signed to holdm ore delicate and lighterdishware suc h as glasses, coffee
andtea cups
Long bladed knives stored ina n upright position are ap otential hazard!
Long and/or sharp itemsof cutlery suchas carvi ng knives must bepositi oned
horizon tally in the upperb asket .
Please do not overload your dishwasher. T his is important forg ood results and for
reasonab le consumption of energy.
Load hollowi tems such as cups, gl asses, pans etc. With theopeni ng facing downwards so that
wat e r c anno t co llec t in t he con t a i n e r or a dee p ba se.
Considerbuying utensils which are identified as dishwasher-proof.
Use a milddetergentthati sdescribed as 'kindto dishes'. If necessary,seekfurther
information from the detergent manufacturers.
Forparticularitems, selecta programwithas lowa temperature as possible.
To prev ent damage , do not take glass andcutlery out of the dishwashe r immed iatel y
after the progra mme has ende d.
(For bestperformance ofthe dishwasher, follow theseloadinggu ide lines.
Features and appearance ofbasketsand cutler y basketsmayvary from your model.)
Scrape off anylarg e amounts ofleftoverfo od. Soften remnants ofburntf ood in pans.
It isnotnecess ary to rinse thed ishes under running water.
Place objects inthedis hwasher in following way:
1.Itemssuchas cups, glasses, pots/pans, etc.a re faced downwards.
2.Curvedi tems, or ones withr ecesses, should be loadedaslants o that water canrun off.
3.Allu tensils are stacked securely andcannot tip over.
4.Allutensilsa re placed intheway that the spray armscanrotat e freely during washing.
Ve ry small itemss hould not bewashedi n the dishwasher asth ey could easilyfallout of the basket.
To prevent water dripping fromtheuppe r basket into the lowerba sket, we recommend thatyou
empty the lowerbasketf irst and thentheupp er basket.
12
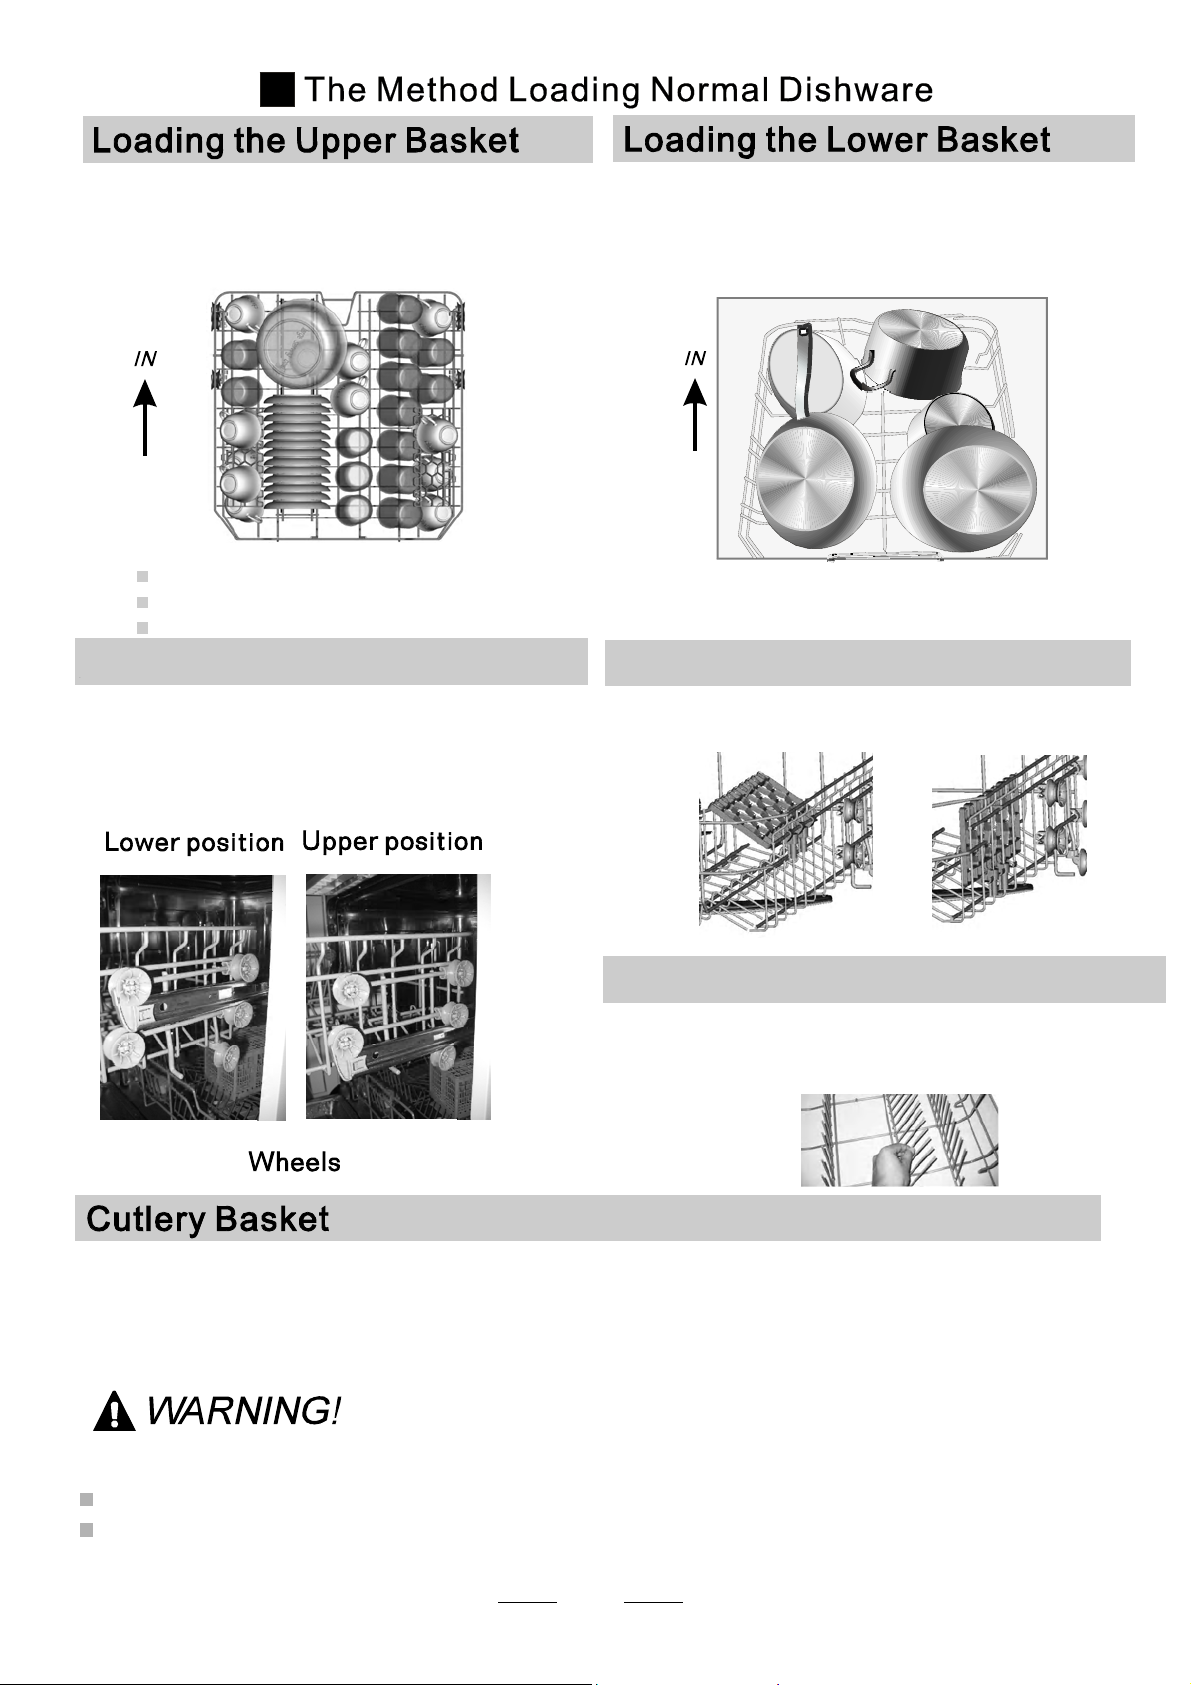
The upper basket isde signed to holdmore del icate
and lighterd ishware such asglasses, coffe e a nd
teacupsandsaucers, aswellas plates,smallbowls
andshallow pans(aslong as theyare not too dirty).
Positionthe dishesand cookware s othat t heywill
notgetmoved by thesprayofwater.
We suggest that you place large item s and the most
difficult tocleanitems are tobeplaced into the lower
basket: su ch aspots,pans , lids, serving dishes and
bowls, as s h own in the figu r e below. It is pr efer able t o
pla ce serving di shes an d li ds on the s i d e of the ra cks
in order toa void blocking thero tation of the top spray
arm.
Pots,servingbowls,etc,mustalwaysbeplacedtopdown.
D eep pots sh o u ld be slanted to a llo w water to flow out .
Please ber eminded that:
The Botto m Basket featur es foldin g spikes so that large r or more pots and pans can beloaded.
Foldin g Spike s of Lower B asket
For better stacking ofpo ts and pans,
the spikescanb e folded down as
show in the picture right.
Adju sting the Upper Bask et
The height oft he upper basket canbe adjus ted inorder to
create more spaceforlarg e utensils bothf or the upper
/lower basket. Thehei ght of the upper basket canbe
adjusted byp lacing the wheels ondifferentheightof the
rails. Long items,servingcut lery,saladser vers and knives
should be placed on the shelfso that they donotobstruct
therotationofthesprayarms..
Foldin g bac k the c up sh elives
For betters tacki ng ofpo ts and pans,
the sp ikes can be folded do wn as
show in the pict u re ri ght .
Cutlery shouldbe pla ced inthe cutleryrackseparately
from each other in the appropriate positions, and do
make sure theute nsils do not nest together, this may
cause badperformance.
Donot letany item extend through the bottom.
Alway s load sharp utens ils wit h the sharp
point down!
13

Intensive
Normal
Rapid
60 min
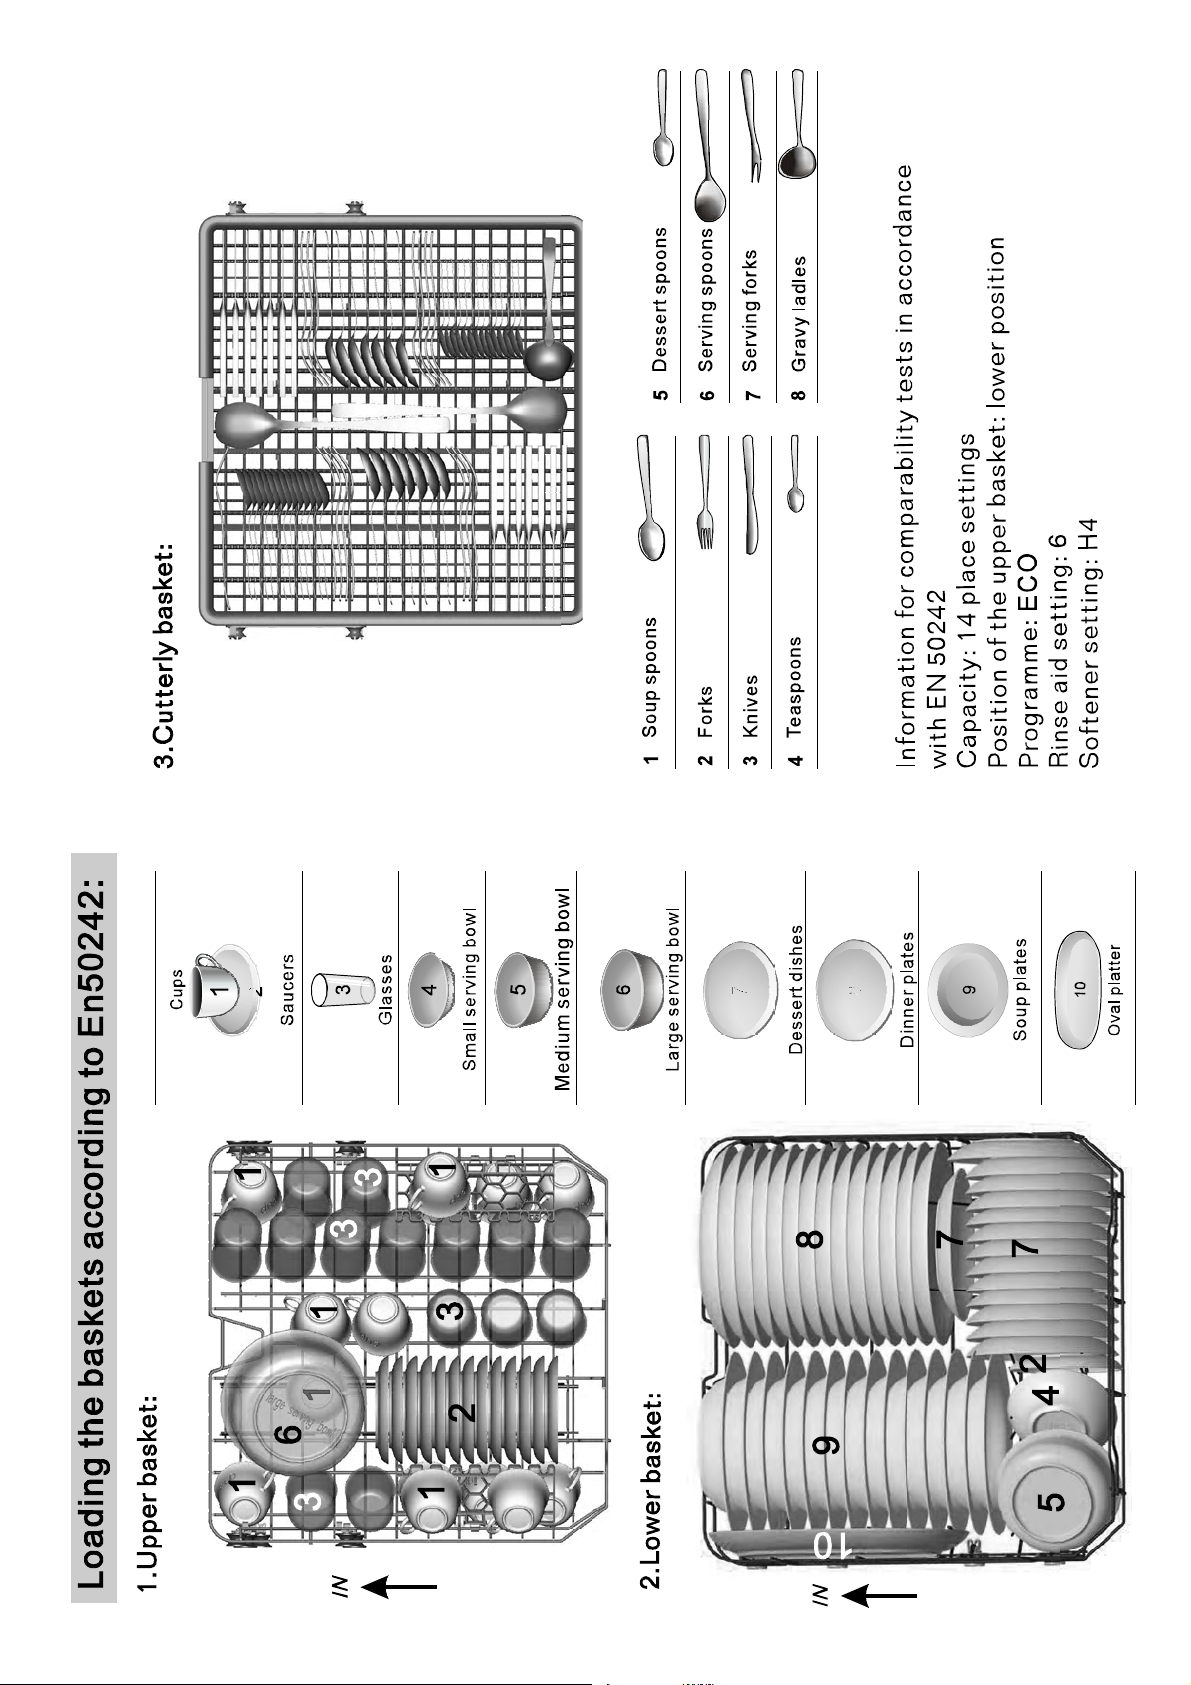
*EN 50242 : This programme isthetes t cycle. Thei nformation for comparability test
in accordance withE N 50242, asfollows:
Capacity: 14 setting
Position Upper basket: upperwhe els onr ai ls
Rinse aid setting: 6
Pl:0.49w;Po:0.45w.
Startin g a cycle wash
Draw out thel ower and upperbasket,loadthe dishes and pu sh them back.
It iscommended toload the lower basketfirst, thentheuppe r one (seethe section entitled
Loading the Dishwa sher ).
Pour in thed etergent (see the section entitled Salt, D etergent and RinseAi d ).
Insert the plugintothe socket. The power supplyis220- 240 VAC/50 HZ, thespecification
of thesocketi s 10A 25 0VAC. Make sure that thewatersupp ly is turned onto full pressure.
“”
“”
1
2
3
5/3 0g
5/30g
20g
To rinse dishes thaty ou plan
to wash later that day
Soa k
80.01
4
Means:need to fill rinse into theRinse-Aid Dispenser.
()
For normally soiledloads,
suchas , plates,glasses
andli ghtly soiledpans.
pots
For hea v i e s t soiled cro c kery,
andnorm ally soiledpots
pans dishes etcwith dried
onsoil ing.
、
、
Ashorter washf or lightly
soiled load sthatdo not
need dryi ng.
For lightlyso iled loads that
donotneed excellent drying
efficiency.
Prewash 50
Wash 6 5
Rinse
Rinse
Rinse 6 5
Drying
(
℃)
(
℃)
(
℃)
Prewas h(45 )
Wash (5 5 )
Rinse
Rinse (65 )
Drying
℃
℃
℃
Prewash
Wash (5 0 )
Rinse(65 )
Drying
℃
℃
Wash (4 0 )
Rinse
Rinse (45 )
℃
℃
Prewash 50
Wash(60 )
Rinse(60 )
Drying
(℃)
℃
℃
Prewash
ECO
(*E N 50242)
This isstan dar d programme , it i s
suitable to clean normally soiled
tableware and iti s the most ef fic ient
programme in terms ofits combi ne d
energy andwater consumption for
that type of tablew a re.
Glass
Pre-wash
wash(40 )
Rinse
Rinse(60 )
Drying
℃
℃
Forlightly soiledcrocke ry
andglass
8.4~12.70.9~1.3
120~180
Pre -wash (45 )
Autowash(45-55 )
Rinse
Rinse (62 )
Dryi ng
℃
℃
℃
Autosensingwash, lightly,
normallyorheavily soiled
crocke ry, withor without
dried-on food
Auto
185
175
175
40
1.3
0.93
1.6
0.6
17
14
10
10
60 101.15
115
0.87
14
(Or )3in1
5/30g
(Or )3in1
5/30g
(Or )3in1
5/30g
(Or )3in1
5/3 0 g
For a top quality cleaning, placet he silverware in theb asket
makingsure that:
They donotnes t together.
Silverware is placed with the malefaceup.
Long utensils inthemiddle.
14
When the workingcyclehasfi nished, thebuzzero f the dishwasher willsoundfo r 8seconds,thensto p. Turn off
the appliance u s ing the Powe r switch butto n , shut off t he water supply and o pe n the door of the d ishwa s her.
Wait fora few minutes before unloading thedishwashertoavoi d handling the dishesandute nsils while they
are still hota nd more susceptible tobreakage. The y will alsod ry better.
SwitchOfftheDishwasher
Front indicator showswhitelight
1.Openth e door,switch off thedishwasherbypressi ng the button.
2.Turn offthewatertap!
, only inthi s case thepro gramme has ended.
Power
Openthedoorcarefully.
Hot dishes aresensitivet o knocks. Thedis hes should therefore bea llowed to cooldownar ound 15 minutes
beforeremoving from theappliance.
Open thedishwasher's door,leave it ajar andwaita few minutes before removing the dishes.Inthis way they
will be cooleran d the drying willb e improved.
Unloading the dishwasher
Itisnormalthat the dishwasher is wetinside.
Empty thelowerba sket first and thenthe upper one. This willavoidwat er dripping from theupperBas ket onto
the dishes inth e lower one.
Ifyouopen the door , themachine will pause. The programlight will
stop blinking and thebuzz erwillmo oingevery minute unlessyou close thedoor. After
you cl os e t he doo r , the machi ne wi ll keep on wo rki ng a f ter 10 secon ds.
duringawashcycle
Premise:
Acycle that is underway can onlybemodi fied if ithason ly been running fo r a shorttime.Ot herwise, the
detergent may have already beenreleased, andt he appliance may have alrea dy drained the wash water.
If thisi s the case, thedetergent dispenser mustber efilled (see the sec tion entitled " Loading the
Detergent" ).
Open the door, the machine will beinsta ndby state, press thep rog ram button more than 3sth en you can
change the program tothedesi red cycle setting (seet he section entitled " Starting awas h cycle. . .").
1
2
Aforgotten dish can be added any time before the detergent c up opens.
Add forgotten dishes.
Close the door, the dishwasher will run
after about 10 seconds.
After the spray arms stop working,you can open the door
completely.
2
3
1
4
Open the door slightly
Press the program button,th e washprogramwi ll bechanged as follows direction:
If a program is selected, the responsep rogram indicator will light, then youca n also choose theE xtra Drying or
Express function, close thedoor, the dishwasher will begin workafterabou t 10 seconds.
ECO->Glass 60min->Rapid ;-> ->Soak->Auto->I ntensive->Normal
4
5
The front indicator show thestateof dishwash er:
a).blue light with blinking: running;
b).blue light without blinking: pause;
c).white light: end ofprocess(open the door,t he white light will extinguish);
d).no light: stand by
It is da ngerous to op en the door when wash ing,
becausethe hotwatermay scald you.
15
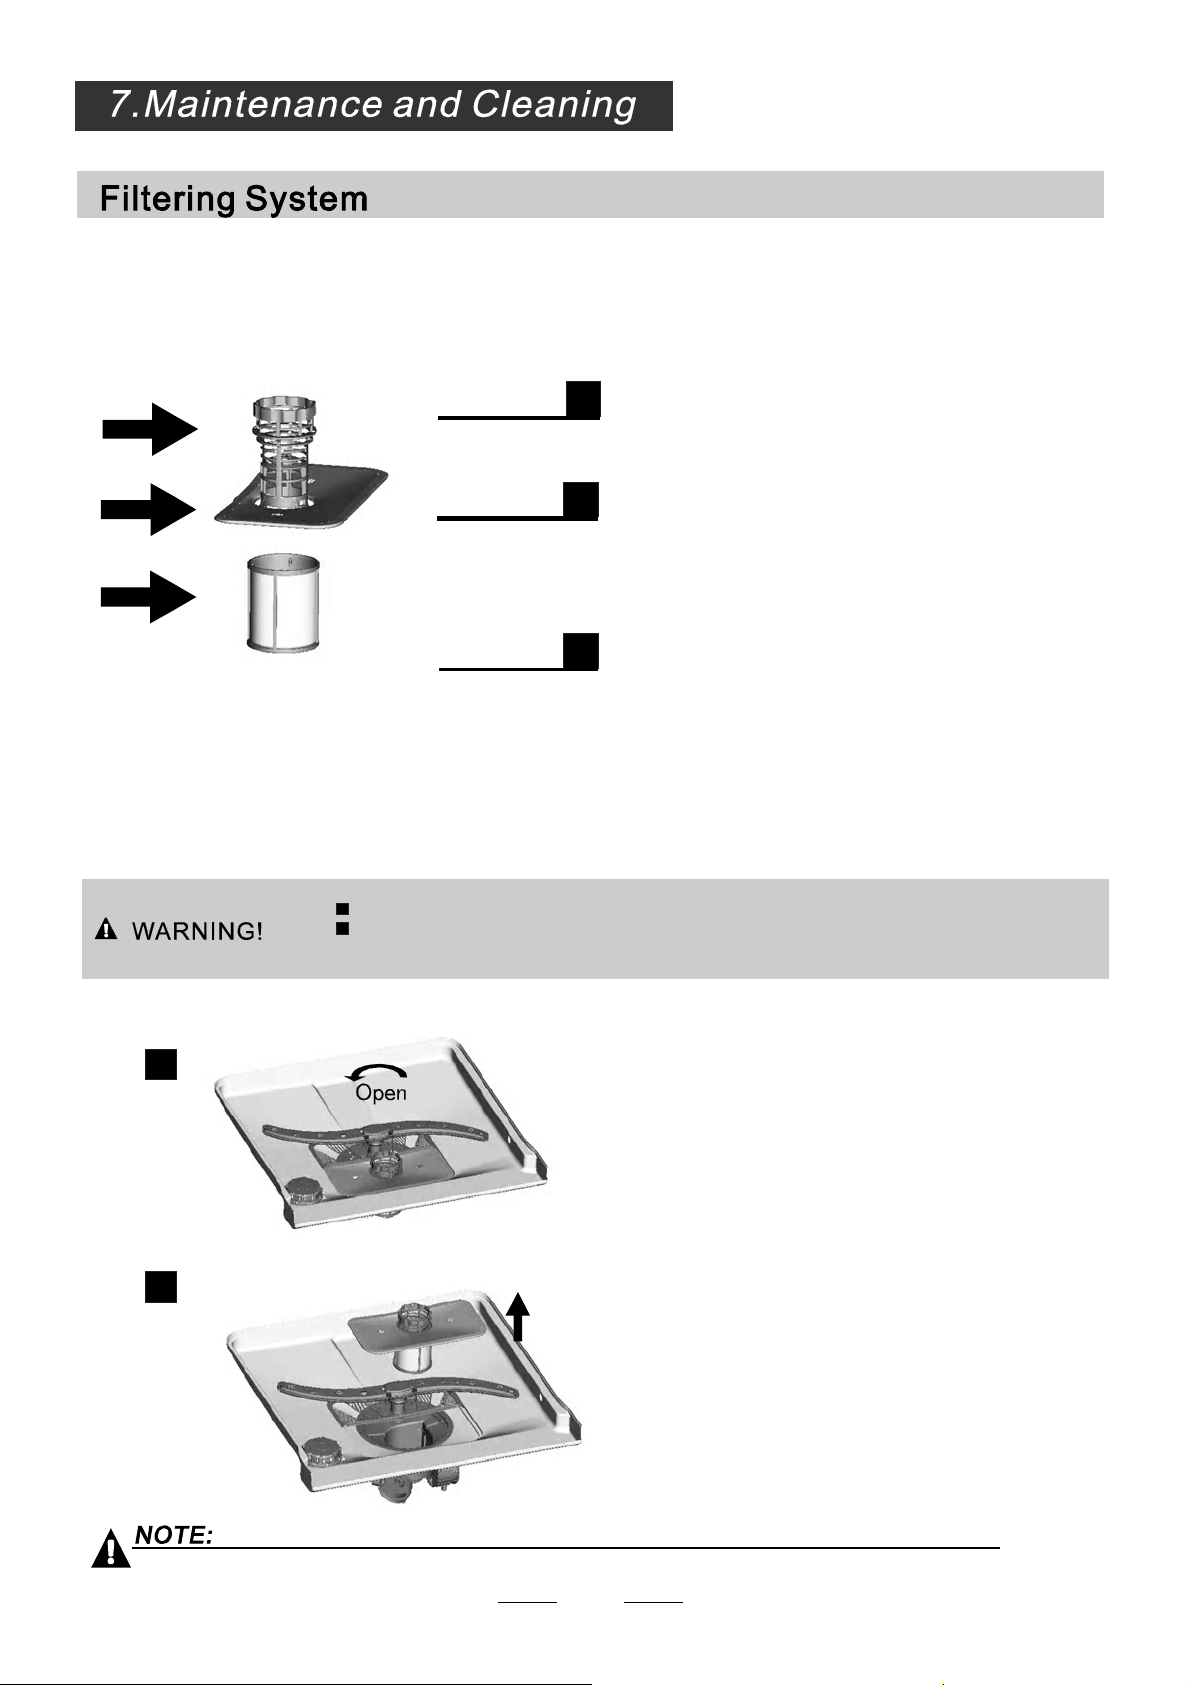
The filter prevents larger remnants offoodor other objects from getting insidethepu mp.
Theresidues mayblock thefilter, in thiscasethey must beremoved.
The filtersystemconsi sts ofacoar se filter, a flat (Main filter)
An d a microfilt er( F i ne fi l ter).
Foodand soil particles trappedin this filterare pulverized bya
special jet ont he lower spray arma nd washed down tod rain.
Larger it ems, s uch as pie c es of bones or glass, t ha t coul d b l o ck
thedrainaretrapped in the coarsefilter. To remove the items
caught by the filter,gently squeeze the taponth e top oft his
filter and liftout.
This filterholdssoiland food residues in the sump areaa nd
preventsi tfrombeingr edepositon the dishesduringwashcycle.
Main filter
1
Coarse filter
2
Fine filter
3
2
3
1
Filterassembly
Thefilterefficiently
For best performance and re sults, the filter mustbecle aned regularly. this reason, it isa goo d ideato
remove the larger foodparticlestr app ed in thef ilter after each washcy cle by rinsing thesemicircular filterand
cup under runningwater. To remove thefilterd evice , pullthecu p handle int he upward direction.
removes food particles fromt he wash water,allowin g it tobe recycle d during the cycle.
For
Th e dishw asher must never be used without the filters .
Improper replacement of thefilter mayred uce the performance level ofthe applian ce
anddamagedishes andutensils.
1
2
Step 1 Turn the filterinant i-clockwis e direction,:
Step 2 l ift the filter assy up:
When following this procedure from step1 to step 2, the filter system will be removed;
when following it from Step 2 to Step 1, the filter system will be installed.
16

The controlpanelc an be cleaned byu sing alightly dampenedc loth .
After cleaning, make sureto dry itthoroughly.
For t he e x t e rior, us e agood appli ance po lish w ax .
Neveruses harp objects, scouring padsorhar sh cleaners onanypart of the dishwasher.
Protec tAga inst Freez ing
1.Cut off the electrical powerto the dishwasher.
2.Turnoff the water supply andd isconnec t thewateri nlet pipe from thew ater valve.
3.Drain thew ater from the inletp ipe and water valve. (U se a pantogathe r thewater)
4.Reconnect the wateri nlet pipe tothe wa ter valve.
5.Remove thefilterat the bottom of thetub and use a spongeto soak up water int he sump.
please take frost protection measuresonthe dishwasher in winter.Every fter washing cycles,
please operate as follows
timea
:
Cleaning the Filter
Cleaning the Door
To cl ean the c o a rse fi l ter and t he fine f ilter, use aclea ning b rush. R e as semble th e filter parts as shown in the figur es
on the last page andreinsert the entire assem bly in the dishwa sher, positio ning it in its seat and pressing downwa rds .
Whencleaning thefilters, don'tknock on them.Otherwise, thefilters couldbe
contortedandtheperformanceof thedishwasher couldbedecreased.
To clean thee dge around the door,you should use onlyasoft warm, damp cloth.
To avoid penetrationofwa ter into thedoorlock and electrical components, do not
useaspr ay cleaner of any ki nd.
Never usea spray cleaner to cleanthedoorpanel as it maydamagethe door lock
and electricalcomponents.
Abrasive agentsorsom e paper towelsshouldnot be used becauseoft he riskof
scra tching or le aving sp ots on the s tainless steel su r f a ce.
Cleani ng the SprayArms
If your dishwasher cannotworkbecauseofthe ice,
please contact professional service persons.
It is n e cess ar y to cle an the spr ay arm s regul arly forhard
wate rchemicalswill clog the sprayarmjetsand bearings.
- Inspect thefilter s for blockinga fter every time the dishwasher hasbeenused .
- Byuns crewing the coarse filter,you can remove the filter system. Re move any foodremnants and
clean the filters under runni ngwater.
Remarks:
Theentirefilter assembly should be cleanedoncea week.
Toremovethelowersprayarm,pullout the spray arm upwa rd.
Tore m ov e the upper spra y arm, ho ld t he n ut, r ot ate the arm
clockwise to removeit.
Washthearms in soapy andwarmw ater and usea soft brush to
clean thejets.R eplace them after rinsingthemth oroughly.
17
It isrecommend that yourun a wash cycle with the
dishwasher emptyandthe n remove theplugfro m the
socket, turnoff the water supply andleave thedoor of
the a pp lian c e s l ight ly ope n. Th is will help t h e door
seals to lastl onger and prevent odoursfrom forming
withinthe appliance.
If the appliancemustbe moved, try to keepi t in the
verticalposition. If absolutely necessary,it can be
positioned on itsback.
Oneofthefactorsthatcauseodourstoforminthe
dishwasher isfoodth at remains trappedin theseals .
Periodic cleaning with adampspo nge will prevent this
fro m oc curr ing.
Ensure the voltageandfrequ ency of thep ower being c orrespond s to
those on the ratin g plate. Onlyin sert the plug intoan electrica l socket whichi s earthed
properly.Ifthe electrical socket to which thea ppliance must beconnectedis not
appropriate for the plug ,replace thesocket, ratherthanusinga adaptors or the like as
theycould causeoverheatingandburns.
Please look at the rating label to know the rating voltage andconnectt he dishwasher to the appropriate powers uppl y.
Use therequired fuse1 0 amp, timedelayf use or circuit breaker recommended and provideseparatecirc uit serving
only this appliance.
Position the appliance in thed esired location. The backshouldrestag ainst the wall behindit,and the sides,
along the adjacent cabinetsorwa lls. The dishwasheris equippedwi th water supply anddrainhos es that can
be positioned either tot he right or thel eft sides to facilitateproperi nstall ation.
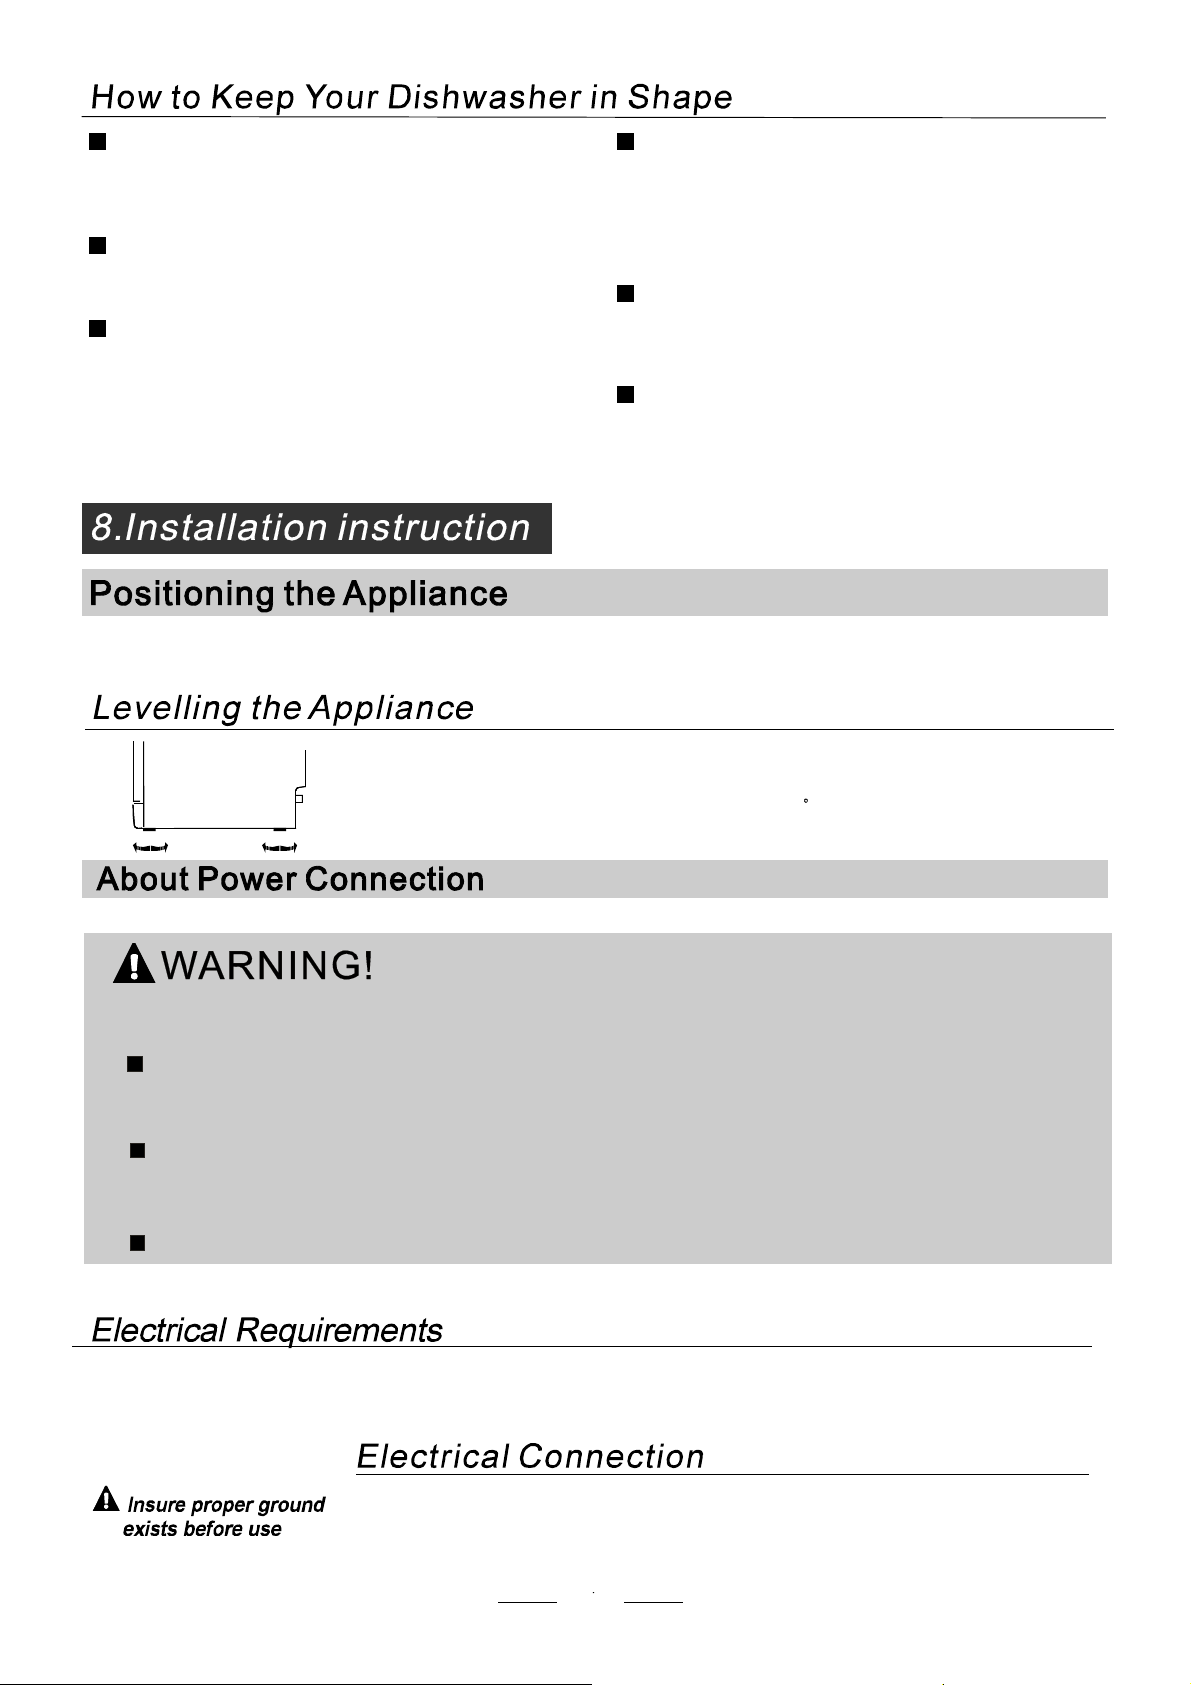
Once the applianceispos itioned for levelling, the heightofthe dishwashe r
may be altered via adjustment of thescre wing level ofthefee t. In anycas e,
the appliance shouldnotbe inclined more than2 .
Before cleaning orperforming maintenance, always
remove theplugfrom the socket.
To clean theexterior and rubber parts of the dishwasher,
donot use solventsorabrasivecleaning products.
Only use a clo th with war m so apy wate r.
Torem ove spots or stains from the sur f ace of the
interi or, use a clothdampened with water an a little
vinegar,o r a cleaning product madesp ecifically for
dishwashers.
RemovethePlug
No S olve nts orAbrasive Cleani ng
Moving theApplia nce
Seals
After every wash, turn off the water supply tothe
appliance and leave the doors lightly open sot hat
moisture and odours aren ot trapped inside.
AfterEveryWash
Whennot inUse for aLongTime
For personal safety:
Do not use an extension cord or an adapter plug
with this appliance.
Do not, under any circumstances, cut or remove the
earthing
Connection from the power cord.
18
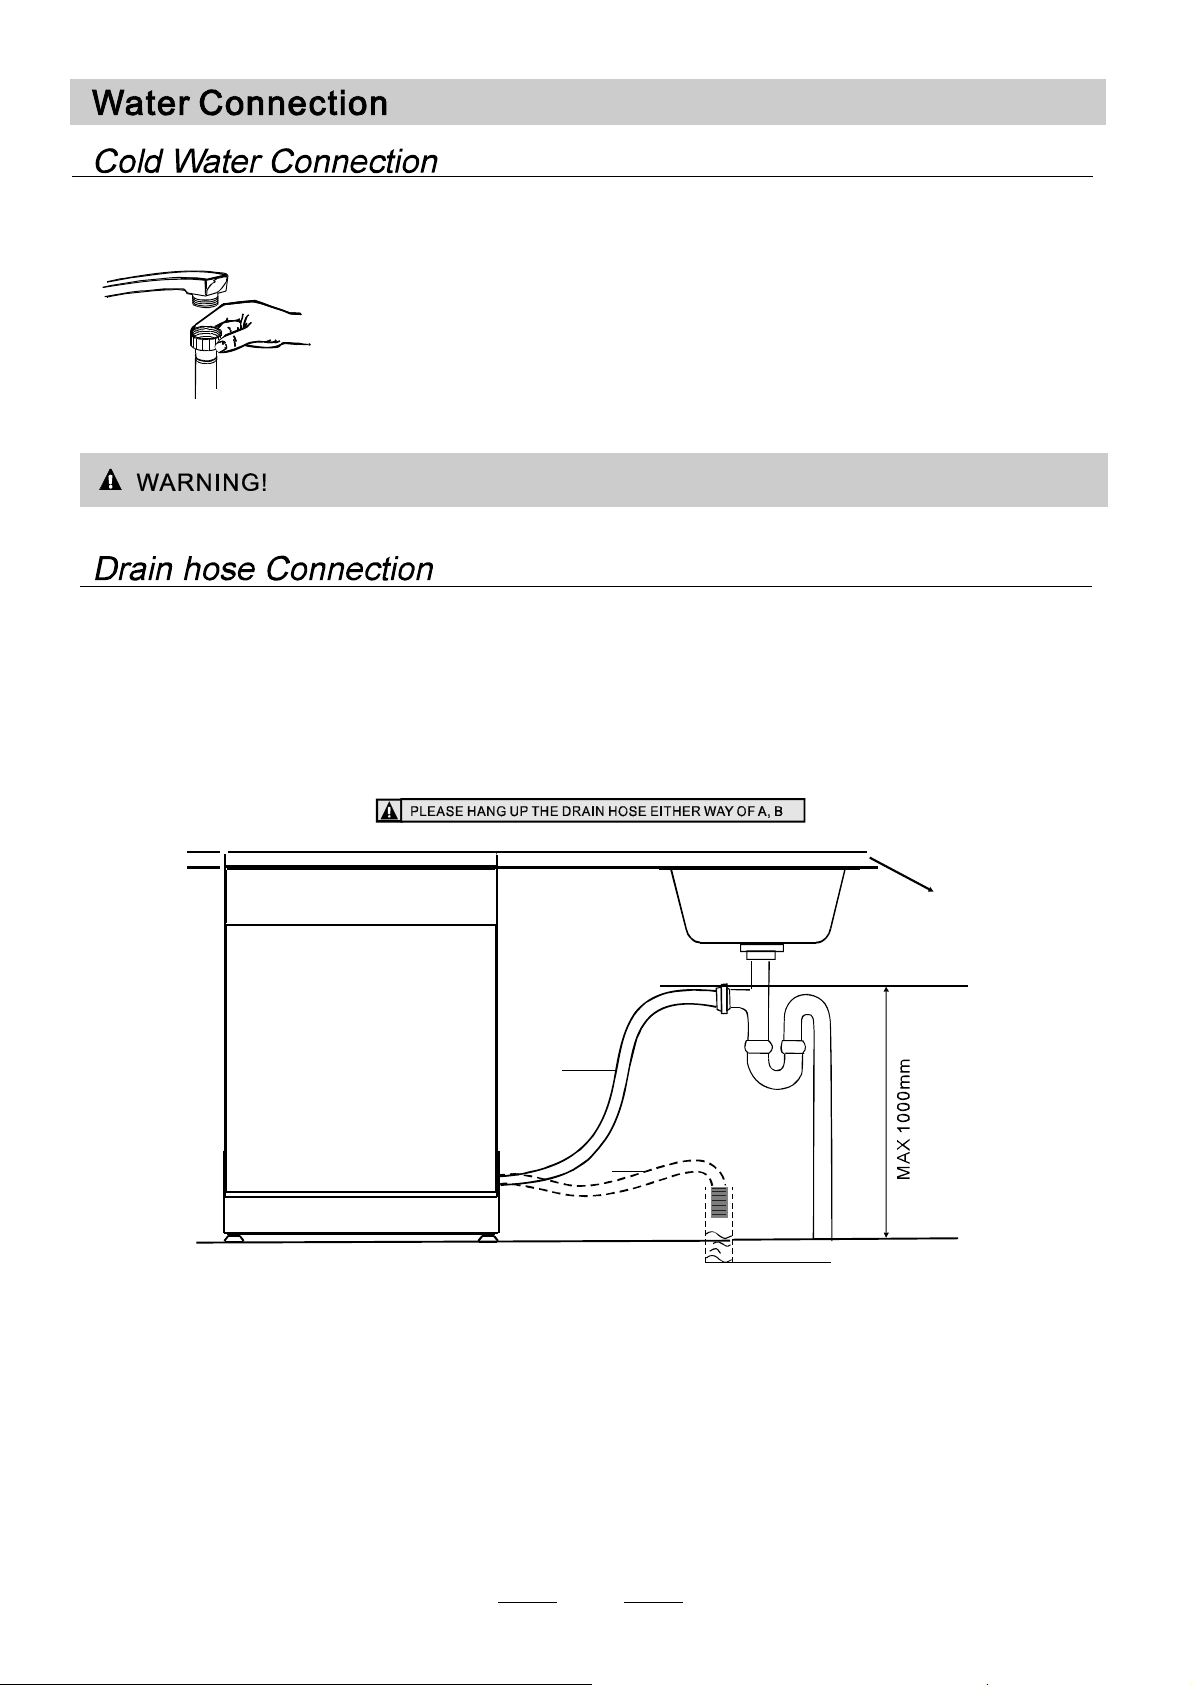
Connect the coldwater sup ply hose to at hreaded 3/4(inch) connector and make sure
that it isf astened tightly in place.
If the waterp ipes are neworha ve not beenu sed for ane x tended period of time, let the
wate rrun to makesure that the wateris clea r. Thisprecaution isneeded to avoid the
risk of the water inletto be blocked and damage theappliance.
Please close thehydrant afterusing.
Insertthe drainhose into adrainpipe witha minimum diameterof 40mm, or let i trun into the sink, makingsureto
avoid bendingorcrim ping it.T he top of theho se must bele ss than 1000mm.
A
Counter
Front
Drain pipe
NOTE
The top of the hose
must be less than
1000mm.
φ 40mm
B
19
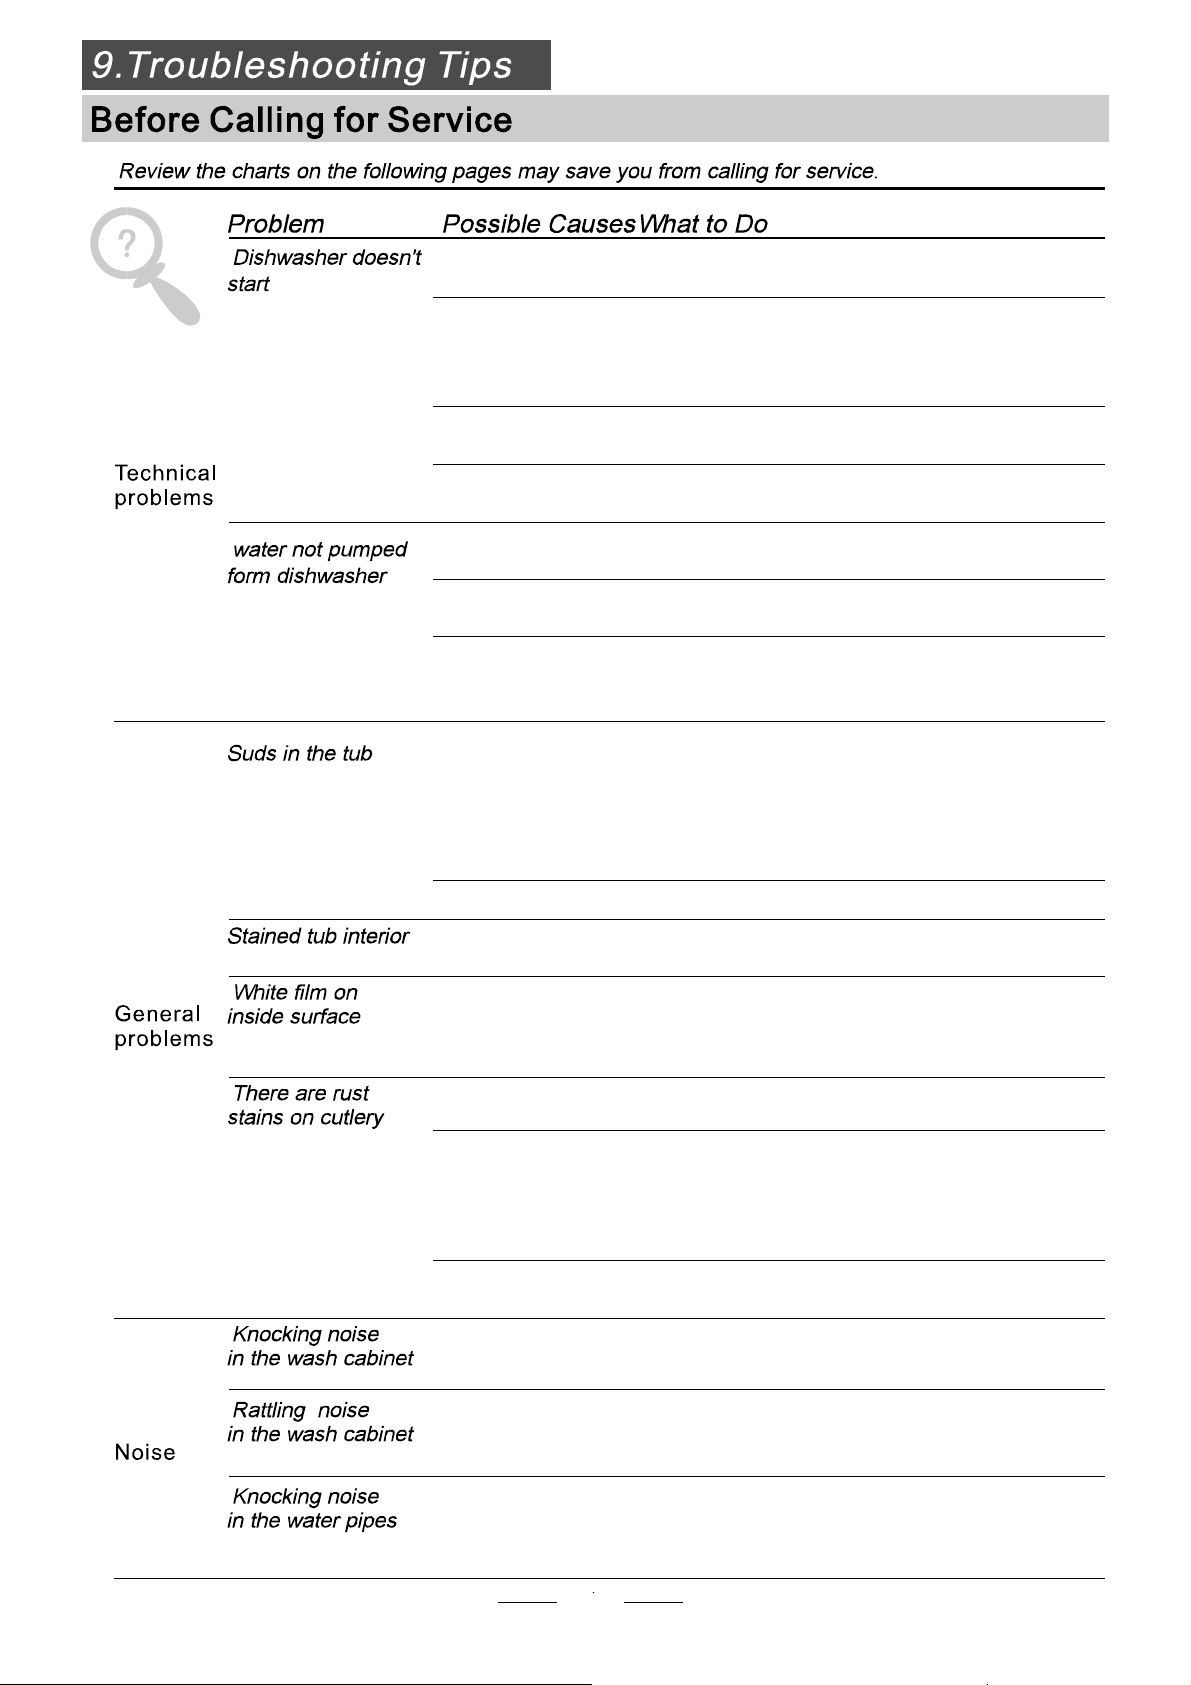
Thefollowingthings should be checkedbeforestarting thedishwasher.
The content of this manual is very helpful to the u sers.
After installation, please make sure to keep this manual.
1
Thedishwasher islevel andfixedproperly
2
The inlet valve is o pen
3
Thereisaleakageattheconnections of the conducts
4
Thewiresaretightlyconnected
5
The poweris switchedon
6
The inlet and dr ain hoses are kno tted
7
Allpackingmaterials and printingsshould be taken outfromthedishwasher
Extension Hose
Ifyou needa drain hoseextension,make sure to use asimilar drain hose.
It mustb e no longerthan4 metres; otherwise the cleaning effectof the dishwasher could be reduced.
Wat er O utl et
Connect the waterdrainhos e. Thedrainh ose must be correctlyfittedt o avoid water leaks.
Ensure that thew ater drain hose is notkin ked or squashed.
If th e si nk is 100 0 h i gher f rom the floor, th e excess w a ter in ho ses ca nnot be dr ained directly
into thesink. It willbe necessary to drain excess waterfromhosesintoa bowl o rsuitable
container that isheld outside and lower thant he sink.
How to Drain ExcessWaterFromH oses
Syphon Conn ection
The w aste co nn ecti on mus t be at a height les s t han 1000 mm(max imum)from thebot tom of the d i s h.
The waterdr ai n hose should befix ed .
20
Fuse blown, or the
circuit breaker acted
Replace fuse or reset cir cuit breaker. Remove any othe r
appliances sharing the same circuit with the dishwasher
Spilled rinse-aid
Always wipe up rinse-ai d s pills immediately.
Hard water minerals
The affected items are
notcorrosionresistant.
The lid of the softer
is loose
Aspayarmis
knocking against
an item in abasket
r
Items of crockery
are loose in the
wash cabinet
This may becaused
by on-site installation
or the cross-section of
the piping.
A programme wasnot
run after dishwasher
salt wasadded.
Traces of salt have
gotten into the wash cycle.
To clean the interior, usea damp sponge with
dishwasher detergent and wear rubber gloves.
Never use any other cleaner than dishwasher
detergent for the risk of foaming or suds.
Always run the quick wash program me .
without any crockery in the dishwasher and
without selecting the Turbo function (if pres ent),
after adding dishwasher salt .
Check the lip .Ensure the fix is fine.
Interrupt the programme, and rearrange the items
which are obstructing the sp ay arm.r
Interrupt the programme,
and rearrange the items of crockery.
This has no influence on the dishwasherfunction.
if in doubt, contact a suitably qualified plumber.
Detergent with
colourant was used
Make sure that the detergent is the one without
colourant.
Improper detergent
Make sure the dishwasher is turned on and the door is
closed securely.
Check that the water supply is connected properly and
the water is turned on.
Make sure to close the door properly and latch it.
Make sure the power cord isproperly plugged into the
wall socket.
Power supply is not
turned on
Water pressure is low
Door of dishwasher
not properly closed.
Kink in drain hose
Filter clogged
Kitchen sink clogged
Check drain hose.
Check coarse the filter
(see section titled )" Cleaning The Filter "
Check the kitchen sink to make sure itis draining well.
If the problem is the kitchen sink not draining ,you may
need a plumber rather than a serviceman for dishwashers.
Use only the special dishwasherdetergen t to a voidsuds .
If this occurs, open the dishwasher and let suds evaporate.
Add 1 gallon of cold water to the tub. Close and latch the
dishwasher, then select anycycle. Dishwasherwill drain
outthe water at the first step.Open the doorafter draining
is stop and check if the suds is disappeared.
Repeat if necessary.
21
The dishes were not
loaded correctly .
See notes in " Loading the Dishwasher Baskets ".
Select a more intensive programme.
See" WashCycle Table ."
Use more detergent,or change your det ergent.
Rearrange the items so that the sp ay can rotate freely.r
Clean and/or fit the filter combination correctly.
Clean the sp ay arm jets. See "Cleaning the Spray
Arms".
r
Use less detergent ifyou have soft water and select
a shortest cycle towash thegl assware and to get
them clean.
Use a mild abrasive cleaner to eliminate those marks.
Re-loadin g the dishesproperly.
Load the dishwasherassuggested in the directions.
Increase theamountof rinse-aid/refill the rinse-aid
dispenser.
Do not empty your dishwasherimmediately after
washing. Openthe doo r slightly so that the steam can
escape. Begin unloading the dishwasher only once t
he dishes are barely warm to the touch. Empty the low
basket first.This prevents water form dropping off
dishes in the upper basket.
In short program the washing temper ature is lower.
This also lowerscleaning performance. Choose
a program with a long washing time.
Water drainage is more difficult with these items.
Cutlery or dishes of this type are not suitable for
washing in the dishwasher.
Theprogrammewas
notpowerfulenough.
Not enough detergent
wasdispensed.
Items are blocking
the path of sp ay arms.r
The filter combination
inthebaseofwash
cabinet is not clean or
is not correctly fitted.
This may cause
the sp ay arm jets
to get blocked.
r
Combination of soft
water and too much
detergent.
Aluminum utensils
have rubbed against
dishes.
Dishes block
detergent cups.
Improper loading
Too little rinse-aid
Dishes are removed
too soon
Wrong program
has been selected
Use ofcutlery with
a low-quality coating
If overflow occurs, turn off the main water supply before calling a service.
If there is water in the base pan because of an overfill or small leak,
the water should be removed before restarting the dishwasher.
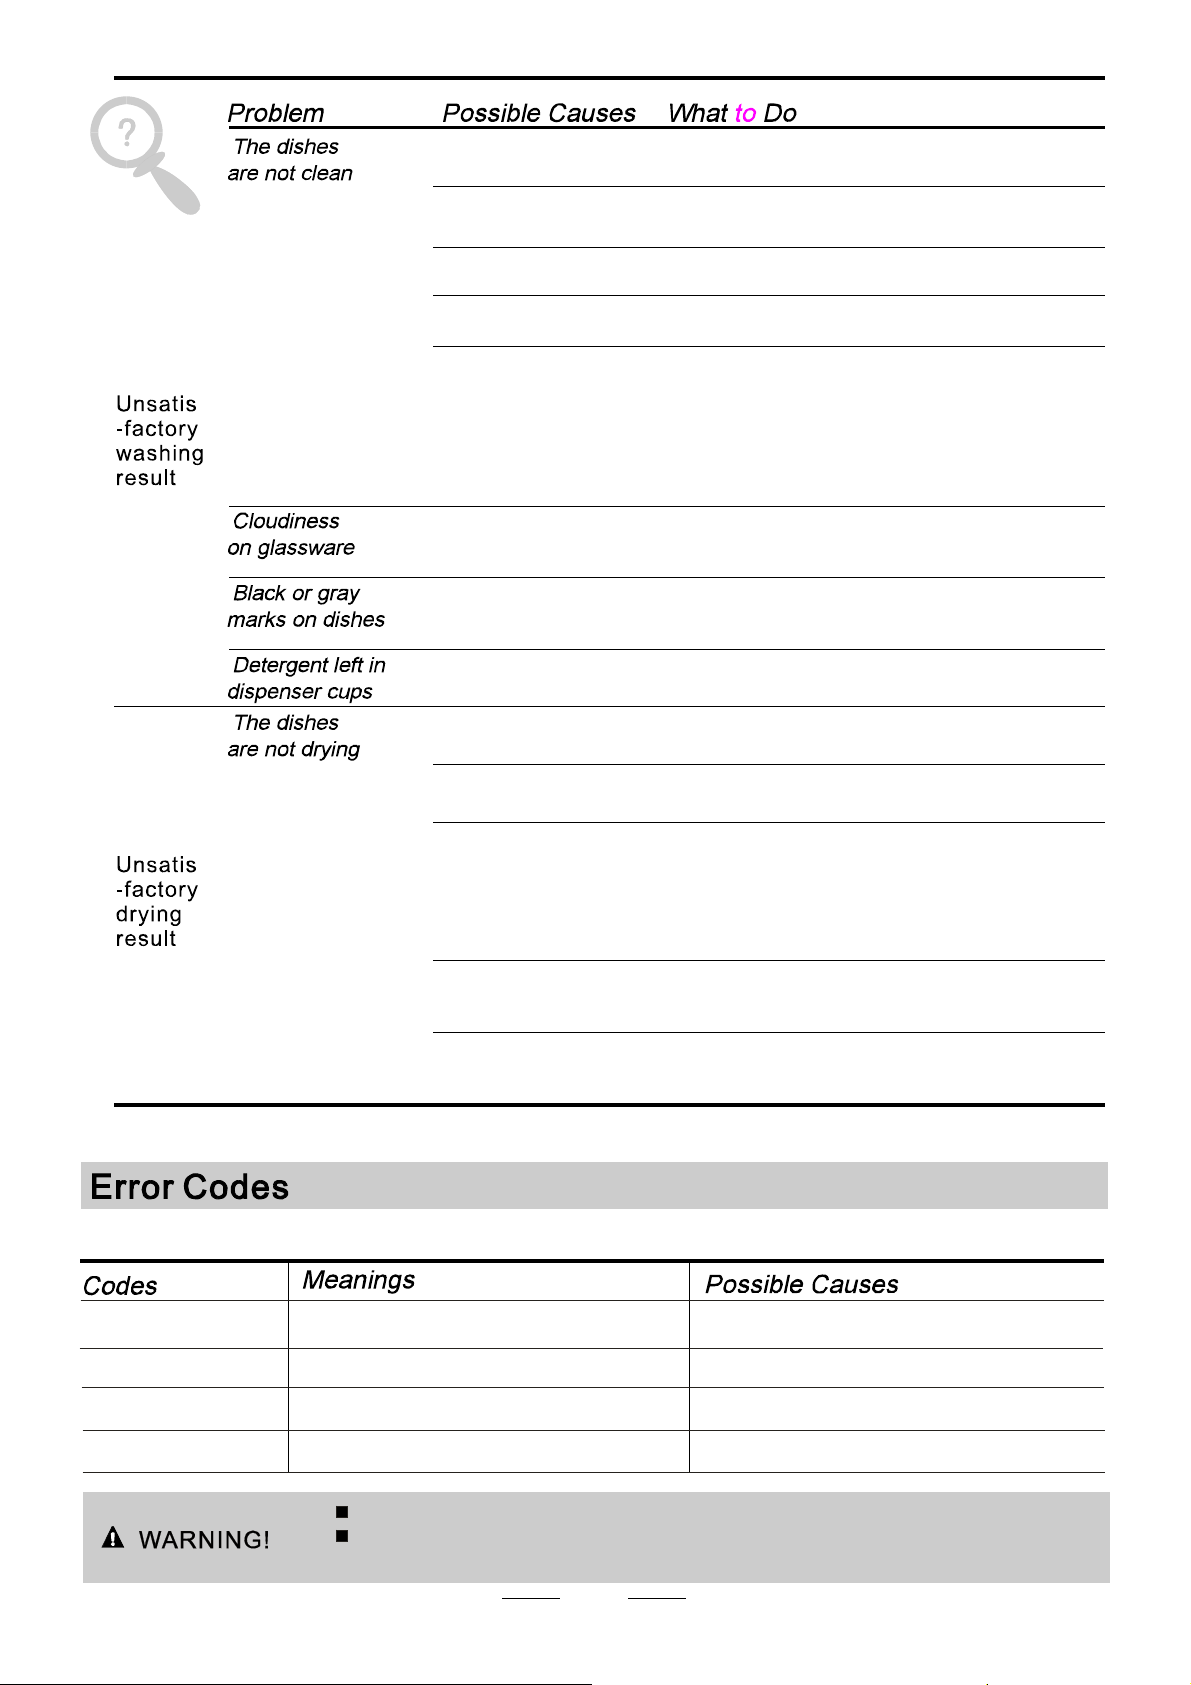
When some malfunctions come on, the appliance will display error codes to warn you:
Overflow.
Longer inlet time.
Faucets is not opened, or water intake is
restricted,or water pressure is too low.
Some eleme ntof dishwash erlea ks .
E4
E1
E8
Divider vale failed
Divider vale failed
E9
Keep pressing a button more than 30 seconds.
Water or something on the button.
22
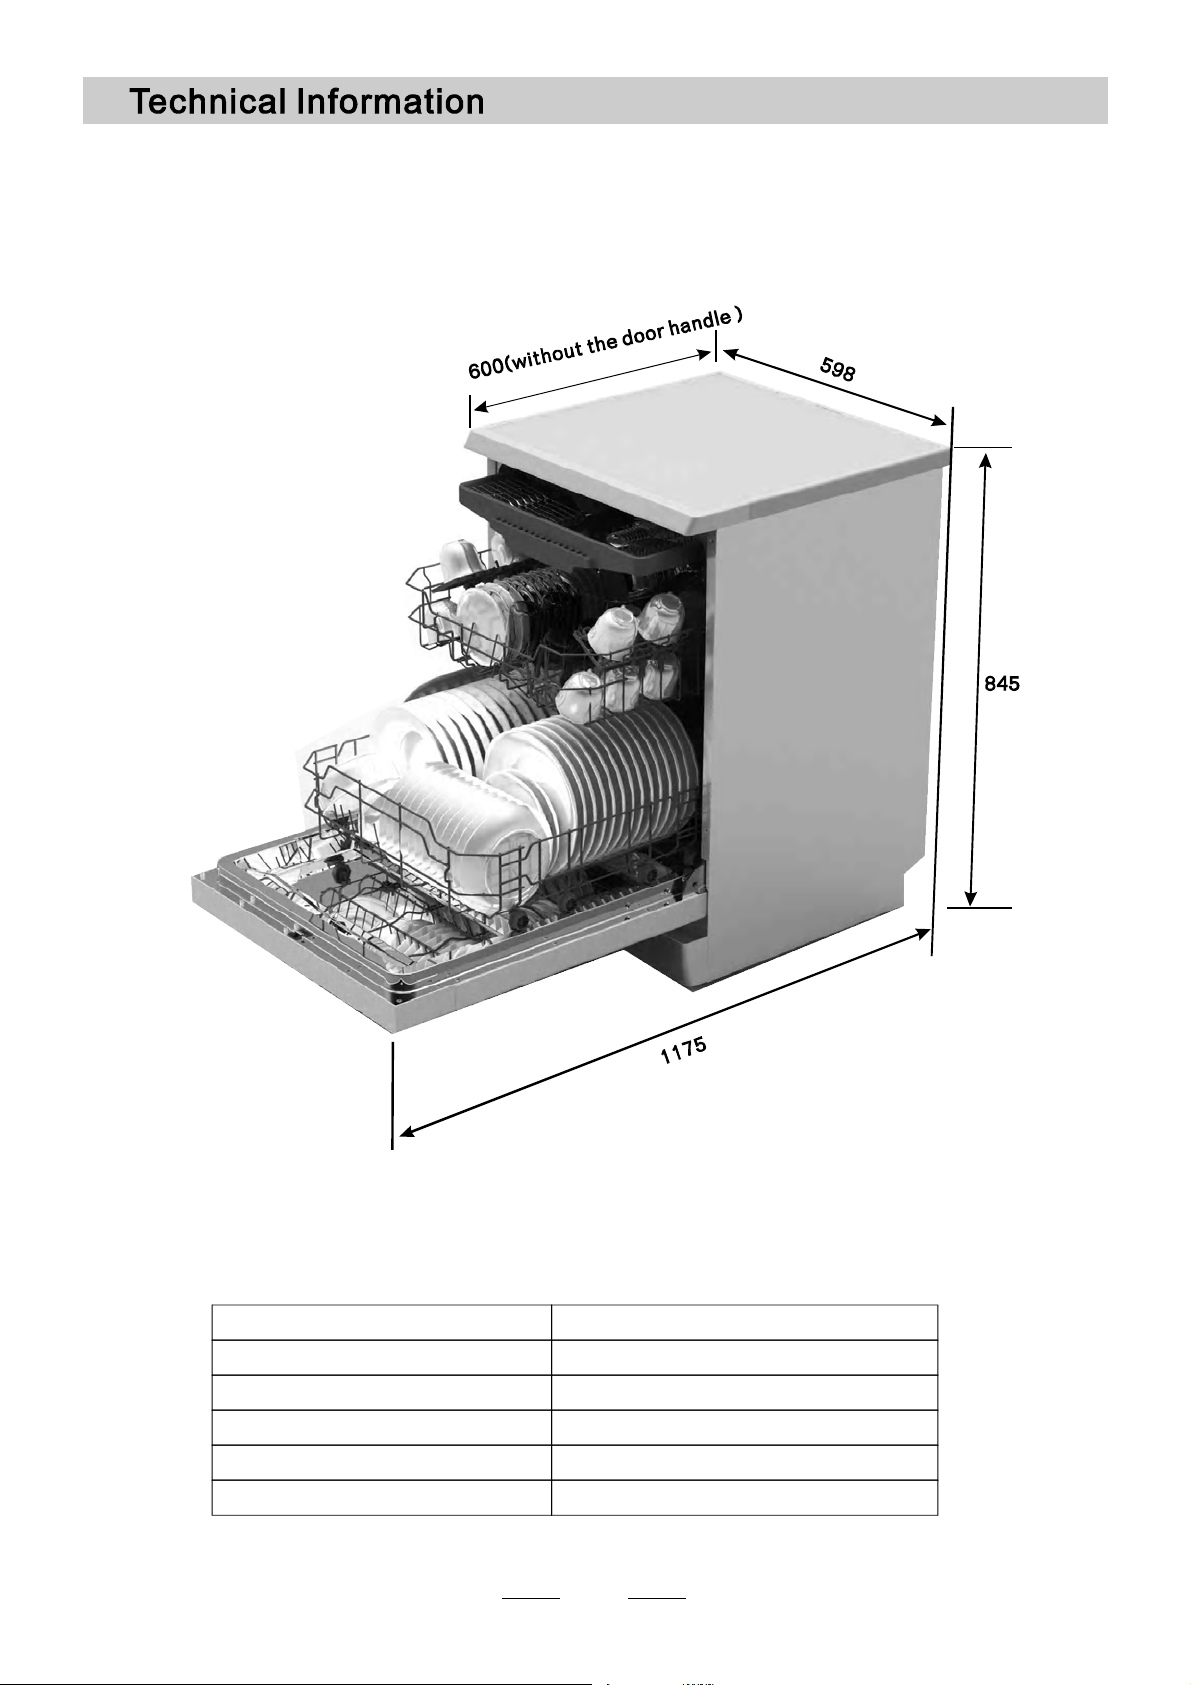
Hei ght : 845mm
Width : 598mm
Depth : 600 mm
(without the door hand le)
Wate r pressure: 0.04-1.0MPa
Power s upply: seerating label
Capa ci ty: 14pla ce set ti ngs
23
24
C
25
26
27

1.Affichage LCD : programme, indicateurs de remplissage du sel et du liquide de rinçage, touche demi-charge 2D,
tempsrestant,départdifféré,codes erreurs,etc.
2.Touche Alt :demi-charge 2D.Cette fonction vous pe rmet de ne laver que le chargement du panier supérieur ou celui
du panier inférieur. Le témoin correspondant clignote.
3.Départ différé de 1 à 24 h eures.
4.Sélecteur d e programme
5.Interrupteur principal
11
12
Vue arrière
1
2
3
4
5
7
8
9
10
Vuedeface
Équipement
6
13
1Brasdelavagesupérieur
2 Tiroir à couverts
3 Panier supérieur
4 Tuyau intérieur
5 Panier inférieur
6 Réservoir à sel
7 Compartiment à détergent
8Étagèreàtasses
9Brasdelavageinférieur
10 Systèmede f iltration
11Branchementdel'arrivéed'eau
12Tuyaudevidange
13Miseàniveaudel'appareil
AUTO
ECO
28
 Loading...