

Page 1
FC700IT
Installation, use
and maintenance instructions
INSTRUCTION MANUAL
:
Made In Italy
WWW.CAMPOMATIC.COM
Page 2
ITALIANO
Istruzioni per l’installazione, l’uso, la manutenzione
IT
ENGLISH
Installation, use and maintenance instructions
GB
Page 3
1
IT
NORMATIVE-AVVERTENZE E CONSIGLI IMPORTANTI
Prima di utilizzare l’apparecchio, leggere attentamente questo manuale, in modo da sapere
esattamente cosa fare e cosa non fare.
Un uso inappropriato dell’apparecchio può essere pericoloso, soprattutto per i bambini.
Prima di collegare l’apparecchio accertarsi che i dati in targa siano corrispondenti a quelli
del vostro impianto.
GB
Before using the appliance, read this manual carefully as it will tell you what to do
and what not to do.
Improper use of the appliance can be dangerous, above all for children.
Before connecting the appliance, make sure that the data on the rating plate complies
with that of the domestic supply.
ST ANDARDS-WARNINGS AND RECOMMENDA TIONS
GO2110NFH-1
Non disperdere i materiali riciclabili dell’imballaggio nell’ambiente ma portarli ad un impianto
di smaltimento affinché possano essere riciclati.
La sicurezza elettrica di questo apparecchio è assicurata soltanto quando è collegato ad
un impianto elettrico munito di un’efficace presa di terra, a norma di legge.
E’ obbligatorio verificare questo fondamentale requisito di sicurezza.
Do not dispose of the recyclable packing materials in an unauthorised manner.
Take them to an appropriate plant for recycling.
The electrical safety of this appliance is only guaranteed when it has been connected
to a mains supply with an efficient earthing system as provided for by law.
1
Page 4
2
R
C
Questa operazione deve essere
compiuta da almeno due persone.
R
This operation must be carried out
by at least two people.
F
S
B
IT
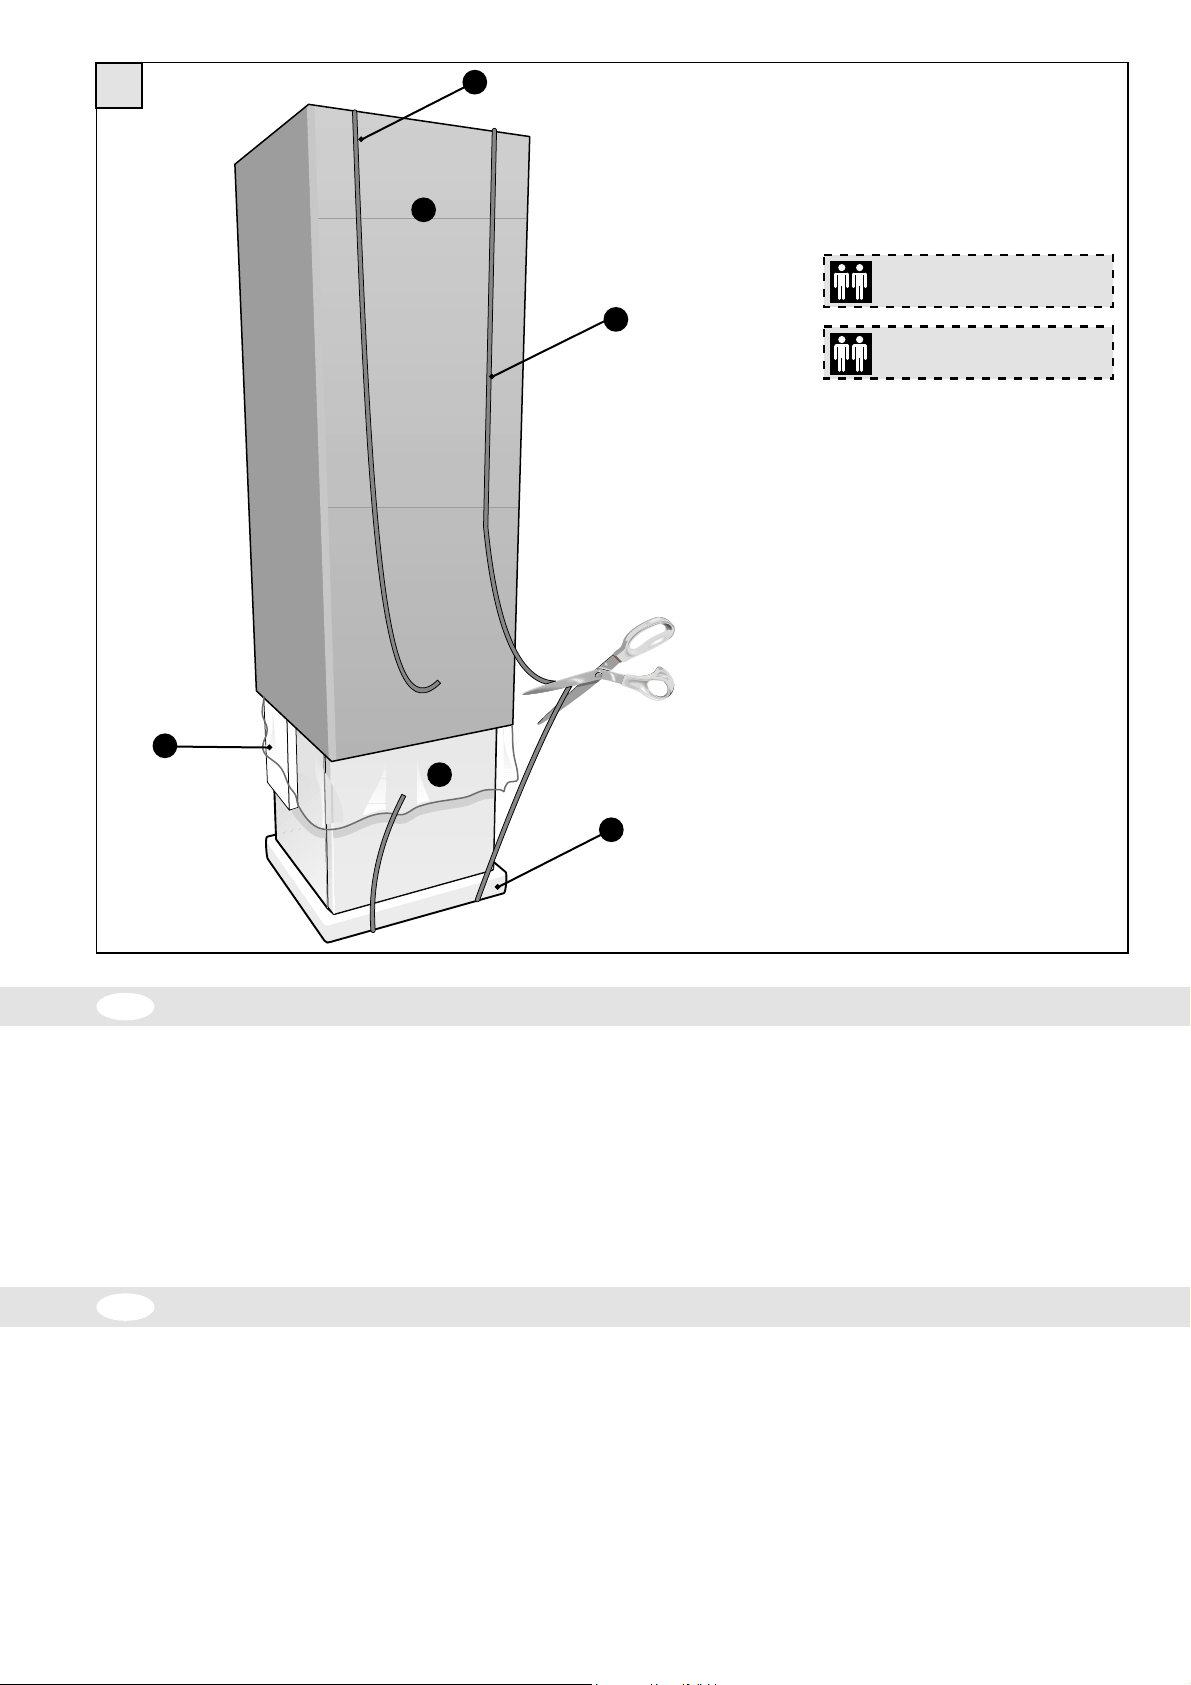
DISIMBALLO
• Ponete l’apparecchio nel punto d’installazione (cap. POSIZIONAMENTO E
MESSA IN OPERA).
• Tagliate le reggette R e sfilate il cartone o sacco in plastica esterno C.
• Eliminate subito i sacchi in plastica S i quali possono rappresentare pericolo per
i bambini.
• Una volta liberato l’apparecchio dal suo imballo eliminate ancora i fianchi F e
quindi il basamento B.
GB
REMOVAL OF PACKAGING
IMBALLO
Il materiale di imballo è riciclabile al 100%. Per lo smaltimento seguite le normative
locali. Il materiale di imballaggio (sacchetti di plastica, parti in polistirolo, ecc.) deve
essere tenuto fuori dalla portata dei bambini in quanto potenziale fonte di pericolo.
PRODOTTO
L’apparecchio è stato fabbricato con materiale riciclabile. La rottamazione dovrà
avvenire seguendo le normative locali per lo smaltimento dei rifiuti. L’apparecchio
da rottamare dovrà essere reso inservibile tagliando il cavo elettrico di alimentazione.
L’apparecchio da rottamare non dovrà essere disperso nell’ambiente , ma consegnato
presso gli appositi centri di raccolta per il recupero dei gas refrigeranti e oli lubrificanti.
• Place the appliance in its installation site (chap. POSITIONING AND INSTALLING
THE APPLIANCE).
• Cut straps R and remove the box or plastic bag C.
• Immediately destroy the plastic bags S as they could be dangerous for children.
• Once the appliance is free from its packaging, remove the side protections F
and then the base B.
PACKAGING
Packaging material is 100% recyclable. For its disposal follow your local regulations.
The packaging material (plastic bags, polystyrene parts etc.) must be kept out of
children’s reach as it could be dangerous.
PRODUCT
Scrapping must be carried out according to your local regulations on the disposal of
waste materials. Before scrapping the appliance, cut the electrical supply cable so that
it can no longer be used. The appliance must not be left in the environment, it must be
handed over to a collection centre specialized in the recovery of refrigerating gases
and lubrificating oils.
2
Page 5
3
1
GLS38FH-11
2
GLS38FH-9
A
GO2110NFH-2
A B C D E
3a
GLS38FH-4
IT
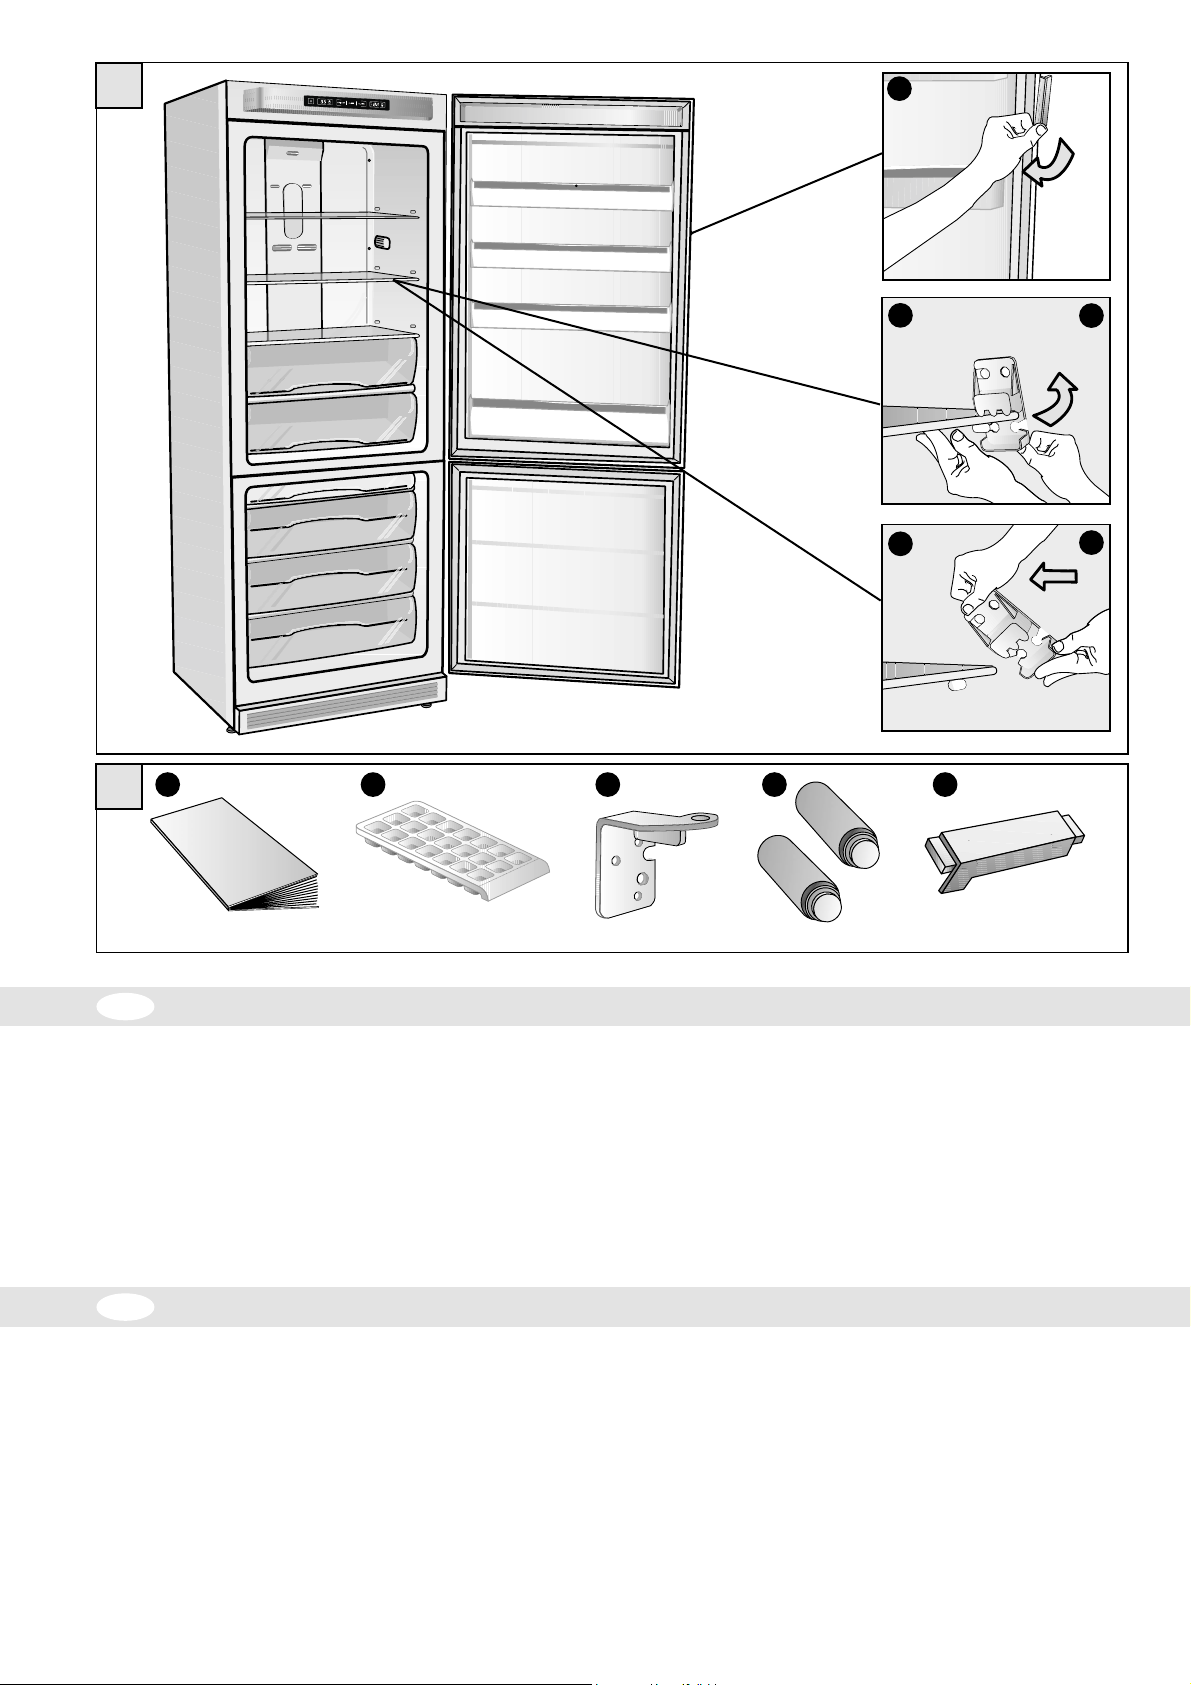
RIMOZIONE DELLE PROTEZIONI PER IL TRASPORTO
GLS38FH-13
Controllate che l’apparecchio non sia danneggiato. I danni subiti durante il trasporto
devono essere segnalati al Vostro Rivenditore entro 24 ore dal ricevimento.
1 Rimuovere la protezione dalla guarnizione della porta.
La protezione evita i possibili danni della guarnizione dovuti al trasporto.
La protezione deve essere rimossa per poter chiudere ermeticamente la porta.
Per togliere la protezione, tirare leggermente un’estremità, ruotandola verso
l’esterno.
2 Rimuovere i dispositivi di blocco dei ripiani in vetro.
Tali elementi in plastica evitano lo spostamento dei ripiani durante il trasporto.
Per rimuovere i dispositivi di blocco, procedere come segue:
2
GLS38FH-10
GLS38FH-7
GLS38FH-6
GLS38FH-5
a) Afferrare gli elementi in plastica, ruotandoli fino a disimpegnarli totalmente dal
ripiano.
b) Estrarre gli elementi tirandoli verso l’esterno.
RICAMBI IN DOTAZIONE
A Libretto istruzioni B Bacinella ghiaccio
C Cerniera (disponibile a seconda del modello) D Distanziali posteriori
E Tappo per zoccolo (disponibile a seconda del modello)
B
GB
REMOVING THE TRANSPORT PROTECTION DEVICES
Check that the appliance is undamaged.
The retailer must be informed of any damage to the appliance within 24 hours of
delivery.
1 Remove the protection from the door gasket.
The protection is used to protect the gasket during transport.
The protection must be removed in order to ensure that the door seal functions
correctly.
To remove the protection, lightly pull one end while rotating it outwards.
a) Grasp the plastic locking device and rotate it until it comes a way from the shelf.
b) Remove the locking device by pulling it outwards.
SPARE PARTS SUPPLIED
A Instruction manual B Ice tray
C Hinge (available depending on the model) D Rear spacers
E Plinth cap (available depending on the model)
2 Remove the glass shelf locking devices.
These plastic elements prevent the shelves from moving during transport.
To remove the shelf locking devices, proceed as follows:
3
Page 6
4
GO2110NFH-2
IT
NORMATIVE-AVVERTENZE E CONSIGLI IMPORTANTI
In caso di dubbio, richiedere un controllo accurato dell’impianto da parte di un tecnico
qualifi cato (legge 46/90).
L’uso di questa macchina, così come di un qualsiasi apparecchio elettrico, comporta
l’osservanza di alcune regole fondamentali:
• non toccare l’apparecchio con mani o piedi bagnati o umidi;
• non tirare il cavo di alimentazione per staccare la spina dalla presa;
• non lasciare esposto l’apparecchio agli agenti atmosferici;
• non permettere che l’apparecchio sia usato dai bambini senza sorveglianza; non staccare
o inserire la spina nella presa con le mani bagnate; - prima di effettuare qualsiasi
operazione di pulizia o di manutenzione, disinserire l’apparecchio dalla rete di
alimentazione elettrica o staccando la spina o spegnendo l’interruttore generale
dell’impianto:
• in caso di guasto o di cattivo funzionamento, spegnere l’apparecchio, e non manometterlo.
GB
This is an important safety requirement and must be complied with.
In case of doubt, have the mains supply checked by a qualified electrician.
As with any other electrical appliance, a few fundamental rules must be observed during
use:
• do not touch the appliance with wet or damp hands or feet.
• do not pull the power cable to remove the plug from its socket.
• do not expose the appliance to atmospheric agents.
• do not allow the appliance to be used by unsupervised children.
• do not plug-in or unplug the appliance using wet hands. - before carrying out any
• in the case of a fault or malfunction, switch off the appliance and do not attempt any
ST ANDARDS-WARNINGS AND RECOMMENDA TIONS
cleaning or maintenance operation, disconnect the appliance from the mains supply
by either unplugging it or switching the mains power supply off at the main switch:
Questo apparecchio è contrassegnato in conformità alla Direttiva Europea 2002/96/EC,
Waste Electrical and Electronic Equipment (WEEE).
Assicurandosi che questo prodotto sia smaltito in modo corretto, l’utente contribuisce a
prevenire le potenziali conseguenze negative per l’ambiente e la salute.
Il simbolo sul prodotto o sulla documentazione di accompagnamento indica che questo
prodotto non deve essere trattato come rifiuto domestico ma deve essere consegnato
presso l’idoneo punto di raccolta per il riciclaggio di apparecchiature elettriche ed elettroniche.
Questa apparecchiatura non è destinata all’uso da parte di persone (inclusi i bambini) con
ridotte capacità fi siche, sensoriali o mentali, oppure prive di esperienza e conoscenze,
che siano senza sorveglianza o non abbiano ricevuto istruzioni sull’uso della macchina
da parte di una persona responsabile della loro sicurezza. Sorvegliate i bambini per
assicurarvi che non giochino con l’apparecchio.
This appliance is marked as complying with European Directive 2002/96/EC, Waste
Electrical and Electronic Equipment (WEEE).
Make sure that the product is disposed of in a correct manner. The user is obliged to
contribute towards prev enting any negativ e consequences f or health and the en vironment.
The symbol affixed to the product or accompanying documents signifies that the
product must not be treated as normal domestic refuse, but must be delivered to an
authorised collection centre to enable the electric and electronic equipment to be recycled.
This appliance is not intended for use by persons (including children) with reduced
physical, sensory or mental capabilities, or lack of experience andknowledge, unless
they have been given super vision or instruction concer ning use of the appliance by a
person responsible for their safety. Children should be supervised to ensure that they
do not play with the appliance.
4
repairs.
Page 7
5
H
Model.
000000000000000000000
REFRIG.-FREEZER
KUHL-GEFRIERGERAT
REFRIGER.-CONGEL.
GROSS VOLUME
INH. BRUTTO
l ...........
..........V .... Hz
R600a
g .... /....
TYPE
.........
CLASS
KLASSE
CLASSE
..................
VOL. NET. REFRIG. / FREEZER
INH. NUTZ KUHLT. / GEFRIER.
.......
02
l .............
....... A
..... kg/24h
P
GO2110NFH-22
H 185,3 cm
D 67,7 cm
W 59,2 cm
IT
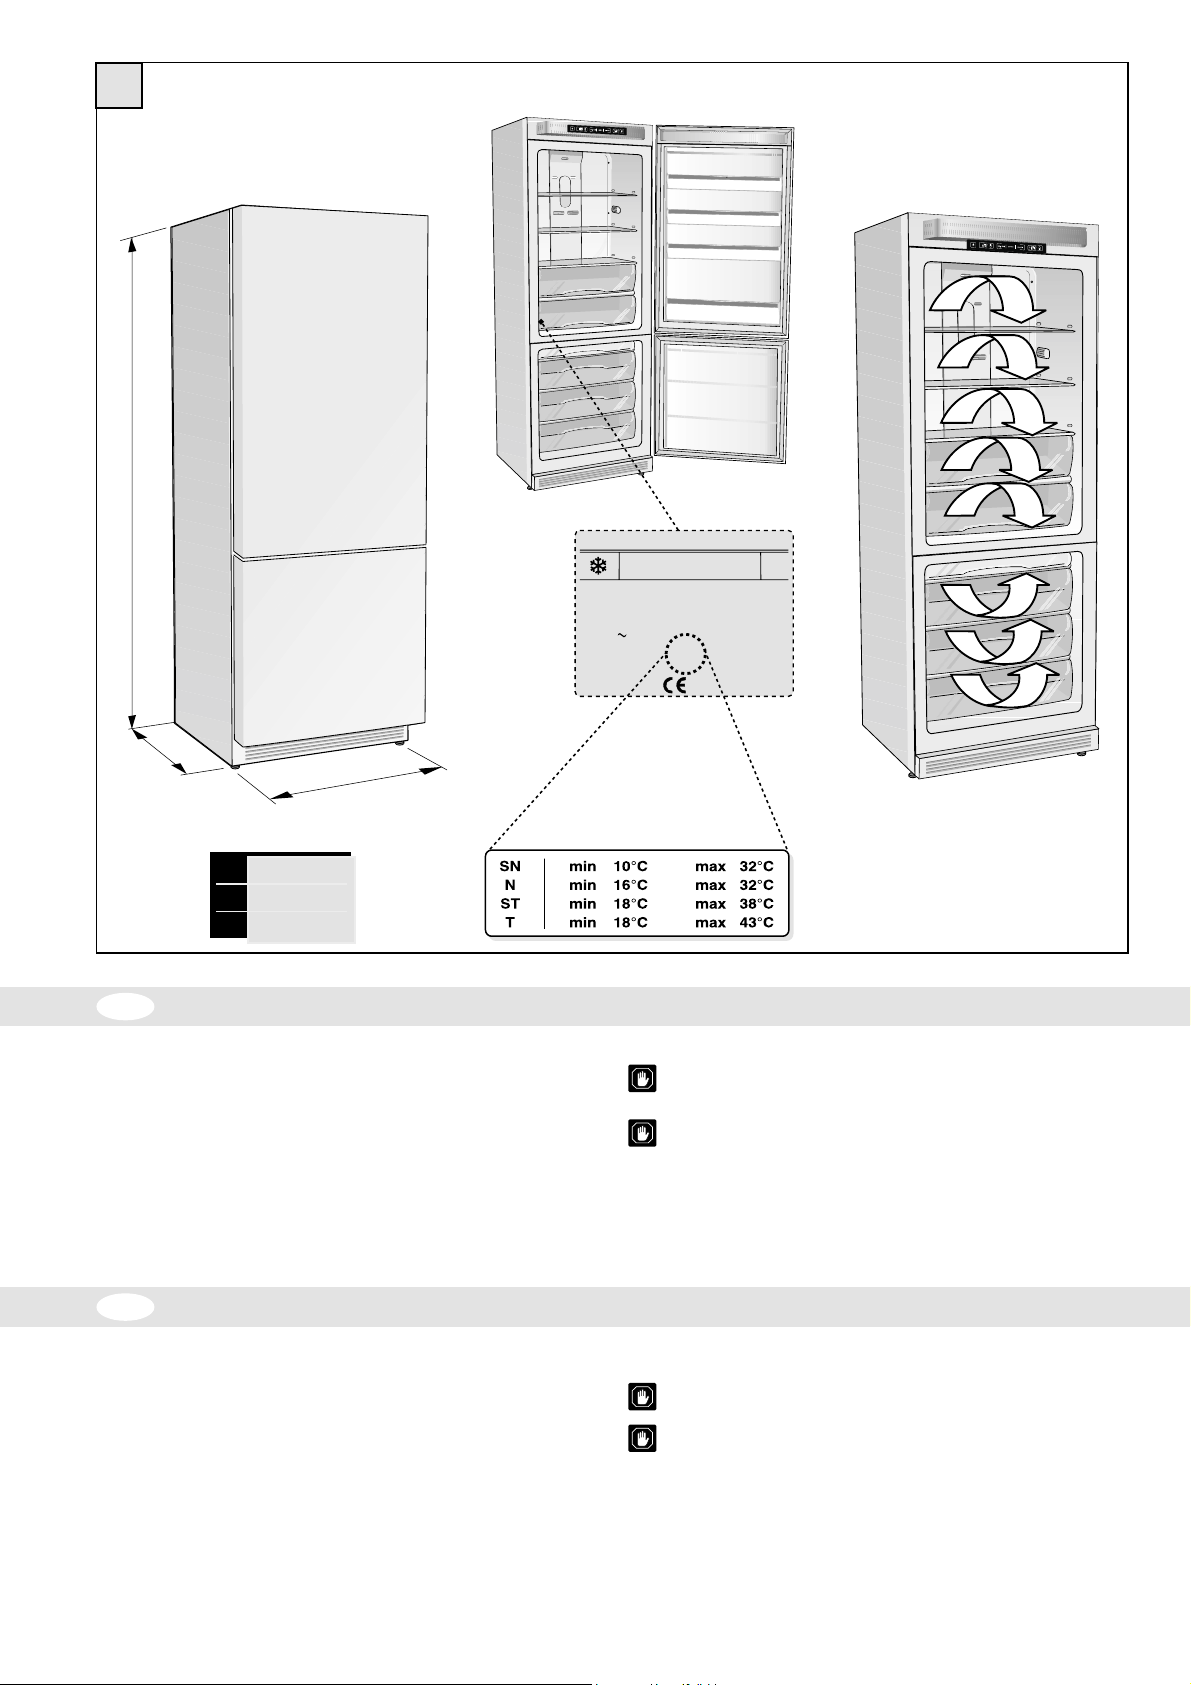
CARATTERISTICHE TECNICHE
STRUTTURA PORTANTE
Realizzata in pannelli di lamiera trattati e verniciati elettrostaticamente per resistere
ai maltrattamenti e rimanere bella e lucente nello stesso tempo.
ISOLAMENTI
Scelti per mantenere costante la temperatura interna e avere grandi spazi interni.
SPAZIO INTERNO
Studiato per poter ospitare qualsiasi forma di cibo da conservare con una facilità di
spostamento dei ripiani.
SBRINAMENTO FRIGORIFERO e CONGELATORE
Automatico
CIRCOLAZIONE ARIA: Forzata
CONTROLLO TEMPERATURA COMPARTO FRIGORIFERO: Elettronica
GB
TECHNICAL SPECIFICATIONS
L
CONTROLLO TEMPERATURA COMPARTO CONGELATORE: Elettronica
L’aria secca della ventilazione permette di raffreddare i cibi pià rapidamente;
così la tecnica NO FROST è stata applicata in modo che il freddo venga
mantenuto pià omogeneo.
A TTENZIONE! Quando installate il vostro apparecchio è importante tener
conto della classe climatica del prodotto. P er conoscere la classe c limatica
del vostro apparecchio controllate la targa dati qui riportata.
GO2110NFH-21
CARRYING STRUCTURE
Made of electrostatically treated and painted plate panels to resist heavy duty wear
and tear and keep its beautiful sine as well.
INSULATION
Selected to keep internal temperature constant and to give large internal spaces.
INTERNAL SPACE
Designed to store any kind of food with easy to move shelves.
FREEZER COMPARTMENT TEMPERATURE CONTROL:
By means of an external thermostat and rapid freezing button.
The dry ventilation air cools food more quickly; thus the NO FROST technique
has been applied to keep chilling more regular.
WARNING! When you install your appliance, it is important to bear in mind the
climatic rating of the appliance. In order to find out the climatic rating of your
appliancem check the data rating plate.
FRIDGE AND FREEZER DEFROSTING
Automatic
AIR CIRCULATION: Forced
REFRIGERATOR COMPARTMENT TEMPERATURE CONTROL:
With the external thermostat.
5
Page 8
6
GLS38FH-2
IT
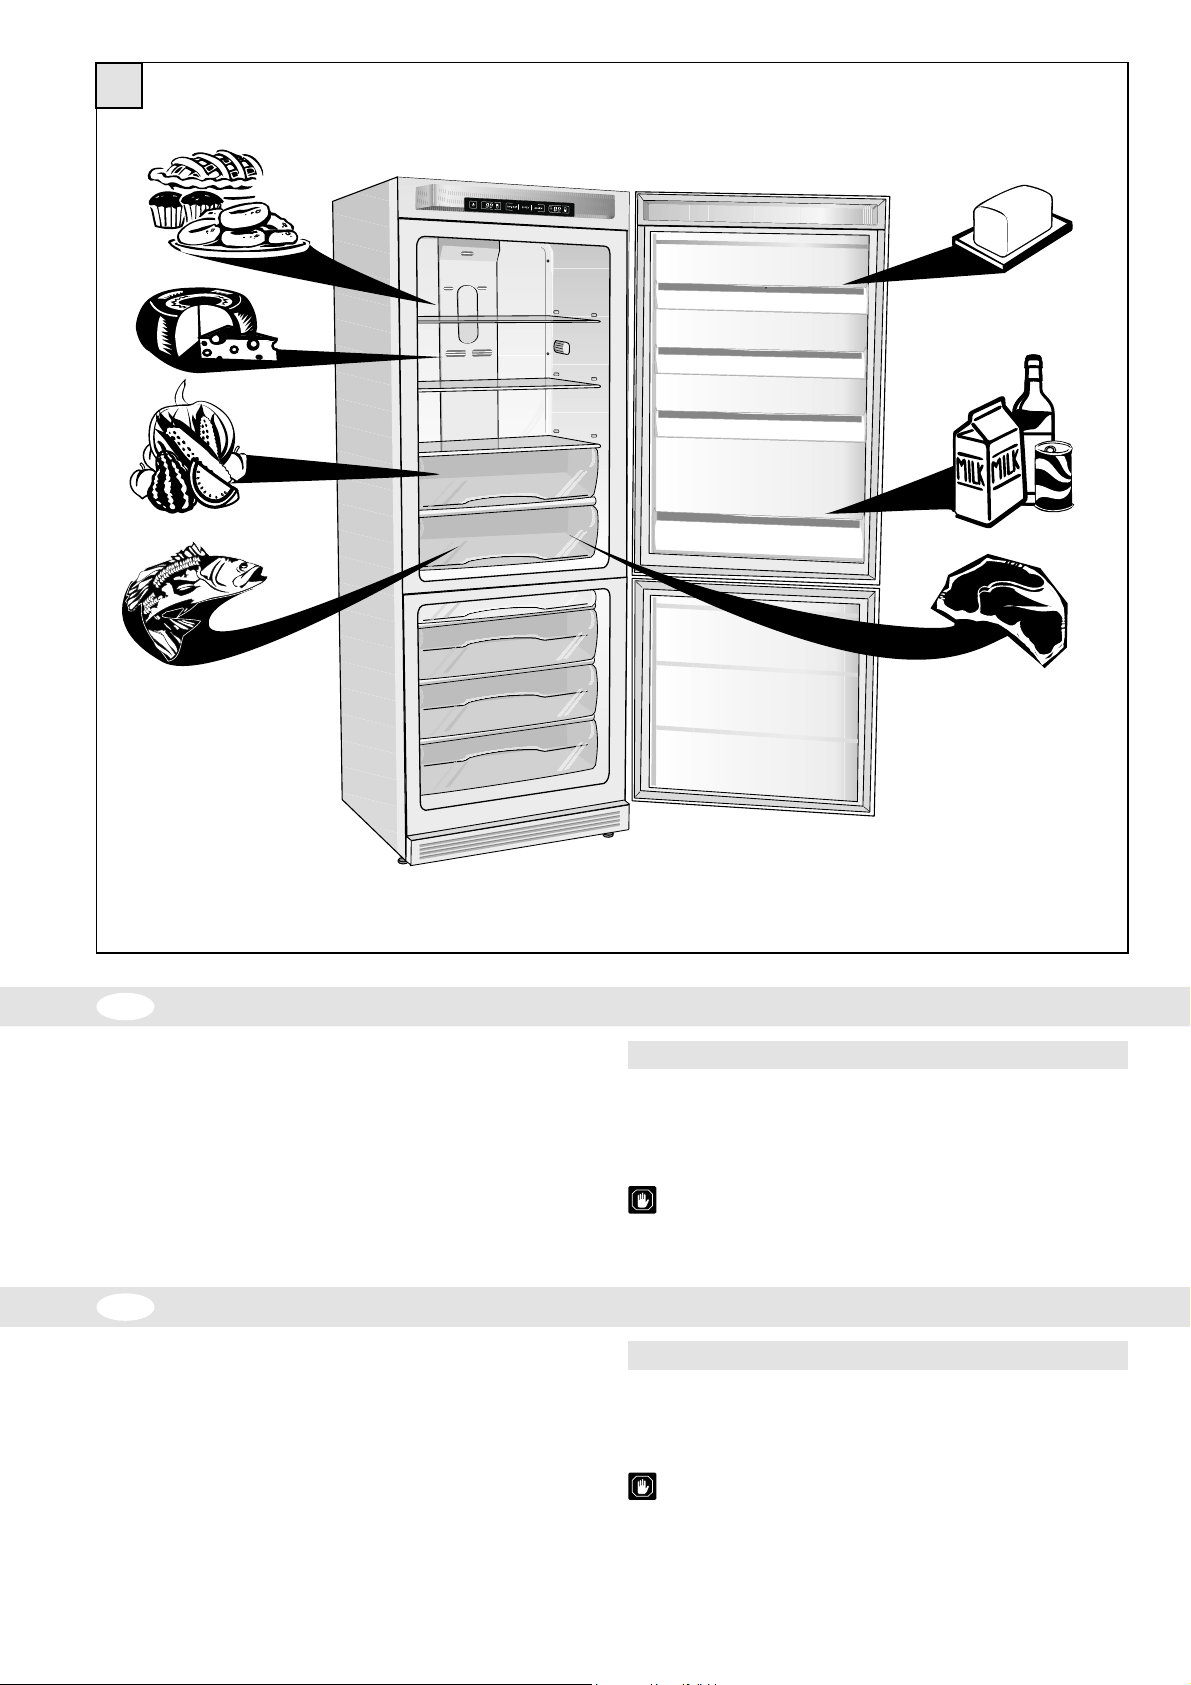
COME CONSERVARE GLI ALIMENTI NEL COMPARTO FRIGORIFERO
Riponete gli alimenti come illustrato nella figura.
VANO SPECIALE PER LA CONSERVAZIONE DI CARNI E PESCE:
Alcuni alimenti delicati quali carne, pesce e alimenti leggermente congelati possono
essere riposti nel cassetto apposito, nel quale la temperatura ha un mantenimento
costante attorno a 0° C.
GB
Place the food as shown in the diagram.
SPECIAL COMPARTMENT FOR THE PRESERVATION OF MEAT AND FISH:
Some delicate food stuffs like meat, fish, and lightly frozen groceries can be placed
in a special box, in which the temperature is kept constant at 0° C.
HOW TO STORE FOOD IN THE REFRIGERATOR COMPARTMENT
NOTE:
• La distanza fra i ripiani e la parete posteriore interna del frigorifero assicura la
libera circolazione dell’aria.
• Non disponete gli alimenti a diretto contatto con la parete posteriore del comparto
frigorifero.
• Non ponete gli alimenti ancora caldi nei comparti.
• Conservare i liquidi in contenitori chiusi
Il sistema NO-FROST garantisce una temperatura costante e una capacità
di raffreddamento più rapida. La circolazione forzata di aria esente da
umidità tende ad asciugare rapidamente i cibi, per questo raccomandiamo
di proteggerli in contenitori sigillati.
NOTE:
• The distance between the shelves and the rear internal wall of the refrigerator
ensures that air circulates freely.
• Do not place food in direct contact with the rear wall of the refrigerator compartment.
• Do not place food that is still warm into the compartments.
• Keep all liquids in closed containers.
The NO-FROST system guarantees a constant emperature and a more
rapid freezing capacity.
The humidity-free, forced air circulation tends to dry food up quickly and
for this reason we advise keeping all food in closed containers.
6
Page 9
7
GLS38FH-12
GLS38FH-3
Gli alimenti da surgelare devono essere preparati in
piccole porzioni: 1kg max.
1 kg MAX
IT
USO DELLO SCOMPARTO CONGELATORE
Quando acquistate alimenti surgelati tenete sempre presenti i seguenti fattori:
• L’imballo o il pacchetto devono essere intatti, poichè l’alimento può deteriorarsi.
Se un pacchetto è gonfio o presenta delle macchie di umido, non è stato conservato
nelle condizioni ottimali e può aver subito un inizio di scongelamento.
• Acquistate gli alimenti surgelati per ultimi e usare borse termiche per il trasporto.
• Appena a casa riponete immediatamente gli alimenti surgelati nel comparto congelatore.
• Evitate o riducete al minimo le variazioni di temperatura.
• Rispettate la data di scadenza riportata sulla confezione dei surgelati.
• Seguite sempre le istruzioni sull’imballo per la conservazione degli alimenti congelati.
• La quantità massima degli alimenti freschi che si possono congelare in kg/24h, è
riportata sulla targhetta delle caratteristiche tecniche.
• Evitate di mettere cibi da congelare a contatto di quelli già congelati, onde evitare
un innalzamento di temperatura di quest’ultimi.
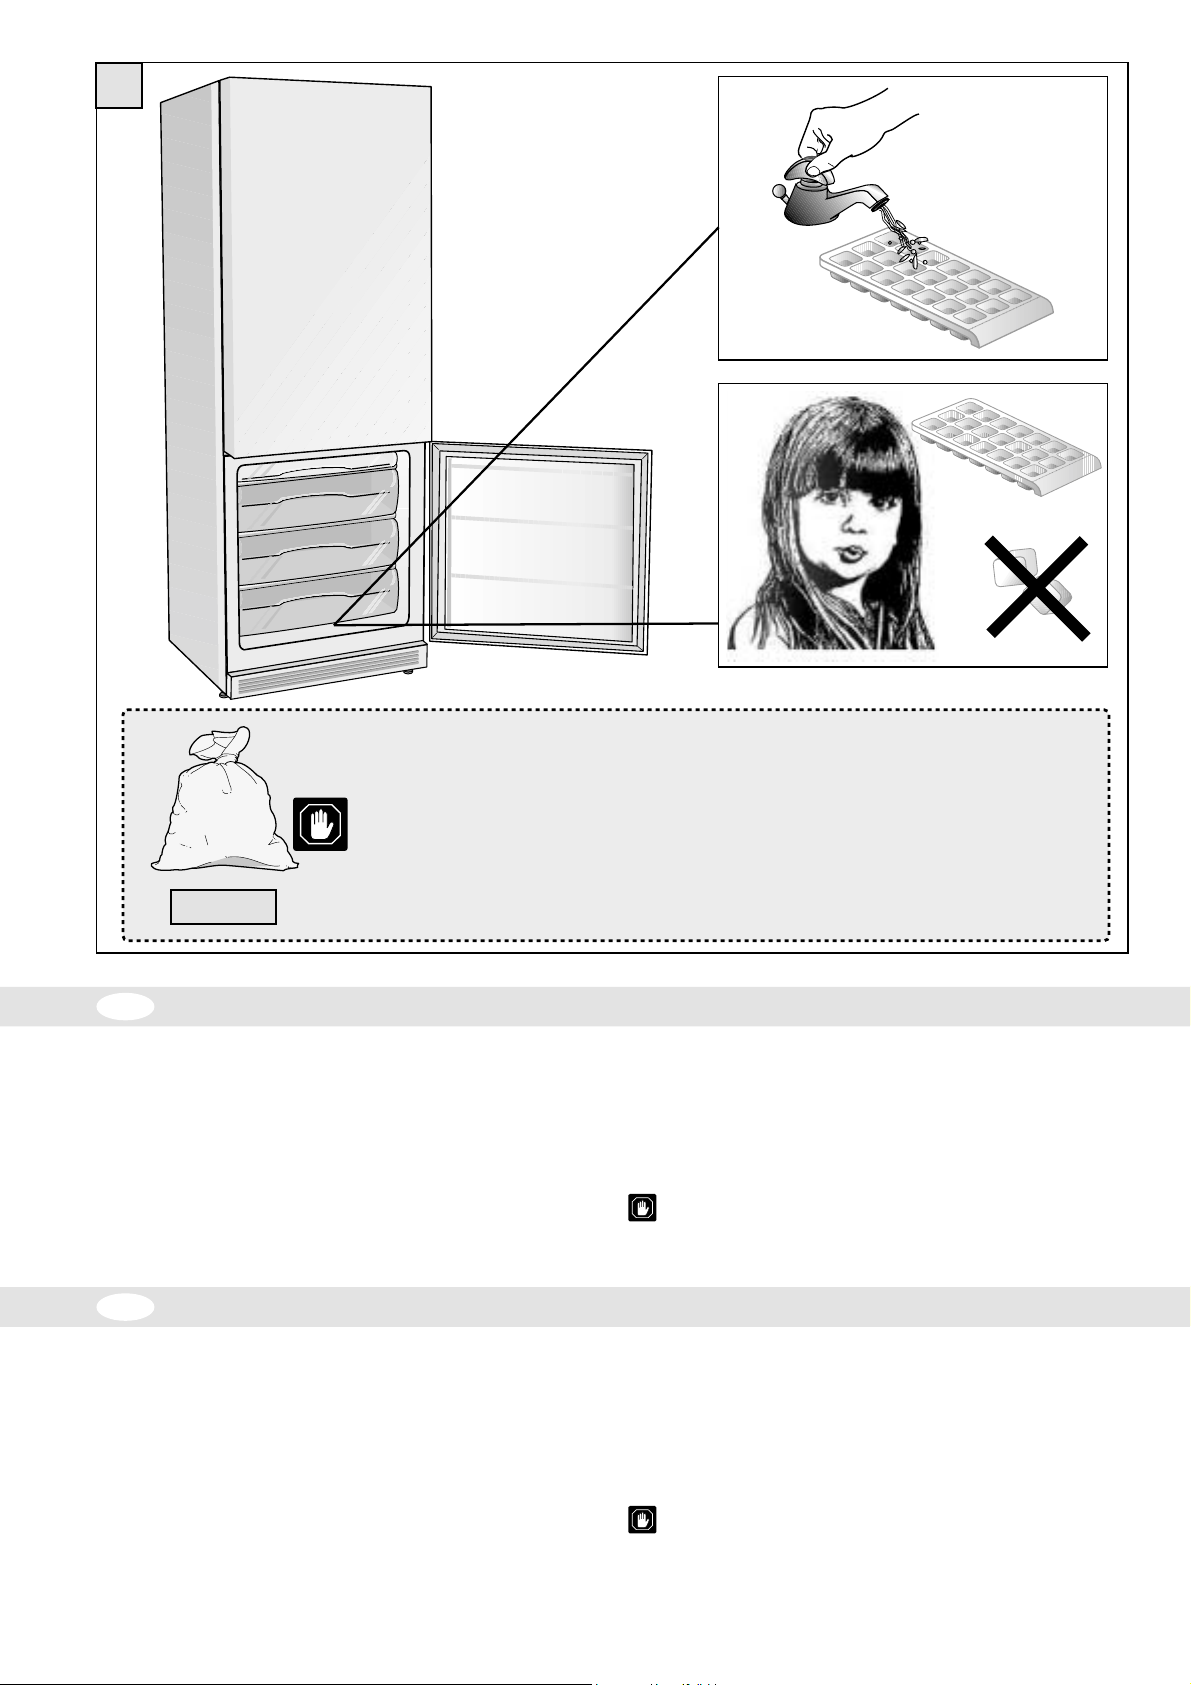
Produzione cubetti di ghiaccio
• Riempite la bacinella del ghiaccio per 3/4 di acqua, riponetela nel vano congelatore
e nell’apposito cassetto scorrevole (se in dotazione).
Sbrinamento
• Lo sbrinamento del frigo-congelatore è automatico pertanto non richiede alcun
intervento.
Non ricongelate gli alimenti parzialmente scongelati, ma consumateli
entro 24 ore
GLS38FH-13
The food that has to be frozen should be prepared
in small portions: max. 1 kg
GB
When you purchase frozen food always bear in mind the following factors:
• The packaging or packet must be intact, otherwise the food may spoil.
If a packet is swollen or shows damp marks, it has not been stored in optimum
conditions and may have started to thaw.
• Purchase frozen food goods last and transport them in an insulated box.
• As soon as you arrive home, place the frozen goods immediately in the freezer
compartment.
• Avoid or reduce variations in temperature to a minimum.
• Keep to the expiry date shown on the frozen food package.
• Always follow the instructions on the packaging on how to preserve the frozen foods.
• The maximum amount of fresh food that can be frozen is shown in kg/24h on the
rating plate with the technical specifications.
USING THE FREEZER COMPARTMENT
• Avoid placing food that has to be frozen in contact with food that has already been
frozen so that the latter does not under go a rise in temperature.
Production of ice cubes
• Fill the ice container three quarters full with water; place it on the appropriate sliding
shelf in the freezer compartment (if available).
Defrosting
• The fridge-freezer defrosts automatically and therefore there is no need for
anything to be done to it.
Never re-freeze partially thawed food and consume it within 24 hours.
7
Page 10
8 9 10
GLS38FH-12 GO2110NFH-16 GO2110NFH-4
I
K
11 12
GO2110NFH-5 GO2110NFH-17
13
GO2110NFH-14
14 15 16
GLS38FH-16 GLS38FH-17 GLS38FH-18
Z
S
IT
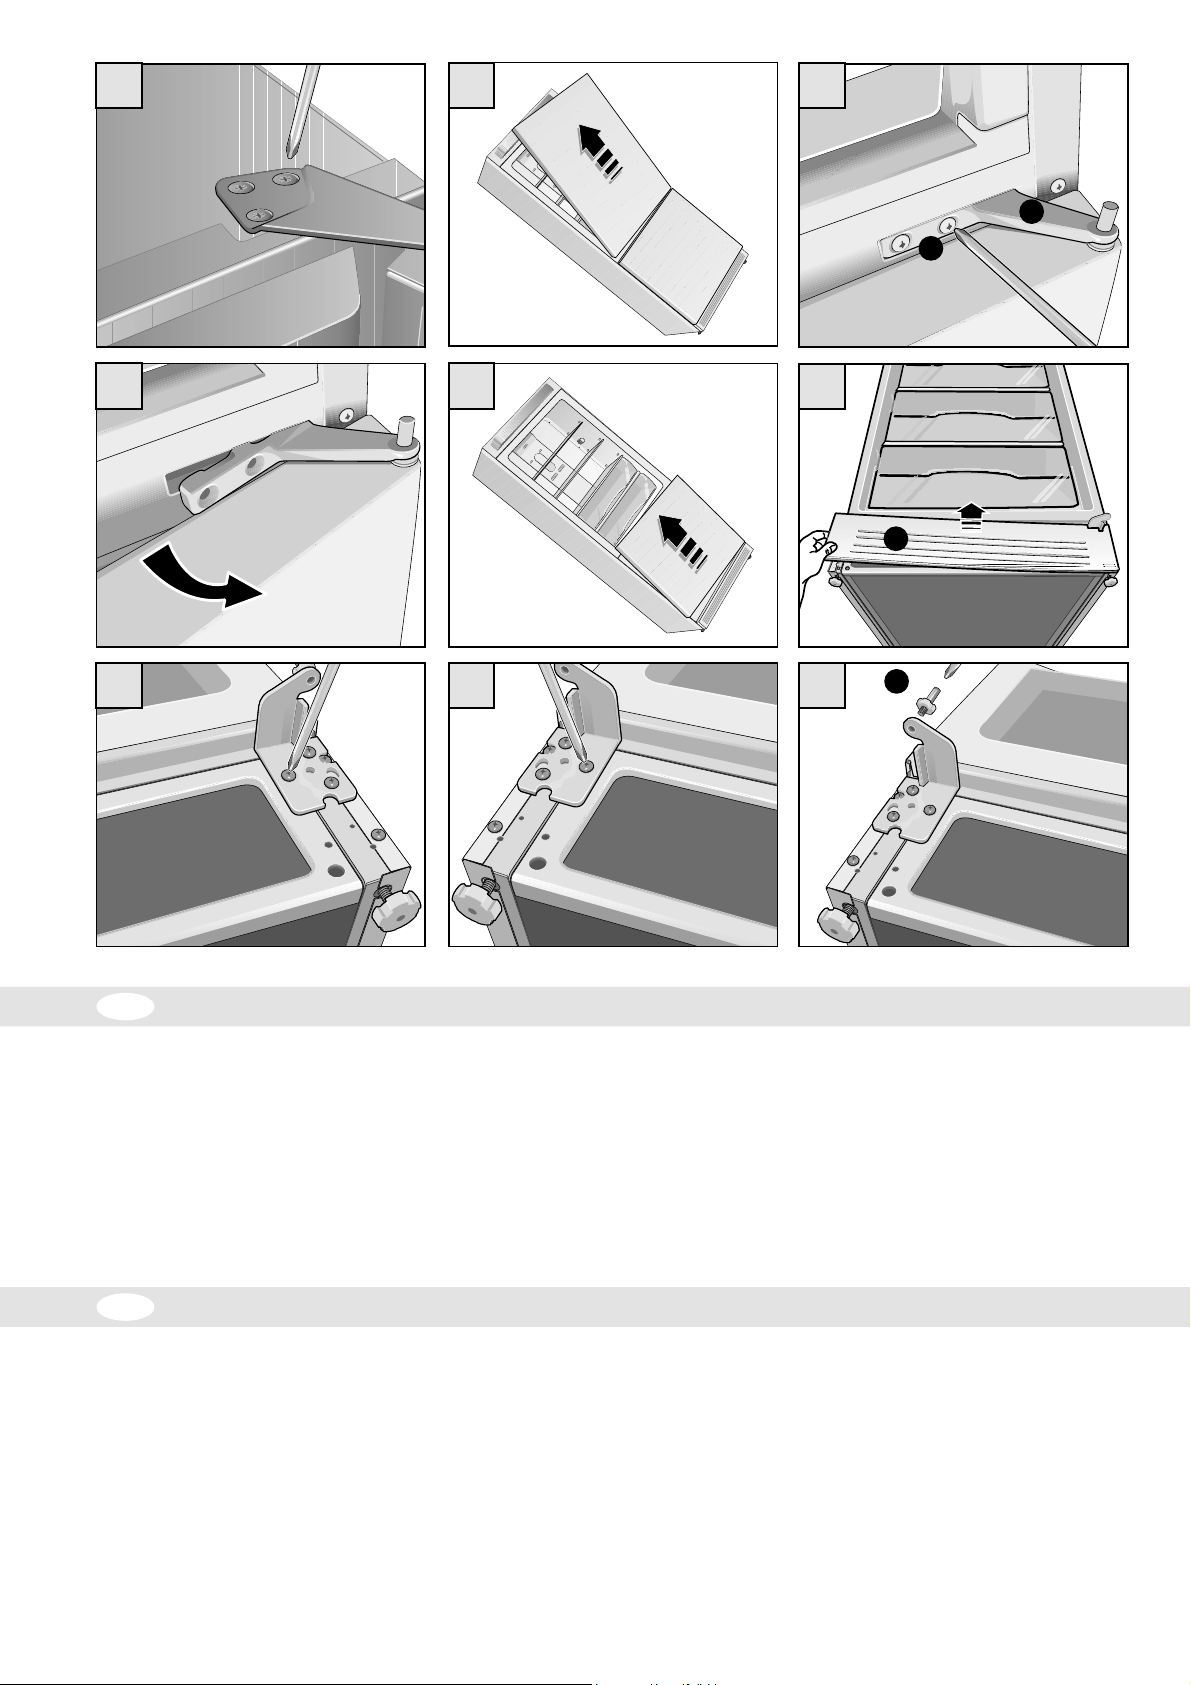
INVERSIONE APERTURA PORTA (solo modelli con maniglia orizzontale)
Tutti i modelli sono predisposti per l’inversione dell’apertura della porta, per un più
coordinato allineamento con l’arredo cucina.
Per effettuare l’inversione della porta procedete nel seguente modo:
- L’operazione d’inversione dell’apertura della por ta va eseguita sempre ad
apparecchio coricato.
-L’apparecchio che è stato coricato non deve essere messo subito in funzione.
Consigliamo di attendere almeno due ore prima di mettere in funzione
l’apparecchio, per dar modo al circuito refrigerante di essere perfettamente
efficiente.
GB
All models are designed so that the door opening direction can be reversed, for
improved integration into the layout of every kitchen.
To reverse the door, proceed as follows:
- The door reversal procedure should always be performed when the appliance
- Any appliance which has recently been laid horizontally should not be operated
We recommend you wait at least tw o hours before switching the appliance on,
so that the cooling circuit has time to recover and achieve its most efficient
level of operation.
REVERSING THE DOOR OPENING (only models with horizontal handle)
is laid horizontally.
immediately.
Svitare le 3 viti della cerniera superiore (Fig. 8).
Sfilare la porta superiore nel senso indicato dalla freccia (Fig. 9).
Svitare le viti K che tengono fissata la cerniera intermedia I (Fig. 10).
Estrarre la cerniera intermedia aprendo la porta inferiore come indicato dalla
freccia (Fig. 11).
Sfilare la porta inferiore nel senso indicato dalla freccia (Fig. 12).
Togliere la mascherina inferiore Z tirando con vigore (Fig. 13).
Svitare la cerniera inferiore e riavvitare sul lato sinistro quella in dotazione
(Fig. 14 - 15).
Riavvitare il perno S (Fig. 16).
Loosen the 3 screws on the upper hinge (Fig. 8).
Slide out the upper door in the direction indicated by the arrow (Fig. 9).
Remove screws K which hold the middle hinge I in place (Fig. 10).
Open the upper door in order to remove the middle hinge in the direction of
the arrow (Fig. 11).
Slide out the lower door in the direction indicated by the arrow (Fig. 12).
Remove the lower cover Z by pulling sharply (Fig. 13).
Unscrew the lower hinge and screw the other hinge supplied onto the lefthand side (Fig. 14 - 15).
Screw in the pin S (Fig. 16).
8
Page 11
17 18
Y X
Z
GLS38FH-19 GO2110NFH-15GLS38FH-19a
19 20 21
Z
I
K
GO2110NFH-18
GO2110NFH-6 GO2110NFH-7
22 23 24
GLS38FH-13 GLS38FH-22GLS38FH-20
IT
INVERSIONE APERTURA PORTA (solo modelli con maniglia orizzontale)
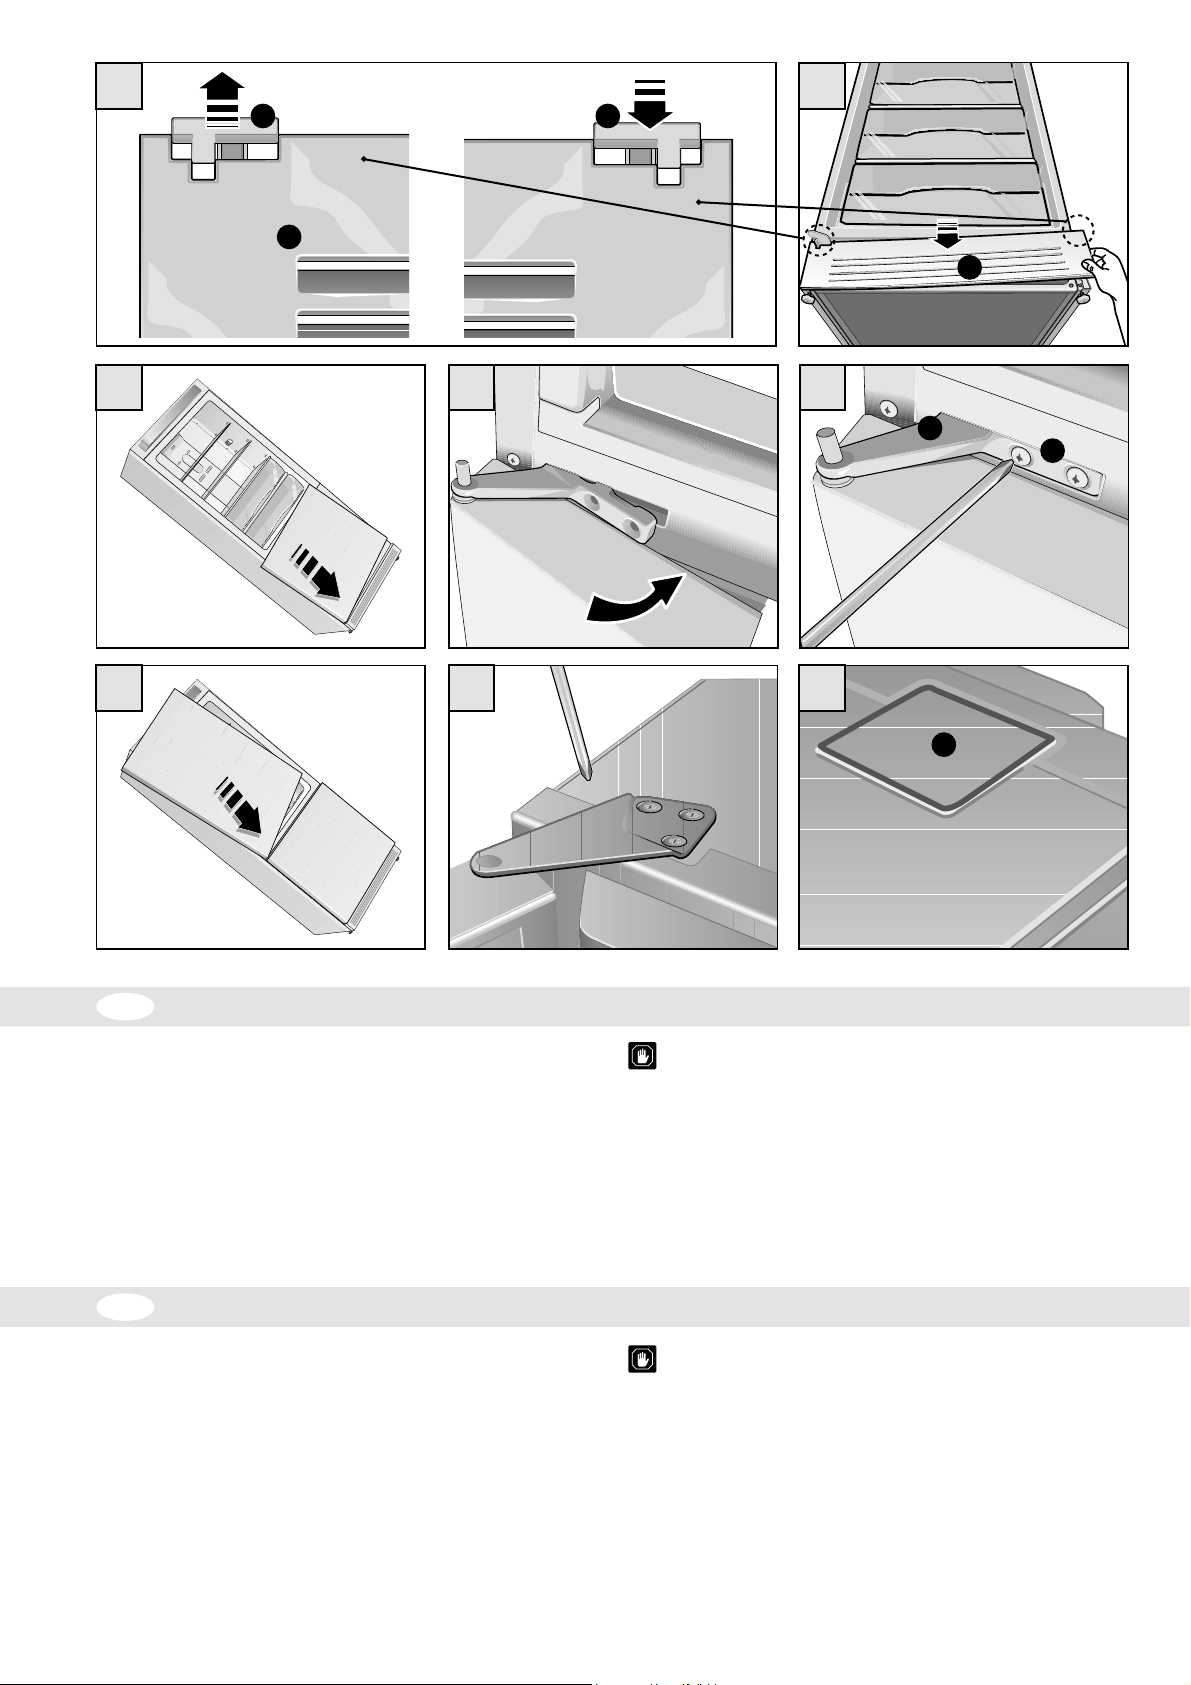
Sfilare il piastrino sinistro Y dalla mascherina inferiore Z. Inserire il piastrino
destro X in dotazione (Fig. 17).
Rimontare la mascherina Z facendo pressione (Fig. 18).
Infilare la porta inferiore nel senso indicato dalla freccia (Fig. 19).
Rimontare la cerniera intermedia sul lato sinistro come indicato dalla freccia
(Fig. 20).
Riavvitare le viti K che tengono fissata la cerniera intermedia I (Fig. 21).
Infilare la porta superiore nel senso indicato dalla freccia (Fig. 22).
Rimontare la cerniera superiore sul lato sinistro (Fig. 23).
Una volta tolta la cerniera superiore ricoprire i fori con l’apposito coprifori F
(Fig. 24).
L’apparecchio è dotato di ruote posteriori per consentire un facile
spostamento.
Non installate l’apparecchio vicino ad una sorgente di calore.
Posizionatelo in un luogo asciutto e ben ventilato.
Per un corretto funzionamento e per evitare formazioni di condensa
all’esterno dell’apparecchio, lasciate libere uno spazio di almeno 5 cm
nella parte superiore e 3 lateralmente.
F
GB
Remove the left-hand plate Y on the lower cover Z. Fit the left-hand plate X
supplied (Fig. 17).
Replace the cover Z by pressing down on it (Fig. 18).
Slide in the lower door in the direction indicated by the arrow (Fig. 19).
Replace the middle hinge on the left-hand side in the direction indicated by
the arrow (Fig. 20).
Re-tighten the screws K which hold the middle hinge I in place (Fig. 21).
Slide in the upper door in the direction indicated by the arrow (Fig. 22).
Replace the upper hinge on the left-hand side (Fig. 23).
After removing the upper hinge, cover the holes with the corresponding cover
plate F (Fig. 24).
REVERSING THE DOOR OPENING (only models with horizontal handle)
The appliance is equipped with rear wheels so that it may be moved easly.
Do not install the appliance near a source of heat.
Put it in a dry, well ventilated place.
To ensure correct running and to avoid the formation of condensate on
the outer surface of the appliancem leave a space of at least 5 cm at the
top and 3 cm at the side.
9
Page 12
25a
25b
26
T
B
V
GO2110NFH-25
27
B
A
GLS38FH-25
IT
REVERSIBLITA’ MANIGLIA
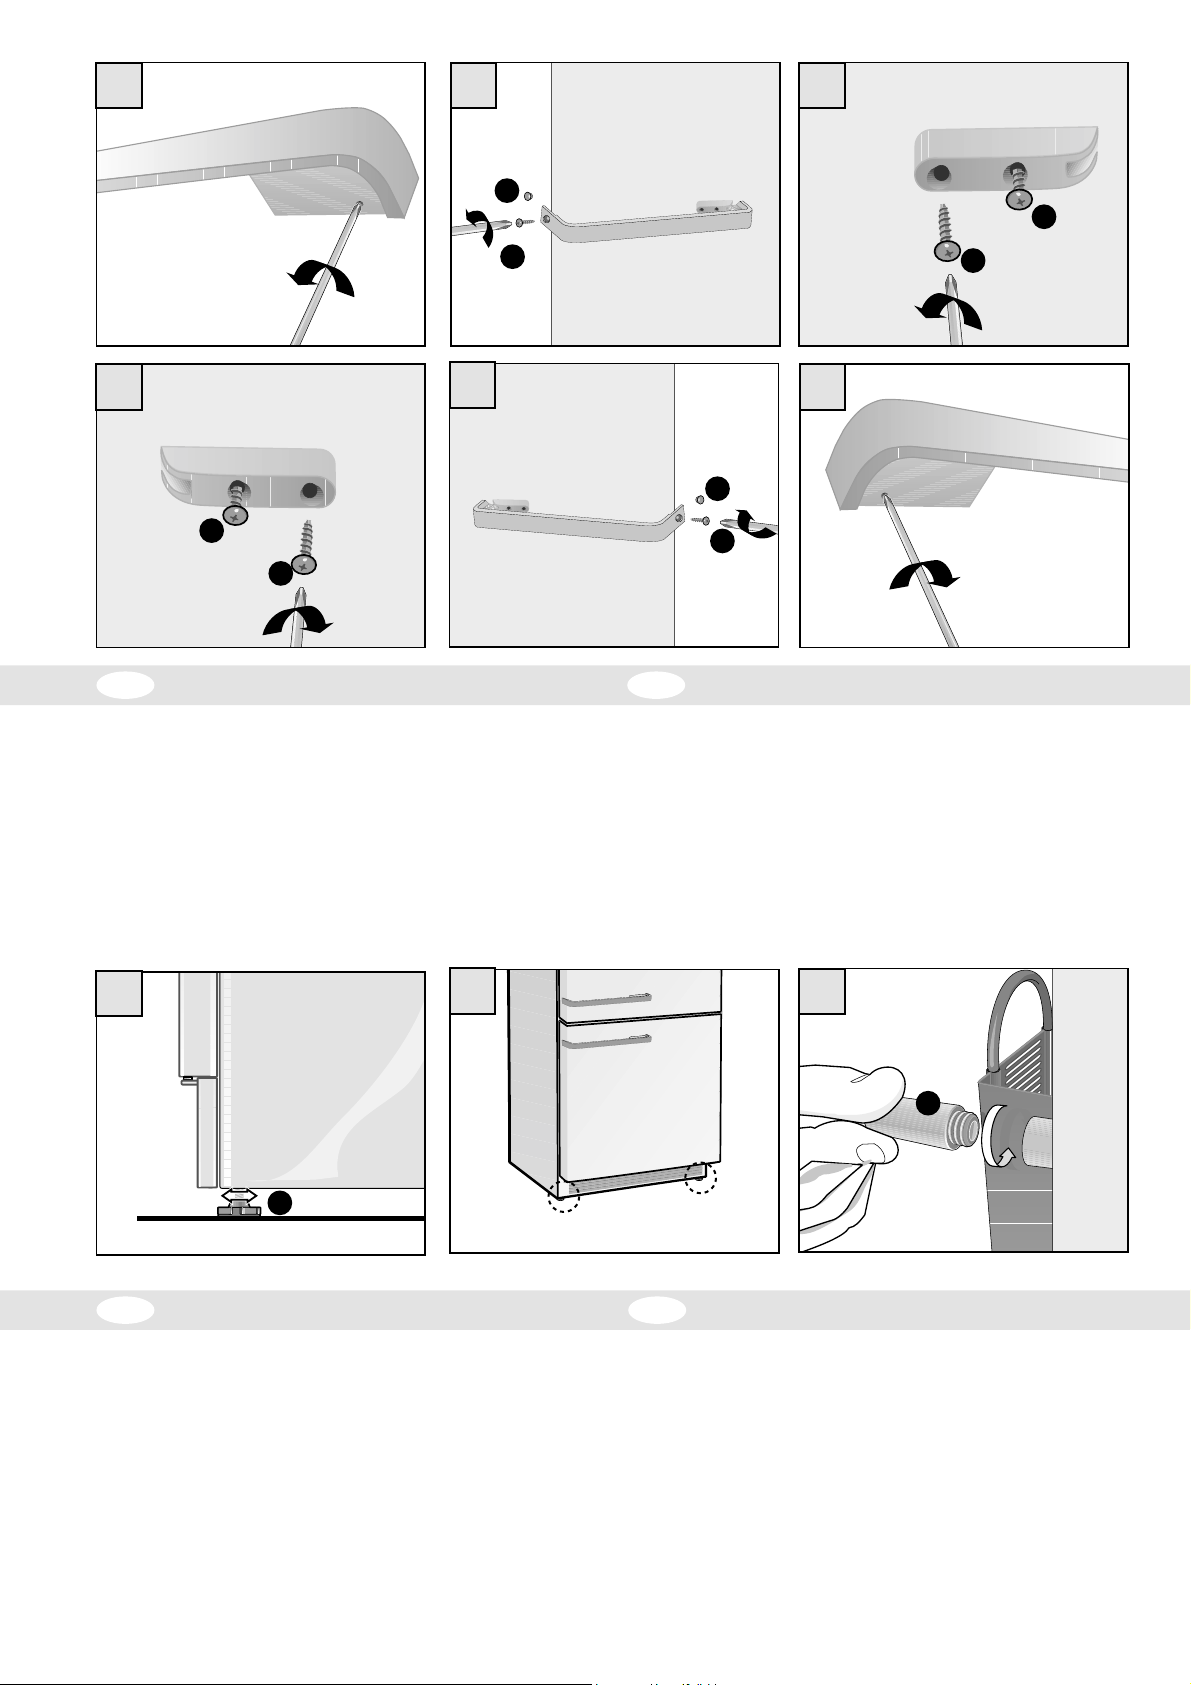
Rimuovere la vite sulla parte inferiore del supporto maniglia (Fig. 25a).
Rimuovere il tappo (T) coprivite (Fig. 25b). Svitare la vite V che tiene fissata la
maniglia alla porta e sfilarla. Coprire il foro con il tappetto recuperato dal lato
opposto.
Svitare completamente la vite A e leggermente la vite B. Ruotare tutto di 180°
(Fig. 26).
Riavvitare le viti A e B (Fig. 27).
Riinfilare la maniglia, avvitare la vite C nell’apposita sede, avvitare la vite di
fissaggio inferiore del supporto maniglia (Fig. 28a) e rimontare il tappo coprivite
(T) (Fig. 28).
GLS38FH-23
28
GLS38FH-26
A
GLS38FH-24
28a
T
C
GO2110NFH-26
GB
Remove the fixing screw at the lower side of the handle support (Fig. 25a).
Loosen the screw V fixing the handle against the door and remove it. Cover the
hole using the plug taken from the other side. Remove the screw cap (Fig. 25b).
Loosen the screw A completely and the screw B slightly. Rotate the entire part
by 180° (Fig. 26).
Re-tighten the screws A and B (Fig. 27).
Slide on the handle again, introduce the screw C into the relevant hole, screw
the fixing screw at the lower side of the handle support (Fig. 28a) and mount
the screw cap (T) (Fig. 28).
REVERSIBILITY HANDLE
29
P
GLS38FH-27
IT GB
POSIZIONAMENTO E MESSA IN OPERA
30
GO2110NFH-1
LIVELLAMENTO
Accertatevi che l’apparecchio sia livellato.
- Regolare i piedini P anteriori se necessario (Fig. 29-30).
MONTAGGIO DISTANZIATORI
La distanza dal muro deve essere di almeno 4-5 cm per garantire un sufficiente
ricircolo di aria.
- Montate i due distanziatori D (in dotazione) sul retro dell’apparecchio come
mostrato in figura 31.
ATTENZIONE! Mantenere libere da ostruzioni le aperture di ventilazione
nell’involucro dell’apparecchio o nella struttura da incasso.
10
31
D
GO2110NFH-8
POSITIONING AND INSTALLING THE APPLIANCE
LEVELLING THE APPLIANCE
Make sure that the appliance is level.
- Adjust the front feet P if necessary (Fig. 29-30).
ASSEMBLY OF SPACERS
The distance from the wall must be at least 4-5 cm to guarantee sufficient air
circulation.
- Attach the two spacers D (see accessories) to the back of the appliance,
as shown in figure 31.
WARNING! Keep ventilation openings, in the appliance enclosure or in the
built-in structure, clear of obstruction.
Page 13
32
33b
32a
GLS38FH-30
15
13
4
2
9
10
5
Model.
000000000000000000000
REFRIG.-FREEZER
KUHL-GEFRIERGERAT
REFRIGER.-CONGEL.
GROSS VOLUME
INH. BRUTTO
l ...........
VOLUME BRUT
..........V .... Hz
R600a
g .... /....
TYPE
.........
CLASS
KLASSE
CLASSE
111
..................
VOL. NET. REFRIG. / FREEZER
INH. NUTZ KUHLT. / GEFRIER.
NET VOLUME REFRIG. / CONGEL.
....... A
.......
7
14
02
l .............
..... kg/24h
12
3
8
6
IT
COLLEGAMENTO ELETTRICO
• I collegamenti elettrici devono essere conformi alle normative di sicurezza elettrica.
• Controllate che il voltaggio sulla targhetta matricola corrisponda alla tensione della
vostra abitazione.
• La messa a terra dell’apparecchio è obbligatoria a termini di legge. Il fabbricante
declina ogni responsabilità per eventuali danni subiti da persone, animali o cose,
derivanti dalla mancata osservanza di queste norme.
• Se la spina e la presa non sono dello stesso tipo, fate sostituire la spina da un
tecnico qualificato.
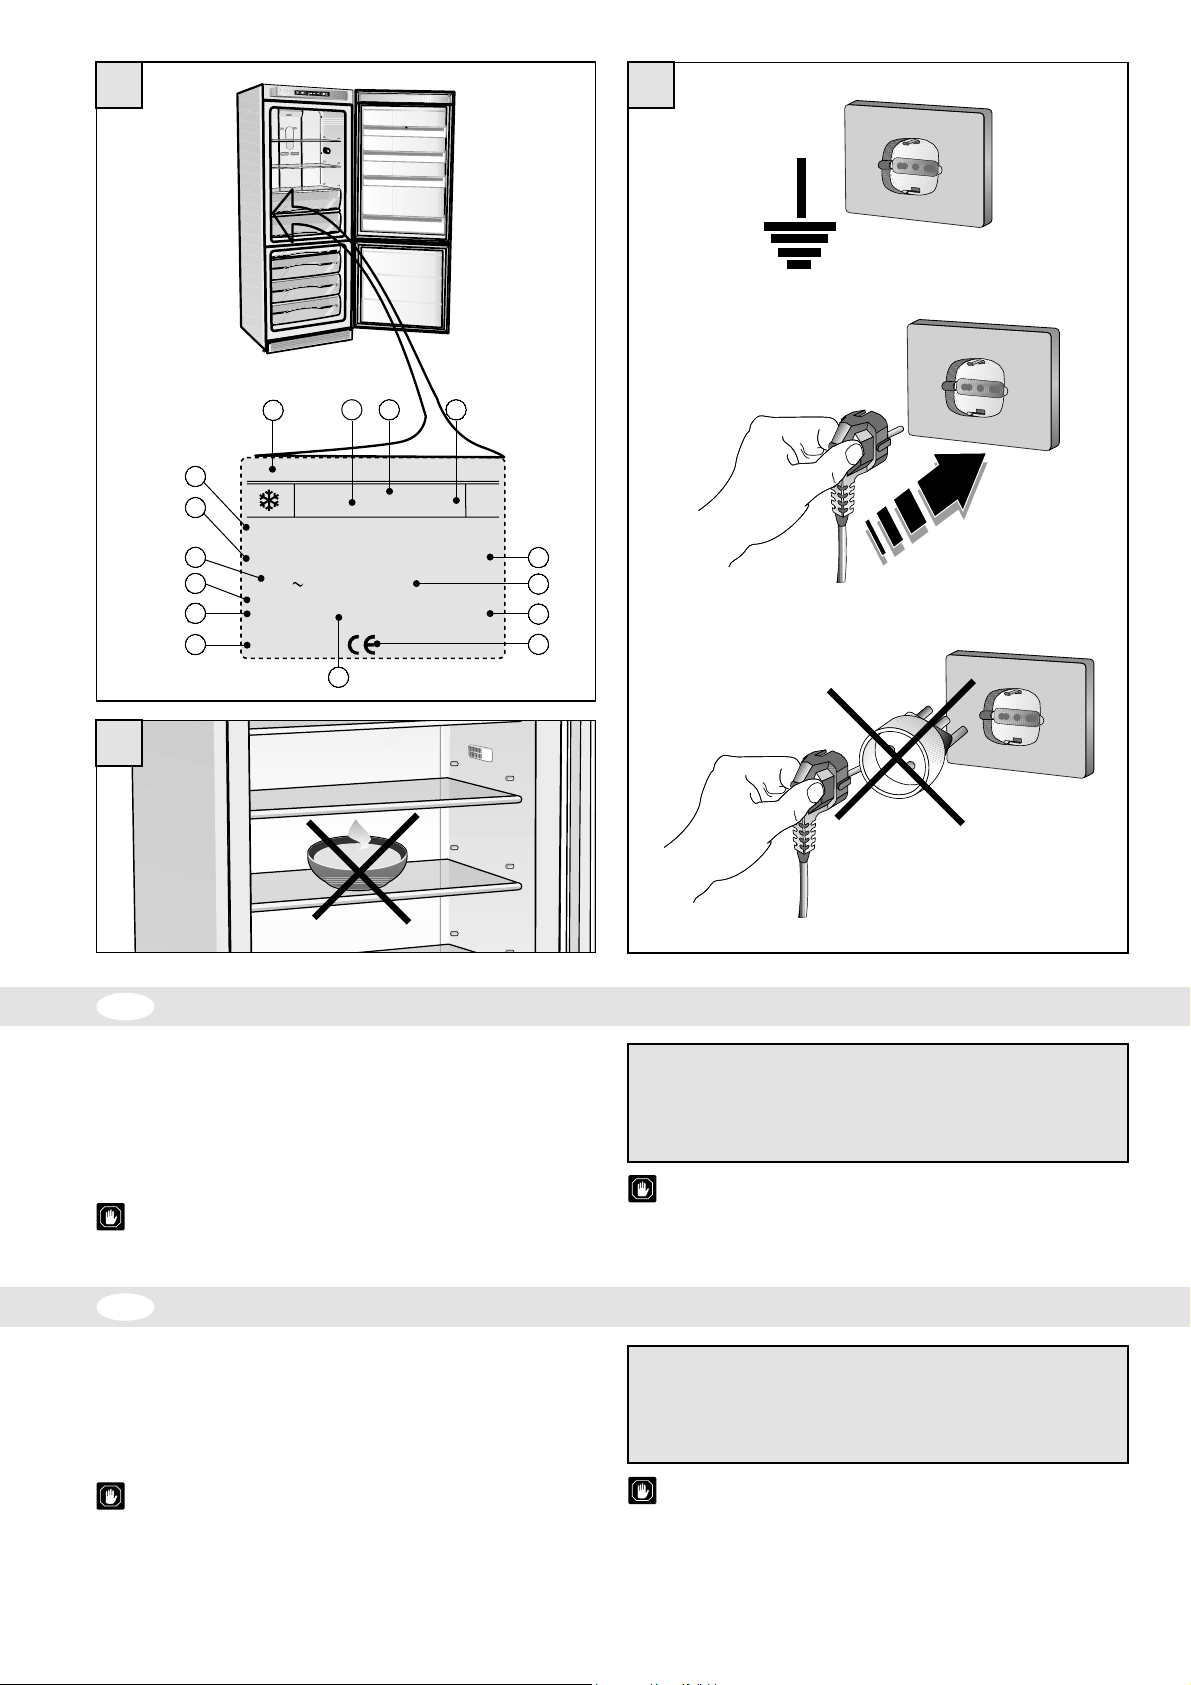
• Non introdurre cibi ancora caldi all’interno del prodotto (Fig. 32a).
Non usate adattatori, prese multiple o prolunghe (Fig. 33b).
GB
• The electrical wiring must comply with the norms on electrical safety.
• Check that the voltage on the rating plate corresponds to the v oltage in y our home.
• The appliance must have an earth according to the laws in force . The manufacturer
• If the plug and the socket are not of the same kind, ask a qualified technician to
ELECTRICAL CONNECTION
declines all responsibility for any damage to persons, animals or things as a result
of failure to comply with these norms.
change theh plug.
1 MODELLO
2 TENSIONE DI ALIMENTAZIONE
E FREQUENZA
3 ASSORBIMENTO MASSIMO
4 CAPACITA’ LORDA TOTALE
5 NUMERO DI TIPO
6 MARCHIO DI CONFORMITA’ CE
7 CLASSE CLIMATICA
A TTENZIONE! Se si spegne e si riaccende subito l’apparecchiatura,
il compressore si mette in funzione dopo circa 10 minuti. Questo
rientra nel normale funzionamento dell’apparecchiatura.
1 MODEL
2 SUPPLY VOL TAGE
AND FREQUENCY
3 MAXIMUM ABSORPTION
4 TOTAL GROSS VOLUME
5 TYPE NUMBER
6 EEC CONFORMITY CHECKMARK
CLIMATE CATEGORY
7
• Do not store warm food inside the appliance (Fig. 32a).
Do not use adaptors, multiple sockets or extensions (Fig. 33b).
WARNING! If the appliance is switched off and then immediately
switched on again, the compressor activates after about 10 minutes.
This is a normal operating procedure for the appliance.
8 CAPACITA’ DI CONGELAMENTO
9 TIPO DI REFRIGERANTE
10 QUANTITA’ REFRIGERANTE
11 NUMERO DI MATRICOLA
12 CAPACITA’ UTILE TOTALE
13 TIPOLOGIA PRODOTTO
14 ANNI DI GARANZIA
15 MARCHIO COMMERCIALE
8 FREEZER CAPACITY
9 TYPE OF REFRIGERANT
10 QUANTITY OF REFRIGERANT
11 MATRICULATION NUMBER
12 TOTAL NET CAPACITY
13 PRODUCT TYPE
14 YEARS OF GUARANTEE
15 COMMERCIAL BRAND
11
Page 14
IT
MESSA IN FUNZIONE
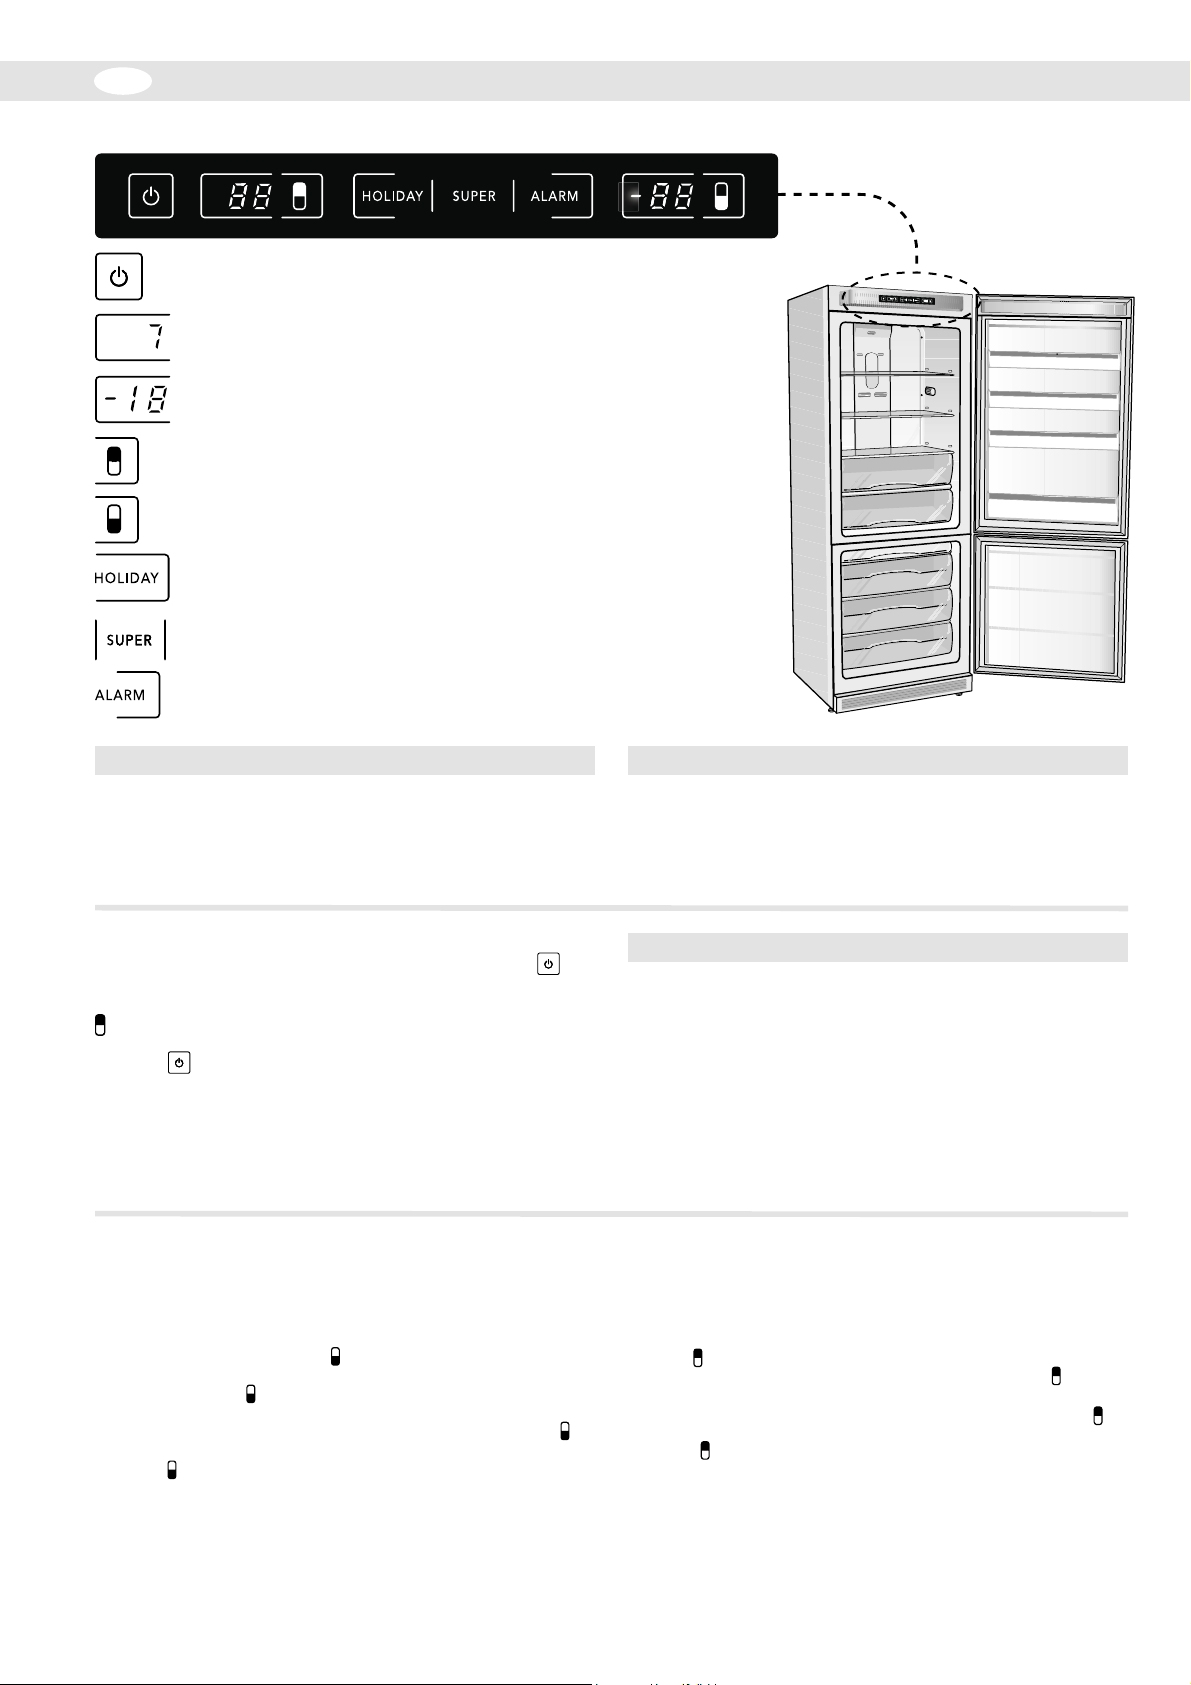
ON / OFF
DISPLAY FRIGO
DISPLAY FREEZER
PULSANTE DI ACCENSIONE/SPEGNIMENTO DEL COMPARTO FRIGO
REGOLAZIONE TEMPERA TURA FRIGO
ALLARME PORTA FRIGO APERTA - (DISATTIVAZIONE)
REGOLAZIONE TEMPERATURA FREEZER
ALLARME PORTA FREEZER APERTA - (DISATTIVAZIONE)
FUNZIONE HOLIDAY
FUNZIONE SUPER
PREALLARME - ALLARME
TEMPERATURA FREEZER
AVVERTENZA IMPORTANTE
Qualora il prodotto fosse stato coricato durante il trasporto,
occorre disporlo nella normale posizione verticale per almeno
sei ore prima della messa in funzione, altrimenti potrebbe risultare
rumoroso nelle fasi di lavoro.
ACCENSIONE APP ARECCHIO
L’accensione del prodotto avviene toccando il simbolo per
almeno 0,5 secondi.
E' possibile spegnere il solo scomparto frigo toccando il simbolo
per 4 secondi (il display visualizza il simbolo "--");
se si desidera spegnere lo scomparto congelatore, toccare il
simbolo per almeno 4 secondi.
NOTA: in questo caso viene spento automaticamente anche
lo scomparto frigo e tutte le visualizzazioni.
IMPOSTAZIONI DELLA TEMPERATURA ZONA FREEZER
Il display freezer indica la temperatura interna reale dello
scomparto freezer compresa tra +20°C e -40°C; qualora siano
riscontrate temperature superiori a +20°C, sul dispay freezer
appare il simbolo "H". La regolazione della temperatura freezer
avviene toccando il simbolo ; è possibile impostare valori di
temperatura compresi tra -16°C a -24°C. Con il freezer acceso,
toccando il simbolo , appare sul display la temperatura impostata
in lampeggio per 6 secondi.
Per impostare una nuova temperatura, toccare il simbolo e,
mentre il display lampeggia, toccare ripetutamente lo stesso
simbolo , fino a che non si visualizza il valore di temperatura
desiderata; la nuova impostazione viene memorizzata al termine
del lampeggio del display ( 6 secondi).
NOTA
Prima di inserire la spina nella presa di corrente, assicurarsi che
la tensione di linea corrisponda con quella riportata nella targa
dati del prodotto (“Vedere la sezione connessioni elettr iche”).
Collegare la spina alla rete di corrente. Il display lampeggia
mostrando la temperatura preimpostata dal costruttore (7 per la
zona frigo e -16 per la zona congelatore).
NOTA!
Con temperature ambiente comprese tra i 20 -25°C, si
consiglia l’impostazione della temperatura frigo +5°C e
freezer -18°C.
La scelta dell’impostazione va comunque fatta tenendo
conto della frequenza dell’aperture della porta, della
temperatura ambiente del locale in cui è installato
l’apparecchio e dalla quantità di cibo contenuta all’interno
del prodotto.
IMPOSTAZIONI DELLA TEMPERATURA ZONA FRIGO
Il display frigo indica la temperatura interna reale dello scomparto
frigo compresa tra 0°C e 19°C; qualora siano riscontrate
temperature superiori a 19°C, sul display frigo appare il simbolo
"H". La regolazione della temperatura frigo avviene toccando il
simbolo ; è possibile impostare valori di temperatura compresi
tra 2°C a 7°C. Con il frigo acceso, toccando il simbolo , appare
sul display la temperatura impostata in lampeggio per 6 secondi.
Per impostare una nuova temperatura, toccare il simbolo e,
mentre il display lampeggia, toccare ripetutamente lo stesso
simbolo , fino a che non si visualizza il valore di temperatura
desiderata; la nuova impostazione viene memorizzata al termine
del lampeggio del display ( 6 secondi).
12
Page 15
FIIT
MESSA IN FUNZIONE
CONTROLLO DELLA TEMPERATURA PROGRAMMATA
Toccando una sola volta il simbolo (zona frigo) e il simbolo
(zona freezer), appare sui display la temperatura programmata
in lampeggio per 6 secondi , dopodichè viene visualizzata la
temperatura reale all'interno degli scomparti. Le funzioni impostate
restano in memoria anche in assenza di energia elettrica o
quando l'apparecchio è scollegato dalla presa di corrente; al
riavvio sul display lampeggerà per 6 secondi l'ultimo valore di
temperatura impostato per entrambi gli scomparti.
FUNZIONE SUPER
La funzione SUPER è stata progettata per avere una temperatura
fredda nello scomparto freezer nel minor tempo possibile;
toccando infatti la scritta "SUPER" per almeno 0,5 secondi,
viene attivata tale funzione per un periodo di 27 ore; durante
questa fase, la scritta "SUPER" risulta retroilluminata bianca;
trascorse le 27 ore, la funzione Super viene disattivata in modo
automatico, ma, volendo, si può disattivare in qualsiasi momento
in modo manuale toccando la scritta "SUPER" per almeno 0,5
secondi; quando tale funzione viene disattivata, la scritta "SUPER"
risulta spenta.
CONDIZIONE DI PREALLARME TEMPERATURA FREEZER
La condizione di preallarme viene attivata quando la temperatura
interna allo scomparto freezer risulta essere più alta di -12°C;
cause possibili:
- è stata introdotta una quantità eccessiva di alimenti da
congelare (vedere modalità di congelamento);
- la porta è rimasta aperta troppo a lungo;
-c'è stata una interruzione di erogazione dell'energia elettrica
per un tempo piuttosto lungo;
-c'è un guasto all'apparecchio.
La condizione di pre-allarme viene segnalata attraverso la
visualizzazione della temperatura sul display freezer in modo
intermittente, dal simbolo ALARM retroilluminato bianco
lampeggiante e dall'allarme sonoro.
FUNZIONE HOLIDAY
La funzione HOLIDAY può essere usata durante un periodo di
assenza prolungata (tipo il periodo di vacanza); questa funzione
consente un risparmio di energia elettrica in quanto è stata
progettata tenendo conto che nel periodo di assenza, la porta
dell'apparecchio non viene mai aperta; con la funzione Holiday
viene garantita la temperatura interna adeguata alla conservazione
dei cibi. Per attivare tale funzione occorre toccare la scritta
"HOLIDAY" per almeno 0,5 secondi; la scritta risulta retroilluminata
bianca. Tale funzione può essere disattivata solo in modo manuale
toccando la scritta "HOLIDAY" per 0,5 secondi. Durante il
funzionamento nella condizione Holiday , tutte le altre impostazioni
sono temporaneamente disabilitate.
Durante il funzionamento nella condizione Super, tutte le altre
impostazioni previste per lo scomparto freezer, sono
temporaneamente disabilitate.
E' possibile disattivare l'allarme sonoro toccando la scritta
ALARM; in questo caso resta comunque attivo ilpreallarme
visualizzato dalla temperatura lampeggiante sul display e la
scritta ALARM passa da luce lampeggiante a fissa.
ll preallarme si disattiva automaticamente solo quando la
temperatura dello scomparto freezer scende al disotto di -12°C;
a questo punto la scritta ALARM è spenta e la temperatura sul
display passa da lampeggiante a fissa. La scritta ALARM è
spenta e la temperatura sul display passa da lampeggiante a
fissa.
CONDIZIONE DI ALLARME TEMPERATURA FREEZER
La funzione di allarme è stata concepita con l'obbiettivo di
avvisare l'utente che, a causa di un intervento esterno (tipo
black-out, porta lasciata aperta. ecc..), i cibi conservati all'interno
dello scomparto congelatore, hanno raggiunto temperature più
alte di +1°C, pertanto hanno subito il completo scongelamento.
In questo caso viene attivata la condizione di allarme temperatura
freezer che è visualizzata in modo lampeggiante sul display con
il grado di temperatura più alta raggiunta nello scomparto; la
scritta ALARM risulta retroilluminata rossa ed è attivato anche
l'allarme sonoro.
Tale memoria del display (temperatura massima raggiunta) è
importante in quanto, nel caso di black-out poi ripristinato,
l'apparecchio ha ripreso le sue funzioni normali e quindi potrebbe
aver regolarmente ricongelato gli alimenti che precedentemente
hanno subito lo scongelamento.
LAMPADA INTERNA
Ad ogni apertura della porta, si accende la lampada di
illuminazione interna dello scomparto frigo; in caso di un'apertura
prolungata della porta, la lampada si spegne in maniera
automatica dopo 5 minuti di funzionamento; per riattivarla occorre
chiudere la porta ed aprirla di nuovo.
ALLARME PORTA APERTA
Ad ogni apertura porta si accende il simbolo luminoso (frigo)
o/e il simbolo (freezer) retroilluminato bianco in modo fisso;
se l'apertura delle porte si protrae per oltre 2 minuti, viene attivato
anche l'allarme sonoro "Porta Aperta" che può essere disattivato
nei seguenti 2 modi:
- chiudendo la porta si disattiva sia l'allarme sonoro che visivo;
- toccando il simbolo (per porta frigo) o il simbolo (per
porta freezer), si disattiva il solo allarme sonoro, mentre resta
attivo l'allarme visivo retroilluminato bianco che passa da
luce fissa a lampeggiante.
GESTIONE ANOMALIE
Qualora sui display frigo-freezer siano visualizzati i simboli "E"
,"E-" "-E", per alcuni giorni il funzionamento dell'apparecchio è
garantito, ma occorre contattare quanto prima il Centro di
Assistenza Tecnica.
13
Page 16
IT
MESSA IN FUNZIONE
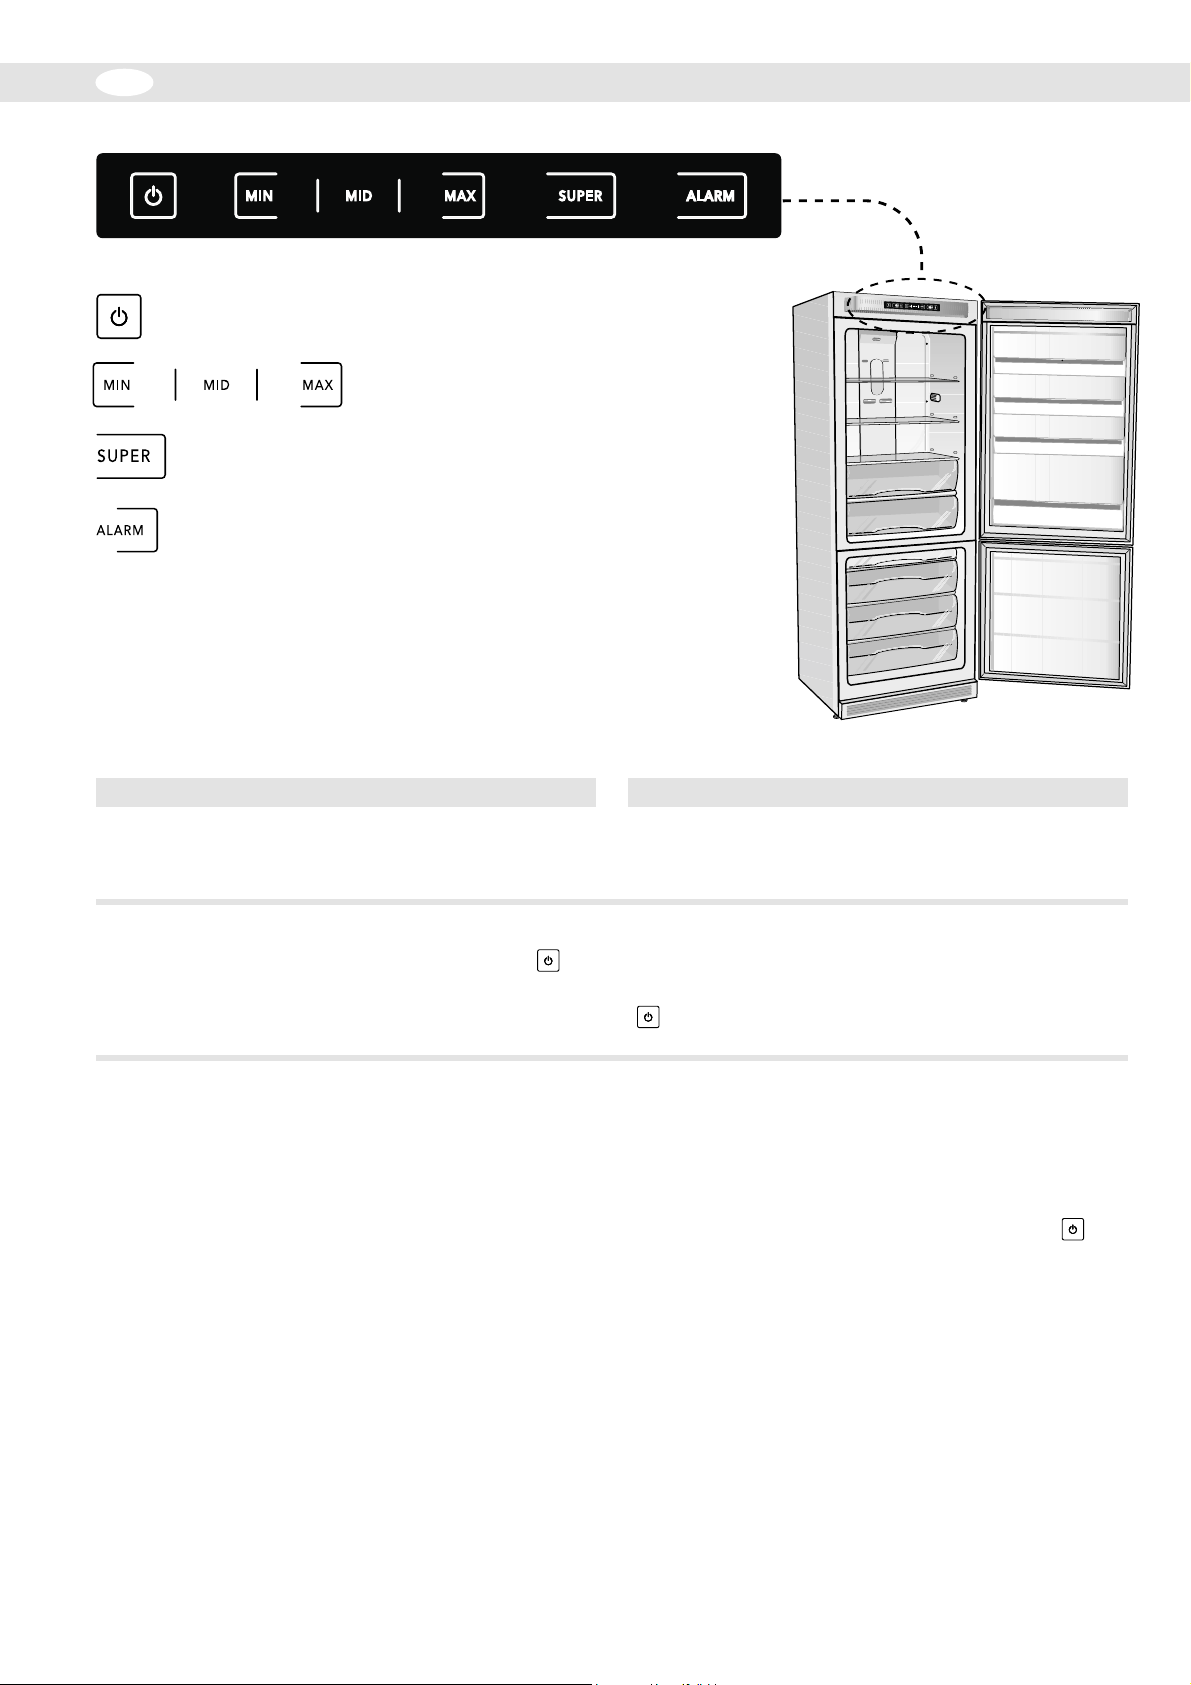
ON / OFF
FUNZIONE SUPER
ALLARME TEMPERATURA
REGOLAZIONE TEMPERATURA
AVVERTENZA IMPORTANTE
Qualora il prodotto fosse stato coricato durante il trasporto,
occorre disporlo nella normale posizione verticale per almeno
sei ore prima della messa in funzione, altrimenti potrebbe risultare
rumoroso nelle fasi di lavoro.
ACCENSIONE APP ARECCHIO
L'accensione del prodotto avviene toccando il simbolo per
almeno 0,5 secondi;
l'accensione viene visualizzata dalla scritta "MID:" retroilluminata
bianca.
IMPOSTAZIONE DELLA TEMPERATURA
E' possibile impostare 3 temperature ben distinte segnalate dalle
scritte "MIN - MID - MAX".
La scritta MIN indica una temperatura interna scomparto frigo
e freezer meno fredda;
La scritta MID indica una temperatura interna scomparto frigo
e freezer media.
La scritta MAX indica una temperatura interna scomparto frigo
e freezer più fredda.
Per cambiare le impostazioni, occorre toccare il simbolo desiderato
tra MIN - MID - MAX per almeno 0,5 secondi; la nuova
impostazione sarà evidenziata dalla scritta prescelta retroilluminata
bianca.
NOTA
Prima di inserire la spina nella presa di corrente, assicurarsi che
la tensione di linea corrisponda con quella riportata nella targa
dati del prodotto. Collegare la spina alla rete di corrente.
Dopo 30 secondi, l'apparecchio inizia a funzionare; non è possibile
far funzionare lo scompartro frigo e freezer separatamente poichè
sono alimentati da un unico compressore
per spegnere il prodotto occorre toccare per 5 secondi il simbolo
; a questo punto tutte le visualizzazioni sono spente.
N.B.: la scelta dell'impostazione va comunque fatta tenendo
conto della frequenza dell'aperture della porta, della temperatura
ambiente del locale in cui è installato l'apparecchio e dalla
quantità di cibo contenuta all'interno del prodotto.
Con temperature ambiente comprese tra i 20 - 25°C, si consiglia
l'impostazione "MID".
Per spegnere il prodotto occorre toccare il simbolo per
almeno 4 secondi.
14
Page 17
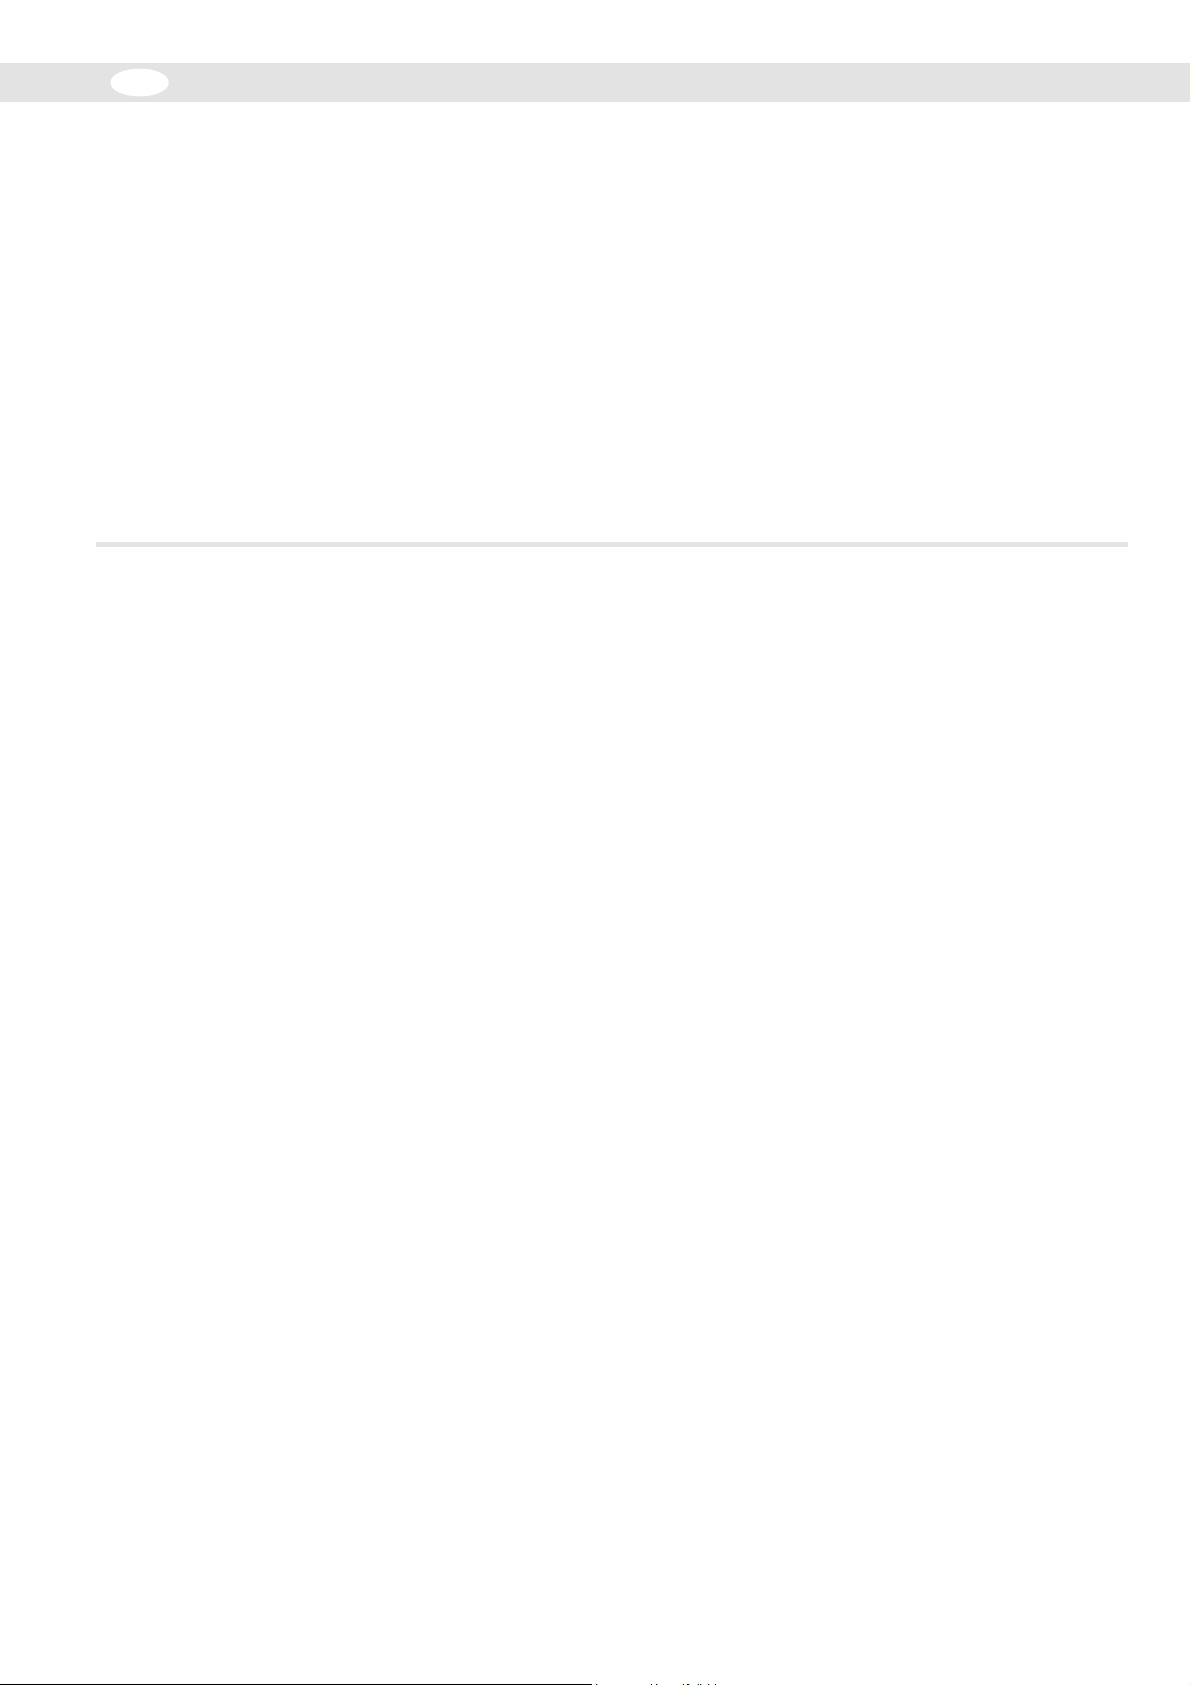
FIIT
MESSA IN FUNZIONE
FUNZIONE SUPER
La funzione Super è stata progettata per avere una temperatura
fredda nello scomparto freezer nel minor tempo possibile;
toccando infatti la scritta "SUPER" per almeno 0,5 secondi, viene
attivata tale funzione per un periodo di 27 ore; durante questa
fase, la scritta "SUPER" risulta retroilluminata bianca;
trascorse le 27 ore, la funzione Super viene disattivata in modo
automatico, ma, volendo, si può disattivare in qualsiasi momento
in modo manuale toccando la scritta "SUPER" per almeno 0,5
secondi; quando tale funzione viene disattivata, la scritta "SUPER"
risulta spenta.
Durante il funzionamento nella condizione Super, tutte le altre
impostazioni previste, sono temporaneamente disabilitate.
LAMPADA INTERNA
Ad ogni apertura della porta, si accende la lampada di
illuminazione interna dello scomparto frigo; in caso di un'apertura
prolungata della porta, la lampada si spegne in maniera
automatica dopo 5 minuti di funzionamento; per riattivarla occorre
chiudere la porta ed aprirla di nuovo.
ALLARME TEMPERATURA FREEZER
La condizione di allarme temperatura viene attivata quando
all'interno dello scomparto freezer viene riscontrata una
temperatura più alta di -12°C (esempio -11°C); cause possibili:
- è stata introdotta una quantità eccessiva di alimenti da
congelare (vedere modalità di congelamento);
- la porta è rimasta aperta troppo a lungo;
- c'è stata una interruzione di erogazione dell'energia elettrica
per un tempo piuttosto lungo;
- c'è un guasto all'apparecchio.
La condizione di allarme viene segnalata attraverso la scritta
ALARM retroilluminata rossa in modo lampeggiante e da un
allarme sonoro. E' possibile disattivare l'allarme sonoro toccando
la scritta ALARM per 3 secondi; in questo caso resta comunque
attivo l'allarme visualizzato dalla scritta ALARM retroilluminata
rossa che dalla condizione lampeggiante passa a fissa.
L'allarme si disattiva automaticamente solo quando la temperatura
dello scomparto freezer scende al disotto di -12°C (esempio 13°C); in questa condizione la scritta ALARM si spegne.
GESTIONE ANOMALIE
Qualora la scritta MIN-MID-MAX risultassero lampeggiare in
contemporanea o in sequenza, per alcuni giorni il funzionamento
del frigo è garantito, ma occorre contattare quanto prima il Centro
di Assistenza T ecnica.
15
Page 18
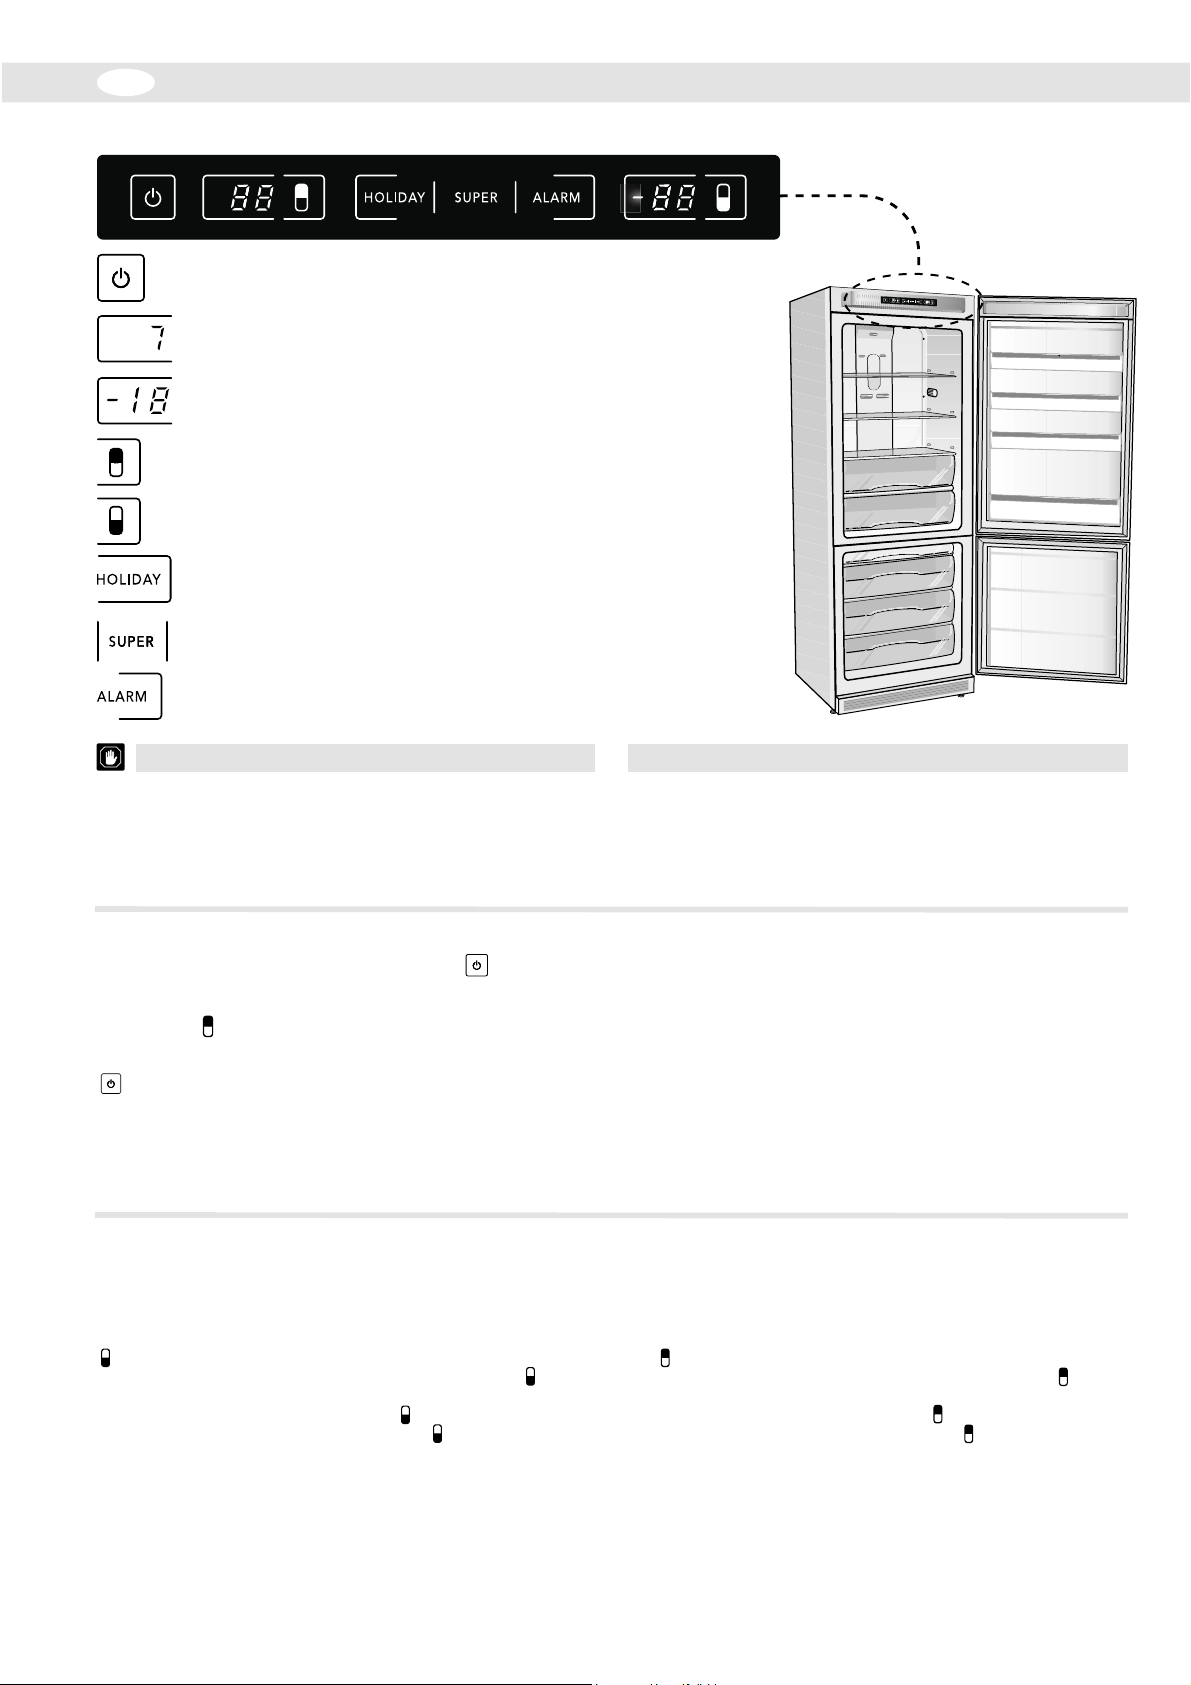
GB
ST ARTING THE APPLIANCE
ON / OFF
FRIDGE DISPLAY
FREEZER DISPLAY
FRIDGE COMPARTMENT POWER SWITCH (ON/OFF)
FRIDGE TEMPERA TURE ADJUSTMENT
FRIDGE DOOR OPEN ALARM (DEACTIVATION)
FREEZER TEMPERA TURE ADJUSTMENT
FREEZER DOOR OPEN ALARM (DEACTIVATION)
HOLIDAY FUNCTION
SUPER FUNCTION
PRE-ALARM - ALARM
FREEZER TEMPERA TURE
CAUTION
Whenever the product has been lying horizontally during
transportation, it should be left to stand upright for at least six
hours before it is switched on, otherwise it may be noisy when
it is in operation.
SWITCHING ON THE APPLIANCE
The appliance is switched on by touching the symbol for at
least 0.5 seconds.
It is possible to switch off only the refrigerator compartment by
touching the symbol for 4 seconds (the "--" symbol appears
on the display);
the freezer compartment may be switched off by touching the
symbol for at least 4 seconds.
NOTE: in this case, the refrigerator compartment and all the
display symbols are also automatically switched off.
SETTING THE TEMPERA TRE OF THE FREEZER AREA
The freezer display indicates the actual internal temperature of
the freezer compartment ranging from +20°C to -40°C; if the
temperature exceeds +20°C , the symbol "H" appears on freez er
display. Freezer temperature can be adjusted by touching the
symbol; temperatures between -16°C and -24°C can be set.
When the refrigerator is switched on, if you touch the symbol
the set temperature value will flash on the display for 6 seconds.
To set a new temperature, touch the symbol and, while the
display is flashing, touch the same symbol repeatedly until the
desired temperature value has been reached; the new setting
will be stored after the display has stopped flashing (6 seconds).
NOTE
Before plugging the appliance in, make sure that the power
supply voltage corresponds to the value shown on the product
data plate (“See the section Electrical connection”). Plug the
appliance into the electricity mains supply. The display will flash,
showing the default temperature set by the manufacturer (7°C
for the refrigerator area, -16°C for the freezer area).
TIP!
With room temperatures between 20°C and 25°C, we
suggest setting the refrigerator temperature at +5°C
and the freezer temperature at -18°C.
The freezer and refrigerator temperature is also depending
on how often the doors are opened and the quantity of food
contained inside the
product.
SETTING THE TEMPERA TURE OF THE REFRIGERA TOR AREA
The refrigerator display indicates the actual internal temperature
of the refrigerator compartment ranging from 0°C to 19°C; if the
temperature exceeds 19°C, the symbol "H" appears on the
display. Refrigerator temperature can be adjusted by touching
the symbol; temperatures between 2°C and 7°C can be set.
When the refrigerator is switched on, if you touch the symbol
the set temperature value will flash on the display for 6 seconds.
To set a new temperature, touch the symbol and, while the
display is flashing, touch the same symbol repeatedly until the
desired temperature value has been reached; the new setting
will be stored after the display has stopped flashing (6 seconds).
16
Page 19
FIGB
ST ARTING THE APPLIANCE
CHECKING THE PROGRAMMED TEMPERA TURE
If the symbol (refrigerator area) and the symbol (freezer area)
are touched once, the programmed temperature will flash on the
display for 6 seconds; after, the actual temperature inside the
compartments will be displayed. The set functions remain stored
in the memory of the appliance, even in the event of a power cut
or when the appliance is disconnected from the electricity supply;
upon start-up, the last temperature setting for both compartments
will flash on the display.
SUPER FUNCTION
The Super function was designed to reduce the temperature
inside the refrigerator compartment in the shortest possible time;
if you touch the text “SUPER” for at least 0.5 seconds the function
will be activated for a period of 7 hours, during which time the
text “SUPER” will be lit up in white. After this 7-hour period, the
Super function will be deactivated automatically. Ho wever, if you
wish to manually deactivate the function before the 7-hour period
has elapsed, simply touch the text “SUPER” for at least 0.5
seconds; when the function has been deactivated the text
“SUPER” will no longer be illuminated.
PRE-ALARM MODE AND FREEZER TEMPERATURE
The pre-alarm mode is activated when the temperature inside
the freezer compartment reaches a value higher than -12°C (for
example, -11°C). This may occur in the following situations:
- a large amount of unfrozen food has been placed in the
freezer (see freezing modes);
- the door has been open for an extended period of time;
- the electricity supply has been cut off for a prolonged period
of time;
- the appliance has malfunctioned.
The pre-alarm mode is indicated by the temperature appearing
intermittently on the freezer display, by the flashing white ALARM
symbol and by the audible alarm.
HOLIDAY FUNCTION
The “HOLIDAY” function may be used during periods of prolonged
inactivity (for example, if all users go on holiday). This function
saves electricity as it takes into account the fact that the door of
the appliance will not be opened at all during this period and
maintains a temperature inside the refrigerator which is suitable
for the storage of food. To activate this function, simply touch the
text “HOLIDAY” for at least 0.5 seconds; the text will be lit up in
white. The function ma y only be deactiv ated manually, by touching
the text “HOLIDAY” for 0.5 seconds. While the appliance is
operating in “HOLIDAY” mode, all other settings are temporarily
disabled.
While the appliance is operating in Super mode, all other freezer
compartment settings are temporarily disabled.
The audible alarm may be disabled by touching the ALARM text;
in this case the pre-alarm mode indicator of the flashing
temperature on the display remains active and the ALARM text
will remain lit in a fixed manner instead of flashing. The pre-alarm
mode is disabled automatically, but only when the temperature
of the freezer compartment falls below -12°C; at this point the
ALARM text will no longer be illuminated, while the temperature
will stop flashing and remain lit in a fixed manner on the display.
FREEZER TEMPERA TURE ALARM
The alarm function was designed with the aim of warning the
user that, due to some external cause (for example, a power
cut, the door has been left open, etc.) the food kept in the freezer
compartment has reached a temperature higher than +1°C and
has therefore completely thawed out.
In this case, the freezer temperature alarm mode is enabled
and flashes on the display, along with the highest temperature
detected inside the compartment; the ALARM text is illuminated
in red and the audible alarm is also activated.
The display memory (maximum temperature reached) is important
because, if power is cut off and then restored, the appliance will
continue operating as normal; this could result in f ood which had
previously thawed out being refrozen.
INTERNAL LIGHT
Every time the door is opened, the light inside the refrigerator
compartment is switched on; if the door is opened for an e xtended
period of time, the light switches off automatically after 5 minutes.
To switch it back on, simply close the door and open it again.
DOOR OPEN ALARM
Every time the door is opened the symbol (refrigerator) and/or
the symbol (freezer) lights up in white, in a fixed manner; if the
door remains open for over 2 minutes, the “Door Open” buzz er
alarm sounds; it may be deactivated in one of the 2 following
ways:
- by closing the door, both the buzzer and the visible alarm
signal deactivate;
- if the symbol (for the refrigerator door) or the symbol (for
the freezer door) is touched, only the buzzer deactivates,
while the white-lit visible alarm signal starts flashing.
MALFUNCTION MANAGEMENT
If the symbols "E","E-","-E", appear on the refrigerator-freezer
display, the appliance is guaranteed to function for a few days,
but the Technical Assistance Centre should be contacted
immediately.
17
Page 20
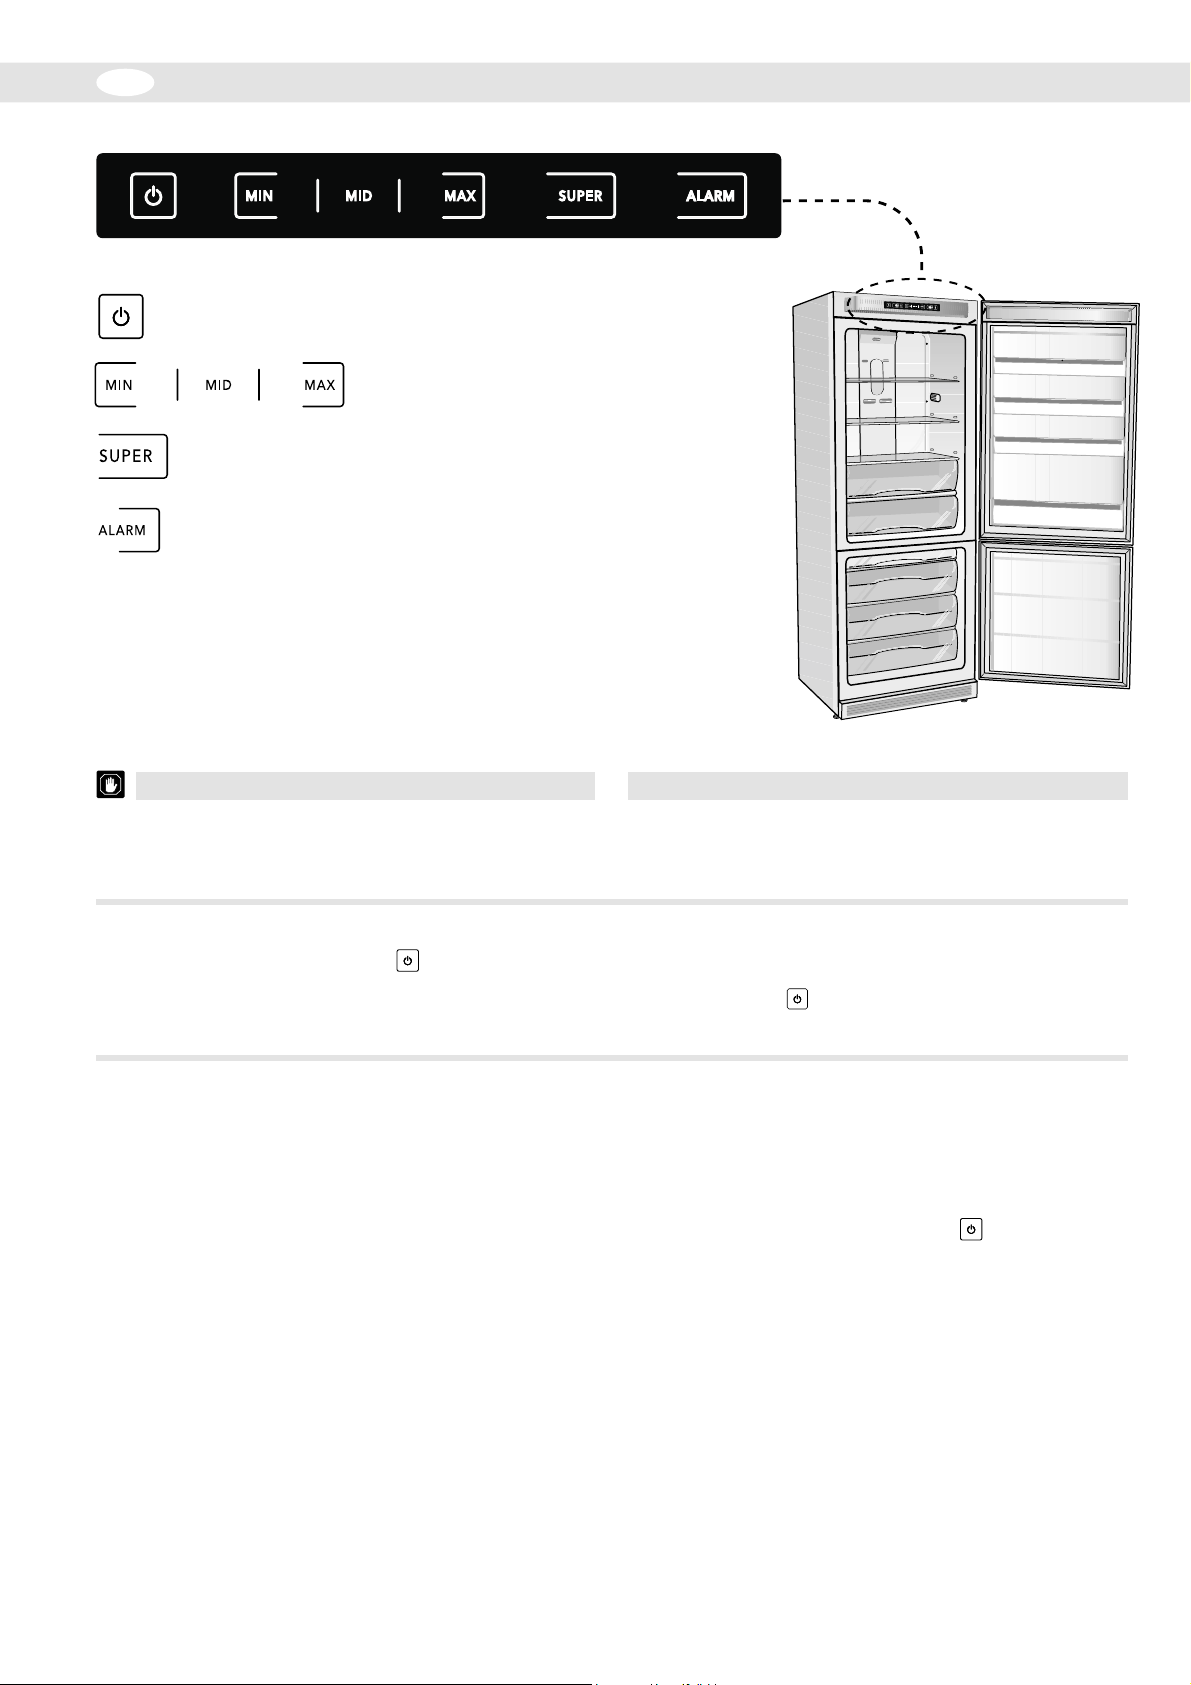
GB
ST ARTING THE APPLIANCE
ON / OFF
TEMPERATURE ADJUSTMENT
SUPER FUNCTION
FUNCTION ALARM
CAUTION
Whenever the product has been lying horizontally during
transportation, it should be left to stand upright for at least six
hours before it is switched on, otherwise it may be noisy when
it is in operation.
SWITCHING THE APPLIANCE ON
Switch the product on by touching the symbol for at least 0.5
seconds; activation will be confir med by the text “MID”, which
will light up in white.
SWITCHING THE APPLIANCE ON
3 separate temperatures may be set (indicated by the text "MIN
- MID - MAX").
MIN indicates a less cold temperature inside the refrigerator-
freezer compartment;
MID indicates a medium temperature inside the refrigeratorfreezer compartment;
MAX indicates a colder temperature inside the refrigeratorfreezer compartment.
To change the settings, touch the desired symbol (MIN – MID
– MAX) for at least 0.5 seconds; the ne w setting will be confirmed
by the illumination in white of the selected option.
NOTE
Before plugging the appliance in, make sure that the power
supply voltage corresponds to the value shown on the product
data plate. Plug the appliance into the electricity mains supply.
The appliance starts functioning after 30 seconds; the refrigerator
and freezer compartments cannot function individually, as they
are powered by a single compressor; the appliance is switched
off by touching the symbol for 5 seconds; at this point, all
display texts will disappear.
N.B.: an option should be selected after taking into account the
frequency with which the door is opened, the temperature of the
room in which the appliance is installed and the quantity of food
contained inside the product.
For room temperatures of between 20 - 25°C, we recommend
the “MID” setting.
To switch the product off, simply touch the symbol f or at least
4 seconds.
18
Page 21
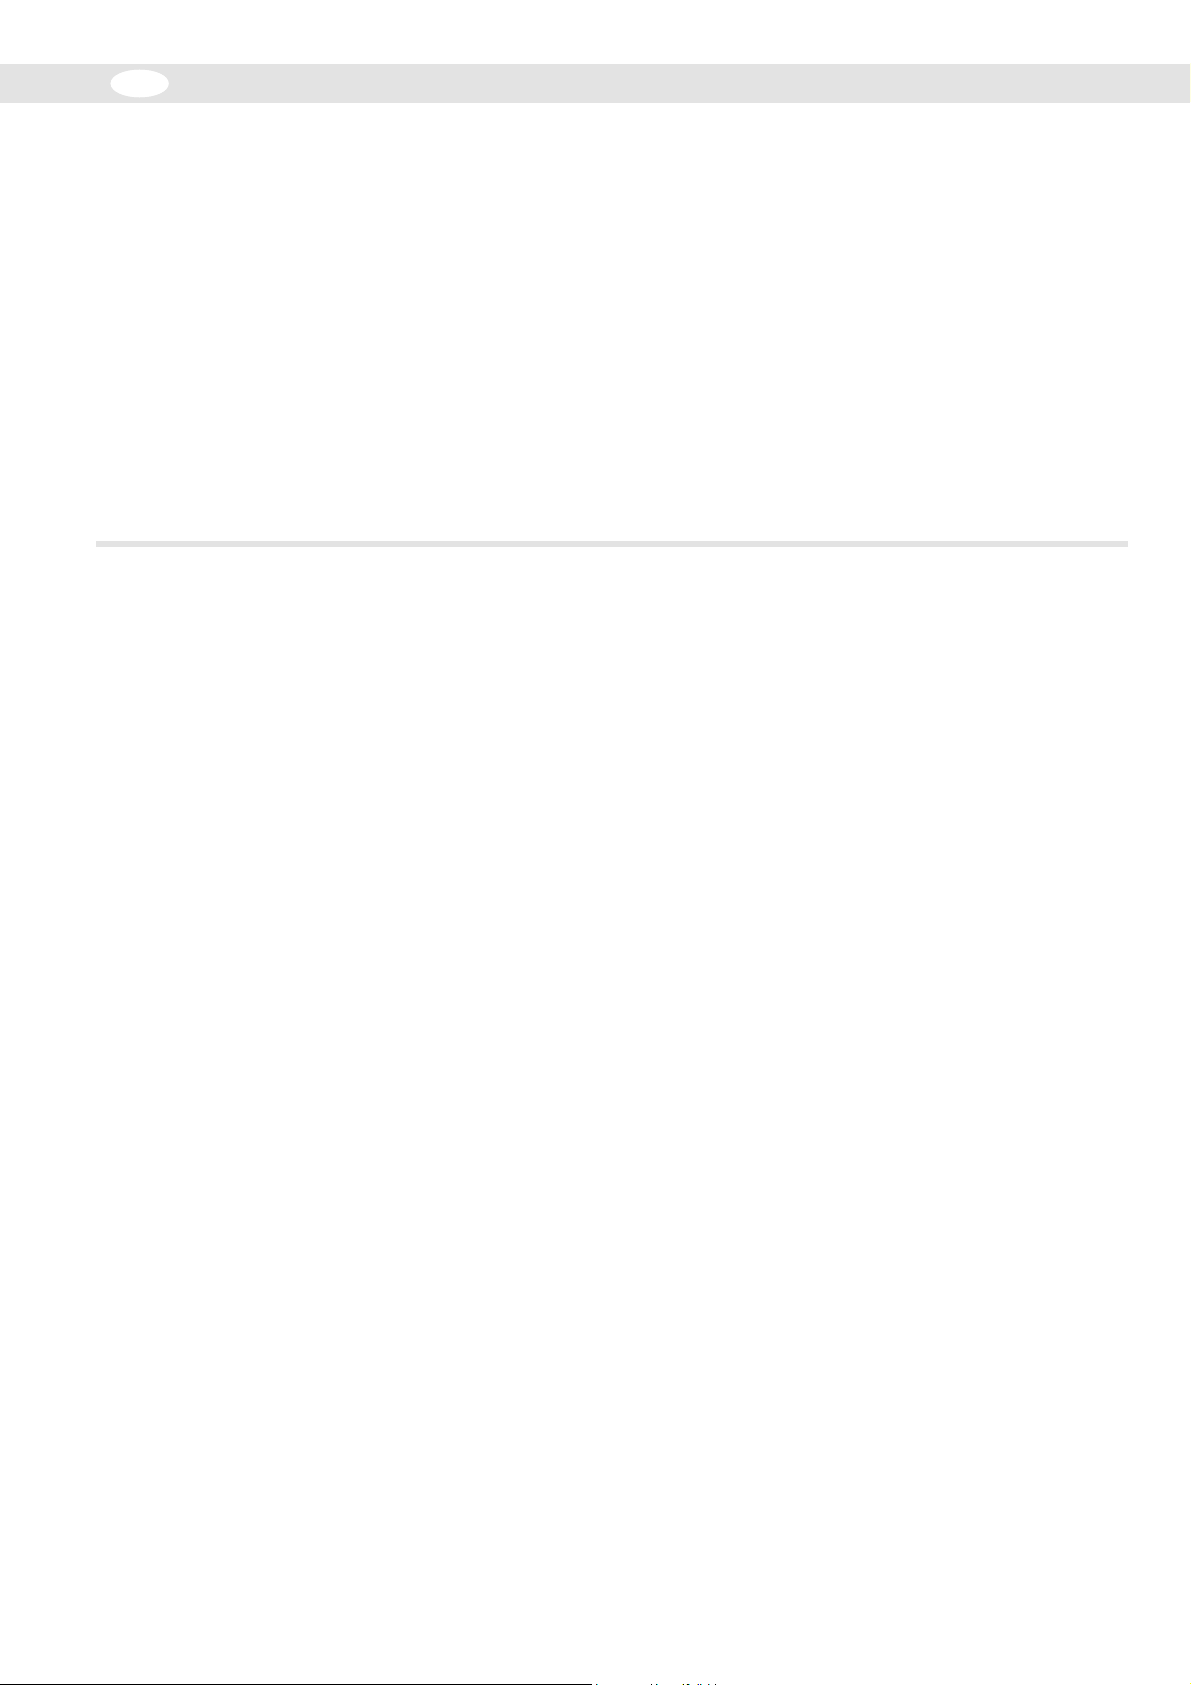
FIGB
ST ARTING THE APPLIANCE
SUPER FUNCTION
The Super function was designed to reduce the temperature
inside the refrigerator compartment in the shortest possible time;
if you touch the text “SUPER” for at least 0.5 seconds the function
will be activated for a period of 27 hours, during which time the
text “SUPER” will be lit up in white. After this 27-hour period, the
Super function will be deactivated automatically. Ho wever, if you
wish to manually deactivate the function before the 27-hour
period has elapsed, simply touch the text “SUPER” for at least
0.5 seconds; when the function has been deactivated the text
“SUPER” will no longer be illuminated. While the appliance is
operating in Super mode, all other freezer compartment settings
are temporarily disabled.
INTERNAL LIGHT
Every time the door is opened, the light inside the refrigerator
compartment is switched on; if the door is opened for an e xtended
period of time, the light switches off automatically after 5 minutes.
To switch it back on, simply close the door and open it again.
FREEZER TEMPERA TURE ALARM
The temperature alarm mode is activated when a temperature
higher than -12°C (for example, -11°C) is detected inside the
freezer compartment. This may occur in the following situations:
- a large amount of unfrozen food has been placed in the
freezer (see freezing modes);
- the door has been open for an extended period of time;
- the electricity supply has been cut off for a prolonged period
of time;
- the appliance has malfunctioned.
The alarm mode is indicated by the flashing red ALARM text
and by an audible alarm. The audible alarm may be disabled by
touching the ALARM text for 3 seconds; in this case the alarm
remains active and is indicated by the red ALARM text, which
will stop flashing and remain lit in a fixed manner.
The alarm is disabled automatically , but only when the temper ature
of the freezer compartment falls below -12°C (for example, 13°C); when this happens, the ALARM text will no longer be
illuminated.
MALFUNCTION MANAGEMENT
Should the MIN - MID - MAX texts flash simultaneously or in
sequence, the fridge is guaranteed to work for a few days, but
the Technical Assistance Centre should be contacted immediately.
19
Page 22
33
GO2110NFH-2
IT
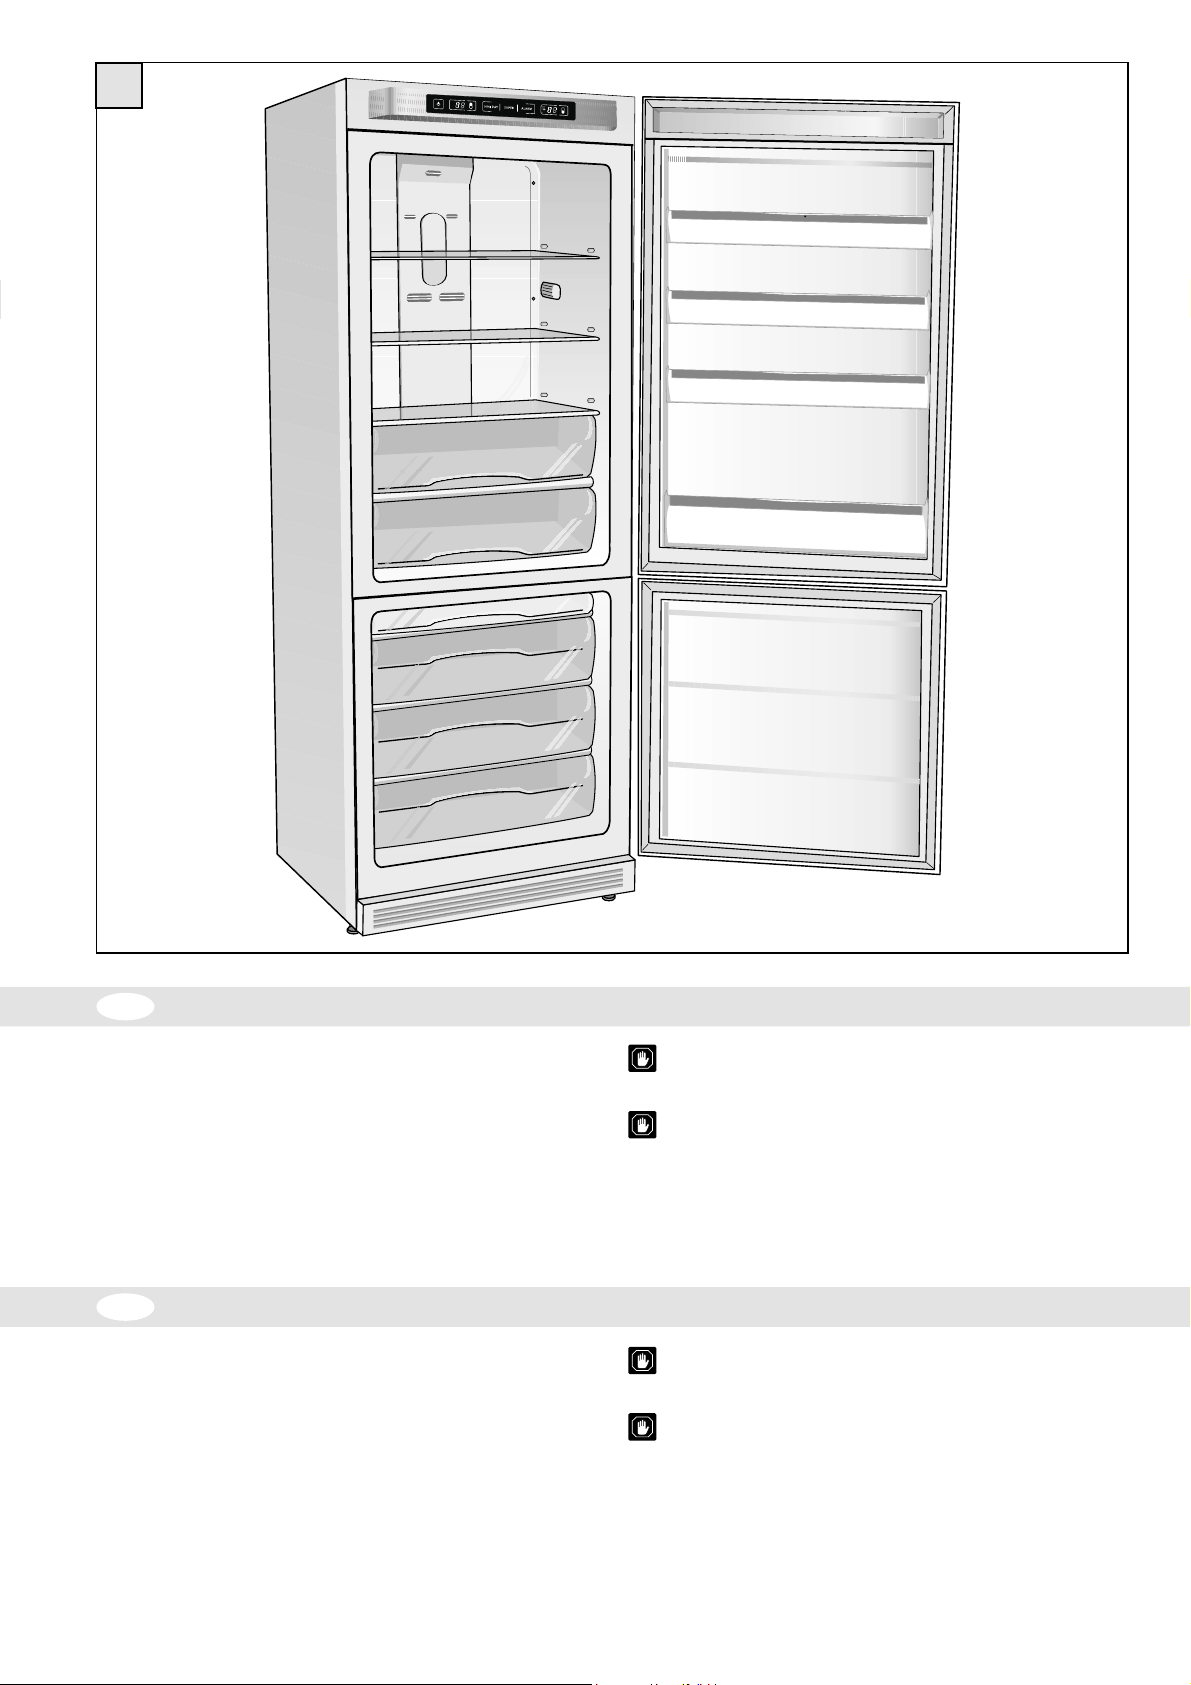
IN ASSENZA DI ENERGIA ELETTRICA
In mancanza di corrente, accertarsi sulla durata della sospensione.
Se la previsione non supera le 12 ore, lasciate gli alimenti nel congelatore e tenete
chiusa la porta.
Se la mancanza di corrente dovesse superare tale periodo di 12 ore e una parte
degli alimenti si dovesse scongelare, è opportuno consumare quest’ultimi al più
presto.
- Togliere gli alimenti e avvolgerli in più strati di carta a gior nale e conservarli in
frigorifero o in un luogo fresco.
- Tenere presente che un aumento di temperatur a degli alimenti riduce sensibilmente
la durata di conservazione degli stessi.
GB
If a power cut should occur, try to establish its duration.
If the forecast is less than 12 hours, leave the food in the freezer and keep the door
closed.
If the power cut lasts for longer than 12 hours and part of the food starts to thaw out,
this should be consumed as soon as possible.
- Remove the food, wrap it in sev er al la y ers of ne wspaper and place it in the fridge
- Remember that an increase in the temperature of the food will greatly reduce
POWER CUT
or in a cool location.
its storage life.
AVVERTENZA! non usare dispositivi meccanici o altri metodi artificiali
per accellerare il processo di sbrinamento, diversi da quelli raccomandati
dal costruttore.
ATTENZIONE: Non usare apparecchi elettrici all’interno dello scomparto
conservatore di cibi, se questi non sono di tipo raccomandato dal
costruttore.
WARNING! Do not use an y mechanical de vices or other artificial methods
other that those recommended by the manufacturer for accelerating the
defrosting process.
WARNING: Unless otherwise approved by the manufacturer, do not use
electrical appliances inside the food storage compartment.
20
Page 23
34a
GLS38FH-33
34b
GLS38FH-34
34
34c
R
V
GLS38FH-35
IT
PULIZIA E MANUNTENZIONE
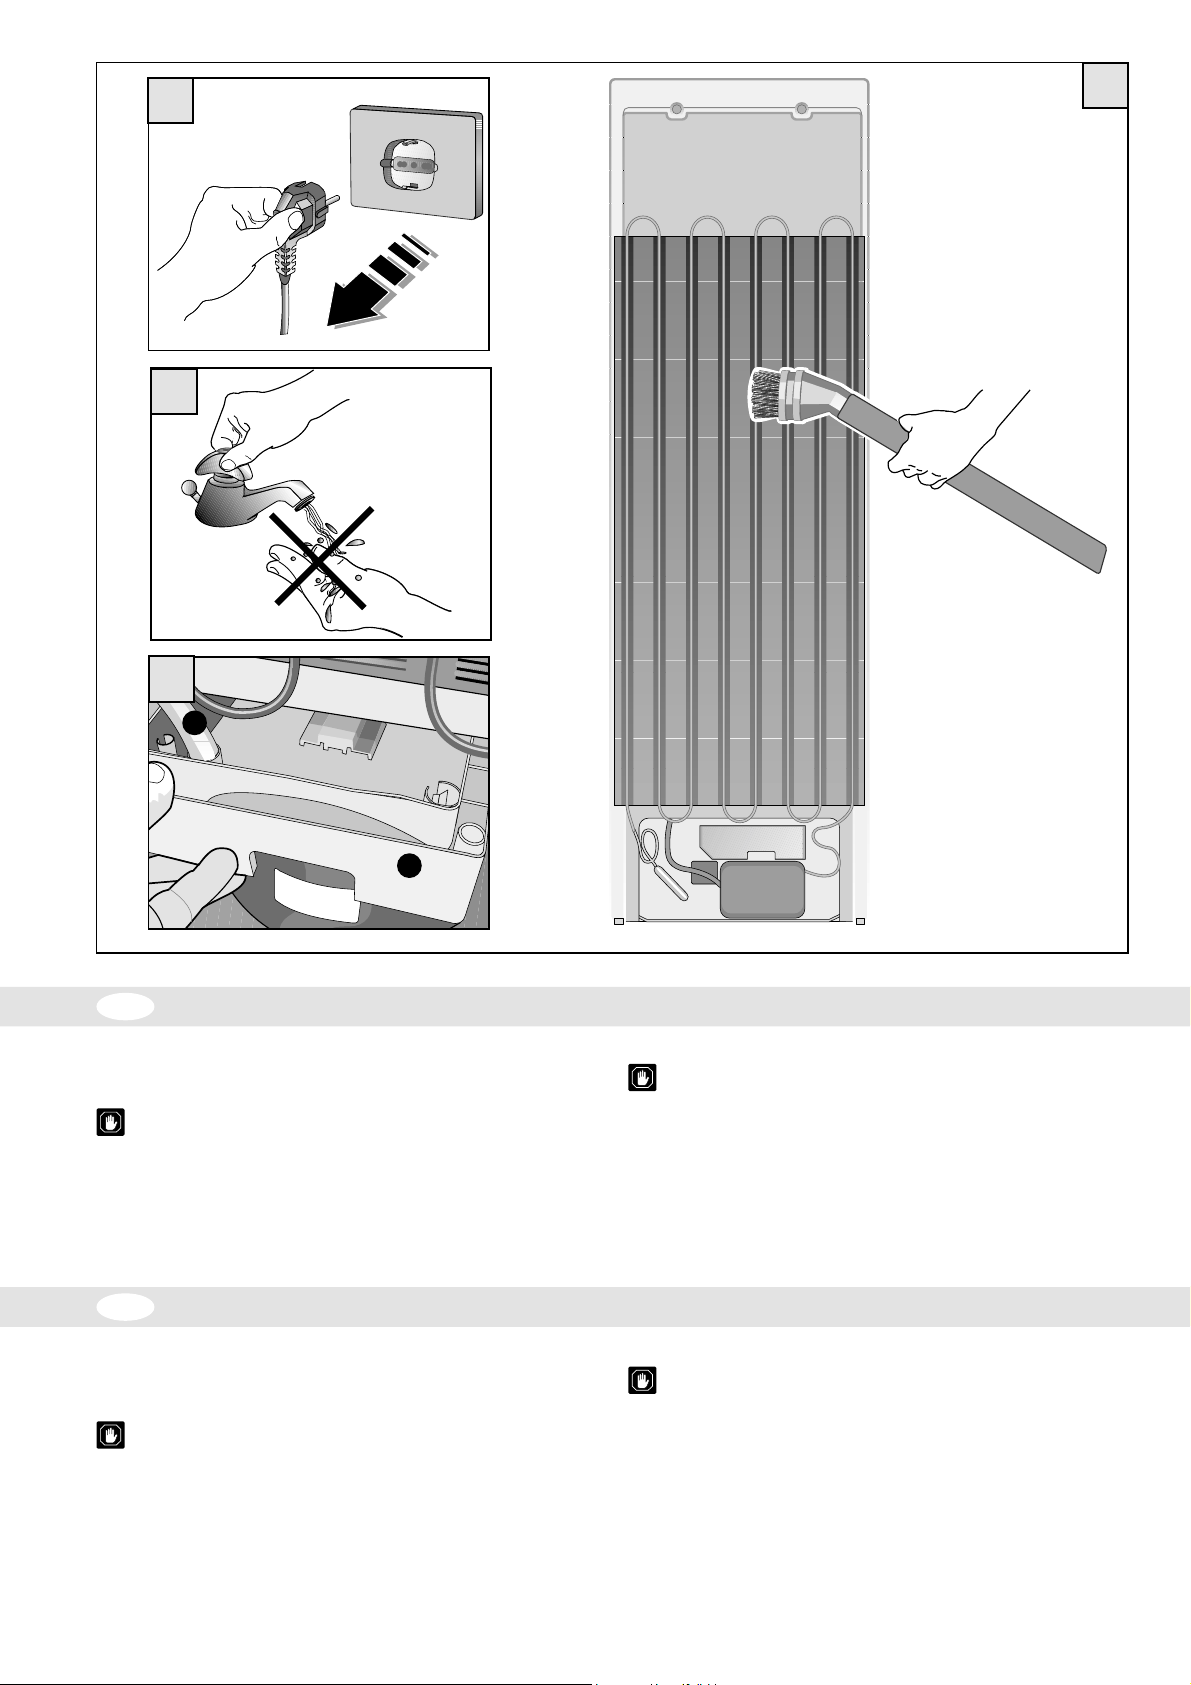
Disinserite sempre l’apparecchio dalla presa di corrente, prima d’effettuare
qualsiasi operazione di pulizia (Fig. 34a).
Per la pulizia interna di tutte le parti in plastica e della guarnizione porta
Non usate abrasivi o detergenti di alcun tipo quando si puliscono le parti
interne e la guarnizione della porta.
- Usate esclusivamente una soluzione di bicarbonato di sodio in acqua tiepida 2
cucchiai in 2 litri di acqua.
1 Pulizia del condensatore (Fig. 34)
- Da compiere almeno due volte l’anno.
- Utilizzate un aspirapolvere per uso domestico o una spazzola. Un condensatore sporco
GLS38FH-32
influisce negativamente sull’apparecchio riducendone le prestazioni.
Nessuna protezione (griglia a filo, carter) deve essere rimossa da parte
di personale non qualificato: evitate assolutamente di far funzionare
l’apparecchio senza queste protezioni.
Pulizia scarico acqua (Fig. 34c)
Contemporaneamente alla pulizia del condensatore, verificate che il tubo R di scarico, sia
libero da ostruzioni.
- Estraete il tubo R di scarico dalla vaschetta V e se necessario provvedete alla sua pulizia.
Per assenze prolungate
- Vuotate i comparti. Disinserite l’apparecchio dalla rete elettrica. Pulite entrambi i comparti
e asciugateli. Lasciate aperte le porte per impedire la formazione di cattivi odori o muffe.
GB
Before starting any cleaning, disconnect the appliance from the mains electricity
supply.
When cleaning the internal plastic parts and the door gasket:
- Use a warm solution of bicarbonate of soda (two spoonfuls in two litres of water).
1 Cleaning the condenser (Fig. 34)
- This should be carried out at least twice a year.
- Clean using a domestic vacuum cleaner or a brush. A dirty condenser will have a negativ e
CLEANING AND MAINTENANCE
Do not use abrasives or detergents af any kind, when c leaning the internal
parts and the door gasket.
effect on the appliance and reduce its performance.
The protections (wire grill, covers) must not be removed by unqualified
personnel: do not use the appliance if the protections ha ve been remo ved.
Cleaning the water drain (Fig. 34c)
When cleaning the condenser, check that the rear drain pipe R is not blocked.
- Remove drain pipe R from the container V and if necessary clean it.
For prolonged absences
- Empty the compartments. Disconnect the appliance from the mains electricity supply.
Clean both the compartments and dry them. Leave the doors open to prevent bad smells
or mould from forming.
21
Page 24
35
GLS38FH-19
IT
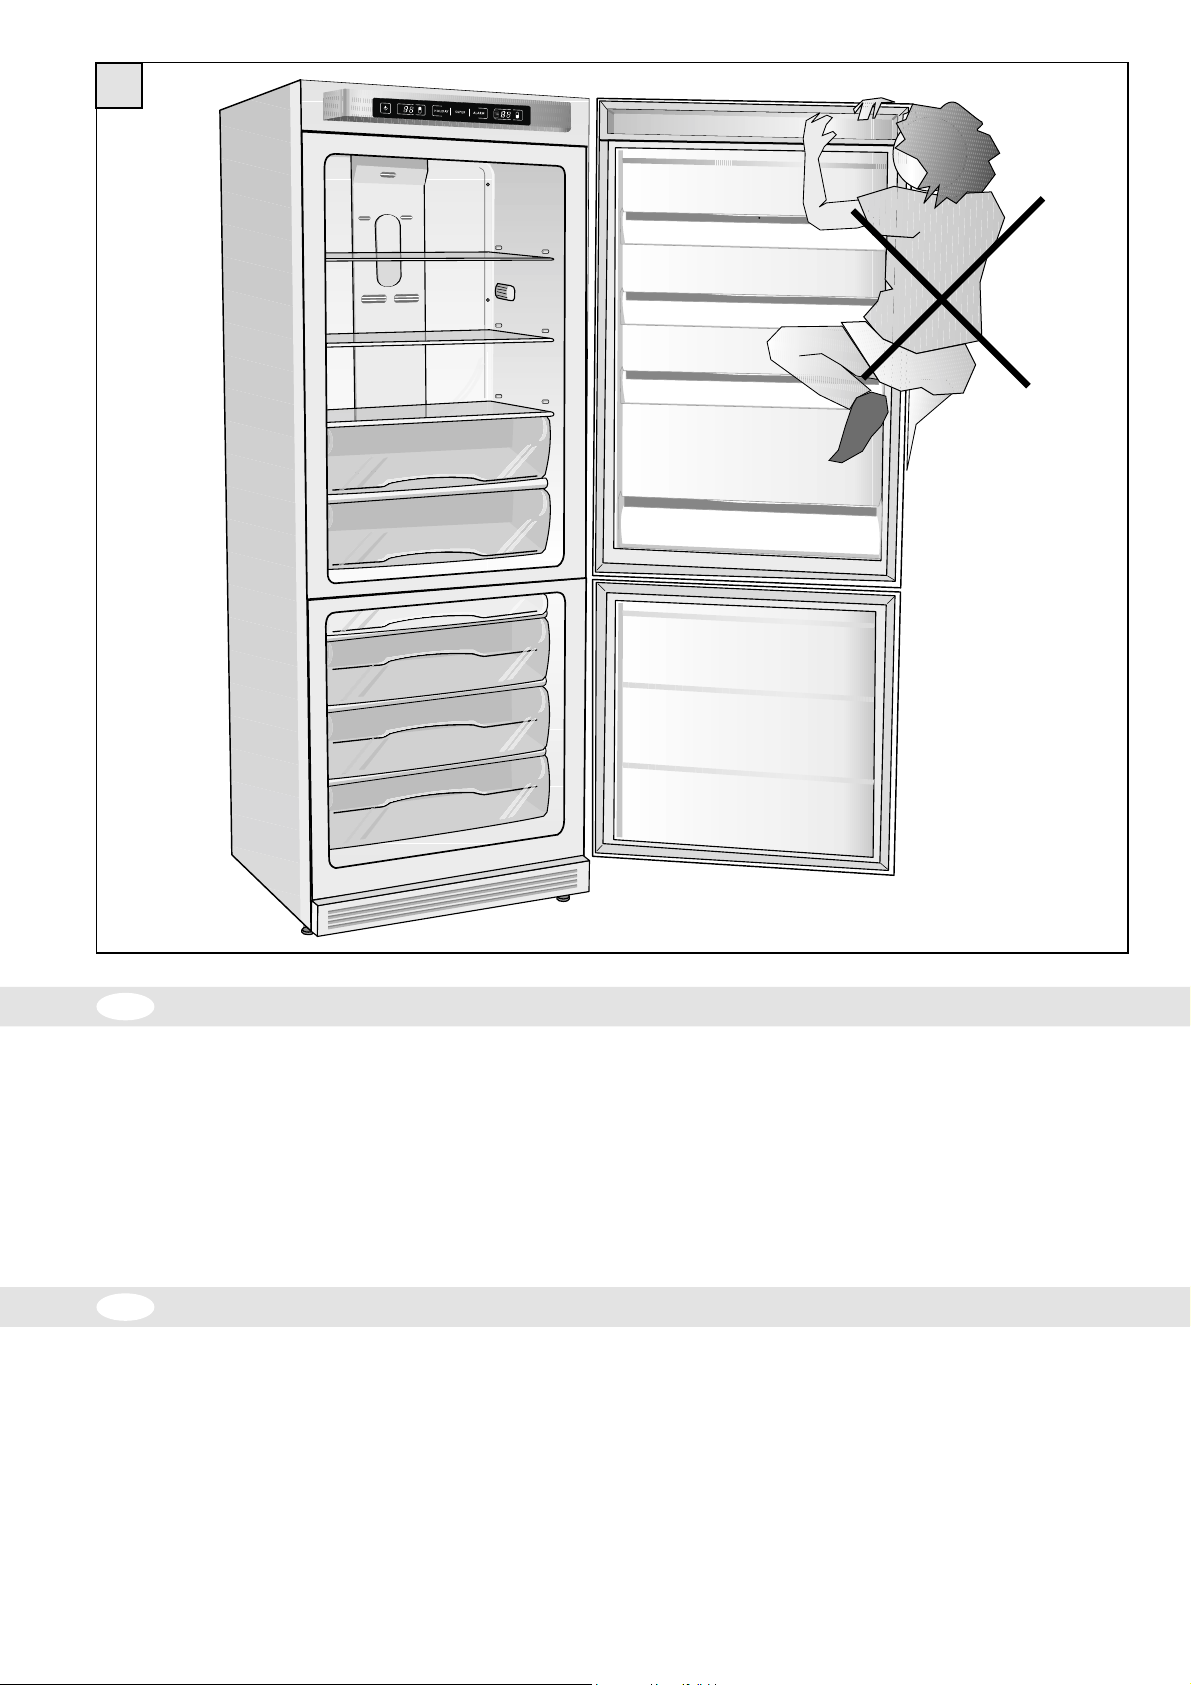
RICERCA GUASTI
1) L’apparecchio non funziona. Controllare che:
- Non ci sia un’interruzione di corrente
- La spina sia ben inserita nella presa di corrente
- Il cavo di alimentazione non sia danneggiato
-L’impostazione della temperatura sia corretta
2) La temperatura all’interno dei comparti non è sufficientemente bassa.
Controllare che:
- Le porte chiudano correttamente
-L’apparecchio non sia installato vicino ad una sorgente di calore
GB
1) The appliance does not work. Check that:
- Is there a power cut?
- Is the plug inserted properly in the mains socket?
- Is the power supply cable damaged?
- Is the temperature setting correct?
2) The temperature inside the compartments is not low enough. Check that:
- Do the doors close properly?
- Is the appliance installed near to a heat source?
- Is the temperature setting correct?.
- Is the condenser clean?
TROUBLESHOOTING
-L’impostazione della temperatura sia corretta
- Il condensatore sia pulito
3) La temperatura all’interno del comparto frigorifero è troppo bassa. Contr ollare
che:
- Il termostato sia sulla posizione corretta
4) L’apparecchio è eccessivamente rumoroso. Controllare che:
-L’apparecchio non sia in contatto con altri mobili o oggetti
- I tubi nella parte posteriore non si tocchino o vibrino
-L’apparecchio sia ben livellato
3) The temperature inside the fridge compartment is too low. Check that:
- Is the thermostat in the right position?
4) The appliance is very noisy. Check that:
- Is the appliance in contact with other furniture or objects?
- Are the pipes on the back touching or vibrating?
- Is the appliance level?
22
Page 25
36
1
2
C
GLS38FH-33
3
GLS38FH-10
GLS38FH-9
4
C
GLS38FH-11
R
25 W
V
GLS38FH-43
IT
RICERCA GUASTI
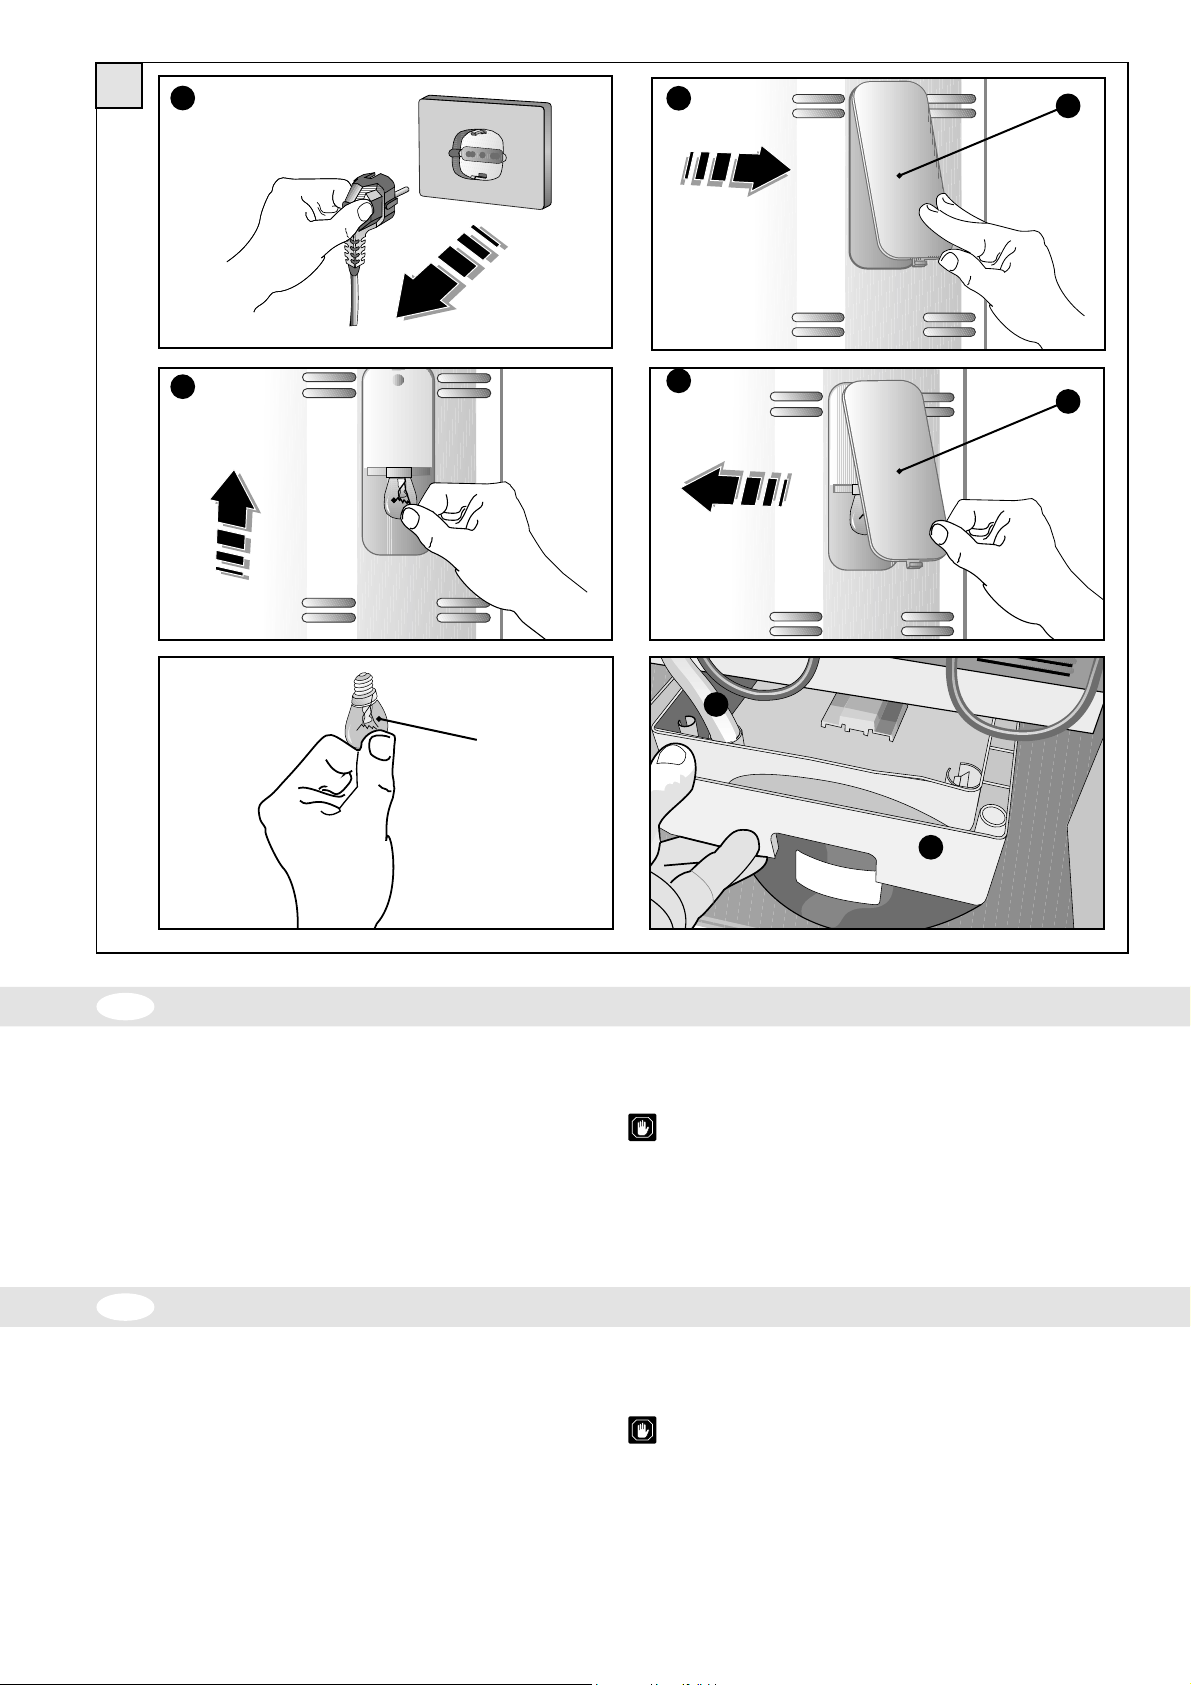
5) La luce interna non funziona
- Controllate prima il punto 1, poi: SOSTITUZIONE LAMPADA.
- Disinserite l’apparecchio dalla rete elettrica.
- Togliete il coperchio C della lampadina.
- Controllate la lampadina e sostituitela se necessario con una nuova (per la
potenza vedere il vattaggio indicato in figura); rimontate il coperchio C.
6) C’è acqua sul pavimento. Controllare che:
- La vaschetta V sia ben inserita a contatto della superficie del compressore.
- Il tubo di scarico R, a sua volta, sia ben inserito nella vaschetta.
GB
TROUBLESHOOTING
5) The interior light does not work
- First check point 1, then: REPLACING THE LIGHT BULB.
- Disconnect the appliance from the mains electricity supply.
- Remove light bulb cover C.
- Check the bulb and replace if necessary (for the bulb rating, refer to the figure).
Replace cover C.
6) There is water on the floor. Check that:
- Is tray V inserted correctly and in contact with the compressor?
- Is drain pipe R correctly inserted in the tray?
GLS38FH-33
LAMPADA INTERNA SCOMPARTO FRIGORIFERO
Con l’apparecchio alimentato, la lampada interna si accende all’apertura del comparto
frigo. E si spegne alla chiusura della stessa.
N. B. In caso di por ta aperta per lungo tempo, la lampada viene spenta
automaticamente. La riaccensione è possibile dopo la chiusura e riapertura
della porta.
FRIDGE COMPARTMENT LIGHT
When the appliance is connected to the mains supply, the fridge compartment light
switches on when the door is opened, and switches off when the door is closed.
N.B. If the door is left open for a long time, the light will switch off
automatically. The light can only be switched on again after the door has
been closed.
23
Page 26
37
GLS38FH-2
IT
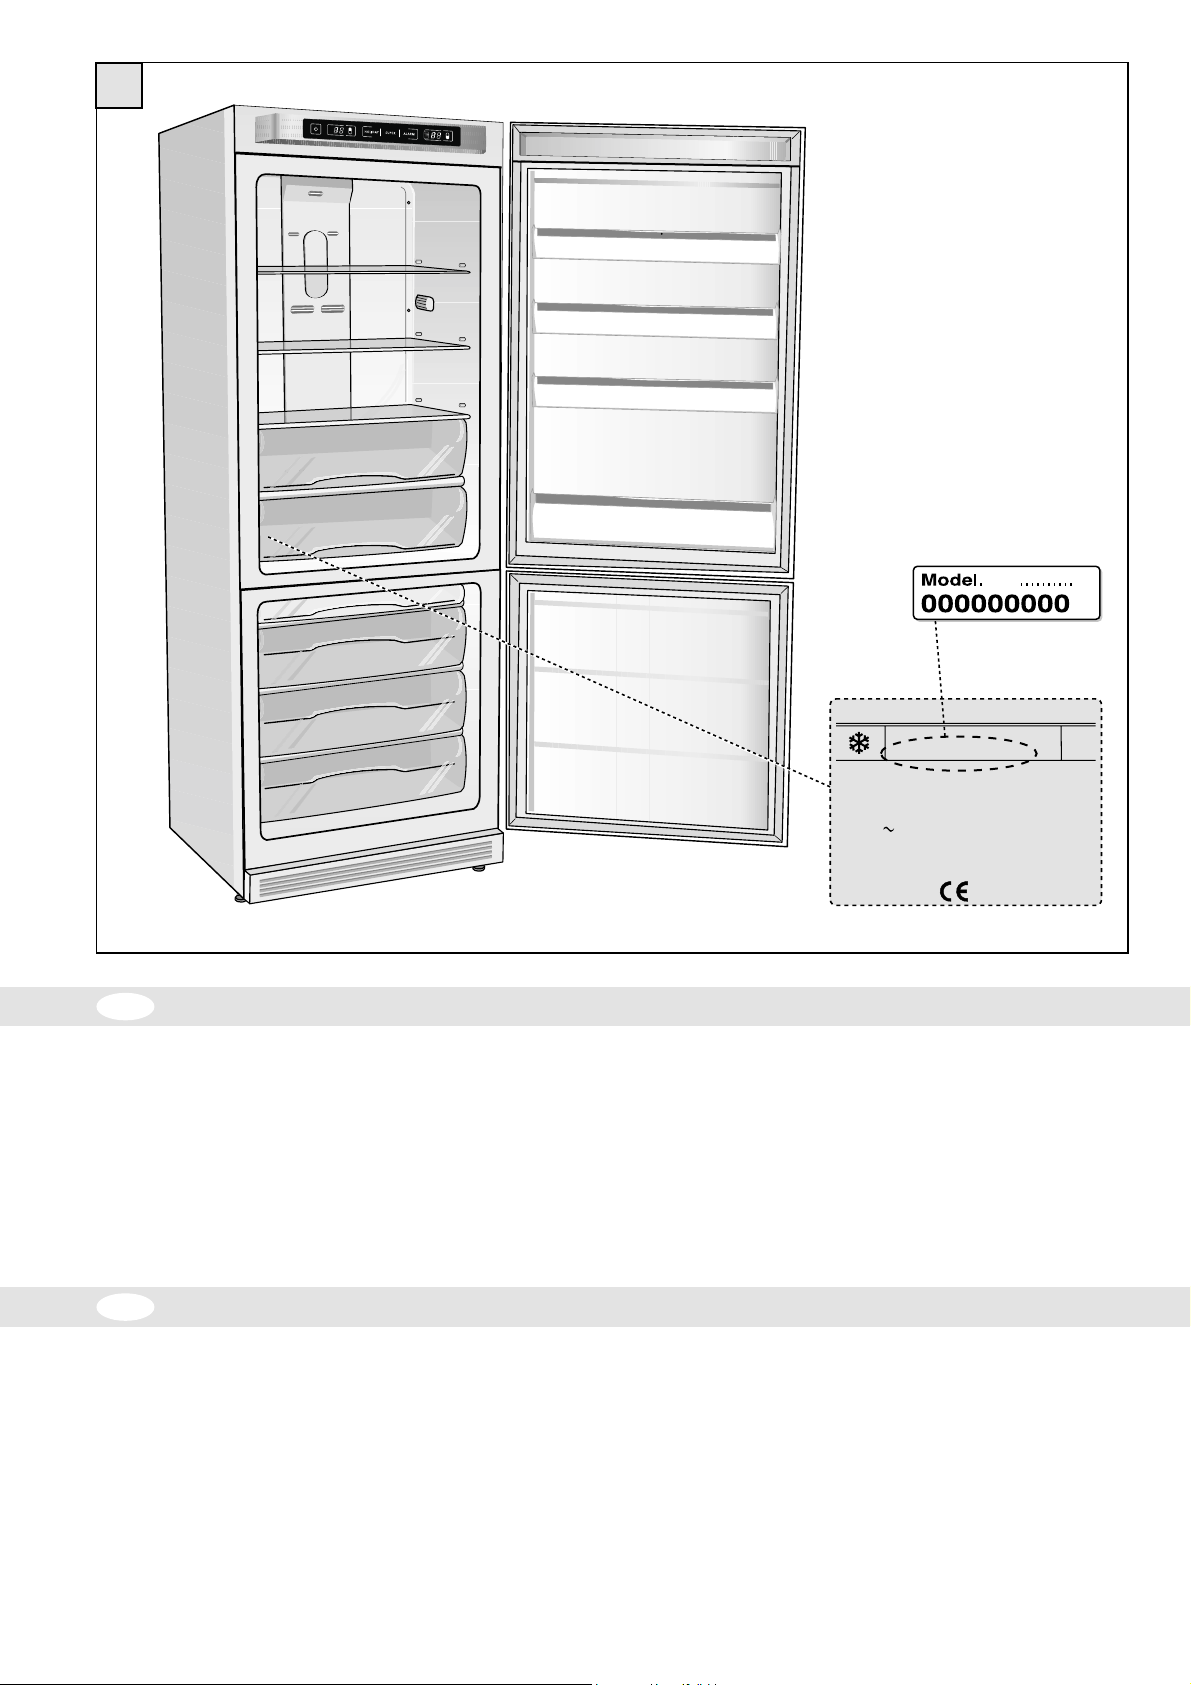
SERVIZIO ASSISTENZA TECNICA
Prima di contattare il Servizio Assistenza:
- Verifi cate se è possibile eliminare da soli i guasti (vedere “Guida Ricerca Guasti”).
- Riavviate l’apparecchio per accertarvi che l’inconveniente sia stato eliminato.
Se il risultato è negativo, disinserite nuovamente l’apparecchio e ripetete
l’operazione dopo un’ora.
Se l’apparecchio non funziona bene o addirittura non funziona affatto prima di
chiedere l’intervento di un tecnico, nel vostro interesse, controllate che:
- la spina sia bene inserita nella presa di corrente;
- ci sia tensione nella linea elettrica;
- la temperatura sia impostato correttamente;
GB
TECHNICAL ASSISTANCE SERVICE
Model.
000000000000000000000
REFRIG.-FREEZER
KUHL-GEFRIERGERAT
REFRIGER.-CONGEL.
GROSS VOLUME
INH. BRUTTO
..........V .... Hz
R600a
g .... /....
TYPE
.........
l ...........
CLASS
KLASSE
CLASSE
..................
VOL. NET. REFRIG. / FREEZER
INH. NUTZ KUHLT. / GEFRIER.
....... A
.......
02
l .............
..... kg/24h
- le chiusure delle porte siano perfette;
- la tensione di alimentazione corrisponda a quella dell’apparecchio (± 6%).
- Se il risultato è ancora negativo, contattate il Servizio Assistenza.
Comunicare:
- il tipo di guasto
- il modello
- Il numero di matricola
Before contacting the Assistance Service:
- Check whether it is possible to rectify the problem by referring to the
“Troubleshooting” guide.
- Restart the appliance to check whether the problem has been resolved. If the
problem still exists, disconnect the appliance from the mains electricity supply
and repeat the operation after one hour.
If the appliance is not working properly or not working at all, before calling the
Technical Assistance Service check that:
- The plug is inserted properly in the mains socket.
- The mains supply is working.
- The temperature is set correctly.
24
- The doors close properly.
- The power supply voltage corresponds to that of the appliance (± 6%).
- If the problem still exists, call the Assistance Service.
Inform the Assistance Service of:
- The type of malfunction
- The appliance model
- The serial number
Page 27

Page 28

461308072 17/11/11
 Loading...