

Page 1
DW911ES / DW911EB
INSTRUCTION MANUAL
:
WWW.CAMPOMATIC.COM
Dishwasher
Page 2

TABLE OF CONTENT
English __________________________________________
1
French
___________________________________________
25
German
___________________________________________
50
Italian
__________________________________________
72
Page 3

Thisapplianceisintended to be used in household
andsimi larapplicationssuchas:
-staff kitch en areas insho ps, offices an do ther
worki ng env ironmen ts;
-farm house s;
-byclients in hotels,motelsandotherresidential type
environments;
-bedand breakfasttype environments.
Thisappliancecan be used by children aged from8
yearsand aboveand persons withreduced physical,
sensory orm ental capa bilities orl ack of exp erience
andknowledge if they have beengiven supervision
or instruction concerninguse of the appliancein a
safe way and understandthe hazardsinvolved.
Children shall not play with the appliance. Cleaning
andusermaintenanceshall notbe madeby children
withoutsupervision. ForEN60335-1
This applianc eis no t intended for use by pers ons
(including children)withreduced physical,sensory
or me nta l c apa bi li ti es , or la ck o f ex pe ri enc e an d
knowled ge ,unles s they h ave be en given s upervisio n
or instruction concerning use of theappliance by a
personresponsible for their safety. ForIEC60335-1
Thisapplianceis forindooruse only,for household
useonly.
To pr otect agai nst th e risk o f ele ctrical sho ck, do no t
immerse the unit, cordor plug in water oro therliquid.
Pleaseunplug before cleaningand maintenancethe
appliance .
Use a soft clothmoisten with mild soap, and thenuse
adryclothtowipeitagain.
()
()
When using your dishw asher,
follow the precautions listed below:
1
Page 4

This appliance must be earthed. In the event of a
malfunction or breakdown, earthing will reduce the risk
of anelectric shock by providing a path of least
resistance of electric current. This appliance is equipped
with a cord having an equipment-earthing conductor
and a grounding plug.
The plug must be plugged into an appropriate outlet that
is installed and earthed in accordance with all local
codes and ordinances.
Improper connection of the equipment-earthing
conductor can result in the risk of an electric shock.
Check with a qualified electrician or service
representative if you are in doubt whether the appliance
is properly grounded.
Do not modify the plug provided with the appliance;
If it does not fit the outlet.
Have a proper outlet installed by a qualified electrician.
Do not abuse, sit on, or stand on the door or dish rack of
the dishwasher.
Do not operate your dishwasher unless all enclosure
panels are properly in place.
Open the door very carefully if the dishwasher is
operating, there is a risk of water squirting out.
Do not place any heavy objects on or stand on the door
when it is open. The appliance could tip forward.
When loading items to be washed:
1) Locate sharp items so that they are not likely to
damage the door seal;
2
Page 5

2) Warning: Knives and other utensils with sharp points
must be loaded in the basket with their points down or
placed in a horizontal position.
Check that the detergent powder is empty after
completion of the wash cycle.
Do not wash plastic items unless they are marked
dishwasher safe or the equivalent.
For plastic items n
ot so marked,
check the manufacturer's
recommendations.
Use only detergent and rinse additives designed for
an automatic dishwasher.
Never use soap, laundry detergent, or hand washing
detergent in your dishwasher.
Children should be supervised to ensure that they do not
play with the appliance.
The door should not be left open, since this could increase
the risk of tripping.
If the supply cord is damaged, it must be replaced by the
manufacturer or its service agent or a similarly qualified
person in order to avoid a hazard.
During installation, the power supply must not be
excessively or dangerously bent or flattened.
Do not tamper with controls.
The appliance is to be connected to the water mains using
new hose sets and that old hose-sets should not be reused.
The maximum number of place settings to be washed
is 14.
The maximum permissible inlet water pressure is 1MPa.
The minimum permissible inlet water pressure is 0.04MPa.
3
Page 6
Dispose of the dishwasherpa ckagingmaterial
correctly.
All packagingmaterialscan be recycled.
Plasticparts aremarkedwith thestandard
international abbreviations:
PE forpolyethylene,e.g. sheetwrappingmaterial
PS for pol ystyrene, e.g. p adding m aterial
POM polyox ymethylene, e.g . plasti c clips
PP poly propyl ene, e.g. Salt fill er
ABS Acrylonitrile ButadieneStyrene, e.g. Control
Panel.
Packag ing mate rial could be dan gerous fo r childre n!
Fordisposing of packageand the appliance please
go to a recycl ing ce ntre. Th erefo re cut o ffthe power
supply cable a nd make the door closing dev ice
unusab le.
Cardboardpackagingis manufacturedfrom recycled
paper a nd should be disposed in the was te paper
collecti on for rec ycling.
Byensuringthis productis disposedof correctly,you
willhelp preventpotential negativeconsequences
forthe environment and humanhealth,which could
otherwi se be c aused by i nappro priate wa ste handling
of thi s p roduct.
Formore detailedinformationaboutrecycling of this
produc t, pl ease co ntact y our lo cal city o ffice a nd your
househ old waste di sposal serv ice.
DISPOSAL: Do not dispose this product as unsorted
municipal waste. C ollectiono f such waste se parately
forspecial treatment is necessary.
4
Page 7
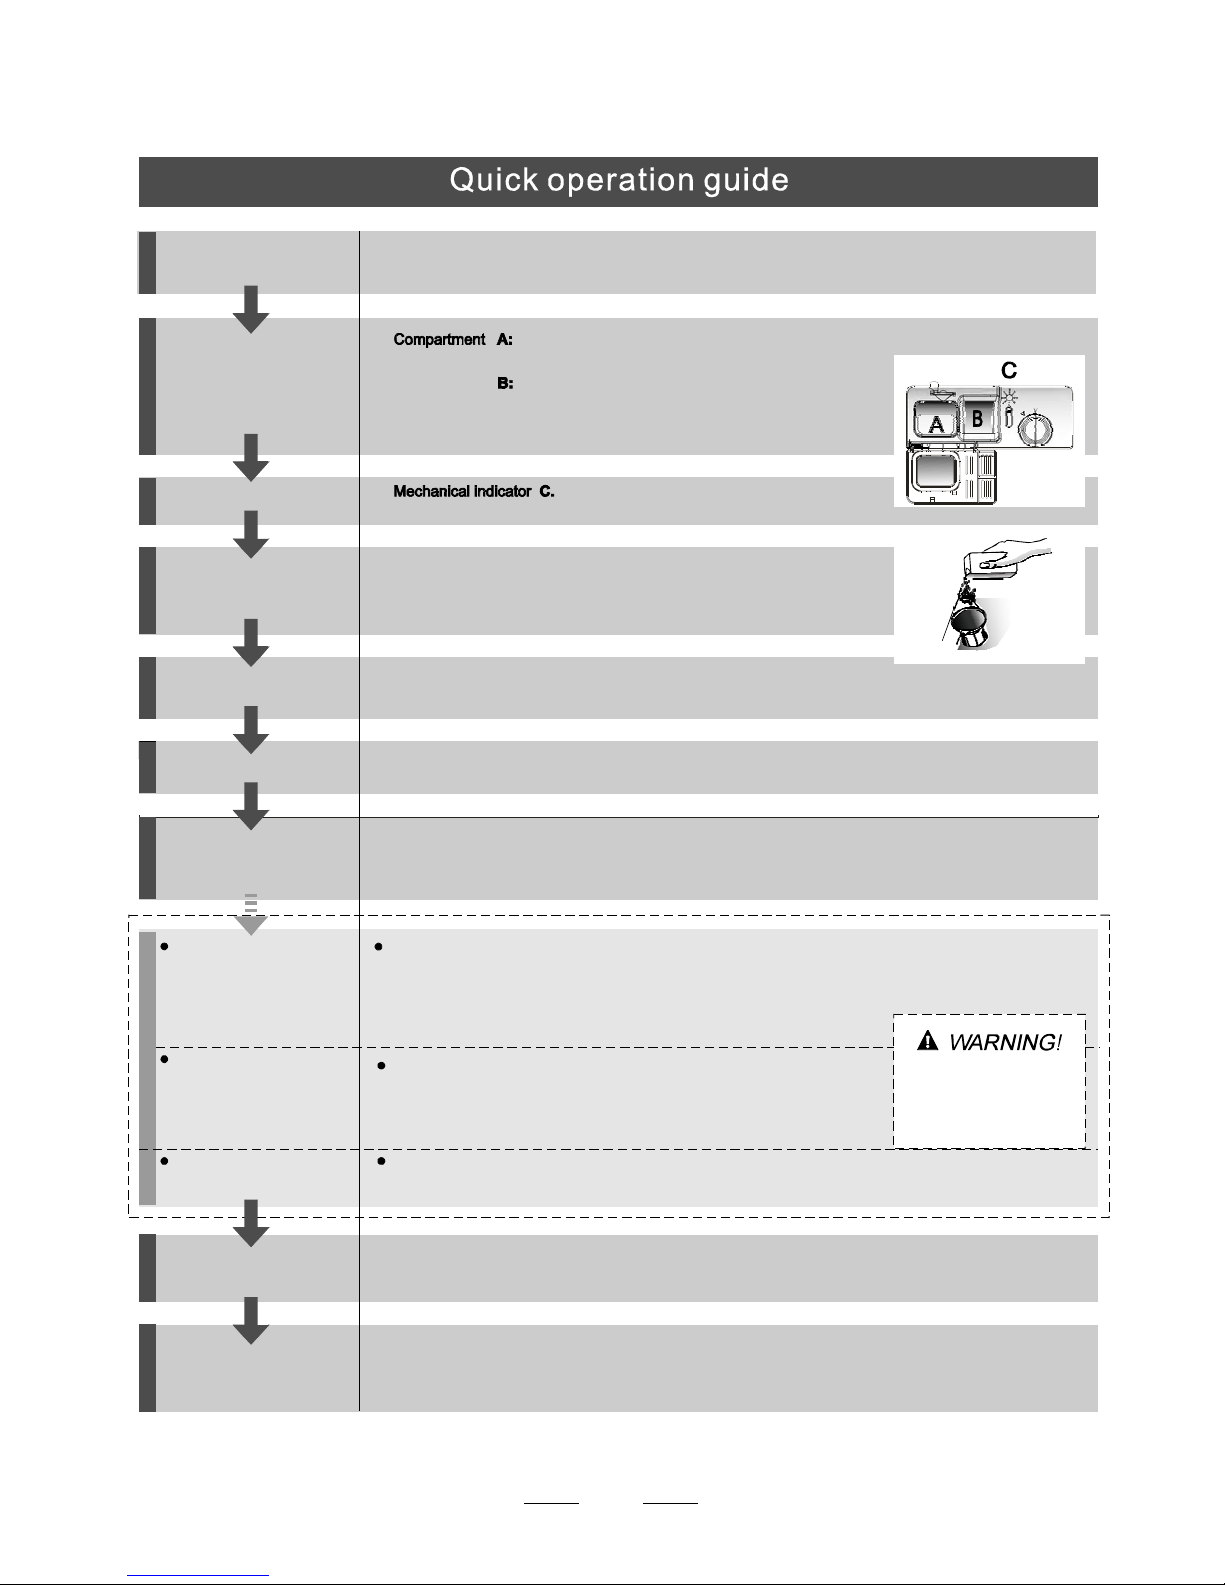
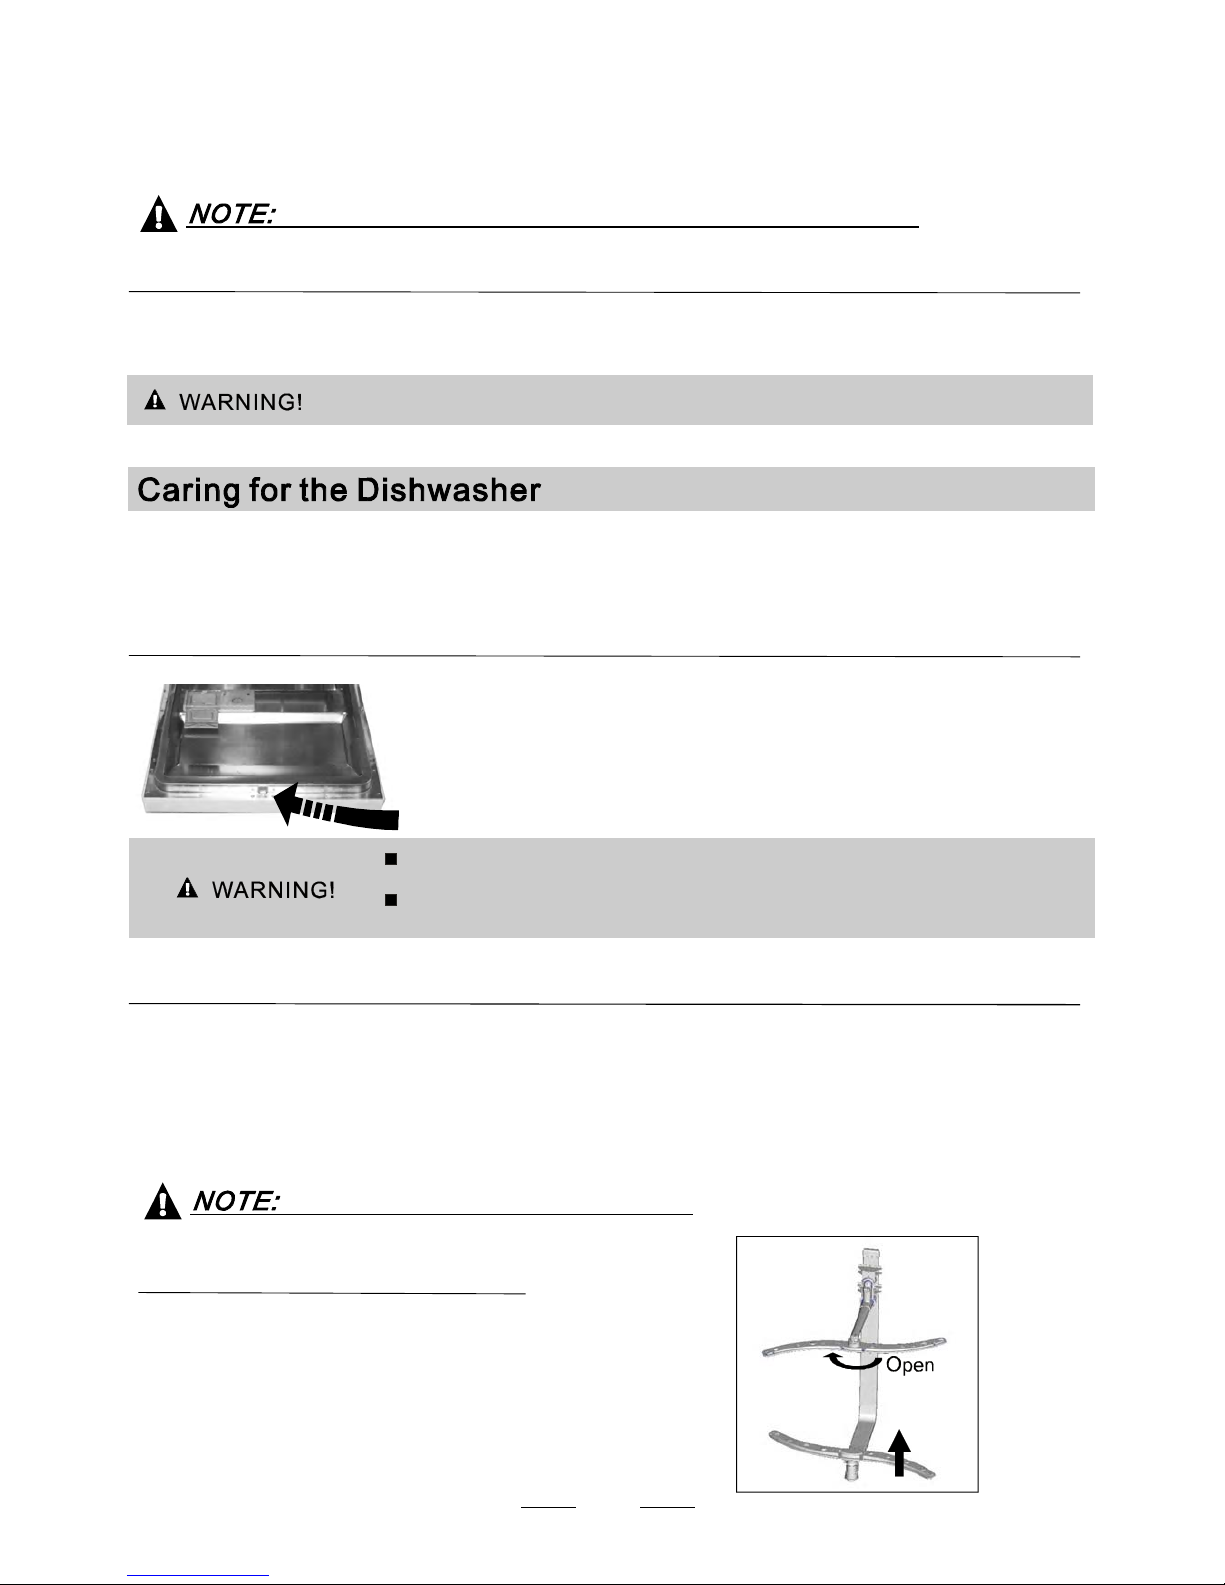
Witheachwashcycle.
Compartment
For programmes with pre-wash only.
(Follow the user instructions!)
Electric indicator on control panel(if provided).
Check the rinse aid level
(On models with water softener system only.)
Electricindicator on control panel (if provided).
If there is no salt warning light in the control panel
(for some models), you can estimate when to fill the salt into
the softener by thenumber of cycles the dishwasher has run.
Checkthe regeneration
salt level
Load the baskets
Select a programme
Close the door, turn on the water tap . The machine will start working after about 10 seconds.
Running the dishwasher
Switch offthe appliance
Turn off the water tap,
unload the baskets
Fill the detergent dispenser
Warning: wait a few minutes(about 15 minutes) beforeunloading the dishwasher toavoid handling
the dishes and utensils while they are still hot and more susceptible to break.
They will alsodry better.Unload the appliance, startingfrom the lowerbasket.
Changing theprogramme
Add forgotten dishes in the
dishwasher.
Scrapeoff any largeamountof leftover food. Soften remnants ofburnt food inpans,
thenload the baskets. Refer to the dishwasherloadinginstructions.
Press the programme button until the selected programme lights up.
( Seethe section entitled Operation instruction )“”
When the working cycle has finished, the buzzer of the
dishwasher will sound 8 times, then stop.
Turn off the appliance using the Power button.
If the appliance is switched
off during a wash cycle.
Open the door carefu l ly.
Hots team may esc ape
when the door is opened!
If the appliance is switched off during a wash cycle, when switched
on again, please re-select the washing cycle and operate the dishwasher
according to the original Power-on state ).
Switch on the appliance Open the door,Press the Power switch button to switch on the appliance.
1.Open the door slightly,.
2.Youcan open the door completely until the spray arms stop .
3.Add the forgotten d ishes.
4.Close the door, the dishwasher will start running again after 10 seconds.
Fordetailed operatingmethod read thecorrespondingcontent on the instruction manual.
1.A running cycle canonly be modified if it has been runningfor ashort time. Otherwise the detergent
may have already been released and the water already drained. If this is the case, the detergent
dispenser must be refilled.
2. Open the door slightly ,then press the program button more than 3 seconds to cancel the
running programme.
3. Select a new programme.
4. Close the door, restart the dishwasher .
5
Page 8

before using it forthe firsttime.
To getthebest performance from yourdishwasher,read all operatinginstructions
313
1
3. : to select option the Extra Drying or
Express function withthem ain program being selected.
OptionButton
6. :Tot urn on/off the powers upply.
Power But to n
4. : To touch the buttontodelay, delay time willbe increased by discontinuous or continuous touch,
maximum 24 hours delaycanbe defined.
Delay Butt o n
5. : To Press the buttonto select
appropriate Program.
Progra m Butt o n
1. : toshow the reminding time, programm
irons,salt andrinse aidwarning;
Display Screen
2.Alt Butt on: Dual zone washfu nction, press thebutton
to select either upper basket or lower basket loaded, and
the response indicatorswilll ight on
7. : tosho w the stateo f dishwasher with the
door closing, itwillbe particularize d at paragraph 6.
State Indicator
Th e g l ass out e r door is breakable o r nament, please do n ot impact. And a broken d o or dish w ashe r is h armf ul to
your family,please call for after service atonce .
11
12
Back Vie w
1
2
3
4
5
7
8
9
10
Front view
Lower basket
Salt cont ainer
Dispenser
Cup shelf
Spra y arms
Filter assembly
Inlet pipe conne cto r
Drainpipe
Upper basket
Cutleryrack
Top spray arm
1
Innerpipe
5
6
7
8
9
10
12
11
3
2
4
6
ECO
6
Page 9
The waterso ftener must be setm anu ally,usin g the waterha rd ness dial.
The waterso ftener is designed toremovemin erals and salts fromt he water,wh ich would have
a detrimentaloradvers e effect onthe operation of the appliance.
The highert he content of thesemineralsandsalts , theharder yourwat er is.
The softenershould beadjusted according to the hardness oft he water inyourarea. Yourlocal WaterAuthor ity
can advise you on the hardness o fthewaterin your area.
Adjusting Salt Consumption
The dishwasher isde signed to allow foradjustmentinthe amount of salt consumed based onthe ha rdness of
the waterused.Thisis intendedto optimise and customise thelevelo f salt consumption.
WATER SOFTENER
Thehardnessofthe water varies fromplacet o place. If hardwater is used int he dishwasher,depositswill
form on the dish esand utensils.
Theappliancei s equipped with asp ecial softener that uses asalt container specifically designed to eliminate
lime and minerals from the water.
Contact your localwaterbo ard for information onthehardne ss of yourw ater supply.
If your model does not have any water softener, you m ayskip this section.
Clark: British degree
fH: French degree
DH: Germ a n de gre e
dH=1.25Clarke=1.78 fH=0.178mmol/l
1
The manufactory setting: H4 (EN 50242)
Before usingyourdi shwasher for the firsttime:
A. Set the wate r softener
B. Add 1.5Kgdishwasher saltandth en full fillt he salt container with water
C. Filltherinseaiddispenser
D. Fil l in dete rgent
1. Open the door ,Switch ontheappl iance;
2. Press the Program button formore than5 seconds to start the watersof tener
set model wit hin 60seconds after thea pplia nce was switched on(The Salt and
Rinseaid warning lights willbe on periodically whenitgetin theset model);
3. Press the Program button to selectthepr oper set according toy our local environment,
the setswill changein the following sequence: H1->H2->H3 ->H4->H5 ->H6;
4. Press the Power button to end these t up model.
Please followthestepsbelowfor adjustment in saltconsumption.
dH
mmol/l
0~90~5 0~0.94
H1
0
10-20
6-11
1.0-2.0 H2 9
21-30
12-17 2.1-3.0
H3
12
H4
20
fH
0~6
7-14
15-21
Clark e
WATER HARDNESS
Selector Position
Salt consumption
(gram/cycle)
18-22 31-40 22-28 3.1 -4.0
41-60
23-34 4.1-6.0
H5
30
H6
60
29-42
35-55 61-98 43-69 6.1 -9.8
7
Page 10
1.Thesalt container must only be refil led when thesaltwarn ing light inthecont rol panel comes on.
Depending on howw ell the salt dissolves, thesaltwarninglight may still be on eventho ugh the
salt container isfi lled.
If thereisno salt warning light inthe control panel (for someModels),you cane stimate when to fill
the salti nto the softener by thecyc les that thedishwasher hasru n.
2. If there arespillsofthe salt, a soakor a rapid program should berun to remove the excessivesa lt.
Always use thesal t intended for use withdishwasher.
The saltc ont ainer is located beneath the lower basketandshoul d be filledase xplained
inthe following:
Attention!
Only usesaltspe cifically designed for the usei n dishwashers! Every othert ype of
salt not specificallyde sig ned for theu se in ad ishwas her, especiallyt able salt, will
damage thewater softener. In case ofd amages caused by the useo f unsuitable
salt the ma nufact urer does notg ive any warranty nor is liableforany damages caused.
Only fillwi th salt justbefore startingoneo f theco mplete washing programs.
This will preventanyg rains of salt orsa lty water,wh ich may have been spilled,
remaining on the bottomo f the machine for anype riod oftime, which maycau se
corrosion.
The rinse aid isr elea se d during the final rinse to prevent water from for ming droplets o n your dishes, which can
leave spots andst reaks. It alsoimprove s drying by allowing water to roll offthe dishes. Your dishwasher is
designed to useliquidrinseaids.The rinse aiddispenserislocatedinsidethe door next to the detergent dispense r.
To fill the dispenser, open the cap and pourthe rinse aid into thedispenser until the level indicat or turns com pletel y
black. Thev olume of the ri nse aidc ont ainer is about110ml.
RinseAid Dispenser
Function of Rin seAi d
Rinse aid isaut oma tically added during the last rinse, ensuring thorough rinsing, and spot and streak free drying.
Attention!
Only use brandedrinse aid for dishwasher.Neverfillthe rinse aid dispenser withany other substances
(e.g. Dishwasher cleaning agent, liqu id detergent). This would damage the appliance.
Full fill thesaltcontainerw ith water,It is normal forasm all amount of water to comeout of the
salt container.
A After the lower basket has been removed, unscrew andremovethec ap from the saltcontainer.
B Place the end of thefu nnel (supp lied) into the hole and introduce about 1.5kg ofdi shwasher salt.
C
D Af ter filling the container , screw thecapt ightly back clockwise .
E Thesaltwarning lightwill stop being afterthesa lt container has beenfilled withsalt.
F Immedi ately after filling the salt into the saltcontainer,awashing progr am should be started
program Other wise the filter system, pump or other important parts oft he machin e may bedamaged
bysalty water. This isout ofwarranty.
(Wesuggest touse a short
).
8
Page 11
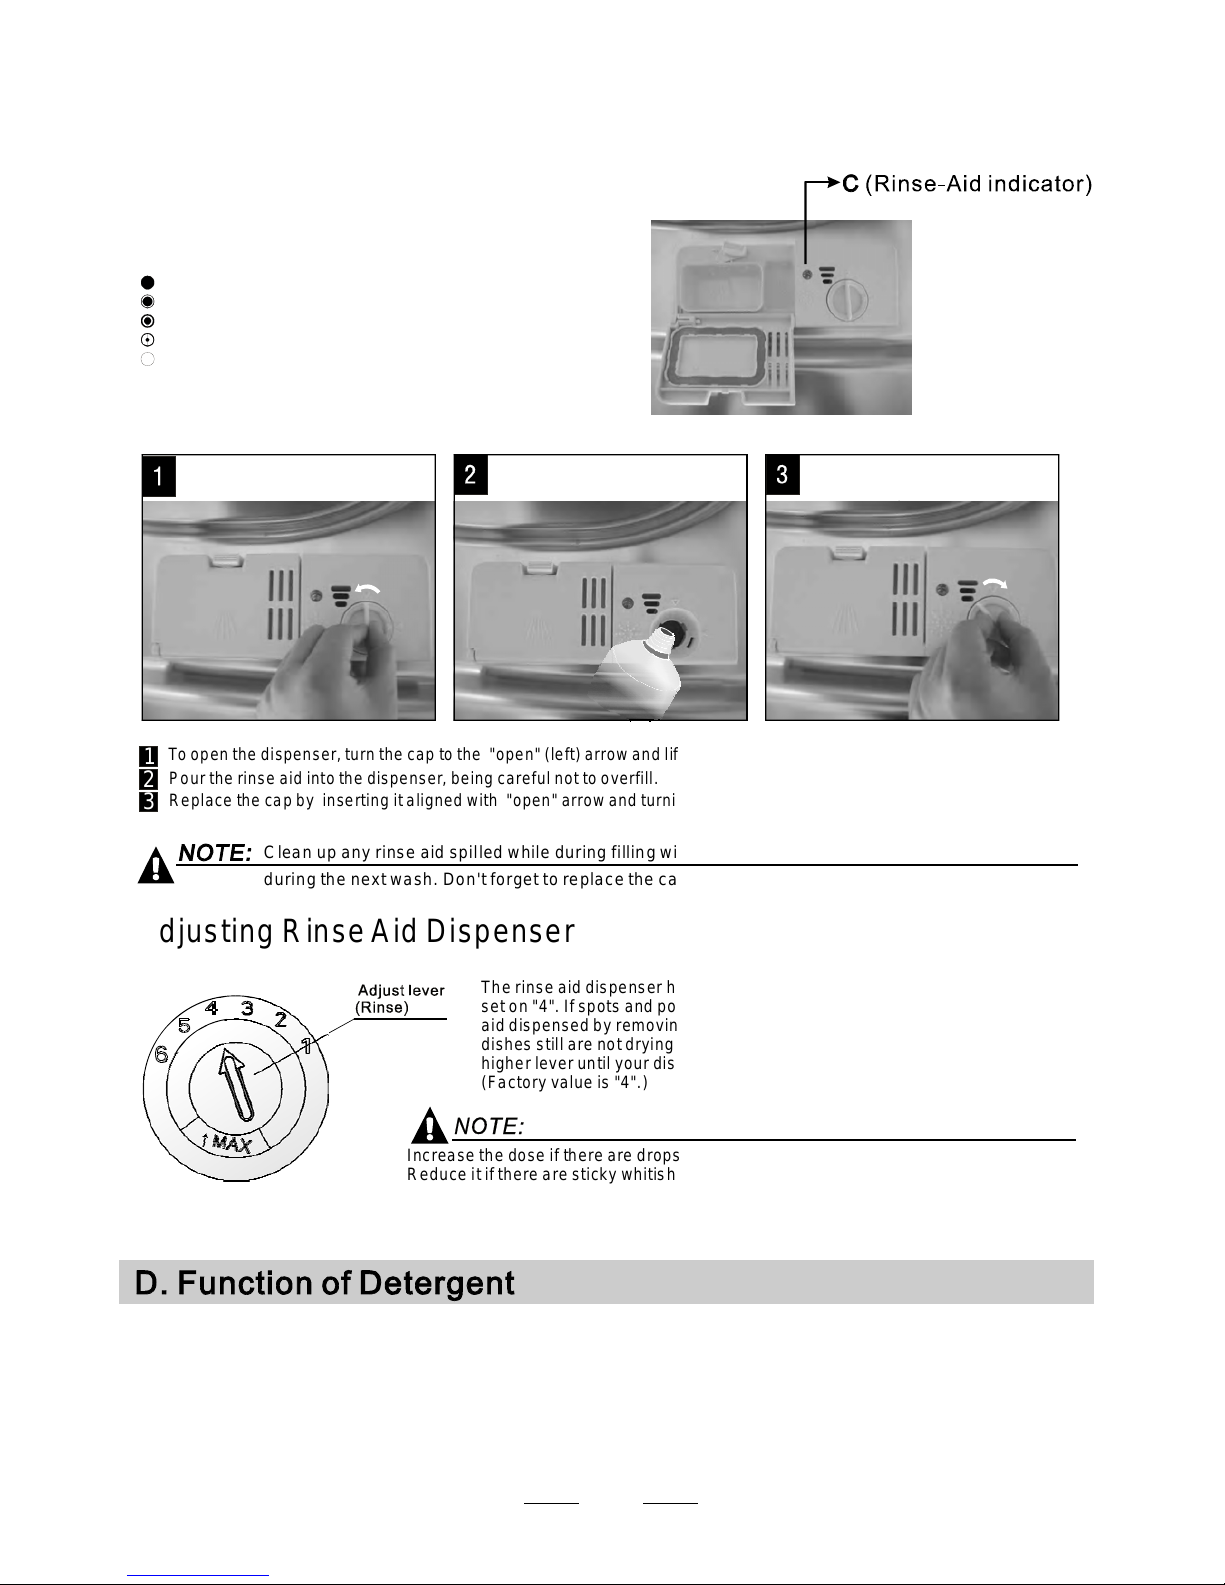
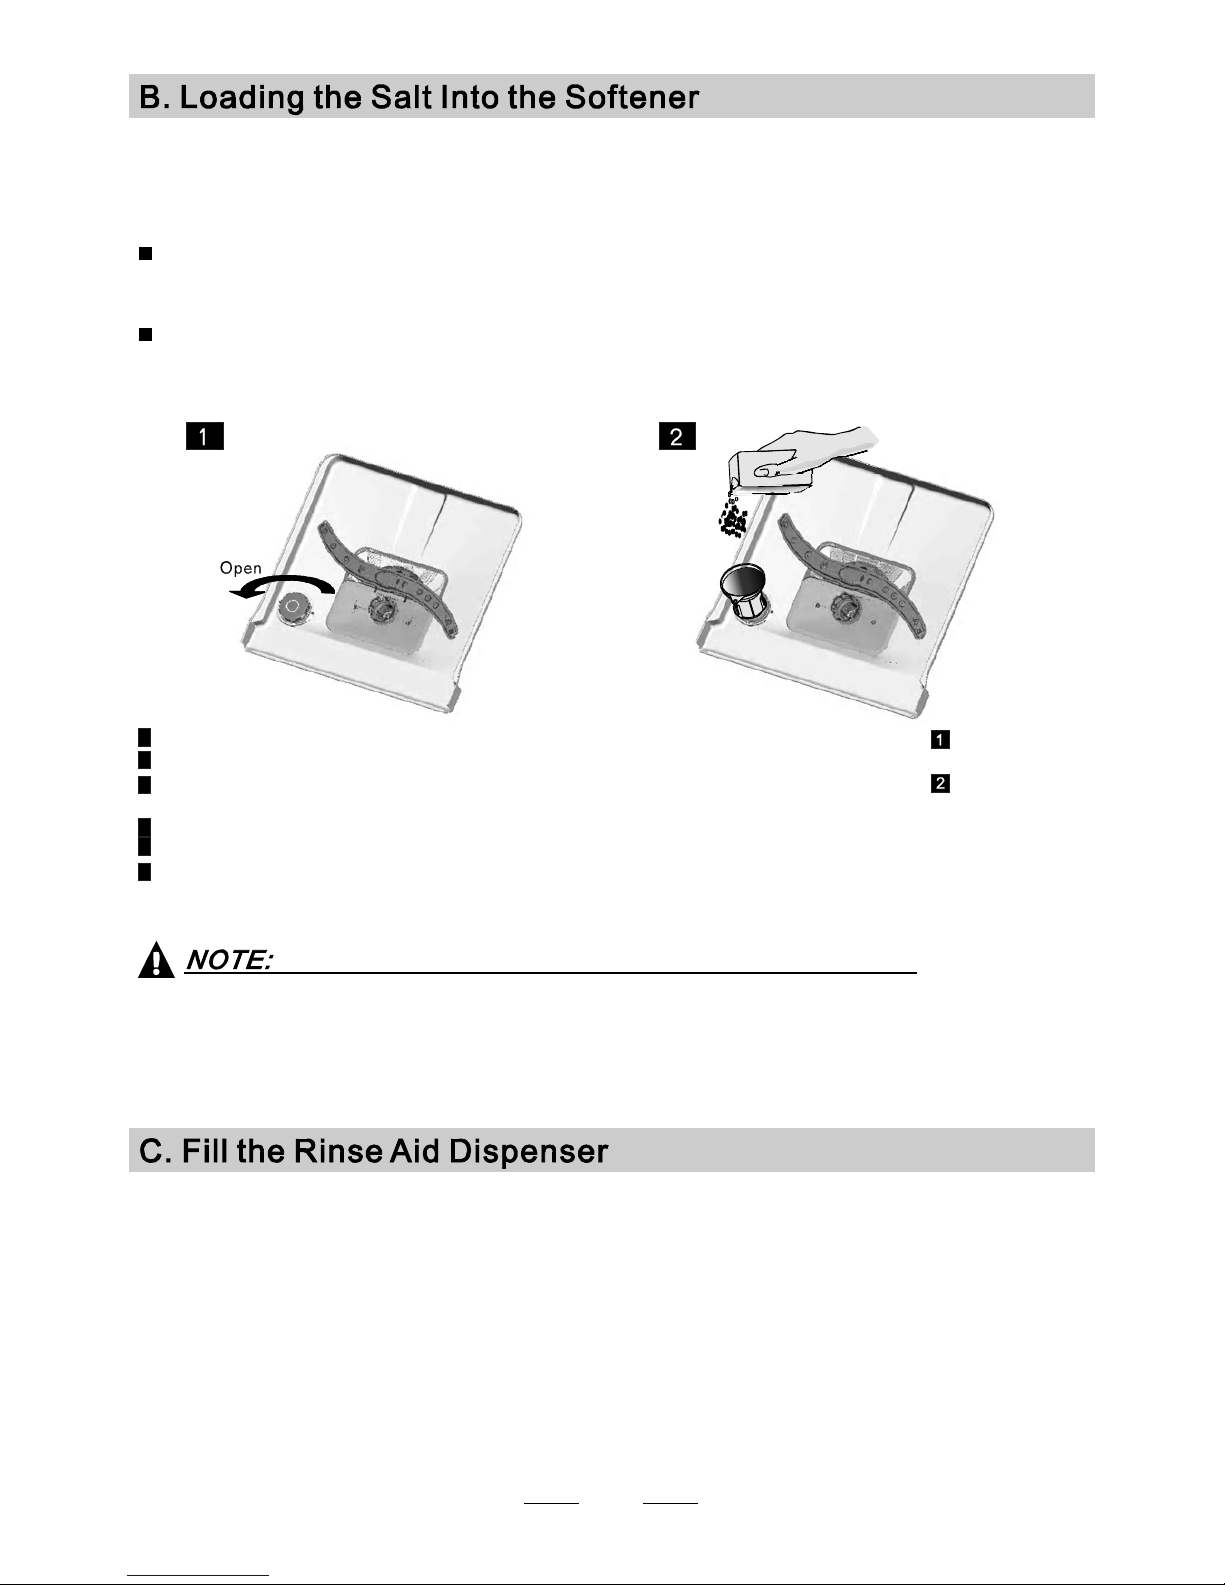
Toopen the dispen ser, turn the cap tot he "open" (le ft) arrow and lift it out.
Pour the rinse aid into the dispenser, being careful no t to overfill .
Replace the capby inserting it aligned with "open" arrow andturningit to the closed(right)arrow.
Adjusti ng R inseA id Di spenser
The rinse aiddispenser hassi x or foursettings.Alw ays start with thed ispens er
set on"4".I f spots andpoordryingare a p roble m, increase the amount ofr inse
aid dispensed by removing thedi spenser lid and rotating thed ial to "5". If the
dishes still are notdr ying properly or are showspots,a djust the dial tothenext
higher lever until your dishesa re spot-free. The recommended setting is "4".
(Factoryvalue is"4".)
Increasethe dose ifthere aredropsof wateror limespotson the dishes afterwashing.
Reduce i tif there arestickywhitishstains onyourdisheso r a bluish filmon glasswareor
knifeblades.
1
2
3
Astheri nse aid diminishes, the sizeo f the blackdot
on the rinse aid level indicatorchanges,as illustrated below.
Full
3/4full
1/2full
1/ 4full-Should refill to eliminate spotting
Emp ty
Whento Refillthe RinseAid Dispenser
Iftherei s no rinse-aid warning light in the control panel, you can estimatethe amount from the colour
oft he optical level indicator C loc ated next to thecap. When the rinse-aid container isf ull, the whole
indicator will bed ark .As ther inse-aid diminishes, the size ofthedark dot decreases. You should never let
the rinse ai d leve l fa ll 1 / 4 full .
during the nextwash.
Don't forget toreplacethe cap before you close dishwasherdoor.
Cl ean up any r inse aid spilled whi le dur i n g filling with an abs o rbent c l oth to av oi d exce ssiv e foami n g
Detergents with its chemical ingredients are necessary to remove dirt, crush dirtandtransport itou t of thedishwasher.
Mostof thecommercial qu ality d eterge ntsare suitable forthispurpose.
""
ProperUse of Detergent
Useonlydet ergent specifical ly made fortheuse in dishwashers. Keep yourdetergent fresh anddry.
Don't put powdered detergent intothe dispenser untilyou'rereadytowash dishes.
Attention!
9
Page 12
Amount of Detergent to Use
Based on theirchemical composition,detergentscanbe split in two basictypes:
Detergent tablets of different brandsdissolve atdifferentspeeds. Forthisreasonsome
detergent tablets cannot dissolvean d develop theirf ul l cleaning powerdurings hort
programs. Therefore pleaseusel ong programs when usingdetergenttablets,to
ensure the comp l ete rem oval of d e terge n t residuals.
The dispenserm ust be refilled before thestar t of eachwashcy cle following the instructions
provided int he wash cycle table .Yourdis hwasher uses less detergent and rinseaid than
Conventional dishwasher. Generally,onlyone tablespoon of detergentis neededfor
anormalwashload.Moreheavily soiled items need more detergent.Always add the
detergen t just before star ting the dish was her, otherwis e it could get damp and will not
dissolve pro pe r ly.
Concentr ated Deterge nt
DetergentTablets
Detergent Dispenser
conventional, alkaline detergentswith caustic components
lo w alkali ne conc entr ated deter ge nts wi t h natur a l enzym es
Normally newpulverised detergent iswith out phosphate. Thus thewate r softener function of
phosphate is not gi ven. In t h i s cas e we r ecomm e nd to fill salt in th e salt co ntai ner even when
the hardnesso f water is only6 dH. If detergents without phosphateareused in the caseof hard water
often whites pots appear on dishesandgl asses. In this casepl ease add more detergent tor each
better re sults . Deter gents witho ut chlorine d o on ly bleach a lit tle. S tr o ng and coloured spo t s will no t
beremoved completely. In thiscasepleasech oose a program with ahi gher temperature.
°
Deterg ents
There are 3 s or t s of det e rgen ts
1.Withphosphateand with chlorine
2.Withphosph ate and without chlorine
3.Withoutph osphate and without chlorine
Always add thedeterg ent just beforestar ting each wash cycle.
Only usebranded detergent aidf ordishwasher.
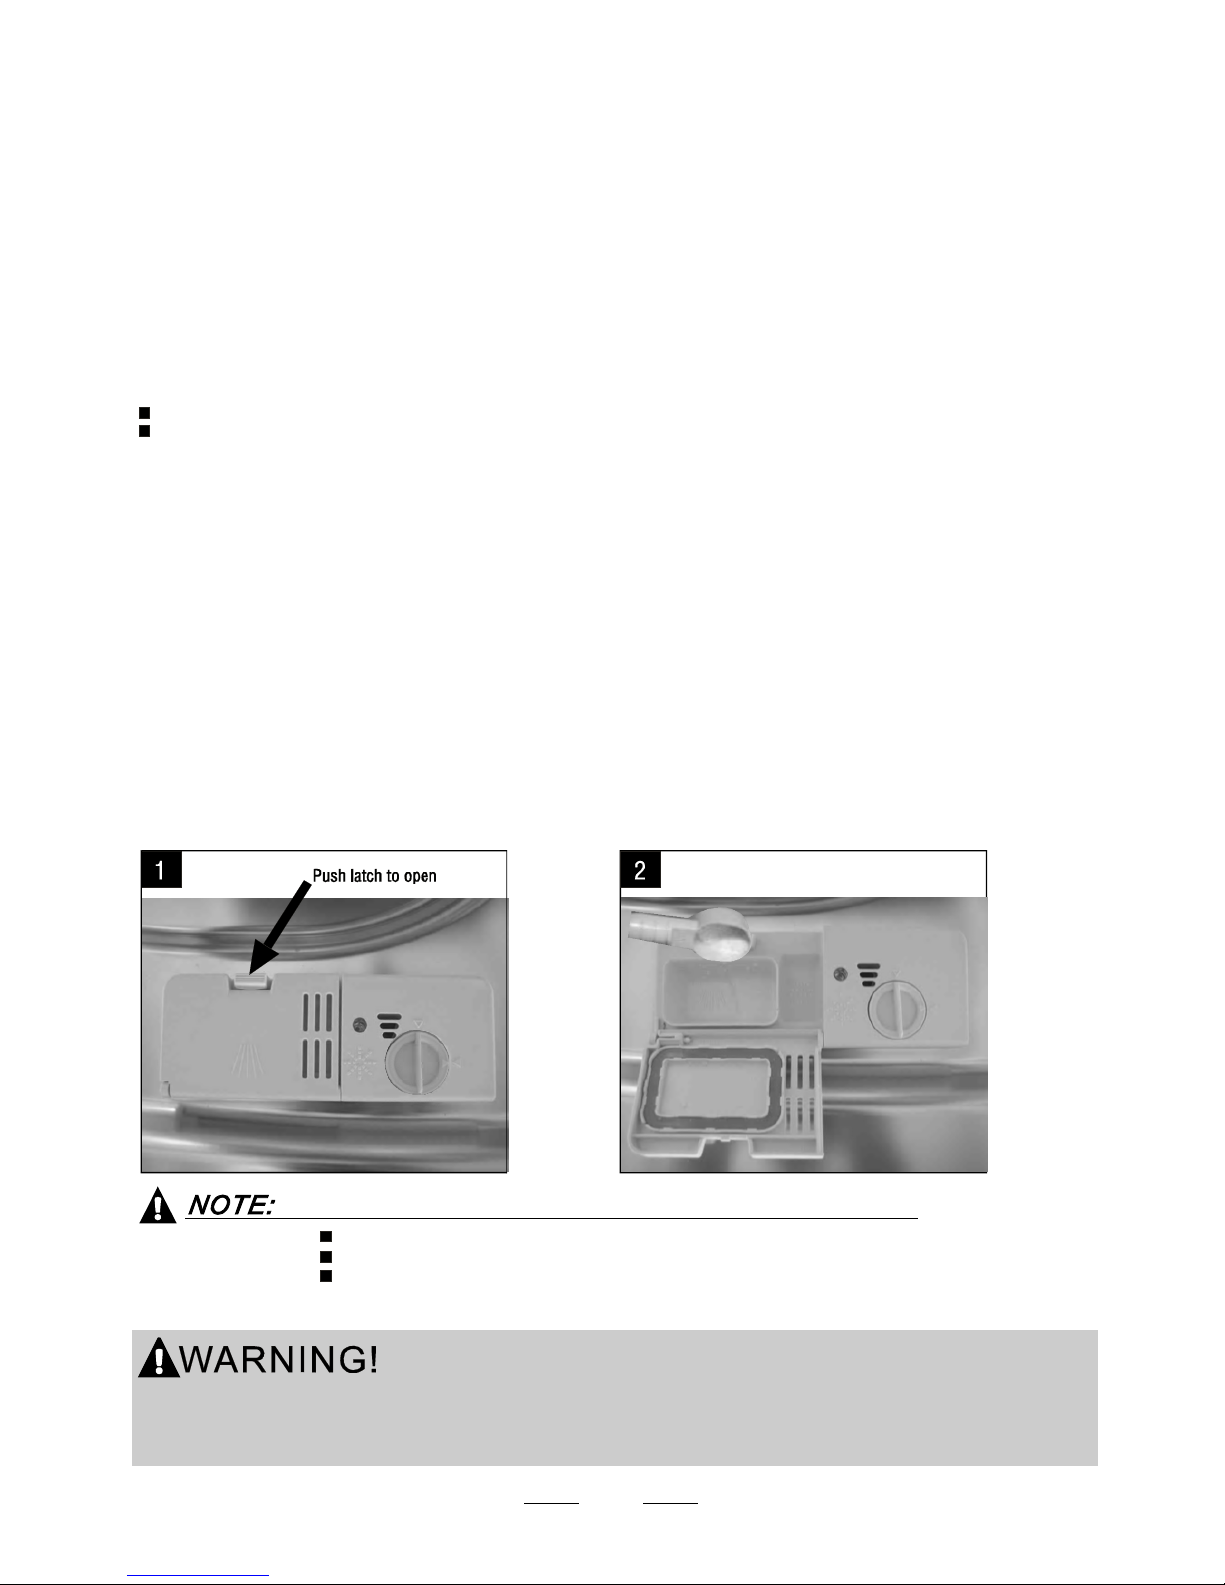
If thel id is closed: pressreleasebutt on. Thelidwillspring open.
Dishwasher detergent is corrosive!
Takecaretokeepitoutofreachofchildren.
10
Page 13
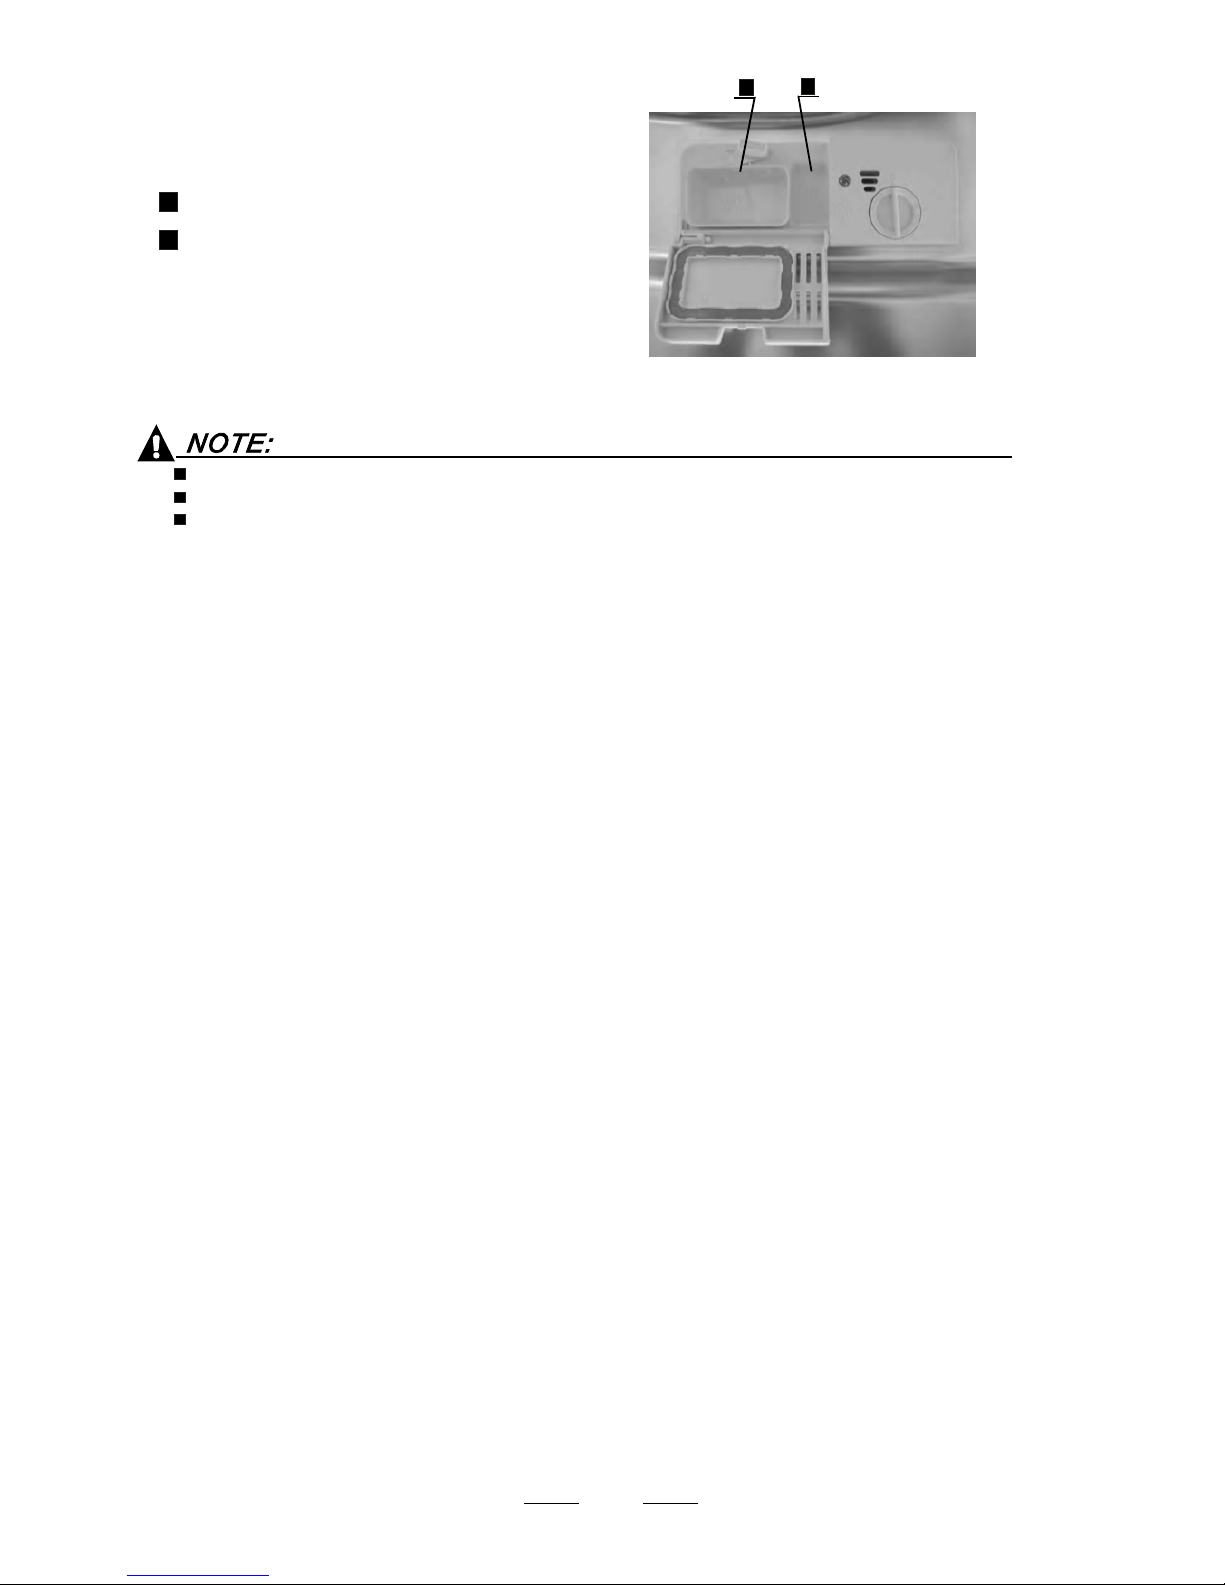
Fillthed etergent dispenser with detergent.
The m arking indi c ates th e dosi ng l evels , a s
illus t rated on the righ t:
The placeo f main wash cycledeterg ent placed.
The placeofpr e-wash cycle detergentplaced.
Pleaseobservethem anufactur ers dosing andsto rage
Recommendations as statedon thedetergent packaging.
Closethe lidand pressuntilit locks in place.
If the d ishes are he avily s o il ed, pl ace an ad ditio nal
detergent dosei n the pre-wash detergent cha mber.Thisdet ergent will take effectd uring the pre-wash phase.
A
B
Fillin Detergent
Youfind information about the amountofde tergent for thesingle programme onthe last page.
Please aware, that accordingtothe level soiling and the specific hardnessof water differences arepossible.
Please observe themanufacturer's recommendations onthedetergent packaging.
A
B
11
Page 14
Cutlery withw ooden,horn china or
mother-of-pearl handles
Plastic items that aren ot heat resistant
Older cutlery with glued partst hat arenot
temperature resistant
Bonded cutlery items or dishes
Pewter or cooperitems
Crystal glass
Steel items subject tor usting
Wooden platters
Items made from syntheticfibres
Some types ofgl asses can become
dull aftera large number of washes
Silver and aluminum par ts have a
tendencyto discolour duringwashing
Glazed patterns mayfade if machine
washed frequently
Are n ot su itable
Are of limitedsuitability
Dishes anditemsof cutlerymustnot lie ins ide oneanother, or covereachother.
To avoid damage to glasses, theym ust not touch.
Load large itemswhichar e most difficult toc lean into thelowerbask et.
The upper basketisdes igned to holdm ore delicate and lighterdishware suchas glasses , coffee
and t eacups
Long bladed knives stored ina n upright position are ap otential hazard!
Long and/or sharp itemso f cutlery such as carving knivesm ust be positioned
horizon tally in the upperb asket.
Please do not overload your dishwasher. T his is important forg ood results and for
reasonab le consumption of energy.
Load hollowi tems such as cups, glasses,p ans etc. With theopeni ng facing downwards so that
wat er can n o t c o l l ect in the con ta iner or a deep ba se.
Considerbuying utensils which are identified as dishwasher-proof.
Use a milddetergentthati sdescribed as 'kindto dishes'. If necessary,seekfurther
information from the detergent manufacturers.
Forparticularitems, selecta programwithas lowa temperature as possible.
Toprev ent damag e, do not take glass and cutlery out of the dishwashe r immed iatel y
after the program me has ende d.
(For bestperformance ofthe dishwasher, follow theseloadinggu ide lines.
Features and appearance ofbaske ts and cutlery basketsmayvary from your model.)
Scrape off anylarg e amounts ofleftoverfo od. Soften remnants ofb urnt food in pans.
It isnotnecess ary to rinse thed ishes under running water.
Place objects inthedis hwasher in following way:
1.Itemss uch as cups,g lasses, pots/pans, etc. aref aced downwards.
2.Curvedi tems, or ones withreces ses, should be loadeda slant so that water canrun off.
3.Allu tensils are stacked securely andcannot tip over.
4.Allu tensils are placed intheway that the spray armscanrotat e freely during washing.
Very small items should notb e washed in thedish washer as theyc ould easily fall outo f the basket.
To prevent water dripping fromtheuppe r basket into the lowerba sket, we recommend thatyou
empty the lowerbasketf irst and thentheupp er basket.
12
Page 15

The upper basket isde signed to holdmore delicate
and lighterd ishware such asglasses, coffe e an d
teacupsandsaucers, as wellas plates, small bowls
and s hallowpans (as long astheyare not too dirty).
Positionthe dishesand cookware s othat th eywill
notgetmoved by the spray of water.
We suggest that you place large item s and the most
difficult tocleanitems are tobeplaced into the lower
basket: su ch aspots,p ans, lids, serving dis hes and
bowls, as s h own in the f igur e below. It is pr eferable to
pla ce serving di shes an d li ds on the s i d e of the r a cks
in order toavoid blocking the rotation of the top spray
arm .
Pots,servingbowls,etc,mustalwaysbeplacedtopdown.
D eep pots sh o u ld be slan t ed to allow wate r t o flow out.
Please ber eminded that:
The Botto m Basket featur es foldin g spikes so that large r or more pots and pans can bel o ade d.
Foldin g Spike s of Lower B asket
For better stacking ofpo ts and pans,
the spikescanb e folded down as
show in the picture right.
Adju sting the Upper Bask et
The height ofthe uppe r basket canbe adjusted in order to
create more spaceforlarg e utensils bothf or the upper
/lower basket. Thehei ght of the upper basket canbe
adjusted byp lacing the wheels ondifferentheightof the
rails. Long items,se rving cutlery,s alad servers and knives
should be placed on the shelfso that they donotobstruct
therotationofthesprayarms..
Foldin g bac k the c up s helives
For betters tacking of pots andp ans,
the sp ikes c an be fol de d down a s
show in the pict ure right.
Cutlery shouldbe placed in thecutleryrackseparately
from each other in the appropriate positions, and do
make sure theute nsils do not nest together, this may
cause badperformance.
Donot letany item extendthroughthe bottom.
Always load sharp uten sils w ith the shar p
pointdown!
13
Page 16
Intensive
Normal
Rapid
60 min
*EN 50242 : This programme isthetes t cycle. Thei nformation for comparability test
in accordance withEN 50242, as follows:
Capacity: 14 setting
Position Upper basket: upperw heels onrails
Rinse aid setting: 6
Pl:0.49w;Po:0.45w.
Startin g a cycle wash
Draw out thel ower and upperbasket,l oad the dishesand push them back.
It iscommended toload the lower basketfirst, thentheuppe r one (seethe section entitled
Loading the Dishwa sher ).
Pour in thed etergent (see the section entitled Salt, Det ergent and RinseAid ).
Insert the plugintothe socket. The power supplyis220-240 VAC/50HZ, the specification
of thesocketi s 10A 25 0VAC. Make sure that thewatersupp ly is turned onto full pressure.
“”
“”
1
2
3
5/3 0g
5/30g
20g
To rinse dishes thaty ou plan
to wash later that day
Soa k
80.01
4
Means:need to fill rinse into theRinse-Aid Dispenser.
()
For normally soiledloads,
suchas , plates,glasses
andli ghtly soiledpans.
pots
For hea v i e st soiled cr o c kery,
andnorm ally soiledpots
pans dishes etcwith d ried
onsoil ing.
、
、
Ashorter washfor lightly
soiled loads that donot
need dryi ng.
For lightlyso iled loads that
donotneed excellent drying
efficien cy.
Prewash 50
Wash 65
Rinse
Rinse
Rinse 6 5
Drying
(
℃)
(
℃)
(
℃)
Prewash(45 )
Wash (5 5 )
Rinse
Rinse (65 )
Drying
℃
℃
℃
Prewash
Wash (5 0 )
Rinse(65 )
Drying
℃
℃
Wash (4 0 )
Rinse
Rinse (45 )
℃
℃
Prewash 50
Wash(60 )
Rinse (60 )
Drying
(℃)
℃
℃
Prewash
ECO
(*E N 50242)
This isstan dar d programme , it i s
suitable to clean normally soiled
tableware and iti s the most ef fic ient
programme in terms ofits combi ned
energy andwater consumption for
that type of tablew a re.
Glass
Pre-wash
wash(40 )
Rinse
Rinse(60 )
Drying
℃
℃
Forlightly soiledcrockery
andglass
8.4~12.70.9~1.3
120~180
Pre -wash (45 )
Autowash(45-55 )
Rinse
Rinse (62 )
Dryi ng
℃
℃
℃
Autosensingwash, lightly,
normallyorheavily soiled
crockery,with orwith out
dried-onfood
Auto
185
175
175
40
1.3
0.93
1.6
0.6
17
14
10
10
60 101.15
115
0.87
14
(Or )3in1
5/30g
(Or )3in1
5/30g
(Or )3in1
5/30g
(Or )3in1
5/3 0 g
For a top quality cleaning, placet he silverware in theb asket
makingsure that:
They donotnes t together.
Silverware is placed with the malefaceup.
Long utensils int he middle.
14
Page 17
When the workingcycleh as finished, thebuzzero f the dishwasher willsoundfo r 8seconds,thensto p. Turnoff
the appli ance us ing the Powe r switch butto n , s hut off th e w ater sup p ly and o pe n the door of the dishw a s her.
Wait fora few minutes before unloading thedi shwa sher toavoidha ndlin g the dishesand ute nsils while they
are still hota nd more susceptible tobreakage. The y will alsod ry better.
SwitchOfftheDishwasher
Front indicatorshowswhitelight
1.Openth e door,switch off thedishwasherbypressing the button.
2.Turn offthewatertap!
, only inthi s case thepro gramme has ended.
Power
Openthedoorcarefully.
Hot dishes aresensi tive to knocks. Thedishes should therefore be allowed tocooldown around 15 minutes
before removingfrom theappliance.
Open thedishwasher's door,leave it ajar andwaita few minutes before removing the dishes.I n this way they
will be cooleran d the drying willbe improved.
Unloadingthe dishwasher
Itisnor mal that the dishwasher iswet inside.
Empty thelowerba sket first and thent he upper one.T his will avoid water drippingfromthe upper Basket onto
the dishes inth e lower one.
Ifyouopen the door , themachine will pause. The programlight will
stop blinking and thebuzzer will mooingevery minute unlessyou close thedoor .After
you cl ose the doo r ,t he m ac hi ne wi ll keep on wo r kin g af ter 10 secon ds .
duringawashcycle
Premise:
Acycle that is underway can onlybemodi fied if ithason ly been running fo r a shorttime.Ot herwise, the
detergent may have already beenreleased, andt he appliance may have alrea dy drained the wash water.
If thisi s the case, thedetergent dispenser mustberefi lled (see the sec tion entitled " Loading the
Detergent" ).
Open the door, t he machine will be in sta ndby state, press the program button morethan3s then you can
change the program tothedesire d cycle setting (seet he section entitled " Starting a was h cycle. . .").
1
2
Aforgotten dish can be added any time before the detergent cupop en s.
Add forgotten dishes.
Close the door, the dishwasher will run
after about 10 seconds.
After the spray arms stop working,you can open the door
completely.
2
3
1
4
Open the door slightly
Press the program button,th e washprogramwill be changed as follows direction:
If a program is selected, the responsep rogram indicator will light, then youca n also choose theE xtra Drying or
Express function, close thedoor, the dishwasher will begin workafterabou t 10 seconds.
ECO->Glass 60min->Rapid ;-> ->Soak->Auto->I ntensive->Normal
4
5
The front indicator show thestateof dishwash er:
a).blue light with blinking: running;
b).blue light without blinking: pause;
c).white light: end ofprocess(open the door,th e white light will extinguish);
d).no light: stand by
It is da ngerous to op en the door when was hing,
becausethe hot water may scald you.
15
Page 18
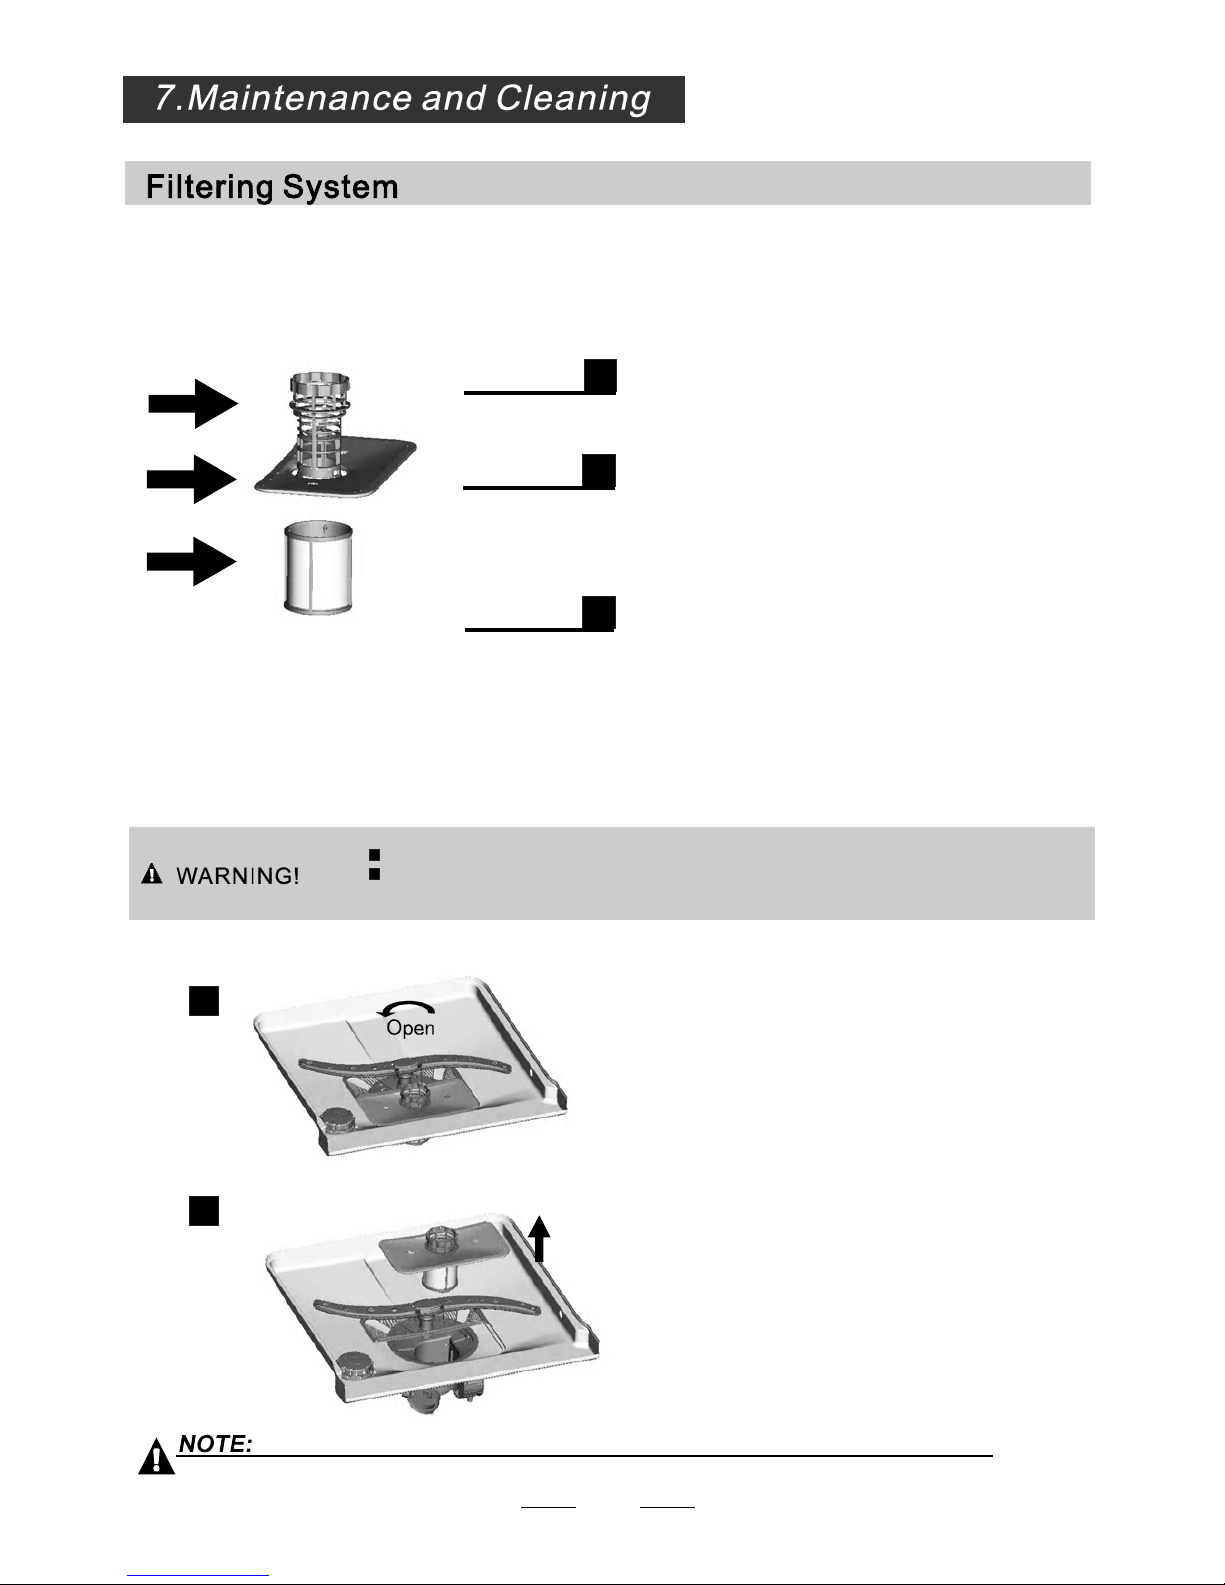
The filter prevents larger remnants offoodor other objects from getting insidethepu mp.
Theresidues mayblock thefilter, in this case they must be removed.
The filtersystemconsists of a coarsef ilter,a flat (Main filter)
And a mic rofilte r( F i ne fi lt er).
Foodand soil particles trappedin this filter are pulverized bya
special jet ont he lower spray arma nd washed down tod rain.
Larger it ems, s uc h as pie c esof bones or glass, tha t cou ldblock
the drain are trappedin the coarse filter. To remove the items
caught by the filter,gently squeeze the taponth e top ofthis
filter andliftout.
This filterholdssoiland food residues in the sump areaand
preventsi tfrombeingredeposit onthedishes duringwashcycle.
Main filter
1
Coarse filter
2
Fine filter
3
2
3
1
Filterassembly
Thefilterefficiently
For best performance and results,thef ilter must becleanedre gular ly. t his reason, it isa goo d ideato
remove the larger foodparticlestr app ed in thefilte r after each washcy cle by rinsing thesemicircular filterand
cup under runningwater.To remove thefilterd evice , pullthecu p handle int he upward direction.
removes food particles fromth e wash water,allowin g it tobe recycle d during the cycle.
For
Th e dishw as her must never be us ed without the filters.
Improper replacement of thefilter mayred uce the performance level ofthe applian ce
anddamage dishesandutensils.
1
2
Step 1 Turn the filterinant i-clockwis e direction,:
Step 2 lif t the filter assy up:
When following this procedure from step1 to step 2, the filter system will be removed;
when following it from Step 2 to Step 1, the filter system will be installed.
16
Page 19
The controlpanelcan be cleaned by usinga lig htly dampened cloth.
After cleaning, make sureto dry itthoroughly.
For the exterior, us e agood appli ance po lish w ax .
Neveruses harp objects, scouring padsorhar sh cleaners onanyp art ofthedi shwasher.
Protec tAga inst Freez ing
1.Cut off the electrical powerto the dishwasher.
2.Turnoff the water supply andd isconnec t thewateri nlet pipe from thew ater valve.
3.Drain thew ater from the inletp ipe and water valve. (U se a pantogathe r thewater)
4.Reconnect the waterinl et pipe tothewa ter valve.
5.Remove thef ilter at the bottomof the tub and usea sponge to soak upwate r in thesump.
please take frost protection measuresonthe dishwasher in winter.Ev ery fter washing cycles,
please operate as follows
timea
:
Cleaning the Filter
Cleaning theDoor
To cl ean the c o a rse fi l t er and the fine f i lter, use a c l eanin g brus h . R e as semble th e filter parts as show n in the figures
on the last page andreinsert the entire assem bly in the dishwa sher, positio ning it in its seat and pressing downwa rds .
Whencleaning thefilters, don'tknock on them.Otherwise, thefilters couldbe
contortedandtheperformance of thedishwasher couldbe decreased.
To clean thee dge around the door,you should use onlyasoft warm, damp cloth.
To avoid penetrationofwa ter into thed oor lock and electrical components,d o not
useaspr ay cleaner of anyki nd.
Never usea spray cleaner to cleanthedoorpanel as it maydamagethedoor lock
andelectricalcomponents.
Abrasive agentso r some paper towels shouldnot be used becauseoft he risk of
scra t c hing or l eaving spots on the s t ainl es s stee l surface.
Cleani ng the SprayArms
If your dishwasher cannotworkbecauseofthe ice,
please contact professional service persons.
It is n e cess ar y to cle an the sp ray arms regular ly for har d
wate rchemicalswill clog the sprayarmjetsand bearings.
- Inspect thefilter s for blockinga fter every time the dishwasher hasbe en used.
- Byuns crewing the coarse filter,you can remove the filter system. Removean y food remnants and
clean the filters under running water.
Remarks:
Theentirefilter assembly should be cleanedoncea week.
Toremovethelowersprayarm,pullout the spray arm upward.
Tore mo v e the up per s pr a y arm, ho l d t he nu t, rot ate the arm
clockwise to removeit.
Washthearms in soapy andw arm water and usea soft brush to
clean thejets.R eplace them after rinsingthemth oroughly.
17
Page 20
It isrecommend that yourun a wash cycle with the
dishwasher emptyandthe n remove theplugfro m the
socket, turnoffthe water supply and leave thedoor of
the a pp lian c e s l ightly open. This will help the d oo r
seals to lastl onger and prevent odoursfrom forming
withinthe appliance.
If the appliancemustbe moved, try to keepit in the
verticalposition. If absolutely necessary,it can be
positioned on itsback.
Oneofthefactorsthatcauseodourstoforminthe
dishwasher isfoodth at remains trappedin theseals .
Periodic cleaning with ad amp sponge will prevent this
fro m oc curr i ng.
Ensure the voltageandfrequ ency of thep ower being cor respond s to
those on the ratin g plate. Onlyinsertthe plug into anelectricalso cket which isearthed
properly.Ifthe electrical socket to which thea ppliance must beconnectedisnot
appropriate for the plug ,replace the socket,rather thanusinga adaptorsor the likeas
theycould causeoverheatingandburns.
Please look at the rating label to know the rating voltage andc onnect the dishwasher to the appropriate powers uppl y.
Use therequired fuse1 0 amp, timed elay fuse or circuit breaker recommended and provideseparatecirc uit serving
only this appliance.
Position the appliance in thed esired location. The backshouldr est against the wall behindit,and the sides,
along the adjacent cabinetso r walls. The dishwasheris equippedwi th water supply anddrainhos es that can
be positioned either tot he right or thel eft sides to facilitateproperi nstall ation.
Once the appliancei s positioned for levelling, the heightofthe dishwashe r
may be altered via adjustment of thescre wing level ofthefee t. In anycas e,
the appliance shouldnotbe inclined more than2 .
Before cleaning orperforming maintenance, always
remove thep lug from thesocket.
To clean the exterior and rubber parts of the dishwasher,
donot use solventsorabrasivecleaning products.
Only use a clo th with warm soapy water.
Torem ove spots or stains from the sur f ace of the
interi or, use a clothdampened with water an a little
vinegar,o r a cleaning product madesp ecifically for
dishwashers.
RemovethePlug
No S olve nts orAbrasive Cleani ng
Moving theApplia nce
Seals
After every wash, turn off the water supply tothe
appliance and leave the doorsli ghtly open soth at
moisture and odours aren ot trapped inside.
AfterEveryWash
Whennot inUse for aLongTime
For personal safety:
Do not use an extension cord or an adapter plug
with this appliance.
Do not, under any circumstances, cut or remove the
earthing
Connection from the power cord.
18
Page 21
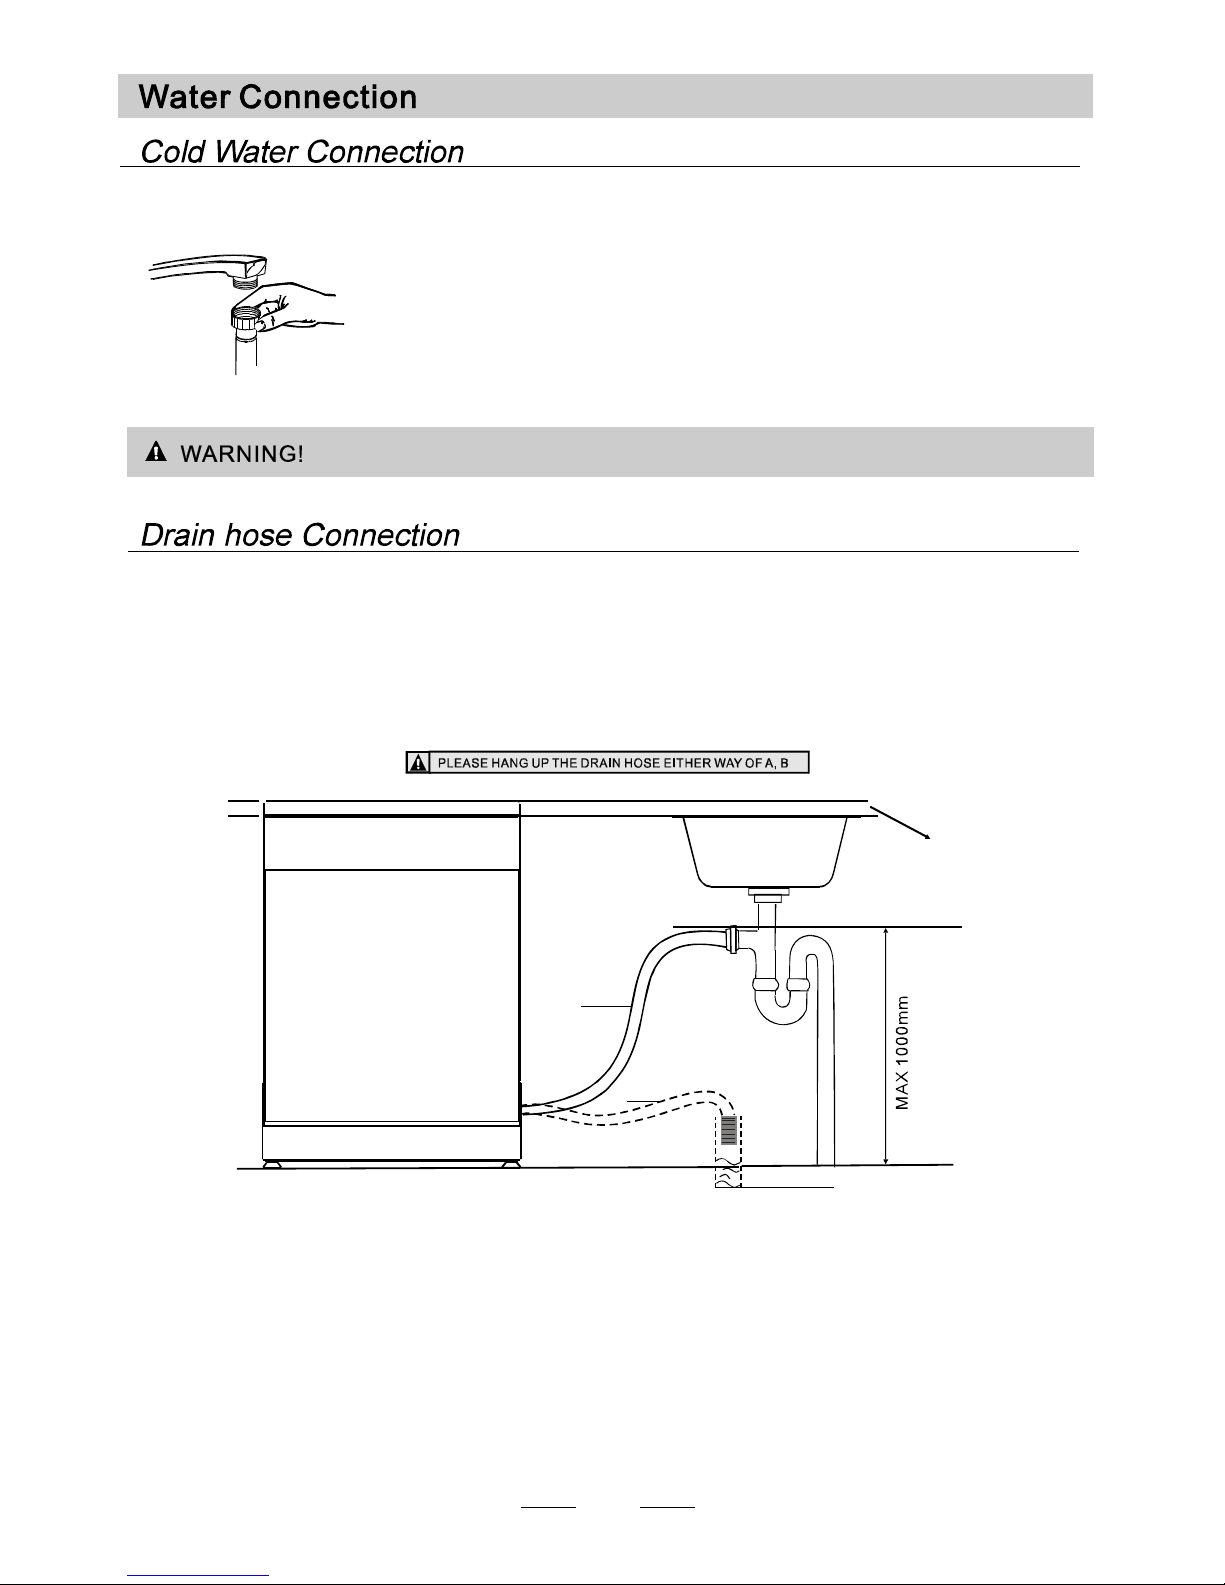
Connect the coldwater supplyhose to a threaded 3/4(inch) connector andm ake sure
that it isf astened tightly in place.
If the waterp ipes are neworha ve not beenu sed for ane xt ended period of time, let the
wate rrun to makesure that the wateris clear. This precautionis needed to avoid the
risk of the water inlet to beblocked and damagethea ppliance.
Pleaseclose thehydrant afterusing.
Insertthe drainhose into a drainpipe with aminimum diameterof 40mm,or let i trun into the sink, makingsure to
avoid bendingorcrim ping it.T he top of theho se must bele ss than 1000mm.
A
Counter
Front
Drain pipe
NOTE
The top of the hose
must be less than
1000mm.
φ 40mm
B
19
Page 22

Thefollowingthings should be checkedbeforestarting the dishwasher.
The content of this manual is very helpful to the u sers.
After installation, please make sure to keep this manual.
1
Thedishwasher is levelandfixed properly
2
The inlet valv e is ope n
3
Thereisaleakageattheconnections of the conducts
4
Thewiresaretightlyconnected
5
The poweris switchedon
6
The inlet and dr ain hoses are k notte d
7
Allpackingmaterials and printingsshould be takenoutfromthe dishwasher
Extension Hose
Ifyou needa drain hoseextension, make sure to use asimilar drain hose.
It mustb e no longerthan4 metres; otherwise the cleaning effectof the dishwasher could be reduced.
Wat e r O utl et
Connect the waterdrainhose.The drain hose mustbe cor rectly fitted to avoidw ater leaks.
Ensure that thew ater drain hose is notkin ked or squashed.
If th e si nk is 100 0 h i gher f rom the floor, the excess water in hoses cannot be dr aine d dire c tly
into thesink. It willbe necessary todrainexcess waterfromhosesintoa bowl o rsuitable
container that isheld outsi de and lowerth an the sink.
How to Drain ExcessWater FromHoses
Syphon Conn ection
The w aste co nn ecti on mus t be at a height les s t han 10 0 0 mm ( m aximu m) fro m thebot tom of the d i s h.
The waterdr ain hose should befixed .
20
Page 23
Fuse blown, or the
circuit breaker acted
Replace fuse or reset circui tbreaker. Remove any other
appliances sharing the same circuit with the dishwasher
Spilled rinse-aid
Always wipe up rinse-aidspills immediately.
Hard water minerals
The affected items are
notcorrosionresistant.
The lid of the softer
is loose
Aspayarmis
knocking against
an item in abasket
r
Items of crockery
are loose in the
wash cabinet
This may becaused
by on-site installation
or the cross-section of
the piping.
A programme wasnot
run after dishwasher
salt wasadded.
Traces of salt have
gotten into the wash cycle.
To clean the interior, usea damp spongewith
dishwashe r detergent and wear rubber gloves.
Never use any other cleaner than dishwasher
detergent for the risk of foaming or suds.
Always run the quick wash progr amme .
without any crockery in the dishwasher and
without selecting the Turbo function (if present) ,
after adding dishwasher salt.
Check the lip .Ensure the fix is fine.
Interrupt the programme, and rearrange the items
which are obs truct ing the sp ay arm.r
Interrupt the programme,
and rearrange the items of crockery.
This has no influence on the dishwasher function.
if in doubt, contact a suitably qualified plumber.
Detergent with
colourant was used
Make sure that the detergent is the one without
colourant .
Improper detergent
Make sure the dishwasher is turned on and thedoor is
closed securely.
Check that the water supply is connected properly and
the water is turned on.
Make sure to close the door properly and latch it.
Make sure the power cord isproperlyplugged into the
wall socket.
Power supply is not
turned on
Water pressure is low
Door of dishwasher
not properly closed.
Kink in drain hose
Filter clogged
Kitchen sink clogged
Check drain hose.
Check coarse the filter
(see section titled )" Cleaning The Filter "
Check the kitchen sinkto make sureitis draining well.
If the problem is the kitchen sink not dr aining ,you may
need a plumber rather thana serviceman for dishwashers.
Use only the special dishwasherdetergent to a voidsuds .
If this occurs, open the dishwasher and let suds evaporate.
Add 1 gallon of cold water to the tub. Close and latch the
dishwasher, then select anycycle. Dishwasherwill drain
outthe water at the first step.Open the doorafter draining
is stop and check if the suds is disappeared.
Repeat if necessary.
21
Page 24
The dishes were not
loaded correctly .
See notes in " Loading the Dishwasher Baskets ".
Select a more intensive programme.
See" WashCycle Table ."
Use more detergent,or change your detergent.
Rearrange the items so that the sp ay can rotate freely.r
Clean and/or fit the filter combination correctly.
Clean the sp ay arm jets. See "Cleaning the Spray
Arms".
r
Use less detergent ifyou have soft water and select
a shortest cycle towash theglassware and to get
them clean.
Use a mild abrasive cleaner to eliminate those marks.
Re-loading the dishes properl y.
Load the dishwasherassuggested in the directions.
Increase theamountof rinse-aid/refill the rinse-aid
dispenser.
Do not empty your dishwasherimmediately after
washing. Openthe door sli ghtly so that the steam can
escape. Begin unloading the dishwasher only once t
he dishes are barely warm to the touch. Empty the low
basket first.This prevents water form dropping off
dishes in the upper basket.
In short program the washi ngtemperature is lower.
This also lowerscleaningperformance. Choose
a program with a long washing time.
Water drainage is more difficult with these items.
Cutlery or dishes of this type are not suitable for
washing in the dishwasher.
Theprogrammewas
notpowerfulenough.
Not enough detergent
wasd ispensed.
Items are blocking
the path of sp ay arms.r
The filter combination
inthebaseofwash
cabinet is not clean or
is not correctly fitted.
This may cause
the sp ay arm jets
to get blocked.
r
Combination of soft
water and too much
detergent.
Aluminum utensils
have rubbed against
dishes.
Dishes block
detergent cups.
Improper loading
Too little rinse-aid
Dishes are removed
too soon
Wrong program
has been selected
Use ofcutlery with
a low-quality coating
If overflow occurs, turn off the main water supply before calling a service.
If there is water in the base pan because of an overfill or small leak,
the water should be removed before restarting the dishwasher.
When some malfunctions come on, the appliance will display error codes to warn you:
Overflow.
Longer inlet time.
Faucets is not opened, or water intake is
restricted,or water pressure is too low.
Some elementof dishwash erleaks .
E4
E1
E8
Divider vale failed
Divider vale failed
E9
Keep pressing a button more than 30 seconds.
Water or something on the button.
22
Page 25
Heig ht : 845mm
Width : 598mm
Depth : 600 mm
(without the door h andle)
Wate r pressure: 0.04-1.0MPa
Power s upply: seeratinglabel
Capa ci ty: 14pla ce set ti ngs
23
Page 26
24
Page 27
C
25
Page 28
26
Page 29
27
Page 30
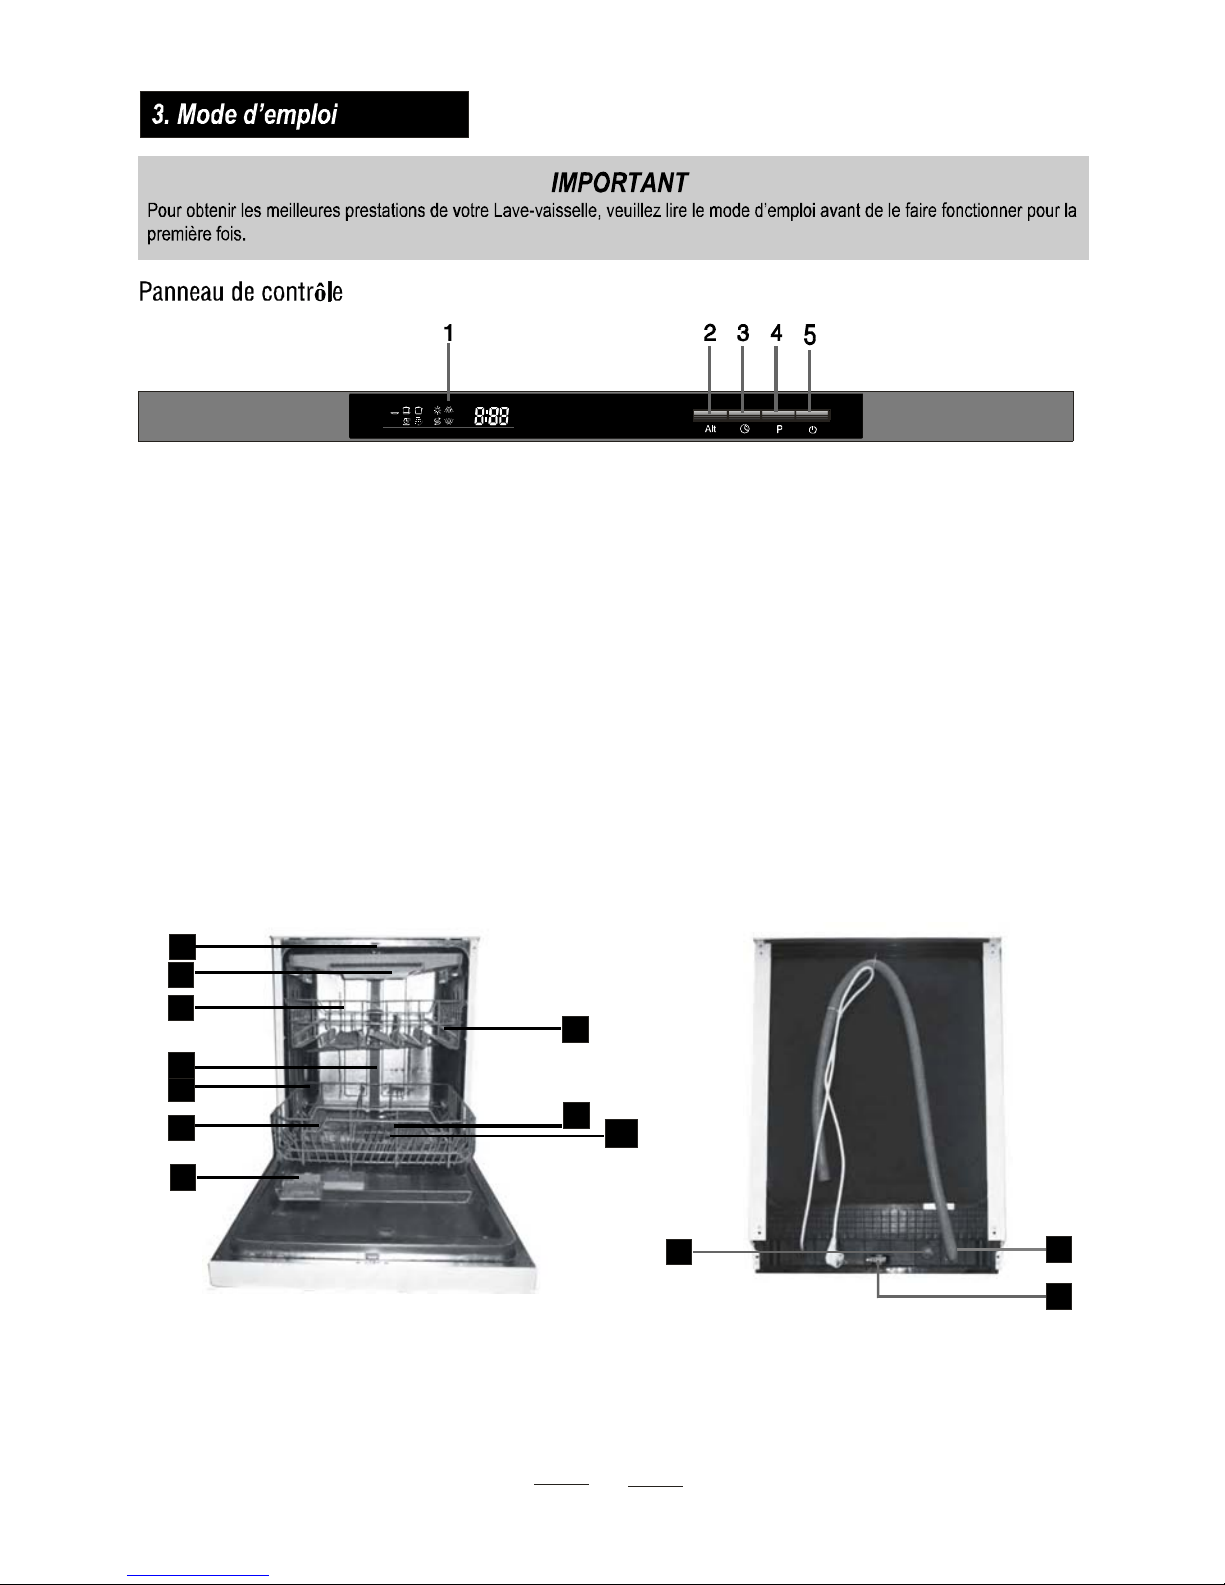
1.Affichage LCD : programme, indicateurs de remplissage du sel et du liquide de rinçage, touche demi-charge 2D,
tempsrestant,départ différé, codes erreurs,etc.
2.ToucheAlt : demi-charge 2D. Cette fonction vouspermet de ne laverqu e le chargement du paniersupérieur oucel ui
du panier inférieur. Le témoin correspondant clignote.
3.Départ différé de 1 à 24 heures.
4.Sé lecteu r de programme
5.Interrupteur principal
11
12
Vue arrière
1
2
3
4
5
7
8
9
10
Vuedeface
Équipement
6
13
1Brasdelavagesupérieur
2 Tiroir à couverts
3 Paniersupérieur
4 Tuyau intérieur
5 Panier inférieur
6 Réservoir à sel
7 Compartiment à détergent
8Étagèreàtasses
9Brasdelavageinférieur
10 Système de filtration
11Branchementdel'arrivéed'eau
12Tuyaudevidange
13Miseàniveaudel'appareil
AUTO
ECO
28
Page 31

A.
B.
C.
D.
Noto:2 Réglageensortied'usine:H4(EN50242)
dH mmol/l
0~90~5 0~ 0.94
H1
0
10-20
6-11
1.0 -2.0
H2
9
21- 3012-17 2.1-3. 0
H3
12
H4
20
fH
0~6
7-14
15-21
Clarke
18-22 31-40 22-28 3.1-4.0
41- 6023-34 4.1-6. 0
H5
30
H6
60
29-42
35-55 61-98 43-69 6.1-9.8
29
Page 32

A
B
C
D
E
30
Page 33

1
2
3
C
C
31
Page 34

1
2
Des détergents contenant des agents chimiques sont nécessaires pour élimerlasaleté de la vaisselle et l'évacuer.
La plupartdes détergentscommerciauxpour lave-vaisselle remplissent cet objectif.
Utilisation appropriée du détergent.
Utilisez uniquement un détergent prévu pour une utilisation en lave-vaisselle. Conservez-le dans un endroit sec et
frais. Ne mettez pas de détergent en poudre dans le compartiment à produits de lavage trop longtemps avant de
lancer un programme.
Attention !
Détergent enpoudre
Détergent tablette
32
Page 35

A
B
33
Page 36

34
Page 37

La hauteur du panier supérieur peut être ajustée pour gagner de l'espace soit dans le panier inférieur, lorsque le
panier supérieur est en position haute, soit dans le panier supérieur, lorsque celui-ci est en position basse.
Soulevez lepanier pour la placer en position hauteet se servir de la poignée latéralepourle descendreen
positio n basse.
Soulevez lepanier en position haute
Pressezla poignée pourabaisser le panier
35
Page 38

14
Le tiroir à couverts garantit un parfait lavage de ces derniers.
Les couverts sont correctement rangés, séparés les uns des
autres, sans risque qu'ils ne s'emboîtent.
Pour un lavage de qualité, assurez-vous que :
-les couverts n e s'emboîtentpas,
-chaque couvert soit placé sur la tranche ouface bombéevers le haut,
-les longs ustensiles soient aumilieu du tiroir.
36
Page 39

37
Page 40

Pour la vaisselle très sale et les
casseroles, poêleset plats
contenant desrestes séchés.
Pour les casseroles, assiettes et
verres normalement sales et les
poêleslégèrementsales.
Pour les charges légèrement sales
ne nécessitant pas unep arfaite
qualitédeséchage.
Prélavage
Lavage 6
Rinçage
Rinçage 5
Séchage
Prélavage
Rinçage
(℃)
℃
(℃)
50
(5 )
5
Prélavage 45
Lavage 50
Rinçage
Rinçage 60
Séchage
(
℃)
℃
(
℃)
()
50
()
(℃)
℃
(℃)
Prélavage
Lavage 62
Rinçage 60
Séchage
Prélavage
Lavage 50
Rinçage 60
Séchage
()℃
(
℃)
*EN50242 Ce programme est leprogramme deréférence.
Informationpourles t ests de comparaison, conformément à la normeEN 50242.
Capacit é : 14 couverts
Positiondu panier supérieur : roulettessupérieures sur les rails
Réglagede laquantitéde liquide de rinçage : 6
La consommation d'énergieà l'arrêt estde 0,45W
en veille est de 0,49 W
(*EN 50242)
NOTE :( ) signifie qu'il est nécessaire de remplir le réservoir à liquide de rinçage.
Normal
ECO
Express
1 heure
Intensif
(Ou )3en1
5/30g
(Ou )3en1
5/30g
(Ou )3en1
5/30g
(Ou )3en1
5/30g
180
175
165
1.2
0.93
1.5
17
14
10
60 10
1.15
Auto
Programme lavage avec capteur
automatique qui règle le
lavage -léger / normal / profond
- selon lavaisselle:peu sale,
standard ou très sale (avec ou sans
résidus alimentaires séchés)
5/ 27.5g
120~170
1. 1~1.4 1 0~13.5
Prélavage 40
Autolavage
Rinçage
Rinçage 70
Séchage
(
℃)
(
℃)
(50-60 )
℃
Trempage
Pour rincer les couverts que
vous désirez laverplus tard,
le même jour
Prélavage
8
3.5
0.1
38
Page 41

4 Ouvrez la porte, mettez en route l'appareil(touche ON/OFF)
5Appuyez surla touche programmeetsélectionnez-en un parmi :
Intensif - Normal - Éco - Verres- 1 heure - Rapide
Lorsqu'un programmeest sélectionné, le témoin correspondant s'allume.
Fermez ensuite la porte,le lave-vaisselle se met enroute.
39
Page 42

panier inférieur.
1
2
3
Systeme de f iltrage
1
2
2
3
1
40
Page 43

endommager l,appareil.
41
Page 44

42
Page 45

1
2
3
Spirit level
50
Placez un niveau à bulle sur la porte, puis le promener à l'intérieur de la cavité
pours'assurer quele lave-vaisselle est
43
Page 46

1
2
3
4
5
6
7
1
3
2
1
2
3
ATTENTION !
Fermer l'arrivée d'eauen cas de non utilisation.
44
Page 47

45
Page 48

E8
E4
E1
Erreurd'orientation du
clapet de distribution
Circuit ouvert ou rupture du clapet de
distribution
46
Page 49

598
815
550
14
47
Page 50

48
Page 51

49
Page 52

Guida rapida
Per leistruzioni d'uso d etta gliate farerife rimento al relativoman uale.
Accensione
dell'apparecchio
Riempimentodel comparto
del detersivo
Controllo del livellodel
brillantante
Controllo del livellodel sale
Caricamentodei cestelli
Selezione di un programma
Avvio della lavastoviglie
Modificade l programma
Aggiuntadi stoviglie
nell'apparecchio
In caso di s pegnim ento
dell'apparecchio durante
un ciclodi lavaggio.
Spegnimento
dell'apparecchio
Chiudereil rubinetto
dell'acquae svuotare i
cestelli
Aprire lo sportello, premere il tasto di accensione/spegnimento per accendere l'apparecchio.
Comparto A:
Comparto B:
Per tutti i cicli di lavaggio.
Solo per i programmi con prelavaggio.
(Seguire le istruzioni del fabbricante!)
Indicatore meccanico C.
Indicatoreelettrico sul pannello comandi (seprevisto).
(Solo sui modellicon sistema addolcitore dell'acqua).
Indicatoreelettrico sul pannello comandi (seprevisto).
Se sul pannello di comando (per certi modelli) non è presente l'indicatore
del livello del sale, è possibile stimare quando occorre aggiungere il sale
nell'addolcitore in base al numero di cicli di lavaggio eseguiti.
Eliminare eventuali res idui di cibo. Ammor bidire eventuali residui d i cibo bruciatonei tegami, quindi
caricarei cestelli. Vedere istruzioniper ilcarico dellal avastoviglie.
Aprireil rubinetto dell'acqua e chiudere lo sportello La macchinasi avviadopocirca 10 secondi
1. Unciclo in corsopuò essere modificatos olo se èiniziato dap oco. Inc aso contrario il
detersivo potrebbe esseregià stato r ilasciat o el'ac qua scaricata. In questo caso ilcomparto del
detersivodeveesseredinuovoriempito.
2. Premereil tasto dei programmio il programmadi lavaggio per almeno 3s econdi per
cancellare ilp rogramma incors o.
3. Selezionedi un nuovoprogra mma
4.Riavviarela lavastoviglie.
1.Aprire leggermente lo sport ello per fermarela lavastoviglie.
2. Dopoche i bracci spru zzatori si sonofermati è possibile aprirelo
sportello completamente.
3. Introdurrele stoviglie eventualmente dimenticate.
4. Chiuderelo sportello; lalavas tovigl ie siria vvia dopo circa10
secondi .
AV VERTENZA!
Aprire il portello con
precauzione.All'apertura
potrebbe fuoriuscire
vapore caldo!
Se l 'apparecc hio vienes pento durante unciclo dila vaggio, alsu ccessivo riavvio occorre
selezionare di nuovoil ciclo dilavaggio e avviarela lavastoviglie nello statoin cui sitrovava al
momento dell'accensione.
Quando ilciclo di lavaggioè terminato, l'avvisatore acusticodella lavastoviglie suonerà per8
volte, poisi arresterà.
Premere iltasto di accensione/spegnimento perspegne re l'apparecchio.
Attendere circa 15 minuti primadiscaricare la lavastoviglie per evitare di maneggiarepiatti e
utensili ancora cal di e quin di più su scett ibili dirott ure.
Inoltre siasciugher anno meglio. Scaricare l'a pparec chio iniziando dalcestello inferiore.
Premere il pulsante del Programma fin quando il programma selezionato non si illumina.
(V.capitolo intitolato “Istruzioni d'uso”)
50
Page 53

1. IMPORTANTI INFORMAZIONI SULLA SICUREZZA LEGGERE
TUTTE LE ISTRUZIONI PRIMA DI UTILIZZARE L'APPARECCHIO
ATTENZIONE! Quando si utilizzal a lavastoviglie osservare le precauzioni elencatediseg uito:
ISTRUZIONI PER LAMESSA ATERRA
Questo apparecchio deveessere collegato a terra.
In caso di guasti o malfunzionamenti, il
collegamento a terra riduce il rischio di scosse
elettriche poiché fornisce un circuito di minore
resistenza alla corrente. Questo apparecchio è
dotato di un cavo con conduttore e spina di messa
aterra.
La spina deve essere inserita in una presa
installata e collegataa terra inconformità conle
norme e le disposizioni locali.
ATTENZIONE!
Un collegamento a terra mal eseguito può
provocare il rischio di scosse elettriche.
In caso di dubbi sulla correttezza del collegamento
a terra consultareun elettricista qualificato o un
tecnico del servizio assistenza. Non modificare la
spina fornita a corredo dell'apparecchio se non si
adatta alla presa a disposizione. Far installare una
presa adeguata ad un elettricista qualificato.
ATTENZIONE! USO CORRETTO
Non sedersi o salire sul portello o sul cestello della
lavastoviglie.
Non toccare l'elemento riscaldante durante o subito
dopo l'uso.
(Indicazione valida solo per le macchine con
elemento riscaldante a vista.)
Non utilizzare la lavastoviglie se tutti i pannelli di
chiusura non sono posizionati correttamente. Aprire
lo sportello e controllare accuratamente che la
lavastoviglie funzioni correttamente onde evitare
fuoriuscite di acqua.
Non posizionare nessun oggetto pesante sullo
sportello, né stazionarvi quando è aperto. Ciò
potrebbe provocare il ribaltamento dell'apparecchio
in avanti.
Quando si caricano le stoviglie da lavare:
1) Sistemare gli oggetti affilati in modo che non
possano danneggiare le guarnizioni dello sportello.
2 Avvertenza: Coltelli e altri utensili affilati devono
essere posti nell'apposito cestello con la parte
affilata rivolta in basso oppure sistemati in posizione
orizzontale.
Quando si usa la lavastoviglie, evitare che gli oggetti
di plastica vengano a contatto con l'elemento
riscaldante. (Questa indicazione è valida solo per gli
apparecchi con l'elemento riscaldante a vista).
Al termine del ciclo di lavaggio verificare che il
comparto del detersivo sia vuoto.
Non lavare oggetti di plastica, salvo se
contrassegnati come adatti a essere lavati in
lavastoviglie o apparecchi simili. Per gli oggetti di
plastica privi di questa indicazione, seguire le
istruzioni del fabbricante.
Utilizzare esclusivamente detersivi e brillantanti per
lavastoviglie.
Non usare mai nella lavastoviglie saponi, detergenti
per biancheria o detergenti per il lavaggio delle
stoviglie a mano. Conservare questi prodotti fuori
dalla portata dei bambini.
Tenere i bambini lontani da detersivi e brillantanti ed
evitare che si avvicinino allo sportello aperto della
lavastoviglie; all'interno potrebbe essere ancora
presente del detersivo.
Questo apparecchionon è destinato ad essere
utilizzato da persone (inclusi i bambini) con ridotte
capacità fisiche, sensoriali o mentali e mancanzadi
esperienza senza la supervisione o la mancata
istruzione sull'uso dell'apparecchio da parte di una
persona responsabile della loro sicurezza.
Sorvegliare i bambini affinchénon giochino con
l'apparecchio.
I detergenti sono fortemente alcalini e possono
essere molto pericolosi se ingeriti. Evita re il contatto
con occhi e pelle e tenere lontani i bambini dalla
lavastoviglie,quandolo sportello è aperto.
Non lasciare lo sportello aperto onde evitare rischio
di intrappolamento.
Se il cavo di alimentazione viene danneggiato, farlo
sostituire dal fabbricante, dal servizio assistenza o
da una persona qualificata onde evitare qualsiasi
rischio.
Smontare lo sportello dello scompartimento di
lavaggio quando si dismette o si smaltisce una
vecchia lavastoviglie.
Smaltire i materiali d'imballaggio in modo appropriato.
Utilizzare la lavastovigliesolo per l'uso previsto.
Durante l'installazione, l'alimentazioneelettrica non
deve essere eccessivamente o pericolosamente
curvatao appiattita. Nonmanomettere i comandi.
L'apparecchio deve essere collegato alla rete idrica
con un set di tubi nuovi; i vecchi tubi non devono
essere riutilizzati.
Numero massimo di coperti: 14.
Pressione massima dell'acqua in ingresso: 1 Mpa.
Pressione minima dell'acqua in ingresso: 0.04 Mpa.
LEGGERE E SEGUIRE CON CURALEPRESENTI INDICAZIONI DI SICUREZZA.
CONSERVARE LE PRESE NTI ISTRUZIONI
51
Page 54

n
n
n
n
n
2. Smaltim ento
Smaltire corret tamente il materiale d'imballaggio della lavastoviglie.
Tuttii materiali d'imballaggiopossono esserericiclati.
Le parti diplast ica sono contrassegnate dalle seguenti sigle internazionali:
PE - polieti le n e, p.e. p ell ic ola pe r imba l l o
PS - polistirene, p.e.materiale dir iempi mento
POM - poliossimetilene, p.e. graffedi plastica
PP -pol ipropilen e, p.e. imbuto perilsal e
ABS -Acrilonitr ile-buta dien e-stirene, p.e. pannello deicomandi.
Il materiale d'imballaggio può esserep ericoloso per i bambini!
Per smaltire l'imballaggio e l'apparecchio rivolgersi a uncentrod i riciclaggio. Tagliare il
cavo dia limentazi one e rendere inutilizzabile lo sportello dichiusu ra.
Gli imballi dica rtone sono ottenuti damaterialiriciclatie devono essere smaltiti conl a
cartap er ilriciclaggio.
Controllando che questo prodotto siacorrettamente smaltitosi contri buisce a prevenire
effetti potenzialmente negativi sull'ambiente e sullasalute,al trimenti possibili in caso
di unos maltimen to scorretto.
Per informazioni più dettagliate sulr iciclag gio di questo prodottorivolgersiaiprop ri
enti locali edalservizi o diraccolta deiri fiuti domestici.
SMALTIMENTO:N on smaltire questo prodotto assieme adaltriri fiuti indifferenziati.
Il prodotto ède stinato alla raccolta differenziata ealtrat tamento speciale dei rifiuti.
52
Page 55

3. Istruzioni per l'uso
IMPORTANTE
Per ottenere lemigliori prestazionidellal avas toviglie leggere tutte leis truz ioni
per l'uso primadiutili zzare l'apparecchio per laprimavol ta.
Caratteristichedellalavastoviglie
Vista frontale
Vista pos t eriore
11
12
1
2
3
4
5
7
8
9
10
6
13
AUTO
ECO
1.Display: indicail prog ramma, la spias ale, la spia brillantante, illava ggio Dual Zone, ilte mpo residuo, il tempo
per lapartenzar itardata, i codici errore ea ltro
2.PulsanteAlt: permett e dise lezion are una sola zonad i lavaggio. Premendo ilpulsante, l'apparecchio seleziona
ilcarico sul cestello superiore o inferiore,con ilsimbolo lampeggiante sul display
3.Pulsante per lapartenza ritarda ta: premere il pulsante per impostarel a partenza ritardata del programma di
lavaggio, che puòe ssere impostata da 1a 24 ore
4.Pulsante programmi: premerequesto pulsante perse lezionare il programma di lavaggio
5.Pulsante On/Off:premere peraccenderee spegnere l'appa recchio
1.braccio dilavaggi o superiore
2.ripianoportaposa te
3.cestello superiore
4.canalizzazione interna
5.cestello inferio re
6.contenitore sale
7.di s penser sapo ne
8.porta tazzee bicchieri
9.braccio dilavaggio
10.f il t r o
11.connettore tubodi ingressoacqua
12.t ub o di scar ico
13.r egistr o
53
Page 56

4. Primadi utilizzarel'apparecchio la prima volta
Cosa fare prima di utilizzare la lavast ovig lie per la prima volta:
Regolare l'addolcitore dell'acq ua
Aggiungere 1,5 kg di sale per lavastoviglie, quindiriempire il serbatoio con acqua
Riempire il distributore del brillant ante
Riempireil comparto del detersivo
A.
B.
C.
D.
A.Addolcitoredell'acqua
L'addolcitore deve essere regolato manualmente inb ase alla scala di durezza dell'acqua.
L'addolcitore è progettato perr imuov ere dall'acqua, i sali ei minerali che altrimenti avrebbero uneffettoneg ativo
sulcorretto funzionamento dell'apparecchio.
Quanto maggiore èi l contenuto di minerali es ali nell'acqua tanto più questaèdura .
L'addolcitore deve essere regolatoi n base alla durezzad ell'acqua nel la zonad ove è installato l'apparecchio.
L'azienda didistribuzionedell'acqua può fornirei ndicazioni sulla sua durezza.
Regolazione del consumo del sale
Lalavastoviglie èpr ogettata per consentire laregolazione dellaq uanti tà disa le consumato in base alladurezz a
dell'acqua impiegata. Questa funzione è voltaa ottimizza re e personalizzare il livello dicon sumo di sale.
Per lare golaz ione del consumo disalese guire le indicazioni riportate sotto.
1.Aprire lo sportello e accendere l'apparecchio;
2. Pr em ere il pulsante progra mm i per almeno 5 secondi per attivare la pr ocedura di reg olazione
addolcitore entro 60 secondi dall accensione dellalavastoviglie(lespies ale e brillantante si
atti vera nno ri petuta mente nellamodalità d i impos tazione) .
3. Pr emere il puls an te progra mm i per selez io nare i l settaggio p iùappropri ato se co ndo le condizioni loca li
dell acq ua.Le impostazioni cambieranno nella seguente sequenza:H1-> H2 -> H3->H4 ->H5 ->H6
4. Pr emer e il pu lsante di accens ione p er terminar e l'impostazione del mode llo.
’
’
Nota1:
1 dH= 1.25 Clarke =1.78 f H=0.178mmol/l
DH:Gradi tedeschi
fH : Gr adi fr an cesi
Clark: Gradi britannici
Nota2:
Impostazio ni di fabbrica: H4(EN50 242)
Consultare la localeazienda dell'acqua per informazionisulla durezza dell'acqua di rete.
NOTA: Se il modello acquistato è privo d iaddolcitoresaltare questo paragrafo.
AD DOLCITO RE DELL'ACQUA
La durezzadell'acqua variada un luogo a unaltr o. Nelcasodiutil izzo di acqua dura,s ulle stoviglie esugli
utensil i si formano dei depositi .
L'apparecchio è dotato diun addolc itore speciale con serbatoiodels ale per l'eliminazione diminerali e
cal c are dal l 'acqu a.
dH
mmol/l
0~90~5 0~0.94
H1
0
10-20
6-11
1.0-2.0 H2 9
21-3 012-17 2.1-3.0
H3
12
H4
20
fH
0~6
7-14
15-21
Clarke
DUREZZAACQUA
Impostaz ione
lavastoviglie
Consumo sale
(gr / ciclo)
18-22 31-40 22-28 3.1-4 .0
41-6 0
23-34 4.1-6.0
H5
30
H6
60
29-42
35-55 61-98 43-69 6.1-9 .8
54
Page 57

B.Riempimento del serbatoiodelsale
Utilizzareesclusivamente sale per lavastoviglie.
Il serbatoio delsale è posto sotto ilc estello inferiore e deveessereri empito come spiegato qui dise guito:
Attenzione!
Usare solo ilsaleap posito per lavastoviglie! Ogni altrot i po di salee, in particolare il saled a tavola,
dannegger ebbe l'addolcitore dell'acqua . Incasodi danni provocati dall'uso di uns ale non idoneo, il fabbricante
non riconosce alcunagaranzia, nés i assume alcuna responsabilità per talida nni.
Procedere al riempimento delserbatoio delsale solo subito prima di avviare unprogr amma completo dilavaggio.
Questo impedirà che eventuali grani disale,o l'acqua salata tracimata,rimangano sul fondodellamacchina
provocandone la corrosione.
Aprire
NOTA:
1. Rabboccare ilse rbat oio del saleso lo quando si accende larel ativa spia sul pannello deico mandi. A
seconda della solubilità delsale,la spia di controllo potrebbe rimanereaccesaanchequando il serbatoio
èpieno.
Se sul pannello dicomand o (per certi modelli) nonè presente l'in dicatore del livello del sale,èpos sibile
stimare quando occorra aggiungere del salenel l'addolci tore in basealnumer o di ciclid i lavaggio eseguiti.
2. Se delsal e viene versato nel vanodi lavaggio occorre eliminar lo avviando ilp rogramma di ammollo o
un programma rapido.
C.Riempire il distributoredelbrillantante
Distributore del brillantante
Ilbrillantante vienerilasciatodurante il risciacquofinaleperevitare che sullestoviglie restinoi segni delle
goc ciolined'acqua. Inoltre,migliora l'asciugaturafacilitandoloscorrimentodell'acqua sullestoviglie. La
lav a stovi g lie è con cepita per l'uso di brill anta nti liqu idi. Il distributore de l brill antante è posto al l'interno dello
sportello accanto a quellode l detersivo. Per riempire ildi stributor e, aprire iltappoeversare il brillantante fin
quando l'i ndic atore diliv el lo non di v enta c omple t amente ner o. Il dis trib ut ore de l brill antante con t i ene ci r ca 110
ml di prodotto.
Funzionedelbrillantante
Il brillantantevi ene aggiunto automaticamen te all'ultimo risciacquo garantendo un risc iacquo efficace el'a ssenza
di mac chie e striat ure.
Attenzione!
Utilizzare solodetersivi di marcaper lavastoviglie. Nonversare nelcomparto del brillantantesostanze di altrot ipo
(p.e. detersivi liquidi, additivi perlapulizi a della lavastoviglie). Questo potrebbe danneggiare l'apparecchio.
A
B
C
D
E
F
Estrarreil cestelloinferiore e svitare il tappo del serbatoio delsale.
Inserire l'estremità dell'imbuto (compre so nella fornitura) nel foroe versa re circa 1,5k g di saleper
lavastoviglie.
Riempireil serbatoio finoall'orlo conacqua.E' normalecheuna piccolaquantità di acquatracimi dal s erbatoio.
opo ilriempimento richiudereilserb atoio avvitando iltappoi n senso orario.
La spiadelsale si spegne dopo che ilco ntenitore del saleès tato riempito.
Subito dopo averriempitod i sale l'apposito contenitore, si dovrebbe avviareu n programma di lavaggio.
Altrimenti il sistema delf iltro, la pompa oal tre parti importanti della macchina potrebbero essere danneggiati
dall'acqua salata. Tali danni nonso no coperti da garanzia.
55
Page 58

Quando rabboc care il distribu tor e de l brillant ante
Se sul pannello di control lo non si accende la spia del brilla ntan te, è possib ile valuta re la quantit à rimast a dal
colore dell'indicatore dilivelloo tti co Cposizionato accanto altappo. Quando il comparto del brillantante èpi eno
l'indicatoreècompletamente scuro. A mano amanocheil livellodiminuisce,la parte scura dell'indicatore siriduce.
Non l as ciar e scender e il livello del br illa n tante s otto 1/4.
C (Indicatore del livellodibrill antante)
A manoa mano ched iminuisce la quantitàdel brillantante,
cambianole dimensioni della zona nera sull'indicatore,
comemostrato nellaseguente figura.
Pieno
3/4
1/2
1/4 - Rabboccarep er evitare macchie
Vuo to
1
2
3
Per aprire ildistr ibutore ruotare ilcoperchio inposi zione "open" (a sinistra)esoll evarlo.
Versareil brillanta nte nel distributore facendo attenzione an on eccedere.
Richiudere ildistributore portando ilcoper chio in posizione "open"eruotand olo a destraperch iuderlo.
NOTA:
Pulire eventuali fuoriuscite di brillantante durante ilr iempimen to con unpann o assorbente per evitare un
eccessivo quantitativo nel lavaggio successivo. Nond imentic are di riposizionare il tappopr ima di chiudere
lo sportello.
Regolazione del distributore del brillantante
Manopola di regolazione
(risciacquo)
Il distributore del brillantante has ei o quattroimpostazioni. Iniziare
sempre ponendo il distributoreinposi zione "4". Incasodi macchie o
problemi dia sciugatu ra aumentare la quantità dibr illantante rilasciato
togliendo ilcoperchio deldistributore eruo tando la manopolai n
posizione "5". Selestovi glie non risultano ancora bena sciutte o
presentano macchie, portare la manopolasullasu ccessiva posizione
fino ache sullestoviglie nonsi notano più macchie.Posizione
consigliata - "4".(Ilvalore impost ato da fabbricante è"4").
NOTA:
Aumentare la dosedelbrill antante se alterminedellava ggio si notano sullest oviglie
gocce om acchie di calcare. Ridurre ladosese sulle stoviglie si notanom acchie
appiccicose e biancastre os e su oggettidivet ro e lamecompa re un alone bluastro.
D. Fun zione d el de tersi vo
Pereliminare los porco dalle stoviglie edespellerlodallala vastovig lie sono necessari detersivi conadditivic himi ci.
Lamaggiorp arte dei detergenti di qualità inco mmercio sono adatti at ale scopo.
Attenzione!
Uso corretto del detergente
Usaresolod etergent i appositi per lavastoviglie. Conservare il detersivoi n unluogo frescoe d asciutto.
Non versare il detersivo neldistributorefinoa chenon si pronti per il lavaggio.
56
Page 59

Detersivi
Esistono 3tipidi detersivi
1. D etersivicontenentifosfati e cloro
2. D etersivicontenentifosfati senzacloro
3.D eter sivi senza fosfati ecloro
Di normainuovi detergenti in polvere sonoprividi fosfati. Quindi in questi prodottil'azioneaddolcente deifo sfati è
assente.Inquestocasosi raccomanda di riempire col saleil relativoserbatoio,ancheseladurezza dell'acqua è
solo 6dH. Ne l ca s o di det ergent i senzafosf ati con ac qua dura, su s t ov igli e ebicchier i s i n o tano s pe sso mac chie
bianche. Inq uest o casoaggiungereu na maggior quantità di detersivo pero ttenere risultati migliori. I detersivi
senzacloro hannoun'azione sbiancante limitata. Macchie resistenti e coloratenon saranno eliminate
completamente. In questi casisel ezionare un programma cont emperatura più alta.
Detersiviconcentrati
Inbase allaloro composizione chimica i detersivi possono esseresuddivisi indue tipi:
detersivi convenzionali , detersivi alcaliniconco mponent i caustici
deters ivi concentrati a bassaalcalinità contenentienziminaturali
Detersiviinpastiglie
Detersivi inpastigliedidivers i marchi sis ciolgono a velocità differenti. Perque sto motivo alcuni detersiviinpasti glie
non r i e scono a s c i o glier si com p l etam e nte e sv i lu ppar e la loro a zione d etergent e nei programm i di lav aggio b revi .
Perciò, q ua ndo s i utilizz ano deter siv i in pastig l ie selezionare pr og rammi lunghi per co nsentire u na comp l eta
rimozione dei residui didetersivo .
Distributoredeldetersivo
Il distributore deve essere riempitoprimad i iniziare ilc iclo dilavaggio, secondo leis truzioni fornite nella relativa
ta bell a. Questa lava stoviglie utilizza minor i q uantità di d etersi vo e bril l antante rispetto allelavastov iglie trad izionali.
Generalment e, perunnor male ciclo di lavaggio èsu fficiente un cucchiaiodatav ola di detersivo. Una maggiore
quantità dovrà essere utilizzata nel casod i stoviglie particolarmente sporche. Riempire il distributore subito primadi
av vi are la l avastovig lie, a ltrim e n ti il deters i v o p otre b be inumidirsi e non sc iogli ersi c ompletamente.
Quantitàdidetersivo da utilizzare
Premere ilp ulsante per aprire
NOTA:
Se il coperchio è chiuso premere il pul sant e di rila scio . Il c op erchio si sol l eva.
Aggiungere il detersivo sempre immediatamente primadelci clo di lavaggio.
Utilizzare solo detersivi dimarca per lavastoviglie.
ATTENZIONE! Ildetergenteper lavastoviglieè corrosivo! Tenerefuori dallaportata deibambini.
57
Page 60

A
B
Riemp im ento d el distributo re del detersivo
Riempir e il di stributor e di det ersivo. I segni in dicano il
dos aggi o , come ripo rtato nell a fig ura a de stra:
Compa rto pe r de ters ivo per il cic lo di lava gg io principale .
Compa rto pe r de ters ivo per il cic lo di pr el avag gio.
Osserva re i con sigl i per dosa ggio e conse r v az ione del
fabbri c a n te, co me i nd icat o su lla confe zi one de l deter gente.
Chiuder e il c op er chio e p remere fi no a blo ccarlo .
Se l e stovigl ie sono molt o sp orche, versar e una dose a
ggiuntiva di d etergente
ne l co mparto d el p relavag gio.
Ques t'ultimo sarà utilizzato ne lla fase di prelav aggi o.
NO TA:
In formazioni sulla quantità d i deters ivo d a u ti lizzare per cias cun program ma sono riportate nell'ul tima pag ina.
Tenere pre sente ch e tali qua ntità posso n o v ariare a sec onda del gra do d i sporco e della durez z a d ell'acqu a.
At tene rsi alle i ndicazioni del fabbri cant e riporta te sull'i mbal lo del deters ivo.
58
Page 61

5. Caricamento dei cestelli
C onsigl i
Considerare di acquistare utensili che possono andare in lavastoviglie, contrassegnati con l'apposito simbolo.
Usare un detergente delicato per stov iglie . Se necessario, richiedere ult eriori informazioni al fabbricante de l detersivo.
Per oggetti part icolari selezionare un progra mma con la più bassa temperatura p ossibile.
Per evit are danni, non estra rre bicchieri e posate dalla lavastoviglie imm ediatamente dop o la fi ne del programma.
Per il lavaggio in lavastovig l ie le seguenti stoviglie e posate
No n so no a datt e
Posa te con m anico di legn o, oss o o madreperla
Oggetti di pla stica non resistent i al calore
Vecchie p osate con parti inco ll ate non resiste nti
alla t emperat ur a
Posa te e sto viglie incolla t e
Oggetti di pel tro e ra me
Bicchieri di crista llo
Oggetti metallici s oggetti a ru ggine
Vassoi di leg no
Oggetti fabbricati con fibre sin te ti che
Sono poco adatte
Alcuni t ip i di bic chie ri poss ono ri manere opa ch i
dop o numerosi l av aggi
Parti in argent o e all uminio te ndon
o a scolorir e
dur ante il lavagg io
Ogget ti smalt at i possono scolor ir e se lav ati di
fre quen te
Attenzione prima e dopo il car icamento de i cestelli
(P e r otte ne re le mi gl io ri p restazio ni dall a lava stov igli e atte ne r si alle se guenti indi ca zi oni per caricamento.
Caratte ristic he e for ma d ei c este ll i po sson o v a riare da l mo dello acquistat o.)
Elimina re r esidui di ci bo d i gr andi dimensioni . Ammor bidire i residui di cibo brucia to nei tegami.
Non è ne cessario sciacquare le s toviglie con acqu a corrent
e.
Sistema re gli o ggetti nel la lavasto viglie come indicato di segu ito:
1. Tazz e, bic ch ie ri, ci otole e cc. devono essere riv ol ti v er so il bass o.
2. O ggetti pi egati o con incavi d evono essere c aricati di lato in modo c h e l'a cqua ne possa defluire.
3. Tu tti gli ut ens ili de vono essere sist emati in modo si cur o e che non po ssano ri baltars i.
4. Tu tti gli ut ens ili de vono essere sist emati in modo da non imp edir e la liber a ro tazione dei bracci sp ruzzatori
dur ante il lav agg io.
NOTA:
Oggetti molto pi ccol
i non devono essere lavati nella lavastovigl ie poiché potrebbero c adere facilmente dal cestello.
Ca ricare gli o ggetti cav i come t azze , bi cc hieri, tega mi e cc. con l'apertura rivolta verso il basso in modo che
l'acqua non po ssa raccogliersi al loro in tern o.
Stoviglie e posa te non devono essere si st em ate una dent ro l 'altraocopr irsi a v icen da.
Pe r evitare da nni ai b icch ieri, questi non devono toccarsi.
Ca rica r e l e stoviglie di maggiori dim ensioni e più d ifficili da lavare ne l cestello inferiore.
Il ces te llo superiore è destina to all e stoviglie pi ù legg er e e de li ca te come bi cchie
ri , ta zze da c affè e tè .
I coltelli a lama lung a in posizione v erti cale sono potenzial me nt e pe ricol osi!
Og getti lunghi e /o affi lati devo no esser e sistem at i in pos izione o rizzontale nel cestell o superiore.
No n sovraccar ic ar e la lavastovi glie. Questa accortez za consente di ottenere migliori risultati e un consumo
di ene r g ia r agionevol e.
Estrazione delle st oviglie
Per evitare il goccio lame nto di acq ua d al cestello supe riore su que llo infer iore è co nsi gliabile svuot are ques t' ult imo
per prim o e succ essivam en te il c estello super i ore .
59
Page 62

Come ca ricare le sto viglie nor mali
Caricamento del cestello superiore
Il cestello superiore è destinatoallestoviglie più leggere e
delicate come bicchieri, tazzedac affè etè , piattini, vassoi,
piccole ciotolee tegamibassi(se non tropposporchi).
Sistemarepiatti e pentole in modoche non possano
essere spostati d aigettid'acqua.
Caricamento del cestello inferiore
Consigliamo di mettere lestoviglie grandie più difficili
dapulire nelcestello inferiore, qualiper esempio
pentole, tegami, coperchi, piatti ec iotole da portata,
come mo s t ra to nella fig ura i n bass o. E' preferibile
si s temare piatti di p or tata e co perchi ai lat i del ces t ello
inmodoche non impediscano l arotazione del braccio
spruzzatore superiore.
Tenere presente quantosegue:
Pentole, ciotole da portataecc. devono essere sempre capovolte.
Le pentole profondedevonoesse re sempre messe inpo sizione inclinata per favorire ildeflussodell'acqua.
Il cestello inferiore èd otato di supporti ribaltabiliinmodo da consentire la sistemazione di piùpen tole o pentoledi
grandi dimensioni.
IN
IN
Regolazione del cestello superiore
L'altezza del cestello superiore puòesse re regolata per
fare più spazioagliutens ili grandi, sia perilce stello
superiore che per quelloi nfer iore. L'altezza delcestello
superiore può essere regolata sollevandolo nella
posizione più alta ep remendo la maniglia per abbassarlo,
come indicato nell'immagine di seguito:
Sollevare il cestello in
posizione alta
Premere la manigliaper
abbassare il cestello.
Regolare lamaniglia
Ripiegare le rastrelliere delle tazze
Supporti ribaltabili delcestelloinferiore
Perunamigliore sistemazionedi pentolee tegami,i
supportipossono essere ribaltati in posizioneabbassata
come m ost ra to nella fig ura a de s tra .
Cestello perleposate
I coltelli devono esserepos izionati nell'apposito cesto con im anici sul fondo. Seso no previsti cestelli laterali, i
cucchiai devono essere caricati separatamente nelle appositefessure;u tensili particolarm ente lunghi devono
essere messi in posizioneorizzontalenellap arte anteriore del cestello superiore, comei ndicat o nella figura.
ATTENZIONE!
Non lasciar sporgerealcuno ggetto verso il basso.
Sistemare gli oggettiaffilaticon la parte affilata rivolta
verso il basso!
Per una migliore sist emazi one di pentole e tegam i, i
supportipossono essere ribaltati inposizione
abbassatacomemostrato nellafigura a destra.
Per la sicurezzae la qualità del lavaggiocaricarel e posate nelr elat ivo cestelloaccertandosi che:
Nonsiano inse ritel'una nell'altra.
Imanicisianoinbasso.
Tu ttavia, coltelli e altriutensilipotenzialmente pericolosi dovranno essere sistematiconil manico in alto.
60
Page 63

6.Avvio di un programmadi lavaggio
Tabelladei ciclidilavaggio
Necessario rabboccare il brillantante nell'apposito distributore.
NOTA:
(*EN 50242) Questoprogramma èil ciclo dicollaudo. Diseguitole infor mazioni per ilt est di comparabilità
secondo EN50242:
Capienza: 14 coperti
Posizio ne cestel lo superi ore: ruo te superiori su guide
Impostazionebrillantante:6
Pl:0.49w;Po:0.45w.
Avvio diun ciclo dilavaggio
1. Estrarreicestellii nferioree superiore, caricarei piatti e reinserirei cestelli. Si consiglia di caricare prima il
cestello inferiore, quindi dip roceder e con quello superiore( veder e la sezione intitolata"Caricamento dei
ces te l l i della lavas tovi glie" ). Cari ca re le posate ne ll'ap p osito ce sto stoviglie supe rior e.
2. Versareild etersivo (vedere le sezioni dedicate a sale,de tersivo e brillantante) .
3. Inserire la spinanella presaelettrica. L'alimentazione elettricadevee ssere compresa fra 220-240V 50 HZe la presa deve essere almenod a 10A 250 V c.a. Verific are che lap resa d'acqua sia collegata
correttamente e che ilru binetto sia totalmente aperto per ave re acqua alla massimapr essione .
4. Aprire la porta lavastoviglie epremere ilpuls ante ON/OFF.
5. Premere ilpulsante programmi,il programmadi lavaggiopotrà esseremodificatonel seguente ordine:
AUTO- >IN TENSIVE-> NORMAL -> ECO-> 1 HOUR-> SOAK. Quando siselezionaun programma,
viene illuminatalacorrispondenteimmagine sul display. Chiuderela porta per far partire la lavastoviglie,
il la vaggio si atti ve rà ent ro p o c h i se cond i .
(*EN 5 0242)
(or3in1)
5/30g
Soak
Prelavaggio(50 )
Lavaggio (65 )
Risciacquo
Risciacquo
Risciacquo(55 )
Asciugatura
℃
℃
℃
Prelavaggio( 45 )
Lavaggio (50 )
Risciacquo
Risciacquo (60 )
Asciugatura
℃
℃
℃
Prelav aggio
Lavaggio (50 )
Rinse(60 )
Asciugat ur a
℃
℃
Prelav aggio
180
175
165
8
1.2
0.93
1.5
0.1
17
14
10
3.5
1Ho u r
Prelavaggio(50 )
Lavaggio(62 )
Risciacquo (60 )
Asciugatura
℃
℃
℃
60 101.15
Intensive
Normal
(or3in1)
5/30g
(or3in1)
5/30g
(or3in1)
5/30g
Per stoviglie normalment e
sporche e padelle poco sp or che
Per stoviglie molto sporche,
anche con incrosta zioni di cibo
Cicloda1orapercarichipoco
sporchi cheno n richiedonou na
asciugatura particolarmente
efficace
Programm a di ammollo per
sciacquare piatti chesaran no
lavati piùtardi
Auto
Lavaggi o con rilevamen to
automati co del carico, adatto a
stoviglie con sporconormaleo
pesante, con o senza
incrostazionidi cibo
Prelavaggio(40 )
Automatico
(50-60 )
Risciacquo
Risciacquo(70 )
Asciugatura
℃
℃
℃
5/27.5g
120~170
1.1~1.4
10~13.5
Il programma standard, adatto
per pulire stoviglie mediament e
sporche, è quello piùeff icien te
in termini dic onsum o d'energi a
ediacqua
Programma
Informazioni sulla selezione
del ciclo
Descrizione
del ciclo
Detergente
prelav/lav
princ
Tempo di
funzionamento
(min)
Energia
(Kwh)
Acqua
(L)
Brillantante
61
Page 64

Washth e arms insoapya nd warm water andusea soft brush to
clean the jets. Replace them after rinsing themthoroughly.
When following this procedur e from step1 to step 3, the filter system will be removed;
when following it from Step 3 to Step 1, the filter system will be installed.
Cambiare un progra mma
Premes sa
1. Uncicloin corso può esserem odificato solo seèin iziato da pocot empo. Incasocontrarioil detersivo
potrebbe essere giàs tato rilasciato e l'acquadi lavag gio scaricata. Inques to caso ildistributored el detersivo
deve esseredinuov o riempito (vedere ilp ara grafo "Aggiunta deldetersivo").
2.Aprire lo sportello, premere il pulsantedeiPr ogrammi, la macchina saràinsta to distand-by, quindi modificare
il programma nell'impostazione desidera ta (vedere il paragrafointi tolato "Avvio di uncic lo di lavaggio. .." ).
NOTA:
Sesi apre lo sportello duranteun ciclo di lavaggio,la macchina entreràin pausa. La spia delprogramma
smetterà dilampeggiaree l'avvi satore acustico sia ttiverà ogni minuto,ameno che nonchiudiatel o
sportello. Una volta chiusolosporte llo, la macchina continuerà afun zionare dopo 10 secondi.
Se si è dimenticatauna stoviglia
Una stoviglia dimenticata puòe ssere caricata in qualsiasi momento primach e si aprai l distributore del detersivo.
1 Aprire leggermentelo sportello.
2 Dopo chei bracci spruzzatori si sonofermatiè possibile aprire lo sportello completamente.
3 Introdurre lest oviglie eventualmen te dimenticate.
4 Chiuderelos portello
5 Lalavastovigliesiriavvierà dopo 10 secondi.
Quando il ciclodi lavagg io è terminato,l 'avvisatore acustico suonerà per 8secondi,po i smetterà. Spegnere
l'apparecchio con iltastodi acce nsione/spegnimento ; chiudere l'alimentazione dell'acqua ea prire lo sportello della
lavastoviglie.
Attendere circa 15minutipr ima di scaricare lal avastoviglie per evitare dimaneggiarepiattieutensi li ancora caldi e
quindi più soggettiarottu ra. Questo, inoltre, consente unam igliore asciugatur a.
Spegnimento della lavastoviglie
La spia delprog ramma è accesamanon lampeggia, solo in questo casoil programma è terminato.
1. Spegnere lala vastoviglie premendo il tasto dia ccensione/spegni mento.
2. Chiudere ilrub inetto dell'acqua!
Aprire lo sportelloconcautel a.
I piattic aldi sono più soggetti arompersi.L asciarli quindi raffreddare per circa 15mi nuti prima di estrarli
dall'apparecchio.
Aprire lo sportellodellalavast oviglie; lasciarlo socchiuso e attendere qualche minutopr ima di estrarre ipia tti. In
questo modo saranno menocal di epiùasciut ti.
Scarico dellalavastoviglie
La presenza diumid ità all'interno della lavastoviglie è unfen omeno normale.
Svuotare prima ilcestelloinf eriore, poi quello superiore. Inquest o modo sieviterài l gocciolamento di acquada l
cestello superiore sulle stoviglie postes u quello inferiore.
ATTENZIONE!
E' pericoloso aprirel o sportello durante illavaggio;l'acquacalda potreb be provocare scottature.
Al terminedelciclodilavaggio
62
Page 65

1
2
3
2
3
1
1
2
7. Manutenzione e pulizia
Sistem a d i f ilt rag gio
Il filtro evitach e residui grossolani dic ibo o altri oggetti finiscanonellapo mpa.
Qu es ti res idui po ssono intasar e il filtr o e, in questo c as o, van no rimossi.
Ilsistemadelfiltroècompostodaunfiltroamaglialarga,unfiltropiatto
(filtroprincipale) eun microfiltro(filtroamaglia fine).
Filt ro principa le
Le particelle dicib o e sporciziatrattenute daqu esto filtro sonodisintegrate
dal braccio spruzzatore inferiore tramiteun getto speciale ed eliminate
attraverso lo scarico.
Filtroa maglia larga
Leparticelledi cibo piùgrandi, come pezzi di ossao vetro,che potrebbero
bloccare lo scarico vengono trattenute dalfiltroa maglia larga. Per
rimuovere questi residui spingere delicatamente il tapposu lla parte
superiore del filtro es ollevarlo .
Filtro a maglia fine
Questo filtro trattiene lo sp orco ei resi dui di ciborac colti nel pozzetto
evitando che si depositino dinu ovo sulle stoviglie durante ilciclodi lavaggio.
Montaggio del filtro
Ilfiltro consente un'efficace rimozione delle particelle di cibodall'acqua di lavaggioin circolazionedurante il ciclo.Per
prestazioni erisultati migliori, il filtro deve essere pulitoregolarmente. Per questo motivo è benerimuoverele
par t icelle di ci bo più grandi blocca te nel filtro d opo ogn i ci clo di l av aggi o, sciac quando il fi lt ro sem ic irc olare e la c o ppa
sotto acqua corrente. Per togliereilfil tro tirare lamano pola della coppa versol'alto.
ATTENZIONE!
Non utilizzar e mai la lavastov igli e senza i filtri.
L'errata installazione del filtro puòr idurre le prestazione dell'apparecchio e danneggiare stoviglie ed utensili.
Apr ire
Fase 1:Ruotarei l filtro ins enso antiorario,
Fase 2:s oll e vare verso l' alto il gruppo del filtr o
NOTA:
Quando sis egue questa procedura, dalla fase1alla fase 2,i l sistema del filtroverràrimoss o;
qua ndo sisegue dallafase2 alla fase 1, verrà invece installato.
63
Page 66

Note:
-Controllare che i filtrinon sianointasatidopo ogniutilizzo dellalavastoviglie.
- Svitand o il filtro a mag lia larg a, è poss ibile r i muovere il si stema del filtro. E l iminare tut t i i residui di cib o e pulir e i
fil tr i sotto un getto d'a c qua.
NOTA:
Tuttoilgruppofiltrodeveesserepulitounavoltalasettimana.
Puliz ia de l filt ro
Per pulireil filtroa maglialargae quello amaglia fine, usareuno spazzolino.Rimontare le partidelfiltrocome
mos t rato nelle figure d ell' ultima p agin a e ri mett ere il gru ppo nel la lava stov iglie in serendolo nell a propria sed e e
spingendolo verso ilbasso.
ATTENZI O NE!
Quando sipulisconoif iltri, non sbatterli. Ciòp otrebbe provocarne la deformazione e di
conseguenza ridurre le prestazionidellalavastoviglie.
Ilpannellodeicoma ndi può esserepulito conun panno leggermen te inumidito.
Dopo l a pu lizi a as ciug are ac cu rata mente il pannello .
Perle superficiesterne utilizzare un buona ceralucid ante.
Non utilizzareoggetti acuminati, pagliette o detersiviabrasivi.
Pulizia de llo spor tell o
Per lapuli zia del profilo attornoallospo rtello utilizzare solounpanno
morbidoinumiditoetiepido.
Per evitare lapenet razione di liquidi nellase rratura dello sportello enei
componenti elettrici non utilizzare detersivispraydi alcun tipo.
Non utilizzare maidetersivis pray per pulireilpann ello della porta; ciò potrebbe
danneggiare la serratura edi componenti elettrici.
Prodotti abrasivi edal cuni tipi dica rta devono essere evitati pernon graffiare o
lasciare segni sullesuperficidi acciaio inox.
Protezi one dal g elo
Adottare misure per laprotez ione della lavastoviglie dal geloi n inverno. Dopo ogni ciclo dil avaggio procedere
com e de scritto qui di se g u i t o:
1 Scollegare la lavast ovi glie dalla rete ele ttric a di alimenta zion e.
2. C hiudereil rubinetto dell'acqua e scollegareil tubo di m andata dalla valvola dell'acqua.
3.Scolarel 'a cqua dalr elativo tubo e dalla valvola. (Raccoglierel'acqua inuna vaschett a)
4.R icoll egare il tubo dim andata allavalvolad ell'acqua.
5. Togliere il filtro sul fondodellavascae con unaspugnaasportare l'acquapresente nel pozzetto.
NOTA:
Nel caso incu i la lavastoviglie nonposs a funzionare per lapre senza di ghiaccio,
rivolgersi ad untecn ico professionista.
Puliziadeibracci spruzzatori
Ibracci spruzzatoridevoessere pulitiregolarmente pereliminare i
residuisolidilasciati dall'acquache possonooccludere i forie bloccare
icuscinetti.
Per rimuovereilb raccio spruzzatore superiore , tenere ilda do, ruotare il
braccio inse nso orario perrimuoverlo.
Per r im uovere il braccio s pruzza t ore in fe rior e, estrarlo t ir ando lo ver so
l'alto .
Lavarei bracci in acqua calda con sapone Sciacquare accuratamente
erimontareibracci.
64
Page 67

●
Come mantene re la la vast ovigl ie in eff icie nza
Dopo ognilavaggio
Dopo ognilavaggioch iudere la mandata dell'acqua elasciarel o sportello socchiuso per eliminareu midità e odori.
Stacc ar e la spina
Prima die seguire la pulizia ol a manutenzione dell'ap parecchio estrarre las pina dall presa dicorrente.
Non utilizzare solventi oprodo tti abrasivi
Per pulire l'esterno ele parti in gomma dellalavastoviglie, nonusare solventi o detergenti abrasivi.
Utilizzare soltanto un panno, acquat iepida e sapone.
Per eliminare eventuali macchie dallesup erfici interne utilizzare un panno imbevutodi acqua e poco acetooppure
un prodotto speci fico per lav astovi glie .
In ca s o di inutiliz z o p r o lung a to
Eseguire un ciclod i lavaggio a vuoto,quindisco llegare la spina dallapresad i corrente, chiudere l'acqua e
lasciare lo sportello dell'apparecchiosocchiuso.Ciòco nsente di allungare ladu rata delle guarnizioni ed evitala
formazionediodoriall'interno dellalavastoviglie.
Spostamento dell'apparecchio
Se l'apparecchio deve esseresp ostato, cercare di tenerloinposi zione verticale. Se fosseassolutamente
necessario ribaltarlo, appoggiarlo sulla parte posteriore.
Guarniz ioni
Una delle causech e provocano laformazione diod ori nella lavastoviglie sono ires idui di cibot rattenuti dalle
guarnizioni. La periodica pulizia delleguarnizioniconuna spugna umida eviterà questo fenomeno.
8. Istruzionip er l'installazione
Attenzione:
L'in stallazione di t ubi eappar ecch i ature
elettriche devee ssere affidata at ecnici
professi onis ti.
ATTENZIONE!
Pericolo discossaelett rica
Scollega re l'al imen taz ione elet t rica prima
di installare lal avastoviglie .
La mancata osservanza diqu esta
indicazione può esserecausadi
folgorazione o morte.
Prepar azi one all'in stal lazi one
La lavastoviglie deve esserecoll ocata in prossimità deipuntid i allacciamento alla rete idrica,el ettrica e allo
scarico.
Per facilitare ilco llegame nto dei tubi discaric o, la lavastoviglie deveesseresi stem ata suunode i latidel mo bile
sottolav ello.
Nota: controllare glia ccessor i perl'in stallazione (gancio per pannello decorativo, vite)
65
Page 68

TUBODIALIMENTA ZIONE DI SICUREZZA
Il tubod i alimentazione di sicurezza è compostod a doppie pareti. Il sistemadi cui è dotatoiltub o garantisce
l'interruzione del flussodiac qua in casod i rottura del tubodiali mentazione e quandolos pazio tra il tubodi
alimentazione e quello esternoondulatoèpien o di acqua.
ATTENZIONE!
Untuboche si attacca alrubinetto dellavel lo può scoppiareseinst allato sulla stessa lineaidricade lla lavastoviglie.
Seillavello è dotato diq uesto tipo di erogatoresiracc omanda di scollegare iltub o e chiudereilforo.
Comescollegare il tubo di alimentazione di sicurezza
1. C hiuderel'acqua.
2.Rilasciare lap ressione dell'acqua premendo l'apposito pulsante . In questom odo siscaricalapre ssione e si
protegge chi operaedil locale da violenti getti d'acqua.
Svitare i l t ubo di si curezza dal ru binetto.
COLLEGAMENTOALLARETE DELL'ACQUAFREDDA
Collegare iltubodi alimentazioneacquafredda ad un attacco filettato 3/4"ed assicurarsi che siaben fissato. In
caso ditub i nuovi ono n utilizzati per un lungoperiodo,far scorrere l'acqua per eliminare eventuali impurità. In caso
contrario sirischial 'ostruzion e dell'ingresso dell'acqu a ei l danneggiamento dell'apparecchi o.
ATTENZIONE!
Chiudere il rubinetto dopo l'uso.
Posizionamentodell'apparecchio
Posizionare l'apparecchio nel postodesiderato. Lapa rte posteriore deve appoggiarsi alla pareteretrostante edi
fianchi aimob ili o allep areti adiacenti. La lavastoviglie èd otata di tubidialim entazione e discaricoche possono
essere sistemanti siaa destra sia a sinistraperfaci litare un'installazione corretta.
Comescaricare l'eccessodiacquadaitubi
Seillavello è più altodi1000 dal pavimento, l'acqua ineccessonei tubi non può esseresca ricata direttamente nel
lavello. Sarànece ssario scaricare l'eccesso di acquai n unavaschetta oaltro recipiente esterno posto adu n livello
inferiore aq uello del lavello.
Uscitadell'acqua
Collegare iltubodi scarico dell'acqua. Il collegamento deve esserefattoc orrettamente per evitare perdite diacqua.
Veri ficare che iltubodi alimentazione non sia piegato osch iacciato.
Tubo di prolunga
Seoccorreuti lizzare un tubodipr olunga, accertarsi che siadeltipo simile a quello discarico.
Laprolungano n deve avere unalunghe zza maggiore a 4metri , altrimenti l'efficienza della lavastoviglie potrebbe
risultare ridotta.
Collegame nto tramit e si fone
Inserireil tubo di scarico in untuborigido con un diametro minimo di 40mm, oppuremetterlo nel lavello evitando di
piegarlo osch iacciarlo. La parte superiore del tubode ve essere inferiore a1000mm.
Avviodellalavastoviglie
Primadi avviarela lavastoviglie verificare quantosegue:
1La lavastoviglieè livellata ecorrettamentefi ssata
2Lavalvola d'ingresso è aperta
3Nonci sono perdite neip unti di unione delle tubazioni
4Icavi sono ben fissati
5Lacorrent e è attaccata
6Itubi d'ingresso e dis carico non sono attorcigliati
7Tutti i materiali d'imballaggio eidocume nti sono stati estrattidallal avastoviglie
Attenz ione :
Altermine dell'installazionec onservareil presentemanuale.
Le info rm az io ni in ess o con te nut e son o molt o uti l i per l'ut i li zza t or e.
66
Page 69

9. Consigli pe r l'individu azione e l'eli minazi one dei problem i
Primadirivolgersialservizioassistenza
Consultare le tabelle riportate nelle pagine seguentipu ò evitare di chiamareilserviz io assistenza.
Problemi
tecnici
Problemi di
carattere
generale
Rumore
Problema
La lavastoviglie
non parte
L'acqua non viene
scaricata dalla
lavastoviglie
Schiuma nella
vasca
Macchie sulle
superfici interne
Patina bianca sulla
superficie interna
Macchie di ruggine
sulle posate
Colpi all'interno
della vasca
Tintinnio all'interno
della vasca
Battiti all'interno
dei tubi dell'acqua
Possibi li cause
Fusibile bruciato o
interruttore scattato
L'alimentazioneelettrica
non è stata attivata
La pressione dell'acqua è
bassa
Lo sportellodella
lavastoviglie non è ben
chiuso
Il tubo di scarico è piegato
Il filtro è intasato
Il lavello è intasato
Detersivo inadatto
Fuoriuscita di brillantante
E' stato utilizzato un
detersivo con coloranti
Minerali nell'acqua dura
Gli oggetti interessati non
sono resistenti alla
corrosione.
Dopo il caricamento del
sale non è stato avviato un
programma di lavaggi o.
Tracce di sale sono finite
nel ciclo di lavaggio.
Coperchio dell'addolcitore
allentato
Uno dei bracci spruzzatori
urtacontro un oggetto nel
cestello
Stoviglie non ben ferme
nella vasca di lavaggio
La causa potrebbe essere
l'installazioneo la sezione
delle tubazioni.
Cosa far e
Sostituire il fusibile o resettare l'interruttore. Scollegare tutti
gli apparecchi serviti dallo stesso circuito della
lavastoviglie
Assicurarsi che la lavastoviglie sia accesae lo sportello
ben chiuso.
Assicurarsi che il cavo di alimentazione sia correttamente
inserito nella relativa presa a parete.
Controllare il corretto collegamento alla rete idrica e cheil
rubinetto sia aperto.
Assicurarsi di chiudere bene e fissare lo sportello.
Controllareiltubodiscarico.
Controllare il filtroa maglia larga (vedere capitolo intitolato
"Pulizia del filtro")
Controllare che lo scaricodal lavello avvenga senza
intoppi. Se il problema è causato dal lavelloche non
scarica bene occorrerà rivolgersi ad un idraulico piuttosto
che ad un tecnico del servizio assistenza.
Usare solo detergenti appositi per lavastoviglie, per evitare
la formazione di schiuma. In tal caso, aprire la lavastoviglie
e lasciare evaporare la schiuma. Aggiungere circa 4 litri di
acqua fredda nella vasca. Chiudere la lavastoviglie, quindi
selezionare qualsiasi ciclo. La lavastoviglie scaricherà
l'acqua subito. Aprire lo sportello dopo lo scarico, arrestare
il ciclo e controllare se la schiuma è scomparsa.
Ripetere se necessario.
Asciugare sempre eventuali fuoriuscite immediatamente.
Assicurarsi cheil detergentesia privo di coloranti.
Per pulire l'interno, usare una spugna umida con
detergente per lavastovigliee indossare guanti di gomma.
Nonusare altri detergenti per evitarelaformazione di
schiuma.
Eseguire sempre il lavaggio rapido senza stovigliee
senza selezionare la funzione Turbo (se presente), dopo
averaggiunto il sale.
Controllare il bordo.Assicurarsiche la tenuta sia corretta.
Interrompere il programma, risistemare gli oggetti che
ostacolano il braccio spruzzatore.
Interrompere il programma e risistemare le stoviglie.
Questo non influisce sulla funzionalità della lavastoviglie.
In caso di dubbio contattare un idraulico qualificato.
67
Page 70

Vedere lenote nelparagrafo "Caricamento deicestelli".
Problema Possibilicause Cosa fare
Lavaggio
insoddisfacente
Asciugatura
insoddisfacente
Le stoviglie non
sono pulite
Bicchieri appannati
Segni neri ogr igi
sulle stoviglie
Detersivo lasciato
nelle vaschette del
distributore
Le stoviglie non
sono asciutte
Le stoviglie non sono state
caricatecorrettamente.
Il programma scelto non
era sufficiente.
Il detersivo erogato non
era sufficiente.
Alcuni oggetti bloccano i
bracci spruzzatori.
Il sistema filtrantenon
pulito o non correttamente
installato. Questo può
provocare il blocco dei
bracci spruzzatori.
Combinazione di acqua
morbida ed eccessodi
detersivo
Sfregamento di utensili di
alluminiocontrolestoviglie.
Piatti bloccano la coppa
del detergente.
Caricamento scorretto
Scarso brillantante
Stoviglie estratte troppo
presto
E' stato selezionato un
programma sbagliato
Posate con rivestimento
di bassa qualità
Selezionare un programma più intensivo.
Vedere la "Tabella dei cicli di lavaggio".
Utilizzare una maggiore quantità di detersivo o cambiarlo.
Risistemare le stoviglie in modo che i bracci spruzzatori
possano ruotare liberamente.
Pulire e/o sistemare correttamente il sistema filtrante.
Pulire i getti dei bracci spruzzatori. Vedere "Pulizia dei
bracci spruzzatori".
Impiegare meno detersivo se l'acqua è dolce e
selezionare un ciclopiù breve per i bicchieri.
Utilizzare un detergente mediamente abrasivo per
eliminare questi segni.
Ricaricare le stoviglie in modo corretto.
Caricare la lavastoviglie come suggerito nelle istruzioni.
Aumentare la quantità di brillantante/ricaricare il
distributore.
Non svuotare la lavastoviglie subito dopo il lavaggio.
Aprire leggermente lo sportello in modo tale da far uscire
il vapore.Procedere alloscaricosolo dopo che lestoviglie
sianomediamentecalde al tatto. Vuotareper primo il
cestello inferiore. In questo modo si evita il gocciolamento
di acqua dalle stoviglie poste nelcestello superiore.
Nei cicli brevi la temperatura è più bassa. Questo
diminuisce anche le prestazioni di pulizia. Scegliere un
programma più lungo.
Il drenaggio dell'acqua è più difficoltoso con questi oggetti.
Posate e stoviglie di questo tipo non sona adatte ad
essere lavate in lavastoviglie.
Codici di errore
In caso di malfunzionamenti, il display dell'apparecchio visualizza dei codici per avvertire l'utilizzatore:
Perdit e d'acq ua
Tempodicaricoacquatroppolungo
Rubinetto nonaperto,presadell' acqua o tubo
strozzati opressionedel l'acqua troppo bassa.
Unelemento dellala vastovigl ie haun a perdita.
E1
E4
E8
Posizione sbagliata dell'elettrovalvol a
Circuito aperto o rott ura dell'elettrovalvol a.
68
Page 71

ATTENZIONE!
In casodifuorius cita d'acqua chiudere l'alimentazione dell'acqua e rivolgersi al
servizio assistenza.
Se nellav asca è presente dell'acqua acausadi traboccamenti o perdite, questa deve
essereeliminata primadi riavviarela lavastoviglie.
Informaz ioni tecnic he
Altezza:
Larghezza:
Profondità:
Pressione dell'acqua:
Tensione di alimentazione:
Capienza:
815mm
598mm
550mm(a sportello chiuso)
0.04-1.0MPa
vederetarga dati
14 coperti
69
Page 72

70
Page 73

Posizione 1: sollevarei l cestello a sinistra,si a a sinistrachea destra i
cestelli rimangono leggermente inclinati
Posizione 2: sistemare ilce stello a sinistra nella posizione inferiore, il
cestelloasinistraèorizzontalementrequelloadestrarimane
leggermente inclinato
Posizione 3: sollevarei l cestello a destra,si a asinistrachea destra i
cestelli sono orizzontali
Posizione 4: muovereilcestello a destra versosin istra, i duece stelli
sono sovrapposti
Posizione 5: rimuovere ilcestell o di destrad al ripiano,
rimane solo ilcest ello di sinistra
Modo 1
Modo 2
Modo 3
Modo 4
Modo 5
Ilripiano porta posatepuò avere5posizioni:
71
Page 74

Schnell
S
ch
nellSchnell
Schnell----Anleitung
AnleitungAnleitung
Anleitung
Detaillierte Informationen finden Sie in den entsprechenden Abschnitten der Bedienungsanleitung.
72
Page 75

Einleitung
E
i
nleitungEinleitung
Einleitung
Vielen Dank, dass Sie sich für unser Produkt entschieden haben. Wir wünschen Ihnen viel Freude mit
dem Gerät.
Symbole in dieser Bedienungsanleitung
Symbole in dieser BedienungsanleitungSymbole in dieser Bedienungsanleitung
Symbole in dieser Bedienungsanleitung
Wichtige Hinweise für Ihre Sicherheit sind besonders gekennzeichnet. Beachten Sie diese Hinweise
unbedingt, um Unfälle und Schäden am Gerät zu vermeiden:
WARNUNG:
WARNUNG:WARNUNG:
WARNUNG:
Warnt vor Gefahren für Ihre Gesundheit und zeigt mögliche Verletzungsrisiken auf.
ACHTUNG:
ACHTUNG:ACHTUNG:
ACHTUNG:
Weist auf mögliche Gefährdungen für das Gerät oder andere Gegenstände hin.
HINWEIS
HINWEISHINWEIS
HINWEIS:
: :
: Hebt Tipps und Informationen für Sie hervor.
Allgemeine Hinweise
Allgemeine HinweiseAllgemeine Hinweise
Allgemeine Hinweise
Lesen Sie vor Inbetriebnahme dieses Gerätes die Bedienungsanleitung sehr sorgfältig durch und bewahren Sie diese inkl. Garantieschein und Kassenbon gut auf. Falls Sie das Gerät an Dritte weitergeben, geben Sie auch die Bedienungsanleitung mit.
HI
HIHI
HINNNNWEIS
WEISWEIS
WEIS::::
Diese Gebrauchsanweisung ist für verschiedene Ausführungen erarbeitet. Beachten Sie die tatsächliche Ausstattung Ihres Modells für die richtige Funktion Ihres Gerätes.
• Benutzen Sie das Gerät ausschließlich für den privaten und den dafür vorgesehenen Zweck. Die-
ses Gerät ist nicht für den gewerblichen Gebrauch bestimmt.
• Benutzen Sie das Gerät nicht im Freien. Halten Sie es vor Hitze, direkter Sonneneinstrahlung, und
Feuchtigkeit fern. Benutzen Sie das Gerät nicht mit feuchten Händen.
• Schalten Sie das Gerät aus wenn Sie das Gerät nicht benutzen, zur Reinigung oder bei Störung.
• Lassen Sie das Gerät nicht
nichtnicht
nicht unbeaufsichtigt. Verlassen Sie während des Betriebes nicht
nichtnicht
nicht das Haus.
• Umbauten oder Veränderungen am Gerät sind aus Sicherheitsgründen nicht zulässig.
• Zur Sicherheit Ihrer Kinder lassen Sie keine Verpackungsteile (Plastikbeutel, Karton, Styropor, etc.)
erreichbar liegen.
WARNUNG:
WARNUNG:WARNUNG:
WARNUNG:
Lassen Sie kleine Kinder nicht mit Folie spielen. Es besteht Erstickungsgefahr!
Spezielle Sicherheitshinweise für dieses Gerät
Spezielle Sicherheitshinweise für dieses GerätSpezielle Sicherheitshinweise für dieses Gerät
Spezielle Sicherheitshinweise für dieses Gerät
• Die max. Anzahl der zu spülenden Gedecke beträgt 9.
• Dieses Gerät ist dazu bestimmt, im Haushalt und ähnlich
en Anwendungen ver-
wendet zu werden wie beispielsweise
- in Personalküchen von Läden, Büros und anderen gewerbl
ichen Bereichen.
73
Page 76

- vo
n Gästen in Hotels, Motels und anderen Wohneinrichtu
ngen;
- in landwirtschaftlichen Anwesen.
• Setzen oder stellen Sie sich nicht auf die geöffnete Tür oder die Geschirrkörbe des
Gerätes und legen Sie keine schweren Gegenstände auf der Tür ab. Das Gerät
kann nach vorne kippen.
• Die Tür darf nicht offen gelassen werden, da diese eine Stolpergefahr darstellt.
• Bei laufendem Gerät darf die Tür nur sehr vorsichtig geöffnet werden, da Wasser
aus dem Gerät herausspritzen kann.
• Messer und andere Gebrauchsgegenstände mit scharfen Sp
itzen müssen mit der
Spitze nach unten oder in waagerechter Lage in den Geschirrkorb gelegt werden.
• Achten Sie auf eine ordnungsgemäße Beladung des Gerätes. Beachten Sie die
Anweisungen, die wir Ihnen im Kapitel
Beladen der Geschirrspülmaschinenkörbe
Beladen der GeschirrspülmaschinenkörbeBeladen der Geschirrspülmaschinenkörbe
Beladen der Geschirrspülmaschinenkörbe
dazu geben.
• Dieses Gerät kann von Kindern
KindernKindern
Kindern ab 8 Jahren und darüber und von Personen mit
reduzierten physischen, sensorischen oder mentalen Fähigkeiten oder Mangel an
Erfahrung und/oder Wissen benutzt werden, wenn sie beaufsichtigt oder bezüglich
des sicheren Gebrauchs des Gerätes
Gebrauchs des GerätesGebrauchs des Gerätes
Gebrauchs des Gerätes unterwiesen wurden und die daraus resultie-
renden Gefahren verstanden haben.
• Kinder die jünger sind als 8 Jahre, sind von dem Gerät fernzuhalten.
• Kinder
Kin
derKinder
Kinder dürfen nicht mit dem Gerät spielen.
• Reinigung und Benutzer
BenutzerBenutzer
Benutzer----Wartung
WartungWartung
Wartung dürfen nicht durch Kinder
KinderKinder
Kinder durchgeführt werden,
es sei denn, sie sind älter als 8 Jahre und werden beaufsichtigt.
• Reparieren Sie das Gerät nicht selbst, sondern suchen Sie einen autorisierten
Fachmann auf. Um Gefährdungen zu vermeiden, ein defektes Netzkabel nur vom
Hersteller, einem qualifizierten Techniker oder dem Kundendienst durch ein
gleichwertiges Kabel ersetzen lassen. Wenn Kabel oder Stecker beschädigt sind,
dürfen Sie das Gerät nicht mehr benutzen.
• Das Gerät ist mit einem neuen Schlauchsatz an die Wasserversorgung anzu-
schließen; alte Schlauchsätze dürfen nicht wiederverwendet werden.
• Der höchstzulässige Wassereinlassdruck beträgt 1 Mpa.
• Der niedrigstzulässige Wassereinlassdruck beträgt 0,04 Mpa.
74
Page 77

Bestimmungsgemäßer Gebrauch
B
e
stimmungsgemäßer GebrauchBestimmungsgemäßer Gebrauch
Bestimmungsgemäßer Gebrauch
Es darf nur in der Art und Weise benutzt werden, wie es in dieser Bedienungsanleitung beschrieben
ist. Jede andere Verwendung gilt als nicht bestimmungsgemäß und kann zu Sachschäden oder sogar
zu Personenschäden führen.
Der Hersteller übernimmt keine Haftung für Schäden, die durch nicht bestimmungsgemäßen Gebrauch entstehen.
Auspacken des Gerätes
Au
spacken des GerätesAuspacken des Gerätes
Auspacken des Gerätes
1. Nehmen Sie das Gerät aus seiner Verpackung.
2. Das Gerät sowie Teile der Innenausstattung sind für den Transport geschützt. Entfernen Sie alle
Klebebänder auf der rechten und linken Seite der Gerätetür. Kleberückstände können Sie mit Reinigungsbenzin entfernen. Entfernen Sie alle Klebebänder und Verpackungsteile auch aus dem Inneren des Gerätes.
3. Überprüfen Sie das Gerät auf eventuelle Transportschäden, um Gefährdungen zu vermeiden.
4. Im Schadensfall nehmen Sie das Gerät nicht in Betrieb. Wenden Sie sich an Ihren Fachhandel.
HI
HIHI
HINNNNWEIS
WEISWEIS
WEIS::::
Am Gerät können sich noch Staub oder Produktionsreste befinden. Wir empfehlen Ihnen, das Gerät
wie unter
Wartung und
Wartung und Wartung und
Wartung und Reinigung
ReinigungReinigung
Reinigung
beschrieben zu säubern.
Gerätebeschreibung
GerätebeschreibungGerätebeschreibung
Gerätebeschreibung
Frontansicht Rückansicht
4 Salzbehälter
5 Behälter für Reinigungs-
mittel, Tabs und Klarsp
ü
ler
1 oberer Geschirrkorb
2 innerer Wasserlauf
3 unterer Geschirrkorb
6 Tassenablage
7 Sprüharme
8 Filtereinheit
9 Zulaufschlauch
10 Ablaufschlauch
75
Page 78

Bedienfeld
Bed
ienfeldBedienfeld
Bedienfeld
1. Ein/Aus-Taste zum Ein-/Ausschalten der Stromverso
rgung.
2. Vorwahltaste zur Auswahl der Startverzögerungszeit 1-24 h.
3. ½ Beladungs-Taste zur Aktivierung der ½ Beladungsfunktion bei einer Ladung von weniger als 7
zu spülenden Gedecken; weniger Energie- und
Wasserverbrauch. Diese Funktion kann bei den
Programmen Intensiv, Normal, ECO, Glas und Express gewählt werden.
4. Programm-Wahltaste zur Auswahl eines von 7
Spülprogrammen.
5. Start/Pause-Taste zum Starten/Unterbrechen
des gewählten bzw. laufenden Spülprogramms.
6. LED-Display für Vorwahlzeit, Restlaufzeit, Fehlercodes etc.
7. ½ Beladungs-Kontrollleuchte, wird angezeigt
wenn die Funktion aktiviert ist.
8. Wasserversorgungs-Kontrollleuchte.
9. Programm-Kontrollleuchte zeigt das gewählte
Spülprogramm.
10. Warnleuchten:
Salzmangel und Klarspülermangel:
Salz- und Klarspüler- Warnleuchten leuchten auf,
wenn die entsprechenden Behälter nachgefüllt
werden müssen.
Kindersicherungs-Kontrollleuchte zeigt an,
dass die Funktion aktiviert ist. Durch gleichzeitiges
Drücken der Vorwahltaste (2) und ½ BeladungsTaste (3) aktivieren Sie die Kindersicherung.
Vo
r der Erstinbetriebnahme
Vor der ErstinbetriebnahmeVor der Erstinbetriebnahme
Vor der Erstinbetriebnahme
Bevor Sie Ihren Geschirrspüler zum ersten Mal verwenden:
Bevor Sie Ihren Geschirrspüler zum ersten Mal verwenden:Bevor Sie Ihren Geschirrspüler zum ersten Mal verwenden:
Bevor Sie Ihren Geschirrspüler zum ersten Mal verwenden:
A. Stellen Sie den Wasserenthärter ein.
B. Geben Sie 1 Liter Wasser in den Salzbehälter und füllen Sie dann das Salz ein.
C. Befüllen Sie den Klarspüler-Behälter.
D. Füllen Sie Reinigungsmittel ein.
A. Wasserenthärter
A. WasserenthärterA. Wasserenthärter
A. Wasserenthärter
Der Wasserenthärter muss manuell mit der Wasserhärteanzeige eingestellt werden. Der Wasserenthärter dient dazu, Mineralien und Salze, die einen schädigenden oder nachteiligen Effekt auf den Betrieb des Gerätes haben würden, aus dem Wasser zu entfernen. Je höher der Anteil der Mineralien
und Salze in Ihrem Wasser ist, desto härter ist Ihr Wasser. Der Wasserenthärter muss gemäß der
Härte des Wassers in Ihrem Wohngebiet eingestellt werden. Ihre lokale Wasserbehörde kann Ihnen
den Härtegrad Ihres Wassers mitteilen.
Einweichen
Schnell
Expr ess
Glas
ECO
Norm al
Intensiv
76
Page 79

Einstellung des Salzverbrauchs
Einstellung des SalzverbrauchsEinstellung des Salzverbrauchs
Einstellung des Salzverbrauchs
Der Salzverbrauch des Geschirrspülers kann gemäß Ihrer
Wasserhärte eingestellt werden. Auf diese
Weise kann der Salzverbrauch optimal reguliert werden.
Befolgen Sie die nachfolgend aufgeführten Schritte, um den Salzverbrauch einzustellen.
1. Schalten Sie das Gerät ein.
2. Halten Sie die Start/Pause-Taste innerhalb der ersten 60 Sekunden für ca. 5 Sekunden gedrückt.
3. Durch Drücken der Start/Pause-Taste kann die Wasserhärte entsprechend Ihrer lokalen Umgebung verändert werden. Das Display zeigt Ihnen die Einstellung an: H1->H2->H3->H4->H5->H6;
(siehe nachstehende Tabelle).
4. Einige Sekunden nach Beendigung Ihrer Wahl erlischt die Anzeige und die Wasserhärte ist automatisch gespeichert oder beenden Sie das Setup durch Drücken der Ein-/AUS-Taste.
Es werden folgende Einstellungen empfohlen:
Wasserhärte
Display-Anzeige
Salzverbrauch
(Gramm/Zyklus)
°dH °fH °Clark mmol/l
0 - 5 0 - 9 0 - 6 0 - 0.94 H1 0
6 - 11 10 - 20 7 - 14 1.0 - 2.0 H2 9
12 - 17 21 - 30 15 - 21 2.1 – 3.0 H3 12
18 - 22 31 - 40 22 - 28 3.1 – 4.0 H4 20
23 - 34 41 - 60 29 - 42 4.1 – 6.0 H5 30
35 - 55 61 - 98 43 - 69 6.1 – 9.8 H6 60
HI
HIHI
HINNNNWEIS
WEISWEIS
WEIS::::
°dH: deutscher Härtegrad = 1.25 mmol/l
°fH: französischer Härtegrad = 0.178 mmol/l
°Clark: britischer Härtegrad = 1.78 mmol/l
Werkseinstellung: H4 (EN 50242)
Wenden Sie sich an Ihren lokalen Wasserversorger, wenn Sie Informationen über die Härte Ihres Wassers
benötigen.
Wasserenthärtungsvorrichtung
WasserenthärtungsvorrichtungWasserenthärtungsvorrichtung
Wasserenthärtungsvorrichtung
Die Wasserhärte ist regional unterschiedlich. Wenn hartes Wasser im Geschirrspüler verwendet wird,
bilden sich Ablagerungen auf dem Geschirr und den Küchenutensilien.
Das Gerät ist mit einer Wasserenthärtungsvorrichtung ausgerüstet, die mittels eines Salzbehälters
Kalk und Mineralien aus dem Wasser entfernt.
B. Einfüllen von Salz in den Salzbehälter
B. Einfüllen von Salz in den SalzbehälterB. Einfüllen von Salz in den Salzbehälter
B. Einfüllen von Salz in den Salzbehälter
Der Salzbehälter befindet sich unter dem unteren Geschirrkorb und muss wie nachfolgend beschrieben, befüllt werden:
AC
ACAC
ACHTUNG:
HTUNG:HTUNG:
HTUNG:
• Verwenden Sie nur Salze, die speziell für die Verwendung in Geschirrspülern hergestellt wurden!
Jedes andere Salz, das nicht speziell für die Verwendung in Geschirrspülern hergestellt wurde,
77
Page 80

insbesondere Tafelsalz, kann die Wasserenthärtungsvorrichtung beschädigen. Für Schäden, die
durch die Verwendung von ungeeignetem Salz entstanden sind, gibt der Hersteller keine Garantie
und ist nicht für entstandene Schäden haftbar zu machen.
• Erst vor dem Beginn eines der vollständigen Spülprogramme mit Salz füllen. Dadurch wird verhin-
dert, dass Salzkristalle oder verschüttetes Salzwasser für längere Zeit auf dem Boden des Geschirrspülers bleiben und dort Korrosionsschäden verursachen.
A. Nehmen Sie den unteren Geschirrkorb heraus und schrauben Sie den Deckel des Salzbehälters
ab (
Abb. 1
Abb. 1Abb. 1
Abb. 1
).
B. Füllen Sie vor der ersten Verwendung 1 Liter Wasser in den Salzbehälter Ihres Geschirrspülers.
C. Stecken Sie das Ende des (mitgelieferten) Trichters in die Öffnung und geben Sie ca. 1,5 kg Salz
hinein. Es ist normal, wenn dabei eine kleine Menge Wasser aus dem Behälter kommt (
Abb. 2
Abb. 2Abb. 2
Abb. 2
).
D. Schrauben Sie nach dem Befüllen des Behälters den Deckel im Uhrzeigersinn wieder zu.
E. Normalerweise schaltet sich die Salzwarnleuchte sofort, spätestens jedoch nach 2-6 Tagen nach
Befüllen des Salzbehälters aus.
F. Unmittelbar nach Befüllen des Salzbehälters mit Salz sollte ein Spülprogramm gestartet werden
(wir empfehlen ein kurzes Programm). Anderenfalls können das Filtersystem, die Pumpe oder andere wichtige Teile des Gerätes von Salzwasser beschädigt werden. Dies wird nicht von der Garantie abgedeckt.
HI
HIHI
HINNNNWEIS
WEISWEIS
WEIS::::
• Der Salzbehälter darf nur nachgefüllt werden, wenn die Salzwarnleuchte im Bedienfeld aufleuchtet.
Je nachdem wie gut sich das Salz auflöst, kann die Salzwarnleuchte weiterleuchten, obwohl der
Salzbehälter gefüllt ist. Wenn sich im Bedienfeld keine Salzwarnleuchte befindet (bei einigen Modellen), können Sie anhand der Anzahl der abgelaufenen Spülvorgänge den Zeitpunkt für die Salznachfüllung schätzen.
• Wenn Salz verschüttet wurde, sollte das
Schnellprogramm
oder
Einweichprogramm
durchlaufen,
um das überschüssige Salz zu entfernen.
C. Befüllen des Klarspüler
C. Befüllen des KlarspülerC. Befüllen des Klarspüler
C. Befüllen des Klarspüler----Behälters
BehältersBehälters
Behälters
Der Klarspüler wird während des letzten Spülvorgangs eingesetzt, um die Bildung von Wassertropfen,
die Flecken und Streifen auf Ihrem Geschirr hinterlassen können, zu verhindern. Außerdem fördert der
Klarspüler den Trocknungsprozess, indem er ein Abperlen des Wassers vom Geschirr ermöglicht. Ihr
Geschirrspüler wurde für die Verwendung von flüssigen Klarspülern konstruiert. Der KlarspülerBehälter befindet sich in der Tür neben dem Reinigungsmittel-Behälter. Zum Öffnen des Behälters
Öffnen
78
Page 81

öffnen Sie den Deckel, und geben Sie Klarspüler hinein, bis die Füllstandsanzeige vollständig schwarz
wird. Es passen etwa 110 ml Klarspüler in den Klarspülerbehälter.
Funktion des Klarspülers
Funktion des KlarspülersFunktion des Klarspülers
Funktion des Klarspülers
Der Klarspüler wird automatisch während des letzten Spülvorgangs zugegeben; er ermöglicht eine
gründliche Spülung sowie eine flecken- und streifenfreie Trocknung.
ACHTUNG:
ACHTUNG:ACHTUNG:
ACHTUNG:
Verwenden Sie nur Qualitäts-Klarspüler für Geschirrspüler. Befüllen Sie den Klarspüler-Behälter niemals mit irgendwelchen anderen Substanzen (z. B. Geschirrspülmittel, flüssige Reinigungsmittel).
Dadurch kann das Gerät beschädigt werden.
Zeitpunkt zum Nachfüllen des Klarspüler
Zeitpunkt zum Nachfüllen des KlarspülerZeitpunkt zum Nachfüllen des Klarspüler
Zeitpunkt zum Nachfüllen des Klarspüler----Behälters
BehältersBehälters
Behälters
Solange die Klarspüler-Warnleuchte im Bedienfeld nicht aufleuchtet, können Sie die Menge des verbleibenden Klarspülers an der optischen Füllstandsanzeige “CCCC“ neben dem Deckel abschätzen.
Wenn der Klarspüler-Behälter voll ist, ist die Anzeige vollständig
dunkel. Wenn die Menge an Klarspüler zurückgeht, wird die Größe
des dunklen Punktes kleiner. Der Füllstand des Klarspüler-Behälters
darf nicht unter 1/4 fallen.
Wenn die Menge an Klarspüler abnimmt, ändert sich die Größe des
schwarzen Punktes auf der Klarspüler-Füllstandsanzeige wie unten
dargestellt.
voll ¾ voll ½ voll ¼ voll - Nachfüllen, um Fle-
ckenbildung zu vermeiden
leer
1. Drehen Sie zum Öffnen des Behälters den Deckel gegen den Uhrzeigersinn in die geöffnete Stel-
lung (Pfeil nach oben) und entnehmen Sie den Deckel.
2. Geben Sie Klarspüler in den Behälter; achten Sie dabei darauf, den Behälter nicht zu überfüllen.
3. Setzen Sie den Deckel in der geöffneten Stellung wieder auf und drehen Sie den Deckel im Uhr-
zeigersinn in die geschlossene Stellung (Pfeil nach rechts).
HI
HIHI
HINNNNWEIS
WEISWEIS
WEIS::::
• Entfernen Sie während des Nachfüllens verschütteten Klarspüler mit einem saugfähigen Tuch, um
ein übermäßiges Schäumen beim nächsten Spülgang zu vermeiden.
• Vergessen Sie nicht, vor dem Schließen der Geschirrspültür den Deckel wieder aufzusetzen.
79
Page 82

Einstellung des Hebels (Spülen)
Einstellung des Hebels (Spülen)Einstellung des Hebels (Spülen)
Einstellung des Hebels (Spülen)
Der Klarspülmittelbehälter hat vier oder sechs Einstellungen. Beginnen Sie
immer mit der Einstellung “4“. Wenn sich Flecken bilden und das Geschirr
schlecht trocknet, erhöhen Sie die Menge des freigesetzten Klarspülers,
indem Sie den Deckel des Behälters abnehmen und drehen Sie den
Schalter auf “5“. Wenn sich dann immer noch Flecken bilden oder das
Geschirr schlecht trocknet, drehen Sie den Schalter auf die nächste Stufe,
bis Ihr Geschirr fleckenfrei ist. Die empfohlene Einstellung ist “4“ (die
Werkseinstellung ist “4“).
HI
HIHI
HINNNNWEIS
WEISWEIS
WEIS::::
• Erhöhen Sie die Dosis, wenn sich nach dem Spülen Wassertropfen oder Kalkflecken auf dem Ge-
schirr befinden sollten.
• Verringern Sie die Dosis, wenn sich auf dem Geschirr weißlich, klebrige Flecken bilden oder sich
auf Ihren Gläsern oder Messern ein bläulicher Film bildet.
D. Funktion des Reinigungsmittels
D. Funktion des ReinigungsmittelsD. Funktion des Reinigungsmittels
D. Funktion des Reinigungsmittels
Die Reinigungsmittel mit ihren chemischen Zusätzen sind dazu erforderlich, Schmutz zu zersetzen
und aus der Geschirrspülmaschine zu entfernen. Die meisten handelsüblichen, qualitativ hochwertigen Reinigungsmittel sind für diesen Zweck geeignet.
Reinigungsmittel
ReinigungsmittelReinigungsmittel
Reinigungsmittel
Es gibt 3 Sorten Reinigungsmittel:
1. mit Phosphat und mit Chlor 2. mit Phosphat und ohne Chlor 3. Phosphatfrei und chlorfrei
Normalerweise sind neue, pulverförmige Reinigungsmittel phosphatfrei. In diesem Fall ist die Wasserenthärtungsfunktion des Phosphates nicht gegeben. In diesem Fall empfehlen wir, Salz in den Salzbehälter zu füllen, auch wenn die Härte des Wassers nur 6°dH beträgt. Falls Reinigungsmittel ohne
Phosphat verwendet werden, treten bei Verwendung von hartem Wasser häufig weiße Flecken auf
Tellern und Gläsern auf. Verwenden Sie in diesem Fall mehr Reinigungsmittel, um bessere Spül- und
Reinigungsergebnisse zu erzielen. Chlorfreie Reinigungsmittel haben nur eine geringe Bleichwirkung.
Kräftige und farbige Flecken werden nicht vollständig entfernt. Verwenden Sie in diesem Fall bitte ein
Spülprogramm mit einer höheren Temperatur.
ACHTUNG:
ACHTUNG:ACHTUNG:
ACHTUNG:
Verwenden Sie in Ihrem Gerät niemals Seife, Waschmittel für Textilien oder Handwaschmittel.
Konzentriertes Reinigungsmittel
Konzentriertes ReinigungsmittelKonzentriertes Reinigungsmittel
Konzentriertes Reinigungsmittel
Je nach ihrer chemischen Zusammensetzung können Reinigungsmittel in zwei Hauptarten unterteilt
werden:
• herkömmliche Alkali-Reinigungsmittel mit ätzenden Bestandteilen
• Reinigungsmittel mit niedrigen Alkali-Konzentrationen und natürlichen Enzymen
80
Page 83

Die Verwendung “normaler” Spülprogramme in Kombination mit konzentrierten Reinigungsmitteln
reduziert die Umweltverschmutzung und schont Ihr Geschirr. Diese Spülprogramme sind auf die
schmutzlösenden Eigenschaften der Enzyme im konzentrierten Reinigungsmittel speziell abgestimmt.
Aus diesem Grund können “normale” Spülprogramme, in denen konzentrierte Reinigungsmittel verwendet werden, die gleichen Reinigungsergebnisse erzielen, die sonst nur mit “Intensivprogrammen”
erzielt werden können.
Reinigungstabs
R
e
inigungstabsReinigungstabs
Reinigungstabs
Reinigungstabs verschiedener Marken lösen sich unterschiedlich schnell auf. Aus diesem Grund lösen
sich während kurzer Spülprogramme einige Reinigungstabs nicht vollständig auf und können daher
nicht ihre volle Leistungsfähigkeit erreichen. Verwenden Sie daher lange Spülprogramme wenn Sie
Reinigungstabs verwenden, um eine vollständige Entfernung von Reinigungsmittelrückständen sicherzustellen.
Reinigungsmittelb
Re
inigungsmittelbReinigungsmittelb
Reinigungsmittelbehälter
ehälterehälter
ehälter
Der Behälter muss vor dem Start jedes Spülzyklus gemäß der Anleitung in der Spülzyklustabelle
befüllt werden. Ihr Geschirrspüler verwendet weniger Reinigungsmittel und weniger Klarspüler als
herkömmliche Geschirrspüler. Normalerweise wird nur ein Esslöffel Reinigungsmittel für einen normalen Spülgang benötigt. Für schmutzigere Geschirrteile wird mehr Reinigungsmittel benötigt. Füllen Sie
das Reinigungsmittel erst kurz vor Einschalten des Geschirrspülers ein; anderenfalls kann es feucht
werden und sich nicht vollständig auflösen.
Menge des zu verwendenden Reinigungsmittels
Menge des zu verwendenden ReinigungsmittelsMenge des zu verwendenden Reinigungsmittels
Menge des zu verwendenden Reinigungsmittels
HI
HIHI
HINNNNWEIS
WEISWEIS
WEIS::::
• Wenn der Deckel geschlossen ist: Drücken Sie die Freigabetaste. Der Deckel öffnet sich.
• Füllen Sie nur unmittelbar vor einem Spülzyklus Reinigungsmittel ein.
• Verwenden Sie nur Qualitäts-Reinigungsmittel für Geschirrspüler.
• Nach Beendigung des Spülzyklus muss der Reinigungsmittelbehälter leer sein.
WARNUNG
WARNUNGWARNUNG
WARNUNG
Reinigungsmittel für Geschirrspüler ist ätzend und von Kindern fernzuhalten.
Ordnungsgemäße Verwendung des Rei
Ordnungsgemäße Verwendung des ReiOrdnungsgemäße Verwendung des Rei
Ordnungsgemäße Verwendung des Reinigungsmittels
nigungsmittelsnigungsmittels
nigungsmittels
Verwenden Sie nur Reinigungsmittel, das für die Verwendung in Geschirrspülern hergestellt wurde.
Lagern Sie das Reinigungsmittel trocken und sauber. Füllen Sie pulverförmige Reinigungsmittel erst
dann in den Behälter, wenn Sie einen Spülvorgang durchführen wollen.
81
Page 84

Einfüllen des Reinigungsmittels
Einfüllen des ReinigungsmittelsEinfüllen des Reinigungsmittels
Einfüllen des Reinigungsmittels
Füllen Sie den Reinigungsmittel-Behälter mit Reinigungsmittel.
Die Markierung zeigt, wie rechts dargestellt, die Dosierstärke an:
A.
A.A.
A. Kammer für den Hauptspülgang; “MIN” entsprechen etwa
20 g Reinigungsmittel.
B.
B.B.
B. Kammer für den Vorspülgang für etwa 5 g Reinigungsmittel.
Beachten Sie die Dosierung- und Lagerungsempfehlungen des Herstellers auf der Verpackung des
Reinigungsmittels.
Schließen Sie den Deckel und drücken Sie auf ihn, bis er einrastet. Geben Sie bei stark verschmutztem Geschirr eine zusätzliche Dosis Reinigungsmittel in das Fach “BBBB“ für das Reinigungsmittel für die
Vorwäsche. Dieses Reinigungsmittel wirkt im Vorspülgang.
HI
HIHI
HINNNNWEIS
WEISWEIS
WEIS::::
• In der
Spülprogrammtabelle
SpülprogrammtabelleSpülprogrammtabelle
Spülprogrammtabelle
finden Sie Informationen über die richtige Menge Reinigungsmittel für
die jeweiligen Programme.
• Beachten Sie bitte, dass je nach Verschmutzungsgrad und Wasserhärte Unterschiede möglich
sind.
• Beachten Sie bitte die Empfehlungen des Herstellers auf der Verpackung des Reinigungsmittels.
Beladen der Geschirrspülmaschinenkörbe
Beladen der GeschirrspülmaschinenkörbeBeladen der Geschirrspülmaschinenkörbe
Beladen der Geschirrspülmaschinenkörbe
Empfehlung
EmpfehlungEmpfehlung
Empfehlung
• Kaufen Sie nur Küchenutensilien, die als spülmaschinenfest gekennzeichnet sind.
• Verwenden Sie ein mildes Reinigungsmittel, das als ‚geschirrfreundlich‘ beschrieben ist. Falls er-
forderlich, holen Sie weitere Informationen vom jeweiligen Hersteller des Reinigungsmittels ein.
• Wählen Sie für bestimmte Geschirrteile ein Programm mit niedrigstmöglicher Temperatur.
• Nehmen Sie Gläser und Besteck nicht unmittelbar nach Ende des Programms aus dem Geschirr-
spüler, um Schäden zu vermeiden.
Die folgenden Besteck
Di
e folgenden BesteckDie folgenden Besteck
Die folgenden Besteck---- und Geschirrteile sind für das Spülen mit dem Geschirrspüler
und Geschirrteile sind für das Spülen mit dem Geschirrspülerund Geschirrteile sind für das Spülen mit dem Geschirrspüler
und Geschirrteile sind für das Spülen mit dem Geschirrspüler
Nicht geeignet:
- Bestecke mit Handstücken aus Holz, Porzellan oder Perlmutt
- nicht wärmebeständige Kunststoffteile
- ältere Bestecke mit geklebten, nicht tempera-
turbeständigen Teilen
- verklebte Besteck- oder Geschirrteile
- Zinn- oder Kupfergeschirr
- Kristallgläser
- Rostempfindliche Stahlteile
- Holzbretter
Bedingt geeignet:
- einige Glassorten können nach einer größeren Anzahl von Spülgängen stumpf werden
- Silber- und Aluminiumteile verlieren tendenziell während des Spülens an Farbe
- glasierte Muster können bei häufigem Spülen ausbleichen
82
Page 85

Vorsicht vor und nach dem Beladen der Geschirrspülkörbe
Vorsicht vor und nach dem Beladen der GeschirrspülkörbeVorsicht vor und nach dem Beladen der Geschirrspülkörbe
Vorsicht vor und nach dem Beladen der Geschirrspülkörbe
HI
HIHI
HINNNNWEIS
WEISWEIS
WEIS::::
Beachten Sie die folgenden Richtlinien, um mit Ihrem Geschirrspüler beste Reinigungsergebnisse zu
erzielen. Die Funktionen und das Aussehen der Geschirr- und Besteckkörbe können von Ihrem Modell
abweichen.
Entfernen Sie größere Mengen von Speiseresten auf dem Geschirr. Weichen Sie in Pfannen angebrannte Reste auf. Das Vorspülen des Geschirrs unter fließendem Wasser ist nicht erforderlich.
Legen Sie die Geschirrteile in folgender Weise in den Geschirrspüler ein:
• Teile wie Tassen, Gläser, Töpfe/Pfannen usw. mit der Öffnung nach unten einlegen.
• Teile mit Kurven oder Einkerbungen schräg einstellen, so dass das Wasser ablaufen kann.
• Sämtliche Teile so einstellen, dass sie fest stehen und nicht umkippen können.
• Sämtliche Teile so platzieren, dass die Sprüharme während des Spülens frei drehen können.
HI
HIHI
HINNNNWEIS
WEISWEIS
WEIS::::
Sehr kleine Teile nicht im Geschirrspüler spülen, da sie aus dem Korb fallen können.
• Hohle Teile wie Tassen, Gläser, Pfannen usw. mit der Öffnung nach unten einstellen, so dass sich
kein Wasser in dem Teil oder in Vertiefungen sammeln kann.
• Geschirr- und Besteckteile nicht ineinander liegend oder einander überdeckend einstellen.
• Gläser dürfen sich nicht berühren, anderenfalls können sie beschädigt werden.
• Große Teile, die schwer zu reinigen sind, in den unteren Korb einlegen.
• In den oberen Korb empfindlichere und leichtere Geschirrteile wie Gläser, Kaffee- und Teetassen
einstellen.
• Messer mit langen Klingen, die hochkant eingestellt werden, stellen eine Gefahr dar!
• Lange und/oder scharfe Besteckteile wie Tranchiermesser müssen waagerecht in die Besteck-
schublade gelegt werden.
• Bitte überladen Sie Ihren Geschirrspüler nicht. Anderenfalls besteht das Risiko unzureichender
Spülergebnisse und hoher Energieverbräuche.
Herausnehmen des Geschirrs
He
rausnehmen des GeschirrsHerausnehmen des Geschirrs
Herausnehmen des Geschirrs
Um ein Herabtropfen von Wasser vom oberen in den unteren Korb zu vermeiden, empfehlen wir, erst
den unteren Korb und dann den oberen Korb zu entleeren.
Methoden zum Beladen von Normgeschirr
Methoden zum Beladen von NormgeschirrMethoden zum Beladen von Normgeschirr
Methoden zum Beladen von Normgeschirr
Beladen des oberen Korbes
Beladen des oberen KorbesBeladen des oberen Korbes
Beladen des oberen Korbes
Im oberen Korb können empfindlichere und leichtere Geschirrteile wie z. B. Gläser, Kaffee- und
Teetassen, Teller, kleine Schüsseln und flache
Pfannen eingestellt werden (solange diese nicht zu
schmutzig sind). Geschirrteile und Kochgeschirr so
einstellen, dass sie nicht vom Wasserstrahl bewegt werden.
Beladen des unteren Korbes
Beladen des unteren KorbesBeladen des unteren Korbes
Beladen des unteren Korbes
Wir empfehlen, größere und schwer zu reinigende Geschirrteile, wie z. B. Töpfe, Pfannen, Topfdeckel, Servierteller und Schüsseln, wie unten
gezeigt in den unteren Korb einzuräumen.
Dabei sollten Servierteller und Topfdeckel außen
in die Gestelle eingestellt werden, um die Rotation des Sprüharmes nicht zu behindern.
83
Page 86

1 Tassen
2 Untertassen
3 Gläser
4 kleine Schüssel
5 mittlere Schüssel
6 große Schüssel
7 Dessertteller
8 Essteller
9 Suppenteller
10 Ovale Schale
Bitte beachten Sie:
• Töpfe, Servierschüsseln usw. immer mit der Öffnung nach unten einstellen.
• Tiefe Töpfe geneigt einstellen, damit das Wasser herausfließen kann.
• Der untere Korb ist mit klappbaren Stiften versehen, so dass auch größere oder mehrere Töpfe
und Pannen eingestellt werden können.
Einstellung des ob
Einstellung des obEinstellung des ob
Einstellung des obeeeeren Korbes
ren Korbesren Korbes
ren Korbes
Die Höhe des oberen Korbes kann eingestellt
werden, um mehr Platz für größere Gegenstände
im oberen/unteren Korb zu schaffen. Die Einstellung erfolgt, indem die Räder in unterschiedlichen Höhen der Schienen angebracht werden.
Lange Gegenstände, Servierbesteck, Salatbesteck und Messer sollten so auf die Tassenablage gelegt werden, dass sie nicht die Drehung der
Sprüharme behindern.
Untere Position Obere Position
Klappbare Tassenablage
Klappbare TassenablageKlappbare Tassenablage
Klappbare Tassenablage
Zum Einräumen großer Geschirrteile, können die
Tassenträger zurückgeklappt werden.
Klappbare Stifte im unteren G
Kl
appbare Stifte im unteren GKlappbare Stifte im unteren G
Klappbare Stifte im unteren Geeeeschirrkorb
schirrkorbschirrkorb
schirrkorb
Um eine bessere Stapelung von Töpfen und
Pfannen zu erreichen, können die Stifte nach
unten geklappt werden.
Besteckkorb
BesteckkorbBesteckkorb
Besteckkorb
Bestecke gehören in den Besteckkorb mit den Griffen nach unten. Wenn der Besteckkorb über seitliche Klappen verfügt, sollte das Besteck einzeln in die entsprechenden Schlitze eingeordnet werden.
Um Ihre persönliche Sicherheit und ein hervorragendes Spülergebnis sicherzustellen, stellen Sie Besteck auf folgende Weise in den Besteckkorb ein:
- Die Besteckteile dürfen nicht aneinander kleben.
- Die Besteckteile werden mit dem Handstück nach unten einsortiert.
Innen
Innen
I
I
I
I
n
n
n
n
nen
nen
nen
nen
84
Page 87

1 Suppenlöffel
2 Gabeln
3 Messer
4 Teelöffel
5 Dessertlöffel
6 Servierlöffel
7 Serviergabeln
8 Soßenlöffel
WARNUNG:
WARNUNG:WARNUNG:
WARNUNG:
• Verhindern Sie, dass das Besteck auf der Unterseite hervorsteht.
• Messer und andere möglicherweise gefährliche Besteckteile müssen mit dem Hand-
stück nach oben eingestellt werden.
• Besonders lange Utensilien waagerecht im oberen Geschirrkorb eingeordnet werden.
Starten eines Spülprogramms
Starten eines SpülprogrammsStarten eines Spülprogramms
Starten eines Spülprogramms
Spülprogramm
SpülprogrammSpülprogramm
Spülprogramm----Tabelle
TabelleTabelle
Tabelle
HI
HIHI
HINNNNWEIS
WEISWEIS
WEIS:::: Das Symbol bedeutet: In den Klarspüler-Behälter ist Klarspüler einzufüllen.
Pr
PrPr
Proooogramm
grammgramm
gramm
Programmau
ProgrammauProgrammau
Programmausssswahl
wahlwahl
wahl----
Information
InformationInformation
Information
Programm
ProgrammProgramm
Programm----
Beschreibung
BeschreibungBeschreibung
Beschreibung
Rein
ReinRein
Reiniiiigungs
gungsgungs
gungs----
mittel
mittelmittel
mittel
Vor/Haupt
Vor/HauptVor/Haupt
Vor/Haupt
Lau
LauLau
Lauffff----
zeit
zeitzeit
zeit
(Min.)
(Min.)(Min.)
(Min.)
Ene
EneEne
Enerrrrgi
gigi
gieeee
(kWh)
(kWh)(kWh)
(kWh)
Wa
WaWa
Wassssser
serser
ser
(L)
(L)(L)
(L)
Kla
KlaKla
Klar-
r-r-
r-
spüler
spülerspüler
spüler
Intensiv
Für stark verschmutztes Geschirr und eingetrockneten Speiseresten.
Vorspülen (50°C)
Hauptspülen (65°C)
Spülen (65°C)
Trocknen
5/22 g
(oder Tab)
160 1,3 16
Normal
Für normal verschmutztes Geschirr, tägliche
Anwendung.
Vorspülen (45°C)
Hauptspülen (55°C)
Spülen (65°C)
Trocknen
5/22 g
(oder Tab)
175 1 12
ECO
(*EN 50242)
Für normal verschmutztes Geschirr.
Vorspülen
Hauptspülen (50°C)
Spülen (65°C)
Trocknen
5/22 g
(oder Tab)
180 0,69 9
Glas
Für leicht verschmutztes Geschirr und Glas.
Vorspülen
Hauptspülen (40°C)
Spülen (60°C)
Trocknen
5/22 g 110 0,75 12
Express
Für leicht verschmutztes Geschirr.
Vorspülen (50°C)
Hauptspülen (65°C)
Spülen (55°C)
Trocknen
5/22 g 60 0,85 9
Innen
InnenInnen
Innen
85
Page 88

Pr
PrPr
Proooogramm
grammgramm
gramm
Programmau
ProgrammauProgrammau
Programmausssswahl
wahlwahl
wahl----
Inf
InfInf
Information
ormationormation
ormation
Programm
ProgrammProgramm
Programm----
Beschreibung
BeschreibungBeschreibung
Beschreibung
Rein
ReinRein
Reiniiiigungs
gungsgungs
gungs----
mittel
mittelmittel
mittel
Vor/Haupt
Vor/HauptVor/Haupt
Vor/Haupt
Lau
LauLau
Lauffff----
zeit
zeitzeit
zeit
(Min.)
(Min.)(Min.)
(Min.)
Ene
EneEne
Enerrrrgie
giegie
gie
(kWh)
(kWh)(kWh)
(kWh)
Wa
WaWa
Wassssser
serser
ser
(L)
(L)(L)
(L)
Kla
KlaKla
Klar-
r-r-
r-
spüler
spülerspüler
spüler
Schnell
Schneller Spülgang
für leicht verschmutztes Geschirr.
Hauptspülen (40°C)
Spülen (45°C)
20 g 40 0,55 10
Einwei-
chen
Um Geschirr zu
spülen, das Sie
später an diesem
Tag spülen wollen.
Vorspülen 8 0,01 3,5
HI
HIHI
HINNNNWEIS
WEISWEIS
WEIS::::
*EN 50242: dieses Programm ist das Testprogramm. Information für den Vergleichbarkeitstest wie folgt:
- Kapazität: 9 Gedecke
- Position des oberen Korbes: obere Räder auf Schienen
- Klarspüler-Einstellung: 6
- Leistungsaufnahme im Aus-Zustand: 0,45 W
unausgeschalteten Zustand: 0,49 W
Einschalten des Gerätes
Einschalten des GerätesEinschalten des Gerätes
Einschalten des Gerätes
Starten eines Spülprogramms
Starten eines SpülprogrammsStarten eines Spülprogramms
Starten eines Spülprogramms
• Ziehen Sie den oberen und den unteren Korb heraus, stellen Sie das Geschirr ein und schieben
Sie die Körbe zurück. Es wird empfohlen, zuerst den unteren Korb und dann den oberen Korb zu
beladen (siehe
Beladen der G
Beladen der GBeladen der G
Beladen der Geeeeschirrspülmaschinenkörbe
schirrspülmaschinenkörbeschirrspülmaschinenkörbe
schirrspülmaschinenkörbe
).
• Füllen Sie Reinigungsmittel ein (siehe
Vor
Vor Vor
Vor der Erstinbetriebnahme
der Erstinbetriebnahmeder Erstinbetriebnahme
der Erstinbetriebnahme
).
• Stecken Sie den Netzstecker in die Netzsteckdose. Stromversorgung: 220-240 VAC/50 Hz, Steck-
dose: 10 A, 250 VAC. Die Wasserversorgung muss bis zum Höchstdruck geöffnet sein.
• Schließen Sie die Tür und drücken Sie die EIN/AUS-Taste.
• Drücken Sie die Programmtaste; das Spülprogramm ändert sich in folgender Reihenfolge:
lntensiv>Normal>Eco>
lntensiv>Normal>Eco>lntensiv>Normal>Eco>
lntensiv>Normal>Eco>Glas
GlasGlas
Glas---->>>>Express>Schnell>
Express>Schnell>Express>Schnell>
Express>Schnell>Einweichen
EinweichenEinweichen
Einweichen
Wenn ein Programm gewählt wurde, leuchtet die entsprechende Kontrollleuchte auf. Drücken Sie
dann die Start/Pause-Taste und der Geschirrspüler startet.
HI
HIHI
HINNNNWEIS
WEISWEIS
WEIS::::
Wenn Sie die Start/Pause-Taste während eines laufenden Programms drücken, stoppt das Gerät. Die
Anzeige im Display blinkt nicht mehr und der Summer gibt einmal pro Minute ein akustisches
Signal aus, bis die Start/Pause-Taste wieder gedrückt wird. Der Spülgang wird fortgesetzt.
86
Page 89

Programmänderung
P
r
ogrammänderungProgrammänderung
Programmänderung
Voraussetzung:
Voraussetzung:Voraussetzung:
Voraussetzung:
• Ein laufender Spülzyklus kann nur geändert werden, wenn er erst kurze Zeit gelaufen ist. Anderen-
falls wurde möglicherweise schon Reinigungsmittel freigesetzt und das Gerät hat möglicherweise
bereits Spülwasser abgelassen. Wenn dies der Fall ist, muss der Reinigungsmittel-Behälter neu
befüllt werden (siehe
Einfüllen des Reinigungsmittel
Einfüllen des ReinigungsmittelEinfüllen des Reinigungsmittel
Einfüllen des Reinigungsmittel
).
• Drücken Sie die Start/Pause-Taste länger als 3 Sekunden. Das Gerät geht in einen Standby-
Zustand über, in dem Sie das Programm auf die gewünschte Zykluseinstellung umprogrammieren
können (siehe
Starten eines Spülprogramms
Starten eines SpülprogrammsStarten eines Spülprogramms
Starten eines Spülprogramms
).
• Das Display zeigt Ihnen den Zustand des Geschirrspülers an:
a) Displayanzeige ----::::--
----
-- Standby-Modus
b) Displayanzeige H:MM (blinkt nicht)
H:MM (blinkt nicht)H:MM (blinkt nicht)
H:MM (blinkt nicht) Pause
c) Displayanzeige H:MM (blinkt)
H:MM (blinkt)H:MM (blinkt)
H:MM (blinkt) Arbeitsprozess
HI
HIHI
HINNNNWEIS
WEISWEIS
WEIS::::
Wenn Sie die Tür während eines laufenden Programms öffnen, hält das Gerät an. Die Anzeige
im Display blinkt nicht mehr und der Summer gibt einmal pro Minute ein akustisches Signal aus, bis
die Tür wieder geschlossen wird. 10 Sekunden nach Schließen der Tür läuft das Gerät weiter.
Geschirrteile vergessen einzuräumen?
Geschirrteile vergessen einzuräumen?Geschirrteile vergessen einzuräumen?
Geschirrteile vergessen einzuräumen?
Vergessene Geschirrteile können solange der Reinigungsmittel-Behälter noch nicht geöffnet hat, eingeräumt werden.
Am En
Am
EnAm En
Am Ende des Spülprogramms
de des Spülprogrammsde des Spülprogramms
de des Spülprogramms
Wenn das Spülprogramm zu Ende ist, ertönt der Summer des Geschirrspülers 8 Sekunden lang; danach schaltet sich das Gerät ab.
Ausschalten des Geschirrspülers
Ausschalten des GeschirrspülersAusschalten des Geschirrspülers
Ausschalten des Geschirrspülers
Die Programmleuchte ist aus, wenn das Programm beendet ist.
• Schalten Sie den Geschirrspüler aus, indem Sie die EIN/AUS-Taste drücken.
• Wasserversorgung schließen!
1. Drücken Sie die Start/Pause-Taste.
2. Öffnen Sie die Tür etwas, um den Spülvorgang
anzuhalten.
3. Sobald die Sprüharme angehalten haben, kön-
nen Sie die Tür vollständig öffnen.
4. Stellen Sie vergessene Geschirrteile ein.
5. Schließen Sie die Tür.
6. 10 Sekunden nach Drücken der
Start/Pause-Taste läuft der Geschirrspüler
wieder an.
87
Page 90

Öffnen Sie die Tür vorsichtig
Öffnen Sie die Tür vorsichtigÖffnen Sie die Tür vorsichtig
Öffnen Sie die Tür vorsichtig
Heiße Geschirrteile sind stoßempfindlich. Lassen Sie die Geschirrteile daher etwa 15 Minuten abkühlen, bevor Sie sie aus dem Gerät nehmen. Öffnen Sie die Geschirrspültür und warten Sie etwa 15
Minuten bevor Sie den Geschirrspüler entladen; anderenfalls sind das Geschirr und die Küchenutensilien noch sehr heiß und bruchempfindlicher. Außerdem trocknen sie dann besser.
Entladen des Geschirr
E
n
tladen des GeschirrEntladen des Geschirr
Entladen des Geschirrspülers
spülersspülers
spülers
Es ist normal, dass der Geschirrspüler innen nass ist. Entleeren Sie erst den unteren, dann den oberen Korb. Dadurch wird vermieden, dass Wasser vom oberen Korb auf die Geschirrteile im unteren
Korb tropft.
WARNUNG:
WARNUNG:WARNUNG:
WARNUNG:
Es ist gefährlich die Tür während des Spülvorgangs zu öffnen, es besteht Verbr
VerbrVerbr
Verbrüüüühungsgefahr!
hungsgefahr!hungsgefahr!
hungsgefahr!
Wartung und Reinigung
Wartung und ReinigungWartung und Reinigung
Wartung und Reinigung
Filtersystem
FiltersystemFiltersystem
Filtersystem
Der Filter verhindert, dass größere Mengen an Speiseresten oder Fremdkörber in das Spülsystem
gelangen. Die Reste können den Filter blockieren; in diesem Fall müssen sie entfernt werden.
Das Filtersystem besteht aus einem Grobfilter, einem flachen Hauptfilter und einem feinen Mikrofilter.
Hauptfilter
In diesem Filter aufgefangene Lebensmittel- und Schmutzpartikel werden von einem Spezialstrahl auf dem unteren Sprüharm pulverisiert
und über den Wasserablauf ausgespült.
Grobfilter
Größere Gegenstände wie Knochenstücke oder Glasscherben, die den
Abfluss blockieren könnten, werden im Grobfilter aufgefangen. Um
diese Gegenstände aus dem Filter zu entfernen, drücken Sie leicht auf
den Deckel dieses Filters und nehmen Sie ihn ab.
Feinfilter
Dieser Filter fängt Schmutz und Lebensmittelreste im Sumpfbereich
und verhindert, dass sich diese Verschmutzungen während des Spülzyklus wieder auf den Geschirrteilen absetzen.
Filterbaugruppe
FilterbaugruppeFilterbaugruppe
Filterbaugruppe
Der Filter beseitigt Lebensmittelpartikel aus dem Waschwasser und ermöglicht so dessen Wiederverwendung für den Spülzyklus. Um beste Leistungen und Ergebnisse zu erzielen, muss der Filter regelmäßig gereinigt werden. Aus diesem Grund ist es vorteilhaft, größere im Filter aufgefangene Lebensmittelpartikel nach jedem Spülzyklus durch Ausspülen des halbrunden Filters und des Behälters
unter fließendem Wasser zu entfernen. Ziehen Sie den Behältergriff nach oben, um den Filtereinsatz
herauszuziehen.
88
Page 91

WARNUNG:
WARNUNG:WARNUNG:
WARNUNG:
• Der Geschirrspüler darf niemals ohne Filter betrieben werden.
• Ein unsachgemäßes Einsetzen des Filters kann die Leistung des Gerätes herabsetzen und Ge-
schirrteile und Küchenutensilien beschädigen.
HI
HIHI
HINNNNWEIS
WEISWEIS
WEIS::::
Zum Herausziehen der Filtereinheit nachstehende Schritte in der Reihenfolge 1-2 durchführen; zum
Wiedereinsetzen der Filtereinheit die Schritte in der Reihenfolge 2-1 durchführen.
Schritt 1: Filter gegen den Uhrzeigersinn drehen. Schritt 2: Filtereinheit herausdrehen.
• Prüfen Sie nach jeder Verwendung des Geschirrspülers die Filter auf Verstopfungen.
• Nach Abschrauben der Filtereinheit können Lebensmittelreste und die Filter unter fließendem
Wasser gereinigt werden.
ACHTUNG:
ACHTUNG:ACHTUNG:
ACHTUNG:
Das gesamte Filtersystem muss einmal pro Woche gereinigt werden.
Reinigen des Filters
Reinigen des FiltersReinigen des Filters
Reinigen des Filters
Verwenden Sie zur Reinigung des Grob- und des Feinfilters eine Reinigungsbürste. Setzen Sie die
Filterteile wie in der Abbildung auf der letzten Seite dargestellt zusammen und setzen Sie die gesamte
Gruppe wieder in den Geschirrspüler ein; dazu positionieren Sie den Filter in die Vorrichtung und drücken ihn dann nach unten.
ACHTUNG:
ACHTUNG:ACHTUNG:
ACHTUNG:
Die Filter nicht zum Reinigen ausklopfen. Sie können sich sonst verformen, was die Reinigungsleistung des Geschirrspülers vermindern kann.
Pflege des Geschirrspülers
Pflege des GeschirrspülersPflege des Geschirrspülers
Pflege des Geschirrspülers
• Das Bedienfeld kann mit einem leicht angefeuchteten Tuch gereinigt werden. Nach dem Reinigen
gründlich abtrocknen.
• Verwenden Sie für die Außenflächen eine gute Gerätepolitur.
• Verwenden Sie an keinem Teil des Geschirrspülers scharfe Gegenstände, Scheuerpads oder ag-
gressive Reiniger.
Reinigung der Tür
Reinigung der TürReinigung der Tür
Reinigung der Tür
Zum Reinigen der Türdichtung verwenden Sie nur ein weiches, mit
warmem Wasser angefeuchtetes Tuch. Vermeiden Sie die Anwendung von Sprühreinigern, da diese zum Eindringen von Wasser in die
Türverriegelung und in elektrische Komponenten führen können.
89
Page 92

WARNUNG:
WARNUNG:WARNUNG:
WARNUNG:
• Verwenden Sie zum Reinigen der Türverkleidung keine Sprühreiniger, da diese die Türverriege-
lung und elektrische Bauteile beschädigen können.
• Scheuernde Reinigungsmittel und einige Papiertücher dürfen nicht verwendet werden, da sie Krat-
zer oder Flecken auf der Edelstahloberfläche hinterlassen können.
Schutz gegen Gefrieren
Schutz gegen GefrierenSchutz gegen Gefrieren
Schutz gegen Gefrieren
Schützen Sie den Geschirrspüler im Winter gegen Frostschäden. Führen Sie nach jedem Spülzyklus
folgendes durch:
1. Unterbrechen Sie die Stromversorgung zum Geschirrspüler.
2. Schließen Sie die Wasserversorgung und nehmen Sie den Wasserzulaufschlauch vom Wasser-
ventil ab.
3. Lassen Sie das Wasser aus dem Zulaufschlauch und aus dem Wasserventil ab (Verwenden Sie
einen Auffangbehälter für das ablaufende Wasser).
4. Schließen Sie den Zulaufschlauch wieder an das Wasserventil an.
5. Nehmen Sie den Filter aus dem Boden der Wanne heraus und entfernen Sie das Wasser im
Sumpf mit einem Schwamm.
HI
HIHI
HINNNNWEIS
WEISWEIS
WEIS::::
Wenn Ihr Geschirrspüler eingefroren ist, wenden Sie sich bitte an den Kundendienst.
Reinigung der Sprüharme
Reinigung der Sprüharme Reinigung der Sprüharme
Reinigung der Sprüharme
Die Sprüharme müssen regelmäßig gereinigt werden, da die Wasserenthärtungschemikalien die Düsen und die Lager des Spürharmes verstopfen können. Zum Entfernen des oberen Sprüharmes die Mutter im Uhrzeigersinn
abschrauben und den Arm abnehmen.
Zum Abnehmen des unteren Sprüharmes den Sprüharm nach oben abziehen.
Die Arme in warmem Seifenwasser waschen; dabei die Düsen mit einer weichen Bürste reinigen. Gründlich abspülen und wieder einbauen.
Erhalten eines guten Betriebszustandes Ihres G
Er
halten eines guten Betriebszustandes Ihres GErhalten eines guten Betriebszustandes Ihres G
Erhalten eines guten Betriebszustandes Ihres Geeeeschirrspülers
schirrspülersschirrspülers
schirrspülers
- Nach jedem Spülen
Nach jedem SpülenNach jedem Spülen
Nach jedem Spülen
Schließen Sie nach jedem Spülvorgang die
Wasserversorgung zum Gerät und lassen Sie
die Tür leicht geöffnet, damit keine Feuchtigkeit und keine Gerüche im Gerät verbleiben.
- Netzstecker ziehen
Netzstecker ziehenNetzstecker ziehen
Netzstecker ziehen
Vor der Durchführung von Reinigungs- oder
Wartungsarbeiten immer den Netzstecker aus
der Netzsteckdose ziehen.
- Bei Nichtverwendung über einen längeren
Bei Nichtverwendung über einen längeren Bei Nichtverwendung über einen längeren
Bei Nichtverwendung über einen längeren
Zei
ZeiZei
Zeittttraum
raumraum
raum
Es wird empfohlen, einen Spülzyklus mit leerem Geschirrspüler zu fahren, anschließend
den Netzstecker zu ziehen, die Wasserversorgung zu trennen und die Tür des Gerätes
leicht geöffnet zu lassen. Auf diese Weise
werden die Türdichtungen geschont und es
können sich im Gerät keine Gerüche bilden.
Öffnen
90
Page 93

- Keine Lösungsmittel oder scheuernde Rein
Keine Lösungsmittel oder scheuernde ReinKeine Lösungsmittel oder scheuernde Rein
Keine Lösungsmittel oder scheuernde Reini-
i-i-
i-
gungsmittel
gungsmittel gungsmittel
gungsmittel
Zum Reinigen der Außenflächen und der
Gummiteile des Geschirrspülers keine Lösungsmittel oder scheuernde Reinigungsmittel
verwenden. Verwenden Sie ausschließlich ein
mit warmem Seifenwasser angefeuchtetes
Tuch. Zum Entfernen von Flecken von Innenflächen ein mit etwas Essig angefeuchtetes
Tuch oder ein spezielles Produkt für die Reinigung von Geschirrspülern verwenden.
- Ve
rsetzen des Gerätes
Versetzen des GerätesVersetzen des Gerätes
Versetzen des Gerätes
Wenn das Gerät bewegt werden muss, versuchen Sie es in vertikaler Position zu tragen.
Falls unbedingt erforderlich, kann das Gerät
auf der Rückseite liegend bewegt werden.
- Dichtungen
DichtungenDichtungen
Dichtungen
In den Dichtungen klebende Speisereste sind
häufig die Ursache für die Bildung unangenehmer Gerüche. Eine regelmäßige Reinigung mit einem feuchten Schwamm verhindert dies.
Installationsanwe
InstallationsanweInstallationsanwe
Installationsanweiiiisung
sungsung
sung
WARNUNG:
WARNUNG:WARNUNG:
WARNUNG:
• Die Montage von Rohren und elektrischen Ausrüstungen darf nur durch Fachpersonal erfolgen.
• Schalten Sie vor der Installation des Geschirrspülers die Stromzufuhr ab. Anderenfalls besteht
Lebensgefahr
Lebensgefahr Lebensgefahr
Lebensgefahr sowie Stromschla
StromschlaStromschla
Stromschlagggggefahr
gefahrgefahr
gefahr.
Positionierung des Gerätes
Positionierung des GerätesPositionierung des Gerätes
Positionierung des Gerätes
Positionieren Sie das Gerät an den gewünschten Aufstellungsort. Die Rückseite des Gerätes sollte zur
Wand stehen, und die Seiten sollten an angrenzenden Unterbauten oder Wänden stehen. Der Geschirrspüler ist mit Wasser-Zu- und -Ablaufschläuchen ausgerüstet, die rechts oder links vom Gerät
verlegt werden können, um eine ordnungsgemäße Installation sicherzustellen.
Ausrichten des
Au
srichten des Ausrichten des
Ausrichten des Gerätes
GerätesGerätes
Gerätes
Wenn das Gerät zum Ausrichten aufgestellt worden ist, kann die Höhe über
die Einstellschrauben an den Füßen verändert werden. Auf keinen Fall sollte
das Gerät mehr als 2° geneigt werden.
Wasseranschluss
WasseranschlussWasseranschluss
Wasseranschluss
• Das Gerät muss mit einem neuen Anschluss-Set am Wasserhahn angeschlossen werden, der eine
separate Abstellmöglichkeit hat. Keine alten Anschluss-Sets wiederverwenden.
• Der Wasserdruck muss zwischen 0,04 MPa und 1 MPa betragen. Ist der Druck geringer, so wen-
den Sie sich bitte an unseren Kundendienst oder einen Fachmann.
1. Wickeln Sie den Zulaufschlauch vollständig auf der Rückseite des Geschirrspülers ab.
2. Schrauben Sie den Wasserzulauf am Wasserhahn mit 3/4"-Gewinde an.
3. Drehen Sie das Wasser voll auf, bevor Sie den Geschirrspüler in Betrieb
nehmen.
91
Page 94

Hinweise zum Zulaufschlauch
Hinweise zum ZulaufschlauchHinweise zum Zulaufschlauch
Hinweise zum Zulaufschlauch----Sicherheitssystem
SicherheitssystemSicherheitssystem
Sicherheitssystem
Der Wasserzulauf ist doppelwandig. Dieses System garantiert die Absperrung des Wasserzulaufs bei
Undichtigkeit des inneren Schlauches. Die Abschaltung des Wasserzulaufs führt über einen elektronischen Kontakt.
Abnehmen des Wasserzulaufschlauchs von der Wasserversorgung
A
b
nehmen des Wasserzulaufschlauchs von der WasserversorgungAbnehmen des Wasserzulaufschlauchs von der Wasserversorgung
Abnehmen des Wasserzulaufschlauchs von der Wasserversorgung
1. Sperren Sie den Zulaufhahn ab.
2. Schrauben Sie den Sicherheits-Wasserzulaufschlauch vom Wasserhahn ab.
Kaltwasseransc
Ka
ltwasseranscKaltwasseransc
Kaltwasseranschluss
hlusshluss
hluss
Schließen Sie den Kaltwasser-Zulaufschlauch an ein Anschlussstück mit 3/4“-Gewinde an; achten Sie
dabei auf festen Sitz. Wenn die Wasserrohre neu sind oder längere Zeit nicht verwendet wurden, lassen Sie Wasser ablaufen, bis das nachströmende Wasser klar ist. Diese Vorsichtsmaßnahme ist erforderlich, um ein Verstopfen des Wasserzulaufs und Schäden am Gerät zu vermeiden.
WARNUNG:
WARNUNG:WARNUNG:
WARNUNG:
Um zu vermeiden, dass Wasserdruck im Zulaufschlauch verbleibt, schließen Sie nach der Verwendung den Haupthahn.
Anschluss des Siphons
Anschluss des SiphonsAnschluss des Siphons
Anschluss des Siphons
Führen Sie den Ablaufschlauch in einen Ablauf mit einem Mindestdurchmesser von 40 mm ein oder
lassen ihn in den Ausguss laufen, wobei Sie darauf achten müssen, dass er nicht verbogen oder gequetscht wird. Der Abwasseranschluss muss sich in einer Höhe von 1000 mm (max.) vom Boden des
Waschraums befinden. Der Wasserablaufschlauch ist mit einer Schlauchschelle zu sichern.
Bringen Sie den Ablaufschlauch auf
Bringen Sie den Ablaufschlauch auf Bringen Sie den Ablaufschlauch auf
Bringen Sie den Ablaufschlauch auf die Weise A oder B an
die Weise A oder B andie Weise A oder B an
die Weise A oder B an
Ablassen überschüss
Ablassen überschüssAblassen überschüss
Ablassen überschüssigen Wa
igen Waigen Wa
igen Wasssssers aus den Schläuchen
sers aus den Schläuchensers aus den Schläuchen
sers aus den Schläuchen
Wenn der Ablauf 1000 mm über dem Fußboden liegt, kann das überschüssige Wasser in den Schläuchen nicht direkt in den Ablauf abgelassen werden. In diesem Fall muss das überschüssige Wasser
aus den Schläuchen in eine Schüssel oder einen geeigneten Behälter abgelassen werden, der unterhalb des Ablaufs steht.
Wasserablauf
WasserablaufWasserablauf
Wasserablauf
Schließen Sie den Wasserablaufschlauch an. Der Ablaufschlauch muss ordnungsgemäß angeschlossen werden, um Wasserundichtigkeiten zu vermeiden. Der Wasserablaufschlauch darf nicht geknickt
oder gequetscht sein.
92
Page 95

Verlängerungsschlauch
Ver
längerungsschlauchVerlängerungsschlauch
Verlängerungsschlauch
Wenn Sie eine Verlängerung für den Ablaufschlauch benötigen, verwenden Sie nur einen ähnlichen
Schlauch. Er darf nicht länger als 4 Meter sein; anderenfalls kann der Reinigungseffekt des Geschirrspülers reduziert werden.
Stromanschluss
StromanschlussStromanschluss
Stromanschluss
WARNUNG
WARNUNGWARNUNG
WARNUNG
Zu Ihrer persönlichen Sicherheit:
• Mit diesem Gerät kein Verlängerungskabel und keinen Adapterstecker verwenden.
• Unter keinen Umständen den Erdanschluss vom Netzkabel abtrennen oder abschneiden.
Elektrische Anforderungen
Elektrische AnforderungenElektrische Anforderungen
Elektrische Anforderungen
Auf dem Typenschild finden Sie Informationen über die Anschlussspannung; schließen Sie den Geschirrspüler an eine entsprechende Stromquelle an. Verwenden Sie die geforderte 10 A-Sicherung,
eine träge Sicherung oder einen empfohlenen Sicherungsschalter und bieten Sie einen gesonderten
Leistungsschutz für dieses Gerät.
Elektrischer Anschluss
Elektrischer Anschluss Elektrischer Anschluss
Elektrischer Anschluss
Spannung und Frequenz der Stromversorgung müssen den Angaben auf dem Typenschild entsprechen. De
DeDe
Der Netzstecker darf nur in eine ordnungsgemäß geerdete Netzsteckdose eingesteckt werden.
r Netzstecker darf nur in eine ordnungsgemäß geerdete Netzsteckdose eingesteckt werden.r Netzstecker darf nur in eine ordnungsgemäß geerdete Netzsteckdose eingesteckt werden.
r Netzstecker darf nur in eine ordnungsgemäß geerdete Netzsteckdose eingesteckt werden.
Wenn die Netzsteckdose, an die das Gerät angeschlossen werden soll, für den Netzstecker geerdet
werden. nicht geeignet ist, ersetzen Sie die Netzsteckdose. Verwenden Sie keine Adapter o. ä., da
diese Überhitzungen und Brände verursachen können.
Erdungsanweisungen
Er
dungsanweisungenErdungsanweisungen
Erdungsanweisungen
Dieses Gerät muss geerdet werden. Bei einer Störung oder Fehlfunktion verringert die Erdung die
Stromschlaggefahr, indem sie einen Weg mit dem geringsten Widerstand für den elektrischen Strom
schafft. Dieses Gerät ist mit einem Kabel ausgestattet, das einen Geräteerdleiter und einen Erdstecker hat. Der Stecker muss in eine passende Steckdose gesteckt werden, die entsprechend den lokalen Gesetzen und Vorschriften installiert und geerdet ist.
WARNUNG:
WARNUNG:WARNUNG:
WARNUNG:
• Ein unsachgemäßer Anschluss des Geräte-Erdungskabels kann zu einem elektrischen Schlag
führen.
• Wenden Sie sich an einem qualifizierten Elektriker oder einen Kundendienstmitarbeiter, wenn Sie
sich nicht sicher sind, ob das Gerät ordnungsgemäß geerdet ist.
• Verändern Sie den mit dem Gerät mitgelieferten Netzanschlussstecker nicht. Wenn der Netzste-
cker nicht richtig in die Netzsteckdose passt, lassen Sie durch einen qualifizierten Elektriker eine
geeignete Netzsteckdose einbauen.
93
Page 96

Starten des Geschirrspülers
Starten des GeschirrspülersStarten des Geschirrspülers
Starten des Geschirrspülers
Vor dem Starten des Geschirrspülers sind folgende Ding
e zu prüfen:
• Der Geschirrspüler steht waagerecht und ist ordnungsgemäß befestigt.
• Das Einlassventil ist geöffnet
• Die Anschlüsse der Zuleitungen dürfen keine Undichtigkeiten aufweisen.
• Die Kabel sind fest angeschlossen.
• Die Stromversorgung ist eingeschaltet.
• Die Zulauf- und Ablaufschläuche sind gesichert.
• Alle Verpackungsmaterialien und Broschüren müssen aus dem Geschirrspüler herausgenommen
sein.
ACHTUNG:
ACHTUNG:ACHTUNG:
ACHTUNG:
Dieses Handbuch nach der Installation bitte aufbewahren. Der Inhalt dieses Handbuchs ist für die
Anwender sehr hilfreich.
Reparaturen
ReparaturenReparaturen
Reparaturen
Eine falsch bzw. nicht fachgerecht durchgeführte Reparatur bringt Gefahr für den Benutzer und führt
zu einem Verlust des Garantieanspruchs.
Reparaturen an elektrischen Geräten dürfen ausschließlich nur von einem hierfür qualifizierten Fachmann ausgeführt werden. Eine beschädigte Netzanschlussleitung darf nur von einer Elektrofachkraft
ausgewechselt werden.
Störungsbehebung
St
örungsbehebungStörungsbehebung
Störungsbehebung
Bevor S
Bevor SBevor S
Bevor Sie den Kundendienst rufen
ie den Kundendienst rufenie den Kundendienst rufen
ie den Kundendienst rufen
Sie brauchen den Kundendienst möglicherweise nicht rufen, wenn Sie diese Fehlersuchtabelle lesen.
Problem
ProblemProblem
Problem Mögliche Ursache
Mögliche UrsacheMögliche Ursache
Mögliche Ursache Behebung
BehebungBehebung
Behebung
Technische
Technische Technische
Technische
Pro
ProPro
Probbbbleme
lemeleme
leme
Der Geschirrspüler startet nicht.
Sicherung durchgebrannt oder
Sicherungsschalter ausgelöst.
Sicherung ersetzen oder Sicherungsschalter zurücksetzen. Alle Geräte, die
sich mit dem Geschirrspüler den gleichen Stromkreis teilen, wegnehmen.
Stromversorgung ist nicht
eingeschaltet.
Das Gerät muss eingeschaltet und die
Tür sicher geschlossen sein. Der Netzstecker muss ordnungsgemäß in der
Netzsteckdose stecken.
Wasserdruck ist zu gering.
Die Wasserversorgung muss ordnungsgemäß angeschlossen und die Wasserzufuhr geöffnet sein.
Die Geschirrspültür ist nicht
richtig geschlossen.
Tür fest verschließen und einrasten
lassen.
94
Page 97

Problem
ProblemProblem
Problem Mögliche Ursache
Mögliche UrsacheMögliche Ursache
Mögliche Ursache Behebung
BehebungBehebung
Behebung
Technische
Technische Technische
Technische
Pro
ProPro
Probbbbleme
lemeleme
leme
Das Wasser wird
nicht abgepumpt.
Knick im Ablaufschlauch. Ablaufschlauch prüfen.
Filter verstopft. Grobfilter prüfen.
Küchenablauf verstopft.
Küchenablauf prüfen, um sicherzustellen, dass das Wasser einwandfrei abfließt. Wenn der Küchenablauf verstopft
ist, benötigen Sie möglicherweise einen
Klempner anstelle des Kundendienstmitarbeiters.
Allgemeine
Allgemeine Allgemeine
Allgemeine
Pro
ProPro
Probbbbleme
lemeleme
leme
Schaum im
Spülraum.
Falsches Reinigungsmittel.
Verwenden Sie nur spezielle Geschirrspüler-Reinigungsmittel. Bildet sich
Schaum, öffnen Sie das Gerät und lassen ihn verdunsten. Geben Sie
4 L Wasser kaltes Wasser in den
Spülraum. Schließen und verriegeln Sie
das Gerät und starten Sie dann ein kurzes Spülprogramm, um das Wasser
herauszupumpen. Wiederholen Sie den
Vorgang falls erforderlich.
Klarspüler verschüttet.
Verschütteten Klarspüler immer sofort
aufwischen.
Spülraum innen
fleckig.
Reinigungsmittel mit Farbstoff
wurde verwendet.
Nur Reinigungsmittel ohne Farbstoff
verwenden.
Weißer Film auf
Innenflächen.
Mineralien aus hartem Wasser.
Verwenden Sie zur Innenraumreinigung
einen feuchten Schwamm mit Reinigungsmittel speziell für Geschirrspüler;
tragen Sie dabei Gummihandschuhe.
Rost oder Flecken
auf Besteck.
Die betroffenen Gegenstände
sind nicht rostfrei.
Nach Hinzufügen von Spülsalz
wurde ein Programm nicht
ausgeführt. Es sind Salzspuren in den Spülzyklus geraten.
Nach dem Hinzufügen von Spülsalz
immer ein kurzes Spülprogramm wählen,
ohne dass sich Geschirr im Gerät befindet.
Der Deckel der Wasserenthärtungsvorrichtung ist locker.
Die Lippe prüfen. Die Befestigung muss
ordnungsgemäß sein.
Geräusche
GeräuscheGeräusche
Geräusche
Klopfgeräusche
im Spülraum.
Ein Sprüharm schlägt gegen
den Korb.
Programm anhalten und die Geschirrteile
anders anordnen.
Rattergeräusche
im Spülraum.
Geschirrteile liegen lose im
Spülraum.
Programm anhalten und Geschirrteile
neu anordnen.
Klopfgeräusche in
den Wasserschläuchen.
Kann durch die Installation
oder den Querschnitt der
Wasserleitungen hervorgerufen werden.
Dies hat keinen Einfluss auf die Funktion
des Gerätes. In Zweifelsfällen wenden
Sie sich an einen qualifizierten Klempner.
95
Page 98

Problem
ProblemProblem
Problem Mögliche Ursache
Mögliche UrsacheMögliche Ursache
Mögliche Ursache Behebung
BehebungBehebung
Behebung
Unbefried
UnbefriedUnbefried
Unbefriedi-
i-i-
i-
gendes Spü
gendes Spügendes Spü
gendes Spül-
l-l-
l-
ergebnis
ergebnisergebnis
ergebnis
Teller/Geschirr
nicht sauber.
Die Teller wurden nicht richtig
eingeräumt.
Siehe Hinweise unter
Beladen der G
Beladen der GBeladen der G
Beladen der Ge-
e-e-
e-
schirrspül
schirrspülschirrspül
schirrspülmaschinen
maschinenmaschinen
maschinenkörbe
körbekörbe
körbe
.
Das Programm war nicht kräftig genug.
Wählen Sie ein intensiveres Programm
siehe
Spülprogrammtabelle
SpülprogrammtabelleSpülprogrammtabelle
Spülprogrammtabelle
.
Es wurde nicht genug Reinigungsmittel freigesetzt.
Verwenden Sie mehr Reinigungsmittel
oder wechseln Sie das Reinigungsmittel.
Die Sprüharme sind durch
Geschirrteile blockiert.
Geschirrteile so einstellen, dass die
Sprüharme nicht behindert werden.
Die Filterkombination im Boden des Spülraums ist nicht
sauber oder richtig eingesetzt.
Dadurch können die Sprüharmdüsen blockiert werden.
Die Filterkombination reinigen und/oder
richtig einsetzen. Die Sprüharmdüsen
reinigen siehe
Reinigung der Sprüha
Reinigung der SprühaReinigung der Sprüha
Reinigung der Sprüharrrrme
meme
me
.
Trübungen auf
Gläsern.
Kombination aus weichem
Wasser und zu viel Reinigungsmittel.
Verwenden Sie weniger Reinigungsmittel, wenn Sie mit weichem Wasser spülen und wählen Sie zum Spülen von
Gläsern den kürzesten Spülzyklus.
Schwarze oder
graue Flecken auf
Tellern.
Küchengeräte aus Aluminium
haben an den Tellern gescheuert.
Entfernen Sie die Flecken mit einem
milden Scheuermittel.
In den Behältern
ist Reinigungsmittel übrig.
Behälter durch Teller blockiert. Teller richtig anordnen.
Unbefried
UnbefriedUnbefried
Unbefriedi-
i-i-
i-
gendes
gendes gendes
gendes
Trocknungs
TrocknungsTrocknungs
Trocknungs----
ergebnis
ergebnisergebnis
ergebnis
Teller/Geschirr
trocknen nicht.
Falsch eingelegt.
Den Geschirrspüler wie in der Bedienungsanleitung angegeben beladen.
Zu wenig Klarspüler.
Klarspülerdosierung erhöhen/KlarspülerBehälter befüllen.
Teller/Geschirr werden/wird zu
früh entnommen.
Das Gerät nicht unmittelbar nach dem
Spülen entleeren. Die Tür etwas öffnen,
damit Dampf entweichen kann. Das
Gerät erst entladen, wenn die Teller
soweit abgekühlt sind, dass sie angefasst werden können. Zuerst den unteren
Korb entladen. Auf diese Weise wird
verhindert, dass Wasser aus dem oberen
in den unteren Korb tropft.
Falsches Programm gewählt.
Bei einem kurzen Spülprogramm ist die
Spültemperatur niedriger. Dadurch wird
die Spülleistung herabgesetzt. Wählen
Sie ein Programm mit langer Spülzeit.
Verwendung von Besteck mit
schlechter Beschichtung.
Bei solchen Besteckteilen läuft das Wasser schlechter ab. Besteck-/Geschirrteile
sind nicht spülmaschinengeeignet.
96
Page 99

Fehlercodes
F
e
hlercodesFehlercodes
Fehlercodes
Bei einigen Fehlfunktionen werden folgenden Fehlercodes im Display angezeigt, um Sie zu warnen:
Fehler
FehlerFehler
Fehler----Code
Code Code
Code Bedeutungen
Bedeutungen Bedeutungen
Bedeutungen Mögliche Ursachen
Mögliche Ursachen Mögliche Ursachen
Mögliche Ursachen
E1
E1 E1
E1
längere
Zulaufzeit
Der Wasserhahn ist nicht geöffnet, der Wasserzulauf ist nicht frei oder der
Wasserdruck ist zu niedrig.
E4
E4 E4
E4 Überlauf Ein Element des Geschirrspülers ist undicht.
E8
E8E8
E8
Fehler der Steuerventile
Steuerventile im Wasserzulauf- oder Ablauf gestört oder defekt.
WARNUNG:
WARNUNG:WARNUNG:
WARNUNG:
• Bei einem Überlauf vor dem Verständigen des Kundendienstes den Haupthahn schließen.
• Wenn sich aufgrund einer Überfüllung oder eine kleinen Undichtigkeit Wasser im Gehäuseunterteil
befinden sollte, dieses Wasser vor dem erneuten Starten des Gerätes entfernen.
HINWEIS
HINWEISHINWEIS
HINWEIS::::
Falls Sie nach dem Durcharbeiten der obigen Schritte immer noch Probleme mit Ihrem Gerät haben
sollten, wenden Sie sich an ihren Fachhandel oder den Kundendienst (siehe
Garantie / Kunde
Garantie / KundeGarantie / Kunde
Garantie / Kunden-
n-n-
n-
dienst
dienstdienst
dienst
).
Technische Information
Technische InformationTechnische Information
Technische Informationen
enen
en
Abmessunge
AbmessungeAbmessunge
Abmessungen /
n /n /
n / Gewichte:
Gewichte:Gewichte:
Gewichte:
Höhe 845 mm
Breite 448 mm
Tiefe exkl. Tür 600 mm
Nettogewicht 36,0 kg
97
 Loading...