

Page 1
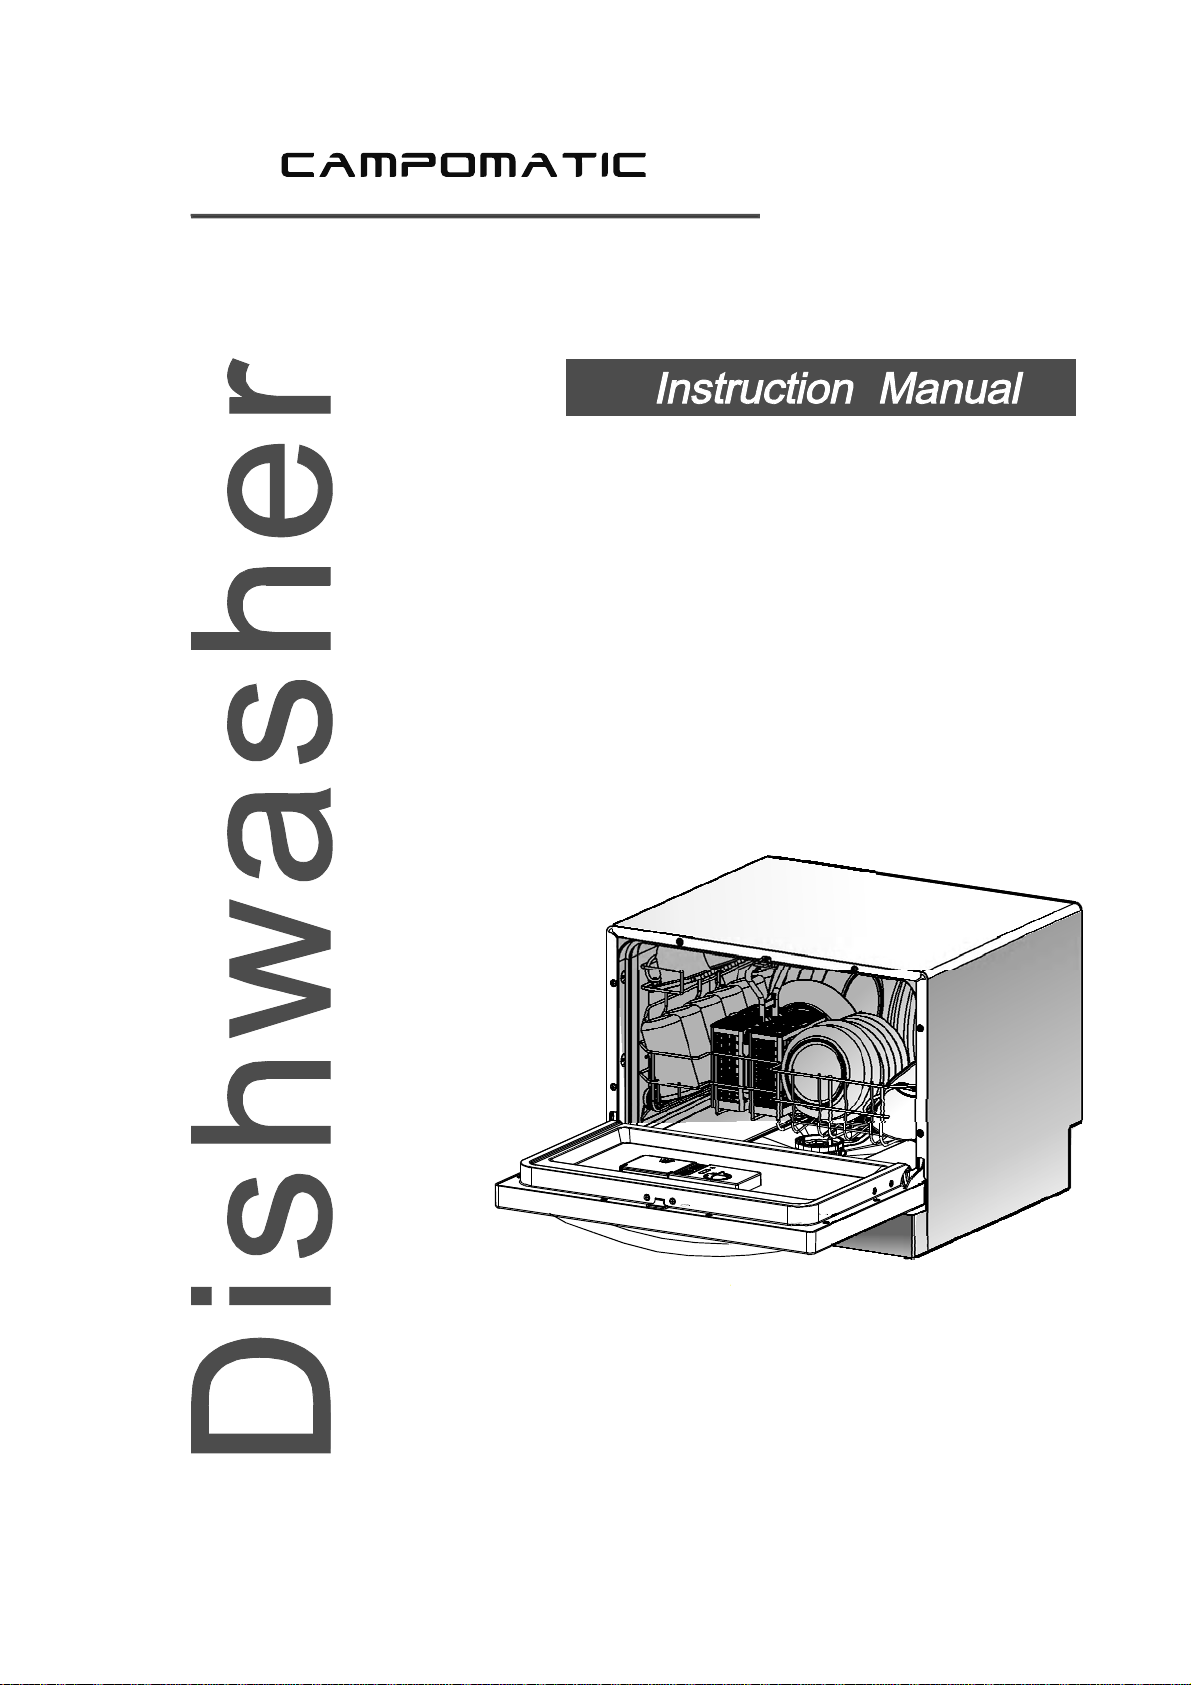
DW214C
Page 2
Dear Cus tom er ,
Thi s a p pli anc e is int en d ed tob e used in househ o ld
ands imilarapplicationssuch as:
-staffkitchenareasin shops,offices and other
workingenvironments;
-far m houses;
-by clientsin hotels,m otels andotherresidential
typee nvironment s;
-bedandbr eakfast type environments.
ControlPanel...................................................3
Dishw as h er Feature s... ... .. .. .. . .. ......... . ... ........ ...3
Pleas e c a ref u lly readi ng it bef or e using t he dishwas h er
willhelpyou touse andmaintainthedishwasherproperly.
Keep it to refer to ata later da te.
Passitontoanysubsequentowner of theappliance.
Thismanual containssectionsofSafetyInst ructions,
OperatingInstructions,InstallationInstruc tionsand
Troubleshoo tingTips,etc.
Toreview the section on Troubleshooting Tips
willhelp you t osolve somecommon problem s
byyourself .
Ifyou can not resolve the troub les b y yourse lf ,
please ask fo r the helpof professiona l techn icians.
A Loading the S alt in to the S oftener.................5、
B FilltheRinse Aid Dispenser.........................5、
C Function ofDetergent.................................6
、
Attentio n b efore oraf ter loading the D ish wash er
Baskets...................... ....................................8
Loading t he Basket...... ...... ... ... ...... ... ...... ...... ... .8
CutleryBasket................................................9
Whenload biggerDinnerPlates.....................10
WashCycleTable.... .............................. .........11
Turn ing onthe Appliance................................11
ChangetheProgramme.............. ............ ....12....
At theE nd oftheWash Cycle...........................12
FilteringSystem.............................................13
Caring for the Dishwasher..................... .........14.
PositioningtheAppliance................... ....... ...16..
About Power C o nnec ti on.... ... .... .. . ... ..... . . . ..... .1 6.
Water Co nnec ti on.... ... .... .. . ... ..... . .. .... ... .. .......16.
Connectionof Drain Hoses..................... .......17.
Startof dishwasher............................. .. ......18.. ..
The manufactu rer,following a p olicy ofconstant
development a nd updati ng of theproduct, may
make modificatio ns witho ut givi ng prior notice.
Beforecallingforservice................... ........ .....19.
Errorcodes.................................... ..............2 0.
Technical information....... ....................... .....21..
Page 3
When usin g your dishwashe r, follow the precautions listed bel ow:
This appliance must be grounded. In the event of a
malfunction or breakdown, grounding will reduce
the risk of electric shock by providing a path of
least resistance of electric current. This appliance
is equipped w ith a cord having an equipmentgrounding conductor and a grounding plug.
The plug must be plugged into an appropriate outlet
that is installed and grounded in accordance with
all local codesand ordinances.
Do not abuse, sit on, or stand on the door or dish
rack of the dishwasher.
Do not operate your dishwasher unless all
enclosure panels are properly in place. Open
the door verycarefully if the dishwasher is
operating, there is a risk of water squirting out.
Do not place any heavy objects of stand on the
door when it is open. The appliance could tip
forward.
When lo ad ing items to be washed:
1) L ocate sharpitems so thatthey arenot likely
todamage the doorseal;
2 Warning: Knives and other ute nsils wi th
)
sh a rp points must be load edin the bas k et
with theirpointsdown or p laced in a
horizonta lposition.
When using y our di shwasher, you shoul d
prevent plast ic items fromcoming int o contact
with heating element.(This instruction isonly
applicable to machines with a vi sual heat ing
element.)
Check that the detergent re ceptible isempt y
after compl etion of thewash cycle.
Do not wash plastic items unless they are marked
dishwasher safe or the equivalent. For plastic items
n
ot so marked, check the manufacturer's
recommendations.
Use only det ergent and rinse additiv es
designed for anaut omatic d ishwasher.
Never use s oap, l aundr y de tergent, orhand
washing deterg ent inyour dishwasher.Keep
these produ cts outoft he re ach ofchild ren.
Improper connection of the equipment-grounding
conductor can result in arisk of electric shock.
Check with a qualified electrician or service
representative if you are in doubt whether the
appliance is properly grounded. Do not modify the
plug provided with the appliance; If it is not fit for
the outlet. Have a proper outlet installed by a
qualified electrician.
Keep children away from detergent and rinse aid, keep
child away fromthe open door of the dishwasher,
ren
there could still be some detergent left inside.
This appliance is not intended for use by persons
(including children with reduced physical, sensory or
mental capabilities, or lack ofexperience and
knowledge ,unless they have been given supervision
or instruction concerning useof the appliance by a
person responsible for their safety.
Children should be supervised to ensure that they do
not play with the appliance.
Dishwasher det ergents ares trongly alkaline, they
can be extre mely da ngerous i f swallo wed.Av oid
contact with skin andeyes and keepchildrenaway
from th e dishwasher wh en the d oor isopen.
Thedoor shouldnot beleftin theopenposi tion
sincethiscouldpresent atripping hazards.
If the suppl y cord i s dam aged, it mustbe replaced
by the m anufacturer oritsservice ag ent or a
similar ly qualified person in or de r t o av oid a
hazard.
Please dispos e of pack ing m aterials properly.
Use the dishwasher only for its intended function.
During installation,t hepower supplymustnot
beexcessivelyor dangerouslybentor flattened.
Do not tamper with controls.
The appliance is tob e conne cted to t he water
mains usingnew hose setsand that old hose-sets
sho ul d not be reuse d .
The maximum sizeof thedishesis260mm.
Themaximum permissible inletwaterpressureis
1Mp a .
Theminimum permissible inletwater pressure is
0.04Mpa.
)
1
Page 4
Dispose o f the d ishwasher pac kaging m aterial c orrectly.
All packaging materials can be recycled.
Plastic pa rts ar emarked w ith th e standar d internati onal a bbreviations:
PE for polyethylene,e .g. s heet wrappin g mater ial
PS forpolystyrene,e.g.paddingmaterial
POM po lyox ymethylene, e.g.pla stic c lips
PP polypropylene , e.g. Salt filler
ABS Acrylonitri le Bu tadiene Sty rene, e.g.Co ntrol Panel .
Packagingmaterial couldbe dangerousforchildren!
For di sposing of pa ckage a nd theappliance please go to are cycling cen tre. There fore cut
offthepower s upply cableandmakethe door closing deviceunusab le.
Cardboard packaging ismanufacturedfromrecycledpaper andshould be dispos edin the
waste p aper collec tion f or recy cling.
By ensuring t his pr oduct is disposed of corr ectly, you will helppre vent po tential n egative
consequences forthe environment and human healt h, which c ould ot herwise be c aused
byinappropriatewastehandling of this product.
For m ore detail ed infor mation a bout rec ycling o f this product, please contact your loca l
city office andyour household waste dis posal ser vice.
DISPOSAL: Do notdis pose th is pr oduct as unsor ted m unicipal wa ste. C ollection of such
waste separa tely forspec ial treatment isnecessary.
2
Page 5

To g etthe best performance from your dishwasher,read all operatinginstructions
beforeusingit for the firsttime.
5
6
2
8
Po wer Butto n: Toturn on/off the power s uppl y.
PowerLight: To be on when the ON/OFFButtonis
2
Pressed down.
Washin g ProgramSelector:To press the buttont o
3
sel e ct wash cycles.
Start/ResetButton: Press thisbutton to start or
4
pausethedishwasher.
7 8
Front view
7
Delay But ton To p ress the button to dela y t ime
5
(0~24hou rs)
3in1functionButton:Topresst heb uttonWhen
6
youneednosaltandrinseaidbut3in1tablet.
(Onlyfor program:Intensive/Normal/Eco.)
Childlock function: To press 3in1 function
7
button and delaybutton at t he same t ime.
Display:To s howdelay time,saltwarming,
8
rinse-aid war ming, countdown of washing
cycle's time, programwhat you s elected , child
lock func tion, 3in1 fu nction and so on.
4
:
Back View
3
1
1
2
4
3
Salt Container
1
2 4
5
Cutlery Basket
3
Filter a ssem blyDetergent Di spenser
6
9 10
RinseAidDispenser
5
Spray Arms
6
3
CupShelf
7
Basket
8
Drainpipeconnector
9
Inlet pipe connector
10
Page 6
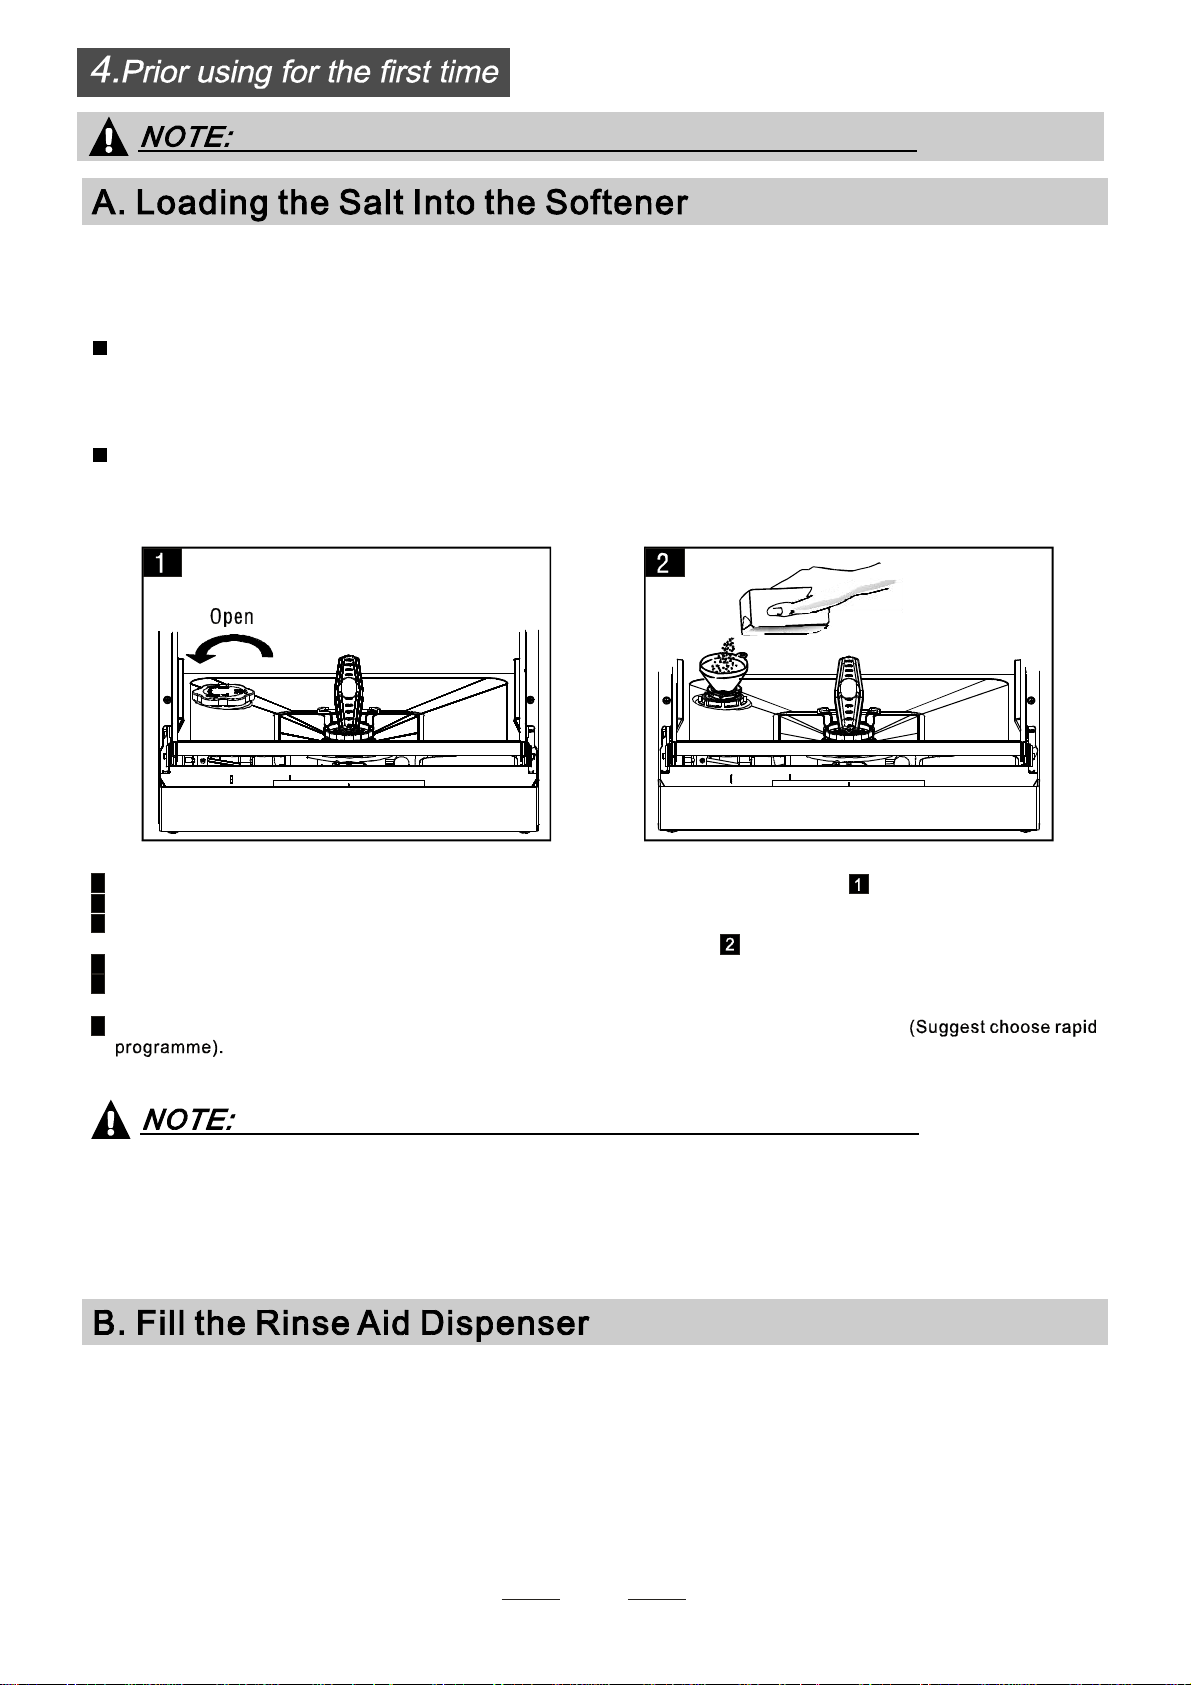
If your model have water softe ner,youmay skip thissection.no
Always use salt intended fo r use withd ishwash er.
The salt c ontain er is l ocated beneath the ba sket and shouldbe filled asfollows:
Attention!
Only use salt specifically desi gned f or use indishwashers!A ll o ther type s of
salt not speci fically de signed forusein a di shwasher,especially tables alt, will
damage the w ater softener. In c ase of da mages causedby the use ofunsuitable
salt the ma nufacturer does notgive any warranty nor is liable for any caused
damages.
Only fill wi th salt justb efore sta rting one of the complete washingp ro grammes.
This will p revent any grains of sa lt or sa lty wate r,w hich mayhave been split,
remaining of theb ottom oft he machin e for a ny period of time, which may cause
corrosion.
A Remo ve t he bask et andt hen unscrewand remo ve the cap from the salt containe r.
B Before fir st was h, ad d 1lt. o f w ater in the salt co ntaine r of y our machine.
C Place the e nd oft he fun nel (su pplied) into the ho le and introduce abou t 1kgofsalt.
normal for a small amo unt o f wa ter to com e ou t of the salt co n tain er.Itis
D Af ter f illing thec ont ainer , screw the cap tightly back clockwise.
E Usually,t he salt warning light will be cea se to be illuminated within 2-6 day s aft er the salt container has been f ille d with
salt.
F Immediately a fter f illin g t he salt into the sa lt co ntainer, a was hing programme should be started
water. Itis outof warranty.
Otherwise filter system, pumpor other important parts ofthemachine maybedamaged by salty
1.The salt container mustonl y be refilled w hen t he salt warninglight in t he cont rol panel comes on.
Depending on howful ly t he salt dissolves, the sa lt warnin g light mayst ill be on even though the
salt container isfi lled.
If there is n o salt warning light in thecon trol panel (For some Models) ,you can judgewhen to loa d
the salt int o the so ftener bythe cycles that thedishwasher hadr un.
2. If therea re spill s o f the salt , a soa k or a rapidprogram should berun to remove t he excesss alt.
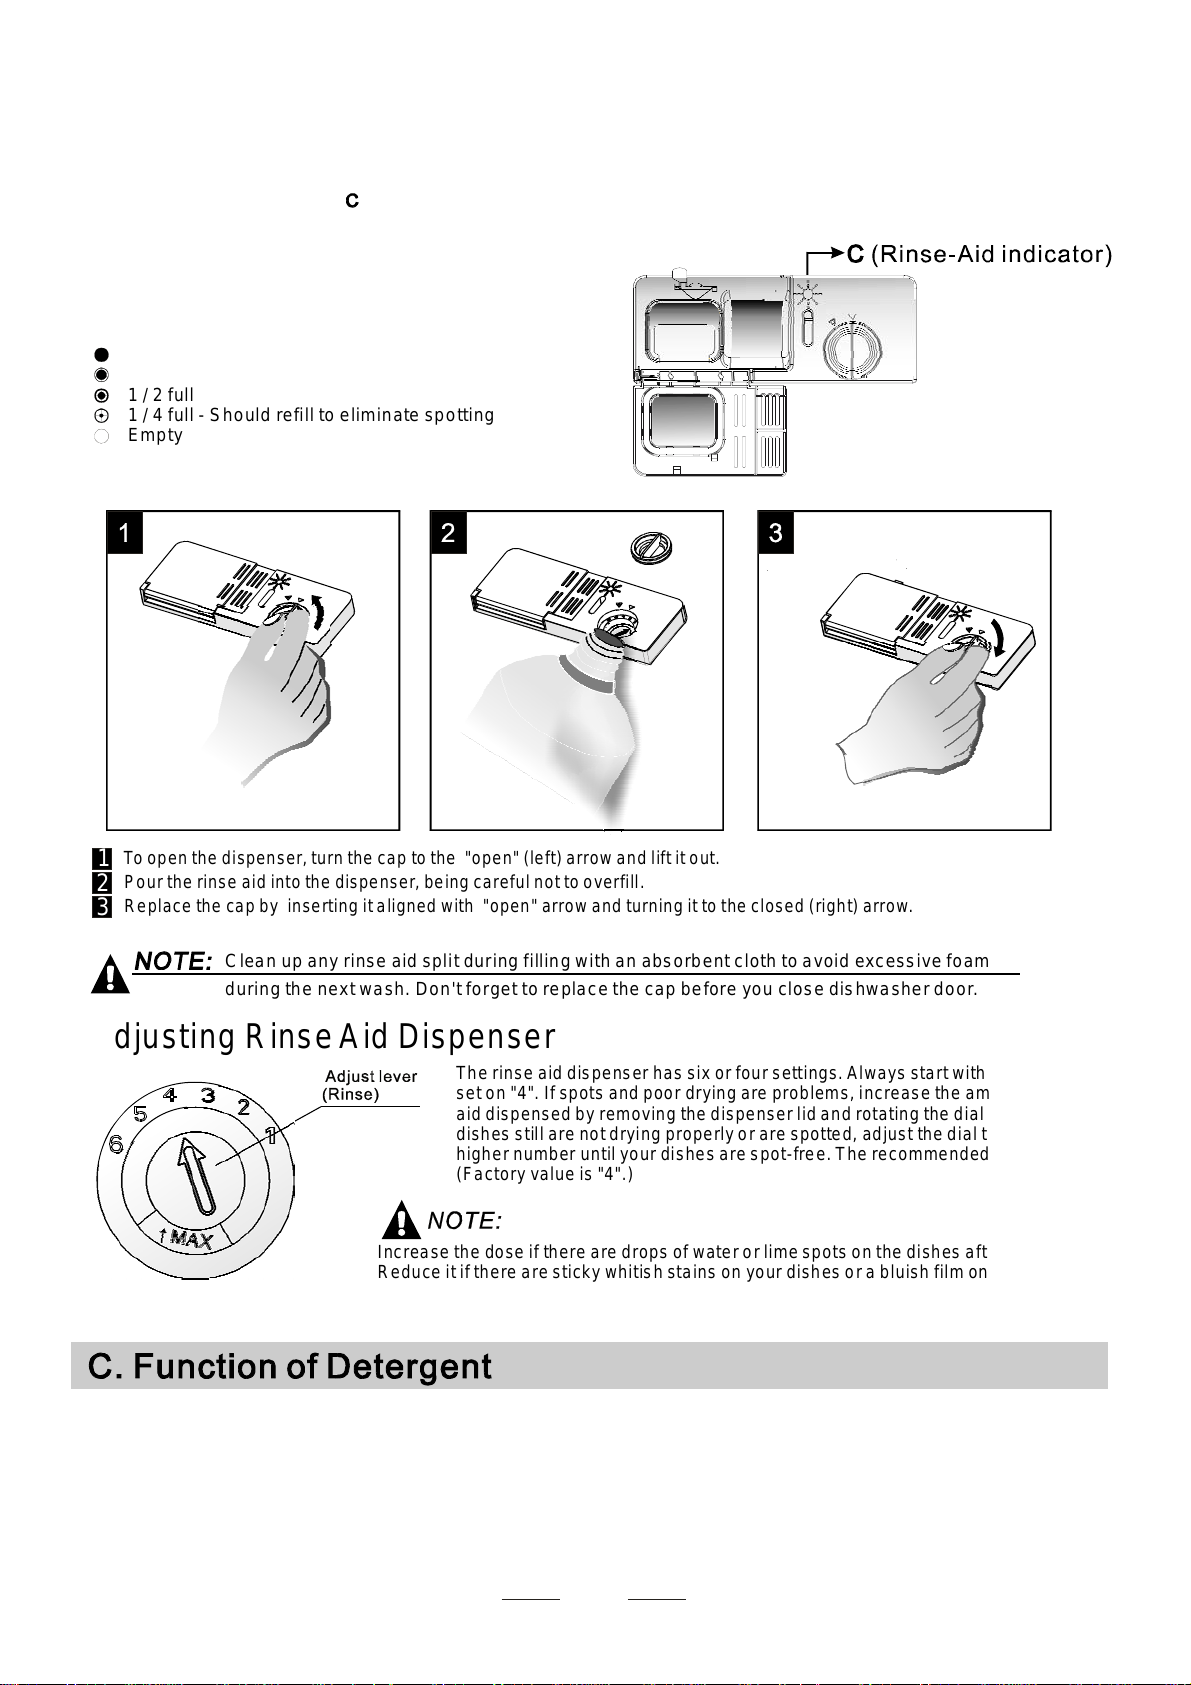
RinseAid Dispenser
The ri nse a id i s relea se d d uring t he final rins e to prevent wat er f rom forming dr oplets onyour dishes.That can leave
spots and strea ks. It al so improve s drying by allowing water to sheet offt he dish es.Yo ur di shwasher isdes igned to
useliquid rins e aids. The rinseaiddispenser i s located insidethedoor next tothe detergent dispenser. To fillthe
dispenser, open thecap andpourthe rinseaidintothe dispenser until thelevelindicator turnscompletelyblack.
Thevolume of ther inse aid container is about 110ml.
Function ofR inseAid
Rinse aid isaut omat ically a dded d uring thel ast r inse, ensuring thor ough rinsing, and spotan d s treak fr ee drying.
4
Page 7
Attention!
Only use branded rinse aid for dishwasher. Never fillthe rinseaiddispenserwithanyo ther substances
(e.g. Dishwasher cleaning agent, liquid dete rgent). Th is woulddamage the appliance.
Whento Refillthe RinseAidDispenser
Ifthere is nor inse-aid warning light in thec ontrol p anel, you can judge the am ount ofri nse-aid by thec olor
of the optical levelindicator located nextto thecap. When the rinse-aidc ontainer is full,the whole
indicator will bedark .As the rinse-aid diminishes, the si ze of the dark dot decreases. You shou ld never let
therinseaidgetbelow1/4full.
Asthe rinse aidd iminishe s, the s ize o f the blackdo t
ontherinse aidlevel indicatorchanges, as illustrated b elow.
Full
3/4full
1/2full
1/ 4 full- Shouldrefilltoeliminate spotting
Empty
""
To open th e di spen ser, tur n the cap to t he "open" (left) arrow and lift it out.
1
Pour t he ri nse aid int o the dispenser, be ing c aref ul n ot too ver fill .
2
Replace the capby inserting i t aligned w ith "open" arrow and turningi t to t he closed (right) arrow.
3
Cl ean up any rins e aid spl it during fill i ng with a n abs o r bent clot h to avoid excessive f oamin g
during the nextw ash.
Don't for get to re place the capbe fore youclose dishwa sher door.
Adjusti ng RinseAid Di spenser
The rinse aiddispenser ha s six orfour setti ngs.Always sta rt wi th the d ispens er
set on "4". If spots and poor drying are problems, incr ease th e amoun t of rinse
aid dispensed b y removing the dispe nser l id and rotating the dial to "5". If t he
dishes stil l are notdr ying properlyo r arespotted, adjust thed ial to the next
higher number until your dis hes are s pot- free. The recommended setting i s " 4".
(Factoryvalue is "4".)
Increasethe doseif there aredropsofwater or lime spotson thedishesafter washing.
Reduce it ifthere are stickywhitishstainson your disheso rabl uishfilm onglassware or
knifeblades.
Detergents w ith itschem ic al ingred ients arenecessary t o rem ove dir t, c rush dir t an d trans port it out of the dishwasher.
Mostof com mercial qual i ty d e tergent s are suitable for th is purpo s e.
Deterg ents
The rear e 3 s orts of d et e rgen ts
1.With phosphateand withchlorine
2.Withphosph ate andwithout chlorine
3.Withoutph osphate andwith out chloride
5
Page 8

Normally new pu lverised detergent is without phos phate. T he water so ftene r functio n of
phosphate is not given. I n this case we rec om mend to f i l l sal t in t h e sal t container even when
the hardness of waterisonly 6 dH. If detergentswithout phosphatewereusedin caseof hardwater
often white spot s appear atd ishes and gl asse s. In this casep lease add moredetergent toreach
better r esults. D etergent s with o ut ch lorin e do only bleach a little. Strong a nd co l o u red spo ts will no t
removed comp letely. In t his case please choo se a pr o gram m e wit h higher Temperature.
°
Conc entrated Deter gent
Based on theirchemical composit ion, dishw asher canbe s plit i n two ba sic types :
conventional, alkaline detergents w ith caus tic comp onents
low alkalin e concentrat ed deter gents wit h natural enzymes
Detergent Tablets
Dete rgent tabletsof diffe rent brands dissolveatdifferent speeds. Fort his reasonsome
detergent tablets ca nnot dissolve and develop the ir ful l cleaning powerduring short
prog rammes. Therefore pleaseuselong progr ammeswhenusingdetergent tablets, to
ens ure t he com plet e rem oval of de t erge n t res idua l s.
Detergent tablets are onlyfor the models with 3 in1 functionor 3 in 1 p rogram.
DetergentDispenser
The dispenser m ust be re filled be fore the startof each was h cycle f ollowing the instructions
provided in t he Wash Cycle Table . Yourdi shwasher us es less d etergent a nd rin se ai dthen
convent ional dishwasher. Generally, only onetablespoon ofdetergentis neededfor
anormal was h load. Also, mor e heavil y soiled itemsneed more det ergent. Always a dd th e
detergen t j ust before star ting the dish was her, othe rwis e it could ge t da mp andwill n ot
dissolve properly.
AmountofDetergentto Use
Detergent powder
Detergenttablet
If the lid isclose d: press release button. The l id spr ings open.
Always add th e detergent justb efore start ing each w ash cycle.
Onlyusebranded detergent aidfor dishwasher.
6
Page 9

Dishwasher de tergent i s corrosive! Take care to keepi t out ofr each of c hildren.
Proper Use o f Deterg ent
Use only detergent s p e c ifica lly made for use i n dishwashers. Ke ep your detergent fresh and dry.
Don't put powder deterge nt intothedispenseruntil you'rereadytowashdishes.
Fillin detergent
Fillthe de tergent disp enser w ith deter gent.
The mar k i ng ind icates th e dos ing l evels , as
illustratedon right:
The place o f main wash cyclede terg ent placed.
A
The place o f pr e-wash cycle det ergent place d.
B
Pleaseobserve th e manu facturers do sing and storage
Recommendationsas stated on thedetergent packaging.
Close the li d and press until it l oc ks in pl ace.
If the d ishes are heavily soil ed, plac e an addit iona l
detergent do sein the pre-wash detergent chamber.Th is deter gent will takeeffect during thepre -wash p hase.
Youfind in formatio n about thea mount o f deterg ent for th e single programme on the last p age.
Please aw are, tha t according t o the levelso iling andthe specific hardnessof waterdifferences ar e possibl e.
Please observethemanufacturer'srecommendationson thedetergentpackaging.
Con sider buying utensils which ar e identif ied asdishwa sh er-pr oof.
Use a mildde tergent th at i s described as'k ind of di shes'. If necessary,seek further
inform a tion f rom dete r ge nt manufactu rers.
For partic ular items,s elect ap rogramme w ith as lo w a t emperat ure.
Toprevent da mage, d o no t take gla ss a nd c utlery o ut of the dish washer immediately
after theprogrammeh asended.
Are not suitab le
Cutlery w ith w ooden, horn chinaor
mother-of -pearl handl es
Pl as tic ite ms that are not
Ol der cu tler y with glued p arts that is n ot
temperature resistant
Bonded cutle ry ite ms or di shes
Pewteror cooperitems
cr ys tal glass
St eel i te ms s ubjec t to rust ing
Wooden platte rs
Items ma de from s ynthetic fibres
heat resistant
Are of lim ited suitab ility
Sometypes of glasses canbecome
dull after a large number of washes
Silverandaluminiumpartshavea
tendency to discolou r during washing
Glaz e d p a tterns m ay fade ifmachi ne
washed freq u entl y
7
Page 10

Attention before or after loading the Dishwasher BasketsAttention before or after loading the Dishwasher Baskets
(For best performance of the dishwasher, follow these loading guidelines.
Features and appearance of baskets and cutlery baskets may vary from your model.)
Scrape off any large amounts of leftover food. Soften remnants of burnt food in pans
It is not necessary to rinse the dishes under running water.
Place objects in the dishwasher in following way:
1.Items such as cups, glasses, pots/pans, etc. are face down.
2.Curved items, or those with recesses, should be loaded at a slant so that water can run off.
3.All utensils are stacked securely and can not tip over.
4.All utensils are placed in the way that the spray arms can rotated freely during washing.
NOTE:NOTE:
Load hollow items such as cups, glasses, pans etc. With the opening downwards so that
water cannot collect in the container or a deep base.
Dishes and items of cutlery must not lie inside one another, or cover each other.
To avoid damage to glasses, they must not touch.
Load large items which are most difficult to clean into the basket.
Long bladed knives stored in an upright position are a potential hazard!
Long and/or sharp items of cutlery such as carving knives must be positioned
horizontally in the basket.
Please do not overload your dishwasher.
Very small items should not be washed in the dishwasher as they could easily fall out of the basket.
Loading the BasketLoading the Basket
Position the dishes and cookware so that they will not get moved by the spray of water.
IN
11
55
33
11
66
99
1010
88
33
44
33
77
22
1
Cups
3
Glasses
5
Dish
7
Dinner plates
9
Dessert dishes
2
Medium serving bowl
4
Saucers
6
Oval platter
8
Soup plates
10
Cutlery basket
8
Page 11

Plateracks ofBasket
The basket is f itted with p late racks which
can be st owed hor izontal ifre quired.
Cutlery should be placed in the cutlery basket with handles atthe bot tom. If t he rack hasside baskets, thespoon
should be loaded individuallyinto the appropriate slots,especiallylongutensils should be placed in the horizontal
position at th e front o f theupper b asket assho wn.
1
616
3
3
7
Forks
5
5
3
1
2
1
3
2
5
1
5
4
55
4
4
2
3
4
5
4
2
1
1
3
4
22
48
Do not le t any iteme xtend through bottom.
Always loa d sharp u tensils w ith t he sharp point down!
3
2
6
7
8
Soupspoons
Dessertsp oons
Teaspoons
Kni v e s
Servingsp oons
Gravyladles
Ser v i n g f ork s
9
Page 12

When load bigger Dinner PlatesWhen load bigger Dinner Plates
Plate racks of Basket
When load bigger Dinner plates,
please fold the rack to left picture
showed location.
The maximum plate can be loaded
is 270mm(10 inches) diameter.
Loading the BasketLoading the Basket
Position the dishes and cookware so that they will not get moved by the spray of water.
IN
11
33
88
66
77
22
44
66
1
Cups
3
Glasses
5
Dish
7
2
Large serving bowl
4
Saucers
6
Dessert dishes
8
55
11
9 9
33
10
Dinner plates
9
Cutlery basket
Soup plates
Page 13

()
Means:needtofillrinseintotheR inse-AidDispenser.
*En50242: This programis the test cycle,the rinse-ai ddispenser
setting is r ecommended toPosition 6.
Inte nsive
Normal
Eco
(*EN50242)
Glass
Rapid
Fortheheaviest soi ledl oads,
such as pots,pans,casserole
dishesand dishes that have
been sitting with dried food
onthem for a while.
For normally soiled loads,
suchas pots, plates,
glassesandlightly
soiledpan s.
Standard daily cycle for
normallys oiled loads,
suchas pots, plates,
glasses.
Forlightly soiled loads,
suchas glasses,crystal and
finechina.
Ashorter wash for lightly
soiledlo ads that do not
needdrying.
Pre-wash 50
Wash (70 )
Rinse
Rinse
Rinse (7 0 )
Drying
Pre-wash
Wash (60 )
Rinse
Rinse (70 )
Drying
Pre-wash
Wash (55 )
Rinse
Rinse (70 )
Drying
Wash( 4 5 )
Rinse
Rinse(60 )
Drying
Wash (40 )
Rinse
Rinse
()
℃
℃
℃
℃
℃
℃
℃
℃
℃
℃
3/15g
(or )3in1
3/15g
(or )3in1
3/15g
(or )3in1
15g.
15g.
145
125
185
75
30
0.94
0.70
0.6
0.48
0.30
11.0
8.4
3
8.4
6.8
6.0
To rinsedishes tha t yo u
Soak
Startinga washcycle...
Drawoutthe basket(see thesection entitle d Loading theDishwasher ).
Pou r in the d e terge nt (s ee the section entitl ed Sal t,
DetergentandRinse Aid ).
Inser tthe plugintothesocket. Thepower supply is 220-240
VAC50 HZ, the specificationof the socket is 10A2 50VAC.
Make sure that the wat er suppl y is turn edon to full pr essure.
Press the pr ogram b utton, th e wash programwi ll be c hanged as follows direction
plan to washla ter that day.
”
Pre-w ash
“”
“
/
Intensive-> Normal ->Eco->Gl ass->Rap id->Soak ;
If a program iss elected, thepro gram ico n will d isplay i n the L ED display.
Then press t he Start /Reset but ton, the dishwash er begin s to start.
When you press the Start/Reset button to pa use duringwashing,
the pro gram ligh t will stop blinki ng and the di sh was h er will mooin g
everyminuteunlessyoupressthe Start/Resetbuttontostart.
11
14
0.01
2.1
Page 14

Premise:
runs for a shorttime.
You can modify the was hingprogram, When the dishwasher just
Otherwise, thedetergent ma y hav eal ready been
released, and the appliance may have already drained the wash water. If this
isthe case, the detergent dispensermust be refilled (see t he section entitled
" Loading the Detergent ").
PressStart/Reset Buttonmore than three s econds the machinewill bein stand
bystate ,thenyou canchange the program to the desired cycle setting(se e
thesection entitled " S tarting a wash cycle. . ." ).
NOTE : If you o pen the doo r durin g washin g, the m a c hine wi ll pause . When you
closethe doora nd press the start/resetButton,the machine will k eepon
working after 10 seconds.
TheLED displayshows thestate ofthe dishwasher :
a)The LED off----------------------------------------Onstand by
b)The LED on--------------------------------------Being paused
c)Colon icon in theLED blinking----------------------Running
display
display
display
If you ope n the doo r when washing, the machin e will pause.When you c lose the door, the machin e
will keep on working after 10 seconds.
Aforgottendish can be added any timebefore the detergent cup opens.
Press the start/reset button
1
Open thedoor a little to stop thewashing.
2
Afterthe spray arms stop working, you can open the
3
door completely.
When the workingcycle has finished, the buzz er of dishwa sher will sound 8 seconds , then st op. Turn off
the appliance using the O N/OFF butto n, shut offth e water s upp ly and open thedoor of th e di shwasher.
Wait a few mi nutes be fore unloadi ng the d ishw asher to av oid handl ing t he dishes an d utensi ls wh ile they
are still hota nd more susceptible to br eakage. The y will als o dry be tter.
Add forgotten dishes.
4
Close the door
5
Press the start/reset button, the dishwasherwill run
6
after 10seconds.
SwitchOff theDishwasher
In the digi tal disp lay app ears 0 (remaining programme time), only in t his case theprogramme has ended.
1.Switchoff the dishwa sher by pressing the ON/ OFF but ton.
2.Turn off thewatertap!
Openthe doorcarefully.
Hot dishes ar e sensit ive to kn ocks. The di shes shou ld ther efore be a llowed t o cool d own arou nd 15 minutes
beforeremoving from the appliance.
Open the d ishwasher's door,leave itajar and wai t a few minutes before rem oving thedishes. In thisway they
will be cool er and t he dryi ng will b e impr oved.
Unloadingthe dishwasher
Itis normal thatt he di shwasher is wet inside.
It is dangero u s t o open th e door w hen washi ng , be c a us e the hot water may s cal d you .
12
Page 15

The filter prevent larger re mnants offood orother obje cts from gettingi nsid e the pump.
The filter system con sists of acoarse filter,a fla t (Mainfilter)
and a micro filte r ( fi n e filter ).
1
2
3
1
3
2
Main filter
Foodandsoilparticlestrapped b ythisfilter a repu lverized by a
special jet on th e spray a r m and washed down to d ra i n.
Fine fil ter
This filte r holds s oil and f ood residue inthe sump a rea and
prevents it frombeing redeposit onthe dishes during wa sh cycle.
Coarsefilter
Larger items,suchas piecesof boneor glass,thatcouldblock
the drain are trapped in the c oarse f ilter.To re move th e items
caughtby the filter,gently squeezeth eta p on the topofthis
filterand lift out.
Filterassembly
Thefilterefficiently
Fo r best per form a n c e and results , the filter assembly must be regu l a r l y. this reason, it i s a g ood i dea t o
remove the la rger food particl estrapping i n the filter after e ach was h cycle b y rinsing the filterand cup un der
running w ater.Toremove the filte r assembly,pull on th e cup ha ndle in th e upwa rd direct ion.
removes food particles from the wa sh w ater,al lowing itt o be re- cyclated duringt he cy cle.
For
Nev er ru n the dis hwas he r wit hout the filters in pl ace.
Th e dish washer m us t never beused wi t hout the fil t er s.
Improper replacementof the f ilter mayred uce the performance level o f the appliance
anddamage dishesandutensils.
1
2
Step1:contrarotate the Fine ,
liftitup;Step2:
Step3:lift the Main filter up
filter
3
If do it from step1 to step 3, the filter system will be removed; while if do it from Step 3 to Step 1,
the filter system will be installed.
13
Page 16

Remarks:
- Inspect t he filter s for blo cking e very time the dishwasher has beenus ed.
- By unscrew ing the c oarse fi lter.you can rem ove the f ilter sys tem.Remove any food remnants a nd
clean thefilters under running water.
Theentire filter assembly shouldbe cleanedoncea week.
CleaningThe Filter
To cl ean the c o a rse filter and the fin e filter, us e a cleaning brush. Reass e mble the f ilter parts as sho wn in the fi gures
int he la st pag e and r einsert th e en tire ass embly in thedishwasher,positioning inits seatand pressin g downward .
Whencleaning the filters, don'tknockon them. Otherwise,thefilterscouldbe
contorted andtheperformanceofdishwasher couldbedebased.
The control p anel can be cleaned by u sing a l ightly dampenedc loth anddr y thoroughly.
The exterior use agoo d appli ance polish wax.
Neveruse sh arp obje cts, scouring padso r har sh c leaners onany p art of the dishwasher.
CleaningThe Door
To clean theedgearound the door, youshould use onlya softwarm,
damp cloth. To avoid penetration of w ater into t he doorloc k an d
electrical comp onents, do notu se a spraycl eaner of anykind.
Never use a spr ay c leaner t o clean t he d oor panel asit maydamage the doorloc k
and electricalcomponents.
Abrasive agent ors ome paper to wel sho uld notbe u sed bec ause of t he ri sk of
scra tchi ng or leaving s pots on the stainless stee l sur fa ce.
Protec tAgain st Freezing
please take frost protection meas ures o ndishwasher inwin ter.E fter washing cycles,
please op erate as follows
1.Cut off electrica l power t o the di shwashe r.
2.Turnoff thewat er suppl y and d isconnec t the w ater inl et pipe from the water val ve.
3.Drain water from theinlet pipe a nd water valve. (Use a pant o catch thewater)
4.Reconnect the wate r inlet pipe to the wa ter valve.
5.Removethe filter at the bottom of thetub anduse aspongeto useup water in sump.
:
ach tim e a
If your dis hwas he r cannot work because of t he ic e, ple a se contactpr ofes s io nal servi ce pe rson s.
14
Page 17

Cleani ng the Spra yArms
Thesprayarmscan be easily r emoved forperiodic cleaning
of the nozzles,to prevent p ossible c logging. Wa sh th em
under running waterand ca refully replace them in their s eats,
checking thattheir rotarymovement is inno wayimpeded .
Grasp the middle of the spr ay a rm, pull itup wards to remove
it. Washthe armsunder a jet of runn ingwater andreturnthem
car e fully to their se at . Afte r reas se mbly, c h eck that t he sp r a y
arms turn freely. Otherwise, check thattheyhavebeen
in stall ed cor r ectly.
AfterEvery Wash
After ever y wash, turn offthe water supplyto the
appliance andl eave the doors lightl y open sotha t
moisture a nd odor s are nottrapped inside.
Removethe Plug
Before cleani ng or p erformi ng mainten ance, always
remove the plug fromt he socket.
No SolventsorAbrasive Cleaning
Tocleanthe exteriorand rubber partsof the dishwasher,
donot usesolvents or abrasive cleani ngproducts.
Only use a c lo th with w arm soapy water.
Torem ove s pots or sta ins from the surface oft he
interi or, use a cloth da mpe ned withw a ter w ith a littl e
vinegar,o r a cleaning product mad e speci fically fo r
dishw ashers.
When itis notin needfor along time
It isrecommend that yourunawash cyclewiththe
dishwasher empt y and the n remove th e plu g from the
socket, turn o ff the wa ter supp ly and l eave thedoor of
the appl iance sli ghtl y open. This w ill h el p th e door
sealsto astlonger andprevent odoursfromforming
withinthe appliance.
Moving t heAp plia nce
If the app liance m ust be mo ved, tr y to keepit int he
vertical position. Ifabsolutelynecessary, itcanbe
positioned on itsback.
Seals
Oneofthe factorsthatcauseodors to formin the
dishwasher is foo d th at remain s trappe din the seals.
Periodic cleaning with a damp sponge will prev ent t his
fro m occ urring.
ElectricalShock Hazard
Theinstallationof thepipes
and electrical equipments
shouldbe doneby professionals.
Disconnect electricalpower before
installingdishwasher.
Failureto do socan result indeath
or electri cal sh ock.
Theinstallationpositionof dishwashershouldbe nearthe existing inletand drain
hosesand powercord.
Oneside of thecabinet sinkshould be chosen tofacilitate theconnectionofdrain
hosesof thedishwasher.
15
Page 18

Positi on the appli ance in thed esired l ocatio n. The back should rest against the w all behind it,
and the s ides, alongt he adjac ent cabi nets orwall. T he dish washer is equippedw ith watersupply
anddrainhoses thatcanbepositioned to the r ight or theleft tofacilitateproper installation.
For personal safety:
DO NOT USE AN EXTENSION CORD OR AN ADAPTER PLUG WITH THIS APPLIANCE.
DONOT, UNDERANYCIRCUMSTANCES, CUTOR REMOVE THE EARTHING
CONNECTION FROM THE POWER CORD.
Please look at th e rating label to knowthe rating voltage andc onnect t he dishw asher to the appropriate powers uppl y.
Use the r equired fuse1 0 amp , tim e delay f use or c ircui t breake r recommend ed and provide separate circ uit s erving
only this appliance.
Ensure the v oltage a nd frequenc y of thep ower being correspond sto
those on therating plate. Only in sert the p lug into an electrical socket whichis ea rthed
properly.Ifthe el ectrical sock et to whi ch the a pplianc e must b e conne cted is not
appropriate for theplug, replacethesocket, ratherthanusinga adaptors orthelikeas
theycould causeoverheatingand burns.
This appliance must be earthed. In the event of a malfunction or breakdown, earthing will reduce the risk of
electric shock by providing a path of least resistance for the electric current. This appliance is equipped with
a cordhaving an equipment-earthing conductor and anearthing plug. The plug must be plugged intoan
appropriate outlet that isinstalled andearthed in accordance with all localstandards and requirements.
Improper connection of the equipment earthing conductor can result in the risk of an
electric shock.
Check with a qualified electrician or service representative if you are in doubt whether the
appliance is properly earthed.
Do not modify the plug provided with the appliance. If the plug does not fit properly to the
outlet, please have a qualified electrician to install a proper outlet.
for personal safety:
DO NOT USE AN EXTENSION CORD OR ANADAPTER PLUG WITH THIS APPLIANCE.
DO NOT, UNDER ANY CIRCUMSTANCES, CUT OR REMOVE THE
CONNECTION
Connect thecoldwatersupply hose to a thread ed3/4(inch) connector andmake sure
that it is fastened tightly in place.If the waterpi pes aren ew or ha ve n ot been u sed for
an extended periodo f tim e, le t the waterru n to makes ure th at the w at er is cle ar and
free of impu rities. If thisp reca ution is n ot ta ken, the re is aris k that th e wa ter in let can
get blocked anddamage the appli ance.
FROM THE POWER CORD.
EARTHING
Please close t he hydrant after us ing
16
Page 19

Insertthe drainhose intoa drain pipewith a minimumdiameterof 4cm,orlet it
runintothesink,makingsuretoavoidbendingorcrimpingit.Usethespe ial
c
plasticsupportthatcomes withthe appliance. Thefree endof thehosem ustbe
ata heightlower than75cm andmustnotbe immersedin waterto avoidthe back
flowof it.
Thespecial plastic hose supportmust besolidly fastened tothe wallto
preventthedrain hosefrom movingand allowing waterto spilloutside
thedrain.
17
Page 20

How to Drain Excess Water Fro m Hoses
If the si nk is 100 0 higher fromthe floor, the exces s wa ter in ho ses cannotb e drained di rectl y
intothe sink. It will be necessaryto d rain excesswater from hosesinto a bowl or suitable
container that isheld outside andlo wer than thesi nk.
Water Outlet
Connectthewater d rainhose. Thedrain hose mustbecorrectly fittedtoavoid water leaks.
Ensure thatthewater drain hose is notkinked or squashed.
Ext ensi on Hose
If you n eed a dra in hos e ext ension, observe touse a si mi lar drain hos e.
Itmustbe nolongerthan4 metres; otherwise the cleaning effect ofthe dishwasher could bereduced.
Thefollowingthings shouldbe checked beforestarting thedishwasher.
1
Thedishwasheris leveland fixedproperly
2
The inle t val ve is ope n
3
Thereis aleakage atthe connections ofthe conducts
4
The wiresare tightlyconnected
5
The poweris switched on
6
The inle t and drai n hoses are k notte d
7
Allpacking materials andprintingsshouldbe takenout fromthe dishwasher
After installation, please make sure to keep thismanual.
The conten t of this manualis veryhelpful t o theusers.
18
Page 21

Fuse blown, or the
circuit breaker tripped.
Replace fuse or reset circuit breaker. Remove any other
appliances sharing the same circuit with the dishwasher
Technical
problem s
Power supplyis not
turned on.
Door ofdishwash er
not properly closed.
Kink in drain hose
Filter clogged.
Kitchen sinkclogged.
Improper detergent
Spilled rinse-aid
Detergent with
colourant was used.
Make sure the dishwasher is turned on and the door is
closed securely.
Make sure the power cordis properly plugged into the
wall socket.
Closed dishwasher making sure that door latches.
Check drain hose.
Check coarse thefilter.
(see section titled )"CleaningTheFilter"
Check kitchen sink to make sure it is draining well.
If problem is kitchen sink not draining ,you may need
a plumber rather than a serviceman for dishwasher.
Use only the special dishwasher detergent to avoid
suds. If this occurs, open the dishwasher and let suds
evaporate.Add 1 gallon of cold wat er to the tub. Close
and latch the dishwasher, then Start the "soak" wash
cycle to drain out the water . Repeat if necessary.
Always wipe up rinse-aid spills immedi ately.
Make sure that the detergentis the one without
colourant.
General
problem s
Noise
Hard water minerals
The affected item s are
notcorrosion resistant.
A programme was not
run after dishwasher
salt wasadded.
Traces of salt have
gotintothe washcy le.c
The lid of softer
is loose.
r
Thesp ay arm is
knocking against
an itemin a basket.
Item of crockery
are insecure
inthewashcabinet.
This may be caused
by on-site installation
or the cross-section of
the piping.
T o clean the interior, use a damp sponge with
dishwasher detergentand wearrubber gloves.
Never use any other cleaner than dishwasher
detergent for the risk of foaming or suds.
Always run the Quick wash programme .
without any crockery in the dishwasher and
without selecting the Turbo function (ifpresent),
after adding dishwasher salt.
Check thelip .Ensure the f ix is fine.
Interrupt the programme, and rearrange the items
whichare obstructing the sp ay arm.r
Interrupt the programme,
and rearrange the items of crockery.
This has no influence on dishwasher function.
if in doubt, contact a suitably qualified plumber.
19
Page 22

The dis hes were not
loaded correctly.
See notes in " Loading the Dishwasher Baskets ".
Unsa ti s
-factory
washin g
resu lt
Theprogramme was
notpowerful enough.
Not enough detergent
wasd ispensed.
Item are bloc king
the path of sp ay arms.r
The filter combination
inthebaseofwash
cabinet is not clean or
is not correctly fitted.
This may cause
the sp ay arm jets
r
to get blocked.
Combination of soft
water and too much
detergent.
Aluminum utensils
have rubbed against
dishes.
Dishes block
detergentcups.
Improper loading
Too little rinse-aid
Select a more intensive programme.
See" Wash Cycle Table ."
Use more detergent, or change your detergent.
Rearrange the items so that the sp ay can rotate freely.r
Clean and/or fit the filter combination correctly.
Clean the sp ay arm jets. See "Cleaning the Spray
Arms".
Use less detergent if you have soft water and select
a shortestcycle to wash the glassware and to get
them clean.
Use a mild abrasive cleaner to eliminate those marks.
Re-loadin g the dishesproperly.
Load the dishwasheras suggested in the directions.
Increase the amount of rinse-aid/Refill the rinse-aid
dispenser.
r
Do not empty your dishwasher immediately after
washing. Open the door slightly so that the steam can
escape. Begin unloading the dishwasher only oncet
he dishes are barely warm to the touch. Empty the low
basket first. This prevents water form dropping off
dishes in the upper basket .
In short programmes the washing temperature is lower.
This also lower scleaningperformance. Choose a
programmewith a long washing time.
Water drainage is more difficult with these items.
Cutlery or dishe s of this type are not suitable for
washing in the dishwasher.
Unsa ti s
-factory
dryi ng
resu lt
Dishes are removed
too soon.
Wrong programme
selection
Using cutlery with
a low-quality coating
When some malfunctions come on, the appliance will display error codes to warn you:
Longerinlettime.
Overflow .
Faucets is not opened, or water intake is restricted,
or water pressure is too low.
Some element of dishwasher leaks .
If overflow occurs, turn off themain water supply before calling a service.
If there is water in the base pan because of an overfill or small leak,
the water should be removed before restarting the dishwasher.
20
Page 23

Height : 438mm
Width : 550mm
Depth : 500mm
Voltage connected Load : see rating label
Water pressure: 0.04-1.0MPa
Power supply: see rating label
Capacity: 6 Place settings
21
 Loading...