

Campingaz Adelaide 3 Woody L User Manual
PRINTING SIZES
46 pages printed on both
sides, sheets stapled in
the middle
210 x 297 (A4)
Material : 64 g/m²
Printing : black – 1 color
1st page view
Propriété de la société Application des G az, reproduction diffusion totale et partielle du plan, fabrication totale ou partielle de la pièce, du matériel ou du
produit, interdites sauf accord express de la Société Application Des Gaz.
METRIC
CRITICAL DIMENSION
CHECKING IS COMPULSORY
TOOLING TO BE PER
3D GEOMETRY
VOLUME cm3
MASS grams
DENSITY g/cm3
GENERAL TOLERANCES
0 TO 6mm = +/-0.1
> 6 TO 30mm = +/-0.2
>30 TO 80mm = +/-0.3
>80 TO 180mm = +/-0.4
> 180mm = +/-0.5
Angular =+/- 3.1
EXCEPT AS NOTED
NL text proofread
all languages: text added about the side burner use.
2 09 JUL 2012
1 18 NOV 2011 Drawing created T HERBULOT 20021137
REV DATE MODIFICATIONS NAME ECN N°
MATERIAL:
FINISH SPEC:
SCALE : DATE:
NAME:
18 NOV 2011
Instructions for use
Adelaide (except Plancha) and Genesco ranges
all languages: add a sentence to explain that the grease drip tray
must be fully put in place
all languages: add a sentence «To ensure safe operation of your
device, never use two full hot plates side by side. » .
Application Des Gaz - Siège social et usines :B.P.55 – 69563
St Genis Laval Cedex - Téléphone : 04 78 86 87 00
COMPOSITE- SHEET 1 OF 1
DRAWN BY:
T HERBULOT
PART N°:
APPROVED BY:
C PAYSANT
4010018197
T HERBULOT 20024082
SHEET SIZE
A4
REVISION
02
FR
Utilisation et entretien (2)
GB
IT
NL
PT
DE
NO
SE
ČZ
PL
ES
DK
FI
HU
SI
SK
HR
RO
BG
TR
Operation and maintenance (6)
Uso e manutenzione (10)
Gebruik en onderhoud (15)
Utilização e manutenção (20)
Benutzung und Wartung (25)
Anvendelse og skjøtsel (29)
Användning och skötsel (33)
Použití a údrîba (37)
Użytkowanie i konserwacja (41)
Utilización y mantenimiento (45)
Anvendelse og vedligeholdelse (50)
Käyttö ja ylläpito (54)
Használat és karbantartás (58)
Uporaba in vzdrževanje (62)
Použitie a údržba (66)
Uporaba i održavanje (70)
Folosire și întreţinere (74)
Ползване и поддръжка (78)
Kulaným ve Bakým (82)
Carte Privilège
Privilege Card
Scheda Privilegio
Carte Privilège
Cartão Privilégio
Privilegkarte
Privilegiumskort
Förmånskort
Karta Privilégium
Karta Klienta
Tarjeta Privilège
Bonus-kort
Etukortti
Akciós kártya
Kartica prednosti
Karta klienta
Kartica kupca
(posljednja stranica)
Card Privilegiu
Карта за предимство
Imtiyaz Kartý
КЬсфб рспнпмЯщн
(dernière page)
(last page)
(ultima pagina)
(laatste pagina)
(última página)
(letzte Seite)
(siste side)
(sista sidan)
(poslední stránka)
(ostatnia strona )
(última página)
(sidste side)
(viimeinen sivu)
(Utolsó oldal)
(zadnja stran)
(posledná strana)
(ultima pagină)
(последна страница)
(son sayfada)
(фелехфбЯб уелЯдб)
GR
CAMPING GAZ ITALIA - VIA CA'NOVA 11, 25010 CENTENARO DI LONATO (BRESCIA) ITALIA
ЧсЮуз кбй ухнфЮсзуз
(86)
Ref. 4010018197-A 07/2012
Utilisation et entretien
FR
• Consulter la notice avant l’utilisation.
• A n’utiliser qu’à l’extérieur des locaux.
• Ne pas utiliser de charbon de bois.
• Ne pas utiliser de détendeur réglable. Utiliser des détendeurs à réglage fixe conformes à la norme
européenne pertinente les couvrant.
• Pour assurer un fonctionnement de votre appareil en toute sécurité, ne jamais utiliser deux plaques
pleines cote à cote.
Le non respect de ces règles d'utilisation peut entraîner une grave détérioration de votre appareil.
a) Pour votre sécurité
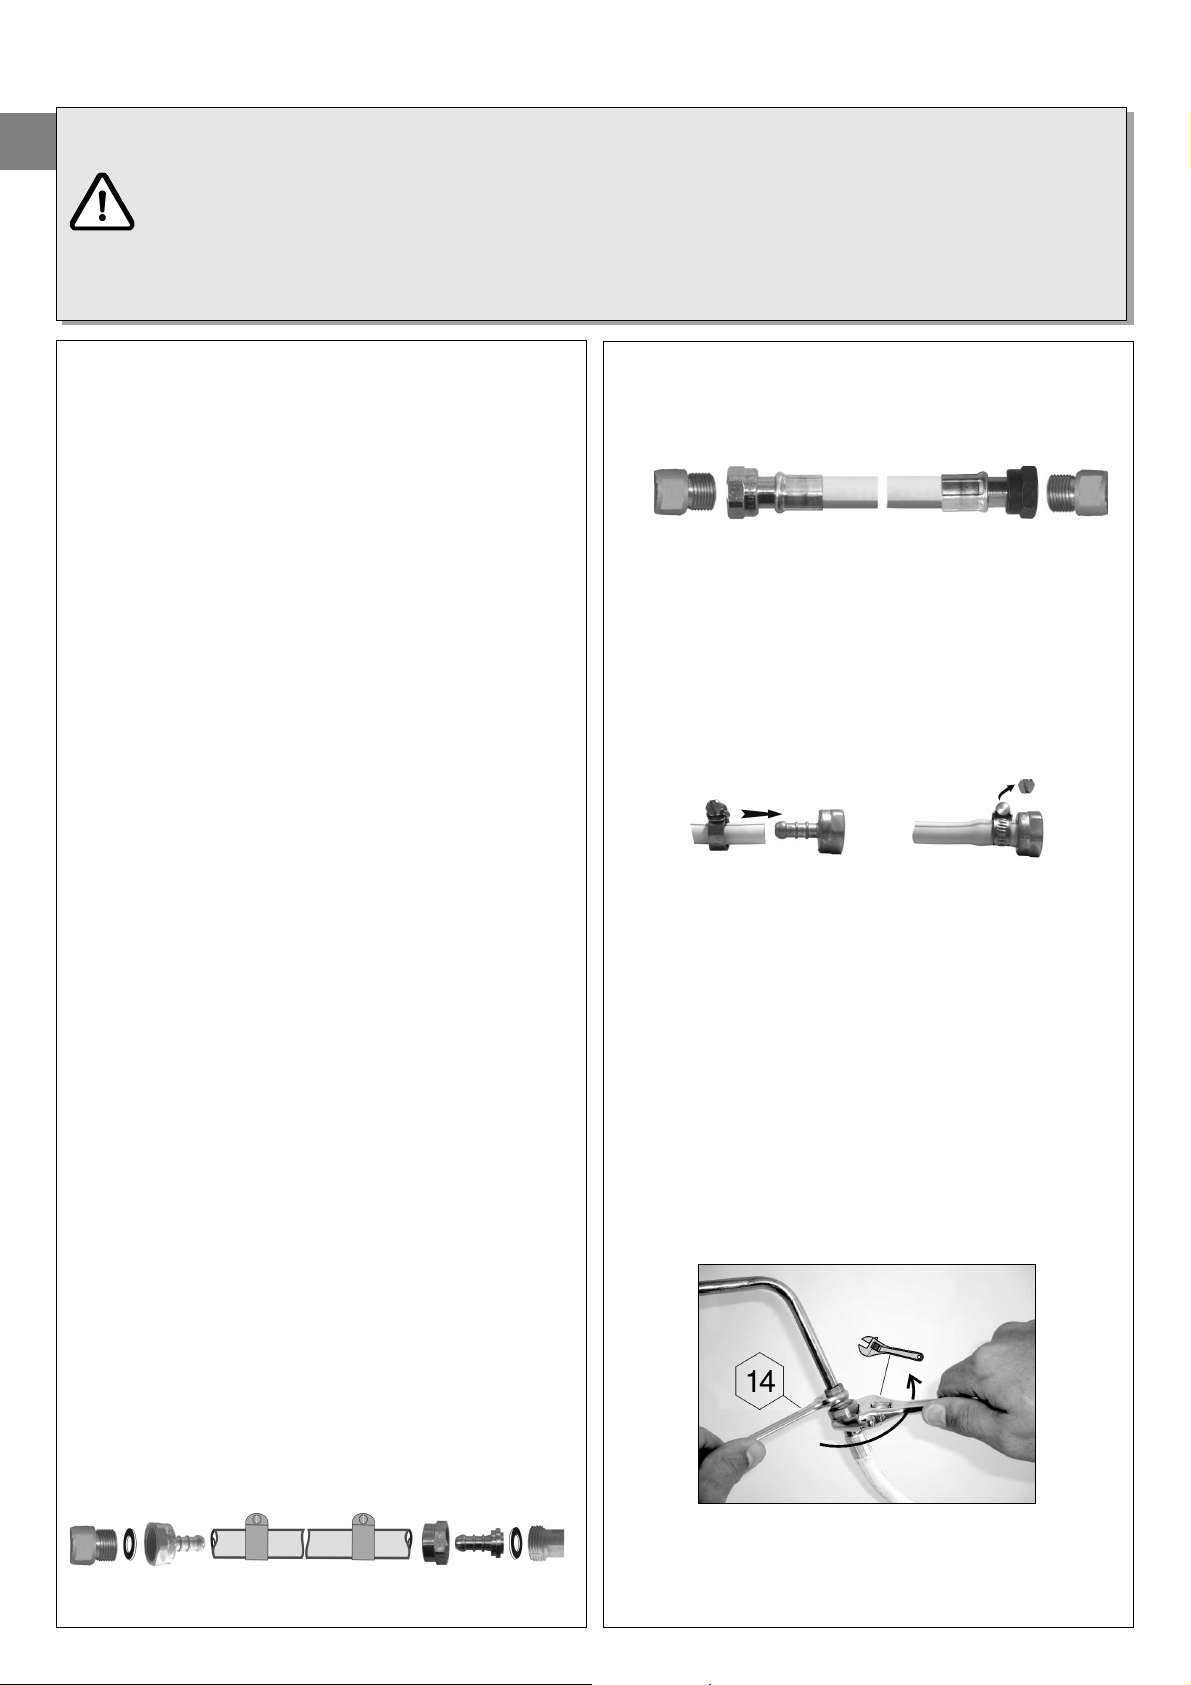
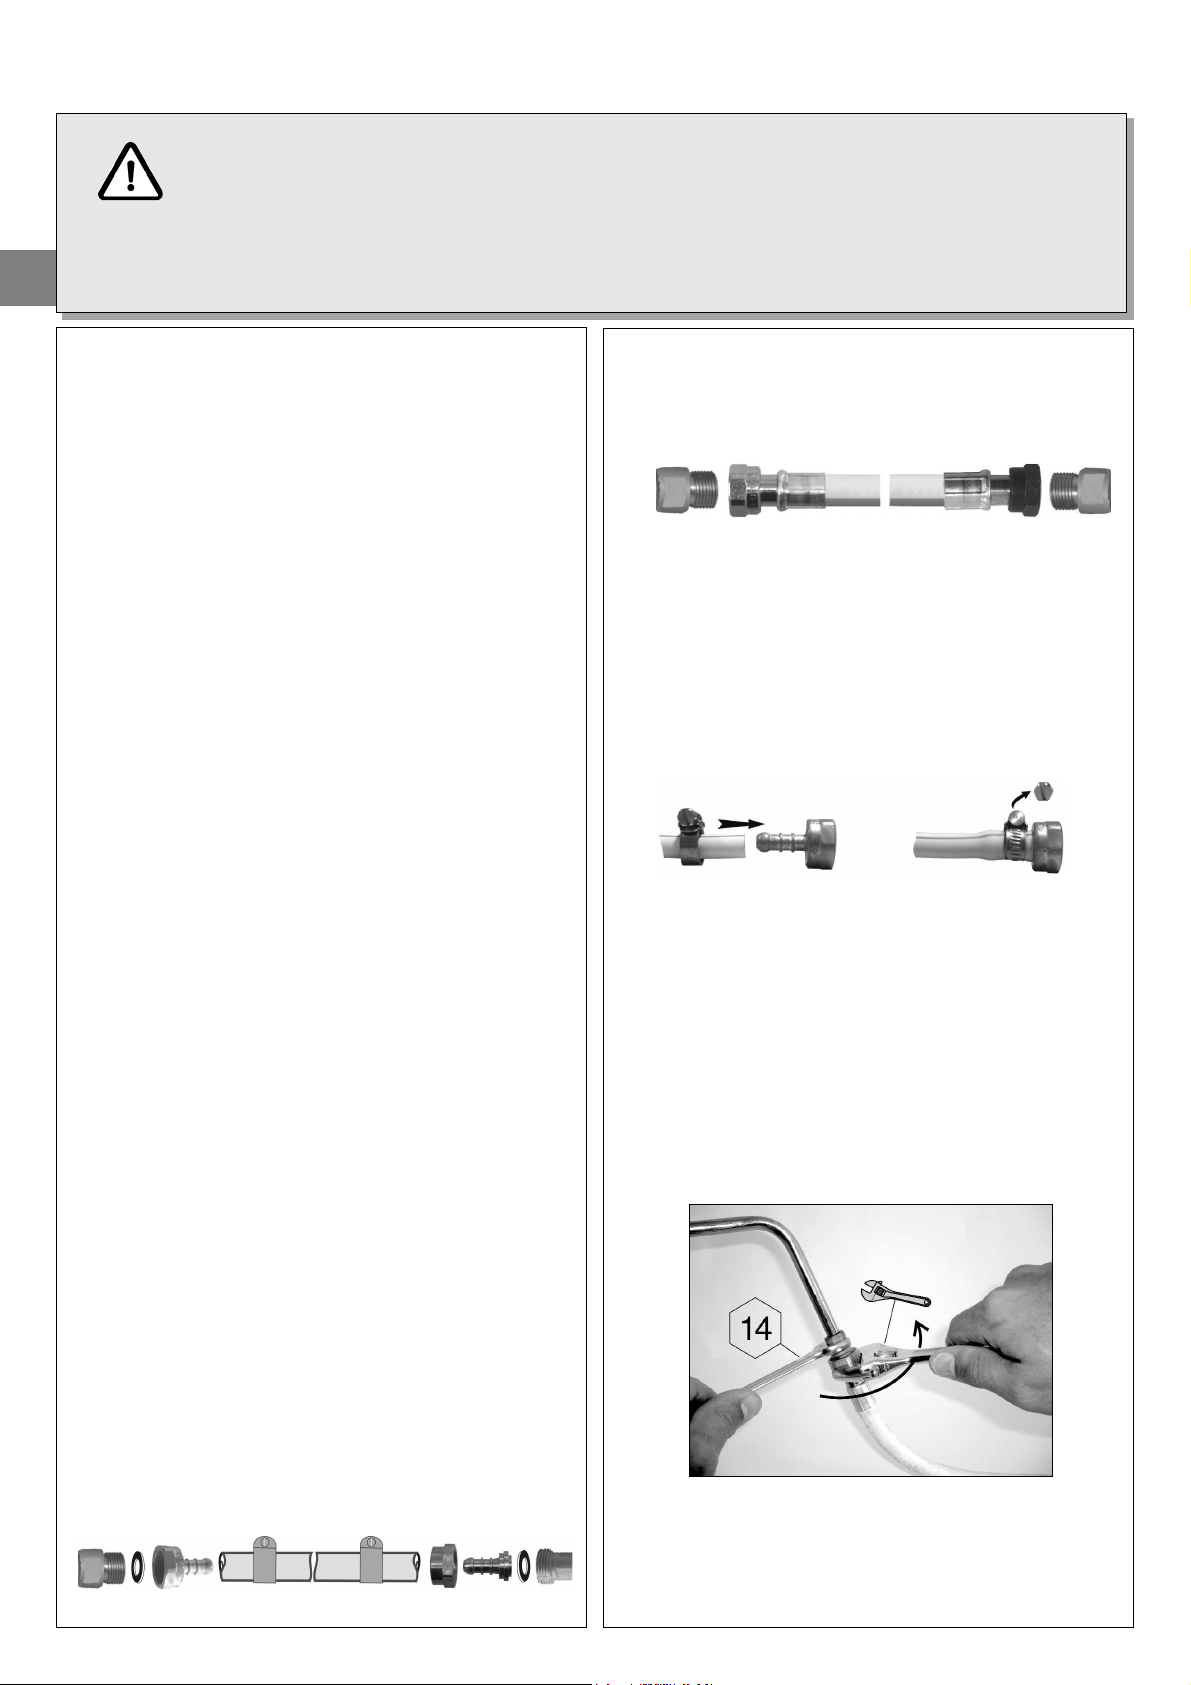
b) tuyau souple (selon la norme XP D 36-112) équipé
d’un écrou fileté G 1/2 pour vissage sur l’appareil et
- N'entreposez pas et n'utilisez pas d'essence ou
d'autres liquides ou vapeurs inflammables à proximité
de votre appareil. Cet appareil doit-être éloigné des
matériaux inflammables durant l’utilisation. En cas
d'odeur de gaz :
d’un écrou fileté M 20x1,5 pour vissage sur le
détendeur, longueur préconisée 1,25 m.
G 1/2
1) Fermez le robinet de la bouteille de gaz.
2) Eteignez toute flamme vive.
3) Ouvrez le couvercle.
4) Si l'odeur persiste, voir § f “Essai d’étanchéité” ou
informez vous immédiatement auprès de votre
revendeur.
- Les parties protégées par le fabriquant ou son
mandataire ne doivent pas être manipulées par
l’utilisateur.
- Fermer le récipient de gaz après usage.
b) Lieu d’utilisation
- Cet appareil ne doit être utilisé qu'à l'extérieur des
locaux.
- ATTENTION: des parties accessibles peuvent être très
chaudes. Eloignez les jeunes enfants.
Appareil
L’appareil possède un raccord fileté d’entrée gaz G
1/2 livré avec l’about annelé NF et le joint déjà
montés.
1) Pour l’utilisation de l’appareil avec tuyau souple
XP D 36-110: (solution d) a))
- emmancher à fond le tuyau souple sur l’about annelé
de l’appareil et du détendeur.
- glisser les colliers derrière les 2 premiers bossages
des abouts et les serrer jusqu’à rupture de la tête de
serrage.
- Aucun matériau combustible ne doit se trouver dans un
rayon de 60 cm environ autour de l'appareil.
- Ne pas déplacer l'appareil pendant l’utilisation.
- Utiliser l'appareil sur un sol bien horizontal.
- Prévoir un débit d'air neuf de 2 m3/kW/h.
c) Bouteille de gaz
- Cet appareil est réglé pour fonctionner avec les
bouteilles butane/propane de 4,5 à 15 kg munies d'un
détendeur approprié :
- France, Belgique, Luxembourg, Royaume Uni,
Irlande, Portugal, Espagne, Italie, Croatie, Grèce :
butane 28 mbar / propane 37 mbar
- Pays-Bas, Norvège, Suède, Danemark, Finlande,
Suisse, Hongrie, Slovénie, Slovaquie, République
Tchèque, Roumanie, Turquie, Bulgarie :
butane 30 mbar / propane 30 mbar.
- Pologne: propane 37 mbar.
- Allemagne, Autriche : butane / propane 50 mbar.
- Pour le branchement ou le changement de la bouteille,
opérer toujours dans un endroit bien aéré, et jamais en
présence d'une flamme, étincelle ou source de chaleur.
La bouteille de gaz équipée du détendeur ne doit pas
être placée sous le gril si sa hauteur totale est
supérieure à 46,5 cm.
Lorsque la bouteille de gaz est placée sous le gril, elle
- l’étanchéité sera vérifiée en suivant les indications du
paragraphe f).
2) Pour l’utilisation de l’appareil avec tuyau souple
XP D 36-112, écrous G 1/2 et M 20x1,5 : (solution
d) b))
- dévisser et enlever l’about annelé NF pour libérer le
raccord d’entrée G1/2.
- enlever le joint .
- visser l’écrou fileté G 1/2 du tuyau sur le raccord
d’entrée de l’appareil et l’écrou fileté M20x1,5 sur le
raccord de sortie du détendeur en suivant les
indications fournies avec le tuyau souple.
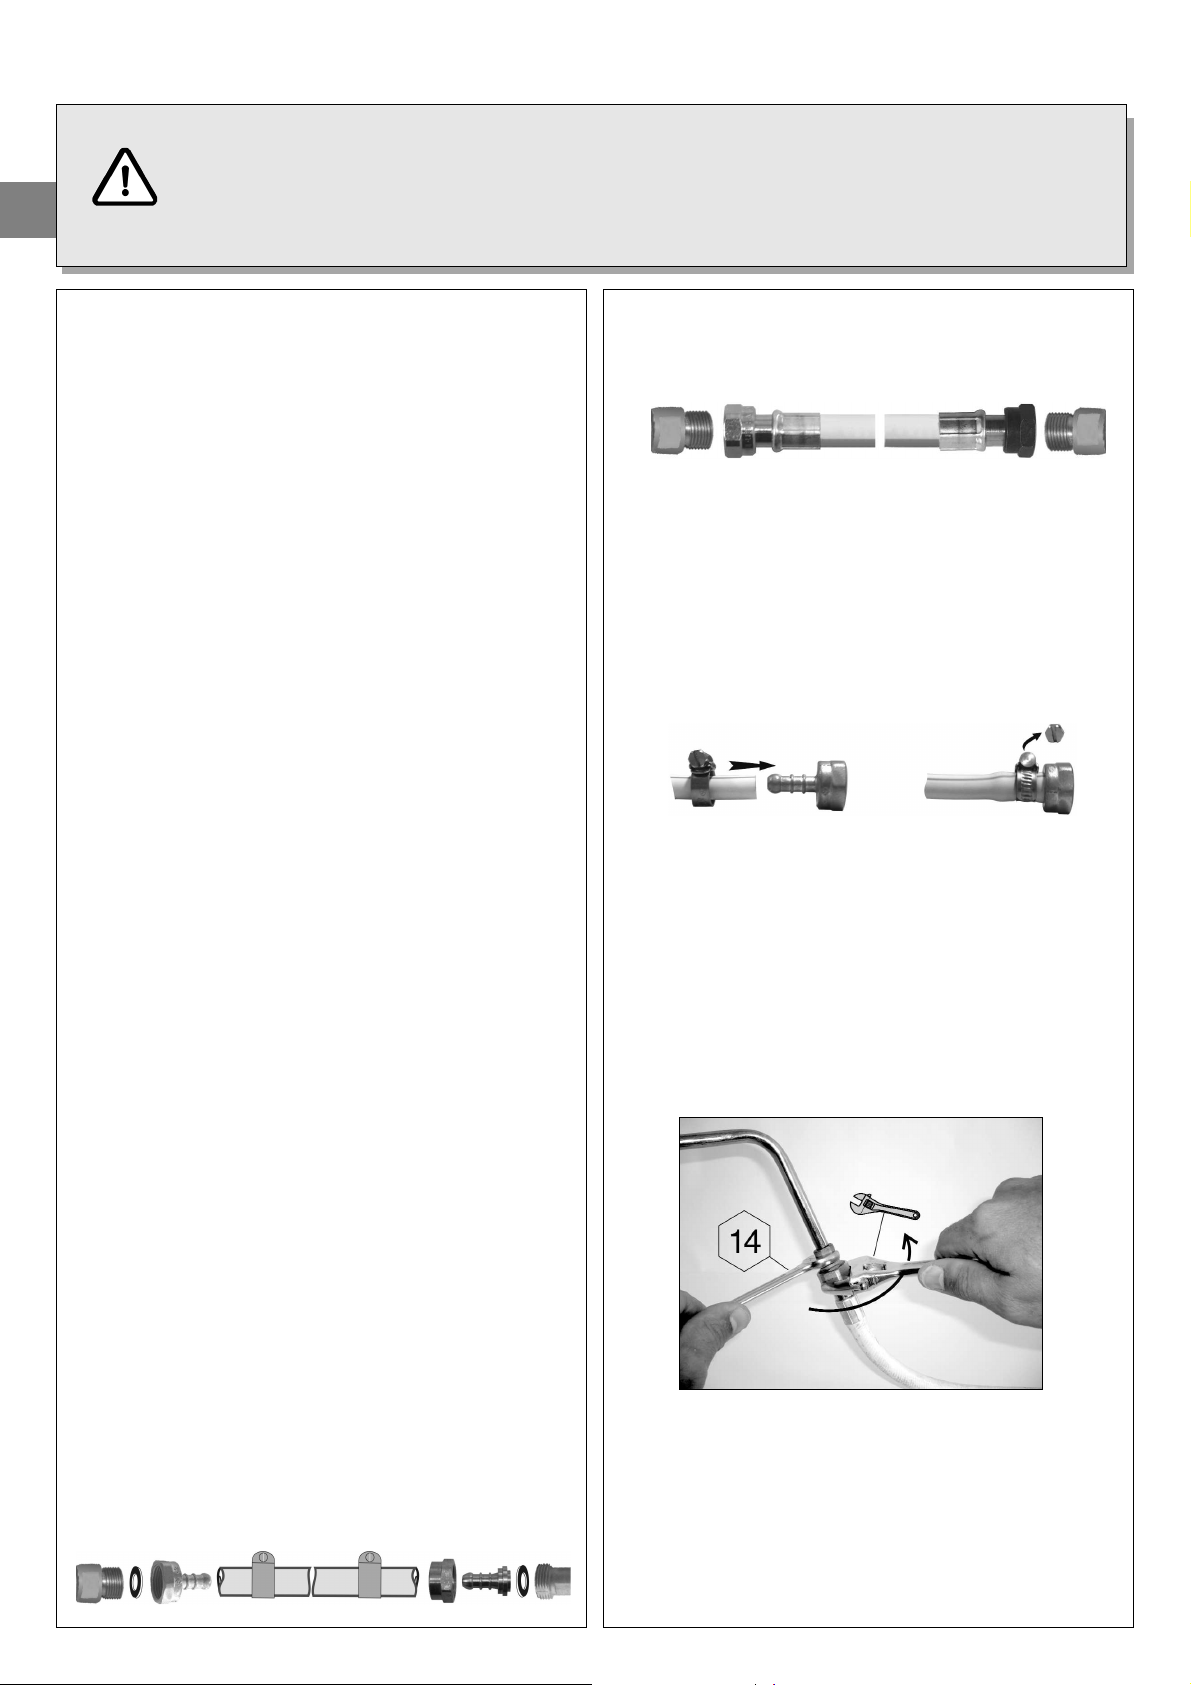
- Utiliser 2 clés pour serrer le tuyau souple sur l'about
gaz de l'appareil :
u une clé de 14 pour immobiliser le raccord
d'entrée de l'appareil,
u une clé à molette pour serrer l'écrou du tuyau
souple.
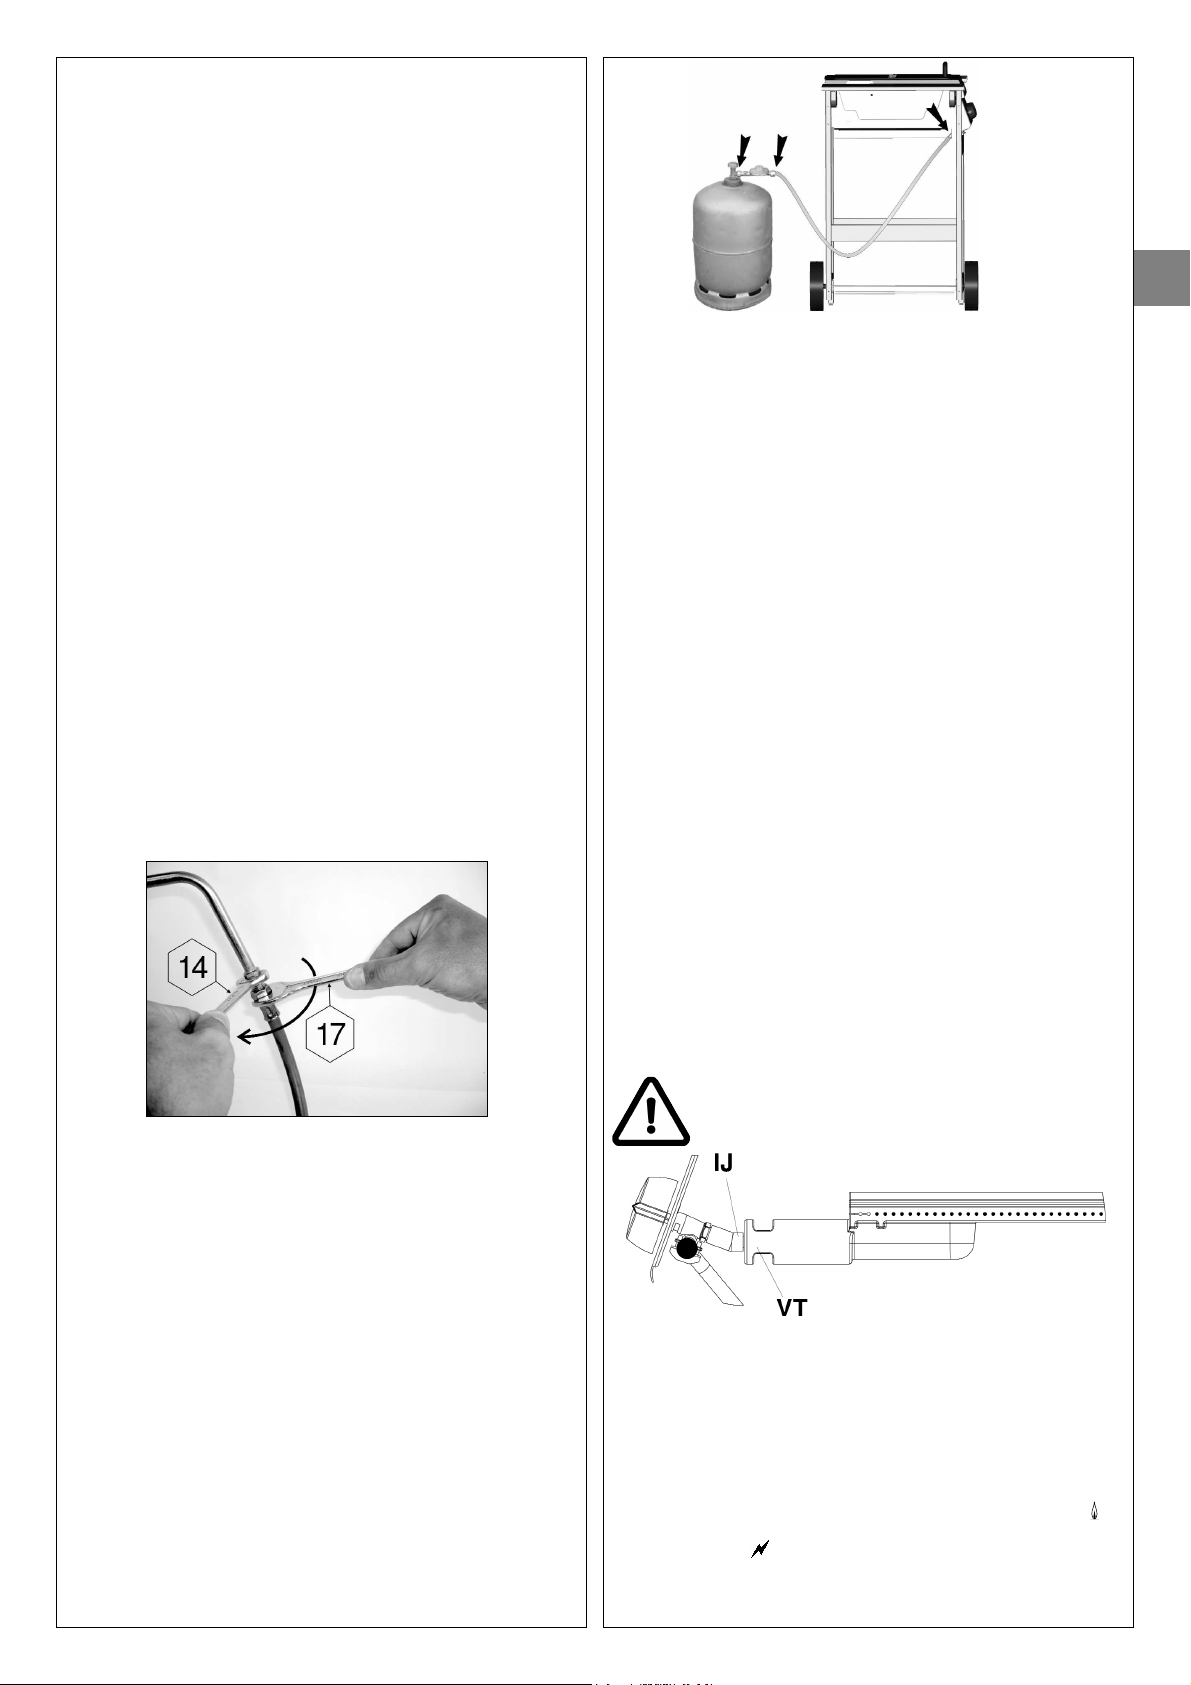
doit être attachée au chassis du barbecue à l'aide de la
sangle fournie.
noir
M 20x1,5
Détendeur
d) Tuyau
France (selon modèle)
L’appareil peut être utilisé avec 2 sortes de tuyaux
souples :
a) tuyau souple destiné à être emmanché sur des
abouts annelés coté appareil et coté détendeur,
immobilisé par des colliers (selon la norme XP D 36-
110). Longueur préconisée 1,25 m.
G 1/2
Appareil
M 20x1,5
Détendeur
- utiliser une clé pour immobiliser le raccord de sortie
du détendeur.
- l’étanchéité sera vérifiée en suivant les indications du
paragraphe f).
2
Vérifier que le tube souple se développe normalement,
sans torsion ou traction, ni contact avec les parois
chaudes de l'appareil. Il devra être changé lorsque la date
de validité inscrite sur le tuyau sera atteinte ou dans tous
les cas s'il est endommagé, s'il présente des craquelures.
Belgique, Luxembourg, Pays-Bas, Royaume Uni,
Irlande, Pologne, Portugal, Espagne, Italie, Norvège,
Suède, Danemark, Finlande, République Tchèque,
Slovénie, Slovaquie, Hongrie, Croatie, Bulgarie,
Roumanie, Turquie, Grèce :
L'appareil est équipé d'un about annelé. Il doit être utilisé
avec un tuyau souple de qualité adaptée à l'utilisation du
butane et du propane. Sa longueur ne devra pas excéder
1,20 m. Il devra être changé s'il est endommagé, s'il
présente des craquelures, lorsque les conditions
nationales l’exigent ou selon sa validité. Ne pas tirer sur
le tuyau ou le vriller. Le tenir éloigné des pièces pouvant
devenir chaudes. Vérifier que le tube souple se
développe normalement, sans torsion ou traction.
Suisse, Allemagne, Autriche:
Cet appareil doit être utilisé avec un tuyau souple de
qualité adaptée à l'utilisation du butane et du propane. Sa
longueur ne devra pas excéder 1,50 m. Il devra être
changé s'il est endommagé, s'il présente des
craquelures, lorsque les conditions nationales l’exigent
ou selon sa validité. Ne pas tirer sur le tuyau ou le vriller.
Le tenir éloigné des pièces pouvant devenir chaudes.
Vérifier que le tube souple se développe normalement ,
sans torsion ou traction.
Raccordement du tuyau souple: utiliser 2 clés pour serrer
le tuyau souple sur l'about gaz de l'appareil :
u une clé de 14 pour immobiliser le raccord d'entrée
de l'appareil
u une clé de 17 pour serrer l'écrou du tuyau souple
7) Si des bulles se forment, cela signifie qu'il y a des fuites
de gaz.
8) Pour supprimer la fuite, serrer les écrous. Si une pièce
est défectueuse, la faire remplacer. L'appareil ne doit
pas être mis en service avant que la fuite ait disparu.
9) Fermer le robinet de la bouteille de gaz.
Important:
Ne jamais utiliser de flamme pour détecter une fuite de
gaz.
Il faut effectuer au moins une fois par an le contrôle et la
recherche des fuites et à chaque fois qu'il y a
changement de la bouteille de gaz.
g) Avant la mise en marche
Ne pas mettre l'appareil en marche avant d'avoir lu
attentivement et compris toutes les instructions.
S'assurer aussi:
- qu'il n'y a pas de fuites
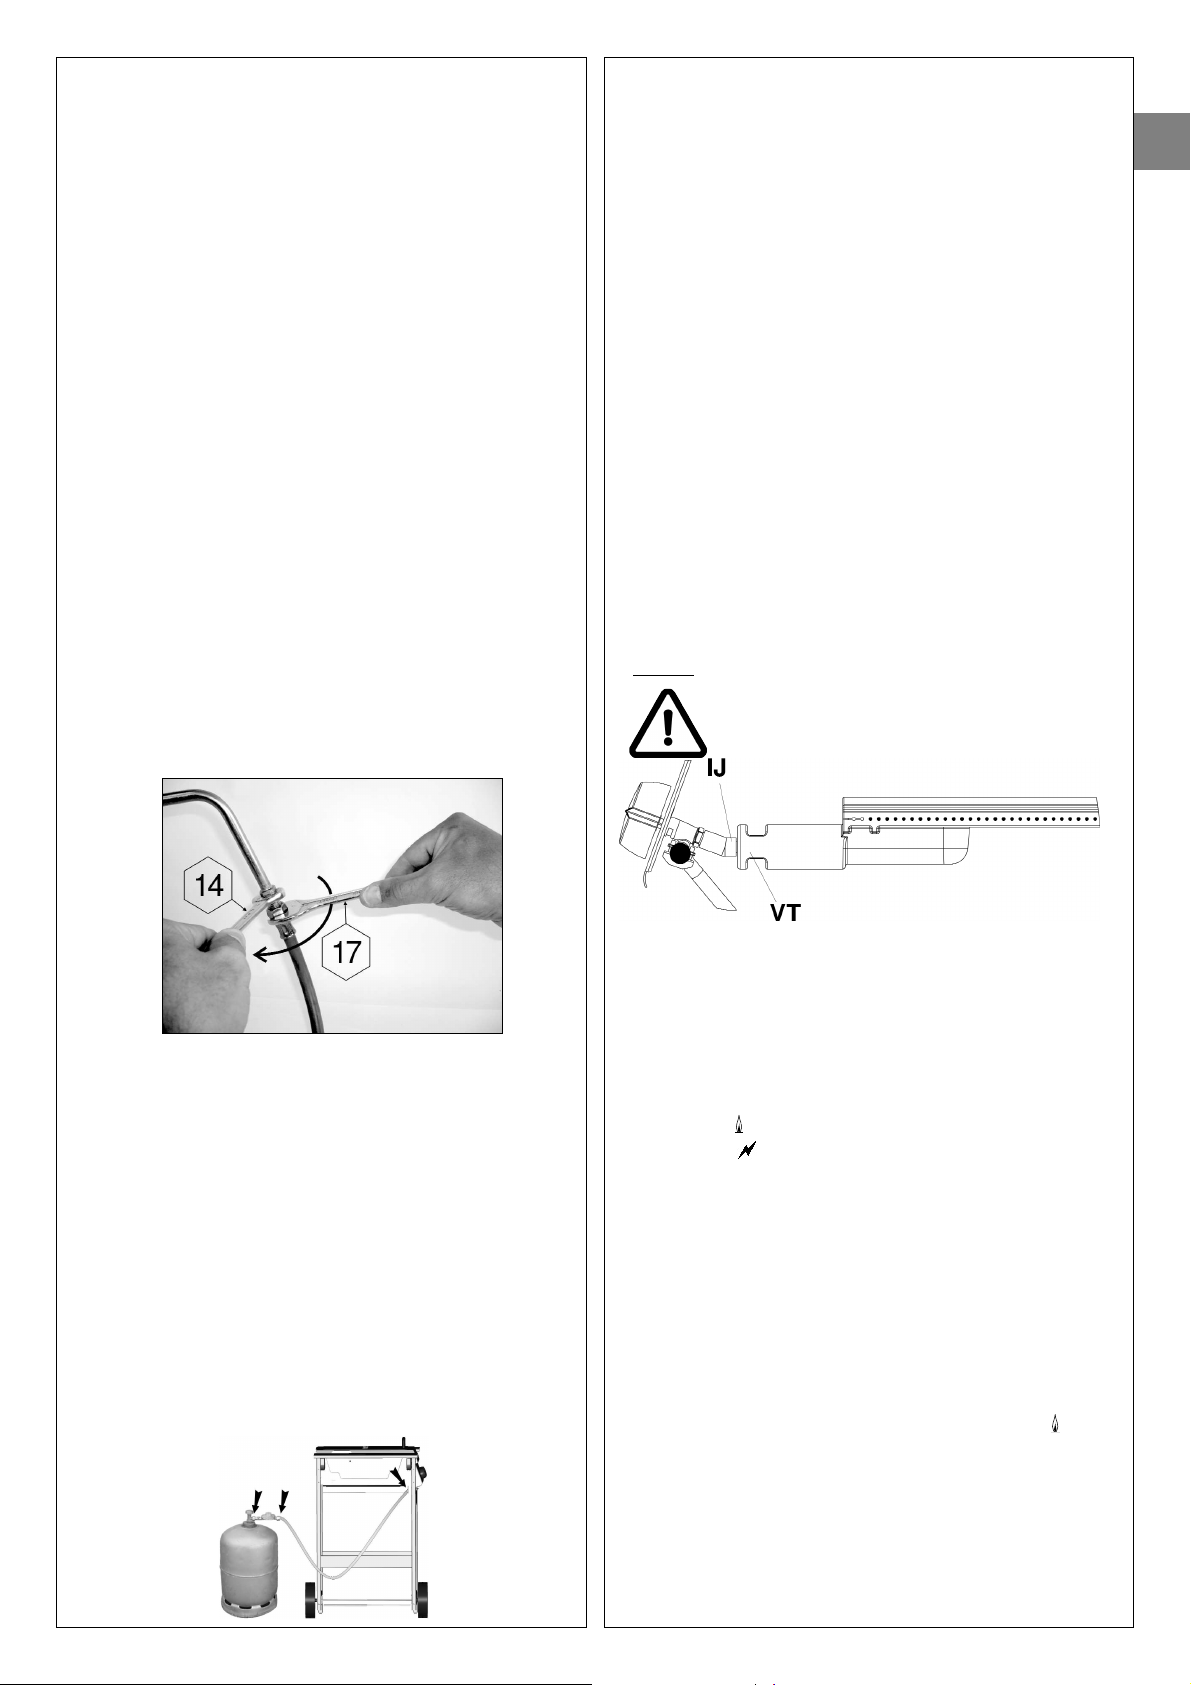
- que les tubes Venturi ne sont pas obstrués (exemple :
toiles d’araignées)
- que le tuyau n'est pas en contact avec des pièces
pouvant devenir chaudes.
- que les ouvertures de ventilation du logement du
récipient de gaz ne soient pas obstruées le cas
échéant.
- que le plateau récupérateur de graisse soit bien mis en
place dans son logement et qu’il soit bien positionné
à fond jusqu’à la butée.
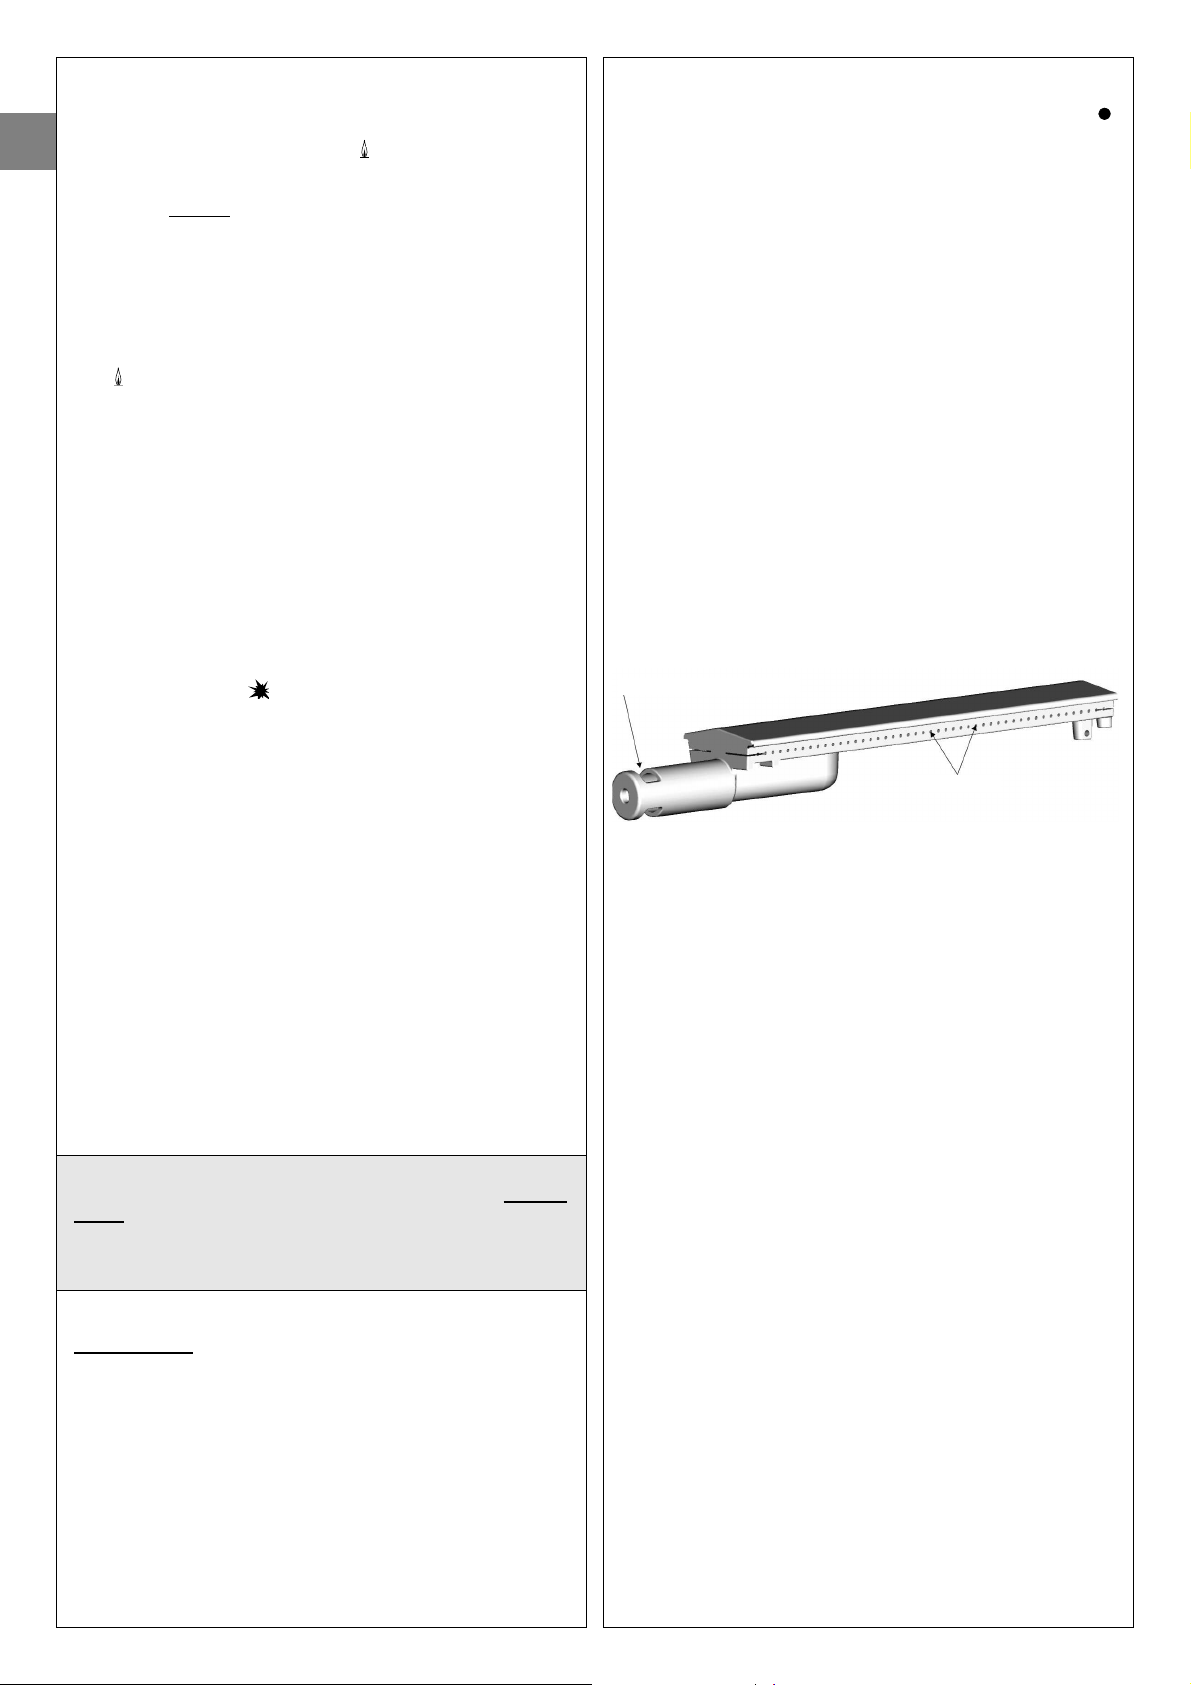
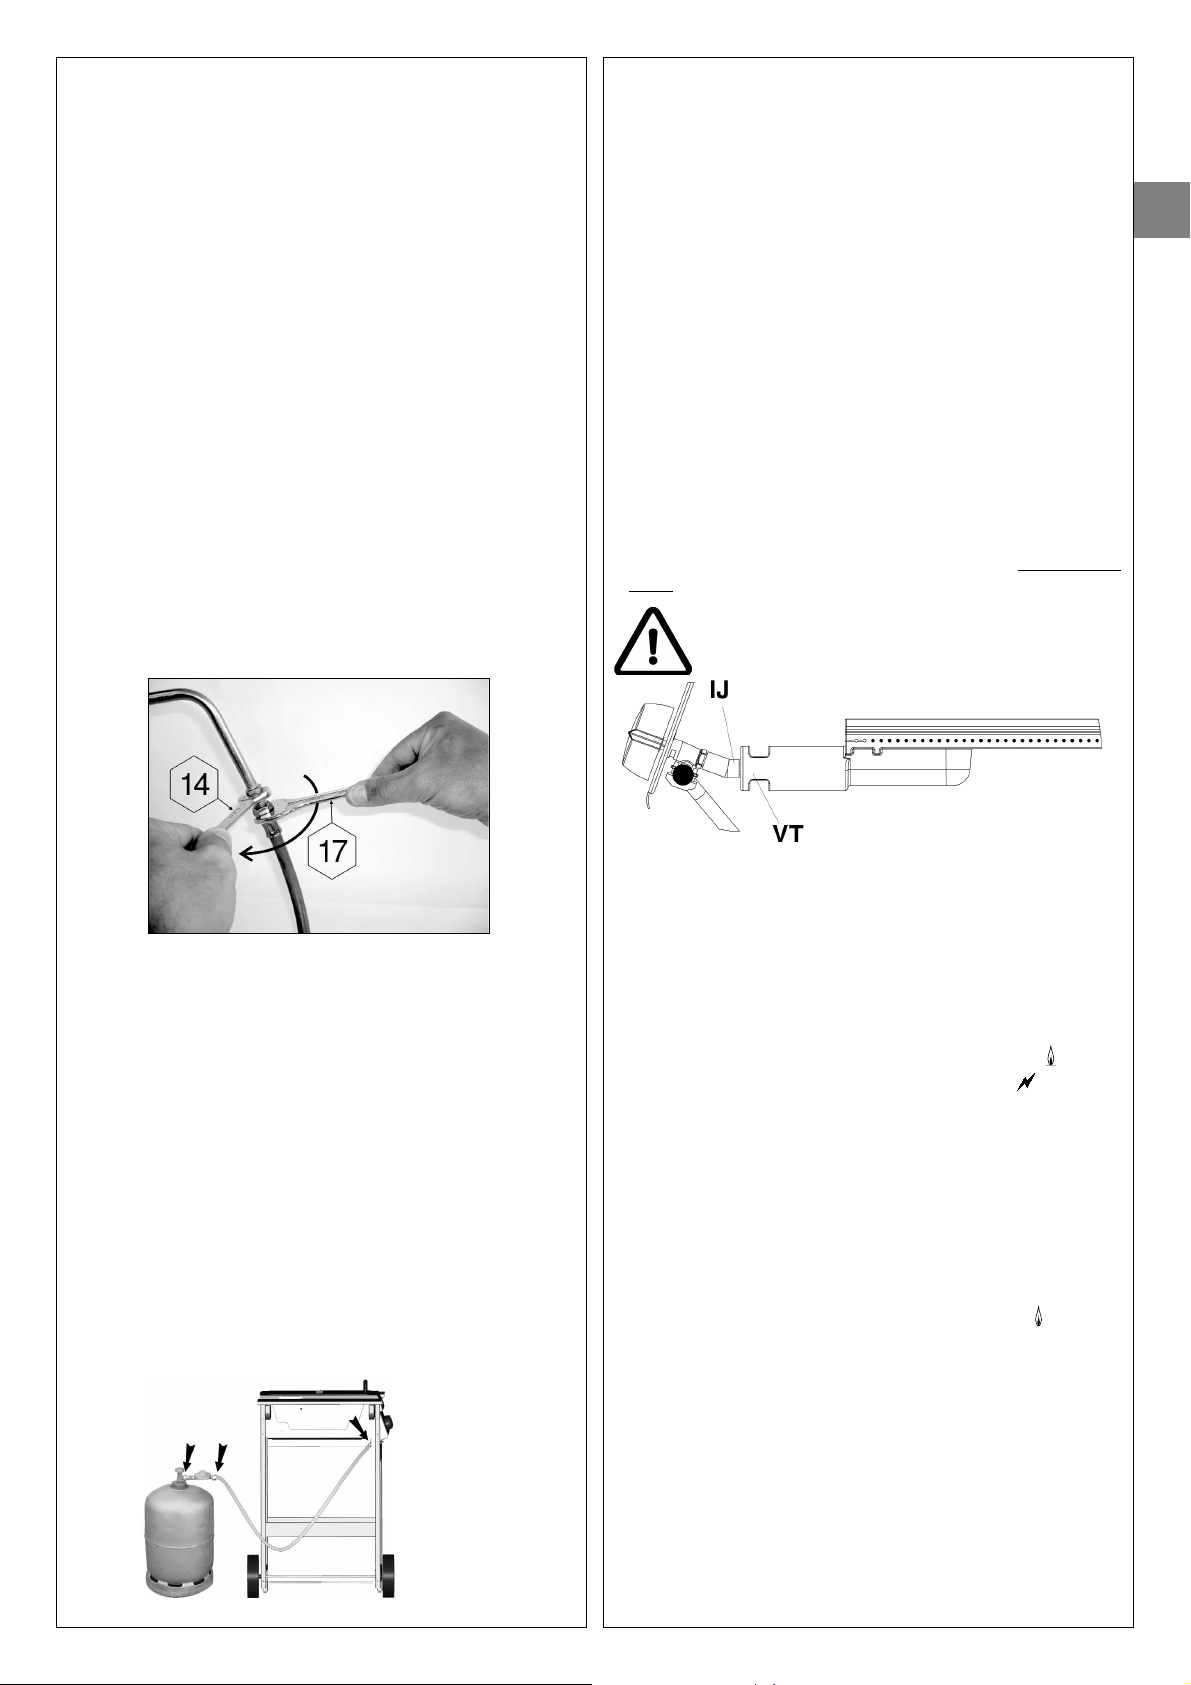
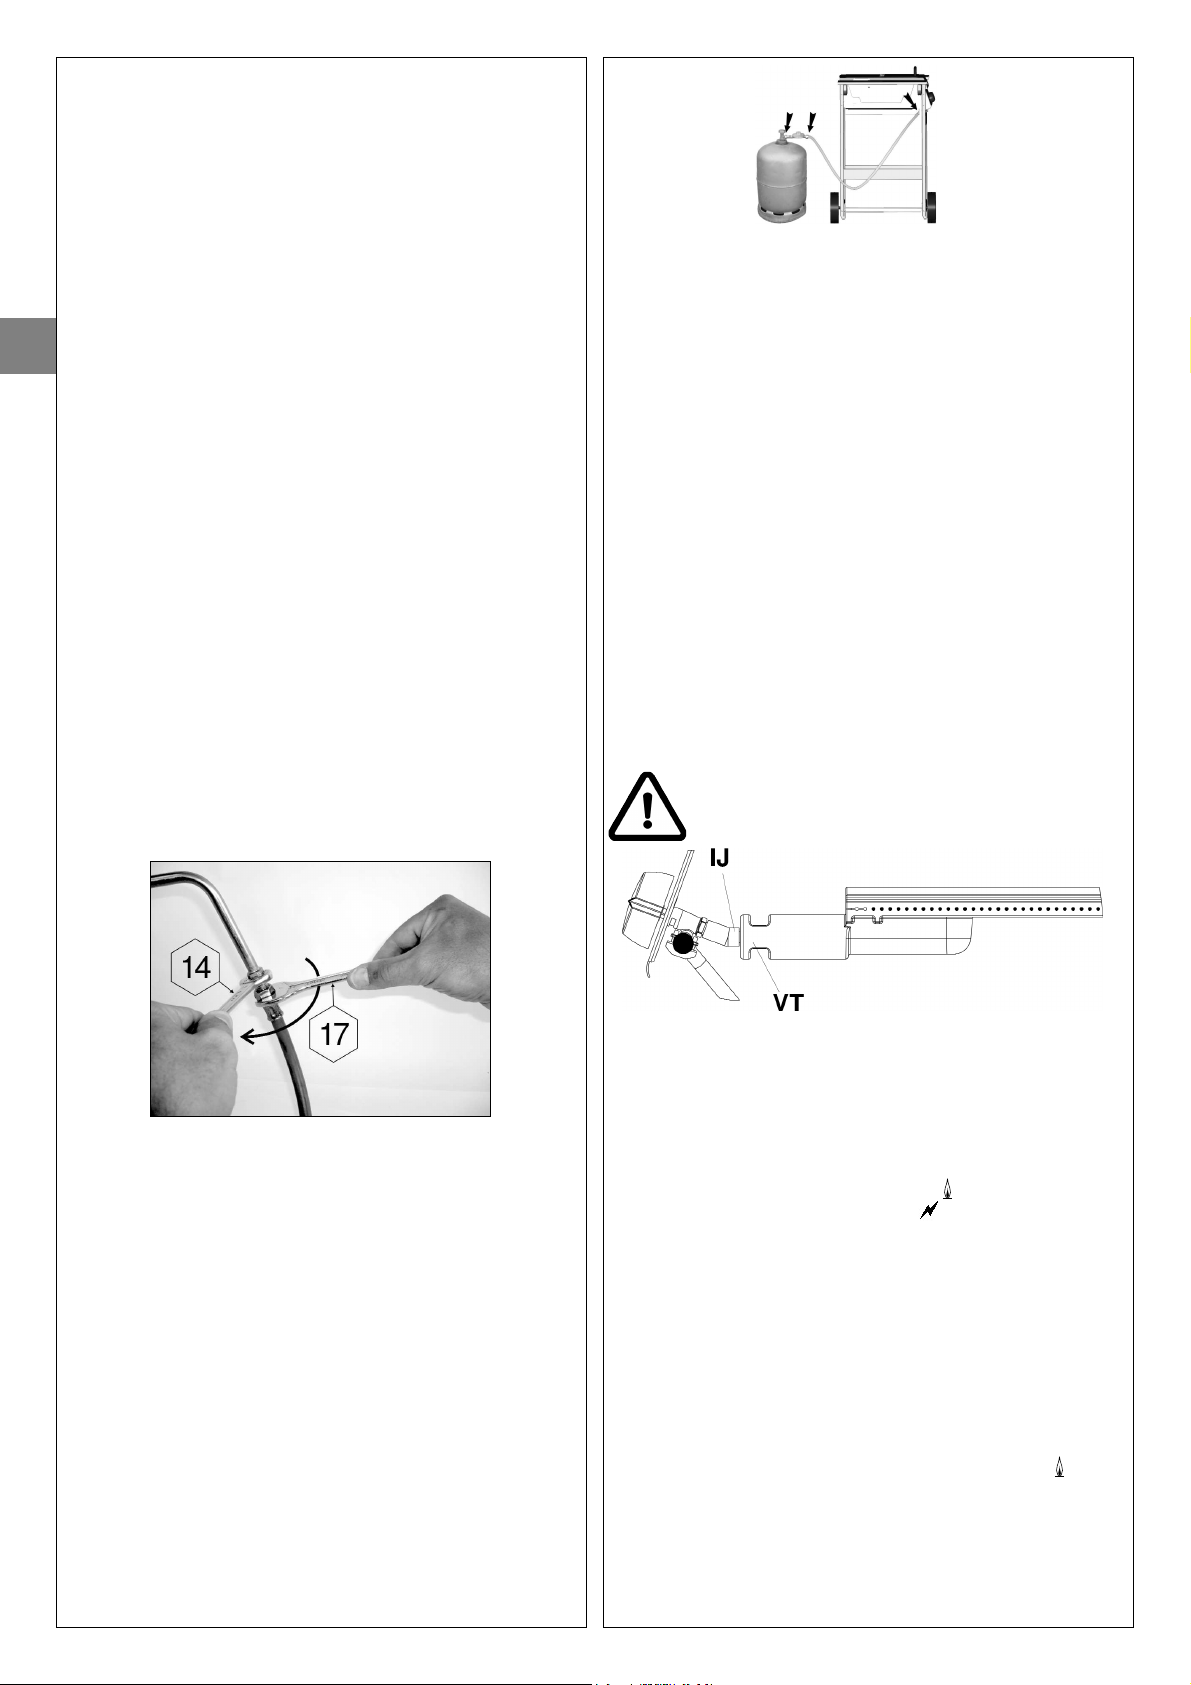
Bien vérifier que les tubes Venturi
(VT) recouvrent les injecteurs (ij)
FR
e) Couvercle (selon modèle)
Manipuler le couvercle avec précaution, notamment en cours
de fonctionnement. Ne pas se pencher au dessus du foyer.
f) Essai d’étanchéité
1) Opérer à l'extérieur des locaux, en éloignant tous les
matériaux inflammables. Ne pas fumer.
2) S'assurer que les boutons de réglage sont en position
"OFF" (l).
3) Raccorder le tuyau souple selon le paragraphe d).
4) Visser le détendeur sur la bouteille de gaz.
5) Pour le contrôle, utiliser un liquide de détection de
fuites gazeuses.
6) Mettre le liquide sur les raccords bouteille/détendeur/
tuyau/appareil. Les boutons de réglage doivent rester
en position "OFF" (l). Ouvrir le robinet de la bouteille
de gaz.
h) Allumage des brûleurs du barbecue
- Enlever le couvercle de protection ou ouvrir le
couvercle de cuisson (selon modèle).
- S'assurer que les boutons de réglage sont en position
"OFF" (l).
- Appuyer et tourner une manette de réglage dans le sens
inverse des aiguilles d'une montre et la mettre en position
plein débit ( ), puis appuyer immédiatement sur le bouton
d'allumage ( ) jusqu'au déclic. Si l'allumage ne se produit
pas au premier déclic, appuyer 3 ou 4 fois si nécessaire.
- Répéter cette opération jusqu'à ce que le brûleur
s'allume.
- Si le brûleur ne s'allume pas après 4 ou 5 essais,
attendre 5 minutes et essayer de nouveau.
- Une fois le brûleur allumé, il existe 2 possibilités pour
allumer un autre brûleur :
l La 1ère possibilité consiste à réitérer l'opération
d'allumage décrite ci-dessus ;
l La 2ème possibilité consiste à allumer le brûleur situé
à la droite ou à la gauche du 1er brûleur allumé, puis
de proche en proche les autres brûleurs en tournant
le bouton de réglage en position plein débit ( ).
- Si l'allumage piezoélectrique ne fonctionne
pas, utiliser l'allumage manuel (paragraphe suivant).
i) Allumage manuel du barbecue
- Enlever le couvercle de protection ou ouvrir le
couvercle de cuisson (selon modèle).
- S'assurer que les boutons de réglage sont en position
"OFF“ (l).
- Enlever le plateau récupérateur de graisse.
3
FR
- Allumer l'allumette puis l'amener depuis le dessous
jusqu'à proximité du brûleur.
- Appuyer et tourner le bouton de réglage correspondant
dans le sens inverse des aiguilles d'une montre,
jusqu'à la position plein débit ( ).
- Une fois le brûleur allumé, remettre le plateau
récupérateur de graisse dans son logement et le
pousser à fond
jusqu’à la butée.
- Une fois le brûleur allumé, il existe 2 possibilités pour
allumer un autre brûleur:
l La 1ère possibilité consiste à réitérer l'opération
d'allumage décrite ci-dessus ;
l La 2ème possibilité consiste à allumer le brûleur
situé à la droite ou à la gauche du 1erbrûleur allumé,
puis de proche en proche les autres brûleurs en
tournant le bouton de réglage en position plein débit
( ).
j) Extinction du gril
Ramener les boutons de réglage en position ”OFF” (l),
puis fermer le robinet de la bouteille de gaz.
k) Allumage du réchaud (selon modèle)
Le réchaud peut fonctionner seul ou en même temps
que le gril.
Allumage : Ouvrir le robinet de la bouteille de gaz.
Vérifier l'étanchéité du circuit gaz depuis la bouteille
jusqu'au réchaud (voir § f). Vérifier l'état du tuyau reliant
le gril au réchaud. Le changer en faisant appel au
Service Après Vente, s'il présente des craquelures.
Ouvrir le robinet du réchaud (sens +) et appuyer sur le
bouton d'allumage ( ) jusqu'au déclic. Appuyer 3 ou 4
fois si nécessaire. En cas de non allumage, présenter
une allumette au bord du brûleur.
Régler la flamme à la dimension du récipient utilisé en
ouvrant plus ou moins le robinet. Ne pas utiliser de
récipient de diamètre inférieur à 12 cm ou supérieur à 26
cm.
Important : s'il arrive, durant le fonctionnement de
l'appareil qu'un brûleur s'éteigne, placer
immédiatement les boutons de réglage sur “OFF” (l).
Attendre 5 minutes afin de permettre l'évacuation du
gaz non brûlé. Procéder une nouvelle fois à l'opération
d'allumage uniquement après ce délai.
o) Nettoyage et entretien
Ne pas modifier l'appareil : toute modification peut se
révéler dangereuse.
Afin de maintenir votre appareil en parfait état de
fonctionnement ;
périodiquement (après 4 ou 5 utilisations).
Attendre que l'appareil ait refroidi avant toute opération
de nettoyage.
Fermer la bouteille de gaz et dévisser le détendeur.
Nettoyer le dessus du brûleur à l'aide d'une éponge
humide (eau additionnée de produit pour la vaisselle). Au
besoin utiliser une brosse en acier, humidifiée.
Vérifier que les trous de sortie du brûleur ne sont pas
bouchés et laisser sécher avant réutilisation. Au besoin
utiliser une brosse métallique pour déboucher les trous de
sortie du brûleur.
Si l'appareil n'a pas été utilisé pendant plus de 30 jours,
vérifier également que des toiles d'araignées ne
bouchent pas les orifices des tubes de brûleur, ce qui
peut conduire à une diminution de l'efficacité du
barbecue ou à une inflammation dangereuse du gaz hors
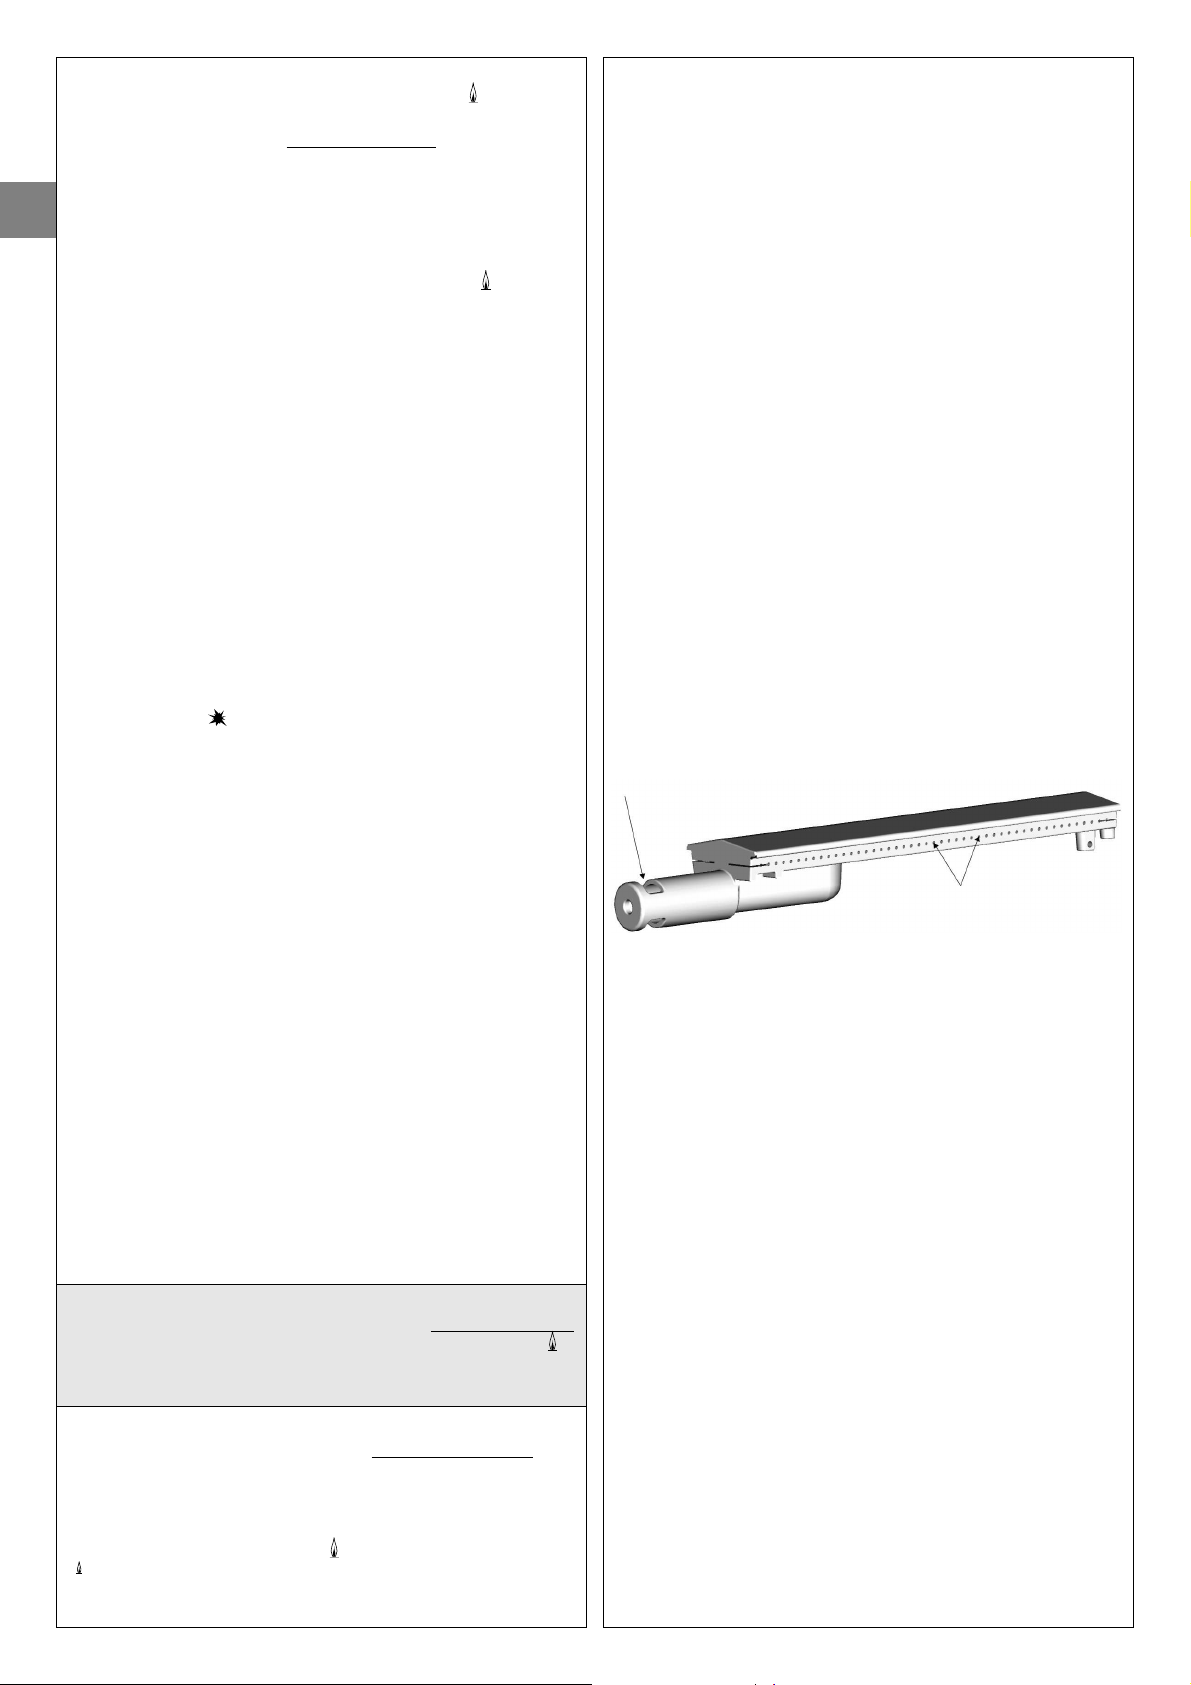
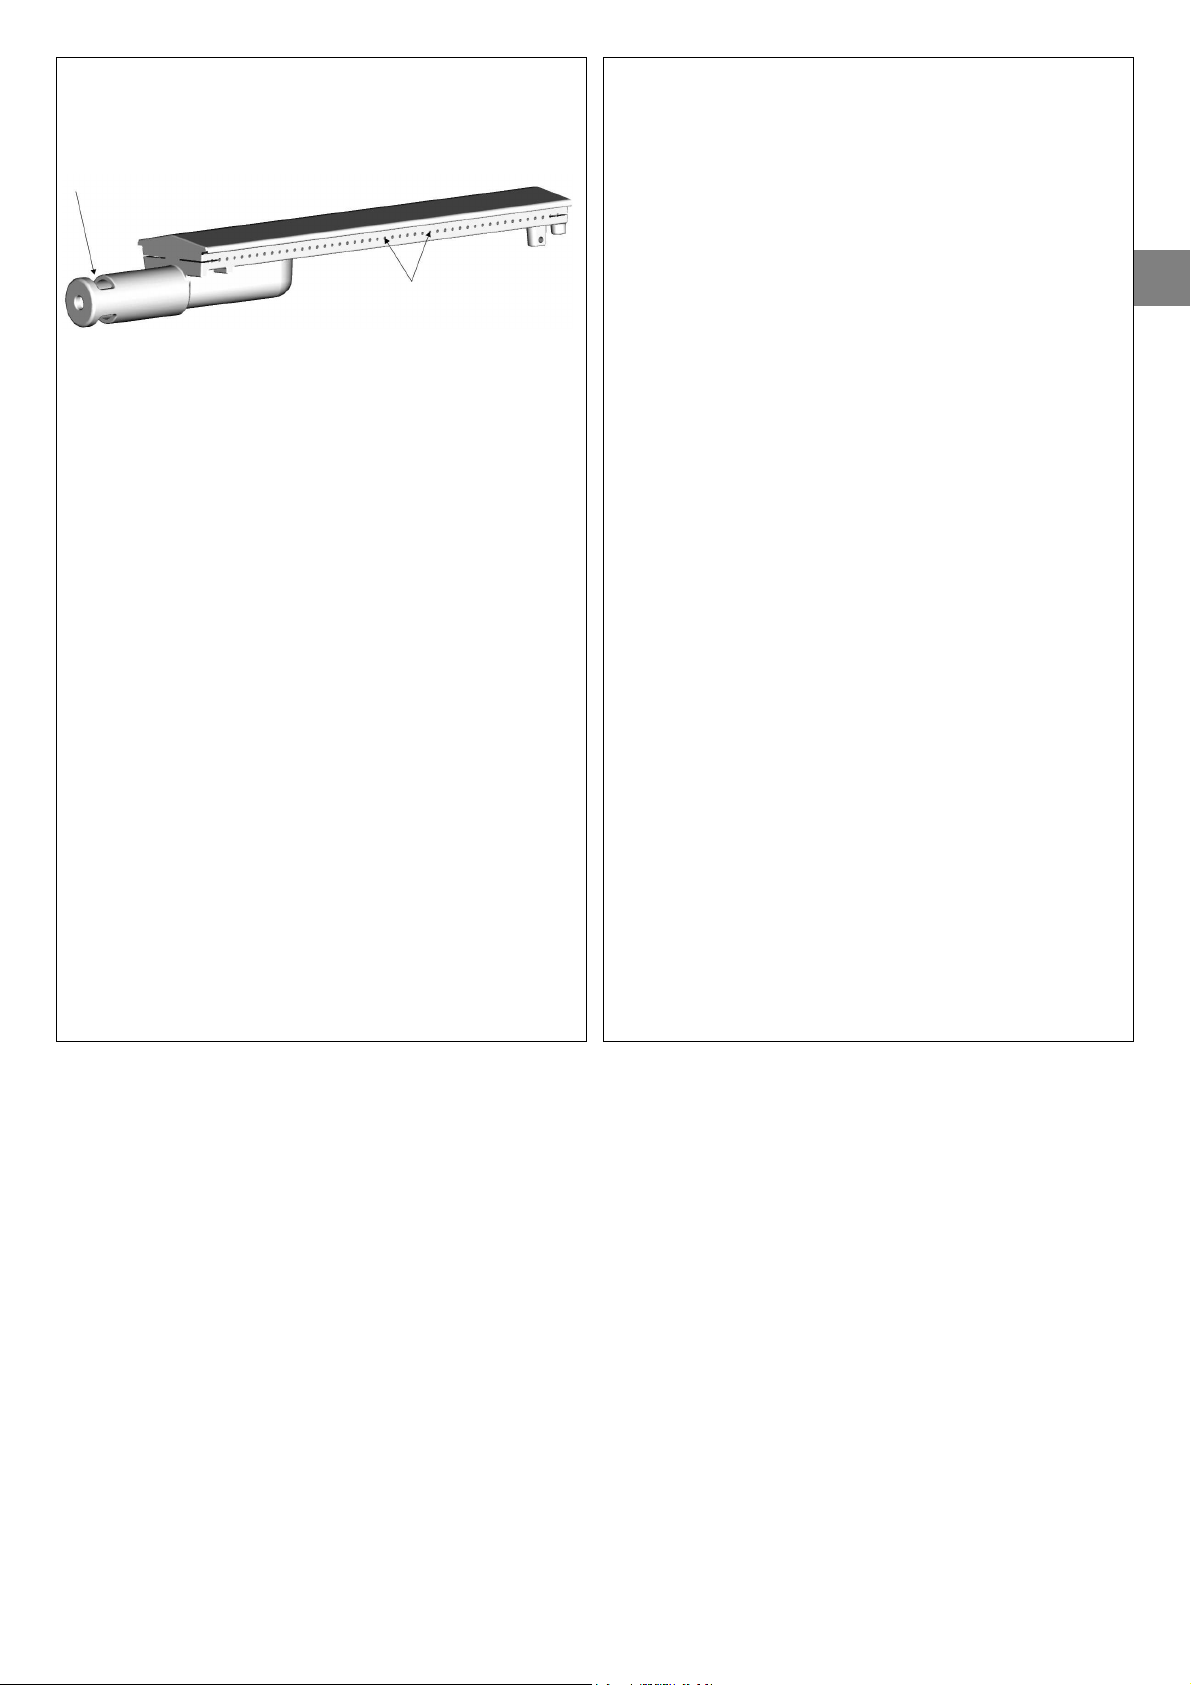
du brûleur. Nettoyer les orifices du tube venturi (voir la
figure ci-dessous) ou le brûleur le cas échéant.
Orifices tube venturi du brûleur
il est recommandé de le nettoyer
Trous de sortie
l) Extinction du réchaud (selon modèle)
Fermer le robinet du réchaud (sens -) et le robinet de la
bouteille si le gril n'est pas en fonctionnement.
m) Changement de la bouteille de gaz
- Opérer toujours dans un endroit bien aéré et jamais en
présence d'une flamme, étincelle ou source de chaleur.
- Ramener les boutons de réglage en position "OFF" (l)
puis fermer le robinet de la bouteille.
- Dévisser le détendeur, vérifier la présence et le bon
état du joint d'étanchéité.
- Mettre la bouteille pleine en place, revisser le
détendeur en veillant à ne pas faire subir de
contraintes de torsion ou de traction au tuyau.
n) Utilisation
Lors de la première utilisation, faire chauffer le barbecue
(selon modèle : fermer le couvercle articulé / ne pas
poser le couvercle de protection) avec ses brûleurs en
position plein débit
afin d'enlever les odeurs de peintures des pièces
neuves.
En fonctionnement normal, faire préchauffer le
barbecue (selon modèle : fermer le couvercle articulé /
ne p
as poser le couvercle de protection) pendant 15 à
20 minutes pour amener les grilles en fonte à bonne
température de cuisson.
La vitesse de cuisson peut être modulée en fonction de
la position des manettes de réglage : entre la position
plein débit
() et la position débit moyen ().
Pour réduire l'accroche de la nourriture sur les grilles de
cuisson, avant de poser la nourriture, badigeonner
légèrement les grilles de cuisson avec de l'huile
alimentaire.
Pour réduire l'inflammation des graisses durant la
cuisson, enlever le surplus de gras de la viande avant
cuisson. Nettoyer le barbecue après chaque cuisson
pour éviter l'accumulation de graisse et diminuer le
risque d'inflammation.
(), pendant 30 minutes environ, ceci
N.B.: L’entretien fréquent du brûleur permet de le
maintenir en bon état pour de nombreuses utilisations
et d’éviter son oxydation prématurée, à cause
notamment des résidus acides des grillades.
L’oxydation du brûleur est toutefois un phénomène
normal dans le temps et un brûleur oxydé qui fonctionne
normalement ne doit pas être remplacé. Le
remplacement du brûleur est nécessaire si son
fonctionnement est incorrect : brûleur percé...
Parois du foyer, tableau de commande :
Nettoyer également périodiquement ces éléments à
l'aide d'une éponge additionnée de produit à vaisselle.
Ne pas utiliser de produits abrasifs.
Plaques de cuisson :
Attendre son refroidissement avant toute opération de
nettoyage. Utiliser un produit de nettoyage Campingaz
BBQ Cleaner Spray et brosses pour barbecues.
Après avoir nettoyé et séché les grilles de cuisson, les
badigeonner légèrement de graisse pour les protéger de
la corrosion et éviter qu'elles ne rouillent et n'adhèrent
aux aliments.
Campingaz®recommande d'utiliser de l'huile végétale
afin d'étaler une fine couche de matière grasse sur les
grilles de cuisson à l'aide de papier absorbant.
Attention : ne pas passer au lave vaisselle, ne pas
laisser sécher sans essuyer.
Bois :
Dans un souci de conserver son aspect naturel tout en
le protégeant, le bois de nos barbecues est recouvert
d'une lazure. C'est cependant une matière vivante qui
reste sensible à l'exposition aux rayons du soleil, à
l'humidité et aux différences de température.
Afin de conserver l'aspect de votre barbecue, nous vous
recommandons de le couvrir avec une housse de
protection Campingaz vendue en accessoire. Important :
bien attendre que le barbecue soit totalement refroidi
avant de mettre la housse de protection.
Au début de la saison, passer une couche de lazure
pour bois en extérieur sur les pièces en bois avec un
®
4
chiffon ou un pinceau afin de lui redonner un aspect plus
brillant et maintenir sa protection.
p) Stockage
- Fermer le robinet de la bouteille de gaz après chaque
utilisation. Si vous entreposez votre barbecue à
l'intérieur, débranchez l'alimentation de gaz. Si vous
l'entreposez à l'extérieur, il est conseillé d'utiliser une
housse de protection. En cas de durée prolongée sans
utilisation, il est recommandé d'entreposer l'appareil
dans un endroit sec et abrité (ex : garage).
q) Accessoires
ADG recommande l'utilisation systématique de ses
barbecues à gaz avec des accessoires et pièces de
rechange de marque Campingaz. ADG décline toute
responsabilité en cas de dommage ou de mauvais
fonctionnement survenant du fait de l'utilisation
d'accessoires et/ou pièces de rechange de marque
différente.
r) Protection de l'environnement
Pensez à la protection de l'environnement ! Votre appareil
contient des matériaux qui peuvent être récupérés ou
recyclés. Remettez-le au service de collecte des déchets
de votre commune et triez les matériaux d'emballage.
FR
Anomalies
Le brûleur ne s’allume pas
Le brûleur a des ratés ou
s’éteint
Flammes soufflantes
instables
Grand panache de flammes à
la surface du brûleur
Flamme à l'injecteur
CONDITIONS D’APPLICATION DE LA GARANTIE
Le produit bénéficie d'une garantie totale pièces et main d'œuvre de 2 (deux) ans à compter de sa date d'achat. La garantie s'applique
lorsque le produit livré n'est pas conforme à la commande ou lorsqu'il est défaillant, dès lors que la réclamation est accompagnée d'une
pièce justificative de la date d'achat (ex : facture, ticket de caisse) et d'une description du problème rencontré. Tout produit fonctionnant
au gaz devra être séparé de la cartouche ou du cylindre auquel il est connecté avant d'être retourné à un centre de service aprèsvente agréé. Le produit sera soit réparé, remplacé ou remboursé - en tout ou partie. La garantie est nulle et ne s'applique pas lorsque
le dommage est survenu du fait (i) d'un emploi ou stockage incorrect du produit, (ii) d'un défaut d'entretien du produit ou d'un entretien
non-conforme aux instructions d'utilisation, (iii) de la réparation, modification, entretien du produit par un tiers non agréé, (iv) de
l'utilisation de pièces de rechange qui ne seraient pas d'origine. NOTA : l'usage professionnel de ce produit est exclu de la garantie.
Toute prise en charge pendant la période de garantie est sans incidence sur la date d'expiration de la garantie. Cette garantie n’affecte
en rien les droits légaux du consommateur qui bénéficie en tout état de cause des conditions des articles 1604 et suivants et 1386.1
et suivants du Code Civil relatifs à la garantie légale. Consulter notre service consommateurs pour toute réclamation.
Causes probables /
remèdes
- Mauvaise arrivée du gaz
- Détendeur ne fonctionne
pas
- Tuyau, robinet, tube
venturi ou orifices du
brûleur sont bouchés
- Le tube venturi ne coiffe
pas l’injecteur
- Vérifier s’il y a du gaz
- Vérifier le branchement
du tuyau
- Voir le S.A.V.
- Bouteille neuve pouvant
contenir de l'air. Laisser
fonctionner et le défaut
disparaîtra
- Voir le S.A.V
- Le porte injecteur est
mal positionné dans le
tube venturi.
Repositionner le venturi.
- le tube venturi est
obstrué (ex: toiles
d’araignées). Nettoyer le
venturi
- Voir le S.A.V
- La bouteille est presque
vide. Changer de
bouteille et le défaut
disparaîtra
- Voir le S.A.V
Anomalies
La graisse s’enflamme d’une
façon anormale
Le brûleur s’allume avec une
allumette mais pas avec
l’allumage « PIEZO »
Fuite enflammée au raccord
Chaleur insuffisante
Fuite enflammée derrière le
bouton de réglage
Fuite enflammée sous la
console
Causes probables /
remèdes
- Nettoyer la tôle de
protection située au
dessus du bruleur
- Température du gril trop
élevée: réduire le débit
- nettoyer le plateau
ramasse graisse
- Bouton, fil ou électrode
défectueux. Contrôler
les jonctions du câble de
l’allumeur
- Contrôler l’état de la
céramique et du câble
de liaison
- Voir le S.A.V.
- Raccord non étanche
- Fermer immédiatement
l’arrivée du gaz
- Voir le S.A.V.
- Injecteur ou tube venturi
bouchés
- Voir le S.A.V.
- Robinet défectueux
- Arrêter l’appareil
- Consulter le S.A.V.
- Arrêter l’appareil
- Fermer la bouteille
- Voir le S.A.V.
APPLICATION DES GAZ SA - Service téléphonique information consommateurs:
219, Route de Brignais - BP 55 - 69563 Saint Genis Laval - France
Tél : 33 (0)4 78 86 88 94 / Fax : 33 (0)4 78 86 88 38
Belgique, Luxembourg
COLEMAN BENELUX B.V., Minervum 7168 - 4817 ZN BREDA - Pays-Bas
Tél : +31-76-572 85 00 / Fax : +31-76-571 10 14
CAMPINGAZ SUISSE SA - Tir-Fédéral 10 - 1762 GIVISIEZ - Suisse
Tél : +41 26 460 40 40 - Fax : +41 26 460 40 50 - E-Mail: info@campingaz.ch
www.campingaz.com
France
Suisse
5
GB
Operation and maintenance
• Please read the instructions carefully before using.
• Use outdoors only
• Do not use charcoal.
• Do not use an adjustable low pressure regulator. Use fixed regulators that comply with the European
standard concerning them.
• To ensure safe operation of your device, never use two full hot plates side by side.
Follow these instructions carefully to avoid seriously damaging your barbecue.
a) FOR YOUR SAFETY
- Do not store or use petrol and other flammable liquids or
vapours in the vicinity of this barbecue. This device must
be kept away from inflammable materials when it is in use.
If you smell gas:
1) Close the valve of the cylinder
2) Extinguish all naked flames
3) Open the lid
4) If the smell continues ,see “f Checking for gas leaks”
or immediately seek advice from your local retailer.
- Parts which are protected by the manufacturer or the
manufacturer's representative must not be manipulated
by the user.
- Close the gas container after use.
b) LOCATION
- This barbecue must only be used outdoors.
- CAUTIOUS: accessible parts may get very hot. Keep
young children away.
- There should be no combustible materials within a
radius of approximately 60 cm around the barbecue
- Do not move the barbecue when alight.
- The appliance should be operated on a level surface.
- Estimated air offtake 2 m3/kW/h.
c) GAS CYLINDER
This barbecue has been adjusted to be operate off 4,5 to
15 kg butane/propane cylinders with an appropriate low
pressure regulator:
- France, Belgium, Luxembourg, United Kingdom,
Ireland, Portugal, Spain, Italy, Croatia, Greece : butane
28 mbar / propane 37 mbar.
- Netherlands, Czech Republic, Slovakia, Hungary,
Slovenia, Norway, Sweden, Denmark, Finland,
Switzerland, Bulgaria, Turkey, Romania: butane 30
mbar / propane 30 mbar.
- Poland: propane 36 mbar.
- Germany, Austria: butane / propane 36 mbar.
Always connect or replace the cylinder in a well-ventilated
area, never in the presence of a flame, spark or heat source.
The gas cylinder equipped with the regulator should
not be put under the barbecue if its total height
exceeds 46.5 cm.
When the gas cylinder is put under the barbecue, it must
be attached to the frame of the barbecue using the
supplied strap.
b) flexible hose (according to standard XP D 36-112) fitted
with a G 1/2 threaded nut for fixing to the barbecue and
a M 20x1.5 threaded nut for fixing to the regulator,
recommended length 1.25 m.
G 1/2
barbecue
black
M 20x1,5
Regulator
The barbecue has a G 1/2 threaded gas inlet
connector supplied with pre-fitted NF ringed tailpiece
and seal.
1) To use the equipment with the flexible hose XP D
36-110: (solution d) a))
- slide the flexible hose onto the ringed tailpiece on both
the barbecue and regulator as far as it will go.
- slide the collars behind the two first bosses on the
tailpieces and tighten them until the tightening head
breaks.
- check for leaks following the instructions in paragraph f).
2) To use the equipment with the flexible hose XP D
36-112, G 1/2 and M 20x1.5 nuts: (solution d) b))
- loosen and remove the NF ringed tailpiece to release
the G 1/2 inlet connector.
- remove the seal
- tighten the G 1/2 threaded nut on the hose onto the
barbecue inlet connector and the M20x1.5 threaded nut
onto the regulator output connector following the
instructions supplied with the flexible hose.
- use a spanner to hold the barbecue inlet connector firm
and tighten or loosen the threaded nut with another
spanner.
d) Hose
France (depending on model)
The equipment may be used with two types of flexible
hose:
a) flexible hose designed to be joined onto ringed
tailpieces on both the barbecue and regulator sides,
held firm with collars (in accordance with standard XP
D 36-110). Recommended length 1.25 m.
G 1/2
barbecue
M 20x1,5
Regulator
- use a spanner to hold the regulator outlet connector
firm.
- check for leaks following the instructions in paragraph f).
Check that the flexible hose stretches out normally
without twisting or pulling and does not come into contact
with the hot sides of the barbecue. It should be replaced
when the expiry date on the hose is passed or whenever
it is damaged or develops surface cracks.
6
Belgium, Luxembourg, United Kingdom, Ireland,
Portugal, Spain, Italy, Croatia, Greece, Netherlands,
Czech Republic, Slovakia, Hungary, Slovenia, Norway,
Sweden, Denmark, Finland, Bulgaria, Turkey, Romania,
Poland:
The barbecue is equipped with a circular connector. It
should be used with flexible hose that is suitable for use with
butane and propane gas. Hose length should not exceed
1.20 metre. It should be replaced if it is damaged or
cracked, when required by national regulations or at the
end of the part lifecycle. Do not pull or pierce the hose.
Keep away from any parts of the barbecue that get hot.
Check that the flexible hose stretches out normally,
without twisting or pulling.
7) Bubbles in the gas leak solution indicate that there are gas
leaks.
8) The leak can be stopped by tightening any hose
connection or replacing any faulty component. The
barbecue must not be used until the leak is stopped.
9) Close the valve on the gas cylinder.
Important:
Check for leaks at least once per year and each time the gas
cylinder is replaced.
g) PRIOR TO USE
GB
Switzerland, Germany, Austria:
The barbecue should be used with flexible tubing that is
suitable for use with butane and propane gas. Hose
length should not exceed 1.50 metre. It should be
replaced if it is damaged or cracked, when required by
national regulations or at the end of the part lifecycle. Do
not pull or pierce the tubing. Keep away from any parts of
the barbecue that get hot. Check that the flexible hose
stretches out normally, without twisting or pulling.
Flexible tubing connection: to connect the tubing to the
connector on the barbecue, tighten the nut on the tubing
firmly but without excess force using the two wrenches
provided:
- no. 14 wrench to tighten the connector
- no. 17 wrench to tighten the nut on the tubing
e) LID (DEPENDING ON MODEL)
Handle the lid carefully, especially during operation. Do not
lean over the base.
f)CHECKING FOR GAS LEAKS
1) Work outside, away from all sources of ignition. Do not
smoke.
2) Make sure the control knobs are in the "off" (l) position.
3)
Connect the flexible tubing to the connector and
barbecue as described in part d).
4) Fit the regulator onto the gas cylinder in accordance with
its instructions.
5) Use a gas leak solution to test for leaks. Important: never
use a naked flame to check for gas leaks.
6) Apply the solution to the connections cylinder/regulator/
hose/apparatus (the control knobs should remain closed:
off position (l)). Open the gas cylinder valve.
Never use the barbecue until the instructions have been read
carefully and understood. Also, make certain that:
- there are no leaks
- the venturi tubes are not blocked (example: spider webs)
- the hose does not touch any components which may get
hot.
- that the ventilation openings in the gas receptacle housing
are not obstructed, if appropriate.
- that the drippings tray has been properly inserted in the
tray housing and that it has been pushed all the way
back until it will not go in any further.
Check that the venturi tubes (VT) cover the
injectors (IJ).
h) LIGHTING THE BARBECUE BURNERS
- Remove the protective cover or open the cooking area
lid (depending on model).
- Make sure that the control knobs are in the "OFF"
position (l).
- Push an adjustment button down and turn it anticlockwise until it is in the full flow position
immediately press the ignition button down ( ) until you
hear a click. Repeat 3 or 4 times if necessary.
- Repeat this operation until the burner lights.
- If the burner does not ignite after 4 or 5 attempts, wait 5
minutes and then repeat the operation.
Once the burner is lit, there are two ways of lighting
another burner:
r Firstly, repeat the lighting operation described above;
r Secondly, light the burner to the right or left of the first
burner lit, then the other burners in turn by turning the
adjustment button to the full flow position
If the piezoelectric ignition does not function, light the burners
manually (next paragraph).
( ), then
( ).
i) LIGHTING THE BARBECUE MANUALLY
- Remove the protective cover or open the cooking area
lid (depending on model).
- Make sure that the control knobs are in the "OFF"
position (l).
- Remove the grease drip tray.
- Strike a match and bring it close to the burner from
below.
7
GB
- Push an adjustment button down and turn it anticlockwise until it is in the full flow position
( ).
- When the burner has been lighted, slide the drippings tray
into its slot and push it all the way back
until it stops.
Once the burner is lit, there are two ways of lighting
another burner:
r Firstly, repeat the lighting operation described above;
r Secondly, light the burner to the right or left of the first
burner lit, then the other burners in turn by turning the
adjustment button to the full flow position
( ).
j) EXTINGUISHING THE BARBECUE
Return the control knobs to the "off" position (l), then close
the cylinder valve.
k) LIGHTING THE SIDE STOVE
(if applicable to your model)
The stove may operate independently or in conjunction
with the grill burner.
Lighting:
- open the gas cylinder valve.
- check that there is no gas leak between the gas cylinder
and the stove.
- check the condition of the hose connecting the grill
burner to the stove. Should it present cracks, call our
After Sales Service to have it replaced.
- open the valve of the stove (towards the +) and press the
igniter button ( ) until you hear the click. Repeat three
or four times if necessary. Should the stove fail to light,
present a match to the edge of the burner.
- adjust the size of the flame to the dimensions of the
container you are using by opening the valve to various
extents. Do not use a container smaller than 12 cm or
larger than 26 cm.
In order to reduce food from sticking to the grilles, brush the
grilles lightly with cooking oil prior to placing any food to be
grilled.
In order to reduce the amount of grease catching fire while
cooking, remove any surplus fat from the meet prior to placing
it on the grille. Clean the barbecue after each use to prevent
the accumulation of grease and the risk of it catching fire.
Important:
If one or several burners go out whilst you are using the
barbecue, move the adjustment buttons to OFF
immediately (l). Wait five minutes to allow the unburned
gas to escape. Only carry out the lighting steps after this
time.
o) CLEANING AND MAINTENANCE
- Never modify the barbecue: any modification may prove
dangerous.
- In order to maintain your barbecue in perfect operating
condition, it is recommended to clean it periodically (after
4 or 5 uses).
- Wait until the barbecue has cooled down before cleaning.
- Close the gas cylinder.
- The grill burner must be cleaned and checked every 3
months. Remove the entire burner and check that no dirt or
spider webs block the venturi tube openings, which may
cause the burner to be less efficient or cause a dangerous
gas fire outside the burner.
- Clean the top of the burner, as well as the sides and base,
using a moist sponge (water with washing up liquid). If
necessary, use a damp steel brush.
- Check that all burner outlets are clear and let dry before
using again. If necessary, use a wire brush to unclog the
burner outlets.
Venturi tube openings
l) TURNING OFF THE SIDE STOVE
(if applicable to your model)
Close the stove valve (towards the -) and the valve of the
gas cylinder if the grill burner is not in use.
m) REPLACING THE GAS CYLINDER
- Always work in a well ventilated area and never in the
presence of a flame, spark or heat source.
- Return the control knobs in the "off" position (l) then close
the cylinder valve.
- Remove the regulator, check that the sealing joint is in
good condition.
- Put the full cylinder in place, refit the regulator, taking care
not to apply stress to the hose. Check for gas leaks.
n) OPERATION
When used for the first time, heat up the barbecue
(depending on model: close the hinged lid/do not reposition
the protective cover) with its burners in full on position ( ),
for approximately 30 minutes in order to eliminate any odors
resulting from the paint on the new parts.
During normal operation, preheat the barbecue (depending
on model: close the hinged lid/do not reposition the
protective cover) approximately 15 to 20 minutes prior to
cooking in order to bring the cast-iron grilles to the proper
temperature.
Cooking speed can be regulated via the adjustment buttons:
between the full flow position ( ) and medium flow position
( ).
Outlet holes
- Refit the grill burner correctly.
- Clean the orifices on the Venturi jet (see diagram below) or
the burner if necessary.
N.B.: Frequent cleaning of the burner maintains it in good
condition for many uses and prevents premature oxidation,
notably due to acid residue from cooking. Oxidation of the
grill burner is, however, normal.
Base walls, control panel
Clean these elements from time to time using a sponge with
washing up liquid. Do not use abrasive products.
Cooking plates
Let them cool down before cleaning. Use Campingaz
Cleaner Spray BBQ cleaner and barbecue brushes.
Before cleaning and drying the cooking grills, rub them
lightly with grease to protect them from corrosion and to
prevent them rusting and sticking to the food.
Campingaz® recommends applying a thin coat of vegetable
oil to the cooking grills with kitchen towel.
Caution: do not put them in the dishwasher or let them dry
without wiping them.
Wood
The wood on our barbecues is finished with a lazure to
protect it and maintain its natural appearance. It is however
a living material which remains sensitive to exposure to the
rays of the sun, humidity and changes in temperature.
To keep your barbecue looking as new, we recommend you
cover it with a Campingaz protective cover available as an
accessory. Important: wait for the barbecue to cool down
®
8
completely before putting on its protective cover.
At the beginning of the season, apply a coat of lazure for
exterior wood on the wooden parts with a rag or brush to
give it a shinier appearance and keep it protected.
p) STORAGE
- Close the gas cylinder valve after use.
- If you store your barbecue indoors, disconnect the gas
cylinder and store the cylinder outdoors.
- If you store your barbecue outdoors, it is recommended
that a protective cover be used.
- When not used for a long period of time, it is
recommended that the barbecue be stored in a dry,
sheltered place (eg: garage).
q) ACCESSORIES
ADG advises that its gas barbecues should systematically
be used with accessories and replacement parts from
Campingaz. ADG accepts no responsibility for any
damage or malfunction due to the use of accessories
and/or replacement parts from other brands.
GB
r) PROTECTING THE ENVIRONMENT
Think about protecting the environment! Your equipment
contains materials which can be recovered or recycled.
Hand them in to the waste collection service in your
municipality and sort the packing materials.
Problems
Burner won’t light
Burner "pops" or blows
itself out
Excessive flare-up
Burner lights with a match,
but not with the "PIEZO"
igniter
Probable causes /
remedies
- Lack of gas supply
- Regulator does not work
- Hose, valve, jet, venturi tube
or burner openings are
blocked.
- Venturi tube not seated over
jet
- Check gas supply
- Check hose connections
- Contact the After Sales
Service
- Clean the protective plate
above the burner.
- Clean the grease drip tray
- Grill temperature too high:
lower flame
- Faulty igniter, wire or
electrode
- Check igniter cable
connections
- Check condition of electrode
and connection wire
- Contact the After Sales
Service
Problems
Fire at any connection
Incomplete flame around
burner
Lack of Heat
Fire behind control knob
Fire under control panel
Probable causes /
remedies
- Leaking connection
- Turn off gas supply at
cylinder immediately
- Tighten connections and
check for leaks
- Contact After Sales Service
- Defective or clogged
burner: relocate the
Venturi.
- Clogged jets: clean the
Venturi
- Contact After Sales Service
- Clogged jet or venturi tube
- Contact After Sales Service
- Defective tap unit
- Turn off gas supply at
cylinder immediately
- Contact After Sales Service
- Turn off gas supply at
cylinder immediately
- Contact After Sales Service
TERMS OF APPLICATION OF THE GUARANTEE
The product is covered by a total parts and labor warranty for a period of 2 (two) years from its purchase date. The warranty
applies to products that do not conform to the order or that are defective. Within the guarantee period, the product shall
be either repaired, replaced or reimbursed - in full or in part. Liability to Buyer under a claim shall in no event exceed the
price of the product. The warranty is null and void and does not apply should the damage arise from (i) abuse of the
products (ii) failure to operate and maintain the products in accordance with the instructions of use (iii) repair, service,
alteration or modification of the product by unauthorized third parties (iv) original parts are not used. The warranty is
excluded in case of professional use. Proof of the purchase date (ie. invoice, till receipt) and claim report are required to obtain
a free warranty service. Do not return the appliance with the gas container (cylinder or cartridge) fitted; ensure it is
dismantled before sending back. Service under the guarantee does not affect the expiry date of the warranty. All other
claims including for damages resulting from this warranty are excluded unless ADG’s liability is legally mandatory. This
guarantee in no way affects a Buyer’s statutory rights. In the event of difficulty, please contact the Local Customer
Service in your country. List of contacts is available in this leaflet.
CONSUMER SERVICE
In case of continued difficulty, please contact your local retailer who will give you details of the nearest After
Sales Service point, or call the CAMPINGAZ Customer Service at:
COLEMAN UK LTD - Gordano Gate Wyndham Way - Portishead - BRISTOL BS20 7GG - ENGLAND
WARNING: Due to our policy of continual product development, the company reserves the right to alter or modify this
product without prior notice.
Tel: 01275 845 024 - Fax: 01275 849 255
www.campingaz.com
9
IT
USO E MANUTENZIONE
• Consultare le avvertenze prima dell'uso.
• Utilizzare esclusivamente all'aperto.
• Non utilizzare carbone di legna.
• Non utilizzare regolatori di pressione variabili. Utilizzare valvole di regolazione fissa
conformi alla norma europea in materia di coperture.
• Per garantire il corretto funzionamento del vostro apparecchio con la massima sicurezza, non usare
mai due piastre piene una di fianco all'altra.
IL MANCATO RISPETTO DI QUESTE REGOLE DI UTILIZZAZIONE PUO COMPORTARE UN GRAVE
DETERIORAMENTO DEL VOSTRO APPARECCHIO.
a) PER LA VOSTRA SICUREZZA
- Non immagazzinare e non utilizzare benzina o altri
liquidi o vapori inflammabili nelle vicinanze
dell’apparecchio. l'impiego, questo apparecchio deve
essere tenuto distante da materiali infiammabili.
Qualora avvertite odore di gas:
1) Chiudere il rubinetto della bombola del gas
2) Spegnere qualsiasi fiamma
3) Aprire il coperchio
4) Se l’odore dovesse persistere, rivolgetevi
immediatamente al vostro rivenditore.
- Le parti protette dal fabbricante o dal suo mandatario
non devono essere manipolate dall'utilizzatore.
- Dopo l'uso, chiudere il recipiente di raccolta del gas.
b) DOVE UTILIZZARE IL BARBECUE
- Questo apparecchio deve essere utilizzato
esclusivamente all’aria aperta.
- ATTENZIONE: alcune parti esposte possono
riscaldarsi. Tenere lontano dalla portata dei bambini.
- Nessun materiale combustibile deve trovarsi ad una
distanza inferiore a 60 cm dall’apparecchio.
- Non spostare l’apparecchio durante l’uso.
- Utilizzare l’apparecchio su di una superficie
perfettamente piana.
- Prevedere un ricambio d’aria di 2m3/h.
c) LA BOMBOLA DEL GAS
Questo apparecchio è regolato per funzionare con
bombole di butano/propano tra 4,5 e 15 kg, dotate di
apposito riduttore di pressione:
- Francia, Belgio, Lussemburgo, Inghilterra, Irlanda, ,
Portogallo, Spagna, Italia, Croazia, Grecia: butano 28
mbar / propano 37 mbar.
- Olanda, Norvegia, Svezia, Danimarca, Finlandia,
Svizzera, Repubblica Ceca, Ungheria, Slovenia,
Slovacchia, Bulgaria, Turchia, Romania: butano 30
mbar / propano 30 mbar.
- Polonia: propano 36 mbar.
- Germania, Austria: butano 50 mbar / propano 50 mbar.
Per collegare o sostituire la bombola, effettuare questa
operazione sempre in un luogo aereato e mai vicino ad
una fiamma, ad una scintilla o ad una fonte di calore.
Se l'altezza totale supera 46,5 cm, la bombola di gas
munita di regolatore di pressione non va sistemata
sotto al barbecue.
Quando è sistemata sotto al barbecue, la bombola va
fissata al telaio del barbecue con la cinghia
appositamente fornita.
b) tubo flessibile (nel rispetto della norma XP D 36-112)
dotato di un dado filettato G 1/2 per avvitatura
sull'apparato e dado filettato M 20x1,5 per avvitatura
sulla valvola di riduzione. Lunghezza raccomandata
1,25m.
G 1/2
Barbecue
L'apparato è dotato di raccordo filettato per entrata
gas G 1/2 consegnato con terminale ondulato NF e
giunto già montati.
1) Per l'utilizzo dell'apparato con tubo flessibile XP D
36-110: (soluzione d) a))
- calettare a fondo il tubo flessibile sul terminale ondulato
dell'apparato e della valvola di riduzione.
- far scivolare le fasce dietro alle prime 2 protuberanze
dei terminali e stringerle fino alla rottura della testa di
serraggio.
- la tenuta sarà verificata seguendo le indicazioni del
paragrafo f).
2) Per l'utilizzo dell'apparato con tubo flessibile XP D
36-112, dadi G 1/2 e M 20x1,5 : (soluzione d) b))
- svitare e rimuovere il terminale ondulato NF per liberare
il raccordo d'entrata G1/2.
- rimuovere il giunto
- svitare il dado filettato G 1/2 del tubo sul raccordo
d'entrata dell'apparato ed il dado filettato M20x1,5 sul
raccordo d'uscita della valvola di riduzione seguendo le
indicazioni fornite assieme al tubo flessibile.
- utilizzare una chiave per immobilizzare il raccordo
d'entrata dell'apparato e stringere o allentare il dado
filettato con un'altra chiave.
M 20x1,5
d) IL TUBO
Francia (a secoda del modello)
L'apparato può essere utilizzato con 2 tipi di tubi
flessibili :
a) tubo flessibile destinato ad essere calettato su terminali
ondulati lato apparato e lato valvola di riduzione,
immobilizzato da fasce ( nel rispetto della norma XP D
36-110). Lunghezza raccomandata 1,25m.
G 1/2
Barbecue
M 20x1,5
- utilizzare una chiave per immobilizzare il raccordo
d'uscita della valvola di riduzione
- la tenuta sarà verificata seguendo le indicazioni del
paragrafo f).
10
Verificare che il tubo flessibile si sviluppi normalmente,
senza torsioni o trazioni, né contatto con le pareti calde
dell'apparato. Esso dovrà essere sostituito al
sopraggiungere della data di scadenza, o in caso di
danno e presenza di screpolature.
Belgio, Lussemburgo, Inghilterra, Irlanda, Portogallo,
Spagna, Italia, Croazia, Grecia, Olanda, Norvegia,
Danimarca, Finlandia, Repubblica Ceca, Ungheria,
Slovenia, Slovacchia, Bulgaria, Turchia, Romania,
Polonia:
L'apparecchio è dotato di un'estremità anellata: deve
essere utilizzato con un tubo flessibile di qualità adatta
all'uso del butano e del propano. La sua lunghezza non
dovrà essere superiore a 1,20 m.
Dovrà essere sostituito se è danneggiato, se presenta
delle crepe, quando le condizioni nazionali lo impongono
o a seconda della sua validità. Non tirare il tubo e non
perforarlo. Tenerlo lontano dagli elementi che possono
diventare caldi.
Verificare che il tubo flessibile si sviluppi normalmente,
senza torsioni o trazioni.
Germania, Austria, Svizzera:
Questo apparecchio deve essere utilizzato con un tubo
flessibile di qualità adatta all'uso del butano e del propano.
La sua lunghezza non dovrà superare 1,50 m. Dovrà
essere sostituito se è danneggiato, se presenta delle
crepe, quando le condizioni nazionali lo impongono o a
seconda della sua validità. Non tirare il tubo e non
perforarlo. Tenerlo lontano dagli elementi che possono
diventare caldi.
Verificare che il tubo flessibile si sviluppi normalmente,
senza torsioni o trazioni.
Collegamento del tubo flessibile: per collegare il tubo
all'estremità dell'apparecchio, stringere forte il dado del
tubo, senza esagerare, con le 2 chiavi previste:
- chiave 14 per bloccare l'estremità
- chiave 17 per avvitare il dado del tubo
IT
7) Mettere il liquido sui raccordi della bombola / regolatore
di pressione / tubo / apparecchio (le manopole di
regolazione devono restare chiuse : posizione "OFF"
(l). Aprire il rubinetto della bombola del gas.
8) Il formarsi di bollicine sta ad indicare che vi sono fughe
di gas.
9) Per sopprimere la fuga di gas, stringete
eventualmente il dado di fissaggio del regolatore di
pressione alla bombola dopo esservi assicurati della
presenza e del buono stato della guarnizione, oppure
inserite a fondo il tubo all’estremità. Se un pezzo
risultasse difettoso, farlo sostituire. L’apparecchio non
deve essere rimesso in funzione fino a quando la fuga
di gas non sia stata eliminata.
10) Chiudere il rubinetto della bombola del gas.
IMPORTANTE:
Non utilizzare mai dell fiamme per individuare una fuga
di gas. Si consiglia di effettuare il controllo e la ricerca di
fughe almeno una volta all’anno e ogni qual volta venga
sostituita la bombola del gas.
g) PRIMA DELLA MESSA IN FUNZIONE
Non mettere in funzione l’apparechio senza aver letto
attentamente queste istruzioni ed averle comprese a
fondo. Assicurarsi inoltre:
- che non vi siano fughe di gas
- che i tubi Venturi non siano ostruiti
- che il tubo non sia in contatto con parti che possono
surriscaldarsi.
- che le aperture per la ventilazione del vano contenitore
del gas non siano eventualmente ostruite.
- che il vassoio collettore per il recupero del grasso sia
correttamente sistemato nell'apposito alloggiamento
e sia correttamente posizionato fino in battuta.
e) IL COPERCHIO (a seconda del modello)
Maneggiare il coperchio con precauzione, in particolare
durante l’uso. Non sporgersi sul focolare.
f) PROVE DI TENUTA
1) Eseguire il controllo all’aperto, allontanando tutti i
materiali infiammabili. Non fumare.
2) Estrarre il cassetto: vedi punto 8 "operazioni di
montaggio"
3) Assicurarsi che le manopole di regolazione siano sulla
posizione "OFF" (l).
4) Inserire a fondo le estremità del tubo flessibile sul
portagomma del regolatore di pressione e del
barbecue (situato dietro al pannello di comando).
L’applicazione di acqua saponata sui portagomma
facilita l’inserimento del tubo.
5) Avvitare il regolatore di pressione sulla bombola del gas.
6) Non cercare le fughe di gas con la fiamma, utilizzare
un liquido rivelatore delle fughe di gas.
Controllare attentamente che i tubi Venturi
(VT) ricoprano gli iniettori (IJ).
h) ACCENSIONE DEL BRUCIATORE DEL
BARBECUE
- Rimuovere il coperchio di protezione o aprire il
coperchio del piano cottura (a seconda del modello).
- Assicurarsi che le manopole di regolazione siano sulla
posizione "OFF" (l).
- Premere e girare il pulsante di regolazione in senso
antiorario, mettendolo in posizione di pieno flusso ( ),
quindi premere immediatamente il pulsante di
accensione ( ), fino a sentire un clic. Se l’accensione
non avviene al primo scatto, premere 3 o 4 volte se
necessario.
11
- Ripetere questa operazione fino all'accensione del
bruciatore.
- Se il bruciatore non si accende, rimettere la manopola
di regolazione in posizione "OFF" (l). Aspettare 5
minuti prima di ripetere l’operazione.
- Una volta acceso il bruciatore, rimontare il vassoio
collettore nell'apposito alloggiamento e spingerlo
fino in battuta.
Una volta acceso il bruciatore, ci sono 2 possibilità per
accendere un altro bruciatore :
IT
r La 1 è quella di reiterare la sovraccitata operazione
di accensione;
r La 2 possibilità consiste nell'accendere il bruciatore
situato a destra o a sinistra del 1° bruciatore acceso
e, via via, gli altri bruciatori vicini, girando il pulsante
di regolazione in posizione di pieno flusso ( ).
Se l'accensione piezoelettrica non funziona, utilizzare
quella manuale (paragrafo successivo).
m) CAMBIO DELLA BOMBOLA DEL GAS
- Operare sempre in un ambiente ben aereato e mai in
presenza di fiamme, scintille o altre fonti di calore.
- Riportare la manopola di regolazione in posizione "OFF"
(l), poi chiudere il rubinetto della bombola del gas.
- Svitare il regolatore di pressione, assicurarsi della
presenza e del buono stato della guarnizione di tenuta.
- Mettere la bombola piena al suo posto, riavvitare il
regolatore di pressione facendo attenzione a non
forzare il tubo.
n) USO
All'atto del primo utilizzo, far scaldare il barbecue (a
seconda del modello : chiudere il coperchio articolato /
non poggiare il coperchio di protezione) con i ruciatori, a
pieno regime ( ), per 30 minuti circa, in modo da
eliminare l'odore di vernice dei pezzi nuovi.
i) ACCENSIONE MANUALE DEL BARBECUE
- Rimuovere il coperchio di protezione o aprire il
coperchio del piano cottura (a seconda del modello).
- Assicurarsi che le manopole di regolazione siano sulla
posizione "OFF" (l).
- Rimuovere il vassoio per il recupero del grasso.
- Accendere un fiammifero ed avvicinarlo dal basso in
prossimità del bruciatore.
- Premere e girare il pulsante di regolazione in senso
antiorario, mettendolo in posizione di pieno flusso ( ).
- Una volta acceso il bruciatore, riposizionare il vassoio
per il recupero del grasso.
Una volta acceso il bruciatore, ci sono 2 possibilità per
accendere un altro bruciatore.
r La 1 è quella di reiterare la sovraccitata operazione
di accensione;
r La 2 possibilità consiste nell'accendere il bruciatore
situato a destra o a sinistra del 1° bruciatore acceso
e, via via, gli altri bruciatori vicini, girando il pulsante
di regolazione in posizione di pieno flusso ( ).
j) ESTINZIONE DEL BARBECUE
Riportare la manopola di regolazione in posizione "OFF"
(l), poi chiudere il rubinetto della bombola del gas.
k) ACCENSIONE DEL FORNELLO
(a seconda dei modelli)
Il fornello puo’ funzionare da solo o contemporaneamente
al barbecue.
- Accensione: Aprire il rubinetto della bombola del gas.
- Verificare la tenuta del circuito del gas dalla bombola al
fornello (vedi §F).
- Verificare che il tubo di collegamento del barbecue al
fornello non sia danneggiato. Se presenta screpolature,
sostituirlo rivolgendosi al Servizio Assistenza Post
Vendita.
- Aprire il rubinetto del fornello (verso il + ) e premere il
pulsante di accensione ( ) fino a farlo scattare.
Premere 3 o 4 volte se necessario.
- Se il fornello non si accende, avvicinare un fiammifero
al bordo del bruciatore.
- Regolare la fiamma aumentando o diminuendo
l’apertura del rubinetto a seconda delle dimensioni della
pentola utilizzato.
- Non utilizzare pentole di diametro inferiore a 12 cm o
superiore a 26 cm.
l) SPEGNIMENTO DEL FORNELLO
(a seconda dei modelli)
Chiudere il rubinetto del fornello (verso il - ) e il rubinetto
della bombola se il barbecue non è acceso.
Facendo funzionare normalmente l'apparecchio,
preriscaldare il barbecue (a seconda del modello :
chiudere il coperchio articolato / non poggiare il
coperchio di protezione) per 15 / 20 minuti, per portare i
grill di ghisa alla giusta temperatura di cottura.
La velocità di cottura può essere regolata in funzione della
posizione dei pulsanti di regolazione : fra la posizione a
pieno flusso ( ) e quella a flusso medio ( ).
Prima di posare gli alimenti da cuocere sul grill di cottura,
ungere leggermente lo stesso con olio alimentare in
modo da evitare che gli alimenti " si attacchino ".
Togliere l'eccesso di grasso della carne prima della
cottura, in modo da ridurre la combustione dei grassi. Per
evitare l'accumulo di grasso e diminuire il rischio di
combustione, pulire il barbecue dopo ogni cottura.
Importante :
In caso di spegnimento di uno o più bruciatori durante il
funzionamento, posizionare immediatamente i pulsanti
dell'apparato su "OFF" (l). Attendere 5 minuti, al fine di
permettere l'espulsione del gas non bruciato, per poi
procedere un'altra volta all'operazione di accensione, da
effettuarsi a seguito di tale attesa.
o) PULIZIA E MANUTENZIONE
- Non modificare mai l’apparecchio: qualsiasi modifica
può essere pericolosa.
- Attendere che l’apparecchio si sia raffreddato prima di
iniziare qualsiasi operazione di pulizia.
- Chiudere la bombola del gas e svitare il regolatore di
pressione.
- Bruciatore del grill : ogni tre mesi, il bruciatore deve
essere pulito e controllato. Togliere il bruciatore
completo, controllare se nella parte inferiore dei tubi
venturi vi sono delle ragnatele...
- Questo procidemento è necessario anche se
l’apparechio non è stato utilizzato per più di un mese.
- Sporcizia o ragnatele possono produrre una
diminuzione del calore o un accensione pericolosa del
gas fuori dal bruciatore.
- Pulire la parte superiore del bruciatore ed il fondo della
vaschetta con una spugna umida (acqua con detersivo
per stoviglie). Se è il caso, utilizzare una paglietta
inumidita.
- Verificare che i fori di uscita del bruciatore non si siano
ostruiti e lasciare asciugare prima di riutilizzare. Se
necessario, utilizzare una spazzola metallica per
liberare i fori di uscita del bruciatore.
- Sistemare il bruciatore del barbecue sulla vaschetta.
- Pulire i fori del tubo venturi (vedere figura sotto) o, se
necessario, il bruciatore.
N.B.:La manutenzione frequente del bruciatoredel grill
permette di mantenerlo in buono stato per numerose
utilizzazioni e di evitare una prematura ossidazione
dovuta sopratutto ai residui acidi delle grigliate.
12
Tuttavia, l’ossidazione del bruciatore è un fenomeno
normale nel tempo ed un bruciatore ossidato che
funziona bene non deve essere sostituito. La
sostituzione del bruciatore è necessaria se il suo
funzionamento non è corretto o se il bruciatore è forato.
Prese d’aria del Venturi
Fori di uscita
- Pareti del focolare coperchio, pannello di comando :
Pulire anche questi elementi periodicamente utilizzando
una spugnà e del detersivo liquido per stoviglie. Non
utilizzare prodotti abrasivi.
- Placche di cottura :
Prima di qualsiasi operazione di pulizia attendere il
raffreddamento delle placche. Utilizzare un prodotto di
pulizia Campingaz® BBQ Cleaner Spray e spazzole per
barbecue.
Dopo aver pulito ed asciugato le griglie di cottura,
ingrassarle leggermente al fine di proteggerle dalla
corrosione ed evitare che si arrugginiscano e non
aderiscano agli alimenti.
Campingaz® raccomanda di utilizzare olio vegetale per
applicare uno strato di grasso sulle griglie di cottura, con
l'aiuto di carta assorbente.
Attenzione : non lavare in lavastoviglie, non lasciar
asciugare senza strofinare.
- Legno
Al fine di conservare e proteggerne l'aspetto naturale, il
legno dei nostri barbecue è ricoperto da uno strato di
velatura, ossia materia sensibile all'esposizione a raggi
solari, umidità e sbalzi termici.
Per conservare il vostro barbecue, vi raccomandiamo di
coprirlo con una fodera di protezione Campingaz,
venduta separatamente. Importante: attendere che il
barbecue si sia completamente raffreddato prima di
coprirlo con la fodera di protezione.
All'inizio della stagione, passare una mano di velatura
per legno all'esterno, sulle parti in legno, con un panno o
un pennellino fine, al fine di restituirgli un aspetto brillante
e di assicurarne la protezione.
p) SISTEMAZIONE DOPO L’USO
- Chiudere il rubinetto della bombola del gas dopo ogni uso.
- Se conservate il vostro barbecue al coperto, staccate
l’alimentazione del gas.
- Se lo conservate all’aperto, si consiglia di utilizzare una
fodera di protezione (vedere il capitolo accessori).
- Nel caso in cui si preveda di non usare l’apparecchio per
lungo tempo, si racommanda di riporre il barbecue in un
luogo asciutto e riparato (es : un garage).
IT
q) ACCESSORI
ADG consiglia di utilizzare sistematicamente i
barbecue a gas con accessori e pezzi di ricambio di
marca Campingaz. ADG declina qualunque
responsabilità per eventuali anomalie o danni dovuti
all'utilizzazione di accessori e/o pezzi di ricambio di
altre marche.
r) TUTELA DELL'AMBIENTE
Pensate a proteggere l'ambiente ! Il vostro apparecchio
contiene materiali riciclabili o recuperabili. Depositatelo
presso il servizio di raccolta degli scarti del vostro comune
e differenziate gli imballaggi.
13
Anomalie / rimedi
Anomalie
I bruciatore non si accende
IT
Il bruciatore perde colpi o si
spegne :
Il grasso si infiamma in
modo anormale
Il bruciatore si accende con
un fiammifero ma non con
l’accen-sione "PIEZO"
Probabile causa
Rimedi
- Bruciatore incrostato : da
pulire
- Arrivo irregolare del gas
- Il regolatore di pressione
non funziona
- Il tubo, il rubinetto,
l’iniettore, il tubo Venturi o
gli orifizi del bruciatore
sono ostruiti
- Il tubo Venturi non calza
bene sull’iniettore
- Verificare che vi sia del
gas
- Verificare il collegamento
del tubo
- Rivolgersi al Servizio
Assistenza
- Pulire la lamiera di
protezione situata al di
sopra del bruciatore.-
- Pulire il vassoio per il
recupero del grasso.
- Temperatura del grill
troppo alta : abbassare il
fuoco
- Pulsante, filo o elettrodo
difettosi
- Controllare le saldature
del cavo del dispositivo di
accensione
- Controllare lo stato della
ceramica e del cavo di
collegamento
Anomalie
Fughe di gas o fiamme a
livello del raccordo
Circuito di fiamme non
uniforme
Calore insufficiente
Fughe di gas o fiamme
dietro la manopola di
regolazione
Fughe di gas o fiamme sotto
il pannello di regolazione
Probabile causa
Rimedi
- Tenuta difettosa del
raccordo
- Interrompere subito
l’erogazione del gas
- Bruciatore difettoso o
ostruito : Riposizionare il
venturi.
- Iniettori ostruiti : Pulire il
venturi.
- Rivolgersi al Servizio
Assistenza
- Iniettore o tubi Venturi
ostruiti
- Rivolgersi al Servizio
Assistenza
- Rubinetto difettoso
- Spegnere l’apparecchio
- Rivolgersi al Servizio
Assistenza
- Spegnere l’apparecchio
- Chiudere la bombola del
gas
- Rivolgersi al Servizio
Assistenza
CONDIZIONI D’APPLICAZIONE DELLA GARANZIA
- Il prodotto gode di una garanzia totale pezzi e manodopera di 2 (due) anni a decorrere dalla data dell'acquisto.
- La garanzia si applica quando il prodotto consegnato non è conforme all'ordine o è difettoso e quando il reclamo è
accompagnato da un documento comprovante la data dell'acquisto (ad es. : fattura, scontrino) nonché da un descrittivo
del problema riscontrato.
- Prima di essere rispediti al servizio assistenza competente, i prodotti funzionanti con gas dovranno essere separati dalla
cartuccia o dalla bombola alla quale sono collegati.
- Il prodotto oggetto del reclamo verrà riparato, sostituito o rimborsato, in tutto o in parte.
- La garanzia non è valida e non si applica quando il danno è conseguente (i) ad un uso o ad una conservazione non
conforme del prodotto, (ii) ad un difetto di manutenzione del prodotto o ad una manutenzione non conforme alle
istruzioni, (iii) alla riparazione, modifica, manutenzione del prodotto da parte di terzi non autorizzati, (iv) all'uso di pezzi
di ricambio non originali.
- NOTA : l'uso del prodotto in ambito professionale è escluso dalla garanzia.
- La presente garanzia non influisce sui diritti legali del consumatore.
- La garanzia non incide sui diritti legali del consumatore.
- Il nostro Servizio Consumatori si tiene a disposizione per qualunque reclamo.
Se non riuscite a risolvere il problema, contattate il rivenditore che vi indicherà il Servizio Assistenza più vicino
al vostro domicilio, oppure telefonate al Servizio Informazioni Consumatori CAMPINGAZ®:
CAMPING GAZ ITALIA Srl - Via Ca’ Nova, 11 - 25010 Centenaro di Lonato (BS) - ITALIA
Tel: 39 (0)30 999 21 / Fax: 39 (0)30 910 31 72
SERVIZIO ASSISTENZA TECNICA: 800 111147
CAMPINGAZ SA - Service clientèle - Tir-Fédéral 10 - 1762 GIVISIEZ - Svizzera
Tel: +41 26 460 40 40 - Fax: +41 26 460 40 50
E-Mail: info@campingaz.ch
www.campingaz.com
14

Gebruik en onderhoud
• Raadpleeg de handleiding vóór gebruik.
• Dit apparaat mag enkel buiten ruimtes gebruikt worden.
• Gebruik geen houtskool.
• Gebruik geen regelbare drukregelaar. Gebruik reduceerventielen met vaste regeling conform de betreffende
Europese wetgeving.
• Voor een goede en veilige werking van uw apparaat mogen nooit twee volle platen naast elkaar worden
gebruikt.
DOOR HET NIET NALEVEN VAN DEZE GEBRUIKSAANWIJZINGEN KAN UW TOESTEL ERNSTIG
BESCHADIGD WORDEN.
a) VOOR UW VEILIGHEID
Bewaar of gebruik geen benzine of andere ontvlambare
vloeistoffen of gassen in de buurt van het toestel. Dit
apparaat mag tijdens gebruik niet in de buurt van
ontvlambare materialen komen. Indien u gas ruikt :
1) Draai dan de kraan van de gasfles dicht.
2) Doof alle vlammen.
3) Open het deksel.
4) Indien u nog steeds gas ruikt, zie § f of raadpleeg
onmiddellijk uw dealer.
- De door de fabrikant of zijn vertegenwoordiger
beveiligde onderdelen mogen door de gebruiker niet
gemanipuleerd worden.
- Sluit de gascilinder na gebruik.
b) PLAATS VAN GEBRUIK
- Dit toestel mag uitsluitend buiten gebruikt worden.
- OPGELET: bepaalde onderdelen kunnen heel heet
zijn. Buiten het bereik van kinderen gebruiken.
- Er mogen zich binnen een straal van 60 cm rond het
toestel geen brandbare materialen bevinden.
- Verplaats het toestel niet terwijl het brandt.
- Gebruik het toestel op een horizontale ondergrond.
- Benodigde toevoer van verse lucht : 2 m3/kW /uur.
c) GASFLES
Dit toestel is gefabriceerd om gebruikt te worden met
butaan - of propaanflessen van 4,5 tot 15 kg, voorzien
van een passende drukregelaar:
- Frankrijk, België, Luxemburg, Verenigd Koninkrijk,
Ierland, Portugal, Spanje, Italië, Kroatië,
Griekenland: butaan 28 mbar, propaan 37 mbar.
- Nederland, Noorwegen, Zweden, Denemarken,
Finland, Zwitserland, Hongarije, Slovenië, Slowakije,
Tsjechische Republiek, Bulgarije, Turkije, Roemenië:
butaan 30 mbar, propaan 30 mbar.
- Polen: propaan 36 mbar.
- Duitsland, Oostenrijk: butaan 50 mbar, propaan 50 mbar.
De gasfles moet vervangen of aangesloten worden op een
goed geventileerde plaats waar zich geen vlammen,
vonken of warmtebronnen mogen bevinden.
De gasfles met drukregelaar mag niet onder de
barbecue geplaatst worden indien de totale hoogte
groter is dan 46,5 cm.
Wanneer de gasfles onder de barbecue geplaatst wordt,
moet deze aan het barbecueframe worden bevestigd met
behulp van de meegeleverde riem.
b) Gasslang (overeenkomstig de norm XP D 36-112)
uitgerust met een schroefdraadmoer G ½ om
rechstreeks op het toestel vast te schroeven en een
schroefdraadmoer M 20 x 1,5 om rechtsreeks op de
drukregelaar te schroeven, aanbevolen lengte 1,25 m.
G 1/2
Barbecue
M 20x1,5
Reduceerventiel
Het toestel heeft een schroefkoppeling voor
gasingang G ½, geleverd met ringuiteinde NF en
reeds gemonteerd afdichtrubber.
1) Gebruik van het toestel met gasslang XP D 36-110:
(toepassing d) a))
- Schuif de gasslang zo ver mogelijk op de slangpilaren
van het toestel en de drukregelaar.
- Schuif de slangenklemmen voorbij de 2 eerste ringen van
de slangpilaar en draai deze vast tot de spankop breekt.
- De luchtdichtheid moet worden gecontroleerd aan de
hand van de aanwijzingen in paragraaf f).
2) Gebruik van het toestel met gasslang XP D 36-112
en G ½- en M 20 x 1,5 koppelingen: (oplossing d)
b))
- Het koppeling NF los en verwijder deze om de
ingangsaansluiting G1/2 los te maken.
- Verwijder de afdichting
- Schroef de G1/2 slangkoppeling op de koppeling van
de barbecue. Schroef de M20 x 1.5 schroefdraad
koppeling op de uitgang van de drukregelaar door de
aanwijzingen te volgen die bij de gasslang zijn
geleverd.
- Gebruik een sleutel om de schroefkoppeling van het
toestel vast te houden en draai de schroefdraadmoer
vast of los met een andere sleutel.
NL
d) GASSLANG
Frankrijk (afhankelijk van het model)
Het toestel mag met 2 soorten gasslangen worden
gebruikt:
a) Gasslang om op de slangpilaren van het toestel en de
drukregelaar te zetten, vastgezet met slangklemmen
(overeenkomstig de norm XP D 36-110). Aanbevolen
lengte 1,25 m.
G 1/2
Barbecue
M 20x1,5
reduceerventiel
Gebruik een sleutel om de schroefkoppeling van de
-
drukregelaar vast te zetten.
- De luchtdichtheid moet worden gecontroleerd aan de
hand van de aanwijzingen in paragraaf f).
15
NL
Controleer of de slang niet gespannen staat of gedraaid
is en niet in contact komt met de warme delen van het
toestel. De gasslang moet worden vervangen als de
vervaldatum op de slang is bereikt of als deze
beschadigd is of barstjes vertoont.
België, Luxemburg, Nederland, Verenigd Koninkrijk,
Ierland, Polen, Portugal, Spanje, Italië, Noorwegen,
Zweden, Denemarken, Finland, Hongarije, Slovenië,
Slowakije, Kroatië, Tsjechische republiek, Bulgarije,
Turkije, Roemenië, Griekenland:
Het apparaat is uitgerust met een ringkop-einde. Het
dient gebruikt te worden met een gasslang geschikt voor
butaan- of propaangas. De slang mag niet langer dan
1,20 m zijn.
De slang moet vervangen worden indien ze beschadigd is
of barsten vertoont, wanneer de nationale voorschriften
dit vereisen of volgens haar geldigheid. Controleer of de
slang niet gespannen staat of gedraaid is. Laat de slang
nooit onderdelen raken die heet kunnen worden.
Zwitserland, Duitsland, Oostenrijk:
Het gebruik van een flexibele gasslang geschikt voor
butaan of propaangas is voorgeschreven.
De slang mag niet langer dan 1,50 m zijn. De slang moet
vervangen worden indien ze beschadigd is of barsten
vertoont, wanneer de nationale voorschriften dit vereisen
of volgens haar geldigheid.
Controleer of de slang niet gespannen staat of gedraaid
is. Laat de slang nooit onderdelen raken die heet kunnen
worden.
Aansluiting van de slang: de slang aan het kopeinde van
het apparaat aansluiten door de moer stevig, maar niet te
strak, aan te draaien met behulp van 2 passende
sleutels:
- Nr 14 moersleutel om het kopeinde te blokkeren.
- Nr 17 moersleutel om de moer van de slang vast te
draaien.
7) De vorming van luchtbellen wijst op gaslekken.
8) De lekkage kan worden verholpen door de koppelingen
van de gasslang aan te draaien of door het vervangen
van defecte onderdelen. Het toestel mag niet worden
gebruikt tot de lekkage is verholpen.
9) Draai de kraan van de gasfles dicht.
BELANGRIJK: Controleer tenminste 1 maal per jaar op
gaslekkage en iedere keer als de gascylinder wordt
vervangen.
g) VOOR DE INGEBRUIKNAME
Het toestel niet in gebruik nemen voordat de instructies
gelezen en begrepen zijn. Zorg er ook voor:
- dat er geen gas ontsnapt
- dat de gastoevoer van de branders niet verstopt is (bv
door een spinnenweb)
- dat de slang niet in contact komt met onderdelen die
heet kunnen worden.
- dat de ventilatie openingen in de brander niet verstopt
zijn, zie tekening.
- dat het opvangbord voor het vet goed op zijn plaats zit
in de behuizing, en helemaal tot het einde toe is
ingeschoven.
Controleer of de branderbuizen (VT) de
sproeiers bedekken (IJ).
e) DEKSEL (afhankelijk van het model)
Hanteer het deksel voorzichtig, vooral tijdens gebruik van
de barbecue.
Niet over de openstaande barbecue buigen.
f) LUCHTDICHTHEIDSTEST
1) Deze test moet buiten worden uitgevoerd, uit de buurt
van ontvlambare materialen Niet roken.
2) Wees er van overtuigd dat de regelknoppen in de
positie "off" staan (l).
3) Schuif het uiteinde van de gasslang volledig op de
aansluiting van de drukregelaar en borg deze met een
slangenklem zoals beschreven in deel d).
4) Monteer de drukregelaar op de gasfles zoals
beschreven in de gebruiksaanwijzing.
5) Probeer nooit een lek op te sporen met behulp van
een vlam, gebruik hiervoor een speciale vloeistof voor
het opsporen van gaslekken.
6) Breng de vloeistof aan op de plaatsen aangegeven op
de tekening (de regelknoppen moeten gesloten blijven
: stand OFF “l”). Open de kraan van de gasfles.
h) ONTSTEKEN VAN DE BARBECUEBRANDERS
- Verwijder de beschermingshoes of open het deksel
(afhankelijk van het model).
- Controleer of de regelknoppen in de OFF-stand staan (l).
- Druk en draai de regelknop tegen de wijzers van de klok
in tot deze volledig geopend is ( ), druk vervolgens
meteen op de ontstekingsknop ( ) tot u een klik hoort.
Herhaal dit 3 of 4 keer indien nodig.
- Herhaal deze handeling tot de brander aangaat.
- Als de brander na 4 of 5 keer proberen niet aangaat,
wacht dan 5 minuten en probeer het opnieuw.
Als de brander eenmaal aan is, zijn er twee
mogelijkheden om nog een brander aan te steken:
r 1ste mogelijkheid is om bovenstaande handeling te
herhalen.
r De 2de mogelijkheid is om de brander rechts of links
van de 1ste brander aan te steken en vervolgens
geleidelijk de andere branders te laten ontbranden
door de regelknop volledig open te draaien ( ).
Als de piëzo-elektrische ontsteking niet werkt, steek de
branders dan met de handmatig aan (zie volgende
paragraaf).
16
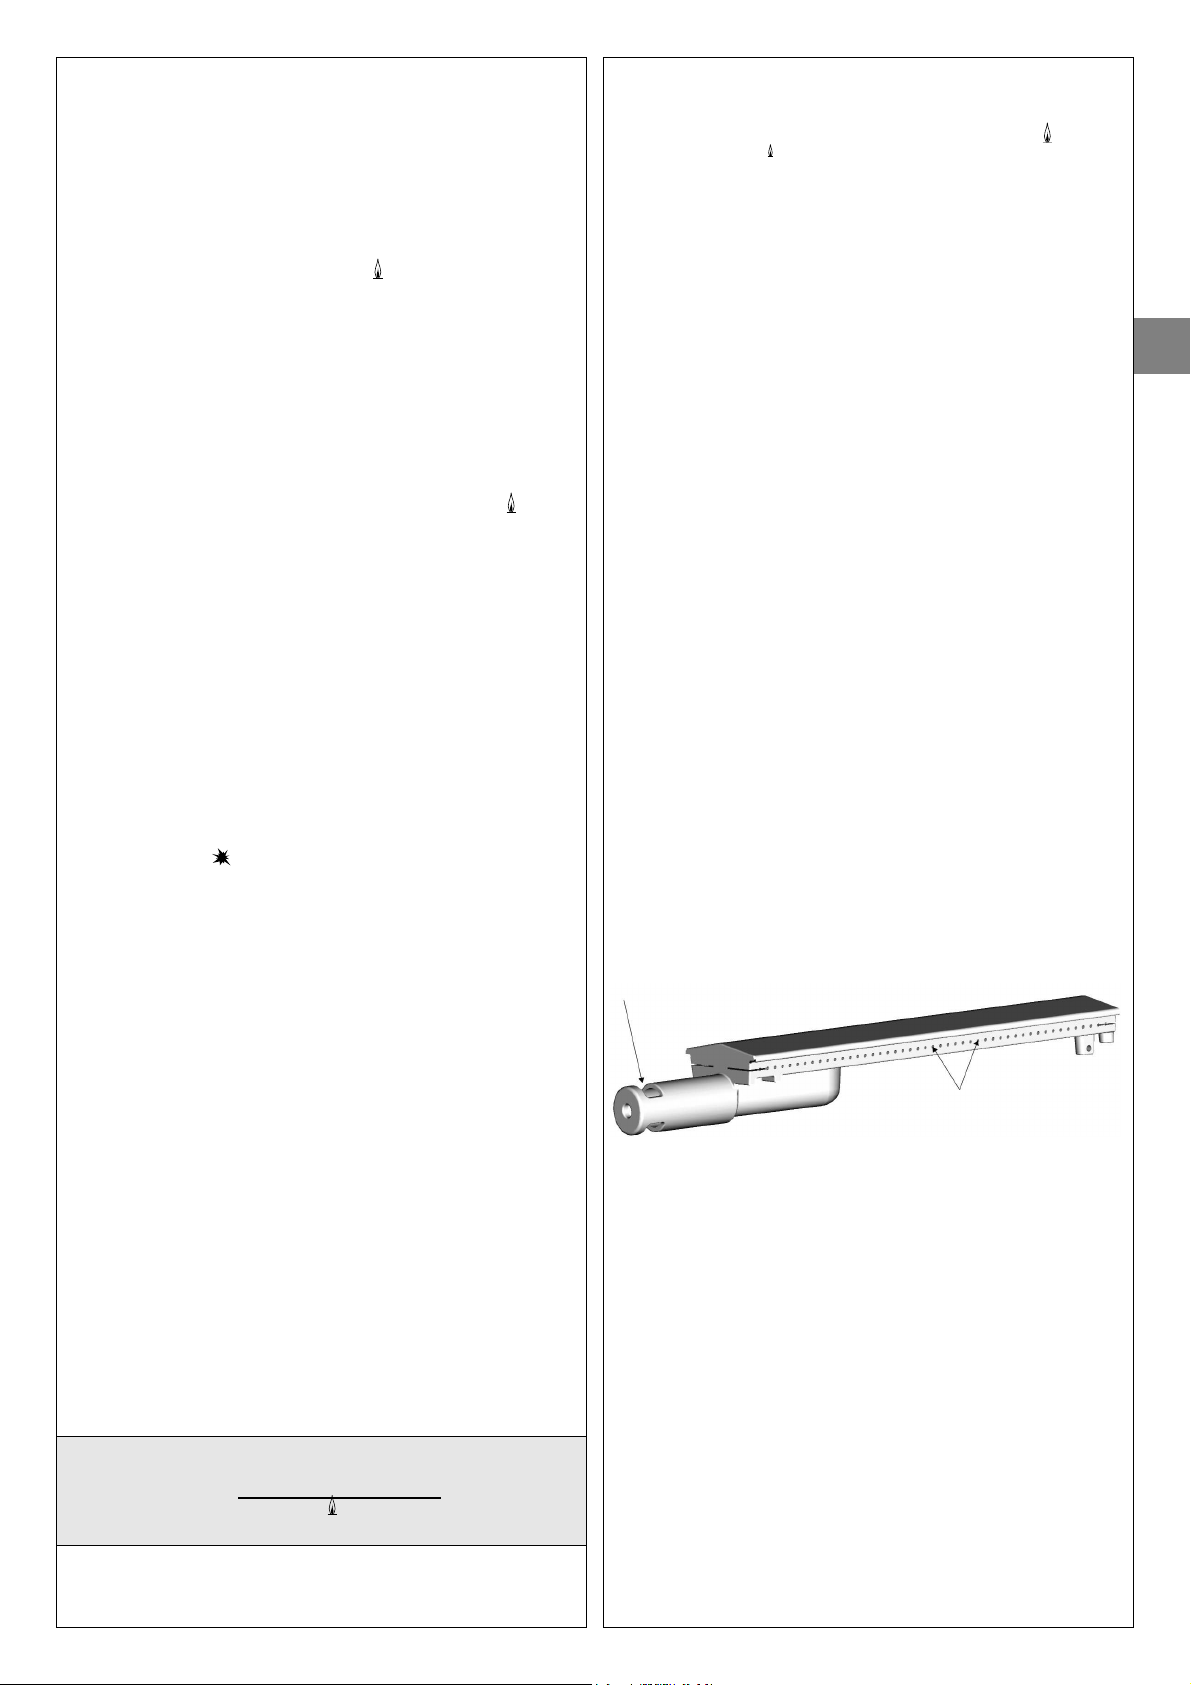
i) HANDMATIG AANSTEKEN VAN DE BARBECUE
- Verwijder de beschermingshoes of open het deksel
(afhankelijk van het model).
- Controleer of de regelknoppen in de OFF-stand staan
(l).
- Verwijder de vetopvangbak(ken).
- Steek de lucifer aan en breng deze langs onderkant zo
dicht mogelijk bij de brander.
- Druk en draai de regelknop tegen de wijzers van de klok
in tot deze volledig geopend is ( ),
- Als de brander aan staat, plaats het opvangbord voor
het vet in zijn behuizing en duw hier tegenaan tot het
niet meer verder kan.
Als de brander eenmaal aan is, zijn er twee
mogelijkheden om nog een brander aan te steken:
r De 1ste mogelijkheid is om bovenstaande handeling
te herhalen.
r De 2de mogelijkheid is om de brander rechts of links
van de 1ste brander aan te steken en vervolgens
geleidelijk de andere branders te laten ontbranden
door de regelknop volledig open te draaien ( ).
à 20 minuten laten voorverwarmen om de gietijzeren
roosters op de juiste temperatuur te brengen.
De bereidingstijd kan worden aangepast met de
regelknoppen: tussen de volledig open stand ( ) en de
half open stand ( ).
Om te voorkomen dat de etenswaren op de bakroosters
vastbakken kunt u de roosters met een beetje slaolie
insmeren voordat u het voedsel er op legt.
Om te voorkomen dat het vet tijdens het bakken vlam vat,
kunt u voor het bakken het overtollige vet van het vlees
verwijderen. Maak de barbecue na elk gebruik schoon om
ophoping van vet te voorkomen en zo de kans op vlam
vatten te verminderen.
Belangrijk:
Als er tijdens het gebruik van het toestel een of meer
branders uitgaan, zet u de regelknoppen meteen op "OFF"
(l). Wacht 5 minuten om het niet-verbrande gas te laten
ontsnappen. Voer nogmaals de handelingen uit om de
barbecue aan te steken, uitsluitend nadat u hebt gewacht.
o) SCHOONMAKEN EN ONDERHOUD
NL
j) DE BARBECUE UITZETTEN
Breng de regelknoppen in de stand "OFF" (l) en sluit
vervolgens de kraan van de gasfles.
k) AANSTEKEN VAN VERWARMER
(VOLGENS MODEL)
De verwarmer kan alleen of samen met de grill werken.
Aansteken : Draai de knop van de gasfles open.
Check op gaslekken vanaf de aansluiting van de fles tot
de verwarmer (zie § F). Chek ook de staat van de buis die
beide verbind.. Indien deze vervangen moet worden, bel
dan de dienst na verkoop, zelf bij kleine kreuken.
Open de knop van de verwarmer (richting +) en duw op de
aansteek-knop ( ) tot ontsteking (duw tot 3 a 4 keer als
nodig is). Als het niet gaat, neem een stekje of aansteker
die U tegen de brander houdt tot ontsteking.
Regel de vlam in verhouding met de kookpot die U
gebruikt. Geen kookpoten gebruiken met een diameter
van minder dan 12 cm of meer dan 26 cm.
l) DOVEN / UITDOEN VAN VERWARMER
(VOLGENS MODEL)
Sluit de knop van verwatmer (richting - )en ook de knop
van de gasfles als de grill niet aanstaat.
- Breng nooit wijzigingen aan uw toestel aan. Dit zou
gevaar met zich kunnen meebrengen.
- Om de goede werking van uw toestel te blijven
garanderen, is het raadzaam deze regelmatig (om de 4
a 5 keer) schoon te maken.
- Wacht voor het reinigen altijd totdat het toestel is
afgekoeld.
- Draai de kraan van de gasfles dicht.
- De branders dienen iedere 3 maanden gecontroleerd en
schoongemaakt te worden. Verwijder de brander en
controleer of vuil of spinnenweb de branderbuis
blokkeert. Dit kan een slechte gastoevoer veroorzaken
of een gasophoping buiten de brander.
- Maak de bovenkant van de brander, de zijkanten en de
onderkant schoon met een spons (water en
afwasmiddel). Indien nodig kunt u een vochtig
schuursponsje gebruiken.
- Controleer of alle branderbuizen schoon en droog zijn
voordat deze opnieuw gebruikt worden. Gebruik indien
nodig een staalborstel om de brandergaten te
ontstoppen.
- Maak de openingen van de gasbuis schoon indien
nodig (zie tekening hieronder).
openingen van de venturi-buisjes
luchttoevoergaatjes
m) VERVANGING VAN DE GASFLES
- Vervang de gasfles altijd op een goed geventileerde
plaats waar zich geen vlammen, vonken of
warmtebronnen mogen bevinden
- Draai de regelknoppen op de stand "OFF" (l) en sluit
vervolgens de kraan van de gasfles.
- Schroef de drukregelaar los en controleer of de
afdichting op zijn plaats zit en in goede staat verkeert.
- Breng de volle gasfles aan, monteer de drukregelaar
opnieuw en let er hierbij op dat de slang niet geforceerd
wordt. Controleer hierna op eventuele gaslekkage.
n) GEBRUIK
Wanneer u het toestel voor de eerste keer gebruikt,
verwarm deze dan (afhankelijk van het model : met
gesloten deksel / zonder beschermhoes
minuten op vol vermogen ( ) om de verfgeur van de
onderdelen te laten verdwijnen.
Bij normaal gebruik de barbecue (afhankelijk van het
model : met gesloten deksel / zonder beschermhoes) 15
) ongeveer 30
N.B. Door regelmatig onderhoud blijft de brander in
goede staat en wordt vroegtijdige roestvorming naar
aanleiding van zure resten van geroosterde
voedingswaren voorkomen. Het is echter normaal dat de
brander na verloop van tijd roestvorming vertoont.
- Zijwanden van de branderruimte, bedieningspaneel
Reinig ook deze onderdelen regelmatig met een spons
en wat afwasmiddel. Gebruik geen schurende
produkten.
- Bakplaten
Wacht tot de bakplaat is afgekoeld alvorens deze
schoon te maken. Gebruik Campingaz®Cleaner Spray,
BBQ cleaner en BBQ borstels.
Nadat u de bakroosters hebt schoongemaakt en
gedroogd, smeert u ze licht in met vet om ze te
beschermen tegen roestvorming en om te voorkomen
dat er voedsel aan blijft plakken.
Campingaz®raadt aan om een dunne laag plantaardige
olie op de bakroosters aan te brengen met een
theedoek.
17

Opgelet: niet in de afwasmachine plaatsen en niet laten
drogen zonder af te drogen.
- Hout
Het hout van onze barbecues is behandeld met Lazure
om het te beschermen en de natuurlijke uitstraling te
behouden. Het is echter een levend materiaal dat
gevoelig blijft voor blootstelling aan zonnestralen, vocht
en temperatuurverschillen.
q) ACCESSOIRES
ADG adviseert zijn gasbarbecues systematisch te
gebruiken met accessoires en onderdelen van het
merk Campingaz. ADG wijst elke aansprakelijkheid af
in geval van beschadiging of slechte werking ten
gevolge van het gebruik van accessoires en/of
onderdelen van een ander merk.
Om uw barbecue in goede staat te houden, raden we u
aan om deze met een Campingaz-beschermhoes te
bedekken die als accessoire wordt verkocht. Belangrijk:
wacht tot de barbecue volledig is afgekoeld voor u de
NL
beschermhoes plaatst.
Breng in het begin van het seizoen een laag Lazure voor
hout aan op de houten delen met een doek of een kwast
om deze te beschermen.
p) OPBERGEN
- De kraan van de gasfles na elk gebruik dichtdraaien.
- Indien u uw barbecue binnen opbergt, koppel dan de
gasfles af en bewaar deze buiten.
- Indien u uw toestel buiten opbergt, is het raadzaam een
beschermhoes te gebruiken.
- Indien het toestel tijdens een lange periode niet gebruikt
wordt, is het raadzaam de barbecue op te slaan in een
droge, beschutte plaats (vb.: garage).
r) BESCHERMING VAN HET MILIEU
Denk aan de bescherming van het milieu! Uw apparaat
bevat materialen die ingezameld of gerecycled kunnen
worden. Breng het naar de milieustraat in uw gemeente
en scheidt de verpakkingsmaterialen.
18
Storingen / Oplossingen
U kunt jarenlang plezier hebben van uw barbecue als deze juist geassembleerd is en u weet hoe deze te gebruiken. Indien
u toch problemen ondervind kunt u hieronder mogelijk de oplossing vinden :
Storingen
De brander gaat niet aan
De brander ploft of gaat uit
Grote vlammen aan het
oppervlak van de brander
De brander is met een lucifer
aan te krijgen, maar niet met
de elektronische ontsteking
Mogelijke
oorzaken/aktie
- Slechte gastoevoer
- De drukregelaar werkt niet
- De slang,de kraan, de sproeier,
branderbuis of de gaatjes van
de brander zijn verstopt
- De branderbuis bedekt niet de
sproeier
- Controleer of gas wordt
aangevoerd
- Controleer de aansluiting van
de slang
- Raadpleeg de klantenservice
- Reinig de beschermplaat
boven de brander
- Reinig de vetopvangbak(ken).
- De temperatuur is te hoog: kies
een lagere stand
- Defecte ontsteking, bedrading
of electrode
- Controleer de aansluitingen
van de kabel en de aansteker
- Controleer de staat van de
electrode en bedrading
- Raadpleeg de klantenservice
Storingen
Geen volledige vlam rond de
brander
Onvoldoende hitte
Vlammen achter de regelknop
Vlammen onder het
bedieningspaneel
Mogelijke
oorzaken/aktie
- Defecte of verstopte brander :
plaats de brander opnieuw
- Verstopte sproeier(s)
- Raadpleeg de klantenservice
NL
- Verstopte sproeier of
branderbuis
- Raadpleeg de klantenservice
- Defecte kraan
- De gastoevoer onmiddellijk
afsluiten
- Raadpleeg de klantenservice
- De gastoevoer onmiddellijk
afsluiten
- Raadpleeg de klantenservice
Vlammen bij een
verbindingsstuk
- Lek verbindingsstuk
- De gastoevoer onmiddellijk
afsluiten
- verbindingen vastdraaien en
controleren op lekkage
- Raadpleeg de klantenservice
TOEPASSINGSVOORWAARDEN VAN DE GARANTIE
- Op het product zit volledige garantie van onderdelen en arbeidskracht gedurende 2 (twee) jaar vanaf de datum van
aankoop.
- De garantie is van toepassing wanneer een geleverd product niet conform de bestelling is of wanneer het defect is,
- Binnen de garantieperiode zal het produkt worden gerepareerd, vervangen of worden terugbetaald - in zijn geheel of
voor een gedeelte.
- De garantie is niet geldig en is niet van toepassing wanneer de schade ontstaan is door (i) onjuist gebruik of onjuiste
opslag van het product, (ii) gebrek aan onderhoud van het product of onderhoud dat niet in conform is aan de
gebruiksinstructies, (iii) reparatie, wijziging, onderhoud van het product door niet erkende derde personen, (iv) het
gebruik van niet-originele reserveonderdelen.
- NOTA BENE: professioneel gebruik van dit product valt niet onder de garantie.
- Een bewijs van aankoop (faktuur of kassabon) zijn noodzakelijk voor afhandeling onder garantie.
- Ieder product dat op gas werkt moet gescheiden worden van de vulling of van de cylinder waarmee het verbonden is,
voordat deze teruggezonden wordt naar het erkende reparatiecentrum.
- Deze garantie heeft geen invloed op de wettelijke rechten van de consument.
- De behandeling van het product tijdens de garantieperiode heeft geen gevolgen voor de vervaldatum van de garantie.
- Raadpleeg onze klantenservice in geval van klachten.
Indien u de storing niet zelf kunt oplossen, neemt u dan contact op met uw dealer die u de dichtstbijzijnde
klantenservice afdeling zal opgeven of neem contact op met CAMPINGAZ:
COLEMAN BENELUX B.V. Minervum 7168 - 4817 ZN BREDA - NEDERLAND
Tel: +31 76 572 85 00 Fax: + 31 76 571 10 14
www.campingaz.com
19
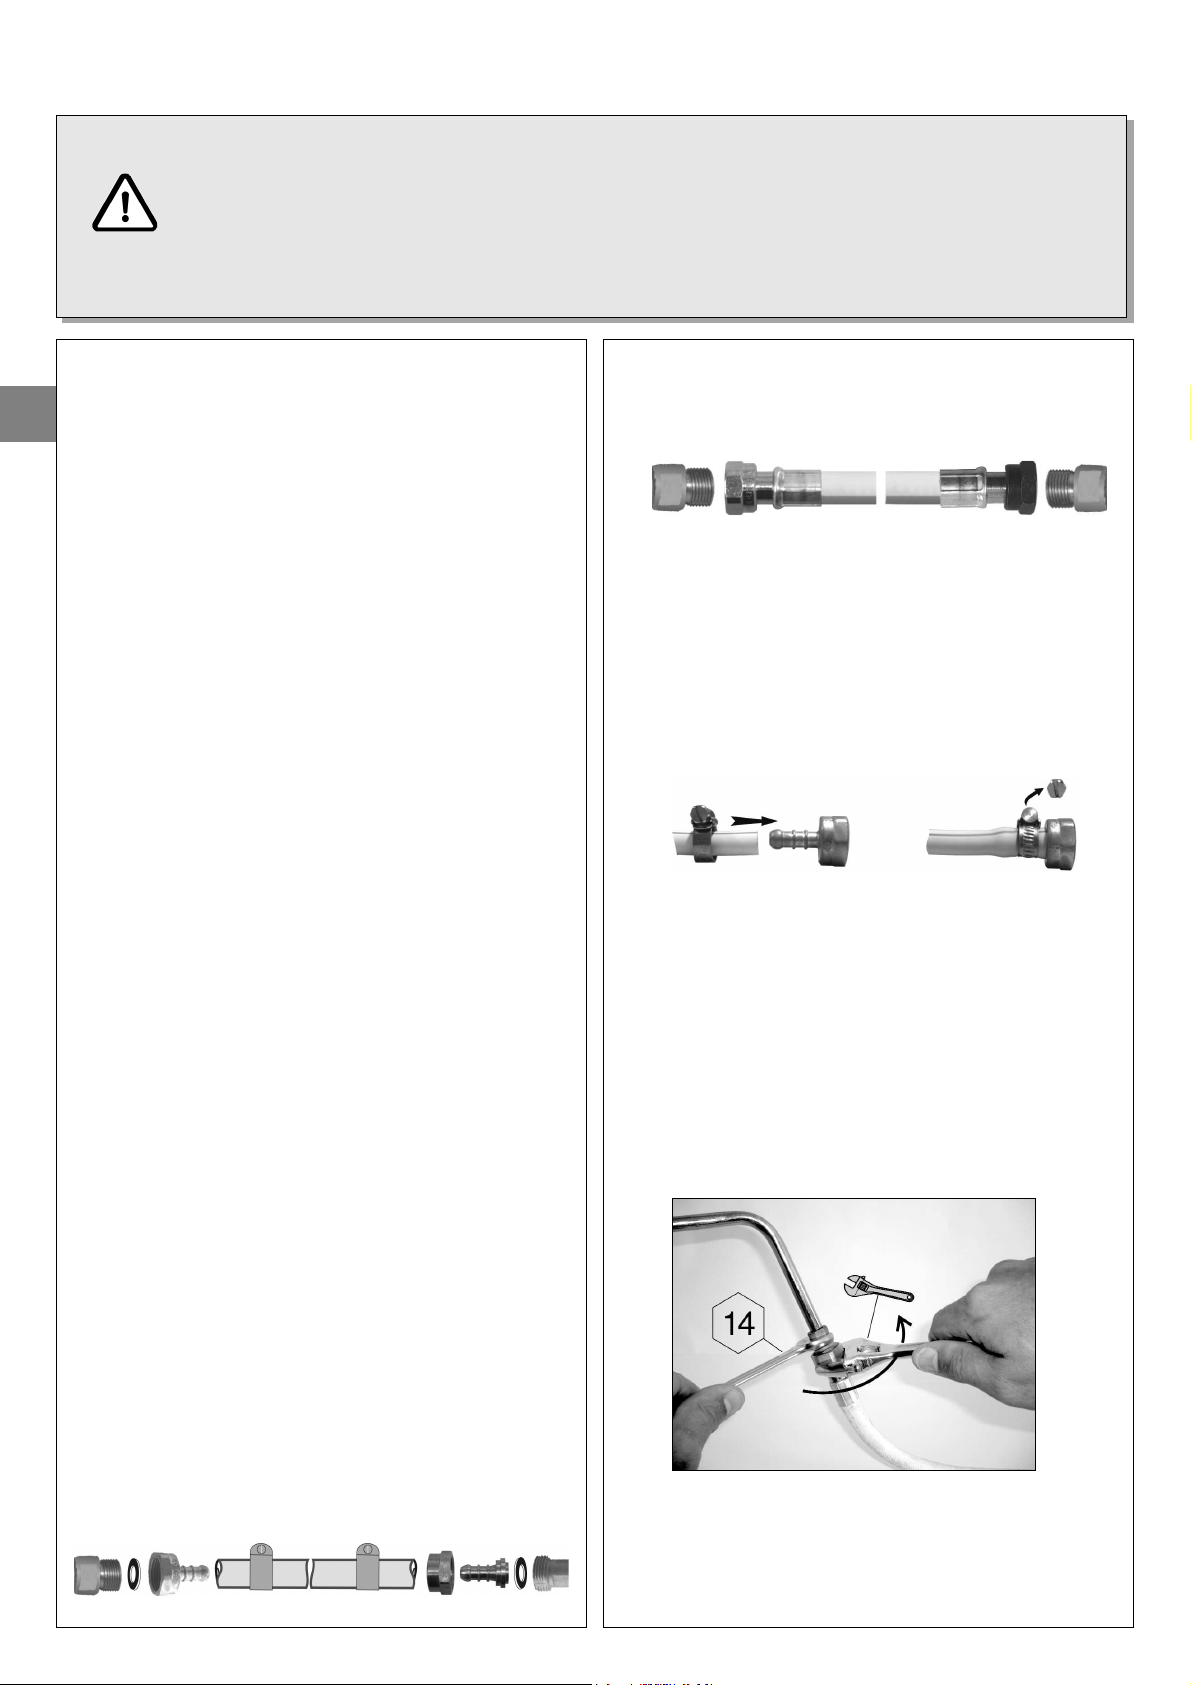
Utilização e manutenção
• Antes de utilizar, ler as instruções
• Utilizar apenas ao ar livre.
• Não utilizar carvão de madeira.
• Não utilizar nenhum redutor regulável. Utilizar as válvulas de regulação fixa em conformidade com a
norma europeia que os abrange.
• Para garantir o funcionamento em total segurança do seu aparelho, nunca utilizar duas placas cheias
lado a lado.
CASO NÃO RESPEITE AS REGRAS DE UTILIZAÇÃO PODE PROVOCAR RAVES DETERIORAÇÕES NO VOSSO
APARELHO.
a) PARA VOSSA SEGURANÇA
- Não armazenar nem utilizar gasolina ou outros líquidos
PT
ou vapores inflamáveis na proximidade do aparelho.
Durante a utilização, este aparelho deve estar afastado
de materiais inflamáveis. No caso de cheiro a gás :
1) Fechar a torneira da garrafa de gás
2) Apagar todas as chamas vivas
3) Abrir a tampa
4) Se o cheiro persistir, ver § f ou informar-se junto do
vendedor.
- As partes protegidas pelo fabricante ou respetivo
mandatário não devem ser manipuladas pelo utilizador.
- Fechar o recipiente de gás depois da utilização.
b) LUGAR DE UTILIZAÇÃO
- Este aparelho só deve ser utilizado no exterior.
- ATENÇÃO : as partes acessíveis podem ficar muito
quentes. Mantenha as crianças afastadas.
- Nenhum material combustível se deve encontrar num
raio de 60 cm ao redor do aparelho.
- Não deslocar o aparelho durante o funcionamento.
- Utilizar o aparelho num terreno bastante plano.
- Prever um débito de ar novo de 2 m3/kW/h.
c) GARRAFA DE GÁS
Este aparelho está regulado para funcionar com as
garrafas de butano/propano 4,5 a 15 kg equipadas com
um redutor apropriado:
- França, Bélgica, Luxemburgo, Reino Unido, Irlanda,
Portugal, Espanha, Itália, Croácia, Grécia: butano 28
mbar / propano 37 mbar.
- Países Baixos, Noruega, Suécia, Dinamarca,
Finlândia, Suíça, Hungria, Eslovénia, República
Chuca, Eslováquia, Bulgária, Turquia, Roménia:
butano 30 mbar / propano 30 mbar.
- Polónia: propano 36 mbar.
- Alemanha, Áustria: butano 50 mbar / propano 50 mbar.
Para a ligação ou a mudança da garrafa, efectuar a
operação sempre num local bem arejado, e nunca em
presença de uma chama, faísca ou fonte de calor.
A garrafa de gás equipada com distensor não deve
ser colocada por baixo da grelha do fogão se a sua
altura total for superior a 46,5 cm.
Uma vez instalada a garrafa de gás por baixo da grelha,
ela deve ser presa à armação do fogão com a ajuda da
correia fornecida.
b) tubo flexível (segundo a norma XP D 36-112) equipado
com uma porca roscada G 1/2 para aparafusar no
aparelho e uma porca roscada M 20x1,5 para
aparafusar no regulador, comprimento previsto 1,25m.
G 1/2
Barbecue
O aparelho possui uma ligação roscada para
admissão do gás G 1/2 entregue com a ponteira
anelada NF e a junta já montadas.
1) Para utilização do aparelho com o tubo flexível XP
D 36-110: (solução d) a))
- introduzir a fundo o tubo flexível na ponteira anelada do
aparelho e do regulador.
- deslizar as abraçadeiras para trás dos 2 primeiros
ressaltos das ponteiras e apertá-las até apertar
totalmente.
- a estanquicidade deverá ser verificada seguindo as
indicações do parágrafo f).
2) Para utilização do aparelho com o tubo flexível XP
D 36-112, porcas G 1/2 e M 20x1,5 : (solução d) b))
- desaparafusar e retirar a ponteira anelada NF para
libertar a ligação de admissão G1/2.
- retirar a junta
- aparafusar a porca roscada G 1/2 do tubo de ligação de
admissão do aparelho e a porca roscada M20x1,5 à
ligação de saída do regulador seguindo as indicações
disponibilizadas com o tubo flexível.
- utilizar uma chave para imobilizar a ligação de
admissão do aparelho e apertar ou desapertar a porca
roscada utilizando outra chave.
M 20x1,5
Redutor
d) MANGUEIRA
França (conforme o modelo)
O aparelho pode ser utilizado com 2 tipos de tubos
flexíveis:
a) tubo flexível destinado a ser ligado em ponteiras
aneladas do lado do aparelho e do regulador, fixado
por abraçadeiras (segundo a norma XP D 36-110).
Comprimento previsto 1,25 m.
G 1/2
Barbecue
M 20x1,5
Redutor
- utilizar uma chave para imobilizar a ligação de saída do
regulador.
- a estanquicidade deverá ser verificada seguindo as
indicações do parágrafo f).
Verificar que o tubo flexível apresente um aspecto normal,
sem torções ou apertos, nem contacto com as paredes
20
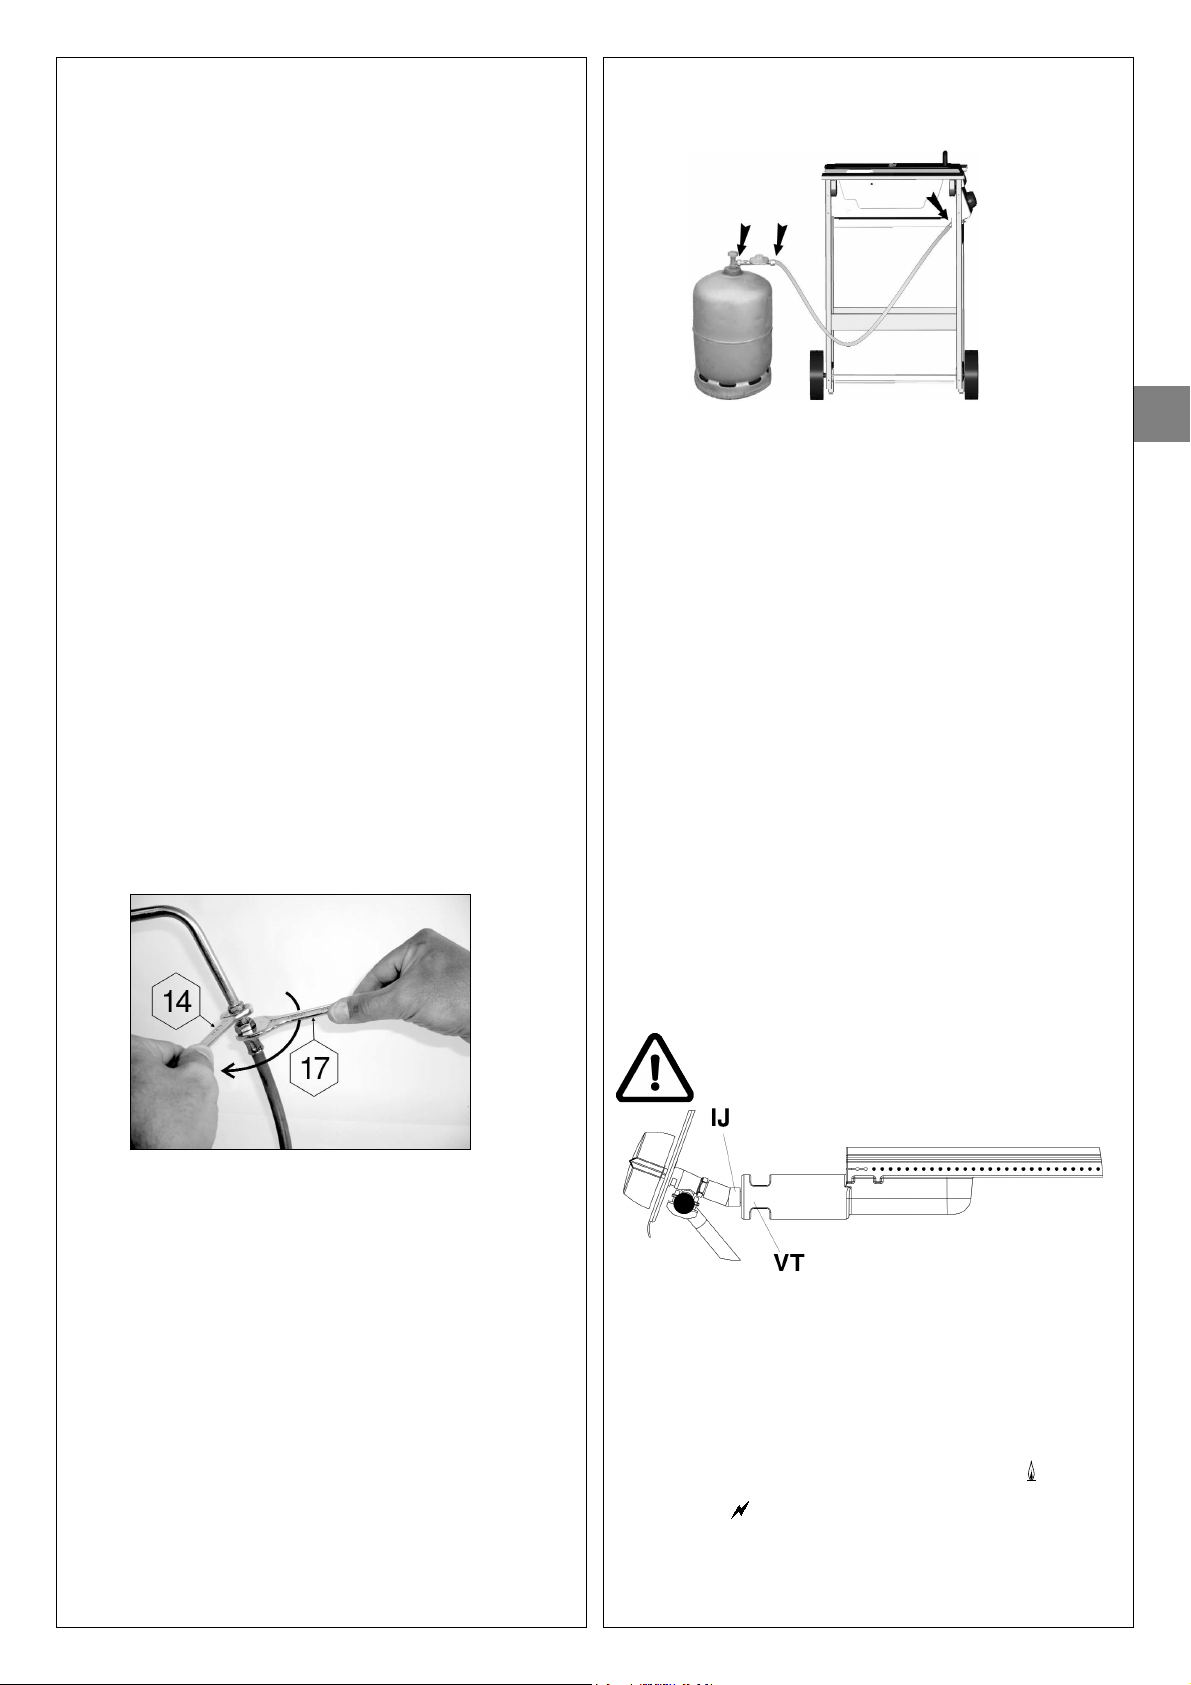
quentes do aparelho. Deverá ser substituído assim que
atinja a data de validade gravada no tubo ou sempre que
apresente danos ou fissuras.
Bélgica, Luxemburgo, Países Baixos, Reino Unido,
Irlanda, Polónia, Portugal, Espanha, Itália, Noruega,
Suécia, Dinamarca, Finlândia, Croácia, Hungria,
Eslovénia, República Chuca, Eslováquia, Grécia,
Bulgária, Turquia, Roménia:
O aparelho está equipado com um terminal anelado.
Deve ser utilizado com um tubo de borracha de qualidade
apropriada para uso com gás butano e propano.
O seu comprimento não deverá exceder os 1,20 metros.
Deve ser substituído caso esteja danificado, apresente
fissuras ou quando a legislação nacional assim o exija ou
conforme a validade.
Não puxar pelo tubo nem torcê-lo. Mantê-lo afastado de
partes ou de componentes do aparelho que possam
aquecer.
Verificar que o tubo flexível um aspecto normal, sem
torções ou apertos.
Suíça, Alemanha, Áustria:
O aparelho deve ser utilizado com um tubo de borracha
de qualidade adaptado para uso com gás butano e
propano.
O seu comprimento não deverá exceder os 1,50 metros.
Deve ser substituído caso esteja danificado, apresente
fissuras ou quando a legislação nacional assim o exija ou
conforme a validade.
Não puxar pelo tubo nem torcê-lo. Mantê-lo afastado de
partes ou de componentes do aparelho que possam
aquecer.
Verificar que o tubo flexível um aspecto normal, sem
torções ou apertos.
6) Pôr o líquido sobre as ligações entre garrafa/redutor/
tubo/aparelho. As alavancas de regulação devem ficar
em posição "OFF" (l). Abrir a torneira da garrafa de
gás.
PT
7) Se se formarem bolhas, isso significa que há fugas de
gás.
8) Para suprimir a fuga, apertar as porcas ou encaixar
com precisão o tubo sobre a tomada respectiva. Se
houver uma peça defeituosa, efectuar a substituição. O
aparelho não deve ser posto em funcionamento antes
da fuga ter sido suprimida.
9) Fechar a torneira da garrafa de gás.
IMPORTANTE:
Nunca utilize uma chama para detectar uma fuga de gás.
É necessário efectuar pelo menos uma vez por ano o
controle e a busca de fugas que devem ser efectuadas
igualmente quando de mudança da garrafa de gás.
g) ANTES DE PÔR EM FUNCIONAMENTO
Ligação do tubo de borracha : para ligar o tubo ao
terminal do aparelho apertar a porca do tubo firmemente
mas sem força excessiva com duas chaves apropriadas :
- chave de 14 para fixar o terminal
- chave de 17 para enroscar a porca do tubo
e) TAMPA (conforme o modelo)
Manipular a tampa com precaução, nomeadamente
durante o funcionamento. Não se deve debruçar por cima
da cuba.
f) ENSAIO DE ESTANQUICIDADE
1) Efectuar a operação no exterior, afastando todos os
materiais inflamáveis. Não fumar.
2) Se certificar-se que as alavancas de regulação estão
em posição "OFF" (l).
3) Encaixar ao máximo as extremidades do tubo flexível
sobre a tomada do redutor e do aparelho. A aplicação
de água de sabão sobre as tomadas facilita o encaixe.
4) Roscar o redutor sobre a garrafa de gás.
5) Não procure identificar fugas com uma chama, utilize
um líquido detector de fugas de gás.
Não pôr o aparelho em funcionamento sem ter lido
atentamente e compreendido todas as instruções.
- Assegure-se também :
- que não há fugas
- que os tubos Venturi não estão obstruídos
- que o tubo não está em contacto com peças que
possam aquecer.
- que as aberturas de ventilação do compartimento do
recipiente de gás não estejam obstruídas.
- que o tabuleiro para recuperação de gordura esteja
correctamente colocado no respectivo encaixe e que
esteja correctamente encaixado até ao batente.
Verificar se os tubos Venturi (VT) cobrem os
injectores (IJ).
h)ACENDIMENTO DOS QUEIMADORES DO
GRELHADOR
- Retirar a tampa de protecção ou abrir a tampa de
cozedura (conforme o modelo).
- Se certificar-se que as alavancas de regulação estão
em posição "OFF" (l).
- Premir e rodar o botão de regulação para a esquerda e
colocá-lo na posição totalmente aberta ( ), depois
carregar imediatamente no botão de acendimento até
ao clique ( ). Se o acendimento não se efectuar ao
primeiro disparo, carregar 3 ou 4 vezes se for
necessário.
- Repetir esta operação até que o queimador acenda.
- Se o queimador não se acender, colocar de novo o
21
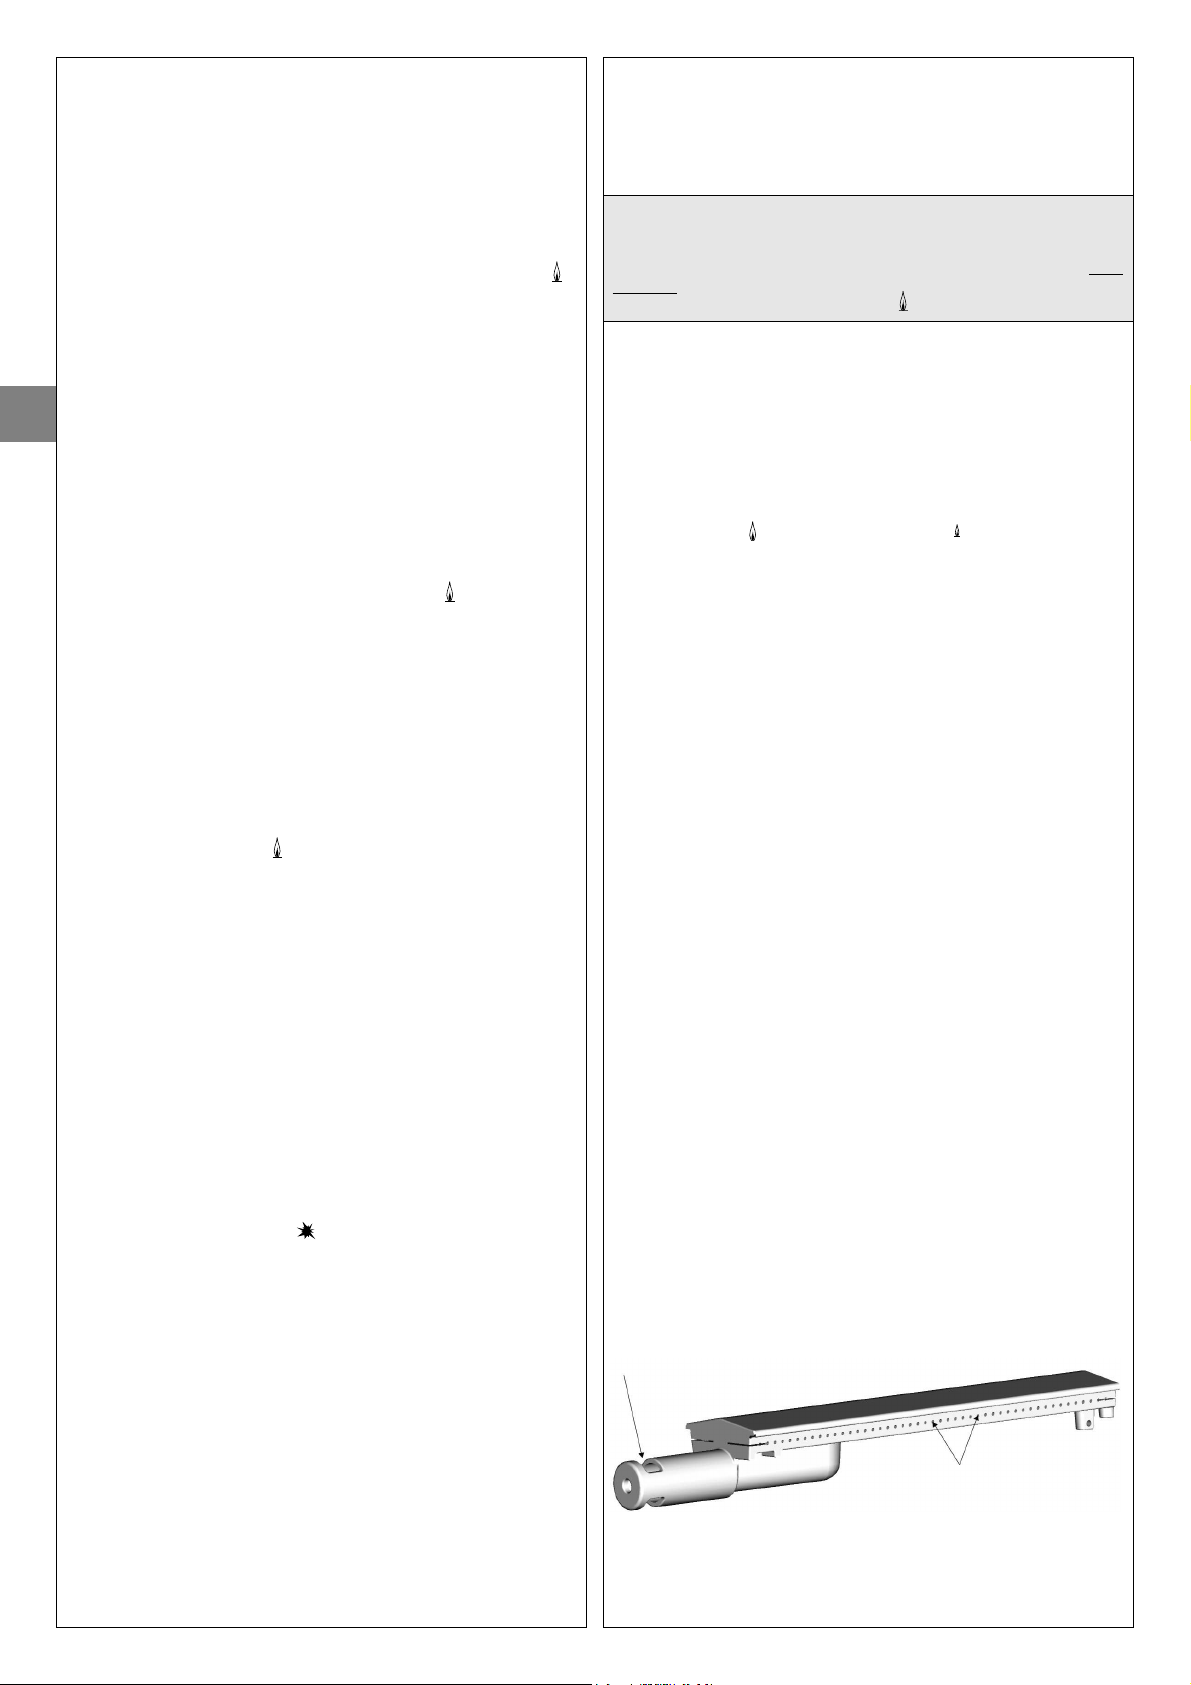
botão de regulação na posição "OFF" (l). Esperar 5
minutos antes de recomeçar a operação.
Uma vez aceso, tem 2 possibilidades para acender
outro queimador:
r A 1ª possibilidade consiste em repetir a operação de
acendimento acima descrita;
r A 2ª possibilidade consiste em acender o queimador à
direita ou à esquerda do 1º queimador aceso, depois
um após o outro os queimadores seguintes rodando o
botão de regulação para posição totalmente aberta ( ).
Se o acendedor de faísca eléctrica não funcionar,
acender manualmente (paragrafo seguinte).
- Desenroscar o redutor, verificar a presença e o estado
da junta de estanquecidade.
- Colocar a garrafa cheia no lugar, roscar de novo o
redutor tendo o cuidado de manter o mangueira flexível
livre de constrangimentos.
n) UTILIZAÇÃO
Aquando da primeira utilização, aquecer o barbecue
(conforme o modelo: fechar a tampa articulada/não
colocar a tampa de protecção) com os queimadores na
posição de abertura máxima ( ), durante cerca de 30
minutos, para fazer desaparecer os cheiros de tinta das
peças novas.
i) ACENDIMENTO MANUAL DO GRELHADOR
PT
- Retirar a tampa de protecção ou abrir a tampa de
cozedura (conforme o modelo).
- Se certificar-se que as alavancas de regulação estão
em posição "OFF" (l).
- Retirar o tabuleiro de recolha de gordura.
- Acender o fósforo e e aproximá-lo por baixo até ao
queimador.
- Remir e rodar o botão de regulação para a esquerda e
colocá-lo na posição totalmente aberta ( ).
- Assim que o queimador esteja aceso, colocar
novamente o tabuleiro de recuperação de gorduras no
respectivo encaixe e empurrá-lo até ao batente.
Assim que o queimador esteja aceso, tem 2
possibilidades para acender outro queimador:
r A 1ª possibilidade consiste em repetir a operação de
acendimento acima descrita;
r A 2ª possibilidade consiste em acender o queimador à
direita ou à esquerda do 1º queimador aceso, e
depois um após outro os queimadores seguintes
rodando o botão de regulação para a posição
totalmente aberta ( ).
j) DESLIGAR/APAGAR O GRELHADOR
Colocar de novo os botões de regulação na posição
"OFF" (l), e depois fechar a torneira da garrafa.
k) ACENDIMENTO DO AQUECEDOR
(conforme modelo)
O aquecedor pode funcionar sozinho ou ao mesmo tempo
que a grelha.
Acendimento : abrir a torneira da garrafa de gás.
Verificar se o circuito de gás está suficientemente vedado,
da garrafa até o aquecedor (ver § F). Verificar o estado
do tubo que liga a grelha ao aquecedor. Ao trocá-lo,
solicitar o Serviço Após Venda, caso ele apresenta
rachaduras.
Abrir a torneira do aquecedor (sentido +) e carregar sobre
o botão de acendimento ( ) até o disparo.
Carregar 3 ou 4 vezes se necessário. Caso não acenda,
colocar um fósforo perto do queimador.
Regular a chama à dimensão do recipiente utilizado abrindo
mais ou menos a torneira. Não utilizar recipientes cujos
diâmetros sejam inferiores à 12 cm ou superiores à 26 cm.
l) EXTINÇÃO DO AQUECEDOR
(conforme modelo)
Fechar a torneira do aquecedor (sentido -) e a torneira da
garrafa se a grelha não estiver funcionando.
m) MUDANÇA DA GARRAFA DE GÁS
- Efectuar sempre a operação num local arejado e nunca
em presença de chamas, faíscas ou fonte de calor.
- Colocar os botões de regulação na posição "OFF" (l) e
depois fechar a torneira da garrafa.
Em funcionamento normal, aquecer previamente o
barbecue (conforme o modelo: fechar a tampa
articulada/não colocar a tampa de protecção) durante 15
a 20 minutos para aquecer as grelhas de ferro de maneira
a obter a temperatura ideal para cozinhar.
A velocidade de cozedura pode ser controlada em função
da posição dos botões de regulação: entre a posição
abertura total ( ) e a posição média ( ).
Para reduzir a aderência dos alimentos contra a grelhas,
untar as grelhas com óleo de cozinhar, antes de colocar
os alimentos sobre a mesma.
Para reduzir as chamas ocasionadas pelas gorduras na
altura de grelhar, retirar o excesso de gordura das carnes
antes do cozinhado. Limpar o barbecue após o grelhado
para evitar a acumulação de gordura e assim diminuir o
risco de inflamação.
Importante:
Caso durante o funcionamento do aparelho um ou mais
queimadores se apaguem, colocar imediatamente os botões
de regulação na posição "OFF" (l). Aguardar 5 minutos para
permitir a saída do gás não queimado Repetir a operação de
acendimento apenas após este período.
o) LIMPEZA E MANUTENÇÃO
Nunca modificar o aparelho : qualquer modificação pode
revelar-se ser perigosa.
Esperar que o aparelho tenha arrefecido antes de efectuar
qualquer operação de limpeza. Fechar a garrafa de gás.
QUEIMADOR DA GRELHA: a cada 3 meses, o
queimador deve ser limpo e controlado. Tirar o queimador
completo, controlar por baixo os tubos venturi para ver se
existem teias de aranha etc. Esse procedimento também
é necessário se a grelha não tiver sido utilizada durante
mais de um mês. Sujeiras ou teias de aranha podem
produzir uma diminuição do calor ou uma inflamação
perigosa do gás fora do queimador. Limpar a parte
superior do queimador assim como o fundo da cuba com
uma esponja húmida (água adicionada de detergente
para a louça).
Se necessário utilizar uma escova de aço molhada.
Verificar se os orifícios de saída do queimador não estão
obstruídos e deixar secar antes de utilizar de novo. Caso
seja necessário utilizar uma escova metálica para
destapar os orifícios de saída do queimador.
Substituir o queimador corretamente na cuba.
Limpar os orifícios do tubo venturi (ver a figura que se
segue) ou o queimador se for esse o caso.
Orificios de los tubos venturi
Orificios de salida
N.B. : A limpeza frequente do queimador permite mantêlo em bom estado por várias utilizações e evita a oxidação
prematura, provocada principalmente por causa dos
resíduos ácidos dos grelhados. A oxidação do queimador
22

é, porém, um fenômeno normal com o passar do tempo e
um queimador oxidado que funcione normalmente não
deve ser substituído. A substituição do queimador é
necessária se o funcionamento do mesmo não estiver
correto : queimador furado ...
- Paredes da fornalha, painel de comando
Limpar igualmente estes elementos periodicamente,
com uma esponja com detergente para a louça. Não
utilize produtos abrasivos.
- Placas de cozedura,
Antes de qualquer peração de limpeza, aguardar que o
aparelho arrefeça. Utilizar um produto de limpeza
Campingaz®BBQ Cleaner Spray e escovas para
grelhadores.
Depois de limpar e secar as grelhas de cozedura, pincelálas levemente com gordura para as proteger da corrosão e
evitar que enferrugem e peguem aos alimentos.
A Campingaz®recomenda a utilização de óleo vegetal
para espalhar uma fina camada de gordura nas grelhas
de cozedura, utilizando papel absorvente.
Atenção: não lavar na máquina da loiça, não deixar
secar sem limpar.
p) ARRUMAÇÃO
- Fechar a torneira da garrafa de gás depois de cada
utilização
- Se arrumar o aparelho no interior, desligue a
alimentação de gás
- Se o arrumar no exterior, é aconselhado a utilização de
uma capa de protecção. (Ver capítulo acessórios).
- No caso de longos períodos sem utilização, é
recomendado conservar o aparelho em um lugar seco e
protegido (ex : garagem).
q) ACESSÓRIOS
ADG recomenda a utilização sistemática dos seus
assadores ao gaz com os acessórios e peças
sobresselentes da marca Campingaz. ADG declina
toda a responsabilidade em caso de mau
funcionamento sobrevindo do facto de uma utilização
de acessórios e/ou peças sobresselentes de marca
diferente.
PT
- Madeira
A fim de manter o aspecto natural, ao mesmo tempo que
o protege, a madeira dos nossos grelhadores está
revestida com produto de protecção. No entanto, é um
material vivo que se mantém sensível à exposição aos
raios solares, à humidade e às variações de
temperatura.
Para conservar o aspecto do grelhador, recomendamos
que o cubra com uma capa de protecção Campingaz
vendida como acessório. Importante: aguardar que o
grelhador esteja totalmente frio antes de colocar a capa
de protecção.
No início da época de utilização, dar uma camada de
produto de protecção para madeiras de exterior nas
partes em madeira, utilizando um pano ou um a trincha,
para lhe dar um aspecto mais brilhante e manter a
protecção.
r) PROTECÇÃO DO MEIO-AMBIENTE
Pense na protecção do meio-ambiente! O seu aparelho
contém materiais que podem ser recuperados ou
reciclados. Entregue-o Ecocentro da sua zona e separe
os materiais da embalagem.
Protecção do meio-ambiente
Pense na protecção do meio-ambiente! O seu aparelho
contém materiais que podem ser recuperados ou
reciclados. Entregue-o Ecocentro da sua zona e separe
os materiais da embalagem.
23
Anomalias / soluções
Anomalias
O queimador não acende
O queimador tem falhas ou
apaga-se
PT
Chamas instáveis em sopro
Grande penacho de chamas
na superfície do queimador
Chama no injector
Causas provaveis
soluções
- Má chegada do gás
- Redutor não funciona
- Mangueira, torneira, tubo
Venturi ou orifícios do
queimador estão entupidos.
- O tubo Venturi não cobre o
injector
- Verificar se há gás
- Verificar a ligação da
mangueira
- Ver o S.A.V.
- Garrafa nova que pode
conter ar.
- Deixar funcionar e o defeito
desaparece.
- Ver o S.A.V.
- O porta-injector está mal
posicionado no tubo
Venturi. Recolocar o
venturi.
- O tubo Venturi está
obstruído (exemplo: teias
de aranha). Limpar o
venturi.
- Ver o S.A.V.
- A garrafa está quase vazia.
Substituir a garrafa e o
defeito desaparece
- Ver o S.A.V.
Anomalias
A gordura inflama-se de um
modo anormal
O queimador acende com
um fósforo mas não com o
acendedor "PIEZO"
Fuga inflamada na união
Calor insuficiente
Fuga inflamada atrás da
torneira
Fuga inflamada debaixo da
consola
Causas provaveis
soluções
- limpar a tela de protecção
que se encotra sobre o
queimador.-
- limpar o tabuleiro de
recolha de gorduras.
- Temperatura do grill
demasiado alta: reduzir o
débito
- Botão, fio ou eléctrodo
defeituoso
- Controlar as uniões do
cabo do acendedor
- Controlar o estado da
cerâmica e do cabo de
ligação
- Ver o S.A.V.
- União não estanque
- Fechar imediatamente a
chegada do gás
- Ver o S.A.V.
- Injector ou tubo de Venturi
tapados
- Ver o S.A.V.
- Torneira defeituosa
- Parar o aparelho
- Consultar o S.A.V.
- Parar o aparelho
- Fechar a garrafa
- Ver o S.A.V
CONDIÇÕES DE APLICAÇÃO DA GARANTIA
- O produto beneficia de uma garantia total nas peças e mão-de-obra durante 2 (dois) anos a contar da data de
aquisição.
- A garantia é activada quando o produto entregue não está em conformidade com a encomenda ou quando apresenta
uma avaria, desde que a reclamação seja acompanhada de um documento justificativo da data de aquisição (Exp.:
factura, talão de caixa) e descrição do problema encontrado.
- Qualquer produto que funcione a gás deverá ser separado do cartucho ou do cilindro ao qual está ligado antes de ser
devolvido a um centro de assistência pós-venda certificado.
- O produto será reparado, substituído ou reembolsado - na totalidade ou em parte.
- A garantia é anulada e não será accionada quando o problema seja resultado (i) de utilização ou armazenagem
incorrecta do produto, (ii) de manutenção incorrecta do produto ou de uma manutenção contrária às instruções de
utilização, (iii) da reparação, alteração, manutenção do produto por terceiros não autorizados, (iv) da utilização de
peças de substituição que não sejam de origem.
- OBSERVAÇÃO: A utilização profissional deste produto está excluída da garantia.
- Qualquer reparação durante o período de garantia não altera a data de validade da mesma.
- Esta garantia não afecta em nada os direitos legais do consumidor.
- Consultar o nosso serviço ao cliente para qualquer reclamação.
Caso não seja possível resolver o problema, é favor contactar o seu revendedor que lhe indicará o Serviço PósVenda mais próximo do seu domicílio. Poderá também contactar com o Serviço de Informações ao Consumidor
CAMPINGAZ:
SERVIÇO CONSUMIDORES
Camping Gaz International Portugal
Apoio ao cliente
Tel: (+351) 21 41 54 066 - Fax: (+351) 21 41 54 067
www.campingaz.com
24
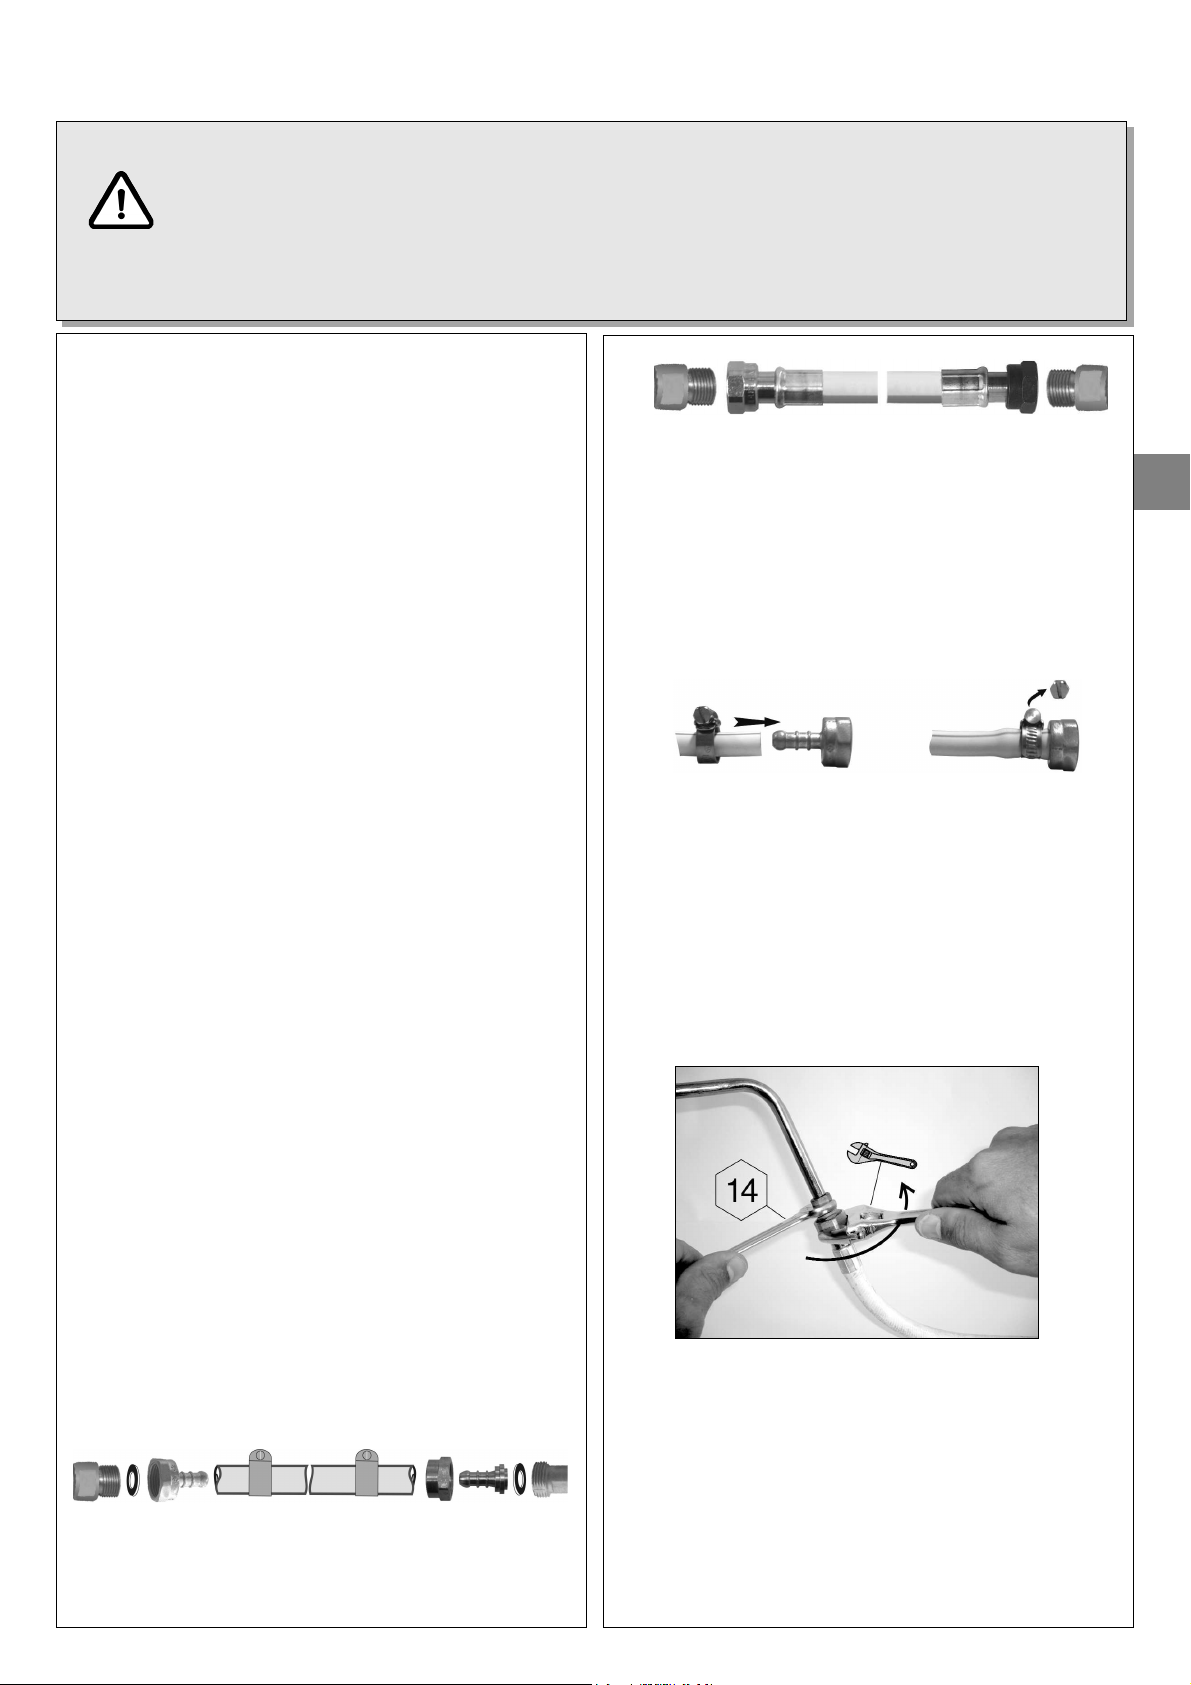
BENUTZUNG UND WARTUNG
l Vor Gebrauch Bedienungsanleitung lesen.
l Nur im Freien benützen.
l Keine Holzkohle benutzen.
l Keinen verstellbaren Druckregler benutzen. Druckminderer mit fester Einstellung nach der
entsprechenden europäischen Norm verwenden.
l Damit Ihr Gerät sicher funktionieren kann, niemals zwei volle Platten nebeneinander verwenden.
BEI NICHTBEACHTUNG DIESER GEBRAUCHSANWEISUNGEN KANN IHR GERÄT ERNSTHAFT
BESCHÄDIGT WERDEN.
a) ZU IHRER SICHERHEIT
- Kein Benzin, andere brennbare Flüssigkeiten oder
Dämpfe in der Nähe des Gerätes lagern oder benutzen.
Dieses Gerät darf beim Gebrauch nicht in der Nähe von
brennbaren Materialien stehen. Bei Gasgeruch:
1) Den Hahn der Gasflasche schließen.
2) Flammen sofort löschen.
3) Den Deckel öffnen.
4) Wenn der Gasgeruch nicht nachlässt, vgl. Abschnitt
f) “Dichtheitskontrolle” oder sofort bei Ihrem Händler
nachfragen.
- Der Benutzer darf die vom Hersteller oder seinem
Beauftragten geschützten Teilen nicht betätigen.
- Gasbehälter nach der Benutzung schließen.
b) VERWENDUNGSORT
- Dieses Gerät darf nur im Freien verwendet werden.
- VORSICHT: die zugänglichen Teile können sehr heiß
sein. Kleine Kinder fernhalten.
- Zu brennbarem Material muss ein Mindestabstand von
60 cm eingehalten werden.
- Den Grill in heißem Zustand nicht verlagern.
- Das Gerät auf ebenem Boden benutzen.
- Eine Frischluftzufuhr von 2 m³/kW-Stunde vorsehen.
c) GASFLASCHE
Das Gerät ist für den Betrieb mit Butan/Propan-Flaschen
(Inhalt zwischen 4,5 und 15 kg) mit geeignetem
Druckminderer eingestellt:
- Frankreich, Belgien, Luxemburg, Großbritannien,
Irland, Portugal, Spanien, Italien, Kroatien,
Griechenland: Butan 28 mbar/Propan 37 mbar
- Niederlande, Norwegen, Schweden, Dänemark,
Finnland, Schweiz, Teschechische Republik,
Ungarn, Slowenien, Slowakei, Bulgarien, Türkei,
Rumänien: Butan 30 mbar/Propan 30 mbar
- Deutschland, Österreich: Butan 50 mbar/Propan 50 mbar
- Polen: Propan 36 mbar
Den Anschluss bzw. Wechsel der Flasche immer an
einem gut belüfteten Ort fern von offenen Flammen,
Funken oder Wärmequellen vornehmen.
Die Gasflasche mit Druckminderventil darf nicht
unter den Grill gestellt werden, wenn sie insgesamt
höher als 46,5 cm ist.
Wenn die Gasflasche unter dem Grill platziert wird, muss
sie mit dem mitgelieferten Gurt am Rahmen befestigt
werden.
G 1/2
Gerät
Das Gerät hat einen Gaseingangsnippel G 1/2, der
zusammen mit dem bereits montierten
Schlauchanschluss NF und der Dichtung geliefert
wird.
1) Bei Verwendung des Geräts mit Schlauch XP D 36-110:
(Lösung d) a))
- Schlauch bis zum Ende auf den Schlauchanschluss
des Geräts und des Druckminderers aufstecken.
- Schellen hinter die ersten beiden Buckel des
Anschlüsse schieben und bis zum Bruch des
Spannkopfes anziehen.
- Dichheit nach Angaben von Abschnitt f) prüfen.
2) Bei Verwendung des Geräts mit Schlauch XP D 36-112,
Muttern G 1/2 und M 20x1,5: (Lösung d) b))
- den Schlauchanschluss NF lösen und abnehmen, um
den Anschluss G1/2 frei zu machen.
- Dichtung entfernen
- Gewindemutter G 1/2 des Schlauches auf den
Eingangsanschluss des Geräts schrauben und
Gewindemutter M20x1,5 auf den Ausgangsanschluss
des Druckminderers nach den mit dem Schlauch
gelieferten Angaben.
- Schlüssel verwenden, um den Eingangsanschluss des
Geräts zu fixieren und Gewindemutter mit einem
anderen Schlüssel anziehen oder lösen.
schwarz
M 20x1,5
Druckregler
DE
d) SCHLAUCH
Frankreich (je nach Modell)
Das Gerät kann mit 2 Arten von Schläuchen benützt
werden:
a) Schlauch zum Aufstecken auf Schlauchanschlüsse am
Gerät und am Druckminderer, befestigt mit Schellen
(nach Norm XP D 36-110). Empfohlene Länge 1,25 m.
G 1/2
Gerät
b) Schlauch (nach Norm XP D 36-112) mit
Gewindemutter G 1/2 zum Aufschrauben auf das Gerät
und Gewindemutter M 20x1,5 zum Aufschrauben auf
den Druckminderer, empfohlene Länge 1,25 m.
M 20x1,5
Druckregler
- einen Schlüssel verwenden, um den
Ausgangsanschluss des Druckminderers zu fixieren.
- Dichtheit nach Angaben von Abschnitt f) prüfen.
Prüfen, ob der Schlauch normal verläuft, ohne Drall oder
Zug und ohne die heißen Wände des Geräts zu berühren.
Er muss bei Erreichen des Verfalldatums auf dem
Schlauch ausgewechselt werden oder immer, wenn er
beschädigt ist oder Risse aufweist.
25
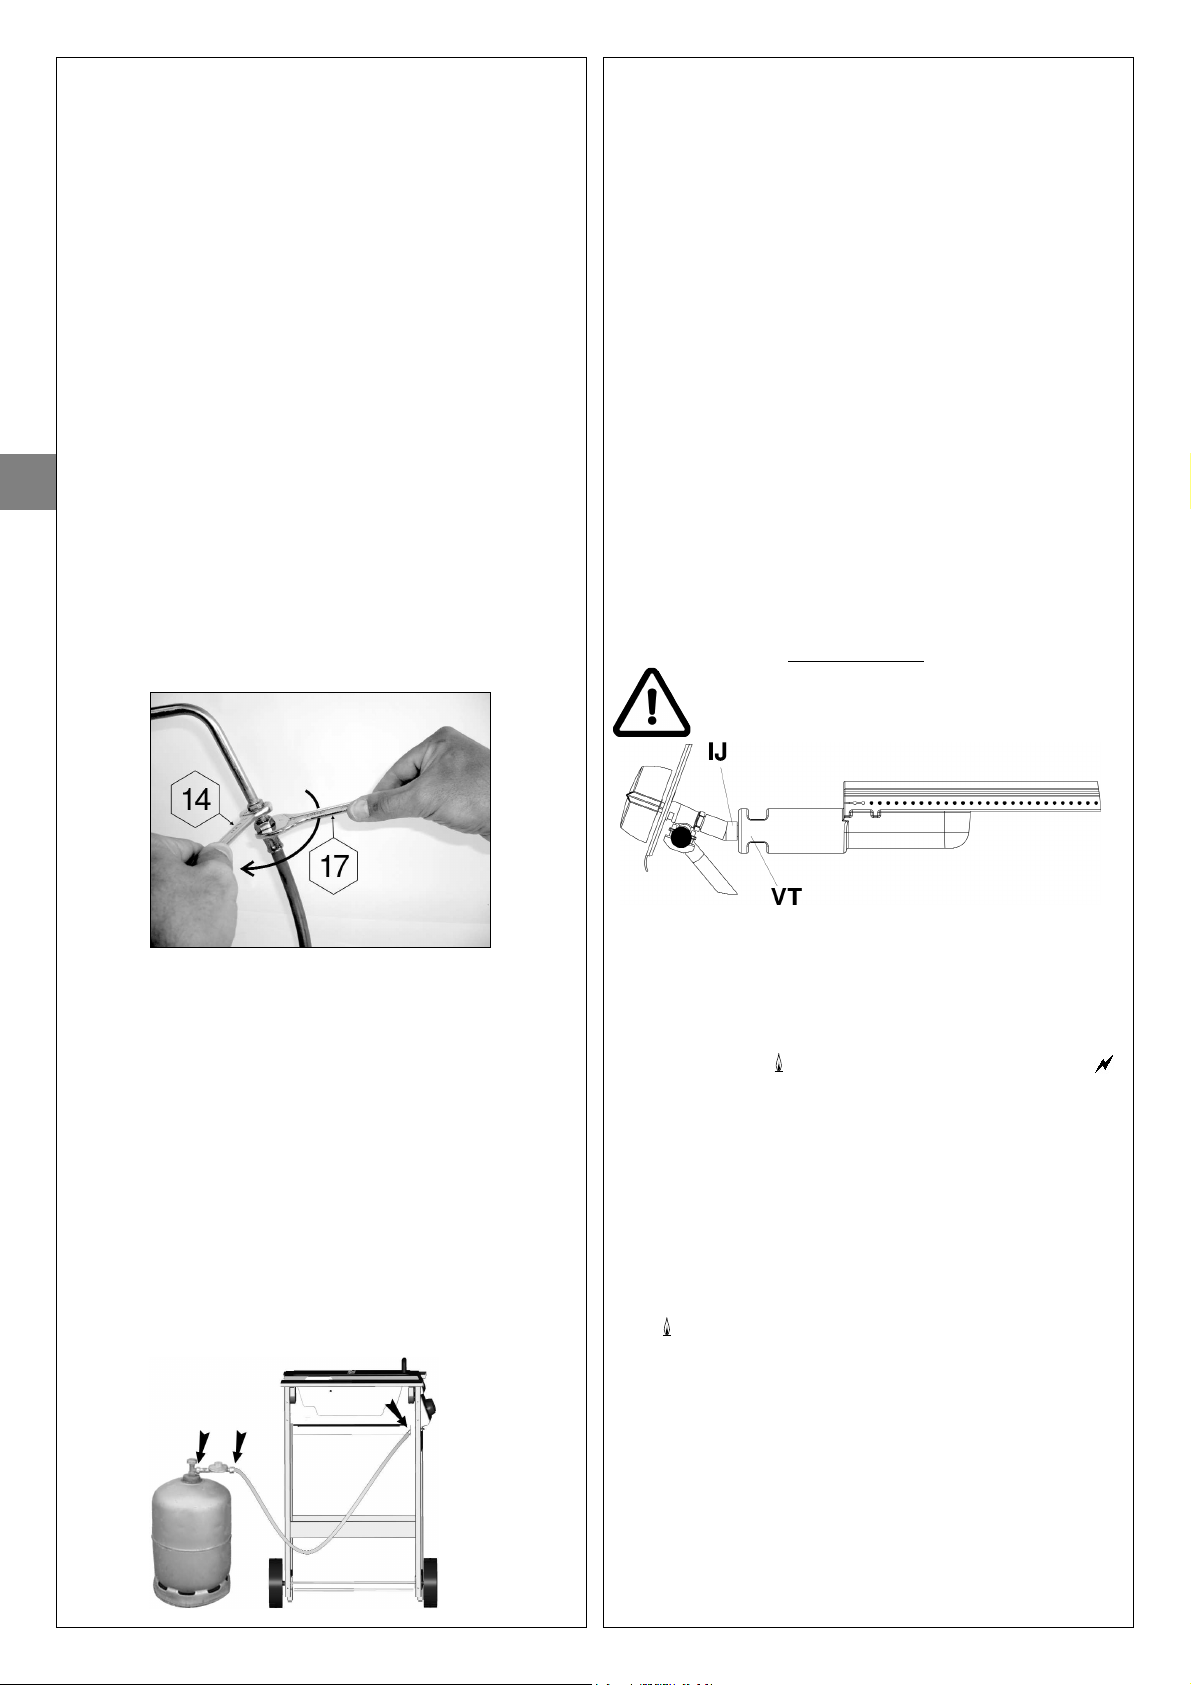
DE
Belgien, Luxemburg, Niederlande, Großbritannien,
Irland, Portugal, Spanien, Italien, Kroatien, Polen,
Norwegen, Schweden, Dänemark, Finnland,
Teschechische Republik, Ungarn, Slowenien, Slowakei,
Griechenland, Bulgarien, Türkei, Rumänien:
Das Gerät ist mit einem gerillten Anschluss versehen, an
den ein nach den jeweiligen Landesvorschriften (NF, BS,
UNI, UNE usw.) für Butan und Propan geeigneter flexibler
Gasschlauch angeschlossen wird. Dieser darf nicht
länger als 1,20 m sein.
Zu ersetzen bei Beschädigungen, Rissen, wenn es die
Vorschriften des Landes verlangen oder je nach seiner
Gültigkeit. Alle Gasschläuche tragen ein
Haltbarkeitsdatum (Jahreszahl) (den Ländern nach).
Wenn dieses erreicht ist, muss der weiche Schlauch
ersetzt werden.
Nicht am Schlauch ziehen und ihn nicht verdrehen. Von
Teilen entfernt halten, die heiß werden können.
Prüfen, ob der Schlauch normal verläuft, ohne Drall oder Zug.
Deutschland, Österreich, Schweiz:
Das Gerät muss mit einem Schlauch verwendet werden,
der für den Einsatz von Butan und Propan geeignet ist.
Dieser darf nicht länger als 1,50 m sein. Zu ersetzen bei
Beschädigungen, Rissen, wenn es die Vorschriften des
Landes verlangen oder je nach seiner Gültigkeit. Nicht
am Schlauch ziehen und ihn nicht verdrehen. Von Teilen
entfernt halten, die heiß werden können.
Prüfen, ob der Schlauch normal verläuft, ohne Drall oder Zug.
Schlauchanschluss: für den Anschluss des Schlauchs am
Geräteansatz mit 2 passenden Schlüsseln die
Schlauchmutter festziehen, ohne zu überdrehen:
- 14er-Schlüssel zum Blockieren des Ansatzstücks
- 17er-Schlüssel zum Festziehen der Schlauchmutter
6) Die Flüssigkeit auf die Anschlüsse
(Flasche/Druckregler/ Schlauch/Gerät) auftragen. Die
Schaltknöpfe müssen geschlossen bleiben (OFFStellung). Das Ventil der Gasflasche öffnen.
7) Entstehen Seifenblasen, so zeigt dies eine undichte
Stelle an.
8) Zur Behebung der undichten Stelle die Muttern
anziehen. Defekte Teile auswechseln. Das Gerät darf
erst wieder in Betrieb genommen werden, wenn keine
undichte Stelle mehr vorhanden ist.
9) Das Ventil der Gasflasche schließen.
WICHTIG: Niemals eine Flamme verwenden, um
undichte Stellen zu suchen!
Die Kontrolle und Suche nach undichten Stellen muss
mindestens einmal im Jahr und jedesmal bei
Auswechseln der Gasflasche vorgenommen werden.
g) VOR DER INBETRIEBNAHME
Nehmen Sie das Gerät nicht in Betrieb, bevor Sie die
Betriebsanleitung sorgfältig gelesen und alle Hinweise
verstanden haben. Sichergehen, dass:
- keine undichten Stellen vorliegen.
- die Venturirohre nicht verstopft sind.
- die Schubeinheit richtig angebracht ist.
- der Schlauch nicht mit Teilen in Berührung steht, die
heiß werden können.
- dass die Lüftungsöffnungen der Halterung des
Gasbehälters nicht eventuell verstopft sind.
- dass sich die Fettauffangschale in ihrer Halterung
befindet und bis zum Anschlag eingeschoben ist.
Bitte genau überprüfen, ob die Venturirohre
(VT) die Düsen abdecken (IJ)
e) DECKEL (je nach Modell)
Den Deckel insbesondere bei Gerätebetrieb vorsichtig
handhaben. Sich nicht über die Grillwanne beugen.
f) DICHTHEITSKONTROLLE
1) Die Kontrolle im Freien vornehmen und dabei alle
Gegenstände aus brennbaren Materialien vom Grill
entfernen. Nicht rauchen.
2) Sicherstellen, dass die Schaltknöpfe auf "OFF" (l)
stehen.
3) Die Schlauchenden ganz auf den Anschlussstutzen
des Druckreglers und auf den Gerätestutzen
schrauben.
4) Den Druckregler auf die Gasflasche schrauben.
5) Leckstellen nicht mit einer offenen Flamme suchen,
sondern geeignete Lecksuchspray dazu verwenden.
h) ANZÜNDEN DER GRILLBRENNER
- Schutzdeckel entfernen und Kochdeckel (je nach
Modell) öffnen.
- Sicherstellen, dass die Reglerknöpfe auf "OFF" (l)
stehen.
- Einstellknopf drücken und entgegen dem Uhrzeigersinn
voll aufdrehen ( ), dann sofort Zündknopf drücken ( )
bis zum Klicken. Erfolgt die Zündung nicht beim ersten
Klicken, noch 3-4mal drücken.
- Solange wiederholen bis der Brenner gezündet hat.
- Wenn der Brenner nach 4 oder 5 Versuchen nicht
zündet, 5 Minuten warten und erneut versuchen.
Sobald der Brenner an ist, gibt es zwei Möglichkeiten,
einen weiteren Brenner anzuzünden:
r Möglichkeit: den oben beschriebenen Vorgang
wiederholen;
r Möglichkeit: den Brenner rechts oder links vom ersten
Brenner anzünden, dann nacheinander die anderen
Brenner, indem der Einstellknopf voll aufgedreht wird
( ).
Wenn die piezoelektrische Zündung nicht funktioniert, die
manuelle Zündung verwenden (vgl. nächster Abschnitt)
i) ZÜNDEN VON HAND
- Schutzdeckel entfernen und Kochdeckel (je nach
Modell) öffnen.
- Sicherstellen, dass die Reglerknöpfe auf "OFF" (l)
stehen.
- Die Fettauffangschale entfernen.
- Ein Streichholz anzünden und von unten in die Nähe
des Brenners führen.
- Auf den entsprechenden Reglerknopf drücken und ihn
26
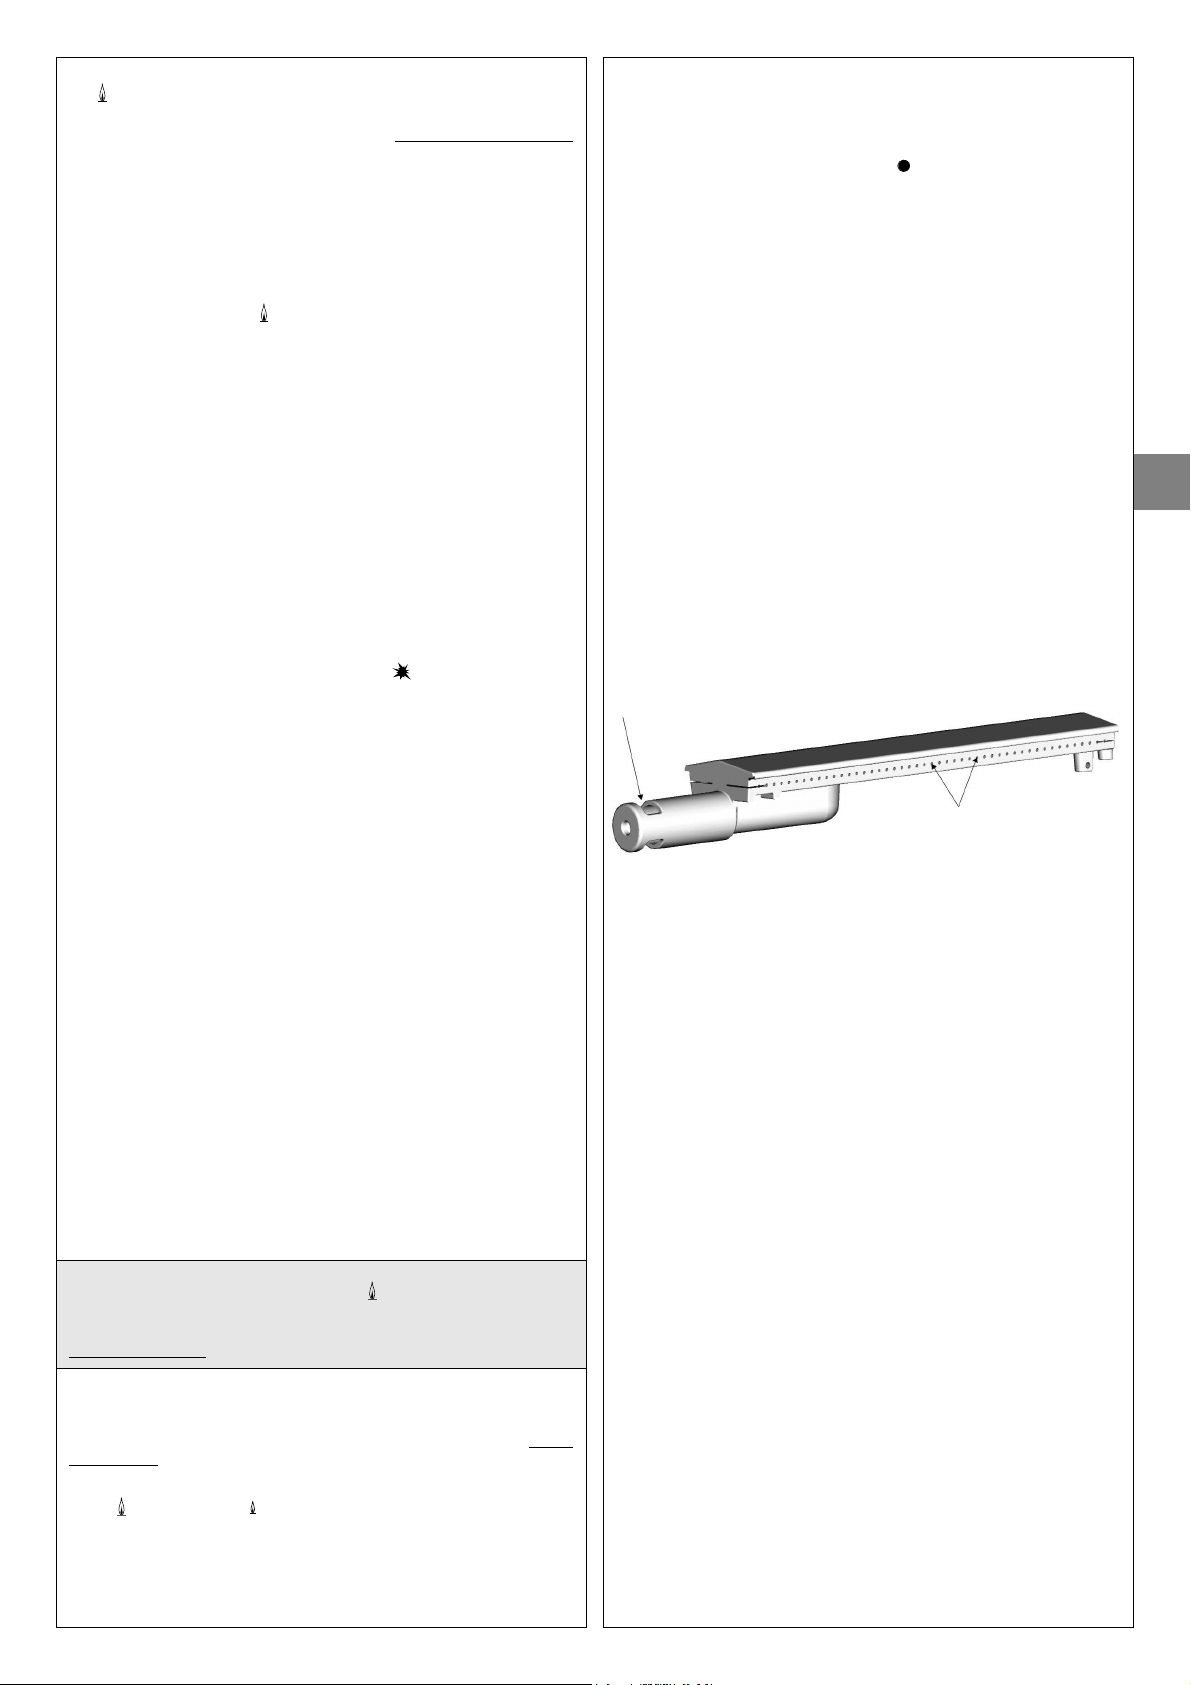
entgegen dem Uhrzeigersinn bis zur Maximalstellung
( ) drehen.
- Sobald der Brenner angezündet ist, Fettauffangschale
in ihre Halterung einsetzen und bis zum Anschlag
einschieben.
Sobald der Brenner an ist, gibt es zwei Möglichkeiten,
einen weiteren Brenner anzuzünden:
r Möglichkeit: den oben beschriebenen Vorgang
wiederholen;
r Möglichkeit: den Brenner rechts oder links vom
ersten Brenner anzünden, dann nacheinander die
anderen Brenner, indem der Einstellknopf voll
aufgedreht wird ( ).
j) AUSSCHALTEN DES GRILLS
Die Schaltknöpfe auf OFF (l) stellen, dann das Ventil der
Gasflasche schließen.
k) ZÜNDEN DES SEITENKOCHERS
(je nach Modell)
Der Kocher kann alleine oder gleichzeitig mit dem Grill
betrieben werden.
Anzünden: Den Hahn der Gasflasche öffnen.
Die Dichtheit des Gaskreises von der Flasche bis zum
Kocher überprüfen (vgl. Abschnitt f). Den Zustand der
Leitung zwischen Grill und Kocher überprüfen. Diese
auswechseln und den Kundendienst heranziehen, wenn
Risse auftreten.
Den Hahn des Kochers öffnen (Plus-Richtung) und bis
zum Klicken auf den Zündknopf ( ) drücken. Wenn
nötig, drei- oder viermal drücken. Falls keine Zündung
erfolgt, ein brennendes Streichholz an den Rand des
Brenners halten.
Die Flamme je nach Größe des verwendeten Kochgeräts
regulieren, indem der Hahn mehr oder weniger geöffnet
wird. Keinen Kochbehälter mit einem Durchmesser unter
12 cm bzw. über 26 cm verwenden.
l) AUSSCHALTEN DES SEINTENKOCHERS
(je nach Modell)
Den Hahn des Kochers (Minus-Richtung) und den Hahn
der Flasche schließen, wenn der Grill nicht in Betrieb ist.
m) AUSWECHSELN DER GASFLASCHE
- Das Auswechseln immer an einem belüfteten Ort und
fern von Flammen, Funken oder Wärmequellen
vornehmen.
- Die Schaltknöpfe auf "OFF" (l) stellen, dann das Ventil
der Gasflasche schließen.
- Den Druckregler abschrauben; überprüfen, ob die
Dichtung an der Gasflasche vorhanden und in gutem
Zustand ist.
- Die volle Gasflasche unter den grill stellen, den
Druckregler wieder anschrauben. Darauf achten, dass
der Schlauch nicht beansprucht wird.
- Dichtheitskontrolle durchführen (siehe Abschnitt f)).
n) GEBRAUCH
Beim erstmaligen Gebrauch den Barbecue mit allen
Brennern in maximaler Stellung ( ) ca. 30 Minuten lang
erhitzen, damit die Neuteile den Farbgeruch verlieren. (je
nach Modell: Schwenkdeckel schließen / Schutzdeckel
nicht anbringen).
Bei Normalbetrieb den Barbecue 15 - 20 Minuten lang
vorwärmen, um die gußeisernen Roste auf die richtige
Grilltemperatur zu bringen. (je nach Modell:
Schwenkdeckel schließen / Schutzdeckel nicht
anbringen).
Die Gargeschwindigkeit kann je nach Stellung der
Einstellknöpfe reguliert werden: zwischen den Stellungen
voll ( ) und mittel ( ).
Vor dem Auflegen der Speisen die Grillroste leicht mit
Speiseöl bestreichen, damit die Grillstücke nicht
hängenbleiben.
Um ein Entflammen des Fetts während des Grillens zu
vermeiden, vorher das überflüssige Fett am Fleisch
entfernen. Nach jedem Grillvorgang das Gerät reinigen,
um eine Fettansammlung zu vermeiden und die
Entflammungsgefahr zu mindern.
Wichtig: Falls während des Betriebs des Gerätes
einer oder mehrere Brenner ausgehen, sofort die
Einstellknöpfe auf "OFF" (l) stellen. 5 Minuten
warten, damit das nicht verbrannte Gas abziehen
kann. Erst danach einen neuen Zündvorgang
starten.
o) REINIGUNG UND WARTUNG
Das Gerät nie verändern: jede Änderung kann sich als
gefährlich erweisen.
Um Ihr Gerät in einwandfreiem betriebsfähigem Zustand
zu halten, wird empfohlen, es in regelmäßigen
Abständen zu reinigen (nach 4- bis 5maliger Benutzung).
Das Gerät vor dem Reinigen völlig abkühlen lassen.
Die Gasflasche schließen und den Druckregler
abschrauben.
Den oberen Teil des Brenners mit einem feuchten
Schwamm (Wasser mit Spülmittelzusatz) reinigen.
Notfalls eine angefeuchtete Stahlbürste benutzen.
Überprüfen, dass die Düsen des Brenners nicht verstopft
sind und vor dem erneuten Gebrauch trocknen lassen.
Notfalls eine Stahlbürste benutzen, um die Auslassdüsen
des Brenners zu reinigen.
Wenn das Gerät mehr als 30 Tage lang nicht benutzt
wurde, ebenfalls überprüfen, ob die Düsen der
Brennerrohre nicht durch Spinnweben verstopft sind,
wodurch die Grillleistung vermindert oder ein
gefährliches Entzünden des Gases außerhalb des
Brenners verursacht werden kann. Bei Bedarf die
Öffnungen des Venturirohres oder den Brenner reinigen.
Öffnungen der Venturirohre
Auslassdüsen
Anmerkung: Durch regelmäßige Reinigung bleibt Ihr
Grillgerät für viele Jahre in gutem Zustand, vorzeitiges
Oxidieren durch säurehaltige Grillreste kann verhindert
werden. Das Oxidieren des Brenners ist jedoch mit der
Zeit eine normale Erscheinung. Ein oxidierter Brenner,
der problemlos funktioniert, muss nicht ausgewechselt
werden. Er muss nur ausgewechselt werden, wenn die
Funktion beeinträchtigt ist (durchgebrochener Brenner
usw.).
SEITENWÄNDE DER WANNE, SCHALTKONSOLE:
Diese Teile ebenfalls regelmäßig mit Schwamm und
Spülmittel reinigen. Keine Scheuermittel verwenden.
Nach dem Reinigen und Trocknen die Grillroste leicht mit
Fett bestreichen, um sie vor Korrosion zu schützen.
KOCHPLATTEN
Vor jeder Reinigung warten, bis sie abgekühlt sind.
Reinigungsmittel Campingaz® BBQ Cleaner Spray und
Grillbürsten verwenden.
Nach dem Reinigen und Trockner der Kochgitter leicht
einfetten, um sie vor Korrosion zu schützen und zu
vermeiden, dass sie rosten und an den Lebensmitteln
kleben. Campingaz®empfiehlt, die Kochgitter mit
saugfähigem Papier dünn mit einem Film aus Pflanzenöl
zu bestreichen.
Achtung: nicht spülmaschinengeeignet, zum Trocknen
vorher abwischen.
HOLZ
Damit das natürliche Aussehen bewahrt und geschützt
bleibt , ist das Holz unserer Grills lasiert. Holz ist jedoch
eine lebendige Materie und reagiert empfindlich auf
Sonneneinstrahlung, Feuchtigkeit und
Temperaturschwankungen.
Um das Aussehen Ihres Grill zu bewahren, empfehlen
wir die Verwendung einer Campingaz-Abdeckhaube, die
als Zubehör zu beziehen ist. Wichtig: bevor Sie die
Schutzhaube anbringen, den Grill vollständig abkühlen
lassen. Am Saisonbeginn mit Lappen oder Pinsel eine
Schicht Lasur für Holz auf die Holzteile aufbringen, damit
Ihr Grill wieder glänzt und geschützt bleibt.
DE
27
 Loading...