

Page 1

Reversible Drill
Operating Instructions
© 2017 Campbell Hausfeld
A Marmon/Berkshire Hathaway Company
Model: XT401000
EN
IN745800 6/17
Page 2

Please read and save these instructions. Read carefully before
attempting to assemble, install, operate or maintain the product
described.
Protect yourself and others by observing all safety information. Failure
to comply with instructions could result in personal injury and/or
property damage! Retain instructions for future reference.
REMINDER: Keep your dated proof of purchase for warranty purposes!
Attach it to this manual or file it for safekeeping.
For parts, product & service information
Model #: ________________________________
Serial #: ________________________________
Purchase Date: __________________________
visit www.campbellhausfeld.com
Campbell Hausfeld
100 Production Drive
Harrison, Ohio 45030
REGISTER YOUR PRODUCT ONLINE NOW! www.campbellhausfeld.com/reg
READ AND FOLLOW ALL INSTRUCTIONS
SAVE THESE INSTRUCTIONS • DO NOT DISCARD
Page 3

BEFORE YOU BEGIN
Description
When you’re in pneumatic mode, this drill meets all the challenges of honing,
reaming, wire-brushing and—of course—drilling. Changing bits and installing
accessories are easy with a keyless chuck and the convenient side-toggle
makes moving from forward to reverse a one-finger task.
Campbell Hausfeld
The company’s history of creating quality products began in 1836, when
it manufactured horse-drawn wagons and agricultural equipment. Today,
Campbell Hausfeld offers a complete line of air compressors, air tools and
accessories, inflators, nailers and staplers, spray guns, pressure washers, and
more. Finish your projects faster and easier with Campbell Hausfeld – The Air
Power Expert.
UNPACKING
After unpacking the unit, inspect carefully for any damage that may have
occurred during transit. Check for loose, missing or damaged parts. Check
to be sure all supplied accessories are enclosed with the unit. In case of
questions, damaged or missing parts, please visit www.campbellhausfeld.com
for customer assistance.
Do not operate unit if damaged during shipping,
cause injury or property damage.
Other Parts (Not Provided)
You will need the following items and/or accessories to properly set-up and
optimally use your air drill:
• 1/4 inch Plug NPT (M)
o For less stress on your air hose and you, try a flex plug.
• 3/8 inch (ID) Air Hose
• 1/4 inch Coupler NPT (F)
o Eliminate coupler confusion with a universal coupler style.
o Quick-connect couplers quickly, easily join hoses to tools.
o If you don’t use a flex plug, consider a swivel coupler to prevent
• 26 Gallon air compressor or larger
• Drill bits/accessories
• PTFE tape for all fitting connections
• Adjustable wrench for tightening fitting connections
See www.campbellhausfeld.com for additional information on accessories to
support your air tools and pneumatic system.
®
makes it easier for you to finish your projects like a pro.
handling or use. Damage may result in bursting and
hose kinks and reduce stress on your air hose.
1
Page 4

BEST PRACTICES
u For best output, maintain pressure at the tool of 90 PSI.
u The longer your air hose the greater the pressure drop from compressor to tool.
If you are using a hose longer than 50 feet, consider upgrading to a 1/2 inch ID air
hose to ensure proper tool pressure.
u Failure to lubricate and maintain your air tools properly will dramatically shorten
their life. Use oil every time you use your air tool to lubricate, clean and inhibit rust
in one step. Campbell Hausfeld sells air tool oil under part number ST1270.
SPECIFICATIONS
XT401000
Maximum pressure (PSI) 90
CFM under load 100% duty 4.0 CFM @ 90 PSI
CFM no load 100% duty 4.6 CFM @ 90 PSI
SCFM under load 100% duty 29.1 SCFM @ 90 PSI
SCFM no load 100% duty 33.3 SCFM @ 90 PSI
Air Compressor Recommendation 26 gallon
Rated RPM (free speed) 2,000
Forward/Reverse Switch Yes
Speed control Trigger
Drill Shank Range 3/64 inch to 3/8 inch
Horsepower 0.36 HP
Chuck Type Keyless
Gear Type Single Planetary
Air Inlet 1/4 inch NPT (F)
Minimum Hose Size 3/8 inch
Housing Material Composite
Tool Weight 2.3 Lbs.
Tool Length 7 inch
Tool Height 6-3/8 inch
Tool Width 1-7/8 inch
2
Page 5

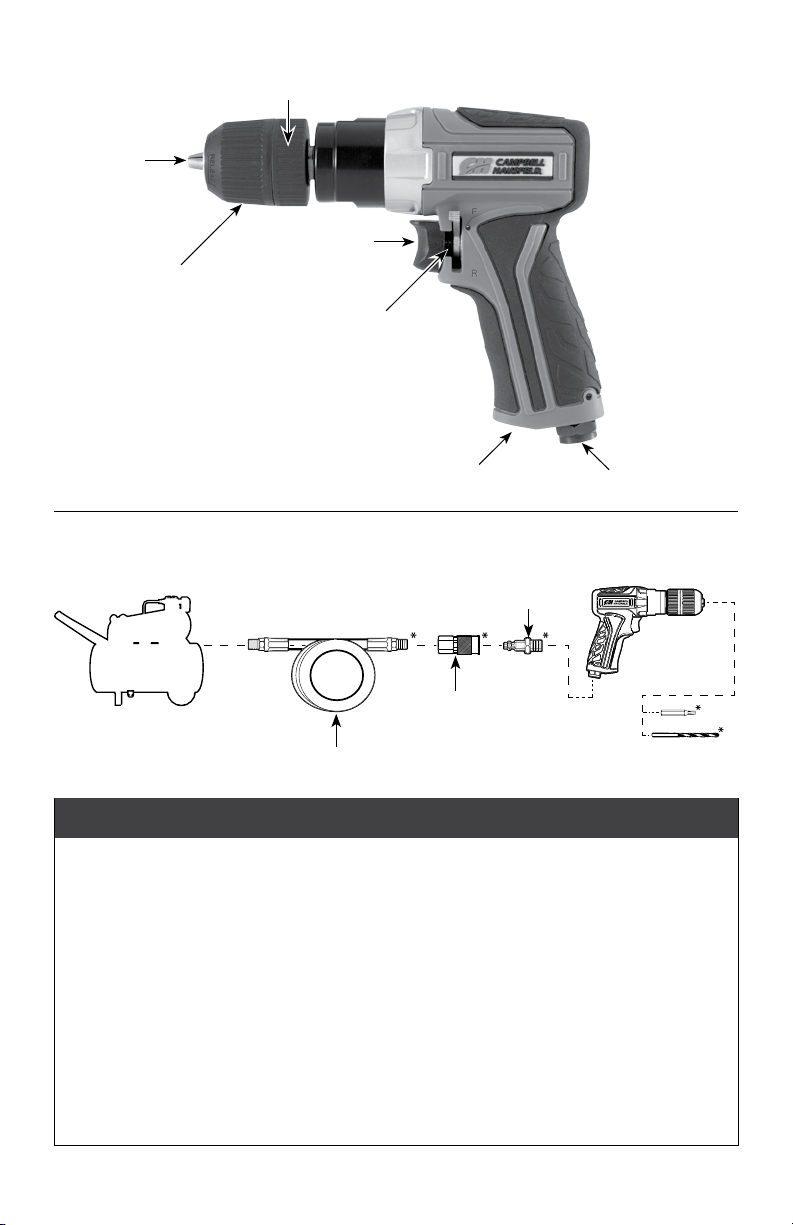
GETTING TO KNOW YOUR UNIT
Ring
Chuck
Trigger
Sleeve
Forward/Reverse
Switch
Exhaust Port
Air Inlet
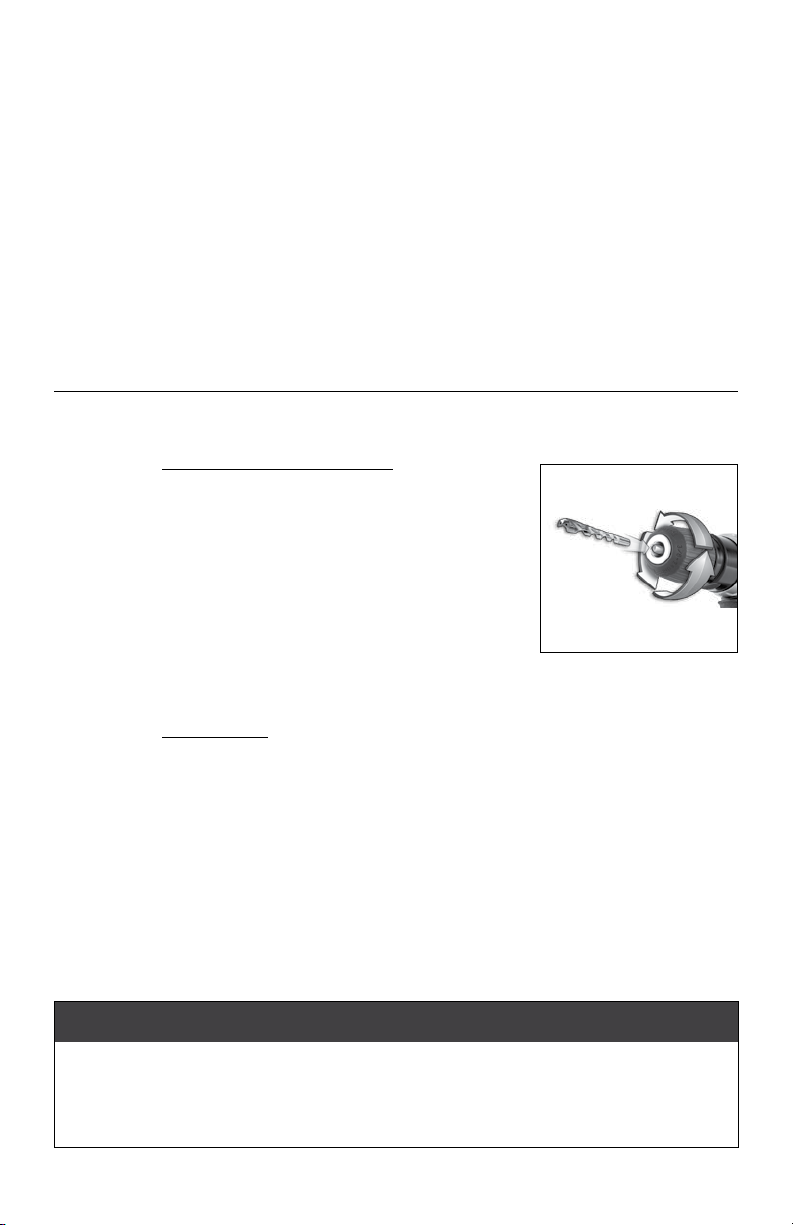
SET UP INSTRUCTIONS
Plug
Quick
Coupler
Air Hose
* Items shown in Set Up Instructions are not included with this tool.
BEST PRACTICES
u The air compressor used with your reversible drill must be able to maintain a
minimum of 90 PSI when the tool is being used. An inadequate air supply can
cause a loss of power and inconsistent tool output/performance.
u A pressure regulator—used at the tool--is helpful to control the operating pressure
of the tool and maintain 90 PSI.
u Use an oiler to provide oil circulation through the tool and a filter to remove liquid
and solid impurities which can rust or “gum up” internal parts of the tool.
u To disconnect a coupler/plug from a system set-up: push the coupler and plug
together before pulling the coupler sleeve back and separating the coupler and
plug.
u Make sure that the bits used with your pneumatic drill are heat-treated steel for
increased durability and longer life.
3
Page 6
LUBRICATION
To protect your tool, lubricate the motor every time--before and after--you
use this tool. You cannot oil the motor too often or put too much oil in the
air inlet.
1. Disconnect the drill from air supply and remove bit and/or attachment.
2. Turn the tool upside down.
3. While pulling the trigger, pour approximately a teaspoon of air tool oil
in the air inlet. Campbell Hausfeld makes an air tool oil under model
number ST1270.
4. Connect the tool to the air supply and cover the exhaust port with a
towel.
5. Run the tool for about 10 seconds. Oil will spray from the exhaust port
when the tool is triggered.
6. Continue to run until no oil is discharged.
7. Wipe all residual oil from tool before use.
OPERATING INSTRUCTIONS
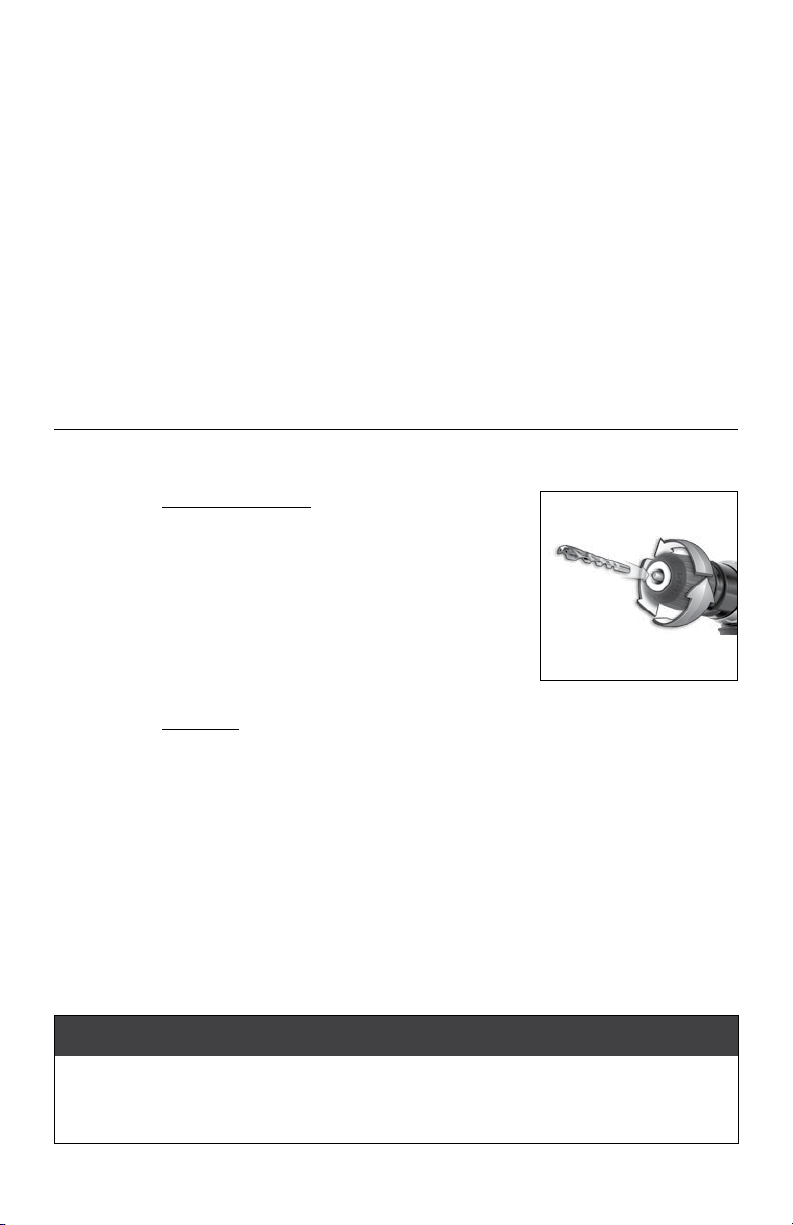
BIT INSTALLATION
1. Remove tool from air supply.
2. Insert drill bit and/or attachment in chuck.
3. Holding the ring stationary, turn the sleeve
clockwise until the chuck jaws close tightly
and the drill bit is secured.
4. To remove bit/attachment, hold the ring
stationery and turn the sleeve counter
clockwise to open the chuck jaws.
DRILLING
1. Locate and mark the desired drill point with a center punch or an awl to
provide a seat for the drill bit tip.
2. Secure workpiece in a vise or with a clamp.
3. Place drill bit tip on the exact drill point and pull the trigger to start drill.
4. Apply steady pressure while guiding the drill.
5. When drilling deep holes, withdraw drill bit several times to clear
cuttings.
6. Reduce drill pressure before completely cutting through workpiece to
keep the chuck from causing damage.
7. Before releasing the trigger, pull bit out of workpiece.
BEST PRACTICES
u Never apply a spinning drill bit to a workpiece as drill will be difficult to control on
work surface potentially causing injury and/or property damage.
u When drilling metal, apply lubricant to the drill bit to reduce friction.
4
Page 7

STORAGE
Lubricate your drill before storing. Follow motor lubrication instructions with
an exception to step #5. Only run the impact wrench for 2-3 seconds (instead
of 10 seconds) because more oil needs to remain in the air tool when storing.
Store your tool in a cool dry place.
TECHNICAL SERVICE
For information regarding the operation or repair of this product, please visit
www.campbellhausfeld.com.
SAFETY INSTRUCTIONS
This manual contains information that is very important to know and
understand. This information is provided for SAFETY and to PREVENT
EQUIPMENT PROBLEMS. To help recognize this information, observe the
symbols found on page 8. The Safety Symbols throughout this manual are to
alert you to important safety hazards and precautions.
The DANGER, WARNING, CAUTION, and NOTICE notifications
and instructions in this manual cannot cover all possible condi-
tions and situations that may occur. It must be understood by
the operator that caution is a factor which cannot be built into
this product, but must be supplied by the operator.
With any piece of equipment, new or used, the most important part of its
operation is SAFETY!
Campbell Hausfeld encourages you to familiarize yourself with your new
equipment and stresses safe operation.
The next few pages of this manual are a summary of the main safety aspects
associated with this unit. Be sure to read and understand completely before
operating the machine.
The symbols used throughout the operation and maintenance sections of
this manual call attention to safety procedures.
Important Safety Information
Please read and save these instructions. Read carefully before attempting to
assemble, install, operate or maintain the product described. Protect yourself
and others by observing all safety information. Failure to comply with
instructions could result in personal injury and/or property damage! Retain
instructions for future reference.
This manual contains important safety, operational and maintenance
information. If you have any questions, please visit
www.campbellhausfeld.com for customer assistance.
5
Page 8
SAFETY INSTRUCTIONS (CONTINUED)
California Proposition 65
MANUAL
This product can expose you to chemicals including
lead, which are known to the State of California
to cause cancer and birth defects or other reproductive harm. For more
information go to www.P65Warnings.ca.gov.
Illinois Lead Poisoning Prevention Act
Contains lead. May be harmful if eaten or chewed.
Complies with Federal Standards.
General Safety
This product is a part of a high pressure system and the following safety
precautions must be followed at all times along with any other existing safety
rules.
1. Read all manuals included with this product carefully. Be thoroughly
familiar with the controls and the proper use of the equipment.
2. Only persons well acquainted with these rules of safe operation should
be allowed to use the air tool.
Do not exceed maximum operating pressure of the
air tool (90 PSI). The air tool could explode and result
in death or serious personal injury.
3. Do not exceed any pressure rating of any component in the system.
4. Disconnect the air tool from air supply before changing tools or
attachments, servicing and during non-operation.
Safety glasses and ear protection must be worn
during operation.
5. Do not wear loose fitting clothing, scarves, or neck ties. Loose clothing
may become caught in moving parts and result in serious personal injury.
6. Do not wear jewelry when operating any tool. Jewelry may become
caught in moving parts and result in serious personal injury.
7. Do not depress trigger when connecting the air supply hose.
8. Always use attachments designed for use with air powered tools. Do not
use damaged or worn attachments.
Disconnect the air line before removing or installing
a drill bit. Tightening or loosening the drill bit with
air supply attached may cause injury.
Forcing or applying excessive force to the drill can
cause the bit to break.
9. Never trigger the tool when not applied to a work object. Attachments
must be securely attached. Loose attachments can cause serious injury.
6
Page 9

Never carry a tool by the hose or pull hose to move
tool or a compressor. Keep hoses away from heat,
oil and sharp edges. Replace any hose that is damaged, weak or worn.
10. Protect air lines from damage or puncture.
11. Never point an air tool at oneself or any other person. Serious injury
could occur.
12. Check air hoses for weak or worn condition before each use. Make sure
all connections are secure.
Release all pressure from the system before
attempting to install, service, relocate or perform
any maintenance.
This air tool requires lubrication before initial use
and before and after each additional use.
Cover exhaust port with a towel before applying air
pressure. Oil will discharge through exhaust port
during first few seconds of operation after an airtool has been lubricated.
Failure to cover exhaust port can result in serious injury.
13. Keep all nuts, bolts and screws tight and ensure equipment is in safe
working condition.
14. Do not put hands near or under moving parts.
15. Always secure work with clamps or in a vise.
Do not misuse this product. Excessive exposure to
vibration, work in awkward positions, and repetitive
work motions can cause injury to hands and arms. Stop using any tool if
discomfort, numbness, tingling, or pain occur, and consult a physician.
7
Page 10
SAFETY INSTRUCTIONS (CONTINUED)
Safety Glossary
This manual contains information that is very important to know and
understand. This information is provided for SAFETY and to PREVENT
EQUIPMENT PROBLEMS. To help recognize this information, observe the
following symbols.
Danger indicates an imminently hazardous situation
which, if not avoided, WILL result in death or serious
injury.
Warning indicates a potentially hazardous situation
which, if not avoided, COULD result in death or
serious injury.
Caution indicates a potentially hazardous situation
which, if not avoided, MAY result in minor or
moderate injury.
Notice indicates important information, that if not
followed, may cause damage to equipment.
IMPORTANT or NOTE: Information that requires special attention.
Safety Symbols
The following Safety Symbols appear throughout this manual to alert you to
important safety hazards and precautions.
MANUAL
Wear Eye
and Mask
Protection
Read Manual
First
Risk of
Explosion
Wear Eye
and Hearing
Protection
Risk of
Pressure
SAVE THESE INSTRUCTIONS
DO NOT DISCARD
8
Page 11

GENERAL TROUBLESHOOTING GUIDE
SYMPTOM POSSIBLE CAUSE(S) CORRECTIVE ACTION
Tool runs slowly or will
not operate
Moisture blowing out
of tool
Drill is jammed and
will not turn
1. Grit or gum in tool 1. Flush tool with Campbell Hausfeld
2. No oil in tool 2. Lubricate tool according to
3. Low air pressure 3. Adjust compressor regulator to 90 PSI
4. Air hose leaks 4. Tighten and seal hose fittings if leaks
5. Pressure drops 5 a. Be sure the hose is properly sized.
1. Water in tank 1. Drain tank. (See air compressor
2. Water in the air lines/hoses 2 a. Install a water separator/filter.
1. Gears or internal gears are
stripped or worn
2. Motor bearings seized 2. Replace tool.
3. Worn or cracked rotor blades 3. Replace tool.
air tool oil, gum solvent, or an
equal mixture of SAE 10 motor oil
and kerosene. Lubricate tool after
cleaning with Campbell Hausfeld (or
comparable) air tool oil.
lubrication instructions in this
manual.
while tool is running free.
are found.
Long hoses or tools using large
volumes of air may require a hose
with an I.D. of 1/2 inch or larger
depending on total hose length.
b. Do not use multiple number
of hoses connected with quick
connect fittings. Additional
pressure drop and reduced tool
power is caused. Connect hoses
directly together.
manual). Oil tool and run until no
water is evident. Oil tool again and
run 1-2 seconds.
NOTE: Separators work properly
only when air passing through
the separator is cool. Locate
separator/filter as far as possible
from compressor.
b. Install an air dryer.
c. Oil tool immediately anytime
water enters tool.
1. Replace tool.
99
Page 12

Reminder: Keep your dated proof of purchase for warranty purposes! Attach it to this manual or file it
for safekeeping.
LIMITED WARRANTY
1. DURATION: From the date of purchase by the original purchaser as follows: Two (2) Years.
2. WHO GIVES THIS WARRANTY (WARRANTOR): Campbell Hausfeld, a Marmon/Berkshire Hathaway
Company, 100 Production Drive, Harrison, Ohio, 45030. Visit www.campbellhausfeld.com.
3. WHO RECEIVES THIS WARRANTY (PURCHASER): The original purchaser (other than for purposes of
resale) of the Campbell Hausfeld product.
4. WHAT PRODUCTS ARE COVERED BY THIS WARRANTY: This Campbell Hausfeld air tool.
5. WHAT IS COVERED UNDER THIS WARRANTY: Substantial defects in material and workmanship which
occur within the duration of the warranty period with the exceptions below.
6. WHAT IS NOT COVERED UNDER THIS WARRANTY:
A. Implied warranties, including those of merchantability and FITNESS FOR A PARTICULAR
PURPOSE ARE LIMITED FROM THE DATE OF ORIGINAL PURCHASE AS STATED IN THE DURATION.
If this product is used for commercial, industrial or rental purposes, the warranty will apply for
ninety (90) days from the date of purchase. Some States do not allow limitation on how long an
implied warranty lasts, so the above limitations may not apply to you.
B. ANY INCIDENTAL, INDIRECT, OR CONSEQUENTIAL LOSS, DAMAGE, OR EXPENSE THAT MAY
RESULT FROM ANY DEFECT, FAILURE, OR MALFUNCTION OF THE CAMPBELL HAUSFELD
PRODUCT. Some States do not allow the exclusion or limitation of incidental or consequential
damages, so the above limitation or exclusion may not apply to you.
C. Any failure that results from an accident, purchaser’s abuse, neglect or failure to operate
products in accordance with instructions provided in the owner’s manual(s) supplied with
product. Accident, purchaser’s abuse, neglect or failure to operate products in accordance with
instructions shall also include the removal or alteration of any safety devices. If such safety
devices are removed or altered, this warranty is void.
D. Normal adjustments which are explained in the owner’s manual(s) provided with the product.
7. RESPONSIBILITIES OF WARRANTOR UNDER THIS WARRANTY: Repair or replace, at Warrantor’s
option, products or components which are defective, have malfunctioned and/or failed to conform
within the duration of the specific warranty period.
8. RESPONSIBILITIES OF PURCHASER UNDER THIS WARRANTY:
A. Provide dated proof of purchase and maintenance records.
B. Visit www.campbellhausfeld.com to obtain your warranty service options. Freight costs must be
borne by the purchaser.
C. Use reasonable care in the operation and maintenance of the products as described in the
owner’s manual(s).
9. WHEN WARRANTOR WILL PERFORM REPAIR OR REPLACEMENT UNDER THIS WARRANTY: Repair
or replacement will be scheduled and serviced according to the normal work flow at the servicing
location, and depending on the availability of replacement parts.
This Limited Warranty applies in the United States, Canada and Mexico only and gives you specific legal
rights. You may also have other rights which vary from state to state or country to country.
10
Page 13

Perceuse réversible
Instructions d’Utilisation
© 2017 Campbell Hausfeld
A Marmon/Berkshire Hathaway Company
Modèle: XT401000
FR
IN745800 6/17
Page 14

Lire et conserver ces instructions. Il faut les lire attentivement avant
de commencer à assembler, installer, faire fonctionner ou entretenir
l’appareil décrit.
Pour se protéger et protéger autrui, observer toutes les informations sur
la sécurité. Négliger d’appliquer ces instructions peut causer
des blessures et/ou des dommages matériels! Conserver ces instructions
pour consultation ultérieure.
RAPPEL: Conservez votre preuve d’achat datée aux fins de garantie!
Attachez-le à ce manuel ou classez-le pour le garder en sécurité.
Pour de l’information sur les pièces,
produits et services veuillez visiter
N° de modèle : _____________________________
www.campbellhausfeld.com
N° de série : _______________________________
Date d’achat : _____________________________
ENREGISTREZ VOTRE PRODUIT EN LIGNE MAINTENANT !
www.campbellhausfeld.com/reg
LIRE ET SUIVRE TOUTES LES INSTRUCTIONS
CONSERVER CES INSTRUCTIONS • NE PAS JETER
Campbell Hausfeld
100 Production Drive
Harrison, Ohio 45030
Page 15

AVANT DE COMMENCER
Description
Lorsque vous êtes en mode pneumatique, cette perceuse répond à tous les
défis qui se présentent à vous pendant l’affûtage, l’alésage, le brossage
métallique et, bien sûr, le forage. Changer les mèches et installer d’autres
accessoires est facile avec le mandrin auto-serrant et l’interrupteur à bascule
latéral pratique vous permet de facilement passer de la marche avant à la
marche arrière avec un seul doit.
CampbellHausfeld® vous facilite le travail afin de terminer vos projets en
pro. L’histoire de l’entreprise est parsemée de produits de qualités depuis
1836, alors que furent fabriqués les wagons tirés par les chevaux et les
équipements agraires. Aujourd’hui, Campbell Hausfeld offre une gamme
complète de compresseurs, outils et d’accessoires pneumatiques, pompes
de gonflage, de cloueurs, agrafeuses, pistolets pulvérisateurs, laveuses à
pression, et plus.Terminez vos projets plus rapidement et plus facilement
grâce à Campbell Hausfeld – l’expert de la puissance de l’air.
DÉBALLAGE
Dès que l’appareil est déballé, l’inspecter attentivement pour tout signe
de dommages en transit. Vérifier s’il y a des pièces desserrées, manquantes
ou endommagées. Vérifier pour s’assurer que tous les accessoires fournis
sont inclus avec l’appareil. Pour toutes questions, pièces endommagées ou
manquantes, veuillez visiter www.campbellhausfeld.com pour l’assistance à la
clientèle.
Ne pas utiliser un modèle qui a été endommagé
Le dommage peut résulter en explosion et peut causer des blessures ou
dégâts matériels.
pendant le transport, la manipulation ou l’utilisation.
Autres pièces (non fournies)
Il vous faudra les éléments et/ou accessoires suivants pour correctement mettre
en marche et utiliser de manière optimale votre perceuse pneumatique :
• Connecteur 1/4 po NTP (M)
o Pour une réduction du stress pour vous et votre tuyau, essayez un
connecteur flexible.
• Tuyau à air 3/8 po (DIA. INT.)
• Raccord 1/4 po NPT (F)
o Élimine la confusion par l’utilisation d’un raccord de style universel.
o Les coupleurs à attache rapide raccordent rapidement et facilement
les tuyaux aux outils.
o Si vous n’utilisez pas un connecteur flexible, un raccord pivotant
pourrait être utilisé afin d’éviter l’entortillement et réduire le stress
imposé à votre tuyau d’air.
• Compresseur d’air 98,41L (26gal) ou plus.
• Mèches/accessoires
• Ruban PTFE pour tous les joints des raccords
• Clé ajustable pour serrer les joints des raccords
Voir au www.campbellhausfeld.com pour d’autres informations sur les
accessoires accompagnant vos outils et votre système pneumatique.
Fr1
Page 16

MEILLEURES PRATIQUES
u Pour une meilleure puissance, maintenez la pression à l’outil de 621 kPa.
u Plus votre tuyau à air est long, plus la pression diminuera entre le compresseur et
l’outil. Si vous utilisez un tuyau à air dépassant 15,2m (50 pi), on devrait plutôt
utiliser un tuyau à air de 1/2 po de dia. int. pour assurer une pression appropriée à
l’outil.
u À défaut de lubrifier et de correctement entretenir vos outils pneumatiques diminuera
drastiquement leur durée de vie. Utilisez de l’huile chaque fois que vous utilisez votre
outil pour le lubrifier, le nettoyer et éviter la rouille, en une seule étape. Campbell
Hausfeld offre une huile à outils pneumatiques sous le numéro de pièceST1270.
CARACTÉRISTIQUES TECHNIQUES
XT401000
Pression maximale (kPa) 621
pi³/min (L/min) en charge de service à 100% 113,3 L/min @ 621 kPa
pi³/min (L/min) sans charge de service à 100% 130,3 L/min @ 621 kPa
pi³/min standard (L/min) en charge de service à 100% 824 L/min @ 621 kPa
pi³/min standard (L/min) sans charge de service à 100% 943 L/min @ 621 kPa
Recommandation pour le compresseur d’air 98,41 L
Classification RPM (vitesse à vide) 2 000
Interrupteur de marche avant/arrière Oui
Commande de la vitesse Détente
Gamme de la tige de perçage 1,2 mm à 9,5 mm
Puissance 0.36 HP
Type de mandarin Automatique
Type d’engrenage Planétaire unique
Arrivée d’air 1/4 po NPT (F)
Taille minimum du tuyau 9,5 mm (3/8 po)
Matériau du logement Composite
Poids de l’outil 1,04 kg
Longueur du tuyau 17,78 cm (7 po.)
Hauteur de l’outil 16,19 cm (6-3/8 po.)
Largeur du tuyau 4,76 cm (1-7/8 po.)
(3/64 po to 3/8 po)
Fr2
Page 17

APPRENEZ À CONNAÎTRE VOTRE UNITÉ
Anneau
Mandarin
Détente
Manchon
Interrupteur de
marche avant/
arrière
Sortie de l’échappement
Arrivée d’air
INSTRUCTIONS DE MISE EN MARCHE
Bouchon
Raccord
Rapide
Tuyau À Air
* Les éléments montrés aux Instructions de mise en marche ne sont pas fournis avec cet outil.
MEILLEURES PRATIQUES
u Le compresseur d’air utilisé avec votre perceuse réversible doit être capable de
maintenir au moins 621 psi lorsque l’outil est en fonction. Un approvisionnement
d’air inadéquat peut causer une perte de puissance et une performance
inconstante de l’outil.
u Un régulateur de pression – utilisé sur l’outil – est utile pour contrôler la pression
de fonctionnement de l’outil et maintenir 621 kPa.
u Utilisez un huileur pour offrir une circulation de l’huile dans l’outil et un filtre pour
retirer les impuretés liquides et solides pouvant causer la rouille ou de l’encrassage.
u Pour débrancher un raccord/embout d’un système: poussez le raccord et l'embout
ensemble avant de tirer le manchon du raccord vers l’arrière et en séparant le
coupleur et l'embout.
u Assurez-vous que les forets qui sont utilisés avec votre perceuse pneumatique
sont en acier traité à la chaleur afin de garantir une durabilité accrue et une plus
longue durée de vie.
Fr3
Page 18

LUBRIFICATION
Pour protéger votre outil, lubrifiez le moteur chaque fois –avant et après–
l’avoir utilisé. Vous ne pouvez huiler le moteur trop fréquemment ou placer
trop d’huile dans l’arrivée d’air.
1. Débranchez la perceuse d’alimentation en air et enlevez la mèche et/ou
l’élément.
2. Tournez l’outil à l’envers.
3. En tirant sur la détente, versez environ une cuillerée à thé d’huile à
outils pneumatiques dans l’arrivée d’air. Campbell Hausfeld offre une
huile à outils pneumatiques avec le numéro de modèle ST1270.
4. Connectez l’outil à l’alimentation d’air et couvrez la sortie de
l’échappement avec une serviette.
5. Mettez l’outil en marche pendant 10 secondes. L’huile sera pulvérisée
par la sortie de l’échappement lorsque l’outil sera mis en marche.
6. Continuez tant qu’il y aura de l’huile.
7. Essuyez toute huile résiduelle de l’outil avant de l’utiliser.
MODE D’EMPLOI
INSTALLATION DE LA MÈCHE
1. Enlevez l’outil de l’alimentation d’air.
2. Insérez la mèche et/ou l’élément dans le
mandarin.
3. Tenez l’anneau immobile, tournez le
manchon en sens anti-horaire jusqu’à ce
que les mâchoires du mandarin se ferment
solidement et que la mèche soit en place.
4. Pour enlever la mèche/l’élément, tenez
l’anneau immobile et tournez le manchon en
sens anti-horaire pour ouvrir les mâchoires du mandarin.
PERCER
1. Localisez et marquez le point de perçage souhaité avec un burin ou un
poinçon afin de fournir un espace pour la mèche de forage.
2. Fixez la pièce à usiner dans un étau ou à l’aide de pinces.
3. Placez la mèche de forage sur le point de perçage exact et appuyez sur
la gâchette pour commencer à percer.
4. Appliquez une pression uniforme pendant que vous guidez la mèche.
5. Lorsque vous percez des trous profonds, retirez la mèche plusieurs fois
afin de retirer les copeaux.
6. Réduire la pression de perçage avant de couper au travers de la pièce
afin que le mandarin n’endommage rien.
7. Avant de relâcher la détente, retirez la mèche de la pièce.
MEILLEURES PRATIQUES
u Ne jamais appliquer de mèche de forage filetée dans une pièce à usiner car la
perceuse sera difficile à manier sur la surface de travail et pourrait provoquer des
blessures graves et/ou des dégâts matériels à la propriété.
u Lorsque vous percez du métal, appliquez un lubrifiant à la mèche pour réduire la
friction.
Fr4
Page 19

ENTREPOSAGE
Lubrifier votre perceuse avant de la ranger. Suivre les directives de
lubrification du moteur, sauf pour l’étape 5. Ne faites fonctionner la clé à
chocs que pendant 2-3 secondes (au lieu de 10 secondes) parce qu’il doit
rester davantage d’huile dans l’outil pneumatique pendant l’entreposage.
Rangez votre outil dans un endroit frais et sec.
SERVICE TECHNIQUE
Pour de l’information sur le fonctionnement ou la réparation de ce produit,
veuillez visiter le www.campbellhausfeld.com.
INSTRUCTIONS DE SÉCURITÉ
Ce guide contient de l’information très importante que vous devez connaître
et comprendre. Cette information est fournie à des fins de SÉCURITÉ et
dans le but d’ÉVITER DES PROBLÈMES AVEC L’ÉQUIPEMENT. Pour faciliter la
reconnaissance de cette information, observez les symboles se trouvant à la
pageFr8. Les symboles sur la sécurité de ce manuel, visent à vous alerter des
importants dangers à la sécurité et les précautions.
Les symboles DANGER, AVERTISSEMENT, ATTENTION et AVIS
ainsi que les instructions de ce manuel ne peuvent pas couvrir
toutes les conditions et situations qui pourraient se produire.
L’opérateur doit comprendre que le bon sens et des précautions
sont des facteurs qui ne peuvent pas être inclus dans ces
produits, mais doivent être fournis par l’opérateur.
Avec toute pièce d’équipement, neuve ou usée, la plus importante partie de
l’opération est la SÉCURITÉ!
Campbell Hausfeld vous encourage à vous familiariser avec votre nouvel
équipement et insiste sur un fonctionnement sécuritaire.
Les prochaines pages de ce manuel résument les aspects principaux sur la
sécurité liée avec cette unité. Assurez-vous de les lire et les comprendre
entièrement avant d’utiliser cet appareil.
Les symboles utilisés dans les sections de fonctionnement et d’entretien du
présent manuel attirent l’attention sur les procédures de sécurité.
Importantes instructions de sécurité
S’il vous plaît lire et conserver ces instructions. Lire attentivement avant
de monter, installer, utiliser ou de procéder à l’entretien du produit décrit.
Se protéger ainsi que les autres en observant toutes les instructions de
sécurité, sinon, il y a risque de blessure et/ou dégâts matériels! Conserver ces
instructions comme référence.
Ce manuel contient des informations concernant la sécurité, le
fonctionnement et l’entretien. Si vous avez des questions, veuillez visiter
www.campbellhausfeld.com pour l’assistance à la clientèle.
Fr5
Page 20

INSTRUCTIONS DE SÉCURITÉ (SUITE)
Proposition 65 de la Californie
Ce produit peut vous exposer à des produits
chimiques incluant le plomb, connus par l’état de la Californie comme
pouvant causer le cancer, des anomalies congénitales ou d’autres
troubles de la reproduction. Pour plus d’informations, rendez-vous
sur le site Web www.P65Warnings.ca.gov.
Illinois Lead Poisoning Prevention Act (Loi sur la prévention de
l’empoisonnement au plomb de l’État de l’Illinois)
Contient du plomb. Peut être nocif si ingéré ou
mâché. Respecte les normes fédérales.
Généralités sur la sécurité
Ce produit fait partie d’un système à haute pression et les précautions de
sécurité suivantes doivent être prises en permanence, en même temps que
toute autre règle de sécurité en vigeur.
MANUAL
1. Lire attentivement tous les manuels, y compris celui de ce produit.
Bien se familiariser avec les commandes et l’utilisation correcte de
l’équipement.
2. Seules les personnes bien familiarisées avec ces règles d’utilisation en
toute sécurité doivent être autorisées à se servir de l’outil pneumatique.
Ne pas dépasser la pression maximum de service
pneumatique risque d’exploser et d’avoir pour résultat des blessures graves,
ou mortelles.
3. Ne pas dépasser la pression nominale de n’importe quelle pièce du
système.
4. Débrancher l’outil pneumatique de l’alimentation en air avant de
remplacer des outils ou accessoires, de procéder à l’entretien et de
ranger l’outil.
Il est nécessaire de porter des lunettes de protection
5. Ne pas porter de vêtements flottants, d’écharpe ni de cravate. Les
vêtements flottants risquent de se prendre dans les pièces mobiles, ce
qui peut provoquer des blessures graves.
6. Ne pas porter de bijoux lorsqu’on utilise un outil quelconque. Ils risquent
de se prendre dans les pièces mobiles, ce qui peut provoquer des
blessures graves.
7. Ne pas appuyer sur la gâchette lorsque l’on branche le tuyau
d’alimentation en air.
8. Toujours utiliser des accessoires conçus pour les outils pneumatiques. Ne
pas utiliser d’accessoires endommagés ou usés.
Débrancher la canalisation d’air avant d’enlever
du foret avec la canali-sation d’air branchée peut causer des blessures.
de l’outil pneumatique (621 kPa). L’outil
et un protecteur auditif pendant l’utilisation.
ou d’installer un foret. Le serrage ou le desserrage
Fr6
Page 21

Forcer ou l’application de force excessive pourrait
casser le foret.
9. Ne jamais appuyer sur la gâchette de l’outil tant qu’il n’y ait pas contact
avec une pièce. Les accessoires doivent être bien fixés pour éviter tout
risque de blessure grave.
Ne jamais transporter un outil par le tuyau et ne
jamais l’utiliser pour déplacer l’outil ou le
compresseur. Garder les tuyaux à l’écart de la chaleur, l’huile et les objets
pointus. Remplacer un tuyau usé, faible ou endommagé.
10. Protéger les canalisations d’air contre les dommages ou perforations.
11. Ne jamais diriger un outil pneumatique vers soi-même ni vers une autre
personne afin d’éviter tout risque de blessure grave.
12. Vérifier les tuyaux d’air pour rechercher tout signe de faiblesse ou
d’usure avant chaque utilisation.Veiller à ce que tous les branchements
soient bien serrés.
Dissiper toute la pression du système avant
d’essayer d’installer, réparer, déplacer le produit ou
de procéder à son entretien.
Cet outil pneumatique requiert un graissage avant
d’être utilisé la première fois et après chaque usage.
Une fois qu’un outil pneumatique a été graissé, de
l’huile s’écoulera de l’orifice de sortie lors des
quelques premières secondes de fonctionnement. C’est pourquoi cet
orifice doit être recouvert d’un torchon avant d’alimenter en air comprimé.
Manque de couvrir l’orifice de sortie peut résulter en blessure grave.
13. Vérifier le serrage des écrous, boulons et vis et s’assurer que
l’équipement soit en bon état de marche.
14. Ne pas se mettre les mains près des pièces mobiles ni en-dessous de
celles-ci.
15. Toujours fixer l’objet de travail avec des brides ou dans un étau.
Ne pas abuser ce produit. L’exposition excessif à
la vibration, au travail dans les positions d’accès
difficile et le mouvement répététif peuvent causer des blessures aux mains
et aux bras. Arrêter d’utiliser un outil et consulter un médecin si vous avez le
malaise, l’engourdissement, le picotement ou la douleur.
Fr7
Page 22
INSTRUCTIONS SUR LA SÉCURITÉ (SUITE)
Glossaire sur la sécurité
Ce manuel contient de l’information très importante qui est fournie pour
la SÉCURITÉ et pour ÉVITER LES PROBLÈMES D’ÉQUIPEMENT. Rechercher les
symboles suivants pour cette information.
Danger indique une situation dangereuse imminente
qui MÈNERA à la mort ou à des blessures graves si
elle n’est pas évitée.
Avertissement indique une situation potentiellement
dangereuse qui, si elle n’est pas évitée, POURRAIT
mener à la mort ou à de graves blessures.
Attention indique une situation potentiellement
dangereuse qui, si elle n’est pas évitée, PEUT mener
à des blessures mineures ou modérées.
Avis indique de l’information importante qui
pourrait endommager l’équipement si elle n’est pas
respectée.
IMPORTANT ou REMARQUE: Information qui exige une attention spéciale.
Symboles de sécurité
Les symboles de sécurité suivants apparaissent dans l’ensemble de ce manuel
pour vous aviser des dangers et précautions importants de sécurité.
MANUAL
Lunettes et
masque de
protection
Lire le manuel
d’abord
Risque
d’explosion
CONSERVER CES INSTRUCTIONS
Portez une
protection
oculaire et
auditive
Risque de
pression
NE PAS JETER
Fr8
Page 23

GUIDE GÉNÉRAL DE DÉPANNAGE
SYMPTÔME CAUSE(S) POSSIBLE(S) ACTION CORRECTIVE
L’outil fonctionne
lentement ou ne
fonctionne pas
Humidité expulsée de
l’outil
La perceuse est
bloquée et ne
fonctionne pas
1. Présence de grenaille ou de
gomme dans l’outil
2. Absence d’huile dans l’outil 2. Lubrifiez l’outil selon les instructions
3. Pression d’air basse 3. Ajustez le régulateur du compresseur
4. Fuites dans le tuyau d’air 4. Serrer et assurer l’étanchéité des
5. Chute de pression 5 a. S’assurer que le tuyau soit de la
1. Présence d’eau dans le
réservoir
2. Présence d’eau dans les
canalisations/tuyaux d’air
1. Engrenages ou engrenages
internes foirés ou usés
2. Paliers de moteur grippés
3. Lames de rotor usées ou
fendues
1. Rincer l’outil avec de l’huile pour
outils pneumatiques Campbell
Hausfeld, du dissolvant de gomme
ou un mélange en proportions
égaux d’huile de moteur SAE 10 et
de kérosène. Lubrifiez l’outil après
l’avoir nettoyé avec de l’huile pour
outil à air Campbell Hausfeld (ou
comparable).
de lubrification énoncées dans ce
manuel.
à 621 kPa pendant que l’outil
fonctionne à vide.
raccords du tuyau en cas de fuites.
bonne taille. Les longs tuyaux
ou les outils exigeant de grands
volumes d’air peuvent nécessiter
un tuyau de diamètre intérieur
d’au moins 12,7 mm (1/2 po.),
suivant la longueur totale du
tuyau,
b. Ne pas utiliser plusieurs tuyaux
reliés ensemble avec des raccords
rapides. Cela provoque des chutes
de pression supplémentaires et
réduit la puissance de l’outil.
Brancher les tuyaux directement
les uns aux autres.
1. Vidanger le réservoir. (Voir le manuel
du compresseur.) Huiler l’outil et le
faire tourner jusqu’à ce qu’il semble
ne plus contenir d’eau. Huiler l’outil
de nouveau et le faire tourner
pendant 1-2 seconde(s).
2 a. Monter un séparateur/filtre
d’eau. REMARQUE:
Les séparateurs fonctionnent
correctement uniquement
lorsque l’air qui passe à travers le
séparateur est froid. Positionner
le séparateur/filtre aussi loin que
possible du compresseur.
b. Installer un sécheur d’air.
c. Lubrifiez immédiatement l’outil si
de l’eau pénètre à l’intérieur.
1. Remplacer l’outil.
2. Remplacer l’outil.
3. Remplacer l’outil.
Fr9
Page 24

Mémento: Gardez votre preuve datée d’achat à fin de la garantie! Joignez-la à ce manuel ou classez-la
dans un dossier pour plus de sécurité.
GARANTIE LIMITÉE
1. DURÉE: À partir de la date d’achat par l’acheteur original comme suit - deux (2) ans.
2. GARANTIE ACCORDÉE PAR (GARANT):Campbell Hausfeld, a Marmon/Berkshire Hathaway Company,
100 Production Drive, Harrison, Ohio, 45030. Visitez www.campbellhausfeld.com.
3. BÉNÉFICIAIRE DE CETTE GARANTIE (ACHETEUR): L’acheteur original (sauf en cas de revente) du
produit Campbell Hausfeld.
4. PRODUITS COUVERTS PAR CETTE GARANTIE: Cet outil pneumatique Campbell Hausfeld.
5. COUVERTURE DE LA PRÉSENTE GARANTIE: Défauts importants de matériaux et de main d’oeuvre qui
se produisent durant la période de garantie à l’exception de ce qui est noté plus bas.
6. LA PRÉSENTE GARANTIE NE COUVRE PAS:
A. Les garanties implicites, y compris celles de commercialisabilité et D’ADAPTION À UNE
FONCTION PARTICULIÈRE SONT LIMITÉES À PARTIR DE LA DATE D’ACHAT INITIALE TELLE
QU’INDIQUÉE DANS LA SECTION DURÉE. Si ce produit est utilisé pour une fonction
commerciale, industrielle ou pour la location, la durée de la garantie sera quatre-vingt-dix (90)
jours à compté de la date d’achat. Quelques Provinces (États) n’autorisent pas de limitations de
durée pour les garanties implicites. Les limitations précédentes peuvent donc ne pas s’appliquer.
B. TOUT DOMMAGE, PERTE OU DÉPENSE FORTUIT OU INDIRECT POUVANT RÉSULTER DE TOUT
DÉFAUT, PANNE OU MAUVAIS FONCTIONNEMENT DU PRODUIT CAMPBELL HAUSFELD.
Quelques Provinces (États) n’autorisent pas l’exclusion ni la limitation des dommages fortuits ou
indirects. La limitation ou exclusion précédente peut donc ne pas s’appliquer.
C. Toute panne résultant d’un accident, d’une utilisation abusive, de la négligence ou d’une
utilisation ne respectant pas les instructions données dans le(s) manuel(s) accompagnant le
produit. Un accident, l’utilisation abusive par l’acheteur, la négligence ou le manque de faire
fonctionner les produits selon les instructions comprend aussi l’enlevage ou la modification
de n’importe quel appareil de sûreté. Si ces appareils de sûreté sont enlevés ou modifiés, la
garantie sera annulée.
D. Réglages normaux qui sont expliqués dans le(s) manuel(s) d’utilisation accompagnant le
produit.
7. RESPONSABILITÉS DU GARANT AUX TERMES DE CETTE GARANTIE: Réparer ou remplacer, au choix du
Garant, les produits ou composants défectueux, qui ont connu une défaillance et/ou qui ne sont pas
conformes pendant la durée précise de validité de la garantie.
8. RESPONSABILITÉS DE L’ACHETEUR AUX TERMES DE CETTE GARANTIE:
A. Fournir une preuve d’achat datée et un état d’entretien.
B. Visitez www.campbellhausfeld.com pour obtenir vos options de service sous garantie. Les frais
de transport sont la responsabilité de l’acheteur.
C. Utilisation et entretien du produit avec un soin raisonable, ainsi que le décri(vent)t le(s)
manuel(s) d’utilisation.
9. RÉPARATION OU REMPLACEMENT EFFECTUÉ PAR LE GARANT AUX TERMES DE LA PRÉSENTE
GARANTIE: La réparation ou le remplacement sera prévu et exécuté en fonction de la charge de
travail dans le centre de service et dépendra de la disponabilité des pièces de rechange.
Cette Garantie Limitée s’applique aux É.-U., au Canada et au Mexique seulement et vous donne des droits
juridiques précis. L’acheteur peut également jouir d’autres droits qui varient d’une Province, d’un État ou
d’un Pays à l’autre.
Fr10
Page 25

Martelo reversível
Instruções de operação
© 2017 Campbell Hausfeld
A Marmon/Berkshire Hathaway Company
Modelo: XT401000
PG
IN745800 6/17
Page 26

Leia e salve estas instruções. Leia atentamente antes de tentar montar,
instalar, operar ou manter o produto descrito.
Proteja-se a você e terceiros observando todas as informações de
segurança. O incumprimento destas instruções pode resultar em lesões
pessoais e/ou danos materiais! Guarde as instruções para referência
futura.
LEMBRETE: Guarde sua prova de compra datada para fins de garantia!
Anexe-a a este manual ou arquivo para sua conservação.
N.º do modelo: _____________________________
N.º de série: _______________________________
Data de compra: ___________________________
REGISTRE SEU PRODUTO ON-LINE AGORA!
www.campbellhausfeld.com/reg
LEIA E SIGA TODAS AS INSTRUÇÕES
GUARDE ESTAS INSTRUÇÕES • NÃO DESCARTE
Para peças, produtos e informações de
serviço,
visite www.campbellhausfeld.com
Campbell Hausfeld
100 Production Drive
Harrison, Ohio 45030
Page 27

ANTES DE COMEÇAR
Descrição
No modo pneumático, este martelo cumpre todos os desafios de afiação,
mandrilagem, escovagem com fio de aço e, claro, perfuração. Mudar as brocas
e instalar acessórios é fácil com um mandril autoserrante e o manípulo lateral
prático faz com que seja possível passar da frente para trás apenas com um dedo.
Campbell Hausfeld
profissional. A história de criação de produtos de qualidade da empresa começou
em 1836, quando fabricou vagões puxados por cavalos e equipamentos agrícolas.
Hoje, a Campbell Hausfeld oferece uma linha completa de compressores de
ar, ferramentas pneumáticas e acessórios, infladores, pistolas de pregos e
grampeadores, pulverizadores, arruelas de pressão, etc. Conclua seus projetos
mais rápido e mais fácil com Campbell Hausfeld - The Expert Air Power.
DESEMBALAMENTO
Após desembalar a unidade, verifique atentamente se ocorreram danos
durante o transporte. Verifique se existem peças soltas, em falta ou
danificadas. Certifique-se de todos os acessórios fornecidos estão junto
com a unidade. Em caso de dúvida, peças danificadas ou em falta, visite
www.campbellhausfeld.com para obter assistência ao cliente.
Não opere a unidade se estiver danificada durante o
resultar em ruptura e causar ferimentos ou danos materiais.
Outras peças (não fornecidas)
Você vai precisar dos seguintes itens e/ou acessórios para configurar
corretamente e usar de forma otimizada seu martelo pneumático:
• Conector NPT (M) de 1/4 pol.
o Para obter menos tensão em sua mangueira de ar, experimente um
conector flexível.
• Mangueira de ar (ID) de 3/8 pol.
• Acoplador NPT (F) de 1/4 pol.
o Elimine o acoplador com um estilo de acoplador universal.
o Acopladores de conexão rápida e fácil para juntar mangueiras para
ferramentas.
o Se você não usar um conector flexível, considere um acoplador
giratório para evitar torções da mangueira e reduzir o estresse em
sua mangueira de ar.
• Compressor de ar de 98,41L (26 galões) ou maior
• Brocas/acessórios
• Fita PTFE para todas as conexões de montagem
• Chave ajustável para apertar as conexões de encaixe
Consulte www.campbellhausfeld.com para obter informações adicionais sobre
os acessórios para apoiar suas ferramentas pneumáticas e sistema pneumático.
®
faz com que você termine seus projetos como um
transporte, manuseio ou uso. Os danos podem
Pg1
Page 28

MELHORES PRÁTICAS
u Para uma melhor produção, mantenha a pressão na ferramenta de 6,2 bar.
u Quanto maior é a sua mangueira de ar, maior é a queda de pressão do compressor
para a ferramenta. Se você estiver usando uma mangueira com mais de 50 pés,
considere a atualização para uma mangueira de ar com 1/2 pol. de Diâm. Int. para
garantir pressão da ferramenta adequada.
u A falta de lubrificação e manutenção de suas ferramentas pneumáticas irá reduzir
corretamente de forma drástica a sua vida útil. Use óleo cada vez que você usar
sua ferramenta pneumática para lubrificar, limpar e inibir a ferrugem em uma
única etapa. A Campbell Hausfeld vende óleo para ferramentas pneumáticas sob o
número de peça ST1270.
ESPECIFICAÇÕES
XT401000
Pressão máxima (bar) 6,2
CFM (L/min.) sob uma carga de trabalho de 100% 113,3 L/min @ 6,2 bar
CFM (L/min.) sem carga de trabalho de 100% 130,3 L/min @ 6,2 bar
SCFM (L/min.) sob uma carga de trabalho de 100% 824,0 L/min @ 6,2 bar
SCFM (L/min.) sem carga de trabalho de 100% 943,0 L/min @ 6,2 bar
Recomendação do compressor de ar 98,41 L
RPM nominal (rotação livre) 2.000
Comutador direto/inverso Sim
Controle da velocidade Acionador
Extensão da haste de perfuração 1,19 mm para 9,53mm
Potência 0.36 HP
Tipo de mandril Autoserrante
Tipo de engrenagem Planetária única
Entrada de ar 1/4 pol. NPT (F)
Tamanho mín. da mangueira 9,5 mm (3/8 pol.)
Material da estrutura Composto
Peso da ferramenta 1,04 kg
Comprimento da ferramenta 17,78 cm (7 pol.)
Altura da ferramenta 16,19 cm (6-3/8 pol.)
Largura da ferramenta 4,76 cm (1-7/8 pol.)
(3/64 pol. to 3/8 pol.)
Pg2
Page 29
CONHECER SUA UNIDADE
Anel
Mandril
Acionador
Manga
Comutador
direto/inverso
Porta de escape
Entrada de ar
INSTRUÇÕES DE MONTAGEM
Conector
Acoplador
de engate
Mangueira de ar
* Os itens mostrados nas instruções de montagem não estão incluídos com esta ferramenta.
MELHORES PRÁTICAS
u O compressor de ar usado com seu martelo reversível deve ser capaz de manter um
mínimo de 621 psi quando a ferramenta está sendo usada. Um fornecimento de
ar insuficiente pode causar uma perda de energia e um desempenho/vida útil da
ferramenta inconsistente.
u Um regulador de pressão — usado na ferramenta — é útil para controlar a pressão
de operação da ferramenta e manter os 6,2 bar.
u Use um lubrificador para proporcionar a circulação de óleo por meio da
ferramenta e um filtro para remoção de impurezas líquidas e sólidas, que podem
oxidar ou colar as partes internas da ferramenta.
u Para desconectar um acoplador/conector a partir da configuração do sistema:
pressione o acoplador e conecte em conjunto antes de puxar a manga do
acoplador para trás e para a separação do acoplador e conector.
rápido
u Certifique-se de que as brocas usadas com seu martelo pneumático são de aço
tratado a quente para maior durabilidade e tempo de vida útil.
Pg3
Page 30

LUBRIFICAÇÃO
Para proteger sua ferramenta, lubrifique o motor a cada-- antes e depois-de você usar esta ferramenta. Você não pode lubrificar o motor demasiado
frequentemente ou colocar demasiado o óleo na entrada de ar.
1. Desconecte o martelo do fornecimento de ar e retire a broca e/ou acessório.
2. Inverta a ferramenta.
3. Enquanto puxa o acionador, verta aproximadamente uma colher de
chá do óleo da ferramenta pneumática na entrada de ar. A Campbell
Hausfeld produz óleo para ferramentas pneumáticas sob o número de
modelo ST1270.
4. Conecte a ferramenta ao fornecimento de ar e proteja a porta de escape
com uma toalha.
5. Coloque a ferramenta em funcionamento por 10 segundos. O óleo será
descarregado da porta de escape quando a ferramenta é acionada.
6. Continue a funcionar até não existir óleo a ser descarregado.
7. Limpe todo o óleo residual da ferramenta antes de usá-la.
INSTRUÇÕES DE OPERAÇÃO
INSTALAÇÃO DAS BROCAS
1. Retire a ferramenta do fornecimento de ar.
2. Insira a broca e/ou o acessório de perfuração
no mandril.
3. Mantenha o anel imóvel, rode a manga para
a direita até os mordentes do mandril se
fecharem bem e a broca ficar fixa.
4. Para retirar a broca/o acessório, mantenha o
anel imóvel e rode a manga para a esquerda
para abrir os mordentes do mandril.
PERFURAÇÃO
1. Localize e assinale o ponto de perfuração pretendido com um perfurador
de centro ou um furador que sirva como base para a ponta da broca.
2. Fixe a peça em um torno ou com um parafuso.
3. Coloque a ponta da broca no ponto de perfuração exato e puxe o
acionador para ligar o martelo.
4. Aplique uma pressão constante enquanto guia o martelo.
5. Ao perfurar orifícios profundos, retire a broca várias vezes para limpar as
aparas.
6. Reduza a pressão de perfuração antes de cortar completamente a peça
para evitar que o mandril provoque danos.
7. Antes de libertar o acionador, retire a broca da peça puxando.
MELHORES PRÁTICAS
u Nunca aplique uma broca giratória na peça, uma vez que o martelo será difícil de
controlar na superfície de trabalho, potencialmente provocando ferimentos e/ou
danos materiais.
u Ao perfurar metal, aplique lubrificante à broca para reduzir a fricção.
Pg4
Page 31

ARMAZENAMENTO
Lubrifique seu martelo antes de armazená-lo. Siga as instruções de
lubrificação do motor à exceção da etapa n.º 5. Acione apenas a
aparafusadora de impacto por 2-3 segundos (em vez de 10 segundos),
pois deve permanecer mais óleo na ferramenta pneumática ao armazenar.
Armazene sua ferramenta em um lugar fresco e seco.
ASSISTÊNCIA TÉCNICA
Para obter informações sobre a operação ou reparação deste produto, visite
www.campbellhausfeld.com.
INSTRUÇÕES DE SEGURANÇA
Este manual contém informações que é muito importante conhecer e
entender. Estas informações são fornecidas para fins de SEGURANÇA e para
EVITAR PROBLEMAS NO EQUIPAMENTO. Para ajudar a reconhecer estas
informações, observe os símbolos encontrados na página 8. Os seguintes
símbolos de segurança aparecem ao longo deste manual para alertar você
sobre perigos e precauções de segurança importantes.
As notificações de PERIGO, ADVERTÊNCIA, PRECAUÇÃO e AVISO
e as instruções neste manual não conseguem abranger todas as
condições e situações possíveis que possam ocorrer. Há que ser
compreendido pelo operador que o cuidado é um fator que não
pode ser incorporado neste produto, mas deve ser fornecido
pelo operador.
Com qualquer peça de equipamento, nova ou usada, a parte mais importante
de sua operação é a SEGURANÇA!
A Campbell Hausfeld encoraja-o a se familiarizar com seu novo equipamento
e salienta a operação segura.
As próximas páginas deste manual são um resumo dos principais aspectos de
segurança associados com esta unidade. Certifique-se de que lê e compreende
completamente estas informações antes de operar a máquina.
Os símbolos usados ao longo das seções de operação e manutenção deste
manual destacam os procedimentos de segurança.
Informações importantes de segurança
Leia e guarde estas instruções. Leia atentamente antes de tentar montar,
instalar, operar ou manter o produto descrito. Proteja-se a você e terceiros
observando todas as informações de segurança. O incumprimento destas
instruções pode resultar em lesões pessoais e/ou danos materiais! Guarde as
instruções para referência futura.
Este manual contém informações importantes de segurança, operação e
manutenção. Se tiver questões, visite www.campbellhausfeld.com para obter
assistência ao cliente.
Pg5
Page 32

INSTRUÇÕES DE SEGURANÇA (CONTINUAÇÃO)
Proposta 65 da Califórnia
Este produto pode expor você a produtos químicos,
incluindo chumbo, conhecidos no estado da Califórnia por causar câncer,
defeitos congênitos ou outros danos genéticos. Para mais informações,
acesse www.P65Warnings.ca.gov.
Lei de Prevenção Contra Envenenamento por Chumbo de Illinois
Contém chumbo. Pode ser nocivo se ingerido
ou mastigado. Cumpre as normas federais.
Segurança geral
Este produto é parte de um sistema de alta pressão e as seguintes precauções
de segurança devem ser sempre seguidas, juntamente com quaisquer outras
regras de segurança existentes.
1. Leia todos os manuais incluídos com este produto cuidadosamente.
MANUAL
Esteja totalmente familiarizado com os controles e o uso adequado do
equipamento.
2. Apenas pessoas bem familiarizadas com estas regras de operação segura
devem ser autorizados a usar a ferramenta pneumática.
Não exceda a pressão máxima de operação da
pneumática pode explodir e provocar a morte ou ferimentos graves.
3. Não exceda a classificação de pressão de qualquer componente do sistema.
4. Desconecte a ferramenta pneumática do fornecimento de ar antes de
mudar de ferramentas ou acessórios, manutenção e durante a inatividade.
Deve usar óculos de segurança e protetores
5. Não use roupas largas, lenços ou gravatas. As roupas soltas podem ficar
presas nas peças móveis e resultar em ferimentos graves.
6. Não use joias ao operar qualquer ferramenta. As joias podem ficar presas
nas peças móveis e resultar em ferimentos graves.
7. Não pressione o acionador ao conectar a mangueira de fornecimento de ar.
8. Use sempre acessórios concebidos para o uso com ferramentas
pneumáticas. Não use acessórios danificados ou desgastados.
Desconecte a linha de ar antes de retirar ou instalar
uma broca. Apertar ou desapertar a broca com fornecimento de ar ligado
pode causar ferimentos.
Forçar ou aplicar força excessiva no martelo pode
fazer com que a broca quebre.
9. Nunca acione a ferramenta quando não estiver aplicada em um objeto
de trabalho. Os acessórios devem ser firmemente conectados. Acessórios
soltos podem causar ferimentos graves.
ferramenta pneumática (6,2 bar). A ferramenta
auditivos durante a operação.
Pg6
Page 33

Nunca transporte uma ferramenta pela mangueira
nem puxe a mangueira para mover a ferramenta
ou um compressor. Mantenha as mangueiras afastadas de calor, óleo e
extremidades afiadas. Substitua qualquer mangueira danificada ou gasta.
10. Proteja as linhas de ar contra danos ou punção.
11. Nunca aponte uma ferramenta pneumática em sua direção ou na
direção de qualquer outra pessoa. Podem ocorrer ferimentos graves.
12. Verifique as mangueiras de ar quanto à resistência ou desgaste antes de
cada utilização. Certifique-se de que todas as conexões estão seguras.
Libere toda a pressão do sistema antes de tentar
instalar, manter, mudar ou executar qualquer
manutenção.
Esta ferramenta pneumática precisa de lubrificação
antes do uso inicial e antes e depois de cada uso
adicional.
Cubra a porta de escape com uma toalha antes de
aplicar pressão de ar. Será descarregado óleo da porta de escape nos primeiros
segundos de operação após a lubrificação de ferramentas pneumáticas. Não
cobrir a porta de escape pode resultar em ferimentos graves.
13. Mantenha todas as porcas, parafusos e pernos apertados e certifique-se
de que o equipamento está em boas condições de segurança.
14. Não coloque as mãos junto ou sob peças móveis.
15. Sempre fixe o trabalho com braçadeiras ou um torno.
Não use este produto indevidamente. A exposição
excessiva vibração, trabalho em posições estranhas e
os movimentos de trabalho repetitivos podem causar ferimentos nas mãos e
braços. Pare de usar qualquer ferramenta se ocorrer desconforto, dormência,
sensação de formigamento ou dor e consulte um médico.
Pg7
Page 34

INSTRUÇÕES DE SEGURANÇA (CONTINUAÇÃO)
Glossário de segurança
Este manual contém informações que é muito importante conhecer e
entender. Estas informações são fornecidas para fins de SEGURANÇA e para
EVITAR PROBLEMAS NO EQUIPAMENTO. Para ajudar a reconhecer estas
informações, observe os seguintes símbolos.
Perigo indica uma situação iminentemente perigosa
iminente que, se não for evitada, pode resultar em
morte ou ferimentos graves.
Advertência indica uma situação potencialmente
perigosa que, se não for evitada, PODE resultar em
morte ou ferimentos graves.
Precaução indica uma situação potencialmente
perigosa que, se não for evitada, PODE resultar em
ferimentos ligeiros ou moderados.
Aviso indica uma informação importante que,
se não seguida, pode causar danos no equipamento.
IMPORTANTE ou NOTA: Informações que exigem uma atenção especial.
Símbolos de segurança
Os seguintes símbolos de segurança aparecem ao longo deste manual para o
alertar sobre perigos e precauções de segurança importantes.
MANUAL
Use máscara
e proteção
ocular
Leia o manual
primeiro
Risco de
explosão
Use proteção
ocular e
auditiva
Risco de
pressão
GUARDE ESTAS INSTRUÇÕES - NÃO DESCARTE
Pg8
Page 35

GUIA GERAL DE SOLUÇÃO DE PROBLEMAS
PROBLEMA CAUSAS POSSÍVEIS AÇÃO CORRETIVA
A ferramenta é
executada lentamente
ou não opera
Insuflação de umidade
da ferramenta
O martelo fica
bloqueado e não gira
1. Material abrasivo ou goma
na ferramenta
2. Nenhum óleo na ferramenta 2. Lubrifique a ferramenta de acordo
3. Pressão de ar baixa 3. Ajuste o regulador de compressor
4. Vazamentos na mangueira
de ar
5. Quedas de pressão 5 a. Certifique-se de que a mangueira
1. Água no tanque 1. Efetue a drenagem do tanque.
2. Água nas linhas/mangueiras
de ar
1. As engrenagens ou
engrenagens internas estão
deformadas ou desgastadas
2. Mancais do motor gripados 2. Substitua a ferramenta.
3. Pás do rotor desgastadas ou
quebradas
1. Lave a ferramenta com óleo para
ferramentas pneumáticas da
Campbell Hausfeld, solvente de
goma ou uma mistura igual de
óleo do motor SAE 10 e querosene.
Lubrifique a ferramenta após a
limpeza com óleo para ferramentas
pneumáticas da Campbell Hausfeld
(ou comparável).
com as instruções de lubrificação
neste manual.
para 90 PSI enquanto a ferramenta
está em execução livre.
4. Aperte e vede os encaixes da
mangueira se encontrar vazamentos.
apresente um tamanho
adequado. As mangueiras
longas ou ferramentas que usam
grandes volumes de ar podem
necessitar de uma mangueira com
um Diâm. Int. de 12,7 mm (1/2
pol.) ou maior, dependendo do
comprimento total da mangueira.
5 b. Não use múltiplas mangueiras
conectadas com encaixes de
conexão rápida. Isto provoca
quedas de pressão adicionais e
reduz a potência da ferramenta.
Conecte as mangueiras
diretamente em conjunto.
(consulte o manual do compressor
de ar). Lubrifique a ferramenta
e acione-a até não existir água.
Lubrifique a ferramenta e acione-a
durante 1-2 segundos.
2 a. . Instale um separador/filtro
de água (PA2121). NOTA:
os separadores funcionam
corretamente somente quando
o fluxo de ar é frio. Coloque o
separador/filtro o mais afastado
possível do compressor.
2 b. Instale um secador de ar.
c. Lubrifique a ferramenta sempre
que houver introdução de água.
1. Substitua a ferramenta.
3. Substitua a ferramenta.
Pg9Pg9
Page 36

Lembrete: Guarde sua prova de compra datada para fins de garantia! Anexe-a a este manual ou arquivo
para guardar.
GARANTIA LIMITADA
1. DURAÇÃO: Desde a data de compra pelo comprador original como se segue: Dois (2) anos.
2. QUEM OFERECE ESTA GARANTIA (RESPONSÁVEL PELA GARANTIA): Campbell Hausfeld, a
Marmon/Berkshire Hathaway Company, 100 Production Drive, Harrison, Ohio, 45030. Visite www.
campbellhausfeld.com.
3. QUEM RECEBE ESTA GARANTIA (RESPONSÁVEL PELA COMPRA): O comprador original (além de para
fins de revenda) do produto da Campbell Hausfeld.
4. QUAL É O PRODUTO ABRANGIDO POR ESTA GARANTIA: Esta ferramenta pneumática da Campbell
Hausfeld.
5. O QUE É ABRANGIDO POR ESTA GARANTIA: Defeitos substanciais no material e fabricação, que
ocorrem ao abrigo do período de garantia, com as seguintes exceções.
6. O QUE NÃO É ABRANGIDO POR ESTA GARANTIA:
A. Garantias implícitas, incluindo de comerciabilidade e ADEQUAÇÃO PARA UMA FINALIDADE
PARTICULAR ESTÃO LIMITADAS A PARTIR DA DATA DE COMPRA ORIGINAL COMO INDICADO
NA DURAÇÃO. Se este produto for usado para fins comerciais, industriais ou de aluguel, a
garantia será aplicada durante noventa (90) dias após a data de compra. Alguns estados não
permitem limitações sobre a duração de uma garantia implícita, logo as limitações acima
podem não se aplicar a você.
B. QUALQUER PERDA, DANO OU DESPESA INCIDENTAL, INDIRETO OU CONSEQUENTE QUE
POSSA RESULTAR DE QUALQUER DEFEITO, FALHA OU MAU FUNCIONAMENTO DO PRODUTO
CAMPBELL HAUSFELD. Alguns estados não permitem a exclusão ou limitações de danos
incidentais ou consequentes, logo a limitação ou exclusão acima pode não se aplicar a você.
C. Qualquer falha que resulte de um acidente, abuso do comprador, negligência ou falha em
operar os produtos de acordo com as instruções fornecidas no(s) manual(is) do proprietário
fornecido(s) com o produto. Os acidentes, abusos do comprador, negligência ou a falha em
operar os produtos de acordo com as instruções também devem incluir a remoção ou alteração
de quaisquer dispositivos de segurança. Se os dispositivos de segurança forem removidos ou
alterados, esta garantia é anulada.
D. Ajustes normais que são explicados no(a) manual(ais) do proprietário fornecido(s) com o
produto.
7. RESPONSABILIDADES DO RESPONSÁVEL PELA GARANTIA AO ABRIGO DESTA GARANTIA: Reparar ou
substituir, a critério do Responsável pela Garantia, os produtos ou componentes com defeito, mau
funcionamento e/ou incumprimento da duração do período de garantia específico.
8. RESPONSIBILIDADES DO COMPRADOR AO ABRIGO DESTA GARANTIA:
A. Fornecer comprovativo de compra com data e registros de manutenção.
B. Visite www.campbellhausfeld.com para obter suas opções do serviço de garantia. Os custos de
transporte devem ser suportados pelo comprador.
C. Tenha um cuidado razoável na operação e manutenção dos produtos conforme descritos no(s)
manual(is) do proprietário.
9. QUANDO O RESPONSÁVEL PELA GARANTIA REALIZARÁ A REPARAÇÃO OU SUBSTITUIÇÃO AO
ABRIGO DESTA GARANTIA: A reparação e a substituição serão agendadas e realizadas de acordo com
o fluxo de trabalho normal na localização de serviço e dependendo da disponibilidade das peças de
substituição.
Esta Garantia Limitada aplica-se apenas aos Estados Unidos da América, Canadá e México e confere
direitos legais específicos. Você também pode ter outros direitos que varia consoante estado ou país.
Pg10
Page 37

Taladro reversible
Manual de Instrucciones
© 2017 Campbell Hausfeld
A Marmon/Berkshire Hathaway Company
Modelo: XT401000
SP
IN745800 6/17
Page 38

Por favor, lea y guarde estas instrucciones. Lealas cuidadosamente antes
de tratar de montar, instalar, operar o dar mantenimiento al producto
aqui descrito.
Protejase usted mismo y a los demas observando toda la informacion de
seguridad. ¡El no cumplir con las instrucciones puede ocasionar daños,
tanto personales como a la propiedad! Guarde estas instrucciones para
referencia en el futuro.
RECORDATORIO: ¡guarde su comprobante de compra con fecha para
fines de la garantía! Adjúntela a este manual o archívela en lugar seguro.
Para ordenar repuestos, información de
productos y servicios visítenos en
Modelo #: ___________________________________
No. de Serie #: ______________________________
Fecha de Compra: ___________________________
www.campbellhausfeld.com
Campbell Hausfeld
100 Production Drive
Harrison, Ohio 45030
¡REGISTRE SU PRODUCTO EN LÍNEA AHORA MISMO!
GUARDE ESTAS INSTRUCCIONES • NO LAS DESECHE
www.campbellhausfeld.com/reg
LEA Y SIGA TODAS LAS INSTRUCCIONES
Page 39

ANTES DE COMENZAR
Descripción
Cuando se encuentra en modo neumático, este taladro supera todos los
retos de bruñido, escariado, cepillado metálico y por supuesto taladrado.
Cambiar brocas e instalar accesorios es sencillo con un mandril sin llave y el
interruptor lateral práctico que cambia la dirección de adelante hacia atrás
con tan solo mover un dedo.
Campbell Hausfeld
historia de la compañía de crear productos de calidad inició en 1836, cuando
fabricaba carros tirados por caballos y equipos agrícolas. Hoy, Campbell
Hausfeld ofrece una línea completa de compresores de aire, herramientas
neumáticas y accesorios, infladores, pistolas de clavos y engrapadoras, rociadores
de pintura, lavadoras de presión y más. Termine sus proyectos con más rapidez y
facilidad con Campbell Hausfeld, los expertos en energía neumática.
DESEMPAQUE
Después de desempacar la unidad, inspecciónela cuidadosamente para
detectar cualquier daño que pueda haber ocurrido durante el envío.
Verifique que no haya piezas sueltas, faltantes ni dañadas. Asegúrese de que
todos los accesorios proporcionados vengan con la unidad. En caso de que
tenga preguntas, o de que haya piezas dañadas o faltantes, por favor visite
www.campbellhausfeld.com para asistencia al cliente.
No debe utilizar la unidad si se ha dañado durante
una explosión y ocasionarle heridas o daños a su propiedad.
®
le facilita terminar sus proyectos como un profesional. La
el envío, manejo o uso. Los daños podrían ocasionar
Otras partes (no incluidas)
Necesitará los siguientes artículos o accesorios para instalar correctamente y
utilizar de manera óptima su taladro neumático:
• Tapón NPT de 1/4 pulg. (M)
o Para reducir la tensión en su manguera de aire y en usted, pruebe
con un tapón flexible.
• Manguera de aire de 3/8 pulg. (D.I.)
• Acoplador NPT de 1/4 pulg. (F)
o Elimine la confusión con los acopladores usando uno de estilo
universal.
o Los acopladores de conexión rápida conectan las mangueras y las
herramientas con facilidad y rapidez.
o Si no utiliza un tapón flexible, considere un acoplador con pivote
para evitar las torceduras y reducir la tensión en su manguera de
aire.
• Compresor de aire de 98,41 L (26 galones) o más
• Brocas para taladro/accesorios
• Cinta PTFE para todas las conexiones
• Llave ajustable para apretar las conexiones
Consulte www.campbellhausfeld.com para ver más información sobre
accesorios para complementar sus herramientas y sistema neumático.
Sp1
Page 40

MEJORES PRÁCTICAS
u Para un mejor desempeño, mantenga una presión de 6,2 bar en la herramienta.
u Mientras más larga sea su manguera de aire, mayor será la caída de presión entre
el compresor y la herramienta. Si está utilizando una manguera de más de 50
pies, considere la opción de cambiar a una manguera de aire de 1/2 pulg. D.I. para
garantizar una presión apropiada en la herramienta.
u De no lubricar y dar mantenimiento de manera apropiada a sus herramientas
neumáticas, reducirá dramáticamente su vida útil. Utilice aceite cada vez que
use su herramienta neumática para lubricar, limpiar e impedir la oxidación en un
solo paso. Campbell Hausfeld vende aceite para herramientas neumáticas con el
número de parte ST1270.
ESPECIFICACIONES
XT401000
Presión máxima (bar) 6,2
CFM (L/min) con carga al 100% 113,3 L/min @ 6,2 bar
CFM (L/min) sin carga al 100% 130,3 L/min @ 6,2 bar
SCFM (L/min) con carga al 100% 824,0 L/min @ 6,2 bar
SCFM (L/min) sin carga al 100% 943,0 L/min @ 6,2 bar
Compresor de aire recomendado 98,41 L
RPM nominales (velocidad libre) 2 000
Interruptor para avance/retroceso Sí
Control de velocidad Gatillo
Variedad de espiga de taladro 1,19 mm a 9,53mm
Caballos de fuerza 0.36 HP
Tipo de mandril Sin llave
Tipo de engranaje Planetario de una etapa
Entrada de aire NPT (F) de 1/4 pulg.
Tamaño mínimo de manguera 9,5 mm (3/8 pulg.)
Material de la carcasa Compuesto
Peso de la herramienta 1,04 kg
Longitud de la herramienta 17,78 cm (7 pulg.)
Peso de la herramienta 16,19 cm (6-3/8 pulg.)
Ancho de la herramienta 4,76 cm (1-7/8 pulg.)
(3/64 pulg. to 3/8 pulg.)
Sp2
Page 41

CONOZCA SU UNIDAD
Mandril
Camisa
Anillo
Gatillo
Interruptor para
avance/retroceso
Puerto de escape
Entrada de aire
INSTRUCCIONES DE CONFIGURACIÓN
Tapón
Acoplador
rápido
Manguera de aire
* Los artículos que se muestran en las instrucciones de instalación no se incluyen con esta herramienta.
MEJORES PRÁCTICAS
u El compresor de aire que utilice con su taladro reversible debe ser capaz de
mantener un mínimo de 621 bar cuando se utilice la herramienta. Un suministro
inapropiado de aire puede causar una pérdida de potencia y un desempeño
inconsistente de la herramienta.
u Un regulador de presión, que se utiliza en la herramienta, es útil para controlar la
presión de operación de la herramienta y para mantener 6,2 bar.
u Utilice un aplicador de aceite para mantener la circulación de aceite en la
herramienta y un filtro para eliminar impurezas líquidas y sólidas que pueden
oxidar o atascar las partes internas de la herramienta.
u Para desconectar un acoplador o tapón de un sistema: empuje el acoplador y
el tapón uno contra el otro antes de jalar la camisa del acoplador hacia atrás y
separar el acoplador y el tapón.
u Asegúrese de que las brocas que utilice con su taladro neumático sean de acero
con tratamiento térmico para una mayor durabilidad y vida más prolongada.
Sp3
Page 42
LUBRICACIÓN
Para proteger su herramienta, lubrique el motor cada vez que la use, antes
y después. No puede aceitar el motor con demasiada frecuencia, ni poner
demasiado aceite en la entrada de aire.
1. Desconecte el taladro del suministro de aire y quite la broca o accesorio.
2. Ponga la herramienta al revés.
3. Cuando jale el gatillo, vierta aproximadamente una cucharadita de aceite para
herramientas neumáticas en la entrada de aire. Campbell Hausfeld fabrica un
aceite para herramientas neumáticas con el número de modelo ST1270.
4. Conecte la herramienta al suministro de aire y cubra el puerto de escape
con una toalla.
5. Haga funcionar la herramienta por unos 10 segundos. Se rociará aceite
desde el puerto de escape cuando active la herramienta.
6. Siga operando hasta que no salga más aceite.
7. Limpie todos los residuos de aceite de la herramienta antes de usarla.
INSTRUCCIONES DE OPERACIÓN
INSTALACIÓN DE LA BROCA
1. Retire la herramienta del suministro de aire.
2. Inserte la broca del taladro o accesorio en el
mandril.
3. Mientras mantiene inmóvil el anillo, gire
la camisa en sentido de las agujas del reloj
hasta que las mordazas del mandril se cierren
completamente y la broca del taladro se
encuentre asegurada.
4. Para retirar la broca/accesorio, mantenga
inmóvil el anillo y gire la camisa en sentido contrario a las agujas del
reloj y abrir así las mordazas del mandril.
TALADRADO
1. Ubique y marque el punto que desea taladrar con un punzón central o
lezna para colocar la punta de la broca del taladro.
2. Asegure la pieza de trabajo en un tornillo de banco o con una abrazadera.
3. Coloque la punta de la broca en el punto exacto que desea taladrar y
jale el gatillo para iniciar el taladrado.
4. Ejerza una presión firme mientras orienta el taladro.
5. Cuando perfore agujeros profundos, retire la broca varias veces para
limpiar los recortes de perforación.
6. Reduzca la presión de taladrado antes de perforar completamente la
pieza de trabajo para evitar daños en el mandril.
7. Antes de soltar el gatillo, retire la broca de la pieza de trabajo.
MEJORES PRÁCTICAS
u Nunca aplique una broca giratoria a una pieza de trabajo ya que puede ser difícil
de controlar el taladrado en la superficie y puede ocasionar una posible lesión o
daño en la propiedad.
u Cuando taladre metal, aplique lubricante en la broca para reducir la fricción.
Sp4
Page 43

ALMACENAMIENTO
Lubrique su taladro antes de guardarlo. Siga las instrucciones de lubricación
del motor con una excepción en el paso 5. Sólo opere la llave de impacto
durante 2 o 3 segundos (en lugar de 10 segundos), porque es necesario que
quede más aceite en la herramienta neumática al almacenarla. Almacene su
herramienta en un lugar seco y fresco.
SERVICIO TÉCNICO
Para obtener información sobre el funcionamiento o reparación de este
producto, visite www.campbellhausfeld.com.
INSTRUCCIONES DE SEGURIDAD
Este manual contiene información que es muy importante que conozca y
comprenda. Esta información se proporciona para su SEGURIDAD y para
EVITAR PROBLEMAS CON EL EQUIPO. Para ayudarle a reconocer esta
información, observe los símbolos que se encuentran en la página Sp8. Los
símbolos de seguridad presentes en este manual sirven para alertarle sobre
riesgos de seguridad y precauciones importantes.
Los símbolos de PELIGRO, ADVERTENCIA, PRECAUCIÓN y AVISO
y las instrucciones en este manual no pueden posiblemente
cubrir todas las condiciones y situaciones posibles que puedan
presentarse. El usuario debe entender que las precauciones y el
sentido común son factores que no pueden incorporarse en este
producto: es el usuario mismo quíen debe contribuirlos.
Con cualquier pieza de equipo, nueva o usada, ¡la parte más importante de la
operación es la SEGURIDAD!
Campbell Hausfeld lo anima a que se familiarice con su nuevo equipo y
enfatiza además una operación segura.
Las siguientes páginas de este manual son un resumen de los principales
aspectos de seguridad relacionados con esta unidad. Asegúrese de leerlos y
comprenderlos por completo antes de usar el equipo.
Los símbolos utilizados en las secciones de operación y mantenimiento de
este manual dirigen su atención a los procedimientos de seguridad.
Importantes instrucciones de seguridad
Sírvase leer y guardar estas instrucciones.Lea con cuidado antes de tratar de
armar, instalar, manejar o darle servicio al producto descrito en este manual.
Protéjase usted. y a los demás observando todas las reglas de seguridad.
El no seguir las instrucciones podría resultar en heridas y/o daños a su
propiedad. Guarde este manual como referencia.
Este manual contiene información sobre seguridad, funcionamiento y
mantenimiento. Si tiene preguntas, por favor visite
www.campbellhausfeld.com para asistencia al cliente.
Sp5
Page 44

INSTRUCCIONES DE SEGURIDAD (CONTINUACIÓN)
Propuesta 65 de California
Este producto puede exponerlo a sustancias
químicas, incluyendo el plomo, las que el estado de California reconoce que
ocasionan cáncer y defectos congénitos u otros daños reproductivos. Para
más información, visite el sitio web www.P65Warnings.ca.gov.
Ley de Prevención de Envenenamiento por Plomo de Illinois
MANUAL
Contiene plomo. Puede ser nocivo si se ingiere o
mastica. Cumple con las normas federales.
Complies with Federal Standards.
Generales seguridad
Este producto es parte de un sistema de alta presión y en todo momento
debe seguir las siguientes medidas de seguridad al igual que otras reglas de
seguridad establecidas.
1. Lea con cuidado los manuales incluídos con este producto. Familiarícese
con los controles y el uso adecuado del equipo.
2. Esta herramienta neumática sólo debe ser usada por personas que estén
bien familiarizadas con las reglas de seguridad de manejo.
Nunca exceda la capacidad máxima de presión de la
herramienta neumática 6,2 bar. La herramienta
neumática podría explotar y ocasionarle la muerte o heridas graves.
3. Nunca exceda ninguna de las presiones máximas indicadas para los
componentes del sistema.
4. Desconecte la herramienta neumática de la fuente de aire antes de
cambiar de herramientas o accesorios, darle servicio o al no estar
funcionando.
Se deben utilizar lentes y protección para los oídos
durante el funcionamiento.
5. No se ponga ropa muy holgada, bufandas o corbatas. La ropa holgada se
le puede enredar en la herramienta y ocasionarle heridas graves.
6. Quítese las joyas para operar cualquier herramienta. Las joyas se le
pueden enredar en la herramienta y ocasionarle heridas graves.
7. No oprima el gatillo mientras esté conectando la manguera de la fuente
de aire.
8. Siempre use accesorios diseñados para usarse con herramientas
neumáticas. No use accesorios dañados o deteriorados.
Desconecte la línea de aire antes de retirar o instalar
una broca. Se pueden ocasionar lesiones al apretar o
aflojar la broca con el suministro de aire conectado.
Forzar o aplicar fuerza excesiva al taladro puede
hacer que la broca se quiebre.
Sp6
Page 45
9. Nunca oprima el gatillo a menos que la herramienta esté apuntada al
área de trabajo. Cerciórese de que los accesorios estén bien apretados.
De lo contrario, podrían ocasionarle heridas graves.
Nunca cargue una herramienta neumática por la
manguera, ni hale la manguera para mover la
herramienta o el compresor. Mantenga las mangueras alejadas de fuentes
de calor, aceite u objetos afilados. Reemplace las mangueras dañadas,
débiles o desgastadas.
10. Proteja las lineas de aire contra daños o perforaciones.
11. Nunca apunte la herramienta neumática hacia Ud. u otras personas. Esto
podría ocasionarle heridas graves.
12. Antes de cada uso revise las mangueras para ver si están deterioradas.
Cerciórese de que todas las conecciones estén bien apretadas.
Libere toda la presión del sistema antes de tratar de
instalar, darle servicio, reubicar o darle
mantenimiento.
Esta herramienta neumática requiere lubricación
antes de su uso inicial y antes y después de cada uso
adicional.
Cubra el orificio de salida con una toalla antes
de aplicar la presión de aire. El aceite saldrá por este
orificio durante los primeros segundos de funcionamiento, después que la
herramienta neumática haya sido lubricada. Si cubre el orificio de salida
podría ocasionarle lesiones graves.
13. Mantenga todas las tuercas, tornillos y pernos bien apretados
y cerciórese de que el equipo esté en buenas condiciones de
funcionamiento.
14. No coloque las manos cerca o debajo de las partes que se mueven.
15. Siempre asegure la pieza de trabajo en una mordaza o prensa de
sujeción.
No haga mal uso de este producto. La exposición a
vibraciones excesivas, el trabajar en posiciones
anormales y los movimientos repetitivos del trabajo pueden causar daños
a las manos y los brazos. Si siente incomodidad, pérdida de sensación,
hormigueo o dolor, suspenda el uso de cualquier herramienta y consulte a un
médico.
Sp7
Page 46
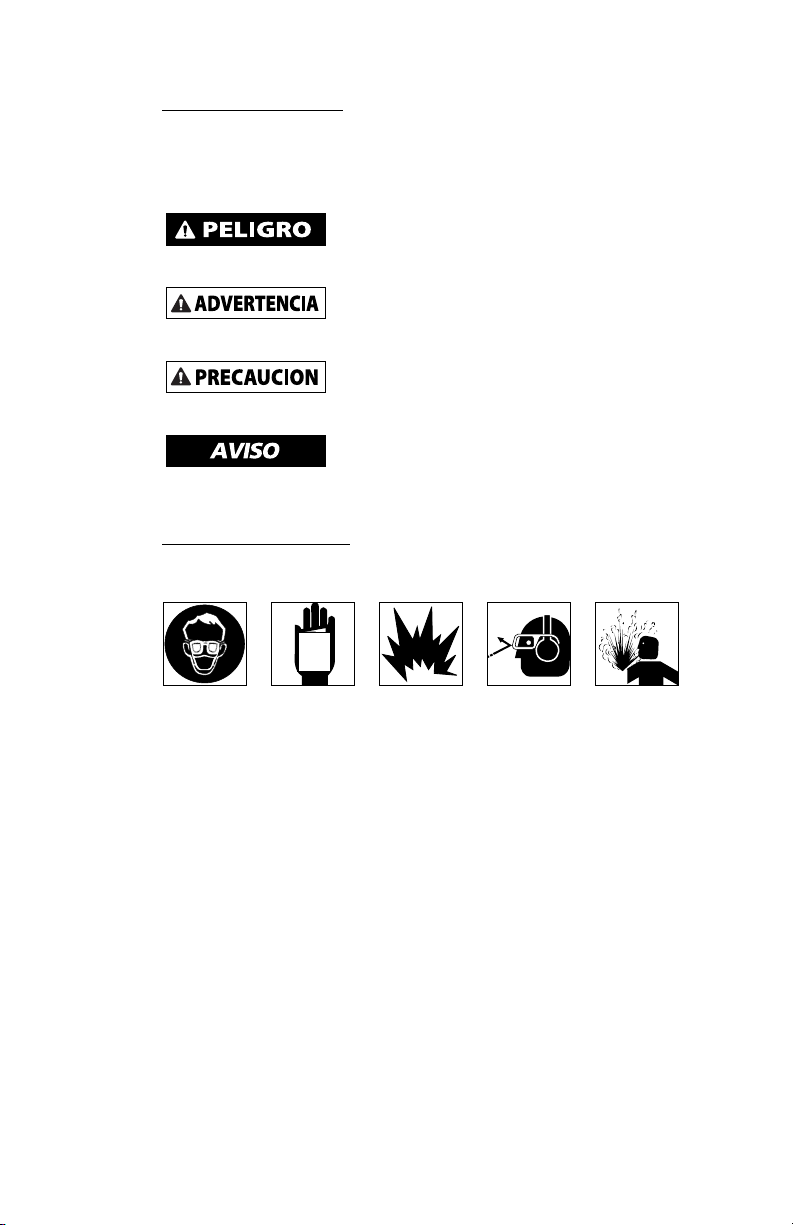
INSTRUCCIONES DE SEGURIDAD (CONTINUACIÓN)
Glosario de seguridad
Este manual contiene información que es muy importante que se conozca
y comprenda. Esta información se proporciona con fines de SEGURIDAD y
para EVITAR PROBLEMAS CON EL EQUIPO. Para ayudar a reconocer esta
información, observe los siguientes símbolos.
Peligro indica una situación inminentemente
peligrosa, que si no se evita, dará como resultado la
muerte o lesiones graves.
Advertencia indica una situación potencialmente
peligrosa, que si no se evita, PODRÍA ocasionar la
muerte o lesiones graves.
Precaución indica una situación potencialmente
peligrosa, que si no se evita, PUEDE dar como
resultado lesiones leves o moderadas.
Aviso indica una información importante, que de no
seguirla, le podría ocasionar daños al equipo.
IMPORTANTE o NOTA: información que requiere atención especial.
Símbolos de seguridad
Los siguientes símbolos de seguridad aparecen a lo largo de este manual para
advertirle de importantes peligros y precauciones de seguridad.
MANUAL
Use protección
para los ojos y
máscara
Lea primero el
manual
Riesgo de
explosión
Use
protectores
para la vista y
los oídos
Riesgo de
presión
GUARDE ESTAS INSTRUCCIONES –
NO LAS DESECHE
Sp8
Page 47

GUÍA GENERAL DE SOLUCIÓN DE PROBLEMAS
SÍNTOMA CAUSA(S) POSIBLE(S) MEDIDA CORRECTIVA
La herramienta
funciona demasiado
lenta o no funciona
Sale humedad por la
herramienta
El taladro está
atascado y no funciona
1. Hay arena o goma en la
herramienta
2. No hay aceite en la
herramienta
3. Baja presión de aire 3. Ajuste el regulador del compresor a
4. Fugas en la manguera de aire 4. Apriete y selle los accesorios de la
5. Baja la presión 5 a. Asegúrese de que el tamaño de
1. Hay agua en el tanque 1. Vacíe el tanque (vea el manual del
2. Hay agua en las líneas/
mangueras de aire
1. Los engranajes o los
engranajes internos están
desgastados
2. Los cojinetes del motor se
atascaron
3. Las aspas del rotor están
desgastadas o fisuradas
1. Limpie la herramienta con aceite para
herramientas hidráulicas Campbell
Hausfeld, solvente de goma o una
mezcla de mitad de aceite para motor
SAE 10 y mitad queroseno. Después de
limpiarla, lubrique la herramienta con
aceite para herramientas neumáticas
Campbell Hausfeld (o comparable).
2. Lubrique la herramienta de acuerdo
con las instrucciones de lubricación en
este manual.
90 PSI mientras la herramienta está
operando sin carga.
manguera, si consigue fugas.
la manguera sea el apropiado.
Las mangueras largas o las
herramientas que utilizan grandes
volúmenes de aire pueden
requerir una manguera con un
D.I. de 12,7 mm (1/2”) o superior,
según el tamaño total de la
manguera.
b. No utilice varias mangueras
conectadas con accesorios de
conexión rápida. Se produce una
baja adicional de presión y reduce
la potencia de la herramienta.
Conecte las mangueras juntas
irectamente.
compresor de aire). Lubrique la
herramienta y hágala funcionar hasta
que no haya agua. Vuelva a lubricar
la herramienta y hágala funcionar por
1 a 2 segundos.
2 a. Instale un separador/filtro de
agua. NOTA: Los separadores
trabajan de forma apropiada
solo cuando el aire que pasa por
el separador se encuentra frío.
Ubique el separador/filtro lo más
lejos posible del compresor.
b. Instale un secador de aire.
c. Lubrique la herramienta
inmediatamente en cualquier
momento que le entre agua.
1. Reemplace la herramienta.
2. Reemplace la herramienta.
3. Reemplace la herramienta.
Sp9
Page 48

Recordatorio: ¡Guarde su comprobante de compra con fecha para fines de la garantía! Adjúntela a este
manual o archívela en lugar seguro.
GARANTÍA LIMITADA
1 DURACION: A partir de la fecha de compra por el comprador original tal como se especifica a
continuación: Dos (2) años.
2. QUIEN OTORGA ESTA GARANTIA (EL GARANTE: Campbell Hausfeld, a Marmon/Berkshire Hathaway
Company, 100 Production Drive, Harrison, Ohio 45030. Visite www.campbellhausfeld.com.
3. QUIEN RECIBE ESTA GARANTIA (EL COMPRADOR): El comprador original (que no sea un revendedor)
del producto Campbell Hausfeld.
4. PRODUCTOS CUBIERTOS POR ESTA GARANTIA: Esta herramienta neumática Campbell Hausfeld.
5. COBERTURA DE LA GARANTIA: Defectos importantes en el material y la mano de obra que ocurran
durante la duración del período de garantía con las excepciones que se mencionan a continuación.
6. LO QUE NO ESTA CUBIERTO POR ESTA GARANTIA:
A. Las garantías implícitas, incluyendo aquellas de comercialidad E IDONEIDAD PARA FINES
PARTICULARES, ESTAN LIMITADOS A LO ESPECIFICADO EN EL PARRAFO DE DURACION. Si este
producto es empleado para uso comercial, industrial o para renta, la garantía será aplicable
por noventa (90) días a partir de la fecha de compra. En algunos estados no se permiten
limitaciones a la duración de las garantías implícitas, por lo tanto, en tales casos esta limitación
no es aplicable.
B. CUALQUIER PERDIDA DAÑO INCIDENTAL, INDIRECTO O CONSECUENTE QUE PUEDA RESULTAR
DE UN DEFECTO, FALLA O MALFUNCIONAMIENTO DEL PRODUCTO CAMPBELL HAUSFELD. En
algunos estados no se permite la exclusión o limitación de daños incidentales o consecuentes,
por lo tanto, en tales casos esta limitación o exclusión no es aplicable
C. Cualquier falla que resulte de un accidente, abuso, negligencia o incumplimiento de las
instrucciones de funcionamiento y uso indicadas en el (los) manual(es) que se adjunta(n) al
producto. Dichos accidentes, abusos por parte del comprador, o falta de operar el producto
siguiendo las instrucciones del manual de instrucciones suministrado también debe incluir
la desconexión o modificación de los instrumentos de seguridad. Si dichos instrumentos de
seguridad son desconectados, la garantía quedaría cancelada.
D. Los ajustes normales explicados en el(los) manual(es) suministrado(s) con el producto.
7. RESPONSABILIDADES DEL GARANTE BAJO ESTA GARANTIA: Según elija el Garante, la reparación o el
reemplazo del producto o los componentes que estén defectuosos, que hayan funcionado en forma
inadecuada y/o que no hayan cumplido con su función dentro de la duración del período específico
de la garantía.
8. RESPONSABILIDADES DEL COMPRADOR BAJO ESTA GARANTIA:
A. Suministrar prueba fechada de compra y la historia de mantenimiento del producto.
B. Visite www.campbellhausfeld.com para ver sus opciones de servicio de garantía. Los costos de
flete correrán por cuenta del comprador.
C. Seguir las instrucciones sobre operación y mantenimiento del producto, tal como se indica(n) en
el (los) manual(es) del propietario
9. CUANDO EFECTUARA EL GARANTE LA REPARACION O REEMPLAZO CUBIERTO BAJO ESTA
GARANTIA: La reparación o reemplazo dependerá del flujo normal de trabajo del centro de servicio y
de la disponibilidad de repuestos.
Esta garantía limitada es válida sólo en los EE.UU., Canadá y México y otorga derechos legales específicos.
Usted también puede tener otros derechos que varían de un Estado a otro. o de un país a otro.
Sp10
 Loading...