

Page 1
ACCESSORI |
ACCESSORIES
|
ACCESSOIRES|
ZÜBEHOR
|
ACCESORIOS
Documentazione
Tecnica
S22
ITALIANO
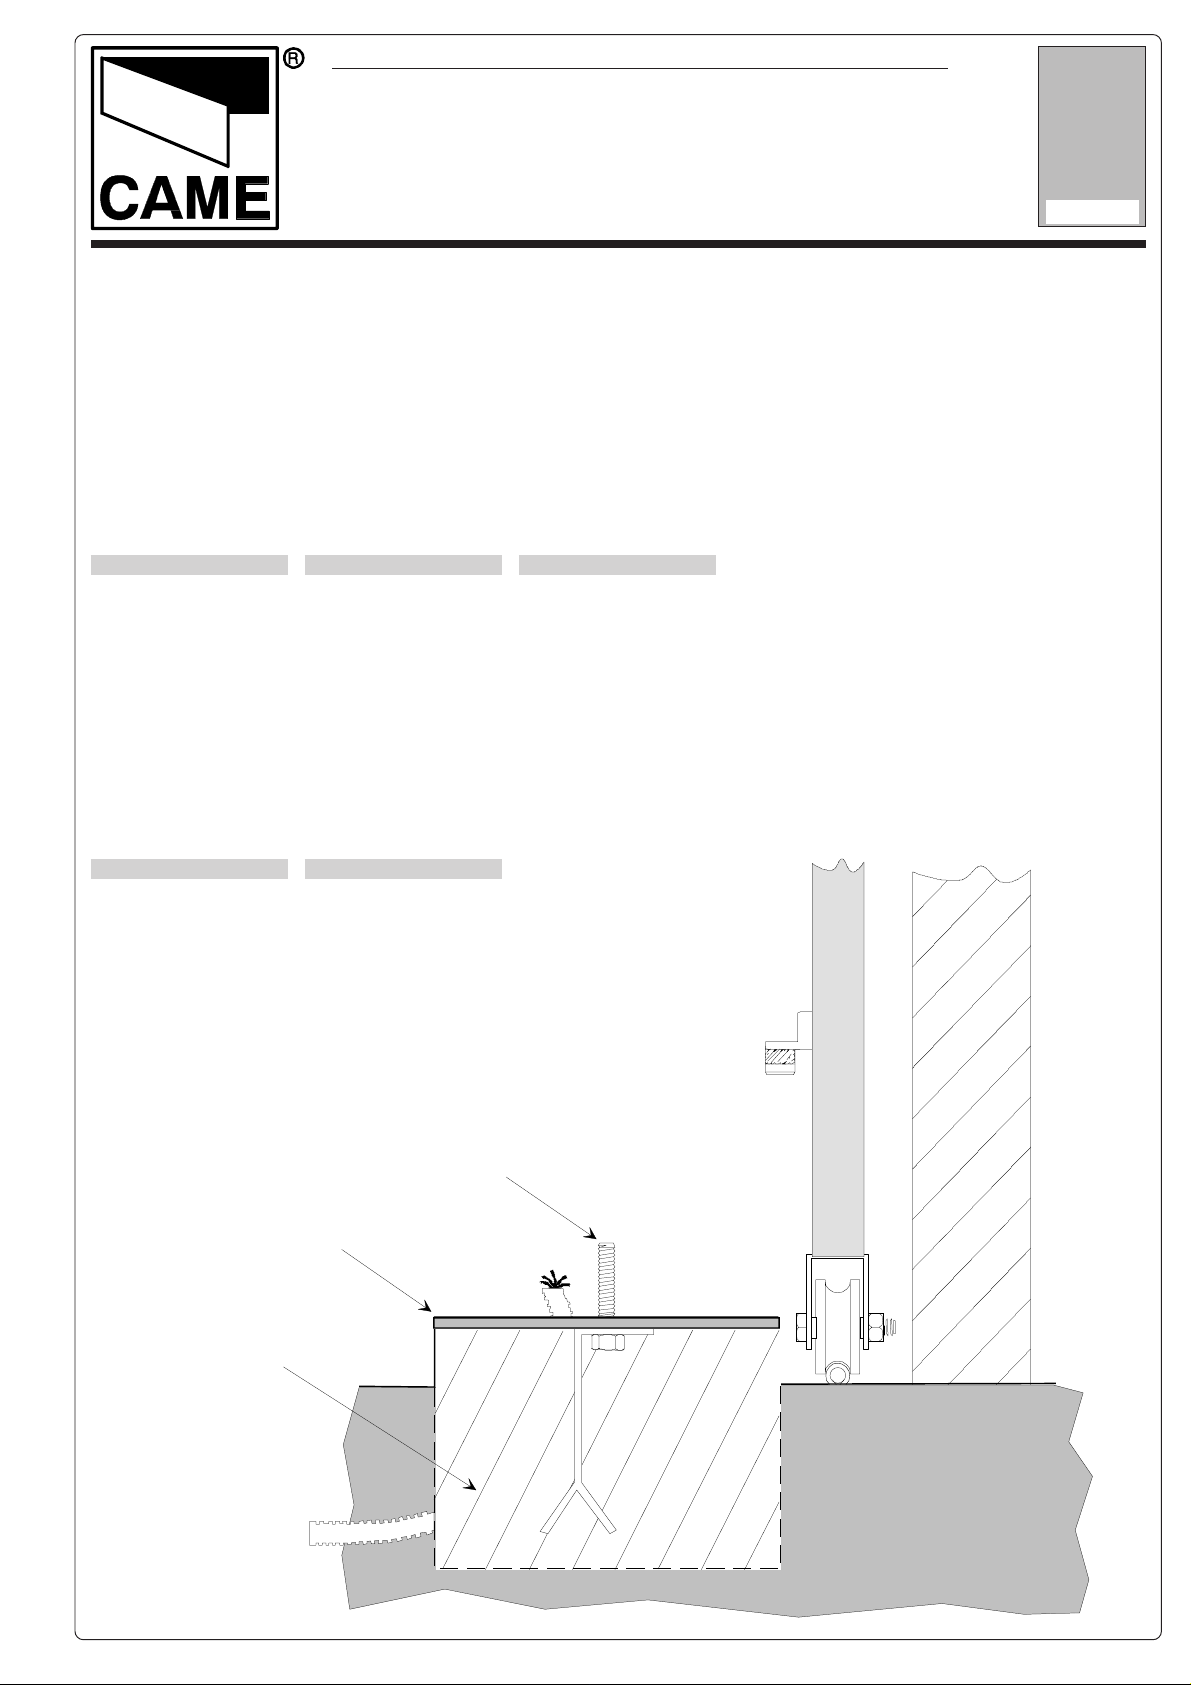
1) Tagliare le viti (A) a
filo della piastra di fissaggio (B);
2) Staccare la piastra di
fissaggio dalla piazzola in cemento (C);
BY1500 / BK
Piastra di adattamento da BY1500 a BK
Adapter plate from BY1500 to BK
Plaque d’adaptation da BY1500 a BK
Adapterplatte von BY1500 zu BK
Placa adaptadora da BY1500 a BK
ENGLISH
1) Cut the screws (A)
flush with the edges of
the securing plate (B);
2) Remove the securing
plate from the cement
pad (C);
FRANÇAIS
1) Couper les vis (A) à
ras de la plaque de
fixation (B);
2) Enlever la plaque de
fixation de l’espace en
ciment (C);
rev. 1.0
© CAME 11/99
119RS22
DEUTSCH
1) Schneiden Sie die
Schrauben (A) auf
gleicher Höhe mit der
Befestigungsplatte (B)
ab.
2) Lösen Sie die
Befestigungsplatte mit
ein paar Hammerschlägen von der
Zementunterlage (C).
(C)
ESPAÑOL
1) Corte los tornillos (A)
al ras de la placa de
sujeción (B);
2) Separe la placa de
sujeción de la
plataforma de cemento
(C);
(A)
(B)
Page 2

ITALIANO
3) Appoggiare la piastra
di adattamento (D) sulla
piazzola in cemento e
praticarvi quattro fori
ø10 (E) in corrispondenza dei rispettivi fori
(F) sulla piastra, prestando attenzione a non forare i tubi flessibili con i
cavi di collegamento;
ENGLISH
3) Place the adapter plate
(D) on the cement pad
and drill four ø10 holes
(E) in correspondence
with the four holes (F) in
the plate; making sure not
to drill into the flexible
sheats with the
connection cables;
FRANÇAIS
3) Poser la plaque
d’adaptation (D) sur
l’espace en ciment et y
percer quatre trous ø10
(E) en corres
pondance des trous
respectifs (F) sur la
plaque, en veillant à ne
pas percer les gaines
flexibles contenant les
câbles de branchement;
170
(F)
325
130
175
(G)
(D)
32,5
32,5
ITALIANO
4) Fissare la piastra di
adattamento tramite i
quattro fori (F) con
quattro tasselli (-G- non
forniti).
ENGLISH
4) Secure the adapter
plate by putting 4 inserts
65
(G not included) through
the four holes (F).
FRANÇAIS
4) Fixer la plaque
d’adaptation en
passant quatre
chevilles (G non
fournies) dans les
quatre trous (F).
DEUTSCH
4) Befestigen Sie die
Adapterplatte. Stecken
Sie dazu vier Dübel (G
nicht beiliegend) durch
die vier Löcher (F).
DEUTSCH
3) Legen Sie die
Adapterplatte (D) auf die
Zementunterlage und
bohren Sie in
Übereinstimmung mit
den Löchern (F) in der
Platte vier Löcher ø10 (E)
in den Zement.
Vorsicht! Beim Bohren
nicht die Kabelführungen
mit den Anschlußkabeln
beschädigen!
ESPAÑOL
3) Apoye la placa
adaptadora (D) sobre la
plataforma de cemento
y hágale cuatro
agujeros ø10 (E) en
correspondencia de los
agujeros respectivos
(F) en la placa, procurando no perforar los
tubos flexibles con los
cables de conexión;
(E)(F)
4) Fije la placa
adaptadora en los
cuatro agujeros (F) con
cuatro tornillos de
expansión (G no
incluidos).
ESPAÑOL
CAME S.P.A. ITALIA
VIA MARTIRI DELLA LIBERTÀ, 15
31030 DOSSON DI CASIER
TREVISO
CAME SUD S.R.L. ITALIA
VIA FERRANTE IMPARATO, 198
CM2 LOTTO A/7
80146 NAPOLI
CAME FRANCE S.A. FRANCE
7 RUE DES HARAS
92737 NANTERRE CEDEX
PARIS
CAME AUTOMATISMOS S.A. ESPAÑA
C/JUAN DE MARIANA, 17
28045 MADRID
CAME
GMBH DEUTSCHLAND
BERGSTRASSE, 17/1
70825 KORNTAL
STUTTGART
CAME GMBH DEUTSCHLAND
AKAZIENSTRASSE, 9
16356 SEEFELD
BERLIN
internet
www.came.it
e-mail
info@came.it
ASSISTENZA TECNICA
NUMERO VERD
800-295830
N° 12 100 8953
 Loading...