

Page 1
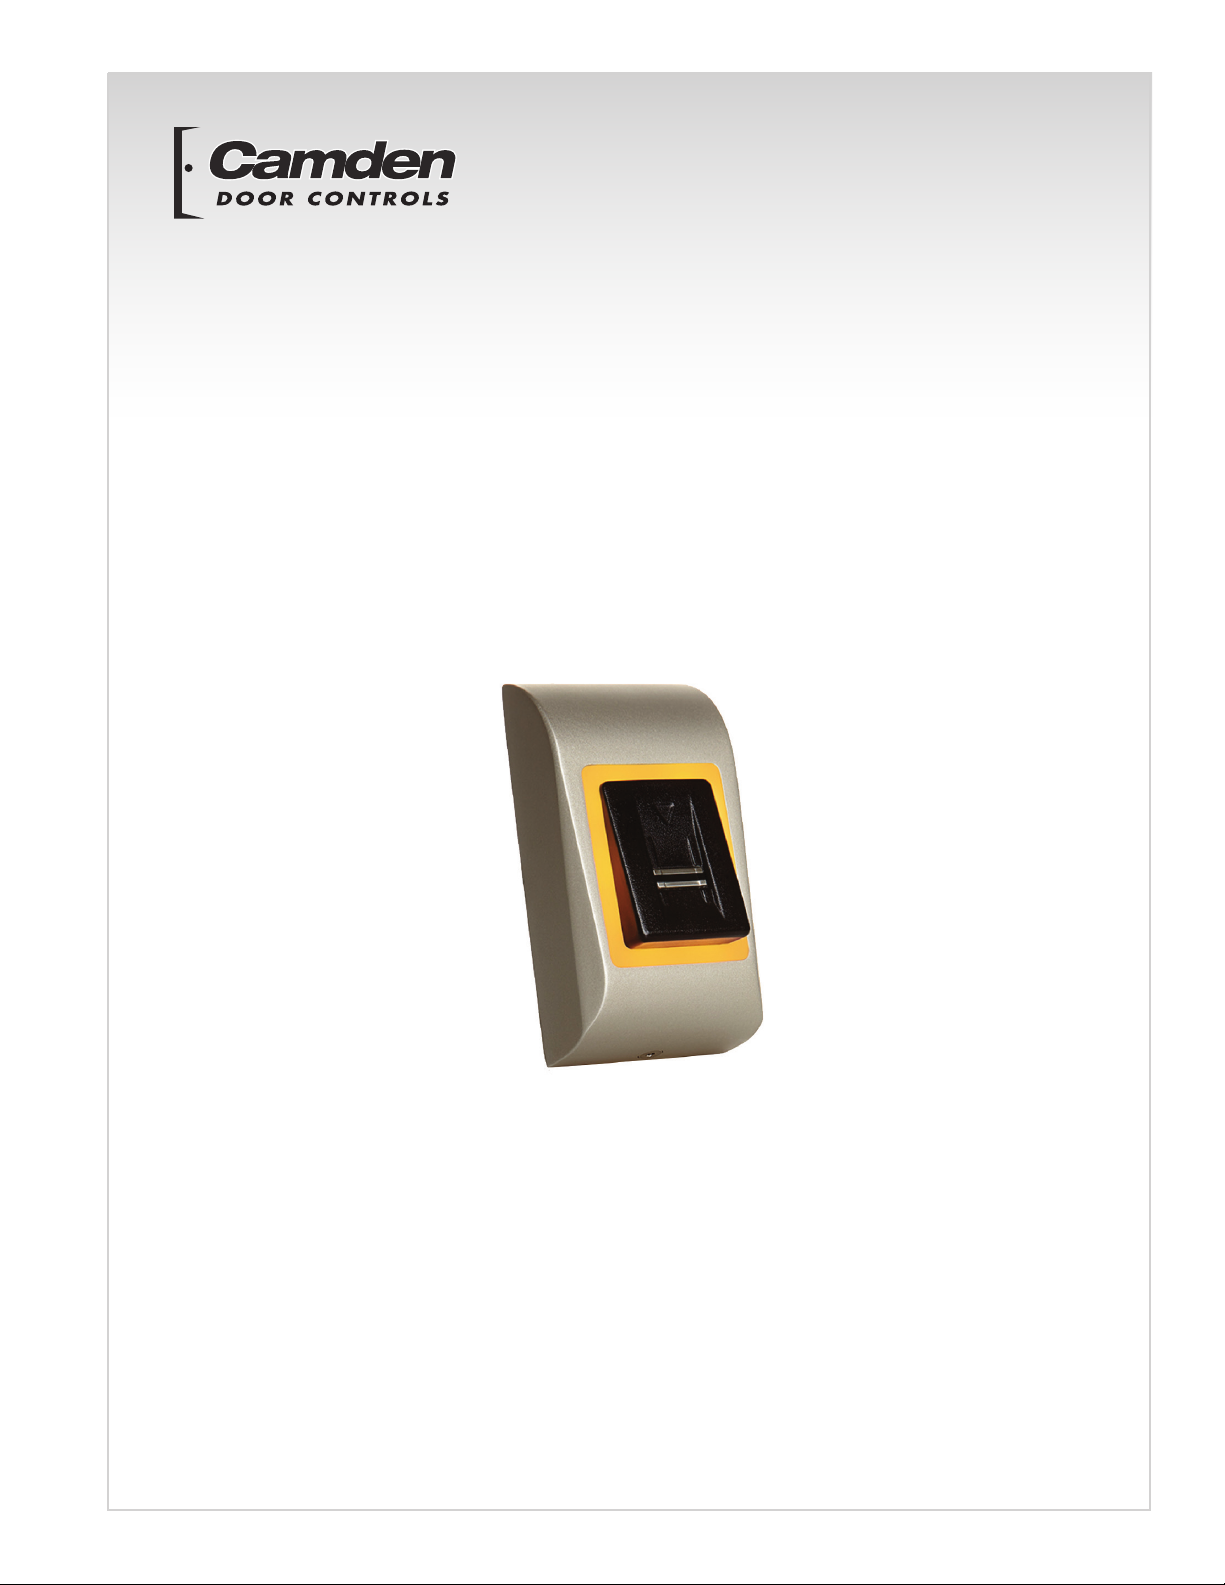
CV-945
Stand-Alone Biometric Reader
Installation Instructions
Page 2

CV-945 Stand-Alone Biometric Reader
Contents
1.0 Introduction ............................................................................................................................................................... 03
2.0 Mounting .................................................................................................................................................................. 03
3.0 Specifications .......................................................................................................................................................... 04
4.0 Application Diagram ................................................................................................................................................. 04
5.0 Wiring ........................................................................................................................................................................ 05
6.0 Recommended Swiping Technique ............................................................................................................................ 06
7.0 Programming ............................................................................................................................................................. 06
7.1 Adding Admin Finger and delete all users .................................................................................................................... 06
8.0 Administrator Programming ...................................................................................................................................... 06
8.1 Add Finger Relay 1 .................................................................................................................................................... 06
8.2 Add Finger Relay 2 .................................................................................................................................................... 07
8.3 Add Finger Relay 1 & 2 .............................................................................................................................................. 07
8.4 Delete Finger ............................................................................................................................................................ 07
8.5 Delete All Fingers ...................................................................................................................................................... 08
8.6 Change Admin Finger ................................................................................................................................................ 08
8.7 Change Installer Finger .............................................................................................................................................. 08
9.0 Administrator Programming Block Diagram ............................................................................................................... 09
10.0 Installer Programming ............................................................................................................................................ 09
10.1 Set Relay 1 Time .................................................................................................................................................... 09
10.2 Set Relay 2 Time .................................................................................................................................................... 10
10.3 Buzzer ON/OFF ........................................................................................................................................................ 10
10.4 Backlight ON/OFF .................................................................................................................................................... 10
11.0 Installer Programming Block Diagram .................................................................................................................... 11
12.0 Pairing - Biometric and Remote Switch/Relay Unit ................................................................................................... 11
Page 3
1.0 Introduction
(5mm)
3 (3 x 30mm)
1 (M3 x 6mm)
CV-945 Stand-Alone Biometric Reader
CV-945 is a simple one-door standalone biometric system.
The reader can store up to 98 nger templates.
It has one relay output and one exit button input. If secure
installation is needed, the reader can be connected to a
remote relay unit in a secured area, which also acts as a
request-to-exit push button. Complete setup and programming
can be done by scrolling and tapping on the sensor.
The sensor incorporates dedicated sensing hardware to
facilitate the detection of “spoong” attacks based on
fake ngers. This data is embedded into the image data
stream, and is processed on the processor. The system is
capable of detecting and defeating well-known fake nger
mechanisms, such as molded “gummy” ngers.
The coating on the surface of the Touch Chip sensor
provides protection from scratching and abrasion due
to normal contact with ngertips and any incidental
contact with ngernails.
Recommendations
Consult with installer about safety level of the installation.
There are devices with relays compatible with this reader
that can increase the security of the system if needed.
One or two enrolled ngers are enough for one user. Ask
the installer before he leaves the site to enroll your nger
as administrator.
Note
The Reader is using physical roughness of the ngerprint
to scan the nger. Some of the users may have very flat
ngertips, making difcult for the sensor to recognize
correctly the ngerprint. In most cases, these are children
and older persons. To solve this problem, do the following:
1. Try with different user’s ngers to nd the “best” nger.
2. Check with the installer other models of the reader with
added card reader or keypad for other type of access.
Maintenance
No special or periodic maintenance is required. If cleaning is
needed, use soft wet cloth and wipe gently the dirt. Do not
use chemicals and materials that can scratch the sensor.
Warning!
Do not touch the sensor with other objects than nger.
Do not pour or splash with water or other liquids. When
painting or construction work is ongoing in the area
around the reader, protect the reader sensor area from
possible damages and paint. If reader is to be dismounted
or relocated, call authorized installer for the job. Disposal
of this product must be handled according to all national
laws and regulations.
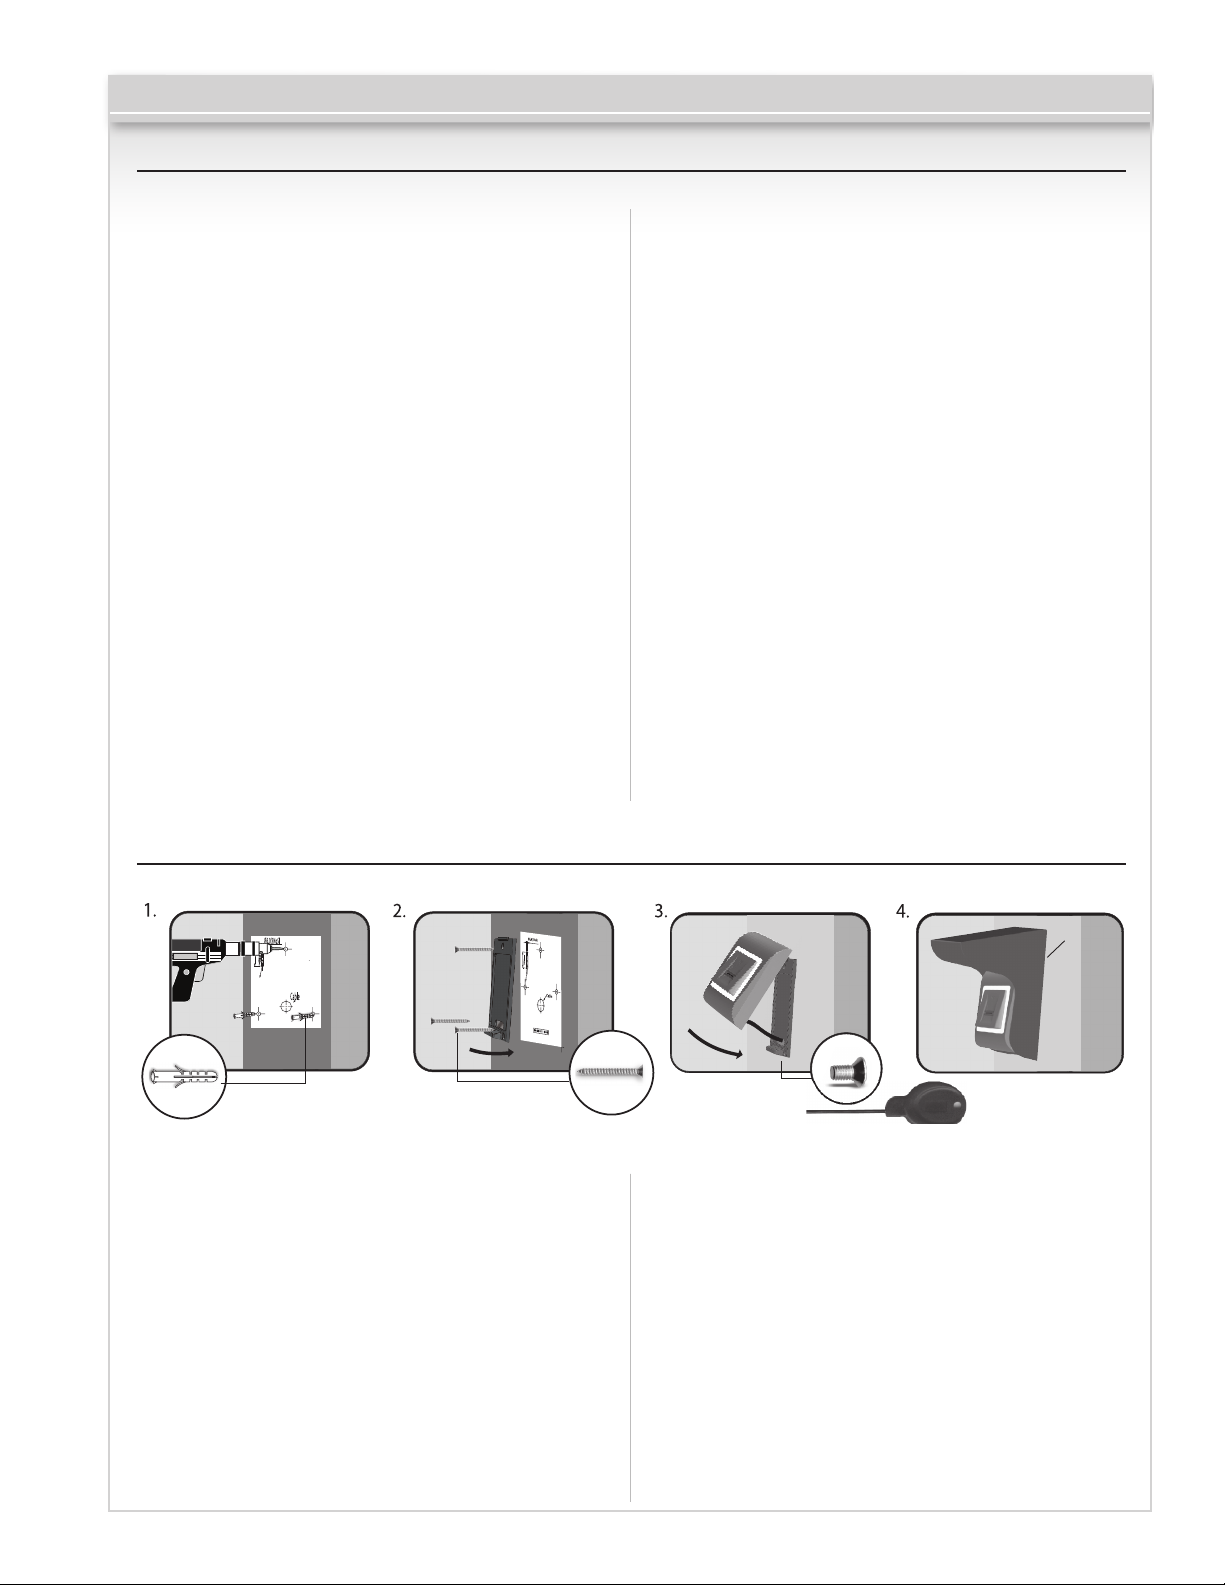
2.0 Mounting
0.2”
Do not install the device and cabling close to a source
of strong electro-magnetic elds like radio-transmitting
antennas.
Do not place the device near or above heating equipment.
If cleaning, do not spray or splash water or other cleaning
liquids. Wipe it out with a smooth cloth or towel.
Do not let children touch the device without supervision.
Note that if the sensor is cleaned by detergent, benzene
or thinner, the surface will be damaged and ngerprints
cannot be entered.
If the biometric reader is installed and used outdoors, the
3 (3 x 1.2”)
CV-940-MCP
1 (M3 x 0.2”)
reader MUST be tted with the CV-940-MCP metal cover in
order to protect the sensor from direct rainfall or snow. The
operating temperature of the product is between -4°F to
+122°F (-20ºC - + 50ºC).
If the reader is installed in an environment where the
temperature can drop below -4°F (-20ºC) and/or the
sensor could only be exposed to direct sunlight, it is
strongly recommended to install the reader inside a third
party sealed wall mount box tted with an additional
heater if the temperature is below
-4°F (-20°C) to keep the sensor level performance.
Camden cannot guarantee the functionality of the product
if these instructions are not followed.
Page 3 of 11
Page 4
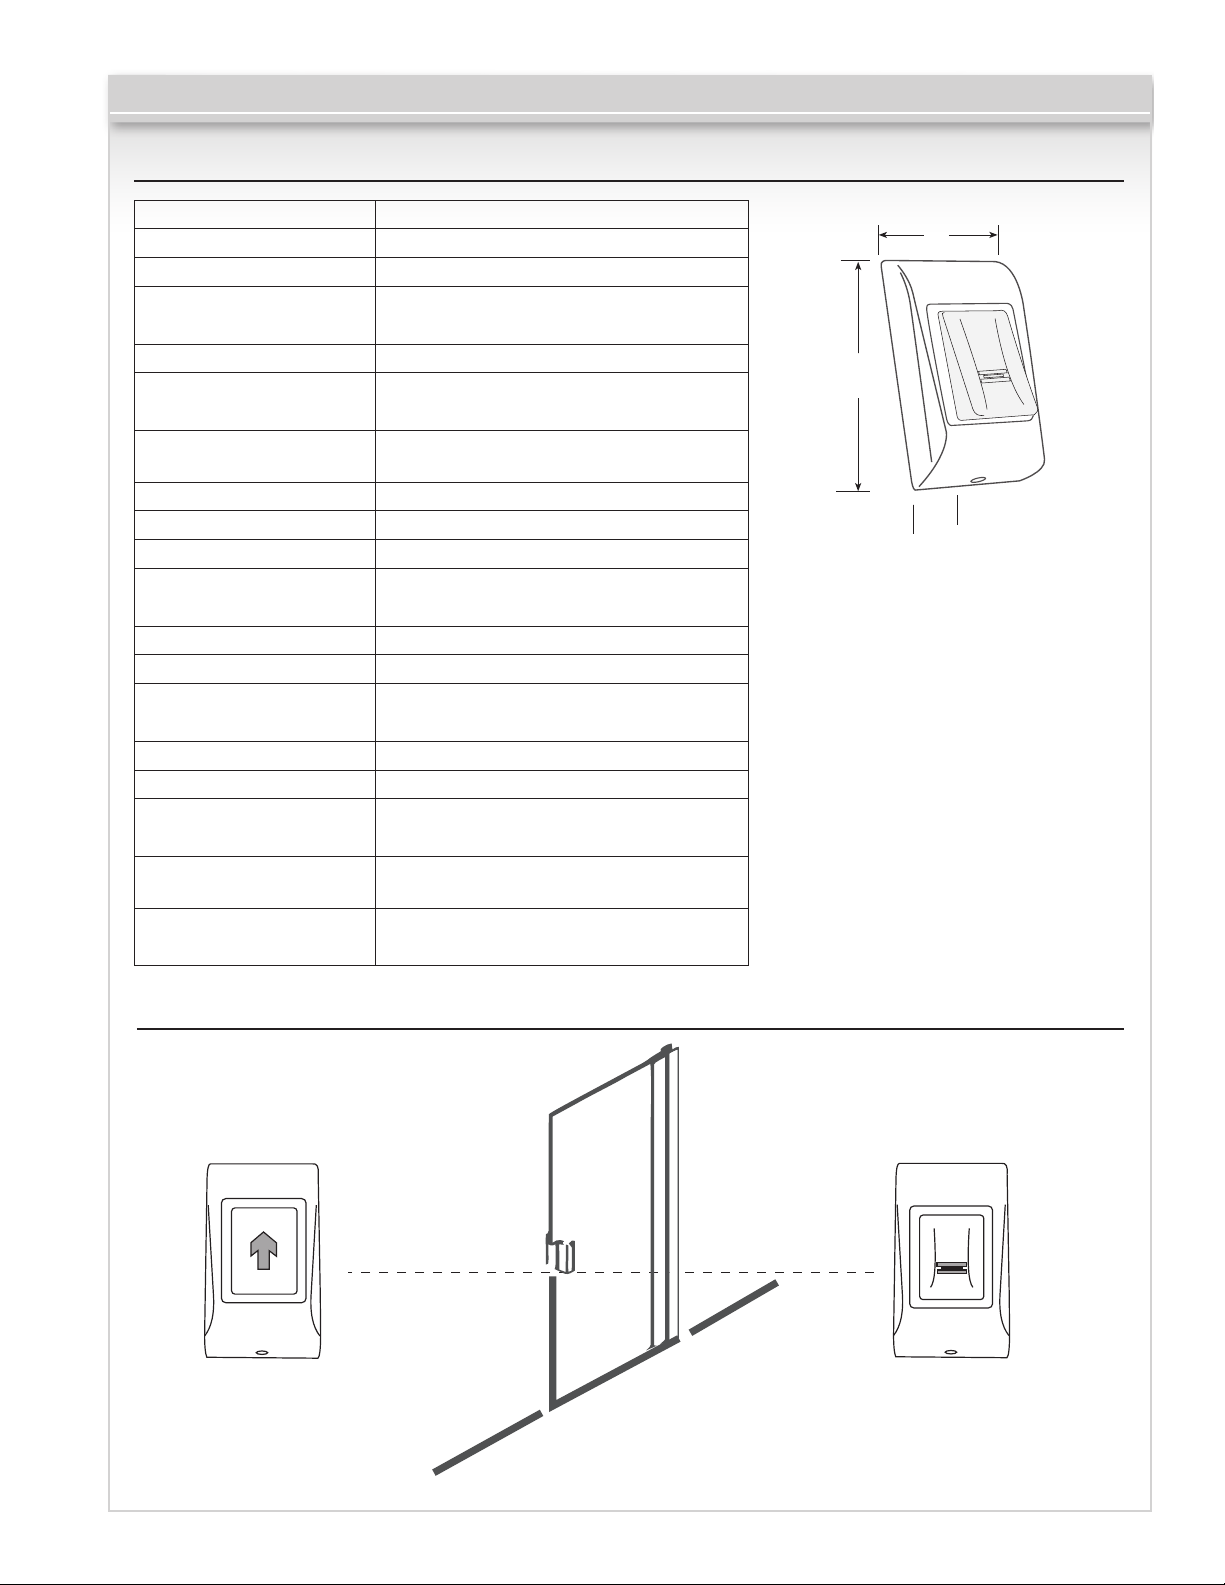
3.0 Specifications
Secured Area
Outside
CV-945 Stand-Alone Biometric Reader
Fingerprint Capacity:
Output:
Push Button Input:
Door Open Time:
Entry Mode:
Programming:
Installer/Admin
Fingers:
Image resolution:
Backlight ON/OFF:
Buzzer ON/OFF:
Firmware Upgrade:
Current Consumption:
Power Supply:
Indication:
Mounting:
IP Factor:
Storage/Operating
Temperature:
Storage/Operating
Humidity:
Dimensions:
98 templates
1 x Relay (1 A /24V AC/DC)
Yes
Pulse (1, 3, 5, 10, 20, 30, 60 seconds)
or Toggle(ON/OFF)
Finger
By scrolling and tapping on
the sensor or by keypad
1 Installer + 1 Admin Finger
Up to 508 DPI
Yes
Yes
Via RS485 converter and
windows application
100 mA max.
9-14 V DC
Tricolor Status LED and
4 x Programming LEDs
Surface
IP65
-4°F to +122°F
(-20°C to +50°C)
5% to 93% RH without condensation
3 5/8” H x 2” W x 1” D
(92mm x 51mm x 25mm)
3 5/8”
(92mm)
2”
(51mm)
1”
(25mm)
4.0 Application Diagram
RS485
164ft. (max. 50m)
CV-945HS
(Optional)
1 Relay Remote Unit
and Request-to-Exit Button
CV-945
Stand-Alone Biometric Reader
Page 4 of 11
Page 5

5.0 Wiring
CV-945 Stand-Alone Biometric Reader
Red
Black
Pink
Violet
Blue
Green
Orange
Gray
Yellow
White
Red
Black
Pink
Violet
Blue
Green
Orange
Gray
Yellow
White
12V DC
GND
A
B
Tamp
PB
NC
COM
NO
+
_
PB
NC
COM
RS485
GND (PB)
Colour
Red
Black
Green
Blue
Orange
Pink
Violet
Grey
Yellow
White
Connection
12V DC
GND
Tamper
Tamper
Push Button
A (RS485)
B (RS485)
NC
COM
NO
+
12VDC
POWER SUPPLY
_
Relay
(1A)
Page 5 of 11
_
+
1N4001
Diode
Electro Magnetic Lock
Page 6

CV-945 Stand-Alone Biometric Reader
6.0 Recommended Swiping Technique
Starting from the first finger joint, place the selected finger
on the swipe sensor and move it evenly downward in one
steady movement.
Result:
For a valid swipe: Tricolour Status LED turns green + OK Beep
(short + long beep)
For an invalid or misread swipe: Tricolour Status LED turns
red + Error Beep (3 short beeps)
7.0 Programming
7.1 Adding Admin Finger and delete all users
1.Push dip switch no.2 to position ON.
ON
1 2
No.2
2.Reset the Power of the device.
3.Wait for One long + multiple short beeps
4.Put the dip switch in position OFF. (short beeps will stop)
5.Wait for the LED to blink Orange.
6.Swipe the Master finger min.6 times. (Until Ok Beep)
Note: This procedure also deletes all the users and administrators previously enrolled.
ON
1 2
x 6
No.2
8.0 Administrator Programming
Use point fingers as Administrator and Installer. You can use the other
fingers as access fingers. Administrator finger is enrolled at the end
of the system installation. Initial enrollment of the Admin finger is
described in installer manual.
8.1 ADD Finger Relay 1 (Finger that will activate relay 1)
ACTION FINGER BACKLIGHT BUZZER SOUND
Swipe Admin Finger 1 time
Wait 5 seconds (until fast blinking) short beep
Swipe User Finger min. 6 times
(until short + long beep)
x 1
x 6
Page 6 of 11
slow blinking
fast blinking
short beep
short + long beep
Page 7

CV-945 Stand-Alone Biometric Reader
8.2 ADD Finger Relay 2 (Finger that will activate relay 2)
ACTION FINGER BACKLIGHT BUZZER SOUND
Swipe Admin Finger 2 times
Wait 5 seconds (until fast blinking) short beep
Swipe User Finger min. 6 times
(until short + long beep)
Relay 2 is available if the reader is used with remote relay unit with 2 relays(DINRTT and RU2). Consult the installer if
Relay 2 is available in your system.
x 2
x 6
slow blinking
fast blinking
short beep
short + long beep
8.3 ADD Finger Relay 1 & 2 (Finger that will activate relay 1 & 2)
ACTION FINGER BACKLIGHT BUZZER SOUND
Swipe Admin Finger 3 times
Wait 5 seconds (until fast blinking) short beep
x 3
slow blinking
short beep
Swipe User Finger min. 6 times
(until short + long beep)
Relay 2 is available if the reader is used with remote relay unit with 2 relays(DINRTT and RU2). Consult the installer if
Relay 2 is available in your system.
x 6
fast blinking
short + long beep
8.4 DELETE Finger
ACTION FINGER BACKLIGHT BUZZER SOUND
Swipe Admin Finger 4 times
Wait 5 seconds (until fast blinking) short beep
Swipe User Finger
Relay 2 is available if the reader is used with remote relay unit with 2 relays(DINRTT and RU2). Consult the installer if
Relay 2 is available in your system.
x 4
x 1
slow blinking
fast blinking
short beep
short + long beep
Page 7 of 11
Page 8

CV-945 Stand-Alone Biometric Reader
8.5 DELETE ALL Fingers
ACTION FINGER BACKLIGHT BUZZER SOUND
Swipe Admin Finger 4 times
Wait 5 seconds (until fast blinking)
Swipe Admin Finger 2 times
x 4
x 2
slow blinking
slow blinking
fast blinking
short beep
short beep
multiple beeps
8.6 CHANGE ADMIN Finger
ACTION FINGER BACKLIGHT BUZZER SOUND
Swipe Admin Finger 5 times
Wait 5 seconds (until fast blinking)
x 5
slow blinking
slow blinking
short beep
short beep
Swipe NEW Admin Finger min.6 times
x 6
fast blinking
3 short beeps
8.7 CHANGE INSTALLER Finger
ACTION FINGER BACKLIGHT BUZZER SOUND
Swipe Admin Finger 6 times
Wait 5 seconds (until fast blinking)
Swipe NEW Installer Finger
min.6 times
x 6
x 6
slow blinking
slow blinking
fast blinking
short beep
short beep
3 short beeps
Page 8 of 11
Page 9

CV-945 Stand-Alone Biometric Reader
9.0 Administrator Programming Block Diagram
Swipe the ADMIN Finger 1 to 6 times depending of the desired menu
1 Swipe
ADD Finger
Relay 1
Wait
5 seconds
(until fast blinking)
SWIPE
new finger
min. 6 times
END
2 Swipes
ADD Finger
Relay 2
Wait
5 seconds
(until fast blinking)
SWIPE
new finger
min. 6 times
END
3 Swipes
ADD Finger
Relay 1 & 2
Wait
5 seconds
(until fast blinking)
SWIPE
new finger
min. 6 times
END
4 Swipes
DELETE FINGER
Relay 1 & 2
Wait
5 seconds
(until fast blinking)
SWIPE
already
enrolled finger
1 time
END
Wait
5 seconds
(until fast blinking)
SWIPE
ADMIN finger
2 times to
DELETE ALL
END
5 Swipes
Change
ADMIN
Finger
Wait
5 seconds
(until fast blinking)
SWIPE
new ADMIN
FINGER
min. 6 times
END
6 Swipes
Enroll
INSTALLER
Finger
Wait
5 seconds
(until fast blinking)
SWIPE
new INSTALLER
FINGER
min. 6 times
END
10.0 Installer Programming
10.1 Set Relay 1 Time
ACTION FINGER BACKLIGHT BUZZER SOUND
Swipe Installer Finger 1 time
x 1
slow blinking
Wait 5 seconds (until fast blinking) short beep
Swipe the INSTALLER Finger and start
counting seconds
x 1
fast blinking
Swipe the INSTALLER Finger to stop or
wait 30 seconds to put the relay in
toggle mode
x 1
fast blinking
short beep
beeps on 1 second
short + long beep
Page 9 of 11
Page 10

CV-945 Stand-Alone Biometric Reader
10.2 Set Relay 2 Time
ACTION FINGER BACKLIGHT BUZZER SOUND
Swipe Installer Finger 2 times
Wait 5 seconds (until fast blinking) short beep
Swipe the INSTALLER Finger and start
counting seconds
Swipe the INSTALLER Finger to stop or
wait 30 seconds to put the relay in
toggle mode
Relay 2 is available if the reader is used with remote relay unit with 2 relays(DINRTT and RU2). Consult the installer if
Relay 2 is available in your system.
x 1
x 1
x 1
slow blinking
fast blinking
fast blinking
short beep
beeps on 1 second
short + long beep
10.3 BUZZER On/Off
ACTION FINGER BACKLIGHT BUZZER SOUND
Swipe Installer Finger 3 times
x 3
slow blinking
short beep
Wait 5 seconds (until fast blinking) short beep
Swipe INSTALLER Finger
x 1
fast blinking
short + long beep
10.4 BACKLIGHT On/Off
ACTION FINGER BACKLIGHT BUZZER SOUND
Swipe Installer Finger 4 times
Wait 5 seconds (until fast blinking) short beep
Swipe INSTALLER Finger
x 4
x 1
slow blinking
fast blinking
short beep
short + long beep
Page 10 of 11
Page 11

CV-945 Stand-Alone Biometric Reader
11.0 Installer Programming Block Diagram
Swipe the INSTALLER Finger 1 to 4 times depending of the desired menu
1 Swipe
Set
RELAY 1
Time
Wait
5 seconds
(until fast blinking)
Swipe the Installer Finger and
start counting seconds
Swipe the Installer Finger to stop
or wait 30 seconds to put the
relay in toggle ON/OFF mode
2 Swipes
Set
RELAY 2
Time
Wait
5 seconds
(until fast blinking)
Swipe the Installer Finger and
start counting seconds
Swipe the Installer Finger to stop
or wait 30 seconds to put the
relay in toggle ON/OFF mode
3 Swipes
BUZZER
ON/OFF
Wait
5 seconds
(until fast blinking)
Swipe the Installer Finger to put
the Buzzer ON/OFF
Swipe the Installer Finger to put
END ENDEND END
12.0 Pairing - Biometric Reader and Remote Switch/Relay Unit
12.1 Pairing CV-945HS
If a more secure installation is required,
the reader can be connected to a remote
switch/relay unit in a secured area, which
also acts as request-to-exit push button.
Follow the instructions bellow to pair
(couple) the devices.
1. Put Dipswitch No.1 to position ON.
HS beeps continuously and the red
LED blinks.
2. Put Dipswitch No.1 to position OFF.
3. Wait for Beep + OK Beep
(short + short + long beep)
12 VDC
-
+
Black
Red
Pink
Violet
Red
Yellow
Black
Brown
Pink
Violet
B (RS485)
12V out
(RS485)
A
COM
GND
4 Swipes
BACKLIGHT
ON/OFF
Wait
5 seconds
(until fast blinking)
the Backlight ON/OFF
NO
White
1N4007
+
-
ON
1 2
After the OK beep, the pairing is done.
Push Buttons Keypads Strikes Magnetic Locks Key Switches Relays & Timers Access Control
5502 Timberlea Blvd.,
Mississauga, ON Canada
L4W 2T7
CV-945
www.camdencontrols.com
Toll Free: 1.877.226.3369
Page 11 of 11
File: CV-945 Stand-Alone Biometric Reader
Installation Instructions.indd R2
Revision: 27/03/2017
Part No.: 40-82B184
HS Switch Relay
 Loading...