

Camco Residential Electric water heater Troubleshooting Manual
2 3
90˚F
150˚F
125˚F
90˚F
150˚F
125˚F
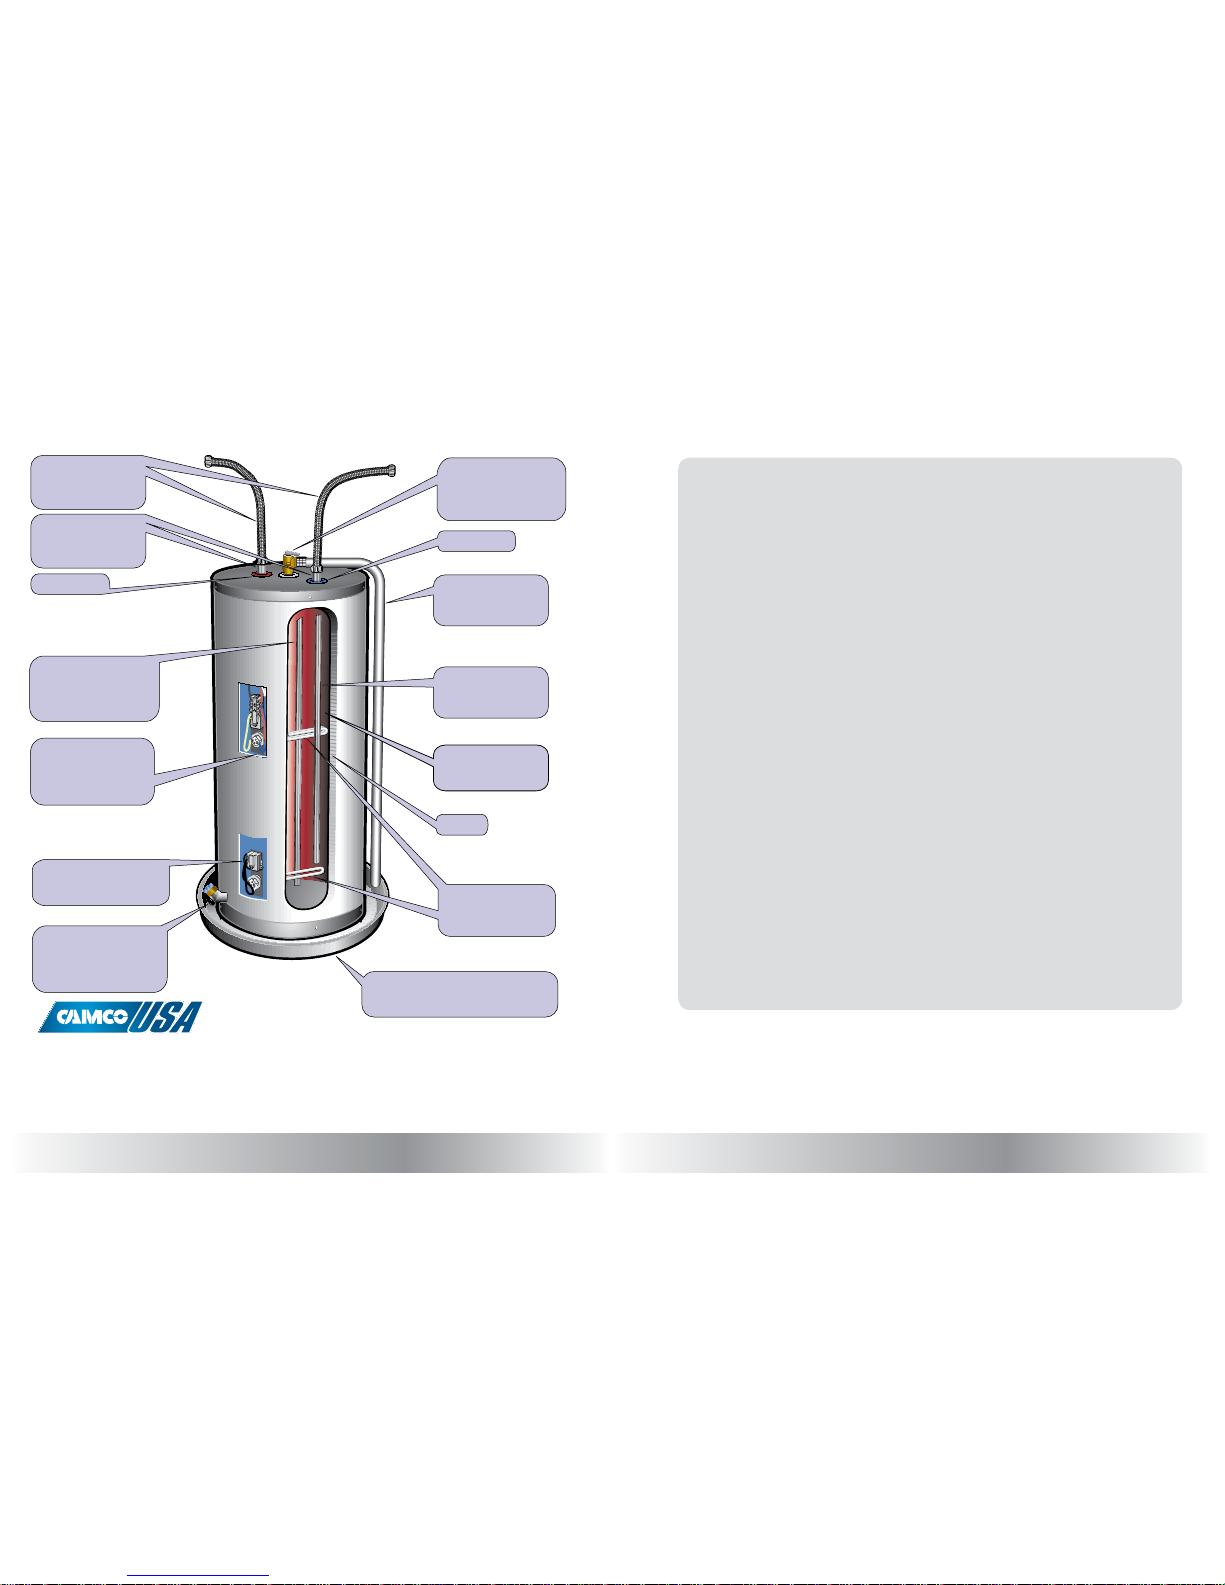
Residential Water Heater Construction
Table of Contents
Drain valve— a metal or plastic
valve used when draining
heater for periodic cleaning or
replacement of a defective water
heater element
Lower thermostat— controls
lower heating element to
maintain desired temperature
Upper thermostat— turns
heating elements on or off
to maintain preset or desired
temperature; regulates power
to the lower thermostat
Anode rod— a rod
composed of sacrificial metal
that prevents deterioration of
the steel tank and elements
by controlling electrolysis
Hot water outlet
Dielectric nipples or
Heat Traps with
thermoplastic lining—
prevents thread corrosion
Flexible stainless steel
or copper connectors—
connects to hot and cold
water pipe system
Drain pan— plastic or metal pan to collect and
drain off leaking water or water from activated
T & P valve; must be plumbed to drain
Heating element—
a resistant type electrical
component to generate heat
Insulation
Steel tank with glass
lining—
to prevent corrosion
Cold water dip tube—
a non-metallic tube that
directs incoming cold water
to the bottom of the tank
Run-off tube— carries
water or steam safely to
drain or drain pan if T & P
valve activates
Cold water inlet
Temperature and pressure
(T & P) valve— safety device
to relieve excessive pressure
and/or temperature buildup
in tank
Limited Warranty: Elements will be replaced to the original purchaser if proven defective in materials or workmanship. No labor
costs are included in this warranty. Complete warranty information available upon request. Warranty is void if element is installed in
anything other than a residential hot water heater.
Standard and Better Elements – 1 year from purchase date.
Premium Elements – 5 years from purchase date.
Our return policy is limited to the replacement of original purchase. No other liability, responsibility or warranty is expressed or implied, including any regarding merchantability or suitability for a particular purpose.
Residential Water Heater Construction .............................................................2
Choosing the Correct Heating Element .............................................................4
Element Flange Styles .......................................................................................... 5
Thermostats ............................................................................................................7
Double Element Thermostats ..............................................................................8
Double Element Thermostat Wiring ...................................................................9
Single Element Thermostat Wiring ...................................................................10
Testing Elements and Thermostats for Failure ..............................................11
Dip Tubes, Run-off Tubes and Anode Rods ....................................................12
Drain Pans, Dielectric Nipples & Heat Traps, T & P Valves ........................13
Frequently Asked Questions about Water Heater Parts ...............................14
Troubleshooting Guide ........................................................................................16
Speciality Items ....................................................................................................18
4 5
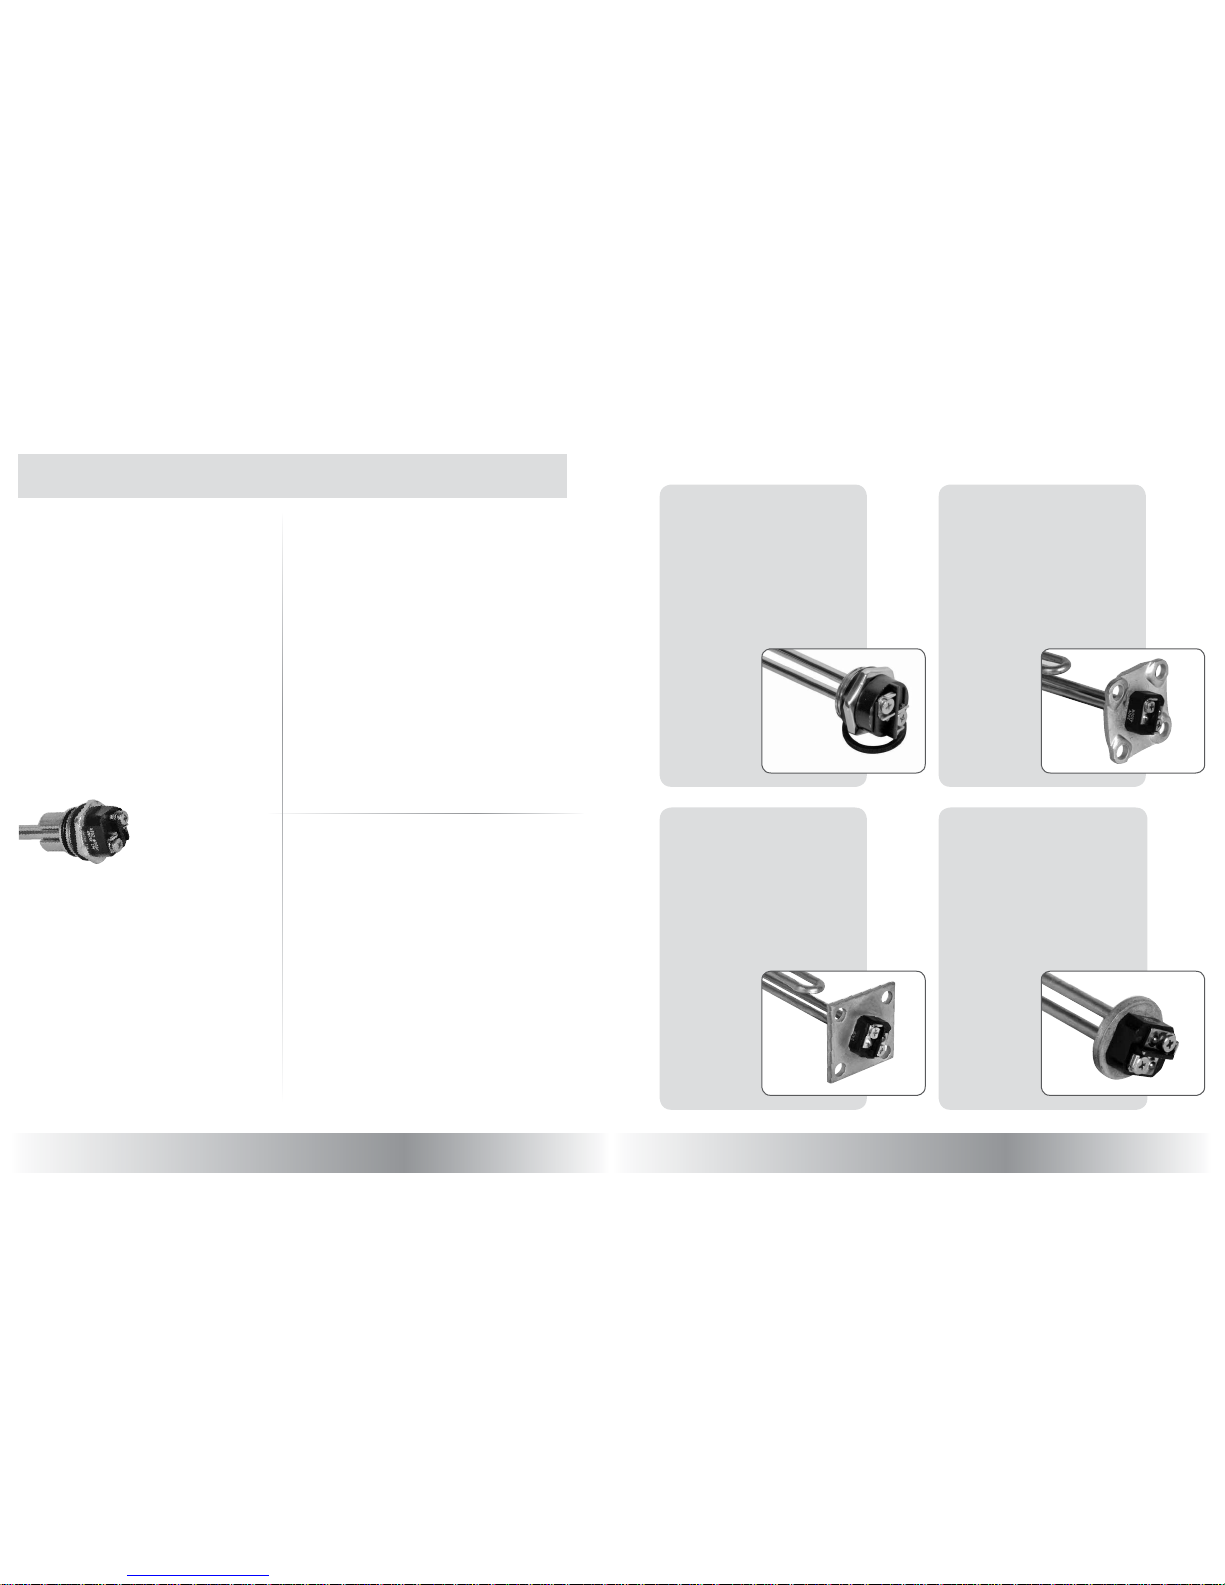
1. Element Flange Style
Water heater elements are offered in several styles.
Since the development of the modern water heater,
manufacturers have used various methods of installing
elements in their water heaters. There are still many of
these older units in operation today that have the older
style elements. The most common are the Universal
Flange, Flat Flange and the Round Head style. The
Universal and the Flat Flange elements are bolted to
the tank with four 3/8" bolts. The Round Head element
is secured to the tank with a separate 4-bolt flange.
Note: The Universal Adapter Kit (Camco #07223) will adapt
a screw-in style element to a bolt-in style element that can
replace the above elements.
Today, all manufacturers of residential water heaters use
only Screw-in style elements. This style provides for easy
installation and serviceability because it screws into a spud
welded directly on the tank of the water heater. The thread
is a 1" (diameter) x 11-1/2 NPSM thread and is standard for
all residential water heaters that use screw-in elements.
EXCEPTION: For a period
of time, State Industries
manufactured a Duron brand
heater that used a 1-3/8"
thread. These elements are
not interchangeable with the
standard 1" threaded element.
2. Voltages and Wattages
The majority of residential style water heaters use
240v power. The 120v elements are primarily used
for smaller water heaters, point-of-use heaters and
in locations where a 240v circuit is not available.
The wattage rating, which determines the heat
output, of the 240v elements can be anywhere
from 1000 watts to 6000 watts. The wattage rating
of 120v elements is 1000 watts to 2500 watts.
Each model water heater is designed for a specific
voltage/wattage rated element. The replacement
element must be the same voltage and wattage
as the element being replaced. Never exceed the
nameplate rating on the water heater.
Choosing the Correct Heating Element Element Flange Styles
When choosing the correct replacement element, three factors must be considered:
1. Element Flange Style (Screw-In, Flat, etc...) 2. Voltage/wattage 3. Watt-density
3. Watt-Density
Another significant difference that should be noted
when choosing a replacement element is the
watt-density construction. Whether the element is
120v or 240v, screw-in or bolt-in, there are three
watt-density ratings available. The watt-density
of an element is basically the amount of heat
concentrated on any point on the surface of
the element.
The lower the watt-density, the greater the amount
of element surface. The heat per square inch of the
surface is reduced, but the total surface is increased
so that the total heat of the element is the same for a
particular wattage. Generally, a lower watt-density in
an element would mean a longer expected life. The
lower watt-density elements normally last longer in
water with high lime content. It helps lower lime
deposit build-up. The fold-back feature of most low
watt-density and Lime Life elements is to keep the
length short enough to fit all tanks.
STANDARD:
Regular High Watt-Density Element
Most common; same as original equipment provided with
most water heaters. It is the least expensive. Can be used in
all replacement situations if the same wattage and voltage
are used.
BETTER: Low Watt Density Element
Most are fold-back elements. Better suited for areas with
problem water (hard water, lime, etc). The lower wattdensity provides no loss of efficiency, yet reduces lime
deposit build-up. Can be used to replace any high wattdensity element if same wattage and voltage are used.
Normally it is more expensive than high watt-density.
PREMIUM: Lime Life Element
Carries a limited 5 year warranty. Ultra low watt-density and
special metal surface (premium grade nickel and stainless
steel) reduce chances of lime build-up. Also resists dryfiring. Ideal for problem water areas and locations with
intermittent water supply. Higher initial cost, but may last
the life of the water heater.
Screw-In Flange
Fits most GE, Rheem, Rudd, Richmond,
Montgomery Ward, Sears/ Kenmore,
State, Norge, Westinghouse, Reliance,
Noland, A.O. Smith, Bradford White,
GS Wood, Maytag, Whirlpool and
Duro-Matic water heaters, some
Mor-Flo, American and Craftmaster
prior to 1991 and all water heaters
manufactured after 1994.
Universal Flange
Fits older Bradford-White, U.S. Water
Heater, most D&R, Day and Night,
Briggs, Jackson, Tennessee Tank and
early models of State and A.O. Smith.
Round Head Style
Fits July 1975 or older models of State,
Reliance, Sears, J.C. Penney, Crane and
some A.O. Smith. Camco no longer
stocks this style. To replace this style,
use a Screw-In Flange element with a
Universal Adapter Kit (#07223).
Flat Flange
Fits most older Mor-Flo, American,
Craftmaster, some older State, Reliance,
Rheem, Rudd, Richmond, Montgomery
Ward, Norge, Intertherm and
Westinghouse models. Fits some Briggs,
Bradford-White, U.S. Water Heater,
Republic, Day and Night, Jackson,
Tennessee Tank and Duro-Matic.
6 7
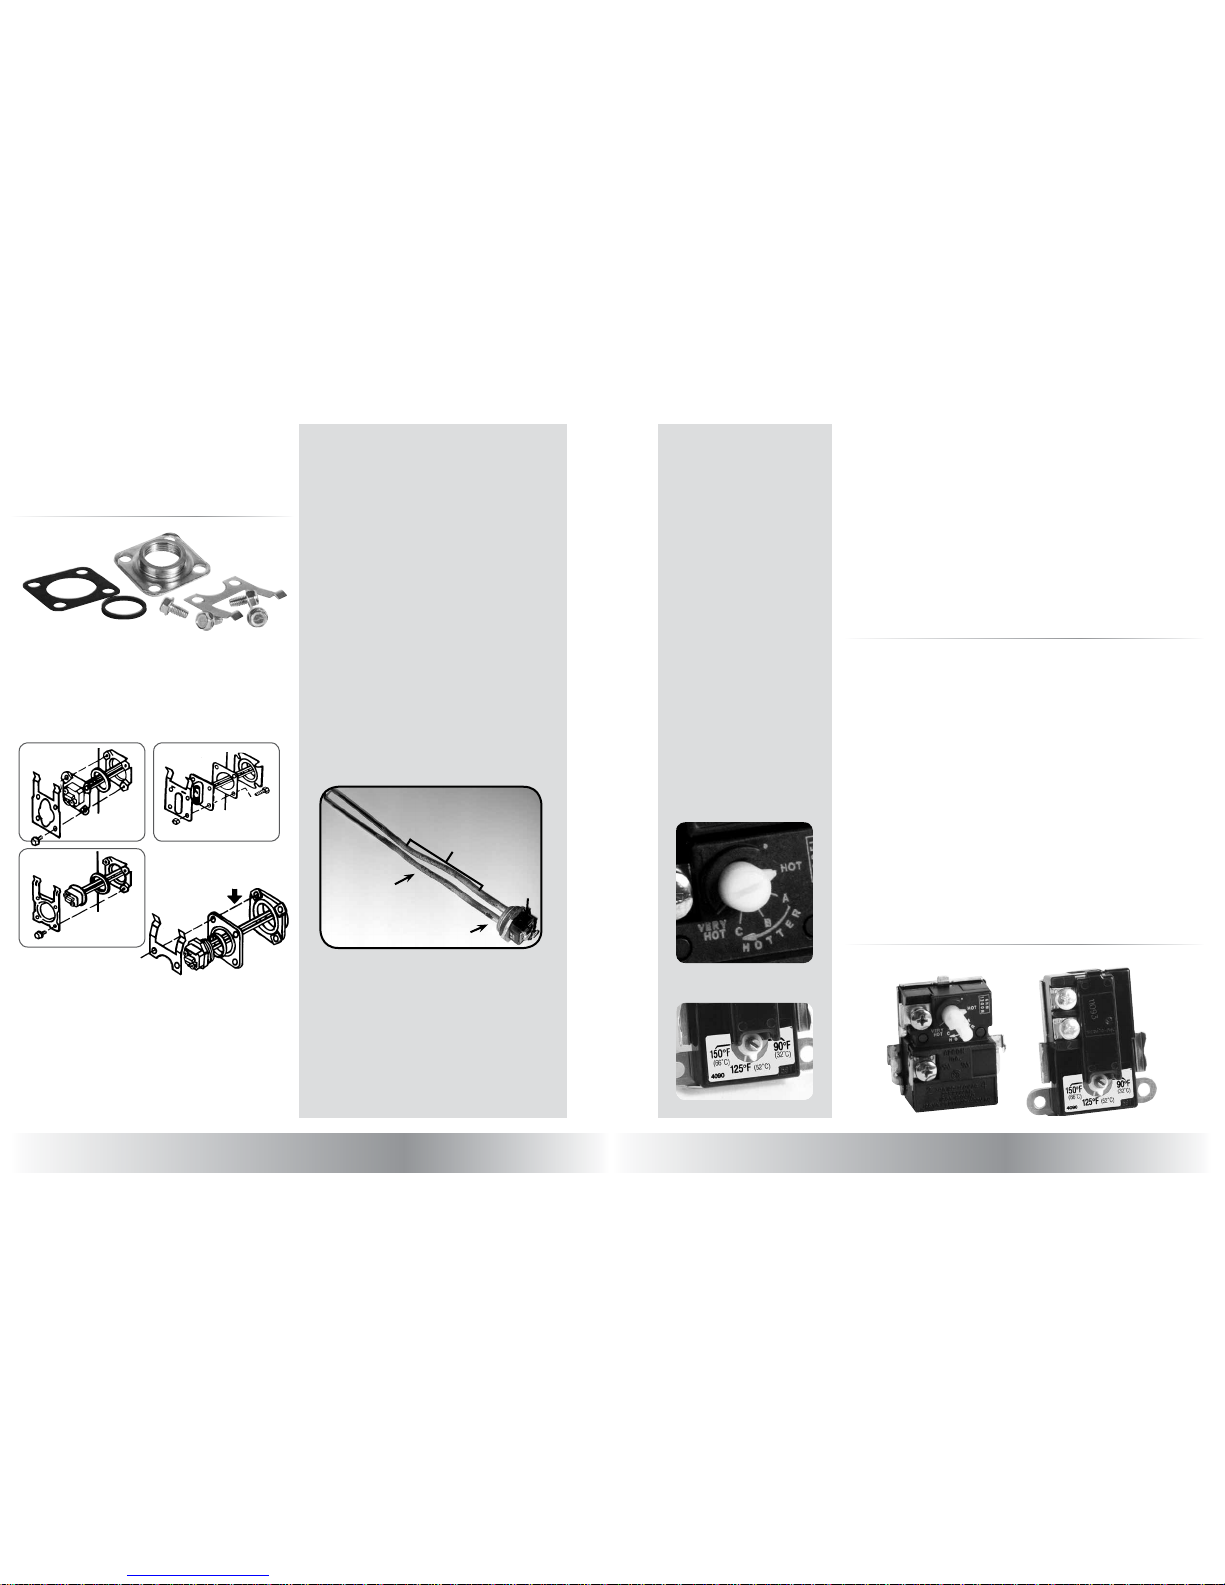
Thermostat Settings
All residential thermostats are factory
preset at 120°. This is a safe, energyefficient setting. If a higher or lower
setting is desired or required, the
thermostat dial may be turned to the
new setting. A flat head screwdriver
may be needed to turn the dial.
Use caution when setting to higher
setting. Scalding can occur.
Therm-O-Disc thermostats have the
temperature settings marked on the
dial. Apcom thermostats do not have
the temperatures on the dial.
Apcom settings:
White Dot = 110° F
Hot = 120° F
A = 130° F
B = 140° F
C = 150° F
Very Hot = 160° F
The settings on both the Apcom and
the Therm-O-Disc thermostats are
accurate to +/- 5° F.
Thermostats
Double Element Water Heaters
The majority of residential water
heaters are designed with two elements
controlled by two different thermostats.
(See drawings on pages 8–9.) The upper
thermostat is the “brain” of the water
heater. It controls the heat generated
by the upper and lower element. Most,
if not all, residential water heaters are
designed to have the upper and lower
thermostats work separately. The lower
element provides the main heat supply.
The upper and the lower thermostats
never operate simultaneously.
The upper thermostat has a safety
device attached to it called a High Limit
Control (HLC). It has a heat sensor that
will shut down the power to the heater
if the temperature of the tank exceeds
safety limits. The button may be reset to
restore power to the heater.
Do not reset the HLC until the problem
causing the unit to trip is corrected.
Operation Cycle of Double Element Water Heaters
1. The upper thermostat senses cold
water and has energized the upper
element. Although contacts on both
thermostats are normally closed
in response to the cold water, the
double throw upper thermostat
completes the circuit only to the
upper heating element. Because of
the double throw action, power to
the lower thermostat is cut off.
2. As the upper element operates,
it heats the water above it
(approximately one quarter of the
tank’s capacity).
3. The water in the upper quarter of
the tank is heated until it reaches
the temperature set on the upper
thermostat. The upper thermostat
then breaks the circuit to the upper
heating element and completes the
circuit to the lower thermostat.
4. The lower element then operates and
heats the remainder of the water in
the tank.
5.
The lower thermostat breaks the
circuit to the lower element when
the water in the lower portion of
the tank has been heated to its set
temperature. The entire tank is now
filled with hot water.
6. As hot water is drawn from the top
of the tank, cool water comes in at
the bottom through the dip tube.
The lower thermostat reacts to the
entering cold water by closing its
contacts, energizing the lower heating
element and heating the water as it
enters the tank.
7. Thermostats are factory preset
at 120°F.
High watt-density and low watt-density elements are
manufactured with a resistance coil wire imbedded in
a magnesium oxide material covered by copper tubing.
Water heater elements are designed to operate only in
water. Dry-firing (applying power to an element with
inadequate or no water in the tank) raises the internal
and tubing temperatures on the copper element to cause
melt-down of the sheath and failure of the internal heating
resistance wire. The expected life of a dry-fired copper
element is 30-45 seconds. In a dry tank the element
temperature may reach 1900 to 2000° F.
Lime Life elements are manufactured of
premium grade nickel and stainless steel
and will resist dry-firing.
Evidence of Dry-Firing
1. The element shaft is annealed so soft you can bend it
with your fingers.
2. Shows evidence of melting.
3. Plastic terminal block melted, even slightly, indicates
that you have positive proof that element was dry-fired.
An immersion element that has been dry-fired has
been misused and therefore is not covered by any
manufacturer’s warranty.
NOTE: A melted sheath can also be caused by
an electrical storm, which is obviously not a
defect in material or workmanship and is therefore
not covered by warranty.
Dry-Fired Elements
Dry-fired means the element operated without being
immersed in water.
We bring this to your attention with the hope that
it will be of some value to you, as it might avoid the
cost and effort of returning the elements.
1
2
4
3
Exhibit A
Element Conversion Kit
Use a standard screw-in element to replace a flat,
universal or round flange element using the Element
Conversion Kit.
This adapter kit is intended for use with a screw-in type
element to replace water heater elements that look like
figures 1, 2 or 3.
Directions:
1. Remove screws and discard old element
and thermostat bracket.
2. Install screw-in element and gasket supplied with element
into square adapter flange. Tighten firmly.
3. Install gasket (supplied with this kit) in element seat, being
careful to ensure a good seat. See diagrams above to
determine which gasket to use.
4. Install element with new thermostat bracket using old
screws or new ones provided. Be careful that screws
are not too long and bottom out against the tank.
Fig. 1: Universal Fig 2: Flat
Fig 3: Round
Element Removal
A long socket wrench is needed to remove and install the
Screw-in style elements. The Camco element wrench
(#09943, 09951, 09883) is designed specifically for the
standard and the Duron screw-in elements.
Replacement gasket goes here.
Apcom Style
Therm-O-Disc Style
 Loading...