

Page 1

Use and Care Guide
®
Electronic Dishwasher
www.GEappliances.ca
Safety Instructions …………3
Installation Instructions
Built-in Dishwasher …………17-23
Portable Dishwasher …………4-5
Operating Instructions, Tips
Appliance Registration ……………2
China, Crystal, Sterling …………14
Detergent Guide …………………..9
Dispenser Cups …………………..9
Features ……………………….6 - 9
How to Operate ……………….6 - 9
Loading ………………………10, 11
Operating Instructions ……….6 - 9
Rinse Agent ………………………..8
Water Temperature ………………..8
Care and Cleaning
Winter Storage ……………………13
Wood Top …………………………13
Problem Solver …………22-24
Preparation
Front Panel Change ……………12
Consumer Services
Model and Serial Numbers ………2
Repair Service ……………………2
Camco Service …………………25
For service please call
1-800-361-3400
TRY
TRY
For Virtually Spotless results!
FOR DEEP CLEANING POWER
ADD ONE LITRE OF WATER
BEFORE INITIAL START
You must add one litre of water into the
dishwasher to facilitate the first start.
RECYCLED PAPER
RECYCLABLE
We care about our environment
IMPORTANT
500A200P065
500A200P045
P
H
Rev. 0
rev. 4
Page 2
A NOTE TO CONSUMERS
®
We’d like to thank you and congratulate you for making the wise decision in purchasing your dishwasher.
This User Guide is designed to be kept near your dishwasher at all times for quick and easy reference.
Features may vary on some dishwasher models. Please read the following tips to insure your dishwasher is
operating at its best performance.
We care about you and your appliance and we want your dishwasher to do its job for you.
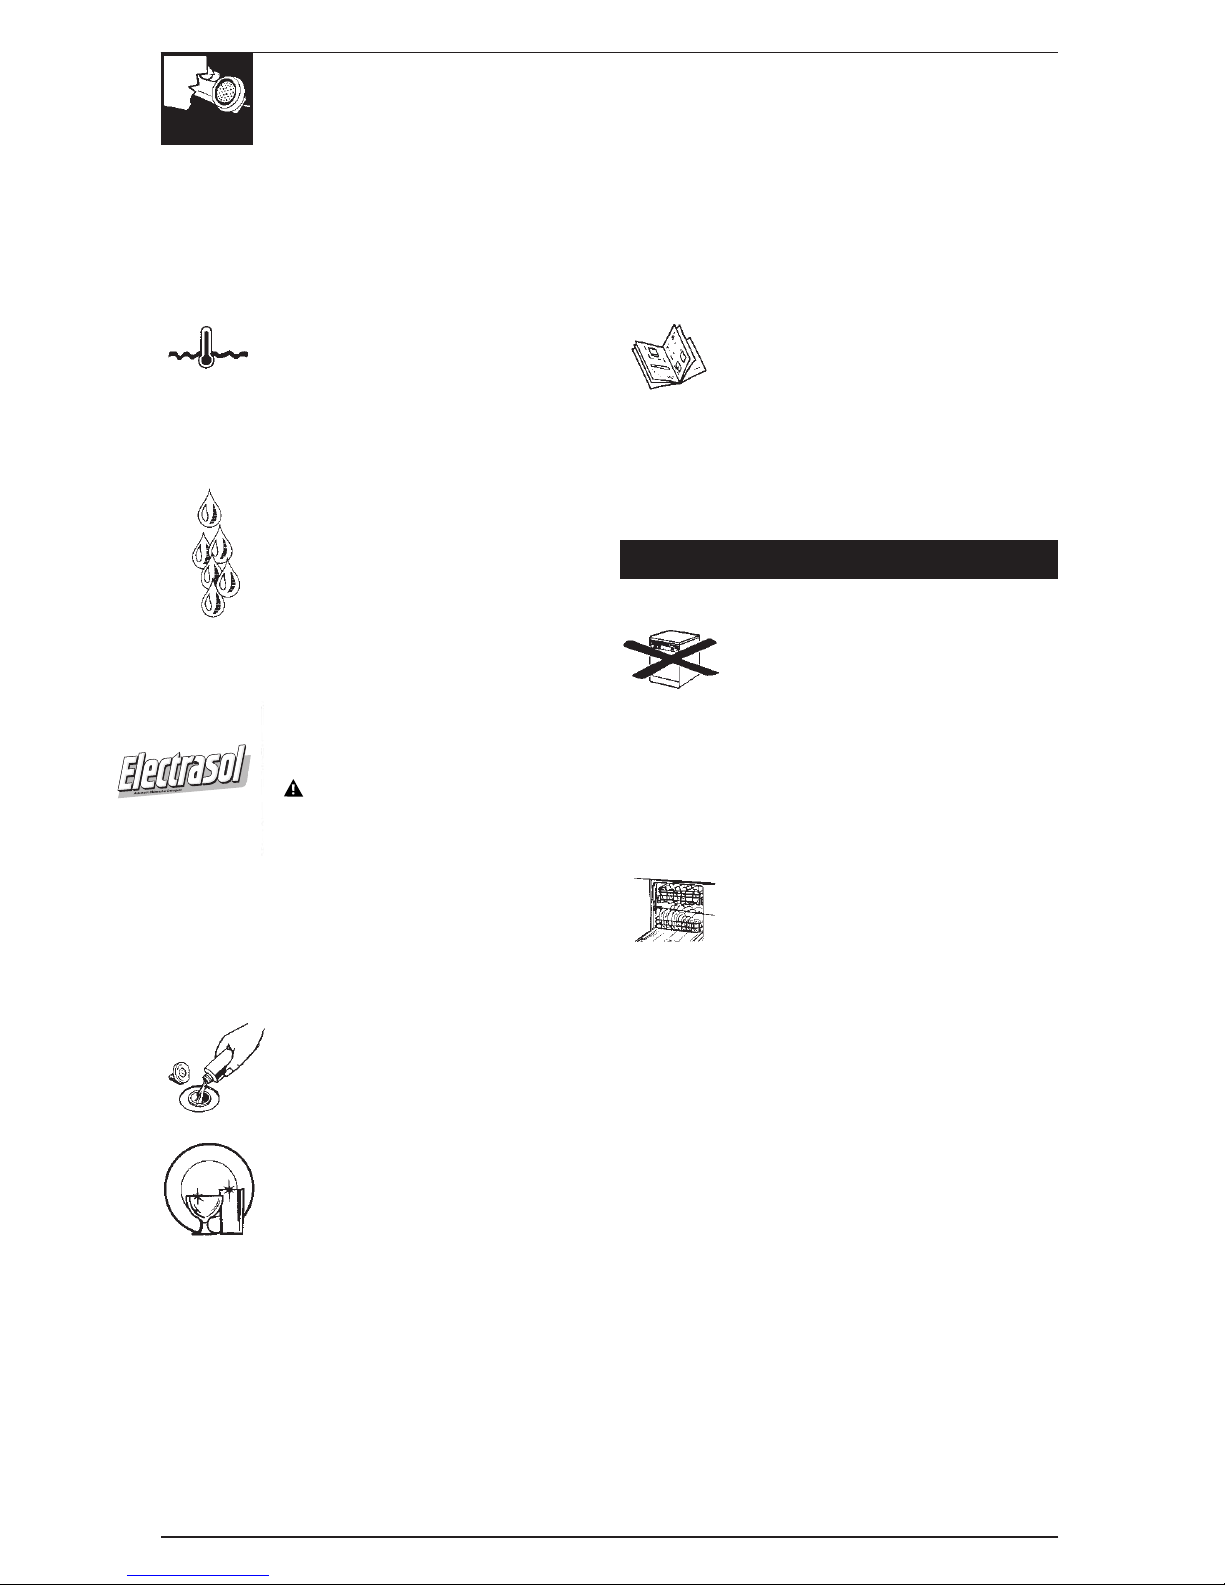
• HOT WATER – Your dishwasher
needs hot water for best results.
Water entering the dishwasher
should be at least 120°F. but your
dishwasher performs BETTER with
HIGHER water temperatures not to
exceed 150°F.
• WATER HARDNESS – The
hardness of the water plays an
important part in how well your
dishwasher cleans. In areas where
water is very hard (12 grains or
more), it may be necessary to install
a water softener. If you do not know
the hardness of your water supply,
contact your local water department.
• DETERGENTS – Only use
detergents labeled for use in
automatic dishwashers.
Never use laundry detergents or
liquid soaps…that will cause
oversudsing and leaks. The amount
of detergent you use depends on the
water hardness and the amount of
soil on your dishes. In most cases,
detergent amounts should be
increased for hard water and heavy
soil.
• RINSE AGENT – should always be
used:
– to reduce water spotting
– to improve drying.
Always check and refill the rinse
agent when necessary.
• FOR BEST RESULTS – The cycles
and the options you choose have an
effect on the results you get. Please,
see the Operating Instructions and
Tips for more information.
2
It is intended to help you operate and maintain your
new dishwasher properly.
Keep it handy for answers to your questions.
If you don’t understand something or need more
help, call:
or refer to page 25.
Save time and money.
Before you request service…
Check the Problem Solver in the back of this guide.
It lists causes of minor operating problems that you
can correct yourself.
These numbers are also on the Consumer Product
Ownership Registration Card that came with your
dishwasher. Before sending in this card, please write
these numbers here:
_____________________________________________
Model Number
_____________________________________________
Serial Number
Use these numbers in any correspondence or service
calls concerning your dishwasher. Staple sales slip
here.
We’ll be there…
No matter what major appliance you buy from us,
you always get more than a quality product. You
receive the added assurance that, should you ever
need our help, we’ll be there.
We ask that you please be sure to read all the
Important Safety Instructions before operating your
new appliance to insure your safety.
Before using your dishwasher, read this guide
carefully.
1-800-361-3400
If you received a damaged
dishwasher…
Immediately contact the dealer (or
builder) that sold you the dishwasher.
Write down the model and
serial numbers.
You’ll find them on a label fastened to
the tub wall just inside the dishwasher
door.
Page 3

IMPORTANT SAFETY INSTRUCTIONS
Read all instructions before using this appliance.
WARNING - When using this
appliance, always exercise basic safety
precautions, including the following.
•
Use this appliance only for its intended
purpose, as you will find described in this Use
and Care Guide.
This dishwasher must be properly
installed and located in accordance with
the Installation Instructions before it is
used.
- This appliance must be connected to a grounded
metal, permanent wiring system; or an equipmentgrounding conductor must be run with the circuit
conductors and connected to the equipmentgrounding terminal or lead of the appliance. See
Installation Instructions for grounding details.
- Connect to a properly rated, protected and sized
power-supply circuit to avoid electrical overload.
Do not store or use combustible
materials, gasoline or other
flammable vapors and liquids in
the vicinity of this or any other
appliance .
• Do not touch the Calrod® heating element during
or immediately after use.
• Do not operate your dishwasher unless all
enclosure panels are properly in place.
• Do not abuse, sit on, or stand on the door or dish
rack of the dishwasher.,
• Close supervision is necessary if this appliance is
used by or near children. Do not allow children to
play inside, on or with this appliance or any
discarded appliance. Dispose of discarded
appliances and shipping or packing material
properly. Before discarding a dishwasher, remove
the door of the washing compartment.
• Keep all washing detergents
and wetting agents out of the
reach of children, preferably
in a locked
cabinet. Observe all warnings on container labels
to avoid personal injury.
• To minimize the possibility of electric shock,
disconnect this appliance from the power supply
before attempting any maintenance. NOTE:
Turning the
not disconnect the appliance from the power
supply. We recommend having a qualified
technician service your appliance.
control dial to the OFF position does
Important Safety Instructions
• Use only powder or liquid detergents or wetting
agents recommended for use in a dishwasher
• Do not wash plastic items unless marked
"dishwasher safe" or the equivalent. For plastic
items not so marked, check the manufacturer's
recommendations.
• Load light plastic items so they will not become
dislodged and drop to the bottom of the
dishwasher - they might come into contact with the
Calrod® heating element and be damaged.
To minimize the possibility of
injury.
CAUTION
Contents washed in SaniWash cycle may be hot to
the touch. Use care before unloading.
• When loading items to be washed:
A. Locate sharp items so that they are not likely
to damage the door seal, and
• B. Load sharp knives with handles up to reduce
the risk of cut-type injuries.
• Do not tamper with controls.
WARNING-HYDROGEN GAS is
produced by the chemical action
within your water heater. It can
accumulate in the water heater and/or
water pipes if hot water has not been used for a
period of two weeks or longer. HYDROGEN GAS
IS EXPLOSIVE. To prevent the possibility of
damage or injury, if you have not used hot water for
two weeks or more, or moved into a residence in
which the hot water system may not have been used
for some time, turn on all hot water faucets and
allow them to run for several minutes before using
any electrical appliance which is connected to the
hot water system. This will allow any hydrogen gas
to escape. Also, since the gas is flammable, do not
smoke or use an open flame or appliance during this
process.
SAVE THESE
INSTRUCTIONS
3
Page 4
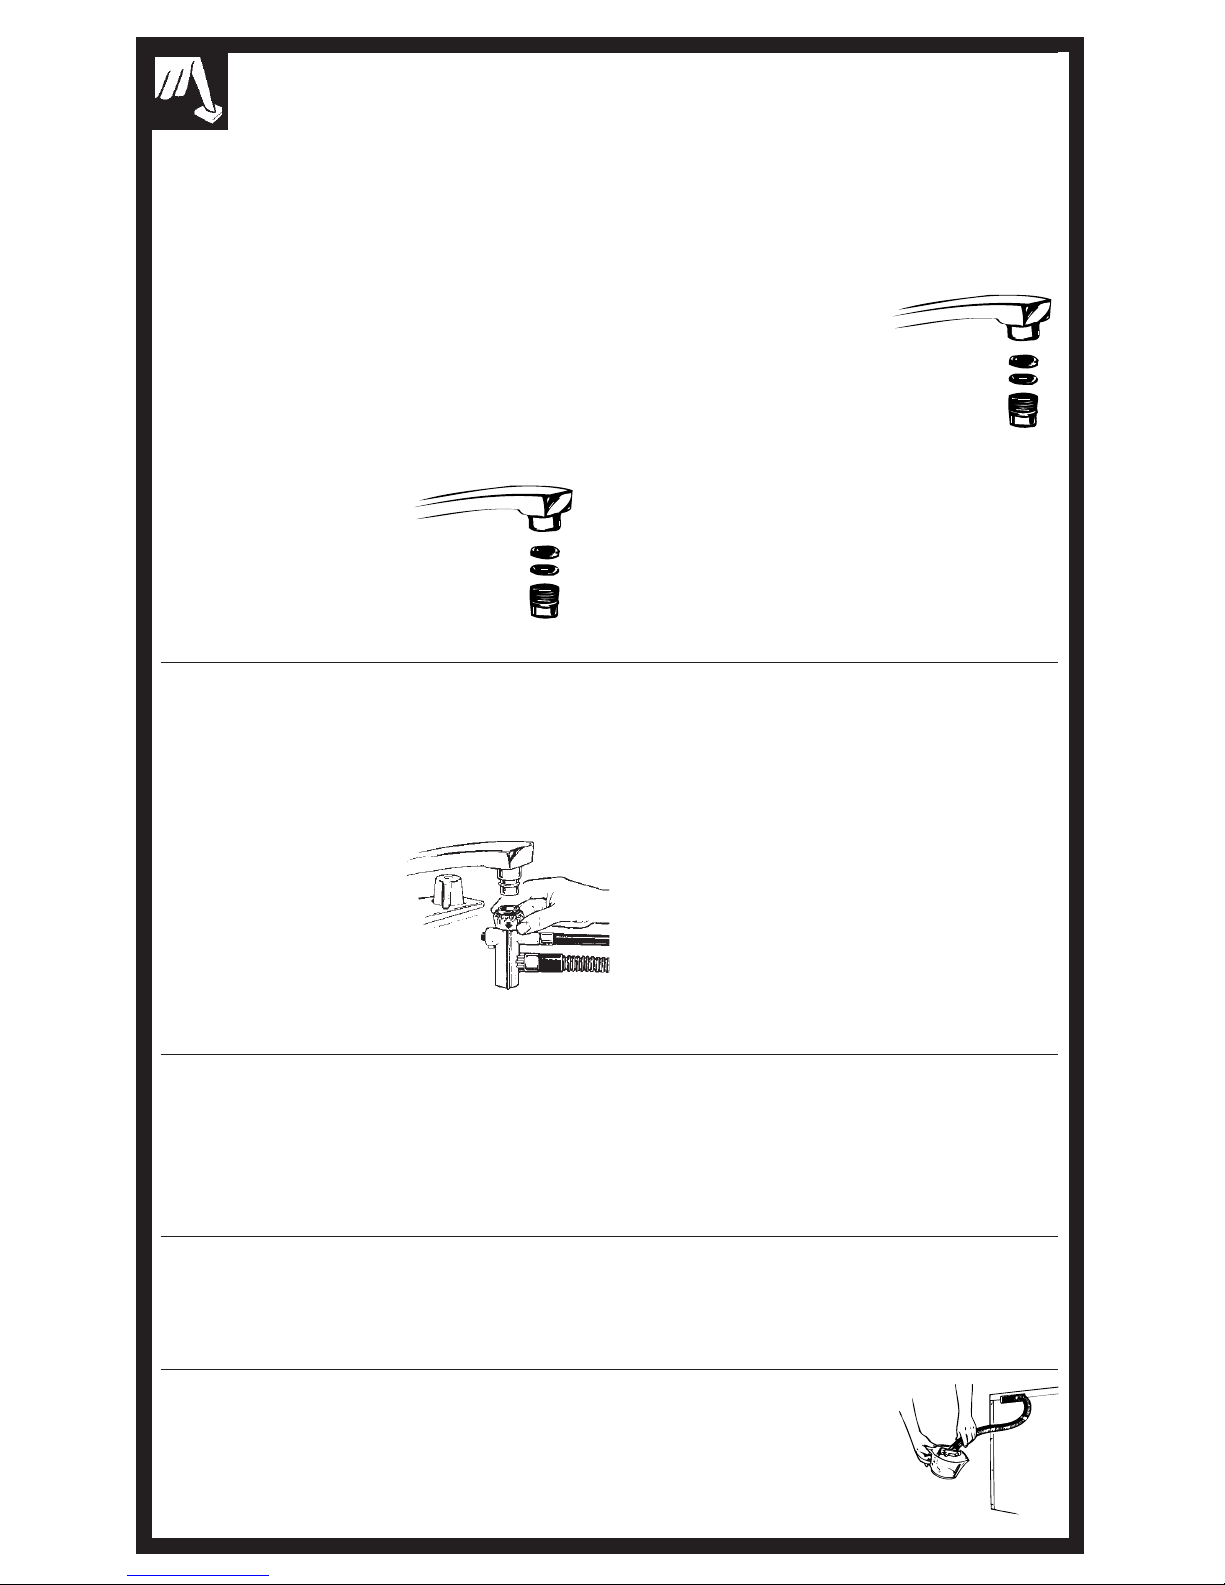
HOW TO USE THE UNICOUPLE
(Portable Models Only)
Before operating your dishwasher the first time...
Attach the Faucet Adapter. The special faucet
adapter supplied with your dishwasher must be
assembled to the sink faucet before you can use
your dishwasher.
The faucet adapter is designed to fit standard
spouts having internal or external threads. You will
find the adapter and two washers in the “Faucet
Adapter’’ packet in your dishwasher.
To install faucet adapter, first remove the old
aerator or trim ring on your faucet spout.
If faucet has external
threads:
Insert the thinner of the two
washers into the faucet
adapter and attach it to the
faucet spout.
Tighten with pliers.
How to connect the Unicouple
1. Pull Unicouple and its hoses completely out from
storage compartment located at rear of dishwasher
and attach it to the faucet adapter.
2. Attach the Unicouple
connector to the faucet
adapter by depressing
collar at the top of the
connector. When
Unicoupler is all the way
up onto the adapter,
release the collar. It will
then snap into position to
lock the Unicouple in
place.
PULL RING DOWN
If faucet has internal threads:
Insert both washers into the
faucet adapter and attach it to
the faucet spout.
Tighten with pliers.
If the faucet adapter threads
do not match your faucet
spout, your local hardware or
plumbing supply
store normally has additional fittings to adapt your
faucet spout to the special faucet adapter.
NOTE: A sink spray attachment hose can burst if it
is installed on the same sink with your dishwasher.
We suggest that you disconnect the sink spray
attachment if your sink has one and plug the hole.
The Unicouple's small hose carries water from the
faucet to the dishwasher. Its large hose carries drain
water to the sink. Be sure Unicouple is pointing
toward the sink bowl drain opening and the sink
drain is open for water that will drain from your
dishwasher. If your dishwasher drains into a disposer, operate the disposer until it is completely
empty before starting the dishwasher.
3. Turn hot water fully on before starting the dish-
washer.
How to disconnect the Unicouple from faucet adapter
1. Turn off the hot water.
2. Release the water pressure by depressing the
pressure release button. This relieves water
pressure and protects you, and the room, from
severe splashing.
How to disconnect your dishwasher
1. Remove the power cord plug from the wall
receptacle.
2. Disconnect Unicouple from faucet adapter.
How to drain excess water from Unicouple hoses
If the sink is 34" or higher from the floor, the excess water in Unicouple hoses cannot
be drained directly into the sink. It will be necessary to drain excess water from hoses
into a bowl or suitable container that is held outside and lower than the sink.
4
3. Release Unicouple from faucet by depressing
the collar at the top of the Unicouple connector.
NOTE:
rinse, the Unicouple can be disconnected and
returned to storage.
When motor stops at the end of the final
Page 5
HOW TO CONNECT ELECTRICITY
GROUNDING INSTRUCTIONS
This appliance must be grounded. In the event of a malfunction or breakdown, grounding will
reduce the risk of electric shock by providing a path of least resistance for electric current. This
appliance is equipped with a cord having an equipment-grounding conductor and a grounding plug.
The plug must be plugged into an appropriate outlet that is installed and grounded in accordance
with all local codes and ordinances.
WARNING
Improper connection of the equipment-grounding conductor can result in a risk of electric shock.
Check with a qualified electrician or service representative if you are in doubt whether the appliance
is properly grounded. Do not modify the plug provided with the appliance; if it will not fit the outlet,
have a proper outlet installed by a qualified electrician.
Caution, for personal safety:
DO NOT USE AN EXTENSION CORD OR AN ADAPTER PLUG WITH THIS APPLIANCE.
DO NOT, UNDER ANY CIRCUMSTANCES, CUT OR REMOVE THE THIRD GROUNDING
PRONG FROM THE POWER CORD.
Dishwasher must be electrically grounded in accordance with local codes and ordinances.
How to Connect Unicouple How to Connect Electricity
Electrical requirements
• This appliance must be supplied with 120V,
60 Hz, and connected to an individual,
properly grounded branch circuit, protected by
a 15 amp circuit breaker or fuse.
• If the electric supply
provided does not meet
the above specifications,
it is recommended that a
licensed electrician install
an approved outlet.
INSURE PROPER
GROUND EXISTS
BEFORE USE
• Your dishwasher circuit should not be used for
any other appliance while the dishwasher is in
operation as the dishwasher requires the full
capacity of the circuit.
• If the wall receptacle you plug
the dishwasher's power cord
into is controlled by a switch,
turn on the switch.
5
Page 6
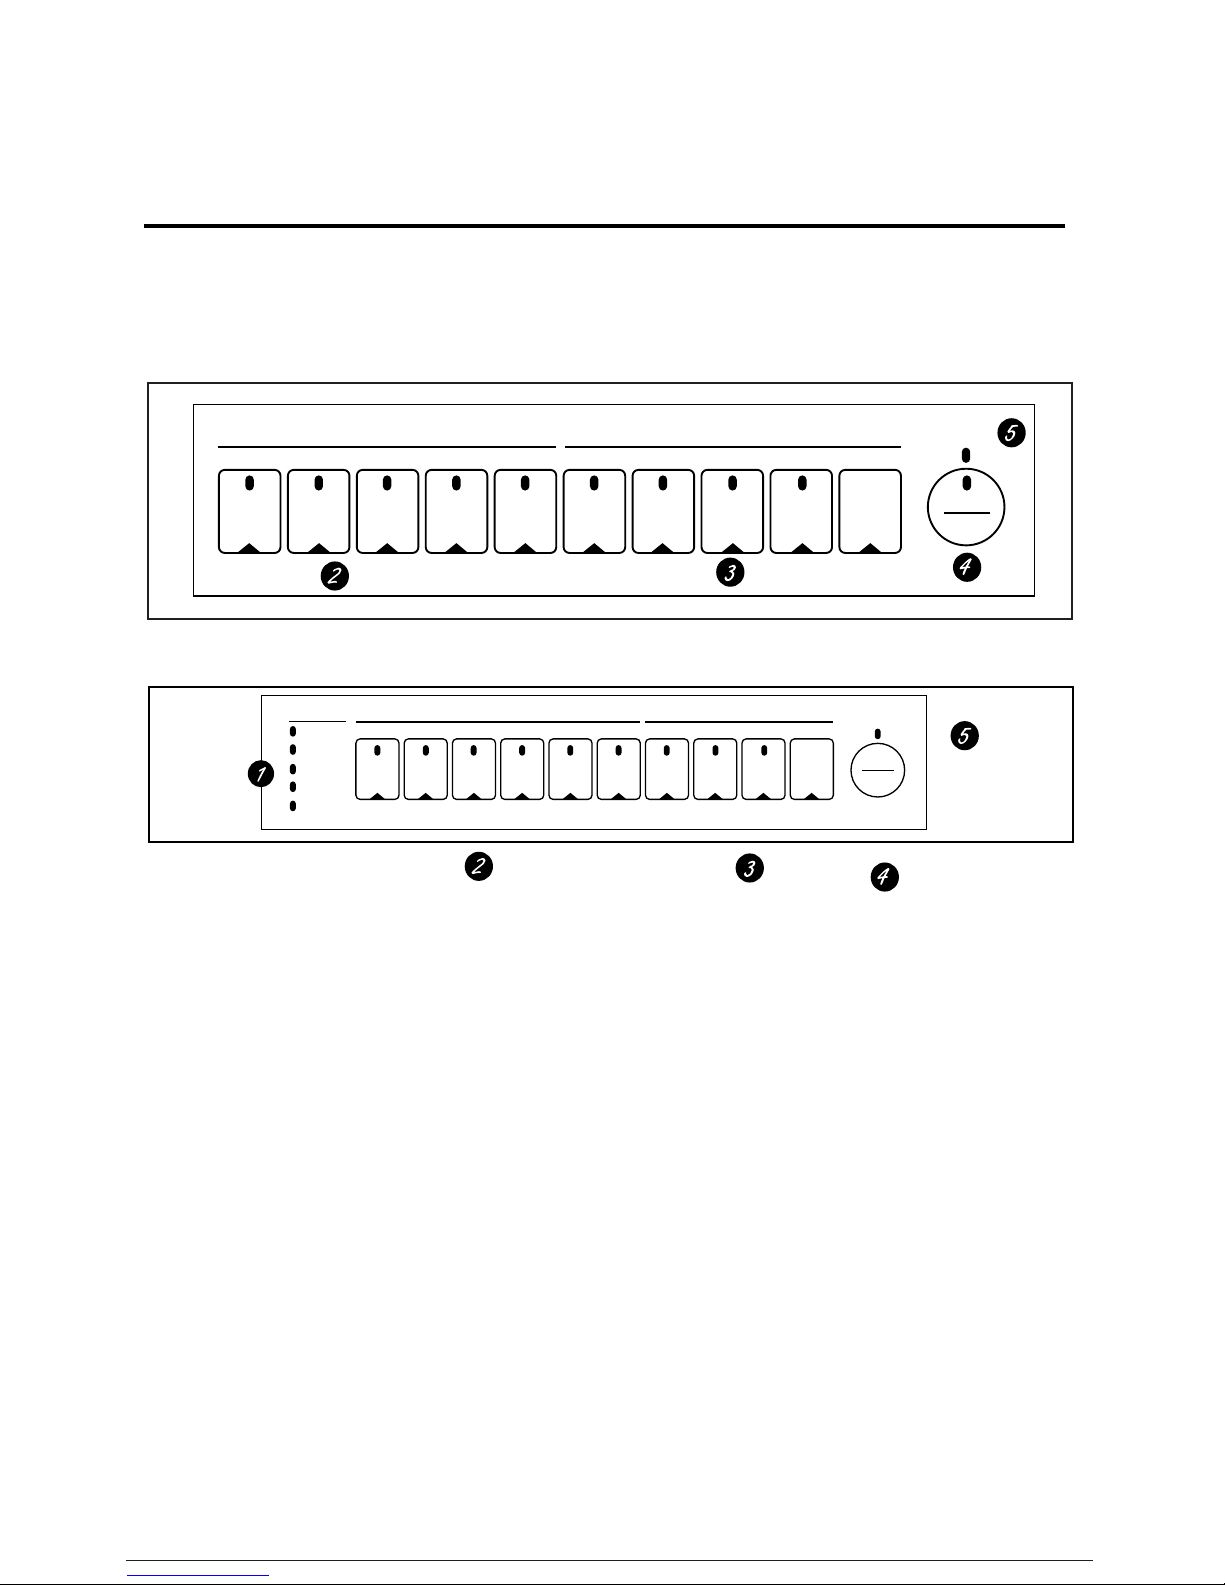
About the dishwasher control panel.
You can locate your model number on the tub wall just inside the door. Throughout this manual
features and appearance may vary from your model.
Model Series GSD5211-5311-5411-5511
POTS
& PANS
NORMAL
Model Series GSD5911
STATUS
SENSING
WASHING
RINSING
DRYING
SANITIZED
LIGHT
WASH
SANI
WASH
CRYSTAL
POTS
& PANS
CHINA
NORMAL
RINSE
ONLY
CHINA
CRYSTAL
HI TEMP
RINSE
LIGHT
WASH
RINSE
ONLY
HI TEMP
WASH
POWER
PRESOAK
OPTIONSCYCLE SELECTIONS
HEATED
DRY
OPTIONSCLEAN SENSOR SELECTIONS
HEATED
DRY
LOCK
(2 TIMES)
LOCK
(2 TIMES)
2 4 8
DELAY
HOURS
2 4 8
DELAY
HOURS
CLEAN
START
RESET
CLEAN
START
RESET
6
Page 7
n
The Status
SENSOR Displayed during periods using CleanSensor technology to measure the amount of soil in the load and decide if another prewash is needed.
WASH Displayed during prewash and main wash periods.
RINSE Displayed during rinse periods.
DRY Displayed during
SPEED DRY/HEATED DRY
.
SANITIZED Displayed when cycle has met sanitization conditions. Light remains ON until door is opened.
Load Selections
The light above the selected pad will be ON to indicate which LOAD SELECTION has been selected.
SANI WASH Heavy 11.5 gal., 99 min., Medium 9.9 gal., 93 min., Light 8.2 gal., 93 min.
This cycle raises the water temperature in the final rinse to sanitize your dishware. The cycle length will vary depending on the temperature
of your inlet water.
NOTE:
The SaniWash cycle is monitored for sanitization requirements. If the cycle is interrupted during or after the main wash portion or
if the incoming water temperature is so low that adequate water heating cannot be achieved, the sanitizing conditions will not be met.
In these cases, the sanitized light will not illuminate at the end of the cycle.
Control Settings
g
The Status display tells you what is happening while the dishwasher is in operation and also any malfunctions if they occur (see page X).
The lights will come ON indicating the sequence of operation the dishwasher is in.
NSF/ANSI 184 Residential Dishwashers
Certified residential dishwashers are not intended for licensed food establishments.
POTS & PANS Heavy 13.1 gal., 101 min., Medium 11.5 gal., 79 min., Light 9.9 gal., 55 min.
For heavily soiled dishes or cookware with dried-on or baked-on soils.
burned-on foods.
NORMAL
SPEED WASH/
LIGHT WASH
CHINA CRYSTAL
RINSE ONLY
NOTE:
If the dishwasher is equipped with Clean Sensor technology, cycle length and time may vary depending on soil and temperature conditions.
Heavy 9.9 gal., 72 min., Light 8.2 gal., 43 min.
For loads of everyday dishes, glasses and cookware with medium soils.
NOTE:
Many dishes have lighter soil than normal. Choosing a
Heavy 9.9 gal., 37 min., Medium 8.2 gal., 34 min., Light 6.6 gal., 25 min.
For dishes with light soils.
Heavy 9.9 gal., 52 min., Medium 8.2 gal., 39 min., Light 6.6 gal., 35 min.
For lightly soiled china and crystal.
Heavy 3.3 gal., 7 min., Light 1.6 gal., 4 min.
For rinsing partial loads that will be washed later. Do not use detergent.
Options
The light above the selected pad will be ON to indicate which OPTION has been selected.
POWER For use with heavily soiled and/or dried-on, baked-on soils. This option
PRESOAK
SPEED DRY/ Shuts off the drying heat option. Dishes air dry naturally and energy is saved. You can prop the door open after the
HEATED DRY illuminates.
SPEED DRY/ Turns the heater on for fast drying. This cycle will extend the time to your wash cycle by 40 minutes for the
HEATED DRY
DELAY HOURS You can delay the start of a wash cycle for up to 8 hours. Press the
This option adds 16 minutes to the cycle time.
OFF
POTS & PANS
ON
NOTE:
Cannot be selected with
LOCK
When the
from being made. Or you can lock the controls after you have
is not interrupted.
Children cannot accidentally start dishwasher by touching pads with this option selected.
To unlock the dishwasher after it has been locked, touch the
delay
the start of the cycle, then press
START/RESET
signal will beep until you do so.
RESET To change a cycle after washing starts, touch the
stops, you can reprogram and restart the dishwasher. This will take approximately 90 seconds.
Start
Close and latch the door. Touch the
the wash action begins.
NOTE:
The dishwasher remembers your last cycle so you don’t have to reprogram each time. When the dishwasher is loaded and
the door latch is in the locked position, the control panel lights will be ONand display the last settings you selected.
If you don’t want to change any of the settings, simply touch the
Also, if a power failure occurs,
and touch the
Clean
This light is illuminated when a wash cycle is complete. The light will stay
START/RESET
Everyday dishes may be included. This cycle will not remove
cycle other than
cycle and 24 minutes for the
RINSE ONLY
LOCK
pad is touched twice within 3 seconds, all pads become inoperative. You can lock the controls to prevent any selections
a second time will cancel the
START/RESET
NORMAL
and
pad to begin the cycle.
SPEED DRY/HEATED DRY
NORMAL, SPEED WASH/LIGHT WASH
cycle.
started a cycle or selected
LOCK
pad twice within 3 seconds. The light above the
START/RESET
pad to begin the cycle. Water fill begins, and approximately 60 seconds later
. The machine will count down and start automatically
DELAY START
START/RESET
START/RESET
will automatically be programmed. Make any new selections
NORMAL
will save energy and water.
MUST
be selected
DELAY HOURS
selection.
NOTE:
pad to cancel the cycle. After water is pumped out and the motor
pad to begin the cycle.
ON
until the door is opened.
PRIOR
to starting the cycle.
CLEAN
and
SANI WASH
DELAY START
pad to choose the number of hours you want to
If you forget to fully close the door, a reminder
CHINA CRYSTAL
cycle.
so the cycle or
at the correct time. Pressing
DELAY START
LOCK
pad will turn off.
Operati
Instructions
light
and
5
7
Page 8
Flashing display lights (on some models)
6
Status Lights What It Means What To Do
CLEANSENSOR
Error If the sensing light doesn’t come on during the first part of the cycle,
the
CLEANSENSOR
is not working. Call for service. The dishwasher will
continue to work without the
CLEANSENSOR
.
NOTE:
This light will NOT stay on the entire cycle.
START/RESET
pad Allow up to 90 seconds for the dishwasher to drain and reset before selecting
has been pressed a new cycle.
Control Error Press the
START/RESET
pad to turn off the beeper. Turn off power at the circuit
breaker for 10 seconds, then restore power. If the rinsing light continues to
flash, then call for service.
Control Error Press the
START/RESET
pad to turn off the beeper and the dishwasher will
attempt to reset. Then restart the wash cycle. If this error continues, call
for service.
Filling the Dispenser
Fill the rinse agent dispenser until it reaches the bottom
of lip inside the opening. Replace cap.
To check if rinse agent is needed, press the clear center
of the fill cap 2 or 3 times. If rinse agent fills the center
of the cap, you have enough.
A full dispenser should last about one month.
If rinse agent spills, wipe up the excess.
Check the Water Temperature
The entering water must be at least 120°F and
not more than 150°F for effective cleaning and to
prevent dish damage. Check the water temperature
with a candy or meat thermometer. Turn on the
hot water faucet nearest the dishwasher, place
the thermometer in a glass and let the water run
continuously into the glass until the temperature
stops rising.
Use Jet-Dry® Rinse Agent
Jet-Dry
®
rinse agent removes spots and prevents new film buildup on your dishes,
glasses, flatware, cookware and plastic.
Using the dishwasher.
PLUS A
BEEPING
SOUND
PLUS A
BEEPING
SOUND
STATUS
SENSING
WASHING
RINSING
DRYING
SANITIZED
STATUS
SENSING
WASHING
RINSING
DRYING
SANITIZED
STATUS
SENSING
WASHING
RINSING
DRYING
SANITIZED
STATUS
SENSING
WASHING
RINSING
DRYING
SANITIZED
8
Page 9

HOW TO OPERATE YOUR DISHWASHER
®
Using the dishwasher
Dish Preparation Prior to Loading
• No pre-rinsing of normal food soil is
required.
• Scrape off hard soils, including bones,
toothpicks, skins and seeds.
• Remove large quantites of any remaining
foods.
Using the Dishwasher Door
1. The door must be closed to select a LOAD SELECTION or an ENHANCEMENT.
2. If the door is opened during a cycle and left open, the dishwasher will beep once every
minute until the door is closed.
• Remove leafy vegetables, meat trimmings,
and excessive amounts of grease or oil.
• Remove acidic food soils that can discolor
stainless steel.
Hot Water Rinse Agents Detergents
Proper Use of Detergtent
Use only detergent specifically made for use
in dishwashers. Electrasol®Automatic
Dishwashing Detergent has been approved
for use in all GE dishwashers. Keep your
detergent fresh and dry. Don’t put detegent
into the dispenser until you’re ready to wash
dishes.
All wash cycles except RINSE ONLY
require detergent in the main and pre-wash
cup. The amount of detergent to use depends
on whether your water is hard or soft. With
hard water, fill the main wash section and
pre-wash section completely. With soft
water, fill both sections halfway. When using
automatic dishwashing detergent tabs, simply
place one tab in the main wash section and
close.
Protect your dishes and dishwasher by
contacting your water department and asking
how hard your water is. Twelve or more
grains is extremely hard water. A water
softener is recommended. Without it, lime
can build up in the water vlave, which could
stick while open and cause flooding. Too
much detergent with soft water can cause a
permanent cloudiness of glassware, called
etching.
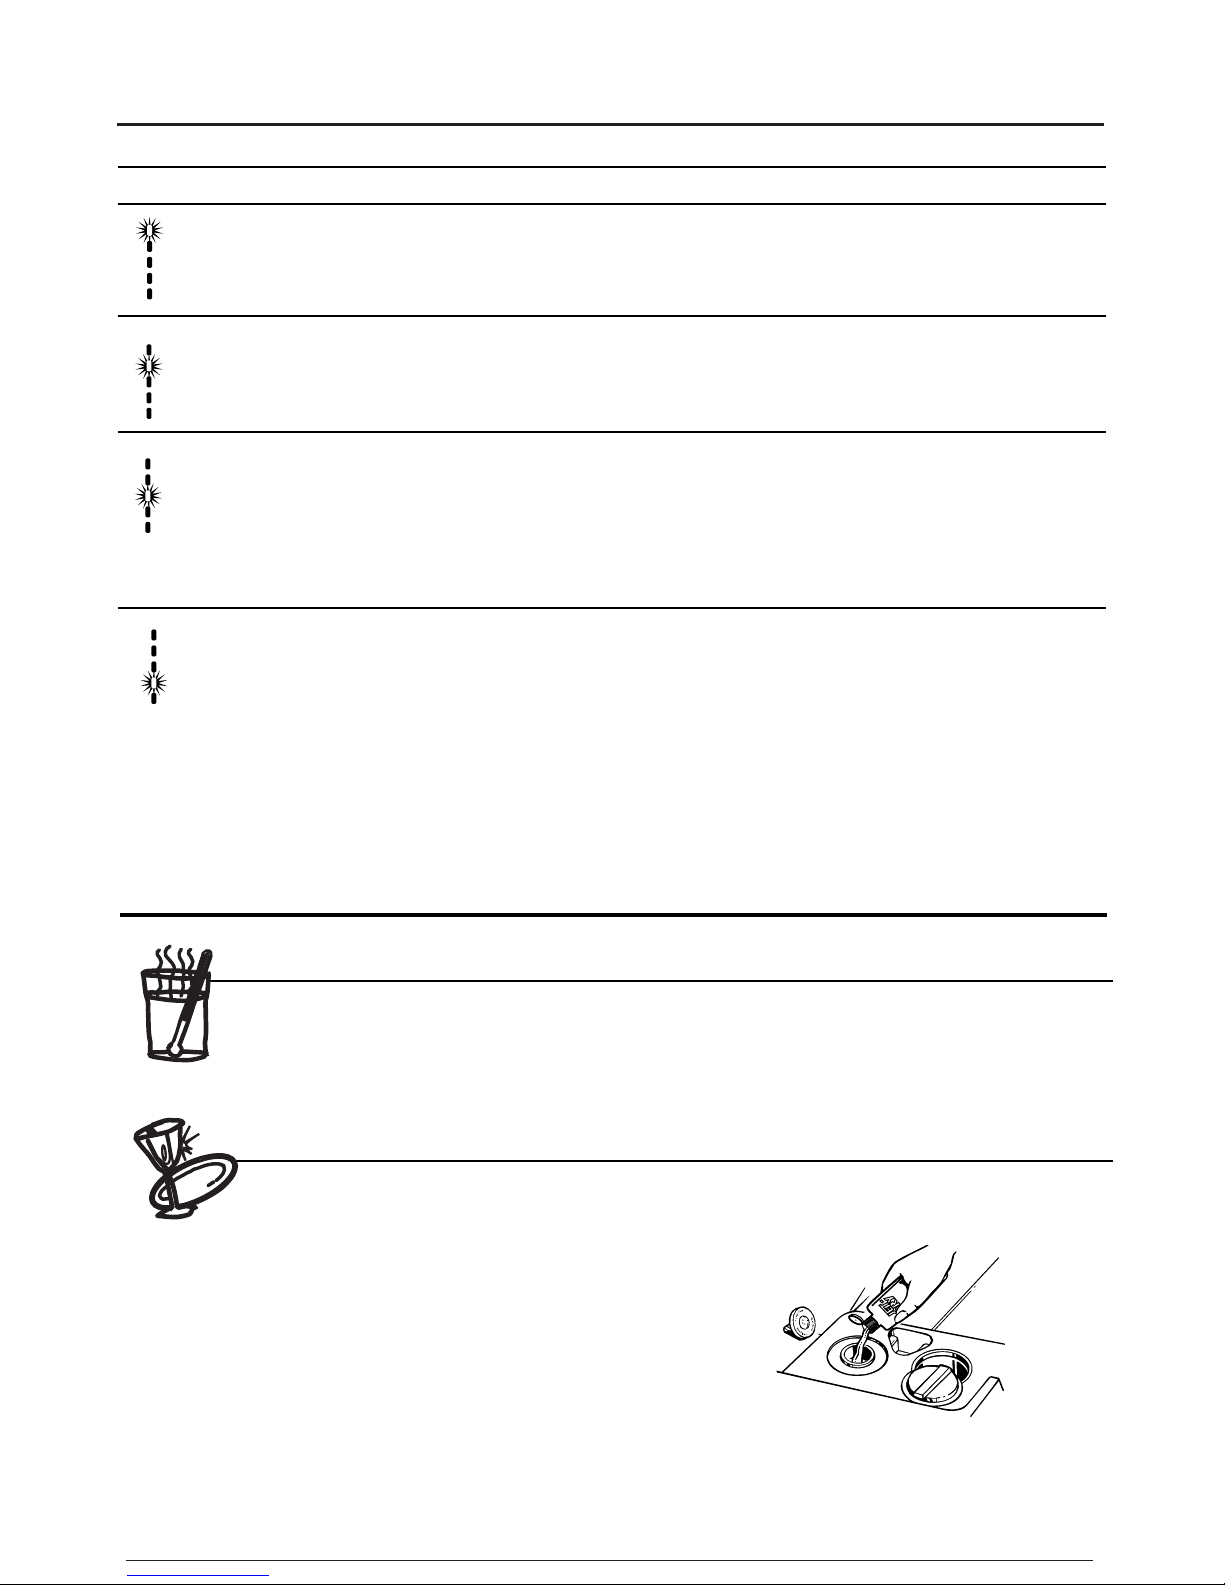
Filling the Dispenser
1. If the dispenser cover is closed, open the
cover by depressing the cover latch.
2. Fill the Main Wash section with detergent.
3. Fill the Pre-Wash section if needed.
4. Close the dispenser cover.
It is normal for the cover to open partially
when dispensing detergent.
Cover
Main Wash
Section
Cover Latch
Pre-wash Section
Forgot to Add a Dish?
A forgotten dish can be added anytime
before the main wash.
1. Squeeze the door latch to release the door.
2. Do not open the door until the water spray
action stops. Steam may rise out of the
dishwasher.
3. Add forgotten dishes.
4. Close the door.
Try for Deep Cleaning Power!
For Virtually
Spotless results!
No need to pre-wash
your dishes
9
Page 10

HOW TO LOAD YOUR DISHWASHER
For best dishwashing results follow these loading guidelines. Features and
appearance of racks and silverware baskets may vary from your model.
Upper Rack
The upper rack is for glasses, cups and
saucers. Cups and glasses fit best along
the sides. This is also a secure place
for dishwasher-safe plastics.
The cup shelf
be placed in the up or down position to
add flexibility.
some models) secures wine glasses at
an angle for best washability. Because
wine glasses come in various sizes,
after loading, slowly push in the rack
to make sure they will clear the top of
the dishwasher.
10 place setting
mixing bowls and other items should be placed face down. Fold-down fingers (on some models) provide
flexibility for extra-large and hard-to-fit items.
Secure larger dishwasher-safe plastics over two fingers when possible.
Make sure small plastic items are secure so they can’t fall onto the heater.
Be sure that items do not protrude through the bottom of the rack and block rotation of the middle spray
arm. This could result in poor wash performance for items in the upper rack.
Check to make sure that tall items will not block rotation of the top wash arm.
The upper rack is good for all kinds of
odd-shaped utensils. Saucepans,
(on some models) may
A wine glass holder
(on
Lower Rack
When loading the lower rack, do not
load large platters or trays in the front
right corner. They may prevent
detergent from circulating during the
wash cycle.
The lower rack is best used for
plates, saucers, and cookware. Large
items such as broiler pans and racks
should go along the right-hand side.
Load platters, pots and bowls along
the sides, in corners, or in the back.
The soiled side of items should face
the center of the rack.
10 place setting
handle extend through the bottom rack. This could block the wash arm and cause poor washing results.
Fold-down fingers (on some models) provide flexibility for extra large and hard-to-fit items. The fingers
may be left in the up position or folded down to customize the lower rack.
Also, be careful not to let a portion
of an item such as a pot or dish
10
Page 11

Wash Tower
Silverware Baskets
Keep the center area clear in the lower rack.
The wash tower rises through the center of the lower rack
during the wash and rinse portions of the cycle. The wash
tower shoots water into the mid-level wash arm located
under the upper rack. Blocking the wash tower could
result in poor wash performance for items in the upper
rack.
Don’t block it or load tall things next to it.
To remove end baskets, grasp the basket
at opposite corners and slide apart. The
basket sections should be placed in the
lower rack by hanging then on the top
hoop.
A variety of options is available regarding the three-piece
silverware basket in your dishwasher. The complete
basket is designed to fit on the right side or back of the
lower rack. Additionally, each end of the basket is
removable to better accommodate flatware and lower rack
capacity needs.
To load flatware, simply push the adjustable handle to
either side. Put flatware in the basket with knife handles
up to protect your hands. Place spoons in the basket with
handles down. Mix knives, forks and spoons so they don’t
nest together. Distribute evenly. Small plastic items, such
as measuring spoons and lids for small containers, should
go in the bottom of the silverware basket with silverware
on top.
The lids of both end baskets can be closed to contain
small items. Long items can be placed on the cupshelf in
the upper rack.
Loading Your Dishwasher Racks
Forget a dish? Here's when you can add it.
Add dishes any time during the RINSE & HOLD
cycle. With other wash cycles, you can add dishes
at any time BEFORE the main detergent wash
portion of the cycle.
However, opening the door during any cycle
lessens cleaning power. So try to load everything
at the beginning.
Here's how to add a forgotten dish:
1. Push the door latch to the left. Washing will
stop.
2. Wait a few seconds until the water calms. Then
open the door. WARNING: Hot vapor may rise
from opened door.
3. Add dishes you've forgotten.
4. Close the door and push the latch to the far
right. When the door is locked, washing will
continue.
11
Page 12

ABOUT OPTIONAL ACCESSORIES
You can change the door and lower access panel
appearance of your dishwasher by ordering of these
optional accessories:
• Colour Panels
• 1/4” Wood Panel Trim Kit
• 3/4” Trimless Panel Kit
These accessories are available at extra cost. Please
consult the Yellow pages for your local Camco
phone number.
Descriptions of Optional Accessories
Colour panels
lower access panels are available in the following
colours:
• GPF410A (Almond)
• GPF410B (Black)
• GPF410W (White)
• GPF410S (Stainless Steel)
• GPF410C (Bisque)
NOTE: The GPF100 dishwasher door spring kit
will be included with the stainless steel colour
panel and must be installed with it.
– Replacement door panels and
Trimless panel kit
This accessory contains parts and instructions for
you to supply and install a 3/4” thick decorative
wood door and lower access panel:
• GPF475
NOTE: The GPF100 dishwasher door spring kit
will be included with the trimless panel kit
and must be installed with it.
Wood panel trim kit
and instructions for you to supply and install a 1/4”
thick decorative wood door and lower access panel:
• GPF425A (Almond)
• GPF425B (Black)
• GPF425W (White)
• GPF425C (Bisque)
NOTE: The GPF100 dishwasher door spring kit
must also be ordered and installed when
the door panel weighs four lbs. or more.
– This accessory contains trim
Conversion Kit
At any time, portable/convertible dishwashers can be built-in under your kitchen counter. A special
conversion kit is available from your dealer or service organization.
12
Page 13

CARE AND CLEANING
USER MAINTENANCE INSTRUCTIONS
Clean the control panel with a lightly
dampened cloth. Dry thoroughly. Do not use
abrasive or sharp objects on the panel. They can
damage it.
Clean the outside with a good appliance polish
wax. The outside cabinet finish is durable, but it
can scratch. So use no scouring pads, or harsh or
gritty cleaners.
The inside usually takes care of itself. If it
should ever need cleaning, use a mild cleansing
powder. Scouring pads and harsh cleaners can
mar the finish.
Alternatively, to remove stains inside the
PermaTuf® tub or, if you wish to refresh the
inside of your unit (including the water
distribution system), you may also use citric acid.
Fill both detergent cups completely with citric
acid and run dishwasher through a full cycle
without any dishes. You may repeat as often as
you feel necessary.
Citric acid is widely available in powder form at
most drugstores across the country. Do not use
liquid bleach.
DO NOT USE LIQUID BLEACH
Not Using Your Dishwasher in Winter? Protect Against Freezing.
(On built-in models only)
If your dishwasher is left in an unheated place
during the winter, ask a service technician to:
• Cut off electrical power to the dishwasher.
Remove fuses or trip circuit breaker.
• Turn off the water supply.
• Disconnect the water inlet line from the water
valve.
• Drain water from the inlet line and water valve.
(Use a pan to catch the water.)
• Reconnect the water inlet line to the water valve.
• Drain collection chamber at
rear of unit below filter
by disconnecting hose to
pump. Reconnect after
draining.
• Remove the plastic
pump
cover in the tub bottom
and use a sponge to soak
up water in the
rubber boot.
PUMP COVER SCREWS
Optional Accessories Care and Cleaning
Care of the Dishwasher Top
Before using, wipe well with a dry cloth to
remove surface dust. Do not use the top of your
dishwasher as a cutting board. It can be scarred
Care & Cleaning of the Dishwasher
Cleaning – Outside
The following are Options for Cleaning Stainless
Steel:
1. Use soap and water, rinse with clean water and
dry with a cotton cloth.
2. Use Stainless Steel Magic or a similar product.
It is available from your parts dealer. Be sure to
follow the manufacturers instructions.
permanently. Never let water stand on the
dishwasher top.
3. Use a thick paste or baking soda and water. Rub
with a soft cloth.
4. Use a non-detergent based cleaner (eg. Formula
409 Glass and Surface cleaner).
Do not use steel wool, acids, abrasives, ammonia
or a commercial oven cleaner.
These instructions apply to Stainless Steel
surfaces, and could damage other surfaces.
13
Page 14

WHAT YOU CAN USUALLY WASH SAFELY
IN YOUR DISHWASHER.
Usually
Material Safe Exceptions (not safe) Special Instructions
Aluminum
China/Stoneware
Crystal
Non-dishwasher
items - such as
electronic air
cleaning filters,
furnace filters,
paintbrushes, etc.
GLASS
Iron
Pewter
Plastics
YES Some coloured anodized
aluminium can fade
YES Antique, metal-trimmed, hand-
painted or over-the glaze
patterns fade. Gold leaf will
discolour.
YES Antique, metal-trimmed or
hand-painted patterns fade.
Gold leaf will discolour.
NO Do not wash in dishwasher. Damage to
YES Milk glass may yellow.
NO Iron will rust
NO Pewter tarnishes
YES If it doesn't say DISHWASHER
Some darkening or spotting possible.
Remove by scouring with soap-filled
steel wool pads.
If in doubt, check with the
manufacturer. Or test wash one piece
daily for at least a month. Compare
with the rest of the set.
Load securely to prevent movement.
Check your manufacturer's instruction
for your crystal.
dishwasher and discolouration or
staining of dishwasher may result.
SAFE, test one piece in the top rack
before washing an entire set.
Stainless Steel
Sterling Silver
and Slver Plate
Non-stick
coatings
Tin
Wood
YES Rinse if not washing immediately.
Salty or acid foods can stain if left on.
YES Don't put in same silverware
basket with stainless steel.
Contact between metals can
damage silver.
Don't wash copper utensils in
the same load. Silver may get a
brown film.
Adhesive used to attach some
hollow-handle knives can
loosen.
YES After washing, wipe the non-stick
NO Tin can rust.
NO Wood can warp, crack or lose
its finish wian any type of
washing.
Rinse if not washing immediately.
Salty or acid foods can stain if left on.
Dry detergent can cause difficult-toremove black spots. Place in back
section of silverware basket to avoid
exposure to detergent from the
detergent cup.
coating area with vegetable oil to keep
it from losing its non-stick quality.
14
Page 15

BUILT-IN DISHWASHER
24"
Min.
This Wall Area
must be Free of
Pipes or wires
Plumbing and Electric Service
Must Enter Inside This Area
34-1/2"±1/4"
Underside of
Countertop
to Floor
4"
24"
Min.
6"
5"
5"
4"
Cabinets Square
and Plumb
25"
Countertop
Dishwasher
Clearance for Door
Opening 2" Minimum
INSTALLATION INSTRUCTIONS
ALL ROUGH-IN PLUMBING AND ELECTRICAL MUST BE COMPLETED
BEFORE THE DISHWASHER IS PLACED IN THE UNDERCOUNTER OPENING
ALL ELECTRICAL AND PLUMBING WORK MUST BE IN ACCORDANCE WITH LOCAL CODES
DISHWASHER SHOULD NOT BE INSTALLED IN AREA WHERE FREEZING OF WATER MAY OCCUR
WARNING
TO REDUCE THE RISK OF ELECTRIC SHOCK, FIRE, OR INJURY TO PERSONS, THE INSTALLER
MUST ENSURE THAT THE DISHWASHER IS COMPLETELY ENCLOSED AT THE TIME OF
INSTALLATION.
MATERIALS YOU WILL NEED
Materials required:
* 90° elbow
(3/8” NPT external thread on one end and
opposite end sized to fit water supply)
* Thread seal tape
* Wire nuts (2)
For new installations only:
* Waste tee for house plumbing, if applicable
* Electrical cable or power cord, if applicable
* Screw type hose clamps
* Strain relief for electrical connection
* Hand shut-off valve (optional)
* Water line 3/8” min. copper or 1/2” min. plastic
PREPARE DISHWASHER ENCLOSURE
Electrical Cable or
Power Cord
Strain Relief Thread Seal Tape Wire Nuts
Waste Tee Hot Water Line Wire Nuts
90° Elbow Screw Type Clamps
Dishwasher Safe Installation Instructions
• The touch cabinet opening must have a minimum
width of 24”, and a minimum of 34” high from
floor to underside of the countertop. Figure A
• The back wall should be free of pipes or wires.
Figure A
• Adjacent cabinets should be square and plumb to
ensure a good fit. Figure A
• For corner installation, allow 2” min. clearance
between dishwasher and adjacent cabinet or wall
or other appliances. Figure B
• Make sure the floor is level inside the opening and even
with the finished floor of the kitchen.
• The dishwasher must be installed no more than 10 feet
from sink for proper drainage.
• This dishwasher must be fully enclosed on the top, sides
and back.
• The dishwasher must not support any part of the
enclosure.
15
Page 16

PREPARE DRAIN PLUMBING
DRAIN REQUIREMENTS
• Follow local codes and ordinances.
• If dishwasher is not adjacent to sink, horizontal drain line
should not be longer than 10 feet and should not contain
more than three 90° long radius turns.
Fasten to underside
of countertop
32"
Min.
18"
Min.
Under the sink connection
Hose may be fastened to
underside of countertop
Fig. C
Installation directly
through the floor
IMPORTANT
TO PREVENT POSSIBLE DRAIN FROM SINK
INTO DISHWASHER OR SIPHONING OF
DISHWASHER WATER, DRAIN LINE MUST
BE ROUTED AS FOLLOWS:
MIN. 30" ABOVE THE FLOOR FOR UNDER
THE SINK CONNECTION.
MIN. 20" ABOVE THE FLOOR FOR
INSTALLATION DIRECTLY THROUGH THE
FLOOR.
20"
Min.
DRAIN PREPARATION
A drain hose already connected to the pump outlet
is supplied with the dishwasher. If the drain hose is
not long enough and has to be extended, use a 1/2"
O.D. copper tubing with clamp.
THE RUBBER END OF THE DRAIN HOSE MAY
BE CUT OFF TO ACCOMMODATE THE
FOLLOWING SIZES OF TAIL PIECE OR
WASTE TEE: 5/8", 3/4" OR 1"
1. A suggested method of connecting the drain hose
to a WASTE TEE or a Y branch tailpiece on the
existing sink trap is shown in Figure C. They are
made by several manufacturers purposely for
electric dishwashers.
2. When connecting the drain hose to a DISPOSER,
remove hopper plug before making connection.
Install waste tee or disposer according to
manufacturer’s instructions.
Note: be sure to remove drain plug from disposer
before attaching drain line. dishwasher will not
drain if plug is left in place.
CABINET PREPARATION
Drill 1-1/2” inch diameter hole in the cabinet wall
within the shaded area shown in Figure A for the
drain hose. Make sure there are no sharp edges.
Drain hose will be passed through this hole and
connected to the drain in a later step.
PREPARE HOT WATER LINE
Follow local codes and ordinances.
1. The hot water line may enter from either side, the
rear or from the floor within the shaded area
shown in Figure D.
2. Cut a hole approximately 1-1/2” dia. within the
shaded area to admit the line.
3. Turn off the water supply.
4. Install a hand shut-off valve in the supply line in
an accessible location, such as under the sink.
(The shut-off valve is optional, but recommended
and may be required by local codes.)
5. Water connection is on left side of dishwasher.
Install the hot water inlet line, using no less than
3/8” O.D. copper tubing or 1/2” O.D. plastic
tubing. Route line as shown in Figure D. Extend
the water line forward at least 19” from rear wall.
6. The water valve has a 3/8 N.P.T. internal thread.
We recommend use of 90 degrees elbow for
connection of copper tubing to water valve.
(See Figure E)
Valve
Elbow
Compression
Ring
Nut
Copper
Tubing
Shut-off
Valve
Hot
Cabinet
Cabinet Face
2"
from
1-1/2" Dia.
Hole
5"
19" from Wall
2" from Floor
4"
4"
5"
6"
Figure D
7. Adjust the water heater to deliver water between
the temperatures of 120°F and 150°F as it comes
in the dishwasher.
8. Flush water line to clean out debris.
9. The water pressure of the hot water supply line
must be between 20-120 PSI.
16
Page 17

PREPARE ELECTRICAL WIRING
5"
White
18"
6"
5"
4"
4"
24"
from Wall
3"
from
Cabinet
Alternate
Receptacle
Location
Ground
Black
1-1/2" Dia. Hole (Max.)
18"
Receptacle
Location
Area
6"
6"
GROUNDING INSTRUCTIONS
(FOR THE APPLIANCES SOLD WITHOUT A CORD SET)
This appliance must be connected to a grounded metal, permanent wiring system or an equipmentgrounding conductor must be run with the circuit conductors and connected to the equipmentgrounding terminal or lead on the appliance.
GROUNDING INSTRUCTIONS
(FOR THE APPLIANCES SOLD WITH A CORD SET)
This appliance must be grounded. In the event of a malfunction or breakdown, grounding will reduce
the risk of electric shock by providing a path of least resistance for electric current. This appliance is
equipped with a cord having an equipment-grounding plug. The plug must be plugged into an
appropriate outlet that is installed and grounded in accordance with all local codes and ordinances.
WARNING
Improper connection of the equipment-grounding conductor can result in a risk of electric shock.
Check with a qualified electrician or service representative if you are in doubt whether the appliance
is properly grounded. Do not modify the plug provided with the appliance; if it will not fit the outlet,
have a proper outlet installed by a qualified electrician.
Installation Instructions
CAUTION
WARNING: FOR PERSONAL SAFETY:
REMOVE HOUSE FUSE OR OPEN CIRCUIT BREAKER BEFORE BEGINNING
INSTALLATION.
DO NOT USE AN EXTENSION CORD OR
ADAPTER PLUG WITH THIS APPLIANCE.
FOLLOW NATIONAL ELECTRICAL CODES OR
PREVAILING LOCAL CODES AND ORDINANCES.
ELECTRICAL REQUIREMENTS:
• This appliance must be supplied with 120V, 60
Hz., and connected to an individual, properly
grounded branch circuit protected by a 15
amperes circuit breaker or fuse.
• Wiring must be 2 insulated wires with ground.
Minimum size No. 14 gauge.
• If the electrical supply provided does not meet
the above requirements, call a licensed electrician
before proceeding.
CABINET PREPARATION & WIRING
ROUTING
• Wiring may enter from either side, the rear, or
from the floor within the shaded area shown in
Figure F.
• Cut hole 1-1/2” max. dia. within the shaded area
to admit the electrical cable or power cord. The
hole must be free of sharp edges. If the cabinet
wall partition is metal, the edge of the hole must
be covered with a rubber cord protector.
ELECTRICAL CONNECTIONS TO
DISHWASHER
A. Dishwasher Sold Without Power Cord
Electrical connection is on right side of
dishwasher.
• For cable direct connections the cable must be
routed
as shown in Figure F. Cable must extend a
minimum of 24” from the rear wall.
Figure F
B. Dishwasher Sold With Power Cord
1. Install 3-prong grounding type receptacle in the
rear wall of sink cabinet next to dishwasher.
Receptacle is installed at least 6”, but not more
than 18”, from cabinet opening for dishwasher.
Do not install receptacle in cabinet opening
for dishwasher.
2. Edges of wall opening for power cord should be
smooth and well rounded. If the cabinet wall
partition is metal, the edge of the opening must
be covered using a rubber cord protector. For
those models supplied with a power cord, the
protector is in a bag inside the dishwasher.
3. Push power cord plug through hole in cabinet
wall before installing dishwasher in cabinet
opening. Take care when installing or moving
dishwasher to avoid damage to power supply
cord.
17
Page 18

INSTALLATION INSTRUCTIONS
Back Out
2 Screws
A
c
c
e
s
s
P
a
n
e
l
To
e
k
ic
k
Remove
2 Screws
CAUTION
Do not remove the wood base until you are
ready to install the dishwasher. The dishwasher
will tip over when the door is opened.
Check door balance before wood base is removed
Locate the 2 Phillips head countertop mounting
screws wrapped with yellow tape and stuck to the
top or side of the dishwasher. Set aside for use in
Step 10.
Check door balance by opening and closing door.
If necessary latch door and adjust one or both
springs before the wood base is removed.
Moving spring
hook to rear hole
increases spring
tension
Spring hook
MUST be turned
to the outside
Step 1. Remove leveling legs and wood base
Move the dishwasher close to the cabinet and lay it
on its back. Remove the four leveling
legs with an adjustable wrench.
Remove and
discard the
wood base.
Do not
“Kick”
wood base
off, damage
will occur.
Figure G
Step 3. Remove access panel and toekick
Remove the two screws below the access panel and
set aside for reuse. Remove access panel by
backing out the two screws located between the
door and access panel. These screws are secured to
access panel with plastic retainers. The junction box
is located behind the access panel.
Figure I
Step 4. Install 90° elbow
Install the 90°
elbow fitting to
the water valve
using thread
seal tape on the
threads. The
water valve
requires 3/8”
NPT fitting
with external
threads. The
Thread
Seal
Tape
Figure J
opposite end
should fit water supply line. Position the end of the
elbow to face the rear of the dishwasher.
Step 5. Position water line and power supply
Step 2. Install Leveling legs
Screw leveling legs back into the dishwasher frame.
The legs should extend approximately 3/4” away
from the frame.
18
Approx.
Figure H
3/4"
Position the water supply line and house wiring on the
floor of the opening to avoid interference with base of
dishwasher and components under dishwasher.
Water
Line
Power
Supply
Figure K
Page 19

90° Elbow
Hot Water
Supply
INSTALLATION INSTRUCTIONS
Step 6. Insert drain hose through cabinet
Upright dishwasher and position in front of the
cabinet opening. Insert the drain hose into the
hole previously drilled in the cabinet wall. If a
power cord is used, guide the end through a
separate hole cut for the electrical cord.
Figure L
Step 7. Slide dishwasher into cabinet
Slide the dishwasher into the opening a few
inches at a time.
As you proceed, pull the drain hose through the
opening and under the sink. Make sure drain
hose is not kinked under dishwasher. Check to
be sure there is no interference with water line
and wiring.
DO NOT PUSH
AGAINST FRONT
DOOR PANEL WITH
YOUR KNEE. Damage
to the door panel will
occur.
Step 10. Position dishwasher and fasten
to cabinet
Open the door and position the dishwasher tub flange
3/4” from the cabinet opening. Fasten the dishwasher
to the underside of the countertop, using the 2
Phillips screws provided in Step 1. Be sure screws
are driven straight and flush to avoid interference
with door operation. See Figure O.
Important:
Make sure that
dishwasher is
centered in the
opening and
there is no
interference
3/4"
with cabinets
when opening
or closing the
door.
Interference
may cause a
water leak when dishwasher is
Figure O
in operation.
Step 11. Connect water supply
Connect water supply line
to 90° elbow installed in
Step 4.
Installation Instructions
Figure M
Step 8. Align water and electrical lines
Route the water line and electrical supply to
their connection locations under the dishwasher.
Do not connect water and electrical in this step.
Step 9. Level dishwasher
Level the dishwasher by adjusting the
four leveling legs individually for
correct alignment. See Figure N.
Dishwasher should be level left to
right and front to back for proper
dish rack operation and dishwasher
performance. Dishwasher door should
be in alignment with adjacent cabinets.
See Figure O.
Figure P
Figure N
19
Page 20

INSTALLATION INSTRUCTIONS
Step 12. Connect drain line
Follow all local codes and ordinances.
DRAIN LINE PREPARATION
1. All models are supplied with a pre-attached 78”
long corrugated drain hose. The molded end is
designed to fit 5/8”, 3/4” or 1” diameter connections
to the waste tee or disposer. Cut on premarked line
as required for your installation as illustrated in
Figure Q.
Note: DO NOT CUT CORRUGATED PORTION
OF HOSE.
1"
Cut Lines
Cutting Lines
3/4"
Do not cut corrugated
portion of hose
5/8"
Figure Q
If the location requires a longer drain hose, add up
to 42” length to the factory installed hose. Use 5/8”
inside diameter hose and thin wall copper coupler
to join the hose ends. Secure connection with
appropriate clamps (not supplied).
Note: TOTAL DRAIN HOSE LENGTH MUST
NOT EXCEED 10 FEET FOR PROPER DRAIN
OPERATION.
DRAIN LINE INSTALLATION
Connect drain line to waste tee or disposer as
previously outlined in “Prepare Drain Plumbing”
section of this manual. Refer to Figure S.
Secure connection using appropriate clamps (not
supplied).
Make sure drain hose is not kinked.
of countertop
Step 13. Connect power supply
Verify that power is turned off at source. If
power cord is used, plug it into the wall outlet and
go to Step 14.
If dishwasher is to be directly wired to house
wiring, continue with this step.
Remove junction box cover.
Secure the power supply cable to the back of the
junction box with a strain relief (not supplied).
Connect incoming wires to dishwasher wires using
wire nuts of appropriate size. Connect incoming
white to white wire, black to black wire and
incoming ground to green wire as shown in
Figure S. Replace the junction box cover.
WARNING
CAUTION
If house wiring is not 2-wire as
shown in Figure S with a ground
wire, a ground must be provided by
the installer.
When house wiring is aluminum, be
sure to use UL/CSA. recognized antioxidant compound and aluminum-to-copper
connectors.
WARNING
CAUTION
Check to be sure that wiring is not
pinched or in contact with the door
springs.
NOTE: Check that harness
leads are threaded through
small hole in bracket. Ground
32"
Min.
18"
Min.
Under the sink connection
Hose may be fastened to
underside of countertop
Fig. R
IMPORTANT: TO PREVENT POSSIBLE
DRAIN FROM SINK INTO DISHWASHER OR
SIPHONING OF DISHWASHER WATER,
DRAIN LINE MUST BE ROUTED AS
FOLLOWS:
MIN. 30” ABOVE THE FLOOR FOR UNDER
THE SINK CONNECTION.
MIN. 20” ABOVE THE FLOOR FOR
INSTAL-LATION DIRECTLY THROUGH THE
FLOOR.
20
20"
Min.
Installation directly
through the floor
White
Neutral
Black
Live
Figure S
Page 21

INSTALLATION INSTRUCTIONS
Step 14. Pre-test check list
f Check to be sure power is off.
f Open dishwasher door and remove all foam
and cardboard packaging.
f Read the Use & Care manual to familiarize
yourself with the operation of the
dishwasher.
f Add two quarts of water to the bottom of the
dishwasher to lubricate the pump seal.
f Remove the protective film if present from
the control panel and trim.
f Check to be sure that wiring is secure under
the dishwasher. Reattach connections if
necessary.
f Pull lower rack about half way out. Check to
be sure it does not roll back into dishwasher
or further out. If it does, relevel dishwasher.
f Turn on water supply.
f Check for plumbing leaks. Tighten
connections if necessary.
f Turn on the hot water faucet at the sink.
Verify that temperature is at least 120°F.
Adjust the water heater to deliver water
between 120° and 150°F if necessary.
f Let the dishwasher run through another fill and
drain cycle. Check again to be sure there are no
leaks.
f At the end of the second drain, push the reset
pad on electronic models. On dial models,
unlatch the door and rotate the dial clockwise to
the “OFF” position.
Step 16. Replace access panel and toekick
Refer to Figure T. Place the toekick against the legs
of the dishwasher. Align the access panel to the
dishwasher and tighten the two access panel screws.
Align the toekick and make sure the bottom edge is
against the floor. Insert and tighten the two toekick
attachment screws, making sure the bottom edge of
the toekick stays in contact with the floor.
Tighten 2
Access Panel Screws
A
cce
ss Pa
n
el
Installation Instructions
Step 15. Dishwasher wet test check list
f Turn on power supply.
f Latch door.
f Select normal cycle on push-button or
electronic models.
f On dial models, turn control dial just enough
to start dishwasher. Be careful not to turn
the dial past the first water fill. On
electronic models, push start pad.
f Check to be sure that water enters the
dishwasher. This could take up to 4 minutes.
If water does not enter the dishwasher,
check to be sure that water is turned on.
f Check for leaks under the dishwasher. If a
leak is found, turn off power supply, tighten
connections and restore power.
f Check for leaks around the door. A leak
around the door could be caused by
dishwasher door rubbing or hitting against
adjacent cabinetry. Reposition the
dishwasher if necessary.
f The dishwasher will drain about 5 minutes
after the first fill. Check drain lines. If leaks
are found, turn off power, correct as
necessary and restore power.
To
e
k
i
c
k
Attachment Screws
Figure T
Step 17. Literature
f Be sure to leave complete literature package and
installation instructions with consumer.
21
Page 22

QUESTIONS?
USE THIS PROBLEM SOLVER
PROBLEM POSSIBLE CAUSE
DISHWASHER WON’T RUN A fuse in your home may be blown, or the circuit breaker tripped.
Replace a fuse or reset circuit breaker. Remove any other
appliances from the circuit.
UNUSUAL NOISE Utensils may not be secure on rack pins, or something small may
have dropped from the rack. Water is causing utensils to rattle.
Make sure everything is securely placed in dishwasher.
DISHES DON’T DRY Make sure inlet water temperature is correct.
(See How to Test Water Temperature section.)
Unload the bottom rack first. Water from dishes in the top rack
may be spilling into the bottom rack.
Check for improper loading. Dishes shouldn’t nest together.
Avoid overloading.
Check the rinse agent dispenser to see that it's not empty.
UNCLEAN DISHES AND
FLATWARE
DETERGENT LEFT IN
DISPENSER CUPS
DETERGENT CUP LID WON’T
LATCH AFTER ADDING
DETERGENT
YELLOW OR BROWN FILM An overall yellow or brown film on dishes or glassware can be
Check inlet water temperature. It should be 49°C (120°F).
(To test, see How to Test Water Temperature section.)
Water pressure may be temporarily low. Turn on a faucet. Is water
coming out slower than usual? If so, wait until pressure is normal
before using your dishwasher.
Improper rack loading. (See Loading section.)
Rising Wash Tower blocked. (See Loading Section.)
Water may not be reaching the detergent cups. Move dishes that
may be blocking detergent cup.
The dispenser cover may not be opening or may be blocked by
improperly loaded items. If you used a powder detergent, open the
cup and remove any caked-on detergent. If the cup still doesn't
open automatically, call for service.
Detergent may be old. If the powder detergent is hard or caked in
the box, throw it away. The detergent may not be working well.
Try Cascade Gel.
Cycle Indicator Dial must be OFF for cup lid to close and latch
properly. If you unlatch the door and open it to dry your dishes,
the Cycle Indicator Dial does not advance by itself.
caused by iron deposits in water. A special filter in the water
supply line is the only way to correct this problem. Your water
softener company can tell you about the filter.
Yellow film on sterling silver results when you wash copper
utensils in the same load. Silver polish will usually remove this
stain.
SANITIZED LIGHT DOES NOT
ILLUMINATE AT THE END OF
THE CYCLE.
22
The door was opened and the cycle was interrupted during or after
the main wash portion.
The incoming water temperature was too low. It should be 49°C
(120°F).
(continued next page)
Page 23

QUESTIONS?
USE THIS PROBLEM SOLVER
PROBLEM POSSIBLE CAUSE
SPOTS AND FILMING ON
GLASSES AND FLATWARE
Spotting can be caused by all these things:
• Extremely hard water. (See How to Choose and Use Detergent
section.)
• Low inlet water temperature. (See How to Test Water
Temperature Section.)
• Overloading the dishwasher.
• Improper loading. (See Loading section.)
• Old or damp powder detergent.
• Phosphate level in detergent too low. (See How to Choose and
Use Detergent section.)
• Rinse agent dispenser empty. (See How to Use a Rinse Agent
section.)
• Too little detergent. (See How to Choose and Use Detergent
section.)
Local water conditions and personal preferences vary. Try
several brands of detergents to find one that gives the best results
for you. A liquid dishwasher detergent may help reduce filming.
To remove stubborn spots and film from glassware:
1. Remove all metal utensils from the dishwasher.
2. Do not add detergent.
3. Select POTSCRUBBER cycle.
4. Start the dishwasher and allow to run for 18 to 22 minutes.
The dishwasher will now be in the main wash.
5. Then open the door and pour 2 cups (500 ml) of white
vinegar into the bottom of the dishwasher.
6. Close the door and allow to complete the cycle.
If vinegar rinse doesn't work: Repeat as above, except use 1/4
cup (60 ml) of citric acid crystals instead of vinegar. (Most
drugstores carry citric acid crystals. If yours doesn't, call Service
Parts.)
Using a vinegar or citric acid crystal rinse more than twice a
month? Consider a home water softener.
The Problem Solver
CLOUDINESS ON GLASSWARE
CHIPPING OF CHINA
BLACK OR GRAY MARKS ON
DISHES
If vinegar or citric acid crystal rinse doesn't work, the cloudiness
is “etching.”
The film cannot be removed.
It can be prevented: Use less detergent if you have soft water.
Wash glassware in the shortest cycle that will get them clean.
Water temperature entering the dishwasher exceeds 63° C (150° F).
Rough handling can cause chipping. Load with care. Make sure
glassware and china are secure and can't jar loose. (See Loading
section.) Make sure tall glasses and stemware will clear the top
of the tub when you push the rack into the dishwasher.
Always use the top rack for delicate items.
Aluminum utensils often leave marks when they rub against
dishes. Remove marks with a mild abrasive cleanser.
(continued next page)
23
Page 24

QUESTIONS?
USE THIS PROBLEM SOLVER
PROBLEM POSSIBLE CAUSE
SMALL AMOUNT OF WATER
STANDING IN THE BOTTOM OF
THE TUB
WATER WON
THE TUB
DISHWASHER LEAKS
MOTOR HUMS
SUDS IN THE TUB
’T PUMP OUT OF
Water around the outlet on the tub bottom at the back of the tub is
normal. It is clean water. It's there to keep the water seal lubricated.
If the entire bottom of the tub has water, you may have a drain
problem. Clean the air gap, if you have one. (See Care and
Cleaning section.)
Check the kitchen sink. Is it draining well? You may need a
plumber.
If dishwasher drains into disposer, run disposer to clear. Be sure
disposer is not clogged.
Suds can cause unit to overflow. That's why it's so important to use
a detergent that's designed for automatic dishwashers.
Spilling the rinse agent can cause foam during washing. This can
lead to overflowing. Wipe up accidental spill of rinse agent with a
damp cloth.
Dishwasher has not been used on a regular basis.
If you do not use your dishwasher often, set it to fill and pump out
once every week. This will help keep the seal moist, and the food
disposer clear.
Sudsing detergents are not meant for dishwashers. USE ONLY
AUTOMATIC DISHWASHER DETERGENTS TO AVOID
SUDSING.
To remove suds from the tub: Open the dishwasher. Let suds
evaporate. Add 1 gallon of cold water to the tub. Close and latch
the dishwasher. Pump out water by slowly turning the control dial
until a drain period is reached.
Repeat if necessary.
STAINING OF
TUB INTERIOR
SOUNDS YOU
WILL HEAR
VAPOR AT THE VENT
24
Some detergents contain colorant (pigment or dyes) that will
discolor the tub interior with extended use. Check the detergent
cup for signs of any discoloration. If cup is discolored, change to
detergent without any colorant.
You’ll hear occasional clicking sounds. These are normal.
• Food disposal shredding action.
• Drain valve opening to pump water out.
• Timer control as cycle progresses.
• Detergent cup opening.
During the drying period:
• The motor stops.
Water vapor comes through the vent by the door latch during
drying and when water is being pumped out.
Page 25

CAMCO SERVICE
CAMCO Service Telephone Numbers
QUESTIONS?
If you have any questions concerning your appliance, please write to:
Director, Consumer Relations
CAMCO, Inc.
1 Factory Lane
Suite 310, Moncton, N.B.
E1C 9M3
IN-HOME REPAIR SERVICE
1-800-361-3400
Expert CAMCO repair service is only a phone call away.
reasonable by Camco to provide
SERVICE CONTRACTS
1-800-461-3636
Purchase a CAMCO service contract while your warranty is still in effect and you will receive a
substantial discount. CAMCO Consumer Service will still be there after your warranty expires.
In areas were it is available and deemed
The Problem Solver Camco Service
PARTS & ACCESSORIES
Individuals qualified to service their own appliances can have parts or accessories sent directly to their
homes (VISA, MasterCard cards are accepted)
Instructions contained in this manual cover procedures to be performed by any user. Other
servicing generally should be referred to a qualified service personnel. Caution must be exercised,
since improper servicing may cause unsafe operation.
Please consult your yellow pages for your local Camco number.
SERVICE SATISFACTION
If you are not satisfied with the service you received:
First, contact the people who serviced your appliance.
Next, if you are still not pleased, write all the details (including your phone number) to:
Director, Consumer Relations,
1 Factory Lane
Suite 310, Moncton, N.B.
E1C 9M3
25
Page 26

Notes
 Loading...