

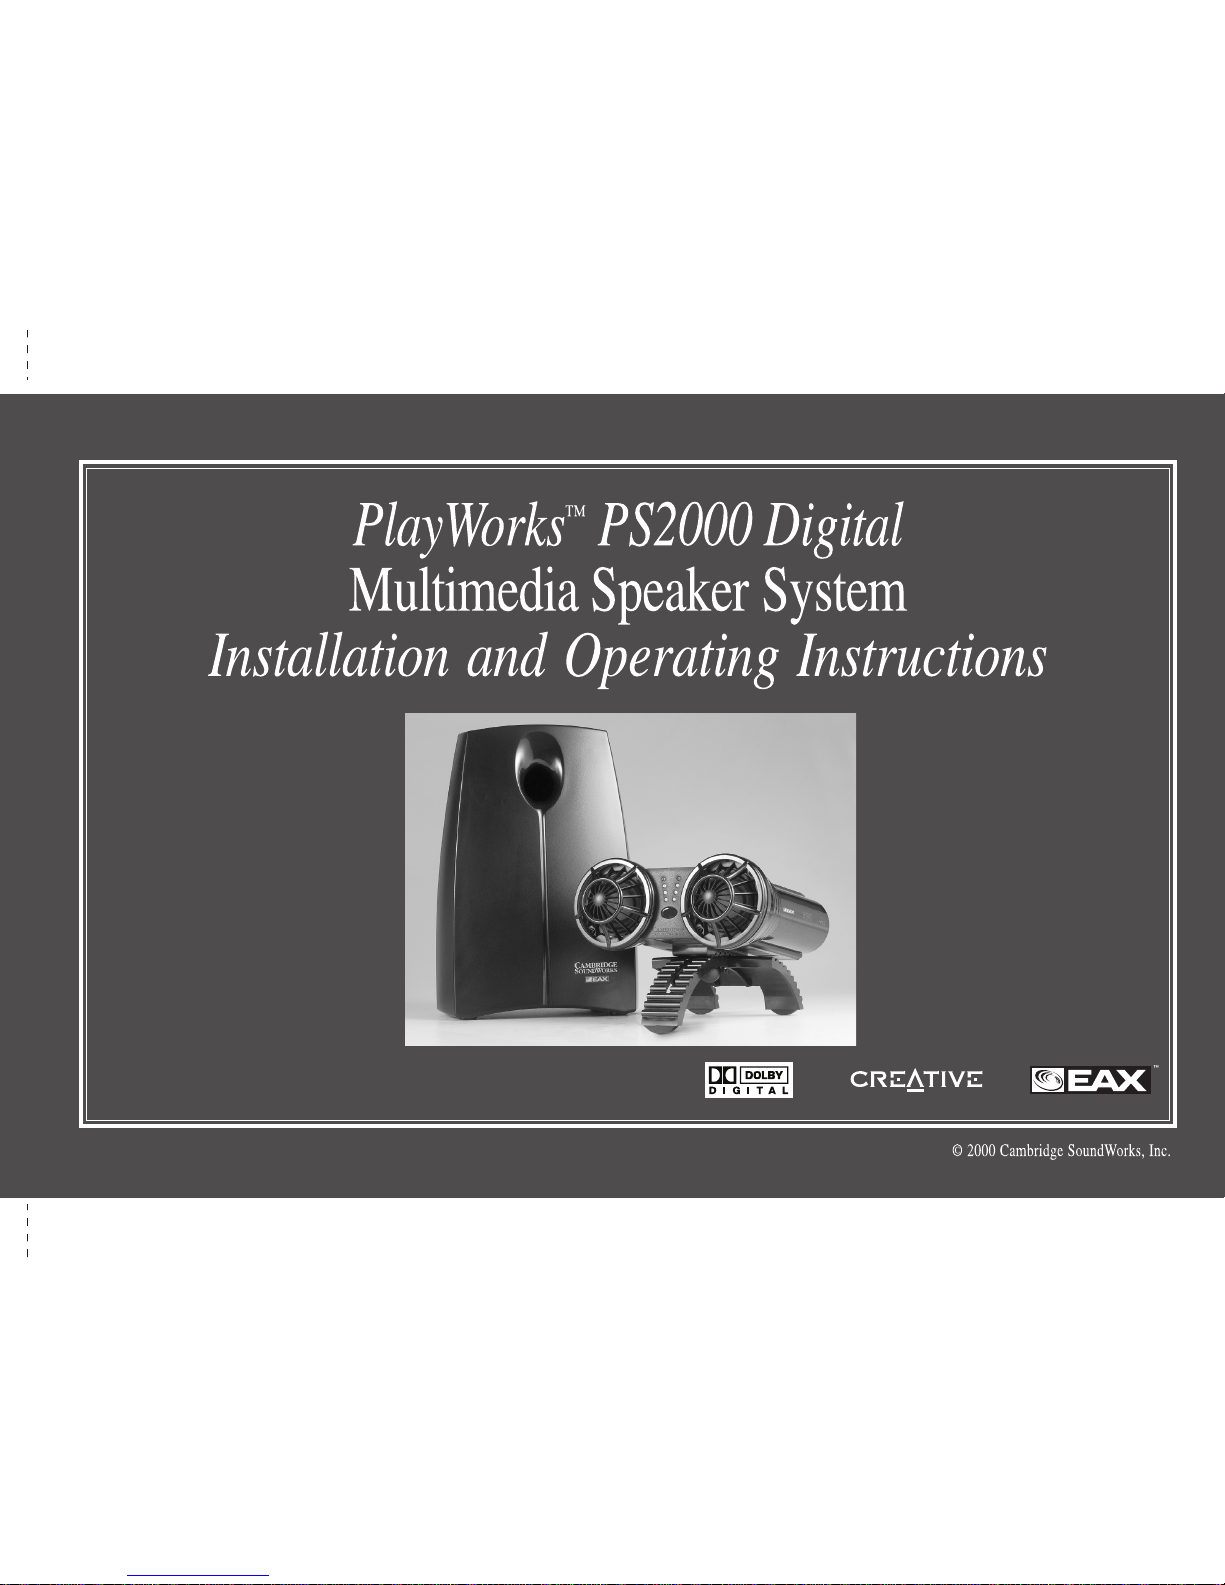
Cambridge SoundWorks PlayWorks PS2000 Digital Installation And Operating Instructions Manual
Page 1
Page 2
Declaration of Conformity
According to the FCC96 208 and ET95-19
Name:
Creative Labs Inc.
Address:
1901 McCarthy Boulevard
Milpitas, CA. 95035
United States
Tel: (408) 428-6600
declares under its sole responsibility that the product
Trade Name:
Creative Labs/
Cambridge SoundWorks
Model Number:
CSW2020
has been tested according to the FCC / CISPR22/85
requirement for Class B devices and found compliant
with the following standards:
EMI/ EMC: ANSI C63.4 1992, FCC Part 15 Subpart B
Complies with Canadian ICES-003 Class B.
This device complies with part 15 of the FCC Rules.
Operation is subject to the following two conditions:
1. This device may not cause harmful interference,
and
2. This device must accept any interference received,
including interference that may cause undesirable
operation.
Ce matériel est conforme à la section 15 des régles FCC.
Son fonctionnement est soumis aux deux conditions
suivantes:
1. Le matériel ne peut étre source d’interférences et
2. Doit accepter toutes les interférences reques, Y
compris celles pouvant provoquer un
fonctionnement indésirable.
Compliance Manager
Creative Labs, Inc.
August 25, 2000
Compliance
This product conforms to the following Council Directive:
•
Directive 89/ 336/ EEC, 92/ 31/ EEC (EMC),
73/ 23/ EEC (LVD)
Important Notice
The serial number for the
PlayWorks PS2000 Digital
is
located on the Subwoofer and Dipole Unit. Please write
this number down and keep it in a secure area. This is
for your security.
WAR NIN G:
To p re ve nt fi re or
shock hazard, do not expose this
appliance to rain or moisture.
Page 3
-2
convenience receptacles, and the point
where they exit from the product.
LIGHTNING – For added protection for this
product during a lightning storm, or when
it is left unattended and unused for long
periods of time, unplug it from the wall
outlet. This will prevent damage to the
product due to lightning and power-line
surges.
OVERLOADING – Do not overload wall
outlets, extension cords, or integral
convenience receptacles as this can result
in a risk of fire or electric shock.
OBJECT AND LIQUID ENTRY – Never push
objects of any kind into this product
through openings as they may touch
dangerous voltage points or short out parts
that could result in a fire or electric shock.
Never spill liquid of any kind on the
product.
SERVICING – Do not attempt to service this
product yourself, as opening or removing
covers may expose you to dangerous
voltage or other hazards. Refer all servicing
to qualified service personnel.
DAMAGE REQUIRING SERVICE – Unplug
this product from the wall outlet or other
power source and refer servicing to
qualified service personnel under the
following conditions:
a) When the power-supply cord or plug is
damaged.
b) If liquid has been spilled into, or objects
have fallen onto the product.
c) If the product has been exposed to rain
or water.
d) If the product does not operate normally
by following the operating instructions;
or exhibits a distinct change in
performance.
e) If the product has been dropped or
damaged in any way.
REPLACEMENT PARTS – When
replacement parts are required, be sure the
service technician has used replacement
parts specified by Cambridge SoundWorks
or have the same characteristics as the
original parts. Unauthorized substitutions
may result in fire, electric shock, or other
hazards.
SAFETY CHECK – Upon completion of any
service or repairs to this product, ask the
service technician to perform safety checks
to determine that the product is in proper
operating condition.
WALL OR CEILING MOUNTING – The
product should be mounted to a wall or
ceiling only as recommended by Cambridge
Soundworks.
Page 4
Inventory ............................................................................................................1
Speaker System Connections .............................................................................2
Signal Source Connections................................................................................. 2
System Connection Diagram .............................................................................. 3
Dipole Unit Stand Installation ...........................................................................4
Speaker Placement .............................................................................................5
System Functions............................................................................................... 7
Surround Reference..........................................................................................10
Applications...................................................................................................... 11
EAX................................................................................................................... 12
Specifications....................................................................................................12
1-Year Limited Warranty.................................................................................. 13
Technical Support............................................................................................. 13
®
Page 5

Page 6

1
Optical Cable
Stereo to Dual RCA Cable Dipole DIN Cable
Dual RCA to RCA Cable
Dual Female RCA AdapterDipole Unit Stand
LED Indicator
Labels
SPDIF Cable (RCA to RCA)
Paste this behind the
Remote Control or
any other surfaces
Tandem Audio Cable
Paste this behind the
Remote Control or
any other surfaces
Page 7

15V
Dolby Digital source
Connect the Dolby Digital/SPDIF
output of your signal source to the
Subwoofer’s
Dolby Digital (AC-3)
SPDIF IN
jack using the
SPDIF Cable
(RCA to RCA)
or the
Optical Cable
.
Game consoles
Connect the optical output of the
game console (e.g. PlayStation 2TM) to
the
Optical
input with the
Optical
Cable
.
If the optical connection is not
available or is being utilized, use the
Stereo to Dual RCA Cable
and the
Dual Female RCA Adapter
to connect
to the game console’s RCA output of
the multiple A/V plug.
For devices with optical output
Connect the optical output of these
devices (e.g. CD or MiniDisc
®
players)
to the
Optical
input with the
Optical
Cable
.
Note:
Optical connections have
priority over coaxial (SPDIF RCA to
RCA) connections.
For all other sound cards
Use the
Tandem Audio Cable
.
Connect the lime-green stereo
miniplugs from the Line Out minijack
output of your sound card to the
Line
In
minijack input of the Subwoofer.
Connect the black stereo miniplugs
from the Rear Out minijack output of
your sound card (if present) to the
Rear In
minijack input of the
Subwoofer.
Page 8

3
Sound Card Output
e.g. Sound Blaster Live!
MiniDisc
®
Player
CD Player
MP3 Player
Stereo to Dual RCA Cable
Tandem Audio Cable
V.C.R.
Cassette Deck
Tuner
Stereo to Dual RCA Cable
Dual Female-to-Female
RCA Adapter
PlayStation 2
TV
CD Player
Dipole Unit
Subwoofer
Dual RCA to RCA Cable
Dipole DIN Cable
R (red) L (white)
R (red)
L(white)
Page 9

diagram A)
.
Tilting the Dipole Unit
Loosen the Ball-fastener below the Dipole Unit Stand to adjust the tilt of the
Dipole Unit. The Dipole Unit can be angled to face you by moving the Dipole
Unit back or forth (see
diagram B
). Tighten the Ball-fastener once the optimum
tilt has been achieved (see
diagram C
).
B
C
Page 10

5
F
G
When placing the Dipole
Unit in front of the T.V. or
monitor, use the Dipole Unit
Stand to tilt the unit
upwards to your listening
position. You can place the
Dipole Unit on the floor,
coffee table or desktop.
We highly recommend that you
place the Subwoofer on the floor,
leave at least 5 cm (2 inches) of
space between the Subwoofer face
and a wall.
Page 11

10
3
9
1
8
5 6
7
J
Remote Control
Page 12

7
PS2000
4.
VOLUME (On Dipole Unit)
:
Adjusts the volume of the entire system.
Press the UP or DOWN button to increase or decrease the volume. (This
function is also available on the Remote Control, use the + or - button)
5.
DIGITAL
(On Remote Control)
: Selects the digital input source signal
for the OPTICAL or COAXIAL input. Digital input is the default mode when
the system is turned on. Optical input has priority. This button is located
on the Remote Control. (This function is also available on the Dipole Unit,
use the SOURCE button) The possible digital input signals are; PCM, 2-Ch
AC-3 or 5.1 AC-3. These signals are auto-detected.
PCM 2-Ch AC-3 5.1 AC-3
Page 13

Page 14

9
. (This
Dimension
: Games.
Pass through
: System check and Stereo Dipole pre-encoded materials.
9.
CMSS (On Remote Control)
:
CMSS
(Creative Multi Speaker
Surround)
processes analog 2-channel program material. Repeated
presses of this button step through two different operation modes:
Music>Movie
. The default mode is CMSS Music.
Music
: Creates a 5.1 speaker soundfield appropriate for music from any
analog sound source.
Movie
: Creates a 5.1 speaker soundfield appropriate for movie or game
enjoyment from an analog sound source. (This function is also available
on the Dipole Unit, use the EFFECT/CMSS button)
10.
BASS LEVEL
(On Subwoofer)
:
MovieMusic
Turn the Bass Level knob
counter-clockwise to reduce
the bass output.
Turn the Bass Level knob
clockwise to increase the
bass output.
Page 15

.
Creative Multi Speaker Surround (CMSS)
CMSS is a 2-channel to 5.1-channel sound processor similar in some aspects to
a Dolby Surround Pro Logic processor.
The Music and Movie modes create a virtual 5.1 audio experience.
Page 16

11
DVD Player
Game Console - Digital Output
Cassette Deck
T.V.
P.C.
Game Console - Analog Output
Tuner
VHS Player
Page 17

TM
.
PS2000 Digital delivers a virtual 5.1
experience.
Featuring innovative 5.1
virtualization technology, full Dolby
Digital decoding is possible from the
unique all-in-one dipole speaker
design plus sub woofer. In addition,
when used with a 4-channel sound
card such as the Sound Blaster Live!,
virtualized rear channels ensure a
great listening experience for
interactive 3D and EAX-enhanced
game titles.
For more information on EAX, be sure
to visit EAX.creative.com
Page 18

13
Inside U.S.A., Canada and
Latin America
Creative Labs Inc.
Technical Support
1523 Cimarron Plaza
Stillwater, OK 74075
Tel: 1–405–742–6622
Fax 1–405–742–6633
Operating hours (Central Time):
Daily 8:00
A.M
.–12 Midnight
To reach Technical Support via the
Internet, visit our web site at
http://www.creativehelp.com.
You can reach Customer Service by
phone at
1–800–998–1000
,
Mon–Fri 8:00 A.M.–7:00 P.M.
(Central Time).
You can also use our Faxback
service at
1–405–372–5227
.
Inside Asia
Creative Technology Ltd.
Technical Support
31 International Business Park
Creative Resource
Singapore 609921
Tel: 65–895–4100
Fax: 65–569–6640
Operating hours (Singapore Time):
Mon–Fri 9:00
A.M
.–6:00 P.M.
Sat–Sun & Public Holidays closed
To reach Technical Support via the
Internet, visit our web site at
http://www.creative-asia.com/
support
Page 19

 Loading...