

Cambridge SoundWorks Outdoor, Outdoor 42, Outdoor 52, Outdoor 62 Installation And User Manual
Page 1

Outdoor 42, Outdoor 52, Outdoor 62
Installation and User Manual
™
®
OUTDOOR 42/52/62 manual 6/4/02 11:21 AM Page 1
Page 2

2
OUTDOOR 42/52/62 manual 6/4/02 11:21 AM Page 2
Page 3

3
Thanks for choosing a Newton Series loudspeaker. The
Newton Series Outdoor loudspeakers feature the finest
drivers and precision crossover network with a rugged
weather resistant cabinet construction that should give
you years of enjoyment.
The product development team at Cambridge
SoundWorks believes there is no better combination of
audiophile level attention to detail and reasonable cost.
After Unpacking
Store the shipping carton and packing material for
future use and transport should you ever need to
return the speaker for service.
Inspecting For Damage
Examine each part carefully for shipping damage. If
there is any, do not install or use the system. Return
the speaker to the store or merchant where you made
the purchase or call Cambridge SoundWorks at
1-800 FOR-HIFI (1-800-367-4434) for assistance.
About This Manual
Care in speaker placement and installation pays dividends in optimum enjoyment. This manual provides
tips and instructions to help you get the most from
your loudspeakers. Please read through it carefully
before proceeding with the installation.
Installing the Outdoor loudspeakers is straightforward
and may be performed by an experienced
do-it-yourself homeowner. However, some familiarity
with typical home construction is necessary.
This manual assumes the installer possesses skill in
the proper use of hand and power tools, a knowledge
of local fire and building codes, and a familiarity with
the area behind the surfaces where the speakers are
to be installed.
INTRODUCTION
If you do not possess the necessary skills or are otherwise not comfortable with performing a speaker system installation, we strongly recommend you rely on a
qualified home entertainment system installer. Contact
your dealer, or Cambridge SoundWorks for assistance
in selecting a suitable installer.
Note: Cambridge SoundWorks will not assume any
responsibility for the integrity of the attachment of the
speaker and it’s mounting brackets to it’s mounting
surface. The quality of the installation is solely the
responsibility of the installer.
Cambridge SoundWorks is not responsible for any
damage resulting from the installation or installation
process, or due to wiring or materials used in the
installation.
OUTDOOR 42/52/62 manual 6/4/02 11:21 AM Page 3
Page 4
4
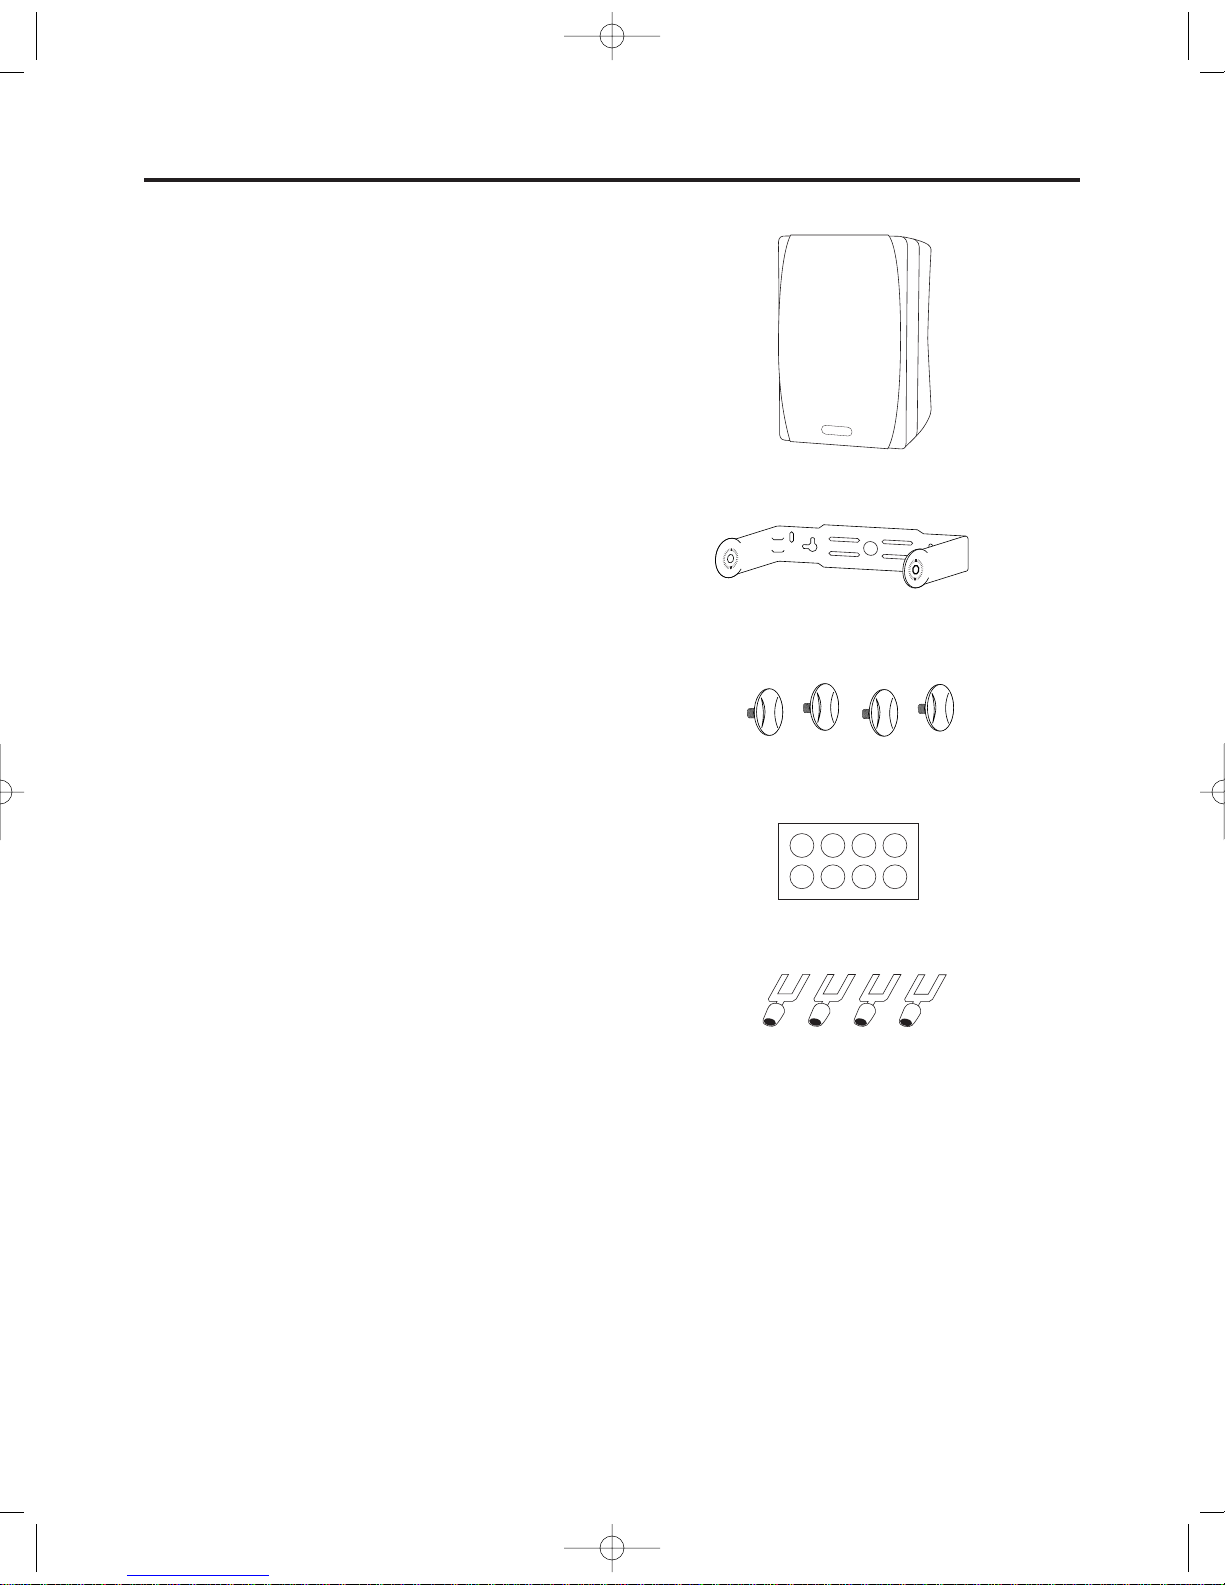
Parts List
1. Loudspeakers (2)
2. Mounting Brackets (4 - attached to speaker)
3. Thumbscrews (4 - attached to speaker)
4. Rubber Feet (8)
5. Spade Lugs (4)
1
2
3
4
5
OUTDOOR 42/52/62 manual 6/4/02 11:21 AM Page 4
Page 5

USE AND PLACEMENT CONSIDERATIONS
5
Installation and use guidelines for all three models
covered in this manual are the same.
The Outdoor loudspeakers are designed to withstand
the extreme conditions of nature, including wide temperature variations and direct contact with water.
However, it is still advisable to exercise some care in
placement to reduce the likelihood of damage. When
the option exists, it is best to avoid direct sunlight, and
direct exposure to water so as to reduce the harmful
long term effects on the speakers cosmetic appearance. Likewise, although they may safely be left outdoors throughout the year, taking the speakers inside
if they are not needed through cold winter months will
further extend their useful life.
Because the Outdoor loudspeakers have very wide
and uniform dispersion there is a great deal of flexibility in placement. The ideal location should provide an
unobstructed path from the speakers to the listeners.
You may use the included brackets to mount the
speakers to a wall, ceiling, or under eaves. Alternately,
the speakers may be used freestanding without brackets. Attach four of the stick-on rubber feet to the bottom of each speaker to protect the surface when used
freestanding.
For the best effect used as a stereo pair, separate the
speakers by at least four to eight feet. The ideal separation is roughly equal to the distance of the speakers
to the listener. Try to place the left and right speakers
at a similar distance from the primary listening area.
When wall mounting, try to place the speakers under
eaves, awnings, or other shelter to help preserve their
appearance and reduce the aging effects of sun and rain.
YES
NO
Try to place the speaker under
overhanging shelter when possible
OUTDOOR 42/52/62 manual 6/4/02 11:21 AM Page 5
Page 6

6
WIRING
The trickiest part of installing outdoor loudspeakers is
running the wire. Pre-wiring new construction is strongly
recommended, but this is not always possible. Access
to a basement, attic, or crawl space can simplify the
task of getting wires to the appropriate locations. If you
are a do-it-yourself homeowner, you may wish to hire a
professional for the purpose of running the wires, even
if you are planning on mounting the speakers yourself.
The terminals used on the Outdoor loudspeakers will
accept up to AWG #12 speaker cable. We recommend
using the largest wire that is practical to run in your
installation. A minimum of AWG #16 should be used
for runs up to 50 feet, with AWG#14 for runs from 50100 feet. Runs longer than 100 feet should use AWG
#12.
While the wire may be directly inserted into the terminals, in outdoor use standard copper wire will eventually oxidize, potentially creating a faulty connection.
For this reason, we recommend using the gold plated
spade lugs we have included to terminate the speaker
wire. A properly crimped or soldered connection will
create a gas-tight contact surface with the wire which
will not deteriorate. The gold-plated contact surfaces
of the spade lug and speaker terminal will be resistant
to oxidation, making the connection more reliable. It is
not mandatory to use the spade terminals. Connecting
the wire directly to the terminals will not compromise
performance, but you may need to periodically scrape
the wire contact surfaces clean if the speakers are left
outside year around.
solder or crimp
OUTDOOR 42/52/62 manual 6/4/02 11:21 AM Page 6
Page 7

7
Building construction practices and materials vary
widely based on your geographical region as well as
the building’s style and age. You will need to adapt
these generalized instructions for your specific needs.
In particular, the method you use to attach the brackets to the mounting surface will differ for various construction types. Because of this, we have not included
hardware to attach the brackets to the building. In
most cases this hardware will consist of some form of
metal or plastic insert with matching screws. If you are
attaching directly to a wood framework, simple wood
screws will be all you need. Make sure that whatever
hardware you choose is made from rust resistant material, such as Stainless Steel. Your local building supply
or hardware store will be best equipped to recommend
appropriate mounting hardware for your needs.
1. Remove the bracket from the speaker by removing
the thumbscrews and pulling the bracket away from
the cabinet while spreading the bracket arms slightly.
2. Decide where you want the speakers to be placed.
3. Use the bracket itself to scribe mounting screw
locations through the bracket holes. Use at least
two screws in each bracket. It is recommended that
a level or plumb bob be used to square the template to other reference points. While there is some
degree of freedom to adjust the speaker, it is best
to have a level mounting hole pattern to begin with.
4. Drill the mounting holes to the size required by your
particular hardware. If you are cutting into a wall or
ceiling with a plaster, stucco or adobe surface, drill
a small hole first, then increase its size a few steps
at a time to reduce the chance of a spreading
crack. Be sure to use the proper drill type for whatever surface material you will be drilling.
Note: When cutting into a wall or ceiling, be careful
not to cut into items such as wiring, conduit, or
plumbing. It is often difficult to know exactly what
lies behind the surface.
5. If you have not already done so, run the speaker
wires to the source, or local volume control. If you
are running wires through an exterior wall, seal the
through-hole with suitable caulking or RTV sealant.
INSTALLATION
remove thumbscrews
and spread bracket
arms to remove
level
mark screw locations
1
3
4
OUTDOOR 42/52/62 manual 6/4/02 11:21 AM Page 7
Page 8

8
6. Locate the speaker wires and strip 3/8" of insulation
from the ends. Pass one of the red insulating sleeves
over the “+” wire, and one of the black sleeves over
the “–” wire. Insert each of the stripped ends into a
spade lug, and crimp or solder them securely. Slide
the insulating sleeves over the connection.
Note: It is important to maintain the polarity of the
speaker wiring between all of the speakers in the
system. Speaker cable usually has some means of
identifying the two conductors, either by color, a
molded-in stripe, or markings on the jacket.
Familiarize yourself with the method used for your
cable, and be consistent with all the connections
within the system. On the loudspeakers, the Red
terminal is used for “+,” and the Black terminal is
used for “–.”
7. Attach the bracket to the mounting surface using
appropriate hardware to the mounting holes made
in step 4.
8. Locate the speaker in the bracket. Loosely screw
the two thumbscrews through the bracket holes
and into the threaded inserts at the ends of each
speaker. Do not tighten the thumbscrews yet.
9. Rotate the speaker for access to the terminals, and
attach the wires firmly. Rotate the speaker back to
the desired angle and tighten the thumbscrews.
to source
5
7
8 9
OUTDOOR 42/52/62 manual 6/4/02 11:21 AM Page 8
Page 9

9
ABOUT AMPLIFIER POWER
The amount of amplifier power needed to drive the
loudspeakers varies significantly with such factors as
the size of the listening area, the type of music you listen
to, and most importantly, how loud you like to play it.
The Outdoor loudspeakers can safely be used with
the most powerful amplifiers and receivers designed
for home listening, as long as these components are
used within reasonable limits. However, the distortion
caused by overdriving either the speaker or associated equipment can cause damage, even if the amplifier or receivers power is technically within the capabilities of the speaker.
If, at a given volume level the sound becomes “grainy”
or exhibits other audible distortion you may be overdriving the amplifier or receiver. This type of distortion
is potentially damaging to tweeters, even from a low
powered amplifier. Reduce the setting of the volume
control until these symptoms disappear. If this is not
sufficiently loud for your needs, you may require a
more powerful amplifier and/or larger loudspeakers.
Contact the retailer where you purchased your loudspeakers, or a Cambridge SoundWorks audio expert
for advice on how to best satisfy your needs.
Also, keep the volume turned down when connecting
or disconnecting components in order to prevent damage from strong, non-musical transients. This will help
protect your ears as well as the speakers.
Protection Circuit
The Outdoor loudspeakers each incorporate a solidstate tweeter protection circuit to reduce the chance
of permanent damage as the result of short-term
overpowering. When activated, this circuit will cut the
signal to the tweeter, and the speaker may sound dull.
When this occurs, it is an indication that the signal is
too loud and has exceeded the capacity of either the
speaker or the amplifier. Simply reduce the volume to
a safe level and the tweeter output will return within a
few seconds.
OUTDOOR 42/52/62 manual 6/4/02 11:21 AM Page 9
Page 10

10
If you suspect that there is a problem with your speakers, contact the retailer where they were purchased, or
Cambridge SoundWorks, who will help you track down
the problem. If together you agree that there is something wrong with your Outdoor loudspeakers, they
should be returned to the retailer where you bought
them. Mail-order and Internet retailers will generally
require a Return Authorization Number. Products purchased from a Cambridge SoundWorks store may be
returned directly to the store where they were purchased, or if you are no longer near a Cambridge
SoundWorks store you may call us at 1-800-FOR-HIFI
for a factory Return Authorization. Do not return the
loudspeakers, or any parts without first obtaining a
Return Authorization.
IN CASE OF DIFFICULTY
OUTDOOR 42/52/62 manual 6/4/02 11:21 AM Page 10
Page 11

Outdoor 42
Speaker Type: 2-way, acoustic suspension
Woofer: 4" injection-mounted polypropylene
Tweeter: 25mm soft polymer dome
Frequency Range: 65-20,000Hz
Recommended Amplifier Power Range: 25W – 120W RMS
Sensitivity (2.83V @ 1meter): 87dB
Nominal Impedance: 8-Ohms
Outdoor 52
Speaker Type: 2-way, acoustic suspension
Woofer: 5 1/4" injection-mounted polypropylene
Tweeter: 25mm soft polymer dome
Frequency Range: 45-20,000Hz
Recommended Amplifier Power Range: 25W – 150W RMS
Sensitivity (2.83V @ 1meter): 89dB
Nominal Impedance: 8-Ohms
Outdoor 62
Speaker Type: 2-way, acoustic suspension
Woofer: 6 1/2" injection mounted polypropylene
Tweeter: 25mm soft polymer dome
Frequency Range: 35-20,000Hz
Recommended Amplifier Power Range: 25W – 165W RMS
Sensitivity (2.83V @ 1meter): 90dB
Nominal Impedance: 8-Ohms
Dimensions
SPECIFICATIONS
A
C
B
D
E
Outdoor 42 Outdoor 52 Outdoor 62
A 7 3/4" 10 3/4" 13 13/16"
B 6" 7" 8 1/2"
C 8 1/4" 11 1/4" 14 5/16"
D 5 1/2" 7 1/4" 7 3/8"
E 6 1/2" 8 1/4" 8 1/2"
Weight 5 lbs 6 lbs 8 lbs
OUTDOOR 42/52/62 manual 6/4/02 11:21 AM Page 11
Page 12

P81-1950
CAMBRIDGE SOUNDWORKS, INC.
26 Dartmouth Street, Westwood MA, 02090
Telephone: 1-800-367-4434
Fax: 1-617-527-3194
A Company
OUTDOOR 42/52/62 manual 6/4/02 11:21 AM Page 12
 Loading...