

Page 1

EDGE A
Manual Generated: 21/01/2023 - 13:52
1
Page 2

Table of Contents
EDGE A 3 .........................................................................................................................................................................................................................
Introduction 4 ................................................................................................................................................................................................................
What’s included with the EDGE A? 5 ..........................................................................................................................................................................
Front panel controls 6 ..................................................................................................................................................................................................
Rear panel connections 7 ............................................................................................................................................................................................
Remote control 9 ...........................................................................................................................................................................................................
Getting connected 10 ...................................................................................................................................................................................................
Advanced connections 15 ............................................................................................................................................................................................
Bluetooth 19 ..................................................................................................................................................................................................................
Factory reset 21 ............................................................................................................................................................................................................
Power syncing 22 ..........................................................................................................................................................................................................
Protection circuitry 23 ..................................................................................................................................................................................................
Troubleshooting 24 .......................................................................................................................................................................................................
Technical specifications 25 ..........................................................................................................................................................................................
Frequently Asked Questions (FAQ) 27 .......................................................................................................................................................................
2
Page 3
EDGE A
Last updated: August 9, 2022 04:57. Revision #7523
3
Users Manual
Page 4

Introduction
Last updated: August 9, 2022 04:57. Revision #7518
This guide is designed to make installing and using this product as easy as possible. Information in this document has been carefully checked for
accuracy at the time of printing; however, Cambridge Audio’s policy is one of continuous improvement, therefore design and specifications are
subject to change without prior notice.
This document contains proprietary information protected by copyright. All rights reserved. No part of this manual may be reproduced by any
mechanical, electronic or other means, in any form, without prior written permission of the manufacturer. All trademarks and registered trademarks
are the property of their respective owners.
© Copyright Cambridge Audio Ltd 2022.
Qualcomm is a trademark of Qualcomm Incorporated, registered in the United States and other countries, used with permission. aptX is a trademark
of Qualcomm Technologies International, Ltd., registered in the United States and other countries, used with permission.
Qualcomm aptX is a product of Qualcomm Technologies International, Ltd.
The Bluetooth® word mark and logos are registered trademarks owned by the Bluetooth SIG, Inc. and any use of such marks by Audio Partnership
Plc is under license. Other trademarks and trade names are those of their respective owners.
4
For upcoming news on future products, software updates and exclusive offers, make sure you register your product
https://www.cambridgeaudio.com/register
at
Page 5
What’s included with the EDGE A?
Last updated: August 9, 2022 04:57. Revision #7517
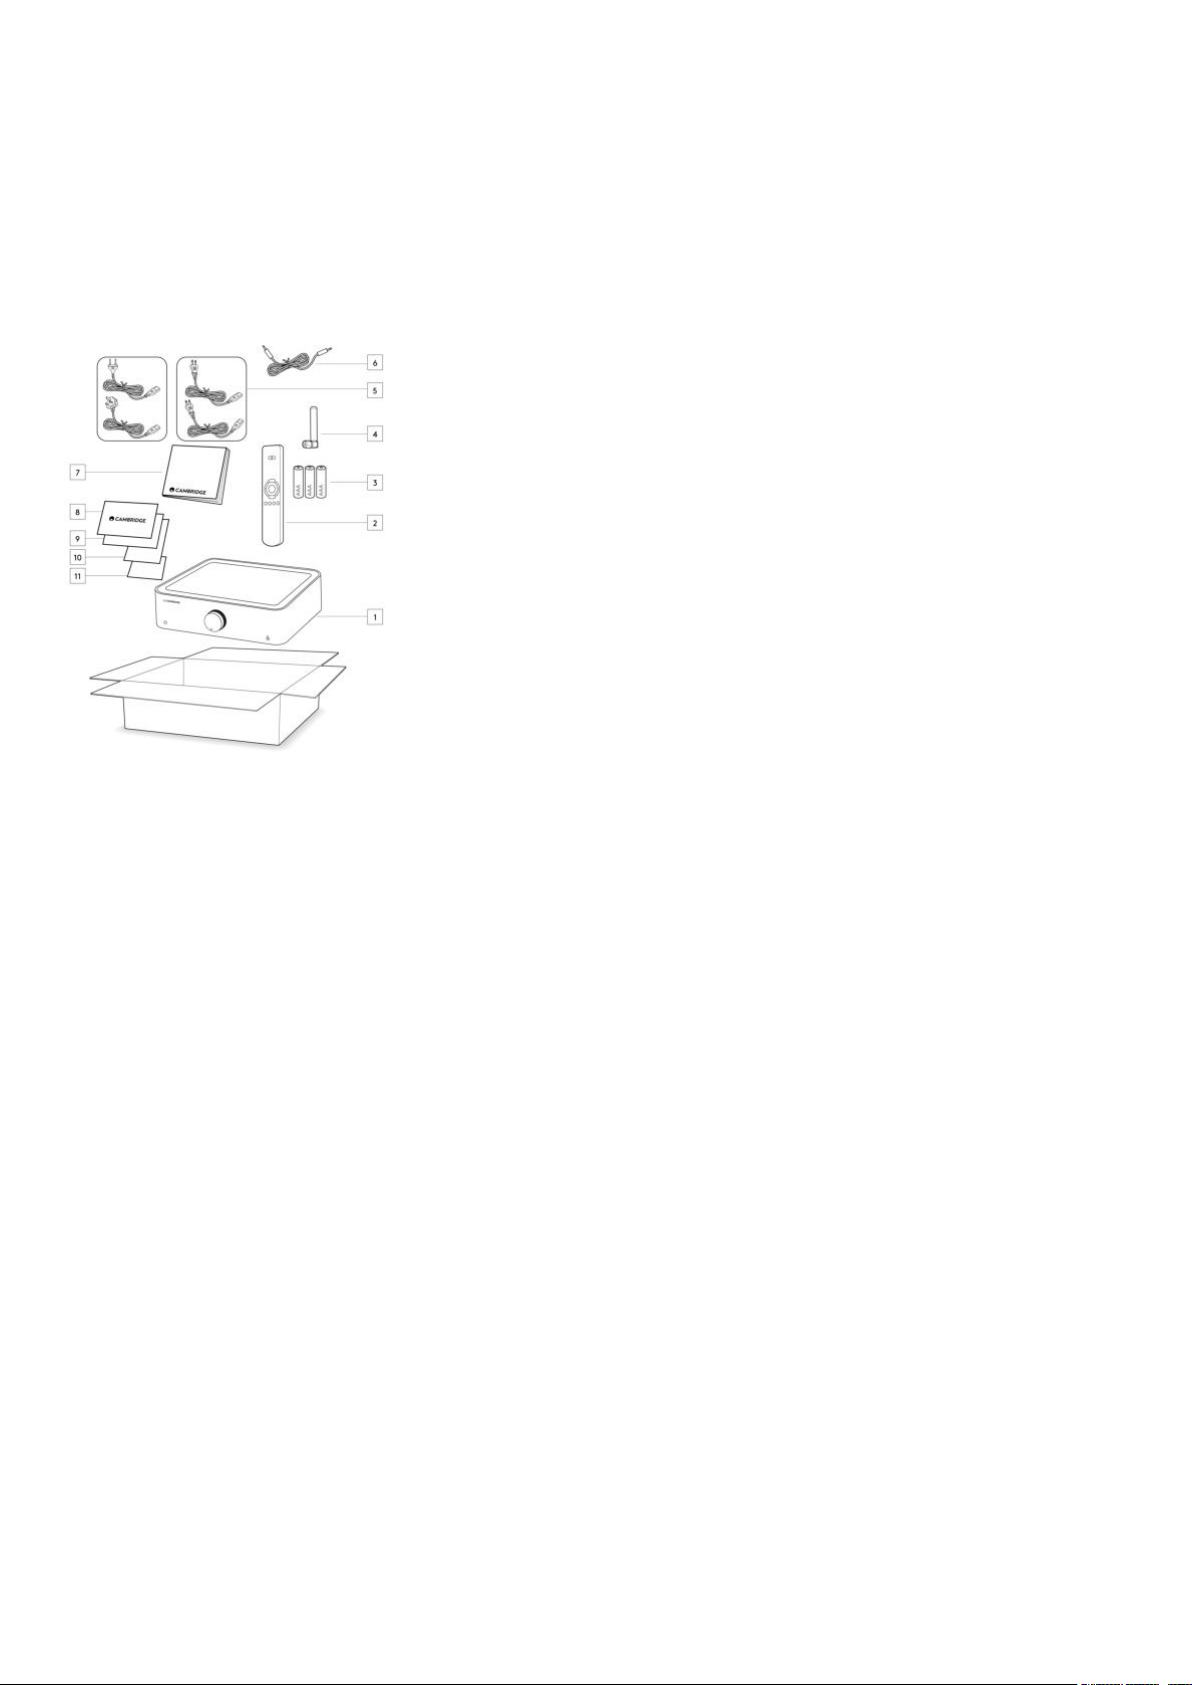
Inside the box of your EDGE A you will receive:
5
EDGE A Integrated Amplifier1.
Remote Control2.
3x AAA batteries3.
Bluetooth antenna4.
UK power cord (Depending on which country the EDGE A was purchased in)5.
EU power cord (Depending on which country the EDGE A was purchased in)
CU power cord (Depending on which country the EDGE A was purchased in)
JP power cord (Depending on which country the EDGE A was purchased in)
Link Cable6.
User Manual7.
Warranty Card8.
Welcome Letter9.
Unboxing Card10.
EC Declaration of Conformity Card11.
Page 6
Front panel controls
Last updated: August 9, 2022 04:57. Revision #7516
6
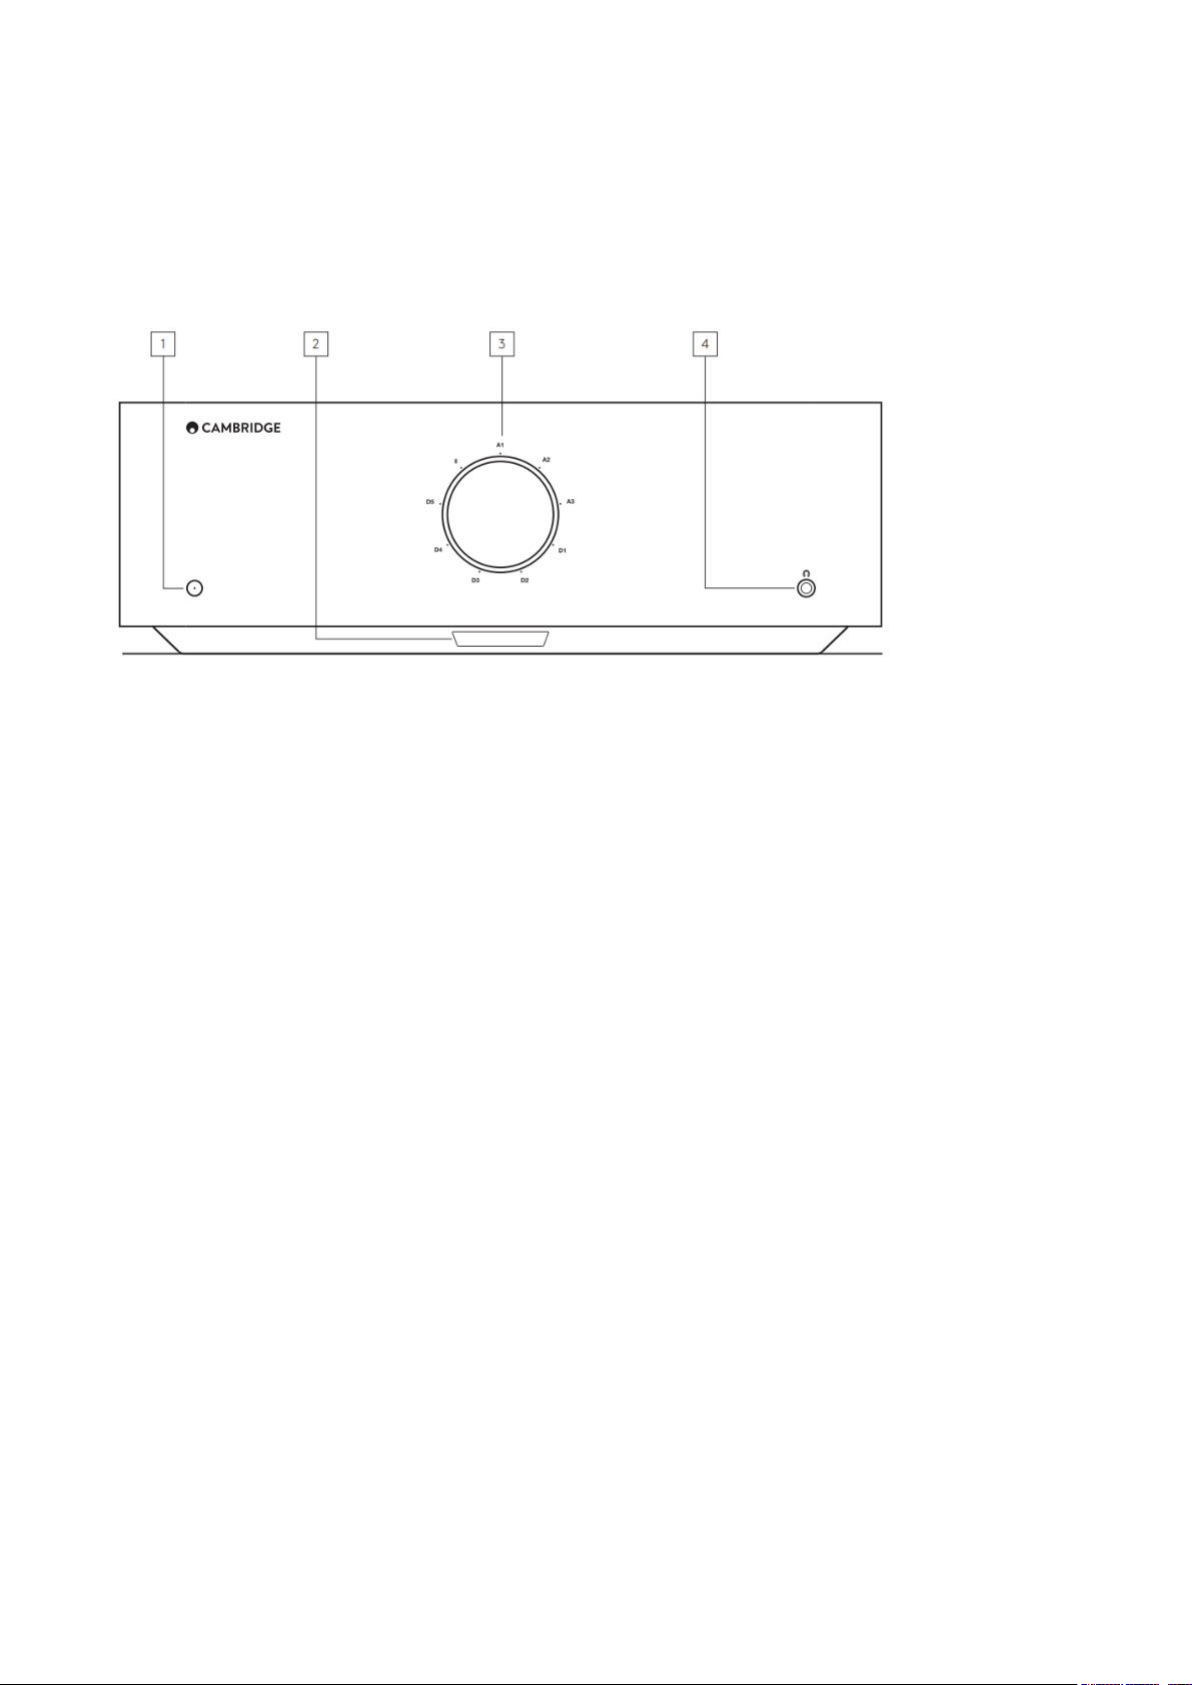
1. STANDBY/ON - Switches the unit between Standby mode (indicated by dim LED) and On (indicated by bright LED). Standby mode is a low
power mode where the power consumption is less than 0.5 Watts.
AUTO POWER DOWN (APD)
The product will automatically switch to standby mode after inactivity of 20 minutes. To enable or disable this function, use the APD switch located
on the rear of the unit.
2. IR SENSOR - Used for remote control.
3. VOLUME/SOURCE SELECTOR - To change the volume, rotate the front part. To select a source, rotate the back part.
4. HEADPHONES - Allows for the connection of stereo headphones with a 3.5mm jack plug. Headphones with an impedance of between 8 and 600
ohms are recommended.
Note: Connection will automatically mute the loudspeaker and pre-out.
VOLUME CALIBRATION
The first time the Edge A is powered on after a factory reset, it will perform a calibration process, which takes approx. 30 seconds. Please allow this
process to complete before attempting to use the product.
Page 7
Rear panel connections
Last updated: November 15, 2022 10:45. Revision #7862
7
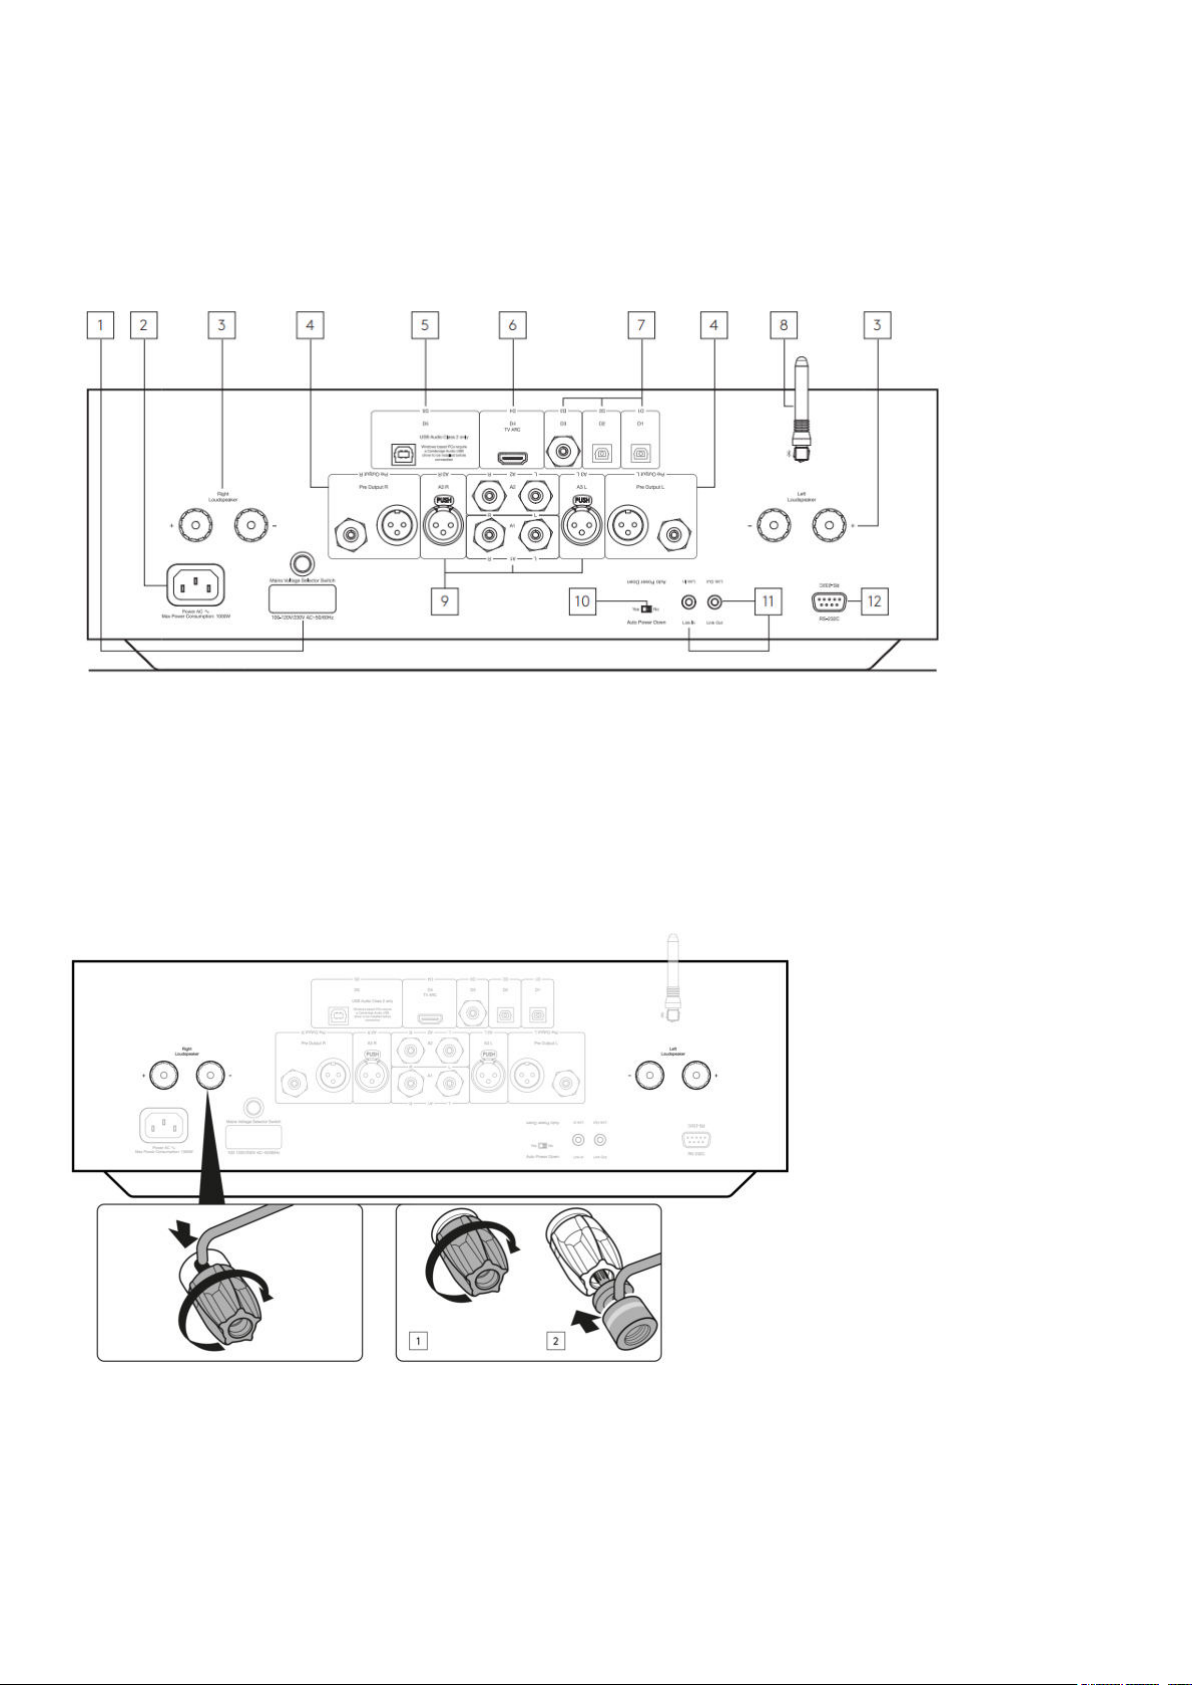
1. VOLTAGE SELECTOR SWITCH
Note: For use by Cambridge Audio service personnel only!
2. AC POWER SOCKET
3. SPEAKER TERMINALS
Note: When using a banana plug, make sure the speaker terminals are completely tightened before inserting the plug.
Connect the wires from your left channel loudspeaker to the left positive and negative terminals and the wires from the right channel loudspeaker
to the right positive and negative terminals.
In each case, the red terminal is the positive output and the black terminal is the negative output.
Page 8

Care should be taken to ensure no stray strands of wire short the speaker outputs together. Please ensure that the loudspeaker terminals have
been tightened completely to provide a good electrical connection.
It is possible for the sound quality to be affected if the screw terminals are loose.
4. PRE OUT - For connection to the inputs of a power amplifier or active subwoofer.
5. USB AUDIO IN (D5) - For connecting to PC/MAC computers. (Class 2 USB Audio only.)
Windows based PCs require a Cambridge Audio USB driver to be installed before connection. Please see the ‘Advanced Connections’ section for
more details
6. AUDIO RETURN CHANNEL (ARC) (D4) - Connection from a TV that supports ARC function.
Note: Ensure that the audio output settings on your TV are set to PCM or Stereo.
7. DIGITAL INPUTS - TOSLINK OPTICAL (D1 AND D2) / S/P DIF DIGITAL (D3)
Coaxial – Use a high quality 75 ohm digital RCA Phono interconnect cable (not one designed for normal analogue audio use).
This input is suitable for 16-24 bit content up to 192 kHz.
TOSLINK optical – Use a high quality TOSLINK fibre optic interconnect cable designed specifically for audio use.
8
This input is suitable for 16-24 bit content up to 96 kHz (TOSLINK is not recommended at 192kHz sampling rates).
8. BLUETOOTH ANTENNA - Used for wireless streaming Bluetooth audio capability directly from most phones, tablets and laptops. See Bluetooth
section for details.
9. ANALOGUE INPUTS - BALANCED XLR (A3) / UNBALANCED RCA (A1 AND A2) - Suitable for any 'line level' source equipment such as
Network Players, CD players or FM/AM tuners etc.
These inputs are for analogue audio signals only. They should not be connected to the digital output of a CD player or other digital devices.
10. AUTO POWER DOWN (APD) SWITCH - Switches to enable or disable the Auto Power Down function. When enabled, the amplifier will
automatically switch to standby mode after inactivity of 20 minutes.
11. LINK - Refer to the 'Power syncing' section of this manual for more information.
12. RS232 - RS232 is a standard serial data communication protocol, which allows devices that support RS232 to communicate with each other as
part of a home automation system.
Custom install control - a full protocol is available for the EDGE A on our website
here.
Page 9
Remote control
Last updated: August 9, 2022 04:57. Revision #7514
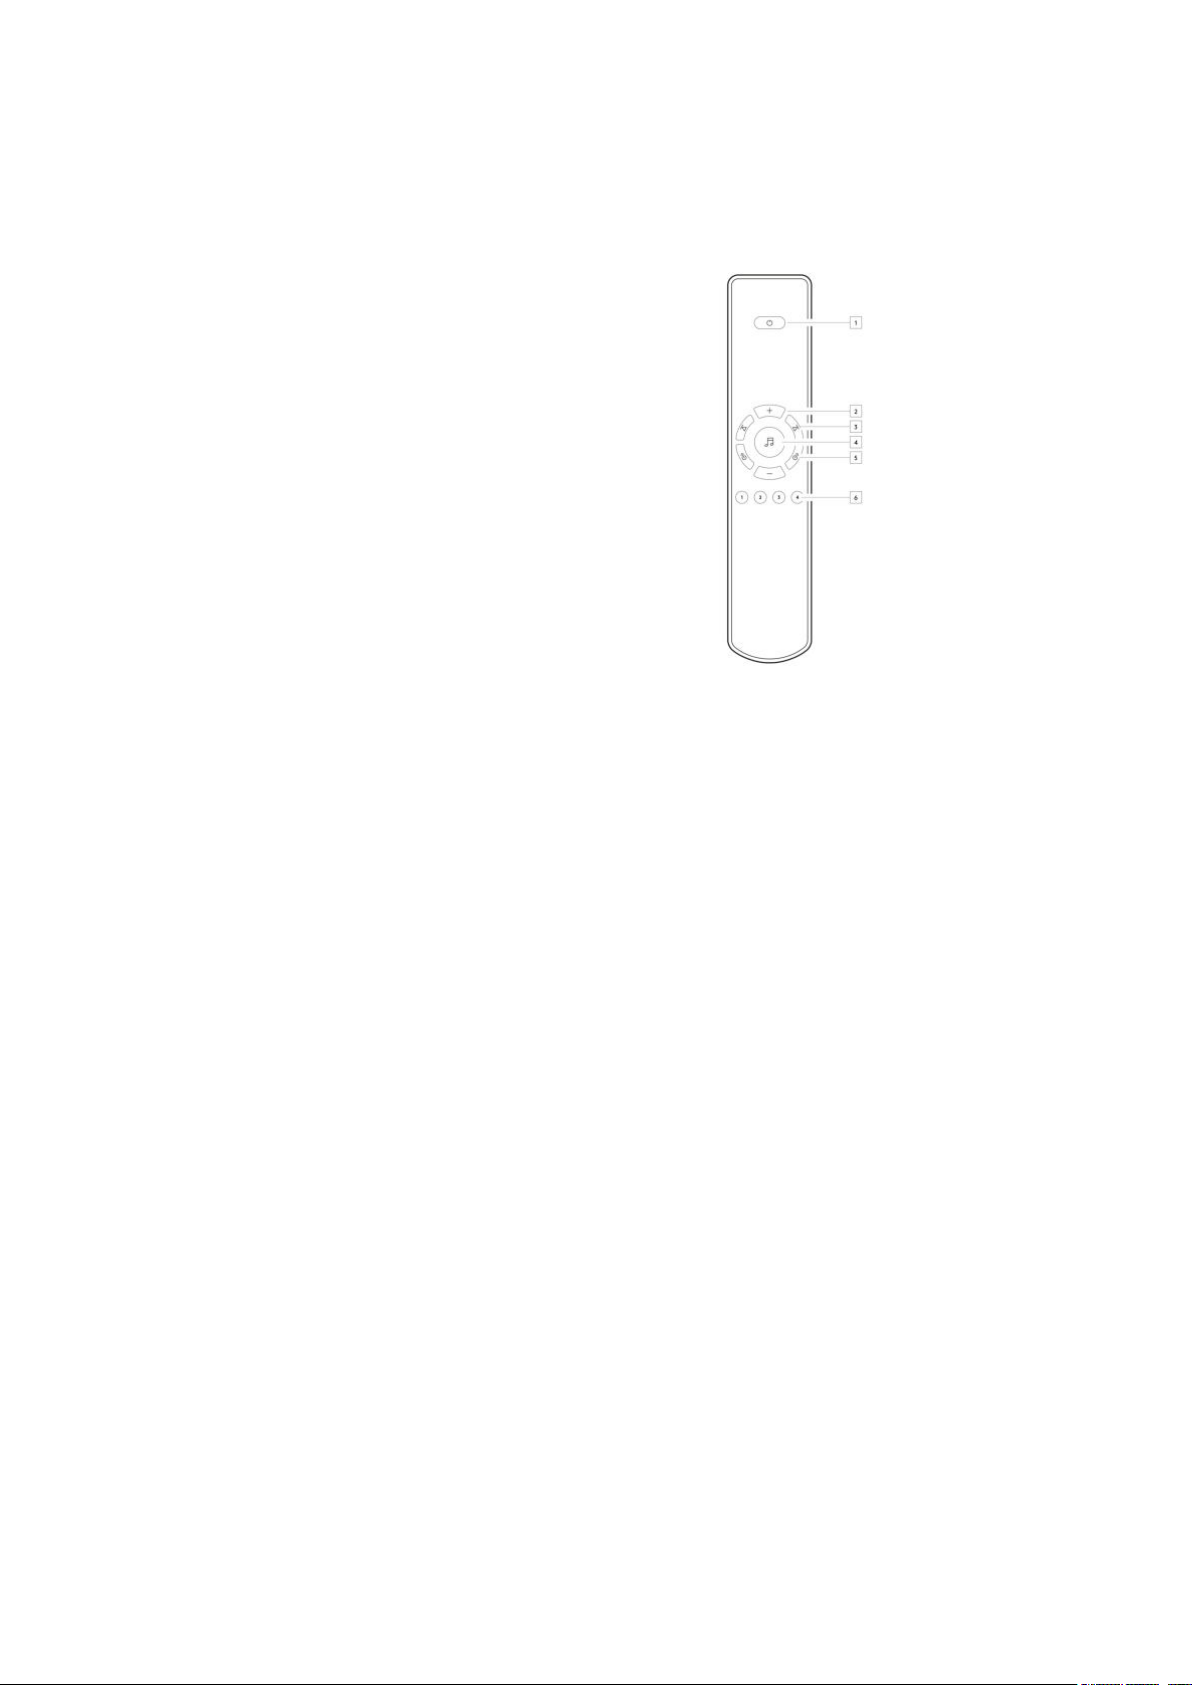
1. STANDBY/ON - Switches the EDGE A between On and Standby mode.
2. VOLUME - Volume level adjustment.
3. SKIP - Skips between previous and next tracks.
4. MUTE/UNMUTE - Press to mute or unmute the loudspeakers, pre-out, sub, and the headphone
outputs.
When using the Bluetooth input, this will instead function as a Play/Pause button.
5. SOURCE SELECTOR - Used to select the source inputs.
6. PROGRAMMABLE BUTTONS – Press and hold to store a specific volume level for an input or
source.
In order to set specific volume levels for inputs on the EDGE A, you will need to manually select
the desired input and volume level, then press and hold one of these buttons (1, 2, 3 or 4) on the
remote control until you see the source LED blink.
Selecting the previously chosen button (1, 2, 3 or 4) will recall your chosen source and volume
level.
Note: If the remote control will not function, please check that the batteries have not expired, and
that there is nothing blocking the front panel IR receiver.
9
Page 10
10
Getting connected
Last updated: November 11, 2022 10:32. Revision #7726
LOUDSPEAKERS
Check the impedance of your speakers. You can use types with an impedance of between 4 and 8 Ohms.
The red coloured speaker terminals are positive (+) and the black speaker terminals are negative (-). Make sure the correct polarity is maintained at
each speaker connector or the sound can become weak and “phasey” with little bass.
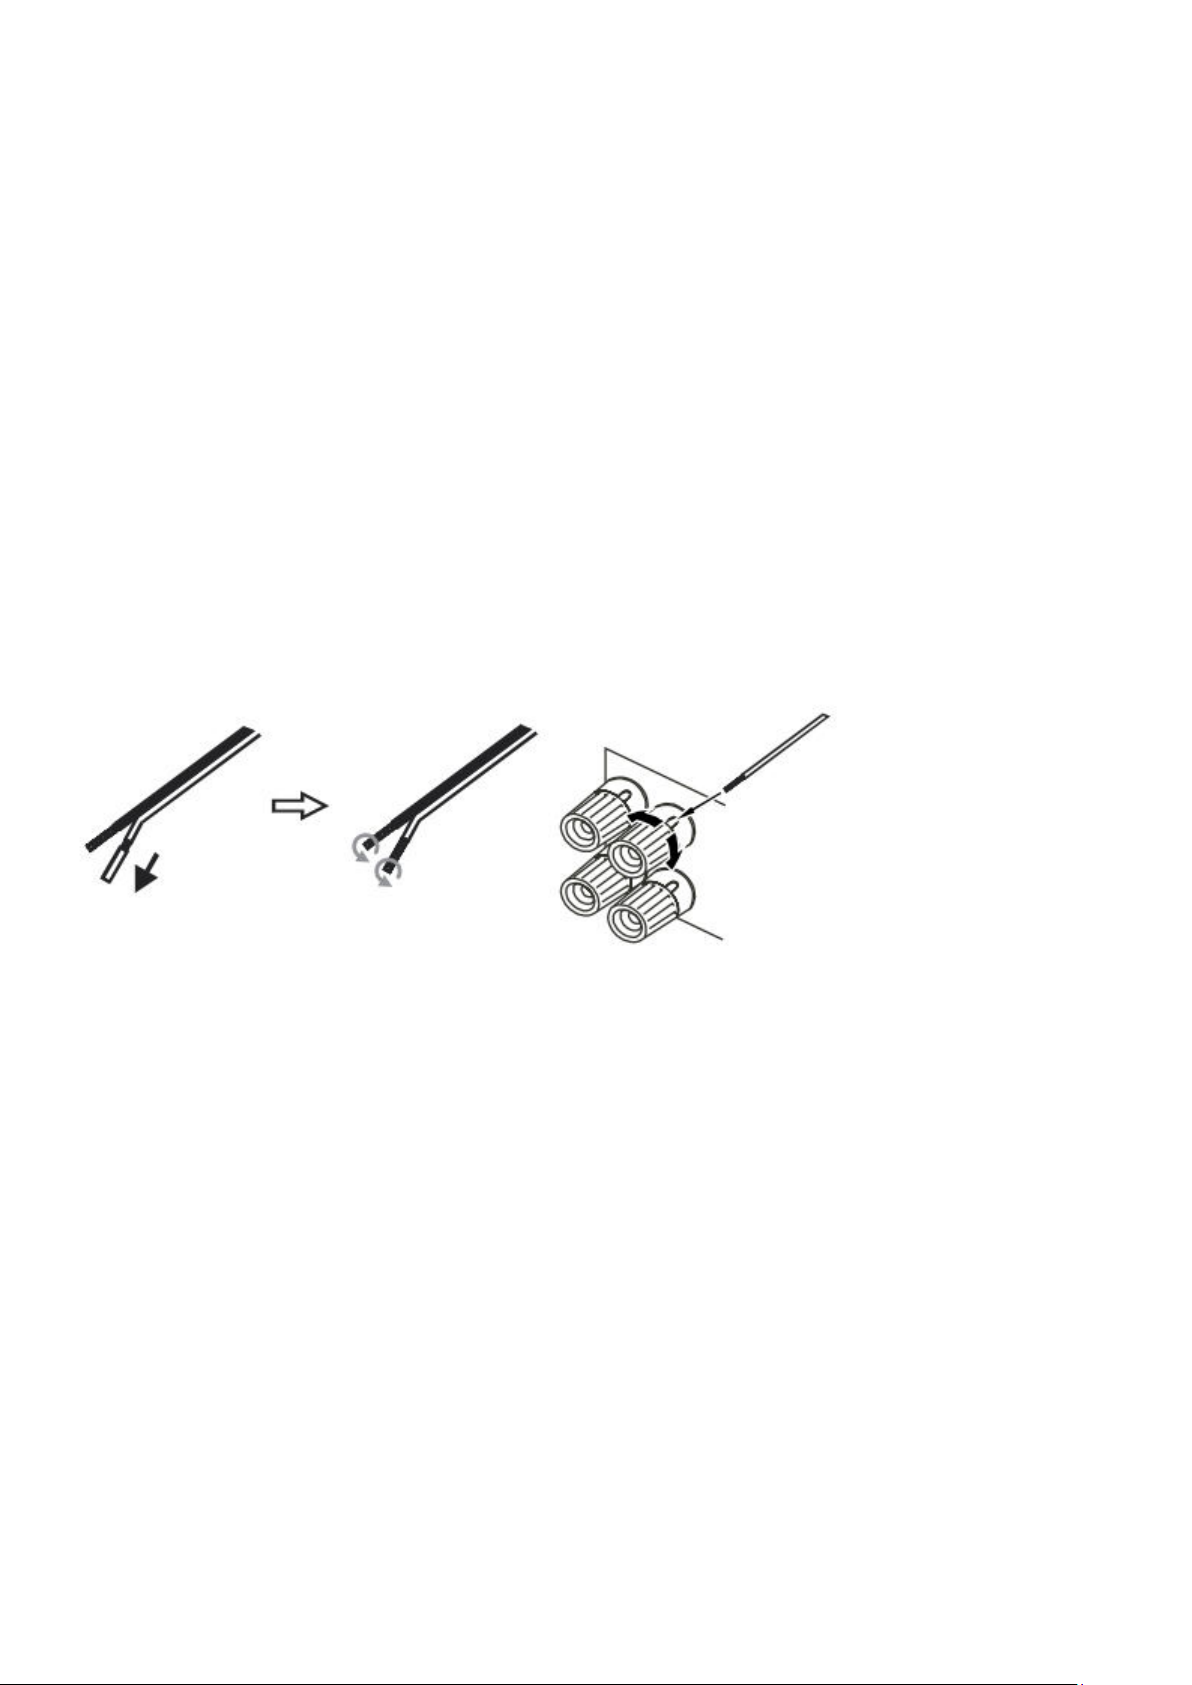
USING BARE WIRE CONNECTIONS
Prepare the speaker cords for connection by stripping off approximately 10mm (3/8”) or less of the outer insulation. More than 10mm could cause a
short circuit. Twist the wires tightly together so there are no loose ends. Unscrew the speaker terminal, insert the speaker cable, tighten the
terminal and secure the cable.
Note: All connections are made using standard loudspeaker cable.
USING BANANA PLUGS
We recommend using Banana plugs with our units to establish a secure connection and ensure there are no loose strands of wire that may cause
unwanted noise or interference.
Once you have stripped the outer insulation of the cable and twisted the wires as indicated below, securely connect these to your banana plugs and
push the plug in as far as possible without applying excessive force.
Note: When using a banana plug, make sure the speaker terminals are completely tightened before inserting the plug.
BASIC CONNECTIONS
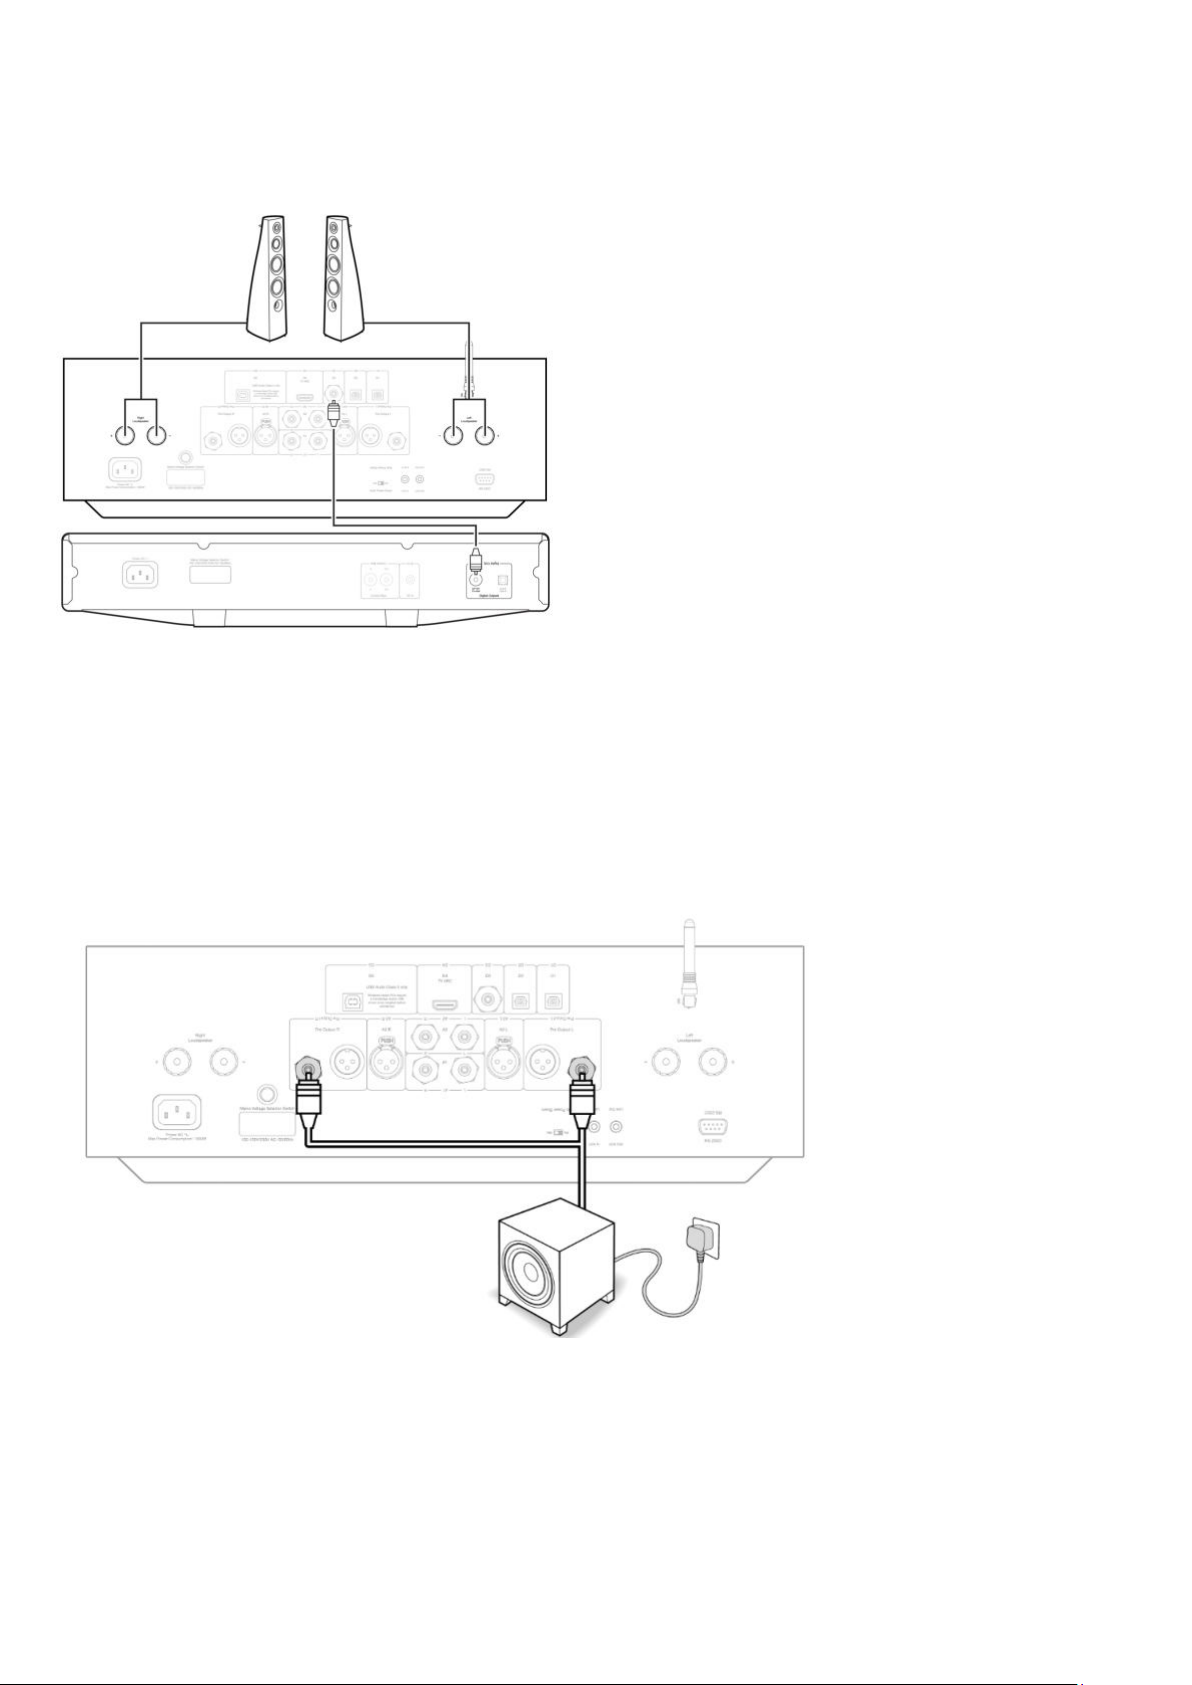
The diagram below shows the basic connection of the EDGE A to a CD player using the D3 coaxial digital input source and a pair of loudspeakers.
Page 11
11
PRE OUT CONNECTIONS
The Pre Out can be connected to the inputs of a power amplifier or active subwoofer.
Subwoofer:
Although the EDGE A does not contain a dedicated subwoofer output, you can connect a subwoofer by connecting either of the unbalanced RCA PreOutputs to the corresponding inputs on the rear of your powered sub.
The sub’s audio level will then follow the volume commands of the EDGE to ensure the volume increases/decreases in sync.
Power amplifier:
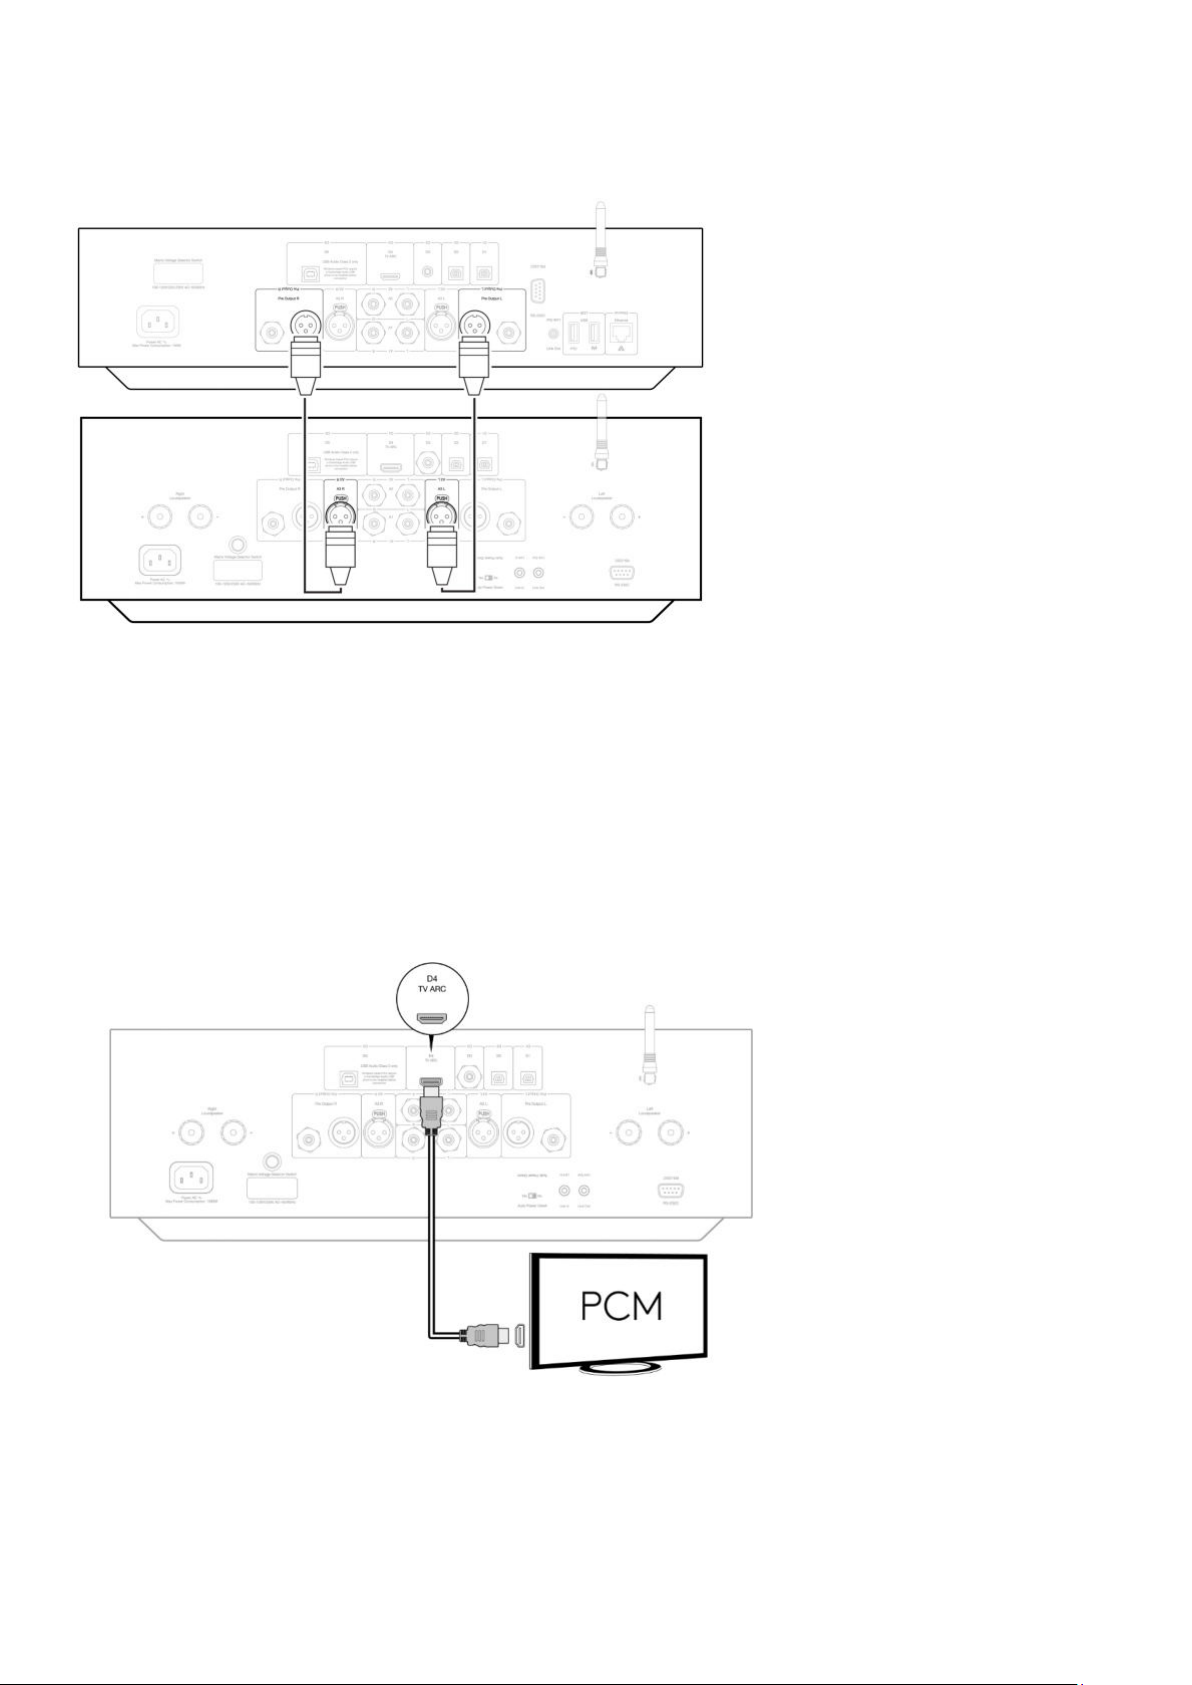
To connect the EDGE A to a power amp, such as the EDGE W, you will need to run either unbalanced RCA cables or balanced XLR cables from the
Pre Outs to the input on the power amp.
Page 12
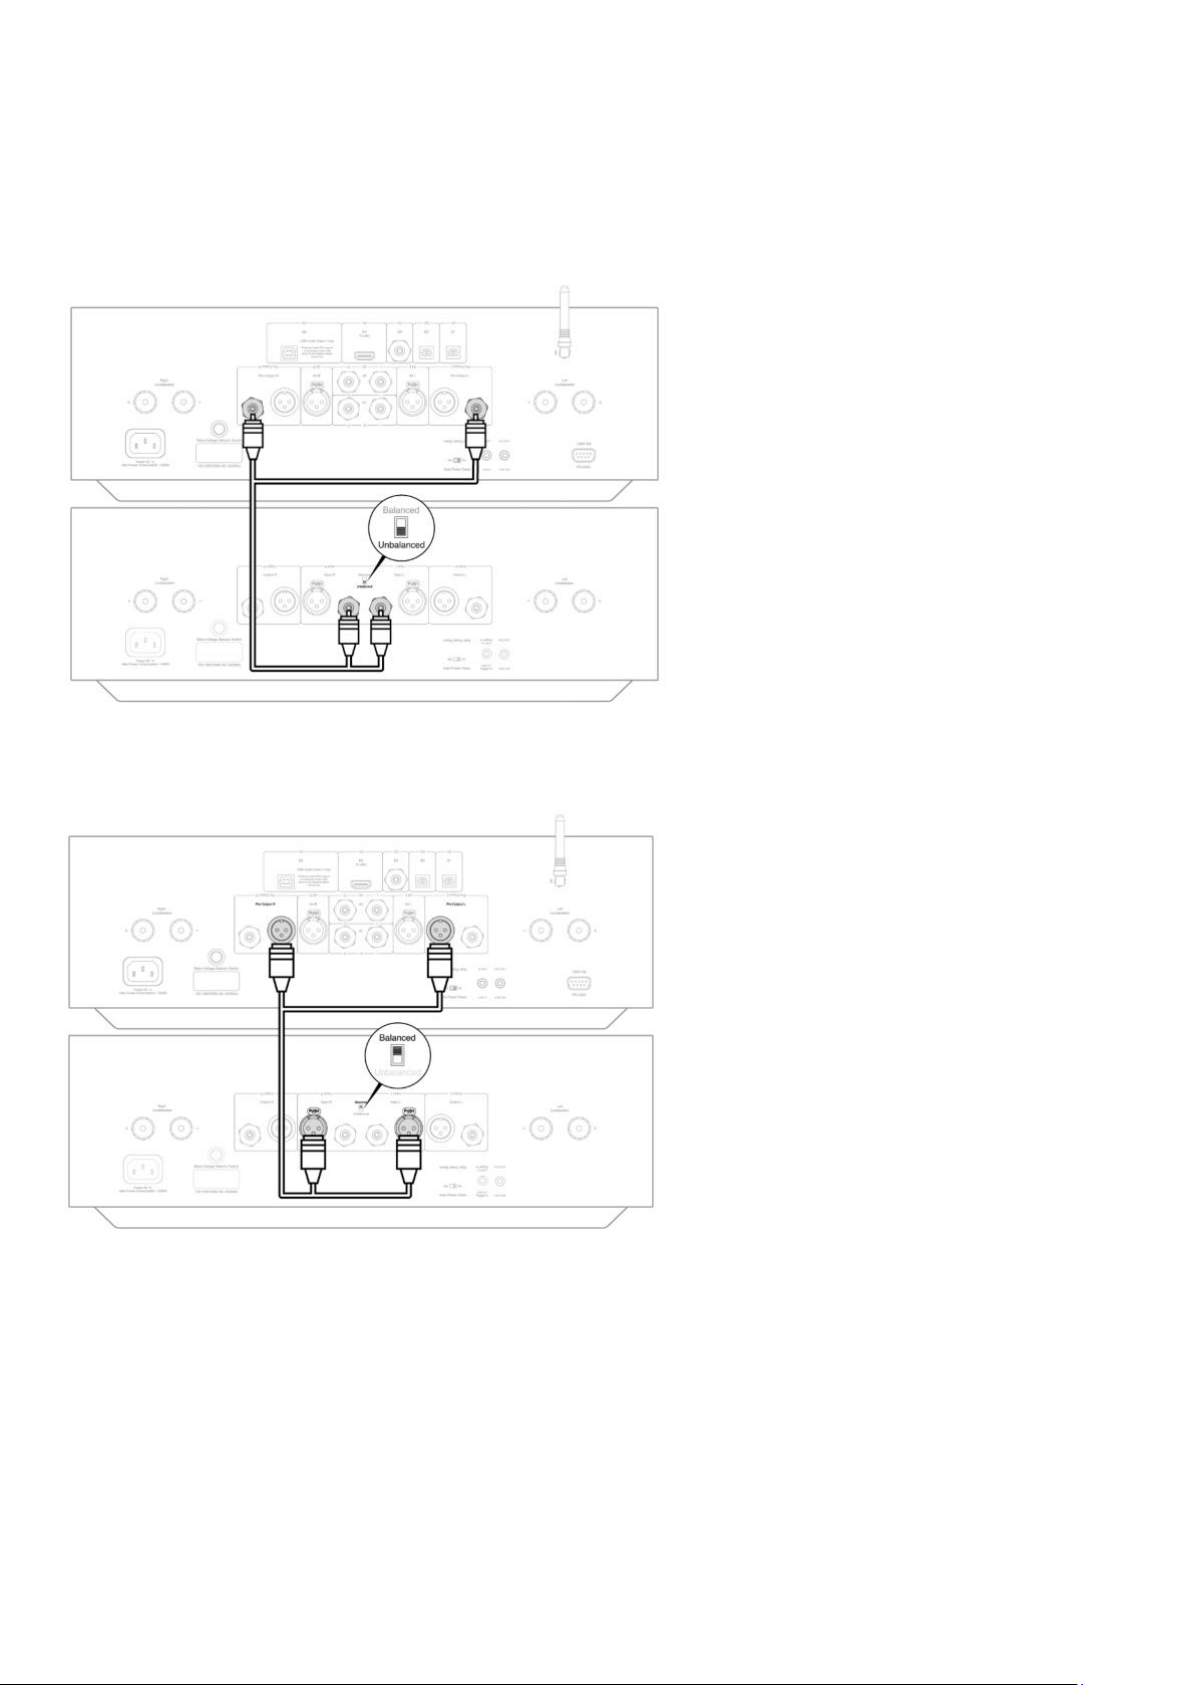
With this setup, you will be using the EDGE A as a dedicated Preamplifier.
Unbalanced:
12
Balanced:
BALANCED AUDIO CONNECTIONS
Balanced connections in an audio system are designed to reject electrical noise, from power wiring etc, and also the effects of noise currents
flowing through ground connections. The basic principle of balanced interconnection is to get the signal you want by subtraction, using a three wire
connection. One signal wire (the hot or in-phase) carries the normal signal, while other (the cold or phase-inverted) carries an inverted version. The
balanced input senses the difference between the two lines to give the wanted signal. Any noise voltages that appear identically on both lines
(these are called common-mode signals) are cancelled by the subtraction.
The EDGE A is designed to work at its highest performance when a balanced interconnect is used.
Page 13
13
Note: Ensure that the A3 input has been selected via the source selector dial on the front panel or the source selector buttons on the remote.
There will be no audio from the EDGE if the correct input hasn’t been selected.
CONNECTING A TV
The EDGE A has an HDMI ARC (Audio Return Channel) input to allow you to create a connection to a TV that supports ARC function.
The TV ARC input is labelled as D4 on the front panel source selector.
Note: As the EDGE A is only able to decode a stereo PCM signal, you will need to ensure the audio output of your TV/App/Box’s settings are
configured to PCM/Stereo. If you are unsure of how to amend your settings, please consult your TV/Box’s manufacturer.
Some Connected TVs will send an inconsistent sample rate to the EDGE A, that the DAC inside the amplifier is unable to process. This can result in
audio dropouts and glitches.
Page 14

14
The issue seems to be mainly related to newer LG and Samsung televisions (QLED and OLED models in particular), but there have also been reports
of TCL televisions experiencing the same issue.
We have now developed a fix for this issue, which permits the use of TV's experiencing this issue with the ARC input (D4) on the Edge A.
If you are experiencing this issue with audio dropouts and glitches, please contact us at
will be able to provide you with instructions on how to perform this update.
Please note that this fix is for the ARC input only, and not TOSLINK inputs on the unit.
https://www.cambridgeaudio.com/gbr/en/contact and we
Page 15
15
Advanced connections
Last updated: November 15, 2022 12:49. Revision #7880
USB AUDIO CONNECTION
The Edge A comes equipped with a USB Audio Input for connecting to a PC/Mac computer.
As the Edge A is Class 2 USB Audio Only, Windows-based PCs require a Cambridge Audio USB driver to be installed before connection, which can be
here. No extra drivers are required when using a Mac.
found
Important Note: Always turn the volume to minimum, switch to another input or turn the EDGE off before plugging/unplugging cables to the USB
input or whilst booting up/shutting down your PC/Mac.
How to connect a Windows PC to the EDGE A via the USB audio input:
1. Install the appropriate Cambridge Audio Windows 2.0 USB driver on your computer. Please find a link to the most recent USB audio driver
The USB driver is required to ensure ASIO is installed, as this allows music player apps to have exclusive use of the peripheral, in addition to enable
native DSD support.
2. Once installed, you should notice the 'CA Control Panel' has been installed in your taskbar. This will show any connected Cambridge Audio USB
Audio device.
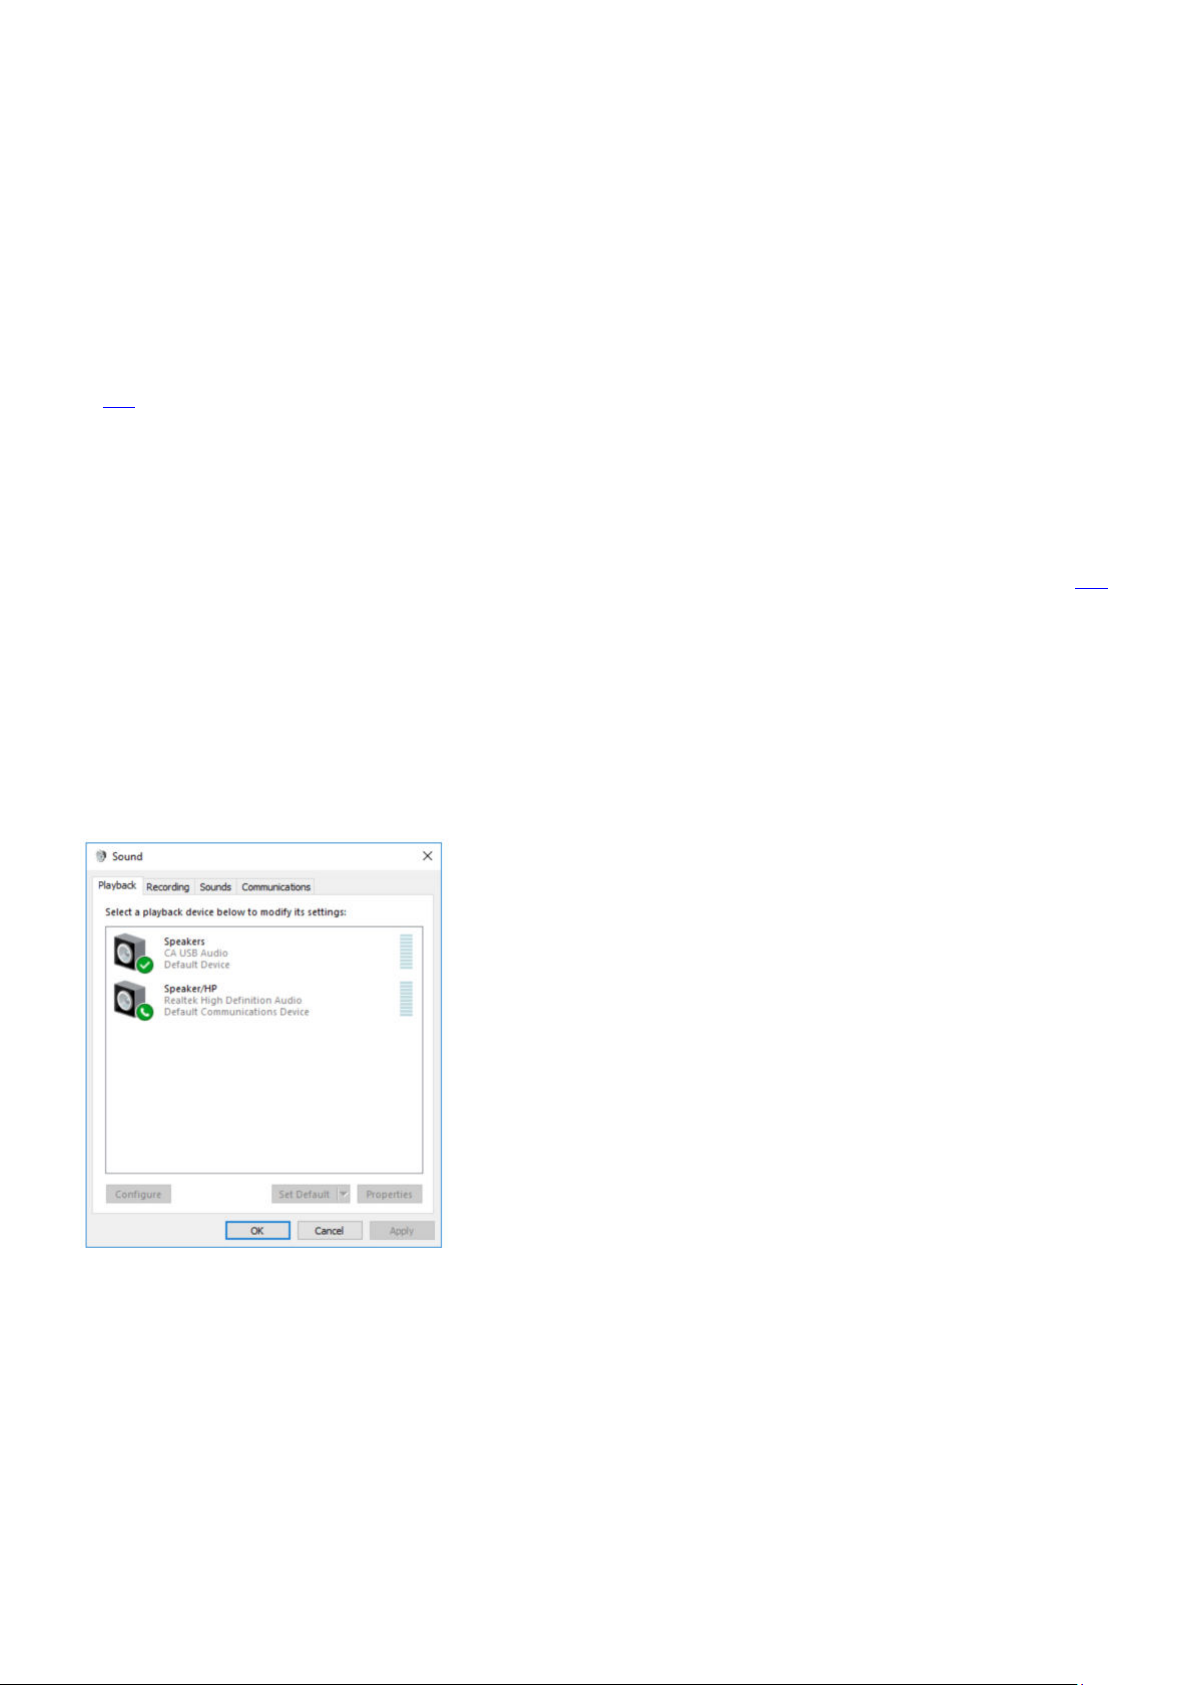
3. Now run a USB Audio cable from the D5 input on your EDGE A to a free USB port on your computer.
4. Upon turning on your EDGE A, please select the D5 input. You should notice that the EDGE A appears as 'CA USB Audio' within the playback
section of your computer’s Sound Settings (Control Panel > Sound > Playback).
here.
5. Make sure that the EDGE A is selected as your default playback Device with a green tick. Once completed the EDGE A should also appear in the
CA Control Panel.
Page 16
16
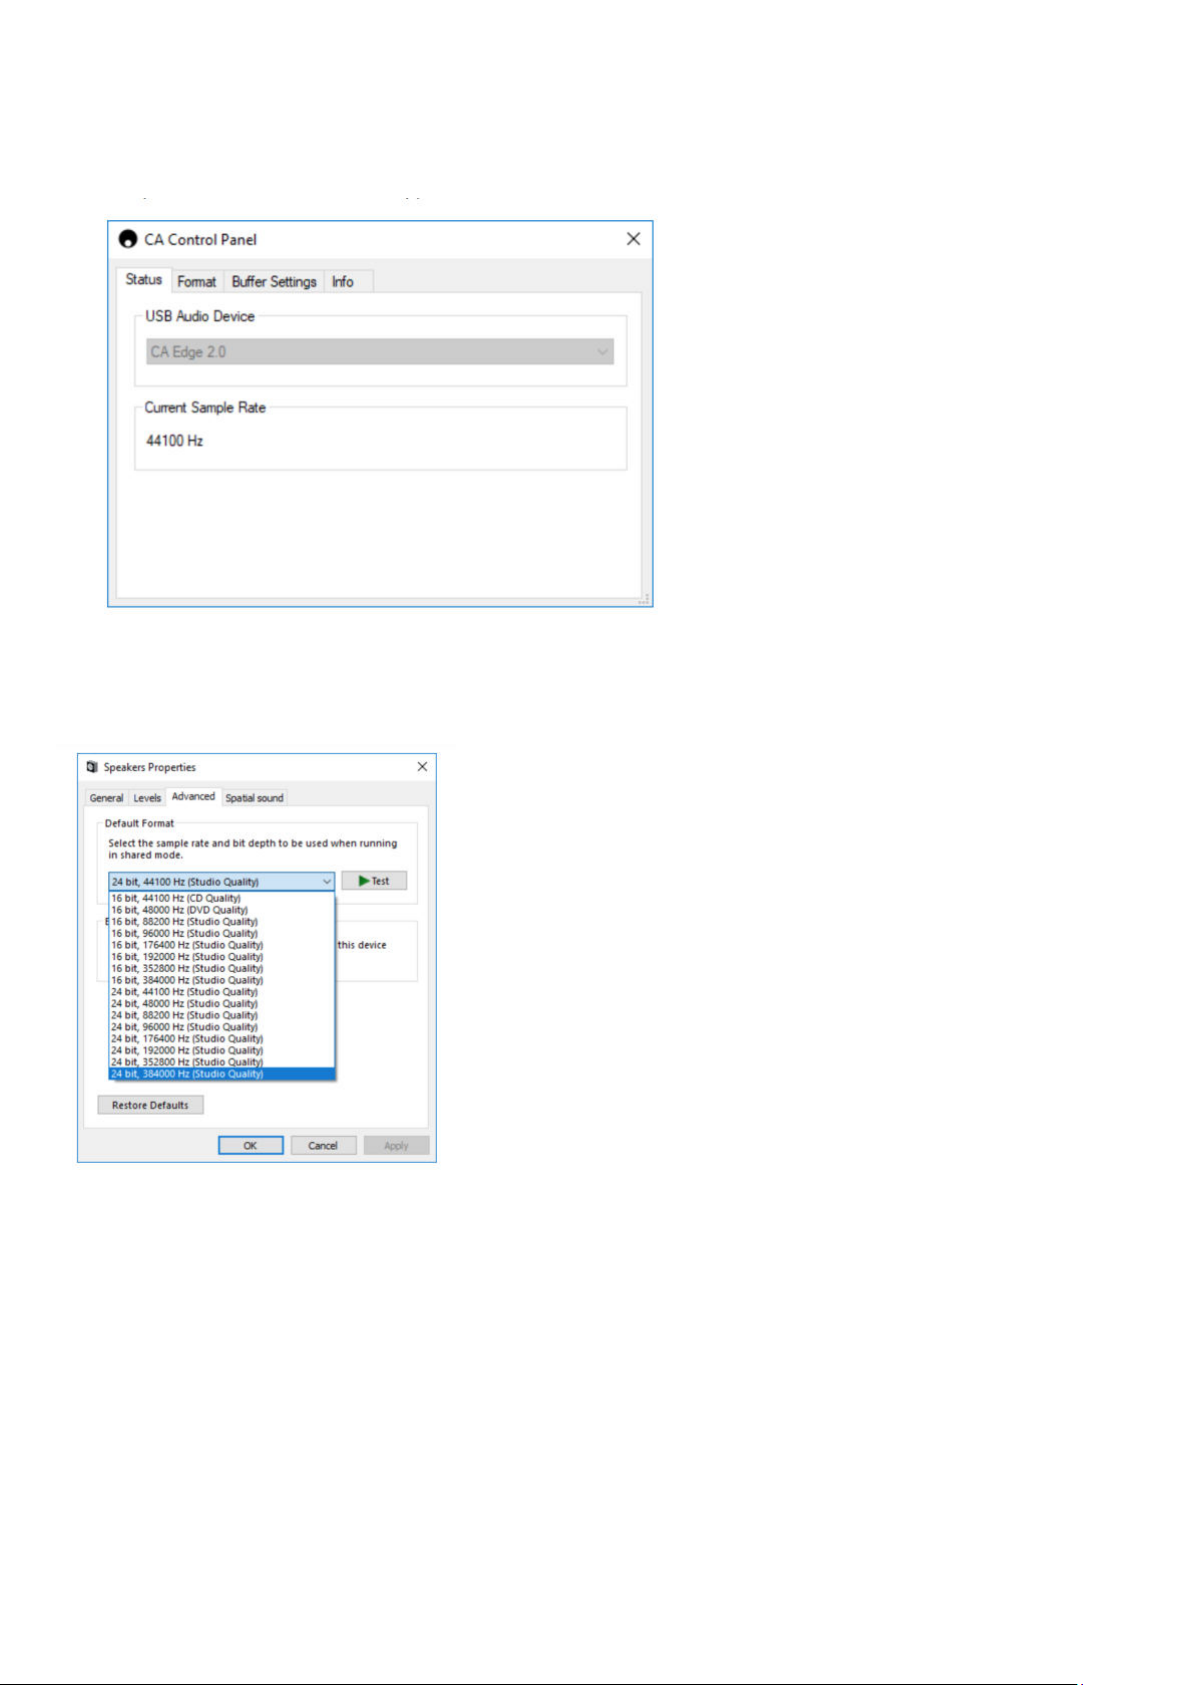
6. Next right click the EDGE A within playback devices and select properties. Here navigate to Advanced where you can select the sample rate and
bit depth to be used. We would recommend selecting the highest available.
Note: This step is optional.
7. After doing this you will notice the 'Current Sample Rate' within the CA Control Panel should now change to reflect the settings you applied within
the Advanced Speaker Properties.
Page 17
17
How to connect a Mac to the EDGE A via the USB audio input:
If you are using an Apple Macbook you will not need to download or install any additional drivers before connecting.
1. Run a USB Audio cable from the D5 input on your EDGE A to a free USB port on your computer. Please be aware if you own a Macbook from 2016
or later you may need to purchase an additional USB-C adapter or a USB-C to USB-B cable.
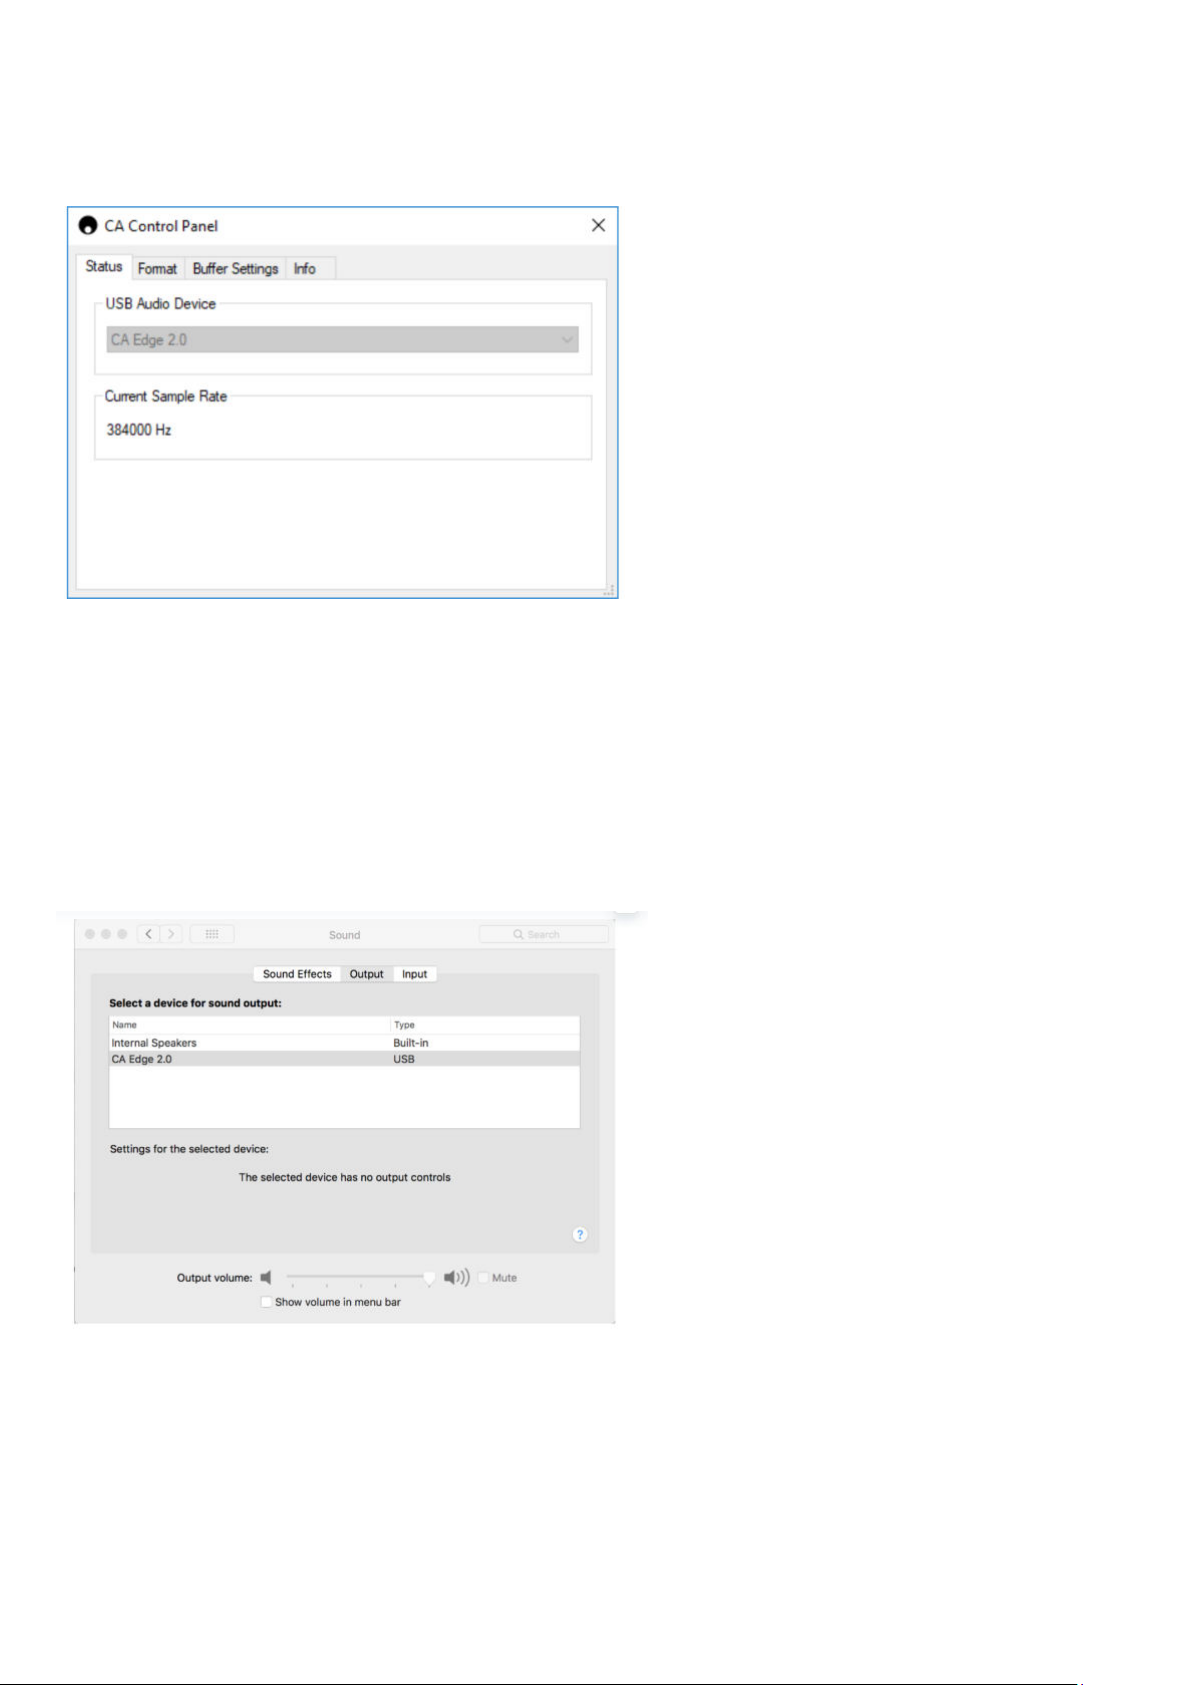
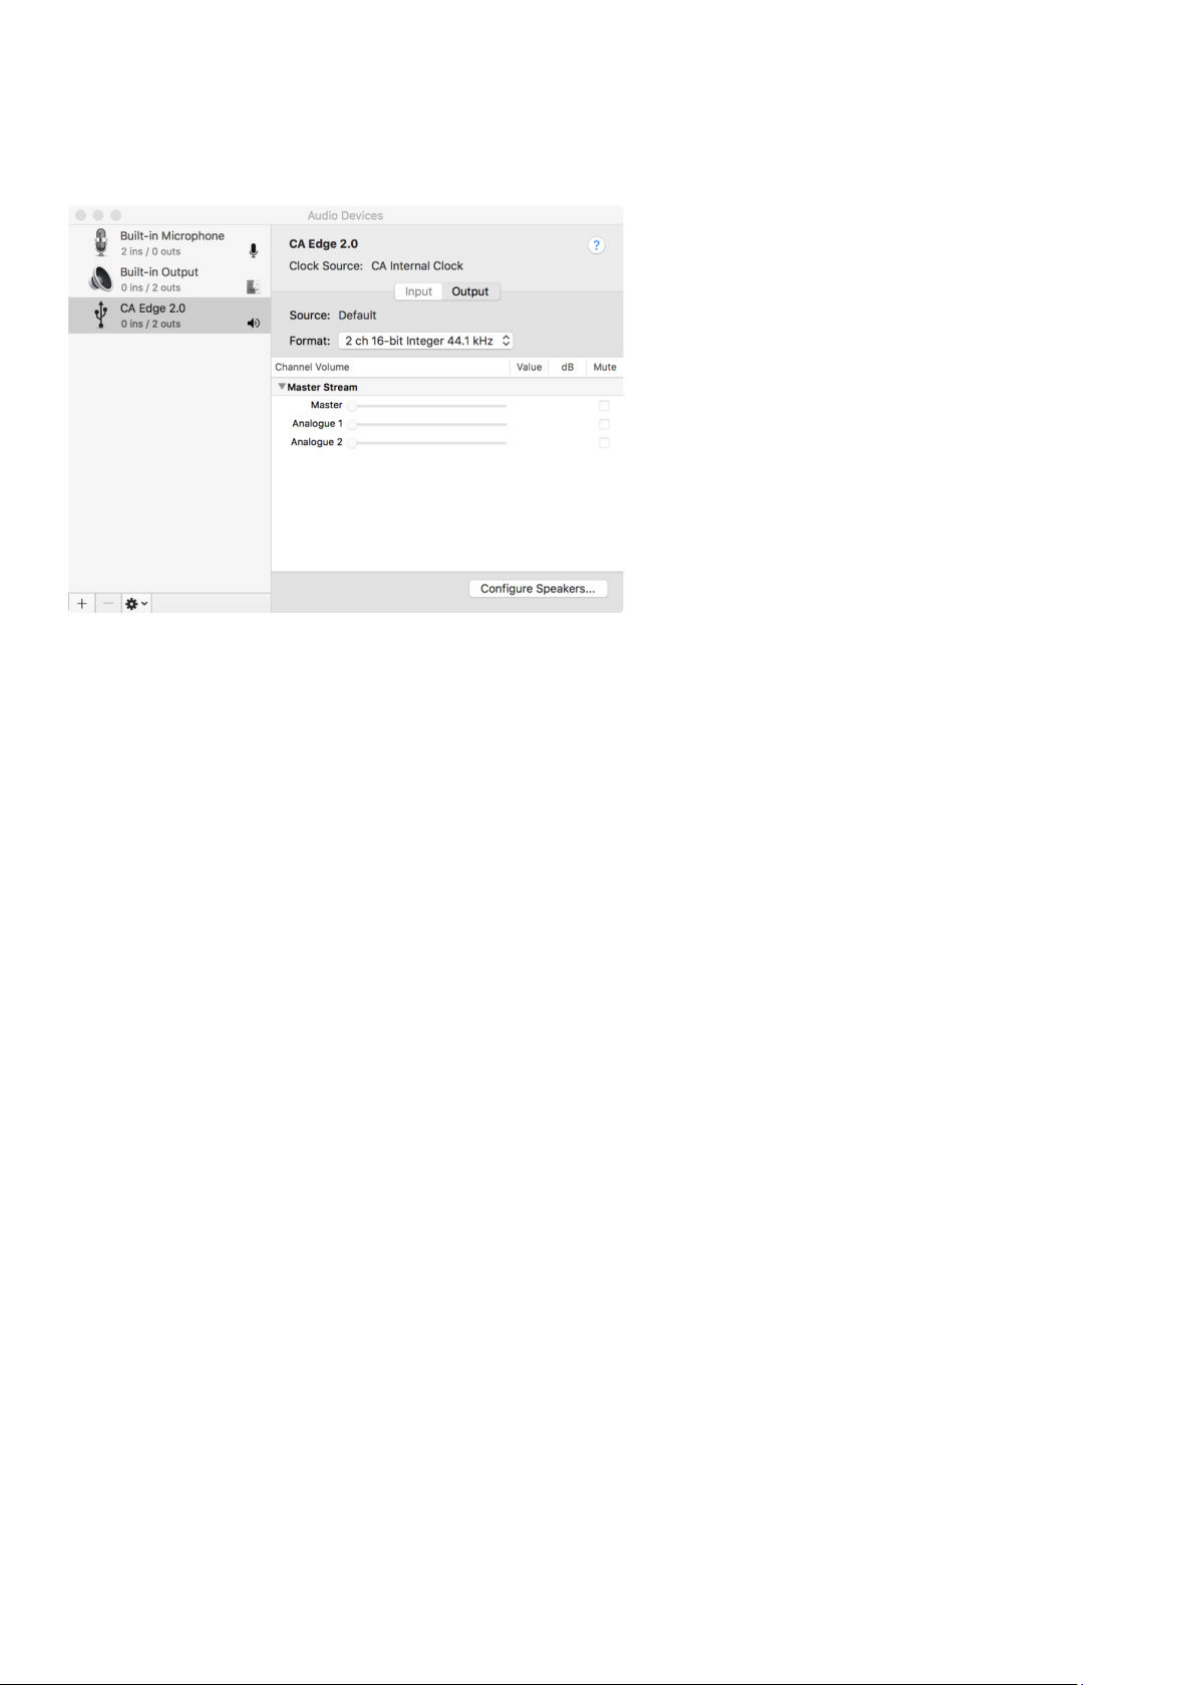
2. Upon turning on your EDGE A please select the D5 input. You should notice that the EDGE A appears as 'CA Edge 2.0' under Output within your
Sound Settings (System Preferences > Sound> Output).
3. Make sure that the EDGE A is selected as the Output Device.
4. To achieve the best possible sound quality you will need to navigate to Audio MIDI Setup (Finder > Applications > Utilities > Audio MIDI Setup).
Within 'Format' you will be able to select which sample rate and bit depth to use. We would recommend selecting the highest available.
Note: This step is optional.
Page 18
18 19
Page 19
Bluetooth
Last updated: October 18, 2022 04:09. Revision #7511
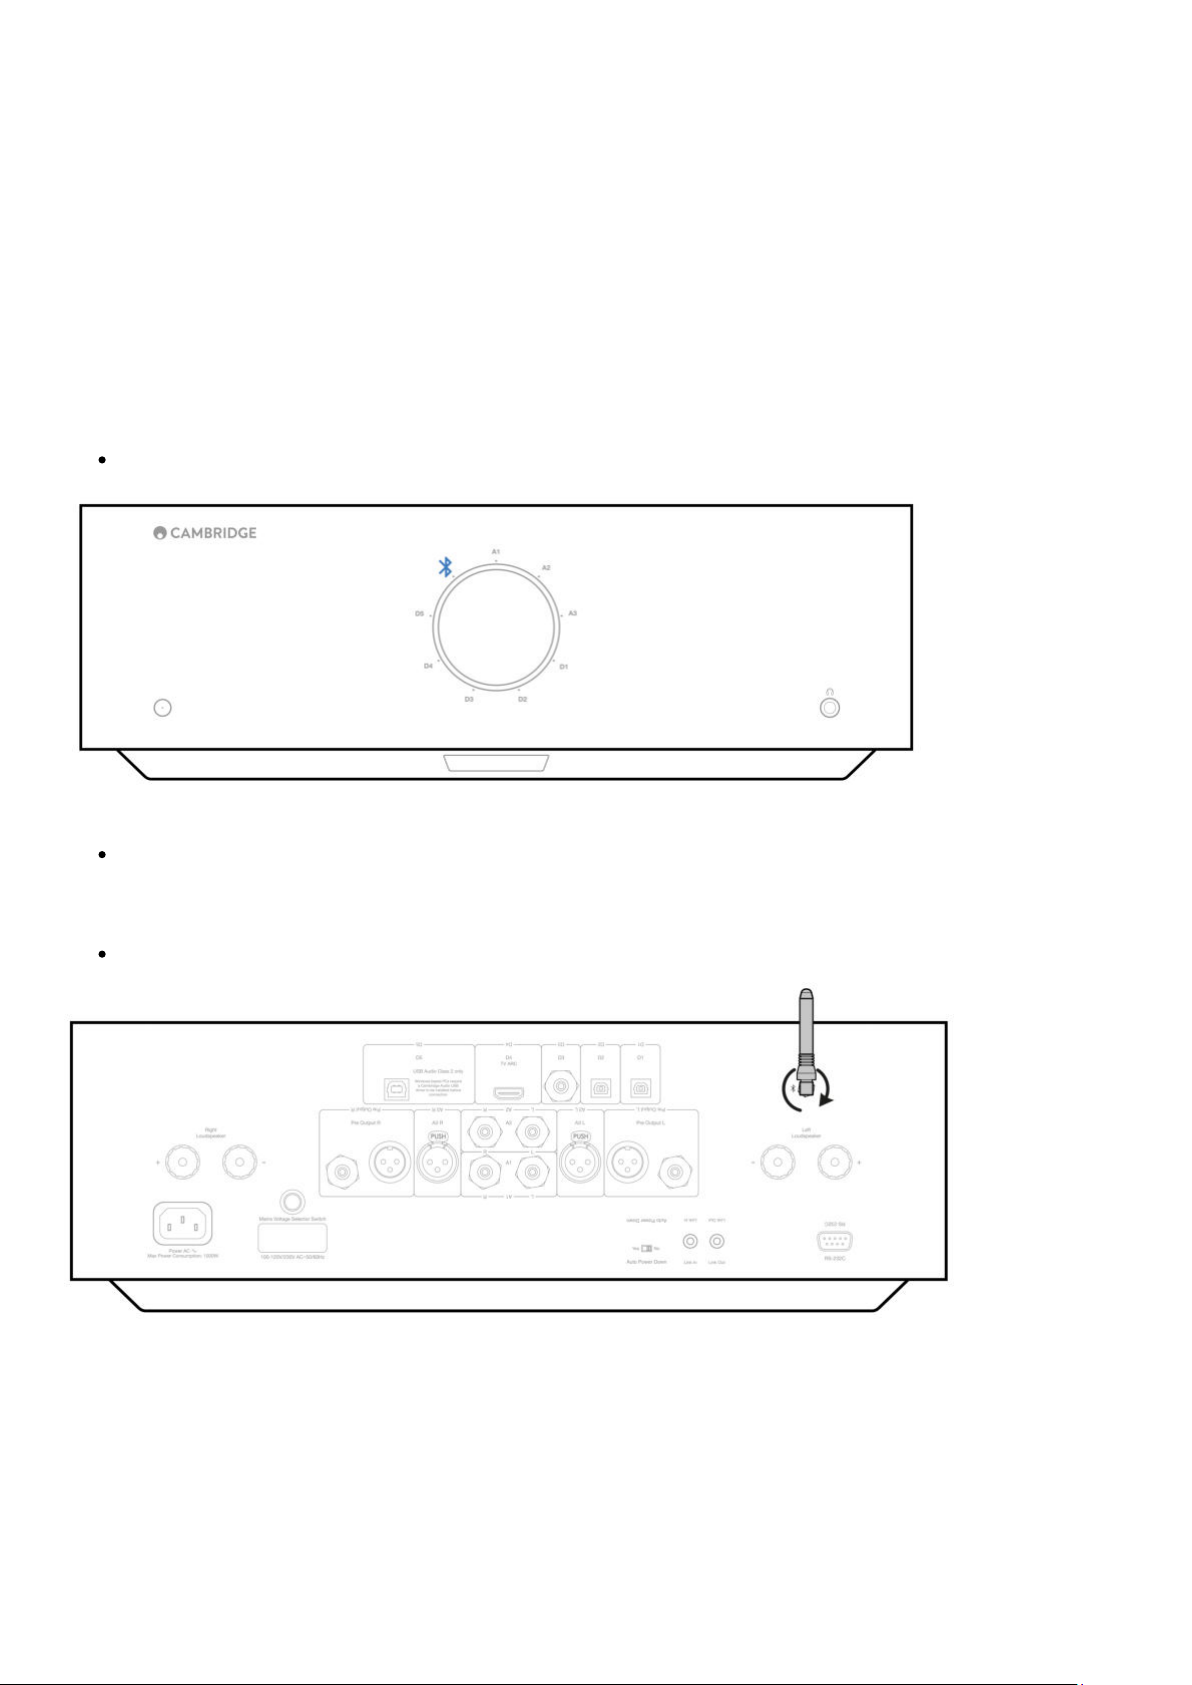
Selecting this allows the EDGE A to receive wireless Bluetooth audio from most phones, tablets and laptops.
PAIRING
To begin streaming high quality music from your chosen media source, it will first need to be paired with the EDGE A.
Notes:
Your device can only be paired and connected to the EDGE A while the Bluetooth source is selected.
The EDGE A is always in discoverable mode when there is no Bluetooth connection. Discoverable mode means that the EDGE A is able to be
paired to another Bluetooth device.
The supplied Bluetooth antenna must be inserted into the rear of the unit to enable Bluetooth functionality.
Bluetooth troubleshooting guide
If you are having problems connecting your Bluetooth device to the EDGE A, please try the following troubleshooting steps:
Page 20

Ensure that the supplied Bluetooth antenna is properly connected to the back of the unit. The EDGE A will be unable to connect to a1.
Bluetooth device without the antenna connected. Try disconnecting and then re-connecting the antenna.
Ensure that the Bluetooth source has been selected via the front panel source selector or the source selector buttons on the remote.2.
Ensure that your Bluetooth device is in pairing mode and not already connected to another Bluetooth unit.3.
Forget the EDGE A from your devices’ list of discoverable Bluetooth items and start the pairing process again.4.
Perform a factory reset on the EDGE A (see 'Factory Reset' section below).5.
20
Page 21
Factory reset
Last updated: August 9, 2022 04:57. Revision #7510
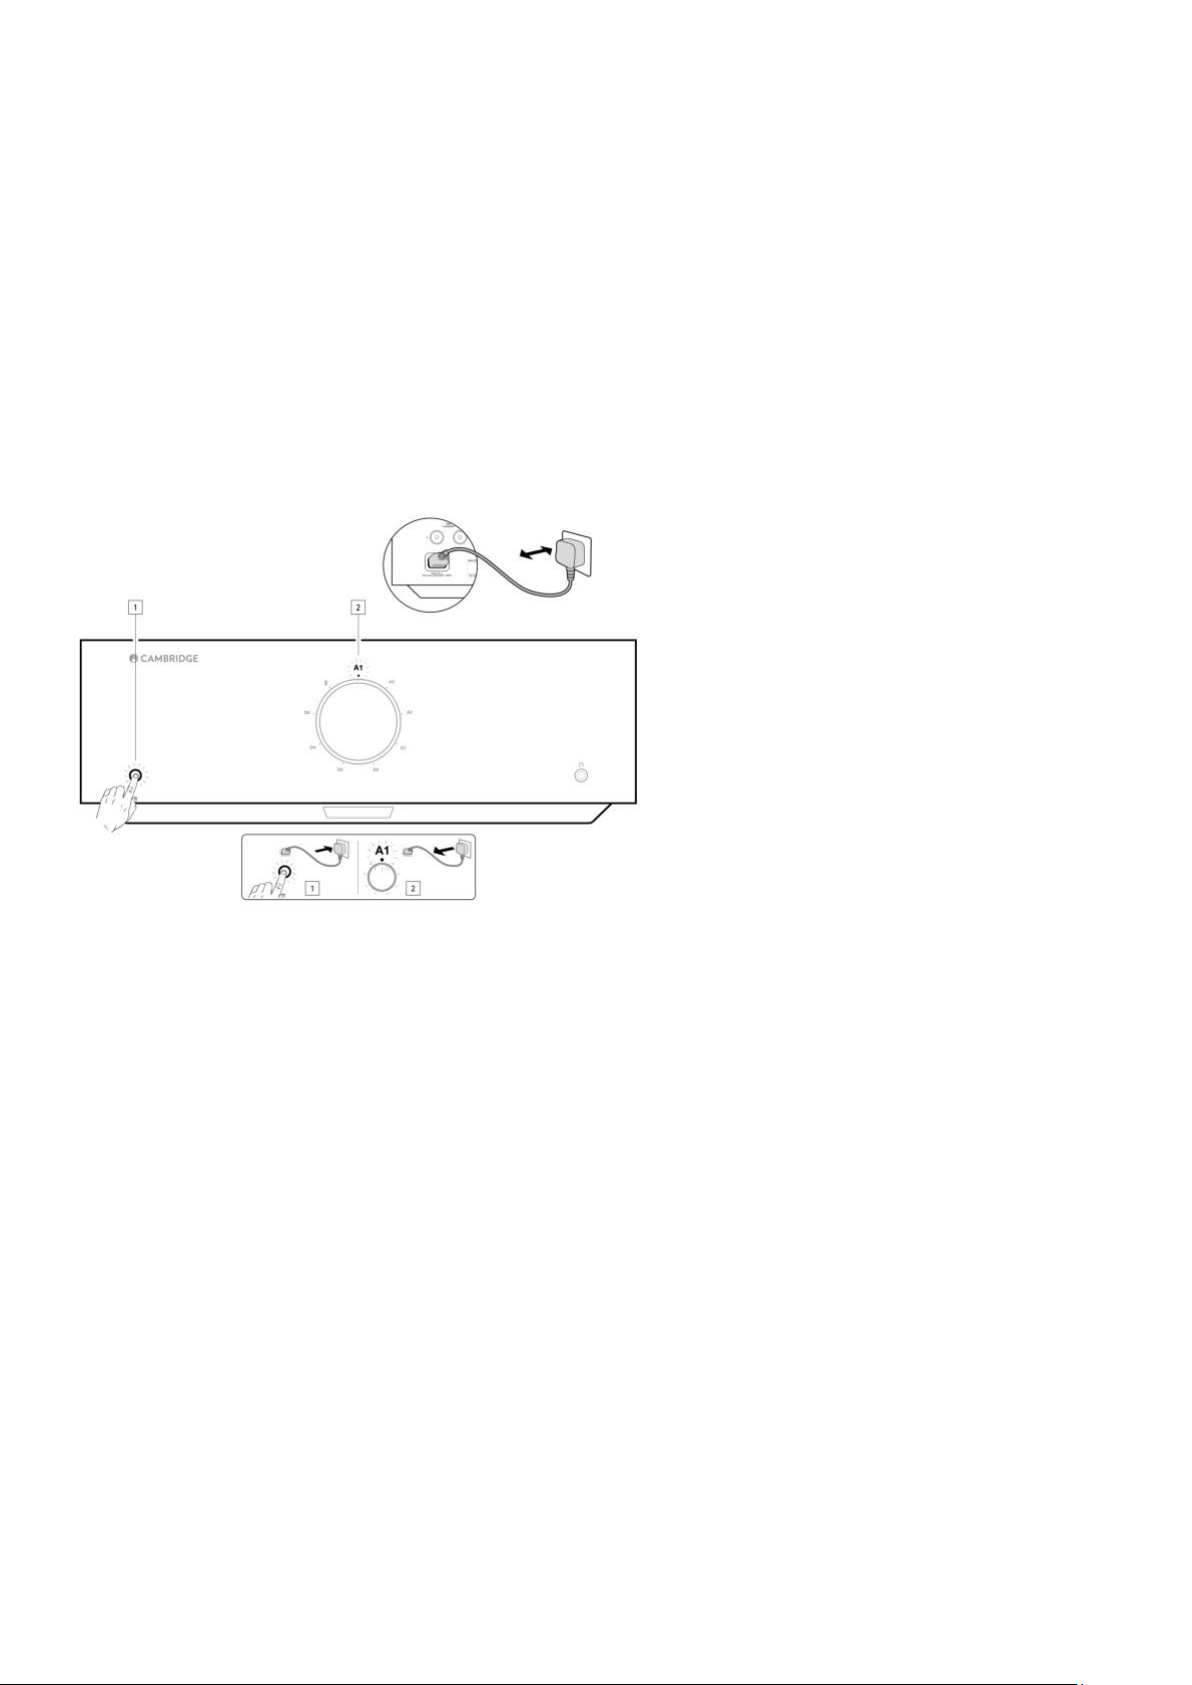
A factory reset can be performed to restore the EDGE A to its original factory settings:
Press and hold the power button on the front of the EDGE A whilst plugging the power cable into the unit.1.
When the A1 input LED starts flashing, disconnect the power cable again to complete the factory reset.2.
21
Page 22
Power syncing
Last updated: August 9, 2022 04:57. Revision #7519
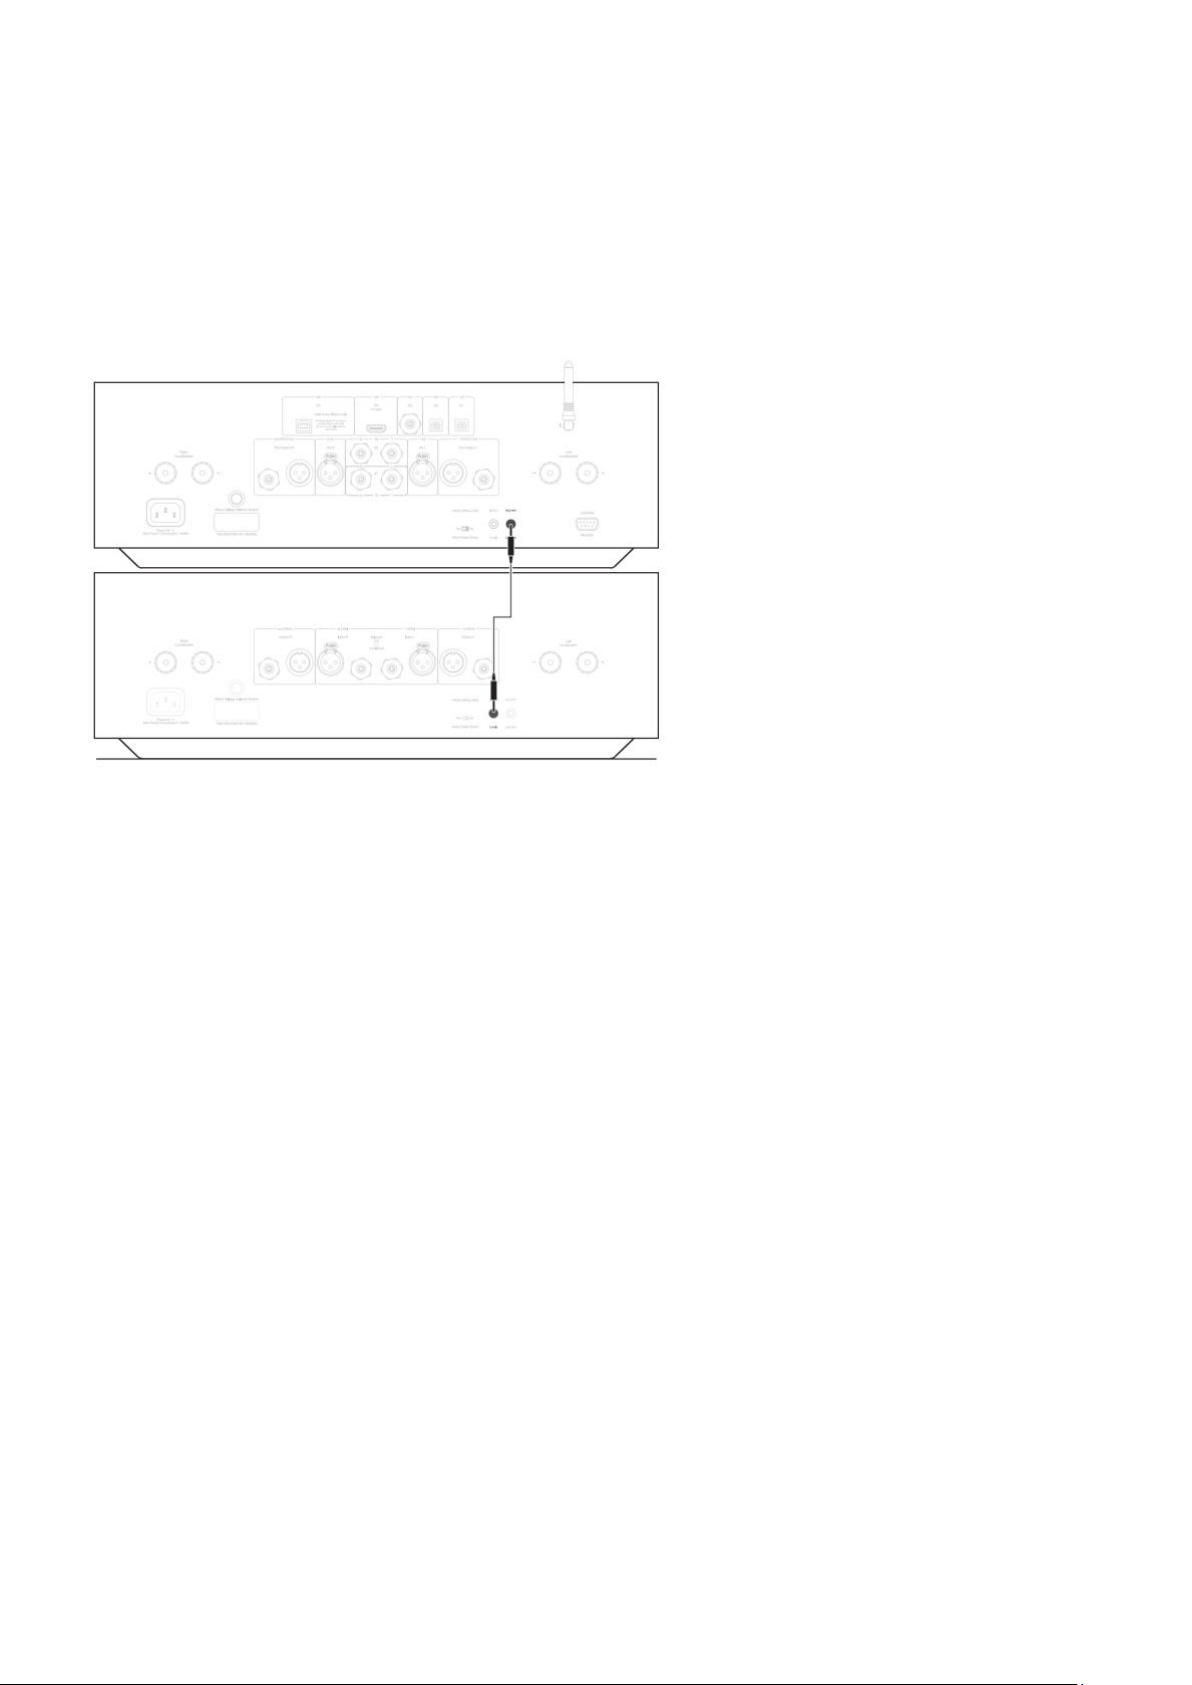
Connecting the Link Wire from 'Link Out' on the EDGE A to 'Link In' on the EDGE W will synchronise power on/standby. When you turn the EDGE A
On/Off, the EDGE W will also turn On/Off.
22
Page 23

23
Protection circuitry
Last updated: November 11, 2022 10:45. Revision #7735
The EDGE A includes Amplifier Protection Circuitry to detect faults with Over Temperature, DC and Over Current. If any of these faults are detected
the LED standby button will turn red.
Please find a description of the faults below.
Over Temperature
Over temperature is caused by a combination of high listening levels and low impedance speakers. The EDGE A includes temperature detection
which constantly monitors the heat generated by the output transistors.
If the monitored temperature reaches a high level (suitably within the limits of the output devices) the amplifier will automatically switch into a fault
mode to protect itself from damage. The unit should ideally be left for 15 minutes in this state to cool down adequately.
If the loudspeaker impedance is low the temperature of the amplifier may rise faster as the amplifier is working harder. If the amplifier is mounted
in a cabinet or the ventilation slots are obstructed the over temperature detection may activate/reactivate after a short listening time.
Remedy - Leave the unit for 15 minutes to cool down before pressing the Standby button to resume normal operation.
If the unit has not fully cooled down then the temperature may reach the limit soon after the amplifier is powered up.
DC
EDGE A offers loudspeaker protection if the output of the amplifier goes to a high constant voltage (DC) because of some internal fault. This is a rare
fault, although detecting it will prevent loudspeakers from damage.
Remedy - Due to the necessary sensitivity of the DC protection circuit, extremely hard clipping of the amplifier may cause DC protection to be
triggered. If this fault occurs, please contact your dealer for service or our support team
https://www.cambridgeaudio.com/gbr/en/contact.
Over Current
EDGE A offers V/I (voltage/current) protection by constantly monitoring the output transistors to keep them working inside their Safe Operating Area
(SOA). The SOA is a set of limits given by the output transistor manufacturer to ensure reliability. The V/I protection has been incorporated within
the amplifier circuitry to provide a fast response to temporary overload conditions. When the V/I protection is triggered the unit will continue to
operate but distortion may be heard as the unit protects the output transistors.
Remedy - Reduce the volume. If distortion is still present, check the speaker connections and ratings.
Page 24

Troubleshooting
Last updated: August 9, 2022 04:57. Revision #7521
There is no power
Ensure the AC power cord is connected securely.
Ensure the plug is fully inserted into the wall socket and is switched on.
Check fuse in the mains plug or adaptor.
There is no sound
Make sure the unit is not in Standby mode.
Check that source component is properly connected.
Check that your speakers are properly connected.
Make sure unit is not in mute mode.
Make sure that the correct source has been selected on the front panel or remote control.
24
There is no sound on one channel
Check speaker connections.
Check interconnects.
If possible, use different interconnect cables and speaker cables.
Switching speaker cables and speakers around will help identify whether the issue is with the amplifier or speakers/cables.
There is a loud buzz or hum
Ensure no interconnects are loose or defective.
There is weak bass or diffused stereo imaging
Ensure that speakers are not wired out of phase.
The remote handset will not function
Check that the batteries have not expired.
Ensure that nothing is blocking the remote sensor.
There is no audio when connecting a TV
The EDGE A is unable to decode a Dolby or Surround signal, ensure that the audio settings on your TV are set to PCM or Stereo.
There are drop outs in audio when connected to a TV via ARC or Toslink
Please see the 'Getting Connected' > ‘Connecting a TV’ section in the manual.
Page 25

Technical specifications
Last updated: August 9, 2022 04:57. Revision #7522
Continuous power output:
100W RMS into 8 Ohms
200W RMS into 4 Ohms
THD (unweighted):
<0.002% 1kHz at rated power (8 Ohms)
<0.02% 20Hz – 20kHz at rated power (8 Ohms)
Frequency response:
<3Hz – >80kHz +/-1dB
S/N ratio (ref full power):
>103 dB
25
Crosstalk @ 1kHz:
< -100dB
Input sensitivity:
Input A1-A2 (unbalanced) 380mV RMS
Input impedances:
Input A3 (balanced) 47k Ohm
Input A1-A2 (unbalanced) 47k Ohm
Inputs:
Balanced, Coax SPDIF, TOSLINK, USB Audio, Unbalanced, Bluetooth, Audio Return Channel (ARC)
Outputs:
Speakers, Preamplifier, Headphones (impedance of between 8 and 600 ohms are recommended)
USB Audio input:
USB Audio Class 2.0 supporting up to 32-bit 384kHz PCM, or up to DSD256
Bluetooth:
4.1 (Smart/BLE enabled) A2DP/AVRCP supporting formats up to aptX HD
TOSLINK input:
16/24 bits, 32-96kHz
Coax SPDIF input:
16/24 bits, 32-192kHz
Max power consumption:
1000W
Standby power consumption:
Page 26

<0.5W
Dimensions:
150 x 460 x 405mm (5.9 x 18.1 x 15.9")
Weight:
24.4kg (53.7lbs)
26
Page 27

Frequently Asked Questions (FAQ)
Last updated: October 18, 2022 02:47. Revision #7509
Can I connect an external HDD to ‘USB Audio In’ on the EDGE A?
No, there is no way to connect a USB drive or HDD directly to the EDGE A using its ‘USB Audio’ input. The ‘USB Audio’ input on the EDGE A will only
support a direct connection with a PC or Mac. You will, however, be able to use one of our
this.
Why does the EDGE A not have tone controls?
The decision not to include tone controls for the EDGE A was made in order to ensure it produces an unprocessed, accurate and natural sound that
is as faithful to the original recording as possible.
Why does the volume knob move when the EDGE A powers on?
The first time the EDGE A is powered on after a factory reset it will perform a calibration process which takes approximately 30 seconds.
network players in combination with the EDGE A to do
27
Please allow this process to complete before attempting to use the product.
Can I use a Turntable with my EDGE A?
You can connect a turntable to either of the EDGE A's RCA analogue inputs, however, as the amplifier does not have a built-in phono stage, you will
require an external phono stage between the turntable and the EDGE A, or a turntable with its own integrated phono stage.
A phono stage boosts the low output from a turntable to 'line level' to allow connection to an amplifier as well as ensuring a minimal amount of
noise and distortion within the signal.
As the amplifier has no phono stage built in, it is also not fitted with a Turntable Earth. Our phono stages have an earth for this reason.
If you are using another manufacturer's phono stage that is not fitted with an earthing connection, you will need to consult with the turntable
manufacturer for earthing options.
What amplification class does the EDGE A use?
The EDGE A uses Class XA amplification. For Class XA, the crossover point is moved so that both sets of transistors are always on until the signal
reaches a loud enough level.
This means that for low level signals, the amplifier is essentially operating as a Class A amplifier and it is only when the signal is sufficiently loud
enough that the transistors switch over. Any crossover distortion is therefore masked within the signal.
 Loading...