

Page 1
This guide is designed to make installing and using this product as easy as possible. Information in this
document has been carefully checked for accuracy at the time of printing; however, Cambridge Audio’s
policy is one of continuous improvement, therefore design and specifications are subject to change without
prior notice.
Befolgen Sie für die Installation und Verwendung des Produkts die Schritte in dieser Bedienungsanleitung. Die Informationen in dieser Anleitung
wurden zur Zeit der Drucklegung hinsichtlich ihrer Genauigkeit sorgfältig überprüft. Cambridge Audio ist jedoch bestrebt, seine Produkte ständig
zu verbessern, und daher können sich das Design und die technischen Daten ohne vorherige Ankündigung ändern.
Ce manuel vise à faciliter l’installation et l’utilisation de ce produit. Les informations qu’il contient ont été vérifiées soigneusement avant leur
impression. Toutefois, comme Cambridge Audio a pour principe d’améliorer constamment ses produits, les caractéristiques techniques et
générales peuvent être modifiées sans préavis.
Esta guía está diseñada para que instalar y utilizar este producto sea lo más fácil posible. La precisión de la información que contiene este
documento fue verificada cuidadosamente en el momento de su impresión. No obstante, la política de Cambridge Audio se basa en mejorar
continuamente, por lo que el diseño y las especificaciones están sujetas a modificaciones sin previo aviso.
Questa Guida è stata ideate per rendere l’installazione e l’impiego di questo prodotto più facili possibile. Le informazioni contenute in questo
documento sono state accuratamente verificate per la loro esattezza al momento della stampa; in ogni caso la poltica di Cambridge Audio è fatta
di miglioramenti continui, per cui il progetto e le specifiche sono soggetti a modifiche senza necessità di preavviso.
Deze handleiding is bedoeld om de installatie en het gebruik van het product zo eenvoudig mogelijk te maken. De in dit document verstrekte
informatie is voor het drukken zorgvuldig gecontroleerd op nauwkeurigheid; het beleid van Cambridge Audio is echter gericht op voortdurende
verbetering. Ontwerp en specificaties kunnen derhalve zonder voorafgaande kennisgeving worden gewijzigd.
Denna handbok är utformad för att underlätta installation och användning av denna produkt. Informationen i detta dokument har kontrollerats
noggrant vid tryckningstillfället. Cambridge Audio har dock en policy av kontinuerliga förbättringar, vilket innebär att design och specifikationer
kan ändras utan föregående meddelande.
Настоящее руководство поможет пользователю упростить установку оборудования и эксплуатировать его с максимальной эффективностью.
Содержащаяся в настоящем документе информация была тщательно проверена на момент публикации. Однако компания Cambridge Audio
проводит политику постоянного усовершенствования выпускаемой ею продукции, и поэтому оставляет за собой право вносить изменения
в конструкцию изделий и их технические характеристики без предварительного уведомления.
Read all instructions
Bitte lesen Sie alle Punkte genau durch
Lisez toutes les instructions
Lea todas las instrucciones
Leggere tutte le istruzioni
Lees alle aanwijzingen
Läs alle instruktioner
Прочтите все инструкции
Avoid damp
Kontakt mit Feuchtigkeit vermeiden
N’installez pas le système dans un
environnement humide
Evite la humedad
Evitare l’umidità
Vermijd vocht
Undvik fukt
Не допускайте воздействия влаги
Avoid direct sunlight
Nie direktem Sonnenlicht aussetzen
Évitez une exposition directe aux rayons
du soleil
Evite la luz directa del sol
Evitare la luce solare diretta
Vermijd direct zonlicht
Undvik direkt solljus
Не допускайте воздействия прямого солнечного
света
The crossed-out wheeled bin is the European Union symbol for indicating separate collection for
electrical and electronic equipment. This product contains electrical and electronic equipment
which should be reused, recycled or recovered and should not be disposed of with unsorted regular
waste. Please return the unit or contact the authorised dealer from whom you purchased this
product for more information.
Die durchgestrichene Abfalltonne auf Rädern ist das Symbol der Europäischen Union, das das getrennte
Sammeln von Elektro- und Elektronikgeräten anzeigt. Dieses Gerät enthält elektrische und elektronische
Teile, die wiederverwendet, recycelt oder wiederhergestellt werden können und nicht mit unsortiertem
normalem Restabfall entsorgt werden dürfen. Bitte geben Sie das Gerät zurück oder wenden Sie sich für
weitere Informationen an Ihren Fachhändler, von dem Sie dieses Gerät gekauft haben.
La poubelle à roulettes barrée d’une croix est le symbole de l’Union européenne indiquant la collecte séparée
des appareils et dispositifs électriques et électroniques. Ce produit contient des dispositifs électriques et
électroniques qui doivent être réutilisés, recyclés ou récupérés, et qui ne doivent pas être jetés avec les
déchets ordinaires non triés. Veuillez remettre l’appareil au revendeur agréé chez qui vous avez acheté ce
produit, ou le contacter pour plus d’informations.
El cubo con ruedas tachado es el símbolo de la Unión Europea para indicar un conjunto separado de equipos
eléctricos y electrónicos. Este producto contiene equipos eléctricos y electrónicos que deben ser reutilizados,
reciclados o recuperados y no deben desecharse con los desperdicios habituales sin clasicar. Por favor
devuelva el equipo o póngase en contacto con el distribuidor autorizado a quien compró este producto para
obtener más información.
Il contenitore a rotelle per riuti, sormontato da una croce, rappresenta il simbolo dell’Unione Europea per
indicare una raccolta separata dei dispositivi e apparecchiature elettriche ed elettroniche. Questo prodotto
contiene parti elettriche ed elettroniche che devono essere riutilizzate, riciclate o riceperate, e non deve
pertanto essere gettato assieme ai normali riuti non riordinati. Potete restituire quest’apparecchio al
negoziante, o mettervi in contatto con il distributore autorizzato presso il quale lo avevate acquistato per
ulteriori informazioni.
De doorgekruiste verrijdbare afvalbak is het symbool van de Europese Unie waarmee wordt aangegeven
dat elektrische en elektronische apparatuur gescheiden dient te worden ingezameld. Dit product bevat
elektrische en elektronische inrichtingen die opnieuw moeten worden gebruikt, gerecycled of hersteld en niet
mogen worden weggegooid bij het ongesorteerde normale afval. Breng het apparaat terug of neem contact op
met de bevoegde dealer waarbij u dit product hebt gekocht voor meer informatie.
Avoid extreme temperatures
Extreme Temperaturen vermeiden
Évitez les températures extrêmes
Evite temperaturas extremas
Evitare temperature estreme
Vermijd extreme temperature
Undvik extrema temperaturförhållanden
Не допускайте воздействия экстремальных
температур
Avoid solvent-based cleaners
Keine Lösemittel zum Reinigen verwenden
N’utilisez pas de produit de nettoyage à
base de solvant
Evite utilizar limpiadores basados en
disolventes
Evitare detergenti basati su solventi
Vermijd reinigingsmiddelen op basis van
oplosmiddelen
Undvik lösningsbaserade rengöringsmedel
Не пользуйтесь очистителями на основе
растворителей
Secure all cables
Alle Kabel gut sichern
Attachez fermement tous les câbles
Asegure todos los cables
Fissare tutti i cavi
Beveilig alle kabels
Säkra alla kablar
Закрепите все кабели
Technical specifications / Technische daten / Caractéristiques techniques
/ Especificaciones técnicas / Specifiche tecniche / Technische specificaties / Tekniska
specifikationer / Технические характеристики
C165 C165SS
Sensitivity (SPL) 90dB (2.83 Vrms input) 86dB (2.83 Vrms input)
Frequency response 50Hz - 20kHz 60Hz - 20kHz
Impedance 4 Ohms 4 Ohms
Drivers 1 x 6.5”(165mm) woofer 1 x 6.5”(165mm) woofer
1 x 1”(25mm) tweeter 2 x 0.5” (13mm) tweeters
Speaker dimensions 97 x 240mm 97 x 240mm
(H x D) (3.8 x 9.4”) (3.8 x 9.4”)
Weight 1.28Kg (2.8lbs) 1.28Kg (2.8lbs)
Den överkorsade soptunnan är Europeiska Unionens symbol för att indikera separat uppsamling av
elektrisk och elektronisk utrustning. Denna produkt innehåller elektrisk och elektronisk utrustning som kan
återanvändas, återvinnas eller återhämtas och inte får kasseras med normalt osorterat hushållsavfall. Ta
tillbaka apparaten eller kontakta den auktoriserade återförsäljaren som du köpte produkten från för med
information.
Ящик с колесами и с крестом – это символ Евросоюза для указания на отдельную коллекцию
электрического и электронного оборудования. Это изделие содержит электрические и электронные
компоненты, которые должны быть повторно использованы, переработаны или восстановлены и
не должны утилизироваться совместно с несортированными обычными отходами. Постарайтесь
возвратить устройство или обратитесь к авторизованному дилеру, у которого Вы приобрели это
изделие, для получения дополнительной информации.
Installation guide
Installationsanleitung
Guide d’installation
Guía de instalación
Guida all’installazione
Installatiehandleiding
Installationsguide
Руководство по установке
C165SS
C165
6.5” Passive
Ceiling Speaker
© Copyright Audio Partnership Plc 2014
Cambridge Audio is a brand of Audio Partnership Plc.
Registered Office: Gallery Court, Hankey Place, London SE1 4BB, UK.
Registered in England No. 2953313
www.cambridge-audio.com
Part No. AP33497/2
Page 2
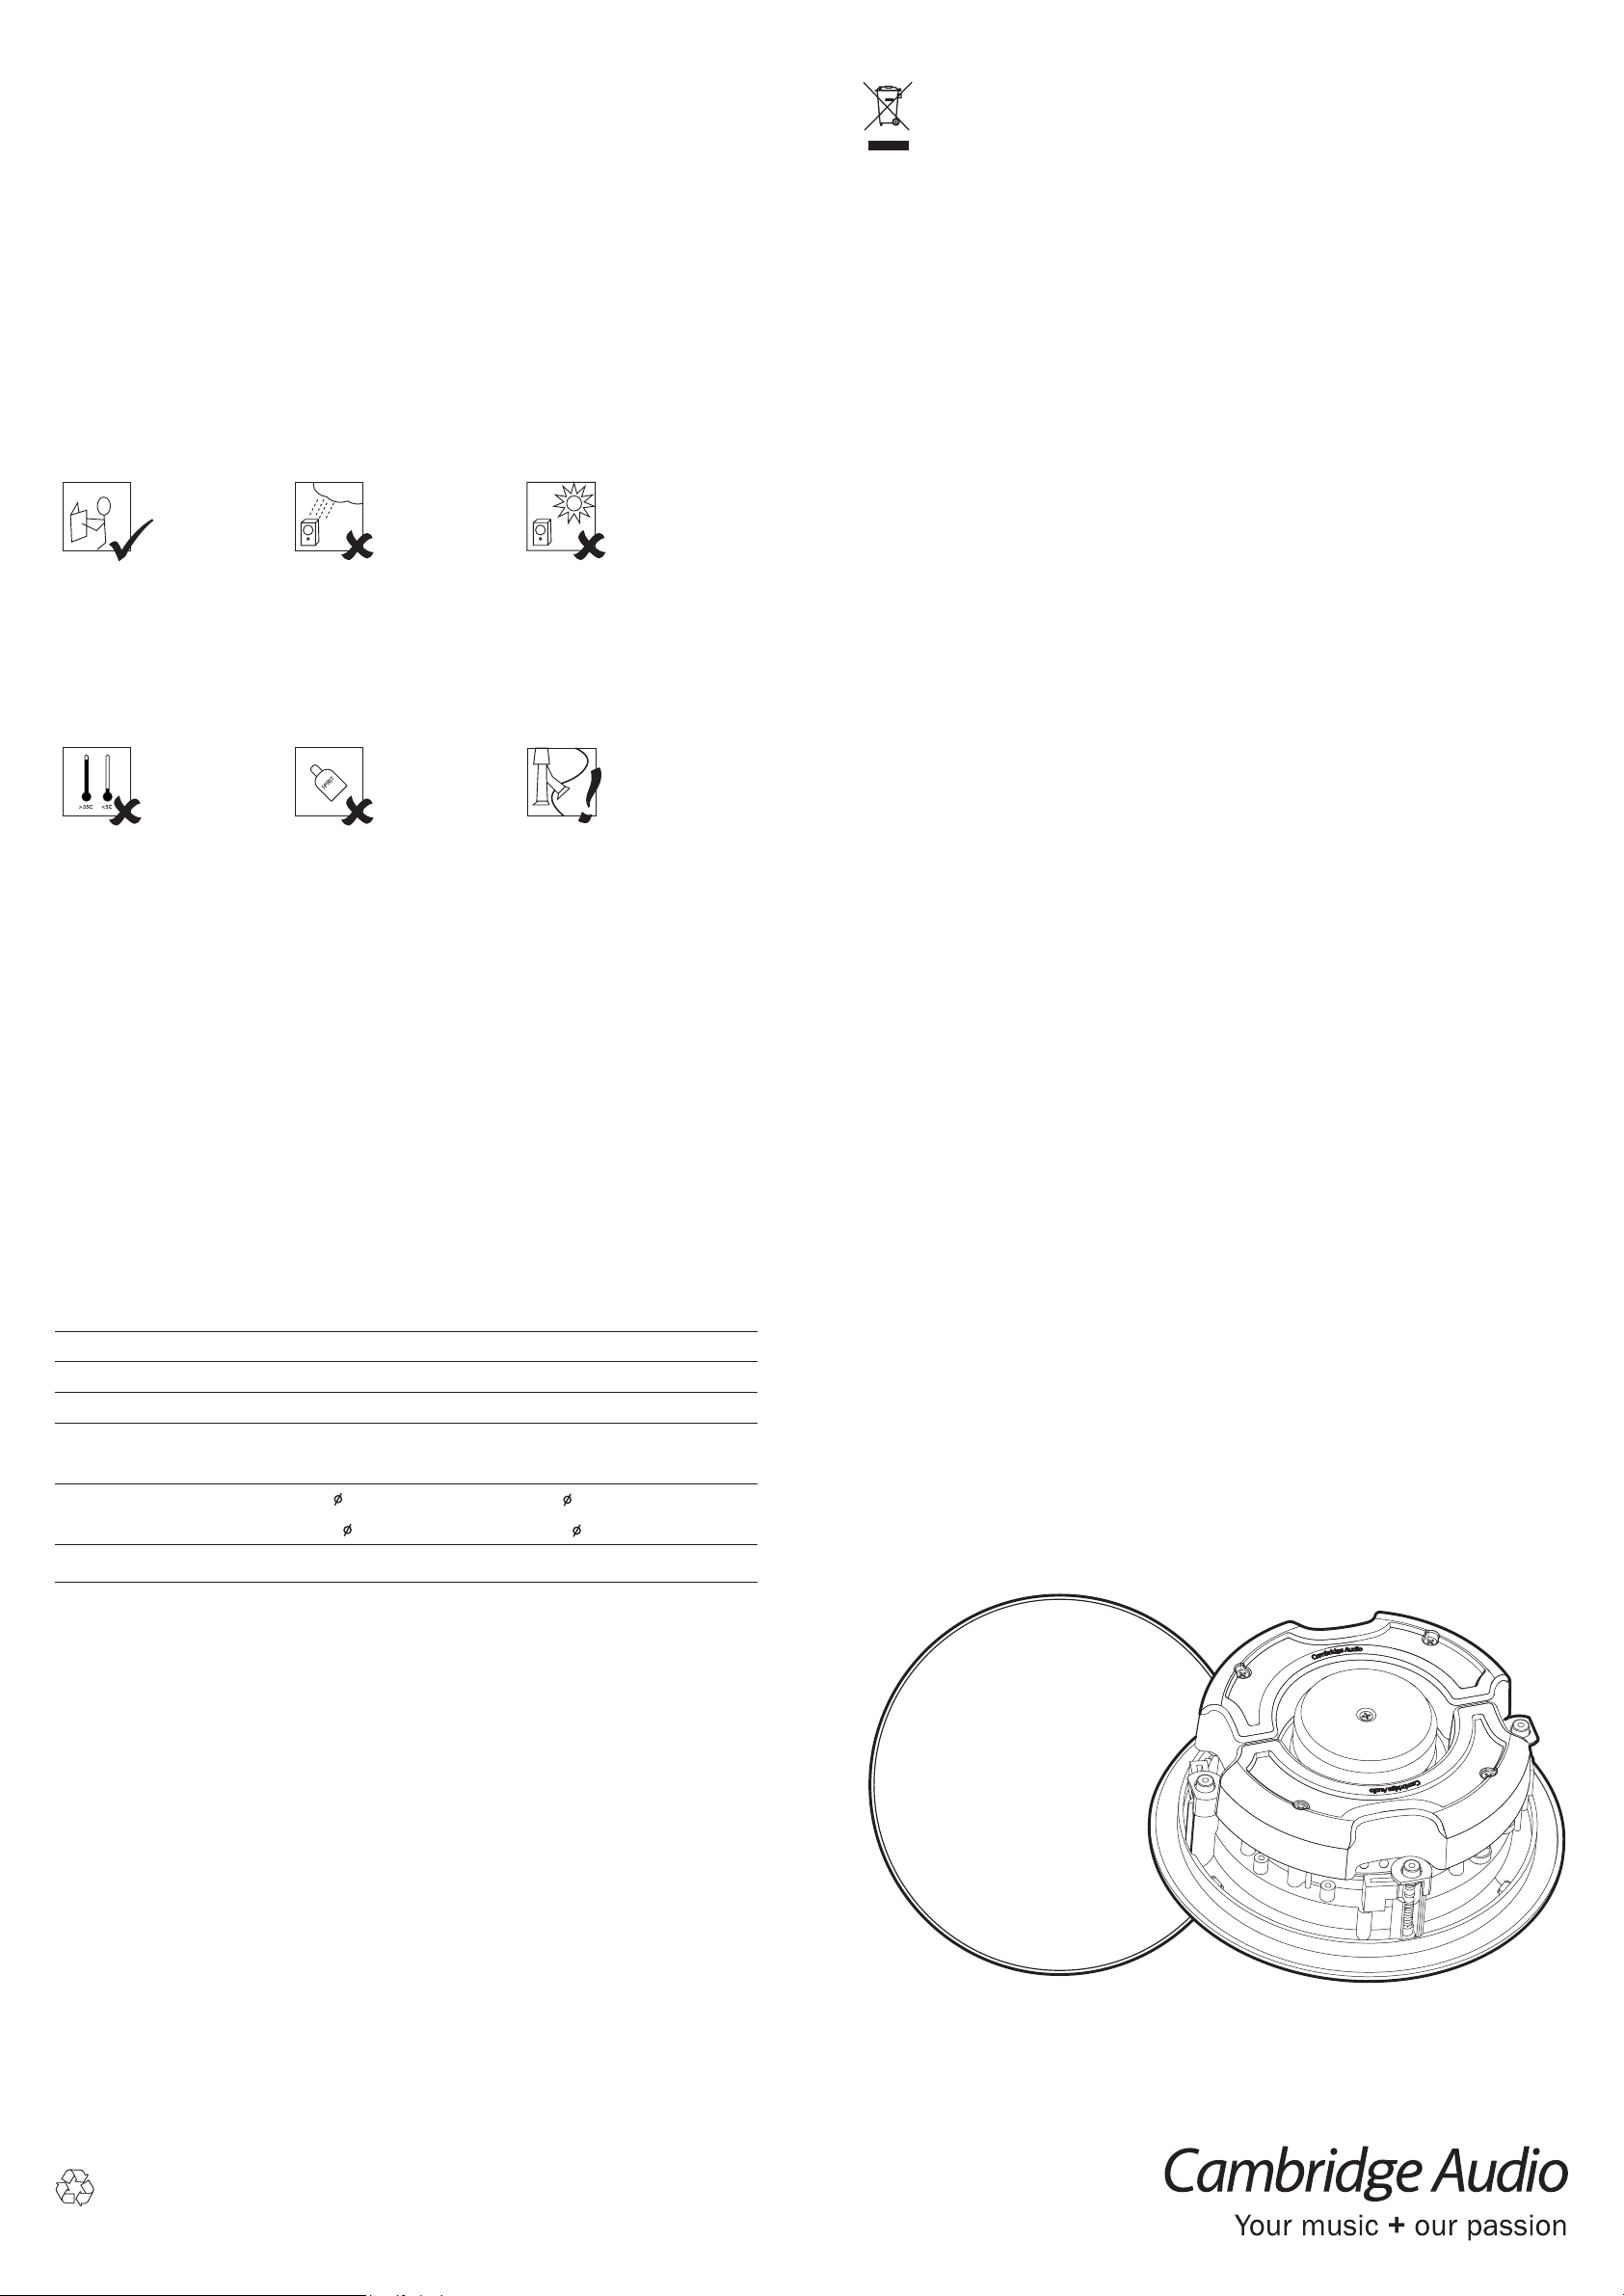
. Remove the round cardboard pad from
125mm
(4.92”)
1
inside the supplied template .
202mm diameter mounting hole
Use the template to mark the position for
2
the mounting hole at the selected location.
Before cutting ceiling speaker holes, it is suggested that the area is
tested for clearance by making an L-shaped probe from strong wire (see
illustration below), drilling a small hole in the target area, inserting the
probe and slowly turning. Any obstructions will be immediately obvious,
and the target area can be moved to a more suitable position.
Connecting
Do not compromise the performance of your system by using inferior quality
speaker cables. We recommend that high quality cables of 16 gauge or higher be
used. Your professional dealer will give you good advice. Always unplug all A.C.
powered components before making any loudspeaker or component connections.
This will avoid the risk of electric shock or damage to your equipment.
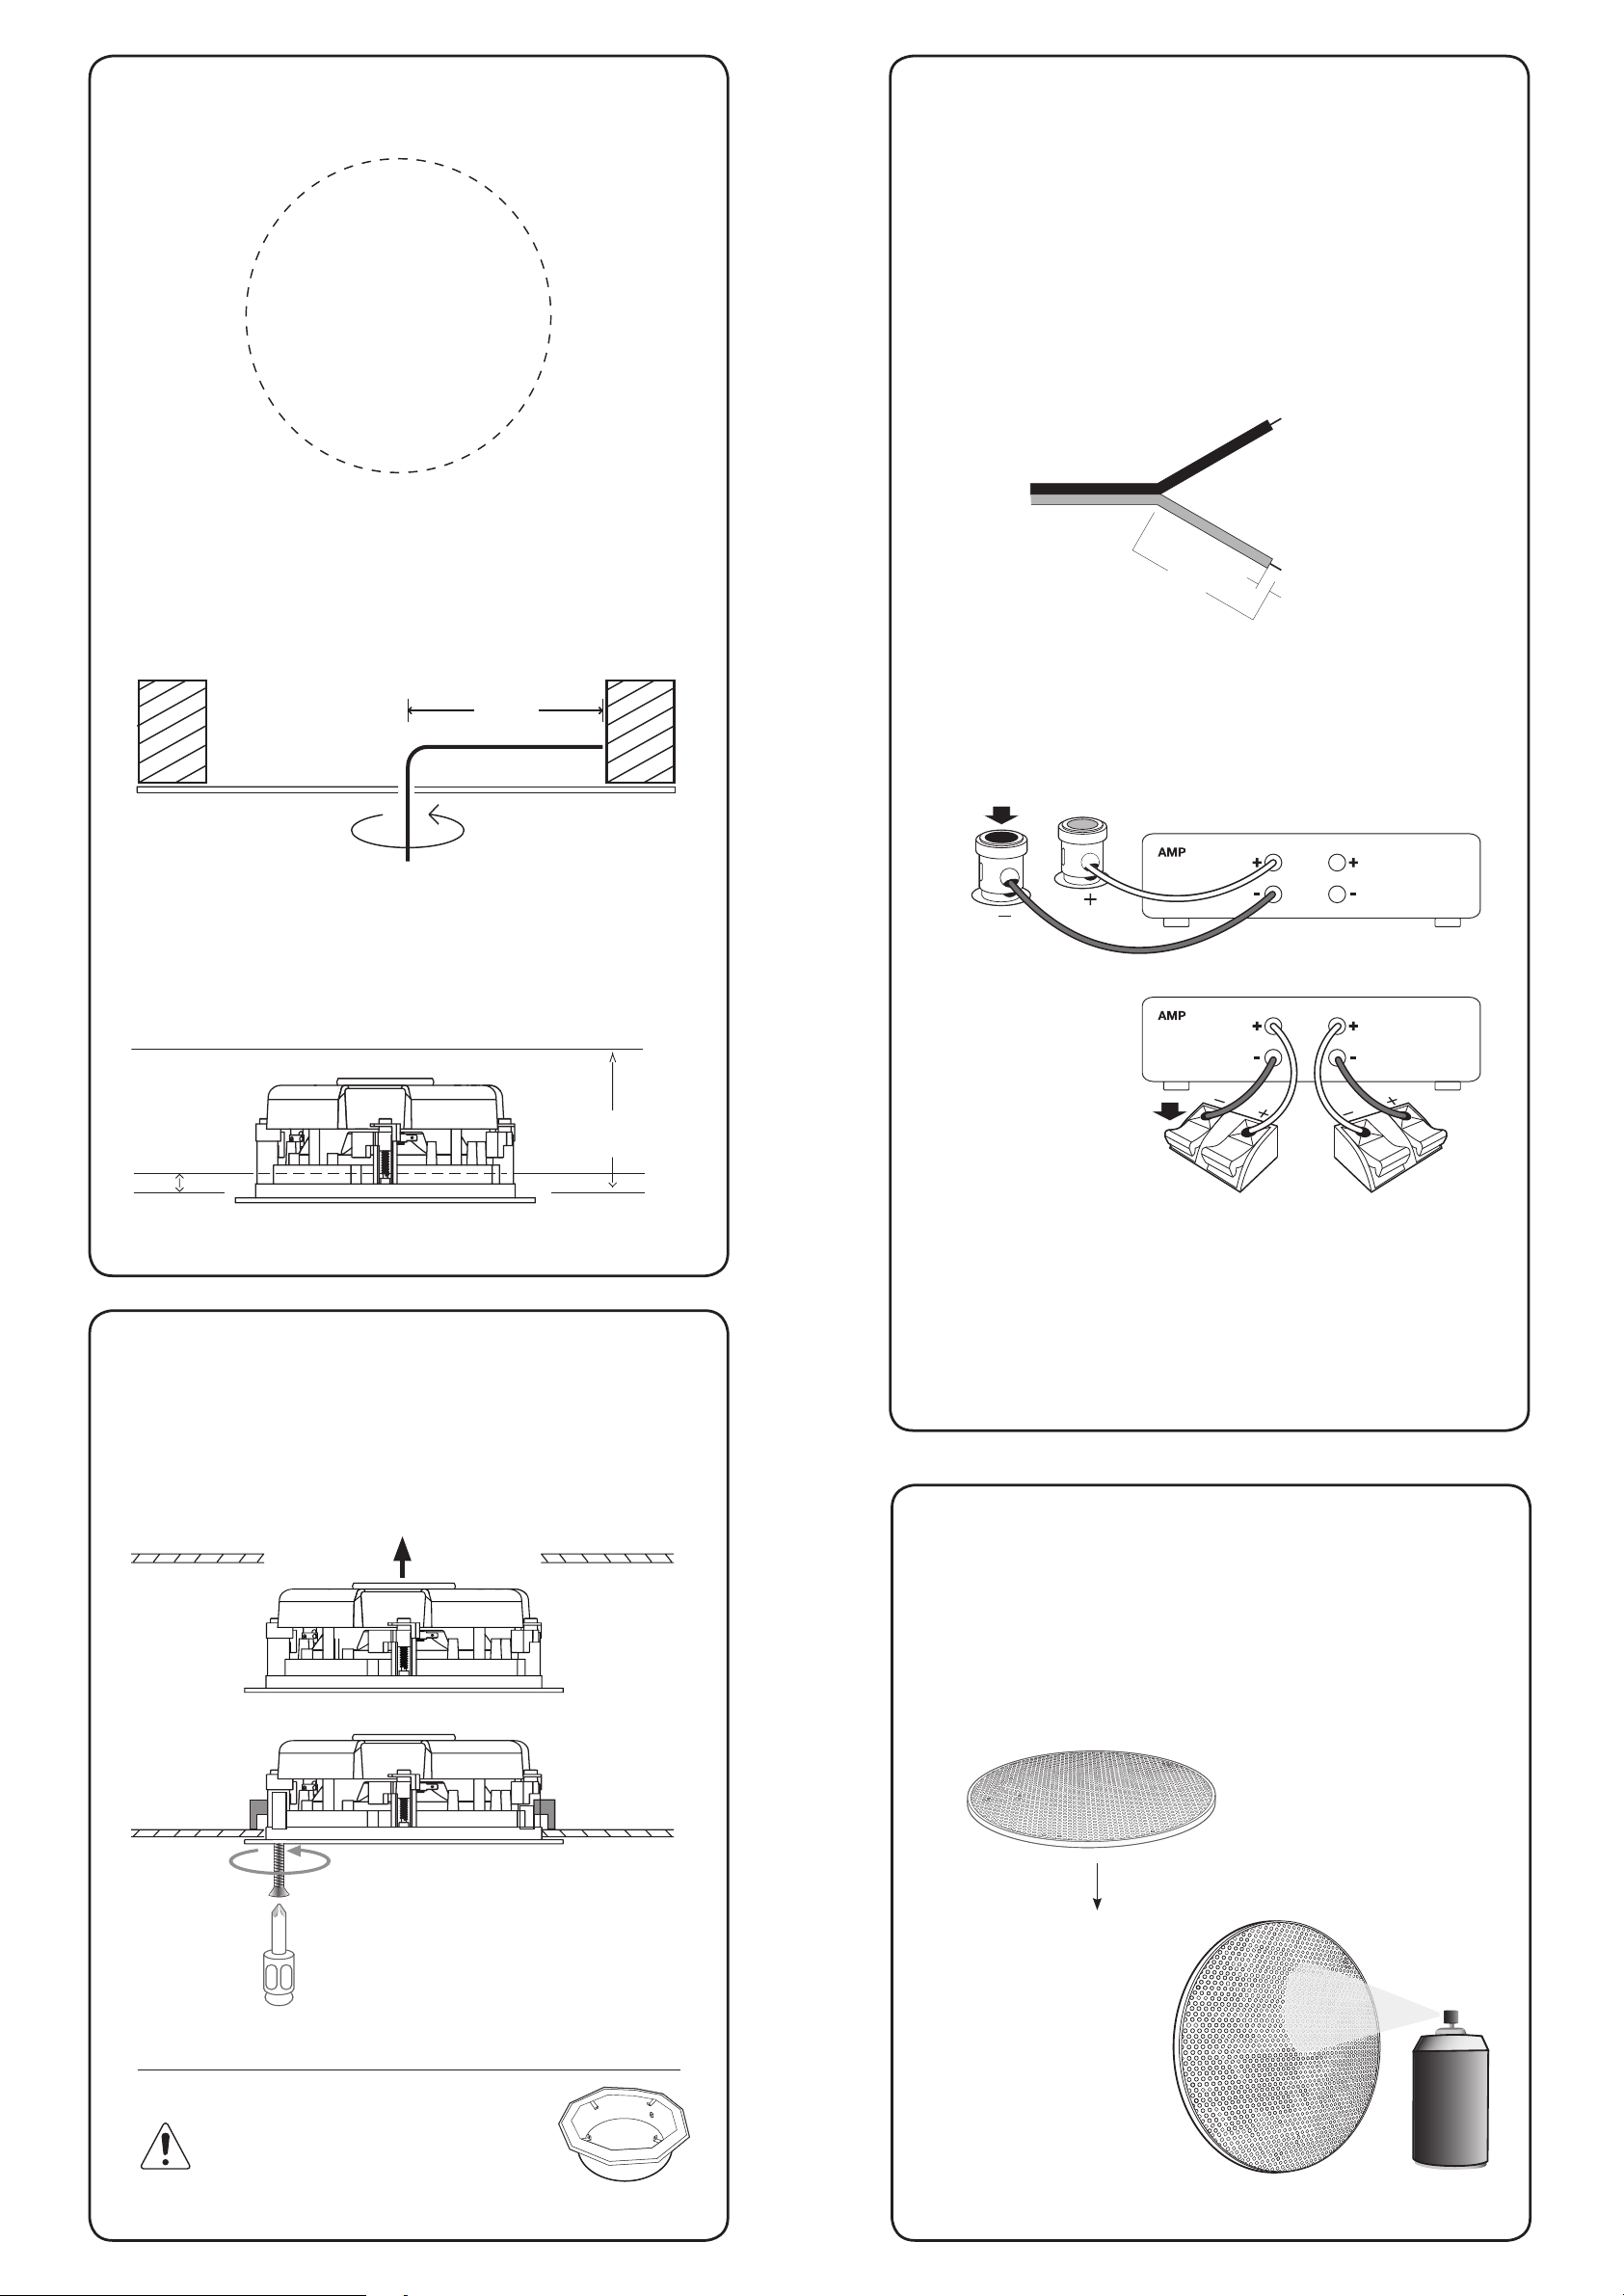
Follow these steps to connect the speaker to your amplification system:
Route the speaker cable from your amplification system to the speakers.
n
1
Separate about 100mm of speaker cable at each end.
2
Using a wire stripper, remove about 10mm of insulation from both ends
3
Observing polarity is of the utmost importance while connecting your
4
Avoid routing the speaker cable near electrical wires
n
Do not nail or staple the cable
100mm
10mm
of each conductor, and then twist the strands of each conductor .
speakers. Ensure that the red (+) terminals on your amplification
system are connected to the red (+) on the speakers, and black
(-) on your amplification system to black (-) on your speakers .
Cut the mounting hole with a drywall or
3
keyhole saw.
Be sure the mounting surface is between 10 and 30mm(0.39 - 1.18”)
thick, and that there is at least 93mm(3.74”) of clearance behind the
mounting surface.
Min 102 mm
(4”)
Min 10-30mm
(0.39 - 1.18”)
Mounting
Before mounting, ensure that the four fixing screws are slackened off so that the red
mounting dog-legs can move freely.
Move each red dog-leg foot to the LEFT into it’s holding slot, and then insert the
speaker into the mounting hole.
Using a cross-head screwdriver, slowly turn each fixing screw clockwise. This will
move the mounting dog-legs out of their slots.
Tighten each fixing screw until the mounting dog-legs grip the ceiling.
C165
C165SS
The speaker cable is coded with a bead or stripe down
one lead’s insulation, or has differently coloured wires.
Press the spring-loaded red or black tab back to reveal the connecting
hole. Insert the stripped end of the speaker wire, then release the tab.
. If your speakers are wired incorrectly they will be out of phase and sound
hollow and indistinct, with a weak bass. Re-check your connections for
5
correct polarity and reverse the connections if necessary.
PAINTING THE FRAME AND GRILLE
Please check with your builder/installer whether
you need to install a fire hood with this product.
“Low smoke/zero halogen” specification Speaker
cable may also be required.
By reason of the magnet, we can remove grille by our finger easily , be careful, Fit
the clear plastic painting mask provided when painting the speaker surround to
avoid getting paint getting on the speaker cone.
(Optional accessories)
 Loading...