

Cambium Networks XS3900A, XS3700A Users Manual
Wireless LAN Array
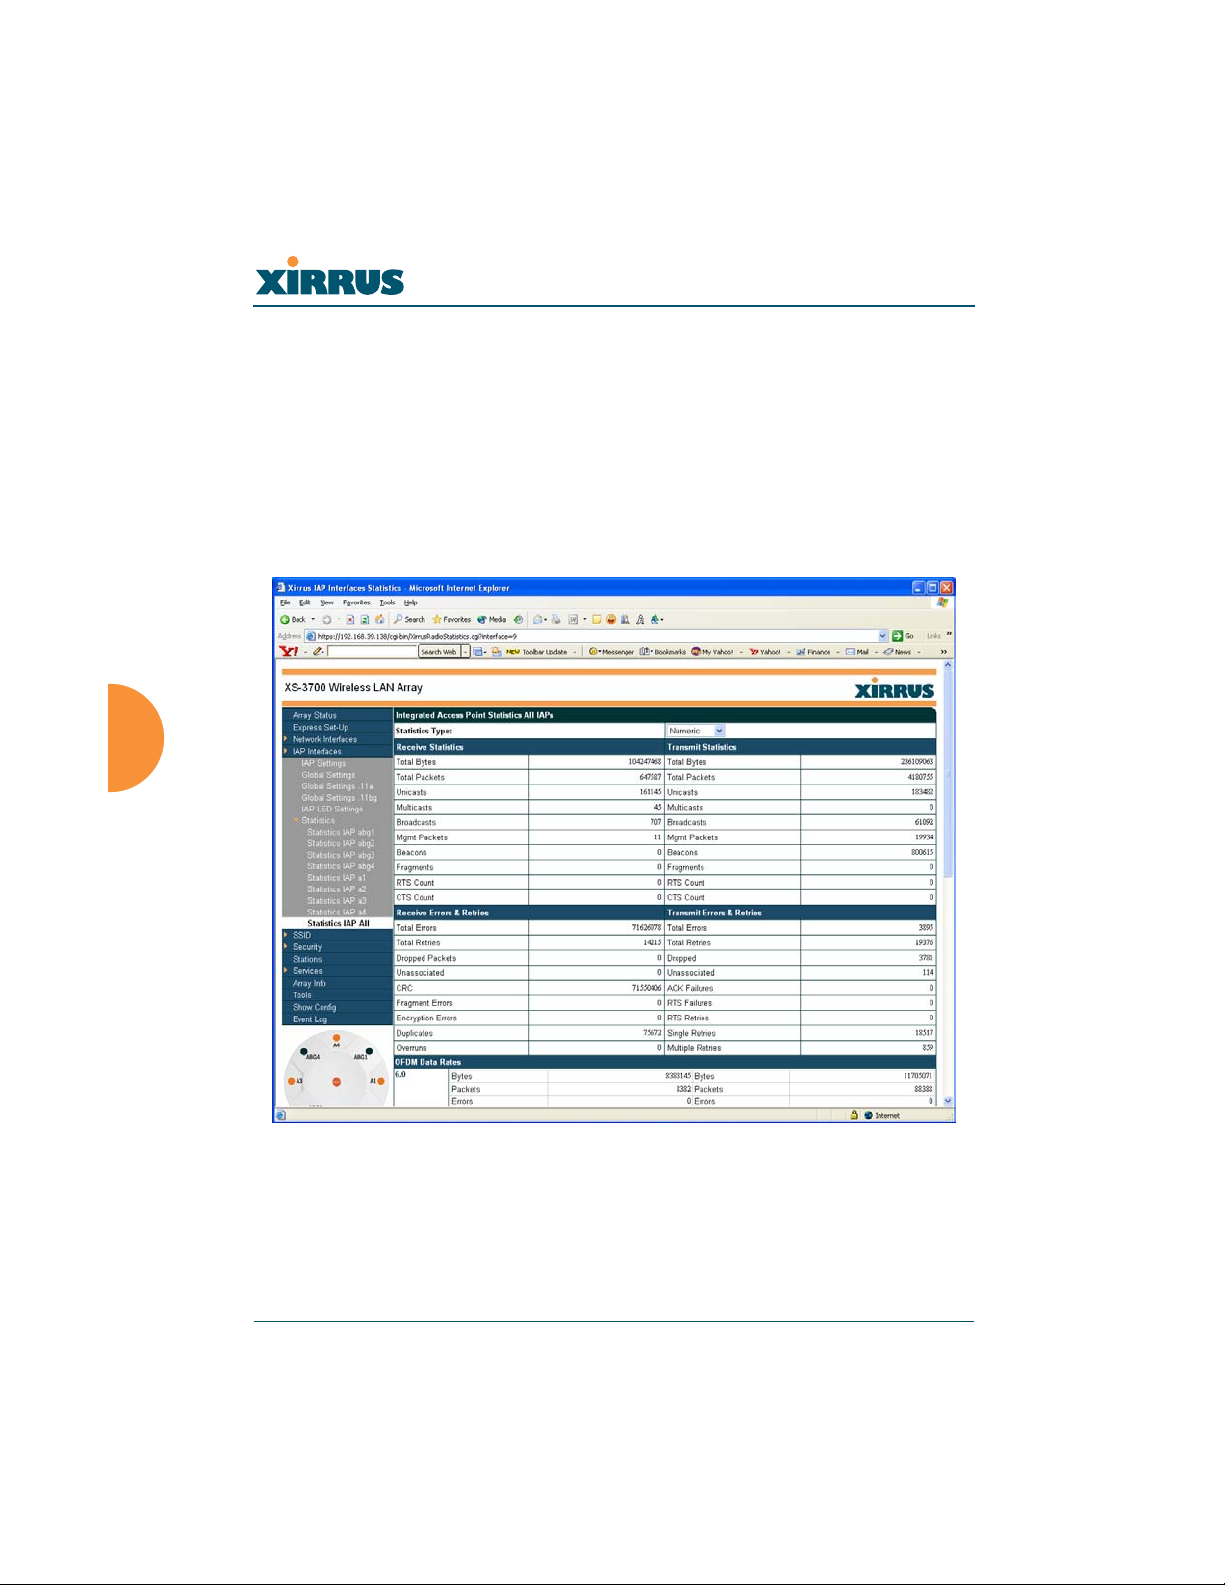
Statistics (for all radios)
This page provides a detailed statistical summary of the performance of all radios,
displayed either numerically or by percentage (your choice). The following image
shows an example from the XS-3700 product.
The default Statistics Type is NUMERIC, but you can change this to
PERCENTAGE from the pull-down menu at the top of the page. In addition, you
can Refresh or Clear the data on this page at any time by clicking on the
appropriate button.
Figure 74. WMI: Statistics for All IAPs Page (XS-3700)
106 Configuring the Xirrus Array
Wireless LAN Array
SSID
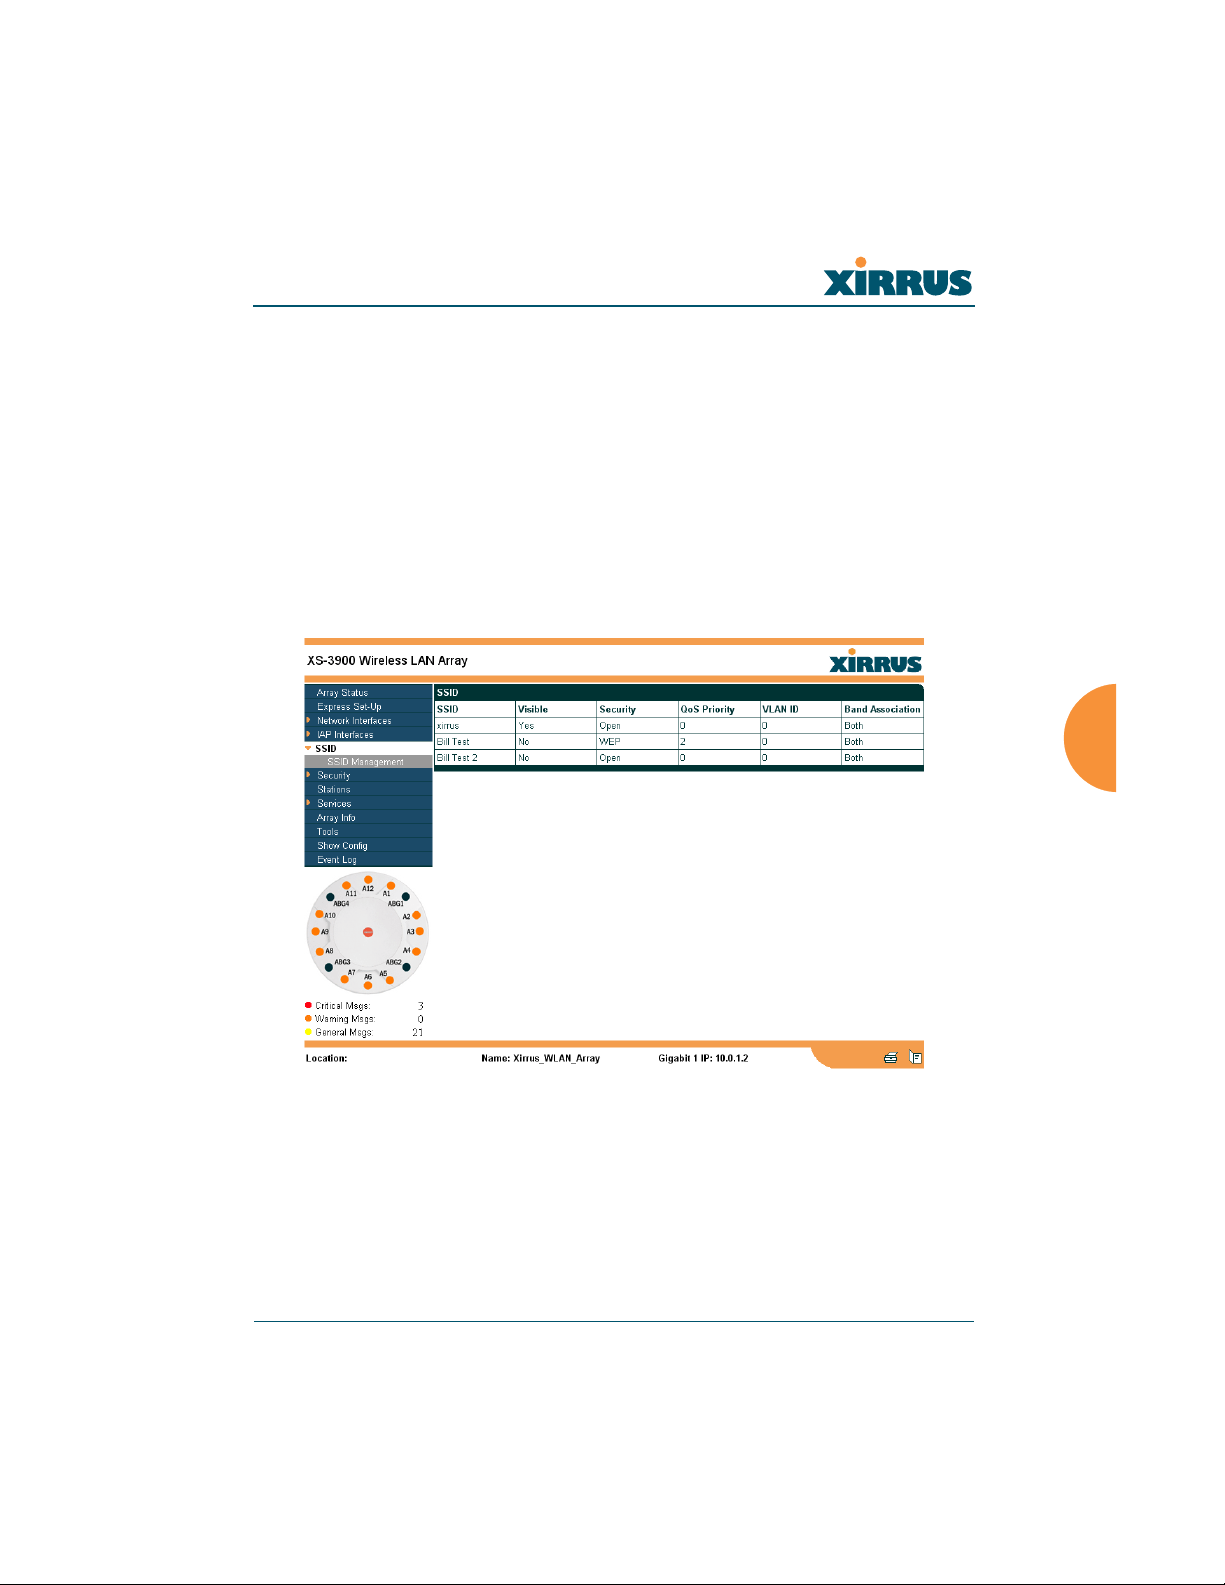
This is a status only page that allows you to review SSID (Service Set IDentifier)
assignments. It includes the SSID name, whether or not an SSID is visible on the
network, any security and QoS parameters defined for each SSID, associated
VLAN IDs, and radio availability per SSID. There are no configuration options
available on this page, but if you are experiencing problems or reviewing SSID
management parameters, you may want to print this page for your records.
For information to help you understand SSIDs and how multiple SSIDs are
managed by the XS-3900, go to the Multiple SSIDs section of “Frequently Asked
Questions” on page 222.
Figure 75. WMI: SSID Page
Configuring the Xirrus Array 107

Wireless LAN Array
Understanding SSIDs
The SSID (Service Set Identifier) is a unique identifier that wireless networking
devices use to establish and maintain wireless connectivity. Multiple access points
on a network or sub-network can use the same SSIDs. SSIDs are case-sensitive
and can contain up to 32 alphanumeric characters (do not include spaces when
defining SSIDs).
Multiple SSIDs
A BSSID (Basic SSID) refers to an individual access point radio and its associated
clients. The identifier is the MAC address of the access point radio that forms the
BSS. A group of BSSs can be formed to allow stations in one BSS to communicate
to stations in another BSS by way of a backbone that interconnects each access
point.
The Extended Service Set (ESS) refers to the group of BSSIDs that are grouped
together to form one ESS. The ESSID (often referred to as SSID or “wireless
network name”) identifies the Extended Service Set. Clients must associate to a
single ESS at any given time. Clients ignore traffic from other Extended Service
Sets that do not have the same SSID.
Legacy access points typically support one SSID per access point. Xirrus Wireless
LAN Arrays support the ability for multiple SSIDs to be defined and used
simultaneously.
Using SSIDs
The creation of different wireless network names allows system administrators to
separate types of users with different requirements. The following policies can be
tied to an SSID:
z The wireless security mode needed to join this SSID.
z The wireless Quality of Service (QoS) desired for this SSID.
z The wired VLAN associated with this SSID.
108 Configuring the Xirrus Array
Wireless LAN Array
As an example, one SSID named accounting might require the highest level of
security, while another SSID named guests might have low security requirements.
Another example may define an SSID named voice that supports voice over
Wireless LAN phones with the highest possible Quality of Service (QoS)
definition. This type of SSID might also forward traffic to specific VLANs on the
wired network.
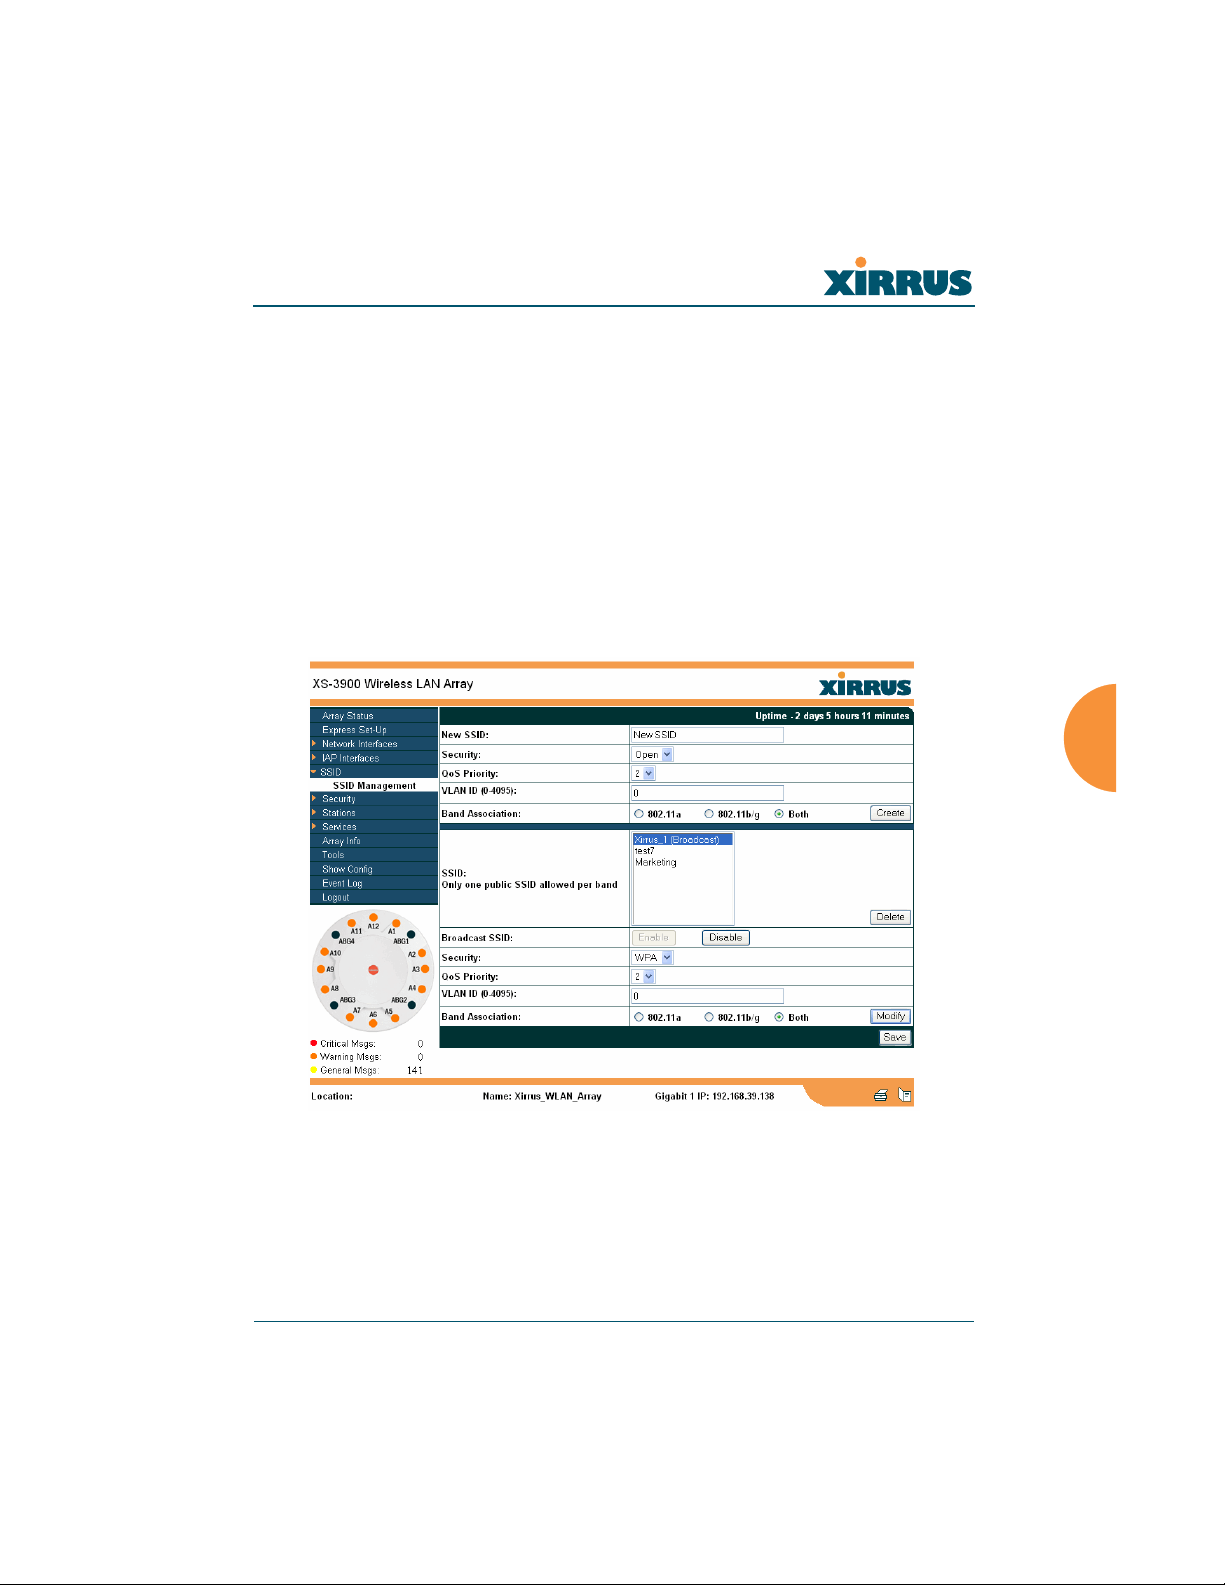
SSID Management
This page allows you to manage SSIDs (create, edit and delete), and assign
security parameters and VLANs on a per SSID basis. When finished, click on the
Save button to save your changes, otherwise your changes will not take effect.
Figure 76. WMI: SSID Management Page
Configuring the Xirrus Array 109

Wireless LAN Array
Procedure for Managing SSIDs
1. New SSID: Enter a new SSID definition.
2. Security: From the pull-down list, choose the security
that will be required by users for this SSID, either
Open, WEP or WPA. The Open option provides no
security and is not recommended. For an overview of
the security options, go to “Security Planning” on
page 35.
3. Qos Priority: From the pull-down list, select a Quality of Service (QoS)
setting. The QoS setting you define here will prioritize wireless traffic for
this SSID over other SSID wireless traffic. This step is optional.
4. VLAN ID: From the pull-down list, select a VLAN that you want this
traffic to be forwarded to on the wired network. This step is optional.
5. Band Association: The Array allows you to choose which wireless band
the SSID will be beaconed on. Select either 802.11a, 802.11b/g or Both.
6. Click on the Create button to create this SSID. The SSID you just created
will appear in the SSID List below.
Editing SSIDs
7. SSID: Choose the SSID that you want to edit or delete from the list. If you
are deleting a selected SSID, click on the Delete SSID button, otherwise
go to Step 2.
8. Broadcast SSID: Click on the Enable button to make the selected SSID
visible to all clients on the network. Although the XS-3900 will not
broadcast SSIDs that are hidden, clients can still associate to a hidden
SSID if they know the SSID name to connect to it. Choose Disable if you
do not want this SSID to be visible on the network.
110 Configuring the Xirrus Array

Wireless LAN Array
9. Security: From the pull-down list, choose the security
that will be required by users for the selected SSID—
either Open, WEP or WPA. The Open option
provides no security and is not recommended. For an
overview of the security options, go to “Security
Planning” on page 35.
10. QoS Priority: From the pull-down list, select a Quality of Service (QoS)
setting. The QoS setting you define here will prioritize wireless traffic for
the selected SSID over other SSID wireless traffic. This step is optional.
11. VLAN ID: From the pull-down list, select a VLAN that you want this
traffic to be forwarded to on the wired network. This step is optional.
12. Band Association: The Array allows you to choose which wireless band
to associate with each SSID. Select either 802.11a, 802.11b/g or Both.
13. Click on the Modify button to edit the selected SSID.
14. Click on the Save button to save your changes (otherwise your new
settings will not take effect).
Configuring the Xirrus Array 111
Wireless LAN Array
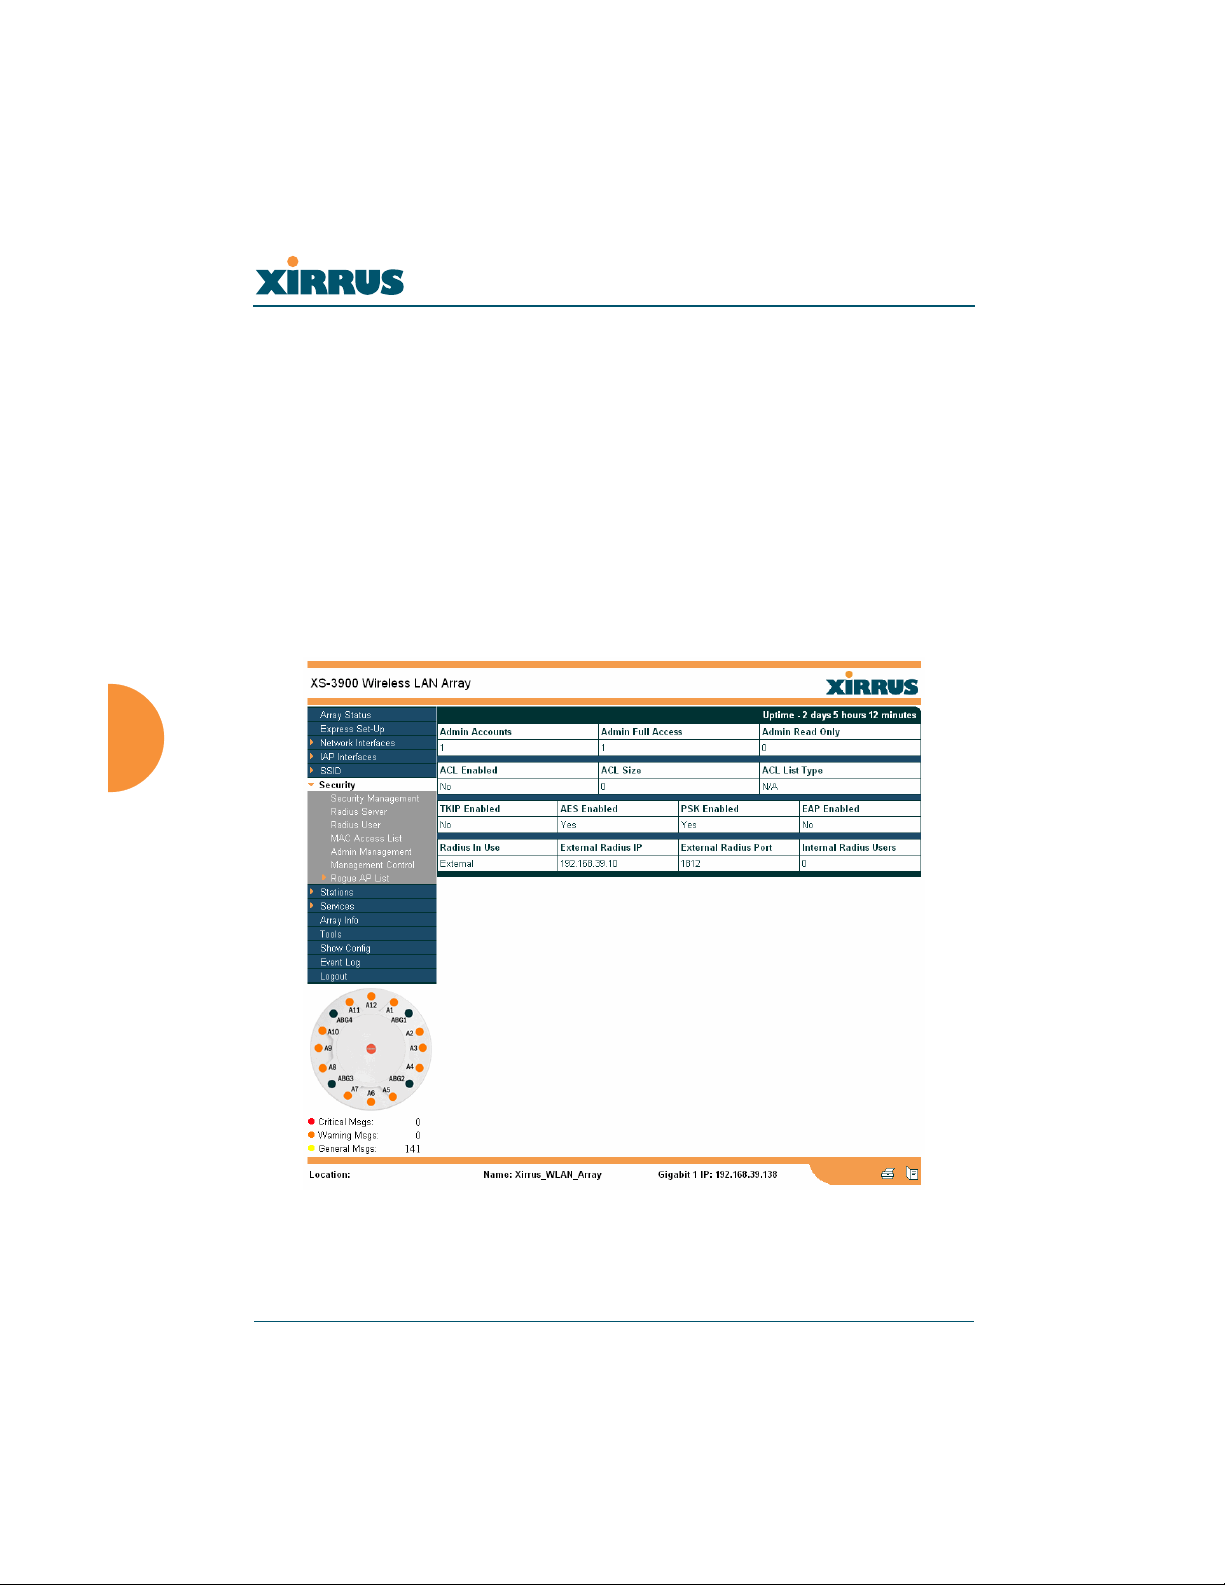
Security
This is a status only page that allows you to review the Array’s security
parameters. It includes the assigned network administration accounts, Access
Control List (ACL) values, WEP and WPA status, and RADIUS configuration
settings. There are no configuration options available on this page, but if you are
experiencing issues with security, you may want to print this page for your
records.
For additional information about wireless network security, refer to:
z “Security Planning” on page 35.
z The Security section of “Frequently Asked Questions” on page 222.
Figure 77. WMI: Security Page
112 Configuring the Xirrus Array
Wireless LAN Array
Security Management
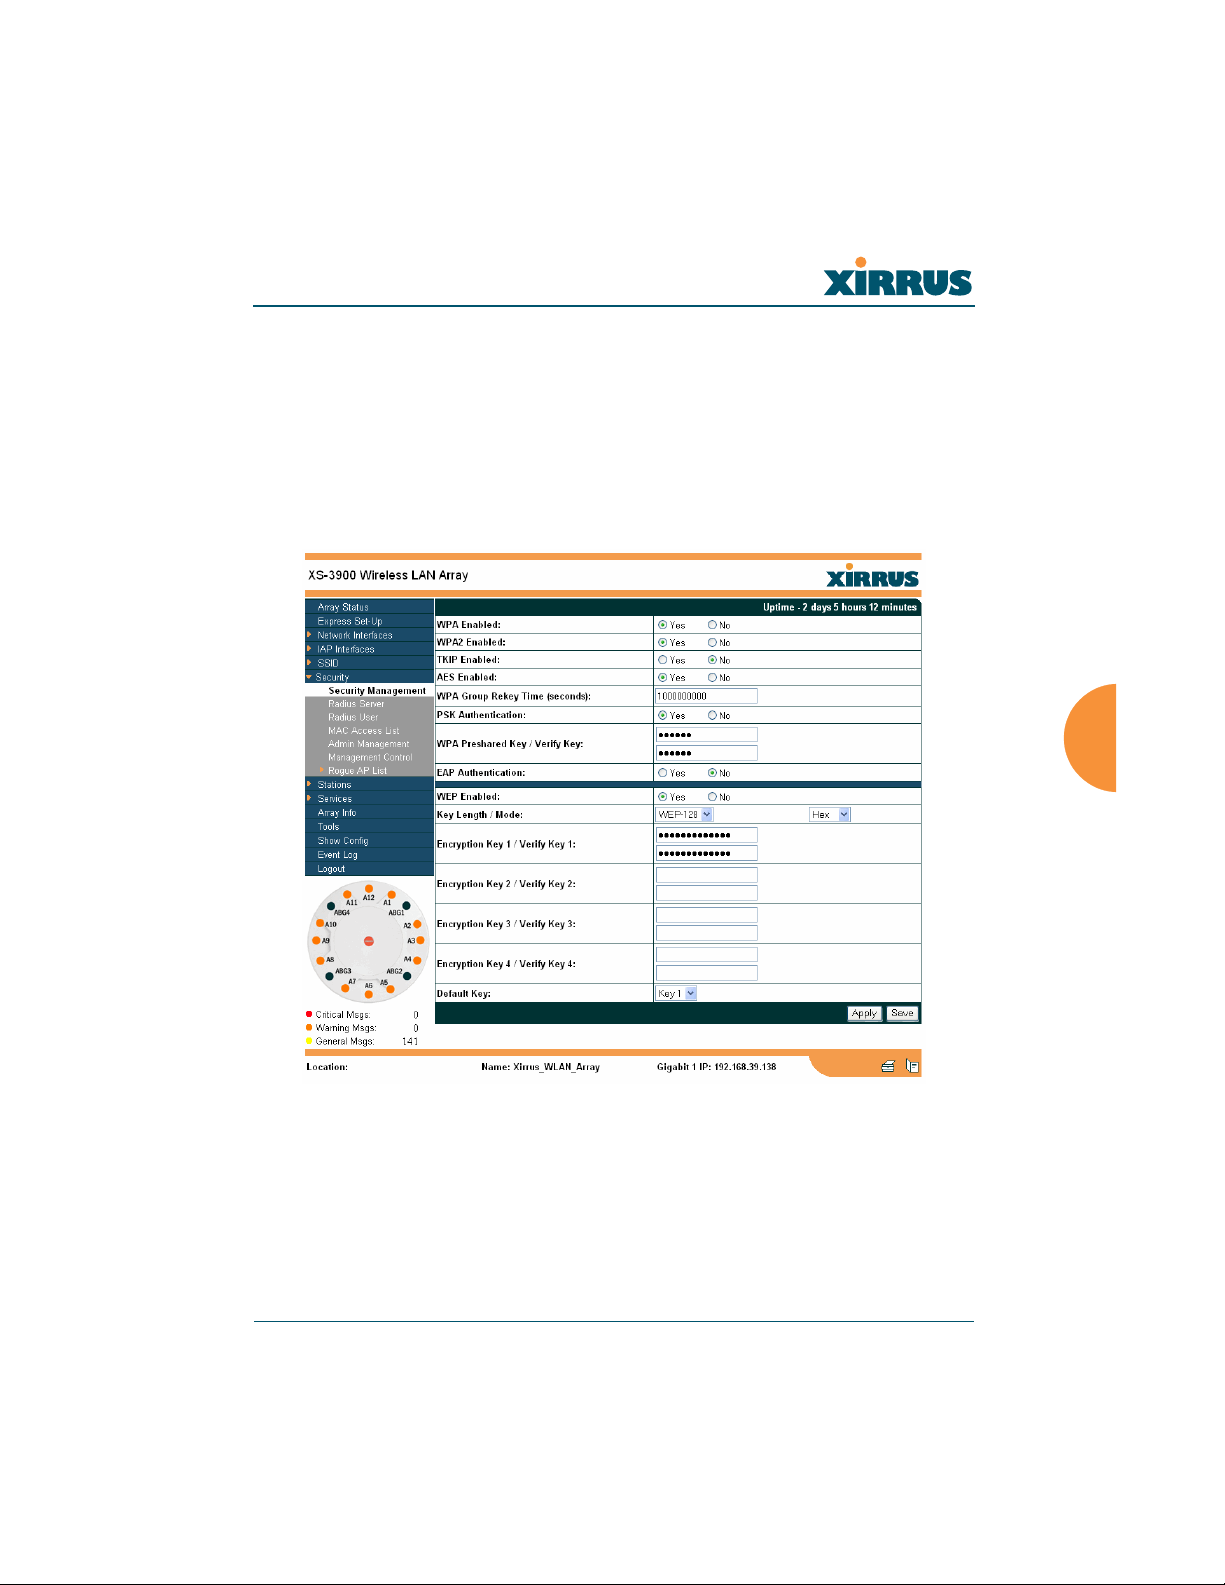
This page allows you to establish the security parameters for your wireless
network, including WEP, WPA and RADIUS authentication. When finished, click
on the Apply button to apply the new settings to this session, then click on the
Save button to save your changes.
For additional information about wireless network security, refer to “Security
Planning” on page 35.
Figure 78. WMI: Security Management Page
Configuring the Xirrus Array 113

Wireless LAN Array
Understanding Security
The Xirrus Wireless LAN Array incorporates many security features that
administrators can configure. After initially installing an Array, always change
the default administrator password (the default is admin), and choose a strong
replacement password (a strong password contains letters, numbers and special
characters). When appropriate, issue read only administrator accounts.
Other security considerations include:
z SSH versus Telnet: Be aware that Telnet is not secure over network
connections and should be used only with a direct serial port connection.
When connecting to the unit’s Command Line Interface over a network
connection, you must use a Secure SHell (SSH) utility. The most
commonly used freeware providing SSH tools is PuTTY.
z Configuration auditing: The optional Xirrus Wireless Management
System (XM-3300) offers powerful management features for small or
large Xirrus Wireless LAN deployments, and can audit your
configuration settings automatically. In addition, using the XM-3300
eliminates the need for an FTP server.
z Choosing an encryption method: Wireless data encryption prevents
eavesdropping on data being transmitted or received over the airwaves.
The Array allows you to establish the following data encryption
configuration options:
z Open—this option offers no data encryption and is not
recommended, though you might choose this option if clients are
required to use a VPN connection through a secure SSH utility,
like PuTTy.
z WEP (Wired Equivalent Privacy)—this option provides minimal
protection (though much better than using an open network). An
early standard for wireless data encryption and supported by all
Wi-Fi certified equipment, WEP is vulnerable to hacking and is
therefore not recommended for use by Enterprise networks.
114 Configuring the Xirrus Array

Wireless LAN Array
z WPA (Wi-Fi Protected Access)—this is a much stronger
encryption mode than WEP and uses TKIP (Temporal Key
Integrity Protocol) or AES (Advanced Encryption Standard) to
encrypt data.
WPA solves security issues with WEP. It also allows you to
establish encryption keys on a per-user-basis, with key rotation
for added security. In addition, TKIP provides Message Integrity
Check (MIC) functionality and prevents active attacks on the
wireless network.
AES is the strongest encryption standard and is used by
government agencies; however, old legacy hardware may not be
capable of supporting the AES mode (it probably won’t work on
older wireless clients). Because AES is the strongest encryption
standard currently available, it is highly recommended for
Enterprise networks.
Any of the above encryption modes can be used, but only one may be
used per SSID. If multiple security methods are needed, you must define
multiple SSIDs.
z Choosing an authentication method: User authentication ensures that
users are who they say they are. For this purpose, the Array allows you to
choose between the following user authentication methods:
z Pre-Shared Key—users must manually enter a key (passphrase)
on the client side of the wireless network that matches the key
stored by the administrator in the Array.
This method should be used only for smaller networks when a
RADIUS server is unavailable. If PSK must be used, choose a
strong passphrase containing between 8 and 63 characters (20 is
preferred). Always use a combination of letters, numbers and
special characters. Never use English words separated by spaces.
Configuring the Xirrus Array 115

Wireless LAN Array
z RADIUS 802.1x with EAP—802.1x uses a RADIUS server to
authenticate large numbers of clients, and can handle different
EAP (Extensible Authentication Protocol) authentication
methods, including EAP-TLS, EAP-TTLS and EAP-PEAP. The
RADIUS server can be internal (provided by the XS-3900) or
external. An external RADIUS server offers more functionality
and security, and is recommended for large deployments. When
using this method, user names and passwords must be entered
into the RADIUS server for user authentication.
The Xirrus Wireless LAN Array will accept up to 512 ACL
entries.
z MAC Address ACLs (Access Control Lists)—MAC address
ACLs provide a list of client adapter MAC addresses that are
allowed or denied access to the wireless network. Access Control
Lists work well when there are a limited number of users—in this
case, enter the MAC addresses of each user in the Allow list. In
the event of a lost or stolen MAC adapter, enter the affected MAC
address in the Deny list.
Procedure for Configuring Network Security
1. WPA Enabled: Choose Yes to enable WPA (Wi-Fi Protected Access), or
choose No to disable WPA.
2. WPA2 Enabled: Choose Yes to enable WPA2 (Wi-Fi Protected Access 2),
or choose No to disable WPA2.
3. TKIP Enabled: Choose Yes to enable TKIP (Temporal Key Integrity
Protocol), or choose No to disable TKIP.
4. AES Enabled: Choose Yes to enable AES (Advanced Encryption
Standard), or choose No to disable AES.
5. WPA Group Rekey Time (in seconds): Enter a value to specify the group
rekey time (in seconds). The default is 600.
116 Configuring the Xirrus Array

Wireless LAN Array
6. PSK Authentication: Choose Yes to enable PSK (Pre-Shared Key)
authentication, or choose No to disable PSK.
7. WPA Preshared Key / Verify Key: If you enabled PSK, enter a passphrase
here, then re-enter the passphrase to verify that you typed it correctly.
8. EAP Authentication: Choose Yes to enable EAP (Extensible
Authentication Protocol) or choose No to disable EAP.
#
9. WEP Enabled: Choose Yes to enable WEP (Wired Equivalent Privacy) or
choose No to disable WEP.
10. Key Length / Mode: If you enabled WEP, choose the desired key length
(either 40 or 128) and the mode (either ASCII or Hex) from the pull-down
lists. You must now provide the encryption key(s).
a. Encryption Key 1 / Verify Key 1: Enter an encryption key of the
length specified (either 10 hex or 26 hex characters), then re-enter the
key to verify that you typed it correctly—hexadecimal characters are
defined as ABCDEF and 0-9.
b. Encryption Key 2 / Verify Key 2 (optional): If desired, enter a second
encryption key, then re-enter the key to verify that you typed it
correctly.
c. Encryption Key 3 / Verify Key 3 (optional): If desired, enter a third
encryption key, then re-enter the key to verify that you typed it
correctly.
d. Encryption Key 4 / Verify Key 4 (optional): If desired, enter a fourth
encryption key, then re-enter the key to verify that you typed it
correctly.
A RADIUS server must be defined to use EAP.
11. Default Key: Choose which key you want to assign as the default key.
Make your selection from the pull-down list.
12. Click on the Apply button to apply the new settings to this session.
Configuring the Xirrus Array 117
13. Click on the Save button to save your changes.
Wireless LAN Array
#
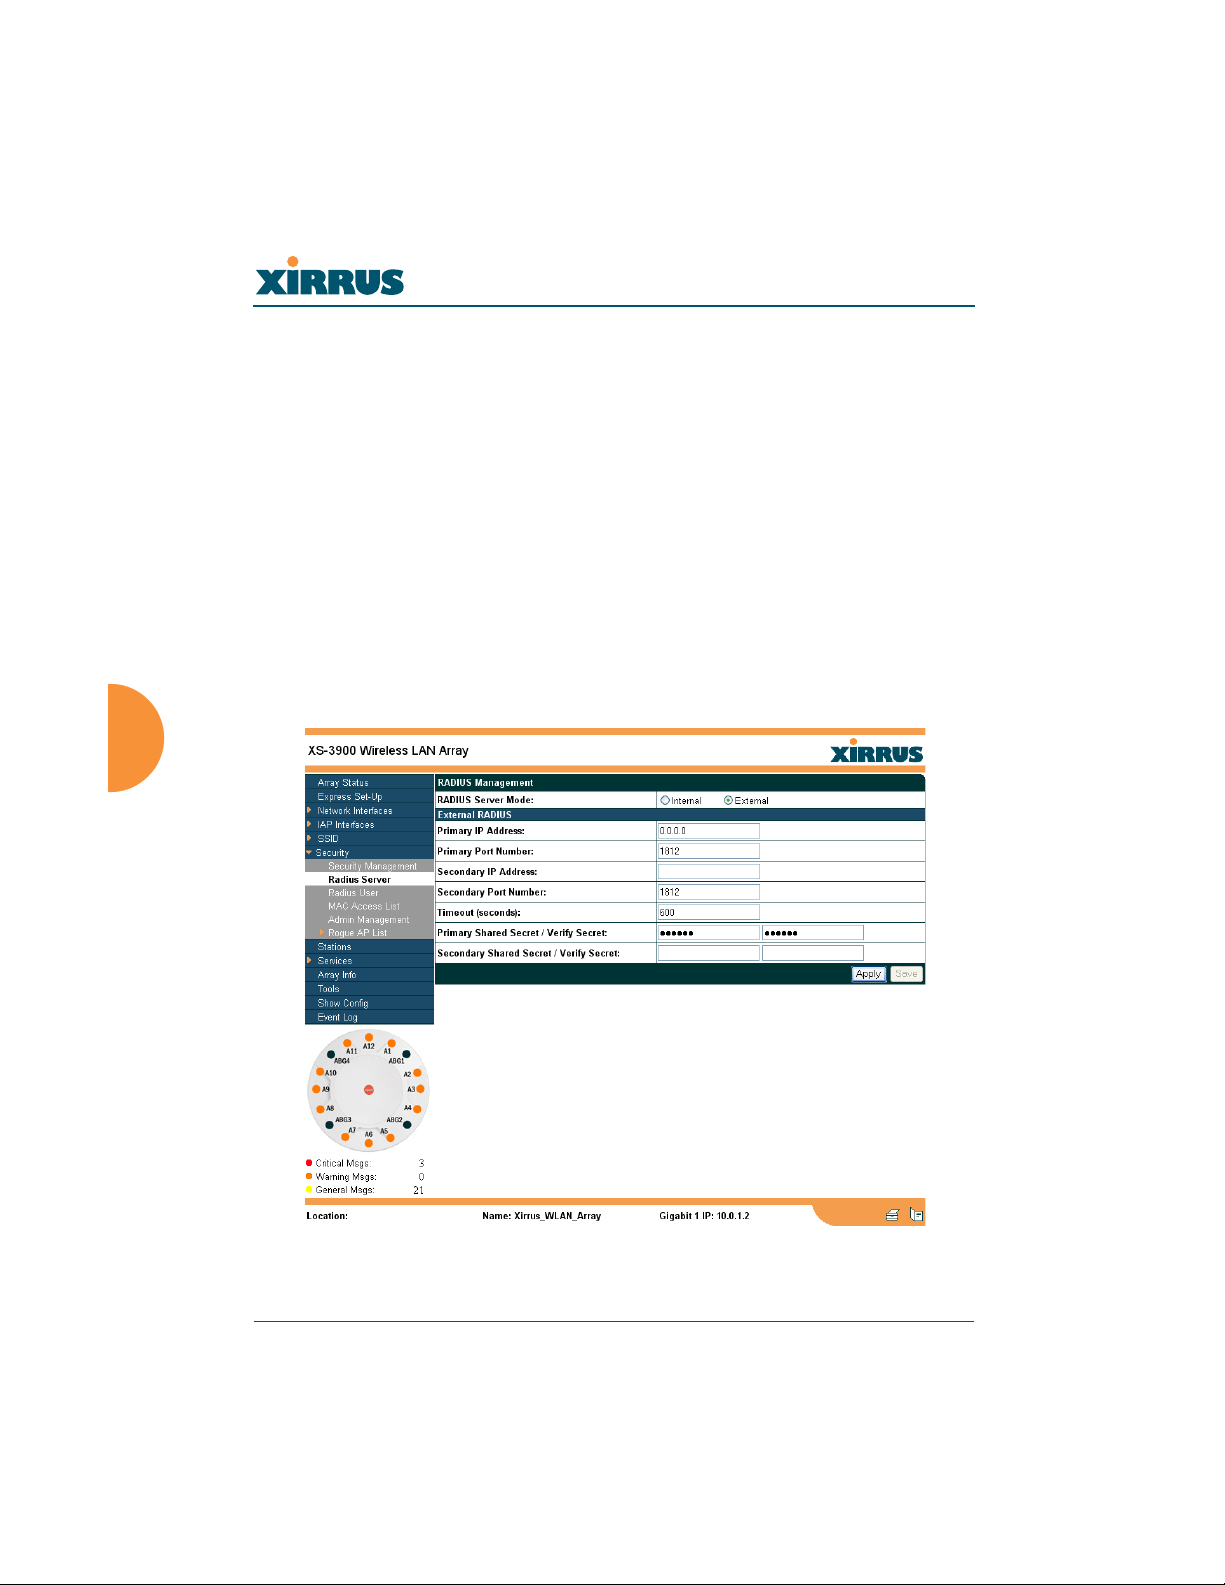
Radius Server
This page allows you to set up the Array’s internal RADIUS server, or define the
use of an external RADIUS server for user authentication.
#
When finished, click on the Apply button to apply the new settings to this
session, then click on the Save button to save your changes.
The internal RADIUS server will only authenticate wireless clients that
want to associate to the Array. This can be useful if an external RADIUS
server is not available.
After configuring network security, the configuration must be
applied to an SSID for the new functionality to take effect.
Figure 79. WMI: Radius Server Page
118 Configuring the Xirrus Array

Wireless LAN Array
Procedure for Configuring Radius Servers
1. Radius Server Mode: Choose Internal if you want to use the XS-3900’s
internal RADIUS server, or choose External to use an external RADIUS
server.
2. Primary IP Address: If you are using an external RADIUS server, enter
the primary server’s IP address.
3. Primary Port Number: If you are using an external RADIUS server, enter
the primary port number.
4. Secondary IP Address (optional): If desired, enter the secondary RADIUS
server’s IP address.
If the primary RADIUS server becomes off-line, the Array will “failover”
to the secondary RADIUS server (defined here).
5. Secondary Port Number: If desired, enter the secondary port number.
6. Timeout: Define the maximum idle time (in seconds) before the RADIUS
session times out. The default is 600 seconds.
7. Primary Shared Secret / Verify Secret: If you are using RADIUS, enter
the primary shared secret, then re-enter the primary shared secret to
verify that you typed it correctly.
8. Secondary Shared Secret / Verify Secret: If you are using RADIUS, enter
the secondary shared secret, then re-enter the secondary shared secret to
verify that you typed it correctly.
9. Click on the Apply button to apply the new settings to this session.
10. Click on the Save button to save your changes (otherwise your new
settings will not take effect).
Configuring the Xirrus Array 119

Wireless LAN Array
Radius User
This page allows you to manage local RADIUS user accounts (create, modify and
delete). When finished, click on the Save button to save your changes.
Figure 80. WMI: Radius User Page
120 Configuring the Xirrus Array

Wireless LAN Array
Procedure for Configuring Radius Users
1. New User Name: Enter a new RADIUS user name.
2. User Password: Enter a password for this user.
3. Verify Password: Re-enter the user password to verify that you typed it
correctly.
4. SSID (Network Name): Choose an SSID from the pull-down list (this will
be the only SSID a user can associate to).
5. Click on the Create User button to add this user to the list.
Editing Radius Users
6. User Management: If you want to edit an existing RADIUS user account,
select the user from the list. You must now enter the user password and
select an SSID.
a. User Password: Enter the password of the user account you want to
edit.
b. Verify Password: Re-enter the password to verify that you typed it
correctly.
c. SSID (Network Name): Choose an SSID from the pull-down list.
When you have finished making your edits, click on the Modify button to
apply the changes.
7. Alternatively, you can delete users by selecting the user from the list and
clicking on the Delete button.
8. Click on the Save button to save your changes (otherwise your new
settings will not take effect).
Configuring the Xirrus Array 121
Wireless LAN Array
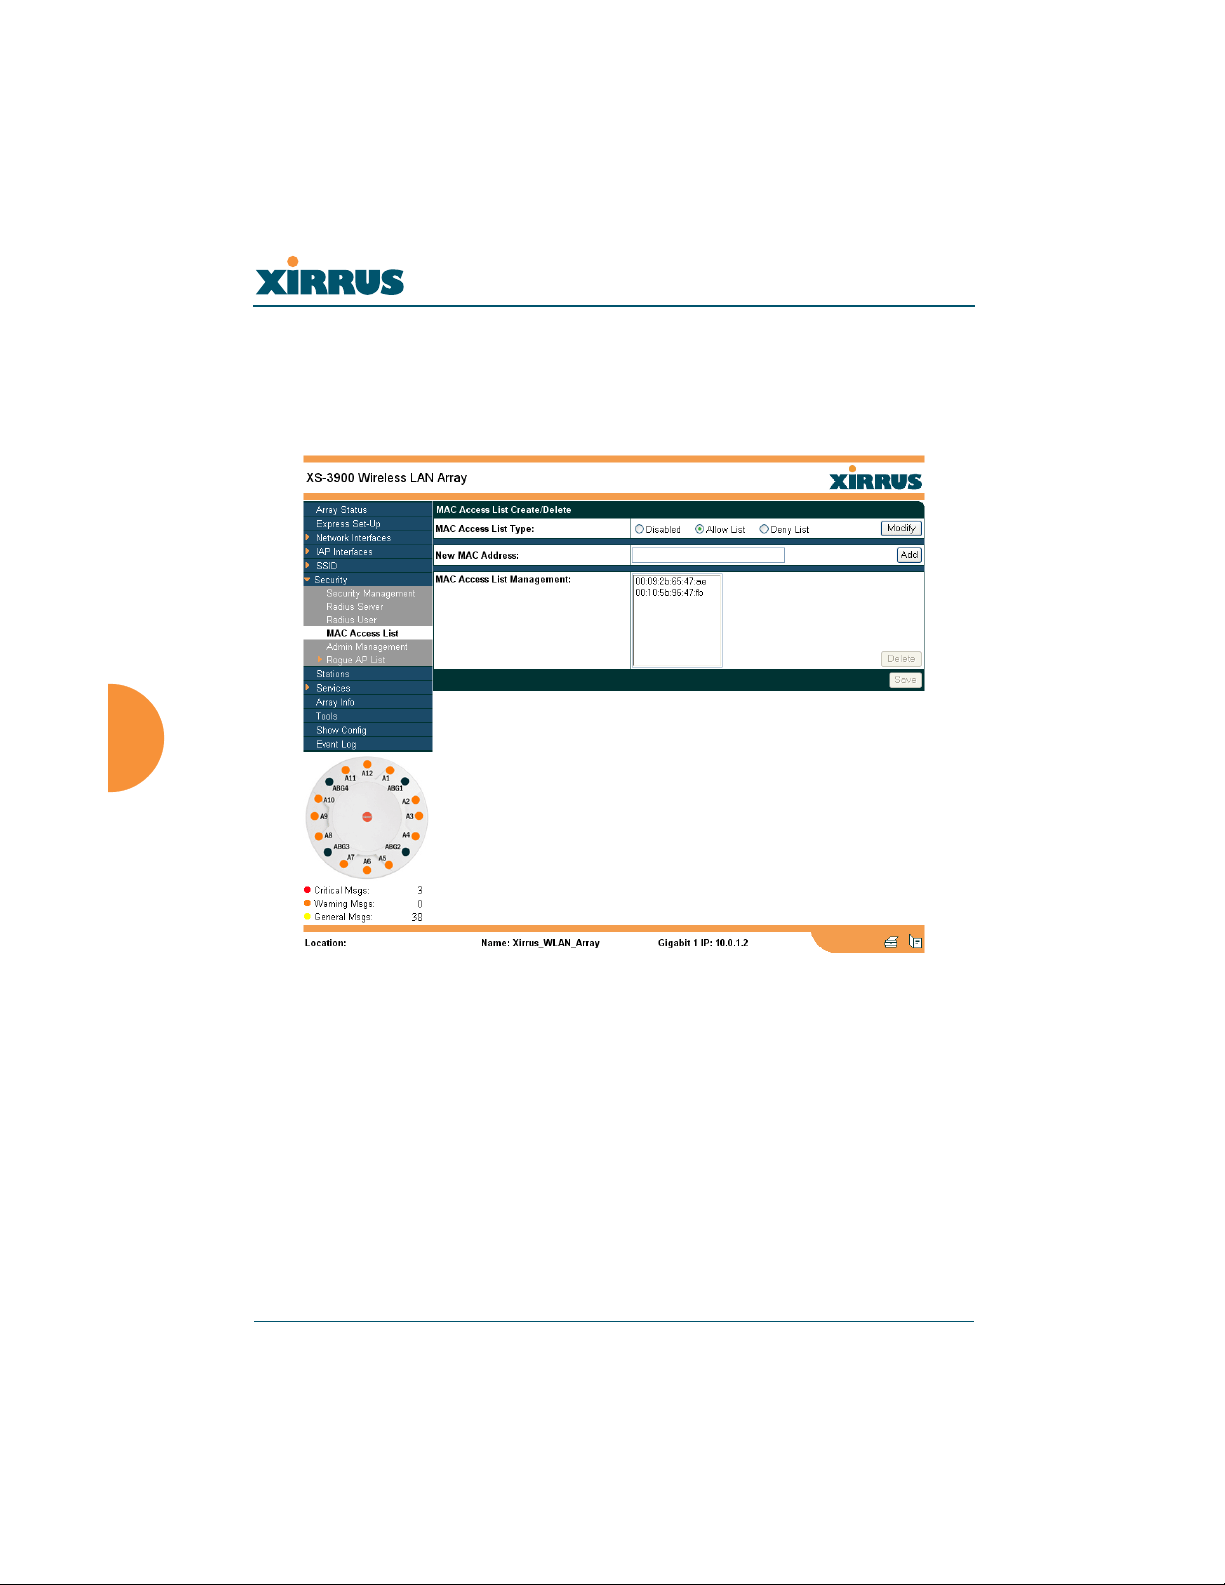
MAC Access List
This page allows you to create new MAC access lists, delete existing lists, and
add/remove MAC addresses. When finished, click on the Save button to save
your changes.
Figure 81. WMI: MAC Access List Page
122 Configuring the Xirrus Array

Wireless LAN Array
Procedure for Configuring MAC Access Lists
1. MAC Access List Type: Select the MAC Access List type—either
Disabled, Allow List or Deny List, then click on the Modify button to
apply your changes.
z Allow List: Only allows these MAC addresses to associate to the
Array.
z Deny List: Allows all MAC addresses except the addresses
defined in this list.
#
2. New MAC Address: If you want to add a MAC address to the ACL, enter
the new MAC address here, then click on the Add button. The MAC
address is added to the ACL.
3. MAC Access List Management: You can delete a MAC Access List by
selecting the list you want to delete then clicking on the Delete button.
4. Click on the Save button to save your changes (otherwise your new
settings will not take effect).
In addition to these lists, other authentication methods (for
example, RADIUS) are still enforced for users.
Configuring the Xirrus Array 123
Wireless LAN Array
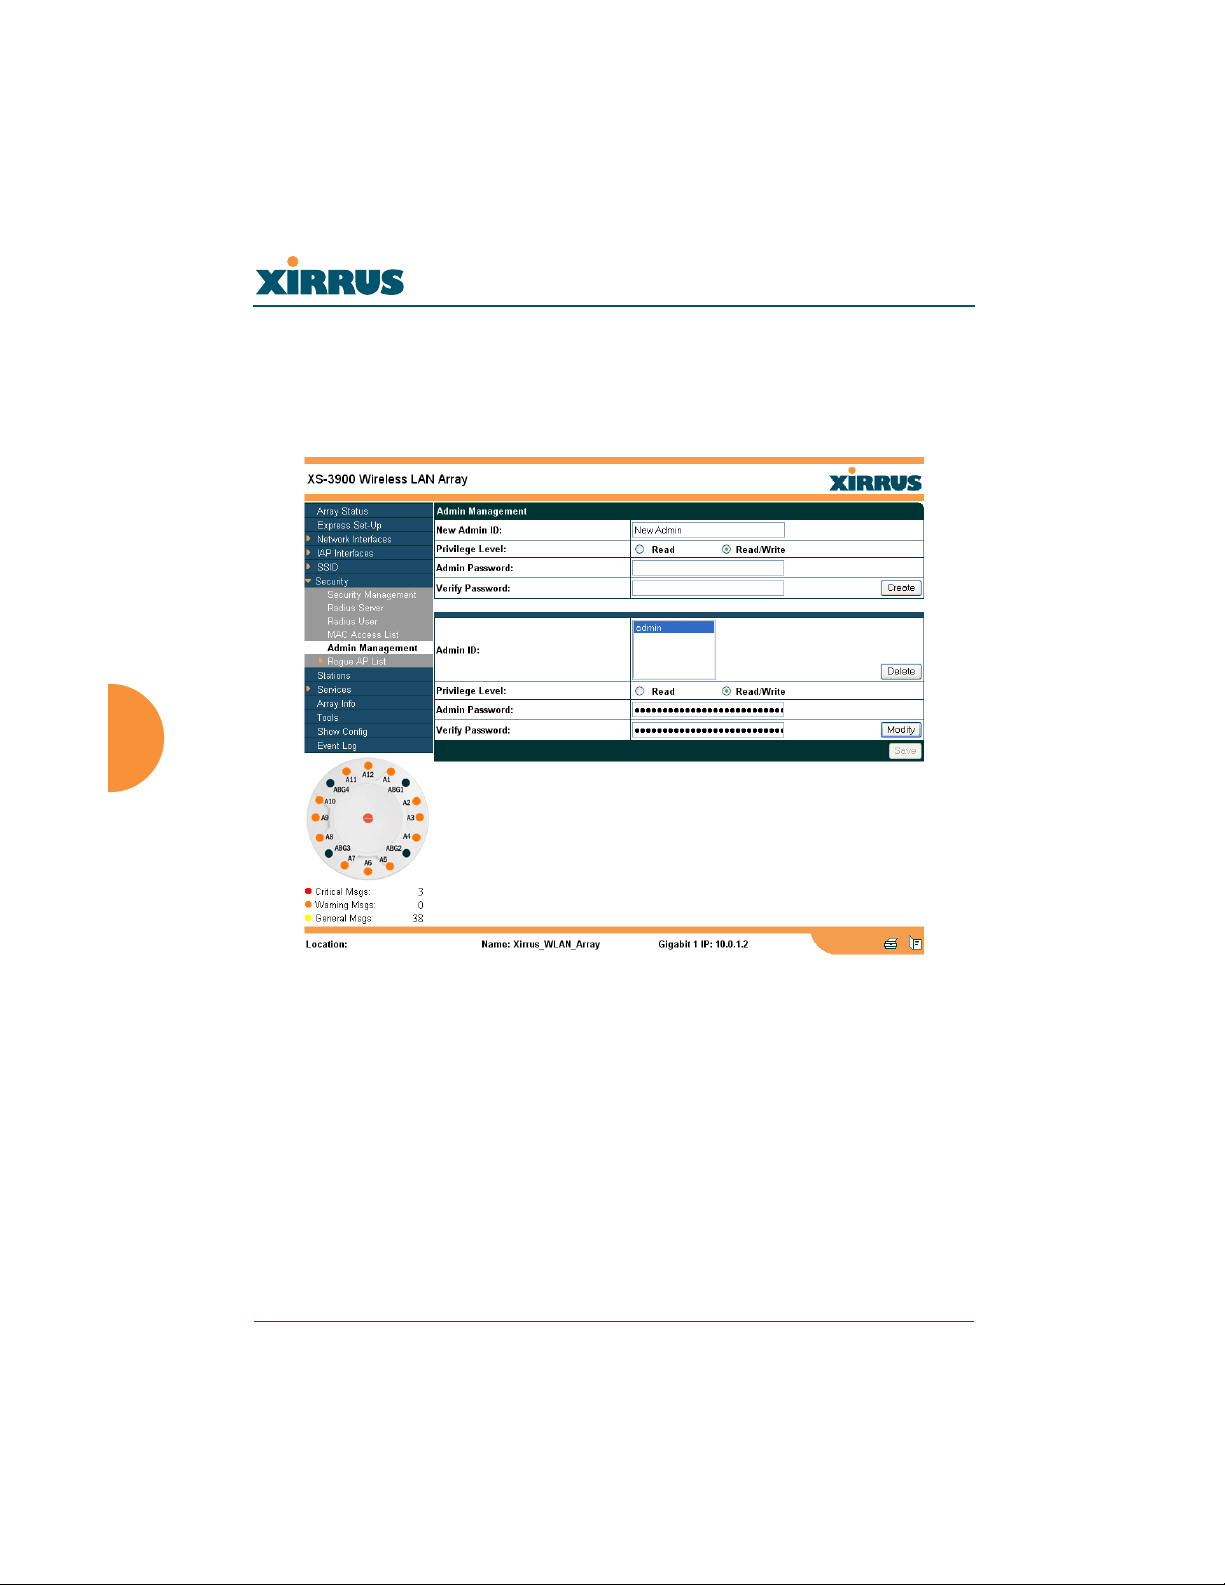
Admin Management
This page allows you to manage network administrator accounts (create, modify
and delete). It also allows you to limit account access to a read only status. When
finished, click on the Save button to save your changes.
Figure 82. WMI: Admin Management Page
124 Configuring the Xirrus Array

Wireless LAN Array
Procedure for Creating Network Administrator Accounts
1. New Admin ID: Enter a meaningful description for this new network
administrator ID.
2. Privilege Level: Choose Read to restrict this administrator ID to read
only status, or choose Read/Write if you want to give this administrator
ID full read/write privileges. In the read only mode, administrators
cannot save changes to configurations.
3. Admin Password: Enter a password for this ID.
4. Verify Password: Re-enter the password in this field to verify that you
typed the password correctly. If you do not re-enter the correct password,
an error message is displayed).
5. Click on the Create button to add this administrator ID to the list.
Editing Network Administrator Accounts
6. Admin ID: Choose the administrator ID you want to edit or delete from
the list. If you are deleting the selecting administrator ID, click on the
Delete button, otherwise go to Step 7.
7. Privilege Level: Choose Read to restrict the selected administrator ID to
read only status, or choose Read/Write if you want to give this
administrator ID full privileges.
8. Admin Password: Enter the password for the selected administrator ID.
9. Verify Password: Re-enter the password in the right field (this field must
match the Admin Password field).
10. Click on the Modify button to apply the new settings to this session.
11. Click on the Save button to save your changes (otherwise your new
settings will not take effect).
Configuring the Xirrus Array 125
Wireless LAN Array
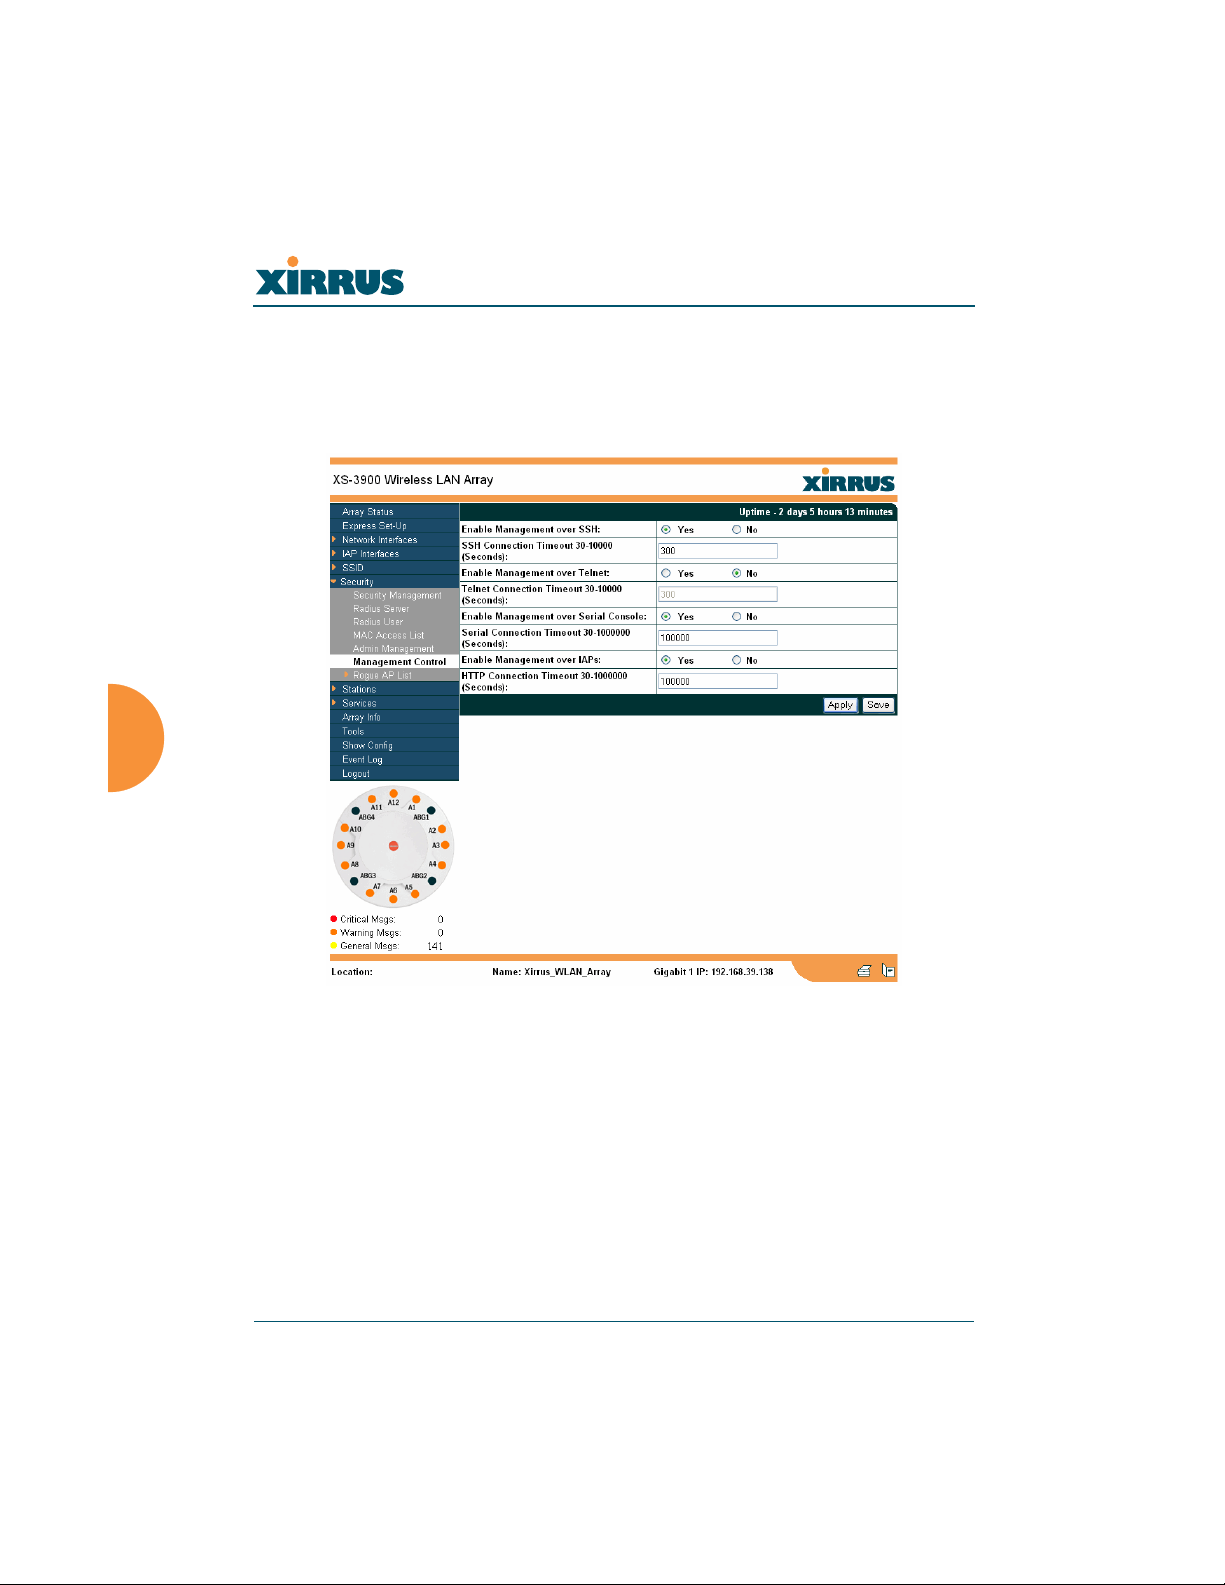
Management Control
This page allows the Array management interfaces to be enabled and disabled
and their inactivity time-outs set. The supported range is 300 (default) to 100,000
seconds.
Figure 83. Management Control
126 Configuring the Xirrus Array
Wireless LAN Array
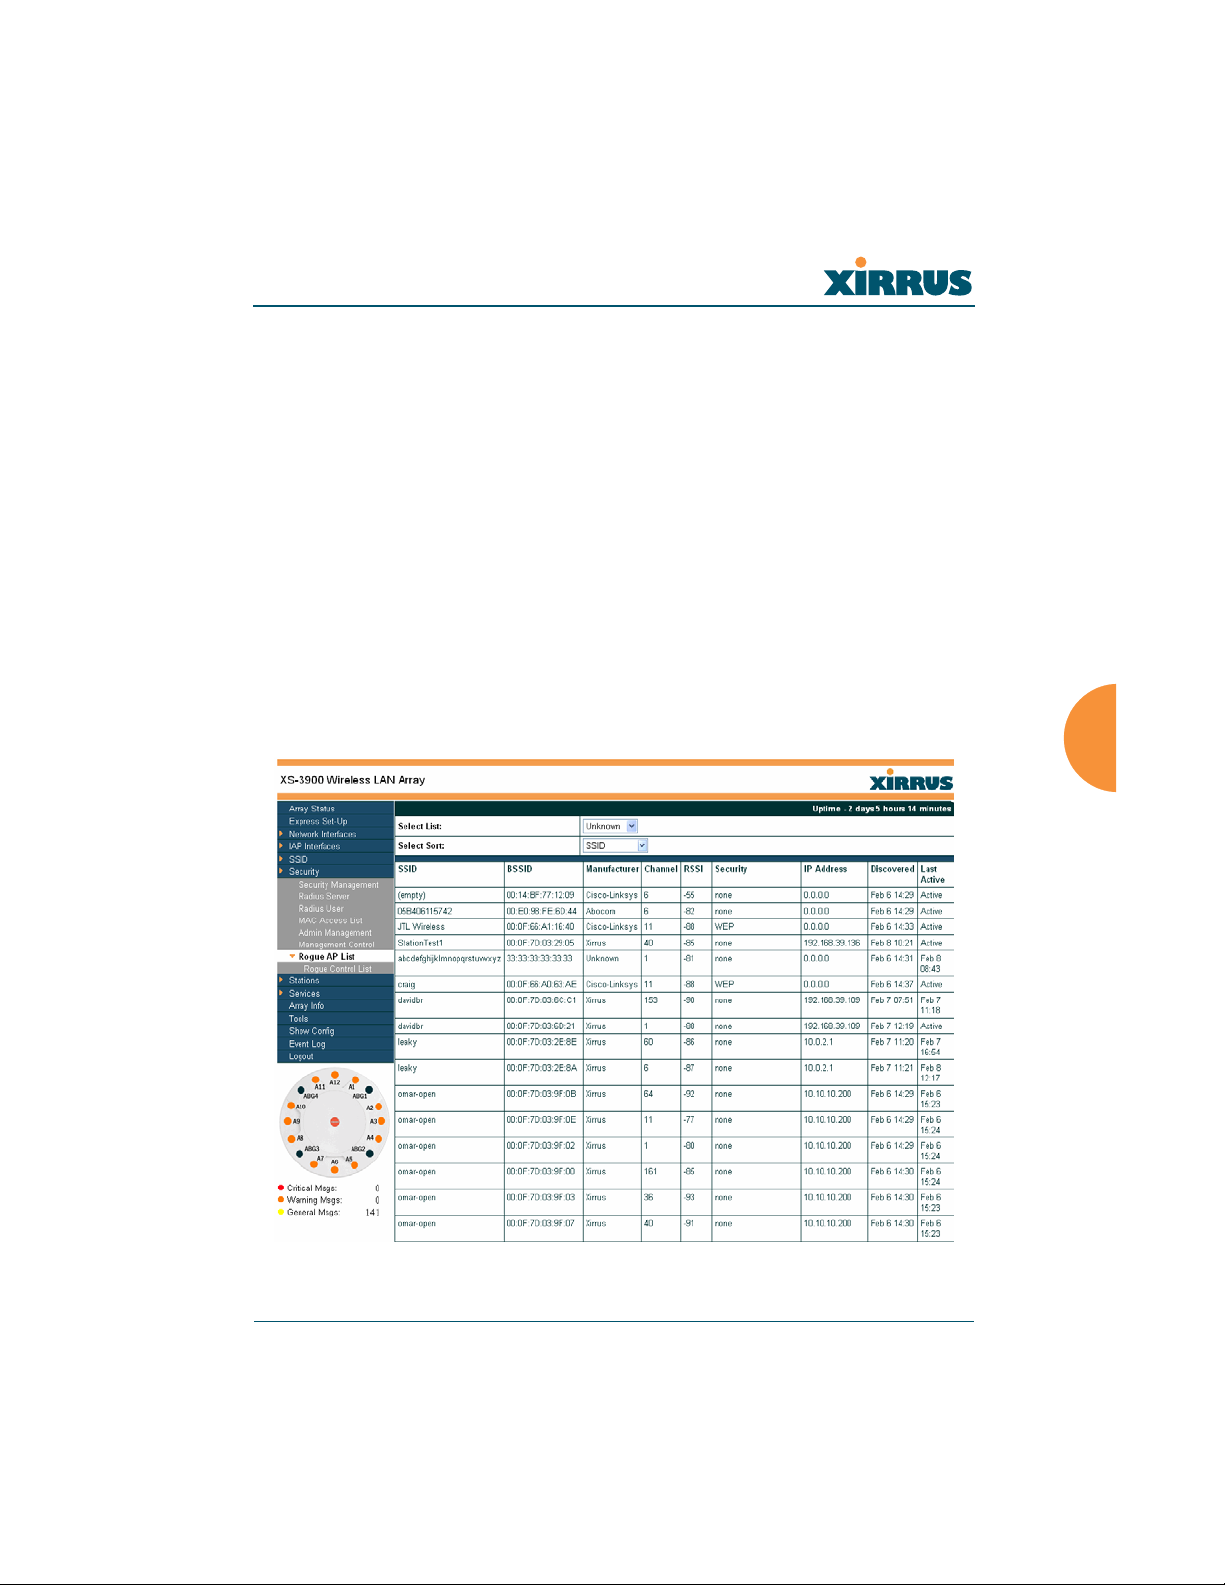
Rogue AP List
This page displays rogue APs, according to the list you select (either Unknown,
Known or Approved). In addition, you can sort the results based on the following
parameters:
z SSID
z BSSID
z Channel
z RSSI
z Security
z IP Address
z Discovered
z Last Active
You can refresh the list at any time by clicking on the Refresh button.
Figure 84. WMI: Rogue AP List Page
Configuring the Xirrus Array 127
Wireless LAN Array
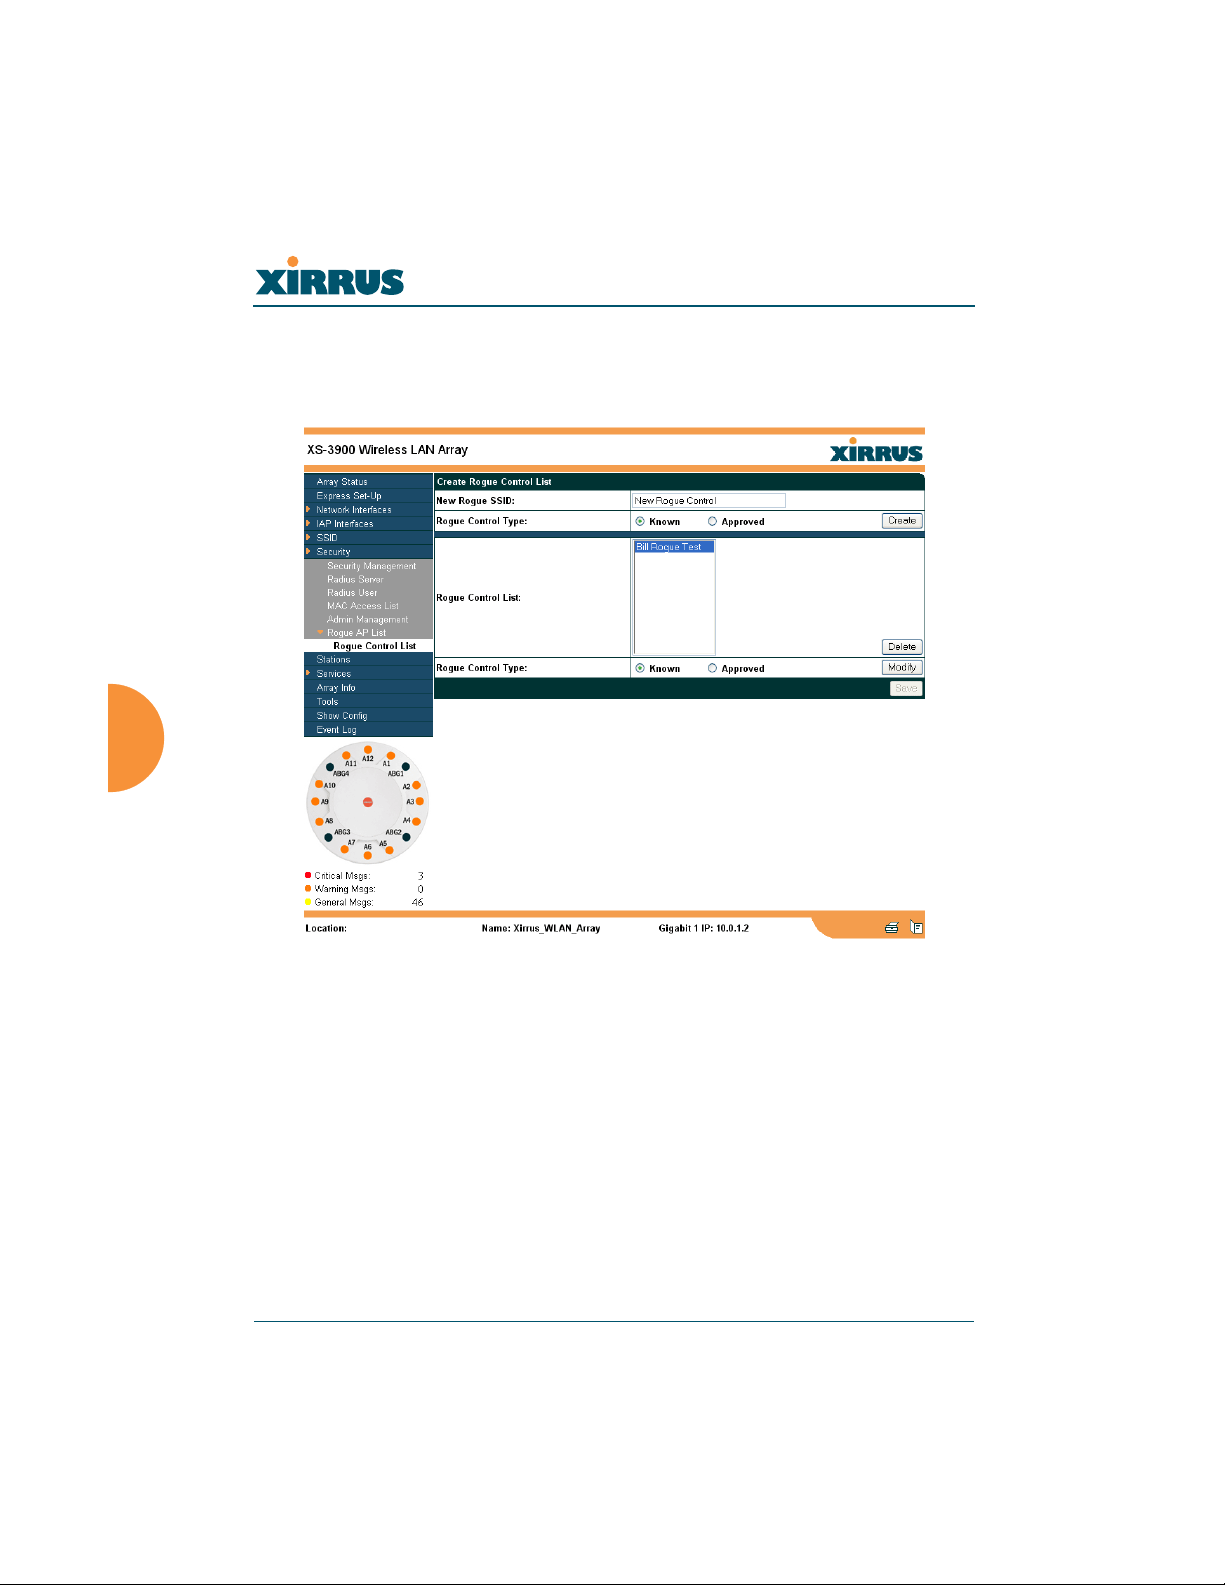
Rogue Control List
This page allows you to set up a control list for rogue APs, based on a type that
you define. When finished, click on the Save button to save your changes.
Figure 85. WMI: Rogue Control List Page
128 Configuring the Xirrus Array

Wireless LAN Array
Procedure for Establishing Rogue AP Control
1. New Rogue SSID: Enter the SSID for the new rogue AP.
2. Rogue Control Type: Define the type, either Known or Approved.
3. Click on the Create button to add this rogue AP to the Rogue Control List.
4. Rogue Control List: If you want to edit the control type for a rogue AP,
select the rogue from the list.
a. After selecting the rogue, redefine whether this rogue is Known,
Approved or Unknown, then click on the Modify button to apply
your change.
5. Alternatively, if you want to delete the selected rogue AP from the list,
click on the Delete button.
6. Click on the Save button to save your changes (otherwise your new
settings will not take effect).
Configuring the Xirrus Array 129

Wireless LAN Array
Stations
This page displays stations (clients) that are currently associated with the Array.
You can sort the results based on the following parameters:
z MAC Address
z Manufacturer
z IP Address
z Netbios Name
z IAP
z SSID
z VLAN
z RSSI
z Time
Figure 86. WMI: Stations Page
130 Configuring the Xirrus Array
Wireless LAN Array
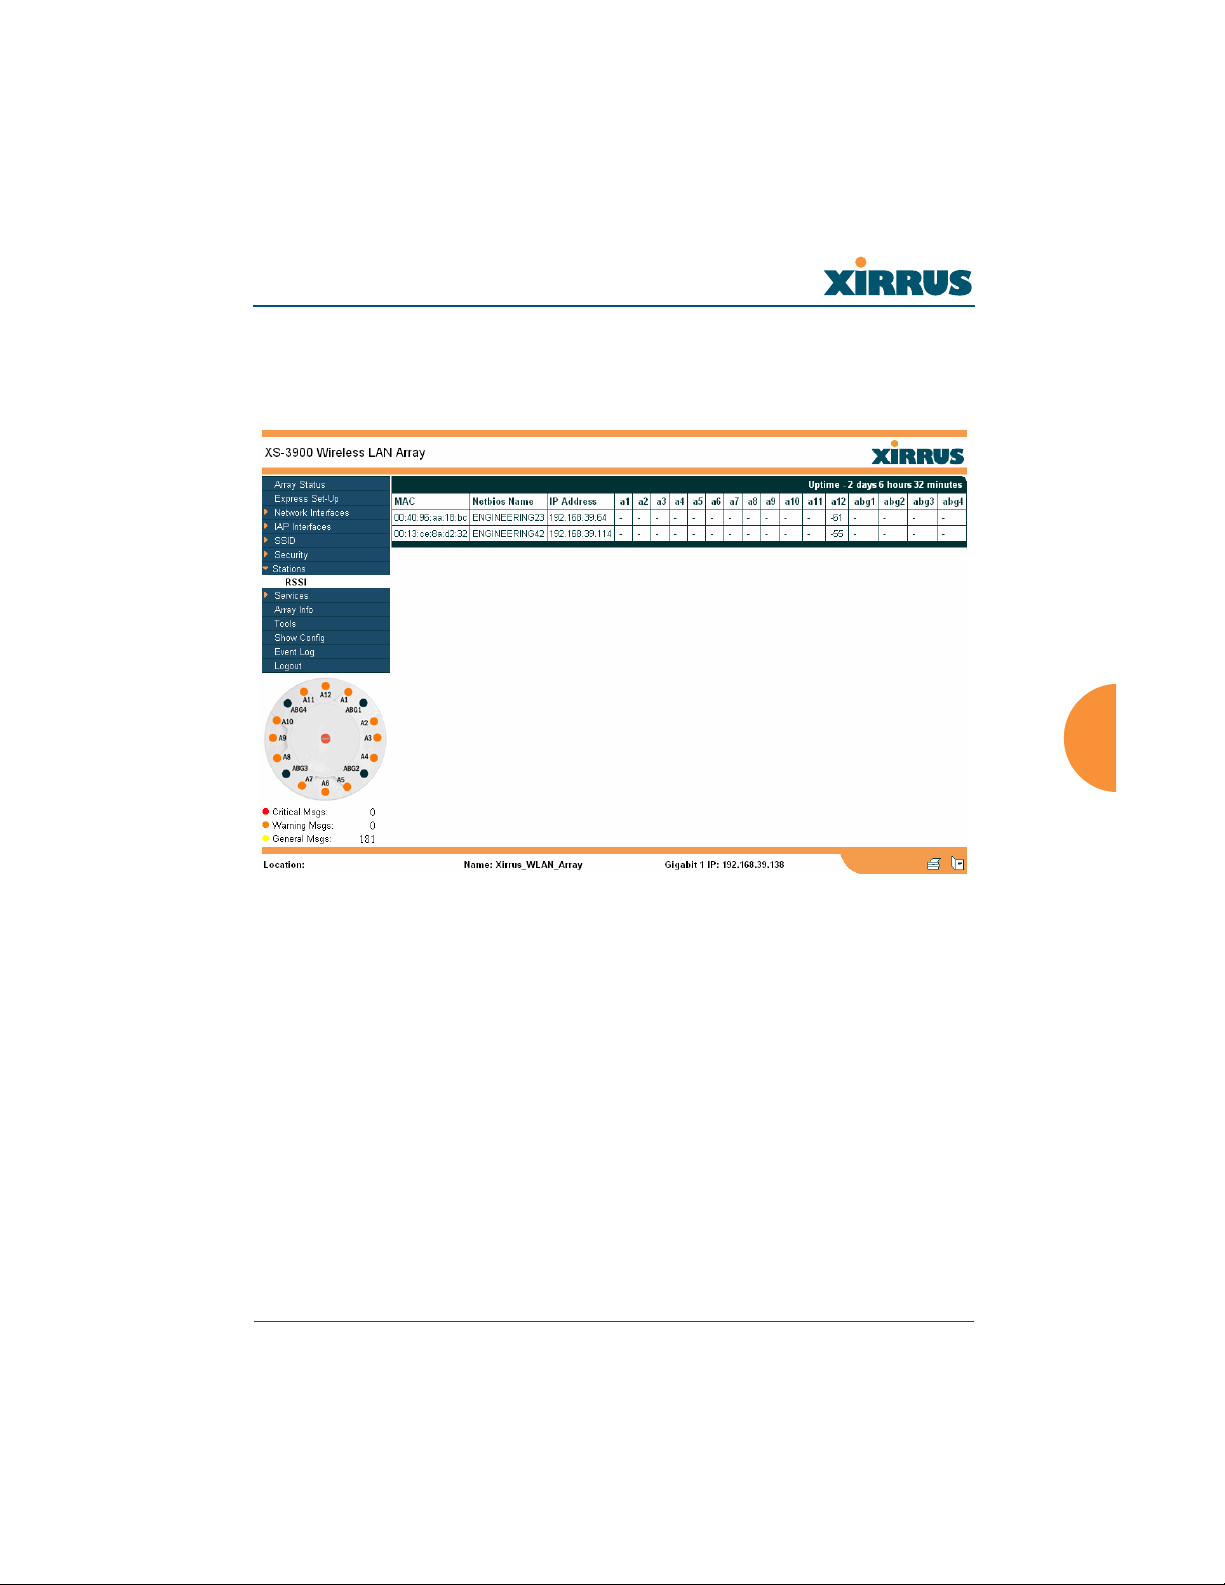
RSSI
An alternative display is given on the RSSI page, which shows each associated
station and their RSSI value (signal strength) as seen by the WLAN Array.
Figure 87. RSSI Page
Configuring the Xirrus Array 131
Wireless LAN Array
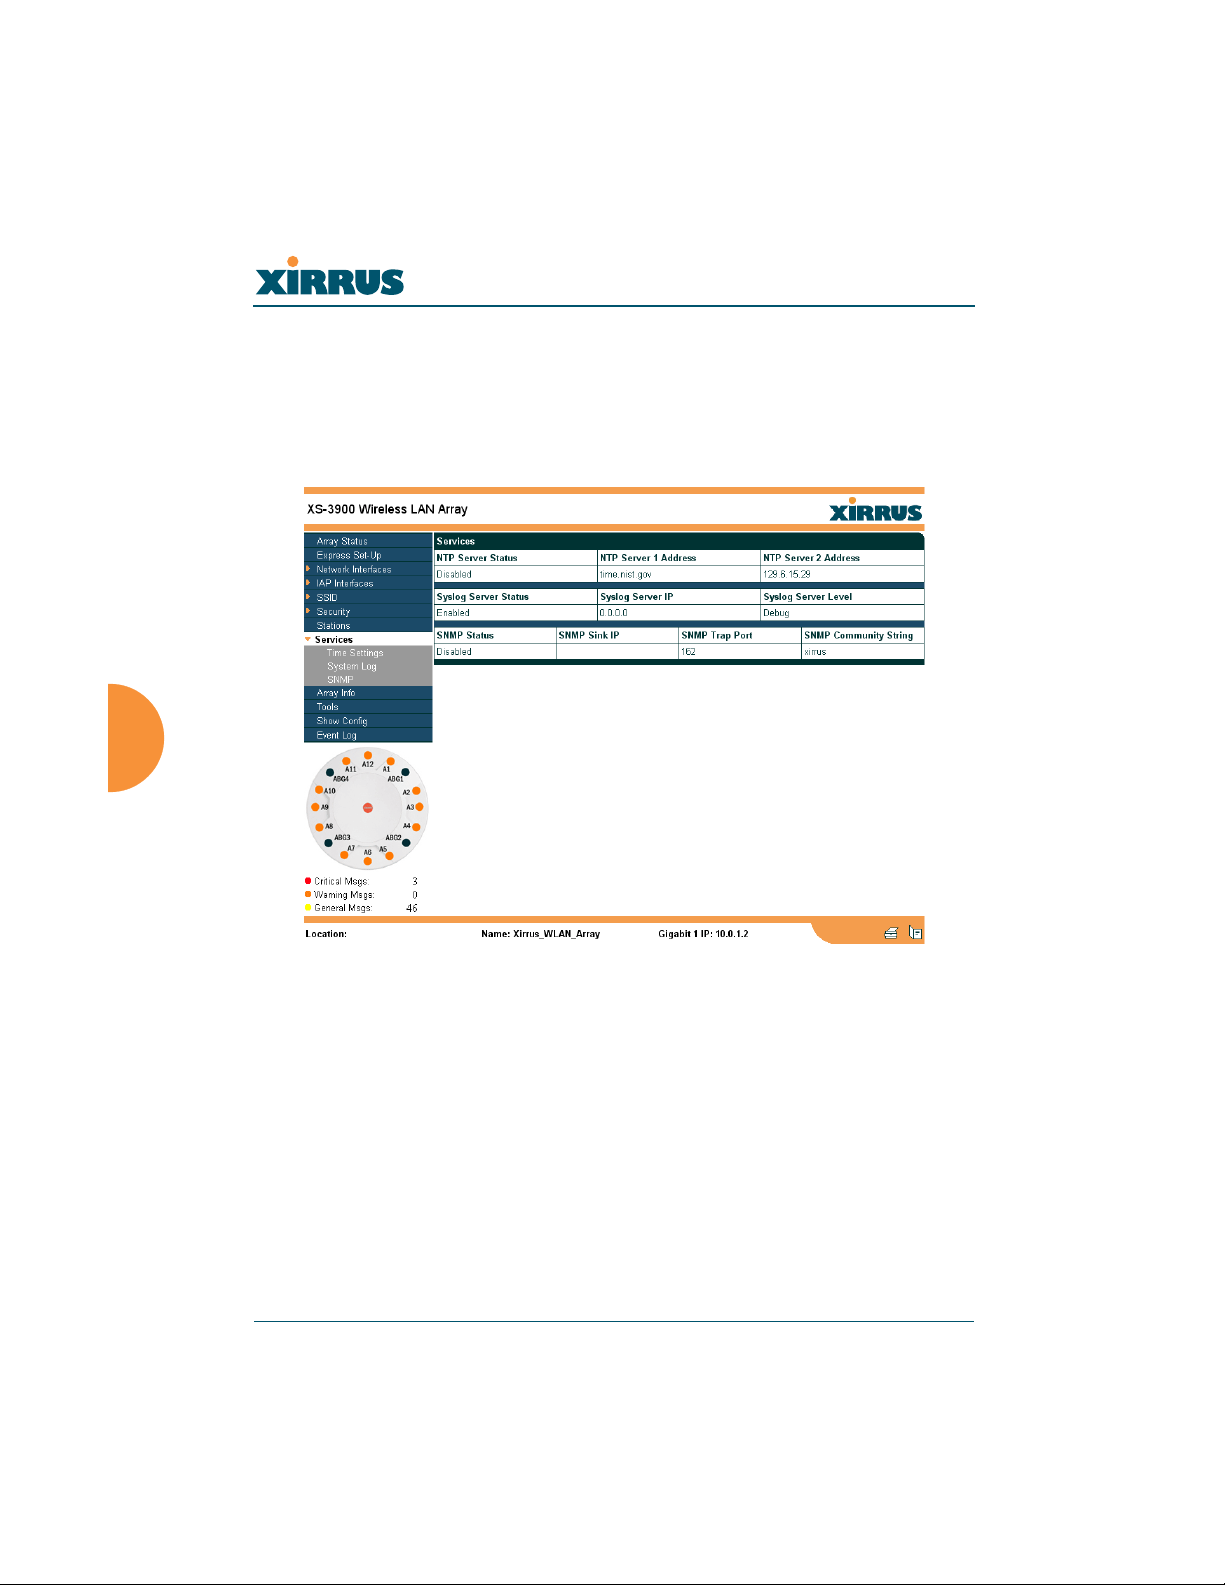
Services
This is a status only page that allows you to review the current status of syslog
and SNMP services. There are no configuration options available on this page, but
if you are experiencing issues with network services, you may want to print this
page for your records.
Figure 88. WMI: Services Page
132 Configuring the Xirrus Array
Wireless LAN Array
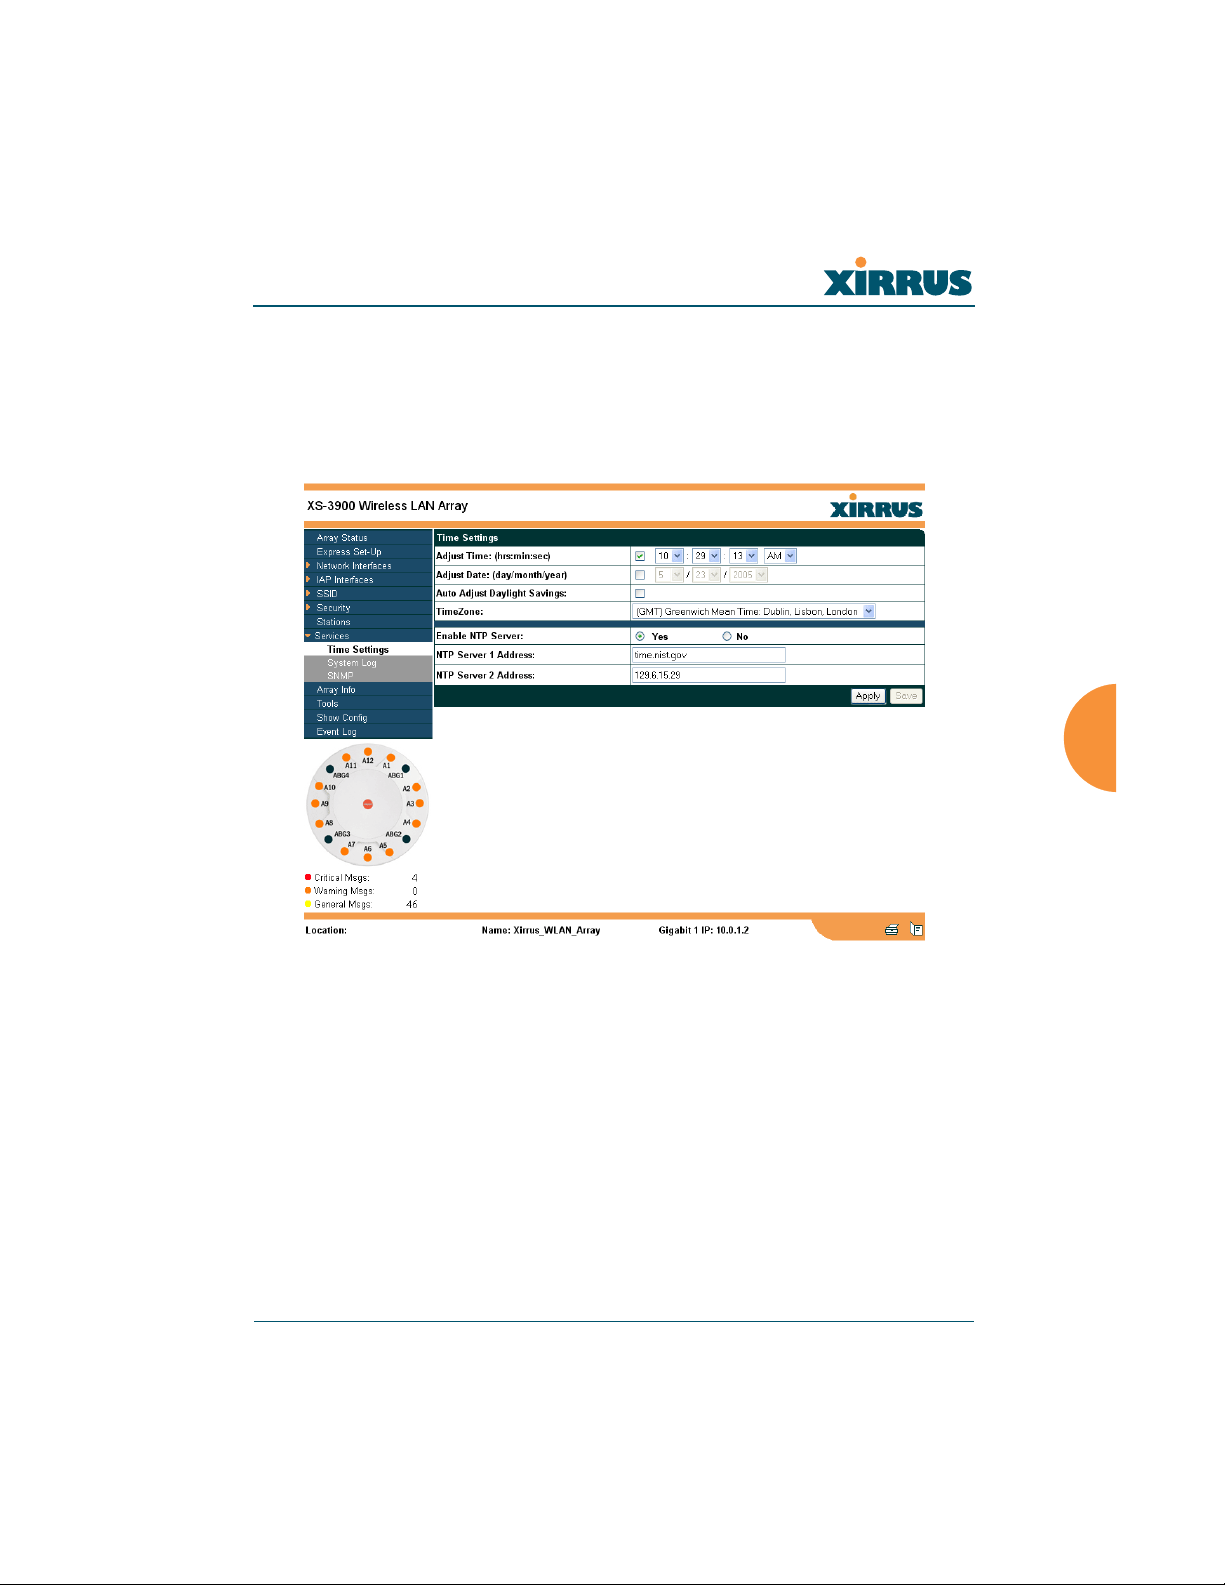
Time Settings
This page allows you to manage the Array’s time settings, including
synchronizing the Array’s clock with a universal clock from an NTP (Network
Time Protocol) server. Synchronizing the Array’s clock with an NTP server
ensures that syslog time-stamping is maintained across all units.
Figure 89. WMI: Time Settings Page
Configuring the Xirrus Array 133

Wireless LAN Array
Procedure for Managing the Time Settings
Manual Time
1. Adjust Time: Check this box to allow manual adjustment of the time in
hours, minutes and seconds (hrs:min:sec).
2. Adjust Date: Check this box to allow manual adjustment of the date
(day/month/year).
3. Auto Adjust Daylight Savings: Check this box if you want the system to
automatically adjust the time for daylight savings.
4. Time Zone: Select the time zone you want to use (normally your local
time zone) from the pull-down list.
Using an NTP Server
5. Enable NTP Server: Check this box if you want to use an NTP (Network
Time Protocol) server to synchronize the Array’s clock. Without an NTP
server assigned (no universal clock), each Array will use its own internal
clock and stamp times accordingly, which may result in discrepancies.
When this box is checked, the NTP Server 1 Address and NTP 2 Server 2
Address fields become active. If you don’t want to use an NTP server,
leave this box unchecked (default), otherwise enter the IP address or DNS
name of the NTP server(s).
6. NTP Server 1 Address: Enter the IP address or DNS name of the primary
NTP server.
7. NTP Server 2 Address: Enter the IP address or DNS name of the
secondary NTP server.
8. Click on the Apply button to apply the new settings to this session.
9. Click on the Save button to save your changes (otherwise your new
settings will not take effect).
134 Configuring the Xirrus Array
Wireless LAN Array
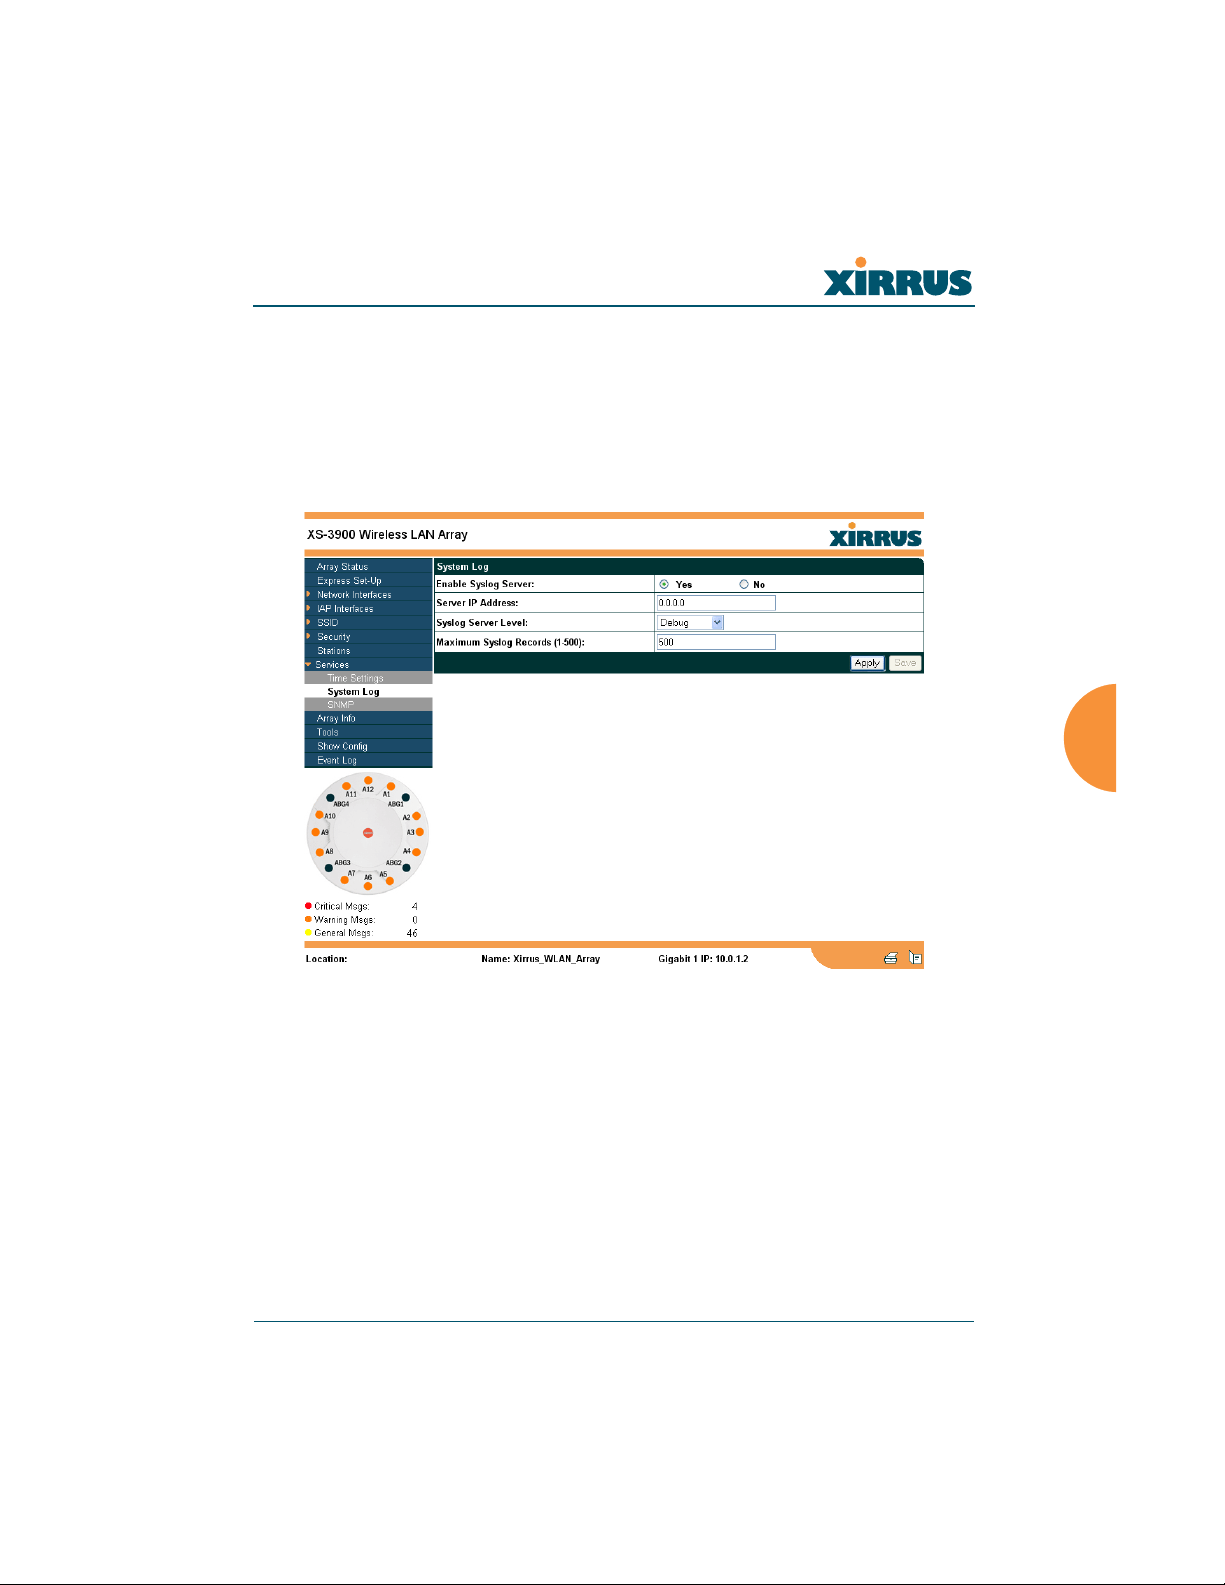
System Log
This page allows you to enable or disable the Syslog server, define the server’s IP
address, and set the level for Syslog reporting—the Syslog service will send
Syslog messages to the defined Syslog server. When finished, click on the Apply
button to apply the new settings to this session, then click on the Save button to
save your changes.
Figure 90. WMI: System Log Page
Configuring the Xirrus Array 135
 Loading...